SanDisk SSD Dashboard User Manual Rev. 1.1 August 2014 The content of this document is confidential and subject to change without notice Document No. 02-02-US-04-00001 SanDisk® Corporation Corporate Headquarters • 951 SanDisk Dr. • Milpitas, CA 95035 Phone (408) 801-1000 • Fax (408) 801-8657 www.sandisk.com

Welcome message from author
This document is posted to help you gain knowledge. Please leave a comment to let me know what you think about it! Share it to your friends and learn new things together.
Transcript

SanDisk SSD Dashboard
User Manual
Rev. 1.1
August 2014
The content of this document is confidential and subject to change without notice
Document No. 02-02-US-04-00001
SanDisk® Corporation
Corporate Headquarters • 951 SanDisk Dr. • Milpitas, CA 95035
Phone (408) 801-1000 • Fax (408) 801-8657
www.sandisk.com

SanDisk SSD Dashboard User Manual
© 2014 SanDisk® Corporation i August 2014
Table of Contents
1. Preface .................................................................................................................................................. 1
1.1 About This Document ................................................................................................................... 1
1.2 Typographical Conventions ........................................................................................................... 1
2. Introduction .......................................................................................................................................... 2
2.1 Minimum System Requirements .................................................................................................. 2
Supported Operating Systems .............................................................................................................. 2
Additional Requirements ...................................................................................................................... 2
2.2 Supported Languages .................................................................................................................... 2
2.3 Installation .................................................................................................................................... 3
2.4 Usage ............................................................................................................................................. 4
3. Status .................................................................................................................................................... 5
Model .................................................................................................................................................... 5
Firmware Version .................................................................................................................................. 5
Drive Health .......................................................................................................................................... 5
Notifications .......................................................................................................................................... 5
Security ................................................................................................................................................. 6
Capacity ................................................................................................................................................. 6
Volumes ................................................................................................................................................ 6
Life Remaining ....................................................................................................................................... 6
Temperature ......................................................................................................................................... 6
Interface Speed ..................................................................................................................................... 6
4. Performance ......................................................................................................................................... 7
4.1 Performance Chart ........................................................................................................................ 7
Transfer Speed MB/s............................................................................................................................. 7
Transfer IOPS ......................................................................................................................................... 7
4.2 TRIM .............................................................................................................................................. 8
5. Tools ...................................................................................................................................................... 9
5.1 Third Party Offers .......................................................................................................................... 9
5.2 Firmware Update ........................................................................................................................ 10
Check for Updates ............................................................................................................................... 12
Create Bootable USB Drive ................................................................................................................. 13
Create Bootable CD/DVD .................................................................................................................... 15

SanDisk SSD Dashboard User Manual
© 2014 SanDisk® Corporation ii August 2014
Update Using File on My Computer .................................................................................................... 17
5.3 Secure Erase ................................................................................................................................ 18
5.4 Sanitize ........................................................................................................................................ 19
5.5 Crypto Erase ................................................................................................................................ 20
5.6 S.M.A.R.T. .................................................................................................................................... 21
Diagnostic Short Test .......................................................................................................................... 21
Diagnostic Extended Test .................................................................................................................... 21
5.7 Drive Details ................................................................................................................................ 22
5.8 System Details ............................................................................................................................. 22
6. Settings ................................................................................................................................................ 23
6.1 Application Update ..................................................................................................................... 23
6.2 Options ........................................................................................................................................ 24
Start SSD Dashboard with Windows Startup ...................................................................................... 24
Windows Write-Cache Buffer Flushing ............................................................................................... 24
Select Language .................................................................................................................................. 24
7. Help ..................................................................................................................................................... 25
7.1 Online Support ............................................................................................................................ 25
7.2 Generate Report ......................................................................................................................... 25
7.3 About SSD Dashboard ................................................................................................................. 26
SanDisk SSD Dashboard User Manual
© 2014 SanDisk® Corporation iii August 2014
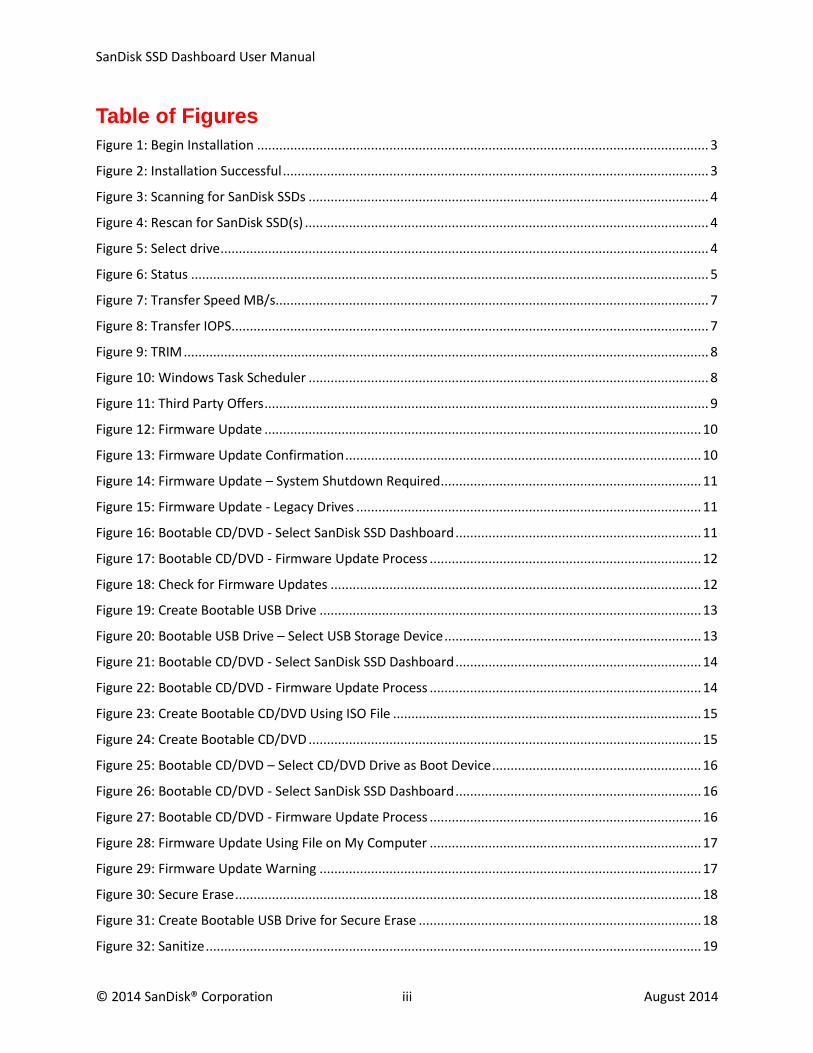
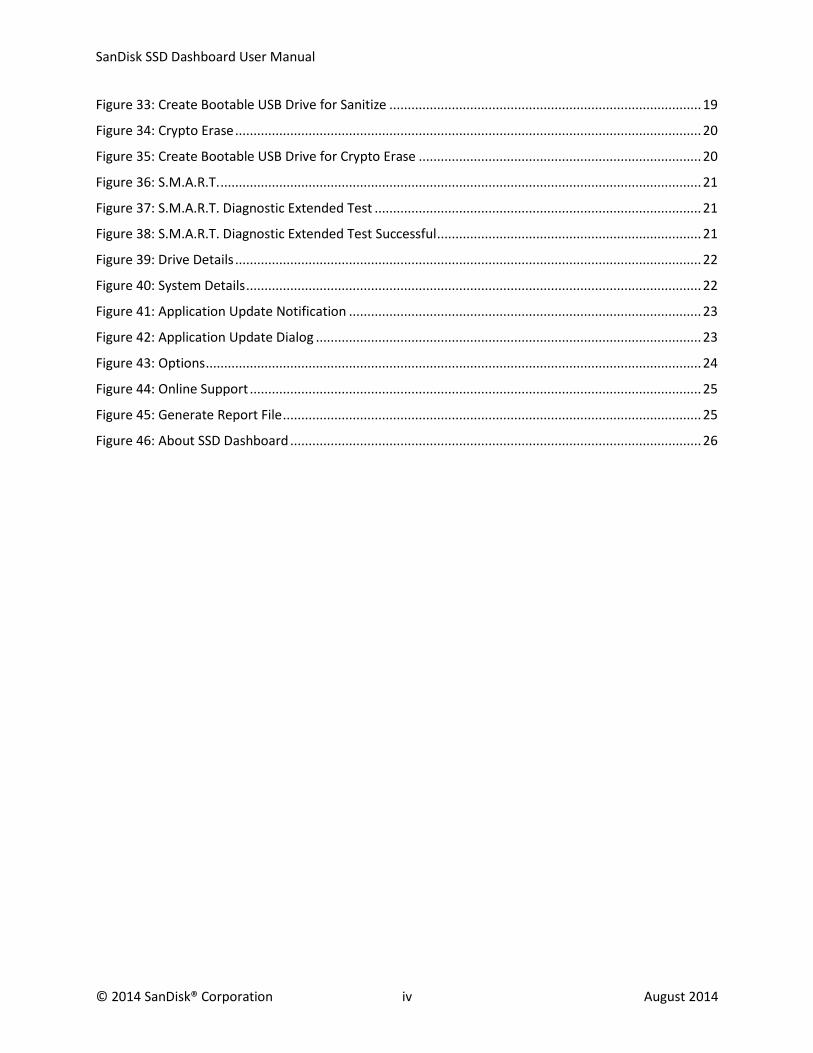
Table of Figures
Figure 1: Begin Installation ........................................................................................................................... 3
Figure 2: Installation Successful .................................................................................................................... 3
Figure 3: Scanning for SanDisk SSDs ............................................................................................................. 4
Figure 4: Rescan for SanDisk SSD(s) .............................................................................................................. 4
Figure 5: Select drive ..................................................................................................................................... 4
Figure 6: Status ............................................................................................................................................. 5
Figure 7: Transfer Speed MB/s...................................................................................................................... 7
Figure 8: Transfer IOPS.................................................................................................................................. 7
Figure 9: TRIM ............................................................................................................................................... 8
Figure 10: Windows Task Scheduler ............................................................................................................. 8
Figure 11: Third Party Offers ......................................................................................................................... 9
Figure 12: Firmware Update ....................................................................................................................... 10
Figure 13: Firmware Update Confirmation ................................................................................................. 10
Figure 14: Firmware Update – System Shutdown Required ....................................................................... 11
Figure 15: Firmware Update - Legacy Drives .............................................................................................. 11
Figure 16: Bootable CD/DVD - Select SanDisk SSD Dashboard ................................................................... 11
Figure 17: Bootable CD/DVD - Firmware Update Process .......................................................................... 12
Figure 18: Check for Firmware Updates ..................................................................................................... 12
Figure 19: Create Bootable USB Drive ........................................................................................................ 13
Figure 20: Bootable USB Drive – Select USB Storage Device ...................................................................... 13
Figure 21: Bootable CD/DVD - Select SanDisk SSD Dashboard ................................................................... 14
Figure 22: Bootable CD/DVD - Firmware Update Process .......................................................................... 14
Figure 23: Create Bootable CD/DVD Using ISO File .................................................................................... 15
Figure 24: Create Bootable CD/DVD ........................................................................................................... 15
Figure 25: Bootable CD/DVD – Select CD/DVD Drive as Boot Device ......................................................... 16
Figure 26: Bootable CD/DVD - Select SanDisk SSD Dashboard ................................................................... 16
Figure 27: Bootable CD/DVD - Firmware Update Process .......................................................................... 16
Figure 28: Firmware Update Using File on My Computer .......................................................................... 17
Figure 29: Firmware Update Warning ........................................................................................................ 17
Figure 30: Secure Erase ............................................................................................................................... 18
Figure 31: Create Bootable USB Drive for Secure Erase ............................................................................. 18
Figure 32: Sanitize ....................................................................................................................................... 19
SanDisk SSD Dashboard User Manual
© 2014 SanDisk® Corporation iv August 2014
Figure 33: Create Bootable USB Drive for Sanitize ..................................................................................... 19
Figure 34: Crypto Erase ............................................................................................................................... 20
Figure 35: Create Bootable USB Drive for Crypto Erase ............................................................................. 20
Figure 36: S.M.A.R.T. ................................................................................................................................... 21
Figure 37: S.M.A.R.T. Diagnostic Extended Test ......................................................................................... 21
Figure 38: S.M.A.R.T. Diagnostic Extended Test Successful ........................................................................ 21
Figure 39: Drive Details ............................................................................................................................... 22
Figure 40: System Details ............................................................................................................................ 22
Figure 41: Application Update Notification ................................................................................................ 23
Figure 42: Application Update Dialog ......................................................................................................... 23
Figure 43: Options ....................................................................................................................................... 24
Figure 44: Online Support ........................................................................................................................... 25
Figure 45: Generate Report File .................................................................................................................. 25
Figure 46: About SSD Dashboard ................................................................................................................ 26
SanDisk SSD Dashboard User Manual
© 2014 SanDisk® Corporation v August 2014
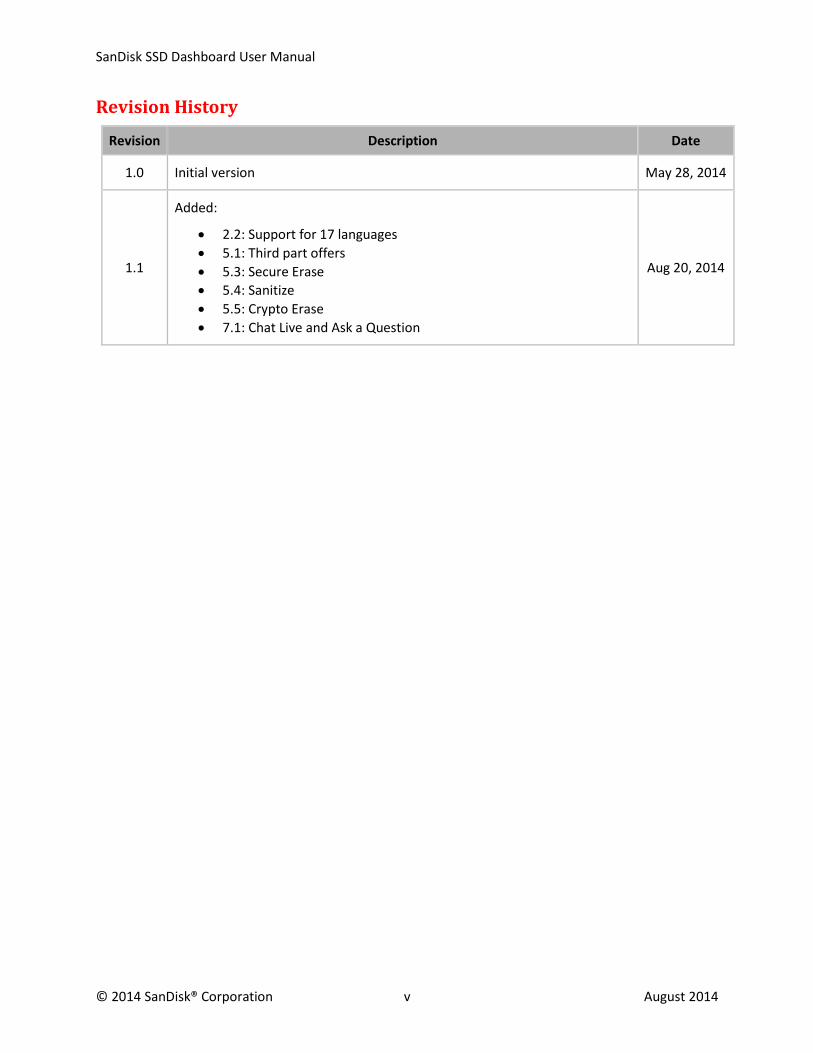
Revision History
Revision Description Date
1.0 Initial version May 28, 2014
1.1
Added:
2.2: Support for 17 languages
5.1: Third part offers
5.3: Secure Erase
5.4: Sanitize
5.5: Crypto Erase
7.1: Chat Live and Ask a Question
Aug 20, 2014
SanDisk Corporation general policy does not recommend the use of its products in life support applications wherein a failure or malfunction of the product may directly threaten life or injury. Without limitation to the foregoing, SanDisk shall not be liable for any loss, injury or damage caused by use of its products in any of the following applications:
Special applications such as military related equipment, nuclear reactor control, and aero¬space
Control devices for automotive vehicles, train, ship and traffic equipment
Safety system for disaster prevention and crime prevention
Medical-related equipment including medical measurement device
Accordingly, in any use of SanDisk products in life support systems or other applications where failure could cause damage, injury or loss of life, the products should only be incorporated in systems designed with appropriate redundancy, fault tolerant or back-up features. Per SanDisk Terms and Conditions of Sale, the user of SanDisk products in life support or other such applications assumes all risk of such use and agrees to indemnify, defend and hold harmless SanDisk Corporation and its affiliates against all damages.
Security safeguards, by their nature, are capable of circumvention. SanDisk cannot, and does not, guarantee that data will not be accessed by unauthorized persons, and SanDisk disclaims any warranties to that effect to the fullest extent permitted by law.
This document and related material is for information use only and is subject to change without prior notice. SanDisk Corporation assumes no responsibility for any errors that may appear in this document or related material, nor for any damages or claims resulting from the furnishing, performance or use of this document or related material. Absent a written agreement signed by SanDisk Corporation or its authorized representative to the contrary, SanDisk Corporation explicitly disclaims any express and implied warranties and indemnities of any kind that may or could be associated with this document and related material, and any user of this document or related material agrees to such disclaimer as a precondition to receipt and usage hereof. EACH USER OF THIS DOCUMENT EXPRESSLY WAIVES ALL GUARANTIES AND WARRANTIES OF ANY KIND ASSOCIATED WITH THIS DOCUMENT AND/OR RELATED MATERIALS, WHETHER EXPRESS OR IMPLIED, INCLUDING WITHOUT LIMITATION, ANY IMPLIED WARRANTY OF MERCHANTABILITY OR FITNESS FOR A PARTICULAR PURPOSE OR INFRINGEMENT, TOGETHER WITH ANY LIABILITY OF SANDISK CORPORATION AND ITS AFFILIATES UNDER ANY CONTRACT, NEGLIGENCE, STRICT LIABILITY OR OTHER LEGAL OR EQUITABLE THEORY FOR LOSS OF USE, REVENUE, OR PROFIT OR OTHER INCIDENTAL, PUNITIVE, INDIRECT, SPECIAL OR CONSEQUENTIAL DAMAGES, INCLUDING WITHOUT LIMITATION PHYSICAL INJURY OR DEATH, PROPERTY DAMAGE, LOST DATA, OR COSTS OF PROCUREMENT OF SUBSTITUTE GOODS, TECHNOLOGY OR SERVICES.
No part of this document may be reproduced, transmitted, transcribed, stored in a retrievable manner or translated into any language or computer language, in any form or by any means, electronic, mechanical, magnetic, optical, chemical, manual or otherwise, without the prior written consent of an officer of SanDisk Corporation.
All parts of the SanDisk documentation are protected by copyright law and all rights are reserved. SanDisk and the SanDisk logo are registered trademarks of SanDisk Corporation, registered in the United States and other countries. Other brand names mentioned herein are for identification purposes only and may be the trademarks of their respective holder(s).
© 2014 SanDisk Corporation. All rights reserved.

SanDisk SSD Dashboard User Manual
© 2014 SanDisk® Corporation 1 August 2014
1. Preface
1.1 About This Document
This document describes the installation process and usage instructions for the SanDisk SSD Dashboard.
1.2 Typographical Conventions
This document follows these conventions:
Convention Usage Examples
Note: Important additional information or further explanation of a topic.
Note: A weekly backup is recommended.
Warning!
The task or operation might have serious consequences if conducted incorrectly or without appropriate safeguards. If you are not an expert in the use of this product, consult SanDisk for assistance.
Warning! Do not change configuration parameters.
Bold A command or system input that you type, or text or a button displayed on a screen.
Click HELP for details on disaster recovery.
Italic
Italic font indicates any of the following:
A term with a specific meaning in the context of
this document.
Emphasis on specific information.
Reference to another document.
Detailed information on disaster recovery methods is available in the Administrator Guide.
Blue text Hyperlinks are underlined; cross references to information within this document are not.
For more details, see Error! eference source not found., or visit www.sandisk.com.

SanDisk SSD Dashboard User Manual
© 2014 SanDisk® Corporation 2 August 2014
2. Introduction
2.1 Minimum System Requirements
The SanDisk SSD Dashboard is a Windows application. It can be installed on 32 or 64 bit Windows Vista, 7, 8, or 8.1 environments. Admin rights are required for installation and execution of the application.
Supported Operating Systems
Windows Vista (32/64 bit)
Windows 7 (32/64 bit)
Windows 8 (32/64 bit)
Windows 8.1 (32/64 bit)
Additional Requirements
.NET 4.0 or above
Internet Explorer 9 or above
2.2 Supported Languages
17 languages are supported:
Czech
Danish
Dutch
English
French
German
Italian
Japanese
Korean
Polish
Portuguese
Russian
Simplified Chinese
Spanish
Swedish
Traditional Chinese
Turkish

SanDisk SSD Dashboard User Manual
© 2014 SanDisk® Corporation 3 August 2014
2.3 Installation
You may download the current version of the SanDisk SSD Dashboard software from http://www.sandisk.com/ssddashboard. Once it has been downloaded, double-click on the SanDiskSSDDashboadSetup.exe file icon to launch the installation program.
Select a language and then click on the Install button to proceed with the installation. Otherwise, click on the red button in the upper right-hand corner to cancel the installation.
Figure 1: Begin Installation
When the installation has completed successfully, click on the Finish button. This will automatically launch the SanDisk SSD Dashboard and load the Status section.
Figure 2: Installation Successful
Note: To perform an Application Update, see section 6.1.
SanDisk SSD Dashboard User Manual
© 2014 SanDisk® Corporation 4 August 2014
2.4 Usage
The SanDisk SSD Dashboard will automatically scan for SanDisk SSDs when it loads.
Figure 3: Scanning for SanDisk SSDs
If a SanDisk SSD was not connected to the system when the application was loaded, or a specific one is not appearing in the SanDisk SSD Dashboard, you may (re)connect it, then click the Refresh icon to rescan the system for SanDisk SSDs.
Figure 4: Rescan for SanDisk SSD(s)
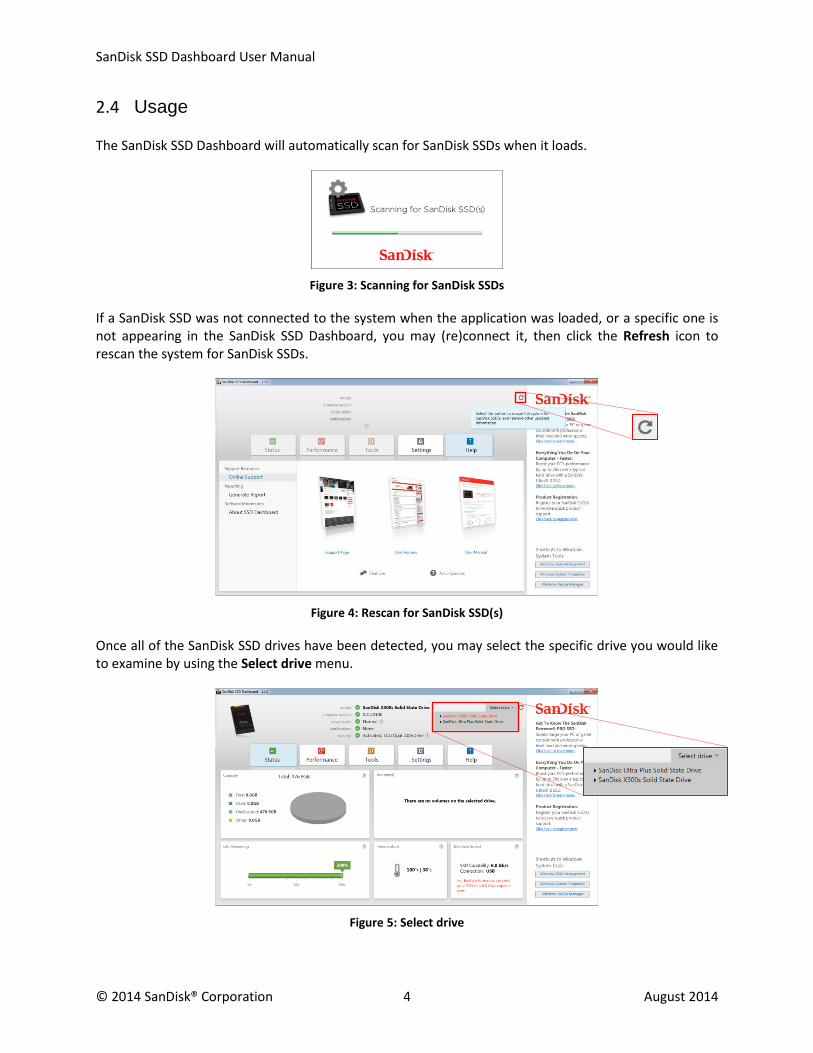
Once all of the SanDisk SSD drives have been detected, you may select the specific drive you would like to examine by using the Select drive menu.
Figure 5: Select drive

SanDisk SSD Dashboard User Manual
© 2014 SanDisk® Corporation 5 August 2014
3. Status
The Status section displays the overall state and health of the drive.
Figure 6: Status
Model
Product model of the selected SanDisk SSD.
Firmware Version
Version number of current firmware installed on the selected SSD.
Drive Health
Drive Health summarizes the current condition of the SSD based on S.M.A.R.T. attributes.
Normal The drive is in good condition.
Poor The number of spare blocks has reached the minimum threshold. It is suggested to replace this drive with a new SSD.
Notifications
Any notifications, such as software or firmware updates available or S.M.A.R.T. attribute warnings, will be displayed in this area.

SanDisk SSD Dashboard User Manual
© 2014 SanDisk® Corporation 6 August 2014
Security
If the selected drive supports security, this area will be visible.
It will display “Not Activated” if the security protocol is not active. Otherwise, it will display the name of the active security protocol, such as TCG Opal 2.0.
Capacity
Displayed capacity is based on Windows® total reported capacity.
Green Free space
Blue Used space
Gray Unallocated space
Yellow Other
Volumes
The chart displays any drive volumes recognized by Windows.
Green Free space
Blue Used space
Red No free space
Life Remaining
The Life Remaining percentage represents the remaining writes that the drive can perform in its lifetime.
Note: If this feature is not supported by the drive, a “Not Supported” message will be displayed.
Temperature
The temperature display is reported by the drive.
Green Normal operation
Red Drive is currently overheating
Interface Speed
SSD Capability is the fastest speed supported by the drive.
Connection Speed is the actual speed negotiated with this system. If the Connection Speed is lower than the SSD Capability, try connecting the drive to a faster port for better performance.
SanDisk SSD Dashboard User Manual
© 2014 SanDisk® Corporation 7 August 2014
4. Performance
4.1 Performance Chart
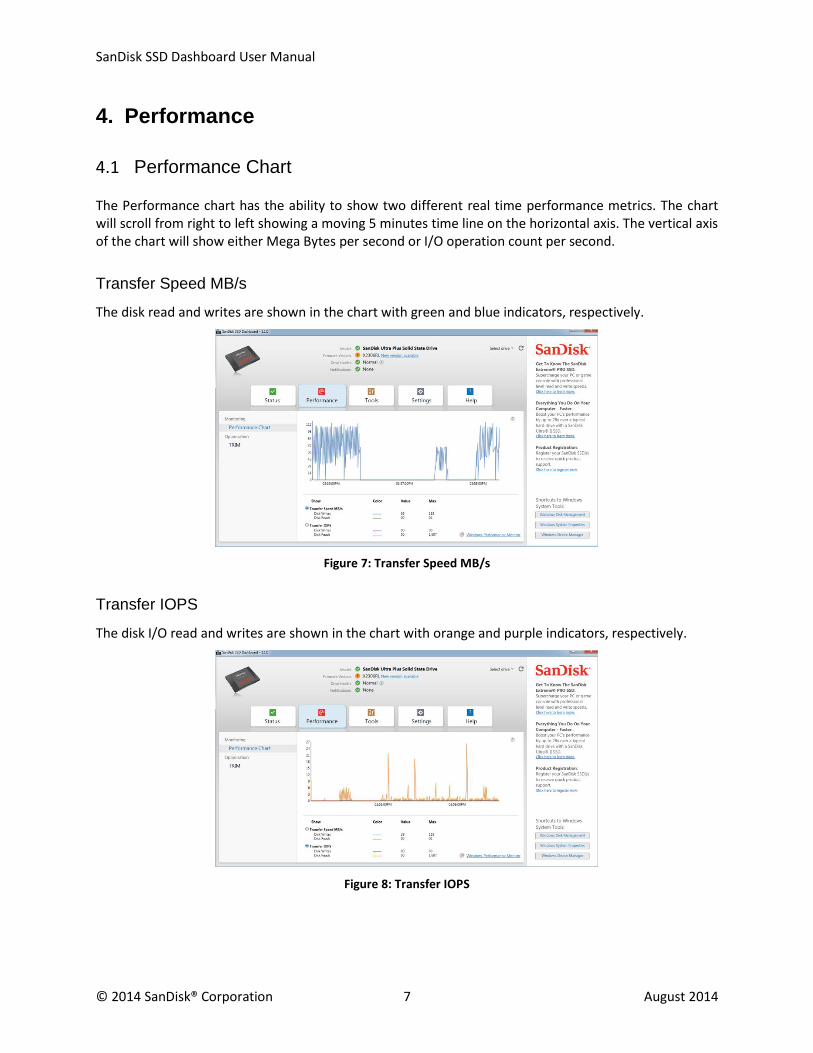
The Performance chart has the ability to show two different real time performance metrics. The chart will scroll from right to left showing a moving 5 minutes time line on the horizontal axis. The vertical axis of the chart will show either Mega Bytes per second or I/O operation count per second.
Transfer Speed MB/s
The disk read and writes are shown in the chart with green and blue indicators, respectively.
Figure 7: Transfer Speed MB/s
Transfer IOPS
The disk I/O read and writes are shown in the chart with orange and purple indicators, respectively.
Figure 8: Transfer IOPS

SanDisk SSD Dashboard User Manual
© 2014 SanDisk® Corporation 8 August 2014
4.2 TRIM
TRIM frees up space on the SSD used by files that have since been deleted.
Figure 9: TRIM
Use the Run TRIM Now button to manually run TRIM.
It is recommended to run TRIM weekly. Select the frequency to be weekly.
To view SanDisk SSD Dashboard scheduled TRIM tasks, click the Windows Task Scheduler button to schedule the task. Each TRIM task is specific to a drive, so multiple drives can be scheduled differently for TRIM.
Figure 10: Windows Task Scheduler

SanDisk SSD Dashboard User Manual
© 2014 SanDisk® Corporation 9 August 2014
5. Tools
5.1 Third Party Offers
Third party offers relevant to the SSD drive will be displayed at the bottom of the Tools section. These may include applications or services such as drive cloning, anti-virus software, theft recovery, drive security, etc... To find out more about a particular offer, simply click on the image or third party logo.
Figure 11: Third Party Offers
SanDisk SSD Dashboard User Manual
© 2014 SanDisk® Corporation 10 August 2014
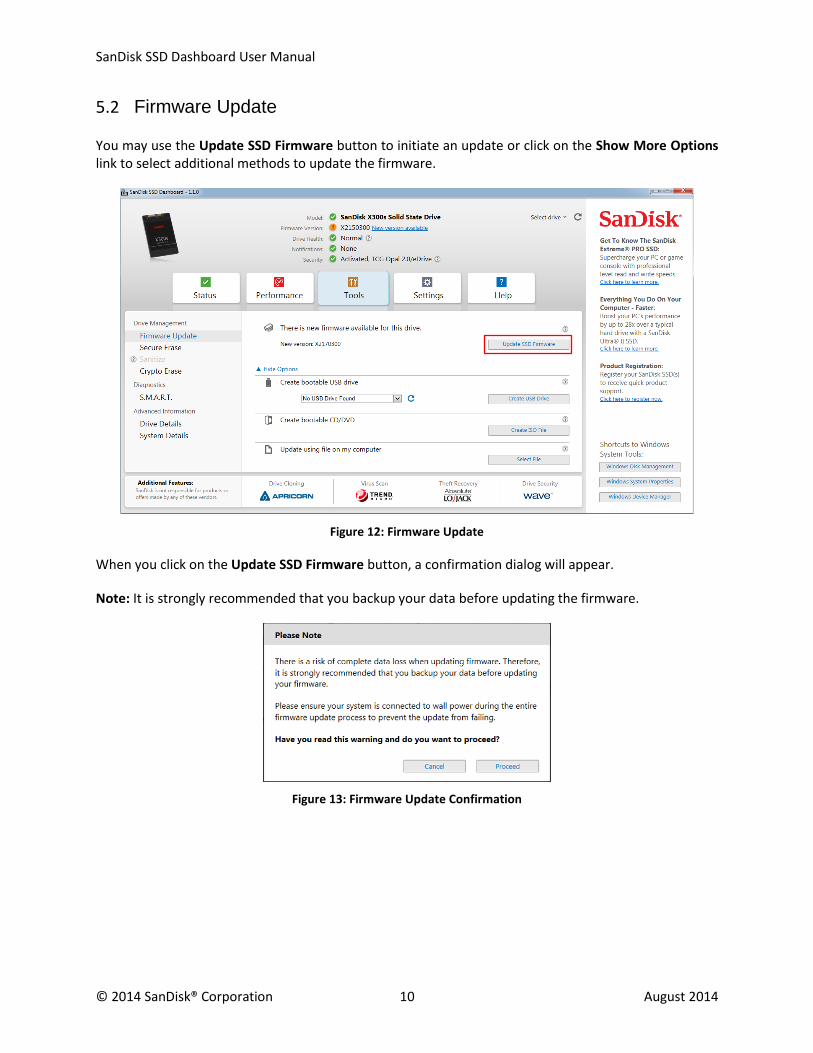
5.2 Firmware Update
You may use the Update SSD Firmware button to initiate an update or click on the Show More Options link to select additional methods to update the firmware.
Figure 12: Firmware Update
When you click on the Update SSD Firmware button, a confirmation dialog will appear.
Note: It is strongly recommended that you backup your data before updating the firmware.
Figure 13: Firmware Update Confirmation

SanDisk SSD Dashboard User Manual
© 2014 SanDisk® Corporation 11 August 2014
Once the firmware has been downloaded to the drive, the power to the SSD must be turned off to complete the firmware update process. This can usually be done by shutting down the computer then turning it back on.
Figure 14: Firmware Update – System Shutdown Required
For legacy drives, SanDisk SSD Dashboard may ask to reboot the computer to run the firmware update tool.
Figure 15: Firmware Update - Legacy Drives
When the boot process is complete, select SanDisk SSD Dashboard to initiate the firmware update.
Figure 16: Bootable CD/DVD - Select SanDisk SSD Dashboard
SanDisk SSD Dashboard User Manual
© 2014 SanDisk® Corporation 12 August 2014
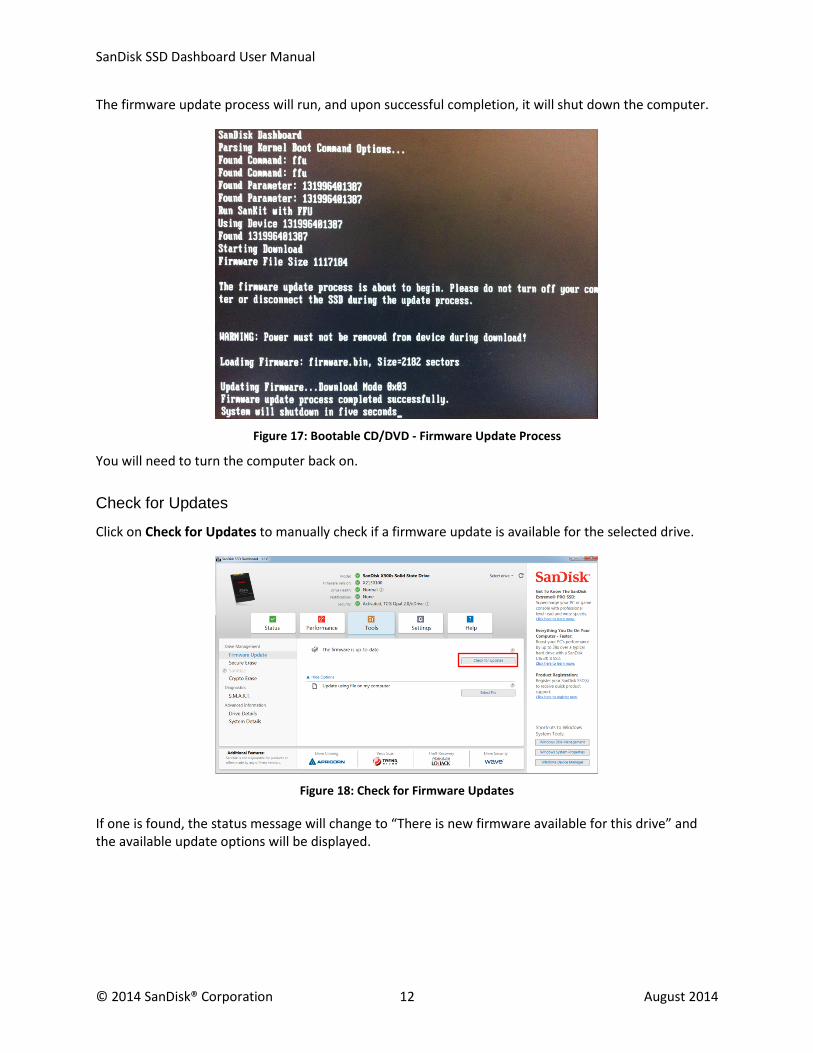
The firmware update process will run, and upon successful completion, it will shut down the computer.
Figure 17: Bootable CD/DVD - Firmware Update Process
You will need to turn the computer back on.
Check for Updates
Click on Check for Updates to manually check if a firmware update is available for the selected drive.
Figure 18: Check for Firmware Updates
If one is found, the status message will change to “There is new firmware available for this drive” and the available update options will be displayed.
SanDisk SSD Dashboard User Manual
© 2014 SanDisk® Corporation 13 August 2014
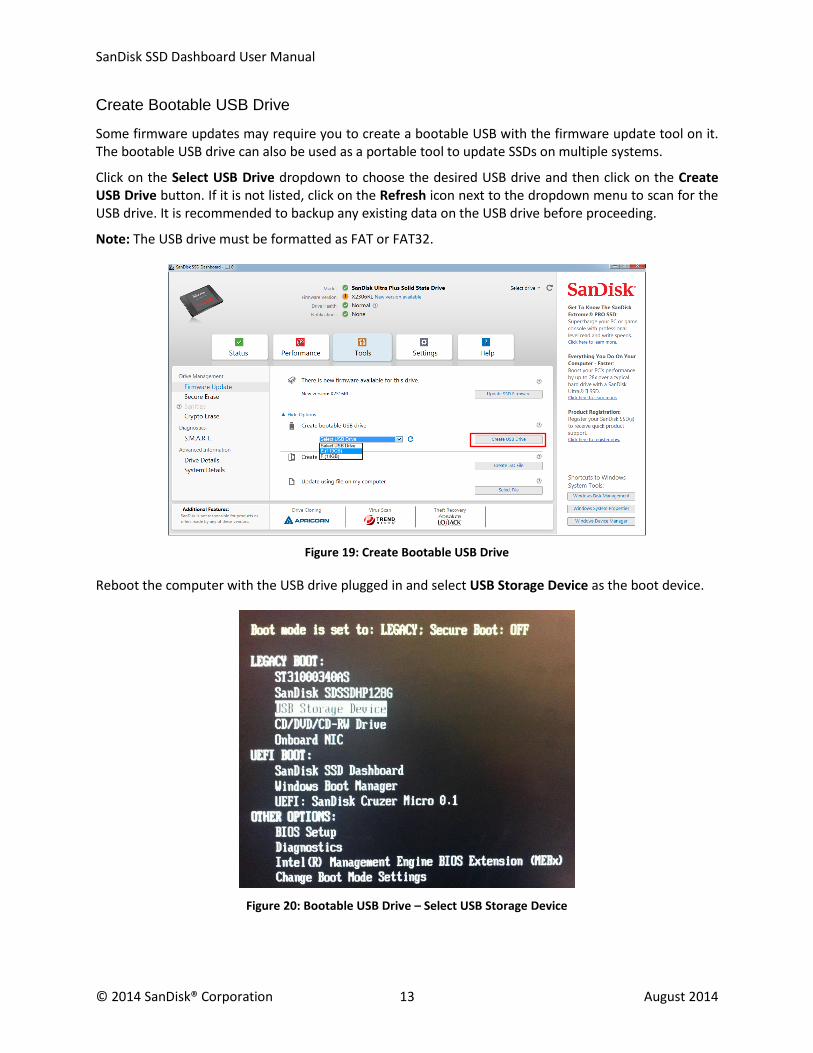
Create Bootable USB Drive
Some firmware updates may require you to create a bootable USB with the firmware update tool on it. The bootable USB drive can also be used as a portable tool to update SSDs on multiple systems.
Click on the Select USB Drive dropdown to choose the desired USB drive and then click on the Create USB Drive button. If it is not listed, click on the Refresh icon next to the dropdown menu to scan for the USB drive. It is recommended to backup any existing data on the USB drive before proceeding.
Note: The USB drive must be formatted as FAT or FAT32.
Figure 19: Create Bootable USB Drive
Reboot the computer with the USB drive plugged in and select USB Storage Device as the boot device.
Figure 20: Bootable USB Drive – Select USB Storage Device

SanDisk SSD Dashboard User Manual
© 2014 SanDisk® Corporation 14 August 2014
When the boot process is complete, select SanDisk SSD Dashboard to initiate the firmware update.
Figure 21: Bootable CD/DVD - Select SanDisk SSD Dashboard
The firmware update process will run, and upon successful completion, it will shut down the computer.
Figure 22: Bootable CD/DVD - Firmware Update Process
You will need to turn the computer back on.
SanDisk SSD Dashboard User Manual
© 2014 SanDisk® Corporation 15 August 2014
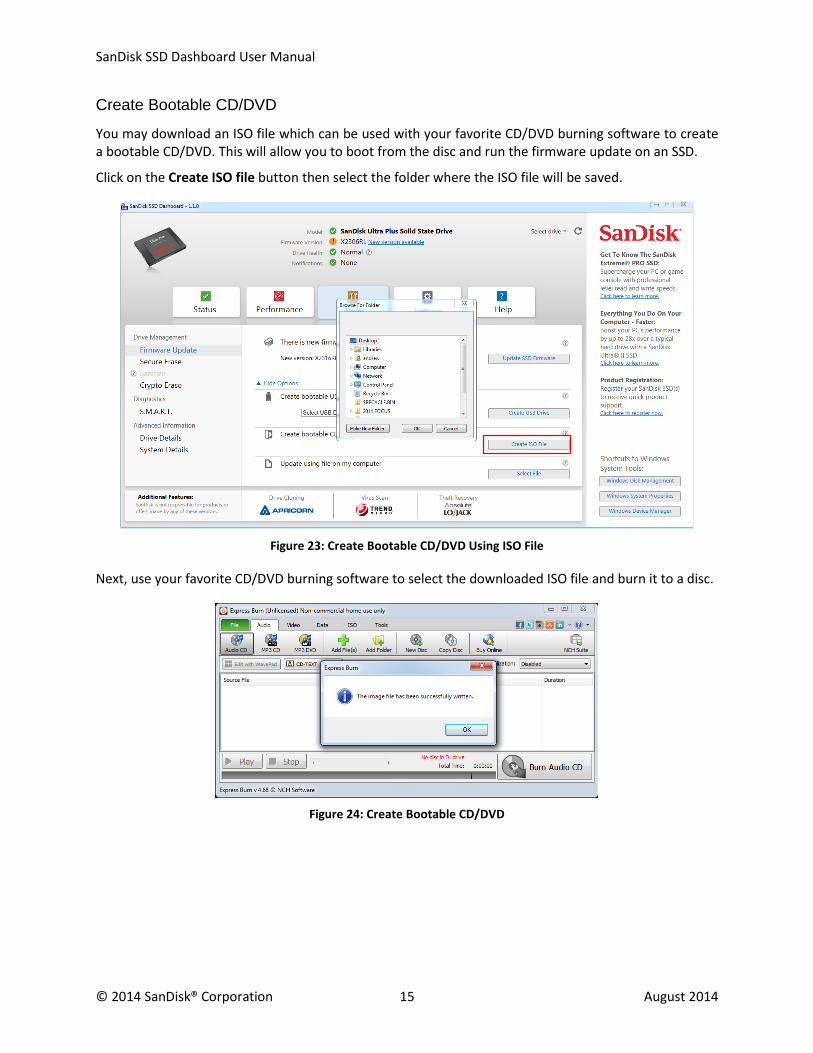
Create Bootable CD/DVD
You may download an ISO file which can be used with your favorite CD/DVD burning software to create a bootable CD/DVD. This will allow you to boot from the disc and run the firmware update on an SSD.
Click on the Create ISO file button then select the folder where the ISO file will be saved.
Figure 23: Create Bootable CD/DVD Using ISO File
Next, use your favorite CD/DVD burning software to select the downloaded ISO file and burn it to a disc.
Figure 24: Create Bootable CD/DVD
SanDisk SSD Dashboard User Manual
© 2014 SanDisk® Corporation 16 August 2014
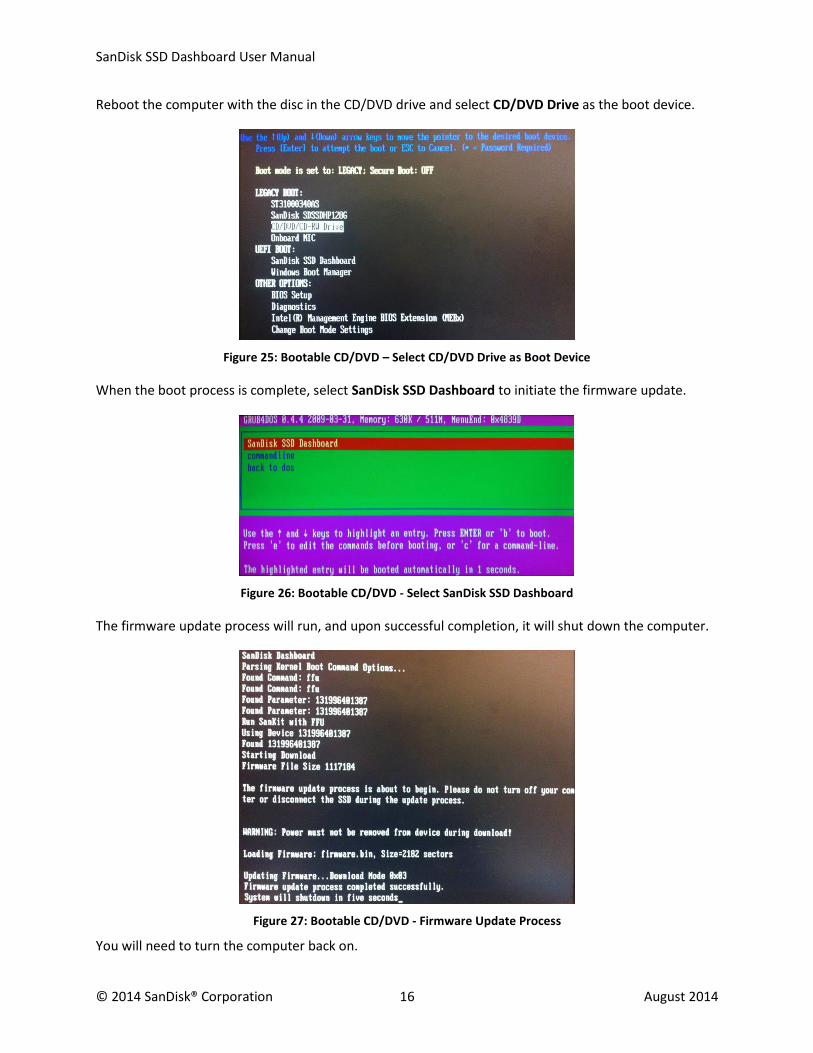
Reboot the computer with the disc in the CD/DVD drive and select CD/DVD Drive as the boot device.
Figure 25: Bootable CD/DVD – Select CD/DVD Drive as Boot Device
When the boot process is complete, select SanDisk SSD Dashboard to initiate the firmware update.
Figure 26: Bootable CD/DVD - Select SanDisk SSD Dashboard
The firmware update process will run, and upon successful completion, it will shut down the computer.
Figure 27: Bootable CD/DVD - Firmware Update Process
You will need to turn the computer back on.

SanDisk SSD Dashboard User Manual
© 2014 SanDisk® Corporation 17 August 2014
Update Using File on My Computer
If there is a specific firmware file already downloaded that should be used for the update, click on the Select File button.
Figure 28: Firmware Update Using File on My Computer
A confirmation dialog will appear before you may proceed to select the file.
Figure 29: Firmware Update Warning
Note: Only compatible firmware update files may be used for this process.

SanDisk SSD Dashboard User Manual
© 2014 SanDisk® Corporation 18 August 2014
5.3 Secure Erase
Secure Erase will erase the drive and can only be performed on SSD drives that are not the boot drive. Click Erase Now to erase the drive and leave it in an unformatted state.
Figure 30: Secure Erase
If the SSD is the boot drive, you may create a bootable USB drive with the Secure Erase tool on it. The bootable USB drive can also be used as a portable tool to erase SSDs on multiple systems.
Click on the Select USB Drive dropdown to choose the desired USB drive and then click on the Create USB Drive button. If it is not listed, click on the Refresh icon next to the dropdown menu to scan for the USB drive. It is recommended to backup any existing data on the USB drive before proceeding.
Note: The USB drive must be formatted as FAT or FAT32.
Figure 31: Create Bootable USB Drive for Secure Erase

SanDisk SSD Dashboard User Manual
© 2014 SanDisk® Corporation 19 August 2014
5.4 Sanitize
Sanitize will explicitly erase all of the data on the drive and can only be performed on SSD drives that are not the boot drive. Click Erase Now to erase the drive and leave it in an unformatted state.
Figure 32: Sanitize
If the SSD is the boot drive, you may create a bootable USB drive with the Sanitize tool on it. The bootable USB drive can also be used as a portable tool to erase SSDs on multiple systems.
Click on the Select USB Drive dropdown to choose the desired USB drive and then click on the Create USB Drive button. If it is not listed, click on the Refresh icon next to the dropdown menu to scan for the USB drive. It is recommended to backup any existing data on the USB drive before proceeding.
Note: The USB drive must be formatted as FAT or FAT32.
Figure 33: Create Bootable USB Drive for Sanitize

SanDisk SSD Dashboard User Manual
© 2014 SanDisk® Corporation 20 August 2014
5.5 Crypto Erase
Crypto Erase is used to revert an OPAL-activated or eDrive-activated SanDisk SSD back to its factory default state. After a Crypto Erase, all security keys will be deleted, rendering the user data unrecoverable. Also, OPAL or eDrive security will be deactivated so that the drive can be reused with any compatible security application.
Crypto Erase can only be performed on security enabled SSDs that are not the boot drive. The drive’s unique Physical Security ID (PSID), which is printed on the drive’s label, is required to perform a Crypto Erase. Click Erase Now to erase the drive and leave it in an unformatted state.
Figure 34: Crypto Erase
If the SSD is the boot drive, you may create a bootable USB drive with the Crypto Erase tool on it. The bootable USB drive can also be used as a portable tool to erase SSDs on multiple systems.
Click on the Select USB Drive dropdown to choose the desired USB drive and then click on the Create USB Drive button. If it is not listed, click on the Refresh icon next to the dropdown menu to scan for the USB drive. It is recommended to backup any existing data on the USB drive before proceeding.
Note: The USB drive must be formatted as FAT or FAT32.
Figure 35: Create Bootable USB Drive for Crypto Erase

SanDisk SSD Dashboard User Manual
© 2014 SanDisk® Corporation 21 August 2014
5.6 S.M.A.R.T.
S.M.A.R.T. is an industry standard and is an acronym for Self-Monitoring, Analysis and Reporting Technology.
Figure 36: S.M.A.R.T.
Diagnostic Short Test
The S.M.A.R.T. Diagnostic Short Test is automatically run every time the application is launched. It is a quick drive health test as defined in the S.M.A.R.T. specification.
Diagnostic Extended Test
The S.M.A.R.T. Diagnostic Extended Test is an extended drive health test as defined in the S.M.A.R.T. specification. When this test is running, you will not be able to do anything else within the SanDisk SSD Dashboard. However, you can cancel the test at any time.
Figure 37: S.M.A.R.T. Diagnostic Extended Test
If the test is successful, the description text will change to a green success message. Otherwise, a link will be displayed to go the details of the test.
Figure 38: S.M.A.R.T. Diagnostic Extended Test Successful

SanDisk SSD Dashboard User Manual
© 2014 SanDisk® Corporation 22 August 2014
5.7 Drive Details
Figure 39: Drive Details
Drive Details displays the following information for the selected drive:
Model Name
Model String
SATA Revision
SATA Link Speed
Serial Number
Maximum LBA
World Wide Name (a unique identifier used for all SanDisk drives)
For additional information, click on Show Advanced Details.
5.8 System Details
Figure 40: System Details
System Details displays information about the operating system, computer hardware, and ATA controller(s) used in the system on which SanDisk SSD Dashboard is installed.

SanDisk SSD Dashboard User Manual
© 2014 SanDisk® Corporation 23 August 2014
6. Settings
6.1 Application Update
If a newer version of the application is available, a message will be displayed in the Notifications area.
Clicking on the New Application Available link will take you to the Settings section, which will display the number of the new version available. Click on Update SanDisk SSD Dashboard to initiate the update.
Figure 41: Application Update Notification
Click on OK to confirm and proceed with the application update (see figure 6). After the update has finished downloading, the installation process will begin (see section 2.1).
Figure 42: Application Update Dialog
SanDisk SSD Dashboard User Manual
© 2014 SanDisk® Corporation 24 August 2014
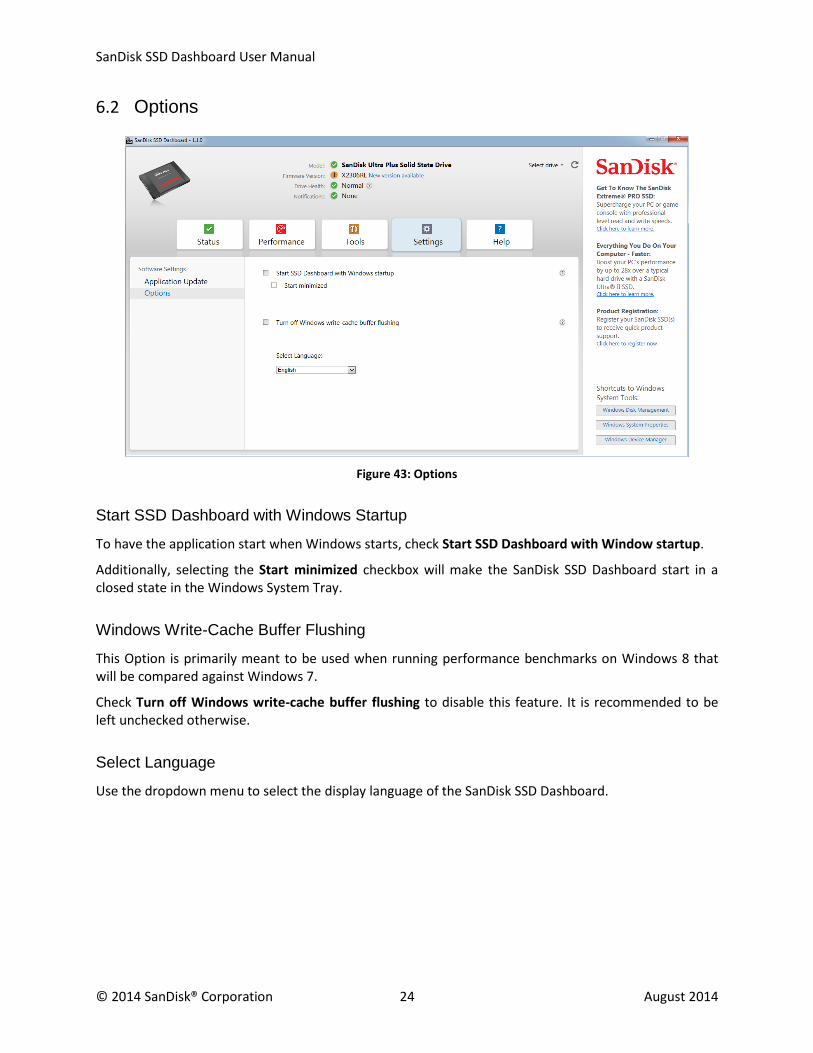
6.2 Options
Figure 43: Options
Start SSD Dashboard with Windows Startup
To have the application start when Windows starts, check Start SSD Dashboard with Window startup.
Additionally, selecting the Start minimized checkbox will make the SanDisk SSD Dashboard start in a closed state in the Windows System Tray.
Windows Write-Cache Buffer Flushing
This Option is primarily meant to be used when running performance benchmarks on Windows 8 that will be compared against Windows 7.
Check Turn off Windows write-cache buffer flushing to disable this feature. It is recommended to be left unchecked otherwise.
Select Language
Use the dropdown menu to select the display language of the SanDisk SSD Dashboard.
SanDisk SSD Dashboard User Manual
© 2014 SanDisk® Corporation 25 August 2014
7. Help
7.1 Online Support
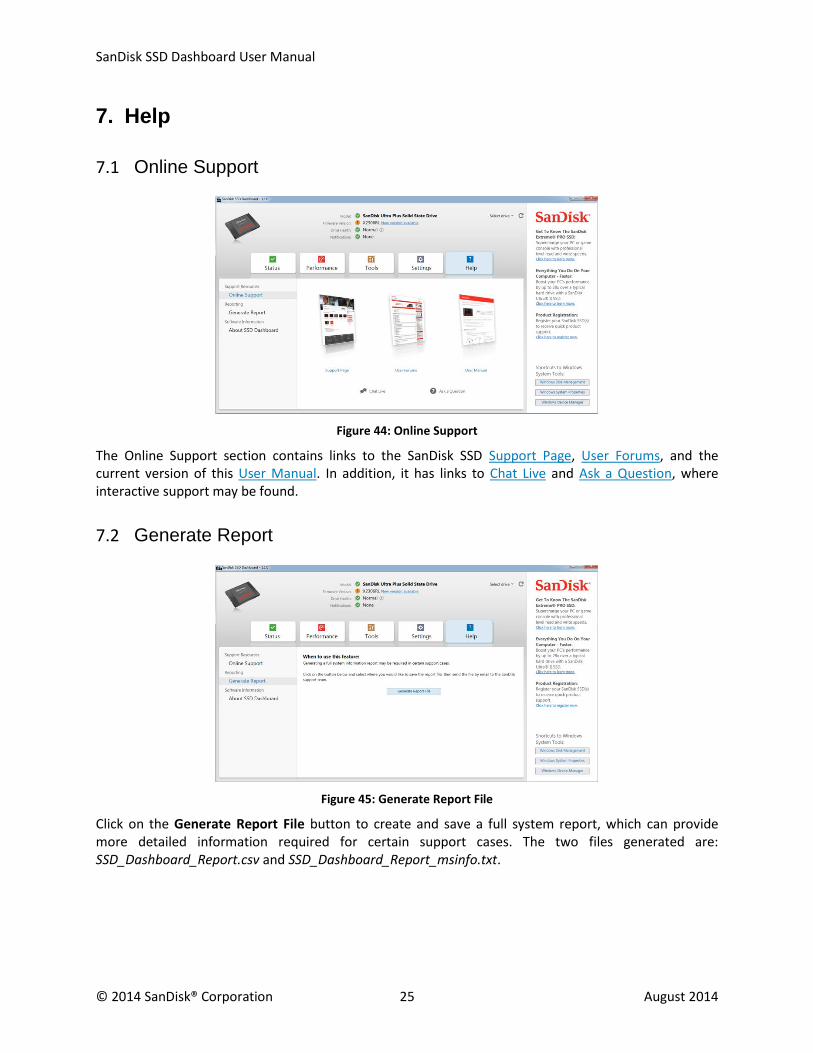
Figure 44: Online Support
The Online Support section contains links to the SanDisk SSD Support Page, User Forums, and the current version of this User Manual. In addition, it has links to Chat Live and Ask a Question, where interactive support may be found.
7.2 Generate Report
Figure 45: Generate Report File
Click on the Generate Report File button to create and save a full system report, which can provide more detailed information required for certain support cases. The two files generated are: SSD_Dashboard_Report.csv and SSD_Dashboard_Report_msinfo.txt.

SanDisk SSD Dashboard User Manual
© 2014 SanDisk® Corporation 26 August 2014
7.3 About SSD Dashboard
The About SSD Dashboard section contains the version number of the SanDisk SSD Dashboard currently being run, as well as links to the End User License Agreement (EULA), third party notices, and the SanDisk Privacy Statement.
Figure 46: About SSD Dashboard
Related Documents