Samsung SDS EMM Installation Guide Solution version 2.2.5 Published: January 2020 Manual version 2.2.5a

Welcome message from author
This document is posted to help you gain knowledge. Please leave a comment to let me know what you think about it! Share it to your friends and learn new things together.
Transcript
Samsung SDS
EMM
Installation Guide
Solution version 2.2.5
Published: January 2020
Manual version 2.2.5a
Before using this information and the product it supports, be sure to read the general
information on this page.
Publisher Samsung SDS Co., Ltd
Address 125, 35-Gil, Olympic-Ro, Songpa-Gu, Seoul, South Korea.
Email [email protected]
Website www.samsungsds.com
Samsung SDS Co., Ltd. has credence in the information contained in this document. However, Samsung SDS
is not responsible for any circumstances which arise from inaccurate content or typographical errors.
The content and specifications in this document are subject to change without notice.
Samsung SDS Co., Ltd. holds all intellectual property rights, including the copyrights, to this document. Using,
copying, disclosing to a third party or distributing this document without explicit permission from Samsung
SDS is strictly prohibited. These activities constitute an infringement of the intellectual property rights of this
company.
Any reproduction or redistribution of part or all of these materials is strictly prohibited except as permitted by
the license or by the express permission of Samsung SDS Co., Ltd. Samsung SDS Co., Ltd. owns the
intellectual property rights in and to this document. Other product and company names referenced in this
document are trademarks and / or registered trademarks of their respective owners.
DFARS Limited Rights Notice
LIMITED RIGHTS
Contractor Name: Samsung SDS Co. Ltd., via its distributor in the U.S., Samsung SDS America, Inc.
Contractor Address: Samsung SDS America, Inc.: 100 Challenger Road, 6th Fl., Ridgefield Park, NJ 07660 U.S.A.
The US Government's rights to use, modify, reproduce, release, perform, display, or disclose these technical data are restricted by
paragraph (b)(3) of the Rights in Technical Data--Noncommercial Items clause contained in the US Government contract under
which the US Government has obtained a license to use this computer software. Any reproduction of technical data or portions
thereof marked with this legend must also reproduce the markings. Any person, other than the US Government, who has been
provided access to such data must promptly notify the above named Contractor.
(End of legend)
FAR Limited Rights Notice
Limited Rights Notice (Dec 2007)
(a) These data are submitted with limited rights under the US Government contract under which the US Government has
obtained a license to use these data. These data may be reproduced and used by the US Government with the express limitation
that they will not, without written permission of the Contractor, be used for purposes of manufacture nor disclosed outside the US
Government; except that the US Government may disclose these data outside the US Government for the following purposes, if
any; provided that the US Government makes such disclosure subject to prohibition against further use and disclosure (if any).
(b) This notice shall be marked on any reproduction of these data, in whole or in part.
(End of notice)
Copyright ⓒ 2019 Samsung SDS Co., Ltd. All rights reserved.

Preface
3
The use of this commercial software, and its documentation is subject to the restrictions stated on the second page of this documentation.
Preface
Users of this guide
This guide is written for system administrators who install Samsung SDS EMM
(hereinafter “EMM”) solution, which provides an integrated security service. It
also covers for users who manage the EMM system such as stop, start, and
update the EMM.
In order to use this solution effectively, the administrator must have the
understanding and experience of the following:
● General knowledge on how to operate systems
● General knowledge on how to set network systems
● General knowledge on security activities
● General knowledge on how to use web servers

Preface
4
The use of this commercial software, and its documentation is subject to the restrictions stated on the second page of this documentation.
Summary of this guide
This guide consists of the following chapters:
● Chapter 1. Samsung SDS EMM installation overview
Provides an overview of EMM and installation environment.
● Chapter 2. Pre-installation
Covers basic system and computer requirements needed for installing EMM.
● Chapter 3. Installation
Explains how to install EMM.
● Chapter 4. Post-installation
Explains an environment’s setup after installation.
● Chapter 5. Updating
Explains how to use the patch installer to update EMM.
● Chapter 6. Configuring EMM High Availability
Explains how to configure the system to increase the availability of EMM.
● Appendix A. Installing or changing a certificate
Explains how to install or change a certificate used by the EMM servers.
● Appendix B. Configuring allowable Cipher
Explains how to configure the ciphers in Push, AppTunnel, Tomcat for TLS
communication.
● Appendix C. Audit Remote Logging
Explains how to install and set the audit remote logging server for managing
Audit logs.
● Appendix D. Using EMM on iOS
Explains the settings for using EMM on iOS devices.
● Appendix E. Installation Environment File
Explains the section of the installation environment file for installing EMM.
● Appendix F. Installing SQL Server certificate
Explains how to install and set the certificate on the MS SQL server.
● Appendix G. Secure Email Gateway
Explains how to install the gateway server and set the certificate for Secure Email
Gateway.
● Appendix H. SecuCamera
Explains how to install the SecuCamera server and set the App management
profile and event from the EMM Admin Portal to use SecuCamera app on the
user’s device.

Preface
5
The use of this commercial software, and its documentation is subject to the restrictions stated on the second page of this documentation.
Conventions
This document uses the following conventions:
Convention Description
Boldface Boldface is used to graphical user interface elements, menus,
navigation trees and directories within the main text.
“ “ “ “ double quotation marks using as below:
• Graphical user interface pages, portals, windows
• Referring to other booklets, white papers, etc., mention the
author or publisher of the publication and mark the title of
the book in double quotation marks
“Cross-reference” “Cross-reference” is used to reference documents or other chapters
in a document. If click the cross reference, it moves to the specified
location.
Monospace Monospace is used to commands, parameters, file names and
codes. Also, the monospace font uses Courier New.
Picture The picture is used to graphics, illustrations, screen captures, etc.
to help understand documents.
Table The table is used to easily identify and display large amounts of
information in the document.
Notes
The Note is used to additional information such as tips, recommendations, exceptions,
and limitations.
Note: To reflect filtered data again, click Refresh Data on the Add Common
Group window.
6
The use of this commercial software, and its documentation is subject to the restrictions stated on the second page of this documentation.
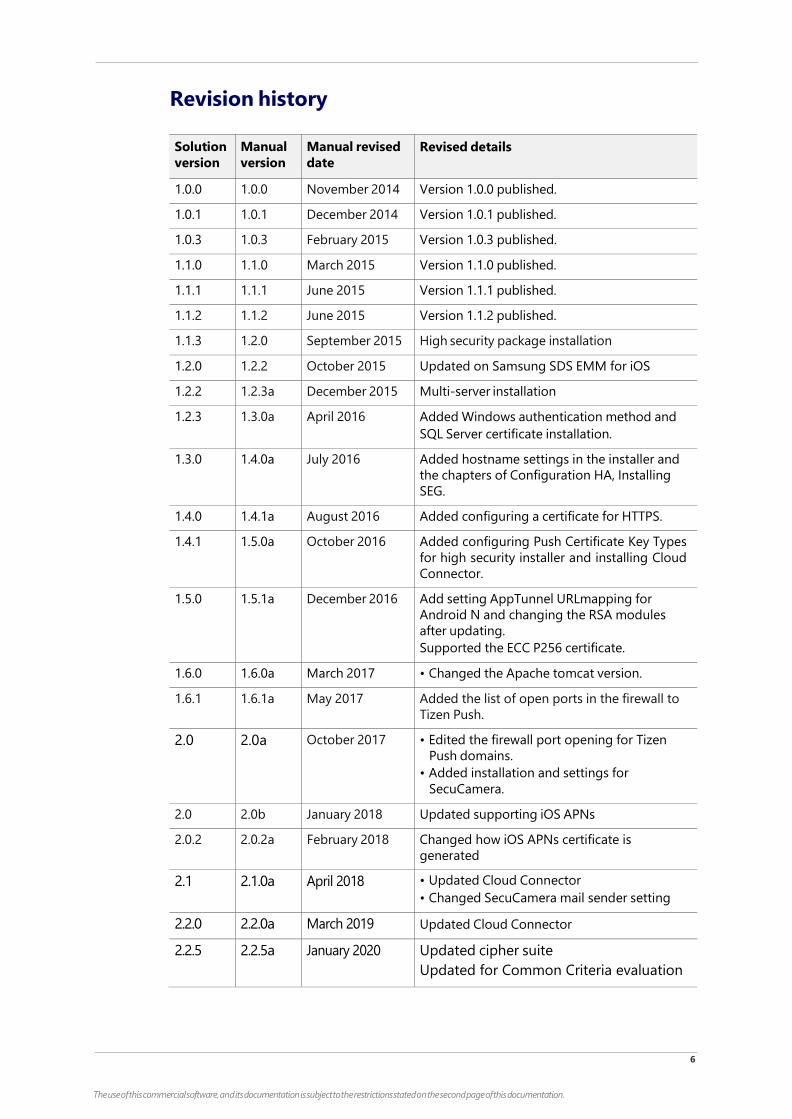
Revision history
Solution
version
Manual
version
Manual revised
date
Revised details
1.0.0 1.0.0 November 2014 Version 1.0.0 published.
1.0.1 1.0.1 December 2014 Version 1.0.1 published.
1.0.3 1.0.3 February 2015 Version 1.0.3 published.
1.1.0 1.1.0 March 2015 Version 1.1.0 published.
1.1.1 1.1.1 June 2015 Version 1.1.1 published.
1.1.2 1.1.2 June 2015 Version 1.1.2 published.
1.1.3 1.2.0 September 2015 High security package installation
1.2.0 1.2.2 October 2015 Updated on Samsung SDS EMM for iOS
1.2.2 1.2.3a December 2015 Multi-server installation
1.2.3 1.3.0a April 2016 Added Windows authentication method and
SQL Server certificate installation.
1.3.0 1.4.0a July 2016 Added hostname settings in the installer and
the chapters of Configuration HA, Installing
SEG.
1.4.0 1.4.1a August 2016 Added configuring a certificate for HTTPS.
1.4.1 1.5.0a October 2016 Added configuring Push Certificate Key Types
for high security installer and installing Cloud
Connector.
1.5.0 1.5.1a December 2016 Add setting AppTunnel URLmapping for
Android N and changing the RSA modules
after updating.
Supported the ECC P256 certificate.
1.6.0 1.6.0a March 2017 • Changed the Apache tomcat version.
1.6.1 1.6.1a May 2017 Added the list of open ports in the firewall to
Tizen Push.
2.0 2.0a October 2017 • Edited the firewall port opening for Tizen
Push domains.
• Added installation and settings for
SecuCamera.
2.0 2.0b January 2018 Updated supporting iOS APNs
2.0.2 2.0.2a February 2018 Changed how iOS APNs certificate is
generated
2.1 2.1.0a April 2018 • Updated Cloud Connector
• Changed SecuCamera mail sender setting
2.2.0 2.2.0a March 2019 Updated Cloud Connector
2.2.5 2.2.5a January 2020 Updated cipher suite
Updated for Common Criteria evaluation
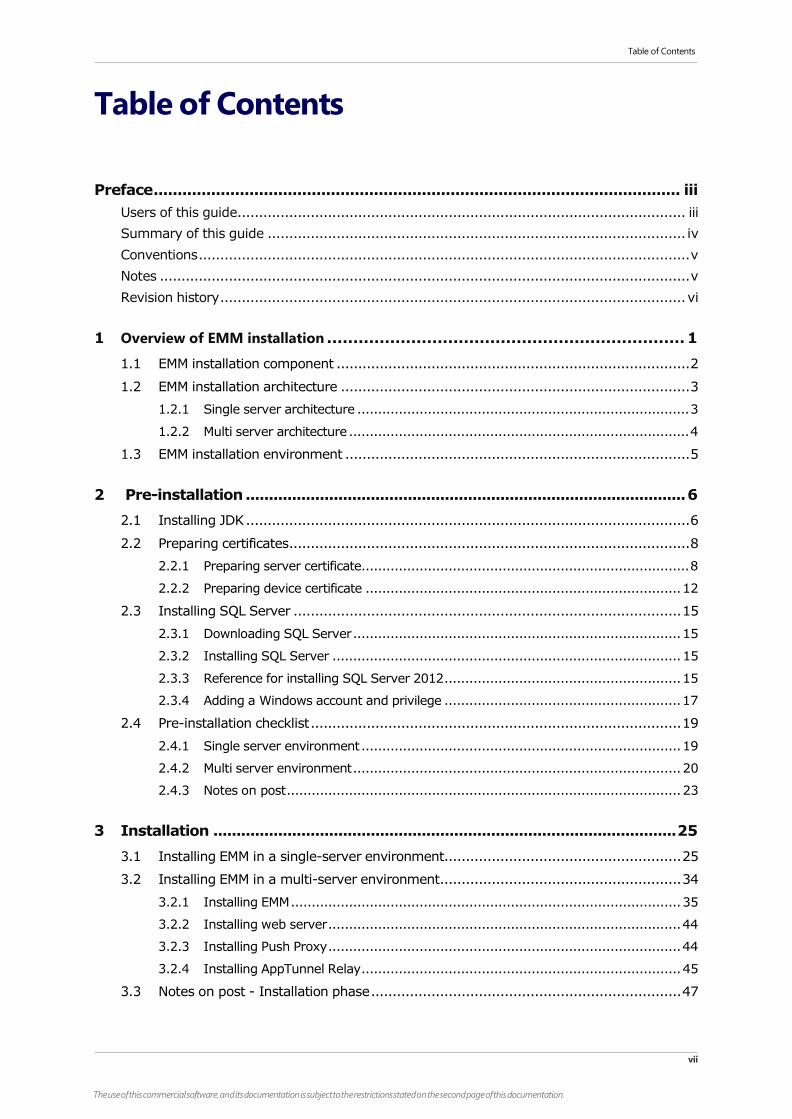
Table of Contents
vii
The use of this commercial software, and its documentation is subject to the restrictions stated on the second page of this documentation.
Table of Contents
Preface .............................................................................................................. iii
Users of this guide........................................................................................................ iii
Summary of this guide ................................................................................................. iv
Conventions .................................................................................................................. v
Notes ........................................................................................................................... v
Revision history ............................................................................................................ vi
1 Overview of EMM installation .................................................................... 1
1.1 EMM installation component .................................................................................. 2
1.2 EMM installation architecture ................................................................................. 3
1.2.1 Single server architecture ................................................................................ 3
1.2.2 Multi server architecture .................................................................................. 4
1.3 EMM installation environment ................................................................................ 5
2 Pre-installation ............................................................................................... 6
2.1 Installing JDK ....................................................................................................... 6
2.2 Preparing certificates ............................................................................................. 8
2.2.1 Preparing server certificate............................................................................... 8
2.2.2 Preparing device certificate ............................................................................ 12
2.3 Installing SQL Server .......................................................................................... 15
2.3.1 Downloading SQL Server ............................................................................... 15
2.3.2 Installing SQL Server .................................................................................... 15
2.3.3 Reference for installing SQL Server 2012 ......................................................... 15
2.3.4 Adding a Windows account and privilege ......................................................... 17
2.4 Pre-installation checklist ...................................................................................... 19
2.4.1 Single server environment ............................................................................. 19
2.4.2 Multi server environment ............................................................................... 20
2.4.3 Notes on post ............................................................................................... 23
3 Installation .................................................................................................... 25
3.1 Installing EMM in a single-server environment ....................................................... 25
3.2 Installing EMM in a multi-server environment ........................................................ 34
3.2.1 Installing EMM .............................................................................................. 35
3.2.2 Installing web server ..................................................................................... 44
3.2.3 Installing Push Proxy ..................................................................................... 44
3.2.4 Installing AppTunnel Relay ............................................................................. 45
3.3 Notes on post - Installation phase ........................................................................ 47
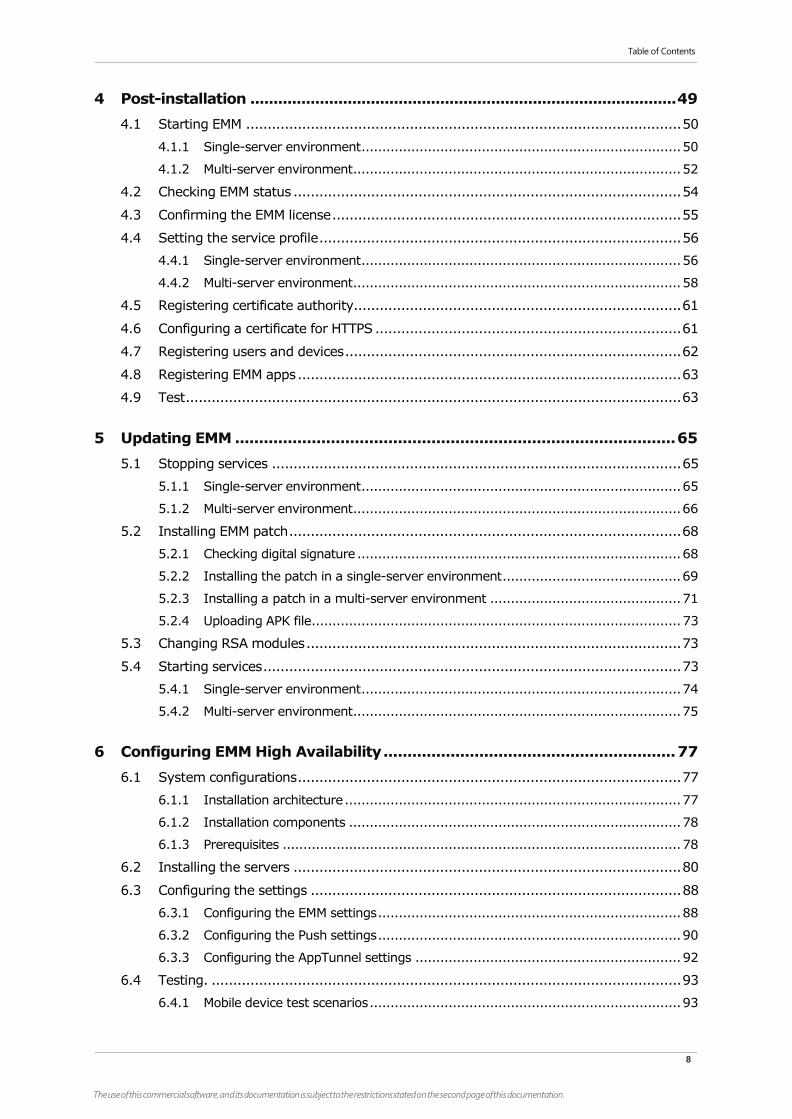
Table of Contents
8
The use of this commercial software, and its documentation is subject to the restrictions stated on the second page of this documentation.
4 Post-installation ............................................................................................ 49
4.1 Starting EMM ..................................................................................................... 50
4.1.1 Single-server environment ............................................................................. 50
4.1.2 Multi-server environment ............................................................................... 52
4.2 Checking EMM status .......................................................................................... 54
4.3 Confirming the EMM license ................................................................................. 55
4.4 Setting the service profile .................................................................................... 56
4.4.1 Single-server environment ............................................................................. 56
4.4.2 Multi-server environment ............................................................................... 58
4.5 Registering certificate authority ............................................................................ 61
4.6 Configuring a certificate for HTTPS ....................................................................... 61
4.7 Registering users and devices .............................................................................. 62
4.8 Registering EMM apps ......................................................................................... 63
4.9 Test ................................................................................................................... 63
5 Updating EMM ............................................................................................ 65
5.1 Stopping services ............................................................................................... 65
5.1.1 Single-server environment ............................................................................. 65
5.1.2 Multi-server environment ............................................................................... 66
5.2 Installing EMM patch ........................................................................................... 68
5.2.1 Checking digital signature .............................................................................. 68
5.2.2 Installing the patch in a single-server environment ........................................... 69
5.2.3 Installing a patch in a multi-server environment .............................................. 71
5.2.4 Uploading APK file ......................................................................................... 73
5.3 Changing RSA modules ....................................................................................... 73
5.4 Starting services ................................................................................................. 73
5.4.1 Single-server environment ............................................................................. 74
5.4.2 Multi-server environment ............................................................................... 75
6 Configuring EMM High Availability ............................................................. 77
6.1 System configurations ......................................................................................... 77
6.1.1 Installation architecture ................................................................................. 77
6.1.2 Installation components ................................................................................ 78
6.1.3 Prerequisites ................................................................................................ 78
6.2 Installing the servers .......................................................................................... 80
6.3 Configuring the settings ...................................................................................... 88
6.3.1 Configuring the EMM settings ......................................................................... 88
6.3.2 Configuring the Push settings ......................................................................... 90
6.3.3 Configuring the AppTunnel settings ................................................................ 92
6.4 Testing. ............................................................................................................. 93
6.4.1 Mobile device test scenarios ........................................................................... 93
Table of Contents
9
The use of this commercial software, and its documentation is subject to the restrictions stated on the second page of this documentation.
6.4.2 Admin Portal test scenarios ............................................................................ 97
Appendix A Installing or changing a certificate ........................................... 101
A.1 Installing and changing EMM server certificate ................................................................................................................. 101
A.2 Installing or changing a certificate for Push and AppTunnel server........................................................................ 102
A.3 Installing or changing a new SA certificate ............................................................................................................................ 103
Appendix B Configuring allowable Cipher .................................................... 104
A.4 Setting Push and AppTunnel ............................................................................... 104
A.5 Setting Tomcat .................................................................................................. 106
Appendix C Audit Remote Logging .............................................................. 108
A.6 Remote logging overview ................................................................................... 108
A.7 Installing stunnel in Windows .............................................................................. 109
A.8 Configuring the remote log server ....................................................................... 111
A.9 Using Audit Remote Logging .............................................................................. 119
Appendix D Using EMM on iOS ..................................................................... 120
A.10 Checking prerequisites ..................................................................................... 120
A.11 Generating Apple Push Notification Service certificates ........................................ 120
A.12 Building the EMM Client .................................................................................... 128
A.13 Registering APNs certificates ............................................................................. 136
A.14 Setting the iOS Sign Cert ................................................................................. 138
Appendix E Installation Environment File .................................................... 142
Appendix F Installing SQL Server certificate ............................................... 150
Appendix G Secure Email Gateway .............................................................. 157
A.15 Pre-installation ................................................................................................ 157
A.16 Installing SEG ................................................................................................. 165
Appendix H SecuCamera ............................................................................... 169
A.17 Overview of Samsung SDS SecuCamera ........................................................... 169
A.18 Configuring SecuCamera .................................................................................. 171
A.19 Installing the SecuCamera server ..................................................................... 175
1 Overview of EMM installation
10
The use of this commercial software, and its documentation is subject to the restrictions stated on the second page of this documentation.
1 Overview of EMM installation
Samsung SDS Enterprise Mobility Management (hereinafter "EMM") is a solution
designed to support comprehensive security management across multiple layers,
ranging from user devices and applications to data. A single, integrated Admin
Portal, regardless of OS, enables more efficient mobile security management. It
also offers security policies and a UI to satisfy customer needs and provide a user-
friendly experience and improves system stability and work productivity.
This guide describes how to install and update EMM software with 6 chapters:
● Installation overview
● Pre-installation (prerequisites)
● EMM installation
● Post-installation
● Updating EMM
● Configuring EMM High Availability
Details on the process of installation are below.
Figure 1-1. EMM installation process
Please refer to a EMM Security Target written by Gossamer for the details of security
functions that have been subject to Common Criteria evaluation.
1.1 EMM installation component
The followings are modules for server and device required to install EMM:
EMM server module
Module Roles Notes
EMM Management of device and policies, communication
with server modules
LTS A server that collects logs from the device.
Push DCM Keeps the communication channel unimpeded and
transfers messages between Device Agent on a device
and Push server
1 Overview of EMM installation
11
The use of this commercial software, and its documentation is subject to the restrictions stated on the second page of this documentation.
PS Register the user’s device on the device side and check
the data channel from DCM
SCM Keeps the communication channel open between the
Service Agent on the EMM and Push server
ECM Keeps the communication channel open between a 3rd
party platform (FCM or APNS) and the Push server
ICM Provides a TLS channel for message exchange between
physically separated servers.
AppTunnel Establish a secured channel for each app to transfer
information without a risk of leak
Push
Porxy
DPP Message relay between device agent and DCM Multi-
server only PPP Message relay between device agent and PS
EPP Message relay between device agent and ECM
AppTunnel Relay Packet relay between device and AppTunnel server
EMM device module
Platform Module Roles
Android EMM Agent Device control and monitoring
Push Agent Communication with a server
iOS EMM Client Device control and monitoring
Windows EMM Client Device control and monitoring
Tizen Push EMM Client Device control and monitoring
Note: If you have installed and are currently using a version which separates
the EMM Client from the EMM Agent, and want to update it to the
integrated EMM Agent, then you need to deactivate the EMM on your
device, and then re-install the integrated EMM Agent.

1 Overview of EMM installation
12
The use of this commercial software, and its documentation is subject to the restrictions stated on the second page of this documentation.
1.2 EMM installation architecture
EMM is installed with either a single server or multiple servers depending on the
number of users and security level.
Note that communication between the EMM Agent and EMM Server are
secured through TLS channels by default. The communication path from
the Admin Portal to the EMM server channels also creates an encrypted
communication channel by supporting HTTPS (over TLS). The
communication path from the EMM to its certificate authority (MC ADCS)
and supporting MS SQL Server are protected using Windows Server
provided IPsec – instructions can be found in Samsung SDS EMM
Configuration Guide for IPsec settings in Microsoft Windows Server 2016 for
Common Criteria Evaluation.
Please refer to the EMM system architecture diagrams below. Note that the
ports identified in the following figures are only examples – the actual ports
can be configured during installation. Note also that while the diagrams
identify the MS ADCS and MS SQL Server connections as HTTPS or TLS, in
the evaluated configuration they are protected using IPsec as identified
above.
1.2.1 Single server architecture
In single server architecture, EMM, Samsung SDS Push (hereinafter “Push”), Samsung
SDS AppTunnel (hereinafter “AppTunnel”), and the database are installed on one
single server. The single-server system is appropriate where there are few users or
the server is used for demo.
Figure 1-2. Single server architecture for EMM
1 Overview of EMM installation
13
The use of this commercial software, and its documentation is subject to the restrictions stated on the second page of this documentation.
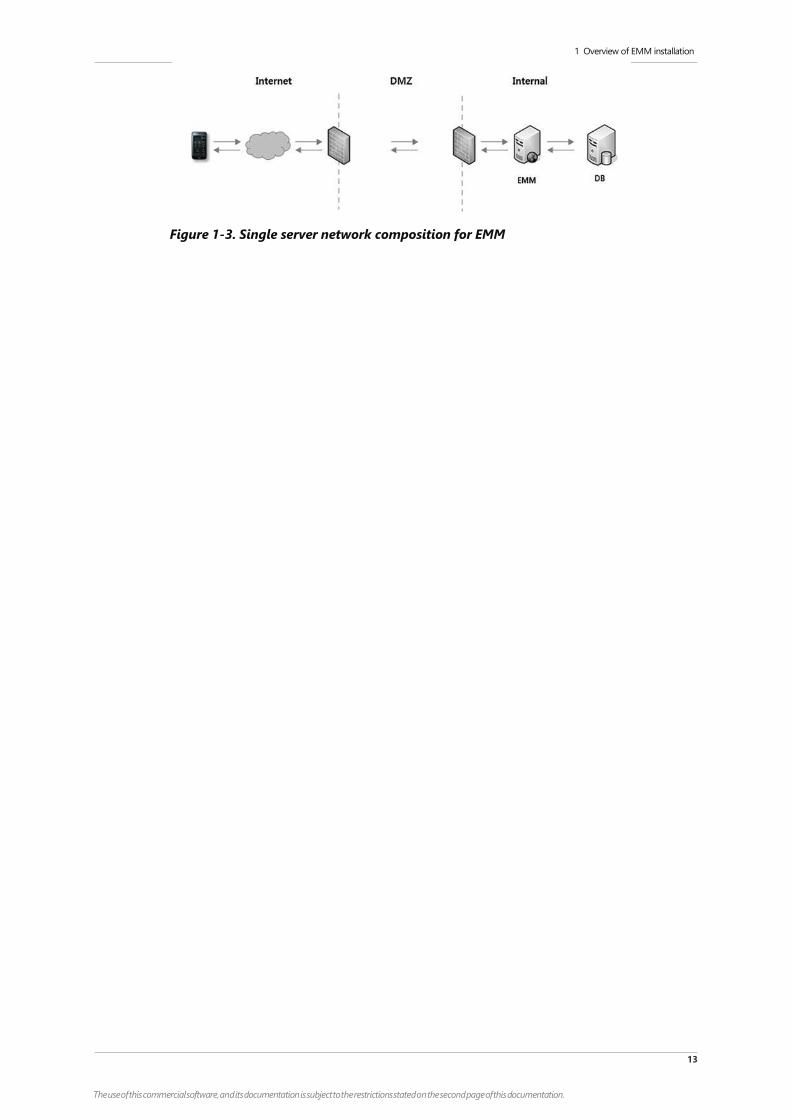
Figure 1-3. Single server network composition for EMM
1 Overview of EMM installation
14
The use of this commercial software, and its documentation is subject to the restrictions stated on the second page of this documentation.
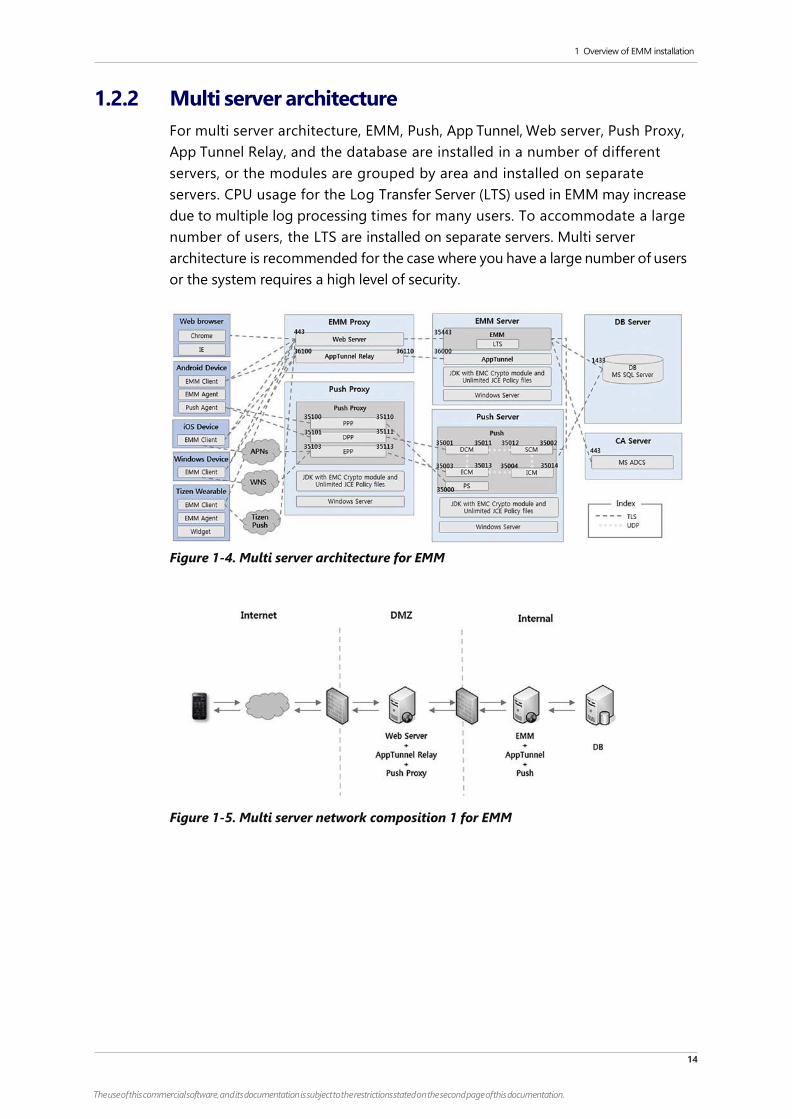
1.2.2 Multi server architecture
For multi server architecture, EMM, Push, App Tunnel, Web server, Push Proxy,
App Tunnel Relay, and the database are installed in a number of different
servers, or the modules are grouped by area and installed on separate
servers. CPU usage for the Log Transfer Server (LTS) used in EMM may increase
due to multiple log processing times for many users. To accommodate a large
number of users, the LTS are installed on separate servers. Multi server
architecture is recommended for the case where you have a large number of users
or the system requires a high level of security.
Figure 1-4. Multi server architecture for EMM
Figure 1-5. Multi server network composition 1 for EMM
1 Overview of EMM installation
15
The use of this commercial software, and its documentation is subject to the restrictions stated on the second page of this documentation.
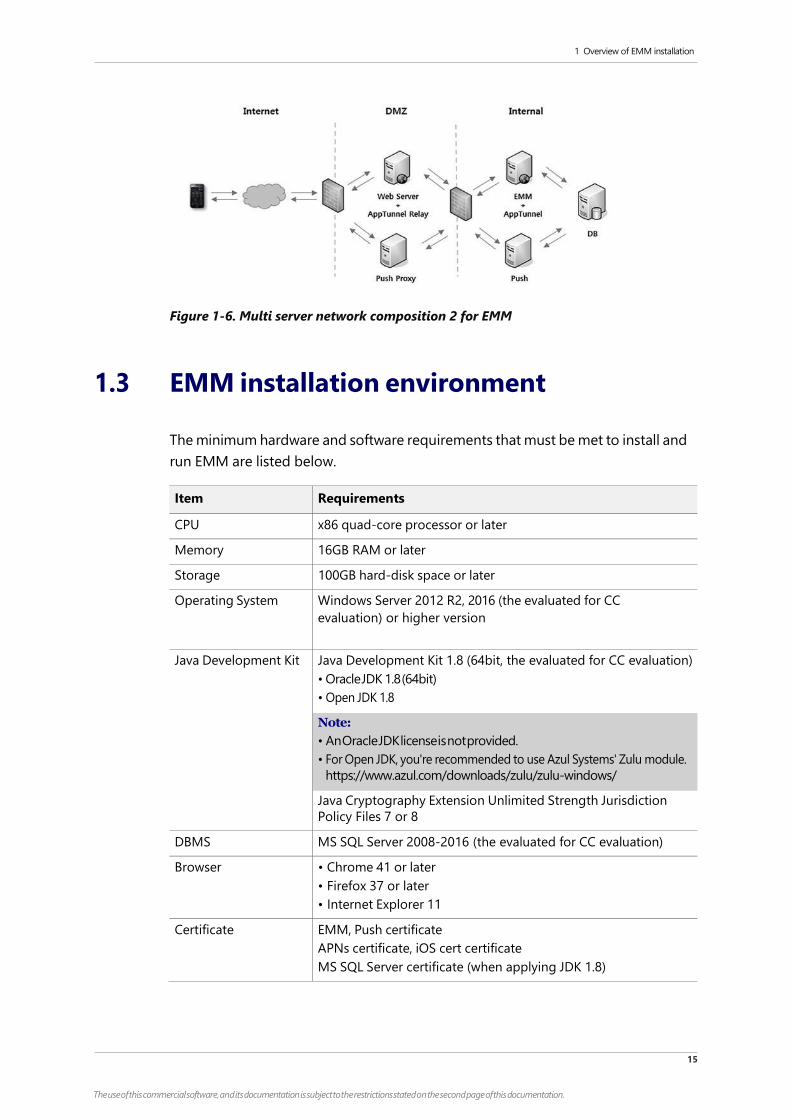
Figure 1-6. Multi server network composition 2 for EMM
1.3 EMM installation environment
The minimum hardware and software requirements that must be met to install and
run EMM are listed below.
Item Requirements
CPU x86 quad-core processor or later
Memory 16GB RAM or later
Storage 100GB hard-disk space or later
Operating System Windows Server 2012 R2, 2016 (the evaluated for CC
evaluation) or higher version
Java Development Kit Java Development Kit 1.8 (64bit, the evaluated for CC evaluation)
• Oracle JDK 1.8 (64bit)
• Open JDK 1.8
Note:
• An Oracle JDK license is not provided.
• For Open JDK, you're recommended to use Azul Systems' Zulu module.
https://www.azul.com/downloads/zulu/zulu-windows/
Java Cryptography Extension Unlimited Strength Jurisdiction
Policy Files 7 or 8
DBMS MS SQL Server 2008-2016 (the evaluated for CC evaluation)
Browser • Chrome 41 or later
• Firefox 37 or later
• Internet Explorer 11
Certificate EMM, Push certificate
APNs certificate, iOS cert certificate
MS SQL Server certificate (when applying JDK 1.8)
2 Pre-installation
16
The use of this commercial software, and its documentation is subject to the restrictions stated on the second page of this documentation.
2 Pre-installation
This chapter describes prerequisites for the Samsung SDS EMM (hereinafter "EMM")
installation. Here are the steps for pre-installation:
2.1 Installing JDK
The servers on which JDK should be installed are:
Category Servers requiring JDK
Single server environment EMM
Multi server environment • EMM
• Push
• Push Proxy
1. Download Java SE Development Kit(64bit). See the Oracle or Open JDK web
page for more details.
2. Install JDK.
• If the newly installed JDK version is 1.8.0_151-b12 or later, you do not need
Java patch and the security attribute must be configured. For more
information, see step 4.
• If you install Open JDK, JCE settings are not required.
3. Install EMC Crypto module certified by officially-released FIPS 140-2.
a. Decompress the tomcat_rsa_module.zip file.
b. Copy the files under {tomcat_rsa_module.zip unzip location}
to {JDK Home location}\jre\lib\ext.
• cryptojce-6.2.5.jar
• cryptojcommon-6.2.5.jar
• jcmFIPS-6.2.5.jar
• sslj-6.2.6.jar
• cryptojtestwriter.jar
2 Pre-installation
17
The use of this commercial software, and its documentation is subject to the restrictions stated on the second page of this documentation.
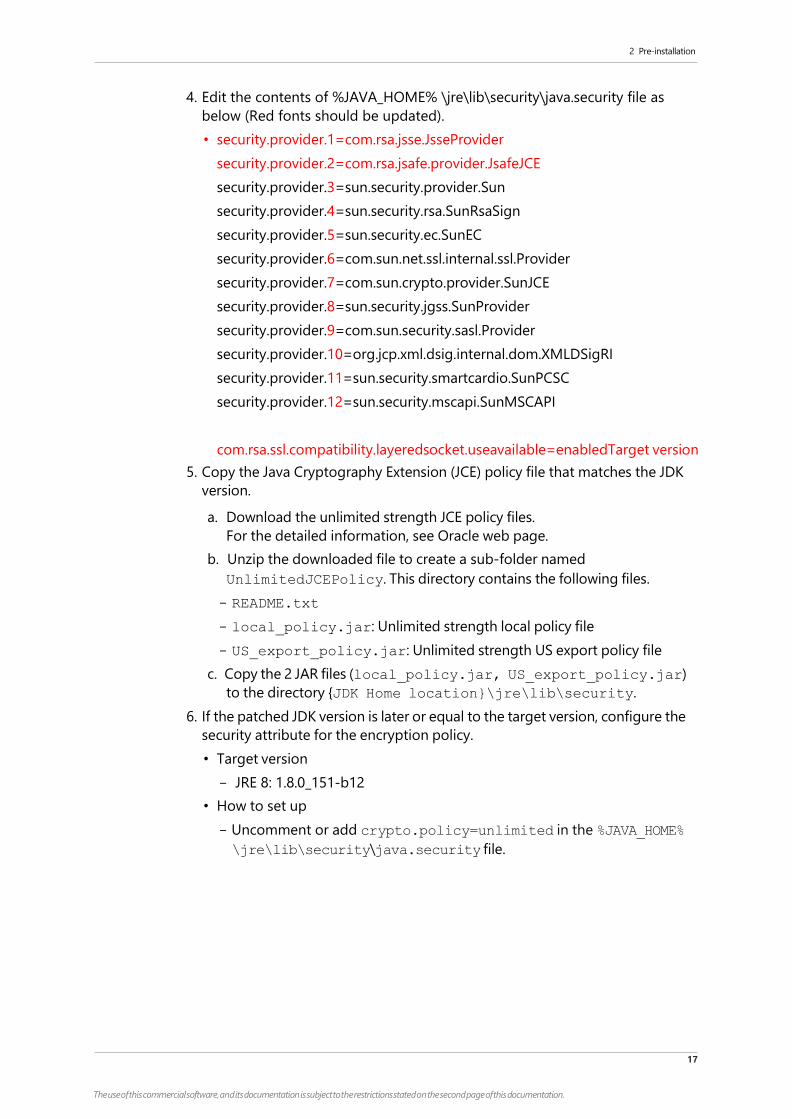
4. Edit the contents of %JAVA_HOME% \jre\lib\security\java.security file as
below (Red fonts should be updated).
• security.provider.1=com.rsa.jsse.JsseProvider
security.provider.2=com.rsa.jsafe.provider.JsafeJCE
security.provider.3=sun.security.provider.Sun
security.provider.4=sun.security.rsa.SunRsaSign
security.provider.5=sun.security.ec.SunEC
security.provider.6=com.sun.net.ssl.internal.ssl.Provider
security.provider.7=com.sun.crypto.provider.SunJCE
security.provider.8=sun.security.jgss.SunProvider
security.provider.9=com.sun.security.sasl.Provider
security.provider.10=org.jcp.xml.dsig.internal.dom.XMLDSigRI
security.provider.11=sun.security.smartcardio.SunPCSC
security.provider.12=sun.security.mscapi.SunMSCAPI
com.rsa.ssl.compatibility.layeredsocket.useavailable=enabledTarget version
5. Copy the Java Cryptography Extension (JCE) policy file that matches the JDK
version.
a. Download the unlimited strength JCE policy files.
For the detailed information, see Oracle web page.
b. Unzip the downloaded file to create a sub-folder named
UnlimitedJCEPolicy. This directory contains the following files.
- README.txt
- local_policy.jar: Unlimited strength local policy file
- US_export_policy.jar: Unlimited strength US export policy file
c. Copy the 2 JAR files (local_policy.jar, US_export_policy.jar)
to the directory {JDK Home location}\jre\lib\security.
6. If the patched JDK version is later or equal to the target version, configure the
security attribute for the encryption policy.
• Target version
- JRE 8: 1.8.0_151-b12
• How to set up
- Uncomment or add crypto.policy=unlimited in the %JAVA_HOME%
\jre\lib\security\java.security file.
2 Pre-installation
18
The use of this commercial software, and its documentation is subject to the restrictions stated on the second page of this documentation.
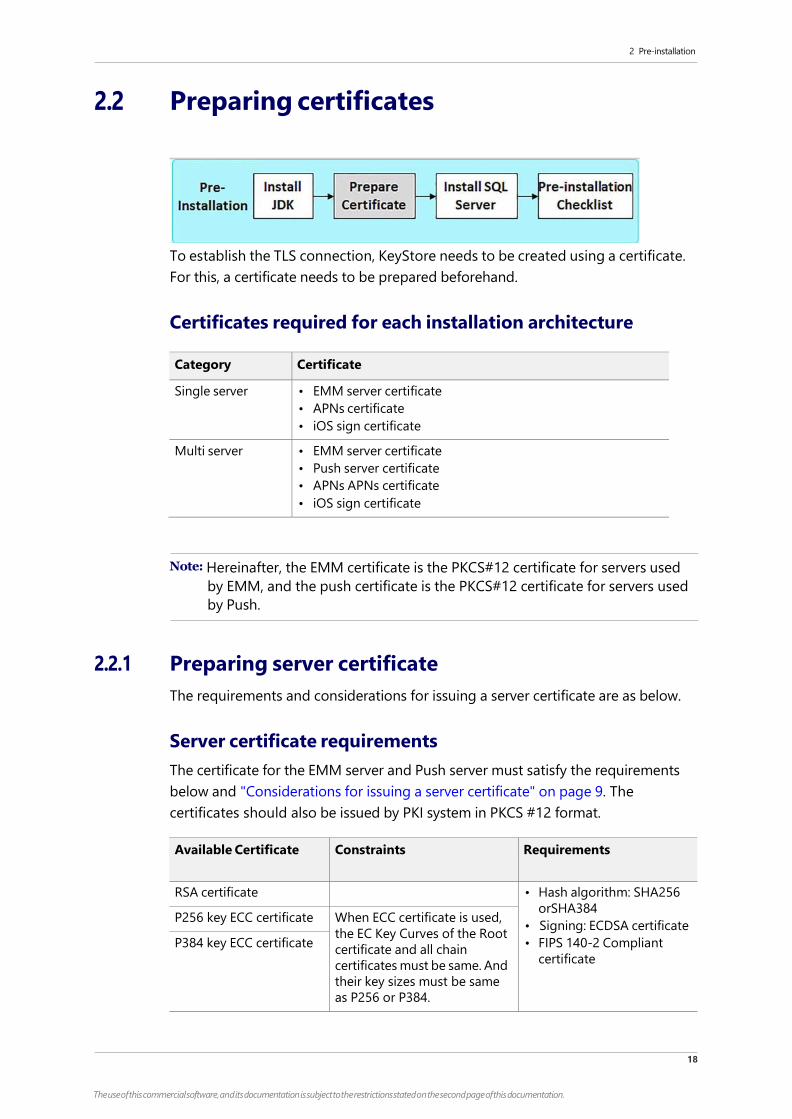
2.2 Preparing certificates
To establish the TLS connection, KeyStore needs to be created using a certificate.
For this, a certificate needs to be prepared beforehand.
Certificates required for each installation architecture
Category Certificate
Single server • EMM server certificate
• APNs certificate
• iOS sign certificate
Multi server • EMM server certificate
• Push server certificate
• APNs APNs certificate
• iOS sign certificate
Note: Hereinafter, the EMM certificate is the PKCS#12 certificate for servers used
by EMM, and the push certificate is the PKCS#12 certificate for servers used
by Push.
2.2.1 Preparing server certificate
The requirements and considerations for issuing a server certificate are as below.
Server certificate requirements
The certificate for the EMM server and Push server must satisfy the requirements
below and "Considerations for issuing a server certificate" on page 9. The
certificates should also be issued by PKI system in PKCS #12 format.
Available Certificate Constraints Requirements
RSA certificate • Hash algorithm: SHA256
orSHA384
• Signing: ECDSA certificate
• FIPS 140-2 Compliant
certificate
P256 key ECC certificate When ECC certificate is used,
the EC Key Curves of the Root
certificate and all chain
certificates must be same. And
their key sizes must be same
as P256 or P384.
P384 key ECC certificate
2 Pre-installation
19
The use of this commercial software, and its documentation is subject to the restrictions stated on the second page of this documentation.
Note: • A general certificate converts to FIP 140-2 mode with the converter
provided.
• The Extended Key Usage item for the RSA certificate must contain Key
Encipherment. For more information, see "Notes for issuing the RSA
certificates" on page 10.
• A certificate for the EMM server needs to be issued by a recognized
certificate authority. As for self-signed certificates, a device is provisioned
only when a self-signed root certificate is stored into a device.
• You can create a self-signed certificate for demonstration purposes by
using Java Keytool or OpenSSL. The self-signed server certificates are
not allowed for CC certification.
• You can find more information on issuing APNs certificate and iOS
sign certificate in "Appendix D, Using EMM on iOS" on page 119.
Installing and registering Certificate Authority
For information on how to install Certificate Authority (CA) with Microsoft
ADCS(Active Directory Certificate Services), see “Applying ADCS” provided
separately.
Considerations for issuing a server certificate
To provide a secure communication channel, EMM establishes TLS between servers
or between a server and devices. A secure communication channel requires a
certificate and PKI system. A certificate is issued by CA included in PKI system.
The certificate used on EMM must meet the following requirements.
● Expiration date
● Extended key usage (ClientAuth, ServerAuth)
● Basic constraints
● Validation of root chain
● Distinguished name (DN)
● Revoked certificate (CRL)
The top 4 items are automatically verified when the server and device check mutual
certificate information.
Verifying certificate distinguished name (DN)
The distinct names for certificates are verified through the EMM sever. The followings
are verification points.
● Device checks the DN of EMM server certificate:
Device checks matching EMM server information (IP or domain name) and
common name (CN) of the certificate.

2 Pre-installation
20
The use of this commercial software, and its documentation is subject to the restrictions stated on the second page of this documentation.
● Push and AppTunnel server check the DN of the device certificate:
Push and AppTunnel server check the device certificate whether it has been
issued from EMM server.
To verify the certificate DN, the configuration constraints for Push and AppTunnel
are the following:
● Configuration Constraints for Push:
- Push Server certificate CN matches server information on a device.
For Example, If IP is used to issue a certificate, IP should be entered when
server information is needed.
- When running Push on non-proxy mode, CN of Push server (PS, DCM)
certificate must correspond with EHOST of execution script.
For Example, java-ehost =”CN of your certificate”...-jar...
- When running Push on proxy mode, CN of Push Proxy (PPP, DPP) certificate
must match EHOST field of Push_ProxyInstanceInfo Table that Push server
refers to.
- When accessing Push Proxy(PPP, DPP) or Push Server (PS, DCM) with L4
equipment, Push Proxy and Push server certificates exclusively for L4 must
be installed.
● Configuration Constraints for AppTunnel
- AppTunnel Server certificate CN matches server information on a device.
For Example, If ATR certificate is issued with IP, enter IP when ATR information
is requested.
- When accessing AppTunnel Relay and AppTunnel Server with L4 equipment,
certificate of AppTunnel Relay and AppTunnel Server exclusively for L4
must be installed.
For Example, CN of ATR certificate must correspond with Domain Name of L4.
Verifying certificate CRL
Certificate CRL verification is to identity if the other party’s certificate has been revoked
during TLS. For information about the OCSP configuration, see “Configuring OCSP”
provided separately.
Notes for issuing the RSA certificates
If you are using an RSA algorithm certificate for TSL communication, Extended Key
Usage items must contain Key Encipherment. Sever certificates in the Extended Key
Usage item that is included Server Authentication and Client Authentication are
generally issued. However, for some CAs, you may not add Key Encipherment to
Extended Key Usage items if they have both Server Authentication and Client
Authentication. In that case, add only Server Authentication to the Extended Key
Usage item when issuing a certificate, and change the set values as follows:
2 Pre-installation
21
The use of this commercial software, and its documentation is subject to the restrictions stated on the second page of this documentation.
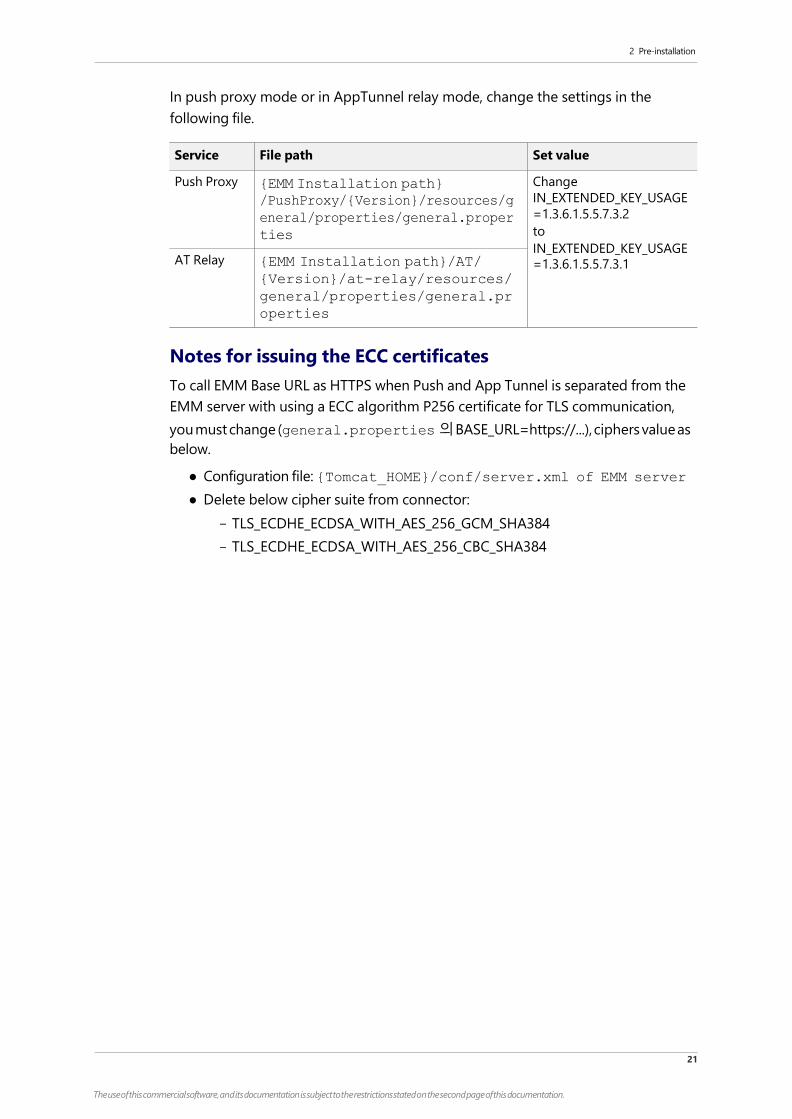
In push proxy mode or in AppTunnel relay mode, change the settings in the
following file.
Service File path Set value
Push Proxy {EMM Installation path} Change
/PushProxy/{Version}/resources/g IN_EXTENDED_KEY_USAGE
eneral/properties/general.proper =1.3.6.1.5.5.7.3.2
ties to
IN_EXTENDED_KEY_USAGE AT Relay {EMM Installation path}/AT/
{Version}/at-relay/resources/
general/properties/general.pr
operties
=1.3.6.1.5.5.7.3.1
Notes for issuing the ECC certificates
To call EMM Base URL as HTTPS when Push and App Tunnel is separated from the
EMM server with using a ECC algorithm P256 certificate for TLS communication,
you must change (general.properties의 BASE_URL=https://...), ciphers value as
below.
● Configuration file: {Tomcat_HOME}/conf/server.xml of EMM server
● Delete below cipher suite from connector:
- TLS_ECDHE_ECDSA_WITH_AES_256_GCM_SHA384
- TLS_ECDHE_ECDSA_WITH_AES_256_CBC_SHA384
2 Pre-installation
22
The use of this commercial software, and its documentation is subject to the restrictions stated on the second page of this documentation.
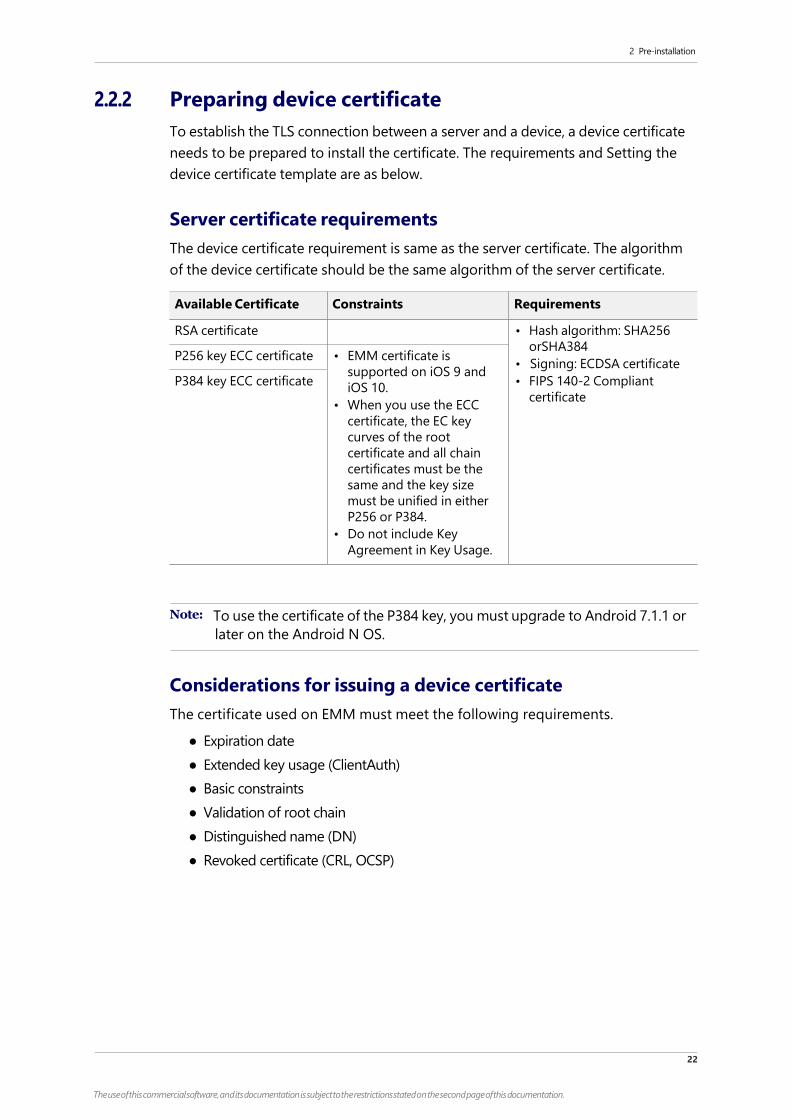
2.2.2 Preparing device certificate
To establish the TLS connection between a server and a device, a device certificate
needs to be prepared to install the certificate. The requirements and Setting the
device certificate template are as below.
Server certificate requirements
The device certificate requirement is same as the server certificate. The algorithm
of the device certificate should be the same algorithm of the server certificate.
Available Certificate Constraints Requirements
RSA certificate • Hash algorithm: SHA256
orSHA384
• Signing: ECDSA certificate
• FIPS 140-2 Compliant
certificate
P256 key ECC certificate • EMM certificate is
supported on iOS 9 and
iOS 10.
• When you use the ECC
certificate, the EC key
curves of the root
certificate and all chain
certificates must be the
same and the key size
must be unified in either
P256 or P384.
• Do not include Key
Agreement in Key Usage.
P384 key ECC certificate
Note: To use the certificate of the P384 key, you must upgrade to Android 7.1.1 or
later on the Android N OS.
Considerations for issuing a device certificate
The certificate used on EMM must meet the following requirements.
● Expiration date
● Extended key usage (ClientAuth)
● Basic constraints
● Validation of root chain
● Distinguished name (DN)
● Revoked certificate (CRL, OCSP)
2 Pre-installation
23
The use of this commercial software, and its documentation is subject to the restrictions stated on the second page of this documentation.
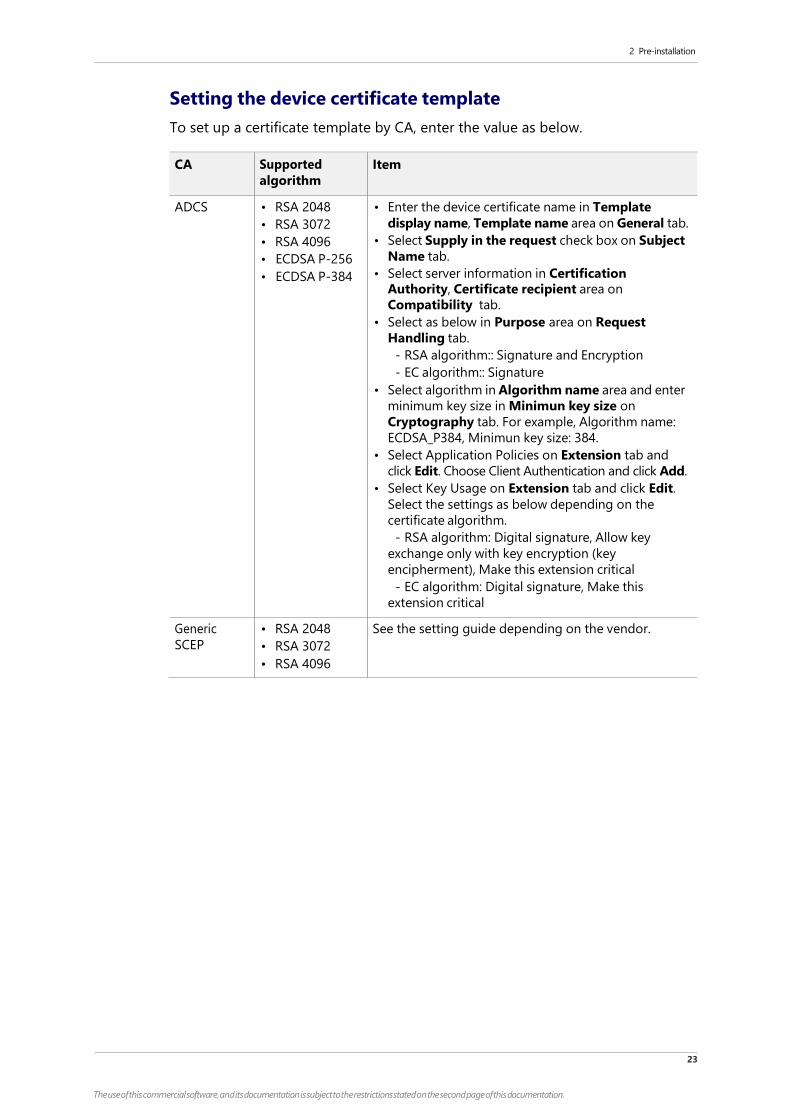
Setting the device certificate template
To set up a certificate template by CA, enter the value as below.
CA Supported
algorithm
Item
ADCS • RSA 2048
• RSA 3072
• RSA 4096
• ECDSA P-256
• ECDSA P-384
• Enter the device certificate name in Template
display name, Template name area on General tab.
• Select Supply in the request check box on Subject
Name tab.
• Select server information in Certification
Authority, Certificate recipient area on
Compatibility tab.
• Select as below in Purpose area on Request
Handling tab.
- RSA algorithm:: Signature and Encryption
- EC algorithm:: Signature
• Select algorithm in Algorithm name area and enter
minimum key size in Minimun key size on
Cryptography tab. For example, Algorithm name:
ECDSA_P384, Minimun key size: 384.
• Select Application Policies on Extension tab and
click Edit. Choose Client Authentication and click Add.
• Select Key Usage on Extension tab and click Edit.
Select the settings as below depending on the
certificate algorithm.
- RSA algorithm: Digital signature, Allow key
exchange only with key encryption (key
encipherment), Make this extension critical
- EC algorithm: Digital signature, Make this
extension critical
Generic
SCEP
• RSA 2048
• RSA 3072
• RSA 4096
See the setting guide depending on the vendor.
2 Pre-installation
24
The use of this commercial software, and its documentation is subject to the restrictions stated on the second page of this documentation.
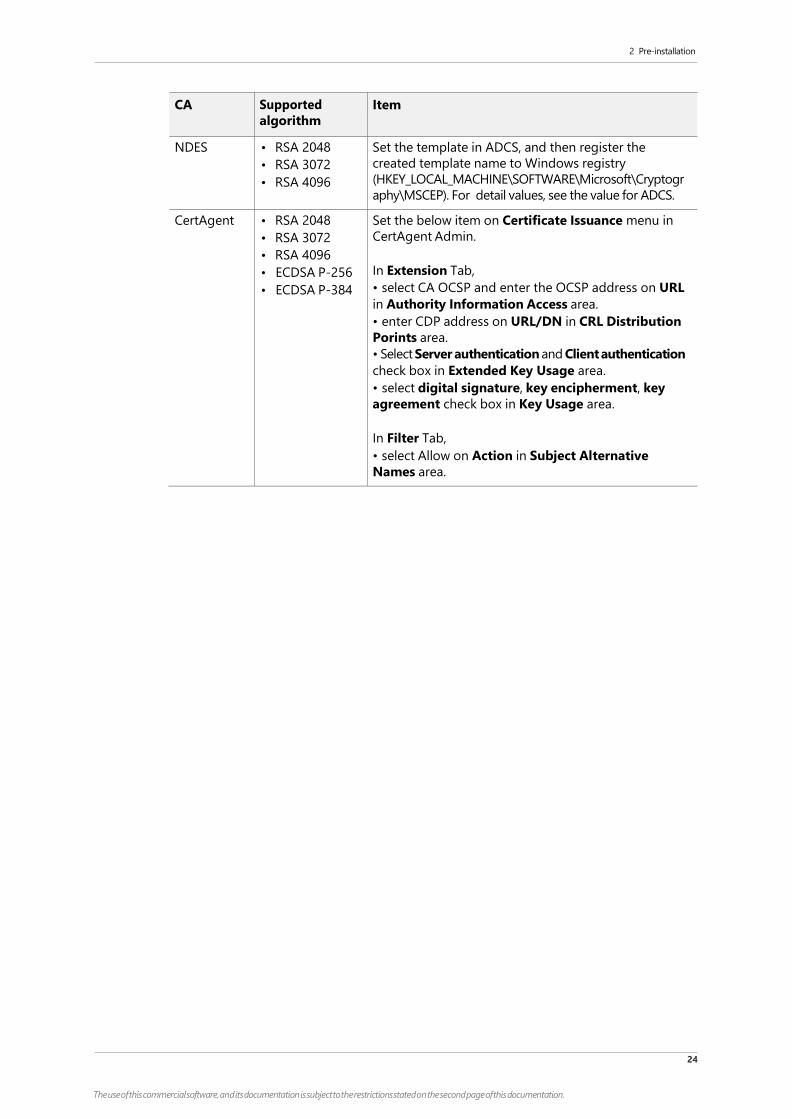
CA Supported
algorithm
Item
NDES • RSA 2048
• RSA 3072
• RSA 4096
Set the template in ADCS, and then register the
created template name to Windows registry
(HKEY_LOCAL_MACHINE\SOFTWARE\Microsoft\Cryptogr
aphy\MSCEP). For detail values, see the value for ADCS.
CertAgent • RSA 2048
• RSA 3072
• RSA 4096
• ECDSA P-256
• ECDSA P-384
Set the below item on Certificate Issuance menu in
CertAgent Admin.
In Extension Tab,
• select CA OCSP and enter the OCSP address on URL
in Authority Information Access area.
• enter CDP address on URL/DN in CRL Distribution
Porints area.
• Select Server authentication and Client authentication
check box in Extended Key Usage area.
• select digital signature, key encipherment, key
agreement check box in Key Usage area.
In Filter Tab,
• select Allow on Action in Subject Alternative
Names area.
2 Pre-installation
25
The use of this commercial software, and its documentation is subject to the restrictions stated on the second page of this documentation.
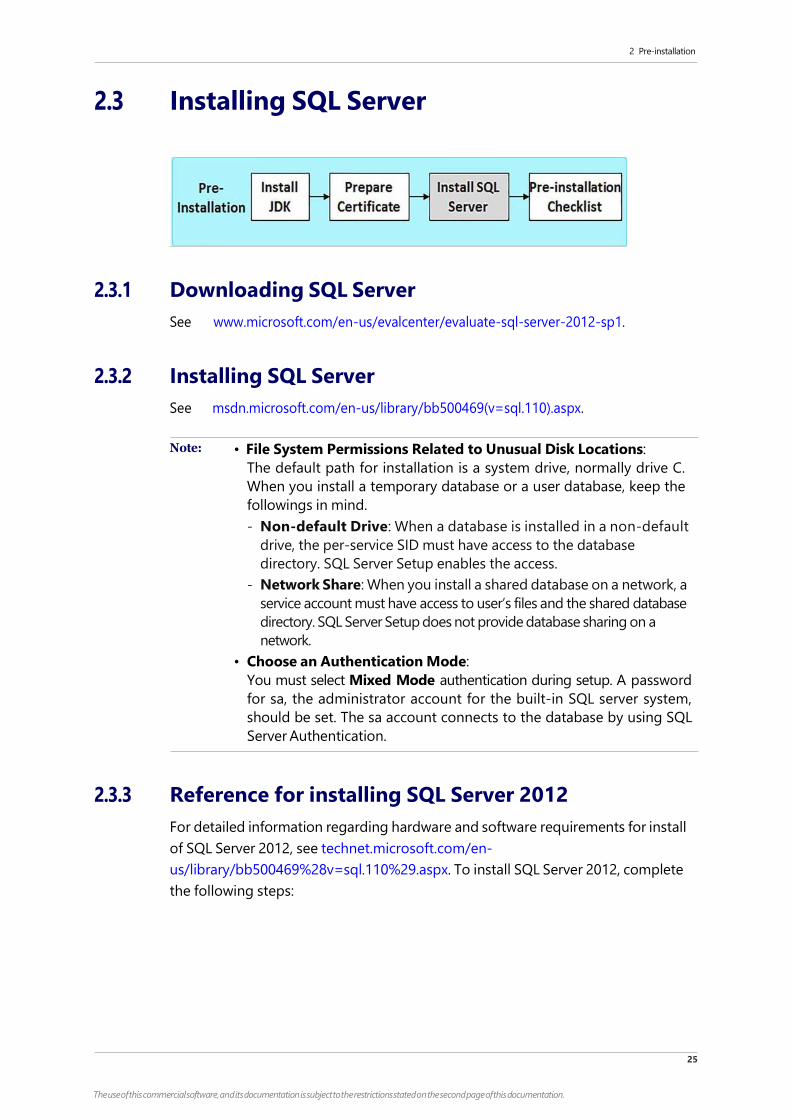
2.3 Installing SQL Server
2.3.1 Downloading SQL Server
See www.microsoft.com/en-us/evalcenter/evaluate-sql-server-2012-sp1.
2.3.2 Installing SQL Server
See msdn.microsoft.com/en-us/library/bb500469(v=sql.110).aspx.
Note: • File System Permissions Related to Unusual Disk Locations:
The default path for installation is a system drive, normally drive C.
When you install a temporary database or a user database, keep the
followings in mind.
- Non-default Drive: When a database is installed in a non-default
drive, the per-service SID must have access to the database
directory. SQL Server Setup enables the access.
- Network Share: When you install a shared database on a network, a
service account must have access to user’s files and the shared database
directory. SQL Server Setup does not provide database sharing on a
network.
• Choose an Authentication Mode:
You must select Mixed Mode authentication during setup. A password
for sa, the administrator account for the built-in SQL server system,
should be set. The sa account connects to the database by using SQL
Server Authentication.
2.3.3 Reference for installing SQL Server 2012
For detailed information regarding hardware and software requirements for install
of SQL Server 2012, see technet.microsoft.com/en-
us/library/bb500469%28v=sql.110%29.aspx. To install SQL Server 2012, complete
the following steps:
2 Pre-installation
26
The use of this commercial software, and its documentation is subject to the restrictions stated on the second page of this documentation.
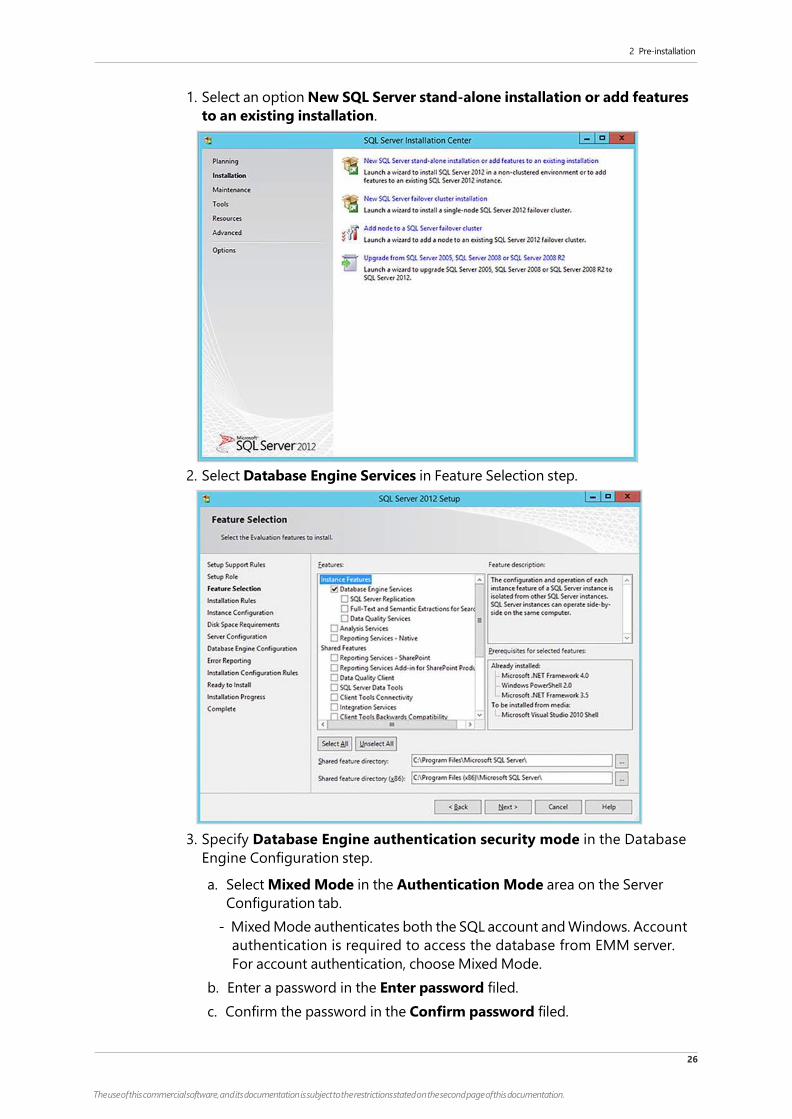
1. Select an option New SQL Server stand-alone installation or add features
to an existing installation.
2. Select Database Engine Services in Feature Selection step.
3. Specify Database Engine authentication security mode in the Database
Engine Configuration step.
a. Select Mixed Mode in the Authentication Mode area on the Server
Configuration tab.
- Mixed Mode authenticates both the SQL account and Windows. Account
authentication is required to access the database from EMM server.
For account authentication, choose Mixed Mode.
b. Enter a password in the Enter password filed.
c. Confirm the password in the Confirm password filed.

2 Pre-installation
27
The use of this commercial software, and its documentation is subject to the restrictions stated on the second page of this documentation.
d. Click Add Current User.
Note: • If information in database in not correct, EMM cannot be installed.
• Confirm your DBA account and password when the message when the
message “ Please enter DBA account and Password to install DB” appears.
2.3.4 Adding a Windows account and privilege
The following procedure should be performed to create an EMM database using a
Windows account as a database authentication method, when installing EMM.
1. Run SQL Server Management Studio and go to Security > Login and then,
right-click the mouse button and select New Login.
2 Pre-installation
28
The use of this commercial software, and its documentation is subject to the restrictions stated on the second page of this documentation.
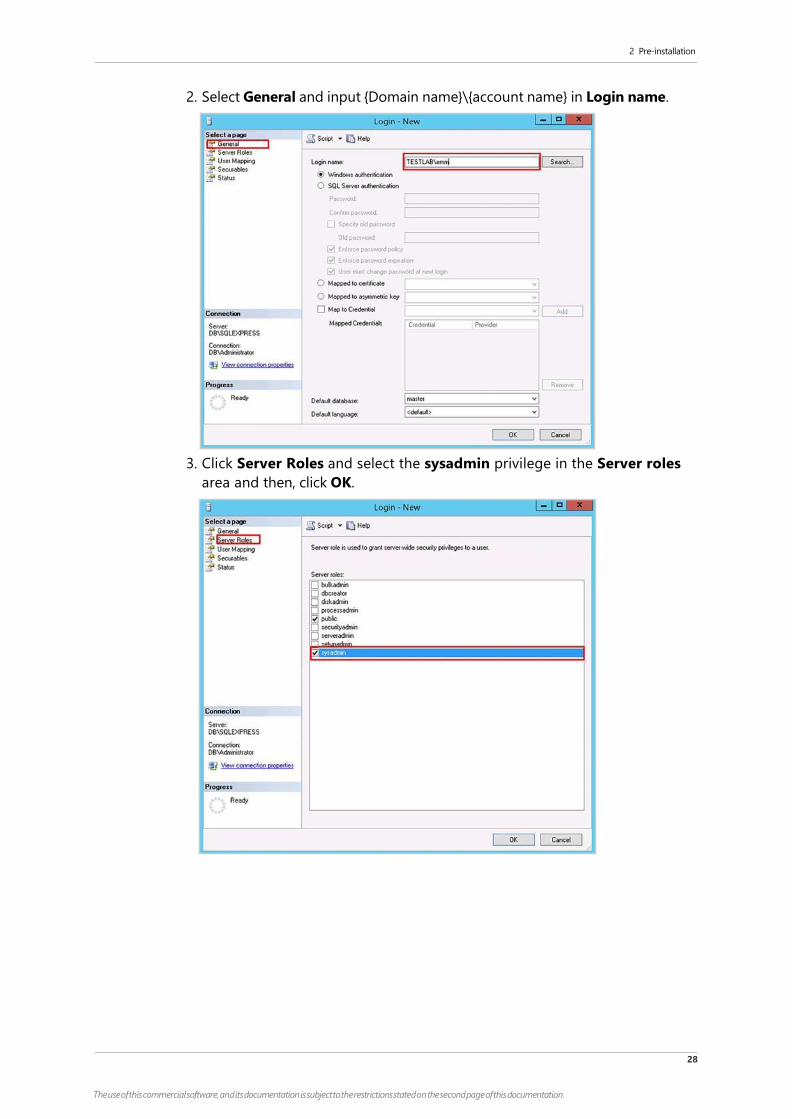
2. Select General and input {Domain name}\{account name} in Login name.
3. Click Server Roles and select the sysadmin privilege in the Server roles
area and then, click OK.

2 Pre-installation
29
The use of this commercial software, and its documentation is subject to the restrictions stated on the second page of this documentation.
2.4 Pre-installation checklist
This chapter specifies what needs to be checked before installing EMM. Before
installing the EMM, you must have a domain and certificate and make sure that the
firewall access and installation environment files are properly set up. You can find
the details of the checklist in the following section.
2.4.1 Single server environment
No Items to be verified
1 Public domain or URL
A domain or URL needs to be accessible on the Internet.
2 EMM server certificate
required to have a certificate, in P12 format, with domain name set as common
name.
3 APNs certificate
required to have APNs certificate issued by Apple to support iOS devices.
4 iOS sign certificate
required to have iOS sign certificate to support iOS devices.
5 Java Development Kit
required to install JDK in EMM server.
6 Java Cryptography Extension Unlimited Strength Jurisdiction Policy Files
required to install JCE policy file in EMM server.
7 Installation environment
See "chapter 1.3, EMM installation environment" on page 5.
8 Firewall access rules
Inbound traffic from network to EMM should be allowed on port 35443.
9 Firewall access rules
Inbound traffic from network to Push should be allowed on port 35000 and 35001.
10 Firewall access rules
Inbound traffic from network to EMM should be allowed on port 36000.
11 Firewall access rules
Outbound traffic from EMM to CA server should be allowed on port 443.
12 Firewall access rules
Outbound traffic from EMM to database should be allowed over TCP/IP (example
port 1433).
2 Pre-installation
30
The use of this commercial software, and its documentation is subject to the restrictions stated on the second page of this documentation.
No Items to be verified
13 Firewall access rules
Outbound traffic from Push to database should be allowed over TCP/IP (example
port 1433).
14 Firewall access rules to 3rd party Push
• Outbound traffic from EMM to gateway.push.apple.com should be allowed
over port 2195.
• Outbound traffic from Push to android.googleapis.com should be allowed over
the port 443,5228, 5229, 5230.
• Outbound traffic from Push to login.live.com, *.notify.windows.com,
*.wns.windows.com should be allowed over port 443.
• Outbound traffic from EMM to Tizen Push should be allowed over port 5223,
8090. For more detail server information, see "List of firewalls to open for Tizen
Push" on page 22.
15 Enabling Multi-tenancy
Change false for ENABLE of MULTI_TENANCY in the installation environment file
(EMM{Version}_H_SETUP.ini).
16 Using features of iOS device
Change DOMAIN_NAME in the installation environment file
(EMM{Version}_H_SETUP.ini) into the domain of EMM.
17 Using features of Kiosk Wizard
Change DOMAIN_NAME in the installation environment file
(EMM{Version}_H_SETUP.ini) into the domain of EMM.
18 SQL Server certificate (when installing JDK 1.8)
A server certificate for SQL Server is required.
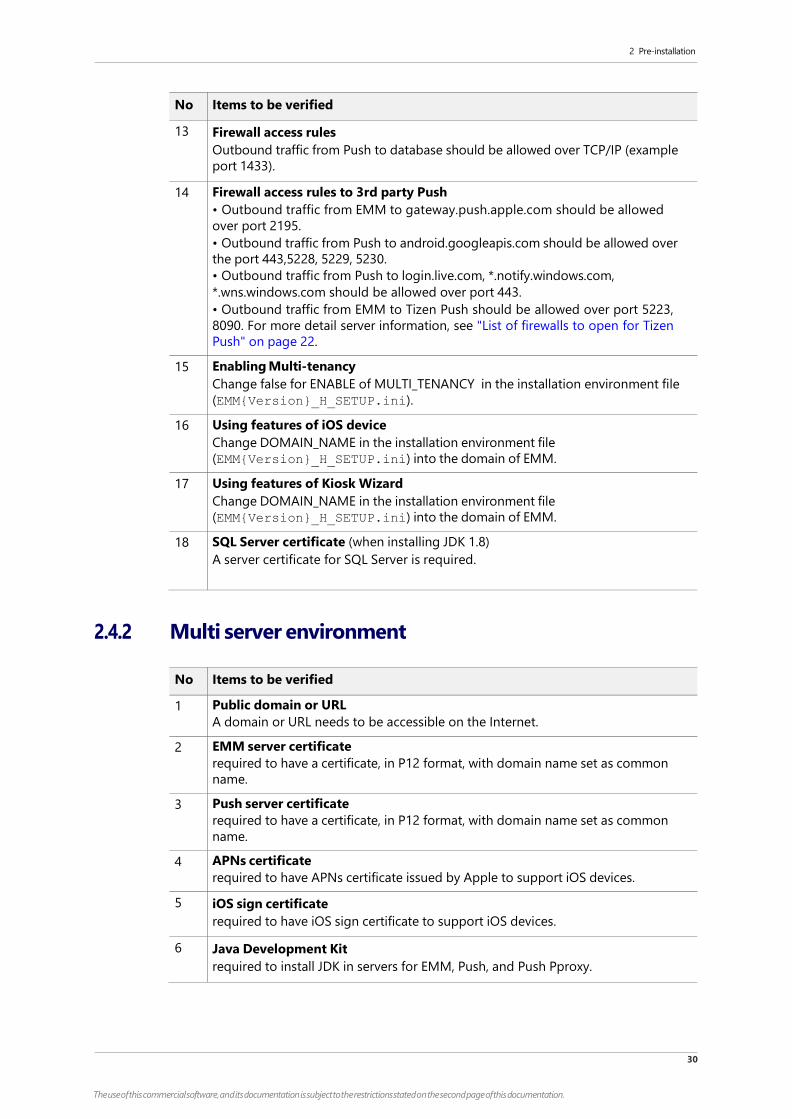
2.4.2 Multi server environment
No Items to be verified
1 Public domain or URL
A domain or URL needs to be accessible on the Internet.
2 EMM server certificate
required to have a certificate, in P12 format, with domain name set as common
name.
3 Push server certificate
required to have a certificate, in P12 format, with domain name set as common
name.
4 APNs certificate
required to have APNs certificate issued by Apple to support iOS devices.
5 iOS sign certificate
required to have iOS sign certificate to support iOS devices.
6 Java Development Kit
required to install JDK in servers for EMM, Push, and Push Pproxy.
2 Pre-installation
31
The use of this commercial software, and its documentation is subject to the restrictions stated on the second page of this documentation.
No Items to be verified
7 Java Cryptography Extension Unlimited Strength Jurisdiction Policy Files
required to install JCE policy file in servers for EMM, Push, and Push Proxy.
8 Installation environment
See "chapter 1.3, EMM installation environment" on page 5.
9 Firewall access rules
Inbound traffic from network to Web server should be allowed on port 443.
10 Firewall access rules
Inbound traffic from network to Push Proxy should be allowed on port 35100 and
35101.
11 Firewall access rules
Inbound traffic from network to AppTunnel Relay should be allowed on port 36100.
12 Firewall access rules
Inbound traffic from Web server to EMM should be allowed on port 35443.
13 Firewall access rules
Outbound traffic from EMM to CA server should be allowed on port 443.
14 Firewall access rules
Outbound traffic from Push to Push Proxy should be allowed on port 35110,
35111, and 35113.
15 Firewall access rules
Outbound traffic from AppTunnel to AppTunnel Relay should be allowed on port
36110.
16 Firewall access rules
Outbound traffic from EMM to database should be allowed over TCP/IP (example
port 1433).
17 Firewall access rules
Outbound traffic from Push to database should be allowed over TCP/IP (example
port 1433).
18 Firewall access rules to 3rd party Push
• Outbound traffic from Push Proxy to gateway.push.apple.com should be allowed
on port 2195.
• Outbound traffic from Push Proxy to android.googleapis.com should be allowed
over the port 443,5228, 5229, 5230.
• Outbound traffic from Push Proxy to login.live.com, *.notify.windows.com,
*.wns.windows.com should be allowed over port 443.
• Outbound traffic from EMM to Tizen Push should be allowed over port 5223,
8090. For more detail server information, see "List of firewalls to open for Tizen
Push" on page 22.
19 Enabling Multi-tenancy
Change TRUE for ENABLE of MULTI_TENANCY in the installtion environment file
(EMM{Version}_H_SETUP.ini).
20 Using features of iOS device
Change DOMAIN_NAME in the installation environment file
(EMM{Version}_H_SETUP.ini) into the domain of EMM.
2 Pre-installation
32
The use of this commercial software, and its documentation is subject to the restrictions stated on the second page of this documentation.
No Items to be verified
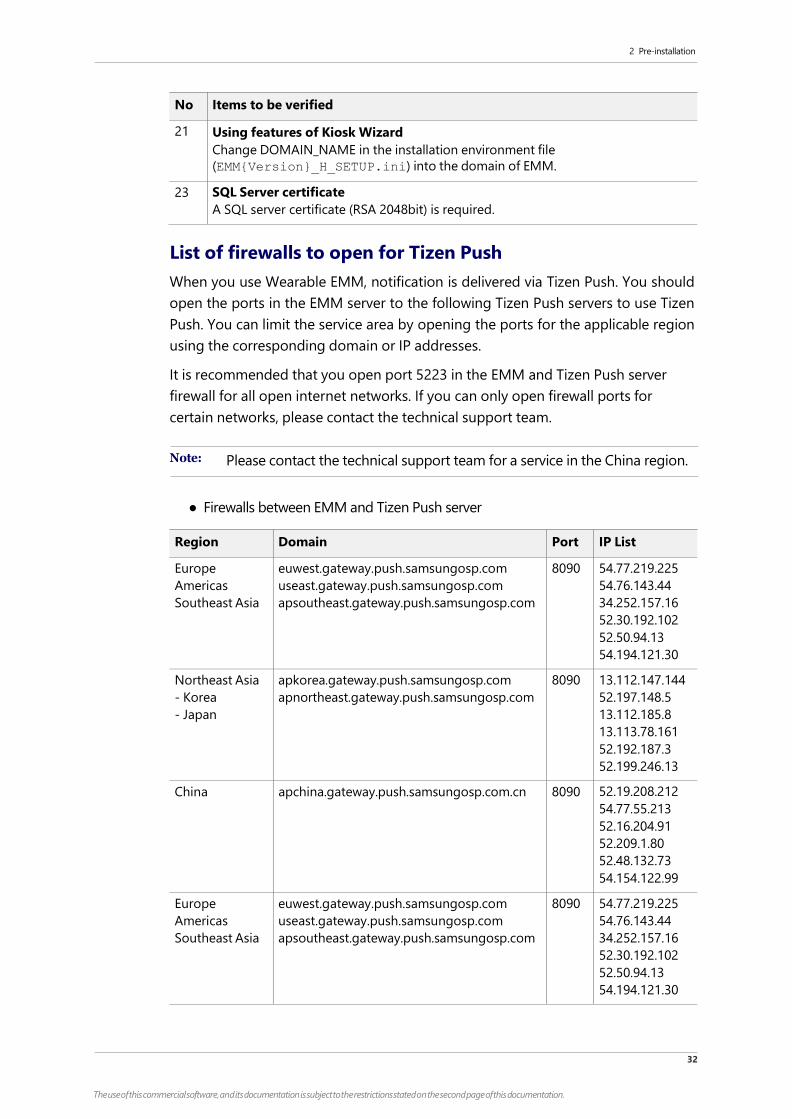
21 Using features of Kiosk Wizard
Change DOMAIN_NAME in the installation environment file
(EMM{Version}_H_SETUP.ini) into the domain of EMM.
23 SQL Server certificate
A SQL server certificate (RSA 2048bit) is required.
List of firewalls to open for Tizen Push
When you use Wearable EMM, notification is delivered via Tizen Push. You should
open the ports in the EMM server to the following Tizen Push servers to use Tizen
Push. You can limit the service area by opening the ports for the applicable region
using the corresponding domain or IP addresses.
It is recommended that you open port 5223 in the EMM and Tizen Push server
firewall for all open internet networks. If you can only open firewall ports for
certain networks, please contact the technical support team.
Note: Please contact the technical support team for a service in the China region.
● Firewalls between EMM and Tizen Push server
Region Domain Port IP List
Europe euwest.gateway.push.samsungosp.com 8090 54.77.219.225
Americas useast.gateway.push.samsungosp.com 54.76.143.44
Southeast Asia apsoutheast.gateway.push.samsungosp.com 34.252.157.16
52.30.192.102
52.50.94.13
54.194.121.30
Northeast Asia apkorea.gateway.push.samsungosp.com 8090 13.112.147.144
- Korea apnortheast.gateway.push.samsungosp.com 52.197.148.5
- Japan 13.112.185.8
13.113.78.161
52.192.187.3
52.199.246.13
China apchina.gateway.push.samsungosp.com.cn 8090 52.19.208.212
54.77.55.213
52.16.204.91
52.209.1.80
52.48.132.73
54.154.122.99
Europe euwest.gateway.push.samsungosp.com 8090 54.77.219.225
Americas useast.gateway.push.samsungosp.com 54.76.143.44
Southeast Asia apsoutheast.gateway.push.samsungosp.com 34.252.157.16
52.30.192.102
52.50.94.13
54.194.121.30
2 Pre-installation
33
The use of this commercial software, and its documentation is subject to the restrictions stated on the second page of this documentation.
2.4.3 Notes on post
Checking EMM port
Open the command prompt and enter netstat command (netstat-noa|
findstr port) to check the available port.
● For the default port used by EMM, see "chapter 2.4, Pre-installation checklist"
on page 14.
● If the default port of EMM has been used for other services, change the value of
the port in EMM{Version}__SETUP.ini before installing.
For more details about EMM{Version}__SETUP.ini, see "Appendix E,
Installation Environment File" on page 120.
Checking MS SQL TCP/IP port
To check MS SQL port and set the TCP/IP port, complete the following steps:
1. Check if MS SQL Server is accessible.
a. Enter telnet command to check whether MS SQL Server is running.
Note: If telnet command fails, do as follows.
1. Go to Server Manager > Dashboard
2. Click on Add roles and features on Configure this local server tab and
there appears “Add Roles and Features Wizard” window.
3. Check Telnet Client in Features stage.
4. Click on Install for Confirmation.
5. When the installation is completed, click Close in Results stage.
b. Enter telnet localhost 1433 command in the command prompt
window.
- If a server is used through localhost or a different port, instead enter
following the format telnet SQL_Server_IP SQL_Server_Port
command.
c. If a command does not run, check as follows.
- Check if SQL server is working properly with a person in charge of the server.
- Contact security person to change firewall settings to add SQL server port.
2. Configure a client to use TCP/IP.
a. Expand SQL Native Client 11.0 Configuration in the “SQL Server
Configuration Manager” window.
2 Pre-installation
34
The use of this commercial software, and its documentation is subject to the restrictions stated on the second page of this documentation.
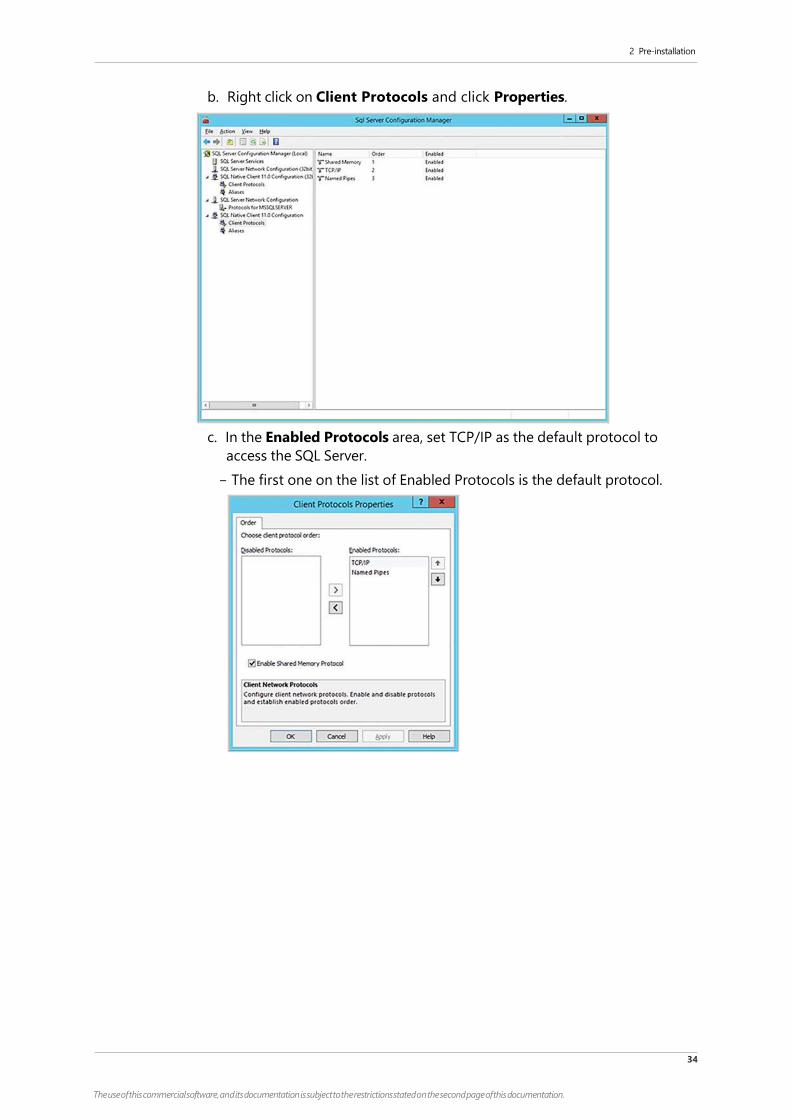
b. Right click on Client Protocols and click Properties.
c. In the Enabled Protocols area, set TCP/IP as the default protocol to
access the SQL Server.
- The first one on the list of Enabled Protocols is the default protocol.
3 Installation
20
The use of this commercial software, and its documentation is subject to the restrictions stated on the second page of this documentation.
3 Installation
This chapter describes how to install Samsung SDS EMM (hereinafter “EMM”) in a
single-server or multi-server environment. Hereinafter Push is Samsung SDS Push
and AppTunnel is Samsung SDS AppTunnel.
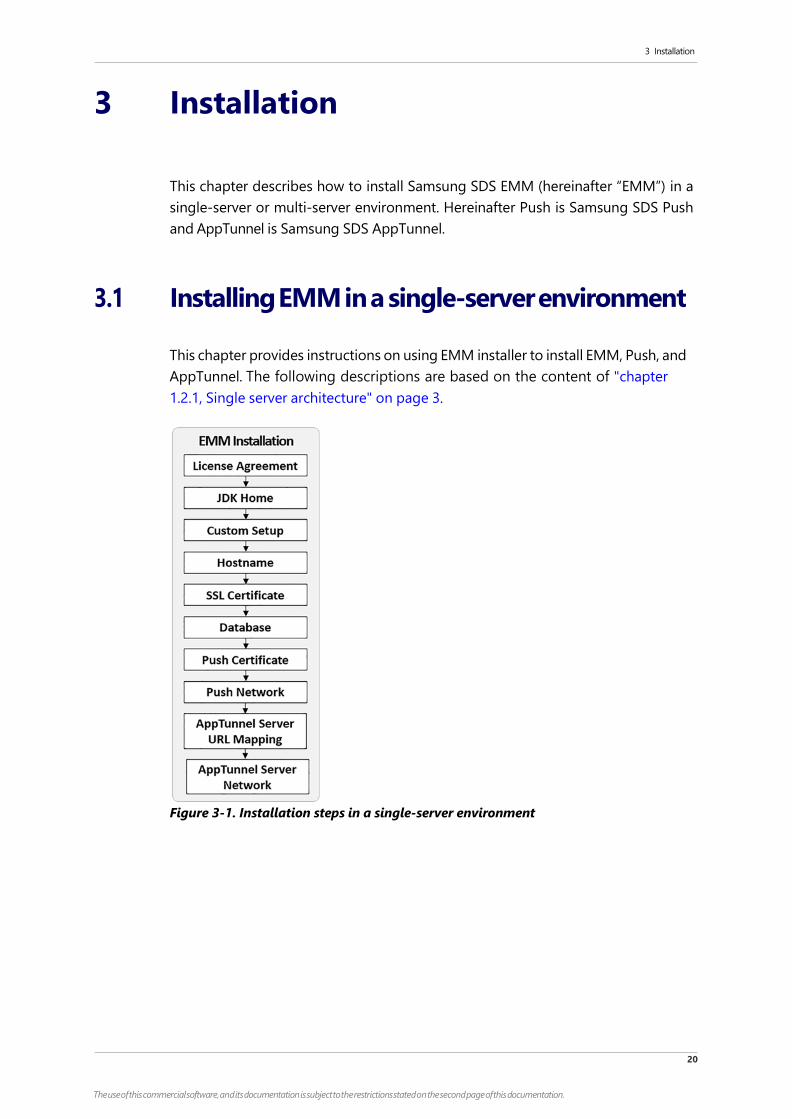
3.1 Installing EMM in a single-server environment
This chapter provides instructions on using EMM installer to install EMM, Push, and
AppTunnel. The following descriptions are based on the content of "chapter
1.2.1, Single server architecture" on page 3.
Figure 3-1. Installation steps in a single-server environment
3 Installation
21
The use of this commercial software, and its documentation is subject to the restrictions stated on the second page of this documentation.
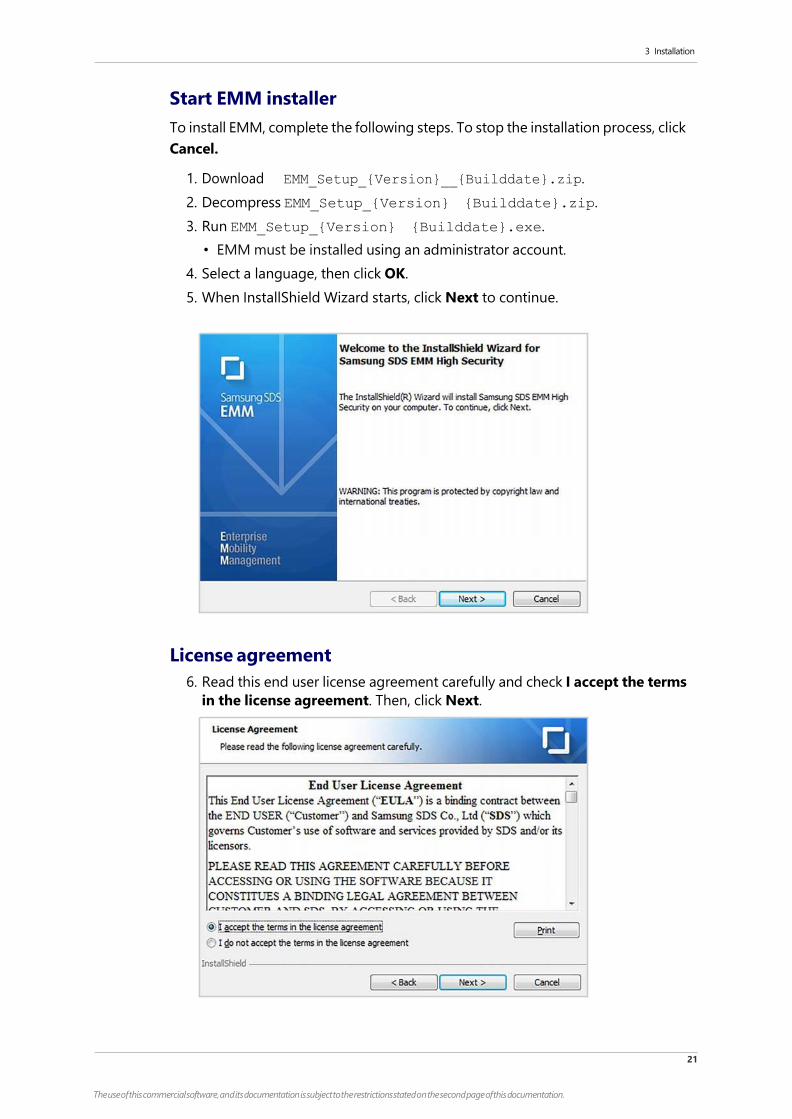
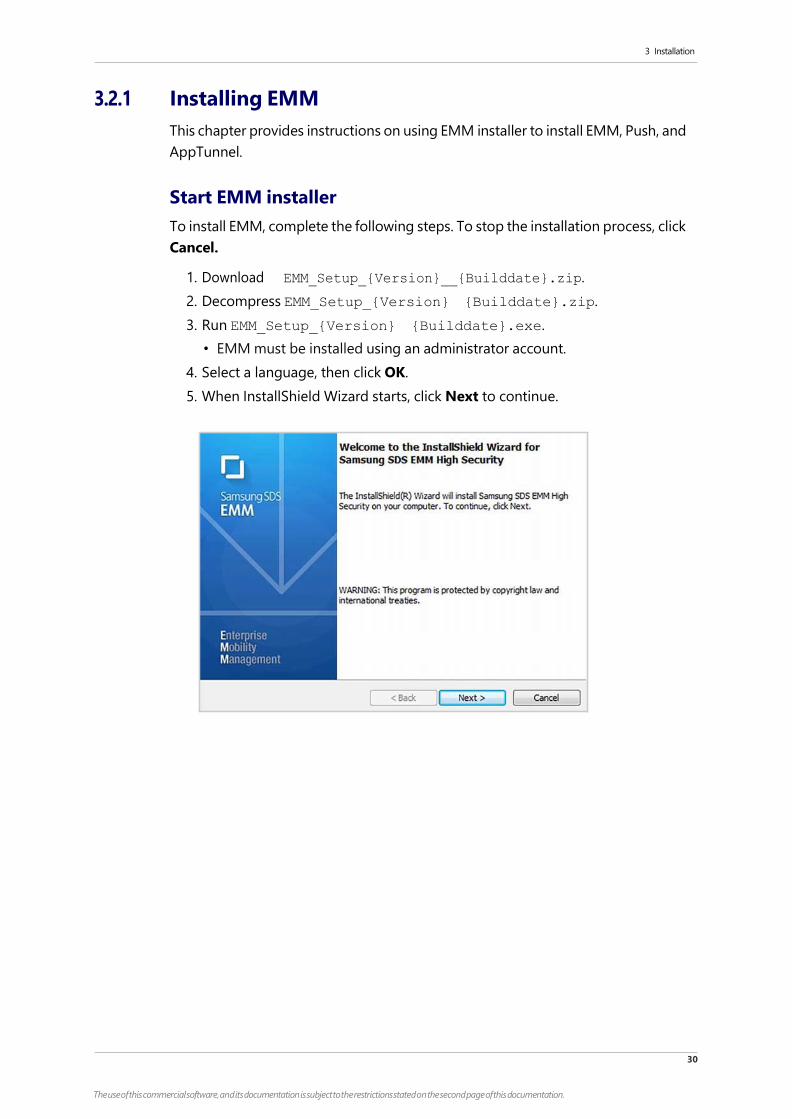
Start EMM installer
To install EMM, complete the following steps. To stop the installation process, click
Cancel.
1. Download EMM_Setup_{Version}__{Builddate}.zip.
2. Decompress EMM_Setup_{Version} {Builddate}.zip.
3. Run EMM_Setup_{Version} {Builddate}.exe.
• EMM must be installed using an administrator account.
4. Select a language, then click OK.
5. When InstallShield Wizard starts, click Next to continue.
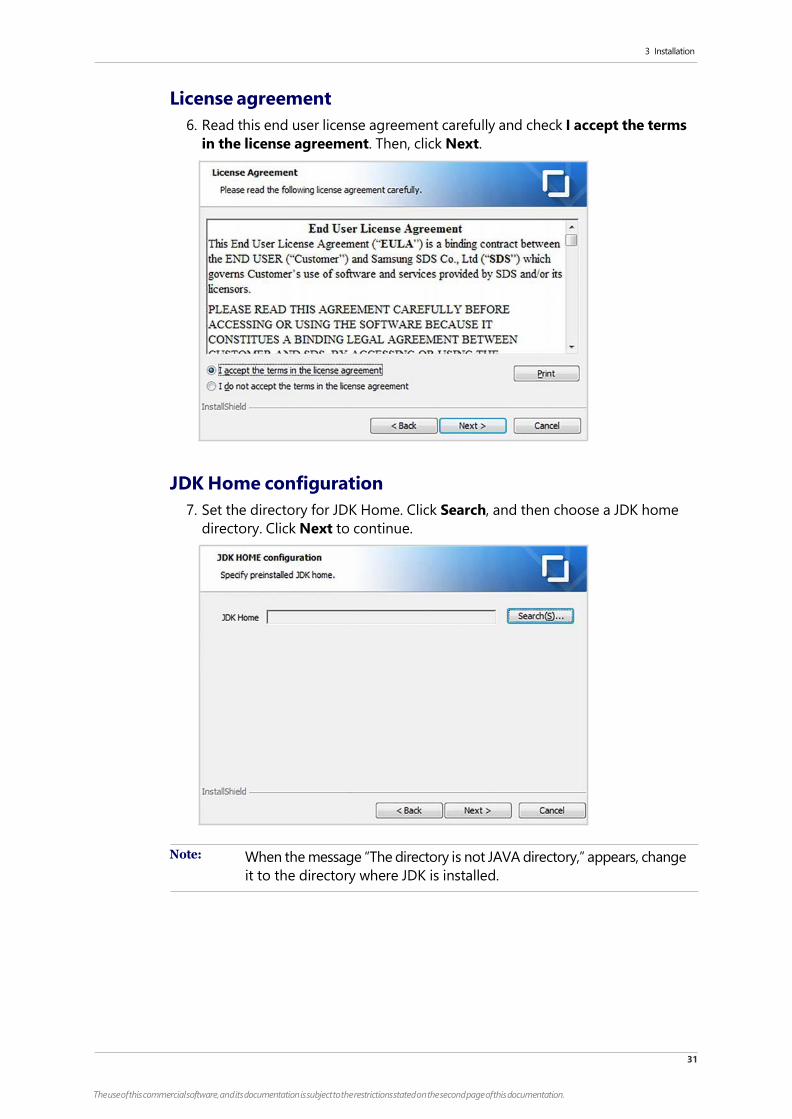
License agreement
6. Read this end user license agreement carefully and check I accept the terms
in the license agreement. Then, click Next.

3 Installation
22
The use of this commercial software, and its documentation is subject to the restrictions stated on the second page of this documentation.
JDK Home configuration
7. Set the directory for JDK Home. Click Search, and then choose a JDK home
directory. Click Next to continue.
Note: When the message “The directory is not JAVA directory,” appears, change
it to the directory where JDK is installed.
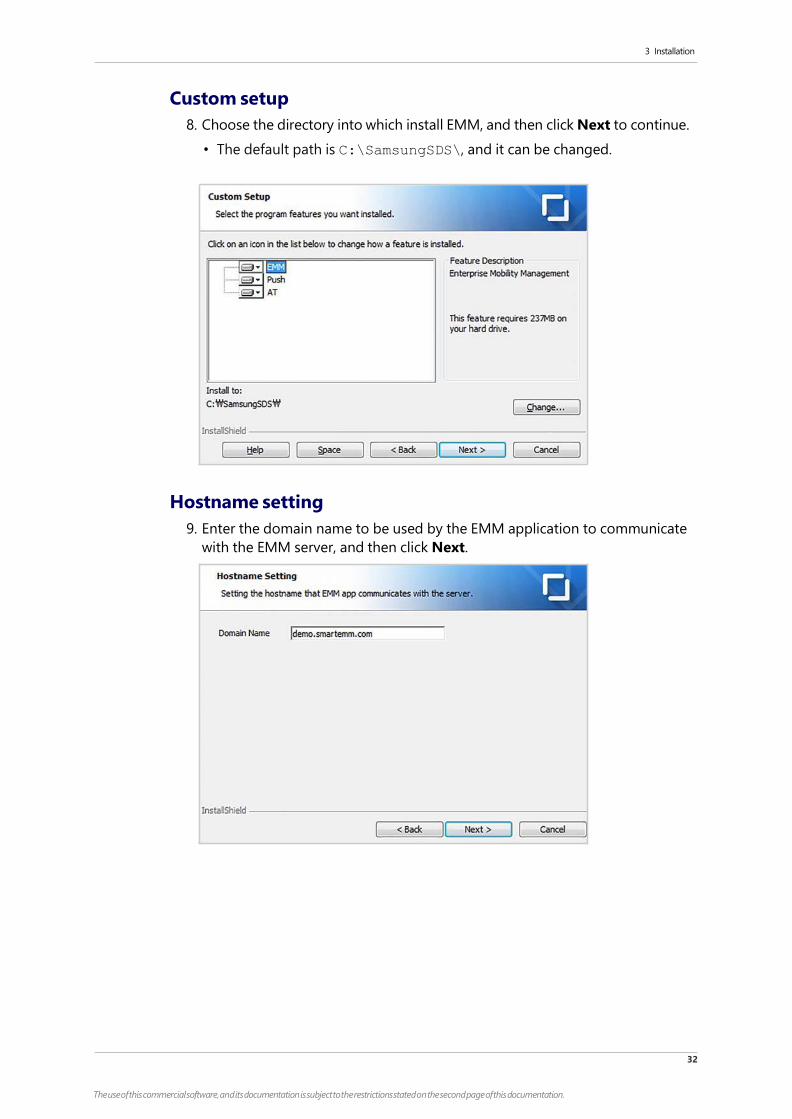
Custom setup
8. Choose the directory into which install EMM, and then click Next to continue.
• The default path is C:\SamsungSDS\, and it can be changed.
3 Installation
23
The use of this commercial software, and its documentation is subject to the restrictions stated on the second page of this documentation.
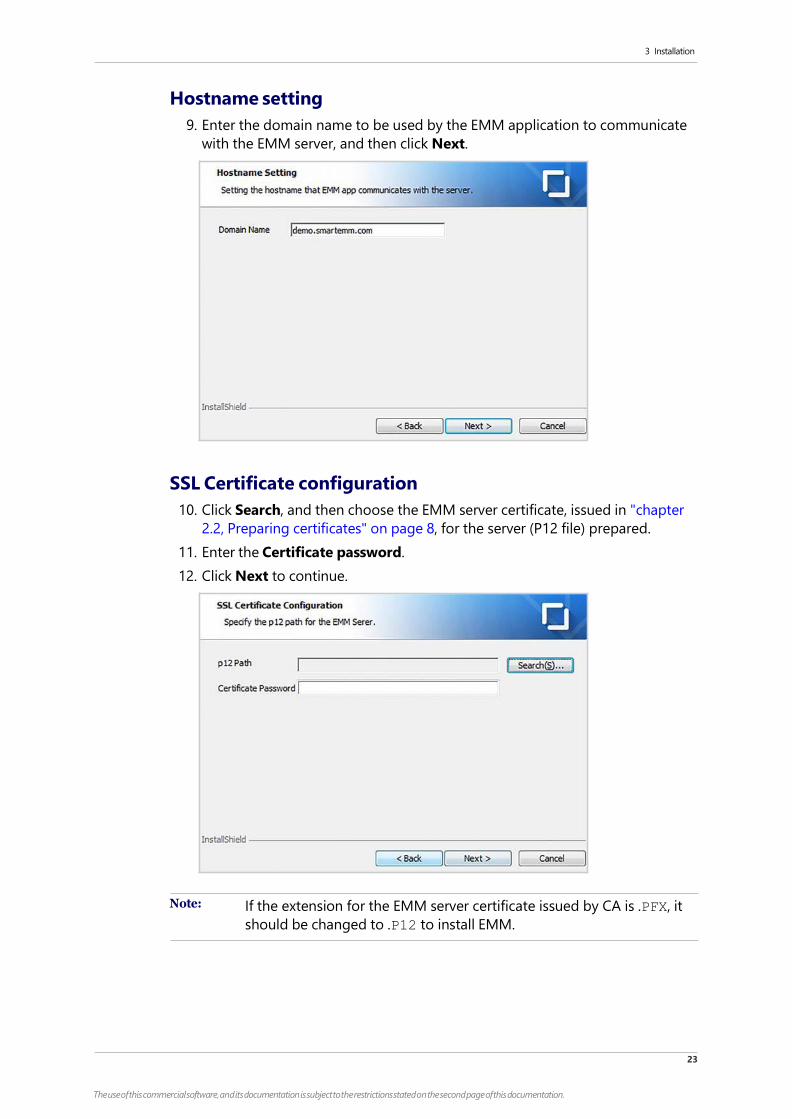
Hostname setting
9. Enter the domain name to be used by the EMM application to communicate
with the EMM server, and then click Next.
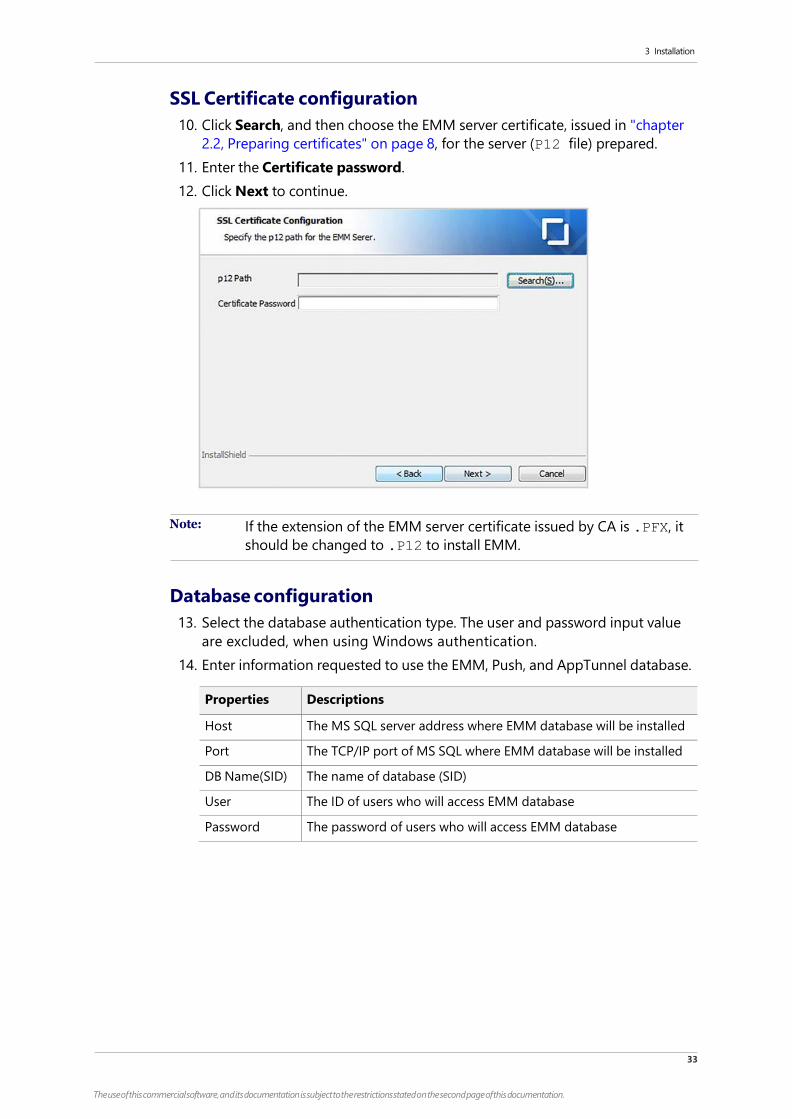
SSL Certificate configuration
10. Click Search, and then choose the EMM server certificate, issued in "chapter
2.2, Preparing certificates" on page 8, for the server (P12 file) prepared.
11. Enter the Certificate password.
12. Click Next to continue.
Note: If the extension for the EMM server certificate issued by CA is .PFX, it
should be changed to .P12 to install EMM.
3 Installation
24
The use of this commercial software, and its documentation is subject to the restrictions stated on the second page of this documentation.
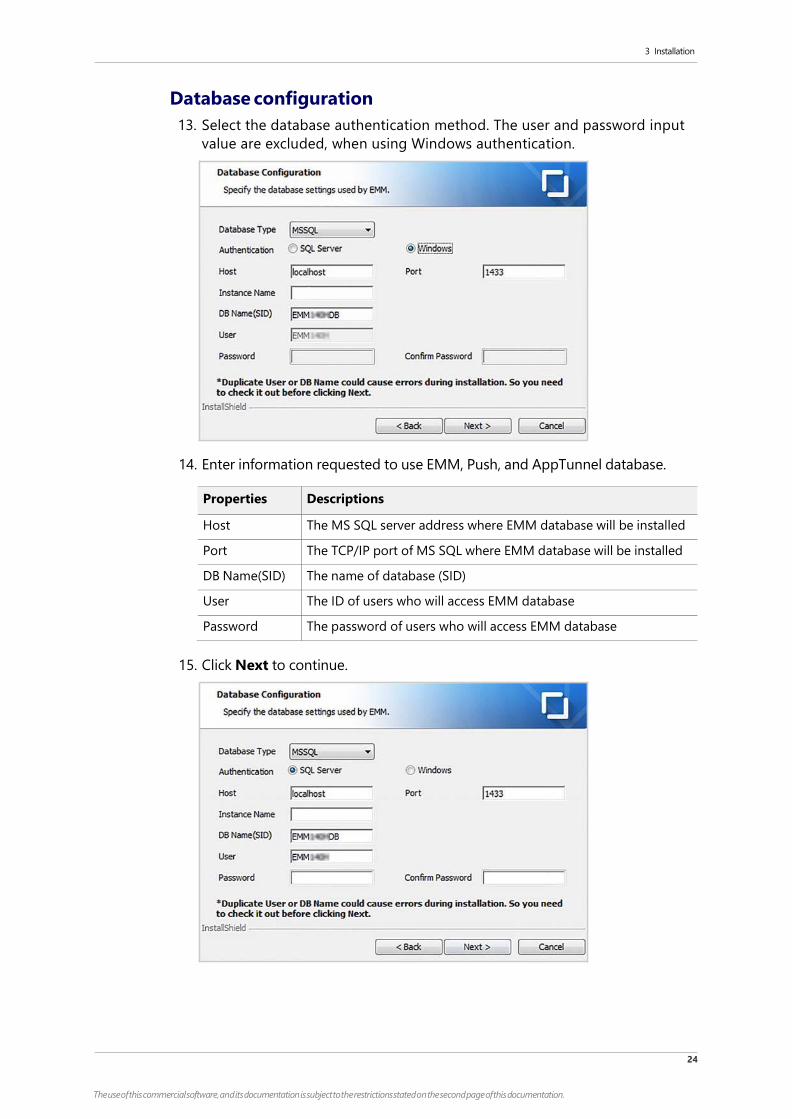
Database configuration
13. Select the database authentication method. The user and password input
value are excluded, when using Windows authentication.
14. Enter information requested to use EMM, Push, and AppTunnel database.
Properties Descriptions
Host The MS SQL server address where EMM database will be installed
Port The TCP/IP port of MS SQL where EMM database will be installed
DB Name(SID) The name of database (SID)
User The ID of users who will access EMM database
Password The password of users who will access EMM database
15. Click Next to continue.
3 Installation
25
The use of this commercial software, and its documentation is subject to the restrictions stated on the second page of this documentation.
Note: • EMM only supports MSSQL.
• Instance is optional.
• Since EMM stores operating information after the installation is completed,
you must remember users and password.
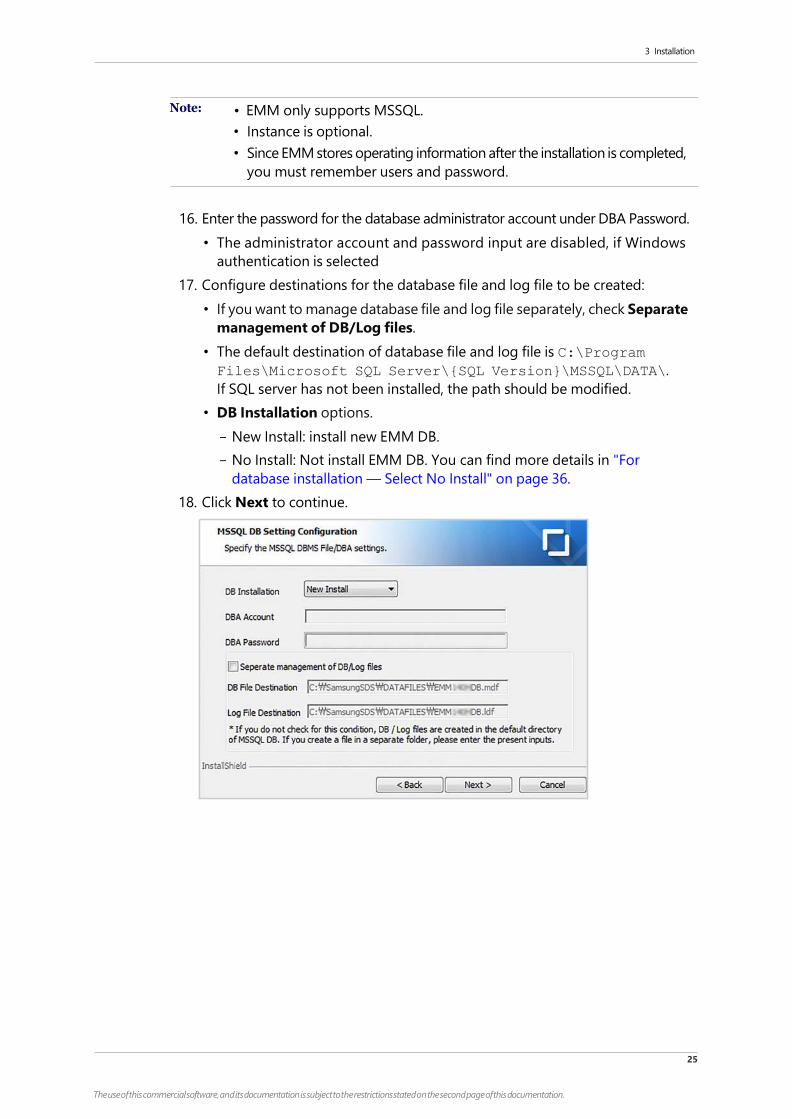
16. Enter the password for the database administrator account under DBA Password.
• The administrator account and password input are disabled, if Windows
authentication is selected
17. Configure destinations for the database file and log file to be created:
• If you want to manage database file and log file separately, check Separate
management of DB/Log files.
• The default destination of database file and log file is C:\Program
Files\Microsoft SQL Server\{SQL Version}\MSSQL\DATA\.
If SQL server has not been installed, the path should be modified.
• DB Installation options.
- New Install: install new EMM DB.
- No Install: Not install EMM DB. You can find more details in "For
database installation — Select No Install" on page 36.
18. Click Next to continue.

3 Installation
26
The use of this commercial software, and its documentation is subject to the restrictions stated on the second page of this documentation.
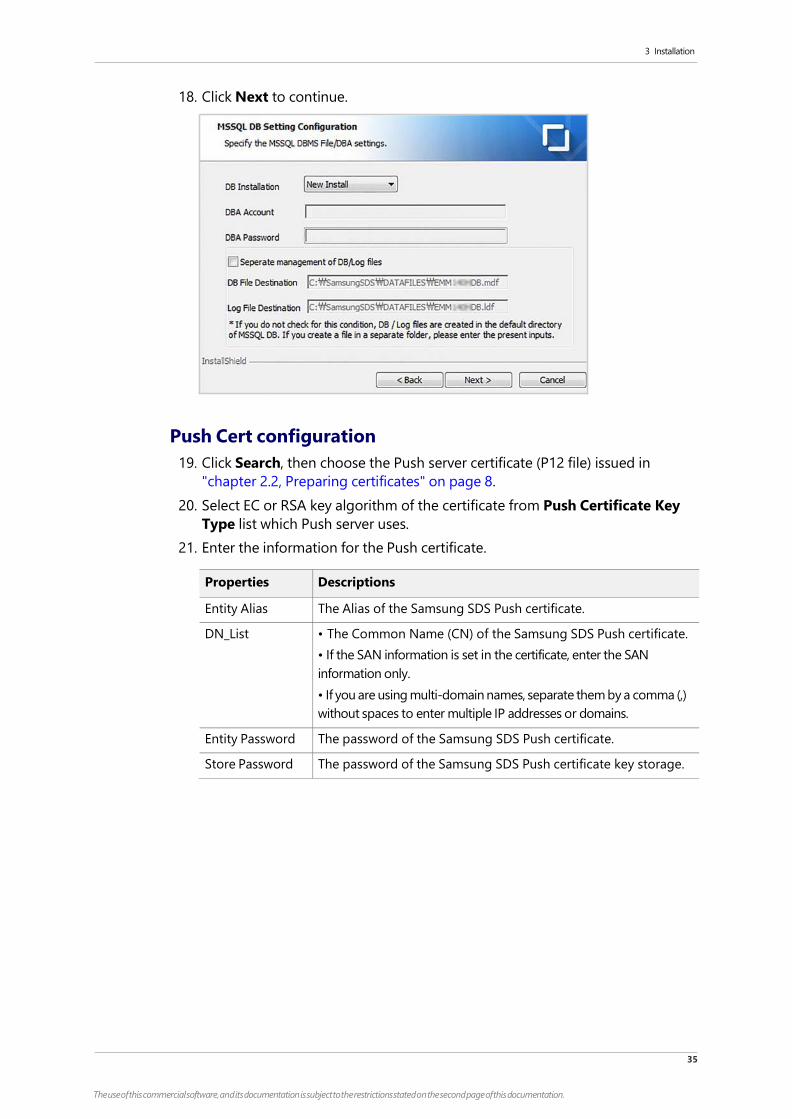
Push Cert configuration
19. Click Search, then choose the Push server certificate (P12 file) issued in
"chapter 2.2, Preparing certificates" on page 8.
20. Select EC or RSA key algorithm of the certificate from Push Certificate Key
Type list which Push server uses.
21. Enter the information for the Push certificate.
Properties Descriptions
Entity Alias The Alias for the Samsung SDS Push certificate
DN_List • The Common Name (CN) for the Samsung SDS Push certificate.
• If the SAN information is set in the certificate, enter the SAN
information only.
• For the multiple DNs, enter IP address or domain using
comman (“,”) seperator without space.
Entity Password The password for the Samsung SDS Push certificate
Store Password The password for the Samsung SDS Push certificate key storage
22. Click Next to continue.
Note: If the extension of Push server certificate issued by CA is .PFX, it should
be changed to .P12 to install EMM.
Push Network configuration
23. Enter the Public IP address or domain of the Push server in Push External
Host field. For Push Internal Host, enter Private IP address of the Push server.
• Push External Host must match the CN on certificate.
• If the CN of the certificate is domain, enter the domain. If it is IP, enter the
IP address.

3 Installation
27
The use of this commercial software, and its documentation is subject to the restrictions stated on the second page of this documentation.
24. Proxy Mode needs to be disabled.
25. Click to continue.
AppTunnel server URL mapping
26. Enter the URL Mapping information for the AppTunnel server.
• For Source URL, enter the EMM HTTP address accessible from the outside.
• For Destination URL, enter the EMM HTTP address used by the AppTunnel
server.
27. Click Next.
Note: If users are using an Android N device and setting the source URL,
Additional settings are required for the /config/spring/spring-
data-config.xml. file. For more information, see "Setting the URL
Mapping for AppTunnel Servers" on page 44.

3 Installation
28
The use of this commercial software, and its documentation is subject to the restrictions stated on the second page of this documentation.
AppTunnel server network configuration
28. Enter the Public IP or the domain for AppTunnel server in Sever External
Host field.
• Server External Host must match the CN on the certificate.
• If the certificate CN is the domain, enter the domain. If it is IP, enter the IP
address.
29. Disable Relay Mode.
30. Click Install.
Finish EMM installation
31. EMM, Push, and AppTunnel service are automatically registered in the background
when Register for Windows Service is checked.
32. When the installation process is completed, click Finish.
Note: When the message “Some information is missing. Fill in all the blanks.”
appears, input the value for all empty fields.

3 Installation
29
The use of this commercial software, and its documentation is subject to the restrictions stated on the second page of this documentation.
3.2 Installing EMM in a multi-server environment
This chapter illustrates how to use EMM Push, and AppTunnel installer to install
EMM, Push, AppTunnel, Push Proxy, and AppTunnel Relay. The following
descriptions are based on the content of "chapter 1.2.2, Multi server architecture"
on page 4.
Figure 3-2. Installation steps in a multi-server environment
3 Installation
30
The use of this commercial software, and its documentation is subject to the restrictions stated on the second page of this documentation.
3.2.1 Installing EMM
This chapter provides instructions on using EMM installer to install EMM, Push, and
AppTunnel.
Start EMM installer
To install EMM, complete the following steps. To stop the installation process, click
Cancel.
1. Download EMM_Setup_{Version}__{Builddate}.zip.
2. Decompress EMM_Setup_{Version} {Builddate}.zip.
3. Run EMM_Setup_{Version} {Builddate}.exe.
• EMM must be installed using an administrator account.
4. Select a language, then click OK.
5. When InstallShield Wizard starts, click Next to continue.
3 Installation
31
The use of this commercial software, and its documentation is subject to the restrictions stated on the second page of this documentation.
License agreement
6. Read this end user license agreement carefully and check I accept the terms
in the license agreement. Then, click Next.
JDK Home configuration
7. Set the directory for JDK Home. Click Search, and then choose a JDK home
directory. Click Next to continue.
Note: When the message “The directory is not JAVA directory,” appears, change
it to the directory where JDK is installed.
3 Installation
32
The use of this commercial software, and its documentation is subject to the restrictions stated on the second page of this documentation.
Custom setup
8. Choose the directory into which install EMM, and then click Next to continue.
• The default path is C:\SamsungSDS\, and it can be changed.
Hostname setting
9. Enter the domain name to be used by the EMM application to communicate
with the EMM server, and then click Next.
3 Installation
33
The use of this commercial software, and its documentation is subject to the restrictions stated on the second page of this documentation.
SSL Certificate configuration
10. Click Search, and then choose the EMM server certificate, issued in "chapter
2.2, Preparing certificates" on page 8, for the server (P12 file) prepared.
11. Enter the Certificate password.
12. Click Next to continue.
Note: If the extension of the EMM server certificate issued by CA is .PFX, it
should be changed to .P12 to install EMM.
Database configuration
13. Select the database authentication type. The user and password input value
are excluded, when using Windows authentication.
14. Enter information requested to use the EMM, Push, and AppTunnel database.
Properties Descriptions
Host The MS SQL server address where EMM database will be installed
Port The TCP/IP port of MS SQL where EMM database will be installed
DB Name(SID) The name of database (SID)
User The ID of users who will access EMM database
Password The password of users who will access EMM database

3 Installation
34
The use of this commercial software, and its documentation is subject to the restrictions stated on the second page of this documentation.
15. Click Next to continue.
Note: • EMM only supports MSSQL.
• Instance is optional.
• Since EMM stores operating information after installation is completed,
you must remember the user and password.
16. Enter the password for the database administrator account in DBA Password.
• The administrator account and password input are disabled, if Windows
authentication is selected
17. Set destinations for the database file and log file to be created:
• If you want to manage the database file and log file separately, check
Separate management of DB/Log files.
• The default destination of database file and log file is C:\Program
Files\Microsoft SQL Server\{SQL Version}\MSSQL\DATA\.
If SQL server has not been installed, the path should be modified.
• DB Installation options.
- New Install: install new EMM DB.
- No Install: Do not install EMM DB. Find more details in "For database
installation — Select No Install" on page 36.
3 Installation
35
The use of this commercial software, and its documentation is subject to the restrictions stated on the second page of this documentation.
18. Click Next to continue.
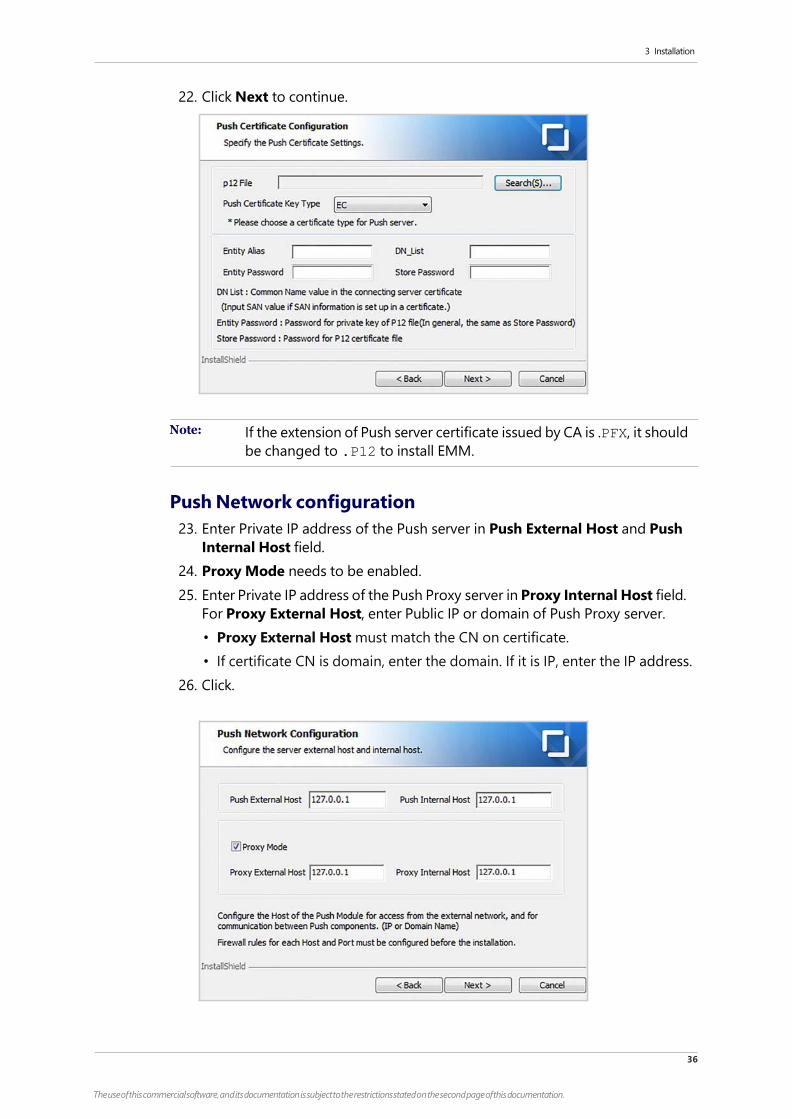
Push Cert configuration
19. Click Search, then choose the Push server certificate (P12 file) issued in
"chapter 2.2, Preparing certificates" on page 8.
20. Select EC or RSA key algorithm of the certificate from Push Certificate Key
Type list which Push server uses.
21. Enter the information for the Push certificate.
Properties Descriptions
Entity Alias The Alias of the Samsung SDS Push certificate.
DN_List • The Common Name (CN) of the Samsung SDS Push certificate.
• If the SAN information is set in the certificate, enter the SAN
information only.
• If you are using multi-domain names, separate them by a comma (,)
without spaces to enter multiple IP addresses or domains.
Entity Password The password of the Samsung SDS Push certificate.
Store Password The password of the Samsung SDS Push certificate key storage.
3 Installation
36
The use of this commercial software, and its documentation is subject to the restrictions stated on the second page of this documentation.
22. Click Next to continue.
Note: If the extension of Push server certificate issued by CA is .PFX, it should
be changed to .P12 to install EMM.
Push Network configuration
23. Enter Private IP address of the Push server in Push External Host and Push
Internal Host field.
24. Proxy Mode needs to be enabled.
25. Enter Private IP address of the Push Proxy server in Proxy Internal Host field.
For Proxy External Host, enter Public IP or domain of Push Proxy server.
• Proxy External Host must match the CN on certificate.
• If certificate CN is domain, enter the domain. If it is IP, enter the IP address.
26. Click.
3 Installation
37
The use of this commercial software, and its documentation is subject to the restrictions stated on the second page of this documentation.
Note: When you select the Proxy Mode check box, you should install Push
Proxy with the Push installer. For more detail, see "chapter 3.2.3,
Installing Push Proxy" on page 35.
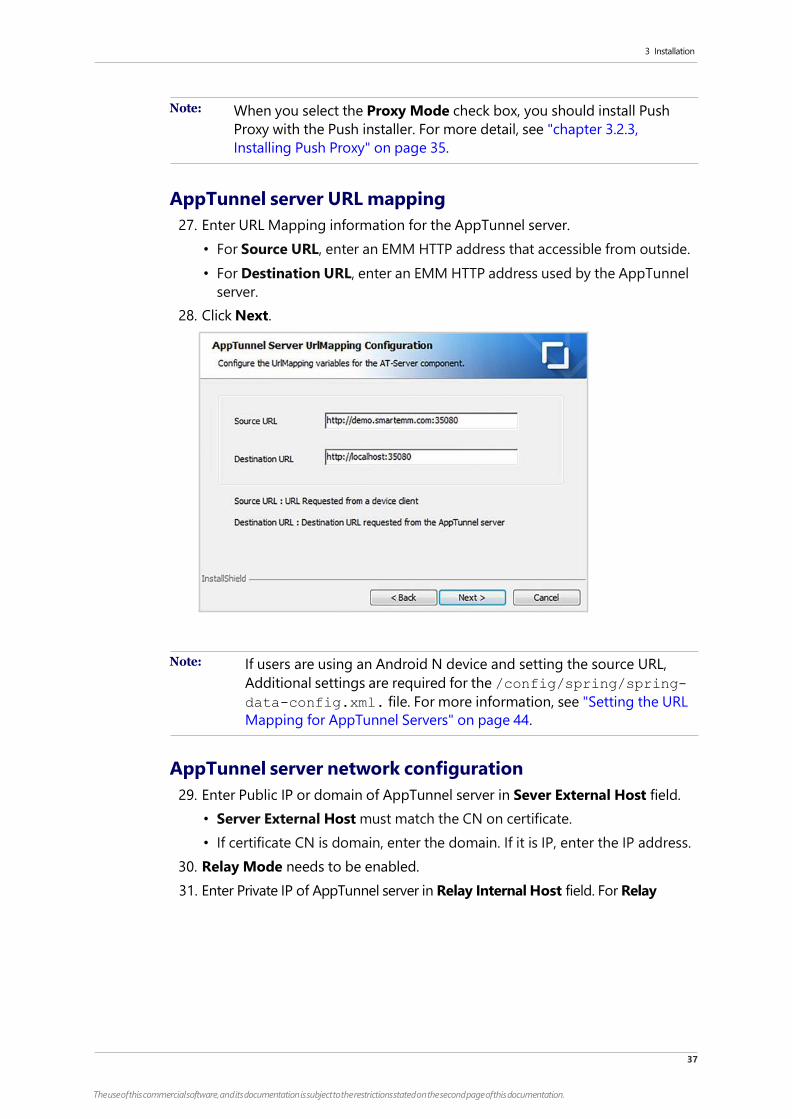
AppTunnel server URL mapping
27. Enter URL Mapping information for the AppTunnel server.
• For Source URL, enter an EMM HTTP address that accessible from outside.
• For Destination URL, enter an EMM HTTP address used by the AppTunnel
server.
28. Click Next.
Note: If users are using an Android N device and setting the source URL,
Additional settings are required for the /config/spring/spring-
data-config.xml. file. For more information, see "Setting the URL
Mapping for AppTunnel Servers" on page 44.
AppTunnel server network configuration
29. Enter Public IP or domain of AppTunnel server in Sever External Host field.
• Server External Host must match the CN on certificate.
• If certificate CN is domain, enter the domain. If it is IP, enter the IP address.
30. Relay Mode needs to be enabled.
31. Enter Private IP of AppTunnel server in Relay Internal Host field. For Relay

3 Installation
38
The use of this commercial software, and its documentation is subject to the restrictions stated on the second page of this documentation.
Internal Port field, enter 36110.
32. Click Install.
Note: When you select the Relay Mode check box, you should install AT Relay
with the AppTunnel installer. For more detail, see "chapter 3.2.4,
Installing AppTunnel Relay" on page 45.
Finish EMM installation
33. EMM, Push, and AppTunnel service are automatically registered in the background
when Register for Windows Service is checked.
• Push services can be viewed in the list and are registered in the background
only if you installed Push by selecting the checkbox for using Samsung SDS
Push.
34. When the installation process is completed, click Finish.
Note: When the message “Some information is missing. Fill in all the blanks.”
appears, input the value for all empty fields.
3 Installation
39
The use of this commercial software, and its documentation is subject to the restrictions stated on the second page of this documentation.
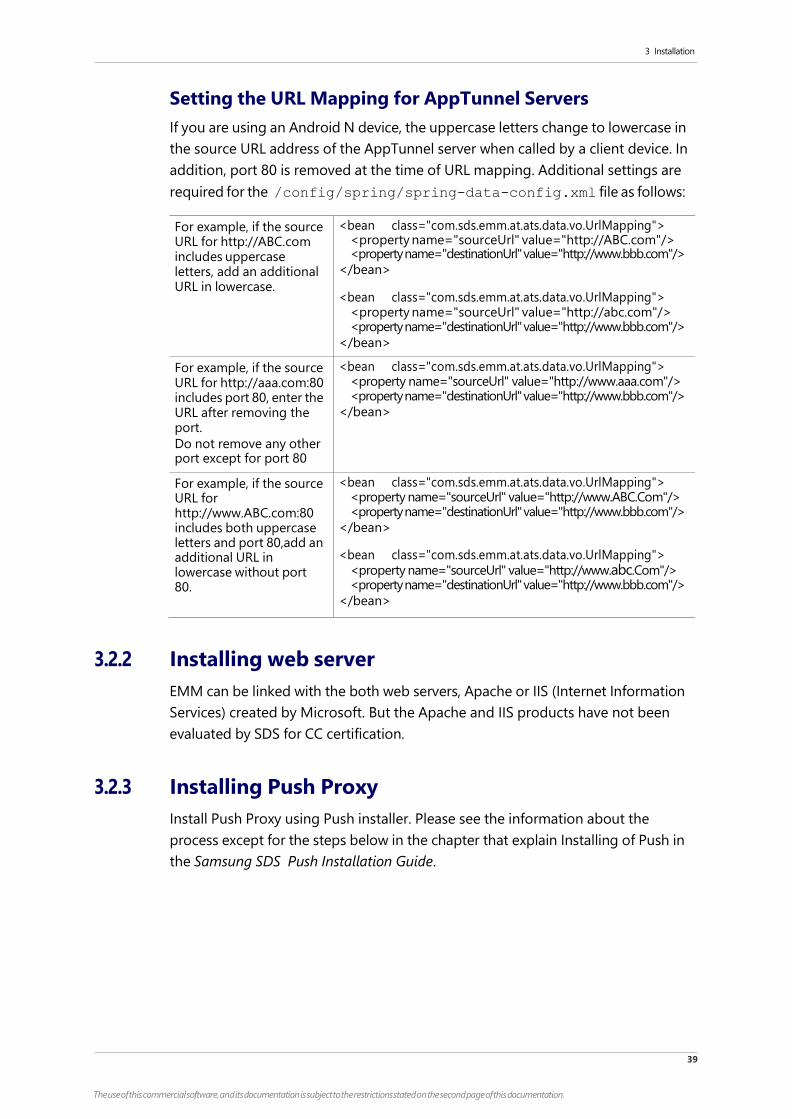
Setting the URL Mapping for AppTunnel Servers
If you are using an Android N device, the uppercase letters change to lowercase in
the source URL address of the AppTunnel server when called by a client device. In
addition, port 80 is removed at the time of URL mapping. Additional settings are
required for the /config/spring/spring-data-config.xml file as follows:
For example, if the source URL for http://ABC.com includes uppercase letters, add an additional URL in lowercase.
<bean class="com.sds.emm.at.ats.data.vo.UrlMapping"> <property name="sourceUrl" value="http://ABC.com"/> <property name="destinationUrl" value="http://www.bbb.com"/>
</bean>
<bean class="com.sds.emm.at.ats.data.vo.UrlMapping"> <property name="sourceUrl" value="http://abc.com"/> <property name="destinationUrl" value="http://www.bbb.com"/>
</bean>
For example, if the source URL for http://aaa.com:80 includes port 80, enter the URL after removing the port.
Do not remove any other port except for port 80
<bean class="com.sds.emm.at.ats.data.vo.UrlMapping"> <property name="sourceUrl" value="http://www.aaa.com"/> <property name="destinationUrl" value="http://www.bbb.com"/>
</bean>
For example, if the source URL for http://www.ABC.com:80 includes both uppercase letters and port 80,add an additional URL in lowercase without port 80.
<bean class="com.sds.emm.at.ats.data.vo.UrlMapping"> <property name="sourceUrl" value="http://www.ABC.Com"/> <property name="destinationUrl" value="http://www.bbb.com"/>
</bean>
<bean class="com.sds.emm.at.ats.data.vo.UrlMapping"> <property name="sourceUrl" value="http://www.abc.Com"/> <property name="destinationUrl" value="http://www.bbb.com"/>
</bean>
3.2.2 Installing web server
EMM can be linked with the both web servers, Apache or IIS (Internet Information
Services) created by Microsoft. But the Apache and IIS products have not been
evaluated by SDS for CC certification.
3.2.3 Installing Push Proxy
Install Push Proxy using Push installer. Please see the information about the
process except for the steps below in the chapter that explain Installing of Push in
the Samsung SDS Push Installation Guide.

3 Installation
40
The use of this commercial software, and its documentation is subject to the restrictions stated on the second page of this documentation.
Push Installation Component
1. Select Proxy Installation.
2. Click Next.
Push Proxy Network configuration
3. Enter Public IP address or domain of Push Proxy for Proxy External Host
and enter Private IP address of Push Proxy for Proxy Internal Host.
4. Click Install.
3.2.4 Installing AppTunnel Relay
Install AppTunnel Relay using AppTunnel installer. Please see the information
about the process except for the steps below in the chapter that explain Installing
AppTunnel in the Samsung SDS AppTunnel Installation Guide.
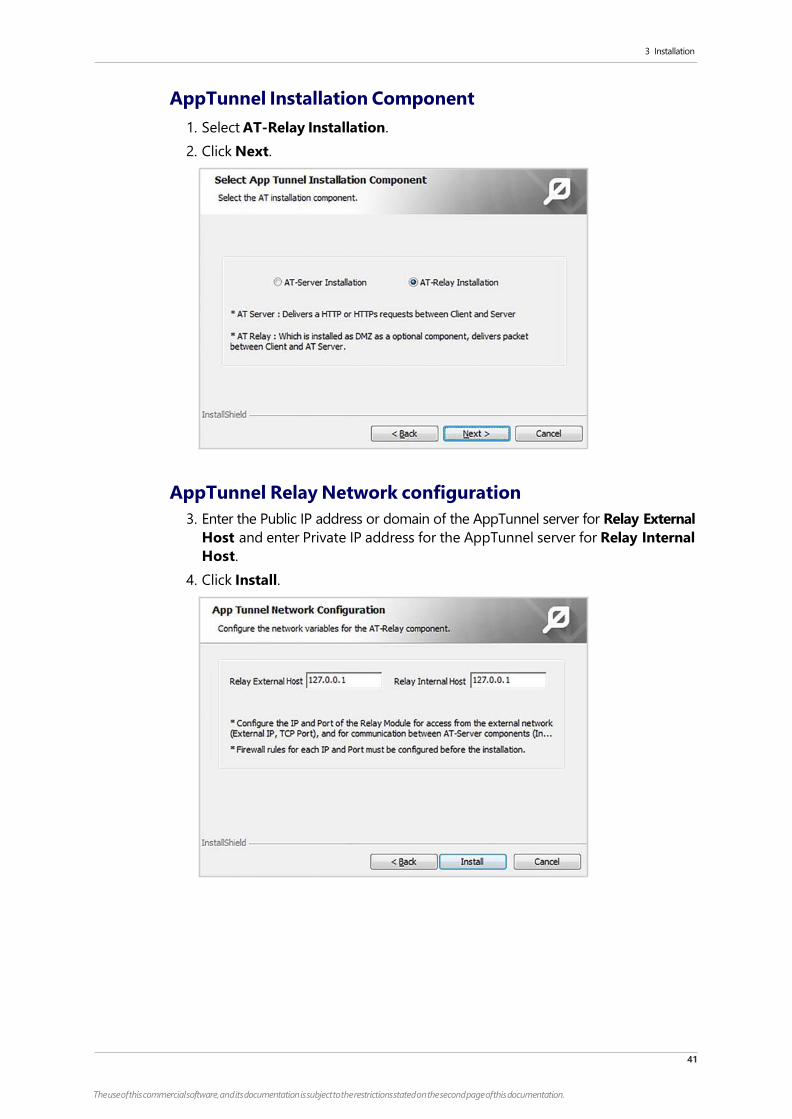
3 Installation
41
The use of this commercial software, and its documentation is subject to the restrictions stated on the second page of this documentation.
AppTunnel Installation Component
1. Select AT-Relay Installation.
2. Click Next.
AppTunnel Relay Network configuration
3. Enter the Public IP address or domain of the AppTunnel server for Relay External
Host and enter Private IP address for the AppTunnel server for Relay Internal
Host.
4. Click Install.
3 Installation
42
The use of this commercial software, and its documentation is subject to the restrictions stated on the second page of this documentation.
3.3 Notes on post - Installation phase
This chapter describes items that need to be manually set, as needed, before starting
EMM installation.
For database installation — Select No Install
When you select No Install, Only EMM applications are installed. In this case, EMM
DB should be installed manually following the steps below.
● Execution directory: {EMM installation location}
\EMM\{Version}\war\db\script\mssql
● Run scripts in the following order:
01.emm_user_script.sql
02.emm_db_schema_metadata_script.sql
- If Korean or Chinese are used, run the following scripts.
- Korean: 02-1.emm_meta_data_ko.sql
- Chinese: 02-2.emm_meta_data_zh.sql
- If EMM system is on-premise (single tenant), run the following scripts.
02-3.emm_single_tenant_data.sql
02-4.emm_single_tenant_proc_script.sql
Execute the Push script below to install the database manually.
● Execution directory: {EMM installation location}
\Push\PushConfig\PushQuery\MSSQL\CREATE
● Run these scripts:
03.push_core.sql
04.push_sa.sql
● Execution directory: {EMM installation location}
\Push\PushConfig\PushQuery\MSSQL\CREATE
● Run these scripts:
01.CORE_INIT.SQL
02.SA_INIT.SQL
Setting interval between Push SA registration monitoring
To manually set an interval for when Push SA registration monitoring recurs,
complete the following steps. The EMM server checks a new tenant based on the
time interval specified.
1. Go to {EMM installation location}\EMM\{Version}\war\WEB-INF\
classes\spring.
2. Use an editor to implement context-task.xml
3. Go to periodforRegister properties to change value.
<property name = “periodForResigter”><value>30</value></property>
3 Installation
43
The use of this commercial software, and its documentation is subject to the restrictions stated on the second page of this documentation.
• The interval is set to 30 minutes by default. If you want to change this, note
that it should be more than 1 minute.
Note: A tenant newly registered during the specified time for Push SA registration
monitoring is not registered on the EMM server.

4 Post-installation
38
The use of this commercial software, and its documentation is subject to the restrictions stated on the second page of this documentation.
4 Post-installation
This chapter guides you in checking the running status for Samsung SDS EMM
(hereinafter “EMM”) after installation is finished. Here are the steps That should be
followed after installation. Push is Samsung SDS Push and AppTunnel is Samsung
SDS AppTunnel.
Figure 4-1. EMM Post-Installation Steps
4 Post-installation
39
The use of this commercial software, and its documentation is subject to the restrictions stated on the second page of this documentation.
4.1 Starting EMM
EMM runs in 2 different ways: Foreground and Background.
Note: The Push ICM module provides a TLS channel for message exchange
between physically separated servers. This service runs when the Push
is installed on a separate server to provide high availability.
4.1.1 Single-server environment
Running EMM as foreground service
1. Go to Apps > Samsung SDS.
2. Execute the following services in the order.
a. Push DCM Start
b. Push ECM Start
c. Push PS Start
d. Push SCM Start
e. Push ICM Start
f. AT Server Start
g. EMM Server Start
Running EMM as background service
If Register for Windows service is checked after EMM installation is completed,
skip 1 to steps.
1. Go to the {EMM installation location}
\EMM\{Version}\apache-tomcat-8.0.39\bin directory.
2. Run emm_service_install.bat.
• emm_service_install.bat must be run using an administrator.
3. Go to the {EMM installation location}\AT\{Version}\bin
directory.
4. Run install_at_server_win_service.bat.
• install_at_server_win_service.bat must be run using administrator
account.
5. Go to Start > Administrative Tools > Services, and then check the following
services.
• Samsung SDS AT{Version} Server Background Service (AppTunnel Server)
• Samsung SDS EMM{Version} Server Background Service (EMM Server)
• Samsung SDS Push{Version} DCM(1) Background Service (Push DCM)
• Samsung SDS Push{Version} ECM(1) Background Service (Push ECM)
• Samsung SDS Push{Version} PS(1) Background Service (Push PS)
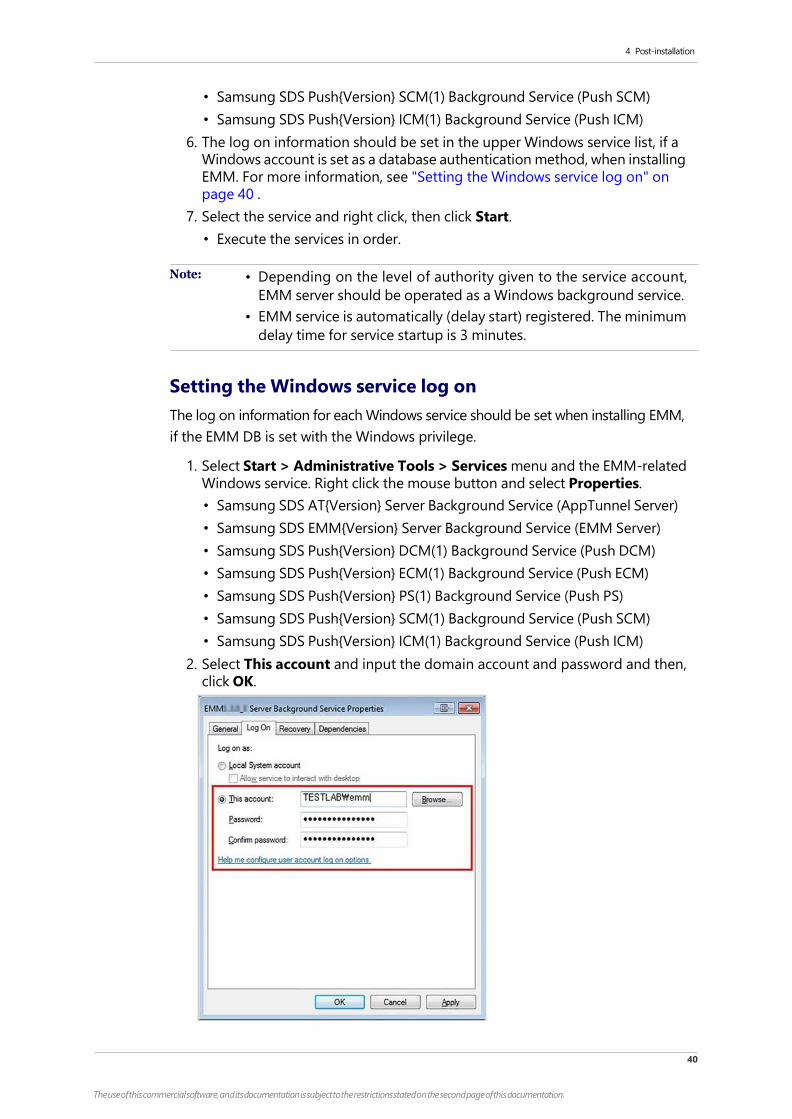
4 Post-installation
40
The use of this commercial software, and its documentation is subject to the restrictions stated on the second page of this documentation.
• Samsung SDS Push{Version} SCM(1) Background Service (Push SCM)
• Samsung SDS Push{Version} ICM(1) Background Service (Push ICM)
6. The log on information should be set in the upper Windows service list, if a
Windows account is set as a database authentication method, when installing
EMM. For more information, see "Setting the Windows service log on" on
page 40 .
7. Select the service and right click, then click Start.
• Execute the services in order.
Note: • Depending on the level of authority given to the service account,
EMM server should be operated as a Windows background service.
• EMM service is automatically (delay start) registered. The minimum
delay time for service startup is 3 minutes.
Setting the Windows service log on
The log on information for each Windows service should be set when installing EMM,
if the EMM DB is set with the Windows privilege.
1. Select Start > Administrative Tools > Services menu and the EMM-related
Windows service. Right click the mouse button and select Properties.
• Samsung SDS AT{Version} Server Background Service (AppTunnel Server)
• Samsung SDS EMM{Version} Server Background Service (EMM Server)
• Samsung SDS Push{Version} DCM(1) Background Service (Push DCM)
• Samsung SDS Push{Version} ECM(1) Background Service (Push ECM)
• Samsung SDS Push{Version} PS(1) Background Service (Push PS)
• Samsung SDS Push{Version} SCM(1) Background Service (Push SCM)
• Samsung SDS Push{Version} ICM(1) Background Service (Push ICM)
2. Select This account and input the domain account and password and then,
click OK.
4 Post-installation
41
The use of this commercial software, and its documentation is subject to the restrictions stated on the second page of this documentation.
4.1.2 Multi-server environment
The explanation below is based on figure 1-5 in "chapter 1.2.2, Multi server
architecture" on page 4.
Running EMM as foreground service
1. Go to the server on which EMM was installed.
2. Go to Apps > Samsung SDS to run the following services in order.
a. Push DCM Start
b. Push ECM Start
c. Push PS Start
d. Push SCM Start
e. Push ICM Start
f. AT Server Start
g. EMM Server Start
3. Go to the web server.
4. Register for Apache service.
a. Open a command prompt with the {Apache24forEMM installation
location}\bin\ directory.
b. Enter httpd -k install {Web server name} command.
5. Click ApacheMonitor.exe in bin directory and click on the right side
of taskbar to check the status.
6. Go to {Push Proxy installation location}\PushProxy\{Version}
\bin and run the following files in order.
a. push_dpp_1_start.bat
b. push_epp_1_start.bat
c. push_ppp_1_start.bat
7. Go to {AppTunnel Relay installation location}\AT\{Version}
\at-relay\bin to run at_realay_start.bat file.
Running EMM as background service
If Register for Windows service is checked after EMM installation is completed,
skip 1 to steps.
1. Go to the server in which EMM was installed.
2. Go to the {EMM installation location}\EMM\{Version}\apache
-tomcat-8.0.39\bin directory.
3. Run emm_service_install.bat file.
• emm_service_install.bat must be run using an administrator.
4. Go to the {EMM installation location}\AT\{Version}\bin
directory.
5. Run install_at_server_win_service.bat file.
4 Post-installation
42
The use of this commercial software, and its documentation is subject to the restrictions stated on the second page of this documentation.
• install_at_server_win_service.bat file must be run using
administrator account.
6. Go to the web server and register for Apache service.
a. Open a command prompt with the {Apache24forEMM installation
location}\bin\ directory.
b. Enter httpd -k install {Web server name} command.
7. Go to {Push Proxy installation location}\PushProxy\{Version}
\bin directory.
8. Run install_push_proxy_win_service.bat file.
• install_push_proxy_win_service.bat must be run using
administrator account.
9. Go to {AppTunnel Relay installation location}\AT\{Version}\
at-relay\bin directory.
10. Run install_at_relay_win_service.bat file.
• install_at_relay_win_service.bat file must be run using
administrator account.
11. Go to Start > Administrative Tools > Services, and then check the following
services.
Server Service
Server with EMM Samsung SDS Push{Version} DCM(1) Background Service
Samsung SDS Push{Version} ECM(1) Background Service
Samsung SDS Push{Version} PS(1) Background Service
Samsung SDS Push{Version} SCM(1) Background Service
Samsung SDS Push{Version} ICM(1) Background Service
Samsung SDS AT{Version} Server Background Service
Samsung SDS EMM{Version} Server Background Service
Web server Samsung SDS PushProxy{Version} DPP(1) Background Service
Samsung SDS PushProxy{Version} EPP(1) Background Service
Samsung SDS PushProxy{Version} PPP(1) Background Service
Samsung SDS AT{Version} Relay Background Service
12. The log on information should be set in the upper Windows service list, if a
Windows account is set as a database authentication method, when installing
EMM. For more information, see "Setting the Windows service log on" on
page 40.
13. Select the service and right click, then click Start.
• Execute the services in the order.
Note: • Depending on the level of authority given to service account, the EMM
server should operate as Windows background service.
• EMM service is automatically (delay start) registered. The minimum delay time for the service startup is 3 minutes.
4 Post-installation
43
The use of this commercial software, and its documentation is subject to the restrictions stated on the second page of this documentation.
4.2 Checking EMM status
This chapter describes how to check if the port and firewall used by EMM are open
after installation.
Checking EMM ports
Check whether the port is used with netstat commands (netstat-noa|findstr
port number) in the command prompt. If the netstat command is not working,
check the log of the server not responding in the {Installation location}\
{Service}\{Version}\log directory.
● For the port used for EMM, see the "chapter 2.4, Pre-installation checklist" on
page 14.
Server Service Log Notes
Server with
EMM
EMM emm.log
Push PS ps_{Service start date}.log
Push DCM dcm_{Service start date}.log
Push SCM scm_{Service start date}.log
Push ECM ecm_{Service start date}.log
Push ICM icm_{Service start date}.log
AppTunnel at_{Service start date}.log
Web server Push Proxy PPP ppp_{Service start date}.log Multi-server
environment
only Push Proxy DPP dpp_{Service start date}.log
Push Proxy EPP epp_{Service start date}.log
AppTunnel Relay at_{Service start date}.log
Check if firewall is open
Check if other PCs can use telnet commands to access the inbound release
port. See "chapter 2.4, Pre-installation checklist" on page 14 for firewall access
rule.
For example, telnet {EMM Server IP} 35080
● Contact the person in charge of the firewall If there is no response to the
command.
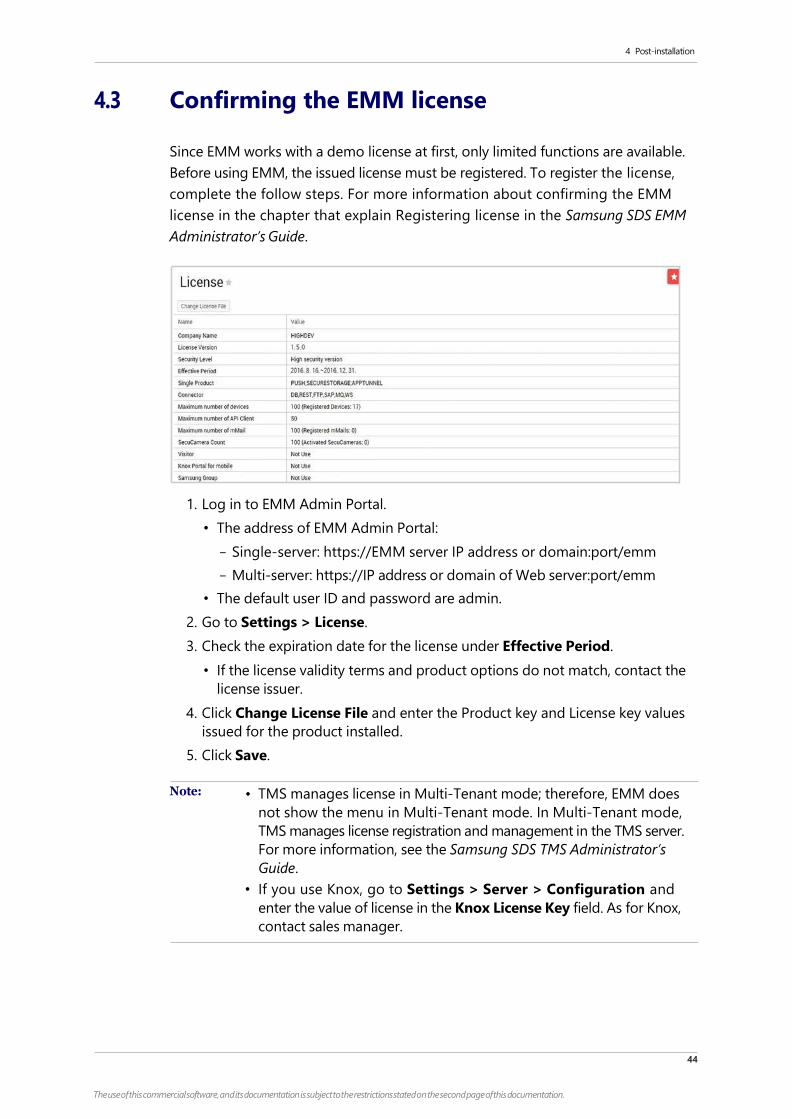
4 Post-installation
44
The use of this commercial software, and its documentation is subject to the restrictions stated on the second page of this documentation.
4.3 Confirming the EMM license
Since EMM works with a demo license at first, only limited functions are available.
Before using EMM, the issued license must be registered. To register the license,
complete the follow steps. For more information about confirming the EMM
license in the chapter that explain Registering license in the Samsung SDS EMM
Administrator’s Guide.
1. Log in to EMM Admin Portal.
• The address of EMM Admin Portal:
- Single-server: https://EMM server IP address or domain:port/emm
- Multi-server: https://IP address or domain of Web server:port/emm
• The default user ID and password are admin.
2. Go to Settings > License.
3. Check the expiration date for the license under Effective Period.
• If the license validity terms and product options do not match, contact the
license issuer.
4. Click Change License File and enter the Product key and License key values
issued for the product installed.
5. Click Save.
Note: • TMS manages license in Multi-Tenant mode; therefore, EMM does
not show the menu in Multi-Tenant mode. In Multi-Tenant mode,
TMS manages license registration and management in the TMS server.
For more information, see the Samsung SDS TMS Administrator’s
Guide.
• If you use Knox, go to Settings > Server > Configuration and
enter the value of license in the Knox License Key field. As for Knox,
contact sales manager.
4 Post-installation
45
The use of this commercial software, and its documentation is subject to the restrictions stated on the second page of this documentation.
4.4 Setting the service profile
The service profile is service information downloaded from the EMM server to the
user device when the device is provisioned. The service profile manages values
such as EMM Server, EMM Client, Push server, AppTunnel server, App store, Audit
Server, Log Server, MDM and mMail Server.
4.4.1 Single-server environment
To set the service profile for single-server, complete the following steps.
1. Go to Settings> Server > Configuration in the EMM Admin Portal.
2. Click Service profile.
3. Change the following values according to the installation environment.
• EMM server domain: Public IP or domain
• HTTPS/HTTP port of EMM server: e.g. 35080
• Push server domain: Public IP or domain.
• TCP port of Push server: e.g. 35000
• AppTunnel server domain: Public IP or domain.
• HTTP port of AppTunnel server: e.g. 36000
• See the "Appendix C, Audit Remote Logging" on page 86 for transferring
Audit logs to the remote log server or for sending the audit log files to an
external server.
Profile category Item The value to be changed
EMM Server Protocol Type to Access EMM Server http
EMM Server Host EMM server domain
EMM Server Port 35080
EMM Server Context emm
Request Timeout(ms) 30000
Compression upon request (TRUE/FALSE) FALSE
Request Data Type XML
Protocol Type to Access Cert Server https
Cert Server Host EMM server domain
Cert Server Port 35443
Cert Server Context emm
Protocol Type to Access Provision Server https
Provision Server Host EMM server domain
Provision Server Port 35443
4 Post-installation
46
The use of this commercial software, and its documentation is subject to the restrictions stated on the second page of this documentation.
Profile category Item The value to be changed
EMM Client URL for EMM packages distribution https://EMM server domain
:35443/emm/ws/appFileDo
wn/getEMMInstallJson
Push AppTunnel Host EMM server domain
AppTunnel Port 36000
Push Master PS Host EMM server domain
Push Master PS Port 35000
Push Slave PS Host EMM server domain
Push Slave PS Port 35000
App Store App Store Access URL https://EMM server
domain:35443/emm/mobile
/bas.do
Audit Server Protocol Type to Access Audit Server https
Audit Server Host EMM server domain
Audit Server Port 35443
Audit Server Context lts
Audit Server Access Timeout(ms) 30000
AuditLog File Size for Automatic Upload
(unit:byte)
10240
The size of the log file
automatically uploaded to
the server from the device
Log Server Protocol Type to Access Log Server https
Log Server Host EMM server domain
Log Server Port 35443
Log Server Context lts
Log Server Access Timeout(ms) 30000
Log File Storage Period(unit:day) 7
Log File Size Limit(unit:byte) 10485760
4 Post-installation
47
The use of this commercial software, and its documentation is subject to the restrictions stated on the second page of this documentation.
Profile category Item The value to be changed
MDM EMM Agent Download URL https://EMM server domain
:35443/emm/down/file/EM
MAgent.apk
Push Agent Download URL https://EMM server domain
:35443/emm/down/file/Sam
sung SDS-Push-Agent.apk
MDM Enrollment URL for iOS https://EMM server domain
:35443/emm
Client Download URL after Factory Reset https://EMM server domain
:35443/emm/down/file/EM
MClient.apk
Client-signature for validation after
factory reset
Signature value that are
extracted from the EMM
Client.
Client package name for validating
installation after factory reset
com.sds.emm.client
mMail Server mMail Server Host mMail server domain
mMail Server Port mMail server port
4.4.2 Multi-server environment To set the service profile for multi-server, complete the following steps.
1. Go to Settings> Service> Configuration.
2. Click Service profile.
3. Change the following values according to the installation environment.
• Domain of EMM server: Public IP or domain of Web server
• HTTPS/HTTP port of EMM server: e.g. 443
• Domain of Push Proxy server: Public IP or domain of Push Proxy server.
• TCP port of Push Proxy PPP: e.g. 35100
• Domain of AppTunnel Relay server: Public IP or domain of Push Proxy server.
• TCP port of AppTunnel Relay server: e.g. 36110
• See the "Appendix C, Audit Remote Logging" on page 86 for transferring
Audit logs to the remote log server or for sending the audit log files to an
external server.
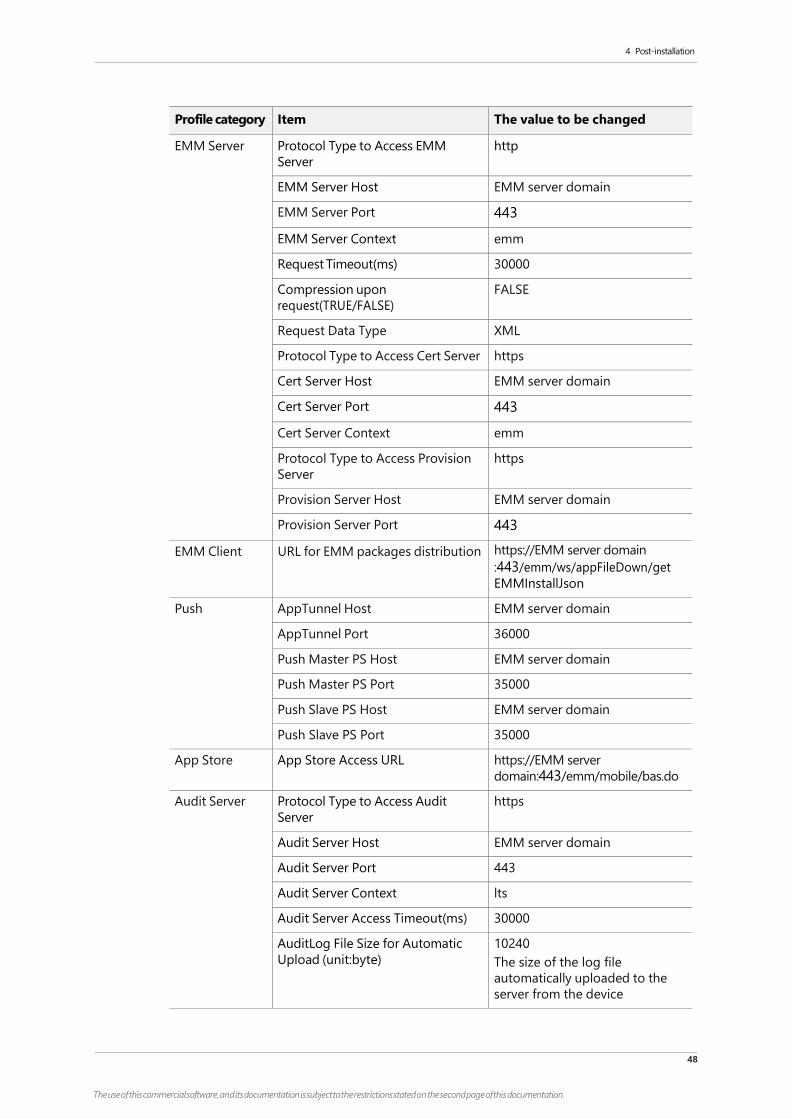
4 Post-installation
48
The use of this commercial software, and its documentation is subject to the restrictions stated on the second page of this documentation.
Profile category Item The value to be changed
EMM Server Protocol Type to Access EMM
Server
http
EMM Server Host EMM server domain
EMM Server Port 443
EMM Server Context emm
Request Timeout(ms) 30000
Compression upon
request(TRUE/FALSE)
FALSE
Request Data Type XML
Protocol Type to Access Cert Server https
Cert Server Host EMM server domain
Cert Server Port 443
Cert Server Context emm
Protocol Type to Access Provision
Server
https
Provision Server Host EMM server domain
Provision Server Port 443
EMM Client URL for EMM packages distribution https://EMM server domain
:443/emm/ws/appFileDown/get
EMMInstallJson
Push AppTunnel Host EMM server domain
AppTunnel Port 36000
Push Master PS Host EMM server domain
Push Master PS Port 35000
Push Slave PS Host EMM server domain
Push Slave PS Port 35000
App Store App Store Access URL https://EMM server
domain:443/emm/mobile/bas.do
Audit Server Protocol Type to Access Audit
Server
https
Audit Server Host EMM server domain
Audit Server Port 443
Audit Server Context lts
Audit Server Access Timeout(ms) 30000
AuditLog File Size for Automatic
Upload (unit:byte)
10240
The size of the log file
automatically uploaded to the
server from the device
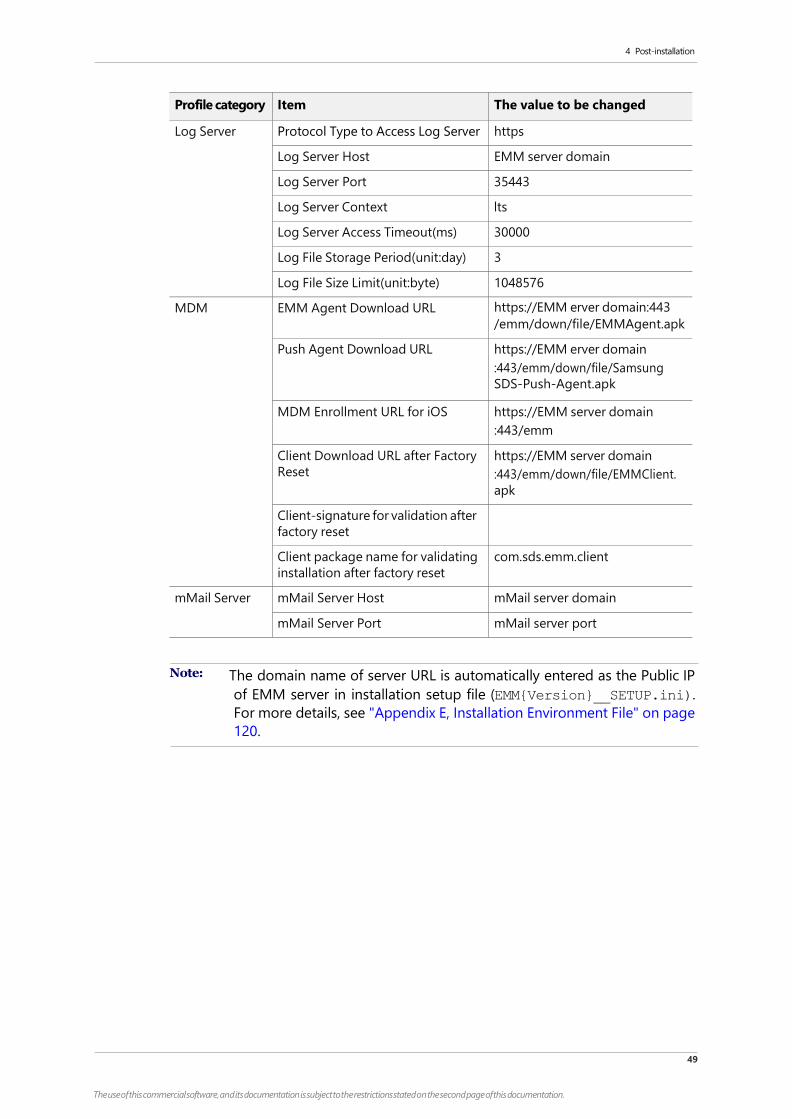
4 Post-installation
49
The use of this commercial software, and its documentation is subject to the restrictions stated on the second page of this documentation.
Profile category Item The value to be changed
Log Server Protocol Type to Access Log Server https
Log Server Host EMM server domain
Log Server Port 35443
Log Server Context lts
Log Server Access Timeout(ms) 30000
Log File Storage Period(unit:day) 3
Log File Size Limit(unit:byte) 1048576
MDM EMM Agent Download URL https://EMM erver domain:443
/emm/down/file/EMMAgent.apk
Push Agent Download URL https://EMM erver domain
:443/emm/down/file/Samsung
SDS-Push-Agent.apk
MDM Enrollment URL for iOS https://EMM server domain
:443/emm
Client Download URL after Factory
Reset
https://EMM server domain
:443/emm/down/file/EMMClient.
apk
Client-signature for validation after
factory reset
Client package name for validating
installation after factory reset
com.sds.emm.client
mMail Server mMail Server Host mMail server domain
mMail Server Port mMail server port
Note: The domain name of server URL is automatically entered as the Public IP
of EMM server in installation setup file (EMM{Version}__SETUP.ini).
For more details, see "Appendix E, Installation Environment File" on page
120.
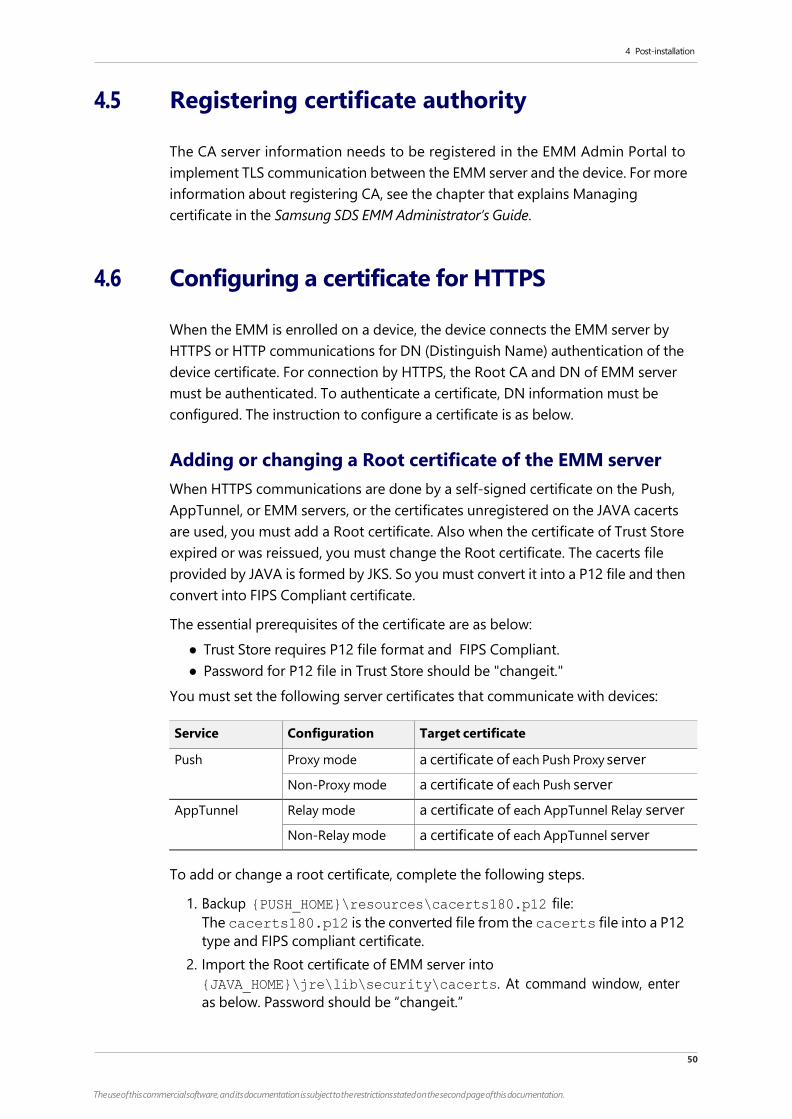
4 Post-installation
50
The use of this commercial software, and its documentation is subject to the restrictions stated on the second page of this documentation.
4.5 Registering certificate authority
The CA server information needs to be registered in the EMM Admin Portal to
implement TLS communication between the EMM server and the device. For more
information about registering CA, see the chapter that explains Managing
certificate in the Samsung SDS EMM Administrator’s Guide.
4.6 Configuring a certificate for HTTPS
When the EMM is enrolled on a device, the device connects the EMM server by
HTTPS or HTTP communications for DN (Distinguish Name) authentication of the
device certificate. For connection by HTTPS, the Root CA and DN of EMM server
must be authenticated. To authenticate a certificate, DN information must be
configured. The instruction to configure a certificate is as below.
Adding or changing a Root certificate of the EMM server
When HTTPS communications are done by a self-signed certificate on the Push,
AppTunnel, or EMM servers, or the certificates unregistered on the JAVA cacerts
are used, you must add a Root certificate. Also when the certificate of Trust Store
expired or was reissued, you must change the Root certificate. The cacerts file
provided by JAVA is formed by JKS. So you must convert it into a P12 file and then
convert into FIPS Compliant certificate.
The essential prerequisites of the certificate are as below:
● Trust Store requires P12 file format and FIPS Compliant.
● Password for P12 file in Trust Store should be "changeit."
You must set the following server certificates that communicate with devices:
Service Configuration Target certificate
Push Proxy mode a certificate of each Push Proxy server
Non-Proxy mode a certificate of each Push server
AppTunnel Relay mode a certificate of each AppTunnel Relay server
Non-Relay mode a certificate of each AppTunnel server
To add or change a root certificate, complete the following steps.
1. Backup {PUSH_HOME}\resources\cacerts180.p12 file:
The cacerts180.p12 is the converted file from the cacerts file into a P12
type and FIPS compliant certificate.
2. Import the Root certificate of EMM server into
{JAVA_HOME}\jre\lib\security\cacerts. At command window, enter
as below. Password should be “changeit.”
4 Post-installation
51
The use of this commercial software, and its documentation is subject to the restrictions stated on the second page of this documentation.
• YYY: Any alias unduplicated with an alias of the existing cacerts certificate
• XXX.cer: The Root certificate of EMM server
3. Copy {JAVA_HOME}\jre\lib\security\cacerts file into
{PUSH_HOME}\resources\cacerts.
4. Convert {PUSH_HOME}\resources\cacerts file as type of JKS into PKCS12
type. The conversion scripts are as below.
5. Convert {PUSH_HOME}\resources\cacerts.p12 file into the FIPS
compliant certificate with the converter provided.
Note: • The provided FIPS conversion tool was changed. You must convert a
certificate by using the changed conversion tool. The
Fips140Converter.jar file date of the latest conversion tool is
July 24, 2015.
• The FIPS conversion tool must be run in a JAVA environment where
the EMC Crypto module (Tomcat RSA patch) is patched.
6. Modify a file name cacerts.p12 in {PUSH_HOME}\resources directory
into cacerts180.p12.
7. Copy a cacerts180.p12 certificate to each server directory based on EMM
configuration.
• Push Proxy: {PushProxy_HOME}\resources
• AppTunnel: {ATS_HOME}\resources
• AppTunnel Relay: {ATR_HOME}\resources
4.7 Registering users and devices
Register the person uses EMM and devices in the Admin Portal. For more
information, see the chapter that explains Managing devices & users in the
Samsung SDS EMM Administrator’s Guide.
keytool -import -alias YYY -file XXX.cer -keystore
{JAVA_HOME}\jre\lib\security\cacerts
keytool -importkeystore -srckeystore
{PUSH_HOME}/resources/cacerts
-srcstoretype JKS -deststoretype PKCS12 -destkeystore
{PUSH_HOME}/resources/cacerts.p12
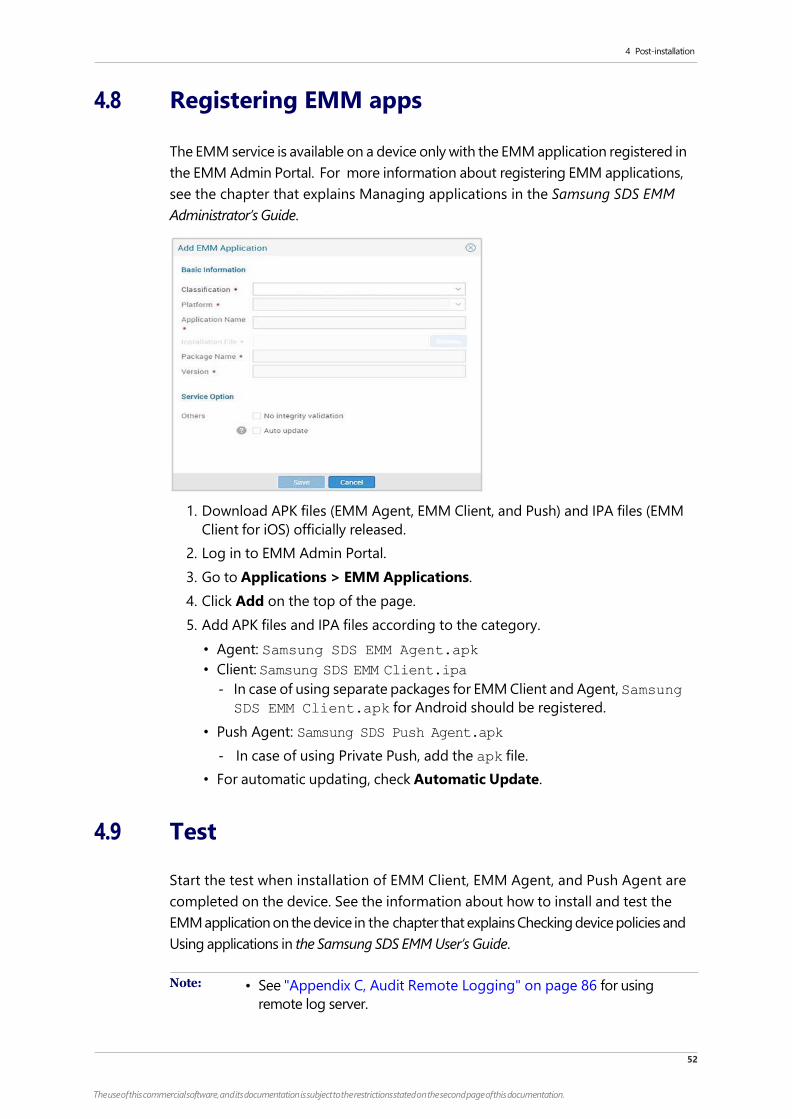
4 Post-installation
52
The use of this commercial software, and its documentation is subject to the restrictions stated on the second page of this documentation.
4.8 Registering EMM apps
The EMM service is available on a device only with the EMM application registered in
the EMM Admin Portal. For more information about registering EMM applications,
see the chapter that explains Managing applications in the Samsung SDS EMM
Administrator’s Guide.
1. Download APK files (EMM Agent, EMM Client, and Push) and IPA files (EMM
Client for iOS) officially released.
2. Log in to EMM Admin Portal.
3. Go to Applications > EMM Applications.
4. Click Add on the top of the page.
5. Add APK files and IPA files according to the category.
• Agent: Samsung SDS EMM Agent.apk
• Client: Samsung SDS EMM Client.ipa
- In case of using separate packages for EMM Client and Agent, Samsung
SDS EMM Client.apk for Android should be registered.
• Push Agent: Samsung SDS Push Agent.apk
- In case of using Private Push, add the apk file.
• For automatic updating, check Automatic Update.
4.9 Test
Start the test when installation of EMM Client, EMM Agent, and Push Agent are
completed on the device. See the information about how to install and test the
EMM application on the device in the chapter that explains Checking device policies and
Using applications in the Samsung SDS EMM User’s Guide.
Note: • See "Appendix C, Audit Remote Logging" on page 86 for using
remote log server.
4 Post-installation
53
The use of this commercial software, and its documentation is subject to the restrictions stated on the second page of this documentation.
• For TLS communication between the EMM server and a device, the
root certificate for the CA server should be installed on a device.
5 Updating EMM
52
The use of this commercial software, and its documentation is subject to the restrictions stated on the second page of this documentation.
5 Updating EMM
This chapter describes how to update Samsung SDS EMM (hereinafter “EMM”) to the
latest version. See the following steps to apply the EMM patch.
Administrator can only update to the new release version from the latest version of
the existing versions. e.g., 1.6.1 -> 2.0
Exceptionally, the EMM 1.5.1 patch installer can be installed from 1.3 or 1.4 version.
The patch is supported in an environment using Windows OS and MS SQL
database.
Please note the following when you update the EMM.
● You must use the existing license information (ticket, ticket index, and key
table file) when updating the EMM.
● When you update EMM from 1.3 or 1.4 version with Push being installed on
the separated server constructed with HA, run the database script after
updating EMM. For more detail about how to run the script, see “Samsung
SDS Push Installation Guide”.
● To use iOS 12, you need to add ciphers to the Tomcat configuration file. To
learn more, see ""Support for iOS 12"" in Chapter 8 on page 85."
Note: The Push ICM module provides a TLS channel for message exchange
between physically separated servers. This service runs when the Push is
installed on a separate server to provide high availability.
5.1 Stopping services
The two services can stop by stopping either the foreground or background service
depending on service implementation method.
5.1.1 Single-server environment
Before installing the EMM patch, EMM, Push, and AppTunnel services should be
stopped.
Stopping foreground services
To stop EMM, Push, and AppTunnel services, complete the following steps.
1. Go to {EMM installation location}\EMM\{Version}\apache-tomcat-
{Version}\bin\.
5 Updating EMM
53
The use of this commercial software, and its documentation is subject to the restrictions stated on the second page of this documentation.
2. Execute shutdown.bat file. This will shut down Tomcat, terminating EMM.
3. Close the following Push service windows:
• Push ({Version}) DCM(1) 35001,35011
• Push ({Version}) PS(1) 35000,35010
• Push ({Version}) SCM(1) 35002,35012
• Push ({Version}) ECM(1) 35003,35013
• Push {Version} ICM(1) 35004,35014
4. Close the following AppTunnel service window:
• AT Server ({Version}) 36000
Stopping background services
Go to Start > Administrative Tools > Services and stop the following background
services. Select a service with a right click, and then click Stop.
● Samsung SDS Push{Version} DCM(1) Background Service
● Samsung SDS Push{Version} PS(1) Background Service
● Samsung SDS Push{Version} SCM(1) Background Service
● Samsung SDS Push{Version} ECM(1) Background Service
● Samsung SDS Push{Version} ICM(1) Background Service
● Samsung SDS AT{Version} Server Background Service
● Samsung SDS EMM{Version} Server Background Service
5.1.2 Multi-server environment
Before installing EMM patch, EMM, Push, AppTunnel, Push Proxy, and AppTunnel
Relay services should be stopped. The explanation below is based on "chapter
1.2.2, Multi server architecture" on page 4.
Stopping foreground services
To stop EMM patch, EMM, Push, AppTunnel, Push Proxy, and AppTunnel Relay
services, complete the following steps.
1. Go to the server in which EMM was installed.
2. Go to {EMM installation location}\EMM\{Version}\apache-tomcat-
{Version}\bin\.
3. Execute shutdown.bat file. This will shut down Tomcat, terminating EMM.
4. Close the following Push and AppTunnel service windows:
• Push ({Version}) DCM(1) 35001,35011
• Push ({Version}) PS(1) 35000,35010
• Push ({Version}) SCM(1) 35002,35012
• Push ({Version}) ECM(1) 35003,35013
• Push {Version} ICM(1) 35004,35014
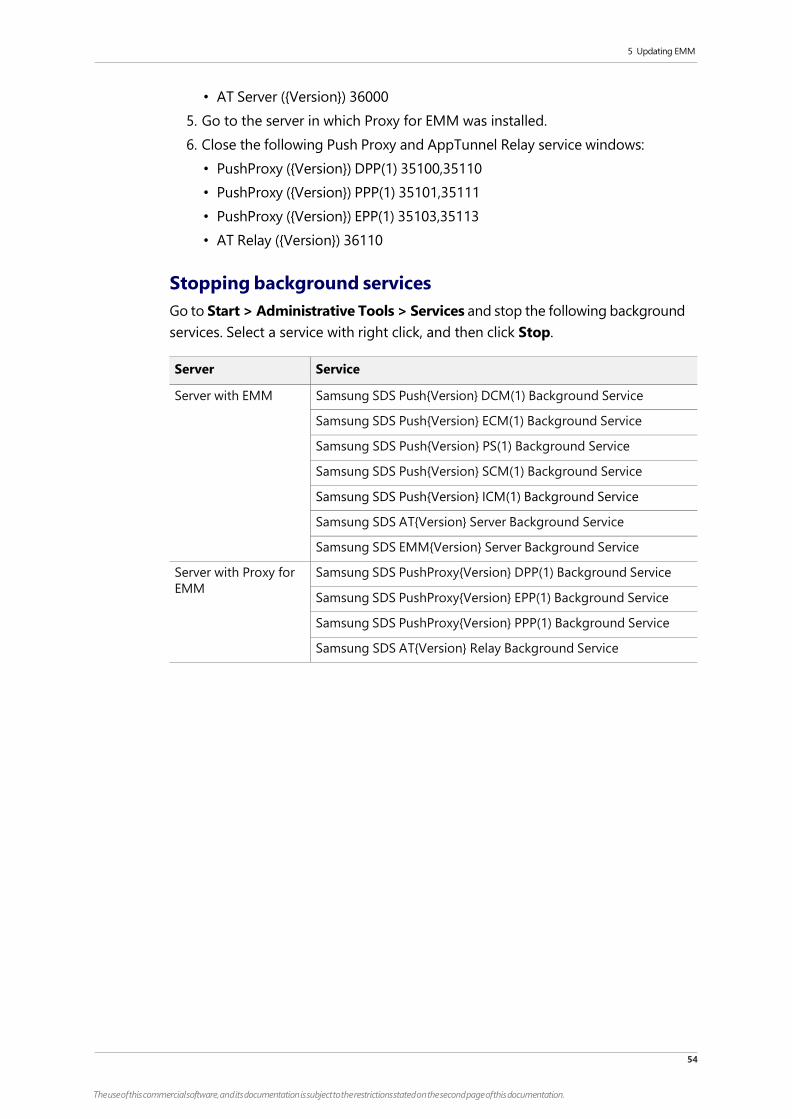
5 Updating EMM
54
The use of this commercial software, and its documentation is subject to the restrictions stated on the second page of this documentation.
• AT Server ({Version}) 36000
5. Go to the server in which Proxy for EMM was installed.
6. Close the following Push Proxy and AppTunnel Relay service windows:
• PushProxy ({Version}) DPP(1) 35100,35110
• PushProxy ({Version}) PPP(1) 35101,35111
• PushProxy ({Version}) EPP(1) 35103,35113
• AT Relay ({Version}) 36110
Stopping background services
Go to Start > Administrative Tools > Services and stop the following background
services. Select a service with right click, and then click Stop.
Server Service
Server with EMM Samsung SDS Push{Version} DCM(1) Background Service
Samsung SDS Push{Version} ECM(1) Background Service
Samsung SDS Push{Version} PS(1) Background Service
Samsung SDS Push{Version} SCM(1) Background Service
Samsung SDS Push{Version} ICM(1) Background Service
Samsung SDS AT{Version} Server Background Service
Samsung SDS EMM{Version} Server Background Service
Server with Proxy for
EMM
Samsung SDS PushProxy{Version} DPP(1) Background Service
Samsung SDS PushProxy{Version} EPP(1) Background Service
Samsung SDS PushProxy{Version} PPP(1) Background Service
Samsung SDS AT{Version} Relay Background Service

5 Updating EMM
55
The use of this commercial software, and its documentation is subject to the restrictions stated on the second page of this documentation.
5.2 Installing EMM patch
5.2.1 Checking digital signature
Samsung SDS provides an EMM patch installer, with a Samsung SDS certificate
included in it, on a CD or by a downloadable link. You can check the digital signature
of the installer, before installing the EMM patch.
1. Right-click EMM_Patch_{Version}_H_{Builddate}.exe, and then go
to Properties.
2. Click Details button in Digital Signature tab.
3. Click View Certificate button to see the details of the digital signature.
Note: An installation file not digitally signed does not have a Digital Signatures
tab as below.

5 Updating EMM
56
The use of this commercial software, and its documentation is subject to the restrictions stated on the second page of this documentation.
5.2.2 Installing the patch in a single-server environment
Install the patch to the server in which EMM has been installed.
1. Run EMM_Patch_{Version}_H_{Builddate}.exe.
• The patch file should be installed using an administrator account.
2. Select a desired language, then click OK.
3. When InstallShield Wizard starts, click Next to continue.
4. Read this end user license agreement carefully and check I accept the terms
in the license agreement. Then click Next.
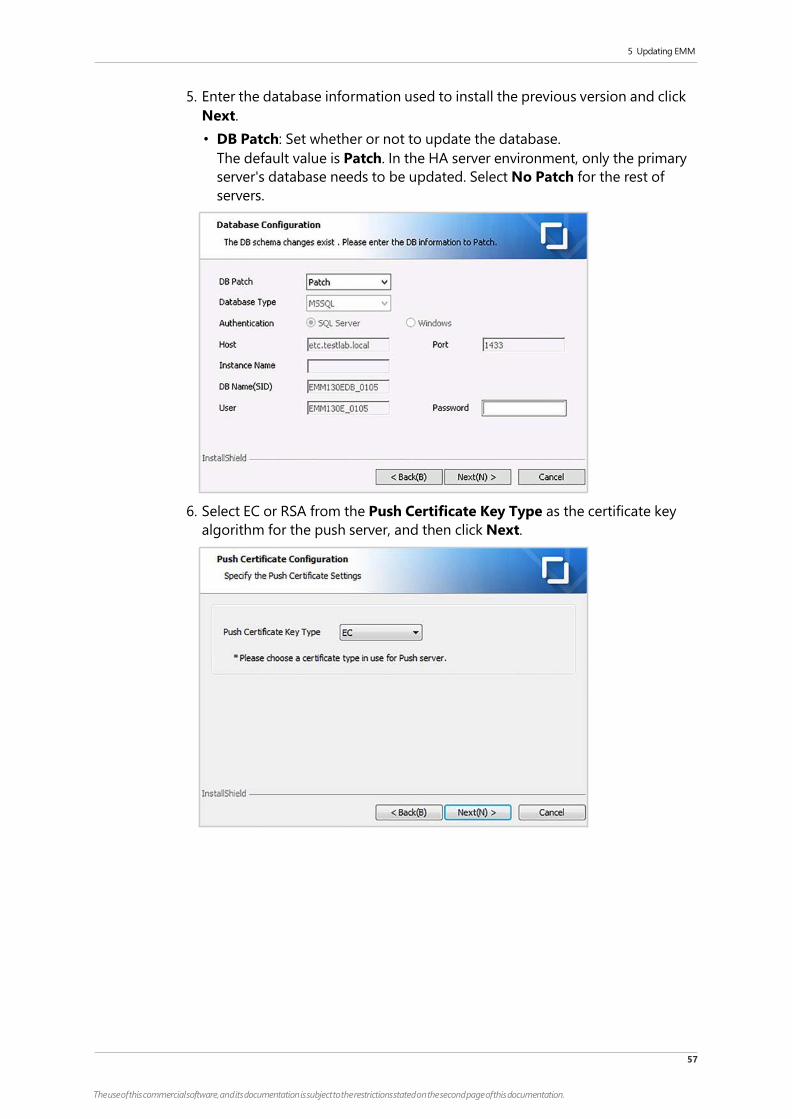
5 Updating EMM
57
The use of this commercial software, and its documentation is subject to the restrictions stated on the second page of this documentation.
5. Enter the database information used to install the previous version and click
Next.
• DB Patch: Set whether or not to update the database.
The default value is Patch. In the HA server environment, only the primary
server's database needs to be updated. Select No Patch for the rest of
servers.
6. Select EC or RSA from the Push Certificate Key Type as the certificate key
algorithm for the push server, and then click Next.
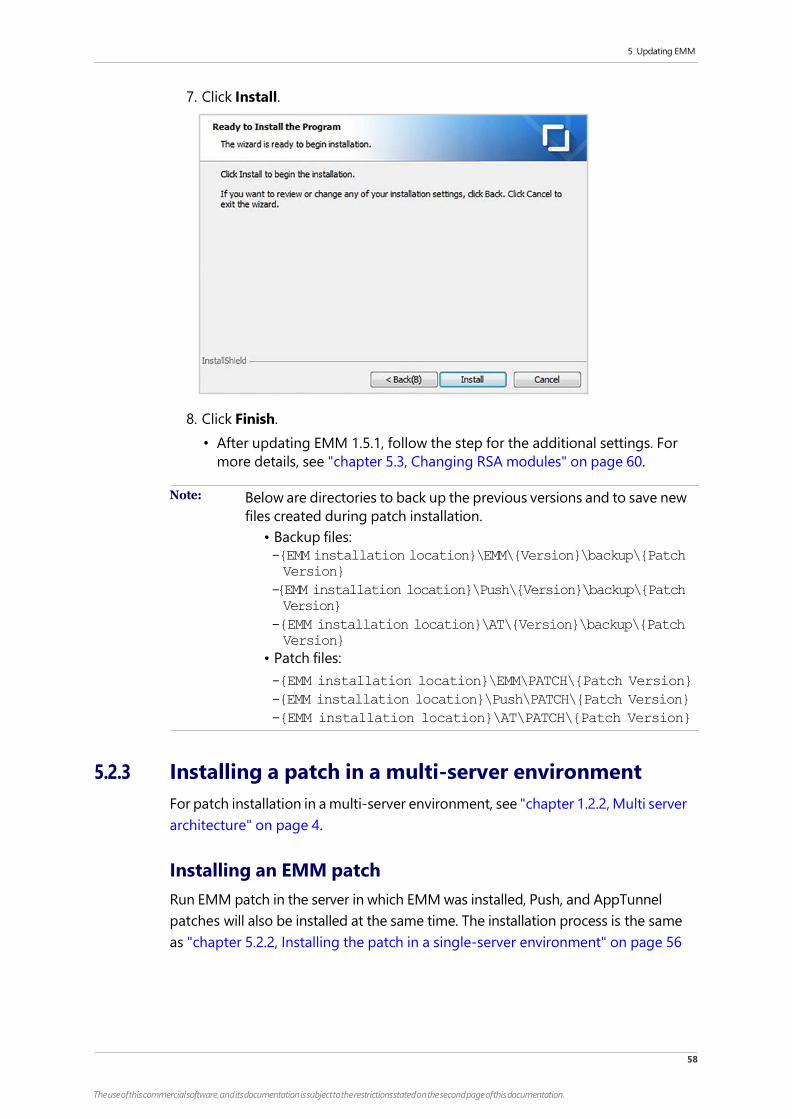
5 Updating EMM
58
The use of this commercial software, and its documentation is subject to the restrictions stated on the second page of this documentation.
7. Click Install.
8. Click Finish.
• After updating EMM 1.5.1, follow the step for the additional settings. For
more details, see "chapter 5.3, Changing RSA modules" on page 60.
Note: Below are directories to back up the previous versions and to save new
files created during patch installation.
• Backup files:
-{EMM installation location}\EMM\{Version}\backup\{Patch
Version}
-{EMM installation location}\Push\{Version}\backup\{Patch
Version}
-{EMM installation location}\AT\{Version}\backup\{Patch
Version}
• Patch files:
-{EMM installation location}\EMM\PATCH\{Patch Version}
-{EMM installation location}\Push\PATCH\{Patch Version}
-{EMM installation location}\AT\PATCH\{Patch Version}
5.2.3 Installing a patch in a multi-server environment
For patch installation in a multi-server environment, see "chapter 1.2.2, Multi server
architecture" on page 4.
Installing an EMM patch
Run EMM patch in the server in which EMM was installed, Push, and AppTunnel
patches will also be installed at the same time. The installation process is the same
as "chapter 5.2.2, Installing the patch in a single-server environment" on page 56
5 Updating EMM
59
The use of this commercial software, and its documentation is subject to the restrictions stated on the second page of this documentation.
Installing the Push Proxy patch
Run Push patch on the server in which Push Proxy was installed. For more details
on installation, see the chapter that explains Installing Push Proxy in the Samsung
SDS Push Installation Guide.
Installing AppTunnel Relay patch
Run AppTunnel patch on the server in which AppTunnel Relay has been installed.
For more information, see the Chapter 5 of “Samsung SDS AppTunnel Installation
Guide”.
Configuring a EMM certificate
When Push and AppTunnel connect with the EMM server by HTTPS communication,
you need to configure a EMM certificate. For more details, see "chapter 4.6,
Configuring a certificate for HTTPS" on page 62.
Note: Below are directories to back up the previous versions and to save new
files created during patch installation.
• Backup files:
-{EMM installation location}\EMM\{Version}\backup\{Patch
Version}
-{EMM installation location}\Push\{Version}\backup\
{Patch Version}
-{EMM installation location}\AT\{Version}at-server\
backup\{Patch Version}
-{Push Proxy installation location}\PushProxy\{Version}
\backup\{Patch Version}
-{AppTunnel Relay installation location}\AT\{Version}\
at-relay\backup\{Patch Version}
• Patch files:
-{EMM installation location}\EMM\PATCH\{Patch Version}
-{EMM installation location}\Push\PATCH\{Patch Version}
-{EMM installation location}\AT\PATCH\{Patch Version}
-{Push Proxy installation location}\PushProxy\PATCH\
{Patch Version}
-{AppTunnel Relay installation location}\AT\PATCH\
{Patch Version}_Relay
5 Updating EMM
60
The use of this commercial software, and its documentation is subject to the restrictions stated on the second page of this documentation.
5.2.4 Uploading APK file
You should upload the EMM Client, Agent, and Push Agent to update to
Applications> EMM application in the EMM Admin Portal.
To update an EMM package, such as Push and EMM Client, you must upload
the APK file to the path in the following Json file:
● URL for EMM packages distribution: https://{EMM server
domain}:35443/emm/down/EMMInstall.json
5.3 Changing RSA modules
After updating by EMM 1.5.1, you need to change the below RSA modules. Install
EMC Crypto module certified by officially-released FIPS 140-2.
1. Back up the below files in the existed {JDK_HOME path}\jre\lib\ext
directory.
• certj.jar
• cryptojce-*.jar
• cryptojcommon-*.jar
• jcmFIPS-*.jar
• sslj-*.jar
2. Decompress the tomcat_rsa_module.zip file to the any directory.
3. Copy the files, {decompressed tomcat_rsa_module.zip path} to
{JDK_HOME path}\jre\lib\ext.
• cryptojce-6.2.5.jar
• cryptojcommon-6.2.5.jar
• jcmFIPS-6.2.5.jar
• sslj-6.2.6.jar
• cryptojtestwriter.jar
5.4 Starting services
After completing the patch installation, start EMM, Push, and AppTunnel services
again by starting either the foreground or background service. If updates were
done successfully, the service runs normally.
5 Updating EMM
61
The use of this commercial software, and its documentation is subject to the restrictions stated on the second page of this documentation.
5.4.1 Single-server environment
Starting foreground services
To run EMM, Push, and AppTunnel by starting the foreground service, complete
the following steps:
1. Go to {EMM installation location}\EMM\{Version}\apache-tomcat-
{Version}\bin\.
2. Execute startup.bat file. That will start Tomcat, starting EMM.
3. Access the directory, {EMM installation location}\Push\{Version}
\bin, to run the following Push batch files:
• push_dcm_1_start.bat
• push_ps_1_start.bat
• push_scm_1_start.bat
• push_ecm_1_start.bat
• push_icm_1_start.bat
4. Access the directory, {EMM installation location}\AT\{Version}\
at-server\bin, to run the AppTunnel batch file.
• AT_Server_Start.bat
Starting background services
Go to Start > Administrative Tools > Services and start the following background
services. Select a service with a right click, and then click Start.
● Samsung SDS Push{Version} DCM(1) Background Service
● Samsung SDS Push{Version} PS(1) Background Service
● Samsung SDS Push{Version} SCM(1) Background Service
● Samsung SDS Push{Version} ECM(1) Background Service
● Samsung SDS Push{Version} ICM(1) Background Service
● Samsung SDS AT{Version} Server Background Service
● Samsung SDS EMM{Version} Server Background Service
Note: • If a Windows account is set as a database authentication method when
EMM is first installed, additional setting is required. The log on information
should be set in the upper Windows service list after updating EMM. For
more information, see "Setting the Windows service log on in chapter 4"
on page 40 .
• Run the file, EMM_Patch_{Version}_H_{Builddate}.exe,
again after the patch is installed to uninstall the patch and restore the
earlier version.
5 Updating EMM
62
The use of this commercial software, and its documentation is subject to the restrictions stated on the second page of this documentation.
5.4.2 Multi-server environment
Starting foreground services
To run EMM, Push, AppTunnel, Push Proxy, and AppTunnel Relay by starting
foreground service, complete the following steps:
1. Go to the server in which EMM has been installed.
2. Go to {EMM installation location}\EMM\{Version}\apache-tomcat-
{Version}\bin\.
3. Execute startup.bat file. That will start Tomcat, starting EMM.
4. Access the directory, {EMM installation location}
\Push\{Version}\bin, to run the following Push batch files:
• push_dcm_1_start.bat
• push_ps_1_start.bat
• push_scm_1_start.bat
• push_ecm_1_start.bat
• push_icm_1_start.bat
5. Access the directory, {EMM installation location}\AT\{Version}
\at-server\bin, to run the AppTunnel batch file.
• AT_Server_Start.bat
6. Go to the server in which Proxy for EMM has been installed.
7. Access the directory, {Push Proxy installation location}\PushProxy
\{Version}\bin, to run the following Push Proxy batch files:
• push_dpp_1_start.bat
• push_epp_1_start.bat
• push_ppp_1_start.bat
8. Access the directory, {AppTunnel Relay installation location}
\{Version}\at-relay\bin, to run at_realay_start.bat file.
Starting background services
Go to Start > Administrative Tools > Services and start the following background
services. Select a service with right click, and then click Start.
Server with EMM
Server Service
Samsung SDS Push{Version} DCM(1) Background Service
Samsung SDS Push{Version} ECM(1) Background Service
Samsung SDS Push{Version} PS(1) Background Service
Samsung SDS Push{Version} SCM(1) Background Service
Samsung SDS Push{Version} ICM(1) Background Service
Samsung SDS AT{Version} Server Background Service

5 Updating EMM
63
The use of this commercial software, and its documentation is subject to the restrictions stated on the second page of this documentation.
Server Service
Samsung SDS EMM{Version} Server Background Service
Server with Proxy for
EMM
Samsung SDS PushProxy{Version} DPP(1) Background Service
Samsung SDS PushProxy{Version} EPP(1) Background Service
Samsung SDS PushProxy{Version} PPP(1) Background Service
Samsung SDS AT{Version} Relay Background Service
Note: • If a Windows account is set as a database authentication method when
EMM is first installed, additional setting is required. The log on information
should be set in the upper Windows service list after updating EMM. For
more information, see "Setting the Windows service log on in chapter 4"
on page 40 .
• Run the file, EMM_Patch_{Version}_H_{Builddate}.exe,
again after the patch is installed to uninstall the patch and restore the
earlier version.
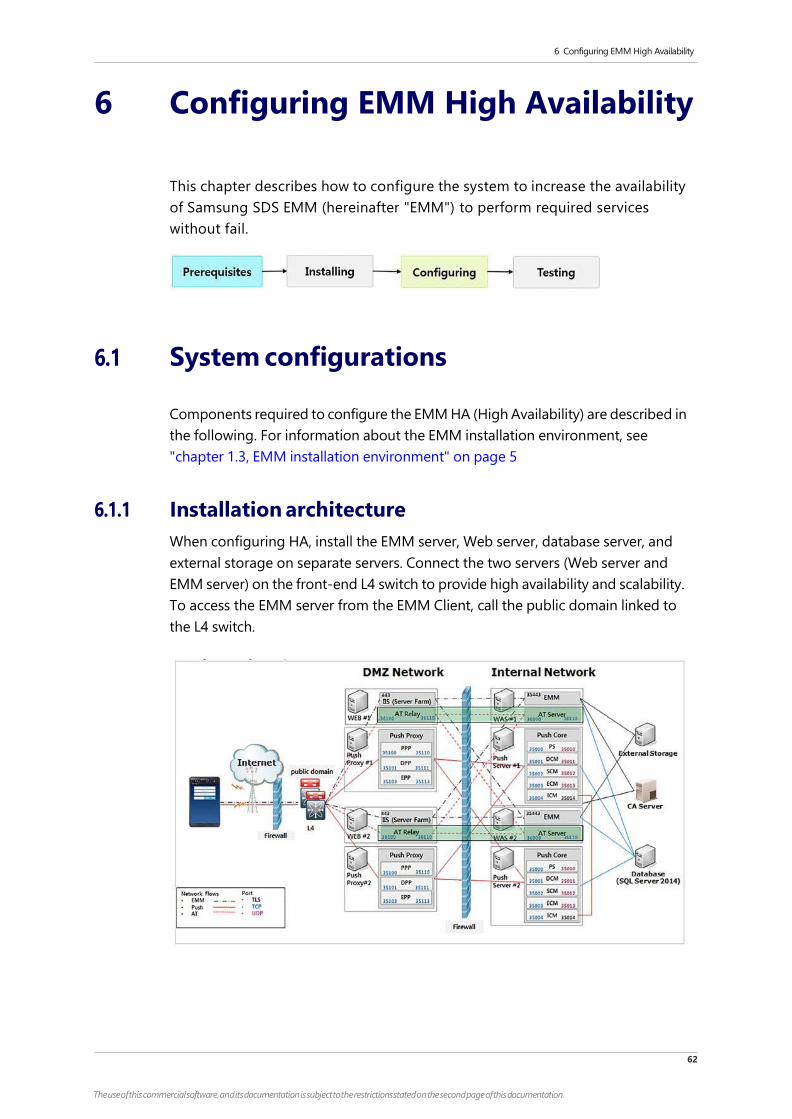
6 Configuring EMM High Availability
62
The use of this commercial software, and its documentation is subject to the restrictions stated on the second page of this documentation.
6 Configuring EMM High Availability
This chapter describes how to configure the system to increase the availability
of Samsung SDS EMM (hereinafter "EMM") to perform required services
without fail.
6.1 System configurations
Components required to configure the EMM HA (High Availability) are described in
the following. For information about the EMM installation environment, see
"chapter 1.3, EMM installation environment" on page 5
6.1.1 Installation architecture
When configuring HA, install the EMM server, Web server, database server, and
external storage on separate servers. Connect the two servers (Web server and
EMM server) on the front-end L4 switch to provide high availability and scalability.
To access the EMM server from the EMM Client, call the public domain linked to
the L4 switch.
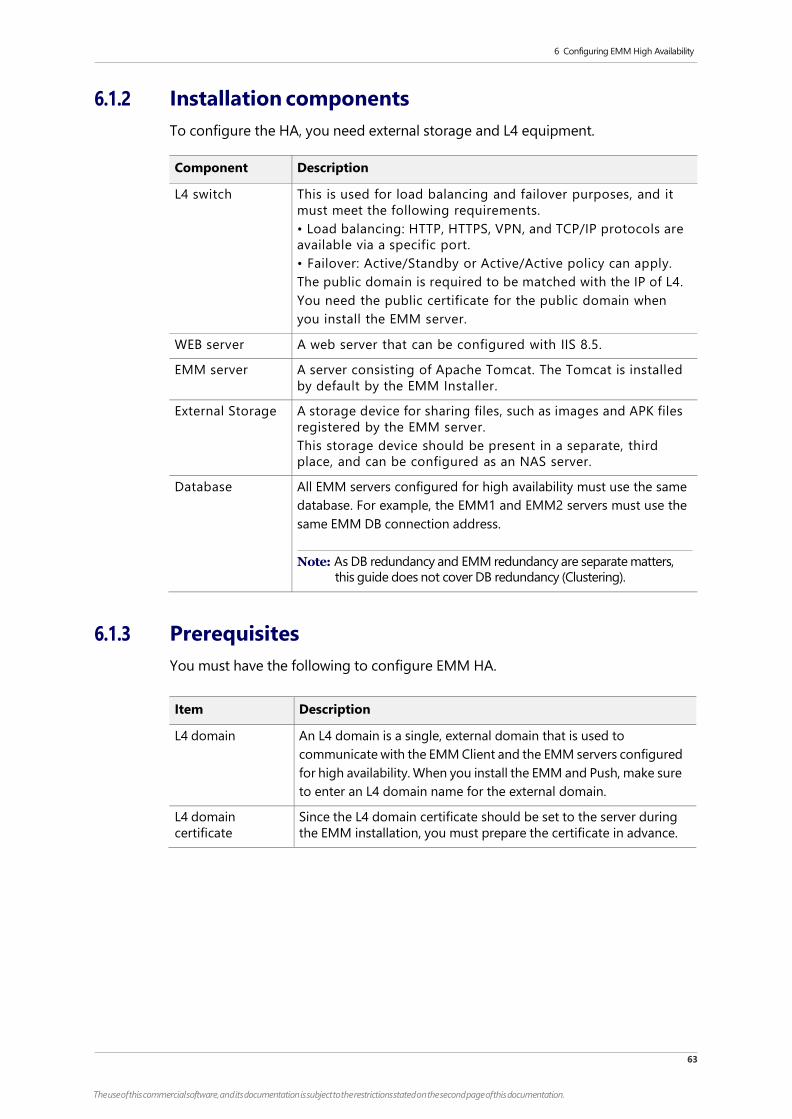
6 Configuring EMM High Availability
63
The use of this commercial software, and its documentation is subject to the restrictions stated on the second page of this documentation.
6.1.2 Installation components
To configure the HA, you need external storage and L4 equipment.
Component Description
L4 switch This is used for load balancing and failover purposes, and it
must meet the following requirements.
• Load balancing: HTTP, HTTPS, VPN, and TCP/IP protocols are
available via a specific port.
• Failover: Active/Standby or Active/Active policy can apply.
The public domain is required to be matched with the IP of L4.
You need the public certificate for the public domain when
you install the EMM server.
WEB server A web server that can be configured with IIS 8.5.
EMM server A server consisting of Apache Tomcat. The Tomcat is installed
by default by the EMM Installer.
External Storage A storage device for sharing files, such as images and APK files
registered by the EMM server.
This storage device should be present in a separate, third
place, and can be configured as an NAS server.
Database All EMM servers configured for high availability must use the same
database. For example, the EMM1 and EMM2 servers must use the
same EMM DB connection address.
Note: As DB redundancy and EMM redundancy are separate matters,
this guide does not cover DB redundancy (Clustering).
6.1.3 Prerequisites
You must have the following to configure EMM HA.
Item Description
L4 domain An L4 domain is a single, external domain that is used to
communicate with the EMM Client and the EMM servers configured
for high availability. When you install the EMM and Push, make sure
to enter an L4 domain name for the external domain.
L4 domain
certificate
Since the L4 domain certificate should be set to the server during
the EMM installation, you must prepare the certificate in advance.
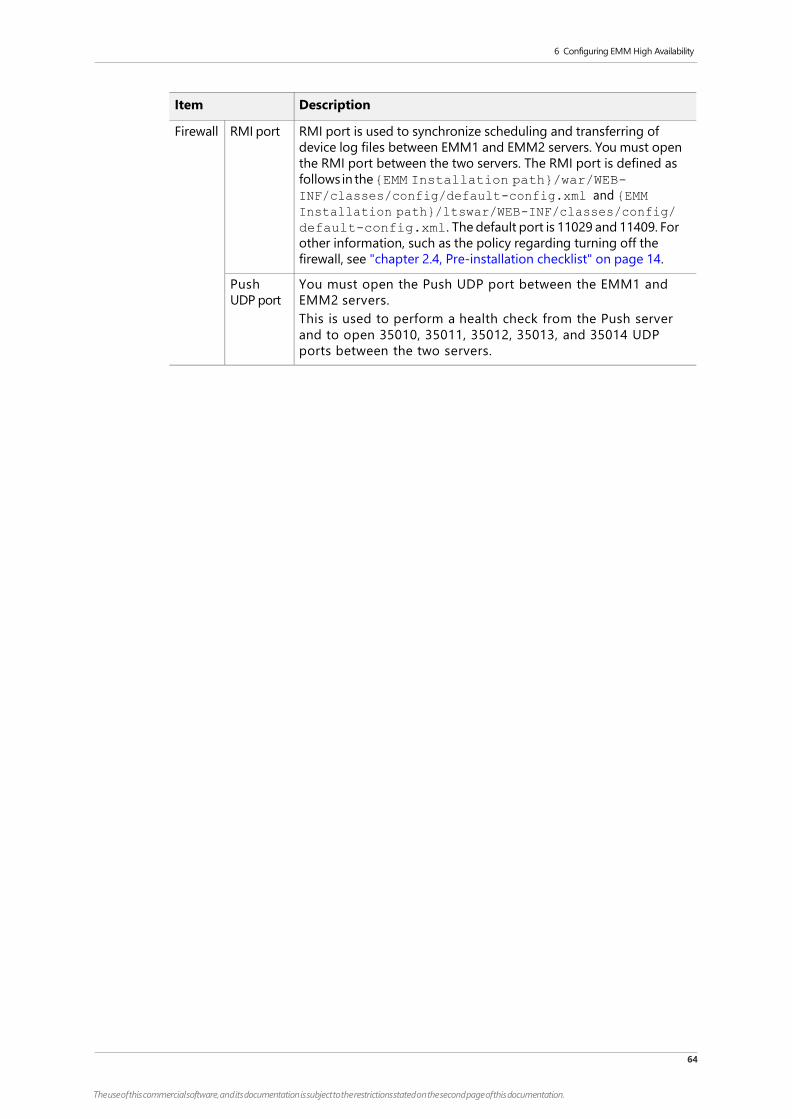
6 Configuring EMM High Availability
64
The use of this commercial software, and its documentation is subject to the restrictions stated on the second page of this documentation.
Item Description
Firewall RMI port RMI port is used to synchronize scheduling and transferring of
device log files between EMM1 and EMM2 servers. You must open
the RMI port between the two servers. The RMI port is defined as
follows in the {EMM Installation path}/war/WEB-
INF/classes/config/default-config.xml and {EMM
Installation path}/ltswar/WEB-INF/classes/config/
default-config.xml. The default port is 11029 and 11409. For
other information, such as the policy regarding turning off the
firewall, see "chapter 2.4, Pre-installation checklist" on page 14.
Push
UDP port
You must open the Push UDP port between the EMM1 and
EMM2 servers.
This is used to perform a health check from the Push server
and to open 35010, 35011, 35012, 35013, and 35014 UDP
ports between the two servers.
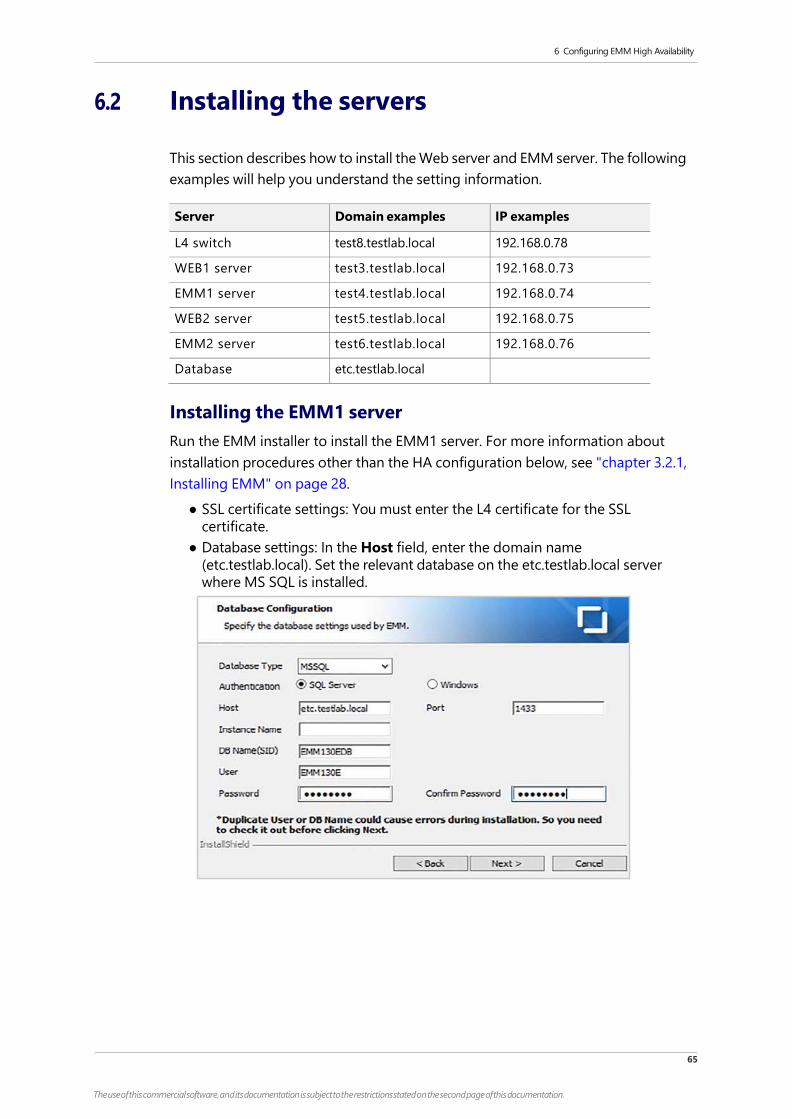
6 Configuring EMM High Availability
65
The use of this commercial software, and its documentation is subject to the restrictions stated on the second page of this documentation.
6.2 Installing the servers
This section describes how to install the Web server and EMM server. The following
examples will help you understand the setting information.
Server Domain examples IP examples
L4 switch test8.testlab.local 192.168.0.78
WEB1 server test3.testlab.local 192.168.0.73
EMM1 server test4.testlab.local 192.168.0.74
WEB2 server test5.testlab.local 192.168.0.75
EMM2 server test6.testlab.local 192.168.0.76
Database etc.testlab.local
Installing the EMM1 server
Run the EMM installer to install the EMM1 server. For more information about
installation procedures other than the HA configuration below, see "chapter 3.2.1,
Installing EMM" on page 28.
● SSL certificate settings: You must enter the L4 certificate for the SSL
certificate.
● Database settings: In the Host field, enter the domain name
(etc.testlab.local). Set the relevant database on the etc.testlab.local server
where MS SQL is installed.
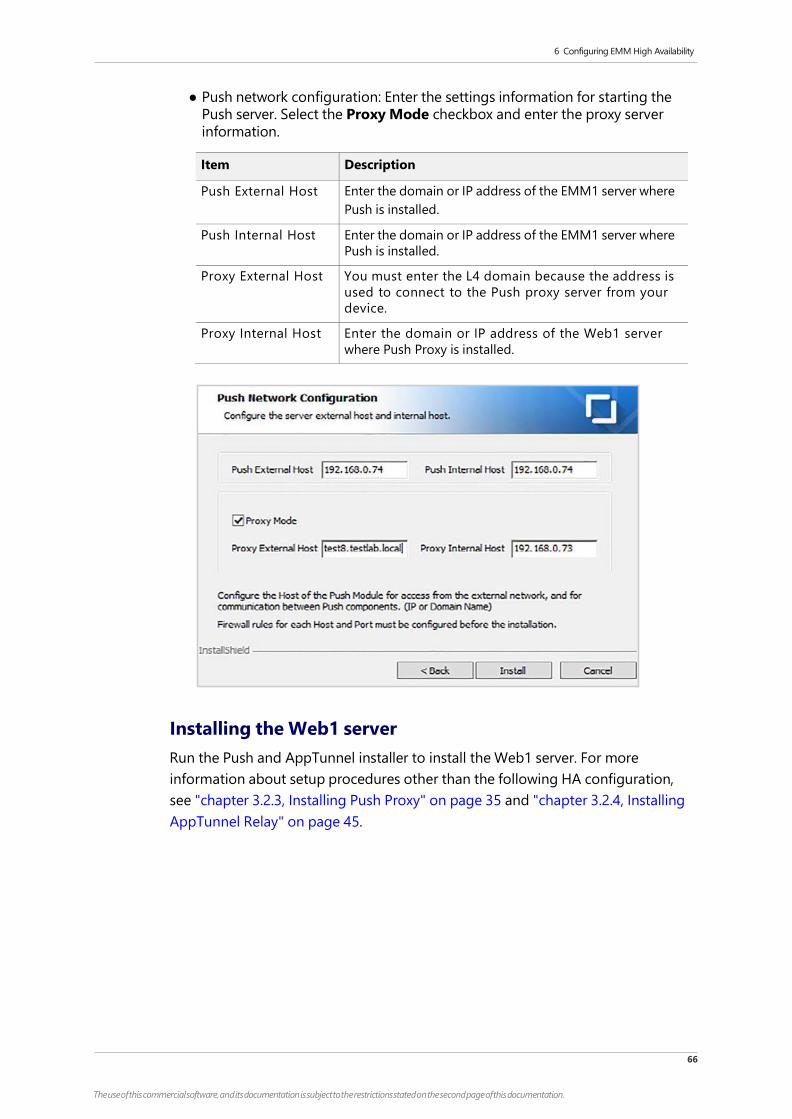
6 Configuring EMM High Availability
66
The use of this commercial software, and its documentation is subject to the restrictions stated on the second page of this documentation.
● Push network configuration: Enter the settings information for starting the
Push server. Select the Proxy Mode checkbox and enter the proxy server
information.
Item Description
Push External Host Enter the domain or IP address of the EMM1 server where
Push is installed.
Push Internal Host Enter the domain or IP address of the EMM1 server where
Push is installed.
Proxy External Host You must enter the L4 domain because the address is
used to connect to the Push proxy server from your
device.
Proxy Internal Host Enter the domain or IP address of the Web1 server
where Push Proxy is installed.
Installing the Web1 server
Run the Push and AppTunnel installer to install the Web1 server. For more
information about setup procedures other than the following HA configuration,
see "chapter 3.2.3, Installing Push Proxy" on page 35 and "chapter 3.2.4, Installing
AppTunnel Relay" on page 45.
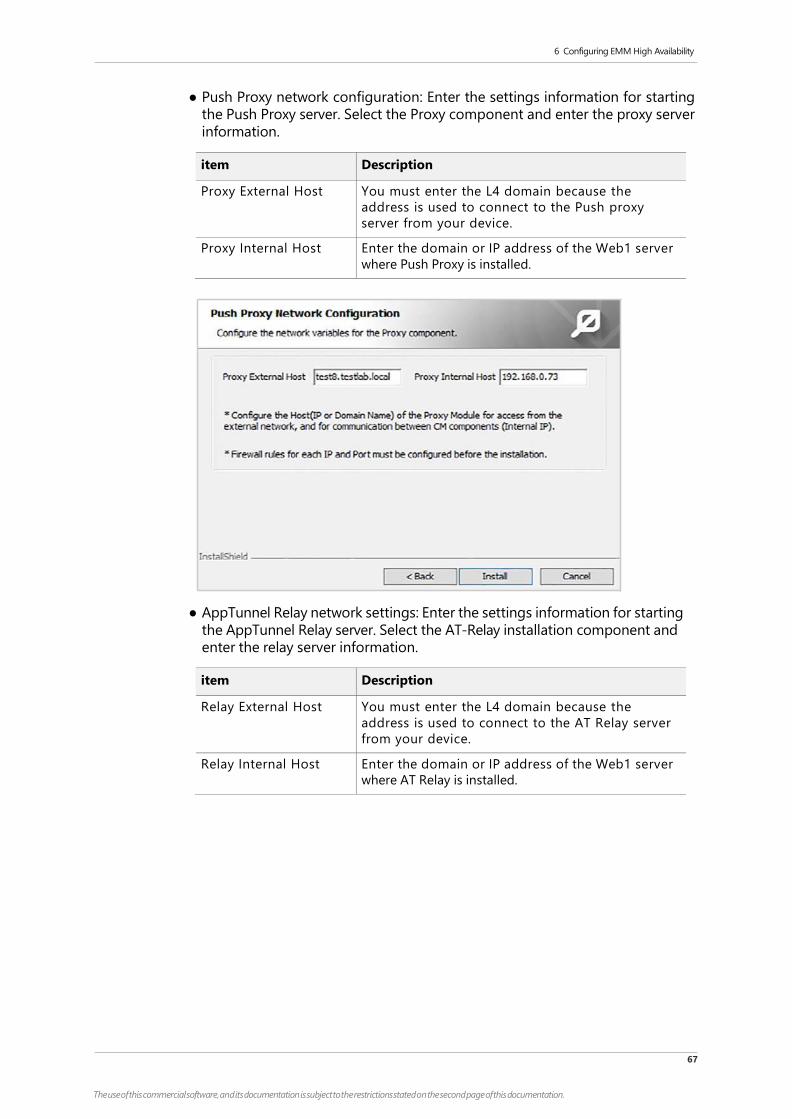
6 Configuring EMM High Availability
67
The use of this commercial software, and its documentation is subject to the restrictions stated on the second page of this documentation.
● Push Proxy network configuration: Enter the settings information for starting
the Push Proxy server. Select the Proxy component and enter the proxy server
information.
item Description
Proxy External Host You must enter the L4 domain because the
address is used to connect to the Push proxy
server from your device.
Proxy Internal Host Enter the domain or IP address of the Web1 server
where Push Proxy is installed.
● AppTunnel Relay network settings: Enter the settings information for starting
the AppTunnel Relay server. Select the AT-Relay installation component and
enter the relay server information.
item Description
Relay External Host You must enter the L4 domain because the
address is used to connect to the AT Relay server
from your device.
Relay Internal Host Enter the domain or IP address of the Web1 server
where AT Relay is installed.

6 Configuring EMM High Availability
68
The use of this commercial software, and its documentation is subject to the restrictions stated on the second page of this documentation.
● For details about the Web server settings, see "Additional settings for IIS" on
page 70.
Installing the EMM2 server
Run the EMM installer to install the EMM2 server. For more information about
setup procedures other than the following HA configuration, see "chapter 3.2.1,
Installing EMM" on page 28.
● SSL certificate settings: You must enter the L4 certificate for the SSL
certificate.
● Database settings: In the Host area, enter the domain name (etc.testlab.local).
Set the relevant database on the etc.testlab.local server where MS SQL is
installed. The database information you enter during the EMM2 server
installation must be the same as that of the EMM1 server installation.
Select No Install so that the EMM database is not created again.
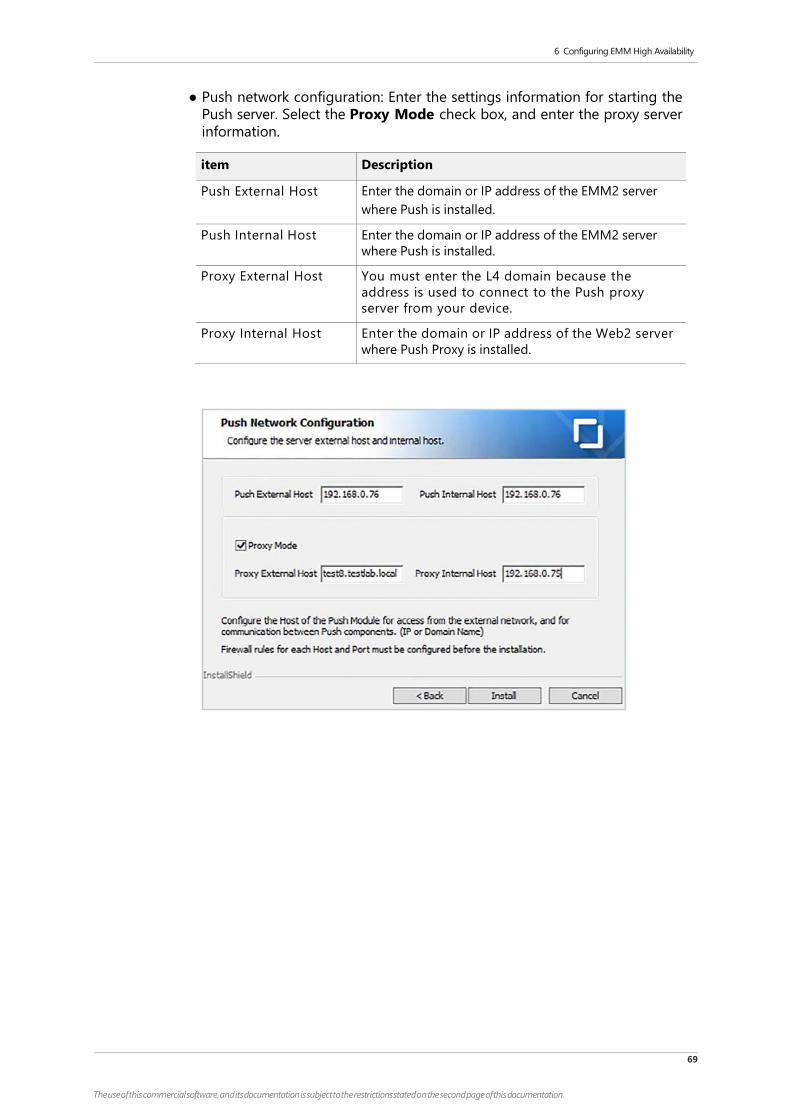
6 Configuring EMM High Availability
69
The use of this commercial software, and its documentation is subject to the restrictions stated on the second page of this documentation.
● Push network configuration: Enter the settings information for starting the
Push server. Select the Proxy Mode check box, and enter the proxy server
information.
item Description
Push External Host Enter the domain or IP address of the EMM2 server
where Push is installed.
Push Internal Host Enter the domain or IP address of the EMM2 server
where Push is installed.
Proxy External Host You must enter the L4 domain because the
address is used to connect to the Push proxy
server from your device.
Proxy Internal Host Enter the domain or IP address of the Web2 server
where Push Proxy is installed.

6 Configuring EMM High Availability
70
The use of this commercial software, and its documentation is subject to the restrictions stated on the second page of this documentation.
Installing the Web2 server
Run the Push and AppTunnel installers to install the Web2 server. For more
information about setup procedures other than the following HA configuration,
see "chapter 3.2.3, Installing Push Proxy" on page 35 and "chapter 3.2.4, Installing
AppTunnel Relay" on page 45.
● Push proxy network configuration: Enter the settings information for starting
the Push Proxy server. Select the Proxy Mode check box and enter the proxy
server information.
item Description
Proxy External Host You must enter the L4 domain because the
address is used to connect to the Push proxy
server from your device.
Proxy Internal Host Enter the domain or IP address of the Web2 server
where Push Proxy is installed.
● AppTunnel relay configuration: Enter the settings information for starting the
AppTunnel Relay server. Select the AT-Relay installation component and enter
the relay server information.
item Description
Relay External Host You must enter the L4 domain because the
address is used to connect to the AT Relay server
from your device.
Relay Internal Host Enter the domain or IP address of the Web2 server
where AT Relay is installed.

6 Configuring EMM High Availability
71
The use of this commercial software, and its documentation is subject to the restrictions stated on the second page of this documentation.
● For details about the Web server settings, see "Additional settings for IIS" on
page 70.

6 Configuring EMM High Availability
72
The use of this commercial software, and its documentation is subject to the restrictions stated on the second page of this documentation.
Additional settings for IIS
Install Internet Information Services (IIS) on the Web server, and then install the
relevant components of Application Request Routing (ARR) as follows.To set up a
Server Farm for the HA configuration through IIS, complete the following steps:
● URL rewrite
● Web Farm Framework
● Application Request Routing
● External Cache
1. In the Internet Information Services (IIS) Manager, go to Connections >
Server Farms, and click Servers. On the Server Farm screen, go to Actions >
Add Server, and add a server to be configured for HA.
2. On the "Add Server" pop-up window, type the domain and IP information of
the EMM Server to link with the Server address, and click Add.
The following is an example of linking servers: The newly added EMM1 server
with the domain test4.testlab.local and the EMM2 server at test6.testlab.local.
The two EMM servers are configured for HA through IIS.
3. Click the Server Farm that is configured for HA, and select Server Affinity.
4. Select the Client affinity check box.
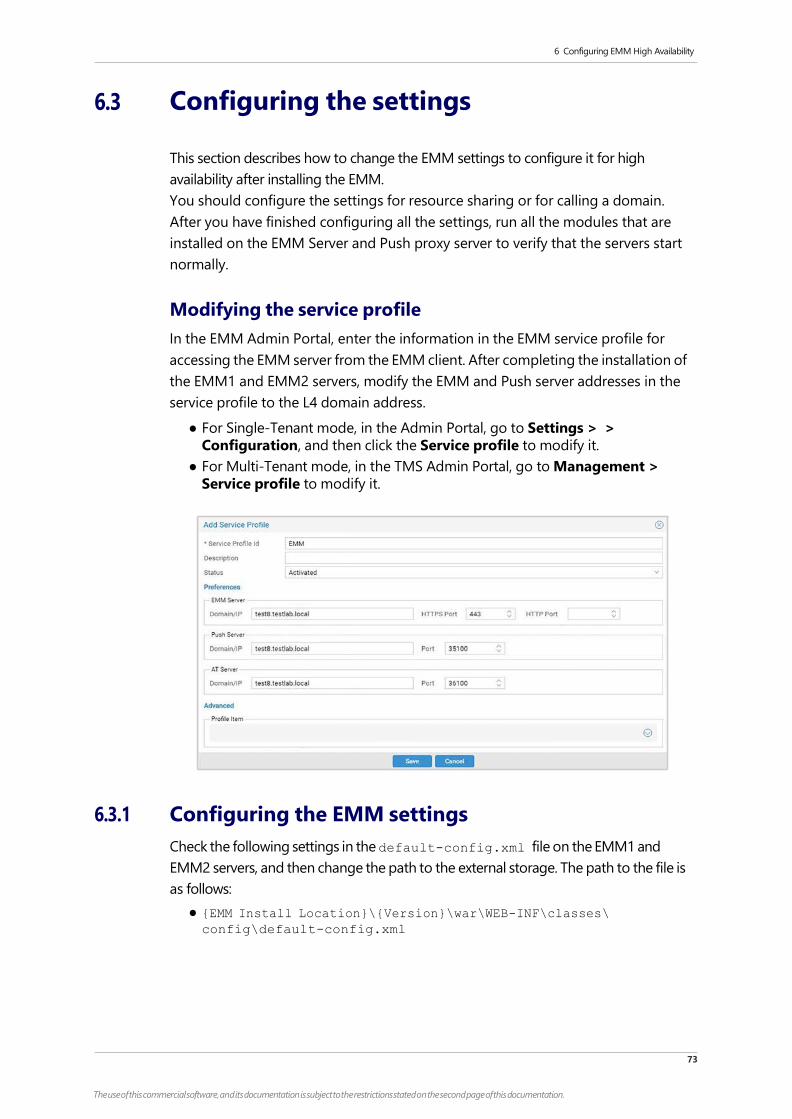
6 Configuring EMM High Availability
73
The use of this commercial software, and its documentation is subject to the restrictions stated on the second page of this documentation.
6.3 Configuring the settings
This section describes how to change the EMM settings to configure it for high
availability after installing the EMM.
You should configure the settings for resource sharing or for calling a domain.
After you have finished configuring all the settings, run all the modules that are
installed on the EMM Server and Push proxy server to verify that the servers start
normally.
Modifying the service profile
In the EMM Admin Portal, enter the information in the EMM service profile for
accessing the EMM server from the EMM client. After completing the installation of
the EMM1 and EMM2 servers, modify the EMM and Push server addresses in the
service profile to the L4 domain address.
● For Single-Tenant mode, in the Admin Portal, go to Settings > >
Configuration, and then click the Service profile to modify it.
● For Multi-Tenant mode, in the TMS Admin Portal, go to Management >
Service profile to modify it.
6.3.1 Configuring the EMM settings
Check the following settings in the default-config.xml file on the EMM1 and
EMM2 servers, and then change the path to the external storage. The path to the file is
as follows:
● {EMM Install Location}\{Version}\war\WEB-INF\classes\ config\default-config.xml
6 Configuring EMM High Availability
74
The use of this commercial software, and its documentation is subject to the restrictions stated on the second page of this documentation.
Changing the EMM host information
The three values, hostname, httpsPort, and url must be configured as the L4
address and https address of L4.
● The following is an example of an L4 address: test8.testlab.local:443.
Changing the storage path
Change the storage path to an external storage device. The external storage path
settings for the EMM1 and EMM2 servers must be the same as that of the External
Storage.
● When the External Storage path is {EXTERNAL_STORAGE_PATH}:
<emm>
<hostname>test8.testlab.local</hostname>
<httpsPort>443</httpsPort>
</emm>
<download>
<url>https://test8.testlab.local:443</url>
</download>
<rootPath>{EXTERNAL_STORAGE_PATH}\storage</rootPath>
<tempPath>{EXTERNAL_STORAGE_PATH}\storage\temp</tempPath>
<fileUploadPath>{EXTERNAL_STORAGE_PATH}\storage\fileUpload</file
UploadPath>
<addPath>{EXTERNAL_STORAGE_PATH}\storage\qrcode</addPath>
<qrCodeImagePath>{EXTERNAL_STORAGE_PATH}\storage\qrcode</qrCodeI
magePath>
<profileBasicUploadPath>{EXTERNAL_STORAGE_PATH}\storage\mdm\uplo
ad</profileBasicUploadPath>
<webClipUploadPath>{EXTERNAL_STORAGE_PATH}\storage\mdm\upload\we
bClip</webClipUploadPath>
<fontUploadPath>{EXTERNAL_STORAGE_PATH}\storage\mdm\upload\font<
/fontUploadPath>
<knoxSSOConfigUploadPath>{EXTERNAL_STORAGE_PATH}\storage\mdm\upl
oad\sso\conf</knoxSSOConfigUploadPath>
<knoxSSOLogoUploadPath>{EXTERNAL_STORAGE_PATH}\storage\mdm\uploa
d\sso\logo</knoxSSOLogoUploadPath>
<knoxGenVPNConfigUploadPath>{EXTERNAL_STORAGE_PATH}\storage\mdm\
upload\knoxGenVPN\profile</knoxGenVPNConfigUploadPath>
<genVPNConfigUploadPath>{EXTERNAL_STORAGE_PATH}\storage\mdm\uplo
ad\genVPN\profile</genVPNConfigUploadPath>
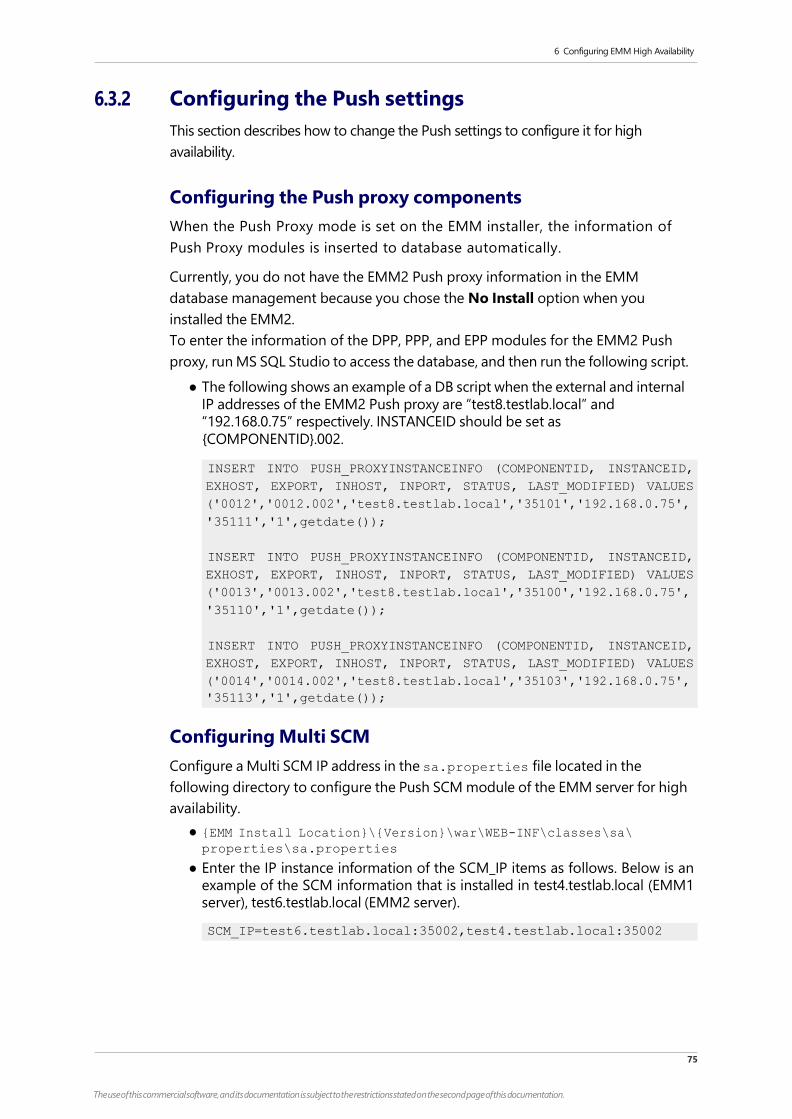
6 Configuring EMM High Availability
75
The use of this commercial software, and its documentation is subject to the restrictions stated on the second page of this documentation.
6.3.2 Configuring the Push settings
This section describes how to change the Push settings to configure it for high
availability.
Configuring the Push proxy components
When the Push Proxy mode is set on the EMM installer, the information of
Push Proxy modules is inserted to database automatically.
Currently, you do not have the EMM2 Push proxy information in the EMM
database management because you chose the No Install option when you
installed the EMM2.
To enter the information of the DPP, PPP, and EPP modules for the EMM2 Push
proxy, run MS SQL Studio to access the database, and then run the following script.
● The following shows an example of a DB script when the external and internal
IP addresses of the EMM2 Push proxy are “test8.testlab.local” and
“192.168.0.75” respectively. INSTANCEID should be set as
{COMPONENTID}.002.
Configuring Multi SCM
Configure a Multi SCM IP address in the sa.properties file located in the
following directory to configure the Push SCM module of the EMM server for high
availability.
● {EMM Install Location}\{Version}\war\WEB-INF\classes\sa\ properties\sa.properties
● Enter the IP instance information of the SCM_IP items as follows. Below is an
example of the SCM information that is installed in test4.testlab.local (EMM1
server), test6.testlab.local (EMM2 server).
INSERT INTO PUSH_PROXYINSTANCEINFO (COMPONENTID, INSTANCEID,
EXHOST, EXPORT, INHOST, INPORT, STATUS, LAST_MODIFIED) VALUES
('0012','0012.002','test8.testlab.local','35101','192.168.0.75',
'35111','1',getdate());
INSERT INTO PUSH_PROXYINSTANCEINFO (COMPONENTID, INSTANCEID,
EXHOST, EXPORT, INHOST, INPORT, STATUS, LAST_MODIFIED) VALUES
('0013','0013.002','test8.testlab.local','35100','192.168.0.75',
'35110','1',getdate());
INSERT INTO PUSH_PROXYINSTANCEINFO (COMPONENTID, INSTANCEID,
EXHOST, EXPORT, INHOST, INPORT, STATUS, LAST_MODIFIED) VALUES
('0014','0014.002','test8.testlab.local','35103','192.168.0.75',
'35113','1',getdate());
SCM_IP=test6.testlab.local:35002,test4.testlab.local:35002

6 Configuring EMM High Availability
76
The use of this commercial software, and its documentation is subject to the restrictions stated on the second page of this documentation.
Applying Push licenses
To change Push licenses, you must apply the same information and files to the
EMM1 and EMM2 servers as shown below:
● Change SAGID, TICKET, and TICKET_KEY_INDEX in the sa.properties file:
{EMM Install Location}\{Version}\war\WEB-
INF\classes\sa\properties\sa.properties
● {EMM Install Location}\{Version}\resources\PushKeyTable.ser
L4 settings
To use L4, change the USE_L4 settings to TRUE in the ps.properties file in the
following directory: You must set the L4 IP and port in PUSH_EXTRACCESSINFO
database.
● {EMM Install Location}\PUSH\{Version}\resources\ps\ properties\ps.properties
● Below is a DB script example of entering the IP and port to the L4 address:
test8.testlab.local.
'test8.testlab.local', {L4 port linked to DPP,getdate());
'test8.testlab.local', {L4 port linked to PPP},getdate());
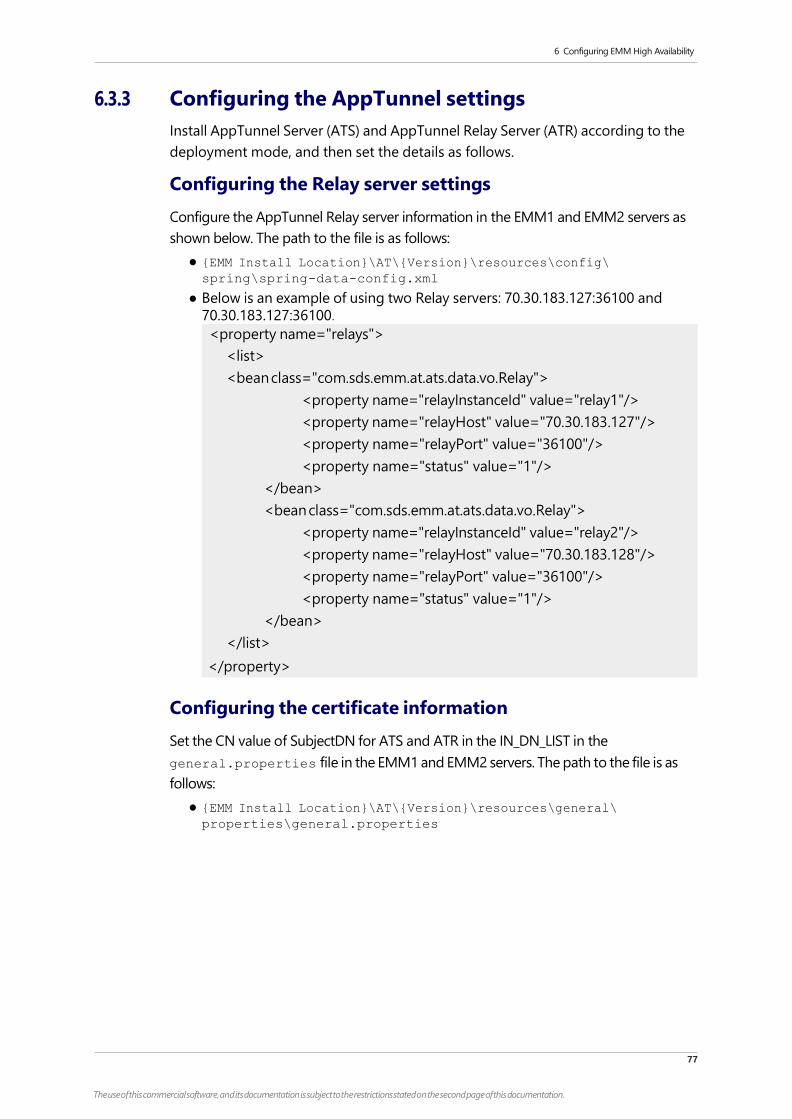
6 Configuring EMM High Availability
77
The use of this commercial software, and its documentation is subject to the restrictions stated on the second page of this documentation.
6.3.3 Configuring the AppTunnel settings
Install AppTunnel Server (ATS) and AppTunnel Relay Server (ATR) according to the
deployment mode, and then set the details as follows.
Configuring the Relay server settings
Configure the AppTunnel Relay server information in the EMM1 and EMM2 servers as
shown below. The path to the file is as follows:
● {EMM Install Location}\AT\{Version}\resources\config\ spring\spring-data-config.xml
● Below is an example of using two Relay servers: 70.30.183.127:36100 and
70.30.183.127:36100.
Configuring the certificate information
Set the CN value of SubjectDN for ATS and ATR in the IN_DN_LIST in the
general.properties file in the EMM1 and EMM2 servers. The path to the file is as
follows:
● {EMM Install Location}\AT\{Version}\resources\general\ properties\general.properties
<property name="relays">
<list>
<bean class="com.sds.emm.at.ats.data.vo.Relay">
<property name="relayInstanceId" value="relay1"/>
<property name="relayHost" value="70.30.183.127"/>
<property name="relayPort" value="36100"/>
<property name="status" value="1"/>
</bean>
<bean class="com.sds.emm.at.ats.data.vo.Relay">
<property name="relayInstanceId" value="relay2"/>
<property name="relayHost" value="70.30.183.128"/>
<property name="relayPort" value="36100"/>
<property name="status" value="1"/>
</bean>
</list>
</property>
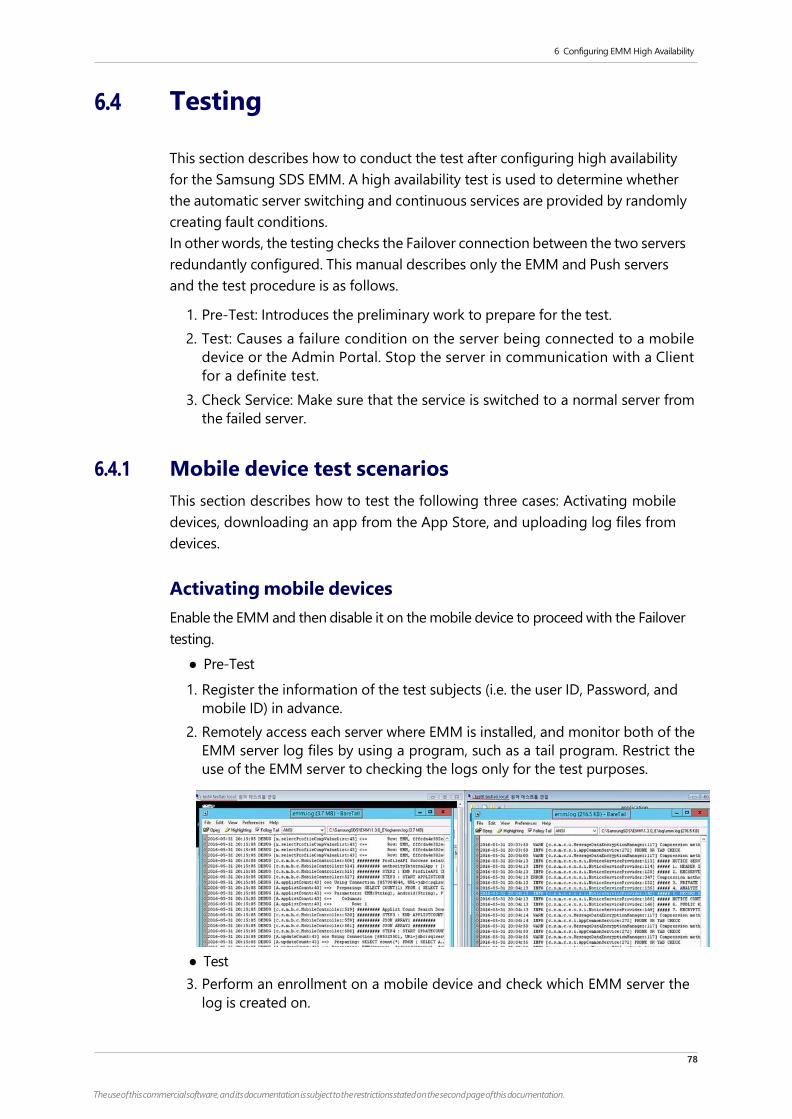
6 Configuring EMM High Availability
78
The use of this commercial software, and its documentation is subject to the restrictions stated on the second page of this documentation.
6.4 Testing
This section describes how to conduct the test after configuring high availability
for the Samsung SDS EMM. A high availability test is used to determine whether
the automatic server switching and continuous services are provided by randomly
creating fault conditions.
In other words, the testing checks the Failover connection between the two servers
redundantly configured. This manual describes only the EMM and Push servers
and the test procedure is as follows.
1. Pre-Test: Introduces the preliminary work to prepare for the test.
2. Test: Causes a failure condition on the server being connected to a mobile
device or the Admin Portal. Stop the server in communication with a Client
for a definite test.
3. Check Service: Make sure that the service is switched to a normal server from
the failed server.
6.4.1 Mobile device test scenarios
This section describes how to test the following three cases: Activating mobile
devices, downloading an app from the App Store, and uploading log files from
devices.
Activating mobile devices
Enable the EMM and then disable it on the mobile device to proceed with the Failover
testing.
● Pre-Test
1. Register the information of the test subjects (i.e. the user ID, Password, and
mobile ID) in advance.
2. Remotely access each server where EMM is installed, and monitor both of the
EMM server log files by using a program, such as a tail program. Restrict the
use of the EMM server to checking the logs only for the test purposes.
● Test
3. Perform an enrollment on a mobile device and check which EMM server the
log is created on.

6 Configuring EMM High Availability
79
The use of this commercial software, and its documentation is subject to the restrictions stated on the second page of this documentation.
4. If the device enrollment is successful, perform unenrollment.
5. Remotely access the server where a log is created in Step 3, and then stop the
EMM service.
● Check Service
6. Perform enrollment on the mobile device again and check if a log is created
on the server where the EMM service has not been stopped.
7. Make sure enrollment is successful from the terminal.
Downloading applications
Download an application from the App Store and delete it from the terminal to
proceed with the failover testing.
● Pre-Test
1. Prepare a device with the EMM service activated.
2. Remotely access each server where EMM is installed, and monitor both of the
EMM server logs by using a program such as a tail program. Restrict the use
of the EMM server to checking the logs only for the test purposes.

6 Configuring EMM High Availability
80
The use of this commercial software, and its documentation is subject to the restrictions stated on the second page of this documentation.
● Test
3. Run the EMM on the device, and then click the App Store menu to check
which server generates the EMM logs.
4. Select and install a random application.
5. Remotely access the server where a log is created in Step 3, and then stop the
EMM service.
● Check Service
6. After you uninstall the application from the mobile device, click on the App
Store and check if the app is missing from the list.
7. Select and reinstall the application that was installed in Step 4 and check if the
installation is complete.
Uploading device log files
You can conduct this test by uploading log files from a mobile device and checking
whether the logs are collected from the failover Admin Portal.

6 Configuring EMM High Availability
81
The use of this commercial software, and its documentation is subject to the restrictions stated on the second page of this documentation.
● Pre-Test
1. Prepare a mobile device with the EMM service activated.
2. Remotely access each server where EMM is installed, and monitor both of the
EMM server log files by using a program, such as a tail program. Restrict the
use of the EMM server to checking the logs only for the test purposes.
● Test
3. Run the EMM on the mobile device, and then click the App Store menu to
check which server generates the EMM logs.
4. From the device’s EMM, go to Support > Send activity Log and send the
device log to the EMM server.
5. Access the EMM Admin Portal, go to Devices & Users > Devices > Device
Diagnosis > Device Logs, and check if the log was uploaded from the mobile
device.
6. Remotely access the server where the log was created in Step 3, and then stop
the EMM service.
● Check Service
7. From the device’s EMM, go to Support > Send activity Log and send the
device log to the EMM server.
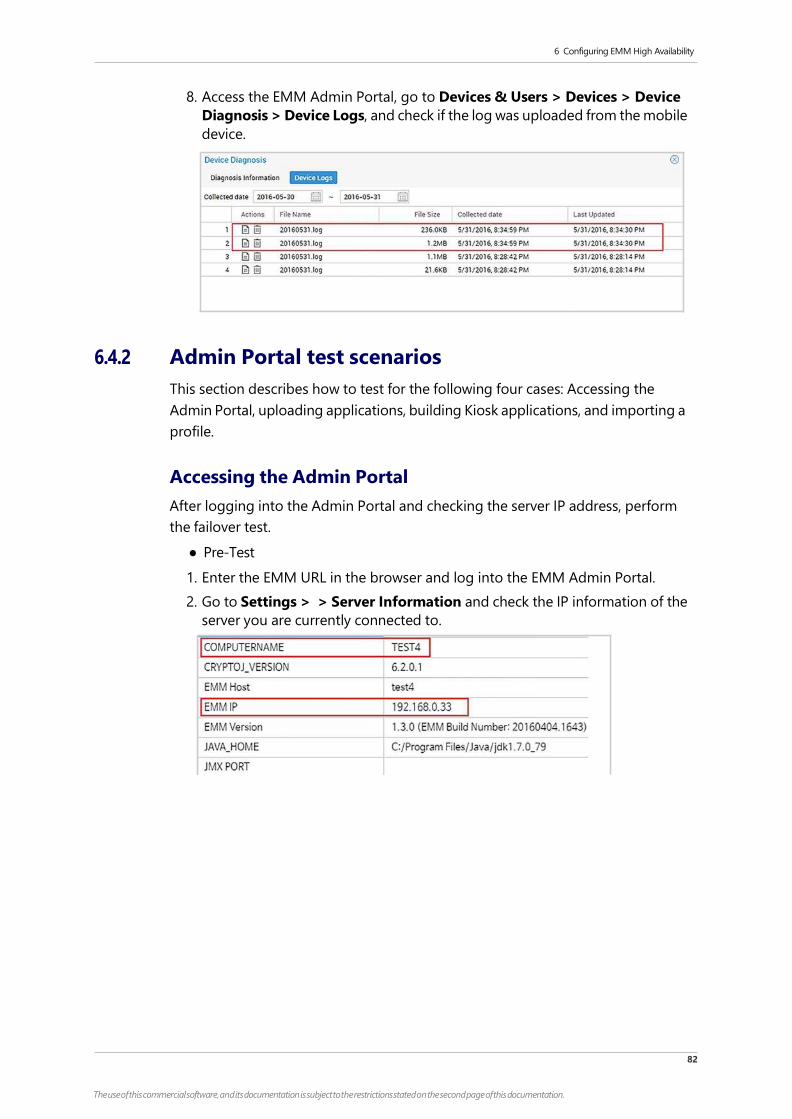
6 Configuring EMM High Availability
82
The use of this commercial software, and its documentation is subject to the restrictions stated on the second page of this documentation.
8. Access the EMM Admin Portal, go to Devices & Users > Devices > Device
Diagnosis > Device Logs, and check if the log was uploaded from the mobile
device.
6.4.2 Admin Portal test scenarios
This section describes how to test for the following four cases: Accessing the
Admin Portal, uploading applications, building Kiosk applications, and importing a
profile.
Accessing the Admin Portal
After logging into the Admin Portal and checking the server IP address, perform
the failover test.
● Pre-Test
1. Enter the EMM URL in the browser and log into the EMM Admin Portal.
2. Go to Settings > > Server Information and check the IP information of the
server you are currently connected to.
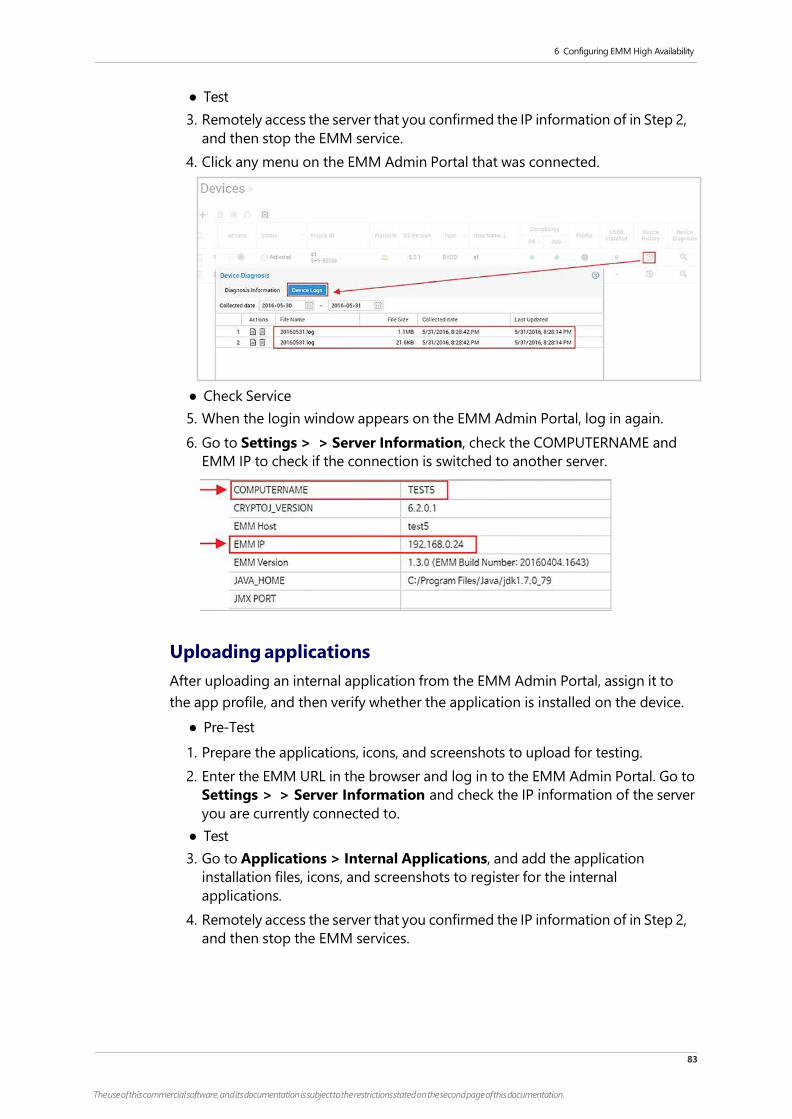
6 Configuring EMM High Availability
83
The use of this commercial software, and its documentation is subject to the restrictions stated on the second page of this documentation.
● Test
3. Remotely access the server that you confirmed the IP information of in Step 2,
and then stop the EMM service.
4. Click any menu on the EMM Admin Portal that was connected.
● Check Service
5. When the login window appears on the EMM Admin Portal, log in again.
6. Go to Settings > > Server Information, check the COMPUTERNAME and
EMM IP to check if the connection is switched to another server.
Uploading applications
After uploading an internal application from the EMM Admin Portal, assign it to
the app profile, and then verify whether the application is installed on the device.
● Pre-Test
1. Prepare the applications, icons, and screenshots to upload for testing.
2. Enter the EMM URL in the browser and log in to the EMM Admin Portal. Go to
Settings > > Server Information and check the IP information of the server
you are currently connected to.
● Test
3. Go to Applications > Internal Applications, and add the application
installation files, icons, and screenshots to register for the internal
applications.
4. Remotely access the server that you confirmed the IP information of in Step 2,
and then stop the EMM services.

6 Configuring EMM High Availability
84
The use of this commercial software, and its documentation is subject to the restrictions stated on the second page of this documentation.
● Check Service
5. Log back in to the Admin Portal, and go to Settings > > Server
Information, and then check the changes in the COMPUTERNAME and EMM
IP that you are currently connected to.
6. Go to Applications > Internal Applications and check the application
information you added in Step 3.
7. After adding the internal application to the app profile, go to Devices >
Device Command, distribute your app management profile, and then verify
that the application is installed.
Importing profiles
Export the device management profile from the Admin Portal to the device, and
then make sure the new profile file has been registered.
● Pre-Test
1. Enter the EMM URL in the browser and log in to the EMM Admin Portal.
2. Go to Settings > > Server Information and check the IP information of the
server you are currently connected to.
3. Generate a random profile, click the profile you created, and then click the
Export icon in the upper-right corner to download the profile file.
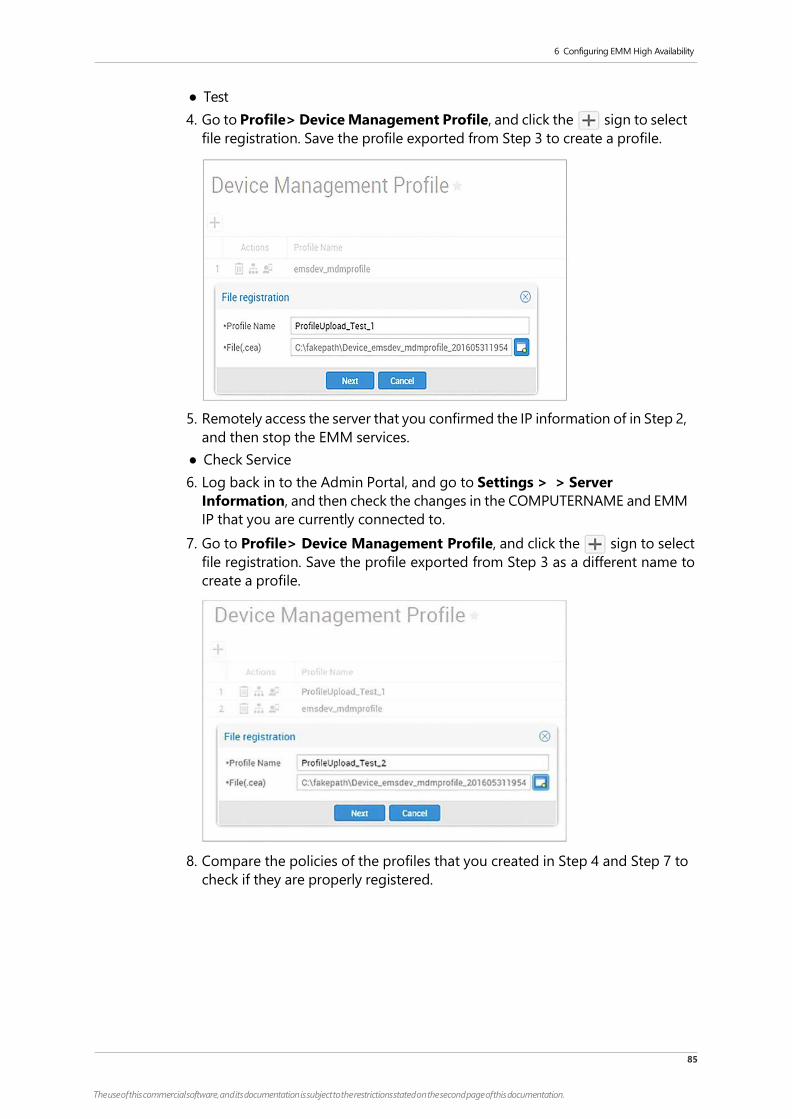
6 Configuring EMM High Availability
85
The use of this commercial software, and its documentation is subject to the restrictions stated on the second page of this documentation.
● Test
4. Go to Profile> Device Management Profile, and click the sign to select
file registration. Save the profile exported from Step 3 to create a profile.
5. Remotely access the server that you confirmed the IP information of in Step 2,
and then stop the EMM services.
● Check Service
6. Log back in to the Admin Portal, and go to Settings > > Server
Information, and then check the changes in the COMPUTERNAME and EMM
IP that you are currently connected to.
7. Go to Profile> Device Management Profile, and click the sign to select
file registration. Save the profile exported from Step 3 as a different name to
create a profile.
8. Compare the policies of the profiles that you created in Step 4 and Step 7 to
check if they are properly registered.

Appendix A Installing or changing a certificate
83
The use of this commercial software, and its documentation is subject to the restrictions stated on the second page of this documentation.
Appendix A Installing or changing a certificate
A.1 Installing and changing EMM server certificate
To install or chang the certificate used by Samsung SDS EMM (hereinafter "EMM")
server, complete the following steps:
1. Stop the EMM server. You can get detailed instructions in the "chapter 5.1,
Stopping services" on page 52.
2. Back up the existing certificate. Skip this step when installing a new certificate.
• The directory where the certificate is installed: Check with the following line
in {EMM installation location}/EMM/{version}/apache-tomcat-
{Version}/conf/server.xml.
3. Install the certificate.
• Copy a new P12 certificate file to the current directory or a new directory.
• If you copy it to a new directory, modify the certificate path for the server.xml
file.
• For the server certificate requirements, see the "chapter 2.2, Preparing
certificates" on page 8.
4. Restart EMM server. For detailed instructions, see the "chapter 5.4, Starting
services" on page 60.
Configuring the EMM server certificate for HTTPS
When the device connects the EMM server by HTTPS communications for DN
(Distinguish Name) authentication of the device certificate, DN of EMM server
must be authenticated. To authenticate a certificate, DN information must be
configured. If DN or Key type of the certificate are changed, configure the
certificate as below
item Description
The file directory {Push_HOME}/resources/certserver/properties
/cert.properties
<Connector port="35443" …….. keystoreFile="Path to certificate" …….></Connector>

84
The use of this commercial software, and its documentation is subject to the restrictions stated on the second page of this documentation.
item Description
DN List of the EMM server
certificate
Enter Common Name (CN) of server certificate from
emm.trusted.dnlist.
• Enter Subject Alternative Name (SAN) if SAN information
is set up in a certificate.
EMM Certificate Key Type Enter EC or RSA key algorithm of the certificate from
emm.certificate.algorithm.
If emm.certificate.algorithm is RSA, enter the cipher list as
below.
• emm.certificate.rsa.cipher.suite=TLS_RSA_WITH_AES_128
_CBC_SHA256,TLS_RSA_WITH_AES_256_CBC_SHA256
If emm.certificate.algorithm is EC, comment the item to be
disabled as below.
• #emm.certificate.rsa.cipher.suite=TLS_RSA_WITH_AES_12
8_CBC_SHA,TLS_RSA_WITH_AES_256_CBC_SHA
A.2 Installing or changing a certificate for Push and
AppTunnel server
To install or change certificates used by Samsung SDS Push (hereinafter “Push”)
server, Proxy, Samsung SDS AppTunnel (hereinafter “AppTunnel”) Server, and
AppTunnel relay, complete the following steps:
1. Stop the process. For more information, see the chapter that explains running
the service of Samsung SDS Push Administrator’s Guide and Samsung SDS
AppTunnel Administrator’s Guide.
2. Backup the existing certificate: Skip this step for installation of a new certificate.
• Directory backup: {EMM installation location} resources/${IP}_
${Port}
• Config file backup: {EMM installation location}/resources/general
/properties/general.properties
• Cert file backup: STORE_FILEPATH for P12 files in
{EMM installation location}/resources/general/properties
/general.propertie/
3. Install a certificate.
a. Delete the existing directory, {EMM installation location}/resources
/${IP}_${Port}
b. Edit the config files: Modify below items in {EMM installation location}
/resources/general/properties/general.properties file.
▪ ENTITY_ALIAS: Alias Name for new P12 certificate
▪ ENTITY_PASSWORD: Key Password for new P12 certificate. Make sure
to enter ENTITY_PASSWORD identical to STORE_PASSWORD.
▪ STORE_FILEPATH: File path for new P12 certificate
▪ STORE_PASSWORD: Password for new P12 file
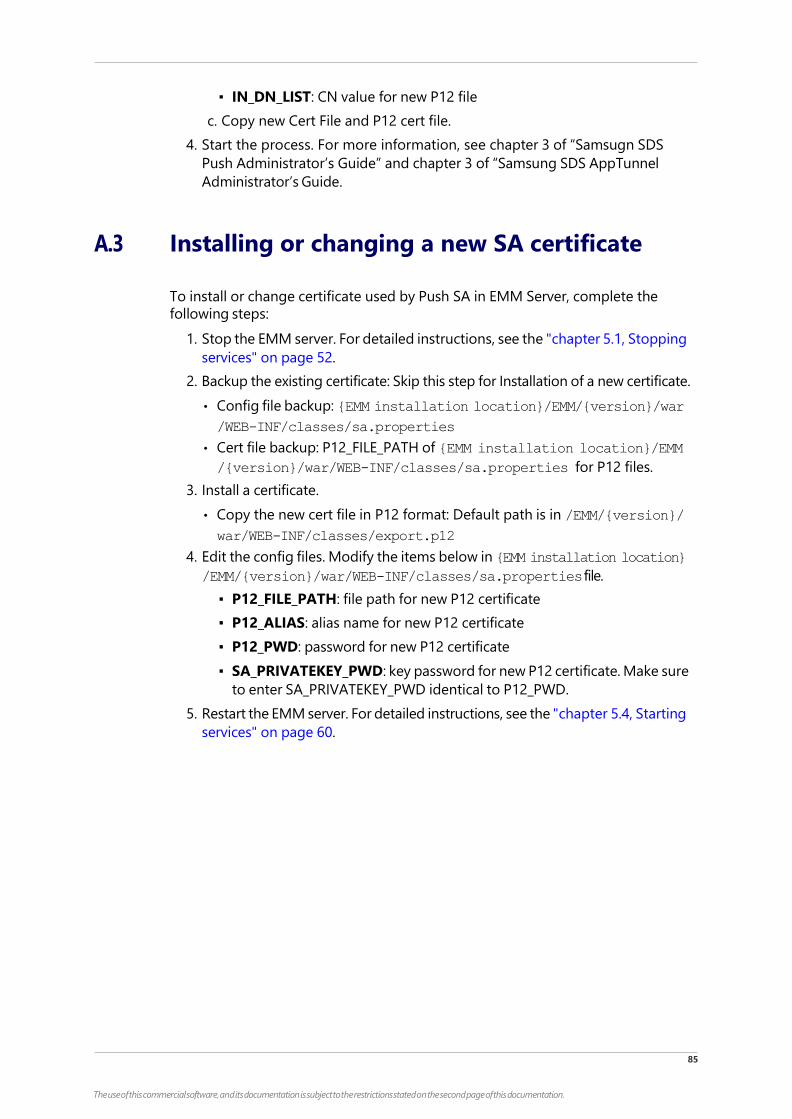
85
The use of this commercial software, and its documentation is subject to the restrictions stated on the second page of this documentation.
▪ IN_DN_LIST: CN value for new P12 file
c. Copy new Cert File and P12 cert file.
4. Start the process. For more information, see chapter 3 of “Samsugn SDS
Push Administrator’s Guide” and chapter 3 of “Samsung SDS AppTunnel
Administrator’s Guide.
A.3 Installing or changing a new SA certificate
To install or change certificate used by Push SA in EMM Server, complete the
following steps:
1. Stop the EMM server. For detailed instructions, see the "chapter 5.1, Stopping
services" on page 52.
2. Backup the existing certificate: Skip this step for Installation of a new certificate.
• Config file backup: {EMM installation location}/EMM/{version}/war
/WEB-INF/classes/sa.properties
• Cert file backup: P12_FILE_PATH of {EMM installation location}/EMM
/{version}/war/WEB-INF/classes/sa.properties for P12 files.
3. Install a certificate.
• Copy the new cert file in P12 format: Default path is in /EMM/{version}/
war/WEB-INF/classes/export.p12
4. Edit the config files. Modify the items below in {EMM installation location}
/EMM/{version}/war/WEB-INF/classes/sa.properties file.
▪ P12_FILE_PATH: file path for new P12 certificate
▪ P12_ALIAS: alias name for new P12 certificate
▪ P12_PWD: password for new P12 certificate
▪ SA_PRIVATEKEY_PWD: key password for new P12 certificate. Make sure
to enter SA_PRIVATEKEY_PWD identical to P12_PWD.
5. Restart the EMM server. For detailed instructions, see the "chapter 5.4, Starting
services" on page 60.
Appendix B Configuring allowable Cipher
84
The use of this commercial software, and its documentation is subject to the restrictions stated on the second page of this documentation.
Appendix B Configuring allowable Cipher
B.1 Setting Push and AppTunnel
All communication within Samsung SDS Push (hereinafter “Push”) and Samsung
SDS AppTunnel (hereinafter “AppTunnel”) is based on TLS. The Samsung SDS
EMM (hereinafter "EMM") supports high security communication with the mutual
authentication and the FIPS certified cryptographic module for TLS.
The cipher module works properly only when the cc-certified module with FIPS
mode on is set on both a server and a device.
• Server: FIPS certified Crypto-J module with FIPS mode on, provided by EMC
• Device: CC certified platforms identified in the EMM and EMM Agent
Security Target provide cryptographic services used by the Samsung
SDS Agent.
Configuration
TLS Control: TLS communication is established and works properly only when
a device supports the protocol and cipher controlled by a server through TLS
handshake procedures. The cipher suite and TLS version should be configured
in EMM server component (In Push Proxy, Push Server, AT Relay, AT Server) before
operation.
Configuration file
• AppTunnel: {EMM installation location}
/AT/resources/general/properties/general.properties
• Push: {EMM installation location}
PUSH/resources/general/properties/general.properties
TLS version control
The TLS channel is established successfully only when the device version matches
that of the server.
• The default setting is set as below, the following case can be connected
only with TLS 1.2.
- PROTOCOL_LIST=TLSv1.2
• You can change the value of PROTOCOL_LIST, enter the range of TLS
versions using comma(,) in PROTOCOL_LIST. If you set as below, the
following case can be connected with TLS 1.2.
- PROTOCOL_LIST=TLSv1.2
• The only TLS version 1.2 are allowed to be configured by the
requirements of the Security Target.

Appendix B Configuring allowable Cipher
85
The use of this commercial software, and its documentation is subject to the restrictions stated on the second page of this documentation.
Cipher control
The TLS channel is established successfully only when the device matches the list
of the cipher suite in the server. The use of the Cipher Suite list varies depending
on the Key Type settings for the certificate.
• CIPHER_SUITE_LIST= TLS_RSA_WITH_AES_128_CBC_SHA256,
TLS_RSA_WITH_AES_256_CBC_SHA256,
TLS_RSA_WITH_AES_256_GCM_SHA384,
TLS_DHE_RSA_WITH_AES_128_CBC_SHA256,
TLS_DHE_RSA_WITH_AES_256_CBC_SHA256,
TLS_DHE_RSA_WITH_AES_256_GCM_SHA384,
TLS_ECDHE_ECDSA_WITH_AES_128_CBC_SHA256,
TLS_ECDHE_ECDSA_WITH_AES_128_GCM_SHA256,
TLS_ECDHE_ECDSA_WITH_AES_256_CBC_SHA384,
TLS_ECDHE_ECDSA_WITH_AES_256_GCM_SHA384,
TLS_ECDHE_RSA_WITH_AES_128_CBC_SHA256,
TLS_ECDHE_RSA_WITH_AES_128_GCM_SHA256,
TLS_ECDHE_RSA_WITH_AES_256_CBC_SHA384,
TLS_ECDHE_RSA_WITH_AES_256_GCM_SHA384
• For ECDSA, the following ciphers should be used.
- TLS_ECDHE_ECDSA_WITH_AES_128_CBC_SHA256,
TLS_ECDHE_ECDSA_WITH_AES_128_GCM_SHA256,
TLS_ECDHE_ECDSA_WITH_AES_256_CBC_SHA384,
TLS_ECDHE_ECDSA_WITH_AES_256_GCM_SHA384
• For RSA, the following ciphers should be used.
- TLS_RSA_WITH_AES_128_CBC_SHA256,
TLS_RSA_WITH_AES_256_CBC_SHA256,
TLS_RSA_WITH_AES_256_GCM_SHA384,
TLS_DHE_RSA_WITH_AES_128_CBC_SHA256,
TLS_DHE_RSA_WITH_AES_256_CBC_SHA256,
TLS_DHE_RSA_WITH_AES_256_GCM_SHA384,
TLS_ECDHE_RSA_WITH_AES_128_CBC_SHA256,
TLS_ECDHE_RSA_WITH_AES_128_GCM_SHA256,
TLS_ECDHE_RSA_WITH_AES_256_CBC_SHA384,
TLS_ECDHE_RSA_WITH_AES_256_GCM_SHA384
• Null cipher, SSL cipher and RC4 cipher are excluded.
• All cipher system supports are available without any extra configuration.
• The administrator should not add any cipher suites except those allowed by
the Security Target.
• In the list for the cipher suite, there must be no spaces between the comma
and the next cipher.
86
The use of this commercial software, and its documentation is subject to the restrictions stated on the second page of this documentation.
B.2 Setting Tomcat
The EMM Admin Portal requires TLS on the Tomcat server. The installation
package provides the default settings, but these can change if necessary.
Configuration file
• {Tomcat_HOME}/conf/server.xml
TLS version control
• <connector port=35443 … sslEnabledProtocols="TLSv1.2"
• Support TLS v1.2
Cipher control
• <Connector port=35443 … sslEnabledProtocols="TLSv1.2" ciphers="
TLS_RSA_WITH_AES_128_CBC_SHA256,TLS_RSA_WITH_AES_256_CBC_SHA25
6,TLS_RSA_WITH_AES_256_GCM_SHA384,TLS_DHE_RSA_WITH_AES_128_CBC
_SHA256,TLS_DHE_RSA_WITH_AES_256_CBC_SHA256,TLS_DHE_RSA_WITH_A
ES_256_GCM_SHA384,TLS_ECDHE_ECDSA_WITH_AES_128_CBC_SHA256,TLS_
ECDHE_ECDSA_WITH_AES_128_GCM_SHA256,TLS_ECDHE_ECDSA_WITH_AES
_256_CBC_SHA384,TLS_ECDHE_ECDSA_WITH_AES_256_GCM_SHA384,TLS_EC
DHE_RSA_WITH_AES_128_CBC_SHA256,TLS_ECDHE_RSA_WITH_AES_128_GC
M_SHA256,TLS_ECDHE_RSA_WITH_AES_256_CBC_SHA384,TLS_ECDHE_RSA_
WITH_AES_256_GCM_SHA384" … />
• Use comma(,) between Cipher Suites.
• Default Cipher Suite
- TLS_RSA_WITH_AES_128_CBC_SHA256, TLS_RSA_WITH_AES_256_CBC_SHA256, TLS_RSA_WITH_AES_256_GCM_SHA384, TLS_DHE_RSA_WITH_AES_128_CBC_SHA256, TLS_DHE_RSA_WITH_AES_256_CBC_SHA256, TLS_DHE_RSA_WITH_AES_256_GCM_SHA384, TLS_ECDHE_ECDSA_WITH_AES_128_CBC_SHA256, TLS_ECDHE_ECDSA_WITH_AES_128_GCM_SHA256, TLS_ECDHE_ECDSA_WITH_AES_256_CBC_SHA384, TLS_ECDHE_ECDSA_WITH_AES_256_GCM_SHA384, TLS_ECDHE_RSA_WITH_AES_128_CBC_SHA256, TLS_ECDHE_RSA_WITH_AES_128_GCM_SHA256, TLS_ECDHE_RSA_WITH_AES_256_CBC_SHA384, TLS_ECDHE_RSA_WITH_AES_256_GCM_SHA384
• The administrator should not add any cipher suites except those allowed by
the Security Target.
Support for iOS 12
.If you have upgraded to version 2.1.6 and wish to use iOS 12, then you need to
complete the following:

87
The use of this commercial software, and its documentation is subject to the restrictions stated on the second page of this documentation.
• Add cipher
TLS_ECDHE_RSA_WITH_AES_256_GCM_SHA384
TLS_ECDHE_RSA_WITH_AES_128_GCM_SHA256
TLS_ECDHE_RSA_WITH_AES_256_CBC_SHA384
TLS_ECDHE_RSA_WITH_AES_128_CBC_SHA256
TLS_ECDHE_RSA_WITH_AES_128_CBC_SHA
TLS_RSA_WITH_AES_256_CBC_SHA256,
TLS_RSA_WITH_AES_256_GCM_SHA384
- <Connector port=35443 … sslEnabledProtocols="TLSv1.2"
ciphers="TLS_ECDHE_ECDSA_WITH_AES_256_GCM_SHA384,TLS_ECDHE_
ECDSA_WITH_AES_256_CBC_SHA384,TLS_ECDHE_ECDSA_WITH_AES_128
_GCM_SHA256,TLS_ECDHE_ECDSA_WITH_AES_128_CBC_SHA256,TLS_EC
DHE_ECDSA_WITH_AES_128_CBC_SHA,TLS_RSA_WITH_AES_256_CBC_SH
A,TLS_RSA_WITH_AES_128_CBC_SHA,TLS_ECDHE_RSA_WITH_AES_256_G
CM_SHA384,TLS_ECDHE_RSA_WITH_AES_128_GCM_SHA256,TLS_ECDHE
_RSA_WITH_AES_256_CBC_SHA384,TLS_ECDHE_RSA_WITH_AES_128_CB
C_SHA256,TLS_ECDHE_RSA_WITH_AES_128_CBC_SHA,TLS_RSA_WITH_A
ES_256_CBC_SHA256,TLS_RSA_WITH_AES_256_GCM_SHA384"></Conn
ector>
• Remove the comment from the Listener
Remove the comment from the code in
org.apache.catalina.core.AprLifecycleListener and leave the
code as below..
<Listener
className=""org.apache.catalina.core.AprLifecycleListen
er"" SSLEngine=""on""></Listener>
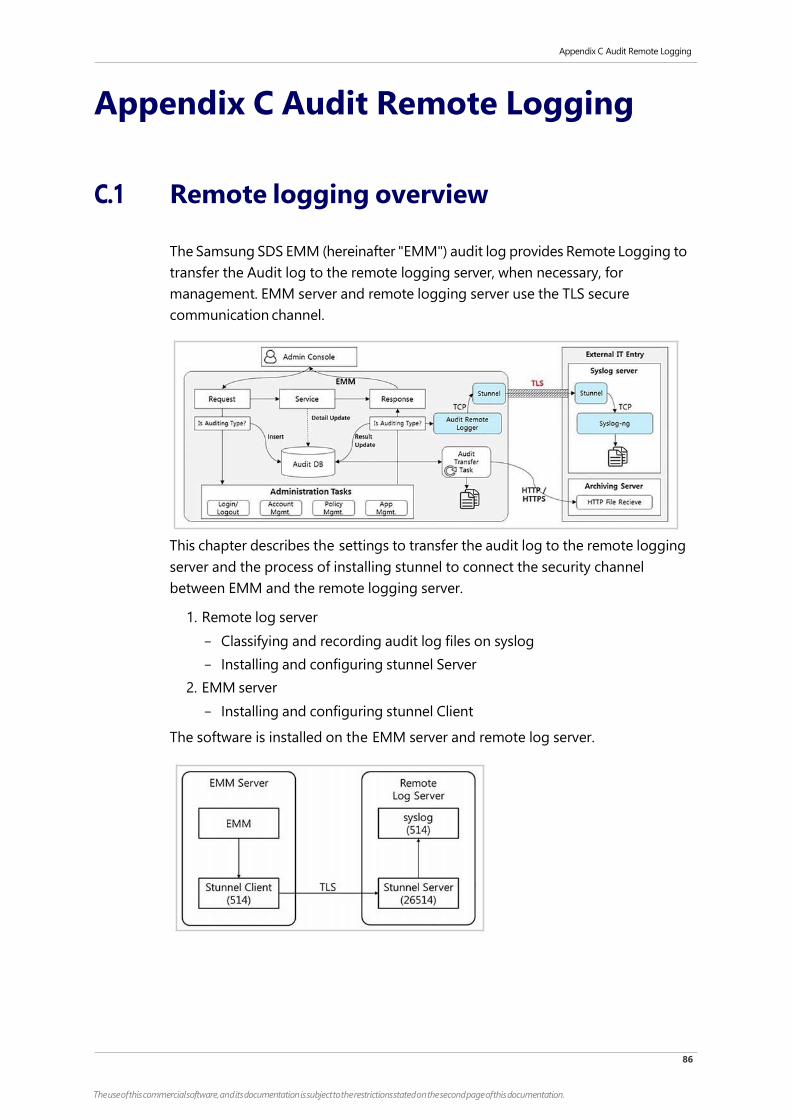
Appendix C Audit Remote Logging
86
The use of this commercial software, and its documentation is subject to the restrictions stated on the second page of this documentation.
Appendix C Audit Remote Logging
C.1 Remote logging overview
The Samsung SDS EMM (hereinafter "EMM") audit log provides Remote Logging to
transfer the Audit log to the remote logging server, when necessary, for
management. EMM server and remote logging server use the TLS secure
communication channel.
This chapter describes the settings to transfer the audit log to the remote logging
server and the process of installing stunnel to connect the security channel
between EMM and the remote logging server.
1. Remote log server
- Classifying and recording audit log files on syslog
- Installing and configuring stunnel Server
2. EMM server
- Installing and configuring stunnel Client
The software is installed on the EMM server and remote log server.
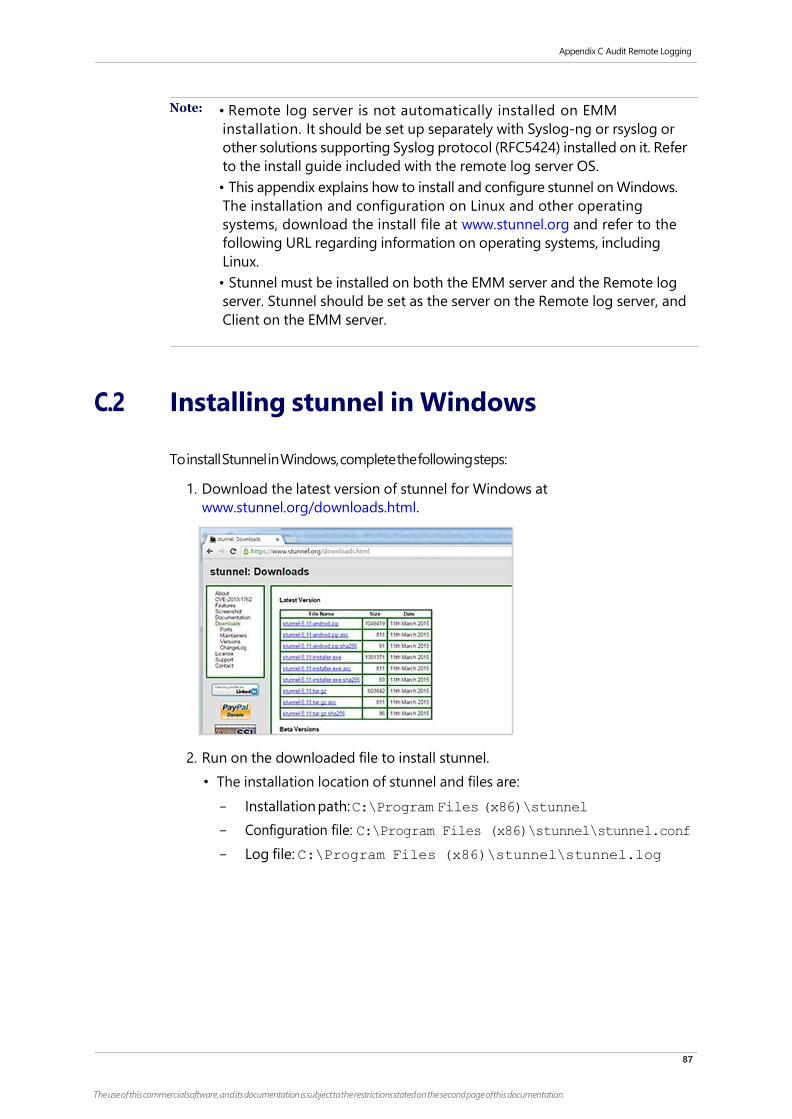
Appendix C Audit Remote Logging
87
The use of this commercial software, and its documentation is subject to the restrictions stated on the second page of this documentation.
Note: • Remote log server is not automatically installed on EMM
installation. It should be set up separately with Syslog-ng or rsyslog or
other solutions supporting Syslog protocol (RFC5424) installed on it. Refer
to the install guide included with the remote log server OS.
• This appendix explains how to install and configure stunnel on Windows.
The installation and configuration on Linux and other operating
systems, download the install file at www.stunnel.org and refer to the
following URL regarding information on operating systems, including
Linux.
• Stunnel must be installed on both the EMM server and the Remote log
server. Stunnel should be set as the server on the Remote log server, and
Client on the EMM server.
C.2 Installing stunnel in Windows
To install Stunnel in Windows, complete the following steps:
1. Download the latest version of stunnel for Windows at
www.stunnel.org/downloads.html.
2. Run on the downloaded file to install stunnel.
• The installation location of stunnel and files are:
- Installation path: C:\Program Files (x86)\stunnel
- Configuration file: C:\Program Files (x86)\stunnel\stunnel.conf
- Log file: C:\Program Files (x86)\stunnel\stunnel.log

Appendix C Audit Remote Logging
88
The use of this commercial software, and its documentation is subject to the restrictions stated on the second page of this documentation.
3. Go to Start Windows > All Programs > stunnel > Edit stunnel.conf and
edit the configuration file:
• See "C.3.2, Configuring stunnel" on page 90 for the detailed instructions.
4. Go to Start Windows > All Programs > stunnel > stunnel Service Install
and register for the Windows Service.
5. Click stunnel Service Start(▶) to start stunnel.
• Go to Start Windows > All Programs > stunnel, then click Service Start.
• Go to Start Windows > Tools > Service, then click Start Service.
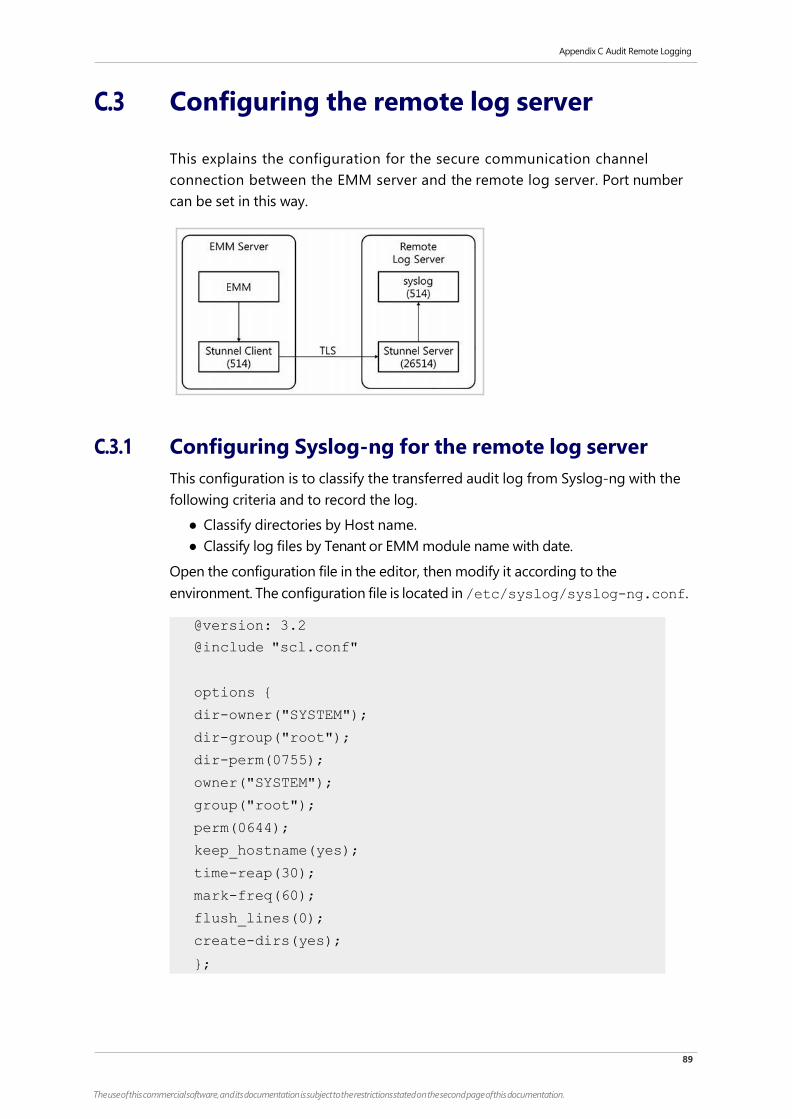
Appendix C Audit Remote Logging
89
The use of this commercial software, and its documentation is subject to the restrictions stated on the second page of this documentation.
C.3 Configuring the remote log server
This explains the configuration for the secure communication channel
connection between the EMM server and the remote log server. Port number
can be set in this way.
C.3.1 Configuring Syslog-ng for the remote log server
This configuration is to classify the transferred audit log from Syslog-ng with the
following criteria and to record the log.
● Classify directories by Host name.
● Classify log files by Tenant or EMM module name with date.
Open the configuration file in the editor, then modify it according to the
environment. The configuration file is located in /etc/syslog/syslog-ng.conf.
@version: 3.2
@include "scl.conf"
options {
dir-owner("SYSTEM");
dir-group("root");
dir-perm(0755);
owner("SYSTEM");
group("root");
perm(0644);
keep_hostname(yes);
time-reap(30);
mark-freq(60);
flush_lines(0);
create-dirs(yes);
};

Appendix C Audit Remote Logging
90
The use of this commercial software, and its documentation is subject to the restrictions stated on the second page of this documentation.
Note: • This chapter describes how to configure syslog-ng. It does not have to be
syslog-ng. You can use other solutions, including Rsyslog and syslogd
supporting Syslog protocol (RFC5424).
• Since the Syslog-ng configuration file for the remote log server is
located in a different directory, depending on the OS, refer to the
install guide for the OS.
• You can use different criteria to sort the audit log, depending on your
environment. The tenant or EMM module name must be included in the
file name.
C.3.2 Configuring stunnel
You have to install stunnel on both the EMM server and the remote log server for
secure communication. Set the Stunnel as the server on the remote logging server
and as a client on the EMM server so that EMM server can ask for secure
communication to the remote log server.
Open the stunnel configuration file using the editor and edit in accordance with
your site’s environment.
● Go to Start Windows > All Programs > Stunnel > Edit stunnel
Configuration.
# EMM Audit
source s_audit_tcp {
tcp(port(514) — Port
flags("syslog-protocol")
max-connections(100)
encoding("UTF-8"));
};
template t_emm_audit_template { — Log file record Template configuration
template("${ISODATE} ${HOST} ${SOURCEIP}
${[email protected]} ${MSG}\n");
template_escape(no); };
destination d_emm_audit { — Log file establishing rule configuration
file("/logs/${HOST}/emm_audit_${.SDATA.emmAudit@180
60.tenantId}-${YEAR}-${MONTH}-${DAY}.log"
template(t_emm_audit_template)
);
};
log {source(s_audit_tcp); destination(d_emm_audit);};
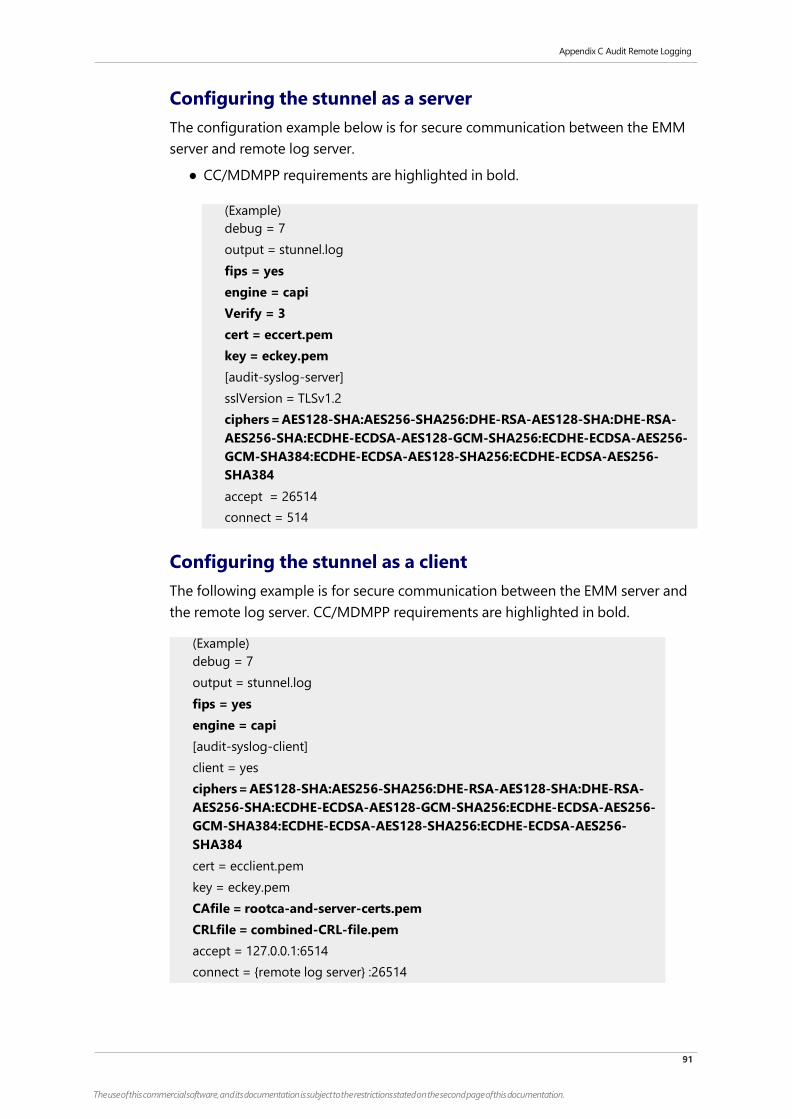
Appendix C Audit Remote Logging
91
The use of this commercial software, and its documentation is subject to the restrictions stated on the second page of this documentation.
Configuring the stunnel as a server
The configuration example below is for secure communication between the EMM
server and remote log server.
● CC/MDMPP requirements are highlighted in bold.
Configuring the stunnel as a client
The following example is for secure communication between the EMM server and
the remote log server. CC/MDMPP requirements are highlighted in bold.
(Example)
debug = 7
output = stunnel.log
fips = yes
engine = capi
Verify = 3
cert = eccert.pem
key = eckey.pem
[audit-syslog-server]
sslVersion = TLSv1.2
ciphers = AES128-SHA:AES256-SHA256:DHE-RSA-AES128-SHA:DHE-RSA-
AES256-SHA:ECDHE-ECDSA-AES128-GCM-SHA256:ECDHE-ECDSA-AES256-
GCM-SHA384:ECDHE-ECDSA-AES128-SHA256:ECDHE-ECDSA-AES256-
SHA384
accept = 26514
connect = 514
(Example)
debug = 7
output = stunnel.log
fips = yes
engine = capi
[audit-syslog-client]
client = yes
ciphers = AES128-SHA:AES256-SHA256:DHE-RSA-AES128-SHA:DHE-RSA-
AES256-SHA:ECDHE-ECDSA-AES128-GCM-SHA256:ECDHE-ECDSA-AES256-
GCM-SHA384:ECDHE-ECDSA-AES128-SHA256:ECDHE-ECDSA-AES256-
SHA384
cert = ecclient.pem
key = eckey.pem
CAfile = rootca-and-server-certs.pem
CRLfile = combined-CRL-file.pem
accept = 127.0.0.1:6514
connect = {remote log server} :26514

Appendix C Audit Remote Logging
92
The use of this commercial software, and its documentation is subject to the restrictions stated on the second page of this documentation.
Note: Prepare the certificates listed below to set the options:
• Remote log server: CA file (pem), CRL file (pem), Server certificate, key file
(pem)
• EMM server: CA file (pem), CRL file (pem), Client certificate, key file (pem)
Set the CC related items in accordance with CC(MDMPP) requirements.
C.3.3 Configuring stunnel options
This explains how to set important options when configuring stunnel. All the
CC/MDMPP related items must be set in accordance with the requirements.
Global option
CC/MDMPP requirements are highlighted in bold.
(Example)
debug = [FACILITY.]LEVEL
debugging level
Level is a one of the syslog level names or numbers emerg (0), alert (1), crit (2),
err (3), warning (4), notice (5), info (6), or debug (7).
output = FILE
append log messages to a file
fips = yes | no
Enable or disable FIPS 140-2 mode.
engine = capi | auto | ENGINE_ID
select hardware engine

Appendix C Audit Remote Logging
93
The use of this commercial software, and its documentation is subject to the restrictions stated on the second page of this documentation.
Editing service-level options
There are two ways to set service level options: Edit Service defaults to apply it to
all services in-cluding server and client, or edit Service definitions to apply it to
each service.
● Service defaults
● Service definitions
Editing cipher suites
Cipher suites, a service-level option, can be set in both Service defaults and
individual service. The administrator must set cipher suites to operate it in a
CCMDMPP Complaint manner.
● ciphers = CIPHER_LIST
- Select permitted SSL ciphers.

Appendix C Audit Remote Logging
94
The use of this commercial software, and its documentation is subject to the restrictions stated on the second page of this documentation.
- A code with a colon list given for SSL connection. (e.g. DES-CBC3-
SHA:IDEA-CBC-MD5.).
- CC/MDMPP requirements are highlighted in bold.
ciphers = AES128-SHA:AES256-SHA256:DHE-RSA-AES128-
SHA:DHE-RSA-AES256-SHA:ECDHE-ECDSA-AES128-GCM-
SHA256:ECDHE-ECDSA-AES256-GCM-SHA384:ECDHE-ECDSA-
AES128-SHA256:ECDHE-ECDSA-AES256-SHA384
● options = SSL_OPTIONS
- OpenSSL library options.
- Except for SSL_OP_prefix.Stunnel, options are derived by combining Stunnel
and open SSL library. Several options can be used to specify multiple
options. A dash(-) should be added to option name to disable the
option:
- For example, for compatibility with the erroneous Eudora SSL
implementation, the following options can be used:
options = DONT_INSERT_EMPTY_FRAGMENTS
default:
options = NO_SSLv2
options = NO_SSLv3
Editing certificate options
Certificate options are service-level options and can be set in both Service defaults and
individual services. EMM Server components act as clients in order to securely
connect to the remote syslog server. If the remote syslog server requires mutual
authentication, the administrator must configure only the certificates for the
EMM Server components.
● cert = PEM_File
- The name of certificate chain PEM file.
- The certificates must be in PEM format, and must be delivered from the
actual server/client certificate to the self-signed root CA certificate.
- A certificate is required in server mode, and optional in client mode.
● key = KEY_File
- The Private key for the certificate is specified as cert option.
- The Private key is needed to authenticate the certificate owner. For
security reasons, only the owner of the file can view its contents. On Unix
systems you can use the chmod 600 keyfile command.
- Default: value of cert option

Appendix C Audit Remote Logging
95
The use of this commercial software, and its documentation is subject to the restrictions stated on the second page of this documentation.
Editing CA & CRL options
CA &CRL options, service level options, can be set in both Service defaults and
individual service. To run it in CC MDMPP Compliant manner, the administrator
must make sure that Stunnel includes both the audit server certificate and
the audit server root certificate. The administrator may include these two
certificates in the stunnel configuration by using either the CApath or the CAfile
options specified below.
● CApath = DIRECTORY
- Certificate Authority directory.
- This is the directory used by stunnel when using verify. Note that the
certificates in this directory should be named XXXXXXXX.0 where
XXXXXXXX is the hash value of the certificate encoded with DER.
- The hash algorithm has been changed in OpenSSL 1.0.0. It is required to
c_rehash the directory When OpenSSL 0.x.x. is upgraded to OpenSSL
1.x.x.
- CApath path is relative to chroot directory.
● CAfile = CERT_FILE
- Certificate Authority file.
- This file contains multiple CA certificates, used with verify.
The administrator may include these two certificates in the stunnel configuration
by using either CRLpath or CRLfile.
● CRLpath = DIRECTORY
- Certificate Revocation Lists directory.
- This is the directory used by stunnel to find CRLs when using the verify.
Note that the CRLs in this directory should be named XXXXXXXX.r0
where XXXXXXXX is the CRL hash value of certificate encoded with DER.
- The hash algorithm has been changed in OpenSSL 1.0.0. It is required for
c_rehash the directory when OpenSSL 0.x.x. is upgraded to OpenSSL
1.x.x.
- CRLpath path is relative to chroot directory.
● CRLfile = CERT_FILE:
- Certificate Revocation Lists file
- This file contains multiple CRLs, used with the verify.
Editing verify certificate
Stunnel has methods for checking certificates, which are controlled by the verify
option. In order to operate in a CC MDMPP Compliant manner, the administrator
must configure the system to use verify=3.
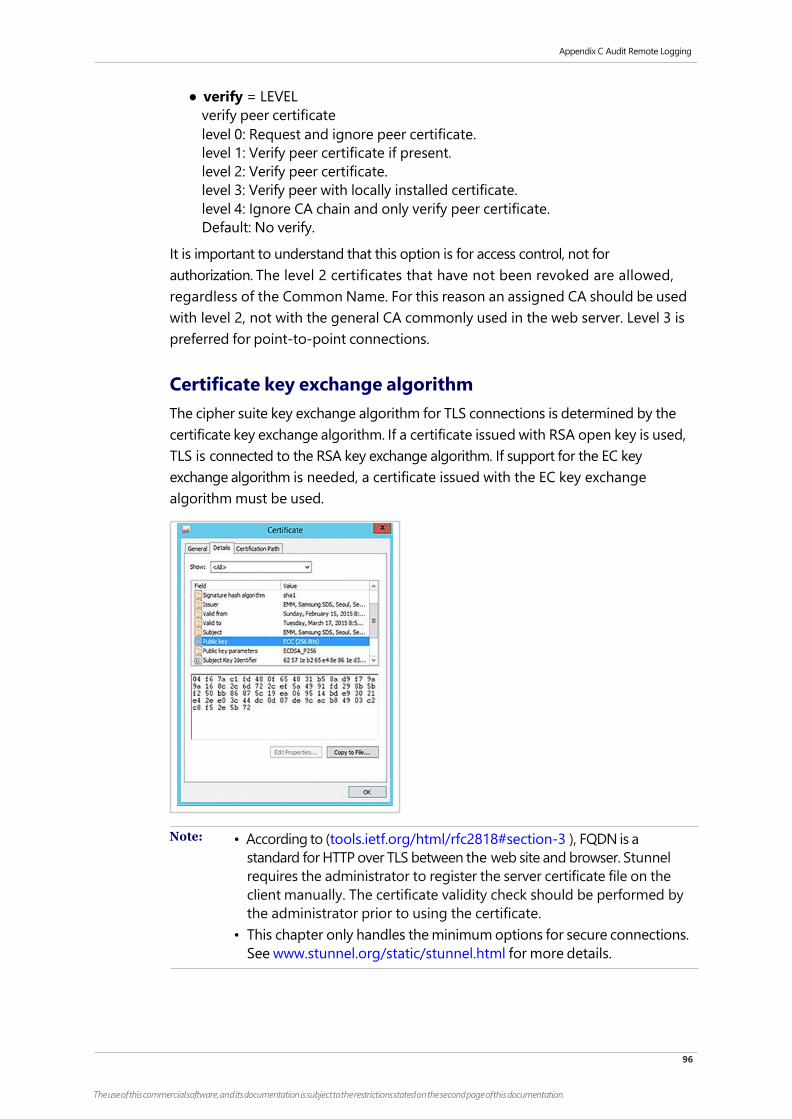
Appendix C Audit Remote Logging
96
The use of this commercial software, and its documentation is subject to the restrictions stated on the second page of this documentation.
● verify = LEVEL
verify peer certificate
level 0: Request and ignore peer certificate.
level 1: Verify peer certificate if present.
level 2: Verify peer certificate.
level 3: Verify peer with locally installed certificate.
level 4: Ignore CA chain and only verify peer certificate.
Default: No verify.
It is important to understand that this option is for access control, not for
authorization. The level 2 certificates that have not been revoked are allowed,
regardless of the Common Name. For this reason an assigned CA should be used
with level 2, not with the general CA commonly used in the web server. Level 3 is
preferred for point-to-point connections.
Certificate key exchange algorithm
The cipher suite key exchange algorithm for TLS connections is determined by the
certificate key exchange algorithm. If a certificate issued with RSA open key is used,
TLS is connected to the RSA key exchange algorithm. If support for the EC key
exchange algorithm is needed, a certificate issued with the EC key exchange
algorithm must be used.
Note: • According to (tools.ietf.org/html/rfc2818#section-3 ), FQDN is a
standard for HTTP over TLS between the web site and browser. Stunnel
requires the administrator to register the server certificate file on the
client manually. The certificate validity check should be performed by
the administrator prior to using the certificate.
• This chapter only handles the minimum options for secure connections.
See www.stunnel.org/static/stunnel.html for more details.
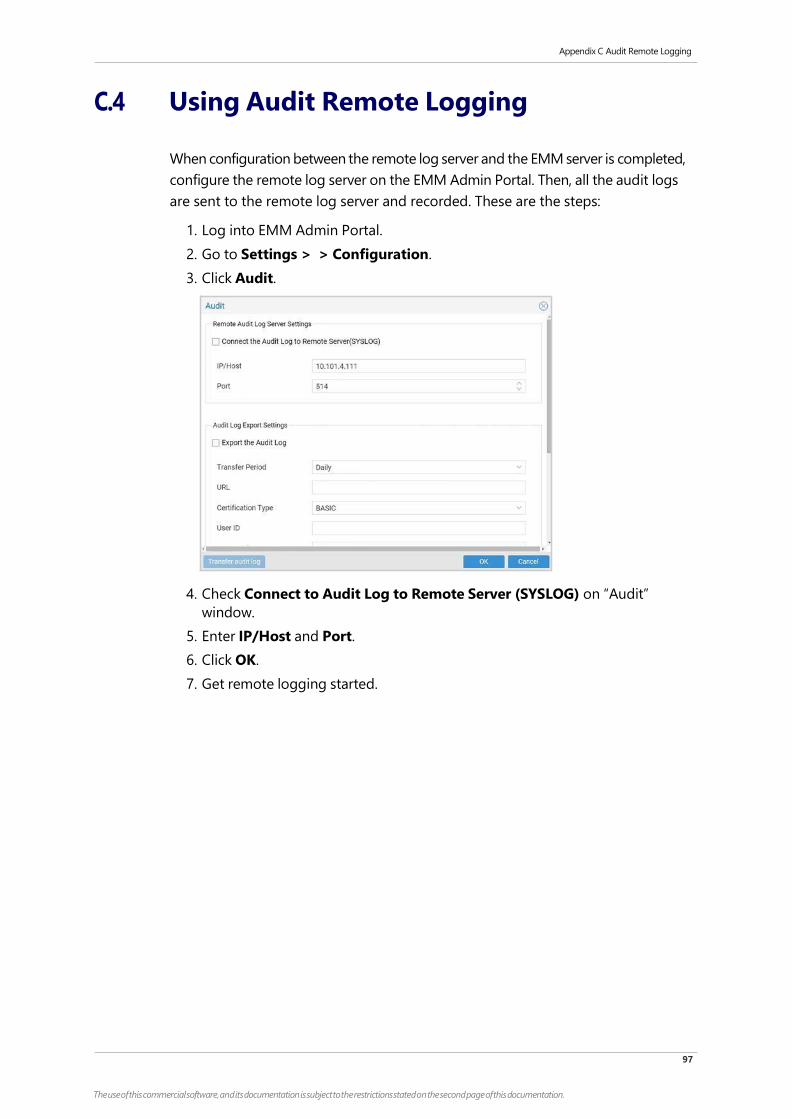
Appendix C Audit Remote Logging
97
The use of this commercial software, and its documentation is subject to the restrictions stated on the second page of this documentation.
C.4 Using Audit Remote Logging
When configuration between the remote log server and the EMM server is completed,
configure the remote log server on the EMM Admin Portal. Then, all the audit logs
are sent to the remote log server and recorded. These are the steps:
1. Log into EMM Admin Portal.
2. Go to Settings > > Configuration.
3. Click Audit.
4. Check Connect to Audit Log to Remote Server (SYSLOG) on “Audit”
window.
5. Enter IP/Host and Port.
6. Click OK.
7. Get remote logging started.
98
The use of this commercial software, and its documentation is subject to the restrictions stated on the second page of this documentation.
Appendix D Using EMM on iOS
Appendix D Using EMM on iOS
This chapter specifies how to set up Samsung SDS EMM (hereinafter "EMM") on iOS
devices. To set up EMM on iOS devices, complete the following steps:
1. Checking prerequisites
2. Setting Apple Push Notification Service (APNs) certificate
3. Building EMM Client
4. Registering APNs certificate
5. Setting iOS Sign certificate
D.1 Checking prerequisites
The following items are required in order to use EMM on iOS:
● Sign up for iDep Site: Sign up for the iOS Developer Enterprise Program at
developer.apple.com/programs/enterprise/ to build and distribute iOS apps
for the enterprise.
● MAC Book: Since EMM is provided to customers in the form of source code, a
device based on iOS, MAC is needed.
D.2 Generating Apple Push Notification Service
certificates
EMM requires Apple Push Notification Service (APNs) certificate in order to send a
Samsung SDS push (hereinafter "Push") message to an iOS device. EMM uses two
different APNs certificates.
● MDM APNs certificate: A certificate to use MDM APNs, which sends Push
messages from the EMM server to the iOS EMM module.
- Create the MDM APNs certificate as an Agent certificate in the Admin
Portal.
● App APNs certificate: A certificate to use App APNs, which sends Push
messages from the EMM server to the EMM application.
- Create the App APNs certificate as an Client certificate in the Admin
Portal.
Both the MDM APNs certificate and App Push certificate must be established on
the Mac Book.
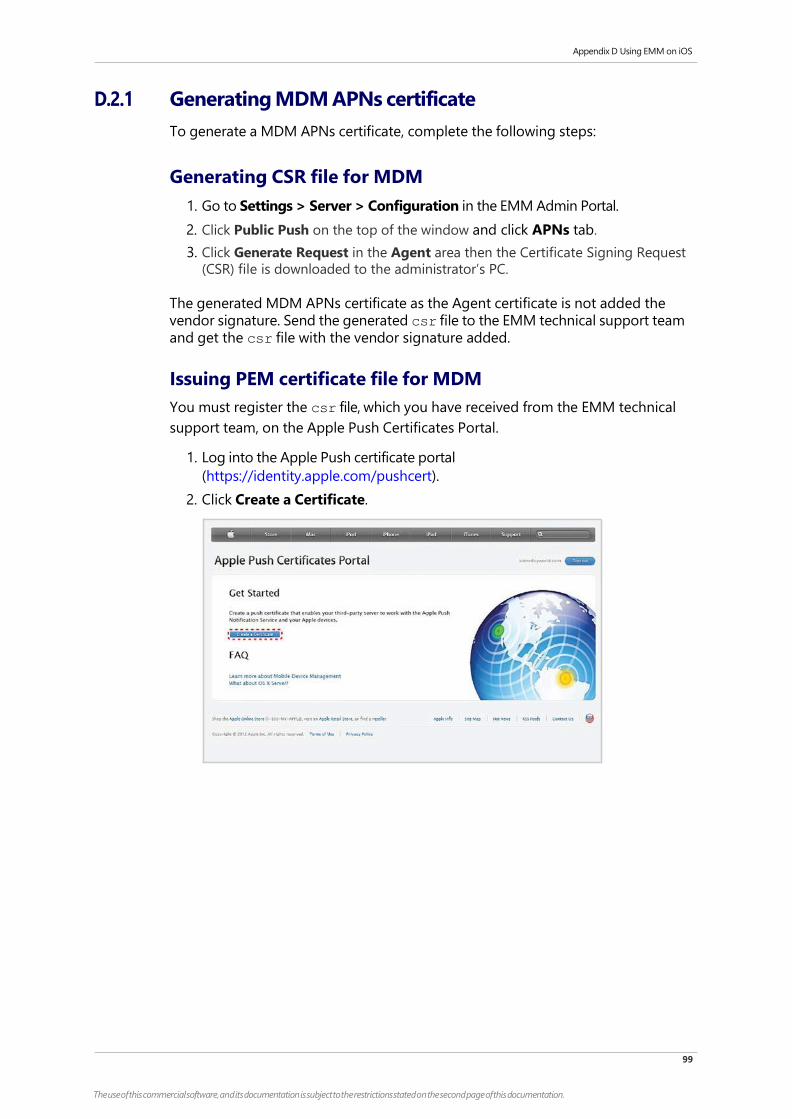
99
The use of this commercial software, and its documentation is subject to the restrictions stated on the second page of this documentation.
Appendix D Using EMM on iOS
D.2.1 Generating MDM APNs certificate
To generate a MDM APNs certificate, complete the following steps:
Generating CSR file for MDM
1. Go to Settings > Server > Configuration in the EMM Admin Portal.
2. Click Public Push on the top of the window and click APNs tab.
3. Click Generate Request in the Agent area then the Certificate Signing Request
(CSR) file is downloaded to the administrator’s PC.
The generated MDM APNs certificate as the Agent certificate is not added the
vendor signature. Send the generated csr file to the EMM technical support team
and get the csr file with the vendor signature added.
Issuing PEM certificate file for MDM
You must register the csr file, which you have received from the EMM technical
support team, on the Apple Push Certificates Portal.
1. Log into the Apple Push certificate portal
(https://identity.apple.com/pushcert).
2. Click Create a Certificate.
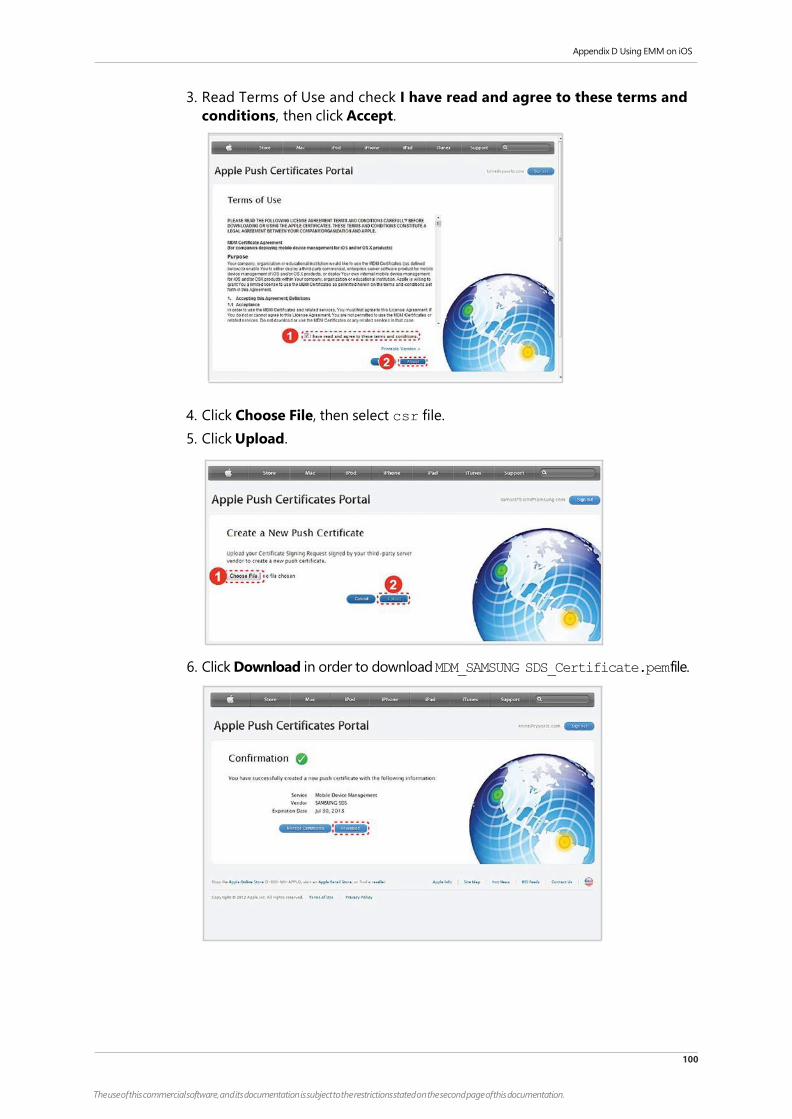
100
The use of this commercial software, and its documentation is subject to the restrictions stated on the second page of this documentation.
Appendix D Using EMM on iOS
3. Read Terms of Use and check I have read and agree to these terms and
conditions, then click Accept.
4. Click Choose File, then select csr file.
5. Click Upload.
6. Click Download in order to download MDM_SAMSUNG SDS_Certificate.pem file.

101
The use of this commercial software, and its documentation is subject to the restrictions stated on the second page of this documentation.
Appendix D Using EMM on iOS
Uploading the PEM certificate for MDM
To upload the downloaded MDM_SAMSUNG SDS_Certificate.pem to
Admin Portal, follow the steps below:
1. Go to Settings > Server > Configuration in the EMM Admin Portal.
2. Click Public Push on the top of the window and click APNs tab.
3. Click Upload APNs Certificate in the Agent area, select the
MDM_SAMSUNG_SDS_Certificate.pem file, and click OK
4. The uploaded certificate information and the expiration date appear on the top of
the window. The MDM APNs certificate registered can be checked in Certificates > External Certificates as APNs_MDM_Certificate.
D.2.2 Generating App APNs certificate
In order to generate an App APNs certificate, you must be registered on ADEP with
a company name. Follow the steps below to generate an App APNs certificate.
Generating CSR file for App
1. Go to Settings > Server > Configuration in the EMM Admin Portal.
2. Click Public Push on the top of the window and click APNs tab.
3. Click Generate Request in the Client area then the Certificate Signing Request
(CSR) file is downloaded to the administrator’s PC.
Creating App ID
App ID consists of a Team ID and a Bundle ID. Team ID is an ID assigned by ADEP and
Bundle ID is used when building EMM Client.
1. Go to Identifiers > App IDs.
2. Click +.
3. Enter App ID information.
a. Enter a Name.
b. Select a Team ID for App ID Prefix
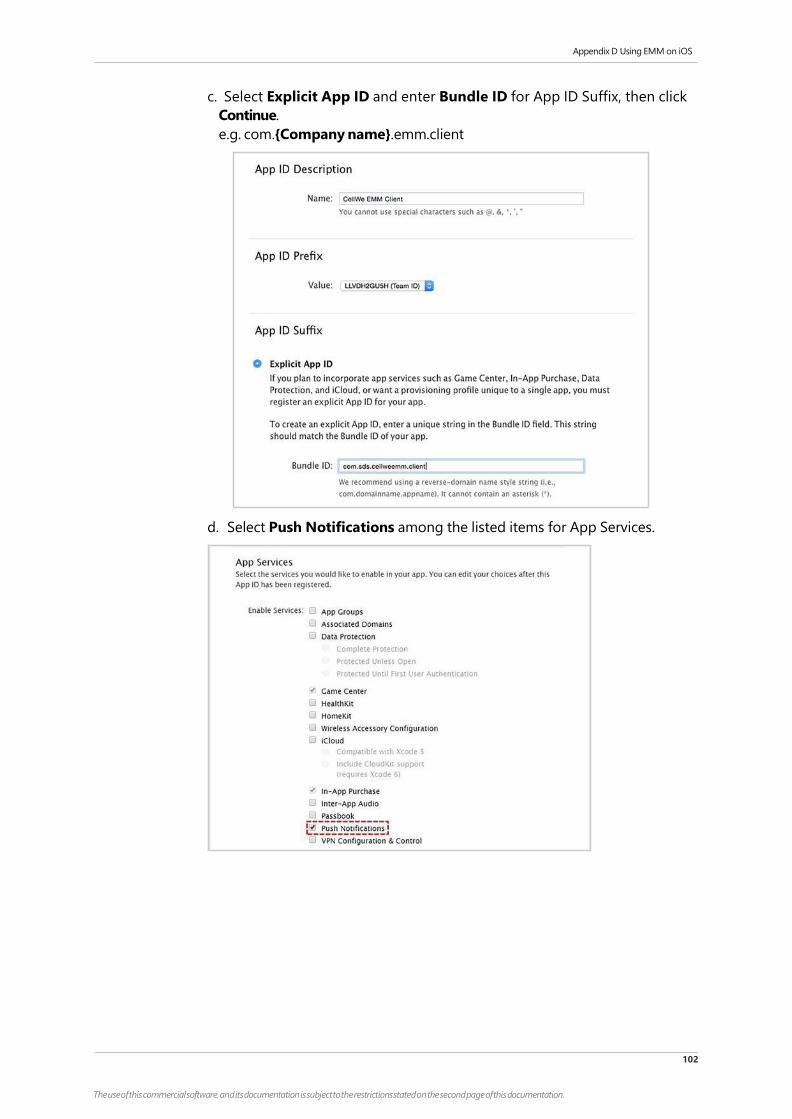
102
The use of this commercial software, and its documentation is subject to the restrictions stated on the second page of this documentation.
Appendix D Using EMM on iOS
c. Select Explicit App ID and enter Bundle ID for App ID Suffix, then click
Continue.
e.g. com.{Company name}.emm.client
d. Select Push Notifications among the listed items for App Services.
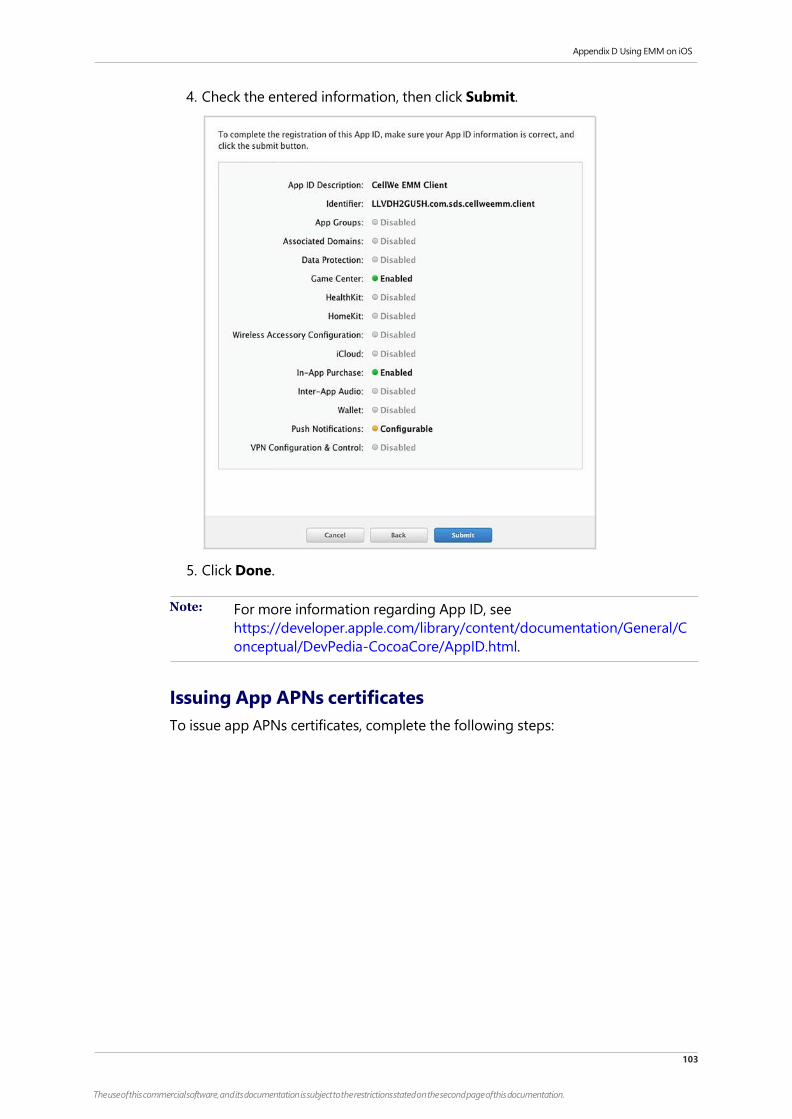
103
The use of this commercial software, and its documentation is subject to the restrictions stated on the second page of this documentation.
Appendix D Using EMM on iOS
4. Check the entered information, then click Submit.
5. Click Done.
Note: For more information regarding App ID, see
https://developer.apple.com/library/content/documentation/General/C
onceptual/DevPedia-CocoaCore/AppID.html.
Issuing App APNs certificates
To issue app APNs certificates, complete the following steps:
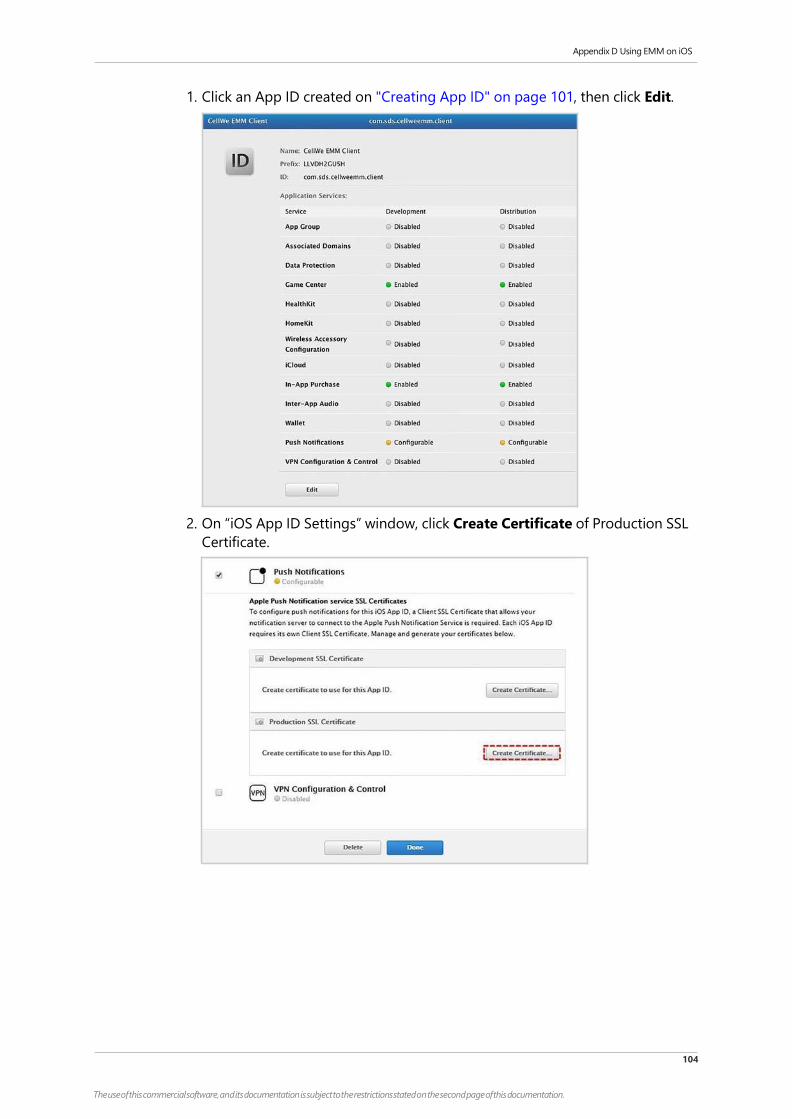
104
The use of this commercial software, and its documentation is subject to the restrictions stated on the second page of this documentation.
Appendix D Using EMM on iOS
1. Click an App ID created on "Creating App ID" on page 101, then click Edit.
2. On “iOS App ID Settings” window, click Create Certificate of Production SSL
Certificate.

105
The use of this commercial software, and its documentation is subject to the restrictions stated on the second page of this documentation.
Appendix D Using EMM on iOS
3. On About Creating a Certificate Signing Request (CSR) step, click Continue.
4. On Generate your certificate step, click Choose File, then select the CSR
file created under the "Generating CSR file for MDM" on page 99 section.
5. Click Generate.
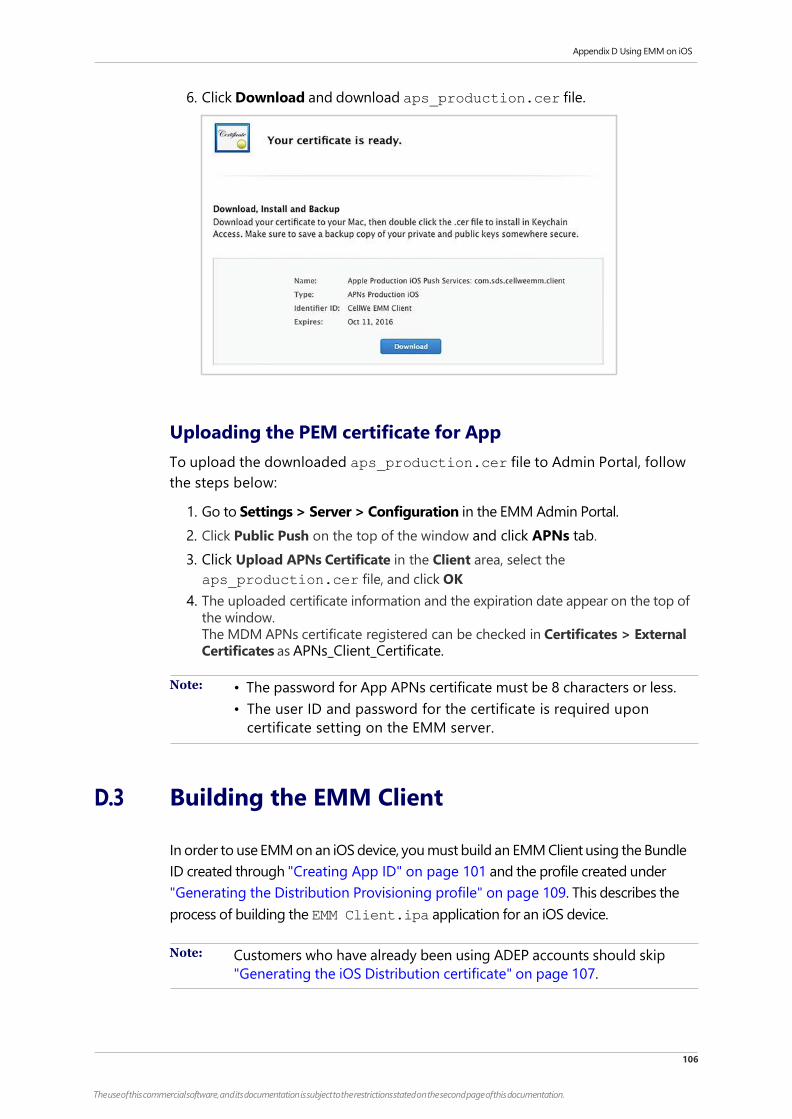
106
The use of this commercial software, and its documentation is subject to the restrictions stated on the second page of this documentation.
Appendix D Using EMM on iOS
6. Click Download and download aps_production.cer file.
Uploading the PEM certificate for App
To upload the downloaded aps_production.cer file to Admin Portal, follow
the steps below:
1. Go to Settings > Server > Configuration in the EMM Admin Portal.
2. Click Public Push on the top of the window and click APNs tab.
3. Click Upload APNs Certificate in the Client area, select the
aps_production.cer file, and click OK
4. The uploaded certificate information and the expiration date appear on the top of
the window.
The MDM APNs certificate registered can be checked in Certificates > External
Certificates as APNs_Client_Certificate.
Note: • The password for App APNs certificate must be 8 characters or less.
• The user ID and password for the certificate is required upon
certificate setting on the EMM server.
D.3 Building the EMM Client
In order to use EMM on an iOS device, you must build an EMM Client using the Bundle
ID created through "Creating App ID" on page 101 and the profile created under
"Generating the Distribution Provisioning profile" on page 109. This describes the
process of building the EMM Client.ipa application for an iOS device.
Note: Customers who have already been using ADEP accounts should skip
"Generating the iOS Distribution certificate" on page 107.
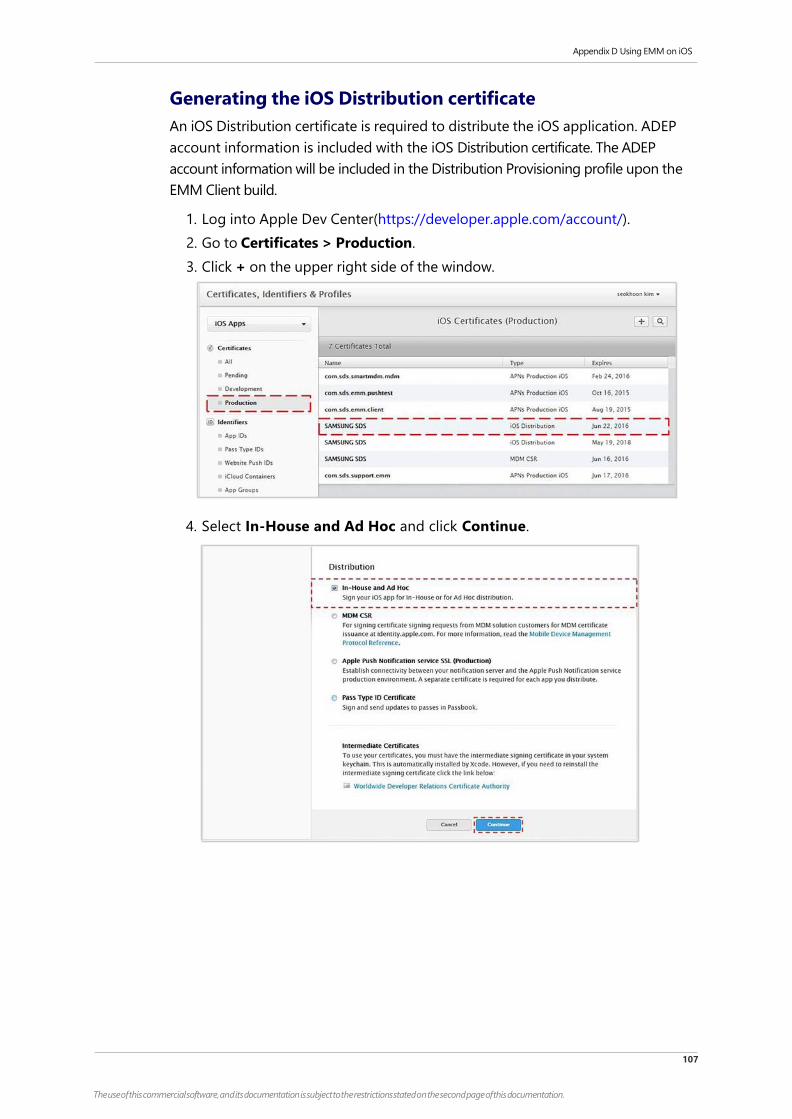
107
The use of this commercial software, and its documentation is subject to the restrictions stated on the second page of this documentation.
Appendix D Using EMM on iOS
Generating the iOS Distribution certificate
An iOS Distribution certificate is required to distribute the iOS application. ADEP
account information is included with the iOS Distribution certificate. The ADEP
account information will be included in the Distribution Provisioning profile upon the
EMM Client build.
1. Log into Apple Dev Center(https://developer.apple.com/account/).
2. Go to Certificates > Production.
3. Click + on the upper right side of the window.
4. Select In-House and Ad Hoc and click Continue.
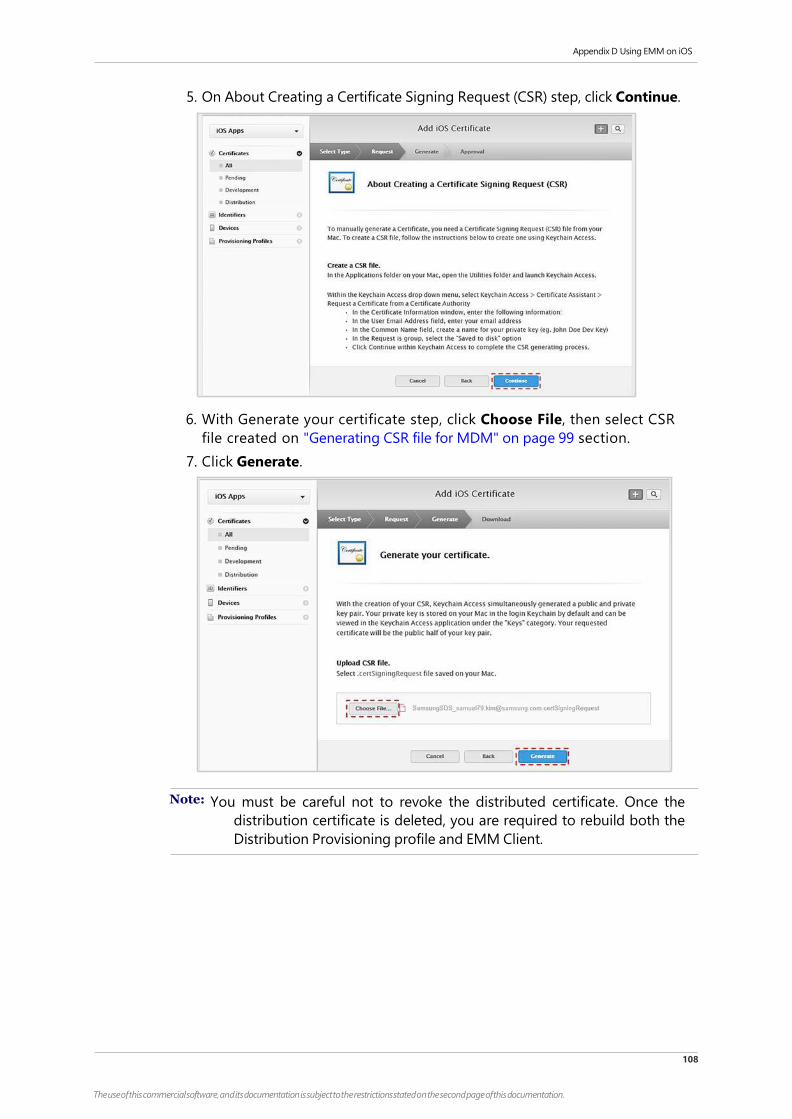
108
The use of this commercial software, and its documentation is subject to the restrictions stated on the second page of this documentation.
Appendix D Using EMM on iOS
5. On About Creating a Certificate Signing Request (CSR) step, click Continue.
6. With Generate your certificate step, click Choose File, then select CSR
file created on "Generating CSR file for MDM" on page 99 section.
7. Click Generate.
Note: You must be careful not to revoke the distributed certificate. Once the
distribution certificate is deleted, you are required to rebuild both the
Distribution Provisioning profile and EMM Client.

109
The use of this commercial software, and its documentation is subject to the restrictions stated on the second page of this documentation.
Appendix D Using EMM on iOS
Generating the Distribution Provisioning profile
1. Log into Apple Dev Center(https://developer.apple.com/account/).
2. Go to Provisioning Profiles > Distribution.
3. Click + on the upper right side of the window.
4. Create the Distribution Provisioning profile.
a. For Distribution Method, select In House and click Continue.
b. For App ID, select an App ID created on "Creating App ID" on page 101 .
c. Select the Distribution certificate established under "Generating the iOS
Distribution certificate" on page 107, then click Continue.
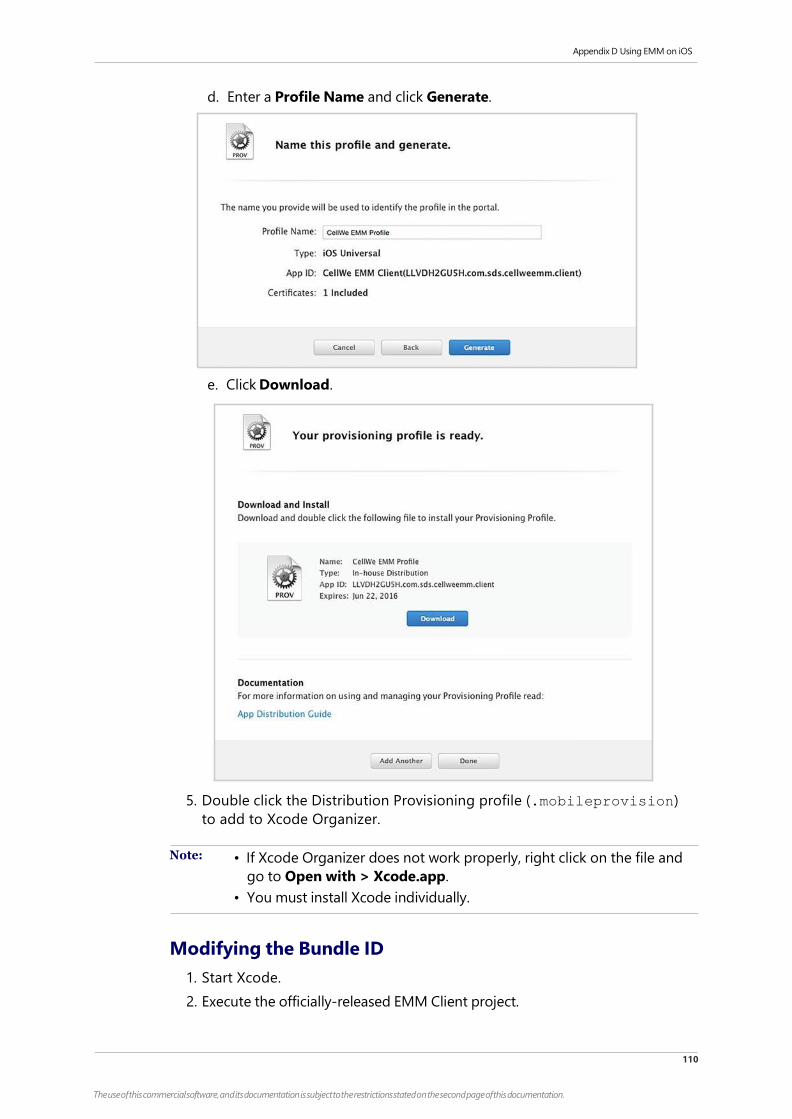
110
The use of this commercial software, and its documentation is subject to the restrictions stated on the second page of this documentation.
Appendix D Using EMM on iOS
d. Enter a Profile Name and click Generate.
e. Click Download.
5. Double click the Distribution Provisioning profile (.mobileprovision)
to add to Xcode Organizer.
Note: • If Xcode Organizer does not work properly, right click on the file and
go to Open with > Xcode.app.
• You must install Xcode individually.
Modifying the Bundle ID
1. Start Xcode.
2. Execute the officially-released EMM Client project.
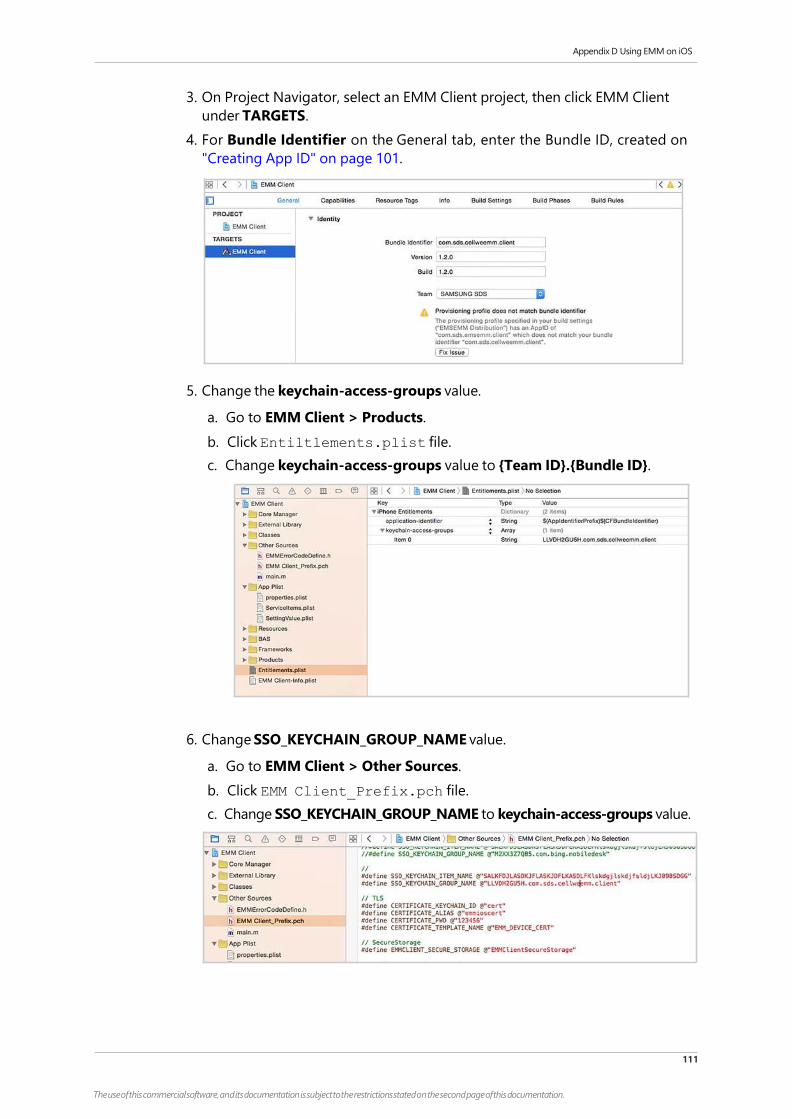
111
The use of this commercial software, and its documentation is subject to the restrictions stated on the second page of this documentation.
Appendix D Using EMM on iOS
3. On Project Navigator, select an EMM Client project, then click EMM Client
under TARGETS.
4. For Bundle Identifier on the General tab, enter the Bundle ID, created on
"Creating App ID" on page 101.
5. Change the keychain-access-groups value.
a. Go to EMM Client > Products.
b. Click Entiltlements.plist file.
c. Change keychain-access-groups value to {Team ID}.{Bundle ID}.
6. Change SSO_KEYCHAIN_GROUP_NAME value.
a. Go to EMM Client > Other Sources.
b. Click EMM Client_Prefix.pch file.
c. Change SSO_KEYCHAIN_GROUP_NAME to keychain-access-groups value.
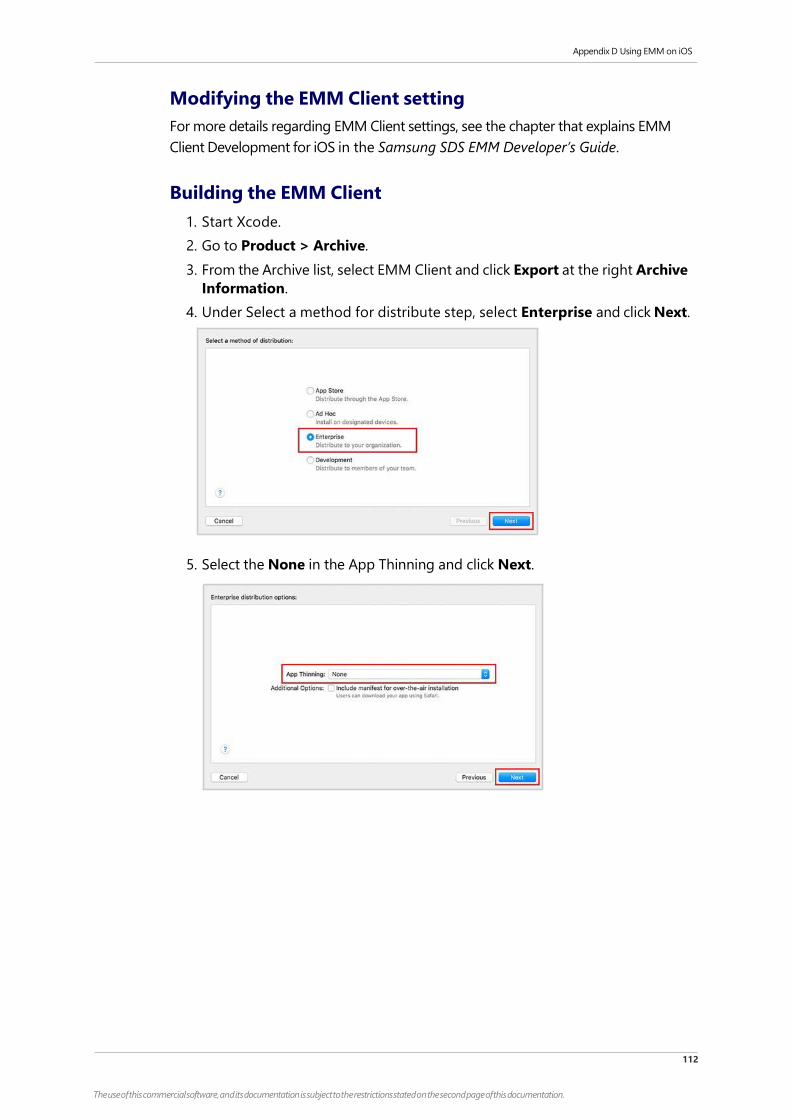
112
The use of this commercial software, and its documentation is subject to the restrictions stated on the second page of this documentation.
Appendix D Using EMM on iOS
Modifying the EMM Client setting
For more details regarding EMM Client settings, see the chapter that explains EMM
Client Development for iOS in the Samsung SDS EMM Developer’s Guide.
Building the EMM Client
1. Start Xcode.
2. Go to Product > Archive.
3. From the Archive list, select EMM Client and click Export at the right Archive
Information.
4. Under Select a method for distribute step, select Enterprise and click Next.
5. Select the None in the App Thinning and click Next.
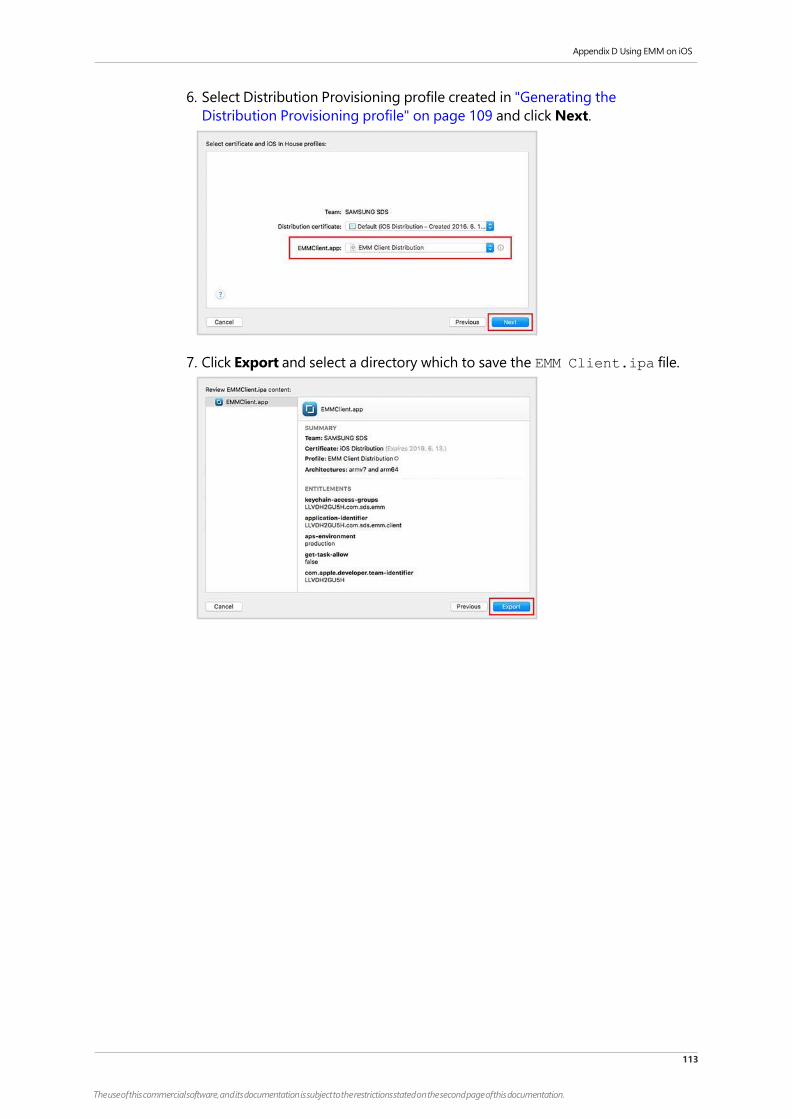
113
The use of this commercial software, and its documentation is subject to the restrictions stated on the second page of this documentation.
Appendix D Using EMM on iOS
6. Select Distribution Provisioning profile created in "Generating the
Distribution Provisioning profile" on page 109 and click Next.
7. Click Export and select a directory which to save the EMM Client.ipa file.
114
The use of this commercial software, and its documentation is subject to the restrictions stated on the second page of this documentation.
Appendix D Using EMM on iOS
D.4 Registering APNs certificates
This part of the chapter describes how to register APNs certificates before
using Samsung SDS EMM on an iOS device. You can register APNs certificates by
running DB script.
Downloading iOS APNs certificate
To use Push service of Samsung SDS EMM, you should download the APNs
certificate from "D.2, Generating Apple Push Notification Service certificates" on
page 98. To download the APNs certificate, complete the following steps:
To upload the downloaded MDM_SAMSUNG SDS_Certificate.pem to
Admin Portal, follow the steps below:
1. Go to Settings > Server > Configuration in the EMM Admin Portal.
2. Click Public Push on the top of the window and click APNs tab.
3. Click Download Cert in the Agent and Client field.
4. Enter the password to set the password for the certificate, then click OK.
• For MDM APNs: APNs_MDM_Certficate.p12
• For App APNs: APNs_Client_Certficate.p12
Registering an iOS APNs certificate directly in Push database
To use the Push service of Samsung SDS EMM on iOS devices, the APNs certificte must
be registered on the device. To register the APNs certificate by running DB script,
complete the followings steps:
1. Connect to the database through a tool, MS SQL Server Management Studio etc.
• An BULK insert authority must be granted to the DB connection account. If the
authority is not granted, you must grant it or connect by a SA account.
2. Copy a certificate file on the MS SQL server.
• The Windows account where MS SQL service operates must have an authority
in accessing the certificate file.
115
The use of this commercial software, and its documentation is subject to the restrictions stated on the second page of this documentation.
Appendix D Using EMM on iOS
3. Run below DB scripts to register the certificate information of EMMA and EMMC.
The bolded APID, Certificate Password, Certificate expiration date, and Certificate
location can be changed according to the system.
Configuring APNs Topic
In order to use Samsung SDS EMM Agent on iOS device, the MDM APNs certificate
information generated under "D.2.1, Generating MDM APNs certificate" on page
99 and the APNs settings configured on EMM Admin Portal must be identical. To
change the APNs Topic value, complete the following steps:
1. Double click the MDM APNs certificate generated under "D.2.1, Generating
MDM APNs certificate" on page 99.
2. Check the User ID in the pop-up window.
INSERT INTO PUSH_APNS_CERTIFICATE
(APID,SUBAPPLICATIONTYPE,CERTIFICATE_PASS,CERTIFICATE,EXPIRAT
IONDATE,STATUS,LAST_MODIFIED)
SELECT 'APID_FOR_EMMA',0,'CERT_PASSWORD', *,'2017-07-
28','1', getdate() FROM OPENROWSET( BULK N'C:\Program
Files\Microsoft SQL
Server\MSSQL11.SQLEXPRESS\MSSQL\DATA\test.p12', SINGLE_BLOB)
rs;
INSERT INTO PUSH_APNS_CERTIFICATE
(APID,SUBAPPLICATIONTYPE,CERTIFICATE_PASS,CERTIFICATE,EXPIRAT
IONDATE,STATUS,LAST_MODIFIED)
SELECT 'APID_FOR_EMMC',1,'CERT_PASSWORD', *,'2017-07-
28','1', getdate() FROM OPENROWSET( BULK N'C:\Program
Files\Microsoft SQL
Server\MSSQL11.SQLEXPRESS\MSSQL\DATA\test.p12', SINGLE_BLOB)
rs;
go

116
The use of this commercial software, and its documentation is subject to the restrictions stated on the second page of this documentation.
Appendix D Using EMM on iOS
3. Set the User ID for the MDM APNs certificate as the APNs Topic value on
the EMM Admin Portal.
a. Log in to the EMM Admin Portal.
b. Go to Settings > Server > Configuration.
c. In the Category: MDM, Change the APNS Topic to the User ID of the
MDM APNs certificate.
d. Click on the upper side of the window and apply the changes.
D.5 Setting the iOS Sign Cert
The iOS Sign Cert (iOSSigningCert.p12) is a server certificate necessary for
communication between the EMM server and iOS devices. Apple MDM
specifications require a digital signature with iOS Sign Cert when the EMM server
sends data to iOS devices.
D.5.1 Generating iOS Sign Cert
The default public key for iOS Sign Cert is RSA (2048bit) and the signature
algorithm is Sha256RSA. The examples below shown in bold should be modified
according to the environment. If you need multiple certificates, repeat steps 3
through 6 after the first certificate is issued. Register the JAVA path in the
environment variables in advance to use the Keytool command.
Note: For more information on Java keytool, see
docs.oracle.com/javase/7/docs/technotes/tools/windows/keytool.html.
1. Create the directory iOS Sign Cert in a specific location you want.
2. Open a command prompt and go to iOS Sign Cert directory.
3. Generate the self-signed Root key storage.
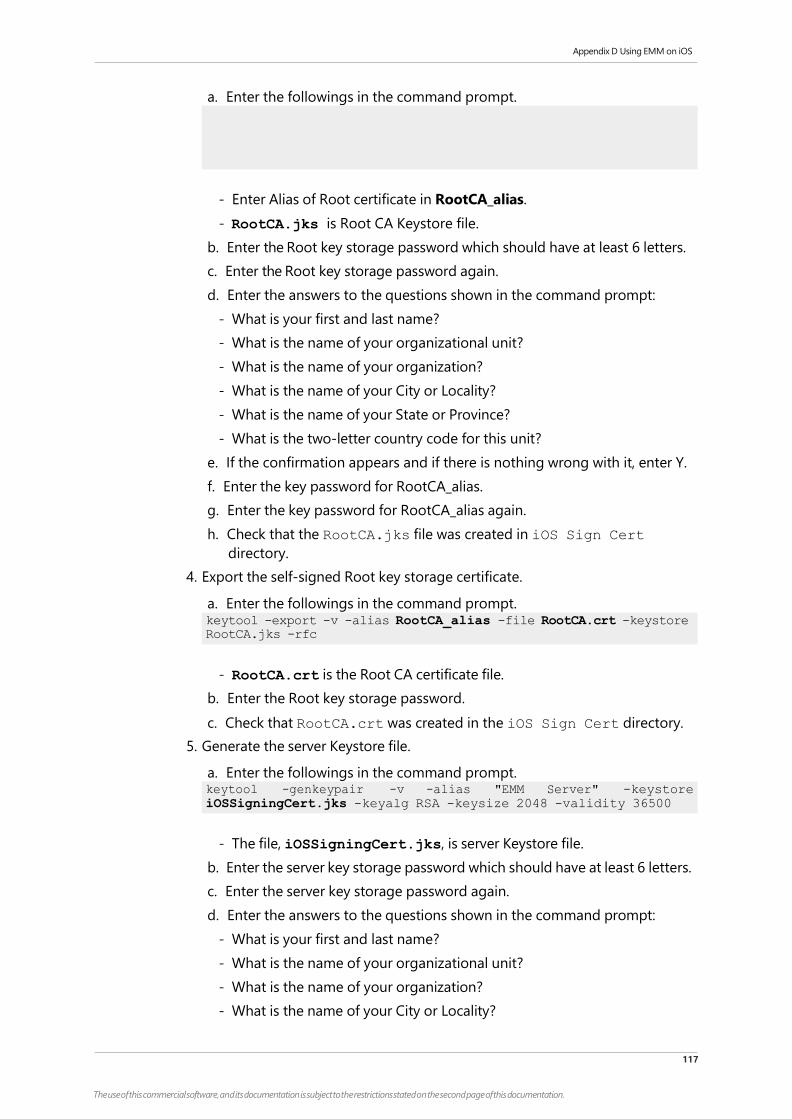
117
The use of this commercial software, and its documentation is subject to the restrictions stated on the second page of this documentation.
Appendix D Using EMM on iOS
a. Enter the followings in the command prompt.
- Enter Alias of Root certificate in RootCA_alias.
- RootCA.jks is Root CA Keystore file.
b. Enter the Root key storage password which should have at least 6 letters.
c. Enter the Root key storage password again.
d. Enter the answers to the questions shown in the command prompt:
- What is your first and last name?
- What is the name of your organizational unit?
- What is the name of your organization?
- What is the name of your City or Locality?
- What is the name of your State or Province?
- What is the two-letter country code for this unit?
e. If the confirmation appears and if there is nothing wrong with it, enter Y.
f. Enter the key password for RootCA_alias.
g. Enter the key password for RootCA_alias again.
h. Check that the RootCA.jks file was created in iOS Sign Cert
directory.
4. Export the self-signed Root key storage certificate.
a. Enter the followings in the command prompt.
- RootCA.crt is the Root CA certificate file.
b. Enter the Root key storage password.
c. Check that RootCA.crt was created in the iOS Sign Cert directory.
5. Generate the server Keystore file.
a. Enter the followings in the command prompt.
- The file, iOSSigningCert.jks, is server Keystore file.
b. Enter the server key storage password which should have at least 6 letters.
c. Enter the server key storage password again.
d. Enter the answers to the questions shown in the command prompt:
- What is your first and last name?
- What is the name of your organizational unit?
- What is the name of your organization?
- What is the name of your City or Locality?
keytool -export -v -alias RootCA_alias -file RootCA.crt -keystore RootCA.jks -rfc
keytool -genkeypair -v -alias "EMM Server" -keystore
iOSSigningCert.jks -keyalg RSA -keysize 2048 -validity 36500
118
The use of this commercial software, and its documentation is subject to the restrictions stated on the second page of this documentation.
Appendix D Using EMM on iOS
- What is the name of your State or Province?
- What is the two-letter country code for this unit?
e. If the confirmation appears and if there is nothing wrong with it, enter Y.
f. Enter key password for EMM Server.
g. Enter the key password for EMM Server again.
h. Check that iOSSigningCert.jks was created in iOS Sign Cert
directory.
6. Generate server certificate.
a. Enter as follows in the command prompt.
b. Enter the server key storage password.
c. Check that rsaOneCert.csr was created in iOS Sign Cert
directory.
- The file, iOSSigningCert.crt, is a digitally signed certificate file.
d. Enter the server key storage password.
7. Import the Root certificate to server Keystore.
a. Enter as follows in the command prompt.
b. Enter the server key storage password.
c. When the question asking if you trust the certificate, and if there is
nothing wrong with it, enter Y.
d. Enter server key storage password.
8. Generate P12 certificate file in server Keystore.
a. Enter as follows in the command prompt.
- The file, iOSSigningCert.p12, is P12 server certificate file.
b. Enter the key storage password for the object (iOSSigningCert.p12).
c. Enter the key storage password for the object (iOSSigningCert.p12)
again.
d. Enter the key storage password for source (iOSSigningCert.jks).
keytool -certreq -v -alias "EMM Server" -keystore
iOSSigningCert.jks -file rsaOneCert.csr
keytool -gencert -v -alias RootCA_alias -keystore RootCA.jks
-infile rsaOneCert.csr -validity 3650 -outfile iOSSigningCert.crt
-rfc -ext KeyUsage:critical="digitalSignature" -ext
EKU="serverAuth"
keytool -import -v -alias RootCA_alias -file RootCA.crt -
keystore iOSSigningCert.jks -storetype JKS
keytool -import -v -alias "EMM Server" -file iOSSigningCert.crt -keystore iOSSigningCert.jks -storetype JKS
keytool -importkeystore -srckeystore iOSSigningCert.jks
-destkeystore iOSSigningCert.p12 -deststoretype PKCS12
-srcalias "EMM Server"
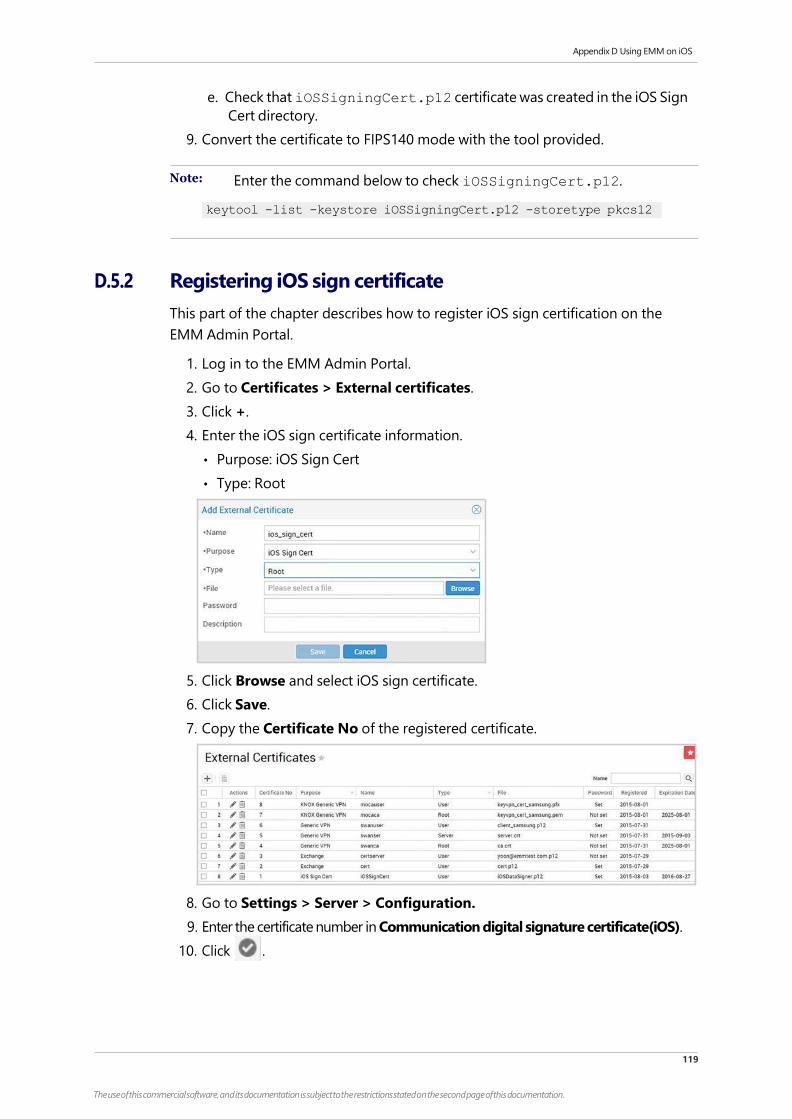
119
The use of this commercial software, and its documentation is subject to the restrictions stated on the second page of this documentation.
Appendix D Using EMM on iOS
e. Check that iOSSigningCert.p12 certificate was created in the iOS Sign
Cert directory.
9. Convert the certificate to FIPS140 mode with the tool provided.
Note: Enter the command below to check iOSSigningCert.p12.
D.5.2 Registering iOS sign certificate
This part of the chapter describes how to register iOS sign certification on the
EMM Admin Portal.
1. Log in to the EMM Admin Portal.
2. Go to Certificates > External certificates.
3. Click +.
4. Enter the iOS sign certificate information.
• Purpose: iOS Sign Cert
• Type: Root
5. Click Browse and select iOS sign certificate.
6. Click Save.
7. Copy the Certificate No of the registered certificate.
8. Go to Settings > Server > Configuration.
9. Enter the certificate number in Communication digital signature certificate(iOS).
10. Click .
keytool -list -keystore iOSSigningCert.p12 -storetype pkcs12
120
The use of this commercial software, and its documentation is subject to the restrictions stated on the second page of this documentation.
Appendix E Installation Environment File
Appendix E Insta ation Environment File
This describes each section of the EMM{Version}__SETUP.ini.
MULTI_TENANCY
Properties Description Default
Value
Location
ENABLE Whether to use multi-
tenant mode
• true: Multi-tenant
• false: Single-tenant
false Path to file:
C:\SamsungSDS\EMM\{Version}\wa
r\WEBINF\classes\config\defaul
t-config.xml
Server_URL
Properties Description Default
Value
Location Notes
HOST IP address for EMM
server installation
localhost • Path to file:
C:\SamsungSDS\EMM\
{Version}\war\WEB-
INF\classes\config\
default-config.xml
• The part that comes after
common/emm:
- hostname
- httpPort
- httpsPort
- loopbackIp
- loopbackPort
PORT HTTP Port of EMM
WAS
35080
DOMAIN_
NAME
Public IP or domain
address with external
access
demo.sm
artemm.c
om
The value
must be
changed.
HTTPS_PO
RT
HTTPS Port of EMM
server
35443
LOOPBACK
_IP
Loopback IP for EMM
server
127.0.0.1
LOOPBACK
_PORT
Loopback Port for
EMM server
35080
EXTERNAL_
PORT
• Single-server:
HTTPS Port with
external access to
EMM server
• Multi-server: HTTPS
Port with external
access to Web server
35443
121
The use of this commercial software, and its documentation is subject to the restrictions stated on the second page of this documentation.
Appendix E Installation Environment File
DATABASE
Properties Description Default
Value
Location
TYPE Type of database MSSQL • Path to file:
C:\SamsungSDS\EMM\{Version}
\war\WEB-INF\classes\
config\default-config.xml
• The part comes after
database/type:
- type
HOST Server address for MSSQL localhost • Path to file:
C:\SamsungSDS\EMM\{Versio
n}\war\WEB-
INF\classes\config\defaul
t-config.xml
• The part comes after
common/datasource/emm:
- driver
- url
- username
- password
PORT TCP/IP port for MSSQL 1433
NAME Database name EMM{Versi
on}DB
USER Database access user ID EMM{Versi
on}
PASSWORD Database access
password
SA_USER MS SQL admin ID sa
SA_PASSWO
RD
MS SQL admin password
PUSH_SAGID
Properties Description Default
Value
Location
SAGID The ID used for the SA
module included in the
application registered
in Push server.
• Duplicate SAGIDs are
not allowed in the
environment with a
single Push server.
• A ticket for the SAGID
set is needed.
SDSEMMSA C:\SamsungSDS\PushConfig
\PushSA\resources\sa\prope
rties\sa.properties
122
The use of this commercial software, and its documentation is subject to the restrictions stated on the second page of this documentation.
Appendix E Installation Environment File
PUSH_APID
Push APID is the ID used for the application that provides Push service. EMM uses
EMM Agent (EMMA) and EMM Client (EMMC) as default.
Properties Description Default
Value
Location
APID The ID used for Push
service application.
• Duplicate APIDs are
not allowed in the
environment with a
single Push server.
EMMA C:\SamsungSDS\PushConfig\PushSA
\resources\sa\properties\sa.pro
perties
GENERAL_CONFIG
Specify the basic information on the Push operating environment.
● USE_L4: Specify whether to implement load balancing with L4 Network
equipment for multiple Push server instances (Proxy or Push CM module).
● SMB_RUN_MODE: Specify the operating mode for the Push server.
- NORMAL: Install Push CM only in DMZ.
- PROXY: Install Push Proxy in DMZ and Push CM in Intranet zone.
Properties Description Default
Value
Properties
USE_L4 Whether to use L4.
• true: Use
• false: Do not use
FALSE C:\SamsungSDS\Push\{Version}\
bin\push_cm_start.bat
SMB_RUN_
MODE
Whether to activate
Proxy mode
• true: Use
• false: Do not use
NORMAL
Properties Description Default
Value
Properties
USE_L4 Whether to use L4.
• true: Use
• false: Do not use
FALSE C:\SamsungSDS\Push\{Version}\
bin\push_cm_start.bat
SMB_RUN_
MODE
Whether to activate
Proxy mode
• true: Use
• false: Do not use
NORMAL
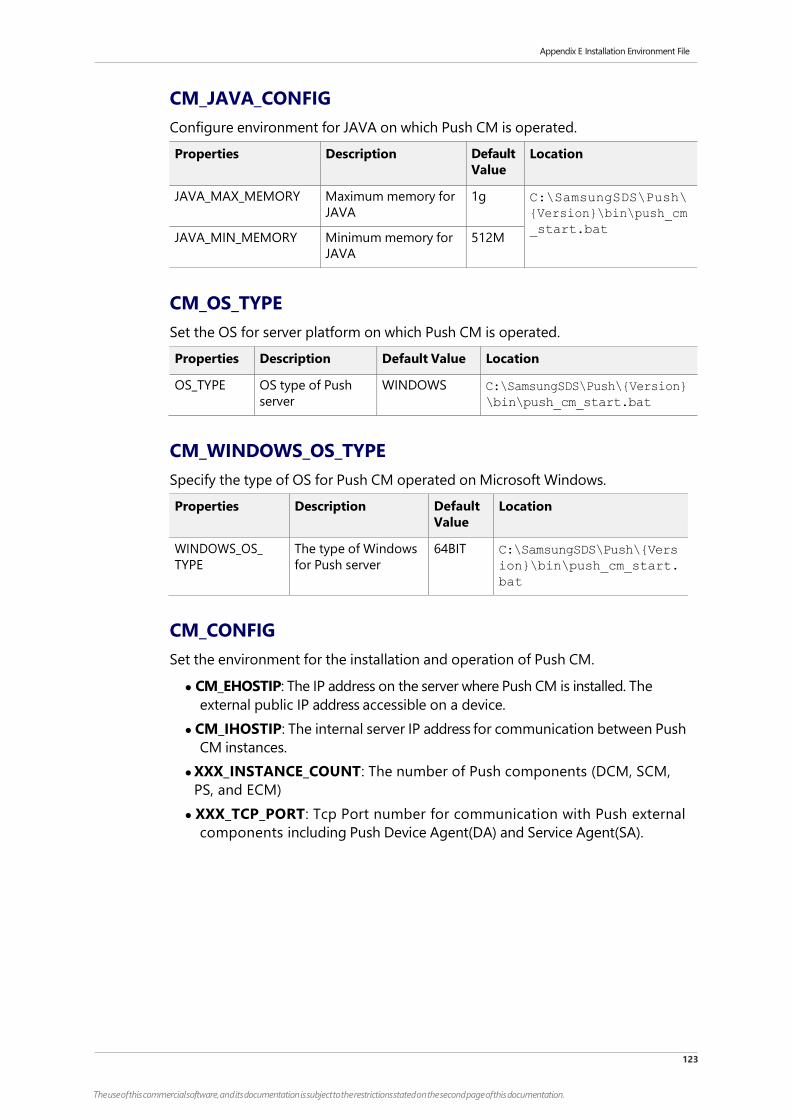
123
The use of this commercial software, and its documentation is subject to the restrictions stated on the second page of this documentation.
Appendix E Installation Environment File
CM_JAVA_CONFIG
Configure environment for JAVA on which Push CM is operated.
Properties Description Default
Value
Location
JAVA_MAX_MEMORY Maximum memory for
JAVA
1g C:\SamsungSDS\Push\
{Version}\bin\push_cm
_start.bat JAVA_MIN_MEMORY Minimum memory for
JAVA
512M
CM_OS_TYPE
Set the OS for server platform on which Push CM is operated.
Properties Description Default Value Location
OS_TYPE OS type of Push
server
WINDOWS C:\SamsungSDS\Push\{Version}
\bin\push_cm_start.bat
CM_WINDOWS_OS_TYPE
Specify the type of OS for Push CM operated on Microsoft Windows.
Properties Description Default
Value
Location
WINDOWS_OS_
TYPE
The type of Windows
for Push server
64BIT C:\SamsungSDS\Push\{Vers
ion}\bin\push_cm_start.
bat
CM_CONFIG
Set the environment for the installation and operation of Push CM.
● CM_EHOSTIP: The IP address on the server where Push CM is installed. The
external public IP address accessible on a device.
● CM_IHOSTIP: The internal server IP address for communication between Push
CM instances.
● XXX_INSTANCE_COUNT: The number of Push components (DCM, SCM,
PS, and ECM)
● XXX_TCP_PORT: Tcp Port number for communication with Push external
components including Push Device Agent(DA) and Service Agent(SA).
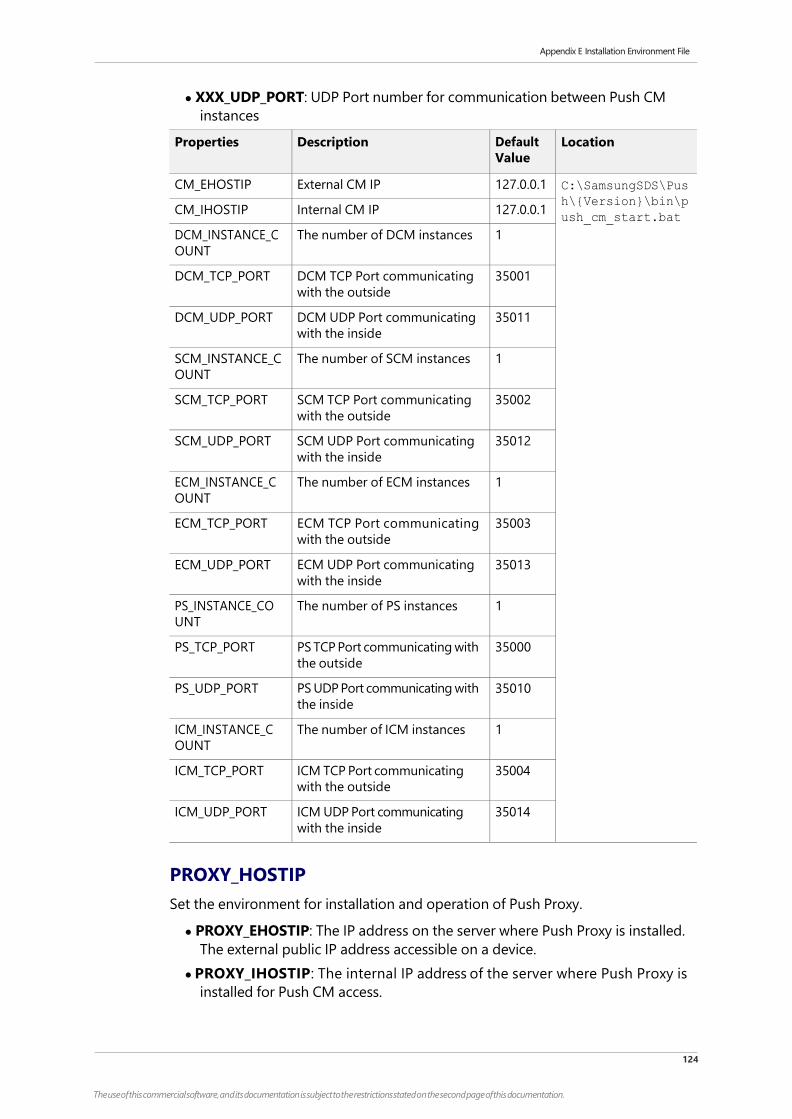
124
The use of this commercial software, and its documentation is subject to the restrictions stated on the second page of this documentation.
Appendix E Installation Environment File
● XXX_UDP_PORT: UDP Port number for communication between Push CM
instances
Properties Description Default
Value
Location
CM_EHOSTIP External CM IP 127.0.0.1 C:\SamsungSDS\Pus
h\{Version}\bin\p
ush_cm_start.bat CM_IHOSTIP Internal CM IP 127.0.0.1
DCM_INSTANCE_C
OUNT
The number of DCM instances 1
DCM_TCP_PORT DCM TCP Port communicating
with the outside
35001
DCM_UDP_PORT DCM UDP Port communicating
with the inside
35011
SCM_INSTANCE_C
OUNT
The number of SCM instances 1
SCM_TCP_PORT SCM TCP Port communicating
with the outside
35002
SCM_UDP_PORT SCM UDP Port communicating
with the inside
35012
ECM_INSTANCE_C
OUNT
The number of ECM instances 1
ECM_TCP_PORT ECM TCP Port communicating
with the outside
35003
ECM_UDP_PORT ECM UDP Port communicating
with the inside
35013
PS_INSTANCE_CO
UNT
The number of PS instances 1
PS_TCP_PORT PS TCP Port communicating with
the outside
35000
PS_UDP_PORT PS UDP Port communicating with
the inside
35010
ICM_INSTANCE_C
OUNT
The number of ICM instances 1
ICM_TCP_PORT ICM TCP Port communicating
with the outside
35004
ICM_UDP_PORT ICM UDP Port communicating
with the inside
35014
PROXY_HOSTIP
Set the environment for installation and operation of Push Proxy.
● PROXY_EHOSTIP: The IP address on the server where Push Proxy is installed.
The external public IP address accessible on a device.
● PROXY_IHOSTIP: The internal IP address of the server where Push Proxy is
installed for Push CM access.
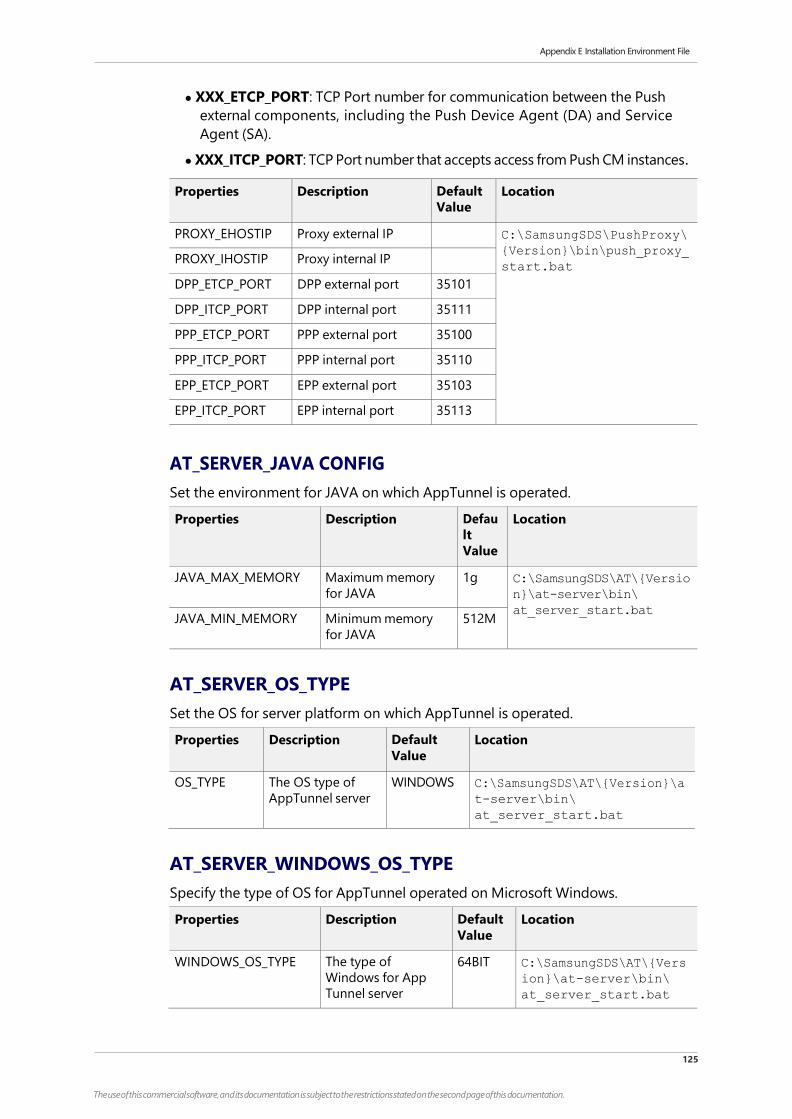
125
The use of this commercial software, and its documentation is subject to the restrictions stated on the second page of this documentation.
Appendix E Installation Environment File
● XXX_ETCP_PORT: TCP Port number for communication between the Push
external components, including the Push Device Agent (DA) and Service
Agent (SA).
● XXX_ITCP_PORT: TCP Port number that accepts access from Push CM instances.
Properties Description Default
Value
Location
PROXY_EHOSTIP Proxy external IP C:\SamsungSDS\PushProxy\
{Version}\bin\push_proxy_
start.bat PROXY_IHOSTIP Proxy internal IP
DPP_ETCP_PORT DPP external port 35101
DPP_ITCP_PORT DPP internal port 35111
PPP_ETCP_PORT PPP external port 35100
PPP_ITCP_PORT PPP internal port 35110
EPP_ETCP_PORT EPP external port 35103
EPP_ITCP_PORT EPP internal port 35113
AT_SERVER_JAVA CONFIG
Set the environment for JAVA on which AppTunnel is operated.
Properties Description Defau
lt
Value
Location
JAVA_MAX_MEMORY Maximum memory
for JAVA
1g C:\SamsungSDS\AT\{Versio
n}\at-server\bin\
at_server_start.bat JAVA_MIN_MEMORY Minimum memory
for JAVA
512M
AT_SERVER_OS_TYPE
Set the OS for server platform on which AppTunnel is operated.
Properties Description Default
Value
Location
OS_TYPE The OS type of
AppTunnel server
WINDOWS C:\SamsungSDS\AT\{Version}\a
t-server\bin\
at_server_start.bat
AT_SERVER_WINDOWS_OS_TYPE
Specify the type of OS for AppTunnel operated on Microsoft Windows.
Properties Description Default
Value
Location
WINDOWS_OS_TYPE The type of
Windows for App
Tunnel server
64BIT C:\SamsungSDS\AT\{Vers
ion}\at-server\bin\
at_server_start.bat
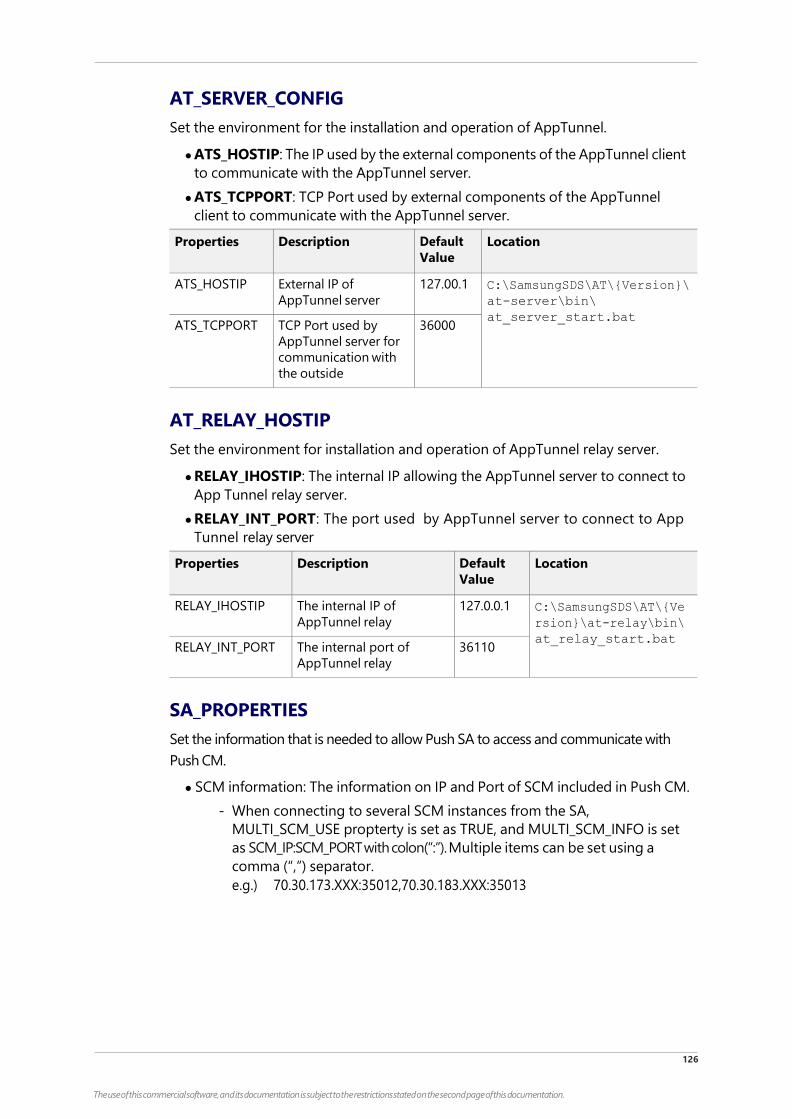
126
The use of this commercial software, and its documentation is subject to the restrictions stated on the second page of this documentation.
AT_SERVER_CONFIG
Set the environment for the installation and operation of AppTunnel.
● ATS_HOSTIP: The IP used by the external components of the AppTunnel client
to communicate with the AppTunnel server.
● ATS_TCPPORT: TCP Port used by external components of the AppTunnel
client to communicate with the AppTunnel server.
Properties Description Default
Value
Location
ATS_HOSTIP External IP of
AppTunnel server
127.00.1 C:\SamsungSDS\AT\{Version}\
at-server\bin\
at_server_start.bat ATS_TCPPORT TCP Port used by
AppTunnel server for
communication with
the outside
36000
AT_RELAY_HOSTIP
Set the environment for installation and operation of AppTunnel relay server.
● RELAY_IHOSTIP: The internal IP allowing the AppTunnel server to connect to
App Tunnel relay server.
● RELAY_INT_PORT: The port used by AppTunnel server to connect to App
Tunnel relay server
Properties Description Default
Value
Location
RELAY_IHOSTIP The internal IP of
AppTunnel relay
127.0.0.1 C:\SamsungSDS\AT\{Ve
rsion}\at-relay\bin\
at_relay_start.bat RELAY_INT_PORT The internal port of
AppTunnel relay
36110
SA_PROPERTIES
Set the information that is needed to allow Push SA to access and communicate with
Push CM.
● SCM information: The information on IP and Port of SCM included in Push CM.
- When connecting to several SCM instances from the SA,
MULTI_SCM_USE propterty is set as TRUE, and MULTI_SCM_INFO is set
as SCM_IP:SCM_PORT with colon(“:”). Multiple items can be set using a
comma (“,”) separator.
e.g.) 70.30.173.XXX:35012,70.30.183.XXX:35013
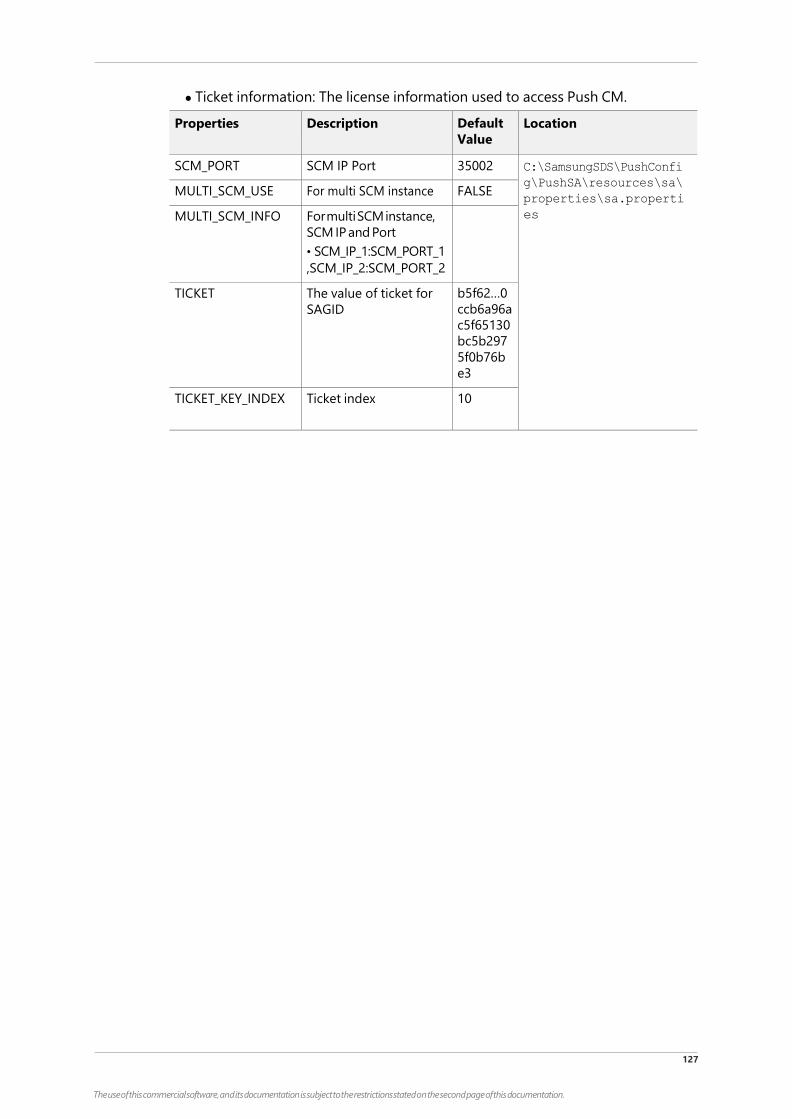
127
The use of this commercial software, and its documentation is subject to the restrictions stated on the second page of this documentation.
● Ticket information: The license information used to access Push CM.
Properties Description Default
Value
Location
SCM_PORT SCM IP Port 35002 C:\SamsungSDS\PushConfi
g\PushSA\resources\sa\
properties\sa.properti
es
MULTI_SCM_USE For multi SCM instance FALSE
MULTI_SCM_INFO For multi SCM instance,
SCM IP and Port
• SCM_IP_1:SCM_PORT_1
,SCM_IP_2:SCM_PORT_2
TICKET The value of ticket for
SAGID
b5f62…0
ccb6a96a
c5f65130
bc5b297
5f0b76b
e3
TICKET_KEY_INDEX Ticket index 10
Appendix F Installing SQL Server certificate
126
The use of this commercial software, and its documentation is subject to the restrictions stated on the second page of this documentation.
Appendix F Installing SQL Server
certificate
The database certificate should be changed due to the limitation of the EMC
Crypto module. This chapter describes how to install a 2048 bit RSA certificate. To
install the certificate, take the following steps.
Note: A problem can occur when installing a 2048 bit certificate, if another
system uses SQL Server. Compatibility with other systems should be
checked.
Creating SQL Server certificate
Create a P12 type certificate for SQL Server, and copy it to SQL Server.
● When creating a certificate, the Common Name (CN) must be the name of
the computer where the database is installed.
● Set Key Size to 2048 bit.
● Input DigitalSignature as Key Usage.
● Input ServerAuth as Extended Key Usage.
The following shows an example of creating a certificate, using keytool.
Installing SQL Server certificate
To install the certificate used in SQL Server, complete the following steps:
1. Enter Windows > Run > mmc in SQL Server to start Windows Management
Console (MMC).
keytool -genkey -v -alias mssql -keystore sqlserver.p12 -
storetype pkcs12 -keyalg RSA -keysize 2048 -keypass 123456 -
validity 7300 -ext KeyUsage:critical="digitalSignature" -ext
EKU="serverAuth" -storepass 123456 -dname CN=computer name
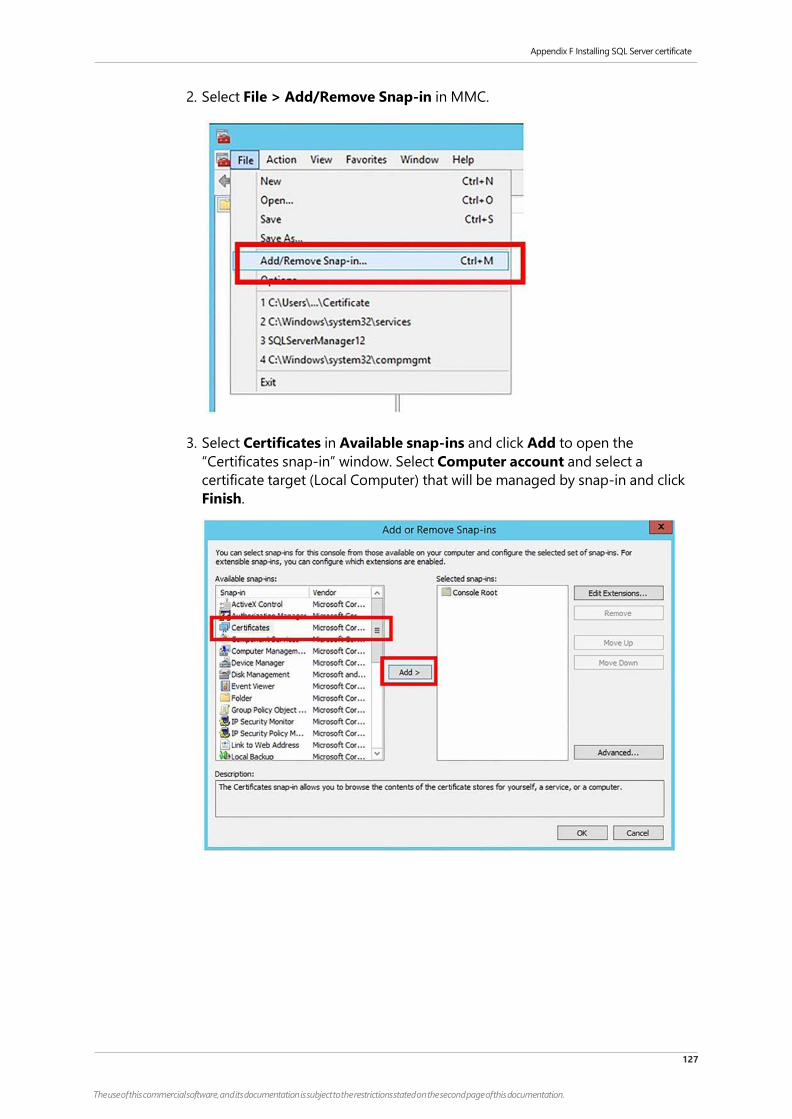
Appendix F Installing SQL Server certificate
127
The use of this commercial software, and its documentation is subject to the restrictions stated on the second page of this documentation.
2. Select File > Add/Remove Snap-in in MMC.
3. Select Certificates in Available snap-ins and click Add to open the
“Certificates snap-in” window. Select Computer account and select a
certificate target (Local Computer) that will be managed by snap-in and click
Finish.

Appendix F Installing SQL Server certificate
128
The use of this commercial software, and its documentation is subject to the restrictions stated on the second page of this documentation.
4. Check the selected snap-in and click OK to finish adding certificates to snap-in.
5. Extend Certificates (Local Computer) added to MMC and select Personal >
Certificates.
6. Right click and select All Tasks > Import.
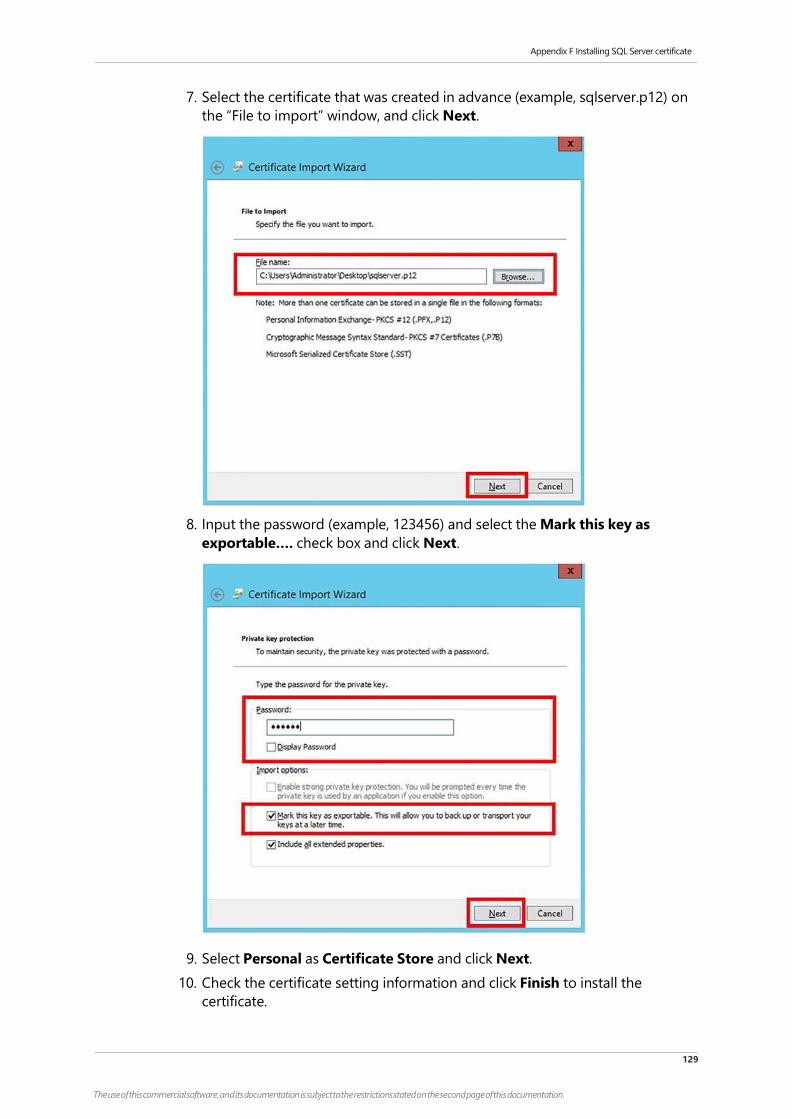
Appendix F Installing SQL Server certificate
129
The use of this commercial software, and its documentation is subject to the restrictions stated on the second page of this documentation.
7. Select the certificate that was created in advance (example, sqlserver.p12) on
the “File to import” window, and click Next.
8. Input the password (example, 123456) and select the Mark this key as
exportable…. check box and click Next.
9. Select Personal as Certificate Store and click Next.
10. Check the certificate setting information and click Finish to install the
certificate.
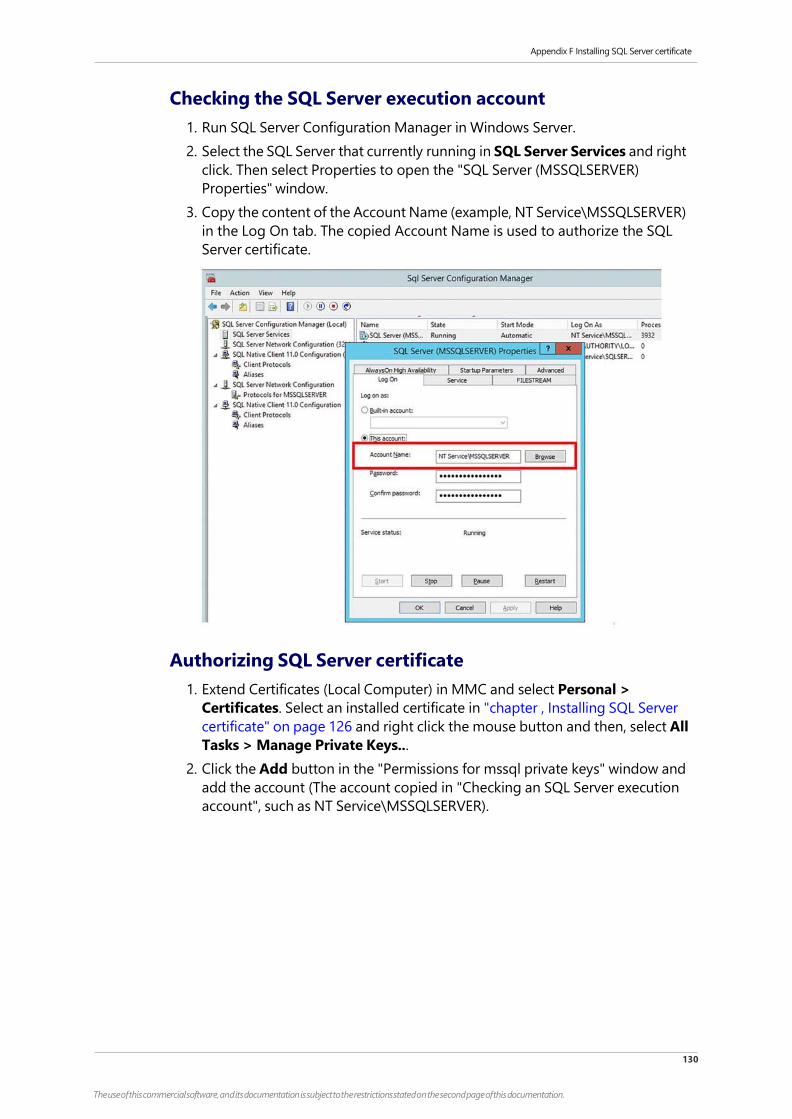
Appendix F Installing SQL Server certificate
130
The use of this commercial software, and its documentation is subject to the restrictions stated on the second page of this documentation.
Checking the SQL Server execution account
1. Run SQL Server Configuration Manager in Windows Server.
2. Select the SQL Server that currently running in SQL Server Services and right
click. Then select Properties to open the "SQL Server (MSSQLSERVER)
Properties" window.
3. Copy the content of the Account Name (example, NT Service\MSSQLSERVER)
in the Log On tab. The copied Account Name is used to authorize the SQL
Server certificate.
Authorizing SQL Server certificate
1. Extend Certificates (Local Computer) in MMC and select Personal >
Certificates. Select an installed certificate in "chapter , Installing SQL Server
certificate" on page 126 and right click the mouse button and then, select All
Tasks > Manage Private Keys...
2. Click the Add button in the "Permissions for mssql private keys" window and
add the account (The account copied in "Checking an SQL Server execution
account", such as NT Service\MSSQLSERVER).

Appendix F Installing SQL Server certificate
131
The use of this commercial software, and its documentation is subject to the restrictions stated on the second page of this documentation.
3. Select the check box for Full Control/Read privilege on the added account.
Designating SQL Server certificate
1. Select Protocol for MSSQLSERVER of the SQL Server Network Configuration
item in SQL Server Configuration Manager. Then, right click and select
Properties.
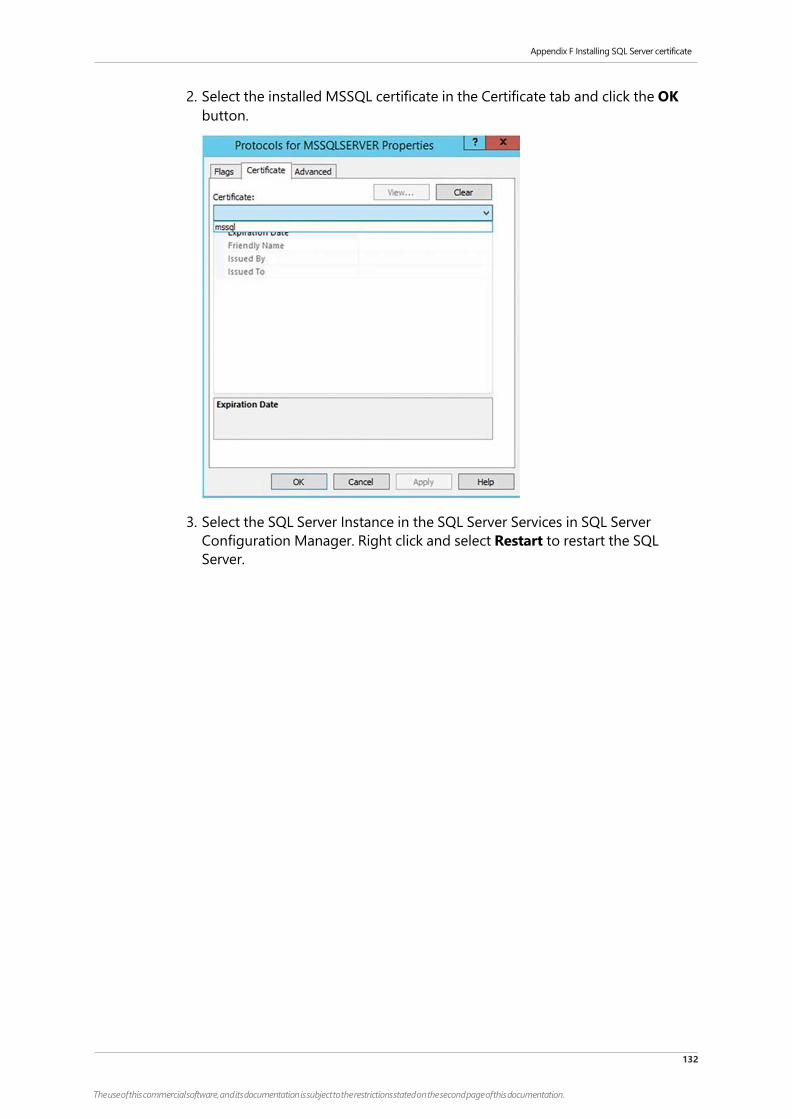
Appendix F Installing SQL Server certificate
132
The use of this commercial software, and its documentation is subject to the restrictions stated on the second page of this documentation.
2. Select the installed MSSQL certificate in the Certificate tab and click the OK
button.
3. Select the SQL Server Instance in the SQL Server Services in SQL Server
Configuration Manager. Right click and select Restart to restart the SQL
Server.

Appendix G Secure Email Gateway
140
The use of this commercial software, and its documentation is subject to the restrictions stated on the second page of this documentation.
Appendix G Secure Email Gateway
Secure Email Gateway (SEG) is a relay server that serves as an intermediary
between the Exchange server and the device user, filtering the services by
utilizing the web firewall capabilities. SEG can protect devices from web-based
attacks by separating incoming traffic and blocking external attacks.
Figure G-1. Samsung SDS Secure Email Gateway composition
Installation Configuration Module
The following describes the module required for the SEG services that is provided in
one installer.
● Application Request Routing (ARR): This is a module installed in the server for
SEG configuration, run by a setup file provided by Microsoft. This module
performs the server load balancing, request routing, and filtering of inbound
and outbound data.
● SEG Manger: Manages the certificate information to communicate with the
Exchange Server.
G.1 Pre-installation
This section describes the pre-installation preparation for SEG.
● Web server installation: Windows IIS (Internet Information Services) should be
installed in advance because SEG uses the Web proxy. Minimum platform
requirements are Windows IIS 7.0 and Windows Server 2008 R2. It can be
installed on a 64bit server
● Certificate installation: For SSL communication between the Gateway Server
and Exchange Server, you must install the certificate (.CER) used by the
Exchange server for the Gateway server.

Appendix G Secure Email Gateway
141
The use of this commercial software, and its documentation is subject to the restrictions stated on the second page of this documentation.
Exporting Certificates
Export the certificates used by the Exchange server in .CER format.
1. Double-click the certificate in IIS Manager.
2. In the installed server certificate, double-click the certificate you want to export.
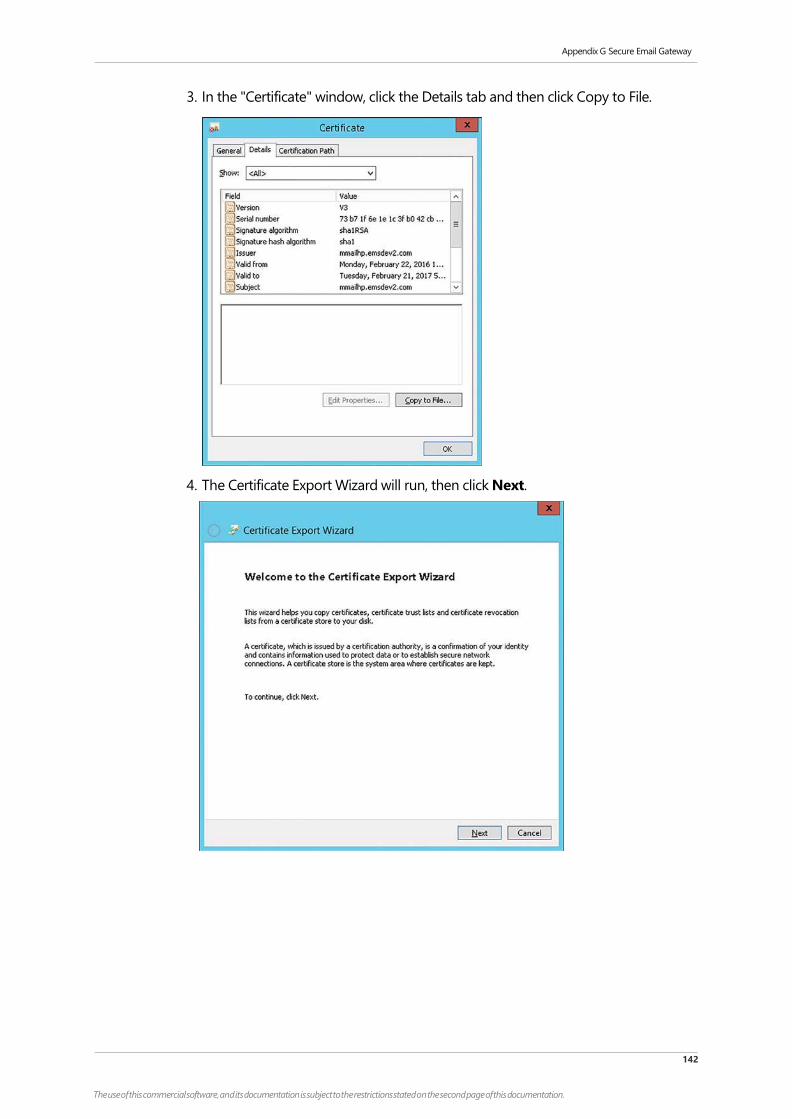
Appendix G Secure Email Gateway
142
The use of this commercial software, and its documentation is subject to the restrictions stated on the second page of this documentation.
3. In the "Certificate" window, click the Details tab and then click Copy to File.
4. The Certificate Export Wizard will run, then click Next.
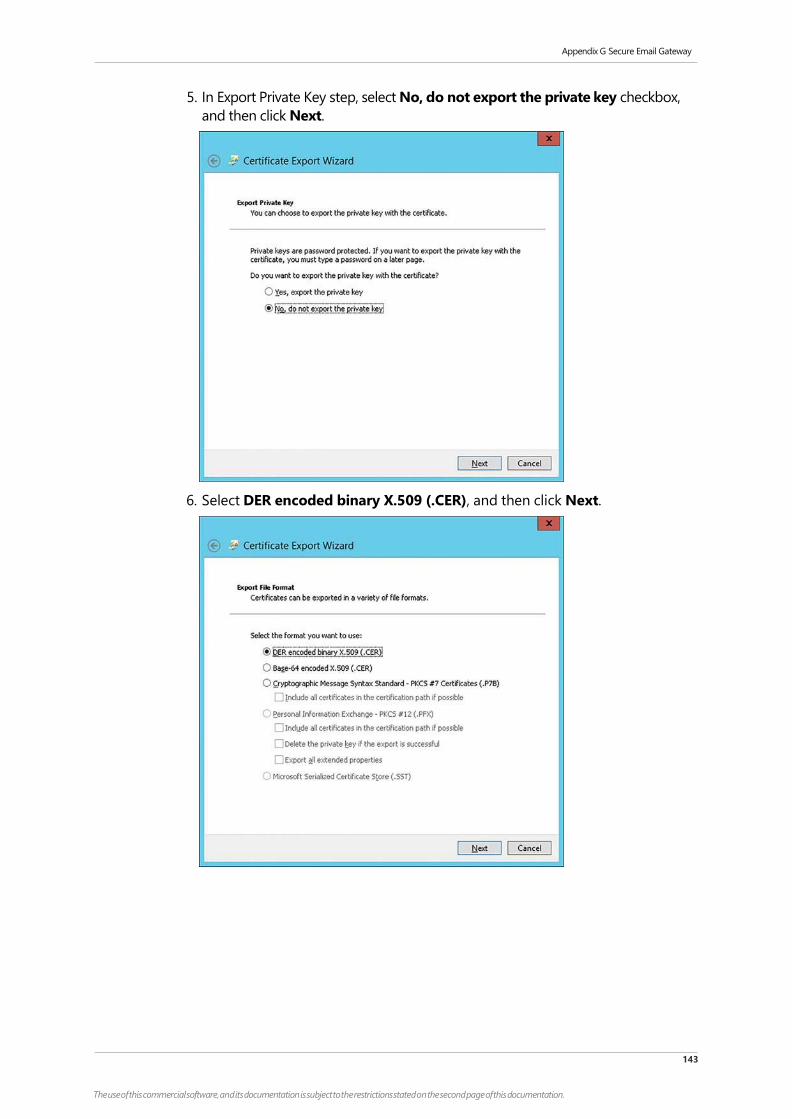
Appendix G Secure Email Gateway
143
The use of this commercial software, and its documentation is subject to the restrictions stated on the second page of this documentation.
5. In Export Private Key step, select No, do not export the private key checkbox,
and then click Next.
6. Select DER encoded binary X.509 (.CER), and then click Next.
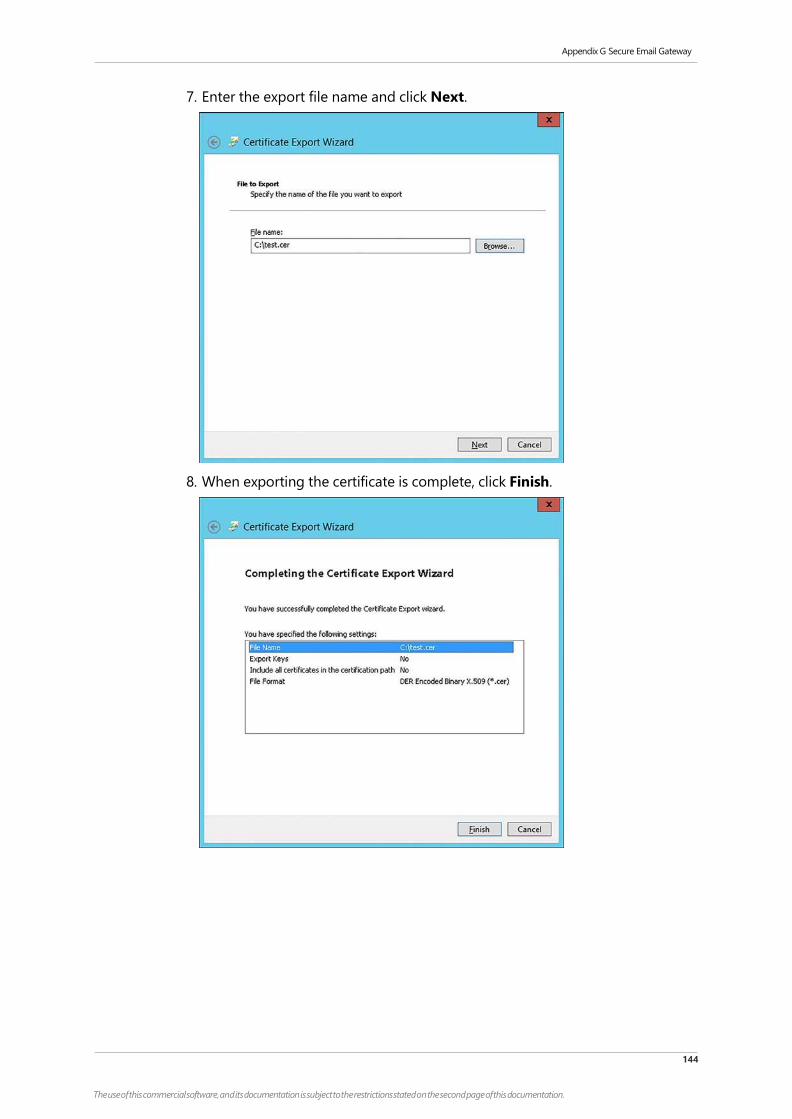
Appendix G Secure Email Gateway
144
The use of this commercial software, and its documentation is subject to the restrictions stated on the second page of this documentation.
7. Enter the export file name and click Next.
8. When exporting the certificate is complete, click Finish.
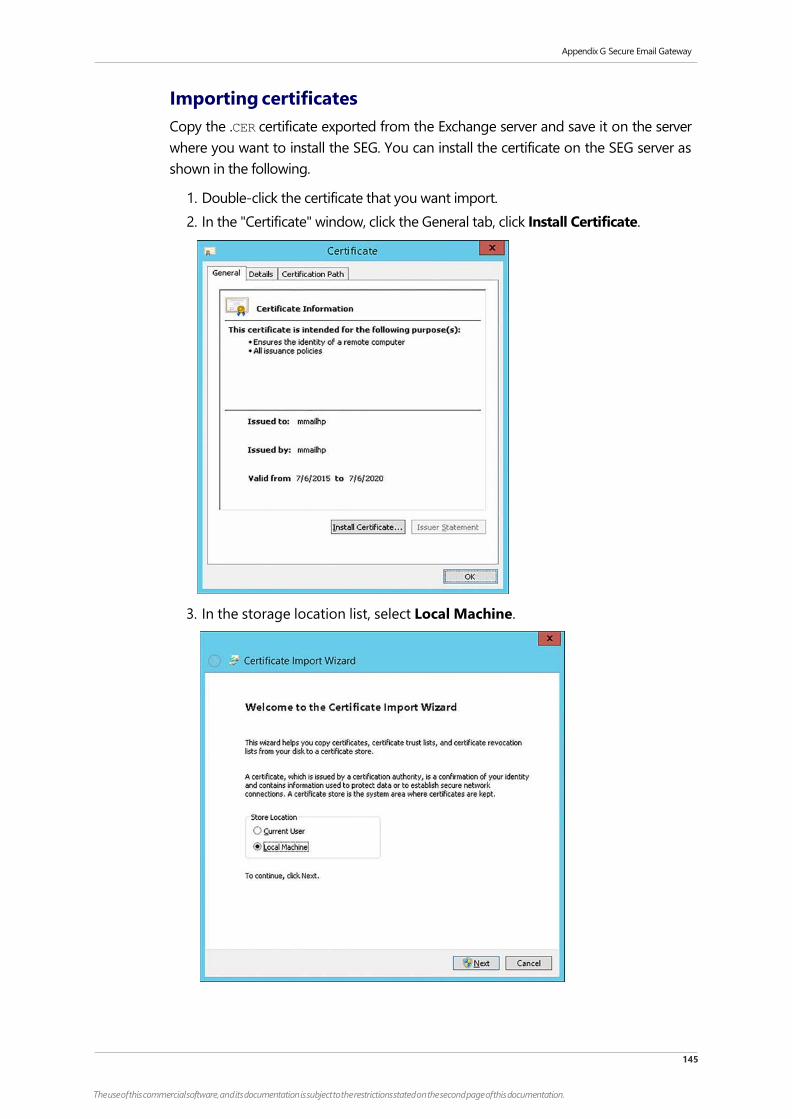
Appendix G Secure Email Gateway
145
The use of this commercial software, and its documentation is subject to the restrictions stated on the second page of this documentation.
Importing certificates
Copy the .CER certificate exported from the Exchange server and save it on the server
where you want to install the SEG. You can install the certificate on the SEG server as
shown in the following.
1. Double-click the certificate that you want import.
2. In the "Certificate" window, click the General tab, click Install Certificate.
3. In the storage location list, select Local Machine.
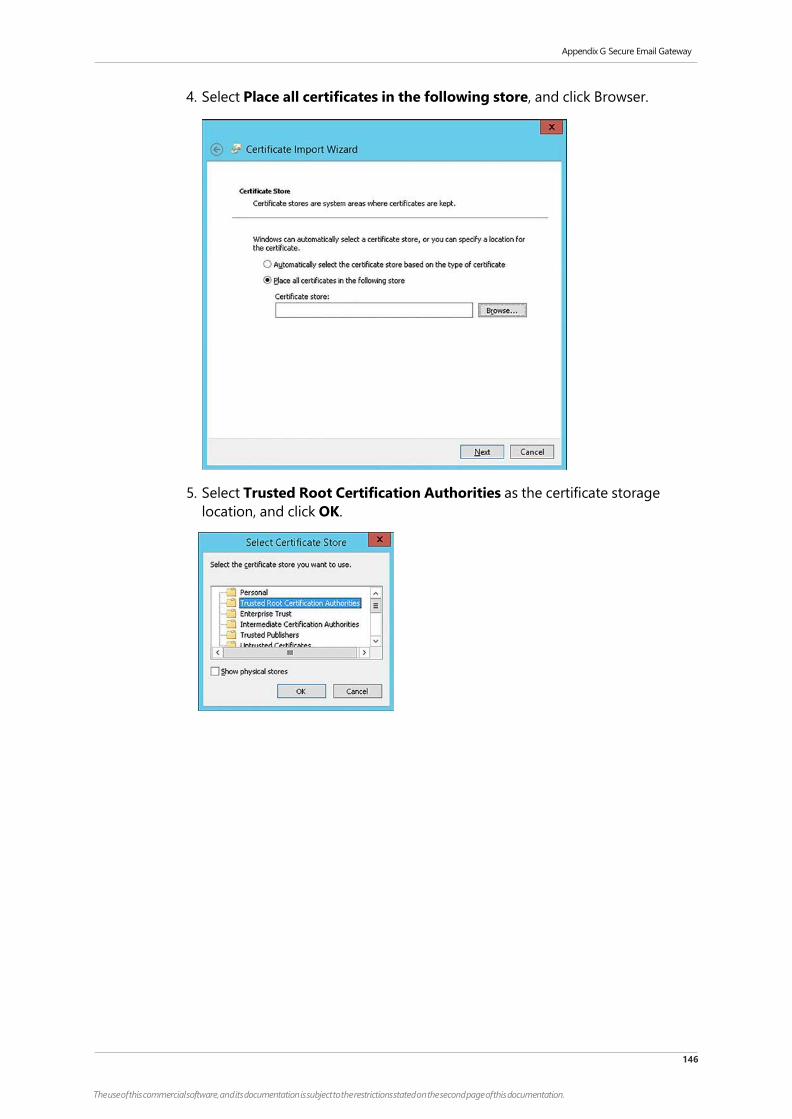
Appendix G Secure Email Gateway
146
The use of this commercial software, and its documentation is subject to the restrictions stated on the second page of this documentation.
4. Select Place all certificates in the following store, and click Browser.
5. Select Trusted Root Certification Authorities as the certificate storage
location, and click OK.
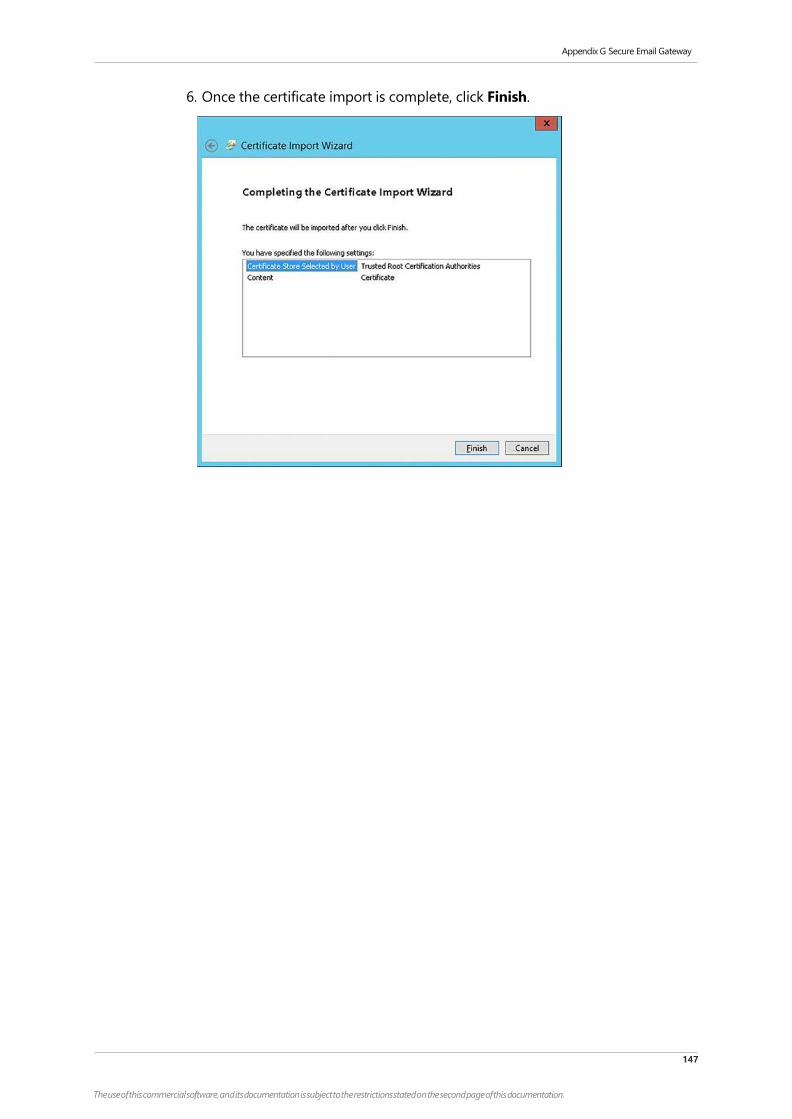
Appendix G Secure Email Gateway
147
The use of this commercial software, and its documentation is subject to the restrictions stated on the second page of this documentation.
6. Once the certificate import is complete, click Finish.
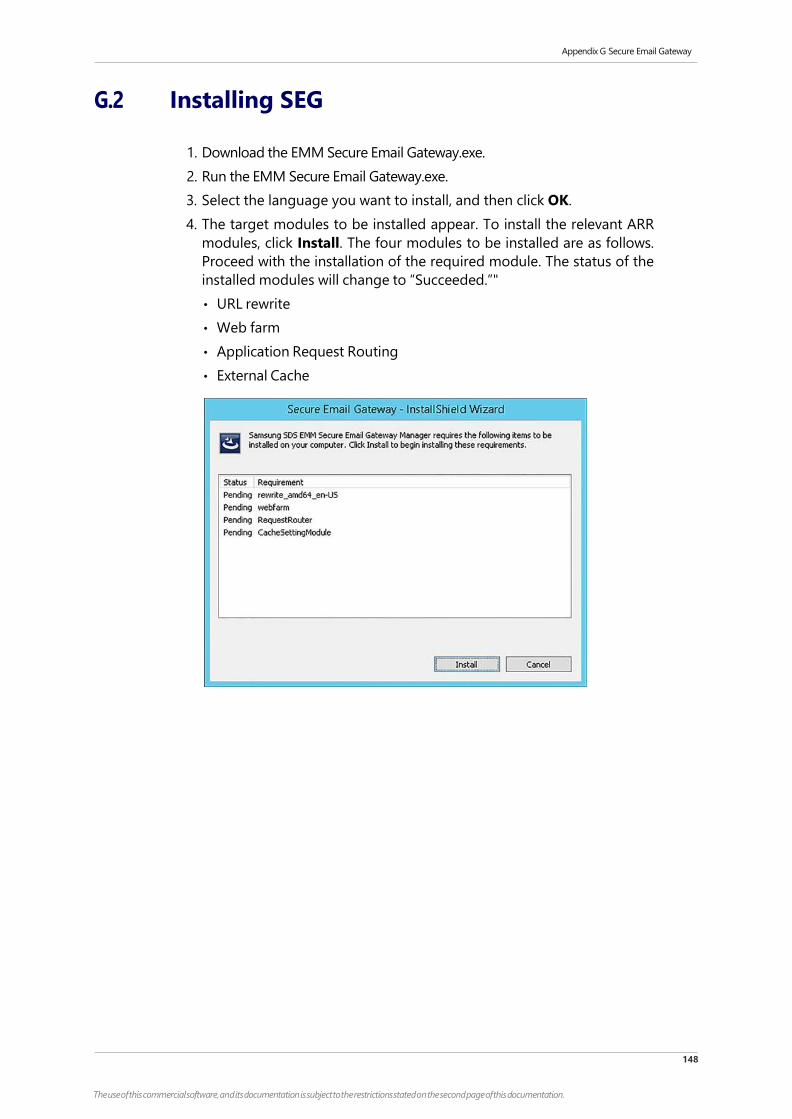
Appendix G Secure Email Gateway
148
The use of this commercial software, and its documentation is subject to the restrictions stated on the second page of this documentation.
G.2 Installing SEG
1. Download the EMM Secure Email Gateway.exe.
2. Run the EMM Secure Email Gateway.exe.
3. Select the language you want to install, and then click OK.
4. The target modules to be installed appear. To install the relevant ARR
modules, click Install. The four modules to be installed are as follows.
Proceed with the installation of the required module. The status of the
installed modules will change to “Succeeded.”"
• URL rewrite
• Web farm
• Application Request Routing
• External Cache
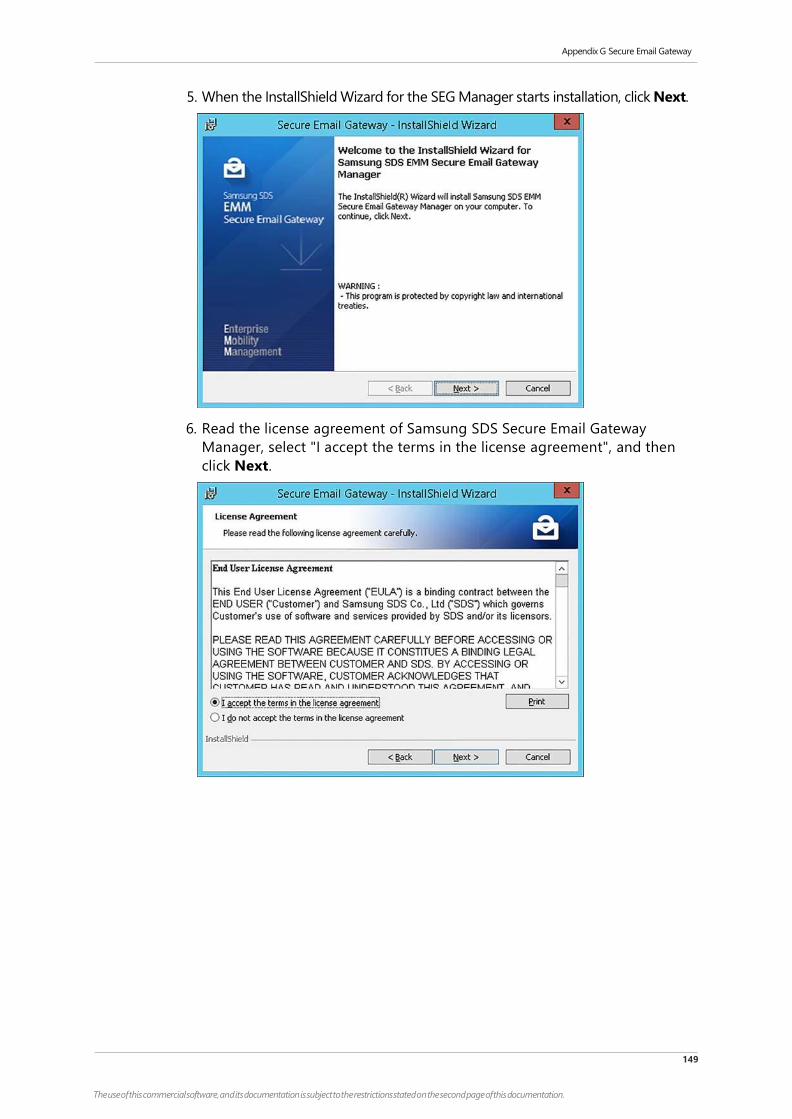
Appendix G Secure Email Gateway
149
The use of this commercial software, and its documentation is subject to the restrictions stated on the second page of this documentation.
5. When the InstallShield Wizard for the SEG Manager starts installation, click Next.
6. Read the license agreement of Samsung SDS Secure Email Gateway
Manager, select "I accept the terms in the license agreement", and then
click Next.
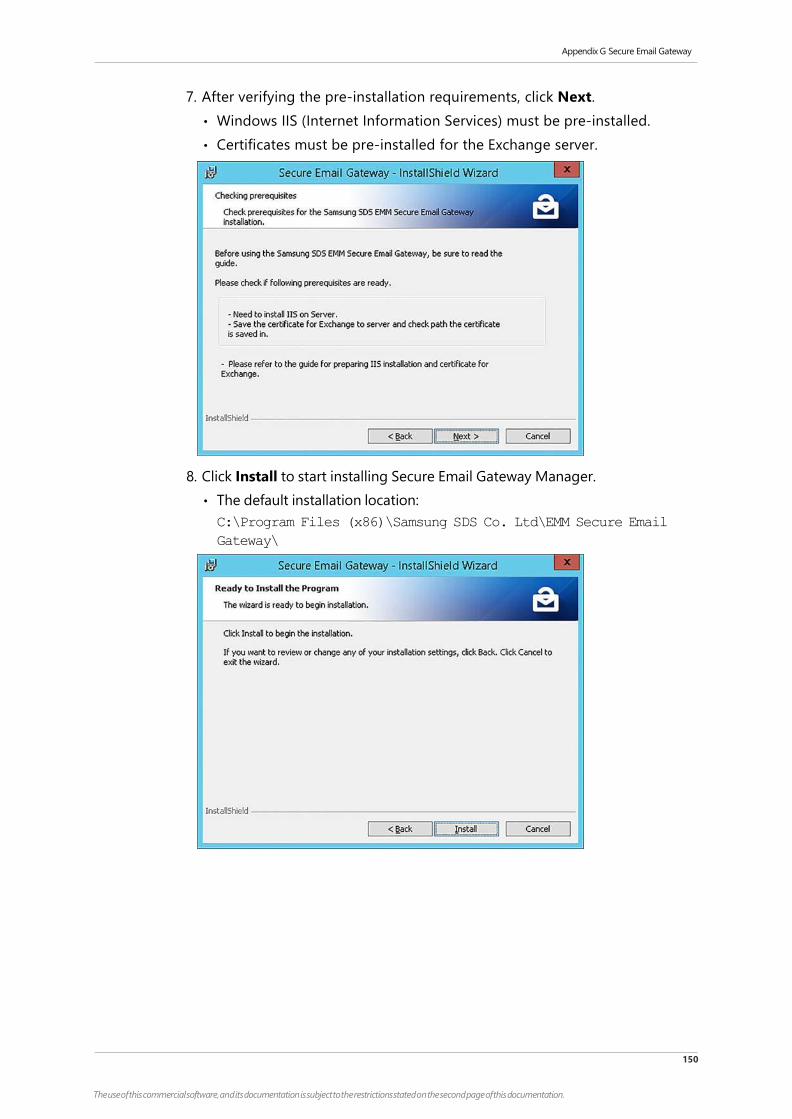
Appendix G Secure Email Gateway
150
The use of this commercial software, and its documentation is subject to the restrictions stated on the second page of this documentation.
7. After verifying the pre-installation requirements, click Next.
• Windows IIS (Internet Information Services) must be pre-installed.
• Certificates must be pre-installed for the Exchange server.
8. Click Install to start installing Secure Email Gateway Manager.
• The default installation location:
C:\Program Files (x86)\Samsung SDS Co. Ltd\EMM Secure Email
Gateway\

Appendix G Secure Email Gateway
151
The use of this commercial software, and its documentation is subject to the restrictions stated on the second page of this documentation.
9. When you select Launch Samsung SDS EMM SEG Manager, the installation
will complete and the SEG Manager will run.
10. Click Finish.
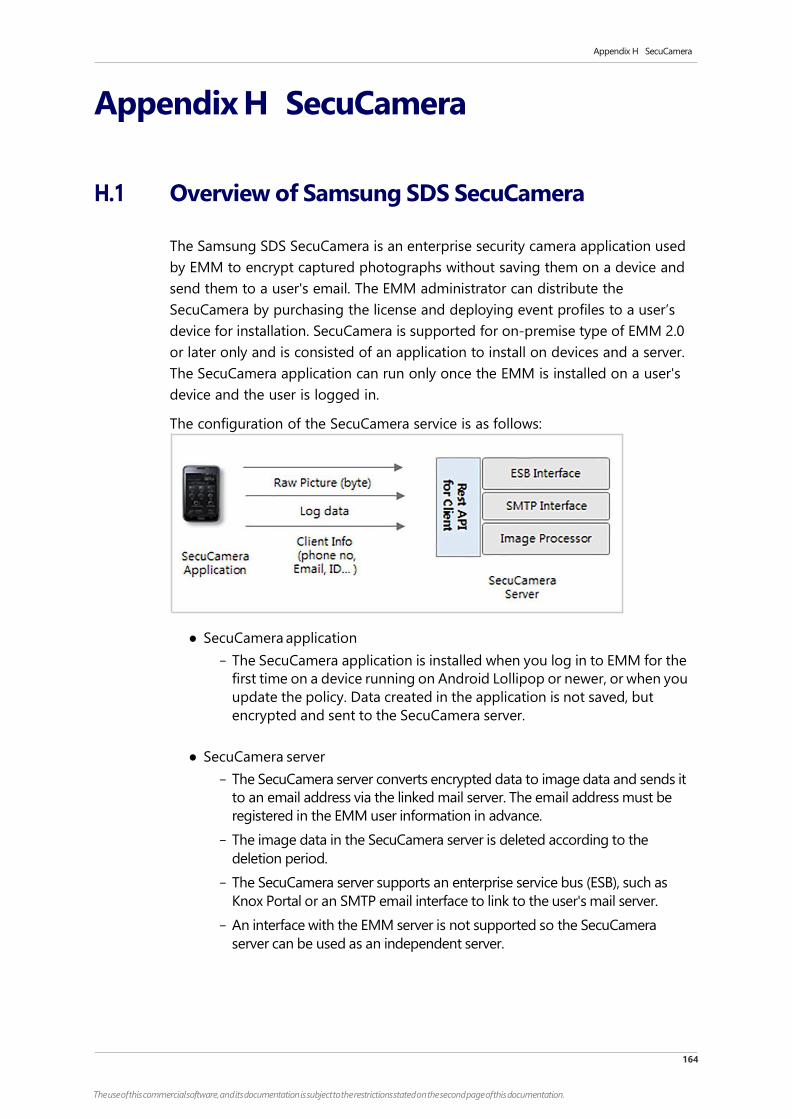
Appendix H SecuCamera
164
The use of this commercial software, and its documentation is subject to the restrictions stated on the second page of this documentation.
Appendix H SecuCamera
H.1 Overview of Samsung SDS SecuCamera
The Samsung SDS SecuCamera is an enterprise security camera application used
by EMM to encrypt captured photographs without saving them on a device and
send them to a user's email. The EMM administrator can distribute the
SecuCamera by purchasing the license and deploying event profiles to a user’s
device for installation. SecuCamera is supported for on-premise type of EMM 2.0
or later only and is consisted of an application to install on devices and a server.
The SecuCamera application can run only once the EMM is installed on a user's
device and the user is logged in.
The configuration of the SecuCamera service is as follows:
● SecuCamera application
- The SecuCamera application is installed when you log in to EMM for the
first time on a device running on Android Lollipop or newer, or when you
update the policy. Data created in the application is not saved, but
encrypted and sent to the SecuCamera server.
● SecuCamera server
- The SecuCamera server converts encrypted data to image data and sends it
to an email address via the linked mail server. The email address must be
registered in the EMM user information in advance.
- The image data in the SecuCamera server is deleted according to the
deletion period.
- The SecuCamera server supports an enterprise service bus (ESB), such as
Knox Portal or an SMTP email interface to link to the user's mail server.
- An interface with the EMM server is not supported so the SecuCamera
server can be used as an independent server.
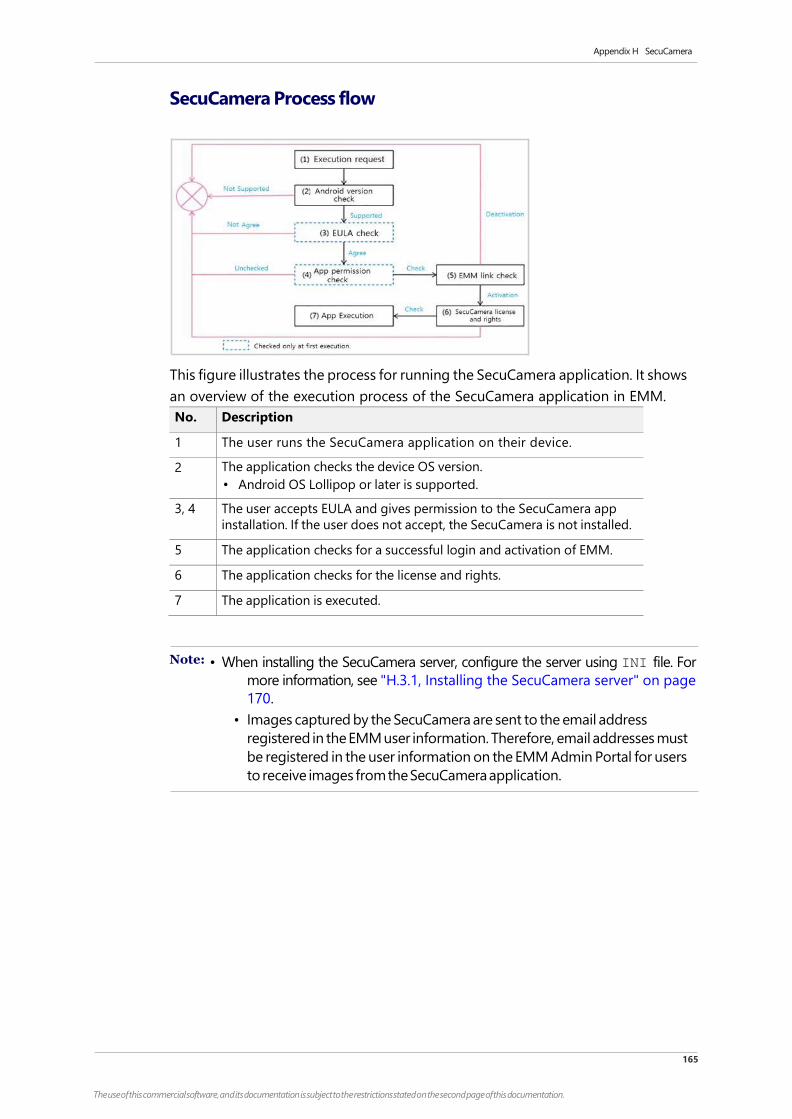
Appendix H SecuCamera
165
The use of this commercial software, and its documentation is subject to the restrictions stated on the second page of this documentation.
SecuCamera Process flow
This figure illustrates the process for running the SecuCamera application. It shows
an overview of the execution process of the SecuCamera application in EMM.
No. Description
1 The user runs the SecuCamera application on their device.
2 The application checks the device OS version.
• Android OS Lollipop or later is supported.
3, 4 The user accepts EULA and gives permission to the SecuCamera app
installation. If the user does not accept, the SecuCamera is not installed.
5 The application checks for a successful login and activation of EMM.
6 The application checks for the license and rights.
7 The application is executed.
Note: • When installing the SecuCamera server, configure the server using INI file. For
more information, see "H.3.1, Installing the SecuCamera server" on page
170.
• Images captured by the SecuCamera are sent to the email address
registered in the EMM user information. Therefore, email addresses must
be registered in the user information on the EMM Admin Portal for users
to receive images from the SecuCamera application.
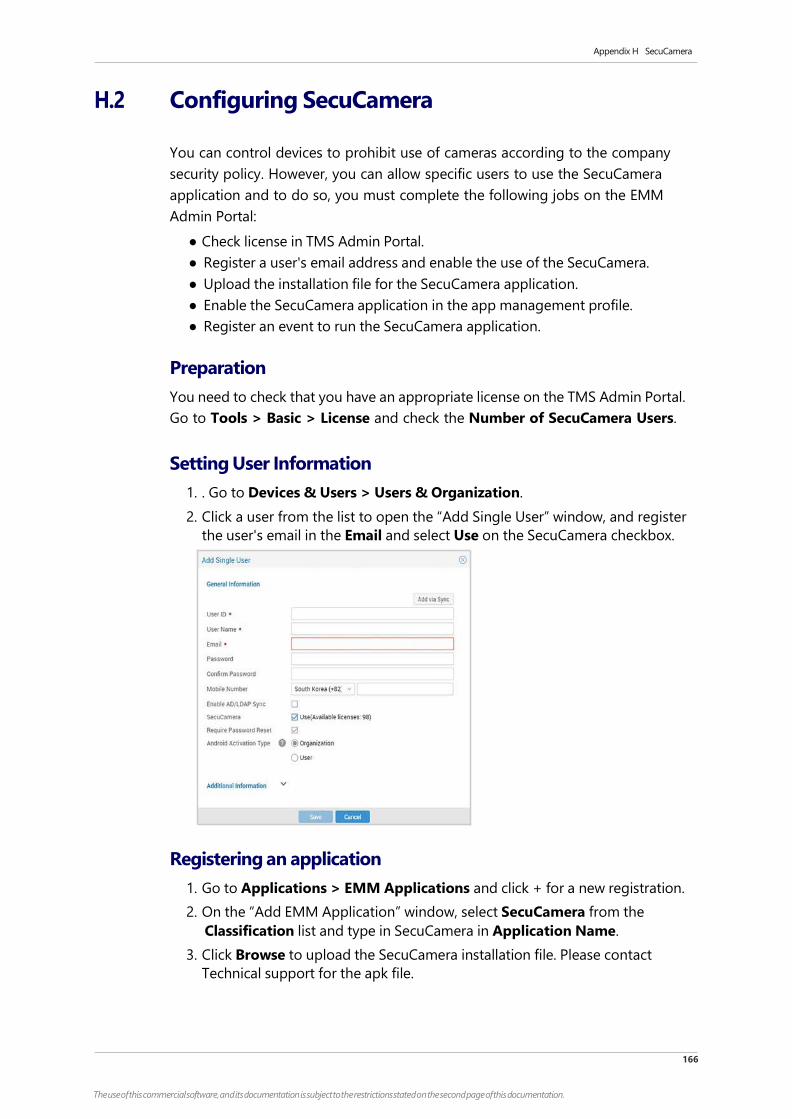
Appendix H SecuCamera
166
The use of this commercial software, and its documentation is subject to the restrictions stated on the second page of this documentation.
H.2 Configuring SecuCamera
You can control devices to prohibit use of cameras according to the company
security policy. However, you can allow specific users to use the SecuCamera
application and to do so, you must complete the following jobs on the EMM
Admin Portal:
● Check license in TMS Admin Portal.
● Register a user's email address and enable the use of the SecuCamera.
● Upload the installation file for the SecuCamera application.
● Enable the SecuCamera application in the app management profile.
● Register an event to run the SecuCamera application.
Preparation
You need to check that you have an appropriate license on the TMS Admin Portal.
Go to Tools > Basic > License and check the Number of SecuCamera Users.
Setting User Information
1. . Go to Devices & Users > Users & Organization.
2. Click a user from the list to open the “Add Single User” window, and register
the user's email in the Email and select Use on the SecuCamera checkbox.
Registering an application
1. Go to Applications > EMM Applications and click + for a new registration.
2. On the “Add EMM Application” window, select SecuCamera from the
Classification list and type in SecuCamera in Application Name.
3. Click Browse to upload the SecuCamera installation file. Please contact
Technical support for the apk file.
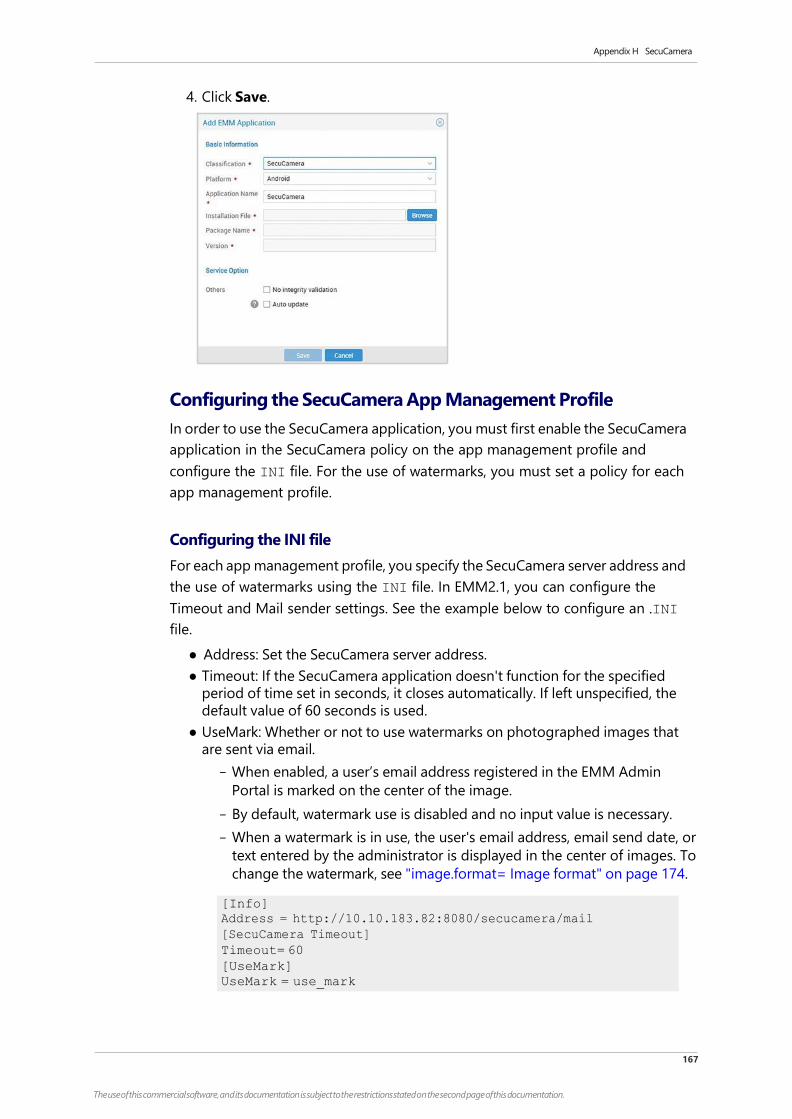
Appendix H SecuCamera
167
The use of this commercial software, and its documentation is subject to the restrictions stated on the second page of this documentation.
4. Click Save.
Configuring the SecuCamera App Management Profile
In order to use the SecuCamera application, you must first enable the SecuCamera
application in the SecuCamera policy on the app management profile and
configure the INI file. For the use of watermarks, you must set a policy for each
app management profile.
Configuring the INI file
For each app management profile, you specify the SecuCamera server address and
the use of watermarks using the INI file. In EMM2.1, you can configure the
Timeout and Mail sender settings. See the example below to configure an .INI
file.
● Address: Set the SecuCamera server address.
● Timeout: If the SecuCamera application doesn't function for the specified
period of time set in seconds, it closes automatically. If left unspecified, the
default value of 60 seconds is used.
● UseMark: Whether or not to use watermarks on photographed images that
are sent via email.
- When enabled, a user’s email address registered in the EMM Admin
Portal is marked on the center of the image.
- By default, watermark use is disabled and no input value is necessary.
- When a watermark is in use, the user's email address, email send date, or
text entered by the administrator is displayed in the center of images. To
change the watermark, see "image.format= Image format" on page 174.
[Info]
Address = http://10.10.183.82:8080/secucamera/mail
[SecuCamera Timeout]
Timeout= 60
[UseMark]
UseMark = use_mark

Appendix H SecuCamera
168
The use of this commercial software, and its documentation is subject to the restrictions stated on the second page of this documentation.
To configure the app management profile, complete the following steps:
1. Go to Profiles > App Management Profile and select the profile to enable
use of SecuCamera.
2. On the “App Manage Profile” window, select a SecuCamera policy.
3. On the “Modify SecuCamera Policy” window, select SecuCamera Whether to
use the app and Configuration File.
4. Click Browse, upload the previously configured INI file, and click Save.
Setting the SecuCamera device management profile
If camera use if prohibited, the SecuCamera application can be enabled by
registering an event exception policy.
To apply the event exception policy, complete the following steps:
1. Go to Profiles > Device Management Profile and select the currently
applied profile.
2. On the “Device Management Profile” window, select Android (Legacy) >
Policy.
3. On the “Modify Android Policy” window, click System and check if Camera is
set to Disallow All and click Save.

Appendix H SecuCamera
169
The use of this commercial software, and its documentation is subject to the restrictions stated on the second page of this documentation.
4. Return to the “Device Management Profile” window, select Events > Event
Management, then click to add an exception event to enable the use of
the SecuCamera.
• Type: Select Applications.
• Run Offline: Select Disallow.
• Application: Click , select the previously registered SecuCamera
application from the “App List” window, and click Save.
5. On the “Device Management Profile” window, select Events > Event Policy
and select Android. On the “Modify Android Event Policy” window, check
Allow for Camera, and click Save.
Appendix H SecuCamera
170
The use of this commercial software, and its documentation is subject to the restrictions stated on the second page of this documentation.
H.3 Installing the SecuCamera server
The SecuCamera server can be configured independently from the EMM server
without being linked. To install the SecuCamera server, first configure the Apache
Tomcat server environment. You can receive the setup.exe file for the
SecuCamera server from the technical support team for installation and set the
server installation file, such as the email server linked to the SecuCamera server,
watermark modification method and the deletion period of photographed images
saved in the server.
Preparing for installation
You must prepare the following before installing the SecuCamera server:
● Environment for installation
- Check supported OS: Windows Server 2008 R2 (64bit) or 2012 (64bit)
- Apache Tomcat installation must be installed for SecuCamera server
operation.
● Java Development Kit (JDK)
- Install Java Development Kit 1.7 (64bit) or Java Development Kit 1.8(bit).
For more information, see "2.1, Installing JDK" on page 6.
● Network environment
- Open the firewall between the SecuCamera server and the email server.
● Request and prepare the installation and configuration files.
- installation file for SecuCamera server
H.3.1 Installing the SecuCamera server
To use the received files to install the SecuCamera server in the Apache Tomcat
environment, complete the following steps:
1. Open the File Explorer, navigate and run the received setup.exe file.
• The file must be installed using the Windows administrator account.
2. Select the language for installation and click OK.
3. When the InstallShield Wizard starts, click OK.

Appendix H SecuCamera
171
The use of this commercial software, and its documentation is subject to the restrictions stated on the second page of this documentation.
4. Read the EULA carefully, select I accept the terms in license agreement, and
click Next.
5. Click Change to change destination path for SecuCamera server installation
as {Tomcat installation path}\webapp, and click Next.
6. Click Install to install the SecuCamera server.
7. When the SecuCamera server installation is complete, modify the Tomcat
configuration file so the SecuCamera server runs automatically when the
Tomcat server is run.
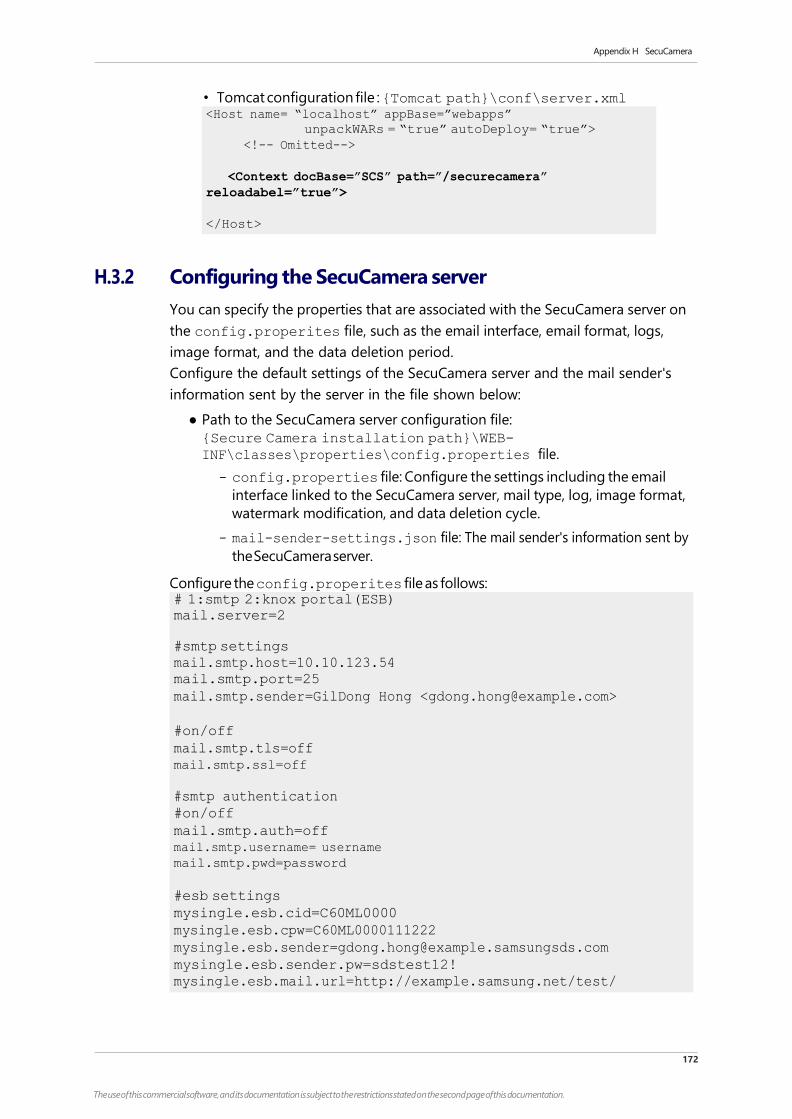
Appendix H SecuCamera
172
The use of this commercial software, and its documentation is subject to the restrictions stated on the second page of this documentation.
• Tomcat configuration file : {Tomcat path}\conf\server.xml
H.3.2 Configuring the SecuCamera server
You can specify the properties that are associated with the SecuCamera server on
the config.properites file, such as the email interface, email format, logs,
image format, and the data deletion period.
Configure the default settings of the SecuCamera server and the mail sender's
information sent by the server in the file shown below:
● Path to the SecuCamera server configuration file:
{Secure Camera installation path}\WEB-
INF\classes\properties\config.properties file.
- config.properties file: Configure the settings including the email
interface linked to the SecuCamera server, mail type, log, image format,
watermark modification, and data deletion cycle.
- mail-sender-settings.json file: The mail sender's information sent by
the SecuCamera server.
Configure the config.properites file as follows:
<Host name= “localhost” appBase=”webapps”
unpackWARs = “true” autoDeploy= “true”>
<!-- Omitted-->
<Context docBase=”SCS” path=”/securecamera”
reloadabel=”true”>
</Host>
# 1:smtp 2:knox portal(ESB)
mail.server=2
#smtp settings
mail.smtp.host=10.10.123.54
mail.smtp.port=25
mail.smtp.sender=GilDong Hong <[email protected]>
#on/off
mail.smtp.tls=off
mail.smtp.ssl=off
#smtp authentication
#on/off
mail.smtp.auth=off
mail.smtp.username= username
mail.smtp.pwd=password
#esb settings
mysingle.esb.cid=C60ML0000
mysingle.esb.cpw=C60ML0000111222
mysingle.esb.sender.pw=sdstest12!
mysingle.esb.mail.url=http://example.samsung.net/test/
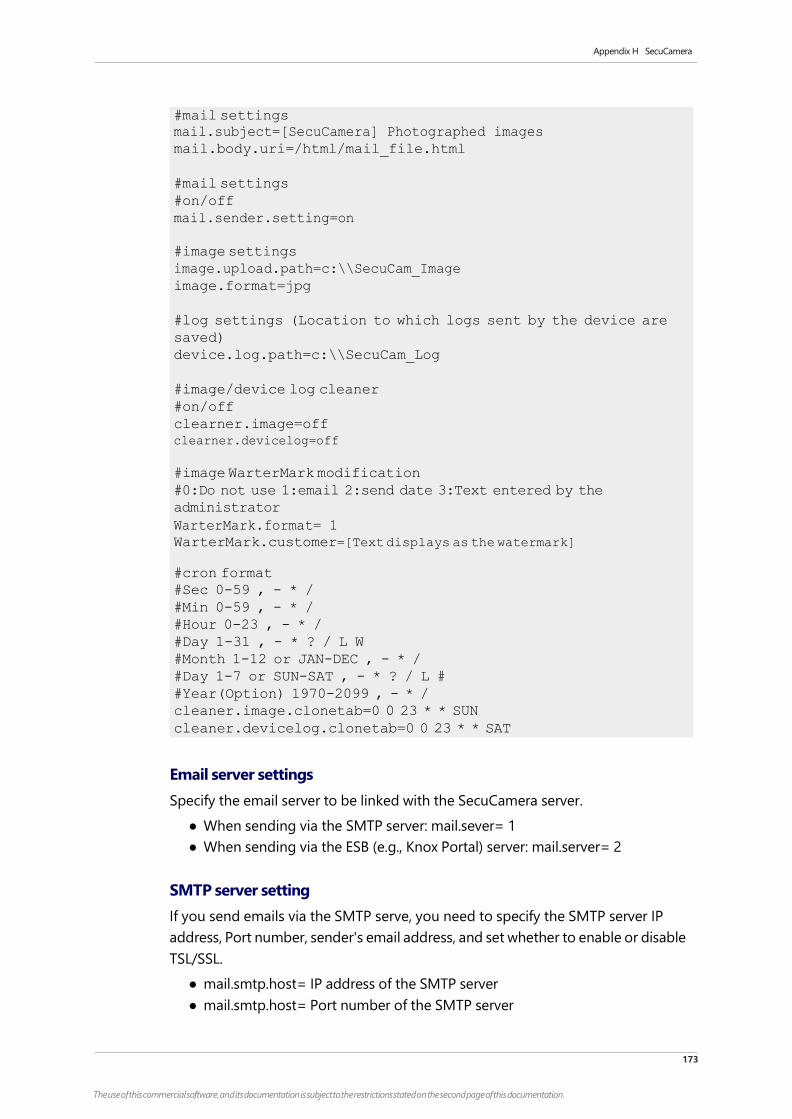
Appendix H SecuCamera
173
The use of this commercial software, and its documentation is subject to the restrictions stated on the second page of this documentation.
Email server settings
Specify the email server to be linked with the SecuCamera server.
● When sending via the SMTP server: mail.sever= 1
● When sending via the ESB (e.g., Knox Portal) server: mail.server= 2
SMTP server setting
If you send emails via the SMTP serve, you need to specify the SMTP server IP
address, Port number, sender's email address, and set whether to enable or disable
TSL/SSL.
● mail.smtp.host= IP address of the SMTP server
● mail.smtp.host= Port number of the SMTP server
#mail settings
mail.subject=[SecuCamera] Photographed images
mail.body.uri=/html/mail_file.html
#mail settings
#on/off
mail.sender.setting=on
#image settings
image.upload.path=c:\\SecuCam_Image
image.format=jpg
#log settings (Location to which logs sent by the device are
saved)
device.log.path=c:\\SecuCam_Log
#image/device log cleaner
#on/off
clearner.image=off
clearner.devicelog=off
#image WarterMark modification
#0:Do not use 1:email 2:send date 3:Text entered by the
administrator
WarterMark.format= 1
WarterMark.customer=[Text displays as the watermark]
#cron format
#Sec 0-59 , - * /
#Min 0-59 , - * /
#Hour 0-23 , - * /
#Day 1-31 , - * ? / L W
#Month 1-12 or JAN-DEC , - * /
#Day 1-7 or SUN-SAT , - * ? / L #
#Year(Option) 1970-2099 , - * /
cleaner.image.clonetab=0 0 23 * * SUN
cleaner.devicelog.clonetab=0 0 23 * * SAT
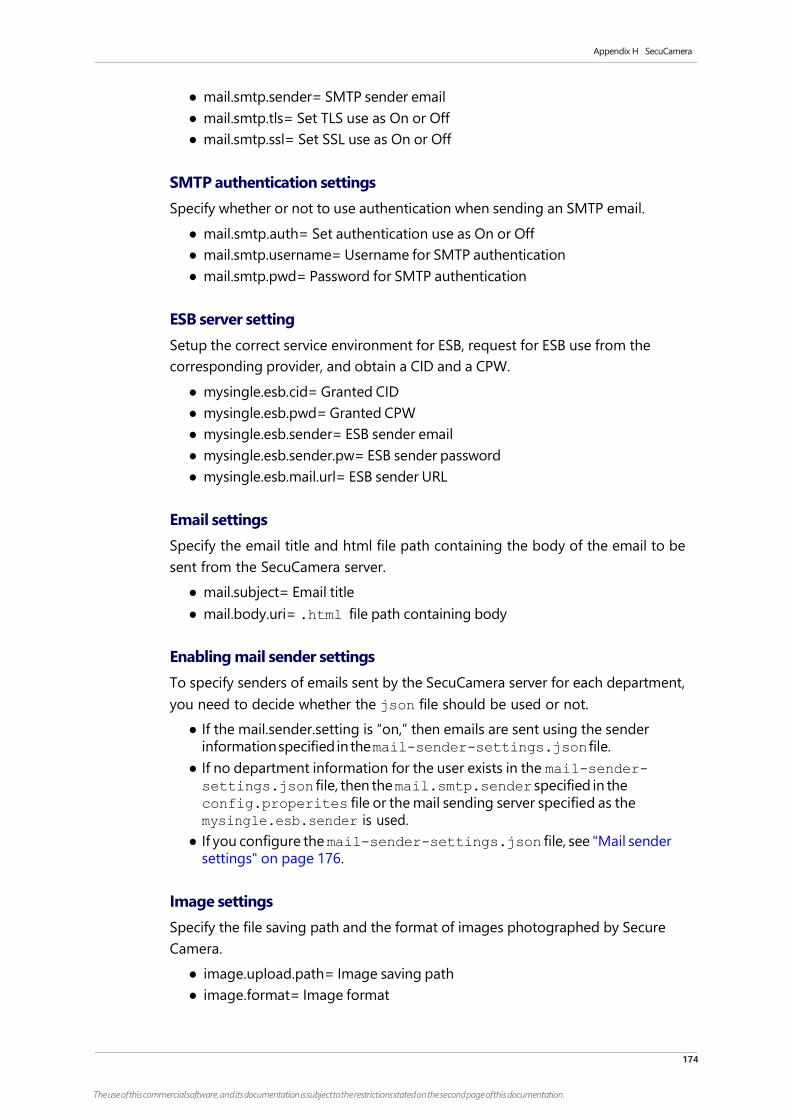
Appendix H SecuCamera
174
The use of this commercial software, and its documentation is subject to the restrictions stated on the second page of this documentation.
● mail.smtp.sender= SMTP sender email
● mail.smtp.tls= Set TLS use as On or Off
● mail.smtp.ssl= Set SSL use as On or Off
SMTP authentication settings
Specify whether or not to use authentication when sending an SMTP email.
● mail.smtp.auth= Set authentication use as On or Off
● mail.smtp.username= Username for SMTP authentication
● mail.smtp.pwd= Password for SMTP authentication
ESB server setting
Setup the correct service environment for ESB, request for ESB use from the
corresponding provider, and obtain a CID and a CPW.
● mysingle.esb.cid= Granted CID
● mysingle.esb.pwd= Granted CPW
● mysingle.esb.sender= ESB sender email
● mysingle.esb.sender.pw= ESB sender password
● mysingle.esb.mail.url= ESB sender URL
Email settings
Specify the email title and html file path containing the body of the email to be
sent from the SecuCamera server.
● mail.subject= Email title
● mail.body.uri= .html file path containing body
Enabling mail sender settings
To specify senders of emails sent by the SecuCamera server for each department,
you need to decide whether the json file should be used or not.
● If the mail.sender.setting is “on,” then emails are sent using the sender
information specified in the mail-sender-settings.json file.
● If no department information for the user exists in the mail-sender-
settings.json file, then the mail.smtp.sender specified in the
config.properites file or the mail sending server specified as the
mysingle.esb.sender is used.
● If you configure the mail-sender-settings.json file, see "Mail sender
settings" on page 176.
Image settings
Specify the file saving path and the format of images photographed by Secure
Camera.
● image.upload.path= Image saving path
● image.format= Image format

Appendix H SecuCamera
175
The use of this commercial software, and its documentation is subject to the restrictions stated on the second page of this documentation.
Watermark settings
You can set the watermark to contain the user's email address, email send date,
or specific text so that it can be added to photos taken using the SecuCamera
application.
● watermark.format= Enter one of the following numbers depending on the
watermark display format.
- 0: Do not use
- 1: User's email address
- 2: Email send date
- 3: Specific text
● watermark.custom= The administrator enters text that should be used as the
watermark (50 bytes).
Cleaner settings
Specify the deletion period of images and logs saved on the SecuCamera server for
a periodic cleanup. For more information, see "Crontab format" on page 176.
● cleaner.image= Set Image deletion as On or Off
● cleaner.devicelog= Set Log deletion as On or Off
● cleaner.image.clonetab= Image deletion period
● cleaner.image.clonetab= Log deletion period

Appendix H SecuCamera
176
The use of this commercial software, and its documentation is subject to the restrictions stated on the second page of this documentation.
Crontab format Second 0-59, - * /
Minute 0-59, - * /
Hour 0-23, - * /
Day of the Month 1-31, - * ? / L W
Month of the Year 1-12 or JAN-DEC, - * /
Day of the Week 1-7 or SUN-SAT, - * ? / L #
Year(optional) 1970-2099, - * /
* : All values
? : No specific value
- : Range of values
, : Separates values
/ : Initial value in conjunction with a step value
L : Last value in the range
W : Monday to Friday or the closest Monday/Friday
# : Day of the week in conjunction with week number of the month, 2#1
=> First Monday
E.g.,) Expression Meaning
Second Minute Hour Day Month Week(Year)
"0 0 12 * * ?": Any days of the week, monthly, daily, 12:00:00
"0 15 10 ? * *": Every days of the week, monthly, any date, 10:15:00
"0 15 10 * * ?": Any days of the week, monthly, daily, 10:15:00
"0 15 10 * * ? *": Every year, any days of the week, monthly, daily,
10:15
"0 15 10 * * ?": 2005" In year 2005, any days of the week, monthly,
daily 10:15
"0 * 14 * * ?": Any days of the week, monthly, daily, 2pm at every 0
sec of a minute
"0 0/5 14 * * ?": Any days of the week, monthly, daily, 2pm at every
0 sec with 5 minute interval
"0 0/5 14,18 * * ?": Any days of the week, monthly, daily, 2pm, 6pm,
at every 0 sec with 5 minute interval
"0 0-5 14 * * ?": Any days of the week, monthly, daily, from 2pm to
2:05pm at every 0 sec
"0 10,44 14 ? 3 WED": March, every Wednesday, any date, 14:10:00,
14:44:00
"0 15 10 ? * MON-FRI": Mon to Fri, monthly, any date 10:15:00
"0 15 10 15 * ?": Any weekday, monthly, 15th 10:15:00
"0 15 10 L * ?": Any weekday, last day of every month, 10:15:00
"0 15 10 ? * 6L": Last Friday of every month, any date, 10:15:00
"0 15 10 ? * 6L 2002-2005": From 2002 to 2005, last Friday of every
month, any date, 10:15:00
"0 15 10 ? * 6#3": Monthly, every 3rd Friday, any date, 10:15:00
Mail sender settings
Photos taken using SecuCamera are sent to the user who has taken them in an
email through the mail server.
The sender can be selected depending on the department to which the user
belongs. If the user's department is not specified in the mail-sender-
setting.json file, then the mail sender specified in the config.properites
file is used to send emails instead. For more information about the default settings
of the SecuCamera server, see "Configuring the SecuCamera server" on page 172.
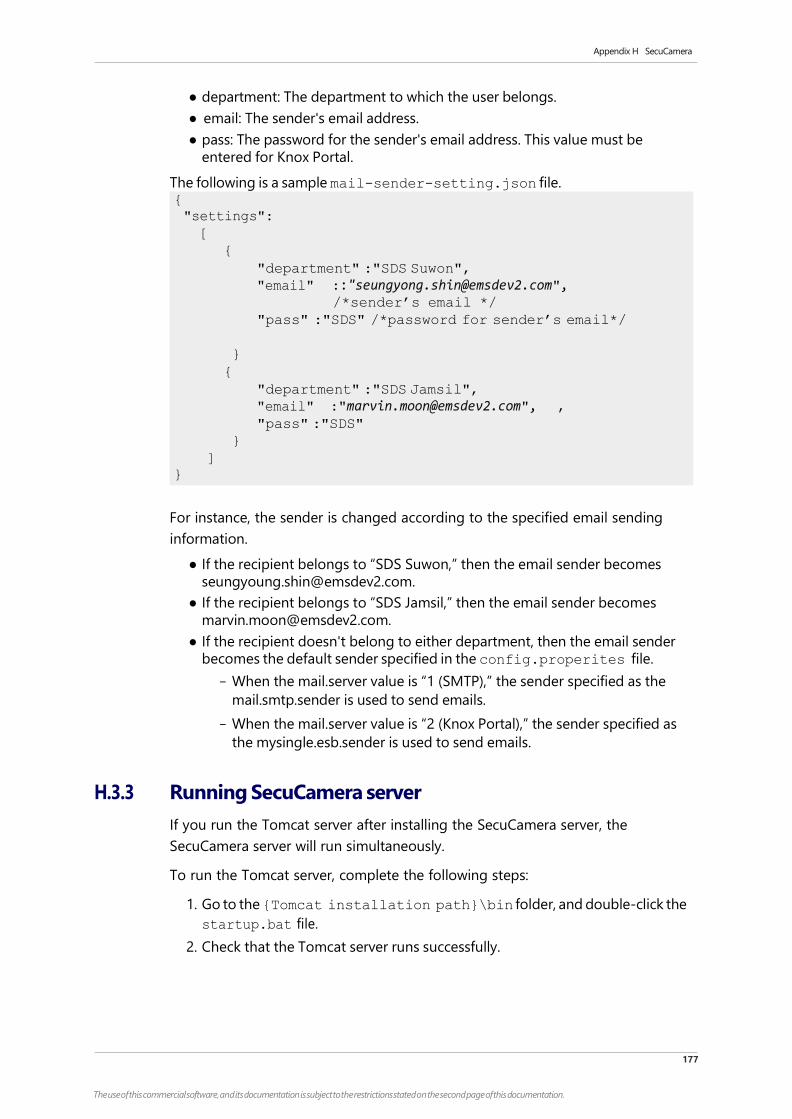
Appendix H SecuCamera
177
The use of this commercial software, and its documentation is subject to the restrictions stated on the second page of this documentation.
● department: The department to which the user belongs.
● email: The sender's email address.
● pass: The password for the sender's email address. This value must be
entered for Knox Portal.
The following is a sample mail-sender-setting.json file.
For instance, the sender is changed according to the specified email sending
information.
● If the recipient belongs to “SDS Suwon,” then the email sender becomes
● If the recipient belongs to “SDS Jamsil,” then the email sender becomes
● If the recipient doesn't belong to either department, then the email sender
becomes the default sender specified in the config.properites file.
- When the mail.server value is “1 (SMTP),” the sender specified as the
mail.smtp.sender is used to send emails.
- When the mail.server value is “2 (Knox Portal),” the sender specified as
the mysingle.esb.sender is used to send emails.
H.3.3 Running SecuCamera server
If you run the Tomcat server after installing the SecuCamera server, the
SecuCamera server will run simultaneously.
To run the Tomcat server, complete the following steps:
1. Go to the {Tomcat installation path}\bin folder, and double-click the
startup.bat file.
2. Check that the Tomcat server runs successfully.
{
"settings":
[
{
"department" :"SDS Suwon",
"email" ::"[email protected]", /*sender’s email */
"pass" :"SDS" /*password for sender’s email*/
}
{
"department" :"SDS Jamsil",
"email" :"[email protected]", ,
"pass" :"SDS"
}
]
}
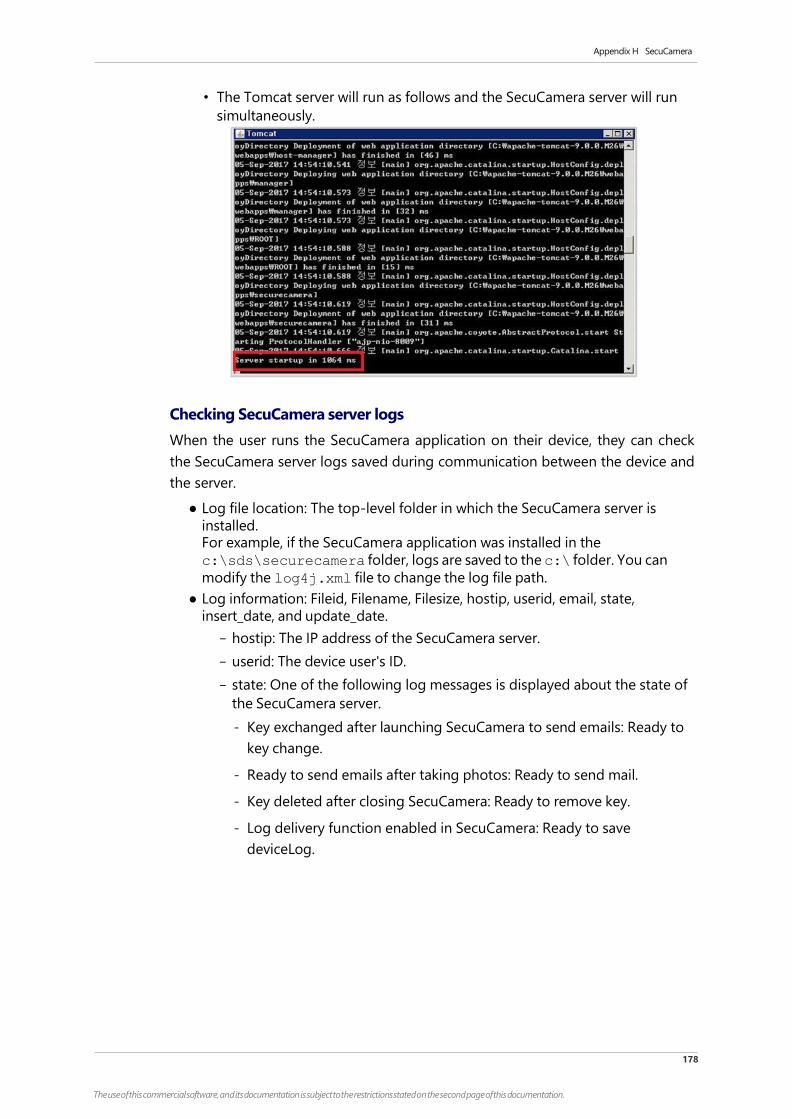
Appendix H SecuCamera
178
The use of this commercial software, and its documentation is subject to the restrictions stated on the second page of this documentation.
• The Tomcat server will run as follows and the SecuCamera server will run
simultaneously.
Checking SecuCamera server logs
When the user runs the SecuCamera application on their device, they can check
the SecuCamera server logs saved during communication between the device and
the server.
● Log file location: The top-level folder in which the SecuCamera server is
installed. For example, if the SecuCamera application was installed in the
c:\sds\securecamera folder, logs are saved to the c:\ folder. You can
modify the log4j.xml file to change the log file path.
● Log information: Fileid, Filename, Filesize, hostip, userid, email, state,
insert_date, and update_date.
- hostip: The IP address of the SecuCamera server.
- userid: The device user's ID.
- state: One of the following log messages is displayed about the state of
the SecuCamera server.
- Key exchanged after launching SecuCamera to send emails: Ready to
key change.
- Ready to send emails after taking photos: Ready to send mail.
- Key deleted after closing SecuCamera: Ready to remove key.
- Log delivery function enabled in SecuCamera: Ready to save
deviceLog.

Realizeyourvision SAMSUNG SOS
www.samsung sds.com
copyright © 2019 Samsung SDS Co.,Ltd. All rights reserved.
Related Documents