SafeCom G4 Administrator's Manual Date: 2019-07-19 Version: 10.520.11.221

Welcome message from author
This document is posted to help you gain knowledge. Please leave a comment to let me know what you think about it! Share it to your friends and learn new things together.
Transcript

SafeCom G4 Administrator's Manual
Date: 2019-07-19 Version: 10.520.11.221
Document Revision Date Revision List
July 10, 2019 Final release as D60650-31
December 15, 2018 Preview release.
December 1, 2018 Draft release.
See Document history for details.
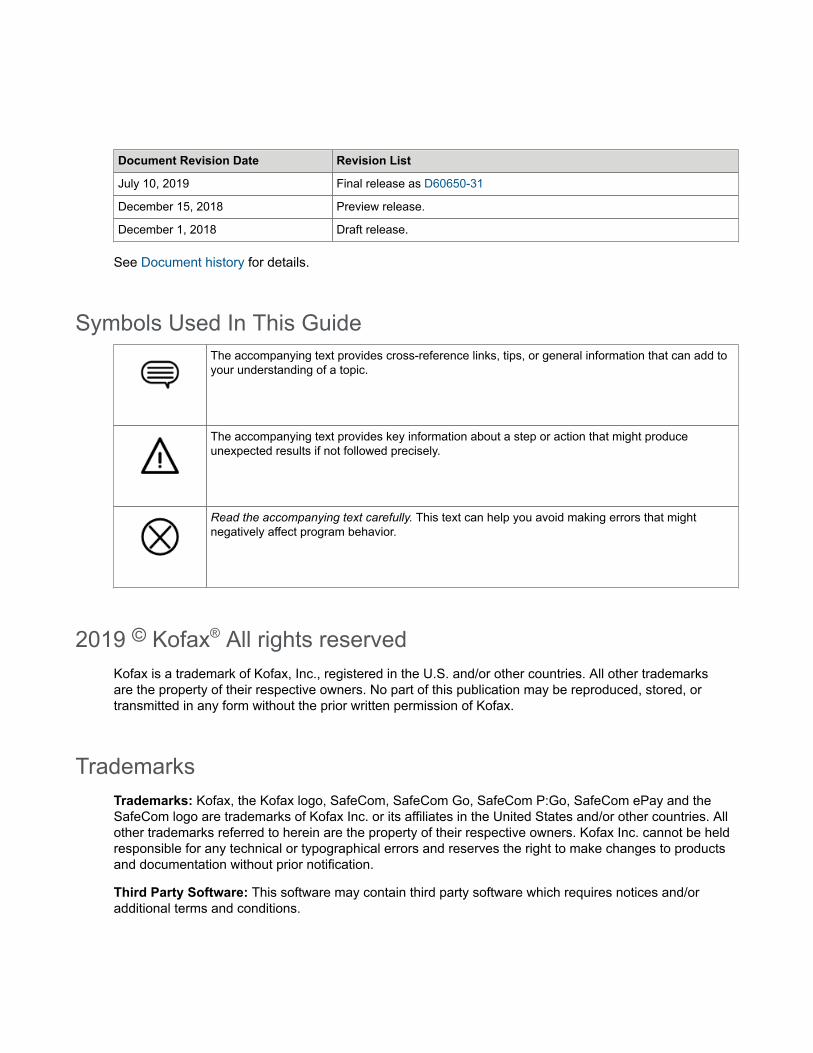
Symbols Used In This GuideThe accompanying text provides cross-reference links, tips, or general information that can add toyour understanding of a topic.
The accompanying text provides key information about a step or action that might produceunexpected results if not followed precisely.
Read the accompanying text carefully. This text can help you avoid making errors that mightnegatively affect program behavior.
2019 © Kofax® All rights reservedKofax is a trademark of Kofax, Inc., registered in the U.S. and/or other countries. All other trademarksare the property of their respective owners. No part of this publication may be reproduced, stored, ortransmitted in any form without the prior written permission of Kofax.
TrademarksTrademarks: Kofax, the Kofax logo, SafeCom, SafeCom Go, SafeCom P:Go, SafeCom ePay and theSafeCom logo are trademarks of Kofax Inc. or its affiliates in the United States and/or other countries. Allother trademarks referred to herein are the property of their respective owners. Kofax Inc. cannot be heldresponsible for any technical or typographical errors and reserves the right to make changes to productsand documentation without prior notification.
Third Party Software: This software may contain third party software which requires notices and/oradditional terms and conditions.

Patent: Kofax Inc. has received the following British patent GB 2350 713 B, US patent US 6,952,780 B2and Europe EUR EP1 120 701.
© Copyright 1995 - 2019 Kofax Inc. All rights reserved
Kofax Inc.
Web: www.safecom.eu
Table of ContentsChapter 1: Introduction............................................................................................................................ 20
SafeCom Smart Printing...................................................................................................................20Components overview...................................................................................................................... 21Database component........................................................................................................................21SafeCom components...................................................................................................................... 21SafeCom Pay components...............................................................................................................22SafeCom APIs.................................................................................................................................. 23SafeCom Service and other services.............................................................................................. 23Pull Printing explained......................................................................................................................23Terms and definitions....................................................................................................................... 24System requirements........................................................................................................................27
Server requirements.............................................................................................................. 27Client requirements................................................................................................................28Printers................................................................................................................................... 29Network ports.........................................................................................................................30SafeCom ID Devices............................................................................................................. 30
Available documentation...................................................................................................................31About this manual.............................................................................................................................33Document history..............................................................................................................................34
Chapter 2: Frequently asked questions................................................................................................. 40What are the benefits of Pull Printing?............................................................................................40What devices are supported?.......................................................................................................... 41Is Copy Control supported?............................................................................................................. 41Is it possible to charge for print costs?............................................................................................41Is it necessary to install software on the users’ computers?........................................................... 41How are users authenticated?......................................................................................................... 42How are users managed?................................................................................................................42How are users with the same name handled?................................................................................ 42How many users, printers, and documents can a server handle?.................................................. 42Can access to devices be restricted?..............................................................................................42Are SafeCom solutions scalable?.................................................................................................... 43How does a solution with multiple servers work?............................................................................43Can documents be printed securely?.............................................................................................. 43What happens to uncollected documents?......................................................................................44
4
SafeCom G4 Administrator's Manual Version: 10.520.11.221
Is it always possible to print?...........................................................................................................44Can print usage be tracked without hardware?...............................................................................44Can a Pull Printer be used for Push tracking?................................................................................44What happens if the SafeCom solution stops working?.................................................................. 45What is the administrative overhead?..............................................................................................45What about integration with other systems?....................................................................................45Does it pay to apply a SafeCom solution?...................................................................................... 46
Chapter 3: Planning your SafeCom solution......................................................................................... 47Introduction....................................................................................................................................... 47Checklist – to help you on the way................................................................................................. 47User authentication by card or ID code...........................................................................................48User creation and management.......................................................................................................49
Import user data from other systems.................................................................................... 49Create users at first print...................................................................................................... 49Let users register their card themselves...............................................................................50Let users register an ID code themselves............................................................................ 50Let administrator register cards to users.............................................................................. 51Let administrator register ID code with users....................................................................... 51Allow users to change their PIN code.................................................................................. 52Determine user’s home server.............................................................................................. 52
Overview of software installation..................................................................................................... 52Server installation.................................................................................................................. 52Multiserver installation........................................................................................................... 53Disk space considerations.....................................................................................................53Shared SafeCom Pull Printer................................................................................................ 53Local SafeCom Pull Printer................................................................................................... 53SafeCom printers can reference multiple servers.................................................................54Printer driver and document fidelity considerations.............................................................. 54High Speed Print considerations...........................................................................................54Device Server failover considerations................................................................................... 55
Print from other systems.................................................................................................................. 56Print from Apple Mac.............................................................................................................56Print from UNIX..................................................................................................................... 57Print from Novell....................................................................................................................57Print from Host systems (mainframe)................................................................................... 57
Roll out considerations..................................................................................................................... 57Test solution prior to roll out..................................................................................................57Inform and prepare your users..............................................................................................57
5
SafeCom G4 Administrator's Manual Version: 10.520.11.221
Clearly define responsibilities and procedures......................................................................58Preemptive support and diagnostic tools.........................................................................................58
Event log and e-mail notification........................................................................................... 58scping..................................................................................................................................... 58SafeCom Service and processes..........................................................................................59TCP and UDP port numbers used by SafeCom................................................................... 59SafeCom SQL databases......................................................................................................65SafeCom database update log..............................................................................................65Windows registry settings......................................................................................................65
Backup and restore.......................................................................................................................... 65Standby computer equipment................................................................................................66SafeCom Windows registry settings......................................................................................66Customized SafeCom files.................................................................................................... 67Printer configurations.............................................................................................................67SafeCom database - backup and restore............................................................................. 67scBackup................................................................................................................................68SafeCom database - maintenance........................................................................................69
SafeCom server trace facility........................................................................................................... 69Enable trace...........................................................................................................................69Trace files.............................................................................................................................. 70TELNET interface.................................................................................................................. 71
SafeCom device trace facility...........................................................................................................72Chapter 4: Installation.............................................................................................................................. 73
Introduction....................................................................................................................................... 73The install program...........................................................................................................................73
Server installation (Basic)......................................................................................................73Server installation (Advanced)...............................................................................................74Client installation....................................................................................................................76Tools installation.....................................................................................................................77Windows Firewall – Ports that must be opened................................................................... 78Windows Firewall – Make SQL use fixed port......................................................................78After installation security checkup.........................................................................................80Scripts to manually create the databases.............................................................................80SQL collation..........................................................................................................................80Create intermediate SQL user: safecominstall......................................................................81Delete intermediate SQL user: safecominstall...................................................................... 83Do not modify SQL user: safecom........................................................................................83Add Windows service account to the SQL server................................................................ 84
6
SafeCom G4 Administrator's Manual Version: 10.520.11.221
Enable TCP/IP protocol on the SQL server..........................................................................84Determine physical and virtual memory on the server..........................................................84Store print files on an external file share..............................................................................85Change location of SafeCom print files................................................................................ 85Configuring encryption...........................................................................................................86Using a custom certificate for TLS communication...............................................................86Update SafeCom software – single server........................................................................... 87Uninstall SafeCom software.................................................................................................. 88Uninstall Microsoft SQL Express 2014 SP1..........................................................................88
SafeCom Print Client........................................................................................................................89Installation.............................................................................................................................. 89 Windows Firewall...................................................................................................................90 Print test page....................................................................................................................... 90 Direct print if SafeCom server is offline................................................................................ 90 Deployment to computers......................................................................................................91 scPrintClient.ini file.................................................................................................................92 Trace facility...........................................................................................................................93 Command line parameters.................................................................................................... 93 Uninstallation..........................................................................................................................95
Upgrade from Express to Microsoft SQL Server............................................................................. 95Stop the SafeCom Service....................................................................................................96 Change Windows Registry to reference SQL Server............................................................96 Change the dependencies on the SafeCom Service............................................................96
Multiserver installation...................................................................................................................... 97Overview................................................................................................................................ 98 Set SQL Server Agent to automatic startup......................................................................... 98 Add the other servers to the primary server’s group............................................................. 98 Check that the replication is working.................................................................................... 98 Repair replication.................................................................................................................100 What happens if servers or network connections are down?............................................. 100 Reinitialize the subscription................................................................................................. 101 Prevent the subscription from expiring................................................................................101 Using Group Management Service Account for services................................................... 102
Update multiserver installation....................................................................................................... 104Pre-requisites....................................................................................................................... 104 Update SafeCom software.................................................................................................. 104
Cluster installation.......................................................................................................................... 105Install the SafeCom license key code............................................................................................105
7
SafeCom G4 Administrator's Manual Version: 10.520.11.221
Determine the Computer Name.......................................................................................... 106Determine the Cluster Name...............................................................................................106Understanding the license key code................................................................................... 106Device license and user settings dependencies................................................................. 107
User rights required when adding printers.....................................................................................108Add a SafeCom Pull Printer on Windows 8 and 2016 / 2012 / 2012 R2....................................... 109Add a SafeCom Pull Printer on client computers.......................................................................... 110
Install SafeCom client..........................................................................................................110Add a local SafeCom Pull Printer on Windows 7............................................................... 110Add a local SafeCom Pull Printer on Windows 10 / Windows 8......................................... 111
SafeCom Pull Port..........................................................................................................................112Enable printer pooling..........................................................................................................112Configure the SafeCom Pull Port........................................................................................113Edit servers dialog...............................................................................................................116SafeCom Print Authentication dialog...................................................................................116Customizing SafeCom PopUp dialogs................................................................................ 117Configure Use job data logon............................................................................................. 117
Add a SafeCom Push Port............................................................................................................ 119SafeCom Smart Scan.....................................................................................................................122
SafeCom Move – scMove.exe............................................................................................ 123Setup SafeCom Move......................................................................................................... 124SafeCom Move example..................................................................................................... 124
SafeCom PopUp – scPopUp.exe...................................................................................................125Setup SafeCom PopUp....................................................................................................... 125SafeCom PopUp deployment on Windows computers....................................................... 128SafeCom PopUp examples................................................................................................. 129Control dialog timeout..........................................................................................................130Remember logon timeout.................................................................................................... 130Working with languages...................................................................................................... 131
Printing encrypted documents........................................................................................................131Make all printing go through the SafeCom.................................................................................... 132Install a card reader on a computer.............................................................................................. 132Install SafeCom Smart Printer Add-on and Driver.........................................................................133
Install Smart Printer Add-on on SafeCom Server............................................................... 133Install Smart Printer Add-on on SafeCom Print Client........................................................ 134Install SafeCom Smart Printing Driver................................................................................ 134Configuring drivers to use both 32-bit and 64-bit clients.....................................................134Verification - Collect your first document............................................................................ 135
8
SafeCom G4 Administrator's Manual Version: 10.520.11.221
Update selected SafeCom components.........................................................................................136Update SafeCom Administrator...........................................................................................136Update SafeCom Port Monitors.......................................................................................... 136Update scJobServer.exe......................................................................................................137Update scSecureLib.dll........................................................................................................137Update filtercard.dll..............................................................................................................137
Chapter 5: SafeCom Administrator....................................................................................................... 139Introduction..................................................................................................................................... 139Install SafeCom Administrator........................................................................................................140Log in to SafeCom Administrator...................................................................................................140
SafeCom Assistant.............................................................................................................. 141Change password................................................................................................................145Test server........................................................................................................................... 145Menus and commands........................................................................................................ 146Server group and server icons............................................................................................149User icons............................................................................................................................149Device icons.........................................................................................................................150Document icons................................................................................................................... 151Other icons...........................................................................................................................152Built-in user accounts.......................................................................................................... 153
System overview.............................................................................................................................153Manuals................................................................................................................................154Users.................................................................................................................................... 154Devices.................................................................................................................................155Servers................................................................................................................................. 155Device Servers.....................................................................................................................155Collect system info.............................................................................................................. 155Check for updates............................................................................................................... 155Save-O-Meter.......................................................................................................................156
License............................................................................................................................................156Server group properties..................................................................................................................157Server properties............................................................................................................................ 157
Server...................................................................................................................................158Users.................................................................................................................................... 159Devices.................................................................................................................................160E-mail................................................................................................................................... 161Tracking................................................................................................................................163Billing....................................................................................................................................164
9
SafeCom G4 Administrator's Manual Version: 10.520.11.221
Encryption............................................................................................................................ 165User properties............................................................................................................................... 166
Identification......................................................................................................................... 167Settings................................................................................................................................ 168ID code.................................................................................................................................170Rights................................................................................................................................... 172Member of............................................................................................................................173Aliases..................................................................................................................................174Delegates............................................................................................................................. 175Account................................................................................................................................ 179Billing....................................................................................................................................180
Device properties............................................................................................................................181Settings................................................................................................................................ 181Charging scheme.................................................................................................................182License................................................................................................................................. 183Statistics............................................................................................................................... 184Configure..............................................................................................................................185
Options dialog.................................................................................................................................187General.................................................................................................................................187Card reader..........................................................................................................................187Network................................................................................................................................ 190Maintenance.........................................................................................................................191Server group info.................................................................................................................191
Branches......................................................................................................................................... 192Administrator rights..............................................................................................................193Add a branch....................................................................................................................... 193Delete a branch................................................................................................................... 194Add a device to a branch....................................................................................................194Remove a device from a branch.........................................................................................194Computer properties............................................................................................................ 194Add a computer to SafeCom solution................................................................................. 195Add a computer to a branch at first print............................................................................195Add a computer to a branch manually................................................................................195Import computers.................................................................................................................195Remove a computer from a branch.................................................................................... 196Delete a computer from the SafeCom solution...................................................................196
Organizational units........................................................................................................................ 196Add an organizational unit...................................................................................................197
10

SafeCom G4 Administrator's Manual Version: 10.520.11.221
Delete an organizational unit...............................................................................................197Restrict access to devices...................................................................................................197
Groups............................................................................................................................................ 198 Add groups manually...........................................................................................................198 Group properties dialog....................................................................................................... 199 Delete groups.......................................................................................................................200 Add members to a group.................................................................................................... 200 Remove users from a group............................................................................................... 201 Select rules to be used on a group.................................................................................... 201 Select favorite billing codes for a group..............................................................................202 Group print...........................................................................................................................203
Device Servers............................................................................................................................... 204 Add Device Server...............................................................................................................205 Device server properties......................................................................................................206 Delete device server............................................................................................................207 Grouping device servers......................................................................................................207 Delete device server group................................................................................................. 207
Statistics..........................................................................................................................................208 Event log.........................................................................................................................................209 Export data..................................................................................................................................... 211
Export users.........................................................................................................................211 Export servers......................................................................................................................212 Export devices..................................................................................................................... 213 Export billing codes............................................................................................................. 214 Export 2-level billing codes................................................................................................. 214
Chapter 6: Manage servers....................................................................................................................216 Introduction..................................................................................................................................... 216 Add a single server group..............................................................................................................217 Create a multiserver group............................................................................................................ 218
Prerequisites........................................................................................................................ 218 Add server............................................................................................................................218 Troubleshooting....................................................................................................................219
Remove single or multiserver group.............................................................................................. 220 Delete a secondary server from a multiserver group............................................................................ 220
Failover servers.............................................................................................................................. 220 Chapter 7: Manage users....................................................................................................................... 223
Introduction..................................................................................................................................... 223 Default user.................................................................................................................................... 223
11
SafeCom G4 Administrator's Manual Version: 10.520.11.221
Import users....................................................................................................................................225Overview.............................................................................................................................. 226Server...................................................................................................................................227Import source.......................................................................................................................228File source (CSV file and XML file).................................................................................... 229Properties (Active Directory)................................................................................................230Properties (Novell eDirectory)............................................................................................. 231Properties (LDAP server).................................................................................................... 232Configuration (CSV).............................................................................................................233Configuration (XML).............................................................................................................235Configuration (Active Directory)...........................................................................................236Configuration (Novell eDirectory)........................................................................................ 238Configuration (LDAP server)............................................................................................... 239Rules.................................................................................................................................... 240Extra..................................................................................................................................... 243Schedule.............................................................................................................................. 243User import log file.............................................................................................................. 244Search filter..........................................................................................................................246Install certificate................................................................................................................... 246Conversion of magnetic ID codes....................................................................................... 247
Create users at first print............................................................................................................... 247Add users manually........................................................................................................................248Find users.......................................................................................................................................248Customize the user list view.......................................................................................................... 248Hide ID codes.................................................................................................................................249Hide document names................................................................................................................... 249Edit the properties of multiple users.............................................................................................. 250Delete users....................................................................................................................................251List of aliases..................................................................................................................................251
Save aliases to file.............................................................................................................. 252List of ID codes.............................................................................................................................. 252
Save ID codes to file...........................................................................................................253Customize the format of ID codes................................................................................................. 253User has lost ID card..................................................................................................................... 255User has forgotten ID code............................................................................................................255User has forgotten PIN code......................................................................................................... 255Delete a user’s print jobs (documents)..........................................................................................255Customize and translate e-mail messages....................................................................................256
12
SafeCom G4 Administrator's Manual Version: 10.520.11.221
Chapter 8: Manage devices................................................................................................................... 259Introduction..................................................................................................................................... 259Device license.................................................................................................................................259Add device......................................................................................................................................260
Resend configuration...........................................................................................................263Add a device to a SafeCom Device Server...................................................................................264
Add device server and device server device...................................................................... 264Add device server device.................................................................................................... 264Print QR code for Mobile Pull Print.....................................................................................266
Find devices....................................................................................................................................267Simple search...................................................................................................................... 267Advanced search – Device licenses................................................................................... 268
Broadcast for devices.....................................................................................................................269Customize the device list view.......................................................................................................269Edit the properties of multiple devices...........................................................................................270Delete devices................................................................................................................................ 271Import Nuance Ethernet Card Readers......................................................................................... 271Update software..............................................................................................................................271
Location of device software.................................................................................................273Single device software update............................................................................................ 273Multiple devices software update........................................................................................ 274
Monitor device................................................................................................................................ 275Look at device statistics...................................................................................................... 276
Restart devices............................................................................................................................... 277Open in web browser..................................................................................................................... 277Restrict users’ access to devices...................................................................................................277DHCP server...................................................................................................................................278Shorten job names in document list.............................................................................................. 278
Chapter 9: SafeCom Tracking................................................................................................................279Introduction..................................................................................................................................... 279Pull print tracking............................................................................................................................279Push print tracking..........................................................................................................................279
Printing directly.................................................................................................................... 280Printing via a second printer............................................................................................... 280Add a secondary printer (output service)............................................................................281Add the first printer (SafeCom Push Port).......................................................................... 281Set TCP port to another value than 9100...........................................................................285Allow printing at all times.................................................................................................... 286
13
SafeCom G4 Administrator's Manual Version: 10.520.11.221
SafeCom Port Configurator............................................................................................................ 286Install SafeCom Port Configurator.......................................................................................287 Start SafeCom Port Configurator........................................................................................ 287 Add server............................................................................................................................288 Convert to Push...................................................................................................................289 Restore to TCP/IP............................................................................................................... 295 List and repair printers........................................................................................................ 297 Read servers from file......................................................................................................... 298 scPortConfigurator.ini...........................................................................................................299 scPortUtility.......................................................................................................................... 303 Troubleshooting....................................................................................................................305
Copy tracking..................................................................................................................................306Fax, Scan and E-mail tracking.......................................................................................................306Post track........................................................................................................................................307
Push Print Post Tracking.....................................................................................................307 Planning your SafeCom Tracking solution.....................................................................................307
Defining print costs via charging schemes..........................................................................307 Track deleted jobs............................................................................................................... 310 Backup and restore............................................................................................................. 310 Using tracking data..............................................................................................................310
Multiple servers: Online or offline tracking.....................................................................................311Configure SafeCom primary server......................................................................................311
Configure SafeCom secondary servers.......................................................................................312 Configuration overview................................................................................................................... 313Charging schemes..........................................................................................................................314
Add charging scheme..........................................................................................................314 Sample charging calculation................................................................................................316 Charging scheme properties............................................................................................... 317 Associate charging scheme with device............................................................................. 317 Default charging scheme for new devices.......................................................................... 318 Delete a charging scheme.................................................................................................. 318
Change cost control to tracking..................................................................................................... 319SafeCom Reports........................................................................................................................... 319
Install SafeCom Reports......................................................................................................320 Start SafeCom Reports....................................................................................................... 320 Make a report...................................................................................................................... 320
Work with the tracking data........................................................................................................... 320Export tracking data.............................................................................................................321
14

SafeCom G4 Administrator's Manual Version: 10.520.11.221
Hide job names in tracking data......................................................................................... 321Delete tracking data.............................................................................................................322
SafeCom Data Mining.................................................................................................................... 323Main tracking........................................................................................................................324User statistics.......................................................................................................................325Device statistics................................................................................................................... 327Billing statistics.....................................................................................................................329Job list..................................................................................................................................331Tracking record dialog......................................................................................................... 331
Update scParser.dll.........................................................................................................................334Chapter 10: SafeCom Rule Based Printing (RBP)...............................................................................335
Introduction..................................................................................................................................... 335Planning your SafeCom RBP solution........................................................................................... 335Creating the rules...........................................................................................................................336Select rules to be used on group.................................................................................................. 341What if the rule does not work?.................................................................................................... 341How to determine the application.................................................................................................. 342Update scRuleExecuter.dll..............................................................................................................342
Chapter 11: SafeCom Client Billing...................................................................................................... 344Introduction..................................................................................................................................... 344
Manage billing codes...........................................................................................................344Plan your SafeCom Client Billing solution...........................................................................345
Configuration overview................................................................................................................... 345Configure SafeCom Client Billing...................................................................................................346Import billing codes........................................................................................................................ 348
Billing code import log file................................................................................................... 354Set up users to use billing codes.................................................................................................. 355
Add favorite billing codes for a user................................................................................... 356Select favorite billing codes for a group..............................................................................357
Edit the template for billing reminder.............................................................................................358Manage 1-level billing code........................................................................................................... 359
Add billing code................................................................................................................... 360Find billing codes.................................................................................................................361Delete billing codes............................................................................................................. 361Modify billing codes............................................................................................................. 361
Manage 2-level billing code........................................................................................................... 361Add primary or secondary code.......................................................................................... 363Find primary or secondary codes........................................................................................363
15
SafeCom G4 Administrator's Manual Version: 10.520.11.221
Delete primary or secondary codes.................................................................................... 363Modify primary or secondary codes.................................................................................... 364Add billing code................................................................................................................... 364Delete billing codes............................................................................................................. 364Modify billing codes............................................................................................................. 365
Work with Tracking data.................................................................................................................365Chapter 12: SafeCom Pay...................................................................................................................... 366
Introduction..................................................................................................................................... 366Planning your SafeCom Pay solution............................................................................................ 366
Accounting policy.................................................................................................................366Ensure users pay.................................................................................................................367Cashless solution.................................................................................................................367
Change cost control to pay............................................................................................................367Credit schedule...............................................................................................................................368Cashier – How to........................................................................................................................... 371
Login to SafeCom Administrator in Cashier mode..............................................................371Find user..............................................................................................................................372User properties dialog......................................................................................................... 373View user transactions........................................................................................................ 375Issue a new PIN code.........................................................................................................375Unlock user..........................................................................................................................376Deposit credits..................................................................................................................... 376Withdraw credits.................................................................................................................. 376Set low limit......................................................................................................................... 376Free reserved credits...........................................................................................................376Reset cash cards.................................................................................................................377Detect attempt to avoid paying........................................................................................... 377Print reports......................................................................................................................... 377
Account status................................................................................................................................ 378Cash flow report............................................................................................................................. 379User transactions dialog.................................................................................................................379Prevent cheating.............................................................................................................................380
E-mail template for an unfinished job................................................................................. 381Difference between print and copy..................................................................................... 381
Job name pricing............................................................................................................................382JobNamePricing.txt.............................................................................................................. 382
Chapter 13: SafeCom Device Utility......................................................................................................383Introduction..................................................................................................................................... 383
16
SafeCom G4 Administrator's Manual Version: 10.520.11.221
Starting SafeCom Device Utility.....................................................................................................383Menus and commands................................................................................................................... 384Populate list of devices.................................................................................................................. 384Working with configurations........................................................................................................... 384
Chapter 14: Format of tracking data.....................................................................................................386Introduction..................................................................................................................................... 386Format history.................................................................................................................................386Format.............................................................................................................................................386
Chapter 15: SafeCom ID Devices.......................................................................................................... 391Introduction..................................................................................................................................... 391SafeCom AWID Reader................................................................................................................. 392SafeCom Barcode Reader............................................................................................................. 392SafeCom Casi-Rusco Reader........................................................................................................ 392SafeCom EM Reader..................................................................................................................... 393SafeCom HID Prox Reader............................................................................................................393SafeCom iCLASS Reader.............................................................................................................. 393SafeCom Indala Reader.................................................................................................................393SafeCom Keypad............................................................................................................................394SafeCom Legic Reader.................................................................................................................. 394SafeCom Magnetic Card Reader...................................................................................................394SafeCom Magnetic Card Reader DD............................................................................................ 395SafeCom Mifare Reader.................................................................................................................395
Chapter 16: Troubleshooting................................................................................................................. 396SafeCom Help Desk Assistant.......................................................................................................396SafeCom Administrator: Login failed..............................................................................................396SafeCom Administrator: Unable to locate all SafeCom servers.................................................... 396SafeCom Administrator: Unable to locate all SafeCom devices....................................................397SafeCom Administrator: Users are missing................................................................................... 397SafeCom Administrator: Add user failed and Add alias failed....................................................... 397SafeCom Administrator: License does not take effect...................................................................397SafeCom Administrator: Controls in dialog are not visible............................................................ 398SafeCom Administrator: device is recognized as SafeCom Controller..........................................398SafeCom Administrator: device cannot be added as a Push printer............................................. 398SafeCom Administrator: device is “Not responding” when the community name has been
changed from “public”................................................................................................................398User is not created at first print..................................................................................................... 398Device web interface: Displayed incorrectly or settings not saved................................................399At the printer: Out of order.............................................................................................................399
17
SafeCom G4 Administrator's Manual Version: 10.520.11.221
At the printer: User unknown......................................................................................................... 399At the printer: Login denied........................................................................................................... 399At the printer: Restricted access....................................................................................................400At the printer: Error printing document.......................................................................................... 400At the printer: Question mark before the document name............................................................ 400At the printer: Printer busy, retry later............................................................................................400At the printer: Printer keeps rebooting...........................................................................................400At the printer: Copy not allowed.................................................................................................... 401At the printer: Login error <number>............................................................................................. 401At the printer: Error printing: General Failure................................................................................ 401At the printer: Card reader not working......................................................................................... 401Document not printed..................................................................................................................... 401Some documents are missing........................................................................................................402Document printed incorrectly..........................................................................................................402Nothing is copied............................................................................................................................402Driver names are missing.............................................................................................................. 402Add Printer Wizard: Specified port cannot be added.................................................................... 402Local SafeCom Pull Printer is unable to print................................................................................403How to start and stop the SafeCom Service................................................................................. 403How to start and stop the Print Spooler........................................................................................ 403User’s computer: Unable to connect to SafeCom server.............................................................. 403User’s computer: Please contact your administrator!.................................................................... 404Import users: No users imported................................................................................................... 404Import billing codes: No codes imported....................................................................................... 404Multiserver installation: replication issues...................................................................................... 405scPopUp: The publisher could not be verified...............................................................................405Smart Printer Driver: reduced performance................................................................................... 406Smart Printer Driver: error codes at the device.............................................................................406Remote SQL server cannot login...................................................................................................406SafeCom server can not login using the safecominstall user........................................................407Spooler crash when the Print System Asynchronous Notification message is not handled by the
Replication subscription for the old SQL primary server appears under the SafeCom ........ secondary server’s SQL Express instance................................................................................409
user............................................................................................................................................ 407 Certificate of the SafeCom G4 primary server is lost.....................................................................407Communication failure between SafeCom components................................................................ 407User Import from Unix that does not contain Domain Info............................................................ 408
SafeCom secondary server is not reachable from the SafeCom primary server................................... 408
18
SafeCom G4 Administrator's Manual Version: 10.520.11.221
Services using GMSA accounts do not start automatically after reboot........................................ 409 Chapter 17: Error codes.........................................................................................................................410
SafeCom Server error codes......................................................................................................... 410 Chapter 18: Administrator’s installation notes....................................................................................416
Introduction..................................................................................................................................... 416 Servers............................................................................................................................................416
SafeCom primary server.......................................................................................................417 SQL primary server.............................................................................................................. 417 SafeCom secondary server.................................................................................................. 418 Failover servers................................................................................................................... 419
User authentication.........................................................................................................................419 Devices........................................................................................................................................... 420 Printer drivers................................................................................................................................. 421
Chapter 19: scPortUtility operations and exit codes.......................................................................... 422 Push Port Creation......................................................................................................................... 422
Command Line usage......................................................................................................... 422 Options and Parameters......................................................................................................422 Exit Codes............................................................................................................................424 Remarks............................................................................................................................... 425
Attach Port...................................................................................................................................... 426 Command Line usage......................................................................................................... 426 Options and Parameters......................................................................................................426 Exit Codes............................................................................................................................426
Queue Migration – Push Print........................................................................................................427 Command Line usage......................................................................................................... 427 Parameters...........................................................................................................................428 Exit Codes............................................................................................................................429 Remarks............................................................................................................................... 430
List Print Queues............................................................................................................................431 Command Line usage......................................................................................................... 431 Options and Parameters......................................................................................................432 Exit Codes............................................................................................................................432
Chapter 20: Disclaimer........................................................................................................................... 433
19
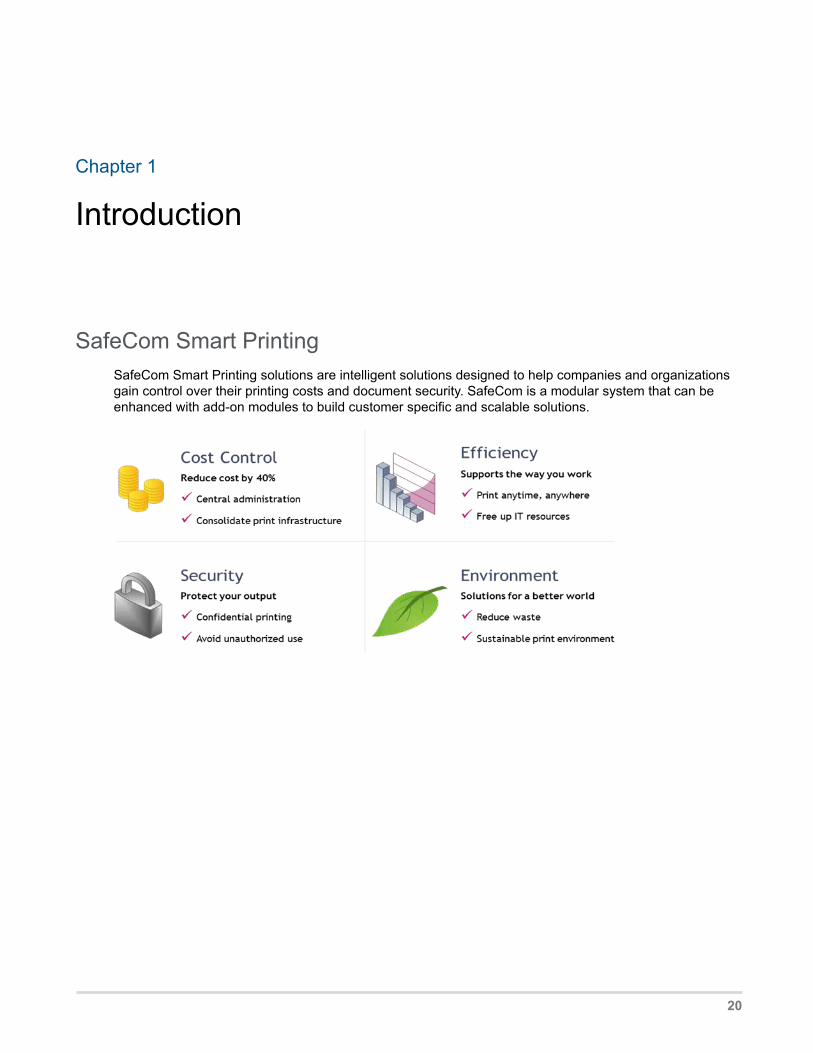
Chapter 1
Introduction
SafeCom Smart PrintingSafeCom Smart Printing solutions are intelligent solutions designed to help companies and organizationsgain control over their printing costs and document security. SafeCom is a modular system that can beenhanced with add-on modules to build customer specific and scalable solutions.
20
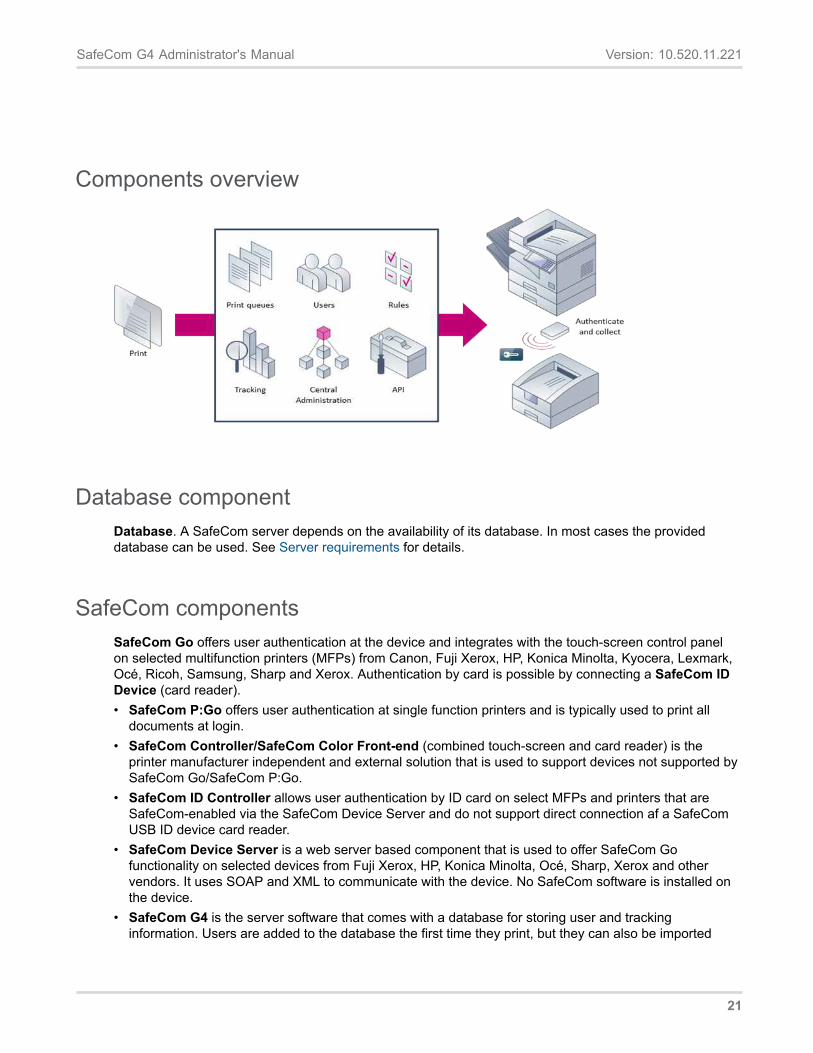
SafeCom G4 Administrator's Manual Version: 10.520.11.221
Components overview
Database componentDatabase. A SafeCom server depends on the availability of its database. In most cases the provideddatabase can be used. See Server requirements for details.
SafeCom componentsSafeCom Go offers user authentication at the device and integrates with the touch-screen control panelon selected multifunction printers (MFPs) from Canon, Fuji Xerox, HP, Konica Minolta, Kyocera, Lexmark,Océ, Ricoh, Samsung, Sharp and Xerox. Authentication by card is possible by connecting a SafeCom IDDevice (card reader).• SafeCom P:Go offers user authentication at single function printers and is typically used to print all
documents at login.• SafeCom Controller/SafeCom Color Front-end (combined touch-screen and card reader) is the
printer manufacturer independent and external solution that is used to support devices not supported bySafeCom Go/SafeCom P:Go.
• SafeCom ID Controller allows user authentication by ID card on select MFPs and printers that areSafeCom-enabled via the SafeCom Device Server and do not support direct connection af a SafeComUSB ID device card reader.
• SafeCom Device Server is a web server based component that is used to offer SafeCom Gofunctionality on selected devices from Fuji Xerox, HP, Konica Minolta, Océ, Sharp, Xerox and othervendors. It uses SOAP and XML to communicate with the device. No SafeCom software is installed onthe device.
• SafeCom G4 is the server software that comes with a database for storing user and trackinginformation. Users are added to the database the first time they print, but they can also be imported
21
SafeCom G4 Administrator's Manual Version: 10.520.11.221
from for example Active Directory. It can also work with an external Microsoft SQL Server, see Serverrequirements for details.
• SafeCom Administrator is the application that is used to configure and administrate the SafeComsolution, including remotely updating SafeCom software on devices.
• SafeCom Reports is used to generate reports based on tracking data collected for printer, copied anddeleted documents. Use it to report cost and environmental savings.
• SafeCom Web Interface offers users self service through a web browser. Users can delete or retaindocuments etc. Runs on Microsoft Internet Information Server (IIS).
• SafeCom Port Configurator is used to conveniently convert direct TCP/IP printers on print serverto Push printers and thus allow tracking of documents sent directly to devices. The printers can bereverted back to TCP/IP printers if required.
• SafeCom Push Port is the port monitor that tracks directly printed documents.• SafeCom Pull Port is a port monitor that tracks and stores the user’s documents. Documents are
stored on the SafeCom server. With SafeCom Print Client documents can optionally be stored on thehard disk drive of the user’s computer or a print server.
• SafeCom Print Client allows documents to be stored on the hard disk drive of the computer that it isinstalled onto.
• SafeCom PopUp displays the popup dialogs on the user’s screen that allow the user to interact withSafeCom.• SafeCom Move SafeCom Move is a simple way for the user to manage pending print jobs or files
scanned via SafeCom Smart Scan. From SafeCom Move the user can access scanned files, deletethem, or download them to any location specified by the user.
• SafeCom Smart Scan represents an easy way to handle scan-to-folder functionally that bypassesboth Microsoft Outlook and complex password issues.
• Smart Printer Add-on and Driver increases versatility across mixed printer vendor parks as itensures that users can use only one print queue, run even complex jobs on all printers and notencounter problems with driver incompatibilities. The Smart Printer Add-on and Driver create andstore print data on the SafeCom Server or the Print Client in Microsoft XPS format (XML PaperSpecification format) until it knows which printer will be used. When the user logs onto an MFP,the system identifies the device type and only then runs the job through the correct vendor-specificprinter driver.
SafeCom Pay componentsThese components are relevant only for solutions where users have to pay for print and copy service.• SafeCom Administrator the application that is used to add (deposit) or subtract (withdraw) credits
(money) from the user’s account.• SafeCom ePay allow users to transfer money from their bank account to their SafeCom account via the
Internet.
22
SafeCom G4 Administrator's Manual Version: 10.520.11.221
SafeCom APIsIn addition to being a modular solution, the SafeCom Smart Printing solution also features a number ofoptional Application Programming Interfaces (APIs).• SafeCom Administrator API is an XML-based tool that makes it possible to manipulate multiple users,
automate tasks, and integrate your SafeCom Smart Printing solution with other systems.• SafeCom Batch Print API is an XML-based tool used to integrate the SafeCom solution with other
systems, such as document archiving systems.
Pull Printing explainedFrom the user’s point of view:
1. Print your documents from Windows.
2. Go to any SafeCom-enabled printer.
3. Log in by means of card and/or code.
4. Select the documents you wish to print and pick them up from the printer’s output bin.
From the administrator’s point of view:
1. SafeCom solutions only require software to be installed on a Windows Server 2016/2012/2012 R2, orWindows 8; there is no need to install software on users’ computers; it is sufficient to add or modify ashared printer on the server.
SafeCom Service and other services SafeCom Service The SafeCom Service (scSafeComService.exe) launches the required SafeCom processes (scBroadcastServer.exe, scJobServer.exe, scMoneyServer.exe and scTrackingServer.exe). On Windows 64-bit the files are named *64.exe. By default, the service runs under a local system account, and the databases are accessed via a “safecom” user with SQL authentication. You can setup a dedicated service account, which requires the “Logon as a service” rights, and can access the SQL database with Windows authentication. The installer prompts for selecting the authentication method. • SafeCom Device Server The SafeCom Device Server (scDeviceServer.exe) launches the SafeCom
Device Server. • SQL Agent The Microsoft SQL Server Agent handles the replication from SQL primary server to the
SafeCom secondary servers. • MSSQL The Microsoft SQL Server runs the database. • Print Spooler The Microsoft Print Spooler (spoolsv.exe) loads files to memory for later printing. • SafeCom XpsPrint Service Part of the Smart Printer Add-on. Handles XPS (Smart Printer Driver) job
printing for SafeCom.
23
SafeCom G4 Administrator's Manual Version: 10.520.11.221
From the system’s point of view:
1. The Windows print queue is using the port monitor SafeCom Pull Port to analyze the document todetermine owner and job characteristics.
2. The SafeCom Pull Port transfers the formatted document and the resulting data to the SafeComserver.
3. When the user logs in at the printer documents are released for printing. Documents that do notmatch the printer can be filtered from the list of documents in advance (Printer driver and documentfidelity considerations).
Terms and definitionsThe relevance of some of the listed terms depends on the availability of SafeCom add-on modules(license key code controlled).
Billing code – A code users can select for any job that is tracked by the SafeCom solution. See SafeComClient Billing.
Charging scheme – In the charging scheme you define the cost of the different paper sizes, use of colorand duplex (double-sided print). A device can be associated with two charging schemes: 1) Primarycharging scheme, which is used to charge users and invoice departments, and 2) Secondary chargingscheme, which is used to reflect the true costs.Requires SafeCom Tracking or SafeCom Pay.
Delegate print – Delegate Print is relevant for an organization that needs the advantages of SafeComPull Print and users who need the flexibility to entrust their print tasks to someone else. With SafeComDelegate Print users authorize other SafeCom users to print or collect print jobs on their behalf andDelegate Print.
Domain – A group of computers that are part of a network and share a common directory database.
Driver name – In Windows the driver name appears as Model on the General tab of the Printerproperties dialog. The name is used to determine document fidelity (Printer driver and document fidelityconsiderations).
Dual charging scheme – See Charging scheme.
Encryption (option) – By means of encryption the SafeCom solution can prevent anyone from readingthe documents, should they be intercepted on their way to the printer (Printing encrypted documents).Requires SafeCom Encryption.
Group – Either a group of SafeCom servers (Server group) or a group of users. A user can be a memberof one or more groups. Existing user grouping can be imported from Windows and used in connection withSafeCom Rule Based Printing. See also: SafeCom Rule Based Printing
Group print – Documents can be printed to all members of a group. With the Print once option thedocument is deleted from all members once one member has collected it.
Home server – The SafeCom server where the list of the user’s print jobs is maintained. See also:Multiserver Support.
LDAP – Lightweight Directory Access Protocol.
24
SafeCom G4 Administrator's Manual Version: 10.520.11.221
License key code – The code provided by your SafeCom solution supplier.
Primary server – If the server group includes multiple SafeCom servers, then one is appointed the role of being the primary server. All system and user data are synchronized and distributed from the SafeCom primary server. See also: Multiserver Support.
MFP – Multifunction Printer; a device that can print, scan, and copy.
Multiserver Support – Enables two or more SafeCom servers to work together. Users can roam between locations to collect their documents at any SafeCom-enabled printer and at any location regardless to which SafeCom server the document was printed (Are SafeCom solutions scalable?). See also: Home server and Primary server.
MSCSMicrosoft Cluster Service.
Organizational unitOrganizational unit (Org. unit) – is an attribute that describes to which part of the organizational tree users, devices and servers belong (Organizational units).
PIN code – PIN (Personal Identification Number) is a personal code consisting of four (4) alphanumeric characters. To increase security users are requested to log in by means of both the personal card (or ID code) and the PIN code. The default PIN code is ‘1234’.
Port Configurator – See: SafeCom Port Configurator.
Port monitor – Port monitor is a component in the Windows print process that is responsible for the communication to the physical printer. When you do a Server installation or Client installation you also install two special port monitors: SafeCom Pull Port and SafeCom Push Port.
PUK code – PUK (Personal Unblocking Key) is an 8-digit code that associates users with their card (or ID code).
Pull Print – The process where users log in at the printer before the submitted documents are printed. See also: SafeCom Pull Printer.
Push Print – The process where submitted documents are sent directly to the printer. See also: SafeCom Push Printer.
RBP – Rule Based Printing.
Rule Based Printing – See: SafeCom Rule Based Printing.
SafeCom Administrator – The application you use to configure and administrate a SafeCom solution.
SafeCom Administrator API – (option)An XML-based tool that makes it possible to manipulate multiple users, automate tasks and integrate the SafeCom solution with other systems. Available in the form of an executable and a dynamic link library (DLL). Refer to SafeCom G4 Administrator API Reference ManualD60825.
SafeCom Batch Print API – (option)An XML-based tool used to integrate the SafeCom solution with other systems, such as document archiving systems. Refer to SafeCom G4 Batch Print API Reference Manual D60826.
SafeCom Broadcast Server – A server process that enables the various SafeCom applications to find and connect to the relevant servers.
25
SafeCom G4 Administrator's Manual Version: 10.520.11.221
SafeCom Client – A computer on which a local SafeCom printer is installed.
SafeCom Client Billing – (option)Allows users to select billing codes with any print, copy and possiblyalso fax, scan and e-mail jobs performed on MFPs. With billing codes it is possible to get a very detailedbreakdown of printer and MFP usage and possibly recover these expenses by invoicing clients. RequiresSafeCom Tracking.
SafeCom Controller – Hardware that connects directly to the Ethernet network and provides networkaccess for the SafeCom ID Device.
SafeCom Devices – The SafeCom Controller, SafeCom Go and other devices that support the SafeComprotocol. Communicates with the SafeCom Job Server.
SafeCom ePay – (option)Allows users to transfer money from their bank account to their SafeComaccount via the Internet.
SafeCom Front-end – Hardware that is used to authenticate users at the printer. It is a card reader withtouch-screen (SafeCom ID Devices).
SafeCom Go – SafeCom device software that integrates with the touch-screen control panel of MFPs tooffer authentication, access control and Pull Print (Printers).
SafeCom ID Device – Hardware that is used to authenticate users at the printer (SafeCom ID Devices).
SafeCom Job Server – A server process that stores user data, device data and print job references in theSafeCom Job database. Configuration data is also stored for the whole SafeCom solution.
SafeCom Mobile Print – Allows users to print via e-mail or to upload a print job to a web page, from amobile device, a tablet, or computer.
SafeCom Money Server – A server process that controls access to the SafeCom Money database thatstores transactions made on the users’ accounts. Requires SafeCom Pay.
SafeCom Port Configurator – A wizard-based tool for converting existing TCP/IP1 printers to SafeComPush printers and revert SafeCom Push printers back to their original TCP/IP settings.
SafeCom Pull Printer (Uses SafeCom Pull Port) – A printer defined in Windows that parses the printeddocument and transfers the printed document and tracked data to the SafeCom server. Subsequently theuser can log in at any SafeCom-enabled printer to collect the document.
SafeCom Push Printer (Uses SafeCom Pull Port) – (Uses SafeCom Push Port) A printer defined inWindows that parses the printed document, transfers the tracked data to the SafeCom server, andforwards the printed document either directly to the physical printer or to another Windows print queue.Requires SafeCom Tracking or SafeCom Pay.
SafeCom Print Client – SafeCom Print Client allows documents to be stored on the hard disk drive of thecomputer that it is installed onto.
SafeCom Reports – (option) SafeCom Reports enables viewing of main tracking statistics, user statistics,device statistics, client billing statistics and job list. SafeCom Reports includes a number of predefined andparameterized reports. Requires SafeCom Tracking.
1 A TCP/IP printer is a Windows print queue that uses the Standard TCP/IP port monitor.
26

SafeCom G4 Administrator's Manual Version: 10.520.11.221
SafeCom Rule Based Printing (RBP) – (option) Allows print cost savings by offering management amethod for enforcing policies for printing. Rules can be applied to groups of users. Existing user groupingcan be imported from Windows.Requires SafeCom Tracking.
SafeCom Server The computer where the SafeCom Server software is installed.
SafeCom Tracking Server – A server process that controls access to the SafeCom Tracking databasethat stores information about who printed what on which printer and at what time. The tracking recordincludes information about paper size, number of pages and possible use of color and duplex (double-sided print). Requires SafeCom Tracking or SafeCom Pay.
SafeCom Web Interface – With SafeCom Web Interface users can use a standard web browser to seea list of their documents on the SafeCom server. In SafeCom Pay environments users can see theircurrent balance and transactions made on their SafeCom account. Refer to SafeCom G4 Web InterfaceAdministrator’s Manual D60651.
Server group name – A unique name used by SafeCom components to reference a group of one or moreSafeCom servers. Maximum is 19 characters.
SQL Server Management Studio (SSMS) – SQL Server Management Studio (SSMS) is a tool used forhandling SQL components.
Virtual server – Microsoft Cluster Service (MSCS) enables the creation of virtual servers. Unlike aphysical server, a virtual server is not associated with a specific computer, and can failover from one nodeto another. SafeCom configurations must reference the virtual server rather than the physical servers.Requires SafeCom Cluster Server license.
System requirementsConsider the hardware and operating systems on your server and clients before installing SafeCom G4.
Server requirements• Windows Server 2016 or 2012 R2. For demo purpose it can also run on Windows 10, 8, and 7.• Virtualization software, such as VMware and Microsoft Virtual Server, is supported as long as it
supports the Operating System.• 8 GB RAM or more (16 GB is a recommended minimum for larger deployments).• 20 GB or more disk space to allow for database growth and print job storage (depends on utilization).• TCP/IP protocol installed and configured.• The Nuance Ethernet Card Reader Service REQUIRES Microsoft .Net Framework 4.6.• SafeCom license key code.• Capability for SHA-2 code signing.
Database• Microsoft SQL Express 2014 SP1 is distributed with the software and REQUIRES Microsoft .Net
Framework 3.5 SP1 and Windows Installer 4.5. Please visit microsoft.com to download and install theseprior to the installation of SafeCom G4.
27
SafeCom G4 Administrator's Manual Version: 10.520.11.221
• In a SafeCom multiserver installation (Multiserver installation) the SQL primary server must run Microsoft SQL Server Microsoft SQL Server 2014 or 2016. It must be licensed and installed (including replication option). Microsoft SQL is quite memory intensive and basically the more memory the better. 8 GB RAM is a good start.
Important When using a standalone SQL Server 2016, ensure that you have the Management Tools – Basic component of the SSMS 2014 installed on the same machine as the SafeCom server before you start installing SafeCom. If SSMS is not installed, replication may not work properly.
Important When using SQL Server 2014, ensure that you have the Management Tools – Basiccomponent of the SSMS installed on the same machine as the SafeCom server. If the SSMS is notinstalled prior to SafeCom, it requires a restarting of the SafeCom service. If SSMS is not installed,replication may not work properly. The SSMS version must match the version of the external SQLserver to be used.
• Decide on the authentication type before installation, as you will be prompted to choose by the installer.If you select Windows authentication, the account is required already during the installation andmust have the “Logon as service” rights. The service account credentials also need to be provided, ifnecessary.
Note: When using Windows Server 2012 R2 (either as a G4 server or for the Print Client), ensure that thefollowing Windows updates are installed in this order: KB2939087; KB2975061; KB2919355, KB2999226.
Note: For SHA-2 signing on Windows 7, ensure that the relevant code signing support is installed. Formore information, see here.
Note: The above is to be considered rules of thumb in terms of the configuration of the SafeCom servers(CPU, RAM, and disk space). The load on the system is very difficult to predict since it depends on somany things, including, number, size and type of documents to be printed, printer driver, number andtypes of printers, number of users etc. Refer to Are SafeCom solutions scalable? for information onscalability.
Note: The Smart Printer Driver supports both 32-bit and 64-bit versions of the operating system.
Note: Ensure that the computer names in the SafeCom environment are shorter than 16 characters, toavoid connection issues due to NetBIOS limitations.
Note: Ensure that ICMP traffic is allowed between SafeCom components (SafeCom G4 server, DeviceServers, Print Client, devices using various SafeCom Go implementations).
Note: Do not install your SafeCom Device Server on a computer that already has a Print Client installed.
Cluster• The SafeCom server and the SafeCom printers on Windows Server 2016, 2012 R2 are cluster-
aware (requires a SafeCom Cluster Server license). If one server in the failover cluster goes downanother takes over. This increases availability of the SafeCom server installation significantly. Refer tomicrosoft.com for additional information on the resulting hardware and software requirements.
Client requirements• Windows 10.
28
SafeCom G4 Administrator's Manual Version: 10.520.11.221
• Clients running Citrix and Windows Terminal Service (WTS).• 1 GHz CPU and 2 GB RAM or greater (recommended 4 GB RAM if 64-bit).• 1 GB free disk space (or more depending on the amount of printing).• TCP/IP protocol installed and configured.
Printing via LPD/LPR from Apple Mac, UNIX, Novell and Host systems (mainframe) is possible to ashared SafeCom Pull Printer, but may require additional software.
Note: For Windows 10 workstations, update 1511 is required.
Note: When using Windows 8 or Windows Server 2012 R2, ensure that the following Windows updatesare installed in this order: KB2939087; KB2975061; KB2919355, KB2999226.
Note: For SHA-2 signing on Windows 7, ensure that the relevant code signing support is installed. Formore information, see here.
Note: Ensure that the computer names in the SafeCom environment are shorter than 16 characters, toavoid connection issues due to NetBIOS limitations.
Note: Push printing does not work if SafeCom Print Client version G4 520*07 is used with SafeCom G4Server version 520*11. To resolve the problem, upgrade to SafeCom Print Client 520*08 or newer.
Printers
Printers and MFPs with a network connection2 can be Pull Print enabled with the SafeCom Go, SafeComP:Go, or SafeCom Controller.
SafeCom Go integrates with the touch-screen control panel of the MFPs and offers user authenticationby code and/or card. SafeCom P:Go is the internal solution for printers and typically offers userauthentication by card. Supported printer vendors:• Canon• Fuji Xerox• HP• Konica Minolta• Kyocera• Lexmark• Océ• Ricoh• Samsung• Sharp• Xerox
SafeCom Controller offers user authentication and Pull Printing independent of printer manufacturer.Users log in either through the attached SafeCom Color Front-end or stand-alone SafeCom ID Device.
If pages are to be counted SafeCom Tracking is required and the print job must be processed by a driverthat support PCL5, PCL5c, PCL5e, PCL6, PCL XL or PostScript level 2 or 3.
2 Printer must support printing via TCP port 9100.
29
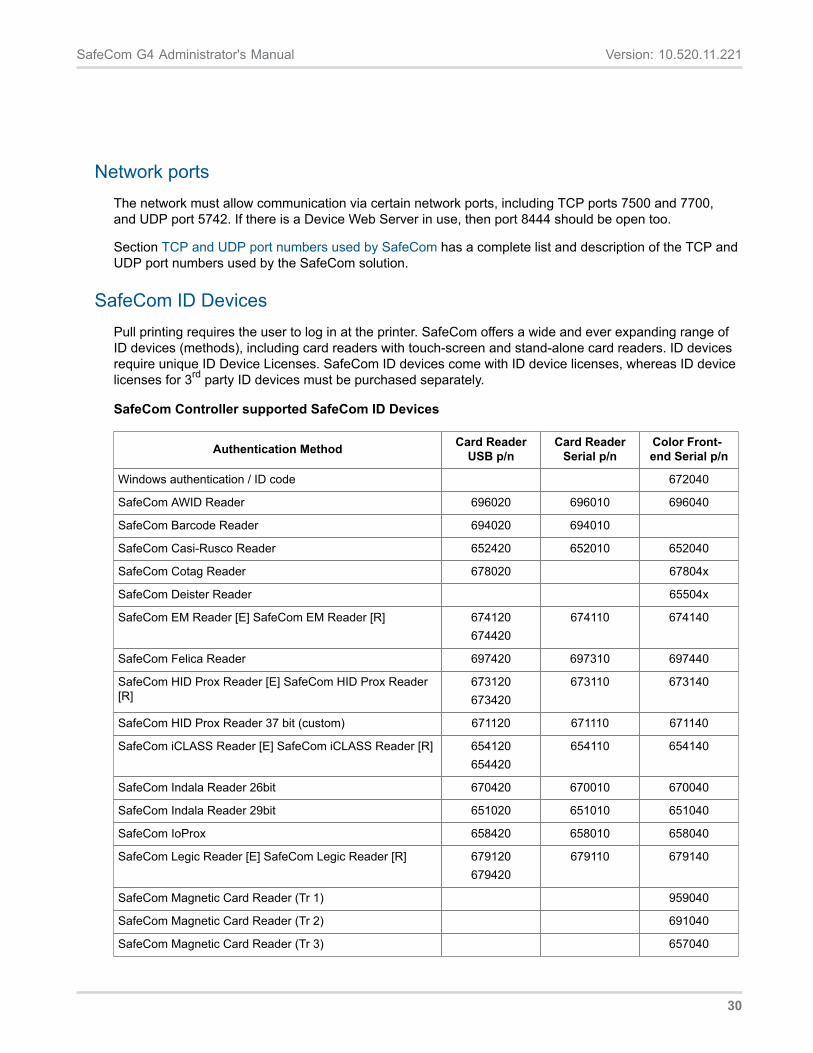
SafeCom G4 Administrator's Manual Version: 10.520.11.221
Network portsThe network must allow communication via certain network ports, including TCP ports 7500 and 7700,and UDP port 5742. If there is a Device Web Server in use, then port 8444 should be open too.
Section TCP and UDP port numbers used by SafeCom has a complete list and description of the TCP andUDP port numbers used by the SafeCom solution.
SafeCom ID DevicesPull printing requires the user to log in at the printer. SafeCom offers a wide and ever expanding range ofID devices (methods), including card readers with touch-screen and stand-alone card readers. ID devicesrequire unique ID Device Licenses. SafeCom ID devices come with ID device licenses, whereas ID devicelicenses for 3rd party ID devices must be purchased separately.
SafeCom Controller supported SafeCom ID Devices
Authentication Method Card ReaderUSB p/n
Card ReaderSerial p/n
Color Front-end Serial p/n
Windows authentication / ID code 672040
SafeCom AWID Reader 696020 696010 696040
SafeCom Barcode Reader 694020 694010
SafeCom Casi-Rusco Reader 652420 652010 652040
SafeCom Cotag Reader 678020 67804x
SafeCom Deister Reader 65504x
SafeCom EM Reader [E] SafeCom EM Reader [R] 674120674420
674110 674140
SafeCom Felica Reader 697420 697310 697440
SafeCom HID Prox Reader [E] SafeCom HID Prox Reader[R]
673120673420
673110 673140
SafeCom HID Prox Reader 37 bit (custom) 671120 671110 671140
SafeCom iCLASS Reader [E] SafeCom iCLASS Reader [R] 654120654420
654110 654140
SafeCom Indala Reader 26bit 670420 670010 670040
SafeCom Indala Reader 29bit 651020 651010 651040
SafeCom IoProx 658420 658010 658040
SafeCom Legic Reader [E] SafeCom Legic Reader [R] 679120679420
679110 679140
SafeCom Magnetic Card Reader (Tr 1) 959040
SafeCom Magnetic Card Reader (Tr 2) 691040
SafeCom Magnetic Card Reader (Tr 3) 657040
30
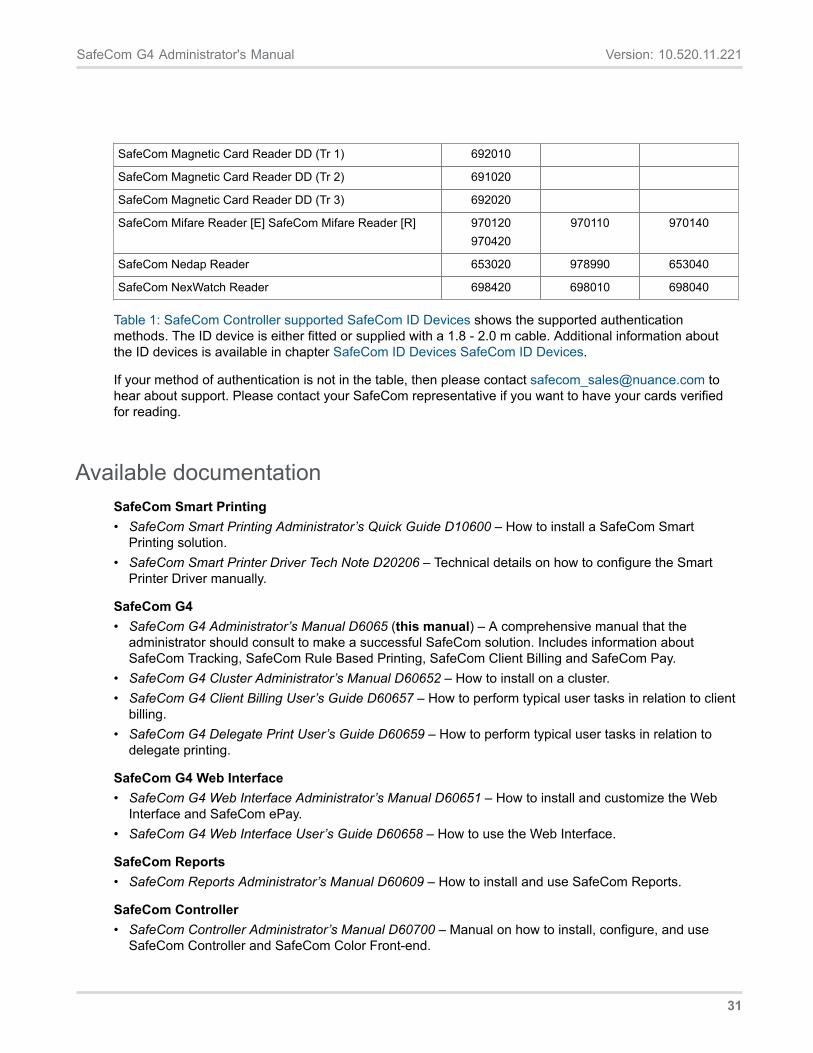
SafeCom G4 Administrator's Manual Version: 10.520.11.221
SafeCom Magnetic Card Reader DD (Tr 1) 692010
SafeCom Magnetic Card Reader DD (Tr 2) 691020
SafeCom Magnetic Card Reader DD (Tr 3) 692020
SafeCom Mifare Reader [E] SafeCom Mifare Reader [R] 970120970420
970110 970140
SafeCom Nedap Reader 653020 978990 653040
SafeCom NexWatch Reader 698420 698010 698040
Table 1: SafeCom Controller supported SafeCom ID Devices shows the supported authenticationmethods. The ID device is either fitted or supplied with a 1.8 - 2.0 m cable. Additional information aboutthe ID devices is available in chapter SafeCom ID Devices SafeCom ID Devices.
If your method of authentication is not in the table, then please contact [email protected] tohear about support. Please contact your SafeCom representative if you want to have your cards verifiedfor reading.
Available documentationSafeCom Smart Printing• SafeCom Smart Printing Administrator’s Quick Guide D10600 – How to install a SafeCom Smart
Printing solution.• SafeCom Smart Printer Driver Tech Note D20206 – Technical details on how to configure the Smart
Printer Driver manually.
SafeCom G4• SafeCom G4 Administrator’s Manual D6065 (this manual) – A comprehensive manual that the
administrator should consult to make a successful SafeCom solution. Includes information aboutSafeCom Tracking, SafeCom Rule Based Printing, SafeCom Client Billing and SafeCom Pay.
• SafeCom G4 Cluster Administrator’s Manual D60652 – How to install on a cluster.• SafeCom G4 Client Billing User’s Guide D60657 – How to perform typical user tasks in relation to client
billing.• SafeCom G4 Delegate Print User’s Guide D60659 – How to perform typical user tasks in relation to
delegate printing.
SafeCom G4 Web Interface• SafeCom G4 Web Interface Administrator’s Manual D60651 – How to install and customize the Web
Interface and SafeCom ePay.• SafeCom G4 Web Interface User’s Guide D60658 – How to use the Web Interface.
SafeCom Reports• SafeCom Reports Administrator’s Manual D60609 – How to install and use SafeCom Reports.
SafeCom Controller• SafeCom Controller Administrator’s Manual D60700 – Manual on how to install, configure, and use
SafeCom Controller and SafeCom Color Front-end.
31
SafeCom G4 Administrator's Manual Version: 10.520.11.221
• SafeCom Controller User’s Guide D20700 – User's Guide on how to use SafeCom Controller andSafeCom Color Front-end.
SafeCom Go Canon• SafeCom Go Canon Administrator’s Manual D60707 – Manual on how to install, configure and use
SafeCom Go Canon.• SafeCom Go Canon User’s Guide D20707 – User's Guide on how to use SafeCom Go Canon.
SafeCom Go HP• SafeCom Go HP Administrator’s Manual D60701 – Manual on how to install, configure and use
SafeCom Go HP.• SafeCom Go HP Hardware Quick Guide D10702 – Quick Guide on how to install the SafeCom Go HP
hardware.• SafeCom Go HP User’s Guide D20701 – User's Guide on how to use SafeCom Go HP.
SafeCom Go Fuji Xerox• SafeCom Go Fuji Xerox Administrator’s Manual D60717 – Manual on how to install, configure, and use
SafeCom Go Fuji Xerox.• SafeCom Go Fuji Xerox User’s Guide D20717 – User's Guide on how to use SafeCom Go Fuji Xerox.
SafeCom Go Konica Minolta• SafeCom Go Konica Minolta Administrator’s Manual D60713 – Manual on how to install, configure and
use SafeCom Go Konica Minolta.• SafeCom Go Konica Minolta User’s Guide D20713 – User's Guide on how to use SafeCom Go Konica
Minolta.
SafeCom Go Kyocera• SafeCom Go Kyocera Administrator’s Manual D60721 – Manual on how to install, configure and use
SafeCom Go Kyocera.• SafeCom Go Kyocera User’s Guide D20721 – User's Guide on how to use SafeCom Go Kyocera.
SafeCom Go Lexmark• SafeCom Go Lexmark Administrator’s Manual D60711 – Manual on how to install, configure and use
SafeCom Go Lexmark.• SafeCom Go Lexmark User’s Guide D20711 – User's Guide on how to use SafeCom Go Lexmark.
SafeCom Go Océ• SafeCom Go Océ Administrator’s Manual D60715 – Manual on how to install, configure, and use
SafeCom Go Océ.• SafeCom Go Océ User’s Guide D20715 – User's Guide on how to use SafeCom Go Océ.
SafeCom Go Ricoh• SafeCom Go Ricoh Administrator’s Manual D60703 – Manual on how to install, configure and use
SafeCom Go Ricoh.• SafeCom Go Ricoh User’s Guide D20703 – User's Guide on how to use SafeCom Go Ricoh.
32
SafeCom G4 Administrator's Manual Version: 10.520.11.221
SafeCom Go Samsung• SafeCom Go Samsung Administrator’s Manual D60719 – Manual on how to install, configure and use
SafeCom Go Samsung.• SafeCom Go Samsung User’s Guide D20719 – User's Guide on how to use SafeCom Go Samsung.
SafeCom Go Sharp• SafeCom Go Sharp Administrator’s Manual D60709 – Manual on how to install, configure and use
SafeCom Go Sharp.• SafeCom Go Sharp User’s Guide D20709 – User's Guide on how to use SafeCom Go Sharp.
SafeCom Go Xerox• SafeCom Go Xerox Administrator’s Manual D60705 – Manual on how to install, configure and use
SafeCom Go Xerox.• SafeCom Go Xerox User’s Guide D20705 – User's Guide on how to use SafeCom Go Xerox.
Other manuals• SafeCom Save-O-Meter Administrators Manual D60640 – This manual describes how to install and
configure the Save-O-Meter and Save-O-Meter widget.• SafeCom Mobile Print Administrators manual D60644 – This manual describes install and configure
SafeCom Mobile Print as well as how users interface with it.• SafeCom G4 Administrator API Reference Manual D60825 – Describes how to use the Administrator
API to add, delete and modify users and how to export tracking data.• SafeCom G4 Batch Print API Reference Manual D6082 – Describes how to integrate SafeCom with
other systems, such as document archiving systems.• SafeCom G4 Administrator DLL Programmer’s Manual D60827 – Describes the SafeCom Administrator
DLL, a C programmer’s interface that can be used to automate SafeCom administration tasks andintegrate SafeCom with existing systems.
About this manualThis manual applies to SafeCom G4 Server version 10.520.11.221, Device Web Server version5.9.1.9343, SafeCom Print Client version S82 070.520*08, SafeCom Device Server S82 060.090*10,SafeCom Controller version S80 508.780*68, SafeCom Controller 3 Port version S80 312.750*67,SafeCom Controller 1 Port version S80 304.750*67, SafeCom Go Canon version S88 010.020*25,SafeCom Go HP version S89 nnn.050*32, SafeCom Go Kyocera S96 020.060*02, SafeCom Go LexmarkS93 nnn.030*21, SafeCom Go Ricoh S87 nnn.030*06 and SafeCom Go Samsung S94 nnn.010*24.
This manual is organized as follows:• Chapter Introduction Introduction lists the supplied SafeCom documentation, introduces SafeCom
relevant terms, system requirements, and describes how this manual is organized.• Chapter Frequently asked questions Frequently asked questions contains answers to some of the
questions frequently asked by administrators.• Chapter Planning your SafeCom solution Planning your SafeCom solution helps and guides the
administrator to a successful SafeCom solution that reduces print costs, is easy to administrate andyields high user satisfaction.
33
SafeCom G4 Administrator's Manual Version: 10.520.11.221
• Chapter Installation Installation covers installation scenarios, including advanced and multiserverinstallation.
• Chapter SafeCom Administrator SafeCom Administrator describes the menus and dialogs of theadministrative application, SafeCom Administrator.
• Chapter Manage servers Manage servers describes how to manage server groups and servers, inparticular groups with multiple servers.
• Chapter Manage users Manage users links the SafeCom options discussed during the planning phasein Chapter Planning your SafeCom solution with easy-to-follow step-by-step procedures.
• Chapter Manage devices Manage devices describes how to manage devices from within SafeComAdministrator.
• Chapter SafeCom Tracking SafeCom Tracking describes how tracking is done, how to plan andconfigure the tracking solution, define costs via charging schemes and how to work with the trackingdata.
• Chapter SafeCom Rule Based Printing (RBP) SafeCom Rule Based Printing (RBP) describes how toplan and configure rule based printing.
• Chapter SafeCom Client Billing SafeCom Client Billing describes how to plan and configure your billingsolution, including how to import and work with billing codes.
• Chapter SafeCom Pay SafeCom Pay describe how to plan and configure your pay solution, chooseaccounting policy, ensure users pay and use deposit and withdraw credits from users’ accounts.
• Chapter SafeCom Device Utility SafeCom Device Utility describes how to use SafeCom Device Utility toload device software and configure devices.
• Chapter Format of tracking data Format of tracking data describes the format of the exported trackingdata.
• Chapter SafeCom ID Devices SafeCom ID Devices contains brief description of the stand-alone cardreaders and their status signals.
• Chapter Troubleshooting Troubleshooting contains hints for troubleshooting.• Chapter Error codes Error codes lists the error codes that you may enconter when using the SafeCom
solution.• Chapter Administrator’s installation notes Administrator’s installation notes contains forms that can be
used to record information about the SafeCom solution.• Chapter 19 scPortUtility operations and exit codes contains in-depth information for the scPortUtility
command line tool.
Document history
Revision D60650-31• Rebranded the entire guide according to Kofax standards:
• Updated trademarks (Trademarks).• Updated 3rd party trademarks (2019 © Kofax All rights reserved).• Removed all legacy weblinks referring to old SafeCom sites and documents.
• Added a note about pricing USB print as copy (Settings).• Updated client requirements (Client requirements).
34
SafeCom G4 Administrator's Manual Version: 10.520.11.221
• Note added about Low limit handling (Account, User properties dialog). • Updated SQL Server compatibility information (document-wide). • Updated cluster server requirements (Server requirements). • Updated Windows Server version requirements to 2012 R2 (document-wide). • Updated Microsoft SQL Express data path (Uninstall Microsoft SQL Express 2014 SP1, Using Group
Management Service Account for services). • Updated item C in the table of markers and in the corresponding tables (Servers, SafeCom primary
server, SafeCom secondary server).
Revision D60650-30 • Added component-related deployment instructions (Deployment to computers). • Updated Troubleshooting (SafeCom Administrator: device is “Not responding” when the community
name has been changed from “public”). • Added .NET dependency to Save-O-Meter (Save-O-Meter).
Revision D60650-28 • Added information on Device Server limitations (Device Server failover considerations, Device Servers,
Grouping device servers).
Revision D60650-27 • Added information on money server and tracking server unavailability (Tracking). • Added information on max login attempts at scAdmin for administrator users (Users). • Updated information on required access rights for scBackup (scBackup). • Added information on user ID expiration (Users).
Revision D60650-26 • Added information on Home Folder (Identification).
Revision D60650-25 • Added a note about upgrade scenarios (Using Group Management Service Account for services).
Revision D60650-24 • Updated update instructions when upgrading from G2 or G3 (Update SafeCom software – single
server, Pre-requisites).
Revision D60650-23 • Added a note on SQL authentication method change during upgrade (Server installation (Basic), Server
installation (Advanced)).
Revision D60650-22 • Corrected HP device family name (TCP and UDP port numbers used by SafeCom).
Revision D60650-21 • Clarified authentication instructions for single- and multiserver installations (Server installation (Basic),
Server installation (Advanced), Multiserver installation). • Clarified SQL-related instructions (Create intermediate SQL user: safecominstall, Delete intermediate
SQL user: safecominstall, Add Windows service account to the SQL server, Multiserver installation: replication issues).
35
SafeCom G4 Administrator's Manual Version: 10.520.11.221
Revision D60650-20 • SafeCom G4 version S82 070.520*09, SafeCom Print Client version S82 070.520*06, SafeCom Device
Server version S82 060.090*09 • Moved SafeCom Push Port creation information (Add a SafeCom Push Port). • Added Push Print Post Tracking information (Push Print Post Tracking). • Added information on Forced Mono-Duplex (FMD) (Settings, Configure). • Added information on alternatively disabling the Telnet interface (TELNET interface). • Added information on default server for Push and Pull ports (Configure the SafeCom Pull Port, Add a
SafeCom Push Port). • Added information on home server checking for Print Client (Installation). • Added information on dedicated device server for device fleets with HP Pro devices (Device Servers).• Added information on SafeCom Application Print installation. • Updated database requirements to include SQL 2014 (Server requirements). • Updated information on adding new secondary server(s) after deleting one (Add server). • Added information on restart delay for SafeCom Administrator (Log in to SafeCom Administrator). • Added information on representing replication for secondary servers (Add server). • Added information on device name length limitations (Convert to Push). • Added a Note on installing the MS Redistributable package (Server installation (Basic)). • Added a Note on installing the SSMS Basic component (Server installation (Advanced)). • Added information on failover configuration (Device Servers, Grouping device servers, Failover
servers). • Added information on Device Server failover configuration (Device Server failover considerations). • Updated information on Print Client uninstallation (Uninstallation).
Revision D60650-19 • SafeCom Print Client version S82 070.520*04 • Added information on Windows 10 workstations (Client requirements).
Revision D60650-18 • Added information on configuring device monitoring (Monitor device). • Added support for Windows 10 (Client requirements).
Revision D60650-17 • Added information on Microsoft Secure Boot not being supported (Client requirements, SafeCom Print
Client). • Added a note about Windows version 4 print drivers (Printers).
Revision D60650-16 • Added new information on Application Print in multi-user environment.
Revision D60650-15 • Added a Note about PIN change when logging in using PUK code (Let users register their card
themselves). • Added information on enabling Citrix/WTS tracing.
36
SafeCom G4 Administrator's Manual Version: 10.520.11.221
Revision D60650-14• Updated information on Restricted access for Org. units (Add an organizational unit).
Revision D60650-13• Updated information on scPrintClient.ini (scPrintClient.ini file, Command line parameters).
Revision D60650-12• Added support for Windows Server 2012 R2 (Server requirements).• Added /SERVER to Print Client command line parameters (Command line parameters).• Discontinued support for Windows Server 2003 R2 and Windows XP.
Revision D60650-11• SafeCom G4 Server version S82 070.520*07• Updated software versions (About this manual)• Updated trace file information (Trace files).• Added information on SNMP community name (Settings, Add device, SafeCom Administrator: device is
recognized as SafeCom Controller, SafeCom Administrator: device cannot be added as a Push printer)
Revision D60650-10• Updated software versions (About this manual)• Clarified various (Trace files, Trace facility, Server requirements)• Clarified customized ID code behavior (Customize the format of ID codes)• Clarified Smart Printer Add-on & Driver issues (SafeCom components, SafeCom Service and other
services, Server requirements, Install SafeCom Smart Printer Add-on and Driver, Smart Printer Driver:reduced performance)
• Added information about troubleshooting hidden SQL server instances (Remote SQL server cannotlogin)
• Added information on login issues with the safecominstall user (SafeCom server can not login using thesafecominstall user)
• Added information on user import from Unix without domain information (Spooler crash when the PrintSystem Asynchronous Notification message is not handled by the user)
• Added information on JobNamePricing.txt in multi-server environments (JobNamePricing.txt)• Clarified trace folder creation (Trace files).• Added information on scPortUtility (scPortUtility,scPortUtility operations and exit codes)
Revision D60650-09• SafeCom G4 Server version S82 070.520*03• Added information on securing the SQL server for transactional replication (Securing the SQL server for
transactional replication).• Updated instructions on adding a device server to SafeCom Administrator (Add Device Server).• Added information on SafeCom error codes (Error codes).
Revision D60650-08• SafeCom G4 Server version S82 070.520*01• Added information on hiding job names in the print window (Enable printer pooling, Configure the
SafeCom Pull Port, Add the first printer (SafeCom Push Port)).
37
SafeCom G4 Administrator's Manual Version: 10.520.11.221
• Added information on device server grouping and failover (Device Servers, Grouping device servers, Delete device server group).
• QR codes for Mobile Pull Print can be generated from devices under Servers instead of under Device servers (Print QR code for Mobile Pull Print).
Revision D60650-07 • SafeCom G4 Server version S82 070.510*01. • In (SafeCom database - backup and restore) and (Overview) now states that backup of database on
secondary servers is needed to prevent database transaction logs from growing endlessly. • New section (SafeCom database - maintenance) about SafeCom database maintenance. • In (Check that the replication is working) updated tables that must be selected for replication. • New section (Configure) on the Configure tab in the Device properties dialog.
Revision D60650-06 • SafeCom G4 Server version S82 070.510*01 and SafeCom Print Client version S82 070.510*03. • Updated Smart Printer driver information throughout the document and added section on how to install
this (Install SafeCom Smart Printer Add-on and Driver). • Minor editorial clarifications throughout the document.
Revision D60650-05 • SafeCom G4 Server version S82 070.510*01. • Added description of replication problems icon (Server group and server icons) • Added info several places that when installing 64-bit SafeCom on 64-bit Windows, some 32-bit
components are installed in another installation folder (Server installation, SafeCom database - backup and restore, Scripts to manually create the databases, User import log file, Customize the format of ID codes, Customize and translate e-mail messages)
• Added info on Smart Printer driver to various relevant chapters (SafeCom components, Server requirements, Install SafeCom Smart Printer Add-on and Driver, scPortConfigurator.ini, Smart Printer Driver: reduced performance, Smart Printer Driver: error codes at the device)
• Added info on performance data collection from secondary servers to primary server (Server)
Revision D60650-04 • SafeCom G4 Server version S82 070.510*01 • Added info that passwords can be max. 16 characters (Change password). • Removed obsolete info about Print + Copy (old) tab (charging scheme) from section Charging
schemes • Support for Windows Server 2012 • Corrected section Server installation (Advanced) Server installation (Advanced) • Replication status in SafeCom Administrator (Check that the replication is working)
Revision D60650-03 • SafeCom G4 Server version S82 070.500*02 • Removed section Register sqldmo.dll on SQL 2008 Server • Updated section SafeCom PopUp deployment on Windows computers • Updated section SafeCom Move – scMove.exe with info that scMove must be installed in a folder
containing certain DLL files.
38
SafeCom G4 Administrator's Manual Version: 10.520.11.221
Revision D60650-02• Section added for SafeCom Smart Scan (Add a SafeCom Push Port).• Edited section about Touch Tone Control (Devices).
Revision D60650-01• Support for the new SafeCom component SafeCom ID Controller (SafeCom components).• Introduction of SafeCom Move (SafeCom Move – scMove.exe).• Support for SafeCom Mobile Pull Print (Print QR code for Mobile Pull Print).• Initial version
39
Chapter 2
Frequently asked questions
There are no stupid questions, only stupid answers. Asking questions and finding answers is a popularway to acquire new knowledge. In the following subsections you will find answers to some of thequestions frequently asked by administrators.
What are the benefits of Pull Printing?• Use cost-effective workgroup devices as personal devices - without jeopardizing document security.
This means fewer devices to service, since all the smaller personal devices can be taken out of service.With fewer devices office space is freed up and floor plans can be designed more freely and userfriendly.
• Documents follow users to their choice of device. If one device goes out of order users can just collecttheir document at another SafeCom-enabled device.
• Avoid situations where uncollected documents clutter the device‘s output bin. Get rid of the frustrationof finding that someone else took your document or that you cannot find it in the pile of uncollecteddocuments that are scattered around the device. The wastebasket (or paper recycle bin) will no longercontain uncollected documents and you can abolish the use of banner pages to separate documents.
• Depending on your printing environment users may need access to just one shared SafeCom PullPrinter on a server in order to be able to print on any SafeCom-enabled device (Printer driver anddocument fidelity considerations). This gives way to a much less complex printing environment and verylittle or no print queue setup on the users’ computers.
• When the users are logged in at the device they have full control and time to load stationeries,transparencies, labels or other media that may require manual feed.
• Users who print many small documents do not need to rush to the device every time they print. Theycan collect their documents when it suites them.
• The time spent at the device waiting for the documents to print is limited because workgroup devicescan output 40 or more pages per minute. Workgroup devices will typically support double-sided print(duplex), printing multiple pages on the same page (N-up printing) and booklet printing. With bookletprinting an 8-page document will print on 2 sheets of paper (paper use is reduced with 75%).
In addition to these benefits you should consider the additional benefits you can gain by installing anySafeCom add-on modules: SafeCom Tracking (SafeCom Tracking), SafeCom Rule Based Printing(SafeCom Rule Based Printing (RBP)), SafeCom Client Billing (SafeCom Client Billing), and SafeCom Pay(SafeCom Pay).
40
SafeCom G4 Administrator's Manual Version: 10.520.11.221
What devices are supported?The SafeCom Go integrates with the touch-screen control panel of Multifunction Printers (MFPs) fromCanon, Fuji Xerox, HP, Konica Minolta, Kyocera, Lexmark, Océ, Ricoh, Samsung, Sharp and Xerox.
For other networked devices the external SafeCom Controller hardware can be connected and used andprinting is via TCP port 9100 or similar. You do not need additional network outlets since the SafeComController has a built-in extra port (RJ-45 Ports, 10/100 BASE-TX). The IP address can be assigned viaDHCP (dynamic or fixed) or manually.
The flexibility of the external SafeCom hardware enables you to change printer vendor and continue touse your SafeCom hardware with the new devices. The SafeCom Controller is Flash upgradeable andfeatures a web interface for easy maintenance and configuration.
Is Copy Control supported?Yes, on selected Multifunction Printers (MFPs) the SafeCom solution can control access to the copyfunction. The user has to log in before copying is allowed.
Note: such control may restrict access to several MFP functions, depending on the specific configuration.
Is it possible to charge for print costs?Yes, with SafeCom Tracking you can monitor print and copy usage and use the recorded data forsubsequent departmental invoicing. Tracking applies to:• Documents printed directly to the device (Push Print)3
• Documents requiring user login at the device (Pull Print)• Copies made after user login at the MFP (Copy Control)
With SafeCom Pay (SafeCom Pay), an add-on to SafeCom Tracking (SafeCom Tracking), users can berequired to pay upfront for printing and copying. With SafeCom ePay users can revalue their account.
Is it necessary to install software on the users’ computers?No, it is normally not necessary to install software on the users’ computers. However, there are a fewexceptions were it is necessary to install a local SafeCom Pull Printer on users’ computers (LocalSafeCom Pull Printer).
3 Tracking of Push Print does not require SafeCom device software or hardware.
41
SafeCom G4 Administrator's Manual Version: 10.520.11.221
How are users authenticated?Users can log in by card or ID code. Refer to User authentication by card or ID code. A complete list ofsupported ID devices can be found in SafeCom ID Devices. There are basically two types of ID devices tochoose from:• Card Reader All the user’s documents are printed as the user’s personal card is used.• Card Reader and touch-screen Document security can be enhanced by requesting the user to
enter a personal PIN code when using their card. Or the user can enter an ID code instead of using acard. Once logged in the user can print all documents with a single touch or browse through the list ofdocuments to print, delete, retain, or request multiple copies of individual documents.
How are users managed?Users can be created in advance, either manually or through a user import wizard (Import users), or theycan be created the first time they print.
How are users with the same name handled?Users with the same name from multiple domains can be added to the SafeCom solution. User logondoes not have to be unique across domains. A user John Smith (JS) within domain A is different from theuser John Smith (JS) within domain B, and different from John Smith (JS) with no domain info.
How many users, printers, and documents can a server handle?The bottleneck is the number of concurrent documents (print jobs) to and from the SafeCom server. Theperformance of a SafeCom server is comparable to that of a Windows print server. This means that aSafeCom server is capable of supporting approximately as many devices as you would normally install onan equivalent Windows print server.
Can access to devices be restricted?Yes, it is possible to control users’ access to devices (printers and MFPs) based on the organizationalrelationship between the user and device (Organizational units) or with Rule Based Printing (Introduction).
Note: access to specific functions can also be restricted on the same basis.
42
SafeCom G4 Administrator's Manual Version: 10.520.11.221
Are SafeCom solutions scalable?Yes, with a SafeCom Enterprise Server license it is possible to use multiple servers to scale the SafeComsolution to match the demanding requirements of large installations with thousands of users and hundredsof devices.
Scalability is achieved by adding the required number of SafeCom servers. Users can roam betweenlocations to collect their documents at any SafeCom-enabled device and at any location regardless of towhich SafeCom server the document was printed.
Large companies and organizations that use multiple Windows print servers to handle printing today arelikely to need SafeCom Enterprise Server license.
Can documents be printed securely?Yes, with a SafeCom Encryption documents can be encrypted on the network; from the moment the userclicks print on the computer and until the document is collected at the device. This prevents anyone fromreading the documents, should they be intercepted on the network. Documents are always encryptedwhen they stored for later printing (Printing encrypted documents).
How does a solution with multiple servers work? A SafeCom multiserver solution consists of one SafeCom primary server and one or more SafeCom secondary servers.
The SafeCom primary server uses the replication capabilities of its Microsoft SQL Server to ensure all SafeCom secondary servers’ databases are up-to-date at all times. The SafeCom secondary servers can use the provided Microsoft SQL Server free and are not required to run a licensed Microsoft SQL Server.
A user’s home server denotes the SafeCom server. Because data about users and devices is known on all servers, only the users and devices belonging to a particular secondary server (home server) will be affected if that server goes down.
Enterprise customers where printing is mission-critical often use Microsoft Cluster Service (Cluster installation) to further ensure the availability of the SafeCom servers. SafeCom print queues can be installed on any of the SafeCom servers, but most enterprise customers choose to install print queues on the SafeCom secondary servers only and keep the primary server free from print processing tasks so it only needs to replicate data (and collect tracking data from the secondary servers).
It is possible to distribute the print processing task to ordinary Windows print servers by doing a SafeCom client installation (Client installation) on these. However, this can increase the network load, as Pull Print jobs will have to go onto the network an extra time (to get transferred from the Windows print server to the user’s home server, if the Store Doc on First Server option is disabled). This may slow performance if the resulting print jobs tend to be big in terms of file size. One cannot assume that the print job will be small in file size, just because the original document is small. We have seen examples where a 1Mb (2- page) PDF file grew to +500Mb. This is very printer driver dependent.
43
SafeCom G4 Administrator's Manual Version: 10.520.11.221
Basic document security is achieved by requesting users to log in by means of both a personal ID card (orID code), and a PIN code when they collect their documents at the device.
What happens to uncollected documents?Documents remain on the SafeCom server until the user logs in at the device to collect the documents.Documents that are not collected by users are automatically deleted after a configurable time.
Is it always possible to print?Like with any other computer system it cannot be guaranteed that printing will always be possible. TheSafeCom solution is depending on the stability of your network, devices and computers, especially thehard disks. However, in some aspects a SafeCom Pull Print solution will give you a more redundantprinting solution, because if a device fails users can just collect their documents at another device.
In general you should apply the same measures that are taken to ensure that Windows print servers andWindows domain controllers are up and running at all times. Typical technologies that can be applied toreduce the risk of failure:• Hard disks use RAID or similar technology.• Microsoft Cluster Service (Cluster installation).• Network connections are duplicated.• Backup of databases, so you can re-create the SafeCom solution in case of computer crash (Backup
and restore).
Can print usage be tracked without hardware?Yes, with the Push Print tracking concept in SafeCom Tracking users can print directly to the device andstill have their print usage tracked. It is not necessary to install dedicated SafeCom hardware. The devicecan be networked or locally attached to a Windows computer via a parallel, USB or SCSI port.
Can a Pull Printer be used for Push tracking?Yes, a SafeCom-enabled device can also be used to track documents that are sent directly. Inother words, users are offered the choice of Push or Pull Printing, while maintaining total print costmanagement. To prevent documents from being mixed, incoming Push Printed documents are put on holdas long as someone is logged in at the printer or MFP.
44
SafeCom G4 Administrator's Manual Version: 10.520.11.221
What happens if the SafeCom solution stops working?In case of any problems the SafeCom solution has three methods to communicate this to the outside:• On the user’s computer A message appears on the user’s computer screen when trying to print via
the SafeCom solution. The message can read: “Unable to connect to SafeCom server. Documentis not printed. Please contact your administrator!” Refer to User’s computer: Please contact youradministrator! to see additional messages.
• At the device An OUT OF ORDER screen is displayed on the SafeCom-enabled device while theproblem persist (Device web interface: Displayed incorrectly or settings not saved).
• E-mail to administrator The administrator can receive service and error (event log) messages via e-mail (E-mail).
What is the administrative overhead?Under the right circumstances your SafeCom solution is capable of creating users automatically the firsttime they print via the SafeCom solution. The system can send a welcoming e-mail with instructionsto new users the first time they print. This method reduces the administrative overhead to a minimum(Create users at first print).
In Chapter Planning your SafeCom solution Planning your SafeCom solution you learn how your SafeComsolution can become one that reduces print costs, is easy to administrate and yields high user satisfaction.Chapter Planning your SafeCom solution features a checklist for planning your SafeCom solution(Checklist – to help you on the way), a section on roll out considerations (Roll out considerations) andinput to the administrative procedures you need to have in place (Clearly define responsibilities andprocedures).
In Chapter Troubleshooting Troubleshooting is a comprehensive. You can even configure theSafeCom solution to e-mail you service and error (event log) messages. The most common problemsreported by end-users have been compiled into an online Help Desk Assistant available at https://nuanceimaging.custhelp.com.
What about integration with other systems?In addition to being a modular solution, the SafeCom solution also features a number of ApplicationProgramming Interfaces (APIs). The SafeCom Administrator API allows you to automate tasks andintegrate the SafeCom solution with other systems. It is an XML-based tool available as an executableand DLL. The SafeCom Batch Print API can be used for integration with document archiving systems.
SafeCom a/s is always ready to discuss customized development, if this is required to optimize your printand copy solution. Please contact [email protected] to hear about possibilities.
45
SafeCom G4 Administrator's Manual Version: 10.520.11.221
Does it pay to apply a SafeCom solution?It is a common (and costly) mistake to compare the price of a SafeCom solution with the purchase price oftoday’s devices. The purchase price of the device constitutes only a small fraction compared to the lifetimecosts of consumables (paper, toner, and moving parts).
Calculations should be based on the amount of money saved due to reduced print costs andadministrative and organizational benefits. The investment in a SafeCom solution will typically be returnedwithin the first year.
46

Chapter 3
Planning your SafeCom solution
IntroductionWe want your SafeCom solution to be one that reduces print costs, is easy to administrate and yields highuser satisfaction. To accomplish this you need to understand your options before you plan your SafeComsolution.
Checklist – to help you on the wayUse the checklist below to plan/design the SafeCom Smart Printing solution.
Checklist for SafeCom Smart Printing solution
Topic Notes
Responsibility
Name of person:
Functionality
□ Pull Print □ Tracking □ RBP □ Client Billing
□ Pay □ ePay
Users
Number of users:
User authentication
□ Card, and type of card: □ Import cards(conversion)
□ ID code
□ PIN code
User creation
Import users from □ Active Directory (AD)□ File□ Other
47
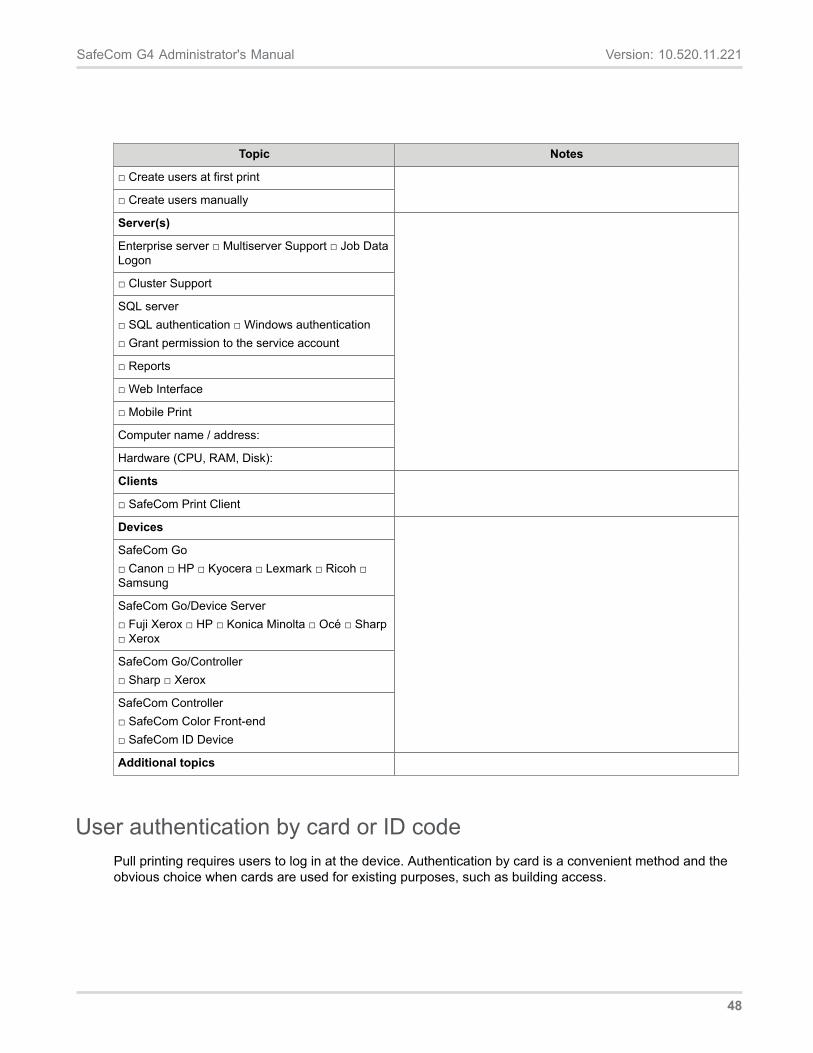
SafeCom G4 Administrator's Manual Version: 10.520.11.221
Topic Notes
□ Create users at first print
□ Create users manually
Server(s)
Enterprise server □ Multiserver Support □ Job DataLogon
□ Cluster Support
SQL server□ SQL authentication □ Windows authentication□ Grant permission to the service account
□ Reports
□ Web Interface
□ Mobile Print
Computer name / address:
Hardware (CPU, RAM, Disk):
Clients
□ SafeCom Print Client
Devices
SafeCom Go□ Canon □ HP □ Kyocera □ Lexmark □ Ricoh □Samsung
SafeCom Go/Device Server□ Fuji Xerox □ HP □ Konica Minolta □ Océ □ Sharp□ Xerox
SafeCom Go/Controller□ Sharp □ Xerox
SafeCom Controller□ SafeCom Color Front-end□ SafeCom ID Device
Additional topics
User authentication by card or ID codePull printing requires users to log in at the device. Authentication by card is a convenient method and theobvious choice when cards are used for existing purposes, such as building access.
48
SafeCom G4 Administrator's Manual Version: 10.520.11.221
There are also solutions where users authenticate themselves by entering an ID code instead of usinga card. The ID code is case sensitive and can be the user’s phone number, employee number, studentnumber, social security number4 or another number that is unique for the user and easy to remember.
Authentication by ID code is possible with the SafeCom Go products that integrate with the device’scontrol panel or the external SafeCom Controller in combination with the SafeCom Color Front-end.Furthermore you can enhance security by requesting users to enter a personal 4-digit PIN code.
If stand-alone card readers are used for authentication, card registration is manual, see Let administratorregister cards to users, or via import, see Import user data from other systems.
User creation and managementUsers can be added, modified, and deleted through SafeCom Administrator. Creating and managingusers are described in the following sections.
User-related data is sorted according to the following categories.• Personal data Personal data includes the user’s full name (John Smith), user logon (JS), domain and
e-mail ([email protected]). This data can normally be imported. The user logon is a mandatory maximumof twenty (20) characters and must be unique within a domain. User logon is normally the same as theuser’s Windows logon.
• Authentication data Authentication data includes the card number and an optional 4-digit PIN code. Ifcards are already used for existing purposes, such as building access, then it may be possible to importdata from an existing database. The card number is mandatory, case sensitive, maximum thirty-nine(39) characters and must be unique.
• Settings data Settings data is specific to the SafeCom solution, so it is not possible to extract andimport this kind of data from other systems. However, to make administration easier, define a defaultuser and let new users inherit settings data from the default user (Default user).
Import user data from other systemsTo make administration easier, data can be imported from other systems including those solutions with alarge number of users.
SafeCom Administrator includes a user import wizard that can import personal data via Windows ActiveDirectory (AD) and Novell eDirectory (NDS eDirectory v.8.7.3 or later). It is also possible to import bothpersonal and authentication data via XML and CSV (Import users).
SafeCom Administrator API (option) is an XML-based tool that makes it possible to manipulate multipleusers, automate tasks and integrate your SafeCom solution with other systems.
Create users at first printThe SafeCom solution is capable of creating users automatically the first time they print via the SafeComsolution. This method keeps administrative overhead to a minimum.
4 The legislation in some countries does not allow the use of social security numbers.
49

SafeCom G4 Administrator's Manual Version: 10.520.11.221
How it works:
1. The user clicks Print in Windows and selects a SafeCom Pull Printer.
2. The document is transferred to the SafeCom server. The server extracts the user logon and finds thatthe user is unknown and/or a card (or ID code) needs to be registered with the user.
3. If the user is unknown the server creates the user based on the default user properties. Next it sendsan e-mail to the user, explaining how to collect the document. See the e-mail template example insection Customize and translate e-mail messages.
Prerequisites:• The user logon (JS) and the e-mail domain (safecom.eu) can be combined to create a valid user e-mail
address ([email protected]).• The user must enter the e-mailed 8-digit PUK code to register their card or ID code.
For step-by-step instructions see Create users at first print.
Let users register their card themselvesIf your SafeCom solution allows users to enter a PUK code at the device, users can register their cardsthemselves.
How it works:
1. Start SafeCom Administrator and then locate or add the user.
2. Provide the user with the 8-digit PUK code or let the system e-mail the PUK code to the user (E-mail).
3. The user goes to the device and uses the card. The SafeCom solution finds that the card is not yetregistered to a user. The user is asked to enter the PUK code once (and a personal PIN code twice).Note: Be aware that if you login using a PUK code for a registered card that already has a PIN code,and you enter a PIN code when prompted, the system will treat this as a PIN code change, thusrendering your old PIN code invalid. You can enter your existing PIN code if you want to keep usingthat.
4. If the PUK code is wrong the registration fails and the user is asked to enter the PUK code again.The user can click Exit to terminate the process.
5. The card is registered with the user when the screen displays: Operation succeeded. Please loginagain.
Prerequisites:• Users must be able to enter their PUK code at the device, for example by having at least one MFP with
SafeCom Go or a printer equipped with a SafeCom Color Front-end.
Let users register an ID code themselvesIf your SafeCom solution allows users to enter a PUK code at the device, users can register an ID codethemselves. The ID code is case sensitive.
Note: Normally the administrator handles the registration of user and ID code. See to Let administratorregister ID code with users.
50
SafeCom G4 Administrator's Manual Version: 10.520.11.221
How it works:
1. Start SafeCom Administrator and then locate or add the user.
2. Provide the user with the 8-digit PUK code or let the system e-mail the PUK code to the user (E-mail).
3. The user goes to the device to log in. The user enters a unique ID code. The SafeCom solution findsthat -the ID code is not yet registered with a user. The user is asked to enter the PUK code once (anda personal PIN code twice).
4. If the PUK code is wrong the registration fails and the user is asked to enter the PUK code again.The user can terminate the process.
5. The ID code is registered with the user when the screen displays: Operation succeeded. Pleaselogin again.
Prerequisites:• All devices must allow users to enter PUK codes and ID codes.
Let administrator register cards to usersHow it works:
1. Start SafeCom Administrator and then locate or add the user.
2. Open the ID code tab in the User properties dialog (ID code).
3. Click Listen and use the card with the connected card reader.
4. If no PIN code is entered the user is assigned the default PIN code ‘1234’.
Prerequisites:• The computer must have a card reader installed (Install a card reader on a computer).• Users must turn up in person to have their card read and a person with administrator rights must be
present to operate the computer.• Administrator must inform the user of their PIN code.
Let administrator register ID code with usersHow it works:
1. Start SafeCom Administrator and then locate, or add the user.
2. Open the ID code tab in the User properties dialog (ID code).
3. Enter the ID code (case sensitive).
4. If no PIN code is entered the user is assigned the default PIN code ‘1234’. The user may change thePIN code subsequently (Allow users to change their PIN code).
Prerequisites:• Administrator must provide users with an ID code and PIN code.
51
SafeCom G4 Administrator's Manual Version: 10.520.11.221
Allow users to change their PIN codeIf Allow users to change PIN code is checked on the Users tab in the Server properties dialog (Users),then users can change their PIN code using any of the below methods:• Using the SafeCom G4 Web Interface.• On devices equipped with SafeCom Color Front-end.
Determine user’s home serverIf SafeCom Multiserver Support is enabled the home server denotes the SafeCom server where the user’sprint jobs remain. If the server group consists of only one SafeCom server there is no need to specifyhome server, since it is identical to that one SafeCom server.
Note: if the Store Doc on First Server option is enabled, the user’s documents are stored on the firstserver the Pull Port print queue contacts.
The user’s home server can be specified in SafeCom Administrator. Refer to Identification. If the userchanges home server his documents will not be shown on the new home server, but the user is still ableto collect his prints.
If no home server is specified the user’s home server will become the one that is first contacted. First-timecontact is when the user prints to a SafeCom device or logs in at a SafeCom device.
The home server for users that are created at first print (Create users at first print) is by default set to theSafeCom server which the SafeCom Pull or Push port connects to.
Overview of software installationIn most cases it is sufficient to install a SafeCom server and a shared SafeCom Pull Printer on the server.
If you have multiple Windows print servers with shared printers you can turn these printers into SafeComPull Printers by making them use the SafeCom Pull Port, a special port monitor (Shared SafeCom PullPrinter). You still need to install SafeCom hardware at the physical device to allow Pull Printing.
To administrate your SafeCom solution from other computers, simply install the SafeCom Administratoron those computers (Install SafeCom Administrator).
To release yourself of some of the administrative obligations you can assign administrator rights toappointed SafeCom users.
Server installationYou need to make a SafeCom Server installation on a server computer. Just download the SafeCominstaller and select Server installation (Server installation (Advanced)). This will install all the requiredsoftware, including the port monitor SafeCom Pull Port and the administrative application SafeComAdministrator. Refer to Server requirements for a description of the server requirements and SQLauthentication.
52
SafeCom G4 Administrator's Manual Version: 10.520.11.221
The Server installation allows you to specify two destination folders; one for the program files and another for the print jobs. You may wish to locate the print jobs on a hard disk equipped with RAID or similar technology.
The default installation folder is:
C:\Program Files\ SafeCom\SafeComG4
The default folder for print jobs is:
C:\Program Files\ SafeCom\SafeComG4\Data
Multiserver installation The SafeCom primary server must run Microsoft SQL Server. You need to make a SafeCom Server installation on each server as outlined in Server installation. You use SafeCom Administrator to group the servers together. The steps involved are described in Multiserver installation.
Disk space considerations The amount of recommended disk space on the SafeCom server depends on a number of parameters: The number of users, number of documents, the size of these documents and the time they are stored before they are collected by the users at the devices.
Through the SafeCom Administrator you can specify how often uncollected documents should be deleted and if users should be notified by e-mail in advance about this (Server).
With today’s low storage prices we recommend something like 100 Mb per user for printing purpose. The SafeCom software itself requires less than 25 Mb.
disk space = average number of jobs on the server per user × average size of jobs
Shared SafeCom Pull Printer The easiest way to make SafeCom Pull Printing available to users is to make an existing shared Windows printer on the SafeCom server or on a Windows print server use the SafeCom Pull Port, a special port monitor that sees to the transfer of documents to the SafeCom server.
Prerequisites: • A Client installation is performed to install the SafeCom Pull Port on the Windows print server
(Client installation). The SafeCom Pull Port is installed on the SafeCom server as part of the Server installation.
• The SafeCom Pull Port should be set to Use network logon.
To avoid interfering with your users while you test your SafeCom solution, we recommend leaving shared printers as they are and just add a few new shared SafeCom Pull Printers, dedicated to testing SafeCom.
Local SafeCom Pull Printer A local SafeCom Pull Printer (Add a SafeCom Pull Printer on client computers) must be installed on the user’s computer in order to print encrypted (Printing encrypted documents). In all other cases it
53
SafeCom G4 Administrator's Manual Version: 10.520.11.221
is sufficient to use a shared SafeCom Pull Printer. However, SafeCom PopUp (SafeCom PopUp –scPopUp.exe) must be running on the user’s computer in these cases:• If users need to print from the computer without being logged into Windows as themselves (SafeCom
Print Authentication dialog).• If SafeCom Rule Based Printing (SafeCom Rule Based Printing (RBP)) is used to ask for print
confirmation.• If SafeCom Client Billing is used and the user has to select a billing code at print submission time
(SafeCom Client Billing).
SafeCom printers can reference multiple serversThe SafeCom Pull Port (Edit servers dialog) and SafeCom Push Port (Push print tracking) canreference more than one SafeCom server.
This feature can be used to give additional resilience in a multiserver solution where SafeCom printers areinstalled on local clients or print servers.
If the first SafeCom server on the list is unavailable it will try the next one. After 60 seconds it will attemptto revert to the first SafeCom server.
Printer driver and document fidelity considerationsWhen printing, the SafeCom solution takes the output from the installed Windows printer driver and storesit in the SafeCom database until the user collects the document at the device.
The question is: What happens if the document is subsequently collected at a different device model? Theworst case is that the document prints incorrectly or not at all. The best case is that the document printscorrectly.
However, you may also experience something in between. For example if you request printing on bothsides (duplex) in the printer driver, but this is not supported by the device. In this case you will probablyget single sided (simplex) print.
Document fidelity is determined by comparing the name of the printer driver embedded in the printjob with the list of driver names returned by the SafeCom device. If there is no match it is consideredlow fidelity and the document is labeled with a question mark [?]. Refer to Devices on how to configuredocument fidelity.
In our experience document fidelity is pretty high if you use a printer driver that generates PCL andsubsequently collect the document at a printer that supports PCL. The same goes for PostScript.
If you use many different devices from different manufacturers then you may have to install multipleshared SafeCom Pull Printers, each one with their specific Windows printer driver.
High Speed Print considerationsBy enabling High Speed Print on the SafeCom-enabled device, documents that are collected at thedevice are printed almost as fast as those that are printed directly. This is because print data is sentdirectly to the device from the SafeCom server (or SafeCom Print Client) via TCP port 9100. Without HighSpeed Print the SafeCom Device that requests the print data from the SafeCom Server (or SafeComPrint Client) via TCP port 7500.
54
SafeCom G4 Administrator's Manual Version: 10.520.11.221
Note: Both TLS encryption (on the EWS configuration page of the device) and the Encrypt documentsoption (Settings) should be unchecked for High Speed Print. If either option is checked and enabled, itoverrides High Speed Print, and disallows the usage of TCP port 9100.
However, as the print data is received directly by the device, it is not always possible to hold off otherusers print jobs, while a user is logged in at the device. Users may risk that the output bin contains otherusers’ documents.
This is obviously not an issue if management has decided to ban all direct printing and only allow PullPrint.
Documents that are submitted via a SafeCom Push Port within the same SafeCom group can be held off,but documents that are submitted via a Standard TCP/IP Port cannot be held off.
Note: High Speed Print must be enabled for each device to use the Smart Printer Driver.
Device Server failover considerationsWhen planning Device Server failover groups (Device Servers, Grouping device servers), consider thefollowing factors:• Number of devices on a given single node.• Expected level of fault tolerance (that is, maximum number of failed nodes at any give time)
Be aware that in case a failover occurs, the devices of the failed node are distributed in the failover groupequally, regardless of how many devices the other nodes have individually. Thus, you must consider andplan to avoid overloading your other nodes in case of a failover. Nuance recommends assigning no morethan 200 devices for a dedicated Device Server, or no more than 100 devices to a shared Device Server/G4 installation.
The following table illustrates a few examples using dedicated Device Servers:
Total amount of devices Expected level of faulttolerance
Amount of equired nodes Amount of devices pernode
200 1 2 Node 1: 100Node 2: 100
600 1 4 Node 1: 100Node 2: 100Node 3: 100Node 4: 100
600 2 5 Node 1: 120Node 2: 120Node 3: 120Node 4: 120Node 5: 120
Failover restriction of Device Server
Device Server failover from SafeCom Device Server version DS 90*10 requires SafeCom G4 Server520*10 or newer to work.
55
SafeCom G4 Administrator's Manual Version: 10.520.11.221
Devices in failover state (that is, they have been distributed from their original home server due to afailover) cannot be modified, until they are reallocated to their original home server.
In case the home server becomes permanently unavailable, you have the option to delete and re-add thedevices.
Note: Be aware that if you power on the original Device Server whose devices you redistributed, theDevice Server will automatically re-acquire all devices previously assigned to it, which may result ininconsistent states.
Known limitations of Device Server failover
For SafeCom Device Server version DS 90*10 with G4 520*10 using SafeCom Device Server failover, thefollowing limitations apply:• New nodes should not be added if there are unavailable node(s) in the group. This is prevented by the
scAdministrator (520*10 or newer); older versions of scAdministrator do not prevent it.• Nodes can be moved only one by one in scAdministrator.• If all the nodes in a group stop at any given time simultaneously, restarting them results in the restarted
nodes only managing their own devices.• Nodes in Pending... state should be not moved.
Print from other systemsEven though the SafeCom solution is a Windows-based printing solution, it is possible to print from othersystems. This is described in the following sections.
Print from Apple MacPrinting from Mac OS X Server via LPR/LPD is possible. The printing system in Mac OS X is based on theCommon UNIX Printing System (CUPS).
Printing from earlier versions of Apple Mac OS is possible using the cross-platform file and printer sharingsolution DAVE from Thursby Software Systems, thursby.com.
Prerequisites:• The Windows component Print Services for UNIX must be installed. The Windows server must be
restarted after installation.
If the user logon on Windows differs from the one on the Mac, then the user logon on the Mac must be onthe user’s list of aliases (Aliases).
Note: If you have the PopUp compatibility mode (SafeCom Pull Port, Add a SafeCom Push Port) enabledand start a print job that uses scPopUp, ensure that you are not logged in to a Windows and a Maccomputer at the same time while using the same credentials.
Note: If you want to print from Apple Mac, ensure that you have a Microsoft v3 printer shared, as printingto v4 printers is not supported from Mac.
56
SafeCom G4 Administrator's Manual Version: 10.520.11.221
Print from UNIXOn UNIX it is possible to define an LPR/LPD printer that prints to the shared SafeCom Pull or Push Printeron the Windows server.
Prerequisites:• The Windows component Print Services for UNIX must be installed. The Windows server must be
restarted after installation.
If the user logon on Windows differs from the one on UNIX, then the user logon on UNIX must be on theuser’s list of aliases (Aliases).
Print from NovellWith Novell Netware 6 and NDPS (Novell Distributed Print Services) you can use Novell iPrint to print viaLPR to the shared SafeCom Pull or Push Printer on the Windows server. Refer to novell.com for additionalinformation.
Print from Host systems (mainframe)From the Host system it is possible to define an LPR/LPD printer that prints to the shared SafeCom Pull orPush Printer on the Windows server.
Prerequisites:• The Windows component Print Services for UNIX must be installed. The Windows server must be
restarted after installation.
Roll out considerationsWe want your SafeCom solution to be easy to administrate and yield high user satisfaction. The followingsections describe how you can make your SafeCom solution a successful one.
Test solution prior to roll outBefore you roll out your SafeCom solution you should test it to make sure that everything works asexpected.
We encourage you to involve a sampling of users during testing. Users are an invaluable source ofinformation, and are likely to come up with suggestions as to how you should implement your SafeComsolution. Users can also help spread the word about the SafeCom solution in the organization.
Inform and prepare your usersA SafeCom solution affects the way users print. It is very important for an organization to use the channelsavailable to them to inform users how their daily work is affected.
57

SafeCom G4 Administrator's Manual Version: 10.520.11.221
Even though the SafeCom solution is as easy to use as a cash dispenser, we urge you to schedule acouple of short user sessions at a SafeCom-enabled device. During these sessions, demonstrate theSafeCom solution, allow users to try it hands-on and answer any questions that users have.
You may wish to temporarily post an instruction sheet at SafeCom-enabled devices. These instructionsshould briefly introduce new users to how they should operate the SafeCom-enabled device. Instructionsheets are available on our web site, safecom.eu.
Clearly define responsibilities and proceduresThe overall responsibility for the SafeCom solution should be assigned to a single person. That way therewill be no doubt as to who is responsible.
You need to decide who should have rights (Rights) as Technician and Administrator.
If your organization has a help desk you should ensure that help desk staff feel comfortable with theSafeCom solution and are capable of answering questions and resolving or escalating problems relatingto the SafeCom solution. We encourage you to include your help desk contact information on theInstruction sheets you can post at your devices.
You can also include help desk contact information on the OUT OF ORDER screen, which the SafeComFront-end displays when communication is lost to the SafeCom server. The SafeCom Front-end returns tonormal operation by itself a couple of minutes after communication is restored.
The person responsible for the SafeCom solution should ensure that administrative procedures are inplace for the following:• Backup and restore (Backup and restore).• When you need to add new users (Add users manually).• When users lose their ID card (User has lost ID card).• When users forgets their ID code (User has forgotten ID code).• When users forget their PIN code (User has forgotten PIN code).
Preemptive support and diagnostic toolsThe following subsections describe the support and diagnostic tools.
Event log and e-mail notificationThe SafeCom server writes information to its Event log (Event log). You can access the Event log fromthe Servers menu in the SafeCom Administrator. Events older than one year are automatically deletedfrom the database.
Furthermore the administrator can receive service and error (event log) messages via e-mail (E-mail).
scpingUse the supplied command line utility scping to search for SafeCom servers.
58
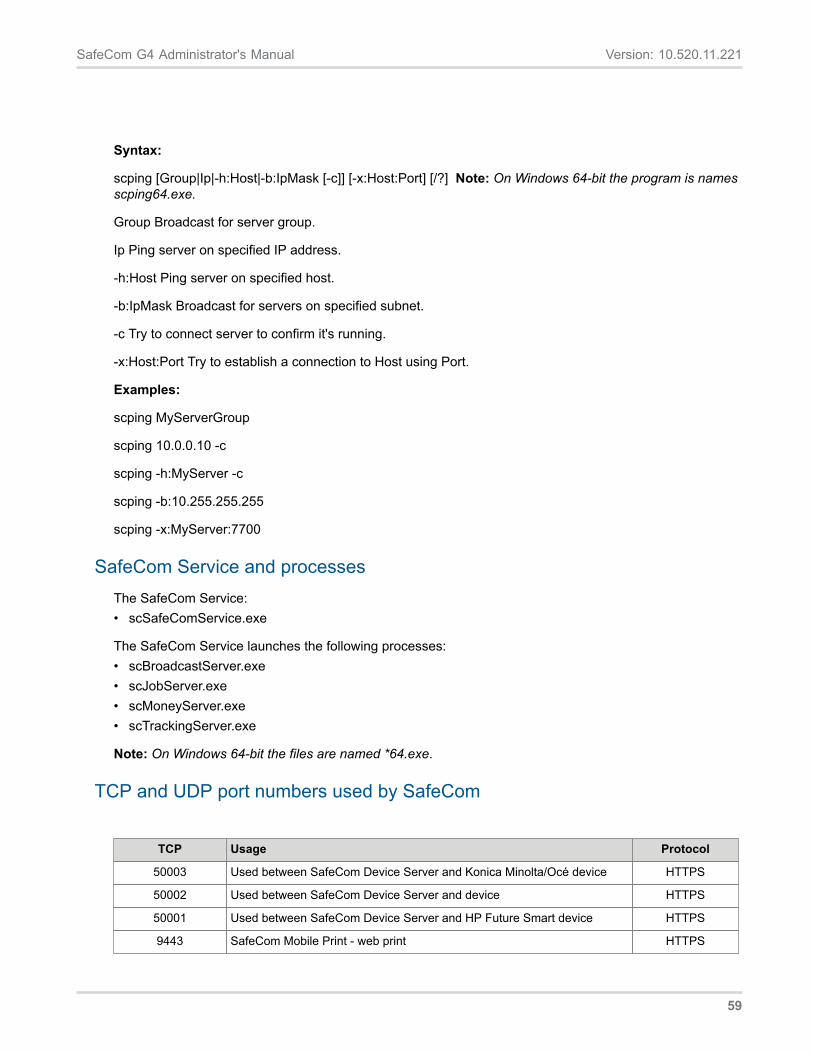
SafeCom G4 Administrator's Manual Version: 10.520.11.221
Syntax:
scping [Group|Ip|-h:Host|-b:IpMask [-c]] [-x:Host:Port] [/?] Note: On Windows 64-bit the program is namesscping64.exe.
Group Broadcast for server group.
Ip Ping server on specified IP address.
-h:Host Ping server on specified host.
-b:IpMask Broadcast for servers on specified subnet.
-c Try to connect server to confirm it's running.
-x:Host:Port Try to establish a connection to Host using Port.
Examples:
scping MyServerGroup
scping 10.0.0.10 -c
scping -h:MyServer -c
scping -b:10.255.255.255
scping -x:MyServer:7700
SafeCom Service and processesThe SafeCom Service:• scSafeComService.exe
The SafeCom Service launches the following processes:• scBroadcastServer.exe• scJobServer.exe• scMoneyServer.exe• scTrackingServer.exe
Note: On Windows 64-bit the files are named *64.exe.
TCP and UDP port numbers used by SafeCom
TCP Usage Protocol
50003 Used between SafeCom Device Server and Konica Minolta/Océ device HTTPS
50002 Used between SafeCom Device Server and device HTTPS
50001 Used between SafeCom Device Server and HP Future Smart device HTTPS
9443 SafeCom Mobile Print - web print HTTPS
59
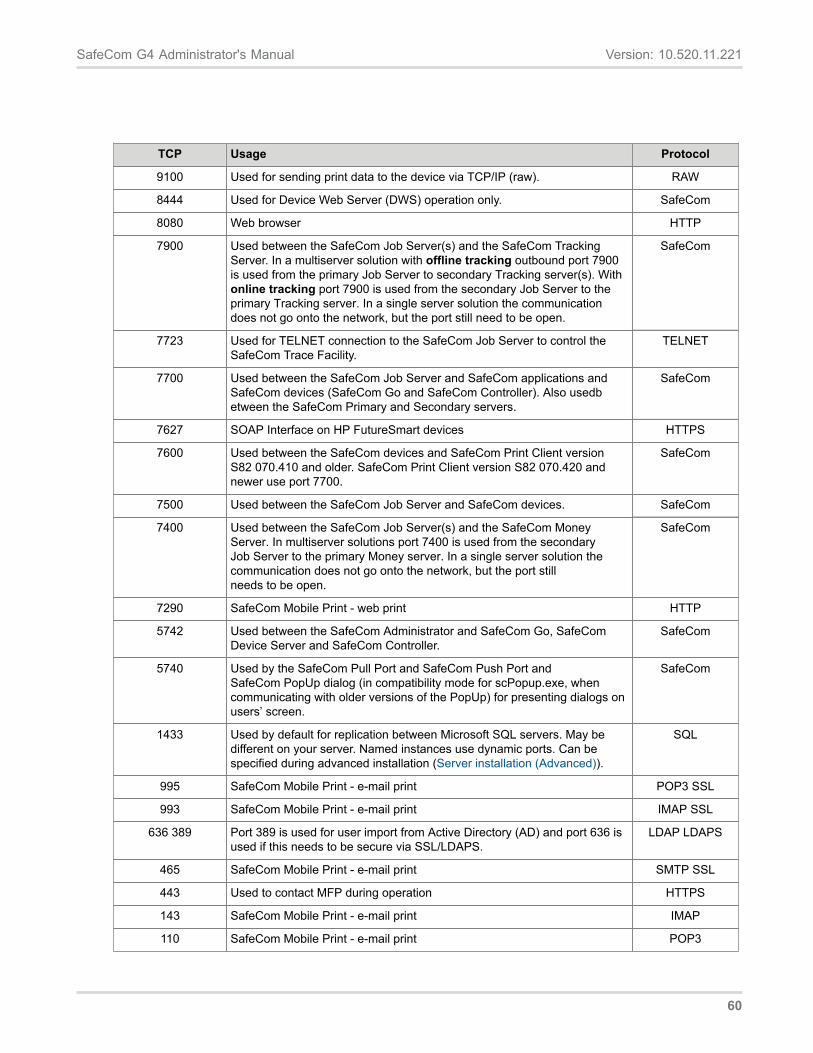
SafeCom G4 Administrator's Manual Version: 10.520.11.221
TCP Usage Protocol
9100 Used for sending print data to the device via TCP/IP (raw). RAW
8444 Used for Device Web Server (DWS) operation only. SafeCom
8080 Web browser HTTP
7900 Used between the SafeCom Job Server(s) and the SafeCom Tracking Server. In a multiserver solution with offline tracking outbound port 7900 is used from the primary Job Server to secondary Tracking server(s). With online tracking port 7900 is used from the secondary Job Server to the primary Tracking server. In a single server solution the communication does not go onto the network, but the port still need to be open.
SafeCom
7723 Used for TELNET connection to the SafeCom Job Server to control theSafeCom Trace Facility.
TELNET
7700 Used between the SafeCom Job Server and SafeCom applications andSafeCom devices (SafeCom Go and SafeCom Controller). Also usedbetween the SafeCom Primary and Secondary servers.
SafeCom
7627 SOAP Interface on HP FutureSmart devices HTTPS
7600 Used between the SafeCom devices and SafeCom Print Client versionS82 070.410 and older. SafeCom Print Client version S82 070.420 andnewer use port 7700.
SafeCom
7500 Used between the SafeCom Job Server and SafeCom devices. SafeCom
7400 Used between the SafeCom Job Server(s) and the SafeCom Money Server. In multiserver solutions port 7400 is used from the secondary Job Server to the primary Money server. In a single server solution the communication does not go onto the network, but the port still needs to be open.
SafeCom
7290 SafeCom Mobile Print - web print HTTP
5742 Used between the SafeCom Administrator and SafeCom Go, SafeComDevice Server and SafeCom Controller.
SafeCom
5740 Used by the SafeCom Pull Port and SafeCom Push Port andSafeCom PopUp dialog (in compatibility mode for scPopup.exe, whencommunicating with older versions of the PopUp) for presenting dialogs onusers’ screen.
SafeCom
1433 Used by default for replication between Microsoft SQL servers. May bedifferent on your server. Named instances use dynamic ports. Can bespecified during advanced installation (Server installation (Advanced)).
SQL
995 SafeCom Mobile Print - e-mail print POP3 SSL
993 SafeCom Mobile Print - e-mail print IMAP SSL
636 389 Port 389 is used for user import from Active Directory (AD) and port 636 isused if this needs to be secure via SSL/LDAPS.
LDAP LDAPS
465 SafeCom Mobile Print - e-mail print SMTP SSL
443 Used to contact MFP during operation HTTPS
143 SafeCom Mobile Print - e-mail print IMAP
110 SafeCom Mobile Print - e-mail print POP3
60
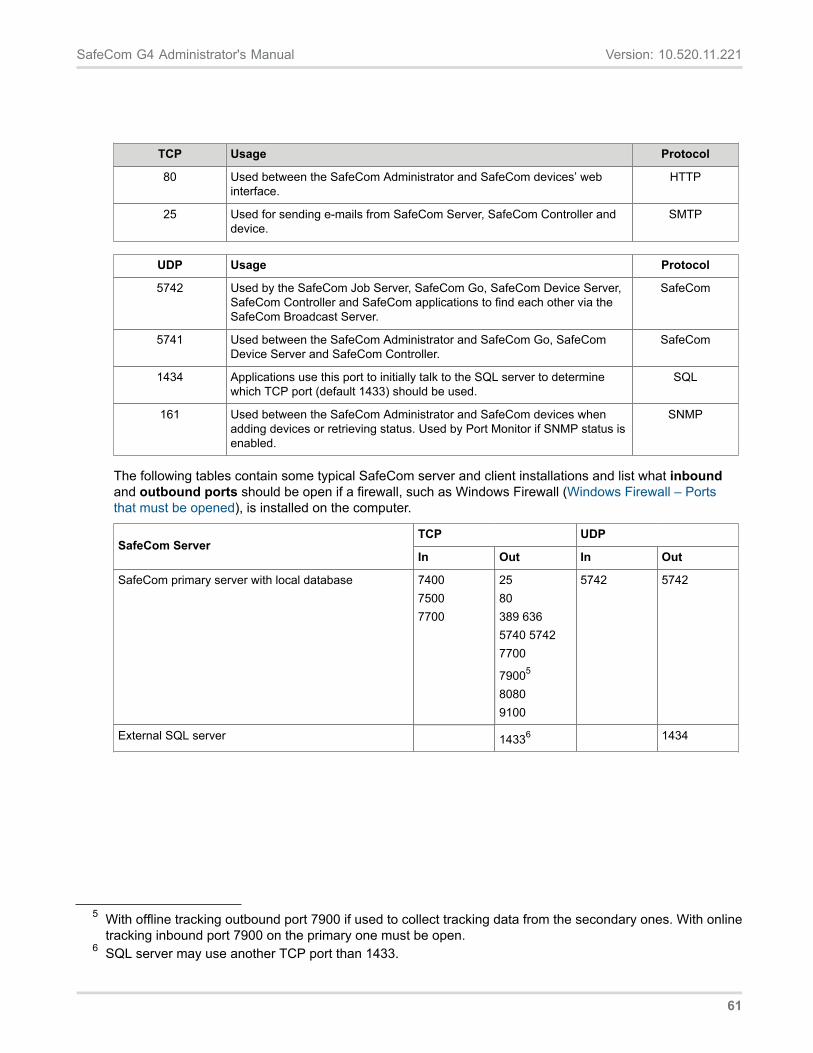
SafeCom G4 Administrator's Manual Version: 10.520.11.221
TCP Usage Protocol
80 Used between the SafeCom Administrator and SafeCom devices’ webinterface.
HTTP
25 Used for sending e-mails from SafeCom Server, SafeCom Controller anddevice.
SMTP
UDP Usage Protocol
5742 Used by the SafeCom Job Server, SafeCom Go, SafeCom Device Server,SafeCom Controller and SafeCom applications to find each other via theSafeCom Broadcast Server.
SafeCom
5741 Used between the SafeCom Administrator and SafeCom Go, SafeComDevice Server and SafeCom Controller.
SafeCom
1434 Applications use this port to initially talk to the SQL server to determinewhich TCP port (default 1433) should be used.
SQL
161 Used between the SafeCom Administrator and SafeCom devices whenadding devices or retrieving status. Used by Port Monitor if SNMP status isenabled.
SNMP
The following tables contain some typical SafeCom server and client installations and list what inboundand outbound ports should be open if a firewall, such as Windows Firewall (Windows Firewall – Portsthat must be opened), is installed on the computer.
TCP UDPSafeCom Server
In Out In Out
SafeCom primary server with local database 740075007700
2580389 6365740 57427700
79005
80809100
5742 5742
External SQL server 14336 1434
5 With offline tracking outbound port 7900 if used to collect tracking data from the secondary ones. With online
tracking inbound port 7900 on the primary one must be open. 6 SQL server may use another TCP port than 1433.
61
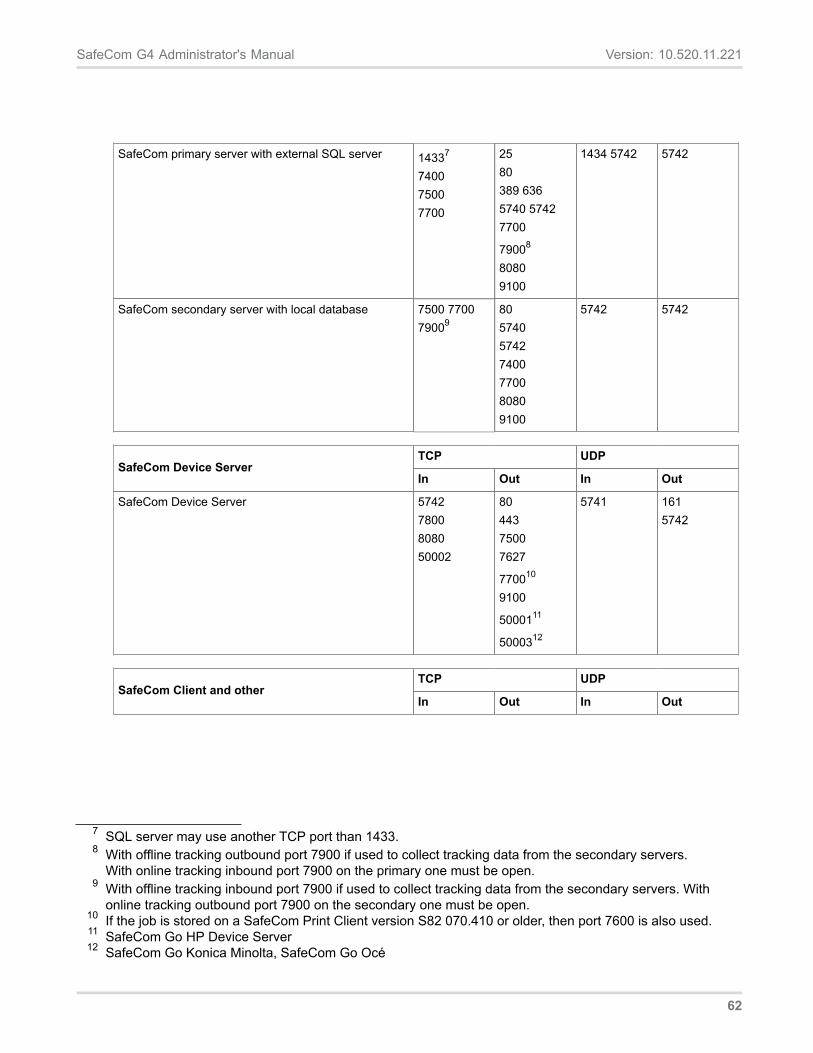
SafeCom G4 Administrator's Manual Version: 10.520.11.221
SafeCom primary server with external SQL server 14337
740075007700
2580389 6365740 57427700
79008
80809100
1434 5742 5742
SafeCom secondary server with local database 7500 770079009
80574057427400770080809100
5742 5742
TCP UDPSafeCom Device Server
In Out In Out
SafeCom Device Server 57427800808050002
8044375007627
770010
9100
5000111
5000312
5741 1615742
TCP UDPSafeCom Client and other
In Out In Out
7 SQL server may use another TCP port than 1433. 8 With offline tracking outbound port 7900 if used to collect tracking data from the secondary servers.
With online tracking inbound port 7900 on the primary one must be open. 9 With offline tracking inbound port 7900 if used to collect tracking data from the secondary servers. With
online tracking outbound port 7900 on the secondary one must be open. 10 If the job is stored on a SafeCom Print Client version S82 070.410 or older, then port 7600 is also used.11 SafeCom Go HP Device Server 12 SafeCom Go Konica Minolta, SafeCom Go Océ
62
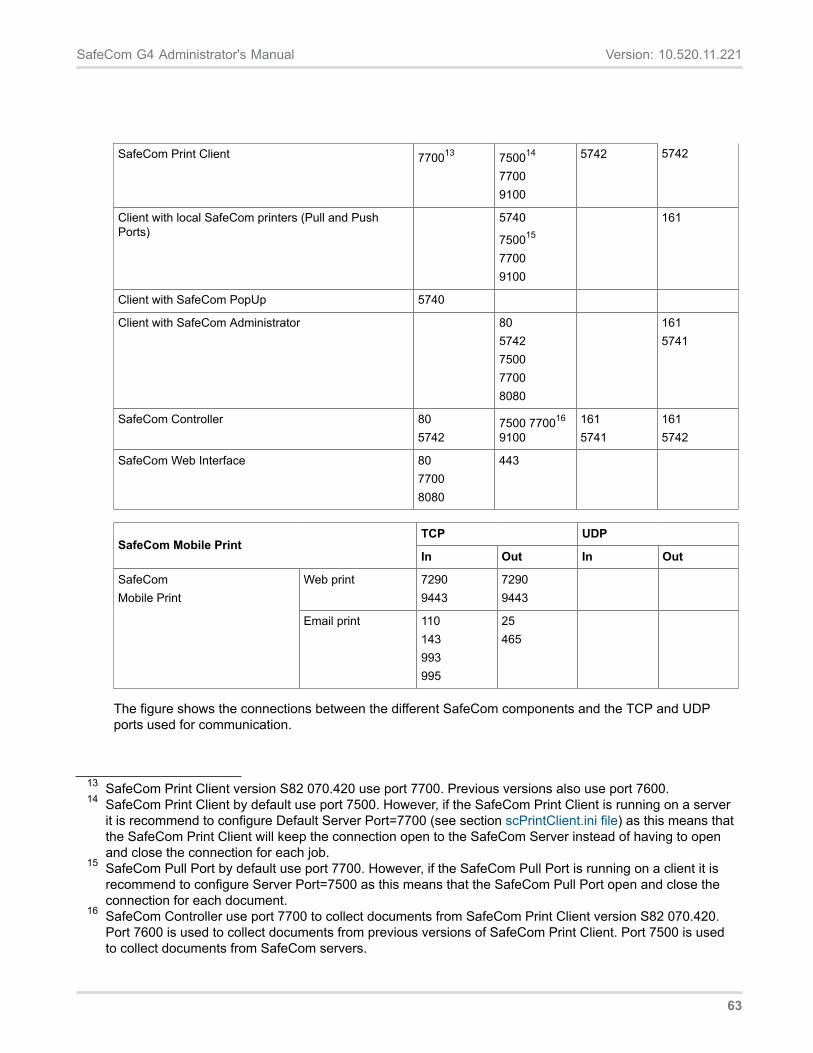
SafeCom G4 Administrator's Manual Version: 10.520.11.221
SafeCom Print Client 770013 750014
77009100
5742 5742
Client with local SafeCom printers (Pull and PushPorts)
5740
750015
77009100
161
Client with SafeCom PopUp 5740
Client with SafeCom Administrator 805742750077008080
1615741
SafeCom Controller 805742
7500 770016
91001615741
1615742
SafeCom Web Interface 8077008080
443
TCP UDPSafeCom Mobile Print
In Out In Out
Web print 72909443
72909443
SafeComMobile Print
Email print 110143993995
25465
The figure shows the connections between the different SafeCom components and the TCP and UDPports used for communication.
13 SafeCom Print Client version S82 070.420 use port 7700. Previous versions also use port 7600.14 SafeCom Print Client by default use port 7500. However, if the SafeCom Print Client is running on a server
it is recommend to configure Default Server Port=7700 (see section scPrintClient.ini file) as this means thatthe SafeCom Print Client will keep the connection open to the SafeCom Server instead of having to openand close the connection for each job.
15 SafeCom Pull Port by default use port 7700. However, if the SafeCom Pull Port is running on a client it isrecommend to configure Server Port=7500 as this means that the SafeCom Pull Port open and close theconnection for each document.
16 SafeCom Controller use port 7700 to collect documents from SafeCom Print Client version S82 070.420.Port 7600 is used to collect documents from previous versions of SafeCom Print Client. Port 7500 is usedto collect documents from SafeCom servers.
63
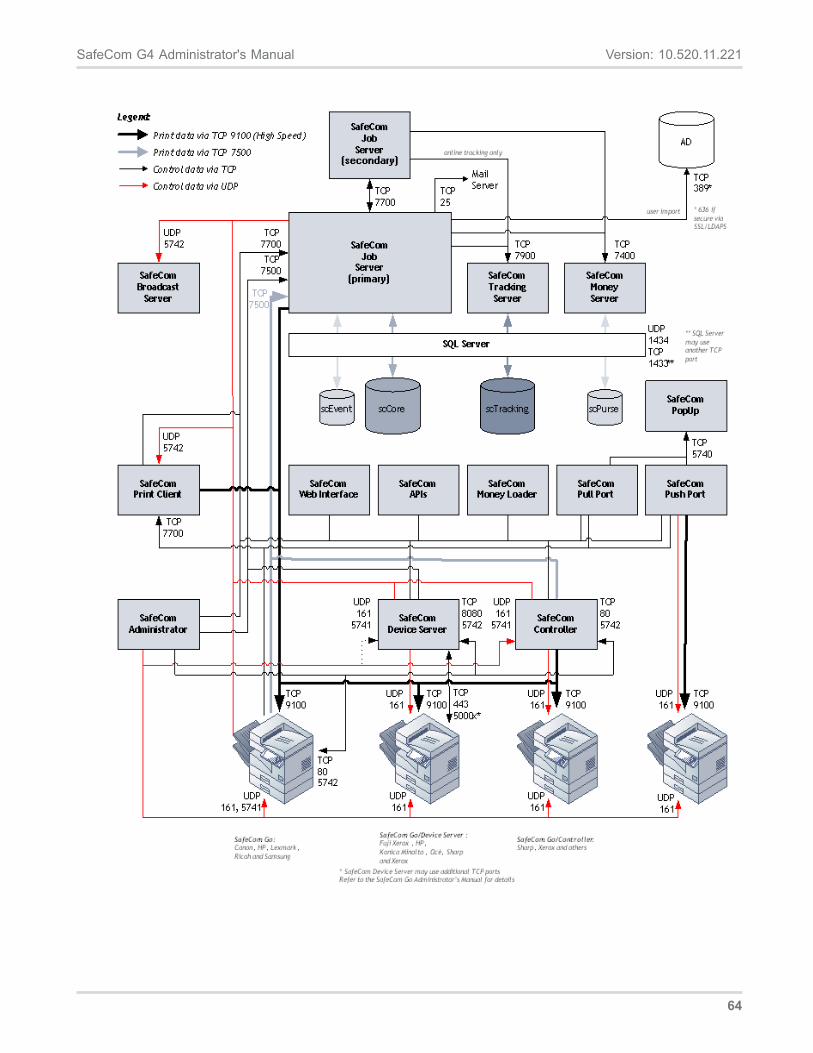
SafeCom G4 Administrator's Manual Version: 10.520.11.221
64
SafeCom G4 Administrator's Manual Version: 10.520.11.221
Backup and restoreWe recommend you have backup and restore processes in place for your SafeCom solution. With well-defined and tested processes it is possible to reduce downtime. With Microsoft Cluster Service (MSCS)the downtime can be reduced even further.
If multiple servers are used each SafeCom secondary server will use TCP port 7900 to deliver tracking data to the SafeCom Tracking server on the SafeCom primary server, either continuously (online tracking) or scheduled (offline tracking). Refer to Multiple servers: Online or offline tracking.
There is only one SafeCom Money Server and it resides on the SafeCom primary server. SafeCom secondary servers will use TCP port 7400 to communicate with the SafeCom Money Server on the SafeCom primary server.
SafeCom SQL databases The following databases are used: • SafeCom Job Database Used by scJobServer.exe and scJobServer64.exe • SafeCom Event Log Used by scEvent.dll • SafeCom Money Database Used by scMoneyServer.exe and scMoneyServer64.exe • SafeCom Tracking Database Used by scTrackingServer.exe and scTrackingServer64.exe. Also used
for device logs.
Each SafeCom server in the server group has its own SafeCom Job Database and SafeCom Event Log. Events older than one year are automatically deleted from the database.
The SafeCom Tracking Database is only relevant if your solution includes the SafeCom Tracking or SafeCom Pay. The SafeCom Money Database is only relevant if your solution includes the SafeCom Pay.
A server group should only use one SafeCom Money Server. This is located on the SafeCom primary server by default.
SafeCom database update log A number of scdbu*.log files are created in the SafeCom installation folder the first time the SafeCom Service is started after a new SafeCom server version has been installed. The files are created whether or not trace is enabled.
Windows registry settings Use the Windows regedit program to view Windows registry settings. Settings for the SafeCom Server software are stored at: • HKEY_LOCAL_MACHINE\SOFTWARE\SafeCom\SafeComG4
Settings for the SafeCom Port Monitors are stored at: • HKEY_LOCAL_MACHINE\SYSTEM\CurrentControlSet\Control\ Print\Monitors\SafeCom Pull Port • HKEY_LOCAL_MACHINE\SYSTEM\CurrentControlSet\Control\ Print\Monitors\SafeCom Push Port
65
SafeCom G4 Administrator's Manual Version: 10.520.11.221
If a Service Level Agreement (SLA) exists it may specify the accepted downtime. The shorter the time period specified, the better prepared you have to be to restore the SafeCom solution and the more evident is the need for a clustered SafeCom solution.
When devising the backup and restore processes you should consider: • Standby computer to replace a faulty one (Standby computer equipment). • Backup and restore SafeCom Windows registry settings (SafeCom Windows registry settings). • Backup and restore any customized SafeCom files (Customized SafeCom files). • Backup and restore printer configurations (Printer configurations). • Backup and restore SafeCom databases (SafeCom database - backup and restore).
Note: The described processes do not include backup and restore of users’ uncollected and retained documents.
Standby computer equipment If you have a complete standby computer, you will be in a good position to immediately replacing the one you currently use one should it become faulty. If the standby computer is dedicated to the SafeCom solution you can reduce downtime even further by ensuring that it is pre-loaded with the right Windows Operating System and SafeCom software.
The SafeCom Server software must be the same version as on the computer it is to replace. This is particularly important in a multiserver solution where all the computers in the SafeCom group must be on the same SafeCom server version. See Chapter Installation Installation.
To secure a smooth transition to the new server, it should inherit the Server address and the computer name of the one it is replacing. That way all references from SafeCom-enabled devices and SafeCom ports to the SafeCom server will remain valid. You should either secure that your DHCP server will give the new server the same IP address or you should give it a static IP address.
You can further reduce downtime if the standby computer is already updated with the more static SafeCom Windows registry settings (SafeCom Windows registry settings), customized SafeCom files (Customized SafeCom files) and printer configurations (Printer configurations). That way you can reduce the restore process to restoring the backup of the SafeCom databases.
If the computer is a SafeCom secondary server it will automatically get its SafeCom databases restored, a as the SafeCom primary server sees to this as part of the replication process. It is recommended to reinitialize the subscription (Reinitialize the subscription).
SafeCom Windows registry settings It is particularly important that the location of print files as specified by the Windows registry setting File Path (Change location of SafeCom print files) is the same on both the standby computer and the current computer. Follow the steps below to backup and restore the SafeCom Windows registry.
To backup:
1. Open the Registry Editor and browse to: HKEY_LOCAL_MACHINE\SOFTWARE\ SafeCom \SafeComG4
2. On the File menu click Export.
66
SafeCom G4 Administrator's Manual Version: 10.520.11.221
3. Specify File name and click Save.
To restore:
1. Double-click the backup registry file and answer Yes when asked to update the Windows registry.
Customized SafeCom filesThe files listed below are typically customized or translated.• EmailWelcome.txt, EmailPUK.txt, EmailWarning.txt and EmailJobDelete.txt (Customize and translate e-
mail messages).• ExcludeJobNames.txt (Shorten job names in document list).• JobNamePricing.txt (JobNamePricing.txt)• EmailBilling.txt (Edit the template for billing reminder)• EmailCode.txt (Customize and translate e-mail messages)• EmailDelegateAccept.txt, EmailDelegateReject.txt, EmailDelegateRequest.txt (Customize and translate
e-mail messages)• IDCodeGenerating.txt (Customize the format of ID codes)• UnfinishedJob.txt (E-mail template for an unfinished job)
Printer configurationsThe Microsoft Print Migrator 3.1, available at microsoft.com/printserver, can back up and restore all printshares and user permissions.
The Print Migrator does not back up the actual SafeCom Pull Port and SafeCom Push Port monitors,only the ports’ attributes. Prior to the restore operation, you must reinstall the original set of SafeCom portmonitors to ensure complete functionality.
Print Migrator comes with a command line interface printmig that takes these switches: -? Help, -bBackup and –r Restore.
If the computer is clustered you must backup the cluster’s virtual server. printmig –b \\filesrv\backup\printers.cap \\clustergroupname where clustergroupname is the Network Name of the virtual server thatcontains the Print Spooler resource. The printmig can be integrated into a job-scheduler, such as theScheduled Task mechanism in Microsoft Windows. Please refer to online help in Windows.
SafeCom database - backup and restoreThis section explains how to backup and restore the SafeCom databases. SafeCom can work with thebelow two versions of the SQL databases.• Microsoft SQL Server Must be purchased and licensed from Microsoft. Backup can be performed by
use of Microsoft SQL Server Management Studio, or an SQL client tool that comes with the MicrosoftSQL Server. Alternatively you can use the Transact-SQL BACKUP DATABASE statement, and run theSQL command line utility, osql.exe. Make sure to configure it to backup the transaction log files as wellto keep them from growing endlessly.
• Microsoft SQL Express 2014 SP1 This is distributed with SafeCom. No license is required fromMicrosoft. Database size is limited to 10 GB.
67
SafeCom G4 Administrator's Manual Version: 10.520.11.221
The SafeCom databases are created to use full recovery model in contrast to simple recovery model. This can lead to large transaction logs if no scheduled backup is put in place from the beginning.
Note: We recommend you establish a nightly scheduled full backup with a maintenance plan that shrinks the transaction logs. In a multiserver solution a database backup should also be scheduled for the secondary server to keep the database transaction log files from growing. The backup itself is not really needed, as data is replicated from the SQL primary server anyway. The provided scBackup (scBackup) program will also backup LDF files and hence prevent these from growing endlessly.
Go to microsoft.com for more information on the Microsoft SQL tools and utilities mentioned above. To backup the database, use the supplied SafeCom command line utility scBackup (scBackup).
All SafeCom print files are by default stored in the folder:
C:\Program Files\ SafeCom\SafeComG4\Data
Database files are by default stored in the folder:
C:\Program Files\ Microsoft SQL Server\MSSQL12.SAFECOMEXPRESS\ MSSQL\DATA
scBackup As mentioned in SafeCom database - backup and restore you can use the supplied command line utility scBackup to backup the SafeCom databases .scBackup must be Run as administrator. The user running scBackup must be a local administrator on both the SafeCom server where the tool is located and the SQL server. The user running the tool must also have the relevant permissions to perform backup and restore on the SQL database. The program works only if the database is set to use full recovery model.
Syntax:
scBackup.exe –b | -r <path> Note: On Windows 64-bit the file is named scBackup64.exe.
Where –b specifies to backup data in the specified path and –r specifies to restore data from the path. The backup results in the files: sccore.bak, scevent.bak, scpurse.bak and sctracking.bak.
Note: To restore successfully the SafeCom server version must NOT change from the time of backup to the restore is performed.
Example:
scBackup.exe –b C:\backup
During restore (-r) scBackup will attempt to stop the SafeCom Service and subsequently restart the SafeCom Service. This will not work in a MS Cluster environment or if other services depend on the SafeCom Service. In such cases the SafeCom Service must be manually stopped and started.
The scBackup can be integrated into a job-scheduler, such as the Scheduled Task mechanism in Microsoft Windows. Please refer to online help in Windows.
Note: The scbackup might fail if the backup is made from a database that is newer than the database used to restore job. Instead, use an SQL Studio manager that is capable of handling both database versions for both the backup and the restore job.
68
SafeCom G4 Administrator's Manual Version: 10.520.11.221
SafeCom server trace facilityNote: Use the SafeCom trace facility only if SafeCom Support instructs you to do so.
Enable trace1. Stop the SafeCom Service (How to start and stop the SafeCom Service) and the Print Spooler.
2. On the SafeCom server create the folder c:\safecom_trace
3. Start the SafeCom Service and the Print Spooler.
Stopping the SafeCom Service and the Print Spooler and then deleting the folder c:\safecom_trace willdisable the trace again. The trace files (Trace files) will by default occupy maximum 220Mb of disk space.
Trace can also be turned on/off without disrupting the SafeCom Service through a TELNET interface(TELNET interface). This interface can also be used to configure the trace facility, including the size andlocation of the trace files.
SafeCom database - maintenance This section explains how to maintain the SafeCom databases, that is preventing the size of the databases from growing endlessly. Backup and restore, including the process of minmizinf transaction logs is covered in (SafeCom database - backup and restore).In tracking solutions, the tracking database (sctracking) will usually grow to a significant size, whereas the job database only grows slowly. The size of the job database depends on the number of users and devices. For each job tracked by SafeCom there is an equivalent record in the tracking database (2KB / tracking record).
When Offline tracking is enabled which by default it is, the tracking database on the SafeCom secondary is automatically emptied every time the SafeCom primary server has collected tracking data.
However, the tracking database on the SQL primary server is not emptied and will continue to grow.
It is therefore recommended to establish a procedure for exporting and deleting old tracking data to keep the database size within the defined limits.
Tracking data can be exported and deleted directly using SQL tools. Alternatively the SafeCom Administrator API’s ExportTracking or DeleteTracking commands can be used.
This housekeeping process should handle the tables: scMoneyLoaderTracking, scSanityTracking, and scTracking.
In Pay solutions both the tracking database (sctracking) and the money database (scpurse) will continue to grow. Even though a money database exists on each server only the money database on the SQL primary server is used. This is because there must only be one single point to store and maintain users' credits. The housekeeping process should handle the table: scTransaction.
The SafeCom event database (scevent) automatically deletes events that are more than one year old.
69
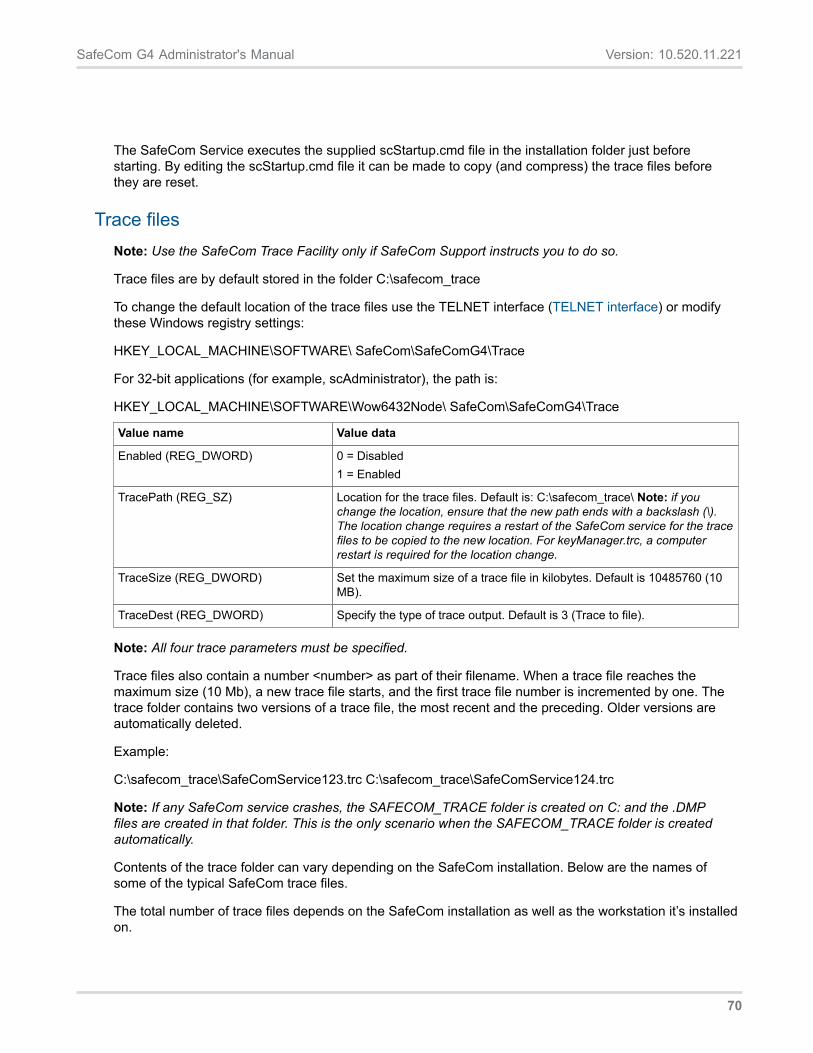
SafeCom G4 Administrator's Manual Version: 10.520.11.221
The SafeCom Service executes the supplied scStartup.cmd file in the installation folder just beforestarting. By editing the scStartup.cmd file it can be made to copy (and compress) the trace files beforethey are reset.
Trace filesNote: Use the SafeCom Trace Facility only if SafeCom Support instructs you to do so.
Trace files are by default stored in the folder C:\safecom_trace
To change the default location of the trace files use the TELNET interface (TELNET interface) or modifythese Windows registry settings:
HKEY_LOCAL_MACHINE\SOFTWARE\ SafeCom\SafeComG4\Trace
For 32-bit applications (for example, scAdministrator), the path is:
HKEY_LOCAL_MACHINE\SOFTWARE\Wow6432Node\ SafeCom\SafeComG4\Trace
Value name Value data
Enabled (REG_DWORD) 0 = Disabled1 = Enabled
TracePath (REG_SZ) Location for the trace files. Default is: C:\safecom_trace\ Note: if youchange the location, ensure that the new path ends with a backslash (\).The location change requires a restart of the SafeCom service for the tracefiles to be copied to the new location. For keyManager.trc, a computerrestart is required for the location change.
TraceSize (REG_DWORD) Set the maximum size of a trace file in kilobytes. Default is 10485760 (10MB).
TraceDest (REG_DWORD) Specify the type of trace output. Default is 3 (Trace to file).
Note: All four trace parameters must be specified.
Trace files also contain a number <number> as part of their filename. When a trace file reaches themaximum size (10 Mb), a new trace file starts, and the first trace file number is incremented by one. Thetrace folder contains two versions of a trace file, the most recent and the preceding. Older versions areautomatically deleted.
Example:
C:\safecom_trace\SafeComService123.trc C:\safecom_trace\SafeComService124.trc
Note: If any SafeCom service crashes, the SAFECOM_TRACE folder is created on C: and the .DMPfiles are created in that folder. This is the only scenario when the SAFECOM_TRACE folder is createdautomatically.
Contents of the trace folder can vary depending on the SafeCom installation. Below are the names ofsome of the typical SafeCom trace files.
The total number of trace files depends on the SafeCom installation as well as the workstation it’s installedon.
70

SafeCom G4 Administrator's Manual Version: 10.520.11.221
Trace file names• AdmClient<number>.trc• AdmGui<number>.trc• BroadcastServer<number>.trc• DeviceControlService.txt• DevMonServer<number>.trc• JobServer<number>.trc• keyManager<number>.trc• MoneyServer<number>.trc• PortConfigurator<number>.trc• PullPM2kSrv<number>.trc• PullPM2kUI<number>.trc• PushPM2kUI<number>.trc• SafeComService<number>.trc• SafeComWeb<number>.trc• SafeComWebconfig<number>.trc• scCoInstall<number>.trc• scDevMonServer<number>.trc• scPopUp<number>.trc• scPrintClient<number>.trc• TrackingServer<number>.trc• SafeCom.XpsPrint.Service.trc
Restarting the SafeCom Service clears the trace files (*.trc), except for the DeviceControlService.txt.
TELNET interfaceThrough the TELNET interface it is possible to enable, disable and configure the SafeCom server tracefacility. Use of telnet can be disabled by changing the Windows Telnet Server’s Registry setting: TelnetPortvalue to 0. Alternatively, create a DisableTelnet DWORD registry setting under HKEY_LOCAL_MACHINE\SOFTWARE\SafeCom\SafeComG4, set its value to 1, and restart the SafeCom service.
1. From the command prompt window, issue the telnet command. Enter:telnet <address> 7723
2. The SafeCom server prompts you for a username and a password of a SafeCom user withAdministrator rights. The default username is admin and the password is nimda. Enter username:admin
3. Enter password:nimda
Once you are logged in you will see the prompt:sc.tel>
71

SafeCom G4 Administrator's Manual Version: 10.520.11.221
4. Enter any of the TELNET commands below such as trace on to enable trace or trace off to disabletrace.• help – online help.• logoff – logoff from the TELNET session.• multiple info – listing of open connections.• server info – list status of servers (Failover servers).• server db info – list database info.• server restart OK <servername> - restarts the server.• trace info – information about current trace setup.• trace off – disable trace.• trace on – enable trace.• trace path <path> - specify a new location for the trace files.• trace size <n> - set the maximum size (in kilobytes) of a trace file.• trace Store – write the trace setup into Windows registry. Note: You can type help to see
additional TELNET commands, and help <command> to get help on a specific command.
5. To close the TELNET session enter 'logoff'.
SafeCom device trace facilityTo further assist the troubleshooting process it is also possible to obtain information from the SafeCom-enabled device.• SafeCom Controller The SafeCom Controller contains a debug interface. Instructions on how to use
enable and use this is forwarded on a per-case basis.• SafeCom Go Please refer to the Troubleshooting chapter in the appropriate SafeCom Go
Administrator’s Manual. A complete list of manuals is available in section Available documentation.
72
Chapter 4
Installation
IntroductionThe installation of software and hardware is described in the SafeCom Go Administrator’s Manual andSafeCom Controller Administrator’s Manual. See section (Available documentation) for a complete list ofthese documents.
This chapter covers SafeCom installation, including multiserver (Stop the SafeCom Service) and clusterinstallation (Cluster installation).
Note: Use the forms in Chapter Administrator’s installation notes to record your SafeCom solutioninformation.
The install programSafeCom has two installation options:• Basic server installation Select this 5-step Basic (Server installation (Basic)) installation of the
SafeCom Server Software and all required components to a default location.• Advanced installation Select this to do a Server(Server installation (Advanced)) installation that use
an existing SQL server or if there is a need to specify the location of SafeCom program files, SafeComprint files and database location. This option also allows Client (Client installation) and Tools (Toolsinstallation) installation.
Server installation (Basic)
Important See Server requirements for software prerequisites and install these prior to the installation ofSafeCom G4.
Note: Installing the Microsoft Redistributable Package (x86) may take minutes, depending on yoursystem. During this time, the installation process may appear to have hanged. Wait a few minutes toensure that the installation proceeds normally.
1. Download safecom_g4_x64_xxxx.exe file from the link supplied to you. The installation must be Runas administrator. When the installation program is launched click Next.
2. Read and accept the end-user license agreement. Click Next.
73
SafeCom G4 Administrator's Manual Version: 10.520.11.221
3. Click Basic server installation. Click Next.
4. Select the SQL authentication: • SQL authentication with safecom user. The safecom SQL user is created with system
administrator (sysadmin) rights when the SafeCom service is first started. The SafeCom service runs under the Local System account. Ensure that the safecominstall user is created, see the relevant sections, for example Create intermediate SQL user: safecominstall.
• Windows authentication with service account. • Create a service account prior to installing SafeCom, and grant it the “Log on as a service” right
for all servers running SafeCom G4. • Do NOT create the safecominstall user in the SQL server. Note: In rare cases, the installer
may display a message to remind you about creating a safecominstall user. Ignore this message.
• Add the selected Windows user with system administrator rights to the primary SQL server instance you plan to use with SafeCom. For more information, see Add Windows service account to the SQL server. The SafeCom service runs under this account.
• Ensure that the selected service account has proper access rights to the private key of the certificate specified in the TlsCert registry entry, which is created by SafeCom itself (under HKLM\Software\SafeCom\SafeComG4). As several components of SafeCom (G4, PrintClient, Port) use this certificate/key pair, ensure that all accounts running the components have proper access rights. If you are using a service user account for Safecom G4, ensure it has administrator access.
Note: Changing your SQL authentication when upgrading your existing installation is not supported. In such cases, remove your existing SafeCom installation (Uninstall SafeCom software) and perform a clean installation where you select your SQL authentication method.
5. Current settings are displayed. Click Install to accept and start the installation. Microsoft SQL Express 2014 SP1 is also installed. The Print Spooler is restarted at the end of this process.
6. Click Finish to launch SafeCom Administrator (Introduction).
7. If Windows Firewall is on, then open ports as specified (Windows Firewall – Ports that must be opened).
8. Optionally, configure your encryption settings (Configuring encryption).
Server installation (Advanced) Advanced installation is used when you need to specify a unique SQL server instance (e.g. primary server SQL server in a Safecom multi server environment) or if you want to specify folder locations for print jobs or folder location for Microsoft SQL Express instance. For prerequisites and details on multi-server installations, see Multiserver installation.
1. Download the safecom_g4_x64_xxxx.exe file from the link supplied to you. Right-click the downloaded installation file and select Properties, then in the properties window click Unblock. Exit the properties window. The installation must be Run as administrator. When the installation program is launched click Next.
2. Read and accept the end-user license agreement. Click Next.
3. Click Advanced installation. Click Next.
4. Click Server. Click Next.
74
SafeCom G4 Administrator's Manual Version: 10.520.11.221
5. Select the SQL authentication:• SQL authentication with safecom user. The SafeCom SQL user is created with system
administrator rights when the SafeCom service is first started. The SafeCom service runs underthe Local System account. Ensure that the safecominstall user is created, see the relevantsections, for example Create intermediate SQL user: safecominstall.
• Windows authentication with service account.• Create a service account prior to installing SafeCom, and grant it the “Log on as a service” right
for all servers running SafeCom G4.• Do NOT create the safecominstall user in the SQL server.
Note In rare cases, the installer may display a message to remind you about creating asafecominstall user. Ignore this message.
6. Select the location for the SafeCom program files. Click Next.
7. Select the location for print files. Click Next. Refer to Store print files on an external file share if youchoose to use an external file share.
• Add the selected Windows user with system administrator rights to the primary SQL server instance you plan to use with SafeCom. The SafeCom service runs under this account.
• Ensure that the selected service account has proper access rights to the private key of the certificate specified in the TlsCert registry entry, which is created by SafeCom itself (under HKLM\Software\SafeCom\SafeComG4). As several components of SafeCom (G4, PrintClient, Port) use this certificate/key pair, ensure that all accounts running the components have proper access rights. If you are using a service user account for Safecom G4, ensure it has administrator access.
Note Changing your SQL authentication when upgrading your existing installation is not supported. In such cases, remove your existing SafeCom installation (Uninstall SafeCom software) and perform a clean installation where you select your SQL authentication method.
75
SafeCom G4 Administrator's Manual Version: 10.520.11.221
8. Select preferred SQL Server and click Next.• Install Microsoft SQL Express 2014 SP1, default data location• Install Microsoft SQL Express 2014 SP1, specify data location Select this to specify the location
of the SQL database files.• Use an existing SQL Server Note: To use this option you must know the instance name prior to
installation.
Important When using SQL Server 2014, ensure that you have the Management Tools – Basiccomponent of the SSMS installed on the same machine as the SafeCom server. If the SSMSis not installed prior to SafeCom, it requires a restarting of the SafeCom service. If SSMS is notinstalled, replication may not work properly. The SSMS version must match the version of theexternal SQL server to be used.
Important When using a standalone SQL Server 2016, ensure that you have the ManagementTools – Basic component of the SSMS 2014 installed on the same machine as the SafeComserver before you start installing SafeCom. If SSMS is not installed, replication may not workproperly.
On the existing SQL server you need to create the intermediate SQL user: safecominstall(Create intermediate SQL user: safecominstall). On SQL 2008 Server enable the TCP/IP protocol (Add Windows service account to the SQL server). Enter the SQL server as:computername\instancename or just computername if there is no named instance of the SQLServer. The instance name is case sensitive. The instance names SAFECOMEXPRESS andSAFECOMMSDE are reserved for the SafeCom embedded SQL server and must NOT be used toname a SQL server instance.
9. Current settings are displayed. Click Install to accept and start the installation. The Print Spooler isrestarted at the end of this process.
10. Click Finish to launch SafeCom Administrator (Introduction).
11. If Windows Firewall is on, then open the ports, inbound as well as outbound, as specified (WindowsFirewall – Ports that must be opened) and make the SQL Server use the fixed TCP port 1433(Windows Firewall – Make SQL use fixed port). You can use the SafeCom provided firewall script toopen the ports.
Tip If the SQL server is to use another fixed port than 1433 you can edit the SafeCom providedfirewall script to include opening the desired port.
12. Optionally, configure your encryption settings (Configuring encryption)..
Client installationA Client installation is relevant if you intend to:• Create a shared SafeCom Pull Printer (Shared SafeCom Pull Printer) or SafeCom Push Printer on a
Windows print server.• Create a local SafeCom Pull Printer (Local SafeCom Pull Printer) or SafeCom Push Printer on clients.
76
SafeCom G4 Administrator's Manual Version: 10.520.11.221
Follow these steps to make a Client installation.
1. Download the safecom_g4_x64_xxxx.exe file from the link supplied to you. The installation must beRun as administrator. When the installation program is launched click Next.
2. Read and accept the end-user license agreement. Click Next.
3. Click Advanced installation. Click Next.
4. Click Client. Click Next.
5. Select the location for the SafeCom program files. Click Next.
6. Current settings are displayed. Click Install to accept and start the installation. The Print Spooler isrestarted at the end of this process.
7. Click Finish.
Tools installationYou only need to do a Tools installation if you want to administer your SafeCom solution from multiplecomputers. Follow these steps to make a Tools installation.
Note: Before installing Tools, ensure that your Windows operating system is fully up-to-date.
Note: Upgrading an already-existing G4 Tools installation is not recommended due to the changes in G4functionality. Uninstall the existing one, and install the new one.
Installing SafeCom Administrator will also install the files required to run SafeCom Administrator API(AdmClient.exe) and SafeCom Batch Print API (scClient.exe). Check SafeCom Port Configurator toinstall it.
1. Download the safecom_g4_x64_xxxx.exe file from the link supplied to you. The installationmust be Run as administrator. When the installation program is launched click Next. Note:If you plan to perform a Tools installation on a 32-bit operating system, download and run theSafeComG4_Tools_x86_xxxx.exe.
2. Read and accept the end-user license agreement. Click Next.
3. Click Advanced installation. Click Next.
4. Click Tools. Click Next.
5. Check the tools you wish to add. Click Next.
6. Select the location for the SafeCom program files. Click Next.
7. Current settings are displayed. Click Install to accept and start the installation. If the installationincludes SafeCom Port Configurator the Print Spooler is restarted at the end of this process.
8. Click Finish.
Users who are to use the SafeCom Administrator on the computer MUST have permission to theWindows registry:
HKEY_LOCAL_MACHINE\SOFTWARE\SafeCom\SafeComG4
77
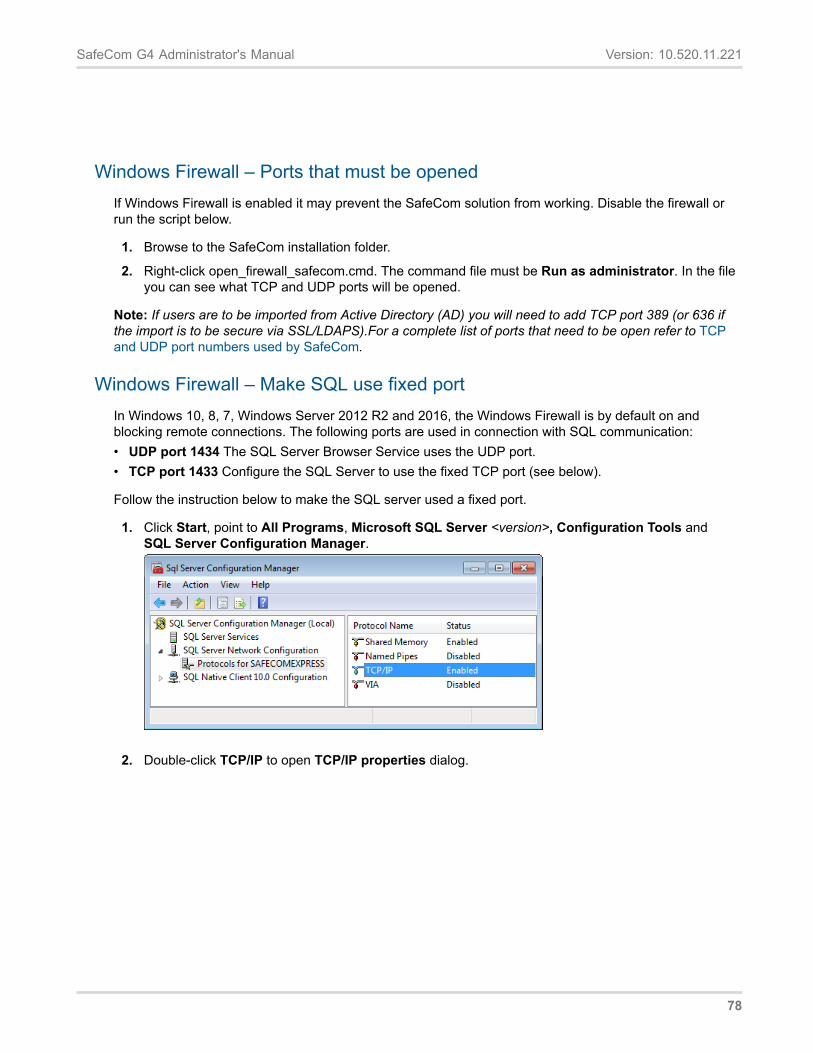
SafeCom G4 Administrator's Manual Version: 10.520.11.221
Windows Firewall – Ports that must be openedIf Windows Firewall is enabled it may prevent the SafeCom solution from working. Disable the firewall orrun the script below.
1. Browse to the SafeCom installation folder.
2. Right-click open_firewall_safecom.cmd. The command file must be Run as administrator. In the fileyou can see what TCP and UDP ports will be opened.
Note: If users are to be imported from Active Directory (AD) you will need to add TCP port 389 (or 636 ifthe import is to be secure via SSL/LDAPS).For a complete list of ports that need to be open refer to TCPand UDP port numbers used by SafeCom.
Windows Firewall – Make SQL use fixed portIn Windows 10, 8, 7, Windows Server 2012 R2 and 2016, the Windows Firewall is by default on andblocking remote connections. The following ports are used in connection with SQL communication:• UDP port 1434 The SQL Server Browser Service uses the UDP port.• TCP port 1433 Configure the SQL Server to use the fixed TCP port (see below).
Follow the instruction below to make the SQL server used a fixed port.
1. Click Start, point to All Programs, Microsoft SQL Server <version>, Configuration Tools andSQL Server Configuration Manager.
2. Double-click TCP/IP to open TCP/IP properties dialog.
78
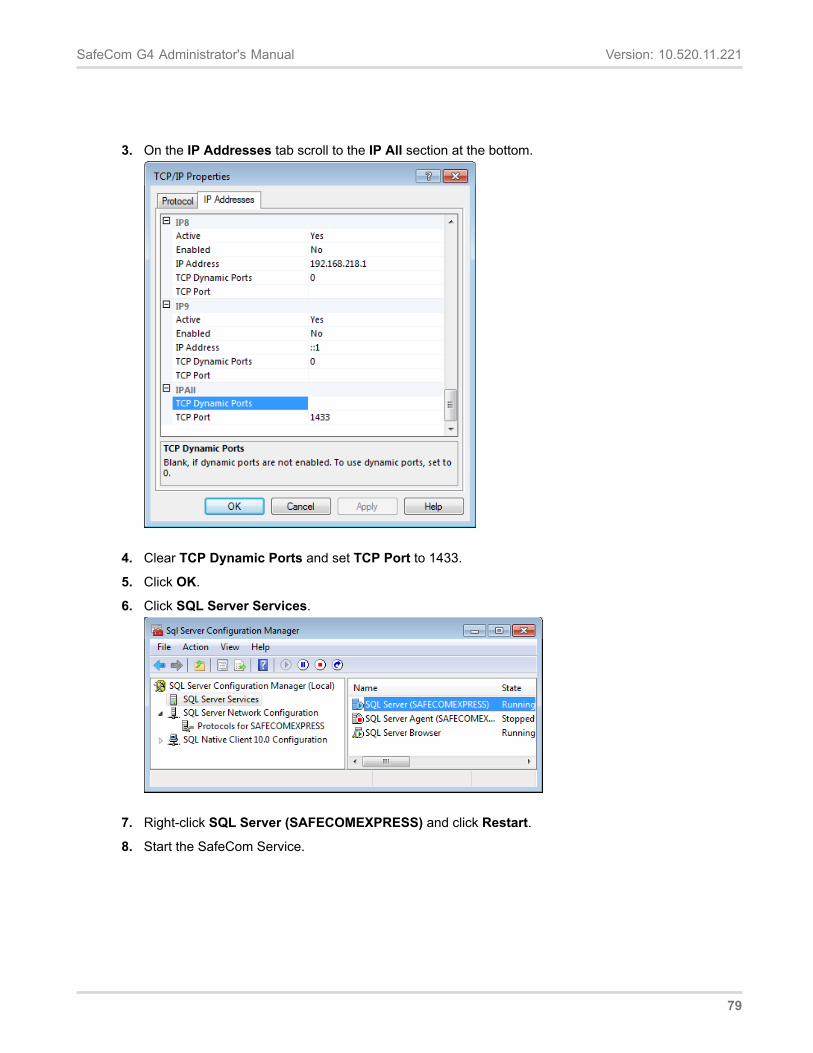
SafeCom G4 Administrator's Manual Version: 10.520.11.221
3. On the IP Addresses tab scroll to the IP All section at the bottom.
4. Clear TCP Dynamic Ports and set TCP Port to 1433.
5. Click OK.
6. Click SQL Server Services.
7. Right-click SQL Server (SAFECOMEXPRESS) and click Restart.
8. Start the SafeCom Service.
79
SafeCom G4 Administrator's Manual Version: 10.520.11.221
After installation security checkupOnce the SafeCom G4 server has been installed and successfully tested it is recommended to go throughthis checklist:• Change the default password (nimda) for the built-in user account ADMIN (Change password).• Change the default password (hcet) for the built-in user account TECH. Check that the initial PUK code
12345678 is no longer present.• Make sure that there is at least one user with Administrator rights (Rights).• Check that SafeCom Controllers and SafeCom Go devices are password protected.• Delete the intermediate SQL user: safecominstall (Delete intermediate SQL user: safecominstall).• Put in place a scheduled backup of the database (SafeCom database - backup and restore).
Scripts to manually create the databasesIncluded in the distribution of SafeCom G4 is a number of *.scs script files that can be used to manuallycreate the databases required by SafeCom.
Note: Running these scripts clears the existing SafeCom databases.
The scripts are located in the SafeCom installation folder. The default installation folder is:
C:\Program Files\ SafeCom\SafeComG4
The scripts must be executed in the following order:• sccore.scs• sccoredef.scs• scevent.scs• sceventdef.scs• scpurse.scs• scpursedef.scs• sctracking.scs• sctrackingdef.scs
If the distribution includes any of the files below these must be executed last.• sccoreadapt.scs• sceventadapt.scs• scpurseadapt.scs• sctrackingadapt.scs
To ensure that the database ownership is correct, run the following script:• scChangeOwner.sql
SQL collationThe databases created by the SafeCom system use the collation: SQL_Latin1_General_CP1_CI_AS.
80

SafeCom G4 Administrator's Manual Version: 10.520.11.221
Use of other collations has not been tested and is as such not supported. Using another collation may perhaps reveal situations where case sensitivity could cause problems.
To use another SQL collation, do the following, before the databases are created:
1. On the SafeCom primary server make a backup of the files: • sccore.scs • scevent.scs • scpurse.scs • sctracking.scs
2. Edit each of the above *.scs files to reference the appropriate SQL collation. Look for the text string:
SQL_Latin1_General_CP1_CI_AS
Note: The corresponding *def.scs should NOT be edited.
If the solution is a multiserver installation the modified *.scs files must also be used on the SafeCom secondary servers. This implies that the modified *.scs files must be copied to the SafeCom secondary server before the secondary one creates its database.
Create intermediate SQL user: safecominstall Note: This chapter uses screenshots and examples from SQL 2008.
The SafeCom Service will automatically create the SafeCom databases in the Microsoft SQL Server the next time the SafeCom Service is restarted. However, before this is done you need to temporarily create an SQL user named safecominstall.
The SQL user is created using the Microsoft SQL Server Management Studio. Refer to online Windows help for additional information on the Management Studio.
1. Click Start, point to All Programs, Microsoft SQL Server <version> and click SQL Server Management Studio. Note: The SQL Server Group must NOT be registered as LOCAL. The server name must be used instead, example SAFECOM4.
2. Expand to the Logins level depicted on the figure below.
81
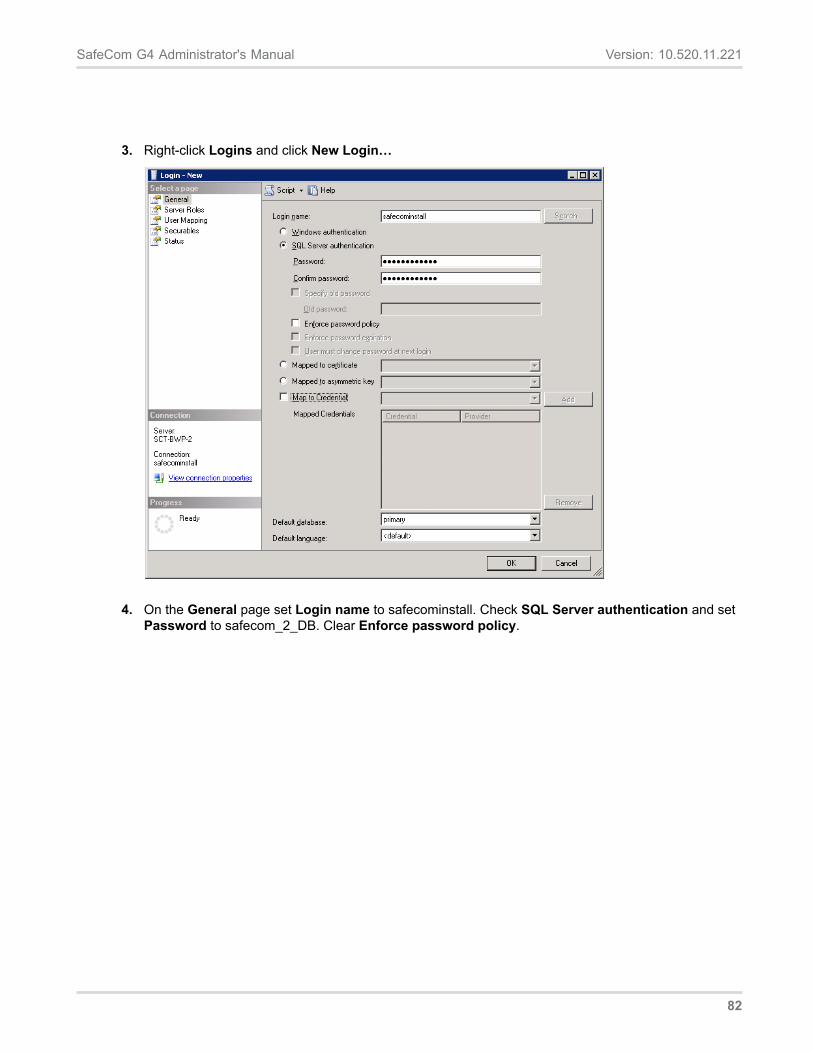
SafeCom G4 Administrator's Manual Version: 10.520.11.221
3. Right-click Logins and click New Login…
4. On the General page set Login name to safecominstall. Check SQL Server authentication and setPassword to safecom_2_DB. Clear Enforce password policy.
82
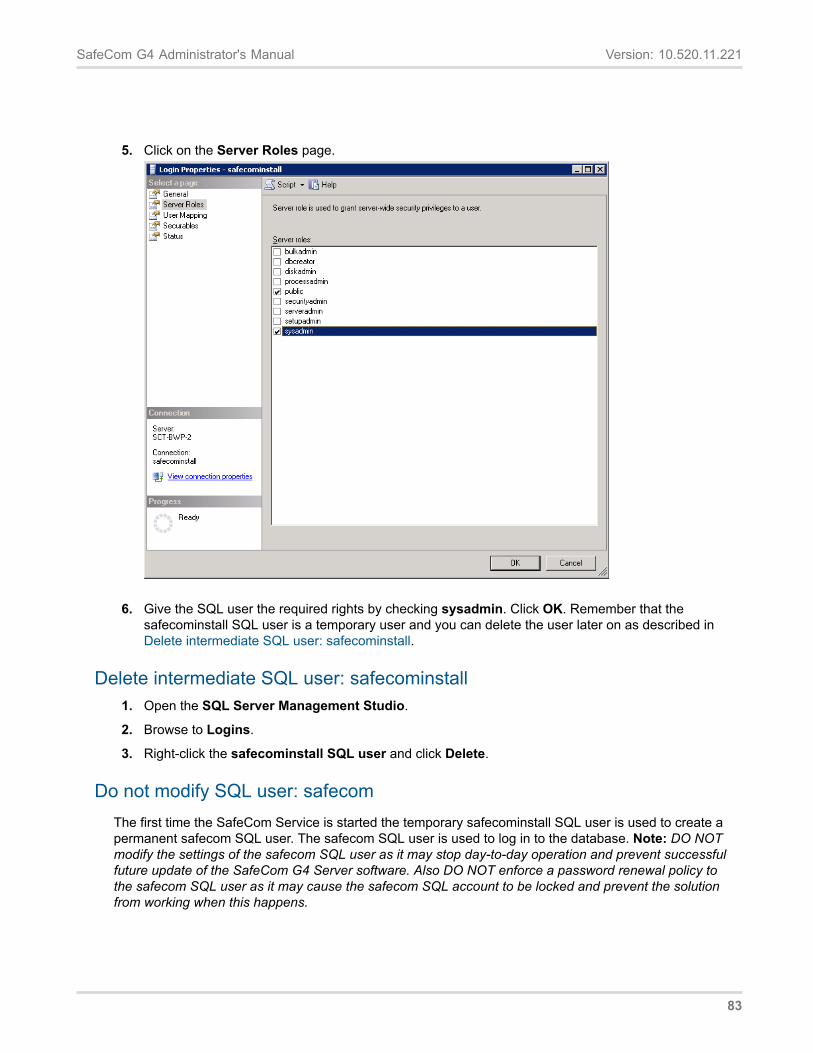
SafeCom G4 Administrator's Manual Version: 10.520.11.221
5. Click on the Server Roles page.
6. Give the SQL user the required rights by checking sysadmin. Click OK. Remember that thesafecominstall SQL user is a temporary user and you can delete the user later on as described inDelete intermediate SQL user: safecominstall.
Delete intermediate SQL user: safecominstall1. Open the SQL Server Management Studio.
2. Browse to Logins.
3. Right-click the safecominstall SQL user and click Delete.
Do not modify SQL user: safecomThe first time the SafeCom Service is started the temporary safecominstall SQL user is used to create apermanent safecom SQL user. The safecom SQL user is used to log in to the database. Note: DO NOTmodify the settings of the safecom SQL user as it may stop day-to-day operation and prevent successfulfuture update of the SafeCom G4 Server software. Also DO NOT enforce a password renewal policy tothe safecom SQL user as it may cause the safecom SQL account to be locked and prevent the solutionfrom working when this happens.
83
SafeCom G4 Administrator's Manual Version: 10.520.11.221
Add Windows service account to the SQL server1. Start the SQL Server Management Studio.
2. Connect to the SQL server instance used by SafeCom.
3. Expand the Security entry.
4. Right-click Logins and select New login….
5. Browse to the Windows user you want to use.
6. Under Server Roles, check sysadmin.
7. Click OK.
Enable TCP/IP protocol on the SQL server1. Click Start, point to All Programs, Microsoft SQL Server <version>, Configuration Tools and
SQL Server Configuration Manager.
2. Browse to SQL Server Network Configuration and Protocols for MSSQLSERVER.
3. Right-click TCP/IP and select Enable.
Determine physical and virtual memory on the serverFor good performance it is important to have sufficient physical RAM. Remember that SQL is a memoryintensive application. 2 GB of physical memory is a good start, but more is better. To take advantage of4 GB or more physical memory it is necessary enable PAE X86 (Physical Address Extension) on 32-bitWindows server. Refer to microsoft.com.
The amount of physical memory can be determined by looking at the General tab in the SystemProperties dialog.
How to determine CPU and RAM:
1. Open the Control Panel on the computer where the SafeCom server software is installed.
2. Click Administrative Tools. Click Computer Management.
3. Right-click Computer Management (Local) and click Properties. The General tab includesinformation about CPU (MHz), RAM (Mb) and will say Physical Address Extension if PAE isenabled.
If you see a little balloon in the bottom right corner of the screen announcing Windows – Virtual MemoryMinimum Too Low Windows is increasing the virtual memory, but during this process, memory requestsfor some applications, such as the SafeCom server may be denied and these applications may potentiallybecome unstable.
How to adjust the virtual memory:
1. Log in with administrator privileges on the server.
2. Open the Control Panel on the computer where the SafeCom server software is installed.
3. Click Administrative Tools. Click Computer Management.
84
SafeCom G4 Administrator's Manual Version: 10.520.11.221
4. Click on the Advanced tab.
5. In Performance click Settings.
6. In Virtual memory click Change.
7. In the Drive list, click the drive that contains the paging file you want to change.
8. Under Paging file size for selected drive, type a new paging file size in megabytes in the InitialSize (Mb) or Maximum Size (Mb) box, and then click Set. If you increase the sizes you are normallynot required to restart the computer.
Note: The initial size is normally equivalent to 1.5 times the amount of physical RAM on the system.If the Task Manager (see below) indicates that the Peak memory use is close to the maximum it isrecommended to change the initial size to 1.5 times the current maximum and to increase the maximumto 2 or more times the current maximum. Example: Initial size is 2 GB and maximum is 4 GB. If Peak getsclose to 4 GB then increase Initial size to 6 GB and maximum to 8 GB.
How to check peak memory usage:
1. Right-click an empty space on the Taskbar and click Task Manager.
2. Click on the Performance tab.
3. In Commit Charge (K) you can see the Peak memory usage. Peak memory usage on a SafeComserver is typically reached when there is high print activity and/or when user data is imported.
Store print files on an external file shareIf the print files folder you specified in Server installation (Advanced) is on an external file share you mustensure that the SafeCom Service runs as an account that has read and write access to the external fileshare.
1. Open the Control Panel on the computer where the SafeCom server software is installed.
2. Click Administrative Tools. Click Services.
3. Right-click SafeCom Service and click Properties.
4. Click on the Log on tab.
5. Check This account and assign an account that has read and write access to the external file share.
Change location of SafeCom print filesUnless you specified an alternate location when you installed the SafeCom software, the SafeCom printfiles are by default stored in the folder:
C:\Program Files\SafeCom\SafeComG4\data
Follow the steps below to change the location of SafeCom print files.
1. Click Start, type service.msc into the Search box and press ENTER.
2. Right-click SafeCom Service and click Stop.
3. Right-click Print Spooler and click Stop.
85
SafeCom G4 Administrator's Manual Version: 10.520.11.221
4. Create the folder that should hold the print files from now on.
5. Copy the existing print files to the new folder.
6. Open the Registry Editor and browse to:HKEY_LOCAL_MACHINE\SOFTWARE\ SafeCom\SafeComG4
7. Change FilePath to the new location.
8. Close the Registry Editor.
9. Start the SafeCom Service and the Print Spooler.
Configuring encryptionBy default, the SafeCom components except the SafeCom Device Server use TLS encryption.
Note: From S82 70.520*10 onwards, scPopUp does not work without TLS; switching TLS off disables thescPopUp as well.
1. Open the Registry Editor and browse to: HKEY_LOCAL_MACHINE\SOFTWARE\ SafeCom\SafeComG4
2. Edit (or create) the ChannelEncryption DWORD setting. The following settings are possible:• 1: Only Legacy enabled.• 2: Only TLS enabled.• 3: Both Legacy and TLS enabled (default).
Using a custom certificate for TLS communicationTo use custom certificates for TLS communication, follow the steps below.
1. On the SafeCom G4 Server machine, import your custom certificate to the local computer’sComputer account > Personal certificate store.
a. On the server machine, press Windows key + R to open the Run dialog, then execute thecertlm.msc command.
b. Under Certificates (Local Computer), expand the Personal node, then click the Certificatesfolder.
c. Right click the background of the right pane, point to All Tasks, then click Import...
d. Follow the instructions of the wizard to import your certificate in the Personal certificate store.
2. Make sure the account running SafeCom has permissions to use the private keys of the importedcertificate.
a. Right-click your certificate in the certificate store, point to All Tasks, and click Manage PrivateKeys...
b. On the Security tab, confirm that the account running SafeCom has Full Control permissions.
3. On the server, run the following PowerShell command to retrieve the certificate thumbprint: Get-ChildItem -path cert:\LocalMachine\My
86
SafeCom G4 Administrator's Manual Version: 10.520.11.221
4. Run the regedit command to open the Registry Editor, and browse to the following key: Computer >HKEY_LOCAL_MACHINE > SOFTWARE > SafeCom > SafeComG4
5. If it does not exist, create a REG_SZ value with the name TlsCert.
6. Paste the certificate thumbprint retrieved in step 3 to the TlsCert value. Note: the certificatethumbprint should only contain upper-case letters. In some cases, the thumbprint query may becase-sensitive, and lower-case letters may cause problems.
7. Restart the SafeCom service.
After completing the steps above, SafeCom G4 Server will use the specified certificate for TLScommunication.
Update SafeCom software – single server
Important!
If you have a SafeCom G2 version S82 070.380*09 (32 bit) installation, you first need to upgrade toSafeCom G3 version S82 070.440*04 (32 bit) before upgrading to SafeCom G4.
The SafeCom license must be valid (not expired) in order to perform an update.
If you launch the install program to update the SafeCom G4 software or do a re-installation the installprogram will adapt to what is currently installed on the computer:• Server is already installed The install program will offer you to update your existing SafeCom server
installation.• Client is already installed The install program will offer you to update your existing SafeCom client
installation and offer you to add whatever tools you have not installed at previous occasions.• SafeCom Administrator is installed alone The install program will offer you to update the SafeCom
Administrator. This implies that if you want to subsequently install a client then you must first uninstallthe SafeCom Administrator as described in Uninstall SafeCom software and then make a Clientinstallation and then a Tools installation.
Note SafeCom solutions originally based on SafeCom G2 or G3 will, after the update, continue to usethe original SafeCom installation folder (SafeCom G2 or SafeCom G3 instead of SafeCom G4) and itwill also continue to use the SQL server. This implies that the update will NOT replace the SQL serveralready in use.
Follow these steps to update a single server:
1. Click Start, type services.msc into the Search box and press ENTER.
2. Stop the SafeCom Service and the Print Spooler, and any other services that depend on the PrintSpooler.
3. Update the SafeCom server software.
87
SafeCom G4 Administrator's Manual Version: 10.520.11.221
4. Check Yes, I want to restart my computer now. 17Click Finish. This will restart the computer (andthe SafeCom Service and Print Spooler).
The update procedure for multiserver installation is covered in Using Group Management ServiceAccount for services. The update procedure for a cluster installation is covered in SafeCom G4 ClusterAdministrator’s Manual D60652.
For more details, refer to SafeCom Tech Note Migration from SafeCom G2 to SafeCom G3 D20178 orcontact [email protected].
Uninstall SafeCom softwareWhen you uninstall SafeCom G4 software on a computer you also delete the SafeCom Pull Printers, thatis, the printers that use the SafeCom Pull Port or SafeCom Push Port.
1. Stop the SafeCom Service (How to start and stop the SafeCom Service) and the Print Spooler(How to start and stop the Print Spooler). If other services depend on the Print Spooler these mustalso be stopped.
2. If SafeCom PopUp (scPopUp.exe) is running, then stop it.
3. Open the Control Panel.
4. Click Programs and Features (or Add or Remove Programs).
5. Right-click SafeCom G4 and click Uninstall.
6. Proceed to section (Uninstall Microsoft SQL Express 2014 SP1) to uninstall the SafeCom specificinstance of the SQL server.
7. You will need to restart your computer after uninstalling Microsoft SQL Express 2014 SP1.
Uninstall Microsoft SQL Express 2014 SP1
1. Open the Control Panel.
2. Click Programs and Features (or Add or Remove Programs).
3. Right-click Microsoft SQL Server 2014 and click Uninstall.
4. Uninstall the DATA folder that contains SafeCom SQL database files (sc*.mdf and sc*.ldf). Thesefiles need to be deleted manually.The default location for the database files:C:\Program Files\Microsoft SQL Server\MSSQL12.SAFECOMEXPRESS\MSSQL\DATA
If you chose a different location during installation (Server installation (Advanced)), find the files anddelete them manuall. If you reinstall SafeCom software, these files are suffixed with *.old before anew set of SafeCom SQL database files is installed.
5. Restart the computer.
17 It is recommended to restart the computer, but in most cases it is sufficient to restart the SafeCom Serviceand Print Spooler.
88
SafeCom G4 Administrator's Manual Version: 10.520.11.221
SafeCom Print ClientNetwork bandwidth is often a barrier to the central administration of printers at remote sites. WithSafeCom Print Client, you can minimize the need for network capacity locally since only control datatravels over the corporate network. Pending documents are stored locally on the user's computer until theuser authenticates and collects the print job at any network printer. Only login and tracking information issent to the SafeCom server.
Note: Tracking data is still sent to the SafeCom server.
Print jobs are stored on the hard disk drive in:
C:\Program Files\SafeCom\
SafeComPrintClient\JobFiles\
On Windows 64-bit:
C:\Program Files (x86)\SafeCom\
SafeComPrintClient\JobFiles\
Note: The location of print jobs is specified in the scPrintClient.ini file (scPrintClient.ini file)
The software can be installed on computers that conform to the specified system requirements (Clientrequirements).
Note: On Windows 7 you MUST set User Account Control18 (Add a local SafeCom Pull Printer onWindows 7) to Never notify during installation.
Installation1. Download the safecom_print_client_xxx.exe file from the link supplied to you. The installation must
be Run as administrator. Click Next.
2. Select the Installation options (default all checked) and click Next. Install Print Client service.Uncheck this to install the Pull Port, Push Port and Print Client software, but the service is notinstalled and started. By unchecking this, the Print Client installer can be used to deploy only the PullPort and Push Port software. Install scPopUp. Uncheck this if no dialog need to popup on the user’scomputer.
3. Enter SafeCom server address. The address can be in form of the hostname or IP address. Usesemicolon as separator if multiple servers19 are entered. Click Next. Note: The installer checks thehome server functionality, when the SafeCom server address IP is typed.
4. Click Install to copy the files to the installation folder. Default installation folder is:C:\Program Files\SafeCom\SafeComPrintClient
18 The creation of the SafeCom Pull Port (scPull) requires User Account Control to be turned off.19 In a SafeCom multiserver solution the SafeCom Print Client and the SafeCom Pull Port (Configure the
SafeCom Pull Port) will failover to the first server in the failover server list.
89
SafeCom G4 Administrator's Manual Version: 10.520.11.221
5. Click Finish to apply the following changes to the system:• New service named: SafeCom Print Client.• New port (scPull) that uses the SafeCom Pull Port (Configure the SafeCom Pull Port).
The SafeCom PopUp (Add a SafeCom Push Port) is also installed and started if selected in theinstallation wizard.Note: if a non-default JobStoragePath is used either during installation or later, the specified foldermust exist, and the account running the SafeCom Print Client must have the necessary access rightsto that folder.
Windows FirewallIf Windows Firewall is enabled it may prevent the SafeCom solution from working. Disable the firewall orrun the script below.
1. Browse to the SafeComPrintClient installation folder.
2. Right-click open_firewall_print_client.cmd. The command file must be Run as administrator. In thefile you can see what TCP and UDP ports will be opened.
Print test page1. Use one of these methods to make a printer use SafeCom Print Client:
• Modify an existing local printer to use the new port. In the Print properties dialog click on thePorts tab and check the scPull port.
• Add a new local printer and make it use the new port. Please refer to these sections forinstructions: Windows 7 (Add a local SafeCom Pull Printer on Windows 7), Windows 10 / Windows8 (Add a local SafeCom Pull Printer on Windows 10 / Windows 8).
2. Print a test page and collect it at one of the SafeCom-enabled devices.
Direct print if SafeCom server is offlineIf the connection to the SafeCom server fails, it is still possible for a user to print with SafeCom Print Clientinstalled.
SafeCom Print Client keeps a record of the devices that have been used for printing so if the connectionto the SafeCom server is lost, SafeCom Print Client offers the user to print directly to one of the last useddevices.
When a user submits a print job and the SafeCom server is offline, the SafeCom Print Client dialogopens, offering the user to send the print job directly to a printer on a list.
90
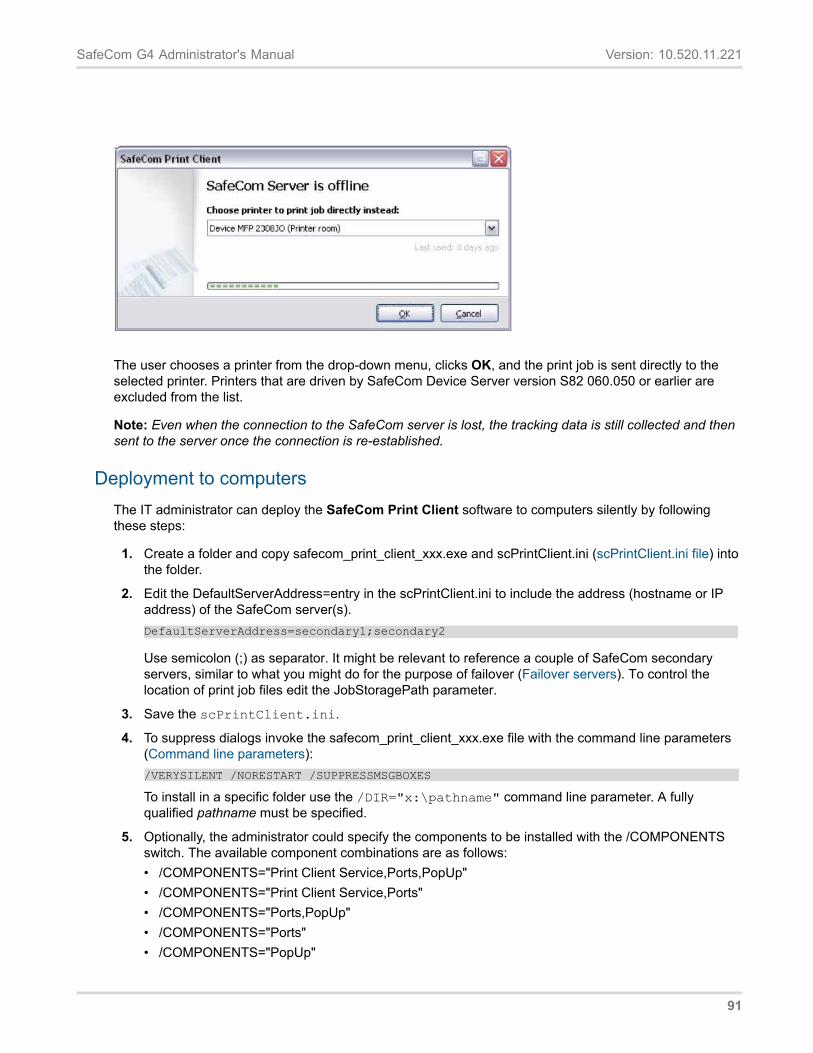
SafeCom G4 Administrator's Manual Version: 10.520.11.221
The user chooses a printer from the drop-down menu, clicks OK, and the print job is sent directly to the selected printer. Printers that are driven by SafeCom Device Server version S82 060.050 or earlier are excluded from the list.
Note: Even when the connection to the SafeCom server is lost, the tracking data is still collected and then sent to the server once the connection is re-established.
Deployment to computers The IT administrator can deploy the SafeCom Print Client software to computers silently by following these steps:
1. Create a folder and copy safecom_print_client_xxx.exe and scPrintClient.ini (scPrintClient.ini file) into the folder.
2. Edit the DefaultServerAddress=entry in the scPrintClient.ini to include the address (hostname or IP address) of the SafeCom server(s). DefaultServerAddress=secondary1;secondary2
Use semicolon (;) as separator. It might be relevant to reference a couple of SafeCom secondary servers, similar to what you might do for the purpose of failover (Failover servers). To control the location of print job files edit the JobStoragePath parameter.
3. Save the scPrintClient.ini.
4. To suppress dialogs invoke the safecom_print_client_xxx.exe file with the command line parameters (Command line parameters): /VERYSILENT /NORESTART /SUPPRESSMSGBOXES
To install in a specific folder use the /DIR="x:\pathname" command line parameter. A fully qualified pathname must be specified.
5. Optionally, the administrator could specify the components to be installed with the /COMPONENTS switch. The available component combinations are as follows: • /COMPONENTS="Print Client Service,Ports,PopUp" • /COMPONENTS="Print Client Service,Ports" • /COMPONENTS="Ports,PopUp" • /COMPONENTS="Ports" • /COMPONENTS="PopUp"
91
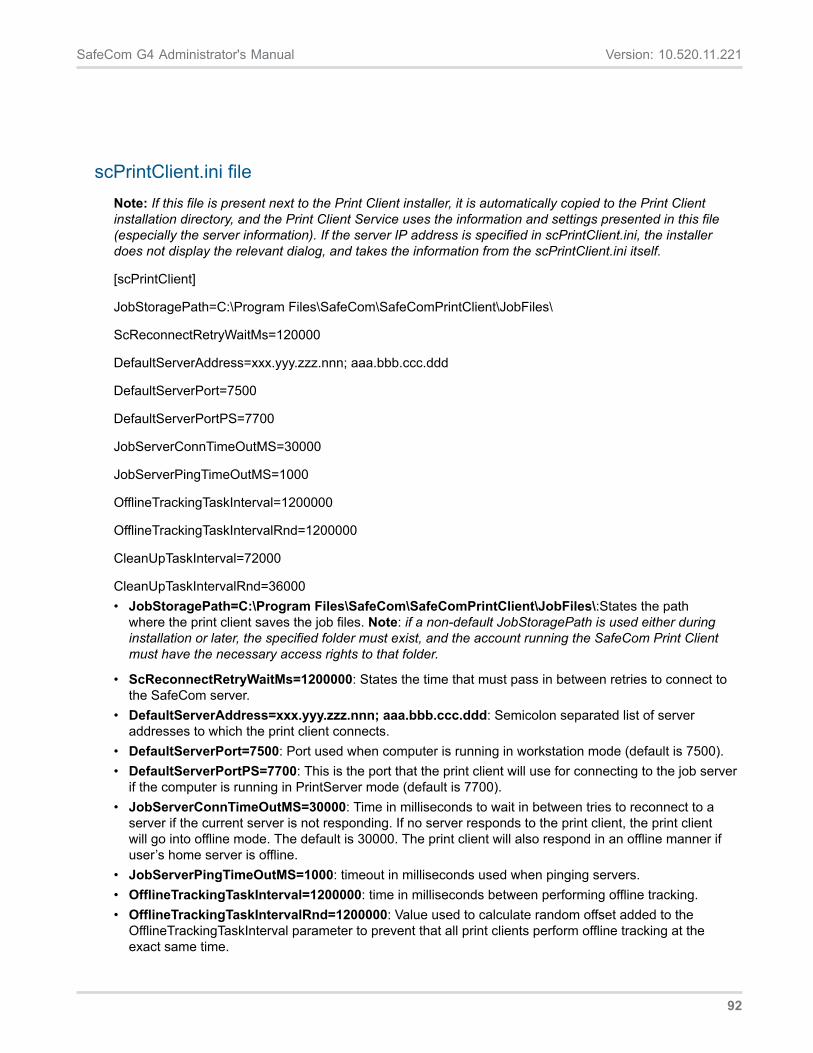
SafeCom G4 Administrator's Manual Version: 10.520.11.221
scPrintClient.ini fileNote: If this file is present next to the Print Client installer, it is automatically copied to the Print Clientinstallation directory, and the Print Client Service uses the information and settings presented in this file(especially the server information). If the server IP address is specified in scPrintClient.ini, the installerdoes not display the relevant dialog, and takes the information from the scPrintClient.ini itself.
[scPrintClient]
JobStoragePath=C:\Program Files\SafeCom\SafeComPrintClient\JobFiles\
ScReconnectRetryWaitMs=120000
DefaultServerAddress=xxx.yyy.zzz.nnn; aaa.bbb.ccc.ddd
DefaultServerPort=7500
DefaultServerPortPS=7700
JobServerConnTimeOutMS=30000
JobServerPingTimeOutMS=1000
OfflineTrackingTaskInterval=1200000
OfflineTrackingTaskIntervalRnd=1200000
CleanUpTaskInterval=72000
CleanUpTaskIntervalRnd=36000• JobStoragePath=C:\Program Files\SafeCom\SafeComPrintClient\JobFiles\:States the path
where the print client saves the job files. Note: if a non-default JobStoragePath is used either duringinstallation or later, the specified folder must exist, and the account running the SafeCom Print Clientmust have the necessary access rights to that folder.
• ScReconnectRetryWaitMs=1200000: States the time that must pass in between retries to connect tothe SafeCom server.
• DefaultServerAddress=xxx.yyy.zzz.nnn; aaa.bbb.ccc.ddd: Semicolon separated list of serveraddresses to which the print client connects.
• DefaultServerPort=7500: Port used when computer is running in workstation mode (default is 7500).• DefaultServerPortPS=7700: This is the port that the print client will use for connecting to the job server
if the computer is running in PrintServer mode (default is 7700).• JobServerConnTimeOutMS=30000: Time in milliseconds to wait in between tries to reconnect to a
server if the current server is not responding. If no server responds to the print client, the print clientwill go into offline mode. The default is 30000. The print client will also respond in an offline manner ifuser’s home server is offline.
• JobServerPingTimeOutMS=1000: timeout in milliseconds used when pinging servers.• OfflineTrackingTaskInterval=1200000: time in milliseconds between performing offline tracking.• OfflineTrackingTaskIntervalRnd=1200000: Value used to calculate random offset added to the
OfflineTrackingTaskInterval parameter to prevent that all print clients perform offline tracking at theexact same time.
92
SafeCom G4 Administrator's Manual Version: 10.520.11.221
• CleanUpTaskInterval=72000: Time in milliseconds between performing cleanup (removing old jobs,and so on).
• CleanUpTaskIntervalRnd=36000: Value used to calculate random offset added to theCleanUpTaskInterval parameter to prevent that all print clients perform cleanup at the exact same time.
Note: The servers listed in parameter DefaultServerAddress are not prioritized. The print client will onlyconnect to the first server in the list at service restart.
Trace facilityNote: Use the SafeCom trace facility only if SafeCom Support instructs you to do so.
1. On the computer create the folder c:\safecom_trace
The trace file scPrintClient<number>.trc contains a number as part of the filename. When a trace filereaches the maximum size (10 Mb) a new one is created and the number is incremented with one. Thetrace folder will hold the current and previous version of the trace file. Older files are automatically deleted.
Restarting the SafeCom Print Client Service will by default reset the trace files.
Command line parametersFollowing command line parameters can be used to achieve the wanted behavior of the deployment
/SILENT, /VERYSILENT
Instructs Setup process to be silent or very silent. When Setup is silent the wizard and the backgroundwindow are not displayed whilst the installation progress window is shown. When a setup is verysilent the installation progress window is not displayed. Everything else is normal as for example errormessages during installation are displayed and the start-up prompt is as well (if it has not been disabledby DisableStartupPrompt).
If a restart is necessary and Setup is silent, the application will display a “Reboot now?” message box.
If it's very silent it will reboot without asking.
/SUPPRESSMSGBOXES
Instructs Setup process to suppress all message boxes. This parameter can only be used when combinedwith '/SILENT' and '/VERYSILENT'.
The default response in situations where there's a choice is:• Yes in a 'Keep newer file?' situation.• No in a 'File exists, confirm overwrite.' situation.• Abort in Abort/Retry situations.• Cancel in Retry/Cancel situations.• Yes (=continue) in a diskSpaceWarning / DirExists / DirDoesntExist /
NoUninstallWarning / ExitSetupMessage / ConfirmUninstall situation.• Yes (=restart) in a FinishedRestartMessage/UninstalledAndNeedsRestart
situation.
93
SafeCom G4 Administrator's Manual Version: 10.520.11.221
5 message boxes are not suppressible:• The About Setup message box.• The Exit Setup? message box.• The FileNotInDir2 message box displayed when Setup requires a new disk to be inserted and the disk
was not found.• Any (error) message box displayed before Setup (or Uninstall) could read the command line
parameters.• Any message box displayed by [Code] support function MsgBox.
/LOG
Causes Setup process to create a log file in the user's TEMP directory detailing file installation and [Run]actions taken during the installation process. This can be a helpful debugging aid. For example, if yoususpect a file is not being replaced when you believe it should be (or vice versa), the log file will tell you ifthe file was really skipped, and why.
The log file is created with a unique name based on the current date. (It will not overwrite or append toexisting files.)
The information contained in the log file is technical in nature and therefore not intended to beunderstandable by end-users. Nor is it designed to be machine-parseable; the format of the file is subjectto change without notice.
/LOG="filename"
Same as /LOG, except it allows you to specify a fixed path/filename to use for the log file. If a file with thespecified name already exists it will be overwritten. If the file cannot be created, Setup will abort with anerror message.
/NOCANCEL
Prevents the user from cancelling during the installation process, by disabling the Cancel button andignoring clicks on the close button. Useful along with '/SILENT' or '/VERYSILENT'.
/LOADINF="filename"
Instructs Setup process to load the settings from the specified file after having checked the command line.This file can be prepared using the '/SAVEINF=' command as explained below. Don't forget to use quotesif the filename contains spaces.
/SAVEINF="filename"
Instructs Setup process to save installation settings to the specified file.
Don't forget to use quotes if the filename contains spaces.
/DIR="x:\dirname"
Overrides the default directory name displayed on the Select Destination Location wizard page. A fullyqualified pathname must be specified.
/SERVER="IP_ADDRESS"
Allows you to specify the G4 server address during silent installation.
94
SafeCom G4 Administrator's Manual Version: 10.520.11.221
Note: If you have an scPrintClient.ini file next to the Print Client installer, and the ini file specifies a serverIP address, the settings in scPrintClient.ini overwrite the /SERVER parameter.
UninstallationYou can uninstall the Print Client in either of the following ways:• Go to Programs and Features, select the Print Client application, then click Remove.• Alternatively, locate and run the unins000.exe in your Print Client installation directory.
You can use the following command line parameters when running the uninstallation:
/KEEPSETTINGS=YES|NO
Keeps or discards your Print Client settings.
Note: If you uninstall the Print Client via Programs and Features, you have the option to keep yoursettings via selecting the relevant UI option when prompted.
/SILENT, /VERYSILENT
See above for more details (Command line parameters).
/SUPPRESSMSGBOXES
See above for more details (Command line parameters).
/LOG
See above for more details (Command line parameters).
/NORESTART
Upgrade from Express to Microsoft SQL ServerYou can use the supplied scBackup (scBackup) to backup the Microsoft SQL Express 2014 SP1database and use it to restore the backup once you have changed to Microsoft SQL Server as describedbelow:
1. Create intermediate SQL user: safecominstall (Create intermediate SQL user: safecominstall).
2. Stop the SafeCom Service (Stop the SafeCom Service).
3. Change Windows Registry to reference SQL Server (Change Windows Registry to reference SQLServer).
4. Change the dependencies on the SafeCom Service (Change the dependencies on the SafeComService).
5. Delete intermediate SQL user: safecominstall (Delete intermediate SQL user: safecominstall).
Note For this to take effect you MUST restart the computer.
95
SafeCom G4 Administrator's Manual Version: 10.520.11.221
Once you have performed the above successfully you may uninstall the Microsoft SQL Express 2014 SP1database as described in Uninstall Microsoft SQL Express 2014 SP1.
Stop the SafeCom Service1. Click Start, type services.msc into the Search box and press ENTER.
2. Right-click the SafeCom Service and click Stop.
Change Windows Registry to reference SQL Server1. Open the Registry Editor and browse to:
HKEY_LOCAL_MACHINE\SOFTWARE\ SafeCom\SafeComG4\Database
2. For each these registry settings:• DBServerNameCore• DBServerNameEvent• DBServerNamePurse• DBServerNameTracking
3. Change the value from:computername\SAFECOMEXPRESS
to one of the below two. It is NOT possible to specify the IP address instead of the computername.• computernameYou only need to specify the computername if there is no named instance
of the SQL Server. There is no named instance of the SQL Server if Services only listsMSSQLSERVER.
• computername\instancenameYou need to specify both computername and instancename if thereis a named instance of the SQL Server. The instance name can be seen in Services. The namedservice will appear in Services as MSSQL$instancename. The instance name is case sensitive.
4. Click OK to save the settings.
5. Repeat step 3-4 for the remaining registry settings.
6. Exit the Registry Editor.
Change the dependencies on the SafeCom Service1. Open the Registry Editor and browse to: HKEY_LOCAL_MACHINE\SYSTEM\CurrentControlSet\
Services\SafeCom Service
2. Double-click DependOnServiceand replace MSSQL$SAFECOMEXPRESS with the instancename of the SQL Server (MSSQL$instancename). Use MSSQLSERVER if there is no namedinstance. See also step 3 in Change Windows Registry to reference SQL Server. The instancename is case sensitive. If the SQL Server is installed on another computer you should right-clickDependOnService and click Delete.
Note For this to take effect you MUST restart the computer.
96
SafeCom G4 Administrator's Manual Version: 10.520.11.221
Multiserver installation Prerequisites: • A SafeCom license key code that includes SafeCom Enterprise Server. The license key code is based
on the computer name (Determine the Computer Name) of the SafeCom primary server. • See Server requirements for server versions required for the SQL primary server. It must be licensed
and installed (including replication option). Microsoft SQL is quite memory intensive and basically the more memory the better. 8 GB RAM is a good start.
• The SQL primary server must be defined as an SQL distributor and publisher. • The SQL primary server must be set to use Authentication method SQL Server and Windows. • The SQL primary server must have the following three services running otherwise the one-way
replication from the primary to the secondary ones does not work: • SQL service Best practice is to use a standard domain user, e.g. SqlRun • SQL Browser • SQL Agent Best practice is to use a standard domain user, e.g. SqlRun - the same as for the SQL
service. • The SQL primary server, and the SafeCom primary and secondary servers must be part of the same
domain or workgroup. • The SQL primary server must know the SafeCom secondary servers by DNS and vice versa. • The SafeCom primary server must know the SQL primary server by DNS. • The SC primary server and its secondary servers must know each other by hostname or IP address. • The firewall for both the primary server and the secondary servers must either be turned off, or a static
SQL port must be set. If you set a static port: (refer to section Windows Firewall – Make SQL use fixed port) • Make sure to open the static port in the firewall. • Open the port 1434. • Make sure the SQL Browser service is running.
• The primary and secondary servers must be installed with the same SafeCom server version. • Depending on how you plan to run the SQL service for the given instance, do the following:
• If you are using the built-in SQL Agent of your SQL server instance, ensure that it has Write/Modify access to C:\Program Files\Microsoft SQL Server\MSSQL.<instance name>\MSSQL\Data. • If you are using a Windows service account to run the SQL Agent of your SQL server
instance, ensure that it has Write/Modify access to C:\Program Files\Microsoft SQL Server \MSSQL.<instance name>\MSSQL\Data.
• In case of using Windows authentication for the SQL server, ensure that the following criteria are met: • The selected user has local administrator rights on all SafeCom servers. • The selected user has “Log on as a service” right on all SafeCom servers. • Ensure that the selected user is added as a system administrator to the SQL server instance. For
more information, see Add Windows service account to the SQL server.
97
SafeCom G4 Administrator's Manual Version: 10.520.11.221
• Ensure that all SafeCom service users have full access rights to the SQL data folder when using Windows authentication to connect to the SQL server.
Note When you add a SafeCom server to a SafeCom primary server’s group the SafeCom secondary server loses its existing data, including: devices, users, and print jobs.
Note Refer to Upgrade from Express to Microsoft SQL Server if you are upgrading from a runningSafeCom Server with Microsoft SQL Express 2014 SP1 to Microsoft SQL Server.
Overview 1. Do a SafeCom Server installation on each secondary server (Server installation (Advanced)).
2. Do a SafeCom Server installation on the primary server. Select Advanced installation and Use an existing SQL Server (Server installation (Advanced)).
3. Use SafeCom Administrator to install the license key code on the primary server (Install the SafeCom license key code).
4. Set the startup type of SQL Server Agent service to Automatic on the primary SQL server (Set SQL Server Agent to automatic startup).
5. Add the secondary servers to the primary server’s group (Add the other servers to the primary server's group).
6. Delete intermediate SQL user: safecominstall (Delete intermediate SQL user: safecominstall).
7. Check that replication is working (Check that the replication is working).
8. Enable Offline tracking (Multiple servers: Online or offline tracking) if tracking is used.
9. Schedule a database backup for the secondary server to keep the database transaction log files from growing. The backup itself is not really needed, as data is replicated from the SQL primary server anyway (SafeCom database - backup and restore).
The Microsoft SQL Server is installed in the folder:
C:\Program Files\ Microsoft SQL Server\MSSQL
Set SQL Server Agent to automatic startup The SQL Server Agent (instancename) on the SQL server must be set to Automatic startup in Services.
Add the other servers to the primary server’s group Use SafeCom Administrator to add the secondary servers to the primary server’s group. The server you add must be running. Refer to section Create a multiserver group.
Check that the replication is working Tip: You can also check the replication status in SafeCom Administrator. The server icon in the Server groups pane will feature a yellow warning triangle if the replication status is Retrying or Failed. More
98
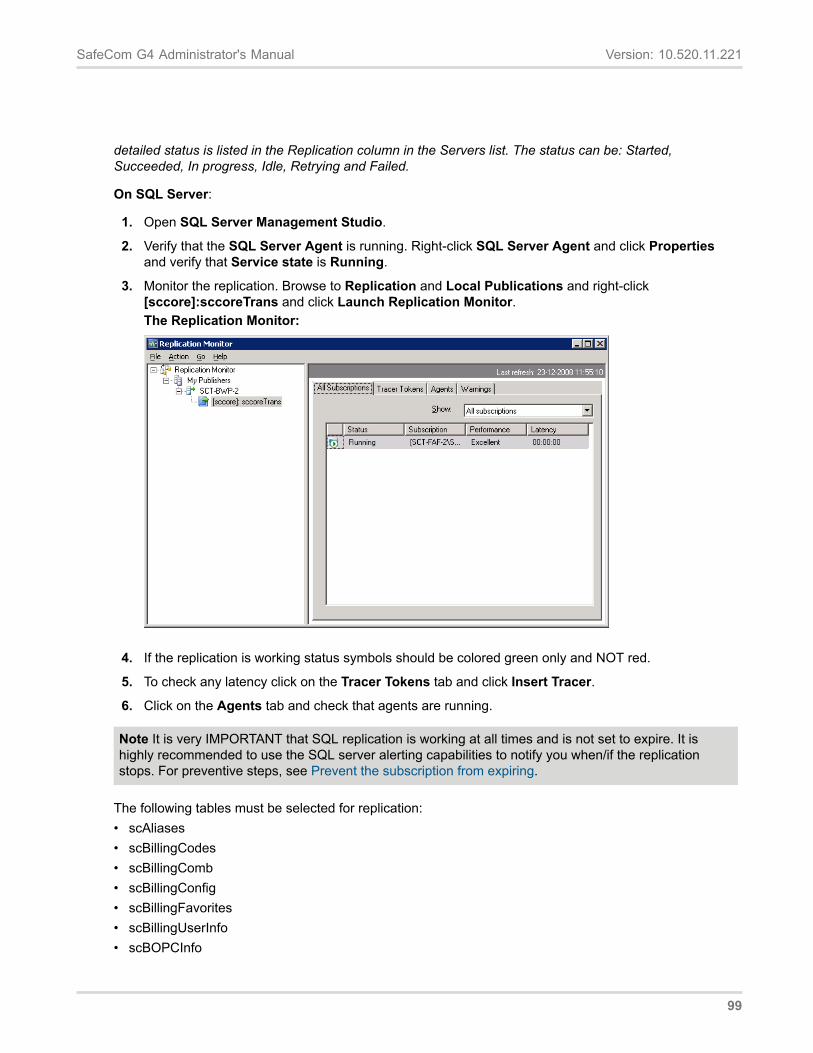
SafeCom G4 Administrator's Manual Version: 10.520.11.221
detailed status is listed in the Replication column in the Servers list. The status can be: Started,Succeeded, In progress, Idle, Retrying and Failed.
On SQL Server:
1. Open SQL Server Management Studio.
2. Verify that the SQL Server Agent is running. Right-click SQL Server Agent and click Propertiesand verify that Service state is Running.
3. Monitor the replication. Browse to Replication and Local Publications and right-click[sccore]:sccoreTrans and click Launch Replication Monitor.The Replication Monitor:
4. If the replication is working status symbols should be colored green only and NOT red.
5. To check any latency click on the Tracer Tokens tab and click Insert Tracer.
6. Click on the Agents tab and check that agents are running.
Note It is very IMPORTANT that SQL replication is working at all times and is not set to expire. It ishighly recommended to use the SQL server alerting capabilities to notify you when/if the replicationstops. For preventive steps, see Prevent the subscription from expiring.
The following tables must be selected for replication:• scAliases• scBillingCodes• scBillingComb• scBillingConfig• scBillingFavorites• scBillingUserInfo• scBOPCInfo
99

SafeCom G4 Administrator's Manual Version: 10.520.11.221
• scBranchInfo • scCardInfo • scClientConfig • scDelegates • scDeviceInfo • scDeviceServerInfo • scDomainInfo • scGroupInfo • scGroupMembers • scGroupRbpRule • scMainSettings • scMasterServerVersion • scPriceScheme • scRbpAction • scRbpCondition • scRbpRuleInfo • scScheduleInfo • scServerInfo • scServerSettings • scTreeView • scUserInfo
Note: Make sure to check the right ones!
Repair replication If a replication fails or is interrupted, it can be repaired from SafeCom Administrator.
Tip: Use Microsoft SQL Management Studio to back up your replication configuration, using the Generate Script button.
Note: This feature can only be used if Setup replication was checked when the secondary server was added (Add server).
1. Right-click the secondary server and select Repair replication.
2. Click OK to confirm and the replication repair begins; the secondary server's subscription is deleted and created again.
3. When the message "The replication was repaired with success!" appears, the replication repair is completed successfully.
4. Click OK.
What happens if servers or network connections are down? In order to answer this question we will first explain the concept behind the SafeCom multiserver solution.
100
SafeCom G4 Administrator's Manual Version: 10.520.11.221
The SafeCom primary server uses SQL replication to propagate the entire configuration to the SafeCom secondary servers. Initially it does a snapshot replication and subsequently it only replicates the changes (transactional replication).
This way all the SafeCom servers have the configuration, including the network details of each other. This allows the servers to communicate directly, rather than having to rely on the SafeCom primary server. You can say the SafeCom servers become autonomous.
The replication from the SQL server to the SafeCom secondary servers is one-way. Changes to the configuration are possible only when the SafeCom primary server and SQL primary server are running. This is secured by the system as users with special rights always have the SafeCom primary server as their home server. • If the primary server is down it is not possible to make any configuration changes (Administrators
cannot log in to SafeCom Administrator). • If a SafeCom server is down users who have this SafeCom server as their home server cannot log in.
However, push printers configured to allow printing at all times can still be used on the servers running. SafeCom servers still running will continue to serve the users who have those servers as their home server. Additional resilience can be achieved by specifying a prioritized list of failover servers (Failover servers) that users should be moved to in the event that their home server becomes unavailable.
• If the network is partially down, it is still possible to print and roam between the servers as long as they can still reach each other (they are not affected by the part of the network that is down). If the network is completely down nothing is possible until the network is up again.
Reinitialize the subscription If a SafeCom secondary server has been restored you may wish to reinitialize the replication from the SQL server to the SafeCom secondary server.
1. Click Start, point to All Programs, Microsoft SQL Server <version> and click SQL Server Management Studio.
2. Log in to the SQL server and browse to Replication, Local Publications and [sccore]:sccoreTrans.
3. Right-click the SafeCom secondary server's subscription and select Reinitialize All Subscriptions.
4. Check Generate the new snapshot now. Click Mark For Reinitialization.
Section Check that the replication is working describes how to check that the replication is working.
Prevent the subscription from expiring The replication from the SQL server to the secondary one may get dropped if the subscription is not synchronized within 72 hours.
1. Click Start, point to All Programs, Microsoft SQL Server <version> and click SQL Server Management Studio.
2. Log in to the SQL server and browse to Replication, Local Publication.
3. Right-click [sccore]:sccoreTrans and select Properties.
101
SafeCom G4 Administrator's Manual Version: 10.520.11.221
4. On the General page check Subscription never expire, but they can be deactivated until they are reinitialized. Click OK.
Using Group Management Service Account for services Follow the steps below to migrate a SafeCom multi-server installation from using SQL authentication to using Windows authentication for its database connections.
Note: Group Managed Service Account in use will be referred to as GMSA.
1. Primary SQL server: • Add full control for the GMSA account to: C:\Program Files\Microsoft SQL Server \MSSQL12.SAFECOMEXPRESS\MSSQL\DATA and all subfolders.
• Assign sysadmin role for the GMSA user within the SQL server instance.
2. SafeCom Primary server and all SafeCom Secondary servers: • Add the GMSA account to the local Administrators group. • Grant the GMSA account the “Log on as a service” right.
• Stop the SafeCom service. • In Services, under the SafeCom service’s properties add the GMSA account on the Log on tab in
the “<username>$” format (without quotes). Do not specify a password. • Open the Registry Editor and browse to: HKEY_LOCAL_MACHINE\SOFTWARE\SafeCom
\SafecomG4\Database • Change the value from 0 to 1 for each of the following registry settings:
DBUseWindowsAuthenticationCore DBUseWindowsAuthenticationEvent DBUseWindowsAuthenticationPurse DBUseWindowsAuthenticationTracking
3. SafeCom Secondary servers: • Assign sysadmin role for the GMSA account in the local SQL instance. • Start SQL Server Configuration Manager, and specify the GMSA account for SQL Server
Browser and for SQL Server (SAFECOMEXPRESS) on the Log On pane.
Note: Microsoft recommends using this tool to change the user for the service instead of the Services built-in control panel.
1. SafeCom Primary server and all SafeCom Secondary servers: • Start the SafeCom service on all SafeCom Secondary servers. • Start the SafeCom service on the SafeCom Primary server. • Start SafeCom Administrator and check that the connection works fine. • Confirm that replication is working properly by adding some users to one of the SafeCom
Secondary servers. If user properties are displayed correctly, then replication works properly.
Tips on migration of databases and SafeCom server instances
To upgrade the Primary SQL server in-place, follow current Microsoft recommendations.
102
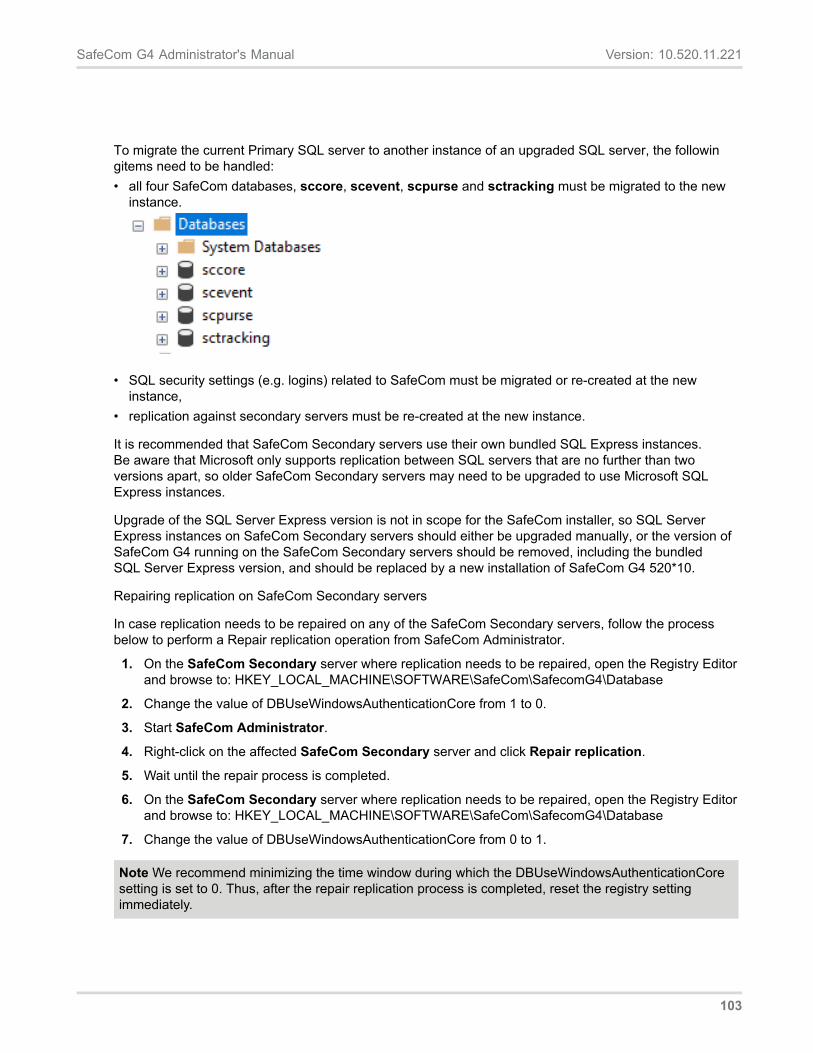
SafeCom G4 Administrator's Manual Version: 10.520.11.221
To migrate the current Primary SQL server to another instance of an upgraded SQL server, the followingitems need to be handled: • all four SafeCom databases, sccore, scevent, scpurse and sctracking must be migrated to the new
instance.
• SQL security settings (e.g. logins) related to SafeCom must be migrated or re-created at the new instance,
• replication against secondary servers must be re-created at the new instance.
It is recommended that SafeCom Secondary servers use their own bundled SQL Express instances. Be aware that Microsoft only supports replication between SQL servers that are no further than two versions apart, so older SafeCom Secondary servers may need to be upgraded to use Microsoft SQL Express instances.
Upgrade of the SQL Server Express version is not in scope for the SafeCom installer, so SQL Server Express instances on SafeCom Secondary servers should either be upgraded manually, or the version of SafeCom G4 running on the SafeCom Secondary servers should be removed, including the bundled SQL Server Express version, and should be replaced by a new installation of SafeCom G4 520*10.
Repairing replication on SafeCom Secondary servers
In case replication needs to be repaired on any of the SafeCom Secondary servers, follow the process below to perform a Repair replication operation from SafeCom Administrator.
1. On the SafeCom Secondary server where replication needs to be repaired, open the Registry Editor and browse to: HKEY_LOCAL_MACHINE\SOFTWARE\SafeCom\SafecomG4\Database
2. Change the value of DBUseWindowsAuthenticationCore from 1 to 0.
3. Start SafeCom Administrator.
4. Right-click on the affected SafeCom Secondary server and click Repair replication.
5. Wait until the repair process is completed.
6. On the SafeCom Secondary server where replication needs to be repaired, open the Registry Editor and browse to: HKEY_LOCAL_MACHINE\SOFTWARE\SafeCom\SafecomG4\Database
7. Change the value of DBUseWindowsAuthenticationCore from 0 to 1.
Note We recommend minimizing the time window during which the DBUseWindowsAuthenticationCore setting is set to 0. Thus, after the repair replication process is completed, reset the registry setting immediately.
103
SafeCom G4 Administrator's Manual Version: 10.520.11.221
Update multiserver installation Note: If you want to perform an upgrade scenario outside the process documented in this manual, contact your Nuance sales representative for a Professional Services engagement.
Pre-requisites
• The SafeCom license must be valid (not expired) in order to perform an update. • If you are updating from SafeCom G2 version S82 070.360 or S82 070.370 you MUST install
scLicenseManager.dll version 8.38.1.1 on all secondary ones prior to the update. • If you have a SafeCom G2 version S82 070.380*09 (32 bit) installation, you first need to upgrade to
SafeCom G3 version S82 070.440*04 (32 bit) before upgrading to SafeCom G4.
Note SafeCom solutions originally based on SafeCom G2 or G3 will, after the update, continue to use the original SafeCom installation folder (SafeCom G2 or SafeCom G3 instead of SafeCom G4) and it will also continue to use the SQL server. This implies that the update will NOT replace the SQL server already in use.
Update SafeCom software All the SafeCom secondary servers must be updated before the SafeCom primary server. The installation will not function properly before all servers are updated to the same version.
Note: It is best practice to use change management during the update process. The update process should occur outside normal working hours as it requires a restart of the computers after the update.
The Microsoft SQL Server will continue to replicate the SafeCom databases to secondary ones during the the update. Every 10 seconds each secondary server will check if the primary server is on the correct version. Once they are on the same version the secondary servers will start automatically.
The update process on each server is as follows:
1. Stop the SafeCom Service (How to start and stop the SafeCom Service) and the Print Spooler (How to start and stop the Print Spooler). If other services depend on the Print Spooler these must be stopped also.
2. Update with the SafeCom server software.
3. Check Yes, I want to restart my computer now20.Click Finish. This will restart the computer (and the SafeCom Service and Print Spooler).
Note: How to update a SafeCom cluster installation is covered in SafeCom G4 Cluster Administrator’s Manual D60652.
The update should be completed outside normal working hours, as printing will be unavailable during the update process. You may want to use the table below to help you through the update process.
20 It is recommended to restart the computer, but in most cases it is sufficient to restart the SafeCom Service and Print Spooler.
104
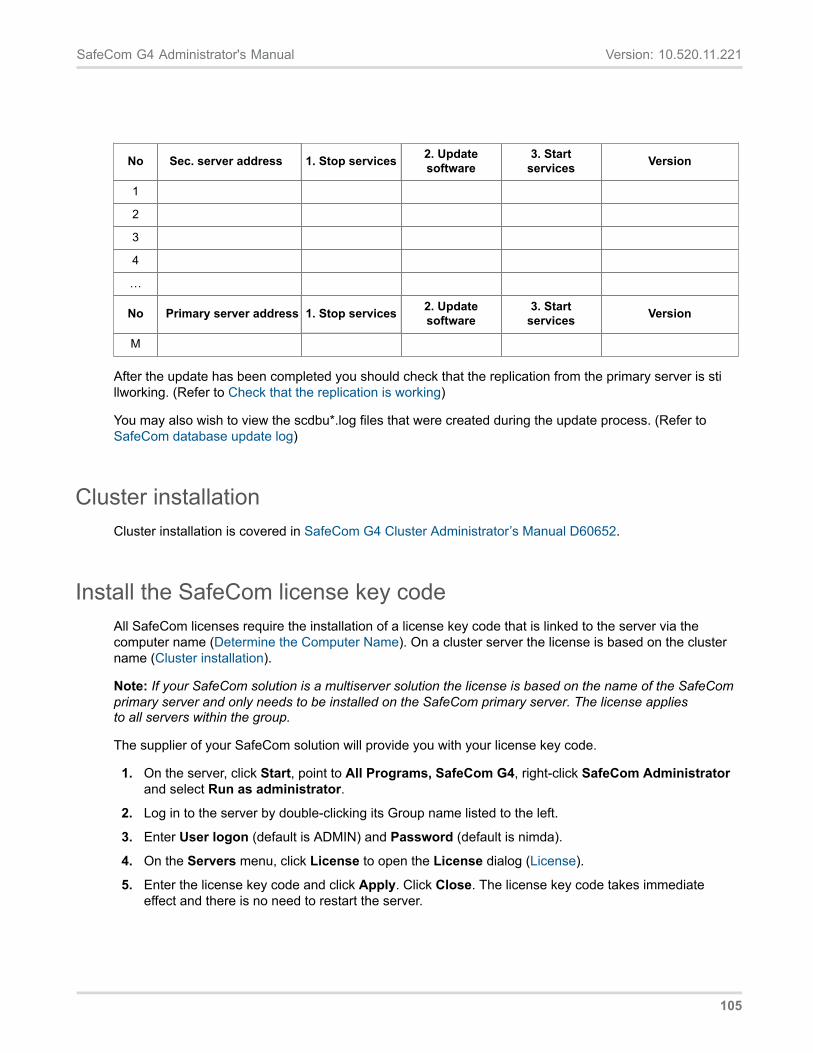
SafeCom G4 Administrator's Manual Version: 10.520.11.221
No Sec. server address 1. Stop services 2. Updatesoftware
3. Startservices Version
1
2
3
4
…
No Primary server address 1. Stop services 2. Updatesoftware
3. Startservices Version
M
Cluster installationCluster installation is covered in SafeCom G4 Cluster Administrator’s Manual D60652.
Install the SafeCom license key code All SafeCom licenses require the installation of a license key code that is linked to the server via the computer name (Determine the Computer Name). On a cluster server the license is based on the cluster name (Cluster installation).
Note: If your SafeCom solution is a multiserver solution the license is based on the name of the SafeCom primary server and only needs to be installed on the SafeCom primary server. The license applies to all servers within the group.
The supplier of your SafeCom solution will provide you with your license key code.
1. On the server, click Start, point to All Programs, SafeCom G4, right-click SafeCom Administrator and select Run as administrator.
2. Log in to the server by double-clicking its Group name listed to the left.
3. Enter User logon (default is ADMIN) and Password (default is nimda).
4. On the Servers menu, click License to open the License dialog (License).
5. Enter the license key code and click Apply. Click Close. The license key code takes immediate effect and there is no need to restart the server.
After the update has been completed you should check that the replication from the primary server is stillworking. (Refer to Check that the replication is working)
You may also wish to view the scdbu*.log files that were created during the update process. (Refer to SafeCom database update log)
105
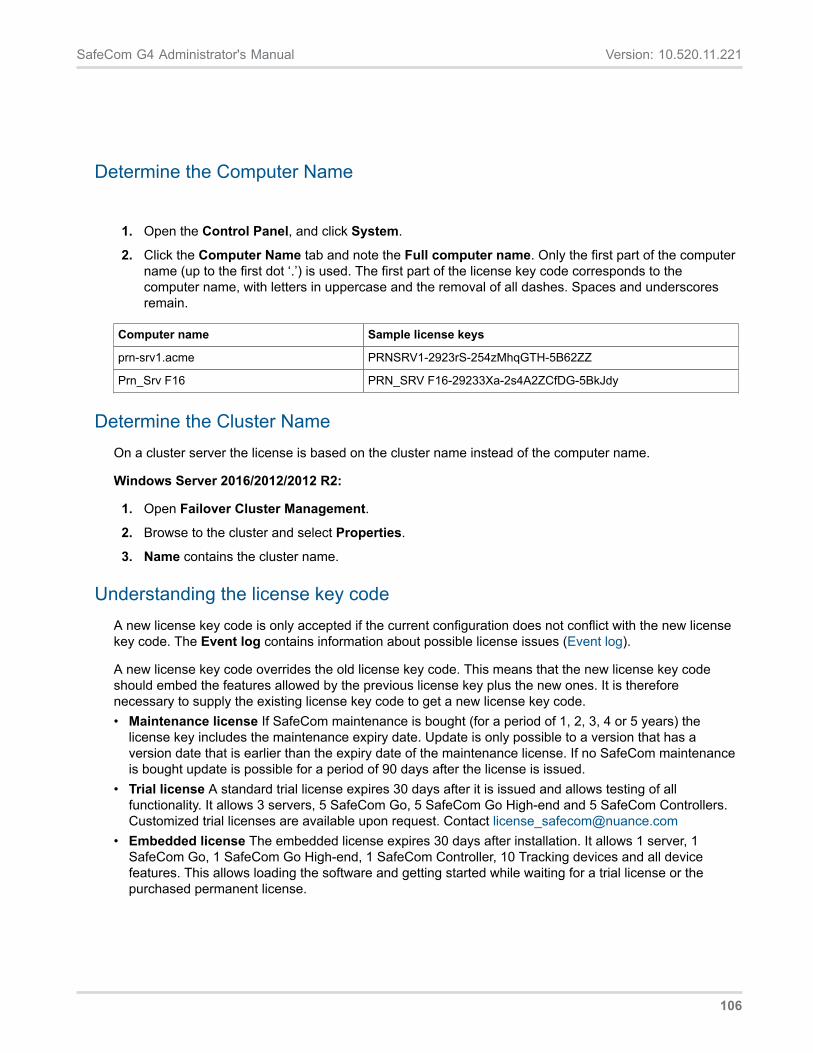
SafeCom G4 Administrator's Manual Version: 10.520.11.221
Determine the Computer Name
1. Open the Control Panel, and click System.
2. Click the Computer Name tab and note the Full computer name. Only the first part of the computername (up to the first dot ‘.’) is used. The first part of the license key code corresponds to thecomputer name, with letters in uppercase and the removal of all dashes. Spaces and underscoresremain.
Computer name Sample license keys
prn-srv1.acme PRNSRV1-2923rS-254zMhqGTH-5B62ZZ
Prn_Srv F16 PRN_SRV F16-29233Xa-2s4A2ZCfDG-5BkJdy
Determine the Cluster NameOn a cluster server the license is based on the cluster name instead of the computer name.
Windows Server 2016/2012/2012 R2:
1. Open Failover Cluster Management.
2. Browse to the cluster and select Properties.
3. Name contains the cluster name.
Understanding the license key codeA new license key code is only accepted if the current configuration does not conflict with the new licensekey code. The Event log contains information about possible license issues (Event log).
A new license key code overrides the old license key code. This means that the new license key codeshould embed the features allowed by the previous license key plus the new ones. It is thereforenecessary to supply the existing license key code to get a new license key code.• Maintenance license If SafeCom maintenance is bought (for a period of 1, 2, 3, 4 or 5 years) the
license key includes the maintenance expiry date. Update is only possible to a version that has aversion date that is earlier than the expiry date of the maintenance license. If no SafeCom maintenanceis bought update is possible for a period of 90 days after the license is issued.
• Trial license A standard trial license expires 30 days after it is issued and allows testing of allfunctionality. It allows 3 servers, 5 SafeCom Go, 5 SafeCom Go High-end and 5 SafeCom Controllers.Customized trial licenses are available upon request. Contact [email protected]
• Embedded license The embedded license expires 30 days after installation. It allows 1 server, 1SafeCom Go, 1 SafeCom Go High-end, 1 SafeCom Controller, 10 Tracking devices and all devicefeatures. This allows loading the software and getting started while waiting for a trial license or thepurchased permanent license.
106
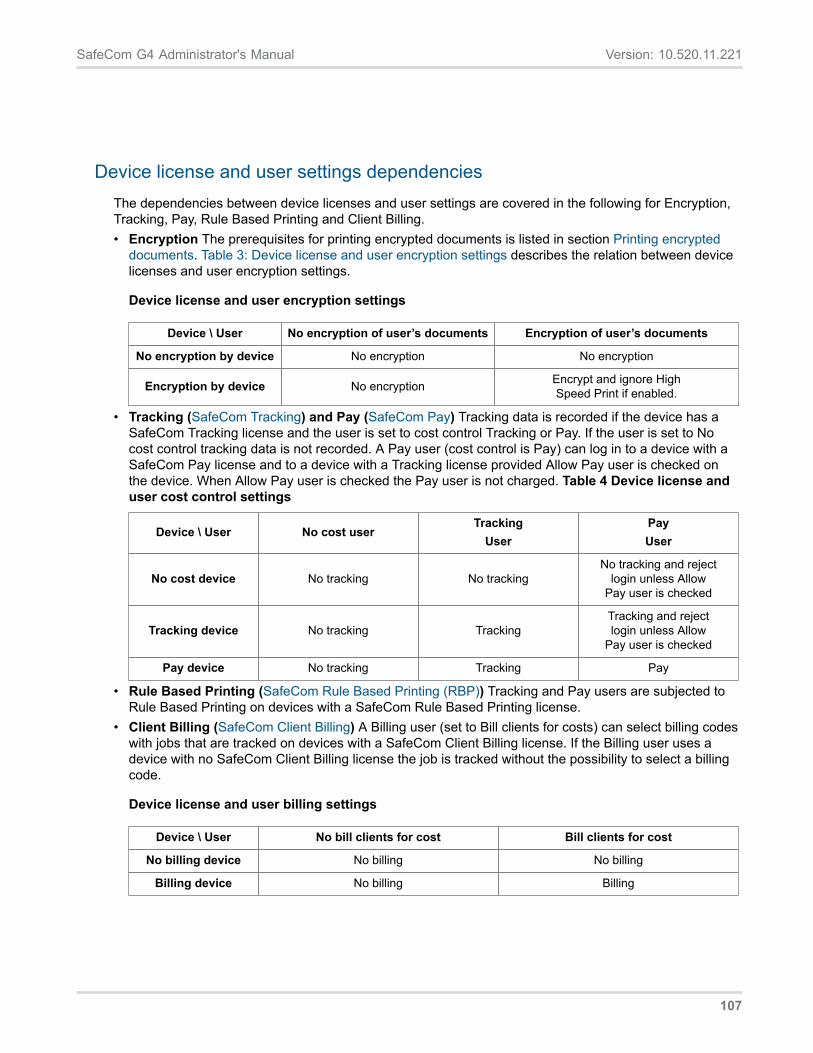
SafeCom G4 Administrator's Manual Version: 10.520.11.221
Device license and user settings dependenciesThe dependencies between device licenses and user settings are covered in the following for Encryption,Tracking, Pay, Rule Based Printing and Client Billing.• Encryption The prerequisites for printing encrypted documents is listed in section Printing encrypted
documents. Table 3: Device license and user encryption settings describes the relation between devicelicenses and user encryption settings.
Device license and user encryption settings
Device \ User No encryption of user’s documents Encryption of user’s documents
No encryption by device No encryption No encryption
Encryption by device No encryption Encrypt and ignore HighSpeed Print if enabled.
• Tracking (SafeCom Tracking) and Pay (SafeCom Pay) Tracking data is recorded if the device has aSafeCom Tracking license and the user is set to cost control Tracking or Pay. If the user is set to Nocost control tracking data is not recorded. A Pay user (cost control is Pay) can log in to a device with aSafeCom Pay license and to a device with a Tracking license provided Allow Pay user is checked onthe device. When Allow Pay user is checked the Pay user is not charged. Table 4 Device license anduser cost control settings
Device \ User No cost userTracking
UserPayUser
No cost device No tracking No trackingNo tracking and reject
login unless AllowPay user is checked
Tracking device No tracking TrackingTracking and rejectlogin unless Allow
Pay user is checked
Pay device No tracking Tracking Pay
• Rule Based Printing (SafeCom Rule Based Printing (RBP)) Tracking and Pay users are subjected toRule Based Printing on devices with a SafeCom Rule Based Printing license.
• Client Billing (SafeCom Client Billing) A Billing user (set to Bill clients for costs) can select billing codeswith jobs that are tracked on devices with a SafeCom Client Billing license. If the Billing user uses adevice with no SafeCom Client Billing license the job is tracked without the possibility to select a billingcode.
Device license and user billing settings
Device \ User No bill clients for cost Bill clients for cost
No billing device No billing No billing
Billing device No billing Billing
107
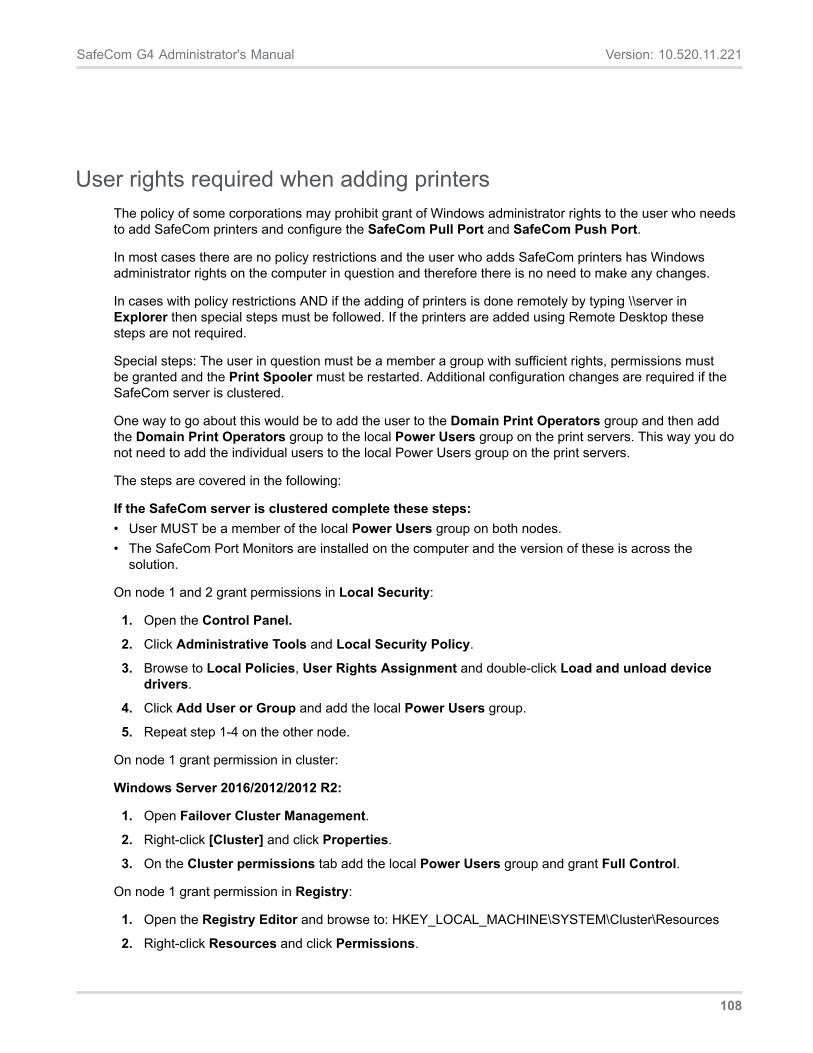
SafeCom G4 Administrator's Manual Version: 10.520.11.221
User rights required when adding printersThe policy of some corporations may prohibit grant of Windows administrator rights to the user who needsto add SafeCom printers and configure the SafeCom Pull Port and SafeCom Push Port.
In most cases there are no policy restrictions and the user who adds SafeCom printers has Windowsadministrator rights on the computer in question and therefore there is no need to make any changes.
In cases with policy restrictions AND if the adding of printers is done remotely by typing \\server inExplorer then special steps must be followed. If the printers are added using Remote Desktop thesesteps are not required.
Special steps: The user in question must be a member a group with sufficient rights, permissions mustbe granted and the Print Spooler must be restarted. Additional configuration changes are required if theSafeCom server is clustered.
One way to go about this would be to add the user to the Domain Print Operators group and then addthe Domain Print Operators group to the local Power Users group on the print servers. This way you donot need to add the individual users to the local Power Users group on the print servers.
The steps are covered in the following:
If the SafeCom server is clustered complete these steps:• User MUST be a member of the local Power Users group on both nodes.• The SafeCom Port Monitors are installed on the computer and the version of these is across the
solution.
On node 1 and 2 grant permissions in Local Security:
1. Open the Control Panel.
2. Click Administrative Tools and Local Security Policy.
3. Browse to Local Policies, User Rights Assignment and double-click Load and unload devicedrivers.
4. Click Add User or Group and add the local Power Users group.
5. Repeat step 1-4 on the other node.
On node 1 grant permission in cluster:
Windows Server 2016/2012/2012 R2:
1. Open Failover Cluster Management.
2. Right-click [Cluster] and click Properties.
3. On the Cluster permissions tab add the local Power Users group and grant Full Control.
On node 1 grant permission in Registry:
1. Open the Registry Editor and browse to: HKEY_LOCAL_MACHINE\SYSTEM\Cluster\Resources
2. Right-click Resources and click Permissions.
108
SafeCom G4 Administrator's Manual Version: 10.520.11.221
3. Add the local Power Users group and grant Full Control.
Restart the Print Spooler:
1. To take effect on the changes, open Cluster Administrator to restart Print Spooler. Locate PrintSpooler service, right-click and choose Take Offline, wait for status changed to Offline. Then right-click Print Spooler again and choose Bring Online to start service.
Add a SafeCom Pull Printer on Windows 8 and 2016 / 2012 / 2012R2
This section describes how to add a shared SafeCom Pull Printer on Windows 8, 2016, 2012 and 2012R2.
1. In Windows Modern interface, activate the Charms bar and press the Search button.
2. Under the Apps appearing, select Control Panel in the Windows System section.
3. In the Control Panel window click Hardware and sound.
4. In the Devices and printers section, click Advanced Printer Setup.
5. In the Add printer window click The printer that I am looking for is not on the list.
6. Select Add a local printer or a network printer with manual settings and click Next.Please ensure that User Account Control (UAC) settings is turned off, otherwise you will not beable to add the printer as there is not sufficient rights to add the SafeCom Pull Port.Note: If you have already created a printer that uses the SafeCom Pull Port, you should use this portinstead of creating a new one (as described in step 4, 5 and 6).
7. Choose Create a new port and select SafeCom Pull Port from the drop-down list. Click Next.
8. Enter a unique name of your choice for the port in Port Name. Click OK.
9. The Configure Pull Port dialog (Configure the SafeCom Pull Port) allows you to enter thehostname or IP address of the SafeCom Server. Select Use network logon as method of Userauthentication.
10. Click OK. The Authorize port configuration dialog appears. Enter User logon and Password of auser that has SafeCom Administrator or Technician rights. Click OK.
11. Click Have Disk to install the files from the printer manufacturer's installation disk (or downloaded thefiles from the manufacturer's web site). Click Next.
12. Enter a Printer name and choose whether or not this printer should be your default Windows printer.Click Next.
13. Select Share this printer and enter Share name. Click Next.
14. Click Print a test page to verify the system. Click OK when prompted to confirm that the test pageprinted correctly. Click Finish.Note: In SafeCom Administrator the Test page appears as a pending print job under the user you arelogged in as (Administrator).
109

SafeCom G4 Administrator's Manual Version: 10.520.11.221
Check the Printer properties:
1. Right-click the printer and click Printer properties.
2. On the Device Settings tab check settings, such as paper size in the trays and installable options.
3. On the Advanced tab check Start printing after last page is spooled. This is required in order forthe tracking and billing information to be correct. Also it allows for faster spooling.
4. Click OK.
For high load systems you can minimize the wait for documents to be processed and transferred to theSafeCom server by checking Enable printer pooling (Enable printer pooling) on the Ports tab and addmultiple identically configured SafeCom Pull Ports. In our experience 1-4 ports is sufficient and no morethan 12 ports should be added.
Add a SafeCom Pull Printer on client computersAs discussed in Local SafeCom Pull Printer you may wish to add a local SafeCom Pull Printer on a clientcomputer. To do this you need to do two things on the client computer:• Install SafeCom client on the computer (Install SafeCom client).• Add a local SafeCom Pull Printer on Windows 7 (Add a local SafeCom Pull Printer on Windows 7),
Windows 10 / Windows 8 (Add a local SafeCom Pull Printer on Windows 10 / Windows 8).
Install SafeCom clientIn order to add a local SafeCom Pull Printer you need to install the SafeCom Pull Port on the clientcomputer. You only need to do this once on the computer.
1. Download the safecom_g4_x64_xxxx.exe file from the link supplied to you. The installation must beRun as administrator. When the installation program is launched click Next.
2. Click Advanced installation. Click Next.
3. Click Client and follow the instructions on the screen (Client installation).
The SafeCom Pull Port is now installed on the client computer. Next you need to either modify anexisting local printer or add a new local printer. When you do this you should make sure that:• The printer is not shared.• The printer uses the SafeCom Pull Port, which sees to the transfer of documents to the SafeCom
server from the SafeCom Pull Printer.• The SafeCom Pull Port is configured correctly (Configure the SafeCom Pull Port).
Add a local SafeCom Pull Printer on Windows 7The User Account Control(UAC) settings must be turned off, otherwise the adding of the printer will failas there is not sufficient rights to add the SafeCom Pull Port.
Turn off User Account Control:
1. Open the Control Panel.
110
SafeCom G4 Administrator's Manual Version: 10.520.11.221
2. Click User Accounts.
3. Click Change User Account Control settings.
4. Select Never notify. Click OK.
5. Restart the computer.
Add the printer:
1. Click Start and Devices and Printers.
2. Click Add a printer.
3. Click Add a local printer.
4. Choose Create a new port and select SafeCom Pull Port from the drop-down list. Click Next. Note:If you have installed SafeCom Print Client (Installation), you can choose Use an existing port andselect scPull from the drop-down list. Click Next and continue to step 8.
5. Enter a unique name of your choice for the port in Port Name. Click OK.
6. The Configure Pull Port dialog (Configure the SafeCom Pull Port) prompts you to enter thehostname or IP address of the SafeCom Server and choose the method of User authentication.Refer to step 5 in Configure the SafeCom Pull Port. Click OK.
7. The Authorize port configuration dialog appears. Enter User logon and Password of a user thathas SafeCom Administrator or Technician rights. Click OK.
8. Select the manufacturer and printer model. Click Next.
9. Select whether or not you want to keep the existing driver or use the new one. Click Next.
10. Enter a Printer Name. Click Next. Note: If the Installing printer… dialog is hanging for more than halfa minute it is because User Account Control was NOT turned off.
11. Select Do not share this printer. Click Next.
12. Clear Set as default printer if this printer should be your default Windows printer. Click Print a testpage to print a test page to verify the system. You are prompted to confirm that the test page wasprinted correctly, but the test page is only printed when you log in at the device. For now, click Close,and then Finish.
If the SafeCom Pull Port has been configured to show the SafeCom Print Authentication dialog(Configure the SafeCom Pull Port) or if SafeCom Rule Based Printing is used to ask for print confirmation,then scPopUp.exe must be setup to start in each session, either by making a shortcut in the WindowsStartup folder or by starting it in a logon script.
Add a local SafeCom Pull Printer on Windows 10 / Windows 81. Click Start, Control Panel, Devices and Printers.
2. On the File menu point to Run as administrator, and click Add a printer. Select the The printerthat I want isn’t listed option.
3. Click Add a local printer or network printer with manual settings.
4. Choose Create a new port and select SafeCom Pull Port from the drop-down list. Click Next. Note:If Run as administrator was NOT chosen in step 2 Windows will report Specified port cannot be
111
SafeCom G4 Administrator's Manual Version: 10.520.11.221
added. Access is denied. Note: If you have installed SafeCom Print Client (Installation), you canchoose Use an existing port and select scPull from the drop-down list. Click Next and continue tostep 8.
5. Enter a unique name of your choice for the port in Port Name. Click OK.
6. The Configure Pull Port dialog (Configure the SafeCom Pull Port) prompts you to enter thehostname or IP address of the SafeCom Server and choose the method of User authentication.Refer to step 5 in Configure the SafeCom Pull Port.
7. Click OK. The Authorize port configuration dialog appears. Enter User logon and Password of auser that has SafeCom Administrator or Technician rights. Click OK.
8. Click OK and select the manufacturer and printer model. Click Next.
9. State whether or not you want to keep the existing driver or use the new one. Click Next.
10. Enter a Printer Name and choose whether or not this printer should be your default Windows printer.Click Next.
11. Select Do not share this printer. Click Next.
12. Click Print a test page to print a test page to verify the system. You are prompted to confirm that thetest page was printed correctly, but the test page is only printed when you log in at the device. Fornow, click Close, and then Finish.
SafeCom Pull PortThe SafeCom Pull Port is a special port monitor that transfers documents to the SafeCom server fromthe SafeCom Pull Printer. The SafeCom Pull Port is installed when you perform a Server installation,Client installation (Add a SafeCom Pull Printer on client computers) and when installing SafeCom PrintClient (SafeCom Print Client).
Note: If you have multiple devices you want to use with the Hide job names feature, ensure that alldevices are properly set to take advantage of the additional value provided by the feature.
If connecting to a shared printer, ensure that the user attempting to connect does have the relevantaccess rights and credentials for accessing the shared printer, and that the appropriate network logon portsettings are employed when connecting to the shared printer.
In workgroup environments, ensure that users who want to access the shared printer has an accounton the server the printer is connected to, and that account uses the exact same credentials as hisworkstation, and that the printer has been connected using that account.
Enable printer poolingYou can enable Windows printer pooling to minimize the wait for documents to be processed andtransferred to the SafeCom server if users are dissatisfied with the time it takes before the SafeCom PrintAuthentication dialog appears.
1. Click Start, point to Settings and click Printers.
2. Right-click the SafeCom Pull Printer and click Properties.
112
SafeCom G4 Administrator's Manual Version: 10.520.11.221
3. Click the Ports tab.
4. Check Enable printer pooling.
5. Click Add Port… to create multiple instances of the SafeCom Pull Port. Note: In our experienceyou should not use more than 12 ports per queue.
Note: If you are using the Hide document name feature, ensure that all ports attached to the same printqueue have the same hide document name setting.
Configure the SafeCom Pull PortThe SafeCom Pull Port is configured when you add a SafeCom Pull Printer.
To configure the SafeCom Pull Port after you have added the SafeCom Pull Printer, go through thefollowing steps:
1. Click Start and then click Devices and Printers.
2. Right-click the SafeCom Pull Printer and click Printer Properties.
113
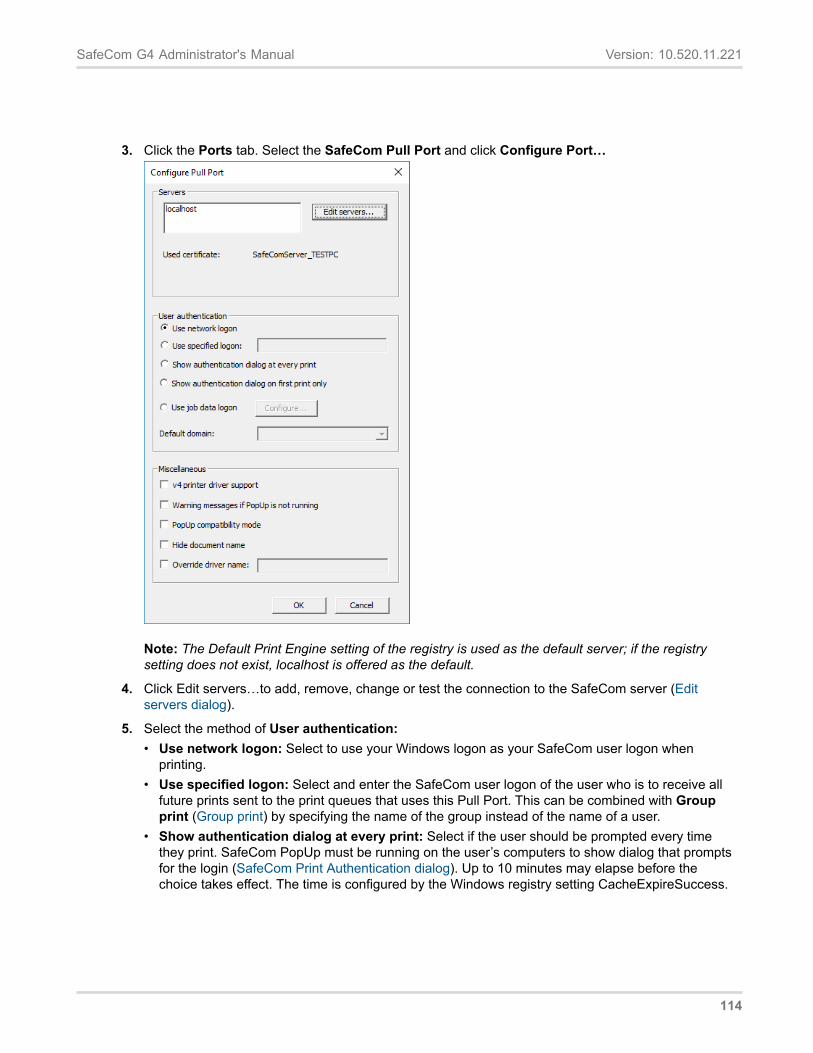
SafeCom G4 Administrator's Manual Version: 10.520.11.221
3. Click the Ports tab. Select the SafeCom Pull Port and click Configure Port…
Note: The Default Print Engine setting of the registry is used as the default server; if the registrysetting does not exist, localhost is offered as the default.
4. Click Edit servers…to add, remove, change or test the connection to the SafeCom server (Editservers dialog).
5. Select the method of User authentication:• Use network logon: Select to use your Windows logon as your SafeCom user logon when
printing.• Use specified logon: Select and enter the SafeCom user logon of the user who is to receive all
future prints sent to the print queues that uses this Pull Port. This can be combined with Groupprint (Group print) by specifying the name of the group instead of the name of a user.
• Show authentication dialog at every print: Select if the user should be prompted every timethey print. SafeCom PopUp must be running on the user’s computers to show dialog that promptsfor the login (SafeCom Print Authentication dialog). Up to 10 minutes may elapse before thechoice takes effect. The time is configured by the Windows registry setting CacheExpireSuccess.
114
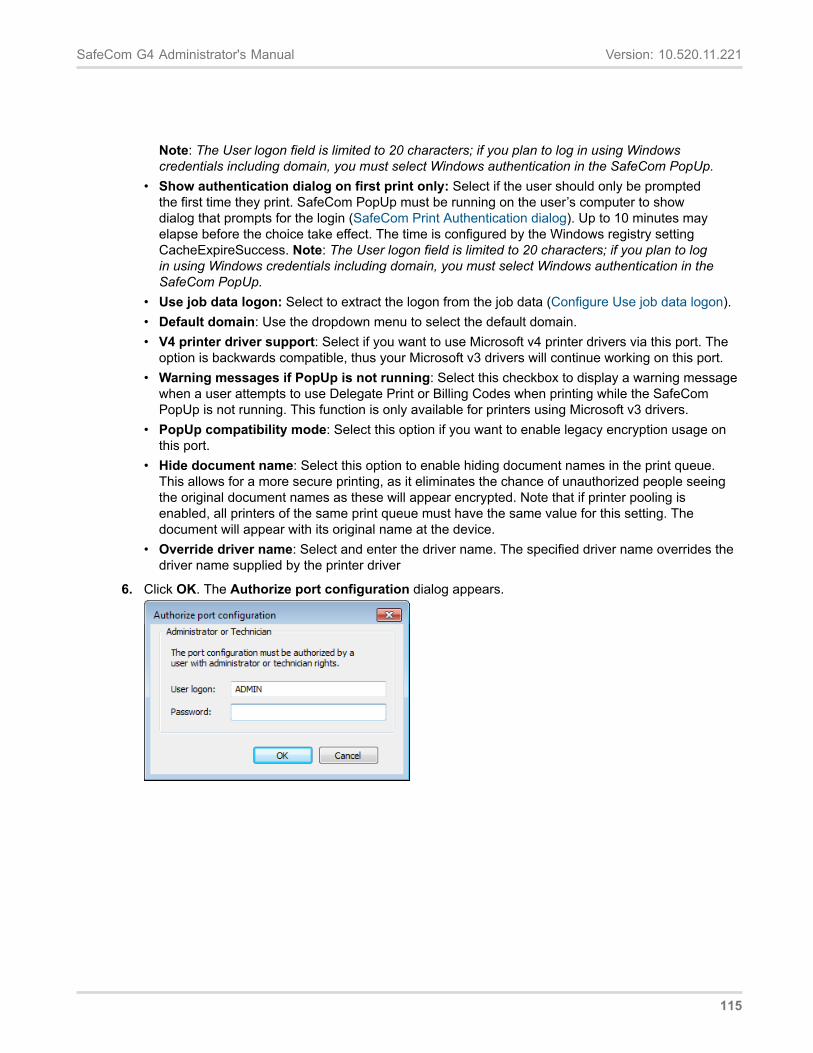
SafeCom G4 Administrator's Manual Version: 10.520.11.221
Note: The User logon field is limited to 20 characters; if you plan to log in using Windowscredentials including domain, you must select Windows authentication in the SafeCom PopUp.
• Show authentication dialog on first print only: Select if the user should only be promptedthe first time they print. SafeCom PopUp must be running on the user’s computer to showdialog that prompts for the login (SafeCom Print Authentication dialog). Up to 10 minutes mayelapse before the choice take effect. The time is configured by the Windows registry settingCacheExpireSuccess. Note: The User logon field is limited to 20 characters; if you plan to login using Windows credentials including domain, you must select Windows authentication in theSafeCom PopUp.
• Use job data logon: Select to extract the logon from the job data (Configure Use job data logon).• Default domain: Use the dropdown menu to select the default domain.• V4 printer driver support: Select if you want to use Microsoft v4 printer drivers via this port. The
option is backwards compatible, thus your Microsoft v3 drivers will continue working on this port.• Warning messages if PopUp is not running: Select this checkbox to display a warning message
when a user attempts to use Delegate Print or Billing Codes when printing while the SafeComPopUp is not running. This function is only available for printers using Microsoft v3 drivers.
• PopUp compatibility mode: Select this option if you want to enable legacy encryption usage onthis port.
• Hide document name: Select this option to enable hiding document names in the print queue.This allows for a more secure printing, as it eliminates the chance of unauthorized people seeingthe original document names as these will appear encrypted. Note that if printer pooling isenabled, all printers of the same print queue must have the same value for this setting. Thedocument will appear with its original name at the device.
• Override driver name: Select and enter the driver name. The specified driver name overrides thedriver name supplied by the printer driver
6. Click OK. The Authorize port configuration dialog appears.
115
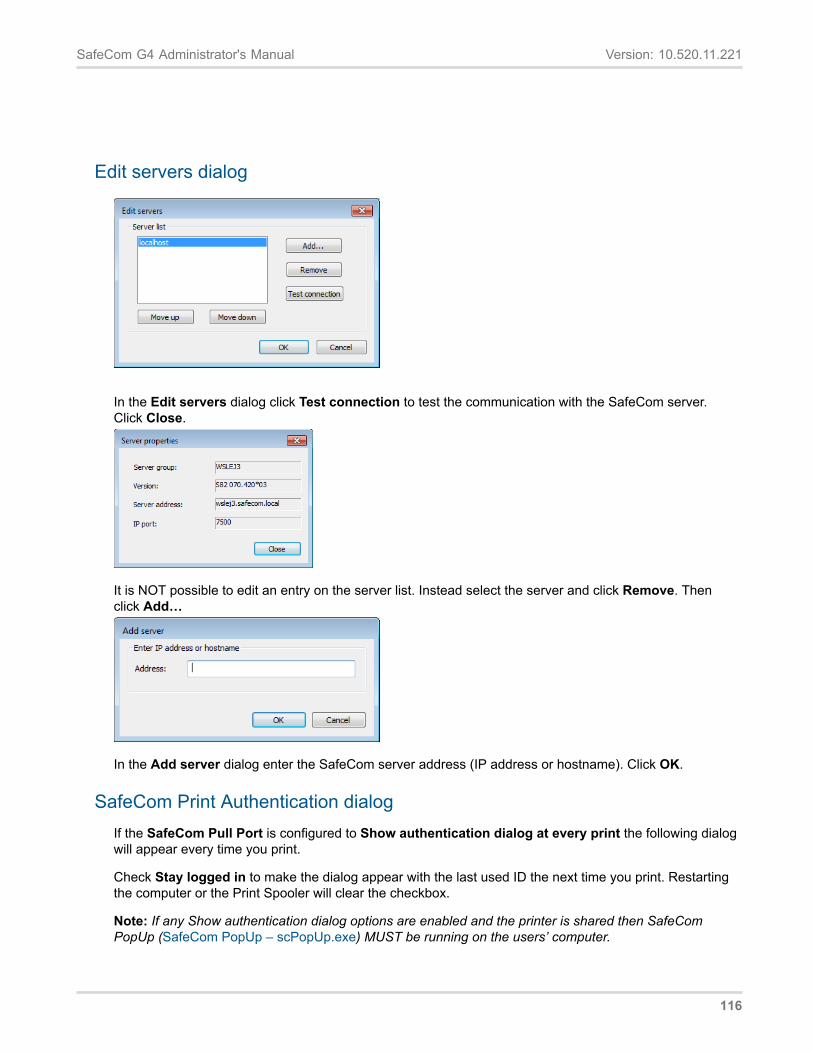
SafeCom G4 Administrator's Manual Version: 10.520.11.221
Edit servers dialog
In the Edit servers dialog click Test connection to test the communication with the SafeCom server.Click Close.
It is NOT possible to edit an entry on the server list. Instead select the server and click Remove. Thenclick Add…
In the Add server dialog enter the SafeCom server address (IP address or hostname). Click OK.
SafeCom Print Authentication dialogIf the SafeCom Pull Port is configured to Show authentication dialog at every print the following dialogwill appear every time you print.
Check Stay logged in to make the dialog appear with the last used ID the next time you print. Restartingthe computer or the Print Spooler will clear the checkbox.
Note: If any Show authentication dialog options are enabled and the printer is shared then SafeComPopUp (SafeCom PopUp – scPopUp.exe) MUST be running on the users’ computer.
116
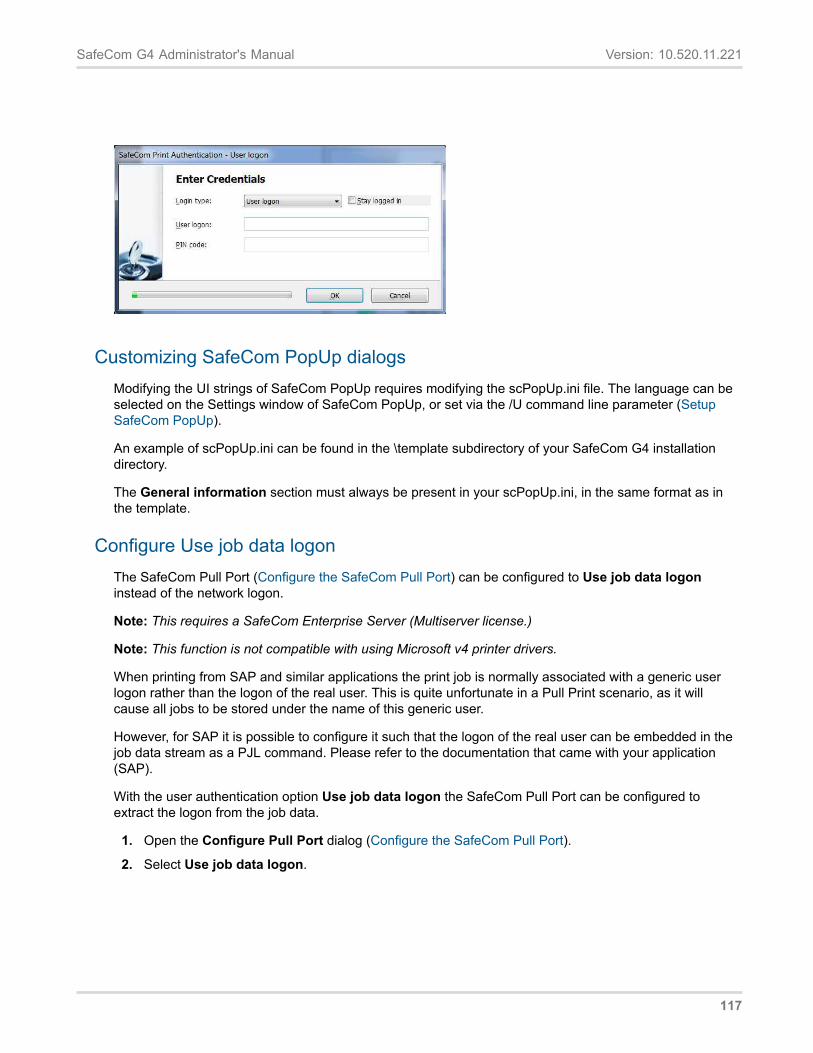
SafeCom G4 Administrator's Manual Version: 10.520.11.221
Customizing SafeCom PopUp dialogsModifying the UI strings of SafeCom PopUp requires modifying the scPopUp.ini file. The language can beselected on the Settings window of SafeCom PopUp, or set via the /U command line parameter (SetupSafeCom PopUp).
An example of scPopUp.ini can be found in the \template subdirectory of your SafeCom G4 installationdirectory.
The General information section must always be present in your scPopUp.ini, in the same format as inthe template.
Configure Use job data logonThe SafeCom Pull Port (Configure the SafeCom Pull Port) can be configured to Use job data logoninstead of the network logon.
Note: This requires a SafeCom Enterprise Server (Multiserver license.)
Note: This function is not compatible with using Microsoft v4 printer drivers.
When printing from SAP and similar applications the print job is normally associated with a generic userlogon rather than the logon of the real user. This is quite unfortunate in a Pull Print scenario, as it willcause all jobs to be stored under the name of this generic user.
However, for SAP it is possible to configure it such that the logon of the real user can be embedded in thejob data stream as a PJL command. Please refer to the documentation that came with your application(SAP).
With the user authentication option Use job data logon the SafeCom Pull Port can be configured toextract the logon from the job data.
1. Open the Configure Pull Port dialog (Configure the SafeCom Pull Port).
2. Select Use job data logon.
117
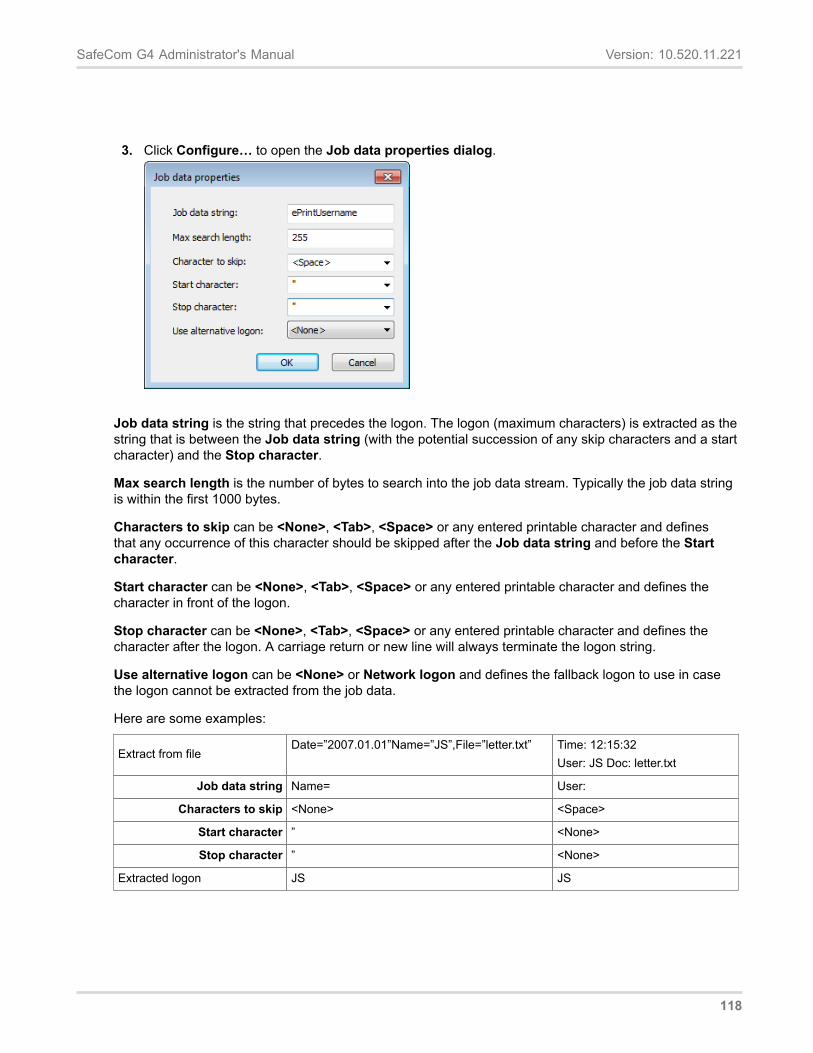
SafeCom G4 Administrator's Manual Version: 10.520.11.221
3. Click Configure… to open the Job data properties dialog.
Job data string is the string that precedes the logon. The logon (maximum characters) is extracted as thestring that is between the Job data string (with the potential succession of any skip characters and a startcharacter) and the Stop character.
Max search length is the number of bytes to search into the job data stream. Typically the job data stringis within the first 1000 bytes.
Characters to skip can be <None>, <Tab>, <Space> or any entered printable character and definesthat any occurrence of this character should be skipped after the Job data string and before the Startcharacter.
Start character can be <None>, <Tab>, <Space> or any entered printable character and defines thecharacter in front of the logon.
Stop character can be <None>, <Tab>, <Space> or any entered printable character and defines thecharacter after the logon. A carriage return or new line will always terminate the logon string.
Use alternative logon can be <None> or Network logon and defines the fallback logon to use in casethe logon cannot be extracted from the job data.
Here are some examples:
Extract from fileDate=”2007.01.01”Name=”JS”,File=”letter.txt” Time: 12:15:32
User: JS Doc: letter.txt
Job data string Name= User:
Characters to skip <None> <Space>
Start character ” <None>
Stop character ” <None>
Extracted logon JS JS
118
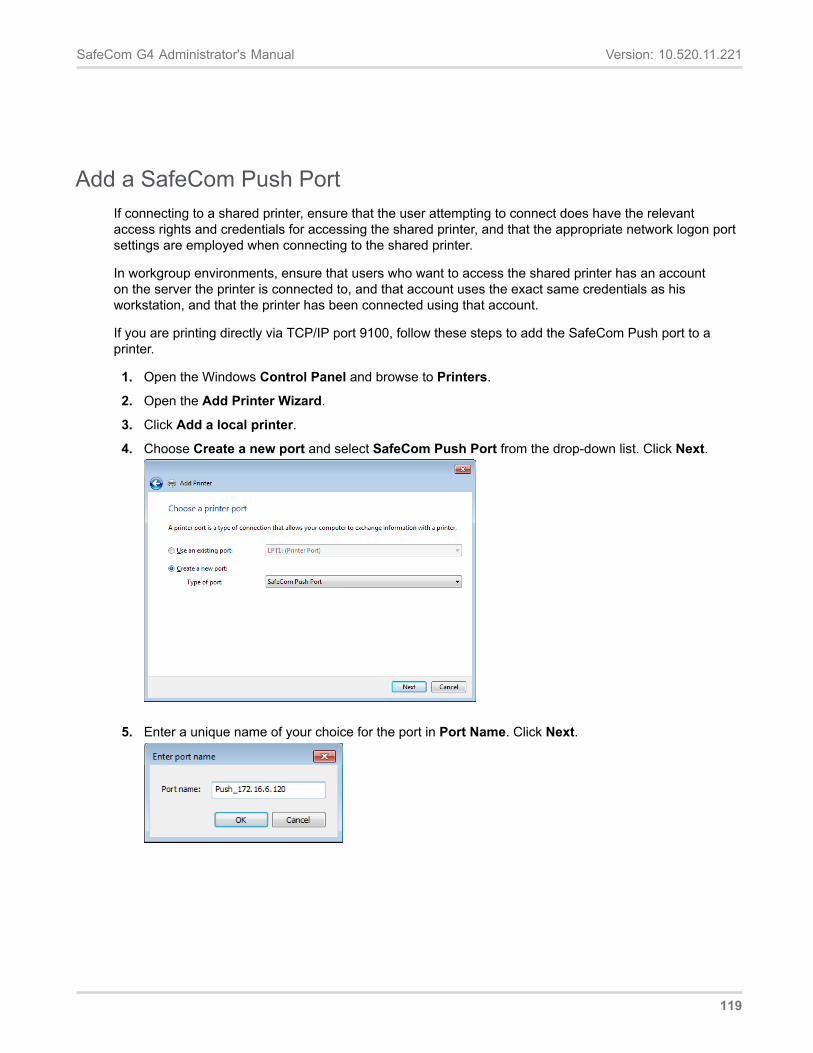
SafeCom G4 Administrator's Manual Version: 10.520.11.221
Add a SafeCom Push PortIf connecting to a shared printer, ensure that the user attempting to connect does have the relevantaccess rights and credentials for accessing the shared printer, and that the appropriate network logon portsettings are employed when connecting to the shared printer.
In workgroup environments, ensure that users who want to access the shared printer has an accounton the server the printer is connected to, and that account uses the exact same credentials as hisworkstation, and that the printer has been connected using that account.
If you are printing directly via TCP/IP port 9100, follow these steps to add the SafeCom Push port to aprinter.
1. Open the Windows Control Panel and browse to Printers.
2. Open the Add Printer Wizard.
3. Click Add a local printer.
4. Choose Create a new port and select SafeCom Push Port from the drop-down list. Click Next.
5. Enter a unique name of your choice for the port in Port Name. Click Next.
119
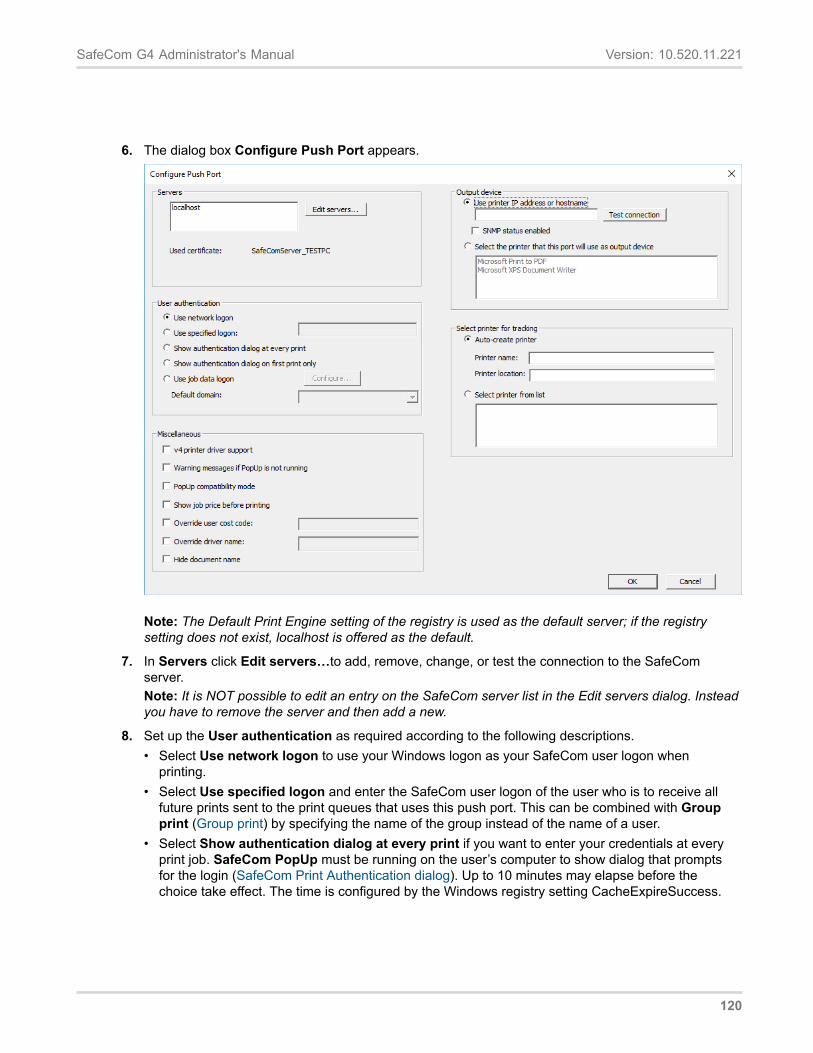
SafeCom G4 Administrator's Manual Version: 10.520.11.221
6. The dialog box Configure Push Port appears.
Note: The Default Print Engine setting of the registry is used as the default server; if the registrysetting does not exist, localhost is offered as the default.
7. In Servers click Edit servers…to add, remove, change, or test the connection to the SafeComserver.Note: It is NOT possible to edit an entry on the SafeCom server list in the Edit servers dialog. Insteadyou have to remove the server and then add a new.
8. Set up the User authentication as required according to the following descriptions.• Select Use network logon to use your Windows logon as your SafeCom user logon when
printing.• Select Use specified logon and enter the SafeCom user logon of the user who is to receive all
future prints sent to the print queues that uses this push port. This can be combined with Groupprint (Group print) by specifying the name of the group instead of the name of a user.
• Select Show authentication dialog at every print if you want to enter your credentials at everyprint job. SafeCom PopUp must be running on the user’s computer to show dialog that promptsfor the login (SafeCom Print Authentication dialog). Up to 10 minutes may elapse before thechoice take effect. The time is configured by the Windows registry setting CacheExpireSuccess.
120
SafeCom G4 Administrator's Manual Version: 10.520.11.221
Note: The User logon field is limited to 20 characters; if you plan to log in using Windowscredentials including domain, you must select Windows authentication in the SafeCom PopUp.
• Select Show authentication dialog on first print only if the user should only be promptedthe first time they print. SafeCom PopUp must be running on the user’s computer to show thedialog that prompts for the login (SafeCom Print Authentication dialog). Up to 10 minutes mayelapse before the choice take effect. The time is configured by the Windows registry settingCacheExpireSuccess. Note: The User logon field is limited to 20 characters; if you plan to login using Windows credentials including domain, you must select Windows authentication in theSafeCom PopUp.
• Select Use job data logon to extract the logon from the job data (Configure Use job data logon).• Select a default domain, to save the user to enter domain.
9. In Output device you need to check Use printer IP address or hostname and specify the IPaddress if you are printing directly. Click Test connection to display the Printer Properties dialog andto test the connection to the printer.The printer must be online and allow SNMPv1 access via UDP port 161, otherwise you will get themessage: Not able to connect to printer. Note: If you are printing via a second printer you need tocheck Select the printer that this port will use as output device and select one of the output devices.
10. Check SNMP status enabled if you want SNMP status to be reported.
11. In Select printer for tracking you can check Select printer from list and choose a tracking device.Alternatively check Auto-create printer and then enter a Printer name and an optional Printerlocation.
12. In the Miscellaneous section select according to the following descriptions:• V4 printer driver support: The option is backwards compatible, thus your Microsoft v3 drivers will
continue working on this port.• Warning messages if PopUp is not running: Select this checkbox to display a warning message
when a user attempts to use Delegate Print or Billing Codes when printing while the SafeComPopUp is not running. This function is only available for printers using Microsoft v3 drivers.
• PopUp compatibility mode: Select this option if you want to enable legacy encryption usage onthis port.
• Show job price before printing: Check if users are to unconditionally see dialog with the costof the document before they print. If the printer is a shared printer users MUST have SafeComPopUp (Add a SafeCom Push Port) setup and running on their computer in order to confirm thatthey wish to print the document.
• Override user cost code: The specified cost code overrides the cost code of the user who prints.Example: If John Smith has the cost code 2949 and prints to a Push Port where a cost code of1009 is specified the resulting UserCostCode parameter in the tracking record will show 1009 andnot 2949.
• Override driver name: The specified driver name overrides the driver name supplied by theprinter driver. This is particular useful to differentiate printers using the HP Universal Print Driver.
• Hide document name: Select this option to enable hiding document names in the print queue.This allows for a more secure printing, as it eliminates the chance of unauthorized people seeingthe original document names as these will appear encrypted. Note that if printer pooling isenabled, all printers of the same print queue must have the same value for this setting.
121
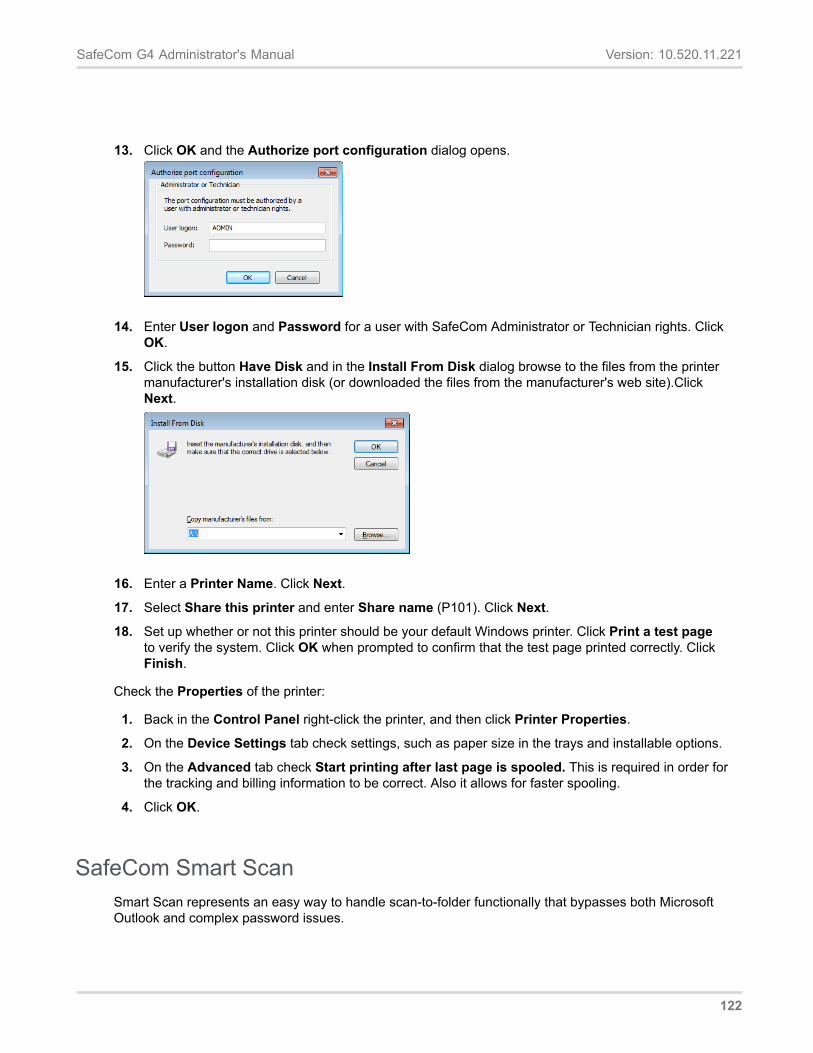
SafeCom G4 Administrator's Manual Version: 10.520.11.221
13. Click OK and the Authorize port configuration dialog opens.
14. Enter User logon and Password for a user with SafeCom Administrator or Technician rights. ClickOK.
15. Click the button Have Disk and in the Install From Disk dialog browse to the files from the printermanufacturer's installation disk (or downloaded the files from the manufacturer's web site).ClickNext.
16. Enter a Printer Name. Click Next.
17. Select Share this printer and enter Share name (P101). Click Next.
18. Set up whether or not this printer should be your default Windows printer. Click Print a test pageto verify the system. Click OK when prompted to confirm that the test page printed correctly. ClickFinish.
Check the Properties of the printer:
1. Back in the Control Panel right-click the printer, and then click Printer Properties.
2. On the Device Settings tab check settings, such as paper size in the trays and installable options.
3. On the Advanced tab check Start printing after last page is spooled. This is required in order forthe tracking and billing information to be correct. Also it allows for faster spooling.
4. Click OK.
SafeCom Smart ScanSmart Scan represents an easy way to handle scan-to-folder functionally that bypasses both MicrosoftOutlook and complex password issues.
122
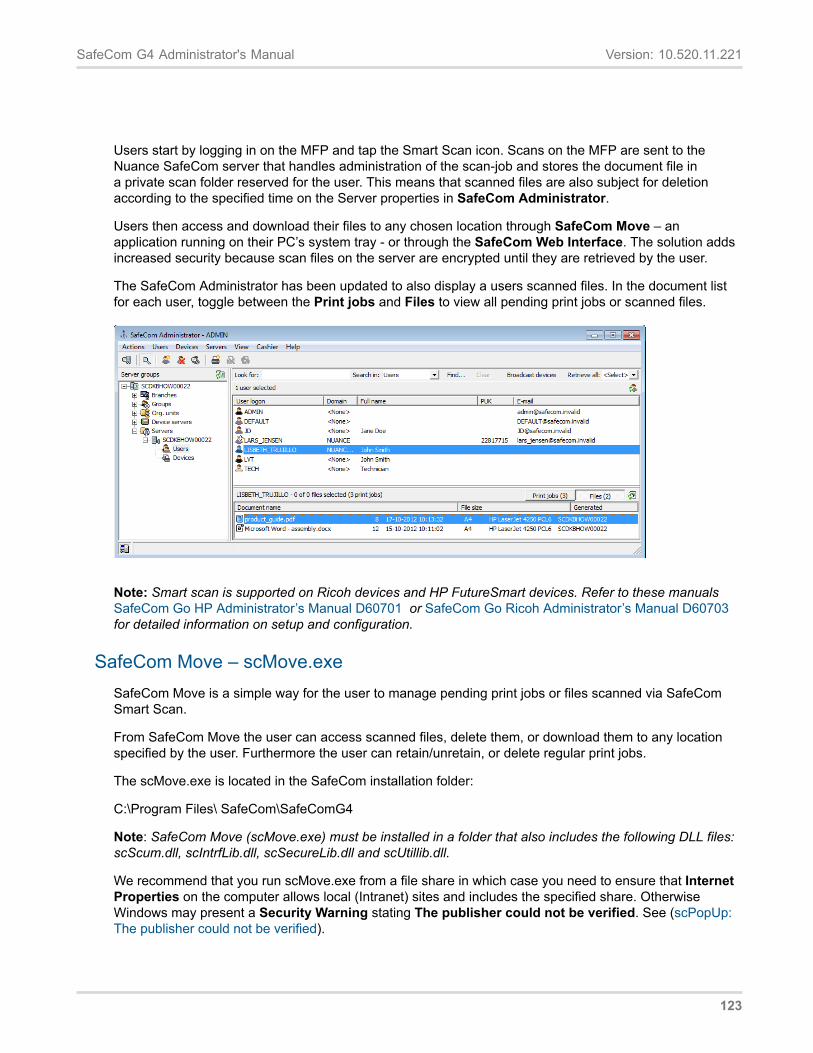
SafeCom G4 Administrator's Manual Version: 10.520.11.221
Users start by logging in on the MFP and tap the Smart Scan icon. Scans on the MFP are sent to theNuance SafeCom server that handles administration of the scan-job and stores the document file ina private scan folder reserved for the user. This means that scanned files are also subject for deletionaccording to the specified time on the Server properties in SafeCom Administrator.
Users then access and download their files to any chosen location through SafeCom Move – anapplication running on their PC’s system tray - or through the SafeCom Web Interface. The solution addsincreased security because scan files on the server are encrypted until they are retrieved by the user.
The SafeCom Administrator has been updated to also display a users scanned files. In the document listfor each user, toggle between the Print jobs and Files to view all pending print jobs or scanned files.
Note: Smart scan is supported on Ricoh devices and HP FutureSmart devices. Refer to these manualsSafeCom Go HP Administrator’s Manual D60701 or SafeCom Go Ricoh Administrator’s Manual D60703for detailed information on setup and configuration.
SafeCom Move – scMove.exeSafeCom Move is a simple way for the user to manage pending print jobs or files scanned via SafeComSmart Scan.
From SafeCom Move the user can access scanned files, delete them, or download them to any locationspecified by the user. Furthermore the user can retain/unretain, or delete regular print jobs.
The scMove.exe is located in the SafeCom installation folder:
C:\Program Files\ SafeCom\SafeComG4
Note: SafeCom Move (scMove.exe) must be installed in a folder that also includes the following DLL files:scScum.dll, scIntrfLib.dll, scSecureLib.dll and scUtillib.dll.
We recommend that you run scMove.exe from a file share in which case you need to ensure that InternetProperties on the computer allows local (Intranet) sites and includes the specified share. OtherwiseWindows may present a Security Warning stating The publisher could not be verified. See (scPopUp:The publisher could not be verified).
123
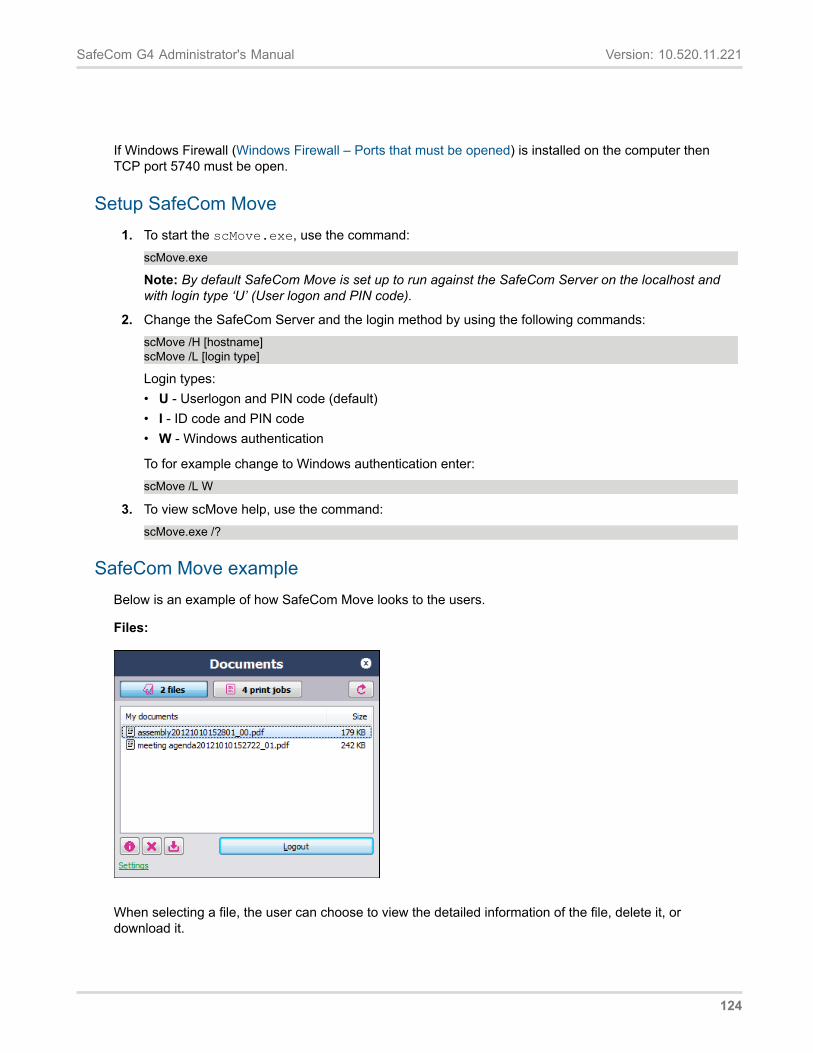
SafeCom G4 Administrator's Manual Version: 10.520.11.221
If Windows Firewall (Windows Firewall – Ports that must be opened) is installed on the computer thenTCP port 5740 must be open.
Setup SafeCom Move1. To start the scMove.exe, use the command:
scMove.exe
Note: By default SafeCom Move is set up to run against the SafeCom Server on the localhost andwith login type ‘U’ (User logon and PIN code).
2. Change the SafeCom Server and the login method by using the following commands:scMove /H [hostname]scMove /L [login type]
Login types:• U - Userlogon and PIN code (default)• I - ID code and PIN code• W - Windows authentication
To for example change to Windows authentication enter:scMove /L W
3. To view scMove help, use the command:scMove.exe /?
SafeCom Move exampleBelow is an example of how SafeCom Move looks to the users.
Files:
When selecting a file, the user can choose to view the detailed information of the file, delete it, ordownload it.
124
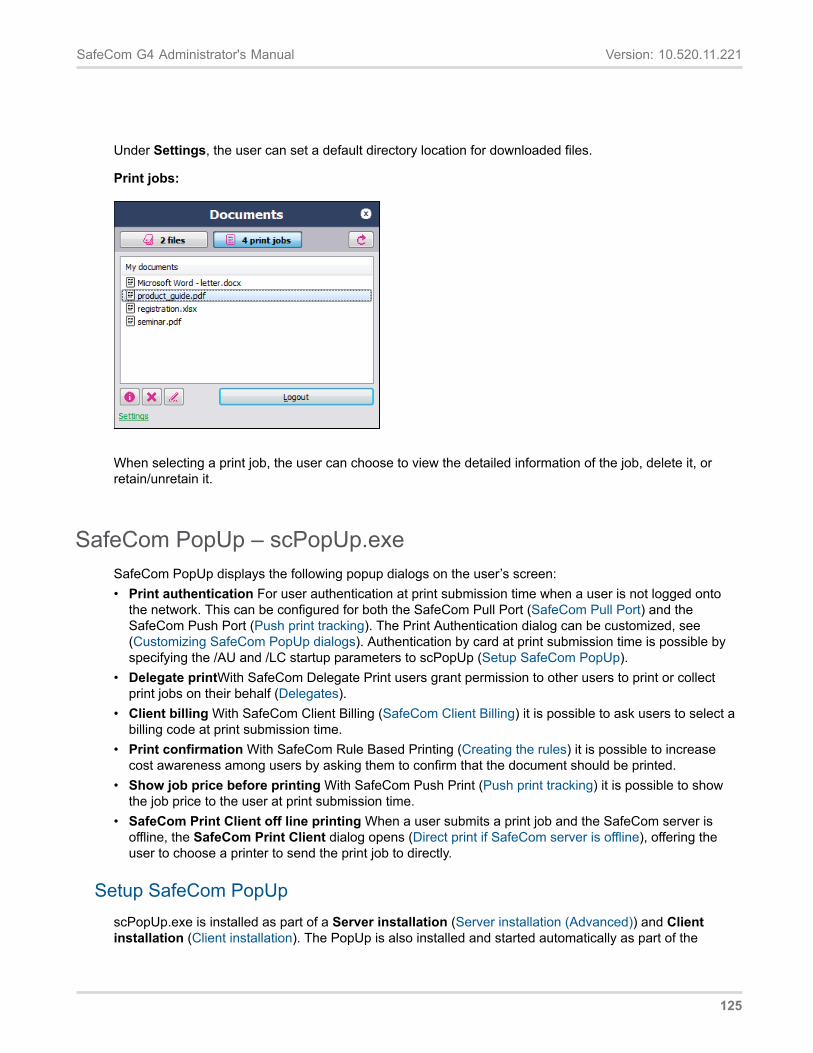
SafeCom G4 Administrator's Manual Version: 10.520.11.221
Under Settings, the user can set a default directory location for downloaded files.
Print jobs:
When selecting a print job, the user can choose to view the detailed information of the job, delete it, orretain/unretain it.
SafeCom PopUp – scPopUp.exeSafeCom PopUp displays the following popup dialogs on the user’s screen:• Print authentication For user authentication at print submission time when a user is not logged onto
the network. This can be configured for both the SafeCom Pull Port (SafeCom Pull Port) and theSafeCom Push Port (Push print tracking). The Print Authentication dialog can be customized, see(Customizing SafeCom PopUp dialogs). Authentication by card at print submission time is possible byspecifying the /AU and /LC startup parameters to scPopUp (Setup SafeCom PopUp).
• Delegate printWith SafeCom Delegate Print users grant permission to other users to print or collectprint jobs on their behalf (Delegates).
• Client billing With SafeCom Client Billing (SafeCom Client Billing) it is possible to ask users to select abilling code at print submission time.
• Print confirmation With SafeCom Rule Based Printing (Creating the rules) it is possible to increasecost awareness among users by asking them to confirm that the document should be printed.
• Show job price before printing With SafeCom Push Print (Push print tracking) it is possible to showthe job price to the user at print submission time.
• SafeCom Print Client off line printing When a user submits a print job and the SafeCom server isoffline, the SafeCom Print Client dialog opens (Direct print if SafeCom server is offline), offering theuser to choose a printer to send the print job to directly.
Setup SafeCom PopUpscPopUp.exe is installed as part of a Server installation (Server installation (Advanced)) and Clientinstallation (Client installation). The PopUp is also installed and started automatically as part of the
125
SafeCom G4 Administrator's Manual Version: 10.520.11.221
Print Client installation (SafeCom Print Client), although with the Print Client the PopUp installation canoptionally be deselected. The scPopUp.exe is located in the SafeCom installation folder:
C:\Program Files\SafeCom\SafeComG4
Note: scPopUp.exe must be the same version as the SafeCom G4 server software. From S82070.520*10 onwards, scPopUp does not work with earlier versions of SafeCom Pull Port or SafeComPush Port.
Note: From S82 070.520*10 onwards, SafeCom Pull and Push ports work with older version of SafeComPopUp if the PopUp compatibility mode option is checked for the Pull (SafeCom Pull Port) or Push (Add aSafeCom Push Port) port.
Note: in case of using Microsoft v3 printers, when the popup is not running but would be needed forcertain operations (for example, authentication), a notification is displayed with the Windows Print SystemAsynchronous Notification. The user can start scPopUp and click OK on the message tab to continue theprinting without interrupting the job in question.
Note: in case of shared network printer queues, restarting the Print Spooler on the server due to anymodifications may be only detected after a couple of minutes of delay on the SafeCom PopUp running onyour workstations.
Note: if the computer running SafeCom PopUp is connected to a new shared SafeCom queue, you mustrestart SafeCom PopUp to detect and work with the new queue.
If you intend to run scPopUp.exe from a file share you should ensure that Internet Properties on thecomputer allows local (Intranet) sites and includes the specified share. Otherwise Windows may present aSecurity Warning stating The publisher could not be verified. See (scPopUp: The publisher could notbe verified).
126
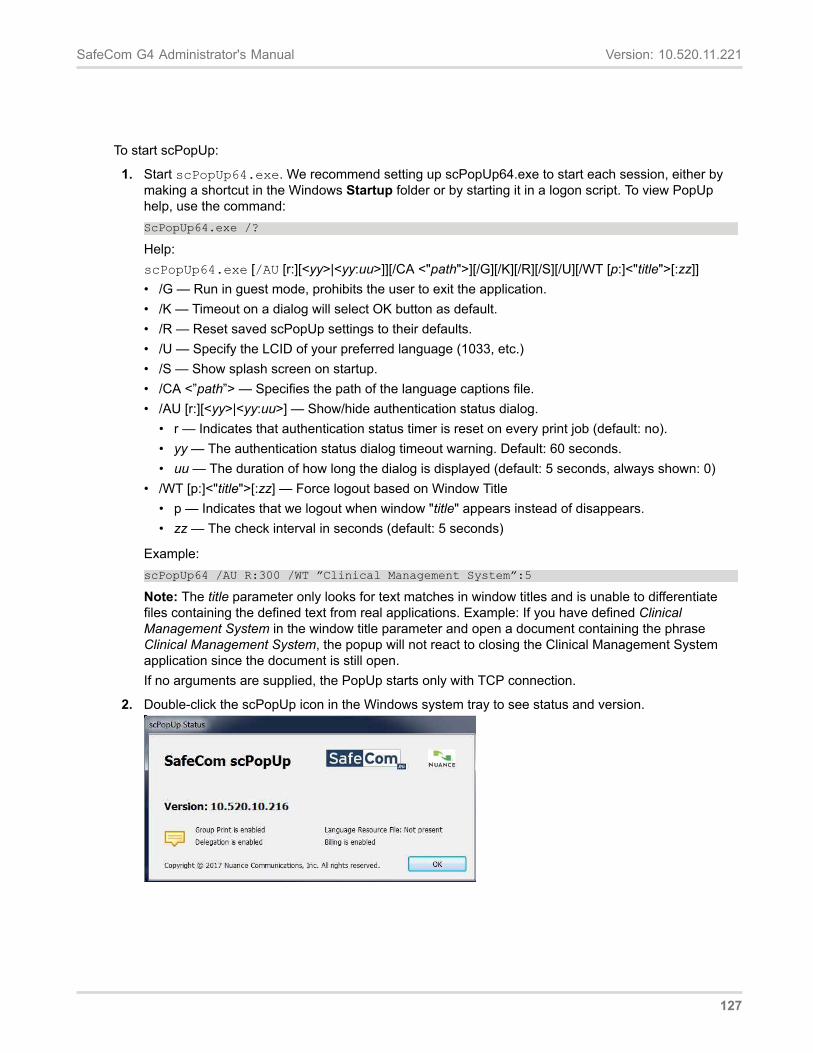
SafeCom G4 Administrator's Manual Version: 10.520.11.221
To start scPopUp:
1. Start scPopUp64.exe. We recommend setting up scPopUp64.exe to start each session, either bymaking a shortcut in the Windows Startup folder or by starting it in a logon script. To view PopUphelp, use the command:ScPopUp64.exe /?
Help:scPopUp64.exe [/AU [r:][<yy>|<yy:uu>]][/CA <"path">][/G][/K][/R][/S][/U][/WT [p:]<"title">[:zz]]• /G — Run in guest mode, prohibits the user to exit the application.• /K — Timeout on a dialog will select OK button as default.• /R — Reset saved scPopUp settings to their defaults.• /U — Specify the LCID of your preferred language (1033, etc.)• /S — Show splash screen on startup.• /CA <”path”> — Specifies the path of the language captions file.• /AU [r:][<yy>|<yy:uu>] — Show/hide authentication status dialog.
• r — Indicates that authentication status timer is reset on every print job (default: no).• yy — The authentication status dialog timeout warning. Default: 60 seconds.• uu — The duration of how long the dialog is displayed (default: 5 seconds, always shown: 0)
• /WT [p:]<"title">[:zz] — Force logout based on Window Title• p — Indicates that we logout when window "title" appears instead of disappears.• zz — The check interval in seconds (default: 5 seconds)
Example:scPopUp64 /AU R:300 /WT ”Clinical Management System”:5
Note: The title parameter only looks for text matches in window titles and is unable to differentiatefiles containing the defined text from real applications. Example: If you have defined ClinicalManagement System in the window title parameter and open a document containing the phraseClinical Management System, the popup will not react to closing the Clinical Management Systemapplication since the document is still open.If no arguments are supplied, the PopUp starts only with TCP connection.
2. Double-click the scPopUp icon in the Windows system tray to see status and version.
127
SafeCom G4 Administrator's Manual Version: 10.520.11.221
SafeCom PopUp deployment on Windows computersThe following SafeCom Popup dialog software must be deployed to client computers:
scPopup.exe
scPopup.ini (optional; for modifying or localizing the strings of the application)
128
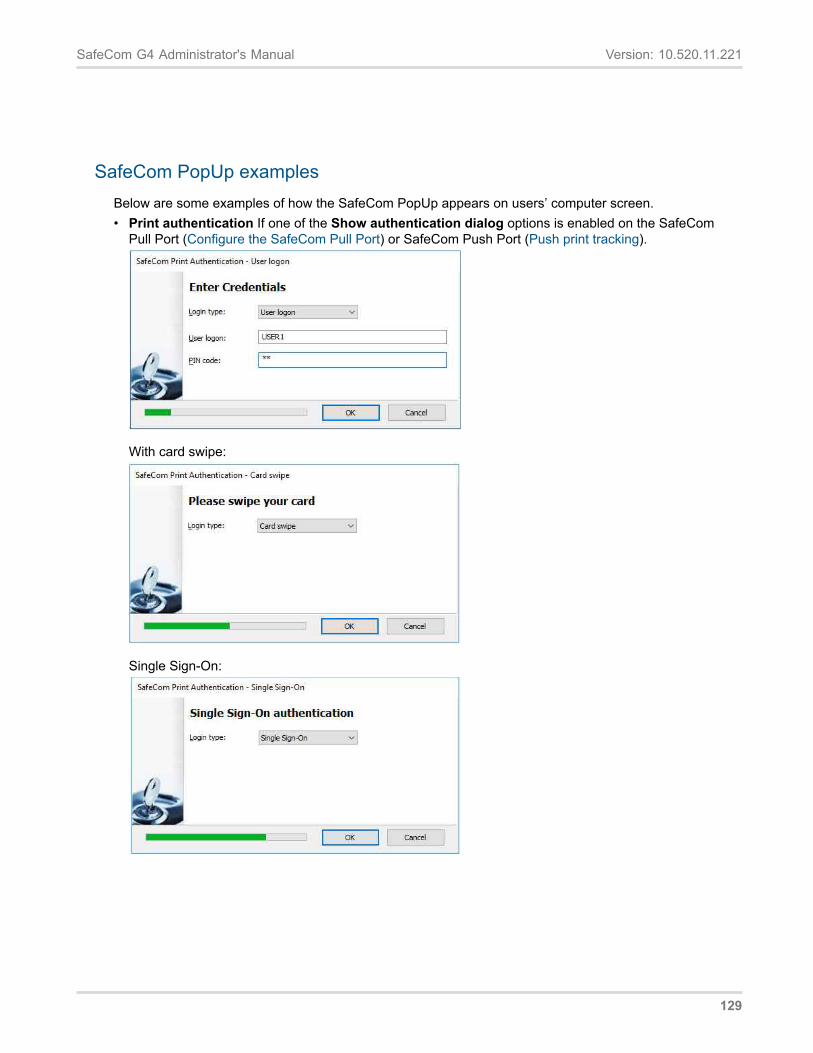
SafeCom G4 Administrator's Manual Version: 10.520.11.221
SafeCom PopUp examplesBelow are some examples of how the SafeCom PopUp appears on users’ computer screen.• Print authentication If one of the Show authentication dialog options is enabled on the SafeCom
Pull Port (Configure the SafeCom Pull Port) or SafeCom Push Port (Push print tracking).
With card swipe:
Single Sign-On:
129
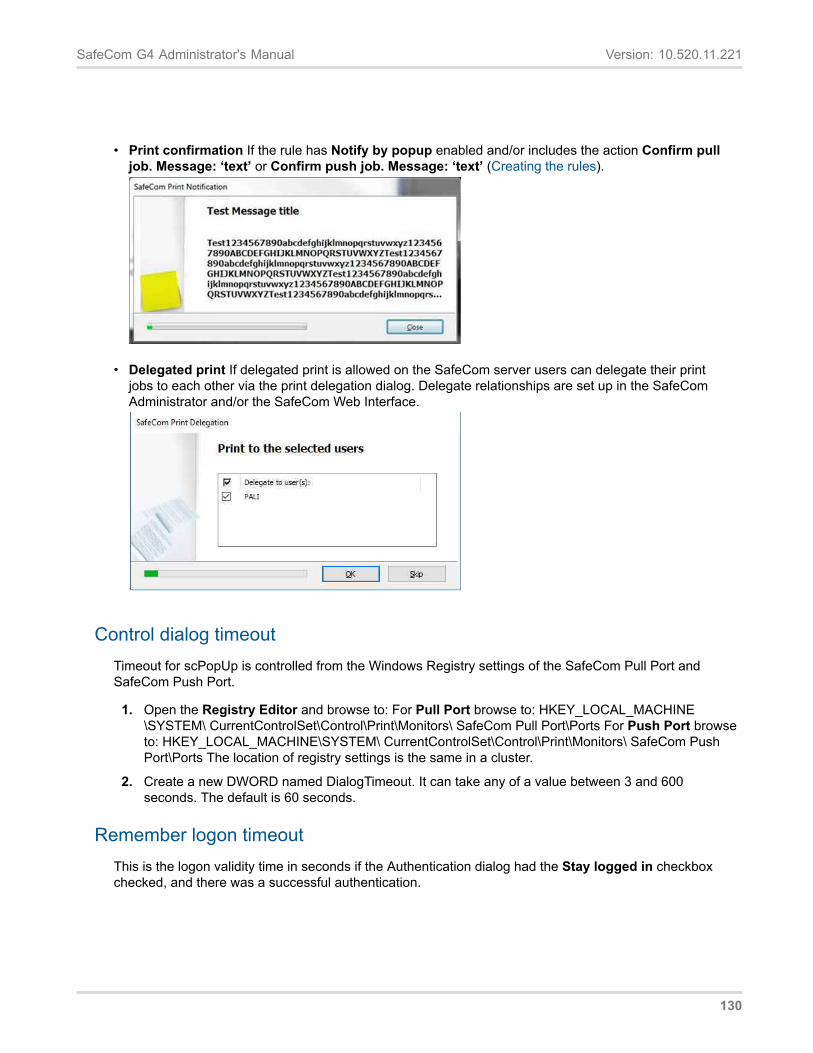
SafeCom G4 Administrator's Manual Version: 10.520.11.221
• Print confirmation If the rule has Notify by popup enabled and/or includes the action Confirm pulljob. Message: ‘text’ or Confirm push job. Message: ‘text’ (Creating the rules).
• Delegated print If delegated print is allowed on the SafeCom server users can delegate their printjobs to each other via the print delegation dialog. Delegate relationships are set up in the SafeComAdministrator and/or the SafeCom Web Interface.
Control dialog timeoutTimeout for scPopUp is controlled from the Windows Registry settings of the SafeCom Pull Port andSafeCom Push Port.
1. Open the Registry Editor and browse to: For Pull Port browse to: HKEY_LOCAL_MACHINE\SYSTEM\ CurrentControlSet\Control\Print\Monitors\ SafeCom Pull Port\Ports For Push Port browseto: HKEY_LOCAL_MACHINE\SYSTEM\ CurrentControlSet\Control\Print\Monitors\ SafeCom PushPort\Ports The location of registry settings is the same in a cluster.
2. Create a new DWORD named DialogTimeout. It can take any of a value between 3 and 600seconds. The default is 60 seconds.
Remember logon timeoutThis is the logon validity time in seconds if the Authentication dialog had the Stay logged in checkboxchecked, and there was a successful authentication.
130
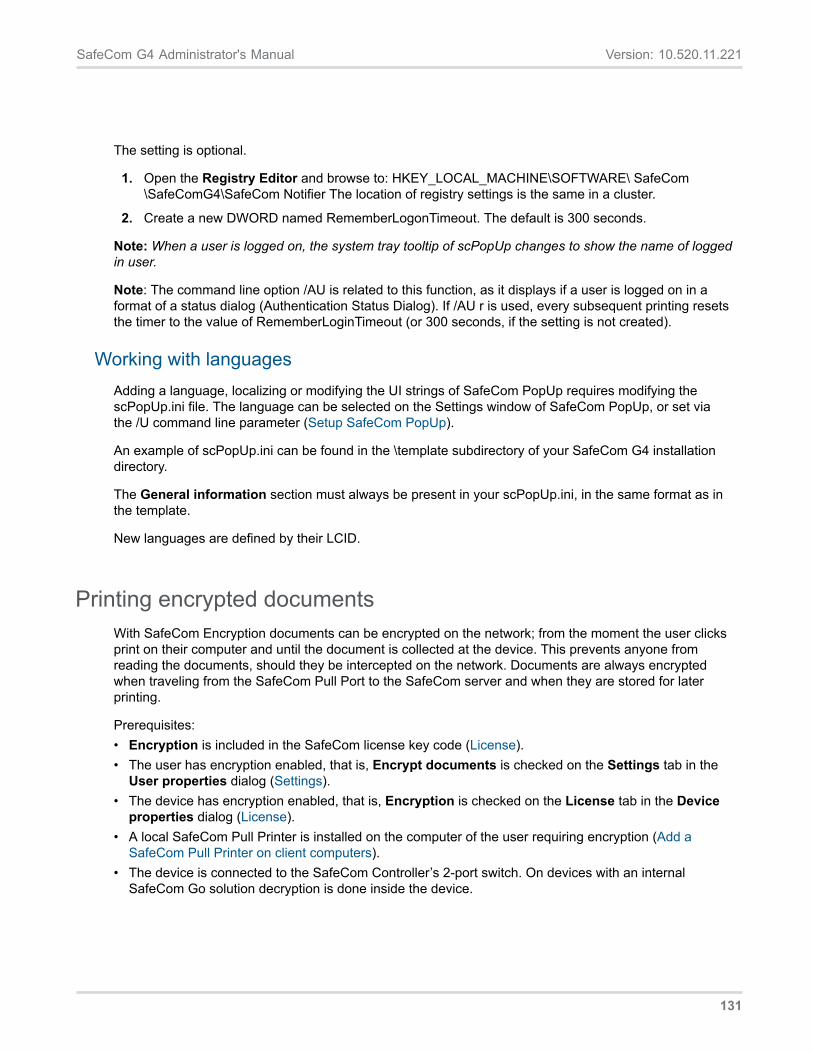
SafeCom G4 Administrator's Manual Version: 10.520.11.221
The setting is optional.
1. Open the Registry Editor and browse to: HKEY_LOCAL_MACHINE\SOFTWARE\ SafeCom\SafeComG4\SafeCom Notifier The location of registry settings is the same in a cluster.
2. Create a new DWORD named RememberLogonTimeout. The default is 300 seconds.
Note: When a user is logged on, the system tray tooltip of scPopUp changes to show the name of loggedin user.
Note: The command line option /AU is related to this function, as it displays if a user is logged on in aformat of a status dialog (Authentication Status Dialog). If /AU r is used, every subsequent printing resetsthe timer to the value of RememberLoginTimeout (or 300 seconds, if the setting is not created).
Working with languagesAdding a language, localizing or modifying the UI strings of SafeCom PopUp requires modifying thescPopUp.ini file. The language can be selected on the Settings window of SafeCom PopUp, or set viathe /U command line parameter (Setup SafeCom PopUp).
An example of scPopUp.ini can be found in the \template subdirectory of your SafeCom G4 installationdirectory.
The General information section must always be present in your scPopUp.ini, in the same format as inthe template.
New languages are defined by their LCID.
Printing encrypted documentsWith SafeCom Encryption documents can be encrypted on the network; from the moment the user clicksprint on their computer and until the document is collected at the device. This prevents anyone fromreading the documents, should they be intercepted on the network. Documents are always encryptedwhen traveling from the SafeCom Pull Port to the SafeCom server and when they are stored for laterprinting.
Prerequisites:• Encryption is included in the SafeCom license key code (License).• The user has encryption enabled, that is, Encrypt documents is checked on the Settings tab in the
User properties dialog (Settings).• The device has encryption enabled, that is, Encryption is checked on the License tab in the Device
properties dialog (License).• A local SafeCom Pull Printer is installed on the computer of the user requiring encryption (Add a
SafeCom Pull Printer on client computers).• The device is connected to the SafeCom Controller’s 2-port switch. On devices with an internal
SafeCom Go solution decryption is done inside the device.
131
SafeCom G4 Administrator's Manual Version: 10.520.11.221
Make all printing go through the SafeComThis section describes how you can ensure that all printing is done solely through SafeCom. When usingthe word “ensure” we disregard outrageous user behavior, such as disconnecting the SafeCom hardware -an act, which could probably be made subject to prosecution.
Basically you only need to take special precautions for devices with a built-in and connected networkinterface. An obvious precaution is to ensure that only the SafeCom servers are allowed to connect to thedevice’s network interface.
Some network interfaces, such as the HP JetDirect print servers and Ricoh Network Interface Cards,features an IP host access list. Only the hosts on the list are allowed to access the network interface. Inthis case it means that the IP address of the SafeCom server and/or SafeCom Controller should be theonly ones on the list. The SafeCom Controller should have a fixed IP address.
You may also need to disable selected network printing protocols, such as the Internet Printing Protocol(IPP). Some network devices also offer the possibility to disable their parallel and/or USB port. Foradditional information, please refer to the documentation that came with your device / network interface orcontact your printer vendor.
Install a card reader on a computerIf the administrator is to register cards with users (Let administrator register cards to users) it requires acard reader to be connected and configured on the computer.
The stand-alone card readers (Table 1: SafeCom Controller supported SafeCom ID Devices onpage Table 1: SafeCom Controller supported SafeCom ID Devices) can be used with the SafeComAdministrator. Most USB card readers can be connected to the computer via the USB port and useddirectly. Connecting a SafeCOm ID device needs to be connected to a USB port if you want to enableSafeCom Print Authentication by card. The serial card readers can be connected to the computer via aSafeCom Serial PC Cable (p/n 660010). The cable connects to the computer’s RS-232 DB9 connector forcommunication and 5 Volt power must be supplied via the PS2 keyboard pass-thru connector.
1. Connected the USB card reader to the USB port. The serial card reader should be connected to thecomputer’s serial port (COM1, COM2 or COM3).
2. Start SafeCom Administrator.
3. On the Actions menu, click Options.
4. Click on the Card reader tab in the Options dialog and make your selections.
Note: SafeCom ID devices come with ID Device Licenses, whereas ID device licenses for 3rd party IDdevices must be purchased separately.
132
SafeCom G4 Administrator's Manual Version: 10.520.11.221
Install SafeCom Smart Printer Add-on and DriverThe Smart Printer Add-on and Driver increases versatility across mixed printer vendor parks as itensures that users can use only one print queue, run even complex jobs on all printers and not encounterproblems with driver incompatibilities.
The Smart Printer Add-on and Driver create and store print data on the SafeCom Server or the Print Clientin Microsoft XPS format (XML Paper Specification format) until it knows which printer will be used. Whenthe user logs onto an MFP, the system identifies the device type and only then runs the job through thecorrect vendor-specific printer driver.
The Add-on and Driver software is distributed in 2 separate installation packages:• SafeCom Smart Printing Driver A printer driver that converts the print data to XPS.• SafeCom Smart Printer Add-on A service that is installed either on the SafeCom Server or on the
computer running the SafeCom Print Client. The service directs the print job to the best suitableprinter driver from the specific printer vendor.
Follow the steps below to enable printing using the concept of SafeCom Smart Printer Driver.
1. Install the SafeCom Smart Printer Add-on:• SafeCom Server (Install Smart Printer Add-on on SafeCom Server).• SafeCom Print Client (Install Smart Printer Add-on on SafeCom Print Client).
2. Install SafeCom Smart Printing Driver (Install SafeCom Smart Printing Driver) and add a SafeComPull Printer that uses the Smart Printing Driver.
3. Verify the installation by collecting your first document (Verification - Collect your first document ).
Tip about vendor specific drivers:
It is recommended to install vendor specific printer driver in advance. For HP Universal Print Driver andsimilar this is best accomplished, by downloading the latest version and subsequently extract the files anduse the add driver function in Windows Print Server Properties to add the printer driver.
Install Smart Printer Add-on on SafeCom ServerPrerequisites:• SafeCom G4 Server version S82 070.510*01 or newer.• Windows Server 2012 / 2012 R2, (32-bit or 64-bit).• Microsoft .Net Framework 3.5.
Installation:
1. Download the safecom_smart_printer_addon_xxx.exe file from the link supplied to you. Theinstallation must be Run as administrator.
2. Follow the instructions and click Finish when done.
3. Install the SafeCom Smart Printing Driver as described in section (Install SafeCom Smart PrintingDriver).
133
SafeCom G4 Administrator's Manual Version: 10.520.11.221
Install Smart Printer Add-on on SafeCom Print ClientPrerequisites:• SafeCom Print Client version S82 070.510*03 or newer.• Windows 7 or later.
• Microsoft .Net Framework 3.5.
Installation:
1. Download the safecom_print_client_smart_printer_addon _xxx.exe file from the link supplied to you.The installation must be Run as administrator.
2. Follow the instructions and click Finish when done.
3. Install the SafeCom Smart Printing Driver as described in section (Install SafeCom Smart PrintingDriver).
Note: Similar to the SafeCom Print Client software the Add-on can also be deployed silently using the /VERYSILENT option (Command line parameters).
Install SafeCom Smart Printing DriverPrerequisites:• Windows 8, 7, Windows Server 2016/2012/2012 R2.
Installation:
1. Download the safecom_smart_printing_driver_xxx.zip file from the link supplied to you.
2. Extract the printer driver files to a folder, that you can reference later on as you proceed to Add aSafeCom Pull Printer as described in Chapter 4. Remember to print a test page as you will use if forverification in (Verification - Collect your first document ).
Configuring drivers to use both 32-bit and 64-bit clientsTo support client computers that use different processor architectures than the print server, you mustinstall additional drivers. For example, if your print server is running a 64-bit version of Windows and youwant to support client computers running 32-bit versions of Windows, you must add x86-based drivers foreach printer.
1. Open Print Management on the print server.
a. In the left pane, click Print Servers, click the applicable print server, and then click Printers.
b. In the center pane, right-click the printer to which you want to add additional printer drivers, andthen click Manage Sharing.
c. Click Additional Drivers. The Additional Drivers dialog box appears.
d. Select the check box of the processor architecture for which you want to add drivers. Forexample, if the print server is running an x64-based edition of Windows, select the x86 check
134
SafeCom G4 Administrator's Manual Version: 10.520.11.221
box to install 32-bit version printer drivers for client computers running 32-bit versions ofWindows.
e. If the print server does not already have the appropriate printer drivers in its driver store,Windows prompts you for the location of the driver files. Download and extract the appropriatedriver files, and then in the dialog box that appears, specify the path to the .inf file of the driver.
Note: For more information on handling driver configuration under various Windows operating systems,check the relevant Microsoft article here.
Verification - Collect your first document1. As you installed SafeCom Smart Printer Driver and added the SafeCom Pull Printer that uses
the driver (Install SafeCom Smart Printing Driver) you should have printed a test page. If not, thenplease print a test page before proceeding.
2. Open SafeCom Administrator and verify that the test page is listed as a pending document for youand that the SafeCom Smart Printer Driver is listed as the Driver.
3. Verify that the SafeCom-enabled device you intend to collect the document at is indeed configuredfor High-speed printing (default).
4. Walk to the device and login. Print the test page. Note: You will experience a first-time delay of10-30 seconds as the system is creating the print queue the first time.
5. The automatically created print queue is named SafeCom-<Device ID>. Depending on your setupyou can verify the existence of the print queue on either the SafeCom Server referenced by theSafeCom-enabled device or your computer running the SafeCom Print Client. Tip: The <Device ID>can be seen in SafeCom Administrator in the upper right corner (ID: xx) on Settings tab in the Deviceproperties dialog. The ID can also be added as separate column to the list of devices in SafeComAdministrator. In the list of devices right-click the column header and check ID on the menu. Note: Ifthe SNMP community name of the device is not public, you have to set it manually via Control Panel> Devices and Printers > Safecom-<Device ID> > Printer properties > Ports > Configure Port... >SNMP Status Enabled > Community Name.
6. You may wish to print and collect a second test page to verify the absence of the delay youexperienced when collecting the first document in step 4 above.
If it failed to print:
If the service fails to locate a compatible driver for the device, the queue generation will fail and the printwill be aborted. Trace will contain the error (example):
Mon Jun 03 15:45:52.773, tid:03708> Result: [0x80131500]: Failed to register device "2". Failed to locatedriver for Hewlett-Packard - HP LaserJet flow MFP M525.
Installing a compatible driver and repeating the printing process will fix the issue.
Additional information: SafeCom Tech Note Smart Printer Driver D20206.
135
SafeCom G4 Administrator's Manual Version: 10.520.11.221
Update selected SafeCom componentsTo update to a completely new SafeCom G4 Server version, please refer to the sections: Single server(Update SafeCom software – single server), Multiserver installation (Using Group Management ServiceAccount for services) and Cluster installation (Cluster installation).
SafeCom Support may in between regular releases release patches for selected components. Alwaysread the release note that accompanies the supplied patch, as it may contain additional and importantinformation.
The update of selected SafeCom components is covered as follows:• SafeCom Administrator, scAdministrator.exe (Update SafeCom Administrator)• SafeCom Port Monitors, scPullPM2k.dll and scPushPM2k.dll (Update SafeCom Port Monitors).• SafeCom Job Server, scJobServer.exe (Update scJobServer.exe).• SafeCom Secure Library, scSecureLib.dll (Update scSecureLib.dll).• SafeCom ID code conversion, filtercard.dll (Update filtercard.dll).• SafeCom Parser, scParser.dll (Update scParser.dll).• SafeCom Rule Executer, scRuleExecuter.dll (Update scRuleExecuter.dll).
Update SafeCom Administrator1. Close SafeCom Administrator.
2. Replace the scAdministrator.exe in the SafeCom installation folder with the new one.
Note: If the server is clustered use the Cluster Administrator to move the virtual server as you updatescAdministrator.exe on the nodes.
Note: To determine the version right-click the scAdministrator.exe file, click Properties and click on theVersion tab.
Update SafeCom Port MonitorsOn Windows 32-bit:
1. On the computer stop the Print Spooler (How to start and stop the Print Spooler).
2. Replace the scPullPM2k.dll and scPushPM2k.dll files in the C:\Windows\system32 folder.
3. Start the Print Spooler.
On Windows 64-bit:
1. On the computer stop the Print Spooler (How to start and stop the Print Spooler).
2. Replace the scPullPM2k64.dll and scPushPM2k64.dll files in the C:\Windows\system32 folder.
3. Replace the scPullPM2k.dll and scPushPM2k.dll files in the C:\Windows\syswow64 folder.
4. Start the Print Spooler.
136
SafeCom G4 Administrator's Manual Version: 10.520.11.221
Note: If any of the servers are clustered use the Cluster Administrator to move the virtual server as youupdate the files on the nodes.
Note: To determine the version right-click the file, click Properties and click on the Version tab.
Update scJobServer.exe1. On all the SafeCom servers you must stop the SafeCom Service (How to start and stop the
SafeCom Service) and replace the scJobServer.exe in the SafeCom installation folder with the newone and then restart the SafeCom Service.Note: On Windows 64-bit the file is named scJobServer64.exe.
2. If you are using the SafeCom G4 Web Interface you must also restart IIS Admin Service, HTTP SSL,World Wide Web publishing service for the fix to take effect.
Note: If any of the servers are clustered use the Cluster Administrator to move the virtual server as youupdate the scJobServer.exe on the nodes.
Note: To determine the version right-click the scJobServer.exe file, click Properties and click on theVersion tab.
Update scSecureLib.dll1. On all the SafeCom servers you must stop the SafeCom Service (How to start and stop the
SafeCom Service) and Print Spooler (How to start and stop the Print Spooler) and replace thescSecureLib.dll in the SafeCom installation folder with the new one and then restart the SafeComService and Print Spooler. Note: On Windows 64-bit the file is named scSecureLib64.dll.
2. If you are using the SafeCom G4 Web Interface you must also restart IIS Admin Service, HTTP SSL,and World Wide Web publishing service for the fix to take effect.
Note: If any of the servers are clustered use the Cluster Administrator to move the virtual server as youupdate the scSecureLib.dll on the nodes.
Note: To determine the version right-click the scSecureLib.dll file, click Properties and click on the Versiontab.
Update filtercard.dllThis section is relevant only for customers who have been supplied with a filtercard.dll to accomplish on-the-fly ID code conversion. This method can be used in installations where SafeCom ID devices return IDcodes differently.
1. Unzip the received file.
2. If the received DLL file is not already named filtercard.dll then rename it to filtercard.dll.
3. Copy the filtercard.dll file to the SafeCom installation folder. The default folder is: C:\Program Files\SafeCom\SafeComG4\
4. Restart the SafeCom Service.
137

SafeCom G4 Administrator's Manual Version: 10.520.11.221
The above steps should be performed on all SafeCom servers. It should also be performed on all thecomputers that have SafeCom Administrator installed and a card reader connected (Install a card readeron a computer).
138
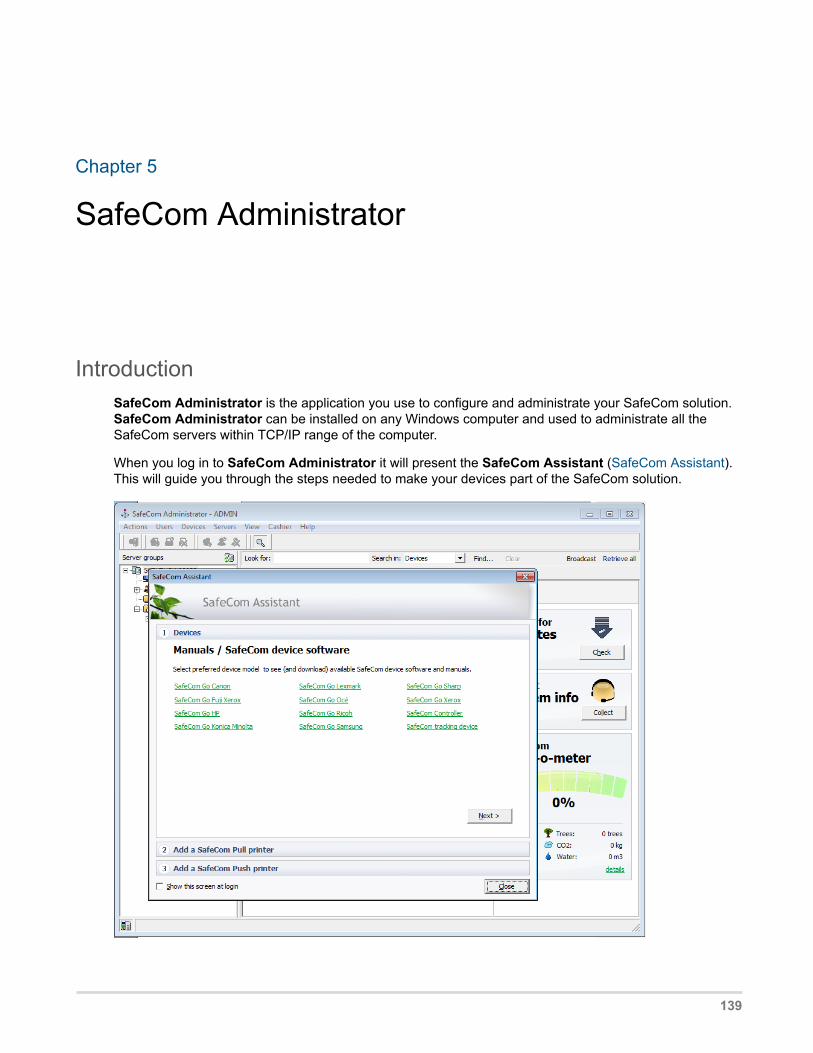
Chapter 5
SafeCom Administrator
IntroductionSafeCom Administrator is the application you use to configure and administrate your SafeCom solution.SafeCom Administrator can be installed on any Windows computer and used to administrate all theSafeCom servers within TCP/IP range of the computer.
When you log in to SafeCom Administrator it will present the SafeCom Assistant (SafeCom Assistant).This will guide you through the steps needed to make your devices part of the SafeCom solution.
139
SafeCom G4 Administrator's Manual Version: 10.520.11.221
Install SafeCom AdministratorTo administrate your SafeCom solution from other computers, you simply install the SafeComAdministrator on those computers. If you want to install a local SafeCom Pull Printer or SafeCom PushPrinter on this computer also you must install SafeCom Client first (Add a SafeCom Pull Printer on clientcomputers).
1. Download the safecom_g4_x64_xxxx.exe file from the link supplied to you. The installation must beRun as administrator. When the installation program is launched click Next.
2. Click Advanced installation. Click Next.
3. Click Tools.
4. Check SafeCom Administrator. Follow the instructions on the screen or refer to Log in to SafeComAdministrator for details.
Log in to SafeCom Administrator1. Click Start, point to All Programs, SafeCom G4, and click SafeCom Administrator. Note: If you
want to restart SafeCom Administrator right after closing it, either wait for a few seconds or checkand ensure that the previous instance is no longer running in the background.
140
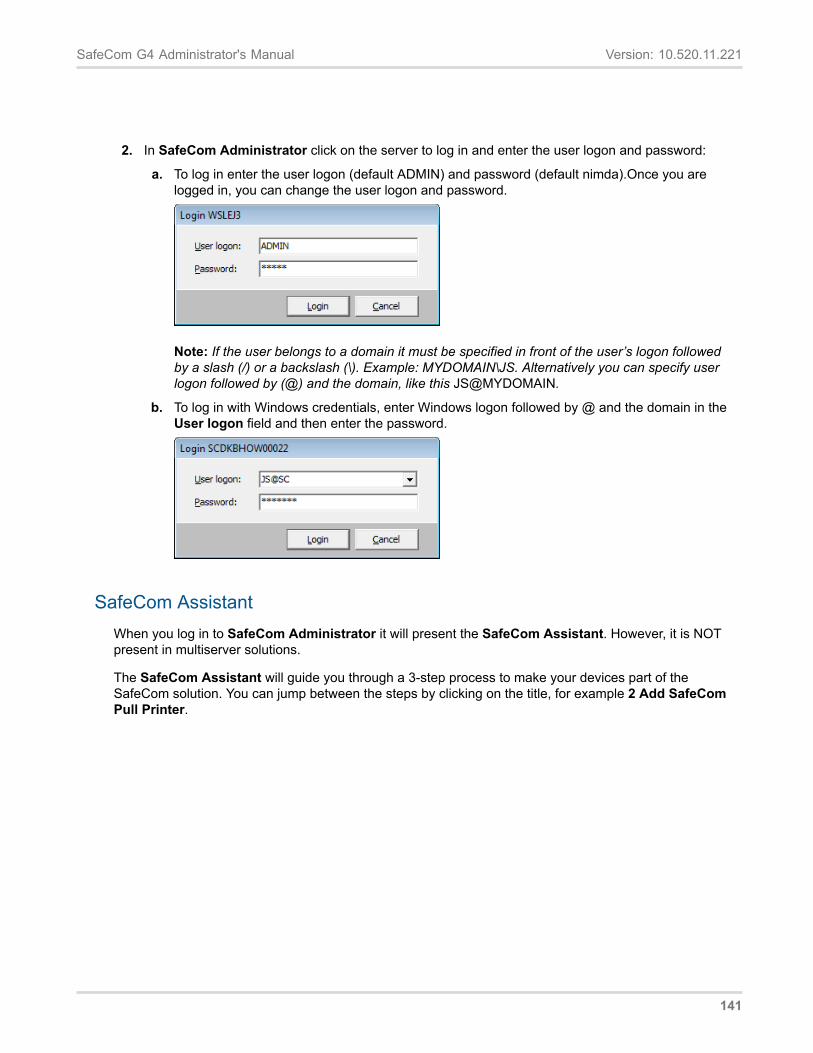
SafeCom G4 Administrator's Manual Version: 10.520.11.221
2. In SafeCom Administrator click on the server to log in and enter the user logon and password:
a. To log in enter the user logon (default ADMIN) and password (default nimda).Once you arelogged in, you can change the user logon and password.
Note: If the user belongs to a domain it must be specified in front of the user’s logon followedby a slash (/) or a backslash (\). Example: MYDOMAIN\JS. Alternatively you can specify userlogon followed by (@) and the domain, like this JS@MYDOMAIN.
b. To log in with Windows credentials, enter Windows logon followed by @ and the domain in theUser logon field and then enter the password.
SafeCom AssistantWhen you log in to SafeCom Administrator it will present the SafeCom Assistant. However, it is NOTpresent in multiserver solutions.
The SafeCom Assistant will guide you through a 3-step process to make your devices part of theSafeCom solution. You can jump between the steps by clicking on the title, for example 2 Add SafeComPull Printer.
141
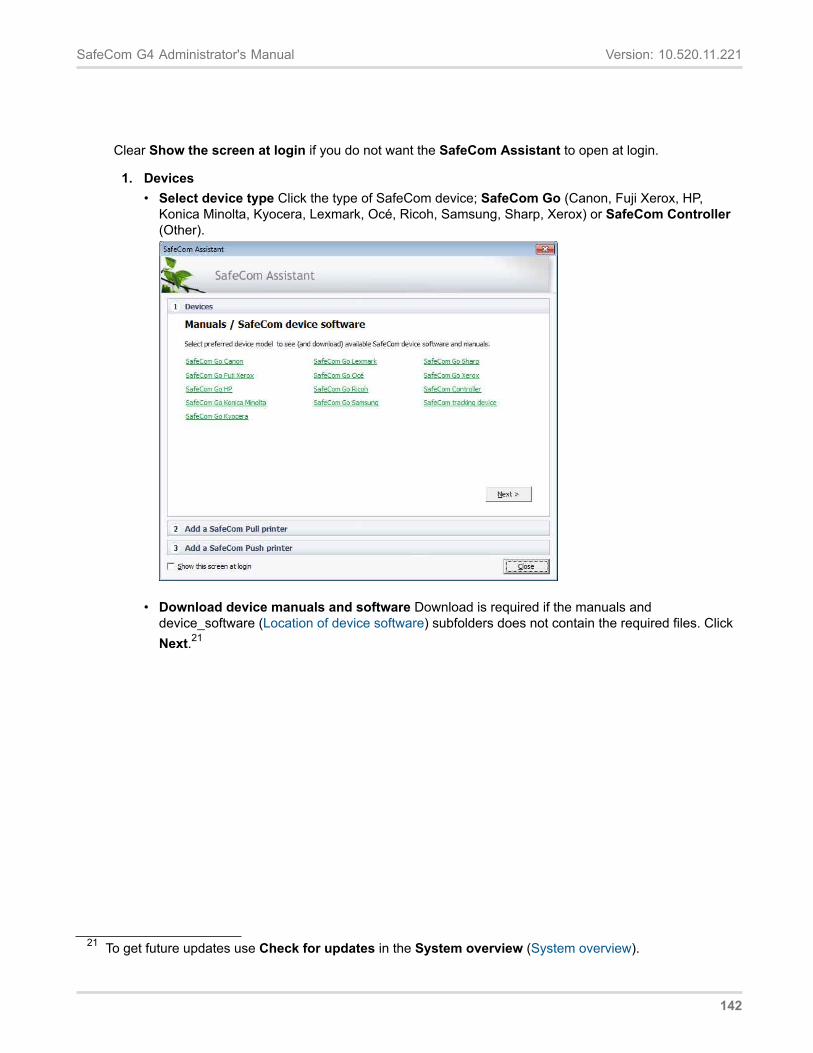
SafeCom G4 Administrator's Manual Version: 10.520.11.221
Clear Show the screen at login if you do not want the SafeCom Assistant to open at login.
1. Devices• Select device type Click the type of SafeCom device; SafeCom Go (Canon, Fuji Xerox, HP,
Konica Minolta, Kyocera, Lexmark, Océ, Ricoh, Samsung, Sharp, Xerox) or SafeCom Controller(Other).
• Download device manuals and software Download is required if the manuals anddevice_software (Location of device software) subfolders does not contain the required files. ClickNext.21
21 To get future updates use Check for updates in the System overview (System overview).
142
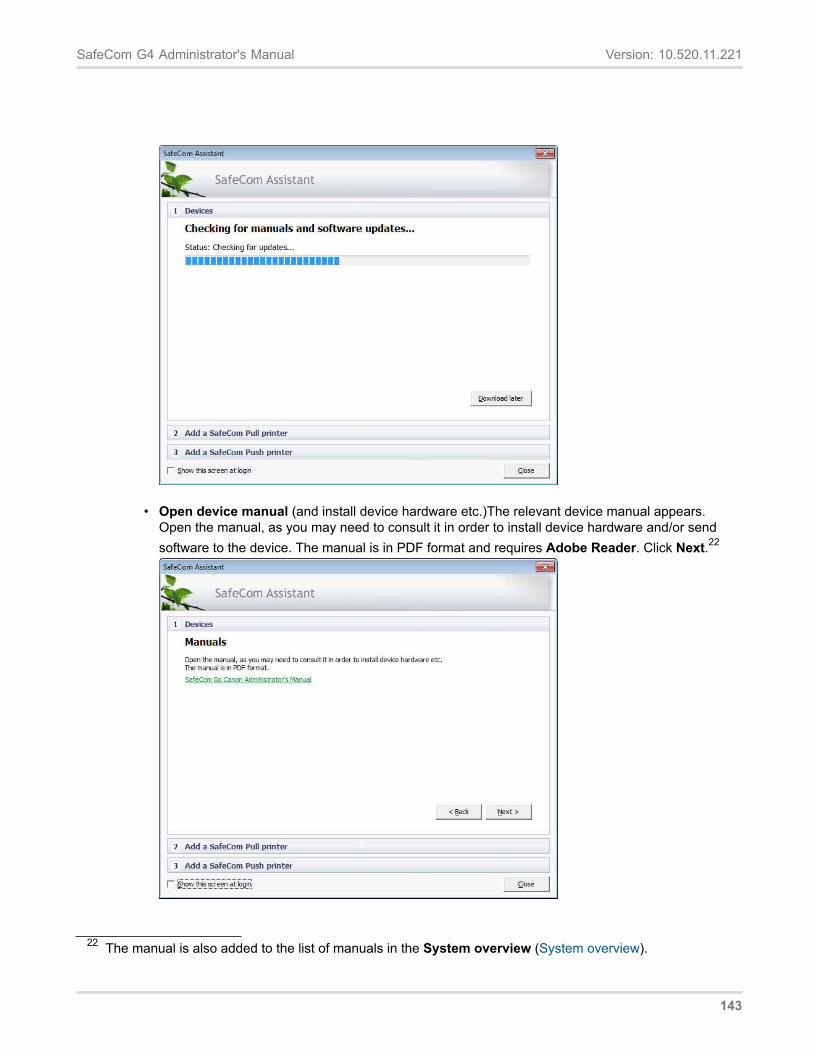
SafeCom G4 Administrator's Manual Version: 10.520.11.221
• Open device manual (and install device hardware etc.)The relevant device manual appears.Open the manual, as you may need to consult it in order to install device hardware and/or sendsoftware to the device. The manual is in PDF format and requires Adobe Reader. Click Next.22
22 The manual is also added to the list of manuals in the System overview (System overview).
143
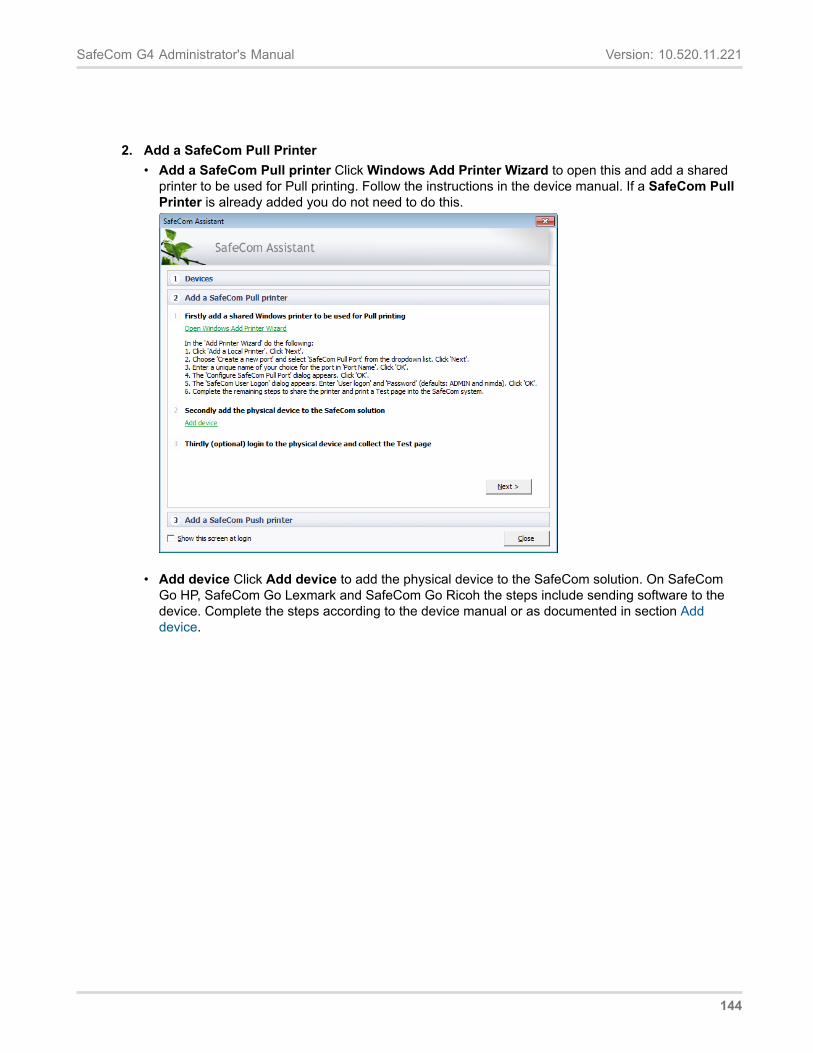
SafeCom G4 Administrator's Manual Version: 10.520.11.221
2. Add a SafeCom Pull Printer• Add a SafeCom Pull printer Click Windows Add Printer Wizard to open this and add a shared
printer to be used for Pull printing. Follow the instructions in the device manual. If a SafeCom PullPrinter is already added you do not need to do this.
• Add device Click Add device to add the physical device to the SafeCom solution. On SafeComGo HP, SafeCom Go Lexmark and SafeCom Go Ricoh the steps include sending software to thedevice. Complete the steps according to the device manual or as documented in section Adddevice.
144
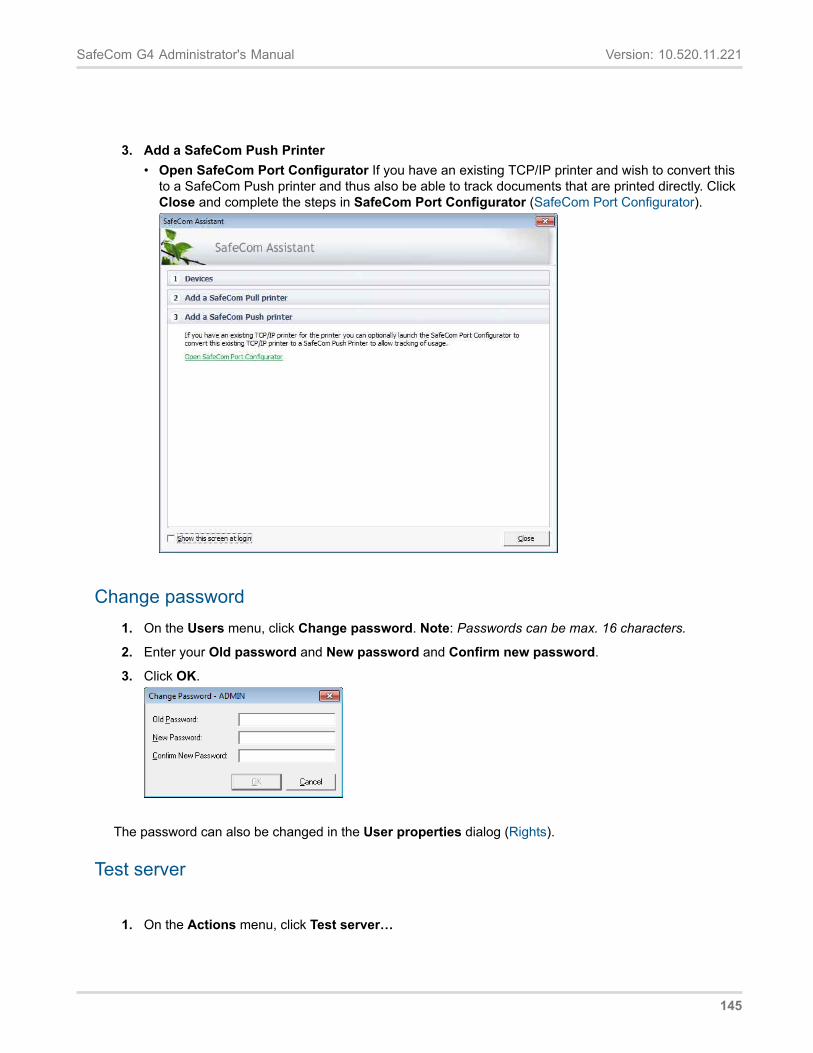
SafeCom G4 Administrator's Manual Version: 10.520.11.221
3. Add a SafeCom Push Printer• Open SafeCom Port Configurator If you have an existing TCP/IP printer and wish to convert this
to a SafeCom Push printer and thus also be able to track documents that are printed directly. ClickClose and complete the steps in SafeCom Port Configurator (SafeCom Port Configurator).
Change password1. On the Users menu, click Change password. Note: Passwords can be max. 16 characters.
2. Enter your Old password and New password and Confirm new password.
3. Click OK.
The password can also be changed in the User properties dialog (Rights).
Test server
1. On the Actions menu, click Test server…
145
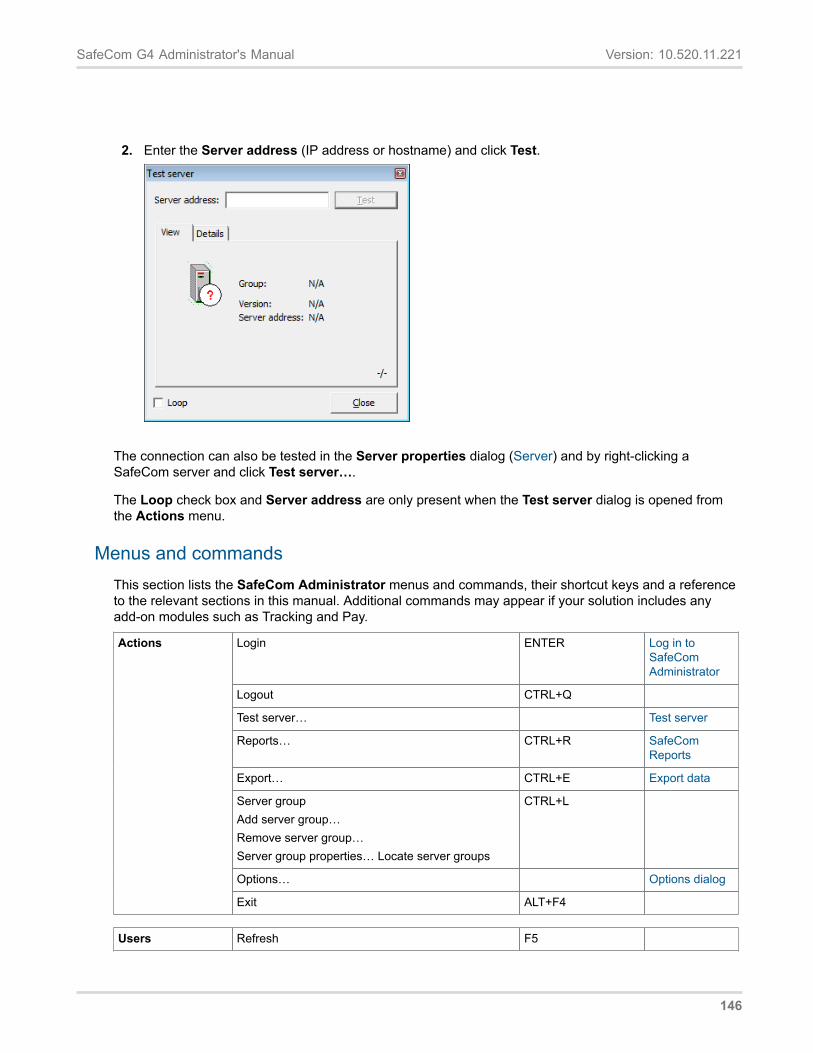
SafeCom G4 Administrator's Manual Version: 10.520.11.221
2. Enter the Server address (IP address or hostname) and click Test.
The connection can also be tested in the Server properties dialog (Server) and by right-clicking aSafeCom server and click Test server….
The Loop check box and Server address are only present when the Test server dialog is opened fromthe Actions menu.
Menus and commandsThis section lists the SafeCom Administrator menus and commands, their shortcut keys and a referenceto the relevant sections in this manual. Additional commands may appear if your solution includes anyadd-on modules such as Tracking and Pay.
Login ENTER Log in toSafeComAdministrator
Logout CTRL+Q
Test server… Test server
Reports… CTRL+R SafeComReports
Export… CTRL+E Export data
Server groupAdd server group…Remove server group…Server group properties… Locate server groups
CTRL+L
Options… Options dialog
Actions
Exit ALT+F4
Users Refresh F5
146
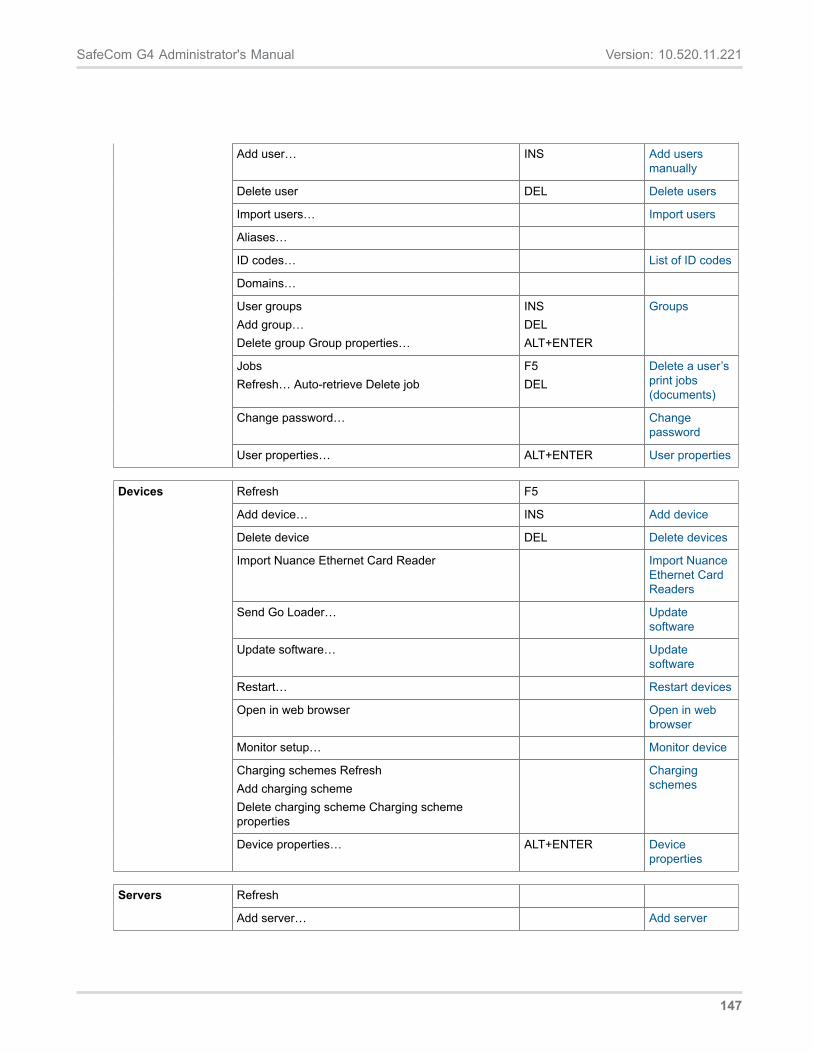
SafeCom G4 Administrator's Manual Version: 10.520.11.221
Add user… INS Add usersmanually
Delete user DEL Delete users
Import users… Import users
Aliases…
ID codes… List of ID codes
Domains…
User groupsAdd group…Delete group Group properties…
INSDELALT+ENTER
Groups
JobsRefresh… Auto-retrieve Delete job
F5DEL
Delete a user’sprint jobs(documents)
Change password… Changepassword
User properties… ALT+ENTER User properties
Refresh F5
Add device… INS Add device
Delete device DEL Delete devices
Import Nuance Ethernet Card Reader Import NuanceEthernet CardReaders
Send Go Loader… Updatesoftware
Update software… Updatesoftware
Restart… Restart devices
Open in web browser Open in webbrowser
Monitor setup… Monitor device
Charging schemes RefreshAdd charging schemeDelete charging scheme Charging schemeproperties
Chargingschemes
Devices
Device properties… ALT+ENTER Deviceproperties
RefreshServers
Add server… Add server
147
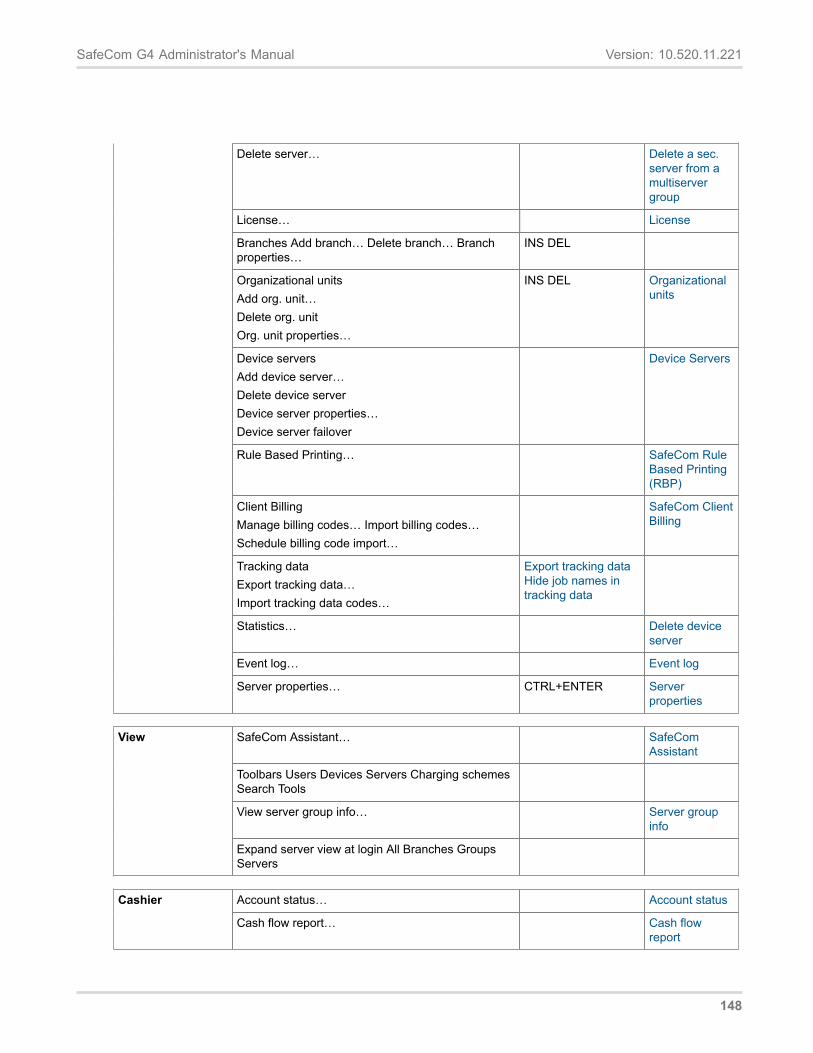
SafeCom G4 Administrator's Manual Version: 10.520.11.221
Delete server… Delete a sec. server from a multiserver group
License… License
Branches Add branch… Delete branch… Branchproperties…
INS DEL
Organizational unitsAdd org. unit…Delete org. unitOrg. unit properties…
INS DEL Organizationalunits
Device serversAdd device server…Delete device serverDevice server properties…Device server failover
Device Servers
Rule Based Printing… SafeCom RuleBased Printing(RBP)
Client BillingManage billing codes… Import billing codes…Schedule billing code import…
SafeCom ClientBilling
Tracking dataExport tracking data…Import tracking data codes…
Export tracking dataHide job names intracking data
Statistics… Delete deviceserver
Event log… Event log
Server properties… CTRL+ENTER Serverproperties
SafeCom Assistant… SafeComAssistant
Toolbars Users Devices Servers Charging schemesSearch Tools
View server group info… Server groupinfo
View
Expand server view at login All Branches GroupsServers
Account status… Account statusCashier
Cash flow report… Cash flowreport
148
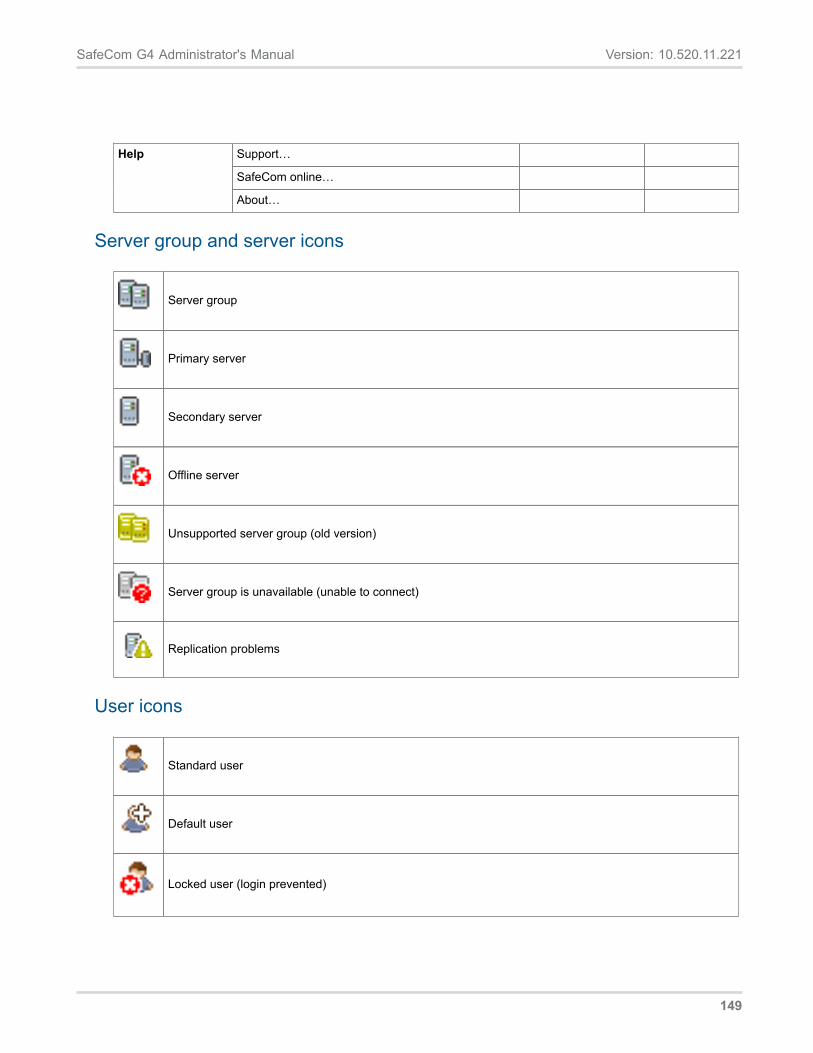
SafeCom G4 Administrator's Manual Version: 10.520.11.221
Support…
SafeCom online…
Help
About…
Server group and server icons
Server group
Primary server
Secondary server
Offline server
Unsupported server group (old version)
Server group is unavailable (unable to connect)
Replication problems
User icons
Standard user
Default user
Locked user (login prevented)
149
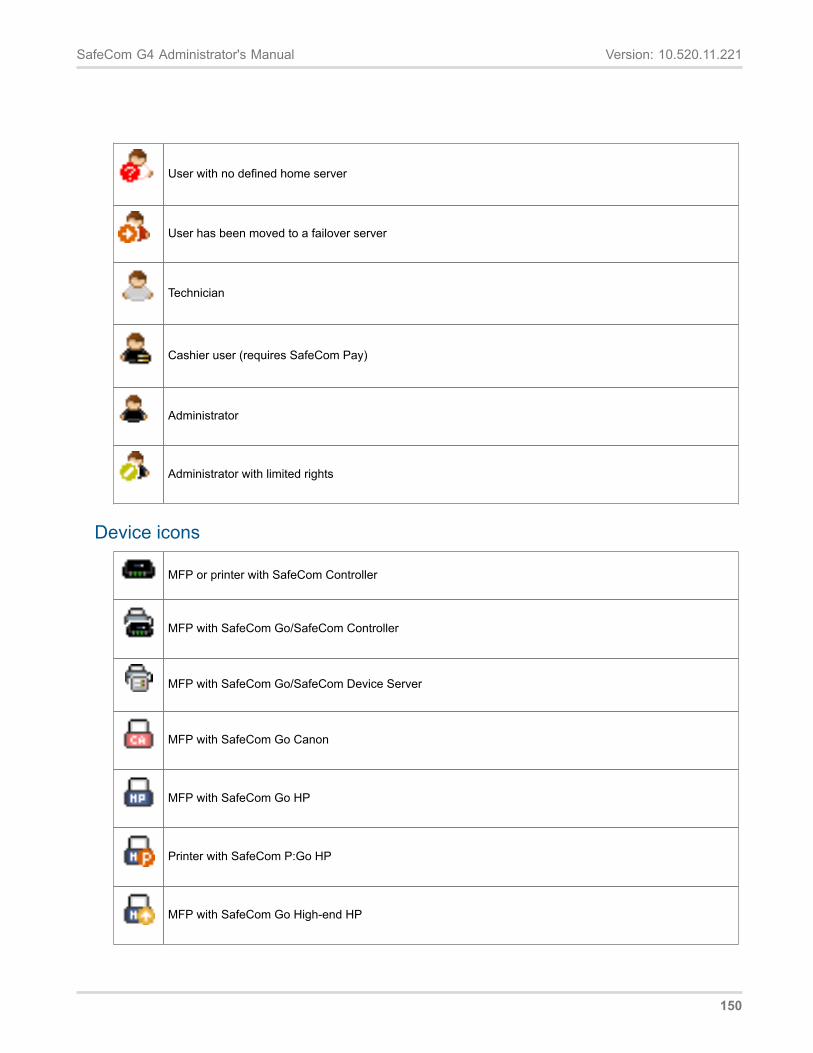
SafeCom G4 Administrator's Manual Version: 10.520.11.221
User with no defined home server
User has been moved to a failover server
Technician
Cashier user (requires SafeCom Pay)
Administrator
Administrator with limited rights
Device icons
MFP or printer with SafeCom Controller
MFP with SafeCom Go/SafeCom Controller
MFP with SafeCom Go/SafeCom Device Server
MFP with SafeCom Go Canon
MFP with SafeCom Go HP
Printer with SafeCom P:Go HP
MFP with SafeCom Go High-end HP
150
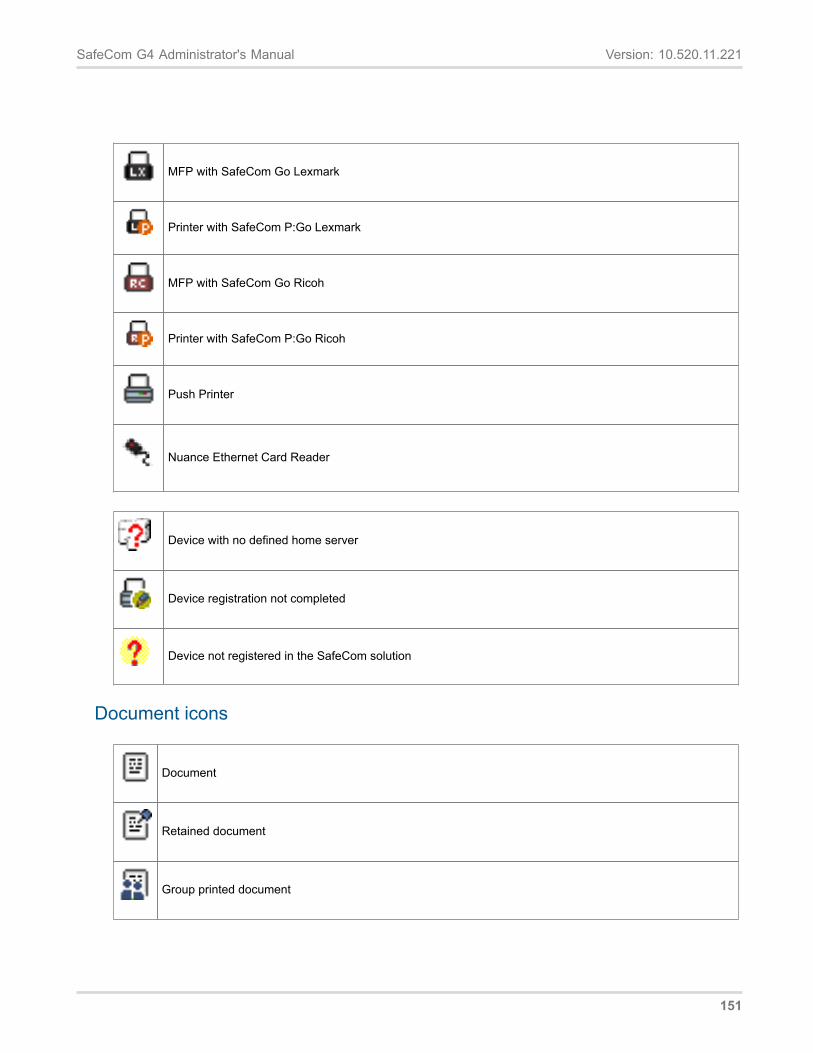
SafeCom G4 Administrator's Manual Version: 10.520.11.221
MFP with SafeCom Go Lexmark
Printer with SafeCom P:Go Lexmark
MFP with SafeCom Go Ricoh
Printer with SafeCom P:Go Ricoh
Push Printer
Nuance Ethernet Card Reader
Device with no defined home server
Device registration not completed
Device not registered in the SafeCom solution
Document icons
Document
Retained document
Group printed document
151
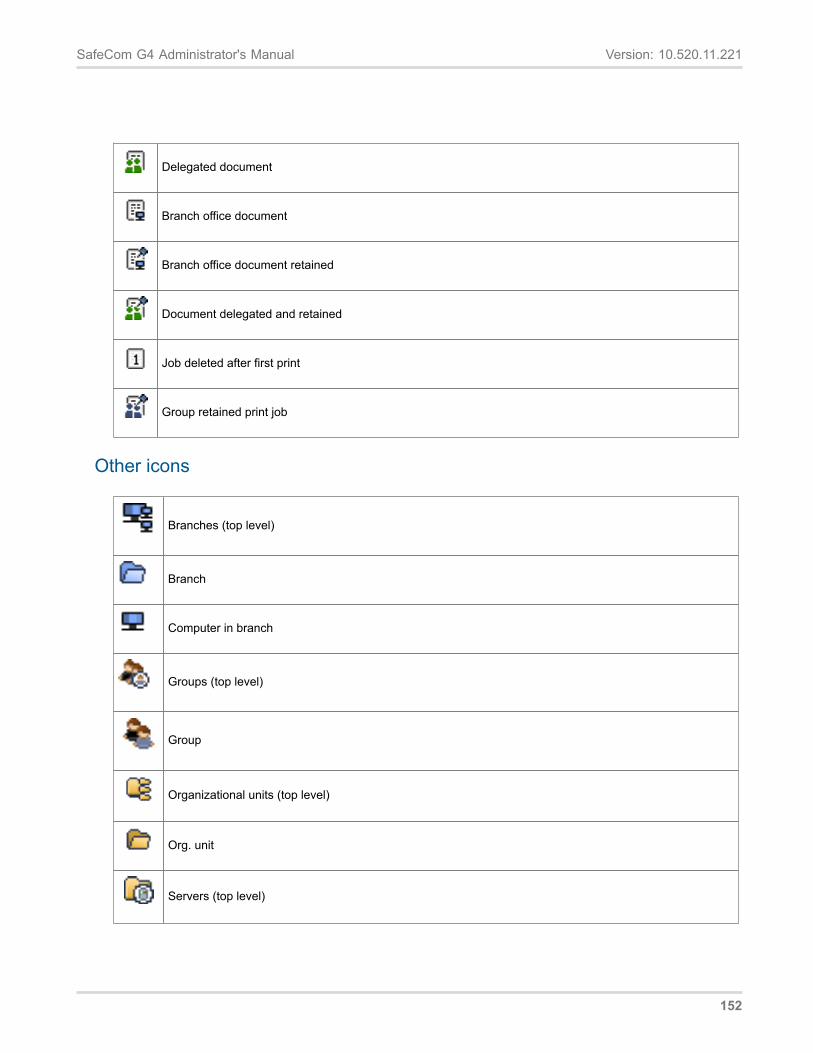
SafeCom G4 Administrator's Manual Version: 10.520.11.221
Delegated document
Branch office document
Branch office document retained
Document delegated and retained
Job deleted after first print
Group retained print job
Other icons
Branches (top level)
Branch
Computer in branch
Groups (top level)
Group
Organizational units (top level)
Org. unit
Servers (top level)
152
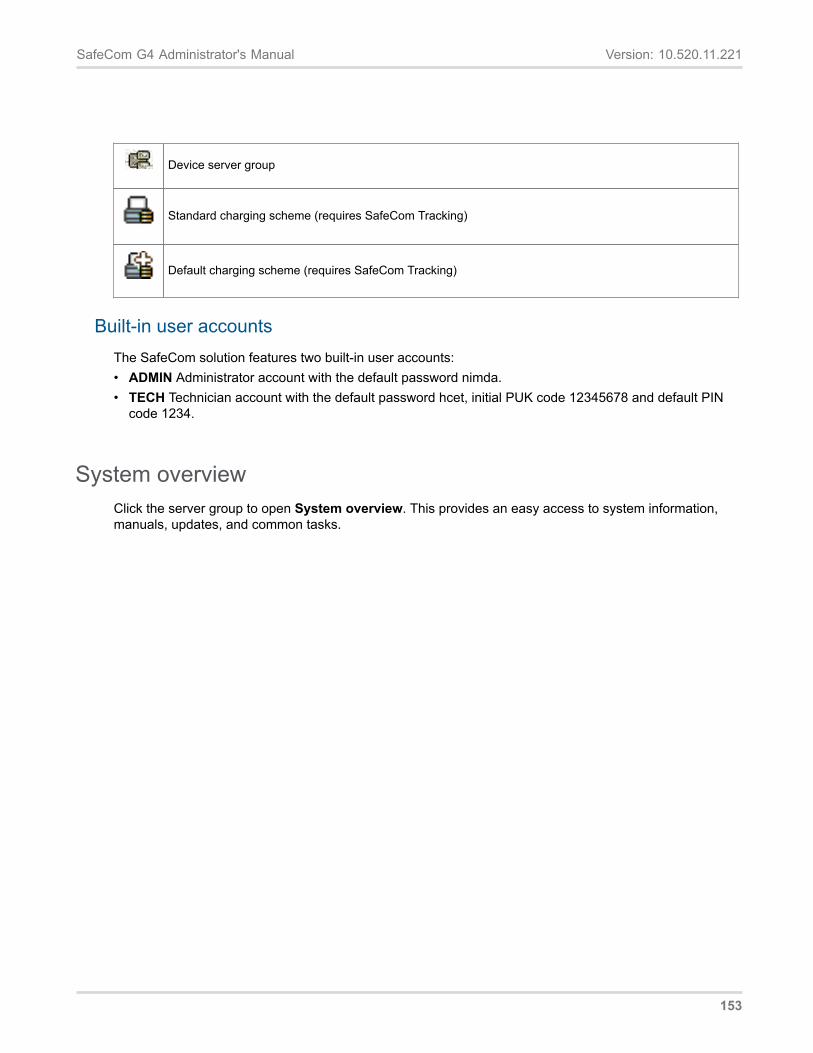
SafeCom G4 Administrator's Manual Version: 10.520.11.221
Device server group
Standard charging scheme (requires SafeCom Tracking)
Default charging scheme (requires SafeCom Tracking)
Built-in user accountsThe SafeCom solution features two built-in user accounts:• ADMIN Administrator account with the default password nimda.• TECH Technician account with the default password hcet, initial PUK code 12345678 and default PIN
code 1234.
System overviewClick the server group to open System overview. This provides an easy access to system information,manuals, updates, and common tasks.
153

SafeCom G4 Administrator's Manual Version: 10.520.11.221
Manuals List the relevant manuals. Click the manual title to open it in Adobe Reader. Click the Manuals arrow icon to configure the manuals of interest. • SafeCom G4 Administrator’s Manual D60650 (this manual) is the initially listed manual. Relevant
SafeCom Go Administrator’s Manuals and others are added to the list as you use the SafeCom Assistant (SafeCom Assistant).
Users Show the total number of users (initially two). Click the Users arrow icon to open the list of users on the primary server. • Default user shows the user logon of the defined default user (Default user). Click the user logon to
open the User properties dialog.
154
SafeCom G4 Administrator's Manual Version: 10.520.11.221
• Click User import to open the Scheduled user import dialog (Import users). The date and time of the next scheduled user import is shown.
Devices Show the total number of devices. Click the Devices arrow icon to open the list of devices on the primary server. • Default charging scheme 1 and Default charging scheme 2. Click the respective names to open the
Charging scheme dialog (Charging schemes). • Click Add device (Add device) to configure and register the device on the SafeCom primary server.
This function is not available in a multiserver solution, as you would normally have devices registered on the secondary ones.
• Click Windows Add Printer Wizard to open this. • Click SafeCom Port Configurator to open this (SafeCom Port Configurator).
Servers Servers show information about the primary (and secondary) servers. Click the Servers arrow icon to open the list of servers.
Click the License arrow icon to open the License dialog (License).
Device Servers Device Servers show information about the device servers. Click the Device Servers arrow icon to open the list of device servers and device server groups.
Right-click a device server in the list to access the grouping feature (Grouping device servers).
Each device has a specific device server as “home” server (the device server to which the device was added to), and by default all information and data of a device is handled by the home server of that device. In case of device failover or device server fallback, the members of the device group distribute the incoming load evenly.
Note: If device failover occurs while a user is logged in, the fallback to the “home” device server does not occur until the user logs out and the device goes into idle state; this prevents user session interrupts.
Collect system info In Collect System Info click Collect.
Check for updates In Check for updates click Check. A connection is established to the SafeCom Update Server to check for new updates of manuals, device software and release notes. Click Run in background to have the files downloaded while you continue your work. If access to the Internet requires use of a Proxy server this can specified on the Network tab in the Options dialog (Network).
Note: If the Check for updates function is used on a cluster, you are advised to update both nodes.
155
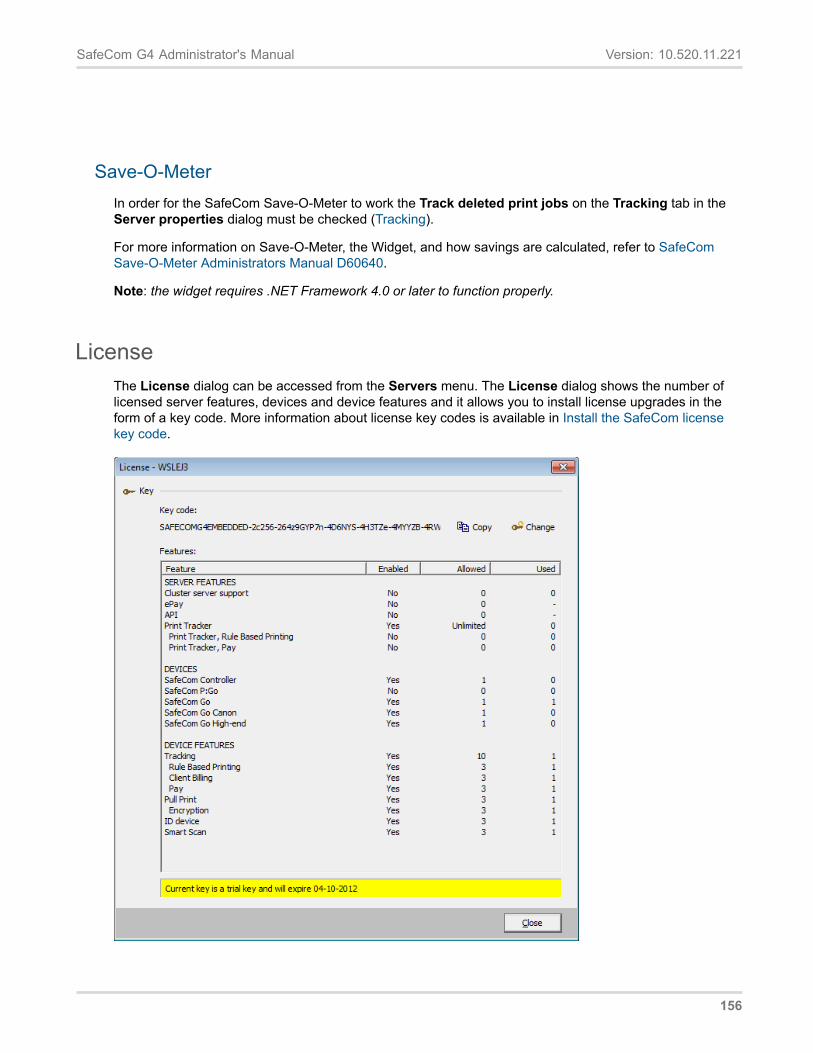
SafeCom G4 Administrator's Manual Version: 10.520.11.221
Save-O-MeterIn order for the SafeCom Save-O-Meter to work the Track deleted print jobs on the Tracking tab in theServer properties dialog must be checked (Tracking).
For more information on Save-O-Meter, the Widget, and how savings are calculated, refer to SafeComSave-O-Meter Administrators Manual D60640.
Note: the widget requires .NET Framework 4.0 or later to function properly.
LicenseThe License dialog can be accessed from the Servers menu. The License dialog shows the number oflicensed server features, devices and device features and it allows you to install license upgrades in theform of a key code. More information about license key codes is available in Install the SafeCom licensekey code.
156
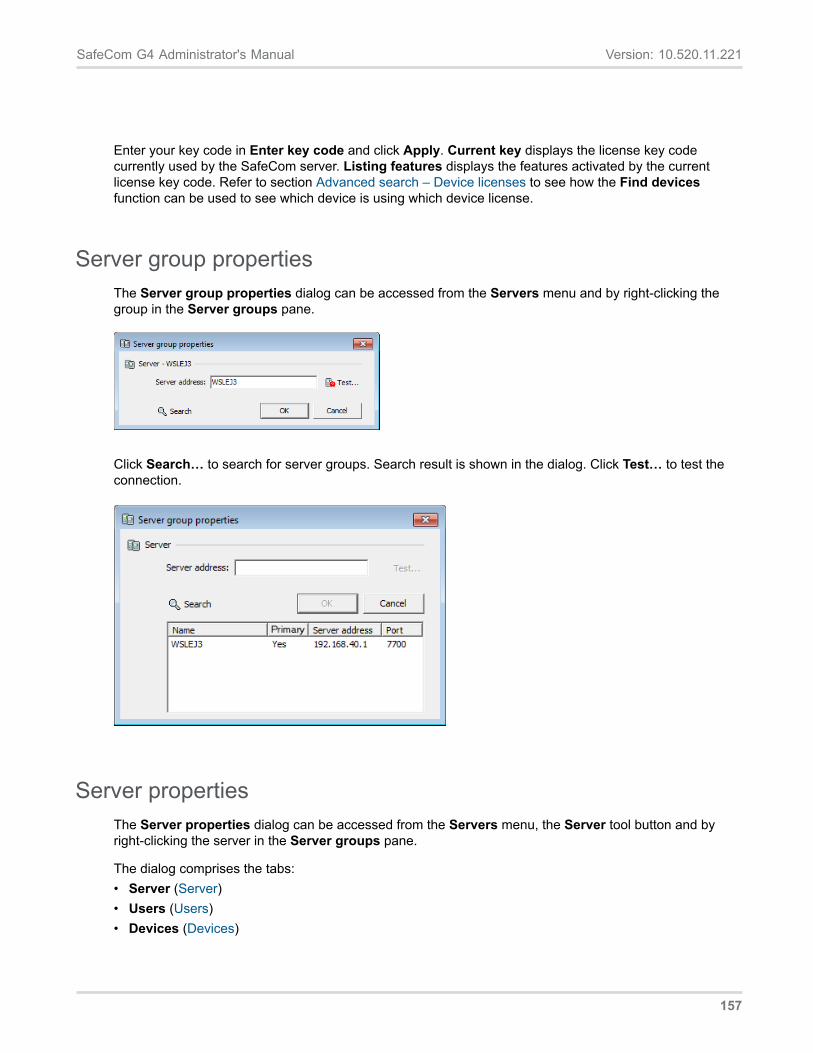
SafeCom G4 Administrator's Manual Version: 10.520.11.221
Enter your key code in Enter key code and click Apply. Current key displays the license key codecurrently used by the SafeCom server. Listing features displays the features activated by the currentlicense key code. Refer to section Advanced search – Device licenses to see how the Find devicesfunction can be used to see which device is using which device license.
Server group propertiesThe Server group properties dialog can be accessed from the Servers menu and by right-clicking thegroup in the Server groups pane.
Click Search… to search for server groups. Search result is shown in the dialog. Click Test… to test theconnection.
Server propertiesThe Server properties dialog can be accessed from the Servers menu, the Server tool button and byright-clicking the server in the Server groups pane.
The dialog comprises the tabs:• Server (Server)• Users (Users)• Devices (Devices)
157
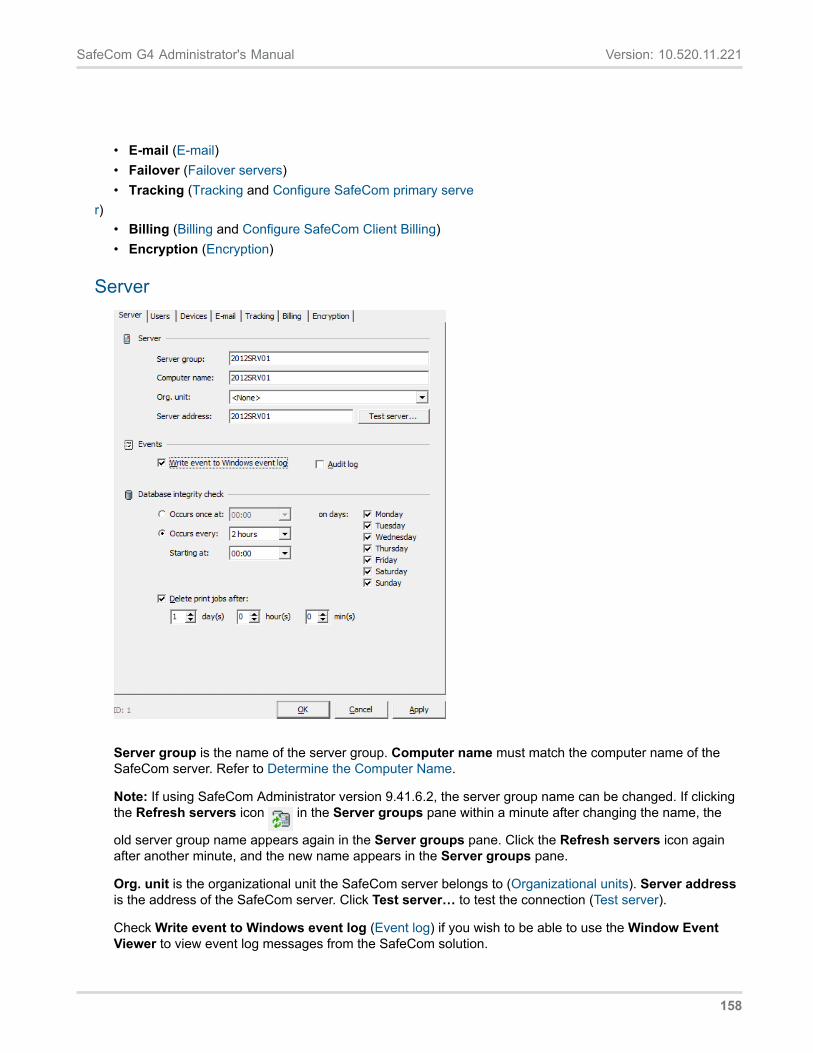
SafeCom G4 Administrator's Manual Version: 10.520.11.221
• E-mail (E-mail) • Failover (Failover servers) • Tracking (Tracking and Configure SafeCom primary serve
r) • Billing (Billing and Configure SafeCom Client Billing) • Encryption (Encryption)
Server
Server group is the name of the server group. Computer name must match the computer name of theSafeCom server. Refer to Determine the Computer Name.
Note: If using SafeCom Administrator version 9.41.6.2, the server group name can be changed. If clickingthe Refresh servers icon in the Server groups pane within a minute after changing the name, the
old server group name appears again in the Server groups pane. Click the Refresh servers icon againafter another minute, and the new name appears in the Server groups pane.
Org. unit is the organizational unit the SafeCom server belongs to (Organizational units). Server addressis the address of the SafeCom server. Click Test server… to test the connection (Test server).
Check Write event to Windows event log (Event log) if you wish to be able to use the Window EventViewer to view event log messages from the SafeCom solution.
158
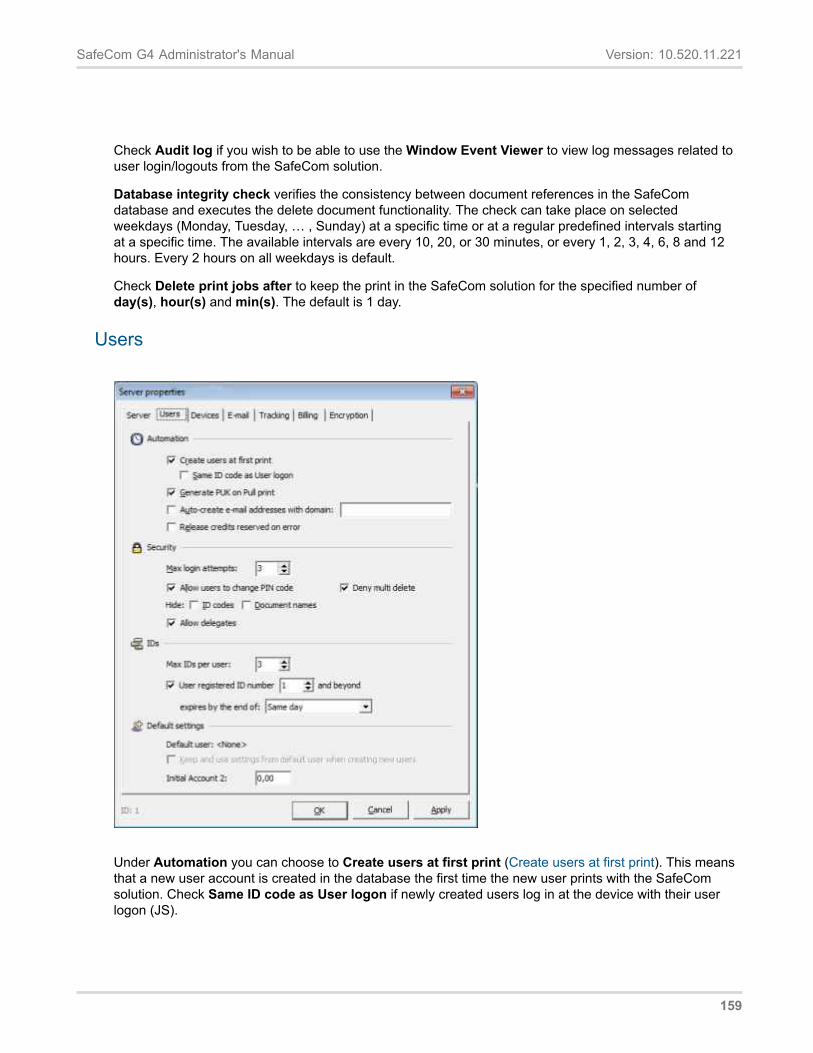
SafeCom G4 Administrator's Manual Version: 10.520.11.221
Check Audit log if you wish to be able to use the Window Event Viewer to view log messages related touser login/logouts from the SafeCom solution.
Database integrity check verifies the consistency between document references in the SafeComdatabase and executes the delete document functionality. The check can take place on selectedweekdays (Monday, Tuesday, … , Sunday) at a specific time or at a regular predefined intervals startingat a specific time. The available intervals are every 10, 20, or 30 minutes, or every 1, 2, 3, 4, 6, 8 and 12hours. Every 2 hours on all weekdays is default.
Check Delete print jobs after to keep the print in the SafeCom solution for the specified number ofday(s), hour(s) and min(s). The default is 1 day.
Users
Under Automation you can choose to Create users at first print (Create users at first print). This meansthat a new user account is created in the database the first time the new user prints with the SafeComsolution. Check Same ID code as User logon if newly created users log in at the device with their userlogon (JS).
159
SafeCom G4 Administrator's Manual Version: 10.520.11.221
Check Generate PUK on Pull print if the PUK code should be generated on Pull print. The PUK code can be e-mailed (E-mail).
Check Create e-mail addresses with domain to combine the user logon (JS) and the E-mail domain (safecom.eu) into the user’s valid e-mail address ([email protected]).
Check Release credits reserved on error to give back users reserved credits if an error occurs. This is only relevant if SafeCom Pay (Ensure users pay) is used.
Under Security you can specify Max login attempts to control the number of times the user can try to log on with an invalid PIN code, before the account is locked. The default is 3 times. The Administrator can unlock a locked user account by clearing Prevent login on the Identification tab in the User properties dialog (Identification).
Note: The max login attempts do not apply to users with Administrator rights on the device side. The setting does affect scAdmin, thus administrators can lock themselves out if the max login attempts are exceeded. Ensure that you set up your system carefully, use multiple administrator accounts to be able tounlock locked administrator accounts.
Check Allow users to change PIN code to allow users to change their PIN code through the SafeCom G4 Web Interface and SafeCom-enabled devices (restrictions may apply). Do not check this if you wish to manage PIN codes centrally.
Check Deny multi delete to prevent deleting multiple devices and users (This option is only editable for administrators with full rights for users).
Check ID codes to hide user codes and card numbers in SafeCom Administrator to all users except the users with administrator rights (Hide ID codes). The administrators are still able to see ID codes andexport these.
Check Document names to hide document names in SafeCom Administrator. When this is checked the Document name column in the list of a user’s pending jobs is not visible for users that do not have administrator rights (Hide document names).
Check Allow delegates to permit users to delegate or accept delegation of print jobs. Allow delegates is not selected by default.
Under IDs you can specify the Max IDs per user. By default there is one ID per user. The IDs control is not present in the Server properties dialog of SafeCom secondary servers. You can also specify an expiration date for the user ID via the expires by the end of dropdown list.
Under Default settings it shows if a default user is defined (Default user). If there is a default user you can choose to Keep default user and use settings when creating new users. You can select the Default user by right-clicking a user with Standard rights in the list of users.
In the list of user the default user is shown with a plus sign:
Initial account 2 is only relevant if SafeCom Pay (Ensure users pay) is used.
Devices
160
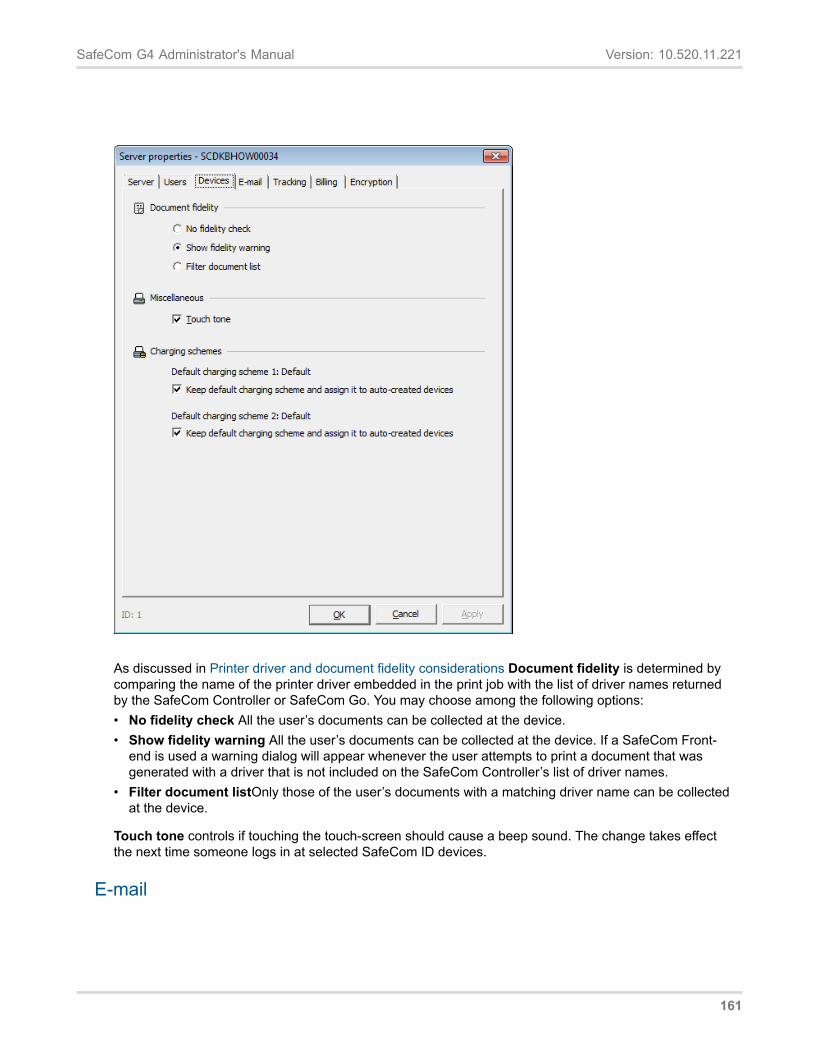
SafeCom G4 Administrator's Manual Version: 10.520.11.221
As discussed in Printer driver and document fidelity considerations Document fidelity is determined bycomparing the name of the printer driver embedded in the print job with the list of driver names returnedby the SafeCom Controller or SafeCom Go. You may choose among the following options:• No fidelity check All the user’s documents can be collected at the device.• Show fidelity warning All the user’s documents can be collected at the device. If a SafeCom Front-
end is used a warning dialog will appear whenever the user attempts to print a document that wasgenerated with a driver that is not included on the SafeCom Controller’s list of driver names.
• Filter document listOnly those of the user’s documents with a matching driver name can be collectedat the device.
Touch tone controls if touching the touch-screen should cause a beep sound. The change takes effectthe next time someone logs in at selected SafeCom ID devices.
161
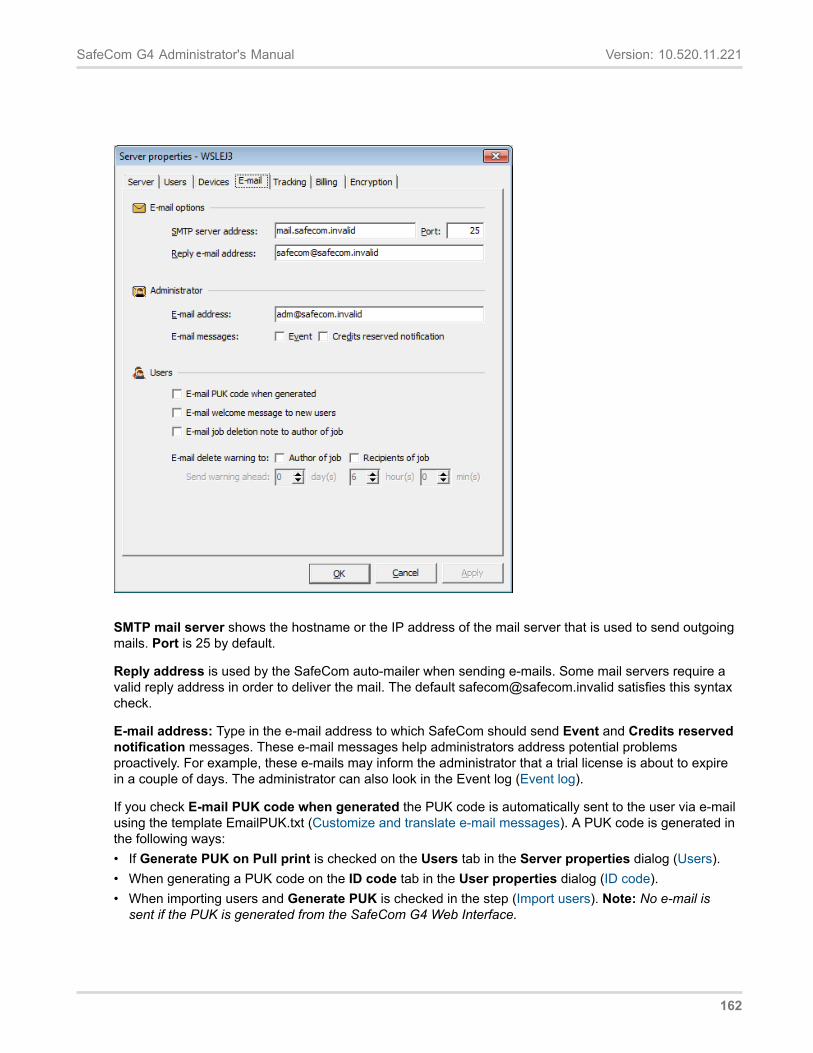
SafeCom G4 Administrator's Manual Version: 10.520.11.221
SMTP mail server shows the hostname or the IP address of the mail server that is used to send outgoingmails. Port is 25 by default.
Reply address is used by the SafeCom auto-mailer when sending e-mails. Some mail servers require avalid reply address in order to deliver the mail. The default [email protected] satisfies this syntaxcheck.
E-mail address: Type in the e-mail address to which SafeCom should send Event and Credits reservednotification messages. These e-mail messages help administrators address potential problemsproactively. For example, these e-mails may inform the administrator that a trial license is about to expirein a couple of days. The administrator can also look in the Event log (Event log).
If you check E-mail PUK code when generated the PUK code is automatically sent to the user via e-mailusing the template EmailPUK.txt (Customize and translate e-mail messages). A PUK code is generated inthe following ways:• If Generate PUK on Pull print is checked on the Users tab in the Server properties dialog (Users).• When generating a PUK code on the ID code tab in the User properties dialog (ID code).• When importing users and Generate PUK is checked in the step (Import users). Note: No e-mail is
sent if the PUK is generated from the SafeCom G4 Web Interface.
162
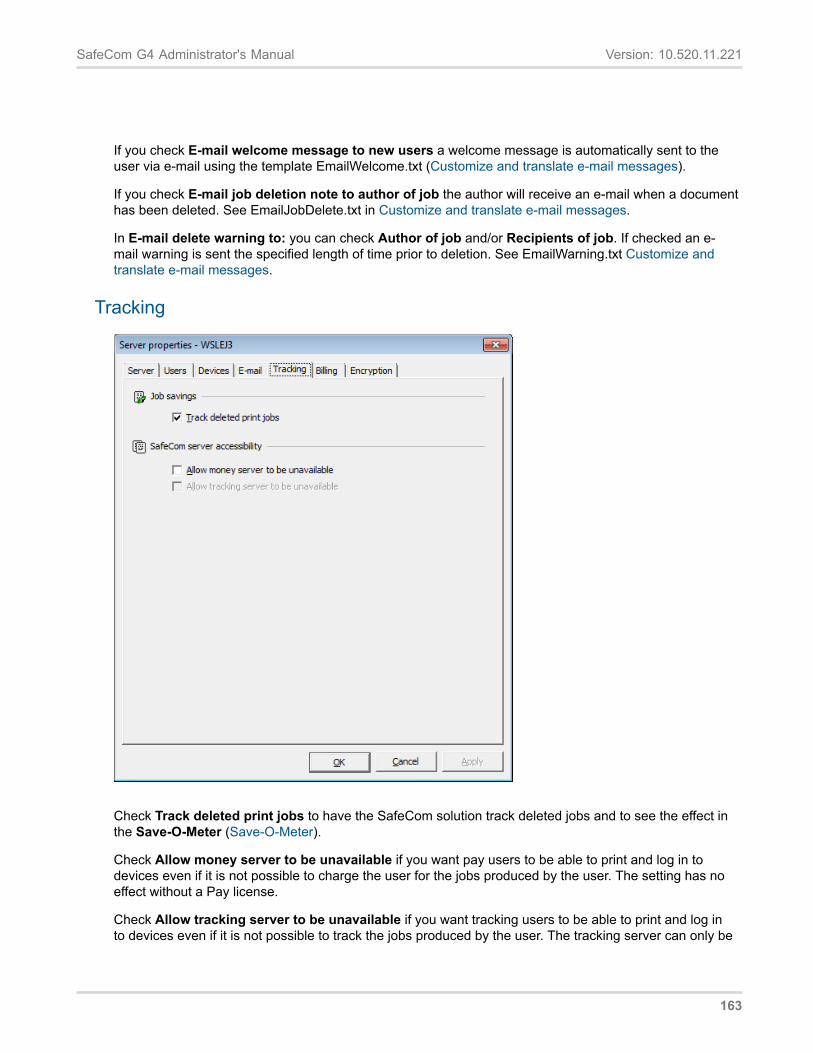
SafeCom G4 Administrator's Manual Version: 10.520.11.221
If you check E-mail welcome message to new users a welcome message is automatically sent to theuser via e-mail using the template EmailWelcome.txt (Customize and translate e-mail messages).
If you check E-mail job deletion note to author of job the author will receive an e-mail when a documenthas been deleted. See EmailJobDelete.txt in Customize and translate e-mail messages.
In E-mail delete warning to: you can check Author of job and/or Recipients of job. If checked an e-mail warning is sent the specified length of time prior to deletion. See EmailWarning.txt Customize andtranslate e-mail messages.
Tracking
Check Track deleted print jobs to have the SafeCom solution track deleted jobs and to see the effect inthe Save-O-Meter (Save-O-Meter).
Check Allow money server to be unavailable if you want pay users to be able to print and log in todevices even if it is not possible to charge the user for the jobs produced by the user. The setting has noeffect without a Pay license.
Check Allow tracking server to be unavailable if you want tracking users to be able to print and log into devices even if it is not possible to track the jobs produced by the user. The tracking server can only be
163
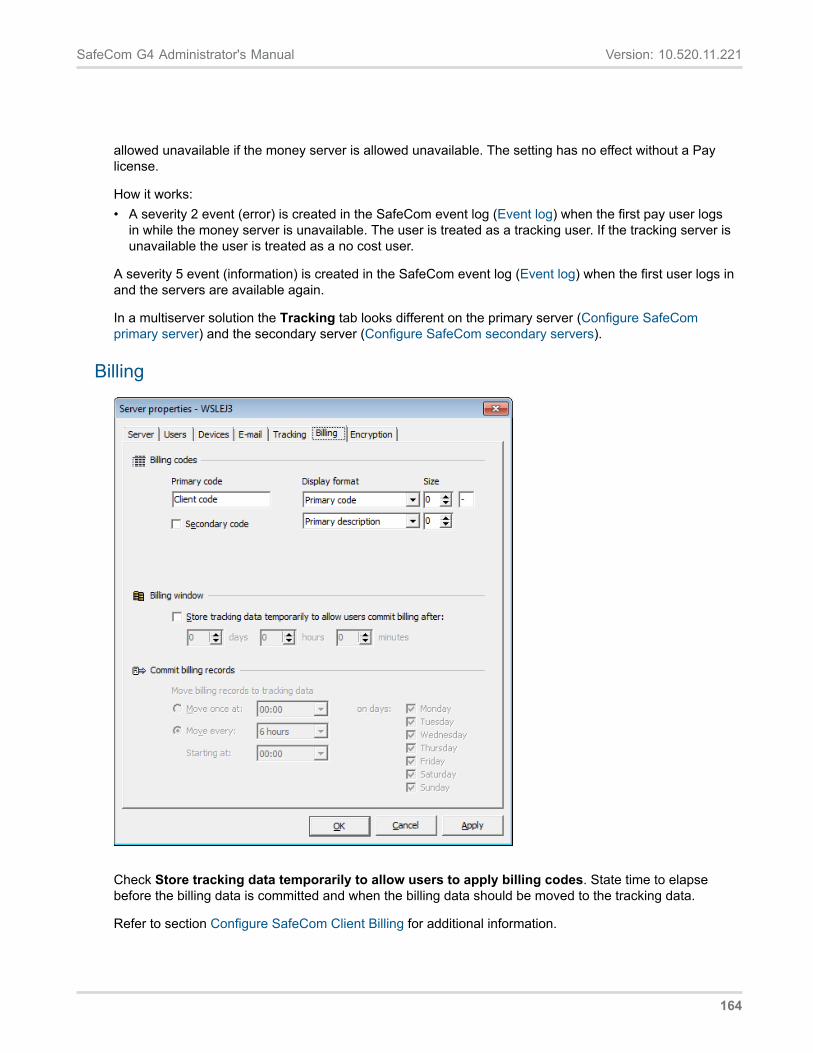
SafeCom G4 Administrator's Manual Version: 10.520.11.221
allowed unavailable if the money server is allowed unavailable. The setting has no effect without a Pay license.
How it works: • A severity 2 event (error) is created in the SafeCom event log (Event log) when the first pay user logs
in while the money server is unavailable. The user is treated as a tracking user. If the tracking server is unavailable the user is treated as a no cost user.
A severity 5 event (information) is created in the SafeCom event log (Event log) when the first user logs in and the servers are available again.
In a multiserver solution the Tracking tab looks different on the primary server (Configure SafeCom primary server) and the secondary server (Configure SafeCom secondary servers).
Billing
Check Store tracking data temporarily to allow users to apply billing codes. State time to elapsebefore the billing data is committed and when the billing data should be moved to the tracking data.
Refer to section Configure SafeCom Client Billing for additional information.
164
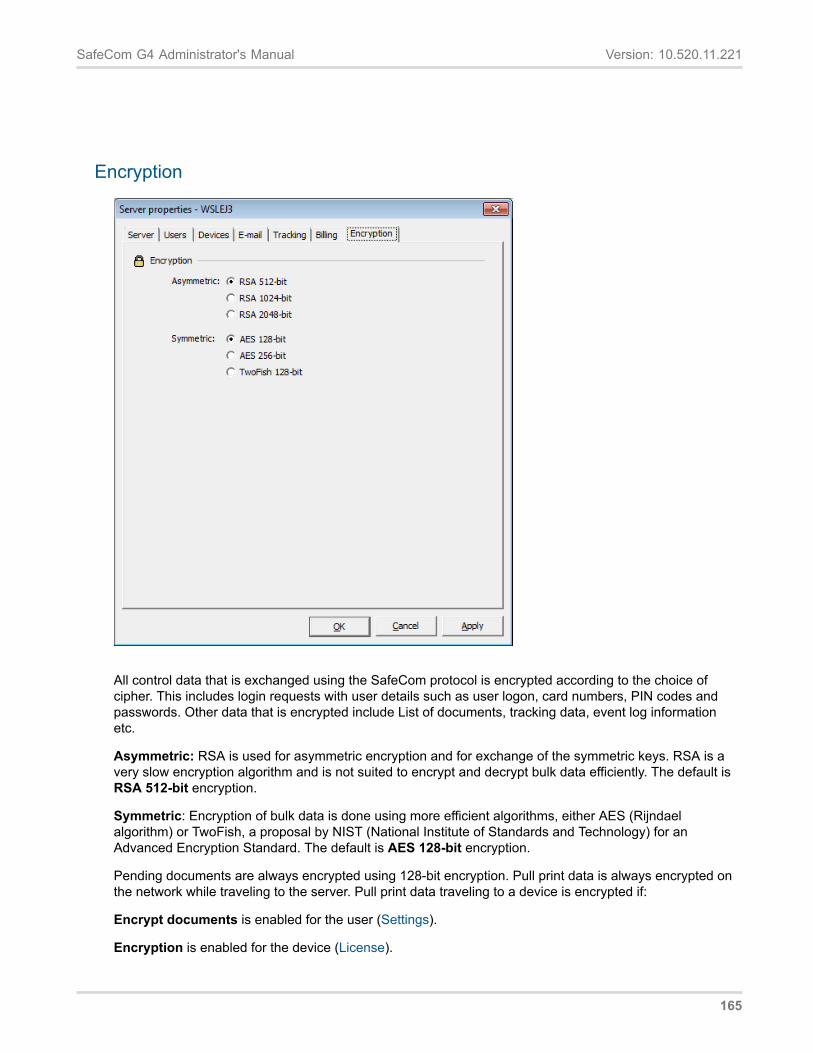
SafeCom G4 Administrator's Manual Version: 10.520.11.221
Encryption
All control data that is exchanged using the SafeCom protocol is encrypted according to the choice ofcipher. This includes login requests with user details such as user logon, card numbers, PIN codes andpasswords. Other data that is encrypted include List of documents, tracking data, event log informationetc.
Asymmetric: RSA is used for asymmetric encryption and for exchange of the symmetric keys. RSA is avery slow encryption algorithm and is not suited to encrypt and decrypt bulk data efficiently. The default isRSA 512-bit encryption.
Symmetric: Encryption of bulk data is done using more efficient algorithms, either AES (Rijndaelalgorithm) or TwoFish, a proposal by NIST (National Institute of Standards and Technology) for anAdvanced Encryption Standard. The default is AES 128-bit encryption.
Pending documents are always encrypted using 128-bit encryption. Pull print data is always encrypted onthe network while traveling to the server. Pull print data traveling to a device is encrypted if:
Encrypt documents is enabled for the user (Settings).
Encryption is enabled for the device (License).
165
SafeCom G4 Administrator's Manual Version: 10.520.11.221
User propertiesThe User properties dialog is accessed from the Users menu, the User tool button and by right-clicking auser in the Users list.
The dialog tabs are:• Identification (Identification)• Settings (Settings)• ID code (ID code)• Rights (Rights)• Member of (Member of)• Aliases (Aliases)• Delegates (Delegates)• Account (Account)• Billing (Billing)
By default any client will try to honor the encryption method and size that has been specified on the server. Clients include the SafeCom Print Client, SafeCom Pull Port, SafeCom Push Port, SafeCom Administrator, SafeCom Reports, SafeCom Web Interface, and SafeCom Go devices.
The SafeCom Go devices will take the processing power and memory of the device into consideration. This means that in most cases no additional configuration steps are required on the device. Refer to therelevant SafeCom Go Administrator’s Manual for additional information.
The choice of encryption on the server take effect once the SafeCom Service has been restarted on the server. When a secondary server is added it will by default get the same encryption settings as that of the primary server.
166

SafeCom G4 Administrator's Manual Version: 10.520.11.221
Identification
• Domain: The domain the user belongs to.• User logon: This is identical to the user’s Windows logon. The user logon is mandatory, maximum 20
characters and must be unique in regards to other user logons, user aliases, and group names. ID isthe database ID.
• Full name: The user’s name.• Home server: The SafeCom server the user belongs to. Only present if you have a SafeCom License
Key.• Org. unit: The organizational unit the user belongs to (Organizational units).• E-mail: The user’s e-mail address. The SafeCom solution can use the e-mail address to send welcome
message and PUK code message.• Description: Enter an optional description of the user.• Cost code: Use to enter a cost code of the user.
167
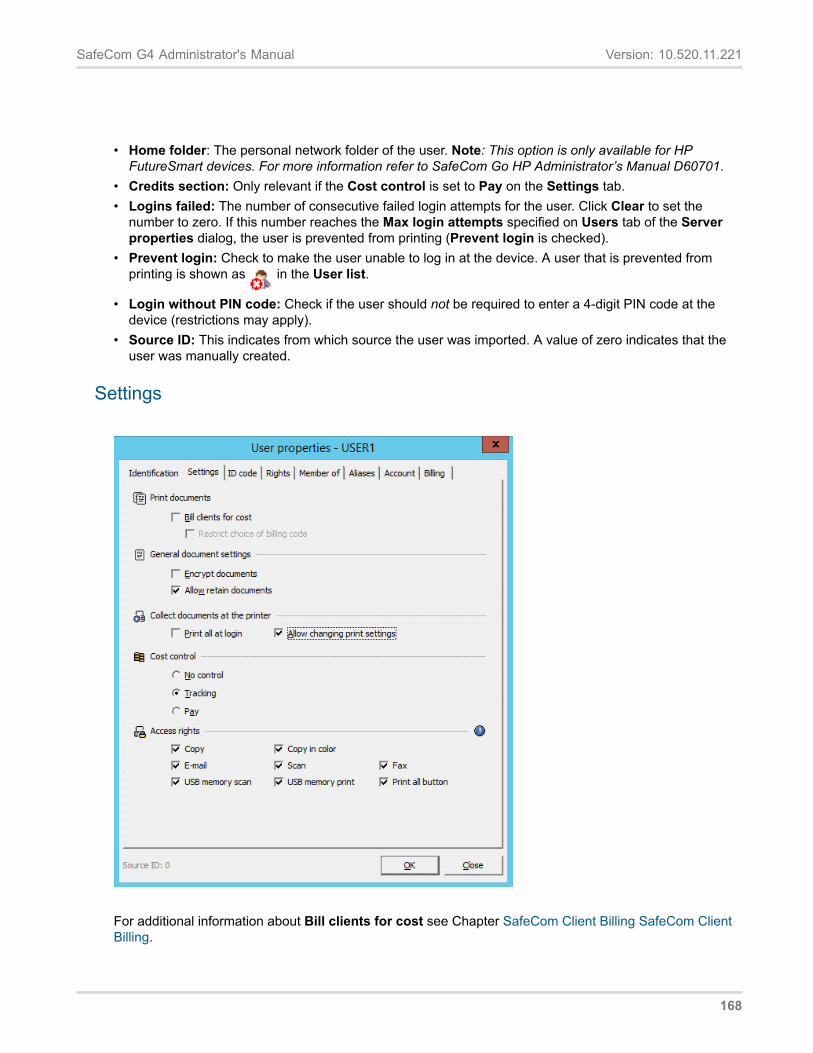
SafeCom G4 Administrator's Manual Version: 10.520.11.221
• Home folder: The personal network folder of the user. Note: This option is only available for HPFutureSmart devices. For more information refer to SafeCom Go HP Administrator’s Manual D60701.
• Credits section: Only relevant if the Cost control is set to Pay on the Settings tab.• Logins failed: The number of consecutive failed login attempts for the user. Click Clear to set the
number to zero. If this number reaches the Max login attempts specified on Users tab of the Serverproperties dialog, the user is prevented from printing (Prevent login is checked).
• Prevent login: Check to make the user unable to log in at the device. A user that is prevented fromprinting is shown as in the User list.
• Login without PIN code: Check if the user should not be required to enter a 4-digit PIN code at thedevice (restrictions may apply).
• Source ID: This indicates from which source the user was imported. A value of zero indicates that theuser was manually created.
Settings
For additional information about Bill clients for cost see Chapter SafeCom Client Billing SafeCom ClientBilling.
168
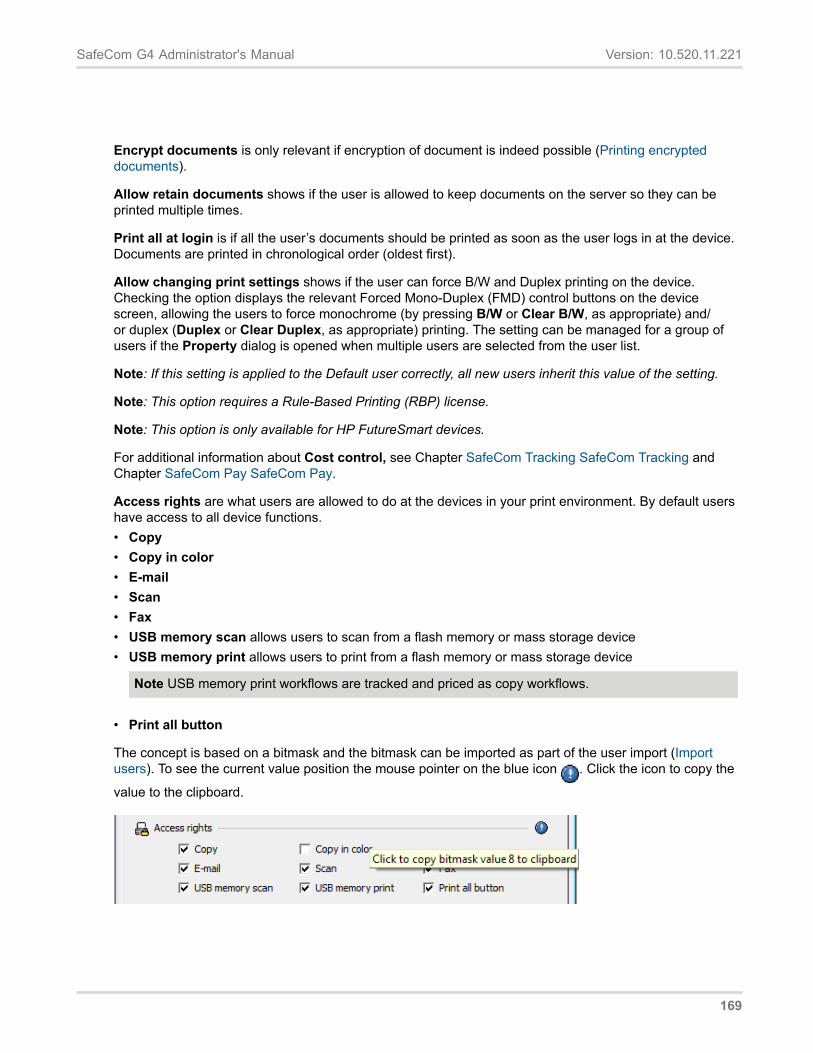
SafeCom G4 Administrator's Manual Version: 10.520.11.221
Encrypt documents is only relevant if encryption of document is indeed possible (Printing encrypteddocuments).
Allow retain documents shows if the user is allowed to keep documents on the server so they can beprinted multiple times.
Print all at login is if all the user’s documents should be printed as soon as the user logs in at the device.Documents are printed in chronological order (oldest first).
Allow changing print settings shows if the user can force B/W and Duplex printing on the device.Checking the option displays the relevant Forced Mono-Duplex (FMD) control buttons on the devicescreen, allowing the users to force monochrome (by pressing B/W or Clear B/W, as appropriate) and/or duplex (Duplex or Clear Duplex, as appropriate) printing. The setting can be managed for a group ofusers if the Property dialog is opened when multiple users are selected from the user list.
Note: If this setting is applied to the Default user correctly, all new users inherit this value of the setting.
Note: This option requires a Rule-Based Printing (RBP) license.
Note: This option is only available for HP FutureSmart devices.
For additional information about Cost control, see Chapter SafeCom Tracking SafeCom Tracking andChapter SafeCom Pay SafeCom Pay.
Access rights are what users are allowed to do at the devices in your print environment. By default usershave access to all device functions.• Copy• Copy in color• E-mail• Scan• Fax• USB memory scan allows users to scan from a flash memory or mass storage device• USB memory print allows users to print from a flash memory or mass storage device
Note USB memory print workflows are tracked and priced as copy workflows.
• Print all button
The concept is based on a bitmask and the bitmask can be imported as part of the user import (Importusers). To see the current value position the mouse pointer on the blue icon . Click the icon to copy the
value to the clipboard.
169
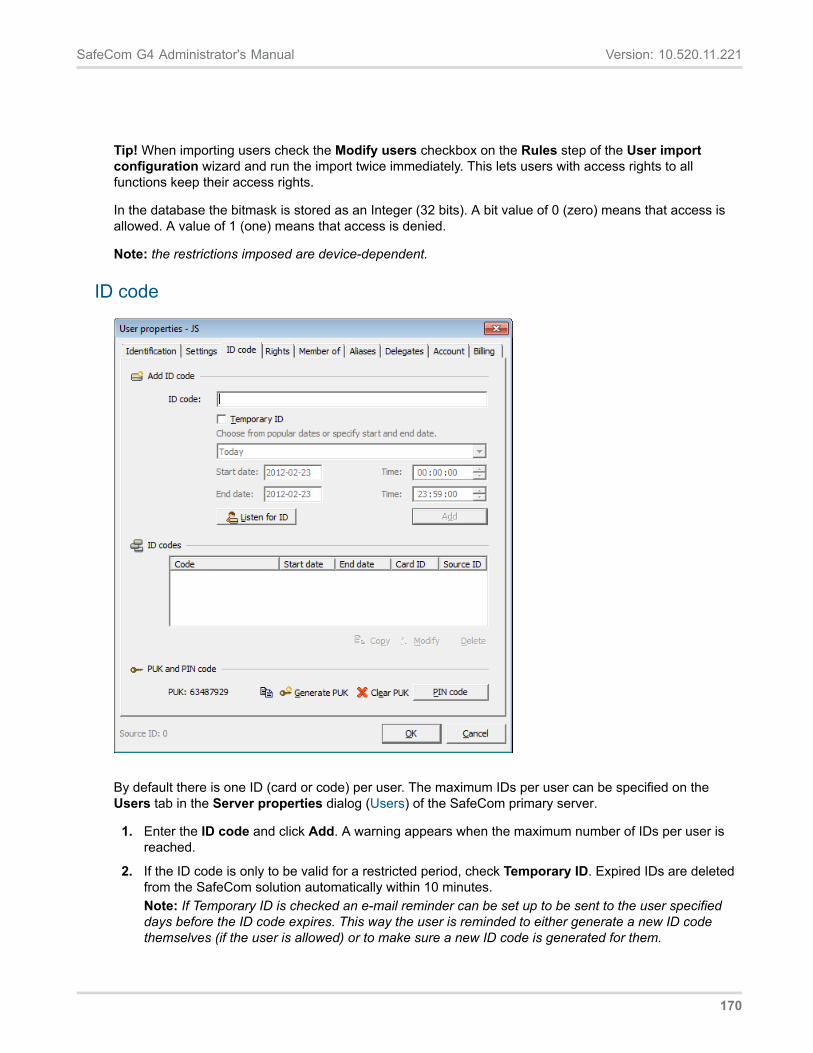
SafeCom G4 Administrator's Manual Version: 10.520.11.221
Tip! When importing users check the Modify users checkbox on the Rules step of the User importconfiguration wizard and run the import twice immediately. This lets users with access rights to allfunctions keep their access rights.
In the database the bitmask is stored as an Integer (32 bits). A bit value of 0 (zero) means that access isallowed. A value of 1 (one) means that access is denied.
Note: the restrictions imposed are device-dependent.
ID code
By default there is one ID (card or code) per user. The maximum IDs per user can be specified on the Users tab in the Server properties dialog (Users) of the SafeCom primary server.
1. Enter the ID code and click Add. A warning appears when the maximum number of IDs per user is reached.
2. If the ID code is only to be valid for a restricted period, check Temporary ID. Expired IDs are deleted from the SafeCom solution automatically within 10 minutes. Note: If Temporary ID is checked an e-mail reminder can be set up to be sent to the user specified days before the ID code expires. This way the user is reminded to either generate a new ID code themselves (if the user is allowed) or to make sure a new ID code is generated for them.
170
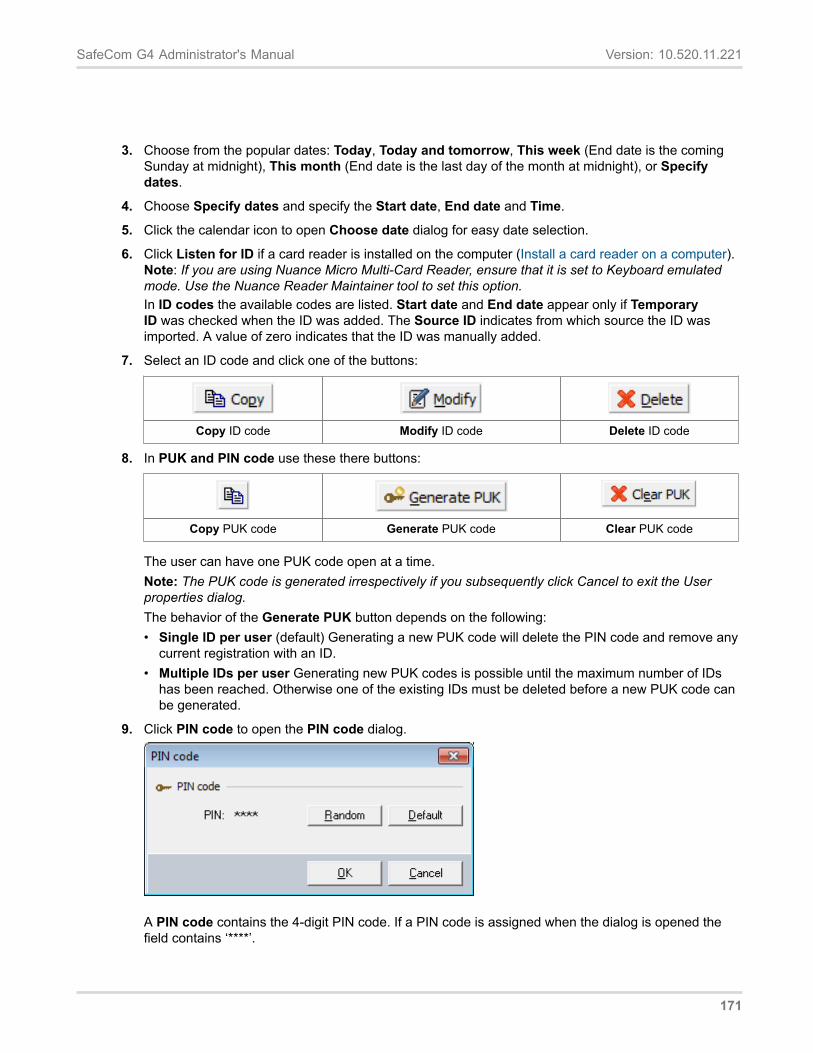
SafeCom G4 Administrator's Manual Version: 10.520.11.221
3. Choose from the popular dates: Today, Today and tomorrow, This week (End date is the comingSunday at midnight), This month (End date is the last day of the month at midnight), or Specifydates.
4. Choose Specify dates and specify the Start date, End date and Time.
5. Click the calendar icon to open Choose date dialog for easy date selection.
6. Click Listen for ID if a card reader is installed on the computer (Install a card reader on a computer).Note: If you are using Nuance Micro Multi-Card Reader, ensure that it is set to Keyboard emulatedmode. Use the Nuance Reader Maintainer tool to set this option.In ID codes the available codes are listed. Start date and End date appear only if TemporaryID was checked when the ID was added. The Source ID indicates from which source the ID wasimported. A value of zero indicates that the ID was manually added.
7. Select an ID code and click one of the buttons:
Copy ID code Modify ID code Delete ID code
8. In PUK and PIN code use these there buttons:
Copy PUK code Generate PUK code Clear PUK code
The user can have one PUK code open at a time.Note: The PUK code is generated irrespectively if you subsequently click Cancel to exit the Userproperties dialog.The behavior of the Generate PUK button depends on the following:• Single ID per user (default) Generating a new PUK code will delete the PIN code and remove any
current registration with an ID.• Multiple IDs per user Generating new PUK codes is possible until the maximum number of IDs
has been reached. Otherwise one of the existing IDs must be deleted before a new PUK code canbe generated.
9. Click PIN code to open the PIN code dialog.
A PIN code contains the 4-digit PIN code. If a PIN code is assigned when the dialog is opened thefield contains ‘****’.
171
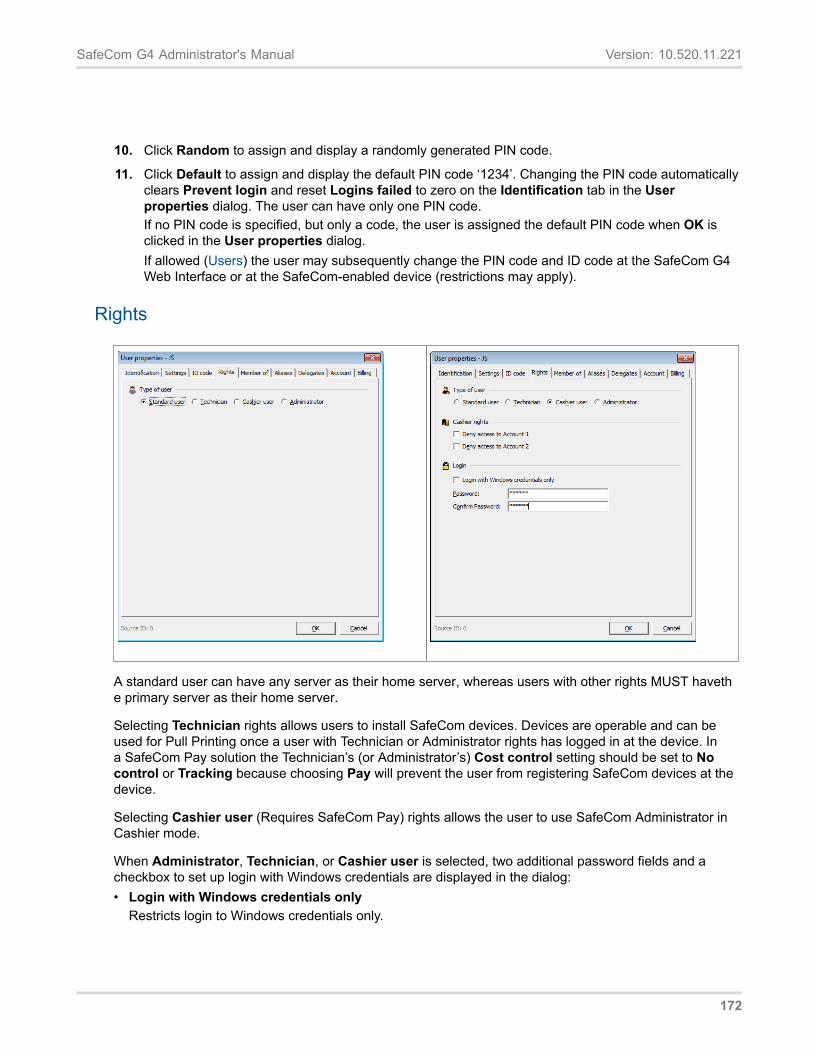
SafeCom G4 Administrator's Manual Version: 10.520.11.221
10. Click Random to assign and display a randomly generated PIN code.
11. Click Default to assign and display the default PIN code ‘1234’. Changing the PIN code automaticallyclears Prevent login and reset Logins failed to zero on the Identification tab in the Userproperties dialog. The user can have only one PIN code.If no PIN code is specified, but only a code, the user is assigned the default PIN code when OK isclicked in the User properties dialog.If allowed (Users) the user may subsequently change the PIN code and ID code at the SafeCom G4Web Interface or at the SafeCom-enabled device (restrictions may apply).
Rights
A standard user can have any server as their home server, whereas users with other rights MUST havethe primary server as their home server.
Selecting Technician rights allows users to install SafeCom devices. Devices are operable and can be used for Pull Printing once a user with Technician or Administrator rights has logged in at the device. In a SafeCom Pay solution the Technician’s (or Administrator’s) Cost control setting should be set to No control or Tracking because choosing Pay will prevent the user from registering SafeCom devices at thedevice.
Selecting Cashier user (Requires SafeCom Pay) rights allows the user to use SafeCom Administrator in Cashier mode.
When Administrator, Technician, or Cashier user is selected, two additional password fields and a checkbox to set up login with Windows credentials are displayed in the dialog: • Login with Windows credentials only
Restricts login to Windows credentials only.
172
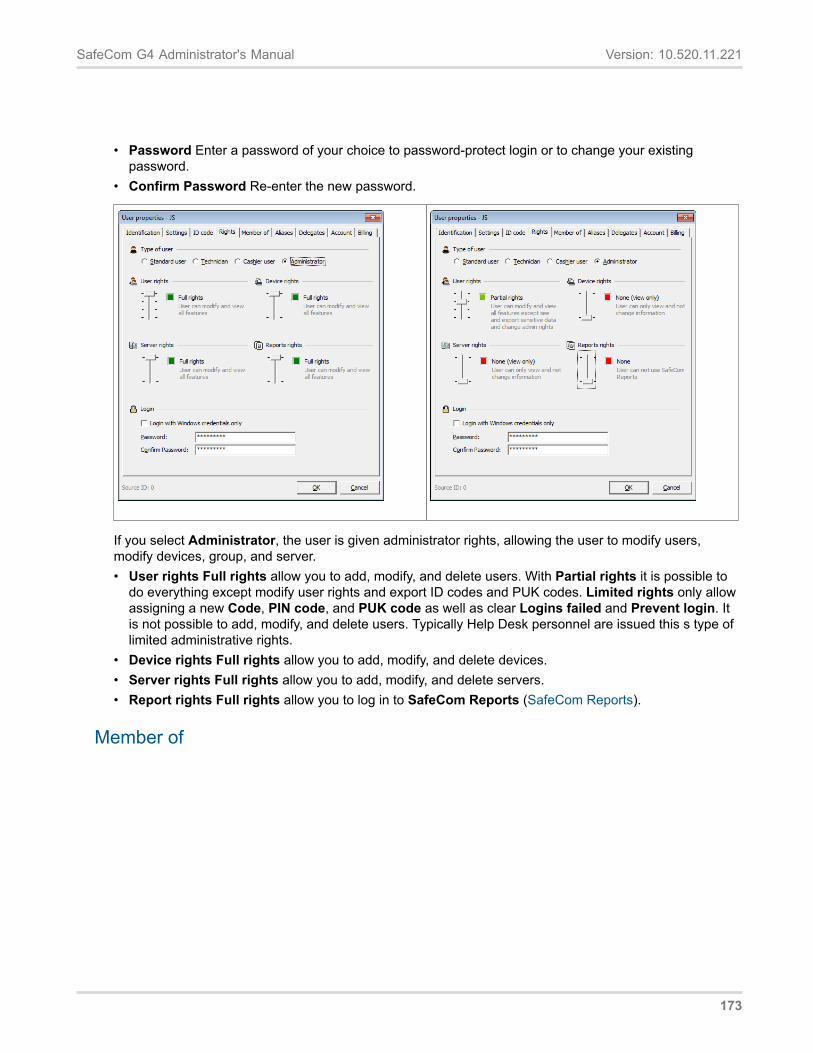
SafeCom G4 Administrator's Manual Version: 10.520.11.221
• Password Enter a password of your choice to password-protect login or to change your existingpassword.
• Confirm Password Re-enter the new password.
If you select Administrator, the user is given administrator rights, allowing the user to modify users,modify devices, group, and server.• User rights Full rights allow you to add, modify, and delete users. With Partial rights it is possible to
do everything except modify user rights and export ID codes and PUK codes. Limited rights only allowassigning a new Code, PIN code, and PUK code as well as clear Logins failed and Prevent login. Itis not possible to add, modify, and delete users. Typically Help Desk personnel are issued this s type oflimited administrative rights.
• Device rights Full rights allow you to add, modify, and delete devices.• Server rights Full rights allow you to add, modify, and delete servers.• Report rights Full rights allow you to log in to SafeCom Reports (SafeCom Reports).
Member of
173
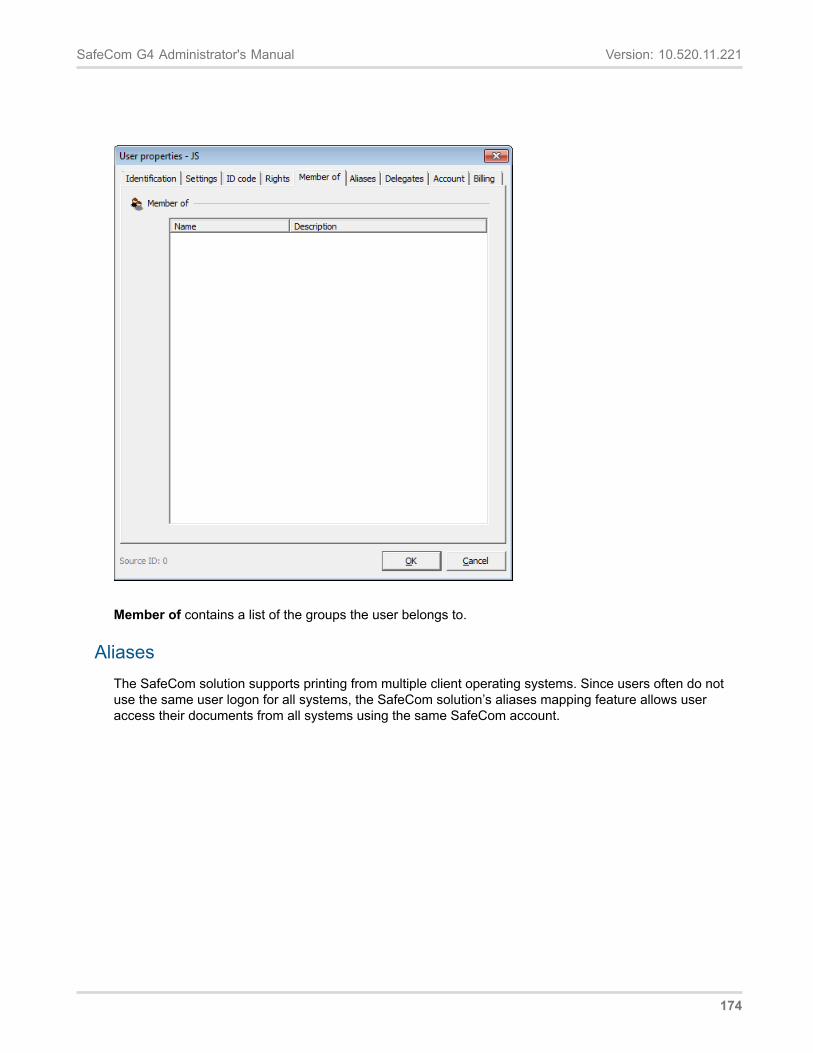
SafeCom G4 Administrator's Manual Version: 10.520.11.221
Member of contains a list of the groups the user belongs to.
AliasesThe SafeCom solution supports printing from multiple client operating systems. Since users often do notuse the same user logon for all systems, the SafeCom solution’s aliases mapping feature allows useraccess their documents from all systems using the same SafeCom account.
174
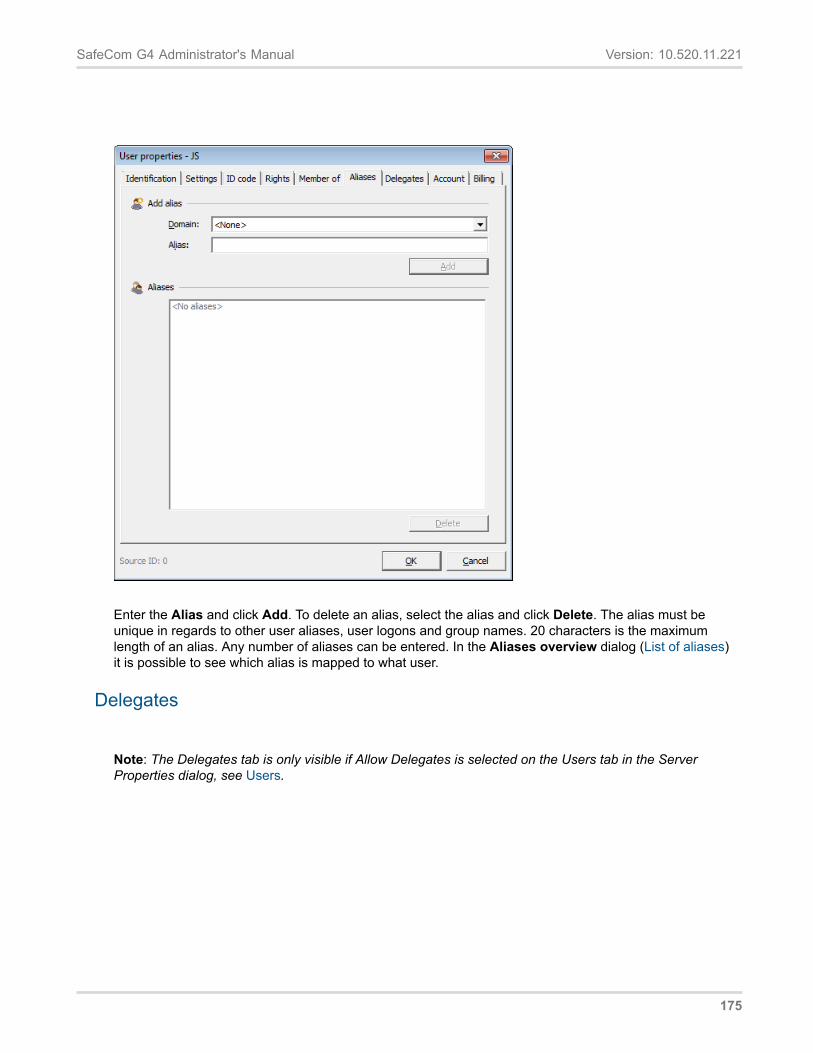
SafeCom G4 Administrator's Manual Version: 10.520.11.221
Enter the Alias and click Add. To delete an alias, select the alias and click Delete. The alias must beunique in regards to other user aliases, user logons and group names. 20 characters is the maximumlength of an alias. Any number of aliases can be entered. In the Aliases overview dialog (List of aliases)it is possible to see which alias is mapped to what user.
Delegates
Note: The Delegates tab is only visible if Allow Delegates is selected on the Users tab in the ServerProperties dialog, see Users.
175
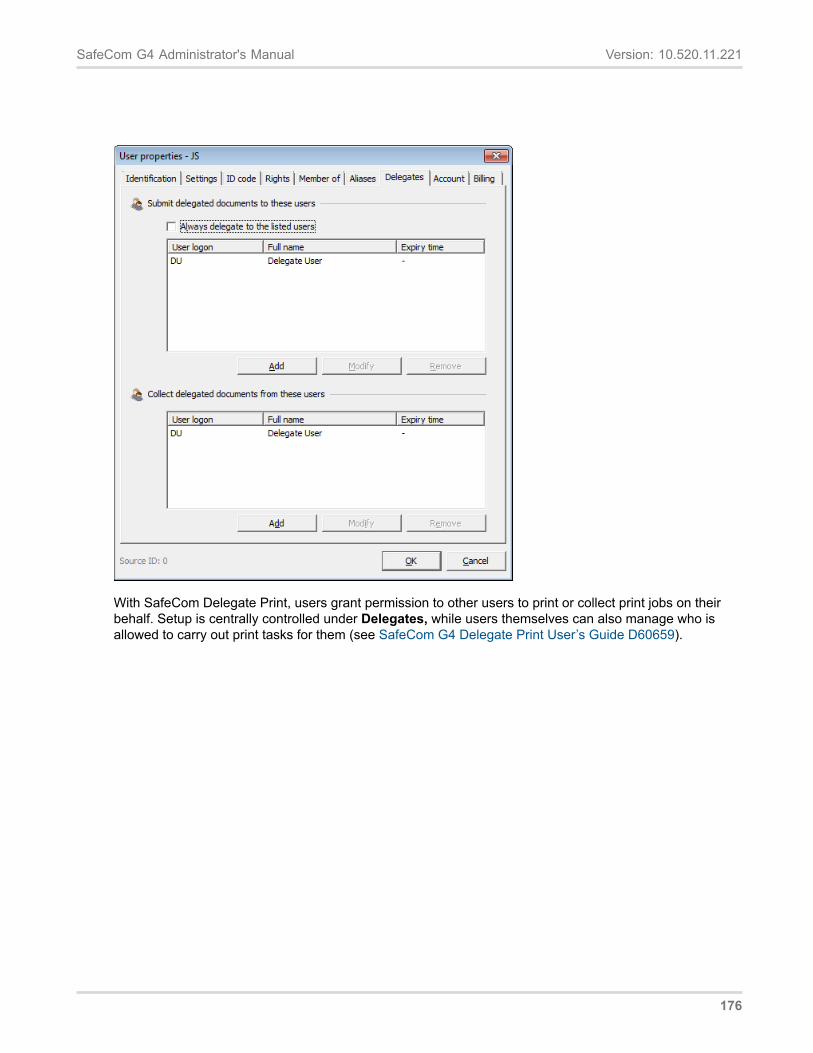
SafeCom G4 Administrator's Manual Version: 10.520.11.221
With SafeCom Delegate Print, users grant permission to other users to print or collect print jobs on theirbehalf. Setup is centrally controlled under Delegates, while users themselves can also manage who isallowed to carry out print tasks for them (see SafeCom G4 Delegate Print User’s Guide D60659).
176
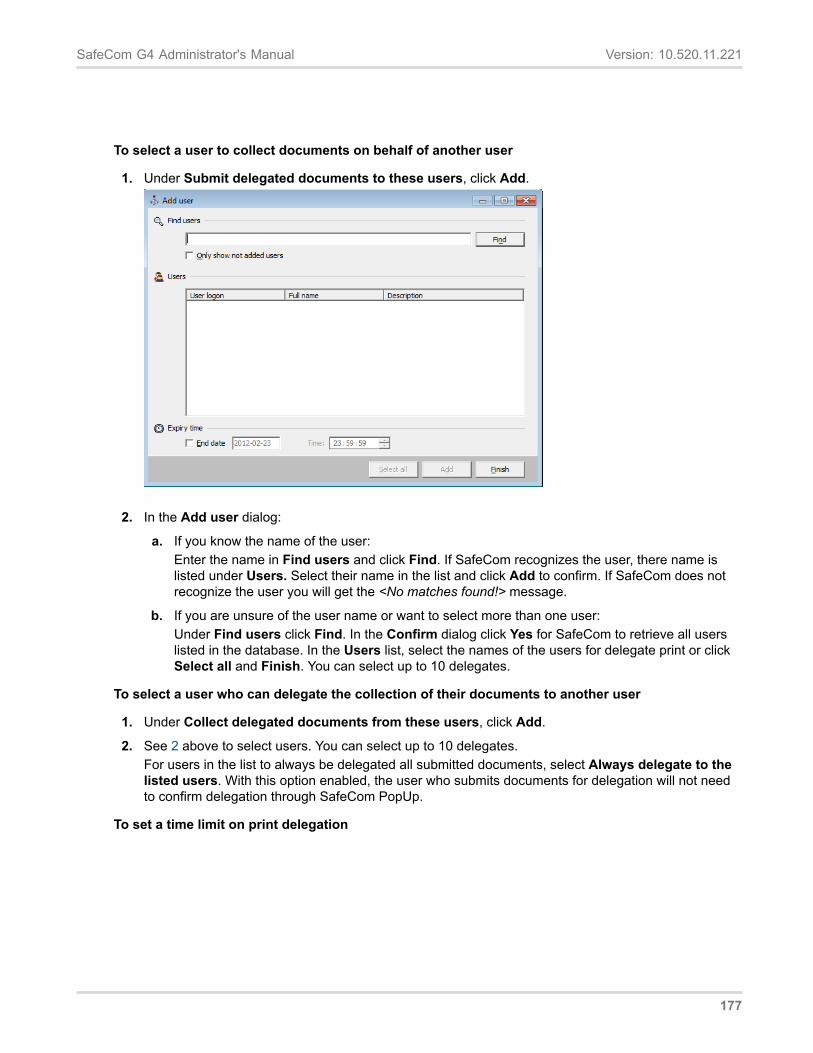
SafeCom G4 Administrator's Manual Version: 10.520.11.221
To select a user to collect documents on behalf of another user
1. Under Submit delegated documents to these users, click Add.
2. In the Add user dialog:
a. If you know the name of the user:Enter the name in Find users and click Find. If SafeCom recognizes the user, there name islisted under Users. Select their name in the list and click Add to confirm. If SafeCom does notrecognize the user you will get the <No matches found!> message.
b. If you are unsure of the user name or want to select more than one user:Under Find users click Find. In the Confirm dialog click Yes for SafeCom to retrieve all userslisted in the database. In the Users list, select the names of the users for delegate print or clickSelect all and Finish. You can select up to 10 delegates.
To select a user who can delegate the collection of their documents to another user
1. Under Collect delegated documents from these users, click Add.
2. See 2 above to select users. You can select up to 10 delegates.For users in the list to always be delegated all submitted documents, select Always delegate to thelisted users. With this option enabled, the user who submits documents for delegation will not needto confirm delegation through SafeCom PopUp.
To set a time limit on print delegation
177
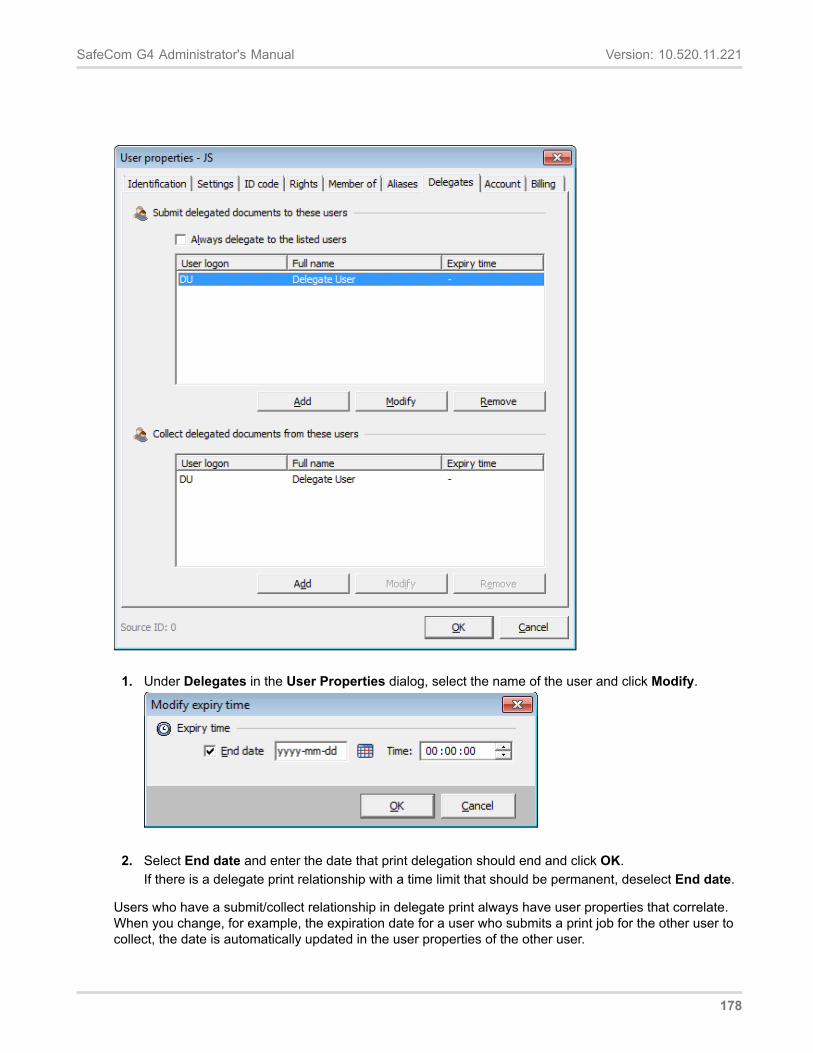
SafeCom G4 Administrator's Manual Version: 10.520.11.221
1. Under Delegates in the User Properties dialog, select the name of the user and click Modify.
2. Select End date and enter the date that print delegation should end and click OK.If there is a delegate print relationship with a time limit that should be permanent, deselect End date.
Users who have a submit/collect relationship in delegate print always have user properties that correlate.When you change, for example, the expiration date for a user who submits a print job for the other user tocollect, the date is automatically updated in the user properties of the other user.
178
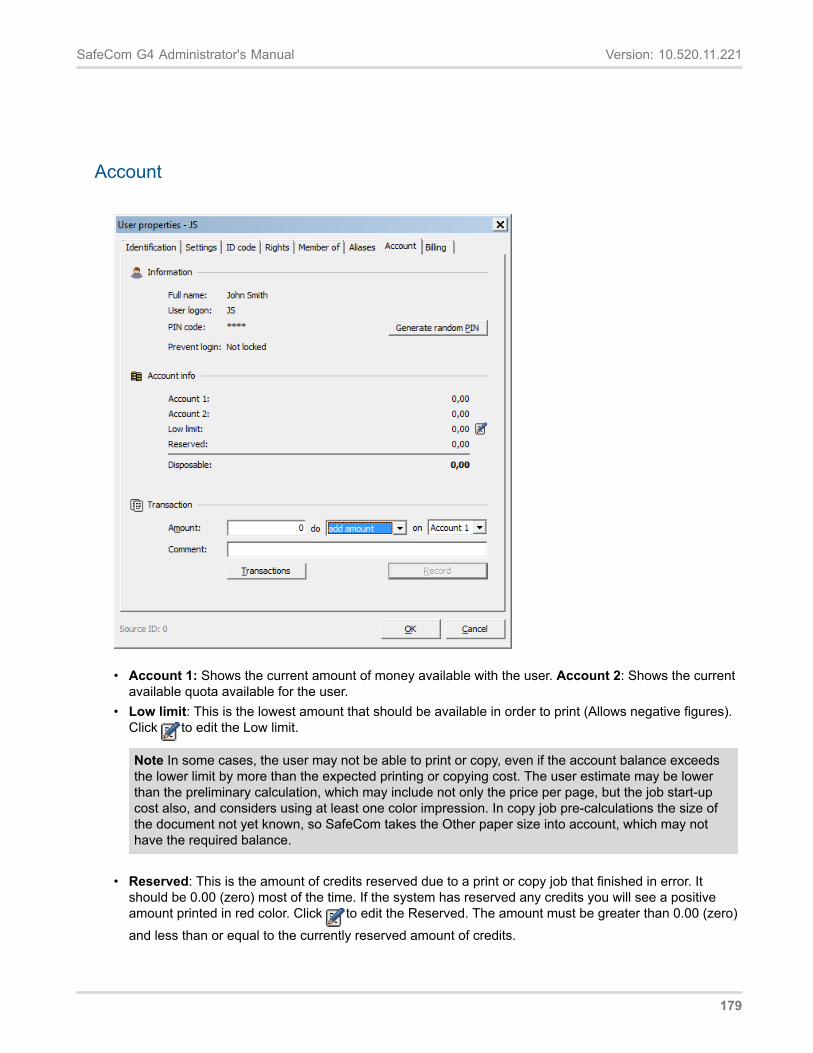
SafeCom G4 Administrator's Manual Version: 10.520.11.221
Account
• Account 1: Shows the current amount of money available with the user. Account 2: Shows the currentavailable quota available for the user.
• Low limit: This is the lowest amount that should be available in order to print (Allows negative figures).Click to edit the Low limit.
Note In some cases, the user may not be able to print or copy, even if the account balance exceedsthe lower limit by more than the expected printing or copying cost. The user estimate may be lowerthan the preliminary calculation, which may include not only the price per page, but the job start-upcost also, and considers using at least one color impression. In copy job pre-calculations the size ofthe document not yet known, so SafeCom takes the Other paper size into account, which may nothave the required balance.
• Reserved: This is the amount of credits reserved due to a print or copy job that finished in error. Itshould be 0.00 (zero) most of the time. If the system has reserved any credits you will see a positiveamount printed in red color. Click to edit the Reserved. The amount must be greater than 0.00 (zero)and less than or equal to the currently reserved amount of credits.
179
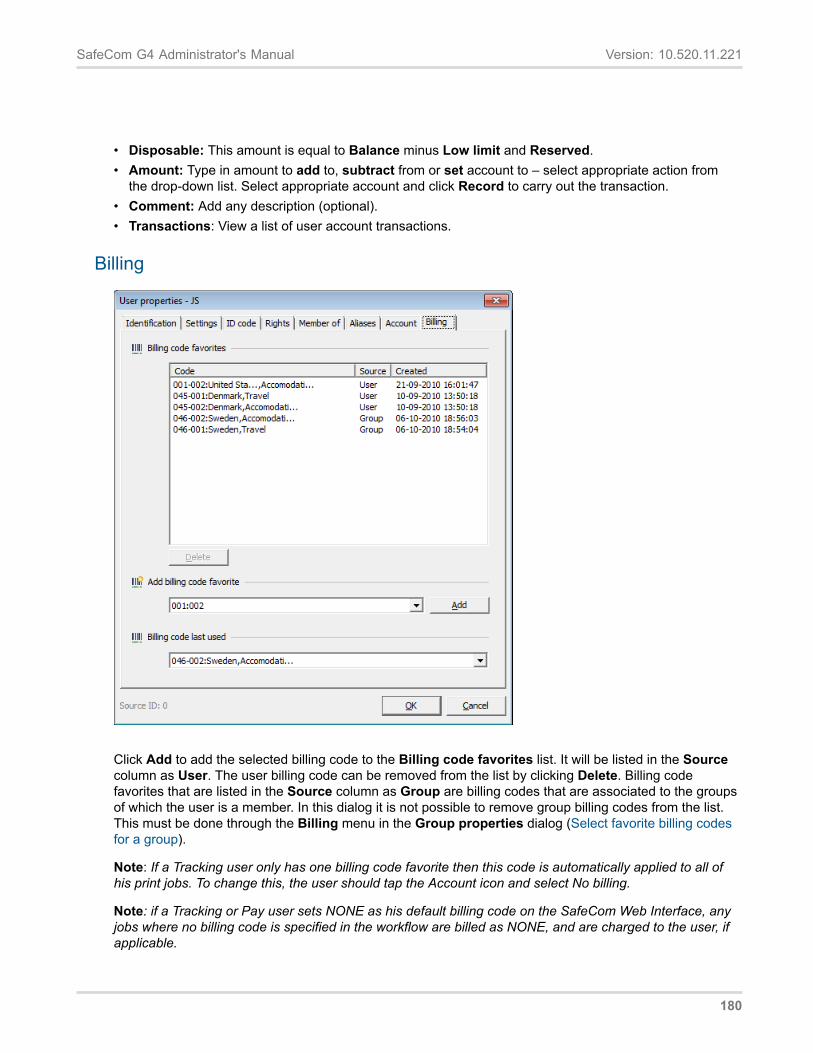
SafeCom G4 Administrator's Manual Version: 10.520.11.221
• Disposable: This amount is equal to Balance minus Low limit and Reserved.• Amount: Type in amount to add to, subtract from or set account to – select appropriate action from
the drop-down list. Select appropriate account and click Record to carry out the transaction.• Comment: Add any description (optional).• Transactions: View a list of user account transactions.
Billing
Click Add to add the selected billing code to the Billing code favorites list. It will be listed in the Sourcecolumn as User. The user billing code can be removed from the list by clicking Delete. Billing codefavorites that are listed in the Source column as Group are billing codes that are associated to the groupsof which the user is a member. In this dialog it is not possible to remove group billing codes from the list.This must be done through the Billing menu in the Group properties dialog (Select favorite billing codesfor a group).
Note: If a Tracking user only has one billing code favorite then this code is automatically applied to all ofhis print jobs. To change this, the user should tap the Account icon and select No billing.
Note: if a Tracking or Pay user sets NONE as his default billing code on the SafeCom Web Interface, anyjobs where no billing code is specified in the workflow are billed as NONE, and are charged to the user, ifapplicable.
180
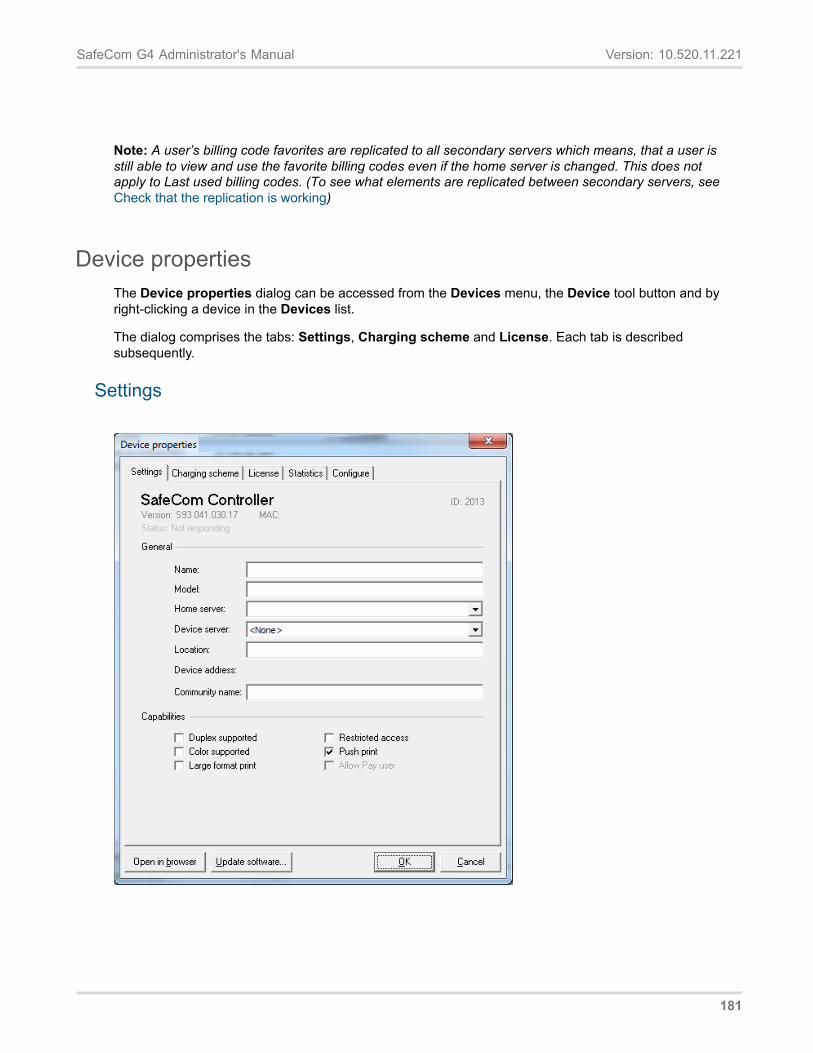
SafeCom G4 Administrator's Manual Version: 10.520.11.221
Device propertiesThe Device properties dialog can be accessed from the Devices menu, the Device tool button and byright-clicking a device in the Devices list.
The dialog comprises the tabs: Settings, Charging scheme and License. Each tab is describedsubsequently.
Settings
Note: A user’s billing code favorites are replicated to all secondary servers which means, that a user is still able to view and use the favorite billing codes even if the home server is changed. This does not apply to Last used billing codes. (To see what elements are replicated between secondary servers, see Check that the replication is working)
181
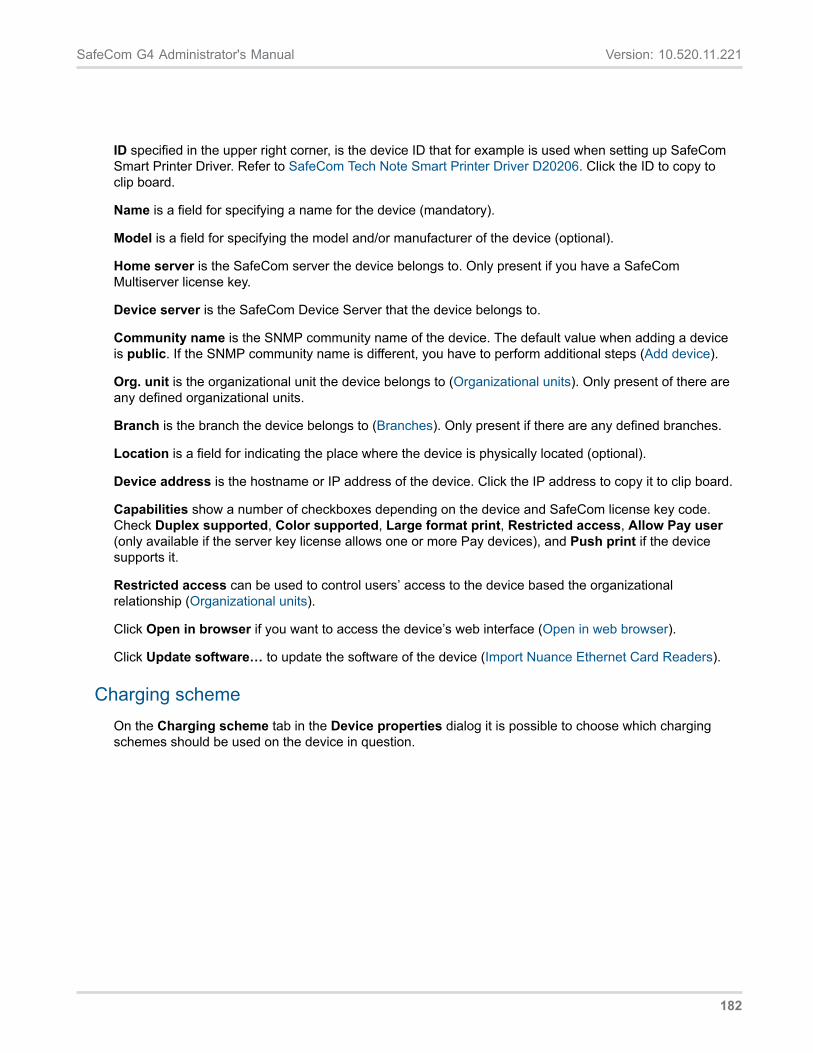
SafeCom G4 Administrator's Manual Version: 10.520.11.221
ID specified in the upper right corner, is the device ID that for example is used when setting up SafeComSmart Printer Driver. Refer to SafeCom Tech Note Smart Printer Driver D20206. Click the ID to copy toclip board.
Name is a field for specifying a name for the device (mandatory).
Model is a field for specifying the model and/or manufacturer of the device (optional).
Home server is the SafeCom server the device belongs to. Only present if you have a SafeComMultiserver license key.
Device server is the SafeCom Device Server that the device belongs to.
Community name is the SNMP community name of the device. The default value when adding a deviceis public. If the SNMP community name is different, you have to perform additional steps (Add device).
Org. unit is the organizational unit the device belongs to (Organizational units). Only present of there areany defined organizational units.
Branch is the branch the device belongs to (Branches). Only present if there are any defined branches.
Location is a field for indicating the place where the device is physically located (optional).
Device address is the hostname or IP address of the device. Click the IP address to copy it to clip board.
Capabilities show a number of checkboxes depending on the device and SafeCom license key code.Check Duplex supported, Color supported, Large format print, Restricted access, Allow Pay user(only available if the server key license allows one or more Pay devices), and Push print if the devicesupports it.
Restricted access can be used to control users’ access to the device based the organizationalrelationship (Organizational units).
Click Open in browser if you want to access the device’s web interface (Open in web browser).
Click Update software… to update the software of the device (Import Nuance Ethernet Card Readers).
Charging schemeOn the Charging scheme tab in the Device properties dialog it is possible to choose which chargingschemes should be used on the device in question.
182
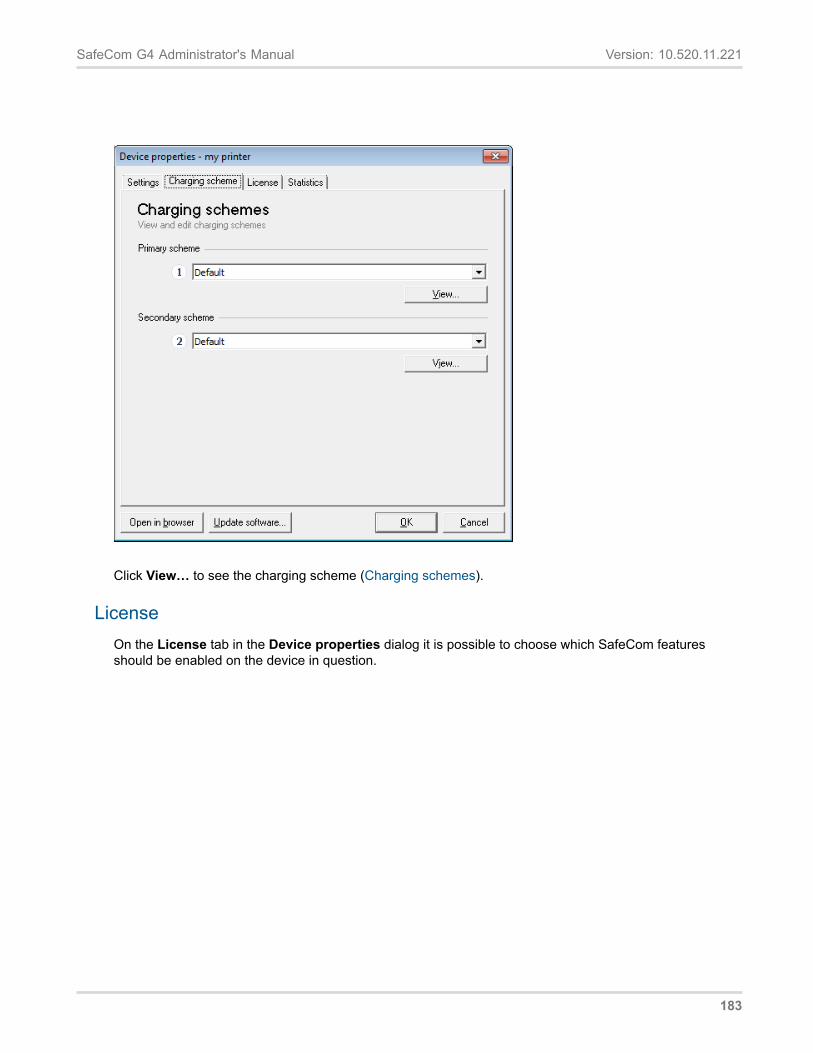
SafeCom G4 Administrator's Manual Version: 10.520.11.221
Click View… to see the charging scheme (Charging schemes).
LicenseOn the License tab in the Device properties dialog it is possible to choose which SafeCom featuresshould be enabled on the device in question.
183
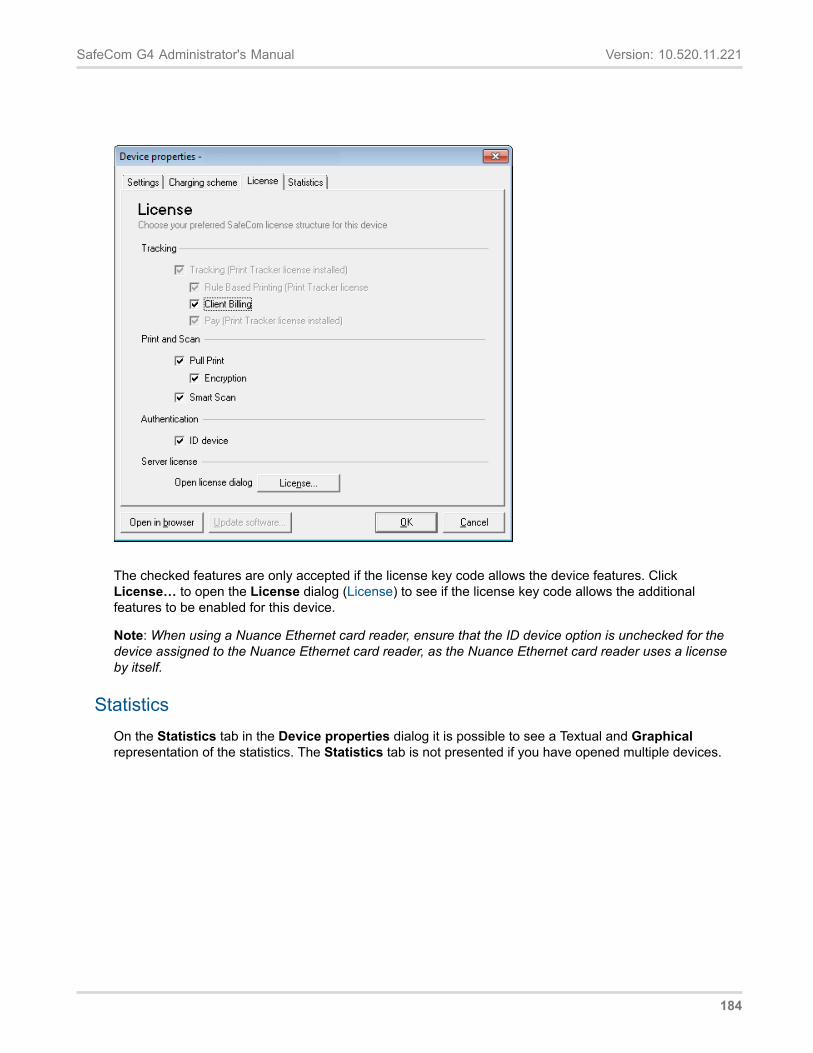
SafeCom G4 Administrator's Manual Version: 10.520.11.221
The checked features are only accepted if the license key code allows the device features. ClickLicense… to open the License dialog (License) to see if the license key code allows the additionalfeatures to be enabled for this device.
Note: When using a Nuance Ethernet card reader, ensure that the ID device option is unchecked for thedevice assigned to the Nuance Ethernet card reader, as the Nuance Ethernet card reader uses a licenseby itself.
StatisticsOn the Statistics tab in the Device properties dialog it is possible to see a Textual and Graphicalrepresentation of the statistics. The Statistics tab is not presented if you have opened multiple devices.
184
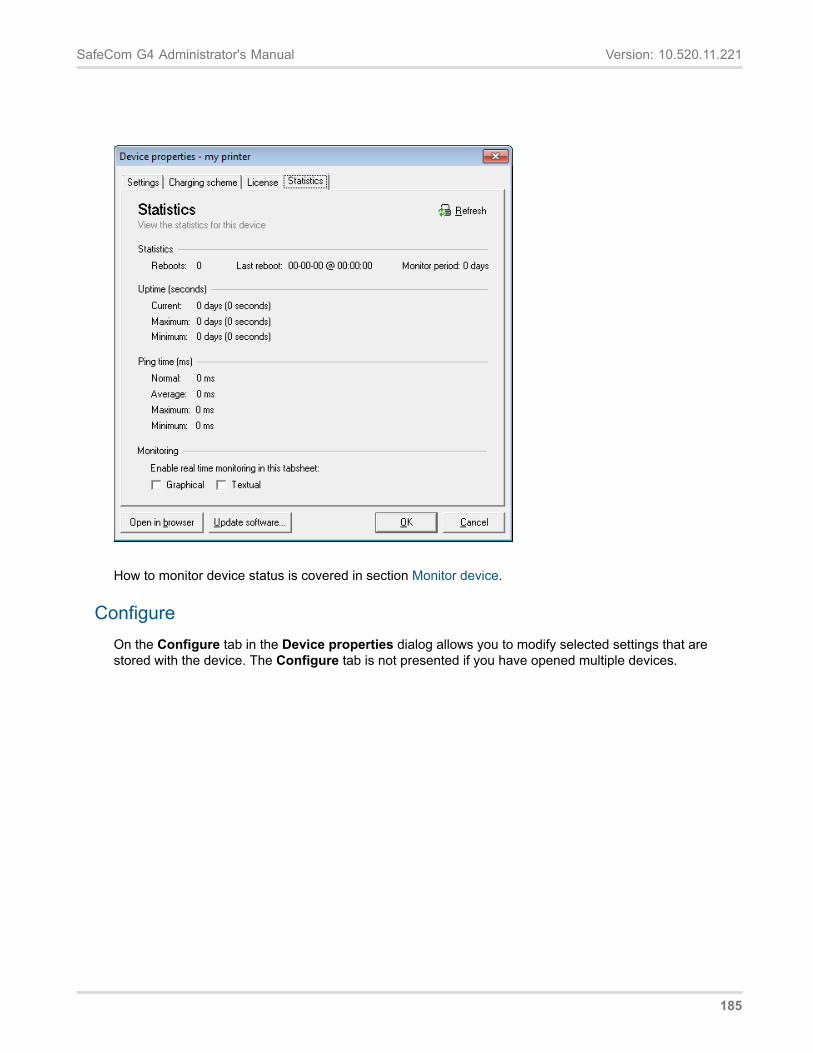
SafeCom G4 Administrator's Manual Version: 10.520.11.221
How to monitor device status is covered in section Monitor device.
ConfigureOn the Configure tab in the Device properties dialog allows you to modify selected settings that arestored with the device. The Configure tab is not presented if you have opened multiple devices.
185
SafeCom G4 Administrator's Manual Version: 10.520.11.221
The Details section is used to specify the SafeCom server. You can directly enter Group name andSafeCom server IP address in Add server. Use the Move up and Move down button to prioritize theorder in which the servers are contacted in case the first one on the list becomes unavailable.
Login method: Specifies how users must identify themselves to log in to the device.
Print all at login: Check if all the user’s documents should be printed as soon as the user logs in. Thissetting applies to the device. If checked this overrules the equivalent user property on the SafeCom G4server.
MFP auth: The SafeCom product on the device will control access to the selected functions. Additionaloptions may be available on the device’s SafeCom Configuration web page.
Print settings: regulates whether users are allowed to control their print jobs. When set to Enabled, thiscontrol is independent from the user-specific settings. Set to Disabled, the device hides the options fromall users and the job settings cannot be changed. Set to User Setting, the device enables or disables thefeatures according to the currently logged on user’s settings.
Note: To properly calculate job prices, ensure that the duplex and color capabilities of the device are setcorrectly on the Settings tab of the Device Properties in SafeCom Administrator.
186
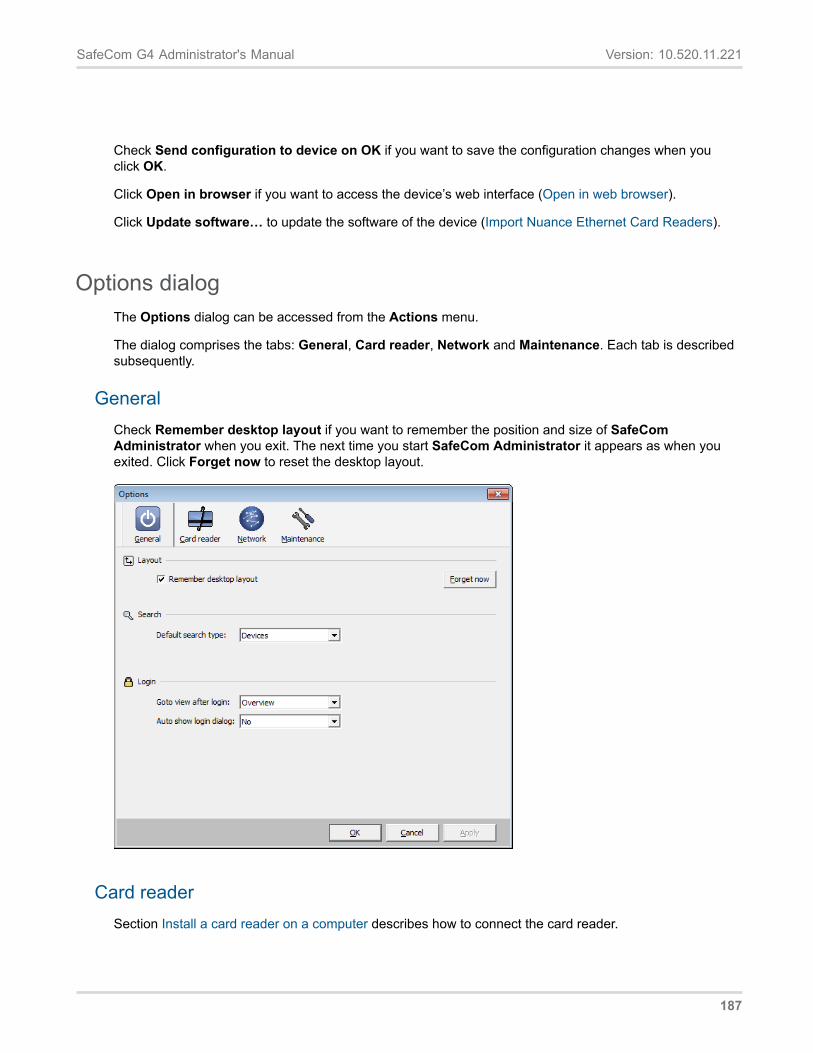
SafeCom G4 Administrator's Manual Version: 10.520.11.221
Check Send configuration to device on OK if you want to save the configuration changes when youclick OK.
Click Open in browser if you want to access the device’s web interface (Open in web browser).
Click Update software… to update the software of the device (Import Nuance Ethernet Card Readers).
Options dialogThe Options dialog can be accessed from the Actions menu.
The dialog comprises the tabs: General, Card reader, Network and Maintenance. Each tab is describedsubsequently.
GeneralCheck Remember desktop layout if you want to remember the position and size of SafeComAdministrator when you exit. The next time you start SafeCom Administrator it appears as when youexited. Click Forget now to reset the desktop layout.
Card readerSection Install a card reader on a computer describes how to connect the card reader.
187
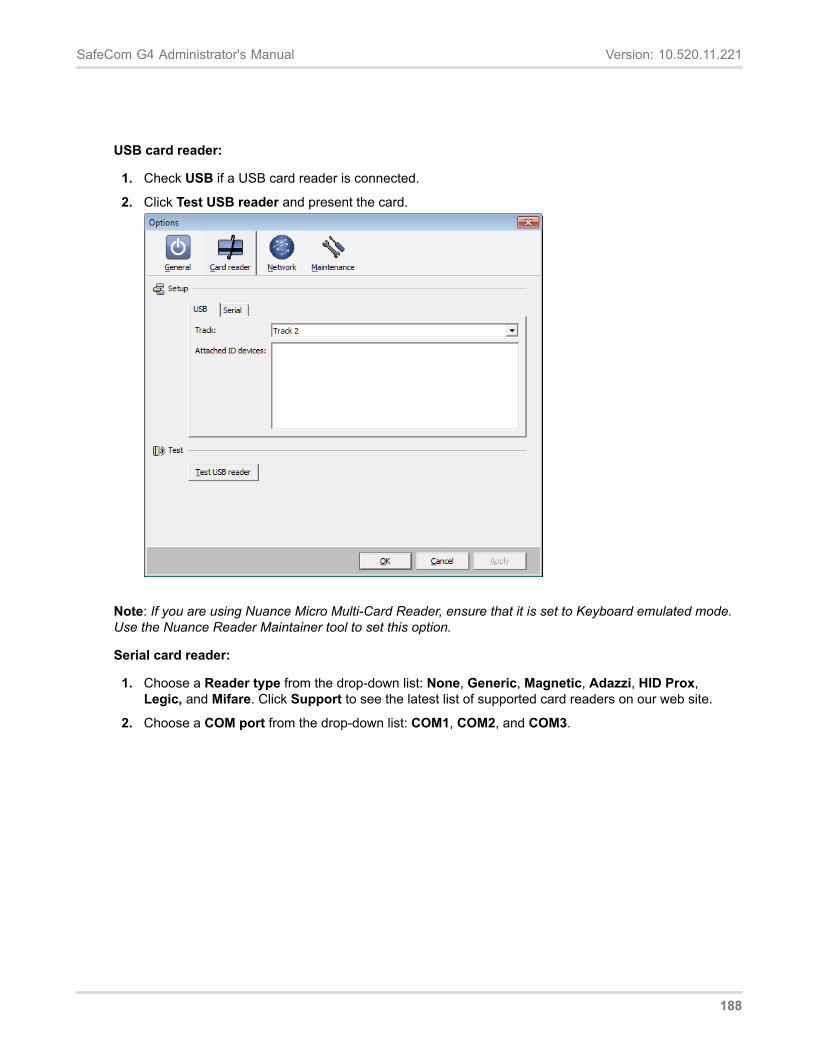
SafeCom G4 Administrator's Manual Version: 10.520.11.221
USB card reader:
1. Check USB if a USB card reader is connected.
2. Click Test USB reader and present the card.
Note: If you are using Nuance Micro Multi-Card Reader, ensure that it is set to Keyboard emulated mode.Use the Nuance Reader Maintainer tool to set this option.
Serial card reader:
1. Choose a Reader type from the drop-down list: None, Generic, Magnetic, Adazzi, HID Prox,Legic, and Mifare. Click Support to see the latest list of supported card readers on our web site.
2. Choose a COM port from the drop-down list: COM1, COM2, and COM3.
188
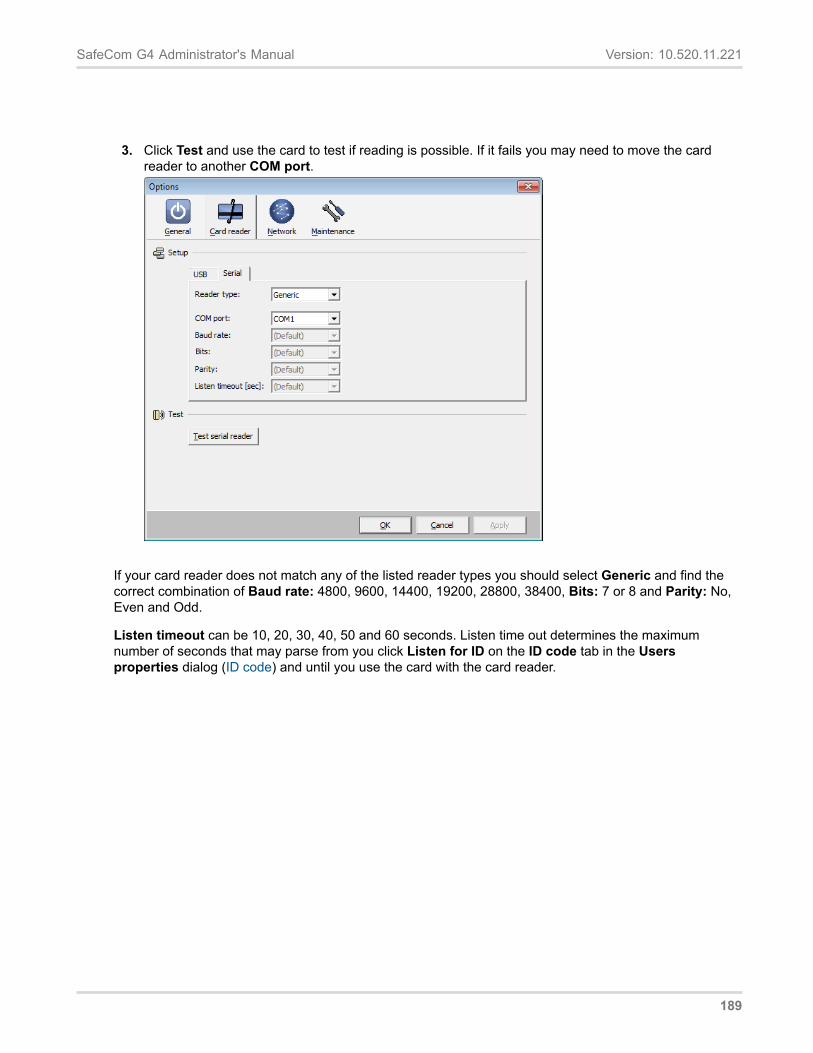
SafeCom G4 Administrator's Manual Version: 10.520.11.221
3. Click Test and use the card to test if reading is possible. If it fails you may need to move the cardreader to another COM port.
If your card reader does not match any of the listed reader types you should select Generic and find thecorrect combination of Baud rate: 4800, 9600, 14400, 19200, 28800, 38400, Bits: 7 or 8 and Parity: No,Even and Odd.
Listen timeout can be 10, 20, 30, 40, 50 and 60 seconds. Listen time out determines the maximumnumber of seconds that may parse from you click Listen for ID on the ID code tab in the Usersproperties dialog (ID code) and until you use the card with the card reader.
189
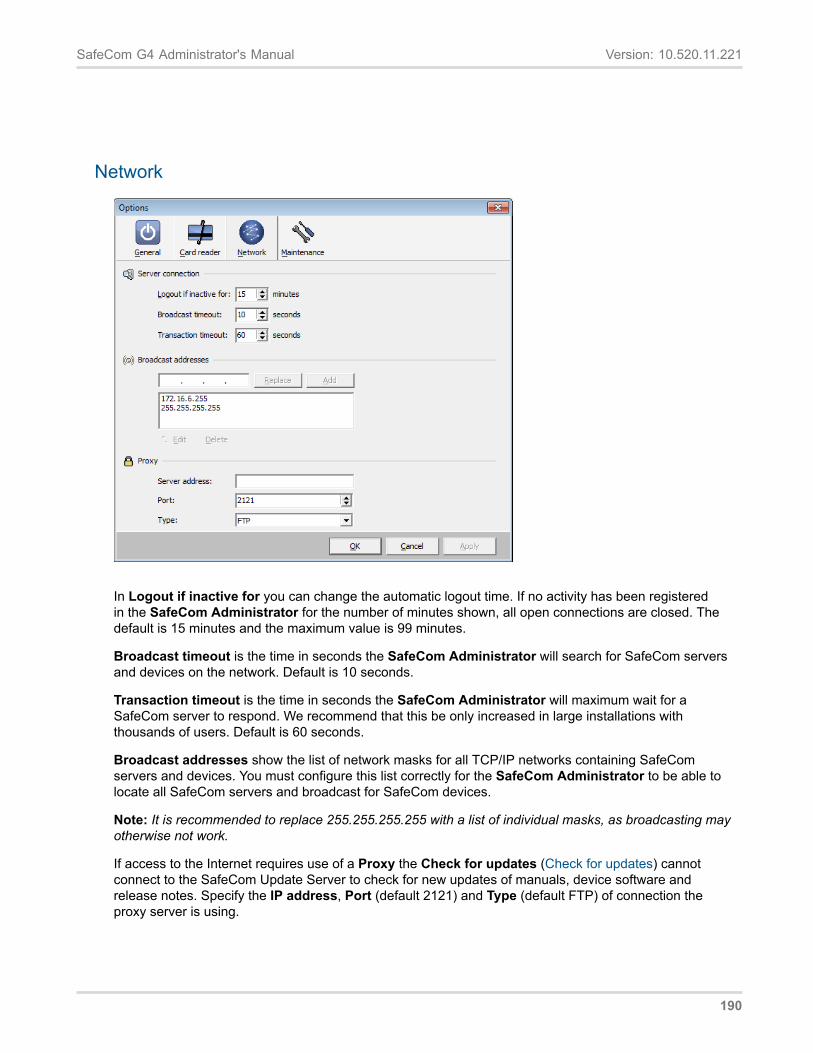
SafeCom G4 Administrator's Manual Version: 10.520.11.221
Network
In Logout if inactive for you can change the automatic logout time. If no activity has been registeredin the SafeCom Administrator for the number of minutes shown, all open connections are closed. Thedefault is 15 minutes and the maximum value is 99 minutes.
Broadcast timeout is the time in seconds the SafeCom Administrator will search for SafeCom serversand devices on the network. Default is 10 seconds.
Transaction timeout is the time in seconds the SafeCom Administrator will maximum wait for aSafeCom server to respond. We recommend that this be only increased in large installations withthousands of users. Default is 60 seconds.
Broadcast addresses show the list of network masks for all TCP/IP networks containing SafeComservers and devices. You must configure this list correctly for the SafeCom Administrator to be able tolocate all SafeCom servers and broadcast for SafeCom devices.
Note: It is recommended to replace 255.255.255.255 with a list of individual masks, as broadcasting mayotherwise not work.
If access to the Internet requires use of a Proxy the Check for updates (Check for updates) cannotconnect to the SafeCom Update Server to check for new updates of manuals, device software andrelease notes. Specify the IP address, Port (default 2121) and Type (default FTP) of connection theproxy server is using.
190
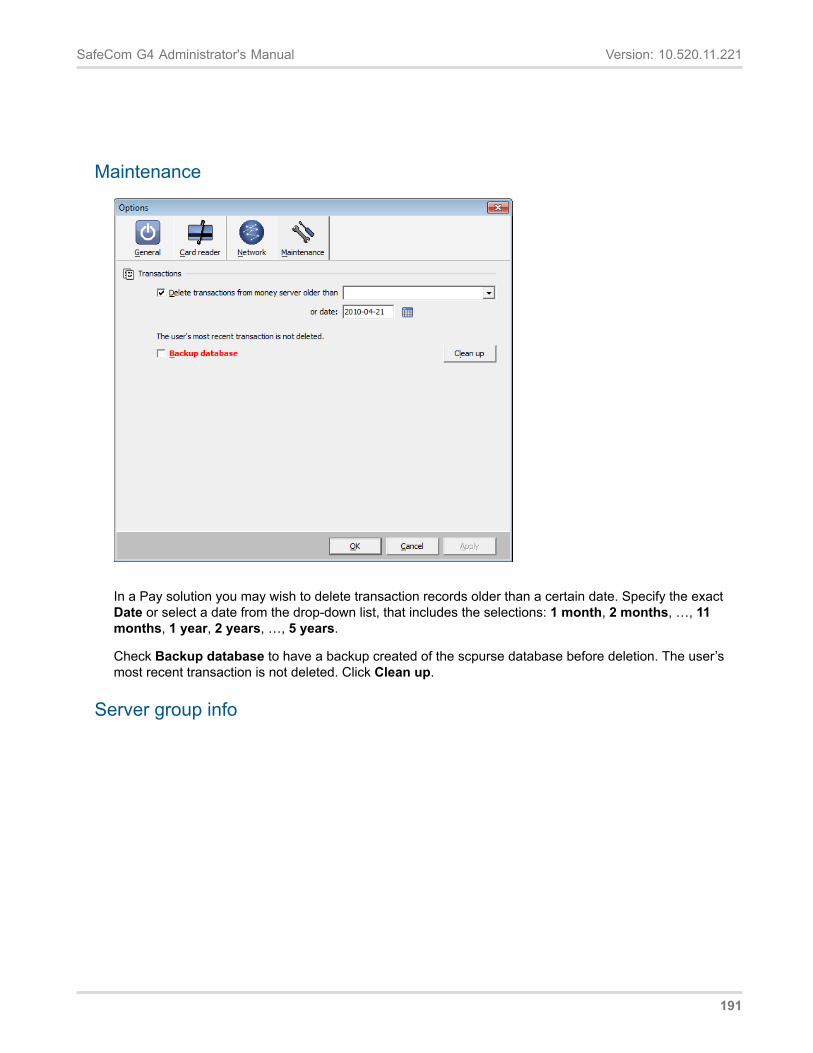
SafeCom G4 Administrator's Manual Version: 10.520.11.221
Maintenance
In a Pay solution you may wish to delete transaction records older than a certain date. Specify the exactDate or select a date from the drop-down list, that includes the selections: 1 month, 2 months, …, 11months, 1 year, 2 years, …, 5 years.
Check Backup database to have a backup created of the scpurse database before deletion. The user’smost recent transaction is not deleted. Click Clean up.
Server group info
191
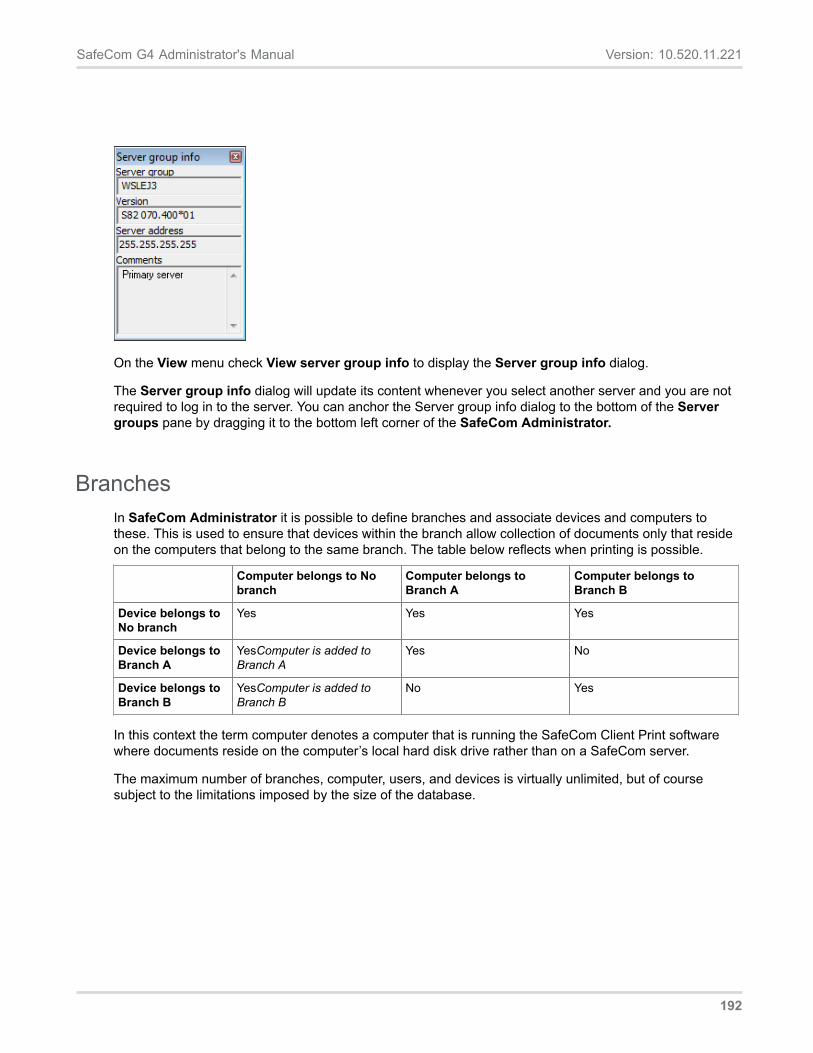
SafeCom G4 Administrator's Manual Version: 10.520.11.221
On the View menu check View server group info to display the Server group info dialog.
The Server group info dialog will update its content whenever you select another server and you are notrequired to log in to the server. You can anchor the Server group info dialog to the bottom of the Servergroups pane by dragging it to the bottom left corner of the SafeCom Administrator.
BranchesIn SafeCom Administrator it is possible to define branches and associate devices and computers tothese. This is used to ensure that devices within the branch allow collection of documents only that resideon the computers that belong to the same branch. The table below reflects when printing is possible.
Computer belongs to Nobranch
Computer belongs toBranch A
Computer belongs toBranch B
Device belongs toNo branch
Yes Yes Yes
Device belongs toBranch A
YesComputer is added toBranch A
Yes No
Device belongs toBranch B
YesComputer is added toBranch B
No Yes
In this context the term computer denotes a computer that is running the SafeCom Client Print softwarewhere documents reside on the computer’s local hard disk drive rather than on a SafeCom server.
The maximum number of branches, computer, users, and devices is virtually unlimited, but of coursesubject to the limitations imposed by the size of the database.
192
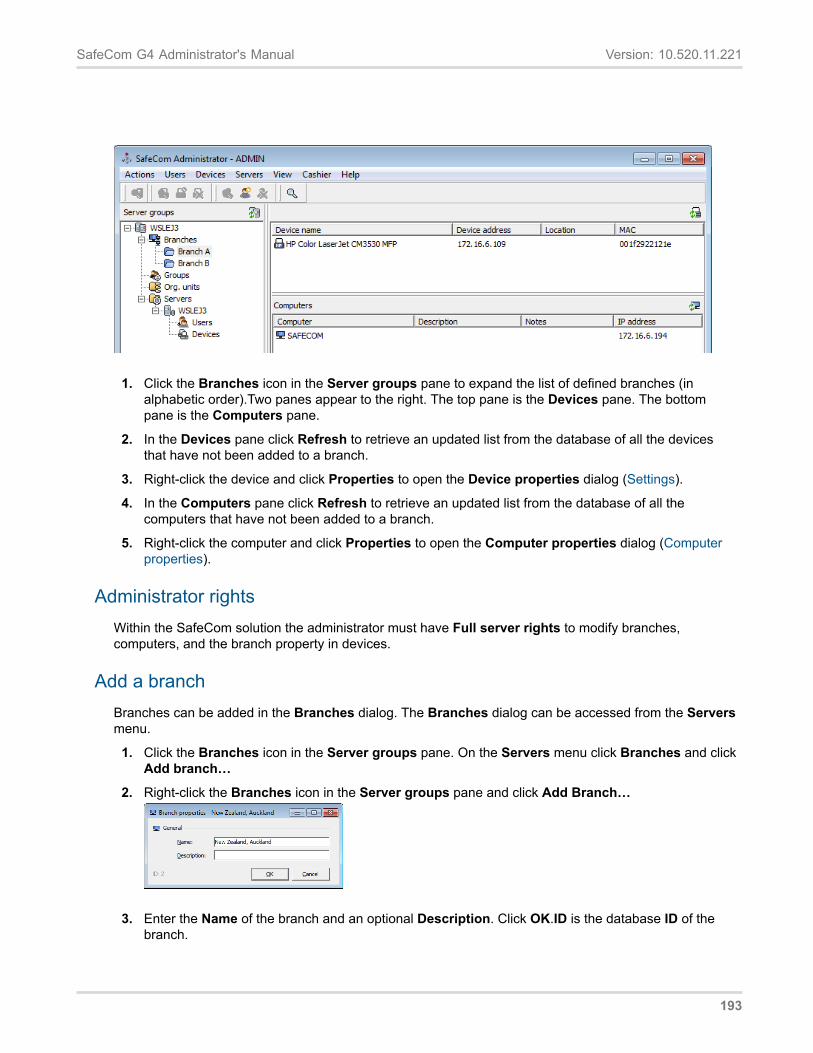
SafeCom G4 Administrator's Manual Version: 10.520.11.221
1. Click the Branches icon in the Server groups pane to expand the list of defined branches (inalphabetic order).Two panes appear to the right. The top pane is the Devices pane. The bottompane is the Computers pane.
2. In the Devices pane click Refresh to retrieve an updated list from the database of all the devicesthat have not been added to a branch.
3. Right-click the device and click Properties to open the Device properties dialog (Settings).
4. In the Computers pane click Refresh to retrieve an updated list from the database of all thecomputers that have not been added to a branch.
5. Right-click the computer and click Properties to open the Computer properties dialog (Computerproperties).
Administrator rightsWithin the SafeCom solution the administrator must have Full server rights to modify branches,computers, and the branch property in devices.
Add a branchBranches can be added in the Branches dialog. The Branches dialog can be accessed from the Serversmenu.
1. Click the Branches icon in the Server groups pane. On the Servers menu click Branches and clickAdd branch…
2. Right-click the Branches icon in the Server groups pane and click Add Branch…
3. Enter the Name of the branch and an optional Description. Click OK.ID is the database ID of thebranch.
193
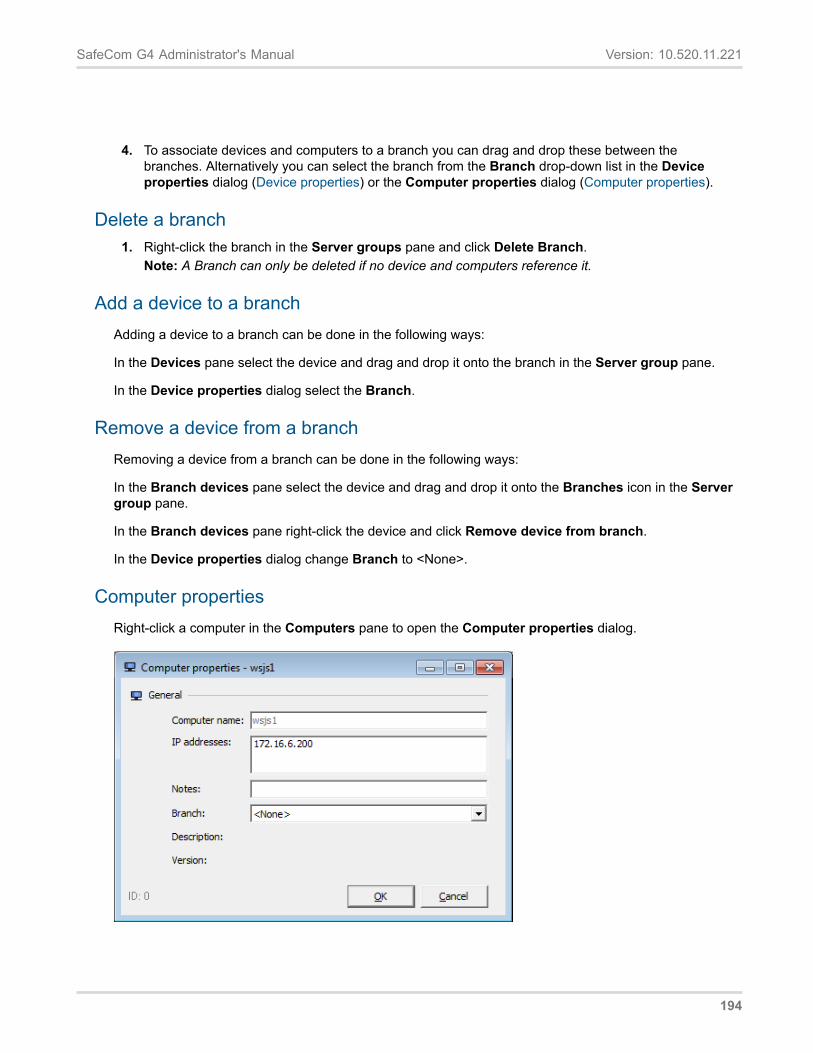
SafeCom G4 Administrator's Manual Version: 10.520.11.221
4. To associate devices and computers to a branch you can drag and drop these between thebranches. Alternatively you can select the branch from the Branch drop-down list in the Deviceproperties dialog (Device properties) or the Computer properties dialog (Computer properties).
Delete a branch1. Right-click the branch in the Server groups pane and click Delete Branch.
Note: A Branch can only be deleted if no device and computers reference it.
Add a device to a branchAdding a device to a branch can be done in the following ways:
In the Devices pane select the device and drag and drop it onto the branch in the Server group pane.
In the Device properties dialog select the Branch.
Remove a device from a branchRemoving a device from a branch can be done in the following ways:
In the Branch devices pane select the device and drag and drop it onto the Branches icon in the Servergroup pane.
In the Branch devices pane right-click the device and click Remove device from branch.
In the Device properties dialog change Branch to <None>.
Computer propertiesRight-click a computer in the Computers pane to open the Computer properties dialog.
194
SafeCom G4 Administrator's Manual Version: 10.520.11.221
Computer name is the hostname (FQDN) of the computer.
IP address holds the IP address the computer had the last time it was started.
Notes hold optional notes that have been entered by the administrator.
Branch is the branch the device belongs to. Only present if there are any defined branches.
Description holds the description of the computer.
Version is the version of the SafeCom Branch software running on the computer.
ID is the database ID of the computer.
Note: The computer is listed in the SafeCom database by its GUID (globally unique identifier). The Computer name, IP address and Description fields are not editable once the computer has been added. These properties are automatically updated when the SafeCom Branch software is started on the computer.
Note: Tracking data is reported to the Home Server of the user printing. The computer has no Home Server itself.
Add a computer to SafeCom solution A computer is by default added to the SafeCom solution the first time the installed SafeCom Branch software is started. Information about the computer is stored in the SafeCom Job Database (sccore) on the SafeCom primary server.
Add a computer to a branch at first print A computer that has not been added to a branch will have the branch determined at first print. When the first document is pulled from the local hard disk drive of the computer the computer is added to the same branch as the device pulling the document.
Add a computer to a branch manually Adding a computer to a branch can be done manually in the following ways:
In the Computers pane select the computer and drag and drop it onto the branch in the Server group pane.
In the Computer properties dialog select the Branch.
Import computers Computers can be imported into the SafeCom solution in the following ways:
Right-click a branch and click Import computers.
Import source file can be in CSV format and can contain the following columns:
Computer name (mandatory)
195
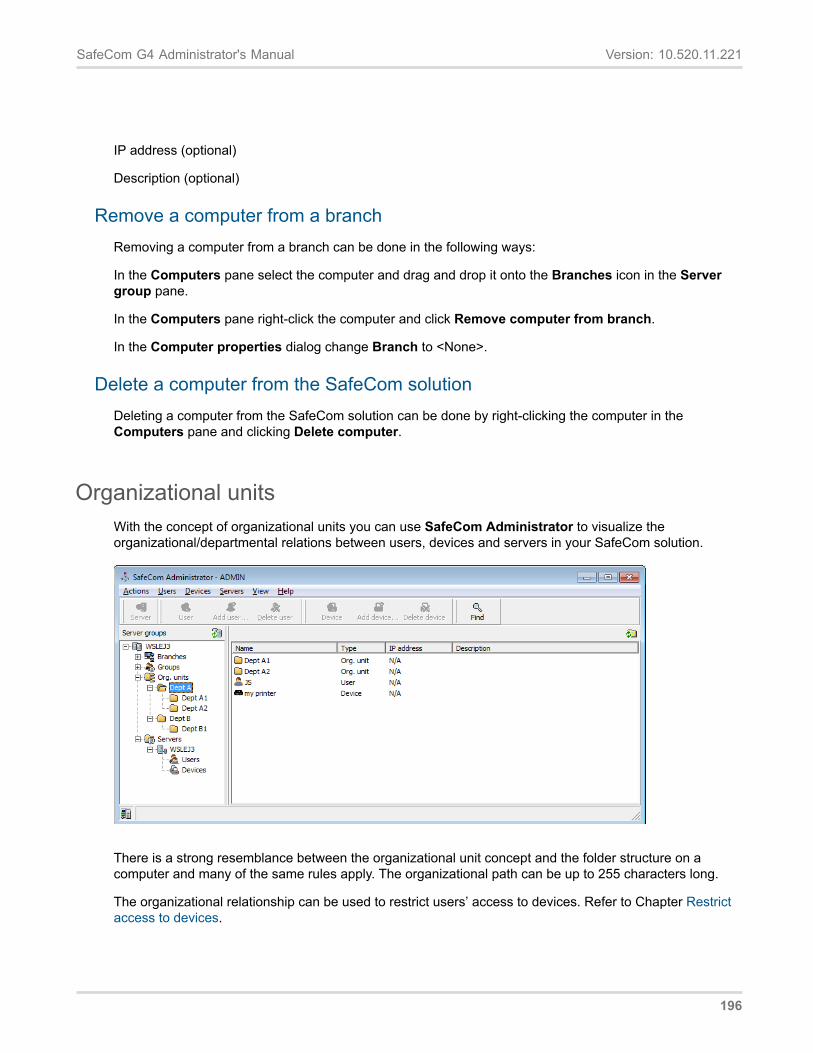
SafeCom G4 Administrator's Manual Version: 10.520.11.221
IP address (optional)
Description (optional)
Remove a computer from a branchRemoving a computer from a branch can be done in the following ways:
In the Computers pane select the computer and drag and drop it onto the Branches icon in the Servergroup pane.
In the Computers pane right-click the computer and click Remove computer from branch.
In the Computer properties dialog change Branch to <None>.
Delete a computer from the SafeCom solutionDeleting a computer from the SafeCom solution can be done by right-clicking the computer in theComputers pane and clicking Delete computer.
Organizational unitsWith the concept of organizational units you can use SafeCom Administrator to visualize theorganizational/departmental relations between users, devices and servers in your SafeCom solution.
There is a strong resemblance between the organizational unit concept and the folder structure on acomputer and many of the same rules apply. The organizational path can be up to 255 characters long.
The organizational relationship can be used to restrict users’ access to devices. Refer to Chapter Restrictaccess to devices.
196
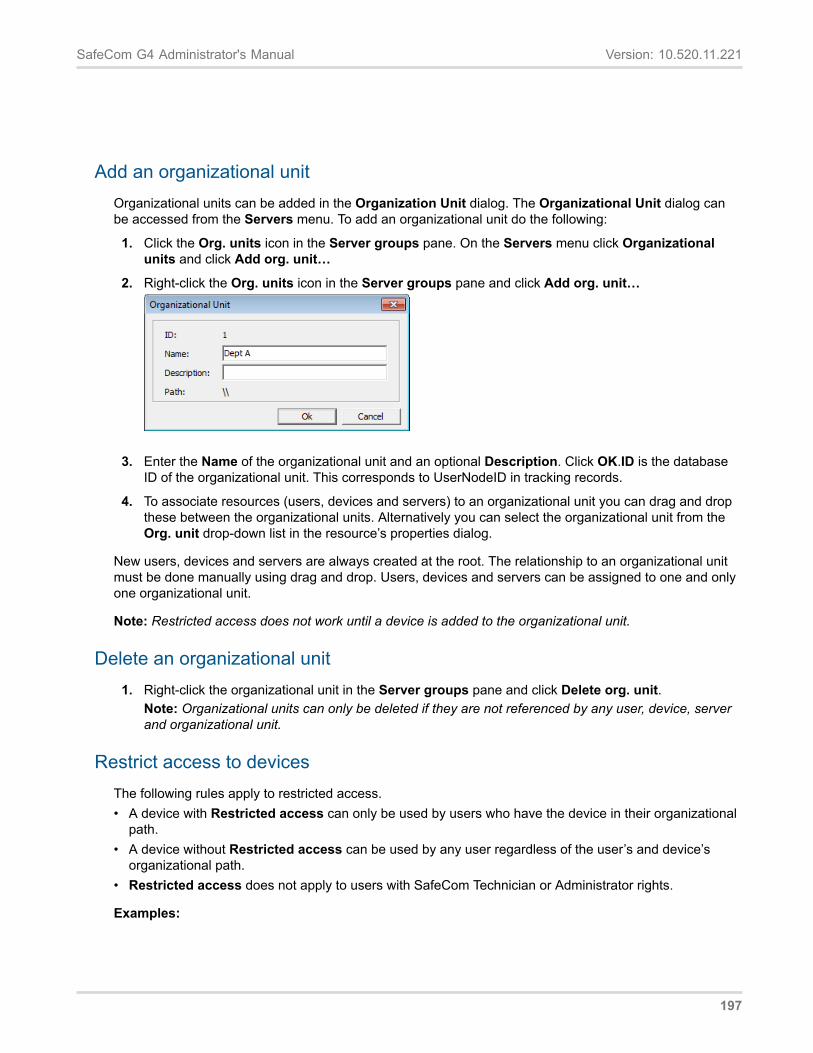
SafeCom G4 Administrator's Manual Version: 10.520.11.221
Add an organizational unitOrganizational units can be added in the Organization Unit dialog. The Organizational Unit dialog canbe accessed from the Servers menu. To add an organizational unit do the following:
1. Click the Org. units icon in the Server groups pane. On the Servers menu click Organizationalunits and click Add org. unit…
2. Right-click the Org. units icon in the Server groups pane and click Add org. unit…
3. Enter the Name of the organizational unit and an optional Description. Click OK.ID is the databaseID of the organizational unit. This corresponds to UserNodeID in tracking records.
4. To associate resources (users, devices and servers) to an organizational unit you can drag and dropthese between the organizational units. Alternatively you can select the organizational unit from theOrg. unit drop-down list in the resource’s properties dialog.
New users, devices and servers are always created at the root. The relationship to an organizational unitmust be done manually using drag and drop. Users, devices and servers can be assigned to one and onlyone organizational unit.
Note: Restricted access does not work until a device is added to the organizational unit.
Delete an organizational unit1. Right-click the organizational unit in the Server groups pane and click Delete org. unit.
Note: Organizational units can only be deleted if they are not referenced by any user, device, serverand organizational unit.
Restrict access to devicesThe following rules apply to restricted access.• A device with Restricted access can only be used by users who have the device in their organizational
path.• A device without Restricted access can be used by any user regardless of the user’s and device’s
organizational path.• Restricted access does not apply to users with SafeCom Technician or Administrator rights.
Examples:
197
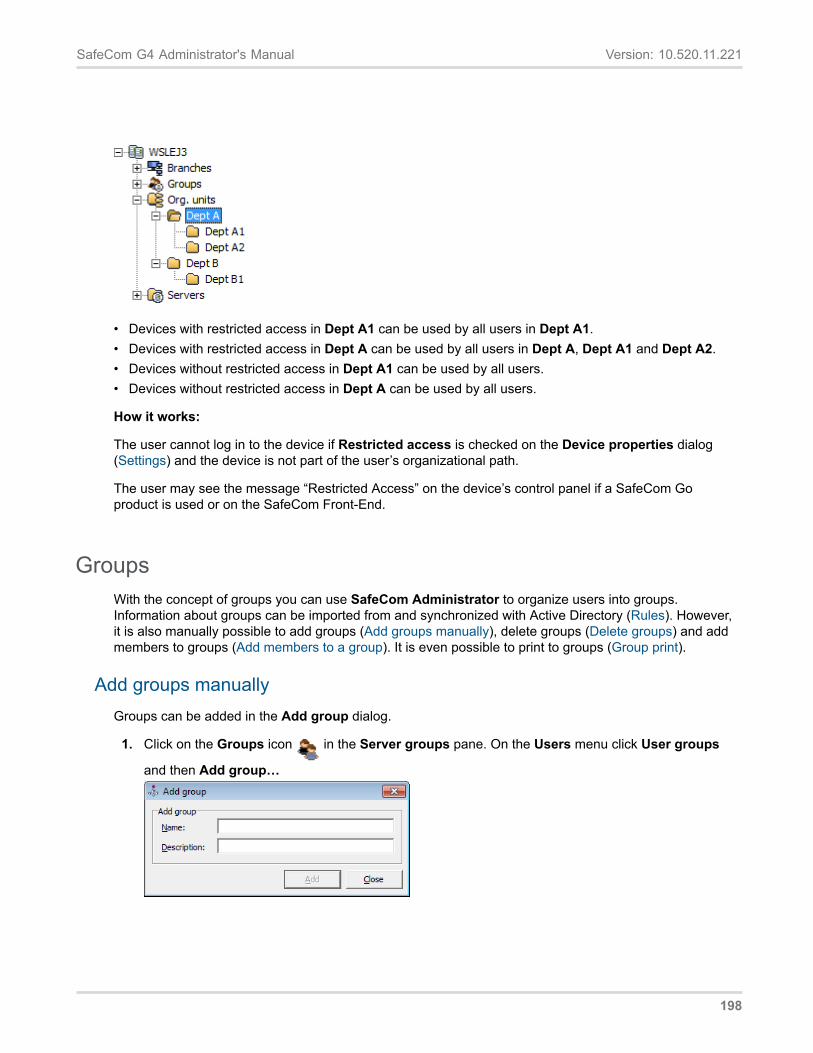
SafeCom G4 Administrator's Manual Version: 10.520.11.221
• Devices with restricted access in Dept A1 can be used by all users in Dept A1.• Devices with restricted access in Dept A can be used by all users in Dept A, Dept A1 and Dept A2.• Devices without restricted access in Dept A1 can be used by all users.• Devices without restricted access in Dept A can be used by all users.
How it works:
The user cannot log in to the device if Restricted access is checked on the Device properties dialog(Settings) and the device is not part of the user’s organizational path.
The user may see the message “Restricted Access” on the device’s control panel if a SafeCom Goproduct is used or on the SafeCom Front-End.
GroupsWith the concept of groups you can use SafeCom Administrator to organize users into groups.Information about groups can be imported from and synchronized with Active Directory (Rules). However,it is also manually possible to add groups (Add groups manually), delete groups (Delete groups) and addmembers to groups (Add members to a group). It is even possible to print to groups (Group print).
Add groups manuallyGroups can be added in the Add group dialog.
1. Click on the Groups icon in the Server groups pane. On the Users menu click User groups
and then Add group…
198
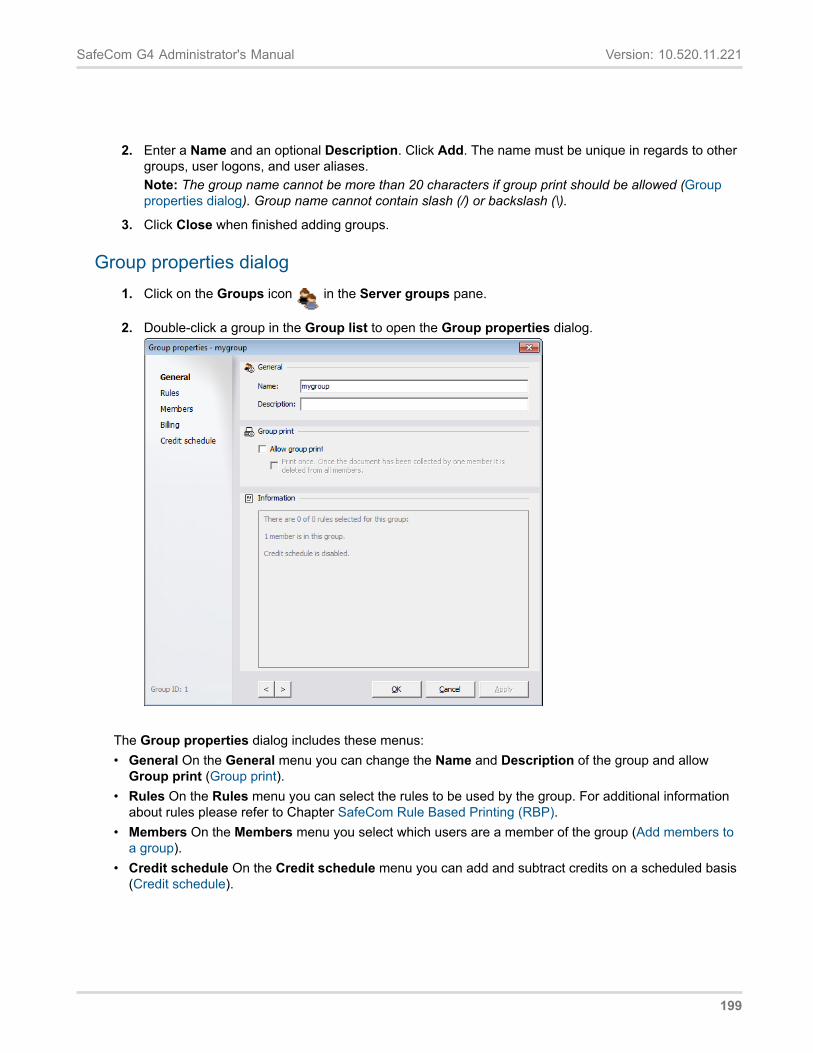
SafeCom G4 Administrator's Manual Version: 10.520.11.221
2. Enter a Name and an optional Description. Click Add. The name must be unique in regards to othergroups, user logons, and user aliases.Note: The group name cannot be more than 20 characters if group print should be allowed (Groupproperties dialog). Group name cannot contain slash (/) or backslash (\).
3. Click Close when finished adding groups.
Group properties dialog1. Click on the Groups icon in the Server groups pane.
2. Double-click a group in the Group list to open the Group properties dialog.
The Group properties dialog includes these menus:• General On the General menu you can change the Name and Description of the group and allow
Group print (Group print).• Rules On the Rules menu you can select the rules to be used by the group. For additional information
about rules please refer to Chapter SafeCom Rule Based Printing (RBP).• Members On the Members menu you select which users are a member of the group (Add members to
a group).• Credit schedule On the Credit schedule menu you can add and subtract credits on a scheduled basis
(Credit schedule).
199
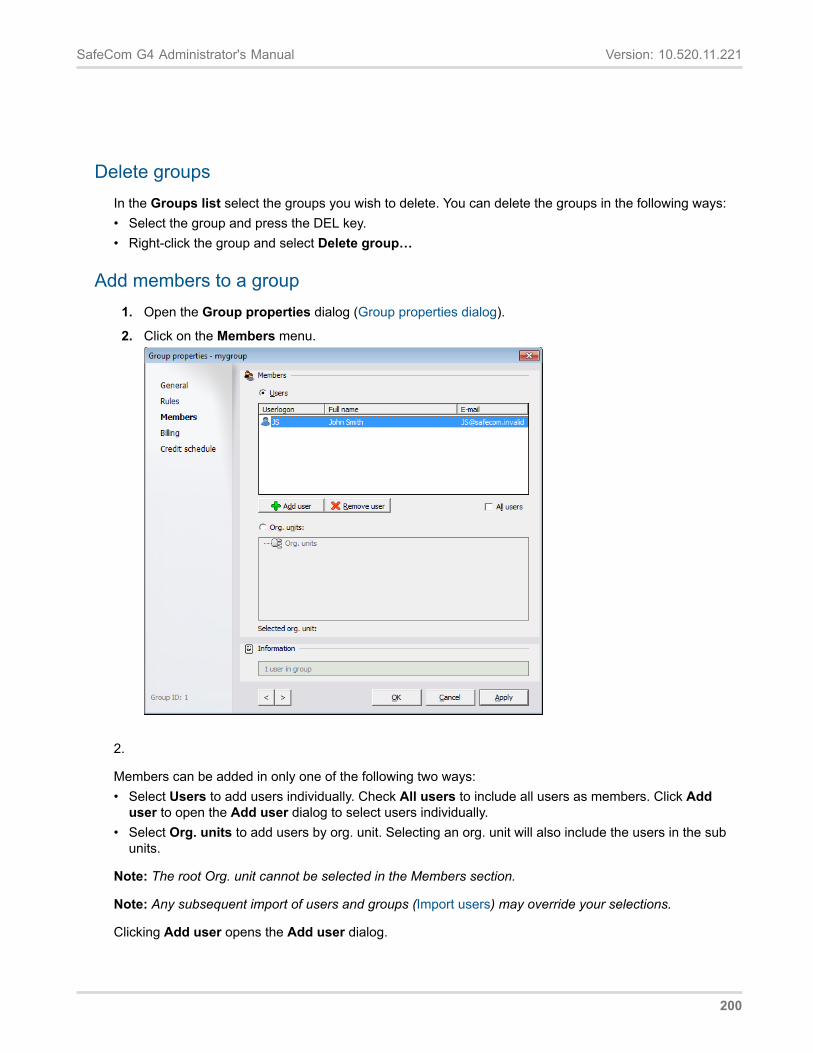
SafeCom G4 Administrator's Manual Version: 10.520.11.221
Delete groupsIn the Groups list select the groups you wish to delete. You can delete the groups in the following ways:• Select the group and press the DEL key.• Right-click the group and select Delete group…
Add members to a group1. Open the Group properties dialog (Group properties dialog).
2. Click on the Members menu.
2.
Members can be added in only one of the following two ways:• Select Users to add users individually. Check All users to include all users as members. Click Add
user to open the Add user dialog to select users individually.• Select Org. units to add users by org. unit. Selecting an org. unit will also include the users in the sub
units.
Note: The root Org. unit cannot be selected in the Members section.
Note: Any subsequent import of users and groups (Import users) may override your selections.
Clicking Add user opens the Add user dialog.
200
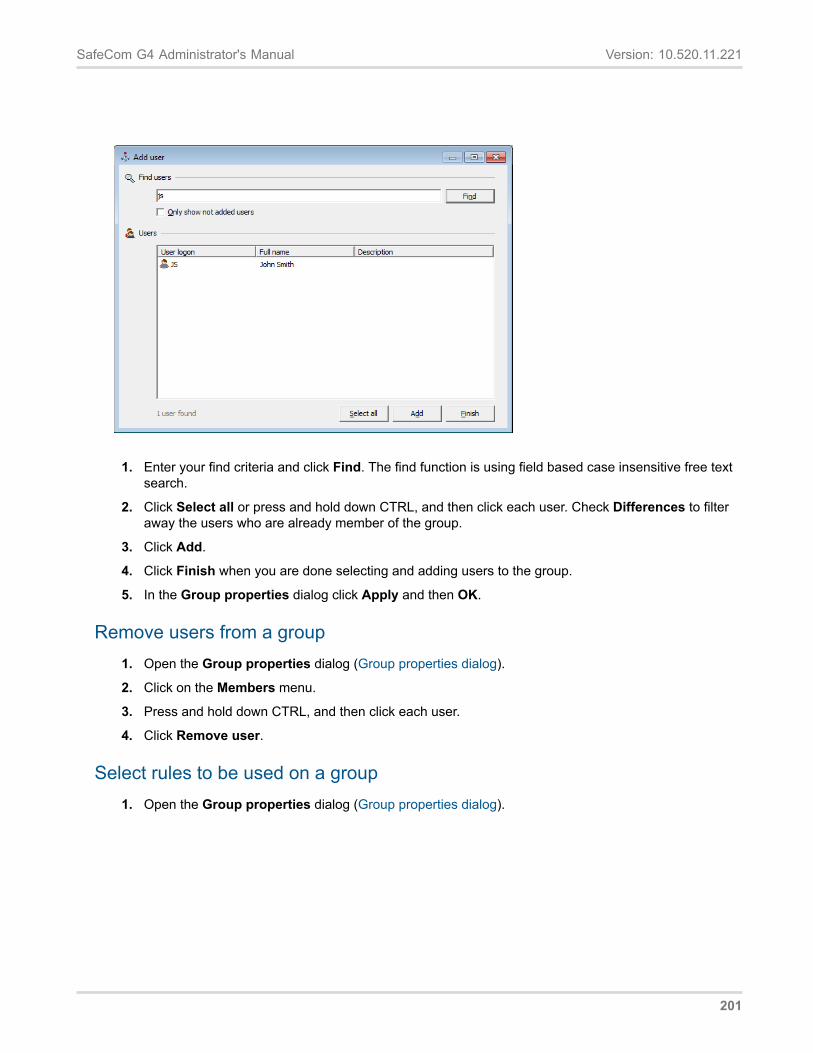
SafeCom G4 Administrator's Manual Version: 10.520.11.221
1. Enter your find criteria and click Find. The find function is using field based case insensitive free textsearch.
2. Click Select all or press and hold down CTRL, and then click each user. Check Differences to filteraway the users who are already member of the group.
3. Click Add.
4. Click Finish when you are done selecting and adding users to the group.
5. In the Group properties dialog click Apply and then OK.
Remove users from a group1. Open the Group properties dialog (Group properties dialog).
2. Click on the Members menu.
3. Press and hold down CTRL, and then click each user.
4. Click Remove user.
Select rules to be used on a group1. Open the Group properties dialog (Group properties dialog).
201
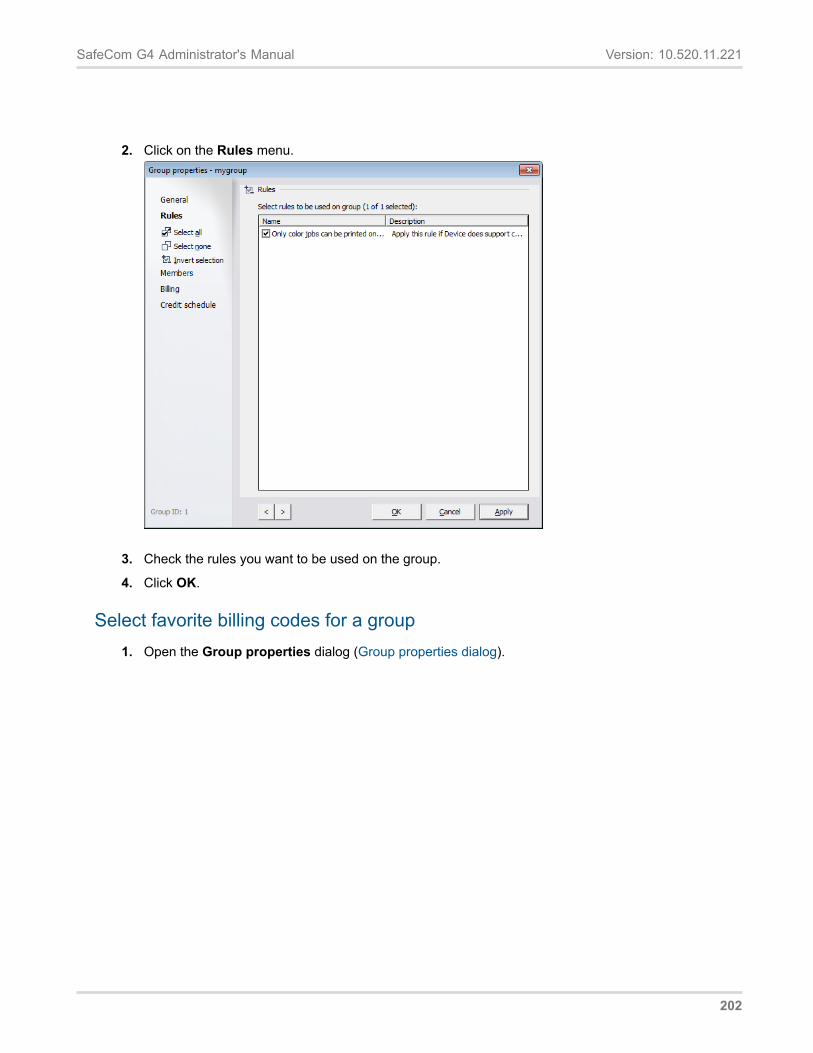
SafeCom G4 Administrator's Manual Version: 10.520.11.221
2. Click on the Rules menu.
3. Check the rules you want to be used on the group.
4. Click OK.
Select favorite billing codes for a group1. Open the Group properties dialog (Group properties dialog).
202
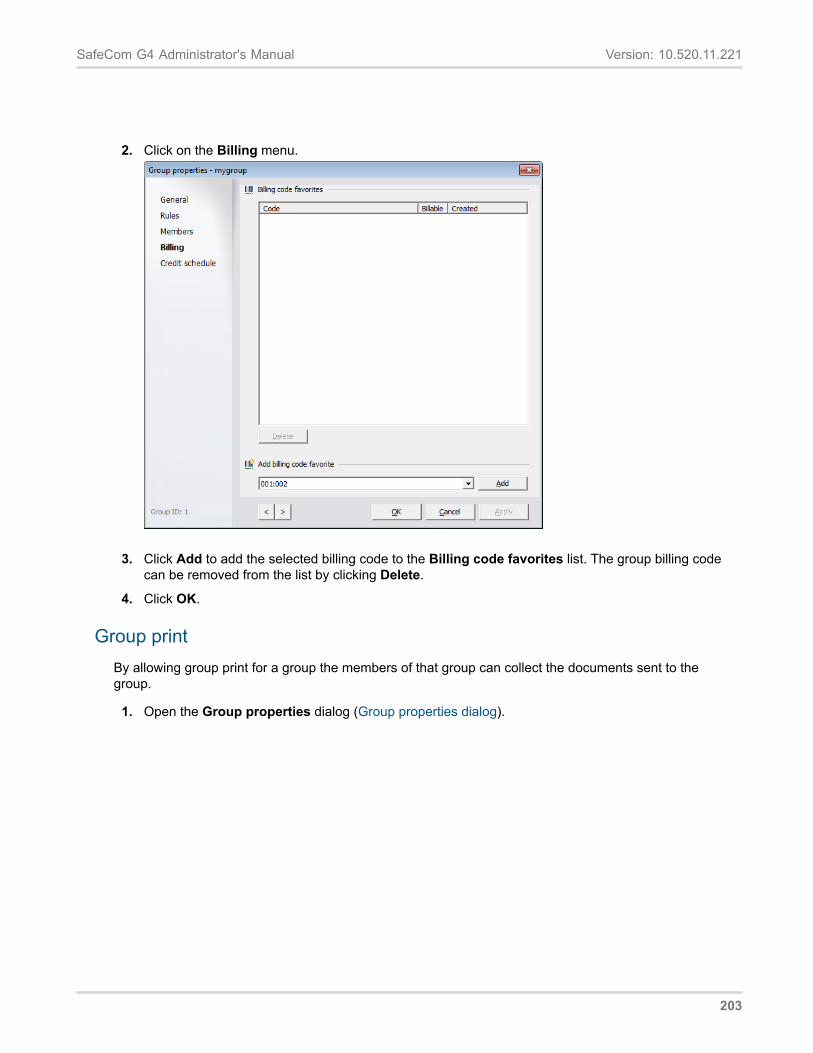
SafeCom G4 Administrator's Manual Version: 10.520.11.221
2. Click on the Billing menu.
3. Click Add to add the selected billing code to the Billing code favorites list. The group billing codecan be removed from the list by clicking Delete.
4. Click OK.
Group printBy allowing group print for a group the members of that group can collect the documents sent to thegroup.
1. Open the Group properties dialog (Group properties dialog).
203
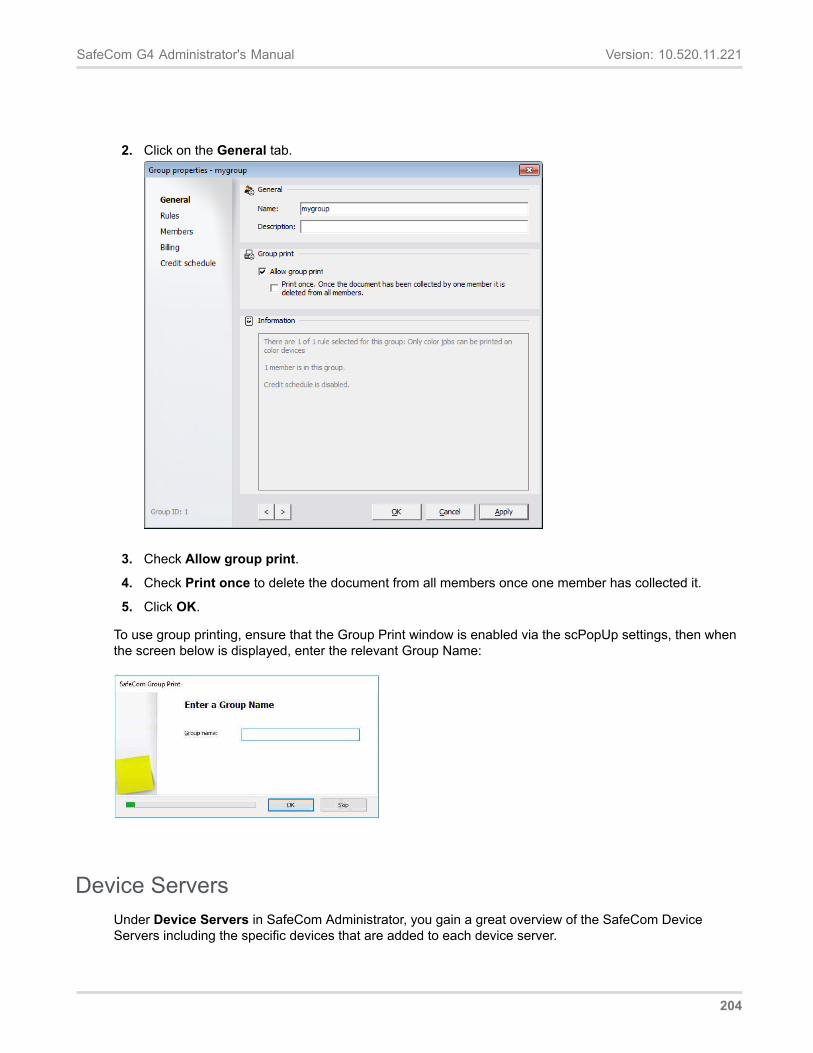
SafeCom G4 Administrator's Manual Version: 10.520.11.221
2. Click on the General tab.
3. Check Allow group print.
4. Check Print once to delete the document from all members once one member has collected it.
5. Click OK.
To use group printing, ensure that the Group Print window is enabled via the scPopUp settings, then whenthe screen below is displayed, enter the relevant Group Name:
Device ServersUnder Device Servers in SafeCom Administrator, you gain a great overview of the SafeCom DeviceServers including the specific devices that are added to each device server.
204
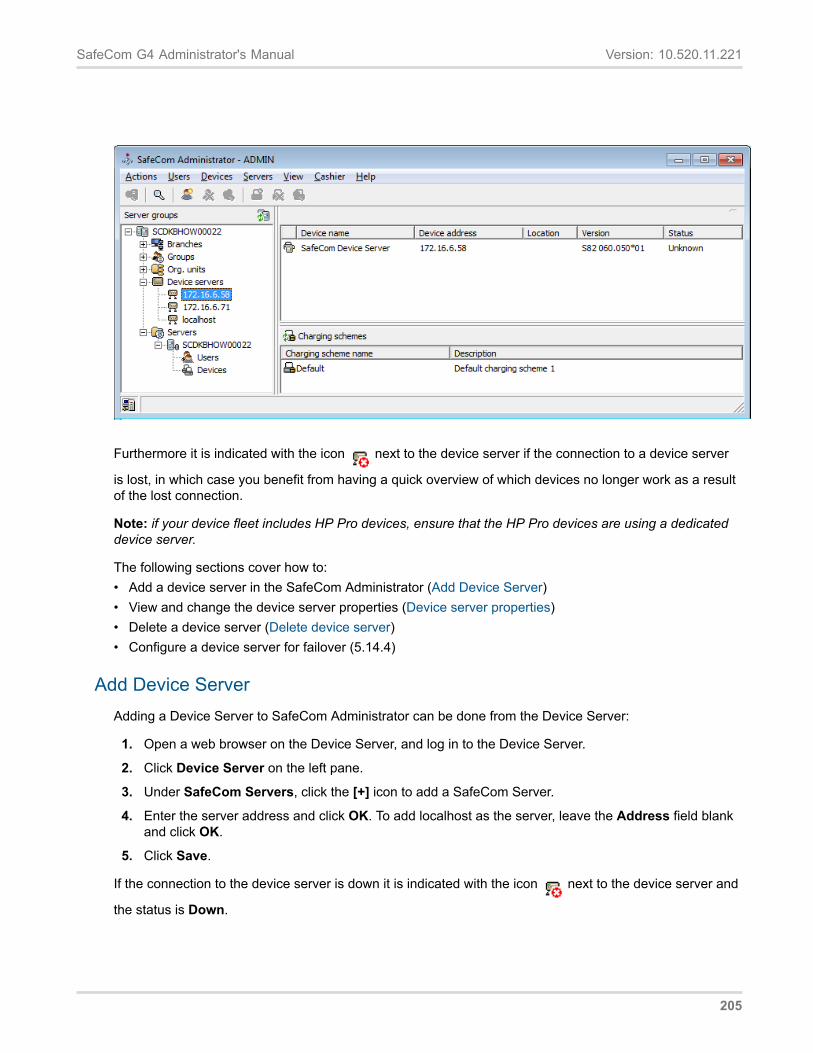
SafeCom G4 Administrator's Manual Version: 10.520.11.221
Furthermore it is indicated with the icon next to the device server if the connection to a device server
is lost, in which case you benefit from having a quick overview of which devices no longer work as a resultof the lost connection.
Note: if your device fleet includes HP Pro devices, ensure that the HP Pro devices are using a dedicateddevice server.
The following sections cover how to:• Add a device server in the SafeCom Administrator (Add Device Server)• View and change the device server properties (Device server properties)• Delete a device server (Delete device server)• Configure a device server for failover (5.14.4)
Add Device ServerAdding a Device Server to SafeCom Administrator can be done from the Device Server:
1. Open a web browser on the Device Server, and log in to the Device Server.
2. Click Device Server on the left pane.
3. Under SafeCom Servers, click the [+] icon to add a SafeCom Server.
4. Enter the server address and click OK. To add localhost as the server, leave the Address field blankand click OK.
5. Click Save.
If the connection to the device server is down it is indicated with the icon next to the device server and
the status is Down.
205
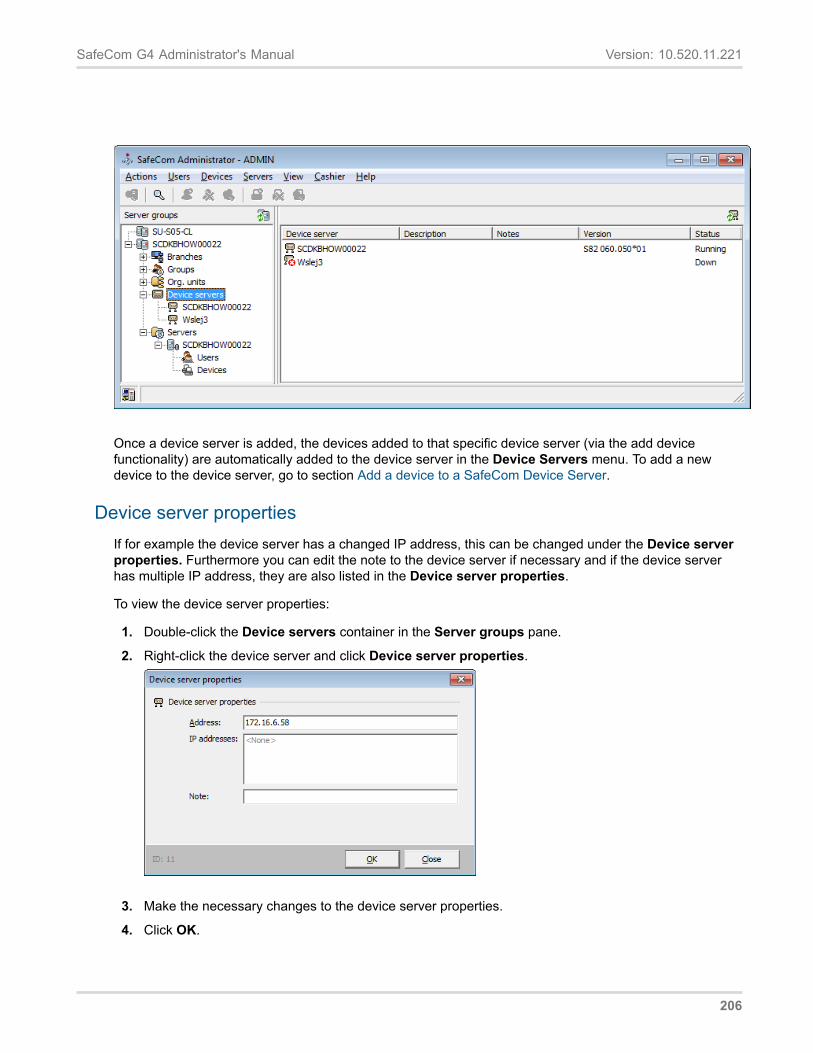
SafeCom G4 Administrator's Manual Version: 10.520.11.221
Once a device server is added, the devices added to that specific device server (via the add devicefunctionality) are automatically added to the device server in the Device Servers menu. To add a newdevice to the device server, go to section Add a device to a SafeCom Device Server.
Device server propertiesIf for example the device server has a changed IP address, this can be changed under the Device serverproperties. Furthermore you can edit the note to the device server if necessary and if the device serverhas multiple IP address, they are also listed in the Device server properties.
To view the device server properties:
1. Double-click the Device servers container in the Server groups pane.
2. Right-click the device server and click Device server properties.
3. Make the necessary changes to the device server properties.
4. Click OK.
206
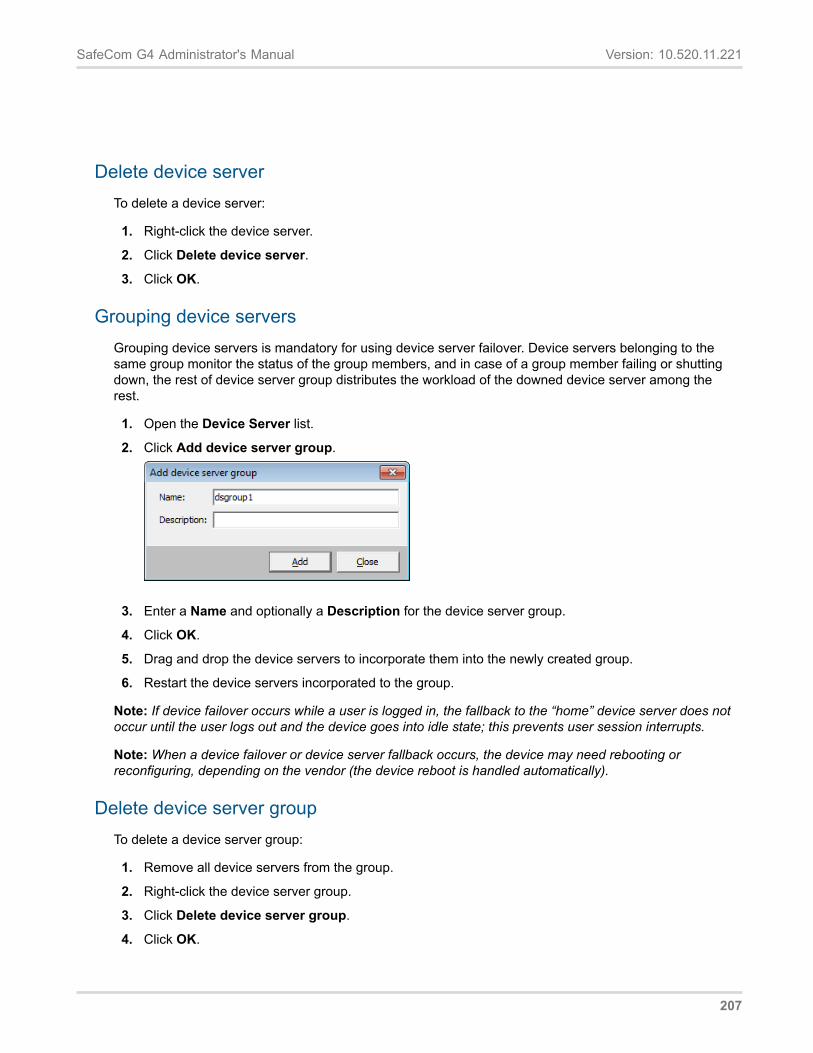
SafeCom G4 Administrator's Manual Version: 10.520.11.221
Delete device serverTo delete a device server:
1. Right-click the device server.
2. Click Delete device server.
3. Click OK.
Grouping device serversGrouping device servers is mandatory for using device server failover. Device servers belonging to thesame group monitor the status of the group members, and in case of a group member failing or shuttingdown, the rest of device server group distributes the workload of the downed device server among therest.
1. Open the Device Server list.
2. Click Add device server group.
3. Enter a Name and optionally a Description for the device server group.
4. Click OK.
5. Drag and drop the device servers to incorporate them into the newly created group.
6. Restart the device servers incorporated to the group.
Note: If device failover occurs while a user is logged in, the fallback to the “home” device server does notoccur until the user logs out and the device goes into idle state; this prevents user session interrupts.
Note: When a device failover or device server fallback occurs, the device may need rebooting orreconfiguring, depending on the vendor (the device reboot is handled automatically).
Delete device server groupTo delete a device server group:
1. Remove all device servers from the group.
2. Right-click the device server group.
3. Click Delete device server group.
4. Click OK.
207
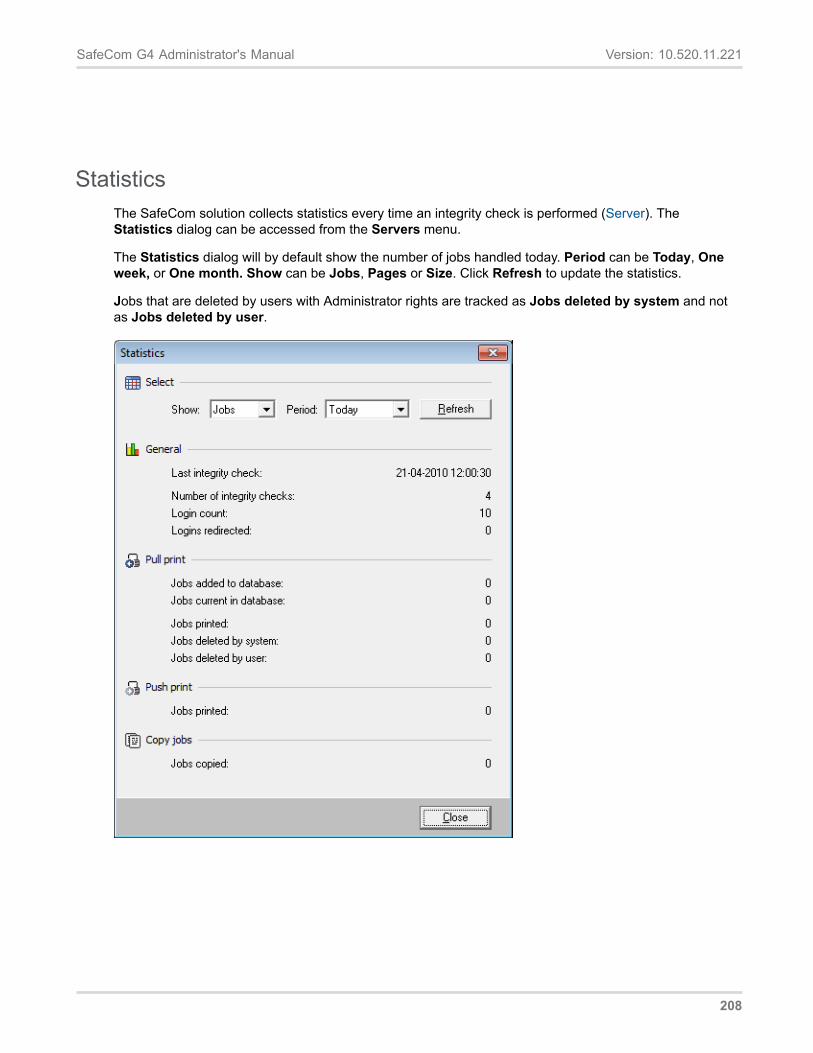
SafeCom G4 Administrator's Manual Version: 10.520.11.221
StatisticsThe SafeCom solution collects statistics every time an integrity check is performed (Server). TheStatistics dialog can be accessed from the Servers menu.
The Statistics dialog will by default show the number of jobs handled today. Period can be Today, Oneweek, or One month. Show can be Jobs, Pages or Size. Click Refresh to update the statistics.
Jobs that are deleted by users with Administrator rights are tracked as Jobs deleted by system and notas Jobs deleted by user.
208
SafeCom G4 Administrator's Manual Version: 10.520.11.221
Event logEvent log messages are written to the SafeCom event log database and optionally to the Windows eventlog if this is enabled in the Server properties dialog (Server).
SafeCom event log:
The Event log dialog can be accessed from the Servers menu and by right-clicking a SafeCom server. Ifyour SafeCom solution does not quite behave the way you expect it to you should always look in the eventlog for a possible explanation. In the event log you will for example find information about license issues.
The event log records which user with special rights (Administrator, Technician or Cashier) logs in andperforms such tasks as: add, modify or delete of users, devices, servers and charging schemes. Theseevents all get severity 6 (Information) and will NOT be forwarded to the administrator by e-mail.
1. Open the Event log dialog.
2. Select the period. A number of predefined periods are available ranging from Today to 7 days back.Choose Specify period to freely specify the beginning (from) and finish (to) of the period.
3. Click Refresh to view the events for the selected period.
4. Click Save to file… to save the events as a CSV file with the fields: EventId, UserId, DateTime,Abstract, Module, Severity and Description.
Windows event log:
Provided writing events to the Windows event log is enabled (Server) it is possible to use the WindowsEvent Viewer to see these and also to use Microsoft Operations Manager (MOM) to monitor SafeComevent alert messages.
1. Open the Control Panel on the computer where the SafeCom server software is installed.
2. Click Administrative Tools. Click Event Viewer.
3. Click SafeCom.
209
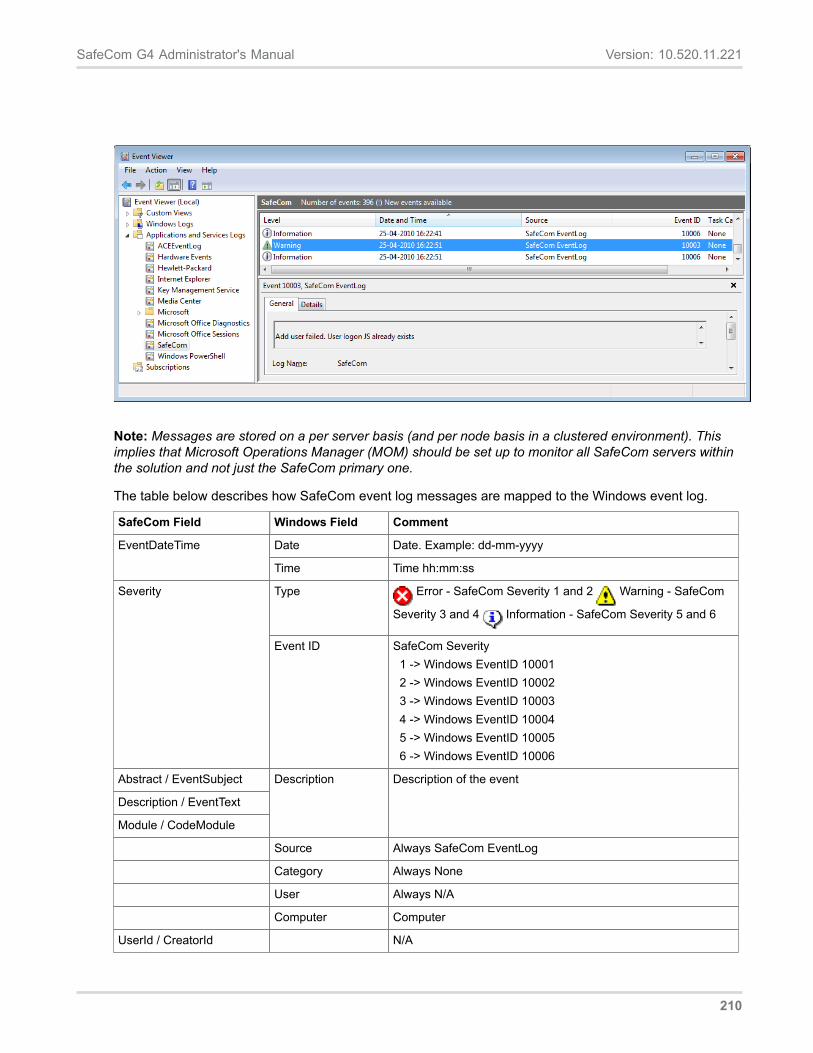
SafeCom G4 Administrator's Manual Version: 10.520.11.221
Note: Messages are stored on a per server basis (and per node basis in a clustered environment). Thisimplies that Microsoft Operations Manager (MOM) should be set up to monitor all SafeCom servers within the solution and not just the SafeCom primary one.
The table below describes how SafeCom event log messages are mapped to the Windows event log.
SafeCom Field Windows Field Comment
Date Date. Example: dd-mm-yyyyEventDateTime
Time Time hh:mm:ss
Type Error - SafeCom Severity 1 and 2 Warning - SafeCom
Severity 3 and 4 Information - SafeCom Severity 5 and 6
Severity
Event ID SafeCom Severity 1 -> Windows EventID 10001 2 -> Windows EventID 10002 3 -> Windows EventID 10003 4 -> Windows EventID 10004 5 -> Windows EventID 10005 6 -> Windows EventID 10006
Abstract / EventSubject
Description / EventText
Module / CodeModule
Description Description of the event
Source Always SafeCom EventLog
Category Always None
User Always N/A
Computer Computer
UserId / CreatorId N/A
210
SafeCom G4 Administrator's Manual Version: 10.520.11.221
Viewed N/A
EventId N/A
Event severity
Events are sorted in six levels on three categories: Level 1 and level 2 events are categorized as errors,level 3 and level 4 events are categorized as warnings, and level 5 and level 6 events are categorized asinformation.
Export dataUsers that are administrators in the SafeCom solution and have Full user rights can export data aboutusers, devices, and servers in XML or CSV format.
Export users1. On the Actions menu, click Export…
2. Check Users.
3. Click Next.
4. Select Save as type and enter File name. Click Save.
5. Click Close.
Note: When exporting to a CSV file it is only the first AliasName, CardNo, and GroupID that is exportedfor each user. When exporting to an XML file all Aliases, Cards and Groups with additional details areexported.
The XML tags are covered in the tables in the following. The CSV column header is the same as the XMLtag.
Parameter Description
UserID Database ID of the user
UserLogon Logon name
FullName Full name
HomeServer Home server
EMail E-mail address
Description Description
UserNodeID Database ID of the organizational unit the user belongs to
CostCode Cost code
LoginsFailed Number of failed login attempts
UserLocked Prevent login. Values: Yes | No
AvoidPINCode Login without PIN code. Values: Yes | No
211
SafeCom G4 Administrator's Manual Version: 10.520.11.221
AllowRetainDocuments Allow retain documents. Values: Yes | No
EnableBillingDialog Bill client for costs. Values: Yes | No | Yes_Restrict
PrintAll Print all at login. Values: Yes | No
AccountingModel Cost control. Values: NONE | PRINT_AND_PAY | PAY_AND_PRINT
PUKCode PUK code
Parameter Description
GroupID Database ID of the group
GroupName Group name
GroupDescription Group description
Parameter Description
CardID Database ID of the card
CardNo Card number
SourceID Source ID of the card
TemporaryCard Temporary card. Values: Yes | No
StartDate Start date, yyyy-mm-dd
StartTime Start time, hh:mm:ss
EndDate End date, yyyy-mm-dd
EndTime End time, hh:mm:ss
Parameter Description
AliasID Database ID of the alias
AliasName Alias name
Export servers1. On the Actions menu, click Export…
2. Check Servers.
3. Click Next.
4. Select Save as type and enter File name. Click Save.
5. Click Close.
The XML tags are covered in the table in the following. The CSV column header is the same as the XMLtag.
Parameter Description
ServerID Database ID of the server
212

SafeCom G4 Administrator's Manual Version: 10.520.11.221
ComputerName Computer name
IPAddress IP address
PrimaryServer Primary server. Values: Yes | No
Export devices1. On the Actions menu, click Export…
2. Check Devices.
3. Click Next.
4. Select Save as type and enter File name. Click Save.
5. Click Close.
The XML tags are covered in the table in the following. The CSV column header is the same as the XMLtag.
Parameter Description
DeviceID Database ID of the device
Name Device name
Model Device model
Type Device type. Values: SafeCom Controller | SafeCom Go <vendor> |SafeCom P:Go <vendor> | SafeCom Go High-end HP
Version Version
HomeServer Home server
Location Location
IPAddress IP address
DuplexSupport Duplex support. Values: Yes | No
RestrictedAccess Restricted access. Values: Yes | No
ColorSupport Color support. Values: Yes | No
PushPrint Push print. Values: Yes | No
PullPrint Pull print. Values: Yes | No
LicenseTracking Tracking license. Values: Yes | No
LicenseClientBilling Client Billing license. Values: Yes | No
LicenseRuleBasedPrinting Rule Based Printing license. Values: Yes | No
LicensePay Pay license. Values: Yes | No
LicensePullPrint Pull Print license. Values: Yes | No
LicenseEncryption Encryption license. Values: Yes | No
DeviceMac MAC address
ChargingSchemeID Database ID of charging scheme
213
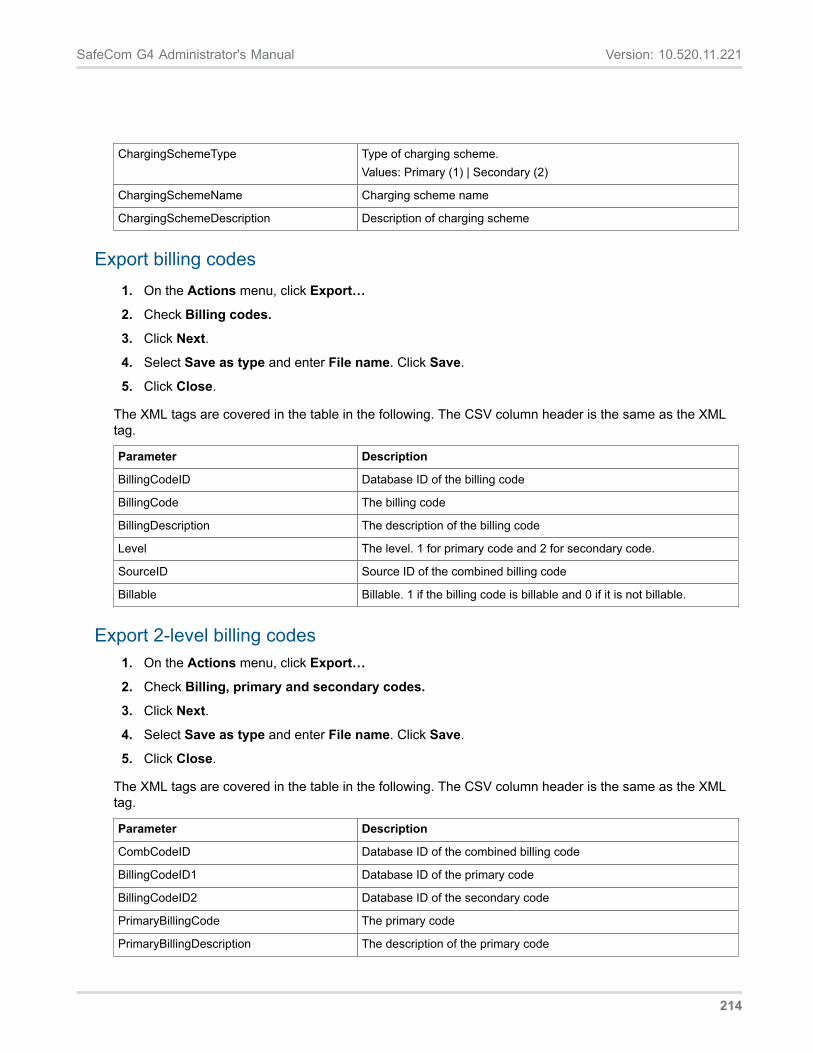
SafeCom G4 Administrator's Manual Version: 10.520.11.221
ChargingSchemeType Type of charging scheme.Values: Primary (1) | Secondary (2)
ChargingSchemeName Charging scheme name
ChargingSchemeDescription Description of charging scheme
Export billing codes1. On the Actions menu, click Export…
2. Check Billing codes.
3. Click Next.
4. Select Save as type and enter File name. Click Save.
5. Click Close.
The XML tags are covered in the table in the following. The CSV column header is the same as the XMLtag.
Parameter Description
BillingCodeID Database ID of the billing code
BillingCode The billing code
BillingDescription The description of the billing code
Level The level. 1 for primary code and 2 for secondary code.
SourceID Source ID of the combined billing code
Billable Billable. 1 if the billing code is billable and 0 if it is not billable.
Export 2-level billing codes1. On the Actions menu, click Export…
2. Check Billing, primary and secondary codes.
3. Click Next.
4. Select Save as type and enter File name. Click Save.
5. Click Close.
The XML tags are covered in the table in the following. The CSV column header is the same as the XMLtag.
Parameter Description
CombCodeID Database ID of the combined billing code
BillingCodeID1 Database ID of the primary code
BillingCodeID2 Database ID of the secondary code
PrimaryBillingCode The primary code
PrimaryBillingDescription The description of the primary code
214

SafeCom G4 Administrator's Manual Version: 10.520.11.221
SecondaryBillingCode The secondary code
SecondaryBillingDescription The description of the secondary code
SourceID Source ID of the billing code
Billable Billable. 1 if the billing code is billable and 0 if it is not billable.
215
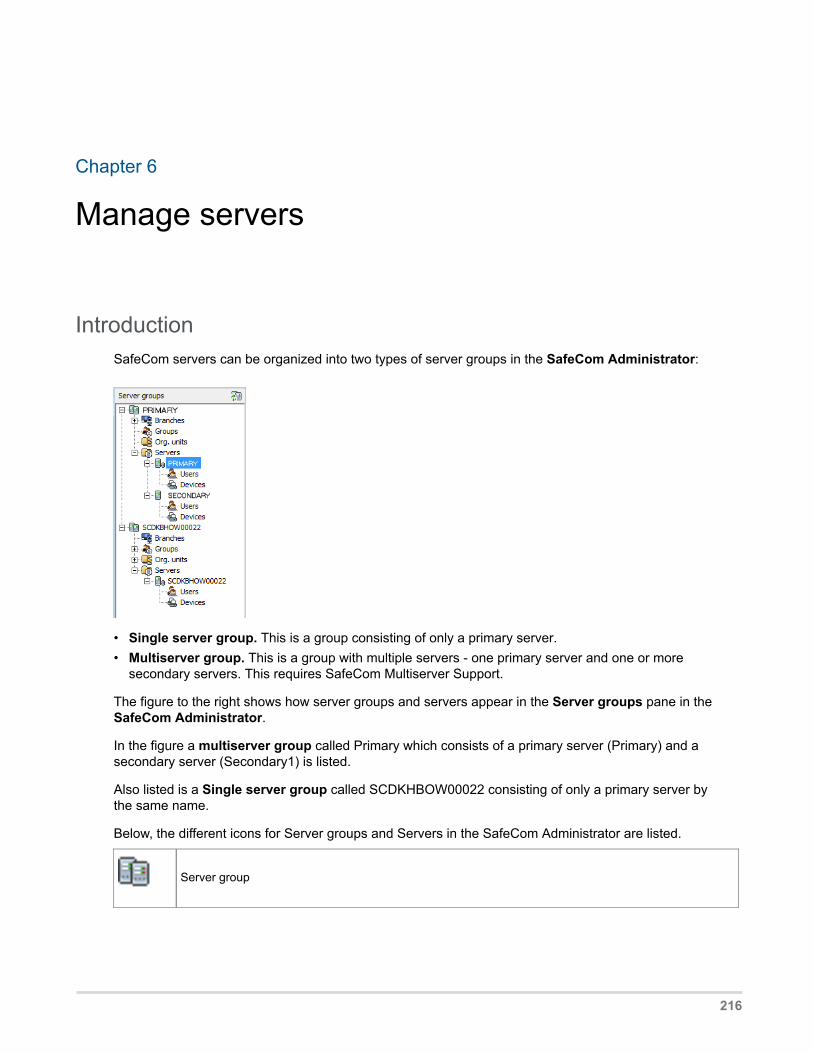
Chapter 6
Manage servers
IntroductionSafeCom servers can be organized into two types of server groups in the SafeCom Administrator:
• Single server group. This is a group consisting of only a primary server. • Multiserver group. This is a group with multiple servers - one primary server and one or more
secondary servers. This requires SafeCom Multiserver Support.
The figure to the right shows how server groups and servers appear in the Server groups pane in the SafeCom Administrator.
In the figure a multiserver group called Primary which consists of a primary server (Primary) and a secondary server (Secondary1) is listed.
Also listed is a Single server group called SCDKHBOW00022 consisting of only a primary server by the same name.
Below, the different icons for Server groups and Servers in the SafeCom Administrator are listed.
Server group
216
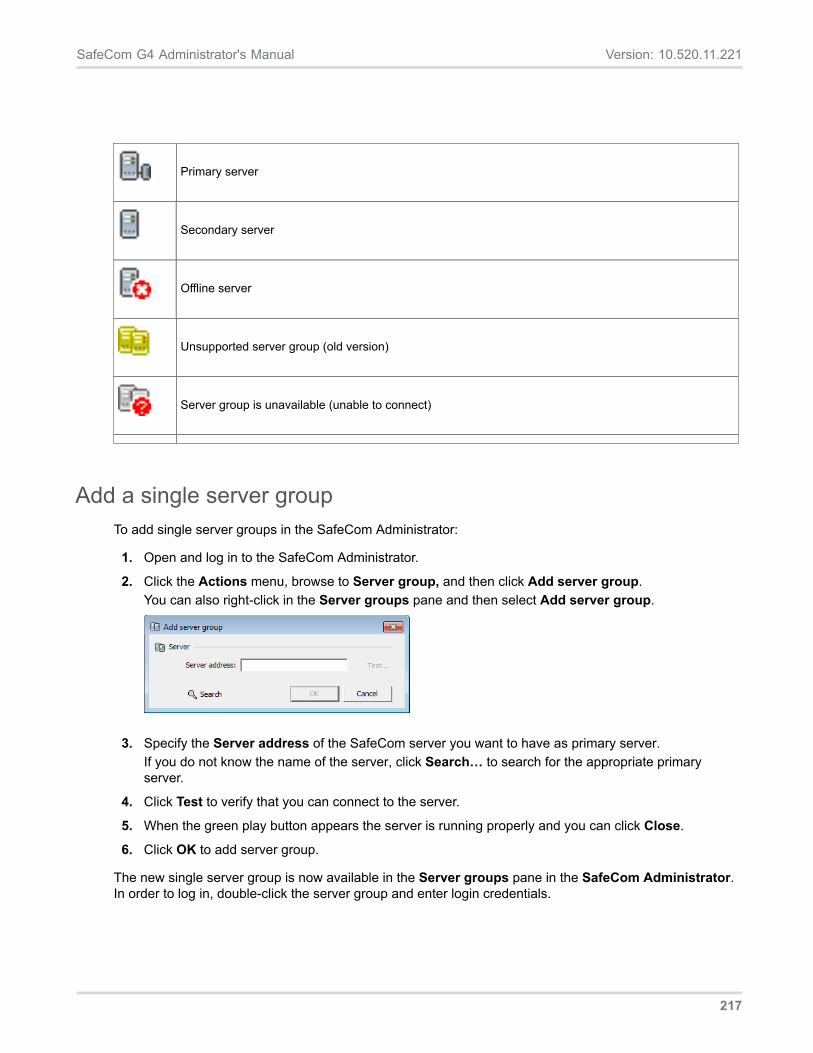
SafeCom G4 Administrator's Manual Version: 10.520.11.221
Primary server
Secondary server
Offline server
Unsupported server group (old version)
Server group is unavailable (unable to connect)
Add a single server groupTo add single server groups in the SafeCom Administrator:
1. Open and log in to the SafeCom Administrator.
2. Click the Actions menu, browse to Server group, and then click Add server group.You can also right-click in the Server groups pane and then select Add server group.
3. Specify the Server address of the SafeCom server you want to have as primary server. If you do not know the name of the server, click Search… to search for the appropriate primary server.
4. Click Test to verify that you can connect to the server.
5. When the green play button appears the server is running properly and you can click Close.
6. Click OK to add server group.
The new single server group is now available in the Server groups pane in the SafeCom Administrator. In order to log in, double-click the server group and enter login credentials.
217
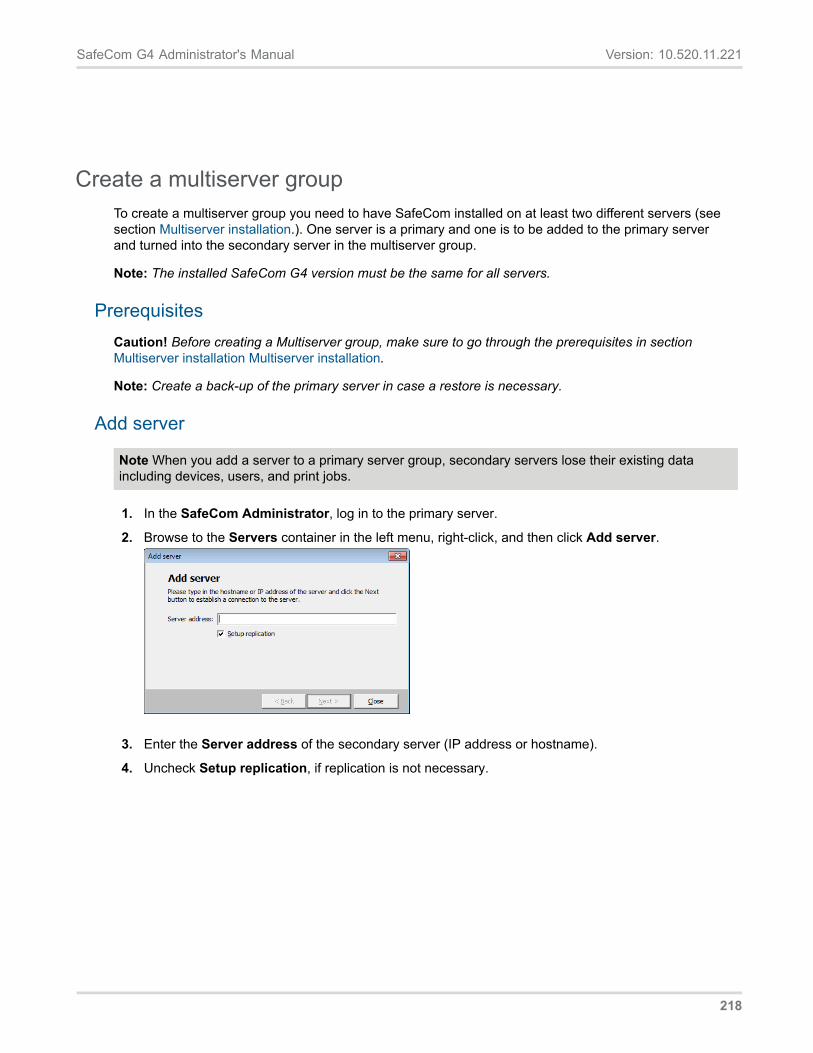
SafeCom G4 Administrator's Manual Version: 10.520.11.221
Create a multiserver group To create a multiserver group you need to have SafeCom installed on at least two different servers (see section Multiserver installation.). One server is a primary and one is to be added to the primary server and turned into the secondary server in the multiserver group.
Note: The installed SafeCom G4 version must be the same for all servers.
Prerequisites Caution! Before creating a Multiserver group, make sure to go through the prerequisites in section Multiserver installation Multiserver installation.
Note: Create a back-up of the primary server in case a restore is necessary.
Add server
Note When you add a server to a primary server group, secondary servers lose their existing data including devices, users, and print jobs.
1. In the SafeCom Administrator, log in to the primary server.
2. Browse to the Servers container in the left menu, right-click, and then click Add server.
3. Enter the Server address of the secondary server (IP address or hostname).
4. Uncheck Setup replication, if replication is not necessary.
218

SafeCom G4 Administrator's Manual Version: 10.520.11.221
5. Click Next and the server is now being added. This can take a few minutes.The server is added successfully when a green check mark appears next to Server added.
6. Once the server is added, select Open Server properties after wizard is completed if needed.
7. Click Finish.
Note If you want to readd a secondary server immediately after deleting the secondary server, you may have to restart SafeCom Administrator before you can add the same secondary server.
Note If you are using an external SQL server, the newly-added secondary server may display a yellow triangle to show the ongoing replication process. This icon is removed once the replication finishes running. If the triangle vanishes from the list view but is still present in the tree view, restart SafeCom Administrator.
Troubleshooting If the attempt to create a multiserver fails, double-check the list of prerequisites in section Multiserver installation Multiserver installation and for troubleshooting go through the lists below.
On the Primary server: • Check that publication and subscription are set up. Refer to section Check that the replication is
working. • Reinitialize subscription (refer to section Reinitialize the subscription) or repair replication from
SafeCom Administrator (refer to section Repair replication). • Use the tool SQL management studio for troubleshooting the SQL.
On the Secondary server: • If secondary server does not start up, enable SafeCom Trace to view the job server trace log file. • Restart the SafeCom Service on secondary. • Restart the SQL service (SafeComExpress) on secondary. • Toggle online/offline tracking on secondary.
Fixes: • If there is no back-up, the primary server may be fixed by removing excess rows from SafeCom
Database table: SCServerInfo, SCServerSettings.
219

SafeCom G4 Administrator's Manual Version: 10.520.11.221
Remove single or multiserver groupA server group can be deleted in the following two ways:• Select the server group that must be deleted in the Server groups pane. Click the Actions menu,
browse to Server group, and then click Remove server group.• Right-click the server group in the Server groups pane and select Remove server group.
Removing a server group only prevents it from appearing in the Server groups pane, it is not deletedcompletel
Failover servers In a SafeCom multiserver solution additional resilience can be achieved by specifying a prioritized list of servers that users should be moved to in the event that their home server becomes unavailable. The home server is where the user’s documents remain until they are either collected or deleted.
Note: if the Store Doc on First Server option is enabled, the user’s documents are stored on the first server the Pull Port print queue contacts.
Prerequisites: • The SafeCom primary server and the SQL primary server are available. • Users with special rights are not moved as they always have the SafeCom primary server as their
home server.
Delete a secondary server from a multiserver group If the server group contains multiple servers you can delete the servers that are not primary server. You must be logged into the server group to delete a server. You can delete a server from the server group in the following way: • From the Servers menu click Delete server.
Before you can delete the server the following conditions must be met. • Secondary server must be running The secondary server must be running at the time of deletion
otherwise its reference to the primary server cannot be removed from its database. • No users must have the server as home server Verify this in SafeCom Administrator by clicking on
the server in question and verify that the Users folder is empty. • No devices must have the server as home server Verify this in SafeCom Administrator by clicking
on the server in question and verify that the Devices folder is empty.
Note: All Windows print queues that uses a SafeCom Pull Port to connect to the deleted server will stop working until they have been configured to use another server in the group.
To remove the SafeCom Server software from the deleted server you must log in to the server and uninstall the SafeCom software (Uninstall SafeCom software).
220
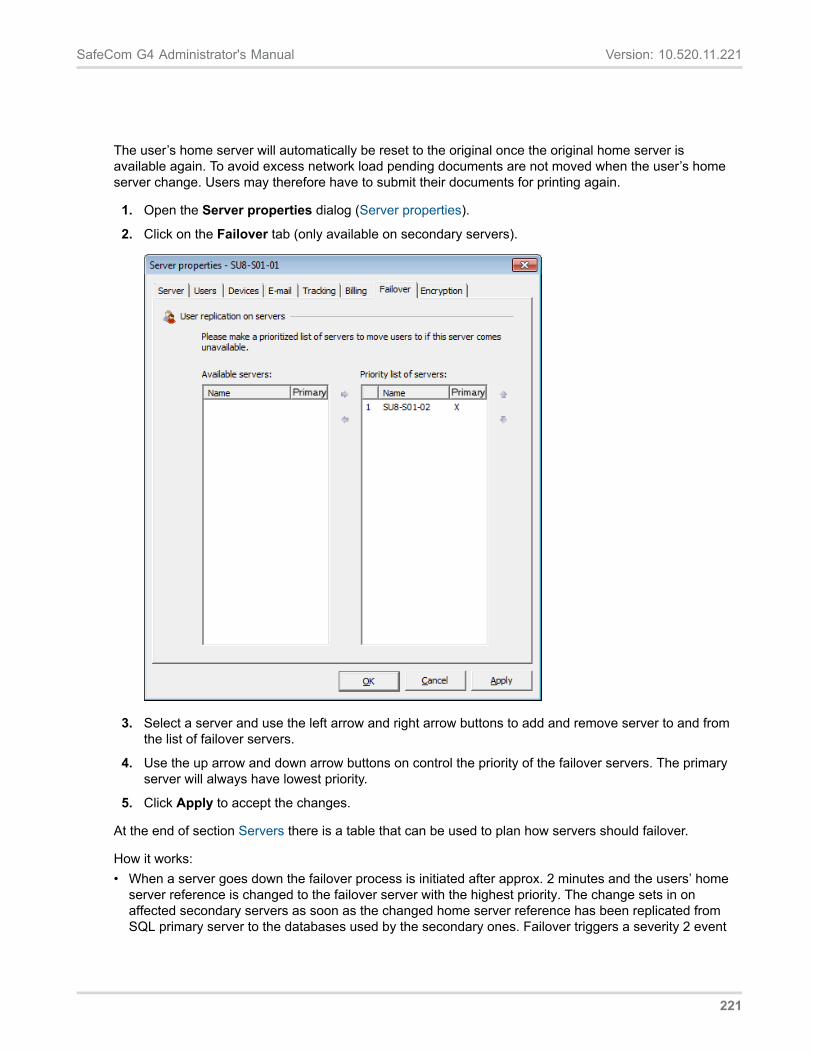
SafeCom G4 Administrator's Manual Version: 10.520.11.221
The user’s home server will automatically be reset to the original once the original home server is available again. To avoid excess network load pending documents are not moved when the user’s homeserver change. Users may therefore have to submit their documents for printing again.
1. Open the Server properties dialog (Server properties).
2. Click on the Failover tab (only available on secondary servers).
3. Select a server and use the left arrow and right arrow buttons to add and remove server to and from the list of failover servers.
4. Use the up arrow and down arrow buttons on control the priority of the failover servers. The primary server will always have lowest priority.
5. Click Apply to accept the changes.
At the end of section Servers there is a table that can be used to plan how servers should failover.
How it works: • When a server goes down the failover process is initiated after approx. 2 minutes and the users’ home
server reference is changed to the failover server with the highest priority. The change sets in on affected secondary servers as soon as the changed home server reference has been replicated from SQL primary server to the databases used by the secondary ones. Failover triggers a severity 2 event
221
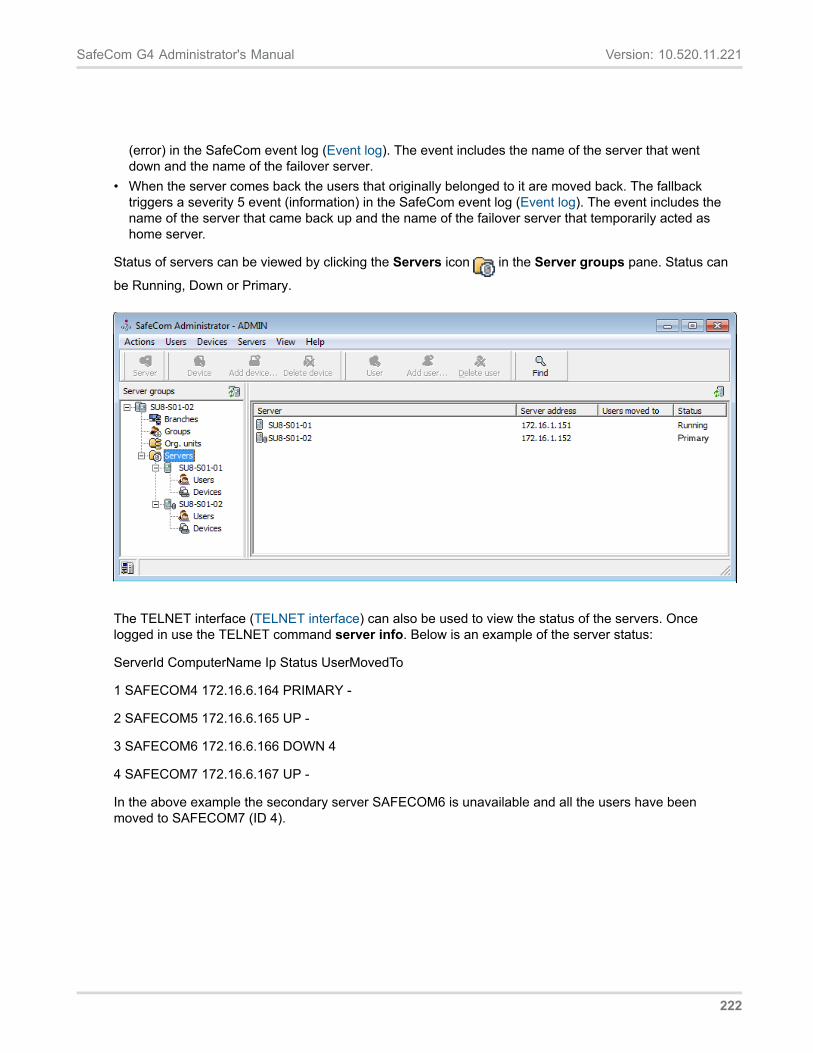
SafeCom G4 Administrator's Manual Version: 10.520.11.221
(error) in the SafeCom event log (Event log). The event includes the name of the server that went down and the name of the failover server.
• When the server comes back the users that originally belonged to it are moved back. The fallback triggers a severity 5 event (information) in the SafeCom event log (Event log). The event includes the name of the server that came back up and the name of the failover server that temporarily acted as home server.
Status of servers can be viewed by clicking the Servers icon in the Server groups pane. Status can
be Running, Down or Primary.
The TELNET interface (TELNET interface) can also be used to view the status of the servers. Once logged in use the TELNET command server info. Below is an example of the server status:
ServerId ComputerName Ip Status UserMovedTo
1 SAFECOM4 172.16.6.164 PRIMARY -
2 SAFECOM5 172.16.6.165 UP -
3 SAFECOM6 172.16.6.166 DOWN 4
4 SAFECOM7 172.16.6.167 UP -
In the above example the secondary server SAFECOM6 is unavailable and all the users have been moved to SAFECOM7 (ID 4).
222
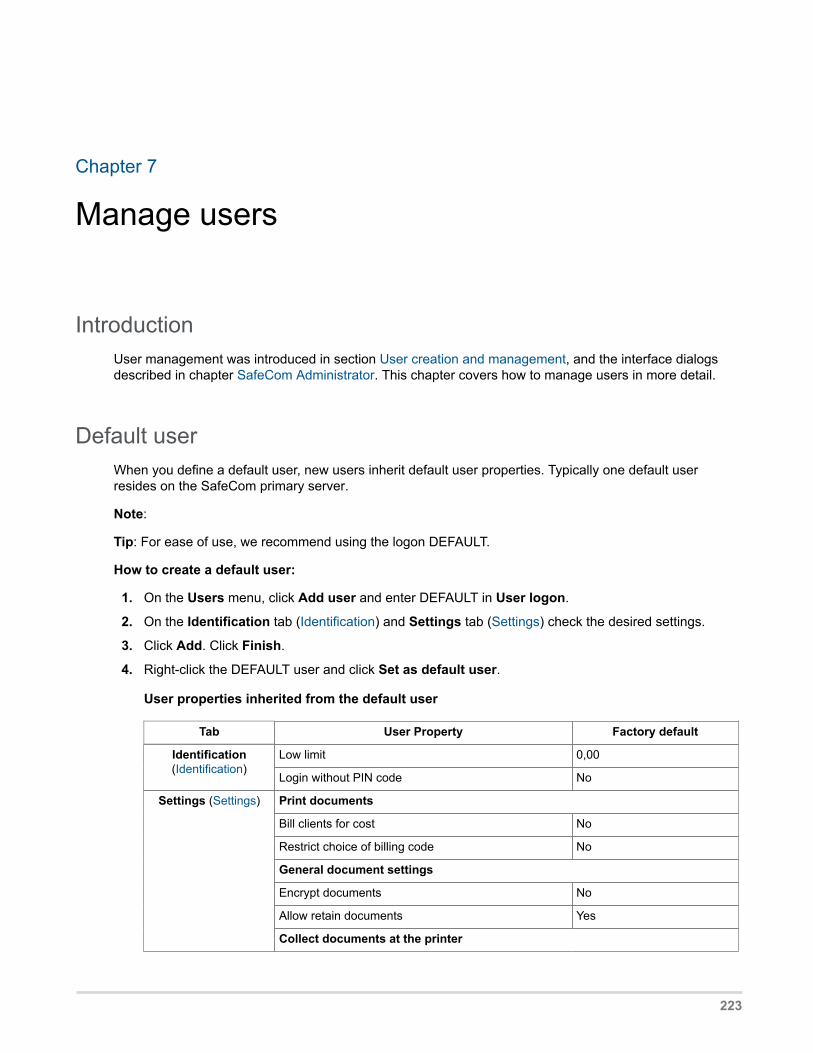
Chapter 7
Manage users
IntroductionUser management was introduced in section User creation and management, and the interface dialogsdescribed in chapter SafeCom Administrator. This chapter covers how to manage users in more detail.
Default user When you define a default user, new users inherit default user properties. Typically one default user resides on the SafeCom primary server.
Note:
Tip: For ease of use, we recommend using the logon DEFAULT.
How to create a default user:
1. On the Users menu, click Add user and enter DEFAULT in User logon.
2. On the Identification tab (Identification) and Settings tab (Settings) check the desired settings.
3. Click Add. Click Finish.
4. Right-click the DEFAULT user and click Set as default user.
User properties inherited from the default user
Tab User Property Factory default
Low limit 0,00Identification(Identification)
Login without PIN code No
Print documents
Bill clients for cost No
Restrict choice of billing code No
General document settings
Encrypt documents No
Allow retain documents Yes
Settings (Settings)
Collect documents at the printer
223
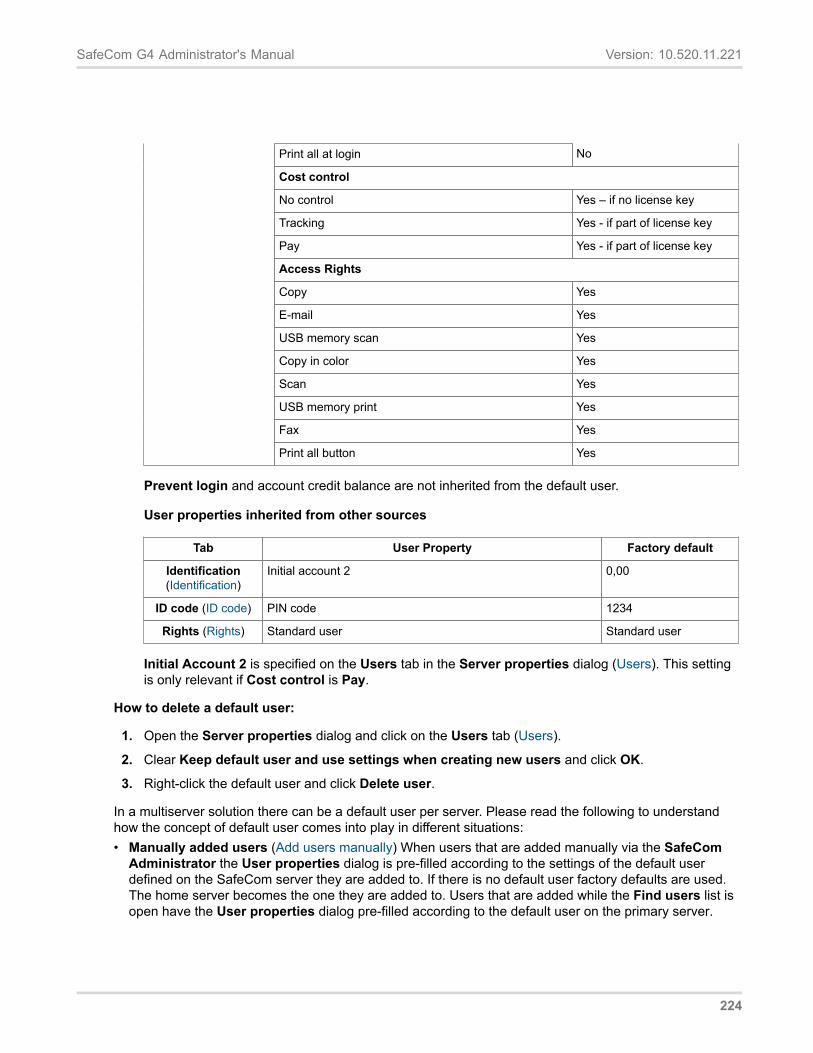
SafeCom G4 Administrator's Manual Version: 10.520.11.221
Print all at login No
Cost control
No control Yes – if no license key
Tracking Yes - if part of license key
Pay Yes - if part of license key
Access Rights
Copy Yes
E-mail Yes
USB memory scan Yes
Copy in color Yes
Scan Yes
USB memory print Yes
Fax Yes
Print all button Yes
Prevent login and account credit balance are not inherited from the default user.
User properties inherited from other sources
Tab User Property Factory default
Identification(Identification)
Initial account 2 0,00
ID code (ID code) PIN code 1234
Rights (Rights) Standard user Standard user
Initial Account 2 is specified on the Users tab in the Server properties dialog (Users). This setting is only relevant if Cost control is Pay.
How to delete a default user:
1. Open the Server properties dialog and click on the Users tab (Users).
2. Clear Keep default user and use settings when creating new users and click OK.
3. Right-click the default user and click Delete user.
In a multiserver solution there can be a default user per server. Please read the following to understand how the concept of default user comes into play in different situations: • Manually added users (Add users manually) When users that are added manually via the SafeCom
Administrator the User properties dialog is pre-filled according to the settings of the default user defined on the SafeCom server they are added to. If there is no default user factory defaults are used. The home server becomes the one they are added to. Users that are added while the Find users list is open have the User properties dialog pre-filled according to the default user on the primary server.
224
SafeCom G4 Administrator's Manual Version: 10.520.11.221
Import usersIt is possible to create multiple user import schedules. This gives great flexibility as exemplified in thefollowing bullets.• Run now Click Run now to instantly run any user import. This way user import is performed
immediately during initial configuration.• Import from multiple sources Import users from different sources, for example the Active Directory,
a file or even a different part of the same Active Directory. The SafeCom Administrator supports infinitepossibilities.
• Default user per import schedule Select Apply settings from default user or choose whichsettings should be applied from a specific user. Example: An educational institution imports stafffrom one part23 of the Active Directory and sets them to Tracking. It then imports students fromanother part of the Active Directory and has them inherit the settings of a manually24 created user(DEFAULT_STUDENT) which is set to Pay.
• User handling There is only one way that users created at first print or added manually in SafeComAdministrator can be deleted during a scheduled import. These users are only deleted if they had, atany time, also been part of a scheduled import and are subsequently missing from a later scheduledimport. The SafeCom solution will notice their absence and delete them. Whenever a user is importedthe ID of the import schedule is recorded in the database together with the user. A manually added userinitially has the Source ID 0. User Logon is unique regardless of Source ID. The function Find user(Find users) allows selection of Source ID as criteria.
• ID handling There is only one way that IDs (or cards) registered at the device or added manuallyin SafeCom Administrator can be deleted during a scheduled import. These IDs are only deletedif their card numbers had, at any time, also been part of a scheduled import and are subsequentlymissing from a later scheduled import. The SafeCom Solution will notice their absence and delete them.Whenever an ID code is imported the ID of the import schedule is recorded in the database togetherwith the ID code. A manually added ID codes initially has Source ID 0. In the ID codes overview dialog
• Created users at first print (Create users at first print) Users that are created at first print inherit the settings of the default user defined on the SafeCom primary server. If there is no default user factory defaults are used. The home server is set to the SafeCom primary server.
• Imported users (Import users) Imported users inherit the settings of the default user defined on the SafeCom primary server or those of a particular user if this is specified for the scheduled import. If there is no default user factory defaults are used. The home server remains undefined until they get in contact with the SafeCom solution in any of the following three ways: • Printing If their first action is to print, their home server will be the one referenced by the SafeCom
Pull Port. • Log in at device If their first action is to log in at a SafeCom-enabled device their home server will
be the one that is referenced by the SafeCom-enabled device. • SafeCom G4 Web Interface If their first action is to log in to the SafeCom G4 Web Interface their
home server will be the one referenced by the SafeCom G4 Web Interface (typically the SafeCom primary server).
23 See search root and search filter in section Properties (Active Directory).24 A User Logon that starts with DEFAULT_ makes it easier to find the user and keep the user out of any
scheduled import to prevent unintentional deletion.
225
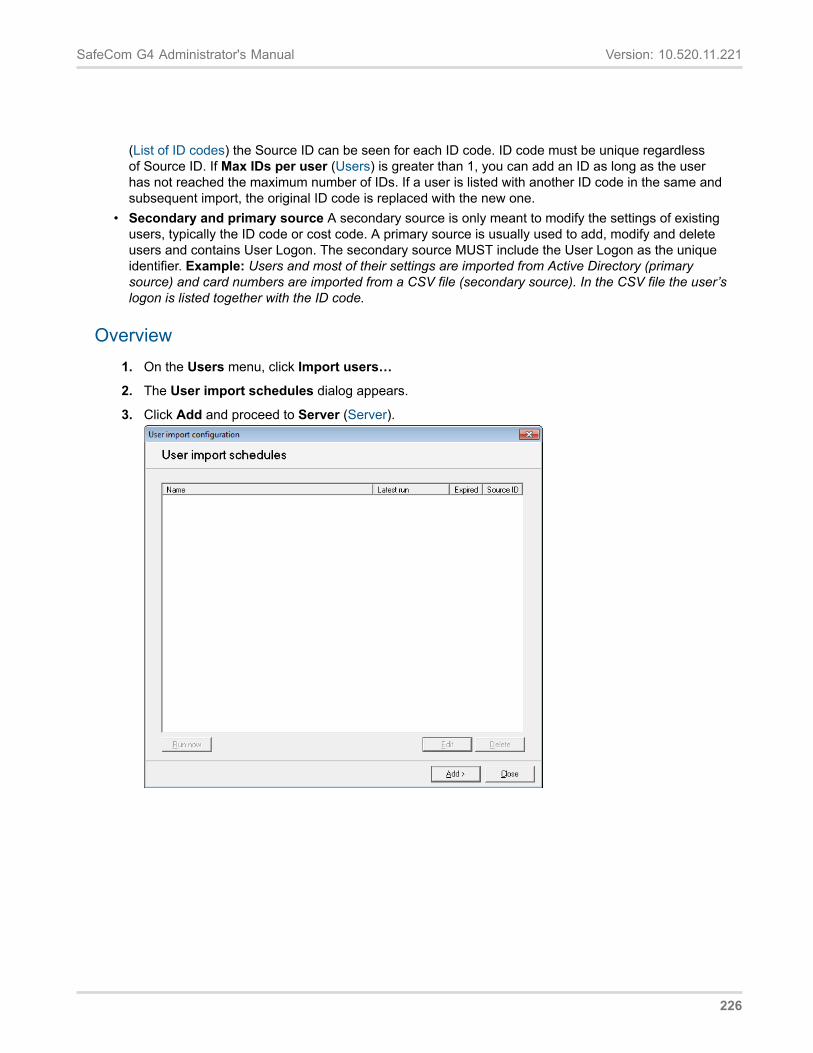
SafeCom G4 Administrator's Manual Version: 10.520.11.221
(List of ID codes) the Source ID can be seen for each ID code. ID code must be unique regardlessof Source ID. If Max IDs per user (Users) is greater than 1, you can add an ID as long as the userhas not reached the maximum number of IDs. If a user is listed with another ID code in the same andsubsequent import, the original ID code is replaced with the new one.
• Secondary and primary source A secondary source is only meant to modify the settings of existingusers, typically the ID code or cost code. A primary source is usually used to add, modify and deleteusers and contains User Logon. The secondary source MUST include the User Logon as the uniqueidentifier. Example: Users and most of their settings are imported from Active Directory (primarysource) and card numbers are imported from a CSV file (secondary source). In the CSV file the user’slogon is listed together with the ID code.
Overview1. On the Users menu, click Import users…
2. The User import schedules dialog appears.
3. Click Add and proceed to Server (Server).
226
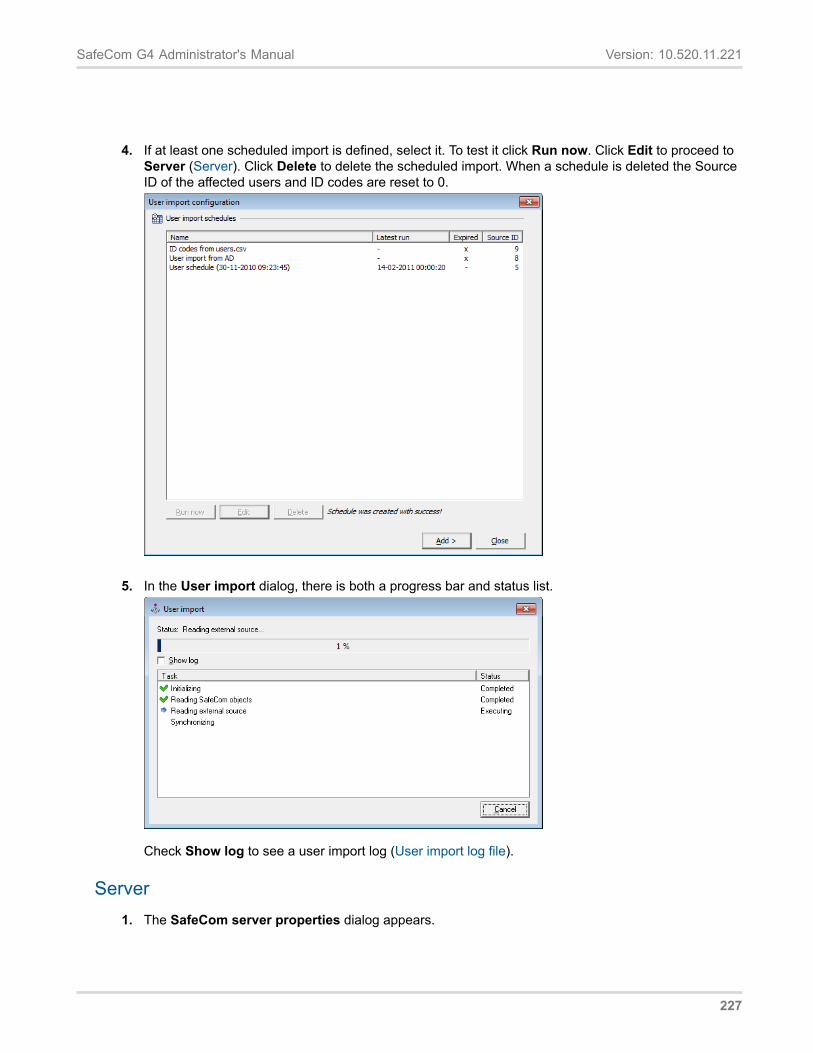
SafeCom G4 Administrator's Manual Version: 10.520.11.221
4. If at least one scheduled import is defined, select it. To test it click Run now. Click Edit to proceed toServer (Server). Click Delete to delete the scheduled import. When a schedule is deleted the SourceID of the affected users and ID codes are reset to 0.
5. In the User import dialog, there is both a progress bar and status list.
Check Show log to see a user import log (User import log file).
Server1. The SafeCom server properties dialog appears.
227
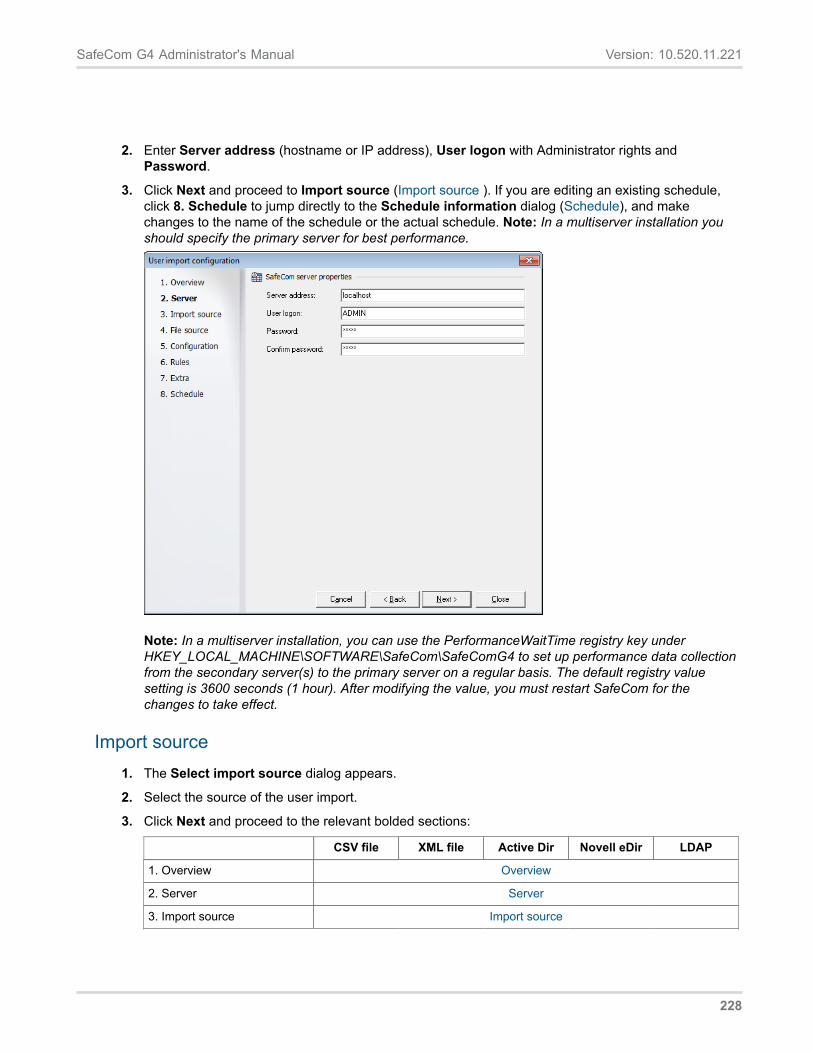
SafeCom G4 Administrator's Manual Version: 10.520.11.221
2. Enter Server address (hostname or IP address), User logon with Administrator rights and Password.
3. Click Next and proceed to Import source (Import source ). If you are editing an existing schedule, click 8. Schedule to jump directly to the Schedule information dialog (Schedule), and make changes to the name of the schedule or the actual schedule. Note: In a multiserver installation you should specify the primary server for best performance.
Note: In a multiserver installation, you can use the PerformanceWaitTime registry key under HKEY_LOCAL_MACHINE\SOFTWARE\SafeCom\SafeComG4 to set up performance data collection from the secondary server(s) to the primary server on a regular basis. The default registry value setting is 3600 seconds (1 hour). After modifying the value, you must restart SafeCom for the changes to take effect.
Import source 1. The Select import source dialog appears.
2. Select the source of the user import.
3. Click Next and proceed to the relevant bolded sections:
CSV file XML file Active Dir Novell eDir LDAP
1. Overview Overview
2. Server Server
3. Import source Import source
228
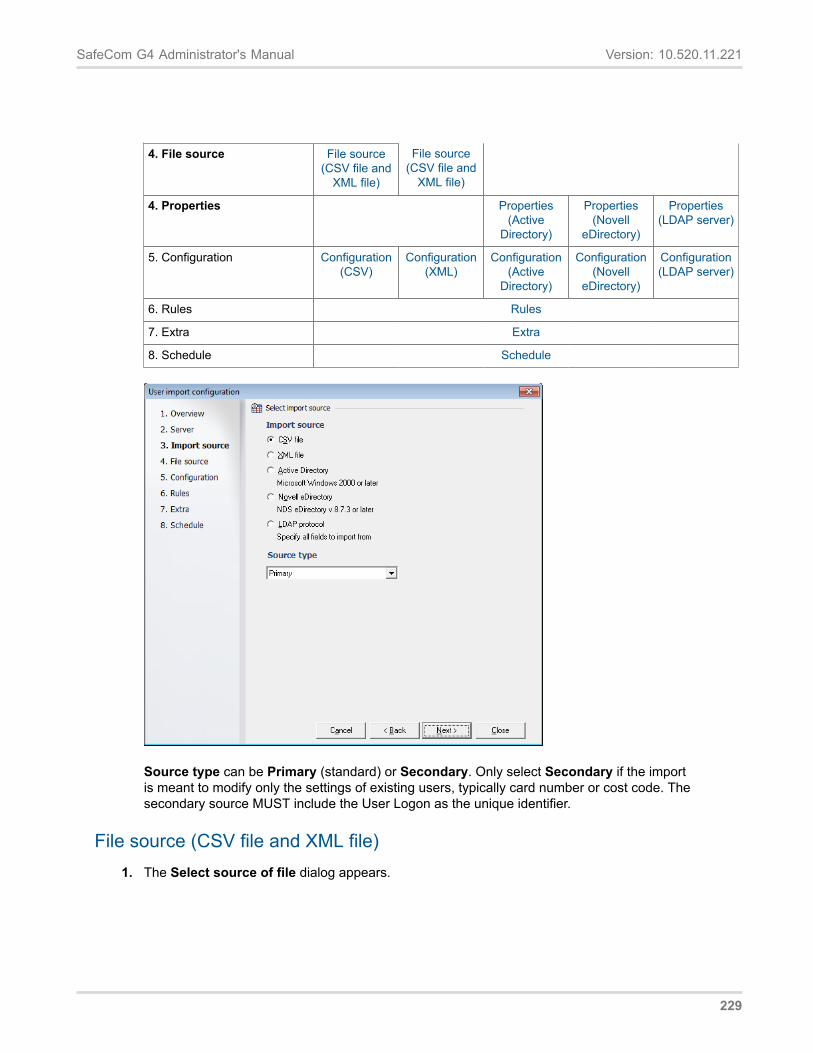
SafeCom G4 Administrator's Manual Version: 10.520.11.221
4. File source File source(CSV file and
XML file)
File source(CSV file and
XML file)
4. Properties Properties(Active
Directory)
Properties(Novell
eDirectory)
Properties(LDAP server)
5. Configuration Configuration(CSV)
Configuration(XML)
Configuration(Active
Directory)
Configuration(Novell
eDirectory)
Configuration(LDAP server)
6. Rules Rules
7. Extra Extra
8. Schedule Schedule
Source type can be Primary (standard) or Secondary. Only select Secondary if the importis meant to modify only the settings of existing users, typically card number or cost code. Thesecondary source MUST include the User Logon as the unique identifier.
File source (CSV file and XML file)1. The Select source of file dialog appears.
229
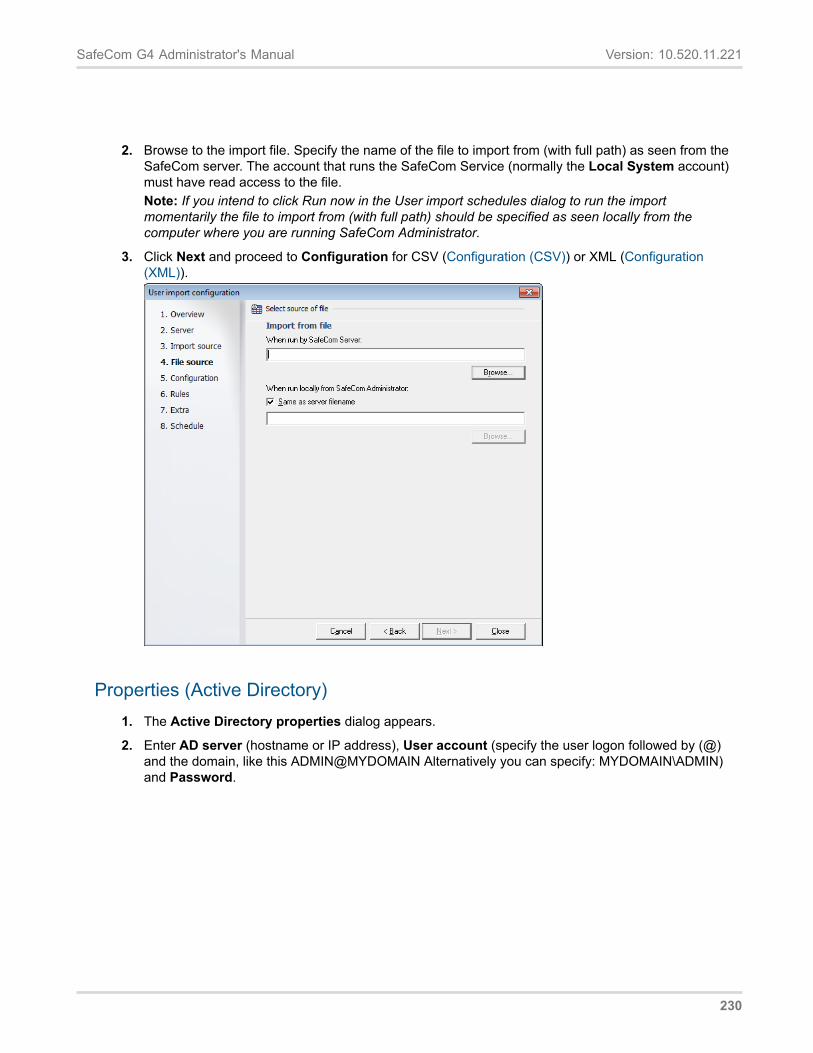
SafeCom G4 Administrator's Manual Version: 10.520.11.221
2. Browse to the import file. Specify the name of the file to import from (with full path) as seen from theSafeCom server. The account that runs the SafeCom Service (normally the Local System account)must have read access to the file.Note: If you intend to click Run now in the User import schedules dialog to run the importmomentarily the file to import from (with full path) should be specified as seen locally from thecomputer where you are running SafeCom Administrator.
3. Click Next and proceed to Configuration for CSV (Configuration (CSV)) or XML (Configuration(XML)).
Properties (Active Directory)1. The Active Directory properties dialog appears.
2. Enter AD server (hostname or IP address), User account (specify the user logon followed by (@)and the domain, like this ADMIN@MYDOMAIN Alternatively you can specify: MYDOMAIN\ADMIN)and Password.
230
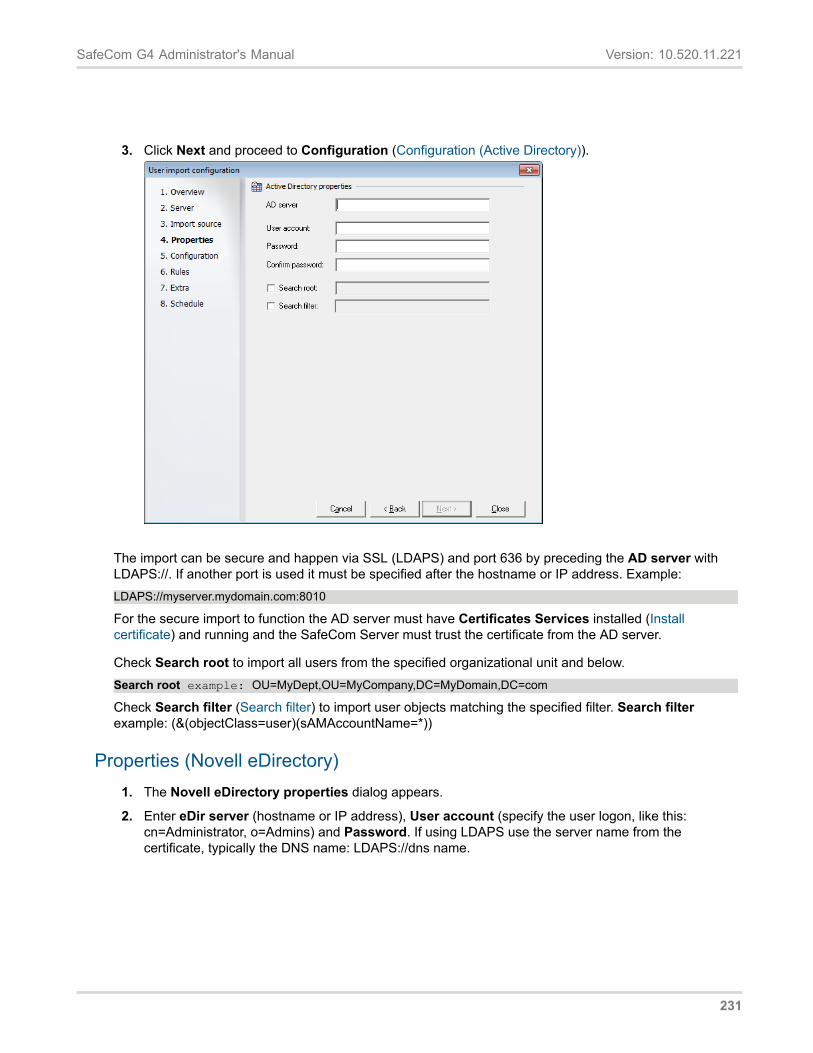
SafeCom G4 Administrator's Manual Version: 10.520.11.221
3. Click Next and proceed to Configuration (Configuration (Active Directory)).
The import can be secure and happen via SSL (LDAPS) and port 636 by preceding the AD server withLDAPS://. If another port is used it must be specified after the hostname or IP address. Example:LDAPS://myserver.mydomain.com:8010
For the secure import to function the AD server must have Certificates Services installed (Installcertificate) and running and the SafeCom Server must trust the certificate from the AD server.
Check Search root to import all users from the specified organizational unit and below.Search root example: OU=MyDept,OU=MyCompany,DC=MyDomain,DC=com
Check Search filter (Search filter) to import user objects matching the specified filter. Search filterexample: (&(objectClass=user)(sAMAccountName=*))
Properties (Novell eDirectory)1. The Novell eDirectory properties dialog appears.
2. Enter eDir server (hostname or IP address), User account (specify the user logon, like this:cn=Administrator, o=Admins) and Password. If using LDAPS use the server name from thecertificate, typically the DNS name: LDAPS://dns name.
231
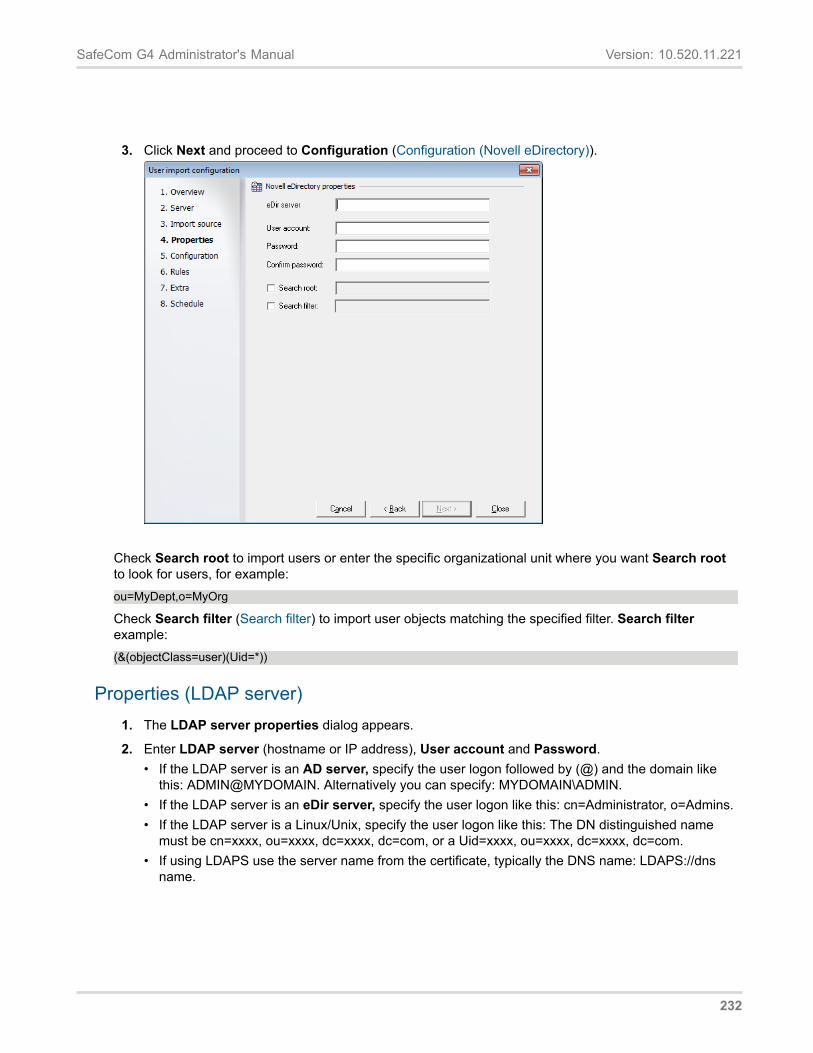
SafeCom G4 Administrator's Manual Version: 10.520.11.221
3. Click Next and proceed to Configuration (Configuration (Novell eDirectory)).
Check Search root to import users or enter the specific organizational unit where you want Search rootto look for users, for example:ou=MyDept,o=MyOrg
Check Search filter (Search filter) to import user objects matching the specified filter. Search filterexample:(&(objectClass=user)(Uid=*))
Properties (LDAP server)1. The LDAP server properties dialog appears.
2. Enter LDAP server (hostname or IP address), User account and Password.• If the LDAP server is an AD server, specify the user logon followed by (@) and the domain like
this: ADMIN@MYDOMAIN. Alternatively you can specify: MYDOMAIN\ADMIN.• If the LDAP server is an eDir server, specify the user logon like this: cn=Administrator, o=Admins.• If the LDAP server is a Linux/Unix, specify the user logon like this: The DN distinguished name
must be cn=xxxx, ou=xxxx, dc=xxxx, dc=com, or a Uid=xxxx, ou=xxxx, dc=xxxx, dc=com.• If using LDAPS use the server name from the certificate, typically the DNS name: LDAPS://dns
name.
232
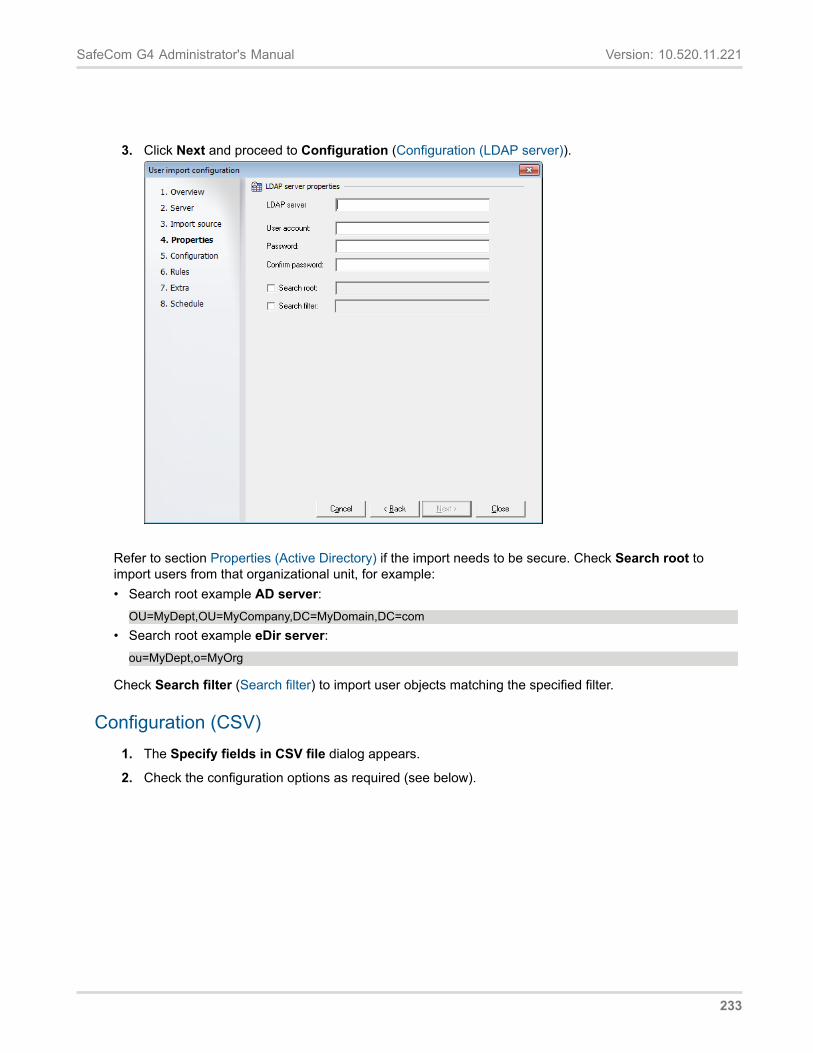
SafeCom G4 Administrator's Manual Version: 10.520.11.221
3. Click Next and proceed to Configuration (Configuration (LDAP server)).
Refer to section Properties (Active Directory) if the import needs to be secure. Check Search root toimport users from that organizational unit, for example:• Search root example AD server:
OU=MyDept,OU=MyCompany,DC=MyDomain,DC=com• Search root example eDir server:
ou=MyDept,o=MyOrg
Check Search filter (Search filter) to import user objects matching the specified filter.
Configuration (CSV)1. The Specify fields in CSV file dialog appears.
2. Check the configuration options as required (see below).
233
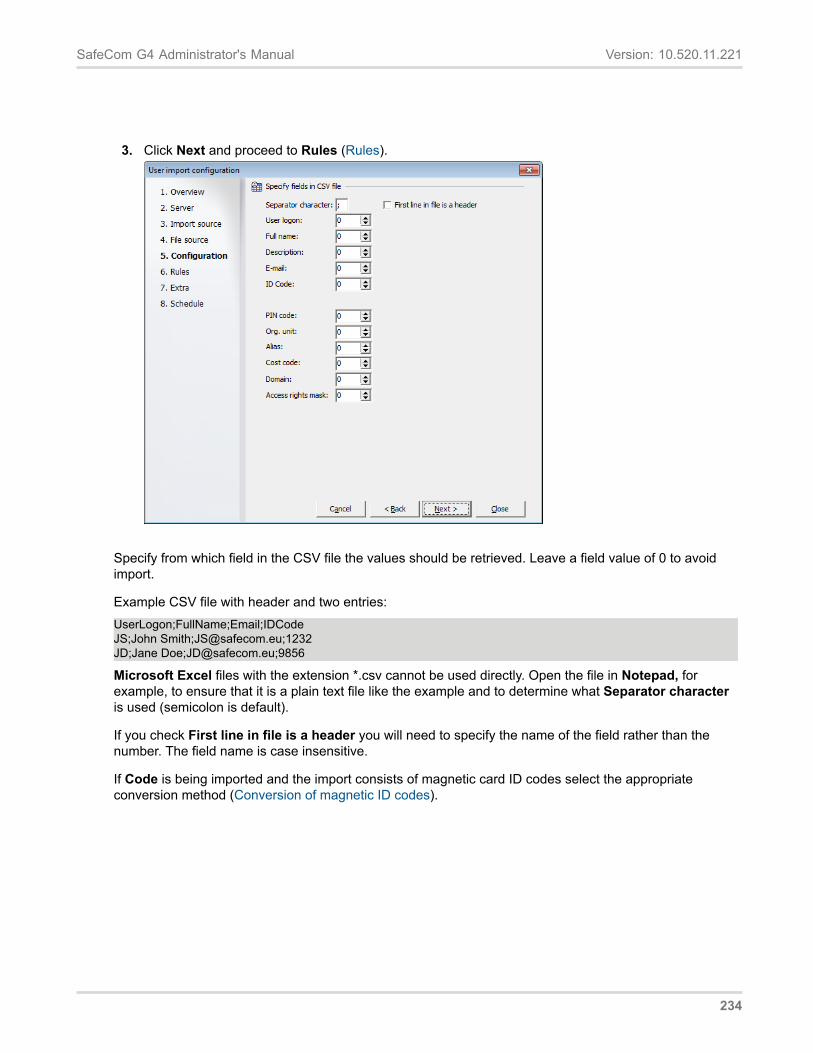
SafeCom G4 Administrator's Manual Version: 10.520.11.221
3. Click Next and proceed to Rules (Rules).
Specify from which field in the CSV file the values should be retrieved. Leave a field value of 0 to avoidimport.
Example CSV file with header and two entries:UserLogon;FullName;Email;IDCodeJS;John Smith;[email protected];1232JD;Jane Doe;[email protected];9856
Microsoft Excel files with the extension *.csv cannot be used directly. Open the file in Notepad, forexample, to ensure that it is a plain text file like the example and to determine what Separator characteris used (semicolon is default).
If you check First line in file is a header you will need to specify the name of the field rather than thenumber. The field name is case insensitive.
If Code is being imported and the import consists of magnetic card ID codes select the appropriateconversion method (Conversion of magnetic ID codes).
234
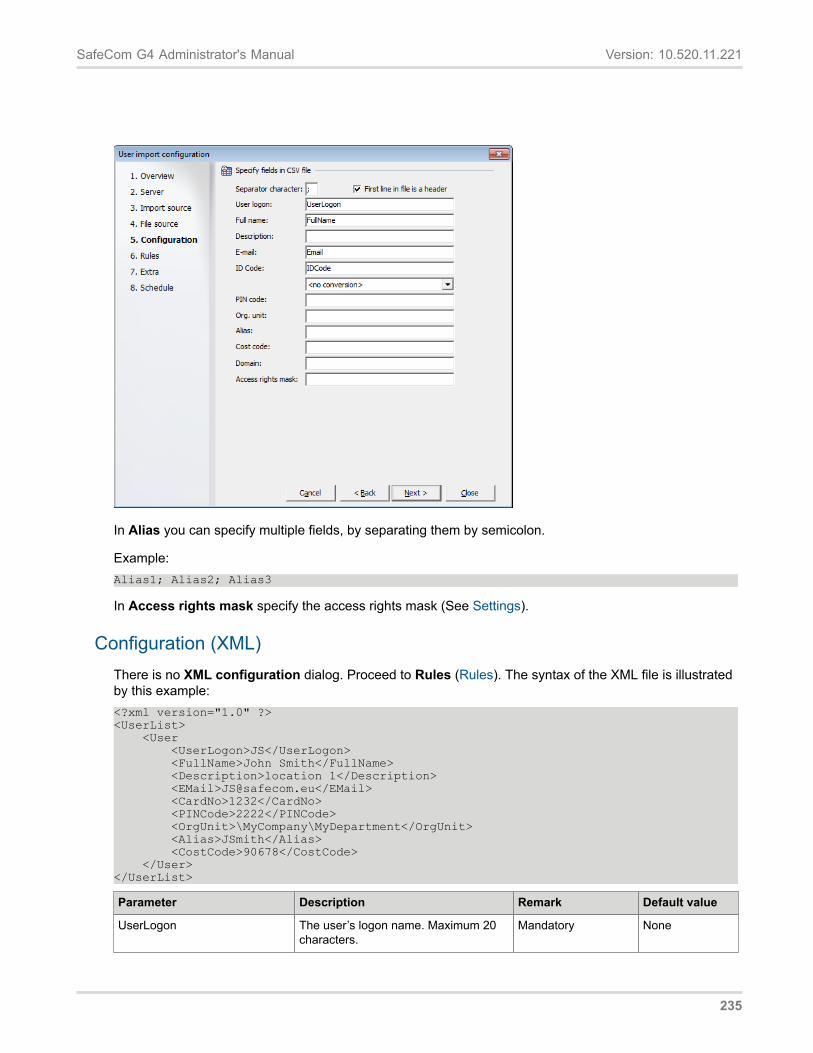
SafeCom G4 Administrator's Manual Version: 10.520.11.221
In Alias you can specify multiple fields, by separating them by semicolon.
Example:Alias1; Alias2; Alias3
In Access rights mask specify the access rights mask (See Settings).
Configuration (XML)There is no XML configuration dialog. Proceed to Rules (Rules). The syntax of the XML file is illustratedby this example:<?xml version="1.0" ?><UserList> <User <UserLogon>JS</UserLogon> <FullName>John Smith</FullName> <Description>location 1</Description> <EMail>[email protected]</EMail> <CardNo>1232</CardNo> <PINCode>2222</PINCode> <OrgUnit>\MyCompany\MyDepartment</OrgUnit> <Alias>JSmith</Alias> <CostCode>90678</CostCode> </User></UserList>
Parameter Description Remark Default value
UserLogon The user’s logon name. Maximum 20characters.
Mandatory None
235
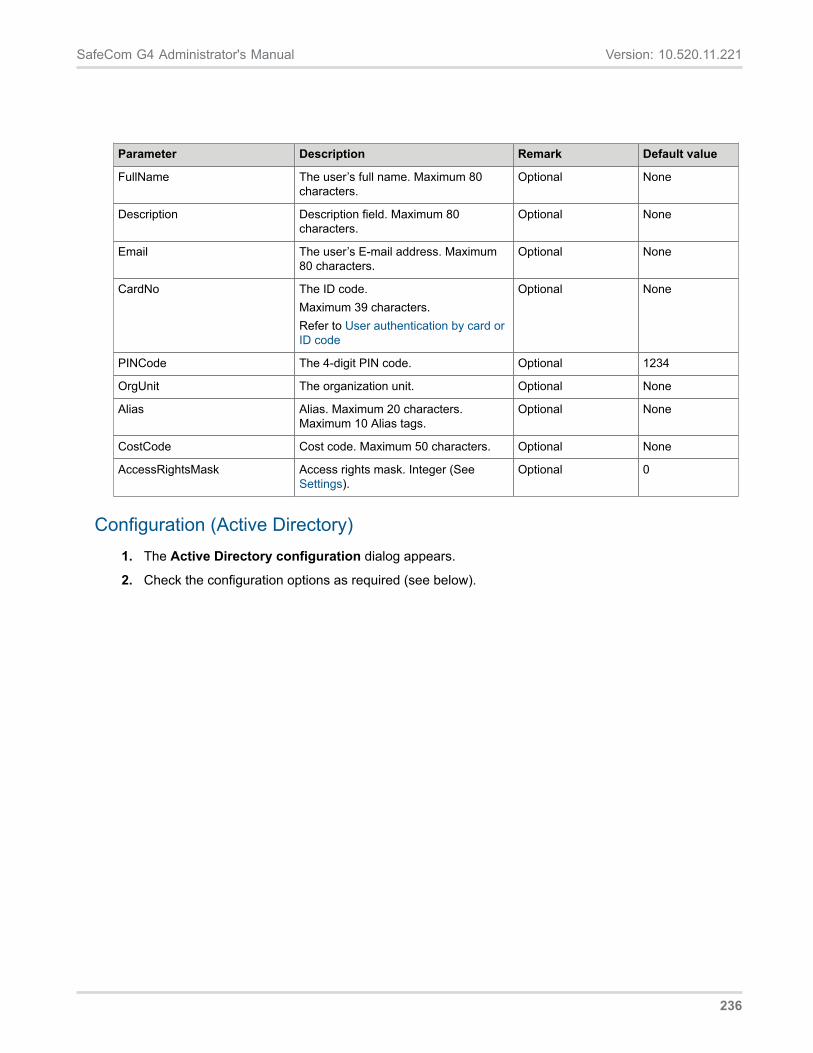
SafeCom G4 Administrator's Manual Version: 10.520.11.221
Parameter Description Remark Default value
FullName The user’s full name. Maximum 80characters.
Optional None
Description Description field. Maximum 80characters.
Optional None
Email The user’s E-mail address. Maximum80 characters.
Optional None
CardNo The ID code.Maximum 39 characters.Refer to User authentication by card orID code
Optional None
PINCode The 4-digit PIN code. Optional 1234
OrgUnit The organization unit. Optional None
Alias Alias. Maximum 20 characters.Maximum 10 Alias tags.
Optional None
CostCode Cost code. Maximum 50 characters. Optional None
AccessRightsMask Access rights mask. Integer (SeeSettings).
Optional 0
Configuration (Active Directory)1. The Active Directory configuration dialog appears.
2. Check the configuration options as required (see below).
236
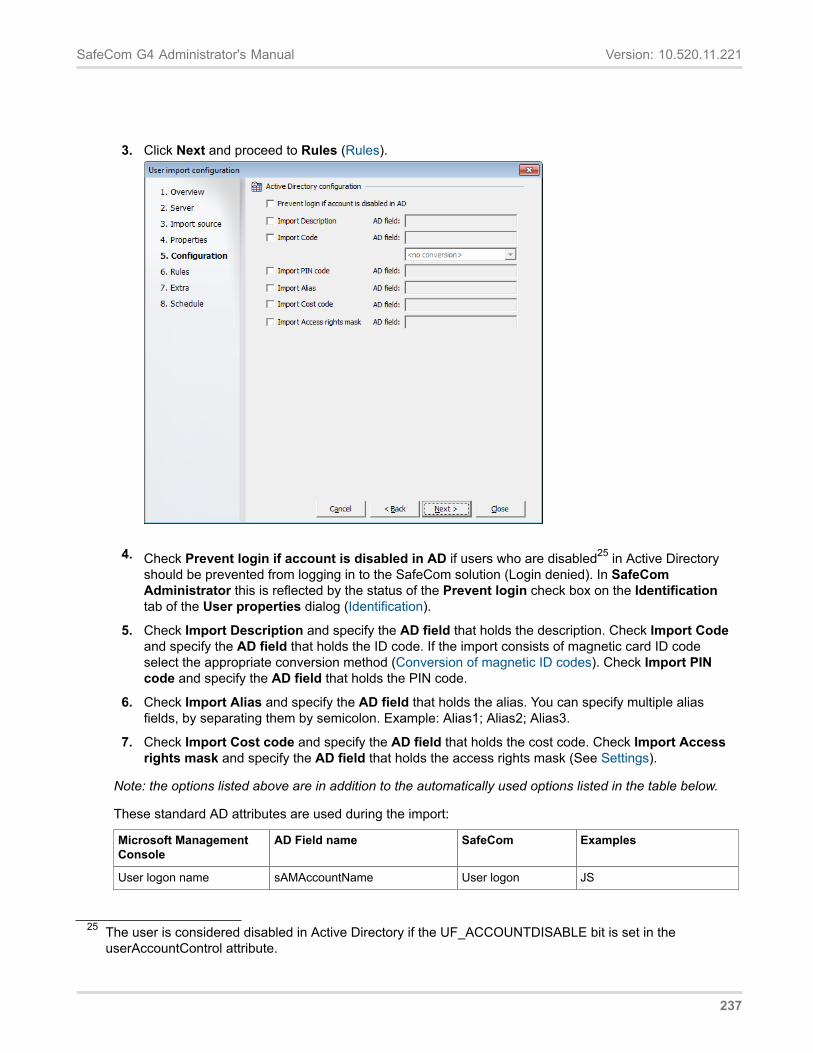
SafeCom G4 Administrator's Manual Version: 10.520.11.221
3. Click Next and proceed to Rules (Rules).
4. Check Prevent login if account is disabled in AD if users who are disabled25 in Active Directoryshould be prevented from logging in to the SafeCom solution (Login denied). In SafeComAdministrator this is reflected by the status of the Prevent login check box on the Identificationtab of the User properties dialog (Identification).
5. Check Import Description and specify the AD field that holds the description. Check Import Codeand specify the AD field that holds the ID code. If the import consists of magnetic card ID codeselect the appropriate conversion method (Conversion of magnetic ID codes). Check Import PINcode and specify the AD field that holds the PIN code.
6. Check Import Alias and specify the AD field that holds the alias. You can specify multiple aliasfields, by separating them by semicolon. Example: Alias1; Alias2; Alias3.
7. Check Import Cost code and specify the AD field that holds the cost code. Check Import Accessrights mask and specify the AD field that holds the access rights mask (See Settings).
Note: the options listed above are in addition to the automatically used options listed in the table below.
These standard AD attributes are used during the import:
Microsoft ManagementConsole
AD Field name SafeCom Examples
User logon name sAMAccountName User logon JS
25 The user is considered disabled in Active Directory if the UF_ACCOUNTDISABLE bit is set in theuserAccountControl attribute.
237
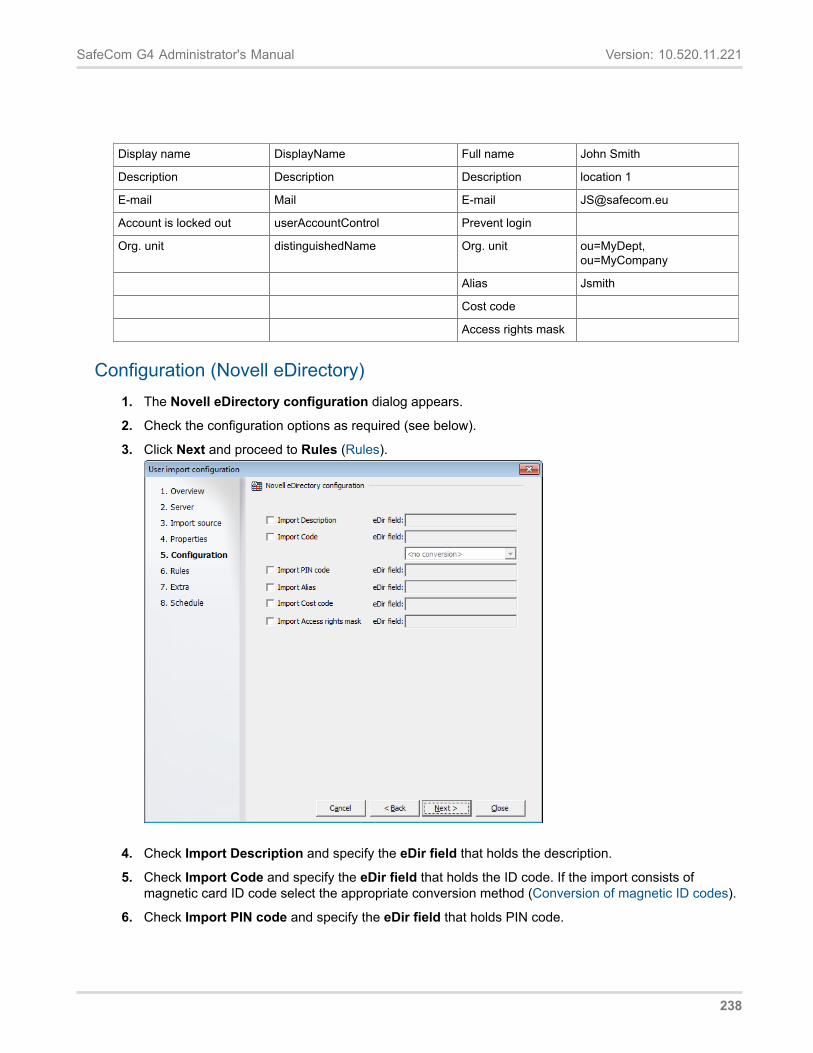
SafeCom G4 Administrator's Manual Version: 10.520.11.221
Display name DisplayName Full name John Smith
Description Description Description location 1
E-mail Mail E-mail [email protected]
Account is locked out userAccountControl Prevent login
Org. unit distinguishedName Org. unit ou=MyDept,ou=MyCompany
Alias Jsmith
Cost code
Access rights mask
Configuration (Novell eDirectory)1. The Novell eDirectory configuration dialog appears.
2. Check the configuration options as required (see below).
3. Click Next and proceed to Rules (Rules).
4. Check Import Description and specify the eDir field that holds the description.
5. Check Import Code and specify the eDir field that holds the ID code. If the import consists ofmagnetic card ID code select the appropriate conversion method (Conversion of magnetic ID codes).
6. Check Import PIN code and specify the eDir field that holds PIN code.
238
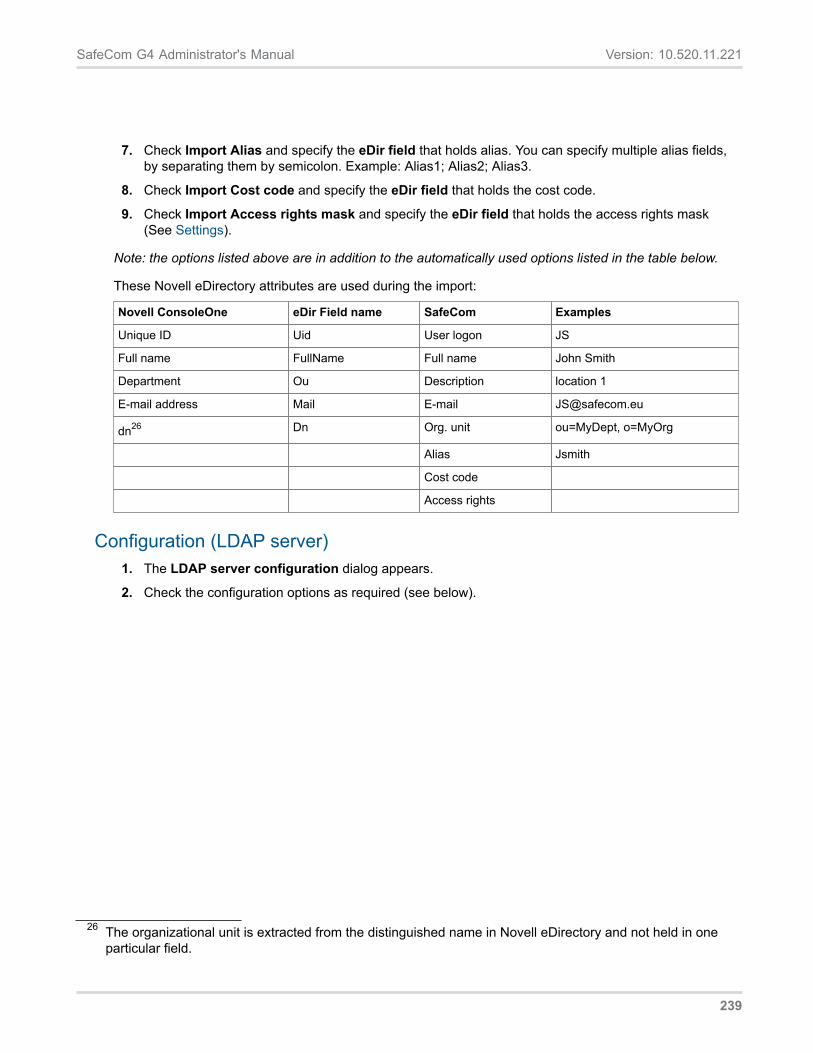
SafeCom G4 Administrator's Manual Version: 10.520.11.221
7. Check Import Alias and specify the eDir field that holds alias. You can specify multiple alias fields,by separating them by semicolon. Example: Alias1; Alias2; Alias3.
8. Check Import Cost code and specify the eDir field that holds the cost code.
9. Check Import Access rights mask and specify the eDir field that holds the access rights mask(See Settings).
Note: the options listed above are in addition to the automatically used options listed in the table below.
These Novell eDirectory attributes are used during the import:
Novell ConsoleOne eDir Field name SafeCom Examples
Unique ID Uid User logon JS
Full name FullName Full name John Smith
Department Ou Description location 1
E-mail address Mail E-mail [email protected]
dn26 Dn Org. unit ou=MyDept, o=MyOrg
Alias Jsmith
Cost code
Access rights
Configuration (LDAP server)1. The LDAP server configuration dialog appears.
2. Check the configuration options as required (see below).
26 The organizational unit is extracted from the distinguished name in Novell eDirectory and not held in oneparticular field.
239
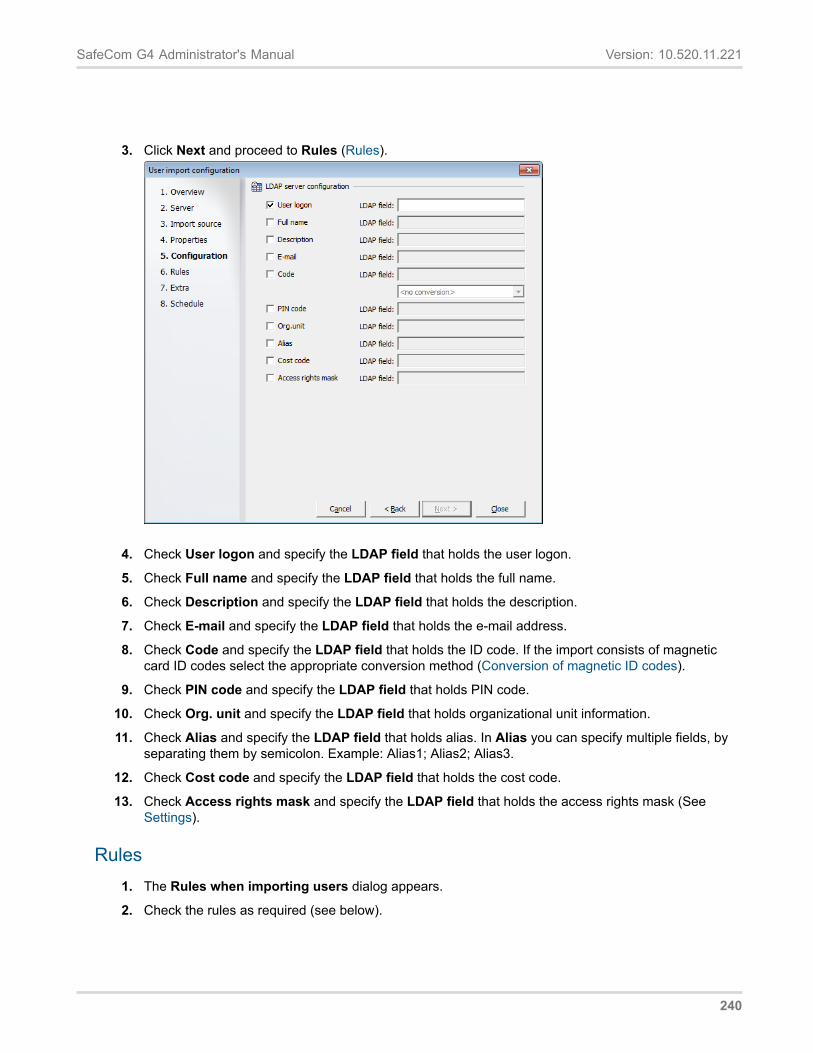
SafeCom G4 Administrator's Manual Version: 10.520.11.221
3. Click Next and proceed to Rules (Rules).
4. Check User logon and specify the LDAP field that holds the user logon.
5. Check Full name and specify the LDAP field that holds the full name.
6. Check Description and specify the LDAP field that holds the description.
7. Check E-mail and specify the LDAP field that holds the e-mail address.
8. Check Code and specify the LDAP field that holds the ID code. If the import consists of magneticcard ID codes select the appropriate conversion method (Conversion of magnetic ID codes).
9. Check PIN code and specify the LDAP field that holds PIN code.
10. Check Org. unit and specify the LDAP field that holds organizational unit information.
11. Check Alias and specify the LDAP field that holds alias. In Alias you can specify multiple fields, byseparating them by semicolon. Example: Alias1; Alias2; Alias3.
12. Check Cost code and specify the LDAP field that holds the cost code.
13. Check Access rights mask and specify the LDAP field that holds the access rights mask (SeeSettings).
Rules1. The Rules when importing users dialog appears.
2. Check the rules as required (see below).
240

SafeCom G4 Administrator's Manual Version: 10.520.11.221
3. Click Next and proceed to Extra (Extra).
4. Check Add users to have all users imported. Check Apply settings from default user if you want the newly imported users to inherit the settings of the default user. Note: The following settings are NOT inherited even though Apply settings from default user is checked; Prevent login, Account Credit Balance, and User Access Rights.
5. Check Specify user logon and enter the user logon of the user from which you wish the new users to inherit settings. In a multiserver installation the default user must have the primary server as home server.
6. Check Generate PUK code if you want a PUK code to generated. The PUK code can be e-mailed to users (E-mail). Generate PUK code is dimmed if ID codes are part of the import. Check Generate PIN code to generate PIN codes for AD users missing PIN codes in AD. Already existing PINs in AD will not be overwritten. Choose between Default PIN (1234) and Random PIN. Change Initial amount on account 2 to another value than 0.00 only if the solution involves Pay and the initial amount on the account should have the specified value. See also section Credit schedule Credit schedule.
7. Check Modify users will modify the settings of any user that were previously imported through this schedule, that is, the schedule ID of the user matches that of the schedule. Running the import twice will ensure that users with access rights to all functions keep these access rights.
8. Check Delete users to delete any existing users that is now missing from this import, but were previously imported through this schedule, that is, the schedule ID of the user matches that of the schedule. The default user and users with special rights (Rights) are not deleted.
9. Use Max user deletion as a safety measure to prevent unintentional deletion of users. A value of 0% will cause the import to take place anyhow. A value of 20% will cancel the import if it would result in a deletion of every fifth or more users that were previously imported through this same scheduled
241
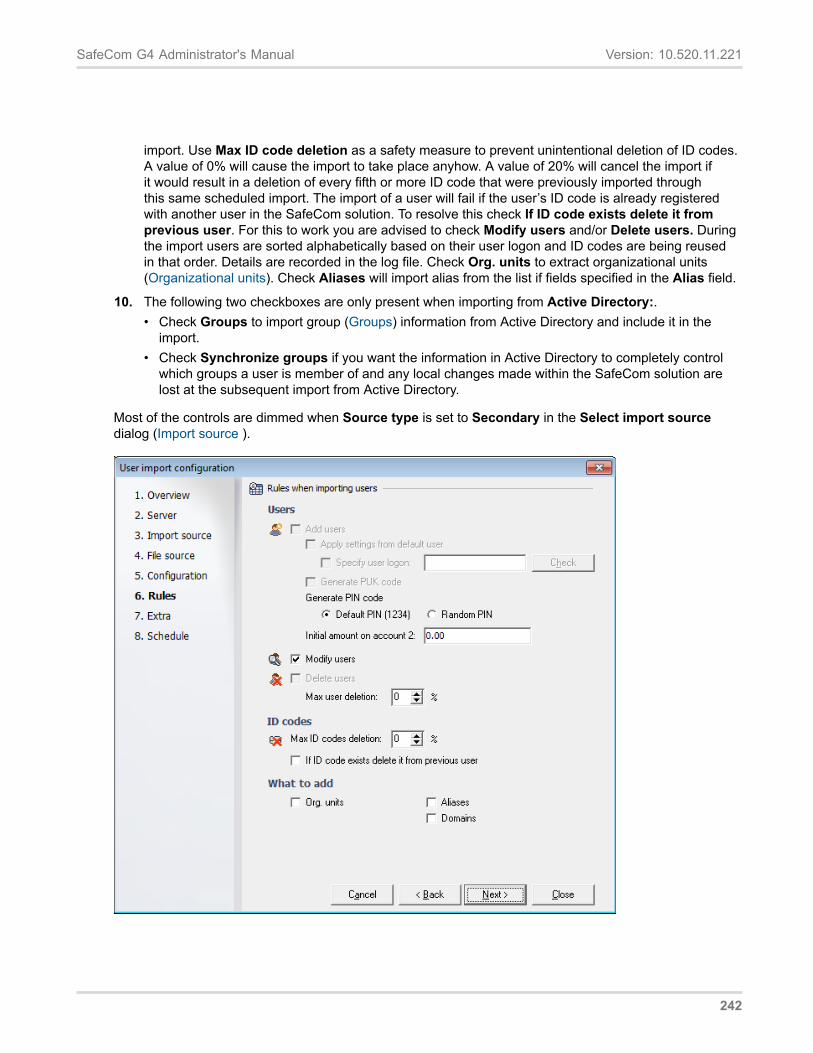
SafeCom G4 Administrator's Manual Version: 10.520.11.221
import. Use Max ID code deletion as a safety measure to prevent unintentional deletion of ID codes.A value of 0% will cause the import to take place anyhow. A value of 20% will cancel the import ifit would result in a deletion of every fifth or more ID code that were previously imported throughthis same scheduled import. The import of a user will fail if the user’s ID code is already registeredwith another user in the SafeCom solution. To resolve this check If ID code exists delete it fromprevious user. For this to work you are advised to check Modify users and/or Delete users. Duringthe import users are sorted alphabetically based on their user logon and ID codes are being reusedin that order. Details are recorded in the log file. Check Org. units to extract organizational units(Organizational units). Check Aliases will import alias from the list if fields specified in the Alias field.
10. The following two checkboxes are only present when importing from Active Directory:.• Check Groups to import group (Groups) information from Active Directory and include it in the
import.• Check Synchronize groups if you want the information in Active Directory to completely control
which groups a user is member of and any local changes made within the SafeCom solution arelost at the subsequent import from Active Directory.
Most of the controls are dimmed when Source type is set to Secondary in the Select import sourcedialog (Import source ).
242
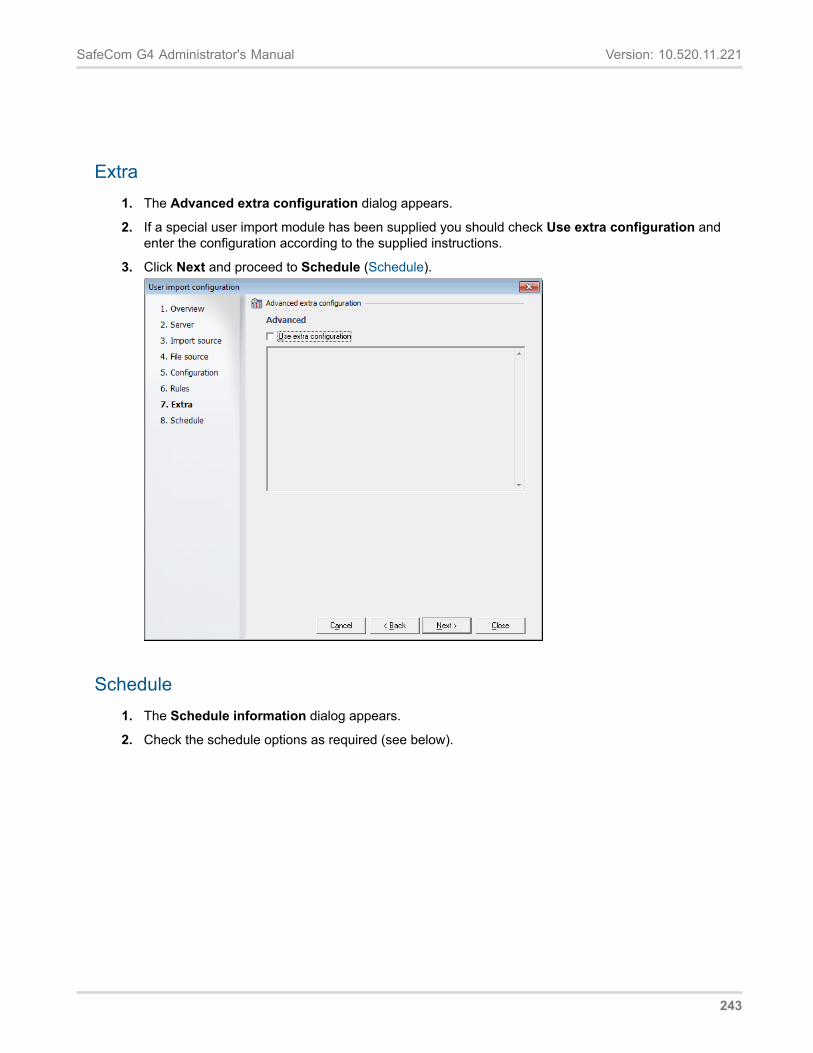
SafeCom G4 Administrator's Manual Version: 10.520.11.221
Extra1. The Advanced extra configuration dialog appears.
2. If a special user import module has been supplied you should check Use extra configuration andenter the configuration according to the supplied instructions.
3. Click Next and proceed to Schedule (Schedule).
Schedule1. The Schedule information dialog appears.
2. Check the schedule options as required (see below).
243
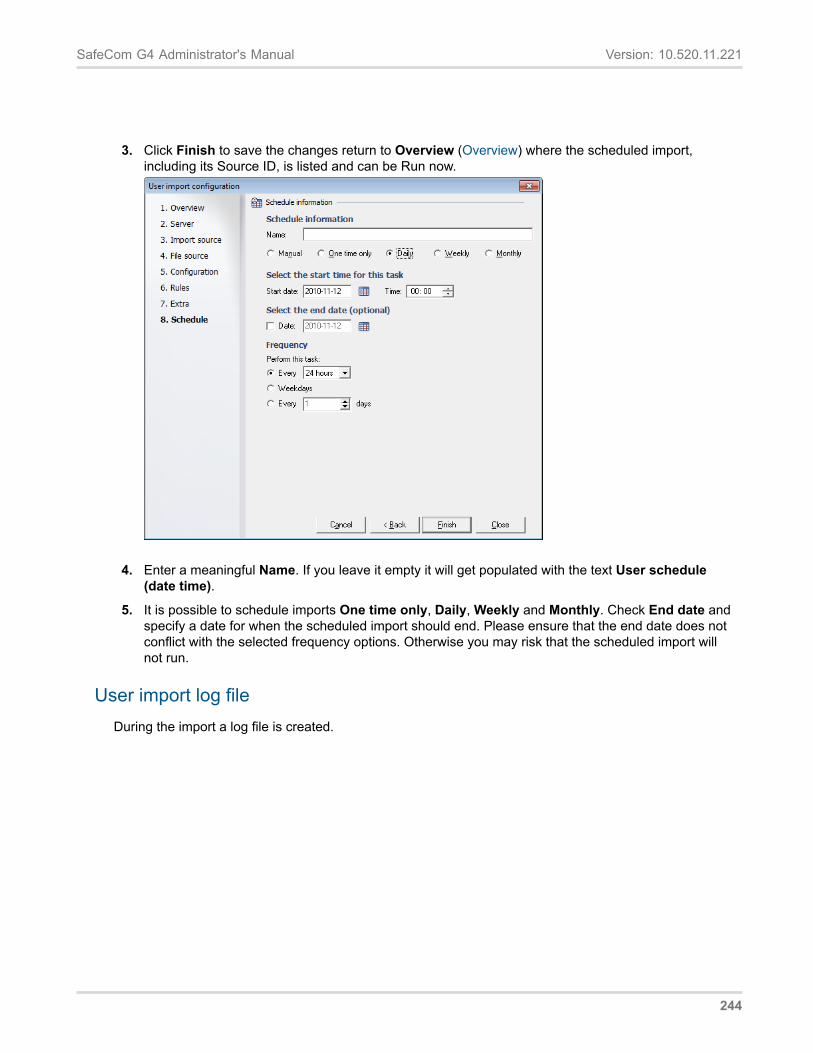
SafeCom G4 Administrator's Manual Version: 10.520.11.221
3. Click Finish to save the changes return to Overview (Overview) where the scheduled import,including its Source ID, is listed and can be Run now.
4. Enter a meaningful Name. If you leave it empty it will get populated with the text User schedule(date time).
5. It is possible to schedule imports One time only, Daily, Weekly and Monthly. Check End date andspecify a date for when the scheduled import should end. Please ensure that the end date does notconflict with the selected frequency options. Otherwise you may risk that the scheduled import willnot run.
User import log fileDuring the import a log file is created.
244
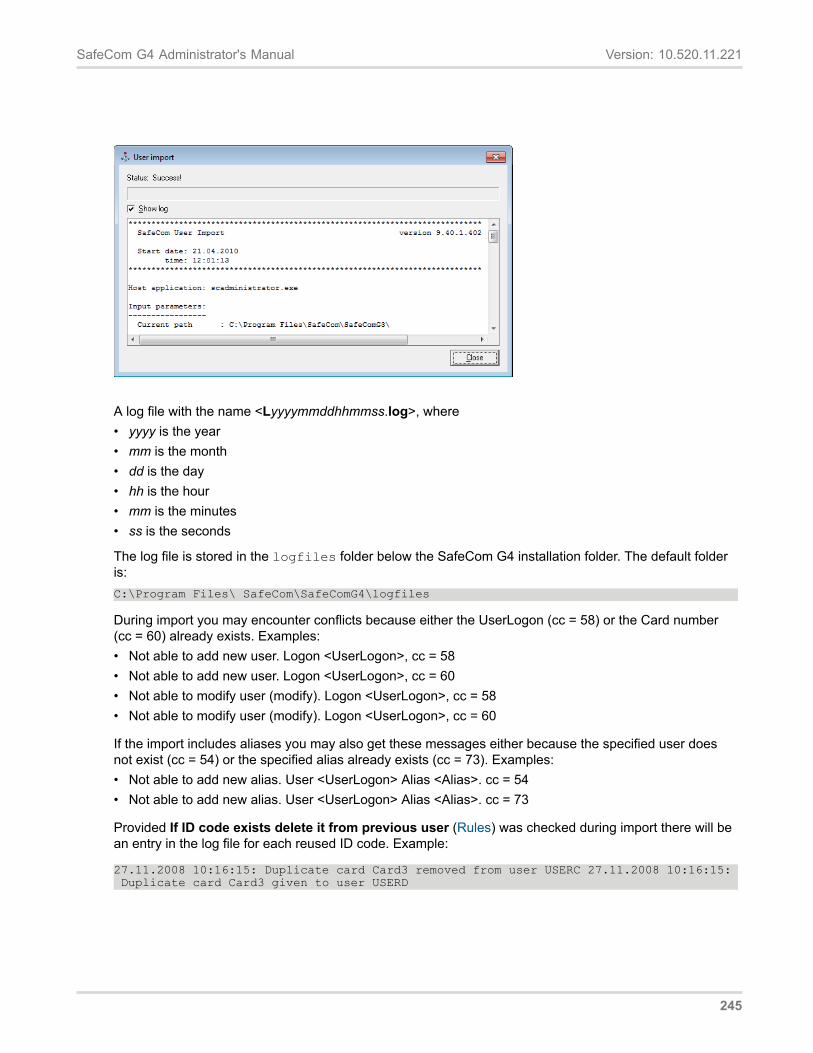
SafeCom G4 Administrator's Manual Version: 10.520.11.221
A log file with the name <Lyyyymmddhhmmss.log>, where• yyyy is the year• mm is the month• dd is the day• hh is the hour• mm is the minutes• ss is the seconds
The log file is stored in the logfiles folder below the SafeCom G4 installation folder. The default folderis:C:\Program Files\ SafeCom\SafeComG4\logfiles
During import you may encounter conflicts because either the UserLogon (cc = 58) or the Card number(cc = 60) already exists. Examples:• Not able to add new user. Logon <UserLogon>, cc = 58• Not able to add new user. Logon <UserLogon>, cc = 60• Not able to modify user (modify). Logon <UserLogon>, cc = 58• Not able to modify user (modify). Logon <UserLogon>, cc = 60
If the import includes aliases you may also get these messages either because the specified user doesnot exist (cc = 54) or the specified alias already exists (cc = 73). Examples:• Not able to add new alias. User <UserLogon> Alias <Alias>. cc = 54• Not able to add new alias. User <UserLogon> Alias <Alias>. cc = 73
Provided If ID code exists delete it from previous user (Rules) was checked during import there will bean entry in the log file for each reused ID code. Example:
27.11.2008 10:16:15: Duplicate card Card3 removed from user USERC 27.11.2008 10:16:15: Duplicate card Card3 given to user USERD
245
SafeCom G4 Administrator's Manual Version: 10.520.11.221
Search filter This section describes how to use the Search filter.
How to match more than one attribute
If the users are distinguished by having two objectClass attributes (one equal to 'person' and another to 'user'), the Search filter should look like this:
(&(objectClass=person)(objectClass=user))
Meaning: Search for objectClass=person AND object=user.
The ampersand symbol '&' symbol at the start denotes AND.
Alternatively,
(|(objectClass=person)(objectClass=user))
Meaning: Search for objectClass=person OR object=user.
The pipe symbol '|' denotes OR.
Wildcards
(&(objectClass=user)(cn=*Marketing*))
Meaning: Search for all entries that have objectClass=user AND cn that contains the word Marketing.
How to match 3 attributes
(&(&(objectClass=user)(objectClass=top))(objectClass=person))
Notice how to weave one query into another.
Matching components of distinguished names
You may want to match part of a DN, for instance when you need to look for your users in two sub trees of your server.
(&(objectClass=user)(|(ou:dn:=Copenhagen)(ou:dn:=London)))
Meaning: Find users with an OU component of their DN which is either Copenhagen OR London.
Using not
To exclude entities which match an expression, use '!'.
(&(objectClass=user)(&(ou:dn:=Copenhagen)(!(ou:dn:=Ballerup))))
Meaning: Find all Copenhagen users except those with a Ballerup OU component. Note the extra parentheses: (!(<expression>))
Install certificate 1. Copy the certificate file to the SafeCom primary server.
246
SafeCom G4 Administrator's Manual Version: 10.520.11.221
2. Right-click the certificate file and click Install Certificate.
3. Complete the steps presented by the Certificate Import Wizard.
Note: If a one-time import is to be done the certificate must be installed on the computer from where theSafeCom Administrator is used.
Conversion of magnetic ID codesWhen importing magnetic ID codes you have to choose which track you want to use (Track1, Track 2 orTrack 3). Track 2 is normally the one you should use.
If you are using SafeCom magnetic cards the ID code is stored on Track 2 and is printed on the card.However, you cannot just import the ID code.
First register the card at the device and check what it looks like in when it appears in SafeComAdministrator. If the ID code contains any of the letters ‘C’, ‘D’ or ‘E’ within the number (not at the end orthe start) then the letter need to be replaced with another character at the same location. In the examplebelow the ‘=’ character is inserted in order to get a resulting ‘D’.
Example:• 60321700000002954890103000
This is how the ID code is printed on the card.• B6032170000000295489D0103000F1
This is how the ID code appears in SafeCom Administrator if it has been registered at a device or inSafeCom Administrator using a connected (card reader).
• 6032170000000295489=0103000This is how the ID code needs to look like before import. The ‘=’ character is inserted in order to get aresulting ‘D’.For the letter ‘C’ to appear insert ‘<’.For the letter ‘D’ to appear insert ‘=’.For the letter ‘E’ to appear insert ‘>’.
Create users at first print As discussed in Create users at first print this method keeps administrative overhead to a minimum.
1. On the Servers menu click Properties. In a multiserver solution these changes are only required on the SafeCom primary server.
2. Click the Users tab (Users).
3. Check Create users at first print.
4. Check Create e-mail addresses and enter the E-mail domain.
5. Check Keep default user and use settings when creating new users and select the Default user.
6. Click the E-mail tab (E-mail).
7. Verify that a valid SMTP mail server has been specified.
247
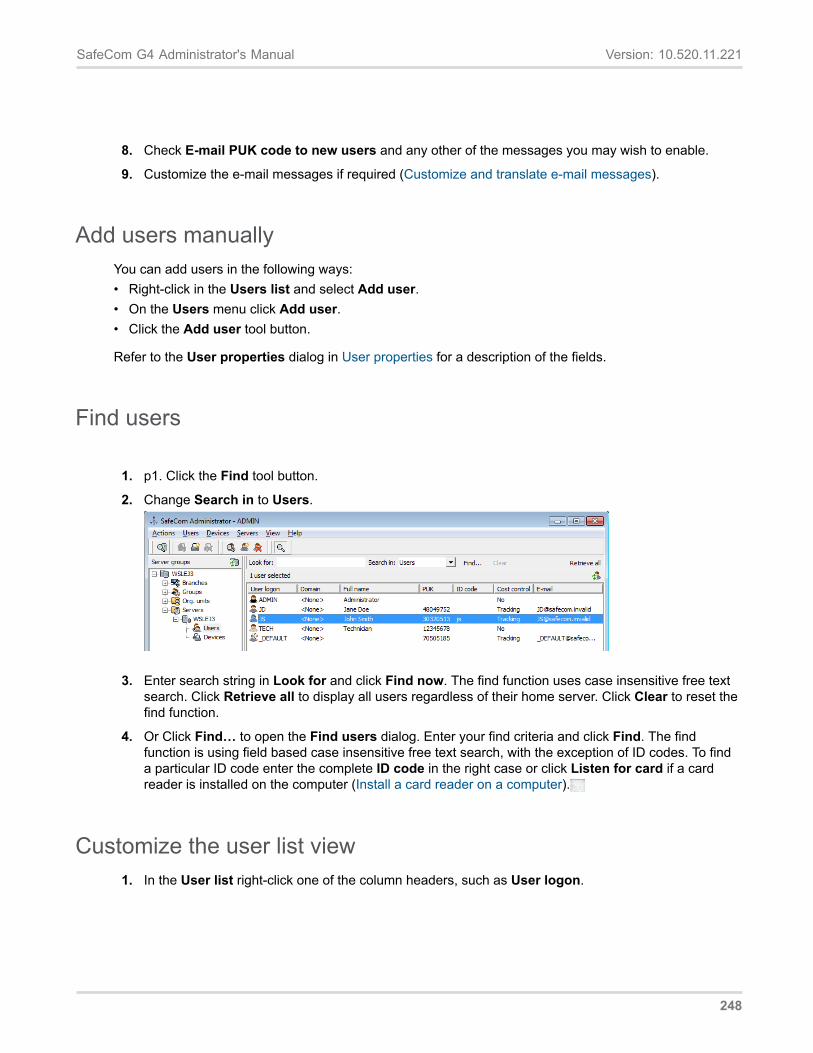
SafeCom G4 Administrator's Manual Version: 10.520.11.221
8. Check E-mail PUK code to new users and any other of the messages you may wish to enable.
9. Customize the e-mail messages if required (Customize and translate e-mail messages).
Add users manuallyYou can add users in the following ways:• Right-click in the Users list and select Add user.• On the Users menu click Add user.• Click the Add user tool button.
Refer to the User properties dialog in User properties for a description of the fields.
Find users
1. p1. Click the Find tool button.
2. Change Search in to Users.
3. Enter search string in Look for and click Find now. The find function uses case insensitive free textsearch. Click Retrieve all to display all users regardless of their home server. Click Clear to reset thefind function.
4. Or Click Find… to open the Find users dialog. Enter your find criteria and click Find. The findfunction is using field based case insensitive free text search, with the exception of ID codes. To finda particular ID code enter the complete ID code in the right case or click Listen for card if a cardreader is installed on the computer (Install a card reader on a computer).
Customize the user list view1. In the User list right-click one of the column headers, such as User logon.
248
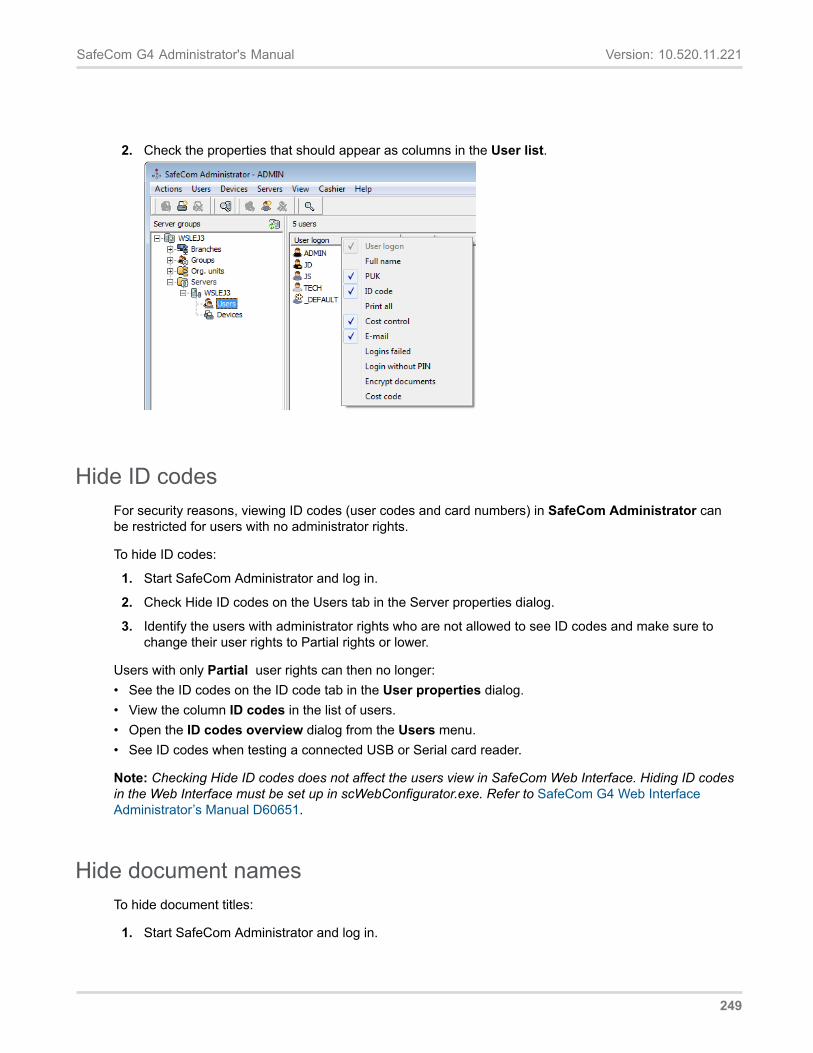
SafeCom G4 Administrator's Manual Version: 10.520.11.221
2. Check the properties that should appear as columns in the User list.
Hide ID codesFor security reasons, viewing ID codes (user codes and card numbers) in SafeCom Administrator canbe restricted for users with no administrator rights.
To hide ID codes:
1. Start SafeCom Administrator and log in.
2. Check Hide ID codes on the Users tab in the Server properties dialog.
3. Identify the users with administrator rights who are not allowed to see ID codes and make sure tochange their user rights to Partial rights or lower.
Users with only Partial user rights can then no longer:• See the ID codes on the ID code tab in the User properties dialog.• View the column ID codes in the list of users.• Open the ID codes overview dialog from the Users menu.• See ID codes when testing a connected USB or Serial card reader.
Note: Checking Hide ID codes does not affect the users view in SafeCom Web Interface. Hiding ID codesin the Web Interface must be set up in scWebConfigurator.exe. Refer to SafeCom G4 Web InterfaceAdministrator’s Manual D60651.
Hide document namesTo hide document titles:
1. Start SafeCom Administrator and log in.
249
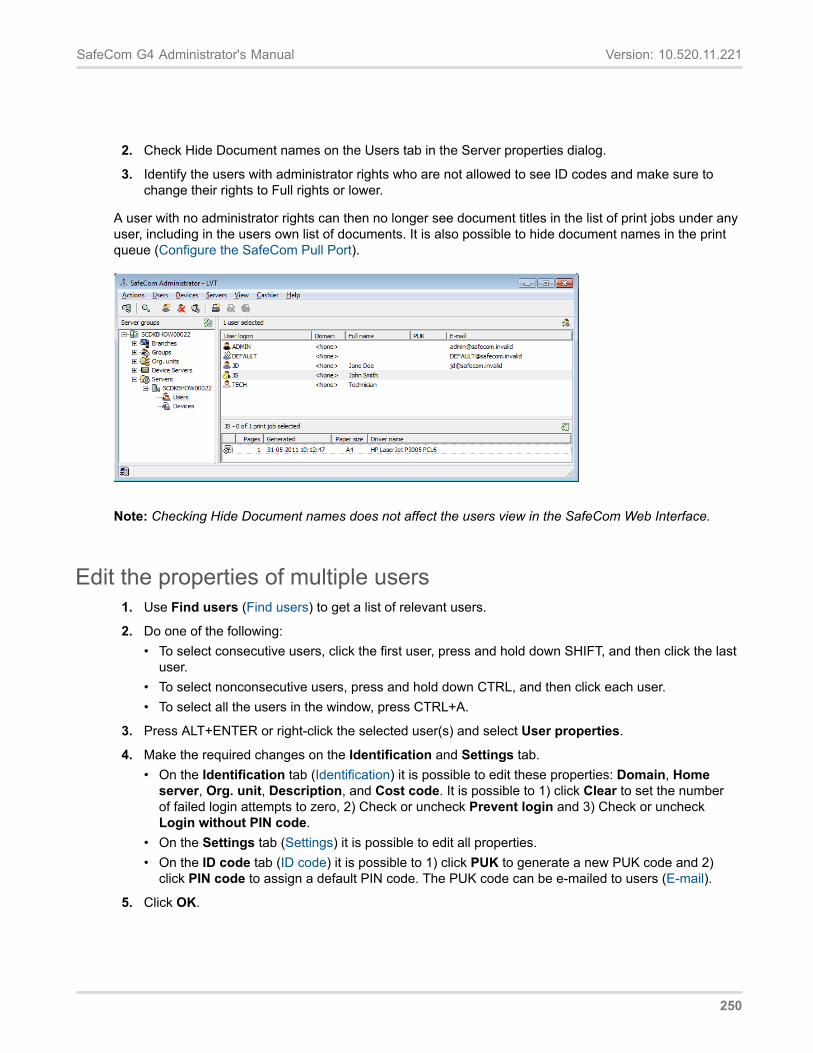
SafeCom G4 Administrator's Manual Version: 10.520.11.221
2. Check Hide Document names on the Users tab in the Server properties dialog.
3. Identify the users with administrator rights who are not allowed to see ID codes and make sure tochange their rights to Full rights or lower.
A user with no administrator rights can then no longer see document titles in the list of print jobs under anyuser, including in the users own list of documents. It is also possible to hide document names in the printqueue (Configure the SafeCom Pull Port).
Note: Checking Hide Document names does not affect the users view in the SafeCom Web Interface.
Edit the properties of multiple users1. Use Find users (Find users) to get a list of relevant users.
2. Do one of the following:• To select consecutive users, click the first user, press and hold down SHIFT, and then click the last
user.• To select nonconsecutive users, press and hold down CTRL, and then click each user.• To select all the users in the window, press CTRL+A.
3. Press ALT+ENTER or right-click the selected user(s) and select User properties.
4. Make the required changes on the Identification and Settings tab.• On the Identification tab (Identification) it is possible to edit these properties: Domain, Home
server, Org. unit, Description, and Cost code. It is possible to 1) click Clear to set the numberof failed login attempts to zero, 2) Check or uncheck Prevent login and 3) Check or uncheckLogin without PIN code.
• On the Settings tab (Settings) it is possible to edit all properties.• On the ID code tab (ID code) it is possible to 1) click PUK to generate a new PUK code and 2)
click PIN code to assign a default PIN code. The PUK code can be e-mailed to users (E-mail).
5. Click OK.
250
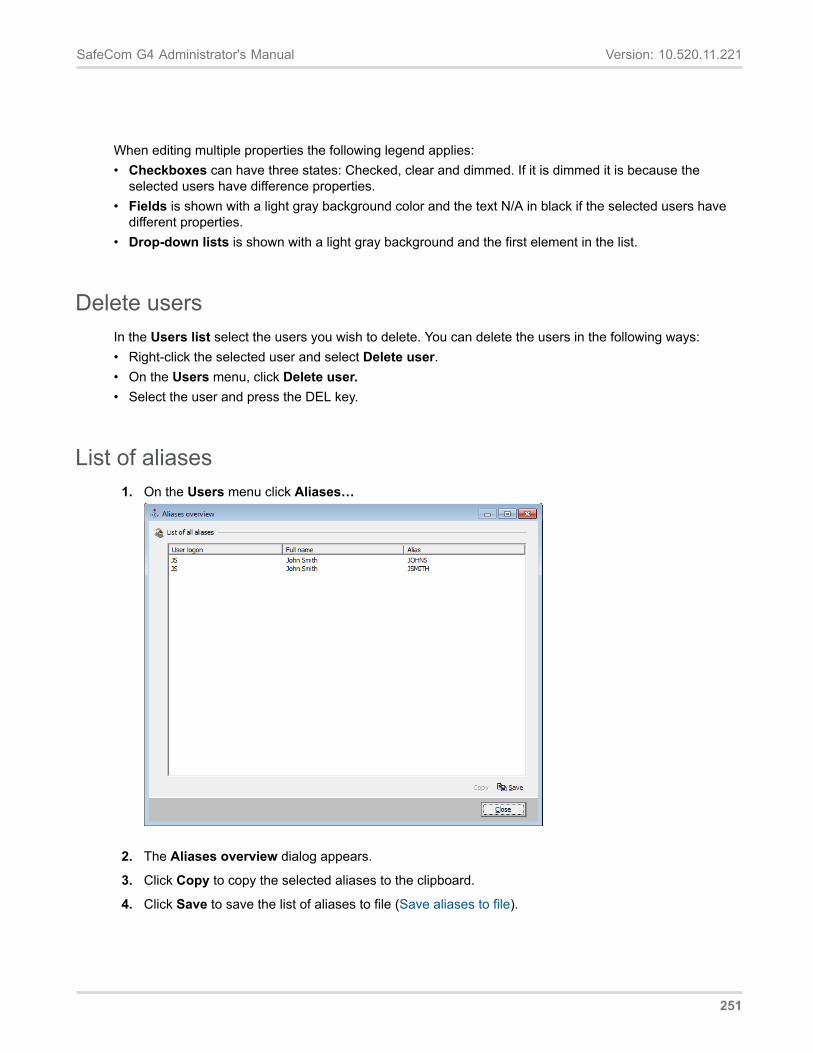
SafeCom G4 Administrator's Manual Version: 10.520.11.221
When editing multiple properties the following legend applies:• Checkboxes can have three states: Checked, clear and dimmed. If it is dimmed it is because the
selected users have difference properties.• Fields is shown with a light gray background color and the text N/A in black if the selected users have
different properties.• Drop-down lists is shown with a light gray background and the first element in the list.
Delete usersIn the Users list select the users you wish to delete. You can delete the users in the following ways:• Right-click the selected user and select Delete user.• On the Users menu, click Delete user.• Select the user and press the DEL key.
List of aliases1. On the Users menu click Aliases…
2. The Aliases overview dialog appears.
3. Click Copy to copy the selected aliases to the clipboard.
4. Click Save to save the list of aliases to file (Save aliases to file).
251
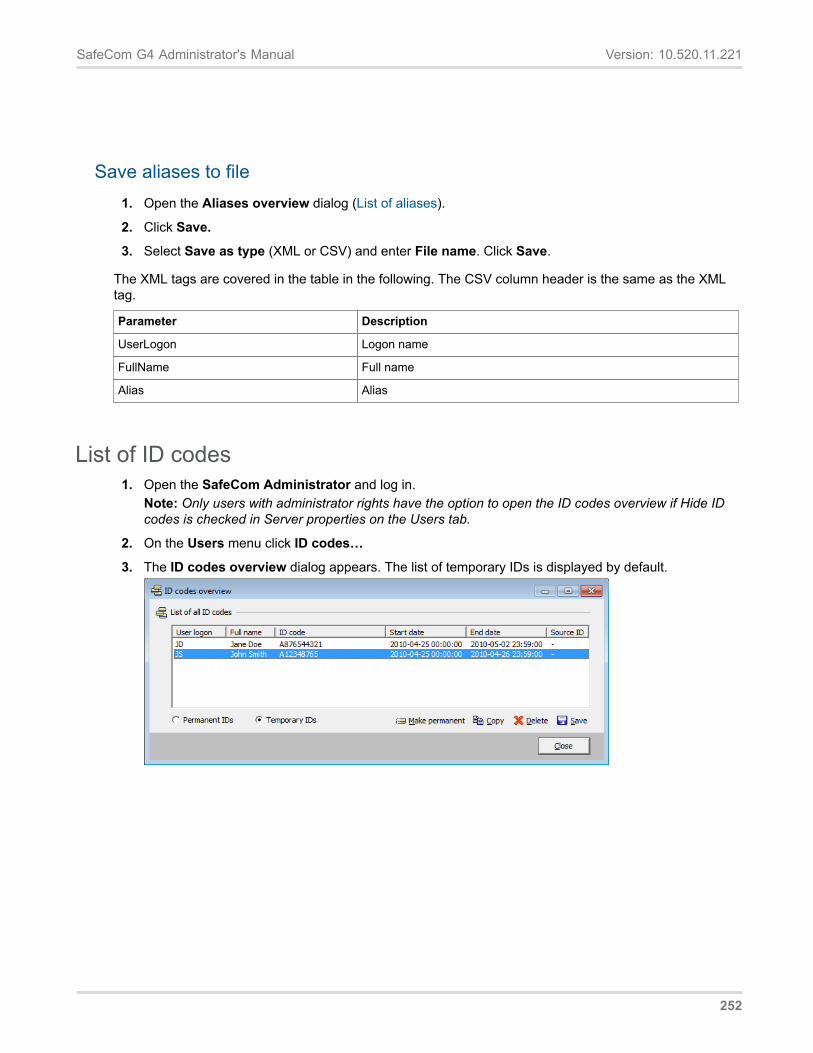
SafeCom G4 Administrator's Manual Version: 10.520.11.221
Save aliases to file1. Open the Aliases overview dialog (List of aliases).
2. Click Save.
3. Select Save as type (XML or CSV) and enter File name. Click Save.
The XML tags are covered in the table in the following. The CSV column header is the same as the XMLtag.
Parameter Description
UserLogon Logon name
FullName Full name
Alias Alias
List of ID codes1. Open the SafeCom Administrator and log in.
Note: Only users with administrator rights have the option to open the ID codes overview if Hide IDcodes is checked in Server properties on the Users tab.
2. On the Users menu click ID codes…
3. The ID codes overview dialog appears. The list of temporary IDs is displayed by default.
252
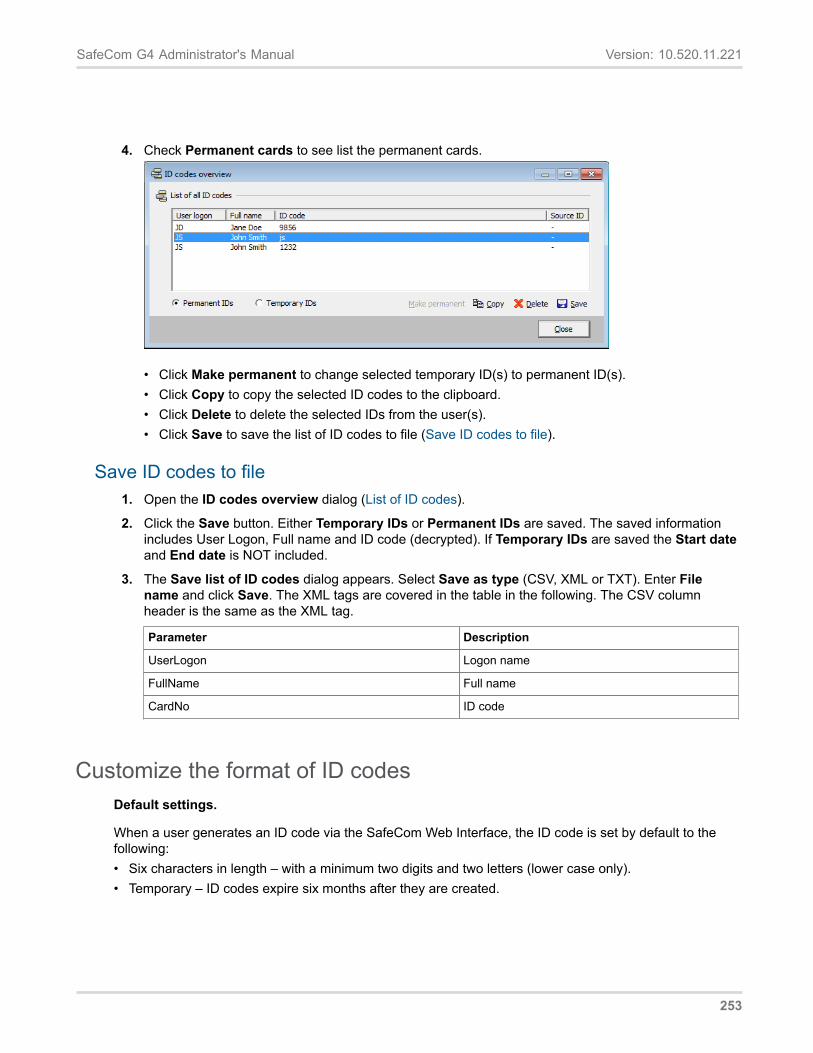
SafeCom G4 Administrator's Manual Version: 10.520.11.221
4. Check Permanent cards to see list the permanent cards.
• Click Make permanent to change selected temporary ID(s) to permanent ID(s).• Click Copy to copy the selected ID codes to the clipboard.• Click Delete to delete the selected IDs from the user(s).• Click Save to save the list of ID codes to file (Save ID codes to file).
Save ID codes to file1. Open the ID codes overview dialog (List of ID codes).
2. Click the Save button. Either Temporary IDs or Permanent IDs are saved. The saved informationincludes User Logon, Full name and ID code (decrypted). If Temporary IDs are saved the Start dateand End date is NOT included.
3. The Save list of ID codes dialog appears. Select Save as type (CSV, XML or TXT). Enter Filename and click Save. The XML tags are covered in the table in the following. The CSV columnheader is the same as the XML tag.
Parameter Description
UserLogon Logon name
FullName Full name
CardNo ID code
Customize the format of ID codesDefault settings.
When a user generates an ID code via the SafeCom Web Interface, the ID code is set by default to thefollowing:• Six characters in length – with a minimum two digits and two letters (lower case only).• Temporary – ID codes expire six months after they are created.
253
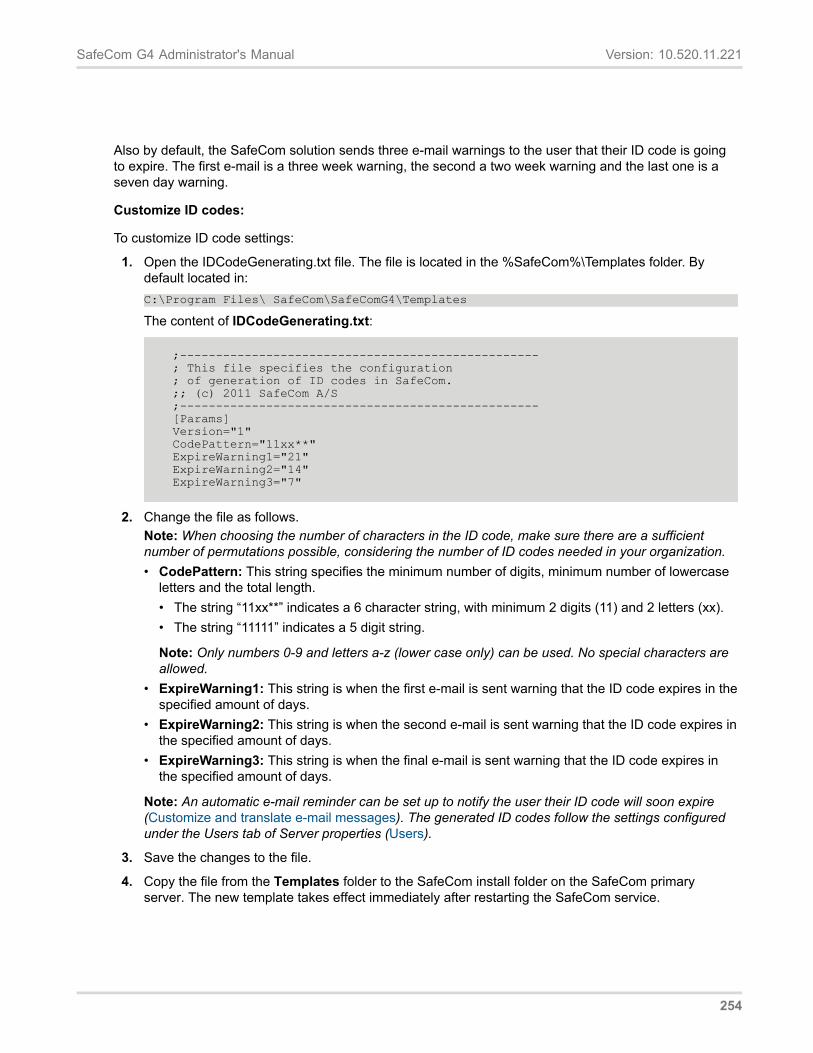
SafeCom G4 Administrator's Manual Version: 10.520.11.221
Also by default, the SafeCom solution sends three e-mail warnings to the user that their ID code is goingto expire. The first e-mail is a three week warning, the second a two week warning and the last one is aseven day warning.
Customize ID codes:
To customize ID code settings:
1. Open the IDCodeGenerating.txt file. The file is located in the %SafeCom%\Templates folder. Bydefault located in:C:\Program Files\ SafeCom\SafeComG4\Templates
The content of IDCodeGenerating.txt:
;-------------------------------------------------- ; This file specifies the configuration ; of generation of ID codes in SafeCom. ;; (c) 2011 SafeCom A/S ;-------------------------------------------------- [Params] Version="1" CodePattern="11xx**" ExpireWarning1="21" ExpireWarning2="14" ExpireWarning3="7"
2. Change the file as follows. Note: When choosing the number of characters in the ID code, make sure there are a sufficient number of permutations possible, considering the number of ID codes needed in your organization. • CodePattern: This string specifies the minimum number of digits, minimum number of lowercase
letters and the total length. • The string “11xx**” indicates a 6 character string, with minimum 2 digits (11) and 2 letters (xx). • The string “11111” indicates a 5 digit string.
Note: Only numbers 0-9 and letters a-z (lower case only) can be used. No special characters are allowed.
• ExpireWarning1: This string is when the first e-mail is sent warning that the ID code expires in the specified amount of days.
• ExpireWarning2: This string is when the second e-mail is sent warning that the ID code expires in the specified amount of days.
• ExpireWarning3: This string is when the final e-mail is sent warning that the ID code expires in the specified amount of days.
Note: An automatic e-mail reminder can be set up to notify the user their ID code will soon expire (Customize and translate e-mail messages). The generated ID codes follow the settings configured under the Users tab of Server properties (Users).
3. Save the changes to the file.
4. Copy the file from the Templates folder to the SafeCom install folder on the SafeCom primary server. The new template takes effect immediately after restarting the SafeCom service.
254
SafeCom G4 Administrator's Manual Version: 10.520.11.221
User has lost ID cardIf a user loses their ID card the user needs to register another card.
1. Find the user (Find users).
2. Open the User properties dialog. Click on the ID code tab (ID code).
3. Click PUK to generate a new PUK code or enter the ID code.
User has forgotten ID codeIf the user forgets their ID code, you can retrieve it.
1. Find the user (Find users).
2. Open the User properties dialog. Click on the ID code tab (ID code).
3. Code contains the ID code.
User has forgotten PIN codeIf the user forgets their PIN code you can generate a new PIN code.
1. Find the user (Find users).
2. Open the User properties dialog. Click on the ID code tab (ID code).
3. Click PIN code.
4. Click Random to assign and display a randomly generated PIN code. Click Default to assign anddisplay the default PIN code ‘1234’. Refer to Allow users to change their PIN code on how users cansubsequently change the PIN code.
Delete a user’s print jobs (documents)Select the user, whose print jobs (documents) you wish to delete. In the Job list select the print jobs andyou can delete them in the following three ways:• On the Jobs menu, click Delete job.• Right-click the selected job and select Delete job.• Press the DEL key.
The job list may contain these columns:• Document name. The name of the print job.• Pages. The number of pages in the print job.• Generated. The date and time when the job was stored.
255
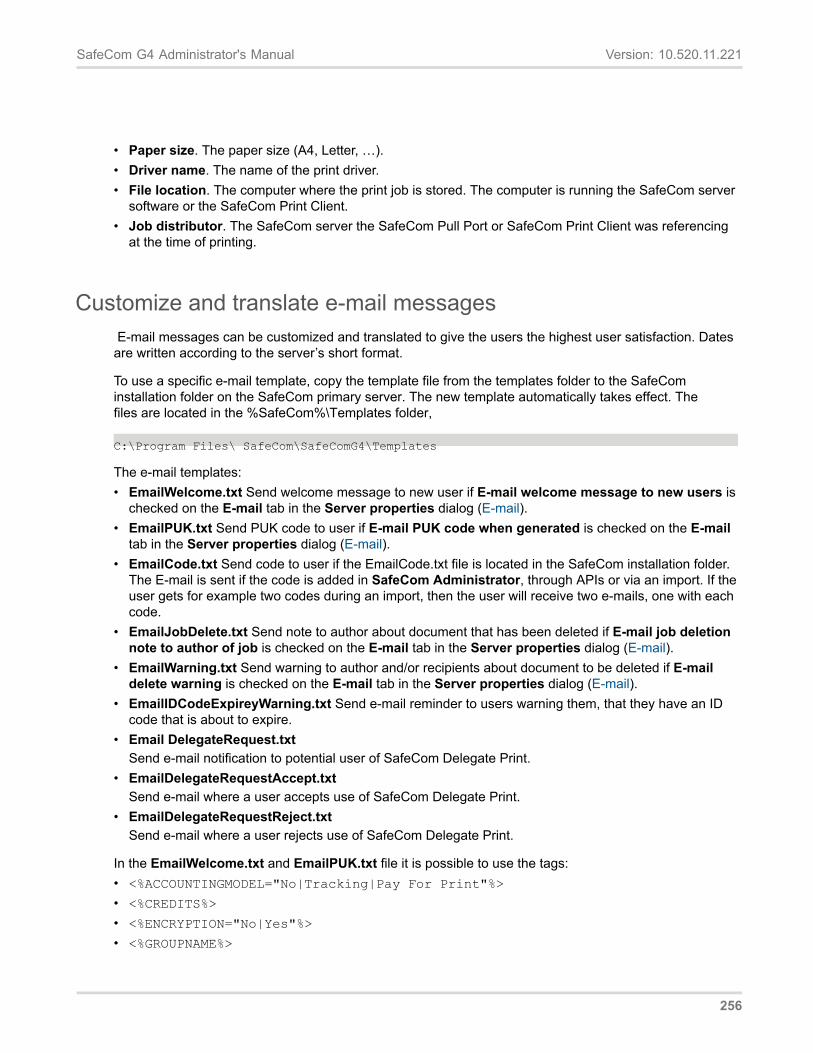
SafeCom G4 Administrator's Manual Version: 10.520.11.221
• Paper size. The paper size (A4, Letter, …).• Driver name. The name of the print driver.• File location. The computer where the print job is stored. The computer is running the SafeCom server
software or the SafeCom Print Client.• Job distributor. The SafeCom server the SafeCom Pull Port or SafeCom Print Client was referencing
at the time of printing.
Customize and translate e-mail messages E-mail messages can be customized and translated to give the users the highest user satisfaction. Dates are written according to the server’s short format.
To use a specific e-mail template, copy the template file from the templates folder to the SafeCom installation folder on the SafeCom primary server. The new template automatically takes effect. The files are located in the %SafeCom%\Templates folder,
C:\Program Files\ SafeCom\SafeComG4\Templates
The e-mail templates: • EmailWelcome.txt Send welcome message to new user if E-mail welcome message to new users is
checked on the E-mail tab in the Server properties dialog (E-mail). • EmailPUK.txt Send PUK code to user if E-mail PUK code when generated is checked on the E-mail
tab in the Server properties dialog (E-mail). • EmailCode.txt Send code to user if the EmailCode.txt file is located in the SafeCom installation folder.
The E-mail is sent if the code is added in SafeCom Administrator, through APIs or via an import. If the user gets for example two codes during an import, then the user will receive two e-mails, one with each code.
• EmailJobDelete.txt Send note to author about document that has been deleted if E-mail job deletion note to author of job is checked on the E-mail tab in the Server properties dialog (E-mail).
• EmailWarning.txt Send warning to author and/or recipients about document to be deleted if E-mail delete warning is checked on the E-mail tab in the Server properties dialog (E-mail).
• EmailIDCodeExpireyWarning.txt Send e-mail reminder to users warning them, that they have an ID code that is about to expire.
• Email DelegateRequest.txt Send e-mail notification to potential user of SafeCom Delegate Print.
• EmailDelegateRequestAccept.txt Send e-mail where a user accepts use of SafeCom Delegate Print.
• EmailDelegateRequestReject.txt Send e-mail where a user rejects use of SafeCom Delegate Print.
In the EmailWelcome.txt and EmailPUK.txt file it is possible to use the tags: • <%ACCOUNTINGMODEL="No|Tracking|Pay For Print"%> • <%CREDITS%> • <%ENCRYPTION="No|Yes"%> • <%GROUPNAME%>
256
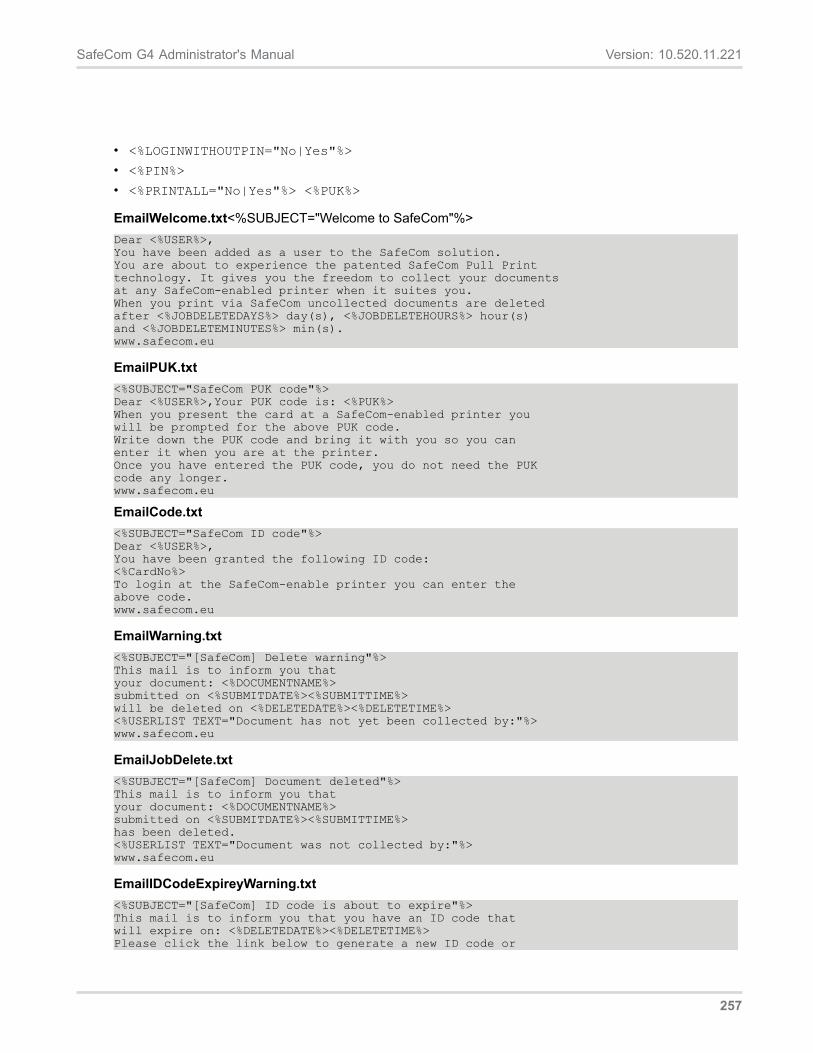
SafeCom G4 Administrator's Manual Version: 10.520.11.221
• <%LOGINWITHOUTPIN="No|Yes"%>
• <%PIN%>
• <%PRINTALL="No|Yes"%> <%PUK%>
EmailWelcome.txt<%SUBJECT="Welcome to SafeCom"%>Dear <%USER%>,You have been added as a user to the SafeCom solution.You are about to experience the patented SafeCom Pull Printtechnology. It gives you the freedom to collect your documentsat any SafeCom-enabled printer when it suites you.When you print via SafeCom uncollected documents are deletedafter <%JOBDELETEDAYS%> day(s), <%JOBDELETEHOURS%> hour(s)and <%JOBDELETEMINUTES%> min(s).www.safecom.eu
EmailPUK.txt<%SUBJECT="SafeCom PUK code"%>Dear <%USER%>,Your PUK code is: <%PUK%>When you present the card at a SafeCom-enabled printer youwill be prompted for the above PUK code.Write down the PUK code and bring it with you so you canenter it when you are at the printer.Once you have entered the PUK code, you do not need the PUKcode any longer.www.safecom.eu
EmailCode.txt<%SUBJECT="SafeCom ID code"%>Dear <%USER%>,You have been granted the following ID code:<%CardNo%>To login at the SafeCom-enable printer you can enter theabove code.www.safecom.eu
EmailWarning.txt<%SUBJECT="[SafeCom] Delete warning"%>This mail is to inform you thatyour document: <%DOCUMENTNAME%>submitted on <%SUBMITDATE%><%SUBMITTIME%>will be deleted on <%DELETEDATE%><%DELETETIME%><%USERLIST TEXT="Document has not yet been collected by:"%>www.safecom.eu
EmailJobDelete.txt<%SUBJECT="[SafeCom] Document deleted"%>This mail is to inform you thatyour document: <%DOCUMENTNAME%>submitted on <%SUBMITDATE%><%SUBMITTIME%>has been deleted.<%USERLIST TEXT="Document was not collected by:"%>www.safecom.eu
EmailIDCodeExpireyWarning.txt<%SUBJECT="[SafeCom] ID code is about to expire"%>This mail is to inform you that you have an ID code that will expire on: <%DELETEDATE%><%DELETETIME%>Please click the link below to generate a new ID code or
257
SafeCom G4 Administrator's Manual Version: 10.520.11.221
contact your administrator.www.safecom.eu
EmailDelegateRequest.txt<%SUBJECT="[SafeCom] Print delegate request"%>Dear <%USER%>,<%DELEGATEUSER%> has requested print delegation. Click the link below to open a web browser and respond to the request.http://server/safecom/<%DELEGATELINK%>Print delegation enables you to submit delegated documents to selected users and/or accept delegated documents from selected users.www.safecom.eu
EmailDelegateRequestAccept.txt<%SUBJECT="[SafeCom] Print delegate request accepted"%>Dear <%USER%>,<%DELEGATEUSER%> has accepted your print delegate request.www.safecom.eu
EmailDelegateRequestReject.txt<%SUBJECT="[SafeCom] Print delegate request rejected"%>Dear <%USER%>,<%DELEGATEUSER%> has rejected your print delegate request.www.safecom.eu
258
Chapter 8
Manage devices
IntroductionFrom within SafeCom Administrator it is possible to manage SafeCom devices and do the following:• Device license (Device license)Choose licenses for the device.• Add device (Add device) Register a device in the database.• Add device to a SafeCom Device Server (Add a device to a SafeCom Device Server)
Register a device to a device server.• Find devices (Find devices) Search the database for devices.• Broadcast for devices (Broadcast for devices)Broadcast on the network to find SafeCom Controllers
and devices with SafeCom Go.• Customize the device list view (Customize the device list view)• Edit the properties of multiple devices (Edit the properties of multiple devices)• Delete devices (Delete devices)Remove a single or multiple devices from the database.• Update software (Import Nuance Ethernet Card Readers)Load new software to a single or multiple
devices.• Monitor device status (Monitor device) See the online status of devices. Enable device status logging
for troubleshooting purpose.• Restart devices (Restart devices) Restart a single or multiple devices.• Open the device’s web interface (Open in web browser)The web interface that can be used for
configuration.
Device licenseOn the License tab in the Device properties dialog it is possible to choose which SafeCom featuresshould be enabled on the device in question.
259
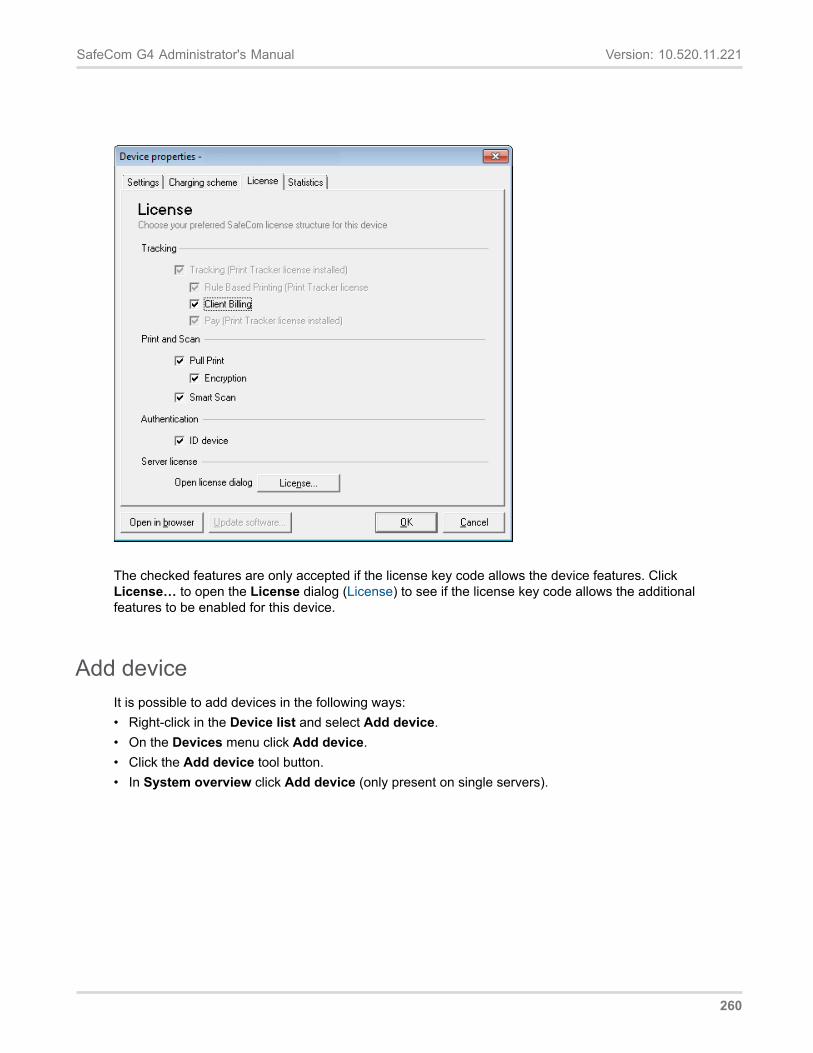
SafeCom G4 Administrator's Manual Version: 10.520.11.221
The checked features are only accepted if the license key code allows the device features. ClickLicense… to open the License dialog (License) to see if the license key code allows the additionalfeatures to be enabled for this device.
Add deviceIt is possible to add devices in the following ways:• Right-click in the Device list and select Add device.• On the Devices menu click Add device.• Click the Add device tool button.• In System overview click Add device (only present on single servers).
260
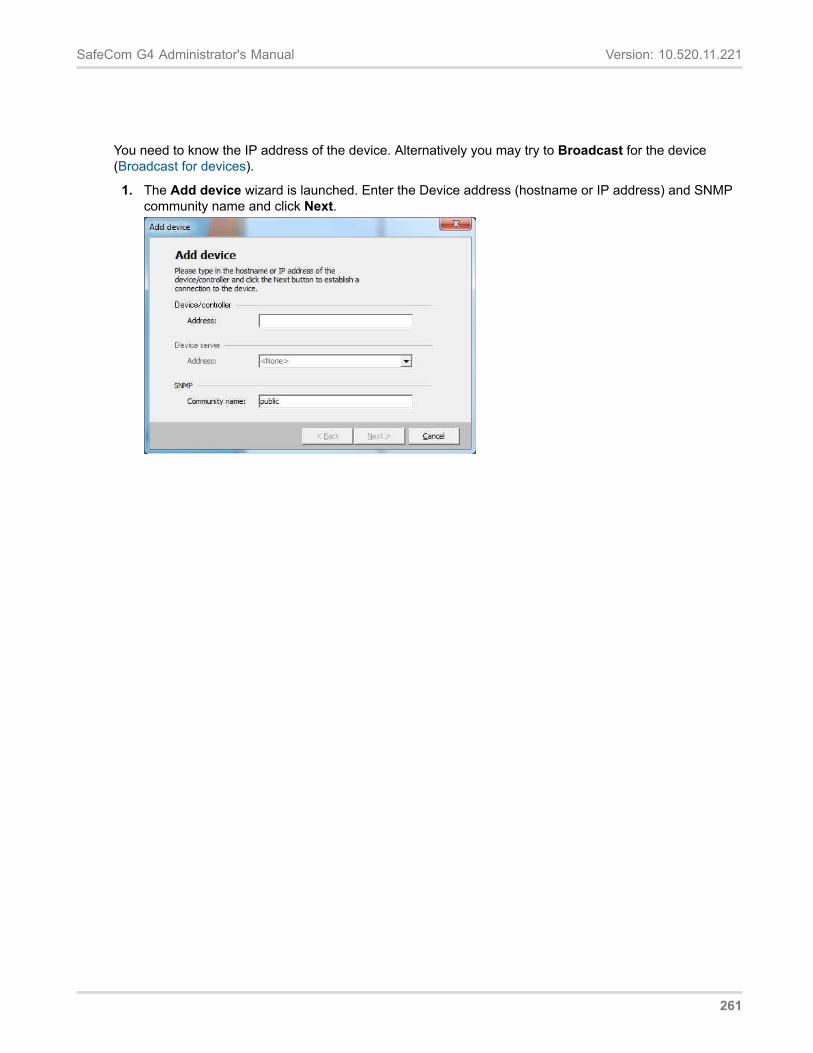
SafeCom G4 Administrator's Manual Version: 10.520.11.221
You need to know the IP address of the device. Alternatively you may try to Broadcast for the device(Broadcast for devices).
1. The Add device wizard is launched. Enter the Device address (hostname or IP address) and SNMPcommunity name and click Next.
261
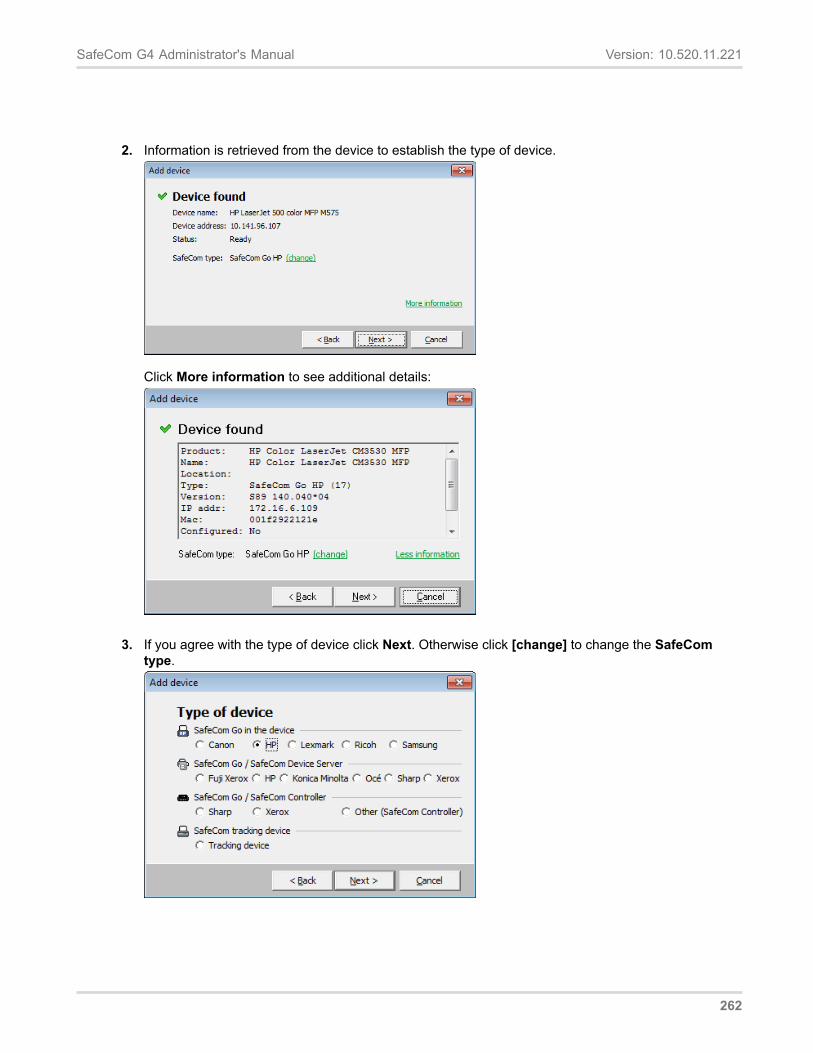
SafeCom G4 Administrator's Manual Version: 10.520.11.221
2. Information is retrieved from the device to establish the type of device.
Click More information to see additional details:
3. If you agree with the type of device click Next. Otherwise click [change] to change the SafeComtype.
262
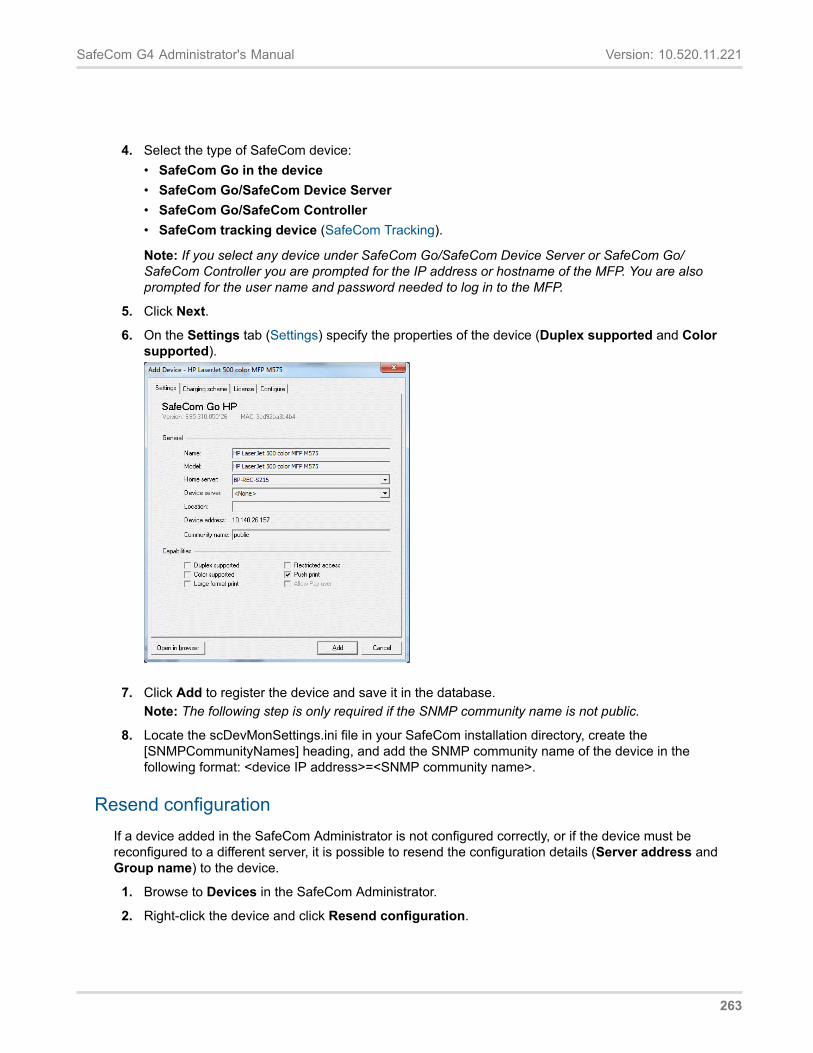
SafeCom G4 Administrator's Manual Version: 10.520.11.221
4. Select the type of SafeCom device:• SafeCom Go in the device• SafeCom Go/SafeCom Device Server• SafeCom Go/SafeCom Controller• SafeCom tracking device (SafeCom Tracking).
Note: If you select any device under SafeCom Go/SafeCom Device Server or SafeCom Go/SafeCom Controller you are prompted for the IP address or hostname of the MFP. You are alsoprompted for the user name and password needed to log in to the MFP.
5. Click Next.
6. On the Settings tab (Settings) specify the properties of the device (Duplex supported and Colorsupported).
7. Click Add to register the device and save it in the database.Note: The following step is only required if the SNMP community name is not public.
8. Locate the scDevMonSettings.ini file in your SafeCom installation directory, create the[SNMPCommunityNames] heading, and add the SNMP community name of the device in thefollowing format: <device IP address>=<SNMP community name>.
Resend configurationIf a device added in the SafeCom Administrator is not configured correctly, or if the device must bereconfigured to a different server, it is possible to resend the configuration details (Server address andGroup name) to the device.
1. Browse to Devices in the SafeCom Administrator.
2. Right-click the device and click Resend configuration.
263
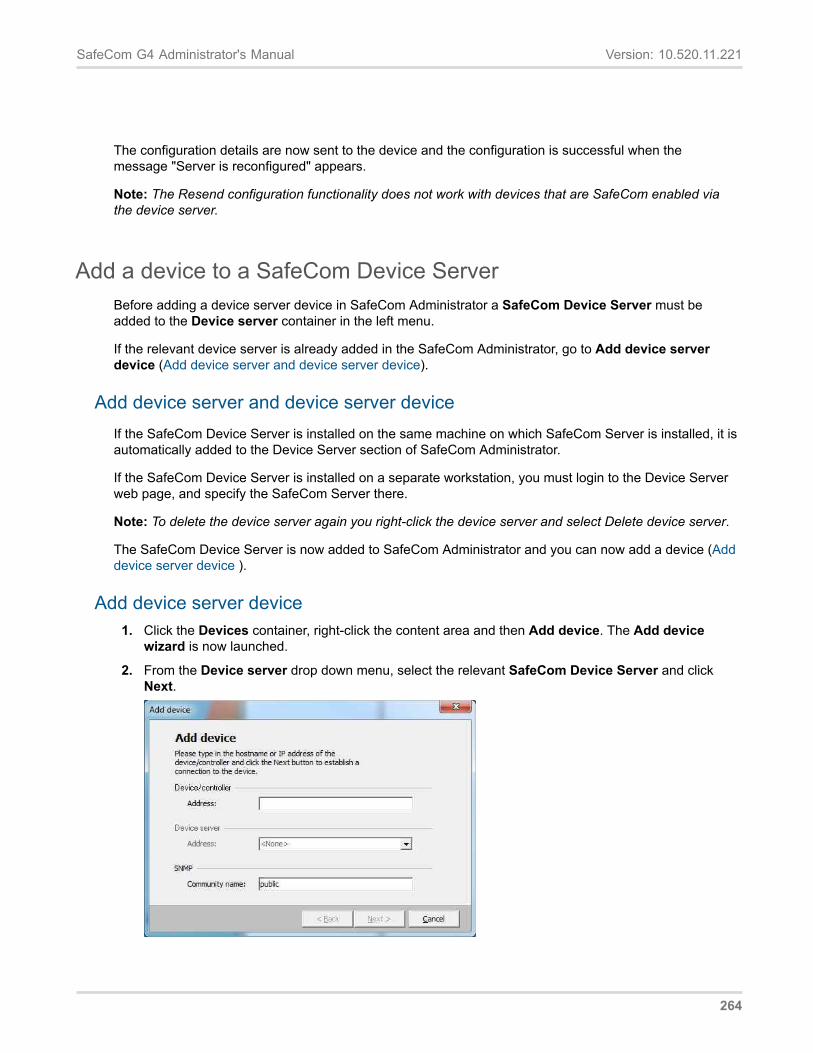
SafeCom G4 Administrator's Manual Version: 10.520.11.221
The configuration details are now sent to the device and the configuration is successful when themessage "Server is reconfigured" appears.
Note: The Resend configuration functionality does not work with devices that are SafeCom enabled viathe device server.
Add a device to a SafeCom Device ServerBefore adding a device server device in SafeCom Administrator a SafeCom Device Server must beadded to the Device server container in the left menu.
If the relevant device server is already added in the SafeCom Administrator, go to Add device serverdevice (Add device server and device server device).
Add device server and device server deviceIf the SafeCom Device Server is installed on the same machine on which SafeCom Server is installed, it isautomatically added to the Device Server section of SafeCom Administrator.
If the SafeCom Device Server is installed on a separate workstation, you must login to the Device Serverweb page, and specify the SafeCom Server there.
Note: To delete the device server again you right-click the device server and select Delete device server.
The SafeCom Device Server is now added to SafeCom Administrator and you can now add a device (Adddevice server device ).
Add device server device1. Click the Devices container, right-click the content area and then Add device. The Add device
wizard is now launched.
2. From the Device server drop down menu, select the relevant SafeCom Device Server and clickNext.
264
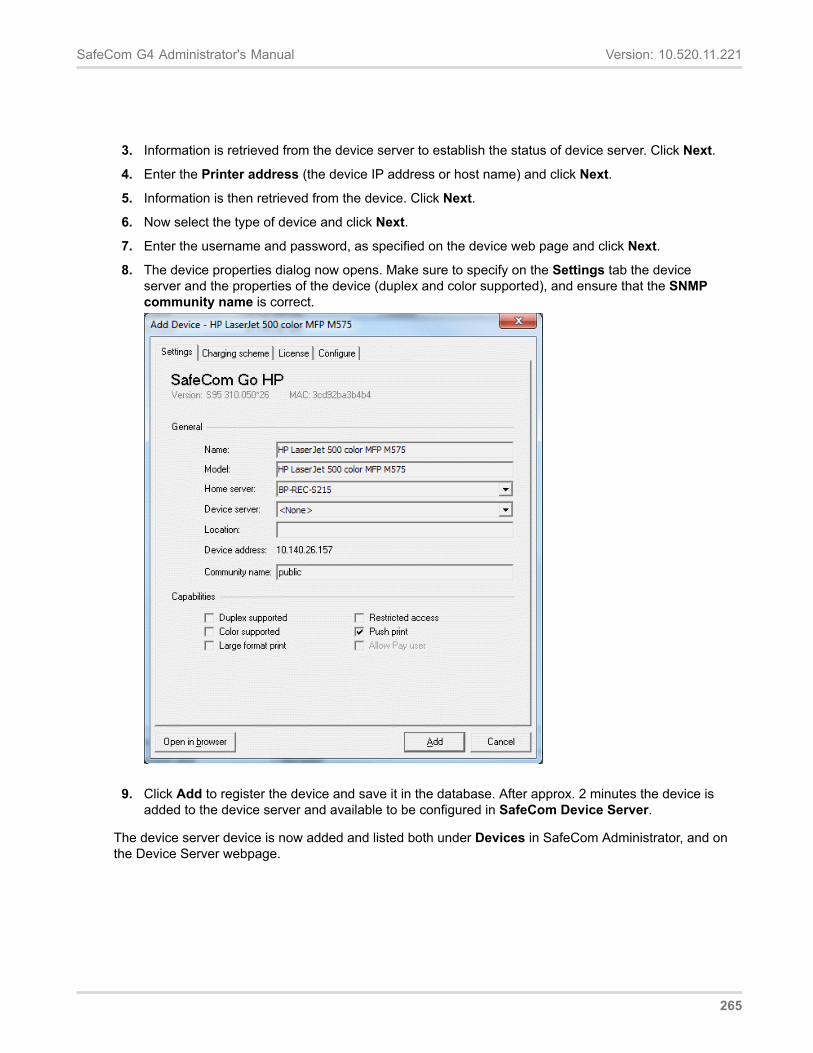
SafeCom G4 Administrator's Manual Version: 10.520.11.221
3. Information is retrieved from the device server to establish the status of device server. Click Next.
4. Enter the Printer address (the device IP address or host name) and click Next.
5. Information is then retrieved from the device. Click Next.
6. Now select the type of device and click Next.
7. Enter the username and password, as specified on the device web page and click Next.
8. The device properties dialog now opens. Make sure to specify on the Settings tab the deviceserver and the properties of the device (duplex and color supported), and ensure that the SNMPcommunity name is correct.
9. Click Add to register the device and save it in the database. After approx. 2 minutes the device isadded to the device server and available to be configured in SafeCom Device Server.
The device server device is now added and listed both under Devices in SafeCom Administrator, and onthe Device Server webpage.
265
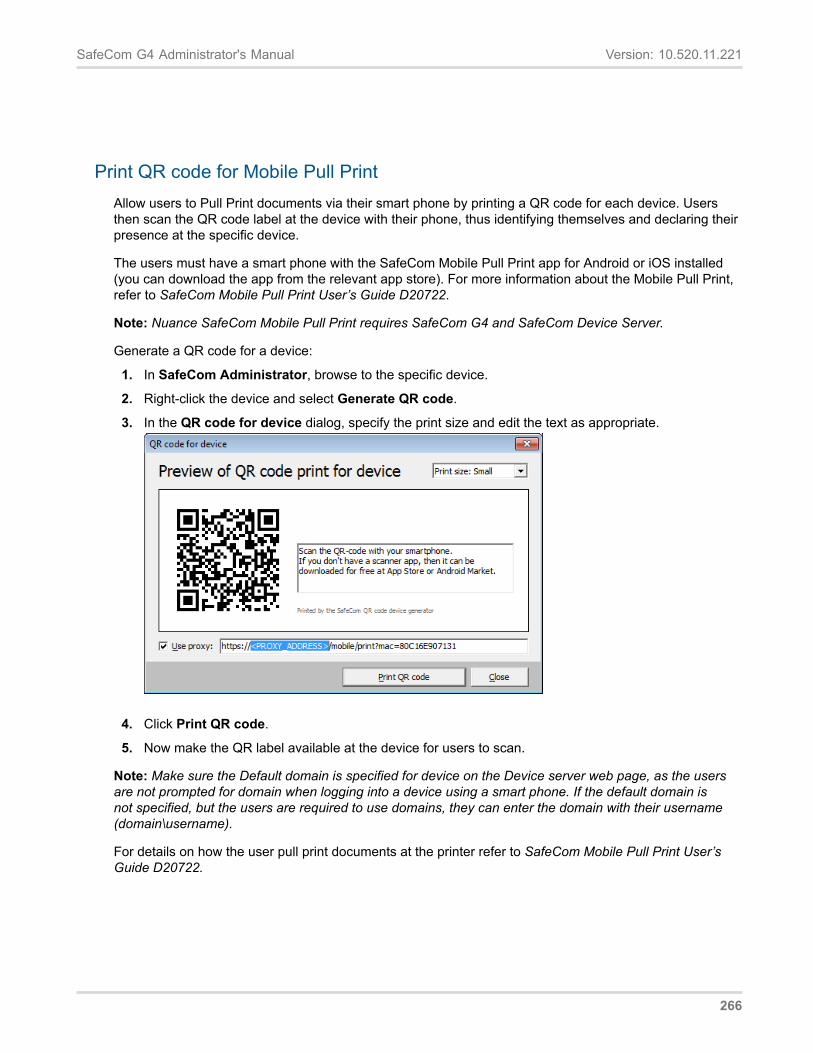
SafeCom G4 Administrator's Manual Version: 10.520.11.221
Print QR code for Mobile Pull PrintAllow users to Pull Print documents via their smart phone by printing a QR code for each device. Usersthen scan the QR code label at the device with their phone, thus identifying themselves and declaring theirpresence at the specific device.
The users must have a smart phone with the SafeCom Mobile Pull Print app for Android or iOS installed(you can download the app from the relevant app store). For more information about the Mobile Pull Print,refer to SafeCom Mobile Pull Print User’s Guide D20722.
Note: Nuance SafeCom Mobile Pull Print requires SafeCom G4 and SafeCom Device Server.
Generate a QR code for a device:
1. In SafeCom Administrator, browse to the specific device.
2. Right-click the device and select Generate QR code.
3. In the QR code for device dialog, specify the print size and edit the text as appropriate.
4. Click Print QR code.
5. Now make the QR label available at the device for users to scan.
Note: Make sure the Default domain is specified for device on the Device server web page, as the usersare not prompted for domain when logging into a device using a smart phone. If the default domain isnot specified, but the users are required to use domains, they can enter the domain with their username(domain\username).
For details on how the user pull print documents at the printer refer to SafeCom Mobile Pull Print User’sGuide D20722.
266
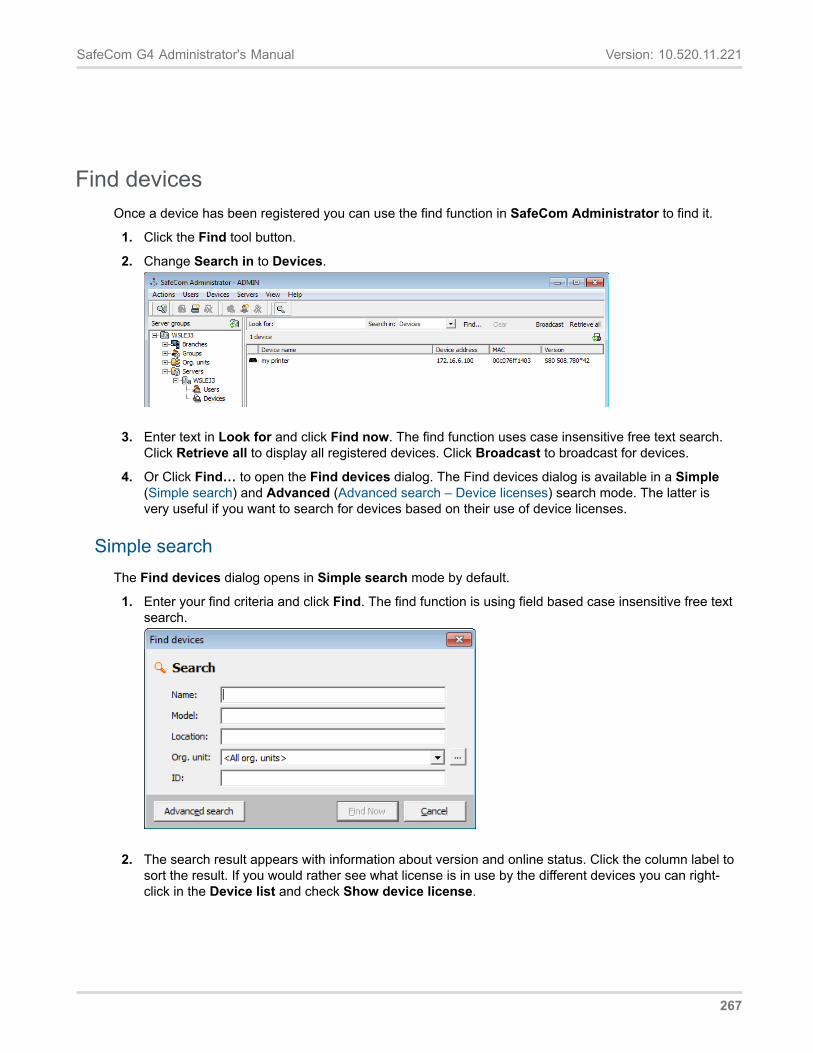
SafeCom G4 Administrator's Manual Version: 10.520.11.221
Find devicesOnce a device has been registered you can use the find function in SafeCom Administrator to find it.
1. Click the Find tool button.
2. Change Search in to Devices.
3. Enter text in Look for and click Find now. The find function uses case insensitive free text search.Click Retrieve all to display all registered devices. Click Broadcast to broadcast for devices.
4. Or Click Find… to open the Find devices dialog. The Find devices dialog is available in a Simple(Simple search) and Advanced (Advanced search – Device licenses) search mode. The latter isvery useful if you want to search for devices based on their use of device licenses.
Simple searchThe Find devices dialog opens in Simple search mode by default.
1. Enter your find criteria and click Find. The find function is using field based case insensitive free textsearch.
2. The search result appears with information about version and online status. Click the column label tosort the result. If you would rather see what license is in use by the different devices you can right-click in the Device list and check Show device license.
267
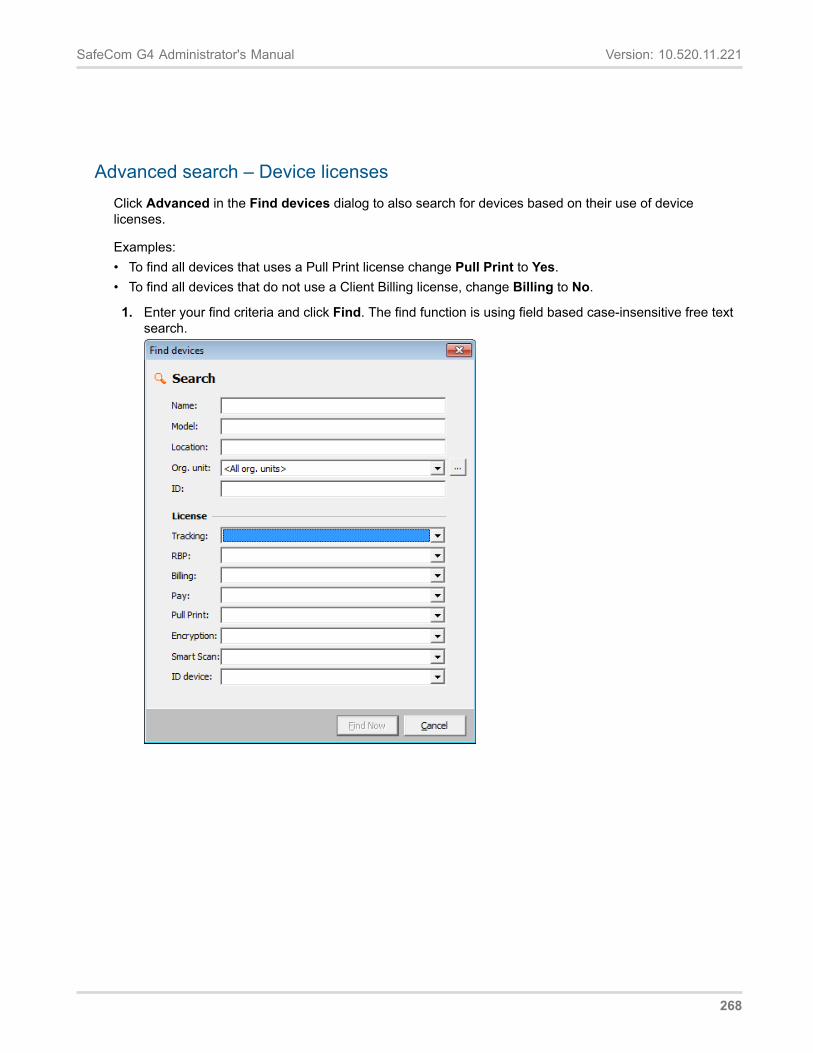
SafeCom G4 Administrator's Manual Version: 10.520.11.221
Advanced search – Device licensesClick Advanced in the Find devices dialog to also search for devices based on their use of devicelicenses.
Examples:• To find all devices that uses a Pull Print license change Pull Print to Yes.• To find all devices that do not use a Client Billing license, change Billing to No.
1. Enter your find criteria and click Find. The find function is using field based case-insensitive free textsearch.
268
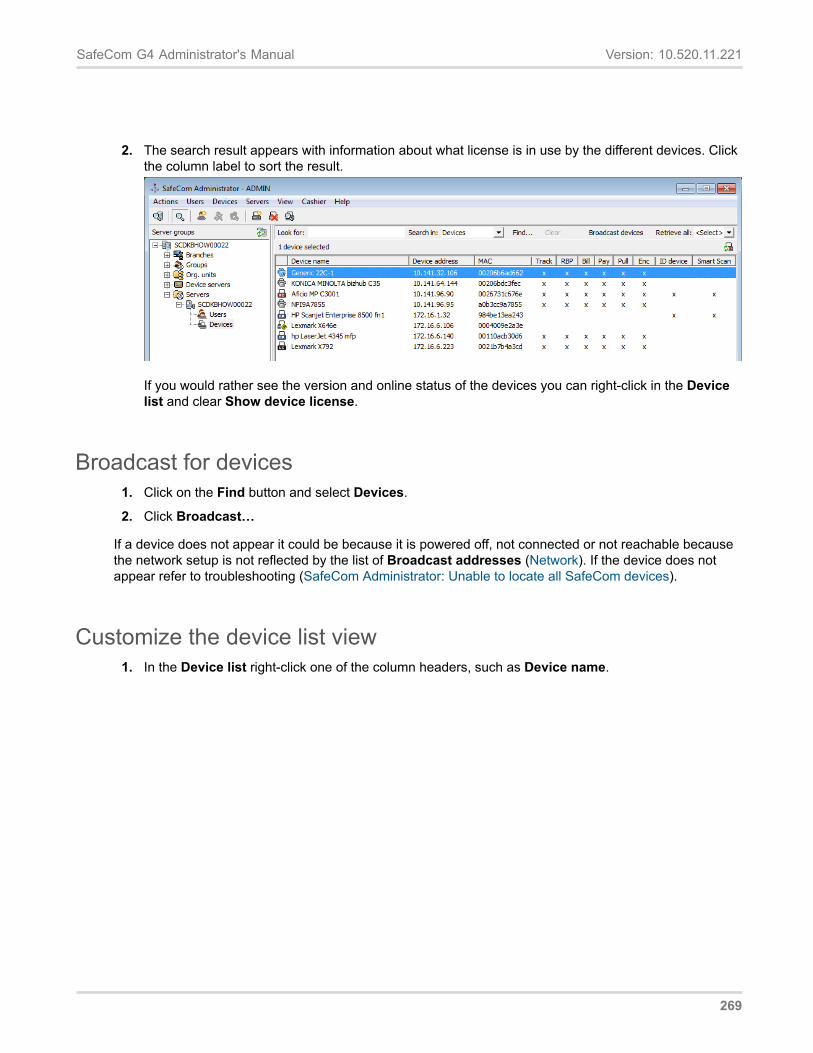
SafeCom G4 Administrator's Manual Version: 10.520.11.221
2. The search result appears with information about what license is in use by the different devices. Clickthe column label to sort the result.
If you would rather see the version and online status of the devices you can right-click in the Devicelist and clear Show device license.
Broadcast for devices1. Click on the Find button and select Devices.
2. Click Broadcast…
If a device does not appear it could be because it is powered off, not connected or not reachable becausethe network setup is not reflected by the list of Broadcast addresses (Network). If the device does notappear refer to troubleshooting (SafeCom Administrator: Unable to locate all SafeCom devices).
Customize the device list view1. In the Device list right-click one of the column headers, such as Device name.
269
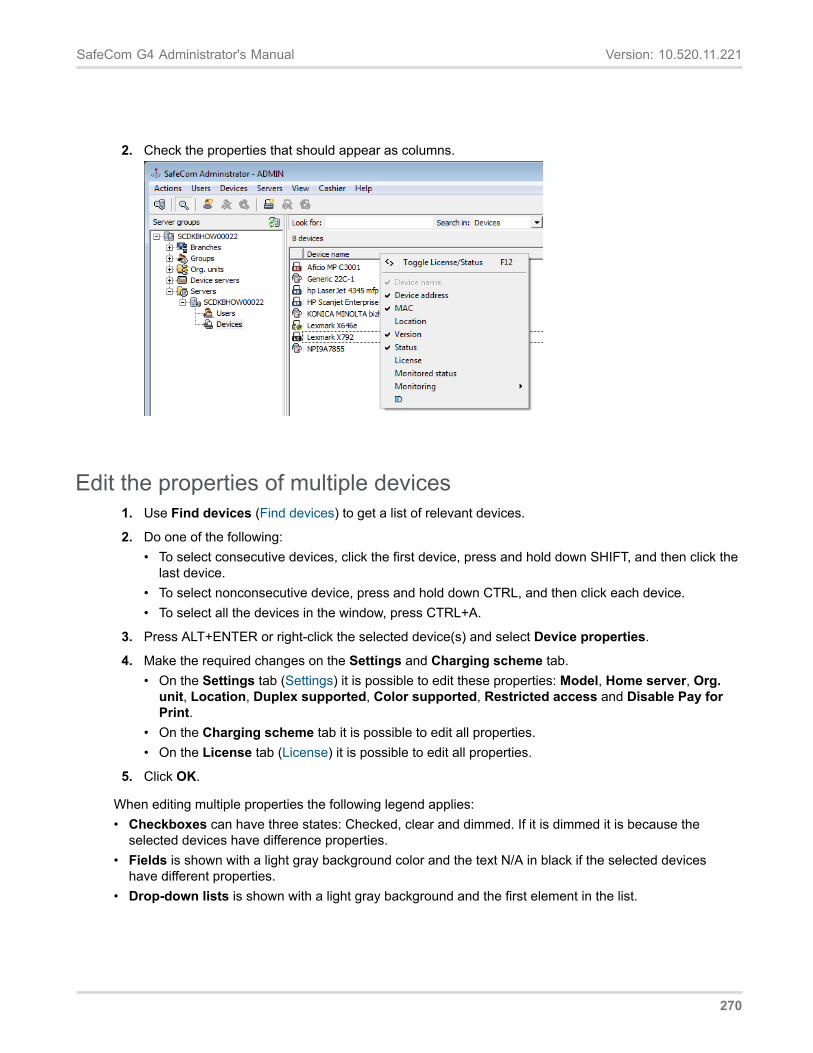
SafeCom G4 Administrator's Manual Version: 10.520.11.221
2. Check the properties that should appear as columns.
Edit the properties of multiple devices1. Use Find devices (Find devices) to get a list of relevant devices.
2. Do one of the following:• To select consecutive devices, click the first device, press and hold down SHIFT, and then click the
last device.• To select nonconsecutive device, press and hold down CTRL, and then click each device.• To select all the devices in the window, press CTRL+A.
3. Press ALT+ENTER or right-click the selected device(s) and select Device properties.
4. Make the required changes on the Settings and Charging scheme tab.• On the Settings tab (Settings) it is possible to edit these properties: Model, Home server, Org.
unit, Location, Duplex supported, Color supported, Restricted access and Disable Pay forPrint.
• On the Charging scheme tab it is possible to edit all properties.• On the License tab (License) it is possible to edit all properties.
5. Click OK.
When editing multiple properties the following legend applies:• Checkboxes can have three states: Checked, clear and dimmed. If it is dimmed it is because the
selected devices have difference properties.• Fields is shown with a light gray background color and the text N/A in black if the selected devices
have different properties.• Drop-down lists is shown with a light gray background and the first element in the list.
270
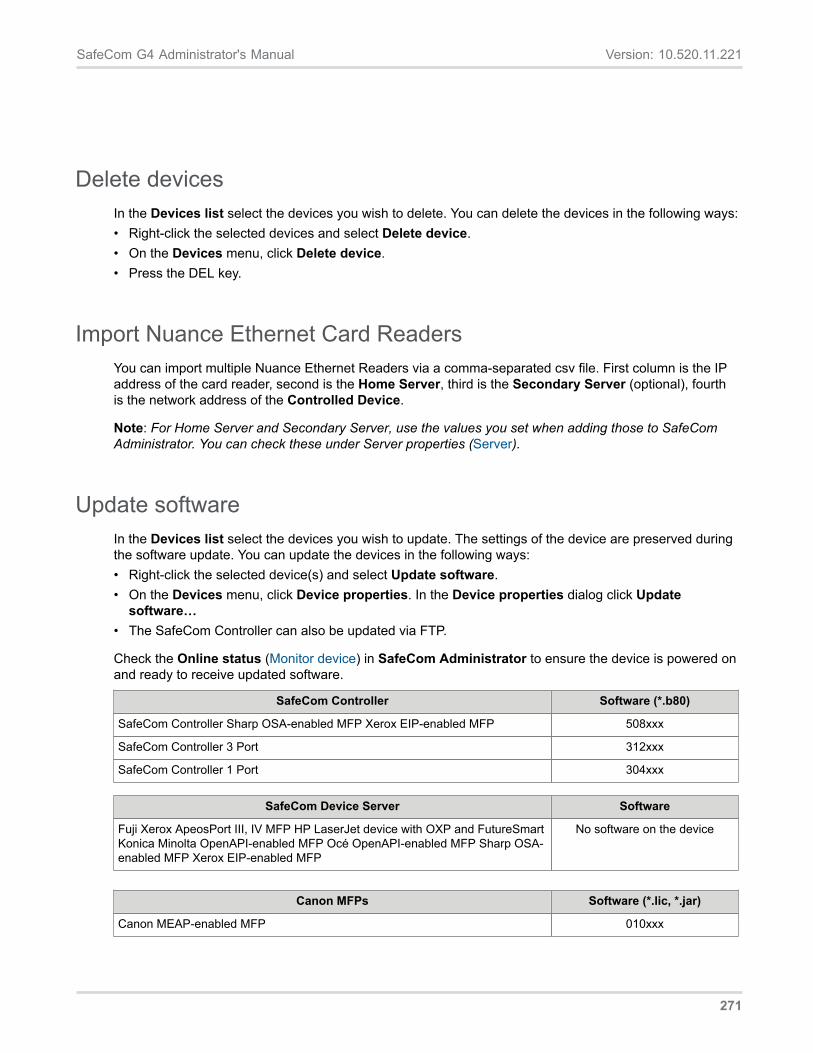
SafeCom G4 Administrator's Manual Version: 10.520.11.221
Delete devicesIn the Devices list select the devices you wish to delete. You can delete the devices in the following ways:• Right-click the selected devices and select Delete device.• On the Devices menu, click Delete device.• Press the DEL key.
Import Nuance Ethernet Card ReadersYou can import multiple Nuance Ethernet Readers via a comma-separated csv file. First column is the IPaddress of the card reader, second is the Home Server, third is the Secondary Server (optional), fourthis the network address of the Controlled Device.
Note: For Home Server and Secondary Server, use the values you set when adding those to SafeComAdministrator. You can check these under Server properties (Server).
Update softwareIn the Devices list select the devices you wish to update. The settings of the device are preserved duringthe software update. You can update the devices in the following ways:• Right-click the selected device(s) and select Update software.• On the Devices menu, click Device properties. In the Device properties dialog click Update
software…• The SafeCom Controller can also be updated via FTP.
Check the Online status (Monitor device) in SafeCom Administrator to ensure the device is powered onand ready to receive updated software.
SafeCom Controller Software (*.b80)
SafeCom Controller Sharp OSA-enabled MFP Xerox EIP-enabled MFP 508xxx
SafeCom Controller 3 Port 312xxx
SafeCom Controller 1 Port 304xxx
SafeCom Device Server Software
Fuji Xerox ApeosPort III, IV MFP HP LaserJet device with OXP and FutureSmartKonica Minolta OpenAPI-enabled MFP Océ OpenAPI-enabled MFP Sharp OSA-enabled MFP Xerox EIP-enabled MFP
No software on the device
Canon MFPs Software (*.lic, *.jar)
Canon MEAP-enabled MFP 010xxx
271
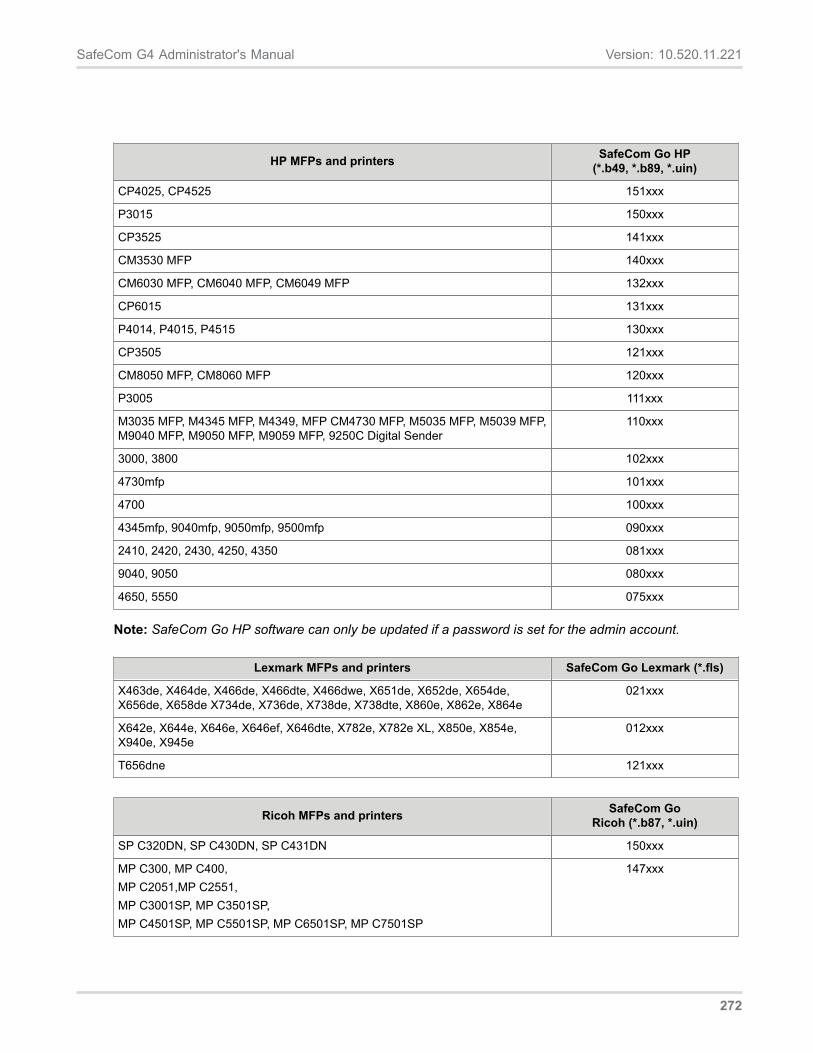
SafeCom G4 Administrator's Manual Version: 10.520.11.221
HP MFPs and printers SafeCom Go HP(*.b49, *.b89, *.uin)
CP4025, CP4525 151xxx
P3015 150xxx
CP3525 141xxx
CM3530 MFP 140xxx
CM6030 MFP, CM6040 MFP, CM6049 MFP 132xxx
CP6015 131xxx
P4014, P4015, P4515 130xxx
CP3505 121xxx
CM8050 MFP, CM8060 MFP 120xxx
P3005 111xxx
M3035 MFP, M4345 MFP, M4349, MFP CM4730 MFP, M5035 MFP, M5039 MFP,M9040 MFP, M9050 MFP, M9059 MFP, 9250C Digital Sender
110xxx
3000, 3800 102xxx
4730mfp 101xxx
4700 100xxx
4345mfp, 9040mfp, 9050mfp, 9500mfp 090xxx
2410, 2420, 2430, 4250, 4350 081xxx
9040, 9050 080xxx
4650, 5550 075xxx
Note: SafeCom Go HP software can only be updated if a password is set for the admin account.
Lexmark MFPs and printers SafeCom Go Lexmark (*.fls)
X463de, X464de, X466de, X466dte, X466dwe, X651de, X652de, X654de,X656de, X658de X734de, X736de, X738de, X738dte, X860e, X862e, X864e
021xxx
X642e, X644e, X646e, X646ef, X646dte, X782e, X782e XL, X850e, X854e,X940e, X945e
012xxx
T656dne 121xxx
Ricoh MFPs and printers SafeCom GoRicoh (*.b87, *.uin)
SP C320DN, SP C430DN, SP C431DN 150xxx
MP C300, MP C400,MP C2051,MP C2551,MP C3001SP, MP C3501SP,MP C4501SP, MP C5501SP, MP C6501SP, MP C7501SP
147xxx
272
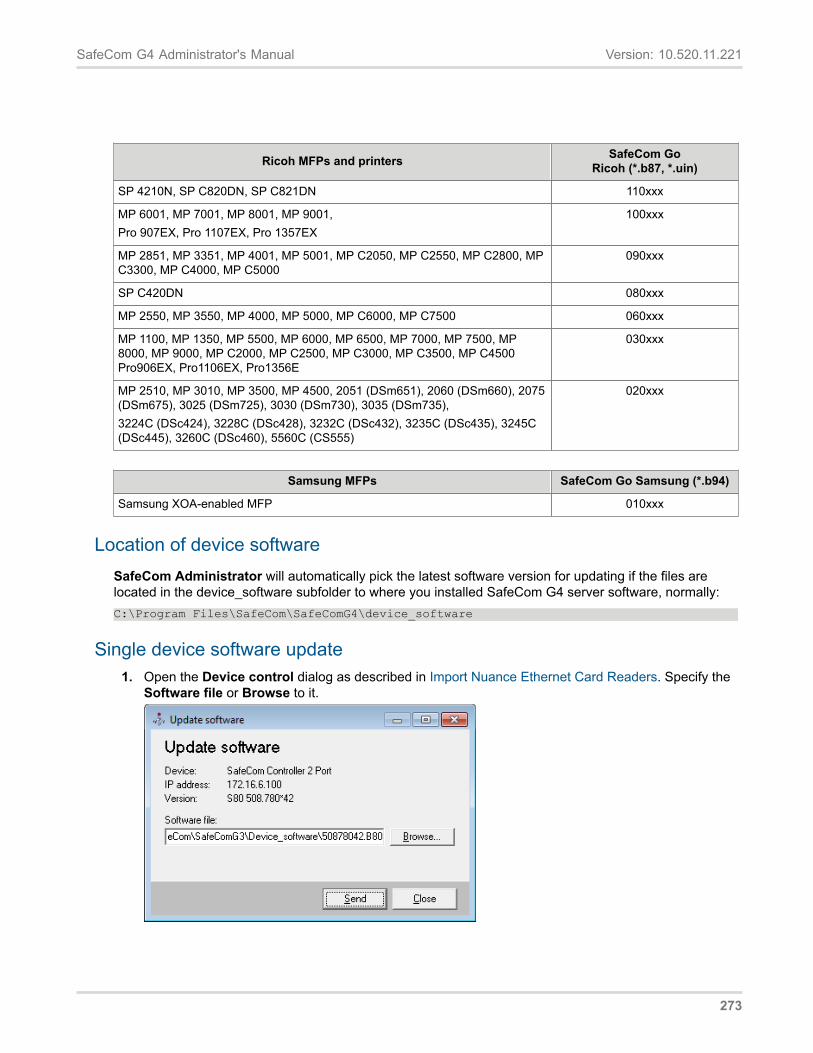
SafeCom G4 Administrator's Manual Version: 10.520.11.221
Ricoh MFPs and printers SafeCom GoRicoh (*.b87, *.uin)
SP 4210N, SP C820DN, SP C821DN 110xxx
MP 6001, MP 7001, MP 8001, MP 9001,Pro 907EX, Pro 1107EX, Pro 1357EX
100xxx
MP 2851, MP 3351, MP 4001, MP 5001, MP C2050, MP C2550, MP C2800, MPC3300, MP C4000, MP C5000
090xxx
SP C420DN 080xxx
MP 2550, MP 3550, MP 4000, MP 5000, MP C6000, MP C7500 060xxx
MP 1100, MP 1350, MP 5500, MP 6000, MP 6500, MP 7000, MP 7500, MP8000, MP 9000, MP C2000, MP C2500, MP C3000, MP C3500, MP C4500Pro906EX, Pro1106EX, Pro1356E
030xxx
MP 2510, MP 3010, MP 3500, MP 4500, 2051 (DSm651), 2060 (DSm660), 2075(DSm675), 3025 (DSm725), 3030 (DSm730), 3035 (DSm735),3224C (DSc424), 3228C (DSc428), 3232C (DSc432), 3235C (DSc435), 3245C(DSc445), 3260C (DSc460), 5560C (CS555)
020xxx
Samsung MFPs SafeCom Go Samsung (*.b94)
Samsung XOA-enabled MFP 010xxx
Location of device softwareSafeCom Administrator will automatically pick the latest software version for updating if the files arelocated in the device_software subfolder to where you installed SafeCom G4 server software, normally:C:\Program Files\SafeCom\SafeComG4\device_software
Single device software update1. Open the Device control dialog as described in Import Nuance Ethernet Card Readers. Specify the
Software file or Browse to it.
273
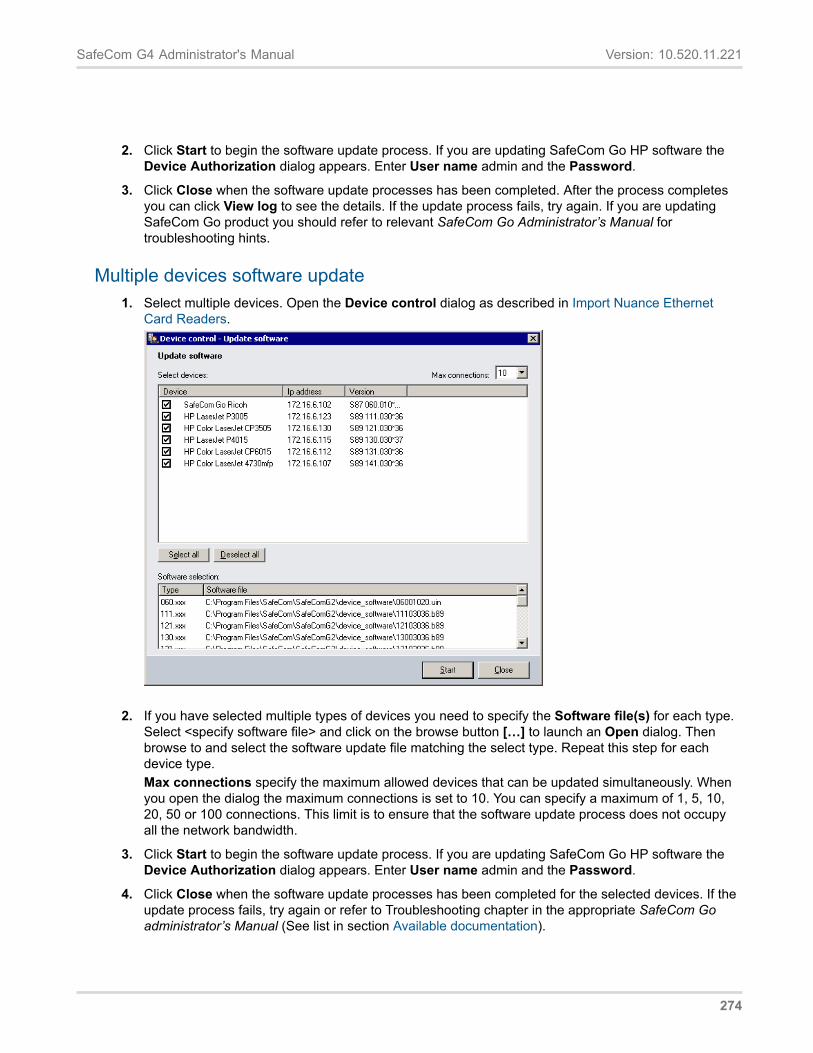
SafeCom G4 Administrator's Manual Version: 10.520.11.221
2. Click Start to begin the software update process. If you are updating SafeCom Go HP software theDevice Authorization dialog appears. Enter User name admin and the Password.
3. Click Close when the software update processes has been completed. After the process completesyou can click View log to see the details. If the update process fails, try again. If you are updatingSafeCom Go product you should refer to relevant SafeCom Go Administrator’s Manual fortroubleshooting hints.
Multiple devices software update1. Select multiple devices. Open the Device control dialog as described in Import Nuance Ethernet
Card Readers.
2. If you have selected multiple types of devices you need to specify the Software file(s) for each type.Select <specify software file> and click on the browse button […] to launch an Open dialog. Thenbrowse to and select the software update file matching the select type. Repeat this step for eachdevice type.Max connections specify the maximum allowed devices that can be updated simultaneously. Whenyou open the dialog the maximum connections is set to 10. You can specify a maximum of 1, 5, 10,20, 50 or 100 connections. This limit is to ensure that the software update process does not occupyall the network bandwidth.
3. Click Start to begin the software update process. If you are updating SafeCom Go HP software theDevice Authorization dialog appears. Enter User name admin and the Password.
4. Click Close when the software update processes has been completed for the selected devices. If theupdate process fails, try again or refer to Troubleshooting chapter in the appropriate SafeCom Goadministrator’s Manual (See list in section Available documentation).
274
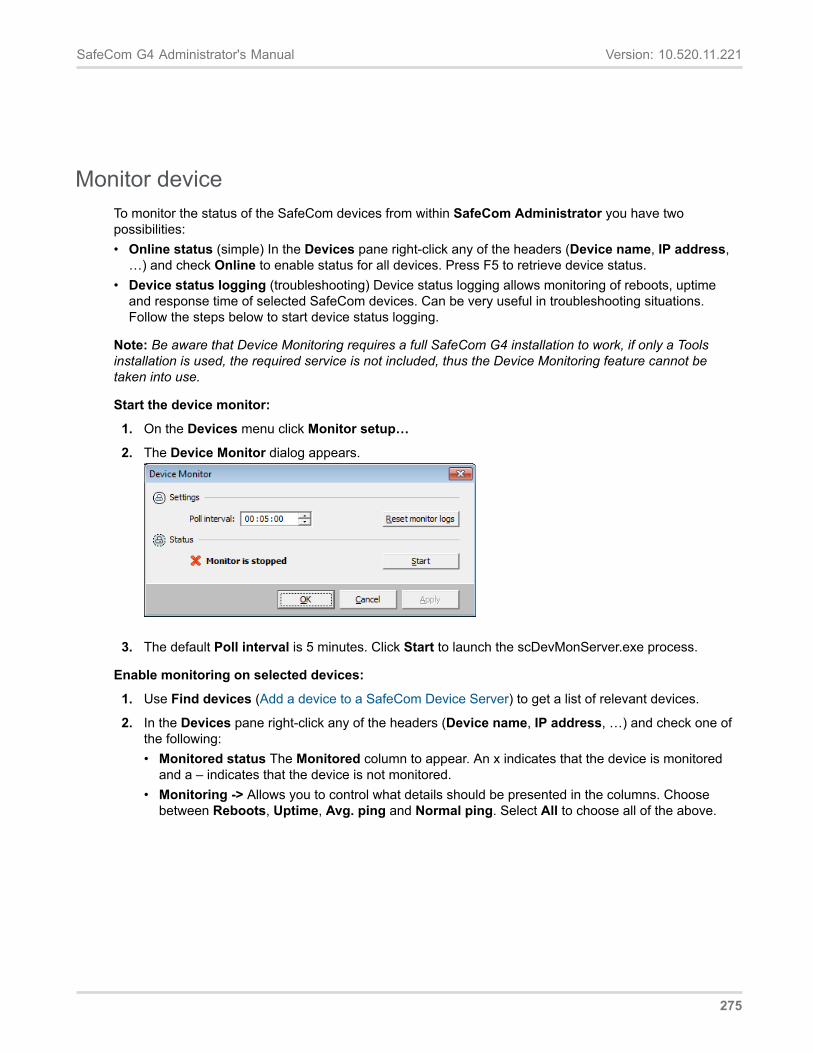
SafeCom G4 Administrator's Manual Version: 10.520.11.221
Monitor deviceTo monitor the status of the SafeCom devices from within SafeCom Administrator you have twopossibilities:• Online status (simple) In the Devices pane right-click any of the headers (Device name, IP address,
…) and check Online to enable status for all devices. Press F5 to retrieve device status.• Device status logging (troubleshooting) Device status logging allows monitoring of reboots, uptime
and response time of selected SafeCom devices. Can be very useful in troubleshooting situations.Follow the steps below to start device status logging.
Note: Be aware that Device Monitoring requires a full SafeCom G4 installation to work, if only a Toolsinstallation is used, the required service is not included, thus the Device Monitoring feature cannot betaken into use.
Start the device monitor:
1. On the Devices menu click Monitor setup…
2. The Device Monitor dialog appears.
3. The default Poll interval is 5 minutes. Click Start to launch the scDevMonServer.exe process.
Enable monitoring on selected devices:
1. Use Find devices (Add a device to a SafeCom Device Server) to get a list of relevant devices.
2. In the Devices pane right-click any of the headers (Device name, IP address, …) and check one ofthe following:• Monitored status The Monitored column to appear. An x indicates that the device is monitored
and a – indicates that the device is not monitored.• Monitoring -> Allows you to control what details should be presented in the columns. Choose
between Reboots, Uptime, Avg. ping and Normal ping. Select All to choose all of the above.
275

SafeCom G4 Administrator's Manual Version: 10.520.11.221
3. Right-click a device and click Monitor device.
Look at device statistics1. Open the Device properties dialog.
2. Click on the Statistics tab. The statistics tab is not presented if you have opened multiple devices.
3. A textual representation of the statistics is shown.
276
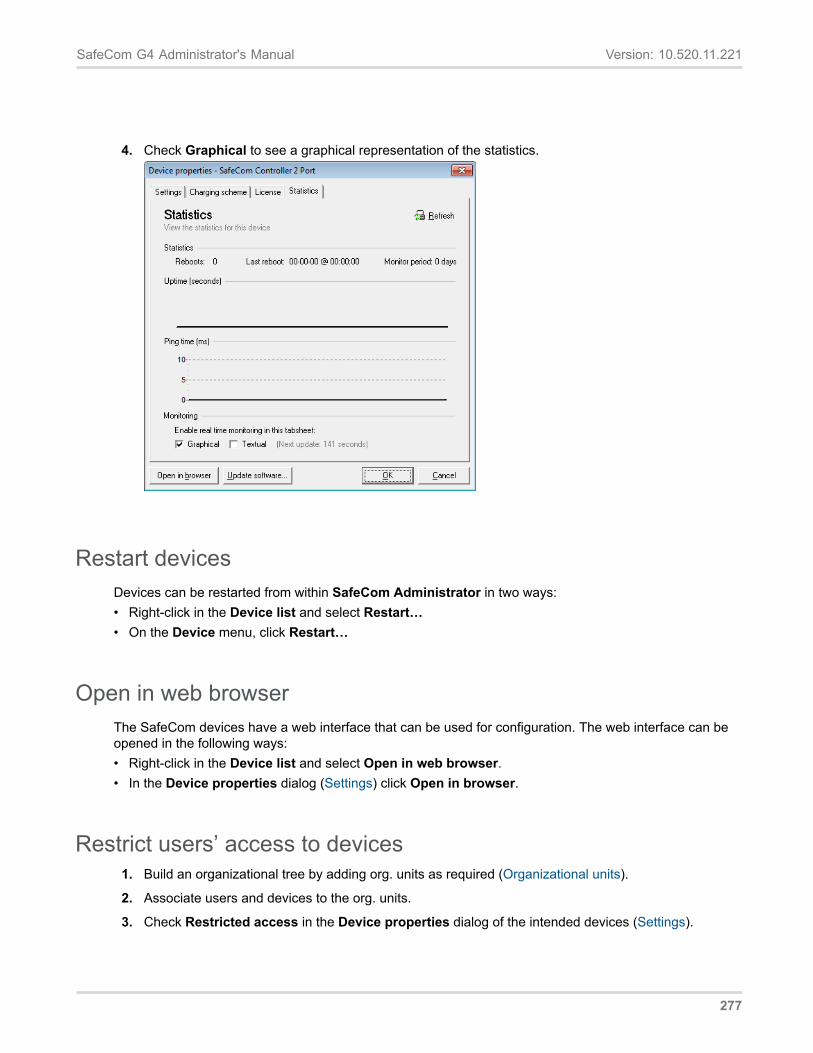
SafeCom G4 Administrator's Manual Version: 10.520.11.221
4. Check Graphical to see a graphical representation of the statistics.
Restart devicesDevices can be restarted from within SafeCom Administrator in two ways:• Right-click in the Device list and select Restart…• On the Device menu, click Restart…
Open in web browserThe SafeCom devices have a web interface that can be used for configuration. The web interface can beopened in the following ways:• Right-click in the Device list and select Open in web browser.• In the Device properties dialog (Settings) click Open in browser.
Restrict users’ access to devices1. Build an organizational tree by adding org. units as required (Organizational units).
2. Associate users and devices to the org. units.
3. Check Restricted access in the Device properties dialog of the intended devices (Settings).
277
SafeCom G4 Administrator's Manual Version: 10.520.11.221
DHCP serverYou can assign a fixed IP address in the DHCP server. If you know the MAC address you can log in tothe DHCP server to determine which IP address has been assigned. The MAC address of the SafeComController is printed on the white label on the bottom of the SafeCom Controller. The MAC address is a12-digit hexadecimal number.
Example: 00C076FF00F2
Shorten job names in document listRedundant text such as Microsoft Word, Microsoft Excel and http:// can be excluded from the job namethat appear in the Document list in the SafeCom Front-end (available as the first action after you clickMORE...) and in the device’s control panel if SafeCom Go is used.
The text to exclude is controlled by the ExcludeJobNames.txt file located in the %SafeCom%\Templates folder. The %SafeCom% indicates the SafeCom installation folder, normally:
C:\Program Files\ SafeCom\SafeComG4
1. Copy the ExcludeJobNames.txt file from the %SafeCom%\Templates folder to the %SafeCom%folder.
2. Modify the ExcludeJobNames.txt file in the %SafeCom% folder to match your requirements.
3. Restart the SafeCom Service (How to start and stop the SafeCom Service).
Note: Subsequent modifications to the file in the %SafeCom% folder will take immediate effect.
ExcludeJobNames.txt;--------------------------------------------------; This file specifies text to be excluded from ; job names in the SafeCom Front-end.; ; Text is excluded if appearing as the first part; of the job name.;; (c) 2003 SafeCom A/S;--------------------------------------------------Version="1"Item="Microsoft Word - "Item="Microsoft Excel - "Item="http://"
278
Chapter 9
SafeCom Tracking
IntroductionThe SafeCom Tracking makes it possible to track print and MFP usage and costs on a per device anduser basis.
You can use SafeCom Reports (SafeCom Reports) to view tracking data and generate reports.
Pull print trackingPull print tracking makes it possible to track print costs on SafeCom Pull printers. Tracking is performed bythe special port monitor SafeCom Pull Port.
The Pull print tracking process:
1. The SafeCom Pull Port analyzes the document in regards to number of pages, paper size, andpossible use of color and duplex.
2. The SafeCom Pull Port transfers the document and the resulting tracking data to the SafeComserver. The document remains on the SafeCom server until the user collects it. Documents that arenot collected are automatically deleted after a configurable time.
3. When the user collects the document the price is calculated based on the charging scheme of theselected device. If Post track (Post track) is enabled the tracking data can be adjusted according tothe information that is available from the device at print time.
Push print trackingPush print tracking makes it possible to track print costs without installing dedicated SafeCom hardware.Push print tracking requires the use of the special port monitor SafeCom Push Port.
The Push print tracking process:
1. The SafeCom Push Port analyzes the document with regards to number of pages, paper size, useof color and duplex.
279
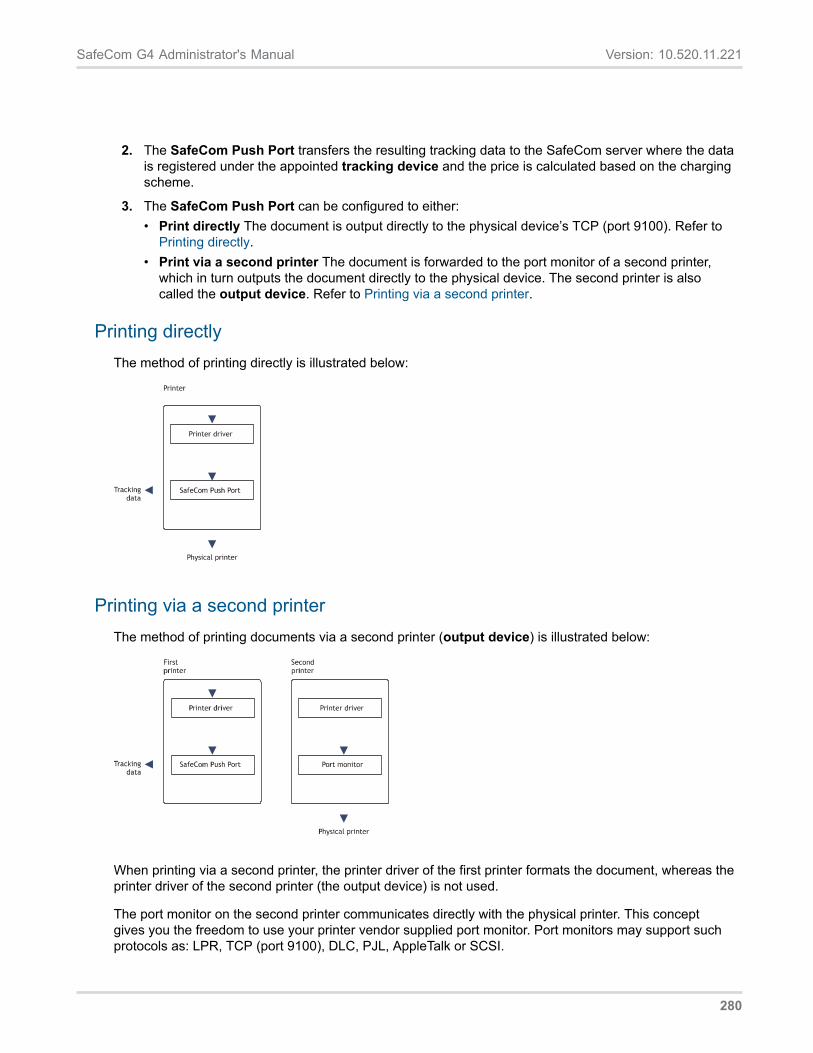
SafeCom G4 Administrator's Manual Version: 10.520.11.221
2. The SafeCom Push Port transfers the resulting tracking data to the SafeCom server where the datais registered under the appointed tracking device and the price is calculated based on the chargingscheme.
3. The SafeCom Push Port can be configured to either:• Print directly The document is output directly to the physical device’s TCP (port 9100). Refer to
Printing directly.• Print via a second printer The document is forwarded to the port monitor of a second printer,
which in turn outputs the document directly to the physical device. The second printer is alsocalled the output device. Refer to Printing via a second printer.
Printing directlyThe method of printing directly is illustrated below:
Printing via a second printerThe method of printing documents via a second printer (output device) is illustrated below:
When printing via a second printer, the printer driver of the first printer formats the document, whereas theprinter driver of the second printer (the output device) is not used.
The port monitor on the second printer communicates directly with the physical printer. This conceptgives you the freedom to use your printer vendor supplied port monitor. Port monitors may support suchprotocols as: LPR, TCP (port 9100), DLC, PJL, AppleTalk or SCSI.
280
SafeCom G4 Administrator's Manual Version: 10.520.11.221
Only the first printer should be shared. Sharing the secondary printer will enable users to print and bypasstracking.
Note: There must be one instance of the SafeCom Push Port per physical printer on each machine.
Add a secondary printer (output service)As explained above the SafeCom Push print concept involves two print queues, print directly, or print viasecondary printer.
In the following it is described how to add a secondary printer (output service).
1. Open the Windows Control panel and browse to printers.
2. Open the Add Printer wizard.
3. Click Add a local printer.
4. Choose an existing port that is used to connect to the printer. Click Next.
5. Click Have Disk and browse to install the files from the printer manufacturer's installation disk (ordownloaded the files from the manufacturer's web site). Click OK.
6. Click Next.
7. Enter a Printer Name. Click Next.
8. Select Do not share this printer. Click Next.Note: Do not make this printer your default Windows printer.
9. Click Print a test page to verify the system. Click OK when prompted to confirm that the test pageprinted correctly. Click Finish.
Add the first printer (SafeCom Push Port)If you are printing directly via TCP/IP port 9100, follow these steps to add the first printer (SafeCom Pushport).
1. Open the Windows Control Panel and browse to Printers.
2. Open the Add Printer Wizard.
3. Click Add a local printer.
281
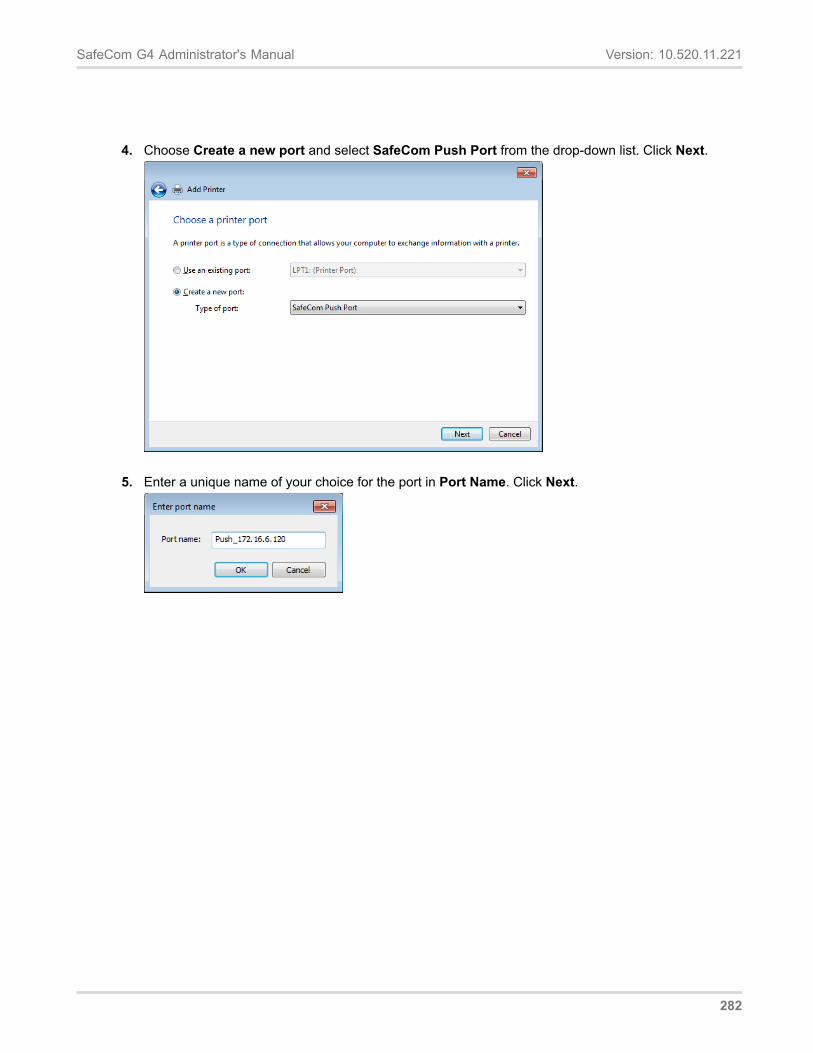
SafeCom G4 Administrator's Manual Version: 10.520.11.221
4. Choose Create a new port and select SafeCom Push Port from the drop-down list. Click Next.
5. Enter a unique name of your choice for the port in Port Name. Click Next.
282
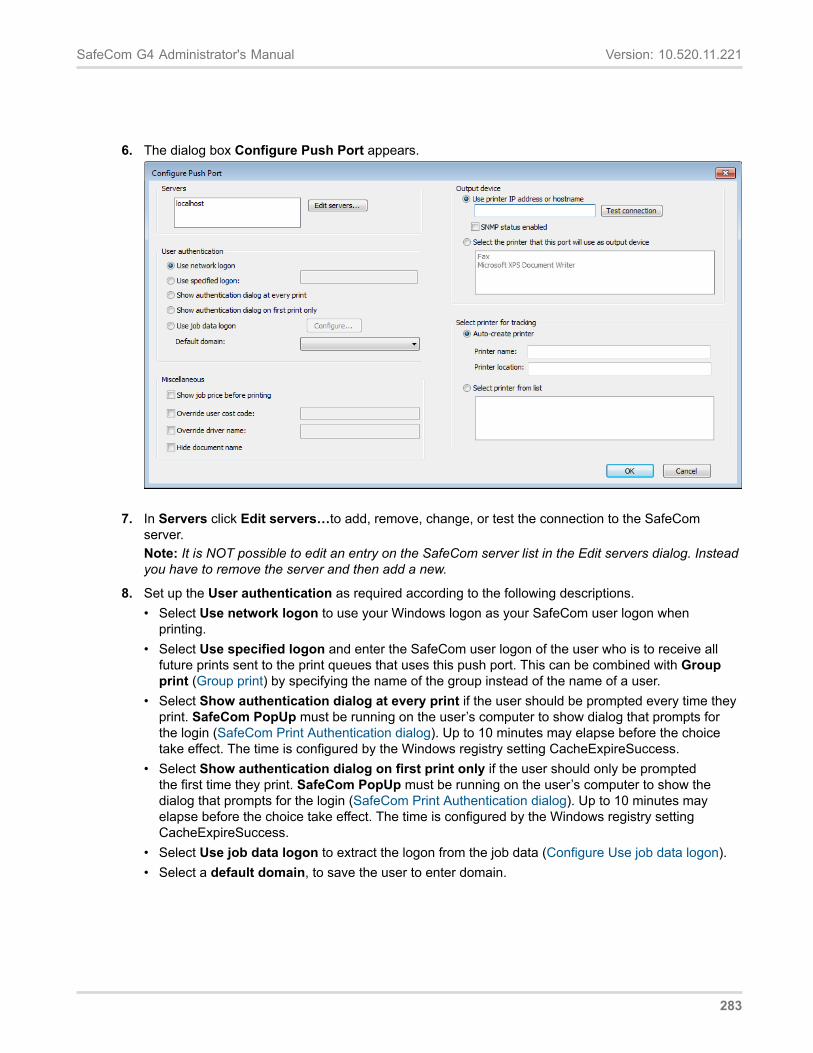
SafeCom G4 Administrator's Manual Version: 10.520.11.221
6. The dialog box Configure Push Port appears.
7. In Servers click Edit servers…to add, remove, change, or test the connection to the SafeComserver.Note: It is NOT possible to edit an entry on the SafeCom server list in the Edit servers dialog. Insteadyou have to remove the server and then add a new.
8. Set up the User authentication as required according to the following descriptions.• Select Use network logon to use your Windows logon as your SafeCom user logon when
printing.• Select Use specified logon and enter the SafeCom user logon of the user who is to receive all
future prints sent to the print queues that uses this push port. This can be combined with Groupprint (Group print) by specifying the name of the group instead of the name of a user.
• Select Show authentication dialog at every print if the user should be prompted every time theyprint. SafeCom PopUp must be running on the user’s computer to show dialog that prompts forthe login (SafeCom Print Authentication dialog). Up to 10 minutes may elapse before the choicetake effect. The time is configured by the Windows registry setting CacheExpireSuccess.
• Select Show authentication dialog on first print only if the user should only be promptedthe first time they print. SafeCom PopUp must be running on the user’s computer to show thedialog that prompts for the login (SafeCom Print Authentication dialog). Up to 10 minutes mayelapse before the choice take effect. The time is configured by the Windows registry settingCacheExpireSuccess.
• Select Use job data logon to extract the logon from the job data (Configure Use job data logon).• Select a default domain, to save the user to enter domain.
283
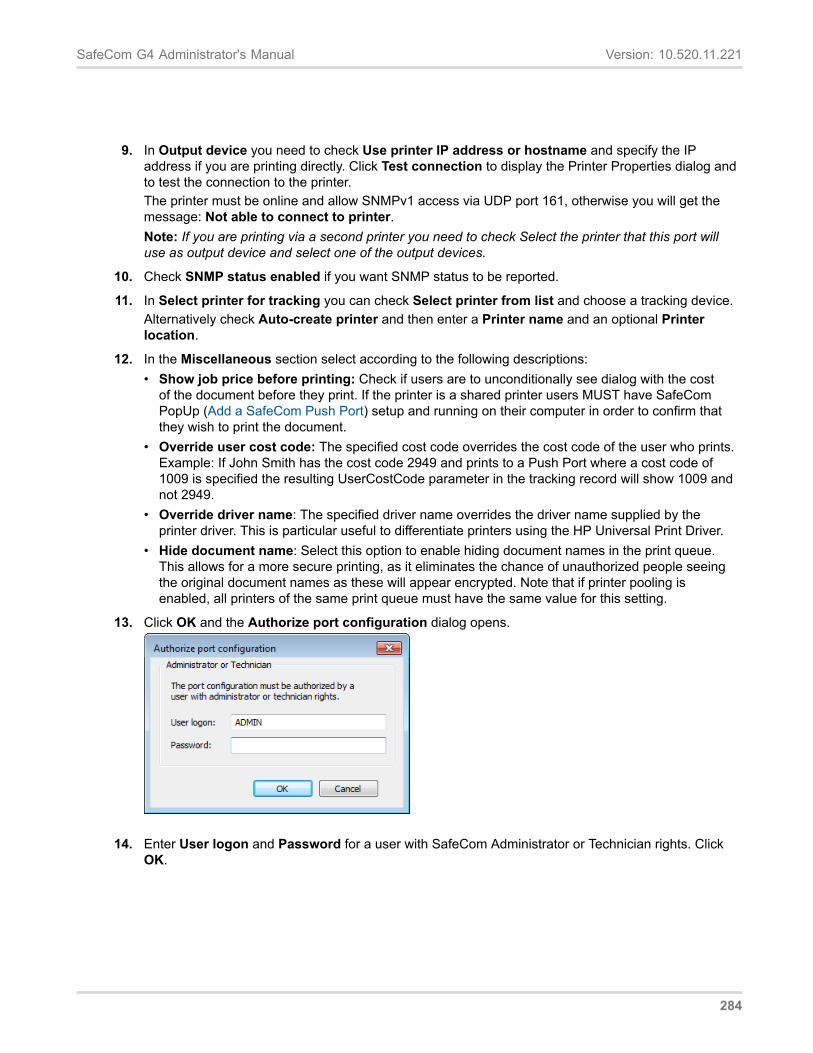
SafeCom G4 Administrator's Manual Version: 10.520.11.221
9. In Output device you need to check Use printer IP address or hostname and specify the IPaddress if you are printing directly. Click Test connection to display the Printer Properties dialog andto test the connection to the printer.The printer must be online and allow SNMPv1 access via UDP port 161, otherwise you will get themessage: Not able to connect to printer.Note: If you are printing via a second printer you need to check Select the printer that this port willuse as output device and select one of the output devices.
10. Check SNMP status enabled if you want SNMP status to be reported.
11. In Select printer for tracking you can check Select printer from list and choose a tracking device.Alternatively check Auto-create printer and then enter a Printer name and an optional Printerlocation.
12. In the Miscellaneous section select according to the following descriptions:• Show job price before printing: Check if users are to unconditionally see dialog with the cost
of the document before they print. If the printer is a shared printer users MUST have SafeComPopUp (Add a SafeCom Push Port) setup and running on their computer in order to confirm thatthey wish to print the document.
• Override user cost code: The specified cost code overrides the cost code of the user who prints.Example: If John Smith has the cost code 2949 and prints to a Push Port where a cost code of1009 is specified the resulting UserCostCode parameter in the tracking record will show 1009 andnot 2949.
• Override driver name: The specified driver name overrides the driver name supplied by theprinter driver. This is particular useful to differentiate printers using the HP Universal Print Driver.
• Hide document name: Select this option to enable hiding document names in the print queue.This allows for a more secure printing, as it eliminates the chance of unauthorized people seeingthe original document names as these will appear encrypted. Note that if printer pooling isenabled, all printers of the same print queue must have the same value for this setting.
13. Click OK and the Authorize port configuration dialog opens.
14. Enter User logon and Password for a user with SafeCom Administrator or Technician rights. ClickOK.
284
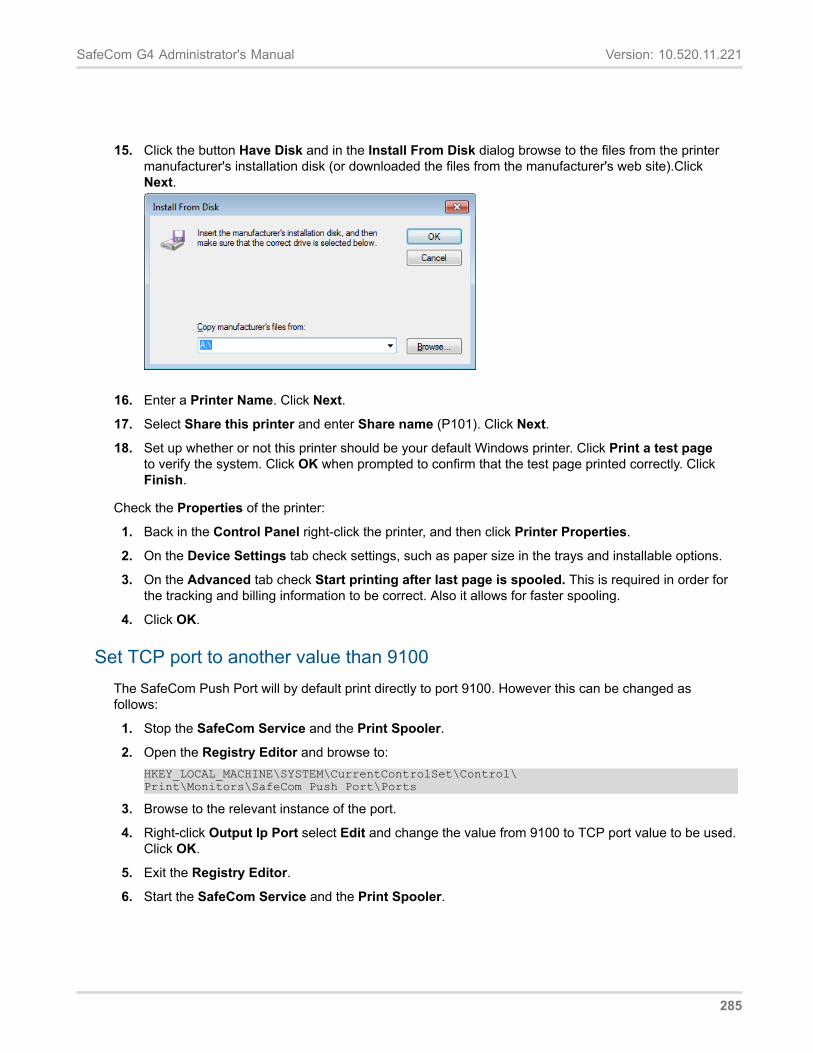
SafeCom G4 Administrator's Manual Version: 10.520.11.221
15. Click the button Have Disk and in the Install From Disk dialog browse to the files from the printermanufacturer's installation disk (or downloaded the files from the manufacturer's web site).ClickNext.
16. Enter a Printer Name. Click Next.
17. Select Share this printer and enter Share name (P101). Click Next.
18. Set up whether or not this printer should be your default Windows printer. Click Print a test pageto verify the system. Click OK when prompted to confirm that the test page printed correctly. ClickFinish.
Check the Properties of the printer:
1. Back in the Control Panel right-click the printer, and then click Printer Properties.
2. On the Device Settings tab check settings, such as paper size in the trays and installable options.
3. On the Advanced tab check Start printing after last page is spooled. This is required in order forthe tracking and billing information to be correct. Also it allows for faster spooling.
4. Click OK.
Set TCP port to another value than 9100The SafeCom Push Port will by default print directly to port 9100. However this can be changed asfollows:
1. Stop the SafeCom Service and the Print Spooler.
2. Open the Registry Editor and browse to:HKEY_LOCAL_MACHINE\SYSTEM\CurrentControlSet\Control\Print\Monitors\SafeCom Push Port\Ports
3. Browse to the relevant instance of the port.
4. Right-click Output Ip Port select Edit and change the value from 9100 to TCP port value to be used.Click OK.
5. Exit the Registry Editor.
6. Start the SafeCom Service and the Print Spooler.
285
SafeCom G4 Administrator's Manual Version: 10.520.11.221
Allow printing at all timesThe port monitors will allow print on server error by default. The behavior can be controlled via theRegistry Editor.
It is possible to create and specify an overall AllowPrintOnServerError setting for the SafeCom Push Port.A setting like this will also prevent dropping of print jobs in case the SafeCom Push Port is referencing anon-existing tracking device.
1. Stop the SafeCom Service and the Print Spooler.
2. Open the Registry Editor and browse to: HKEY_LOCAL_MACHINE\SYSTEM\CurrentControlSet\Control\ Print\Monitors\SafeCom Push Port\Ports
3. Create a new DWORD named AllowPrintOnServerError. It can take any of the following values:• 0: Do not print on server error.• 1: Allow print on server error (Default).
4. Exit the Registry Editor.
5. Start the SafeCom Service and the Print Spooler.
The overall AllowPrintOnServerError setting takes effect, when local PrintOnJdbError for the SafeComPush Port has a value of 2.
Follow these steps to change the port specific PrintOnJdbError setting:
1. Stop the SafeCom Service and the Print Spooler.
2. Open the Registry Editor and browse to:HKEY_LOCAL_MACHINE\SYSTEM\CurrentControlSet\Control\ Print\Monitors\SafeCom Push Port\Ports\<port>
• 0: Do not print on server error.• 1: Allow print on server error.• 2: Use the overall setting AllowPrintOnServerError (Default).
3. Browse to the relevant instance of the port.
4. Right-click PrintOnJdbError select Edit and change the value. Click OK.
5. Exit the Registry Editor.
6. Start the SafeCom Service and the Print Spooler.
SafeCom Port ConfiguratorSafeCom Port Configurator is a wizard-based tool for converting existing TCP/IP27 printers to SafeComPush printers and revert SafeCom Push printers back to their original TCP/IP settings. The tool allowsviewing of printers in the domain and easy launch of the Port configuration dialog for TCP/IP, Push and
27 A TCP/IP printer is a Windows print queue that uses the Standard TCP/IP port monitor.
286
SafeCom G4 Administrator's Manual Version: 10.520.11.221
Pull printers. Selected settings in the scPortConfigurator.ini file (scPortConfigurator.ini) can be edited tocustomize the behavior of SafeCom Port Configurator.
This chapter includes:• Install SafeCom Port Configurator (Install SafeCom Port Configurator)• Start SafeCom Port Configurator (Start SafeCom Port Configurator)• Add server (Add server)• Convert to Push (Convert to Push)• Restore to TCP/IP (Restore to TCP/IP)• List and repair printers (List and repair printers)• Read servers from file (Read servers from file)• scPortConfigurator.ini (scPortConfigurator.ini)• Troubleshooting (Troubleshooting)
Install SafeCom Port ConfiguratorSafeCom Port Configurator can be installed in the following two ways:• Server installation It is always installed as part of a Server installation (Server installation (Basic)).• Tools installation Optional when doing a Tools installation by checking SafeCom Port Configurator.
If you intend to make a Client and Tools installation on the same computer, you should make theClient installation (Client installation) first.
The SafeCom installation files are copied to the SafeCom installation folder.
The default is:
C:\Program Files\SafeCom\SafeComG4
Start SafeCom Port ConfiguratorThe SafeCom Port Configurator enables you to:• Convert to Push (Convert to Push) Convert existing TCP/IP printers to SafeCom Push, allowing
SafeCom Tracking and SafeCom Rule Based Printing.• Restore to TCP/IP (Restore to TCP/IP) Restore printers converted to SafeCom Push back to their
original TCP/IP settings.• List and Repair Printers (List and repair printers) List printers in the domain and reconfigure these.
To start the SafeCom Port Configurator:
1. Click Start, point to All Programs, click SafeCom G4, and then SafeCom Port Configurator.Alternatively click scPortConfigurator.exe if a separate installation (Install SafeCom PortConfigurator) was performed.
287
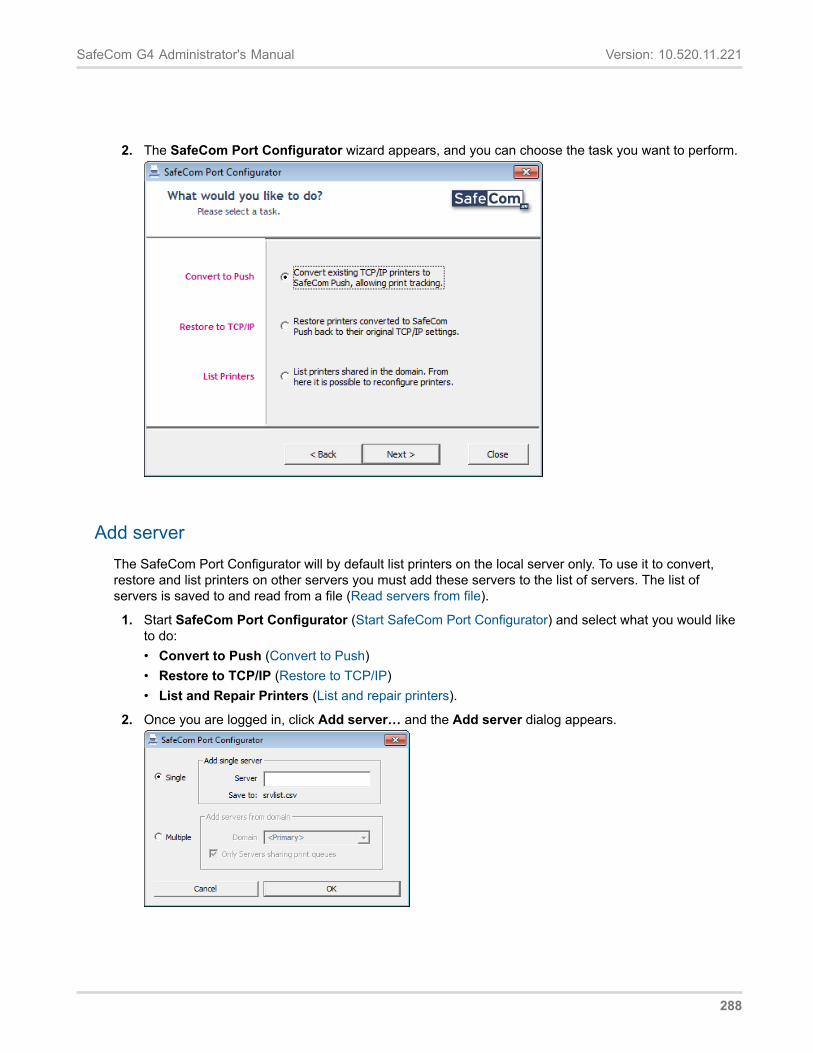
SafeCom G4 Administrator's Manual Version: 10.520.11.221
2. The SafeCom Port Configurator wizard appears, and you can choose the task you want to perform.
Add serverThe SafeCom Port Configurator will by default list printers on the local server only. To use it to convert,restore and list printers on other servers you must add these servers to the list of servers. The list ofservers is saved to and read from a file (Read servers from file).
1. Start SafeCom Port Configurator (Start SafeCom Port Configurator) and select what you would liketo do:• Convert to Push (Convert to Push)• Restore to TCP/IP (Restore to TCP/IP)• List and Repair Printers (List and repair printers).
2. Once you are logged in, click Add server… and the Add server dialog appears.
288

SafeCom G4 Administrator's Manual Version: 10.520.11.221
3. To add just one server select Single, enter the Server (Host name or IP address). Click OK.Note: If the server is clustered you MUST reference the Virtual Server.
4. To add multiple servers select Multiple, then select the Domain. Click OK.
Once a server has been added it is stored in a file. In section scPortConfigurator.ini it is covered how youcan customize behavioral settings of SafeCom Port Configurator.
If you wish to remove a server open the file and remove the row containing the server(s) in question(Read servers from file).
Convert to PushTo convert existing TCP/IP printers to SafeCom Push:
1. Start SafeCom Port Configurator(Start SafeCom Port Configurator)
2. Check Convert to Push. Click Next.
289
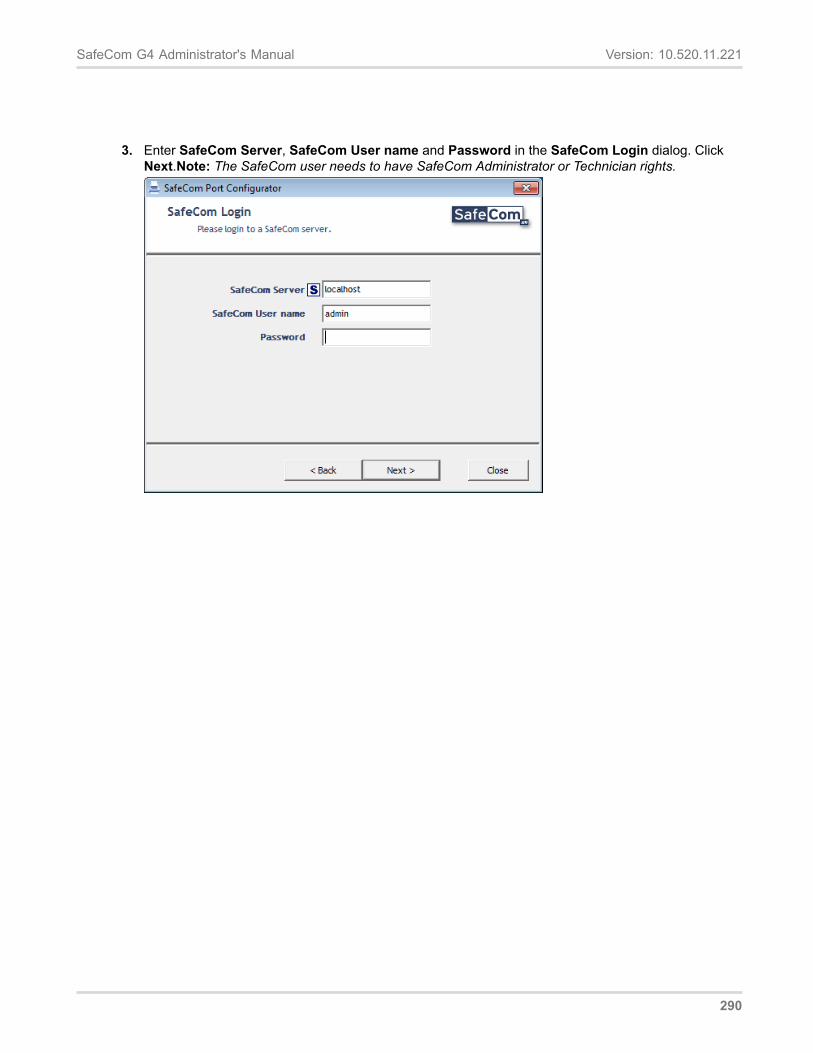
SafeCom G4 Administrator's Manual Version: 10.520.11.221
3. Enter SafeCom Server, SafeCom User name and Password in the SafeCom Login dialog. ClickNext.Note: The SafeCom user needs to have SafeCom Administrator or Technician rights.
290
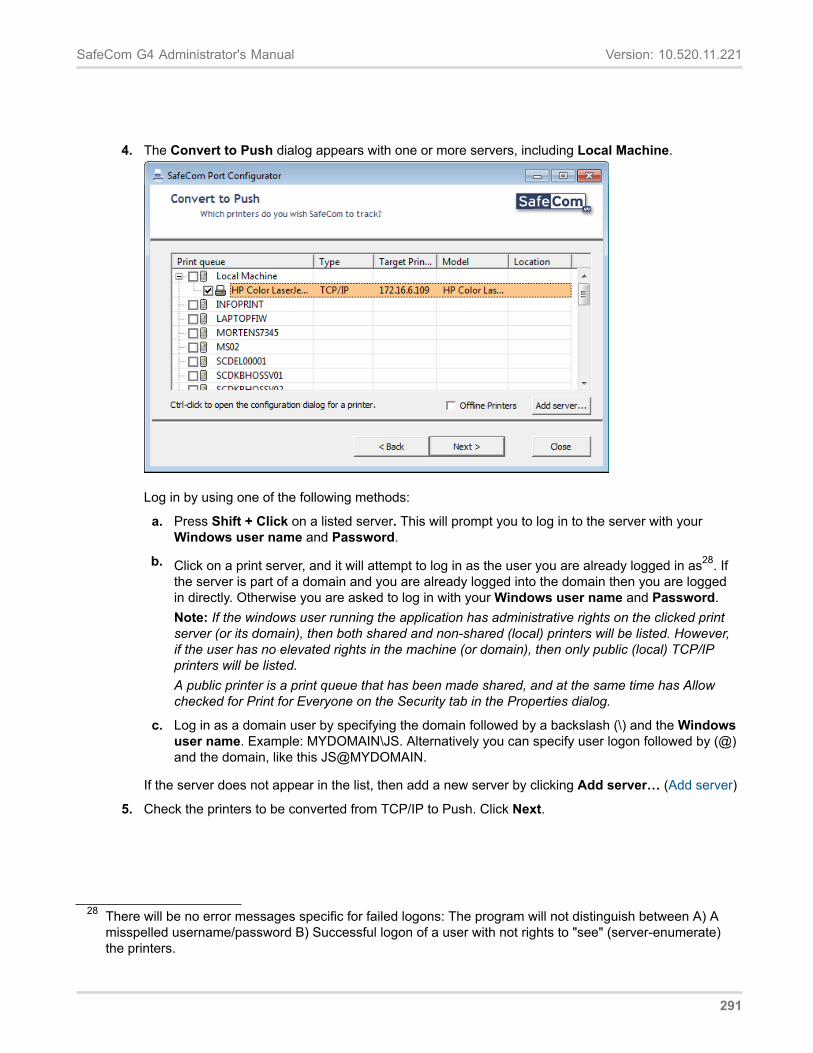
SafeCom G4 Administrator's Manual Version: 10.520.11.221
4. The Convert to Push dialog appears with one or more servers, including Local Machine.
Log in by using one of the following methods:
a. Press Shift + Click on a listed server. This will prompt you to log in to the server with yourWindows user name and Password.
b. Click on a print server, and it will attempt to log in as the user you are already logged in as28. Ifthe server is part of a domain and you are already logged into the domain then you are loggedin directly. Otherwise you are asked to log in with your Windows user name and Password.Note: If the windows user running the application has administrative rights on the clicked printserver (or its domain), then both shared and non-shared (local) printers will be listed. However,if the user has no elevated rights in the machine (or domain), then only public (local) TCP/IPprinters will be listed.A public printer is a print queue that has been made shared, and at the same time has Allowchecked for Print for Everyone on the Security tab in the Properties dialog.
c. Log in as a domain user by specifying the domain followed by a backslash (\) and the Windowsuser name. Example: MYDOMAIN\JS. Alternatively you can specify user logon followed by (@)and the domain, like this JS@MYDOMAIN.
If the server does not appear in the list, then add a new server by clicking Add server… (Add server)
5. Check the printers to be converted from TCP/IP to Push. Click Next.
28 There will be no error messages specific for failed logons: The program will not distinguish between A) Amisspelled username/password B) Successful logon of a user with not rights to "see" (server-enumerate)the printers.
291
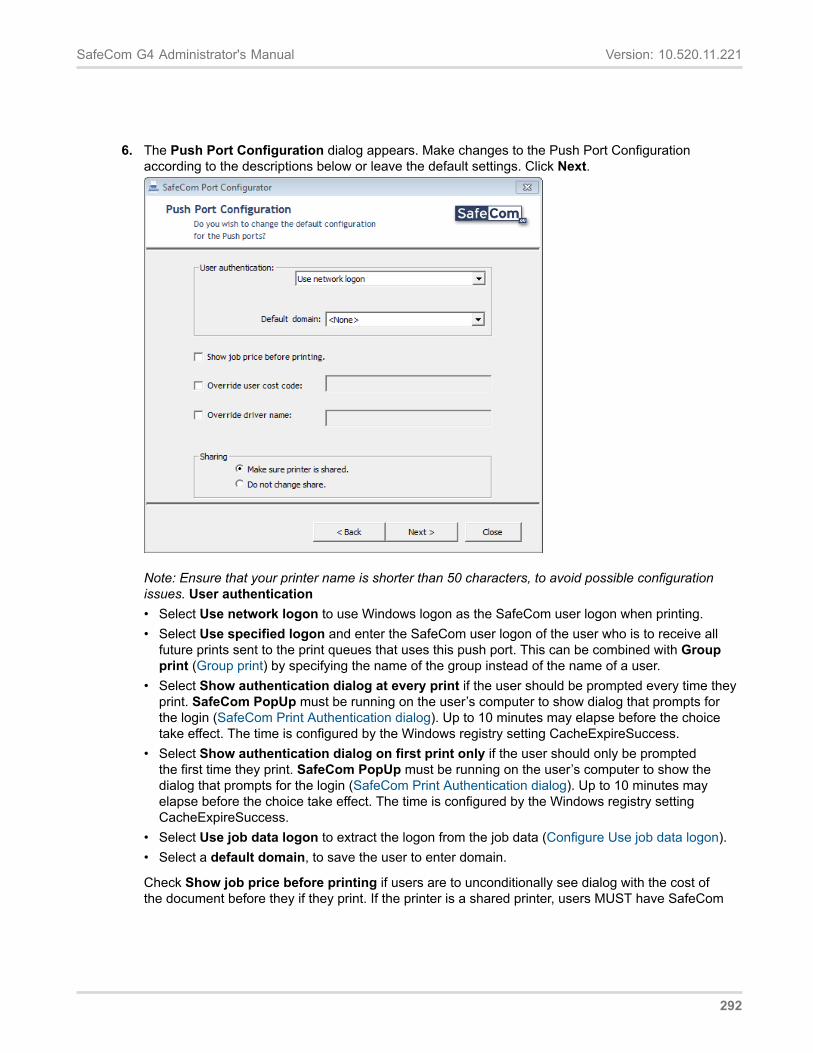
SafeCom G4 Administrator's Manual Version: 10.520.11.221
6. The Push Port Configuration dialog appears. Make changes to the Push Port Configurationaccording to the descriptions below or leave the default settings. Click Next.
Note: Ensure that your printer name is shorter than 50 characters, to avoid possible configurationissues. User authentication• Select Use network logon to use Windows logon as the SafeCom user logon when printing.• Select Use specified logon and enter the SafeCom user logon of the user who is to receive all
future prints sent to the print queues that uses this push port. This can be combined with Groupprint (Group print) by specifying the name of the group instead of the name of a user.
• Select Show authentication dialog at every print if the user should be prompted every time theyprint. SafeCom PopUp must be running on the user’s computer to show dialog that prompts forthe login (SafeCom Print Authentication dialog). Up to 10 minutes may elapse before the choicetake effect. The time is configured by the Windows registry setting CacheExpireSuccess.
• Select Show authentication dialog on first print only if the user should only be promptedthe first time they print. SafeCom PopUp must be running on the user’s computer to show thedialog that prompts for the login (SafeCom Print Authentication dialog). Up to 10 minutes mayelapse before the choice take effect. The time is configured by the Windows registry settingCacheExpireSuccess.
• Select Use job data logon to extract the logon from the job data (Configure Use job data logon).• Select a default domain, to save the user to enter domain.
Check Show job price before printing if users are to unconditionally see dialog with the cost ofthe document before they if they print. If the printer is a shared printer, users MUST have SafeCom
292

SafeCom G4 Administrator's Manual Version: 10.520.11.221
PopUp (SafeCom PopUp – scPopUp.exe) set up and running on their computer in order to be able toconfirm that they wish to print the document.Check Override user cost code and enter the cost code to have the specified cost code overridethe cost code of the user who prints. Example: If John Smith has the cost code 2949 and prints toa Push Port where a cost code of 1009 is specified the resulting UserCostCode parameter in thetracking record will show 1009 and not 2949.Check Override driver name and enter the driver name to have the specified driver name overridethe driver name supplied by the printer driver. This is particular useful to differentiate printers usingthe HP Universal Print Driver.In Sharing you can check Make sure printer is shared (default) or check Do not change share toleave it as is.
7. One of the following two dialogs will open:• Printer not registered in SafeCom server (default)Create a tracking device in the SafeCom
server.• Printer already registered in SafeCom server A tracking device with a matching MAC address
is already registered in the SafeCom server and it is suggested to use that.
Make your choices. Click Next.Both dialogs are described in detail in the following:• The Printer not registered in SafeCom server dialog:
• Check Create in SafeCom, a new device to track this printer if your SafeCom solution isPush Print solution only.
• Check Skip reconfiguring the print queue for this printer if your SafeCom solution includesPull Print and you wish to add the printer as a Pull Printer to the SafeCom solution first. This
293
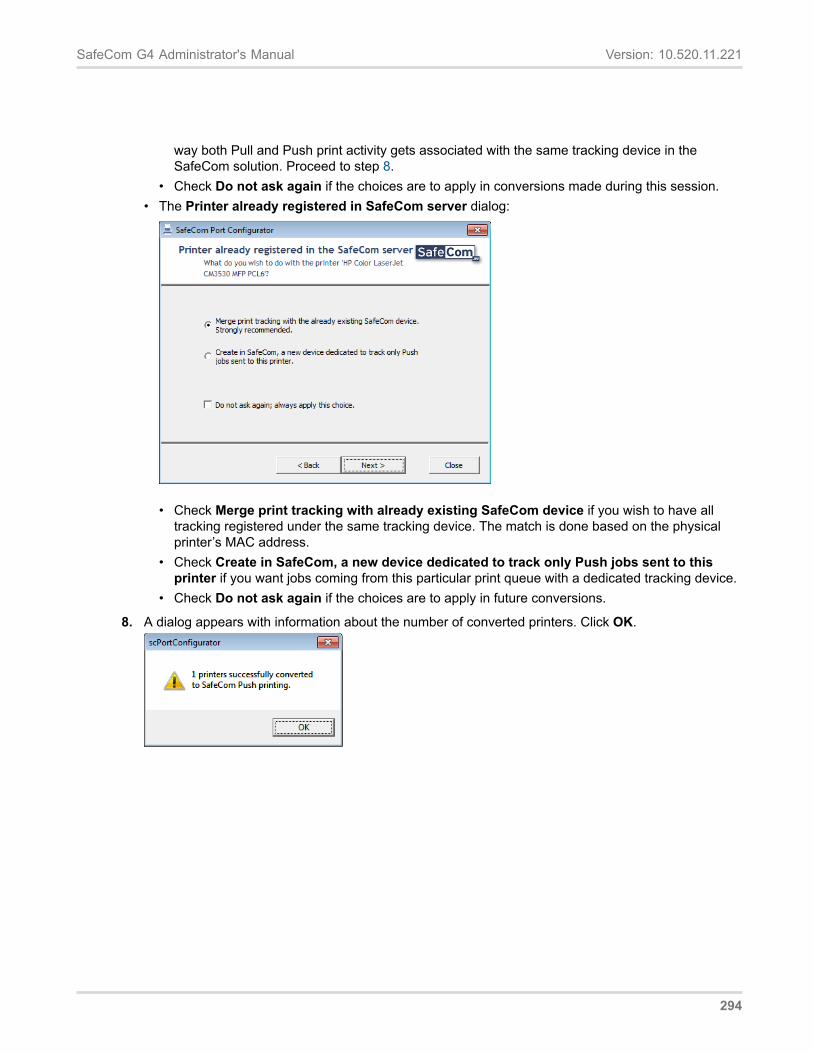
SafeCom G4 Administrator's Manual Version: 10.520.11.221
way both Pull and Push print activity gets associated with the same tracking device in theSafeCom solution. Proceed to step 8.
• Check Do not ask again if the choices are to apply in conversions made during this session.• The Printer already registered in SafeCom server dialog:
• Check Merge print tracking with already existing SafeCom device if you wish to have alltracking registered under the same tracking device. The match is done based on the physicalprinter’s MAC address.
• Check Create in SafeCom, a new device dedicated to track only Push jobs sent to thisprinter if you want jobs coming from this particular print queue with a dedicated tracking device.
• Check Do not ask again if the choices are to apply in future conversions.
8. A dialog appears with information about the number of converted printers. Click OK.
294
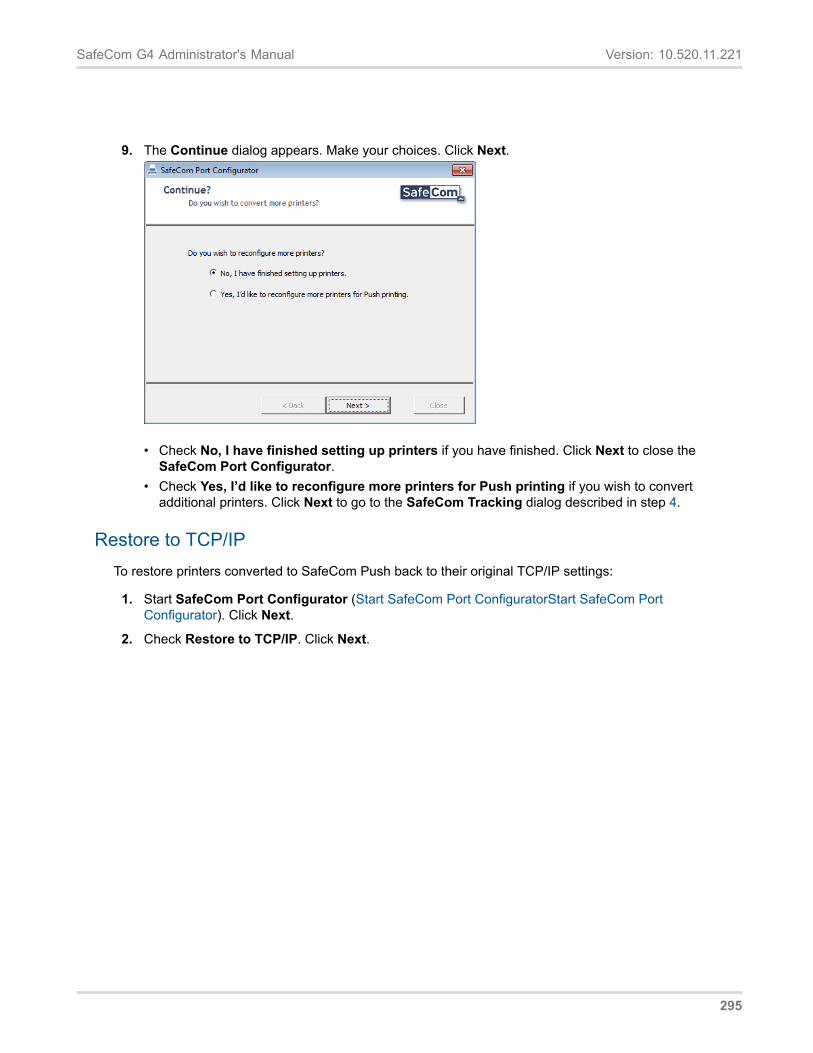
SafeCom G4 Administrator's Manual Version: 10.520.11.221
9. The Continue dialog appears. Make your choices. Click Next.
• Check No, I have finished setting up printers if you have finished. Click Next to close theSafeCom Port Configurator.
• Check Yes, I’d like to reconfigure more printers for Push printing if you wish to convertadditional printers. Click Next to go to the SafeCom Tracking dialog described in step 4.
Restore to TCP/IPTo restore printers converted to SafeCom Push back to their original TCP/IP settings:
1. Start SafeCom Port Configurator (Start SafeCom Port ConfiguratorStart SafeCom PortConfigurator). Click Next.
2. Check Restore to TCP/IP. Click Next.
295
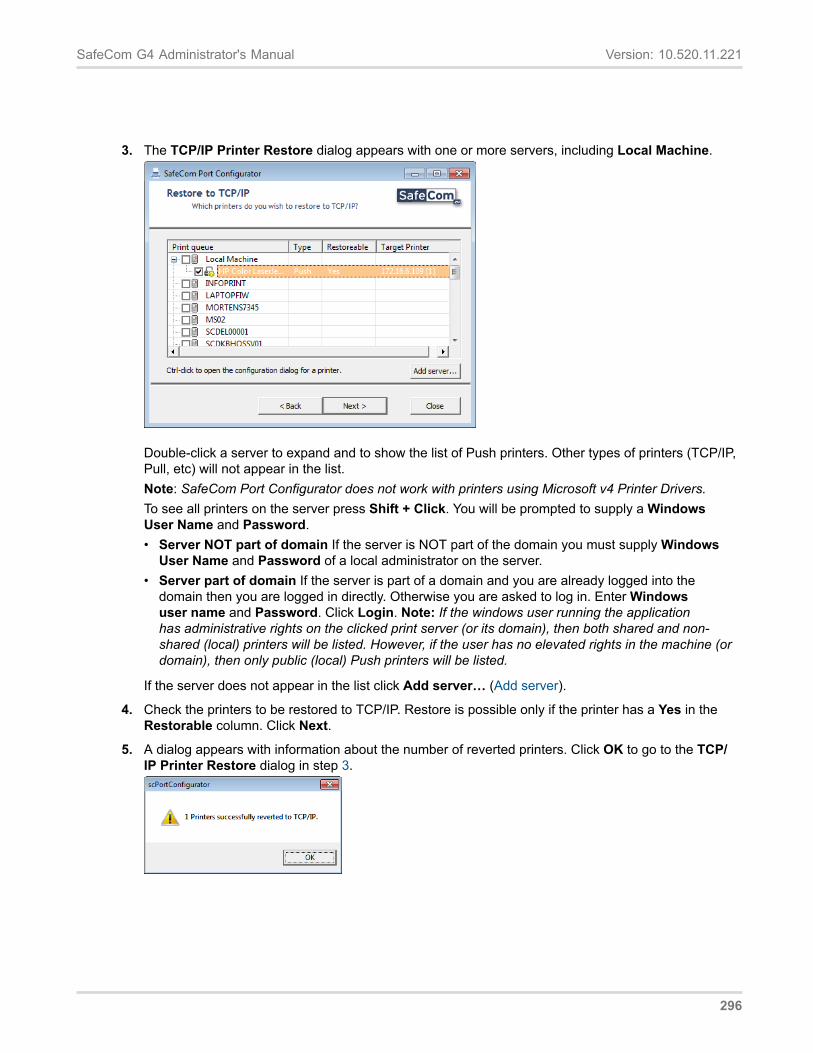
SafeCom G4 Administrator's Manual Version: 10.520.11.221
3. The TCP/IP Printer Restore dialog appears with one or more servers, including Local Machine.
Double-click a server to expand and to show the list of Push printers. Other types of printers (TCP/IP,Pull, etc) will not appear in the list.Note: SafeCom Port Configurator does not work with printers using Microsoft v4 Printer Drivers.To see all printers on the server press Shift + Click. You will be prompted to supply a WindowsUser Name and Password.• Server NOT part of domain If the server is NOT part of the domain you must supply Windows
User Name and Password of a local administrator on the server.• Server part of domain If the server is part of a domain and you are already logged into the
domain then you are logged in directly. Otherwise you are asked to log in. Enter Windowsuser name and Password. Click Login. Note: If the windows user running the applicationhas administrative rights on the clicked print server (or its domain), then both shared and non-shared (local) printers will be listed. However, if the user has no elevated rights in the machine (ordomain), then only public (local) Push printers will be listed.
If the server does not appear in the list click Add server… (Add server).
4. Check the printers to be restored to TCP/IP. Restore is possible only if the printer has a Yes in theRestorable column. Click Next.
5. A dialog appears with information about the number of reverted printers. Click OK to go to the TCP/IP Printer Restore dialog in step 3.
296
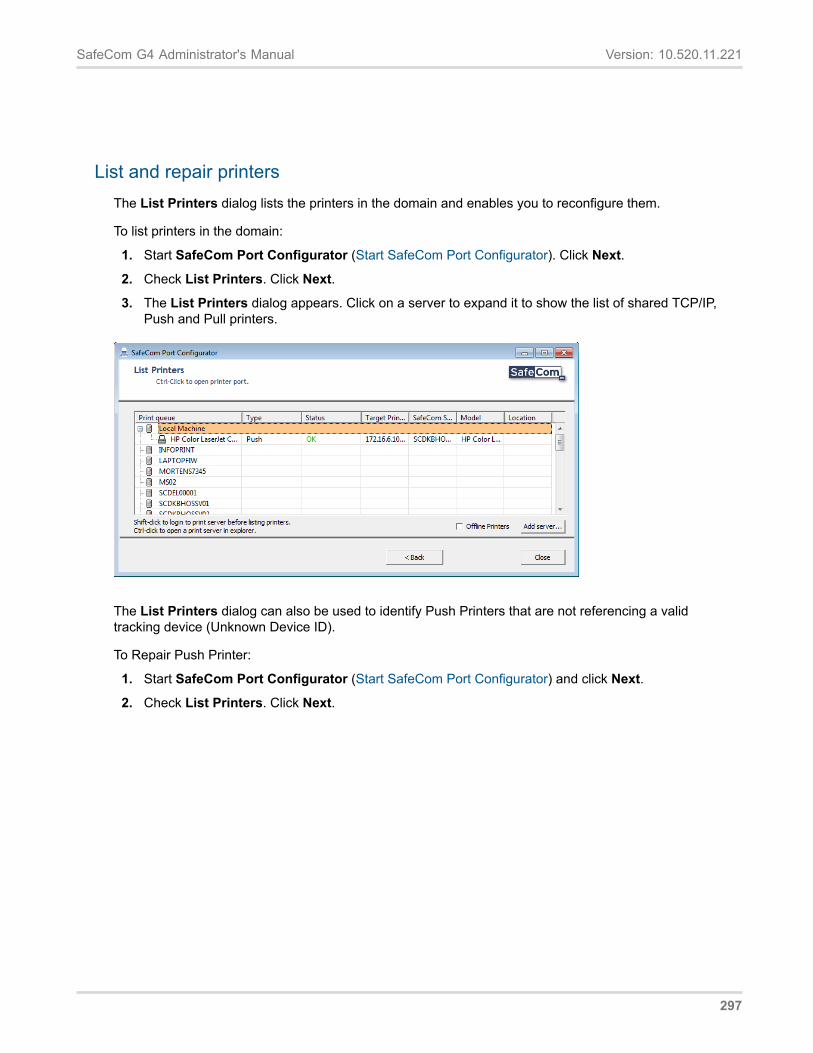
SafeCom G4 Administrator's Manual Version: 10.520.11.221
List and repair printersThe List Printers dialog lists the printers in the domain and enables you to reconfigure them.
To list printers in the domain:
1. Start SafeCom Port Configurator (Start SafeCom Port Configurator). Click Next.
2. Check List Printers. Click Next.
3. The List Printers dialog appears. Click on a server to expand it to show the list of shared TCP/IP,Push and Pull printers.
The List Printers dialog can also be used to identify Push Printers that are not referencing a validtracking device (Unknown Device ID).
To Repair Push Printer:
1. Start SafeCom Port Configurator (Start SafeCom Port Configurator) and click Next.
2. Check List Printers. Click Next.
297
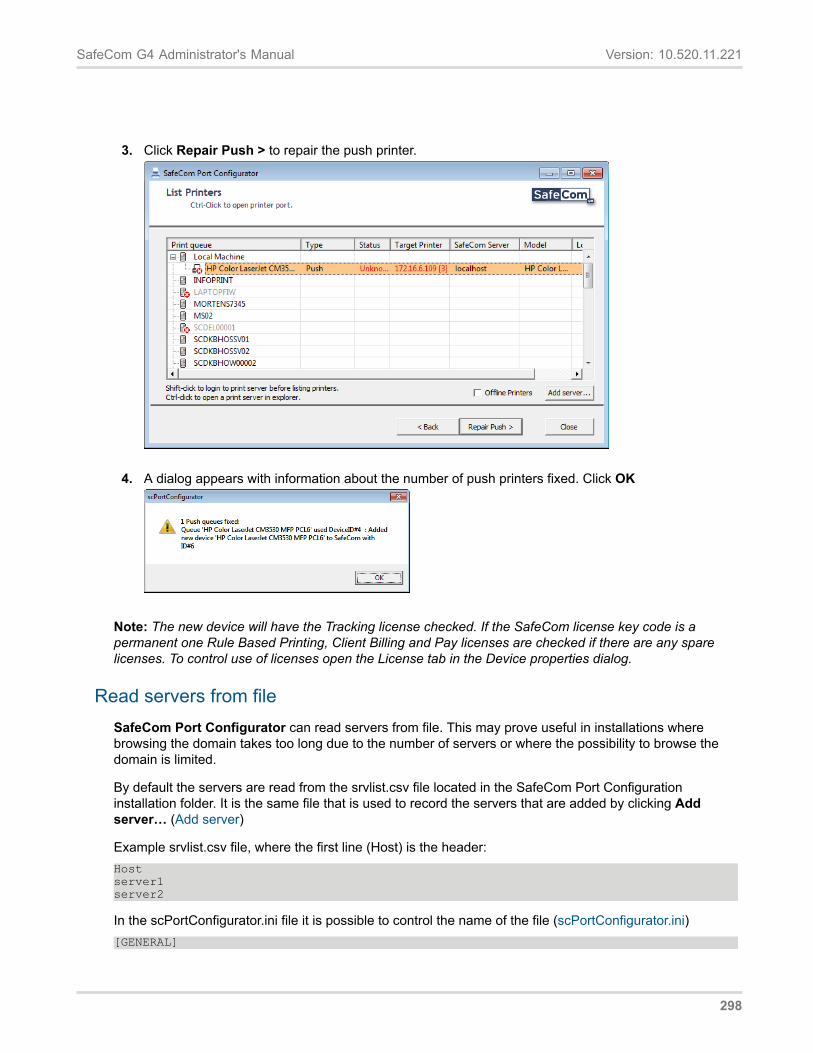
SafeCom G4 Administrator's Manual Version: 10.520.11.221
3. Click Repair Push > to repair the push printer.
4. A dialog appears with information about the number of push printers fixed. Click OK
Note: The new device will have the Tracking license checked. If the SafeCom license key code is apermanent one Rule Based Printing, Client Billing and Pay licenses are checked if there are any sparelicenses. To control use of licenses open the License tab in the Device properties dialog.
Read servers from fileSafeCom Port Configurator can read servers from file. This may prove useful in installations wherebrowsing the domain takes too long due to the number of servers or where the possibility to browse thedomain is limited.
By default the servers are read from the srvlist.csv file located in the SafeCom Port Configurationinstallation folder. It is the same file that is used to record the servers that are added by clicking Addserver… (Add server)
Example srvlist.csv file, where the first line (Host) is the header:Hostserver1server2
In the scPortConfigurator.ini file it is possible to control the name of the file (scPortConfigurator.ini)[GENERAL]
298
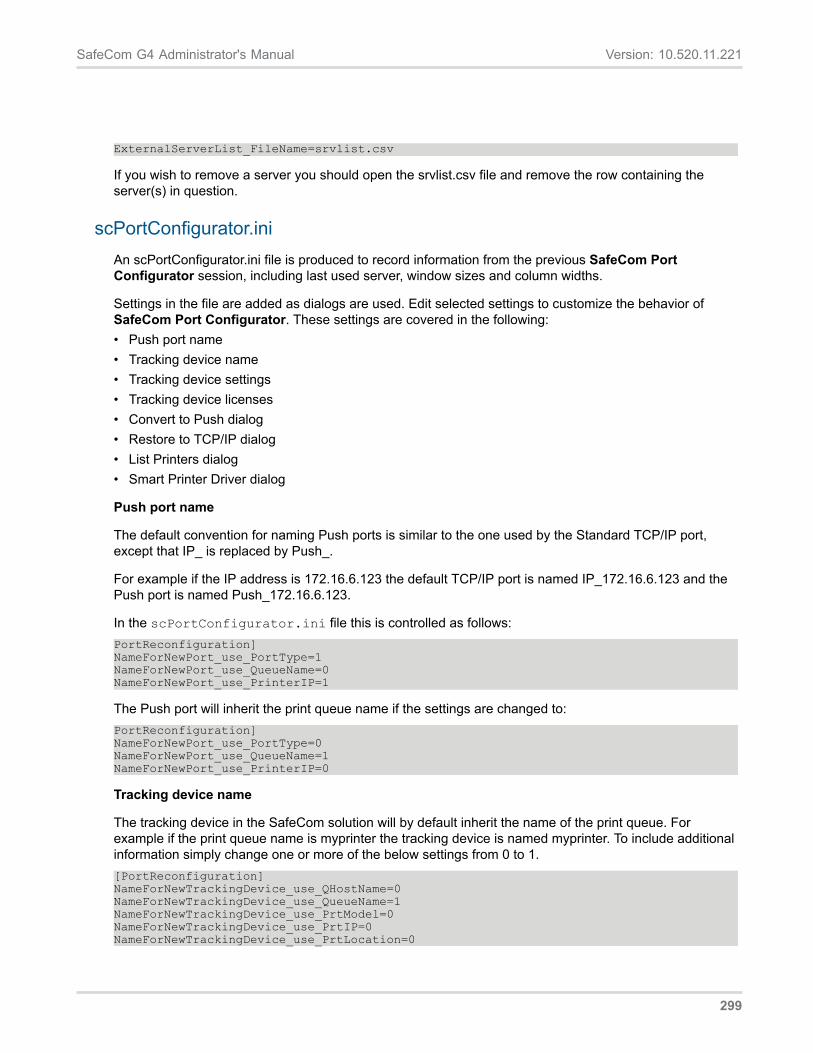
SafeCom G4 Administrator's Manual Version: 10.520.11.221
ExternalServerList_FileName=srvlist.csv
If you wish to remove a server you should open the srvlist.csv file and remove the row containing theserver(s) in question.
scPortConfigurator.iniAn scPortConfigurator.ini file is produced to record information from the previous SafeCom PortConfigurator session, including last used server, window sizes and column widths.
Settings in the file are added as dialogs are used. Edit selected settings to customize the behavior ofSafeCom Port Configurator. These settings are covered in the following:• Push port name• Tracking device name• Tracking device settings• Tracking device licenses• Convert to Push dialog• Restore to TCP/IP dialog• List Printers dialog• Smart Printer Driver dialog
Push port name
The default convention for naming Push ports is similar to the one used by the Standard TCP/IP port,except that IP_ is replaced by Push_.
For example if the IP address is 172.16.6.123 the default TCP/IP port is named IP_172.16.6.123 and thePush port is named Push_172.16.6.123.
In the scPortConfigurator.ini file this is controlled as follows:PortReconfiguration]NameForNewPort_use_PortType=1NameForNewPort_use_QueueName=0NameForNewPort_use_PrinterIP=1
The Push port will inherit the print queue name if the settings are changed to:PortReconfiguration]NameForNewPort_use_PortType=0NameForNewPort_use_QueueName=1NameForNewPort_use_PrinterIP=0
Tracking device name
The tracking device in the SafeCom solution will by default inherit the name of the print queue. Forexample if the print queue name is myprinter the tracking device is named myprinter. To include additionalinformation simply change one or more of the below settings from 0 to 1.[PortReconfiguration]NameForNewTrackingDevice_use_QHostName=0NameForNewTrackingDevice_use_QueueName=1NameForNewTrackingDevice_use_PrtModel=0NameForNewTrackingDevice_use_PrtIP=0NameForNewTrackingDevice_use_PrtLocation=0
299

SafeCom G4 Administrator's Manual Version: 10.520.11.221
NameForNewTrackingDevice_TokenSeparator=' '
Tracking device settings
The Settings tab in the Device properties dialog in SafeCom Administrator.
In the following it is described how selected settings from the [CoScum] section maps to the controls onthe Settings tab in the Device properties dialog.CoScum]NewTrackingDevice_Default_DeviceIPAddress=127.0.0.1NewTrackingDevice_Default_AllowPay=1NewTrackingDevice_Default_AllowBilling=1NewTrackingDevice_Default_RBP=1NewTrackingDevice_Default_AllowPull=1NewTrackingDevice_Default_AllowEncryption=1NewTrackingDevice_Default_Duplex=0NewTrackingDevice_Default_Color=0NewTrackingDevice_Default_TreeNodeId=0NewTrackingDevice_Default_DeviceTypeBitmask=2NewTrackingDevice_Default_ServerId=-1NewTrackingDevice_Default_DisablePayAndPrint=0NewTrackingDevice_Default_RestrictedAccess=0
• MAC is pre-filled if the physical printer is online at the time of creation. Otherwise it will read 00000000.• ID is the database ID of the tracking device.
300

SafeCom G4 Administrator's Manual Version: 10.520.11.221
• Name is for specifying a name for the device (mandatory). This is by default the name of the printqueue, but it can be customized to be composed of for example the IP address and Model (TrackingDevice Name).
• Model is for specifying the model and/or manufacturer of the device (optional). If the physical printerwas online at the time of conversion it is pre-filled. Otherwise it is left blank.
• Home server is present only if SafeCom Multiserver Support is enabled. This can be controlled at thetime of creation by setting NewTrackingDevice_Default_ServerId. The default is –1.
• Org. unit is the organizational unit the device belongs to. The default is 0. The settingNewTrackingDevice_Default_TreeNodeId does NOT control the ID of the org. unit.
• IP address is pre-filled if the physical printer was online at the time of creation. Otherwise it will defaultto the value specified by NewTrackingDevice_Default_DeviceIPAddress.
• Capabilities show a number of checkboxes depending on the device and SafeCom license key code.• Duplex supported is checked if the printer driver that is associated with the device supports duplex.
The NewTrackingDevice_Default_Duplex is NOT used.• Color supported is checked if the printer driver that is associated with the device supports color. The
NewTrackingDevice_Default_Color setting is NOT used.• Restricted access.The NewTrackingDevice_Default_RestrictedAccess setting is NOT used.• Allow Pay user is only available if the server key license allows one or more Pay devices. The
NewTrackingDevice_Default_DisablePayAndPrint is NOT used.• Push print is checked by default.
Tracking device licenses
The License tab in the Device properties dialog in SafeCom Administrator.
301
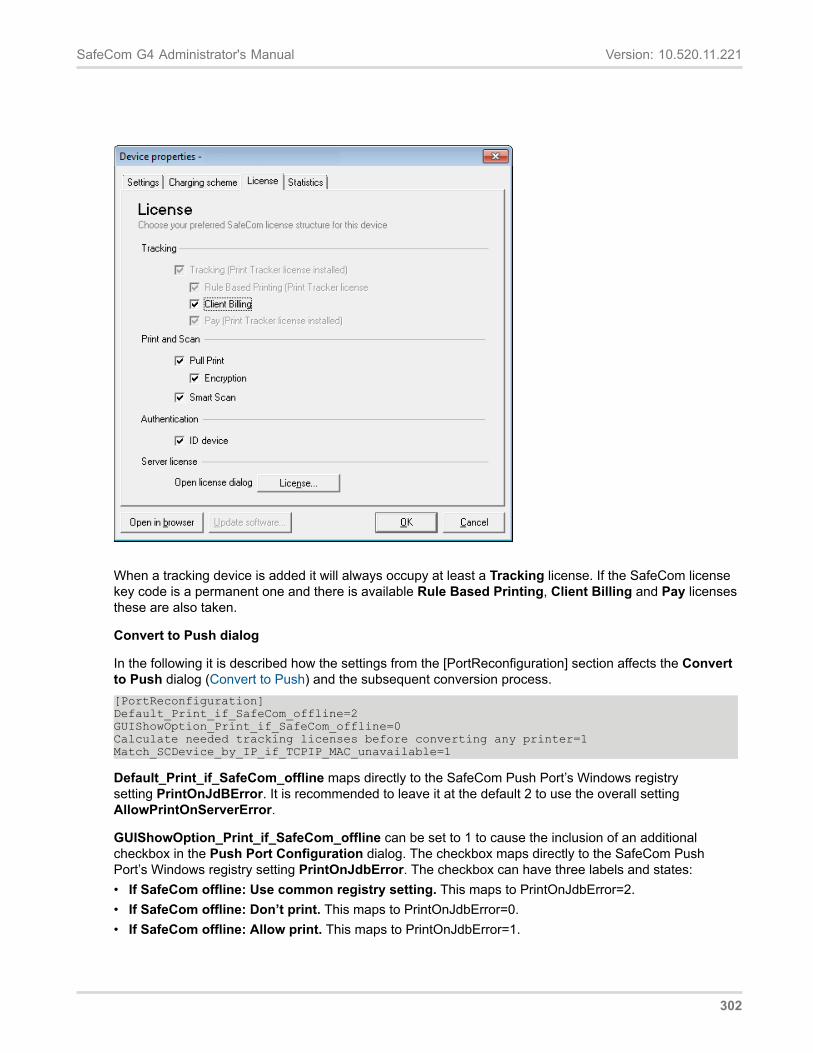
SafeCom G4 Administrator's Manual Version: 10.520.11.221
When a tracking device is added it will always occupy at least a Tracking license. If the SafeCom licensekey code is a permanent one and there is available Rule Based Printing, Client Billing and Pay licensesthese are also taken.
Convert to Push dialog
In the following it is described how the settings from the [PortReconfiguration] section affects the Convertto Push dialog (Convert to Push) and the subsequent conversion process.[PortReconfiguration]Default_Print_if_SafeCom_offline=2GUIShowOption_Print_if_SafeCom_offline=0Calculate needed tracking licenses before converting any printer=1Match_SCDevice_by_IP_if_TCPIP_MAC_unavailable=1
Default_Print_if_SafeCom_offline maps directly to the SafeCom Push Port’s Windows registrysetting PrintOnJdBError. It is recommended to leave it at the default 2 to use the overall settingAllowPrintOnServerError.
GUIShowOption_Print_if_SafeCom_offline can be set to 1 to cause the inclusion of an additionalcheckbox in the Push Port Configuration dialog. The checkbox maps directly to the SafeCom PushPort’s Windows registry setting PrintOnJdbError. The checkbox can have three labels and states:• If SafeCom offline: Use common registry setting. This maps to PrintOnJdbError=2.• If SafeCom offline: Don’t print. This maps to PrintOnJdbError=0.• If SafeCom offline: Allow print. This maps to PrintOnJdbError=1.
302
SafeCom G4 Administrator's Manual Version: 10.520.11.221
Calculate needed tracking licenses before converting any printer is 1 by default. By setting it to 0there is no check to ensure that the SafeCom license key code includes the required device trackinglicenses. Lack of device tracking licenses will cause print jobs to be cancelled.
Match_SCDevice_by_IP_if_TCPIP_MAC_unavailable is used to control if the device IP address can beused to determine if the device is already registered and if the Printer already registered in SafeComserver dialog should appear.
Restore to TCP/IP dialog
In the following it is described how the settings from the [RestoreTCPDialog] section affects the Restoreto TCP/IP dialog (Restore to TCP/IP) and the subsequent restore process.MachinePingTimeOutMS=1000CtrlClick_opens_remote_queue=1SNMPWaitTimeoutMS_when_clicking_next=5000Deserialize remote TCP port on restore=0
List Printers dialog
In the following it is described how the settings from the [PrinterViewDialog] section affects the ListPrinters dialog (List and repair printers).Update_scDevices_IP=1Update_scDevices_MAC=1Update_scDevices_Location=1Update_scDevices_Model=1MachinePingTimeOutMS=1000
Smart Printer Driver dialog
The setting SmartPrintingReservedQueNamePrefix=SafeCom- regulates which TCP/IP queues areignored; any such queues are ignored and not converted when SafeCom Port Configurator is run.
Note: if the SmartPrintingReservedQueNamePrefix= setting is empty; the Port Configurator ignores allqueues.
scPortUtilityThe SafeCom Port Configuration Utility (scPortUtility) is a command line tool that can be used to createSafeCom Push Ports or migrate existing Windows print queues to use SafeCom Push Port.• Push Port Creation• Attach Port• Queue Migration• List Print Queues
The operations are specified on the command line as parameters.
Command line options can use quotation marks (") for option strings that include spaces.
The SafeCom Port Utility returns an exit code, indicating a success or failure of the operation. Exit codeswill be in the range 0-255.
For a detailed list of command line parameters and exit codes, see scPortUtility operations and exit codes.
303
SafeCom G4 Administrator's Manual Version: 10.520.11.221
Simple Push Port CreationThe following example creates a new push port called PRN-U134-PRT for the device with IP address10.42.58.134. The port connects to the SafeCom Server at 10.42.57.8.
A tracking device will automatically be created. The tracking device name will be PRN-U134-PRT,the same as the port. The IP address for the tracking device will be the same as the output device(10.42.58.134).
To create this port, a an administrator user called admin will be used, where the password for that user isnimda (without the quotes)
scPortUtility --create-push-port –sc-server-address10.42.57.8 --port PRN-U134-PRT --output-address 10.42.58.134--sc-user admin --sc-password "nimda"
Attaching queue to portThe following example will, on the print server named prnsvr02, attach the PRN-U134 queue to the PRN-U134PRT port.
scPortUtility --attach-port --port PRN-U134PRT --queuePRN-U134 –target-machine prnsvr02
Queue migrationThe following example creates a new push port called PRN-U134-PRT based on the settings from theStandard TCP/IP Port attached to the PRN-U134 queue. The port connects to the SafeCom Server at10.42.57.8. The queue PRN-U134 will be connected to the newly created port PRN-U134-PRT.
A tracking device will automatically be created. The tracking device name will be PRN-U134, the same asthe queue. The IP address for the tracking device will be the same as the previous Standard TCP/IP Portaddress.
An administrator user called admin will be used, where the password for that user is nimda (without thequotes).
scPortUtility --migrate –sc-server-address 10.42.57.8 –queuePRN-U134 --port PRN-U134-PRT --sc-user admin--sc-password "nimda"
List printingPrint all
The following example will output all queues, including queues with print pooling enabled (PRN-U135).
scPortUtility --list-print-queues
The output would be similar to:
"PRN-U134";"PRN-U134-PRT";"SafeCom Push Port";"SafeCom Push Port";"PRN-U135";"IP_10.0.0.45";"TCPMON.DLL";"Standard TCP/IP Port";"PRN-U135";"IP_10.0.0.46";"TCPMON.DLL";"Standard TCP/IP Port";
304
SafeCom G4 Administrator's Manual Version: 10.520.11.221
"PRN-U135";"IP_10.0.0.47";"TCPMON.DLL";"Standard TCP/IP Port";"PRN-U136";"IP_10.0.0.48";"TCPMON.DLL";"Standard TCP/IP Port";"PRN-U137";"IP_10.0.0.49";"IPP Provider";"IPP Port";
List print queues eligible for migration
The following example will output only queues eligible for migration.
scPortUtility --list-print-queues --only-migratable
The output on the same machine as the previous example would be:
"PRN-U136";"IP_10.0.0.48";"TCPMON.DLL";"Standard TCP/IP Port";
TroubleshootingSafeCom Administrator: Unable to locate all SafeCom servers
The SafeCom Administrator uses broadcasts to locate the SafeCom servers. If your network is a VLAN(Virtual Local Area Network) then it may prevent the SafeCom Administrator from locating the SafeComservers.
To solve the problem you should enter the SafeCom servers’ IP addresses directly in the list of individualBroadcast addresses on the Network tab in the Options dialog.
Document is not printed
Check this if the document leaves the print queue as printed:• Is the printer powered on and connected?• Is the printer online?• Is intervention required? Check for:
1. wrong paper size
2. manual feed
3. out of paper
4. paper jam
5. toner low• Does the printer driver work with the printer? Test this by using the Standard TCP/IP port instead of the
SafeCom Push Port. If it still fails try to use a more appropriate printer driver. Another possibility is totest if the problem is related to a specific application or perhaps version of an application.
Check this if the document remains in the print queue:• Is the print queue paused?
Check this if the document is deleted from the print queue:• Does the SafeCom Event Log contain any event of the type Push print failed? The event will contain
additional details indicating that perhaps the Tracking device is missing. Open the Configure Push Portdialog and verify that a SafeCom printer is selected for tracking. SafeCom Port Configurator can beused to repair the Push printer (List and repair printers).
305
SafeCom G4 Administrator's Manual Version: 10.520.11.221
• Does the SafeCom Event Log contain any event of the type Push print failed? The event will containadditional details indicating that perhaps the cost control of user does not match device, that is, a Payuser is trying to print on a device that does not have a Pay license.
• Does the SafeCom Event Log contain any event of the type Push print failed? The event will containadditional details indicating perhaps user credits shortage, that is, the Pay user did not have enoughcredits.
• Is the user subject to SafeCom Rule Based Printing and the rule is causing the deletion of thedocument?
• Is the user unknown to SafeCom? If SafeCom trace is enabled the PullPM2kSrv.trc will contain a linewith the text: ExecuteTransaction: Status error [SC_USER_NOT_FOUND].
Document is not tracked• Did the document print?• Is the user set to Cost control Tracking?• Does the device include a Tracking license?• If Client Billing is enabled there is a delay before you can see the tracking record.
User’s computer: “… Please contact your administrator!”
If there are problems that prevent users from printing documents via SafeCom, the Messenger Servicedialog will appear on the screen.
Typical messages:• Unable to connect to SafeCom server.• There is not enough disk space on the SafeCom server.• Unable to logon to the SafeCom database.• SafeCom license violation.• You are unknown to SafeCom.
The above SafeCom generated messages will appear after any print notification messages sent by theWindows print subsystem. For this reason we recommend that you disable notification messages fromthe Windows print subsystem. On the Windows server open the Printers folder. On the File menu, clickServer Properties and click the Advanced tab. Refer to online Windows help.
Copy trackingCopy tracking makes it possible to track copy costs on MFPs. Your SafeCom license key code mustinclude Copy Control and the MFP must be networked and in most cases you need a special SafeComMFP cable. There is a complete list of supported MFPs in SafeCom Controller Administrator’s ManualD60700.
Fax, Scan and E-mail trackingFax, Scan and E-mail tracking is possible on most MFPs equipped with SafeCom Go.
306
SafeCom G4 Administrator's Manual Version: 10.520.11.221
Post trackPost track affects these tracking data for Pull print jobs:• Tracking pages (TrackingPageCount) is adjusted to reflect the actual number of pull printed pages. If a
100 page document is cancelled after 10 pages the job is only tracked (and priced) as 10 pages.• Color pages (TrackingColorPageCount) is adjusted to reflect the actual number of pull printed pages
with color.• Price 1 (JobPrice) and Price 2 (JobPrice2) are adjusted as well to reflect the adjustment of Tracking
pages and Color pages. See also Accounting policy Accounting policy.• Toner (TonerCyan, TonerMagenta, TonerYellow and TonerBlack) is tracked. The values are not shown
in the Tracking record dialog (Tracking record dialog).
Push Print Post TrackingSafeCom Push Print Post Tracking is an extension of the tracking feature of the SafeCom solution. Thetracking and charging data was based on the information that former versions of SafeCom componentswere able to collect while documents were printing at the workstation or the server. This data is notaccurate enough to calculate the precise tracking information and the price of the jobs. The softwareutilizes the detailed information that is sent by the printing device itself and all information is calculatedfrom these reports.
Note: Push Print Post Tracking is supported on HP FutureSmart devices. Refer to SafeCom Go HPAdministrator’s Manual D60701 for detailed information on setup and configuration.
Planning your SafeCom Tracking solutionWhen planning your SafeCom Tracking solution you need to:• Define what the cost of printing should be. This is accomplished via a charging scheme (Charging
scheme). Print costs defaults to 0.00 if no charging scheme is defined.• Set up the server properties to track deleted jobs (Track deleted jobs).• Plan how you will secure the recorded tracking data (Backup and restore).• Decide if you wish to use the recorded tracking data for invoicing and/or auditing (Using tracking data).• Control what happens if the tracking server is unavailable (Tracking).• If your SafeCom solution is a multiserver solution you need to configure if tracking data should be
collected online or offline (Multiple servers: Online or offline tracking).
Defining print costs via charging schemesThe price calculation is defined in a charging scheme. The price calculation is based on paper size,number of sheets and impressions and possible use of color. Multiple charging schemes can be created toreflect the varying print costs of different printer models.
307
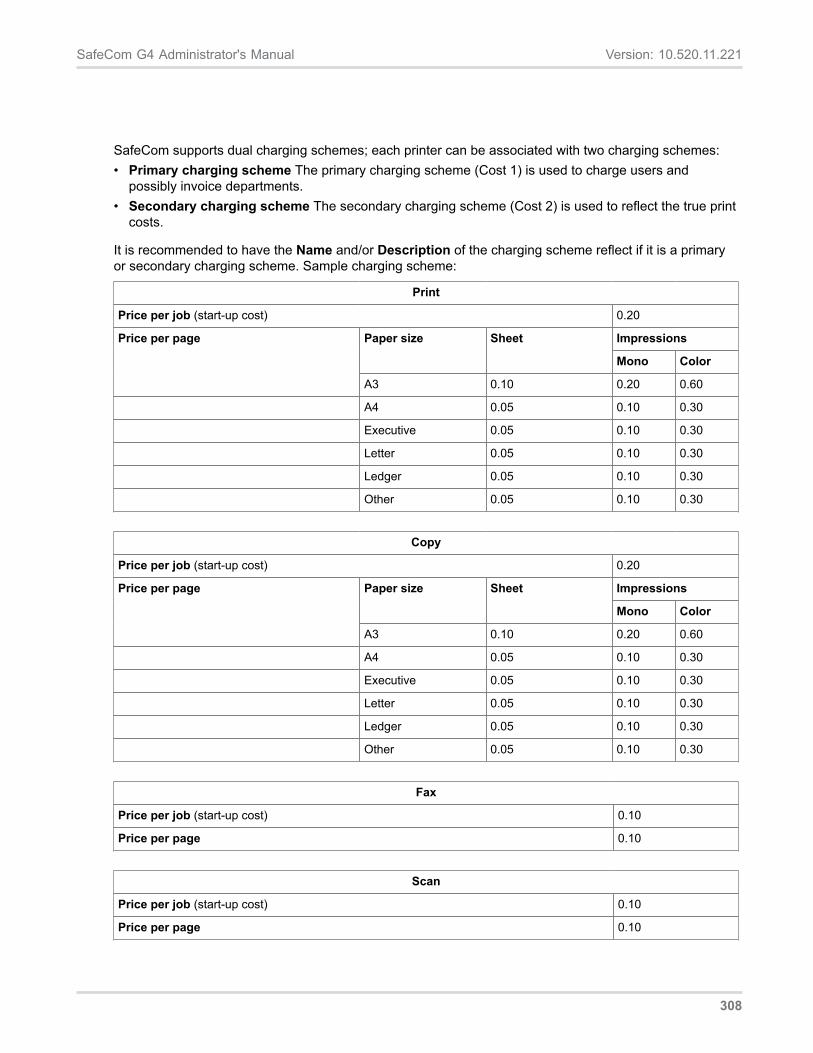
SafeCom G4 Administrator's Manual Version: 10.520.11.221
SafeCom supports dual charging schemes; each printer can be associated with two charging schemes:• Primary charging scheme The primary charging scheme (Cost 1) is used to charge users and
possibly invoice departments.• Secondary charging scheme The secondary charging scheme (Cost 2) is used to reflect the true print
costs.
It is recommended to have the Name and/or Description of the charging scheme reflect if it is a primaryor secondary charging scheme. Sample charging scheme:
Price per job (start-up cost) 0.20
ImpressionsPaper size Sheet
Mono Color
Price per page
A3 0.10 0.20 0.60
A4 0.05 0.10 0.30
Executive 0.05 0.10 0.30
Letter 0.05 0.10 0.30
Ledger 0.05 0.10 0.30
Other 0.05 0.10 0.30
Copy
Price per job (start-up cost) 0.20
ImpressionsPaper size Sheet
Mono Color
Price per page
A3 0.10 0.20 0.60
A4 0.05 0.10 0.30
Executive 0.05 0.10 0.30
Letter 0.05 0.10 0.30
Ledger 0.05 0.10 0.30
Other 0.05 0.10 0.30
Fax
Price per job (start-up cost) 0.10
Price per page 0.10
Scan
Price per job (start-up cost) 0.10
Price per page 0.10
308
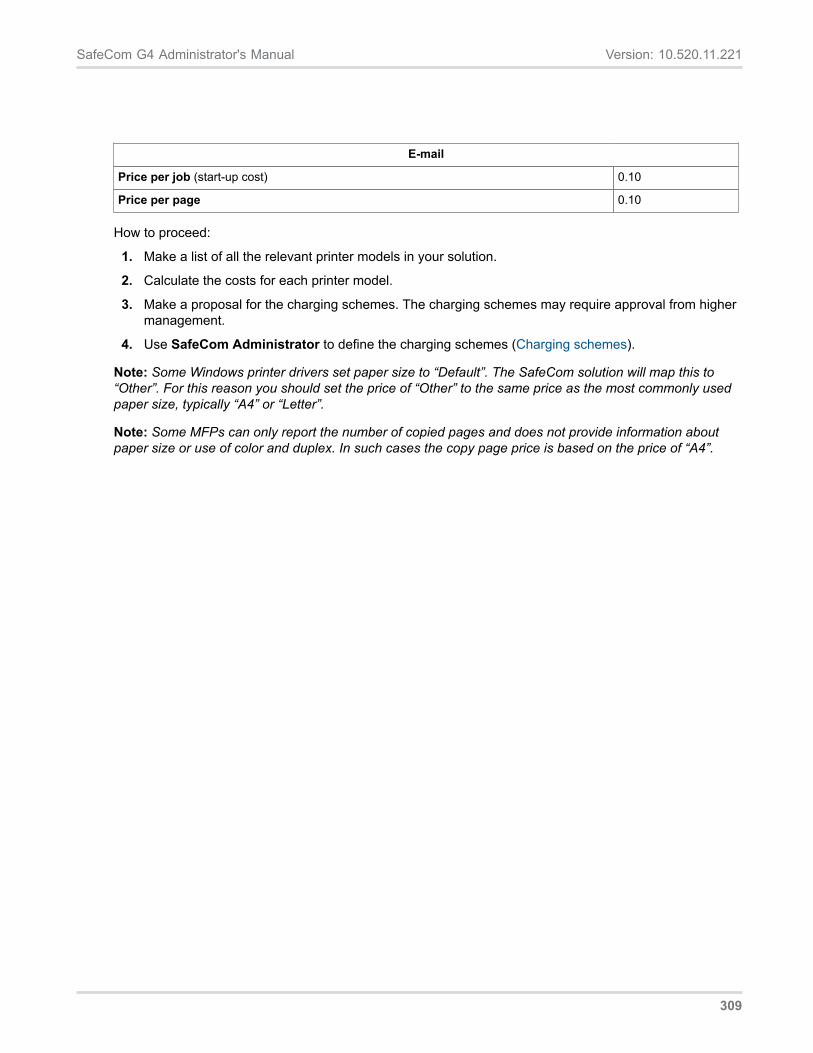
SafeCom G4 Administrator's Manual Version: 10.520.11.221
Price per job (start-up cost) 0.10
Price per page 0.10
How to proceed:
1. Make a list of all the relevant printer models in your solution.
2. Calculate the costs for each printer model.
3. Make a proposal for the charging schemes. The charging schemes may require approval from highermanagement.
4. Use SafeCom Administrator to define the charging schemes (Charging schemes).
Note: Some Windows printer drivers set paper size to “Default”. The SafeCom solution will map this to“Other”. For this reason you should set the price of “Other” to the same price as the most commonly usedpaper size, typically “A4” or “Letter”.
Note: Some MFPs can only report the number of copied pages and does not provide information aboutpaper size or use of color and duplex. In such cases the copy page price is based on the price of “A4”.
309
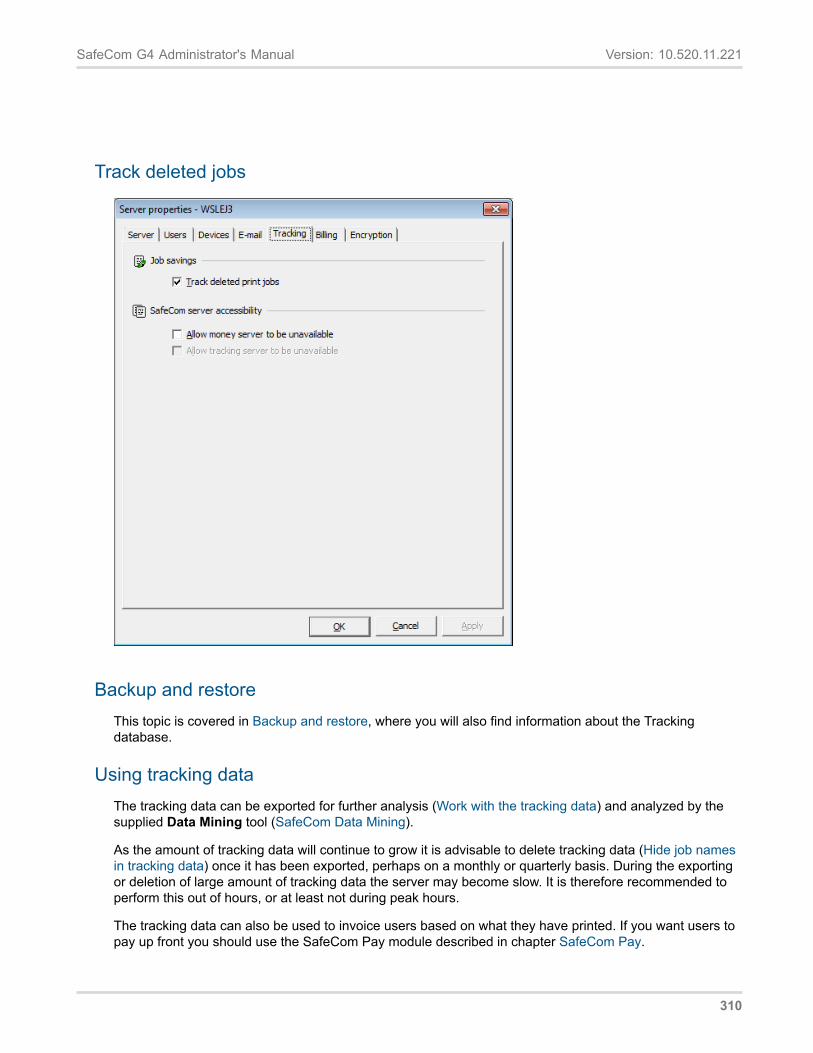
SafeCom G4 Administrator's Manual Version: 10.520.11.221
Track deleted jobs
Backup and restoreThis topic is covered in Backup and restore, where you will also find information about the Trackingdatabase.
Using tracking dataThe tracking data can be exported for further analysis (Work with the tracking data) and analyzed by thesupplied Data Mining tool (SafeCom Data Mining).
As the amount of tracking data will continue to grow it is advisable to delete tracking data (Hide job namesin tracking data) once it has been exported, perhaps on a monthly or quarterly basis. During the exportingor deletion of large amount of tracking data the server may become slow. It is therefore recommended toperform this out of hours, or at least not during peak hours.
The tracking data can also be used to invoice users based on what they have printed. If you want users topay up front you should use the SafeCom Pay module described in chapter SafeCom Pay.
310
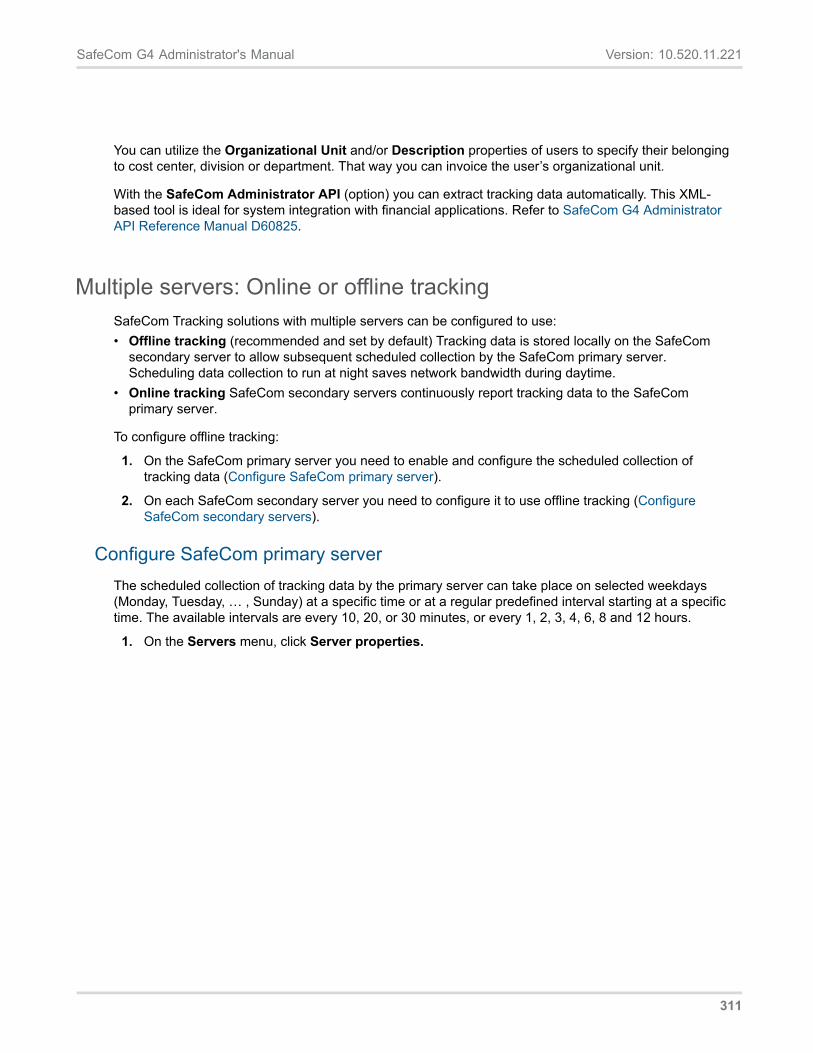
SafeCom G4 Administrator's Manual Version: 10.520.11.221
You can utilize the Organizational Unit and/or Description properties of users to specify their belongingto cost center, division or department. That way you can invoice the user’s organizational unit.
With the SafeCom Administrator API (option) you can extract tracking data automatically. This XML-based tool is ideal for system integration with financial applications. Refer to SafeCom G4 AdministratorAPI Reference Manual D60825.
Multiple servers: Online or offline tracking SafeCom Tracking solutions with multiple servers can be configured to use: • Offline tracking (recommended and set by default) Tracking data is stored locally on the SafeCom
secondary server to allow subsequent scheduled collection by the SafeCom primary server. Scheduling data collection to run at night saves network bandwidth during daytime.
• Online tracking SafeCom secondary servers continuously report tracking data to the SafeCom primary server.
To configure offline tracking:
1. On the SafeCom primary server you need to enable and configure the scheduled collection of tracking data (Configure SafeCom primary server).
2. On each SafeCom secondary server you need to configure it to use offline tracking (Configure SafeCom secondary servers).
Configure SafeCom primary server The scheduled collection of tracking data by the primary server can take place on selected weekdays (Monday, Tuesday, … , Sunday) at a specific time or at a regular predefined interval starting at a specific time. The available intervals are every 10, 20, or 30 minutes, or every 1, 2, 3, 4, 6, 8 and 12 hours.
1. On the Servers menu, click Server properties.
311
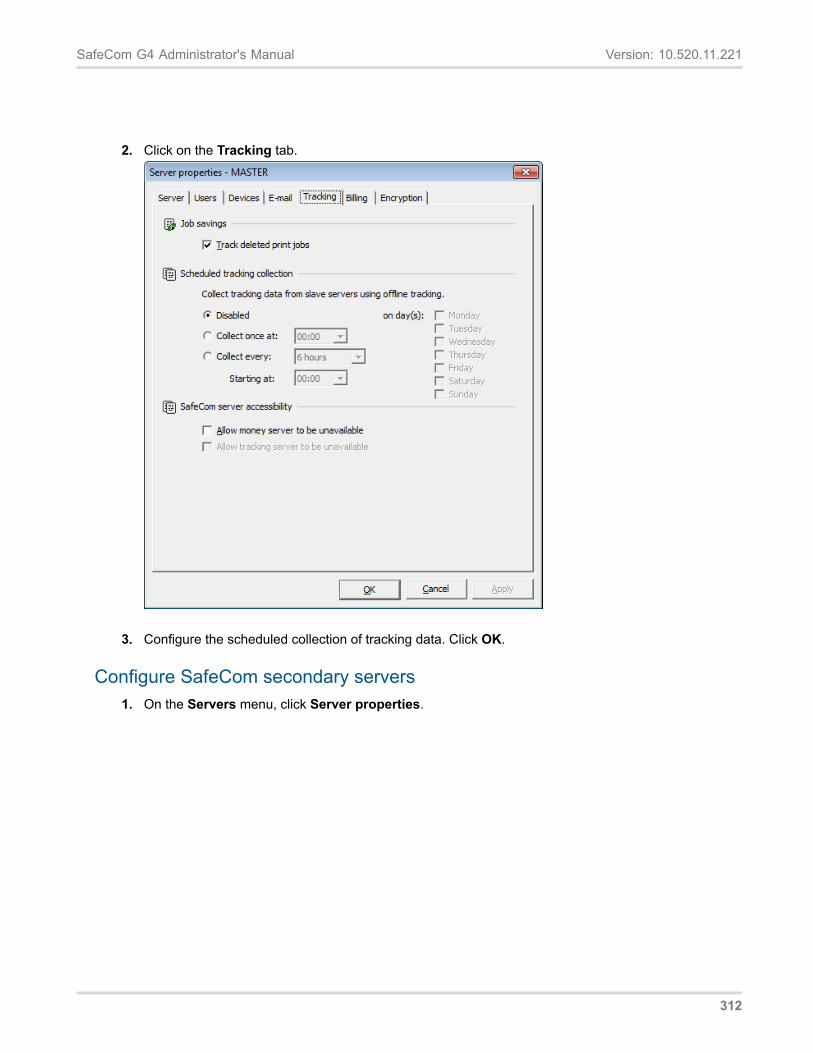
SafeCom G4 Administrator's Manual Version: 10.520.11.221
2. Click on the Tracking tab.
3. Configure the scheduled collection of tracking data. Click OK.
Configure SafeCom secondary servers 1. On the Servers menu, click Server properties.
312
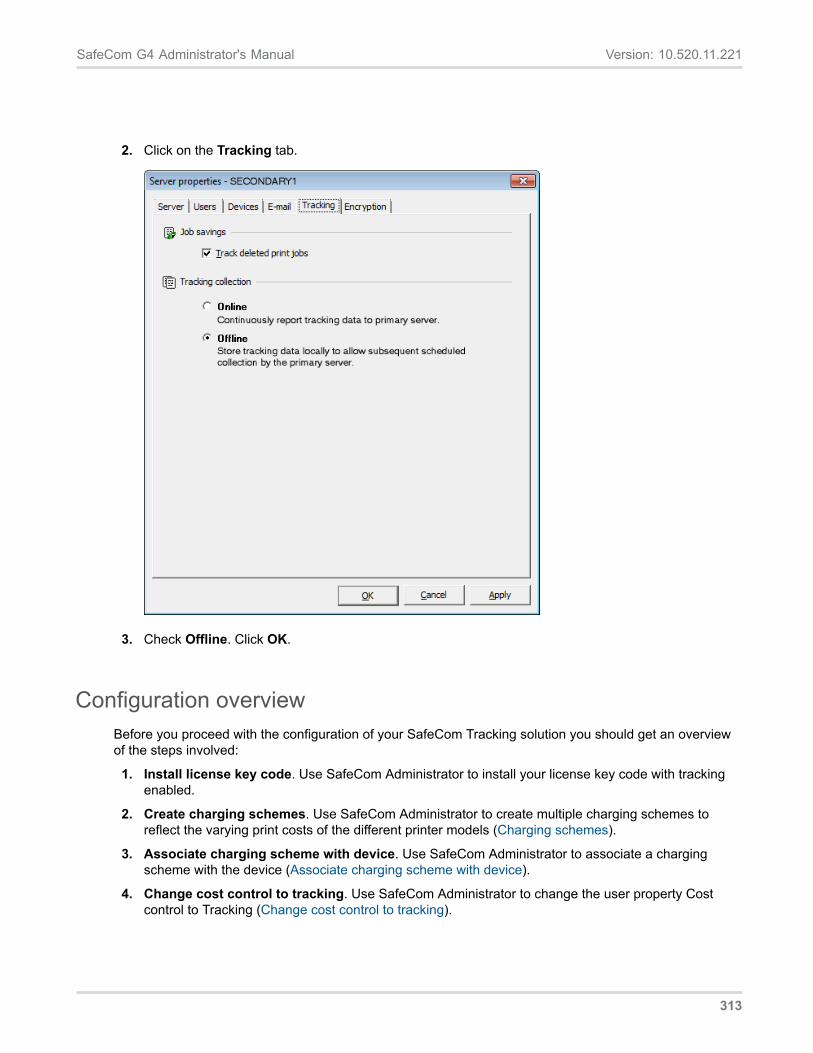
SafeCom G4 Administrator's Manual Version: 10.520.11.221
2. Click on the Tracking tab.
3. Check Offline. Click OK.
Configuration overviewBefore you proceed with the configuration of your SafeCom Tracking solution you should get an overviewof the steps involved:
1. Install license key code. Use SafeCom Administrator to install your license key code with trackingenabled.
2. Create charging schemes. Use SafeCom Administrator to create multiple charging schemes toreflect the varying print costs of the different printer models (Charging schemes).
3. Associate charging scheme with device. Use SafeCom Administrator to associate a chargingscheme with the device (Associate charging scheme with device).
4. Change cost control to tracking. Use SafeCom Administrator to change the user property Costcontrol to Tracking (Change cost control to tracking).
313

SafeCom G4 Administrator's Manual Version: 10.520.11.221
5. Work with the tracking data. Use the Data Mining tool to view the tracking data (Work with thetracking data).
Charging schemesIn section Charging scheme we described the concept of charging schemes, dual charging schemes, andhow to set them up. The following subsections describe how to work with charging schemes in SafeComAdministrator.
Add charging scheme1. On the Devices menu, point to Charging schemes and click Add charging scheme…
2. The New Charging Scheme dialog appears. Enter prices.
3. Click Add and then Finish.
• Name is the unique name of the charging scheme (mandatory).• Description is an optional description of the charging scheme.• Enter price per job to charge a Start-up cost per job. Check Enable job name pricing if you
wish to enable pricing based on job name (Job name pricing).• Enter Price per page in the form of the price for Sheet (paper), Mono Impression and Color
Impression for the paper sizes: A3, A4, Executive, Letter and Legal. Click Set all to quickly entera price for all paper sizes. The price specified in Other is used when the paper size is unknown (ordefault).
314
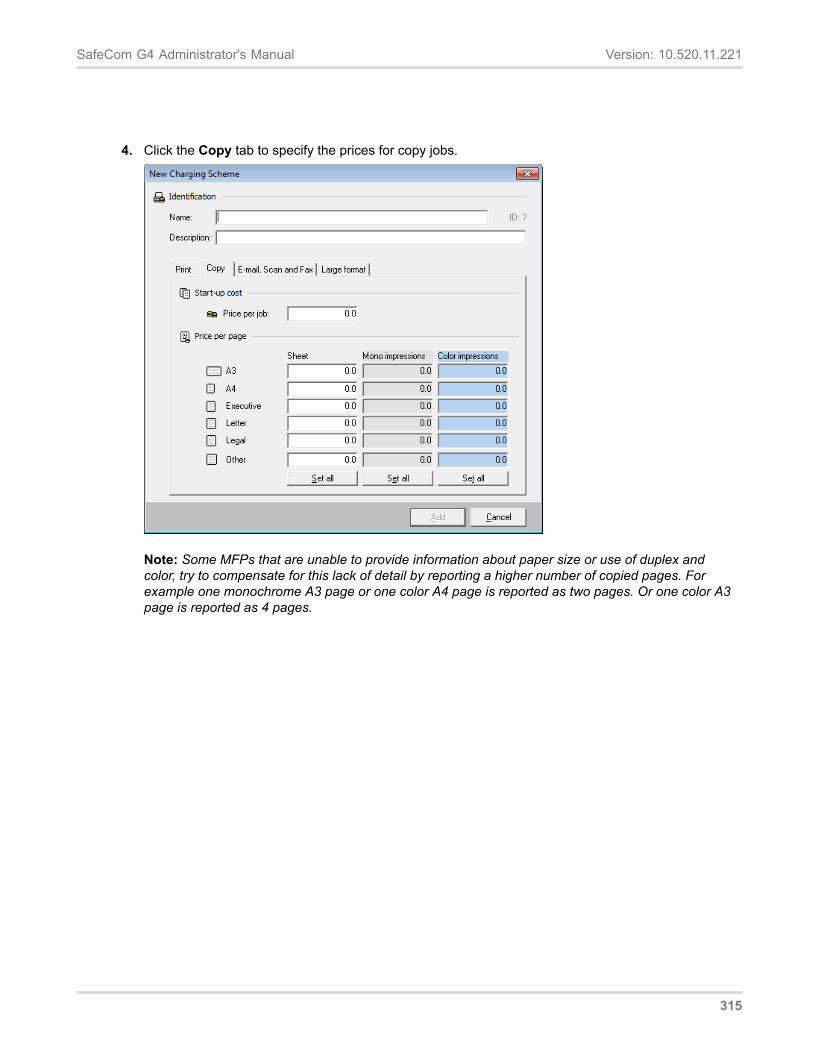
SafeCom G4 Administrator's Manual Version: 10.520.11.221
4. Click the Copy tab to specify the prices for copy jobs.
Note: Some MFPs that are unable to provide information about paper size or use of duplex andcolor, try to compensate for this lack of detail by reporting a higher number of copied pages. Forexample one monochrome A3 page or one color A4 page is reported as two pages. Or one color A3page is reported as 4 pages.
315
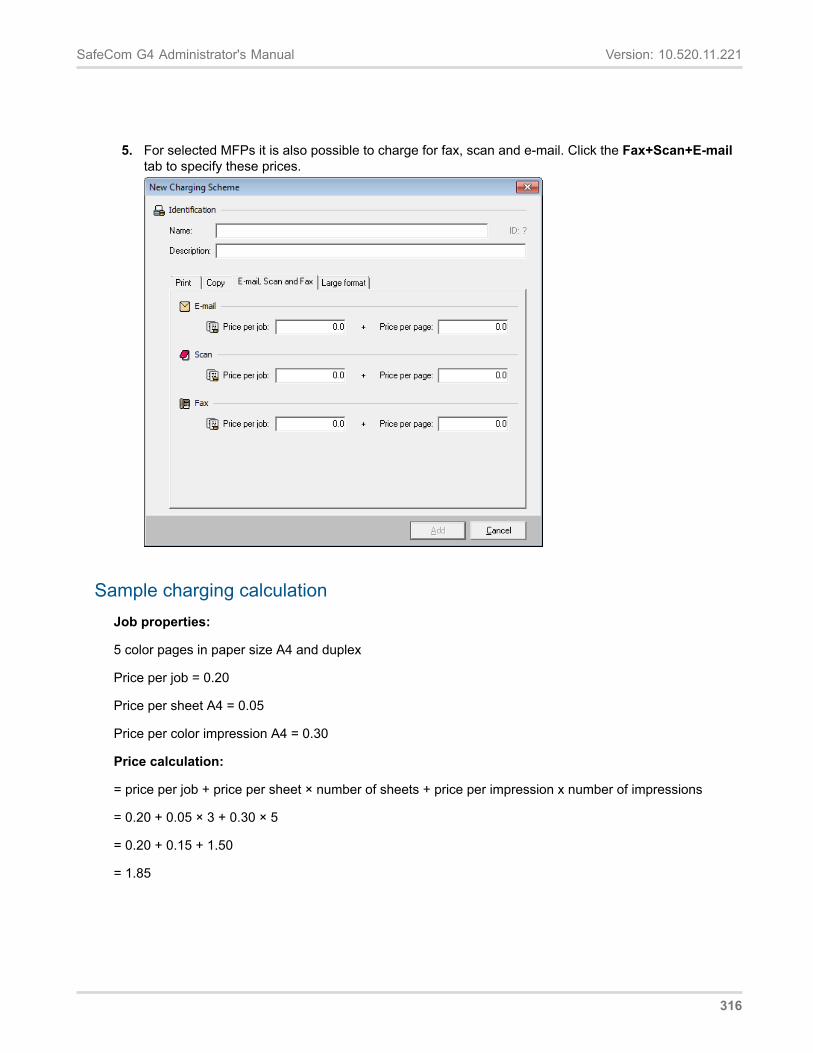
SafeCom G4 Administrator's Manual Version: 10.520.11.221
5. For selected MFPs it is also possible to charge for fax, scan and e-mail. Click the Fax+Scan+E-mailtab to specify these prices.
Sample charging calculationJob properties:
5 color pages in paper size A4 and duplex
Price per job = 0.20
Price per sheet A4 = 0.05
Price per color impression A4 = 0.30
Price calculation:
= price per job + price per sheet × number of sheets + price per impression x number of impressions
= 0.20 + 0.05 × 3 + 0.30 × 5
= 0.20 + 0.15 + 1.50
= 1.85
316
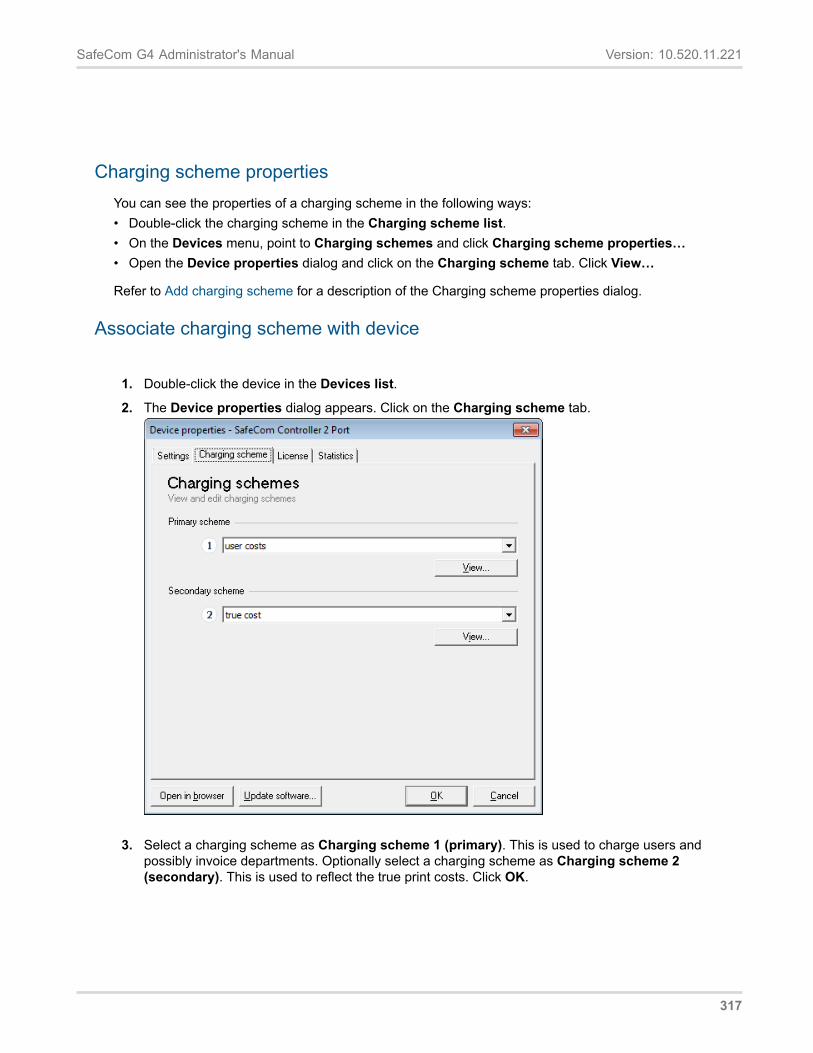
SafeCom G4 Administrator's Manual Version: 10.520.11.221
Charging scheme propertiesYou can see the properties of a charging scheme in the following ways:• Double-click the charging scheme in the Charging scheme list.• On the Devices menu, point to Charging schemes and click Charging scheme properties…• Open the Device properties dialog and click on the Charging scheme tab. Click View…
Refer to Add charging scheme for a description of the Charging scheme properties dialog.
Associate charging scheme with device
1. Double-click the device in the Devices list.
2. The Device properties dialog appears. Click on the Charging scheme tab.
3. Select a charging scheme as Charging scheme 1 (primary). This is used to charge users andpossibly invoice departments. Optionally select a charging scheme as Charging scheme 2(secondary). This is used to reflect the true print costs. Click OK.
317
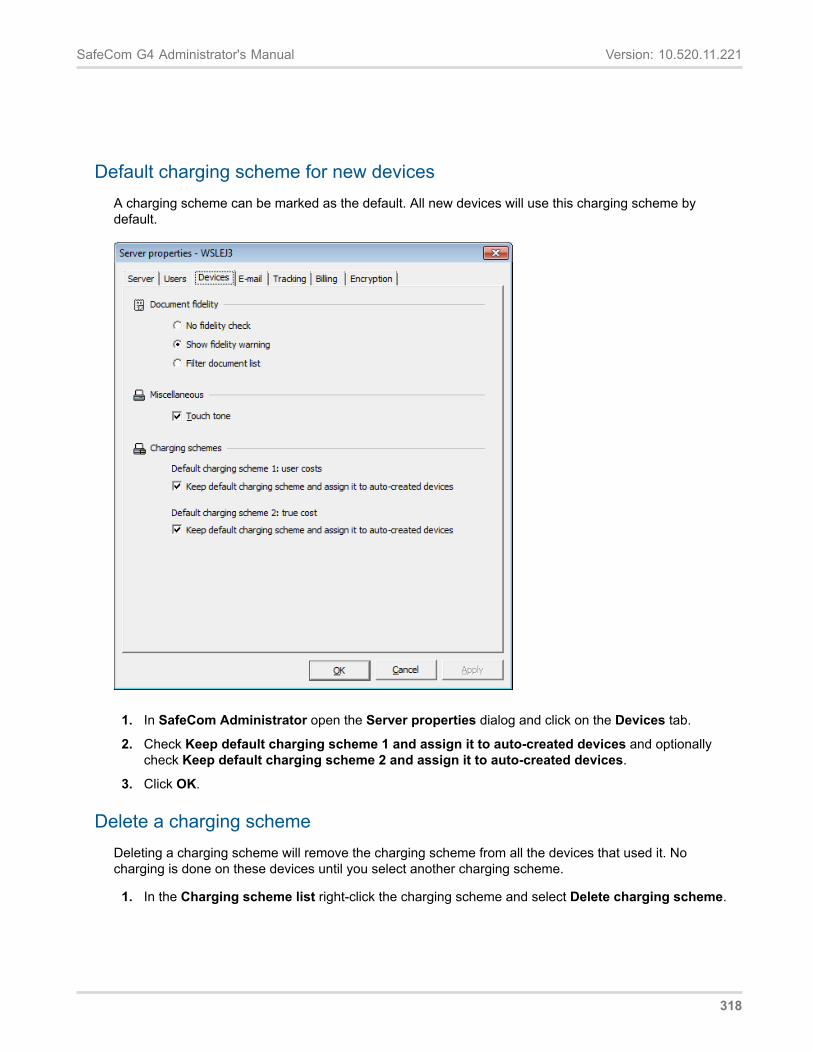
SafeCom G4 Administrator's Manual Version: 10.520.11.221
Default charging scheme for new devicesA charging scheme can be marked as the default. All new devices will use this charging scheme bydefault.
1. In SafeCom Administrator open the Server properties dialog and click on the Devices tab.
2. Check Keep default charging scheme 1 and assign it to auto-created devices and optionallycheck Keep default charging scheme 2 and assign it to auto-created devices.
3. Click OK.
Delete a charging schemeDeleting a charging scheme will remove the charging scheme from all the devices that used it. Nocharging is done on these devices until you select another charging scheme.
1. In the Charging scheme list right-click the charging scheme and select Delete charging scheme.
318
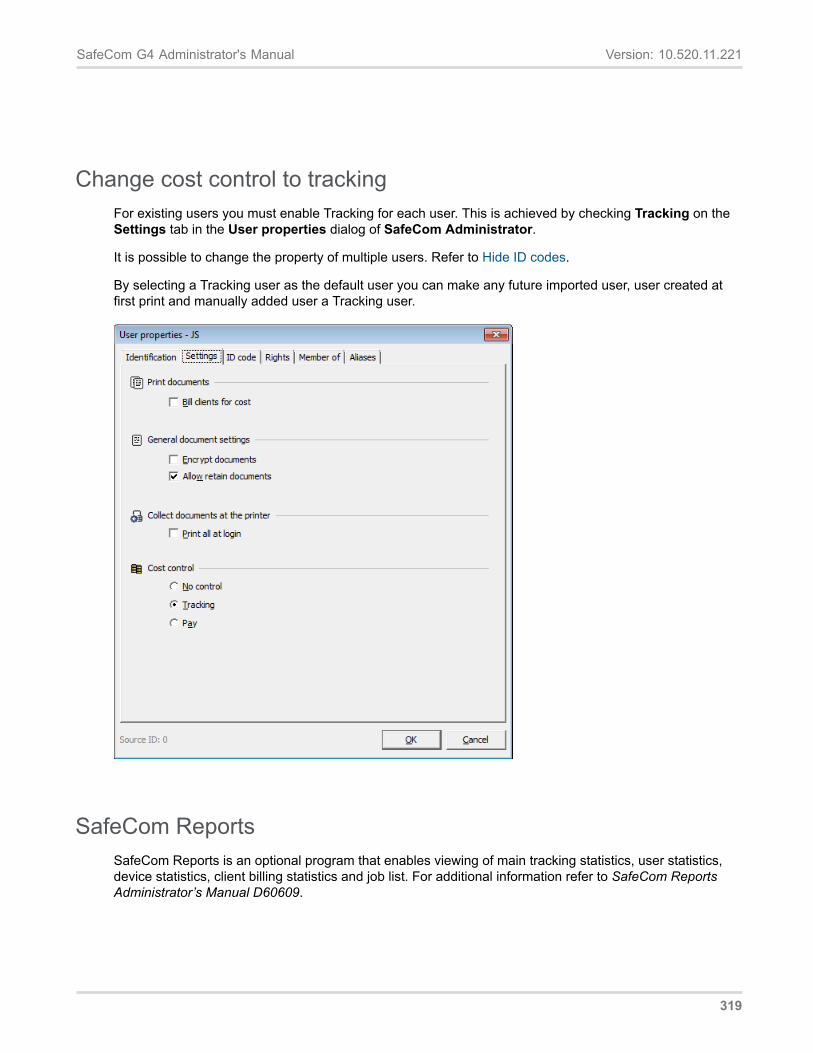
SafeCom G4 Administrator's Manual Version: 10.520.11.221
Change cost control to trackingFor existing users you must enable Tracking for each user. This is achieved by checking Tracking on theSettings tab in the User properties dialog of SafeCom Administrator.
It is possible to change the property of multiple users. Refer to Hide ID codes.
By selecting a Tracking user as the default user you can make any future imported user, user created atfirst print and manually added user a Tracking user.
SafeCom ReportsSafeCom Reports is an optional program that enables viewing of main tracking statistics, user statistics,device statistics, client billing statistics and job list. For additional information refer to SafeCom ReportsAdministrator’s Manual D60609.
319
SafeCom G4 Administrator's Manual Version: 10.520.11.221
Install SafeCom Reports1. Download the software from the link supplied to you.
2. When the SafeCom Reports Setup Wizard appears click Next.
3. Choose the destination folder for the SafeCom Report files. Optionally click Disk Cost… to checkthe available disk drives for required disk space. Check Everyone to install SafeCom Reports soeveryone who uses the computer can use it. Click Next.
4. Click Next to start the installation. A progress bar appears.
5. Click Close when the installation has completed.
The default installation folder is:
C:\Program Files\SafeCom\SafeCom Reports
Start SafeCom Reports1. Click the SafeCom Reports icon on the desktop.
2. Enter SafeCom Server (IP address or hostname or) or click the SafeCom Server button to broadcastfor available SafeCom servers. Enter User (default is ADMIN), Password (default is nimda). Note: Ifthe user belongs to a domain the domain followed by a backslash (\) must be specified in front of theuser’s logon. Example: MYDOMAIN\JS.
3. You must have SafeCom Report rights (Rights) to log in. Click Login.
Make a report1. Once you are logged into SafeCom Reports you will be able to generate a report. Select a report of
in the Report column, for example Application Usage or Largest Print Users.
2. Click Extract New Data for Report.
3. In most reports you need to specify the period in the form of Date of first record and Date of lastrecord.
4. Click OK to generate the report. In the Exporting Records dialog you can monitor the progress asrecords are being exported.
It is possible to schedule one or more reports using the supplied SafeCom Reports command lineinterface. Refer to SafeCom Reports Administrator’s ManualD60609.
Work with the tracking data
320
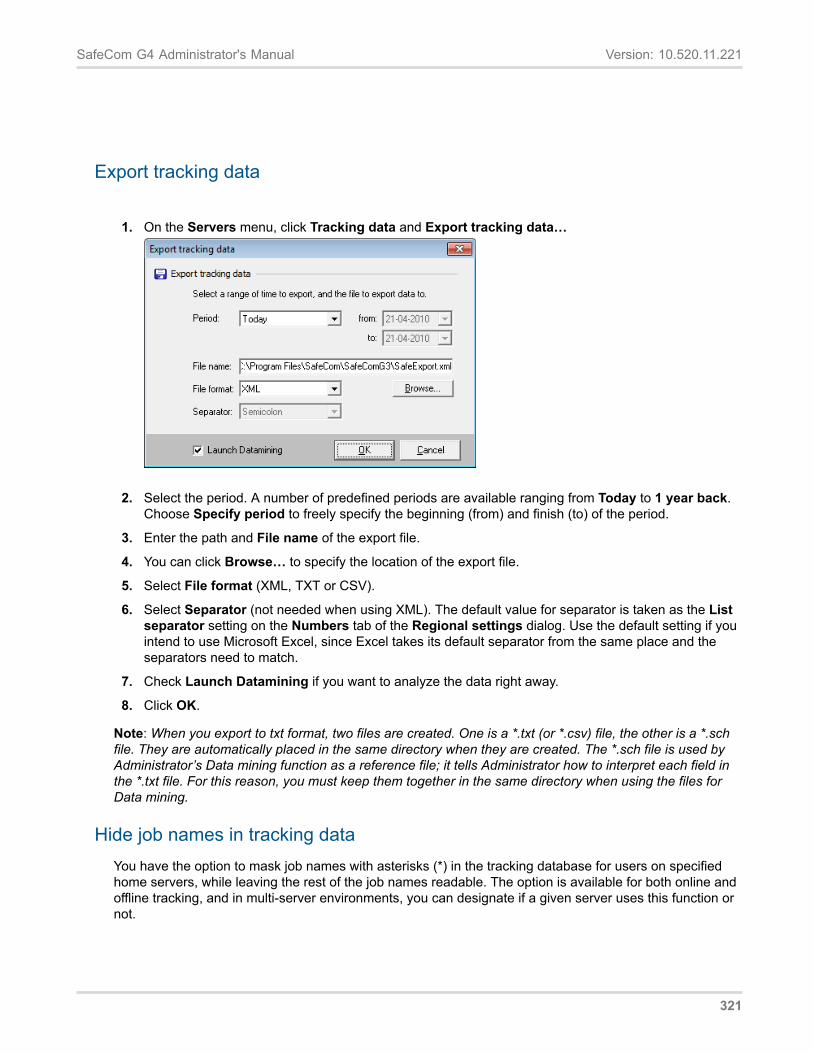
SafeCom G4 Administrator's Manual Version: 10.520.11.221
Export tracking data
1. On the Servers menu, click Tracking data and Export tracking data…
2. Select the period. A number of predefined periods are available ranging from Today to 1 year back.Choose Specify period to freely specify the beginning (from) and finish (to) of the period.
3. Enter the path and File name of the export file.
4. You can click Browse… to specify the location of the export file.
5. Select File format (XML, TXT or CSV).
6. Select Separator (not needed when using XML). The default value for separator is taken as the Listseparator setting on the Numbers tab of the Regional settings dialog. Use the default setting if youintend to use Microsoft Excel, since Excel takes its default separator from the same place and theseparators need to match.
7. Check Launch Datamining if you want to analyze the data right away.
8. Click OK.
Note: When you export to txt format, two files are created. One is a *.txt (or *.csv) file, the other is a *.schfile. They are automatically placed in the same directory when they are created. The *.sch file is used byAdministrator’s Data mining function as a reference file; it tells Administrator how to interpret each field inthe *.txt file. For this reason, you must keep them together in the same directory when using the files forData mining.
Hide job names in tracking dataYou have the option to mask job names with asterisks (*) in the tracking database for users on specifiedhome servers, while leaving the rest of the job names readable. The option is available for both online andoffline tracking, and in multi-server environments, you can designate if a given server uses this function ornot.
321
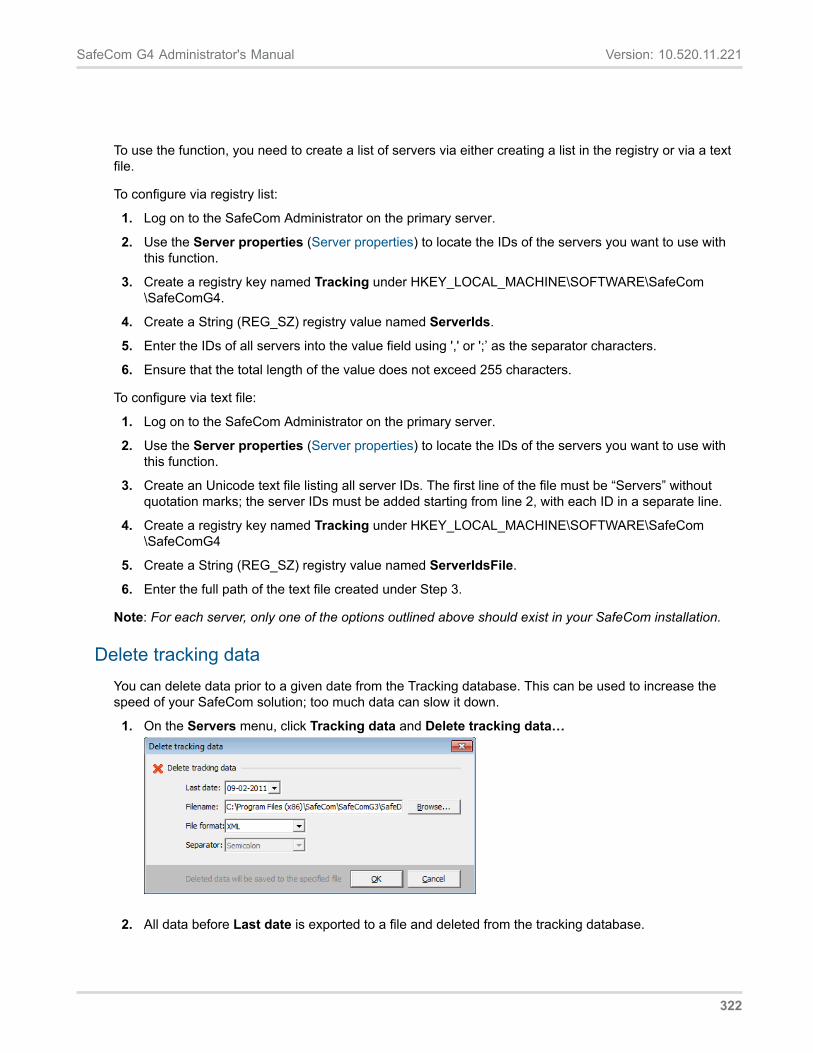
SafeCom G4 Administrator's Manual Version: 10.520.11.221
To use the function, you need to create a list of servers via either creating a list in the registry or via a text file.
To configure via registry list:
1. Log on to the SafeCom Administrator on the primary server.
2. Use the Server properties (Server properties) to locate the IDs of the servers you want to use with this function.
3. Create a registry key named Tracking under HKEY_LOCAL_MACHINE\SOFTWARE\SafeCom \SafeComG4.
4. Create a String (REG_SZ) registry value named ServerIds.
5. Enter the IDs of all servers into the value field using ',' or ';’ as the separator characters.
6. Ensure that the total length of the value does not exceed 255 characters.
To configure via text file:
1. Log on to the SafeCom Administrator on the primary server.
2. Use the Server properties (Server properties) to locate the IDs of the servers you want to use with this function.
3. Create an Unicode text file listing all server IDs. The first line of the file must be “Servers” without quotation marks; the server IDs must be added starting from line 2, with each ID in a separate line.
4. Create a registry key named Tracking under HKEY_LOCAL_MACHINE\SOFTWARE\SafeCom \SafeComG4
5. Create a String (REG_SZ) registry value named ServerIdsFile.
6. Enter the full path of the text file created under Step 3.
Note: For each server, only one of the options outlined above should exist in your SafeCom installation.
Delete tracking data You can delete data prior to a given date from the Tracking database. This can be used to increase the speed of your SafeCom solution; too much data can slow it down.
1. On the Servers menu, click Tracking data and Delete tracking data…
2. All data before Last date is exported to a file and deleted from the tracking database.
322
SafeCom G4 Administrator's Manual Version: 10.520.11.221
3. Enter the path and File name of the delete file.
4. You can click Browse… to specify the location of the export file.
5. Select File format (XML, TXT or CSV). Do not select CSV if you intend to Launch Datamining.
6. Select Separator (not needed when using XML). The default value for separator is taken as the Listseparator setting on the Numbers tab of the Regional settings dialog. Use the default setting if youintend to use Microsoft Excel, since Excel takes its default separator from the same place and theseparators need to match. In chapter Format of tracking data there is a complete description of theexported tracking data.
7. Click OK.
SafeCom Data MiningSafeCom Data Mining enables you to see main tracking statistics, user statistics, device statistics, billingstatistics and job list.
Note: SafeCom Data Mining is designed to handle up to 50,000 tracking records. Use SafeCom Reports(SafeCom Reports) to work with more tracking records. The optional SafeCom Administrator API can beused to export selected fields from the tracking records. This allows optimized data post processing bythird party applications that can work on the CSV or XML file exported from the SafeCom solution.
To start SafeCom Data Mining:
1. Check Launch Datamining when you export tracking data (Export tracking data) or delete trackingdata (Hide job names in tracking data).
2. The SafeCom Datamining window is displayed (Main tracking).
Using SafeCom Data Mining:
1. On the File menu click Open.
2. Find the SafeCom Data Mining File (*.xml or *.txt) containing the data you want to view. Click Open.
3. Choose either to view All data or Selecta Period (click Refresh if you change Period).
4. Click User Statistics, Device Statistics or Billing statistics tab, according to the data you want toview.
323
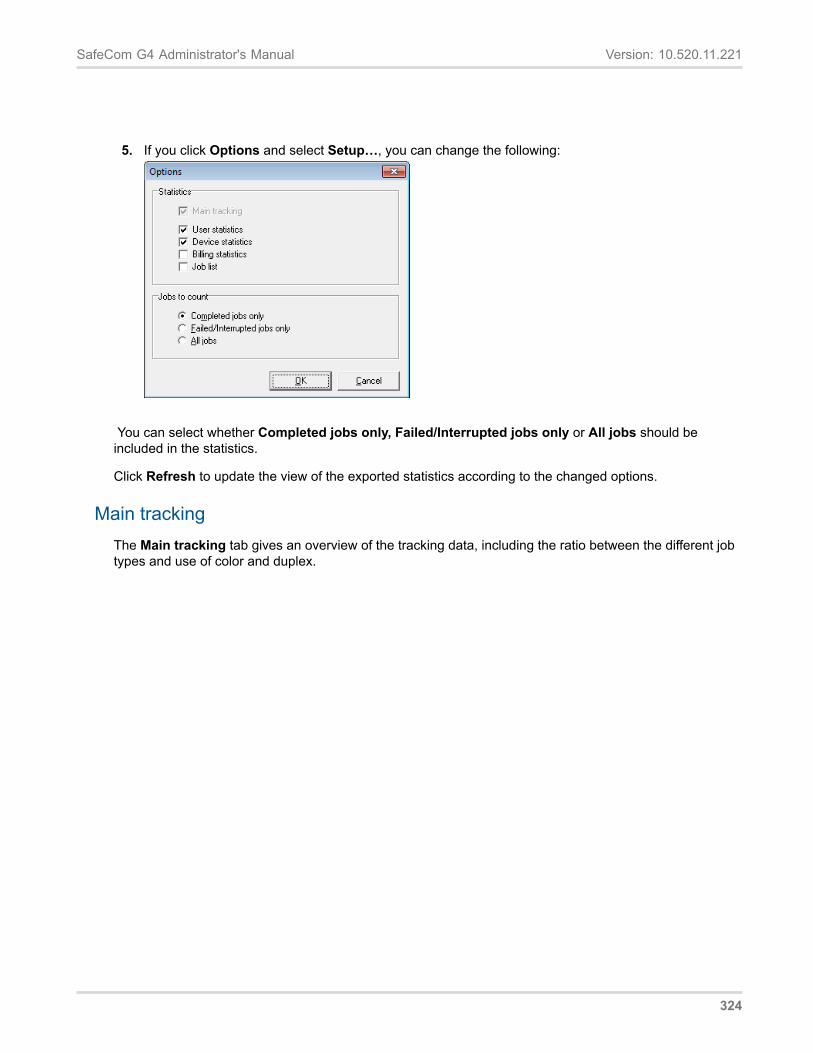
SafeCom G4 Administrator's Manual Version: 10.520.11.221
5. If you click Options and select Setup…, you can change the following:
You can select whether Completed jobs only, Failed/Interrupted jobs only or All jobs should beincluded in the statistics.
Click Refresh to update the view of the exported statistics according to the changed options.
Main trackingThe Main tracking tab gives an overview of the tracking data, including the ratio between the different jobtypes and use of color and duplex.
324
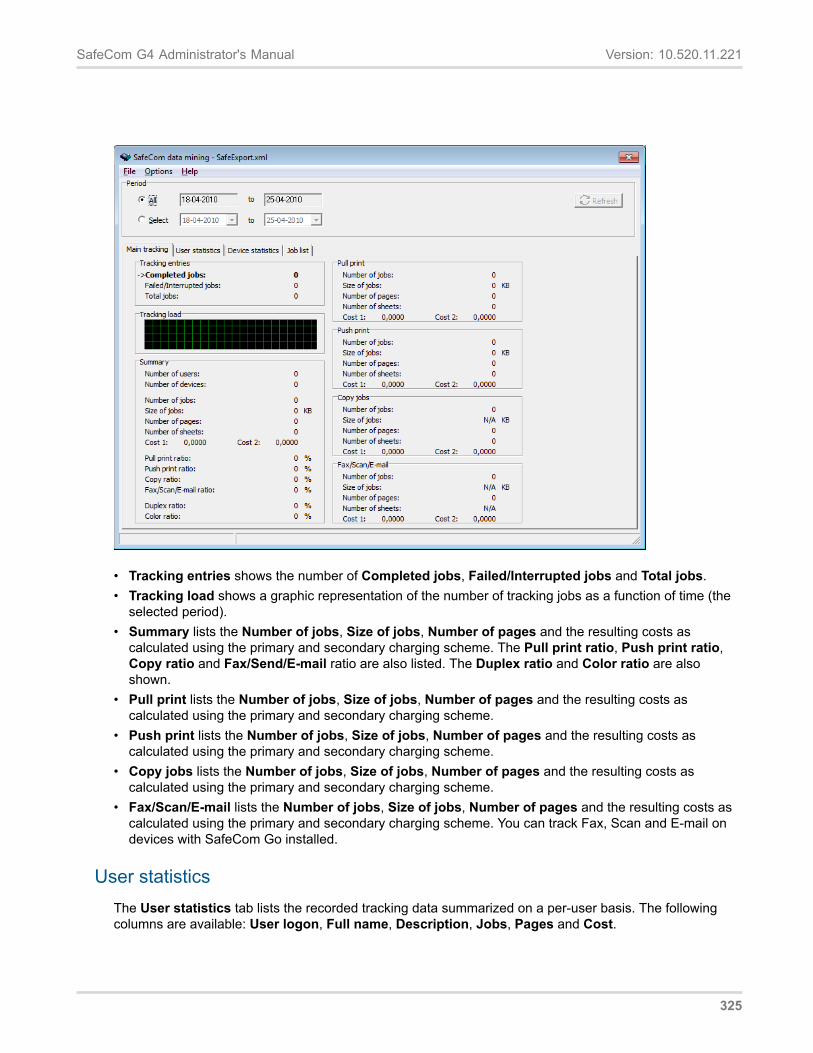
SafeCom G4 Administrator's Manual Version: 10.520.11.221
• Tracking entries shows the number of Completed jobs, Failed/Interrupted jobs and Total jobs.• Tracking load shows a graphic representation of the number of tracking jobs as a function of time (the
selected period).• Summary lists the Number of jobs, Size of jobs, Number of pages and the resulting costs as
calculated using the primary and secondary charging scheme. The Pull print ratio, Push print ratio,Copy ratio and Fax/Send/E-mail ratio are also listed. The Duplex ratio and Color ratio are alsoshown.
• Pull print lists the Number of jobs, Size of jobs, Number of pages and the resulting costs ascalculated using the primary and secondary charging scheme.
• Push print lists the Number of jobs, Size of jobs, Number of pages and the resulting costs ascalculated using the primary and secondary charging scheme.
• Copy jobs lists the Number of jobs, Size of jobs, Number of pages and the resulting costs ascalculated using the primary and secondary charging scheme.
• Fax/Scan/E-mail lists the Number of jobs, Size of jobs, Number of pages and the resulting costs ascalculated using the primary and secondary charging scheme. You can track Fax, Scan and E-mail ondevices with SafeCom Go installed.
User statisticsThe User statistics tab lists the recorded tracking data summarized on a per-user basis. The followingcolumns are available: User logon, Full name, Description, Jobs, Pages and Cost.
325
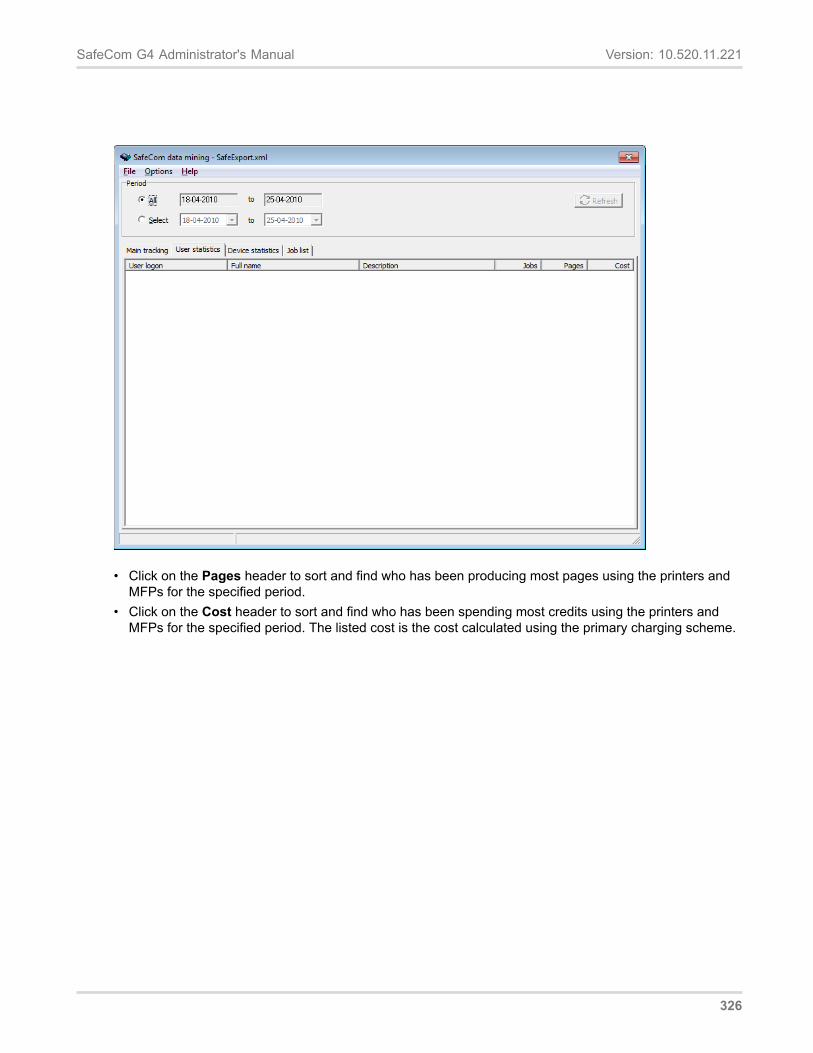
SafeCom G4 Administrator's Manual Version: 10.520.11.221
• Click on the Pages header to sort and find who has been producing most pages using the printers andMFPs for the specified period.
• Click on the Cost header to sort and find who has been spending most credits using the printers andMFPs for the specified period. The listed cost is the cost calculated using the primary charging scheme.
326
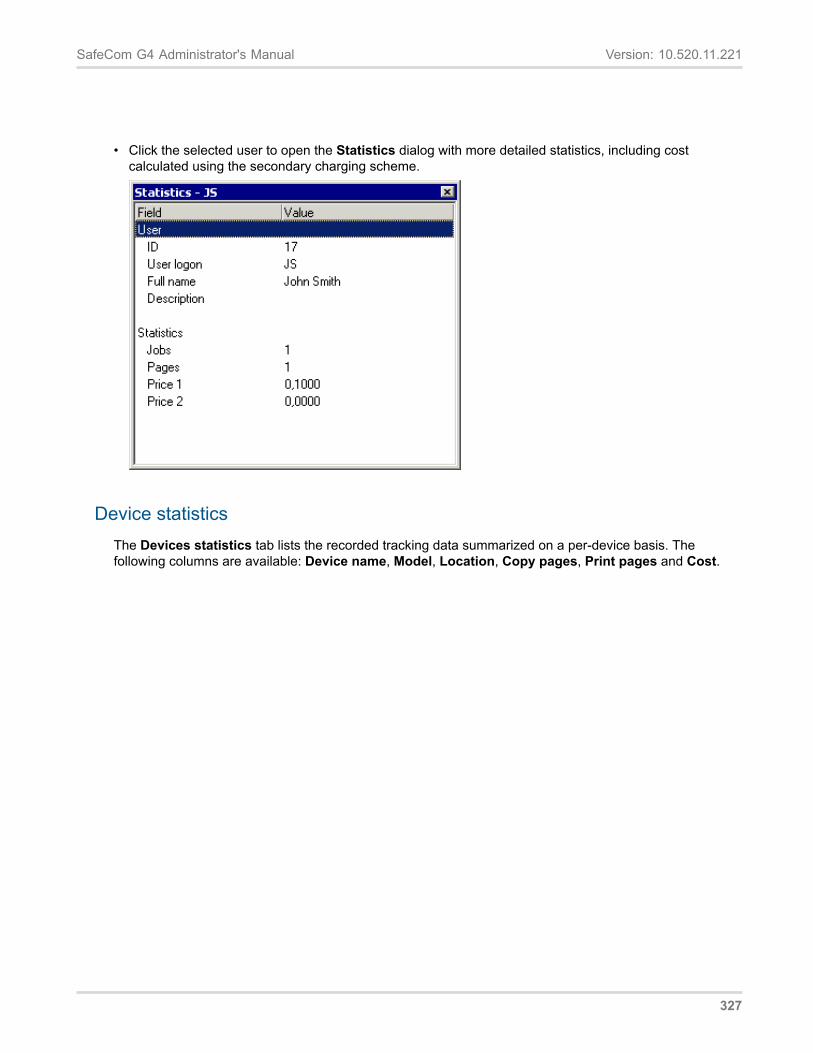
SafeCom G4 Administrator's Manual Version: 10.520.11.221
• Click the selected user to open the Statistics dialog with more detailed statistics, including costcalculated using the secondary charging scheme.
Device statisticsThe Devices statistics tab lists the recorded tracking data summarized on a per-device basis. Thefollowing columns are available: Device name, Model, Location, Copy pages, Print pages and Cost.
327
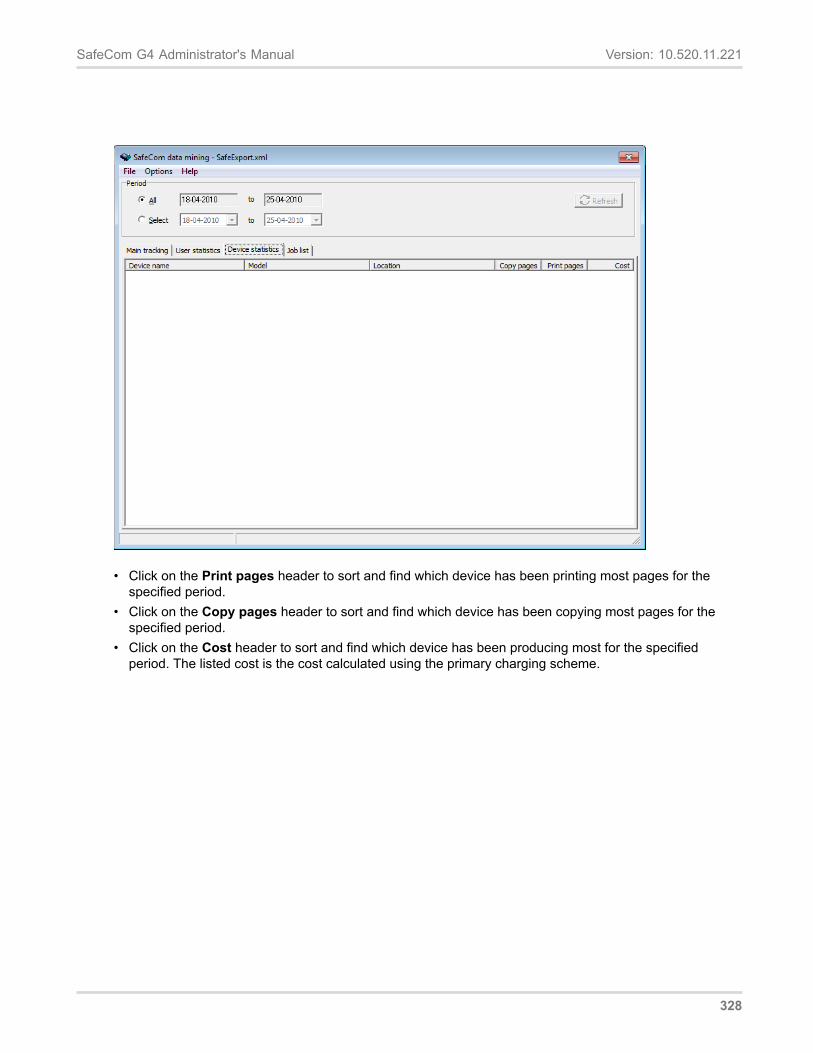
SafeCom G4 Administrator's Manual Version: 10.520.11.221
• Click on the Print pages header to sort and find which device has been printing most pages for thespecified period.
• Click on the Copy pages header to sort and find which device has been copying most pages for thespecified period.
• Click on the Cost header to sort and find which device has been producing most for the specifiedperiod. The listed cost is the cost calculated using the primary charging scheme.
328
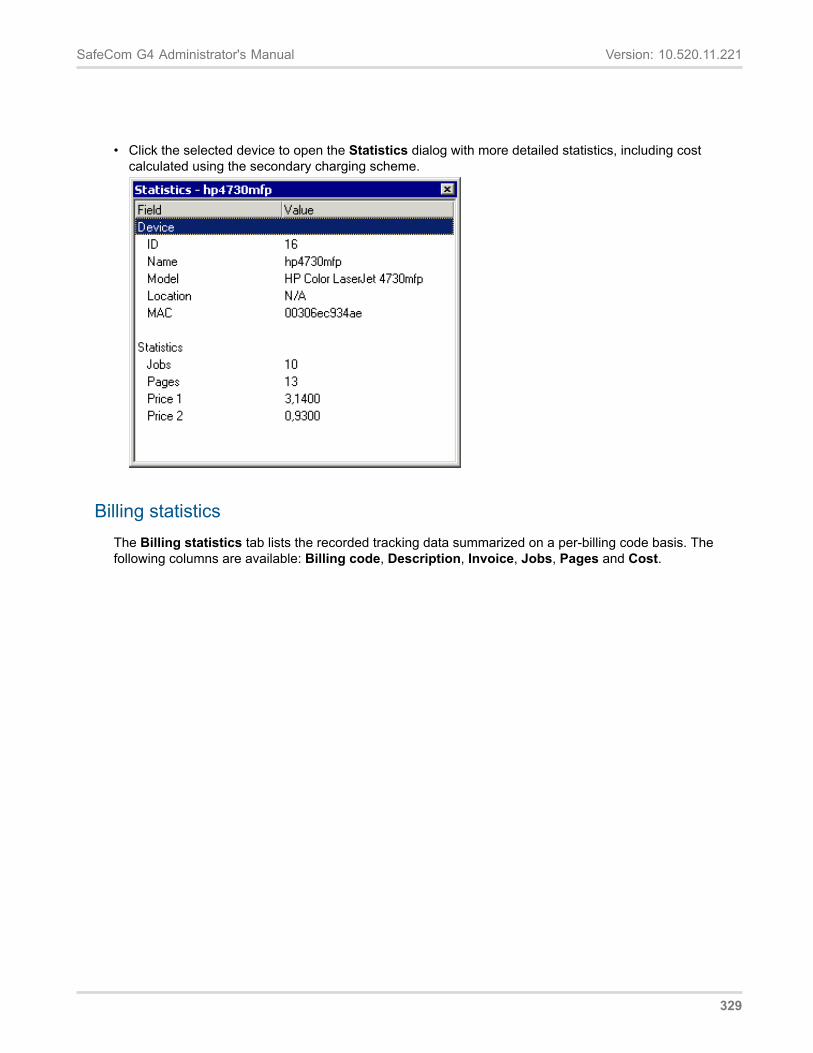
SafeCom G4 Administrator's Manual Version: 10.520.11.221
• Click the selected device to open the Statistics dialog with more detailed statistics, including costcalculated using the secondary charging scheme.
Billing statisticsThe Billing statistics tab lists the recorded tracking data summarized on a per-billing code basis. Thefollowing columns are available: Billing code, Description, Invoice, Jobs, Pages and Cost.
329
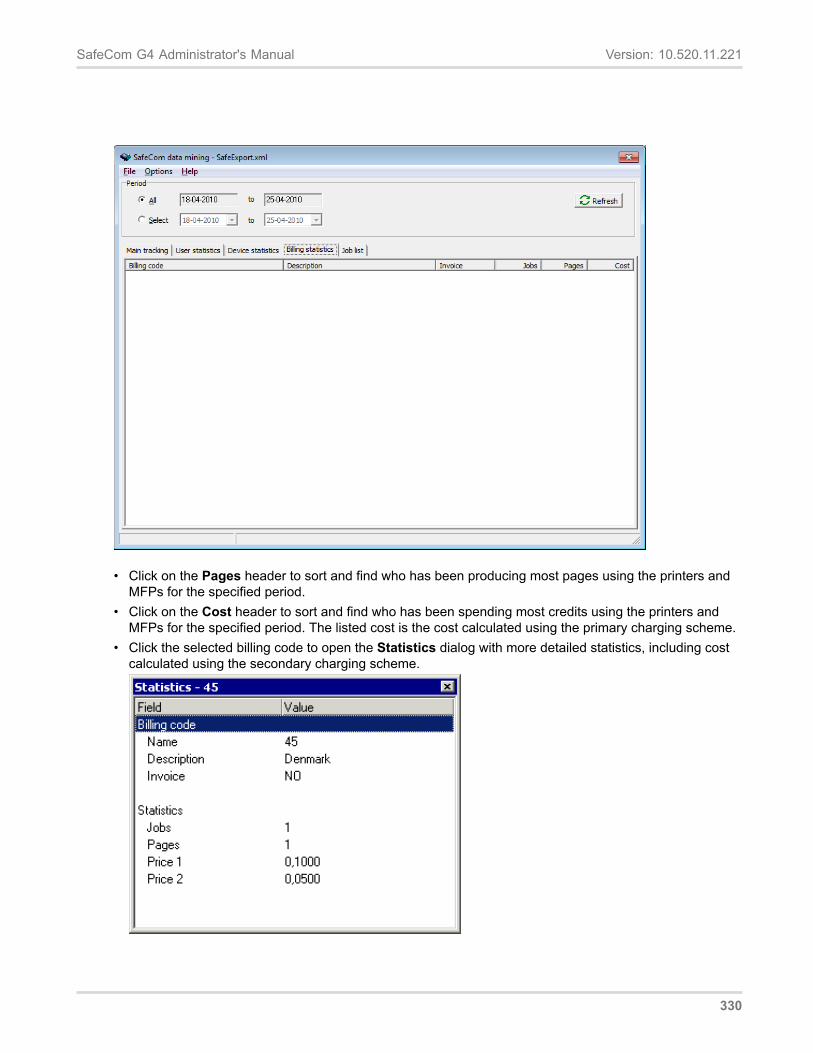
SafeCom G4 Administrator's Manual Version: 10.520.11.221
• Click on the Pages header to sort and find who has been producing most pages using the printers andMFPs for the specified period.
• Click on the Cost header to sort and find who has been spending most credits using the printers andMFPs for the specified period. The listed cost is the cost calculated using the primary charging scheme.
• Click the selected billing code to open the Statistics dialog with more detailed statistics, including costcalculated using the secondary charging scheme.
330
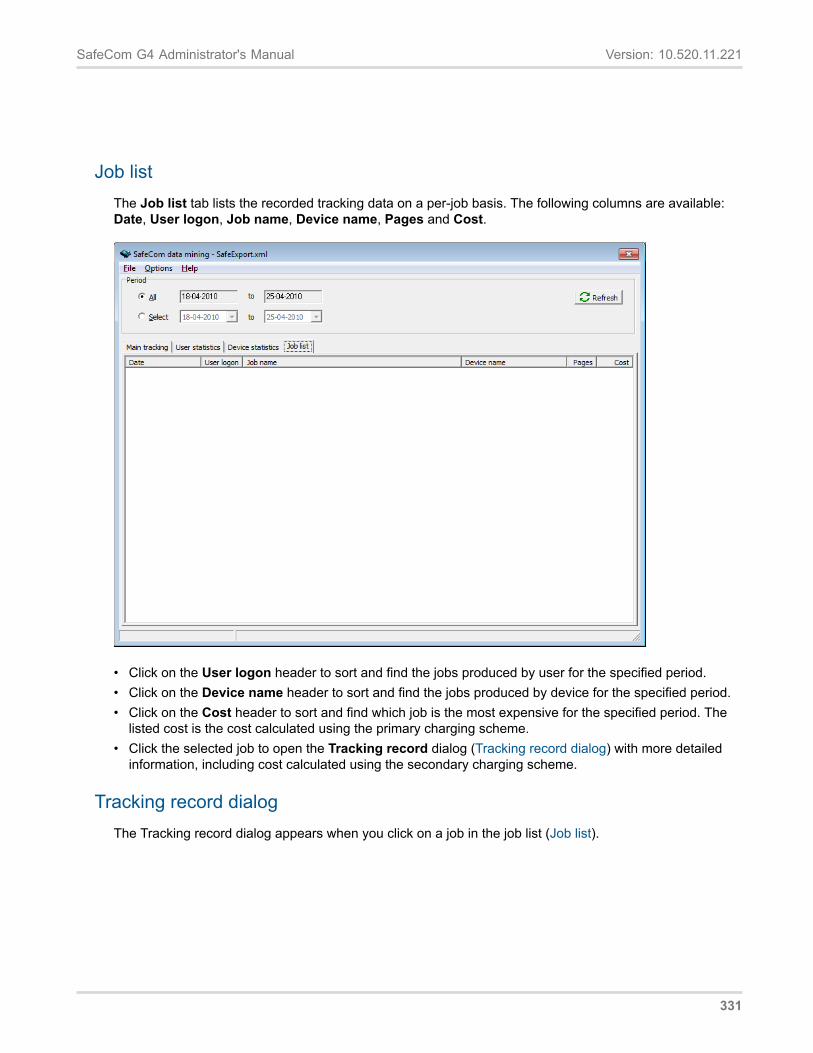
SafeCom G4 Administrator's Manual Version: 10.520.11.221
Job listThe Job list tab lists the recorded tracking data on a per-job basis. The following columns are available:Date, User logon, Job name, Device name, Pages and Cost.
• Click on the User logon header to sort and find the jobs produced by user for the specified period.• Click on the Device name header to sort and find the jobs produced by device for the specified period.• Click on the Cost header to sort and find which job is the most expensive for the specified period. The
listed cost is the cost calculated using the primary charging scheme.• Click the selected job to open the Tracking record dialog (Tracking record dialog) with more detailed
information, including cost calculated using the secondary charging scheme.
Tracking record dialogThe Tracking record dialog appears when you click on a job in the job list (Job list).
331
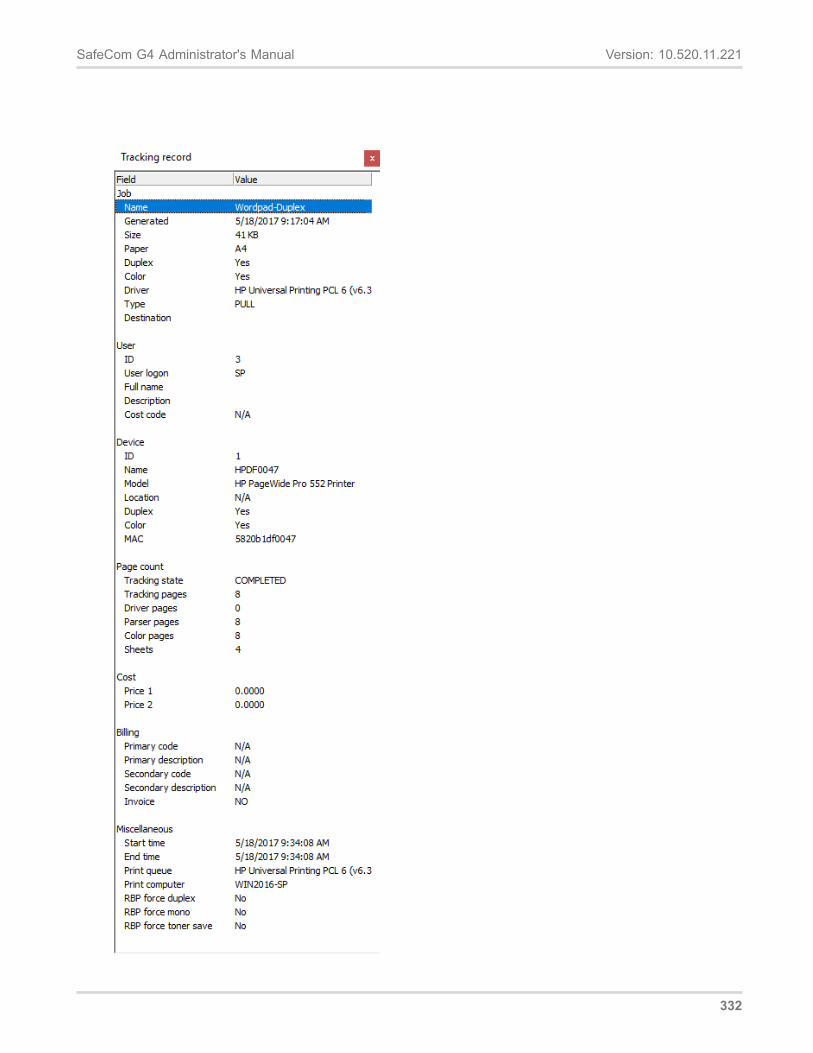
SafeCom G4 Administrator's Manual Version: 10.520.11.221
332
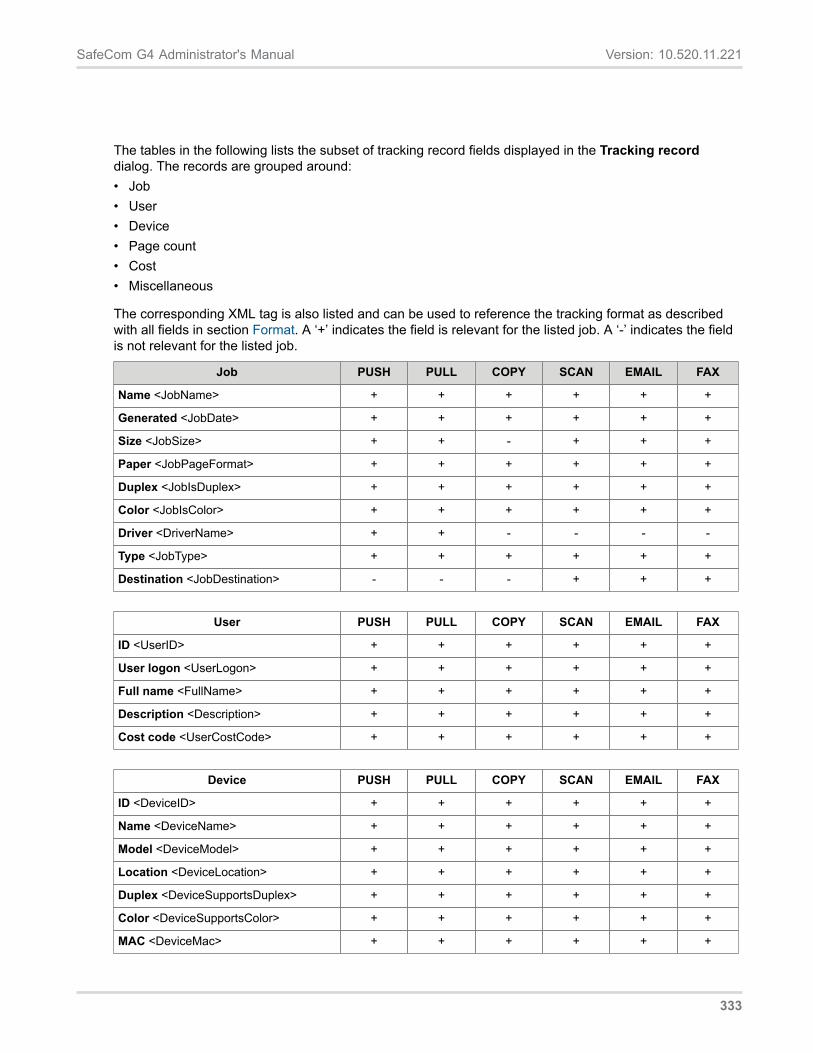
SafeCom G4 Administrator's Manual Version: 10.520.11.221
The tables in the following lists the subset of tracking record fields displayed in the Tracking recorddialog. The records are grouped around:• Job• User• Device• Page count• Cost• Miscellaneous
The corresponding XML tag is also listed and can be used to reference the tracking format as describedwith all fields in section Format. A ‘+’ indicates the field is relevant for the listed job. A ‘-’ indicates the fieldis not relevant for the listed job.
Job PUSH PULL COPY SCAN EMAIL FAX
Name <JobName> + + + + + +
Generated <JobDate> + + + + + +
Size <JobSize> + + - + + +
Paper <JobPageFormat> + + + + + +
Duplex <JobIsDuplex> + + + + + +
Color <JobIsColor> + + + + + +
Driver <DriverName> + + - - - -
Type <JobType> + + + + + +
Destination <JobDestination> - - - + + +
User PUSH PULL COPY SCAN EMAIL FAX
ID <UserID> + + + + + +
User logon <UserLogon> + + + + + +
Full name <FullName> + + + + + +
Description <Description> + + + + + +
Cost code <UserCostCode> + + + + + +
Device PUSH PULL COPY SCAN EMAIL FAX
ID <DeviceID> + + + + + +
Name <DeviceName> + + + + + +
Model <DeviceModel> + + + + + +
Location <DeviceLocation> + + + + + +
Duplex <DeviceSupportsDuplex> + + + + + +
Color <DeviceSupportsColor> + + + + + +
MAC <DeviceMac> + + + + + +
333
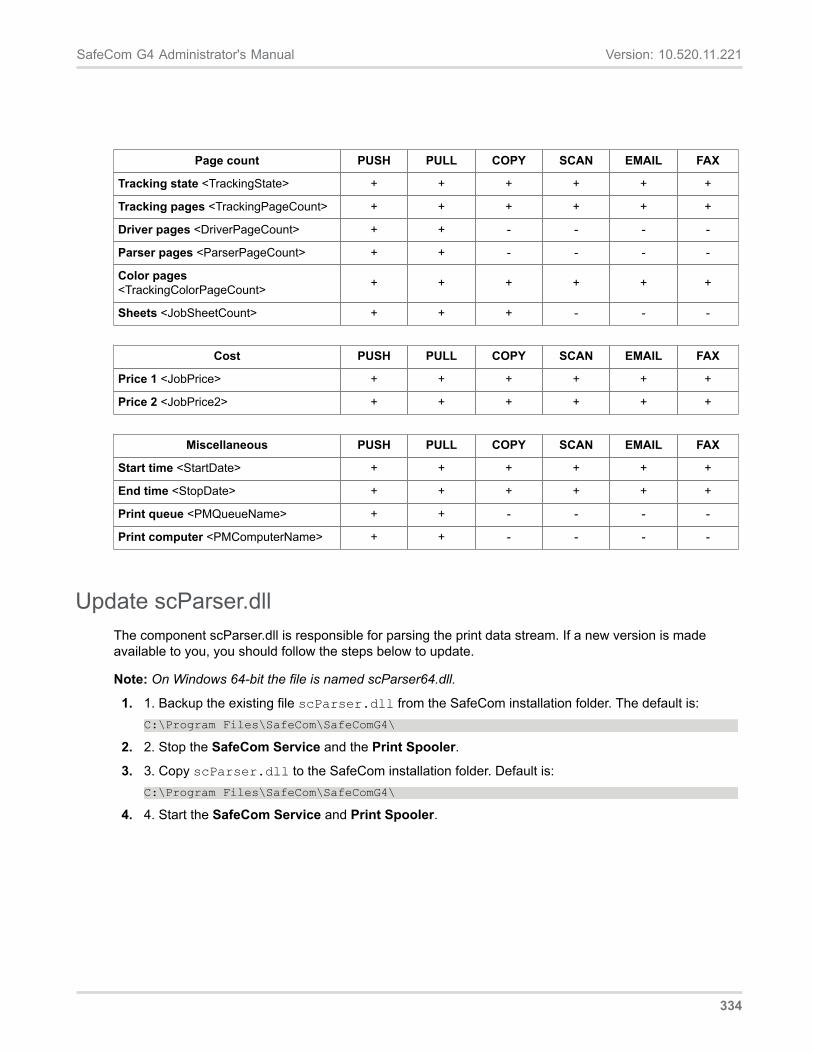
SafeCom G4 Administrator's Manual Version: 10.520.11.221
Page count PUSH PULL COPY SCAN EMAIL FAX
Tracking state <TrackingState> + + + + + +
Tracking pages <TrackingPageCount> + + + + + +
Driver pages <DriverPageCount> + + - - - -
Parser pages <ParserPageCount> + + - - - -
Color pages<TrackingColorPageCount> + + + + + +
Sheets <JobSheetCount> + + + - - -
Cost PUSH PULL COPY SCAN EMAIL FAX
Price 1 <JobPrice> + + + + + +
Price 2 <JobPrice2> + + + + + +
Miscellaneous PUSH PULL COPY SCAN EMAIL FAX
Start time <StartDate> + + + + + +
End time <StopDate> + + + + + +
Print queue <PMQueueName> + + - - - -
Print computer <PMComputerName> + + - - - -
Update scParser.dllThe component scParser.dll is responsible for parsing the print data stream. If a new version is madeavailable to you, you should follow the steps below to update.
Note: On Windows 64-bit the file is named scParser64.dll.
1. 1. Backup the existing file scParser.dll from the SafeCom installation folder. The default is:C:\Program Files\SafeCom\SafeComG4\
2. 2. Stop the SafeCom Service and the Print Spooler.
3. 3. Copy scParser.dll to the SafeCom installation folder. Default is:C:\Program Files\SafeCom\SafeComG4\
4. 4. Start the SafeCom Service and Print Spooler.
334
Chapter 10
SafeCom Rule Based Printing (RBP)
IntroductionThe Rule Based Printing module makes it possible to gain cost savings by offering management a methodof enforcing policies for printing.
The policies are formulated as one or more rules. Rules are assigned to groups of users. It is possible toconstruct rules like:• Only color jobs can be printed on color devices.• Print e-mail as b/w and with toner save.• Color print is not allowed.• Allow color print, but warn that color printing is more expensive.
Disclaimer:• SafeCom Rule Based Printing needs to modify the print data stream to control: Duplex on/off, Toner
save on/off and Force job to b/w. SafeCom does NOT guarantee that these modifications will work andcannot be held responsible if they do not work as expected. SafeCom Rule Based Printing has beentested against PCL5, PCL5c, PCL5e, PCL6, PCL XL and PostScript level 2 and 3 printer drivers fromHP using a broad range of HP LaserJets.
Planning your SafeCom RBP solutionWhen planning your SafeCom Rule Based Printing solution you need to:• Organize users into groups, as rules apply to groups rather than individual users. A user can be a
member of multiple groups and is subject to all rules of the groups he is a member of.• Create the rules enforcing the policies (Creating the rules).• Run the scPopUp.exe program on the user’s computer if the rule to notify the user runs on the user’s
computer (Add a SafeCom Push Port).• Test all new rules using the available printer drivers and printers to ensure that the outcome is as
expected before applying the rules on a large scale. Section What if the rule does not work? includessome troubleshooting hints.
• Select the rules to use on the different groups (Select rules to be used on group).• Make sure your license covers tracking (Device license and user settings dependencies) and that
relevant users’ cost control is set to either Tracking or Pay (Settings).
335
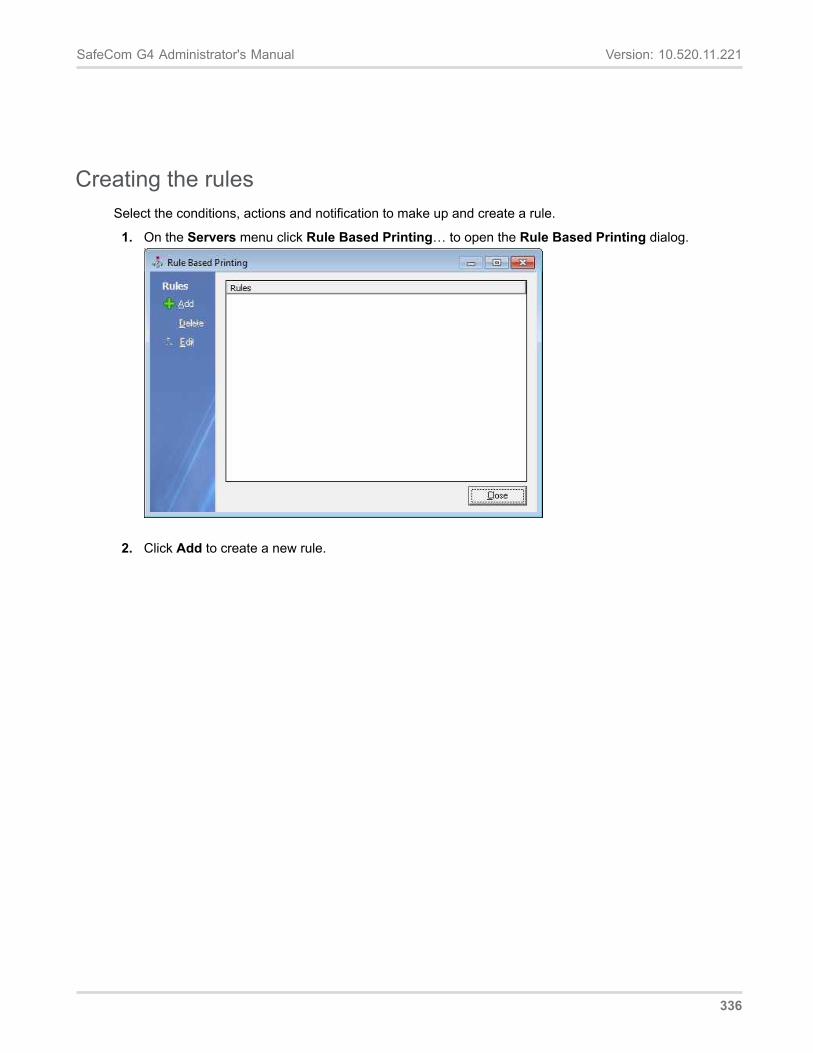
SafeCom G4 Administrator's Manual Version: 10.520.11.221
Creating the rulesSelect the conditions, actions and notification to make up and create a rule.
1. On the Servers menu click Rule Based Printing… to open the Rule Based Printing dialog.
2. Click Add to create a new rule.
336
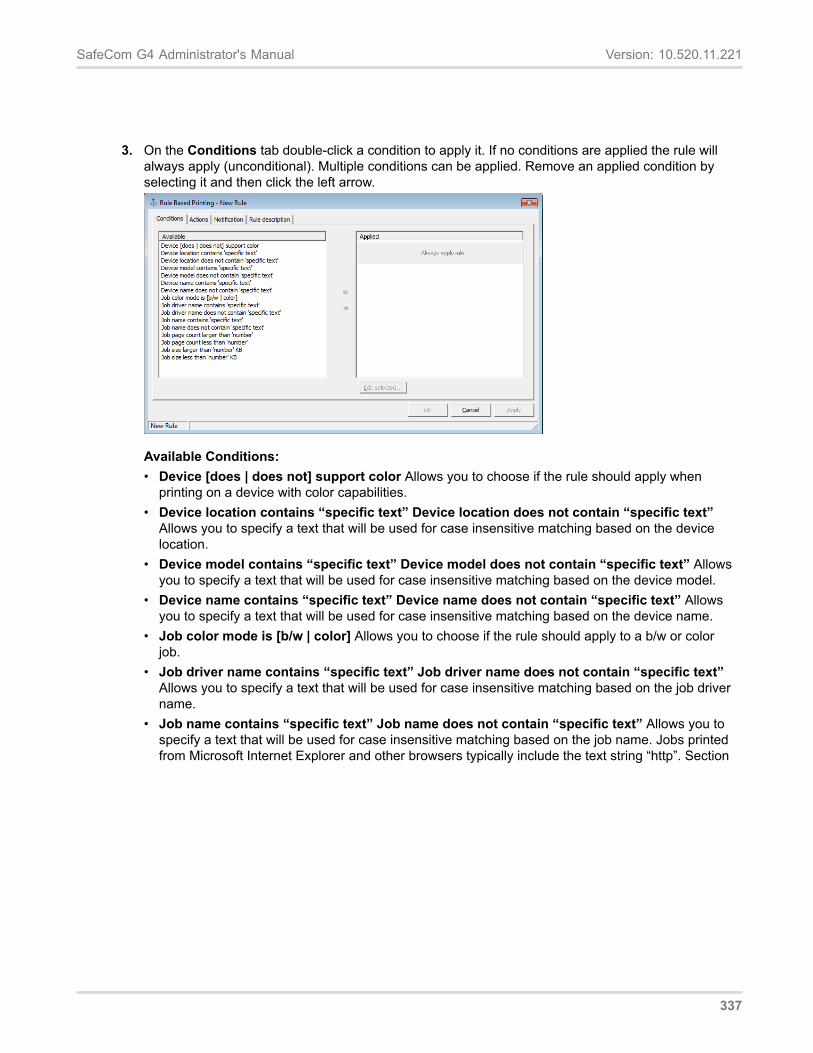
SafeCom G4 Administrator's Manual Version: 10.520.11.221
3. On the Conditions tab double-click a condition to apply it. If no conditions are applied the rule willalways apply (unconditional). Multiple conditions can be applied. Remove an applied condition byselecting it and then click the left arrow.
Available Conditions:• Device [does | does not] support color Allows you to choose if the rule should apply when
printing on a device with color capabilities.• Device location contains “specific text” Device location does not contain “specific text”
Allows you to specify a text that will be used for case insensitive matching based on the devicelocation.
• Device model contains “specific text” Device model does not contain “specific text” Allowsyou to specify a text that will be used for case insensitive matching based on the device model.
• Device name contains “specific text” Device name does not contain “specific text” Allowsyou to specify a text that will be used for case insensitive matching based on the device name.
• Job color mode is [b/w | color] Allows you to choose if the rule should apply to a b/w or colorjob.
• Job driver name contains “specific text” Job driver name does not contain “specific text”Allows you to specify a text that will be used for case insensitive matching based on the job drivername.
• Job name contains “specific text” Job name does not contain “specific text” Allows you tospecify a text that will be used for case insensitive matching based on the job name. Jobs printedfrom Microsoft Internet Explorer and other browsers typically include the text string “http”. Section
337
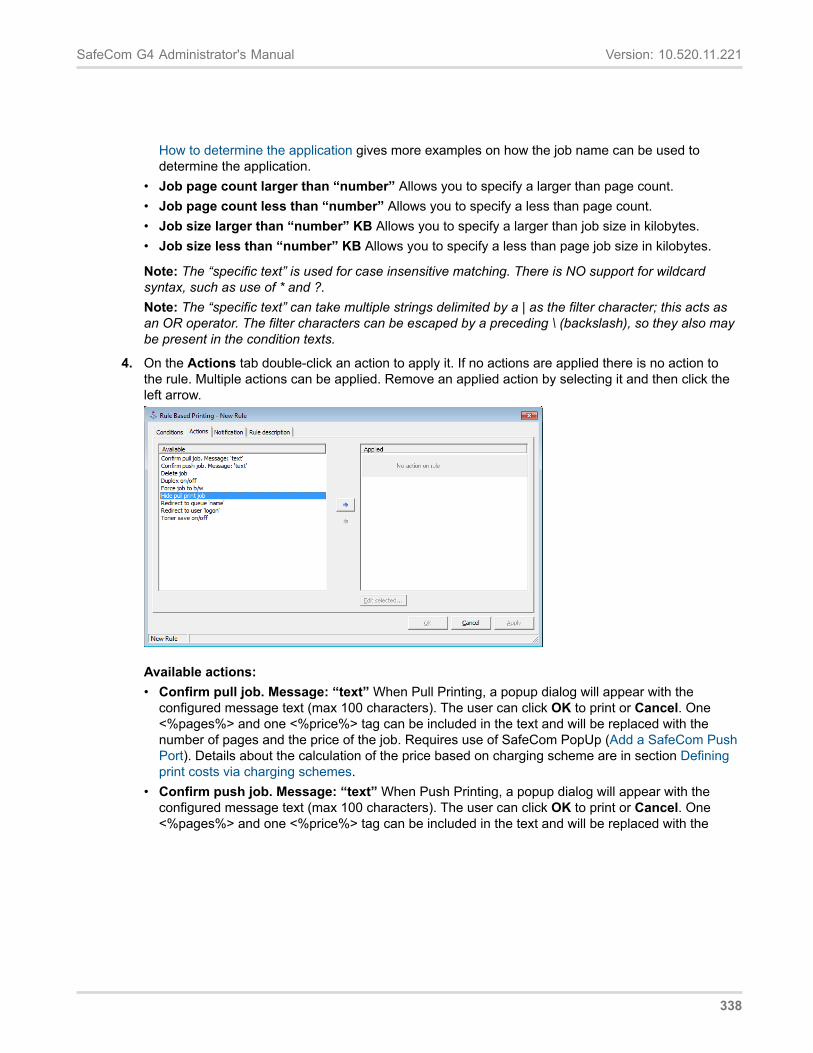
SafeCom G4 Administrator's Manual Version: 10.520.11.221
How to determine the application gives more examples on how the job name can be used todetermine the application.
• Job page count larger than “number” Allows you to specify a larger than page count.• Job page count less than “number” Allows you to specify a less than page count.• Job size larger than “number” KB Allows you to specify a larger than job size in kilobytes.• Job size less than “number” KB Allows you to specify a less than page job size in kilobytes.
Note: The “specific text” is used for case insensitive matching. There is NO support for wildcardsyntax, such as use of * and ?.Note: The “specific text” can take multiple strings delimited by a | as the filter character; this acts asan OR operator. The filter characters can be escaped by a preceding \ (backslash), so they also maybe present in the condition texts.
4. On the Actions tab double-click an action to apply it. If no actions are applied there is no action tothe rule. Multiple actions can be applied. Remove an applied action by selecting it and then click theleft arrow.
Available actions:• Confirm pull job. Message: “text” When Pull Printing, a popup dialog will appear with the
configured message text (max 100 characters). The user can click OK to print or Cancel. One<%pages%> and one <%price%> tag can be included in the text and will be replaced with thenumber of pages and the price of the job. Requires use of SafeCom PopUp (Add a SafeCom PushPort). Details about the calculation of the price based on charging scheme are in section Definingprint costs via charging schemes.
• Confirm push job. Message: “text” When Push Printing, a popup dialog will appear with theconfigured message text (max 100 characters). The user can click OK to print or Cancel. One<%pages%> and one <%price%> tag can be included in the text and will be replaced with the
338
SafeCom G4 Administrator's Manual Version: 10.520.11.221
number of pages and the price of the job. Requires use of SafeCom PopUp (Add a SafeCom PushPort).
• Delete job The job is deleted.• Duplex on/off The print data is modified to get double-sided print. To avoid 1-page documents
from using the duplexer it is recommended to combine include the condition: Job page countlarger than 1.
• Force job to b/w The print data is modified to force job to b/w.• Hide pull print job The job will not appear on the Pull Print list of documents. Typically combined
with the conditions Device supports color and Job color mode is color to ensure that only colorjobs can be Pull printed on color devices. If the job is Push Print it is deleted.
• Redirect to queue “name” This action applies to Push Print only. The print job will be redirectedto the specified destination. Normally the destination is in the form of a printer’s IP addressor hostname. However, it is also possible to redirect to another print queue by for exampleentering the share name: Example \\SERVER\Printer. If you redirect to a print queue that uses theSafeCom Push Port the print job is tracked again.
• Redirect to user “logon” This action applies to Pull Print only. The print job is redirected andstored under the specified user logon. Redirecting to a Group name is not supported.
• Toner save on/off The print data stream is modified to enable toner save (Economode on b/w HPLaserJets).
339
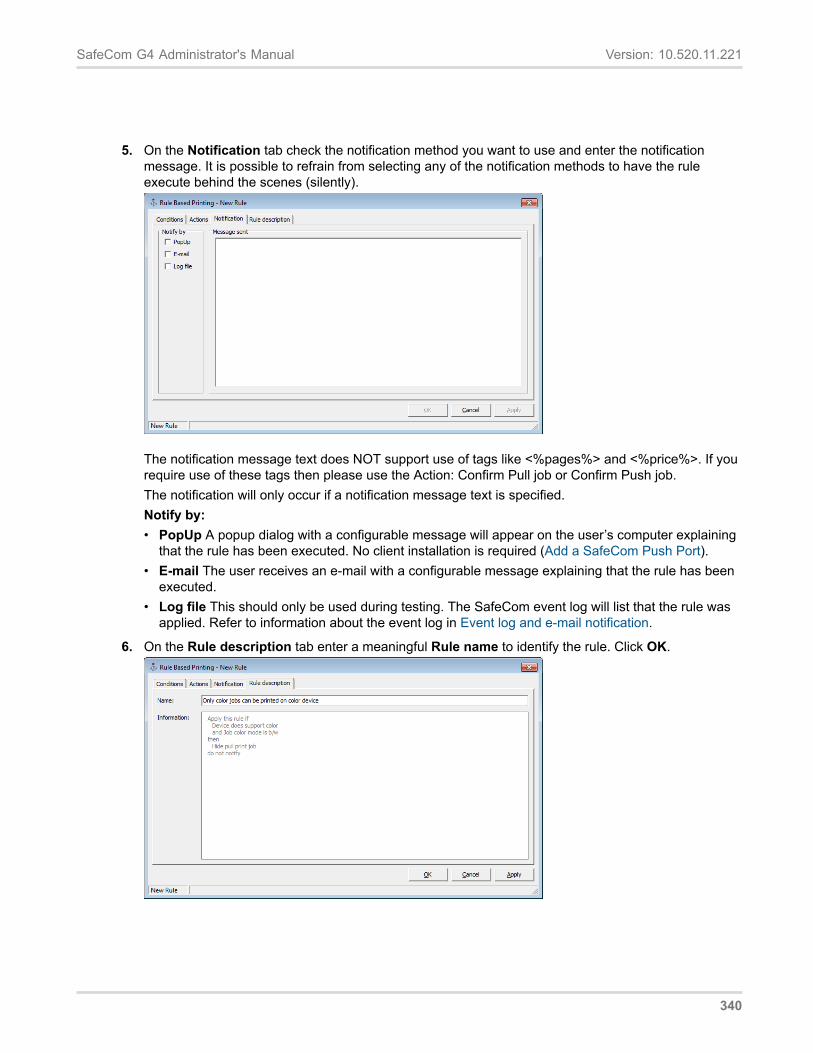
SafeCom G4 Administrator's Manual Version: 10.520.11.221
5. On the Notification tab check the notification method you want to use and enter the notificationmessage. It is possible to refrain from selecting any of the notification methods to have the ruleexecute behind the scenes (silently).
The notification message text does NOT support use of tags like <%pages%> and <%price%>. If yourequire use of these tags then please use the Action: Confirm Pull job or Confirm Push job.The notification will only occur if a notification message text is specified.Notify by:• PopUp A popup dialog with a configurable message will appear on the user’s computer explaining
that the rule has been executed. No client installation is required (Add a SafeCom Push Port).• E-mail The user receives an e-mail with a configurable message explaining that the rule has been
executed.• Log file This should only be used during testing. The SafeCom event log will list that the rule was
applied. Refer to information about the event log in Event log and e-mail notification.
6. On the Rule description tab enter a meaningful Rule name to identify the rule. Click OK.
340
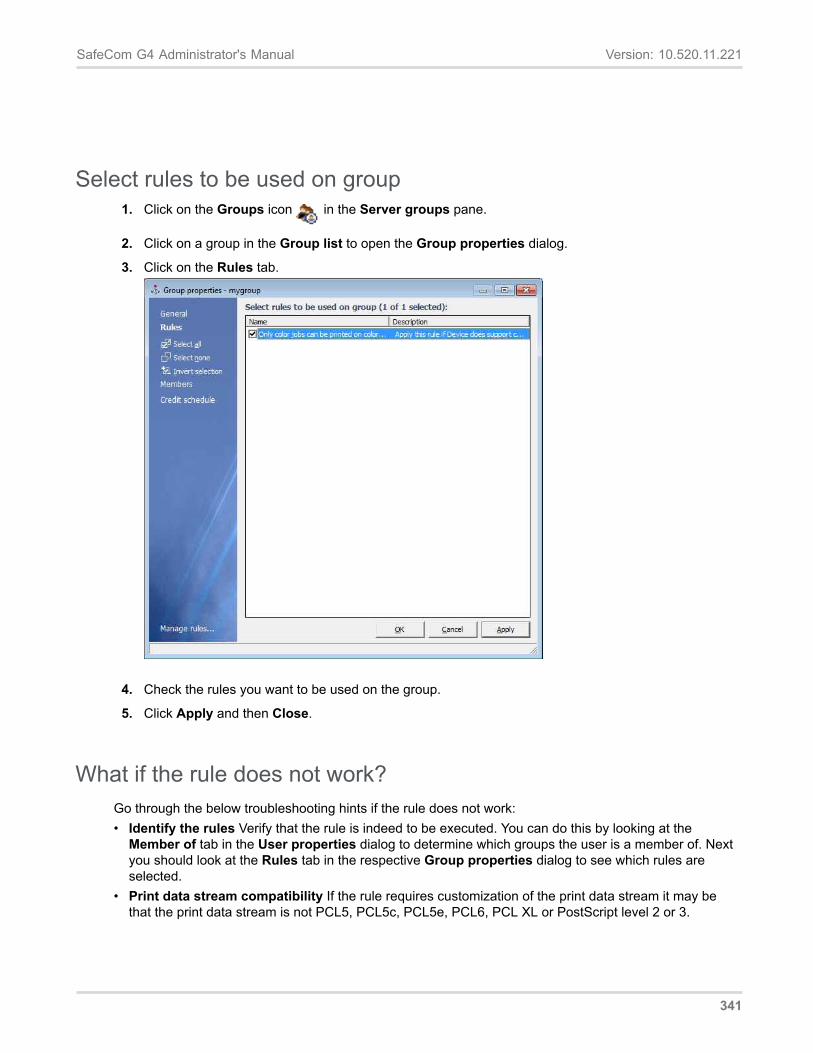
SafeCom G4 Administrator's Manual Version: 10.520.11.221
Select rules to be used on group1. Click on the Groups icon in the Server groups pane.
2. Click on a group in the Group list to open the Group properties dialog.
3. Click on the Rules tab.
4. Check the rules you want to be used on the group.
5. Click Apply and then Close.
What if the rule does not work?Go through the below troubleshooting hints if the rule does not work:• Identify the rules Verify that the rule is indeed to be executed. You can do this by looking at the
Member of tab in the User properties dialog to determine which groups the user is a member of. Nextyou should look at the Rules tab in the respective Group properties dialog to see which rules areselected.
• Print data stream compatibility If the rule requires customization of the print data stream it may bethat the print data stream is not PCL5, PCL5c, PCL5e, PCL6, PCL XL or PostScript level 2 or 3.
341
SafeCom G4 Administrator's Manual Version: 10.520.11.221
• Printer driver compatibility Even if the print data stream is indeed supported it may be driver/printerspecific to a level that is not supported by the current SafeCom Rule Based Printing. In this case youshould refrain from using the rule.
Feedback wanted: We would be very grateful if you could send an e-mail [email protected] with the technical details, including information about the printer model,printer firmware version, driver, driver version, description of rule and document you are printing.
How to determine the applicationMany customers want to define rules based on the application. The application can in most cases bedetermined by using the condition: Job name contains “specific text”
The table below contains suggested texts to use for popular applications.
Application Specific text
Adobe .pdf
Microsoft Excel .xls
Microsoft OutlookMicrosoft Outlook
outbind://
Microsoft PowerPoint Microsoft PowerPoint
Microsoft Word Microsoft Word
Notepad Notepad
Plain text files .txt
Windows Internet Explorer http
Windows Test Page Test Page
Note: E-mails printed from Lotus Notes will have the same job name as the subject of the e-mail. It istherefore NOT possible to use the job name to determine that it’s the Lotus Notes application.
Update scRuleExecuter.dllThe component scRuleExecuter.dll is responsible for modifying the print data stream. If a new version ismade available to you, you should follow the steps below to update.
Note: On Windows 64-bit the file is named scRuleExecuter64.dll.
1. Backup the existing file scRuleExecuter.dll from the SafeCom installation folder. The default is:C:\Program Files\SafeCom\SafeComG4\
2. Stop the SafeCom Service and the Print Spooler.
3. Copy scRuleExecuter.dll to the SafeCom installation folder. Default is:C:\Program Files\SafeCom\SafeComG4\
342

SafeCom G4 Administrator's Manual Version: 10.520.11.221
4. Start the SafeCom Service and Print Spooler.
343

Chapter 11
SafeCom Client Billing
IntroductionThe Client Billing module makes it possible to register billing codes with any job that is tracked by theSafeCom solution. The billing data can be exported and used for further analysis.
Users can specify billing codes in the following three ways:• At print submission A billing code can be specified when submitting a job for either Pull or Push
print. When a billing code is added at print submission for a Pull print it is preserved and cannot beoverridden by a new billing code selected at the device. Note: For billing codes to be selectable at printsubmission time SafeCom PopUp (SafeCom PopUp – scPopUp.exe) MUST be running on the user’scomputer.
• At the device On selected SafeCom-enabled MFPs a billing code can be selected with any job that istracked by SafeCom. The user can select from a list of specified, favorite billing codes and the last used10 billing codes.
• Via web interface Via SafeCom G4 Web Interface users can specify billing codes on their print jobs, ifthis is done before the elapsed time. Also, the users can change billing codes specified earlier.
How users perform typical tasks related to client billing is covered in SafeCom G4 Client Billing User’sGuide D60657.
Manage billing codesManaging billing codes involves these administrator tasks:• Import billing codes into the SafeCom solution Billing codes can be imported either on a scheduled
basis or added manually through the SafeCom Administrator or SafeCom API. Refer to SafeCom G4Administrator API Reference Manual D60825.
• Assign favorite billing codes to users and/or user groups To control which billing codes a user canchoose from on print jobs, the administrator can create a predefined list, Favorite billing codes, for eachuser.The administrator can create these predefined lists of billing codes either through the SafeComAdministrator or the SafeCom API. Using the SafeCom API enables system integration and limits themanual labor involved in managing billing codes.Utilizing the SafeCom G4 Web Interface, users can be allowed to build and manage their own list offavorite billing codes. This reduces the administrative overhead, but it requires that the administratorcan rely on user’s honesty and ability to select the appropriate billing code for the jobs they perform.
344
SafeCom G4 Administrator's Manual Version: 10.520.11.221
Plan your SafeCom Client Billing solutionWhen planning your SafeCom Client Billing solution you need to:• Plan and configure SafeCom Tracking as SafeCom Client Billing relies on that. Consult chapter
SafeCom Tracking on how to plan (Planning your SafeCom Tracking solution) and configure(Configuration overview) SafeCom Tracking.
• Decide where to install the SafeCom G4 Web Interface and how users should authenticate themselvesto see the SafeCom Client Billing web page. Refer to SafeCom G4 Web Interface Administrator’sManual D60651.
• Decide if client billing should be done using one- or two-level codes. For two-level codes the billingcode consists of a primary (Client) code and a secondary (Matter) code.
• Decide if billing codes should be imported on a scheduled basis.• Decide the elapse time before billing codes are committed to tracking data. During this period of time
users can select and change billing codes on the SafeCom Client Billing web page.• Schedule and prepare training of users on how to select billing codes for jobs.
Configuration overviewPre-requisites:• Configure SafeCom Tracking. Refer to section Planning your SafeCom Tracking solution, Multiple
servers: Online or offline tracking and Configuration overview.• Install the SafeCom G4 Web Interface. Refer to SafeCom G4 Web Interface Administrator’s Manual
D60651.
Before proceeding to the configuration of the SafeCom Client Billing solution you should get an overviewof the steps involved:
1. Configure SafeCom Client Billing (Configure SafeCom Client Billing)
2. Add the billing codes into the SafeCom solution. Import billing codes automatically (Importbilling codes). Add one-level billing codes (Manage 1-level billing code ) and two-level billing codes(Manage 2-level billing code) manually.
3. Assign favorite billing codes to users and/or user groups.
a. Select favorite billing codes for a user (Billing).
b. Select favorite billing codes for a group (Select favorite billing codes for a group).
4. Allow users to select billing codes on print jobs (Set up users to use billing codes).
5. Edit the reminder template so it references the SafeCom G4 Web Interface, that is, the Billing webpage (Edit the template for billing reminder).
6. Work with the tracking data. Use the Data Mining tool to view the tracking data (SafeCom DataMining).
345
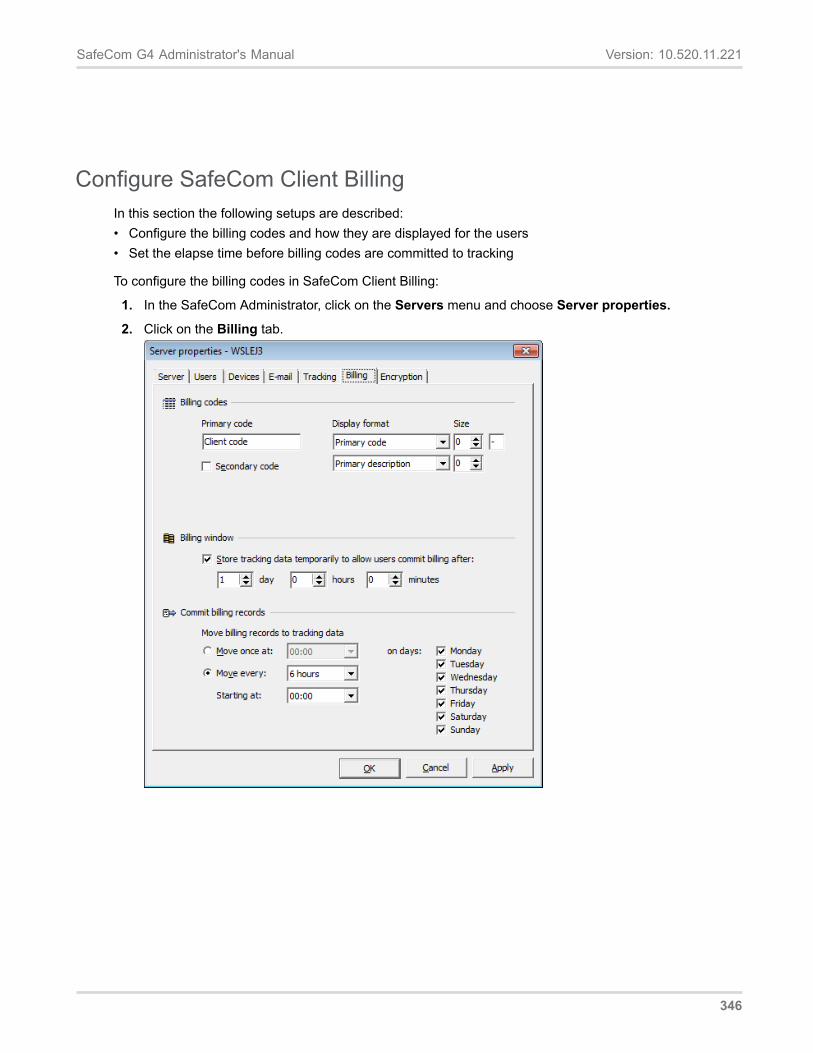
SafeCom G4 Administrator's Manual Version: 10.520.11.221
Configure SafeCom Client BillingIn this section the following setups are described:• Configure the billing codes and how they are displayed for the users• Set the elapse time before billing codes are committed to tracking
To configure the billing codes in SafeCom Client Billing:
1. In the SafeCom Administrator, click on the Servers menu and choose Server properties.
2. Click on the Billing tab.
346
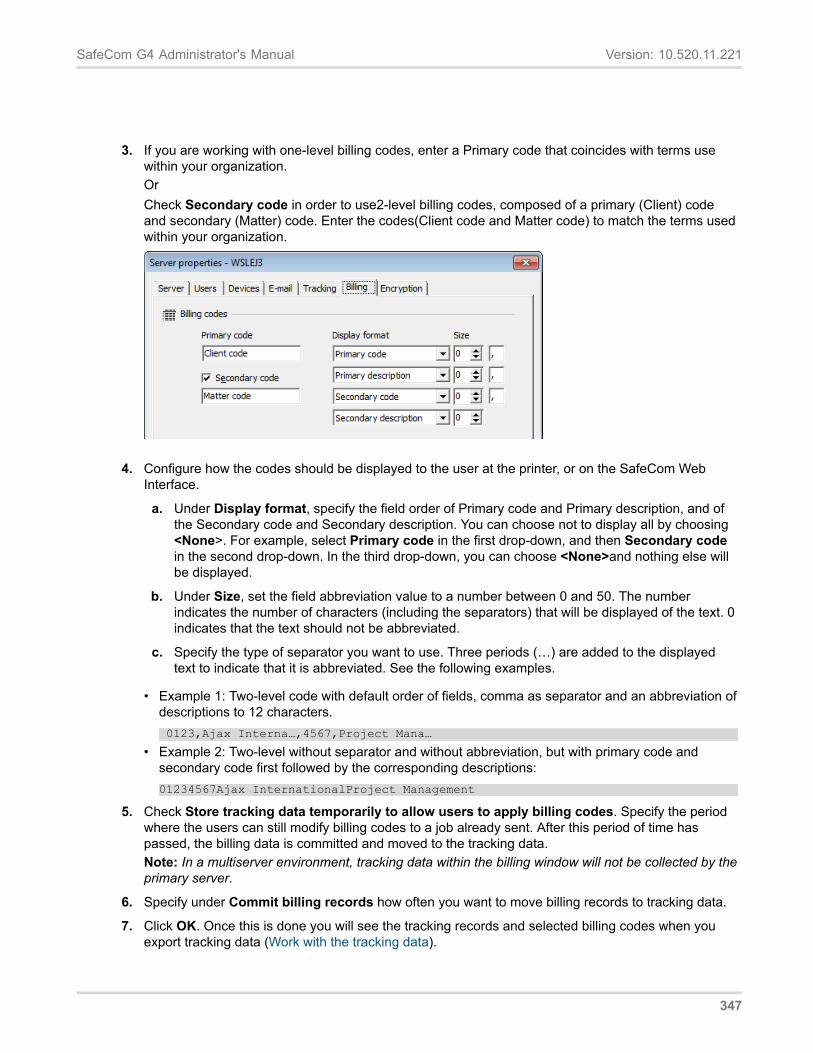
SafeCom G4 Administrator's Manual Version: 10.520.11.221
3. If you are working with one-level billing codes, enter a Primary code that coincides with terms usewithin your organization.OrCheck Secondary code in order to use2-level billing codes, composed of a primary (Client) codeand secondary (Matter) code. Enter the codes(Client code and Matter code) to match the terms usedwithin your organization.
4. Configure how the codes should be displayed to the user at the printer, or on the SafeCom Web Interface.
a. Under Display format, specify the field order of Primary code and Primary description, and of the Secondary code and Secondary description. You can choose not to display all by choosing <None>. For example, select Primary code in the first drop-down, and then Secondary code in the second drop-down. In the third drop-down, you can choose <None>and nothing else will be displayed.
b. Under Size, set the field abbreviation value to a number between 0 and 50. The number indicates the number of characters (including the separators) that will be displayed of the text. 0 indicates that the text should not be abbreviated.
c. Specify the type of separator you want to use. Three periods (…) are added to the displayed text to indicate that it is abbreviated. See the following examples.
• Example 1: Two-level code with default order of fields, comma as separator and an abbreviation of descriptions to 12 characters. 0123,Ajax Interna…,4567,Project Mana…
• Example 2: Two-level without separator and without abbreviation, but with primary code and secondary code first followed by the corresponding descriptions: 01234567Ajax InternationalProject Management
5. Check Store tracking data temporarily to allow users to apply billing codes. Specify the period where the users can still modify billing codes to a job already sent. After this period of time has passed, the billing data is committed and moved to the tracking data. Note: In a multiserver environment, tracking data within the billing window will not be collected by the primary server.
6. Specify under Commit billing records how often you want to move billing records to tracking data.
7. Click OK. Once this is done you will see the tracking records and selected billing codes when you export tracking data (Work with the tracking data).
347
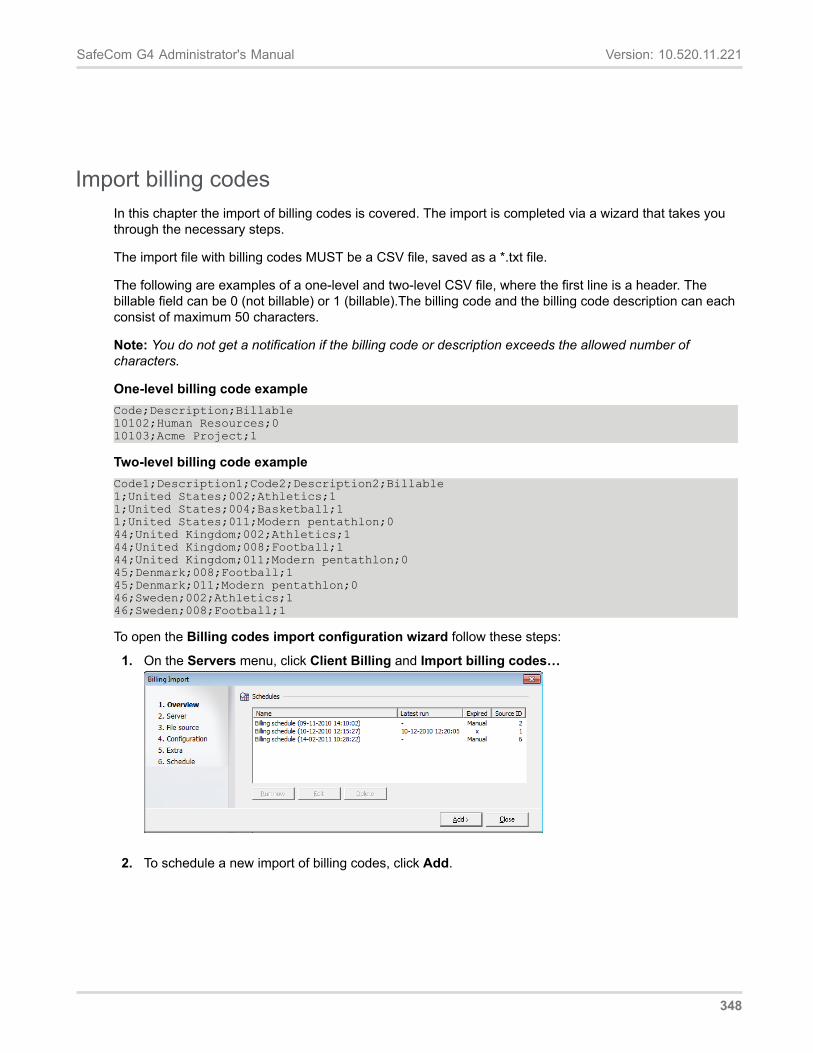
SafeCom G4 Administrator's Manual Version: 10.520.11.221
Import billing codesIn this chapter the import of billing codes is covered. The import is completed via a wizard that takes youthrough the necessary steps.
The import file with billing codes MUST be a CSV file, saved as a *.txt file.
The following are examples of a one-level and two-level CSV file, where the first line is a header. Thebillable field can be 0 (not billable) or 1 (billable).The billing code and the billing code description can eachconsist of maximum 50 characters.
Note: You do not get a notification if the billing code or description exceeds the allowed number ofcharacters.
One-level billing code exampleCode;Description;Billable10102;Human Resources;010103;Acme Project;1
Two-level billing code exampleCode1;Description1;Code2;Description2;Billable1;United States;002;Athletics;11;United States;004;Basketball;11;United States;011;Modern pentathlon;044;United Kingdom;002;Athletics;144;United Kingdom;008;Football;144;United Kingdom;011;Modern pentathlon;045;Denmark;008;Football;145;Denmark;011;Modern pentathlon;046;Sweden;002;Athletics;146;Sweden;008;Football;1
To open the Billing codes import configuration wizard follow these steps:
1. On the Servers menu, click Client Billing and Import billing codes…
2. To schedule a new import of billing codes, click Add.
348
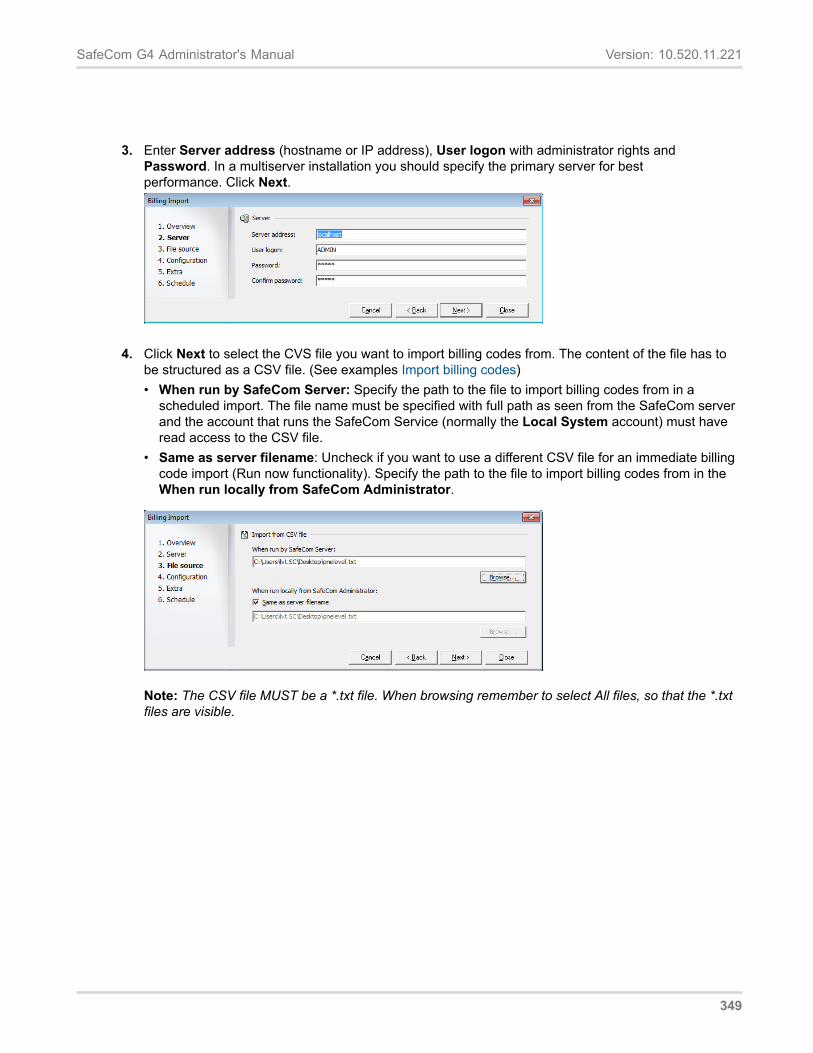
SafeCom G4 Administrator's Manual Version: 10.520.11.221
3. Enter Server address (hostname or IP address), User logon with administrator rights and Password. In a multiserver installation you should specify the primary server for best performance. Click Next.
4. Click Next to select the CVS file you want to import billing codes from. The content of the file has tobe structured as a CSV file. (See examples Import billing codes)• When run by SafeCom Server: Specify the path to the file to import billing codes from in a
scheduled import. The file name must be specified with full path as seen from the SafeCom serverand the account that runs the SafeCom Service (normally the Local System account) must haveread access to the CSV file.
• Same as server filename: Uncheck if you want to use a different CSV file for an immediate billingcode import (Run now functionality). Specify the path to the file to import billing codes from in theWhen run locally from SafeCom Administrator.
Note: The CSV file MUST be a *.txt file. When browsing remember to select All files, so that the *.txtfiles are visible.
349
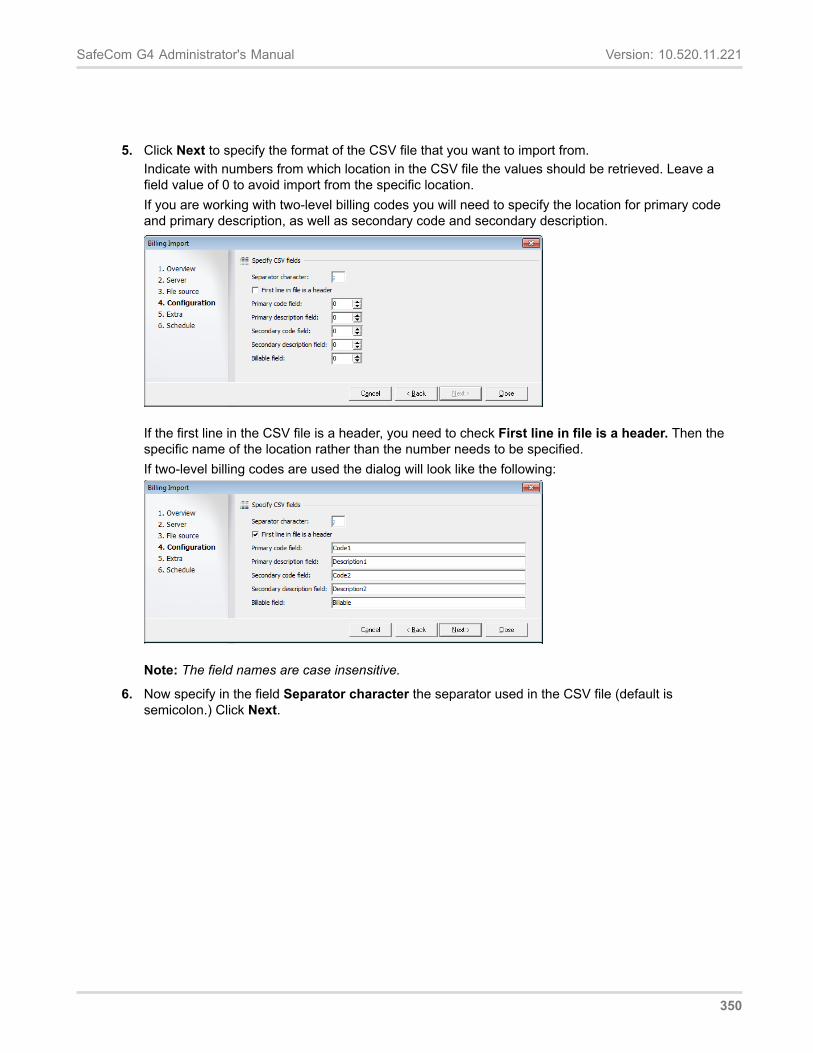
SafeCom G4 Administrator's Manual Version: 10.520.11.221
5. Click Next to specify the format of the CSV file that you want to import from.Indicate with numbers from which location in the CSV file the values should be retrieved. Leave afield value of 0 to avoid import from the specific location.If you are working with two-level billing codes you will need to specify the location for primary codeand primary description, as well as secondary code and secondary description.
If the first line in the CSV file is a header, you need to check First line in file is a header. Then thespecific name of the location rather than the number needs to be specified.If two-level billing codes are used the dialog will look like the following:
Note: The field names are case insensitive.
6. Now specify in the field Separator character the separator used in the CSV file (default issemicolon.) Click Next.
350
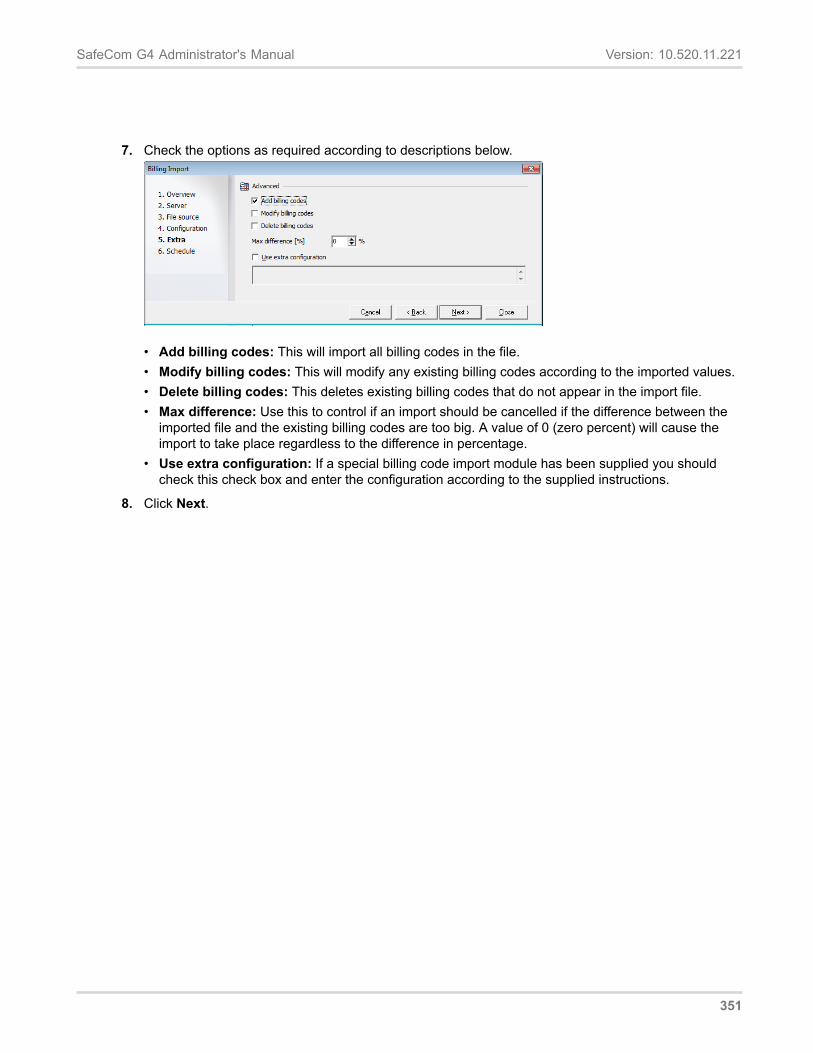
SafeCom G4 Administrator's Manual Version: 10.520.11.221
7. Check the options as required according to descriptions below.
• Add billing codes: This will import all billing codes in the file.• Modify billing codes: This will modify any existing billing codes according to the imported values.• Delete billing codes: This deletes existing billing codes that do not appear in the import file.• Max difference: Use this to control if an import should be cancelled if the difference between the
imported file and the existing billing codes are too big. A value of 0 (zero percent) will cause theimport to take place regardless to the difference in percentage.
• Use extra configuration: If a special billing code import module has been supplied you shouldcheck this check box and enter the configuration according to the supplied instructions.
8. Click Next.
351
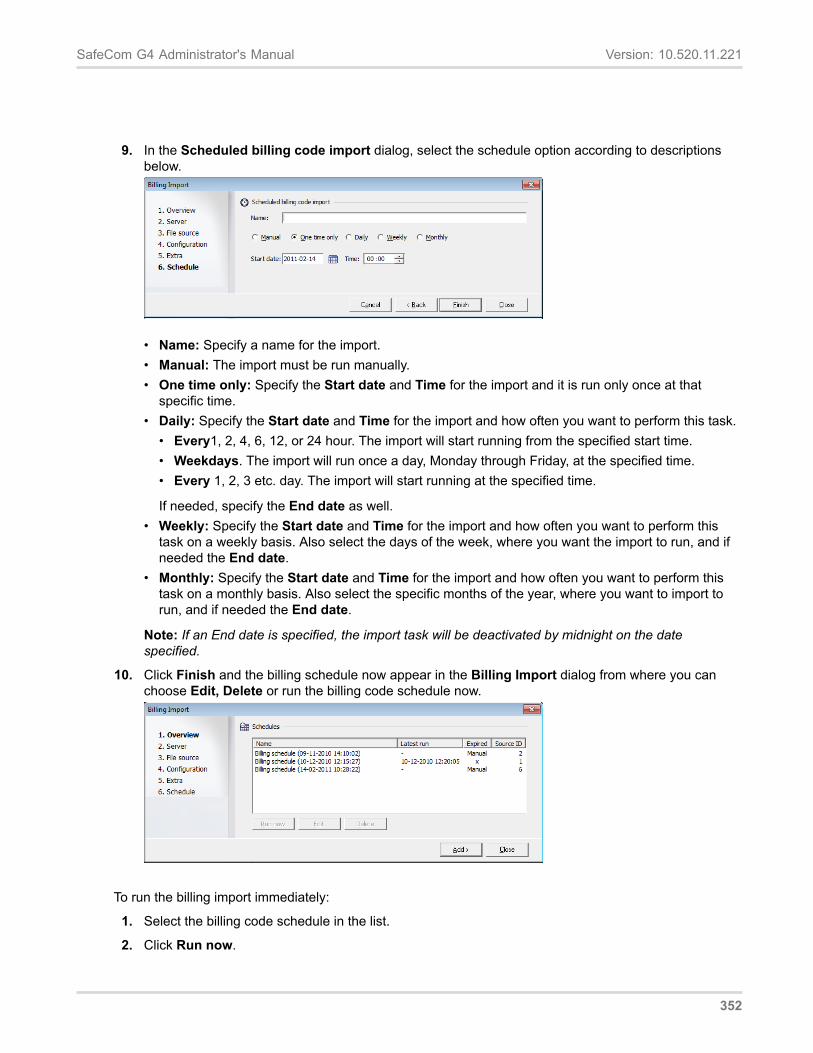
SafeCom G4 Administrator's Manual Version: 10.520.11.221
9. In the Scheduled billing code import dialog, select the schedule option according to descriptionsbelow.
• Name: Specify a name for the import.• Manual: The import must be run manually.• One time only: Specify the Start date and Time for the import and it is run only once at that
specific time.• Daily: Specify the Start date and Time for the import and how often you want to perform this task.
• Every1, 2, 4, 6, 12, or 24 hour. The import will start running from the specified start time.• Weekdays. The import will run once a day, Monday through Friday, at the specified time.• Every 1, 2, 3 etc. day. The import will start running at the specified time.
If needed, specify the End date as well.• Weekly: Specify the Start date and Time for the import and how often you want to perform this
task on a weekly basis. Also select the days of the week, where you want the import to run, and ifneeded the End date.
• Monthly: Specify the Start date and Time for the import and how often you want to perform thistask on a monthly basis. Also select the specific months of the year, where you want to import torun, and if needed the End date.
Note: If an End date is specified, the import task will be deactivated by midnight on the datespecified.
10. Click Finish and the billing schedule now appear in the Billing Import dialog from where you canchoose Edit, Delete or run the billing code schedule now.
To run the billing import immediately:
1. Select the billing code schedule in the list.
2. Click Run now.
352
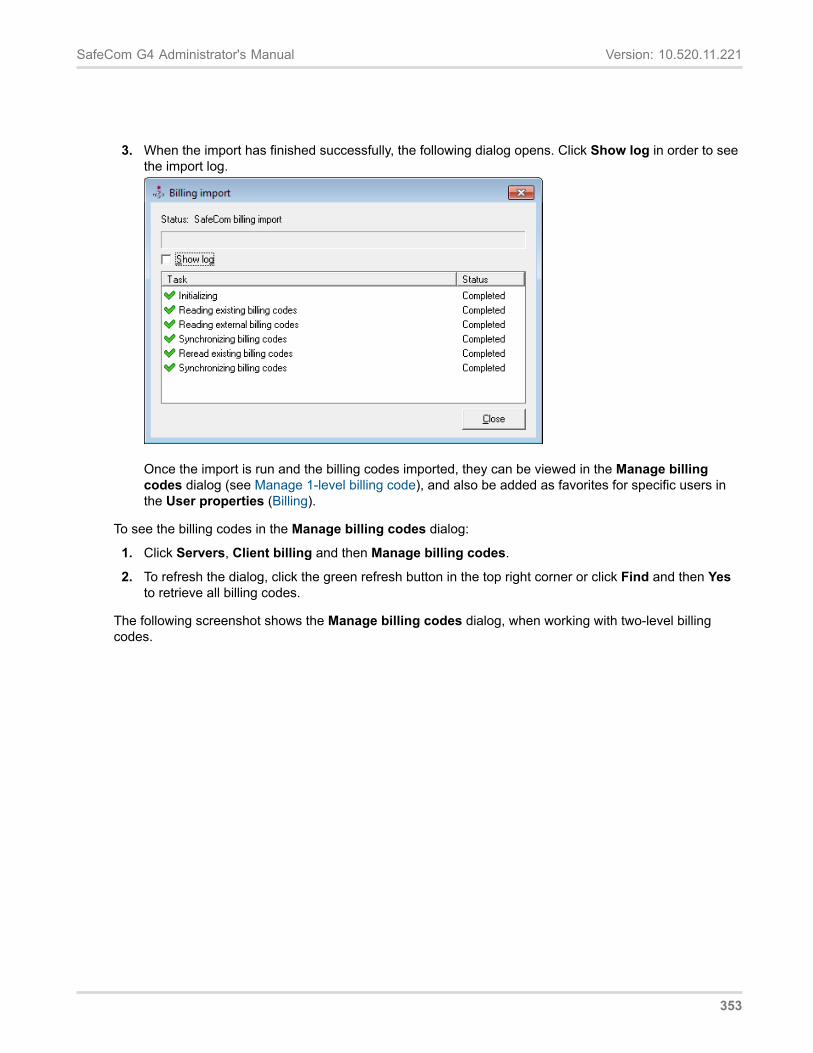
SafeCom G4 Administrator's Manual Version: 10.520.11.221
3. When the import has finished successfully, the following dialog opens. Click Show log in order to seethe import log.
Once the import is run and the billing codes imported, they can be viewed in the Manage billingcodes dialog (see Manage 1-level billing code), and also be added as favorites for specific users inthe User properties (Billing).
To see the billing codes in the Manage billing codes dialog:
1. Click Servers, Client billing and then Manage billing codes.
2. To refresh the dialog, click the green refresh button in the top right corner or click Find and then Yesto retrieve all billing codes.
The following screenshot shows the Manage billing codes dialog, when working with two-level billingcodes.
353
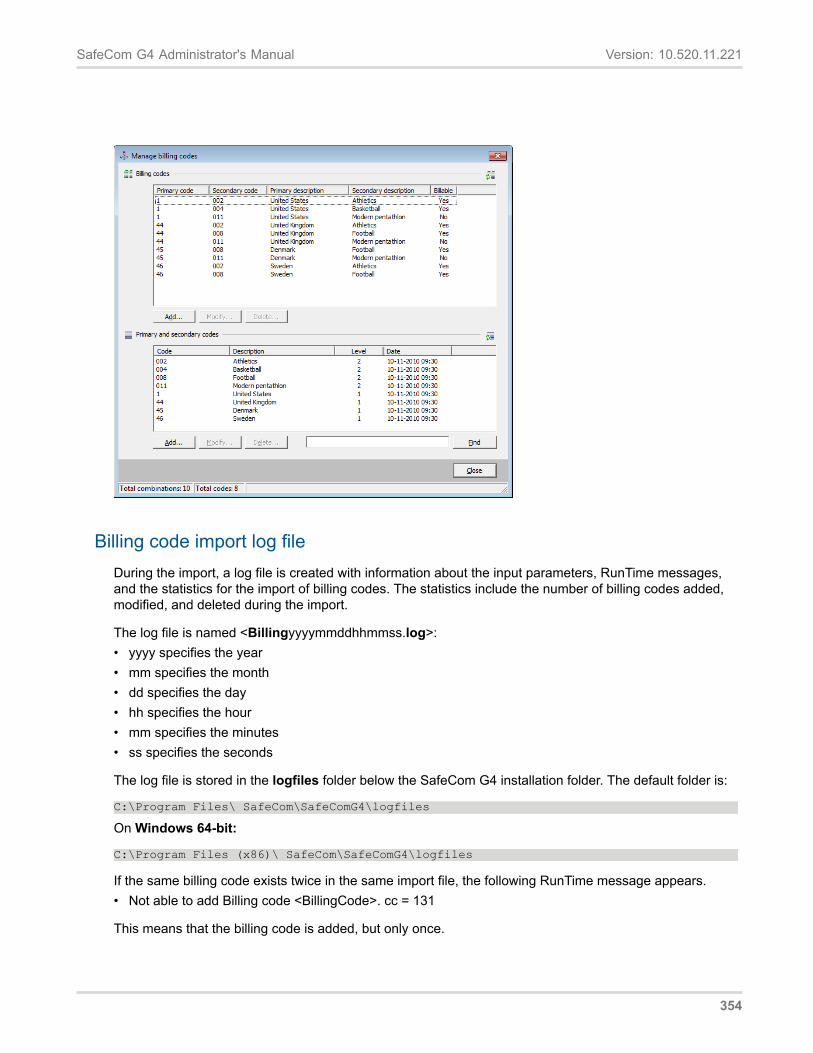
SafeCom G4 Administrator's Manual Version: 10.520.11.221
Billing code import log fileDuring the import, a log file is created with information about the input parameters, RunTime messages,and the statistics for the import of billing codes. The statistics include the number of billing codes added,modified, and deleted during the import.
The log file is named <Billingyyyymmddhhmmss.log>:• yyyy specifies the year• mm specifies the month• dd specifies the day• hh specifies the hour• mm specifies the minutes• ss specifies the seconds
The log file is stored in the logfiles folder below the SafeCom G4 installation folder. The default folder is:
C:\Program Files\ SafeCom\SafeComG4\logfiles
On Windows 64-bit:
C:\Program Files (x86)\ SafeCom\SafeComG4\logfiles
If the same billing code exists twice in the same import file, the following RunTime message appears.• Not able to add Billing code <BillingCode>. cc = 131
This means that the billing code is added, but only once.
354
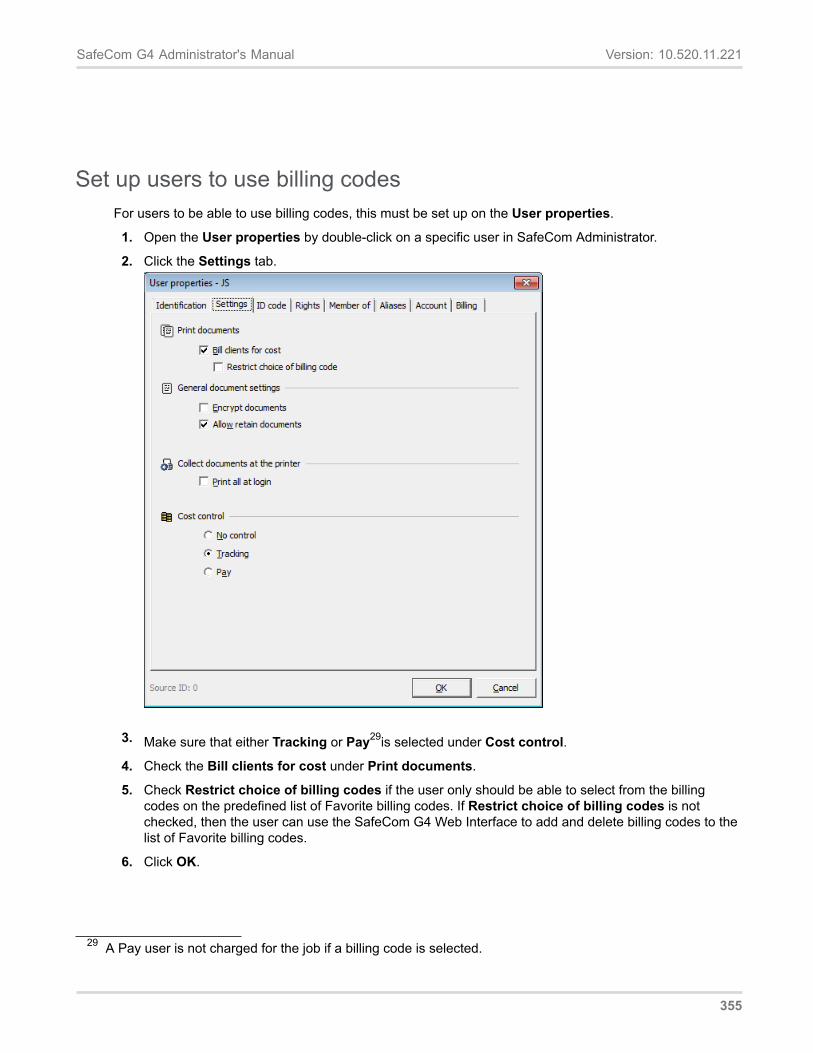
SafeCom G4 Administrator's Manual Version: 10.520.11.221
Set up users to use billing codesFor users to be able to use billing codes, this must be set up on the User properties.
1. Open the User properties by double-click on a specific user in SafeCom Administrator.
2. Click the Settings tab.
3. Make sure that either Tracking or Pay29is selected under Cost control.
4. Check the Bill clients for cost under Print documents.
5. Check Restrict choice of billing codes if the user only should be able to select from the billingcodes on the predefined list of Favorite billing codes. If Restrict choice of billing codes is notchecked, then the user can use the SafeCom G4 Web Interface to add and delete billing codes to thelist of Favorite billing codes.
6. Click OK.
29 A Pay user is not charged for the job if a billing code is selected.
355
SafeCom G4 Administrator's Manual Version: 10.520.11.221
Note: When importing users, you can specify that the settings from the Default user should be appliedto the imported users. This could for example be the Bill clients for cost parameter if this is set up on theDefault user.
The following describes how Tracking and Pay affects billing:• If the user is set to Tracking and Bill clients for cost and only has one Favorite billing code, then that
one billing code will be used when printing. In order not to use that billing code the user must accessthe Account icon on the printer and press No billing.
• If the user is set to Tracking and Bill clients for cost and if the user has more than one Favoritebilling code, then the user must choose the specific billing code by pressing the Account icon on theprinter. Otherwise the print job is not billed.
• If the user is set to Pay and Bill clients for cost then the user must choose a billing code at the printerby pressing the Account icon. Otherwise the print job is not billed and the user is charged for the job.
• If a billing code is added at print submission time it is preserved and not overridden by for example abilling code selected at the device.
To change the Bill clients for cost property of multiple users:
1. Use Find users (Find users) to get a list of relevant users.
2. Do one of the following:• To select consecutive users, click the first user, press and hold down SHIFT, and then click the last
user.• To select nonconsecutive users, press and hold down CTRL, and then click each user.• To select all the users in the window, press CTRL+A.
3. Open the User properties by pressing ALT+ENTER or right-click the selected user(s) and selectUser properties.
4. Click the Settings tab and make the changes as described above.
Add favorite billing codes for a userWhen a user selects a billing code to a print job, the user can choose a billing code from a list of 10 lastused billing codes or from the Favorite billing codes list.
The list of Favorite billing codes is a list of the billing codes that are relevant to a specific user or group.This is set up in the SafeCom Administrator, but in some cases users can select the favorite billing codesthemselves via the SafeCom Web Interface.
In the SafeCom Administrator, favorite billing codes can be applied to a specific user or user group.
To add favorite billing codes to a user:
1. Open the User properties for on a specific user in SafeCom Administrator.
356
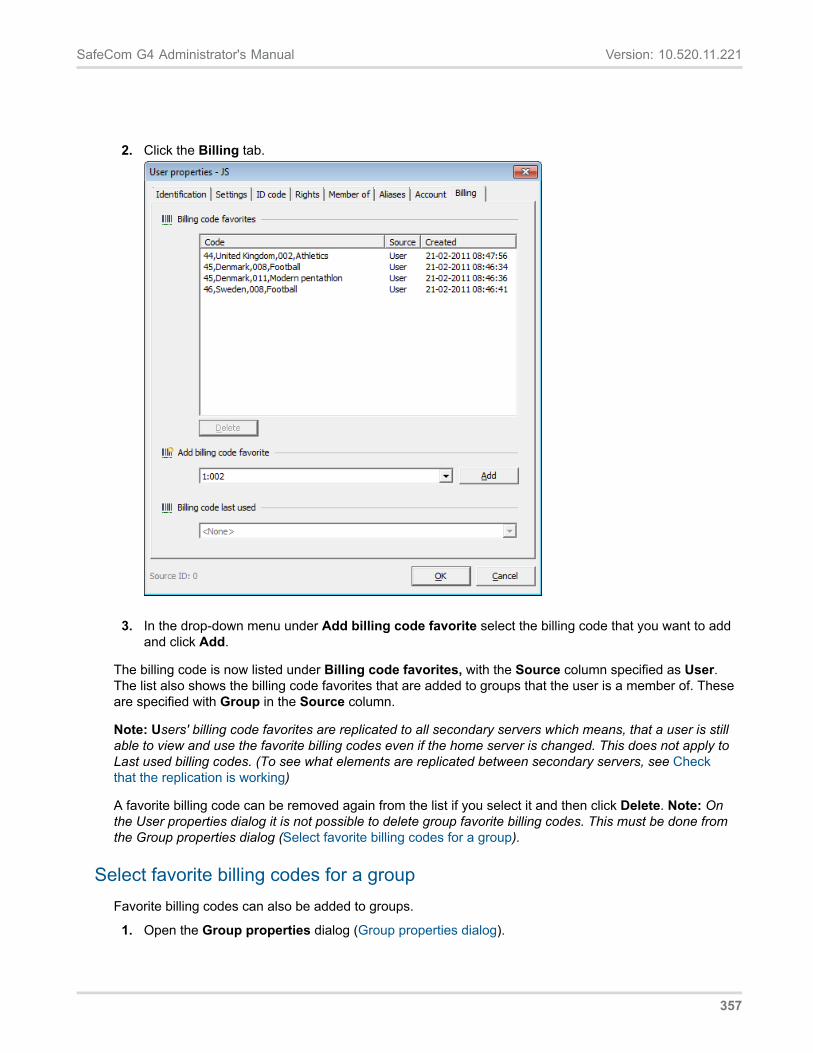
SafeCom G4 Administrator's Manual Version: 10.520.11.221
2. Click the Billing tab.
3. In the drop-down menu under Add billing code favorite select the billing code that you want to add and click Add.
The billing code is now listed under Billing code favorites, with the Source column specified as User. The list also shows the billing code favorites that are added to groups that the user is a member of. These are specified with Group in the Source column.
Note: Users' billing code favorites are replicated to all secondary servers which means, that a user is still able to view and use the favorite billing codes even if the home server is changed. This does not apply to Last used billing codes. (To see what elements are replicated between secondary servers, see Check that the replication is working)
A favorite billing code can be removed again from the list if you select it and then click Delete. Note: On the User properties dialog it is not possible to delete group favorite billing codes. This must be done from the Group properties dialog (Select favorite billing codes for a group).
Select favorite billing codes for a group Favorite billing codes can also be added to groups.
1. Open the Group properties dialog (Group properties dialog).
357
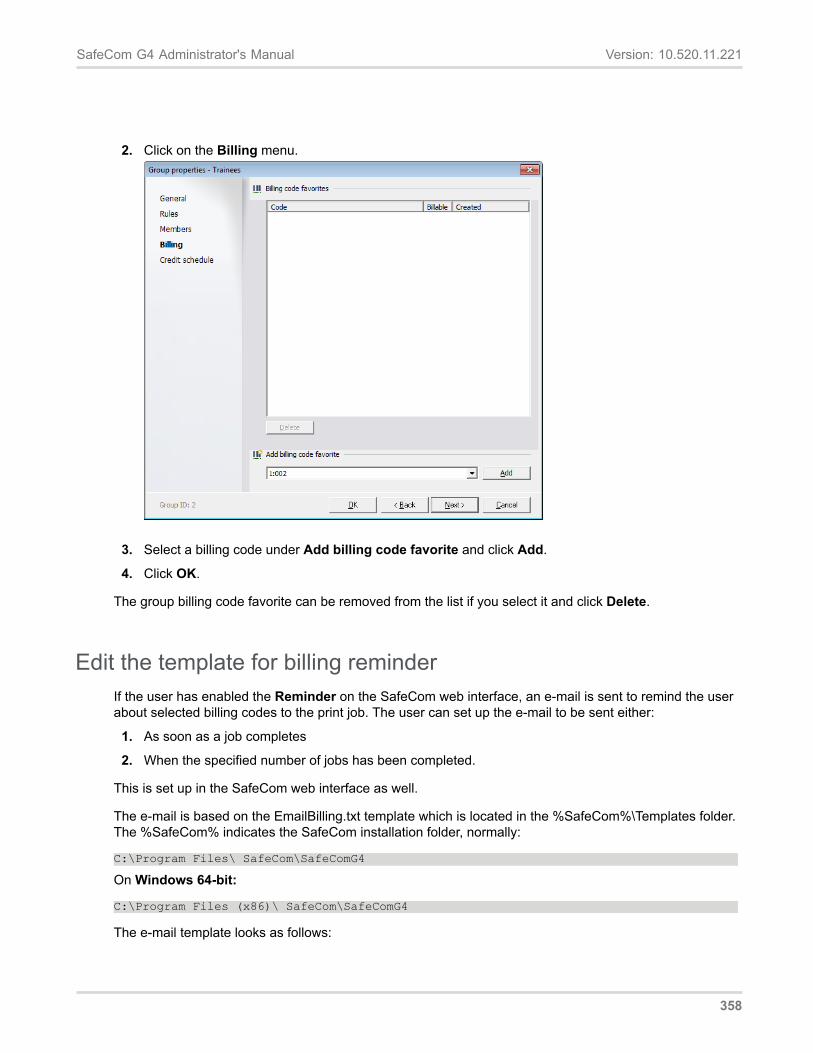
SafeCom G4 Administrator's Manual Version: 10.520.11.221
2. Click on the Billing menu.
3. Select a billing code under Add billing code favorite and click Add.
4. Click OK.
The group billing code favorite can be removed from the list if you select it and click Delete.
Edit the template for billing reminderIf the user has enabled the Reminder on the SafeCom web interface, an e-mail is sent to remind the userabout selected billing codes to the print job. The user can set up the e-mail to be sent either:
1. As soon as a job completes
2. When the specified number of jobs has been completed.
This is set up in the SafeCom web interface as well.
The e-mail is based on the EmailBilling.txt template which is located in the %SafeCom%\Templates folder.The %SafeCom% indicates the SafeCom installation folder, normally:
C:\Program Files\ SafeCom\SafeComG4
On Windows 64-bit:
C:\Program Files (x86)\ SafeCom\SafeComG4
The e-mail template looks as follows:
358
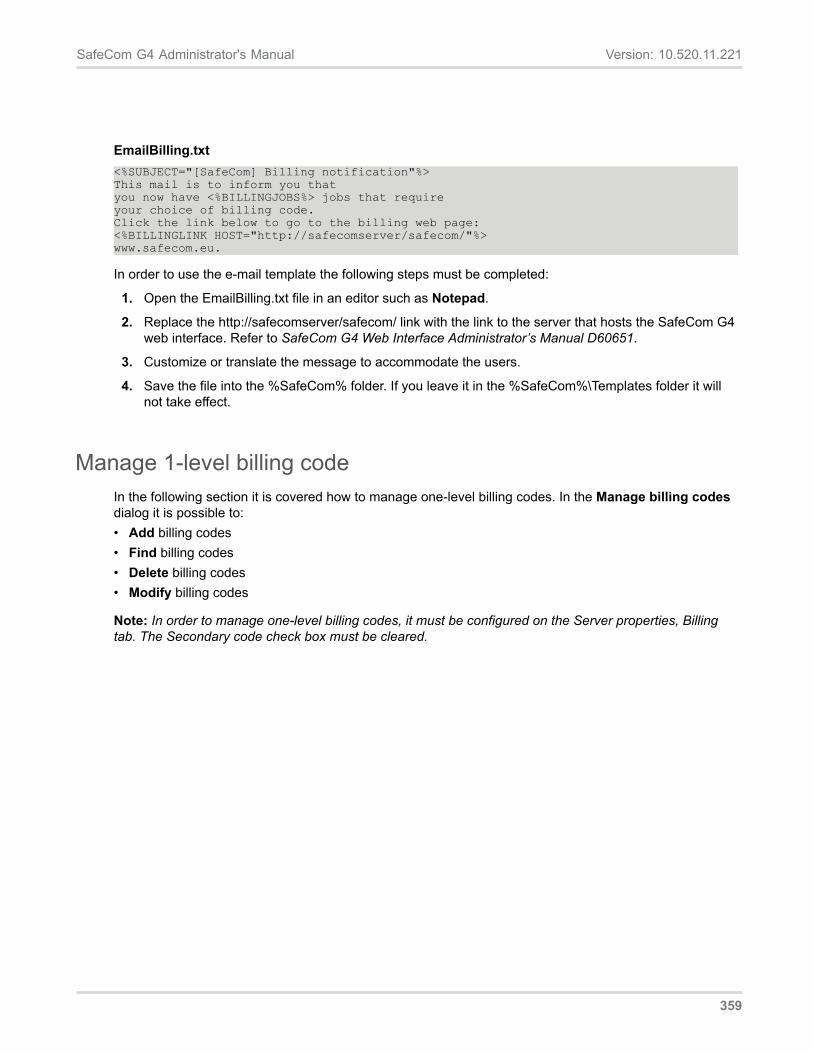
SafeCom G4 Administrator's Manual Version: 10.520.11.221
EmailBilling.txt<%SUBJECT="[SafeCom] Billing notification"%>This mail is to inform you thatyou now have <%BILLINGJOBS%> jobs that requireyour choice of billing code.Click the link below to go to the billing web page:<%BILLINGLINK HOST="http://safecomserver/safecom/"%>www.safecom.eu.
In order to use the e-mail template the following steps must be completed:
1. Open the EmailBilling.txt file in an editor such as Notepad.
2. Replace the http://safecomserver/safecom/ link with the link to the server that hosts the SafeCom G4web interface. Refer to SafeCom G4 Web Interface Administrator’s Manual D60651.
3. Customize or translate the message to accommodate the users.
4. Save the file into the %SafeCom% folder. If you leave it in the %SafeCom%\Templates folder it willnot take effect.
Manage 1-level billing codeIn the following section it is covered how to manage one-level billing codes. In the Manage billing codesdialog it is possible to:• Add billing codes• Find billing codes• Delete billing codes• Modify billing codes
Note: In order to manage one-level billing codes, it must be configured on the Server properties, Billingtab. The Secondary code check box must be cleared.
359
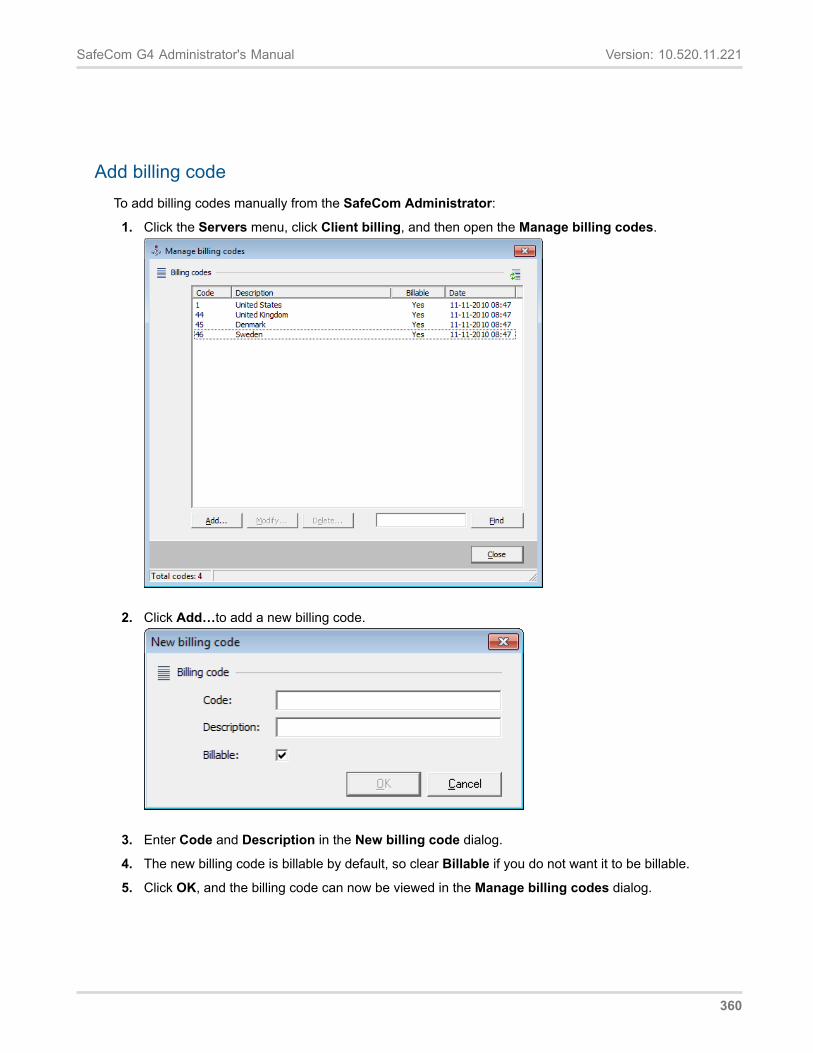
SafeCom G4 Administrator's Manual Version: 10.520.11.221
Add billing codeTo add billing codes manually from the SafeCom Administrator:
1. Click the Servers menu, click Client billing, and then open the Manage billing codes.
2. Click Add…to add a new billing code.
3. Enter Code and Description in the New billing code dialog.
4. The new billing code is billable by default, so clear Billable if you do not want it to be billable.
5. Click OK, and the billing code can now be viewed in the Manage billing codes dialog.
360
SafeCom G4 Administrator's Manual Version: 10.520.11.221
Find billing codes
1. Open the Manage billing code dialog
2. Enter the search text in the Find field and click Find. If the search field is left empty all billing codesare retrieved.
Note: The find function is using case insensitive free text search across both the code and descriptionfields.
Delete billing codes
1. In the Manage billing code dialog use the Find function to retrieve all relevant billing codes.
2. Select the billing codes and click Delete…
3. Click Yes in the Confirm dialog to delete the billing code.
Note: If a user selects a billing code for a print job at the computer, and if then the billing code is deletedfrom SafeCom before the user collects the print job the printer, the billing code for the print job is notremembered. The billing information is then replaced by N/A.
Modify billing codes
1. In the Manage billing code dialog use the Find function to retrieve the relevant billing codes.
2. Select the billing code you want to modify and click Modify…
3. Modify Description and Billable as required.
4. Click OK.
Note: You cannot modify the Code for the billing code, only the Description and whether it needs to bebillable or not. This applies to both imported and manually created billing codes.
Manage 2-level billing codeIn the following section it is covered how to manage two-level billing codes. In the Manage billing codesdialog it is possible to manage both billing codes and primary and secondary codes.
361
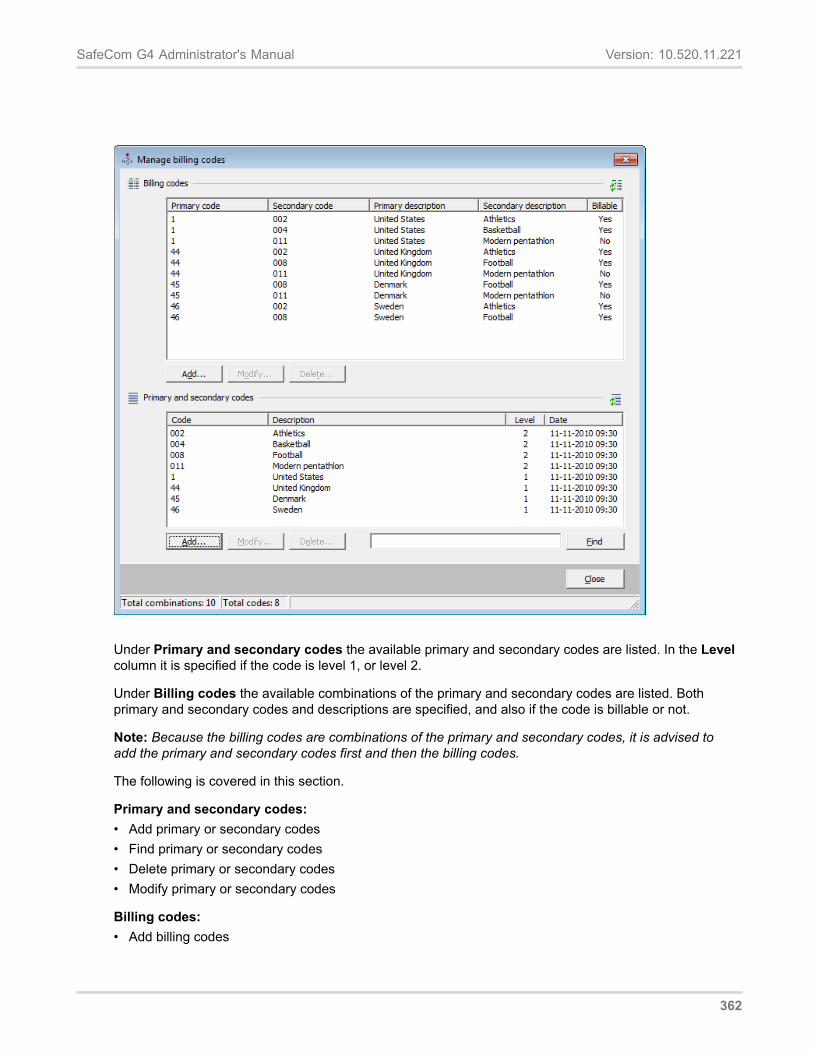
SafeCom G4 Administrator's Manual Version: 10.520.11.221
Under Primary and secondary codes the available primary and secondary codes are listed. In the Levelcolumn it is specified if the code is level 1, or level 2.
Under Billing codes the available combinations of the primary and secondary codes are listed. Bothprimary and secondary codes and descriptions are specified, and also if the code is billable or not.
Note: Because the billing codes are combinations of the primary and secondary codes, it is advised toadd the primary and secondary codes first and then the billing codes.
The following is covered in this section.
Primary and secondary codes:• Add primary or secondary codes• Find primary or secondary codes• Delete primary or secondary codes• Modify primary or secondary codes
Billing codes:• Add billing codes
362
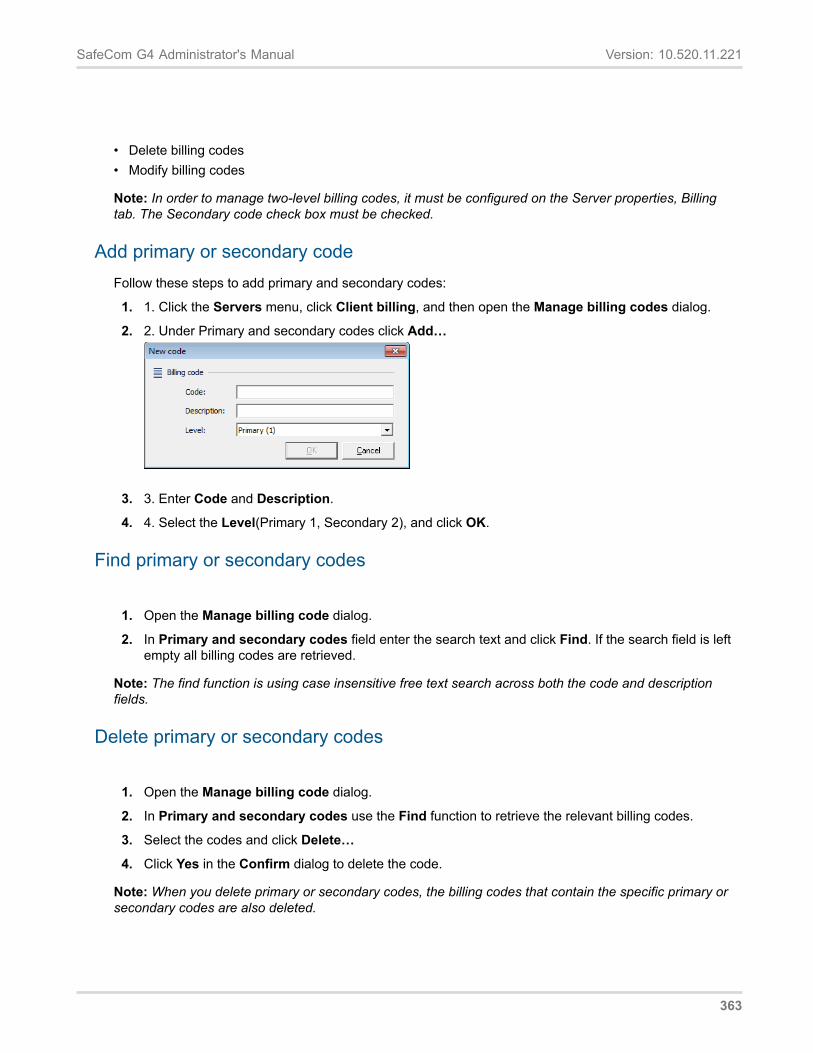
SafeCom G4 Administrator's Manual Version: 10.520.11.221
• Delete billing codes• Modify billing codes
Note: In order to manage two-level billing codes, it must be configured on the Server properties, Billingtab. The Secondary code check box must be checked.
Add primary or secondary codeFollow these steps to add primary and secondary codes:
1. 1. Click the Servers menu, click Client billing, and then open the Manage billing codes dialog.
2. 2. Under Primary and secondary codes click Add…
3. 3. Enter Code and Description.
4. 4. Select the Level(Primary 1, Secondary 2), and click OK.
Find primary or secondary codes
1. Open the Manage billing code dialog.
2. In Primary and secondary codes field enter the search text and click Find. If the search field is leftempty all billing codes are retrieved.
Note: The find function is using case insensitive free text search across both the code and descriptionfields.
Delete primary or secondary codes
1. Open the Manage billing code dialog.
2. In Primary and secondary codes use the Find function to retrieve the relevant billing codes.
3. Select the codes and click Delete…
4. Click Yes in the Confirm dialog to delete the code.
Note: When you delete primary or secondary codes, the billing codes that contain the specific primary orsecondary codes are also deleted.
363
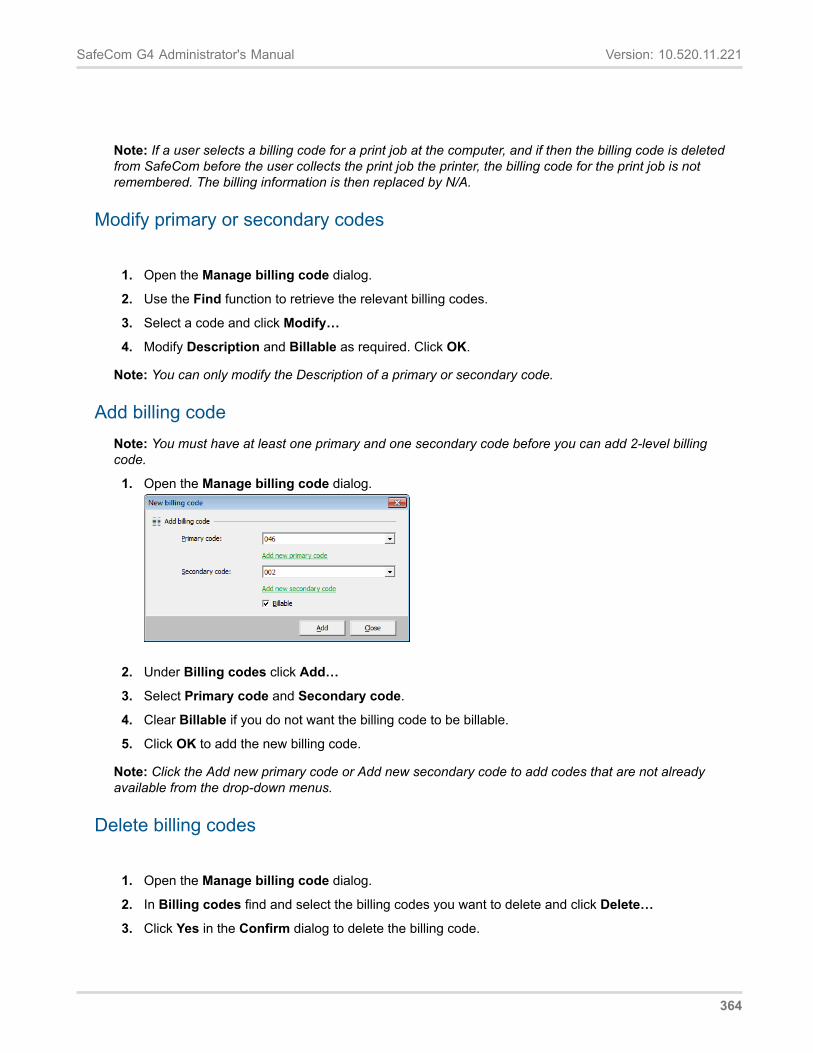
SafeCom G4 Administrator's Manual Version: 10.520.11.221
Note: If a user selects a billing code for a print job at the computer, and if then the billing code is deletedfrom SafeCom before the user collects the print job the printer, the billing code for the print job is notremembered. The billing information is then replaced by N/A.
Modify primary or secondary codes
1. Open the Manage billing code dialog.
2. Use the Find function to retrieve the relevant billing codes.
3. Select a code and click Modify…
4. Modify Description and Billable as required. Click OK.
Note: You can only modify the Description of a primary or secondary code.
Add billing codeNote: You must have at least one primary and one secondary code before you can add 2-level billingcode.
1. Open the Manage billing code dialog.
2. Under Billing codes click Add…
3. Select Primary code and Secondary code.
4. Clear Billable if you do not want the billing code to be billable.
5. Click OK to add the new billing code.
Note: Click the Add new primary code or Add new secondary code to add codes that are not alreadyavailable from the drop-down menus.
Delete billing codes
1. Open the Manage billing code dialog.
2. In Billing codes find and select the billing codes you want to delete and click Delete…
3. Click Yes in the Confirm dialog to delete the billing code.
364
SafeCom G4 Administrator's Manual Version: 10.520.11.221
Modify billing codes
1. Open the Manage billing code dialog.
2. Under Billing codes find and select the billing code you want to modify and click Modify…
3. Change the choice of Primary code and/or Secondary code.
4. Click Modify.
Work with Tracking dataUse the Data Mining tool to view and work with the tracking data created with relations to billing codes.See more atSafeCom Data Mining.
Note: If a print job is sent to the printer with an assigned billing code and before printing the job the billingcode is deleted from the server, then once the job is printed it is tracked without a billing code.
365
Chapter 12
SafeCom Pay
IntroductionThe SafeCom Pay module provides total print cost management. In addition to the SafeCom Trackingmodule described in chapter SafeCom Tracking the module can be used to prevent a user from printing ifthe account balance falls below a specified limit (default zero credits).
The SafeCom Administrator (Cashier – How to) can be used to add (deposit) or subtract (withdraw)credits from the user’s account. Credits are equivalent to money.
Planning your SafeCom Pay solutionWhen planning your SafeCom Pay solution you need to:• Define what the cost of printing should be. This is accomplished via a charging scheme (Charging
scheme).• Plan how you will secure the data stored in the tracking server and money server databases (Backup
and restore).• Control what happens if the money server is unavailable (Tracking).• Choose accounting policy (Accounting policy).• Ensure that users pay (Ensure users pay).• Investigate if a cashless solution is required (Cashless solution).• Change the user property Cost control to Pay (Change cost control to pay).
Accounting policyThere are three different accounting policies:• Full cost recoveryThe user has to pay for all prints (and copies). This policy is popular in libraries.
Involves account 1 only.• Partial cost recoveryThe user is given a certain amount of credits on their account 2. When the credits
run out the user can choose to add money to their account 1. This policy is popular at universities.• Quota control The user is given a certain amount of credits and can print until they run out (quota is
used). This policy is popular in schools that do not allow fee-based printing. Involves using account 2only.
366

SafeCom G4 Administrator's Manual Version: 10.520.11.221
In addition you need to decide if Post track (Post track) should be enabled, in which case, pay usersmay be charged a different (lower) price compared to the price they were given when they collected theirdocument.
Ensure users payThe introduction of a fee-based printing solution may tempt some users to try to avoid having to pay fortheir prints (and copies). To make these attempts in vain you can apply a number of counter measures:• Make all printing go through the SafeCom solution Refer to Make all printing go through the
SafeCom.• View list of unfinished jobs The SafeCom Tracking database record information about unfinished
print (and copy) jobs. An unfinished job may be caused by legitimate network or printer failure.However, the cause may also be purposely tampering with the printer and SafeCom hardware. The listof unfinished (failed/interrupted) jobs can be viewed in SafeCom Data Mining (SafeCom Data Mining).
• Notify administrator by e-mail You can configure your SafeCom solution to send an e-mail to theadministrator whenever a job does not finish. By looking at and perhaps sorting the list of received e-mails, the administrator can quickly spot if someone is trying to avoid having to pay. If required theadministrator can prevent the user from logging into the SafeCom solution.
• Do not release credits reserved on errorWhen the user prints the SafeCom solution reserves creditscorresponding to the cost of the print job. When the user copies the SafeCom solution will reserve allthe user’s credits. On the Users tab in the Server properties dialog (Users) you can request that thereserved credits are not released in case of error. The reserved credits can be released manually fromSafeCom Administrator (Free reserved credits).
• Awareness through informationBy making users aware that the SafeCom Pay solution includescounter measures to prevent repeated attempts to avoid paying will probably reduce the number ofattempts.
Educational institutions in particular should inform their users about these counter measures. This willhelp them limit the number of unfinished jobs that are likely to happen at the start of semester when newstudents enroll.
Cashless solutionYour SafeCom solution can be enhanced to support methods where users can make deposits to theiraccount via the Internet using SafeCom ePay.
SafeCom Pay solutions also support the use of smart cards. If the user’s SafeCom account is empty, theuser can use a smart pay to finance their print activity. Contact [email protected] for moredetails.
Change cost control to payFor existing users you must enable Pay for each user. This is achieved by checking Pay on the Settingstab in the User properties dialog.
It is possible to change the property of multiple users (Hide ID codes).
367
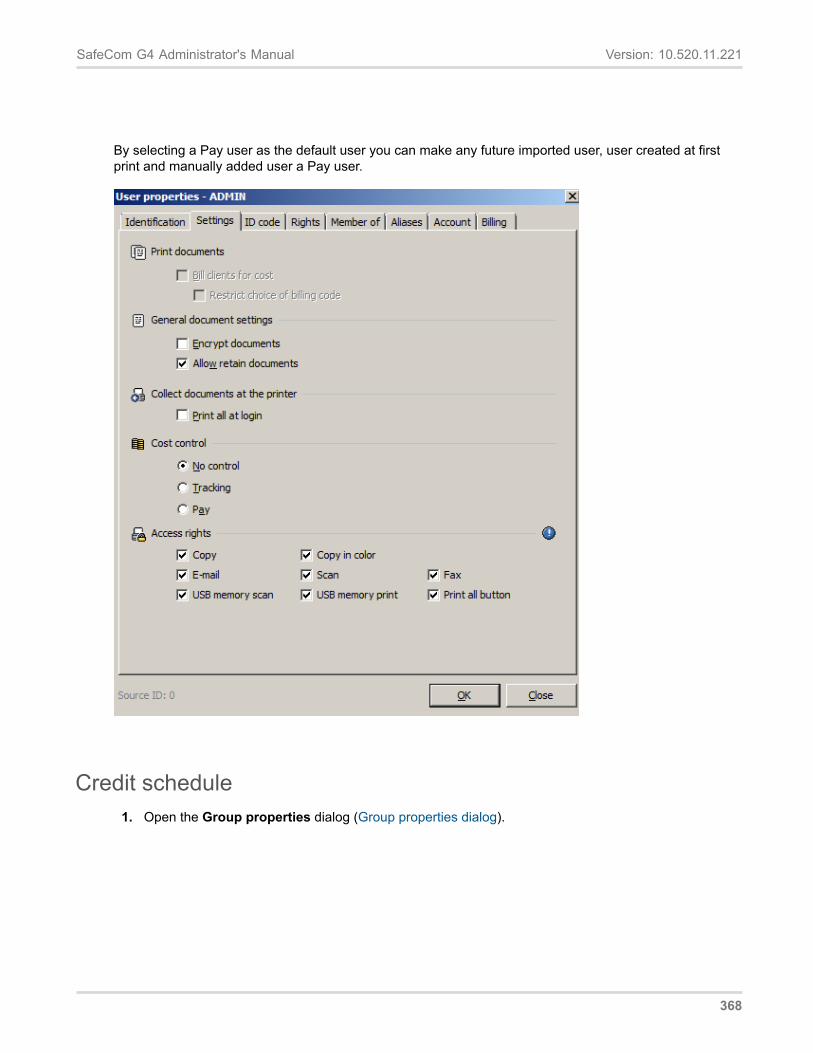
SafeCom G4 Administrator's Manual Version: 10.520.11.221
By selecting a Pay user as the default user you can make any future imported user, user created at firstprint and manually added user a Pay user.
Credit schedule1. Open the Group properties dialog (Group properties dialog).
368

SafeCom G4 Administrator's Manual Version: 10.520.11.221
2. Click on the Credit schedule tab.
3. Enter a meaningful Description.
4. In Transaction select if the member’s Account 1 or Account 2 should be Set to the specifiedAmount or changed with the specified amount (Add or Subtract). An optional Comment can beentered.
5. Provided the schedule is Enabled it is possible to schedule credits One time only, Daily, Weeklyand Monthly. Check End date and specify a date for when the periodic schedule should end. Please
369
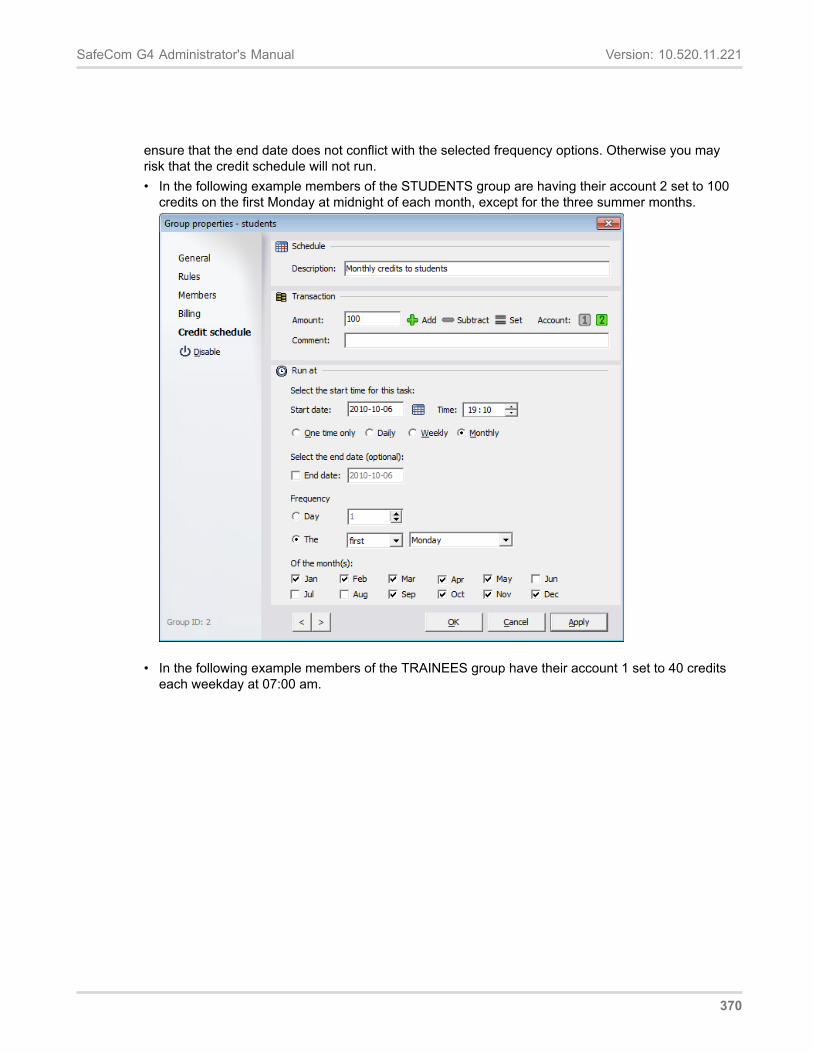
SafeCom G4 Administrator's Manual Version: 10.520.11.221
ensure that the end date does not conflict with the selected frequency options. Otherwise you mayrisk that the credit schedule will not run.• In the following example members of the STUDENTS group are having their account 2 set to 100
credits on the first Monday at midnight of each month, except for the three summer months.
• In the following example members of the TRAINEES group have their account 1 set to 40 creditseach weekday at 07:00 am.
370
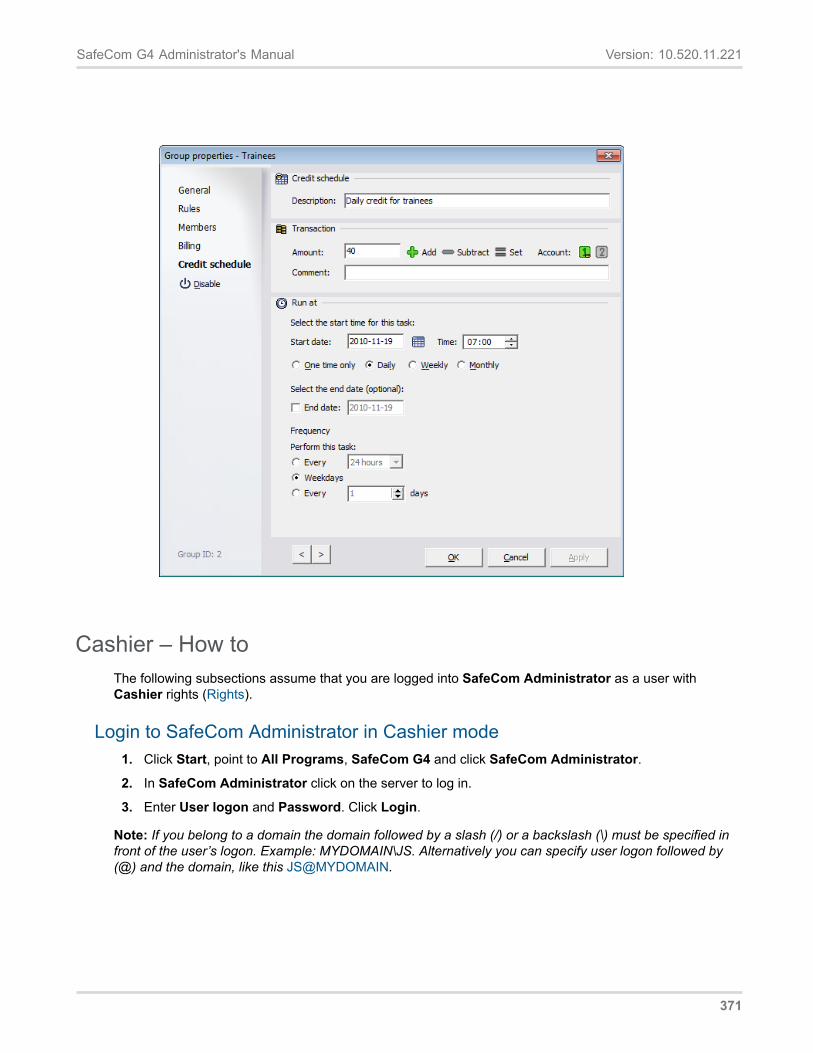
SafeCom G4 Administrator's Manual Version: 10.520.11.221
Cashier – How toThe following subsections assume that you are logged into SafeCom Administrator as a user withCashier rights (Rights).
Login to SafeCom Administrator in Cashier mode1. Click Start, point to All Programs, SafeCom G4 and click SafeCom Administrator.
2. In SafeCom Administrator click on the server to log in.
3. Enter User logon and Password. Click Login.
Note: If you belong to a domain the domain followed by a slash (/) or a backslash (\) must be specified infront of the user’s logon. Example: MYDOMAIN\JS. Alternatively you can specify user logon followed by(@) and the domain, like this JS@MYDOMAIN.
371
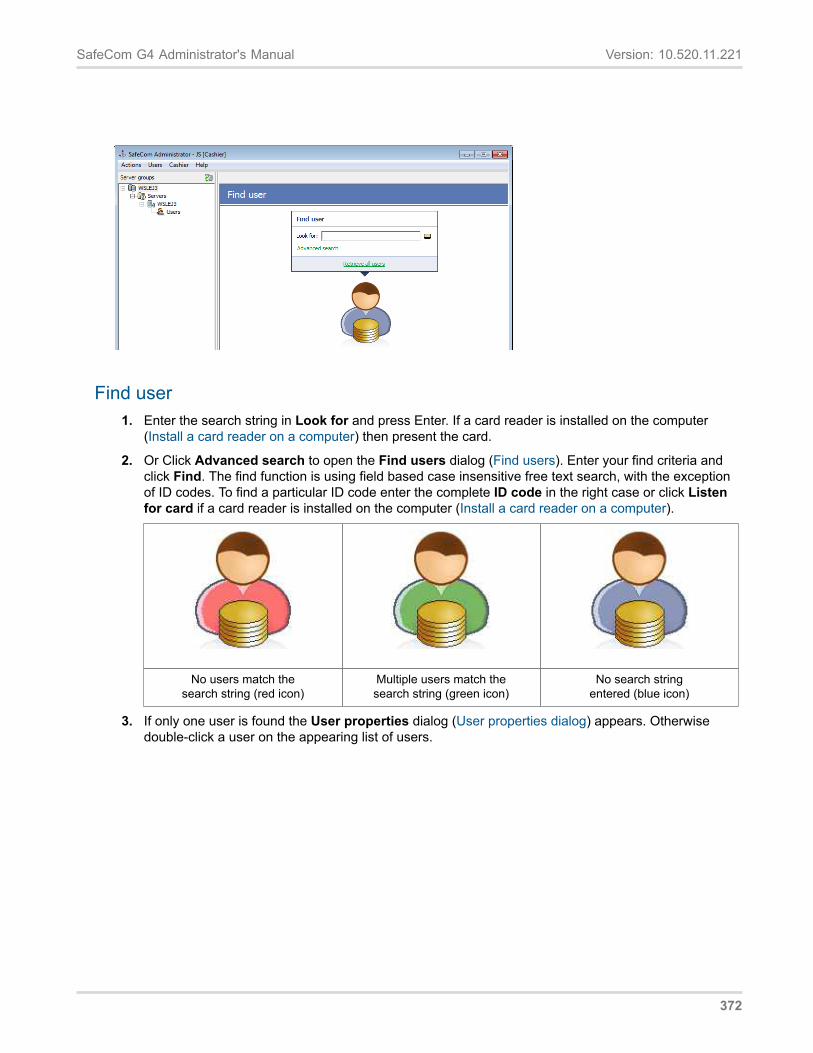
SafeCom G4 Administrator's Manual Version: 10.520.11.221
Find user1. Enter the search string in Look for and press Enter. If a card reader is installed on the computer
(Install a card reader on a computer) then present the card.
2. Or Click Advanced search to open the Find users dialog (Find users). Enter your find criteria andclick Find. The find function is using field based case insensitive free text search, with the exceptionof ID codes. To find a particular ID code enter the complete ID code in the right case or click Listenfor card if a card reader is installed on the computer (Install a card reader on a computer).
No users match thesearch string (red icon)
Multiple users match thesearch string (green icon)
No search stringentered (blue icon)
3. If only one user is found the User properties dialog (User properties dialog) appears. Otherwisedouble-click a user on the appearing list of users.
372
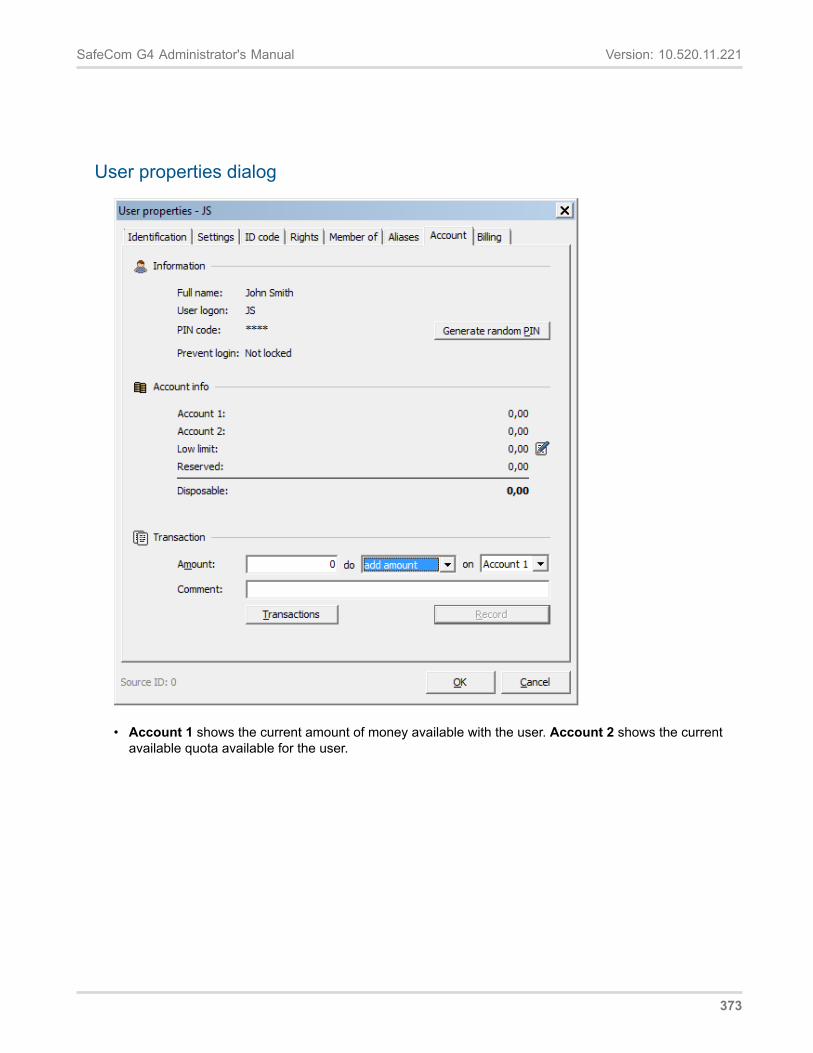
SafeCom G4 Administrator's Manual Version: 10.520.11.221
User properties dialog
• Account 1 shows the current amount of money available with the user. Account 2 shows the currentavailable quota available for the user.
373
SafeCom G4 Administrator's Manual Version: 10.520.11.221
• Low limit is the lowest amount that should be available in order to print (Allows negative figures). Clickto edit the Low limit.
Note The user account balance needs to exceed the Low limit value in order to successfully log in onthe device.
Note In some cases, the user may not be able to print or copy, even if the account balance exceedsthe lower limit by more than the expected printing or copying cost. The user estimate may be lowerthan the preliminary calculation, which may include not only the price per page, but the job start-upcost also, and considers using at least one color impression. In copy job pre-calculations the size ofthe document not yet known, so SafeCom takes the Other paper size into account, which may nothave the required balance.
• Reserved is the amount of credits reserved due to a print or copy job that finished in error. It should be0.00 (zero) most of the time. If the system has reserved any credits you see a positive amount printedin red color. Click to edit Reserved. The amount must be between 0.00 (zero) and the currentlyreserved amount of credits.
• Disposable is equal to Balance minus Low limit and Reserved.• Amount Type in amount to add to, subtract from or set account to – select appropriate action from the
drop-down list. Select appropriate account and click Record to carry out the transaction.• Comment allows you to add any description (optional).• Transactions: View a list of user account transactions.
Select the Details tab to see additional information about the user.
374
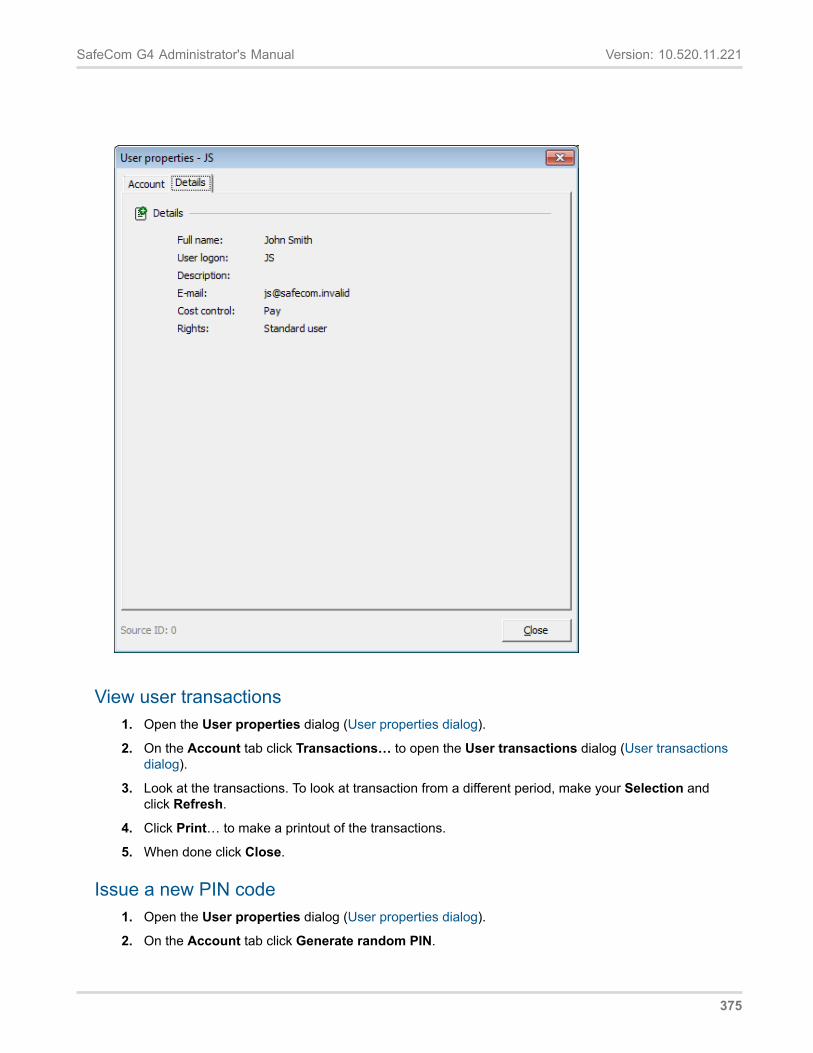
SafeCom G4 Administrator's Manual Version: 10.520.11.221
View user transactions1. Open the User properties dialog (User properties dialog).
2. On the Account tab click Transactions… to open the User transactions dialog (User transactionsdialog).
3. Look at the transactions. To look at transaction from a different period, make your Selection andclick Refresh.
4. Click Print… to make a printout of the transactions.
5. When done click Close.
Issue a new PIN code1. Open the User properties dialog (User properties dialog).
2. On the Account tab click Generate random PIN.
375
SafeCom G4 Administrator's Manual Version: 10.520.11.221
3. A new random 4-digit PIN code is displayed.
4. Click Close.
Unlock user1. Open the User properties dialog (User properties dialog).
2. On the Account tab click Unlock user.
3. Click Close.
Deposit credits1. Open the User properties dialog (User properties dialog).
2. On the Account tab select Account 1 (money) or select Account 2 (quota).
3. Enter the Amount and select add amount from the drop-down list.
4. Enter an optional Comment and click Record.
5. Click Close.
Withdraw credits1. Open the User properties dialog (User properties dialog).
2. On the Account tab select Account 1 (money) or select Account 2 (quota).
3. Type in the Amount and select subtract amount from the drop-down list.
4. Type in an optional Comment and click Record.
5. Click Close.
Set low limitLow limit is the amount of credits that must be available in order to print (and copy).
1. Open the User properties dialog (User properties dialog).
2. On the Account tab click and enter Low limit amount and click OK. The amount is normally0.00, but it can be both positive and negative.
3. Press Enter.
Free reserved creditsIf the system has reserved any credits you see a positive amount printed in red color in the User accountdialog. Refer to section Prevent cheating for a discussion of reserved credits.
To free the reserved credits:
1. Open the User properties dialog (User properties dialog).
376
SafeCom G4 Administrator's Manual Version: 10.520.11.221
2. On the Account tab click next to the reserved amount and enter the amount that must bereleased. To free up the whole amount enter 0 and the maximum is the currently reserved amount.
3. Press Enter.
Reset cash cardsThis section is only relevant if the SafeCom Pay solution stores money on a Smart Card. The dialog willdisplay Temporary card: <amount> in red color when the user has had the specified amount transferredfrom the cash card to the SafeCom account on the SafeCom server.
Warning: If you click Reset the money will NOT be transferred back to the user’s cash card the next timethe cash card is used at one of the SafeCom-enabled printers.
1. Open the User properties dialog (User properties dialog).
2. On the Account tab click Reset.
3. Click Close.
Detect attempt to avoid payingThe SafeCom Pay solution can be configured to send an e-mail to the administrator whenever a SafeComsession does not terminate appropriately.
1. Log in to SafeCom Administrator as an administrator.
2. Log in and open the Server properties dialog.
3. Click on the E-mail tab.
4. Check E-mail notification on credits reserved.
For additional information please refer to section Prevent cheating.
Print reportsIt is possible to print a number of reports, including:• Account status (Account status)• Cash flow report (Cash flow report)• Transactions (User transactions dialog)
Refer to the relevant sections for additional information.
377
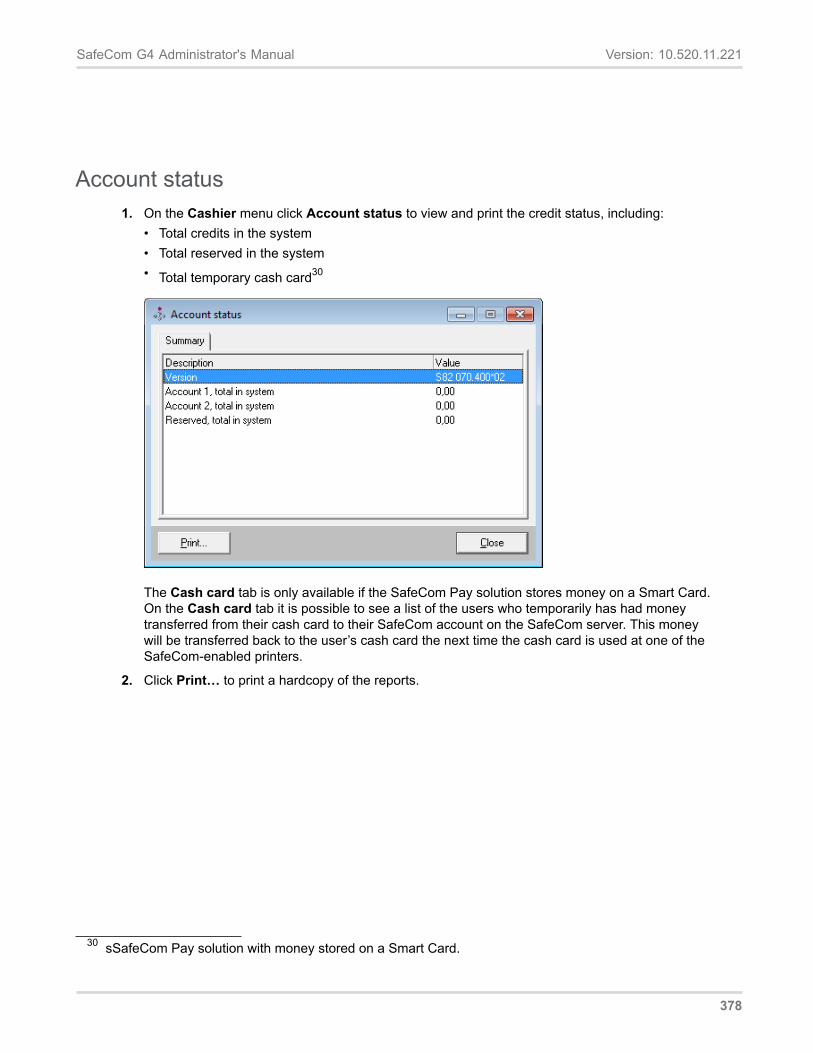
SafeCom G4 Administrator's Manual Version: 10.520.11.221
Account status1. On the Cashier menu click Account status to view and print the credit status, including:
• Total credits in the system• Total reserved in the system• Total temporary cash card30
The Cash card tab is only available if the SafeCom Pay solution stores money on a Smart Card.On the Cash card tab it is possible to see a list of the users who temporarily has had moneytransferred from their cash card to their SafeCom account on the SafeCom server. This moneywill be transferred back to the user’s cash card the next time the cash card is used at one of theSafeCom-enabled printers.
2. Click Print… to print a hardcopy of the reports.
30 sSafeCom Pay solution with money stored on a Smart Card.
378
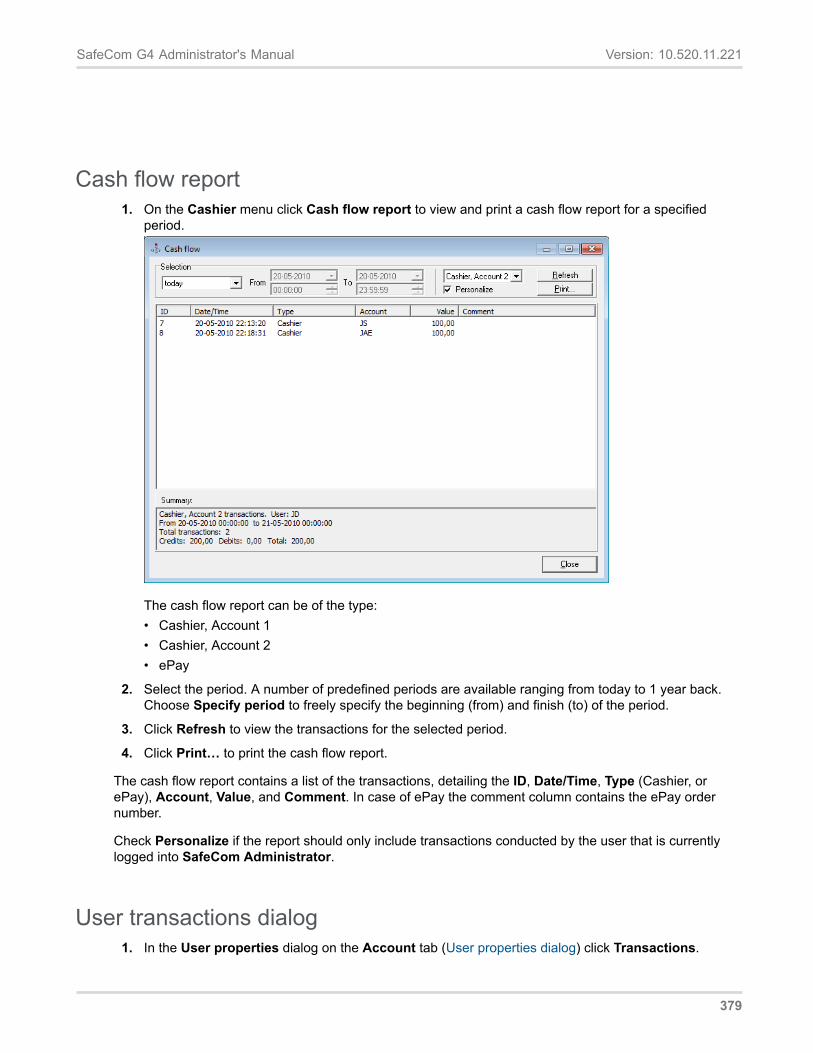
SafeCom G4 Administrator's Manual Version: 10.520.11.221
Cash flow report1. On the Cashier menu click Cash flow report to view and print a cash flow report for a specified
period.
The cash flow report can be of the type:• Cashier, Account 1• Cashier, Account 2• ePay
2. Select the period. A number of predefined periods are available ranging from today to 1 year back.Choose Specify period to freely specify the beginning (from) and finish (to) of the period.
3. Click Refresh to view the transactions for the selected period.
4. Click Print… to print the cash flow report.
The cash flow report contains a list of the transactions, detailing the ID, Date/Time, Type (Cashier, orePay), Account, Value, and Comment. In case of ePay the comment column contains the ePay ordernumber.
Check Personalize if the report should only include transactions conducted by the user that is currentlylogged into SafeCom Administrator.
User transactions dialog1. In the User properties dialog on the Account tab (User properties dialog) click Transactions.
379
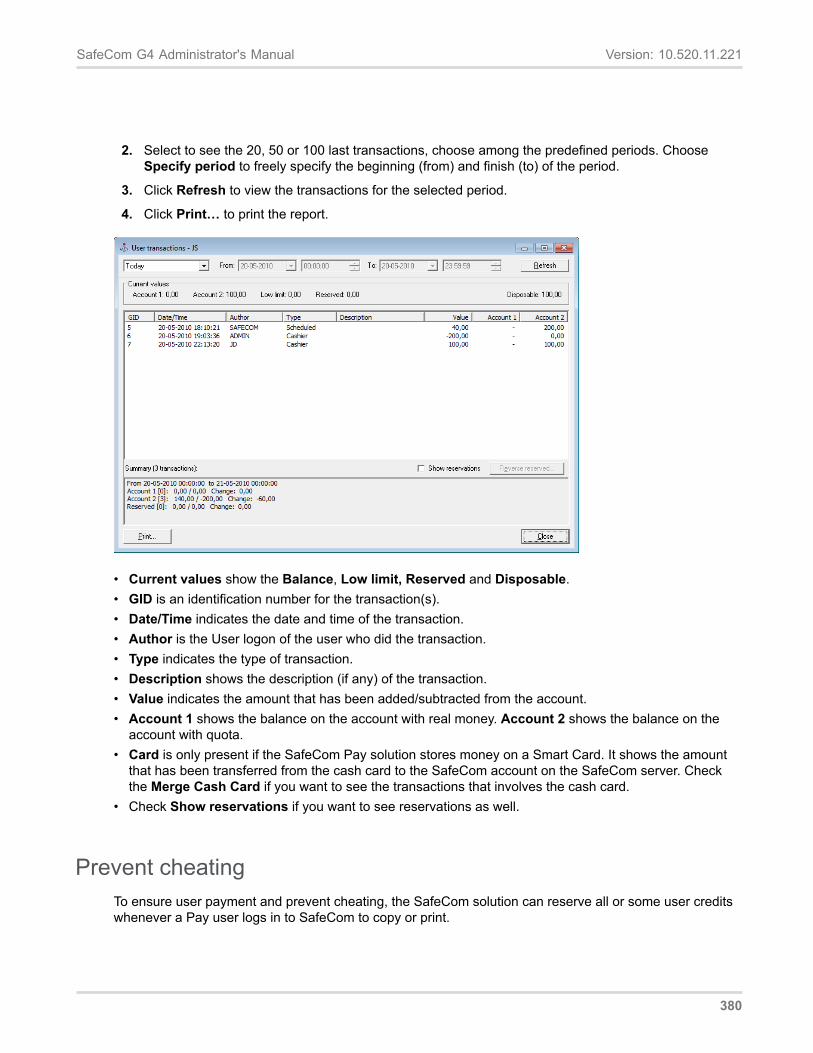
SafeCom G4 Administrator's Manual Version: 10.520.11.221
2. Select to see the 20, 50 or 100 last transactions, choose among the predefined periods. ChooseSpecify period to freely specify the beginning (from) and finish (to) of the period.
3. Click Refresh to view the transactions for the selected period.
4. Click Print… to print the report.
• Current values show the Balance, Low limit, Reserved and Disposable.• GID is an identification number for the transaction(s).• Date/Time indicates the date and time of the transaction.• Author is the User logon of the user who did the transaction.• Type indicates the type of transaction.• Description shows the description (if any) of the transaction.• Value indicates the amount that has been added/subtracted from the account.• Account 1 shows the balance on the account with real money. Account 2 shows the balance on the
account with quota.• Card is only present if the SafeCom Pay solution stores money on a Smart Card. It shows the amount
that has been transferred from the cash card to the SafeCom account on the SafeCom server. Checkthe Merge Cash Card if you want to see the transactions that involves the cash card.
• Check Show reservations if you want to see reservations as well.
Prevent cheatingTo ensure user payment and prevent cheating, the SafeCom solution can reserve all or some user creditswhenever a Pay user logs in to SafeCom to copy or print.
380
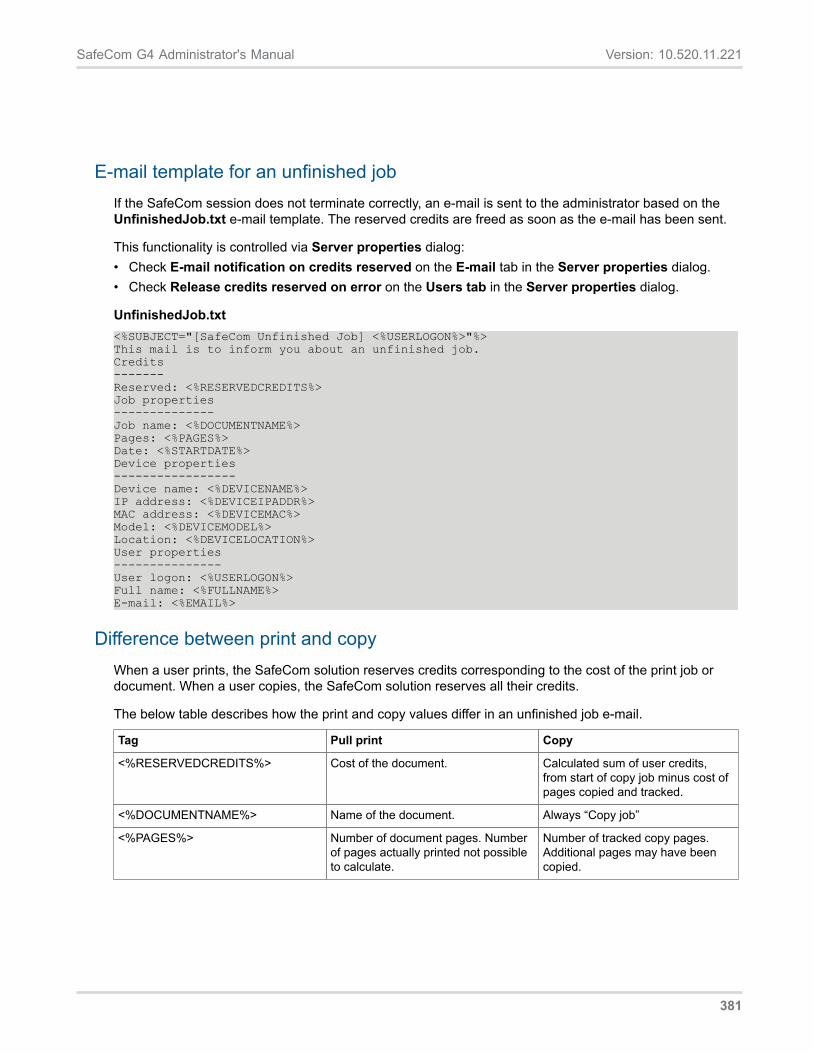
SafeCom G4 Administrator's Manual Version: 10.520.11.221
E-mail template for an unfinished jobIf the SafeCom session does not terminate correctly, an e-mail is sent to the administrator based on theUnfinishedJob.txt e-mail template. The reserved credits are freed as soon as the e-mail has been sent.
This functionality is controlled via Server properties dialog:• Check E-mail notification on credits reserved on the E-mail tab in the Server properties dialog.• Check Release credits reserved on error on the Users tab in the Server properties dialog.
UnfinishedJob.txt<%SUBJECT="[SafeCom Unfinished Job] <%USERLOGON%>"%>This mail is to inform you about an unfinished job.Credits-------Reserved: <%RESERVEDCREDITS%>Job properties--------------Job name: <%DOCUMENTNAME%>Pages: <%PAGES%>Date: <%STARTDATE%>Device properties-----------------Device name: <%DEVICENAME%>IP address: <%DEVICEIPADDR%>MAC address: <%DEVICEMAC%>Model: <%DEVICEMODEL%>Location: <%DEVICELOCATION%>User properties---------------User logon: <%USERLOGON%>Full name: <%FULLNAME%>E-mail: <%EMAIL%>
Difference between print and copyWhen a user prints, the SafeCom solution reserves credits corresponding to the cost of the print job ordocument. When a user copies, the SafeCom solution reserves all their credits.
The below table describes how the print and copy values differ in an unfinished job e-mail.
Tag Pull print Copy
<%RESERVEDCREDITS%> Cost of the document. Calculated sum of user credits,from start of copy job minus cost ofpages copied and tracked.
<%DOCUMENTNAME%> Name of the document. Always “Copy job”
<%PAGES%> Number of document pages. Numberof pages actually printed not possibleto calculate.
Number of tracked copy pages.Additional pages may have beencopied.
381
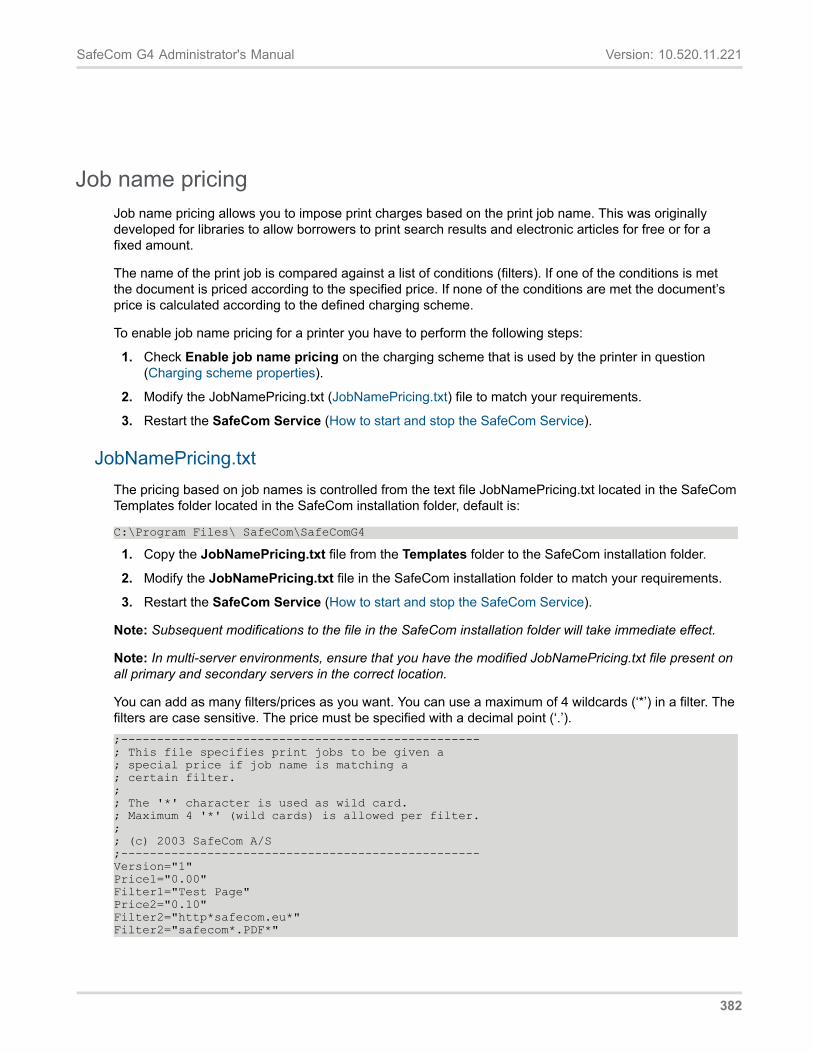
SafeCom G4 Administrator's Manual Version: 10.520.11.221
Job name pricing Job name pricing allows you to impose print charges based on the print job name. This was originally developed for libraries to allow borrowers to print search results and electronic articles for free or for a fixed amount.
The name of the print job is compared against a list of conditions (filters). If one of the conditions is met the document is priced according to the specified price. If none of the conditions are met the document’s price is calculated according to the defined charging scheme.
To enable job name pricing for a printer you have to perform the following steps:
1. Check Enable job name pricing on the charging scheme that is used by the printer in question (Charging scheme properties).
2. Modify the JobNamePricing.txt (JobNamePricing.txt) file to match your requirements.
3. Restart the SafeCom Service (How to start and stop the SafeCom Service).
JobNamePricing.txt The pricing based on job names is controlled from the text file JobNamePricing.txt located in the SafeCom Templates folder located in the SafeCom installation folder, default is:
C:\Program Files\ SafeCom\SafeComG4
1. Copy the JobNamePricing.txt file from the Templates folder to the SafeCom installation folder.
2. Modify the JobNamePricing.txt file in the SafeCom installation folder to match your requirements.
3. Restart the SafeCom Service (How to start and stop the SafeCom Service).
Note: Subsequent modifications to the file in the SafeCom installation folder will take immediate effect.
Note: In multi-server environments, ensure that you have the modified JobNamePricing.txt file present on all primary and secondary servers in the correct location.
You can add as many filters/prices as you want. You can use a maximum of 4 wildcards (‘*’) in a filter. The filters are case sensitive. The price must be specified with a decimal point (‘.’). ;-------------------------------------------------- ; This file specifies print jobs to be given a ; special price if job name is matching a ; certain filter. ; ; The '*' character is used as wild card. ; Maximum 4 '*' (wild cards) is allowed per filter. ; ; (c) 2003 SafeCom A/S ;-------------------------------------------------- Version="1" Price1="0.00" Filter1="Test Page" Price2="0.10" Filter2="http*safecom.eu*" Filter2="safecom*.PDF*"
382
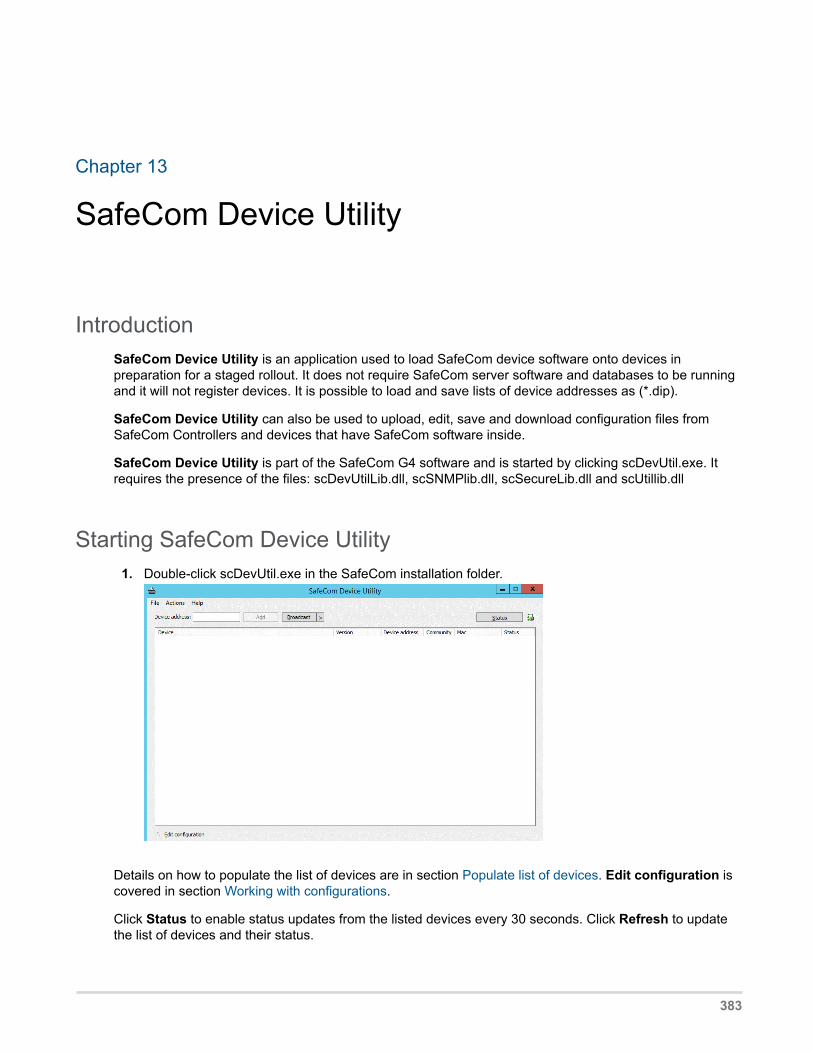
Chapter 13
SafeCom Device Utility
IntroductionSafeCom Device Utility is an application used to load SafeCom device software onto devices inpreparation for a staged rollout. It does not require SafeCom server software and databases to be runningand it will not register devices. It is possible to load and save lists of device addresses as (*.dip).
SafeCom Device Utility can also be used to upload, edit, save and download configuration files fromSafeCom Controllers and devices that have SafeCom software inside.
SafeCom Device Utility is part of the SafeCom G4 software and is started by clicking scDevUtil.exe. Itrequires the presence of the files: scDevUtilLib.dll, scSNMPlib.dll, scSecureLib.dll and scUtillib.dll
Starting SafeCom Device Utility1. Double-click scDevUtil.exe in the SafeCom installation folder.
Details on how to populate the list of devices are in section Populate list of devices. Edit configuration iscovered in section Working with configurations.
Click Status to enable status updates from the listed devices every 30 seconds. Click Refresh to updatethe list of devices and their status.
383
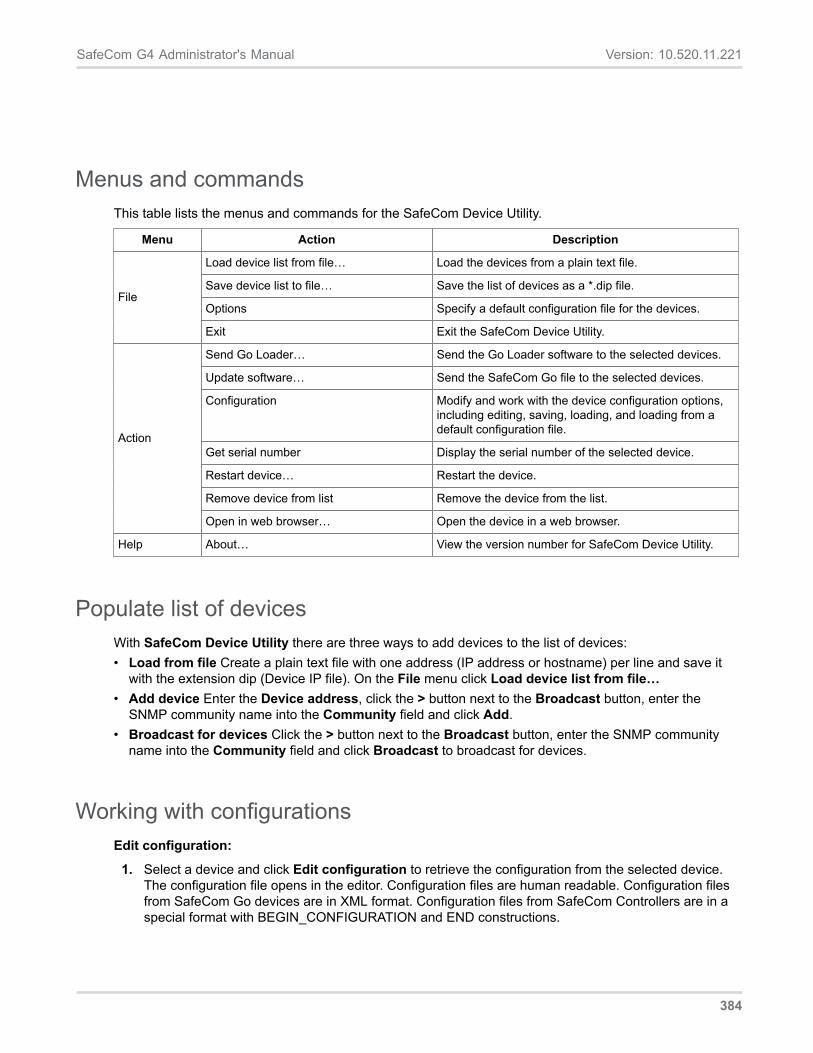
SafeCom G4 Administrator's Manual Version: 10.520.11.221
Menus and commandsThis table lists the menus and commands for the SafeCom Device Utility.
Menu Action Description
Load device list from file… Load the devices from a plain text file.
Save device list to file… Save the list of devices as a *.dip file.
Options Specify a default configuration file for the devices.File
Exit Exit the SafeCom Device Utility.
Send Go Loader… Send the Go Loader software to the selected devices.
Update software… Send the SafeCom Go file to the selected devices.
Configuration Modify and work with the device configuration options,including editing, saving, loading, and loading from adefault configuration file.
Get serial number Display the serial number of the selected device.
Restart device… Restart the device.
Remove device from list Remove the device from the list.
Action
Open in web browser… Open the device in a web browser.
Help About… View the version number for SafeCom Device Utility.
Populate list of devicesWith SafeCom Device Utility there are three ways to add devices to the list of devices:• Load from file Create a plain text file with one address (IP address or hostname) per line and save it
with the extension dip (Device IP file). On the File menu click Load device list from file…• Add device Enter the Device address, click the > button next to the Broadcast button, enter the
SNMP community name into the Community field and click Add.• Broadcast for devices Click the > button next to the Broadcast button, enter the SNMP community
name into the Community field and click Broadcast to broadcast for devices.
Working with configurationsEdit configuration:
1. Select a device and click Edit configuration to retrieve the configuration from the selected device.The configuration file opens in the editor. Configuration files are human readable. Configuration filesfrom SafeCom Go devices are in XML format. Configuration files from SafeCom Controllers are in aspecial format with BEGIN_CONFIGURATION and END constructions.
384
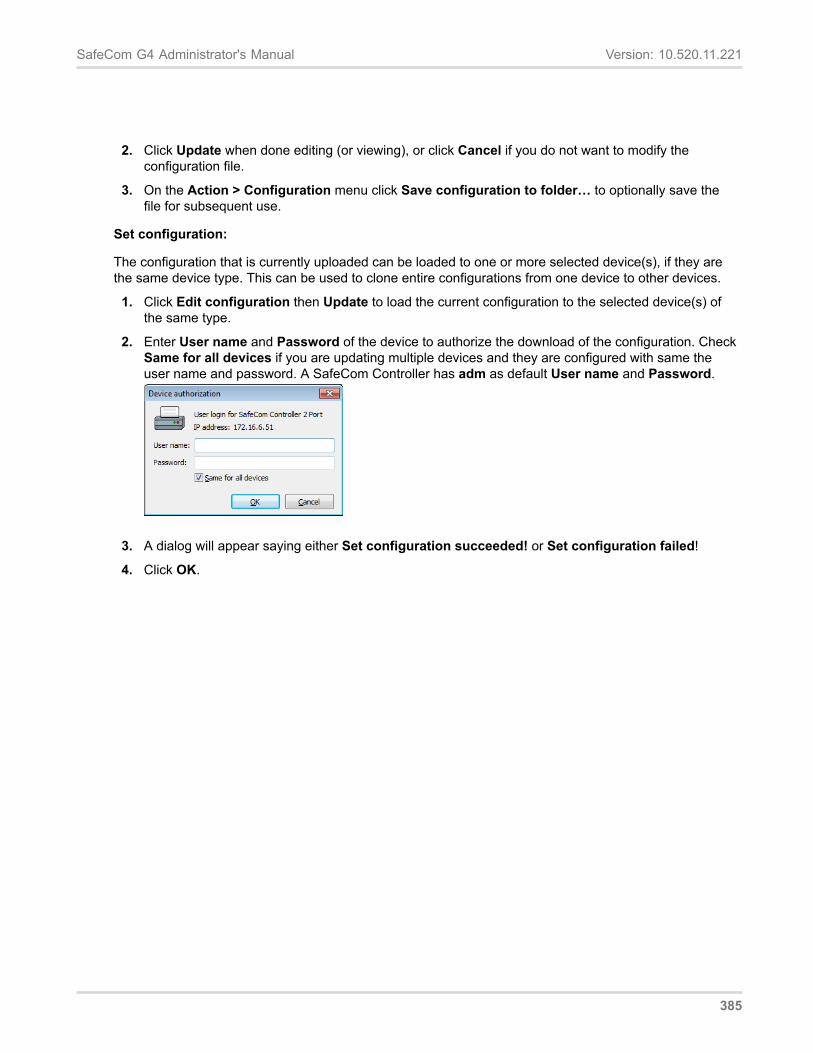
SafeCom G4 Administrator's Manual Version: 10.520.11.221
2. Click Update when done editing (or viewing), or click Cancel if you do not want to modify theconfiguration file.
3. On the Action > Configuration menu click Save configuration to folder… to optionally save thefile for subsequent use.
Set configuration:
The configuration that is currently uploaded can be loaded to one or more selected device(s), if they arethe same device type. This can be used to clone entire configurations from one device to other devices.
1. Click Edit configuration then Update to load the current configuration to the selected device(s) ofthe same type.
2. Enter User name and Password of the device to authorize the download of the configuration. CheckSame for all devices if you are updating multiple devices and they are configured with same theuser name and password. A SafeCom Controller has adm as default User name and Password.
3. A dialog will appear saying either Set configuration succeeded! or Set configuration failed!
4. Click OK.
385
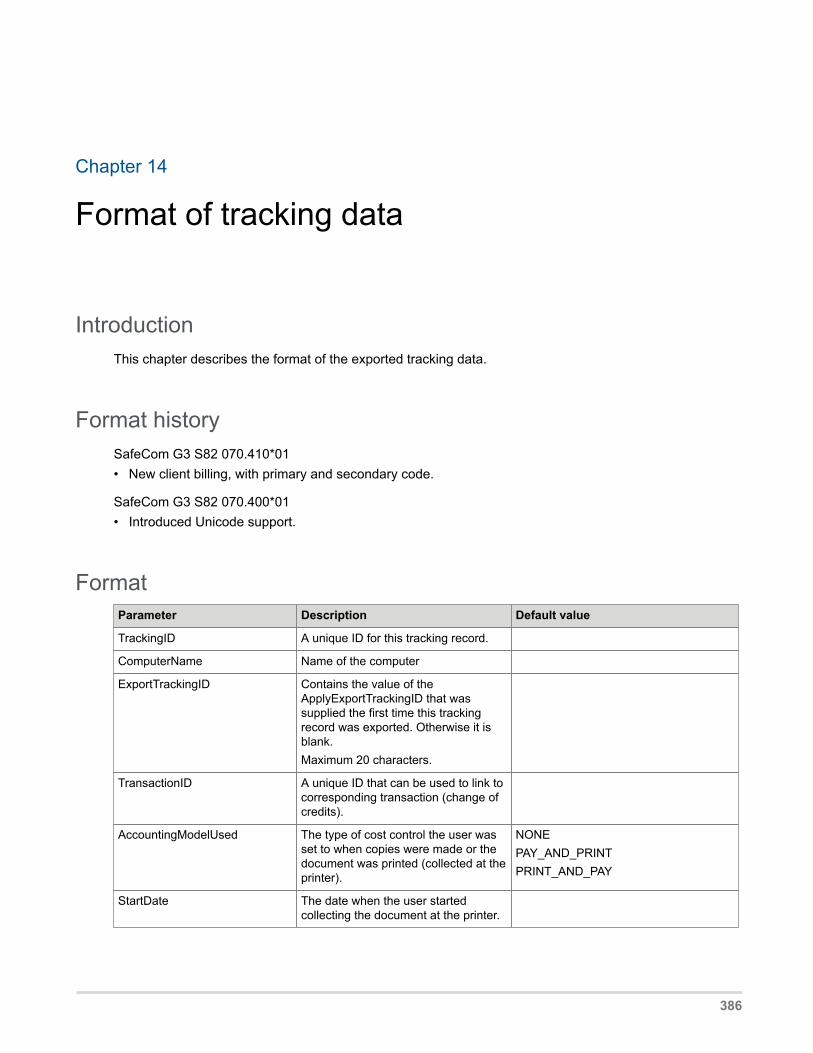
Chapter 14
Format of tracking data
IntroductionThis chapter describes the format of the exported tracking data.
Format historySafeCom G3 S82 070.410*01• New client billing, with primary and secondary code.
SafeCom G3 S82 070.400*01• Introduced Unicode support.
FormatParameter Description Default value
TrackingID A unique ID for this tracking record.
ComputerName Name of the computer
ExportTrackingID Contains the value of theApplyExportTrackingID that wassupplied the first time this trackingrecord was exported. Otherwise it isblank.Maximum 20 characters.
TransactionID A unique ID that can be used to link tocorresponding transaction (change ofcredits).
AccountingModelUsed The type of cost control the user wasset to when copies were made or thedocument was printed (collected at theprinter).
NONEPAY_AND_PRINTPRINT_AND_PAY
StartDate The date when the user startedcollecting the document at the printer.
386
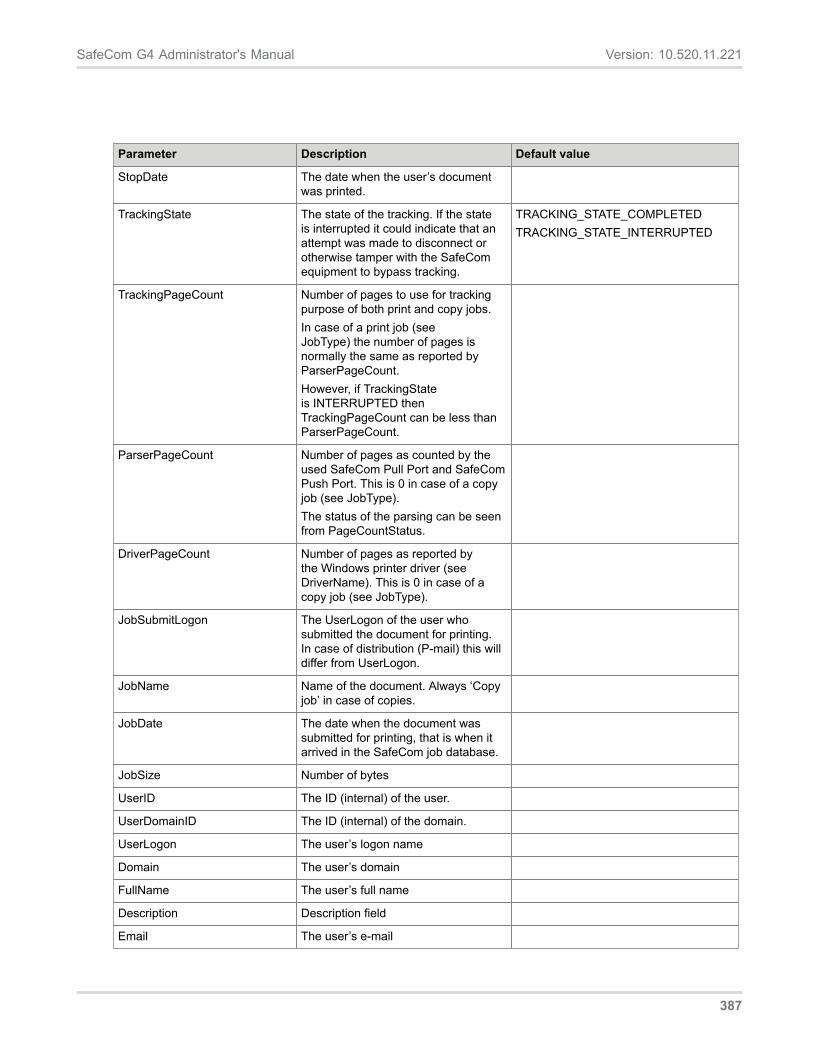
SafeCom G4 Administrator's Manual Version: 10.520.11.221
Parameter Description Default value
StopDate The date when the user’s documentwas printed.
TrackingState The state of the tracking. If the stateis interrupted it could indicate that anattempt was made to disconnect orotherwise tamper with the SafeComequipment to bypass tracking.
TRACKING_STATE_COMPLETEDTRACKING_STATE_INTERRUPTED
TrackingPageCount Number of pages to use for trackingpurpose of both print and copy jobs.In case of a print job (seeJobType) the number of pages isnormally the same as reported byParserPageCount.However, if TrackingStateis INTERRUPTED thenTrackingPageCount can be less thanParserPageCount.
ParserPageCount Number of pages as counted by theused SafeCom Pull Port and SafeComPush Port. This is 0 in case of a copyjob (see JobType).The status of the parsing can be seenfrom PageCountStatus.
DriverPageCount Number of pages as reported bythe Windows printer driver (seeDriverName). This is 0 in case of acopy job (see JobType).
JobSubmitLogon The UserLogon of the user whosubmitted the document for printing.In case of distribution (P-mail) this willdiffer from UserLogon.
JobName Name of the document. Always ‘Copyjob’ in case of copies.
JobDate The date when the document wassubmitted for printing, that is when itarrived in the SafeCom job database.
JobSize Number of bytes
UserID The ID (internal) of the user.
UserDomainID The ID (internal) of the domain.
UserLogon The user’s logon name
Domain The user’s domain
FullName The user’s full name
Description Description field
Email The user’s e-mail
387
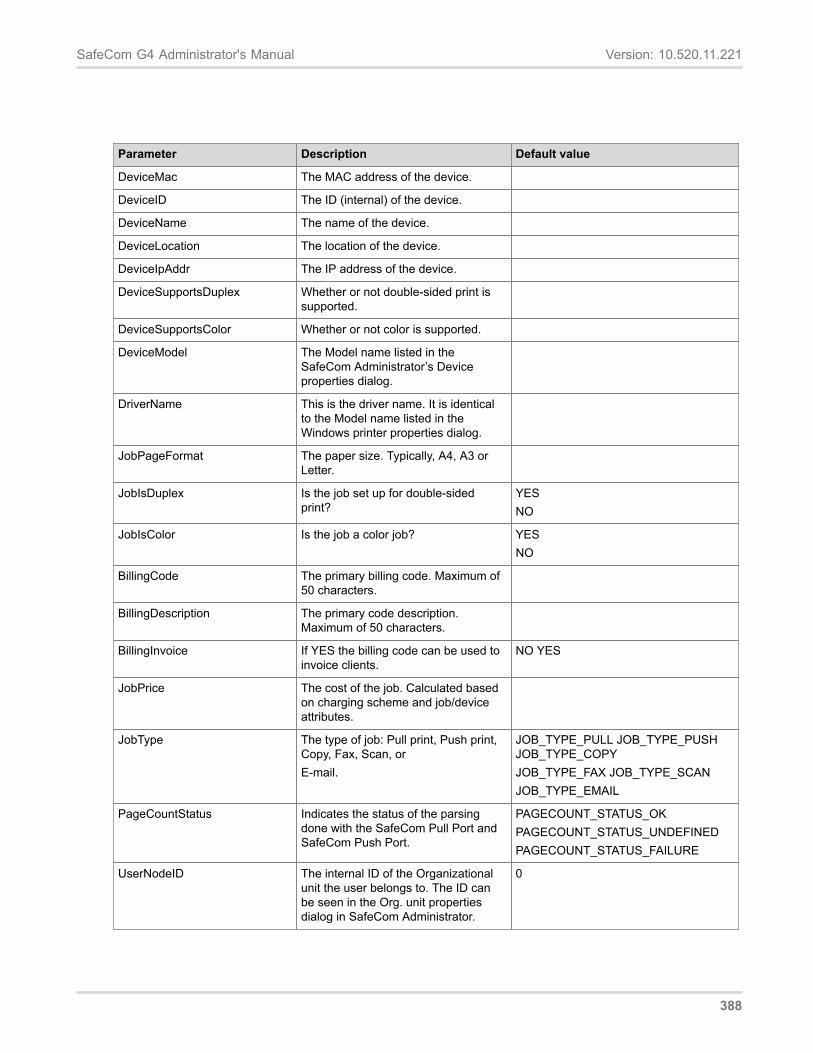
SafeCom G4 Administrator's Manual Version: 10.520.11.221
Parameter Description Default value
DeviceMac The MAC address of the device.
DeviceID The ID (internal) of the device.
DeviceName The name of the device.
DeviceLocation The location of the device.
DeviceIpAddr The IP address of the device.
DeviceSupportsDuplex Whether or not double-sided print issupported.
DeviceSupportsColor Whether or not color is supported.
DeviceModel The Model name listed in theSafeCom Administrator’s Deviceproperties dialog.
DriverName This is the driver name. It is identicalto the Model name listed in theWindows printer properties dialog.
JobPageFormat The paper size. Typically, A4, A3 orLetter.
JobIsDuplex Is the job set up for double-sidedprint?
YESNO
JobIsColor Is the job a color job? YESNO
BillingCode The primary billing code. Maximum of50 characters.
BillingDescription The primary code description.Maximum of 50 characters.
BillingInvoice If YES the billing code can be used toinvoice clients.
NO YES
JobPrice The cost of the job. Calculated basedon charging scheme and job/deviceattributes.
JobType The type of job: Pull print, Push print,Copy, Fax, Scan, orE-mail.
JOB_TYPE_PULL JOB_TYPE_PUSHJOB_TYPE_COPYJOB_TYPE_FAX JOB_TYPE_SCANJOB_TYPE_EMAIL
PageCountStatus Indicates the status of the parsingdone with the SafeCom Pull Port andSafeCom Push Port.
PAGECOUNT_STATUS_OKPAGECOUNT_STATUS_UNDEFINEDPAGECOUNT_STATUS_FAILURE
UserNodeID The internal ID of the Organizationalunit the user belongs to. The ID canbe seen in the Org. unit propertiesdialog in SafeCom Administrator.
0
388
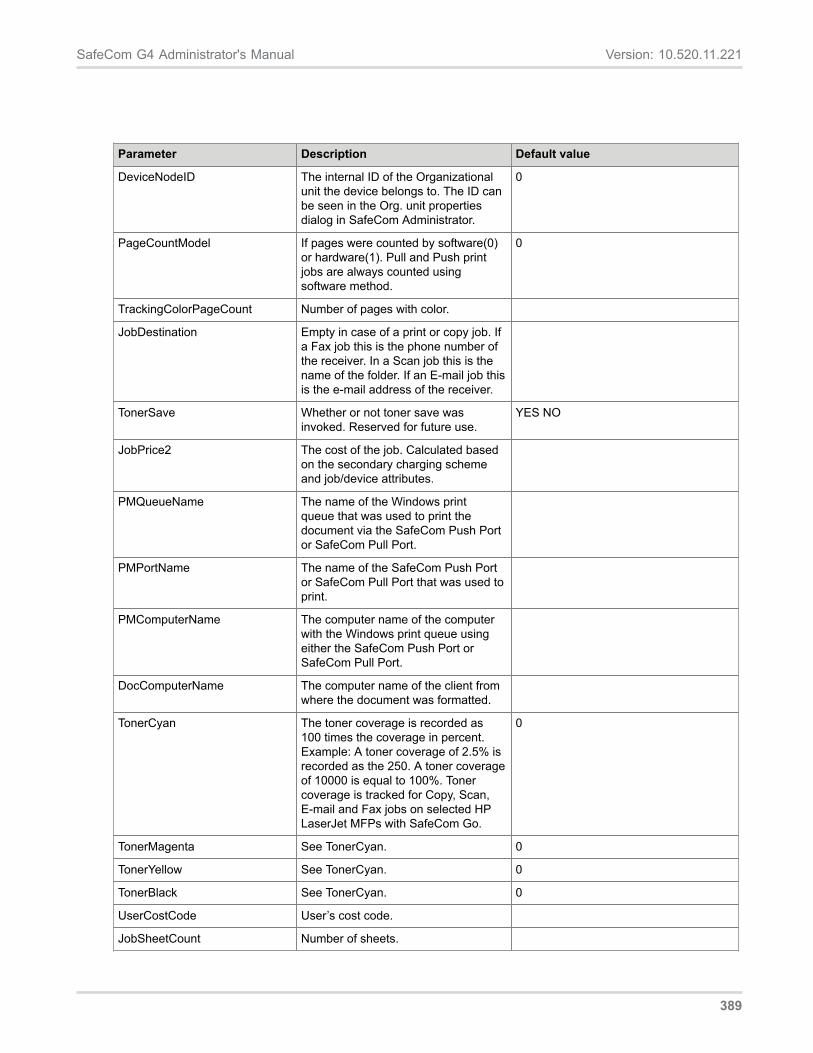
SafeCom G4 Administrator's Manual Version: 10.520.11.221
Parameter Description Default value
DeviceNodeID The internal ID of the Organizationalunit the device belongs to. The ID canbe seen in the Org. unit propertiesdialog in SafeCom Administrator.
0
PageCountModel If pages were counted by software(0)or hardware(1). Pull and Push printjobs are always counted usingsoftware method.
0
TrackingColorPageCount Number of pages with color.
JobDestination Empty in case of a print or copy job. Ifa Fax job this is the phone number ofthe receiver. In a Scan job this is thename of the folder. If an E-mail job thisis the e-mail address of the receiver.
TonerSave Whether or not toner save wasinvoked. Reserved for future use.
YES NO
JobPrice2 The cost of the job. Calculated basedon the secondary charging schemeand job/device attributes.
PMQueueName The name of the Windows printqueue that was used to print thedocument via the SafeCom Push Portor SafeCom Pull Port.
PMPortName The name of the SafeCom Push Portor SafeCom Pull Port that was used toprint.
PMComputerName The computer name of the computerwith the Windows print queue usingeither the SafeCom Push Port orSafeCom Pull Port.
DocComputerName The computer name of the client fromwhere the document was formatted.
TonerCyan The toner coverage is recorded as100 times the coverage in percent.Example: A toner coverage of 2.5% isrecorded as the 250. A toner coverageof 10000 is equal to 100%. Tonercoverage is tracked for Copy, Scan,E-mail and Fax jobs on selected HPLaserJet MFPs with SafeCom Go.
0
TonerMagenta See TonerCyan. 0
TonerYellow See TonerCyan. 0
TonerBlack See TonerCyan. 0
UserCostCode User’s cost code.
JobSheetCount Number of sheets.
389
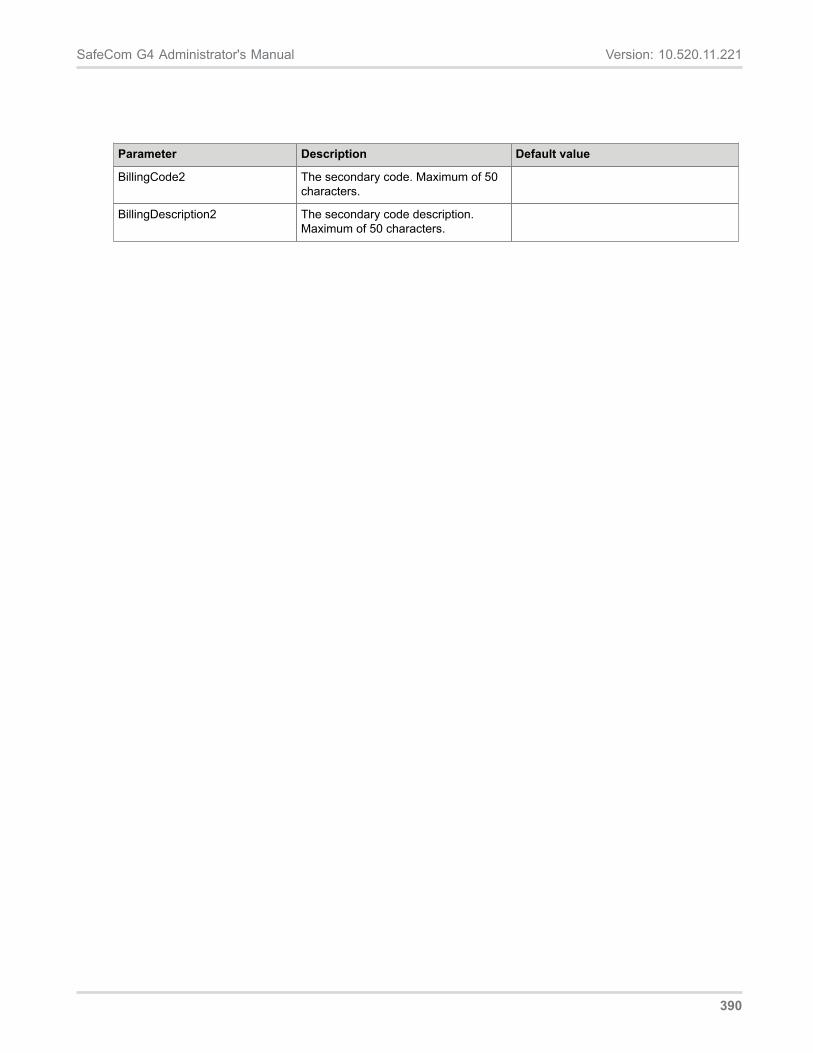
SafeCom G4 Administrator's Manual Version: 10.520.11.221
Parameter Description Default value
BillingCode2 The secondary code. Maximum of 50characters.
BillingDescription2 The secondary code description.Maximum of 50 characters.
390
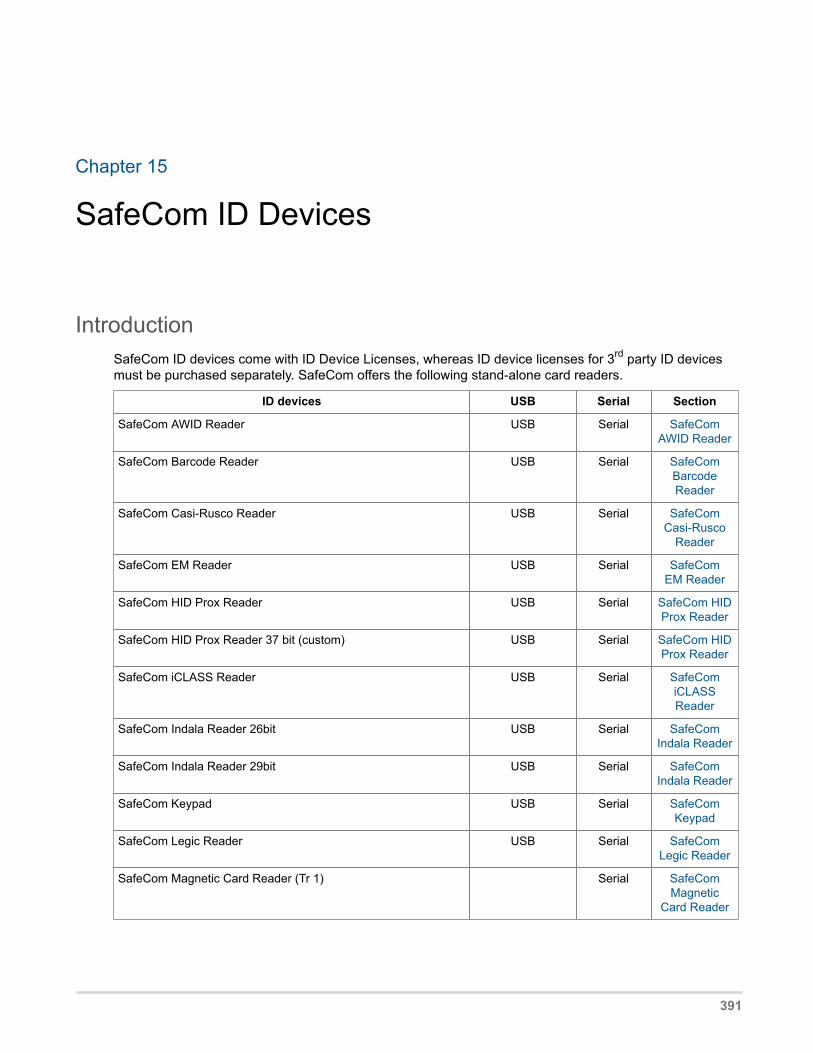
Chapter 15
SafeCom ID Devices
IntroductionSafeCom ID devices come with ID Device Licenses, whereas ID device licenses for 3rd party ID devicesmust be purchased separately. SafeCom offers the following stand-alone card readers.
ID devices USB Serial Section
SafeCom AWID Reader USB Serial SafeComAWID Reader
SafeCom Barcode Reader USB Serial SafeComBarcodeReader
SafeCom Casi-Rusco Reader USB Serial SafeComCasi-Rusco
Reader
SafeCom EM Reader USB Serial SafeComEM Reader
SafeCom HID Prox Reader USB Serial SafeCom HIDProx Reader
SafeCom HID Prox Reader 37 bit (custom) USB Serial SafeCom HIDProx Reader
SafeCom iCLASS Reader USB Serial SafeComiCLASSReader
SafeCom Indala Reader 26bit USB Serial SafeComIndala Reader
SafeCom Indala Reader 29bit USB Serial SafeComIndala Reader
SafeCom Keypad USB Serial SafeComKeypad
SafeCom Legic Reader USB Serial SafeComLegic Reader
SafeCom Magnetic Card Reader (Tr 1) Serial SafeComMagnetic
Card Reader
391
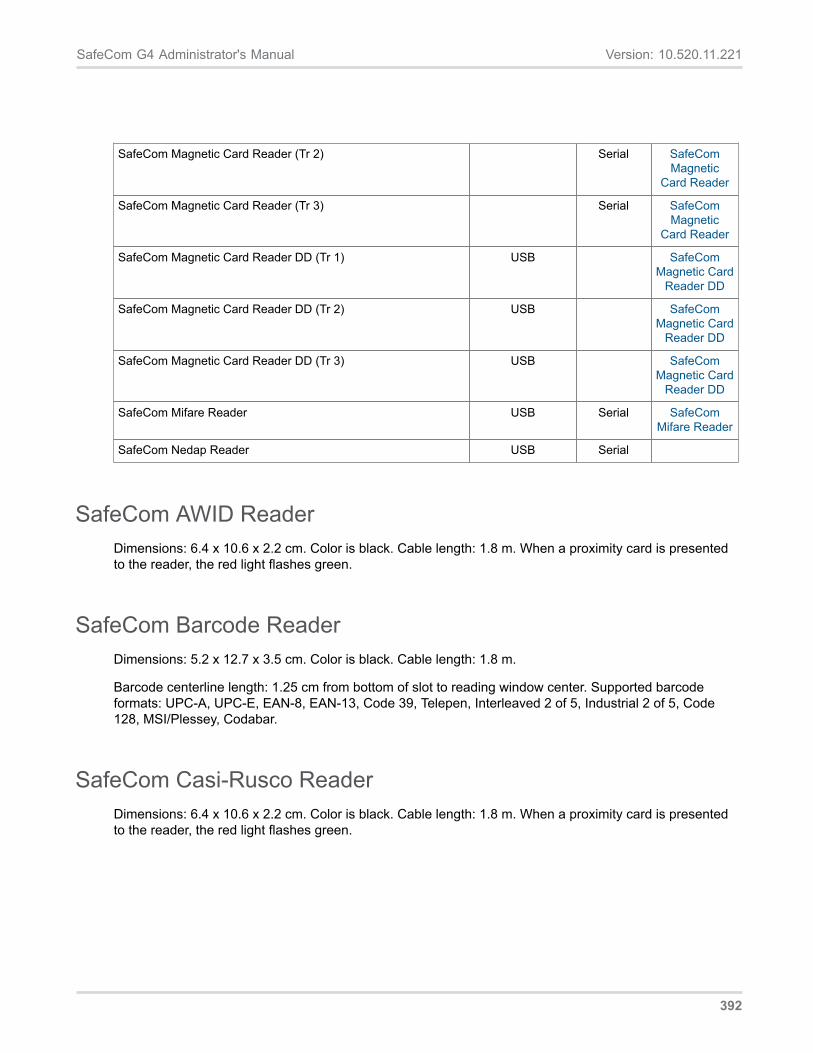
SafeCom G4 Administrator's Manual Version: 10.520.11.221
SafeCom Magnetic Card Reader (Tr 2) Serial SafeComMagnetic
Card Reader
SafeCom Magnetic Card Reader (Tr 3) Serial SafeComMagnetic
Card Reader
SafeCom Magnetic Card Reader DD (Tr 1) USB SafeComMagnetic Card
Reader DD
SafeCom Magnetic Card Reader DD (Tr 2) USB SafeComMagnetic Card
Reader DD
SafeCom Magnetic Card Reader DD (Tr 3) USB SafeComMagnetic Card
Reader DD
SafeCom Mifare Reader USB Serial SafeComMifare Reader
SafeCom Nedap Reader USB Serial
SafeCom AWID ReaderDimensions: 6.4 x 10.6 x 2.2 cm. Color is black. Cable length: 1.8 m. When a proximity card is presentedto the reader, the red light flashes green.
SafeCom Barcode ReaderDimensions: 5.2 x 12.7 x 3.5 cm. Color is black. Cable length: 1.8 m.
Barcode centerline length: 1.25 cm from bottom of slot to reading window center. Supported barcodeformats: UPC-A, UPC-E, EAN-8, EAN-13, Code 39, Telepen, Interleaved 2 of 5, Industrial 2 of 5, Code128, MSI/Plessey, Codabar.
SafeCom Casi-Rusco ReaderDimensions: 6.4 x 10.6 x 2.2 cm. Color is black. Cable length: 1.8 m. When a proximity card is presentedto the reader, the red light flashes green.
392
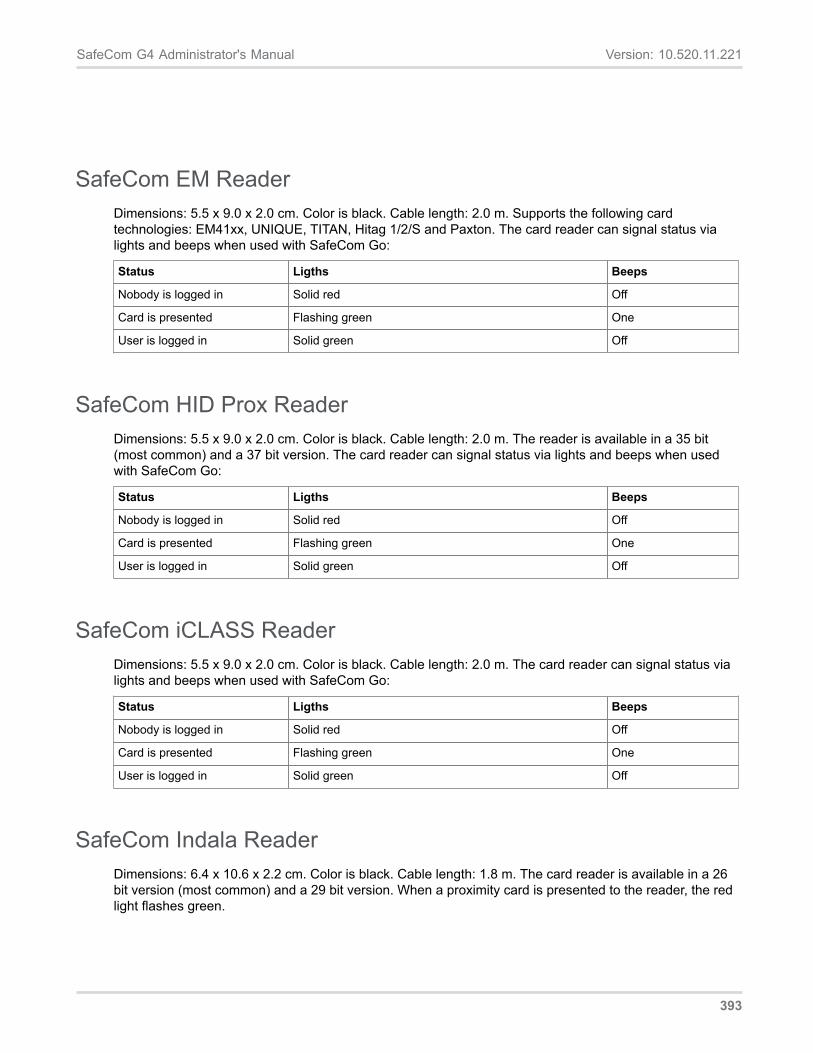
SafeCom G4 Administrator's Manual Version: 10.520.11.221
SafeCom EM ReaderDimensions: 5.5 x 9.0 x 2.0 cm. Color is black. Cable length: 2.0 m. Supports the following cardtechnologies: EM41xx, UNIQUE, TITAN, Hitag 1/2/S and Paxton. The card reader can signal status vialights and beeps when used with SafeCom Go:
Status Ligths Beeps
Nobody is logged in Solid red Off
Card is presented Flashing green One
User is logged in Solid green Off
SafeCom HID Prox ReaderDimensions: 5.5 x 9.0 x 2.0 cm. Color is black. Cable length: 2.0 m. The reader is available in a 35 bit(most common) and a 37 bit version. The card reader can signal status via lights and beeps when usedwith SafeCom Go:
Status Ligths Beeps
Nobody is logged in Solid red Off
Card is presented Flashing green One
User is logged in Solid green Off
SafeCom iCLASS ReaderDimensions: 5.5 x 9.0 x 2.0 cm. Color is black. Cable length: 2.0 m. The card reader can signal status vialights and beeps when used with SafeCom Go:
Status Ligths Beeps
Nobody is logged in Solid red Off
Card is presented Flashing green One
User is logged in Solid green Off
SafeCom Indala ReaderDimensions: 6.4 x 10.6 x 2.2 cm. Color is black. Cable length: 1.8 m. The card reader is available in a 26bit version (most common) and a 29 bit version. When a proximity card is presented to the reader, the redlight flashes green.
393
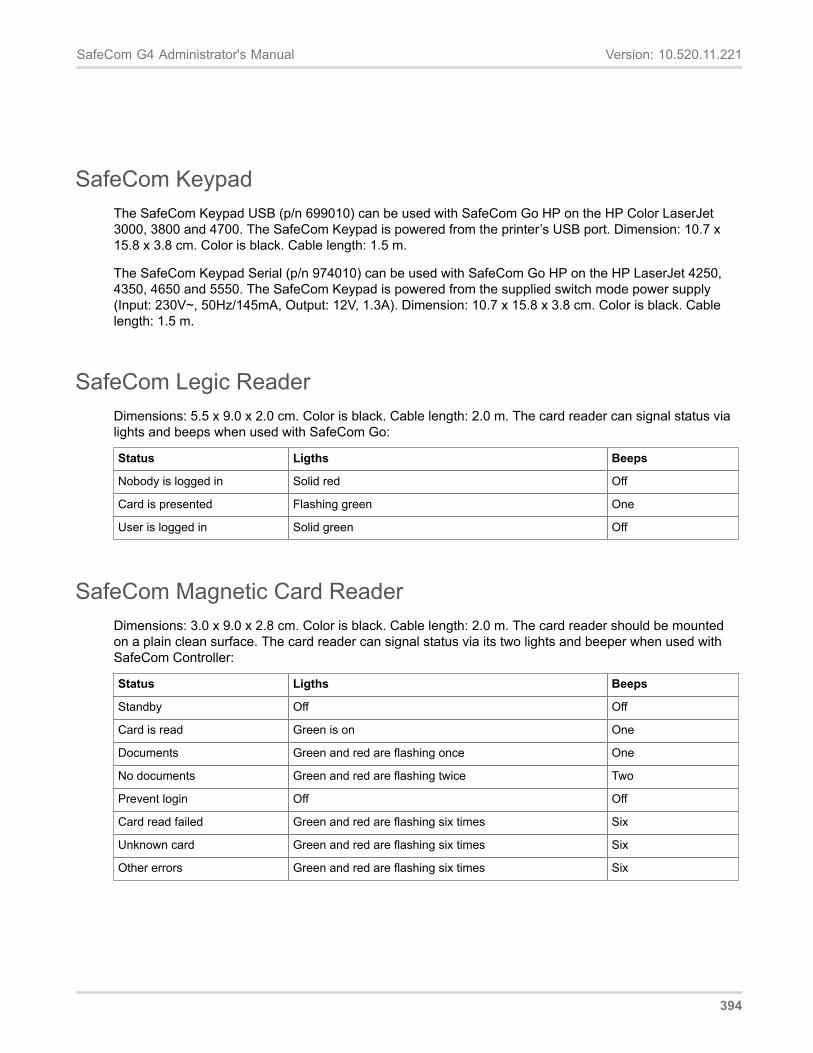
SafeCom G4 Administrator's Manual Version: 10.520.11.221
SafeCom KeypadThe SafeCom Keypad USB (p/n 699010) can be used with SafeCom Go HP on the HP Color LaserJet3000, 3800 and 4700. The SafeCom Keypad is powered from the printer’s USB port. Dimension: 10.7 x15.8 x 3.8 cm. Color is black. Cable length: 1.5 m.
The SafeCom Keypad Serial (p/n 974010) can be used with SafeCom Go HP on the HP LaserJet 4250,4350, 4650 and 5550. The SafeCom Keypad is powered from the supplied switch mode power supply(Input: 230V~, 50Hz/145mA, Output: 12V, 1.3A). Dimension: 10.7 x 15.8 x 3.8 cm. Color is black. Cablelength: 1.5 m.
SafeCom Legic ReaderDimensions: 5.5 x 9.0 x 2.0 cm. Color is black. Cable length: 2.0 m. The card reader can signal status vialights and beeps when used with SafeCom Go:
Status Ligths Beeps
Nobody is logged in Solid red Off
Card is presented Flashing green One
User is logged in Solid green Off
SafeCom Magnetic Card ReaderDimensions: 3.0 x 9.0 x 2.8 cm. Color is black. Cable length: 2.0 m. The card reader should be mountedon a plain clean surface. The card reader can signal status via its two lights and beeper when used withSafeCom Controller:
Status Ligths Beeps
Standby Off Off
Card is read Green is on One
Documents Green and red are flashing once One
No documents Green and red are flashing twice Two
Prevent login Off Off
Card read failed Green and red are flashing six times Six
Unknown card Green and red are flashing six times Six
Other errors Green and red are flashing six times Six
394
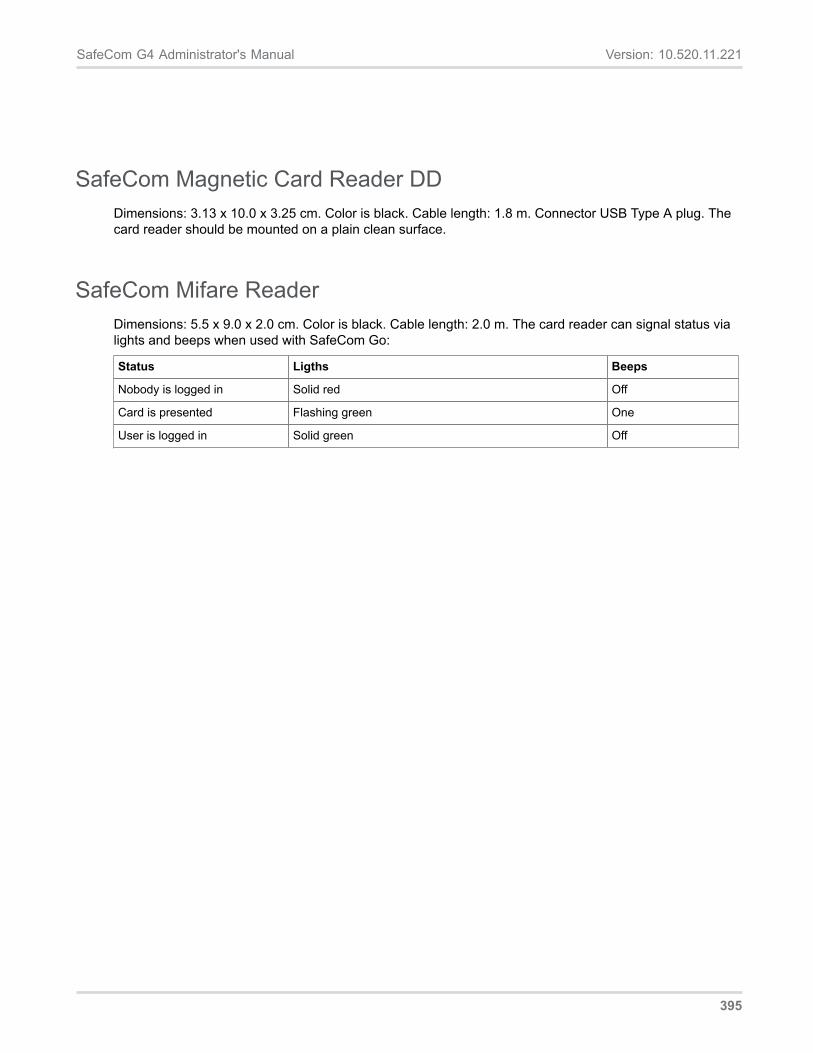
SafeCom G4 Administrator's Manual Version: 10.520.11.221
SafeCom Magnetic Card Reader DDDimensions: 3.13 x 10.0 x 3.25 cm. Color is black. Cable length: 1.8 m. Connector USB Type A plug. Thecard reader should be mounted on a plain clean surface.
SafeCom Mifare ReaderDimensions: 5.5 x 9.0 x 2.0 cm. Color is black. Cable length: 2.0 m. The card reader can signal status vialights and beeps when used with SafeCom Go:
Status Ligths Beeps
Nobody is logged in Solid red Off
Card is presented Flashing green One
User is logged in Solid green Off
395
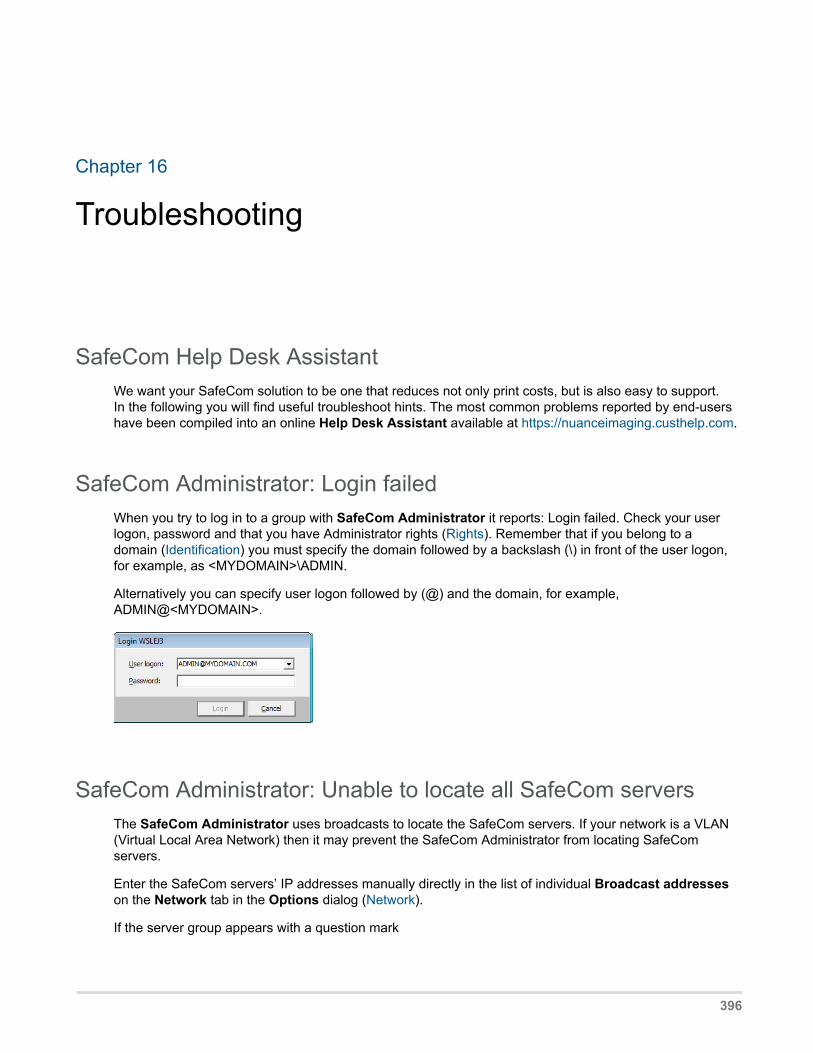
Chapter 16
Troubleshooting
SafeCom Help Desk AssistantWe want your SafeCom solution to be one that reduces not only print costs, but is also easy to support.In the following you will find useful troubleshoot hints. The most common problems reported by end-usershave been compiled into an online Help Desk Assistant available at https://nuanceimaging.custhelp.com.
SafeCom Administrator: Login failedWhen you try to log in to a group with SafeCom Administrator it reports: Login failed. Check your userlogon, password and that you have Administrator rights (Rights). Remember that if you belong to adomain (Identification) you must specify the domain followed by a backslash (\) in front of the user logon,for example, as <MYDOMAIN>\ADMIN.
Alternatively you can specify user logon followed by (@) and the domain, for example,ADMIN@<MYDOMAIN>.
SafeCom Administrator: Unable to locate all SafeCom serversThe SafeCom Administrator uses broadcasts to locate the SafeCom servers. If your network is a VLAN(Virtual Local Area Network) then it may prevent the SafeCom Administrator from locating SafeComservers.
Enter the SafeCom servers’ IP addresses manually directly in the list of individual Broadcast addresseson the Network tab in the Options dialog (Network).
If the server group appears with a question mark
396
SafeCom G4 Administrator's Manual Version: 10.520.11.221
it is either because the SafeCom server is not running or because it is not referencing the IP addresses ofthe SafeCom server.
1. Start SafeCom Administrator (Log in to SafeCom Administrator) and right-click the group in theServer groups pane and click Server group properties (License).
2. In IP address of entry point you should enter the IP address of the SafeCom server. Click OK.
3. Log in to the group and open the Server properties dialog (Server). In IP address you should enterthe IP address of the SafeCom server. Click OK.
The IP address of the SafeCom server can be obtained by logging into the SafeCom server, start aCommand Prompt and type ipconfig -all
SafeCom Administrator: Unable to locate all SafeCom devicesA device will only appear in the SafeCom Administrator after it was added through the SafeComAdministrator or after a user with either Technician or Administrator rights (Rights) has logged in.
If you are attempting to Broadcast (Broadcast for devices) for SafeCom Controllers:
1. In SafeCom Administrator click on the Actions menu, Options and verify that the list ofBroadcasts addresses on the Network tab is correct.
2. Contact a network administrator that has access to the DHCP server. The network administrator canlog in to the DHCP server and see the IP address that is assigned to the device.
SafeCom Administrator: Users are missingUsers are either not associated to a server or they belong to another server than the one you are lookingat. Click on the Find tool button and then click Retrieve all (Find users).
SafeCom Administrator: Add user failed and Add alias failedThis is because either a user with the specified user logon or alias (Aliases) exists already. Consult theSafeCom server event log (Event log) to see which user is causing the conflict.
SafeCom Administrator: License does not take effectIf nothing happens when you try to apply a new license key code (Install the SafeCom license key code),close SafeCom Administrator and start it again by right-clicking SafeCom Administrator and selectingRun as administrator.
397

SafeCom G4 Administrator's Manual Version: 10.520.11.221
SafeCom Administrator: Controls in dialog are not visibleThe menus and controls in SafeCom Administrator adapt to reflect the SafeCom license key code andthe rights with which you are logged into SafeCom Administrator. However, if certain control in the dialogdisplayed by the SafeCom Administrator is not completely visible it may be because the resolution of thescreen is configured for different value than 96 dpi. Change the resolution to 96 dpi.
SafeCom Administrator: device is recognized as SafeComController
When adding a new device, if is displayed with a SafeCom type: SafeCom Controller on the AddDevice Wizard, it may have an incorrect SNMP community name. Check that the SNMP communityname on the device matches the SNMP community name you entered when adding the deviceto SafeCom Administrator. Also, if the SNMP community name is not public, you have to edit thescDevMonSettings.ini file. For more information, see Add device
SafeCom Administrator: device cannot be added as a Push printerDevices that do not have public as their SNMP community name cannot be added to SafeComAdministrator as Push printers.
SafeCom Administrator: device is “Not responding” when thecommunity name has been changed from “public”
Ensure that you are running SafeCom Administrator with as an administrator (Run as administratoroption or equivalent).
User is not created at first printFirst verify that Create users at first print is checked (Users). If the user is printing from a workgroupcomputer to a shared SafeCom Pull Printer the user must be known on the server under the exact samelogon and password as used on the client. If this is not the case the print job is stored under the serveraccount that owns the printer, typically the Administrator or Guest account. If the server and the clientbelong to the same domain there is no problem.
398
SafeCom G4 Administrator's Manual Version: 10.520.11.221
Device web interface: Displayed incorrectly or settings not savedYour web browser must allow use of JavaScript (Active Scripting). The steps below apply to InternetExplorer.
1. Start Internet Explorer.
2. On the Tools menu click Internet Options…
3. Click on the Security tab in the Internet Options dialog.
4. Click on Custom Level… to open the Security Settings dialog.
5. Scroll down to Scripting, Active scripting and click Enable.
6. Click OK.
7. Click OK.
At the printer: Out of orderThis message is displayed when communication with the SafeCom server is lost. Check the following:• Does the web page of the SafeCom device reference a SafeCom server and is the IP address and
Group name correct?• Is the SafeCom Service running on the SafeCom server (How to start and stop the SafeCom Service)?• Is the network down?• Is there a firewall blocking communication (Windows Firewall – Ports that must be opened)?• Is the SafeCom Controller connected to the network via the MDI/MDI-X port? If the network is up and
running the port’s green light should be on and its yellow light should be flashing.• Is the printer connected to the network?
The message is cleared and the device returns to normal operation a couple of minutes aftercommunication has been restored.
At the printer: User unknownThe used card (or entered ID code) is unknown. The user needs a PUK code from the administrator. Referto Add users manually and Customize the format of ID codes.
At the printer: Login denied
• Wrong PIN code.
399
SafeCom G4 Administrator's Manual Version: 10.520.11.221
• The device is not registered. For SafeCom Controller refer to the SafeCom Controller Administrator’sManual and for SafeCom Go refer to the How to chapter in the appropriate SafeCom Go Administrator’sManual (See list in Available documentation).
• Too many consecutive failed login attempts has caused Prevent login to be checked on theIdentification tab in the User properties dialog (Identification).
If none of the above, it could be because the Windows system on the SafeCom server does not allow anymore connections. If you also get a “Connection error. Login failed” when you try to log in to SafeComAdministrator, then you should restart the computer.
At the printer: Restricted access
• The user is not allowed to use the device.• A Pay user is trying to log in and Pay is not checked on the License tab in the Device properties
dialog.
At the printer: Error printing document
• Pull Print is cleared on the License tab in the Device properties dialog (License).• Pull Print is cleared on the Settings tab in the Device properties dialog (Settings).
At the printer: Question mark before the document nameThe list of supported printer drivers does not include an entry matching the driver you used. Use the webbrowser to add the driver name to the list (Devices).
At the printer: Printer busy, retry laterThe 'Print busy, retry later' message on the device’s control panel indicates that SafeCom does not haveexclusive access control of the device. Exclusive SafeCom access control ensures that it is only the usercurrently logged in can print or copy documents. If there is no apparent reason for this message, checkwhether SNMP is disabled on the printer and enable it.
At the printer: Printer keeps rebootingPlease check that the printer’s formatter board is properly in place.
400

SafeCom G4 Administrator's Manual Version: 10.520.11.221
At the printer: Copy not allowedPlease check that MFP is checked in the Device properties dialog (Settings).
At the printer: Login error <number>• Is the SafeCom Service running on the SafeCom server?• Is the SafeCom device registered at the SafeCom server?
At the printer: Error printing: General FailureThe document you are trying to print is no longer on the SafeCom server. This may happen if you log in attwo or more devices and try to perform a simultaneous print all.
At the printer: Card reader not working• Is the card reader powered and firmly connected?• Is the card compatible with the reader?• Try to move the card reader away from the printer to check that if it is electrical interference that
prevents the reader from working.
Document not printed• Is the print queue paused?• Is the printer powered on and connected?• Is the printer online?• Is intervention required? Check for:
1. Wrong paper size
2. Manual feed
3. Out of paper
4. Paper jam
5. Toner low
.
401
SafeCom G4 Administrator's Manual Version: 10.520.11.221
Some documents are missing• The user may be trying to collect documents that have not yet been transferred to the SafeCom
solution. Allow sufficient time for the document to be processed and spooled. Try to log in again.• The user may previously have attempted to print the documents on another device, but did not collect
all of the documents. (Perhaps because the printer required intervention or needed to warm up?)Consult SafeCom Tracking data (if available) to confirm whether this is the case.
• The Filter document list (Devices) should be enabled, to control that only documents generated bycertain drivers are available for printing on a particular printer.
• The printer may have discarded the document due to driver compatibility problems. Try to print thesame document directly to the printer to verify that this has nothing to do with SafeCom.
Document printed incorrectly• Is there a paper jam?• Is the toner low?• Does the driver support the printer? If PostScript or PCL data is sent to a printer that does not support
it, the result may be garbage print. Change to a printer driver that supports the printer.
Nothing is copied• Is the MFP powered on and is the SafeCom MFP Cable connected?• Is the MFP online?• Is the MFP out of paper, low on toner or is there a paper jam?
Driver names are missingDuring the installation of the SafeCom Front-end you are presented with a list of driver names. The list ofdriver names is provided and maintained by the SafeCom server.
New driver names are automatically added to the list when a document is printed from a printer that usesthe SafeCom Pull Port. If there are driver names missing from the list it is because you have not printed adocument with that driver.
Add Printer Wizard: Specified port cannot be addedWhen you try to configure a Windows printer to use the SafeCom Pull Port or Push Port and you receivethe message:
Specified port cannot be added. The request is not supported.
402
SafeCom G4 Administrator's Manual Version: 10.520.11.221
It is because you tried to create a shared SafeCom printer on a clustered server computer other than thetwo nodes.
Local SafeCom Pull Printer is unable to printUse the SafeCom Administrator to check if the document is on the user’s Job list. If this is the case,then it could be because the SafeCom Pull Port used by the local SafeCom Pull Printer cannot connectto the SafeCom server.
Open the Configure Pull Port dialog (Configure the SafeCom Pull Port) and enter the Address of theSafeCom server.
How to start and stop the SafeCom Service1. Click Start, type services.msc into the Search box and press ENTER.
2. Locate the SafeCom Service. Check the Status field. Click Start or Stop SafeCom Service asneeded.
3. To restart, right-click the SafeCom Service and click Restart.
How to start and stop the Print Spooler
1. Click Start, type services.msc into the Search box and press ENTER.
2. Locate the Print Spooler. Check the Status field. Click Start or Stop as needed.
3. To restart, right-click the Print Spooler and click Restart. Note: If other services, such as Fax,depend on the Print Spooler these must also be stopped.
User’s computer: Unable to connect to SafeCom serverEither the SafeCom server is not running or the SafeCom Pull Port cannot broadcast to the SafeComserver.
1. Open the Configure Pull Port dialog (Configure the SafeCom Pull Port).
2. Test the connection to the configured SafeCom server(s).
403
SafeCom G4 Administrator's Manual Version: 10.520.11.221
User’s computer: Please contact your administrator!If a user can not print documents via SafeCom, the Messenger Service dialog displays one of thefollowing error messages:• Unable to connect to SafeCom server (User’s computer: Unable to connect to SafeCom server).• There is not enough disk space on the SafeCom server.• Unable to logon to the SafeCom database.• SafeCom license violation.• You are unknown to the SafeCom solution.
These SafeCom generated messages appear after print notification messages sent by the Windows printsubsystem. For this reason we recommend that you disable notification messages from the Windows printsubsystem. On the Windows server open the Printers folder. On the File menu, click Server Propertiesand click the Advanced tab. Refer to online Windows help.
Import users: No users importedIf the Import user function (see Import users) fails or yields only incomplete results, check whether:• The separator specified in the CSV import (Configuration (CSV)) matches the actual separator used in
the CSV file. Use Notepad or another editor to verify the separator in the CSV file.• The specified field name is the correct one or if it was is typed incorrectly.• The specified import file exists, is empty or is formatted incorrectly. Make sure to specify the name
of the file to import from (with full path) as seen from the SafeCom server. The account that runs theSafeCom Service (normally the Local System account) must have read access to the file.
• The difference between the existing users and the users in the import file exceeds the percentagespecified in Max user deletion.
• In a multiserver installation, the users have a home server assigned. Use Find users (Find users) tosee the imported users. If users are not assigned a home server then they will not appear in the importlist.
For additional troubleshooting, consult the log file produced during the attempted import (User import logfile).
Import billing codes: No codes importedIf the Import billing codes function (see Import billing codes) fails or yields incomplete results Checkwhether:• The separator specified in the CSV import (Import billing codes) matches the actual separator used in
the CSV file. Use Notepad or another editor to verify the separator in the CSV file.• The specified field name is the correct one or if it was typed incorrectly.
404
SafeCom G4 Administrator's Manual Version: 10.520.11.221
• The specified import file is non-existing, empty, or formatted incorrectly. Make sure to specify the nameof the file to import from (with full path) as seen from the SafeCom server. The account that runs theSafeCom Service (normally the Local System account) must have read access to the file.
• The difference between the existing billing codes and the billing codes in the import file exceeds thepercentage specified in the Max difference [%] field.
For additional troubleshooting consult the log file produced during the attempted import (User import logfile).
scPopUp: The publisher could not be verifiedIf you run scPopUp.exe (Setup SafeCom PopUp) from a file share and Windows presents a SecurityWarning stating The publisher could not be verified you need to:
1. Click Start, type inetcpl.cpl into the Search box and press ENTER.
2. The Internet Properties dialog appears. Click on the Security tab.
3. Select Local intranet as Zone. Click Sites.
4. Ensure that Include all local (intranet) sites not listed in other zones is checked. Click Advanced.
5. Enter the website (\\share) and click Add. Click Close.
6. Click OK. Click OK.
Multiserver installation: replication issues • User is unknown when logging in on some devices Occurs if the replication from the primary
server to the secondary servers does not work. Refer to section Check that the replication is working and verify that the replication is working. Remember to set SQLSERVERAGENT to automatic startup (Set SQL Server Agent to automatic startup).
• Unknown state Occurs if the SQL Agent does not have proper access rights to the DATA folder. Ensure that the relevant rights are set as outlined in Multiserver installation.
• Failed state Occurs if the user does not have the explicit Connect SQL right. Check the user properties on the SQL server, and ensure that the Connect SQL is checked under Login properties > Securables > Permissions > Explicit tab. Check if the user is listed under Replication Monitor > My Publishers > <server\instance> > [sccore]:sccoreTrans > Properties > Publication Access List. If the user is not listed, add the user.
Note If you performed any of the above instructions, wait for a few minutes to the replication to restart. If the replication does not restart automatically, force a refresh from SafeCom Administrator.
405
SafeCom G4 Administrator's Manual Version: 10.520.11.221
Smart Printer Driver: reduced performanceIf performance suffers, it might be because one or more printer drivers are leaking resources. One solutionis to restart of the SafeCom XPS Print Service or maybe it is necessary to find and use another printerdriver that does not have that problem.
Smart Printer Driver: error codes at the deviceIf error codes in the 400-499 range appear on the device, it is related to the SafeCom XPS Print Service.
Example:
“Cannot print to printer queue "SafeCom-<DeviceID>". Printing is not supported when EMF spooling isenabled.”
This relates to the setting Print directly to printer under Printer properties.
Example:
“Could not open printer queue " SafeCom-<DeviceID>".
or
“Failed to lookup Windows Queue name for Device ID "3000". Failed to open Windows Queue "SafeCom-<DeviceID>".
This relates to the Windows queue that does not work properly or it may not exist at all.
For details on error logs, open Event viewer > Applications Services Logs > SafeCom > SafeComXPS Print Service .
Remote SQL server cannot login If your SafeCom primary server cannot login to your external SQL server, and you cannot detect any connection issues, the external server instance may be hidden. In such cases check the following:
1. In SQL Server Configuration Manager, expand SQL Server Network Configuration, right-click Protocols for <server instance>, and select Properties.
2. On the Flags tab, check the Hide Instance box, and ensure that it is set to No.
406
SafeCom G4 Administrator's Manual Version: 10.520.11.221
Spooler crash when the Print System Asynchronous Notificationmessage is not handled by the user
In such cases, a message is displayed that notifies the user about the SafeCom PopUp not running, andprovides a prompt for starting the SafeCom PopUp. If the user does not take action in 4 minutes, on someoperating systems the print spooler may crash, requiring restart.
Communication failure between SafeCom componentsSafeCom G4 uses TLS 1.2 by default for encryption. If your system is not set to use TLS 1.2 or uses olderversions of TLS, ensure that the following registry entries are created and set:• [HKEY_LOCAL_MACHINE\SYSTEM\CurrentControlSet\Control\SecurityProviders\SCHANNEL\Protocols\TLS 1.2]
Certificate of the SafeCom G4 primary server is lost In such cases, ensure that you perform a factory reset on the Nuance Ethernet Card Readers, and then you can re-add the readers to your SafeCom G4 installation.
SafeCom server can not login using the safecominstall user In cases the SafeCom server cannot login with the safecominstall user to an SQL server instance named <servername>\<SQLINSTANCE>, do the following:
1. Verify that the safecominstall user is created correctly (use Microsoft SQL Server Management Studio to remotely connect to the server instance in question). If you cannot connect, proceed with the steps below.
2. Verify that the SQL server instance is setup to run in mixed authentication mode.
3. Verify if the SQL browser service is running on the SQL server. In a multi-server environment, verify that the SQL agent is also running.
4. Use the SQL Server Configuration Manager to enable the TCP protocol for the SQL server instance.
5. Ensure that the firewall exceptions for the SQL server are set up properly, or stop and disable the firewall. If using Microsoft firewall, you can use the SafeCom firewall script.
6. Ensure that the network discovery policy is enabled on both the SQL server and the SafeCom server (if you can ping the SQL server by servername from the primary server and vice versa then it is working properly).
7. Restart the SafeCom service on the primary server.
8. Verify that all four SafeCom databases are created.
407
SafeCom G4 Administrator's Manual Version: 10.520.11.221
• [HKEY_LOCAL_MACHINE\SYSTEM\CurrentControlSet\Control\SecurityProviders\SCHANNEL\Protocols\TLS 1.2\Client]
• "DisabledByDefault"=dword:00000000
• [HKEY_LOCAL_MACHINE\SYSTEM\CurrentControlSet\Control\SecurityProviders\SCHANNEL\Protocols\TLS 1.2\Server]
• "DisabledByDefault"=dword:00000000
Note: Be aware that modifying the TLS version may cause issues for any other applications you are usingwith an older TLS version.
User Import from Unix that does not contain Domain InfoIf you are planning to import users from Unix, but your Unix system does not have domain information,you must do the following:
1. Under User import configuration > Extra, check the Use extra configuration checkbox.
2. Add the following lines:
[SPECIAL_IMPORT_SETTINGS]ExDomainField=DoNotUse
SafeCom Secondary server is not reachable from the SafeCom Primary server
This symptom can be confirmed by running the netstat -an command from the command line on an unreachable SafeCom Secondary server. If the port 7700 is not in the list of open ports, but the SafeCom Service is running, the following procedure can be used to recover the SafeCom Secondary server.
Note: This process should only be used as a last measure. In some cases (for example, when offline tracking is enabled), this process could result in loss of data that has not been propagated to the SafeCom Primary server yet.
A last emergency repair measure for this symptom is to delete all local databases on affected secondaries so they can be recreated by SafeCom, and valid data from the primary SQL database can be replicated. To do this, follow the steps below:
1. Stop the SafeCom Service on the affected SafeCom Secondary server.
2. Delete all four SafeCom databases from the SafeCom Secondary server’s SQL Express database instance.
3. Delete any replication subscriptions from the SafeCom Secondary server’s SQL Express database.
4. Restart the SafeCom Secondary computer.
5. Repair replication from SafeCom Administrator on the affected SafeCom Secondary server.
408
SafeCom G4 Administrator's Manual Version: 10.520.11.221
Services using GMSA accounts do not start automatically afterreboot
Services that run from under a GMSA account may not be able to start up after a computer reboot, if thefollowing registry value is not configured properly.
Replication subscription for the old SQL Primary server appears under the SafeCom Secondary server’s SQL Express instance
In cases when the old and the new SQL Primary servers are online at the same time, replication subscriptions may show for both servers at the SafeCom Secondary server’s SQL Express instance. As long as SafeCom databases on the old SQL Primary server are offline this symptom should not cause any functional problems, as no replication will take place from the old SQL Primary server. To clean up this setup, follow the steps below:
1. On the old SQL Primary server, delete any replication publications for SafeCom.
2. On affected SafeCom Secondary servers, delete replication subscriptions pointing to the old SQL Primary server.
HKEY_LOCAL_MACHINE\SYSTEM\CurrentControlSet\Services\<service_name>\ServiceAccountManaged
If you experience startup problems after reboot for any service run by a GMSA account, confirm that thisregistry value is set to “01 00 00 00”.
409
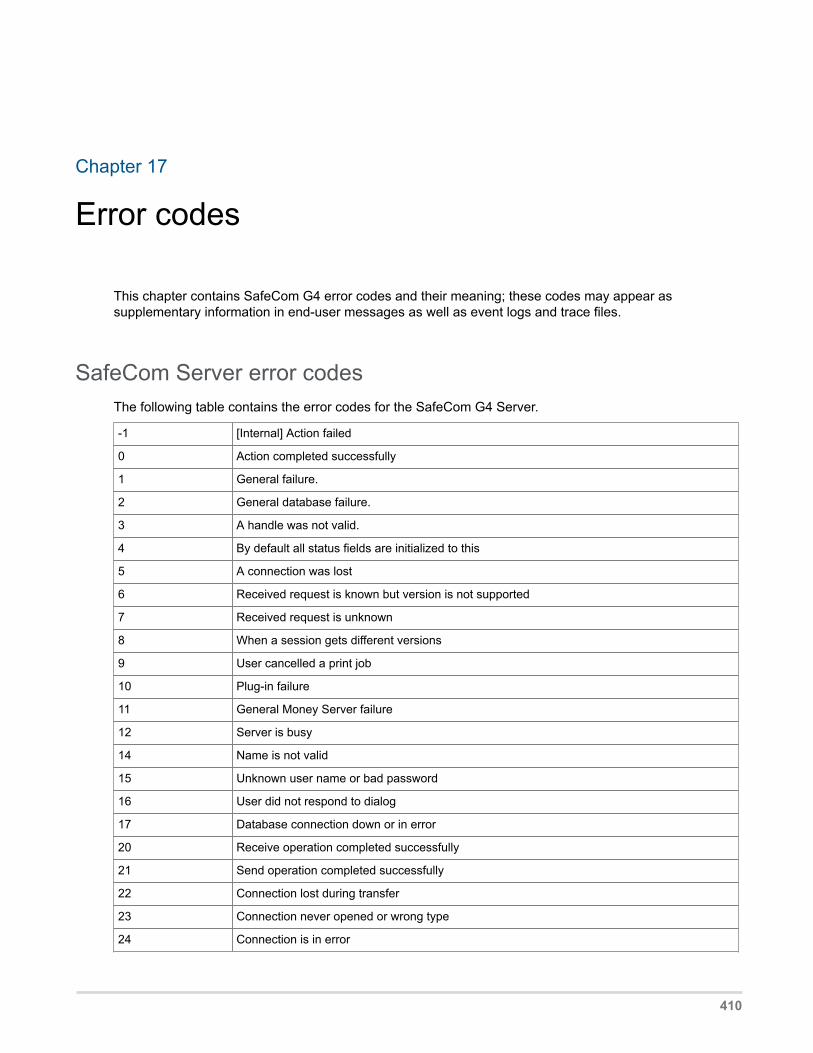
Chapter 17
Error codes
This chapter contains SafeCom G4 error codes and their meaning; these codes may appear assupplementary information in end-user messages as well as event logs and trace files.
SafeCom Server error codesThe following table contains the error codes for the SafeCom G4 Server.
-1 [Internal] Action failed
0 Action completed successfully
1 General failure.
2 General database failure.
3 A handle was not valid.
4 By default all status fields are initialized to this
5 A connection was lost
6 Received request is known but version is not supported
7 Received request is unknown
8 When a session gets different versions
9 User cancelled a print job
10 Plug-in failure
11 General Money Server failure
12 Server is busy
14 Name is not valid
15 Unknown user name or bad password
16 User did not respond to dialog
17 Database connection down or in error
20 Receive operation completed successfully
21 Send operation completed successfully
22 Connection lost during transfer
23 Connection never opened or wrong type
24 Connection is in error
410
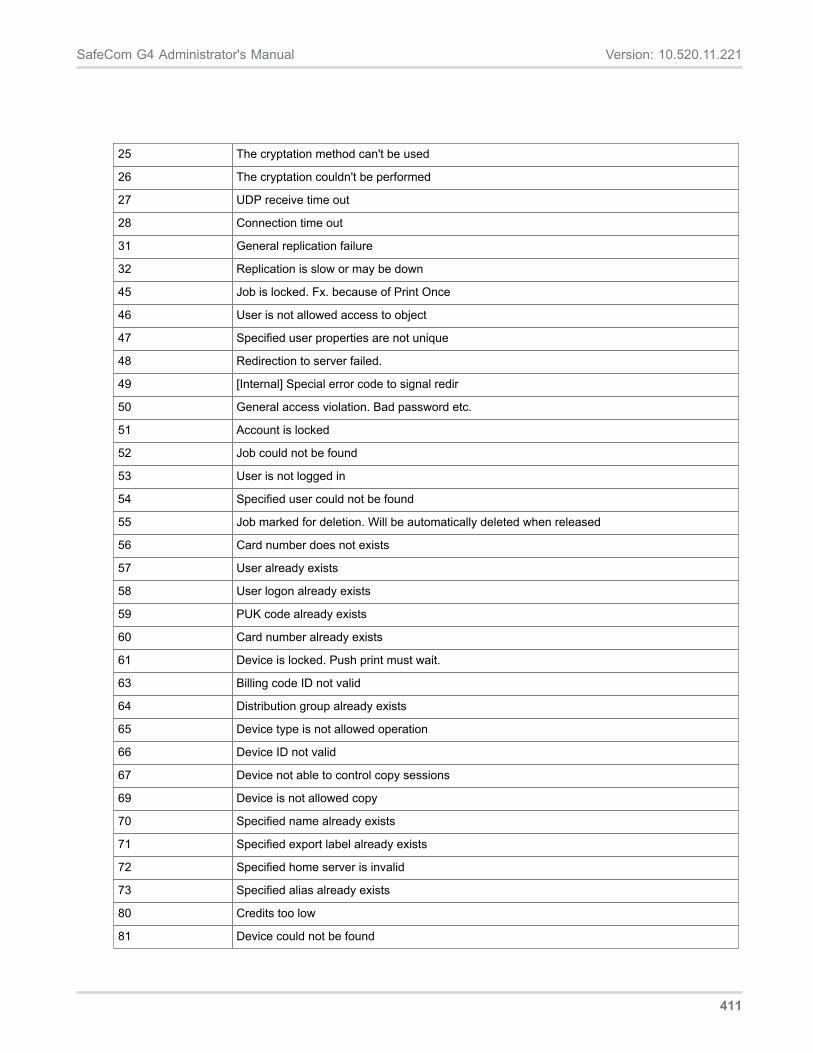
SafeCom G4 Administrator's Manual Version: 10.520.11.221
25 The cryptation method can't be used
26 The cryptation couldn't be performed
27 UDP receive time out
28 Connection time out
31 General replication failure
32 Replication is slow or may be down
45 Job is locked. Fx. because of Print Once
46 User is not allowed access to object
47 Specified user properties are not unique
48 Redirection to server failed.
49 [Internal] Special error code to signal redir
50 General access violation. Bad password etc.
51 Account is locked
52 Job could not be found
53 User is not logged in
54 Specified user could not be found
55 Job marked for deletion. Will be automatically deleted when released
56 Card number does not exists
57 User already exists
58 User logon already exists
59 PUK code already exists
60 Card number already exists
61 Device is locked. Push print must wait.
63 Billing code ID not valid
64 Distribution group already exists
65 Device type is not allowed operation
66 Device ID not valid
67 Device not able to control copy sessions
69 Device is not allowed copy
70 Specified name already exists
71 Specified export label already exists
72 Specified home server is invalid
73 Specified alias already exists
80 Credits too low
81 Device could not be found
411

SafeCom G4 Administrator's Manual Version: 10.520.11.221
82 Server could not be found
83 Server contains working objects
84 Primary Server cannot be deleted
85 Multi server not supported when running WIN auth in DB
86 Server already exists
90 Domain could not be found
91 Domain already exists
92 Domain contains working objects
95 User has too many cards
101 File not found
102 Could not open file
103 Could not read file
104 Could not write to file
105 Reading file not finish
106 Error reading file
107 No more disk space
108 Invalid file handle
109 File path could not be found
110 File already exists
111 File is empty
112 Error reading file
113 Error reading registry
-101 Registry access violation
120 OU could not be found
121 OU already exists
122 Specified OU parent is invalid
123 OU contains other OU's
124 OU contains users
125 OU contains devices
126 OU contains servers
130 Billing code not found
131 Billing code already exists
132 Billing is not enabled
140 Group could not be found
141 Group already exists
412
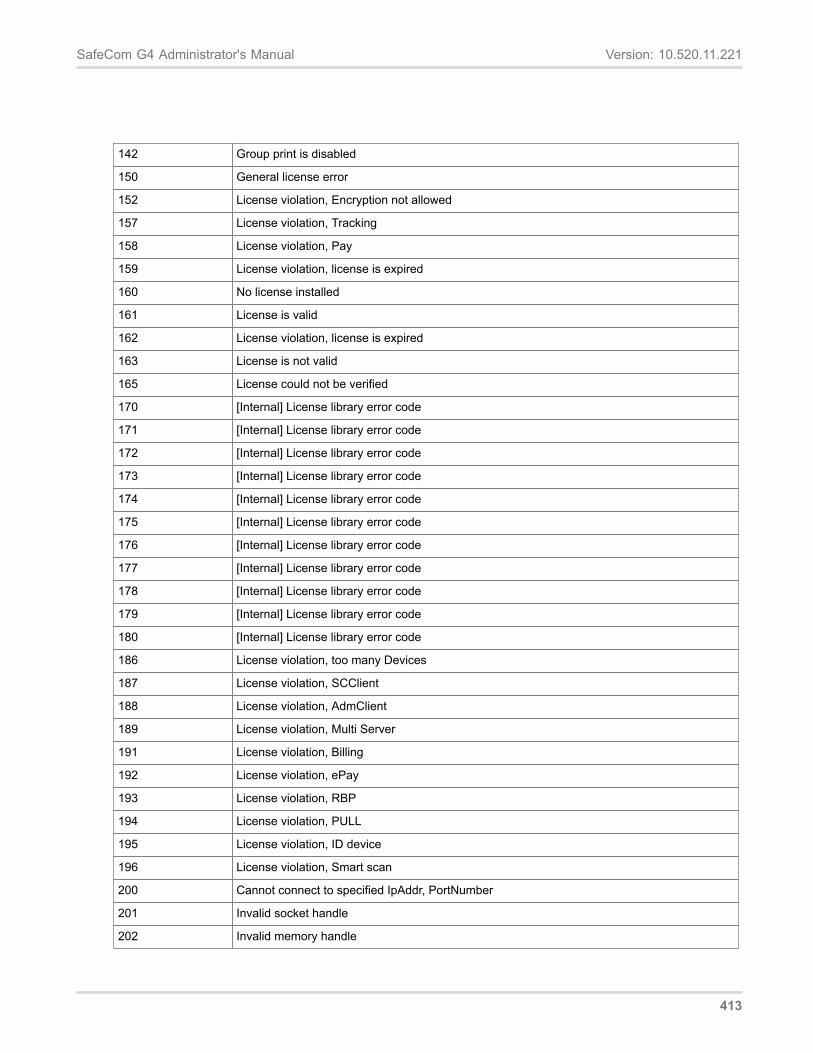
SafeCom G4 Administrator's Manual Version: 10.520.11.221
142 Group print is disabled
150 General license error
152 License violation, Encryption not allowed
157 License violation, Tracking
158 License violation, Pay
159 License violation, license is expired
160 No license installed
161 License is valid
162 License violation, license is expired
163 License is not valid
165 License could not be verified
170 [Internal] License library error code
171 [Internal] License library error code
172 [Internal] License library error code
173 [Internal] License library error code
174 [Internal] License library error code
175 [Internal] License library error code
176 [Internal] License library error code
177 [Internal] License library error code
178 [Internal] License library error code
179 [Internal] License library error code
180 [Internal] License library error code
186 License violation, too many Devices
187 License violation, SCClient
188 License violation, AdmClient
189 License violation, Multi Server
191 License violation, Billing
192 License violation, ePay
193 License violation, RBP
194 License violation, PULL
195 License violation, ID device
196 License violation, Smart scan
200 Cannot connect to specified IpAddr, PortNumber
201 Invalid socket handle
202 Invalid memory handle
413
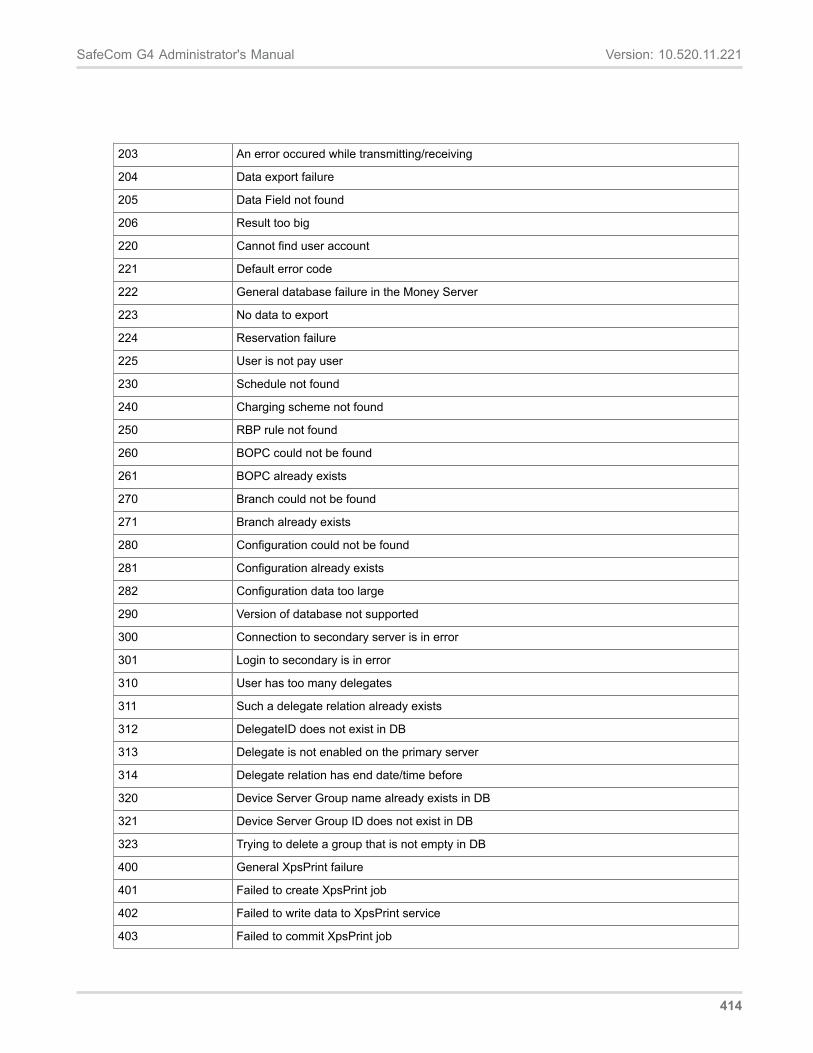
SafeCom G4 Administrator's Manual Version: 10.520.11.221
203 An error occured while transmitting/receiving
204 Data export failure
205 Data Field not found
206 Result too big
220 Cannot find user account
221 Default error code
222 General database failure in the Money Server
223 No data to export
224 Reservation failure
225 User is not pay user
230 Schedule not found
240 Charging scheme not found
250 RBP rule not found
260 BOPC could not be found
261 BOPC already exists
270 Branch could not be found
271 Branch already exists
280 Configuration could not be found
281 Configuration already exists
282 Configuration data too large
290 Version of database not supported
300 Connection to secondary server is in error
301 Login to secondary is in error
310 User has too many delegates
311 Such a delegate relation already exists
312 DelegateID does not exist in DB
313 Delegate is not enabled on the primary server
314 Delegate relation has end date/time before
320 Device Server Group name already exists in DB
321 Device Server Group ID does not exist in DB
323 Trying to delete a group that is not empty in DB
400 General XpsPrint failure
401 Failed to create XpsPrint job
402 Failed to write data to XpsPrint service
403 Failed to commit XpsPrint job
414
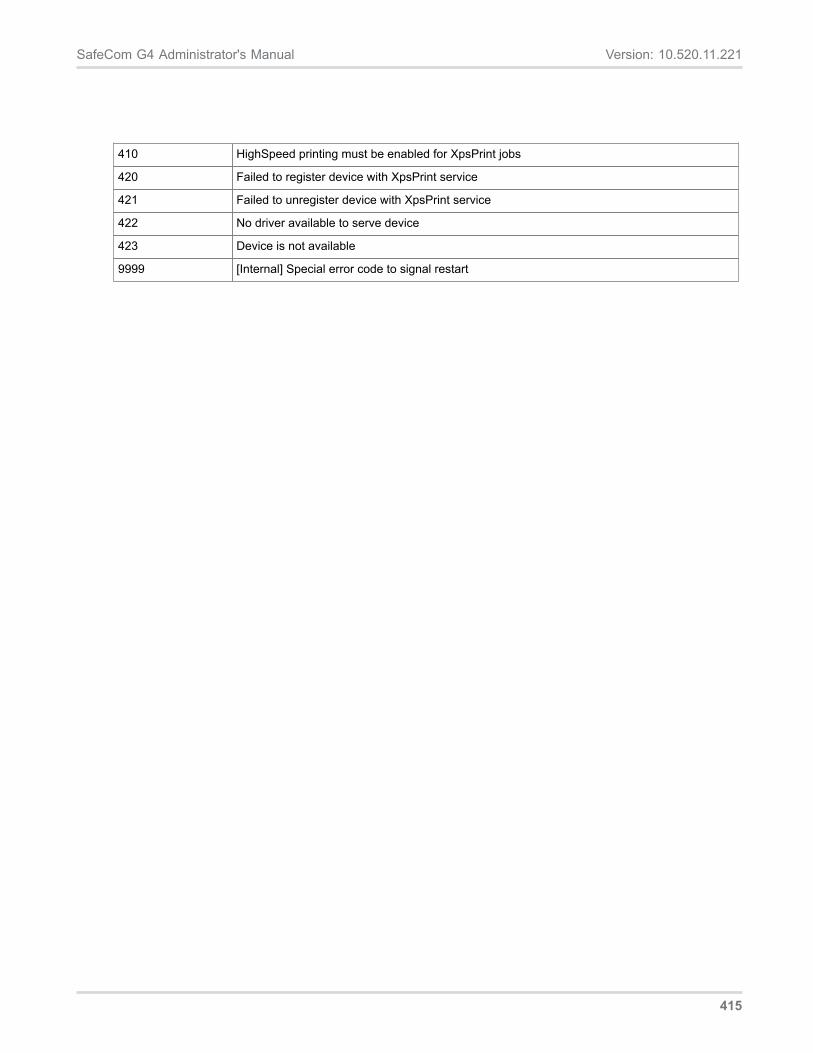
SafeCom G4 Administrator's Manual Version: 10.520.11.221
410 HighSpeed printing must be enabled for XpsPrint jobs
420 Failed to register device with XpsPrint service
421 Failed to unregister device with XpsPrint service
422 No driver available to serve device
423 Device is not available
9999 [Internal] Special error code to signal restart
415
Chapter 18
Administrator’s installation notes
IntroductionThis chapter contains forms that allow you to record relevant information about the SafeCom solution. Theinformation is relevant when multiple people are involved in the solution over time in connection with forexample maintenance and support.
Servers If the solution is a multiserver solution, we recommend creating an overview diagram (using Microsoft Visio or a similar tool). The diagram should visually illustrate the different servers and ports used in your solution.
This section contains several types of tables: • SafeCom primary Server • SQL primary Server • SafeCom secondary Server • Failover servers
The right-most column in the tables contains one or more letters. Use the letters with the legend below:
Legend:
A If the SafeCom server is clustered all other SafeCom components (devices, port monitors, etc.) must referenceVirtual Server and not the nodes. Otherwise failover will not function properly.
B The SafeCom license key code is based on the Computer Name (Determine the Computer Name), unlessthe primary server is clustered in which case it is based on the Cluster Name
C A SafeCom multiserver solution requires the SafeCom primary server to use Microsoft SQL Server. If the SQL server resides on another server then added the word Remote and fill-in the SQL primary server table.
D Enter the SafeCom G4 version.Example: S82 070.410*07.
E Enter the Windows OS information.Example: Windows Server 2012 64-bit.
F Normally a cluster has two nodes. Add more rows if required.
416

SafeCom G4 Administrator's Manual Version: 10.520.11.221
G If the SQL server is clustered the reference to the SQL server should be NetworkName\instancename,otherwise it should be computername\instancenameThe instance name is case sensitive.
H
akos.bohacs
Zone de texte
Normal practice is to install and use Microsoft SQL Express 2014 SP1 on SafeCom secondary servers.

SafeCom G4 Administrator's Manual Version: 10.520.11.221
Server address
Port
Computer Name G
SQL
SQL instancename
Windows OS
Cluster information
Server address
Cluster NameCluster Group
Disk Resource (Q)
Server address
Network Name GVirtual Server
Disk Resource
Server address F
Heartbeat address FNode 1
Network Name F
Server address F
Heartbeat address FNode 2
Network Name F
Folder SQL
SafeCom secondary server SafeCom secondary server
Server address A
Computer Name B
SQL / Express
SafeCom G4 version S82 070. D
Windows OS E
Cluster information
Server address
Cluster NameCluster Group
Disk Resource (Q)
Server address A
Network Name AVirtual Server 1
Disk Resource
418
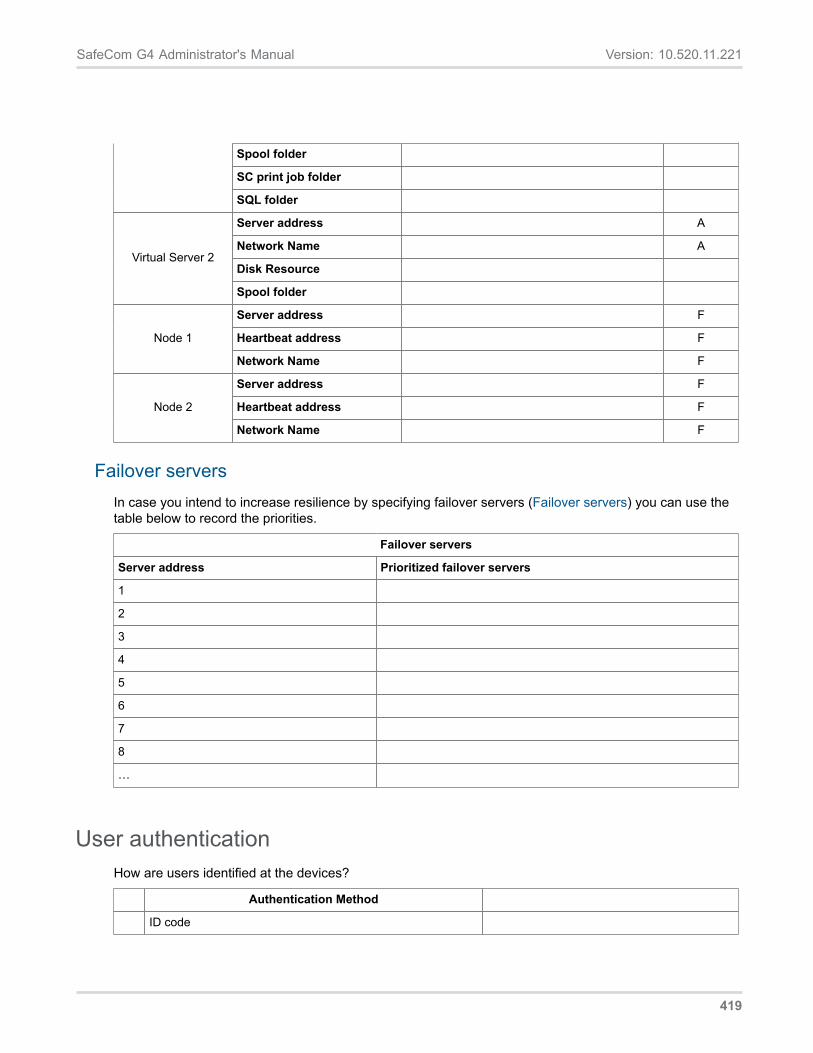
SafeCom G4 Administrator's Manual Version: 10.520.11.221
Spool folder
SC print job folder
SQL folder
Server address A
Network Name A
Disk ResourceVirtual Server 2
Spool folder
Server address F
Heartbeat address FNode 1
Network Name F
Server address F
Heartbeat address FNode 2
Network Name F
Failover serversIn case you intend to increase resilience by specifying failover servers (Failover servers) you can use thetable below to record the priorities.
Failover servers
Server address Prioritized failover servers
1
2
3
4
5
6
7
8
…
User authenticationHow are users identified at the devices?
Authentication Method
ID code
419
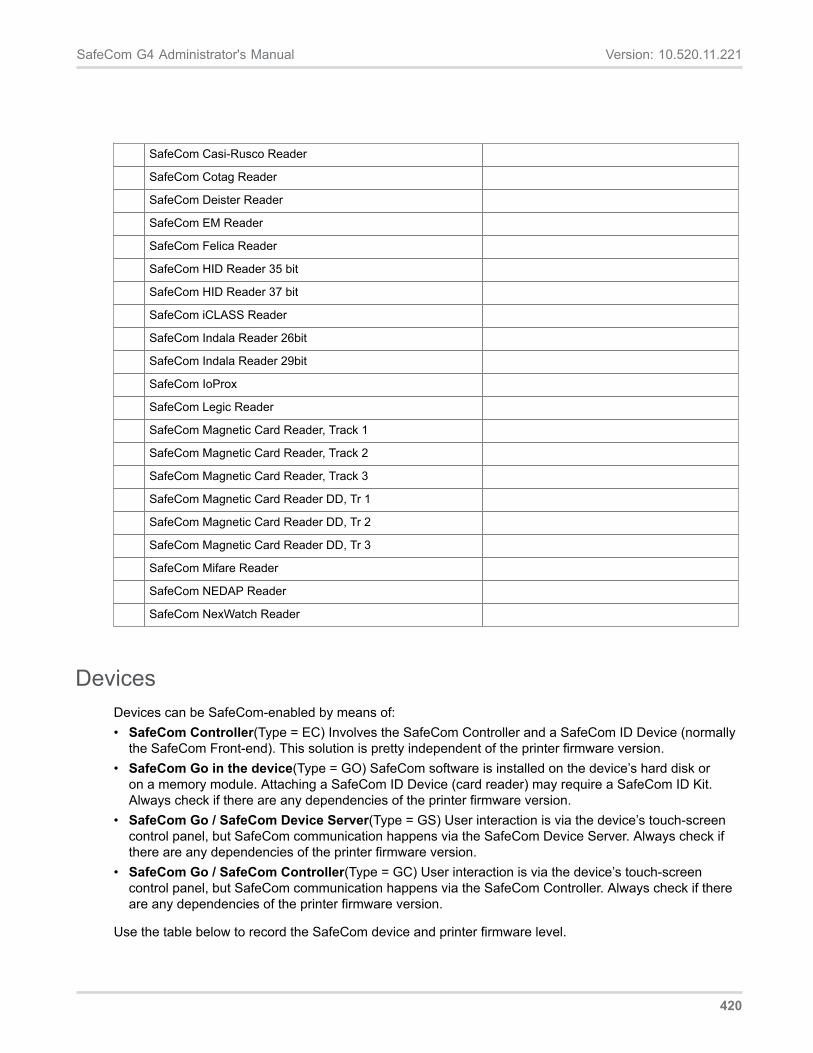
SafeCom G4 Administrator's Manual Version: 10.520.11.221
SafeCom Casi-Rusco Reader
SafeCom Cotag Reader
SafeCom Deister Reader
SafeCom EM Reader
SafeCom Felica Reader
SafeCom HID Reader 35 bit
SafeCom HID Reader 37 bit
SafeCom iCLASS Reader
SafeCom Indala Reader 26bit
SafeCom Indala Reader 29bit
SafeCom IoProx
SafeCom Legic Reader
SafeCom Magnetic Card Reader, Track 1
SafeCom Magnetic Card Reader, Track 2
SafeCom Magnetic Card Reader, Track 3
SafeCom Magnetic Card Reader DD, Tr 1
SafeCom Magnetic Card Reader DD, Tr 2
SafeCom Magnetic Card Reader DD, Tr 3
SafeCom Mifare Reader
SafeCom NEDAP Reader
SafeCom NexWatch Reader
DevicesDevices can be SafeCom-enabled by means of:• SafeCom Controller(Type = EC) Involves the SafeCom Controller and a SafeCom ID Device (normally
the SafeCom Front-end). This solution is pretty independent of the printer firmware version.• SafeCom Go in the device(Type = GO) SafeCom software is installed on the device’s hard disk or
on a memory module. Attaching a SafeCom ID Device (card reader) may require a SafeCom ID Kit.Always check if there are any dependencies of the printer firmware version.
• SafeCom Go / SafeCom Device Server(Type = GS) User interaction is via the device’s touch-screencontrol panel, but SafeCom communication happens via the SafeCom Device Server. Always check ifthere are any dependencies of the printer firmware version.
• SafeCom Go / SafeCom Controller(Type = GC) User interaction is via the device’s touch-screencontrol panel, but SafeCom communication happens via the SafeCom Controller. Always check if thereare any dependencies of the printer firmware version.
Use the table below to record the SafeCom device and printer firmware level.
420
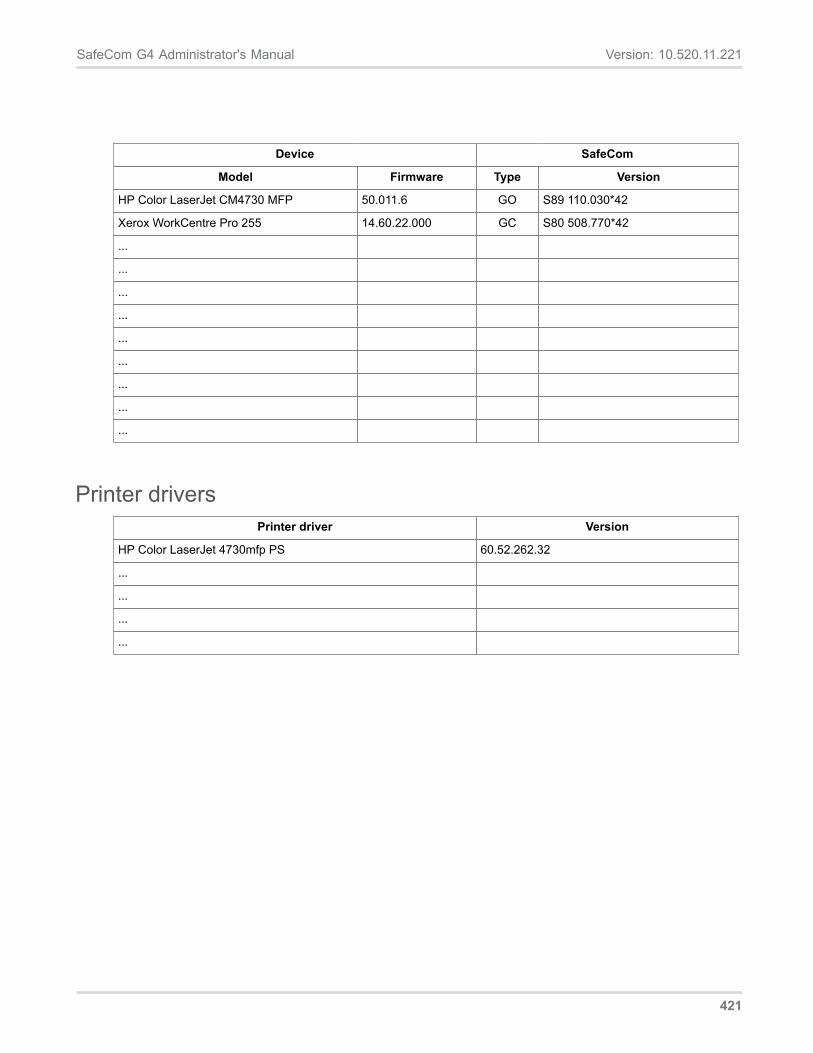
SafeCom G4 Administrator's Manual Version: 10.520.11.221
Device SafeCom
Model Firmware Type Version
HP Color LaserJet CM4730 MFP 50.011.6 GO S89 110.030*42
Xerox WorkCentre Pro 255 14.60.22.000 GC S80 508.770*42
...
...
...
...
...
...
...
...
...
Printer driversPrinter driver Version
HP Color LaserJet 4730mfp PS 60.52.262.32
...
...
...
...
421
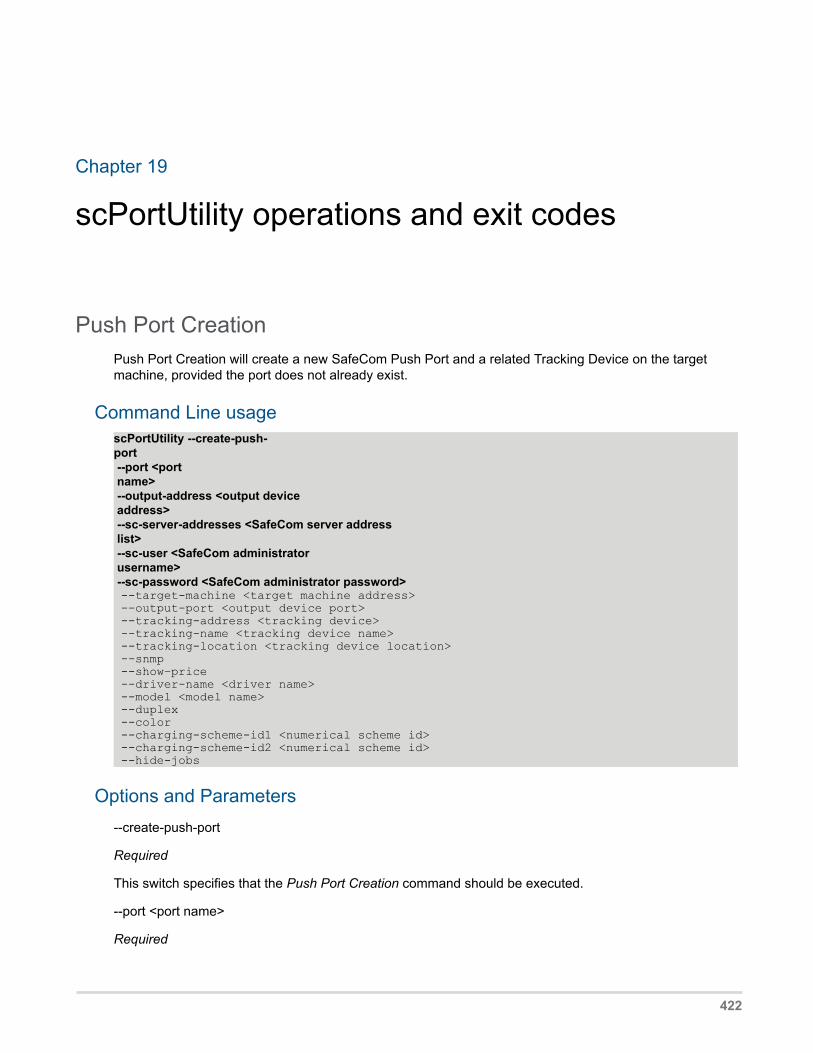
Chapter 19
scPortUtility operations and exit codes
Push Port CreationPush Port Creation will create a new SafeCom Push Port and a related Tracking Device on the targetmachine, provided the port does not already exist.
Command Line usagescPortUtility --create-push-port --port <port name> --output-address <output device address> --sc-server-addresses <SafeCom server address list> --sc-user <SafeCom administrator username> --sc-password <SafeCom administrator password> --target-machine <target machine address> --output-port <output device port> --tracking-address <tracking device> --tracking-name <tracking device name> --tracking-location <tracking device location> --snmp --show–price --driver-name <driver name> --model <model name> --duplex --color --charging-scheme-id1 <numerical scheme id> --charging-scheme-id2 <numerical scheme id> --hide-jobs
Options and Parameters--create-push-port
Required
This switch specifies that the Push Port Creation command should be executed.
--port <port name>
Required
422
SafeCom G4 Administrator's Manual Version: 10.520.11.221
The parameter specifies the name of the port to be created.
--output-address <output device address>
Required
This is the address or name of the device the print output will be forwarded to.
--sc-server-addresses <SafeCom server address list>
Required
The parameter provides a semicolon separated list of SafeCom Servers to which the new port shouldconnect, in order of priority. They can be specified either as IP or fully qualified hostnames.
The SafeCom Port Utility will also use this list.
--sc-user <SafeCom administrator user name>
Required
This is the SafeCom administrator user name.
--sc-password <SafeCom administrator password>
Required
This is the SafeCom administrator user password.
--target-machine <target machine address>
Hostname or address of the machine on which to create the new port. Default is the local machine.
--output-port <output device port>
TCP/IP port of the target device. The default is 9100, which is the standard RAW / JetDirect port.
--tracking-address <tracking device>
This is the address of the SafeCom Server tracking device.
If this option is not specified, the specified output device will be used instead.
--tracking-name <tracking device name>
This is the name of the tracking device.
If this is not specified, the tracking device will be named the same as the SafeCom Push port.
--tracking-location <tracking device location>
This option specifies the location of the tracking device as it will appear in scAdministrator.
If this is not specified the location field in scAdministrator will be empty.
--snmp
423
SafeCom G4 Administrator's Manual Version: 10.520.11.221
This switch enables SNMP for the newly created port. If the option is not specified, the default value isOFF.
--show–price
Show job prize before printing. If the option is not specified, the default value is OFF.
--driver-name <driver name>
Override driver name with the specified name, when committing jobs to SafeCom Server.
--model <model name>
Tracking device model. The model name will be displayed in SafeCom Administrator Console.
--duplex
Specifies that this is a duplex capable tracking device.
--color
Specifies that this is a color tracking device.
--charging-scheme-id1 <numerical scheme id>
Primary charging scheme used for price calculation.
--charging-scheme-id2 <numerical scheme id>
Secondary charging scheme used for price calculation.
--hide-jobs
This switch enables the hide jobs feature which hide the job names in the print queue. If the option is notspecified, the default value is OFF.
If the switch is specified and the SafeCom Push Port monitor does not support the feature, port creationwill fail.
Note: The option works with G4-520 (or later) SafeCom Push Port monitors.
Exit Codes0—SCPORTUTIL_ERROR_SUCCESS
The operation completed successfully.
1—SCPORTUTIL_ERROR_GENERAL_FAILURE
The operation could not be completed due to a general failure.
2—SCPORTUTIL_ERROR_ACCESS_DENIED
Access is denied by target machine (Windows Print Spooler) or the SafeCom server.
3—SCPORTUTIL_ERROR_INVALID_PARAMETER
424
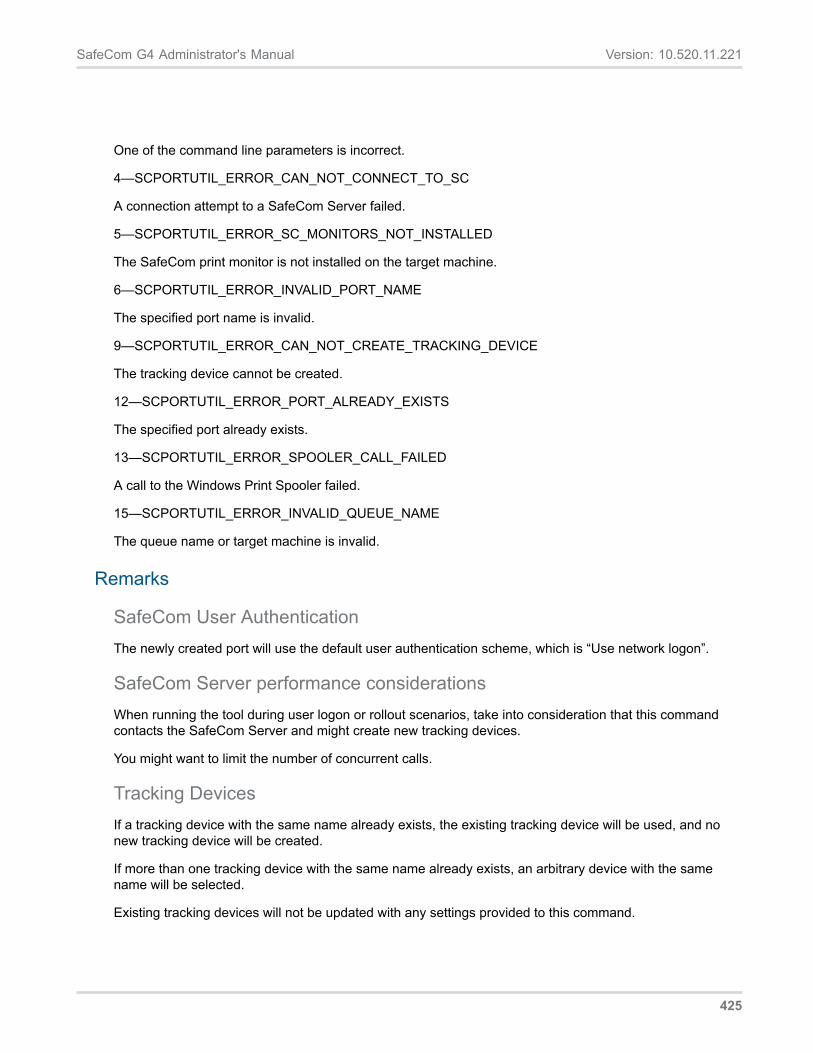
SafeCom G4 Administrator's Manual Version: 10.520.11.221
One of the command line parameters is incorrect.
4—SCPORTUTIL_ERROR_CAN_NOT_CONNECT_TO_SC
A connection attempt to a SafeCom Server failed.
5—SCPORTUTIL_ERROR_SC_MONITORS_NOT_INSTALLED
The SafeCom print monitor is not installed on the target machine.
6—SCPORTUTIL_ERROR_INVALID_PORT_NAME
The specified port name is invalid.
9—SCPORTUTIL_ERROR_CAN_NOT_CREATE_TRACKING_DEVICE
The tracking device cannot be created.
12—SCPORTUTIL_ERROR_PORT_ALREADY_EXISTS
The specified port already exists.
13—SCPORTUTIL_ERROR_SPOOLER_CALL_FAILED
A call to the Windows Print Spooler failed.
15—SCPORTUTIL_ERROR_INVALID_QUEUE_NAME
The queue name or target machine is invalid.
Remarks
SafeCom User AuthenticationThe newly created port will use the default user authentication scheme, which is “Use network logon”.
SafeCom Server performance considerationsWhen running the tool during user logon or rollout scenarios, take into consideration that this commandcontacts the SafeCom Server and might create new tracking devices.
You might want to limit the number of concurrent calls.
Tracking DevicesIf a tracking device with the same name already exists, the existing tracking device will be used, and nonew tracking device will be created.
If more than one tracking device with the same name already exists, an arbitrary device with the samename will be selected.
Existing tracking devices will not be updated with any settings provided to this command.
425
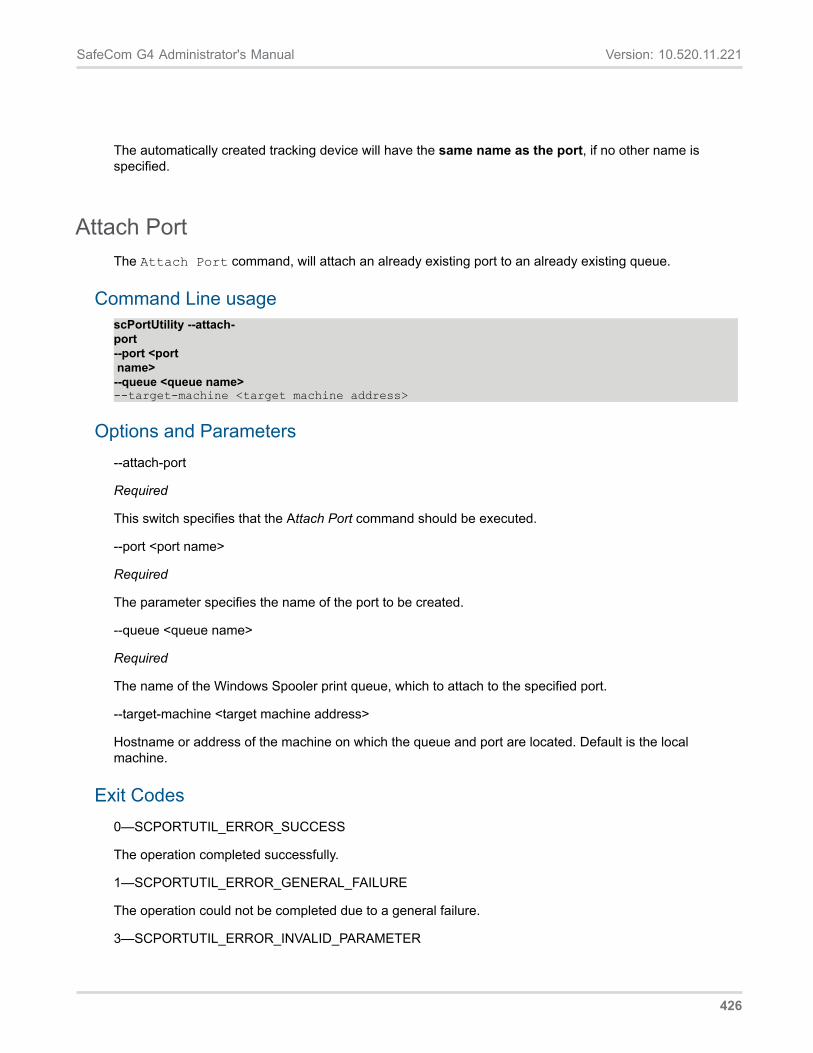
SafeCom G4 Administrator's Manual Version: 10.520.11.221
The automatically created tracking device will have the same name as the port, if no other name isspecified.
Attach PortThe Attach Port command, will attach an already existing port to an already existing queue.
Command Line usagescPortUtility --attach-port --port <port name>--queue <queue name>--target-machine <target machine address>
Options and Parameters--attach-port
Required
This switch specifies that the Attach Port command should be executed.
--port <port name>
Required
The parameter specifies the name of the port to be created.
--queue <queue name>
Required
The name of the Windows Spooler print queue, which to attach to the specified port.
--target-machine <target machine address>
Hostname or address of the machine on which the queue and port are located. Default is the localmachine.
Exit Codes0—SCPORTUTIL_ERROR_SUCCESS
The operation completed successfully.
1—SCPORTUTIL_ERROR_GENERAL_FAILURE
The operation could not be completed due to a general failure.
3—SCPORTUTIL_ERROR_INVALID_PARAMETER
426
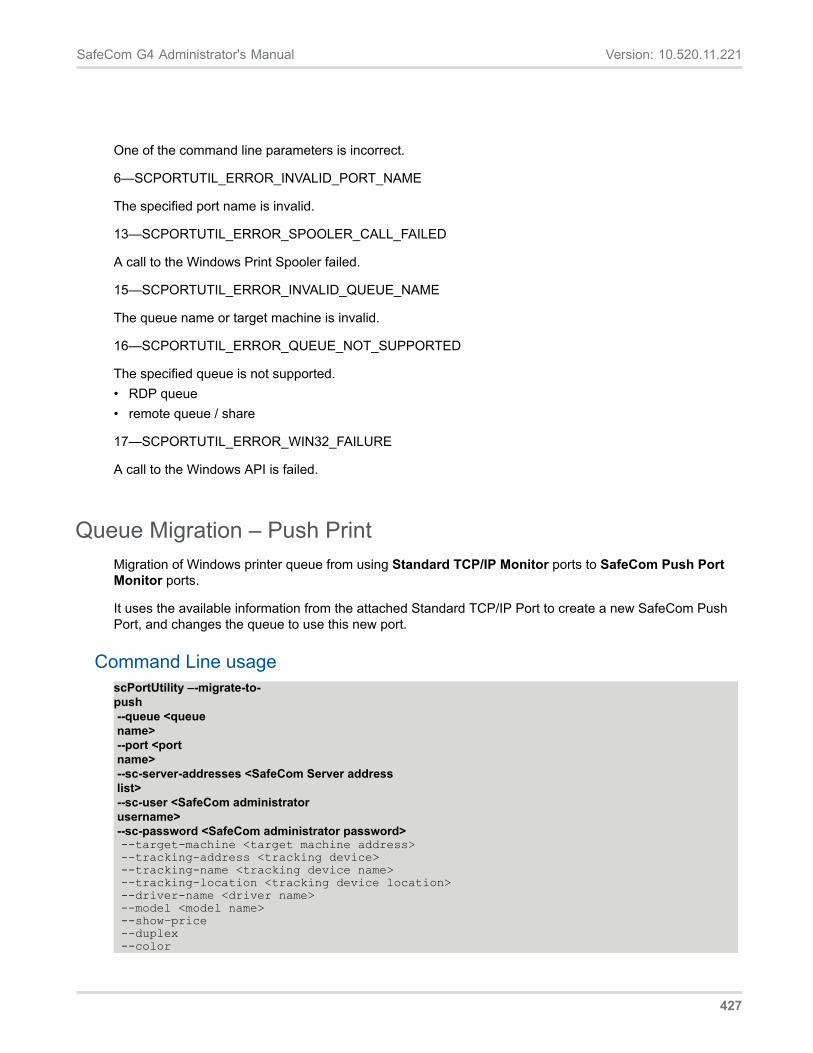
SafeCom G4 Administrator's Manual Version: 10.520.11.221
One of the command line parameters is incorrect.
6—SCPORTUTIL_ERROR_INVALID_PORT_NAME
The specified port name is invalid.
13—SCPORTUTIL_ERROR_SPOOLER_CALL_FAILED
A call to the Windows Print Spooler failed.
15—SCPORTUTIL_ERROR_INVALID_QUEUE_NAME
The queue name or target machine is invalid.
16—SCPORTUTIL_ERROR_QUEUE_NOT_SUPPORTED
The specified queue is not supported.• RDP queue• remote queue / share
17—SCPORTUTIL_ERROR_WIN32_FAILURE
A call to the Windows API is failed.
Queue Migration – Push PrintMigration of Windows printer queue from using Standard TCP/IP Monitor ports to SafeCom Push PortMonitor ports.
It uses the available information from the attached Standard TCP/IP Port to create a new SafeCom PushPort, and changes the queue to use this new port.
Command Line usagescPortUtility –-migrate-to-push --queue <queue name> --port <port name> --sc-server-addresses <SafeCom Server address list> --sc-user <SafeCom administrator username> --sc-password <SafeCom administrator password> --target-machine <target machine address> --tracking-address <tracking device> --tracking-name <tracking device name> --tracking-location <tracking device location> --driver-name <driver name> --model <model name> --show–price --duplex --color
427
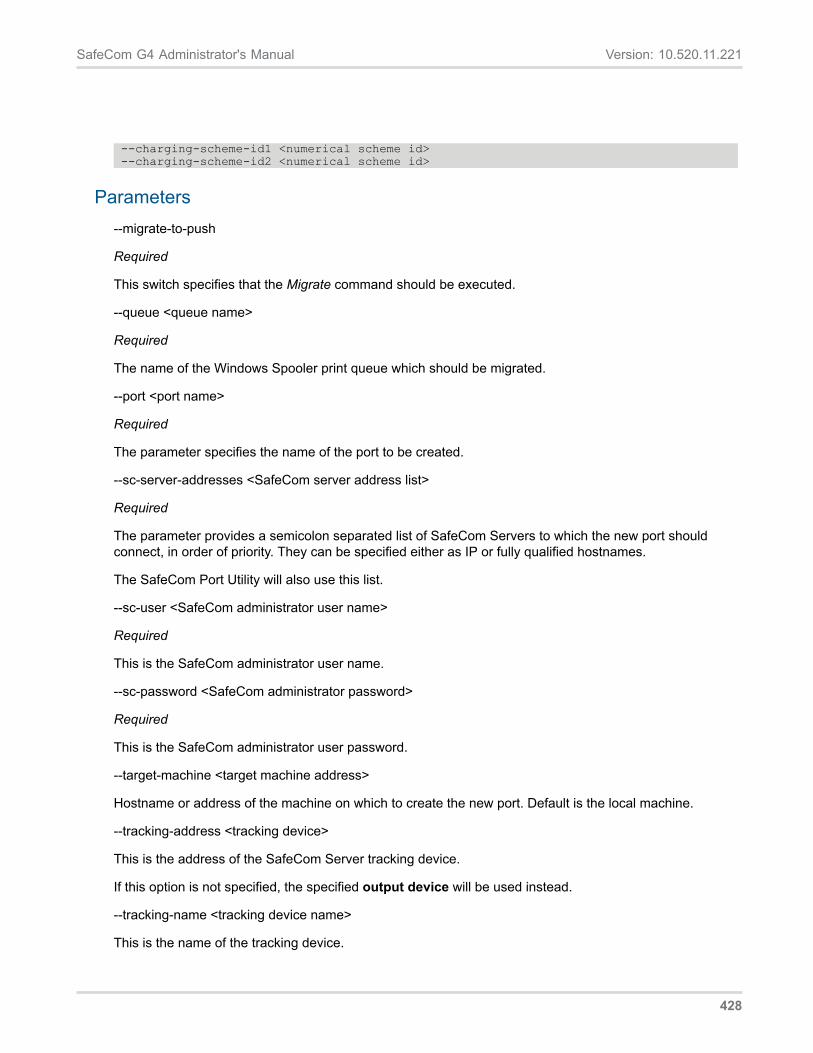
SafeCom G4 Administrator's Manual Version: 10.520.11.221
--charging-scheme-id1 <numerical scheme id> --charging-scheme-id2 <numerical scheme id>
Parameters--migrate-to-push
Required
This switch specifies that the Migrate command should be executed.
--queue <queue name>
Required
The name of the Windows Spooler print queue which should be migrated.
--port <port name>
Required
The parameter specifies the name of the port to be created.
--sc-server-addresses <SafeCom server address list>
Required
The parameter provides a semicolon separated list of SafeCom Servers to which the new port shouldconnect, in order of priority. They can be specified either as IP or fully qualified hostnames.
The SafeCom Port Utility will also use this list.
--sc-user <SafeCom administrator user name>
Required
This is the SafeCom administrator user name.
--sc-password <SafeCom administrator password>
Required
This is the SafeCom administrator user password.
--target-machine <target machine address>
Hostname or address of the machine on which to create the new port. Default is the local machine.
--tracking-address <tracking device>
This is the address of the SafeCom Server tracking device.
If this option is not specified, the specified output device will be used instead.
--tracking-name <tracking device name>
This is the name of the tracking device.
428
SafeCom G4 Administrator's Manual Version: 10.520.11.221
If this is not specified, the tracking device will be named the same as the SafeCom Push port.
--tracking-location <tracking device location>
This option specifies the location of the tracking device as it will appear in scAdministrator.
If this is not specified the location field in scAdministrator will be empty.
--driver-name <driver name>
Override driver name with the specified name, when committing jobs to SafeCom Server.
--model <model name>
Tracking device model. Will be displayed in SafeCom Administrator Console.
--show–price
Show job prize before printing.
--duplex
Specifies that this is a duplex capable tracking device.
--color
Specifies that this is a color tracking device.
--charging-scheme-id1 <numerical scheme id>
Primary charging scheme used for price calculation.
--charging-scheme-id2 <numerical scheme id>
Secondary charging scheme used for price calculation.
Exit Codes0—SCPORTUTIL_ERROR_SUCCESS
The operation completed successfully.
1—SCPORTUTIL_ERROR_GENERAL_FAILURE
The operation could not be completed due to a general failure.
2—SCPORTUTIL_ERROR_ACCESS_DENIED
Access is denied.
3—SCPORTUTIL_ERROR_INVALID_PARAMETER
The command line parameter is incorrect.
4—SCPORTUTIL_ERROR_CAN_NOT_CONNECT_TO_SC
A connection attempt to a SafeCom Server failed.
429
SafeCom G4 Administrator's Manual Version: 10.520.11.221
5—SCPORTUTIL_ERROR_SC_MONITORS_NOT_INSTALLED
The SafeCom print monitor is not installed.
6—SCPORTUTIL_ERROR_INVALID_PORT_NAME
The specified port name is invalid.
9—SCPORTUTIL_ERROR_CAN_NOT_CREATE_TRACKING_DEVICE
The tracking device cannot be created.
12—SCPORTUTIL_ERROR_PORT_ALREADY_EXISTS
The specified port already exists.
13—SCPORTUTIL_ERROR_SPOOLER_CALL_FAILED
A call to the Windows Print Spooler failed.
15—SCPORTUTIL_ERROR_INVALID_QUEUE_NAME
The queue name or target machine is invalid.
16—SCPORTUTIL_ERROR_QUEUE_NOT_SUPPORTED
The queue name is invalid. The specified queue is not supported, could be due to:• Port pooling• No Port attached• RDP queue• Remote queue / share
17—SCPORTUTIL_ERROR_WIN32_FAILURE
A call to the Windows API is failed.
Remarks
Supported queue typesOnly queues that use any of the supported port types are supported for migration.
Unsupported queue typesThe tool does not support migration of the following queue types:• Remote queues not local to the target machine. Queues that are attached using shares.• Queues with no port attached• Remote Desktop queues• Queues that have Printer Pooling enabled
430
SafeCom G4 Administrator's Manual Version: 10.520.11.221
Supported port typesOnly queues that are attached to Standard TCP/IP Ports using the RAW protocol are supported formigration. The LPR protocol is not supported.
Existing ports and queuesThe existing Standard TCP/IP port will not be deleted or altered in any way.
Other queues attached to the same Standard TCP/IP port will not be affected.
SafeCom User AuthenticationThe newly created port will use the default user authentication scheme, which is “Use network logon”.
SafeCom Server performance considerationsWhen running the tool during user logon or rollout scenarios, take into consideration that this commandcontacts the SafeCom Server and might create new tracking devices.
You might want to limit the number of concurrent calls.
Tracking DevicesIf a tracking device with the same name already exists, the existing tracking device will be used, and nonew tracking device will be created.
If more than one tracking device with the same name already exists, an arbitrary device with the samename will be selected.
Existing tracking devices will not be updated with any settings provided to this command.
The automatically created tracking device will have the same name as the queue, if no other name isspecified.
List Print QueuesThis operation outputs a list of print queues, their attached port, port types and port descriptions.
It can be restricted to only output queues that are eligible for migration by the SafeCom Port Utility.
Command Line usagescPortUtility --list-print-queues --only-migratable --target-machine <target machine address>
431
SafeCom G4 Administrator's Manual Version: 10.520.11.221
Options and Parameters--list-print-queues
Required
This switch specifies that the List Print Queues command should be executed.
--only-migratable
List only queues that are eligible for migration by the SafeCom Port Utility.
--target-machine <target machine address>
Hostname or address of the machine on which the queue and port are located. Default is the localmachine.
Exit Codes0—SCPORTUTIL_ERROR_SUCCESS
The operation completed successfully.
1—SCPORTUTIL_ERROR_GENERAL_FAILURE
The operation could not be completed due to a general failure.
3—SCPORTUTIL_ERROR_INVALID_PARAMETER
The command line parameter is incorrect.
13—SCPORTUTIL_ERROR_SPOOLER_CALL_FAILED
A call to the Windows Print Spooler failed.
15—SCPORTUTIL_ERROR_INVALID_QUEUE_NAME
The target machine is invalid.
17—SCPORTUTIL_ERROR_WIN32_FAILURE
A call to the Windows API is failed.
432
Chapter 20
Disclaimer
SafeCom software features interact with non-proprietary information areas of printer drivers. Printerdrivers withholding print job information in proprietary information areas may hinder correct SafeCombehavior. SafeCom does NOT guarantee that each and all SafeCom software features will work with allprinter drivers and cannot be held responsible if they do not work as expected.
The following sections contain known issues with proprietary printer driver information causing incorrectSafeCom behavior:
Rule Based Printing rules have no effect
SafeCom Rule Based Printing needs to modify the print data stream to control: Duplex on/off, Toner saveon/off and Force job to b/w. SafeCom Rule Based Printing has been tested against PCL5, PCL5c, PCL5e,PCL6, PCL XL and PostScript level 2 and 3 printer drivers from HP using a broad range of HP LaserJets.
Incorrect copy page count and job price in SafeCom PopUp
Some printer drivers sending print jobs in Enhanced Metafile (EMF) format may provide the SafeComPopUp dialog with an incorrect page count when printing multiple copies of a document causing thepopup dialog to show an incorrect page count and job price. However, once the print job is completed theSafeCom database holds the correct page count and job price.
In most cases the issue is caused by the printer driver not setting the dmCopies value of the DEVMODEdata structure correctly. Typically the printer driver will set a value of 1 in dmCopies instead of the actualnumber of copies.
For print jobs in PCL and PostScript the SafeCom Parser compensates for this flaw in the printer driverand obtains the correct page count value by parsing the print job and then reporting the page count toSafeCom PopUp.
When the print job is in EMF format, it is not parsed and hence the only available information is that whichis made available by the print driver in the DEVMODE data structure. It may be that the print driver hasembedded the page count information into the driver specific (proprietary) part of the DEVMODE datastructure, but SafeCom solution does not this information, because it is not only printer driver specific, butalso printer driver version specific.
If you experience the issue, try any of the following:• Switch the printer driver to one that correctly sets the dmCopies value, for example HP Universal Print
Driver PCL6 or Xerox Global Print Driver PCL6.• Enable Client Side Rendering in the printer driver, provided the printer driver supports this. This way
print data is sent in RAW format (PCL or PostScript) and not in EMF format.• Clear (disable) Enable advanced printing features in the printer driver, provided the printer driver
supports this. This way print data is sent in RAW format (PCL or PostScript) and not in EMF format.
433
Related Documents