Capacity Management – Perspective Setup LHSC Nurses and Clerks| Quick Guide Partnering with you to deliver excellent patient care through technology and innovation. Page | 1 STAGE ONE – SET UP SCREEN 1. Log into Capacity Management using your PowerChart username and password. Capacity Management screen when log in the first time 2. Click Personalization. 3. Mouse over Manage Perspectives. 4. Click My Perspective Configuration. The Navigation Bar Configuration window will now display 5. Click House Supervisor/Bed Management. 6. Click right arrow . House Supervisor/Bed Management will now appear in the My Perspectives section 7. Click *TO SETUP:Personalization>Manage Perspectives>My… 8. Click left arrow .

Welcome message from author
This document is posted to help you gain knowledge. Please leave a comment to let me know what you think about it! Share it to your friends and learn new things together.
Transcript

Capacity Management – Perspective Setup LHSC Nurses and Clerks| Quick Guide
Partnering with you to deliver excellent patient care through technology and innovation.
P a g e | 1
STAGE ONE – SET UP SCREEN 1. Log into Capacity Management using your PowerChart username and password.
Capacity Management screen when log in the first time
2. Click Personalization. 3. Mouse over Manage Perspectives. 4. Click My Perspective Configuration.
The Navigation Bar Configuration window will now display
5. Click House Supervisor/Bed Management.
6. Click right arrow .
House Supervisor/Bed Management will now appear in the My Perspectives section
7. Click *TO SETUP:Personalization>Manage Perspectives>My…
8. Click left arrow .

Capacity Management – Perspective Setup LHSC Nurses and Clerks| Quick Guide
Partnering with you to deliver excellent patient care through technology and innovation.
P a g e | 2
8. Click Save and Exit.
9. Click Save Perspective Layout icon
10. Enter a name for your perspective.
11. Click OK.
A pop-up message appears indicating your perspective has been saved 12. Click OK.
Remove/Move Gadgets
Nurses and clerks do not have access to the Bed Board gadget and should remove it.
Remove the Bed Board
1. Click on the Bed Board tab.
This sets the focus on this gadget and makes the white X visible
2. Click on the X in the Bed Board tab.
Capacity Management – Perspective Setup LHSC Nurses and Clerks| Quick Guide
Partnering with you to deliver excellent patient care through technology and innovation.
P a g e | 3
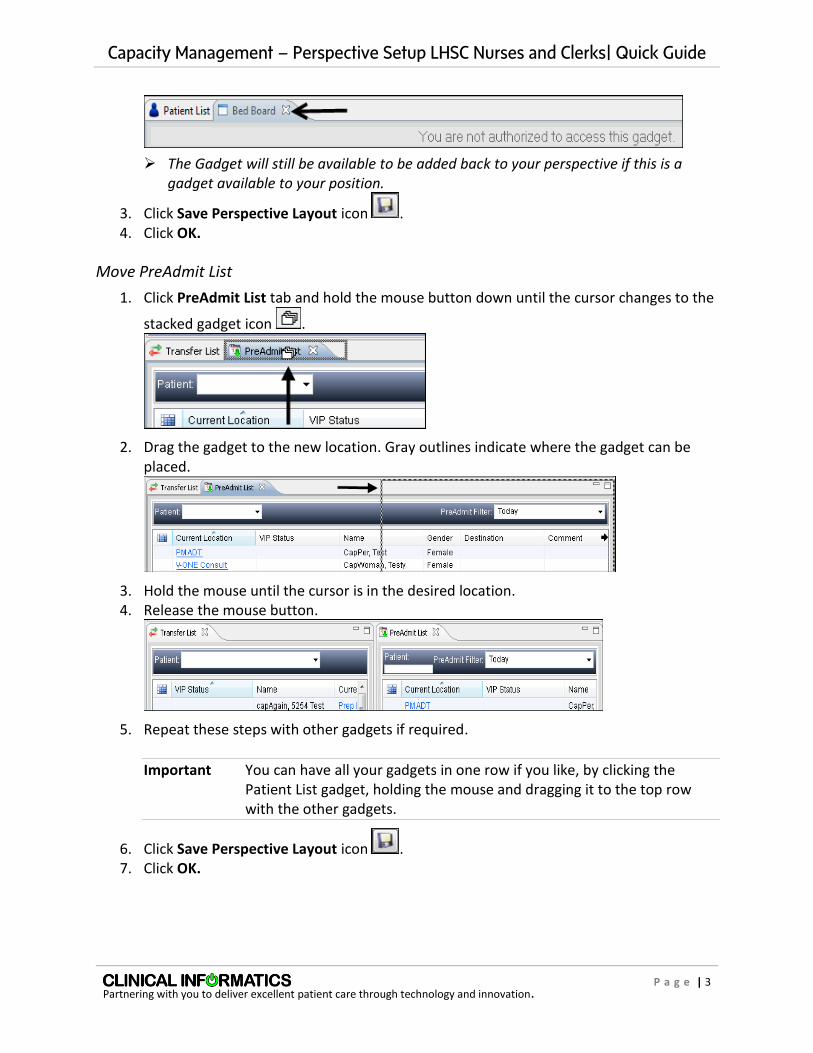
The Gadget will still be available to be added back to your perspective if this is a gadget available to your position.
3. Click Save Perspective Layout icon . 4. Click OK.
Move PreAdmit List
1. Click PreAdmit List tab and hold the mouse button down until the cursor changes to the
stacked gadget icon .
2. Drag the gadget to the new location. Gray outlines indicate where the gadget can be placed.
3. Hold the mouse until the cursor is in the desired location. 4. Release the mouse button.
5. Repeat these steps with other gadgets if required.
Important You can have all your gadgets in one row if you like, by clicking the Patient List gadget, holding the mouse and dragging it to the top row with the other gadgets.
6. Click Save Perspective Layout icon . 7. Click OK.

Capacity Management – Perspective Setup LHSC Nurses and Clerks| Quick Guide
Partnering with you to deliver excellent patient care through technology and innovation.
P a g e | 4
STAGE TWO - SET YOUR LOCATION
1. Click the Building icon
2. Click on your facility. 3. Click on the arrow to the right of your facility and then continue to click on the next
arrow to narrow down your location until you reach your unit.
4. To save this location as a favorite, click on the Add Location Favorite icon 5. Click Add Current Location.
Repeat steps 1-5 if you work on more than one unit and need to save them as a favorite
6. Click Save Perspective Layout icon to save your selections. 7. Click OK. 8. If your unit consists of multiple units create a custom location favourite :
a. Click on Add to Favourite icon b. Click on Add Custom Location Favorite.
Add Custom Location Favorite window opens c. Enter a name for favourite. d. Click on the triangle beside the facility to expand selection to your unit. e. Click on your unit and click the Add button in the middle of the window. f. Repeat this step until all the sub-units from your floor are on the right side of the
window.
g. Click OK.
Capacity Management – Perspective Setup LHSC Nurses and Clerks| Quick Guide
Partnering with you to deliver excellent patient care through technology and innovation.
P a g e | 5
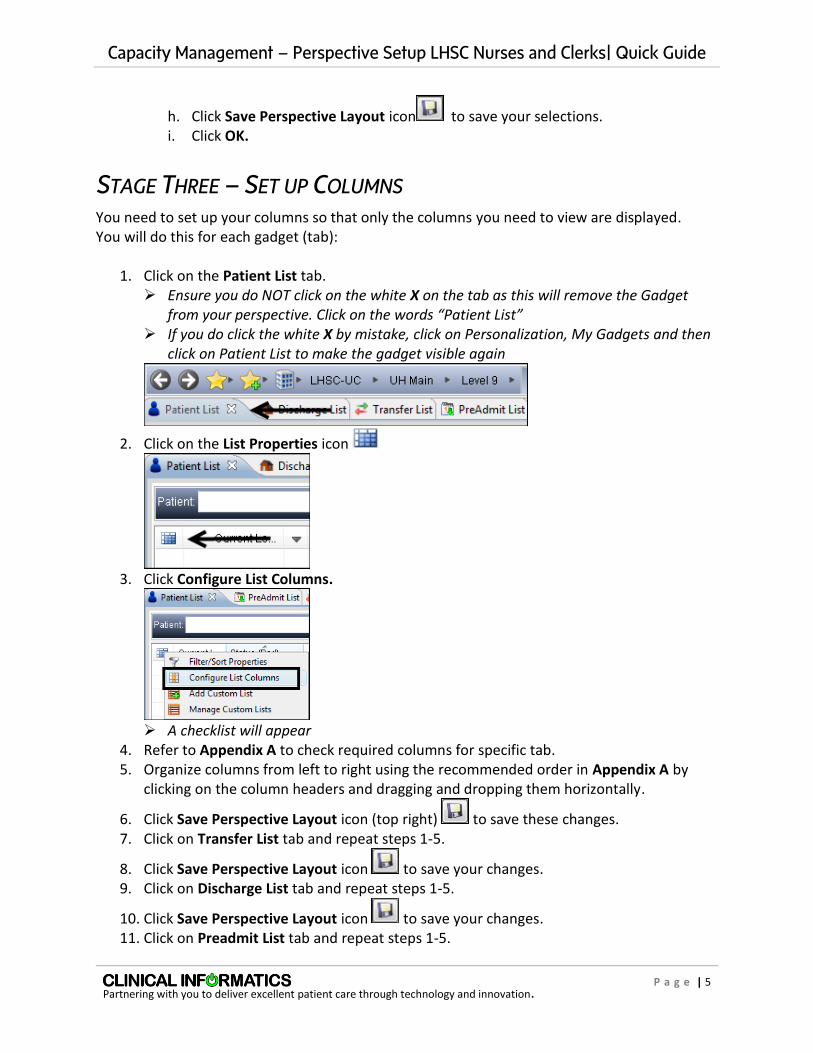
h. Click Save Perspective Layout icon to save your selections. i. Click OK.
STAGE THREE – SET UP COLUMNS You need to set up your columns so that only the columns you need to view are displayed. You will do this for each gadget (tab):
1. Click on the Patient List tab. Ensure you do NOT click on the white X on the tab as this will remove the Gadget
from your perspective. Click on the words “Patient List” If you do click the white X by mistake, click on Personalization, My Gadgets and then
click on Patient List to make the gadget visible again
2. Click on the List Properties icon
3. Click Configure List Columns.
A checklist will appear
4. Refer to Appendix A to check required columns for specific tab. 5. Organize columns from left to right using the recommended order in Appendix A by
clicking on the column headers and dragging and dropping them horizontally.
6. Click Save Perspective Layout icon (top right) to save these changes. 7. Click on Transfer List tab and repeat steps 1-5.
8. Click Save Perspective Layout icon to save your changes. 9. Click on Discharge List tab and repeat steps 1-5.
10. Click Save Perspective Layout icon to save your changes. 11. Click on Preadmit List tab and repeat steps 1-5.

Capacity Management – Perspective Setup LHSC Nurses and Clerks| Quick Guide
Partnering with you to deliver excellent patient care through technology and innovation.
P a g e | 6
12. Click Save Perspective Layout icon to save your changes. Tips:
Column sizes can be made smaller by clicking on the right hand border of the column and dragging to the left. This will allow you to view more columns without scrolling.
The column order can be changed and moved to fit personal preference at any point with one exception: VIP Status MUST be located beside Name.
STAGE FOUR – FILTER LISTS You need to filter the Discharge, PreAdmit and Transfer lists so you see only the information
that applies to your specific unit. Each list is completed individually as the details vary between
the different tabs. If you work on multiple units on different floors and need assistance with
filtering please contact your SuperUser for assistance.
Discharge List
1. Click on the Discharge List tab.
Ensure that column order is the same as recommended in Appendix A
2. Click on Current Location column heading.
Clicking on this column header makes it the focus for the filter
3. Click List Properties icon
4. Click Filter/Sort Properties to turn the filter on.
Please note that if you click Filter/Sort properties a second time it turns off the filter
5. Click on Current Location column heading.
6. Click in the box beside “All”.
This will remove the check mark beside “All” and “Blank”
7. Click on the round button beside Include.
8. Click on the box with three dots beside Include.
The Select Locations to Include window will open
9. Click on the triangles beside your facility to filter down to the unit you work on.
Clicking on the subsequent triangles will expand the selection

Capacity Management – Perspective Setup LHSC Nurses and Clerks| Quick Guide
Partnering with you to deliver excellent patient care through technology and innovation.
P a g e | 7
10. Click in the box beside your unit (including the relevant sub-units for your floor).
11. Click OK.
12. Click OK.
13. Click Save Perspective Layout icon to save your selections.
14. Click OK.
PreAdmit List
1. Click on the PreAdmit List tab.
Ensure that column order is the same as recommended in Appendix A
2. Click on List Properties icon
3. Click Filter/Sort Properties to turn the filter on.
Please note that if you click Filter/Sort properties a second time it turns off the filter
4. Click on Current Location column heading.
A Pop up window will appear
5. Click in the box beside “All”.
This will remove the check mark beside “All” and “Blank”
6. Click in the round button beside Include.
7. Click on the box with three dots beside Include.
Capacity Management – Perspective Setup LHSC Nurses and Clerks| Quick Guide
Partnering with you to deliver excellent patient care through technology and innovation.
P a g e | 8
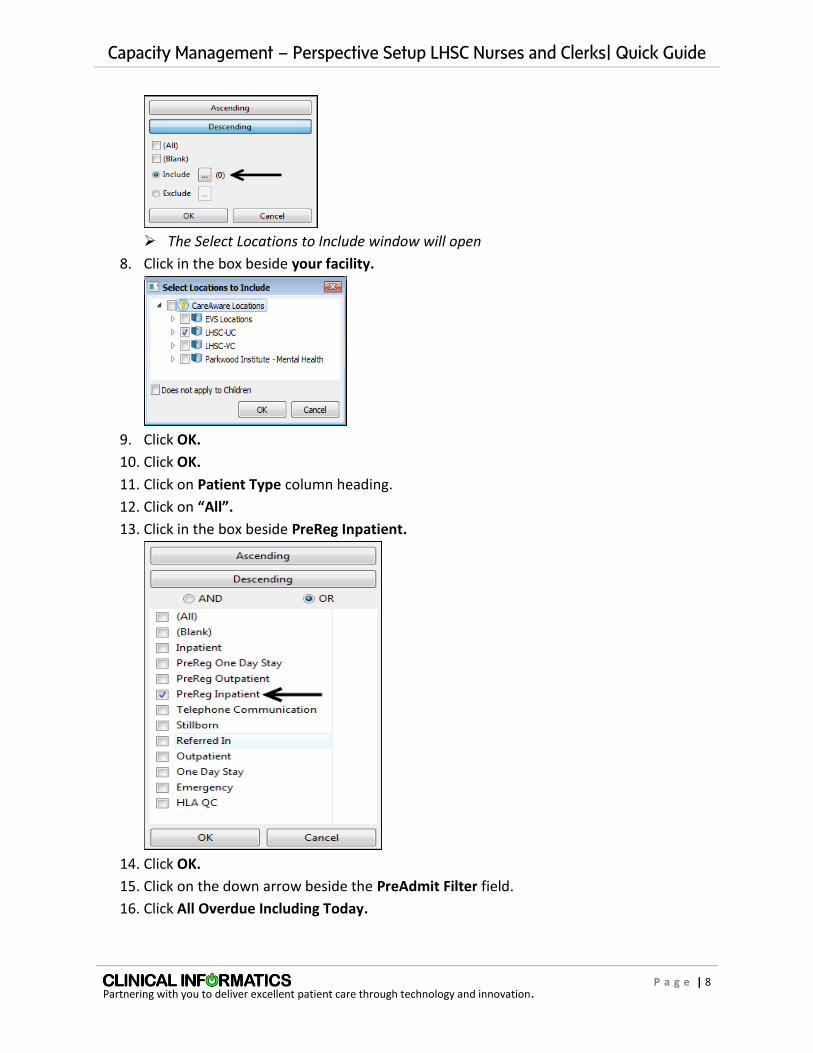
The Select Locations to Include window will open
8. Click in the box beside your facility.
9. Click OK.
10. Click OK.
11. Click on Patient Type column heading.
12. Click on “All”.
13. Click in the box beside PreReg Inpatient.
14. Click OK.
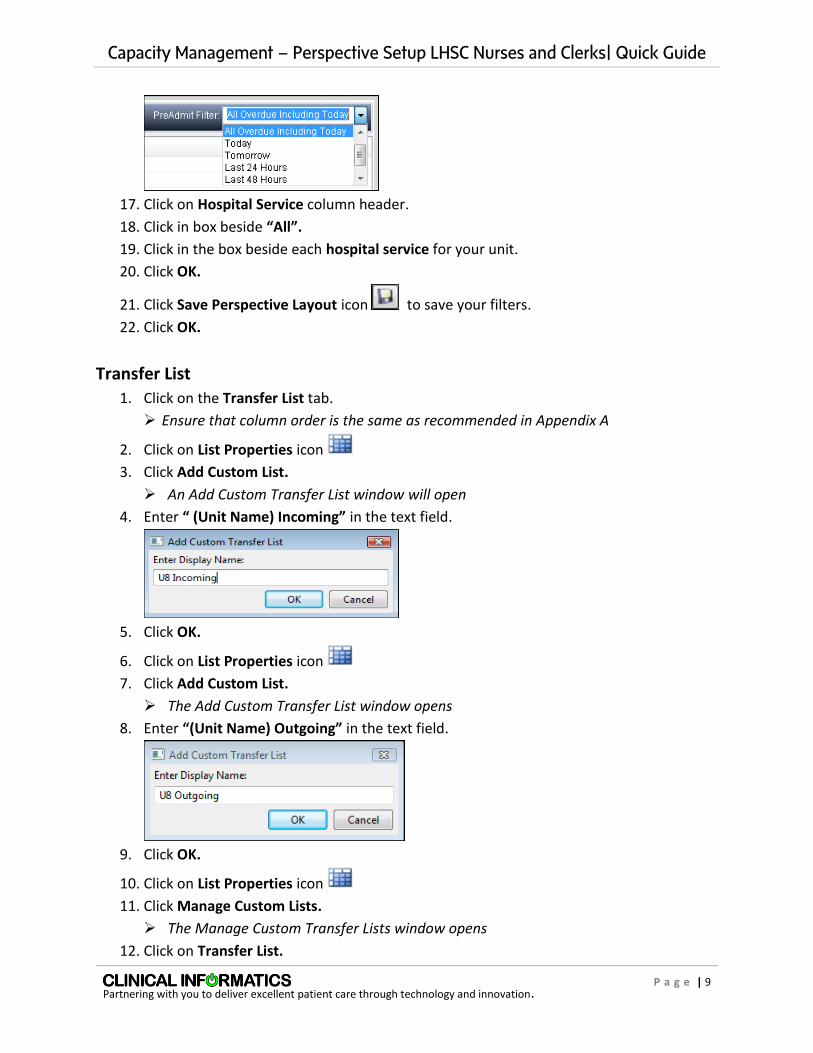
15. Click on the down arrow beside the PreAdmit Filter field.
16. Click All Overdue Including Today.
Capacity Management – Perspective Setup LHSC Nurses and Clerks| Quick Guide
Partnering with you to deliver excellent patient care through technology and innovation.
P a g e | 9
17. Click on Hospital Service column header.
18. Click in box beside “All”.
19. Click in the box beside each hospital service for your unit.
20. Click OK.
21. Click Save Perspective Layout icon to save your filters.
22. Click OK.
Transfer List
1. Click on the Transfer List tab.
Ensure that column order is the same as recommended in Appendix A
2. Click on List Properties icon
3. Click Add Custom List.
An Add Custom Transfer List window will open
4. Enter “ (Unit Name) Incoming” in the text field.
5. Click OK.
6. Click on List Properties icon
7. Click Add Custom List.
The Add Custom Transfer List window opens
8. Enter “(Unit Name) Outgoing” in the text field.
9. Click OK.
10. Click on List Properties icon
11. Click Manage Custom Lists.
The Manage Custom Transfer Lists window opens
12. Click on Transfer List.

Capacity Management – Perspective Setup LHSC Nurses and Clerks| Quick Guide
Partnering with you to deliver excellent patient care through technology and innovation.
P a g e | 10
12. Click the Blue Arrow in the middle of the window.
This moves the Transfer List to the Available Lists pane on the left
13. Click OK.
Only the two new custom lists that you created (Incoming & Outgoing) will now be
visible when in the Transfer List
14. Click Save Perspective Layout icon to save your filters.
15. Click OK.
Filtering the Incoming Transfer list
1. Click on the Incoming transfer tab.
2. Click on the Destination column heading.
3. Click on List Properties icon
4. Click Filter/Sort Properties.
5. Click on the Destination column heading.
6. Click on “All”.
7. Click on round button beside Include.
8. Click on the box with three dots beside Include.
The Select Locations to Include window will open
9. Click on the triangles beside your facility to filter down to your unit.

Capacity Management – Perspective Setup LHSC Nurses and Clerks| Quick Guide
Partnering with you to deliver excellent patient care through technology and innovation.
P a g e | 11
10. Click OK.
11. Click OK.
12. Click Save Perspective Layout icon to save your filters.
13. Click OK.
Filtering the Outgoing Transfer list
1. Click on the Outgoing transfer tab.
2. Click on the Current Location column heading.
3. Click on List Properties icon
4. Click Filter/Sort Properties.
5. Click on the Current Location column heading.
6. Click on “All”.
7. Click on round button beside Include.
8. Click on the box with three dots beside Include.
The Select Locations to Include window will open

Capacity Management – Perspective Setup LHSC Nurses and Clerks| Quick Guide
Partnering with you to deliver excellent patient care through technology and innovation.
P a g e | 12
9. Click on the triangles beside your facility to filter down to your unit.
10. Click OK.
11. Click OK.
12. Click Save Perspective Layout icon to save your filters.
13. Click OK.
STAGE FIVE – ANONYMOUS FILTER SET UP
The Anonymous filter must be set so that the names of patients who request to be anonymous
do not appear on the patient list.
Refer to Appendix B for instruction on how to set the Anonymous filter.
For further assistance please contact the Capacity Management Super User for your area or contact the Help Desk (ext. 44357 or [email protected]).
Related Documents