RUSLE2 - Instructions & User Guide January 2016 1

Welcome message from author
This document is posted to help you gain knowledge. Please leave a comment to let me know what you think about it! Share it to your friends and learn new things together.
Transcript
RUSLE2 - Instructions & User Guide
January 2016
1
Index - RUSLE2 - Instructions & User Guide
2
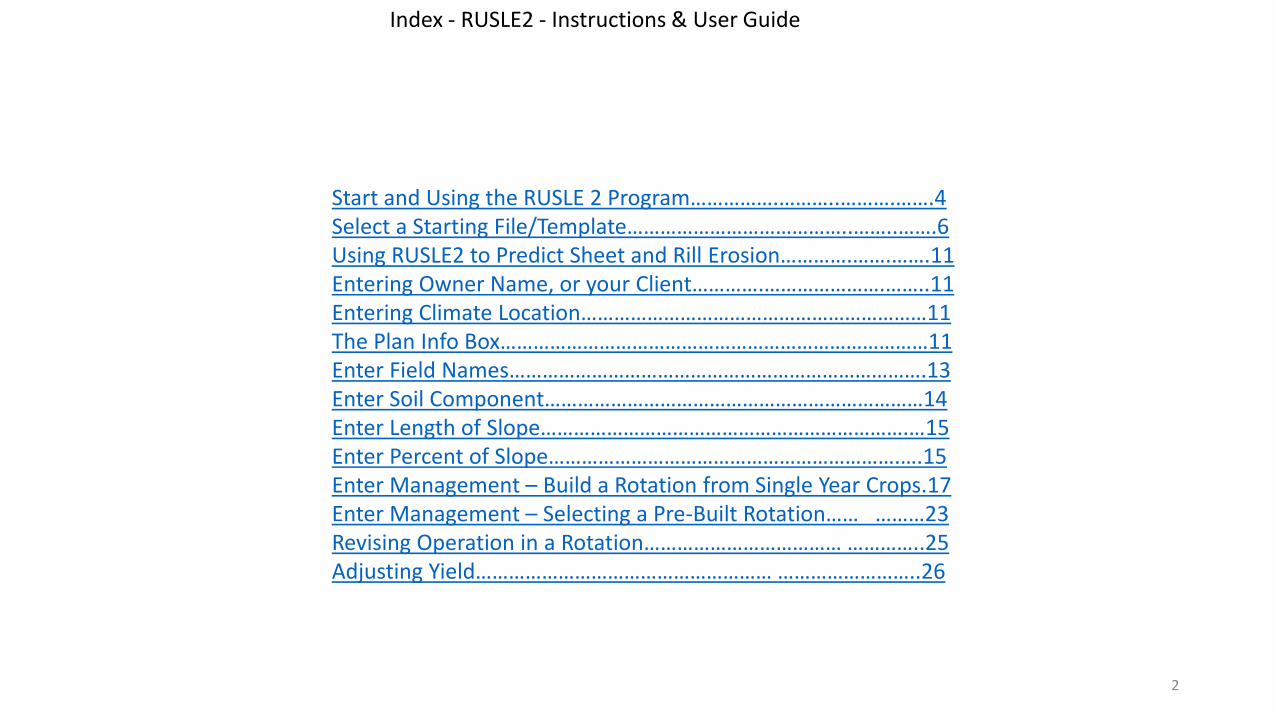
Start and Using the RUSLE 2 Program…………….………..……….…….4Select a Starting File/Template…………………………………..……..…….6Using RUSLE2 to Predict Sheet and Rill Erosion………….…….…….11Entering Owner Name, or your Client………….………………….……..11Entering Climate Location………………………………………………………11The Plan Info Box……………………………………………………………………11Enter Field Names………………………………………………………………….13Enter Soil Component……………………………………………………………14Enter Length of Slope………………………………………………………….…15Enter Percent of Slope……………………………………………………….….15Enter Management – Build a Rotation from Single Year Crops.17Enter Management – Selecting a Pre-Built Rotation…… ………23Revising Operation in a Rotation……………………………… …………..25Adjusting Yield……………………………………………… ……………………..26
3
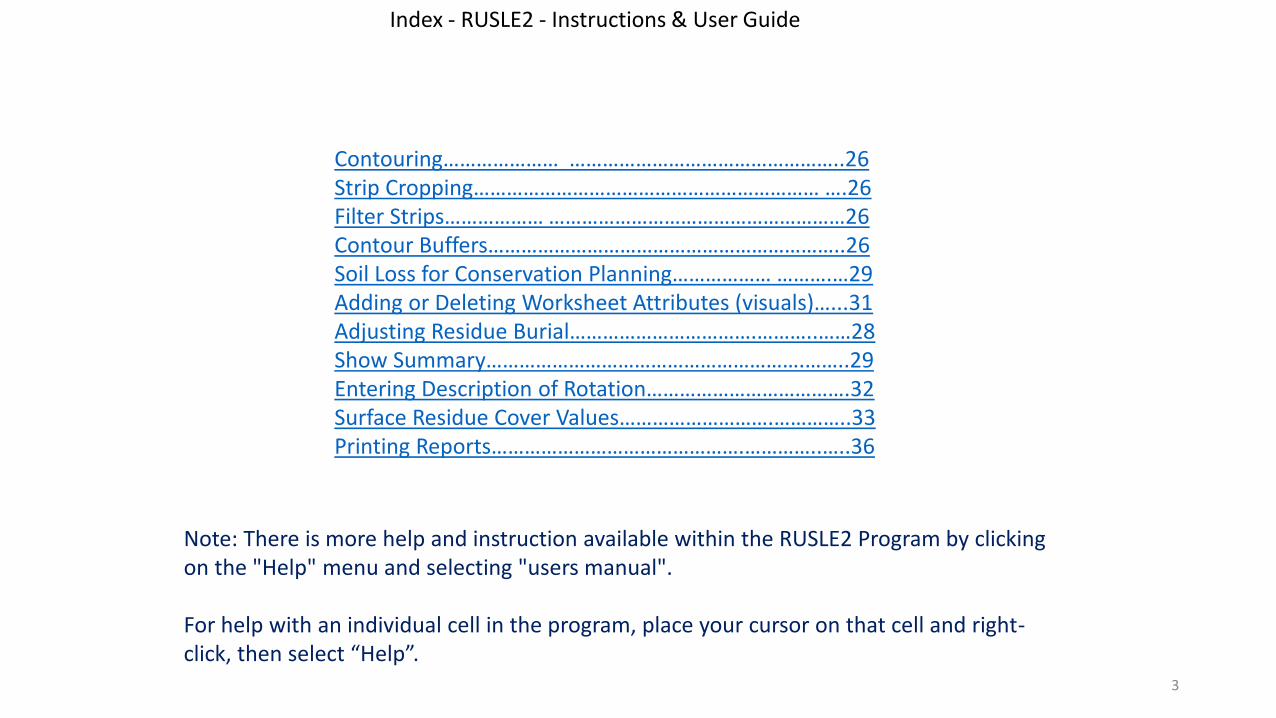
Contouring………………… …………………………………………..26Strip Cropping……………………………………………………… ….26Filter Strips……………… ………………………………………………26Contour Buffers………………………………………………………..26Soil Loss for Conservation Planning……………… ……….…29Adding or Deleting Worksheet Attributes (visuals)…...31Adjusting Residue Burial…………………………….………..……28Show Summary………………………………………………….……..29Entering Description of Rotation……………………………….32Surface Residue Cover Values……………………….…………..33Printing Reports……………………………………….…………..…..36
Note: There is more help and instruction available within the RUSLE2 Program by clicking on the "Help" menu and selecting "users manual".
For help with an individual cell in the program, place your cursor on that cell and right-click, then select “Help”.
Index - RUSLE2 - Instructions & User Guide
4
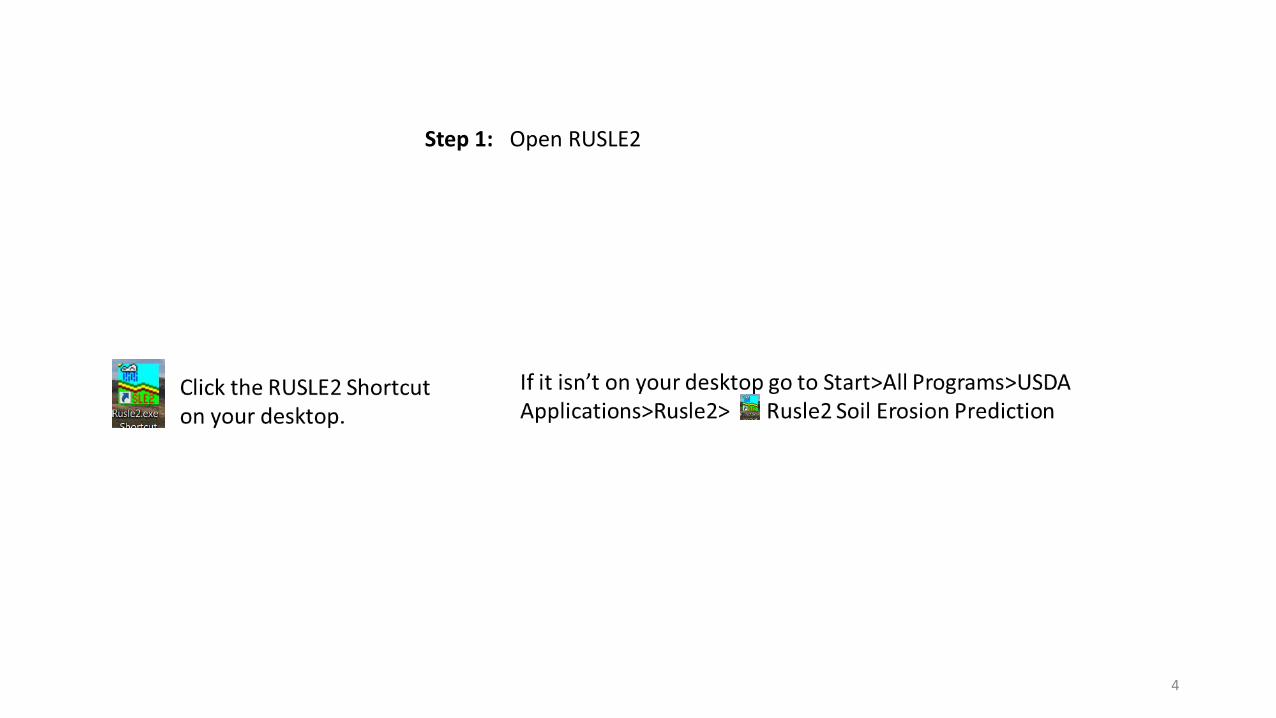
Step 1: Open RUSLE2
5
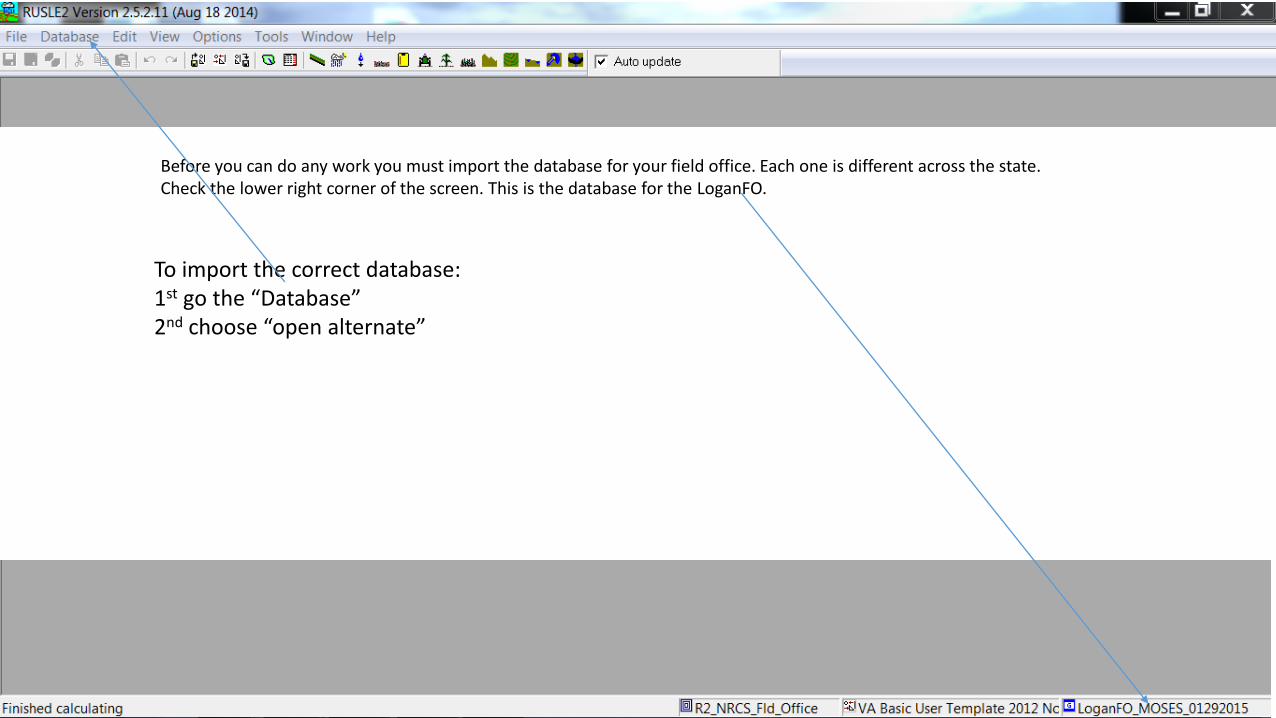
Before you can do any work you must import the database for your field office. Each one is different across the state.Check the lower right corner of the screen. This is the database for the LoganFO.
To import the correct database:1st go the “Database”2nd choose “open alternate”
6
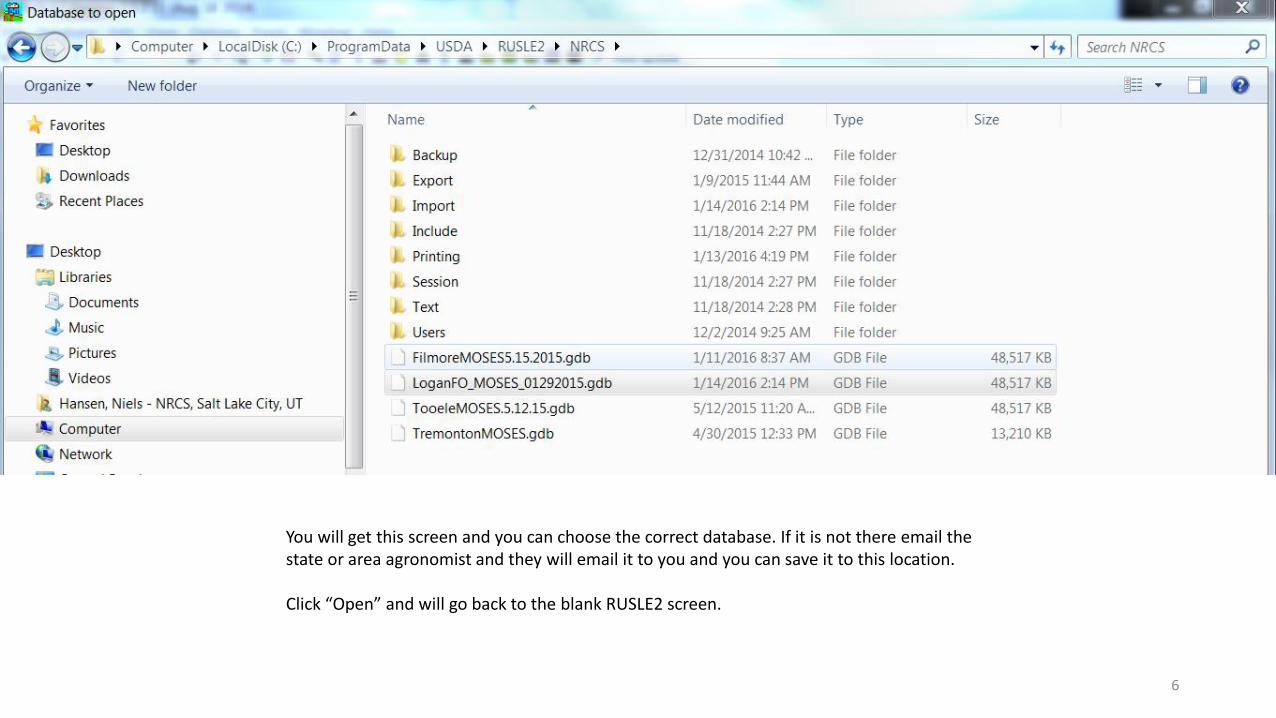
You will get this screen and you can choose the correct database. If it is not there email the state or area agronomist and they will email it to you and you can save it to this location.
Click “Open” and will go back to the blank RUSLE2 screen.
7
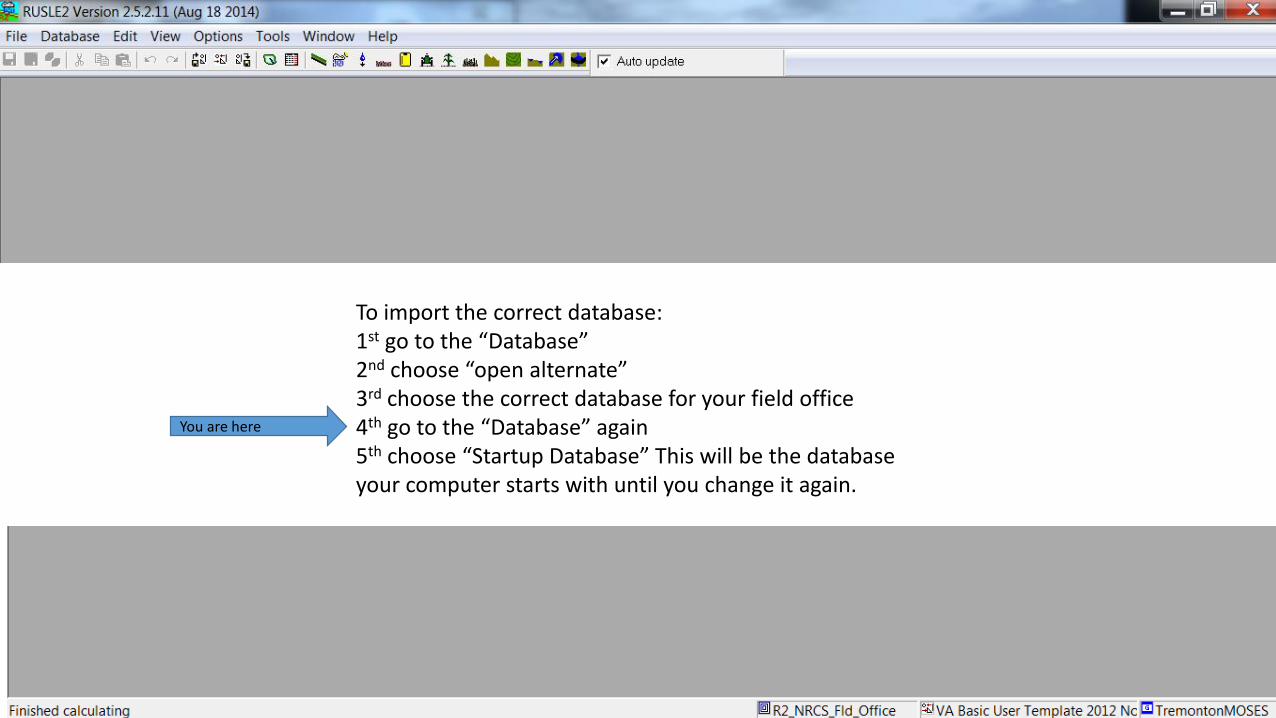
To import the correct database:1st go to the “Database”2nd choose “open alternate”3rd choose the correct database for your field office4th go to the “Database” again5th choose “Startup Database” This will be the database your computer starts with until you change it again.
You are here
8
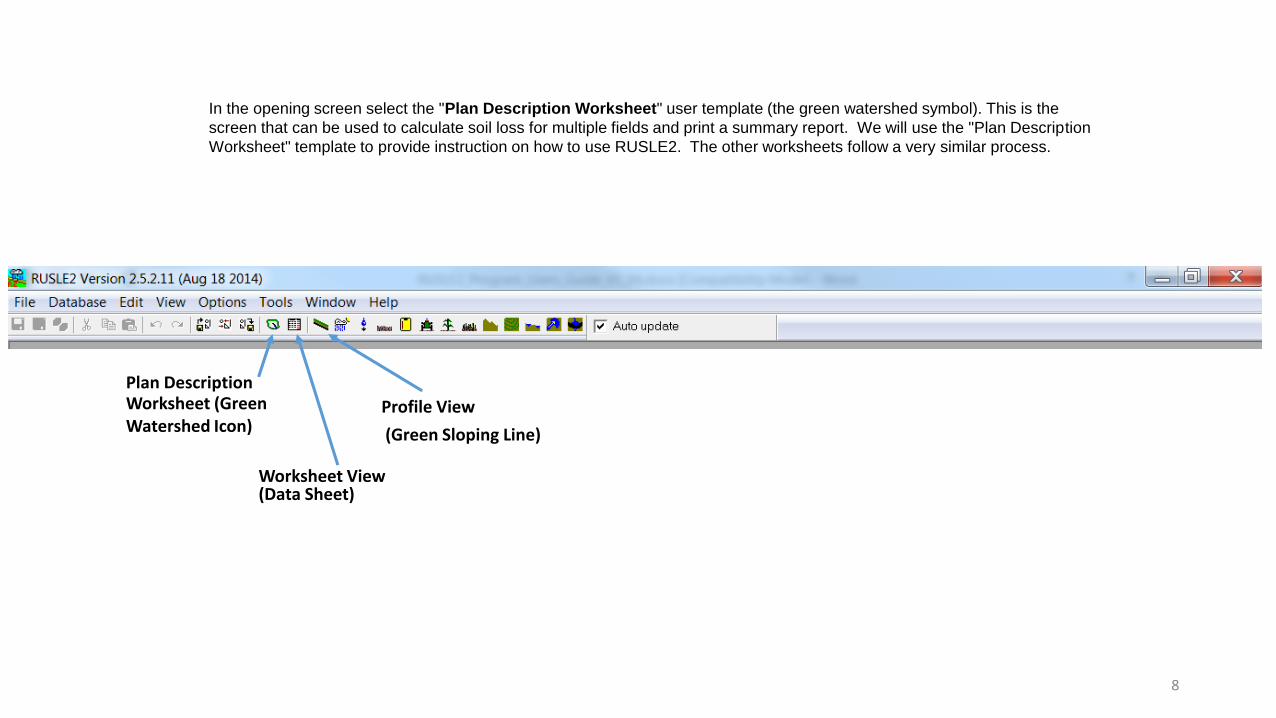
In the opening screen select the "Plan Description Worksheet" user template (the green watershed symbol). This is the
screen that can be used to calculate soil loss for multiple fields and print a summary report. We will use the "Plan Description
Worksheet" template to provide instruction on how to use RUSLE2. The other worksheets follow a very similar process.
Plan DescriptionWorksheet (Green Watershed Icon)
Worksheet View(Data Sheet)
Profile View
(Green Sloping Line)
9
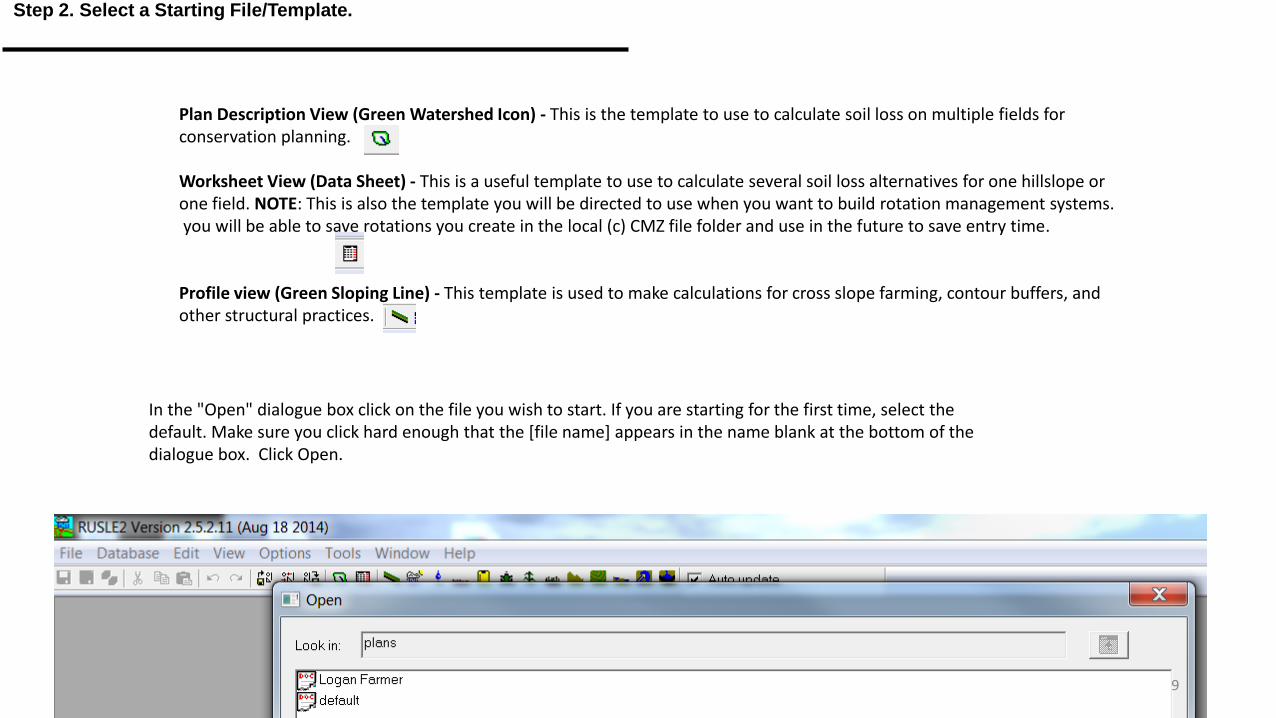
Plan Description View (Green Watershed Icon) - This is the template to use to calculate soil loss on multiple fields for conservation planning.
Worksheet View (Data Sheet) - This is a useful template to use to calculate several soil loss alternatives for one hillslope or one field. NOTE: This is also the template you will be directed to use when you want to build rotation management systems. you will be able to save rotations you create in the local (c) CMZ file folder and use in the future to save entry time.
Profile view (Green Sloping Line) - This template is used to make calculations for cross slope farming, contour buffers, and other structural practices.
Step 2. Select a Starting File/Template.
In the "Open" dialogue box click on the file you wish to start. If you are starting for the first time, select the default. Make sure you click hard enough that the [file name] appears in the name blank at the bottom of the dialogue box. Click Open.
10
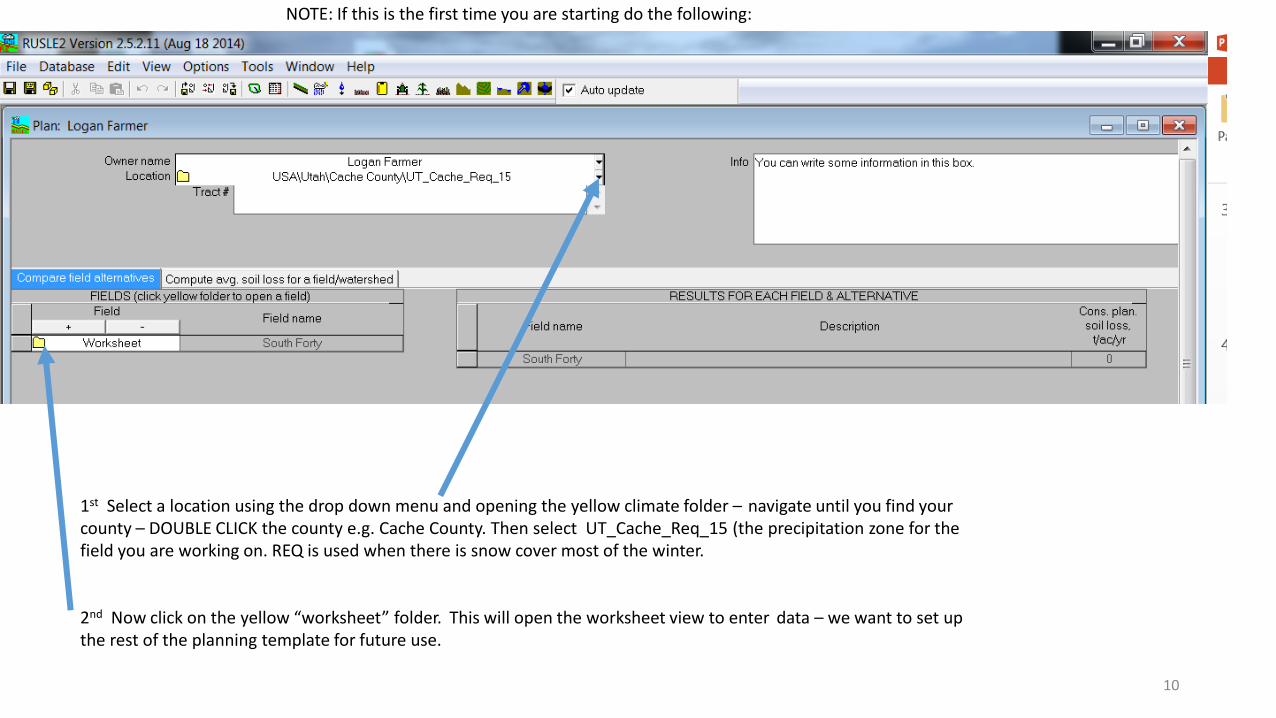
NOTE: If this is the first time you are starting do the following:
1st Select a location using the drop down menu and opening the yellow climate folder – navigate until you find your county – DOUBLE CLICK the county e.g. Cache County. Then select UT_Cache_Req_15 (the precipitation zone for the field you are working on. REQ is used when there is snow cover most of the winter.
2nd Now click on the yellow “worksheet” folder. This will open the worksheet view to enter data – we want to set upthe rest of the planning template for future use.
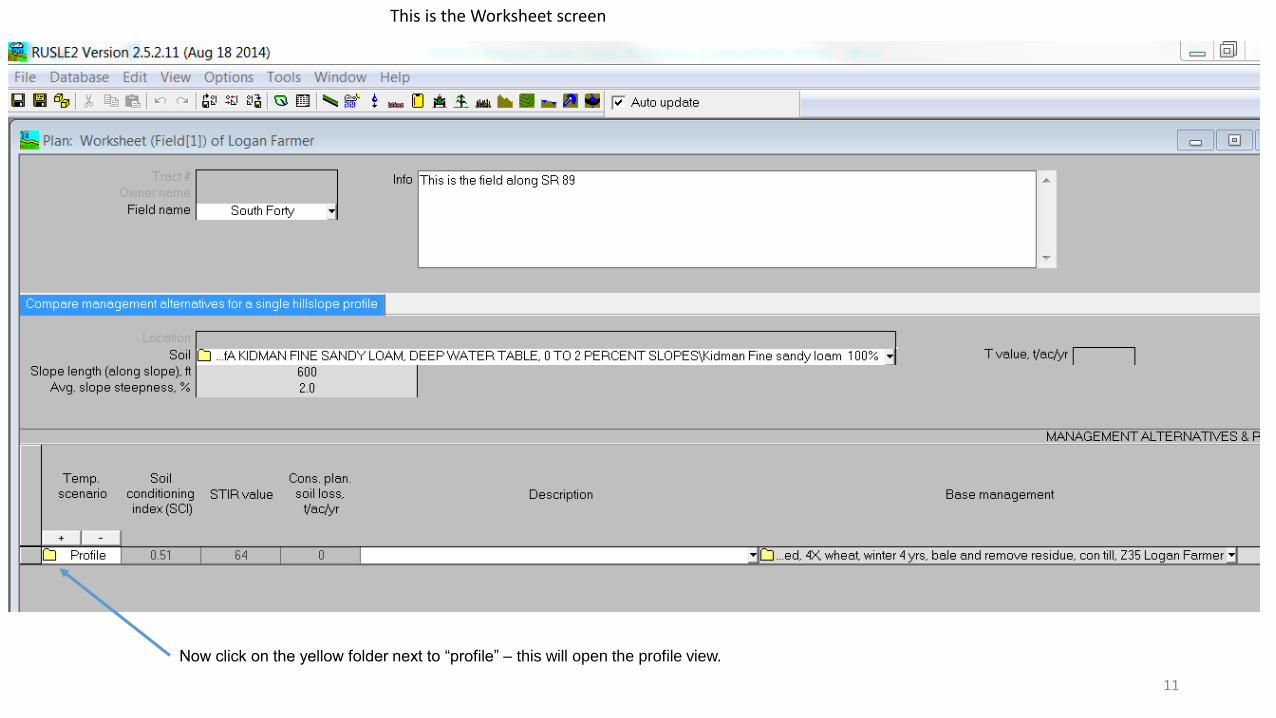
Now click on the yellow folder next to “profile” – this will open the profile view.
11
This is the Worksheet screen
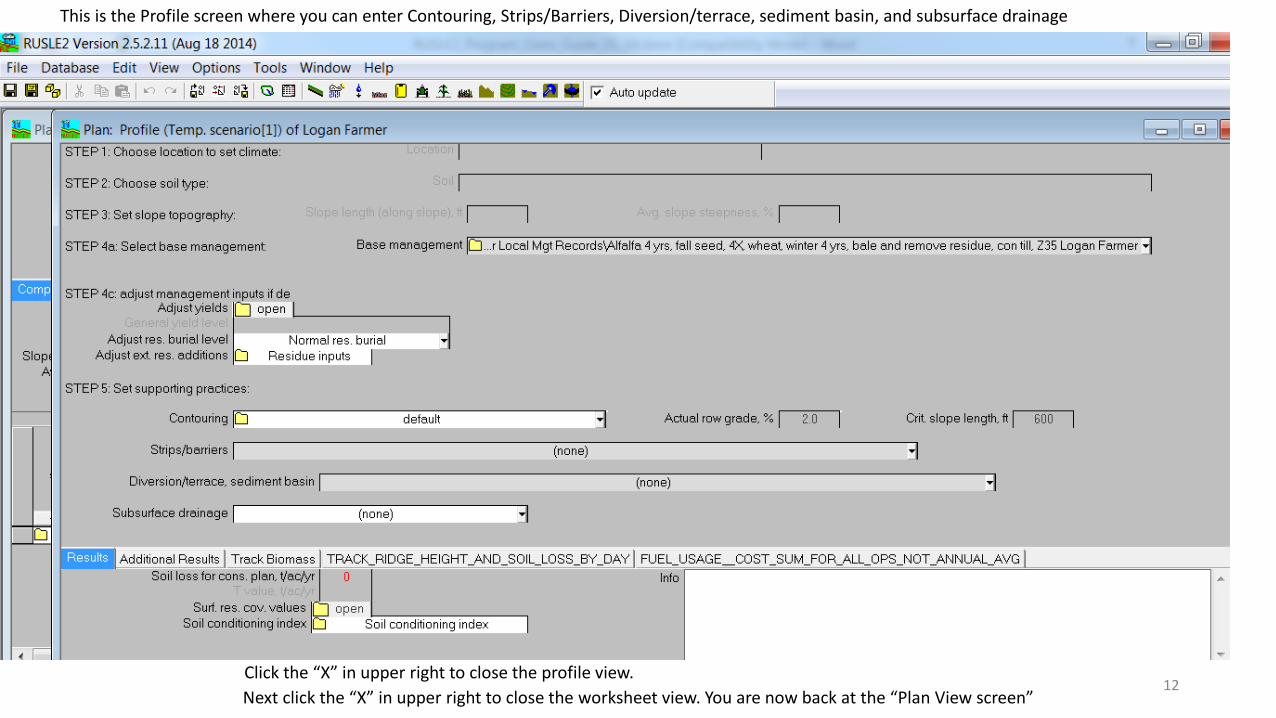
Next click the “X” in upper right to close the worksheet view. You are now back at the “Plan View screen”12
This is the Profile screen where you can enter Contouring, Strips/Barriers, Diversion/terrace, sediment basin, and subsurface drainage
Click the “X” in upper right to close the profile view.
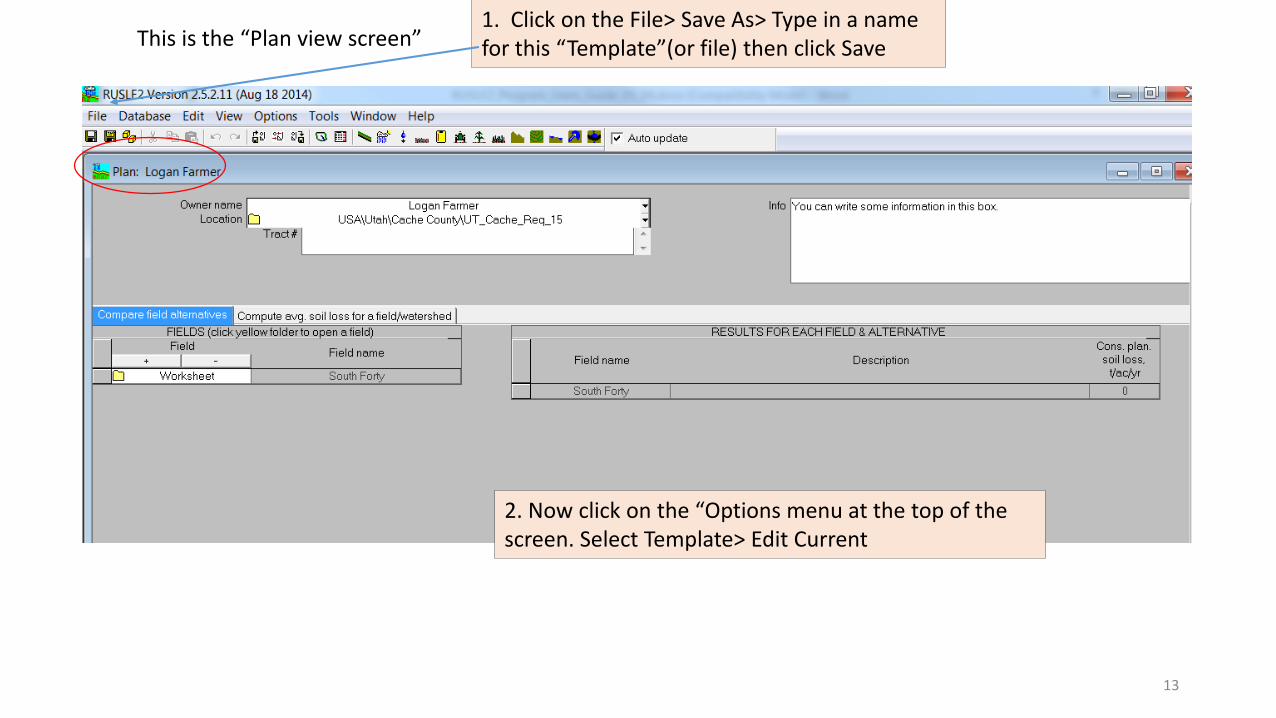
This is the “Plan view screen”1. Click on the File> Save As> Type in a name for this “Template”(or file) then click Save
2. Now click on the “Options menu at the top of the screen. Select Template> Edit Current
13

14
In the "Startup Tab ", check the box next to "use this template on startup" if you want thisone to start when you open the "Plan Descriptions Template". If not, do not check it.
In the "General Tab" click "Highlight Selected Tab" and "Show Calendar…" Click OK
15
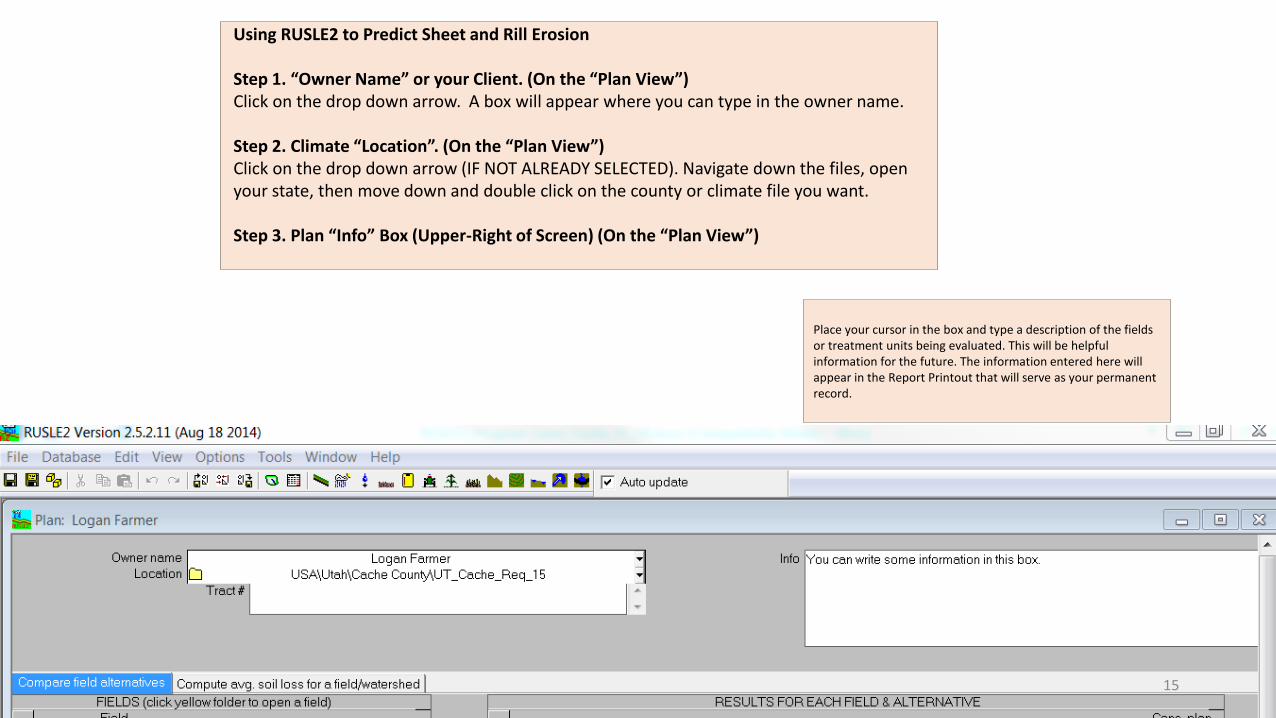
Using RUSLE2 to Predict Sheet and Rill Erosion
Step 1. “Owner Name” or your Client. (On the “Plan View”)Click on the drop down arrow. A box will appear where you can type in the owner name.
Step 2. Climate “Location”. (On the “Plan View”)Click on the drop down arrow (IF NOT ALREADY SELECTED). Navigate down the files, open your state, then move down and double click on the county or climate file you want.
Step 3. Plan “Info” Box (Upper-Right of Screen) (On the “Plan View”)
Place your cursor in the box and type a description of the fields or treatment units being evaluated. This will be helpful information for the future. The information entered here will appear in the Report Printout that will serve as your permanent record.
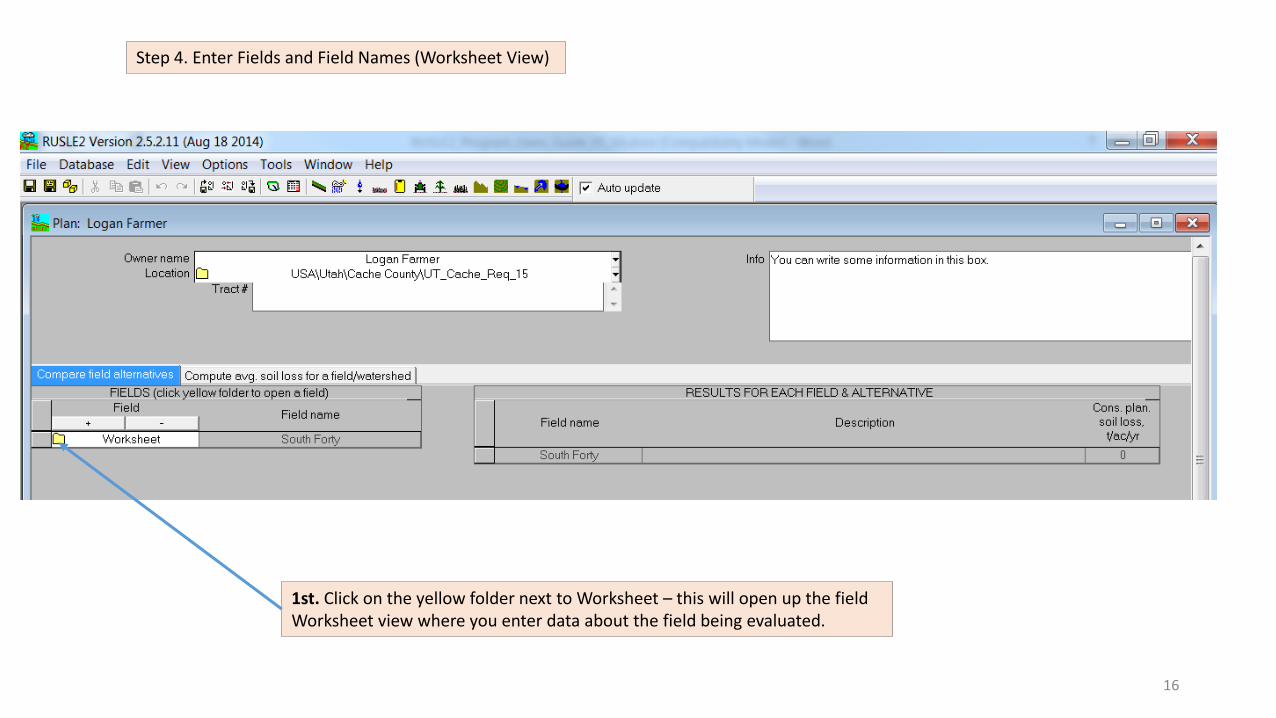
Step 4. Enter Fields and Field Names (Worksheet View)
1st. Click on the yellow folder next to Worksheet – this will open up the field Worksheet view where you enter data about the field being evaluated.
16
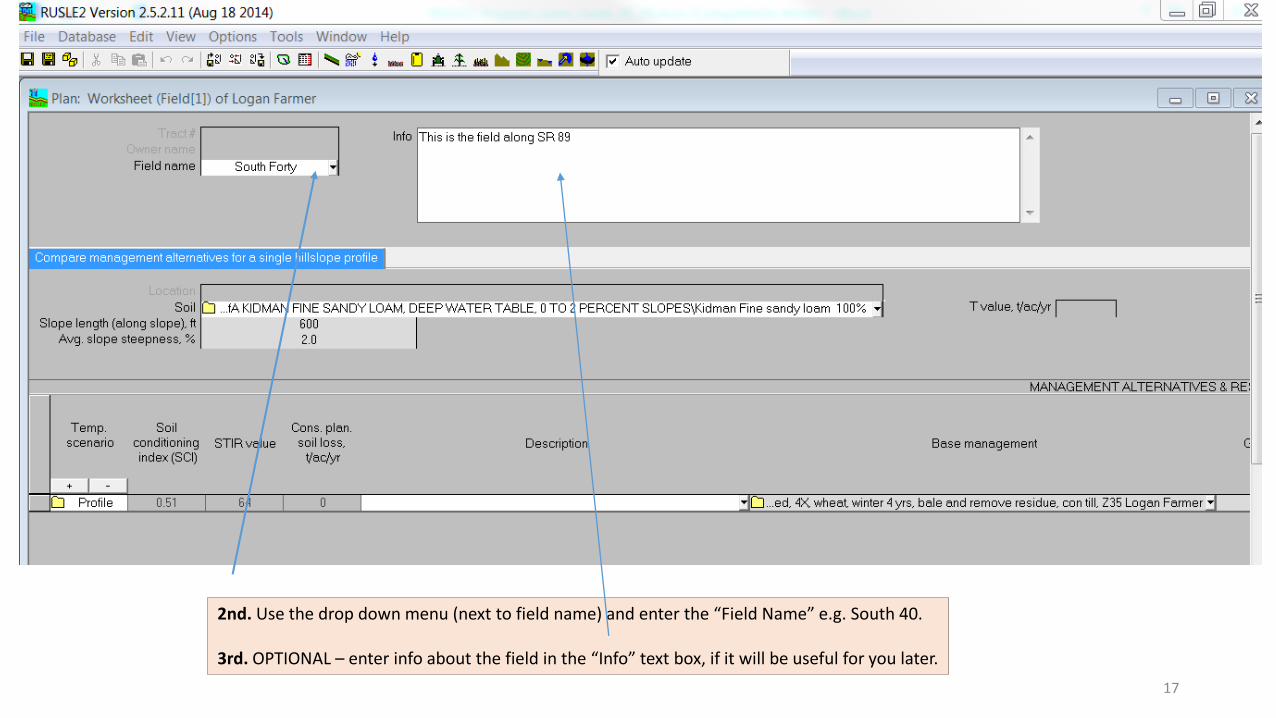
2nd. Use the drop down menu (next to field name) and enter the “Field Name” e.g. South 40.
3rd. OPTIONAL – enter info about the field in the “Info” text box, if it will be useful for you later.
17
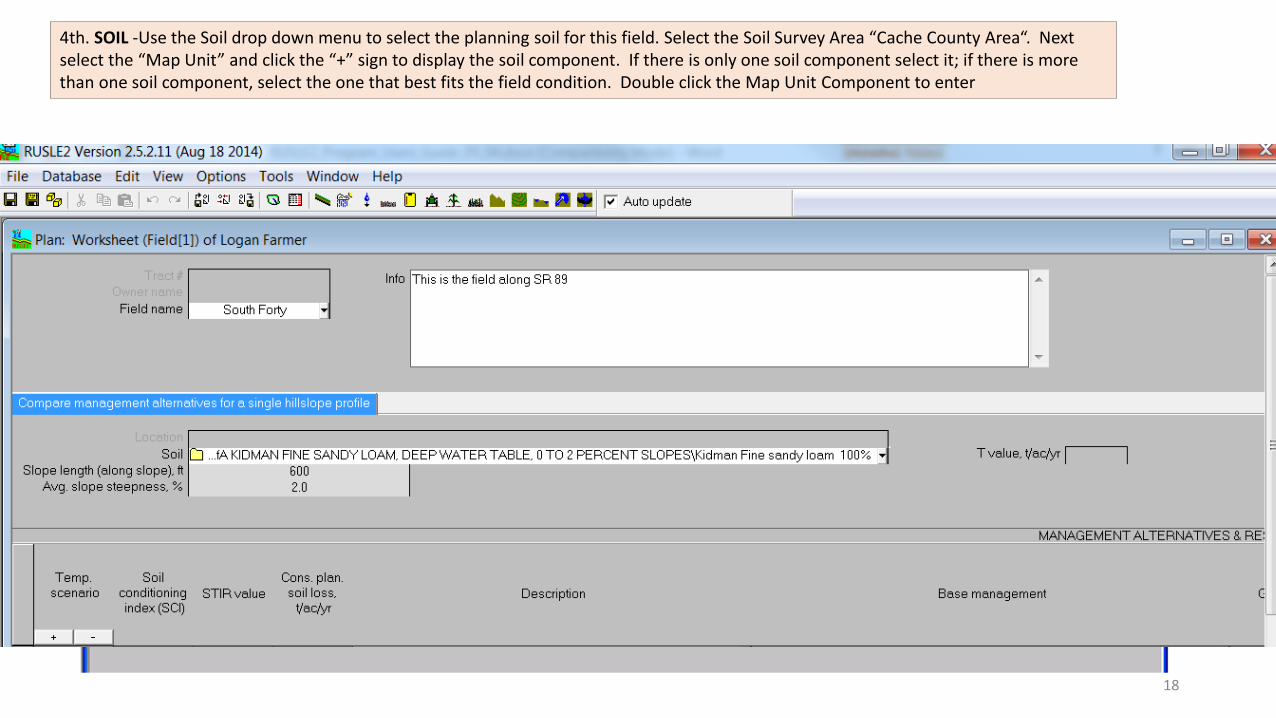
4th. SOIL -Use the Soil drop down menu to select the planning soil for this field. Select the Soil Survey Area “Cache County Area“. Next select the “Map Unit” and click the “+” sign to display the soil component. If there is only one soil component select it; if there is more than one soil component, select the one that best fits the field condition. Double click the Map Unit Component to enter
18
19
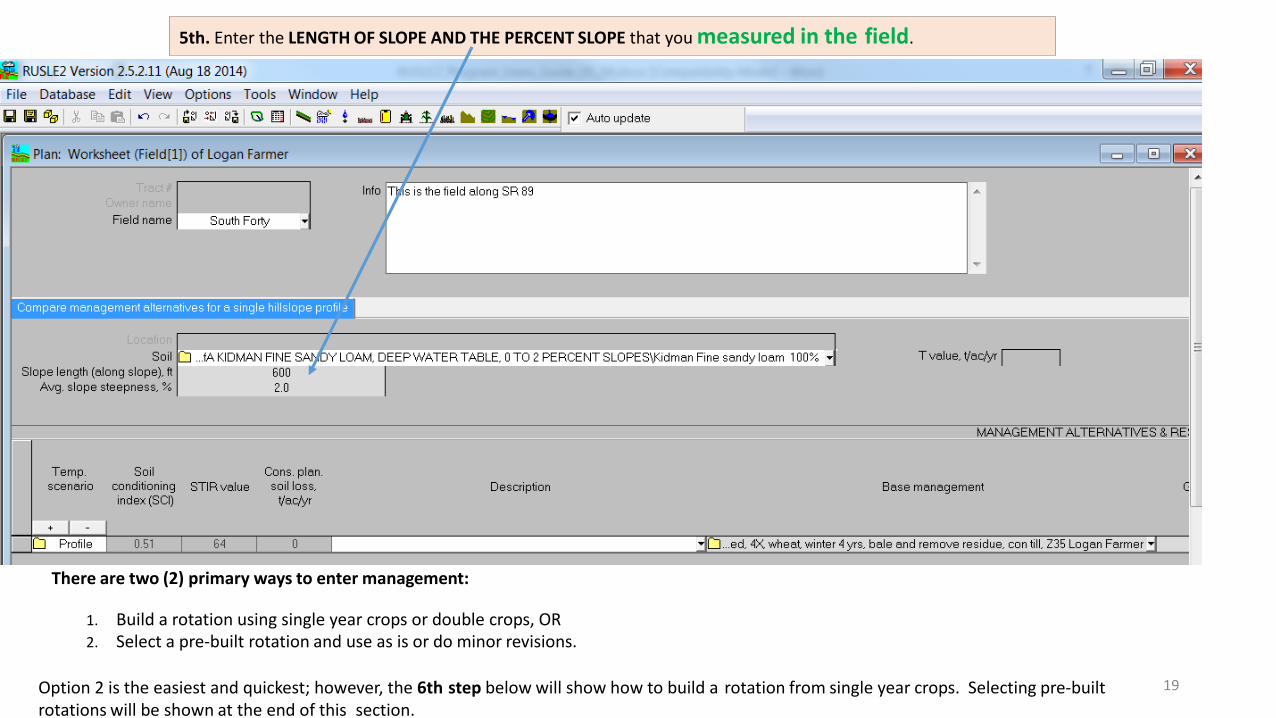
5th. Enter the LENGTH OF SLOPE AND THE PERCENT SLOPE that you measured in the field.
There are two (2) primary ways to enter management:
1. Build a rotation using single year crops or double crops, OR2. Select a pre-built rotation and use as is or do minor revisions.
Option 2 is the easiest and quickest; however, the 6th step below will show how to build a rotation from single year crops. Selecting pre-builtrotations will be shown at the end of this section.
20
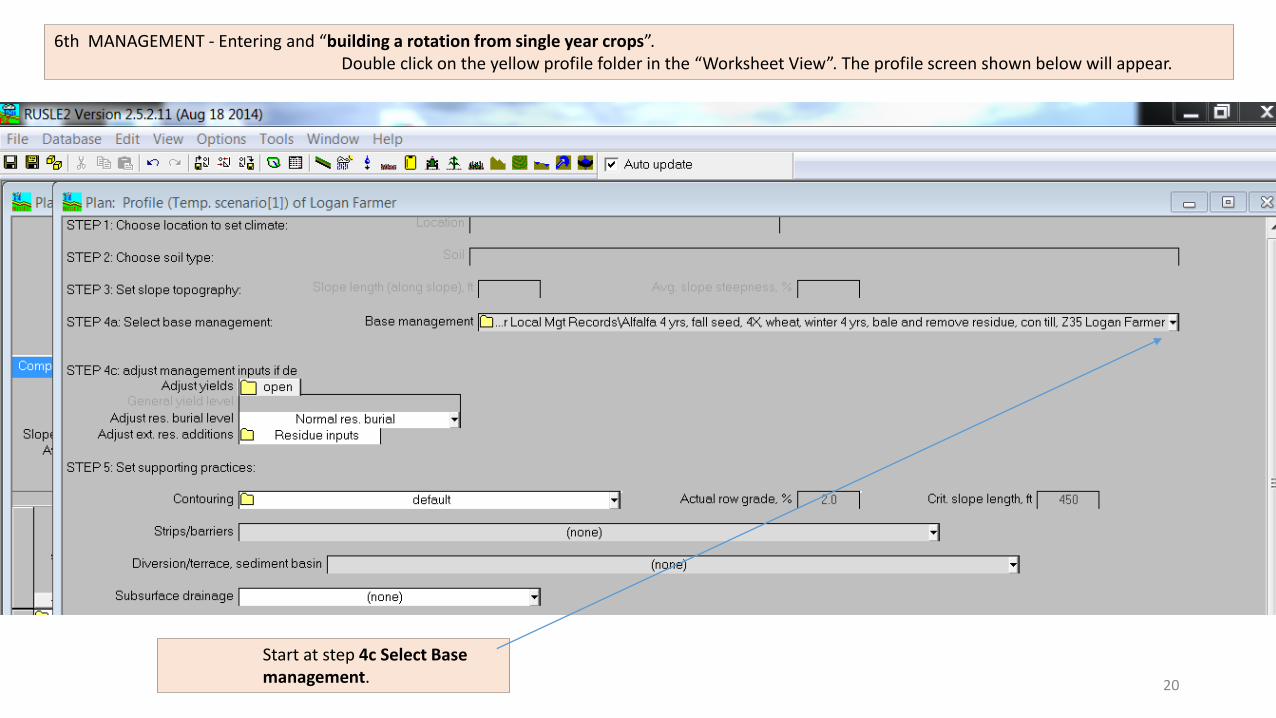
6th MANAGEMENT - Entering and “building a rotation from single year crops”.Double click on the yellow profile folder in the “Worksheet View”. The profile screen shown below will appear.
Start at step 4c Select Base management.
21
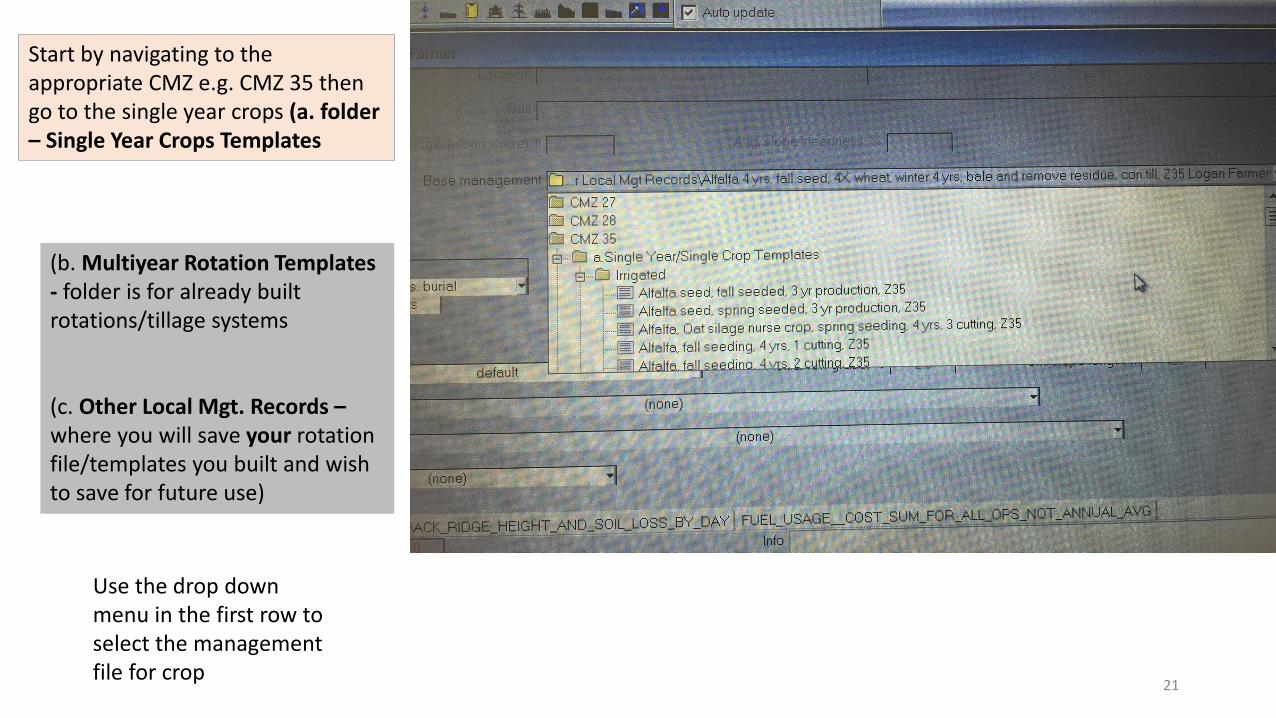
Use the drop down menu in the first row to select the management file for crop
Start by navigating to the appropriate CMZ e.g. CMZ 35 then go to the single year crops (a. folder – Single Year Crops Templates
(b. Multiyear Rotation Templates - folder is for already built rotations/tillage systems
(c. Other Local Mgt. Records –where you will save your rotation file/templates you built and wish to save for future use)
22
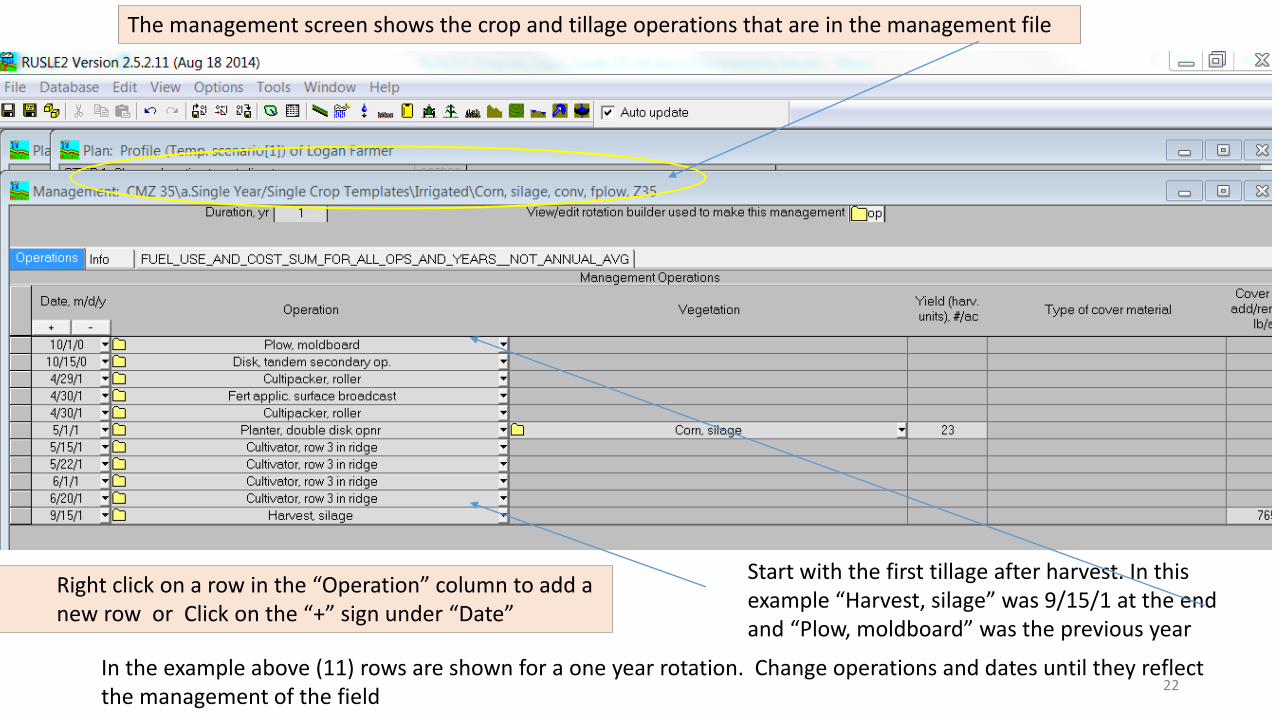
Right click on a row in the “Operation” column to add a new row or Click on the “+” sign under “Date”
In the example above (11) rows are shown for a one year rotation. Change operations and dates until they reflect the management of the field
Start with the first tillage after harvest. In this example “Harvest, silage” was 9/15/1 at the end and “Plow, moldboard” was the previous year
The management screen shows the crop and tillage operations that are in the management file
23
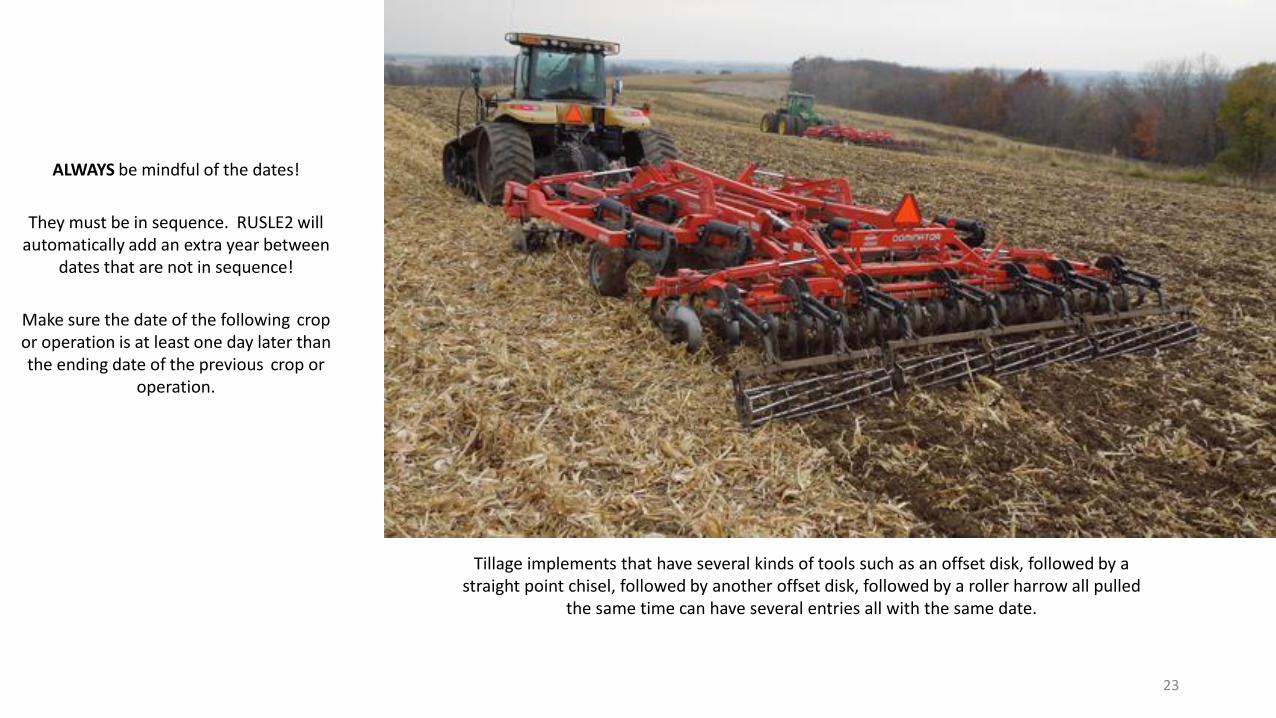
ALWAYS be mindful of the dates!
They must be in sequence. RUSLE2 will automatically add an extra year between
dates that are not in sequence!
Make sure the date of the following crop or operation is at least one day later thanthe ending date of the previous crop or
operation.
Tillage implements that have several kinds of tools such as an offset disk, followed by a straight point chisel, followed by another offset disk, followed by a roller harrow all pulled
the same time can have several entries all with the same date.
24
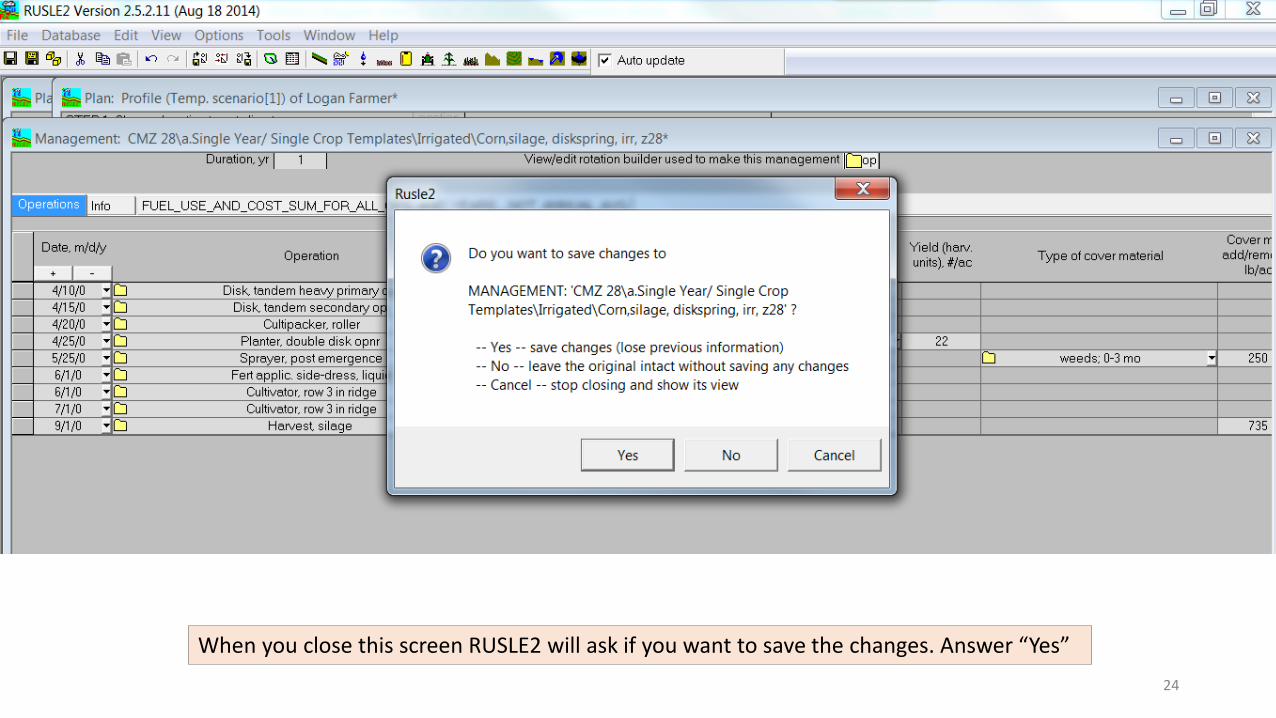
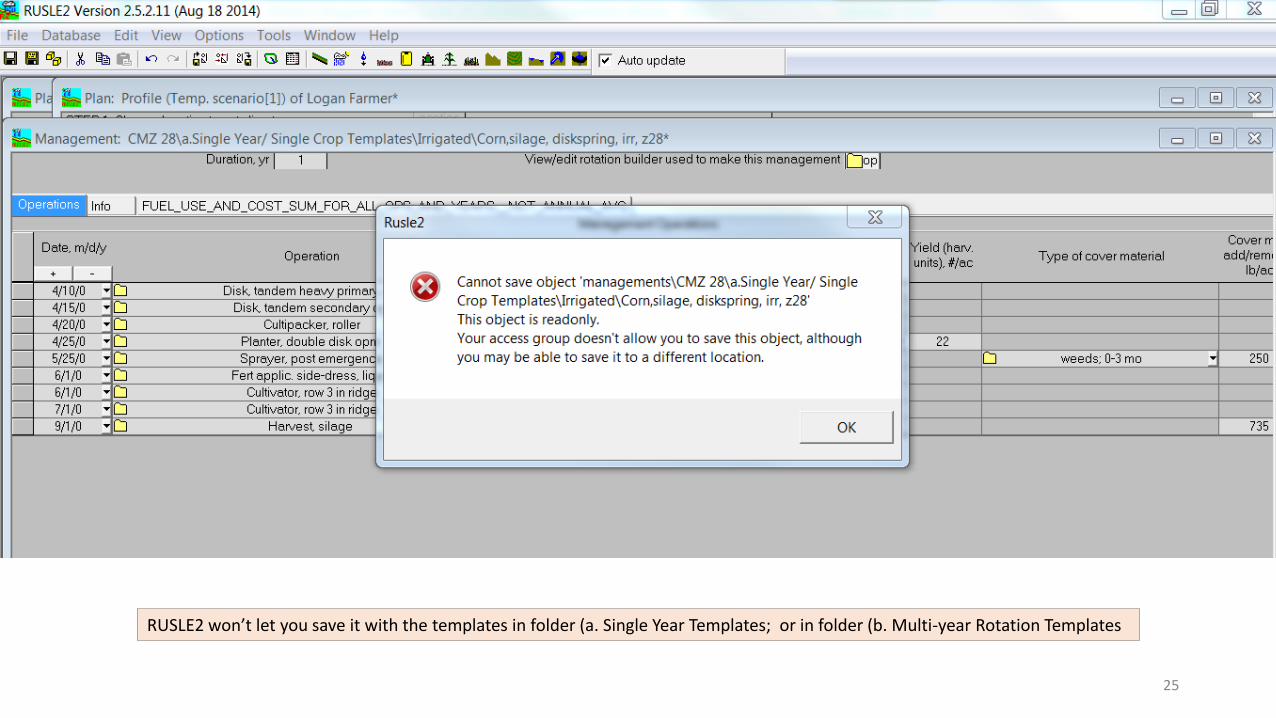
When you close this screen RUSLE2 will ask if you want to save the changes. Answer “Yes”
25
RUSLE2 won’t let you save it with the templates in folder (a. Single Year Templates; or in folder (b. Multi-year Rotation Templates
26
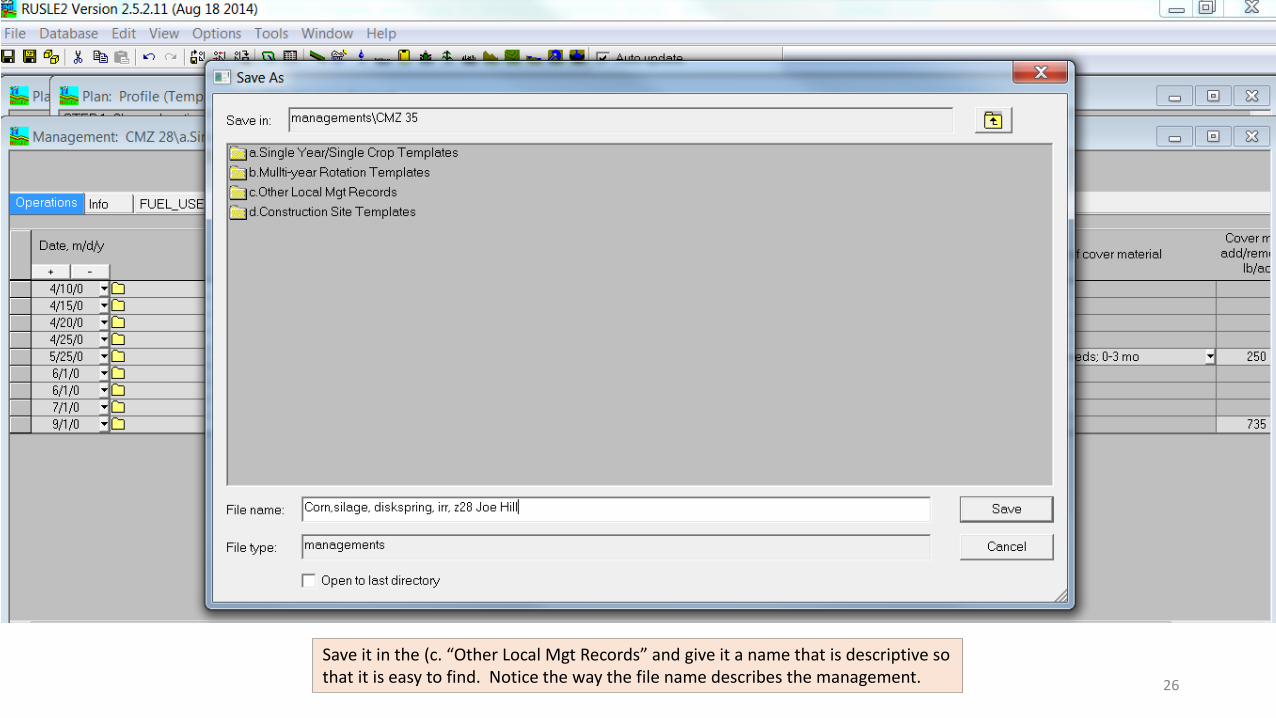
Save it in the (c. “Other Local Mgt Records” and give it a name that is descriptive so that it is easy to find. Notice the way the file name describes the management.
27
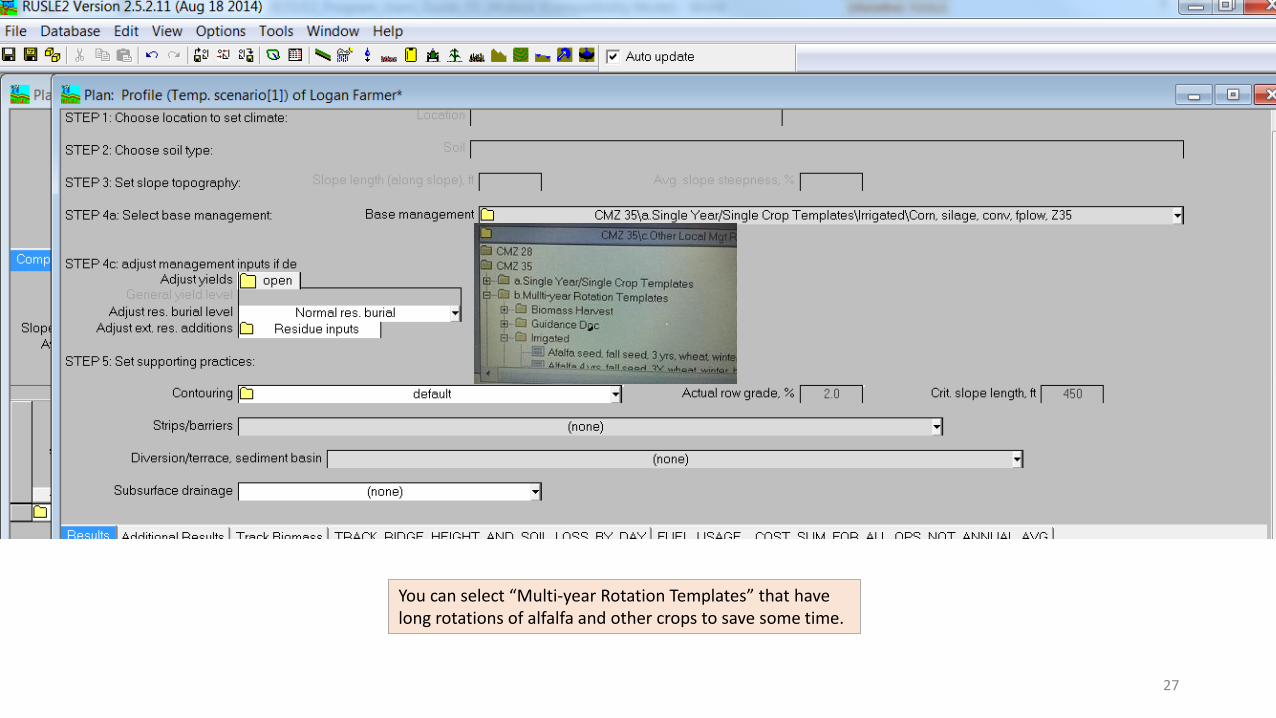
You can select “Multi-year Rotation Templates” that have long rotations of alfalfa and other crops to save some time.
28
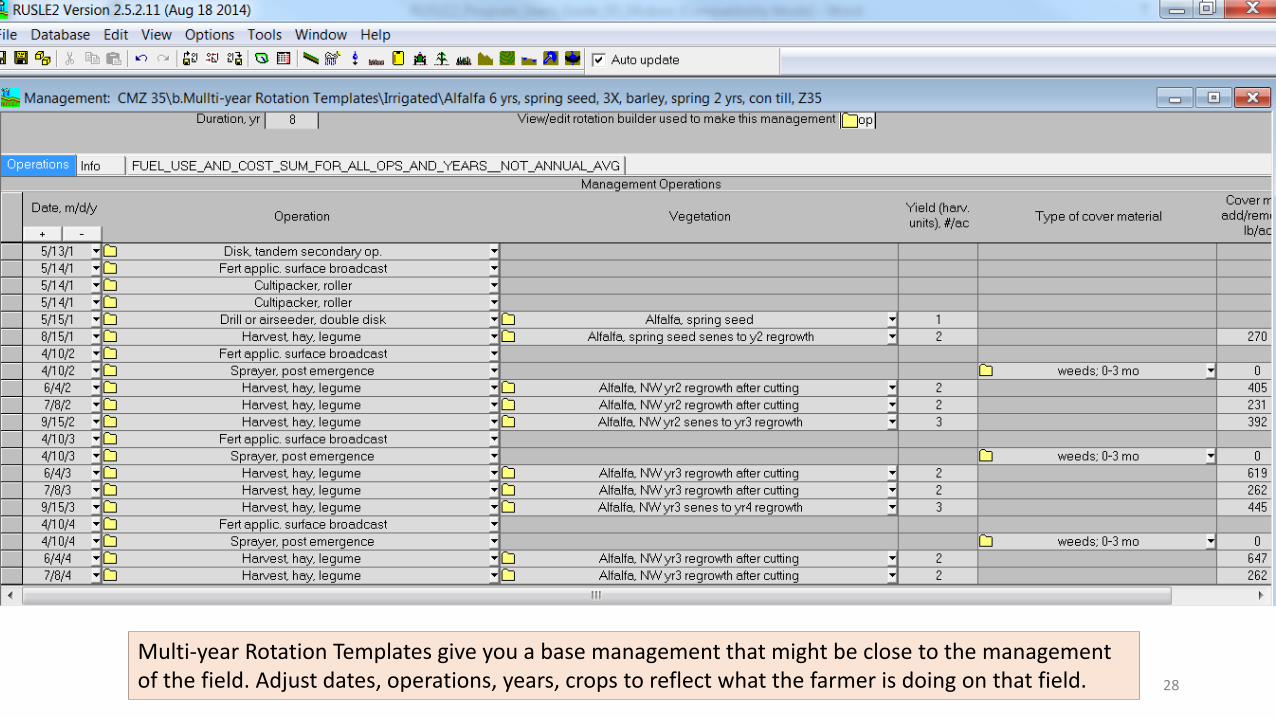
Multi-year Rotation Templates give you a base management that might be close to the management of the field. Adjust dates, operations, years, crops to reflect what the farmer is doing on that field.
29
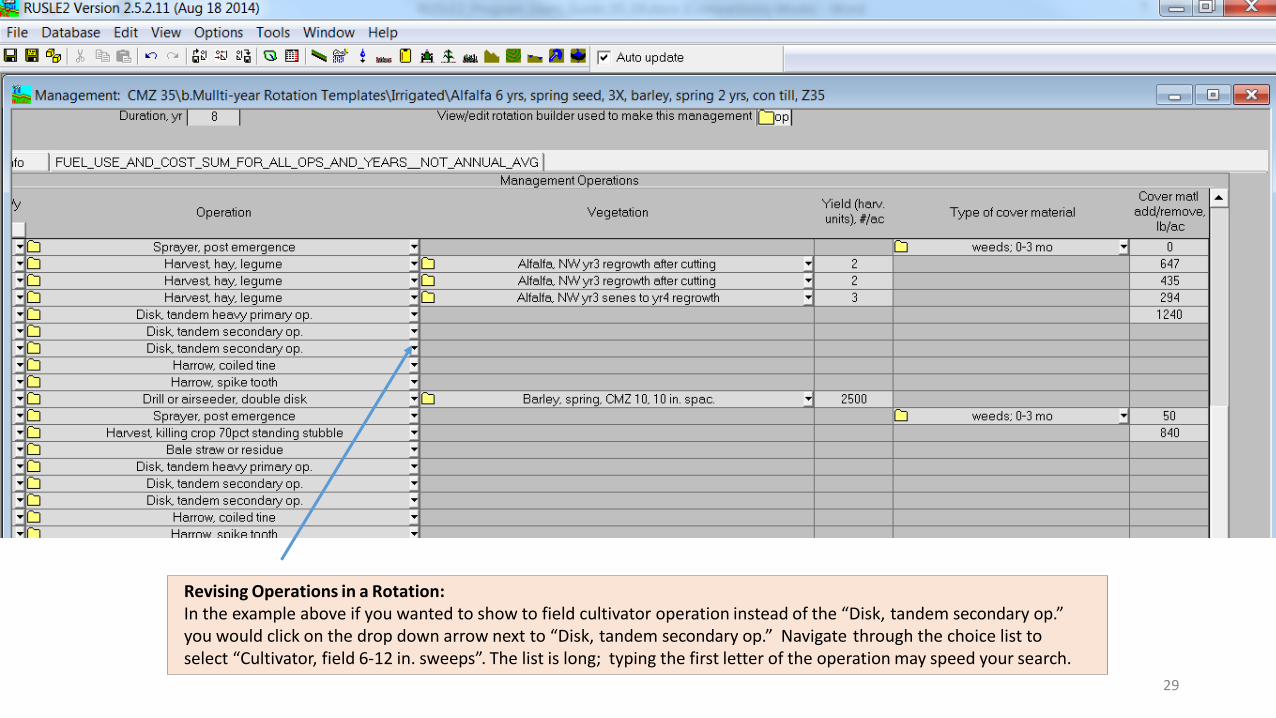
Revising Operations in a Rotation:In the example above if you wanted to show to field cultivator operation instead of the “Disk, tandem secondary op.” you would click on the drop down arrow next to “Disk, tandem secondary op.” Navigate through the choice list toselect “Cultivator, field 6-12 in. sweeps”. The list is long; typing the first letter of the operation may speed your search.
30
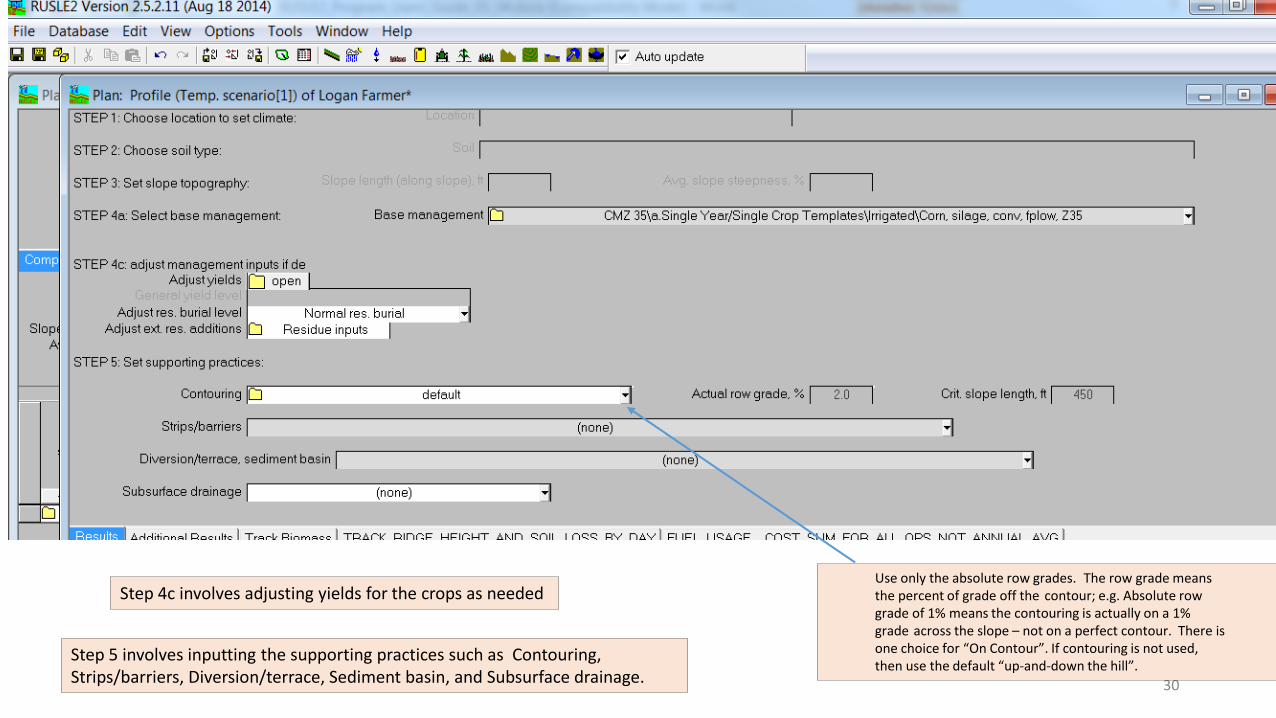
Step 4c involves adjusting yields for the crops as needed
Step 5 involves inputting the supporting practices such as Contouring, Strips/barriers, Diversion/terrace, Sediment basin, and Subsurface drainage.
Use only the absolute row grades. The row grade meansthe percent of grade off the contour; e.g. Absolute row grade of 1% means the contouring is actually on a 1% grade across the slope – not on a perfect contour. There is one choice for “On Contour”. If contouring is not used, then use the default “up-and-down the hill”.
31
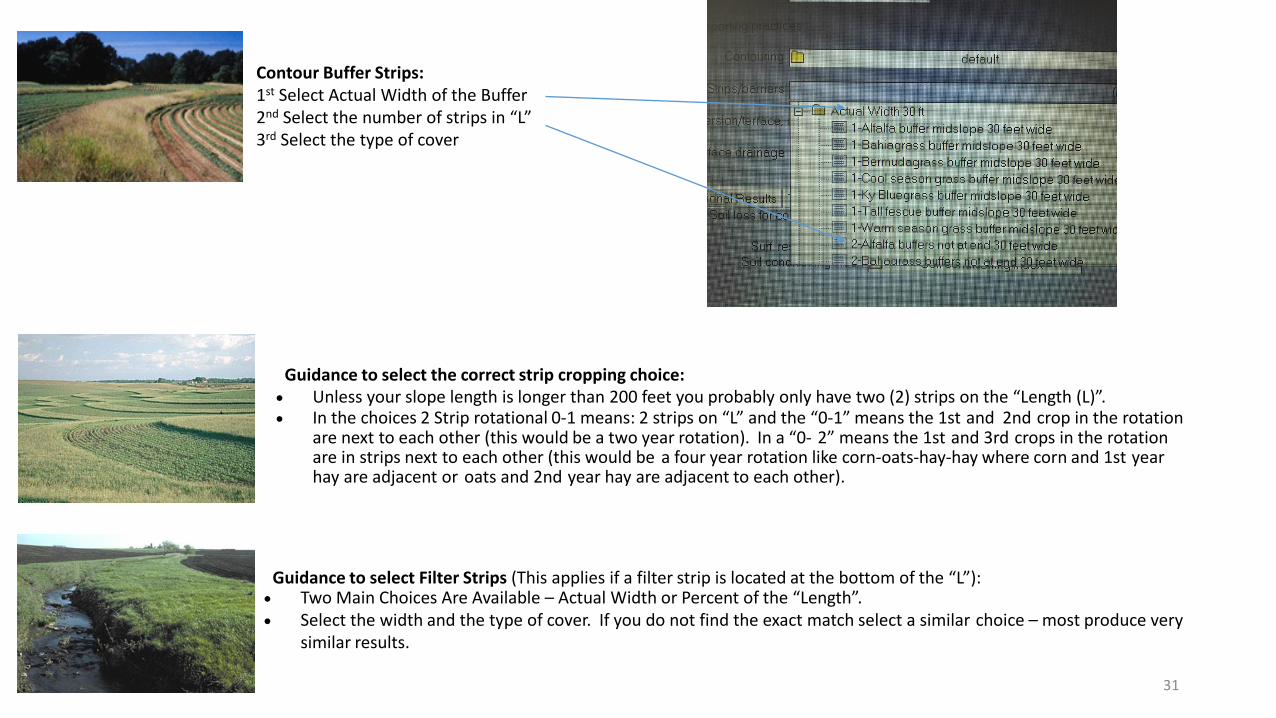
Contour Buffer Strips:1st Select Actual Width of the Buffer2nd Select the number of strips in “L”3rd Select the type of cover
Guidance to select the correct strip cropping choice: Unless your slope length is longer than 200 feet you probably only have two (2) strips on the “Length (L)”. In the choices 2 Strip rotational 0-1 means: 2 strips on “L” and the “0-1” means the 1st and 2nd crop in the rotation
are next to each other (this would be a two year rotation). In a “0- 2” means the 1st and 3rd crops in the rotation are in strips next to each other (this would be a four year rotation like corn-oats-hay-hay where corn and 1st year hay are adjacent or oats and 2nd year hay are adjacent to each other).
Guidance to select Filter Strips (This applies if a filter strip is located at the bottom of the “L”): Two Main Choices Are Available – Actual Width or Percent of the “Length”. Select the width and the type of cover. If you do not find the exact match select a similar choice – most produce very
similar results.
32
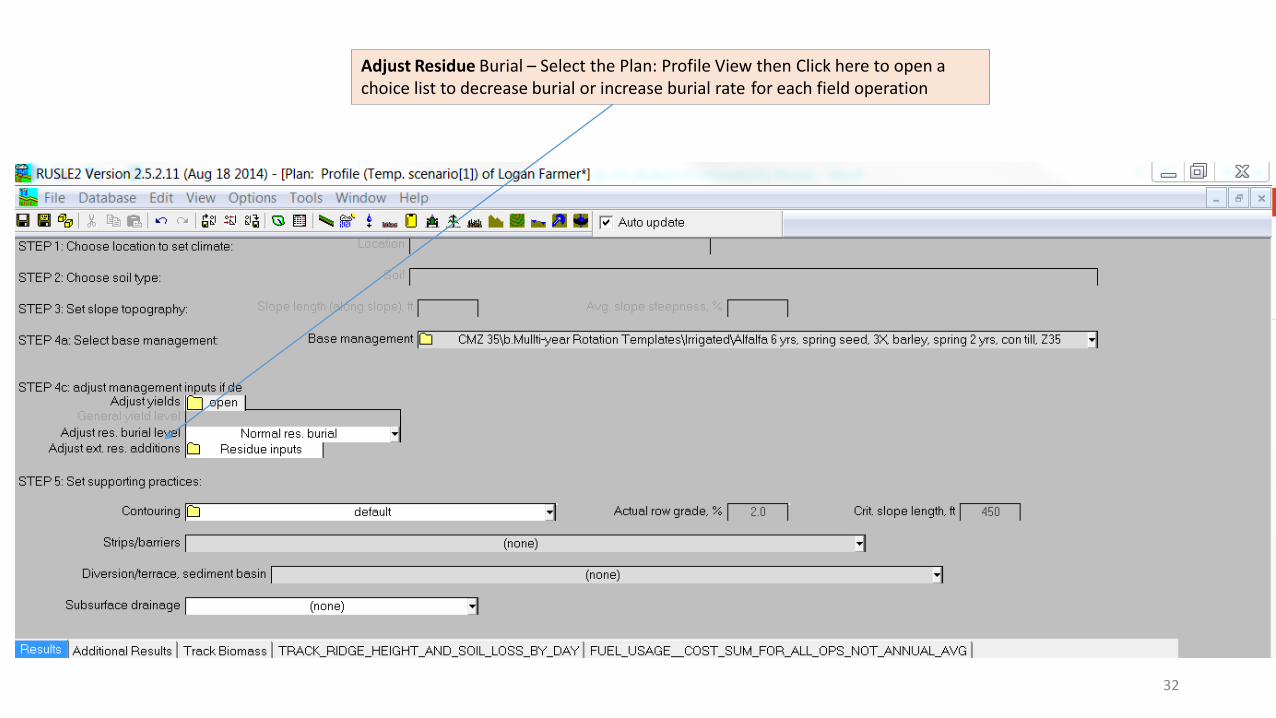
Adjust Residue Burial – Select the Plan: Profile View then Click here to open achoice list to decrease burial or increase burial rate for each field operation

33
Worksheet View shows the soil loss on the selected “L” and “S”. This is the conservation planning value.
Slide to the right
34
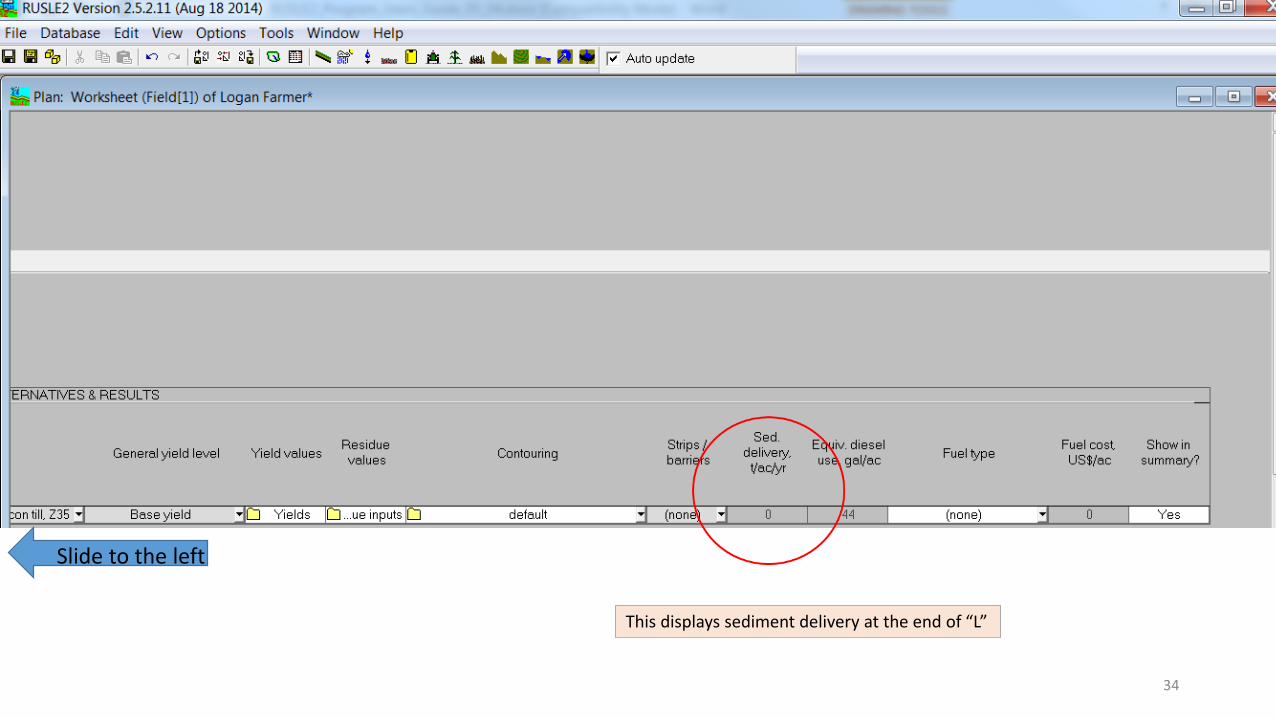
This displays sediment delivery at the end of “L”
Slide to the left
35
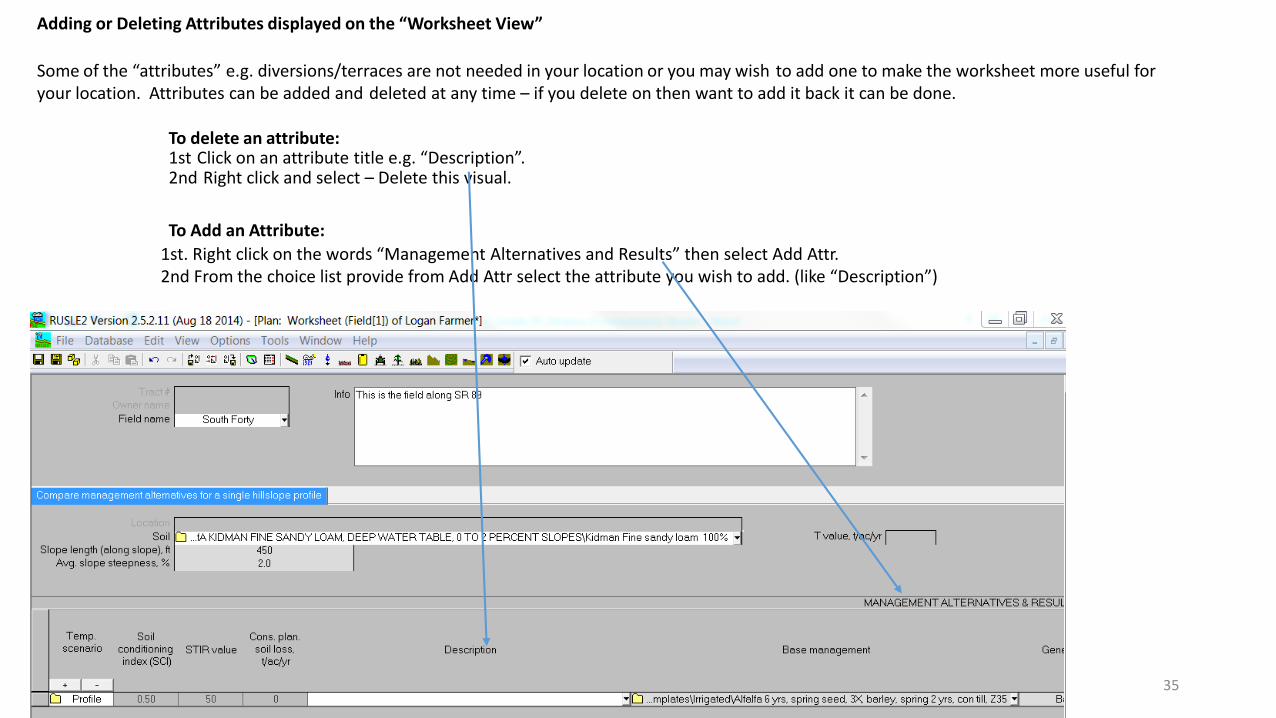
1st. Right click on the words “Management Alternatives and Results” then select Add Attr. 2nd From the choice list provide from Add Attr select the attribute you wish to add. (like “Description”)
To delete an attribute:1st Click on an attribute title e.g. “Description”. 2nd Right click and select – Delete this visual.
Adding or Deleting Attributes displayed on the “Worksheet View”
Some of the “attributes” e.g. diversions/terraces are not needed in your location or you may wish to add one to make the worksheet more useful for your location. Attributes can be added and deleted at any time – if you delete on then want to add it back it can be done.
To Add an Attribute:

36
Description - Type in a short description of the rotation system. The resultswill be shown on the Description will be displayed in the printout report.
37
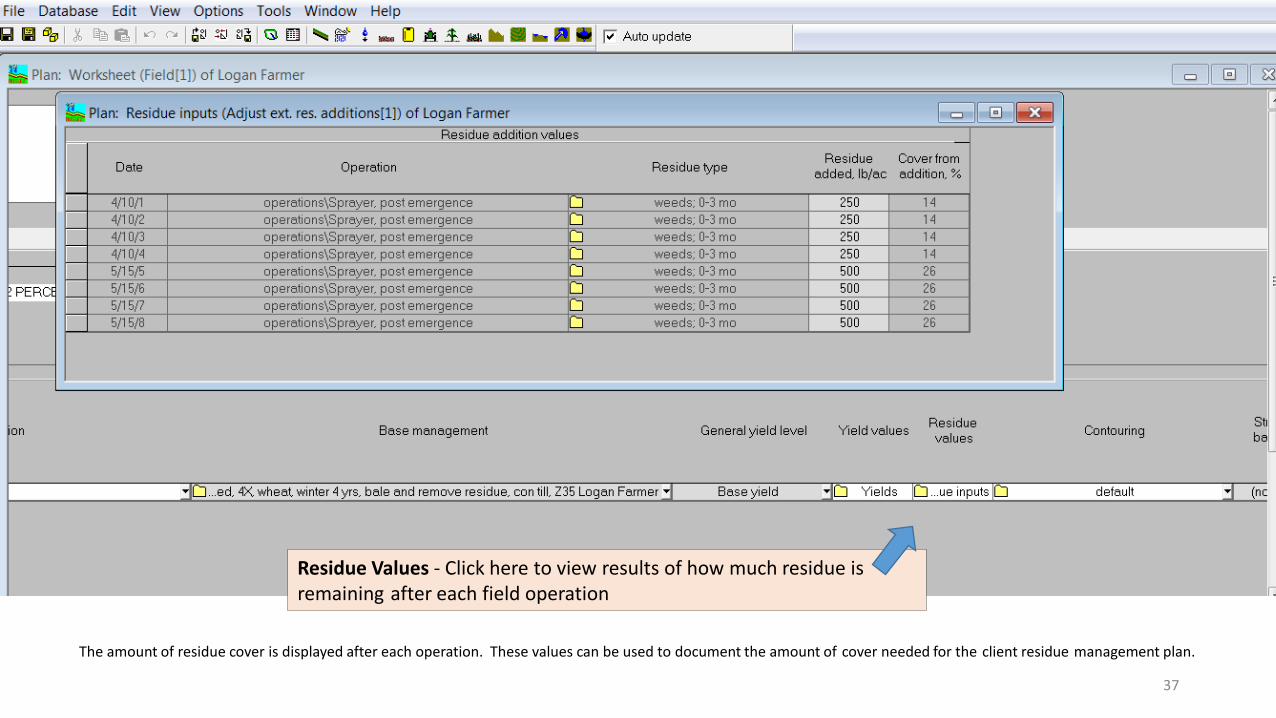
Residue Values - Click here to view results of how much residue isremaining after each field operation
The amount of residue cover is displayed after each operation. These values can be used to document the amount of cover needed for the client residue management plan.
38
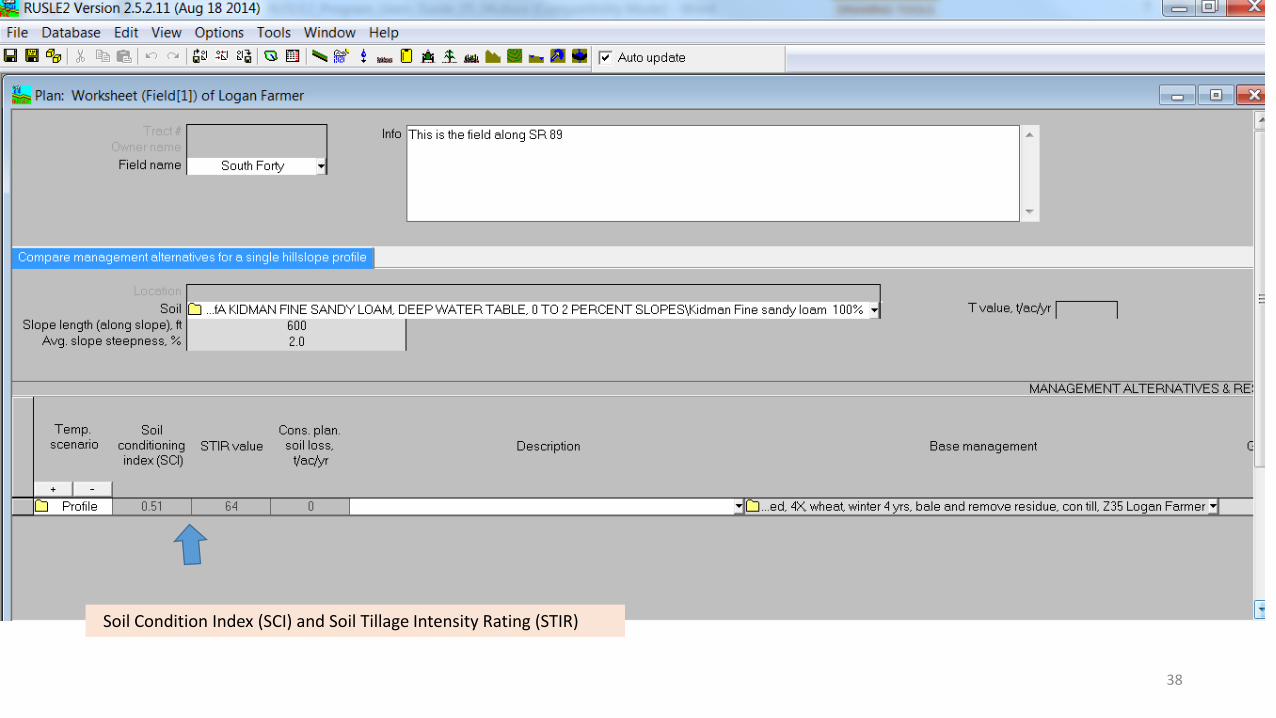
Soil Condition Index (SCI) and Soil Tillage Intensity Rating (STIR)

39
Help: Printing and Saving ReportsAfter the user has completed data entry and the results are displayed in Worksheet, Plan View, or Profile View the user can print the results and save as a permanent record. The record can be saved as a Microsoft Word (.doc) file anywhere in your file directory. For NRCS and Conservation District users it is suggested you save the file in the client's folder within the Toolkit directory
1st. Click on the FILE menu. Select Print to MS Word Template
To Print the Results, do the Following
2nd. After the dialogue box appears select the appropriate template.
3rd. Click "OPEN" in the dialogue box. This will open MS Wordand display your record of the results.
4th. At this point you have the option of printing and/or saving the document in your filedirectory. The next page shows an example printout of the four fields used in preparing these instructions
5th. If you want to save this RUSLE2 run, click the FILE menu and do a SAVE AS. Give it aunique name and SAVE. One should not do this very often as it will take up memoryspace and could reduce the speed performance of the RUSLE2 program.
Related Documents