Rotary Saws SECTION: Tools and Equipment ISSUED: 02-2011 REVISED: 02-2012

Rotary Saws SECTION: Tools and Equipment ISSUED: 02-2011REVISED: 02-2012.
Dec 14, 2015
Welcome message from author
This document is posted to help you gain knowledge. Please leave a comment to let me know what you think about it! Share it to your friends and learn new things together.
Transcript

Rotary Saws
SECTION: Tools and EquipmentISSUED: 02-2011 REVISED: 02-2012

Objectives
• To provide an understanding of the following– Specifications– Use– Maintenance– Safety

Specifications
• Engine– 2 stroke – Carbureted– Electric ignition– Air cooled
• Fuel mixture- 50:1 premix• Spark plug gap- .02”
or .5mm• 3 stage air filter• Belt drive: V-belt with
manual tensioner
• Reversible cutting arm– Inboard and outboard
cutting positions• Decompression valve for
easy starts– TS400 and TS510
• Blade size– TS360 and TS400: 12
inches– TS510 and K970: 14
inches• Cut depth
– 12” blade: 4”– 14” blade: 5”

Uses
• Cuts-metal, reinforced concrete, masonry, wood, and plastics
• Primarily used in forcible entry
• Great tool for RIC due to ability to cut many materials
• Breaking and breaching operations

BladesBlack Star Diamond Blade
• Cuts any type of material– Not optimal to cut wood
• Diamond chip cutting surface
• Wet or dry blade• Must use orange arbor
spacer• Bi-directional• Lasts 150 Xs longer than
abrasive blade

BladesDiamond Chunk
• Cuts wood, sheet metal, stucco and other like building materials
• Diamond chunk cutting surface• Bi-directional

BladesComposite Metal Abrasive
• Cuts metal• Bi-directional• Do not store in same compartment as gasoline• Never use if cracked, warped or water soaked
– Can shatter creating shrapnel

BladesDiamond Abrasive Masonry
• Cuts masonry and reinforced concrete• Wet or dry• Cuts in one direction

BladesComposite Masonry Abrasive
• Cuts masonry, concrete and reinforced concrete• Do not store in same compartment as gasoline• Never use if cracked, warped or water soaked
– Blade can shatter creating shrapnel
• Bi-directional

TS 510 Controls
• Stop• Choke• Trigger lock• Throttle
• Throttle interlock• Decompression valve

TS 510 Start Up Procedure
• Saw should be in ready to run settings– Stop switch in on position, decompression valve depressed,
choke on and throttle engaged with trigger lock
• Pull start until engine fires – Use quick pulls not pulling cord out completely – Engine will fire but not run
• Switch choke off• Pull start again until engine fires• Depress throttle interlock and depress throttle
– This disengages the trigger lock
• Saw is ready to run

TS 400 Controls
• Throttle lock/off• Throttle interlock• Throttle• Decompression valve
• Choke/half choke

TS 400 Start Up Procedure
• Saw should be in ready to run settings– Stop switch in on position, decompression valve depressed,
choke on and throttle engaged with trigger lock
• Pull start until engine fires – Use quick pulls not pulling cord out completely – Engine will fire but not run
• Switch choke to ½ choke• Pull start again until engine fires• Depress throttle interlock and depress throttle
– This disengages the trigger lock
• Turn choke to off position• Saw is ready to run

TS 360 Controls
• Stop
• Trigger lock• Choke
– Pull to engage
• Throttle• Throttle interlock
TS 360 Start Up Procedure
• Saw should be in ready to run settings– Stop switch in the “on” position, decompression valve
depressed, choke on, and the throttle engaged with trigger lock• Pull start until engine fires
– Use quick pulls not pulling cord out completely – Engine will fire but not run
• Push choke in– Choke can be pushed in ½ way to act as ½ choke if saw is not
starting• Pull start again until engine fires• Depress throttle interlock and depress throttle
– This disengages the trigger lock• Push choke in if not already done so• Saw is ready to run
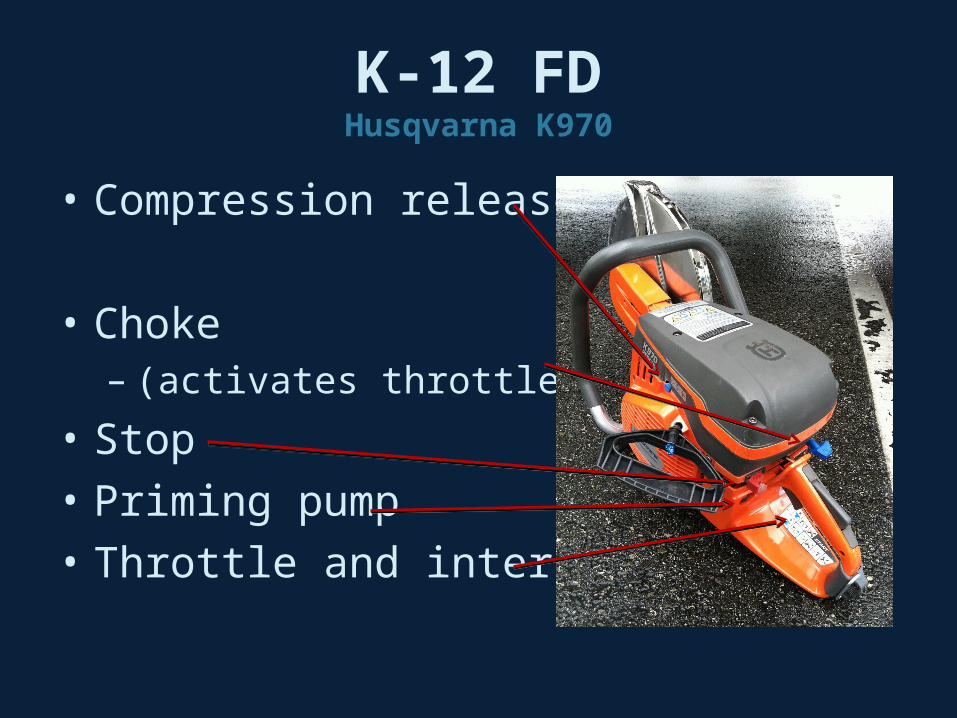
K-12 FDHusqvarna K970
• Compression release
• Choke– (activates throttle lock)
• Stop
• Priming pump
• Throttle and interlock

K-12 FDHusqvarna K970
• 94cc, 2-cycle Air Cooled Gas Engine• Large “D” Handle Starter Grip• “D” Ring for Sling Attachment• 14” Diameter Blade; 5” Cutting Depth• Reflective Fire Department Lettering• Excellent Ergonomics - Slimmer Design, Perfect Balance• Most Technological Advances
– Active Filtration, SmartCarb Carburetor, Decompression Relief Valve, Enclosed Transmission, “Ready Start” Ignition Switch

K970 Start Up Procedure• Saw should be kept ready to run
– Compression release depressed, choke on, and the throttle engaged with trigger lock engaged
– Throttle is locked open when choke is pulled• Press priming pump 6 times • Pull start cord until engine fires
– Use quick pulls not pulling cord out completely – Engine will fire but not run

K970 Start Up Procedure
• Push choke in– Choke can be pushed in ½ way to act as ½ choke if
saw is not starting• Pull start again until engine fires• Depress throttle interlock and depress throttle
– This disengages the trigger lock• Push choke in if not already done so• Saw is ready to run

Start Up ProcedureTips and Trouble Shooting
• If saw is warm and you need to restart choke is not needed
• Older saws may need to warm up or run at low RPM’s briefly to avoid saw from dying initially
• If saw becomes flooded– You can tell when exhaust smells like gas– Pull cord repeatedly with choke off and throttle not depressed
• If saw is hard to start or after being cleared after flooding– Have someone depress throttle completely with choke off and
pulling the pull start repeatedly

Blade Position
• Outboard– Better for forcible entry
applications– Allows to cut close to
walls or ground– Gyro effect increased
• Inboard– Used primarily in
masonry cutting applications
– Saw better balanced– Gyro effect decreased

Changing Blade Position
• Remove the 3 bolts
• Remove cutting head and guard from cast arm
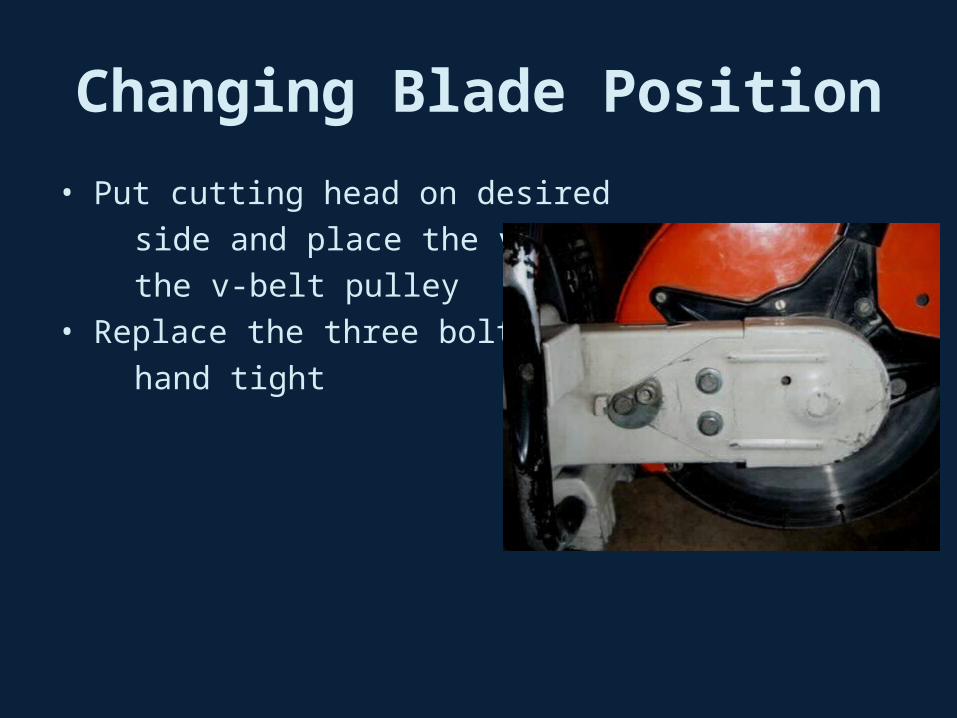
Changing Blade Position
• Put cutting head on desired
side and place the v-belt on
the v-belt pulley• Replace the three bolts only
hand tight
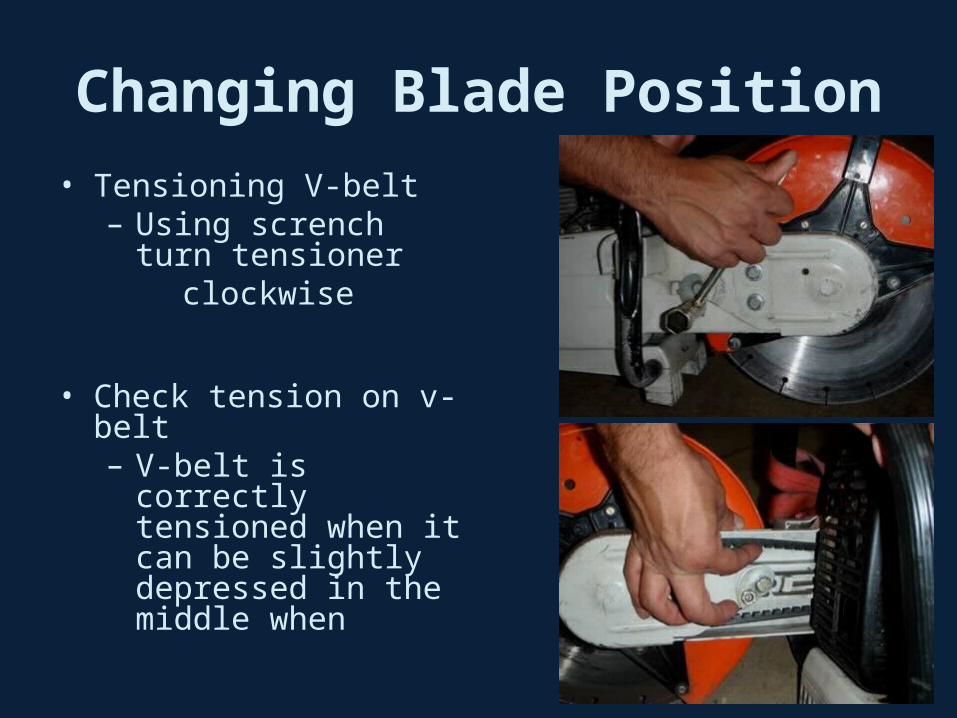
Changing Blade Position
• Tensioning V-belt– Using scrench turn
tensioner clockwise
• Check tension on v-belt– V-belt is correctly
tensioned when it can be slightly depressed in the middle when

Changing Blade Position
• While maintaining tension tighten a bolt• After one bolt is tight you can release tension
and tighten the remainder of bolts

Changing Blades
• Place arbor wrench in hole on guard• Unscrew bolt on blade• Remove thrust washer and blade

Changing Blade
• Replace blade– Ensure proper arbor
spacer is used for blade
• Replace thrust washer and line up flanges
• Tighten bolt and remove arbor wrench

Maintenance
• Use air compressor to blow off dirt• Use degreaser to clean dirt• Inspect spark plug for proper gap and condition• Inspect V-belt for wear and proper tension• Inspect all bolts for proper tightness• Inspect blades for damage and wear
– Diamond blades may become gummed up when cutting soft metals, they can be cleaned by cutting into concrete

Maintenance
• Cleaning air filter– Close choke before removing filter– Remove filter cover and clean– Clean around filter– Outer filter can be blown out and/or washed with
degreaser, only replace when dry– If main filter is dirty and/or saw performance is
decreased, replace filter– Auxiliary filter should only need replacing if main filter
fails

Safety
• Proper PPE– Gloves, eye protection, hearing protection and proper clothing
dust mask if needed• Do not use in flammable atmosphere• If using in an enclosed environment provide proper ventilation• Use proper blade for cutting application• Do not use damaged blades• Do not exceed blades maximum RPM• Adjust guard to deflect sparks• Be aware of where sparks are flying
– Have extinguishing if needed incase of accidental fire• Ensure other personnel are clear of cutting area• Avoid cutting overhead
Related Documents