Robotic Arm Remote Control Arnold Fernandez and Victor Fernandez Instructor: Janusz Zalewski CNT 4104 Software Project in Computer Networks Florida Gulf Coast University 10501 FGCU Blvd, South Fort Myers, FL 33965-6565 Fall 2012 Final Draft Submission Date: November 29, 2012

Welcome message from author
This document is posted to help you gain knowledge. Please leave a comment to let me know what you think about it! Share it to your friends and learn new things together.
Transcript
Robotic Arm Remote Control
Arnold Fernandez and Victor Fernandez
Instructor: Janusz Zalewski
CNT 4104 Software Project in Computer Networks
Florida Gulf Coast University
10501 FGCU Blvd, South
Fort Myers, FL 33965-6565
Fall 2012
Final Draft
Submission Date: November 29, 2012

2 | P a g e
1. Introduction
This project expands Robert S. LaForge’s work on Web-Based Control with Spatial Awareness
and Intuitive Manipulation [1] and Saldivar’s and Rosier’s work on uploading new applications
[2].
This project consists of three objectives, one main objective and two secondary objectives. The
secondary objectives will be implemented if there is sufficient time to complete them. The three
objectives are presented briefly below.
1) Enhance the capability to upload a new Robot Server application file to the eBox 2300
following the specifications of Saldivar’s and Rosier’s work [2].
2) Redesign the graphical user interface designed by Robert S. LaForge of the AL5A
Robotic Arm client/server application [1] that allowed video streams and servo motor
rotation commands to be transmitted using socket connections (Figure 1). The new
graphical user interface design of the client application shall give the user a better
understanding of which servo motors the user is controlling. Furthermore, the new
graphical user interface will be resolution-independent and take advantage of modern
graphics hardware to provide the user with a visually stunning experience.
3) Add the capability to send user commands to the robot using socket connections via an
Xbox 360 controller.

3 | P a g e
Figure 1 Robert S. LaForge’s GUI Design

4 | P a g e
1.1 Hardware
The following list describes the hardware devices used in this project:
1) eBox 2300 (Figure 2 and Figure 3). The eBox 2300 is considered a thin client, which is
sometimes called a lean client. This is a “low-cost, centrally-managed computer devoid
of CD-ROM players, diskette drives, and expansion slots”. The eBox 2300 is used in this
project as a server and is accessible to clients/users in a Local Area Network or Wide
Area Network.
Figure 2 eBox 2300 Front [3]
Figure 3 eBox 2300 Rear [4]

5 | P a g e
2) AL5A Robotic Arm (Figure 4). The AL5A robotic arm is equipped with a
1061_1 PhidgetAdvancedServo 8-Motor servo controller (Figure 5) that delivers fast,
accurate, and repeatable movement. The robot features: base rotation, single plane
shoulder, elbow, wrist motion, a functional gripper, and optional wrist rotate [5].
Figure 4 AL5A Robotic Arm [6]

6 | P a g e
Figure 5 1061_1 – PhidgetAdvancedServo 8-Motor [7]
3) Logitech QuickCam Pro 5000 (Figure 6). The QuickCam Pro 5000 features a 640x480
VGA sensor. It uses RightLight 2 Technology, an imaging system from Logitech that
delivers sharp video even in dim lighting. The QuickCam is used to transmit video
streams of the AL5A robotic arm to the client application.
Figure 6 Logitech QuickCam Pro 5000 WebCam [8]

7 | P a g e
4) Xbox 360 Controller (Figure 7). The Xbox 360 Controller features an extended nine-foot
cable and a comfortable ergonomic design [9]. The Xbox 360 Controller is used to easily
send servo commands to the eBox 2300 and AL5A robotic arm.
Figure 7 Xbox 360 Controller [10]

8 | P a g e
The hardware devices described above are connected in a system detailed in Figure 8.
A user could send commands from client computer to the eBox 2300, which would then control
the AL5A Robotic Arm. Images of the AL5A Robotic Arm movements are then sent back to the
client from the Logitech QuickCam Pro 5000.
Figure 8 Physical Configuration of the System
1061_1 - PhidgetAdvancedServo 8-Motor
Xbox 360 Controller

9 | P a g e
2. Previous Accomplishments
The previous teams’ accomplishments include the development of the following components:
Remote Client Application: The Remote Client application to run on any Internet host
was created using the C# programming language, the XNA Framework, and the .Net
Framework. The program sends servo rotation commands to the eBox 2300 and robot and
receives video transmissions back. Through a circular map, the user may choose the
radial position and distance out from the base of the robot in inches. When the left mouse
button is clicked and held down, a height map is displayed. The user may then select a
height, also in inches. On release, the program calculates the necessary servo adjustments
to reach the destination point and prepares them for transmission. Through use of the
scroll wheel, the program allows the user to move the robot to the destination at a desired
speed depending on the scroll wheel rotation speed. The robot gripper may be adjusted by
holding down the right mouse button.
Camera Server: The Camera Server application was developed using the C#
programming language and the .NET Framework. This software is deployed on the eBox
2300 thin client that runs a Windows CE6 environment. This application enables live
video streaming over a network (the Internet) to client software once a connection has
been established.
Robot Server: The Robot Server application was developed using the C# programming
language and the .NET Framework. This software is deployed on the eBox 2300 thin
client that runs a Windows CE6 environment. These technologies enable an application
to run continuously waiting for a connection over a network (in this case, the Internet).
Once a connection is established, the remote client application can send data over the
network to the Robot Server. The Robot Server is also responsible for relaying
commands from the user to the Robotic Arm, enabling the user to control it.
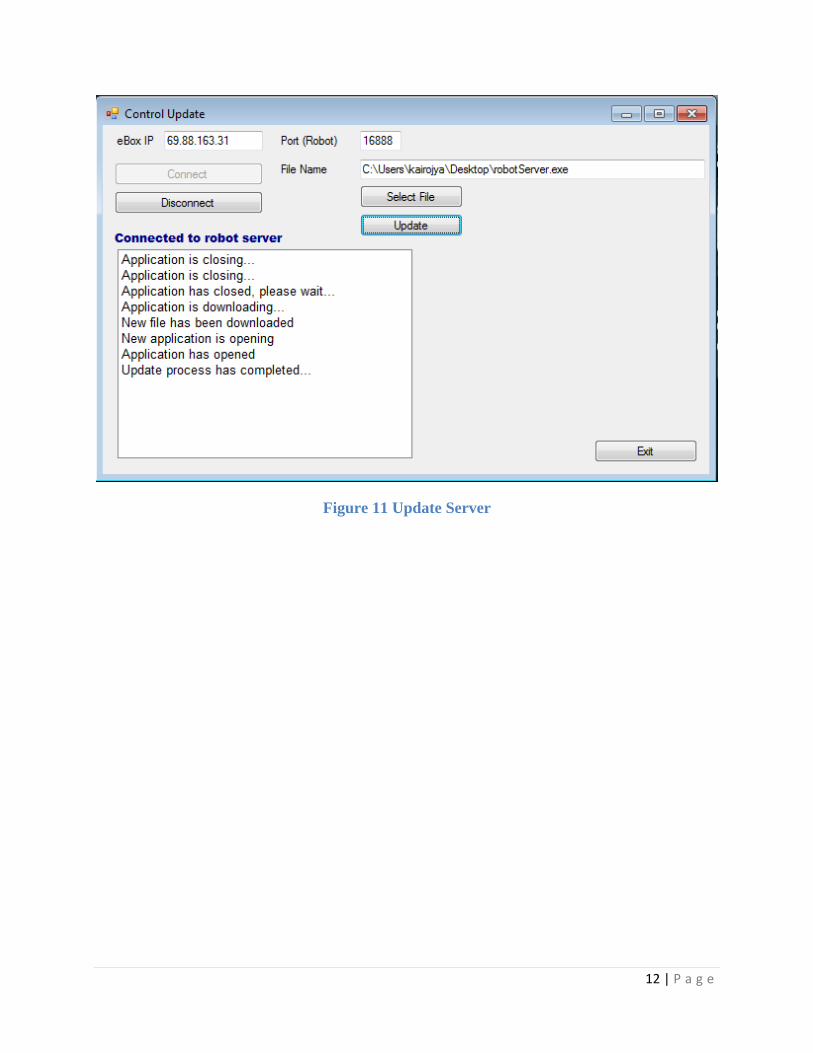
Update Server: The Update Server application (Figure 9 and Figure 10) was developed
using the C# programming language and the .NET Framework. The Update Server
accepts a new Robot Server software, stops the current Robot Server (if it’s running) and
replaces it with the new executable (Figure 11). This software also shares the connection
to the client software with the Robots Server [2].

10 | P a g e
Figure 9 Update Server

11 | P a g e
Figure 10 Update Server
12 | P a g e
Figure 11 Update Server

13 | P a g e
3. Problem Description
The project objectives were introduced briefly in the Introduction. The main objective is to
enhance the capability to upload a new Robot Server to the eBox 2300 following the
specifications of Saldivar’s and Rosier’s work [2]. Their work consisted of a two part software,
an extension to the Remote Client application and the Update Server application.
Figure 12 Structure Diagram Showing the Update Process [2]
Figure 12 is a structure diagram that shows the update process [2]. The client connects to the
Update Server running on the eBox 2300, and then this connection is used to send/receive a new
version of the Robot Server. Once the Update Server receives this new version, it replaces the
current version with the new one.

14 | P a g e
The secondary optional objective of this project is intended to fix the problem with LaForge’s
GUI lacking the necessary descriptions so that the user can understand what he/she is doing. If a
user has no previous experience working with the AL5A robotic arm, it might be unclear to
him/her what the definitions of current servos AB, AS, AF, AH and AG mean (Figure 13).
Figure 13 LaForge’s GUI Design
It might be unclear to new users of the AL5A what these labels mean.

15 | P a g e
Furthermore, the user may not know what do the numbers he/she inputs next to the servos AB,
AS, AF, AH and AG actually represent (Figure 14).
Figure 14 LaForge’s GUI Design
User might not know what these numbers represent.
16 | P a g e
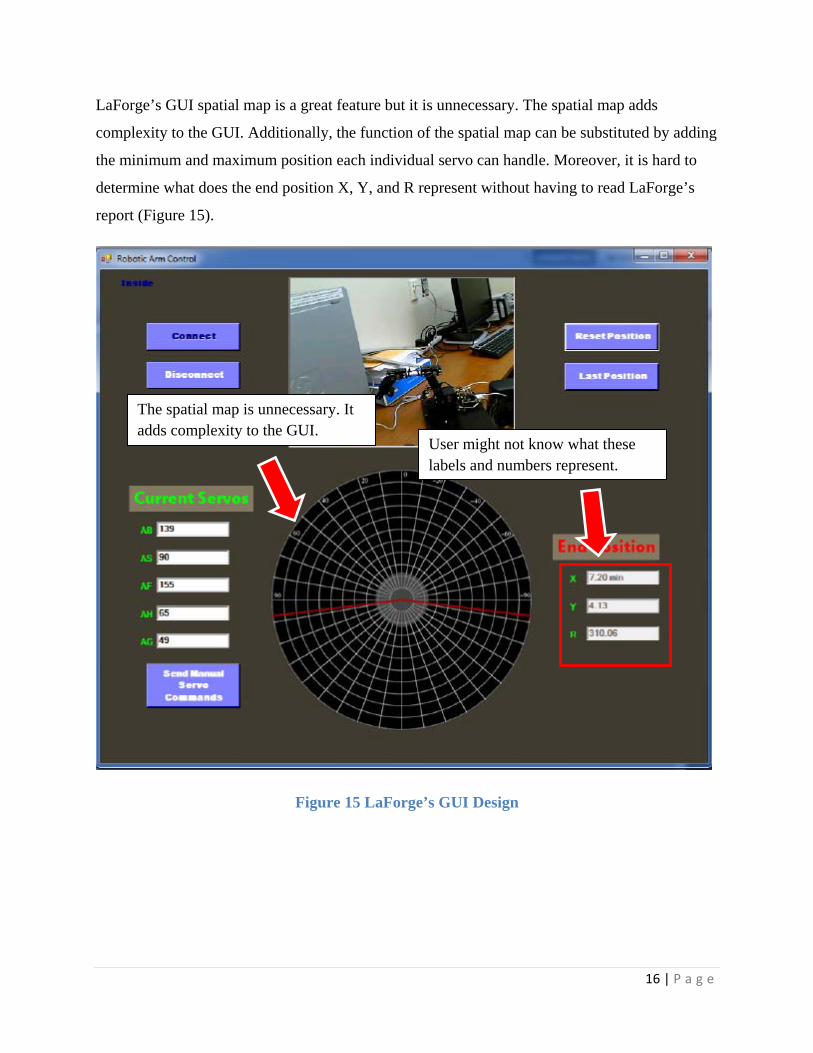
LaForge’s GUI spatial map is a great feature but it is unnecessary. The spatial map adds
complexity to the GUI. Additionally, the function of the spatial map can be substituted by adding
the minimum and maximum position each individual servo can handle. Moreover, it is hard to
determine what does the end position X, Y, and R represent without having to read LaForge’s
report (Figure 15).
Figure 15 LaForge’s GUI Design
User might not know what these labels and numbers represent.
The spatial map is unnecessary. It adds complexity to the GUI.
17 | P a g e
4. Solution and Implementation
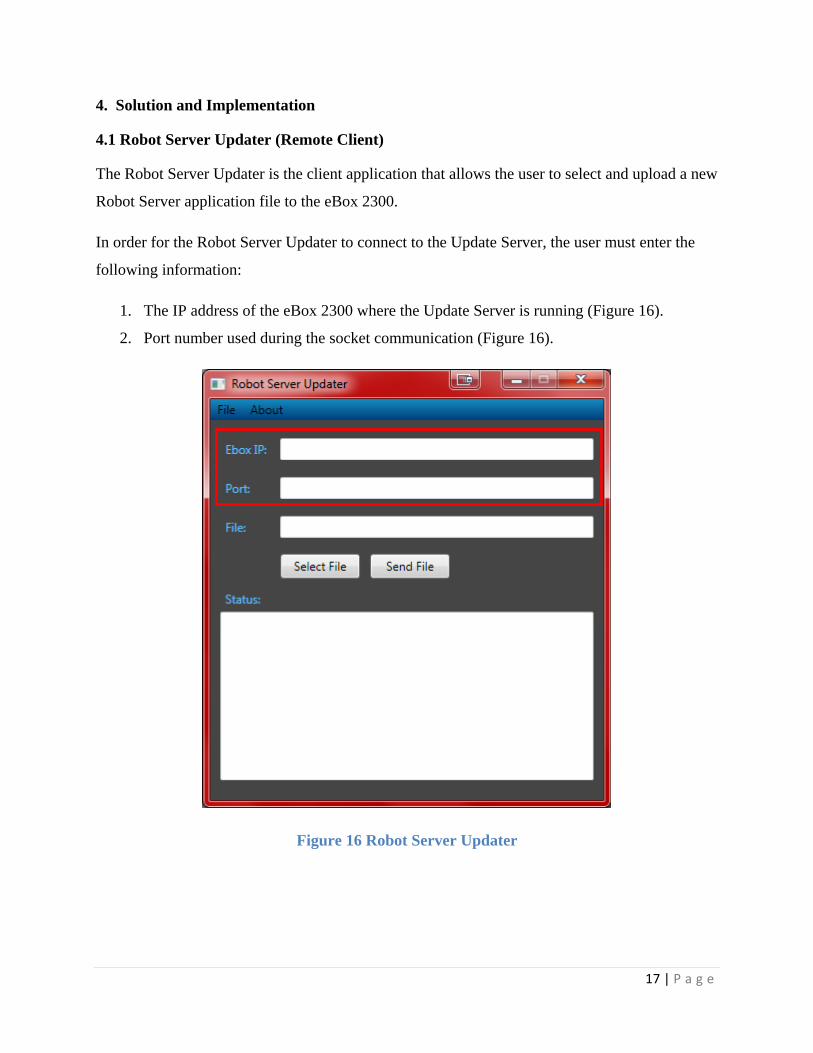
4.1 Robot Server Updater (Remote Client)
The Robot Server Updater is the client application that allows the user to select and upload a new
Robot Server application file to the eBox 2300.
In order for the Robot Server Updater to connect to the Update Server, the user must enter the
following information:
1. The IP address of the eBox 2300 where the Update Server is running (Figure 16).
2. Port number used during the socket communication (Figure 16).
Figure 16 Robot Server Updater

18 | P a g e
After the user entered the eBox 2300 IP address and port number, the user may click the “Select
File” button to select the new Robot Server application file that is going to be uploaded to the
eBox 2300 (Figure 17). When clicking the “Select File” button, an open file dialog box will be
displayed (Figure 18). The open file dialog box will allow the user to select the new Robot
Server application file he/she wishes to upload to the eBox 2300. The open file dialog box limits
the user to select only executable files (.exe extension).
Figure 17 Robot Server Updater
19 | P a g e
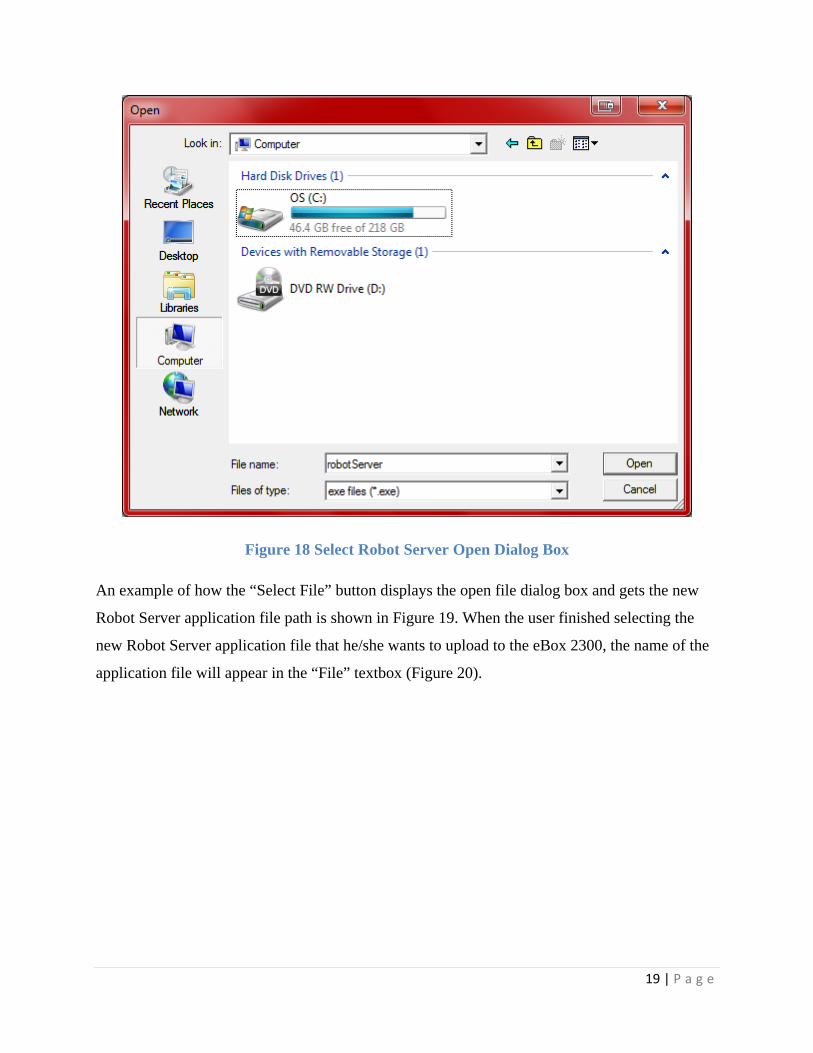
Figure 18 Select Robot Server Open Dialog Box
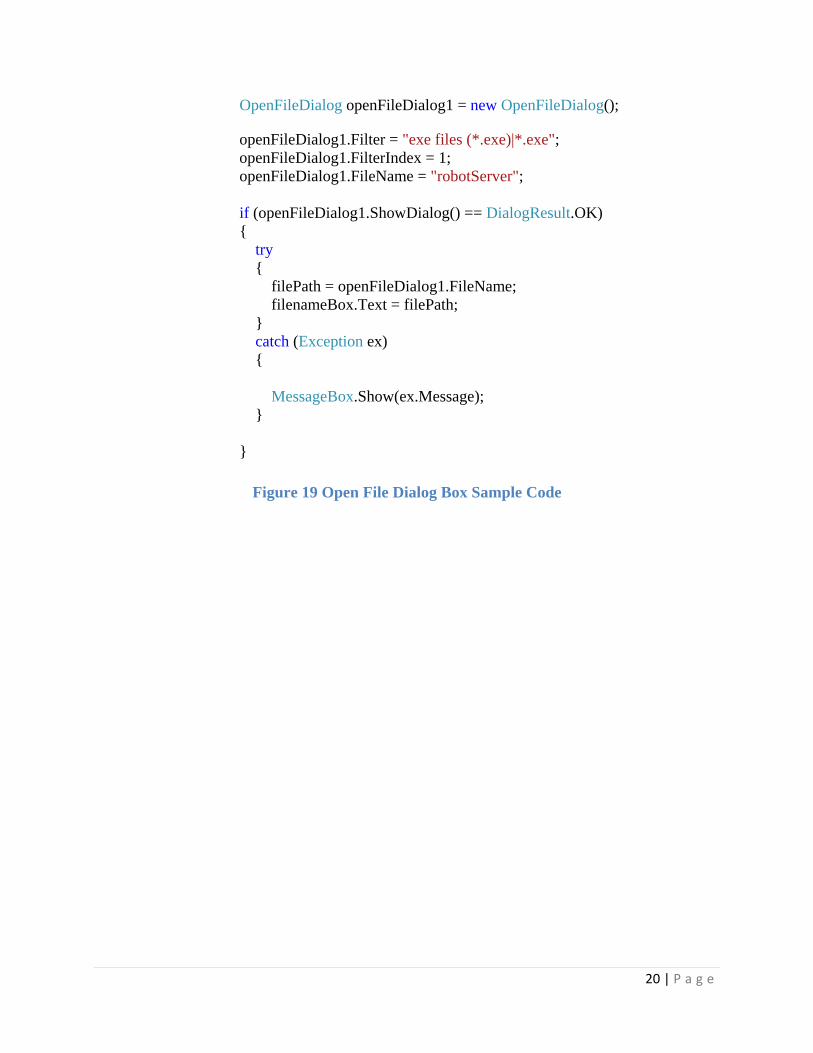
An example of how the “Select File” button displays the open file dialog box and gets the new
Robot Server application file path is shown in Figure 19. When the user finished selecting the
new Robot Server application file that he/she wants to upload to the eBox 2300, the name of the
application file will appear in the “File” textbox (Figure 20).
20 | P a g e
OpenFileDialog openFileDialog1 = new OpenFileDialog();
openFileDialog1.Filter = "exe files (*.exe)|*.exe"; openFileDialog1.FilterIndex = 1; openFileDialog1.FileName = "robotServer"; if (openFileDialog1.ShowDialog() == DialogResult.OK) { try { filePath = openFileDialog1.FileName; filenameBox.Text = filePath; } catch (Exception ex) { MessageBox.Show(ex.Message); } }
Figure 19 Open File Dialog Box Sample Code

21 | P a g e
Figure 20 File Name
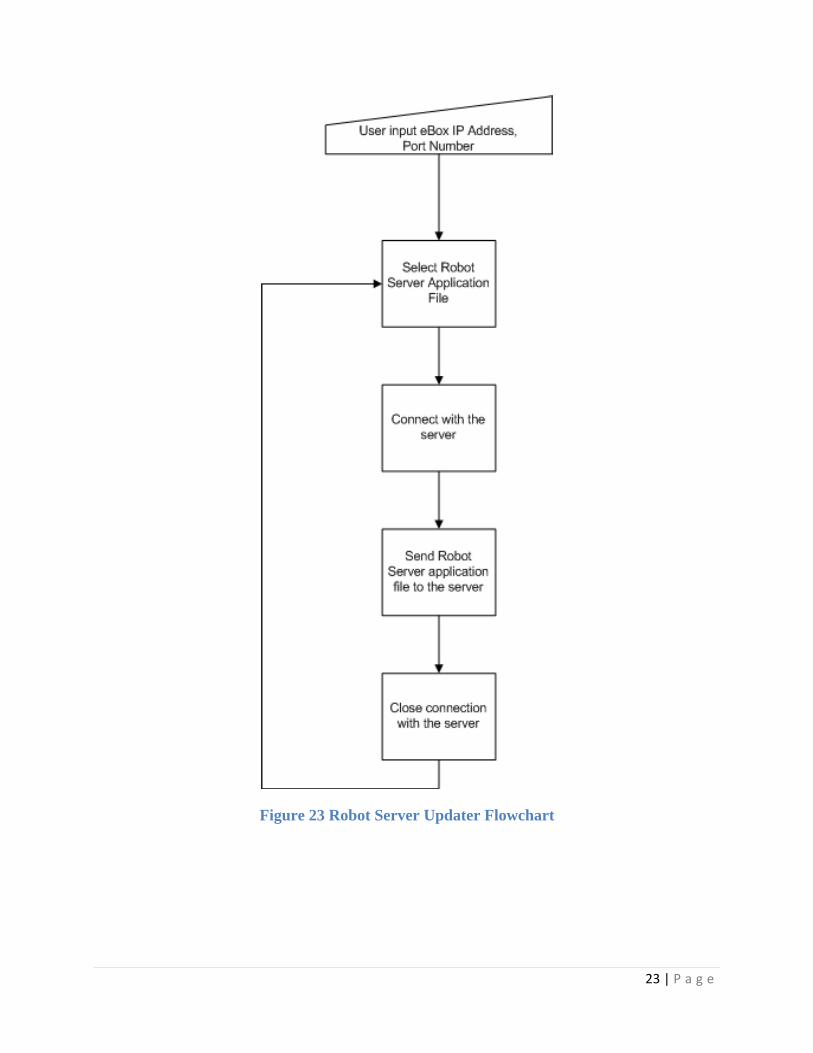
Once the Robot Server application file has been selected, the user may click the “Send File”
button to begin uploading the new Robot Server application file to the eBox 2300. Feedback
indicating that the new Robot Server application file was send successfully to the eBox 2300 will
be displayed to the user in the “Status” textbox (Figure 21). The transferring of the Robot Server
application file will be accomplished using sockets. An example of how the Robot Server
application file is sent to the eBox 2300 is shown in Figure 22. A complete flowchart of the
Robot Server Updater is shown in Figure 23.

22 | P a g e
Figure 21 Robot Server Updater
// get the file
fileStream = File.Open(filepath, FileMode.Open); byte[] dataToSend = new byte[fileStream.Length]; fileStream.Read(dataToSend, 0, dataToSend.Length); fileStream.Close(); // send the file to the server networkStream.Write(dataToSend, 0, dataToSend.Length); networkStream.Flush();
Figure 22 Robot Server Updater
23 | P a g e
Figure 23 Robot Server Updater Flowchart

24 | P a g e
4.2 Update Server
The initial step performed by the Update Server is to ask the user to enter the eBox 2300 IP
address. After the user entered the eBox 2300 IP address, the Update Server will ask the user to
enter the port number used during the socket communication. When both IP address and port
number has been entered, the Update Server will wait for an incoming connection from a Robot
Server Updater (client) and then accept that connection. An example of how the Update Server
accepts a Robot Server Updater connection is shown in Figure 24.
tcpClient = tcpListener.AcceptTcpClient(); Console.WriteLine("a client connected!"); networkStream = tcpClient.GetStream(); networkStream.Flush();
Figure 24 Accept Client Connection
Once the Update Server accepts a connection from a Robot Server Updater (client), the Update
Server determines if there is a Robot Server application running. If a Robot Server application
was running, the Update Server will shut down the running Robot Server. An example of how
the Update Server determines if there is a Robot Server application running and shut down this
running Robot Server is shown in Figure 25.
if (p != null && !p.HasExited) { try { Console.WriteLine("Proccess " + p.Id + " is running, terminating it"); p.Kill(); p.WaitForExit(); p = null; GC.Collect(); Console.WriteLine("Done!"); } catch (Exception ex) {
Console.WriteLine("Failed to terminante robot server"); } }
Figure 25 Shut Down Running Robot Server

25 | P a g e
After the above step is completed, the Update Server gets the new Robot Server application file
sent by the Robot Server Updater (client) and then begins to transfer this new Robot Server
application file. If the new Robot Server application file was not transferred, an error message is
displayed and the connection with the Robot Server Updater (client) is closed. If the new Robot
Server application file was transferred successfully, the Update Server will copy the new Robot
Server application file to the eBox’s 2300 Hard Drive Disk under “My Device” > “Hard Disk” >
“My Documents” > “Robot Servers”. An example of the steps described in this paragraph is
shown in Figure 26.
try { using (Stream stream = new FileStream(filepath,
FileMode.Create, FileAccess.ReadWrite))
{ // Buffer for reading the stream Byte[] bytes = new Byte[1024]; int length;
// get the new robot server sent by the client while ((length = networkStream.Read(bytes, 0, bytes.Length)) != 0)
{ stream.Write(bytes, 0, length); } } networkStream.Flush(); success = true;
Console.WriteLine("new robot server received successfully"); } catch (Exception ex) {
Console.WriteLine("A critical error occurred during the file transfer. " + "Closing connection with the client"); }
Figure 26 Transfer New Robot Server
Lastly, the new Robot Server will be executed and the connection with the Robot Server Updater
will be closed. A complete flowchart of the Update Server is shown in Figure 27.

26 | P a g e
Figure 27 Update Server Flowchart
27 | P a g e
5. Conclusion
The previous team project was not operational; therefore a new client and server applications
were developed. The Update Server was developed using .NET Compact Framework 2.0 and
build specifically for the eBox 2300. The Robot Server Updater (client) was developed using
.NET Framework 2.0.
The Robot Server Updater (client) allows a user to sends a new Robot Server application file to
the Update Server running on the eBox 2300. The Update Server determines if a Robot Server
application was previously running. If a Robot Server application was running, the Update
Server will shut down the running Robot Server. Then, the Update Server gets the new Robot
Server application file send by the Robot Server Updater (client) and then begins to transfer this
new Robot Server application file. If the new Robot Server application file was transferred
successfully, the Update Server will copy the new Robot Server application file to the eBox’s
2300 Hard Drive. Finally, the new Robot Server will be executed and the connection with the
Robot Server Updater will be closed.
During the development life cycle of this project, many problems were encountered. The eBox
2300 was not turning on. The team had to determine if this was due to an internal hardware
malfunction or just a faulty power supply. After the team meticulously opened the eBox 2300
and examined the internal hardware, it was determined that the problem of the eBox 2300 not
turning on was due to a faulty power adapter. Furthermore, the previous team source code was
not made available to the team until several weeks after the development of this project started.
In addition, the previous team program was not build using .NET Compact Framework 2.0 and
properly prepared to run on the eBox 2300, thus it crashed on execution.
Since priority and focus was given to the main objective of this project, the secondary objectives
were not accomplished. In the future, this project can be expanded to accomplish the secondary
objectives.

28 | P a g e
It is extremely important to mention that in order for a Robot Server to run on the eBox 2300, the
Robot Server must be developed using Visual Studio 2005 and the .NET Compact Framework
2.0. Additionally, to debug or test a Robot Server, the Robot Server has to be deployed to the
eBox 2300 as a Smart Device – Windows CE 5.0 Device Application. For further explanation on
how to connect Visual Studio 2005 to the eBox 2300 and develop and deploy an application to
the eBox 2300 please refer to the User Manual.

29 | P a g e
6. References
[1] R. LaForge, "AL5A Robotic Arm Project: Web-Based Control with Spatial Awareness and Intuitive Manipulation.," FGCU 26 April 2011. URL: http://itech.fgcu.edu/faculty/zalewski/CNT4104/Projects/Robotic_Arm_Final4.pdf.
[2] A. Saldivar and K. Rosier, "Remote Software Updater for eBox 2300 and Windows CE6," FGCU 4 April 2012. URL: http://itech.fgcu.edu/faculty/zalewski/projects/files/RoboticArmRemoteControl2012.pdf.
[3] eBox 2300 front image, URL: http://www.windowsfordevices.com/files/misc/dmp_ebox3300_front.jpg.
[4] eBox 2300 rear image, URL: http://www.windowsfordevices.com/files/misc/dmp_ebox3300_rear.jpg.
[5] AL5A Robotic Arm, Lynxmotion, URL: http://www.lynxmotion.com/c-124-al5a.aspx.
[6] AL5A Robotic Arm image, Lynxmotion, URL: http://www.lynxmotion.com/images/product/large/al5a01.jpg.
[7] 1061_1 - PhidgetAdvancedServo 8-Moto image, Phidgets, URL: http://www.phidgets.com/products.php?category=11&product_id=1061_1.
[8] Logitech QuickCam Pro 5000 WebCam, URL: http://www.amazon.com/Logitech-QuickCam-Pro-5000-WebCam/dp/B000BDH2XY.
[9] Xbox 360 Controller, Microsoft, URL: http://www.xbox.com/en-US/xbox360/accessories/controllers/Xbox360Controller.
[10] Xbox 360 Wired Controller image, URL: http://www.amazon.com/Xbox-360-Wired-Controller/dp/B000B6MLTQ/ref=sr_1_5?ie=UTF8&qid=1349490963&sr=8-5&keywords=xbox+360+controller.
[11] S. Phung, "eBox-2300 Windows Embedded CE 6.0 Jump Start Guide," ICOP Technology Inc, URL: ftp://ftp.dmp.com.tw/os-wince/eBox2300_CE60_JumpStart_Rev03.pdf.
30 | P a g e
Appendix A
User Manual
1.0 Downloading and Installing Visual Studio 2005
1.1 Navigate to http://go.microsoft.com/fwlink/?LinkId=51411&clcid=0x409
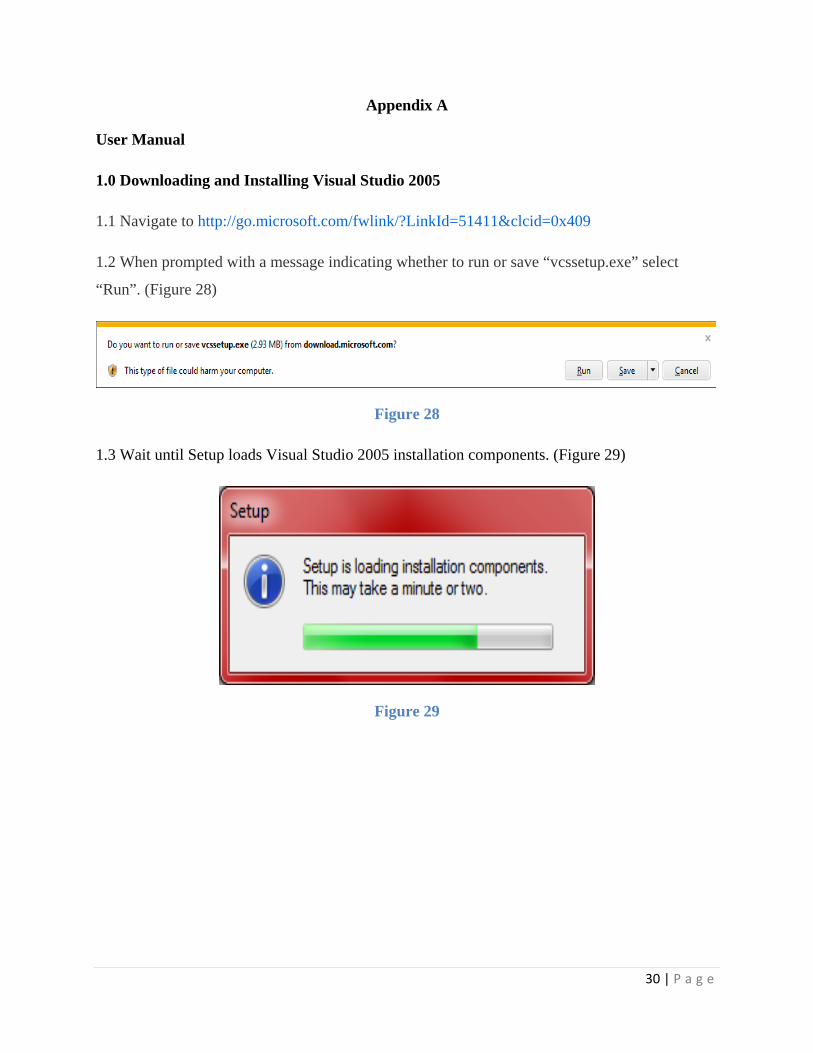
1.2 When prompted with a message indicating whether to run or save “vcssetup.exe” select
“Run”. (Figure 28)
Figure 28
1.3 Wait until Setup loads Visual Studio 2005 installation components. (Figure 29)
Figure 29

31 | P a g e
1.4 When Setup finished loading the installation components, a welcome window appears
(Figure 30). Select “Next” and follow the instructions to install Visual Studio 2005 on the
computer’s Hard Drive.
Figure 30

32 | P a g e
Visual Studio 2005 has known compatibility issues with Windows 7 64 bit edition. (Figure 31
and Figure 32)
Figure 31
Figure 32
To fix the compatibility issues shown in the previous figures, Microsoft Visual Studio 2005
Team Suite Service Pack 1 and Visual Studio 2005 Service Pack 1 Update for Windows Vista
need to be installed on the computer’s Hard Drive.
33 | P a g e
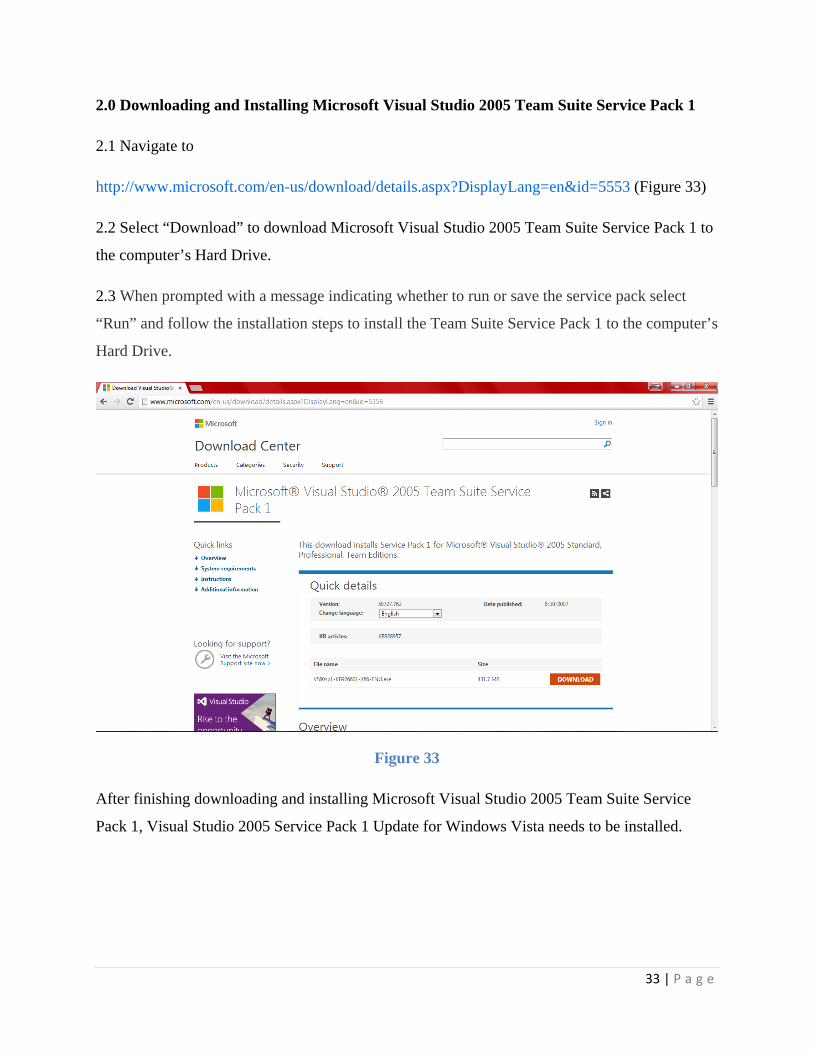
2.0 Downloading and Installing Microsoft Visual Studio 2005 Team Suite Service Pack 1
2.1 Navigate to
http://www.microsoft.com/en-us/download/details.aspx?DisplayLang=en&id=5553 (Figure 33)
2.2 Select “Download” to download Microsoft Visual Studio 2005 Team Suite Service Pack 1 to
the computer’s Hard Drive.
2.3 When prompted with a message indicating whether to run or save the service pack select
“Run” and follow the installation steps to install the Team Suite Service Pack 1 to the computer’s
Hard Drive.
Figure 33
After finishing downloading and installing Microsoft Visual Studio 2005 Team Suite Service
Pack 1, Visual Studio 2005 Service Pack 1 Update for Windows Vista needs to be installed.

34 | P a g e
3.0 Downloading and Installing Visual Studio 2005 Service Pack 1 Update for Windows
Vista
3.1 Navigate to
http://www.microsoft.com/en-us/download/details.aspx?displaylang=en&id=7524 (Figure 34)
3.2 Select “Download” to download Visual Studio 2005 Service Pack 1 Update for Windows
Vista to the computer’s Hard Drive.
3.3 When prompted with a message indicating whether to run or save the service pack, select
“Run” and follow the installation steps to install Service Pack 1 Update for Windows Vista to the
computer’s Hard Drive.
Figure 34

35 | P a g e
4.0 Downloading and Installing Windows Embedded CE 6.0
4.1 Navigate to
http://www.microsoft.com/windowsembedded/en-us/downloads/download-windows-embedded-
ce6.aspx (Figure 35)
Figure 35
4.2 Locate Windows Embedded CE 6.0 and select the “+” sign next to “View Downloads” to
view the downloads related to Windows Embedded CE 6.0. (Figure 36)

36 | P a g e
Figure 36
4.3 After expanding “View Downloads” select “Windows Embedded CE 6.0”.
4.4 Enter your Microsoft Account Email and Password when prompted. (Figure 37)

37 | P a g e
Figure 37
4.5 After signing in with your Microsoft Account, fill in the information form and select “Next”.
4.6 A new window will appear providing you with a 120 day trial key for Windows Embedded
CE 6.0
4.7 After obtaining the trial key, navigate to
http://www.microsoft.com/en-us/download/details.aspx?id=20083 (Figure 38)
4.8 Select “Download” to download Windows Embedded CE 6.0 Evaluation Edition to the
computer’s Hard Drive.

38 | P a g e
4.9 When prompted with a message indicating whether to run or save Windows Embedded CE
6.0, select “Run”.
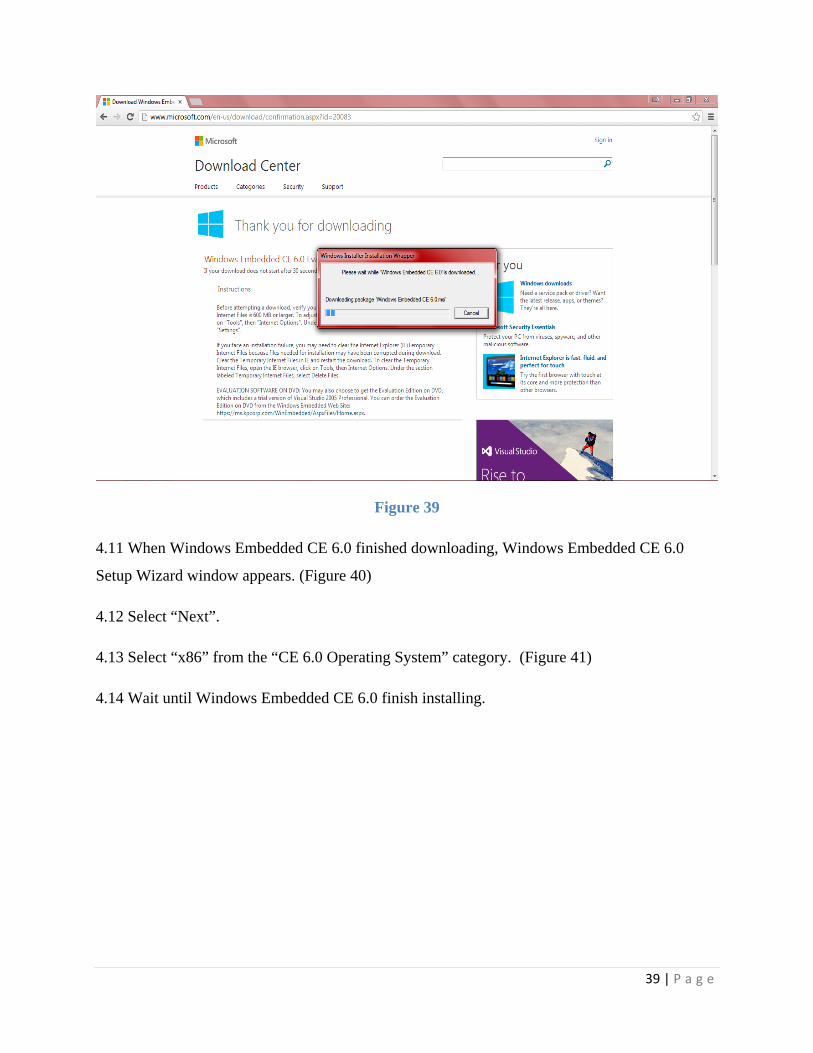
4.10 Wait until Windows Embedded CE 6.0 is downloaded to the computer’s Hard Drive. The
download might take several minutes. (Figure 39)
Figure 38
39 | P a g e
Figure 39
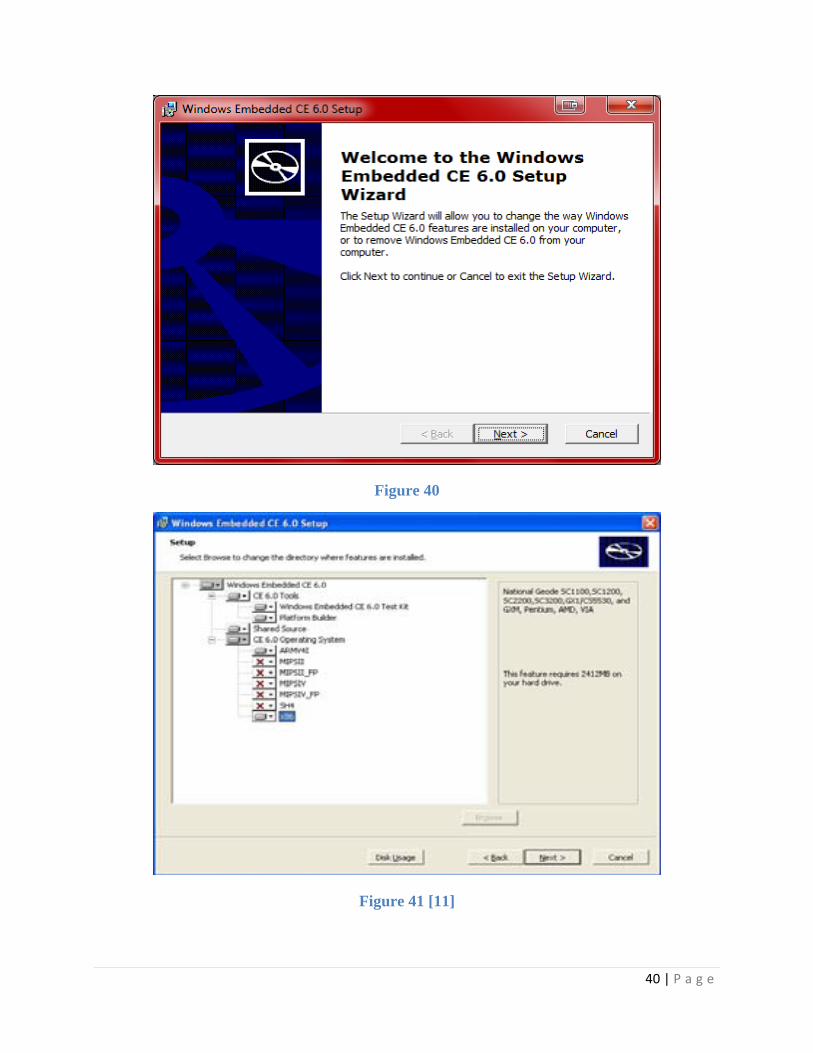
4.11 When Windows Embedded CE 6.0 finished downloading, Windows Embedded CE 6.0
Setup Wizard window appears. (Figure 40)
4.12 Select “Next”.
4.13 Select “x86” from the “CE 6.0 Operating System” category. (Figure 41)
4.14 Wait until Windows Embedded CE 6.0 finish installing.
40 | P a g e
Figure 40
Figure 41 [11]

41 | P a g e
5.0 Build and Install Windows Embedded CE 6.0 SDK
5.1 Navigate to
ftp://ftp.dmp.com.tw/os-wince/eBox2300_CE60_JumpStart_Rev03.pdf
5.2 Follow Samuel Phung guide to create a Visual Studio 2005 project to configure a Windows
Embedded CE 6.0 OS design and customize and build the OS Design. Save the project.
5.3 Open the Visual Studio 2005 project that was created to configure and build the Windows
Embedded CE 6.0 OS design.
5.4 Select “Project” > “Add New SDK…” (Figure 42) to open the SDK Property Pages window
(Figure 43).
Figure 42

42 | P a g e
Figure 43
5.6 Fill in the required information for the SDK on the Property Pages.
5.7 Select “Install” and fill in the information required. (Figure 44)
5.8 Select “Development Languages” and check both Native and Managed development support.
(Figure 45)

43 | P a g e
Figure 44
Figure 45
44 | P a g e
5.9 After finishing adding all the required information for the SDK, Select “Apply” and then
“OK” to complete the Add New SDK process.
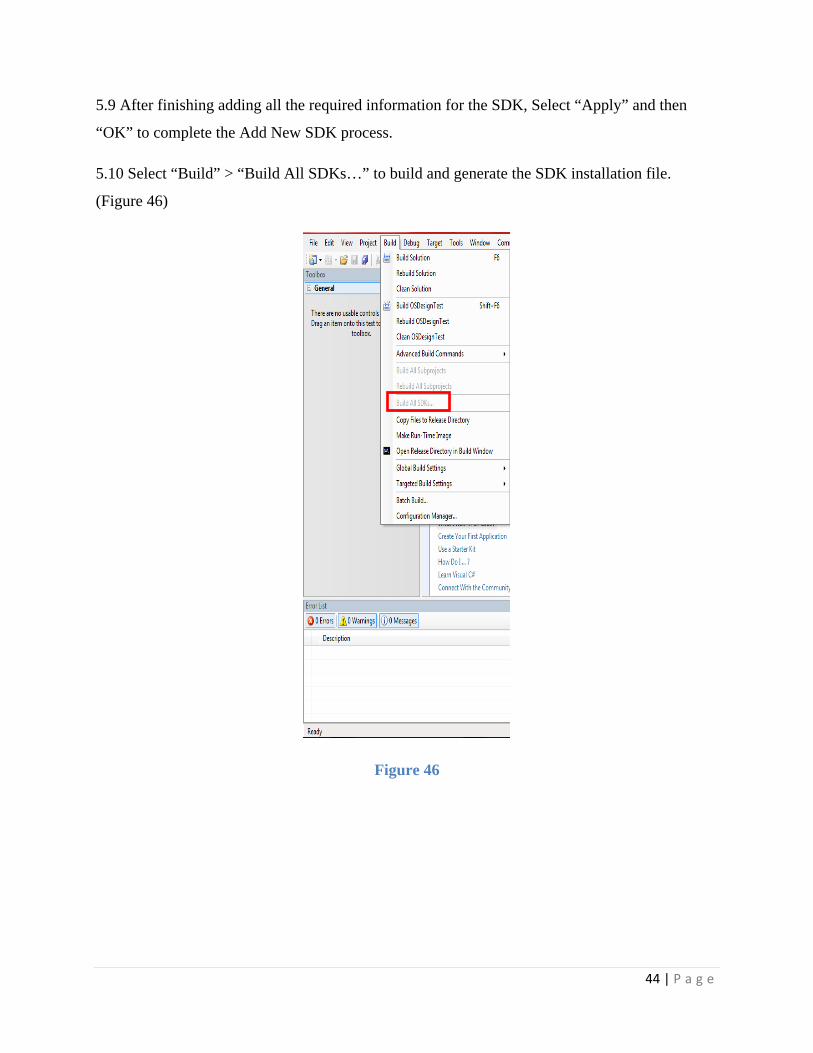
5.10 Select “Build” > “Build All SDKs…” to build and generate the SDK installation file.
(Figure 46)
Figure 46
45 | P a g e
5.11 A SDK file with the extension “msi” and file name you provided is generated in the
directory you specified when filling the information for the SDK.
5.12 Install the SDK generated to Visual Studio 2005 by double clicking the SDK msi file and
following the instructions for the installation.

46 | P a g e
6.0 Opening or Creating a Visual Studio 2005 Project
6.1 Open Visual Studio 2005.
6.2 To open a project select “File” > “Open” > “Project/Solution…”. (Figure 47)
6.3 Locate the project to open and select “Open”.
6.4 To create a project for the eBox 2300 select “File” > “New Project” > “Visual C#” > “Smart
Device” > “Windows CE 5.0” > “Device Application”.
Figure 47

47 | P a g e
7.0 Connect Visual Studio 2005 and eBox 2300
7.1 From the eBox 2300 Desktop select “My Device” > “Hard Disk” > “Windows”.
7.2 Double click ConmanClient2.exe and then double click CMaccept.exe.
7.3 From the eBox 2300 Desktop select “Start” > “Run”, and type cmd.
7.4 Type ipconfig to obtain the eBox’s 2300 IP address.
7.5 From Visual Studio 2005 select “Tools” > “Options” > “Device Tools” > “Devices”.
7.6 Select the SDK build in “Show devices for platform”. (Figure 48)
Figure 48
48 | P a g e
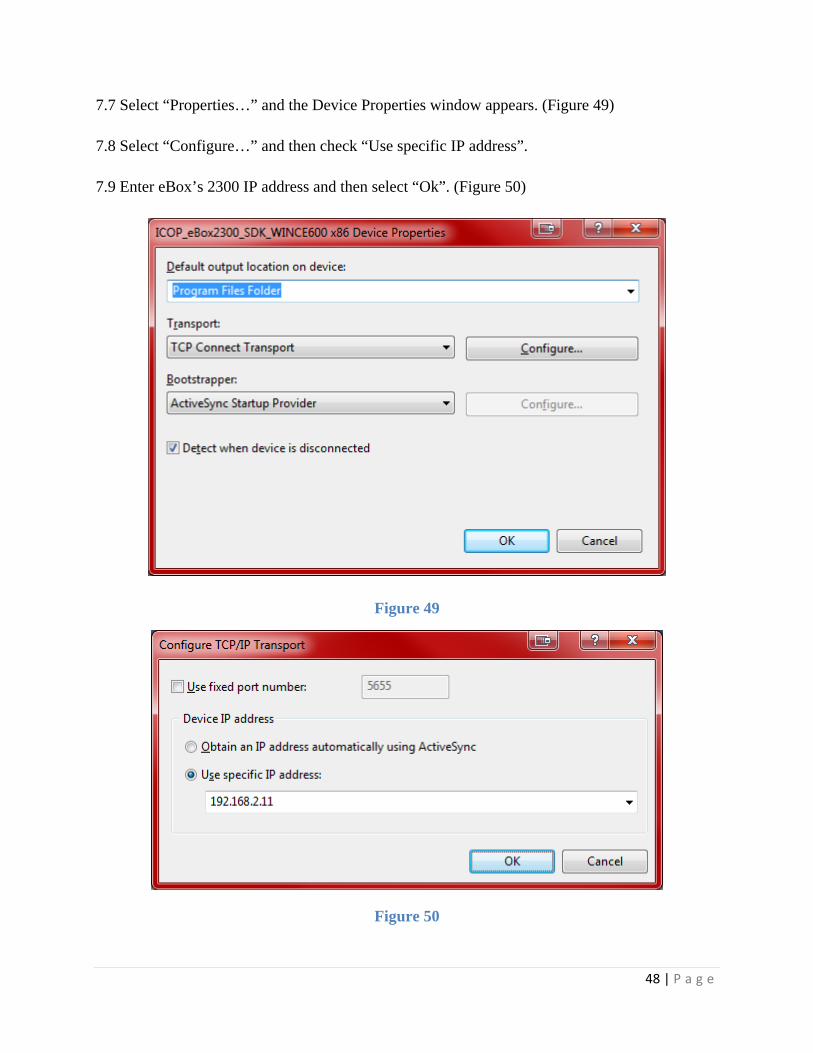
7.7 Select “Properties…” and the Device Properties window appears. (Figure 49)
7.8 Select “Configure…” and then check “Use specific IP address”.
7.9 Enter eBox’s 2300 IP address and then select “Ok”. (Figure 50)
Figure 49
Figure 50

49 | P a g e
7.10 Select “Tools” > “Connect to Device”. (Figure 51)
7.11 Under Platform choose the SDK build and select “Connect”
7.12 Wait until the connection is established with the eBox 2300.
Figure 51

50 | P a g e
8.0 Deploy Application to eBox 2300
8.1 Select “Debug” > “Start Debugging”. (Figure 52)
Figure 52
8.2 On the deploy window select the eBox 2300 SDK build and select “Deploy”. The application
will be deployed to the eBox 2300 and it will be temporarily saved under “My Device” >
“Program Files”. (Figure 53)
Figure 53
51 | P a g e
9.0 Set eBox 2300 Static IP Address
9.1 From the eBox 2300 Desktop select “Start” > “Settings” > “Network and Dial-up
Connections”
9.2 Right click “PCI-RTL81391” and select “Properties”
9.3 On the IP Address tab select “Specify an IP address” and enter the following information
IP Address: 69.88.163.31
Subnet Mask: 255.255.255.0
Default Gateway: 69.88.163.1
9.4 On the Name Servers tab enter the following information and click “OK”
Primary DNS: 172.28.254.2
Secondary DNS: 172.28.254.3

52 | P a g e
10.0 Update Server User Manual
10.1 From the eBox 2300 Desktop double click “My Device” > “Hard Disk” > “My Documents”
> “UpdateServer.exe”. The server will start running.
10.2 Enter the server IP: 69.88.163.31
10.3 Enter listening port: 16888
10.4 The server will wait until a client connects. Feedback of the update process will be
displayed on the Console.

53 | P a g e
11.0 Robot Server Updater User Manual
11.1 Enter the eBox 2300 IP address (69.88.163.31) and Port number (16888) (Figure 54).
Figure 54 eBox 2300 IP Address and Port Number

54 | P a g e
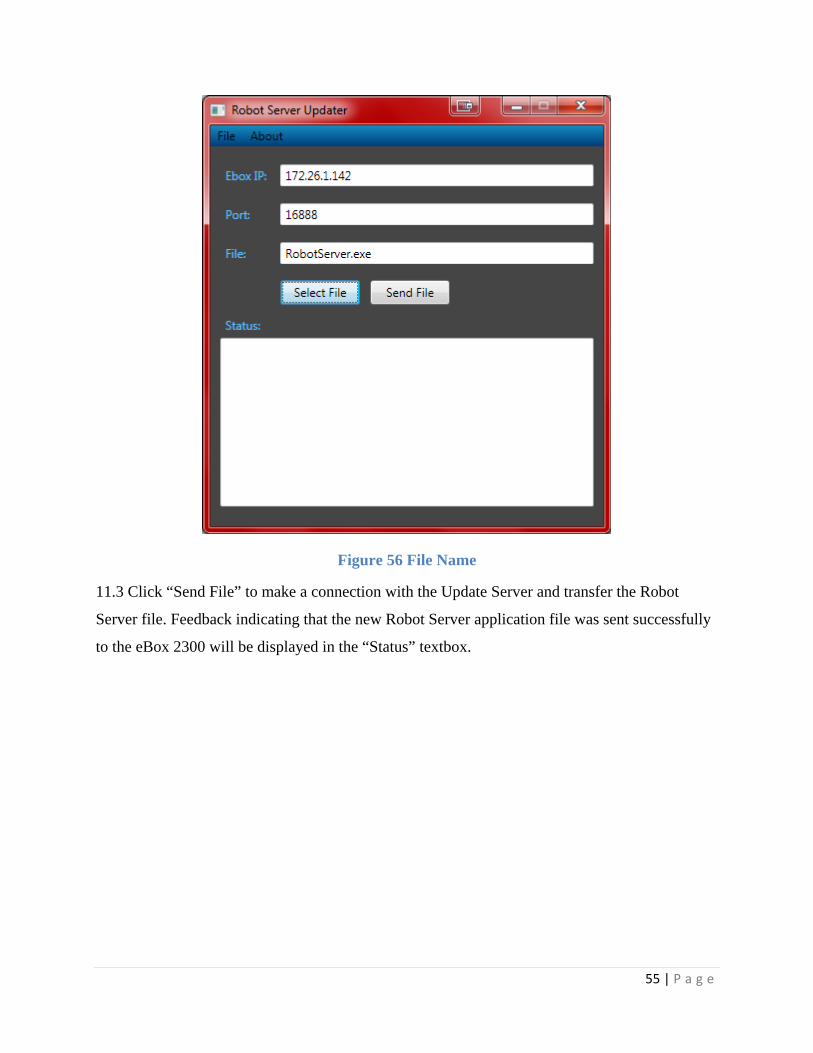
11.2 Click “Select File”, navigate to the location of the Robot Server application file and click “Open” (Figure 55). The name of the application file will appear in the “File” textbox (Figure 56).
Figure 55 Select Robot Server Open Dialog Box
55 | P a g e
Figure 56 File Name
11.3 Click “Send File” to make a connection with the Update Server and transfer the Robot
Server file. Feedback indicating that the new Robot Server application file was sent successfully
to the eBox 2300 will be displayed in the “Status” textbox.

56 | P a g e
Appendix B
Robot Server Updater
using System; using System.Collections.Generic; using System.Text; using System.Windows; using System.Windows.Controls; using System.Windows.Data; using System.Windows.Documents; using System.Windows.Input; using System.Windows.Media; using System.Windows.Media.Imaging; using System.Windows.Navigation; using System.Windows.Shapes; using System.IO; using System.Net.Sockets; using Microsoft.Win32; namespace RobotServerUpdaterWpf { /// <summary> /// Interaction logic for MainWindow.xaml /// </summary> public partial class MainWindow : Window {
string filePath = null; FileStream fileStream = null; NetworkStream networkStream = null; TcpClient tcpClient = null; public MainWindow() { InitializeComponent(); } /// <summary> /// invoked when the user clicks the "select file" button. /// gets the file path of the file selected by the user /// </summary> /// <param name="sender"></param> /// <param name="e"></param> private void selectButton_Click(object sender, EventArgs e) { OpenFileDialog openFileDialog1 = new OpenFileDialog(); openFileDialog1.Filter = "exe files (*.exe)|*.exe"; openFileDialog1.FilterIndex = 1; openFileDialog1.FileName = "robotServer"; if (openFileDialog1.ShowDialog() == DialogResult.OK) { try { filePath = openFileDialog1.FileName;
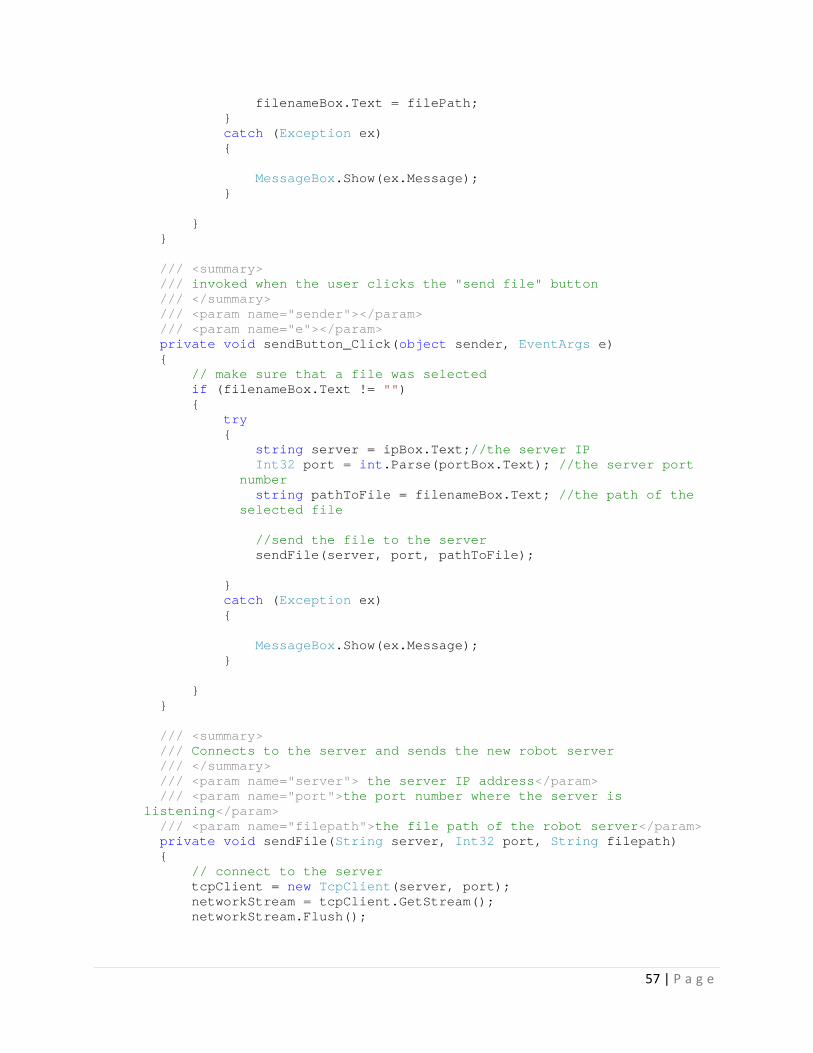
57 | P a g e
filenameBox.Text = filePath; } catch (Exception ex) { MessageBox.Show(ex.Message); } } } /// <summary> /// invoked when the user clicks the "send file" button /// </summary> /// <param name="sender"></param> /// <param name="e"></param> private void sendButton_Click(object sender, EventArgs e) { // make sure that a file was selected if (filenameBox.Text != "") { try { string server = ipBox.Text;//the server IP
Int32 port = int.Parse(portBox.Text); //the server port number string pathToFile = filenameBox.Text; //the path of the
selected file //send the file to the server sendFile(server, port, pathToFile); } catch (Exception ex) { MessageBox.Show(ex.Message); } } } /// <summary> /// Connects to the server and sends the new robot server /// </summary> /// <param name="server"> the server IP address</param>
/// <param name="port">the port number where the server is listening</param>
/// <param name="filepath">the file path of the robot server</param> private void sendFile(String server, Int32 port, String filepath) { // connect to the server tcpClient = new TcpClient(server, port); networkStream = tcpClient.GetStream(); networkStream.Flush();

58 | P a g e
// get the file fileStream = File.Open(filepath, FileMode.Open); byte[] dataToSend = new byte[fileStream.Length]; fileStream.Read(dataToSend, 0, dataToSend.Length); fileStream.Close(); // send the file to the server networkStream.Write(dataToSend, 0, dataToSend.Length); networkStream.Flush(); //close the connection with the server networkStream.Close(); tcpClient.Close();
receivedBox.Text += "file: " + filepath + " successfully sent to eBox 2300" + "\n\n";
} }
59 | P a g e
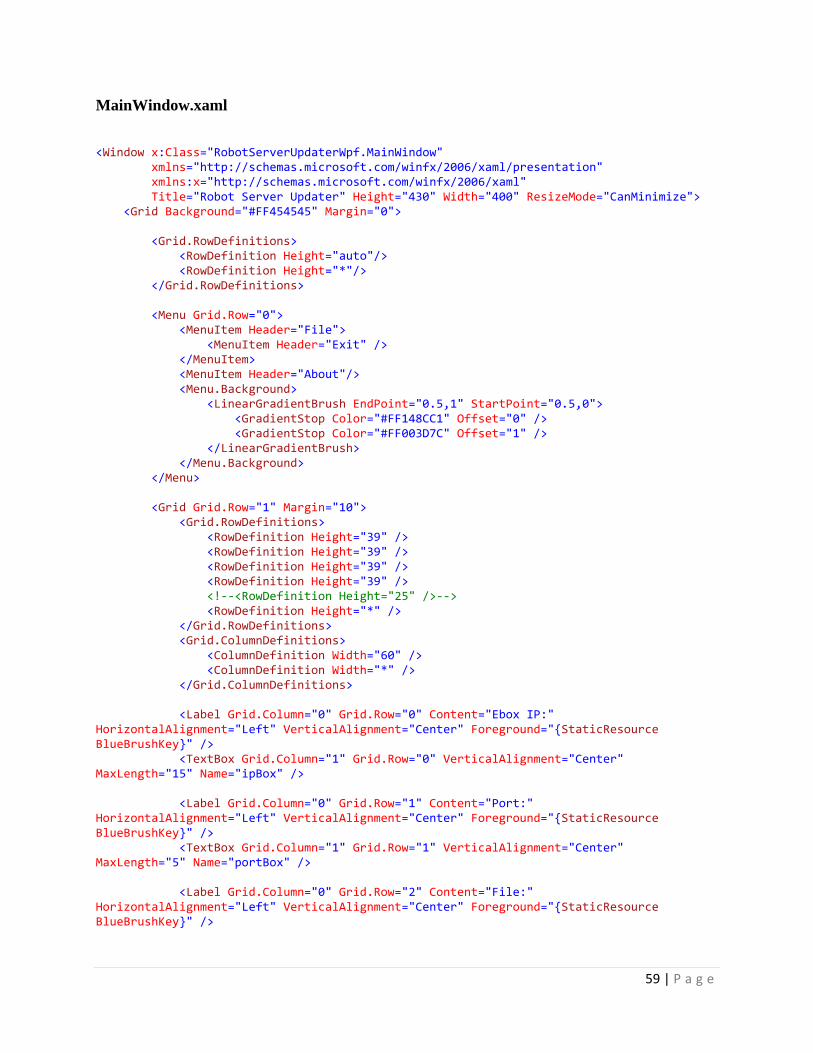
MainWindow.xaml
<Window x:Class="RobotServerUpdaterWpf.MainWindow" xmlns="http://schemas.microsoft.com/winfx/2006/xaml/presentation" xmlns:x="http://schemas.microsoft.com/winfx/2006/xaml" Title="Robot Server Updater" Height="430" Width="400" ResizeMode="CanMinimize"> <Grid Background="#FF454545" Margin="0"> <Grid.RowDefinitions> <RowDefinition Height="auto"/> <RowDefinition Height="*"/> </Grid.RowDefinitions> <Menu Grid.Row="0"> <MenuItem Header="File"> <MenuItem Header="Exit" /> </MenuItem> <MenuItem Header="About"/> <Menu.Background> <LinearGradientBrush EndPoint="0.5,1" StartPoint="0.5,0"> <GradientStop Color="#FF148CC1" Offset="0" /> <GradientStop Color="#FF003D7C" Offset="1" /> </LinearGradientBrush> </Menu.Background> </Menu> <Grid Grid.Row="1" Margin="10"> <Grid.RowDefinitions> <RowDefinition Height="39" /> <RowDefinition Height="39" /> <RowDefinition Height="39" /> <RowDefinition Height="39" /> <!‐‐<RowDefinition Height="25" />‐‐> <RowDefinition Height="*" /> </Grid.RowDefinitions> <Grid.ColumnDefinitions> <ColumnDefinition Width="60" /> <ColumnDefinition Width="*" /> </Grid.ColumnDefinitions> <Label Grid.Column="0" Grid.Row="0" Content="Ebox IP:" HorizontalAlignment="Left" VerticalAlignment="Center" Foreground="{StaticResource BlueBrushKey}" /> <TextBox Grid.Column="1" Grid.Row="0" VerticalAlignment="Center" MaxLength="15" Name="ipBox" /> <Label Grid.Column="0" Grid.Row="1" Content="Port:" HorizontalAlignment="Left" VerticalAlignment="Center" Foreground="{StaticResource BlueBrushKey}" /> <TextBox Grid.Column="1" Grid.Row="1" VerticalAlignment="Center" MaxLength="5" Name="portBox" /> <Label Grid.Column="0" Grid.Row="2" Content="File:" HorizontalAlignment="Left" VerticalAlignment="Center" Foreground="{StaticResource BlueBrushKey}" />

60 | P a g e
<TextBox Grid.Column="1" Grid.Row="2" VerticalAlignment="Center" TextWrapping="Wrap" Name="filenameBox" IsReadOnly="True" /> <StackPanel Orientation="Horizontal" Grid.Column="1" Grid.Row="3"> <Button Content="Select File" Width="80" Height="25" Name="selectButton" Click="selectButton_Click" /> <Button Content="Send File" Width="80" Height="25" Margin="10,0,0,0" Name="sendButton" Click="sendButton_Click" /> </StackPanel> <StackPanel Grid.ColumnSpan="2" Grid.Row="4" > <Label Content="Status:" Foreground="{StaticResource BlueBrushKey}" /> <TextBox IsReadOnly="True" HorizontalScrollBarVisibility="Auto" VerticalScrollBarVisibility="Auto" Name="statusBox" Height="169" TextWrapping="Wrap" /> </StackPanel> </Grid> </Grid> </Window>

61 | P a g e
Appendix C
Update Server
using System; using System.Collections.Generic; using System.Text; using System.Threading; using System.Net.Sockets; using System.Net; using System.IO; using System.Diagnostics; namespace UpdaterServer { class Program { // path (on Ebox) where the new robot server is stored
static string filepath = @"\Hard Disk\My Documents\Robot Servers\robotserver.exe"; static bool success; static int pId; static string processId = null; static Process p = null; static void Main(string[] args) { //get the server's IP Console.Write("Enter the server IP: "); string input = Console.ReadLine(); //string input = "127.0.0.1"; IPAddress ip = IPAddress.Parse(input); //get the port number where the server will listens for //connections Console.Write("Enter listening port: "); input = Console.ReadLine(); //input = "16000"; Int32 port = int.Parse(input); // start listening for client connections Listen(ip, port); } /// <summary> /// Listens for client connections and gets the /// new robot server sent by the client /// </summary> /// <param name="ip">the IP address of the server socket</param> /// <param name="port">port where the server is listening</param> private static void Listen(IPAddress ip, Int32 port) { TcpListener tcpListener = null; TcpClient tcpClient = null; NetworkStream networkStream = null;

62 | P a g e
try { tcpListener = new TcpListener(ip, port); tcpListener.Start(); while (true) { try { // accept the connection from a client Console.WriteLine("\nWaiting for a connection... "); success = false; tcpClient = tcpListener.AcceptTcpClient(); Console.WriteLine("a client connected!"); networkStream = tcpClient.GetStream(); networkStream.Flush();
// if the robot server is running, terminate it so the new robot server
// can be installed if (p != null && !p.HasExited) { try { Console.WriteLine("Proccess " + p.Id + " is running, terminating it"); p.Kill(); p.WaitForExit(); p = null; GC.Collect(); Console.WriteLine("Done!"); } catch (Exception ex) {
Console.WriteLine("Failed to terminante robot server");
} } try { using (Stream stream = new FileStream(filepath,
FileMode.Create, FileAccess.ReadWrite))
{ // Buffer for reading the stream Byte[] bytes = new Byte[1024]; int length;
// get the new robot server sent by the client
while ((length = networkStream.Read(bytes, 0, bytes.Length)) != 0)
{

63 | P a g e
stream.Write(bytes, 0, length); } } networkStream.Flush(); success = true;
Console.WriteLine("new robot server received successfully");
} catch (Exception ex) {
Console.WriteLine("A critical error occurred during the file transfer. " +
"Closing connection with the client"); } // close the network stream if (networkStream != null) { networkStream.Close(); } // close the client connection if (tcpClient != null) { tcpClient.Close(); }
//closed connection with client. start the new robot server if it was
//received succesfully if (success) {
Console.WriteLine("Executing new robot server...\n\n");
try { p = Process.Start(filepath, null); pId = p.Id; processId = pId.ToString(); } catch (Exception ex) {
Console.WriteLine("Error, could not start the new robot server");
} } } catch (Exception ex) { Console.WriteLine(ex.Message); } }
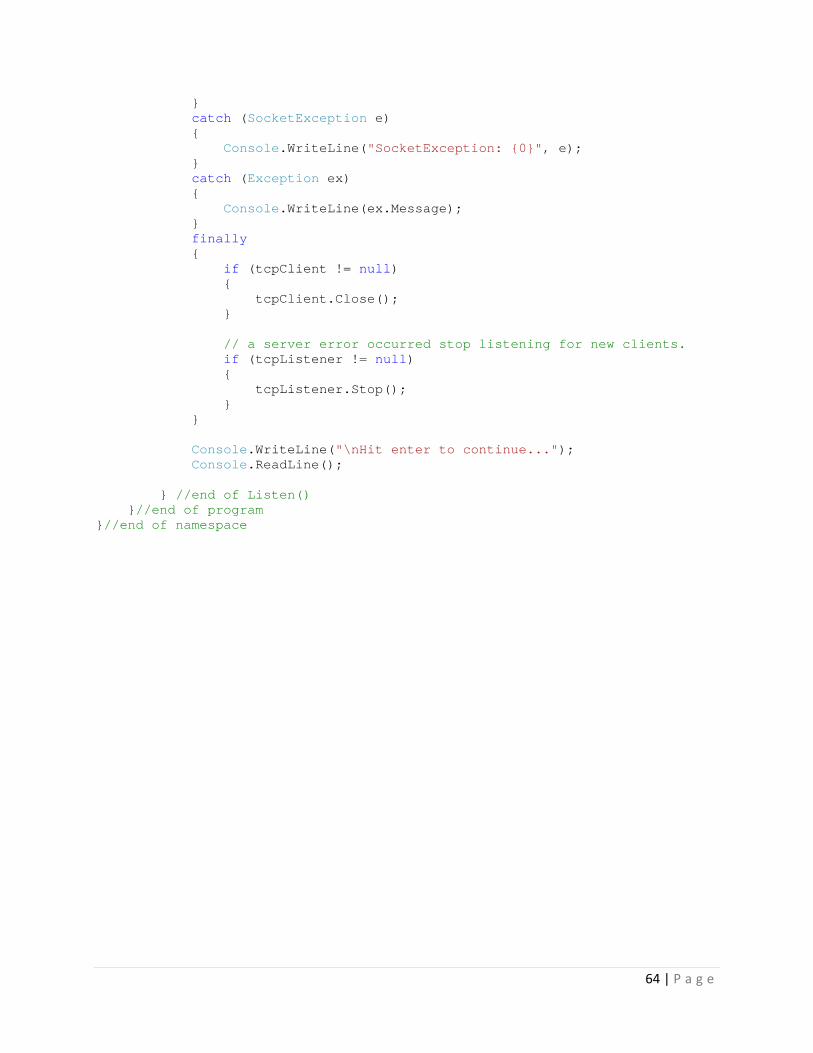
64 | P a g e
} catch (SocketException e) { Console.WriteLine("SocketException: {0}", e); } catch (Exception ex) { Console.WriteLine(ex.Message); } finally { if (tcpClient != null) { tcpClient.Close(); } // a server error occurred stop listening for new clients. if (tcpListener != null) { tcpListener.Stop(); } } Console.WriteLine("\nHit enter to continue..."); Console.ReadLine(); } //end of Listen() }//end of program }//end of namespace
Related Documents


![Robotic Technology in Surgery: Past, Present and Futureai.stanford.edu/~jks/pubs/2004-Camarillo-Krummel-Salisbury-Robotic... · now California governor Arnold Schwarzenegger. [5]](https://static.cupdf.com/doc/110x72/5ee31c8dad6a402d666d30c1/robotic-technology-in-surgery-past-present-and-jkspubs2004-camarillo-krummel-salisbury-robotic.jpg)


