Robot Espresso Maker User Manual 1.0 10/2018

Welcome message from author
This document is posted to help you gain knowledge. Please leave a comment to let me know what you think about it! Share it to your friends and learn new things together.
Transcript

Robot Espresso Maker User Manual 1.0 10/2018
RobotUserManual1.010/2018
2
Robot user manual Contents
Page Number 1. Introduction
• Warnings and safety 3 • What it does do • What it doesn’t do
2. Inside the box and component part names 3-5
3. Quick Start Guide 6
4. Basic overview of using the machine 7
5. Advanced brewing with the Professional Basket 13
6. Advanced brewing with the Pressurised Basket 15
7. Pressure gauge kit 15
8. Care and maintenance 16
9. Troubleshooting 17 10. Parts diagrams 19-21
11. Warranty 22

RobotUserManual1.010/2018
3
1. Introduction Warnings
• This coffee machine is not to be used by children. • Please take care when pouring the hot water into the basket
as hot water can burn your skin. • Make sure both portafilter tabs are inserted into the main
body before brewing. • NEVER try and operate the machine without the red piston
seal in place. • The base of ceramic cups are very abrasive and will scratch
the area of the under the spouts. For this reason we have supplied a silicone mat to protect the area.
• Do not put any parts of the machine or the accessories for cleaning into a dishwasher.
What it does do
• The Robot is capable of making real espresso coffee, those shots of coffee can then be drank as espresso or used as the base for other drinks such as Americano, Cappuccino, Latte etc.
• The Robot uses a commercial 58mm basket size What is does not do
• The Robot does not have an internal heating element • It does not steam milk
2. Inside the box Inside the box you will find the following items
• The main body of the Robot with the arms and base assembled.
• 1 portafilter without the spouts installed • 1 basket of your choice • 1 stainless steel tamper • 1 stainless steel dispersion disc • 1 silicone mat • 1 coffee measuring spoon (supplied with the pressurized
basket only) • Piston blanking plug and Teflon washer (if you have the
Barista version)

RobotUserManual1.010/2018
4
Main part names and basic function Here are the names of the components parts, all mention of these parts during the remainder of this manual refer to these parts. For a detailed parts list please see section 10
Almost all of the component parts are made from stainless steel. Certainly any part of the machine that comes into contact with the water and/or coffee is made from food grade stainless steel – one exception to that is the capillary tube on the Barista Robot, which is made from an FDA approved material. The other exception is the piston seal, which is made from an FDA approved silicone. Top Pin – this is the main pivot for the Lever Arms
RobotUserManual1.010/2018
5
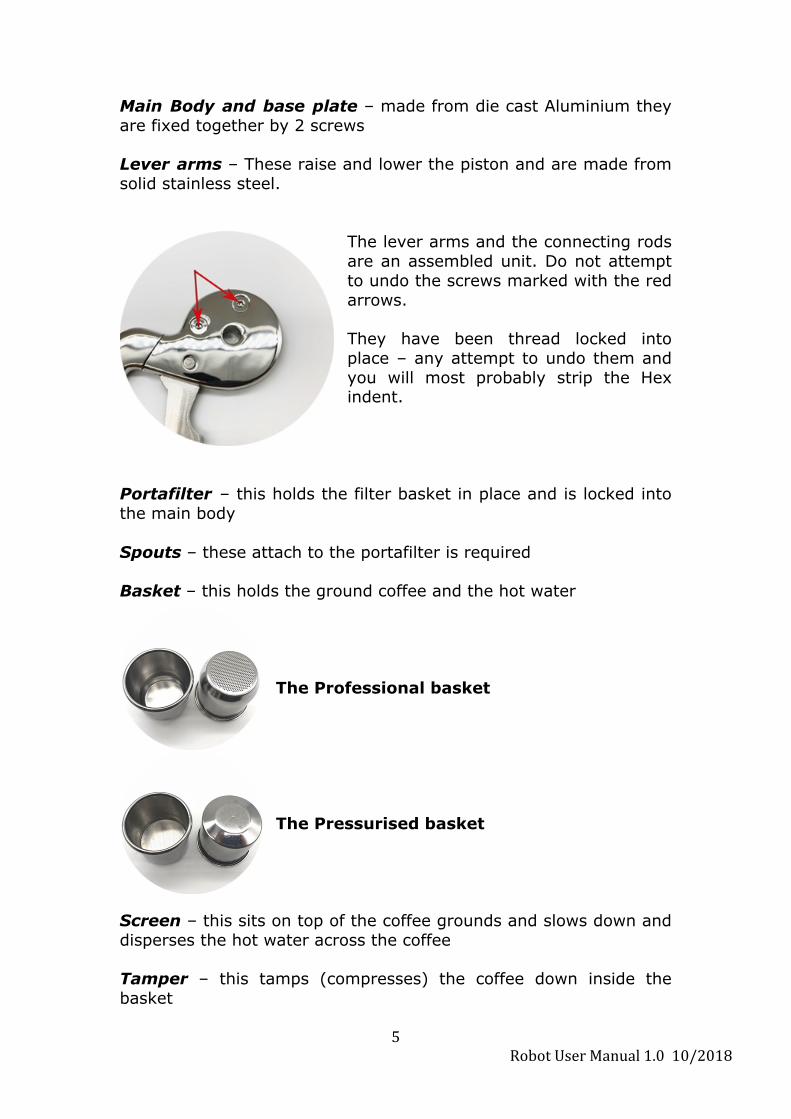
Main Body and base plate – made from die cast Aluminium they are fixed together by 2 screws Lever arms – These raise and lower the piston and are made from solid stainless steel.
The lever arms and the connecting rods are an assembled unit. Do not attempt to undo the screws marked with the red arrows. They have been thread locked into place – any attempt to undo them and you will most probably strip the Hex indent.
Portafilter – this holds the filter basket in place and is locked into the main body Spouts – these attach to the portafilter is required Basket – this holds the ground coffee and the hot water
The Professional basket The Pressurised basket
Screen – this sits on top of the coffee grounds and slows down and disperses the hot water across the coffee Tamper – this tamps (compresses) the coffee down inside the basket
RobotUserManual1.010/2018
6
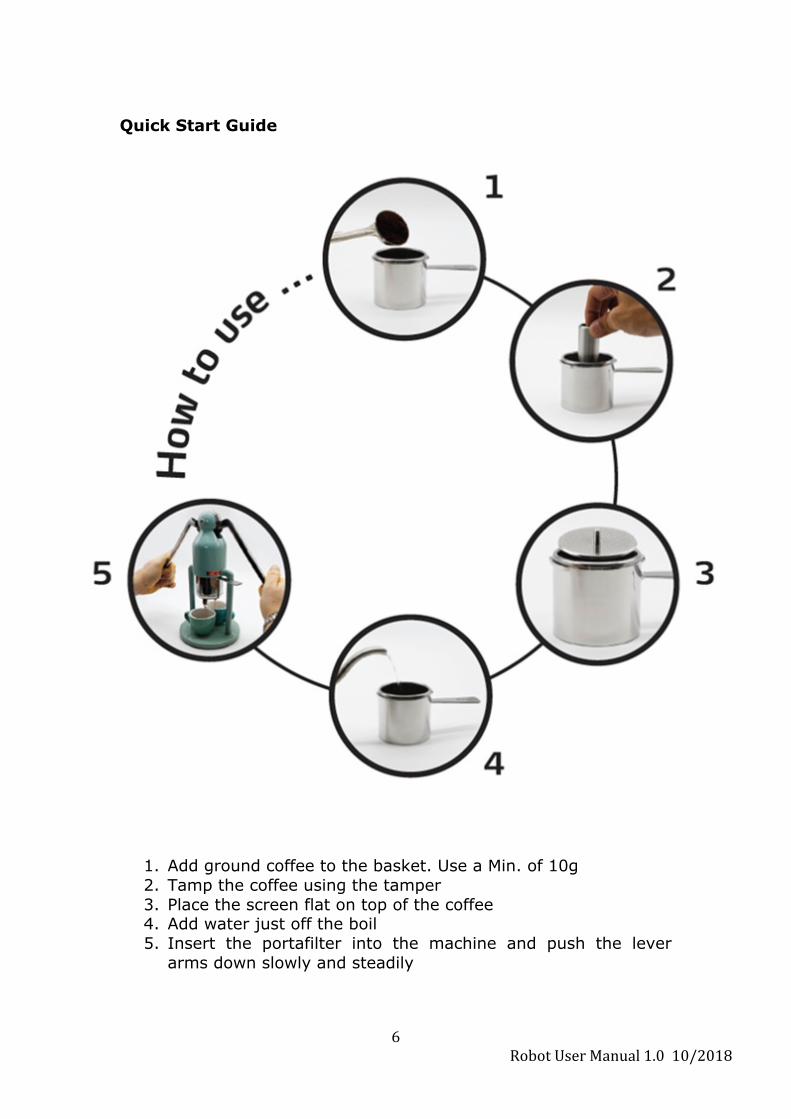
Quick Start Guide
1. Add ground coffee to the basket. Use a Min. of 10g 2. Tamp the coffee using the tamper 3. Place the screen flat on top of the coffee 4. Add water just off the boil 5. Insert the portafilter into the machine and push the lever
arms down slowly and steadily
RobotUserManual1.010/2018
7
4. Basic Overview of using the machine The Robot is capable of making real espresso coffee as defined by the Instituto Nazionale Espresso Italiano. http://www.espressoitaliano.org/ Modern espresso coffee can trace it’s origins back to the first lever coffee machine produced by Gaggia in 1948 which used a spring and a piston to force water at pressure through the coffee grounds. Such machines are referred to as Traditional Lever Coffee Machines. (TLCM) The Robot uses the exact same principal as a TLCM, except the power to drive the piston is not provided by a spring but by the user. The Robot does not have a boiler or a heating element, yet is still able to brew coffee the same as a TLCM thanks to it’s oversized filter basket which becomes a brewing chamber once it is filled with hot water. By raising or lowering the lever arms the piston is raised or lowered into the filter basket. It is important to find a sturdy table or counter on which to use the machine, trial and error will help you find a comfortable height to place the machine as well. For example a table that is lower than usual will help you get your shoulders over the machine and allow you to push the arms. Whereas a counter that is higher will allow you to bend over and pull the arms down - you may not get as much power in the shot but you will get a better look of the process. Having a counter that is level is important as a wonky counter may cause under or over extraction in one area of the basket. The Base Plate has a silicone gasket on the underside that prevents damage to your counter top and helps it to grip the surface.

RobotUserManual1.010/2018
8
Assembling the portafilter The handle that holds the filter basket and locks into the main body is called the Portafilter (PF). One of the most important developments in espresso in recent times has been the introduction of bottomless portafilters, (BPF) i.e. portafilters without spouts.
Above left photos shows the Regular PF (top) and BPF (bottom). Above right photos shows the o-ring seal in between the PF body and the Spout. BPFs allow the user to get a close-up view of the coffee exiting the basket on its journey into the cup. Not only does this look great, but it also gives you instant feedback on what is happening inside the filter basket. If you are unfamiliar with a BPF I highly recommend you do some research on these valuable tools. With regards our Robot I would say some benefits are:
• When you see the first drops of coffee appear on the underside you would say the coffee puck is fully infused
• You can tell if you have an even extraction – i.e. is the coffee exiting the basket evenly all over or just on one side/area?
• Any pinhole sprays would indicate poor preparation • More crema • Possibly hotter coffee in the cup
The main drawback of using a BPF is the fact that the coffee will be in one pour, if you want to make 2 single shots then you will need to install the plate, this will split the coffee into 2 streams. Since we are such big fans of using a BPF we have included our patented all-in-one system that means you can use the PF as either a regular PF or as a BPF. The PF assembly consists of the PF with the Spouts combined. The Spouts are press-fit held in place with

RobotUserManual1.010/2018
9
the help of a silicone o-ring. On first installation of the spouts into the PF body it may be necessary to use some silicone lubricant (such as Dow 111) or some water. The spout should be fairly tight in the PF body, if they are too loose, clean the o-ring as there may be too much lubricant on them or replace the o-ring. The basket is simply placed into the PF; there is no spring clip to hold it in place. To familiarize yourself with locking in the portafilter into the main body, you can practice without a basket in place.
RobotUserManual1.010/2018
10
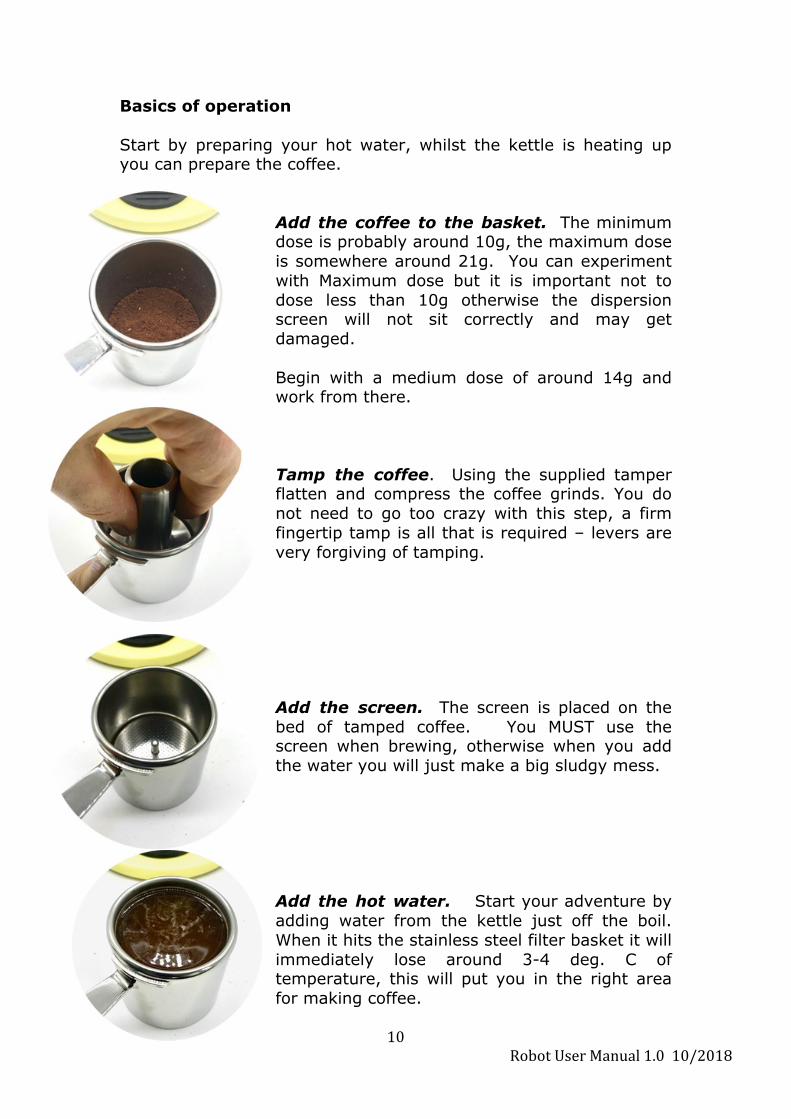
Basics of operation Start by preparing your hot water, whilst the kettle is heating up you can prepare the coffee.
Add the coffee to the basket. The minimum dose is probably around 10g, the maximum dose is somewhere around 21g. You can experiment with Maximum dose but it is important not to dose less than 10g otherwise the dispersion screen will not sit correctly and may get damaged. Begin with a medium dose of around 14g and work from there. Tamp the coffee. Using the supplied tamper flatten and compress the coffee grinds. You do not need to go too crazy with this step, a firm fingertip tamp is all that is required – levers are very forgiving of tamping. Add the screen. The screen is placed on the bed of tamped coffee. You MUST use the screen when brewing, otherwise when you add the water you will just make a big sludgy mess. Add the hot water. Start your adventure by adding water from the kettle just off the boil. When it hits the stainless steel filter basket it will immediately lose around 3-4 deg. C of temperature, this will put you in the right area for making coffee.

RobotUserManual1.010/2018
11
It is important not to overfill the basket with water. You must leave around 5-8mm of space between the top of the water and the rim of the basket. If it is filled higher you will notice water leaking when you put the PF in place. It is also important not to under fill the basket either. Air compresses whereas water does not, if you have a large void full of air the lever press will feel a bit spongy and not give you good feedback on the pressure you are extracting.
Extraction. Carefully move the PF to the machine and lock it in place. To do so you will have to lift the lever arms to raise the piston. The arms must be raised all the way to the top in order to correctly lock the PF in. The PF should be inserted all the way to the right as far as it will go.
Now slowly lower the arms and you will feel some resistance as the water meets the coffee. This initial meeting of the coffee and water is called pre-infusion, it is when water permeates through the coffee and causes it to swell. Pre-infusion is usually done at a much lower pressure then during full extraction. Press the lever arms down firmly and in one motion. Do not attempt to pump the arms up and down, as this will just disturb the puck, the screen and the water. It will result in a big mess and make very poor coffee. In fact even letting go of the levers for a tiny amount will ruin a shot. So it is best to keep a firm even pressure on the levers at all times. A tailing-off pressure is fine, but no sudden start-stops. Experimentation is the key.
Extraction time. As you are starting out I would say you need at least 5 seconds from when the levers descend and you see coffee appear on the bottom of the basket, and a minimum of 15 seconds of actual coffee flowing from the basket when you are pushing the levers down.

RobotUserManual1.010/2018
12
Ending the shot. The coffee maker has the capacity to make a full double shot of well in excess of 50-60g of Beverage. However you may chose to end the shot at any time by just simply stopping pressing the levers down and removing your cup. The coffee will stop extracting at this point – a tip to prevent any drips is to lift the levers a fraction and it will suck back the water and stop the flow. Cleaning. At this point you should place a spare cup or container under the spouts – this will collect the water/coffee left in the PF. If you were to simply remove the PF at this point you will be left with a sludgy mess, what we want to see is a nice hard coffee cake that is easy to dispose of. With your extra cup or container under the spouts, life the levers and push them down again, this will express the remaining water from the basket in the form of some weak coffee (which is why we do not “pump” the arms). You may have to repeat this a 2nd time, as you will notice how spongy and soft the pressures now are (which is why we do not like a big air void above the water). You will know when all water has been forced through the coffee when you can hear, and possibly see, a whoosh of air pass through the coffee. Now you can remove the PF. Lift the levers to the top again, and then remove the PF. It will still be hot at this point so either cautiously remove the filter screen or let it cool for a few moments. With the screen removed you may now “knock out’ the puck.

RobotUserManual1.010/2018
13
5. Advanced coffee making with the professional basket The basics in section 4 will provide you with a good foundation on how the machine works, but as with everything, practice makes perfect and so here are some extra tips on using the professional coffee basket. The Robot is exactly the same as any high-end coffee machine, for example the advanced basics would be:
• Use fresh coffee from a local coffee roaster (local so it is fresh)
• Use a decent burr coffee grinder and grind just before you will use it
• The grind setting will roughly be in the same area as your grind setting for a regular machine
• Start with a 14g dose and work from there • For best results use the BPF
As you get more familiar with the machine you can then start to take things to the next level, but before we do let us take a moment to talk about extraction pressure. The 9 bar magic number. Ignore that number when dealing with a lever machine. In my experience TLCM rarely extract above 7 bars pressure. The 9 bar pressure has come from the Faema E61 machine, where the pressure was taken from the water inlet to the coffee machine, the extraction pressure at the actual group head was much less, possibly even 1 bar lower. But 9 bars was adopted as the gold standard. On the Robot you should be aiming for an extraction pressure of somewhere between 6-7 bars. Feel free of course to experiment but that is what I have found works best so far. Bathroom scales and pressure For Robots with the Pressure Gauge Kit you can see the extraction pressure. For regular Robots you can use a set of bathroom scales to test your pressure. Place the Robot on some bathroom scales and make coffee as usual. Registering around 17kg on the scales when pressing the levers down will put you in the right area of around 6-7 bars.
RobotUserManual1.010/2018
14
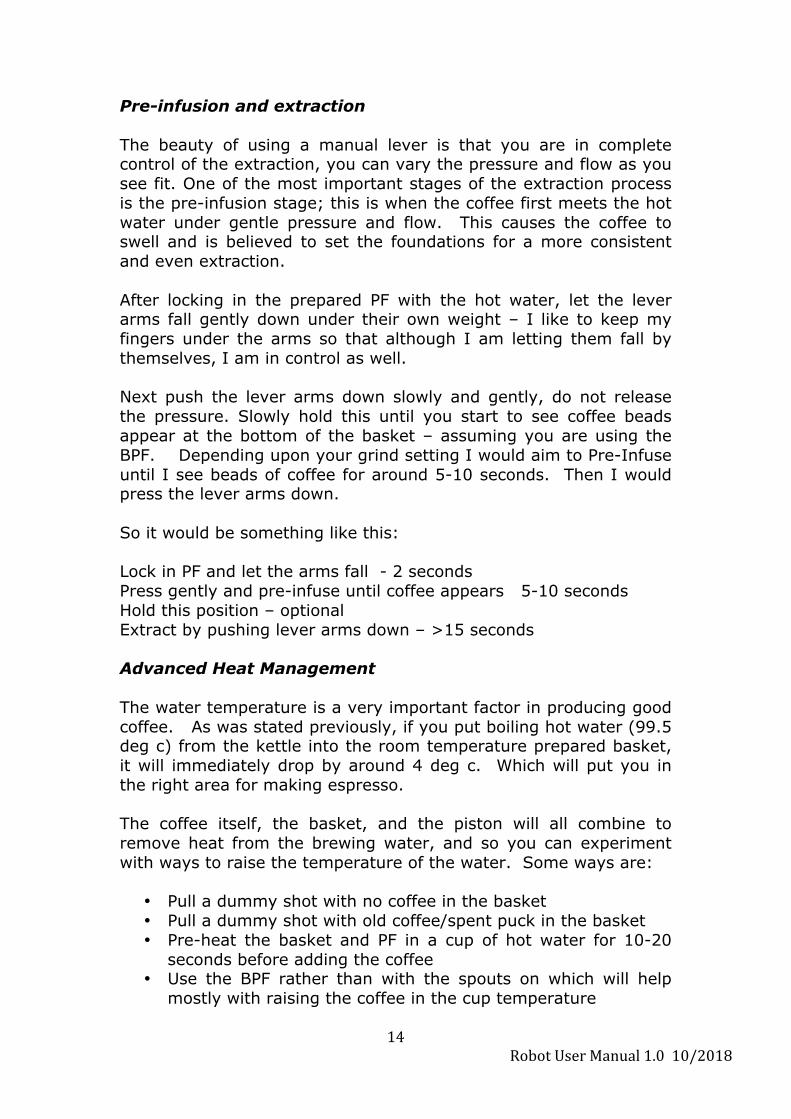
Pre-infusion and extraction The beauty of using a manual lever is that you are in complete control of the extraction, you can vary the pressure and flow as you see fit. One of the most important stages of the extraction process is the pre-infusion stage; this is when the coffee first meets the hot water under gentle pressure and flow. This causes the coffee to swell and is believed to set the foundations for a more consistent and even extraction. After locking in the prepared PF with the hot water, let the lever arms fall gently down under their own weight – I like to keep my fingers under the arms so that although I am letting them fall by themselves, I am in control as well. Next push the lever arms down slowly and gently, do not release the pressure. Slowly hold this until you start to see coffee beads appear at the bottom of the basket – assuming you are using the BPF. Depending upon your grind setting I would aim to Pre-Infuse until I see beads of coffee for around 5-10 seconds. Then I would press the lever arms down. So it would be something like this: Lock in PF and let the arms fall - 2 seconds Press gently and pre-infuse until coffee appears 5-10 seconds Hold this position – optional Extract by pushing lever arms down – >15 seconds Advanced Heat Management The water temperature is a very important factor in producing good coffee. As was stated previously, if you put boiling hot water (99.5 deg c) from the kettle into the room temperature prepared basket, it will immediately drop by around 4 deg c. Which will put you in the right area for making espresso. The coffee itself, the basket, and the piston will all combine to remove heat from the brewing water, and so you can experiment with ways to raise the temperature of the water. Some ways are:
• Pull a dummy shot with no coffee in the basket • Pull a dummy shot with old coffee/spent puck in the basket • Pre-heat the basket and PF in a cup of hot water for 10-20
seconds before adding the coffee • Use the BPF rather than with the spouts on which will help
mostly with raising the coffee in the cup temperature

RobotUserManual1.010/2018
15
6. Advanced coffee making with the pressurized basket Making coffee with the pressurized basket is extremely easy. Whilst the kettle is boiling you can prepare the basket and by the time the kettle has boiled you just need to add the water, pull the shot and within 20 seconds you are all done. Make sure you are adding at least 10g of coffee. Less than that and you risk damaging the screen. You can also follow the temperature guidelines listed in section 4. The measuring spoon provided will dose approx. 7g of coffee per level measure. You must use the Spouts with the pressurized basket, the pressurized basket has flow restrictor in place which is a precision stamped orifice, properly calibrated to create sufficient back pressure to mimic extraction pressure of around 8 bars. If you do not use the spouts you will get a very small stream of coffee exiting the basket and it will make a huge frothy mess in your cup. It will raise the temperature of the coffee drink enormously if you pull a dummy shot with hot water first. 7. Pressure gauge kit - Patented The pressure gauge kit is an optional accessory that is added to the Robot, this enables you to measure the extraction pressure from inside the basket itself and provides real time feedback. A full parts breakdown is given on page 20. The pressure gauge is permanently fixed to the bracket and then to the female fitting on the back. A filter screen is then placed between that and the elbow fitting on the back. The hydraulic connection to the piston is then made with a 4mm OD FDA approved tube made by Parker Legris. The tube fittings are called quick connect push fittings, they are simply pushed into the fitting.
To remove the tube from these fittings you must push down the locking collar whilst at the same time pulling the pipe out of the fitting. Please refer to the photo.

RobotUserManual1.010/2018
16
Please do not tamper or try and remove the pressure gauge. The gauge itself has been locked in place with the 13mm hexagonal fitting on the back. There is no need to try and remove the gauge, you may remove the elbow fitting on the back and inspect for blockages if required. 8. Care and Maintenance The machine is relatively maintenance free and requires little in the way of maintenance. Since the parts that contact water are stainless steel they will wipe clean with a cloth. From time to time you may use a commercial coffee machine detergent to soak the parts in. In particular the basket, screen and spouts would benefit most from this. Please refer to the manufacturers instructions for that, but I would use half a teaspoon in roughly 500ml of hot water and soak for maybe 5-10 minutes. Rinse well with clean water afterwards. There is no reason to put any parts of the Robot in a dishwasher! The steel parts would handle this of course but there is no need. The main body of the Robot needs just a clean with a damp and dry cloth from time to time. The aluminium model may be buffed and shined with a metal polish such as Autosol. The only part of the machine that would require any lubrication is the silicone seal. For this you should use a silicone-based lubricant such as Dow 111 and only to give the seal sheen.

RobotUserManual1.010/2018
17
9 Troubleshooting The Robot is so simple and should give you plenty of trouble free coffee shots, if it is set-up and being used correctly. This guide applies to all Robots. Text in red are specific to the pressure gauge kit Robots. Water leaks from the top of the PF when I try and brew.
• Basket has been overfilled with water. Leave around 5-8mm gap
• Silicone seal is not fitted correctly • Silicone seal could do with some Dow 111 • Silicone seal may need replacement (unlikely)
Coffee seems weak and watery
• Adjust the grind finer • Increase the coffee dose – use a minimum of 10g • Stale coffee – use fresher coffee • Using pre-ground coffee in a professional basket – use the
Pressurised basket for pre-ground coffee • Water is not hot enough, pour boiling water straight from the
kettle • Not enough pressure – use greater force on the levers • Do not do multiple lever pumps such as the infamous “Fellini
move” Little coffee is coming out
• Grind coarser • Decrease the dose – recommended maximum is 21g • Press the levers down with more force • A leak from the piston plug meaning pressure and water is
leaking inside the piston (unlikely but still possible) • A leak from pressure gauge hydraulic system from the piston
fitting up to the gauge
The pressure gauge registers very little pressure
• Push the levers down with more force if that makes no change to the gauge…
• Coffee is ground too coarse (this would also show up with a very “fast” shot)
• Check for leaks in the hydraulic circuit, you would see water drops or hear air hissing from somewhere along the tube
RobotUserManual1.010/2018
18
• It is unlikely but possible the gauge is broken. Use the Robot with the piston plug installed and contact Cafelat.
Dispersion screen is dented or damaged
• Lower the dose • Screen was not installed correctly • The multiple pump technique was used – this will cause the
screen to move and will result in it smashing into the piston Coffee seems to be “cold”
• Use water from the kettle straight from boiling • Try a dummy shot first to pre-heat the components • If using the Pro Basket use as a BPF
Coffee using the Pressurised Basket is very frothy
• Must be used with the spouts installed for it to work Cannot install the portafilter into the main body
• Ensure the silicone seal is installed correctly • Make sure you lift BOTH lever arms when attempting to lock it
in place • May be time to relube the seal •
The Aluminium finish or the powder coated finish is scratched
• Use the silicone mat under the cups • Relax it is just a tool for making coffee!
RobotUserManual1.010/2018
19
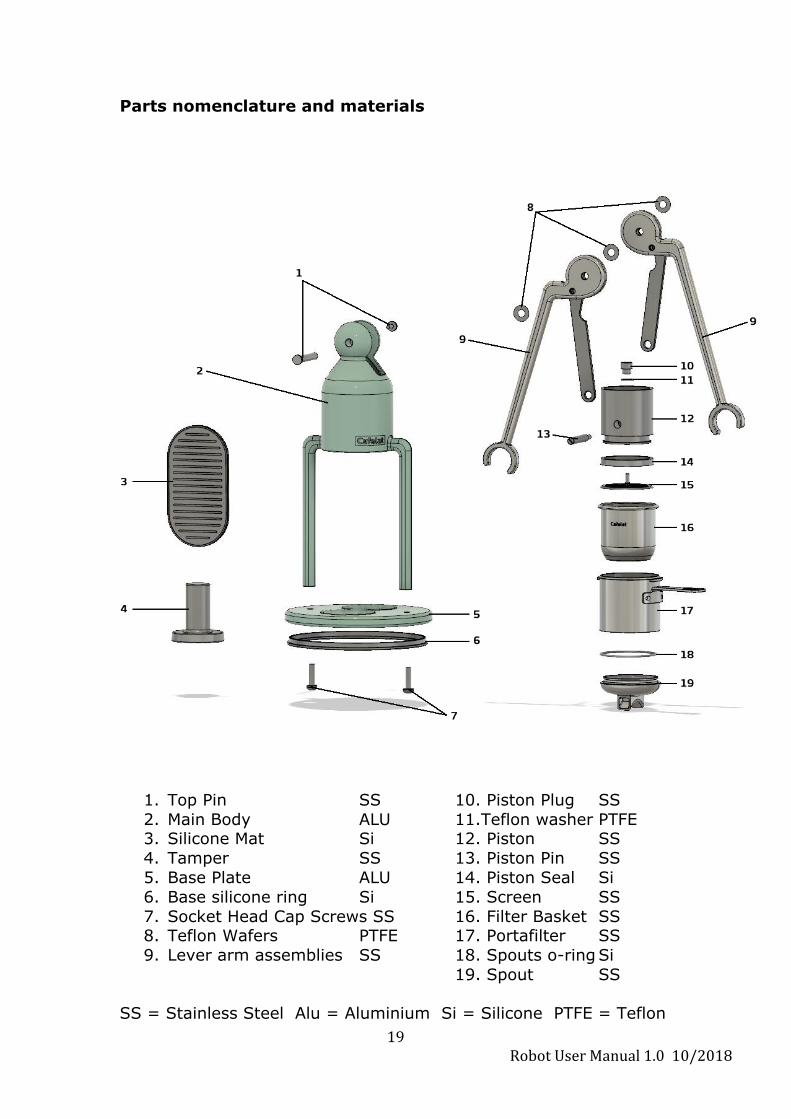
Parts nomenclature and materials
1. Top Pin SS 10. Piston Plug SS 2. Main Body ALU 11.Teflon washer PTFE 3. Silicone Mat Si 12. Piston SS 4. Tamper SS 13. Piston Pin SS 5. Base Plate ALU 14. Piston Seal Si 6. Base silicone ring Si 15. Screen SS 7. Socket Head Cap Screws SS 16. Filter Basket SS 8. Teflon Wafers PTFE 17. Portafilter SS 9. Lever arm assemblies SS 18. Spouts o-ring Si
19. Spout SS
SS = Stainless Steel Alu = Aluminium Si = Silicone PTFE = Teflon

RobotUserManual1.010/2018
20
Pressure gauge kit parts
1. Manometer 8. Fitting 1/8 BSPP 2. Bracket 9. Viton o-ring 3. Grub Screws x 2 10. Piston 4. Female 1/8 BSPP fitting 11. Piston Seal 5. Filter Screen 6. Elbow Fitting 1/8BSPP 7. 4mm OD flexible tube

RobotUserManual1.010/2018
21
Fasteners guide
All the fasteners have metric threads and use Metric tools
1. Piston Pin – use a 5mm allen key 2. Top Pin – use a 3mm allen key both ends 3. Piston plug – use a 6mm allen key 4. Bracket grub screws - use a 2mm allen key 5. Straight fitting - use an 9mm socket 6. Female fitting – use a 13mm spanner 7. Base Plate screws – use a 5mm allen key 8. Elbow fitting – use a 13mm spanner
RobotUserManual1.010/2018
22
For lubricating the piston seal and spout o-ring we recommend silicone grease such as Dow 111. For cleaning, do not use a dishwasher on the main body parts. The SS parts such as tamper, basket, spouts, screen and portafilter only require a rinse from time to time in hot water, but a wipe with a cloth will more than suffice. If required those parts may also be used with a commercial coffee detergent such as Puly Caff, Puro Caff, Urnex etc… Warranty Cafelat will provide a 1 years parts warranty on manufacturing defects only from the date of purchase – or from the date of shipping if it is a Kickstarter reward. The warranty does not cover damage from misuse and Cafelat will decide if the damage or malfunction was a manufacturing defect or user error. The warranty does not cover consumable parts such as the Piston Seal or the Dispersion screen.
Robot Design is Registered
Piston pressure gauge kit is Patented
Cafelat Limited 4/F Unit 4C
5 Lai Yip Street Kwun Tong Hong Kong
Tel +852 2345 0451
www.cafelat.com [email protected]
Related Documents