RMS Installation Guide
Dec 14, 2015
Pathmaker install guide
Welcome message from author
This document is posted to help you gain knowledge. Please leave a comment to let me know what you think about it! Share it to your friends and learn new things together.
Transcript

Installation Guide Installation Guide/RMS Network
Important User Notices Copyright 1991-2014 Delcam Ltd. All rights reserved. Delcam Ltd has no control over the use made of the software described in this manual and cannot accept responsibility for any loss or damage howsoever caused as a result of using the software. Users are advised that all the results from the software should be checked by a competent person, in accordance with good quality control procedures. The functionality and user interface in this manual is subject to change without notice in future revisions of software. The software described in this manual is furnished under licence agreement and may be used or copied solely in accordance with the terms of such licence. Delcam Ltd grants permission for licensed users to print copies of this manual or portions of this manual for personal use only. Schools, colleges and universities that are licensed to use the software may make copies of this manual or portions of this manual for students currently registered for classes where the software is used. Acknowledgements This documentation references a number of registered trademarks and these are the property of their respective owners. For example, Microsoft and Windows are either registered trademarks or trademarks of Microsoft Corporation in the United States. Patents PartMaker software is subject to the following patents: Patent granted: US 6, 112, 133 Visual system and method for generating a CNC program for machining parts with planar and curvilinear surfaces Patent granted: US 6, 741, 905 Visual system for programming of simultaneous and synchronous machining operations on lathes
Delcam 2015. Published on 15 January 2015

Copyright @2014 Delcam Ltd Installation Guide i
Introduction ..................................................................................... 1
About this guide ........................................................................................... 1
System requirements ................................................................................... 1
Network Installation (RMS) ............................................................ 3
Overview of RMS networking ...................................................................... 3
How RMS licensing works ........................................................................... 4
Known issues with an RMS installation ....................................................... 5
Setting up the RMS host computer ............................................................. 6
Installing the files ..................................................................................................... 6 Loading Initial License File ...................................................................................... 8 Creating Services .................................................................................................... 9 Setting up networked client computers .................................................................. 10
Using the RMS License Manager ................................................ 11
Monitoring License Usage ......................................................................... 11
Installing and Updating License Files ........................................................ 14
Monitoring RMS License from Client Machine .......................................... 15
Reference Section ........................................................................ 17
Troubleshooting the license file ................................................................. 17
Installing multi-axis post processors for SwissCAM, Turn-Mill and Mill .... 19
Contents

Copyright @2014 Delcam Ltd Installation Guide 1
Introduction About this guide
This guide describes how to install the RMS network license for use with Delcam products:
Installing the Network License Manager (see page 6).
Setting up networked client computers (see page 9)
Reference sections (see page 7).
System requirements Please refer to the What’s New guide for the specific software product or the Delcam website, www.delcam.com, for the current system requirements.
The host computer must have a Windows operating system.
Installation Guide 2 Copyright @2014 Delcam
Network Installation (RMS)
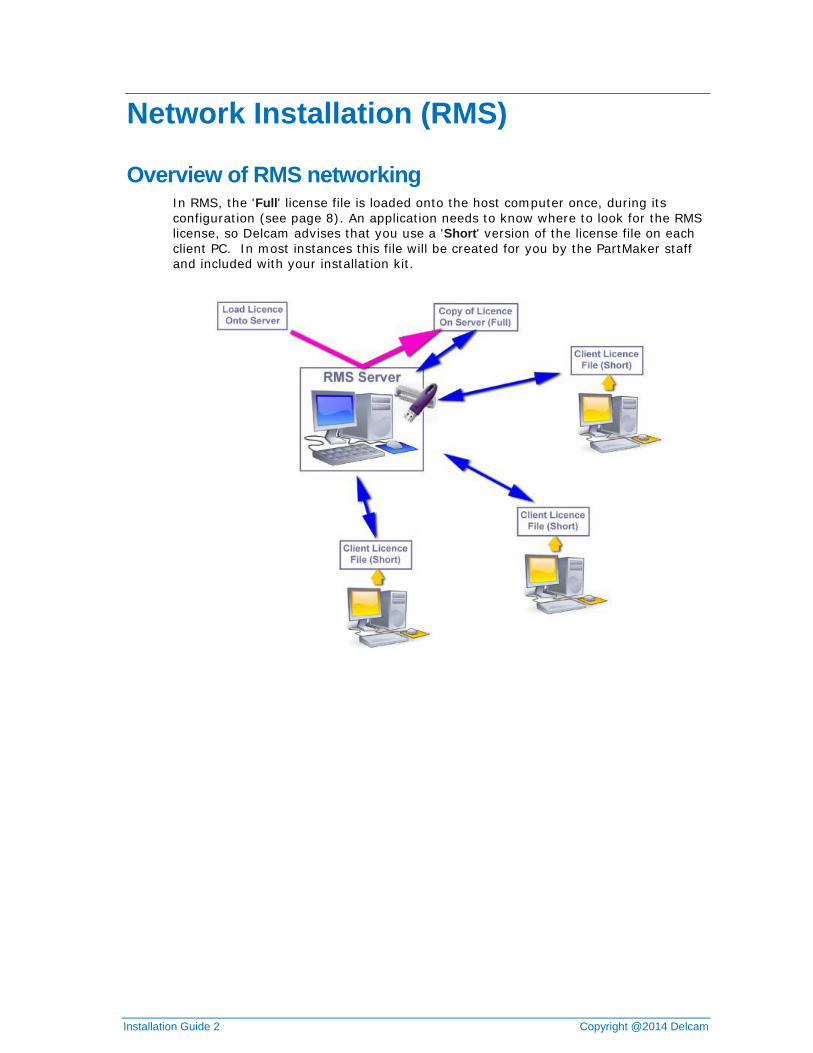
Overview of RMS networking In RMS, the 'Full' license file is loaded onto the host computer once, during its configuration (see page 8). An application needs to know where to look for the RMS license, so Delcam advises that you use a 'Short' version of the license file on each client PC. In most instances this file will be created for you by the PartMaker staff and included with your installation kit.
Copyright @2014 Delcam Ltd Installation Guide 3
How RMS licensing works RMS licensing protection works as follows:
Licensing multiple sessions of PartMaker Each PartMaker license enables you to run two sessions of a PartMaker application on a computer.
For example, if there are three PartMaker/SwissCAM licenses available and you run multiple sessions of PartMaker on a computer, the licenses are allocated as follows:
1 SwissCAM session uses 1 license
2 SwissCAM sessions use 1 license
3 SwissCAM sessions use 2 licenses
4 SwissCAM sessions use 2 licenses
5 SwissCAM sessions use 3 licenses
6 SwissCAM sessions use 3 licenses.
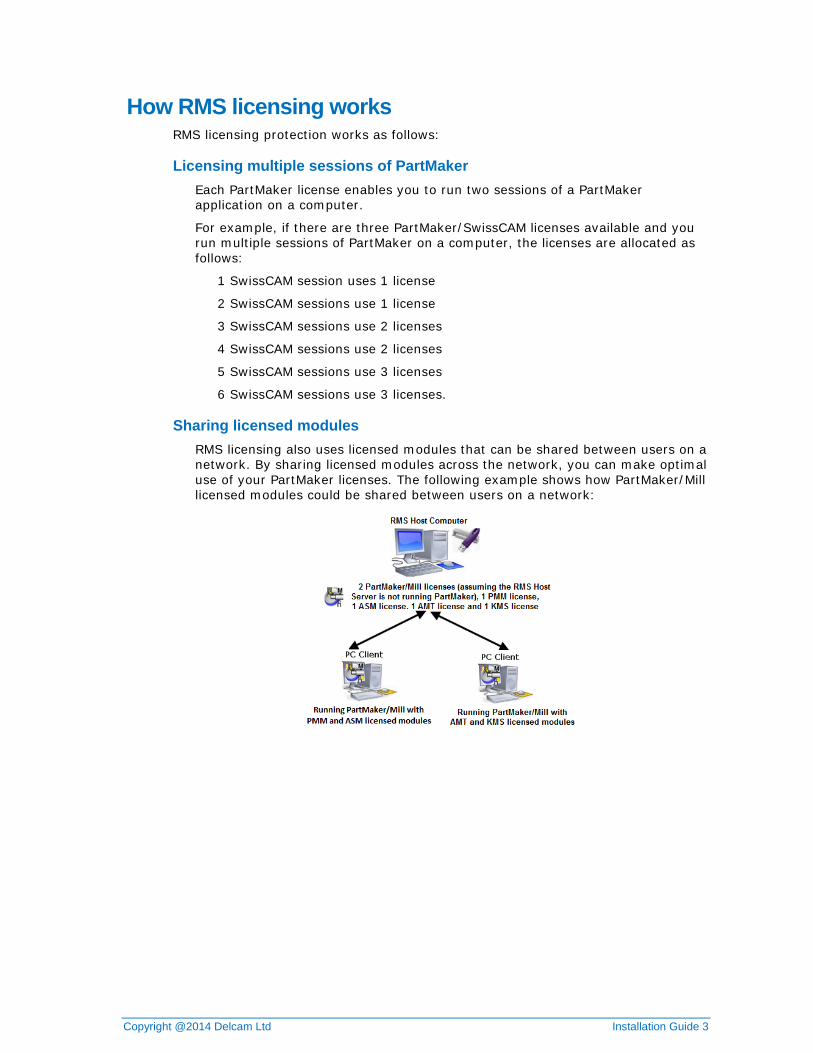
Sharing licensed modules RMS licensing also uses licensed modules that can be shared between users on a network. By sharing licensed modules across the network, you can make optimal use of your PartMaker licenses. The following example shows how PartMaker/Mill licensed modules could be shared between users on a network:
Installation Guide 4 Copyright @2014 Delcam
By default, PartMaker automatically allocates all of the licensed modules available for a product when the user starts that product on a client PC. However, you can share the licensed modules across the network using the following menu options:
Help > Release Licenses.
Help > Request Licenses.
To view details of your PartMaker license, select Help > License Info to display the License Info dialog.
Known issues with an RMS installation When installing the RMS network, be aware of the following issues:
At present, Delcam RMS is known to be incompatible when running in conjunction with any other RMS license that may already be running on your machine. For example, earlier versions of FeatureCAM have used RMS licensing and CGTech Vericut continues to use RMS licensing. The solution here is to read the Vericut license onto the PartMaker implementation of the RMS License Manager. This has been tested and found to work.
You must have Sentinel Protection Server installed and running on the host computer for RMS to work successfully. You should also ensure that the Sentinel Protection Server has access through your firewall; usually port 6001/2. This can be achieved by making an exception for the executable spnsrvnt.exe. Installing the Sentinel Protection Server with a download available from SafeNET (http://www.safenet-inc.com/support-downloads/sentinel-drivers) will normally make this exception for you. However, it is not done by default when installing the RMS kit.
Delcam recommends that you disable the Sentinel Protection Server on client machines because it can increase the start-up time for some products.
You must also allow an exception on your firewall for delcam_rms.exe. You will normally be asked to provide access the first time that you run the ‘test mode’ discussed in Setting up the RMS host (see page 6).
Flex 4004 installs and runs successfully on Windows 7. During the installation you will have to allow access through the firewall. With UAC turned on, you will have to run all processes as an Administrator.
Copyright @2014 Delcam Ltd Installation Guide 5
Setting up the RMS host computer
Installing the files 1 Insert the Support Files CD into the computer’s CD drive.
If install files were sent electronically, ensure they are unzipped before proceeding.
2 Run the file, Delcam Flex4004.msi, found in the RMS Installation Kit folder.
3 Choose the defaults during the installation.
A REBOOT WILL BE REQUIRED AT THIS TIME.
4 Once the computer has completed restarting, attach the dongle ensuring that the end of the dongle lights up.
If it does not, it is most likely not being recognized by the computer and a newer driver is needed from SafeNet. Visit http://www.safenet-inc.com/support-downloads/sentinel-drivers and download the latest version of Sentinel Driver.
If prompted for reboot after installing the driver, it is not required and can be skipped.
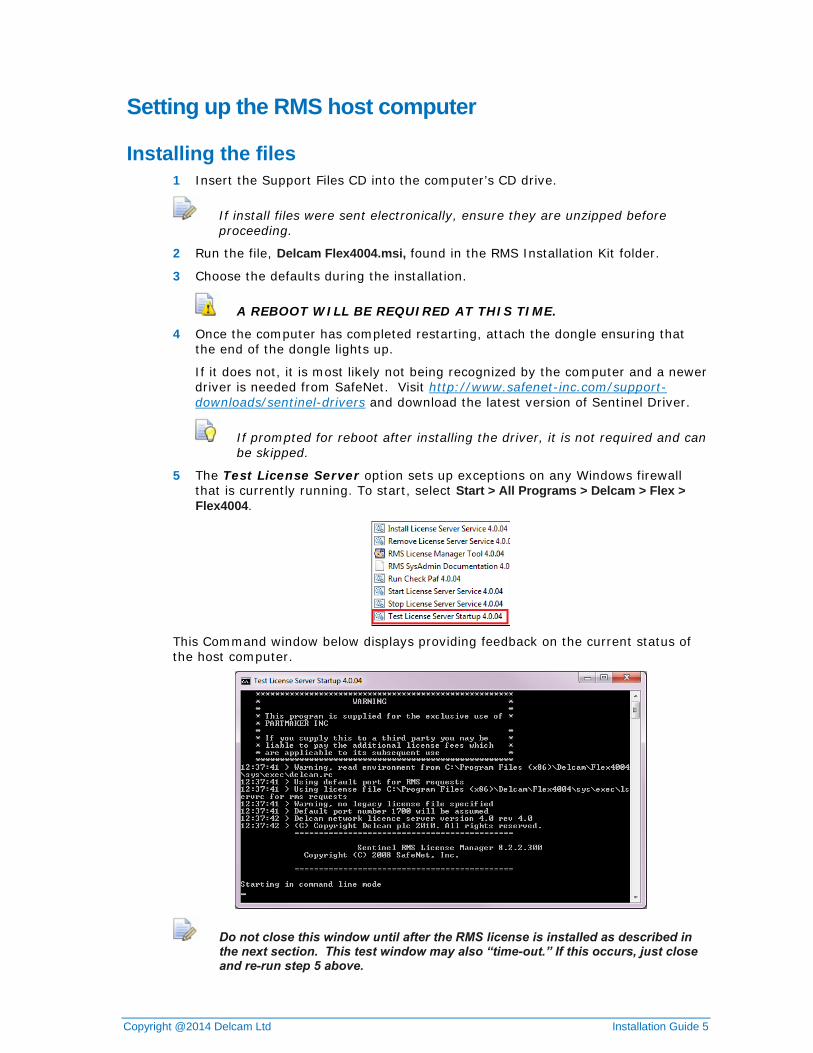
5 The Test License Server option sets up exceptions on any Windows firewall that is currently running. To start, select Start > All Programs > Delcam > Flex > Flex4004.
This Command window below displays providing feedback on the current status of the host computer.
Do not close this window until after the RMS license is installed as described in the next section. This test window may also “time-out.” If this occurs, just close and re-run step 5 above.

Installation Guide 6 Copyright @2014 Delcam
6 Start the RMS License Manager Tool from Start > All Programs > Delcam > Flex > Flex4004.
7 Click to expand the Subnet Servers list. You should see your server running as
shown below:
Note: If network broadcast messages are blocked by a firewall, you may not see the server listed and the following message may display.
Copyright @2014 Delcam Ltd Installation Guide 7
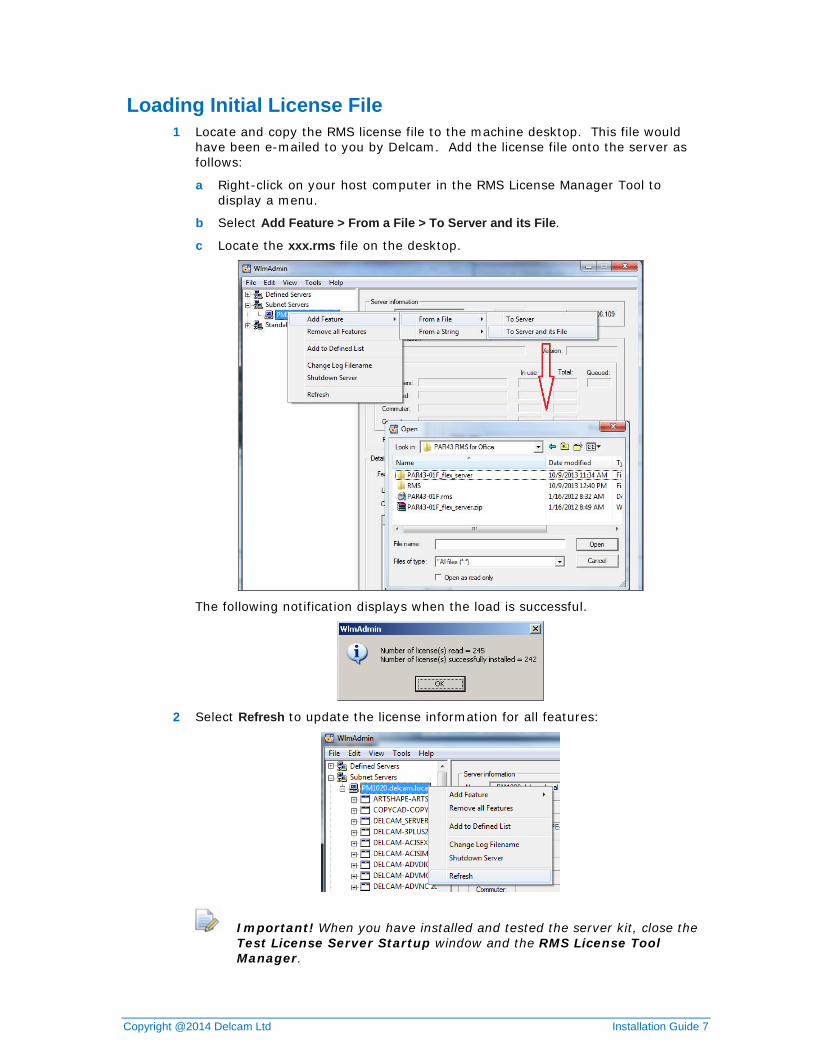
Loading Initial License File 1 Locate and copy the RMS license file to the machine desktop. This file would
have been e-mailed to you by Delcam. Add the license file onto the server as follows:
a Right-click on your host computer in the RMS License Manager Tool to display a menu.
b Select Add Feature > From a File > To Server and its File.
c Locate the xxx.rms file on the desktop.
The following notification displays when the load is successful.
2 Select Refresh to update the license information for all features:
Important! When you have installed and tested the server kit, close the Test License Server Startup window and the RMS License Tool Manager.
Installation Guide 8 Copyright @2014 Delcam
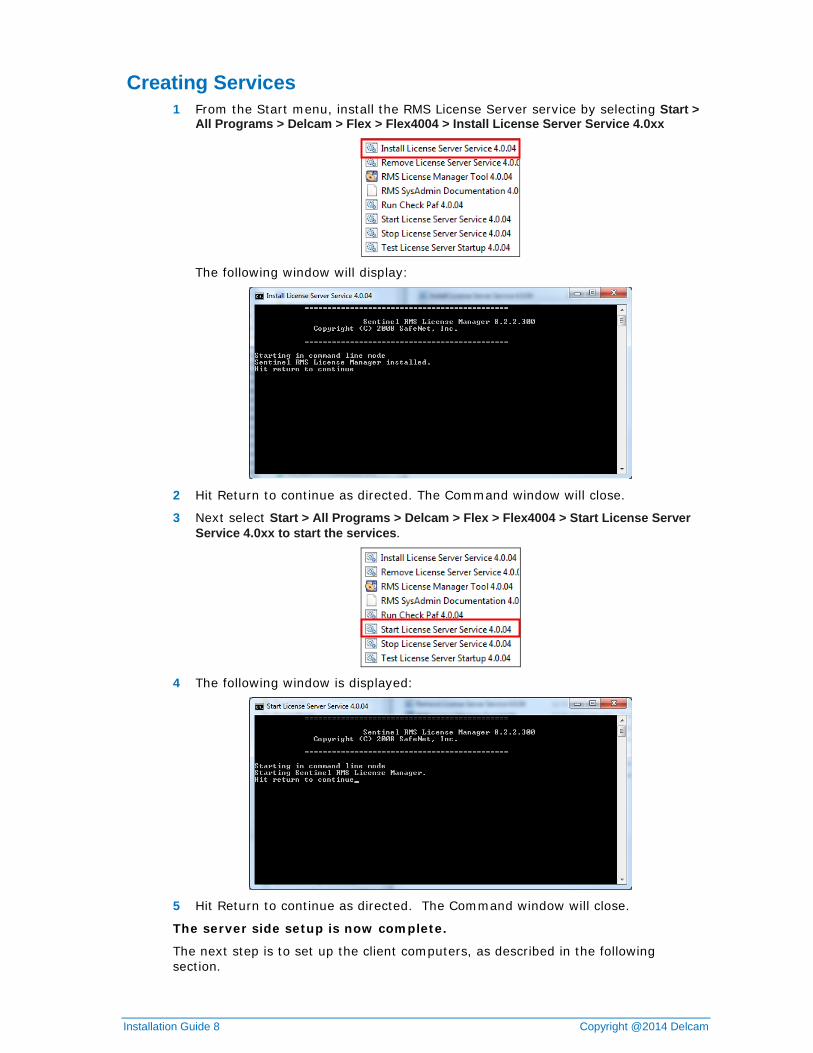
Creating Services 1 From the Start menu, install the RMS License Server service by selecting Start >
All Programs > Delcam > Flex > Flex4004 > Install License Server Service 4.0xx
The following window will display:
2 Hit Return to continue as directed. The Command window will close.
3 Next select Start > All Programs > Delcam > Flex > Flex4004 > Start License Server Service 4.0xx to start the services.
4 The following window is displayed:
5 Hit Return to continue as directed. The Command window will close.
The server side setup is now complete.
The next step is to set up the client computers, as described in the following section.
Copyright @2014 Delcam Ltd Installation Guide 9
Setting up networked client computers First install the Delcam software on each client computer according to the instructions found in the What’s New guide that is included with its installation kit.
Each client PC needs to have a Short version of the license file. This file directs the PartMaker application to look at the license file on the RMS host computer rather than a local license file. The advantage of this approach is that you only have to set up licensing on the client PC once. If, at a future date, there is a license update then you only need to update the RMS license on the host computer, which is useful on a large network with many clients.
The name of the Short license file is dcam.rms which is included on the Support Files CD partially customized with the assigned dongle ID.
Add server name to short license file 1 Using Notepad, open the RMS Client Files folder on the Support Files CD folder
and copy the dcam.rms file to the desktop.
2 In the file, change XXXXXXX to the name of the RMS host computer, where the RMS license is installed (for example, PartMaker-Server). Use only the computer name; the domain is not required.
Make sure the file does not have the .txt file extension when saving.
Copy short license file to client 1 Place the dcam.rms file in the C:\Program Files\Common Files\Delcam
folder of each client PC.
If this is a conversion from a standalone configuration, check the following folders to make sure all files with the extension *.paf have been removed:
C:\Program Files\Common Files\Delcam
C:\Program Files (x86)\Common Files\Delcam
C:\dcam\config\pass
2 Test the installation by running one of the Delcam applications installed.
Tip: Save the dcam.rms file in a network-accessible location to make it easier to set up multiple client computers.
If you use post processors for SwissCAM, TurnMill or Production Milling Module (PartMaker Mill), make sure they are installed (see page 19) before starting to use PartMaker.
Installation Guide 10 Copyright @2014 Delcam
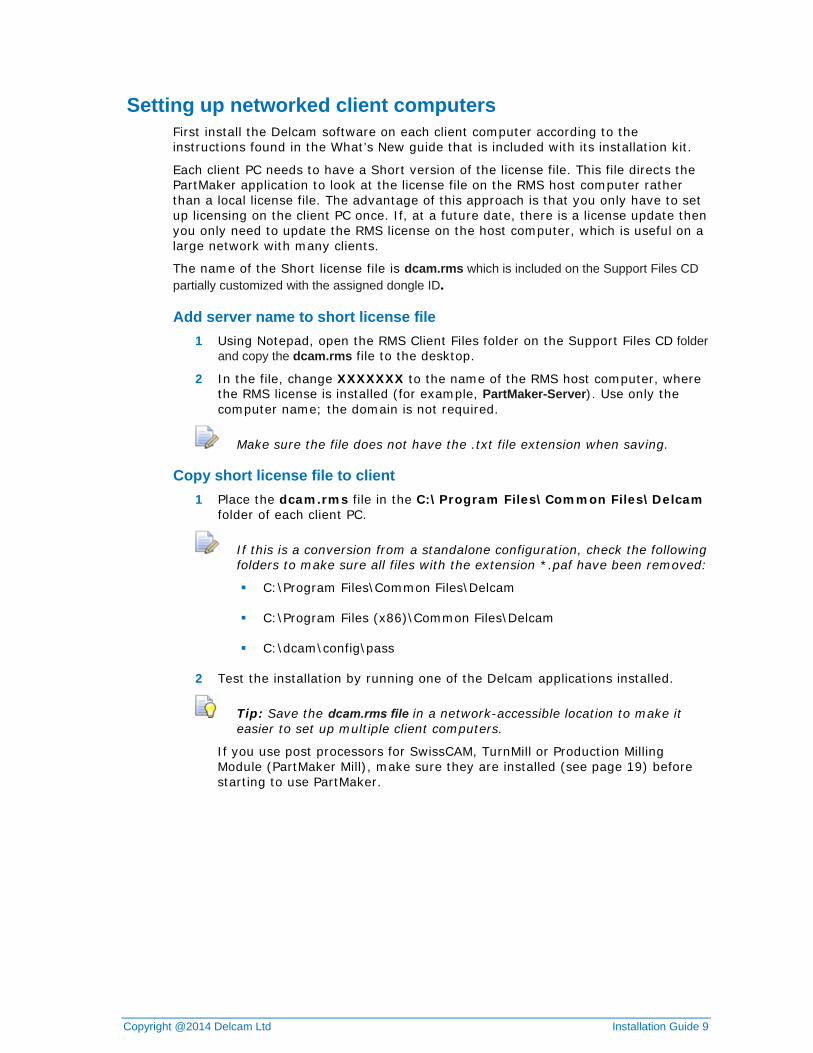
Using the RMS License Manager The RMS License Manager Tool is used periodically for monitoring usage and installing updated license files. To use the RMS License Manager Tool, select Start > All Programs > Delcam > Flex > Flex4004.
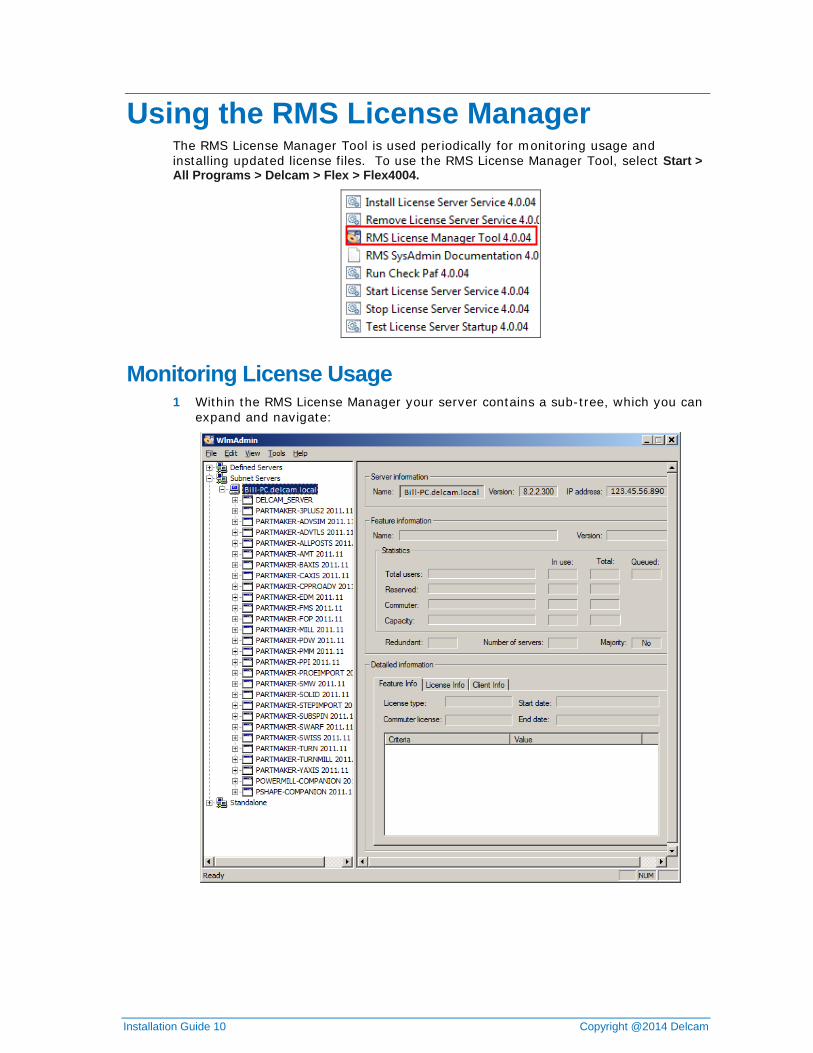
Monitoring License Usage 1 Within the RMS License Manager your server contains a sub-tree, which you can
expand and navigate:
Copyright @2014 Delcam Ltd Installation Guide 11
2 Expanding each license enables you to monitor the total number of licenses available for each 'feature,' how many licenses are currently in use, who is using them and where:
In this example Bill-PC is set as the RMS server. There are a total of three PartMaker/SwissCAM licenses. One instance of PartMaker/SwissCAM is launched from the client computer JohnPC. Two licenses of PartMaker/SwissCAM are still available.
Installation Guide 12 Copyright @2014 Delcam
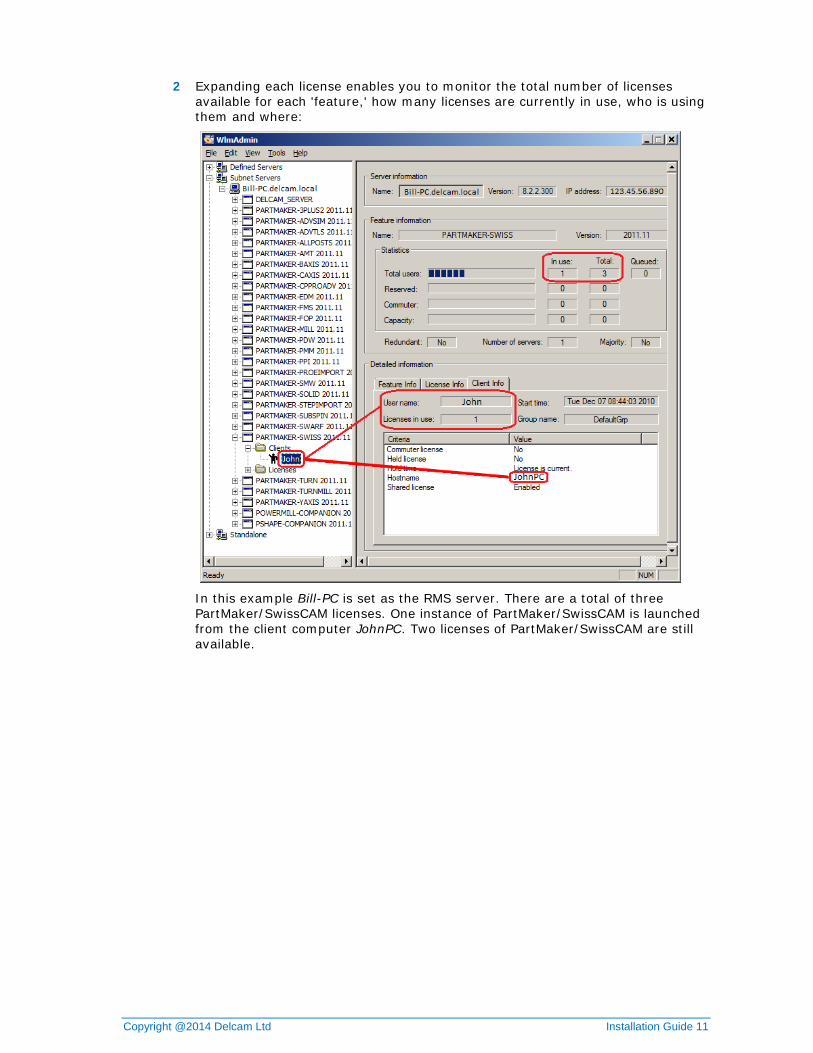
3 You can use this functionality to check how many licenses are in use compared with the number of sessions that have been started on a machine. PartMaker allows you to open two sessions of the same application on a computer.
In this example Bill-PC is set as the RMS server. There are three PartMaker/SwissCAM licenses. Now there are two instances of PartMaker/SwissCAM launched from JohnPC. Two licenses of PartMaker/SwissCAM are still available.
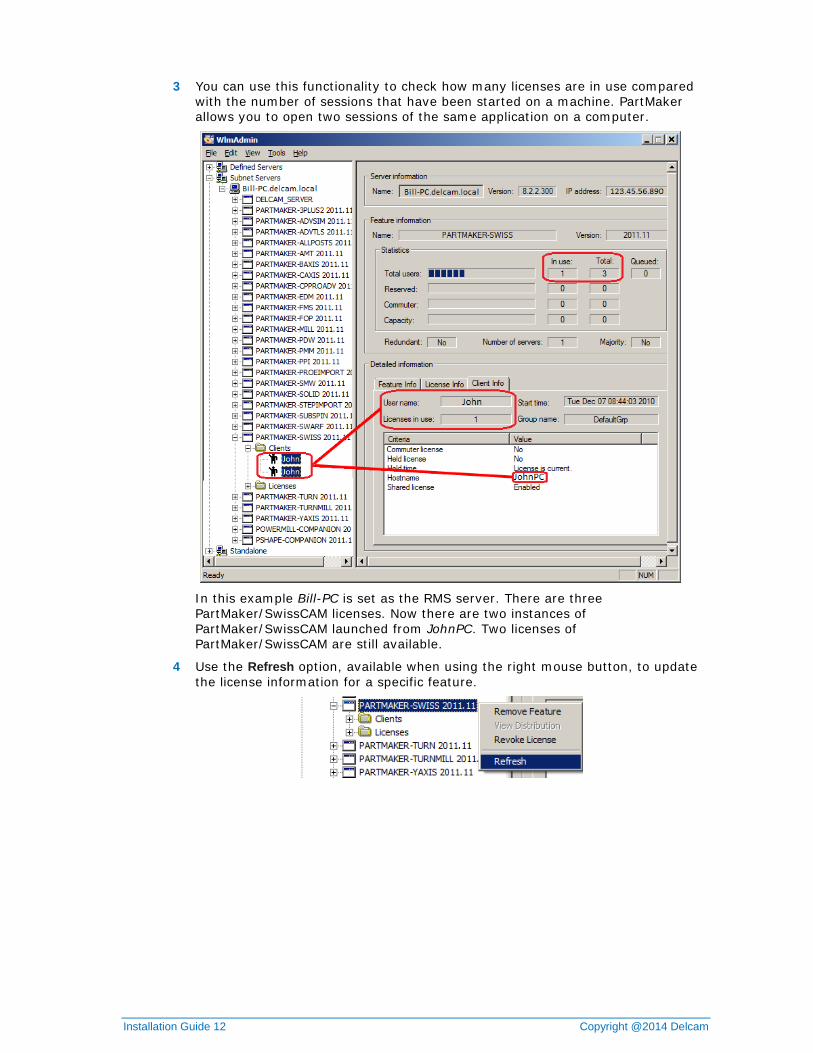
4 Use the Refresh option, available when using the right mouse button, to update the license information for a specific feature.
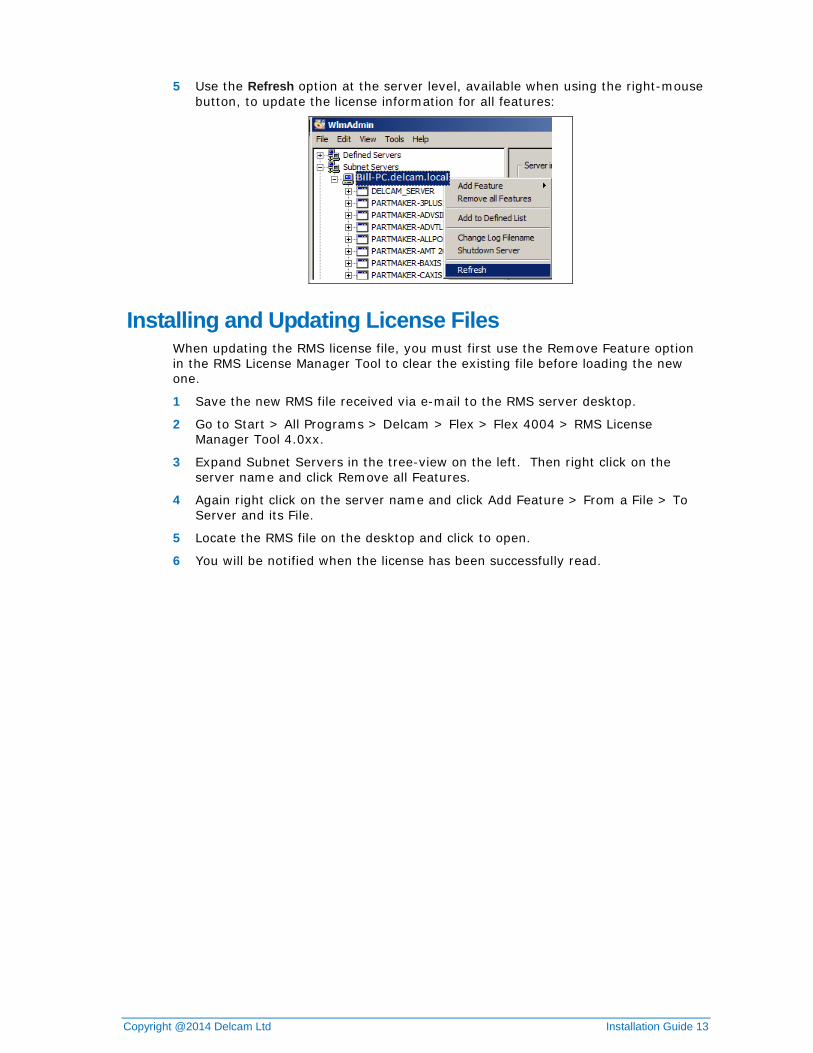
Copyright @2014 Delcam Ltd Installation Guide 13
5 Use the Refresh option at the server level, available when using the right-mouse button, to update the license information for all features:
Installing and Updating License Files When updating the RMS license file, you must first use the Remove Feature option in the RMS License Manager Tool to clear the existing file before loading the new one.
1 Save the new RMS file received via e-mail to the RMS server desktop.
2 Go to Start > All Programs > Delcam > Flex > Flex 4004 > RMS License Manager Tool 4.0xx.
3 Expand Subnet Servers in the tree-view on the left. Then right click on the server name and click Remove all Features.
4 Again right click on the server name and click Add Feature > From a File > To Server and its File.
5 Locate the RMS file on the desktop and click to open.
6 You will be notified when the license has been successfully read.
Installation Guide 14 Copyright @2014 Delcam
Monitoring RMS License from Client Machine The RMS License Manager Tool can be set up on a client computer for monitoring the individual license usage. This allows the license administrator to view this information from their machine directly rather than accessing the server either directly or remotely.
This local installation of the RMS License Manager Tool should not be used to install or update the actual license file. This should always be completed on the server.
You will either need the RMS Installation CD or the files in order to complete this task.
1 Create a folder named Local RMS License Tool on the client computer in your documents folder or where desired
2 Insert and browse the RMS License Installation CD
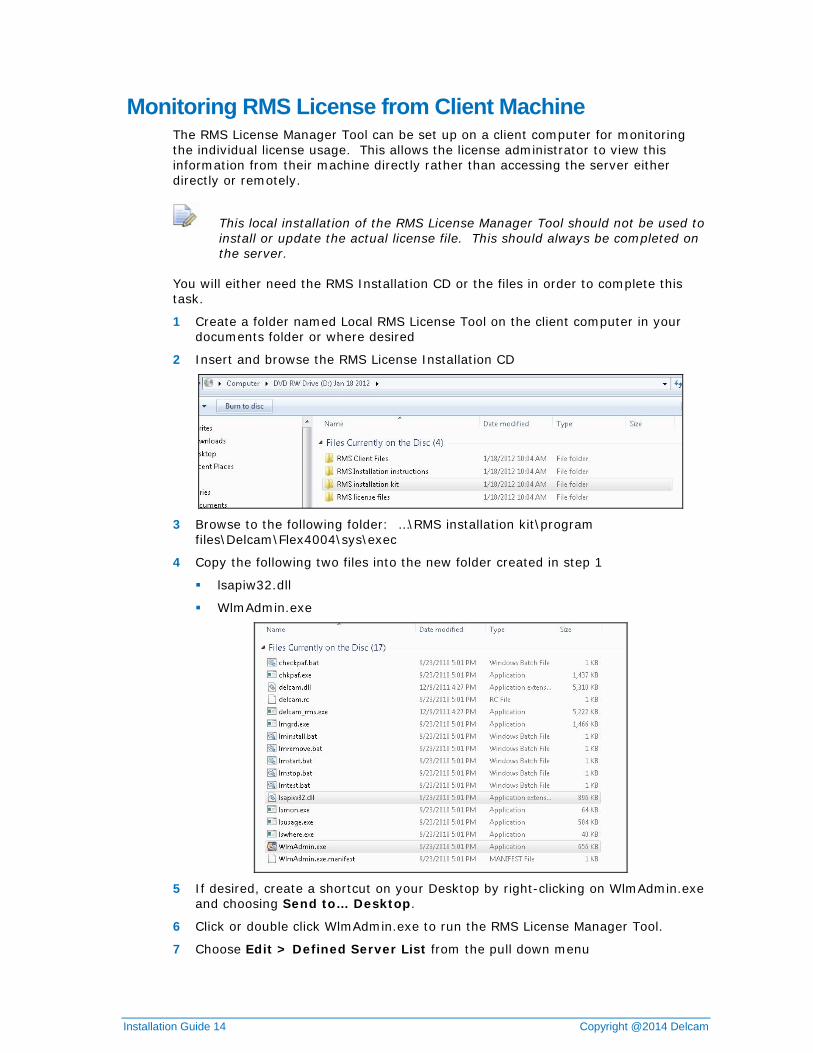
3 Browse to the following folder: …\RMS installation kit\program
files\Delcam\Flex4004\sys\exec
4 Copy the following two files into the new folder created in step 1
lsapiw32.dll
WlmAdmin.exe
5 If desired, create a shortcut on your Desktop by right-clicking on WlmAdmin.exe
and choosing Send to… Desktop.
6 Click or double click WlmAdmin.exe to run the RMS License Manager Tool.
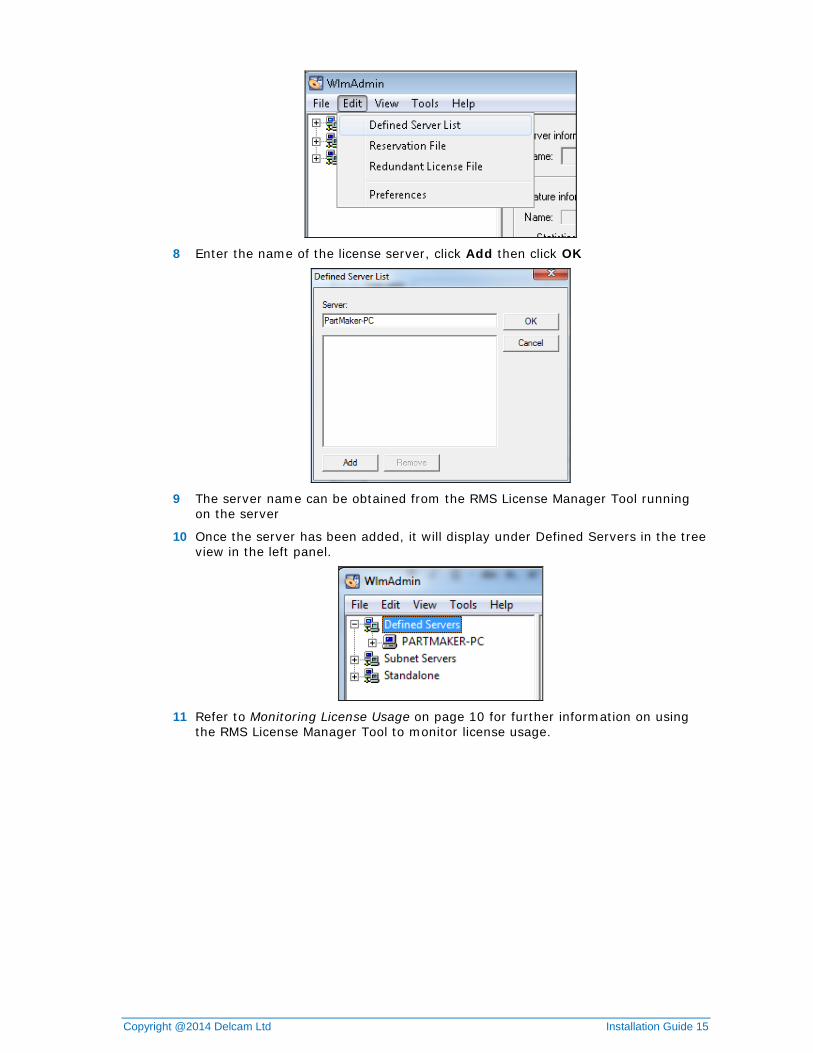
7 Choose Edit > Defined Server List from the pull down menu
Copyright @2014 Delcam Ltd Installation Guide 15
8 Enter the name of the license server, click Add then click OK
9 The server name can be obtained from the RMS License Manager Tool running
on the server
10 Once the server has been added, it will display under Defined Servers in the tree view in the left panel.
11 Refer to Monitoring License Usage on page 10 for further information on using
the RMS License Manager Tool to monitor license usage.
Installation Guide 16 Copyright @2014 Delcam
Reference Section Troubleshooting the license file
This section provides a list of items you can check that may help resolve issues involving PAF errors. PAF errors may occur for both stand alone and RMS configured client computers.
If you receive an error that prevents PartMaker from launching, use the following list to troubleshoot possible causes.
First, determine if other license programs will launch. If not, then continue with license troubleshooting.
The following troubleshooting suggestions may be specific to either stand alone (SA), the RMS client computer (RMS client), or the RMS license server (RMS server) Each item is marked with an appropriate indicator to that effect.
1 (SA only) Check that the dongle is securely connected to the computer.
2 (SA and RMS server) If the indicator light is not lit, unplug the dongle and either plug it into the same USB port or another port.
3 (SA and RMS server) If a new install or update and changing USB ports did not correct the issue, the latest version of the Sentinel driver may be needed. This driver can be found at http://www.safenet-inc.com/support-downloads/sentinel-drivers/. The download required is Sentinel Driver and is usually the second on the list. If installing or reinstalling the Sentinel driver, you may be prompted to restart the computer. This restart is not required.
4 (SA only) Ensure that only the current PAF is in the C:\Program Files\Common Files\Delcam folder and that no other files have a *.paf file extension. To check to see if you have the most current license file, you may need to contact PartMaker Technical Support.
5 (RMS client) Ensure that the dcam.rms file with the proper RMS server name is located in the C:\Program Files\Common Files\Delcam folder.

Copyright @2014 Delcam Ltd Installation Guide 17
6 (SA and RMS server) Sometimes the PAF and/or the RMS license file(s) can be affected by the method of copying from e-mail. The recommended method is to copy the file to the computer desktop before copying the PAF to the proper directory or attempting to read the license file into the RMS License Manager Tool.
7 (SA and RMS server) After upgrading the current version of PartMaker will not launch but the previous version will. This is usually due to an outdated license file. When maintenance is renewed, a new license file is e-mailed to the contact person for your company. This file needs to be copied into the C:\Program Files\Common Files\Delcam folder to allow future versions to launch.
8 (SA only) Use the Delcam PAFWizard to check the PAF. To open the wizard, select All Programs > Delcam > PAFWizard > PAFWizard 2012 > PAFWizard 2012. Then click the icon with the letters, "PAF."
Do not change the license file or the system date on your computer. This does not solve the problem and can cause problems on your computer.
9 (RMS server only) Verify that the RMS License Manager Tool services are running on the server and that the client computers can connect through the network.
10 (SA only) If PartMaker is running and other issues are noted, you can check for old and/or misplaced PAF files. PartMaker will check the following folders for license files:
C:\Program Files\Common Files\Delcam
C:\Program Files (x86)\Common Files\Delcam
C:\dcam\config\pass
Any incorrect or old files with a .paf extension could cause issues within PartMaker.
Installation Guide 18 Copyright @2014 Delcam
Installing multi-axis post processors for SwissCAM, Turn-Mill and Mill
In PartMaker/SwissCAM, PartMaker/Turn-Mill and Mill, you can download your licensed post processor (Post) files from within PartMaker using an Internet connection.
PartMaker post processors must be downloaded from within the associated application, i.e. swiss post processors are downloaded from within SwissCAM.
To download licensed Post files:
1 In PartMaker, select Help > Download Licensed Post Config Files to display the Download Licensed Post Config Files dialog.
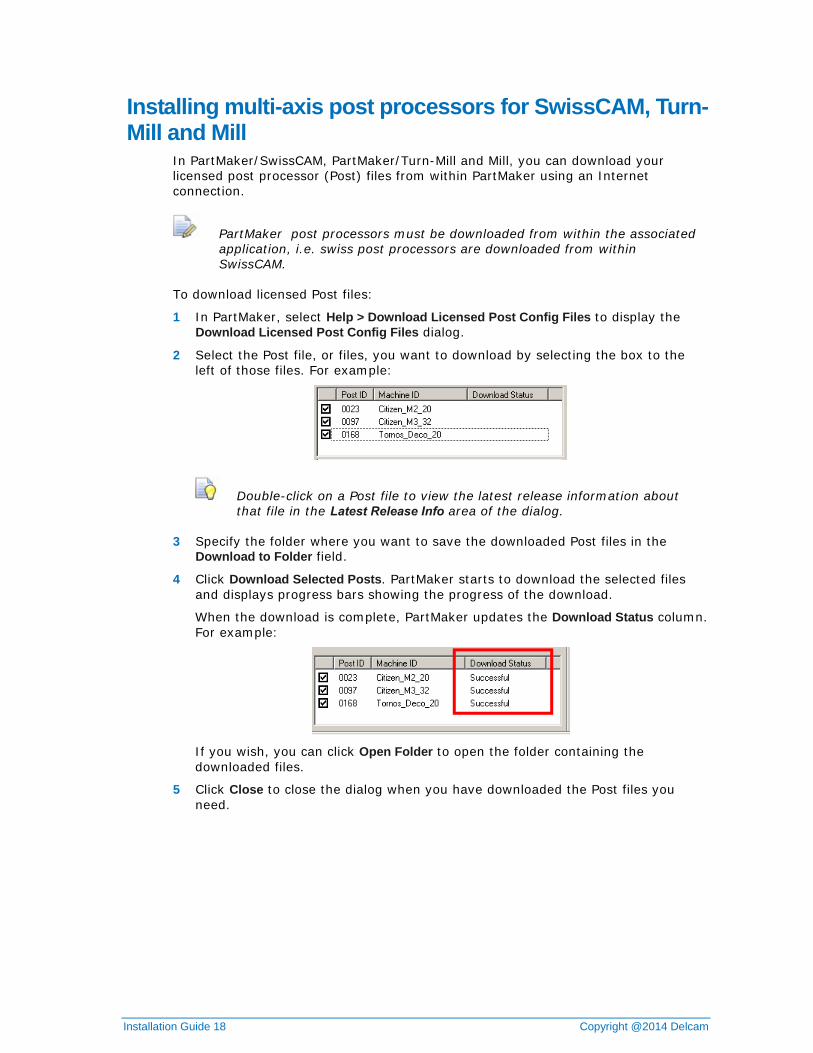
2 Select the Post file, or files, you want to download by selecting the box to the left of those files. For example:
Double-click on a Post file to view the latest release information about that file in the Latest Release Info area of the dialog.
3 Specify the folder where you want to save the downloaded Post files in the Download to Folder field.
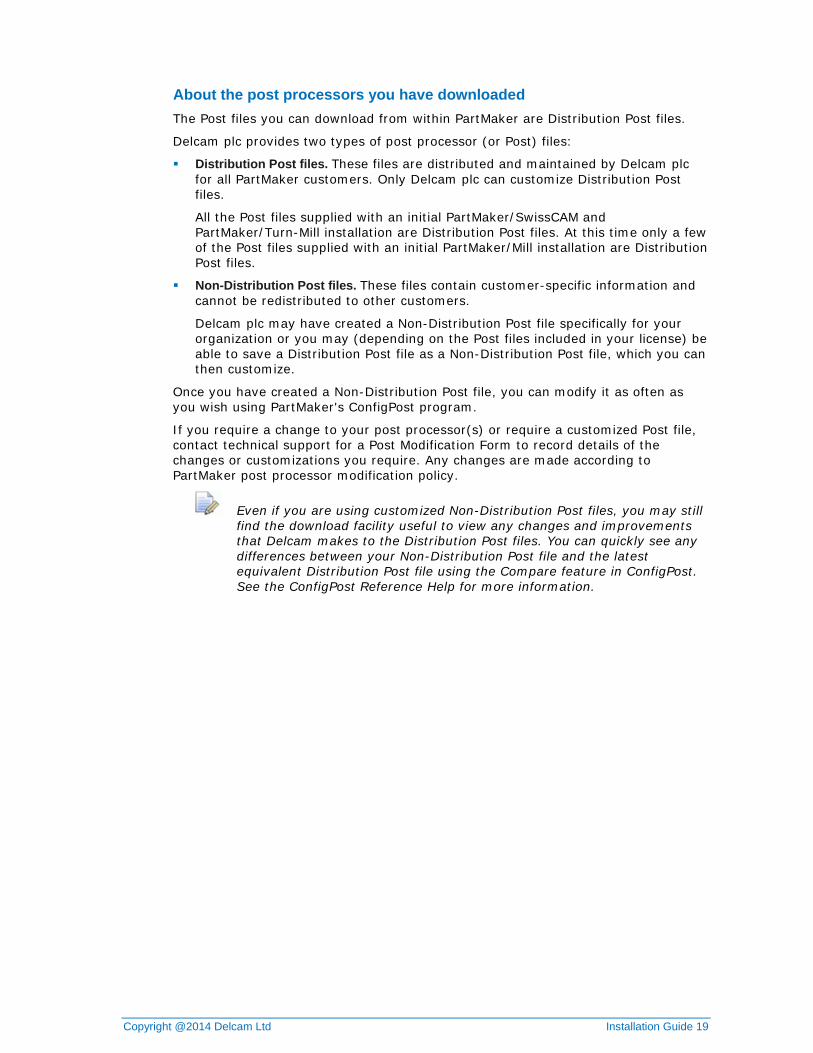
4 Click Download Selected Posts. PartMaker starts to download the selected files and displays progress bars showing the progress of the download.
When the download is complete, PartMaker updates the Download Status column. For example:
If you wish, you can click Open Folder to open the folder containing the downloaded files.
5 Click Close to close the dialog when you have downloaded the Post files you need.
Copyright @2014 Delcam Ltd Installation Guide 19
About the post processors you have downloaded The Post files you can download from within PartMaker are Distribution Post files.
Delcam plc provides two types of post processor (or Post) files:
Distribution Post files. These files are distributed and maintained by Delcam plc for all PartMaker customers. Only Delcam plc can customize Distribution Post files.
All the Post files supplied with an initial PartMaker/SwissCAM and PartMaker/Turn-Mill installation are Distribution Post files. At this time only a few of the Post files supplied with an initial PartMaker/Mill installation are Distribution Post files.
Non-Distribution Post files. These files contain customer-specific information and cannot be redistributed to other customers.
Delcam plc may have created a Non-Distribution Post file specifically for your organization or you may (depending on the Post files included in your license) be able to save a Distribution Post file as a Non-Distribution Post file, which you can then customize.
Once you have created a Non-Distribution Post file, you can modify it as often as you wish using PartMaker's ConfigPost program.
If you require a change to your post processor(s) or require a customized Post file, contact technical support for a Post Modification Form to record details of the changes or customizations you require. Any changes are made according to PartMaker post processor modification policy.
Even if you are using customized Non-Distribution Post files, you may still find the download facility useful to view any changes and improvements that Delcam makes to the Distribution Post files. You can quickly see any differences between your Non-Distribution Post file and the latest equivalent Distribution Post file using the Compare feature in ConfigPost. See the ConfigPost Reference Help for more information.
Installation Guide 20 Copyright @2014 Delcam
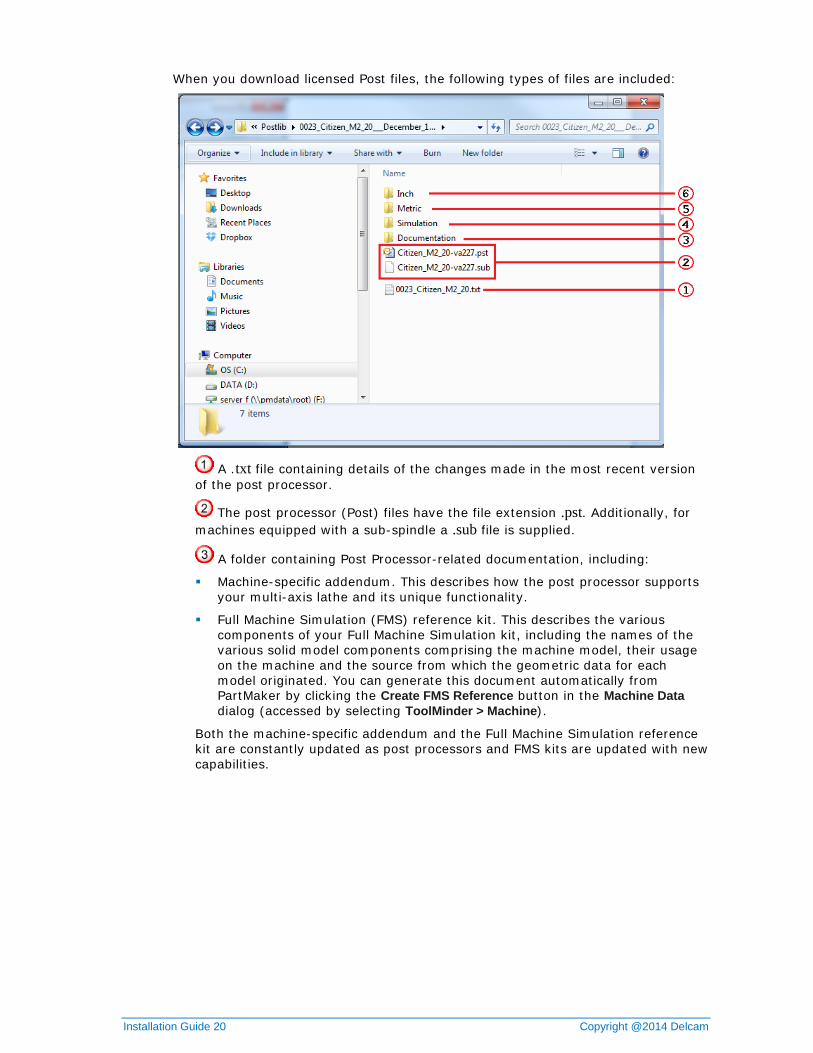
When you download licensed Post files, the following types of files are included:
A .txt file containing details of the changes made in the most recent version of the post processor.
The post processor (Post) files have the file extension .pst. Additionally, for machines equipped with a sub-spindle a .sub file is supplied.
A folder containing Post Processor-related documentation, including:
Machine-specific addendum. This describes how the post processor supports your multi-axis lathe and its unique functionality.
Full Machine Simulation (FMS) reference kit. This describes the various components of your Full Machine Simulation kit, including the names of the various solid model components comprising the machine model, their usage on the machine and the source from which the geometric data for each model originated. You can generate this document automatically from PartMaker by clicking the Create FMS Reference button in the Machine Data dialog (accessed by selecting ToolMinder > Machine).
Both the machine-specific addendum and the Full Machine Simulation reference kit are constantly updated as post processors and FMS kits are updated with new capabilities.
Copyright @2014 Delcam Ltd Installation Guide 21
A folder containing any related simulation files. PartMaker’s Advanced Simulation and Full Machine Simulation modules use additional files to allow you to simulate the architecture of your machine.
For Advanced Simulation, use the .mch file corresponding to your post processor to view your machine’s working.
For Full Machine Simulation, use the .fms and .mch (or .mchdat for PartMaker/Mill) files corresponding to your post processor to view your machine’s working envelope.
For more information about Advanced or Full Machine Simulation, see the PartMaker Reference Help.
and Folders containing sample PartMaker files. Sample Job (.job), Tools (.tdb) and Cycles (.cdb) files configured to your machine tool’s specific architecture are also provided. Separate folders are provided for inch and metric measurements.
If you are using Advanced and/or Full Machine Simulation, you may wish to place the .fms and .mch (or .mchdat in PartMaker/Mill) files in the same folder as the .pst and .sub files, so the simulation files open automatically when you load the associated post processor file in PartMaker (using the Job Optimizer > Post Config File = option).
Related Documents