Rochester Institute of Technology Rochester Institute of Technology RIT Scholar Works RIT Scholar Works Theses 12-2014 re÷belief re÷belief Raymond McCarthy Bergeron Follow this and additional works at: https://scholarworks.rit.edu/theses Recommended Citation Recommended Citation McCarthy Bergeron, Raymond, "re÷belief" (2014). Thesis. Rochester Institute of Technology. Accessed from This Thesis is brought to you for free and open access by RIT Scholar Works. It has been accepted for inclusion in Theses by an authorized administrator of RIT Scholar Works. For more information, please contact [email protected].

Welcome message from author
This document is posted to help you gain knowledge. Please leave a comment to let me know what you think about it! Share it to your friends and learn new things together.
Transcript

Rochester Institute of Technology Rochester Institute of Technology
RIT Scholar Works RIT Scholar Works
Theses
12-2014
re÷belief re÷belief
Raymond McCarthy Bergeron
Follow this and additional works at: https://scholarworks.rit.edu/theses
Recommended Citation Recommended Citation McCarthy Bergeron, Raymond, "re÷belief" (2014). Thesis. Rochester Institute of Technology. Accessed from
This Thesis is brought to you for free and open access by RIT Scholar Works. It has been accepted for inclusion in Theses by an authorized administrator of RIT Scholar Works. For more information, please contact [email protected].

re÷belief
A Short, Experimental F ilm by Raymond McCarthy Bergeron
Submitted in partial Fulfillment of the requirements for the degree of Master of Fine Arts
School of Film and Animation – College of Imaging Arts and Sciences Rochester Institute of Technology
December 2014
Stephanie Maxwell [ Committee Chair ] Professor, Animation Program Chair School of Film and Animation
Marla Schweppe [ Committee Advisor ] Professor School of 3D Digital Graphics
Mark Reisch [ Committee Advisor ] Lecturer School of Film and Animation

Table of Contents | ii
Table of Contents
Title Page .............................................................................................................................. i
Table of Contents ................................................................................................................ iv
Table of Figures .................................................................................................................... v
Acknowledgements ..........................................................................................................viii Abstract................................................................................................................................ ix
Introduction ........................................................................................................................ 1
Backstory................................................................................................................................................................ 2
Building a Foundation ......................................................................................................................................... 2
Maturing Responsibilities ..................................................................................................................................... 3
A Severe Mistake ................................................................................................................................................ 4
From Darker to Enlightened ............................................................................................................................... 5
A Fish Chasing A Fish ...................................................................................................................................... 6
A Gift of Humanity ............................................................................................................................................ 7
Cyclical & Experimental Story Development .................................................................................................. 8
Why 3D Printed vs. Rendered Zoetropes ........................................................................................................ 9
Experimental Inspiration ...................................................................................................................................10
Sculpture & Animation ....................................................................................................................................11
Film vs. Installation ...........................................................................................................................................13
Iterative Production Cycle ................................................................................................................................13
Planned Production vs. Actual Production ....................................................................................................14
A Number of 3D Printing Solutions .................................................................................................................14
Locating a 3D Printing Service ..........................................................................................................................16
Initial Timeline vs. Actual Timeline ...................................................................................................................20
Pre-Production .................................................................................................................. 22
Character Concepts & Design ..........................................................................................................................22
Story Strategies ....................................................................................................................................................24

re÷belief [ MFA Thesis Paper ]
Table of Contents | iii
Motif Choices ......................................................................................................................................................25
Proof of Concept: Virtual Zoetrope Prototyping ........................................................................................26
Modeling, Texturing & Rigging Prep for Zoetropes ......................................................... 28
Characters ............................................................................................................................................................28
UV Unwrapping & Texturing .........................................................................................................................29
Rigging ...............................................................................................................................................................31
Motifs & Environments ....................................................................................................................................34
Fish Rig ............................................................................................................................................................35
House Rig ..........................................................................................................................................................36
Fern Rig ............................................................................................................................................................37
Test Prints in Various Materials .......................................................................................................................38
Zoetrope Design & Printing .............................................................................................. 41
Initial & Actual Manufacturing Strategy .........................................................................................................41
Sculptural vs. Staged Set ....................................................................................................................................42
MEL Scripting .....................................................................................................................................................43
Design Choices & Strategies per Zoetrope ....................................................................................................47
Considerations for 3D Printing Preparation .......................................................................................................47
Zoetrope 1 ..........................................................................................................................................................51
Zoetrope 2 ..........................................................................................................................................................54
Zoetrope 3 ..........................................................................................................................................................57
Zoetrope 4 ..........................................................................................................................................................60
Zoetrope 5 ..........................................................................................................................................................63
Zoetrope 6 ..........................................................................................................................................................66
Zoetrope 7 ..........................................................................................................................................................69
Zoetrope 8 ..........................................................................................................................................................75
Zoetrope 9 ..........................................................................................................................................................81
Filming of Zoetropes ......................................................................................................... 82
Building the Zoetrope Pedestal ........................................................................................................................82
Camera Selection ................................................................................................................................................87
Previsualization ...................................................................................................................................................91
Shooting Strategies .............................................................................................................................................92

re÷belief [ MFA Thesis Paper ]
Table of Contents | iv
Post-Production ................................................................................................................. 95
Editing While Filming........................................................................................................................................95
Compositing ........................................................................................................................................................96
Titles & Credits ...................................................................................................................................................97
Music Composition ............................................................................................................................................99
Voice Overs ...................................................................................................................................................... 101
Sound Mixing ................................................................................................................................................... 102
Public Release & Reaction ............................................................................................... 104
RIT Screening Reaction .................................................................................................................................. 104
Initial Wife’s Reaction ..................................................................................................................................... 105
Public & Media Reaction................................................................................................................................ 106
Conclusion & Experience ................................................................................................ 109
Appendix A : Original Approved Thesis Proposal .......................................................... A–1
Synopsis............................................................................................................................................................ A–1
Story Concept ................................................................................................................................................. A–1
Rationale .......................................................................................................................................................... A–1
Appendix B : Proposed & Actual Timeline ...................................................................... B-1
Appendix C : Original & Actual Budget ........................................................................... C-1
Appendix D : Screening Respondent – Shaun Foster ..................................................... D-1
Appendix E : Response – RIT Screening .......................................................................... E-1
Appendix F : Response – Michael Starobin ..................................................................... F-1
Appendix G : Response – Publicity & Media ................................................................... G-1
Conferences & Presentations ........................................................................................................................ G-1
Installations ...................................................................................................................................................... G-1
News & Mentions ........................................................................................................................................... G-1
Appendix H : I Will Wait Lyrics ....................................................................................... H-1

Table of Figures | v
Table of Figures
Figure 1: Cover Art for The Moon and the Son: An Imagined Conversation . .................................................... 8
Figure 2: One of Copenhagen Cycle's zoetopes, created using paper cutouts. ......................................... 9
Figure 3: 3D Printed and hand painted "Volcano" from Bellows March. ...................................................11
Figure 4: Example of The Feral Fount built in 1996. .....................................................................................12
Figure 5: MakerBot Replicator 2X Desktop 3D Printer with examples of dual extrusion models. ....15
Figure 6: Material examples printable through Shapeways. ........................................................................17
Figure 7: Example of wall fixing tool through Shapeways backend designer’s site. ..............................18
Figure 8: Example polyamide pricing for cubes of varying densities. ......................................................19
Figure 9: Easter Island Moai Heads. ..............................................................................................................22
Figure 10: Character Sketches. .........................................................................................................................23
Figure 11: Refined Character Sketches. ..........................................................................................................24
Figure 12: Final Character Designs. ................................................................................................................24
Figure 13: 3D Printed Heart. ...........................................................................................................................25
Figure 14: 3D Printed Cross. ...........................................................................................................................25
Figure 15: 3D Printed Block. ...........................................................................................................................26
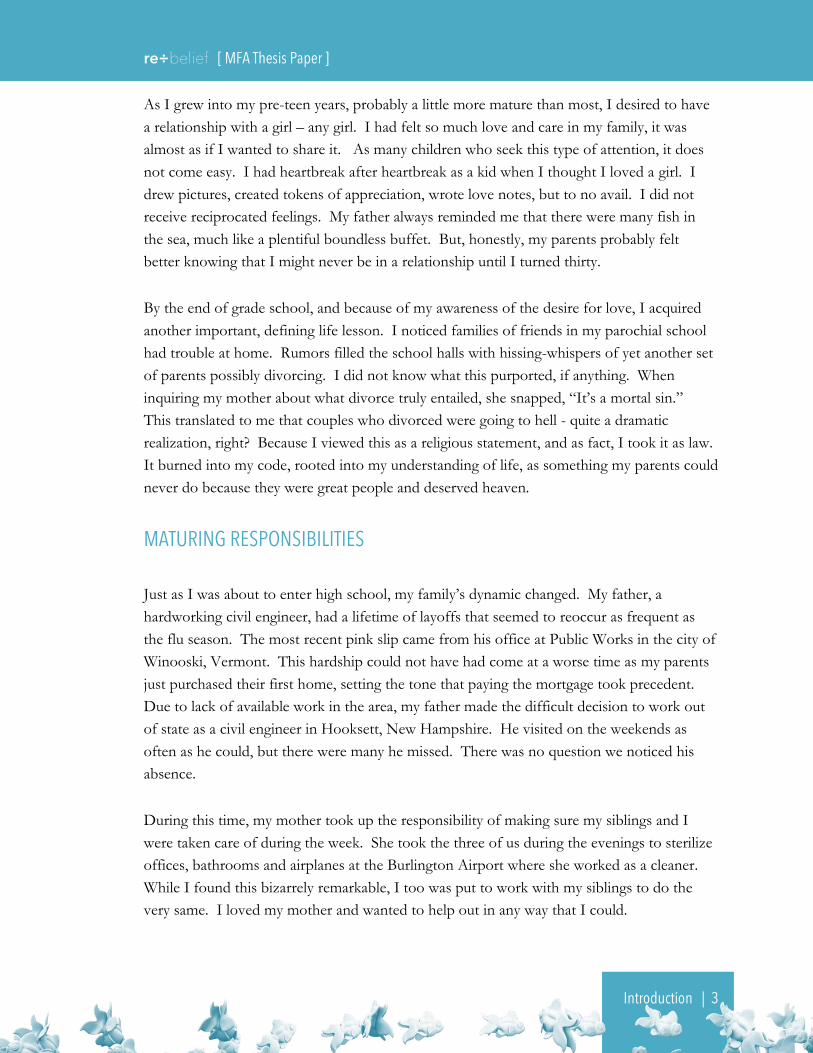
Figure 16: 3D Printed Fish. .............................................................................................................................26
Figure 17: Old Zoetrope example with replaceable animation strips. ......................................................27
Figure 18: Maya rig of Male Adult with Controls. .......................................................................................29
Figure 19: 3DCoat’s UV display shows high pixel density in red and low pixel density in blue. .........30
Figure 20: Texture map with male adult colors on the left and female adult colors on the right. .......31
Figure 21: Rig displaying joint chain structure with controls. ....................................................................31
Figure 22: Mesh with texture within Mudbox showing layers of blendshape controls. ........................32
Figure 23: Blendshapes arranged in Maya to be bound to rig on far left. ................................................33
Figure 24: The same rig referenced twice to make both the female (left) and male (right). .................34
Figure 25: Fish rig and controls. .....................................................................................................................35
Figure 26: House rig and controls. .................................................................................................................36

re÷belief [ MFA Thesis Paper ]
Table of Figures | vi
Figure 27: Fern rig and controls. ....................................................................................................................37
Figure 28: Fish sizes in relation to inch side of ruler and a penny for visual reference. ........................38
Figure 29: Material Resolution - Nylon (upper left), Sandstone (right), Acrylic (bottom left). ............39
Figure 30: Examples of M.C. Escher's tessellated works. ...........................................................................42
Figure 31: Zoetrope ring rig used to for duplication script and spatial reference. .................................44
Figure 32: Zoetrope Object Duplication Procedure. ...................................................................................45
Figure 33: Example Duplication Procedure Call. ..........................................................................................46
Figure 34: MeshLab example of decimation - 2605404 faces (Left) to 950000 (Right).........................48
Figure 35: netfabb progression of detecting repair needs, fix, and resolved geometry (left to right). .49
Figure 36: Zoetrope 1 virtual render with grid lines for size reference. ...................................................52
Figure 37: Broken Zoetrope 2 due to material weight and shipping. .......................................................54
Figure 38: Zoetrope 2 virtual render with grid lines for size reference. ...................................................55
Figure 39: Zoetrope 3 virtual render with grid lines for size reference. ...................................................58
Figure 40: Gluing and clamping the four 3D Printed pieces together. ....................................................60
Figure 41: Zoetrope 4 virtual render with grid lines for size reference. ...................................................61
Figure 42: Broken zoetrope due to lack of packaging materials for protection and stabilization. .......63
Figure 43: Zoetrope 5 virtual render with grid lines for size reference. ...................................................64
Figure 44: Zoetrope 6 virtual render with grid lines for size reference. ...................................................67
Figure 45: Slices of watch layers prepped for printing. ...............................................................................70
Figure 46: Assembly and gear tests prior to painting. .................................................................................71
Figure 47: Tests of movable parts after painting prior to final assembly. ................................................72
Figure 48: Zoetrope 7 virtual render with grid lines for size reference. ...................................................73
Figure 49: Figures re-broken to correct a Shapeways’ Technician’s bad fix. ...........................................76
Figure 50: Figures arranged after fern was painted using printed registration points. ...........................77
Figure 51: Setup to adjust and register strings using a contrasting backdrop. .........................................78
Figure 52: Zoetrope 8 virtual render with grid lines for size reference. ...................................................79
Figure 53: Zoetrope 9 virtual render with grid lines for size reference. ...................................................81
Figure 54: Initial plate design – deviated changes thickened the plate to 0.25 inches. ..........................82
Figure 55: Original prototype setup for spinning zoetropes using a DC Motor. ....................................83
Figure 56: Stepper motor coils energizing in sequence per step. ..............................................................83

re÷belief [ MFA Thesis Paper ]
Table of Figures | vii
Figure 57: Arduino setup with prototyping board utilizing programmable buttons. .............................84
Figure 58: Code for Zoetrope Pedestal using a 1.8° Stepper Motor..........................................................86
Figure 59: Setup to fine-tune code for proper registration of rotation at angles of 15 degrees. ..........87
Figure 60: Frame by frame example of recording a moving image with a rolling shutter. ....................89
Figure 61: Examples of distortion when recording zoetropes with a Canon 6D CMOS sensor. ........90
Figure 62: Various staged setups when recording scenes for the film. .....................................................92
Figure 63: Setup for theater scene using micro-LEGO dolly. ...................................................................94
Figure 64: New Zealand night sky. .................................................................................................................96
Figure 65: Double exposure technique used in George Méliès’ L'homme à La Tête De Caoutchouc. ......97
Figure 66: Progression of title and design. ....................................................................................................98
Figure 67: Example of a bird and cage thaumatrope. .................................................................................98
Figure 68: A demonstration of a 3D Printed zoetrope after MFA screenings. .................................... 105

Acknowledgements | viii
Acknowledgements
Amongst all those who made this film possible, I want to thank my thesis advisor and good
friend, Stephanie Maxwell, at the School of Film and Animation. She is the reason why I
pursued an MFA at RIT, introducing me to the idea that there is more to animation than
Pixar and Disney. If it were not for her open-mind, guidance and experience, this film
would have never seen the day of light. Skip Battaglia deserves a nod as well for not only
taking over Stephanie’s position as chair while she was on sabbatical, but he, like Stephanie,
was supportive and open-minded about my crazy, bizarre process.
I would also like to thank my thesis committee, Mark Reisch and Marla Schweppe, for
asking the simplest questions that gave me the most complex answers I could find. Tom
Gasek contributed much effort in making sure I was squared away in my responsibilities
while living remotely from RIT campus. I would like to thank Eric Dyer for being a genius
who blew my mind and inspired much of this project. I would like to thank John
Canemaker for encouraging me through his film, The Moon and the Son: An Imagined
Conversation, to tell a very personal story. To those who were willing to work and collaborate
with me on my film: Stephen J. Bullen, Brett Wilson, Gloria Arteaga, Maria Mejía-Yepes,
Colleen Horan and Alex Bone – you all rock.
Many thanks to my talented friends, faculty and peers in SOFA who have inspired me
through screenings, their personal stories and experiences, especially talented Meghdad
Asadi Lari, Vijay Kumar Madurai Chandrasekhar and Ihab Mardini. Much appreciation goes
to Shapeways who made the printing possible and a special nod to Andrew Thomas who
made the process effortless. Thank you to Ann DeMarle for believing in me and for
pointing me in the right directions. Thank you to my family who was always there for me,
regardless of the situation.
Finally, most importantly, much love and thanks to my exceptional wife, Corinn, who saved
me through her love, support and actions. This thesis is my love letter to you.

Abstract | ix
Abstract
re÷belief, is a 3D Printed, hand crafted, zoetropic short-film that asks if recalling memories
can break a cycle. re÷belief is a graduate student produced animated thesis, completed for
the MFA in the School of Film and Animation at Rochester Institute of Technology. Much
of this film is a personal story that recalls nine very specific instances of my life. These are
memories that have repeatedly haunted me throughout my youth and adulthood. The
memories regularly reflected times of bliss mixed with sullen, miserable moments.
Ultimately, the story thread focuses on cycles, and choosing 3D printed zoetropes as the
metaphor and medium within a short film seemed perfect to share a story about childhood,
religion and relationships. After all, Zoe translates as 'life' and trope is a reoccurring motif.
3D Printing, handcrafting and manufacturing these zoetropes are physical representations
that impart a physicality within this film.
It is hoped that while watching this experimental, filmed animation, the viewer would allow
their own life experiences, moments and feelings to emerge and discover the resonances of
the film's themes within their own memories or consciousness.

Introduction | 1
Introduction
The creation of my graduate thesis film, re÷belief, began in May 2012 and continued to
completion at the very end of May 2014 to satisfy the production requirement for the
Masters in Fine Arts in the School of Film and Animation at the Rochester Institute of
Technology. My thesis committee was chosen carefully for their expertise and diverse
backgrounds. Stephanie Maxwell was my Committee Chair with a focus in experimental
filmmaking. Mark Reisch was an Advisor with a focus in the technical aspects of 3D
Animation and Modeling as well as a curiosity in new tech. Marla Schweppe was an Advisor
who has a focus in Digital Graphics, Projection and New Media technologies.
For this thesis film, I had several goals I wanted to achieve during this production. My first
goal was to learn more about 3D Printing technology. My hive-like-mind would buzz with
curiosity in the process of what makes a virtual object physical. I wanted to explore the
limitations of what was possible, and to create dynamic sculptures that could tell stories on
their own, ones that would be enhanced through movement.
My second goal was to attempt an experimental process in filmmaking and storytelling.
Considering that the 3D Printing industry was in a hot bed of exciting developments when I
first looked into it in 2010, particularly in terms of materials and what people were doing to
push the medium, 3D Printing had not been explored much in filmmaking. I wanted to be
one of the pioneers to experiment, discover and share the results of this new-age
opportunity.
My third goal was to successfully tell a very personal, dramatic story. Considering my prior
films and preferences favored comedy, I wanted to understand and challenge myself in
leaving people touched and meditative after experiencing my work. More importantly, I
wanted to make a film that could potentially be universally appreciated. A film that people
could find something to connect to, in a non-direct way.
My self-funded, self-produced, self-directed project took on many challenges of exploring
the traditional animation pipeline and applying it to an experimental process and technology
for a new type of storytelling medium. The six-minute and fifty-five second film uses nine
3D Printed Zoetropes to convey ideas and experiences in a cyclical story manner. My

re÷belief [ MFA Thesis Paper ]
Introduction | 2
discovered production cycle, while unique and new, had many insights, challenges and
setbacks that will be explored in more detail within this thesis document.
One of the biggest challenges was trying to complete this film within the originally planned
year timeline. The production faced many necessary and unexpected life interruptions, such
as moving due to my wife’s promotion and our relocation, funding loss and surgery to
remove a tumor from my ankle. However, it not only required me to push the originally
anticipated finish date forward from May 2013 (see Table 1) to May 2014 (see Table 3), it
challenged me to consolidate ideas, find creative solutions to complex problems and brave
the trust needed for those willing to help in a pinch on my production.
Backstory
As noted in my goals within the Introduction, I wanted to create a narrative that focused on
a more personal, dramatic story. This challenged me to find something relatable as well as
something with a much more mature context, tone and feel. For re÷belief, I focused on one
thread of many chronological sets of events that lead from my childhood to where I am
today and celebrates what my relationship with Corinn – my wife – has taught me.
BUILDING A FOUNDATION
I was one of three kids with a father and mother who loved us greatly. Being the oldest, but
only a year apart from my brother, and two from my sister, I had the slight privilege and
appreciation of being more aware of the family dynamics growing up. My father worked as a
Civil Engineer and my mother worked many jobs to help out with finances while taking care
of us three kids. As a young child, this was the natural order. This was what I naïvely
expected for the rest of my life.
My family also raised us Roman Catholic. I learned from my mother and the church that the
orders of priority were God, family, work and play. Luckily as a child, it was very simple:
God was present in our lives, family loved us, I did not have to work and I certainly played a
lot. In fact, I believed, and still to this day, that in order for a proper upbringing, family
should raise their children with much love, interaction and play. Without love and the ability
to play, I do not think it would be easy to believe and/or practice religious faith as a child.
re÷belief [ MFA Thesis Paper ]
Introduction | 3
As I grew into my pre-teen years, probably a little more mature than most, I desired to have
a relationship with a girl – any girl. I had felt so much love and care in my family, it was
almost as if I wanted to share it. As many children who seek this type of attention, it does
not come easy. I had heartbreak after heartbreak as a kid when I thought I loved a girl. I
drew pictures, created tokens of appreciation, wrote love notes, but to no avail. I did not
receive reciprocated feelings. My father always reminded me that there were many fish in
the sea, much like a plentiful boundless buffet. But, honestly, my parents probably felt
better knowing that I might never be in a relationship until I turned thirty.
By the end of grade school, and because of my awareness of the desire for love, I acquired
another important, defining life lesson. I noticed families of friends in my parochial school
had trouble at home. Rumors filled the school halls with hissing-whispers of yet another set
of parents possibly divorcing. I did not know what this purported, if anything. When
inquiring my mother about what divorce truly entailed, she snapped, “It’s a mortal sin.”
This translated to me that couples who divorced were going to hell - quite a dramatic
realization, right? Because I viewed this as a religious statement, and as fact, I took it as law.
It burned into my code, rooted into my understanding of life, as something my parents could
never do because they were great people and deserved heaven.
MATURING RESPONSIBILITIES
Just as I was about to enter high school, my family’s dynamic changed. My father, a
hardworking civil engineer, had a lifetime of layoffs that seemed to reoccur as frequent as
the flu season. The most recent pink slip came from his office at Public Works in the city of
Winooski, Vermont. This hardship could not have had come at a worse time as my parents
just purchased their first home, setting the tone that paying the mortgage took precedent.
Due to lack of available work in the area, my father made the difficult decision to work out
of state as a civil engineer in Hooksett, New Hampshire. He visited on the weekends as
often as he could, but there were many he missed. There was no question we noticed his
absence.
During this time, my mother took up the responsibility of making sure my siblings and I
were taken care of during the week. She took the three of us during the evenings to sterilize
offices, bathrooms and airplanes at the Burlington Airport where she worked as a cleaner.
While I found this bizarrely remarkable, I too was put to work with my siblings to do the
very same. I loved my mother and wanted to help out in any way that I could.

re÷belief [ MFA Thesis Paper ]
Introduction | 4
Starting at a public high school, in my family’s current situation, created an odd tension
within myself. Though I did well academically my first year, it was the first time I had to
start fresh making new friends as though we moved to the other side of the world. I was
worried about being accepted into a new culture – outside the comfort of my religion and
former classmates. I continued seeking a relationship, but the love I desired turned more
into an attention need. Love was competitively sought for in our malnourished home.
The drama and concerns in school competed with the drama at home. My father and
mother often argued in front of us, during the few moments they both seemed to be home
together; often yelling loud enough where I vacated the home to distract myself outside.
From time to time, I ran away – not far though – filled with rage, naivety and
misunderstandings. I wanted them to fight about me and not each other. Occasionally, my
brother and I would get into fights, not making it any easier on my mother to handle or deal
with. This was just one of the unfortunate ways my siblings and I processed our tortuous
feelings.
A SEVERE MISTAKE
One day, during a gloomy fall evening in Vermont, my brother and I were riding back home
in my father’s car. He looked unhappy, pensive and drove like we were not in the car. The
tires gripping against the broken-paved road occupied the white noise for most of the ride.
Seemingly random, my father broke the silence suggesting how funny it was that my mother
was hanging out more with the engineers at the airport hangar. Not thinking much about it,
I retorted with a chuckle, “Maybe mom doesn’t love you anymore.” My brother responded,
as expected, “You’re an idiot.” Then awkward silence quickly crept back into the car as I
immediately regretted what I had said. In fact, I had no idea what and why I felt that was
the appropriate response to my father’s concern. It came out of nowhere, feeling like a
knee-jerk reaction. Within four hours of that statement, it was going to be the third most
haunting memory of my entire life.
Once my father dropped us off, I stowed myself in my futon bed, under the comforter,
agonizingly replaying what I had said to make sense of it. Hours passed as I lay in a kind of
rigor mortis. I wanted to apologize to my father, but I had no idea how to or if I should just
let it ride out.
Suddenly, a wailing woman burst through the front door and ran into the living room.
Looking dressed-up for a night out on the town, she immediately threw her mascara-

re÷belief [ MFA Thesis Paper ]
Introduction | 5
streaming, tear-soaked face into the phone yelling. I quickly realized it was my almost-
unrecognizable mother. Never in my life did I see her in a state like this. Paralyzed, I
coward in my bed, peering just over the covers, as the situation grew worse.
Soon after my mother flew up the stairs in hysterics, coughing on her tears along the way,
my father arrived home. She sprinted back down the stairs, meeting my father in the kitchen
where furiously, flailing fists met his body. Yelling followed as they chased each through the
house. Faster than I could comprehend what felt like a nuclear bomb hitting my house, my
father left with a bag stuffed with clothes.
Just before I thought he was gone for good, the lights flipped on in my room and abruptly
his large body was on hovering over mine. With his heavy pointed finger trembling in my
face, he spat, “What happened tonight… is your fault!” And just like that, he evaporated
from my sight. Instantaneously, I time traveled to a moment in memory when I was just
outside a door of my mother’s doctor. I recalled joyously peering through a Highlight
magazine, discovering lovely illustrations of anthropomorphized pigs, mice and cows in
small cities and cars. My fascination was jarred just as my mother crossed the threshold of
the doctor’s room into the children’s waiting area, tears marking her face of concern. I
asked her what was wrong. She turned towards me, with a glassy, piercing stare, “He said
you are what’s wrong with me.” We promptly left.
I was five years old when my mother seared this into my memory. I had never thought
much of those words during this odd remarkable moment, until it was provoked to
anamnesis in bed when I was thirteen year old and confronted with a horrific cognizance: I
just broke up my family. I was the one responsible for their failed marriage. These two
moments jumped to the top of my terrifying recollections in life.
FROM DARKER TO ENLIGHTENED
The years following were darkened with sadness, depression and suicidal emotions. My
parents separated, my mother took primary custody of us, the family went bankrupt kicking
us out of our home, and I naturally was in the middle of my parents’ reoccurring fights and
quarrelling. I recall arriving home one day in January 1998 – my junior year in high school –
to find my overworked, tired mother weeping over the finalized divorce papers. This also
happened to be around the same time that my first girlfriend of a couple months broke up
with me. As noted before, I tended to lean on relationships as an emotional crutch, which
made this break-up a bit more devastating than it should have.

re÷belief [ MFA Thesis Paper ]
Introduction | 6
During my high school years, the foundation that my parents once built for me as a child,
crumbled. I stopped going to church. Faith seeped out of my body as I attempted to
scientifically prove that the bible, everything I knew about the Catholic faith and teachings,
was false. I wanted to prove that my parents were not going to hell. At least I hoped that
they would not. They were good people; why would this happen to them? To my family? I
worried that I could never have a loving relationship and feared if I ever did, it would not
last.
When I entered college, I felt a sense of ownership in my life. It appeared that turning 18
gave me the epiphany that I was in control. It helped me with confidence, though I still had
concerns for my family. It was also a time when I first felt free, like many other freshmen,
to do what I desired. Though this constantly felt diminished when I reencountered the
drama back at home. Luckily, I had a great friend my freshman year who distracted me and
inevitably brought me on an amazing, unforeseeable journey that would change my life.
This friend, Phlip, who happened to be my roommate, introduced me to the idea of trying
out for an annual play called Toys Take Over Christmas, which showed at the University of
Vermont’s Royal Tyler Theater. He planned on heading out one evening to make the
tryouts and practically dragged me with him. Upon entering the building where the meeting
was called, I noticed a cute lady across the table that only introduced herself as, “Sign-in” –
just enough to sink my interest. Luckily my eyes worked as her nametag read “Corinn”.
A FISH CHASING A FISH
Subsequently, I got a callback and eventually I was offered a small role in the production. I
was thrilled to be part of something big. Even better, I felt that I could possibly find a
romantic connection. I viewed Corinn chromatically: lovely, smart and distant like a
rainbow. She was friendly, but never seemed to want to be friends. Of course, she was the
stage manager and I assumed her manner was how a good theater production kept their
actors in line. Being a silly prince in the play, I performed my role and sought ways to
simply make her smile, and it was not easy.
After rehearsal one evening, Corinn hurriedly tracked down actors for missing props while
lugging a giant plastic jar full of sparkly, wooden hearts. The hearts were props that the toys
in the play would put over their chest to feel love and warmth. Generally, the role of the
stage manager was to keep things in order and to track down items to be properly located
before, during and after a production. Typically this meant they often pursued props from

re÷belief [ MFA Thesis Paper ]
Introduction | 7
actors who carelessly, or purposely, didn’t return them to their rightful place. In this case,
Corinn was seeking the only missing prop.
Upon approaching me, as I was the only one sitting in the theater, she immediately asked
accused, “Where’s the heart?” Through her marathon of chasing down actors, I deductively
became the last to potentially scold. With a smirk on my face, I revealed the heart in the
palm of my hand, “It’s been here waiting for you.” There was a pause of, “Did he just say
that,” on her face. And, finally, she broke, snickered and blushed. Just like that, there was
an opening, an opportunity – a connection.
She had jumpstarted my heart again. This old, rusted, ticking kit, stuffed into my hallowed
chest, warmed every moment we spent with each other. This potential, long-term
relationship restored my confidence in love. She jumpstarted my faith in that I could love
and be loved.
Thereafter, I sought Corinn out on a romantic chase before we interlocked in our first kiss.
We became engaged a few years later, and, in a few more after that, we finally married. I
worried that I’d rushed things, but I never felt happier. We were both happy. We are both
happy.
A GIFT OF HUMANITY
Much like a dance, we were betrothed in a trusting relationship filled with honest expression
and impulses of movement. These feelings and the occasional conflict showed that we
appreciated our time with each other and that we could work issues out. When moments
felt like we were spiraling away from each other, we trusted that somehow, through
communication and action, we could bring ourselves back into the rhythm of love
transcending space and time.
Despite our happiness, there was one thing I incessantly wrestled with in my conscience:
could I ever have a child? Would I ever want kids? For me, the answer appeared to always
have been yes. For Corinn, she was not so certain. Eventually, I too felt uncertain, but for
more complex reasons.
It had no relation to financial concerns or the lack of love. The feeling materialized out of
my history and experience. Could I ever have a happy relationship while children are
present? I saw what that had eventually done to my father and mother. I witnessed good

re÷belief [ MFA Thesis Paper ]
Introduction | 8
families struggle in the same way. I did not want that to be a problem or a situation that I
would want to impose on our marriage. Could we break this potential, tragic cycle? After
all, I believed that my parents once loved and chased each other much like how Corinn and I
had. We were much like them, but – kids or not – I had no desire to risk repeating the past.
Cyclical & Experimental Story Development
After watching John Canemaker’s The Moon and the Son: An
Imagined Conversation2, and just before finalizing my thesis
idea, I realized I wanted to create a story that was
personal. I desired to focus on something that troubled
me through life and express it through the production of
my thesis, something that Canemaker’s film did.
However, I wanted to get to the root of my story in a
medium of mimicking the reoccurring memories that
haunted me. This led me to choosing zoetropes as the
primary medium to express the story.
Just knowing the medium of what I wanted to tell my
story in was not enough. While zoetropes fit the idea of a
memory replaying in my head repeatedly from time to
time, I had difficulty in understanding how this could
work. How could you tell a story in a medium that rotates
once per second? My research earlier on during my RIT studies pointed me to Eric Dyer,
who has done just that.
Dyer’s work focused primarily on stories that worked in revolutionary ways. His works like
Copenhagen Cycles3 and Kinetic Sandwich4 spanned a spectrum of story narrative interpreted by
cyclical, visual animations to just pure experimentation of textures and colors that provide an
experience. The latter was most intriguing as it sought repeatable patterns, which made the
cyclical nature of it so fascinating.
1 Source: http://www.michaelspornanimation.com/splog/wp-content/I/moonandsun.jpg 2 A short, 2D animated film by John Canemaker, The Moon and the Son: An Imagined Conversation: https://files.nyu.edu/jc7/public/press/press.html 3 A short, paper sculpture (cinetrope) production by Eric Dyer: https://vimeo.com/17603523 4 A short, experimental film by Eric Dyer: https://vimeo.com/17615482
Figure 1: Cover Art for The Moon and the Son: An Imagined Conversation .1

re÷belief [ MFA Thesis Paper ]
Introduction | 9
Figure 2: One of Copenhagen Cycle's zoetopes, created using paper cutouts.5
My challenge now was to combine a personal story that may not be as controlled as
Canemaker’s film, but not so freely interpreted as in Dyer’s works. In this case, I desired to
make each zoetrope a contained memory, a point in history, which animated my story.
Then, I planned on creating multiples of these memories, each being zoetropic, that would
be filmed and edited together in a linking fashion. I decided to construct appropriate lengths
and timing to focus on smaller sections of the overall larger zoetropes, cutting them together
in a linear story, attempting to be careful not to show the entire zoetrope which could kill
the ultimate enjoyment and secret of telling the story, unless it would be on purpose.
The major task would be to figure out how to tell a personal story about a single character
when a zoetrope has repeating copies of characters to animate the story.
Why 3D Printed vs. Rendered Zoetropes
I struggled for a while to decide what would be best: should I render the film, or film the
film? Rendering had it a huge advantage in cost. In fact, my production budget (see B-1)
would have been much cheaper due to advantages of not paying for rendering in the same
5 Source: http://blog.creative-capital.org/wp-content/uploads/2013/09/Dyer-Copenhagen-Cycles-zoetrope.jpg

re÷belief [ MFA Thesis Paper ]
Introduction | 10
way as one would for 3D Printed mistakes. The other advantage of rendering would have
been to perfect much of my already experienced skillset in digital production (managing
virtual cameras, digital texture and materials, animated movements, VFX, etc.). Also related
to the known factor of rendering, it meant that my production pipeline would have been
straightforward, understood and easily followed.
Despite how relatively easy it would have been to render these zoetropes, 3D Printing to me
was new and exciting. One of the big advantages I saw was that very, very few people have
done this before. But this was also a concern as there was no textbook to tell you how to do
it. It also presented a new, problem-solving experience and challenge I embraced that could
be applicable in a new realm of jobs in the future.
Most importantly, I realized in this artistic medium that 3D Printed zoetropes could
appropriately and metaphorically represent a physical manifestation of my memories. The
idea that these pieces could exist in reality suggests that they are factual. Virtual rendered
objects have lost their spectacle over the years, no longer feeling real. It could be suggested
that animated films are ephemeral and transient. Printed, physical objects suggest the
known, real and factual in many ways. Of course there is a novelty to this medium, but for
my story, it made sense.
EXPERIMENTAL INSPIRATION
Of course, much of my inspiration stemmed from Dyer’s works. One work in particular did
utilize 3D Printing to tell an amazing story. Bellows March6 used 3D Printed pieces that were
hand painted, spun and filmed to tell a story of concertinas marching into battle, dying, and
being reborn again just to be celebrated and marched into battle. Much of the filming
focused on physical parts of each zoetrope to tell the story, using various levels of depth of
field to focus on these parts of the zoetropes.
6 A short, 3D Printed Cinetropic film by Eric Dyer: https://vimeo.com/17314292

re÷belief [ MFA Thesis Paper ]
Introduction | 11
Figure 3: 3D Printed and hand painted "Volcano" from Bellows March.7
Bellows March alone proved that through clever editing and careful selection of printed
animation, I could produce a successful filmed story of 3D Printed zoetropes. I just needed
to create a sense of continuity through each zoetrope. This meant the character would need
to be present in each zoetrope to tell the story and that distinct objects and motifs would
need to exist in multiple zoetropes, but in ways that kept the story exciting and engaging.
SCULPTURE & ANIMATION
In addition to Eric Dyer’s work, I found inspiration from another artist, Gregory
Barsamian8, who told amazing stories in a single, stroboscopic zoetrope. Barsamian’s work
primarily focused on installations with a strobe – something not very conducive to filming
due to the equivalent frames rates he needed to work in. Feral Fount9 was an example of an
installation I visited at the Museum of the Moving Image in Brooklyn, New York. As the
curator at the museum describes:
7 Source: Eric Dyer 8 An experimental, zoetropic, sculptural artist: http://gregorybarsamian.com/ 9 A stroboscopic zoetrope installation at the Museum of the Moving Image

re÷belief [ MFA Thesis Paper ]
Introduction | 12
Feral Fount is a physical representation of a dream the artist had in which drops of water from his
kitchen faucet transformed into a bomb, and then a paper airplane before crashing into his dishpan.
The artwork is a stroboscopic zoetrope made up of a series of ninety-seven small sculptures, each
slightly different from the preceding one. These sculptures function in the same way as the individual
drawings in the frames of an animated film. The sculptures are mounted on a rotating armature. A
strobe light flashes thirteen times per second, illuminating the sculptures. Because there are intervals
of darkness between the flashes, we do not see a blur as the sculptures spin by, but perceive a 'moving
image.' 10
After experiencing Barsamian’s work, I realized I wanted my zoetropes to not only animate
on screen, but also to have them stand out as complete memories in a non-staged method.
I spent much time thinking about the design of each zoetrope to see how each could
conform to a shape and space to express each thought. I did not want the zoetrope to feel
like a staged prop, but more like a physical object that does not predominately focus on the
animation and instead is designed for meaningful storytelling.
Figure 4: Example of The Feral Fount built in 1996.11
Also important to note: animation in the real world would be vastly different from virtual
animation. By entering into a physical reality, the animation was transformed with a much
10 Curator’s statement: https://vimeo.com/18906121 11 Source: http://macaulay.cuny.edu/eportfolios/christinajanae22/2011/12/05/the-feral-fount-you-have-to-see-it/

re÷belief [ MFA Thesis Paper ]
Introduction | 13
higher restriction on what an animator can get away with in cheating the camera – a technique
occasionally used to make movement work or look right for a scene. This technique, by
default, must be embraced. Otherwise, it would be impossible for any animator to complete
a project. This also meant to me that there would be much trial and error as the physical
world has restrictions to size of materials and weight to be factored in sculptural art.
FILM VS. INSTALLATION
Another problem I encountered was the decision to make this a film vs. an installation.
While it would work for both, it would demand two completely different paths to execute
for my thesis project. After much deliberation, I realized a story told with an installation
would not reach as wide of an audience, as I wanted. Film today, especially in the form of a
virtual link, allows many to experience the story and the spectacle. The chances are that
those I wanted to reach with my story might be least likely to travel to a studio or exhibition
of and installation. The downside of a film-only project is that the format allows for varied
viewing experiences, such as on television, laptops, iPhones, etc.; and, many of these
experiences of the film do not provide a truly cinematic experience in a large screen setting.
In consideration of this, I created a line in my budget for festival submissions so that the
work could be projected in the optimal theater setting by film enthusiasts, and then I would
follow up with an online release after a year’s time.
Additionally, after the release of the film, and depending on time and budget, I have also
considered the possibility of installation as a secondary pursuit, post thesis.
Iterative Production Cycle
Though it would make sense to follow a more traditional pipeline for animation, a 3D
Printed film that was experimental in nature meant that a different pipeline needed to be
considered. Reason stems from the fact no one has really created a 3D Printed, zoetropic
film before, or at least documented its process. Because of the need to do prototyping and
research prior to creation of any content, it meant I would have time to consider how the
production cycle would need to work.
Because I desired to have sculptural animated zoetropes, I had to consider how to build
them, and to destroy them, and to rebuild them again if the visual design did not work or
was not physically possible. For this, it meant I might need to go back to prior, completed

re÷belief [ MFA Thesis Paper ]
Introduction | 14
zoetropes to adjust them relative to the entire story instead of just to their physical
standalone structures, since they had to relate in shape and story somehow. To help in this
process, I considered a pipeline that:
Allowed focus on the animation of characters and objects
Referenced the animation to shape it into a sculptural piece
Allowed review of the sculpture by virtually spinning it for visual esthetics and
storytelling strategies and restrictions
Output optimally for printing costs and physical restrictions
Print the resulting zoetrope in hopes for it to survive spinning and shipment
At any point during the process, I could easily revisit any of the above for
corrections and adjustments
Because Autodesk’s’ Maya was my choice of poison, I built scene files to be modular and
light so they could then be referenced into more complex scenes for animation and then
zoetrope creation. I also decided to build several simple and complex MEL scripts to handle
the creation of zoetropes, which could save a lot of time for review of the sculptural pieces.
While general sketches and drawings could have been useful, I learned through an iterative
design process (the process discussed above) that allowed for quicker design variations of
the zoetropes to meet my expectations for the story.
Planned Production vs. Actual Production
Despite the originally proposed timeline of a one-year time frame and a budget of $9,305
(see C-1), new life events caused some changes and challenges.
A NUMBER OF 3D PRINTING SOLUTIONS
One of the big changes in my personal life during the production was my unexpected move
from Rochester, New York, to North Bethesda, Maryland due to my wife, Corinn’s
company promoting her into an amazing job opportunity. While this beneficial and
important to our lives, it caused a dramatic swing of expectations in production costs.
Originally, the plan was to work with RIT’s Brinkman Lab12 to 3D Print all my zoetropes.
12 RIT’s Brinkman Lab Homepage: https://www.rit.edu/kgcoe/ise/brinkman/

re÷belief [ MFA Thesis Paper ]
Introduction | 15
The Brinkman Lab had a ZCorp 650 full color printer utilizing an inexpensive “EBay”13
material for prototyping parts. These types of 3D Printing machines can vary greatly in the
$50,000 to $100,000 price tag range, making it easily accessible for a student to use. At the
time, it was the only printer on the market that allowed for a white powder printer material
to be pigmented much like a standard desktop color printer, while also having a nice large
printing volume. However, since the lab was student run with an irregular schedule, and
because the printer was down periodically and backlogged with other machine shop printing
projects, it was difficult for me to rely on this as a printing solution for production.
For a brief moment, during the end of September 2012, I considered purchasing one of
Makerbot’s new Replicator 2X14 printers for just around $2800 so I could 3D Print all my
zoetropes from home. It was a supported machine allowing two printing materials to be
extruded at the same time: A plastic material in one extruder (PLA), and a dissolvable
material in the other extruder – much like a type of Elmer’s glue. The benefit of printing
both at the same time for this additive printing process was to allow for complex geometries
with overhangs to be supported with a secondary printing structure that could easily be
removed post printing by placing it into water. The downsides to a 3D Printer like this –
ones that extruded a PLA or ABS filament – were its printing errors in the form of
spaghetti-like slag that simply would not adhere properly due to temperature changes during
printing and/or if a machine instruction was sent incorrectly.
Figure 5: MakerBot Replicator 2X Desktop 3D Printer with examples of dual extrusion models.15
While this 3D Printer seemed like the best possibility and alternative at the time, Superstorm
Sandy16 ruined Makerbot’s production facility in Brooklyn, New York when it made landfall
13 The powder was only available through a shop on EBay citing it to be a special powder to be an alternative, cheaper solution to 3D Systems supported and expensive material standard in all it’s ZCorp printers. 14 A dual extruder printer platform: http://store.makerbot.com/replicator2x 15 Source:

re÷belief [ MFA Thesis Paper ]
Introduction | 16
on October 29, 2012. Makerbot’s online purchasing site changed their turnaround time for
their printers from a 6-week timeframe to an indefinite timeframe making this a dead-end
plan. Needless to say, this forced me to seek another solution.
I considered building alternative printers varying from $300 to $1800 from online stores and
groups pointing to parts that could be ordered online or at local electronics parts and Home
Depot locations. Many of these printers were not as advanced in resolution of detail as
Makerbot’s products, and were really meant for play and prototyping – not very conducive
to a reliable need for quality output under a strict timeline. Also, the printing volume sizes
of these printers ranged greatly and were smaller than those of Makerbot’s platforms.
LOCATING A 3D PRINTING SERVICE
With concerns of time, cost and quality of production, I began looking into services local to
the East Coast to understand the cost benefits of working with a 3D Printing service.
Online companies such as Shapeways17, Sculpteo18 and i.materialise19 allowed a consumer to
print in any printing material available to the market. These printing materials included
polyamide, alumide, acrylic resins, ceramics, ABS, titanium, steel, brass, bronze, silver, gold,
rubber, and sandstone (see Figure 6). These websites also conveniently allowed the ability
for a content creator to upload their 3D model and to immediately obtain a cost quote after
selecting one of these materials. Each material uses a different printer and process for
production and because of this it also has varying costs, properties, printing resolutions and
production timeline.
16 An unprecedentedly, powerful hurricane off the Atlantic Coast: http://www.cnn.com/2013/07/13/world/americas/hurricane-sandy-fast-facts/ 17 Shapeways website: http://www.shapeways.com/ 18 Sculpteo website: http://www.sculpteo.com/ 19 i.materialise website: http://i.materialise.com/

re÷belief [ MFA Thesis Paper ]
Introduction | 17
Figure 6: Material examples printable through Shapeways.20
Because I was considering a printing service rather than a desktop printer, I researched
materials ranging from plastics and wood to sugar and recyclables in order to understand the
pay-per-print costs through desktop 3D Printers. Makerbot’s filament ranged from $40 to
$70 per pound of material in PLA, ABS and Dissolvable. Many other competitive sources
reported similar prices. Another factor I started to realize was my cat’s fur and dust
interfering with printing quality at home using a desktop 3D Printer. This all factored into a
concern of re-printing and support materials required to finish zoetrope outputs.
20 Material examples can be found here: https://www.shapeways.com/materials

re÷belief [ MFA Thesis Paper ]
Introduction | 18
Typically, online printing services post their material costs and material considerations for
public access. The costs were listed as dollar amounts per cubic inch or centimeter. So if
you knew the volume of your object in cubic inches or cubic centimeters, you could easily
estimate cost. As noted before, if I uploaded an OBJ file21 to a service online, it meant that
the instant quote returned could provide crucial feedback on how to make adjustments to
cut costs, if necessary. Some services, such as Shapeway’s site, also provided instant
feedback on potential printing problems by outputting the model to screen with color-
coding for references to how thick or thin the model is in certain areas (see Figure 7).
Figure 7: Example of wall fixing tool through Shapeways backend designer’s site.
Some online 3D Printing services also had hidden cost savings or penalties for printing. For
example, if you were to print a 3D cube, there are several factors that determine price: the
density, the overall size, and material of the object. If the cube were solid, the density would
be at 100% since the density is calculated by putting a bounding box around the object and
determining how much material would fill that space (see Figure 8). If it were hollow, the
cube’s density would be far less, particularly in the situation when it was defined as a
wireframe of 2mm thickness. In regards to size, typically discounts are given based on
reaching a minimum volume of material, of say, 20 cubic centimeters – anything less than
21 A generic geometry, open file format, typically imported and exported by 3D Software Programs

re÷belief [ MFA Thesis Paper ]
Introduction | 19
this would be charged the regular price, and anything more than this would get a 10%
discount.
Figure 8: Example polyamide pricing for cubes of varying densities.
Lastly, the material prices would vary depending on the manufacturer and usually cheaper
materials offered volume discounts. A cubic centimeter of a polyamide material would
typically run $1.50 per cubic centimeter and printing in silver could easily reach into the $80
per cubic centimeter range. However, if a model was printed in polyamide at Shapeways, as
an example, you could get a discount of 50% if the object printed had a density of more than
10% and was at least 20 cubic centimeters in size. If your models were less than 2% dense,
the pricing would be based on the bounding box size – making this appear as a penalty for
not using up the optimal space in their printer. Volume pricing calculations was a reasonable
business practice since accepting a low-density model to print would not allow the company
to capitalize on their investments in their service.

re÷belief [ MFA Thesis Paper ]
Introduction | 20
After much consideration, I chose to prototype and produce my film through Shapeways’
because of their main company’s location and production facility being in the heart of New
York City, their website was well designed for uploading and evaluating virtual goods, and
their pricing system was the best in the industry. My hope at the time was to find a person
whom I could talk to and get information that would help me produce these yet-to-be-
created zoetropes. By working with someone local versus someone overseas, like the service
i.materialise, I could personally pick up printed parts in case shipment would be impossible.
I believed that human interaction through this process, versus a robot-like, impersonal
approach, would be invaluable and crucial to completing this film.
However, this decision meant that prior budgeting costs would explode due to the higher
costs of working directly with a business to print objects. The added costs were easily
justified, however, since I did not have direct access to a reliable printer for creating vibrant,
full-color 3D Prints. The added, crucial benefit came later when I realized that human
workers, with much experience behind them, became part of the workflow when
determining if a zoetrope could survive 3D Print manufacturing as well as shipping.
Considering that I planned for very delicate and intricate designs, it was well worth the cost
in time and quality.
INITIAL TIMELINE VS. ACTUAL TIMELINE
A few other factors that created lapses in my original timeline came mostly down to funding.
When the RIT SOFA Faculty passed my thesis proposal, I was also nominated for a Princess
Grace Award22. This award could have potentially brought in $25,000 to help in funding my
thesis. I also applied for a RIT College of Arts and Sciences Grant to help fund the thesis as
well. Despite the award nomination and efforts to gain funding this way, I was never
granted either.
After the thesis proposal was accepted, I had the opportunity to study abroad in New
Zealand for a period of time during the summer of 2012. This naturally took time away
from my planned initial story development and the pre-production phase. What was
amazing about this trip in particular was the fact that while at home, my wife was offered a
promotion, but in two different locations in the U.S.: Seattle, Washington and Bethesda,
Maryland. Without going into too much detail, and as noted before, Corinn eventually
accepted the position in Bethesda, Maryland, with a start date of November 2012. Our lives
22 A prestigious grant in the Arts and Humanities offered to students who are nominated by their schools for recognition: http://www.pgfusa.com/

re÷belief [ MFA Thesis Paper ]
Introduction | 21
turned a bit upside down for a moment as the projected path now took a deviated turn
causing concern for what might happen to our lives and my thesis production.
Once Corinn and I completed our journey to Bethesda, Maryland at the end of October
2012, we realized we were not putting away anything into our savings anymore since the DC
Metro area has a cost of living more than twice what we had experienced in Rochester, New
York. Because of my decision to print through Shapeways, it meant that I had to seek more
funding beyond what was available in my savings. I also needed to look for work to both
help pay for our new high living expenses and help fund my thesis film production.
I was offered an opportunity to work on a NASA Science on the Sphere project through the
Imaging Research Center at the University of Maryland, Baltimore County in late February
2013. Because this was a fulltime effort, I could not focus on my thesis and I divided my
production over a few months (see Table 2). Eventually, I finished the amazing NASA
opportunity in July 2013 when my contract ended. This experience also put me in closer
contact with Eric Dyer, who acted in an advisor-like role on my thesis. Despite the lapse in
time, the NASA work tremendously helped to save the needed funds to complete my thesis
and also furthered great new connections in the community.
Lastly, another large lapse in time was due to a much-needed surgical procedure that began
in October 2013 (see Table 3), to remove a benign tumor from my ankle. Prior to surgery,
the tumor mass made it difficult for me to sit, walk or be active on a daily basis. After the
tumor was removed and a slow recovery began I was still not able to work immediately or
for long periods. When I resumed working on the production in mid-January 2014, I felt the
great deficit in time and work that I was facing in order to complete my production.

Pre-Production | 22
Pre-Production
During pre-production, there were a few crucial items that needed to be solidified before
starting the creation of the zoetropes. Aside from general zoetrope research, the main
characters of the story needed to be fleshed out and then the environments would become
my next focus. Since the creation of the zoetropes was an experimental procedural process,
the foundation of the story and motifs needed to be established beforehand. And then, of
course, I needed to make sure I could create a working prototype concept to wrap my head
around for animating in the third dimension of a zoetrope to discover potential mechanical
considerations before designing and spinning the sculptural pieces.
Character Concepts & Design
Abstracted from the backstory, the characters in the
story are a young adult male and a young adult
female. To save costs, the characters needed to be as
small as possible, but easily understood and relatable
in human form. To me this meant that arms and
bodies would be disproportionately smaller than the
head to allow for emotions to be conveyed, if desired.
Since the printing aspects meant that the character’s
eyes might never be discernible, I considered focusing
on large body movements as the primary way of
expressing emotion. My research led me to designs
for the characters that resembled the ancient Easter
Island statues, called the Moai.
The Moai have very distinct, monolithic features that
make them very unique. They have a broad,
furrowed brow and angular faces that give them a strong countenance, and their large head
and small torso exaggerate their proportions. These extraordinary statues are still puzzling to
23 Photo taken by Aurbina: http://en.wikipedia.org/wiki/File:Moai_Rano_raraku.jpg
Figure 9: Easter Island Moai Heads.23

re÷belief [ MFA Thesis Paper ]
Pre-Production | 23
archeologists as to their meaning and function in ancient Polynesian culture. They are
seemingly eternal - almost as if they have been around since the existence of the island itself.
I decided to work with Gloria Arteaga, a talented conceptual artist and peer in the School of
Film and Animation program, to aid me in the design of the main characters. Since the film
idea stemmed from reoccurring memories, I wanted the characters designed in such a way
that suggested human features, but did not show that they had any human senses other than
maybe communication through feeling. This means that the eyes and mouths would be
mask-like representations, without pupils and a mouth being able to open. The ears and
noses would be purely representational. This approach also eliminated the difficulty of
having to animate eyes and mouths in light of the potential precarious results when going
through the printing process.
The initial sketches were to help with a variety of options in both design and understanding
poses. Eventually a few were chosen that best represented the adult characters in my story,
and Gloria made a few examples of the characters’ front, side and back views to help better
comprehend their volume and silhouettes (see Figure 10). Originally, we thought an angular
face and body would be a great representation and direct inspiration of the Moai (see Figure
11). However, after further review, we softened the face and body a bit to give it a more
welcoming appeal, and we left some of the defining features inspired by the Moai (see Figure
12). Once this was completed, we developed an understanding of how the figures,
proportionally, would age over time from child to adult.
Figure 10: Character Sketches.

re÷belief [ MFA Thesis Paper ]
Pre-Production | 24
When it came to deciding color and textures, I chose to have the characters represented as
nude bodies instead of clothed. A big reason for this was to not only have the characters
understood easily, but also the idea that nakedness symbolized there was nothing to hide.
Nakedness suggested vulnerability as well with a sense of truth and acceptance.
Story Strategies
To better understand the medium, I looked into why zoetropes would be the best
storytelling medium for this film. Breaking down the word zoetrope to its core construction,
“zoe” is a Greek root translated as “life” and “tropos” means “turning”. “Trope” by
definition also suggested metaphor, motifs and figurative expressions. Taking these variable
correspondences into account, I wanted the zoetropes to represent a cyclical nature of
something that reoccurs – both literally and figuratively. Since we are often reminded
repeatedly of the past, zoetropes made the best sense to help focus the story.
Figure 11: Refined Character Sketches.
Figure 12: Final Character Designs.

re÷belief [ MFA Thesis Paper ]
Pre-Production | 25
After much consideration, each zoetrope represented a reoccurring recollection. Originally,
18 zoetropes were planned to tell the story. However, due to costs and time I needed to
consolidate down to a much more reasonable number of zoetropes, and this resulted in
cutting their numbers down to about half. This naturally forced me to condense the
memories expressed by each zoetrope into much more meaningful representations, and to
be highly selective in choosing the memories that would be important to telling the story
through film.
Motif Choices
There were several storytelling motifs that were crucial to binding the zoetropes’ meanings
together. Besides the characters that populate the film, the physical motifs also carry
significant meanings. These motifs are the hearts, crosses, alphabet blocks and fish.
The hearts in the film were fairly obvious in representing
love. Not only love in the sense between two people, but
love that passes through generation after generation much
like a memento. The heart in the film goes through stages
of saturation and loss, just as the main character does.
The heart also represents pieces of the self. Pieces that
one feels like they are ripping from their chest to give to
others. It has a sense of investment when performed in
this way, which in turn can be taken away when
represented as a physical element.
Much like in my Roman Catholic upbringing, crosses
signify the representation of religion. In this film, the use
of the cross was to establish a sense of faith, and, much
like the heart, it too would be a physical element that
could be lost. In the story, faith would be built up
through a foundation of love and play, which would
eventually be represented by a protective-like cage. Later
on, this dissolves into a pile of lost items to signify the
nature of growing up over the years and questioning
religion and faith.
Figure 13: 3D Printed Heart.
Figure 14: 3D Printed Cross.
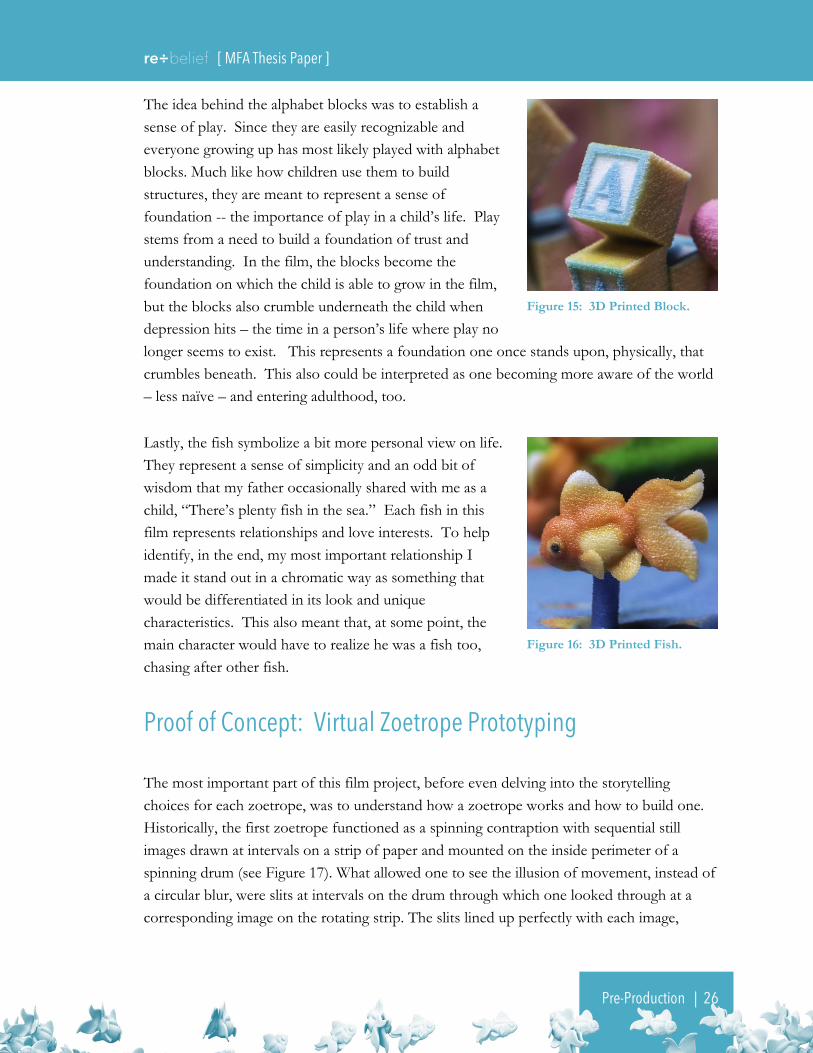
re÷belief [ MFA Thesis Paper ]
Pre-Production | 26
The idea behind the alphabet blocks was to establish a
sense of play. Since they are easily recognizable and
everyone growing up has most likely played with alphabet
blocks. Much like how children use them to build
structures, they are meant to represent a sense of
foundation -- the importance of play in a child’s life. Play
stems from a need to build a foundation of trust and
understanding. In the film, the blocks become the
foundation on which the child is able to grow in the film,
but the blocks also crumble underneath the child when
depression hits – the time in a person’s life where play no
longer seems to exist. This represents a foundation one once stands upon, physically, that
crumbles beneath. This also could be interpreted as one becoming more aware of the world
– less naïve – and entering adulthood, too.
Lastly, the fish symbolize a bit more personal view on life.
They represent a sense of simplicity and an odd bit of
wisdom that my father occasionally shared with me as a
child, “There’s plenty fish in the sea.” Each fish in this
film represents relationships and love interests. To help
identify, in the end, my most important relationship I
made it stand out in a chromatic way as something that
would be differentiated in its look and unique
characteristics. This also meant that, at some point, the
main character would have to realize he was a fish too,
chasing after other fish.
Proof of Concept: Virtual Zoetrope Prototyping
The most important part of this film project, before even delving into the storytelling
choices for each zoetrope, was to understand how a zoetrope works and how to build one.
Historically, the first zoetrope functioned as a spinning contraption with sequential still
images drawn at intervals on a strip of paper and mounted on the inside perimeter of a
spinning drum (see Figure 17). What allowed one to see the illusion of movement, instead of
a circular blur, were slits at intervals on the drum through which one looked through at a
corresponding image on the rotating strip. The slits lined up perfectly with each image,
Figure 15: 3D Printed Block.
Figure 16: 3D Printed Fish.
re÷belief [ MFA Thesis Paper ]
Pre-Production | 27
acting as a shutter effect. During spinning, when looking through the slits, the images would
animate.
Figure 17: Old Zoetrope example with replaceable animation strips.24
For filmmaking, the shutter in this case was inside the camera. The important
considerations that needed to be worked out were how many frames per second would the
film be shot and how many figures could I fit on a rotating disc. This was to ensure proper
syncing. The simple math suggested that filming at 24 frames per second, in progressive
mode, would be ideal, which meant that one would essentially see 24 still figures on the disc.
I virtually prototyped a couple tests, within Autodesk Maya, to see what the effects of a disc
rotating slightly faster or slower would be. I created a simple 24 frame animation cycle that
I duplicated by 15° offset around a circular disc. Then I spun the zoetrope one revolution
per second, with the virtual camera set at 24fps. If the zoetrope became off sync with the
camera shutter, the perception of the imagery would appear to drift. If a figure was jumping
forward in scene, being off sync by a single frame could make it appear that the character is
attempting to catch up. Understanding this helped me in judging where this effect could be
present in my scenes when recording, and where to pay attention to accuracy in revolutions.
24 Source: http://media.web.britannica.com/eb-media/30/62530-050-55A02BE6.jpg

Modeling, Texturing & Rigging Prep for Zoetropes | 28
Modeling, Texturing & Rigging Prep for Zoetropes
In order to create the zoetropes, I employed a strategy of creating a pipeline to make
designing and animating the zoetropes easily adjustable, without having to worry about the
process of re-creating what would not work. To start, the characters and environment
objects where modeled, textured and rigged as separate scene files in Autodesk Maya. Once
they were rigged and cleaned-up, they were referenced into another scene file to create the
animation. Once those animation files were completed, the animated scene files were
referenced into another, new scene file to be duplicated and manipulated into complex
shapes and the final zoetrope designs.
Creating this pipeline for zoetrope creation allowed for consistency in look and permitted
adjustments to be made anywhere within each zoetrope. Interesting to the nature of what
zoetrope means, the iterative process of designing them within this film ended up itself
becoming a cyclical cycle of creating and destroying.
Characters
The strategy in designing the male and female characters was to create models that would
morph through their different ages – baby, child, teen and adult, as well as to morph from
male to female. Doing so meant that one character file could allow for one rig setup with a
simple swap of textures to differentiate the characters. This in turn allowed for easy updates
and population in referenced files when changes were required.
The characters needed to be printable and not to be too delicate, so features such as the
small hands and fingers needed to be stubby and fatter than normal. To start, the boy was
box modeled from the concept art, starting from a cube and using extruded faces to come
up with the general character bodies. As anticipated in industry, the geometry designs
focused on proper loop and ring polygon structures, as well as keeping all polygons as quads
to ensure good deformation during rigging and animation. Once a general shape was
created, I brought the model into Autodesk Mudbox to shape the body more with large
brushes, since at this stage the small details of the body did not need to exist. When the
shape was defined, I went back into Maya and re-topologized the figure where needed.

re÷belief [ MFA Thesis Paper ]
Modeling, Texturing & Rigging Prep for Zoetropes | 29
Figure 18: Maya rig of Male Adult with Controls.
UV UNWRAPPING & TEXTURING
Upon completing the final geometric design of the character, it needed to be unwrapped and
then textured. To do this as quickly as possible, I exported the character as an OBJ into
another program called 3DCoat to start with the UV Unwrapping process (see Figure 19).
At the time, 3DCoat offered easy manipulation of the UV map by using my loop and ring
structure to separate the UVs into islands and then to optimize them for proper distortion
and pixel resolution. During the process, I would turn on a checker texture map to see how
well the UVs were laid out and through the instant feedback I could then easily update the

re÷belief [ MFA Thesis Paper ]
Modeling, Texturing & Rigging Prep for Zoetropes | 30
UV layouts to make sure that the pixel densities were optimized in areas where they were
needed, such as the face and torso.
Figure 19: 3DCoat’s UV display shows high pixel density in red and low pixel density in blue.
Once the UV Unwrapping was completed, I exported the object as an OBJ and imported it
back into Autodesk Maya to verify that the UV layout was imported properly. Typically, a
weird anomaly happened where the each face UV was not part of the big islands – separated
into individual UV faces, which required a quick fix to bind all the UV Vertices together. To
verify that it looked right, I applied a grid-texture material to the character in Maya to verify
that the distortion was not horrible.
Once the UV map was verified and fixed, I imported it from Autodesk Maya into Autodesk
Mudbox to easily manipulate the texture of the object. Because the character was to be 3D
Printed, the resolution of the textures after printing would not allow for a great amount of
detail as you would expect in film, especially since many of the 3D Printed objects would be
no more than an inch tall. Understanding this, I focused on broader colors, closer to warm,
Caucasian skin tones, concerned that, printing-wise, pigments would blend much like make-
up (see Figure 20).

re÷belief [ MFA Thesis Paper ]
Modeling, Texturing & Rigging Prep for Zoetropes | 31
Figure 20: Texture map with male adult colors on the left and female adult colors on the right.
RIGGING
Since the character needed to morph from
male to female, in addition to different
sizes and shapes for age, I started by
creating a human IK/FK skeleton that
would scale through morphing and would
work for both human sexes. I made
choices on controls typical to human,
bipedal rigs using NURB curves and
created extra controls on each to do curl
fingers, switch from IK to FK, and to
switch between facial morph targets.
Once the joint structures and rig were
designed in Autodesk Maya, I then went
into Mudbox to design the blendshapes for
the geometry (see Figure 22). What made
this rig a bit more unusual than film type
rigs is that the character’s head absolutely needed to be geometrically part of the entire body.
This meant that I had to be careful of blendshape adjustments that may accidentally be
painted to the other parts of the body. My strategy here though was to create all the blend
Figure 21: Rig displaying joint chain structure with controls.

re÷belief [ MFA Thesis Paper ]
Modeling, Texturing & Rigging Prep for Zoetropes | 32
shape changes symmetrically and then break them up in Maya using a MEL tool I developed
that would invert morph targets from one side to the other. This pipeline that I created
made for easy changes to blend targets in the face and body when needed.
Figure 22: Mesh with texture within Mudbox showing layers of blendshape controls.
When the blendshapes target geometries populated the scene, I then bound them all to the
body, making sure they were all properly named (see Figure 23). I then went through and
tested each blendshape, particularly in the face, to see if they blended well or if vertices
collided in poor ways. I also tested the different body proportion blendshape changes that
were created for the male character’s baby, child, teen and adult forms.
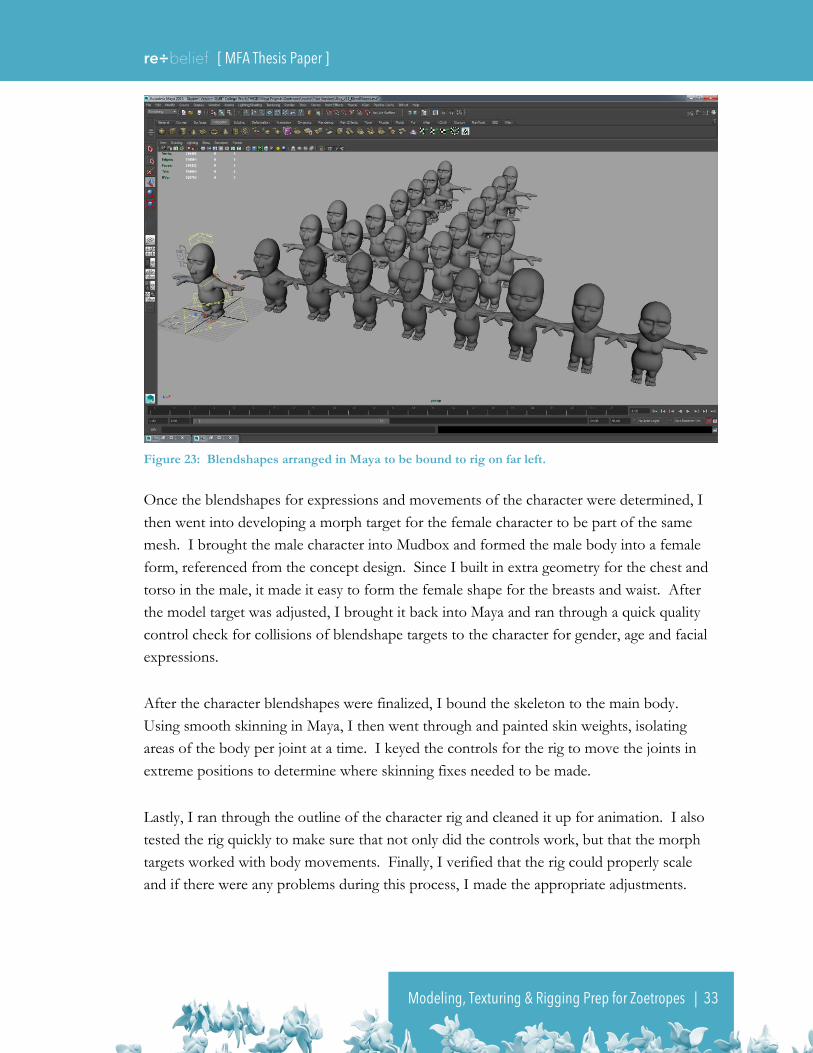
re÷belief [ MFA Thesis Paper ]
Modeling, Texturing & Rigging Prep for Zoetropes | 33
Figure 23: Blendshapes arranged in Maya to be bound to rig on far left.
Once the blendshapes for expressions and movements of the character were determined, I
then went into developing a morph target for the female character to be part of the same
mesh. I brought the male character into Mudbox and formed the male body into a female
form, referenced from the concept design. Since I built in extra geometry for the chest and
torso in the male, it made it easy to form the female shape for the breasts and waist. After
the model target was adjusted, I brought it back into Maya and ran through a quick quality
control check for collisions of blendshape targets to the character for gender, age and facial
expressions.
After the character blendshapes were finalized, I bound the skeleton to the main body.
Using smooth skinning in Maya, I then went through and painted skin weights, isolating
areas of the body per joint at a time. I keyed the controls for the rig to move the joints in
extreme positions to determine where skinning fixes needed to be made.
Lastly, I ran through the outline of the character rig and cleaned it up for animation. I also
tested the rig quickly to make sure that not only did the controls work, but that the morph
targets worked with body movements. Finally, I verified that the rig could properly scale
and if there were any problems during this process, I made the appropriate adjustments.

re÷belief [ MFA Thesis Paper ]
Modeling, Texturing & Rigging Prep for Zoetropes | 34
Figure 24: The same rig referenced twice to make both the female (left) and male (right).
Motifs & Environments
Much of the same concepts in the character creation process were followed for the motif
designs. The objects were modeled and rigged through the same box-modeling strategy and,
for more geometric objects, I skipped importing to Autodesk Mudbox and simply used
Photoshop for texturing the 3D Objects. Geometrically, I needed to make choices to keep
the polygon count to a minimum to allow for duplication of the objects not to exceed the
triangle limits of what Shapeways (or any printer) would allow.
I chose to stick with componentizing all objects for animation, keeping individual scene files
for everything. Keeping the files as clean and minimalized was crucial since the designing of
the zoetropes would require a lot of complex distortion, animation and duplication of these
objects. The following are a few notable rigs that were more than a simple squash and
stretch rig.

re÷belief [ MFA Thesis Paper ]
Modeling, Texturing & Rigging Prep for Zoetropes | 35
FISH RIG
Figure 25: Fish rig and controls.
The fish was built with a set of complicated controls that allowed for automated swimming.
Using a triple, grouped, joint chain, with controls on the fins and tail, allowed for intentional
and/or corrective positioning for the animation of the fish. The controls also allowed
adjustments to the amplitude of which the fish swam. The rig was done quickly, and though
there were imperfections on how it worked, I was pretty satisfied with the result, especially
with the automated swimming controls.

re÷belief [ MFA Thesis Paper ]
Modeling, Texturing & Rigging Prep for Zoetropes | 36
HOUSE RIG
Figure 26: House rig and controls.
The house rig would only appear in one zoetrope, but it needed to meaningfully express a
sense of sadness. To achieve this, the house design was a reflection of the cape-style home
where my parents fought and separated. The cape had a red door, white trim with grey side
panels, and two windows above the entrance of the home, with a garage attached. To
optimize size restrictions during printing, and to keep it simple, I chose to make the home
cycloptic with the window centered on the second floor, directly above the red door, in the
style of what you would see in a cape. The eye was rigged with a bend deformer and a
separate blendshape node that closed the eye, much like the deformations you would see in a
human blinking or squinting. The door had a simple control to open and close with the
ability to bend the door to later be used in animation to heighten opening and slamming.

re÷belief [ MFA Thesis Paper ]
Modeling, Texturing & Rigging Prep for Zoetropes | 37
FERN RIG
Figure 27: Fern rig and controls.
Interestingly, the fern rig was one of the most complex, yet simple rigs, to figure out. In the
idea of the animation, the fern needed to unfurl from the form of a fiddlehead to a large
frond and then back again. What made this difficult was the geometry of the frond needed
to be incredibly simple and thin. The strategy here was to design the frond as a planar-flat
design and very low-level poly, but with just enough to allow good deformation. Since this
was to be printed without color, there was no need to add texture. However, it was
important to figure out the UV’s properly to optimize how Maya deformers were to apply to
it. I created a simple deformer control setup where a bend deformer was applied to the
width of the frond as well as its length. Then by moving the deformer handles and the curve
attributes in a specific order, I could get the look of the frond rolling in and out. A
surprisingly easier setup than I thought it would need to be.

re÷belief [ MFA Thesis Paper ]
Modeling, Texturing & Rigging Prep for Zoetropes | 38
Test Prints in Various Materials
In order to make sure I was on the right path in designing these zoetropes, I needed to
understand the process of 3D Printing for various materials. As noted before, I couldn’t
find the right opportunity to use RIT’s facilities to do print tests, so I eventually resorted to
working through Shapeways. In doing so, I had many materials to choose from with prices
ranging greatly depending on the type of material. Looking to keep costs down, and to test a
material’s attributes, I decided to 3D Print initially in three different materials initially: full-
color sandstone, white sintered nylon plastic, and frosted detailed translucent acrylic.
Figure 28: Fish sizes in relation to inch side of ruler and a penny for visual reference.
Just for the print test, I decided to take the fish and pose it to exploit areas of thickness and
color to test for details – particularly the fins. I printed in two different sizes to test for
detail resolution. I tested the fish in two sizes for full-color sandstone (large and small), one
large size print for the white nylon plastic and one small size for transparent acrylic.
Originally, I wanted to print in white nylon plastic in both large and small, but the minimum
size restriction for Nylon was larger than the Sandstone and acrylic. The prices for the
sandstone, plastic and acrylic materials were $0.75 per cm3, $1.50 per cm3, and $3.00 per cm3,
respectively.
Once the objects were mailed and then returned, I was elated with the results (see Figure 29).
Nothing was more exciting to see a virtual object materialized. That aside, the color and
textures of the fish were surprisingly decent. You could not see the details of the fish’s
scales, but you had their sense of color, which worked well. The blacks ran into the color
unexpectedly, and later on I adjusted the colors so they were a bit less black, but just a

re÷belief [ MFA Thesis Paper ]
Modeling, Texturing & Rigging Prep for Zoetropes | 39
deeper shade. For all materials, the texture qualities varied greatly, with the sandstone being
grainy and the acrylic being smooth.
Figure 29: Material Resolution - Nylon (upper left), Sandstone (right), Acrylic (bottom left).
In regards to the plastic materials, the white Nylon was vastly lighter and stronger than the
full-color sandstone, just as Shapeways noted on their website. It also had a bit more
resolution to it in comparison and the texture was smoother, though you could see the
stepping, but this is due to its accuracy in many ways. The acrylic small fish visually
appeared to have an amazingly accurate resolution at ¼ of the size of the standard fish size
in white nylon plastic. It’s even more apparent how accurate this was when compared to the
resolution of the sandstone fish printed in the smaller, but same size. However, the acrylic
would be much more brittle than the sandstone in some ways, but neither would have both
the resolution and strength of the white nylon plastic material.

re÷belief [ MFA Thesis Paper ]
Modeling, Texturing & Rigging Prep for Zoetropes | 40
After much consideration and deliberation with the resulted prints, and with the purpose of
keeping the project within budget, I decided to plan on printing the zoetropes mostly in full-
color sandstone to reduce time for painting by hand. The print volume for the sandstone
material meant that I had to keep the zoetropes to a boundary of no more than 250mm x
380mm x 200mm per part, or for the entire piece.
For zoetropes that needed a larger volume, a wire thickness or higher strength due to size, I
decided to print in the nylon plastic material. The added benefit of this showed when the
density reached beyond a 10% because it meant that I could print in this material for half the
cost, putting the price tag in sandstone and nylon plastic at the same level. Also, the print
volume of the material allowed for objects to be a greater size within the bounds of 650mm
x 550mm x 350mm. The downside was that the colors and textures between full-color
sandstone and hand painted white nylon plastic would vary greatly. Taking this into
consideration, I made sure to plan swatches of acrylic paint color and structural, strategic
considerations when planning the design of the final zoetropes.

Zoetrope Design & Printing | 41
Zoetrope Design & Printing
Strategies for all zoetrope designs were to focus on both a sense of feeling, emotion and
visual spectacle. A challenge was to also tell a quick narrative in 24 frames per cyclical
second without boring the audience. Motifs, characters and themes needed to flow through
each to further the story. Another task required each zoetrope to be within a $1,000 budget,
if at all possible. Of course, this would change depending on a number of factors, but gave a
realistic understanding of budget restrictions, considering that the number of zoetropes was
reduced from an initial 18 to about nine total.
Initial & Actual Manufacturing Strategy
Originally, each zoetrope was to be printed as one solid piece, straight out of the printer bed,
in a full-color material. After researching size restrictions, physical properties and accuracy,
and resulting shipments through UPS, my expectations had to change. I embraced the
restrictions as a challenge rather than fight them. This also led to anticipation that some
would successfully print as one piece entirely and other zoetropes would require assembly
from hundreds of parts.
For this reason, I decided to work on each zoetrope individually while I considered future
zoetrope designs, sans blueprints. To this point, I premeditated designing the zoetrope for
esthetic and visual storytelling purposes first, as if it were to be printed as one piece. It
would not be until after it was completed that I intended to chop up the model if it required
multiple prints or various materials.
This process would be similar to straight-ahead animation, where each frame is drawn
without much planning until it’s completed. I was not quite sure how each zoetrope would
relate other than through motifs and themes. However, consciously aware that I had to
reduce from 18 zoetropes in the end, I wanted to make sure the story could be told linearly
within a film that had a cyclical narrative. Each zoetrope also had to be a completed thought
or idea – self-contained. So, at the very least, I wrote down a simple outline in my personal
journal to help consider the narrative pearls, knowing the outline could potentially change
after each zoetrope was completed.

re÷belief [ MFA Thesis Paper ]
Zoetrope Design & Printing | 42
Because of this choice in development, and due to my time restrictions, I could not
prototype print each zoetrope. I therefore had to model each zoetrope for final print and
then print it before moving on to the next one. After receiving the print, I would then make
judgments on how the next print would work and make changes to the next zoetrope based
on the results. This naturally became a mix of iterative design and why the final zoetropes, I
believe, became more interesting, intricate and complex towards the end of production.
Sculptural vs. Staged Set
Much like theatrical stage productions, film animations in film are typically designed in a
virtual existence where the sets and objects populating a scene only exist for that one shot.
In prior films I worked on myself, rooms would be carved up just to render character
interactions in the scene. In the case of my film and zoetrope designs, I wanted each piece
to be more than just for the camera.
When considering designs of zoetropes, I looked to how I could sculpt the zoetropes into
Escherian-like forms25 that would bring more meaning to each piece. I wanted to have at
least a few designs to figuratively represent an idea beyond just the action within the piece,
even if not recognized exclusively within the film itself. For time and cost, many of the
zoetropes needed to exist just to tell the story, but if I could, I took the extra time to
consider an extension for those interested in seeing the physical zoetrope outside of the film,
to experience the shape of it in a different light.
Figure 30: Examples of M.C. Escher's tessellated works.26
25 Maurits Cornelis Escher, well-known modern artist who created imaginative tessellations, impossible architecture and investigations into infinity. 26 Source: http://www.wikiart.org/en/m-c-escher/

re÷belief [ MFA Thesis Paper ]
Zoetrope Design & Printing | 43
This had to be a careful balance, as the primary purpose was to tell a story in a film, and not
to have the zoetropes be just an installation in a gallery. To this end, I considered what
actions would be interesting for the camera to catch after playing with designs to see if they
would work both for film and for gallery-type exhibition beyond the film. Again, as more
time passed in developing the zoetropes from start to finish, one can see the evolution in my
playfulness and intent in later designs.
MEL Scripting
Because of my background in computer information technology and supporting software
and system designs, I had much experience in programming and scripting solutions for
complex problems. A big time-sink in the process of animating and designing zoetropes was
the inherent need to create and destroy, repeatedly. If the animation did not work with the
design, or if the design did not work for the animation, the process of creating the zoetropes
needed to be re-initiated. To this end, I worked on developing a method and MEL script to
help me focus on the more important artistic aspects of these sculptures and to not waste
my time in virtually duplicating animated objects by hand.
To write the script, I created an understanding for the order of procedures that helped the
design process and script. The simple concept was:
1. Animate the object over a period of time.
2. Reference the animated objects into a new scene.
3. Position and animate the referenced animated objects’ rig along a path to help shape
the zoetrope, if needed.
4. Duplicate the objects and parent them to a separate, temporary, rotating object per
frame that matched the final frame rate required for the zoetrope.
5. Group the duplicated objects and un-parent them from the temporary, rotating
object.
6. Create layers for the duplicated objects for easy manipulation afterwards.
7. Delete the Maya history in order to save on computer resources.
And, of course, if the final design did not work to my expectations, the final piece was
destroyed, the animation would be adjusted and the procedure repeated. In some cases,
instead of deleting the final object, the scene would need to be reopened due to the size and
complexity of the final pieces.

re÷belief [ MFA Thesis Paper ]
Zoetrope Design & Printing | 44
Once the set of procedures was understood, I created a simple rig of a NURBS curve with
visual frame numbers set to a rotation of 360 degrees per second, which equated to 24 FPS
within Maya’s scene file (see Figure 31). The visual design was not necessary, but helped as
an observable understanding of where in the designed zoetrope there might be a missing
frame or another problem that needed fixing. Once completed, the file was referenced into
all the zoetrope build scenes after the animation scenes were completed as separate files.
Figure 31: Zoetrope ring rig used to for duplication script and spatial reference.
Then, using the MEL script I wrote (see Figure 32), the selected objects would be duplicated
as time incremented for the duration of the referenced animation. The script took into
consideration unique object names and that the timeline could have a negative starting frame
and ending frame. To aid in this, many variables were created to the top of the script to
allow for quick changing and modification. A GUI27 would have been designed and written
to aid as a more functional tool, however, due to time constraints, I decided to avoid this to
save time on interface bugs that might appear. It also helped that I was fairly comfortable
working in the script editor within Maya.
27 A GUI is a Graphical User Interface, a visual design for human-computer interaction, which utilizes menu options, buttons and variables for easy access by a mouse and keyboard.
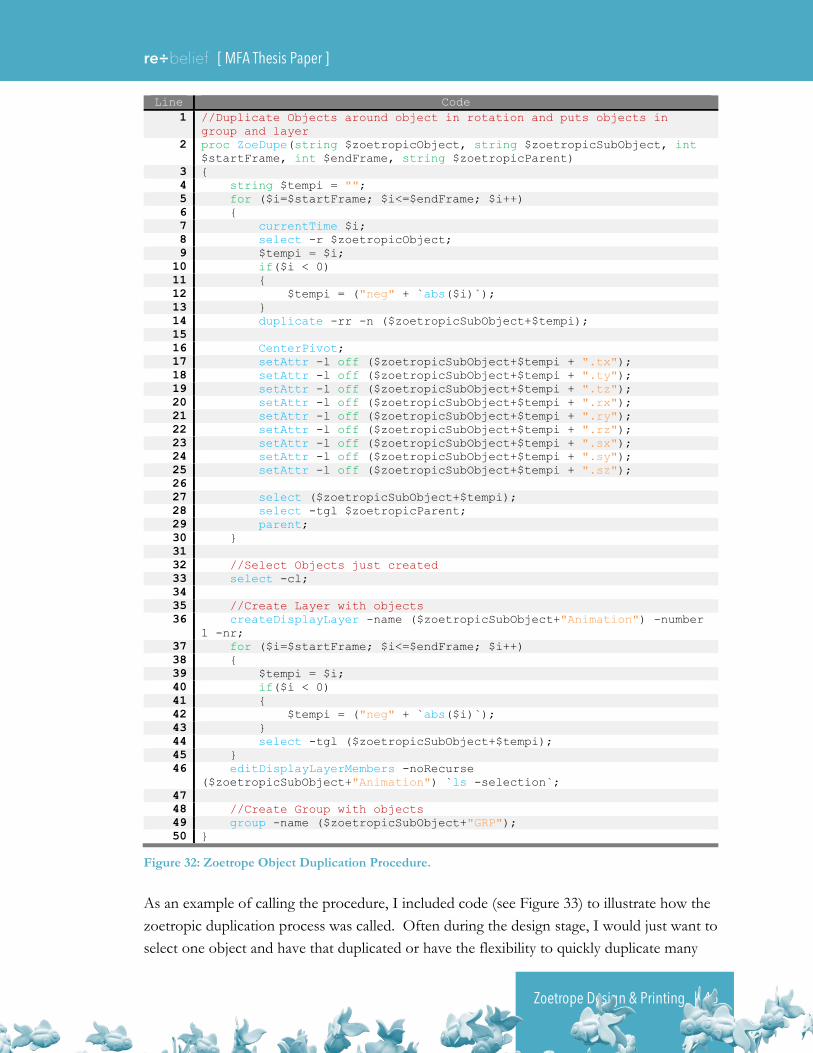
re÷belief [ MFA Thesis Paper ]
Zoetrope Design & Printing | 45
Line Code
1 //Duplicate Objects around object in rotation and puts objects in
group and layer
2 proc ZoeDupe(string $zoetropicObject, string $zoetropicSubObject, int
$startFrame, int $endFrame, string $zoetropicParent)
3 {
4 string $tempi = "";
5 for ($i=$startFrame; $i<=$endFrame; $i++)
6 {
7 currentTime $i;
8 select -r $zoetropicObject;
9 $tempi = $i;
10 if($i < 0)
11 {
12 $tempi = ("neg" + `abs($i)`);
13 }
14 duplicate -rr -n ($zoetropicSubObject+$tempi);
15
16 CenterPivot;
17 setAttr -l off ($zoetropicSubObject+$tempi + ".tx");
18 setAttr -l off ($zoetropicSubObject+$tempi + ".ty");
19 setAttr -l off ($zoetropicSubObject+$tempi + ".tz");
20 setAttr -l off ($zoetropicSubObject+$tempi + ".rx");
21 setAttr -l off ($zoetropicSubObject+$tempi + ".ry");
22 setAttr -l off ($zoetropicSubObject+$tempi + ".rz");
23 setAttr -l off ($zoetropicSubObject+$tempi + ".sx");
24 setAttr -l off ($zoetropicSubObject+$tempi + ".sy");
25 setAttr -l off ($zoetropicSubObject+$tempi + ".sz");
26
27 select ($zoetropicSubObject+$tempi);
28 select -tgl $zoetropicParent;
29 parent;
30 }
31
32 //Select Objects just created
33 select -cl;
34
35 //Create Layer with objects
36 createDisplayLayer -name ($zoetropicSubObject+"Animation") -number
1 -nr;
37 for ($i=$startFrame; $i<=$endFrame; $i++)
38 {
39 $tempi = $i;
40 if($i < 0)
41 {
42 $tempi = ("neg" + `abs($i)`);
43 }
44 select -tgl ($zoetropicSubObject+$tempi);
45 }
46 editDisplayLayerMembers -noRecurse
($zoetropicSubObject+"Animation") `ls -selection`;
47
48 //Create Group with objects
49 group -name ($zoetropicSubObject+"GRP");
50 }
Figure 32: Zoetrope Object Duplication Procedure.
As an example of calling the procedure, I included code (see Figure 33) to illustrate how the
zoetropic duplication process was called. Often during the design stage, I would just want to
select one object and have that duplicated or have the flexibility to quickly duplicate many

re÷belief [ MFA Thesis Paper ]
Zoetrope Design & Printing | 46
animated parts included in an animated object. By creating a procedure that could be
referenced many times in a very simple way helped modularize the MEL scripting, and
reduced the amount of time when just needing to duplicate a small portion of the zoetrope
rather than recreating it entirely.
Line Code
1 //Zoetrope 8
2 int $choseDupe = 5;
3
4 //Quick Copy Code for calling function
5 //ZoeDupe(zoetropicObject, zoetropicSubObject, startFrame, endFrame,
"ZoeRef:ZoeCircle24FPS");
6
7 if ($choseDupe == 1) //string
8 {
9 ZoeDupe("extrudedSurface1", "string1_", -23, 240,
"ZoeRef:ZoeCircle24FPS");
10 }
11 else if ($choseDupe == 2) //Bow
12 {
13 ZoeDupe("Bow:MusicBow", "bow1_", -46, 248,
"ZoeRef:ZoeCircle24FPS");
14 }
15 else if ($choseDupe == 3) //Guy&Girl
16 {
17 ZoeDupe("Couple:Guy:MaleAdult", "guy1_", -11, 89,
"ZoeRef:ZoeCircle24FPS");
18 ZoeDupe("Couple:Lady:MaleAdult", "girl1_", -11, 89,
"ZoeRef:ZoeCircle24FPS");
19 }
20 else if ($choseDupe == 5) //Fern
21 {
22 ZoeDupe("Fern:FernLeafGeo", "Fern1", -18, 96,
"ZoeRef:ZoeCircle24FPS");
23 ZoeDupe("SupportStrutGuyRT", "SStrutGuyRT_", -10, 89,
"ZoeRef:ZoeCircle24FPS");
24 ZoeDupe("SupportStrutGuyLT", "SStrutGuyLT_", -10, 89,
"ZoeRef:ZoeCircle24FPS");
25 ZoeDupe("SupportStrutGrlLT", "SStrutGrlLT_", -10, 89,
"ZoeRef:ZoeCircle24FPS");
26 ZoeDupe("SupportStrutGrlRT", "SStrutGrlRT_", -10, 89,
"ZoeRef:ZoeCircle24FPS");
27 }
Figure 33: Example Duplication Procedure Call.
This zoetrope creation MEL script saved an immense amount of time and frustration.
Other small and large scripts were written to help offset UV mapping for texture
replacements, to move pieces at fine increments, aid in blendshape creation, and to duplicate
keyframes to other rigs. However, the zoetrope creation script was a small, but shining
achievement of this thesis. In fact, if this script had not been created, meeting the deadline
for completion of the film would have been impossible and the creative integrity of the
designs would have suffered.

re÷belief [ MFA Thesis Paper ]
Zoetrope Design & Printing | 47
Design Choices & Strategies per Zoetrope
Each zoetrope I planned on creating had its unique set of creative challenges. Since I did
not want each zoetrope to look the same structurally, I invested much thought as to how
each design, architecturally, might shape out. I also approached each with an open mind and
a continual sense of play after every previous zoetrope was created. I had a rough outline to
base each zoetrope on that continued to be in flux during the process of its creation. This
resulted in an odd and uniquely iterative approach to developing each zoetrope to be visually
exciting and different.
Once each zoetrope created virtually, I rendered a quick playblast through Maya to view the
zoetrope in motion. In this review process, I looked for visual errors and potential printing
problems. Since they animated within one revolution per second, this meant that all I
needed was to quickly render 24 frames and have it simply loop. The result was reviewed by
me, by my committee and trusted peers for feedback. Due to my process and MEL script, I
then applied changes if the zoetrope did not animate well, the design was not interesting
enough, or if the narrative that was intended for the piece was muddled within the
animation.
Focusing on the visual storytelling of each zoetrope also meant that I had to consider which
3D Printing technique was to be employed afterwards. For most, the plan was to print in
full-color sandstone. This saved much time and money since the colorful textures would
mostly stay consistent from print to print. For others, I chose to print in white nylon plastic
for strength and integrity of the design, expecting to hire a painter to help with the extra time
that would need to be invested for the final look of the zoetrope. For a few zoetropes, I
discovered that a mix of both printing methods and hands on creation of pieces would need
to be employed. And, for zoetrope in particular, I created the world’s first zoetropic-
automaton.
CONSIDERATIONS FOR 3D PRINTING PREPARATION
The process of prepping the zoetropes for print varied. A majority of the designs printed in
full-color sandstone required a single print to have only one texture file as part of the ZIP
package sent to Shapeways via their website. The texture file could be a max of 2048 x 2048
pixels and in a file format of JPG or PNG. This required a tedious and planned process of
making sure that the animation referenced into the Maya zoetrope design scene had a new

re÷belief [ MFA Thesis Paper ]
Zoetrope Design & Printing | 48
texture applied with an offset texture map that fit all other zoetrope objects in them as well,
just before duplication. Choices needed to be made when certain objects needed more
texture space than others, depending on how large they were to be printed in relation to each
other. Usually, for complicated setups, I ran a specialized script to help automate the
offsetting of UVs per object, especially in areas where a character changed color during the
zoetrope’s animation.
The other part of the ZIP file required for upload was a special X3D file, containing all the
geometry information to be output for printing, including texture-mapping information. At
the time, outputting straight out of Maya consistently failed to produce a proper result.
Instead, I would export an OBJ file with texture information referencing the JPG or PNG
file. From there, I imported the OBJ into two programs: MeshLab28 to decimate the mesh
and export as an X3D file format, and netfabb29 for geometry related problems.
Decimating the mesh was necessary in helping to reduce the file size and triangle count of
the zoetrope geometry (see Figure 34). Shapeways limited file sizes to either 64 megabytes
or one million triangles. Many of the zoetropes exported often reached into 250 megabyte
OBJ files with several million triangles. MeshLab helped not only to reduce geometry and
file size, using many experimented settings during the course of my production, but it also
did a great job at keeping UV information relative and intact to the new mesh with very little
or no displacement.
Figure 34: MeshLab example of decimation - 2605404 faces (Left) to 950000 (Right).
28 MeshLab is an open source software for processing and editing 3D polygon meshes: http://meshlab.sourceforge.net/ 29 netfabb is a software tool used to edit and fix meshes for 3D printing output: http://www.netfabb.com/

re÷belief [ MFA Thesis Paper ]
Zoetrope Design & Printing | 49
After decimating, I imported the zoetropes into netfabb to verify several important factors
in making a 3D object printable. I first checked to make sure that the print volume did not
exceed the printer size as well as the triangle count. Next, I ran manual checks to not only
verify that the thickness of small pieces and structures within the zoetropes were within the
suggested guidelines of Shapeways, but to also make sure that the supported weight on those
structures could physically exist. Then, I checked to see if a basic repair was required to fix
errors in the mesh, which would result in a failed print, though I often fixed them in Maya
and reimported to check them (see Figure 35). Some of the errors would be non-manifold
geometry, flipped triangles, multiple triangles within the same plane, holes in the mesh, and
accidentally duplicated objects that would potentially cause the mesh to disappear during
printing. Finally, once all errors were fixed, I could potentially increase or decrease the scale
of the object to make the print larger or smaller, depending on the costs and size needs to
help with structural support and printing resolution.
Figure 35: netfabb progression of detecting repair needs, fix, and resolved geometry (left to right).
Once everything was verified and ready, I ZIP’ed the texture and X3D files to upload to
Shapeways for an instant quote. If the object was printed in white nylon plastic or other
non-texture mapped based materials, I exported and uploaded an STL without a texture file.
The instant quotes were sometimes resolved quickly, showing a preview of the object to be
printed with texture and a bit of shadow information. Other times, I found that some of my
files accidently exceeded their system resources and would crash the server causing time
delays in knowing the cost of the 3D model to be printed. A quick message to customer
support helped out with this.

Zoetrope Design & Printing | 50

re÷belief [ MFA Thesis Paper ]
Zoetrope Design & Printing | 51
ZOETROPE 1
This was the first zoetrope I worked on for the project and it took a bit of time to wrap my
head around the process. I approached it with a sense of experimentation and duplicated
the blocks initially using various animation paths to see how the design would work out.
After much frustration with the results, and not really knowing where the story would go, I
decided to be inspired by the memory of evoking play. Instead of designing what I originally
thought the story should be, I decided to play with the character and alphabet block with a
sense of fun. As a result of playing within Maya, I became optimistic about my ability to
approach the rest of the zoetropes in the same way – with a sense of curiosity and playful
wonder.
The memory conveyed in this loop consists of several parts to establish a few of the motifs
for the rest of the zoetropes and the film. The family silhouetted behind the child in the
photo and frame represents family. The love invested by the family would pop out of the
frame and become part of the foundation of the child’s wellbeing and growth. The alphabet
blocks represent play, which is another important foundation of a child’s upbringing that
family encourages. The child freely plays without worry of falling or becoming hurt,
seemingly taking risks that establish a sense of trust. The platform establishes the
impression of childhood, with its doilies that were often on top of small round tables that
my parents and grandparents had set family photos on, and suggests a cozy home.
Because this was my first print, I learned that you needed to expect 3D Prints to not be
perfect. Moving from the virtual world to the real world presented many unexpected results,
and I imagined architects would know best about this. In this case, the print arrived broken
in several places, suggesting that shipping was rough and/or the design was not physically
strong enough. The parts primarily damaged were the baby and its fingers, some of which
were destroyed to dust while others could be glued together. Aside from that, I was elated
that it printed at all. It was a moment of excitement that made me realize I was on the path
to a good thing.
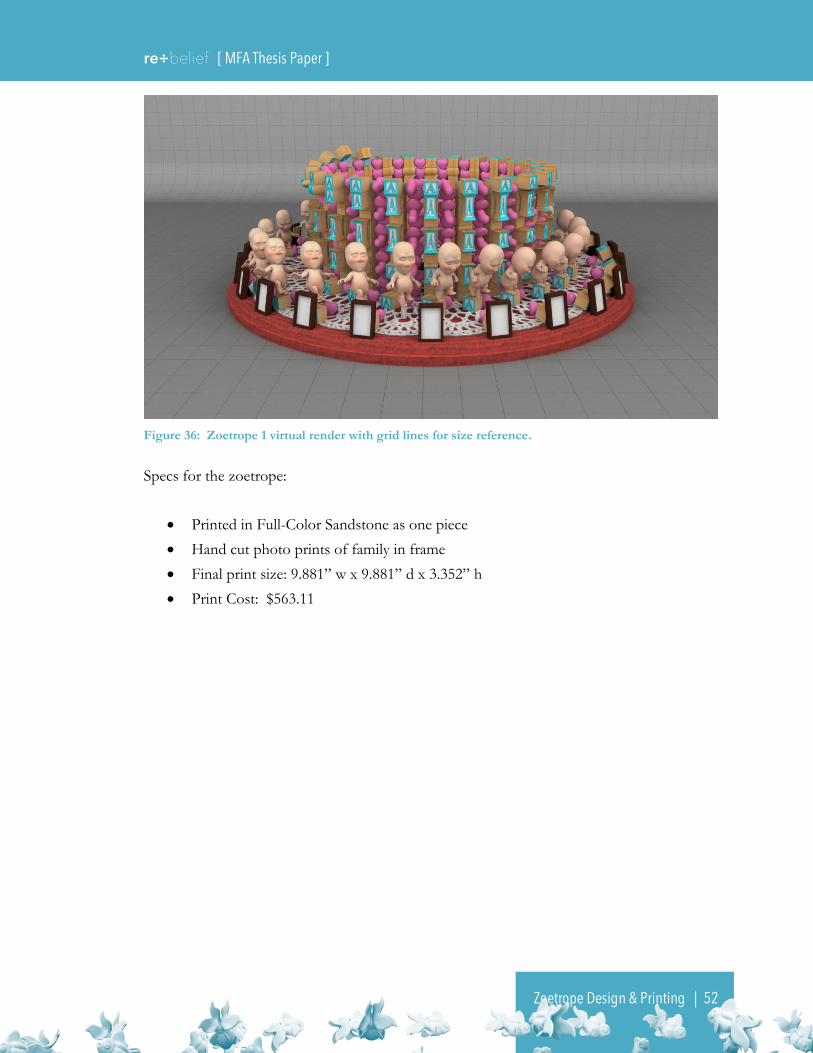
re÷belief [ MFA Thesis Paper ]
Zoetrope Design & Printing | 52
Figure 36: Zoetrope 1 virtual render with grid lines for size reference.
Specs for the zoetrope:
Printed in Full-Color Sandstone as one piece
Hand cut photo prints of family in frame
Final print size: 9.881” w x 9.881” d x 3.352” h
Print Cost: $563.11

Zoetrope Design & Printing | 53

re÷belief [ MFA Thesis Paper ]
Zoetrope Design & Printing | 54
ZOETROPE 2
In this design, the idea was to show religious faith develop from the sense of play and love
as a foundation. In my eyes, without a sense of trust play and feeling loved, it would be hard
for a child to learn about faith and religion. In turn, faith and religion act as a living shield of
protection. This created a sense of understanding that allows a child to grow, learn and
make sense of the world in many ways. As a result, the zoetrope design shows a rosary
transcending the wooden alphabet blocks and love. The fence like structure is the crucifix
end of the rosary.
3D Printing this design was a huge undertaking.
Initially, the zoetrope was rejected because
printing this in full-color sandstone would be
impossible due to the thinness of the rope pieces
that would break under the weight of the top part.
After thickening the ropes, which obscured the
delicateness and integrity of the design, and
submitting to Shapeways again, it printed just fine.
However, when it arrived from their overseas
production site to their main office in NYC, the
result broke into hundreds of pieces during
shipment.
At this point in time, I almost gave up. I hated the
idea that I would have to spend money in this way
and have these kinds of risks. After a period of
reflection, I realized this project would have these
reoccurring problems and it was something I needed to either embrace as part of the process
or avoid by simply rendering the project as any other 3D computer generated film project.
Because I hated quitting and the medium and physicality of these structures were important
to the concept and story, I decided to go back to my original design, where ropes and the
feel of the piece were delicate, and I reprinted in the Nylon plastic material. Doing this
surprisingly resulted in a much cheaper print30. And, I would send this to Brett Wilson, my
hired painter, to fully render with acrylics. The shipment to Brett resulted in a broken piece,
30 The full color print originally was $1200.34 vs. $461.46 for the nylon plastic printed a ¾ size.
Figure 37: Broken Zoetrope 2 due to material weight and shipping.
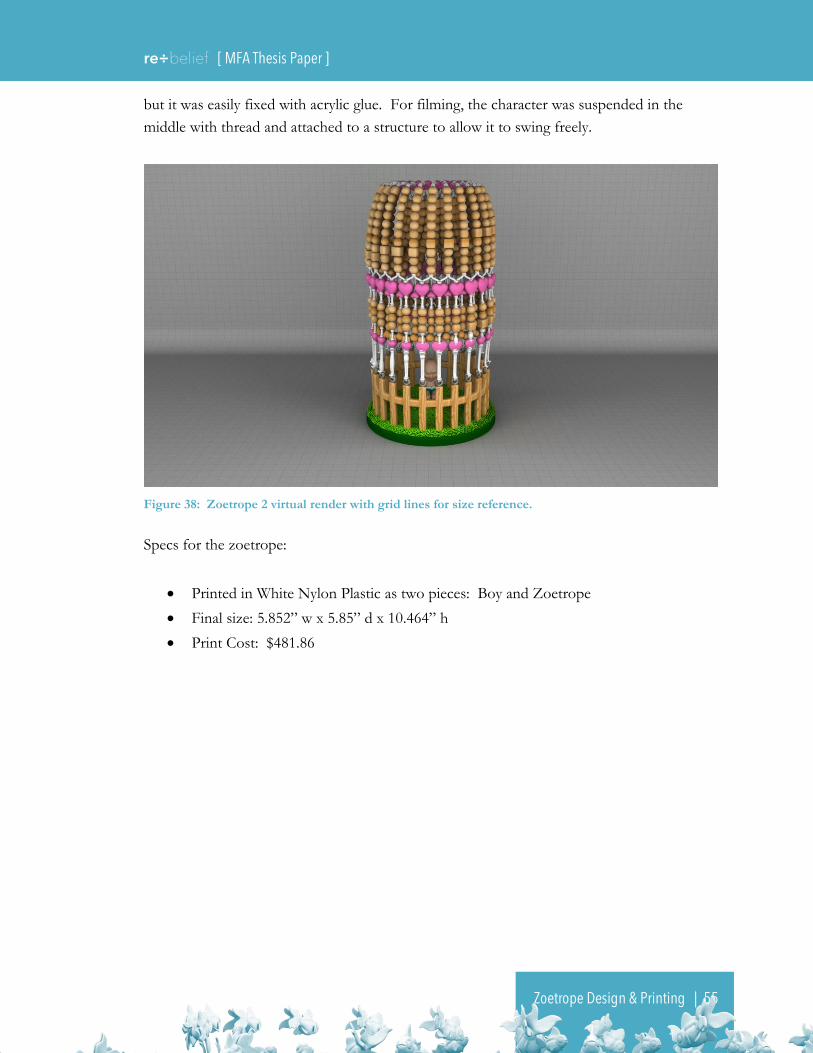
re÷belief [ MFA Thesis Paper ]
Zoetrope Design & Printing | 55
but it was easily fixed with acrylic glue. For filming, the character was suspended in the
middle with thread and attached to a structure to allow it to swing freely.
Figure 38: Zoetrope 2 virtual render with grid lines for size reference.
Specs for the zoetrope:
Printed in White Nylon Plastic as two pieces: Boy and Zoetrope
Final size: 5.852” w x 5.85” d x 10.464” h
Print Cost: $481.86

Zoetrope Design & Printing | 56

re÷belief [ MFA Thesis Paper ]
Zoetrope Design & Printing | 57
ZOETROPE 3
I introduced the desire and wanting to love in this zoetrope. The boy would attempt to
share the love invested in his family with others by laying it out in front of him. The fish
passing by, uninterested and non-transformed, represent the many past relationships or
desired relationships. Much like the first zoetrope, the sense here was to be visually playful.
The metaphor of the fish stemmed from my father’s sage advice that there were plenty of
fish in the sea.
A favorite aspect of this challenge was to “bake in” the reflection of the fish as well as parts
where the fish can be seen swimming under water. To do this, I created a simple geo plane
with a reflection map in Maya. After the fish animation was completed, I rendered in
orthographic views just the resulting reflections and then baked them into the texture using
Photoshop. I also loved playing with the zoetropic grass and ripples.
I had to work with Shapeways a lot to make this print possible. The fish had to be very
small to keep costs down, and also make everything work within a size limitation of four
prints. I first designed the zoetrope and then chopped it up, carefully finding the spots
where the fish or the boy would intersect. When the prints were done, some of the fish tails
were broken and missing. However, due to the quick pace of animation and spinning, I
decided to forego worrying about the tails since Shapeways would not reprint these
zoetropes due to the complexity of size. So, I glued them together to a flat, black, circular
piece of MDF that I hand cut.

re÷belief [ MFA Thesis Paper ]
Zoetrope Design & Printing | 58
Figure 39: Zoetrope 3 virtual render with grid lines for size reference.
Specs for the zoetrope:
Printed in Full-Color Sandstone as four pieces
Final print size: 19.685” w x 19.685” d x 1.9” h
Print Cost: $1081.33

Zoetrope Design & Printing | 59

re÷belief [ MFA Thesis Paper ]
Zoetrope Design & Printing | 60
ZOETROPE 4
This zoetrope took a darker dive into the story. The house would cry and the tears that
drained through the duct would reveal the teen boy. The act of crying was a representation
of the boy running away from home, as if the home pushed him out. As noted before, the
home is a direct design inspiration of the house my family owned at the time of my parents’
separation. What would be happening inside the home were the fighting and problems of the
parents. The boy running back inside represented the idea of him trying to resolve the issues
himself.
I was challenged to find a way to have the boy be on screen for a period of time before
returning back into the house. Through traditional animation techniques, I decided to skip
the boy running into the house by simply stretching him out using a lattice in Maya and
having him slide in. This allowed for the boy to be seen on screen longer, helped the viewer
to track where the character was headed, and allowed me to pause on the boy figure for a lot
longer to create a detectable sense of tension for the viewer.
Once again, working with Shapeways, I went through several iterations to 3D Print this
particular zoetrope. This also happened to be one of the prints I had Shapeways hold onto
so I could pick it up at their factory in NYC. The reason for this was because shipping
without breakage seemed impossible, and I did not want to risk these being broken in
shipment as well. Broken pieces were glued back together and then overall glued to a flat,
black, circular piece of MDF that I hand cut.
Figure 40: Gluing and clamping the four 3D Printed pieces together.

re÷belief [ MFA Thesis Paper ]
Zoetrope Design & Printing | 61
Figure 41: Zoetrope 4 virtual render with grid lines for size reference.
Specs for the zoetrope:
Printed in Full-Color Sandstone as four pieces
Final print size: 18.57” w x 18.57” d x 3.693” h
Print Cost: $1074.22

Zoetrope Design & Printing | 62

re÷belief [ MFA Thesis Paper ]
Zoetrope Design & Printing | 63
ZOETROPE 5
This was one of those zoetropes that create meaning through camera angles and cutting
through shots, but also has another meaning when viewing the whole zoetrope object. The
design would allow the camera to follow the action, but seeing the entire zoetrope added
another layer of meaning. The shape of the zoetrope is crown like, representing a sense of
patriarchy.
Here, the teen continues his journey through the door in the previous zoetrope and comes
out to the other side in an upside down world. Like a grinder, the hands not only pull the
boy inward to fall, but it filters out his heart in the process. This action represents the idea
of the boy feeling numb and lost. The alphabet blocks make another appearance to
represent the crumbling foundation on which the boy once depended and stood. The
crosses at the bottom represent the religious faith that has been lost.
This zoetrope is one of the first where I baked in an animated texture using the alphabet
blocks. The trick here was to setup the blocks of texture in the texture map, and when
animating it, offset the UVs for each block. Upon duplication, the blocks would retain the
coordinates in the sequence of animated frames, much like how sprite sheets were used in
games. The final effect was to reveal that the blocks lost their effects of welcoming and life.
Unfortunately, this was one of the zoetropes that was greatly affected during shipment (see
Figure 42). The piece was printed entirely at Shapeways and a photo sent to me showed it
was perfectly intact. But when I received it in shipment, it was broken into in more than 75
pieces, with some of the pieces smashed to powder. What made this even worse was that I
noticed some blocks in the middle of the zoetrope looked like they were re-glued, suggesting
that someone attempted to save the print. As a result, the intricate pieces were mismatched
and appeared very crooked, which would result in poor animation when spun.
Figure 42: Broken zoetrope due to lack of packaging materials for protection and stabilization.

re÷belief [ MFA Thesis Paper ]
Zoetrope Design & Printing | 64
Since Shapeways did not want to reprint the piece, I decided to ask for a replacement part to
be reprinted, and eventually re-broke and re-glued everything. Because the part replaced was
a door, it made it very difficult to perfectly reposition since the 3D Printing resulted in
inaccurate reproduction prints. During printing, objects will deform slightly due to weight
and size, which basically makes printed models a wet sandcastle that can become difficult to
pull out of the print hopper. Each print will never match exactly, essentially resulting in a
uniquely printed piece. In the end, I filed down some areas of the door and tried my best to
make it work. I found one frame that jumped a bit, but I figured through clever editing this
particular zoetrope could still work.
Figure 43: Zoetrope 5 virtual render with grid lines for size reference.
Specs for the zoetrope:
Printed in Full-Color Sandstone as one piece
Final print size: 9.967” w x 10.16” d x 4.377” h
Print Cost: $507.45

Zoetrope Design & Printing | 65

re÷belief [ MFA Thesis Paper ]
Zoetrope Design & Printing | 66
ZOETROPE 6
This was probably one of my favorite zoetropes to produce. Learning from the experiences
with the other zoetrope designs, I took a huge risk in this zoetrope with its sheer size and
eventual cost. Another huge risk was to try to imbue a personal feeling that might not be
relatable to the viewer. So I tried to keep the characters in this part the focus, and hoped
that the abstraction through editing would communicate at least the intended feeling of
wonder and amazement.
The adult character initially starts out looking very pail and depressed, sitting on the only
remnant play left – an alphabet block that suggests something special. The rainbow fish
represented a link to the original fish motif of relationships, but it was also different and
exotic and attracted the attention of the character and pulled him out of his depressive state.
As the fish dove into the crumbled foundation of the past, the character gets sucked in as
well. I wanted this scene to feel like a conveyor system to help transition to a new point
where the chairs were eventually discovered to be part of a theater setup in the next scene.
Another important part to this piece is that not only did the male seek something different in
his life, he transforms into a fish as well. The point here was to convey a new sense of play
and importance, where he too may be perceived as an equal in relationships, through his
transcendence into something he thought he couldn’t be a part of. This represented the
point in my own life where I felt I chased my future wife through the theater, where we first
met, in a playful way.
The pillar symbolizes creation as well. I loved astronomy and drew inspiration from the
Pillars of Creation, a photo taken by the Hubble Telescope, where a nebula houses a future
of new beginnings. The idea was that if a seed was planted, and there was enough
nourishment in the soil, then something new would grow. Much like a nebula, or even a
flower in this case, my romantic relationship seemingly started from nothing. At the very
top, the chairs form into red flower petals suggesting a new romance.
This was also another example where I worked with Shapeways back and forth to iterate the
final design. Even though the fish that printed in zoetrope 3 printed just fine, and keeping
in mind the sand castle comment, the fish tails caused this zoetrope to fail initial checks.
The tails needed to be much thicker and the fish needed to be a little bit bigger – by
millimeters. Also, the inside of the column was hollowed out to save money, but the facility
workers that ran the printers suggested that the columns needed to be very thick so they

re÷belief [ MFA Thesis Paper ]
Zoetrope Design & Printing | 67
could pull out the print without breaking it. And even then, when the print finally worked
and I picked it up at the NYC facility, I noticed that it looked like there was a printing error
that caused a slight zoetrope malformation in the chair region. Of course Shapeways had
concerns about reprinting. I took the zoetrope home and verified that it would not be too
bad while spinning since it was a small anomaly that would not be noticed while the rest of
the animation was happening.
Figure 44: Zoetrope 6 virtual render with grid lines for size reference.
Specs for the zoetrope:
Printed in Full-Color Sandstone as two pieces
Final print size: 9.24” w x 9.377” d x 16.898” h
Print Cost: $2249.72

Zoetrope Design & Printing | 68

re÷belief [ MFA Thesis Paper ]
Zoetrope Design & Printing | 69
ZOETROPE 7
Once I got the hang of designing the prior zoetropes, I considered doing something that
would be truly new and unique. Because I felt that Corinn jumpstarted my heart again, along
with the belief that I could be in a great relationship, I decided to create a zoetrope where
the action of the female character sharing her love would metaphorically run the mechanical
parts of what would be an automaton-like device. So for this scene and zoetrope, I designed
a geared system that would animate the heart pumping with steam coming out of the pipes.
It would also somehow glow to represent warmth making its way back into the male’s chest.
This was one of the most complicated and risky zoetropes to create. Due to time
constraints, I realized that the entire system could not be 3D Printed. By the time I had
designed this zoetrope, I had less than 4 weeks to finish the film, which meant that with a
12-business day lead time to produce prints, and little time to re-print if it failed, I’d need to
come up with a new strategy.
I decided that the heart design could be 3D Printed while I worked on the watch-like base
using base plywood which would allowed me to quickly modify if needed. The insides of the
heart were designed using a gear system and pulley-like rod that would turn and pull the
heart pieces together and create a pumping-like action. Designing everything in Maya, I
created a simple rig to understand how to get the timing of the heart to work and to make
educated guesses on how the gear system would function in reality. Then I tweaked it to get
it right.
The heart, pistons and internal gears were printed using the same white nylon material.
However, Shapeways allows the nylon to be colored and polished. Even though it is a bit
more expensive and has a reduced printing envelop to dye and smooth objects, I realized
that this would be a wonderful opportunity to actually use the material to benefit the visual
aesthetics. In the design, I made the walls as thin as possible to allow a LED lighting system
to be placed inside the heart chamber to illuminate from within, making the heart glow and
appear as if it was warming up when the light was turned on.
Much like a watchmaker, I wanted to invest a reasonable amount of time designing the
esthetics of the layers of plywood to be laser cut using Adobe Illustrator (see Figure 45).
Each layer was inspired by New Zealand designs and car engine-like qualities. Because my
trip to New Zealand during the summer of 2012 was incredibly valuable and life changing, I
felt that incorporating New Zealand somehow into the zoetrope design was very important.

re÷belief [ MFA Thesis Paper ]
Zoetrope Design & Printing | 70
Particularly since Corinn and I shared a great two-week exploration experience during our
eighth wedding anniversary and she was promoted into a new career path – a huge event in
our lives that decided our future and this thesis.
Figure 45: Slices of watch layers prepped for printing.
The gears were designed specifically so that all would turn at the right time and appear to
turn the heart piece. One particular gear that was the most complex to figure out was the
one that directly drove the 3D Printed plastic shaft of the heart. Much like a transmission, it
had two gears attached where one would catch onto another gear that was offset vertically to
create two different timings that changed the pacing of how fast the heart pumped. I figured
out the animation timing in Maya and replicated the design in Illustrator.
The larger, zoetropic gear supported the pipe-like tubes running into one of the main arteries
of the heart. I created registration points for where the female character was to exist and
anticipated them to be printed in full-color sandstone. Before printing, I made sure before
printing that the characters had frame numbers that were legible at the bottom of the block
stubs to help in placing them during final assembly.

re÷belief [ MFA Thesis Paper ]
Zoetrope Design & Printing | 71
To laser cut the designs, I took a class for about $100 and joined a facility in Baltimore,
Maryland, called the Fab Lab31 that gave me access to an Epilog 40watt and a Universal
60watt laser cutters32. I used the cutters to create the ¼” base plywood used for each layer
and gears. The wood pieces were 12” x 24” and they fit perfectly into the bed of the cutters.
I then iteratively adjusted gear sizes and sanded them down while assembling them together
using threaded bolts to see if the gears moved properly. If adjustments were needed, I either
used a box cutter or re-lasered the gears.
Figure 46: Assembly and gear tests prior to painting.
Afterwards, I tested the entire system and spray painted all the watch base pieces with a layer
of grey primer followed by silver paint before passing them off to Brett Wilson for the final
painting touches. The heart pieces worked initially, but it became frustrating when they had
31 Fab Lab Baltimore is a non-profit digital fabrication lab found within the Community College of Baltimore County: http://www.fablabbaltimore.org/ 32 Available equipment and models found at the Fab Lab: http://www.fablabbaltimore.org/equipment.html

re÷belief [ MFA Thesis Paper ]
Zoetrope Design & Printing | 72
to be adjusted by hand because the internal heart pieces and watch base had some physical
snags that needed to be worked out. The timing gear also had to be replaced when I realized
that gravity did a great job at helping out with the animation because the gears inside the
heart created an interesting and natural rhythm without the frequent friction issues I
encountered with the gears slipping. Even then, I still found myself putting it all together
last minute, cramming toothpicks inside and using a Dremel33 to hack together a working
system.
Figure 47: Tests of movable parts after painting prior to final assembly.
Right before the film shoot, I did a dry run to see if the LED lighting system, heart and gears
worked together, and I was elated when it did! It was very eerie to see a heart pumping right
in front of me. It was very uncanny and about the coolest thing I could imagine seeing. I
33 A hand-held, rotary tool that has a swappable bit system making it a very versatile device that can sand, polish, cut and drill for many applications.

re÷belief [ MFA Thesis Paper ]
Zoetrope Design & Printing | 73
quickly ran and yanked Corinn by the hand away from the TV and into the room where I
staged the filming. Her expression was priceless, with eyes the size of saucers – genuinely
amazed. But this moment of amazement together ended abruptly when there was a sudden
loud snap and the system started to grind. The plastic shaft had broken inside the heart and
disabled the entire animated system.
My assumption was that the shaft twisted and didn’t turn because of friction in the entire
system inside the heart that carried too much stress from the weight. Because of this this
problem, I resorted to very carefully filming the heart frame by frame while the gears turned.
I made the heart animate each frame with a quick tap on the bottom part of it to relieve the
stress in the pulley and allow it to turn.
Figure 48: Zoetrope 7 virtual render with grid lines for size reference.
Specs for the zoetrope:
Printed in Full-Color Sandstone, White Nylon Plastic and Smoothed Red Nylon
Plastic as 39 pieces
Base plywood and machine bolts with nuts used for the base
Two modified LED cabinet lights used for glow effect
Final size: 17.75” w x 12” d x 11” h
Print Cost: $744.06

Zoetrope Design & Printing | 74

re÷belief [ MFA Thesis Paper ]
Zoetrope Design & Printing | 75
ZOETROPE 8
I felt the climax of the film needed to have another large zoetrope as a great spectacle.
Originally, I imagined this zoetrope to be the celebration of the two characters falling in
love. At first, I thought that the zoetrope would focus on light and reflections, and then this
idea evolved into another idea of having a cylindrical disco ball with umbrellas shooting out
revealing the characters dancing. But this was not to be, as the film shows.
Scrapping the previous idea put me in a jam. I felt creatively exhausted of good ideas, and I
was completely stressed out on how to make this very important zoetrope because this scene
would be a representation of how I feel about Corinn. So I took a break from designing. I
decided that the most important highlight of this zoetrope would be the dance between the
two characters.
During a seemingly random moment, I set up a camera and turned on some music, Harry
Belafonte’s Jump in the Line played, and I snatched my wife to start dancing. The footage that
I filmed of us dancing would later be used as reference for the animation. Reviewing the
footage, I watched how we danced and embraced each other. It reminded me of the fun we
had in New Zealand, and, as a result, the idea of the couple dancing out onto a fern came to
mind. Much like love, ferns grow and survive season after season, which worked very well
with the metaphor of zoetropes and cycles.
For the design of this zoetrope, I decided the celebration would be heightened by an
orchestra-like effect that mirrored the same intention behind the rosary in the second
zoetrope design. The bows and strings would vibrate to a consistent rhythm that could be
reflected in the music when it came time for a composer to score the music for this scene.
The spherical space in this scene also represents a field of protection, enveloping the couple.
As the couple would reach to the top, the male’s skin tones gradually change and represent
the warmth of love coming back to his body.
Because of the sheer size of the zoetrope, not to mention its delicate nature, the only way to
print the entire piece was to break it up into multiple sections and assemble it later. The
bows and strings were printed in white nylon plastic since the pieces were very thin and
needed to be as strong as possible to hold its own weight. The fern was printed as one piece
in the same material because of its size alone. The couple was printed in full-color
sandstone to keep the character’s look consistent.

re÷belief [ MFA Thesis Paper ]
Zoetrope Design & Printing | 76
One of the most complex parts the zoetrope creation was the registration of the couple. To
help during assembly, and learning from the previous zoetrope designs, I created four tiny
registration pegs on the bottom of each foot of each character and offset the texture to
different frame numbers using a script in Maya. After this, I used the same pegs, enlarged
them a bit and Booleaned the fern using a subtraction method to create the receiving holes.
The problem that became quickly apparent was that the fern needed to have its geometry
tediously adjusted and cleaned due to some pegs breaking up the structural integrity of the
fern’s leaves. This was a bit of a nightmare since Maya crashed repeatedly trying to calculate
if the Boolean would work and if certain vertices would merge properly.
The printing part of this process turned out to be a wildly unexpected drama. Shapeways
misprinted the bows and strings and some were delivered curled up, and permanently
bending and breaking in places where they should not have. Also, some frames of the bows
and strings were missing or printed twice leaving me no room to correct the problem before
the film was due to be finished. To make things slightly worse, during printed the Fern had
shifted about halfway through, throwing a permanent printing error into the design that
could not be fixed, and this made the leaves appear to vibrate during spinning. Lastly, some
of the characters turned out broken after printing and were kindly glued back together by the
technicians, but not in the right way. This meant the characters did not register properly,
and it forced me to painstakingly and carefully re-break arms and hands to remove the
acrylic and re-glue them properly (see Figure 49).
Figure 49: Figures re-broken to correct a Shapeways’ Technician’s bad fix.

re÷belief [ MFA Thesis Paper ]
Zoetrope Design & Printing | 77
Since my original idea of painting the bows with brown, black and silver colors would be
very tedious and time consuming, I worked with Brett Wilson on a strategy that was inspired
by Jackson Pollock. In a creative pinch, the idea of splattering watered down acrylics
carefully in a chromatic way would allow a rainbow effect that I believe actually accentuated
the overall celebration. We had to plan to make sure all the frames were in the right order,
and in doing this, the duplicated frame errors would be masked as well.
Figure 50: Figures arranged after fern was painted using printed registration points.
Finally, the assembly of this design took days. Most of the characters and registration pins
worked out properly, but due to some slight differences in sandstone print qualities the
characters’ registrations were offset making the animation also vibrate undesirably. When

re÷belief [ MFA Thesis Paper ]
Zoetrope Design & Printing | 78
attaching the bows and strings, I discovered they drooped unexpectedly. To fix this in the
relatively quickest way possible, I decided to use fishing wire that could be translucent
enough to not be seen in the film. I threaded the filament through each and every bow,
spiraling from the top to bottom and tightening to help retain a much better shape of the
bows and strings. This method also allowed me to somewhat easily adjust each frame since
the tension allowed me to carefully slide the prints back and forth. During this process, I
used a simple camera setup to help register every one using an onion-skin like technique
using Canon’s remote capture computer software (see Figure 51).
Figure 51: Setup to adjust and register strings using a contrasting backdrop.
What’s not seen in the final design here, but used elsewhere in the film, is the theater stage
inspired by the same theater where Corinn and I first met and fell in love. I chose to keep
the overall design of the zoetrope less complex as it did not really matter to the film to have
both in the scene. It also helped to bridge other parts of the story. As a result, I decided to
have the stage separate and build in a separate scene to reveal the couple for the first time to
establish them together. The characters would simply stand in place staring at each other
during filming, suggesting a sense of wonder and love at first sight.

re÷belief [ MFA Thesis Paper ]
Zoetrope Design & Printing | 79
Figure 52: Zoetrope 8 virtual render with grid lines for size reference.
Specs for the zoetrope:
Printed in Full-Color Sandstone and White Nylon Plastic as 126 pieces
Final print size: 25.5” w x 25.5” d x 17.5” h
Print Cost for Zoetrope: $2051.79
Print Cost for Stage: $244.78

Zoetrope Design & Printing | 80

re÷belief [ MFA Thesis Paper ]
Zoetrope Design & Printing | 81
ZOETROPE 9
This zoetrope brought the work full cycle. The characters in frame represent the male and
female adults in love. The link to the first zoetrope with the silhouettes of the parents in the
same positions was the representation that the couple may be the next generation of parents.
But this time around possibly breaking the cycle that once was.
Figure 53: Zoetrope 9 virtual render with grid lines for size reference.
Specs for the zoetrope:
Printed in Full-Color Sandstone as one piece
Hand cut photo prints of couple in frame
Final print size: 9.881” w x 9.881” d x 1.019” h
Print Cost: $368.53

Filming of Zoetropes | 82
Filming of Zoetropes
Filming the 3D Printed zoetropes in theory was to replace the physical cylinder and slits of
original zoetrope designs and opens it up to the camera in full form. A great benefit of using
the camera allowed me to film at many angles and adding the opportunity to move in and
out of the zoetrope space using a macro lens, as well as playing with depth of field.
However, in reality, filming the zoetropes using contemporary digital camera sensors
resulted in unexpected results that required a combination of embracing the camera flaws
and resorting to single frame shooting at precise increments.
Building the Zoetrope Pedestal
The pedestal design was fairly simple to start. I designed a circular plate that the zoetrope
would sit upon and that would attach to a motor shaft using a small screw. I hired a
machinist to mill a sturdy plate out of aluminum that could handle the weight of any
zoetrope, but it would itself also be lightweight when attached to a spinning motor. This
would prevent potential warping of the plate and guarantee stability. The plate also was
fitted with a ¼” screw on top to allow for tightening to secure the zoetrope and for
registration alignment during animation.
Figure 54: Initial plate design – deviated changes thickened the plate to 0.25 inches.

re÷belief [ MFA Thesis Paper ]
Filming of Zoetropes | 83
The plate could attach to the shaft of a 12VDC, 0.166A Gearhead Motor34 or a 1.8°,
12VDC, 0.4A Stepper Motor35 depending on need – these were the motors I purchased for
this project. The DC motor utilized a very simple setup where the terminals connected to an
AC to DC Power Supply36 and the rotation speed was controlled by turning the power up or
down, but being careful not to exceed the 12VDC limit of the motor. This motor provided
great torque; however, it was not precise. The stepper motor on the other hand needed a bit
more than a power supply.
Figure 55: Original prototype setup for spinning zoetropes using a DC Motor.
Stepper motors were built with two sets of coils,
typically including center-taps (see Figure 56). The
permanent-magnet rotor required the coils to be
energized in a precisely timed order to step in one
direction or the other. Each coil either had a negative
and positive lead, or a negative, positive and ground lead
depending on the requirement for the application. DC
motors also had permanent magnets, but with a single
coil in the rotor, typically just a negative and positive
lead setup. To turn a DC motor, you simply energized
the coil by applying a voltage to the two leads. Because
stepper motors have more leads, they require a
34 More information and purchasing through Jameco: http://www.jameco.com/webapp/wcs/stores/servlet/Product_10001_10001_164786_-1 35 More information and purchasing through Jameco: http://www.jameco.com/webapp/wcs/stores/servlet/Product_10001_10001_238538_-1 36 More information and purchasing through Jameco: http://www.jameco.com/webapp/wcs/stores/servlet/Product_10001_10001_301971_-1 37 Source: http://i.stack.imgur.com/tqWmd.png
Figure 56: Stepper motor coils energizing in sequence per step.37

re÷belief [ MFA Thesis Paper ]
Filming of Zoetropes | 84
controller or driver to run.
Most of the filming utilized the stepper motor because of the ability to reliably turn it to a
fairly accurate and consistent position. In order to make this happen, I used an Arduino
Uno R3 Board38 with an Adafruit Motorshield V239 to control the rotation speed and
precision of the stepper. I wrote code (see Figure 58) and used a breadboard with buttons to
allow for full-steps and microstepping40, both forward and reverse, along with a button to
release the motor. Since some of the zoetropes were fairly large, a lot of torque and power
was needed to turn a stepper to both move the shaft beyond the initial inertia, and find the
right accelerated speed to handle the reflected inertia when spinning.
Figure 57: Arduino setup with prototyping board utilizing programmable buttons.
Line Code
1 #include <Wire.h>
2 #include <Adafruit_MotorShield.h>
3 #include "utility/Adafruit_PWMServoDriver.h"
4
5 // Create the motor shield object with the default I2C address
6 Adafruit_MotorShield AFMS = Adafruit_MotorShield();
7 // 200 steps per revolution (1.8 degree)
8 // motor port #1(M1 and M2, #2 (M3 and M4)
9 Adafruit_StepperMotor *myMotor = AFMS.getStepper(200, 1);
10
11 int stepCount = 0; //initialize counter
12 int buttonStateForward = 0; // variable for reading the pushbutton
status
13 int buttonStateBackward = 0; // variable for reading the pushbutton
status
14 int buttonStateRelease = 0; // variable for reading the pushbutton
status
15 int buttonStateMicroBackward = 0; // variable for reading the
pushbutton status
16 int buttonStateMicroForward = 0; // variable for reading the
pushbutton status
17 const int buttonPinForward = 4; // the number of the pushbutton pin
18 const int buttonPinBackward = 2; // the number of the pushbutton pin
38 Arduino is an open-source electronics platform for creating small projects and prototyping: www.arduino.cc. 39 Arduino based board used to run multiple motors of varying types. 40 A method of programming to get greater resolution out of stepper motors’ degree of steps.

re÷belief [ MFA Thesis Paper ]
Filming of Zoetropes | 85
19 const int buttonPinRelease = 3; // the number of the pushbutton pin
20 const int buttonPinMicroBackward = 5; // the number of the
pushbutton pin
21 const int buttonPinMicroForward = 6; // the number of the
pushbutton pin
22
23 void setup() {
24 Serial.begin(9600); // set up Serial library at 9600 bps
25
26 AFMS.begin(); // create with the default frequency 1.6KHz
27
28 //pinMode(ledPin, OUTPUT); // initialize the LED pin as an
output:
29 pinMode(buttonPinForward, INPUT); // initialize the pushbutton
pin as an input:
30 pinMode(buttonPinBackward, INPUT); // initialize the pushbutton
pin as an input:
31 pinMode(buttonPinRelease, INPUT); // initialize the pushbutton
pin as an input:
32 pinMode(buttonPinMicroForward, INPUT); // initialize the
pushbutton pin as an input:
33 pinMode(buttonPinMicroBackward, INPUT); // initialize the
pushbutton pin as an input:
34
35 //myMotor->setSpeed(250); // RPM for steady flow of motion
36 myMotor->setSpeed(1); // 10 rpm
37
38 }
39
40 void loop() {
41 // read the state of the pushbutton value:
42 buttonStateForward = digitalRead(buttonPinForward);
43 buttonStateBackward = digitalRead(buttonPinBackward);
44 buttonStateRelease = digitalRead(buttonPinRelease);
45 buttonStateMicroBackward = digitalRead(buttonPinMicroBackward);
46 buttonStateMicroForward = digitalRead(buttonPinMicroForward);
47
48 // check if the pushbutton is pressed.
49 // if it is, the buttonState is HIGH:
50 if (buttonStateBackward == HIGH)
51 {
52 Serial.print("Starting... ");
53 for(int i = 1; i <= 133; i++) // 134 just a tad forward, 133 just
a tad backward
54 {
55 myMotor->onestep(BACKWARD, MICROSTEP);
56 //delay(100);
57 }
58 delay(500);
59 stepCount++;
60 Serial.print("Microstepping Complete - Frame: ");
61 Serial.println(stepCount);
62 //myMotor->release();
63 }
64
65 if (buttonStateForward == HIGH)
66 {
67 Serial.print("Starting... ");
68 for(int i = 1; i <= 133; i++) // 134 just a tad forward, 133 just
a tad backward
69 {
70 myMotor->onestep(FORWARD, MICROSTEP);
71 //delay(100);
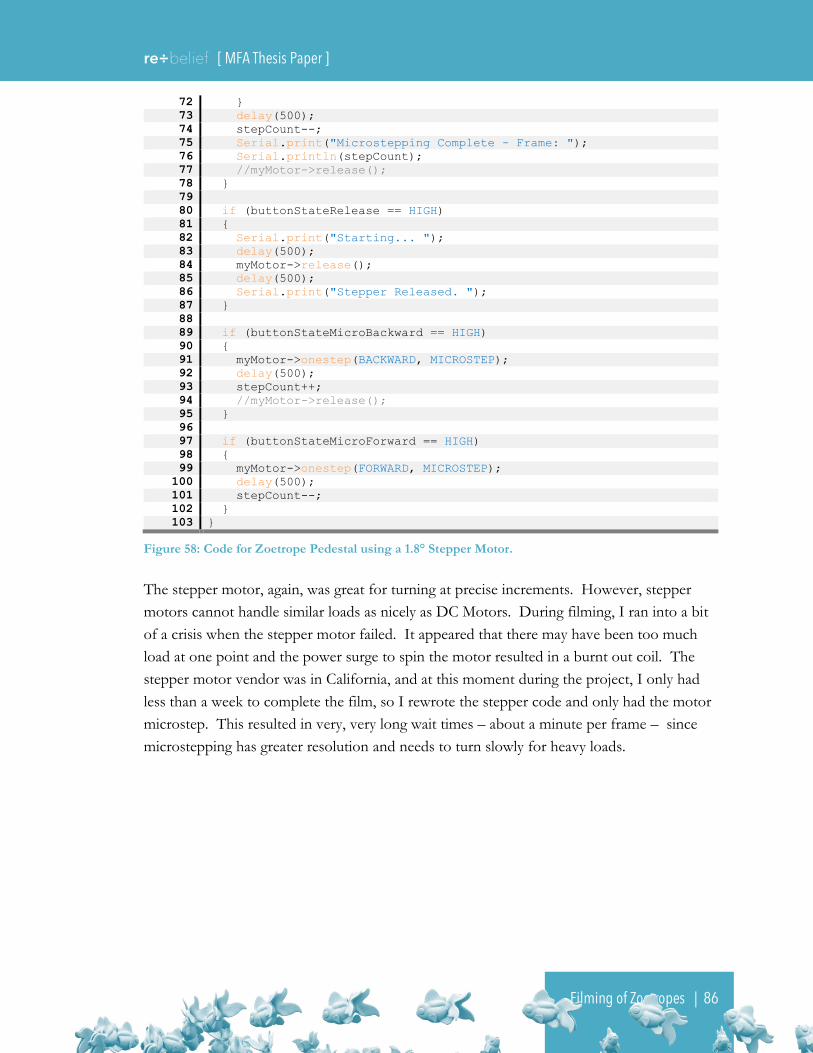
re÷belief [ MFA Thesis Paper ]
Filming of Zoetropes | 86
72 }
73 delay(500);
74 stepCount--;
75 Serial.print("Microstepping Complete - Frame: ");
76 Serial.println(stepCount);
77 //myMotor->release();
78 }
79
80 if (buttonStateRelease == HIGH)
81 {
82 Serial.print("Starting... ");
83 delay(500);
84 myMotor->release();
85 delay(500);
86 Serial.print("Stepper Released. ");
87 }
88
89 if (buttonStateMicroBackward == HIGH)
90 {
91 myMotor->onestep(BACKWARD, MICROSTEP);
92 delay(500);
93 stepCount++;
94 //myMotor->release();
95 }
96
97 if (buttonStateMicroForward == HIGH)
98 {
99 myMotor->onestep(FORWARD, MICROSTEP);
100 delay(500);
101 stepCount--;
102 }
103 }
Figure 58: Code for Zoetrope Pedestal using a 1.8° Stepper Motor.
The stepper motor, again, was great for turning at precise increments. However, stepper
motors cannot handle similar loads as nicely as DC Motors. During filming, I ran into a bit
of a crisis when the stepper motor failed. It appeared that there may have been too much
load at one point and the power surge to spin the motor resulted in a burnt out coil. The
stepper motor vendor was in California, and at this moment during the project, I only had
less than a week to complete the film, so I rewrote the stepper code and only had the motor
microstep. This resulted in very, very long wait times – about a minute per frame – since
microstepping has greater resolution and needs to turn slowly for heavy loads.

re÷belief [ MFA Thesis Paper ]
Filming of Zoetropes | 87
Figure 59: Setup to fine-tune code for proper registration of rotation at angles of 15 degrees.
Knowing what I know now, I should have gone with a larger stepper with a 5.0A AC
Adapter for this project. The zoetropes would have had an easier time turning and the
motor would have been capable of the same resolution, but at a higher torque. A Jameco
1.8°, 12VDC, 600mA41 stepper motor would have been a better choice. I have used this
motor for other projects since the completion of my thesis.
Camera Selection
Thinking this would be a simple and straightforward process, I bought a Canon 6D DSLR
during my pre-production phase. Since I was familiar with Canon’s brand, and because I
also practiced photography on a semi-professional level, this seemed to be a good long-term
choice. The sensor was a full-frame (non-crop), 20.2 Megapixel sensor, which would allow
for full use from the EF lens line up I had in my arsenal. It also had a wide ISO range from
100 to 25600, which allowed for great flexibility in lighting situations for filming. The
camera was capable of recording high quality, H264 compressed, 1080P footage at 24FPS.
Lastly, it’s high-dynamic range of 13 f-stops in RAW (single frame) meant that a great
amount of color information could be recorded and manipulated afterwards in post.
41 More information and purchasing through Jameco: http://www.jameco.com/webapp/wcs/stores/servlet/Product_10001_10001_162027_-1

re÷belief [ MFA Thesis Paper ]
Filming of Zoetropes | 88
However, I quickly discovered after receiving the camera that there were characteristic issues
using contemporary DSLR Camera sensors.
Many DSLR cameras and digital film cameras available on the market used Complementary
Metal–Oxide–Semiconductor (CMOS) image sensors for recording video. Very few utilized
Charge-Coupled Device (CCD) image sensor technology. In fact, the Canon 6D that I
purchased uses a CMOS sensor. The advantage of CMOS over CCD was not only the low-
cost for production, but also the technology allowed for high sensitivity in low lighting
situations. The downside to CMOS was the distortion caused by a rolling shutter whereas a
CCD will capture an image with no distortion using a method of recording called a global
shutter.
The most important difference between a rolling shutter and a global shutter really only
becomes apparent when recording fast moving objects and actions. A rolling shutter
records pixels in rows – from left to right, top to bottom, then turning off pixels in the same
pattern (see Figure 60). A global shutter records images by charging the sensor, recording,
then dumping the sensor charges to start over again, basically making the recording of pixels
all open or equally all closed. Because of the delay in recording using a rolling shutter,
objects/images that pass by the sensor quickly often result in a skewed motion. Global
shutters typically record the most accurate representation of motion.

re÷belief [ MFA Thesis Paper ]
Filming of Zoetropes | 89
Figure 60: Frame by frame example of recording a moving image with a rolling shutter.42
With respect to my zoetropes, a CMOS sensor using a rolling shutter would cause significant
artifacting during filming. When I filmed my zoetrope up close, focusing on an animated
character or object, and because the object essentially moved out of frame instantaneously to
be swapped with a new object during the next frame, it resulted in a significant skewing
effect. I tried methods of correcting this using software, camera hacks43, and even rotating
the camera on its side (see Figure 61). But, to no avail can something like this be corrected,
especially in post.
42 Source: http://commons.wikimedia.org/wiki/File:Rolling_shutter_effect.svg#mediaviewer/File:Rolling_shutter_effect.svg 43 I temporarily hacked the Canon 6D using a non-supported software – Magic Lantern (http://www.magiclantern.fm/) – to unlock full control of the sensor and recording methods of the camera. I reverted back to the original software due to not needing this as a solution due to lack of time.

re÷belief [ MFA Thesis Paper ]
Filming of Zoetropes | 90
Figure 61: Examples of distortion when recording zoetropes with a Canon 6D CMOS sensor.
Desperate, I looked into renting other cameras that used a global shutter. The Blackmagic
Production Camera 4K44 appeared initially to be a great solution and with a price point of
$250 for four days45, and I rented one after a technician at the rental place suggested this
would be the silver-bullet. However, the sensor not only lacked the same sensitivity as the
Canon 6D (the Blackmagic camera could only go to ISO 1600 with noticeably poor image
quality at ISO 800), the fastest shutter topped at 1/196 of a second. In order to prevent as
much motion blur as possible, the shutter speed needed to be at least 1/1200 of a second. I
also looked into a RED Camera solution, with a Motion Mount (a global shutter solution
attachment), but at $950/day and a two-week lead-time to be processed through the rental
business, it became a roadblock. Rental of other potential cameras were priced into the
thousands of dollars per day, which abruptly ended my desire to find the optimal solution.
As the end of this extensive search, I decided to stick with the Canon 6D for the duration of
my thesis due to time and budget. I made up my mind to embrace the flaws in CMOS
rolling shutter sensors and I actually discovered benefits of its flaws when it added to the
film in certain spots. For most sequences, I chose to do single frame shots and increment
the zoetrope using the stepper motor setup I created.
44 https://www.blackmagicdesign.com/products/cinemacameras 45 Lens Pro to Go is a rental outfit focused primarily on photographers and digital film: https://www.lensprotogo.com/rent/category/cameras/

re÷belief [ MFA Thesis Paper ]
Filming of Zoetropes | 91
Previsualization
To film the zoetropes in an efficient matter without wasting time, hard drive space and
energy in setting up shots and editing in post, I created a previsualization animatic (previz).
Previz entered into my consciousness a couple of years prior to starting this project
following a presentation at RIT by Chris Edwards, the CEO of The Third Floor46. The idea
of previz was to help films achieve a complex, visualized, cinematic story prior to filming a
movie. Much like an animatic and storyboarding, this planning technique frequently uses
roughly animated 3D objects while positioning and moving the camera in a scene with
specific lens settings and focal points. As a result, it saves a filmmaker time, money and
resources in planning the film while fully developing a better story.
Since all my models were developed in Maya, it made complete sense to virtually add the
Canon 6D to new scenes while referencing my animated zoetropes. I created a simple
camera rig to help me understand the boundaries of the equipment I planned on using.
Then, I positioned the camera in scene to get an idea of where I wanted to focus on certain
actions to maximize the storytelling of each piece. I took into consideration how close I
could get in with my Canon 100mm f/2.8L Macro IS USM lens, taking into consideration
the minimal focal length possible that would result in sharp imagery.
Once the playblasts from Maya were rendered out, I put them into Adobe Premiere to do a
string-out of the footage. To help inspire the mood and pacing of the piece, I edited to
Mumford & Sons’, I Will Wait, a song that resonated for me on a relationship and spiritual
level (see H-1). As much as I would have loved to use this song for the entire film itself, I
did not want to turn my thesis into a music video. But there were advantages to listening to
this music and using as a temp track in the edit. While editing, I discovered that the song
length consequently limited the duration of some important shots. It also helped me to
understand the reason I responded so positively to the song. It was because of the strong
relationship of the repetition in the song with the repetition inherent in the visuals.
I noticed through this previz method that a few scenes needed visual pauses and bridges in
between scenes, things that were not built into the zoetropes themselves. For example, since
I could not risk creating any more zoetropes I chose to use the footage of time-lapsed storm
clouds that I shot while living in Maryland to help in transitioning in and out of the
46A company started by RIT Alum, Chris Edwards, that focuses on previsualizations for major film productions: http://www.thethirdfloorinc.com/

re÷belief [ MFA Thesis Paper ]
Filming of Zoetropes | 92
depressing scenes. The representation of “a storm is coming” was a figurative transition into
the home scene, which I felt was an appropriate way to handle the abrupt metaphor of
problems in the home. It also kept my visual effects in the real world instead of a computer
generated solution.
After completing the previz edit, I exported the film without the temporary music track.
The resulting animatic was then shared with my advisors and peers to get feedback on the
storytelling of the entire piece. Eventually, the cut went to my composer and sound effects
artists to build the music and sound track.
Shooting Strategies
Once my blueprint was completed, setting up the shots became fast and efficient. The plan
was to use Canon’s remote capture software (EOS Utility) to capture and monitor what was
in scene. I planned on framing the shots and matching the exact zoetrope frame motion by
having both the previz animatic up on a screen and then quickly match the look using
Canon’s live-view capture software. I used my Apple MacBook Pro to record all the
footage and frames directly from the Canon 6D to the drive. This reduced the need of
repeatedly swapping and copying data from the memory card. It also helped me for review
of the footage by simply dumping it into After Effects as imported still sequences.
Figure 62: Various staged setups when recording scenes for the film.
I converted our second bedroom into a cramped, pseudo-studio to film in a controlled
lighting space. To light the sets, I used a couple of 600-Watt tungsten-halogen, Teenie-

re÷belief [ MFA Thesis Paper ]
Filming of Zoetropes | 93
Weenie Moles with barn doors, flags, whiteboard foam and natural day lighting depending
on day, night or closed in scenes. I placed my Canon 6D on a tripod and the zoetropes on
top of a small dresser with the zoetrope pedestal clamped down to prevent as much
movement as possible within the tight quarters. I hung and lit different cloth backgrounds
of chroma key blues and greens, black jersey, red jersey and/or crumpled brown paper
depending on the scene. I also setup a small, uncomfortable, desk-like area to hold my
laptop and Arduino circuitry to capture the footage and modify the zoetrope pedestal code
on the fly when necessary.
I wanted to move the camera for certain shots to keep the overall feeling alive and hand
held. However, it was not feasible in the amount of time I had left after waiting for a camera
rental solution to materialize. Instead, I realized a very nifty trick to give the camera a feeling
of movement expecting that in post I’d move the hi-resolution shots up and down using
After Effects. To make the movement of the zoetropes not feel static and repetitive, I offset
the stepping of the code to increment slightly more in one direction and then placed the
zoetrope off center, giving it a slight wobble. Combined with the virtual pans in post, this
would create the effect of an actual and high quality camera movement through each shot.
During shooting, I also varied the depth of field depending on what I wanted to focus on in
the foreground or background. Because I was mostly shooting stills, I set the Canon 6D to a
low ISO of 100 with bright lights and aperture between f10 and f16. Otherwise, because of
how macro lenses work with light, everything would be blurry with a hairline of focus at
f2.8. When I shot 1080P footage, I needed a lot of light and shot at 1/1000 of a second with
an aperture of 11f and ISO of 3200 to keep the image noise as low as possible.
A frequent problem I ran into, due to my small working space and the amount of electronics
in use, was my camera overheating due to the black of the camera absorbing all the hot light.
Much of my time was spent making sure the camera would not fail or deform during the
entire shooting process that went on essentially 24 hours each day for a couple weeks. This
required me to be conscious of how close the camera was to the zoetrope and since the
camera lens at the time needed to be right on top of it for proper exposure of the image.
For the theater scene, I needed to seek a unique set and perform dolly movements to help
keep the scene alive (see Figure 63). In order to film this particular scene, I used our dining
room table and set it up in front of our TV. I ran imagery that I had shot while driving in
New Zealand from my laptop to the TV to draw in a personal, subtle reference to our
experience there and to bring deeper artistic meaning to the scene. I placed the figures and
theatrical stage on the table and lit them using natural morning light combined with two

re÷belief [ MFA Thesis Paper ]
Filming of Zoetropes | 94
Moles. I created a quick dolly from The DeLorean time machine47 LEGO set I was given for
Christmas earlier that year. It was small yet large enough to hold the camera in scene and I
shot the move several times using the 100mm Lens’ IS technology to help keep the
movement as smooth as possible.
Figure 63: Setup for theater scene using micro-LEGO dolly.
47 A LEGO IDEAS toy set inspired by the famous car seen in Back to the Future movie by Stephen Spielberg.

Post-Production | 95
Post-Production
My goal in post-production was to keep this film as lean and raw as possible – in terms of
computer generated graphics – to stay as true to the physical zoetropes and art form as
possible. I desired to not have to worry about editing a lot of footage since my previz
animatic helped me correctly visualize and tell the story. Because I kept background
replacements to a minimum, by shooting all my zoetropes with specific backgrounds in
mind, just a few shots had green screen replacements. In the case of Zoetrope 8, I shot on
black to easily be able to superimpose a background of choice. My strategy, too, in this case
was to keep all footage throughout the film as images that I personally shot or
photographed, with the exception of the NASA’s photograph of the moon. As a result, I
only really used Adobe After Effects to create titles and credits for a majority of the
computer generated graphics.
Editing While Filming
Because I was on a tight deadline, I found myself getting into a rhythm of shooting and
laying the shots out into highly organized folders for quick editing and review on my laptop.
In doing so, and because many of these images were shot in full-sized RAW stills, I
multitasked during filming and edited on my laptop by putting in sequences into After
Effects to evaluate how the shots would turn out. I realized in doing this that I could make
faster and better judgments during the next sequence of shots for each zoetrope.
The decisions for simultaneous shooting and editing ranged in various ways. After reviewing
low-res renders in After Effects, I changed how zoetropes spun, I evaluated how each shot
related to each other in color and light, if there was enough light for image processing, and
considered how the animation moved correctly when I worked in my faked camera panning
techniques. Some decisions resulted from simply waiting for preview renders to complete,
realizing I did not need every shot to be a sequence of full-sized 14-bit RAW files. Through
this awareness, shot choices resulted in selective choices between full-sized RAW output
(5742 x 3648 pixels), medium-sized RAW output (4104 x 2736 pixels) or small-sized RAW
output (2736 x 1824 pixels). Individual RAW file sizes typically ranged from 8MB to 30MB
apiece.

re÷belief [ MFA Thesis Paper ]
Post-Production | 96
By being selective in file sizes, and only capturing the amount of stills I needed per shot, this
allowed for quick processing, little editing, and faster render times when it came to
outputting. The final file from After Effects was planned to be 1920 x 1080 pixels (16:9)
resolution. The final storage size of all raw footage (RAW Files including H264 videos) took
up 50GB instead of a potential 100GB for just over 3200 files.
Compositing
As a common theme across the entire film, and
because of my love for astronomy, I used a New
Zealand nighttime photo I took when Corinn
and I visited the east coast town of Kaikoura one
evening (see Figure 64). For me, it holds much
meaning and took a while to compose. One of
the many levels of representations in that
moment that I am reminded of was how Corinn
made a great life-changing, first-ever career-
driven decision to have us eventually move to
Maryland. It just made complete and absolute
sense to involve the photograph in film as a nod
and thank you to her. It was also a great way to
end my experience at RIT, with a nod of thanks
to Stephanie Maxwell as well for convincing me
to join the School of Film and Animation grad
program, for engaging me in the New Zealand
experience and for encouraging me to grow and
experiment as an artist.
In this first and last shot of the film we see with
the silhouetted Zoetrope 6 and characters.
These objects were shot on green screen
separately and taken into After Effects to be
layered together. The background was replaced
with a blurred night sky shot depending on when
a rack-focus-like effect was needed. The result
was output to frames to be inserted into the first
Figure 64: New Zealand night sky.
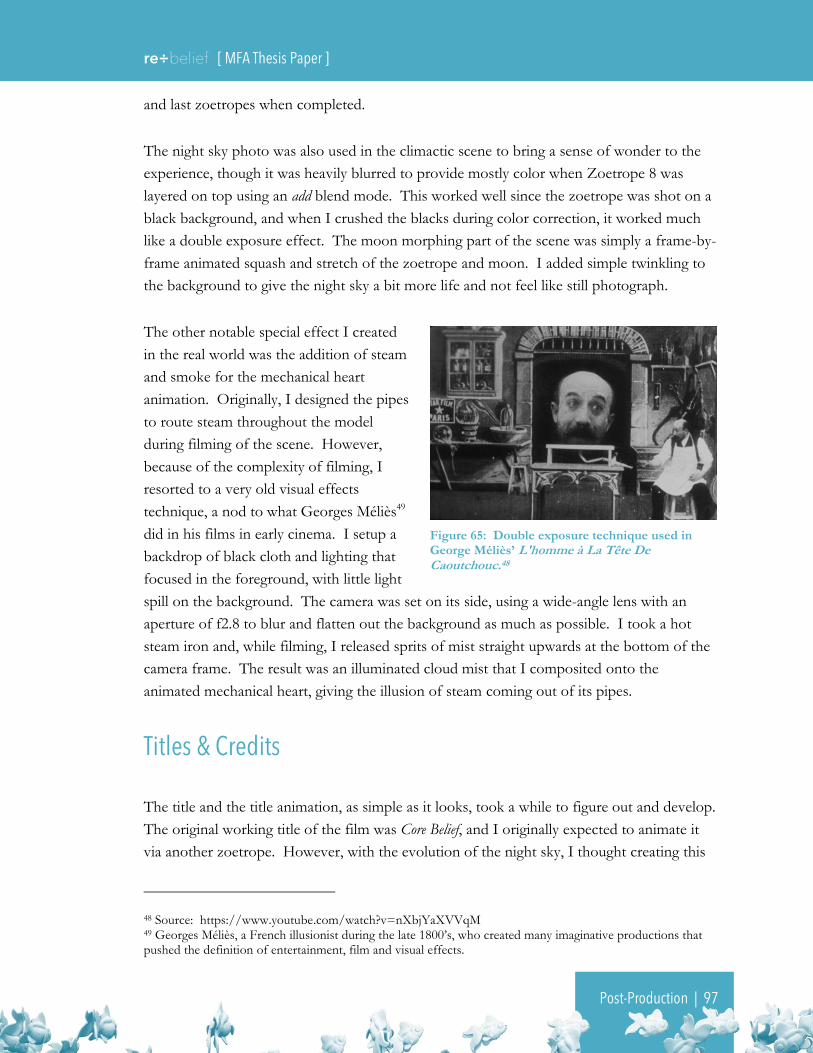
re÷belief [ MFA Thesis Paper ]
Post-Production | 97
and last zoetropes when completed.
The night sky photo was also used in the climactic scene to bring a sense of wonder to the
experience, though it was heavily blurred to provide mostly color when Zoetrope 8 was
layered on top using an add blend mode. This worked well since the zoetrope was shot on a
black background, and when I crushed the blacks during color correction, it worked much
like a double exposure effect. The moon morphing part of the scene was simply a frame-by-
frame animated squash and stretch of the zoetrope and moon. I added simple twinkling to
the background to give the night sky a bit more life and not feel like still photograph.
The other notable special effect I created
in the real world was the addition of steam
and smoke for the mechanical heart
animation. Originally, I designed the pipes
to route steam throughout the model
during filming of the scene. However,
because of the complexity of filming, I
resorted to a very old visual effects
technique, a nod to what Georges Méliès49
did in his films in early cinema. I setup a
backdrop of black cloth and lighting that
focused in the foreground, with little light
spill on the background. The camera was set on its side, using a wide-angle lens with an
aperture of f2.8 to blur and flatten out the background as much as possible. I took a hot
steam iron and, while filming, I released sprits of mist straight upwards at the bottom of the
camera frame. The result was an illuminated cloud mist that I composited onto the
animated mechanical heart, giving the illusion of steam coming out of its pipes.
Titles & Credits
The title and the title animation, as simple as it looks, took a while to figure out and develop.
The original working title of the film was Core Belief, and I originally expected to animate it
via another zoetrope. However, with the evolution of the night sky, I thought creating this
48 Source: https://www.youtube.com/watch?v=nXbjYaXVVqM 49 Georges Méliès, a French illusionist during the late 1800’s, who created many imaginative productions that pushed the definition of entertainment, film and visual effects.
Figure 65: Double exposure technique used in George Méliès’ L'homme à La Tête De Caoutchouc.48

re÷belief [ MFA Thesis Paper ]
Post-Production | 98
with a simple graphic treatment would be easier and more effective. While waiting for my
laser cutting to finish, during the build of Zoetrope 7, I took the time in Adobe Illustrator to
sketch out different graphical ways to layout the typography of the title itself (see Figure 66).
During a period of frustration, I separated the “Co” briefly and wondered how I was
planning on making the “re” work through kerning and/or spacing. Eventually, something
clicked and I saw “re belief”.
Figure 66: Progression of title and design.
While playing with different style treatments of the text, I knew the title needed something a
bit more, a way to incorporate the zoetrope aspect. Instead of getting lost in graphically
embellishing the letters, I approached it for what “re” and “belief” meant or could mean.
“Belief” simply meant religious conviction, knowing that something existed, and confidence
in someone or something. “Re:” as a preposition translated as about, regarding and
concerning. “Re-” as a prefix could mean repetition, again, anew, in return, etc. This made
it a bit difficult to decide which meaning to go with because I felt both fit very well. So I
combined both “:” and “-” punctuation marks which resulted in a “÷” symbol out of
curiosity. The symbol represented the idea of conflict, the act of separation, and the
disagreement between two or more groups. Again, I got a bit stuck thinking that this
worked well for another level of story meaning. It was then that I had the epiphany to have
my cake and eat it too.
I recalled a point in my early studies during my MFA
when I was introduced to the thaumatrope (see Figure
67). It was a simple device consisting of separate
images imprinted on the front and back of a disk made
from cardstock with pieces of string attached at
opposite ends. When the strings are wound up and
then pulled in opposite directions to release the kinetic
energy, the disk rotates rapidly and reveals the illusion
that the separate images appear combined on top of
each other. Common exploitation of this creative
50 Source: http://www.olivet-providence.info/wp-content/uploads/2009/02/thaumatrope_web_.jpg
Figure 67: Example of a bird and cage thaumatrope.50

re÷belief [ MFA Thesis Paper ]
Post-Production | 99
illusion consisted of visuals of a cage on one side of the disk and a bird on the other side, so
that when the sick was spun our persistence of vision allows the illusion that the bird is in
the cage.
Taking into consideration this novel and clever technique, I chose to animate both “:” and “-
” along an axis in After Effects while keeping “re” and “belief” present on either side. I
thought of starting on the idea of the story being about (“:”) belief, then reverting to the
dash (“-“), then spinning to have it symbolize a sense of cycle, as a direct reference to the
thaumatrope and zoetrope, and thus bridging their histories to my chosen technique of
animation. And with this elevated meaning and animation, once it spun fast enough, both
symbols formed a division sign that suggested the idea of a contradiction, conflict and other
interpretive meanings that would tie all three together. To promote the film, I decided in the
non-animated spectrum where I would keep the division symbol in print and text, making it
a very unique film title. Needless to say, I was euphoric upon this approach to discovery,
which helped me get through the rest of the filmmaking process.
To book end the film, I went with a minimalist approach of keeping the graphics serene and
simple. I blurred out the New Zealand night sky photo and had it move from left to right,
adding an animated fractal noise effect in the background to keep it alive. I also took the
opportunity to use a metaphor of Zoetrope 7 in relation to all the people I wanted to thank
and put in the credits. Symbolically they added layers to making this this film possible, so I
animated the watch-like pieces as constellation-like images while the credits of people’s roles
and names appeared on the other side of the screen.
Music Composition
I worked out a contract with a composer to collaborate on my film early in my pre-
production process. However, I ran into many unexpected events that caused me to delay
production. After a long stretch of time in both our lives where there was no contact
between us and I went through my ankle surgery, I attempted to reconnect with the
composer to no avail. It wasn’t until late February that I discovered he had joined the police
force, putting his availability on hiatus,. This forced me to seek out another skilled
composer.
This was when I re-stumbled upon Stephen J. Bullen. I knew he had created music scores
for several other films at RIT that were produced by MFA students. He had a great
reputation, and he had studied and graduated from the Eastman School of Music. It was

re÷belief [ MFA Thesis Paper ]
Post-Production | 100
during May 2011 when we first met and I asked him for his business card for potential
future projects. After dusting off his business card in February 2014, I called Stephen up
and had a discussion about my project and expressed my interest in collaborating with him.
Hiring Stephen onto my project was a great benefit. Once we worked out a contract and
discussed payment after his delivery of the music for the film, which was costlier than
originally budgeted, I sent him my script and ideas. I shared the previz-animatic with him
and he used it to create the initial music. Since he worked on short films often, and was film
artist as well, it was a joy to discuss what would and would not work within the context of
the film. As noted previously, I also mentioned the influence that the Mumford and Son’s
music had on the rhythms, pacing and build up in my work and suggested this be a as
starting blueprint to help give a general idea of direction. Because of the tight deadlines, we
agreed that we would flesh out a final music version after the film was completed, figuring
that I might have to make some changes in the film that would affect the pacing and,
ultimately, the timing of the music.
To my pleasant surprise, Stephen developed a very stirring score that was perfect for the
premier screening of the film. He placed in layers of strings that helped tie together themes
while methodically including other instruments that related to the many metaphors in the
piece. I could never have imagined what he did in the music. I put in a lot of trust into his
work and he delivered. It was my belief that you hire an expert to do what they do best with
some direction from yourself, and you do not micromanage an artist so he/she can
independently and creatively develop the work.
After screenings, Stephen made some small adjustment in the music for the climax of the
film. Originally, I wanted a somber composition, one ending on a sad and somewhat
indifferent note. However, because the final zoetrope looked so colorful and celebratory,
Stephen decided to create a new stretch of music for that area that radically changed my
perception of the film ending. It was difficult to see initially due to the fact I embraced the
film with the original music composition. That strangling embrace made it much more
difficult for me to walk away from it and trade it for anything different. Though I would
have preferred to leave the feeling ambiguous, I believe Stephen’s new edit gave a greater
continuity, and interrelationship and meanings of the visuals throughout the film. As a result
of this eye-opening collaborative process, experience and product, I would love to work with
Stephen in the future.

re÷belief [ MFA Thesis Paper ]
Post-Production | 101
Voice Overs
This part of the film process was probably as difficult in deciding as designing the zoetropes
in a way. I struggled with the idea of narrating the film myself, to tell the story almost
verbatim through my own voice. This was what John Canemaker had successfully done in
The Moon and the Son: An Imagined Conversation. I reached out to John one day via email asking
why he chose to narrate the film and for his opinion regarding my conundrum. In his reply:
“I wanted clarity for the audience and to give them information that may not be perceived only
through the visuals. I'm also a control freak. You have to decide whether the accessibility of your
message is more important than allowing free discovery by the audience, or vice versa. It is a
personal decision. The latter approach is classic experimental practice, i.e., bringing the audience
half-way and allowing the imaginations to bring the other half to the process.”
Taking his words of wisdom into account, I decided to go the experimental route with my
film and not do narration. I did, however, decide the film needed a few important, vocalized
lines to add to the personal importance during a few instances in the film.
Between the scenes involving zoetrope 4 and 5, the adult male and adult female needed to
exist in the form of an arguing couple. The significance of this was to emphasize a
transcendental, falling-out moment between two parents:
Female: I do everything for you!
Male: You always blame me!
Female: I do everything for this family!
Male: You always try to make it my fault!
Female: No one appreciates me.
Male: Oh…
Female: Would you even notice if I wasn’t here?
Male: I can’t be wrong about everything all the time!
These statements demonstrated how arguing couples often do not listen to each other,
pointing out one another’s flaws or stating selfish thoughts and feelings. These kinds of
parental statements proliferated between my parents in our home during times of discontent.
Following these lines are probably the most personal, cutting and haunting assertions I heard
in all my life and they were directed at me personally:

re÷belief [ MFA Thesis Paper ]
Post-Production | 102
Male: What happened tonight is your fault!
Female: You are what’s wrong with me!
Male: You’re to blame for all this!
These lines were difficult to place within the film, but became significant in the film when
the hand pulls the boy in. I felt the insertion of these were vital to quickly understanding
that the boy struggled with a sense of sadness, depression and guilt stemming from the
accusations and the previous argument between two parents. It also helped bring some
understanding when the foundation is crumbling apart, and where on there was pure love
and play; it no longer existed in the same form.
To record the lines, I hired two professional voiceover actors. Both were located in New
York City. But, I could not be present to meet them or direct them. To setup a solution
remotely, I contacted several studios in downtown Manhattan and found one51 that could
record during the weekend when both actors could be available. I paid the actors in advance
and reserved the studio for an hour. The actors were able to use the studio’s recording
equipment. We called each other after each of the multiple recordings of their lines together
until the session was completed. One of the downsides of not being present with them
during the recording was my inability to visually communicate and direct. And there was
also an accidental sound levels problem that occurred during the recording: One of the
actors turned down the DB recording levels from -10 to -30, but luckily there was no noise
existing in the background, allowing us to boost the voices in post.
Sound Mixing
I snatched up a sound designer, Maria (Vicky) Mejía-Yepes, a colleague in the graduate
program, as soon as I announced my thesis idea. Though I wanted to sound design myself, I
realized this was an opportunity to work with another individual who was trained in sound
design and who also understood music composition, which was invaluable for when it came
to mixing. She was a fantastic and popular sound editor amongst my peers at RIT, making it
vital to reserve her time for my project well in advance.
In our initial sound edit, we worked with the previsualization animatic and outlined a quick
idea of what sounds were to play where. About a week into the process, Vicky contacted me
51 Ripley-Grier Studios, voice acting, training and studio rental operation in downtown Manhattan, New York: http://www.ripleygrier.com/

re÷belief [ MFA Thesis Paper ]
Post-Production | 103
confused and frustrated. She had a very difficult time placing sound on a repeating
zoetropic pattern. I explained that we just needed to have a sense of single sound
occurrences and not many. She had creative freedom in the sound design for each scene.
Trusting in her abilities, I did not hesitate to say yes to her ideas or solutions. When the
initial mix came back, it was to my surprise that a majority of the track sounded like a horror
film experience, where scenes such as the fish leaping through the chairs sounded like
screeching pterodactyls and slashing machetes. Needless to say, a second pass was needed.
In the second to final mix down, Vicky did a great job smoothing out the issues from the
first scratch track and rediscovered new opportunities to really capitalize on. Throughout, I
enjoyed the feeling of a beating heart, as well as the rhythm that would come in and out, but
never go silent, always feeling present on some level. One of my favorite places of the
soundtrack was where she created an amazing conglomeration of sound for the heart scene.
It probably also helped that Vicky found that visual sequence to be one of her personal
favorites. Another unique area where the visuals and sound beautifully worked well together
was the conveyor belt scene with the blocks tumbling just before the chairs appear. The
sound effects there gave it a much larger feeling than I could have hoped for. The climax
point worked out well also, as the small rhythm you hear in the final scene leading into the
credits. It felt like a great moment for pausing on the experience with just a faint awareness
of continued rhythm and soundscape.
Unfortunately for Vicky and me, Stephen Bullen had a hard time delivering the final music
composition on time. The screenings mix arrived just a few hours before the film
submission deadline. This forced me to go along with some sound problems and choices
that I did not necessarily agree with in the last minute mix. So, after screenings, and once
Stephen Bullen sent out the final revised music track and I adjusted some shots, Vicky did
another final mix guided by suggestions I outlined for her. When I received the final mix, I
put it with the visuals and the work was completed. And now ready for festival submission.

Public Release & Reaction | 104
Public Release & Reaction
The initial completion of re÷belief was on May 15th, 2014 and the premier of the work at the
School of Film and Animation Screenings MFA night was May 19th, 2014. Lecturer Shawn
Foster of the RIT 3D Design and Graphics program was my respondent (see D-1) that
night. His words and thoughts were fantastic, many in line with my intentions, and he took
his reactions to the work in a direction that made me sound smarter than I really am. Aside
from Shaun’s response, I believe the reception was positive, but mixed.
RIT Screening Reaction
After Shawn opened up the discussion after his presentation, I walked down to the podium
in a bizarre state of mind. The emotions that were bottled up before were partially released
and I tried to regain and keep my composure. As a result, I could not recall much of the
audiences’ reactions, and I seemed to focus only on the seemingly negative responses, as I
went through what felt like an out of body experience. Luckily, my wife recorded the whole
event so I could reflect on the reactions later (see E-1).
In reviewing the recording, I discovered that the questions and comments were not as bad as
I had thought. Most comments were about the cloud time-lapse portion of the film. The
other, more abundant, comments directed attention to the treatment of the voices arguing
and yelling. Some people felt the film worked with it, others would have preferred it were
left out. While I could see both points of view, the voiceovers were important to me
personally because of their resonance with my personal past and so it was important that
they exist. They added to the emotional extremes and psychological realities within the world
of the film.
After screenings let out, I setup a demonstration just outside the auditorium to show the first
zoetrope in action for those who had interest (see Figure 68). I brought my equipment and
used the Canon 6D camera to demonstrate the animation through the lens. To my surprise,
a large crowd gathered at the zoetrope and the real fun started. I was able to finally witness
people giddy in excitement over something I created. To sum up their reactions, Charles
Bandla had the best description of what his perception during the screening of my film was
like:
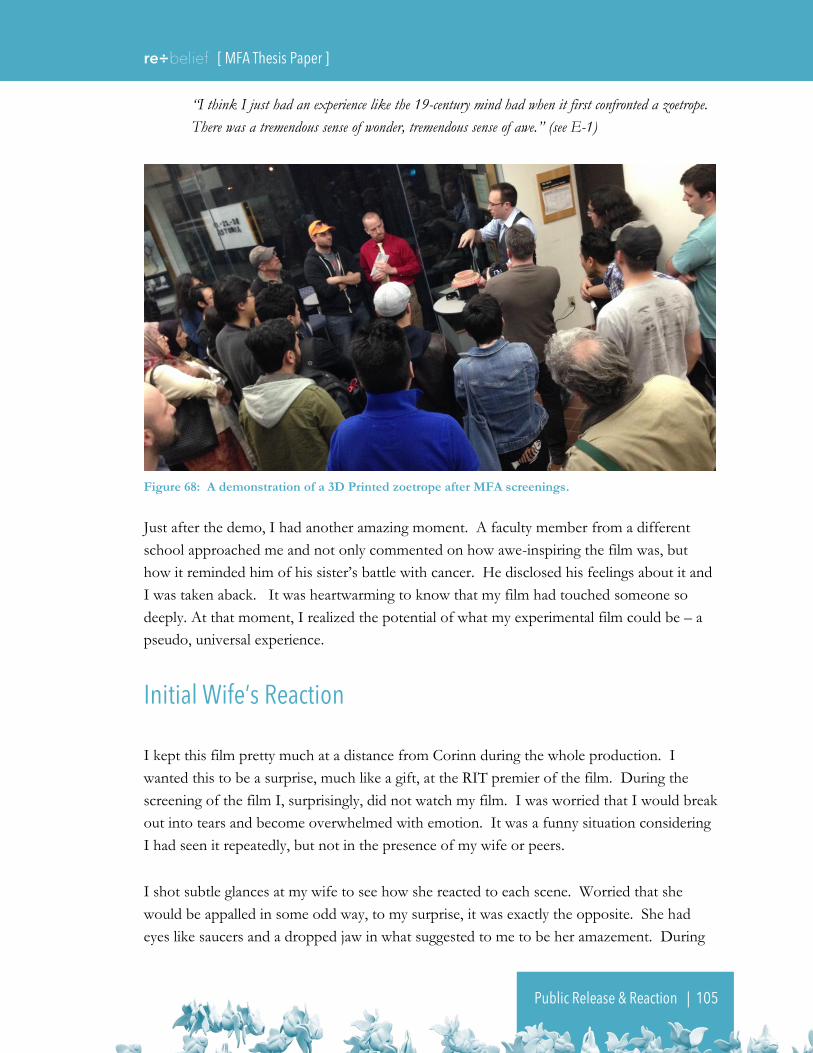
re÷belief [ MFA Thesis Paper ]
Public Release & Reaction | 105
“I think I just had an experience like the 19-century mind had when it first confronted a zoetrope.
There was a tremendous sense of wonder, tremendous sense of awe.” (see E-1)
Figure 68: A demonstration of a 3D Printed zoetrope after MFA screenings.
Just after the demo, I had another amazing moment. A faculty member from a different
school approached me and not only commented on how awe-inspiring the film was, but
how it reminded him of his sister’s battle with cancer. He disclosed his feelings about it and
I was taken aback. It was heartwarming to know that my film had touched someone so
deeply. At that moment, I realized the potential of what my experimental film could be – a
pseudo, universal experience.
Initial Wife’s Reaction
I kept this film pretty much at a distance from Corinn during the whole production. I
wanted this to be a surprise, much like a gift, at the RIT premier of the film. During the
screening of the film I, surprisingly, did not watch my film. I was worried that I would break
out into tears and become overwhelmed with emotion. It was a funny situation considering
I had seen it repeatedly, but not in the presence of my wife or peers.
I shot subtle glances at my wife to see how she reacted to each scene. Worried that she
would be appalled in some odd way, to my surprise, it was exactly the opposite. She had
eyes like saucers and a dropped jaw in what suggested to me to be her amazement. During

re÷belief [ MFA Thesis Paper ]
Public Release & Reaction | 106
the theater scene to heart transition, she reached for my hand. That’s when I couldn’t hold
my emotions in check and I released the built-up tension. That moment made the entire
two-year journey of frustration and filmmaking worth it. Those moments watching Corinn
watch the film said to me, without any prompting or words, that Corinn got it and that it
meant something to her.
When we finally got home at 2AM after the screenings, Corinn surprisingly asked me to
watch it again with her. Unlike her reaction during screenings, she responded more
profoundly, with tears streaming down her face. After requesting to see it for a third time,
she asked me to step through my thought process and to share with her the various
meanings of each scene that went into the film. Another moment that solidified that the
whole experience was worth it.
Public & Media Reaction
After completing the release version of the film on May 30th, 2014, I started putting it in
front of as many eyes as possible. However, I did not want to initially release it publically
online so that I would have a better chance of getting it into international festivals that want
works that are premieres in their showcases. During the time of writing this report, my film
was entered into 140 international festivals, with a plan to enter the film into more than 40
more festivals depending on submission deadlines and fees. So far, 43 festivals have replied
with rejections, and my film has been officially selected into seven festivals52:
Grace Film Festival, January 31, 2015, San Francisco, California
Aakruti International Film Festival, November 29, 2014, Mumbai, India
Imagine Science Film Festival at STATE Festival, October 30 to November 2, 2014,
Berlin, Germany
WV FILMmakers Festival, October 3 to 6, 2014, Sutton, WV, USA
Loop de Loop53, September 30 to October 3, 2014, Melbourne, Australia; Sydney,
Australia; Adelaide, Australia; Los Angeles, California
RIT Honor Show, September 20, 2014, Rochester, NY, USA
Croq’Anime Festival du Film d’Animation de Paris, September 10 to 14, 2014, Paris,
France
52 An updated list of festivals and other events can be accessed at: http://www.spunkyddog.com/rebelief/ 53 Loop de Loop selected a looping 24 frames of zoetrope 1 for a special festival celebrating themed loops about childhood during the month of September 2014.

re÷belief [ MFA Thesis Paper ]
Public Release & Reaction | 107
Unfortunately, due to timing and life situations, I have been unable to attend any of these
festivals, and hoping for audience reactions beyond RIT. To this point as well, it was hard
to get any feedback directly from festivals that decided to reject my film. Learning from this
festival dismissal process, I started to selectively choose festivals thinking that they may be a
better fit for my film, rather than blindly entering into just any festival. I decided to submit
into animation festivals, and specifically for experimental and short narrative categories. I
also adopted the strategy of sending an email to prospective festivals, which included my 30-
second trailer54, to allow them to preview the film so I could get a sense on whether the film
would possibly fit the festival themes or interests.
In addition to film festivals, I also screened the film to several individuals whom I respect
and trust, hoping for their feedback. One person in particular, Michael Starobin55, a NASA
Senior Producer with whom I worked with on a film project during the production of my
thesis looked at my film. His reaction to my film was profound fascination. He took time
out of his weekend to delve into a deep discussion over email about what worked and did
not work for him in the film (see F-1). Michael did have a desire to know more of why and
it resonated around the presence of the voices in the film:
“The use of human voices in the middle of the piece is my principal evidence, especially coupled with
the strong depictions of the central relationship in the film. I bring myself to the film—like every
other person always brings him or herself to a work of art—and thus have my own readings of what
I think you’re trying to ‘say’. But when I found myself trying hard to get closer to the experience—
when I felt a momentary sense that some of the uncertainties and mysteries of the first two minutes
were now about to become clearer—I couldn’t help but feel a touch frustrated that the clues
WEREN’T a little clearer. I WANTED to know more about the emotional life you were
presenting. I WANTED to know more about whether there was a narrative arc, or whether you
simply wanted to ‘paint’ in gestural strokes, in colors and movement simply to evoke an emotional
state. I came away with a little of both, but I wanted to get a clearer sense of your intention.”
In addition to Michael, I wanted to get feedback from Eric Dyer, who very much inspired
my direction for this film. In many ways, I revered him with the prestige of Walt Disney in
regards to his tenacity and creativity. After viewing the film, he sent me an email with the
following response:
54 The 30 second trailer can be accessed here: https://vimeo.com/97552441 55 Michael was a very creative and intelligent individual who has pushed the creative boundaries within the confines of government video and film production.

re÷belief [ MFA Thesis Paper ]
Public Release & Reaction | 108
“Wow. You’ve pushed the envelope of this process in so many ways, and the piece has depth, not just
visual delight and intrigue. It must have blown your audience away. Congrats. Really. Now it will
go off into the world and have a life of its own - very exciting. Thanks for inspiring me, too.”
Eric’s response meant the world to me. Though he did not have much criticism on the film
itself, his initial reaction made me feel that I did accomplish something wonderful.
Needless to say, I felt quite honored.
Lastly, I attempted to get the film recognized a bit more in the public eye with my trailer.
After building my website with a subpage dedicated to my film, I sent out an email to several
online media outlets in the hopes of getting noticed. A couple of individuals responded
back with an interest for an online interview with me. After the interviews were released
online, a blip of a firestorm happened with a small portion of the online community who
were fascinated with the technique and were curious to watch the full film.
It was mind blowing the amount of attention56 surrounding just my trailer alone. I quickly
realized I should develop an online release strategy for when the film does go public.
Particularly, I planned to reach out again to those who showed initial interest.
56 To see the publicity garnished at the time this thesis was written, including web links to the articles themselves, please refer to: : Response – Publicity & Media.

Conclusion & Experience | 109
Conclusion & Experience
As an artist, re÷belief became a cathartic expression on all the years of guilt and frustration
surrounding a pinnacle moment in my youth. At the same time, it was an opportunity to
celebrate what I have in my life. I chose to insert these powerful and important personal
recollections into my film, even though I knew I would risk potentially confusing the
audience. I felt that any youth or adults who have gone through similar situations could
potentially reflect and relate on some level with the emotion of this experimental narrative.
Maybe they could bring their own personal experience/story to the film and find familiarity,
hope and appreciation in their lives.
As a graduate student, the production was a revelation. Never in my life could I have
imagined completing a film of this caliber within the time I had allotted it, and considering
the unexpected events in my life that muddled my expenses and timeline. This production
would not succeed if following a set of guidelines and rules. I had to discover, iterate and
experiment with a novel production approach. It allowed me to problem solve new
technologies that directly translated to the potential for a unique artistic and professional
career – one that I am excited about and driven to learn more about. No doubt this project
revealed to me how I could surpass hurdles and barriers that were present throughout the
production and in every direction imaginable.
As a husband, it left me greatly appreciating the relationship I have with my wife and best
friend, Corinn. The past several years of uprooting our family and venturing into unknown
territory gave me constant worry and apprehension, wondering if I might have screwed up in
changing careers and interests. Despite the unknowns and uncertainty, Corinn was there
with reassurance that we could figure it all out, and she believed I would be successful in
attaining my personal goals. She helped me both directly and indirectly every step of the
way.
This film production was no less than an emotional roller coaster ride. My hope was to
create something new and contributive to the field of animation. If this film does not leave a
mark on history, it certainly has left an optimistic mark and great appreciation for my
relationship with my wife. It gave me confidence that I could break the cycle – the ability to
walk away from the haunting concerns of repeating the past.

Appendix A: Original Approved Thesis Proposal | A–1
Appendix A: Original Approved Thesis Proposal
Synopsis
This personal work will explore the expressive potential of a particular form of ‘primitive’
animation using the zoetrope. The principles and construction of an unusual kind of
zoetrope will be directed toward its evocative capabilities in telling a dramatic story.
Combing the zoetrope with other animation and filmmaking techniques will result in a short
animated, experimental film that has future possibilities as an installation to reach another
level of audience participation. The story of Core Belief focuses on a young man who is
tormented by his past and how meeting a young woman changes all that.
Story Concept
A young man encounters a young woman as she walks by. He hesitates to grab her attention
or to interact with her. The young man recalls the troubles of his parents’ failing marriage
when he was a young boy. Their eternal words directed at him, “This is your fault!” festers
at his core. He attempts to hide his ailment as he gathers the courage to approach the young
woman. As he nears her, she turns and looks into his inner being. The young woman
discovers his trouble and the festering wound in his chest where his heart lies. She
approaches the young man and a bond begins between them.
The young man at first pushes her away. But then he suddenly opens up to her. She crawls
inside his chest to repair and dissolve his agonizing torments. The young man heals.
Afterwards they dance and meld into one being with two hearts beating in sync.
Rationale
The artist and kinetic animator, Eric Dyer has greatly influenced my thoughts on a technique
for executing this personal story. His Cinetropes (zoetrope like devices) captivate those who
watch in amazement as his animations play out his stories and ideas in cyclical form in the

re÷belief [ MFA Thesis Paper ]
Appendix A: Original Approved Thesis Proposal | A–2
form of visually magical translations into video performances produced in both real-time and
in post. The goal of my project is to produce something on the magnitude of Dyer’s works
and use the concept of the Cinetrope as a technical and metaphorical springboard to develop
this experimental work. Dyer has agreed to consult with me for technical help, guidance, and
problems solving.
Using the endlessly spiraling zoetrope as a metaphor for torment suits the ‘telling’ of this
story in that an inherent cyclical form of animation reinforces the idea of the repetition of
the young man’s ongoing misery. Processes of experimentation, testing, and transformation
to cinematic expression is intended to uncover methods to tell the story between the young
man and woman. One of the most challenging aspects of this work is to reveal the linear
narrative of the story in a cyclical world. Eric Dyer recently stated:
“While refining Short Ride’s narrative, I reaffirmed my theory that Cinetropes demand their own
unique form of story-telling. I initially tried to apply traditional plot structures to the story, but the
structures and forms created by Cinetropes don't lend themselves to these plots. Traditional plots
want linear events and individual characters while Cinetropes lend themselves to repetition, collision,
a waterfall of form and motion. It’s a pioneering form of narrative that is both temporal and
spatial, speaking a language of loops and spirals.”
This project is an exciting challenge for me – to tell a dramatic story in an alternative form.
It is my intention to take the basic zoetrope approach and bridge it with other techniques of
animation and filmmaking to discover unique expressions of the story that audiences can
access.
My 2D and 3D technology skills, and filmmaking and animation knowledge and abilities will
suit this mixed media exploration. Autodesk’s Maya contains all the tools necessary to
produce all models, character(s), objects, and environments, as well as to rig the characters
and objects for animation. The physical elements for the creation of the physical sets and
moving parts will most likely utilize a combination of 2D animation printed on paper and
3D Printing technology. Mechanical and electronic functionalities of motors and other
devices to put things into their workable motions will take some time to learn and devise.
Priming and painting the final 3D Prints in acrylics will also require experimentation and
acquiring skills.
Core Belief will entail the digital filming of 18+ zoetropes in real-time using a Canon 5D
DSLR video camera and editing the digital movie files in post. The cyclical animation of the
sculptures will be directed towards the storytelling. However, there is much still unknown

re÷belief [ MFA Thesis Paper ]
Appendix A: Original Approved Thesis Proposal | A–3
on the ‘real’ manifestations of this work. I look forward to experimenting and discovering
on this project and to exploring the perception of cyclical phenomenon for its emotive and
dramatic potential with ‘bridging’ to also break cycles and isolate key moments in the story.
Sound will be very important in contributing to the visceral nature of this work. The
soundtrack will require original Foley and music composition.
This work also has the potential for other manifestations, such as gallery and interactive
installation, in addition to a film. Although these other iterations are not being proposed
here, this project may become a foundation for future explorations. For instance, the
physical zoetropes could be staged as live moving sculptures with several video feeds piped
to video screens/displays along with a sound mix to play through specially designed speaker
systems to allow each zoetrope its own unique performance and soundscape.

Appendix B: Proposed & Actual Timeline | B-1
Appendix B: Proposed & Actual Timeline
Table 1: Proposed Thesis Calendar (2012-2013)
Table 2: Actual Thesis Calendar (2012-2013)
Table 3: Actual Thesis Calendar (2013-2014)

Appendix C: Original & Actual Budget | C-1
Proposed Expenses Actual Expenses
Hardware Used: Hardware Used:
Computer Workstation In Kind Computer Workstation In Kind
3D Printer $1,800.00 Logitech Mouse $53.00
Canon 5D Mark II DSLR Camera In Kind Canon 6D Camera $2,493.00
Misc Camera Accessories In Kind Canon ACK-e6 Adapter Kit $119.00
Tripod In Kind Canon 100mm 2.8 L Macro Lens & Acc. $721.86
Canon EF 1.8F 50mm Lens In Kind Canon EF 2.8F 20-72mm Lense In Kind
Canon EF 2.8F 20-72mm Lens In Kind Canon EF 2.8F 75-200mm Lense In Kind
Canon EF 2.8F 75-200mm Lens In Kind Tripod Head Rental $48.00
Macro Tube Extensions In Kind Tripod In Kind
LCD Projectors/Screens/Monitors In Kind Stage Lighting In Kind
Stage Lighting In Kind 55" LCD Television In Kind
Software Utilized: Software Utilized:
Autodesk Maya In Kind Autodesk Maya In Kind
Autodesk Mudbox In Kind Autodesk Mudbox In Kind
Solid Works In Kind Adobe CC Year License $240.00
Adobe Production Creative Suite In Kind Meshlab In Kind
Apple Final Cut Pro In Kind netfabb Basic In Kind
Apple Sound Track Pro In Kind
Avid Pro Tools In Kind
Manufacturing Materials: Manufacturing Materials:
3D Printer Parts/Materials $2,500.00 Test Prints & Misc. Build Costs $171.07
Electronic motors/hardware $200.00 Pedistal Circuits & Soldering Parts $300.28
Wood/Metal (Fabrication) $200.00 Milled Aluminum Spinning Platform $100.00
Zoetrope Packaging $200.00 Zoetrope 1 $563.11
Paint Supplies $150.00 Zoetrope 2 $1,327.93
Zoetrope 3 $342.35
Zoetrope 4 $461.62
Zoetrope 5 $973.85
Zoetrope 6 $2,024.84
Zoetrope 7 $813.95
Zoetrope 8 & Theater Stage Prints $2,029.55
Zoetrope 9 $276.26
Hired Help: Hired Help:
Painters $150.00 Composer $800.00
Composer $300.00 VO Studio Reservation & VO Actors $230.00
Brett Zoetrope Painting & Stay $1,200.00
Fabrication Studio Expenses: Fabrication Studio Expenses:
Rent (4 months) $1,000.00 Appartment Usage in place of Studio In Kind
Storage Containers $100.00 15 CCBC Fab Lab Visits $50.00
Workbench $100.00
Desk $100.00
Power/Office/Studio Supplies $50.00
Travel Expenses: Travel Expenses:
Travel to Baltimore (3 trips) $360.00 March NYC Print Pickup $190.96
Couchsurfing in Baltimore (3 nights) In Kind Tolls for Shapeways Visit $66.50
Festival Expenses: Festival Expenses (Planned):
DVD/Blue-Ray Materials $150.00 DVD/Blue-Ray Materials $150.00
Festival Fees $1,200.00 Festival Fees $1,500.00
Postage/Shipping $150.00 Postage/Shipping $150.00
Digibeta $200.00 Digibeta $200.00
Misc Formats $200.00 Misc Formats $200.00
Web & Marketing: Web & Marketing:
Domain URL Registration (5 years) $70.00 Hosting $125.00
Hosting $125.00 VIMEO Pro Account $50.00
Subtotals: Subtotals:
Film Production $6,850.00 Film Production $15,339.67
Travel $360.00 Travel $257.46
Festivals $1,900.00 Festivals $2,200.00
Marketing $195.00 Marketing $175.00
Total Production Budget: $9,305.00 Total Production Expenses: $17,972.13
Appendix C: Original & Actual Budget

Appendix D: Screening Respondent – Shaun Foster | D-1
Appendix D: Screening Respondent – Shaun Foster
Shaun Foster’s Respondent Write-up
RIT Lecturer | 3DDG “Projections of my own perception”
It is the goal of a Master’s Thesis film to push the field forward. Ray has done that with his
film re÷belief. It demonstrates a unique method and a complex sets of spinning visuals.
The first thing that I noticed about this film was the physical and textural quality of the
printed and painted objects. The slight diffusion of light through them mixed with macro
lens photography created a feeling of intimacy with a miniature world. While the zoetropes
that the film was made on were never shown in their entirety they were perceivable as
multiple “frames” of animation were shown simultaneously.
The mechanistic Zoetropes; Zoe a word meaning life, and trope meaning a nonliteral
interpretation. Animation itself has within it the duality of control vs. chaos. both in briefly
discussing this with the filmmaker it seemed that a lot of flexibility had to be given to the
process which created a dialog between the intent and the process itself which seemed
appropriate to a zoetrope creating (animation) life The duality of control over the world,
but also learning that once something has life it is inherently uncontrollable and that the
filmmaker becomes part of the film. Beyond the process and physical construct, the
underlying messages were not any less simple, but often commented on process itself.
There was an underlying theme of “rotational recursion”, cycles, and circadian rhythms. The
process itself was about objects that had been visualized inside a computer, then printed,
then redigitized through filming, then post process on top of that. The spinning zoetropes
constantly played through their cycles, beginnings & endings. The initial imagery and
character design appears to be childlike figures, but could easily be designs from an ancient
civilization.
A main theme of heart played throughout the film, accented by the rhythm of the
soundtrack. The visuals represent the heart as both as a machine, but also as percussive

re÷belief [ MFA Thesis Paper ]
Appendix D: Screening Respondent – Shaun Foster | D-2
instrument of life. Initially the heart seems to be “worn on the character’s proverbial sleeve”.
The film goes into a serious set of blue colors and visual motifs which could be seen as
“crosses one bears” , could symbolize some death or some connection to the church.
Whatever the private meaning, it seems clear that an unprotected heart suffers and looks like
is ripped from the characters chest.
The film uses inversions of the external and internal and ties them to dualities of real and
versus the manufactured. At one point in the film the camera pulls back to reveal a house
where realistic, timelapsed clouds are inside the building.
Having gone through a blue period, the cycle returns to a colorful vision where fish leap
across what look like the seats of a theater. As if to reference the line from Shakespeare’s As
You Like It, “all the world is a stage”, stage lights turn on and the character encounters a
kindred soul who reignites the fire within.
The final scenes appear to have the two characters together with glowing threads
surrounding them, in a way that show their intimacy, but also which made me think of the
protective van allen belts of electromagnetic forces surrounding the earth. A cut to the moon
right after, shows the beautiful, but pocked surface. The film concludes by showing the
characters surrounded by a glowing galaxy.

Appendix E: Response – RIT Screening | E-1
Appendix E: Response – RIT Screening
The following audience responses were transcribed from an audio recording of the SOFA
Screenings MFA Night comments and questions section that followed the film’s showing.
Please note the recording was not the best and some parts of the comments were inaudible
where noted. For the sake of keeping the thoughts fluid, I removed audible pauses (e.g.
“um” and “uh”) and repeated words due to pauses.
Charles Bandla: Ray I’m sitting here and I think I just had an experience like the 19-
century mind had when it first confronted a zoetrope. There was a tremendous sense of
wonder, tremendous sense of awe. Watching this film it was a lot like listening to good
minimalist music through that repetition and evolution. I was just extremely touched and I
didn’t detect any story in it. But just the visual experience of it was very moving. You’ve
done a wonderful job.
Harlan Doolittle: Ray, your craftsmanship and your attention to detail has always been so
completely on point and this one is really no different. When I first saw the zoetrope go
into action on screen I was just taken aback by your visuals happening on screen. For a split
second I thought the voice-overs were a little bit on the nose, but the emotional resonance
might not be as strong, it really didn’t bother me.
Lucas Gonzalez: On that note, with the voices, there were three things that stuck out for
me that was not working out. The voices were one of them, I think if you ease into the
voices a little bit more and can pop up her and pop up there and build up to their full on
arguments it probably would have worked a bit better than just… I don’t know… Here they
are! Another thing is that partially just because the way that the zoetropes are built, you got
this really interesting texture going on. And then there’s a couple shifts, particularly that
cloud state thing where the clouds are going by in time-lapse, that it is such a huge difference
texturally that I am watching a video of clouds, and it completely pulled me out of this old
kind of zoetrope experience. So that wasn’t working out at all for me. And then I forgot
what the third thing was…
Male Audience Member: I actually disagree with Charles. I think there is a lot of story in
there, but I agree with Lucas with that the voices did throw me off, I think it’s just because
it’s not throughout the whole thing. You know, you kind of just throw that in there; you

re÷belief [ MFA Thesis Paper ]
Appendix E: Response – RIT Screening | E-2
don’t really hear anything again. I would almost keep the voices out and play with the sound
a little bit more because you tell the story visually. And I can see it in the visual and I don’t
need to hear the voices since I can see what’s going on.
Kenton Cummings: I think you need to ease into the voices (inaudible comment) and I
remember that. And I just think that they were… Everything was engaging. And the voices
we don’t want to let them out so it left me wanting more of the voice… it was distracting
more than anything. I just felt like everything was in my face.
Brian Larson: Harlan used some good words there I want to co-op, he used whimsy and
detail which are definitely evident, as well as a real creative presence. This whole process, a
curious mind, a creative interpretation of ideas, which is really fun to watch. And I also want
to comment on Stephen’s music – I thought it was really well done and well integrated into
the whole piece.
Skip Battaglia: What you got is what every filmmaker wants – you got a real film. You got
a machine, it’s obviously a machine, and it’s willingness to create an emotion. And you got
that love of repetition, which we decipher and it becomes like a dance. And very, very
engaging. It’s even small but on the big screen it’s tactile and I tried to decipher it but it still
remains a mystery to me? So it creates its own space and you’re making something
mechanical and giving it life. And that’s what we should do.
Peter Murphey: It was a beautiful experience and a really successful film. I really did
appreciate that you had this tactile presence that you organized in this really interesting way.
And the rhythms and choreography of that was very engaging both in the way you broke up
the screen, but the way you used colors throughout the piece. I really loved the fish diving
over the chairs; it was one of my favorite parts of the film. And it was a different and new
thing to look at, a fresh new vision to experience. I also didn’t like the time-lapse
photography; I think it kind of broke the stage. You have this world that you created that I
was pulled into and that pulled me right out making me aware that it was something other
than that experience. So that bothered me, but minor in comparison to how well the film
was done.
Syeda Quadri: Yeah, I agree it’s beautiful. I love (inaudible). Also, I think the voices really
work for me? It felt like a life cycle (inaudible). I was curious about two things: one was
why were there chairs, it felt like at one point you set up the stage and I wasn’t sure what
that had to do with anything? (inaudible – speaking about the crucifixes) …everything up
until then felt very organic, life cycle sort of way, and there’s these two things that feel

re÷belief [ MFA Thesis Paper ]
Appendix E: Response – RIT Screening | E-3
imposed rather than growing out of something. So I was curious why those were there or it
just happened without you knowing about it?
Malcolm Spaull: I would need to see the film again and maybe a third time because I think
I ever seen a film like this. Quite, quite fascinating. I just want to address the comments
about the voices – (inaudible) It’s certainly not thrown in there. They were very important I
thought because this is a very personal piece of work. Clearly.
Kenton Cummings: I don’t know how you did it (inaudible). For me to make sense of it I
have to associate my ideas to what I see. And that was what I was doing when I saw crosses
and stuff that I was putting the story together. You know, like, I was putting myself into
those places associating my real life making it personal that way. I didn’t know if that was
your intention or not for the viewer. The chairs felt like I’m in front of the world, that the
audience was seeing my life.
Male Audience Member: To me, this is the smoothest stop motion animation I’ve ever
seen. So it’s that part that’s so amazing to me, especially with the fishes jumping over the
chair, I was like holy crap dude. The texture made it all kinda sugary, I just want to eat
snacks now. So I got something completely different.
Stephanie Clark: I know that a lot of the metaphors, some of them you have, cycle into the
process like the chairs, but there are things like the strings. The violin strings that you have I
found to be absolutely beautifully done. The colors and the way they move, it’s remarkable
really. All that level of detail and time you put into making these is really mind boggling
especially I think I can’t understand that you built it in 3D first and figured out how it would
work? And brought it into stop motion? Bringing that across multiple mediums and still
having and idea of what it is and what it isn’t?
Male Audience Member: I mean this as a compliment, but I don’t know how you did this
but you almost made me cry. And I don’t cry.
David Sluberski: (inaudible but complimenting on Stephen Bullen and Maria (Vicky)
Mejía-Yepes dedication, work and craftsmanship)

Appendix F: Response – Michael Starobin | F-1
Appendix F: Response – Michael Starobin
Michael Starobin’s e-mail Response
Senior Producer | NASA-TV/Honeywell
It’s a profoundly impressive piece, clearly the result of intense labor and mental energy. It’s
inventive, energetic, and strangely mesmerizing. I appreciate the attention to detail in the
models you built (fabricated? replicated? what is the proper term of art in terms of 3D
Printing?) and more than once I marveled at the subtle details that breathed life into those
shapes. The inherent repetition of movement that was organic to the physical sets gave many
scenes a powerful, hypnotic sense—less pure repetition, and more an articulation of
minimalistic gravity. I couldn’t help but feel evocations of Steve Reich or Phillip Glass if
their music could be made visual. The repetitions helped amplify scene and setting as well as
convey feeling. They asked the viewer to consider individual ideas in a different way than
fast cuts behave.
There are many visual delights to be found in the work, from texture, to movement, to shape
and rhythm. One particular visual element that deserves its own note is the shape of your
two human characters. It was a good choice to abstract them in rather plain, unclothed,
unheroic forms, with limited detail. That universality grounds us and pulls us in as viewers. It
humanizes what otherwise might be simply a phantasmagorical, chaotic piece, and asked us
to invest ourselves. The character shapes themselves help make human sense of a
technologically destabilized word by adding familiar context. Even as they have their own
experiences and narrative arc, they speak to us, the viewers.
But that’s my segue. (Uh-oh. Is that ominous music rising in the distant soundtrack of my
email?)
Because the film presents itself as a relationship from the earliest scene, the movie provokes
inevitable questions for viewers about the relevance and trajectory of that central
relationship. Not for a second do I believe that all films (and other works of art) need to be
literal or linear. This is very important; I don’t mean that at all. But in this case, especially
since this case is a SHORT film, you present the subject of a relationship right off the top.
With other themes at play, no doubt, we cannot help but feel that the relationship between

re÷belief [ MFA Thesis Paper ]
Appendix F: Response – Michael Starobin | F-2
these two people as central to the overall experience, and in my mind that immediately sets a
high bar, and an essential bar, for the storyteller to clear. But I must admit after reflecting
and consideration that after experiencing hard-to-hold expressions of feeling and emotion
and, of course, a rich visual and aural experience, the movie quickly starts to become
untethered to the metaphoric ground.
I love abstraction as a means to describe and approach very literal things. I ALSO love
abstraction simply for it’s own merits. But abstraction can be a galloping horse. The rider
might know where it’s going, but to onlookers it can appear to be a wild animal out of
control. Its the same for movies, and unlike that horse a’running, moviemakers cannot leave
onlookers to wonder where it’s going.
I’m concerned that certain narrative “clues” (for lack of a better word) that populate the
world of RE: BELIEF ask viewers to TRY and UNDERSTAND what’s happening. The
trick here is one of clarity. I’m all for cinema that simply aims at evoking feelings beyond
mere narrative. (Terrance Malick especially comes to mind. Akira Kurosowa comes to mind.
Even Stanley Kubrick.) But where narrative clues are left for viewers to encounter directly,
we must have enough information to hold. That’s not to say that viewers will all come to the
same conclusions! How many times have you debated the meaning and merit of a movie
with someone else when you were CERTAIN that the message had been clear? My point is
that narrative hooks have to be clear enough if you want them to deeply resonate beyond a
purely sensory experience.
And I gather from this piece that you do.
The use of human voices in the middle of the piece is my principal evidence, especially
coupled with the strong depictions of the central relationship in the film. I bring myself to
the film—like every other person always brings him or herself to a work of art—and thus
have my own readings of what I think you’re trying to “say”. But when I found myself trying
hard to get closer to the experience—when I felt a momentary sense that some of the
uncertainties and mysteries of the first two minutes were now about to become clearer—I
couldn’t help but feel a touch frustrated that the clues WEREN’T a little clearer. I
WANTED to know more about the emotional life you were presenting. I WANTED to
know more about whether there was a narrative arc, or whether you simply wanted to
“paint” in gestural strokes, in colors and movement simply to evoke an emotional state. I
came away with a little of both, but I wanted to get a clearer sense of your intention.

re÷belief [ MFA Thesis Paper ]
Appendix F: Response – Michael Starobin | F-3
Please read those last few sentences again. The REASON I wanted to get a better sense of
these things was not simply because I like you (okay, yeah: I do) and not because I think
you’re a smart, good artist (okay, yeah: extraordinary to absurd degrees), but because THE
MOVIE ITSELF grabbed my attention because of it’s own merits and quality. It’s daring
and bold and so very well made, and because of THOSE reasons I wanted to be able to get
greater clarity about its tone and intention. It didn’t need to be less vague. It needed to
decide if it was SUPPOSED TO BE vague and then it needed to show me.
I thought your use of live action footage was rather inspired. I appreciate mixed media very
much, and the passage of time conveyed by the time-lapse clouds was elegant and real. That
DID ground the movie, and made it all the more relatable overall. I very much appreciated
the framing image at the beginning and end of the two silhouettes standing together, rather
intimately, against the stars. I also very much appreciated the image of the two people
meeting each other in the theater: so human, so honest, appropriately evocative of intangible
emotion even as it also stood as a proxy for so many moments that your viewers could easily
identify in their own lives.
I loved the jumping fish! (Geek moment here: How did you get the ripples from their
splashes to, uh, ripple?)
John Lassiter, the creative brains behind Pixar, has long asserted that he always believed
animation had the potential to achieve the same levels of feeling and humanity as live action
because filmmakers could control every single aspect of a frame. I agree, although it’s a
challenging art to do so because people live in a physical world and animation lives in a
world of mind. After all, it HAS TO. But worlds of mind do not abrogate the potential for
rich, deep, nuanced feeling. They are no less vital than the real world, but they need to be
carefully shepherd through the process of communicating to us who live in the real world.
When music broke free from traditional, classical structure in the mid 19th century, it
unleashed the romantics to explore texture and feeling in brand new ways. That ultimately
yielded the wild colors and gestures of jazz and rock and a million other things, but it never
damaged nor impugned the value of the old-school classical world. The best expressions of
those new forms of music sometimes asked daring things of listeners, sometimes with literal
experiences, sometimes not. I’m not saying that one is better than the other, but I am saying
that without brave experiments from brave experimenters, there can never be break-through
works like The Rite of Spring or Kind of Blue or Sgt. Pepper. This is to say that I think you’ve
done something daring here, and something very, very valuable. That I have some
substantial criticisms of the piece is more a function of recognizing the profound effort and

re÷belief [ MFA Thesis Paper ]
Appendix F: Response – Michael Starobin | F-4
work that went into its creation. For work that didn’t merit substantial respect there would
be far less to say.

Appendix G: Response – Publicity & Media | G-1
Appendix G: Response – Publicity & Media
The following are references to articles, conferences, gallery shows and presentations that
occurred after the production of the film. The interviews regarded the trailer of my film, the
technology utilized and process behind the film itself as the film was not yet publically
available in full online.
Conferences & Presentations
Official Opening of the Champlain College Maker Lab, October 3, 2014, Burlington, VT,
USA, http://www.champlain.edu/x18592.xml
Visiting Artist Lecture at UMBC, October 1, 2014, Baltimore, MD, USA
Shapeways “Lunch and Learn” series – Factory, August 15, 2014, Queen City Island, NY,
USA
Shapeways “Lunch and Learn” series – Manhattan Office, August 14, 2014, Manhattan,
NY, USA
IFP and Shapeways: Animation Goes 3D with the Made in NY Media Center, August 14,
2014, Brooklyn, NY, USA,
http://www.meetup.com/Shapeways/events/194802252/
Installations
Gallery 788, Z0: Digital Fabrication & the New Language of Materiality, June 2014,
Baltimore, MD, USA, http://www.meetup.com/fab-lab-
baltimore/events/185949832/
News & Mentions
Watch a Short Movie With 3D Printed Objects – by Jelmer Luimstra,
http://3dprinting.com/news/watch-short-movie-3d-printed-objects/

re÷belief [ MFA Thesis Paper ]
Appendix G: Response – Publicity & Media | G-2
A Modern Spin on Vintage Animation: Digital film gets physical with 3D-printed zoetropes, by
Doug Bierend, http://medium.com/re-form/a-modern-spin-on-vintage-animation-
451654c59d19
Enhancing the Art of the Zoetrope with 3D Printing in Short Film, ‘re-belief’, by Bridget
Butler Millsaps, http://3dprint.com/15821/3d-printing-re-belief-zoetrope/
re÷belief ein komplett 3D-gedruckter Stop Motion Film, http://3druck.com/kunst/rebelief-
ein-komplett-3d-gedruckter-stop-motion-film-3223779/
Animator Ray McCarthy Bergeron’s re÷belief short created from 3D-Printed Zoetropes
#3DxAnimation #3DThursday #3DPrinting, by Matt,
http://www.adafruit.com/blog/2014/10/02/ray-mccarthy-bergerons-3d-printed-
zoetropes/
Tech Fashion Week’s, Future Health Comms & 3D Cars, by INITION,
http://www.inition.co.uk/tech-fashion-week-future-health-comms-3d-cars/
Watch A Vibrant Short Entirely Made From 3D-Printed Zoetropes, by Beckett Mufson,
http://thecreatorsproject.vice.com/en_au/blog/watch-a-vibrant-short-entirely-
made-from-3d-printed-zoetropes
August 14: Animation goes 3D with the Made in NY Media Center, by Eleanor Whitney,
http://www.shapeways.com/blog/archives/17025-august-14-animation-goes-3d-
with-the-made-in-ny-media-center.html

Appendix H: I Will Wait Lyrics | H-1
Appendix H: I Will Wait Lyrics
Mumford and Sons’ song lyrics57 to I Will Wait, off their album Babel.
Well I came home
Like a stone
And I fell heavy into your arms
These days of dust
Which we've known
Will blow away with this new sun
But I'll kneel down
Wait for now
And I'll kneel down
Know my ground
And I will wait, I will wait for you
And I will wait, I will wait for you
So break my step
And relent
Well you forgave and I won't forget
Know what we've seen
And him with less
Now in some ways
Shake the excess
'Cause I will wait, I will wait for you
And I will wait, I will wait for you
And I will wait, I will wait for you
And I will wait, I will wait for you
(continued)
Now I'll be bold
As well as strong
And use my head alongside my heart
So tame my flesh
And fix my eyes
A tethered mind freed from the lies
And I'll kneel down
Wait for now
And I'll kneel down
Know my ground
Raise my hands
Paint my spirit gold
Bow my head
Keep my heart slow
'Cause I will wait, I will wait for you
And I will wait, I will wait for you
And I will wait, I will wait for you
And I will wait, I will wait for you
57 Song Lyrics sourced from: http://www.metrolyrics.com/i-will-wait-lyrics-mumford-sons.html
Related Documents