RightFAX 6.0 Administrator's Guide

Welcome message from author
This document is posted to help you gain knowledge. Please leave a comment to let me know what you think about it! Share it to your friends and learn new things together.
Transcript
RightFAX 6.0Administrator's Guide

2 RightFAX Administrator's Guide
Information in this document is subject to change without notice. Companies, names, anddata used in examples herein are fictitious unless otherwise noted.
COPYRIGHT
©1990-1998 RightFAX, Inc., a subsidiary of Applied Voice Technology, Inc. All rightsreserved. No part of this publication may be reproduced, transmitted, transcribed, stored ina retrieval system, or translated into any language in any form by any means without thewritten permission of RightFAX, Inc.
TRADEMARKS
The RightFAX logo design and RightFAX are registered trademarks of RightFAX, Inc.Other brand names, company names, and product names are trademarks or registeredtrademarks of their respective companies.
Revision No. 1, 11/98Document No. Spiral bound edition: 000-00020-02 Perfect bound edition: 000-00024-02
Printed in the United States of America.

Table of Contents 3
Contents
Chapter 1: Introduction to RightFAX ....... 9Welcome to RightFAX ............................................................................. 10How RightFAX Works ............................................................................. 11Using This Guide and Other Learning Tools ........................................... 13Technical Support .................................................................................... 15
Chapter 2: Installation Overview ............. 17Planning the RightFAX Installation ......................................................... 18Fax Server Requirements .......................................................................... 18Client Workstation Requirements ............................................................ 19Fax Board Requirements .......................................................................... 20Phone Line Requirements ........................................................................ 20
Chapter 3: RightFAX ServerInstallation ............................... 23
Upgrading to RightFAX 6.0 ..................................................................... 24Installing RightFAX Server Software ....................................................... 24
Chapter 4: Configuring theRightFAX Fax Server .............. 27
The RightFAX Fax Server Module ........................................................... 28General Tab.............................................................................................. 28Advanced Tab ......................................................................................... 31Channel Authorization Tab ...................................................................... 33Custom Messages Tab ............................................................................ 34The Fax Server Internal Event Queue....................................................... 36
Chapter 5: Configure theWorkServers ........................... 37
RightFAX WorkServer Module ................................................................ 38Printer Configuration ............................................................................... 46Xerox Configuration................................................................................. 47Kofax NetScan Configuration .................................................................. 48HP NetScan Configuration ....................................................................... 49
4 RightFAX Administrator's Guide
PeopleSoft Configuration ......................................................................... 50OCR Configuration.................................................................................. 51
Chapter 6: Configure theBoardServer ............................ 53
RightFAX BoardServer Module ............................................................... 54Auto Billing Code Settings ...................................................................... 54Advanced Settings .................................................................................. 55Global Board Settings .............................................................................. 56Brooktrout Board Configuration .............................................................. 62Brooktrout Channel Configuration .......................................................... 64Detect GammaLink Board......................................................................... 66GammaLink Board Configuration............................................................. 67GammaLink Channel Configuration.......................................................... 68Running Multiple BoardServers on Remote Machines ............................ 71
Chapter 7: RightFAX ClientInstallation ............................... 75
Setting up Client Workstations ................................................................ 76Manual Installation .................................................................................. 76Automated Installation ............................................................................ 78
Chapter 8: Installing and ConfiguringPrint-to-Fax Drivers ................ 81
How the PowerBar Works ........................................................................ 82PowerBar Configuration ........................................................................... 82Installing Programs to the PowerBar ........................................................ 84Installing Printers to the PowerBar .......................................................... 85PowerBar Operation ................................................................................. 85The RFAX: Port ........................................................................................ 86RightFAX Tray Icon ................................................................................ 86Tray Icon Installation ............................................................................... 86Tray Icon Configuration .......................................................................... 87Tray Icon Operation ................................................................................. 89
Chapter 9: Enterprise Fax ManagerOverview .................................. 91
What is Enterprise Fax Manager? ............................................................ 92Starting Enterprise Fax Manager .............................................................. 92
Table of Contents 5
Setting Your Preferences .......................................................................... 94RightFAX Server Information .................................................................. 98Working with Objects .............................................................................. 99Managing Server Status and Services ..................................................... 101Managing Users ...................................................................................... 104Managing Groups .................................................................................... 106Managing Signatures ............................................................................... 108Managing Forms ...................................................................................... 109Managing Printers ................................................................................... 110Managing Billing Codes .......................................................................... 112Managing Library Documents ................................................................. 113Managing Pager and SMS Services ......................................................... 115Managing Dialing Rules .......................................................................... 118Managing Prefix Tables ............................................................................ 120Customizing Cover Sheet Fields .............................................................. 121Synchronizing RightFAX with External Systems ..................................... 121
Chapter 10: Managing Usersand Groups ............................. 123
Managing Users ...................................................................................... 124Editing User Properties ............................................................................ 125Importing Users ....................................................................................... 142Managing Groups .................................................................................... 143Editing Group Properties .......................................................................... 144Using the ModUser Utility ...................................................................... 149
Chapter 11: Signatures, Forms andLibrary Documents ................ 155
Signatures ................................................................................................ 156Forms....................................................................................................... 157Library Documents .................................................................................. 161
Chapter 12: Printers and BillingCodes ....................................... 165
Managing Printers ................................................................................... 166Managing Billing Codes .......................................................................... 169Integrating ODBC Billing Codes .............................................................. 172

6 RightFAX Administrator's Guide
Chapter 13: LCR and Dialing PlanConfiguration .......................... 175
LCR Overview.......................................................................................... 176Creating and Editing Dialing Rules .......................................................... 176Prefix Tables............................................................................................. 186Testing Rules and Routes ........................................................................ 188Call Blocking............................................................................................ 191LCR Sample Scenarios............................................................................. 191
Chapter 14: Creating and UsingCover Sheets .......................... 197
Creating Cover Sheets ............................................................................. 198Switching Cover Sheets ........................................................................... 200Customizing Cover Sheet Required Fields ............................................... 201
Chapter 15: Generating Fax Reports ........ 203Installing Fax Reporter ............................................................................. 204Running Fax Reporter .............................................................................. 205Creating Data Sets ................................................................................... 205Generating a Fax Report ........................................................................... 207Creating Custom Reports ......................................................................... 208Data Set File Format ................................................................................. 210FaxDump.................................................................................................. 221
Chapter 16: Advanced ServerFeatures ................................... 231
Server-Side Application Conversion ....................................................... 232Starting and Stopping the Fax Server ....................................................... 238Scanner Integration .................................................................................. 239Standalone Fax Machine Connector ........................................................ 240Maintaining the RightFAX Database....................................................... 241Backing Up RightFAX and Data Files ...................................................... 243

Table of Contents 7
Appendix A: T roubleshooting .................... 245
Appendix B: Error and StatusMessages ............................... 257
Appendix C: Native Document FileFormats .................................. 267
Appendix D: Command LineReferences ............................. 271
Appendix E: Automatic InboundRouting ................................... 283
Index .............................................................. 297

8 RightFAX Administrator's Guide

Introduction to RightFAX
In this chapter:
• Welcome to RightFAX• How RightFAX Works• Using this Guide and Other Learning Tools• Technical Support

10 RightFAX Administrator's Guide
Welcome to RightFAX
Congratulations on your purchase of RightFAX fax server software. With thiscomprehensive network fax solution, you can create, send, receive, and managefaxes directly from your desktop computer, saving time, money, and manpower.RightFAX’s intuitive features and sleek design make faxing as easy and unobtrusiveto the end-user as printing to a network printer. Administrators will find that as anative NT service, RightFAX is easy to install, configure, and manage.
RightFAX offers five versions of its fax server software:
RightFAX Enterprise Suite
RightFAX Enterprise Suite is a fully integrated server based fax solution designedto meet the needs of larger national and global organizations. The Suite combinesthe industry's most comprehensive least cost routing, load balancing, and receivedfax technologies with: RightFAX E-mail Gateway, RightFAX Web Client, Right-FAX Docs on Demand, RightFAX TeleConnect, RightFAX OCR module, andRightFAX PDF/Postscript module.
RightFAX Enterprise
RightFAX Enterprise was developed for organizations that want their RightFAXservers to share faxes, workloads, and data. RightFAX Enterprise includes all thefeatures of our original NT-based fax server, plus the added benefits of intelligentleast cost routing (LCR), load balancing, and RightFAX Interconnect Inbound FaxRouting.
RightFAX NT
The RightFAX NT-based fax server was developed for organizations that wanttheir fax servers to work independently.
RightFAX Satellite
The RightFAX Satellite server is an enterprise fax server specifically designed forthe branch or satellite office within a large organization. The RightFAX Satelliteserver will meet all the faxing needs of your business unit while providing thebenefits of realtime connectivity to your corporate fax server(s) and other Satelliteservers, Intelligent Least Cost Routing, and seamless e-mail integration.
11Chapter 1: Introduction to RightFAX
RightFAX Small Business Server
The RightFAX Small Business Server is specifically designed to provide thefeatures and functionality of a high-end fax server, but scaled down for the smallbusiness. The RightFAX Small Business Server will meet all the faxing needs ofyour small business or office, allowing you to fax documents directly from yourcomputer desktop, integrate fax and e-mail, generate reports, and much more.
How RightFAX Works
The RightFAX system is composed of three main parts: the fax database andimages, the fax server services, and the client programs. Before configuringRightFAX for your particular network installation, you should understand thefunction of each component.
Fax Database and Images
The RightFAX database stores information about RightFAX system objects (suchas users, groups, and printers) and details about each fax in the system (such astime and date, number of pages, and destination). The database is stored in aproprietary file format and is not accessible using common database tools. You canaccess the database using the RightFAX API (Application Programming Interface),described in a separate document and via the Fax Reporter, included with Right-FAX.
Fax images are stored in compressed graphic image files (CCITT Group III format),one file for each fax page sent or received. A typical fax consumes 35K, thoughsome may be as large as 150K or as small as 5K per page. Fax images can beviewed, edited, and annotated using the RightFAX Fax Viewer. See the RightFAXUser’s Guide for more information.
Since fax images may consume a large amount of storage space, you should beready to dedicate at least 500 megabytes of storage. More space may be requireddepending on the number of faxes sent and received, and how frequently old faxesare deleted.
Fax Server Services
The RightFAX fax server consists of several services: RightFAX Server Module,RightFAX WorkServer Module(s), RightFAX RPC Server Module, RightFAXDatabase Module, RightFAX Queue Handler, RightFAX BoardServer Module andoptionally the E-mail Gateway Module. In most cases, all the modules run on thesame machine so that the Server Module can automatically start and stop theprograms as necessary. However, the RightFAX WorkServer Module can run on adifferent machine to redistribute a heavy workload.
RightFAX monitors theamount of free disk
space on the server andwill shut down certainprocessing elementswhen available disk
space falls below 50Mb.When sufficient diskspace is restored, faxprocessing continues
automatically.

12 RightFAX Administrator's Guide
RightFAX Server ModuleRightFAX Server Module manages the network print queues assigned to faxing,controls the conversion of outgoing faxes, and works with the BoardServer toschedule outgoing faxes and route incoming faxes.
RightFAX WorkServer Module(s)RightFAX WorkServer Module performs one or more functions on behalf of theRightFAX Server Module. It regularly asks the Database if its services have beenrequested; if they have, WorkServer executes its task and notifies the Databasewhen it finishes. You can run multiple copies of the WorkServer on your networkto handle processing-intensive tasks such as print-file conversions; for example,one WorkServer may convert PCL-5 print files into fax images, while anotherWorkServer handles automatic printing of incoming faxes at the same time.
RightFAX BoardServer ModuleThe RightFAX BoardServer Module acts as an interpreter between the fax board(s)and Server Module, handling requests to schedule outgoing faxes for transmissionand informing the Server Module when a new fax has been received and needs to beprocessed. The BoardServer must run on the computer containing the fax board(s)which is always the same computer on which the Server Module is executed.
RightFAX Database ModuleThe RightFAX Database Module is the fax database manager. It accesses the faxdatabase to provide client programs with the information used in fax transactions,including deleting, forwarding, creating, viewing, and printing faxes. For example,when a user wants to view a fax, the RightFAX Database Module providesinformation about the fax images to FaxUtil, which can then display the fax onscreen for the user.
RightFAX RPC ModuleThe RightFAX RPC Module acts an interpreter between the client software andthe fax database at the server.
RightFAX Queue HandlerThe RightFAX Queue Handler monitors the HPFAX print queue for inbound jobsand directs them to RightFAX for processing.
FaxUtil
FaxUtil is the primary RightFAX client interface. With FaxUtil, clients can view,print, and manage their faxes.

13Chapter 1: Introduction to RightFAX
Enterprise Fax Manager
Enterprise Fax Manager is the primary RightFAX administrator interface. WithEnterprise Fax Manager, the RightFAX administrator can manage users, groups,printers, least cost routing, and the general functions of the fax system.
FaxStat
The RightFAX FaxStat utility monitors the WorkServer, BoardServer, Database,and fax channel performance at the server. The utility (FAXSTAT.EXE) isavailable in Windows NT and Windows 95 versions located in separate directoriesin the \RIGHTFAX\FAXSTAT directory. You can select the fax server on yournetwork to which you wish to connect. Status information can be viewed for anyof the RightFAX modules and on NT workstations you can even change configura-tion remotely. Most configuration changes take effect without having to interruptfaxing operations. Fax board capabilities may be changed on-the-fly, allowing anadministrator to adjust the number of fax modems dedicated to inbound and/oroutbound faxing.
Using this Guide and Other Learning Tools
The RightFAX Administrator's Guide is designed for use by RightFAXadministrators who will be installing and configuring the RightFAX software onboth client and server machines. This Guide assumes you have knowledge of theWindows NT and Windows 95 operating systems as well as knowledge ofnetworking systems and you own organizations network.
In addition to this RightFAX Administrator's Guide, RightFAX provides severaladditional sources for information on getting the most out of your RightFAXsoftware:
RightFAX User's Guide
The RightFAX User's Guide is a reference for RightFAX users at every level ofexpertise. It is a comprehensive guide to all the features and functions of FaxUtil,RightFAX’s client interface.

14 RightFAX Administrator's Guide
RightFAX Optional Modules Guide
The RightFAX Optional Modules Guide is included when you purchase RightFAXEnterprise Suite or any one or more of the optional RightFAX modules (which canbe purchased separately). This guide provides information on installing, using,managing, and integrating the following utilities with your RightFAX software:
• RightFAX E-mail Gateway• RightFAX Web Client• RightFAX Docs on Demand• RightFAX TeleConnect• RightFAX Optical Character Recognition (OCR)• RightFAX PScript/PDF Conversion
Please contact RightFAX at (520) 320-7000 for more information on using orpurchasing these or any of RightFAX's powerful, fully integrated utilities.
RightFAX Fax Board Guide
The RightFAX Fax Board Guide provides installation, testing, and configurationinstructions for all supported fax hardware.
Quick Reference Card
Keep this card close to your computer for quick and easy access to all the mostcommon FaxUtil functions and features.
Online Help
RightFAX's Online Help is a convenient and easy-to-use source of assistance. Youcan access the Online Help by selecting the Help menu in any FaxUtil or Enter-prise Fax Manager window. Online help lets you scan for help by topic, or searchfor key words and terms.
RightFAX Training
Count on RightFAX's classroom training to enhance your RightFAX productknowledge. Technical, administrative, and user training programs provide you withthe tools to optimize your RightFAX solution, and provide you with the knowl-edge to fully utilize RightFAX in your environment. Customized training is alsoavailable to meet your organization's specific needs. Classes are held throughoutthe year at the RightFAX corporate office in Tucson, Arizona. You may alsochoose the convenience of RightFAX training at your own location. For moreinformation on RightFAX training classes and schedules, please visit our Web siteat www.rightfax.com.

15Chapter 1: Introduction to RightFAX
Technical Support
Your Customer Support Guide (enclosed in the product box) includes detailedinformation about the support options available to RightFAX customers. Pleasefill out the RightFAX Software Warranty & Registration Card and return itimmediately. If you have questions of a technical nature, please contact yourorganization’s RightFAX administrator or network administrator before calling ourtechnical support department.
RightFAX Technical Support Voice: (520) 320-70706303 E. Tanque Verde Fax: (520) 321-7461Suite 200 Web: www.rightfax.comTucson, AZ 85715 USA E-mail: [email protected]
5:00 a.m. to 6:00 p.m. MST, Monday through Friday6:00 a.m. to 6:00 p.m. MST, Saturday

16 RightFAX Administrator's Guide

Installation Overview
In this chapter:
• Planning the RightFAX Installation• Fax Server Requirements• Client Workstation Requirements• Fax Board Requirements• Phone Line Requirements
18 RightFAX Administrator's Guide
Planning the RightFAX Installation
It is important to plan and prepare for your RightFAX installation to avoidunnecessary delays. You must complete five major tasks before RightFAX will beready for operation:
1. Install the appropriate fax board(s) (refer to the RightFAX FaxBoard Guide)
2. Install the RightFAX server software (Chapter 3)
3. Configure the RightFAX server (Chapter 4)
4. Test the fax board(s) (refer to the RightFAX Fax Board Guide)
5. Set up users, groups, etc. in the RightFAX database using Enterprise FaxManager (Chapters 10-13)
Before you begin these tasks, ensure that your equipment meets the minimumrequirements for installation.
Fax Server Requirements
The RightFAX server is the machine that will run the fax server software. Thiscomputer will do the work required for sending and receiving faxes, includingmanaging the fax database, converting documents into fax images, adding signatures,overlaying forms, maintaining logs, printing faxes, and creating the fax cover sheet.
The computer designated as the RightFAX server must meet or exceed thefollowing specifications:
• Pentium 90 MHz processor (Pentium 200 MHz or faster is stronglyrecommended for optimal speed.)
• 64 Mb of RAM. Note that more RAM may be needed if the server will alsobe running other services such as SQL Server, SMS, Exchange, etc.
• 540 Mb hard drive or better. You may need more disk space depending on anumber of factors, such as how long you will allow users to keep old faxes inthe system. The RightFAX software itself requires about 150Mb of diskspace, but consider that each fax image (page) stored by RightFAX consumesan average of 35k. If disk storage space is a problem, encourage users todelete their faxes after reading or printing them.
• Display adapter and monitor. Windows NT requires a VGA or bettergraphics adapter.

19Chapter 2: Installation Overview
• Appropriate Network Interface Card. The RightFAX server must beconnected to your local area network via a network interface card. RightFAXwill work on most popular LAN topologies and is compatible with mostmanufacturer’s network interface cards. You may use any networkingprotocol supported by Microsoft Networking: NetBEUI, TCP/IP, or IPX/SPX.
• Windows NT Server version 4.0.
Client Workstation Requirements
Your RightFAX CD includes workstation software for Windows 3.1, Windows forWorkgroups, Windows NT, and Windows 95 platforms.
Windows 3.x & Windows for Workgroups
RightFAX clients will run on Windows 3.x, running in Standard or Enhanced modewith at least 4Mb of RAM. In order for the PowerBar to be automaticallyinstalled, a LaserJet III or LaserJet 4 driver must be installed on each machine.
Windows NT 4.0 Workstations
RightFAX clients will run on a Windows NT Workstation v4.0 or later with atleast 32Mb of memory. In order for the RightFAX print driver to be automaticallyinstalled, a LaserJet III driver must be installed on each machine.
Windows NT 3.51 Workstations
RightFAX clients are compatible with Windows NT 3.51 workstations. Theseclients can use Enterprise Fax Manager and FaxUtil just as Windows 95, and NT4.0 clients do. In order for the RightFAX print driver to be automatically installed,a LaserJet III or LaserJet 4 driver must be installed on each machine. The printdriver is not incorporated into the tray icon as it is in Windows NT 4.0 becauseNT 3.51 does not support tray icons. Instead, the Print-to-Fax Driver remainsminimized on the desktop, awaiting fax operations.
Windows 95
Windows 95 workstations must have either NetBEUI, IPX/SPX, or TCP/IPinstalled and must be bound to the Client for Microsoft Networks, possibly inaddition to a NetWare network. In order for the RightFAX print driver to beautomatically installed, a LaserJet III or LaserJet 4 driver must be installed on eachmachine.
The RightFAX PowerBaris not compatible with
32-bit Windows clients.The RightFAX print-to-fax driver is installed
instead.
Windows NT clientsmust be able to print to
a print queue (i.e.HPFAX) on the fax
server.

20 RightFAX Administrator's Guide
WARNING! You shouldnever plug an analog
phone line into a DID faxboard when there is anyvoltage present on thephone line. Doing sowill damage the faxboard and void all
warranties!
Fax Board Requirements
RightFAX supports Brooktrout and GammaLink fax boards. You must have atleast one fax board installed in the machine where the fax server software isrunning. See the RightFAX Fax Board Guide for a list of the latest supportedhardware.
Phone Line Requirements
RightFAX can use several types of phone lines: loop-start (regular phone lines, likethose used for the telephones in your home or for a modem connection), directinward dial (DID), Integrated Services Digital Network (ISDN), and several type ofdigital lines.
Loop-Start
Loop-start lines may be used for incoming or outgoing faxes. A line may beinstalled by the local telephone company if one is not already available throughyour organization’s existing phone system. Loop-start lines are also called POTS(plain old telephone service) lines and they are what you would use to hook upany normal fax machine or data modem.
Direct Inward Dial (DID)
DID is one method by which RightFAX is able to automatically route incomingfaxes to their intended destination within your company. Each DID phone line iscalled a trunk. When a DID trunk is installed, it is assigned a bank of numbers.For example, a DID trunk may be assigned the bank of 20 numbers ranging from321-7450 to 321-7469. Whenever someone dials a number within that range, theDID trunk is activated by the phone company. At that point, the fax board willrecognize the call and the phone company’s central office (CO) will tell the boardthe last three or four digits of the phone number dialed. The fax board acknowl-edges the digits and the call is connected as usual.
DID phone lines have a few special attributes. First, DID lines are used forincoming faxes only; outgoing faxes must be sent through a standard loop-start line.Second, the customer, rather than the phone company, supplies the power (calledthe talk battery) necessary to drive the phone line. For this reason, DID fax boardscome with an additional power adapter which provides the necessary -48 voltcurrent, i.e. the PC’s power supply is not used to supply the talk battery.
RightFAX uses the DID digits sent by the phone company to route the fax to theproper recipient. Each RightFAX user is assigned a personal fax mailbox which inturn, is assigned a DID number (also known as a routing code). When a call comesin with a valid DID number, the fax is placed in the corresponding user’s fax or e-mail mailbox.

21Chapter 2: Installation Overview
Dialed Number Identification Service (DNIS)
This service is the T-1 version of DID service. This manual does not address T-1fax board installation or phone line requirements. Instead, please refer to thehardware guide included with your fax board(s).
Integrated Services Digital Network (ISDN)
ISDN is a worldwide standard communications network for digital data, voice, andvideo communication. The advantages of using ISDN lines (as opposed to analogtelephone lines) for fax applications is fast call setup and use of Called PartyNumber (CPN) information for inbound fax routing.
PRI, BRI, E-1, and T-1 Digital Phone Lines
RightFAX supports the use of these types of digital phone lines assuming youhave purchased and installed the appropriate type of fax and network interfacecards. For more information on digital phone lines, please refer to the RightFAXFax Board Guide.

22 RightFAX Administrator's Guide
RightFAX Server Installation
In this chapter:
• Upgrading to RightFAX 6.0• Installing RightFAX Server Software

24 RightFAX Administrator's Guide
Upgrading to RightFAX 6.0
Before upgrading from any previous version of RightFAX, fully back up the entireRightFAX directory structure as well as your fax board directory (usually\RFBOARD). To get a complete backup of your RightFAX server software, youmust first stop all RightFAX services.
For the latest information on installing your upgrade, go tohttp://www.rightfax.com/60upgrade. This Web site contains detailed proceduresfor upgrading from your particular version of RightFAX. It also outlines all thelatest issues relating to the upgrade. Visit this site before continuing to ensure thatyour upgrade goes smoothly.
Installing RightFAX Server Software
Follow these steps to install your RightFAX server software.
1. The machine RightFAX will execute on must be running Windows NTServer v4.0 or later. Log on to the fax server using an ID with WindowsNT administrative access. If you fail to log on with Windows NTadministrative access, the installation and configuration ofRightFAX will not work.
2. Ensure that an HP LaserJet 4 printer driver is installed on the RightFAXserver. If not, install the driver by selecting Printers from the ControlPanel and running the Add Printers utility. When prompted for a printerport, select File. Use the default printer name and don't print a testpage. This step allows RightFAX to automatically create a print-to-faxqueue.
3. On the RightFAX server, insert the RightFAX CD. Run the RightFAXSetup program by selecting Run from the Start menu and type:
D:\SETUP (where D is the drive letter of your CD-ROM)
4. Enter your name, company name, and your product serial number whenprompted. Your product serial number is stamped on the inside of thefront cover of your Customer Support Guide (included in your Right-FAX product box).
5. When prompted to select an installation, choose the appropriate option:
• New install - Select this option to install a new RightFAX server.This option overwrites any existing installation of RightFAX.
• Upgrade a previous version of RightFAX - Select this option toinstall RightFAX, retaining the database from your previous version.
• Add component - Select this if you have already installed orupgraded the server and want to add an optional module. This willnot be available if the RightFAX server has not been installed.
The SAP Agent,NWLINK IPX/SPX, andGateway for NetWaremust be installed onyour RightFAX server
machine if you areinstalling on a Novell
network. File and PrintServices for NetWarecan be installed if youplan to connect DOS
clients.

25Chapter 3: RightFAX Server Installation
• Install a blank database - Select this option to overwrite yourexisting RightFAX database. The server must already be installedbefore this option is available. Important Note: Selecting thisoption will permanently delete all RightFAX data.
6. If you have purchased any RightFAX optional modules or an EnterpriseSuite server, you will be prompted to install these options. TheTeleConnect and Docs on Demand modules will not be an option, sincethey are installed automatically. These modules will remain disabled untilyou purchase a license and call for a bump code.
7. Select the manufacturer, and specifications of the installed fax board(s).This step configures one or more of a single type of fax board. If youhave more than one type of fax board installed in your server (i.e.,Brooktrout and GammaLink, or PCI and ISA bus), you must configurethe remaining boards after installation using the BoardServer ControlPanel applet (described in Chapter 6: Configuring the BoardServer).
8. If you are installing the E-mail Gateway, select the type of gateway toinstall. You must purchase and license each gateway separately if yourun more than one.
9. If you are installing the OCR and/or PScript/PDF modules, select theWorkServer(s) that should execute the process. This can be reconfiguredlater, if desired (described in Chapter 5: Configuring the WorkServers).
10. When you confirm that you have entered all the setup informationcorrectly, the Setup program will install the necessary files and promptyou for any additional diskettes as needed.
11. Select the Service Account RightFAX Services will use to startup. Ifyou will be storing files to, accessing files from, or printing to Novellqueues on a NetWare volume, the Service Account must exist in Novell asan account.
12. Once the software is installed, reboot the server. Share the \RIGHTFAXdirectory by entering the following command at a DOS commandprompt:
NET SHARE RIGHTFAX=C:\RIGHTFAX(where C: is the drive where you installed the server software.)
13. On Novell networks, the \RIGHTFAX\CLIENT directory may need tobe manually copied to a NetWare server volume.
Setup created several new Control Panel applets: RightFAX WorkServer, Right-FAX FaxServer, RightFAX BoardServer, and (optionally) an E-mail Gateway.Using these applets you can change your server configuration without having toreinstall the software.

26 RightFAX Administrator's Guide

Configuring the RightFAX FaxServer
In this chapter:
• The RightFAX Fax Server Module• General Tab• Advanced Tab• Channel Authorization Tab• Custom Messages Tab• The Fax Server Internal Event Queue

28 RightFAX Administrator's Guide
The RightFAX Fax Server Module
The RightFAX Server Module manages the network print queues assigned tofaxing, controls the conversion of outgoing faxes, and works with the RightFAXBoardServer Module to schedule outgoing faxes and route incoming faxes.
To configure the RightFAX Server Module, select the RightFAX Server applet inthe Control Panel:
General Tab
Enable CSID RoutingAutomatic inbound routing through CSID (caller subscriber identification) can beenabled by checking this field.
For CSID routing to work, you must create a CSID Routing Table that listsRightFAX users and the CSID's to be routed to them. This must be an ASCII filecalled CSID.TBL located in the \RIGHTFAX\BIN directory. To create this tablego to a command prompt on the RightFAX server and type:
EDIT C:\RIGHTFAX\BIN\CSID.TBL [Enter]
For each entry, type a separate line consisting of the RightFAX user's routing code,a space, and the exact CSID to be assigned to that routing code. For example:
8847 520-322-88618858 ACME
A À symbol appearsnext to configuration
parameters that can bechanged on-the-fly,
without stopping andrestarting the services.
To configure theRightFAX Server
Module, select theRightFAX Server applet
in the Control Panel

29Chapter 4: Configuring the RightFAX Server
where 8847 and 8858 are the routing codes of the RightFAX users to receive thefaxes and 520-322-8861 and ACME are the respective CSID's to be routed tothem.
Enable Quick HeadersNormally, the TTI Line (at the top of all pages) is a single line on which the date,time, page number, total pages, and Fax ID are placed. By checking this parameter,a second line is attached to the TTI Line. The second line, called the Quick-Header, is customizable in the Format parameter in the BoardServer ControlPanel. If Quick-Headers are enabled, they apply to all faxes sent and to all phonelines.
Create New User when Printing to the Fax Queue ÀÀÀÀÀ
If this option is checked, network users who print to the fax queue, but don’t haveRightFAX user ID’s, will automatically have a RightFAX user ID created.RightFAX uses the DEFAULT user as a template when creating new users. If thisoption is not checked, user ID’s will not be automatically added.
Event LogLevel ÀÀÀÀÀThis parameter specifies the level of information logged in the ApplicationEventLog, under the Service name RightFAX Server Module. A value of Tersewill cause the RightFAX Server Module to record only critical errors, while theVerbose setting will record significant amounts of information which may helptrack down problems. Do not leave this value set to Verbose for any length oftime, as the EventLog can fill quite quickly.
Record DNIS Information ÀÀÀÀÀDNIS information is special coded data that may be being delivered to your phonesystem with all incoming calls. This is a service provided by your phone com-pany. RightFAX fax records do not include a field dedicated to storing this DNISinformation. However, you can still save DNIS information in one of three existingfields:
Select Fax DID number to save DNIS information where the originating phonenumber is saved. Select Billing code 1 to save DNIS information in the fax’sBilling Code 1 field. Select Billing code 2 to save DNIS information in the fax’sBilling Code 2 field. Select Don’t record to discard any included DNIS informa-tion
Note: Because it overwrites any data in the location you specify, DNIS informa-tion should be saved to a filed usually unused by your RightFAX system.
Information written to theApplication EventLog is
valuable in trackingdown problems. If youhave a problem whichyou can duplicate, you
should set the LogLevelfor all RightFAX serverprograms to Verbose,
and then go through thesteps to duplicate theproblem. The data
stored in the Applicationlog may help you solve
the problem yourself. Ifthe answer is not
obvious, the EventLogwill help RightFAX
Technical Support solvethe problem.

30 RightFAX Administrator's Guide
Delay All Faxes Until ÀÀÀÀÀThis parameter specifies a time to which all faxes sent by non-administrative userswill be delayed. Range for this parameter is 12:00 AM through11:30 PM. Forced delays may also be set up through RightFAX groups. For moreinformation on groups, see Chapter 10, Managing Users and Groups.
Notification Settings ÀÀÀÀÀ
Allow NotificationCheck this option to allow notification of fax messages to RightFAX clients. Ifthis is checked ON then the clients will receive notification based on their indi-vidual FaxUtil specifications. If this parameter is not enabled, then users will neverreceive notifications. If the server is primarily used for broadcast faxing, thenAllow Notification should be disabled.
Admin ONCE OnlyIf this option is checked, the group administrator and alternate administrator arenotified once only of users unviewed faxes.
User Notify TimeThis setting specifies the length of time, in minutes, the server will attempt tonotify a user of an unviewed fax before it will attempt to notify the user's groupadministrator.
Admin Notify TimeThis setting specifies the length of time, in minutes, the server will notify a user'sgroup administrator alternate group administrator of unviewed faxes.
Retry Settings ÀÀÀÀÀ
CountThis setting specifies the number of times (including the first attempt) an outgoingfax transmission will be attempted after it encounters a non-fatal error (i.e. a busysignal).
IntervalThis setting specifies the minimum time delay (in minutes) before a failed faxtransmission will be rescheduled.
31Chapter 4: Configuring the RightFAX Server
Note: RightFAX displays the code "ER" (error-retry) in the status column ofFaxUtil when a fax transmission is unsuccessful. If the fax is still unsuccessfulafter the specified number of retries, then it will be saved in the sender’s faxmailbox with the status message: “ED:Fax Number Busy,” where the “ED” standsfor “Error, Transmission Dropped.” In this case, the user can force RightFAX totry sending the fax one more time by highlighting the fax in the window andselecting Kick from the File menu. You may kick a fax as many times as you like.Alternately, the user can send the fax again as if it were newly created by executingthe Forward to Fax Machine command. This will create a new fax record for thesame fax.
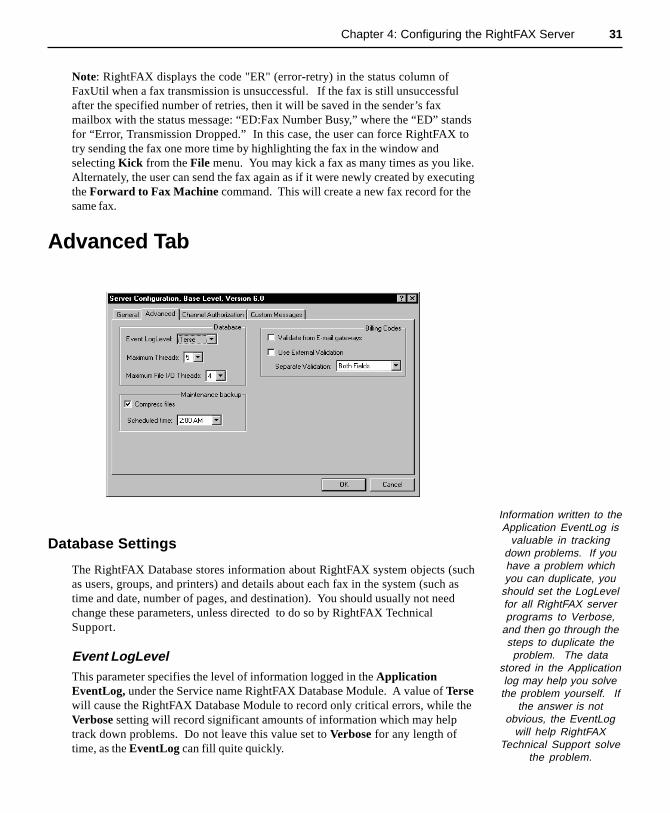
Advanced Tab
Database Settings
The RightFAX Database stores information about RightFAX system objects (suchas users, groups, and printers) and details about each fax in the system (such astime and date, number of pages, and destination). You should usually not needchange these parameters, unless directed to do so by RightFAX TechnicalSupport.
Event LogLevelThis parameter specifies the level of information logged in the ApplicationEventLog, under the Service name RightFAX Database Module. A value of Tersewill cause the RightFAX Database Module to record only critical errors, while theVerbose setting will record significant amounts of information which may helptrack down problems. Do not leave this value set to Verbose for any length oftime, as the EventLog can fill quite quickly.
Information written to theApplication EventLog is
valuable in trackingdown problems. If youhave a problem whichyou can duplicate, you
should set the LogLevelfor all RightFAX serverprograms to Verbose,
and then go through thesteps to duplicate theproblem. The data
stored in the Applicationlog may help you solve
the problem yourself. Ifthe answer is not
obvious, the EventLogwill help RightFAX
Technical Support solvethe problem.
32 RightFAX Administrator's Guide
Maximum ThreadsThe RightFAX Database Module can respond to database requests from multipleclients and multiple protocols at the same time. The degree to which this can beaccomplished depends on the number of database I/O threads devoted to servicingthese client requests. Because each thread uses resources (file handles, CPU timeand memory) you should never increase the number of threads to more than 10. Ifa database request occurs when all the threads are busy, that request will wait inline to be serviced, incurring a slight delay which should not be noticeable to theclient. If a client has to wait too long for a response, it may time-out and return anerror to the user.
Maximum File I/O ThreadsThe RightFAX Database Module can respond to file I/O requests from multipleclients and multiple protocols at the same time. The degree to which this can beaccomplished depends on the number of file I/O threads devoted to servicing theseclient requests. Because each thread uses resources (file handles, CPU time andmemory), you should never increase the number of threads so as to thoroughlydeplete the machine’s resources. If a file I/O request occurs when all the threadsare busy, that request will wait in line to be serviced, incurring a slight delay whichshould not be noticeable to the client. If a client has to wait too long for aresponse, it may time-out and return an error.
Maintenance Backup ÀÀÀÀÀ
Compress FilesIf this option is checked, all files automatically backed up during RightFAXmaintenance will be compressed to save storage space. For this compression towork, the \RIGHTFAX\DATABASE directory must located on an NTFS volume.
Scheduled TimeThis field lets you set a time at which the server can do daily maintenance, forexample, file backup, fax aging, purging, etc. The default is 2:00 a.m. If the serveris frequently busy at 2:00 a.m., then adjust the setting to a more appropriate time.See Chapter 16 for more information on RightFAX maintenance.
Validating Billing Codes Settings ÀÀÀÀÀ
Validate from E-mail Gateways If this option is checked, billing codes added to fax-bound e-mail messages will bevalidated by RightFAX. If the code(s) cannot be validated, the fax will not sendand the user will receive notification that the fax did not send to invalid billingcodes. If this option is not checked, billing codes may be added to fax-bound e-mail messages, but will not be validated prior to sending.
33Chapter 4: Configuring the RightFAX Server
Use External ValidationIf this option is checked, RightFAX will use of an auxiliary program to verifybilling codes on outbound faxes. This gives the user the ability to validate faxesbased on several different criteria, i.e. not just Billing Code #1 and Billing Code #2.To work, a program must be written with the RightFAX API to do the verificationof billing codes.
Separate ValidationThis setting lets you customize the way in which required billing codes arevalidated against the RightFAX database. Both Fields means that both billing codefields must contain valid codes. Field 1 or Field 2 means that either one of thefields must contain a valid code, but not necessarily both. Field 1 Only meansthat only field #1 must contain a valid code. Field 2 Only means that only field#2 must contain a valid code.
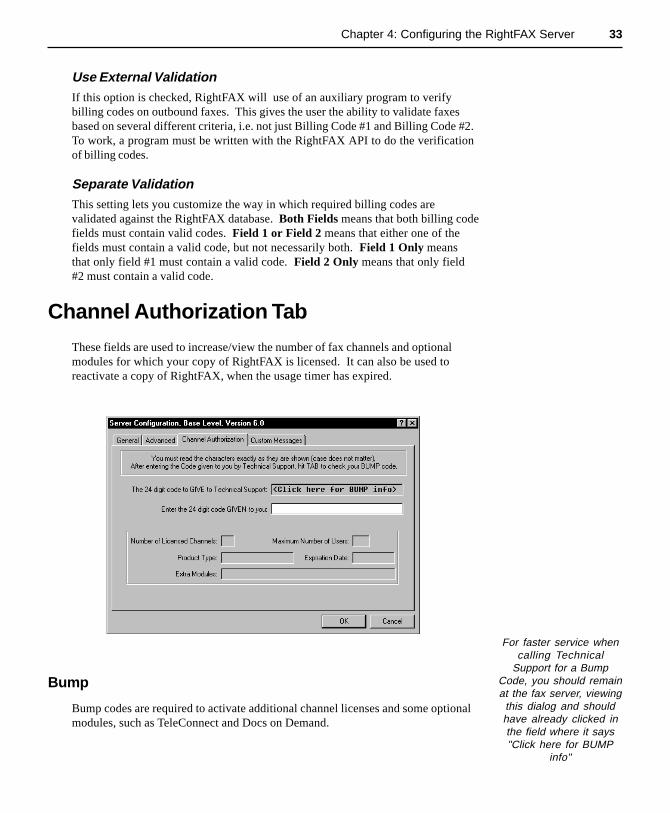
Channel Authorization Tab
These fields are used to increase/view the number of fax channels and optionalmodules for which your copy of RightFAX is licensed. It can also be used toreactivate a copy of RightFAX, when the usage timer has expired.
Bump
Bump codes are required to activate additional channel licenses and some optionalmodules, such as TeleConnect and Docs on Demand.
For faster service whencalling Technical
Support for a BumpCode, you should remainat the fax server, viewing
this dialog and shouldhave already clicked inthe field where it says"Click here for BUMP
info"
34 RightFAX Administrator's Guide
You must call RightFAX Technical Support for your bump code. Please have yourserial numbers for the fax server, channel upgrades, or optional modules available,as they will be requested by Technical Support personnel. You will enter the codegiven to you by RightFAX Technical Support here.
Important! Please have the following information available when calling TechSupport: serial number of the RightFAX server; serial number of each additionalchannel purchased; name of the vendor from which the software was purchased (ifapplicable); 24-digit bump code. Please call while you are at the server with theabove dialog on screen.
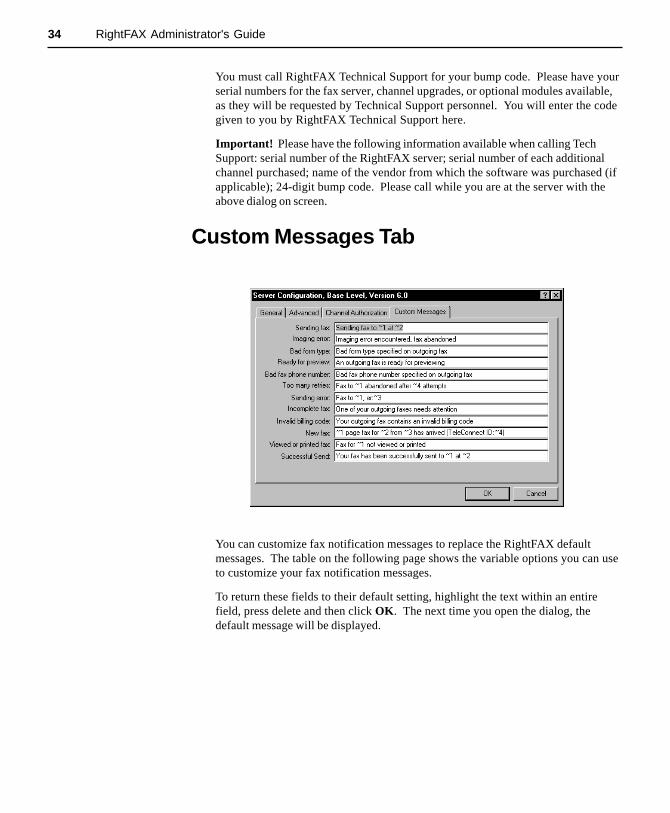
Custom Messages Tab
You can customize fax notification messages to replace the RightFAX defaultmessages. The table on the following page shows the variable options you can useto customize your fax notification messages.
To return these fields to their default setting, highlight the text within an entirefield, press delete and then click OK . The next time you open the dialog, thedefault message will be displayed.

35Chapter 4: Configuring the RightFAX Server
Fax Status Message Variable Options When Used
Sending fax~1- recipient name~2 - recipient fax number~3 - user ID
Fax starts to send or is stillsending after a few minutes.
Imaging Error~1 - user ID Unable to produce image.
Bad form type ~1 - user IDBad form type specified onoutgoing fax.
Ready for preview
~1 - user ID~2 - recipient name~3 - recipient fax number~4 - billing code 1~5 - billing code 2
Fax was held for preview andis now ready.
Bad phone fax number ~! - user IDPhone number contains aninvalid character.
Too many retries
~1 - recipient name~2 - recipient fax number~3 - fax error code~4 - number of retries~5 - user ID
Fax abandoned after specifiednumber of retries.
Sending error
~1 - recipient name~2 - recipient fax number~3 - fax error code~4 - number of retries~5 - user ID
Unable to send fax.
Incomplete fax ~1- user IDUser did not provide allrequired fields.
Invalid billing code~1 - user ID~2 - billing code 1~3 - billing code 2
User did not provide a correctbilling code.
New fax~1 - number of pages received~2 - user ID~3 - received remote ID
New fax received.
Viewed or printed fax ~1 - user IDUser has not viewed or printedfax yet.
Successful Send~1 - recipient name~2 - recipient fax name
Fax transmission successful.
36 RightFAX Administrator's Guide
The Fax Server Internal Event Queue
The Fax Server Module queues and monitors each of its internal processes. Thestatus of this Event Queue is measured as a percentage of queue resources that areoccupied with Fax Server Module functions (such as sending and routing faxes).
The Fax Server Event Queue measures of the fax traffic volume to server resourcesratio. The higher your traffic volume, the higher this number will be. The EventQueue status is displayed in Enterprise Fax Manager when you open and select theRightFAX server.
When the Fax Server Event Queue reaches 90%, the fax server will automaticallysuspend certain functions. At 90%, all new outbound and inbound faxes will beheld (temporarily set aside) while the server processes its existing workload. Oncethe Event Queue falls to 75%, these held faxes will be immediately processed alongwith all new fax traffic.
This internal workload regulation is all handled automatically by the Fax ServerModule and cannot be overridden. If your fax server is consistently reaching the90% capacity level, you should consider upgrading your fax server's systemresources and/or fax channels.

Configuring the WorkServers
In this chapter:
• RightFAX WorkServer Module• Printer Configuration• Xerox Configuration• Kofax NetScan Configuration• HP NetScan Configuration• PeopleSoft Configuration• OCR Configuration

38 RightFAX Administrator's Guide
RightFAX WorkServer Module
The RightFAX WorkServer Module performs one or more functions on behalf ofthe RightFAX Server Module. It regularly asks the Database Module if there arejobs to be serviced. If there are, the WorkServer executes the tasks and notifies theDatabase when it has finished. Multiple WorkServers can be run on the fax serverto handle processor-intensive tasks such as PCL5 conversions. Each WorkServer isconfigured separately through the RightFAX WorkServer Control Panel applet.
Add/Delete WorkServerThe RightFAX WorkServer Module Service polls the RightFAX Database Modulefor requests for conversions, print jobs, form overlays, etc. The default installationof RightFAX installs three WorkServers locally. Two WorkServers are devoted tothe most common services (except for network messaging) and one is devotedsolely to network messaging and deleting image files. This default setup is optimalfor most configurations.
Changing this default may by necessary for some configurations. For example, ifthe server will only be used for broadcasting, WorkServer3 can be configured to doPCL5 conversions, as network notifications will not be necessary.
Common reasons for adding more WorkServers:
• If running OCR, either for routing or conversion purposes, you may want tohave a separate WorkServer dedicated to performing these services.
A À symbol appearsnext to configuration
parameters that can bechanged on-the-fly,
without stopping andrestarting the services.
To configure theRightFAX WorkServer
Module, select theRightFAX WorkServerapplet in the Control
Panel

39Chapter 5: Configuring the WorkServers
• If the majority of your conversions are POSTSCRIPT, it is recommended thatyou dedicate at least one RightFAX WorkServer Module for this operation.
• If you do a great deal of fax printing, it is recommended that you have at leastone RightFAX WorkServer Module Services to solely execute this operation.
Remote WorkServer ServiceThis option tells RightFAX that this WorkServer Service will be executing onanother NT machine on the network for additional processing power. This can beset for each WorkServer. If you check this box, then the Service will not beautomatically started by the RightFAX Server Module Service.
Use PCL Converters for Text FilesCheck this option to use RightFAX's PCL conversion engine when converting PCLfiles and ASCII text files to fax format. This conversion engine usually producesmore accurate fax images of PCL and ASCII text files than RightFAX's nativedocument conversion engines. If you notice that PCL and/or ASCII text files arenot converting to fax format as accurately as you expect, uncheck this option toreturn to using RightFAX's native document conversion engines.
Services ÀÀÀÀÀTo specify which Services the RightFAX WorkServer Module Service shouldperform, use the following keywords:
Keyword Service
ARCHIVE Archiving of sent faxes
COVERSHEETS Creating cover sheets
CVL Handles faxes with multiple LIBDOC orLIBDOC2 codes and faxes with ADDDOCcodes
FILEROUTE Routing of received faxes to network directories
OVERLAY Overlaying faxes with forms
PCL5 PCL5 to fax conversion
POSTSCRIPT PostScript to fax conversion (requires optionalPostScript engine)
PRINT Servicing fax printing requests for both on-demand and automatic fax printing
NETWORK MESSAGING Servicing network broadcast notifications
DELETE IMAGE FILES Deletion of fax image files
INTERCONNECT Routing of received faxes to another RightFAXserver
OCR Optical Character Recognition (requires optionalOCR module)

40 RightFAX Administrator's Guide
Note: If you want to run multiple RightFAX WorkServer Module Services tohandle different tasks, use the Add WorkServer button in the RightFAX Work-Server applet. Select the new RightFAX WorkServer Module Service, and choosethe desired Services.
Event LogLevel ÀÀÀÀÀThis parameter specifies the level of information logged in the ApplicationEventLog, under the Service name RightFAX WorkServer Module. A value ofTerse will cause the RightFAX WorkServer Module to record only critical errors,while the Verbose setting will record significant amounts of information whichmay help track down problems.
Frequency ÀÀÀÀÀThis indicates how often the WorkServer Module should query RightFAXDatabase Module for any new requests. This value is specified in seconds. If youonly have one RightFAX WorkServer Module, 5 or 10 seconds is appropriate. Ifyou have multiple RightFAX WorkServer Modules, then a larger frequency (suchas 15) prevents request storms from burdening RightFAX Database Module (youdon’t want RightFAX WorkServer Modules to keep RightFAX Database Moduleso busy that clients cannot get serviced in a timely manner).
Billing Code Import Interval ÀÀÀÀÀThe Billing Code Import Interval , in minutes, is the interval at which RightFAXWorkServer Module Service should check for a new billing code delta file. A valueof 15 is a reasonable value for the interval billing code delta file. At every interval,RightFAX WorkServer Module Service checks for the file, CODECHG.CSV, in itsown directory. If the file exists, RightFAX WorkServer Module Service proceedsto import the adds, changes, and deletions named in the file. See the RightFAXUser's Guide for more information on creating billing code import files.
Telephony Server Routing
Enable Telephony Server RoutingRightFAX integrates with AVT’s CallXpress Voice Response Systems. If you havepurchased this system and wish to integrate the two products, check this box on.Please refer to AVT’s special RightFAX integration documentation forcustomization information.
ServerSpecify the name of the CallXpress server on your network with which you wishto integrate RightFAX.
ProtocolSelect the protocol with which you wish to communicate between the RightFAXand CallXpress servers.
Information written to theApplication EventLog is
valuable in trackingdown problems. If youhave a problem whichyou can duplicate, you
should set the LogLevelfor all RightFAX serverprograms to Verbose,
and then go through thesteps to duplicate theproblem. The data
stored in the Applicationlog may help you solve
the problem yourself. Ifthe answer is not
obvious, the EventLogwill help RightFAX
Technical Support solvethe problem.

41Chapter 5: Configuring the WorkServers
Interconnect Retry Settings
(Requires RightFAX Enterprise)
RightFAX Interconnect allows faxes received on one RightFAX Enterprise serverto be automatically routed through the network to a fax box of the same name on adifferent RightFAX Enterprise server.
CountThe Count option specifies the number of times routing a received fax will beretried when it encounters a non-fatal error (e.g. a busy signal).
IntervalThe Interval option gives the minimum time delay (in minutes) before a failed faxrouting event will be rescheduled.
Optimize Faxing ÀÀÀÀÀ
Short CoversIf this parameter is checked ON, then the fax cover sheet will be only as long as thetext requires. Sending short cover sheets can reduce transmission times. This mayproduce a partial page on some fax machines. If this parameter is unchecked, thencover sheets will be padded to fill out the entire page.
Short BodiesIf this parameter is checked ON, then the fax body pages will only be as long as thetext requires. Otherwise, the fax body pages will be padded out to the page size asset by the PCL-5 control codes and the PCL-5 configuration. Sending short pagescan reduce transmission times.
Archive Settings
Format ÀÀÀÀÀWhen archiving faxes to disk, files are normally stored in a multi-paged TIFF-G3format with Group III data compression. If a sent fax has a cover sheet, it will bearchived as well. The Format option allows the default format of TIFF-G3 to bechanged to PCX or DCX.
History ÀÀÀÀÀThis parameter automatically archives the transmission history of the sent faxusing the above archive path and format. RightFAX creates a file with the sameformat as Path and the extension .TRX; i.e. 21494.trx for a fax sent on 2/14/94.

42 RightFAX Administrator's Guide
Path ÀÀÀÀÀBy including this option, sent faxes will be archived to a specific path on the harddrive of the fax server or an any network drive. RightFAX WorkServer Modulewill create the path if it doesn’t already exist. Further, the Path can be composedof “macros” that will be replaced. A list of the possible macros follows:
~1= Date in the format YYYYMMDD~2= Day of the week (SUN, MON, TUE, WED, THU, FRI, SAT)~3= Month (JAN, FEB, MAR, APR, MAY, JUN, JUL, AUG, SEP,
OCT, NOV, DEC)~4= Year (YYYY)~5= Day of the month (DD)~6= Month as decimal (01, 02 ... 12)~7= User ID (truncated to 11 characters, i.e. 8.3 FAT format)~8= Week of year (00..51)~9= Bill Code #1 (truncated to 11 characters, i.e. 8.3 FAT format)~0= Bill Code #2 (truncated to 11 characters, i.e. 8.3 FAT format)~A= Remote ID (Left to Right in 8.3 FAT format)~B= Remote ID (Right to Left in 8.3 FAT format)
The file name is a unique name assigned by the fax server and cannot be changed.The total path length, after macro replacement, cannot exceed 128 characters. Eachuser account has an Archive Sent Faxes flag which needs to be enabled usingEnterprise Fax Manager in order for this feature to take effect.
F.Index ÀÀÀÀÀIf present, all fax image-saving from Archive operations will be logged in the file.Output will be standard comma -separated values (CSV) format.
If a third-party application will be accessing the index file, it should open the file inshared mode, denying write access, though it should not keep the file open for morethan 10 to 20 seconds. A better method is to rename the index file and then accessthe file by the new name, avoiding concurrent access. The file is comma-delimitedASCII with the following fields:
Specify the Path in UNCformat.

43Chapter 5: Configuring the WorkServers
Field Type Max Notes
Owner_ID String 21
To_FaxNum String 31
To_ContactNum String 31
To_Name String 59
To_Company String 59
To_CityState String 59
From_Name String 59
From_PhoneNum String 31
Billinfo1 String 15
Billinfo2 String 15
FaxDIDNum String 31
OperatorNum String 31
RemoteID String 21
GeneralFaxNum String 31
Send_Time Integer Total time on fax board, in seconds
Fax_Status Integer
Fax_Termstat Integer
NumPages Integer Includes optional cover sheet if any
FineMode Integer0=normal1=fine
Received Integer0=sent1=received
FaxDate String 10Date fax record last modified(mm/dd/yyyy)
FaxTime String 5Time fax record last modified(hh:mm)
Archived_Name String 256File name under which the imagewas archived
NewLine(CR-LF combination recordseparator)
44 RightFAX Administrator's Guide
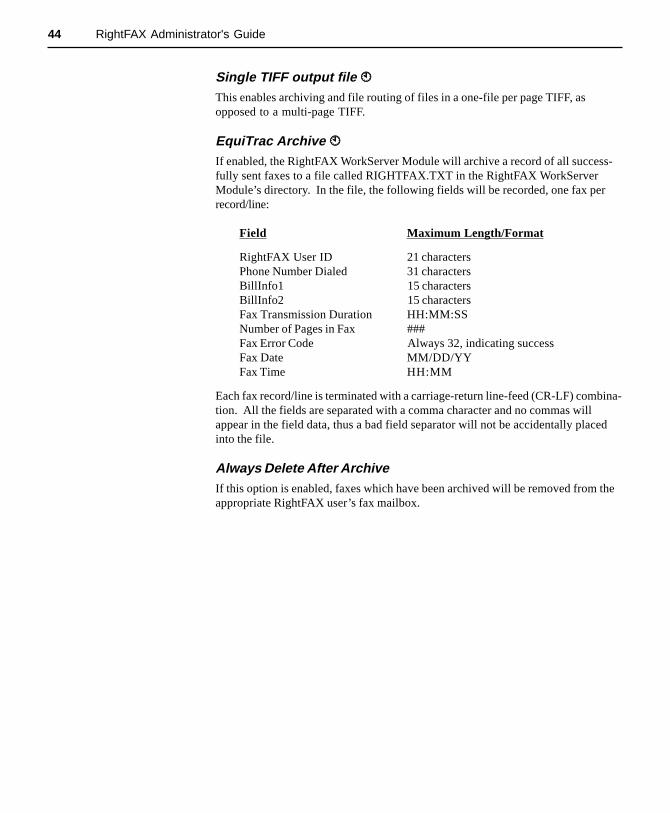
Single TIFF output file ÀÀÀÀÀThis enables archiving and file routing of files in a one-file per page TIFF, asopposed to a multi-page TIFF.
EquiTrac Archive ÀÀÀÀÀIf enabled, the RightFAX WorkServer Module will archive a record of all success-fully sent faxes to a file called RIGHTFAX.TXT in the RightFAX WorkServerModule’s directory. In the file, the following fields will be recorded, one fax perrecord/line:
Field Maximum Length/Format
RightFAX User ID 21 charactersPhone Number Dialed 31 charactersBillInfo1 15 charactersBillInfo2 15 charactersFax Transmission Duration HH:MM:SSNumber of Pages in Fax ###Fax Error Code Always 32, indicating successFax Date MM/DD/YYFax Time HH:MM
Each fax record/line is terminated with a carriage-return line-feed (CR-LF) combina-tion. All the fields are separated with a comma character and no commas willappear in the field data, thus a bad field separator will not be accidentally placedinto the file.
Always Delete After ArchiveIf this option is enabled, faxes which have been archived will be removed from theappropriate RightFAX user’s fax mailbox.

45Chapter 5: Configuring the WorkServers
Select Service Account
The RightFAX WorkServers and E-mail Gateway(s) require Service Accountaccess. The Service Account was initially selected during setup. You can edit thisoption through the RightFAX WorkServer Control Panel applet by clicking on theSelect Service Account button.
The Service Account is the user account the RightFAX E-mail Gateway(s) andWorkServer Services use to log in. If you will be storing or accessing files on aNetWare volume, you must make sure the Service account exists as an accountwithin Novell. Also remember that passwords are case sensitive.
Note: If you change the Service Account after installation, the fax server will bestopped automatically.
46 RightFAX Administrator's Guide
Printer Configuration
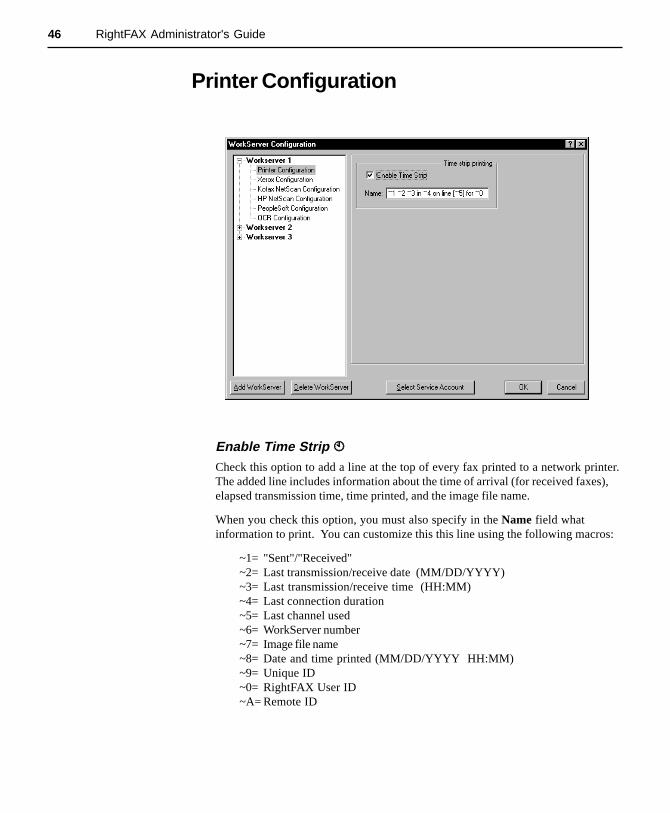
Enable Time Strip ÀÀÀÀÀCheck this option to add a line at the top of every fax printed to a network printer.The added line includes information about the time of arrival (for received faxes),elapsed transmission time, time printed, and the image file name.
When you check this option, you must also specify in the Name field whatinformation to print. You can customize this this line using the following macros:
~1= "Sent"/"Received"~2= Last transmission/receive date (MM/DD/YYYY)~3= Last transmission/receive time (HH:MM)~4= Last connection duration~5= Last channel used~6= WorkServer number~7= Image file name~8= Date and time printed (MM/DD/YYYY HH:MM)~9= Unique ID~0= RightFAX User ID~A= Remote ID

47Chapter 5: Configuring the WorkServers
Xerox Configuration
Enable Xerox DCS InterfaceToggling this check box enables integration with a Xerox DCS machine.
Default address name on cover sheetBecause the Xerox DCS provides no way to input recipient names for a fax coversheet, you should enter the generic information you wish to appear on the coversheet of all faxes sent from the Xerox DCS.
Location of Xerox template filesSpecify the UNC name where the Xerox DCS template files are located. You canlist a maximum of 32 directories.
48 RightFAX Administrator's Guide
Kofax NetScan Configuration
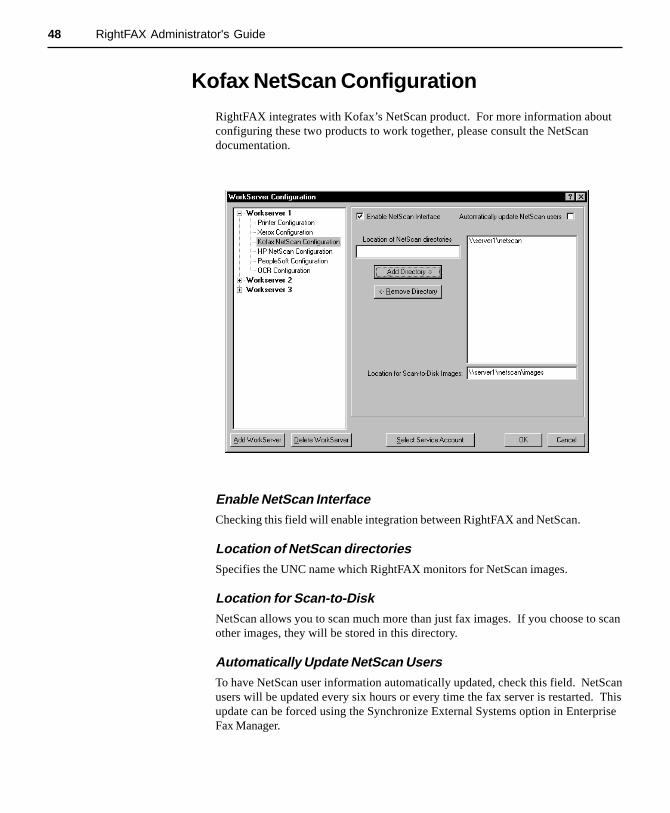
RightFAX integrates with Kofax’s NetScan product. For more information aboutconfiguring these two products to work together, please consult the NetScandocumentation.
Enable NetScan InterfaceChecking this field will enable integration between RightFAX and NetScan.
Location of NetScan directoriesSpecifies the UNC name which RightFAX monitors for NetScan images.
Location for Scan-to-DiskNetScan allows you to scan much more than just fax images. If you choose to scanother images, they will be stored in this directory.
Automatically Update NetScan UsersTo have NetScan user information automatically updated, check this field. NetScanusers will be updated every six hours or every time the fax server is restarted. Thisupdate can be forced using the Synchronize External Systems option in EnterpriseFax Manager.
49Chapter 5: Configuring the WorkServers
HP NetScan Configuration
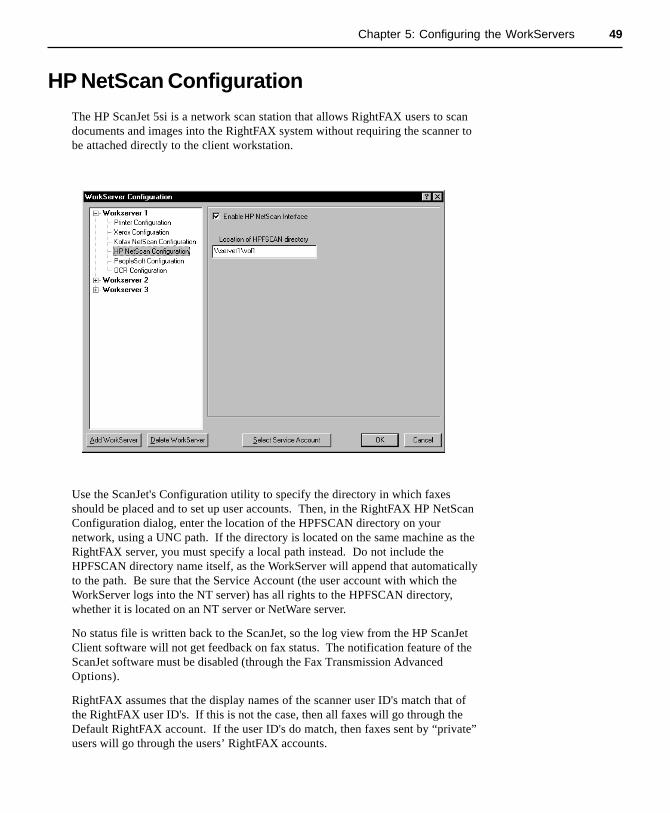
The HP ScanJet 5si is a network scan station that allows RightFAX users to scandocuments and images into the RightFAX system without requiring the scanner tobe attached directly to the client workstation.
Use the ScanJet's Configuration utility to specify the directory in which faxesshould be placed and to set up user accounts. Then, in the RightFAX HP NetScanConfiguration dialog, enter the location of the HPFSCAN directory on yournetwork, using a UNC path. If the directory is located on the same machine as theRightFAX server, you must specify a local path instead. Do not include theHPFSCAN directory name itself, as the WorkServer will append that automaticallyto the path. Be sure that the Service Account (the user account with which theWorkServer logs into the NT server) has all rights to the HPFSCAN directory,whether it is located on an NT server or NetWare server.
No status file is written back to the ScanJet, so the log view from the HP ScanJetClient software will not get feedback on fax status. The notification feature of theScanJet software must be disabled (through the Fax Transmission AdvancedOptions).
RightFAX assumes that the display names of the scanner user ID's match that ofthe RightFAX user ID's. If this is not the case, then all faxes will go through theDefault RightFAX account. If the user ID's do match, then faxes sent by “private”users will go through the users’ RightFAX accounts.
50 RightFAX Administrator's Guide
While the ScanJet allows a bill-back code to be entered for pre-programmed faxdestinations, RightFAX supports more than one billing code. If an HP pre-programmed fax destination is used where the destination includes a bill-back code,the code will be entered in the RightFAX billing code #1 field.
The HP ScanJet control panel does not allow billing codes to be entered for ad-hock fax destinations, so RightFAX has created an extended phone number formatto support billing codes: phone*billinfo1*billinfo2 and phone*billinfo1 where phoneis the fax number and billinfo1 and billinfo2 are possible billing codes. The asteriskis one of the few non-numeric keys on the LCD control panel, so it is used toseparate the fax number from the billing codes.
When configuring file format options, be sure to specify faxes as TIFF-G4 as it isthe only format supported. In addition, note that the following ScanJet options arenot used by RightFAX: ECM, Maximum Transmission Speed and SuperfineResolution.
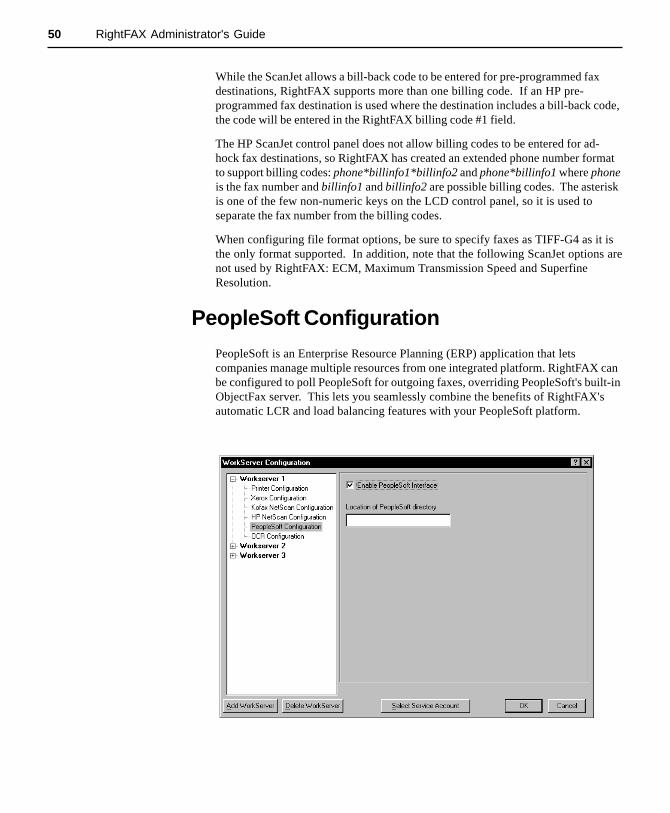
PeopleSoft Configuration
PeopleSoft is an Enterprise Resource Planning (ERP) application that letscompanies manage multiple resources from one integrated platform. RightFAX canbe configured to poll PeopleSoft for outgoing faxes, overriding PeopleSoft's built-inObjectFax server. This lets you seamlessly combine the benefits of RightFAX'sautomatic LCR and load balancing features with your PeopleSoft platform.
51Chapter 5: Configuring the WorkServers
Enable PeopleSoft InterfaceCheck this option if you run PeopleSoft and want to use your RightFAX server tomanage outgoing faxes.
Location of PeopleSoft DirectoryEnter the full directory path where PeopleSoft stores its outgoing fax jobs. Thiscan be any directory on the local computer, or a UNC path to a different locationon the network. The RightFAX WorkServer must have read and write access tothis directory. Please refer to your PeopleSoft documentation for information ondetermining the PeopleSoft outgoing fax directory.
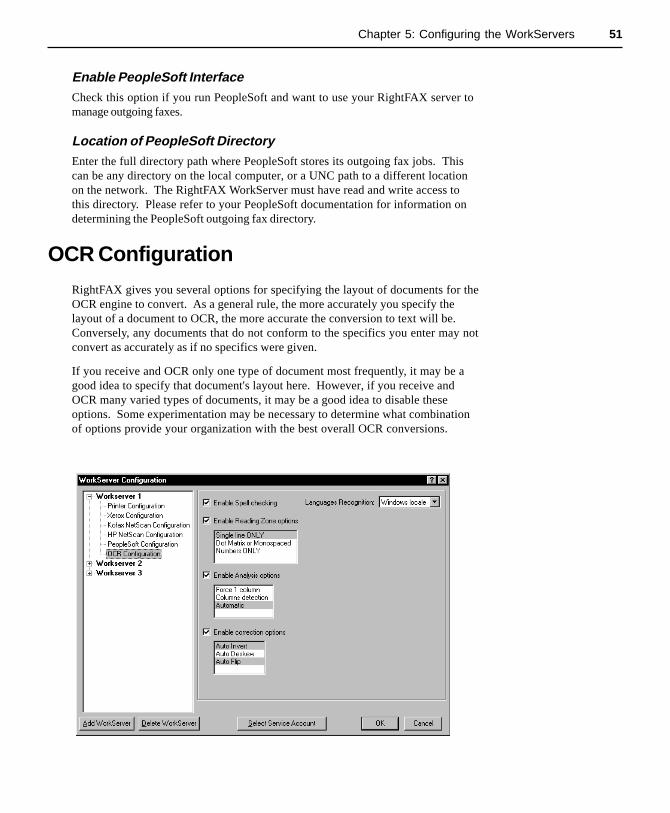
OCR Configuration
RightFAX gives you several options for specifying the layout of documents for theOCR engine to convert. As a general rule, the more accurately you specify thelayout of a document to OCR, the more accurate the conversion to text will be.Conversely, any documents that do not conform to the specifics you enter may notconvert as accurately as if no specifics were given.
If you receive and OCR only one type of document most frequently, it may be agood idea to specify that document's layout here. However, if you receive andOCR many varied types of documents, it may be a good idea to disable theseoptions. Some experimentation may be necessary to determine what combinationof options provide your organization with the best overall OCR conversions.

52 RightFAX Administrator's Guide
Enable Spell CheckingIf this option is checked, RightFAX's OCR engine will compare converted text to abuilt-in spell checker in an attempt to improve accuracy of converted text. Wordsthat are not found by the spell checker are automatically converted to the wordthat most closely matches.
Languages RecognitionSelect the language of incoming faxes. Select Windows Locale to use the defaultWindows language setting.
Enable Reading Zone OptionsCheck this option to specify how the fax images to OCR are expected to look. Youmay select any or all of the listed options:
Single Line Only - Select this option if the expected fax image will consistof one line of text only.
Dot Matrix or Monospaced - Select this option is the expected fax image willconsist of dot matrix characters and/or contain monospaced lines.
Numbers Only - Select this option if the expected fax image will containnumbers but no text.
Enable Analysis OptionsCheck this option to specify the column layout of the fax images to OCR. Youmay select any or all of the listed options:
Force 1 Column - Select this option if the expected fax image will consist ofone column of text only.
Columns Detection - Select this option is the expected fax image will consistof text formatted into multiple columns.
Automatic - Select this option if the expected fax image will contain one ormore columns of text.
Enable Correction OptionsCheck this option to automatically detect and correct text orientation problemsprior to converting the image to text. You may select any or all of the listedoptions:
Auto Invert - Select this option if some or all of the expected fax image will bedisplayed as light characters on a dark background.
Auto Deskew - Select this option to automatically detect and correct whenthe fax image has been pulled skewed through a fax machine.
Auto Flip - Select this option to automatically detect and correct when the faximage has been transmitted either sideways or upside down.

Configuring the BoardServer
In this chapter:
• RightFAX BoardServer Module• Auto Billing Code Settings• Advanced Settings• Global Board Settings• Brooktrout Board Configuration• Brooktrout Channel Configuration• Detect GammaLink Board• GammaLink Board Configuration• GammaLink Channel Configuration• Running Multiple BoardServers on Remote Machines

54 RightFAX Administrator's Guide
RightFAX BoardServer Module
The RightFAX BoardServer Module is the interpreter between the fax boarddrivers and the RightFAX Server Module. It handles requests to schedule outgoingfaxes for transmission, and informs the Server Module when a new fax has beenreceived and needs to be processed.
To configure the RightFAX BoardServer Module, run the BoardServer applet fromthe Control Panel.
Auto Billing Code Settings
This feature lets you configure RightFAX to automatically determine and dial thecorrect phone code for domestic or international calls based on the user ID of thesender.
Enable User Specific Phone Codes ÀÀÀÀÀCheck this option to enable the Automatic Billing Codes feature.
Adding, Editing and Deleting Auto Billing Code Entries
Click the Add button to add a new entry. This opens a dialog asking you to enter aRightFAX User ID, and that user's domestic and international billing codes.
A À symbol appearsnext to configuration
parameters that can bechanged on-the-fly,
without stopping andrestarting the services.
To configure theRightFAX BoardServer
Module, select theRightFAX BoardServerapplet in the Control
Panel

55Chapter 6: Configuring the BoardServer
To edit an entry, highlight the entry to edit and click on the Edit button.
To delete an entry, highlight the entry and click on the Delete button.
Configuring RightFAX to Distinguish International andDomestic Long Distance Calls
In order for RightFAX to automatically add a billing code to a domestic longdistance or international phone call, you must add dialing rules that indicate whento dial the codes.
When creating dialing rules, the character "F" added to the dial string will beautomatically replaced with the user's Domestic billing code. The character "G"added to the dial string will be automatically replaced with the user's Internationalbilling code. For example, for international calls, you might create a dialing rule likethis:
Pattern Append
011+ wGii
which means that if the first three digits of the outgoing fax number are 011 (theinternational dialing prefix), then wait for a dial tone (w), look up the user'sinternational billing code and dial it (G), then wait 10 seconds before dialing thenumber (ii).
For more information on creating dialing rules, see Chapter 13.
Advanced Settings
Docs on Demand and TeleConnect
If you purchased the Docs on Demand and/or TeleConnect optional modules, referto the RightFAX Optional Modules Guide for installation and configurationinstructions.

56 RightFAX Administrator's Guide
Global Board Settings
CD TimeoutThis parameter specifies the length of time, in seconds, to wait for a fax answertone (CED tone) from a remote fax machine. This parameter also controls theamount of time the board plays a CNG (calling) tone. Changing this parametermay not have an affect in certain countries.
Event LogLevel ÀÀÀÀÀSpecify the level of information to be logged in the Application EventLog, underthe Service name RightFAX BoardServer Module. A value of Terse will cause theRightFAX BoardServer Module to record only critical errors, while the Verbosesetting will record significant amounts of information which may help track downproblems.
ANI Pattern MatchRightFAX collects information about the dialing party’s phone number for displayin FaxUtil and for CSID routing (if used). However, some organizations receiveadditional information (ANI, DNIS, etc.) along with the dialed party’s phonenumber. This field lets you specify the pattern of the extra data so that it can beremoved by RightFAX prior to display or routing.

57Chapter 6: Configuring the BoardServer
The ANI matching pattern is defined using the following key:
* - matches one or more “star” characters in the source string# - matches one or more “pound” characters in the source stringX - matches one or more digits belonging to the ANI numberY - matches one or more digits belonging to the DNIS numberZ - matches one or more digits which are discardedA maximum character match can be added to any of the above.
(For example, “x2*y” will match xx***...yyy...)0-9 & A-D - valid phone digits (literal digits)
(separate literal digits from max-modifiers with a space)
Examples:
“1x10*y” matches 1xxxxxxxxxx***...yyy...“x2z*y2 2” matches xxzzz...***...yy2
Audit Settings ÀÀÀÀÀIf you check Allow Auditing , the RightFAX BoardServer Module Service willrecord a log of each incoming or outgoing fax. When logging to a network printer,each job needs to be closed before the next one can be opened. To do this, enableClose file between each page.
For each record, there are three Levels of detail: 1 prints a single line summary ofthe call; 2 prints a detailed description; and 3 outputs a CSV (Comma SeparatedValues) file. You can specify where the audit data should be printed in the Pathfield. If you want output to the printer, simply enter the printer port. Otherwise,enter the name of a disk file. This file will be created if it does not exist and newdata will always be appended.
You can specify an InitialString which will be output to the audit file at thebeginning of every page. This string might specify some codes to choose a certainfont or character set for the log data. To put control codes into this string, you canuse the following notations:
\x## (i.e. \x1b ) for a hexadecimal character value \### (i.e. \027 ) for a decimal character value ^X (i.e. ^[ ) for a ASCII representation of a control character

58 RightFAX Administrator's Guide
Audit Log Format
Field Name TypeMax
Length
1 Sent/Received Flag (S or R) String 1
2 Transaction Date Stamp MM/DD/YYYY 10
3 Transaction Time Stamp HH:MM 5
4 Channel (0-32) Numeric 2
5 Elapsed Time in Seconds Numeric 5
6SENT: Phone Number DialedRECEIVED: Routing Code(DID or DTMF)
String 31
7 Remote Fax Machine ID String 49
8 Result in English String 59
9 Page Record String 79
10SENT: To_ContactNumRECEIVED: n/a
String 31
11SENT: To_NameRECEIVED: n/a
String 59
12SENT: To_CompanyRECEIVED: n/a
String 59
13SENT: User ID of SenderRECEIVED: n/a
String 21
14SENT: Billing Code 1RECEIVED: n/a
String 15
15SENT: Billing Code 2RECEIVED: n/a
String 15

59Chapter 6: Configuring the BoardServer
TTI Line Settings ÀÀÀÀÀ
Allow TTI LineThe TTI Line is an informational line that can be added to the top of every page ofa fax which contains the Fax ID of the sending machine, the date and time of thetransmission, and a page number and count. Fax machines normally add this line,but RightFAX can be instructed to not add the line. We recommend that you checkthis box, because it gives the receiver a total page count and allows the receiver toput the pages into proper order. Note that the format of the date in TTI lines is afunction of the international or regional settings of Windows NT as installed on thefax server.
Quick-Headers Format Example:
Please Deliver To: ~2 at ~5
Macros can be specified which expand into information specific to the fax beingsent. The following macros may be used:
~1 To-Name field (59 characters max)~2 Shortened To-Name (23 characters max)~3 To-Contact Number field (31 characters max)~4 To-Company field (59 characters max)~5 Shortened To-Company field (23 characters max)~6 BillInfo1 field (15 characters max)~7 BillInfo2 field (15 characters max)~8 Unique ID (15 characters max)
Controlling TTI Line PlacementThe registry parameter, HeaderInsertMode, controls the placement of TTI lines onoutbound fax pages. The mode may be set to Insert (3) where the TTI line isadded to the top of the page (this lengthens the page) or Replace (2) where the TTIline replaces the top scan-lines of the fax page (does not lengthen page). Thedefault, if no parameter is found, is Replace mode. This functionality is availablefor both Brooktrout and GammaLink fax boards. Edit the Registry parameter:
HKEY_LOCAL_MACHINE\SOFTWARE\RIGHTFAX\BOARDSERVER\HEADERINSERTMODE
Some countries requirea TTI line, so remove it
at your own risk.

60 RightFAX Administrator's Guide
Dialing Settings ÀÀÀÀÀ
Prefix/PostfixUsing these fields, specify a universal prefix or postfix to add to every fax sentfrom this server. Prefixes and postfixes can be used in conjunction with prependand append features in the dialing plan. They are added only if the fax is sentthrough the local hardware, i.e., if a fax is sent through another server because ofLeast Cost Routing (LCR), then they are not added. In this case, the prefix andpostfix of the server that eventually sends the fax will be used. Valid dialingcharacters are:
Character Description
0 through 9 Phone numbers and access numbers
, (comma) 1-second pause
I 5-second pause
W Wait up to 15 seconds for a dial tone
P Pulse dialing tone
T Tone dialing mode (default)
FThis character is replaced in the dialstring by the user's domestic longdistance Auto Billing Code
GThis character is replaced in the dialstring by the user's international longdistance Auto Billing Code
! Hook-flash signal
* Generates tone as would '*' button ontouch-tone phone
# Generates tone as would '#' button ontouch-tone phone
@ Causes all following digits to be hiddenon fax cover sheet
{ Causes dialing prefix to NOT beprepended
} Causes dialing postfix to NOT beappended
Call Grouping ÀÀÀÀÀ
Allow Grouping (Brooktrout only)When RightFAX sends a fax, it submits the fax to the RightFAX BoardServerModule’s call queue. The RightFAX BoardServer Module Service will place thecall, transmit the fax, and if call grouping is enabled, will check the call queue foranother fax going to the same number. If it sees that another fax is scheduled to goto that same number, it keeps the line open and transmits the second fax. Thissaves you the time and money to dial the number and connect the line a secondtime.
"W" is the default prefix,if none is supplied.
Dialing characters arenot case sensitive

61Chapter 6: Configuring the BoardServer
Where multiple calls to the same number are disallowed, Look-Ahead is employedso one channel will know that another channel is already sending to a particularphone number. This feature is useful because a multi-channel server will notattempt to dial a single phone number multiple times because there may only be asingle fax machine on that phone number.
Maximum Grouping (Brooktrout only)In conjunction with Allow Grouping , this lets you set the maximum number ofpages that RightFAX will send to one phone number before hanging up and sendinganother set of faxes. Choose a number between 1 and 256. The default value is 50.
Other Options
T.434 BFT Reception EnabledThis enables the reception of data files, i.e. executables or files in their nativeformat, using the T.434 Binary File protocol. This also allows viruses and otherunchecked programs to enter the fax server and the network.
T.434 BFT Send EnabledThis enables the sending of data files, i.e. executables or files in their native format,using the T.434 BFT protocol.
Secure RPC EnabledThis feature enables data encryption between multiple RightFAX BoardServermodules or between a RightFAX BoardServer and the FaxStat program. Youshould enable this feature in FaxStat to view the status of the BoardServer. IfSecure RPC is enabled, then any BoardServer service on any other RightFAXserver communicating with this server must be started using a valid ID account/password, rather than a local system account.
Beeping ÀÀÀÀÀIf Beeping is checked, the machine where the fax boards are installed will beepwhenever a call is placed or received. With a large volume of calls, this may be anannoyance. The setting has absolutely no bearing on faxing operations.

62 RightFAX Administrator's Guide
Brooktrout Board Configuration
Base I/O AddressThis value must match the physical I/O address set on the fax board. A completelisting of addresses can be found in the manuals that come with the fax boards.
InterruptThe Interrupt is the same for all fax boards in the machine. You can use Interrupts2-7 and 10-15 but make sure it does not conflict with other hardware in thesystem.
Board ModelSet this field to match the type of fax board installed, which may or may not be thecountry in which you reside.
Disable Loop Current DetectionLoop current detection is a fax transmission error correction feature available onBrooktrout fax boards. Check this option to disable loop current detection if it iscausing too many of your fax transmissions to fail. This feature is not available forGammaLink fax boards.
To add a Brooktroutboard to your list of
installed fax boards,click the Add BrooktroutBoard button, or right-
click in the board/channel list on the leftand select Add Board.Select your board from
the list of supportedBrooktrout boards that
appears

63Chapter 6: Configuring the BoardServer
Set Fax ID for All ChannelsEach fax channel has a Fax ID which is transmitted to remote fax machines.Whenever someone receives one of your faxes, they will see this ID on their faxmachine. Usually, this is a company name or the general fax phone number.
When this option is checked and a Fax ID entered, the Fax ID will be used for allthis board's fax channels, saving you the time of entering a Fax ID for each channelseparately.
Set Capability for All ChannelsEach fax channel can have its Capability set to answer-only (Answer), send-only(Dial), or both send and receive (Both).
When this option is checked and a Capability selected, the Capability will be usedfor all this board's fax channels, saving you the time of entering a Capability settingfor each channel separately.
DID Settings
Number of Digits to CollectFor direct inward dial (DID) capable fax boards, specify the number of incomingcall digits being sent to you by the phone company. This value is fixed andmaintained by your phone company when your DID service is installed. If youare not sure what setting to use, contact your phone company for more informa-tion.
Number of Digits for RoutingFor direct inward dial (DID) capable fax boards, specify the number of digits to usefor DID routing. This is the number of digits in each RightFAX user’s DID routingCode.
This value may be equal to, but not greater than, the Number of Digits to Collectsetting.
DID Service TypeFor direct inward dial (DID) and T1 capable fax boards, specify the type of DIDservice (WINK or IMMEDIATE). This setting is determined by your phonecompany when your DID service is installed. If you are not sure what setting touse, contact your phone company for more information.
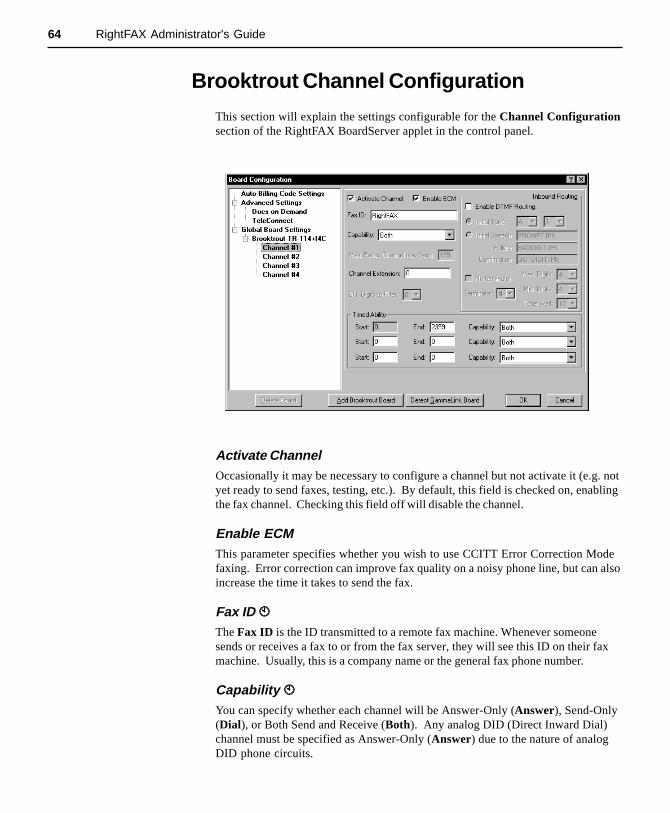
64 RightFAX Administrator's Guide
Brooktrout Channel Configuration
This section will explain the settings configurable for the Channel Configurationsection of the RightFAX BoardServer applet in the control panel.
Activate ChannelOccasionally it may be necessary to configure a channel but not activate it (e.g. notyet ready to send faxes, testing, etc.). By default, this field is checked on, enablingthe fax channel. Checking this field off will disable the channel.
Enable ECMThis parameter specifies whether you wish to use CCITT Error Correction Modefaxing. Error correction can improve fax quality on a noisy phone line, but can alsoincrease the time it takes to send the fax.
Fax ID ÀÀÀÀÀThe Fax ID is the ID transmitted to a remote fax machine. Whenever someonesends or receives a fax to or from the fax server, they will see this ID on their faxmachine. Usually, this is a company name or the general fax phone number.
Capability ÀÀÀÀÀYou can specify whether each channel will be Answer-Only (Answer), Send-Only(Dial), or Both Send and Receive (Both). Any analog DID (Direct Inward Dial)channel must be specified as Answer-Only (Answer) due to the nature of analogDID phone circuits.
65Chapter 6: Configuring the BoardServer
Max Pages this Channel may Send ÀÀÀÀÀThis sets the maximum number of pages per fax that can be sent by this channel,from 0 to 999 (1-1000 pages per fax). This setting allows channels to be "re-served" for smaller size faxes only.
Channel Extension ÀÀÀÀÀThis is the number assigned as the routing code to all incoming faxes on thisparticular channel, if no routing code is assigned to the fax. Since DID, T1 withDNIS, and ISDN telephone lines require routing codes, this setting only applies toloop-start lines and T1 lines without DNIS. If DTMF routing is enabled on theline and the caller does not enter a routing code, then this setting will be used.
Timed Ability ÀÀÀÀÀThis feature allows you to automatically adjust the capabilities of a fax channelduring different times throughout the day. For example, you can set a channel toonly answer calls during business hours, then switch it to dial AND answer afterhours so it can be used to send a faxes during a broadcast.
This function will always assume a start time of 0000 hours (midnight), so this willalways be the start time of the first period. You must also always specify the endtime of the last period as 2359.
DTMF Inbound Routing Settings
Enable DTMF Inbound RoutingDTMF routing is a method for routing faxes directly to an individual based on therouting code entered by the caller.
Initial Tone/Initial SpeechWhen DTMF routing is enabled, RightFAX can prompt callers to enter the routingcode for the fax with a tone and/or voice prompt.
For a tone prompt, specify both the tone to be played and the duration of the tonein seconds. For example, to play the ‘A’ tone for 1 second, enter “A” and “1” asthe tone parameter. You can use digits 1 through 9, A, B, C, D, *, and #.
For a voice prompt, specify the voice to be played. Contact RightFAX forinformation about recording prompts other than the default prompt(PROMPT.IPK) supplied with the system.
FailureThis enables a voice prompt to be played if the caller does not enter DTMF digitsor does not enter enough DTMF digits for the fax. The default prompt is(BADDIGIT.IPK) supplied with the system.
Requires voice license
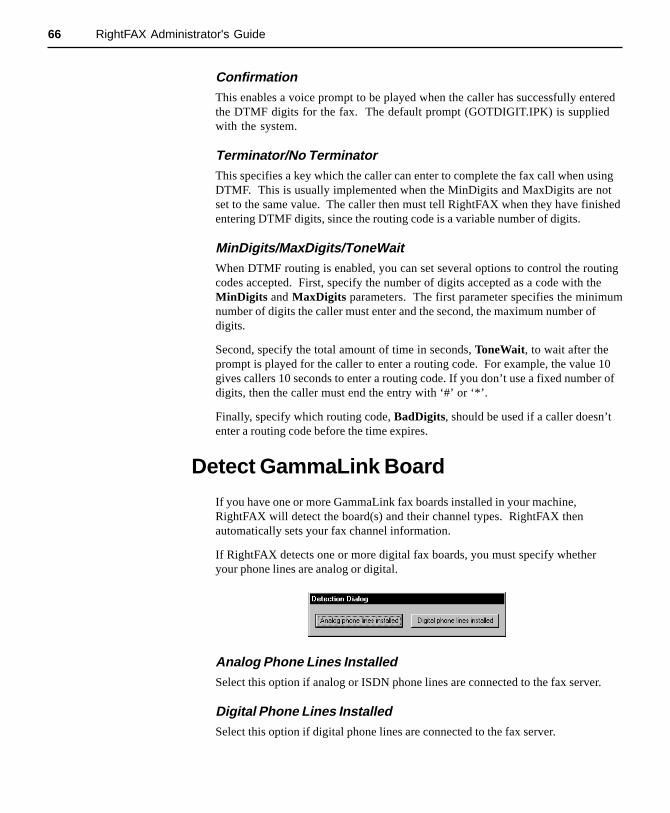
66 RightFAX Administrator's Guide
ConfirmationThis enables a voice prompt to be played when the caller has successfully enteredthe DTMF digits for the fax. The default prompt (GOTDIGIT.IPK) is suppliedwith the system.
Terminator/No TerminatorThis specifies a key which the caller can enter to complete the fax call when usingDTMF. This is usually implemented when the MinDigits and MaxDigits are notset to the same value. The caller then must tell RightFAX when they have finishedentering DTMF digits, since the routing code is a variable number of digits.
MinDigits/MaxDigits/ToneWaitWhen DTMF routing is enabled, you can set several options to control the routingcodes accepted. First, specify the number of digits accepted as a code with theMinDigits and MaxDigits parameters. The first parameter specifies the minimumnumber of digits the caller must enter and the second, the maximum number ofdigits.
Second, specify the total amount of time in seconds, ToneWait, to wait after theprompt is played for the caller to enter a routing code. For example, the value 10gives callers 10 seconds to enter a routing code. If you don’t use a fixed number ofdigits, then the caller must end the entry with ‘#’ or ‘*’.
Finally, specify which routing code, BadDigits, should be used if a caller doesn’tenter a routing code before the time expires.
Detect GammaLink Board
If you have one or more GammaLink fax boards installed in your machine,RightFAX will detect the board(s) and their channel types. RightFAX thenautomatically sets your fax channel information.
If RightFAX detects one or more digital fax boards, you must specify whetheryour phone lines are analog or digital.
Analog Phone Lines InstalledSelect this option if analog or ISDN phone lines are connected to the fax server.
Digital Phone Lines InstalledSelect this option if digital phone lines are connected to the fax server.

67Chapter 6: Configuring the BoardServer
GammaLink Board Configuration
Base I/O AddressThis value must match the physical I/O address set on the fax board. A completelisting of addresses can be found in the manuals that come with the fax boards.
Board ModelSet this field to match the type of fax board installed, which may or may not be thecountry in which you reside.
Terminal EndPoint Identifier
Point-to-PointA Point-to-Point configuration is used when there is only one BRI device on theline. All incoming calls will be answered by the BRI board and the inbound digitswill be collected (similar to DID but without requiring a range of numbers from theCO). This configuration is the common connection type for PBX’s and is used atalmost 95% of installations.
Check with your phone company on the type of BRI line you have installed.Although the CPi/200-BRI board supports both PTP and PTMP, the CPi/200-BRIboard cannot be used on a shared BRI line.

68 RightFAX Administrator's Guide
Point-to-MultipointThe Point-to-Multipoint configuration is used when multiple devices will share thesame line. This configuration can support up to 8 devices on the same BRI line.This configuration used only at about 5% of installations.
Check with your phone company on the type of BRI line you have installed.Although the CPi/200-BRI board supports both PTP and PTMP, the CPi/200-BRIboard cannot be used on a shared BRI line.
Digit Collection
Digit Type/Line TypeSet the Digit Type to touch-tone or pulse. If the digits are being pulsed down,specify Loop Pulse or Ground Pulse. Line Type for GammaLink boards is alwaysset to Wink.
Set Fax ID for all ChannelsChecking this field will automatically copy the Fax ID description to all channelson this particular board.
GammaLink Channel Configuration
This section will explain the settings configurable for the Channel Configurationsection of the RightFAX BoardServer applet in the control panel.
69Chapter 6: Configuring the BoardServer
Activate ChannelOccasionally it may be necessary to configure a channel but not activate it (e.g. notyet ready to send faxes, testing, etc.). By default, this field is checked on, enablingthe fax channel. Checking this field off will disable the channel.
Enable ECMThis parameter specifies whether you wish to use CCITT Error Correction Modefaxing. Error correction can improve fax quality on a noisy phone line, but can alsoincrease the time it takes to send the fax.
BRI Digits to FilterSet this value to the number digits you wish to filter or remove from the incomingISDN phone number. In most cases, the incoming number will be the full phonenumber (country code + area code + number). For the purpose of inbound routing,only the last several digits are useful.
Fax ID ÀÀÀÀÀThe Fax ID is the ID transmitted to a remote fax machine. Whenever someonesends or receives a fax to or from the fax server, they will see this ID on their faxmachine. Usually, this is a company name or the general fax phone number.
Capability ÀÀÀÀÀYou can specify whether each channel will be Answer-Only (Answer), Send-Only(Dial), or Both Send and Receive (Both). Any analog DID (Direct Inward Dial)channel must be specified as Answer-Only (Answer) due to the nature of analogDID phone circuits.
Max Pages this Channel may Send ÀÀÀÀÀThis sets the maximum number of pages per fax that can be sent by this channel,from 0 to 999 (1-1000 pages per fax). This setting allows channels to be "re-served" for smaller size faxes only.
Channel Extension ÀÀÀÀÀThis is the number assigned as the routing code to all incoming faxes on thisparticular channel, if no routing code is assigned to the fax. Since DID, T1 withDNIS, and ISDN telephone lines require routing codes, this setting only applies toloop-start lines and T1 lines without DNIS. If DTMF routing is enabled on theline and the caller does not enter a routing code, then this setting will be used.
This parameter is onlyused with GammaLinkISDN-BRI fax boards.

70 RightFAX Administrator's Guide
Timed Ability ÀÀÀÀÀThis feature allows you to automatically adjust the capabilities of a fax channelduring different times throughout the day. For example, you can set a channel toonly answer calls during business hours, then switch it to dial AND answer afterhours so it can be used to send a faxes during a broadcast.
This function will always assume a start time of 0000 hours (midnight), so this willalways be the start time of the first period. You must also always specify the endtime of the last period as 2359.
GammaLink Inbound Routing Settings
Enable Digit CollectionChecking this parameter enables the GammaLink board to collect digits on anincoming call, regardless of the type of signaling (DTMF, DID, digital). Youshould not check this field if no routing digits are being passed.
Initial ToneWhen DTMF routing is enabled, RightFAX can prompt callers to enter the routingcode for the fax with a tone prompt.
For a tone prompt, specify both the tone to be played and the duration of the tonein seconds. For example, to play the ‘A’ tone for 1 second, enter “A” and “1” asthe tone parameter. You can use digits 1 through 9, A, B, C, D, *, and #.
Terminator/No TerminatorThis specifies a key which the caller can enter to complete the fax call when usingDTMF. This is usually implemented when the MinDigits and MaxDigits are notset to the same value. The caller then must tell RightFAX when they have finishedentering DTMF digits, since the routing code is a variable number of digits.
MaxDigits/ToneWaitWhen DTMF routing is enabled, you can set several options to control the routingcodes accepted. First, specify the number of digits accepted as a code with theMaxDigits parameters. This parameter specifies the number of digits the callermust enter.
Second, specify the total amount of time, ToneWait, in seconds to wait after theprompt is played for the caller to enter a routing code. For example, the value 10would give callers 10 seconds to enter a routing code. If you don’t use a fixednumber of digits, then the caller must end the entry with ‘#’ or ‘*’.
Finally, specify which routing code, BadDigits, should be used if a caller doesn’tenter a routing code before the time expires.

71Chapter 6: Configuring the BoardServer
Running Multiple BoardServers on RemoteMachines
RightFAX lets you install and run multiple BoardServers simultaneously on thelocal and/or remote machines. This lets RightFAX distribute its workload acrossseveral machines and provides expanded channel capacity and system redundancy.
When RightFAX is configured to run one or more BoardServers remotely, theworkload of faxing is divided between multiple machines. The RightFAX serveritself can remain dedicated to database management and WorkServer operations,while the remote BoardServer machine(s) handle all the work relating to sendingand receiving faxes.
Because your fax boards can be distributed between several machines, your abilityto expand your system's fax channel capacity is virtually unlimited.
Also, running remote BoardServers allow for system redundancy. If a hardware orphone line failure occurs, fax traffic can be automatically rerouted to other availableBoardServers quickly and with no interruption of service. In addition, remoteBoardServers let you make the most out of redundant hardware in clustered serverconfigurations. For example:
Cluster CPU #2
Cluster CPU #1 Shared
RAID
BoardServer 1 1-48 ports
BoardServer 2 1-48 ports
T1 T1
Installing Remote BoardServers
Follow these steps to install the RightFAX BoardServer service remotely:
1. On the RightFAX server, create a shared resource named "RightFAX"which points to the \RIGHTFAX directory.
The ability to installmultiple BoardServers is
available in RightFAXEnterprise and Enter-
prise Suite servers only

72 RightFAX Administrator's Guide
2. In the machine where you will install the remote BoardServer, install theanalog or digital fax board(s) that the BoardServer will control. This mustbe a Windows NT machine, and must conform to the same minimumspecifications and a RightFAX server.
3. Insert the RightFAX CD. Run the RightFAX Setup program by selectingRun from the Start menu and type:
D:\SETUP (where D is the drive letter of your CD-ROM).
4. Enter your name, company name, and your product serial number whenprompted. Your product serial number is stamped on the inside of thefront cover of your Customer Support Guide (included in your Right-FAX product box).
5. When prompted to select an installation option, choose New Install.Click Next.
6. A screen will ask you to select the components to install. Make surethat the only option checked is Remote BoardServer. Click Next.
7. Select the manufacturer, and specifications of the installed fax board(s).This step configures one or more of a single type of fax board. If youhave more than one type of fax board installed (i.e., Brooktrout andGammaLink, or PCI and ISA bus), you must configure the remainingboards after this installation using the BoardServer Control Panel applet.
8. When you confirm that you have entered all the setup informationcorrectly, the Setup program will install the necessary files and start theRemote BoardServer Configuration Wizard. Click Next to start theWizard.

73Chapter 6: Configuring the BoardServer
9. On the Configure a Fax Server dialog, click the Add Server button.This opens the Select Server dialog:
10. Type the name of your RightFAX server's domain in the Domain fieldthen click the Load button. This lists all servers on the domain. Selectyour RightFAX server and click OK . You can make this BoardServeravailable to multiple RightFAX servers by repeating this step for eachserver.
11. Click through the remaining message screens. When the installation iscomplete, reboot the computer.
12. When all remote BoardServers have been installed, you must stop andrestart the Fax Server service on the RightFAX server the remoteBoardServers point to.
Running Remote BoardServers
The RightFAX server makes no distinction between remote and local fax channels,and no additional configuration is necessary.
Because they are not located on your RightFAX server, remote BoardServerscannot prevent you from exceeding your RightFAX channel license. You mustmanage the number of activated channels across all the BoardServers and be sureyou do not try to activate more channels than your organization has licensed. TheFaxServer service will automatically shut down if the total number of channels onall BoardServers exceeds your bumped license.

74 RightFAX Administrator's Guide

RightFAX Client Installation
In this chapter:
• Setting up Client Workstations• Automated Installation• Manual Installation• Alternate Print Methods for Other Clients
76 RightFAX Administrator's Guide
Setting up Client Workstations
Install PCL5 Print Drivers
Before you install RightFAX on Windows 3.x, Windows for Workgroups,Windows NT, or Windows 95 workstations, make sure that a PCL5 printer driver(LaserJet III or LaserJet 4) is installed on the machine. These drivers are shippedwith the operating system software and can be installed by creating a new printerthrough the Printer Control Panel applet. You do not need to connect to a realprinter, merely install the driver.
Manual Installation
Windows and Win-OS/2 Workstations
1. After installing a PCL5 printer driver, go to the Windows File Manager,choose Connect Network Drive from the Disk menu and connect to theRightFAX fax server share name.
2. Click on the new drive connection that was just established.
3. Using the mouse, open the \CLIENT\WINDOWS directory and double-click on the SETUP.EXE to install the RightFAX client workstationcomponents. The Setup Wizard will guide you through the steps.
4. Choose between a LAN and local setup.
5. Select the components to be installed: FaxUtil, Enterprise FaxManager, and/or the PowerBar. You must install the PowerBar in orderto print to the FaxUtil from other applications unless you have captureda print queue.
6. When the installation is complete, you may see a Fax Server Optionsdialog. This would happen only if the RightFAX fax server could not befound, went down, or was not started. If this occurs, simply highlightthe name of the fax server, leave the protocol field set to automaticselection, and enter your user ID if you don't want to use your networklogin ID. If the automatic selection of protocols is not working, you maytry another protocol type.
7. FaxUtil or Enterprise Fax Manager may then be started from theRightFAX group location.

77Chapter 7: RightFAX Client Installation
Windows 95 Workstations
1. After installing a PCL5 printer driver, choose Run from the TaskbarStart menu and enter:
\\SERVERNAME\RIGHTFAX\CLIENT\WIN95\SETUP
where SERVERNAME is the name of the server where you installedRightFAX.
2. Choose between a LAN and local setup.
3. Select the components to be installed: Print Driver, FaxUtil , EnterpriseFax Manager, Fax Reporter and/or Outlook Fax Extensions (requiresoptional RightFAX E-mail Gateway).
4. The Setup Wizard will install the RightFAX software, add a RightFAXprint driver, the RightFAX tray icon and a new control panel applet, theRightFAX Client, to your system.
If you selected to install Fax Reporter, it will be installed to the localdirectory \FAXRPT2. If you selected to install the Outlook FaxExtension, your Outlook interface will be automatically updated onceyou reopen Outlook.
Configuration Restriction ParameterIf you do not want users to have access to the configuration options of RightFAXthrough the tray icon menu, you can specify the following parameter in the[FaxServer] section of the FAXSERVE.INI file located in the \WINDOWSdirectory on each WIN95 workstation: NoConfigs=1. If this parameter is present,the Configuration, ODBC Configuration and LDAP Configuration options will notbe available. Users will still be able to launch the fax clients and switch betweenprinter drivers.
Windows NT Workstations
1. After installing a PCL5 printer driver, choose Run the Start menu in thetaskbar. Enter:
\\SERVERNAME\RIGHTFAX\CLIENT\WINNT\SETUP
where SERVERNAME is the name of the server on which RightFAX isinstalled.
2. Choose between a LAN and local setup.
3. Select the components to be installed: Print Driver, FaxUtil , EnterpriseFax Manager, Fax Reporter and/or Outlook Fax Extensions (requiresoptional RightFAX E-mail Gateway).
78 RightFAX Administrator's Guide
4. The Setup Wizard will install the RightFAX software, add a RightFAXprint driver, the RightFAX tray icon and a new control panel applet, theRightFAX Client, to your system.
If you selected to install Fax Reporter, it will be installed to the localdirectory \FAXRPT2. If you selected to install the Outlook FaxExtension, your Outlook interface will be automatically updated onceyou reopen Outlook.
Configuration Restriction ParameterIf you do not want users to have access to the configuration options of RightFAXthrough the tray icon menu, you can specify the following parameter in the[FaxServer] section of the FAXSERVE.INI file located in the \WINNT directory oneach WinNT workstation: NoConfigs=1. If this parameter is present, the Configu-ration, ODBC Configuration and LDAP Configuration options will not beavailable. Users will still be able to launch the fax clients and switch betweenprinter drivers.
Presentation Manager Workstations
There is no Setup procedure for the PM FaxUtil. To run the Presentation ManagerFaxUtil, switch to the \RIGHTFAX\CLIENT\PM directory and type FUPM.EXE.
Automated Installation
You can automate the installation of RightFAX client software if your network isequipped with SMS, LanDesk, or a similar network management system. Use thefollowing command line switches and parameters to install multiple RightFAXclients simultaneously:
Switches (Specified on the Command Line)
QUIET Runs Setup without any required prompts. OnWindows NT and Windows 95 clients, an OKbutton may need to be clicked to add theappropriate settings to the print queue.
DRIVER or POWERBAR Use DRIVER to install the RightFAX print driveron Windows NT and Windows 95 clients. UsePOWERBAR to install the Powerbar on Windows 3.xclients.
CLIENT or FAXUTIL Install the FaxUtil client software.
ADMIN or EFM Install the Enterprise Fax Manager software.
OUTLOOK Install the Outlook Fax Extension (if available)

79Chapter 7: RightFAX Client Installation
FAXREPORTER Install the FaxReporter software (if available)
HD Installs the RightFAX client applications to thelocal hard drive.
LAN Installs the RightFAX client applications to theLAN, saving local hard drive space.
NODELPREV Tells the Setup program to not delete a previousclient if it is detected
Parameters (You Must Specify a Value for Each Parameter)
S=<servername> Computer name of RightFAX server.
P=<protocol> Protocol. Possible values are: AUTO,AUTOMATIC, NP, IPXOS2, SPX, TCP, IPX,IPXNT.
L=<path> Specify the path that the client files shouldinstall to. Only valid if HD (local) install isenabled.
Sample command line:
SETUP QUIET DRIVER CLIENT HD S=RFAXSRV1 P=TCPL=C:\RIGHTFAX
Examples of Automated Installations:
• To install FaxUtil clients for the server named RightFAX:
[C:\] setup faxutil s=rightfax
• To install Enterprise Fax Manager in a specific location:
[C:\] setup efm l=c:\apps\rightfax
• To install the FaxUtil so that it uses Named Pipes networking protocol:
[C:\] setup faxutil p=np

80 RightFAX Administrator's Guide
SETUP.INI
All of the command line options can be specified in a file called SETUP.INI in the\RIGHTFAX\CLIENT install directory. Options set in this file will remain ineffect for every subsequent installation run from this directory. Below are thevalues that can be specified in the file.
Note: Default values are in boldface
Server= {Computer Name of RightFAX Server}
Quiet= 0 = FALSE - Do not run in quiet mode (does not promptuser for interaction, setup is run in the foreground andvisible).1 = TRUE
Driver= 0 = FALSE - Do not install the driver if 32-bit client orpowerbar if 16-bit client.1 = TRUE
Client= 0 = FALSE - Do not install the Client software.1 = TRUE
Admin= 0 = FALSE - Do not install the Admin software.1 = TRUE
Protocol= AUTO - Auto Select the protocolNP - Named PipesTCP - TCP/IPSPX - SPX protocolIPX - IPX protocolIPXNT - Same as IPX - maintained for backward capability.
Location= {Path} - Enter the Path that you what the software to beinstalled. This is only valid on a LOCAL install.
Network= 0 = FALSE - Do not do a network install, do a local installinstead.1 = TRUE - Do a network install, copies minimum fileslocally.
HotKeys= 0 = FALSE - Do not associate the programs to a Hot Key.1= TRUE - Associate the programs to the standard HotKeys.
DeletePreviousClient =0 = FALSE - Do not delete the previous client.1= TRUE - Do delete the previous client (if detected).

Installing and ConfiguringPrint-to-Fax Drivers
In this chapter:
• How the PowerBar Works• PowerBar Configuration• Installing Programs to the PowerBar• Installing Printers to the PowerBar• PowerBar Operation• The RFAX: Port• RightFAX Tray Icon• Tray Icon Installation• Tray Icon Configuration• Tray Icon Operation

82 RightFAX Administrator's Guide
How the PowerBar Works
RightFAX does not require a special print driver for Windows workstations. Byusing a normal LaserJet or PostScript driver to send faxes, the user gets a truewhat-you-print-is-what-you-fax output. PowerBar is the utility which allowsRightFAX to utilize standard print drivers. It’s advantages are:
• Uses standard HP LaserJet3 or HP LaserJet 4 shipped with platform software
• Fewer changes to documents when changing between fax and print drivers —i.e. there is no fax driver
• No need for users to change printers through File-Print Setup — now theyjust click a button.
• Visual feedback available at all times to indicate whether faxing or printing isselected.
• Custom icon’s can be added to PowerBar.
• Works on Windows 3.1, Windows 3.11, WFWG 3.11, and WIN-OS/2workstations (PowerBar is not supported by Windows NT and Windows 95workstations).
The PowerBar sits on the Windows desktop:
Users can select to print or fax just by clicking the appropriate icons. Thisexample also shows that FaxUtil has been added to the PowerBar so that it can bestarted at any time simply by clicking.
PowerBar Configuration
If you wish, the Power-Bar can be installed
automatically during theclient software installa-
tion.

83Chapter 8: Installing and Configuring Print-to-Fax Drivers
You can configure the PowerBar by clicking on the miniature System menu icon inthe top left corner of the window and choosing Configuration from the menu orby clicking the right mouse button in the title bar of the window.
In the RightFAX PowerBar Configuration dialog, printers and custom icons canbe configured. In the box labeled Program Configuration, you can add customicons to run programs currently on your computer. RightFAX FaxUtil andEnterprise Fax Manager are set up for you automatically during the installationprocess. In the field labeled Printer Drivers , names will be added for each of theprinters and fax printers currently on your computer. In the Options box, you canchoose to have the PowerBar always remain in the foreground of your screen byselecting On top. Selecting Labels will enable the comment for each printer, faxand program icon to appear whenever the mouse sits on top of any one icon for afew seconds. Selecting Fade will change the look of the PowerBar windowbackground. Selecting Metz Phones allows you to use Metz Phones, a separatecontact management application. Selecting Popup Msgs allows you to receivepopup notifications. The Fax Server button allows you to specify your faxserver name and default user ID.

84 RightFAX Administrator's Guide
Installing Programs to the PowerBar
In the Program Configuration box, click on the Add button. This brings up theAdd Program/File dialog. Clicking on the Network button will display a list ofnetwork drives. Select the drive, directory, and program file you wish to add to thePowerBar from this window, and make sure that the name of the file appears in theFile Name box. Click OK .
This will display the Program Item Properties dialog, where you can select thetitle of the program in the Description box, specify any switches and options inthe Command Line box, choose the working directory, and change the icon. Youcan also enter the text label, which appears when you let your mouse sit on aPowerBar icon f or a few seconds, in the Comment box. Once finished selectingoptions for this dialog, click OK.
All selections chosen here, except for Description, can be modified again at anytime by clicking on the Configure button in the Program Configuration box. Tomodify Description, you must first delete the current PowerBar icon by highlight-ing its description in the Program Configuration box and clicking on the Deletebutton. Then you simply re-add the program with the new description using theprocedure outlined above.
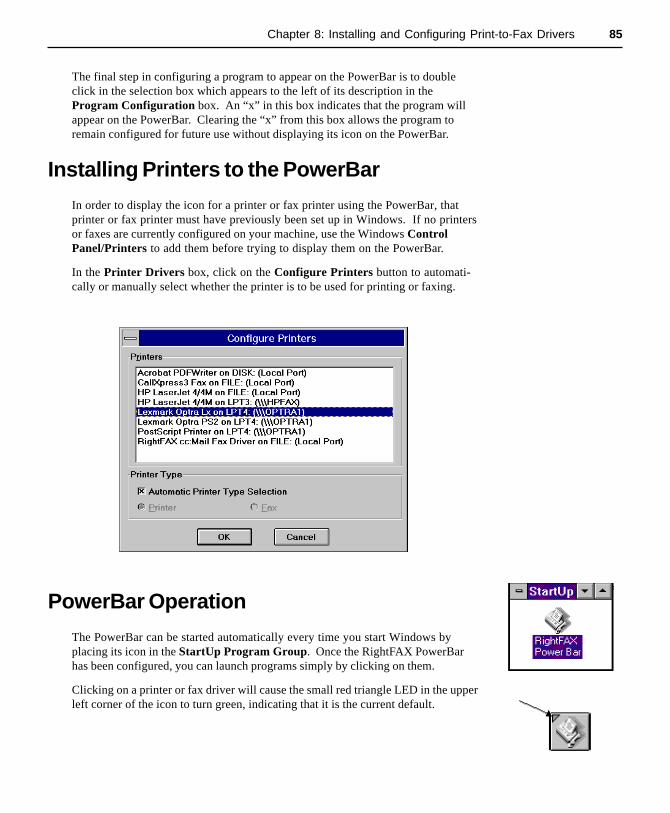
85Chapter 8: Installing and Configuring Print-to-Fax Drivers
The final step in configuring a program to appear on the PowerBar is to doubleclick in the selection box which appears to the left of its description in theProgram Configuration box. An “x” in this box indicates that the program willappear on the PowerBar. Clearing the “x” from this box allows the program toremain configured for future use without displaying its icon on the PowerBar.
Installing Printers to the PowerBar
In order to display the icon for a printer or fax printer using the PowerBar, thatprinter or fax printer must have previously been set up in Windows. If no printersor faxes are currently configured on your machine, use the Windows ControlPanel/Printers to add them before trying to display them on the PowerBar.
In the Printer Drivers box, click on the Configure Printers button to automati-cally or manually select whether the printer is to be used for printing or faxing.
PowerBar Operation
The PowerBar can be started automatically every time you start Windows byplacing its icon in the StartUp Program Group. Once the RightFAX PowerBarhas been configured, you can launch programs simply by clicking on them.
Clicking on a printer or fax driver will cause the small red triangle LED in the upperleft corner of the icon to turn green, indicating that it is the current default.

86 RightFAX Administrator's Guide
Whenever an application prints to a Windows printer which is configured as a faxprinter in the PowerBar, it will automatically provide the user with a fax addressingdialog which will prompt the user for the fax number, recipient, etc. for the faxthey are attempting to send. If the printer is not configured in the PowerBar as afax printer, or if the PowerBar is not running, the user will not receive thisaddressing dialog and will need to address the fax with embedded codes or inFaxUtil.
The RFAX: Port
Windows 3.x and Windows for Workgroups workstations will have a special port,called RFAX:, created by the RightFAX client software setup. When the Power-Bar is running, any printer which is connected to the RFAX port will send its printoutput directly to the NT fax server, rather than using a network print queue.Printers connected to the RFAX: port will automatically be considered fax printersby the PowerBar, and may not be configured as normal printers. The PowerBarmust be running for the RFAX: port to function.
RFAX2: Port
RFAX2: is similar to RFAX: in that it captures the application output andtransports it directly to the fax server. However, it does not cause a pop-upaddress dialog. RFAX2: is useful for custom applications using embedded codes orfax merging.
RightFAX Tray Icon
How the Tray Icon Works
The RightFAX TrayFax utility gives users quick and easy access to commonRightFAX client functions by adding itself the Windows taskbar tray. It allowsusers to send faxes, provides access to ODBC, MAPI and LDAP phonebooks,allows switching between installed printers, and acts as an application launcher forFaxUtil and Enterprise Fax Manager.
Tray Icon Installation
The TrayFax utility is installed when the “Print Driver” option is selected duringthe RightFAX Client installation (run SETUP.EXE from either the Win95 orWinNT directories under RIGHTFAX\CLIENT). The installation program willadd TrayFax to the Windows Startup group so that it appears in the user’s taskbartray whenever she logs-on to the computer.
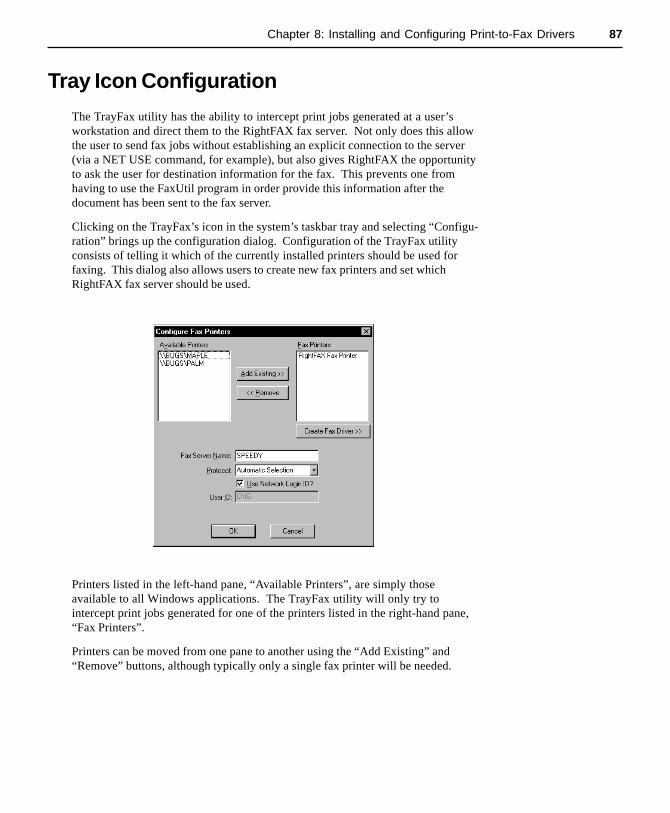
87Chapter 8: Installing and Configuring Print-to-Fax Drivers
Tray Icon Configuration
The TrayFax utility has the ability to intercept print jobs generated at a user’sworkstation and direct them to the RightFAX fax server. Not only does this allowthe user to send fax jobs without establishing an explicit connection to the server(via a NET USE command, for example), but also gives RightFAX the opportunityto ask the user for destination information for the fax. This prevents one fromhaving to use the FaxUtil program in order provide this information after thedocument has been sent to the fax server.
Clicking on the TrayFax’s icon in the system’s taskbar tray and selecting “Configu-ration” brings up the configuration dialog. Configuration of the TrayFax utilityconsists of telling it which of the currently installed printers should be used forfaxing. This dialog also allows users to create new fax printers and set whichRightFAX fax server should be used.
Printers listed in the left-hand pane, “Available Printers”, are simply thoseavailable to all Windows applications. The TrayFax utility will only try tointercept print jobs generated for one of the printers listed in the right-hand pane,“Fax Printers”.
Printers can be moved from one pane to another using the “Add Existing” and“Remove” buttons, although typically only a single fax printer will be needed.

88 RightFAX Administrator's Guide
Any printer created by within TrayFax’s configuration dialog (see followingsection) will send its output to the RightFAX server (note that this requiresTrayFax be running). If a TrayFax-created printer is placed on the left-hand paneof the TrayFax configuration dialog, then it will deliver its output to the fax serverwithout prompting the user for destination information. This is useful in caseswhere you’d prefer to use RightFAX embedded codes to specify destinationinformation (mail-merge applications are prime candidates for this type ofconfiguration). See the RightFAX User Guide for more information on embeddedcodes.
Creating New Fax Printers
The “Create Fax Driver” button allows users to create a new fax printer with oneof three possible destinations: a RightFAX server, a MAPI-enabled e-mail system,or a VIM-enabled e-mail system.
To create a new fax printer which sends documents to a RightFAX fax server,select the “Create PCL-5 Fax Driver” option. You will be asked for the newprinter’s name and the name of the fax server to which jobs should be sent. Thisnew printer will automatically be placed in the configuration dialog’s right-handpane, making it available for sending faxes.
See the RightFAX User Guide for information on configuring fax printers withMAPI or VIM e-mail destinations.
Note: On Windows 95 systems, RightFAX printers are set to print to the “RFAX”port. This is a specially-designated port used by the TrayFax utility to distinguishnormal print jobs from those destined for RightFAX servers. On Windows NTsystems, RightFAX printers are set to use the “RFAX” print processor, whichcauses TrayFax to handle the print job instead of the normal Windows printprocessor.
Configuring ODBC Data Sources
If you click ODBC Configuration on the tray icon menu, the Configure ODBCPhone Books dialog is displayed. Clicking the Add button allows you to create anew ODBC source.
For detailed information on configuring ODCB Phonebooks, refer to the "Phone-books and Broadcast Faxing" chapter in your RightFAX User's Guide.
Configuring LDAP Data Sources
Lightweight Directory Access Protocol (LDAP) is a high-level protocol foraccessing directories. If your company uses LDAP, you can access it by clickingLDAP Configuration from the RightFAX tray icon pop-up menu. For detailedinformation on configuring LDAP Phonebooks, refer to the "Phonebooks andBroadcast Faxing" chapter in your RightFAX User's Guide.
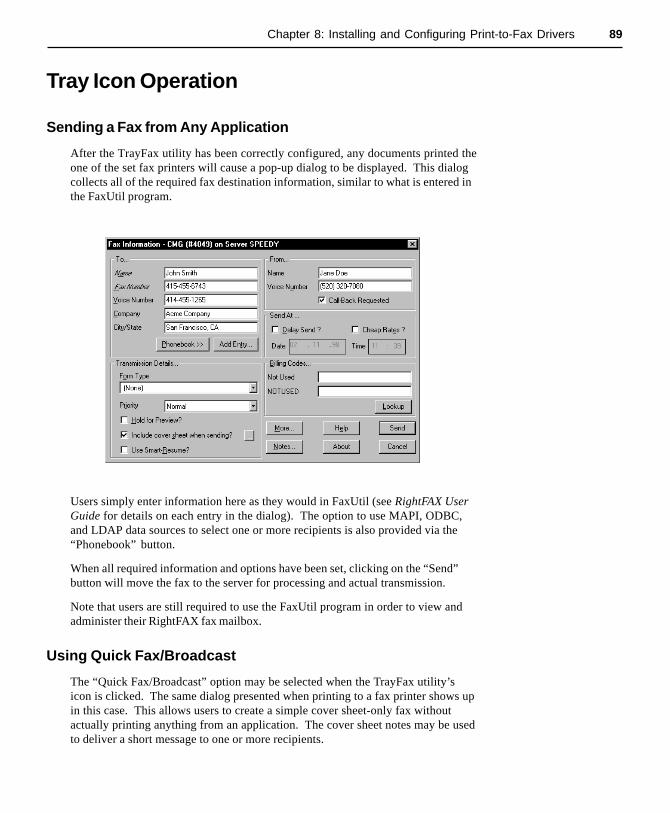
89Chapter 8: Installing and Configuring Print-to-Fax Drivers
Tray Icon Operation
Sending a Fax from Any Application
After the TrayFax utility has been correctly configured, any documents printed theone of the set fax printers will cause a pop-up dialog to be displayed. This dialogcollects all of the required fax destination information, similar to what is entered inthe FaxUtil program.
Users simply enter information here as they would in FaxUtil (see RightFAX UserGuide for details on each entry in the dialog). The option to use MAPI, ODBC,and LDAP data sources to select one or more recipients is also provided via the“Phonebook” button.
When all required information and options have been set, clicking on the “Send”button will move the fax to the server for processing and actual transmission.
Note that users are still required to use the FaxUtil program in order to view andadminister their RightFAX fax mailbox.
Using Quick Fax/Broadcast
The “Quick Fax/Broadcast” option may be selected when the TrayFax utility’sicon is clicked. The same dialog presented when printing to a fax printer shows upin this case. This allows users to create a simple cover sheet-only fax withoutactually printing anything from an application. The cover sheet notes may be usedto deliver a short message to one or more recipients.

90 RightFAX Administrator's Guide
LaunchingFaxUtil or Enterprise Fax Manager
Both FaxUtil and Enterprise Fax Manager can be launched from TrayFax’s pop-upmenu. TrayFax will look in the “Start” menu under “Programs” for shortcuts toeither or both of these utilities. TrayFax will not display a menu option for eithershortcut which does not exist or which has moved to a different location.
Selecting the Default Printer
TrayFax allows users to select the current default printer for all Windowsapplications by simply selecting that printer from its pop-up menu. This preventsone from having to open the “Printers” window under the “Start” menu or in theControl Panel. Users can quickly switch between sending faxes via a RightFAXprinter and actually printing documents on their standard printer.

Enterprise Fax Manager
In this chapter:
• What is Enterprise Fax Manager?• Starting Enterprise Fax Manager• Setting Your Preferences• RightFAX Server Information• Working with Objects• Managing Server Status and Services• Managing Users• Managing Groups• Managing Signatures• Managing Forms• Managing Printers• Managing Billing Codes• Managing Library Documents• Managing Pager and SMS Services• Managing Dialing Rules• Managing Prefix Tables• Customizing Cover Sheet Fields• Synchronizing RightFAX with External Systems

92 RightFAX Administrator's Guide
What is Enterprise Fax Manager?
Enterprise Fax Manager is RightFAX’s 32-bit multi-server administrative inter-face. With Enterprise Fax Manager, an administrator can manage users, groups,signatures, forms, printers, billing codes, library documents, and more, for allRightFAX servers from one intuitive application.
Enterprise Fax Manager is a client application that can be run from any Windows95 or Windows NT-based RightFAX client machine. It is installed as an optionalcomponent during the client workstation setup (described in Chapter 7).
Enterprise Fax Manager replaces the 16-bit administrative interface FaxAd-min. It is recommended that you do not run FaxAdmin on any RightFAXserver v6.0 or higher. FaxAdmin is not compatible with RightFAX v6.0databases and may cause database corruption. If you have installed multiplecopies of FaxAdmin (FAW.EXE) across your network, you should replace allcopies with Enterprise Fax Manager as soon as you upgrade to version 6.0.
Starting Enterprise Fax Manager
Once it has been installed, you can start the Enterprise Fax Manager fromPrograms on the Start menu, or by selecting Enterprise Fax Manager from theRightFAX tray icon. When you start Enterprise Fax Manager for the first time, itwill try to log in under your network user ID. If you did not log into the networkas "Administrator" a login dialog will appear. Enter the default Enterprise FaxManager user ID, "Administrator", and leave the password field blank.
Exiting Enterprise Fax Manager
To exit Enterprise Fax Manager, select Exit from the File menu, or click on theClose Application button in the top right corner of the Window.
When you exit the program, all your changes and additions will be automaticallysaved.
Enterprise Fax Manageris compatible with
RightFAX servers v5.0and higher. If your
version of RightFAX islower than v6.0, some ofthe features and utilitieslisted in this chapter will
be unavailable
The Enterprise FaxManager icon

93Chapter 9: Enterprise Fax Manager
The Enterprise Fax Manager Main Screen
Running Enterprise Fax Manager opens the Main screen:
The left side of the screen displays RightFAX servers and their administrativecomponents (users, forms, printers, etc.) The right side displays details of theselected component. Items listed on the right (such as individual users or librarydocuments) are referred to as "objects." Objects can be added, deleted, andmodified according your needs.
In the Enterprise FaxManager Main screen,
pressing [F6] will switchthe cursor between the
left and right panes

94 RightFAX Administrator's Guide
Opening RightFAX Servers
To display fax servers in the left portion of the screen, you must first open theservers. To open a server, press [Ctrl+O] or select Open Server from the Filemenu. This brings up the Open Server dialog:
In the Server Name field, type the name of the RightFAX server to open. In theProtocol field, enter the network protocol used by that server. You can have anyor all of your RightFAX servers open simultaneously on this screen by repeatingthis process for each.
Once a RightFAX server has been opened in Enterprise Fax Manager, that serverwill, by default, automatically open each time you run the program. (This settingcan be changed in Preferences, described below.)
Closing RightFAX Servers
To close a RightFAX server, highlight the server name in the list on the left of theEnterprise FAX Manager Main screen and select Close Server from the File menu.
Refresh
New library documents, forms, and signatures can be created from clients' FaxUtilmailboxes after the Enterprise Fax Manager has already been opened. These newfiles will not automatically appear listed as objects. The Refresh command tellsEnterprise Fax Manager to look for and re-display all objects, including objectsadded or modified since the last check. To refresh Enterprise Fax Manager, press[F5] or select Refresh from the Edit menu.
Setting Your Preferences
Enterprise Fax Manager lets you customize several preferences. To view yourpreferences, select Preferences from the Edit menu. The Preferences dialog hasthree tabs.
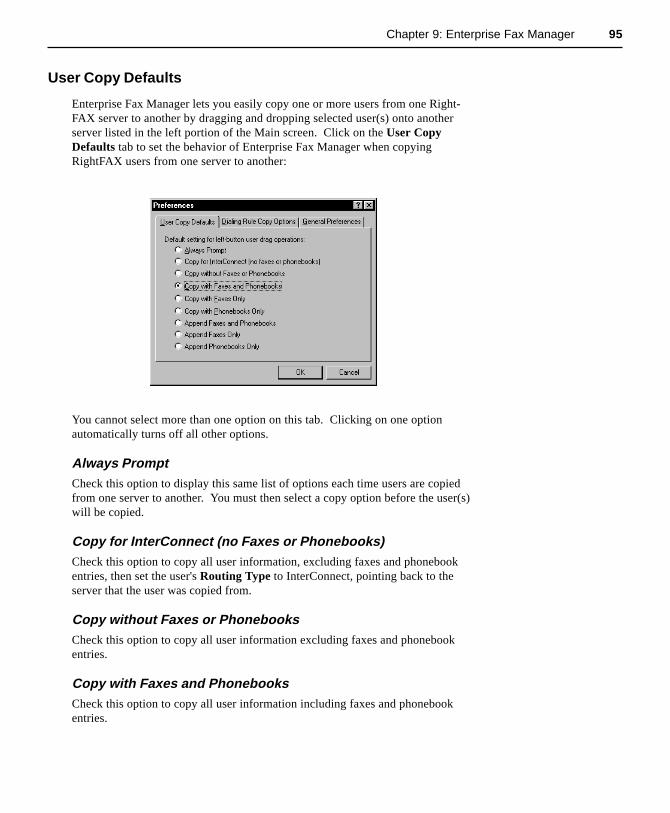
95Chapter 9: Enterprise Fax Manager
User Copy Defaults
Enterprise Fax Manager lets you easily copy one or more users from one Right-FAX server to another by dragging and dropping selected user(s) onto anotherserver listed in the left portion of the Main screen. Click on the User CopyDefaults tab to set the behavior of Enterprise Fax Manager when copyingRightFAX users from one server to another:
You cannot select more than one option on this tab. Clicking on one optionautomatically turns off all other options.
Always PromptCheck this option to display this same list of options each time users are copiedfrom one server to another. You must then select a copy option before the user(s)will be copied.
Copy for InterConnect (no Faxes or Phonebooks)Check this option to copy all user information, excluding faxes and phonebookentries, then set the user's Routing Type to InterConnect, pointing back to theserver that the user was copied from.
Copy without Faxes or PhonebooksCheck this option to copy all user information excluding faxes and phonebookentries.
Copy with Faxes and PhonebooksCheck this option to copy all user information including faxes and phonebookentries.

96 RightFAX Administrator's Guide
Copy with Faxes OnlyCheck this option to copy all user information including faxes but not phonebookentries.
Copy with Phonebooks OnlyCheck this option to copy all user information including phonebook entries but notfaxes.
Append Faxes and PhonebooksIf this option is checked, RightFAX will only copy information for duplicate useraccounts. All faxes and phonebook entries from the source user account will beadded to the destination user account. No other user information will be changed.
Append Faxes OnlyIf this option is checked, RightFAX will only copy information for duplicate useraccounts. All faxes from the source user account will be added to the destinationuser account. No other user information will be changed.
Append Phonebooks OnlyIf this option is checked, RightFAX will only copy information for duplicate useraccounts. All phonebook entries from the source user account will be added to thedestination user account. No other user information will be changed.
Dialing Rule Copy Options
Enterprise Fax Manager lets you easily copy one or more dialing rules from oneRightFAX server to another by dragging and dropping selected rule(s) ontoanother server listed in the left portion of the Main screen. Click on the DialingRule Copy Options tab to set the behavior of Enterprise Fax Manager whencreating a copy of one or more dialing rules:

97Chapter 9: Enterprise Fax Manager
Replace all Rules on DestinationIf this option is checked, RightFAX will copy all dialing rules from the sourceserver to the destination server, deleting any existing dialing rules.
Copy 'Receive into Local' RulesIf this option is checked, all dialing rules with the "Receive into local server"action will be included in the copy. If this option is not checked, "Receive intolocal" rules will be ignored during the copy.
Copy 'Send Locally' RulesIf this option is checked, all dialing rules with the "Send locally" action will beincluded in the copy. If this option is not checked, "Send locally" rules will beignored during the copy.
General Preferences
Click on the General Preferences tab to set some general options for EnterpriseFax Manager:
Automatically Re-Open Servers upon StartupCheck this option to recall what servers were open when the program was lastexited and automatically open those servers again on startup. If this option is notchecked, you will have to reopen each RightFAX server upon starting EnterpriseFax Manager.

98 RightFAX Administrator's Guide
Confirm Object DeletionsCheck this option to bring up a confirmation dialog each time you delete an object(such as a user or library document). If this option is not checked, there will be noconfirmation prior to deleting objects. This is convenient if you are deleting lotsof objects, but makes it more likely that you will accidentally delete an object thatyou want.
Confirm Object OverwritesCheck this option to bring up a confirmation dialog each time you overwrite anobject (such as by copying an object with the same name into the system). If thisoption is not checked, there will be no confirmation prior to overwriting objects.
RightFAX Server Information
Enterprise Fax Manager lets you easily check the status of all open servers. Toview the status of all RightFAX servers, click on Fax Servers at the top of theserver list in the left part of the Main screen:

99Chapter 9: Enterprise Fax Manager
Server Name
This field displays the RightFAX server's name and network protocol. An icon tothe left of the field name indicates the status of the RightFAX services. A green '+'indicates that all services are running normally. A yellow '!' indicates that one ormore services are not running but that normal fax operations are available. A red '-' indicates that one or more services are not running and normal fax operations arenot available.
Version
This field displays the RightFAX server software version.
Time Running
This field displays the length of time that has elapsed since the RightFAX serverservice was last started. Time is displayed in the formatdays:hours:minutes:seconds.
Queue Usage
This field displays the percentage of the fax server's internal Event Queuecurrently in use. The Event Queue is described in Chapter 4, Configuring theRightFAX Server.
Fax Board Availability Index
This field displays a number indicating the relative availability of the server's faxboard(s). The higher the number, the more available the server for sending faxes.RightFAX uses this value when an outgoing fax number has two equally weighteddialing rules that send it to two different servers. In such a case, RightFAXautomatically sends the fax via the server with the highest Availability Index.
Working with Objects
Sorting Objects
You can sort the objects listed in Enterprise Fax Manager by column. To sort bycolumn, double-click on the column header in the right portion of the screen. Theobjects will automatically sort in ascending order and an indicator will appear inthe column header.
You can also use the shortcut by double-clicking the left mouse button anywhere inthe column heading to sort in ascending order or descending order. Enterprise FaxManager will recall how objects are sorted when you exit and reopen the program.

100 RightFAX Administrator's Guide
Sorting columns
You can also reorder the columns in the right portion of the Enterprise FaxManager Main screen. To move a column, click on the header of the column anddrag it left or right to its new position.
Selecting Objects
To edit, delete, or otherwise work with an existing object, you must first select itfrom the list of objects displayed. Selected objects are highlighted.
To select an object, click on it or use the [Up] and [Down] arrow keys to move tothe object and press [Space] to highlight it. Un-select an object by clicking on itor pressing [Space] again.
To select a continuous list of objects, drag the mouse pointer down the objectswhile holding the left mouse button. If the desired objects are not all in acontinuous group, click on each object while holding down the [Shift] key.
Before Adding Objects
Before you begin adding objects to the RightFAX system, it is important that youplan the structure and anticipate the needs of your network users. Considerwhether you will divide your organization into groups, whether you would likeeach group/department to have its own cover sheet, and who will act as administra-tor or alternate administrator for the group. Determine a block of routing codessufficient for the entire system and decide upon any custom notification typesdesired. You should create new objects in RightFAX only after you have carefullyconsidered these issues.

101Chapter 9: Enterprise Fax Manager
Managing Server Status and Services
Enterprise Fax Manager lets you easily view statistics and channel information,and manage services for each individual RightFAX server. To manage eachRightFAX server's status, click on the server's name in the left part of the Mainscreen:
Update Now ButtonClick on the Update Now button to recalculate all statistics and re-display allinformation on this screen.
Statistics
Fax Server Event Queue UsageThis field displays the percentage of the fax server's internal Event Queuecurrently in use. The Event Queue is described in Chapter 4, Configuring theRightFAX Server.
Fax Server Events ProcessedThis is the total number of events processed by the fax server since the Fax ServerModule was started.
If you run remoteBoardServers, those
servers may be displayedin Enterprise Fax
Manager, but will notinclude fax server data
102 RightFAX Administrator's Guide
BoardServer Availability IndexThis is the relative availability of the server's fax board(s). The higher the number,the more available the server for sending faxes. RightFAX uses this value when anoutgoing fax number has two equally weighted dialing rules that send it to twodifferent servers. In such a case, RightFAX automatically sends the fax via theserver with the highest Availability Index.
Current Faxes Queued for SendingThis displays the current number of outgoing faxes waiting to be sent.
Current Pages Queued for SendingThis displays the current number of outgoing fax pages waiting to be sent.
Available Disk Space for Fax ImagesThis is the percentage of disk space on your RightFAX server available for storingfax images.
Available Disk Space for Fax DatabaseThis is the percentage of disk space on your RightFAX server available for storingfax database information.
All-Time Faxes SentThis is the total number of faxes sent from this server since the All-Time CounterStarting Date (below).
All-Time Pages SentThis is the total number of fax pages sent from this server since the All-TimeCounter Starting Date (below).
All-Time Faxes ReceivedThis is the total number of faxes received on this server since the All-TimeCounter Starting Date (below).
All-Time Pages ReceivedThis is the total number of fax pages received on this server since the All-TimeCounter Starting Date (below).
All-Time Counter Starting DateThis is the starting date from which the "All-Time" statistics (above) are calcu-lated. This is typically the date of your RightFAX installation.
103Chapter 9: Enterprise Fax Manager
Channel Information
ChannelA list of each fax channel available on this RightFAX server.
OperationThis displays the current operational status of each channel.
Routing CodeThis displays the inbound routing code for incoming faxes.
User IDThis displays the destination user ID for incoming faxes.
Managing Services
The bottom half of the Server Status screen lists each RightFAX service, its status(running or stopped), the length of time it has been running, and its startup method(manual or automatic).
In order to manage services on remote servers, you must have network administra-tive access to the server as well as RightFAX administrative access. Specifically,you must have access to the \IPC$ directory on the remote server.
You can configure Enterprise Fax Manager to access each remote server with anadministrative NT user account by running the following from the command line:
NET USE \\ SERVER\IPC$ /User: domain\ID password
where SERVER is the name of the remote RightFAX server, domain\ID is thename of the remote domain (if any) and administrative user ID, and password isthe password for the specified user ID.
You can automate this process by creating and running a batch file that runs thisNET USE command for each remote RightFAX server and then executes Enter-prise Fax Manager. This will save you considerable time each time you runEnterprise Fax Manager, especially if your organization has several RightFAXservers.
Starting and Stopping ServicesTo start or stop any service, right-click on the service to open a menu of options.Select Start Service to start the selected service. Select Start all Services to startall services in the appropriate sequence. Select Stop Service to stop the selectedservice. Select Stop all Services to stop all services.
104 RightFAX Administrator's Guide
Configuring ServicesTo configure any configurable service, double-click on the service, or right-clickon the service to open a menu of options, then select Configure Service.
For information on configuring a RightFAX Fax Server, BoardServer, or Work-Server, please refer to the appropriate chapter in this guide. For information onconfiguring a RightFAX E-mail Gateway, please refer to the appropriate chapter inyour Optional Modules Guide or E-Mail Guide.
Managing Users
In RightFAX, "users" are individual RightFAX clients. Every individual Right-FAX client must have a unique User ID. For more information on users, seeChapter 10: Managing Users and Groups.
To add, edit, or delete RightFAX users, highlight Users under the RightFAX serverin the left portion of the screen. This opens a list of RightFAX users in the rightpart of the Enterprise Fax Manager Main screen.
Each user ID is preceded by an icon. If this icon is red, the user has administrativeaccess to RightFAX. If the icon is yellow, the user does not have administrativeaccess.
If this icon is red, the user has administrative access to RightFAX. A dot in the upper right indicates that the user is synchronized with another user record in another application, and any editing changes should be made to the user in that application, and not in RightFAX

105Chapter 9: Enterprise Fax Manager
Adding Individual Users
To add a new RightFAX user, press [Insert] or select New from the Edit menu.This opens the User Edit dialog:
The new user will have the same attributes as the DEFAULT user, except for theUser ID, User Name, Password, and Distinguished Name fields. Because eachRightFAX user must have a unique User ID, you must enter a value in the User IDfield to create the new user. All other fields are optional. For information oncompleting each of the options on each tab, please refer to Chapter 10: ManagingUsers and Groups.
Importing Users from the Network
To import users from a Windows NT volume, select Import Users from an NTDomain from the Utility menu.
For information on completing each of the fields on each tab of the Import Usersfrom NT Server/Domain dialog, please refer to Chapter 10: Managing Users andGroups.

106 RightFAX Administrator's Guide
Copying Users from one Server to Another
Enterprise Fax Manager lets you easily copy one or more users from one Right-FAX server to another. Select the user(s) you want to copy, then simply drag anddrop the selected user(s) onto another server listed in the left portion of the Mainscreen. The amount of information copied is configurable in your Preferences,described earlier in this chapter.
Editing User Properties
To edit the properties of an existing user, select the user to edit and press [Enter] orselect Edit from the Edit menu. You can also double click on the user. Thisopens the User Edit dialog (shown above).
For information on each of the fields on each tab of this dialog, please refer toChapter 10: Managing Users and Groups.
Deleting Users
To delete a user, select the user to delete and press [Delete] or select Delete fromthe Edit menu. By default, you will be prompted for confirmation that you want todelete the user (configured in Preferences, described earlier in this chapter).
Managing Groups
In RightFAX, the term "groups" refers to groups of RightFAX users. Groupingusers makes it easy for you as an administrator to set fax properties for multipleusers at once, instead of one user at a time. For more information on groups, seeChapter 10: Managing Users and Groups.
To add, edit, or delete RightFAX groups, highlight Groups under the RightFAXserver in the left portion of the screen. This opens a list of RightFAX groups inthe right part of the Enterprise Fax Manager Main screen.

107Chapter 9: Enterprise Fax Manager
Creating Groups
To create a new RightFAX group, press [Insert] or select New from the Edit menu.This opens the Group Edit dialog:
Because each RightFAX group must have a unique Group ID, you must enter avalue in the Group ID field to create the new group. All other fields are optional.For information on completing each of the options on each tab, please refer toChapter 10: Managing Users and Groups.
Copying Groups from one Server to Another
Enterprise Fax Manager lets you easily copy one or more groups from oneRightFAX server to another. Select the group(s) you want to copy, then simplydrag and drop the selected group(s) onto another server listed in the left portion ofthe Main screen.
Editing Group Properties
To edit the properties of an existing group, select the group to edit and press[Enter] or select Edit from the Edit menu. You can also double click on thegroup. This opens the Group Edit dialog (shown above). For information oneach of the fields on each tab of this dialog, please refer to Chapter 10: ManagingUsers and Groups.
Deleting Groups
To delete a group, select it and press [Delete] or select Delete from the Edit menu.By default, you will be prompted for confirmation that you want to delete thegroup (configured in Preferences, described earlier in this chapter).

108 RightFAX Administrator's Guide
Managing Signatures
In RightFAX, "signatures" are graphic files which can be easily inserted into adocument. Creating a graphic image of your signature lets you "sign" letters andother documents prior to faxing without having to print, sign, then scan the imageback in. For more information on creating and using signatures, see Chapter 11:Signatures, Forms, and Library Documents.
To edit or delete signature files, highlight Signatures under the RightFAX serverin the left portion of the screen. This opens a list of RightFAX signature files inthe right part of the Enterprise Fax Manager Main screen.
New signature files must be created from the FaxUtil mailbox. Only RightFAXusers with administrative access can create signature files.
Once you create a new signature file from within FaxUtil, it will appear as anobject in the Enterprise Fax Manager.
Editing Signature File Properties
To edit a signature file's properties, select the signature to edit and press [Enter] orselect Edit from the Edit menu. You can also double click on the signature. Thisopens the Edit Signature dialog:
Each field is configurable except for the Image File Name. This is createdautomatically when the signature file is created. All signature files are saved in the/RIGHTFAX/SIG directory on your RightFAX server. For information on each ofthe other fields on this dialog, please refer to Chapter 11: Signatures, Forms, andLibrary Documents.

109Chapter 9: Enterprise Fax Manager
Copying Signatures from one Server to Another
Enterprise Fax Manager lets you easily copy one or more signature files from oneRightFAX server to another. Select the signature(s) you want to copy, then simplydrag and drop the selected signature(s) onto another server listed in the left portionof the Main screen.
Deleting Signatures
To delete a signature, select the signature object and press [Delete] or select Deletefrom the Edit menu. By default, you will be prompted for confirmation that youwant to delete the signature (configured in Preferences, described earlier in thischapter).
Deleting the signature's reference in Enterprise Fax Manager does not automati-cally delete the signature file itself. A second confirmation dialog will ask you ifyou want to delete the file as well.
Managing Forms
In RightFAX, "forms" are graphic images that you can "overlay" a fax onto. Usingforms (such as letterhead or invoices) gives the appearance that your documentwas printed onto the form prior to faxing. For more information on creating andusing forms, see Chapter 11: Signatures, Forms, and Library Documents.
To edit or delete forms, highlight Forms under the RightFAX server in the leftportion of the screen. This opens a list of RightFAX form files in the right part ofthe Enterprise Fax Manager Main screen.
New form files must be created from the FaxUtil mailbox. Only RightFAX userswith Can Edit/Add Forms checked in their Permissions can create forms.
Once you create a new form from within FaxUtil, it will appear as an object in theEnterprise Fax Manager.

110 RightFAX Administrator's Guide
Editing Form Properties
To edit a form's properties, select the form object to edit and press [Enter] or selectEdit from the Edit menu. You can also double click on the form. This opens theEdit Form dialog:
Each field is configurable except for the Image File Name. This is createdautomatically when the form is created. All form files are saved in the/RIGHTFAX/PAPERS directory on your RightFAX server. For information oneach of the other fields on this dialog, please refer to Chapter 11: Signatures,Forms, and Library Documents.
Deleting Forms
To delete a form, select the form object and press [Delete] or select Delete fromthe Edit menu. By default, you will be prompted for confirmation that you want todelete the form (configured in Preferences, described earlier in this chapter).
Deleting the form's reference in Enterprise Fax Manager does not automaticallydelete the form file itself. A second confirmation dialog will ask you if you wantto delete the file as well.
Managing Printers
You must add and configure a printer in RightFAX in order to make it available forfax printing.
To add, edit, or delete printers from RightFAX, highlight Printers under theRightFAX server in the left portion of the screen. This opens a list of availableprinters in the right part of the Enterprise Fax Manager Main screen.

111Chapter 9: Enterprise Fax Manager
Adding Printers
To add a new RightFAX printer, press [Insert] or select New from the Edit menu.This opens the Edit Network Printer dialog:
For information on completing each of the options on this dialog, please refer toChapter 12: Printers and Billing Codes.
Copying Printers from one Server to Another
Enterprise Fax Manager lets you easily copy one or more printers from oneRightFAX server to another. Select the printer(s) you want to copy, then simplydrag and drop the selected printer(s) onto another server listed in the left portion ofthe Main screen.
Editing Printer Properties
To edit the properties of an existing printer, select the printer to edit and press[Enter] or select Edit from the Edit menu. You can also double click on theprinter. This opens the Edit Network Printer dialog (shown above).
For information on each of the fields on this dialog, please refer to Chapter 12:Printers and Billing Codes.
Deleting Printers
To delete a printer from RightFAX, select the printer to delete and press [Delete]or select Delete from the Edit menu. By default, you will be prompted forconfirmation that you want to delete the printer (configured in Preferences,described earlier in this chapter).

112 RightFAX Administrator's Guide
Managing Billing Codes
RightFAX can track and report individual fax activity using billing codes.RightFAX users may be required to enter one or two billing codes for every faxbefore it can be sent or deleted. These codes can be validated internally against amaster billing code table, or can be validated externally with a separate application(such as an accounting program). To validate billing codes internally, you mustcreate a list of all possible codes in RightFAX.
To add, edit, or delete billing codes from RightFAX, highlight Billing Codes underthe RightFAX server in the left portion of the screen. This opens the master list ofavailable billing codes in the right part of the Enterprise Fax Manager Mainscreen.
Adding Billing Codes
To add a new billing code, press [Insert] or select New from the Edit menu. Thisopens the Edit Billing Code dialog:
You may enter billing codes in either or both billing code fields. These fields mayhave different names, depending on how you have customized your cover sheetfields (described later in this chapter).
The Description field is optional. For more information on completing each of thefields on this dialog, please refer to Chapter 12: Printers and Billing Codes.
Copying Billing Codes from one Server to Another
Enterprise Fax Manager lets you easily copy one or more billing codes from oneRightFAX server to another. Select the code(s) you want to copy, then simply dragand drop the selected code(s) onto another server listed in the left portion of theMain screen.
Editing Billing Codes
To edit a billing code already listed, select the code to edit and press [Enter] orselect Edit from the Edit menu. You can also double click on the billing code.This opens the Edit Billing Code dialog (shown above).

113Chapter 9: Enterprise Fax Manager
For information on each of the fields on this dialog, please refer to Chapter 12:Printers and Billing Codes.
Deleting Billing Codes
To delete a billing code from RightFAX, select the code to delete and press[Delete] or select Delete from the Edit menu. By default, you will be promptedfor confirmation that you want to delete the billing code (configured in Prefer-ences, described earlier in this chapter).
Managing Library Documents
In RightFAX, library documents are documents that are stored in a centralizedlocation on the RightFAX server. This lets you create a "database" of documentsthat your organization faxes frequently (such as company literature, tax forms, oremployment forms) for easy access and distribution. For more information oncreating and using library documents, see Chapter 11: Signatures, Forms, andLibrary Documents.
To edit or delete library documents, highlight Library under the RightFAX serverin the left portion of the screen. This opens a list of library documents, includingsome usage statistics, in the right part of the Enterprise Fax Manager Main screen.
New library document files must be created from the FaxUtil mailbox. OnlyRightFAX users with Can Edit/Add Library Docs checked in their Permissionscan create library documents.
Once you create a new library document from within FaxUtil, it will appear as anobject in the Enterprise Fax Manager.

114 RightFAX Administrator's Guide
Editing Library Document Properties
To edit a library document's properties, select the library document object to editand press [Enter] or select Edit from the Edit menu. You can also double click onthe library document. This opens the Edit Library Document dialog:
Each field is configurable except for the Image File Name. This is createdautomatically when the library document is created. All library document files aresaved in the /RIGHTFAX/IMAGE directory on your RightFAX server. Forinformation on each of the other fields on this dialog, please refer to Chapter 11:Signatures, Forms, and Library Documents.
Copying Library Documents from one Server to Another
Enterprise Fax Manager lets you easily copy one or more library documents fromone RightFAX server to another. Select the document(s) you want to copy, thensimply drag and drop the selected document(s) onto another server listed in the leftportion of the Main screen.
Deleting Library Documents
To delete a library document, select it and press [Delete] or select Delete from theEdit menu. By default, you will be prompted for confirmation that you want todelete the library document (configured in Preferences, described earlier in thischapter).
Deleting the library document's reference in Enterprise Fax Manager does notautomatically delete the file itself. A second confirmation dialog will ask you ifyou want to delete the file as well.
115Chapter 9: Enterprise Fax Manager
Resetting Library Document Usage Statistics
Enterprise Fax Manager keeps a record of each time a library document is sent viaFax on Demand, the Web, or local area network, and displays the totals in the rightportion of the Enterprise Fax Manager Main screen. To reset these counters backto zero, highlight the library document(s) to reset and select Reset Usage Countsfrom the Edit menu.
Managing Pager and SMS Services
RightFAX can be configured to page clients and administrators to alert them ofspecified RightFAX events. This feature also lets you send SMS (Short MessageService) messages to cellular phones with SMS capability. To configure pager/SMS services in RightFAX, you must first create a list of available service typesand providers, then specify pager information and alert events for each user.
Users can be paged via SMTP e-mail (requiring Internet connectivity), or via TAPor UCP protocols (requiring any TAPI or AT compatible modem).
Configuring Pager Services
You must create a pager service configuration for each type of paging service yourusers subscribe to. To add, edit, or delete pager services, highlight SMS/PagerServices under the RightFAX server in the left portion of the screen. This opens alist of pager services.
Pager notification isavailable in RightFAX
Enterprise and EnterpriseSuite servers only

116 RightFAX Administrator's Guide
To add a new pager service, press [Insert] or select New from the Edit menu. Thisopens the Edit SMS/Pager Service Definition dialog:
The fields that are available depend on the service type you select. Complete eachfield according to the specifications provided by your service provider.
Service IDEnter a descriptive ID for the service provider/type .
Service TypeSelect the service type (SMTP e-mail, TAP, or UCP). SMTP requires that yourRightFAX have SMTP connectivity to the Internet. Both TAP and UCP requireyour server to dial the service provider via modem.
SMTP ServerIf you select SMTP as your service type, enter the name of your service provider'sSMTP server.
SMTP Sender AddressBecause some SMTP message servers require the sender's SMTP address, enter avalid SMTP mail address from which the page message will be sent.
When you edit andrename a listed pager
service, Enterprise FaxManager automaticallycreates a copy of theservice with the new
name, rather than simplyrenaming the service.
117Chapter 9: Enterprise Fax Manager
Terminal Phone NumberEnter your service provider's modem phone number for TAP and UCP messaging.
Service PasswordIf your service provider requires a password to access their TAP or UCP messag-ing systems, enter the password here.
ProviderSelect the specific provider for your UCP or TAP service. If your provider is notlisted here, select None.
Timeout SettingsIn the Connection Timeout field, enter the length of time, in seconds, forRightFAX to successfully connect to the TAP or UCP messaging system. In theMessage Transaction Timeout field, enter the length of time, in seconds, forRightFAX to successfully send the message to the TAP or UCP messaging system.If a timeout occurs in either of these cases, RightFAX will abandon the call and nomessage will be sent.
Maximum Message SizeEnter the maximum number of characters allowed by your service provider forpager/SMS messages.
Modem Communication DriverSelect the COM port for your modem on the RightFAX server. If you haveinstalled one or more TAPI modems on your RightFAX server, you can select fromthose modems as well. If you select a TAPI modem, the Direct Modem Param-eters settings (below) will gray out as those settings will be taken from your TAPImodem configuration on the RightFAX server.
Ignore TAPI Dialing Location RulesIf you have specified a TAPI modem in the Modem Communication Driver field(above), you can check this option to ignore any specified dialing location rules(such as add 9 to dial out) in the TAPI configuration.
Direct Modem ParametersComplete each of these fields according to your modem type and phone system'sdialing requirements. If your paging/SMS service provider recommends a baudrate for connecting to their TAP/UCP systems, enter that baud rate in the PortSpeed field.
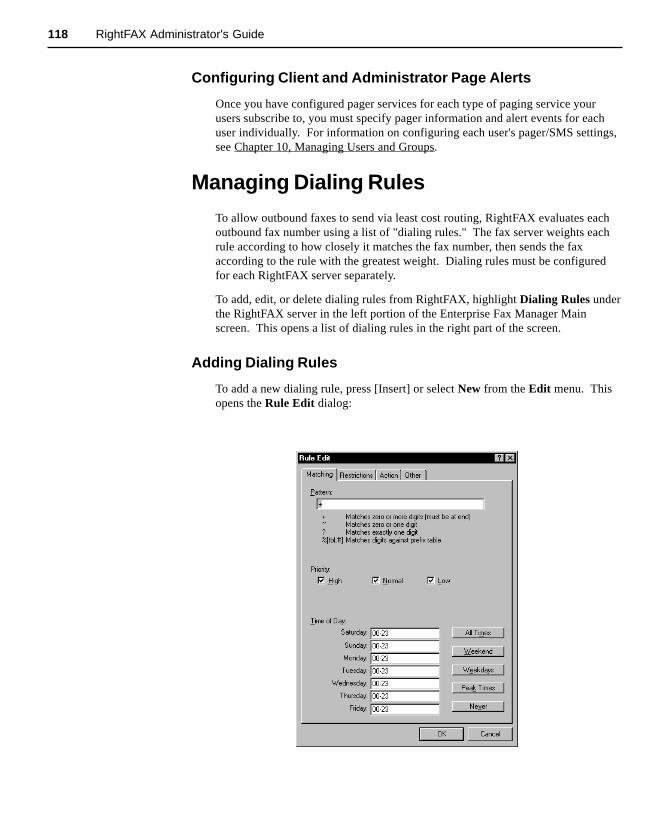
118 RightFAX Administrator's Guide
Configuring Client and Administrator Page Alerts
Once you have configured pager services for each type of paging service yourusers subscribe to, you must specify pager information and alert events for eachuser individually. For information on configuring each user's pager/SMS settings,see Chapter 10, Managing Users and Groups.
Managing Dialing Rules
To allow outbound faxes to send via least cost routing, RightFAX evaluates eachoutbound fax number using a list of "dialing rules." The fax server weights eachrule according to how closely it matches the fax number, then sends the faxaccording to the rule with the greatest weight. Dialing rules must be configuredfor each RightFAX server separately.
To add, edit, or delete dialing rules from RightFAX, highlight Dialing Rules underthe RightFAX server in the left portion of the Enterprise Fax Manager Mainscreen. This opens a list of dialing rules in the right part of the screen.
Adding Dialing Rules
To add a new dialing rule, press [Insert] or select New from the Edit menu. Thisopens the Rule Edit dialog:

119Chapter 9: Enterprise Fax Manager
For information on completing each of the fields on each tab of this dialog, pleaserefer to Chapter 13: LCR and Dialing Plan Configuration.
Copying Dialing Rules from one Server to Another
Enterprise Fax Manager lets you easily copy one or more dialing rules from oneRightFAX server to another. Select the rule(s) you want to copy, then simply dragand drop the selected rule(s) onto another server listed in the left portion of theMain screen. The amount of information copied is configurable in your Prefer-ences, described earlier in this chapter.
Editing Dialing Rules
To edit a dialing rule, select the rule to edit and press [Enter] or select Edit fromthe Edit menu. You can also double click on the dialing rule. This opens the RuleEdit dialog (shown above).
For information on each of the fields on this dialog, please refer to Chapter 13:LCR and Dialing Plan Configuration.
Deleting Dialing Rules
To delete a dialing rule, select the rule to delete and press [Delete] or select Deletefrom the Edit menu. By default, you will be prompted for confirmation that youwant to delete the billing code (configured in Preferences, described earlier in thischapter).
Saving Changes to Dialing Rules
To quickly save any editing change you have made to your dialing rules, press[Ctrl+S] or select Save Dialing Rules from the File menu.
Testing Dialing Rules
RightFAX provides several utilities for testing and diagnosing dialing rules. Eachof the four dialing rule tests, Ping Server, Trace Fax Routing, Rule Execution,and Show Downed Server List, is listed on the Enterprise Fax Manager Testmenu. You must select Dialing Rules under an open server in the left portion ofthe Main screen for these menu options to become available.
For information on each of these diagnostic options, please refer to Chapter 13:LCR and Dialing Plan Configuration.

120 RightFAX Administrator's Guide
Managing Prefix Tables
Prefix tables let you store and organize groups of numbers such as dialing prefixesand area codes. These tables are used when creating least cost routing dialingrules to represent a range of numbers, rather than having to create a separate rulefor each number pattern.
To add, edit, or delete prefix tables from RightFAX, highlight Prefix Tables underthe RightFAX server in the left portion of the Enterprise Fax Manager Mainscreen. This opens a list of prefix tables in the right part of the screen.
Creating New Prefix Tables
To create a new prefix table, press [Insert] or select New from the Edit menu.This opens the Prefix Table Edit dialog:
For information on completing each of the fields on this dialog, please refer to theChapter 13: LCR and Dialing Plan Configuration.
Copying Prefix Tables from one Server to Another
Enterprise Fax Manager lets you easily copy one or more prefix tables from oneRightFAX server to another. Select the table(s) you want to copy, then simply dragand drop the selected table(s) onto another server listed in the left portion of theMain screen.

121Chapter 9: Enterprise Fax Manager
Editing Prefix Tables
To edit a prefix table, select the table to edit and press [Enter] or select Edit fromthe Edit menu. You can also double click on the prefix table. This opens thePrefix Table Edit dialog (shown above).
For information on each of the fields on this dialog, please refer to Chapter 13:LCR and Dialing Plan Configuration.
Deleting Prefix Tables
To delete a prefix table, select the table to delete and press [Delete] or selectDelete from the Edit menu. By default, you will be prompted for confirmationthat you want to delete the billing code (configured in Preferences, describedearlier in this chapter).
Customizing Cover Sheet Fields
In order to transmit an outgoing fax, RightFAX requires that certain information becompleted in the Fax Information dialog (described in Chapter 3 of the RightFAXUser's Guide.) As the RightFAX administrator, you can specify how much or howlittle information the user must complete before the fax is considered ready tosend. You can also require certain fields be completed in received faxes (forbilling purposes) before they can be deleted. In addition, you can customize thefield names for your Billing Code 1 and Billing Code 2 information.
To customize your cover sheet settings and requirements, select Customize CoverSheet Fields from the Utility menu.
For information on completing each option on each tab of the Customize CoverSheet Information dialog, please refer to Chapter 14: Creating and Using CoverSheets.
Synchronizing RightFAX with ExternalSystems
When you select Synchronize External Systems from the Utility menu, theWorkServer(s) will be forced to synchronize with any external systems immedi-ately, as opposed to at the scheduled time. RightFAX normally synchronizes withsystems like the Kofax NetScan user tables, library document catalogs, and importfiles for billing codes on a periodic basis. When you choose this option, synchro-nization happens as soon as possible, although the normal schedule is alsofollowed.

122 RightFAX Administrator's Guide

Managing Users and Groups
In this chapter:
• Managing Users• Editing User Properties• Importing Users• Managing Groups• Editing Group Properties• Using the ModUser Utility

124 RightFAX Administrator's Guide
Managing Users
To display a list of all registered users on a RightFAX server, highlight Users underthe desired RightFAX server in the left portion of the Enterprise Fax ManagerMain screen:
For more information on using the Enterprise Fax Manager, see Chapter 9,Enterprise Fax Manager.
The DEFAULT RightFAX User
The RightFAX DEFAULT user ID is automatically included in your list of userson each RightFAX server. This user is used as a template when creating new users.Also, faxes that, for whatever reason, cannot be assigned owners have theirownership assigned to the DEFAULT user. When you are configuring yourRightFAX users, your should edit the DEFAULT user to have the same attributesas the majority of your fax clients. Never delete the Default user ID.
Adding New Users Individually
To add a new RightFAX user, press [Insert] or select New from the Edit menu.This opens the User Edit dialog. The new user will have the same attributes as theDEFAULT user, except for the User ID, User Name, Password, and Distin-guished Name fields. Because each RightFAX user must have a unique User ID,you must enter a value in the User ID field to create the new user. All other fieldsare optional. See Editing User Properties (below) for information on completingeach of the options on each tab of this dialog.

125Chapter 10: Managing Users and Groups
Deleting Users
To delete a user, select the user to delete and press [Delete] or select Delete fromthe Edit menu. By default, you will be prompted for confirmation that you wantto delete the user.
Editing User Properties
To edit the properties of an existing user, select the user to edit and press [Enter]or select Edit from the Edit menu. You can also double-click on the user. Thisopens the User Edit dialog. This dialog is divided into ten separate tabs, eachdescribed below.
Identification
To make global editingchanges to selectedgroups of users, you
must use the ModUserUtility, described later in
this chapter

126 RightFAX Administrator's Guide
User ID The User ID field is the identifier which will be used throughout the RightFAXsystem to identify a user. This ID should be the same as the user’s network logonname, because RightFAX uses it when starting FaxUtil and Enterprise Fax Managerand to match up print jobs. The User ID must be unique; no two RightFAX usersmay have the same ID's. This should not present a problem since most networksoftware enforces this same restriction.
User NameThis is simply a descriptive field by which to identify users. RightFAX makes nouse of this field in normal operations. When a user is automatically added by thefax server during import, the User Name field will be read from the Bindery(NetWare 3.x), NDS (NetWare 4.x), or Domain Controller (NT).
PasswordThis field is only available for newly created users or if the Change Passwordbutton is pressed. If Change Password is pressed and no password is entered, theuser's password will be erased. You can change the user's password withoutknowing the old password.
Distinguished NameThe MS-Exchange distinguished name, used to confirm accurate RightFAX/Exchange user synchronization.
Group IDUsing the drop-down list, select the name of the group of which this user is amember. Groups must be created before creating a new user in order to be listed inthe drop-down list.
Voice Mail Subscriber IDIf you want to route faxes to an AVT CallXpress mailbox, enter the appropriatemailbox number here. This field is also used to assign TeleConnect mailboxnumbers to RightFAX accounts (requires optional TeleConnect Module, purchasedseparately).
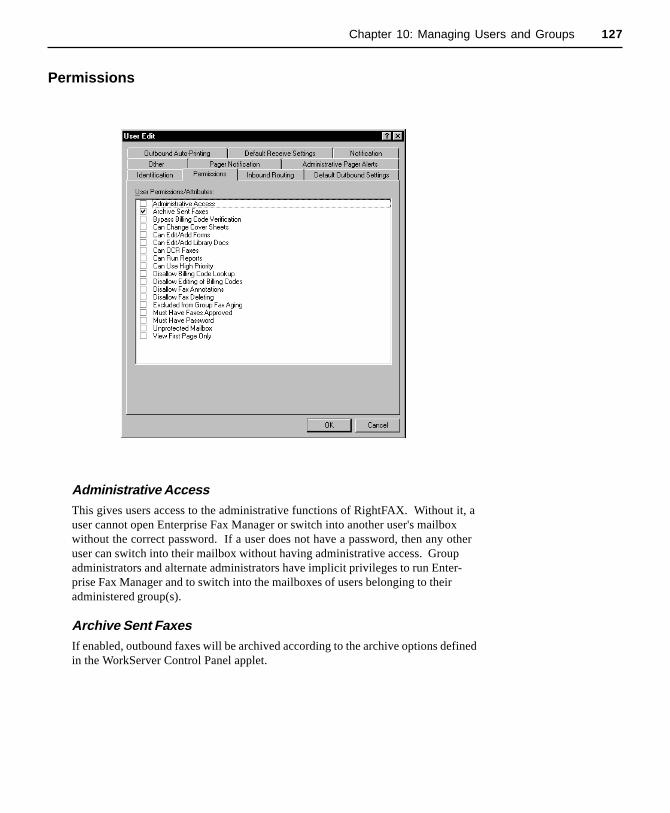
127Chapter 10: Managing Users and Groups
Permissions
Administrative AccessThis gives users access to the administrative functions of RightFAX. Without it, auser cannot open Enterprise Fax Manager or switch into another user's mailboxwithout the correct password. If a user does not have a password, then any otheruser can switch into their mailbox without having administrative access. Groupadministrators and alternate administrators have implicit privileges to run Enter-prise Fax Manager and to switch into the mailboxes of users belonging to theiradministered group(s).
Archive Sent FaxesIf enabled, outbound faxes will be archived according to the archive options definedin the WorkServer Control Panel applet.

128 RightFAX Administrator's Guide
Outbound faxes are archived upon their completion, whether successful orunsuccessful. Faxes with a status (ER:XXX), where ER stands for Error-Retry,are not archived. If a fax fails too many times, as defined by the Retry Countparameter in the Fax Server Control Panel applet, then its status will change toError-Dropped (ED:XXX). It is at that point that the fax will be archived. In thisway, a fax which fails five times in a row will not be archived five times. If a faxfails and then succeeds on a subsequent retry, it will be archived after it succeeds.
Enabling Archive Sent Faxes implicitly disables Automatic Deleting of sentfaxes (an option controlled by the user from within FaxUtil.)
Bypass Billing Code VerificationThis attribute is only effective if billing code verification is enabled on a system-wide basis. If so, then any user with this attribute enabled will be allowed to sendfaxes without supplying correct billing codes. This attribute will not exclude theuser from having to supply other required fields in order to be able to send faxes.
Can Change Cover SheetsThis allows a user to freely change cover sheets. If you want to restrict users to aspecific cover sheet, remove this attribute by un-checking the field.
Can Edit/Add FormsThis parameter allows users to use the Store as Form feature of FaxUtil to addforms to the RightFAX system.
Can Edit/Add Library DocsThis parameter allows users to use the Store in Library feature of FaxUtil to adddocuments to the RightFAX library.
Can OCR FaxesThis controls whether or not a user can OCR faxes using RightFAX’s optionalOptical Character Recognition software. Users initiate the OCR process viaFaxUtil. This attribute does not affect OCR routing and does not have to beenabled if OCR routing is being used.
Can Run ReportsThis parameter allows users to create fax information reports from new andexisting data sets using the RightFAX Fax Reporter.
Can Use High PriorityThis check box controls whether or not a user can send faxes using High priority.Without this attribute enabled, a user is restricted to Normal and Low prioritiesselected from FaxUtil and through the embedded code <PRIORITY:XXXX> whereXXXX can be High, Normal or Low.

129Chapter 10: Managing Users and Groups
Disallow Billing Code LookupEnabling this security feature will prevent a user from viewing the entire list ofvalid billing codes. Instead they must know the code they need.
Disallow Editing of Billing CodesIf this attribute is checked, the user will not be able to change their default billingcode settings for outgoing faxes. In addition, any billing codes in phonebookentries will be ignored, as will any <BILLINFO> embedded codes.
Disallow Fax AnnotationsWhen enabled, this attribute will prevent a user from adding notes to faxes.
Disallow Fax DeletingWhen enabled, this attribute will prevent a user from deleting faxes. It is useful forpersons doing manual routing. The restriction applies to the user as opposed tothe mailbox, so even if the user switches mailboxes, he still cannot delete faxes.
Excluded from Group Fax AgingWhen enabled, this feature excludes a specific user from the automatic fax aging(image deletion) attributes of the group to which the user belongs.
Must Have Faxes ApprovedThis feature enables the fax authorization system for this user. If checked on,every fax the user sends must be approved by a full, group, or alternate groupadministrator.
Must Have PasswordWith this box checked, the user MUST have a password. Once a password hasbeen created for that user, they will not be allowed to enter a blank password whenthey change their password. This does not restrict the user from changing theirpassword.
Unprotected MailboxNormally, only administrators can switch into a mailbox without supplying apassword to the mailbox. By enabling this attribute, any user can switch into thismailbox without having to supply a password. This is useful when setting upgeneral or group mailboxes where security is not an issue. This does not affectsecurity of phonebook entries belonging to this mailbox.
You must check bothDisallow Billing CodeLookup and Disallow
Editing of Billing Codesto ensure that users will
not be able to modifytheir default billing code
settings

130 RightFAX Administrator's Guide
View First Page OnlyThis attribute restricts users from viewing or printing anything but the first page ofa received fax (useful when manual routing is employed). The restriction applies tothe mailbox, not a user. Therefore, a user cannot log on to RightFAX as them-selves, switch into a mailbox with the View First Page Only restriction, and beable to view anything but the first page of any received fax. Faxes must be routedout of a restricted mailbox to another user before subsequent pages could be viewedor printed.
Inbound Routing
Routing Code (DID/DNIS Number)This field lets you determine exactly who to route the fax to. You may specify theDTMF extension, DID phone number, or channel number which you have assignedto this user. Any fax received for this Routing Code through a DID phone line orvia DTMF routing tones, will be placed in this user’s fax mailbox.

131Chapter 10: Managing Users and Groups
As is true with the user ID, the Routing Code should be unique. The same faxcannot be routed to more than one person at a time, unless you are not going to useDID or DTMF routing. This rule, however, is not enforced so you must ensurethat no Routing Code is used more than once. If you do use the same RoutingCode more than once, only one of the persons to whom it is assigned will receiveincoming faxes. For more information on inbound routing, see Appendix E,Automatic Inbound Routing.
Routing TypeThis field lets you specify to what application each incoming fax will be routed toafter it arrives in the user's FaxUtil mailbox. For more information on each of theoptions in this list box, see Appendix E, Automatic Inbound Routing.
File FormatSome of the above Routing Types let you choose the file format in which the faxwill be delivered. Select from the following:
PCX - This format produces a single page per file with an average fax page size of135 Kb. It is useful for routing received faxes to cc:Mail, DOS, and Macintoshclients as cc:Mail for DOS and Macintosh have built-in capabilities to view PCXformatted fax pages. This format is not recommended for Windows clients, asPCX is a large format and users have to sift through multiple attachments whenviewing multi-paged faxes.
DCX - This format is simply a consolidation of multiple PCX pages into a singlefile. It solves the multiple attachment problem of PCX files, but maintains the largepage size (average of 135 Kb per page). MS Mail clients have the capability toview DCX formatted faxes.
TIFF-G3/TIFF-G4 - TIFF is a common graphics file format. TIFF-G3 are TIFF-structured files that are much better for monochromatic pages like fax pages(average of 35 Kb per page). Most of the newer e-mail packages have the ability tonatively read TIFF-G3 files. However, you can associate the RightFAX FaxViewer with TIFF-G3 files to view these faxes in any of the e-mail packages. TheTIFF-G4 standard offers a newer, even more compressed file format.
If users will be receivingtheir faxes in e-mail andthey will be using one of
the remote e-mailpackages (i.e. using a
modem to retrievemessages), TIFF-G3 orTIFF-G4 should be used
for its superior com-pression rates.

132 RightFAX Administrator's Guide
Routing InfoThis field lets you enter information that distinguishes exactly how to route the faxto the intended recipient. If you are routing faxes to an e-mail mailbox, you mustenter the e-mail address here. For information on the required Routing Info foreach routing type, see Appendix E, Automatic Inbound Routing.
Delete After RoutingCheck this option to automatically delete received faxes from the user's FaxUtilmailbox after the fax has been successfully routed.
Received Fax Routing FormIf you set your Routing Type to Exchange Mailbox, and you have installedOutlook forms (described in the RightFAX Optional Modules Guide), select theform you want to route incoming faxes to. Select {Default} to use the form set inthe E-mail Gateway Control Panel applet.
Default Outbound Settings

133Chapter 10: Managing Users and Groups
Default Fax ResolutionFaxes can be sent at two different resolutions: Normal - 100 x 200 dots per inch(DPI) and Fine - 200 x 200 DPI. Normal mode works well for draft-qualityresolution and shorter transmission times. Fine resolution is recommended forhigh-quality printed documents and optical character recognition (OCR). Thissetting affects the body of a fax, but not the cover sheet.
Default PriorityThis field can be set to low, normal, or high priority. This determines the priorityat which all faxes are responded to by the fax server unless otherwise specified onthe sender's Fax Information screen.
Auto-Delete SettingBecause fax images can occupy a large amount of disk space, you may want toautomatically delete a user's faxes as soon as they are sent. You can specifywhether to delete all faxes, only those successfully sent, or none of the faxes. Thedisadvantage to using this option is that you will not be able to view what yousent, it will not appear on your fax list, and cannot be forwarded. Enablingautomatic deletion does not affect the original document if it was created in anotherapplication. If the user has the Archive Sent Faxes permission checked, thatsetting will always override this setting.
Use Smart-Resume?RightFAX incorporates technology that allows the fax server to intelligently resendonly the portion of a fax which failed to send. For example, if you are sending a50-page fax and the transmission is broken after 40 pages, normally all 50 pageshave to be present. By enabling this feature, the server will only resend the last 10pages.
Cover Sheet DefaultsCheck the option Send Cover Sheets to enable the user to send cover sheets withfaxes. If this option is checked, select the fax cover sheet file to use in the CoverSheet Model field. This pull down menu lists all fax cover sheet files in the\RIGHTFAX\FCS directory. You can also set the fax cover sheet default resolutionto normal or fine.
Complete the remaining fields with the user's name, fax, and phone numberinformation as you want it to appear on fax cover sheets.

134 RightFAX Administrator's Guide
Other
Automatic Fax List UpdatesCheck this option to configure the user's FaxUtil mailbox to automatically refresh(scan for new faxes).
Update Interval in SecondsIf you checked the option Automatic Fax List Updates, this setting is the intervalat which updates will occur.
Default Billing CodesThese two fields are the Billing Code 1 and Billing Code 2 settings that will beentered in the Fax Information dialog for this user each time a fax is sent.

135Chapter 10: Managing Users and Groups
Pager Notification
RightFAX can be configured to page clients and administrators to alert them ofspecified RightFAX events. This feature also lets you send SMS (Short MessageService) messages to cellular phones with SMS capability. This dialog lets youspecify which fax events to notify the user of.
Before completing this dialog, you must first configure a list of available servicetypes and providers. For information on configuring paging/SMS services, seeChapter 9, Enterprise Fax Manager.
Pager IDEnter the user's pager ID. This is usually a numeric ID and is often the phonenumber for the pager.
Pager/SMS ServiceSelect the user's pager/SMS service from the drop-down list. If you have notadded and properly configured paging/SMS services for this user, you must do sobefore completing this dialog. See Chapter 9, Enterprise Fax Manager for informa-tion on configuring paging/SMS services.
Pager Notification isavailable in RightFAXEnterprise and Enter-
prise Suite servers only
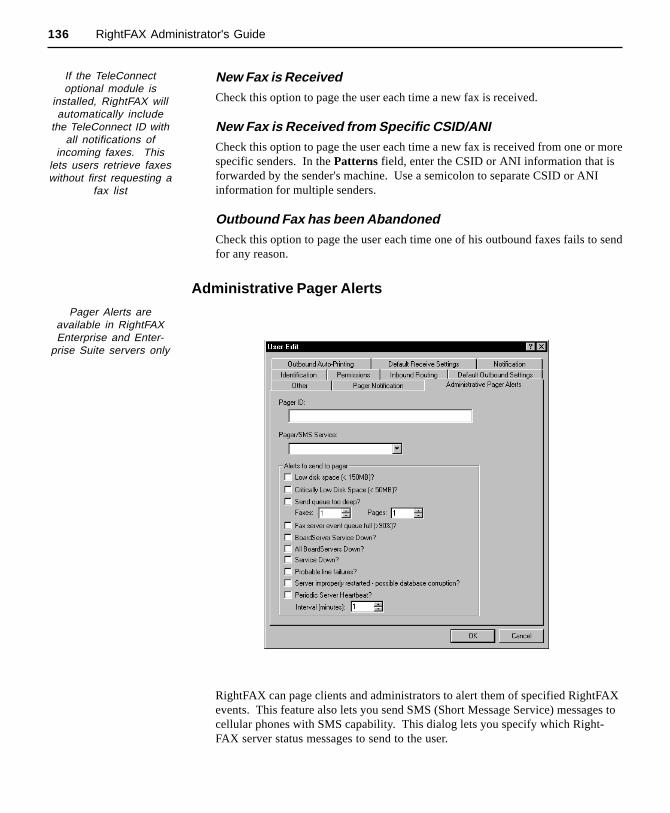
136 RightFAX Administrator's Guide
New Fax is ReceivedCheck this option to page the user each time a new fax is received.
New Fax is Received from Specific CSID/ANICheck this option to page the user each time a new fax is received from one or morespecific senders. In the Patterns field, enter the CSID or ANI information that isforwarded by the sender's machine. Use a semicolon to separate CSID or ANIinformation for multiple senders.
Outbound Fax has been AbandonedCheck this option to page the user each time one of his outbound faxes fails to sendfor any reason.
Administrative Pager Alerts
RightFAX can page clients and administrators to alert them of specified RightFAXevents. This feature also lets you send SMS (Short Message Service) messages tocellular phones with SMS capability. This dialog lets you specify which Right-FAX server status messages to send to the user.
If the TeleConnectoptional module is
installed, RightFAX willautomatically include
the TeleConnect ID withall notifications of
incoming faxes. Thislets users retrieve faxeswithout first requesting a
fax list
Pager Alerts areavailable in RightFAXEnterprise and Enter-
prise Suite servers only

137Chapter 10: Managing Users and Groups
Before completing this dialog, you must first configure a list of available servicetypes and providers. For information on configuring paging/SMS services, seeChapter 9, Enterprise Fax Manager.
Pager IDEnter the user's pager ID. This is usually a numeric ID and is often the phonenumber for the pager.
Pager/SMS ServiceSelect the user's pager/SMS service from the drop-down list. If you have notadded and properly configured paging/SMS services for this user, you must do sobefore completing this dialog. See Chapter 9, Enterprise Fax Manager for informa-tion on configuring paging/SMS services.
Low Disk SpaceCheck this option to send a page when free hard drive space on the RightFAXserver falls below 150 Mb.
Critically Low Disk SpaceCheck this option to send a page when free hard drive space on the RightFAXserver falls below 50 Mb.
Send Queue too DeepCheck this option to page the user when the number of faxes or fax pages queuedto send exceeds a fixed number. Enter the number of faxes to exceed in the Faxesfield. Enter the number of fax pages to exceed in the Pages field.
Fax Server Event Queue FullCheck this option to send notification when the percentage of the fax server'sinternal Event Queue reaches 90%. The Event Queue is described in Chapter 4,Configuring the RightFAX Server.
BoardServer Service DownCheck this option to send a notification when, for any reason, one of theBoardServers becomes unable for sending and receiving faxes.
All BoardServers DownCheck this option to send a notification when, for any reason, all the BoardServersbecome unable for sending and receiving faxes.
Service DownCheck this option to send notification when any RightFAX service stops for anyreason.
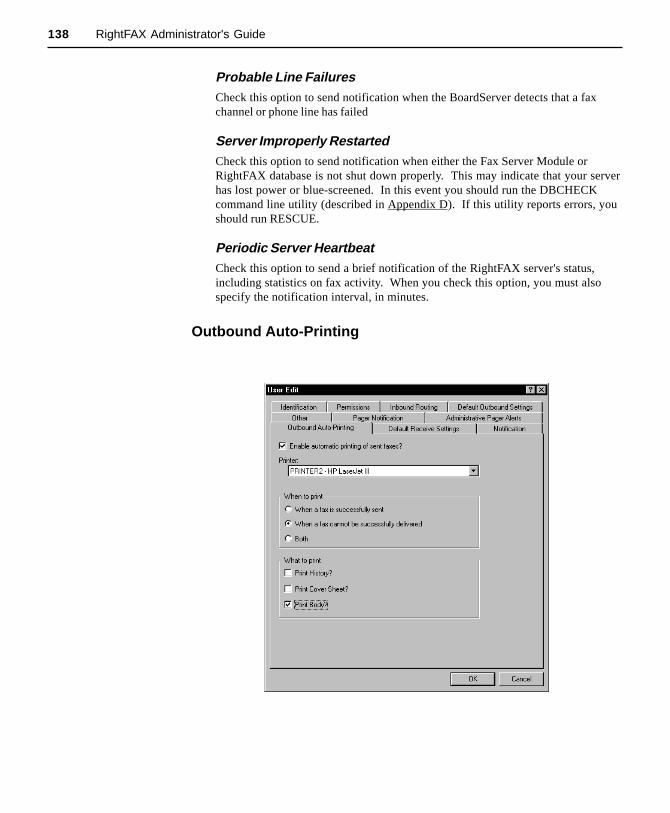
138 RightFAX Administrator's Guide
Probable Line FailuresCheck this option to send notification when the BoardServer detects that a faxchannel or phone line has failed
Server Improperly RestartedCheck this option to send notification when either the Fax Server Module orRightFAX database is not shut down properly. This may indicate that your serverhas lost power or blue-screened. In this event you should run the DBCHECKcommand line utility (described in Appendix D). If this utility reports errors, youshould run RESCUE.
Periodic Server HeartbeatCheck this option to send a brief notification of the RightFAX server's status,including statistics on fax activity. When you check this option, you must alsospecify the notification interval, in minutes.
Outbound Auto-Printing

139Chapter 10: Managing Users and Groups
Enable Automatic Printing of Sent FaxesCheck this option to configure the user to automatically print all sent faxes. If thisoption is checked, you must also select a printer from the drop down list ofavailable printers. These are the printers that you have set up under Printers inthe Enterprise Fax Manager (described in Chapter 12, Printers and Billing Codes.)
When to PrintThese options let you specify whether to print successfully sent faxes, faxes thatwere not successfully sent, or both. You may only check one option at a time, andselecting one will automatically unselect the others.
What to PrintThese options let you specify whether to automatically print the fax history, thefax cover sheet, and/or the fax body.
Default Receive Settings
Automatic Forwarding OptionsCheck Enabled to automatically forward this user's faxes to either a fax machine oranother network user as soon as they are received. Specify the fax number orRightFAX user ID to forwarding to.

140 RightFAX Administrator's Guide
Automatic Printing OptionsCheck Enabled to automatically print received faxes. If this option is checked, youmust also select a printer from the drop down list of available printers. These arethe printers that you have set up under Printers in the Enterprise Fax Manager(described in Chapter 12, Printers and Billing Codes.) You may also specify aprint resolution (high, medium, or low.)
Automatic OCR OptionsCheck Enabled to automatically OCR all faxes. This option converts received faximages to editable text and requires the OCR Optional Module. Enter a three-letterfile extension for the output file in the Extension field.
In the Format field, select the text format used to interpret your fax pages. ASCIIproduces a plain text file. Smart ASCII approximates the original format. RTF(Rich Text Format) preserves fonts and formatting, but is only available forWindows clients.
In the Layout field, select how you want the text to be formatted on the page.WYSIWYG will try to read the fax in the layout it sees. If, for instance, Right-FAX sees that the fax has three columns, it will try to read the document in columnstyle. Left Justified displays the text starting from the left margin of the fax.
Notification
141Chapter 10: Managing Users and Groups
These settings let you configure how and when users are notified of sent andreceived faxes, their status in the RightFAX system, and any errors encounteredduring transmission. This lets users work in other applications and still be awareof their fax mailbox activity.
Notification MethodFrom the pull down list, select the notification method (e-mail, pager, etc.) for theuser.
Select Use Group's Type to use the notification type assigned to the user's group.Select cc:Mail , Notes, MS Mail , GroupWise, Exchange, or SMTP to send faxnotifications to the user's e-mail mailbox (requires the optional RightFAX E-mailGateway module.) You must specify the e-mail address of the user in the RoutingInformation field (below).
RightFAX can also send fax messages to a pager. If you select Pager, you mustenter the pager service/SMS information in the Routing Information field(below).
RightFAX also lets you design custom notification methods. For information,please contact RightFAX Technical Support.
Notification Address/InfoIn this field, specify the user's e-mail address for e-mail notification, or otherinformation necessary for sending fax notifications of the type selected in theNotification Method field.
Notification About Outbound FaxesCheck any or all of the events for outbound faxes for which the user will receivenotification.
Notification About Received FaxesCheck any or all of the events for received faxes for which the user will receivenotification. If you check the option Reroute Received Fax Notification, you mustalso select a RightFAX user ID to route to from the pulldown list.

142 RightFAX Administrator's Guide
Importing Users
You can automatically import groups of users from your network to RightFAX allat one time. Select Import Users from NT Domain from the Enterprise FaxManager Utility menu. This opens the Import Users from NT Server/Domaindialog:
Enter the computer name of the Primary Domain Controller (PDC) or BackupDomain Controller (BDC) from which the users will be imported. Select the groupto import, then specify the RightFAX user ID to use as a template.
If you want to automatically assign a routing code to each user, check the Auto-matically Assign Routing Codes option, then enter the starting code. The firstimported user will receive the starting routing code and each additional user'srouting code will increment by one. If the system increments to a routing code thatalready exists, it will be skipped.
When you have completed the dialog, click on the Import button to begin.
You can also use the IMPUSER program to import users from an NT domain. Formore information on IMPUSER, see Appendix D, Command Line References.

143Chapter 10: Managing Users and Groups
Managing Groups
A "group" is a set of users to which you can assign a common administrator,alternate administrator, fax options, and fax cover sheet. Groups let you subdivideyour organization in order to manage the RightFAX system more efficiently.
For example, instead of having one administrator for your entire organization, youcan have different fax administrators for the Marketing and Sales departments.This would mean creating separate marketing and sales groups in RightFAX.
Groups also play an important role in the process of notifying users of new faxes.If a user does not respond to their notification by viewing or printing a new faxwithin a specified time, the group administrator will be alerted to the fax, who maythen print the fax or forward it to someone who will read it.
To display a list of all groups on a RightFAX server, highlight Groups under thedesired RightFAX server in the left portion of the Enterprise Fax Manager Mainscreen:
For more information on using the Enterprise Fax Manager, see Chapter 9,Enterprise Fax Manager.
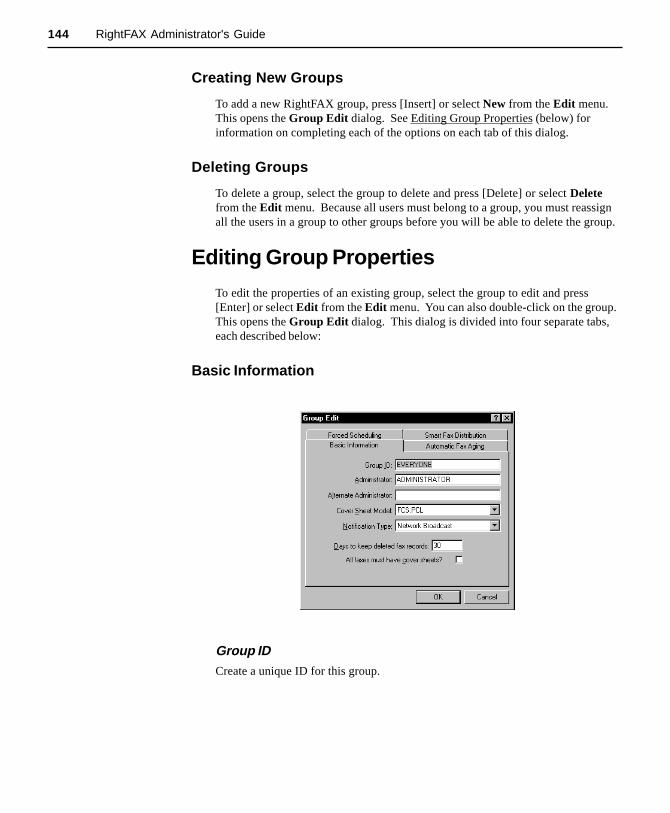
144 RightFAX Administrator's Guide
Creating New Groups
To add a new RightFAX group, press [Insert] or select New from the Edit menu.This opens the Group Edit dialog. See Editing Group Properties (below) forinformation on completing each of the options on each tab of this dialog.
Deleting Groups
To delete a group, select the group to delete and press [Delete] or select Deletefrom the Edit menu. Because all users must belong to a group, you must reassignall the users in a group to other groups before you will be able to delete the group.
Editing Group Properties
To edit the properties of an existing group, select the group to edit and press[Enter] or select Edit from the Edit menu. You can also double-click on the group.This opens the Group Edit dialog. This dialog is divided into four separate tabs,each described below:
Basic Information
Group IDCreate a unique ID for this group.

145Chapter 10: Managing Users and Groups
AdministratorEnter the user ID of the person who will be the administrator of this group. Theadministrator will have access to all the mailboxes in this group and will receivemessages about faxes belonging to group members if a user has not printed orviewed a fax in the designated interval. You can enter an ID here even if you havenot yet created that user in RightFAX or you can leave it blank and fill it in aftercreating users.
Alternate AdministratorEnter the user ID of the person who will be the alternate administrator of thisgroup. The alternate administrator will have access to all the mailboxes in thisgroup and will receive messages about faxes belonging to group members if the userand the administrator has not printed or viewed a fax in the designated interval.You can enter an ID here even if you have not yet created that user in RightFAX oryou can leave it blank and fill it in after creating users.
Cover Sheet FileIf you have created a customized fax cover sheet for the group, select the file fromthe drop-down list. If you do not select a file, the default cover sheet file(FCS.PCL) will be used.
Notification Type Select the method by which group members are to be notified of fax messages (i.e.when a new fax has arrived, when an outgoing fax needs attention, etc.).
Network Broadcast - This option uses standard network notification to notifyusers of fax messages.
Custom Types - You can design custom notification methods with the help ofRightFAX Technical Support.
E-mail Notification (cc:Mail, Notes, MS Mail, GroupWise, Exchange, SMTP)- RightFAX can send fax messages to your e-mail mailbox if you have purchasedthe optional RightFAX E-mail Gateway module. You must specify the e-mailaddress of each user in the Routing Information field in the Edit User dialog.
TRS NetComm Message Server - RightFAX can send fax messages to thismessage server if you have TRS's NetComm Message Server installed on your faxserver and client workstations.
CallXpress3 - RightFAX can send fax messages to your CallXpress3 mailbox ifyou have installed Applied Voice Technology's CallXpress3 on your server andclient workstations. You must specify the network protocol used, the CallXpress3server name, the ID of the RightFAX mailbox on the CallXpress3 server, thepassword (if any) for that mailbox, and the mailbox to which messages will bedirected for each user in the Routing Information field of the Edit User dialog.
RightFAX can also send fax messages to a pager.
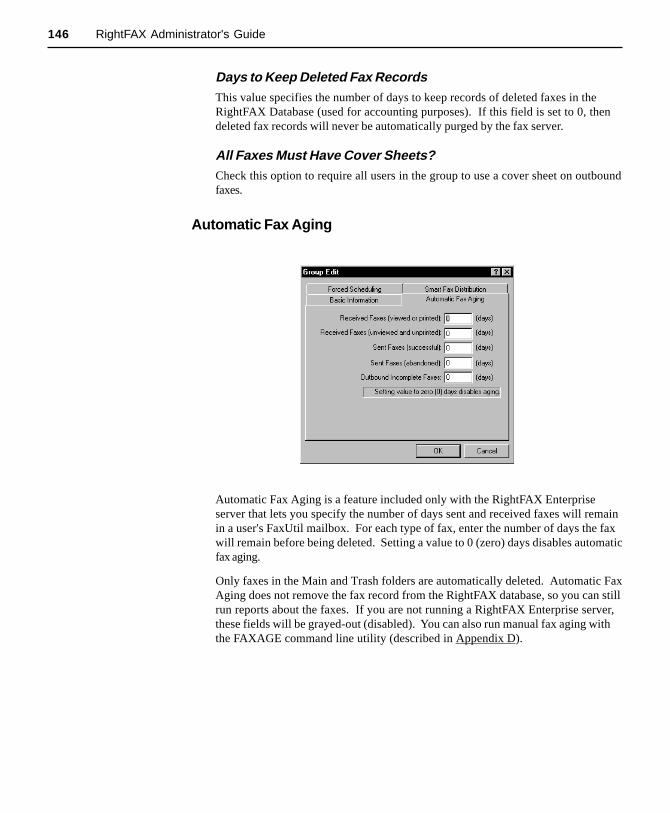
146 RightFAX Administrator's Guide
Days to Keep Deleted Fax RecordsThis value specifies the number of days to keep records of deleted faxes in theRightFAX Database (used for accounting purposes). If this field is set to 0, thendeleted fax records will never be automatically purged by the fax server.
All Faxes Must Have Cover Sheets?Check this option to require all users in the group to use a cover sheet on outboundfaxes.
Automatic Fax Aging
Automatic Fax Aging is a feature included only with the RightFAX Enterpriseserver that lets you specify the number of days sent and received faxes will remainin a user's FaxUtil mailbox. For each type of fax, enter the number of days the faxwill remain before being deleted. Setting a value to 0 (zero) days disables automaticfax aging.
Only faxes in the Main and Trash folders are automatically deleted. Automatic FaxAging does not remove the fax record from the RightFAX database, so you can stillrun reports about the faxes. If you are not running a RightFAX Enterprise server,these fields will be grayed-out (disabled). You can also run manual fax aging withthe FAXAGE command line utility (described in Appendix D).
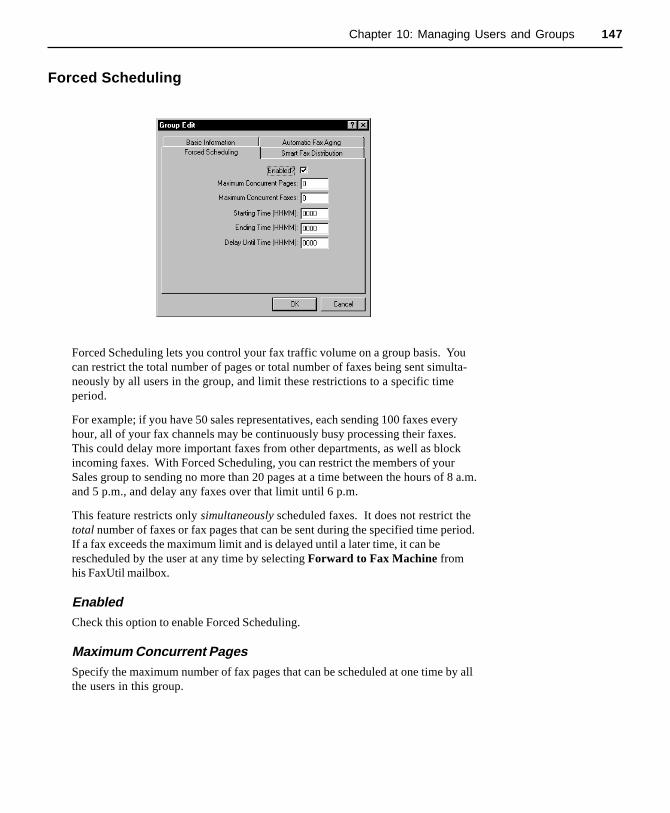
147Chapter 10: Managing Users and Groups
Forced Scheduling
Forced Scheduling lets you control your fax traffic volume on a group basis. Youcan restrict the total number of pages or total number of faxes being sent simulta-neously by all users in the group, and limit these restrictions to a specific timeperiod.
For example; if you have 50 sales representatives, each sending 100 faxes everyhour, all of your fax channels may be continuously busy processing their faxes.This could delay more important faxes from other departments, as well as blockincoming faxes. With Forced Scheduling, you can restrict the members of yourSales group to sending no more than 20 pages at a time between the hours of 8 a.m.and 5 p.m., and delay any faxes over that limit until 6 p.m.
This feature restricts only simultaneously scheduled faxes. It does not restrict thetotal number of faxes or fax pages that can be sent during the specified time period.If a fax exceeds the maximum limit and is delayed until a later time, it can berescheduled by the user at any time by selecting Forward to Fax Machine fromhis FaxUtil mailbox.
EnabledCheck this option to enable Forced Scheduling.
Maximum Concurrent PagesSpecify the maximum number of fax pages that can be scheduled at one time by allthe users in this group.

148 RightFAX Administrator's Guide
Maximum Concurrent FaxesSpecify the maximum number of faxes that can be scheduled at one time by all theusers in this group.
Starting/Ending TimeSet the starting and ending times during which the restriction applies in the 24-hourformat HHMM. For example, to set the restriction between 8:00 a.m. and 5:30p.m., set the Starting Time to 0800, and set the Ending Time to 1730.
If, during this time period, any faxes sent by this group exceed the limits you set inthe Maximum Concurrent Pages and Maximum Concurrent Faxes fields,those faxes will be delayed until the time you specify in the Delay Until Timefield.
Delay Until TimeSet the time at which delayed faxes will be sent in the 24-hour format HHMM.For example, to send delayed faxes at 6:00 p.m., set this field to 1800.
If the Delay Until Time falls between the Starting and Ending Times, automati-cally delayed faxes will never be sent. This is because delayed faxes, by definition,cannot be sent between your Starting and Ending Times. In such a case, delayedfaxes will be continuously bumped to the next day at that same time
Smart Fax Distribution
With Smart Fax Distribution, a group routing code is created, and all faxes receivedby the group are automatically distributed systematically between all the users inthat group.
If the Delay Until Timefalls between the
Starting and EndingTimes, automatically
delayed faxes will neverbe sent. This is
because delayed faxes,by definition, cannot be
sent between yourStarting and Ending
Times. In such a case,delayed faxes will be
continuously bumped tothe next day at that
same time
149Chapter 10: Managing Users and Groups
EnabledEnable Smart Fax Distribution for this group.
Routing CodeAssign a routing code to the group.
Distribution TypeSelect either linear or balanced distribution. With linear distribution, faxes aredistributed to each group member in succession. With balanced distribution, faxesdistribution is determined by each user's processing rate. If one user is faster atprocessing faxes than another, the faster user is automatically distributed faxes at afaster pace.
Member Refusal AllowedCheck this option to let users take themselves temporarily out of the distributionloop. When this option is enabled, users can refuse faxes by selecting Refuse FaxDistributions from the Options menu in FaxUtil.
Using the ModUser Utility
ModUser is a RightFAX utility that lets you:
• Change RightFAX user attributes for individual users or for multiple users atone time.
• Import users from a text file or an NT domain and automatically assign themattributes.
Many of ModUser's features are incorporated in the Enterprise Fax Manager(described in Chapter 9). However, ModUser is required if you want to makeglobal changes to selected groups of users.
Requirements
ModUser is available only on RightFAX Enterprise fax servers.
To modify or import users from disk you need a Windows NT 4.0 or Windows 95workstation. To import users from an NT network, you need a Windows NT 4.0workstation.
You must have RightFAX administrative privileges to run ModUser.

150 RightFAX Administrator's Guide
Running ModUser
ModUser requires no separate installation or configuration. You can runMODUSER.EXE from the \RIGHTFAX\ADMUTILS directory from anyworkstation on the network. You can also select Modify User from the RightFAXfolder under the Programs menu on the fax server Start Menu.
When prompted for a server name, enter the name of the RightFAX server youwant to modify, then click Next. Choose the network protocol for server and clickNext. Finally, enter your RightFAX administrator user ID and password. (Youmust have administrative access to run ModUser.) Click Finish. This opens theModify User dialog, listing each RightFAX user on the server you selected:
menu.

151Chapter 10: Managing Users and Groups
Editing Individual Users
To edit a single user, double-click on the user, or highlight the user and click onEdit! in the menu bar. This opens the User Information dialog:
For information on each of the options on this dialog, please refer to the ManagingUsers section, earlier in this chapter. When you have made the changes you want,click OK to return to the Modify User dialog. An asterisk (*) will appear next theuser name to indicate that the user has unsaved changes. You will be prompted tosave all your changes when you exit ModUser. To immediately apply changeswithout exiting, select Save Changes from the File menu.
Editing Multiple Users
To make global changes that will affect a group of selected users, highlight the usersyou want by clicking on the user ID's while holding down the [Shift] or [Control]keys.
When you have selected the users you want to edit, click on Edit! in the menu bar.This opens the User Information for Multiple Selections dialog.
A black check mark in a check box indicates that the option is checked for allselected users. A gray check mark indicates that the option is checked for someusers. If there is no check mark, the option is unchecked for all users.
152 RightFAX Administrator's Guide
For information on each of the options on this dialog, please refer to the EditingUser Properties section, earlier in this chapter. When you have made the changesyou want, click OK to return to the Modify User dialog. An asterisk (*) willappear next the user names to indicate that the users have unsaved changes. Youwill be prompted to save all your changes when you exit ModUser. To immedi-ately apply changes without exiting, select Save Changes from the File menu.
Importing Users with ModUser
You can automatically import users from your network or from disk and createaccounts for them in RightFAX using the ModUser utility.
Importing Users from DiskThe ModUser utility allows you to import users from a text file on disk or from anNT domain, using the same format and parameters used in the command line utilityIMPUSER.EXE. Refer to IMPUSER in Appendix D, Command Line References.
Your import file should be a set of comma-separated values, detailing the valuesand flags to enable or disable for a particular user account. You must specify all 16fields or at least insert a comma if you wish to leave a field blank. Note that if auser already exists in RightFAX, their record will be updated based on the datafrom the import file. If a users does not already exist, they will be created. Usethe fields below to create the import file.

153Chapter 10: Managing Users and Groups
Field Type Max Len Notes
User ID Alpha-numeric 21Must be unique. If ID already exists, the existing userwill be changed.
User Name Alpha-numeric 29 The user's name.
Password Alpha-numeric 11 If empty, existing user password will be maintained.
Group Alpha-numeric 21The group must already exist. If group does notexist, record will be skipped.
Route-Code Numeric 7This should be unique, though uniqueness is notenforced.
FCS Model Alpha-numeric 12File name (no path) of FCS model for user. Filename must end with .PCL. Leave blank to usegroup's cover sheet.
Flags Alpha 31Each character in this field will change a particularuser attribute. Possible flag characters are listedbelow.
Notify Type Numeric 2
0=Use group's type1-9=custom10=cc:Mail11=MS Mail12=GroupWise
Route Info Alpha 99
Formatted as: TYPE:INFO or +TYPE:INFOwhere TYPE must be one of the following:RF, CC, MS, FILE, OCR, GW, NOTES, RFIC, TRS,CX3, or EXCHand where INFO should be the routing information forthat particular type.The format +TYPE:INFO is identical except that itenables delete-after-routing.
Route FMT Alpha 4Format of the file to be routed. Must be one of thefollowing: PCX, DCX, TIFF-G3, or TIFF-G4
Subscriber ID Numeric 7Voice mail subscriber ID, if CallXpress routing isenabled.
From Name Alpha 59 Default 'From Name' for cover sheet
From Phone Alpha 31 Default 'From Voice Number' for cover sheet
DID Fax Num Alpha 31 Default 'DID Fax Number' for cover sheet
General Fax Alpha 31 Default 'General Fax Number' for cover sheet
Operator Num Alpha 31 Default 'Operator Voice Number' for cover sheet
Example:
BOB, BOB JONES,,EVERYONE,1000,FCS.PCL,A+H+D+L—,O,RF:BOB,TIFF-G3,7100,BOB JONES,,,,
154 RightFAX Administrator's Guide
To import users from disk:
1. In the Modify User dialog, open the File menu and select Load Usersfrom Disk .
2. In the Open dialog, select the file you want to open.
3. Click Open.
4. Users will appear in the list with an asterisk until you save the changes.
Importing Users from a Windows NT ServerYou can also import users from a Windows NT machine on the network using theModUser utility, if you have the proper authorization.
1. In the Modify User dialog, open the File menu and select Load Usersfrom Network .
2. In the Server Selection dialog, enter the name of the Windows NTserver from which you want to import users.
3. Click OK to import all users on the selected server.
Note: If the server is a Primary Domain Controller (PDC) or a BackupDomain Controller (BDC) then it will import all users in the domain.
Signatures, Forms, andLibrary Documents
In this chapter:
• Signatures• Forms• Library Documents

156 RightFAX Administrator's Guide
Signatures
RightFAX lets you personalize your outgoing faxes with signatures. Signatureimages are created in FaxUtil and stored in the \RIGHTFAX\SIG directory on theserver. Enterprise Fax Manager catalogs all the signatures and maintains the filenames, descriptions, and authorized user information.
To display a list of all signature files on a RightFAX server, highlight Signaturesunder the desired RightFAX server in the left portion of the Enterprise FaxManager Main screen:
For more information on using the Enterprise Fax Manager, see Chapter 9,Enterprise Fax Manager.
Creating a Signature
Signature files are created from a fax in a your FaxUtil mailbox. You can scan asigned piece of paper into your mailbox or fax a signed document to yourself.Once the document arrives in your FaxUtil mailbox, follow these steps to create asignature file:
1. View the fax using the RightFAX Fax Viewer.
2. Using the Select tool in the Fax Viewer toolbar, highlight the signature.
Only users withadministrative accesscan create signatures.

157Chapter 11: Signatures, Forms, and Library Documents
3. Select Make Signature from the FaxUtil Edit menu. This opens theMake Signature dialog:
4. Enter an ID for the signature in the Signature Code field. This must beunique, as it will be the identifying code Enterprise Fax Manager displaysin the ID column when viewing the list of signatures. Enter the Owner'sUser ID and a Description of the signature. In the Authorized Usersfield, list up to three user or group ID's of other users who can use thesignature. Be sure to include the owner's user ID in the list of authorizedusers, as permission to use it is not implicitly granted.
Editing Signatures
To edit the properties of an existing signature, select the signature to edit inEnterprise Fax Manager and press [Enter] or select Edit from the Edit menu. Youcan also double-click on the signature. This opens the Edit Signature dialog. Youcan add, delete, and change any of the fields; however, changing the Image FileName field will assign another image to the signature ID.
Deleting Signatures
To delete a signature, select the signature to delete and press [Delete] or selectDelete from the Edit menu.
Forms
The forms feature allows you to "overlay" the image of a form (i.e. your companyletterhead, invoices, etc.) on your fax to give the appearance of being printed on itoriginally.
If you want more thanthree users to be
authorized to use asignature, create a
group for them and enterthe group ID as and
authorized user.

158 RightFAX Administrator's Guide
To display a list of all form files on a RightFAX server, highlight Forms under thedesired RightFAX server in the left portion of the Enterprise Fax Manager Mainscreen:
For more information on using the Enterprise Fax Manager, see Chapter 9,Enterprise Fax Manager.
Creating a Form
You should always create forms in Fine resolution. To ensure this, set this optionin your FaxUtil mailbox in Send Fax Options before proceeding.
Using the print-to-fax driver, print the form document from its original applicationto your FaxUtil mailbox. (This produces the highest quality image.) In FaxUtil,view the faxed form to ensure that it is acceptable.
Users must be assignedpermissions in theiruser record to add oredit forms in FaxUtil.

159Chapter 11: Signatures, Forms, and Library Documents
Close the Fax Viewer, then highlight the form on the list of received faxes. SelectStore as Form from the Fax menu. This opens the Store Fax as Form dialog:
TTI Line RemovalThis option is only available if you are creating your form from a received fax (i.e.you faxed the form to yourself). If this field is set to None, the TTI lines(transmission information headers at the top of the page) will not be removed fromthe fax and will become part of the form. If you select Use Blank Lines, the TTIlines on the form will be covered by blank lines, effectively hiding them, yet notremoving them. If you select Cut Out Lines, you will be deleting the TTI linesfrom the fax.
Paper SizeThis option is only available if you are creating your form from a received fax (i.e.you faxed the form to yourself). If you select None, RightFAX will not adjust theform to fit a specific paper size. The form will be created from the actual size ofthe fax. Selecting Letter, Legal, or A4 will cause RightFAX to scale the form to fitthe specific paper size.
Form CodeThis unique code is used in embedded codes to identify the form.
DescriptionType a description for the form.
Start PageThis field determines the beginning page of the fax document onto which this formis to be overlaid (i.e. if this form is the second page of your company letterhead,you would assign this value to 2 so that it would not be overlaid on the first pageof your fax).
The page numbers youspecify in the Start Pagefield are absolute. If theStart Page for a form is
set to three and youapply it to a document
which only has twopages, none of the
document pages will beoverlaid.
160 RightFAX Administrator's Guide
Overlay on All PagesThis field determines if all the pages of faxes are to be overlaid with this form. Youshould not toggle this box if this form is specific to a certain page on a multipagefax.
Number of PagesThis value determines how many pages of the fax will be overlaid with the form. Ifit is set to 0, then the entire fax will be overlaid with the form. This option is onlyavailable if you did not toggle the Overlay on all pages field.
Secure Form and Authorized Group/User You can secure forms by restricting them to specific groups or users. To secure aform, toggle the Secure Form field and use the drop-down list to select the user orgroup authorized to use the form.
Editing Forms
To edit the properties of an existing form, select the form to edit in Enterprise FaxManager and press [Enter] or select Edit from the Edit menu. You can also double-click on the form. This opens the Edit Form dialog. You can add, delete, andchange any of the fields as long as the Form Number and Form Code remainunique.
Three of the fields in the Edit Form dialog were not available when you created theform. Each is described below:
Form NumberThis number will be used to identify the form so it can be linked with other formsif desired. This number is automatically assigned by RightFAX when the form iscreated.
Next Form ID NumberThis value should be set only if you are combining multiple forms in one fax (i.e. adifferent form for the first and second page of your company letterhead).
Image File Name For each new form you create, you must set this field by selecting the form filename from the drop-down list. This field is automatically defined by RightFAXwhen the form is created.
Deleting Forms
To delete a form, select the form to delete and press [Delete] or select Delete fromthe Edit menu.
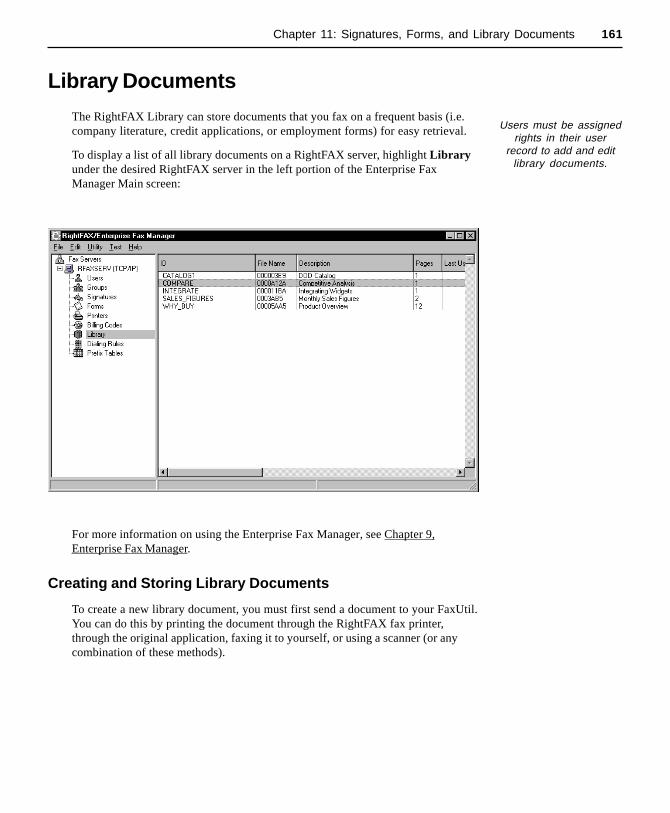
161Chapter 11: Signatures, Forms, and Library Documents
Library Documents
The RightFAX Library can store documents that you fax on a frequent basis (i.e.company literature, credit applications, or employment forms) for easy retrieval.
To display a list of all library documents on a RightFAX server, highlight Libraryunder the desired RightFAX server in the left portion of the Enterprise FaxManager Main screen:
For more information on using the Enterprise Fax Manager, see Chapter 9,Enterprise Fax Manager.
Creating and Storing Library Documents
To create a new library document, you must first send a document to your FaxUtil.You can do this by printing the document through the RightFAX fax printer,through the original application, faxing it to yourself, or using a scanner (or anycombination of these methods).
Users must be assignedrights in their user
record to add and editlibrary documents.

162 RightFAX Administrator's Guide
Once the fax arrives in your FaxUtil mailbox, highlight it and select Store inLibrary from the Fax menu. This opens the Store Fax as Library Documentdialog:
Document IDThis is a unique code used to identify the library document. If you want thelibrary document to be available via the Web or Fax on Demand (described in theDocs on Demand section of the RightFAX Optional Modules Guide), you mustassign a numeric Document ID.
DescriptionEnter a description of the library document.
Image File NameThis is the actual file name of the library document. All library document files aresaved in the \RIGHTFAX\IMAGE directory on the RightFAX server.
PagesThe number of pages in the document. This setting is generated automatically.
Accessible via LANCheck this option to make the library document available on your LAN for faxingfrom client workstations.
Accessible via WebCheck this option to make the library document available to users via your Website using Web Fax Tools.

163Chapter 11: Signatures, Forms, and Library Documents
Accessible via FODCheck this option to make the library document available to users via touch tonephone using Fax on Demand.
Include in CatalogCheck this option to include this document in the Fax on Demand catalog listing ofavailable faxes.
Request PasswordEnter a numeric password here to require Fax on Demand users to enter thepassword when requesting this document.
Activation DateTo specify the date you want your document to become available for retrieval,click the check box and enter a date.
Expiration DateTo specify when you want your library document to become unavailable forretrieval, click the check box and enter a date.
Editing Library Documents
To edit the properties of an existing library document, select the document to editin Enterprise Fax Manager and press [Enter] or select Edit from the Edit menu.You can also double-click on the document. This opens the Edit Library Docu-ments dialog. You can add, delete, and change any of the fields; however, changingthe Image File Name field will assign another image to the Document ID.
Deleting Library Documents
To delete a library document, select the form to delete and press [Delete] or selectDelete from the Edit menu.
Resetting Usage Counts
Select Reset Usage Counts from the Edit menu to reset all the library documentsusage counters to zero.
If you have not licensedthe Docs on Demandoptional module, theAccessible via Web/FOD options will be
disabled
For more information onWeb Fax Tools and Fax
on Demand, see theDocs on Demand
section of the RightFAXOptional Modules Guide

164 RightFAX Administrator's Guide

Printers and Billing Codes
In this chapter:
• Managing Printers• Managing Billing Codes• Integrating ODBC Billing Codes

166 RightFAX Administrator's Guide
Managing Printers
You can define an unlimited number of network printers in RightFAX and makethem available to users for fax printing. You can add printers individually orimport large groups of printers from your network.
To display a list of all printers configured for use with RightFAX, highlightPrinters under the desired RightFAX server in the left portion of the EnterpriseFax Manager Main screen:
For more information on using the Enterprise Fax Manager, see Chapter 9,Enterprise Fax Manager.

167Chapter 12: Printers and Billing Codes
Adding Printers Individually
To add a new printer, press [Insert] or select New from the Edit menu. This opensthe Edit Network Printer dialog:
Printer IDThis is the identifier RightFAX will use for this printer. This ID should match theprinter's network ID to avoid confusion.
DescriptionThis is a text field for your reference only. If this field is completed, users will seeboth the Printer ID and Description as a printer choice in the Print dialog. If thisfield is not completed, only the Printer ID will be displayed.
Server NameThis field indicates on which file server the queue exists. If the queue is in NDS,this should be the tree top.
Queue NameThis value will differ depending on your network operating system. On NetWare3.x, the Queue Name should contain the Bindery name of the queue, i.e. "LA-SER1". On LAN Server and NT networks, Queue Name should contain the sharename of the queue. On NetWare 4.x servers that are using NDS, Queue Nameshould contain the Distinguished Name of the queue object, i.e."LASER1.SALES.ACME."
Printer TypeThis field determines the printer driver used by the fax server to format faxesprinted to this printer. Choose the one that most closely corresponds to yourprinter. If your laser printer supports both PostScript and PCL5, choose one ofthe HP LaserJet types rather than PostScript for faster printing.
To print to local printers,users must print from
the Fax Viewer.
168 RightFAX Administrator's Guide
Default Paper SizeThis determines how the fax server will scale a fax page to fit onto the printablearea of a laser printer. This also sets what size paper to select. Settings include:
None - This will not scale the image at all which may result in some portion of thepage being truncated.
Fit Letter - This setting causes the fax page to be scaled to fit onto the printablearea of U.S. Letter size paper (8.5 x 11 in.).
Fit Legal - This will cause the fax page to be scaled to fit onto the printable area ofU.S. Legal size paper (8.5 x 14 in.).
Fit Letter/Legal - If the fax page is 12.5 inches or less, it will scale to fit ontoLetter size paper. Otherwise it will be scaled to fit onto Legal size paper. This isuseful for firms receiving faxes in a mix of letter and legal sizes and where dual-binlaser printers are used. In such cases, the laser printer will automatically select theappropriate size paper, letter or legal, to correspond to the size of the fax page.
Fit A4 - This setting will cause the fax page to be scaled to fit onto the printablearea of A4 size paper (210 x 297 mm).
Fit A4/Legal - This setting is identical to Fit Letter/Legal, except that the printerwill choose between A4 and Legal paper trays.
There is always an unprintable region for each laser printer. RightFAX takes thisinto account when scaling and fits the full fax page within the printable region. Theresult is a small (5%) reduction in the page image when printed on a laser printer.Since fax pages have no unprintable regions, the scaling must occur else portions ofthe fax would be lost during printing.
Default Paper SourceThis field determines which paper tray selection command RightFAX will send tothe printer. If the Default Paper Size is set to Fit Letter/Legal or Fit A4/Legal,it is recommended that this value be set to None, else the automatic selection ofpaper trays will not work.
Editing Printers
To edit the properties of an existing network printer, select the printer to edit inEnterprise Fax Manager and press [Enter] or select Edit from the Edit menu. Youcan also double-click on the printer. This opens the Edit Network Printer dialog(described above).
Deleting Printers
To delete a printer, select the printer to delete and press [Delete] or select Deletefrom the Edit menu. By default, you will be prompted for confirmation that youwant to delete the printer.
The Paper Size andPaper Source can be
overridden by the userwhen they manually print
a fax from FaxUtil.

169Chapter 12: Printers and Billing Codes
Importing Printers from the Network
To import printers from your network, select Import Printers from Networkfrom the Utility menu. This opens the Import Network Printers dialog.
Select the network context to import from, specify a default printer type (driver),then click the Find Printers in Selected Context button. Depending on the size ofyour organization's network, this scan may take several minutes. You can click theStop Loading button during the scan to cancel. If the list includes printers thatyou do not want to import, highlight each printer to remove and press [Del]. Toimport the printers, click the Import Listed Printers button.
Managing Billing Codes
RightFAX tracks and reports fax activity using billing codes. Users may berequired to enter one or two codes for every fax before it can be sent or deleted.These codes can be validated internally against a master table or can be validatedexternally with a separate application (i.e. your accounting program). To validatebilling codes internally, you must create a list of all valid codes in RightFAX.
To display a list of billing codes, highlight Billing Codes under the desiredRightFAX server in the left portion of the Enterprise Fax Manager Main screen:
For more information on using the Enterprise Fax Manager, see Chapter 9,Enterprise Fax Manager.
Validating billing codesexternally requires you
to create a customapplication using the
RightFAX API

170 RightFAX Administrator's Guide
Adding Billing Codes Individually
To add a new billing code, press [Insert] or select New from the Edit menu. Thisopens the Edit Billing Code dialog:
Billing Code Fields (You may have changed these field names to reflect the needs of your companyusing Customize FCS Required Fields in the Utility menu.) Enter the newbilling code(s) to add to the list.
DescriptionEnter a description of what these billing codes represent (such as "Account" and"Matter").
Importing Billing Codes
RightFAX lets you import billing code records from an ASCII text file. This ismost useful when systems such as EquiTrac or central databases are used to store amaster set of billing codes. Such systems can be programmed to periodicallygenerate a formatted ASCII file which the RightFAX server will automatically pickup and process. Once such a system is configured, billing code maintenance can befully automated.
The ASCII billing codes file must be called CODECHG.CSV, and must be locatedin the directory \RIGHTFAX\WORKSRV# (where # is the WorkServer numberthat you want to handle the billing code imports.)
The file CODECHG.CSV must be formatted with one complete billing code recordper line. The codes themselves cannot contain spaces, but descriptions may. Foreach record, the codes and description must be separated by commas. You canimport new billing codes as well as specify deletions and changes to billing codes.Each billing code record must include a leading field that indicates the desiredoperation. The leading field (a single character followed by a comma in all cases)may be an: ‘A’ indicating an Addition; ‘C’ indicating a Change to an existing code;or a ‘D’ indicating that a code should be Deleted.
171Chapter 12: Printers and Billing Codes
Format:
Operation,BillInfo1,BillInfo2,Description
Examples:
A,Smith,9054,Harry Smith Inc.C,Jones,5687,Bob Jones Corp.D,Smith,2390
(A Delete line need not contain a description, and any included descriptionwill be ignored.)
Once you have created a comma-delimited ASCII file of billing codes, RightFAXcan be configured to automatically import the file. To configure RightFAX toautomatically import the ASCII billing code file, run the WorkServer Control Panelapplet, select the WorkServer in whose directory you saved the CODECHG.CSVfile, and set a value in the Billing Code Import Interval field. This parameterdetermines the interval, in minutes, that the WorkServer should check for a newbilling code file. At every interval, the WorkServer checks for the fileCODECHG.CSV, in its own directory. If the file exists, the WorkServer importsthe additions, changes, and deletions specified in the file. After the entire file isprocessed, the WorkServer erases CODECHG.CSV so that it will not be picked upagain at the next check.
The WorkServer also produces a log file, CODECHG.LOG, which can be examinedto see what codes were imported from the most recent CODECHG.CSV. The logfile is overwritten each time an import is executed, so it will not grow indefinitely.
When writing the input file it is recommended that it not be initially namedCODECHG.CSV. If it is, the WorkServer may attempt to open and process the filebefore you have finished building it. It is best to use a temporary name (such asCODECHG.$$$) to build the file. After all lines have been written to the file,close it and rename it to CODECHG.CSV. A batch file can be created thatautomates this process, for example:
C:\> j:J:\> cd \rfax\worksrv1J:\RFAX\WORKSRV1>getcodes codechg.$$$J:\RFAX\WORKSRV1>ren codechg.$$$ codechg.csv
In this example, GETCODES is a program you supply which creates an ASCII fileof billing code changes in the required format.

172 RightFAX Administrator's Guide
Integrating ODBC Billing Codes
You can integrate billing codes from an external ODBC source for use in all of yourWindows NT and Windows 95/98 users' outbound faxes. The ODBC source maybe created and configured using the 32-bit ODBC Configuration applet in theControl Panel. Each client workstation must be configured individually to accessthese billing codes.
Click on the RightFAX tray icon in the corner of the taskbar. From the menu,select ODBC Configuration . This opens the Configure ODBC Tables dialog:
Click on the RightFAXtray icon and selectODBC Configuration

173Chapter 12: Printers and Billing Codes
Click on the Add button next to ODBC Billing Tables. This opens the Config-ure ODBC Billing Table dialog:
Complete each of the fields according to your ODBC datacase's specifications:
Billing Table NameEnter a descriptive name for this billing codes table.
ODBC SourceEnter the name of your ODBC billing codes data source, or click the browse buttonto the right of this field to select from a list of available sources.
ODBC Field NamesNext, you must relate the fields of the ODBC database to the standard RightFAXbilling code fields. This is done with simple SQL query statements.
ODBC User ID and PasswordEnter the ID and password to access the ODBC database. If the ID and passwordmatch those used to log into RightFAX, you may check those boxes instead.
Records to Load at OnceYou can limit the number of records displayed at one time during billing codelookup by entering the limit in this field.
Type a descriptive namefor the billing codestable
Click the browse buttonand select the ODBCdriver
Completing these fieldsrequires a familiaritywith SQL syntaxconventions. Pleaserefer to your SQLdatabase documentationfor information on SQLsyntax
Fill in the ID andpassword necessary toaccess the ODBCdatabase. If the ID andpassword match thoseused to log intoRightFAX FaxUtil, youmay check these boxesinstead
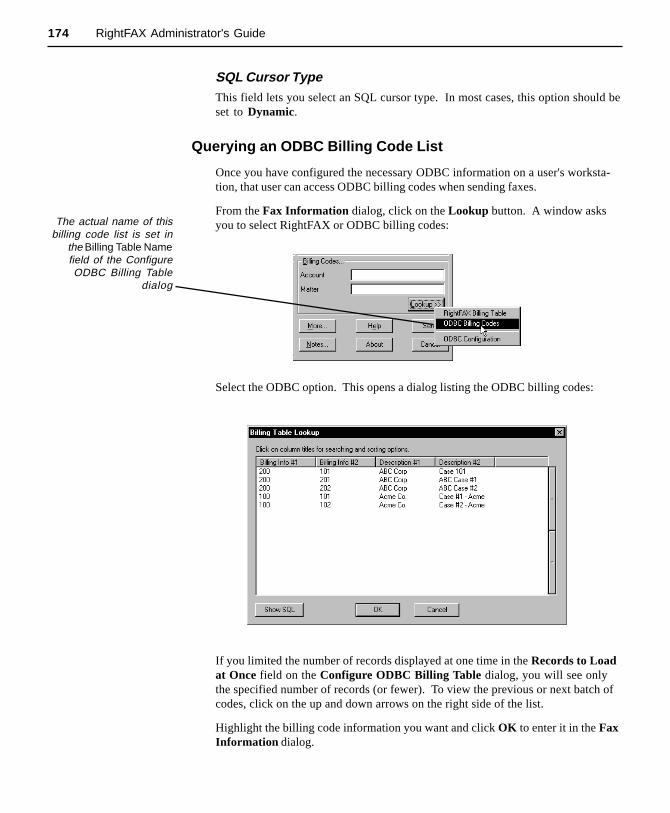
174 RightFAX Administrator's Guide
SQL Cursor TypeThis field lets you select an SQL cursor type. In most cases, this option should beset to Dynamic.
Querying an ODBC Billing Code List
Once you have configured the necessary ODBC information on a user's worksta-tion, that user can access ODBC billing codes when sending faxes.
From the Fax Information dialog, click on the Lookup button. A window asksyou to select RightFAX or ODBC billing codes:
Select the ODBC option. This opens a dialog listing the ODBC billing codes:
If you limited the number of records displayed at one time in the Records to Loadat Once field on the Configure ODBC Billing Table dialog, you will see onlythe specified number of records (or fewer). To view the previous or next batch ofcodes, click on the up and down arrows on the right side of the list.
Highlight the billing code information you want and click OK to enter it in the FaxInformation dialog.
The actual name of thisbilling code list is set in
the Billing Table Namefield of the ConfigureODBC Billing Table
dialog

LCR and Dialing PlanConfiguration
In this chapter:
• LCR Overview• Creating and Editing Dialing Rules• Prefix Tables• Testing Rules and Routes• Call Blocking• LCR Sample Scenarios
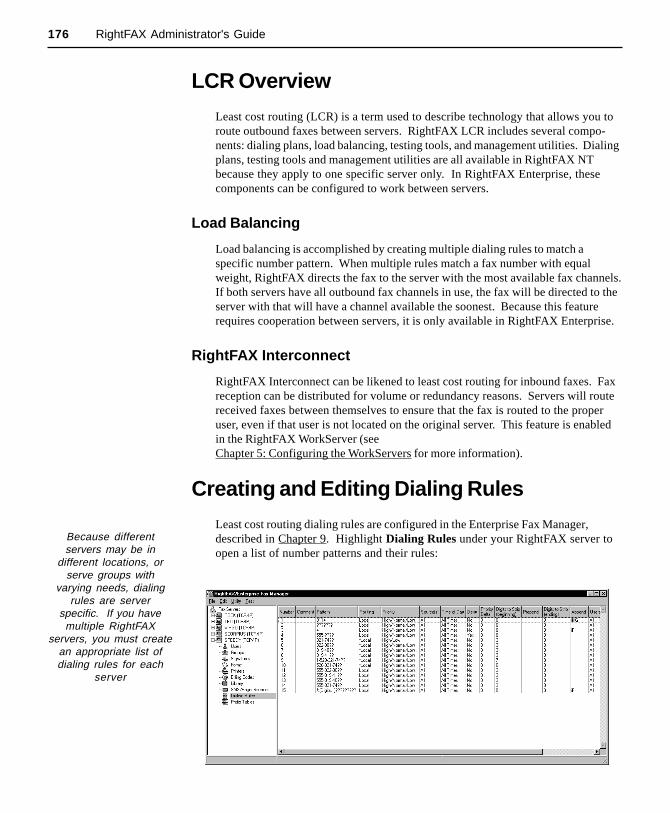
176 RightFAX Administrator's Guide
LCR Overview
Least cost routing (LCR) is a term used to describe technology that allows you toroute outbound faxes between servers. RightFAX LCR includes several compo-nents: dialing plans, load balancing, testing tools, and management utilities. Dialingplans, testing tools and management utilities are all available in RightFAX NTbecause they apply to one specific server only. In RightFAX Enterprise, thesecomponents can be configured to work between servers.
Load Balancing
Load balancing is accomplished by creating multiple dialing rules to match aspecific number pattern. When multiple rules match a fax number with equalweight, RightFAX directs the fax to the server with the most available fax channels.If both servers have all outbound fax channels in use, the fax will be directed to theserver with that will have a channel available the soonest. Because this featurerequires cooperation between servers, it is only available in RightFAX Enterprise.
RightFAX Interconnect
RightFAX Interconnect can be likened to least cost routing for inbound faxes. Faxreception can be distributed for volume or redundancy reasons. Servers will routereceived faxes between themselves to ensure that the fax is routed to the properuser, even if that user is not located on the original server. This feature is enabledin the RightFAX WorkServer (seeChapter 5: Configuring the WorkServers for more information).
Creating and Editing Dialing Rules
Least cost routing dialing rules are configured in the Enterprise Fax Manager,described in Chapter 9. Highlight Dialing Rules under your RightFAX server toopen a list of number patterns and their rules:
Because differentservers may be in
different locations, orserve groups with
varying needs, dialingrules are server
specific. If you havemultiple RightFAX
servers, you must createan appropriate list ofdialing rules for each
server

177Chapter 13: LCR and Dialing Plan Configuration
RightFAX compares each outgoing fax number to the number patterns listed herethen assigns a “weight” to each listed rule. The more closely an outgoing faxnumber matches a rule, the higher the weighted value of that rule. The fax serverwill then use the rule with the highest weight to send the fax. Rules that rout to aremote server are automatically deemed ineligible and taken out of contention if aWAN link or destination server is down.
It is possible that all a server will do is route every fax to another server. It is evenpossible to configure a single fax server on the network to only modify fax numbers(prepend/append digits, etc.)
Matching
The first step in creating dialing rules is to establish standards against whichRightFAX will to try to match fax numbers. Fax numbers will be compared to thepatterns and conditions described below to determine the “best match.”
The RightFAX Board-Server must be running
in order to edit thedialing rules

178 RightFAX Administrator's Guide
PatternsThe board server will attempt to match the pattern of numbers or characters in thefax number with the pattern of numbers or characters in the dialing rules. Youshould enter a number pattern for each rule. RightFAX will ignore any hyphens,parentheses, or spaces entered in the pattern string. Only the following charactersare significant:
0-9#*
Wildcards:
Because it is impossible to anticipate the exact pattern of every fax number,RightFAX provides several wildcards or variable characters which can be substi-tuted for digits.
Wildcard Definition Examples
+ Matches zero or more digits; mustalways appear at the end of numberstring.
+ = matches any fax numberentered, including 320-7000,100, and 011-44-75653442.
415+ = matches any number thatbegins with 415, including 415-320-7000, 415-4455, and 4151.
~ Matches zero or one digit; can beplaced anywhere in the numberstring
~415+ = matches any numberbeginning with 415or digit -415including 415-320-7000, 415-3222, 1-415-320-7000, and2520.
~~415+ = matches 1-415-320-7000, 9-1-415-320-7000, and415-320-7000.
? Matches exactly one digit 415-320-7??? = matches anynumber that has final four digitsbetween 7000-7999.
415-???-???? = matches anynumber within the area code 415.
%[ table name,number of digits
to match]
Matches digits defined in a prefixtable to the number of digitsspecified (refer to "Prefix Tables"below)
415-%[EAST,3]+ = matches allnumbers that begin with 415 andhave a 3-digit prefix defined inthe table called EAST.
179Chapter 13: LCR and Dialing Plan Configuration
Wildcards always decrease the weight of a match as they are always less specificthan an exact match. For example:
Dialing Rule #1: 520-320-700? Server 1Dialing Rule #2: 520+ Server 2
The fax number 520-320-7000 matches both rules, but will always match rule #1better as it is more specific.
Digit/Wildcard Precedence:
0123456789*# %?~+
PriorityYou can restrict rule matching by fax priority (assigned by the user). Only thosepriority levels which are checked in this field will be considered to match the rule,provided all the other fields match. Matching based on priority can be extremelyuseful when doing fax broadcasts or other large-volume faxing. It can also be usefulfor universal redirection of faxes (e.g. all high priority faxes should send fromServer 2 instead of Server 1).
Example:
A broadcast of 1000 faxes is scheduled to be routed from the local Tucson server tothe remote London server for sending to cities throughout the UK. High priorityfaxes will never be sent through London because rule #1 only matches low andnormal priority faxes. The assumption here is that the PSTN is more reliable thanthe WAN link to London (maybe the WAN link is the Internet).
There are two dialing rules defined on the Tucson server:
1. 01144+ should be routed to the London servernormal, low priority
2. + should be sent from the local serverhigh, normal, low priority
Time of DayYou can also restrict rule matching by time of day and/or day of week. Set thespecific hours and days for which this rule should be considered eligible. Severaltelephone companies offer significant savings during off-peak hours (typicallybetween 7 p.m. and 6 a.m.) and on weekends. You can use this feature alone tobalance loads between servers, or combine it with priority features to manage largefax broadcasts on specific servers.

180 RightFAX Administrator's Guide
Restrictions
Once a fax number has found a pattern and condition match, it will evaluate therestrictions placed on the rule. Rules can restrict the originating server of a fax toinclude or exclude specific servers, users and groups. You can enter multipleservers, users and groups by separating the ID's with commas.
For example, the above Rule Edit dialog restricts SERVER1 from being matchedagainst the rule for servers. XYZ and JANE are excluded from being matchedagainst the rule for users.

181Chapter 13: LCR and Dialing Plan Configuration
Action
After determining which rule is the best match for the number, RightFAX will usethe information in this dialog to determine the actions to be taken (e.g. where thefax will be routed, if at all).
Routing allows you to specify the destination of faxes which match this rule. Youcan choose to route all matching faxes through the local fax server machine. This isrecommended if this is a single fax server installation or if there is no cost- or time-savings in routing the fax to a remote server for sending.
You can also choose to reroute all faxes that match this rule to another server.Remember that the server specified in this field may not necessarily be the serverfrom which the fax is ultimately sent, as each new server applies its own destina-tion rules.
RightFAX LCR allows you to define “intra-company” routing rules that let youbypass the public switched telephone network (PSTN). An outbound fax routedfrom Server 1 can be routed to Server 2 as an inbound fax and be delivered to a useron that remote server without being transmitted over a phone line.

182 RightFAX Administrator's Guide
For example, a company with RightFAX servers in Tucson and Seattle might havecreated the following rules on the Tucson server:
206-???-???? remove three digits route to Seattle server206-820-50?? remove first six digits receive into Seattle server
When someone in Tucson sends a fax to 206-820-7000, faxing to a customer inSeattle, the server will route the fax to the Seattle server that will send it via a localcall. However when someone in Tucson sends a fax to a co-worker in Seattle at206-820-5065, the server will consider the fax a “received fax” and will automati-cally route it to the appropriate internal fax mailbox (5065). Note that the faxnumber must match a routing code on the receiving RightFAX server, otherwise thefax will be routed to the default mailbox.
Send via Local ServerThis specifies that the outgoing fax will be sent from the local server.
Receive into Local ServerThis allows a fax to be routed directly to the local server and be delivered as aninbound fax to avoid transmission over a phone line. The fax may have originatedon this server or any other server.
Send via Fax ServerThis specifies the server to which a fax should be routed for outbound sending.The server name and communications protocol should be specified for remoteservers.
Receive into Fax ServerThis allows a fax to be routed to another RightFAX server and delivered as aninbound fax to avoid transmission over a phone line. The server name andcommunications protocol must be specified.
Phone Number ModificationDigits can be added or removed from the beginning and end of a fax number to makethe number “dialable.” For example, when dialing long distance numbers, someusers enter a 1 before the area code (1-520-xxx-xxxx) while other simply begin withthe area code (520-xxx-xxxx). Some users have been told to add a 9 before the faxnumber to get an outside line and other users have not. The following rules willcorrectly adjust the dialed phone number to handle all possible user combinations:
1. 520-???-???? Prepend ‘91’2. 1520-???-???? Prepend ‘9’3. 91520-???-???? Prepend nothing

183Chapter 13: LCR and Dialing Plan Configuration
These rules assume that there is no global dialing prefix programmed in your GlobalBoard Settings (described in Chapter 6). If a global dialing prefix of ‘9’ is pro-grammed, these rules should look like this:
1. 520-???-???? Prepend ‘1’2. 1520-???-???? Prepend nothing3. 91520-???-???? Strip one digit, prepend nothing
Valid characters to add in dialing rules are:
Character Description
0 through 9 Phone numbers and access numbers
, (comma) 1-second pause
I 5-second pause
W Wait up to 15 seconds for a dial tone
P Pulse dialing tone
T Tone dialing mode (default)
FThis character is replaced in the dialstring by the user's domestic longdistance Auto Billing Code
GThis character is replaced in the dialstring by the user's international longdistance Auto Billing Code
! Hook-flash signal
* Generates tone as would '*' button ontouch-tone phone
# Generates tone as would '#' button ontouch-tone phone
@ Causes all following digits to be hiddenon fax cover sheet
{ Causes dialing prefix to NOT beprepended
} Causes dialing postfix to NOT beappended
Dialing characters arenot case sensitive
If you have troublesending faxes to
international numbers,try putting two or three “i”
characters after thenumber, for example:011-44-321-230117iii

184 RightFAX Administrator's Guide
Other
After determining which rule matches, if any restrictions apply to that rule, andwhat actions should be taken, RightFAX will then check to see if a new priorityneeds to be assigned to the fax or if the fax number triggers any special flags.
Priority DeltaPriority values are assigned to faxes when the user creates them. These priorityvalues can play an important role in the rule matching process, as they candetermine the server to which a fax is routed. You can adjust the priority valuesassigned to faxes that match a particular rule, using the priority scale.

185Chapter 13: LCR and Dialing Plan Configuration
Priority is normally rated on a 3 point scale: 1= low, 2= normal, 3= high. Thefollowing table illustrates what happens to fax priority as it is adjusted.
OriginalPriority
Priority Delta/Adjusted Priority
Low +2/High+1/Normal 0/No change (Low)-1/No change (Low)-2/No change (Low)
Normal +2/High+1High 0/No change (Normal)-1/Low-2/Low
High +2/No change (High)+1/No change (High) 0/No change (High)-1/Normal-2/Low
This feature can be used to universally adjust the priority of a group of faxes. Forinstance, you can define a rule for all international faxes: Pattern = 011-44+,Priority Delta = -2. This will reduce the priority of all faxes that match this rule toLow priority, regardless of their original assigned priority. Note that if you haveincluded or excluded specific users or groups from this rule, then the priority deltawill not affect their faxes.
Send on Specific Range of ChannelsYou can create dialing rules to direct faxes to be sent on a specific range of channels.Any channel range specified in a dialing rule will override any channel restrictionused on a specific fax with the <CHANNEL:##> embedded code. This functional-ity applies to the local server only. This parameter is not transferred with the faxif it is routed to another fax server for sending.

186 RightFAX Administrator's Guide
For example, a rule on Server A which specifies that faxes are to be transmittedthrough Server B and specifies a channel range of 3 . . 5 would route the fax throughServer B, but Server B can use any channel. Alternately, Server B can have arule(s) which sets a channel range. This behavior is by design because one servershould not have to "know" the line/channel configuration of another server.
Disallow SendingThe Disallow Sending feature restricts dialing rules. This allows a dialing rule toprevent sending faxes based on various attributes, e.g. number pattern, time of day,sender, etc. The user will get a scheduling failed error message and the send willnot be retried unless the user “kicks” the fax.
Prefix Tables
Prefix tables are a useful way of storing and organizing groups of numbers such astelephone number prefixes or area codes. Rather than create a separate dialing rulefor each number pattern, prefix tables let you create a one rule that applies toseveral number patterns. For example, using a prefix table called Region1containing the entries "458,459,460,and 461," the following four rules can be easilyreplaced by one rule:
1. 520-458-???? Strip 3 digits, add ‘1’2. 520-459-???? Strip 3 digits, add ‘1’3. 520-460-???? Strip 3 digits, add ‘1’4. 520-461-???? Strip 3 digits, add ‘1’
Can all be replaced with :
1. 520-%[Region1,3]-????Strip 3 digits, add ‘1’
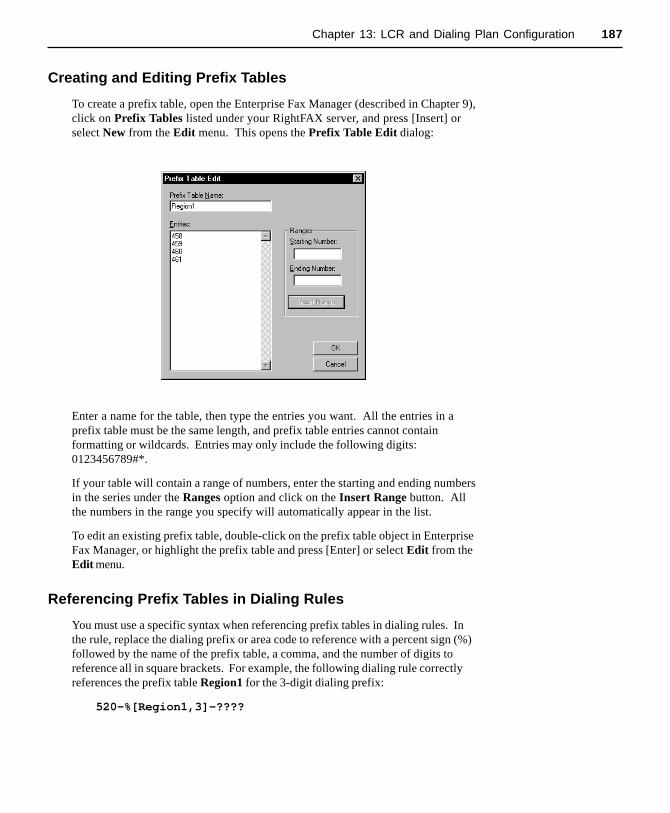
187Chapter 13: LCR and Dialing Plan Configuration
Creating and Editing Prefix Tables
To create a prefix table, open the Enterprise Fax Manager (described in Chapter 9),click on Prefix Tables listed under your RightFAX server, and press [Insert] orselect New from the Edit menu. This opens the Prefix Table Edit dialog:
Enter a name for the table, then type the entries you want. All the entries in aprefix table must be the same length, and prefix table entries cannot containformatting or wildcards. Entries may only include the following digits:0123456789#*.
If your table will contain a range of numbers, enter the starting and ending numbersin the series under the Ranges option and click on the Insert Range button. Allthe numbers in the range you specify will automatically appear in the list.
To edit an existing prefix table, double-click on the prefix table object in EnterpriseFax Manager, or highlight the prefix table and press [Enter] or select Edit from theEdit menu.
Referencing Prefix Tables in Dialing Rules
You must use a specific syntax when referencing prefix tables in dialing rules. Inthe rule, replace the dialing prefix or area code to reference with a percent sign (%)followed by the name of the prefix table, a comma, and the number of digits toreference all in square brackets. For example, the following dialing rule correctlyreferences the prefix table Region1 for the 3-digit dialing prefix:
520-%[Region1,3]-????

188 RightFAX Administrator's Guide
Testing Dialing Rules and Routes
Because there are so many variables that could potentially conflict with each other,you should use the following tools to diagnose problems and test fax routes.
Ping Server
To run this test, select Ping Server from the Enterprise Fax Manager Test Menu:
This diagnostic tool will test communications with the current server over aparticular protocol. The amount of time it takes information packets to make around trip will be displayed in seconds as “time for call.” The current sever loadwill be displayed as “server availability index.” The higher the index value, thegreater the server availability.
Trace Fax Routing
Select Trace Fax Routing from the Enterprise Fax Manager Test Menu:
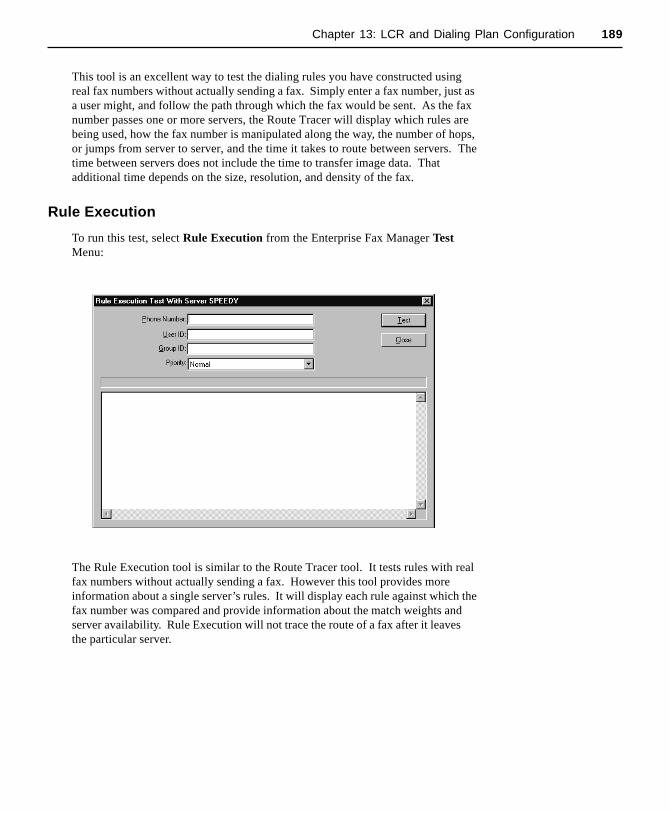
189Chapter 13: LCR and Dialing Plan Configuration
This tool is an excellent way to test the dialing rules you have constructed usingreal fax numbers without actually sending a fax. Simply enter a fax number, just asa user might, and follow the path through which the fax would be sent. As the faxnumber passes one or more servers, the Route Tracer will display which rules arebeing used, how the fax number is manipulated along the way, the number of hops,or jumps from server to server, and the time it takes to route between servers. Thetime between servers does not include the time to transfer image data. Thatadditional time depends on the size, resolution, and density of the fax.
Rule Execution
To run this test, select Rule Execution from the Enterprise Fax Manager TestMenu:
The Rule Execution tool is similar to the Route Tracer tool. It tests rules with realfax numbers without actually sending a fax. However this tool provides moreinformation about a single server’s rules. It will display each rule against which thefax number was compared and provide information about the match weights andserver availability. Rule Execution will not trace the route of a fax after it leavesthe particular server.

190 RightFAX Administrator's Guide
Show Downed Servers
To run this test, select Show Downed Server List from the Enterprise FaxManager Test Menu:
When a fax server has a problem communicating with a remote fax server over aparticular protocol, any rules which target the remote server over using theparticular protocol will be disabled for a specified amount of time. This timedefaults to five (5) minutes but may be changed via a value in the Registry.Disabled rules are essentially invisible to the server and thus do not affect routing.Rules are automatically re-enabled after the programmed delay (5 minutes bydefault).
The benefit to this system is that a fax server will not continually attempt tocommunicate after a problem is detected. Doing so could significantly affectperformance given that protocols such as TCP/IP have large, built-in timeoutvalues.
The Show Downed Server tool will display all rules which are currently disabled.As well, the error which caused the rule to be disabled will also be displayed,allowing for diagnosis. The Reset Downed Servers button refreshes the ShowDowned Server list.
Route Loop Errors
It is possible to construct rules that create a routing loop on a single server ormultiple servers. For example:
SERVER1 #1 520+ route to SERVER2SERVER2 #1 520+ route to SERVER3SERVER3 #1 520+ route to SERVER1

191Chapter 13: LCR and Dialing Plan Configuration
In a case such as this, the fax would continuously route between the four serversuntil it has “hopped” between servers ten (10) times, at which point the fax wouldbe sent.
Call Blocking
The RightFAX BoardServer module supports a call blocking mechanism (separatefrom the call-rule system provided by RightFAX’s least cost routing). This featureallows an administrator to prevent certain calls from going out at the fax hardwarelevel.
By default, the BoardServer module will block any calls going out to a numberbeginning with “911” - the standard emergency number across the United States.The numbers blocked can be changed by adding the following value to the faxserver’s registry:
HKEY_LOCAL_MACHINE\SOFTWARE\RightFAX\BoardServer\BlockedNumbers
This value is of the type “REG_MULTI_SZ”, which means it can contain multiplelines of information. Each line should be one number prefix to block (such as“911”). Note that leading prefix characters will be ignored when the comparison ismade, so that a dialed number “,,911” will still match “911” correctly.
When a RightFAX user’s outgoing fax is blocked by this feature, it’s error statuswill be displayed as “Scheduling Failed”.
BoardServer call blocking may be disabled altogether by adding the followingregistry value:
HKEY_LOCAL_MACHINE\SOFTWARE\RightFAX\BoardServer\BlockingFlags
This entry should be a “REG_DWORD” value set to the number “2”.
LCR Sample Scenarios
Case #1: Using LCR – A Simple Example
PDQ Company has a RightFAX server in New York City (“NYSERVER”) and aTucson RightFAX server (“TSNSERVER”). PDQ wants to save money usingLCR. NYSERVER will detect fax calls directed to fax numbers attached to thePBX in Tucson. TSNSERVER is connected to the PBX, thus line charges will beeliminated for these faxes. PDQ also has determined that it would be cheaper tosend NY faxes bound for Tucson and Southern Arizona numbers via TSNSERVER.
192 RightFAX Administrator's Guide
Thus it installs LCR and adds the following rule via LCRCFG:
Server Name: NYSERVERMatching — Pattern: 520+Action – Other RightFAX Server – Server Name: TSNSERVERAction – Other RightFAX Server – Protocol: TCP/IP
PDQ has 100 PBX fax lines in Tucson all starting with the prefix 320 and digits 71(e.g. 320-71??).
PDQ wants those faxes to be routed by TSNSERVER to use the internal PBXrather than dialing outside lines. The following rules should be setup:
Server Name: TSNSERVERMatching — Pattern: 520-320-71+Action – Send via Local MachineAction – Number of digits to remove: 6
Server Name: TSNSERVERMatching — Pattern: 320-71+Action – Send via Local MachineAction – Number of digits to remove: 3
Case #2: Using dialing prefix tables
PDQ also wants to make sure that Southern Arizona calls outside of Tucson getdialed correctly from TSNSERVER. The 458 prefix requires a ‘1’ be prependedonto the number. Also, the 520 area code should not be used. Thus the followingrules:
Server Name: TSNSERVERMatching — Pattern: 458+Action – Send via Local MachineAction – Digits to prepend: 1
Server Name: TSNSERVERMatching — Pattern: 520-458+Action – Send via Local MachineAction – Number of digits to remove: 3Action – Digits to prepend: 1
193Chapter 13: LCR and Dialing Plan Configuration
Actually there are more prefixes that could be dialed in Southern Arizona, but itwould be cumbersome to add rules for each one. LCR takes care of this with“prefix tables.” PDQ determines that there are three prefixes (458, 459, 652) thatencompass the other numbers that could be dialed. PDQ creates a prefix table(Edit – Prefix Tables), named SOUTHAZ and adds all three prefixes. It thenreplaces the above two rules with these two:
Server Name: TSNSERVERMatching — Pattern: %[SOUTHAZ,3]+Action – Send via Local MachineAction – Digits to prepend: 1
Server Name: TSNSERVERMatching — Pattern: 520-%[SOUTHAZ,3]+Action – Send via Local MachineAction – Number of digits to remove: 3Action – Digits to prepend: 1
This handles all of PDQ’s Southern Arizona prefixes at once.
Case #3: Distinguishing ‘+’ wildcard rules from other localnumbers
The system administrator for NYSERVER now finds that faxes bound for internal4-digit PBX numbers in NY beginning with “520” are being routed out to Tucson!To top that off, NY just added a prefix for the Tri-State area of “520” and thosecalls are going to Tucson, too.
To correct this situation, the administrator adds two new rules to PDQNYSERVER:
Server Name: NYSERVERMatching — Pattern: 520?Action – Send via Local Machine
Server Name: NYSERVERMatching — Pattern: 520-????Action – Send via Local MachineAction – Digits to prepend: 1
Note: The new Tri-State prefix requires a ‘1’ be prepended to the phone numberfor proper dialing to occur.
These two rules intercept 520 calls that would otherwise match the “520+” ruleabove. Wildcard patterns with a ‘+’ are overruled by those without them.Patterns without wildcards overrule those with them.
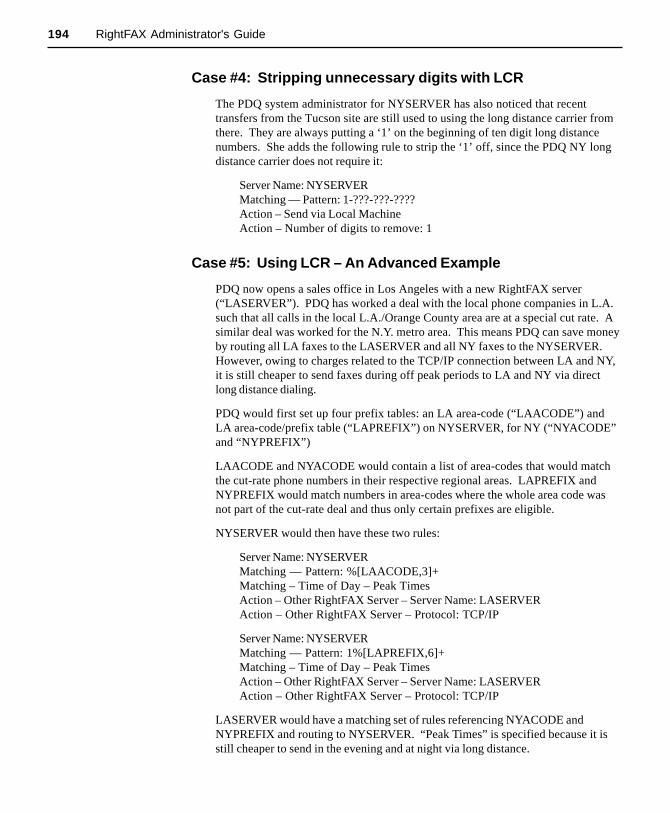
194 RightFAX Administrator's Guide
Case #4: Stripping unnecessary digits with LCR
The PDQ system administrator for NYSERVER has also noticed that recenttransfers from the Tucson site are still used to using the long distance carrier fromthere. They are always putting a ‘1’ on the beginning of ten digit long distancenumbers. She adds the following rule to strip the ‘1’ off, since the PDQ NY longdistance carrier does not require it:
Server Name: NYSERVERMatching — Pattern: 1-???-???-????Action – Send via Local MachineAction – Number of digits to remove: 1
Case #5: Using LCR – An Advanced Example
PDQ now opens a sales office in Los Angeles with a new RightFAX server(“LASERVER”). PDQ has worked a deal with the local phone companies in L.A.such that all calls in the local L.A./Orange County area are at a special cut rate. Asimilar deal was worked for the N.Y. metro area. This means PDQ can save moneyby routing all LA faxes to the LASERVER and all NY faxes to the NYSERVER.However, owing to charges related to the TCP/IP connection between LA and NY,it is still cheaper to send faxes during off peak periods to LA and NY via directlong distance dialing.
PDQ would first set up four prefix tables: an LA area-code (“LAACODE”) andLA area-code/prefix table (“LAPREFIX”) on NYSERVER, for NY (“NYACODE”and “NYPREFIX”)
LAACODE and NYACODE would contain a list of area-codes that would matchthe cut-rate phone numbers in their respective regional areas. LAPREFIX andNYPREFIX would match numbers in area-codes where the whole area code wasnot part of the cut-rate deal and thus only certain prefixes are eligible.
NYSERVER would then have these two rules:
Server Name: NYSERVERMatching — Pattern: %[LAACODE,3]+Matching – Time of Day – Peak TimesAction – Other RightFAX Server – Server Name: LASERVERAction – Other RightFAX Server – Protocol: TCP/IP
Server Name: NYSERVERMatching — Pattern: 1%[LAPREFIX,6]+Matching – Time of Day – Peak TimesAction – Other RightFAX Server – Server Name: LASERVERAction – Other RightFAX Server – Protocol: TCP/IP
LASERVER would have a matching set of rules referencing NYACODE andNYPREFIX and routing to NYSERVER. “Peak Times” is specified because it isstill cheaper to send in the evening and at night via long distance.
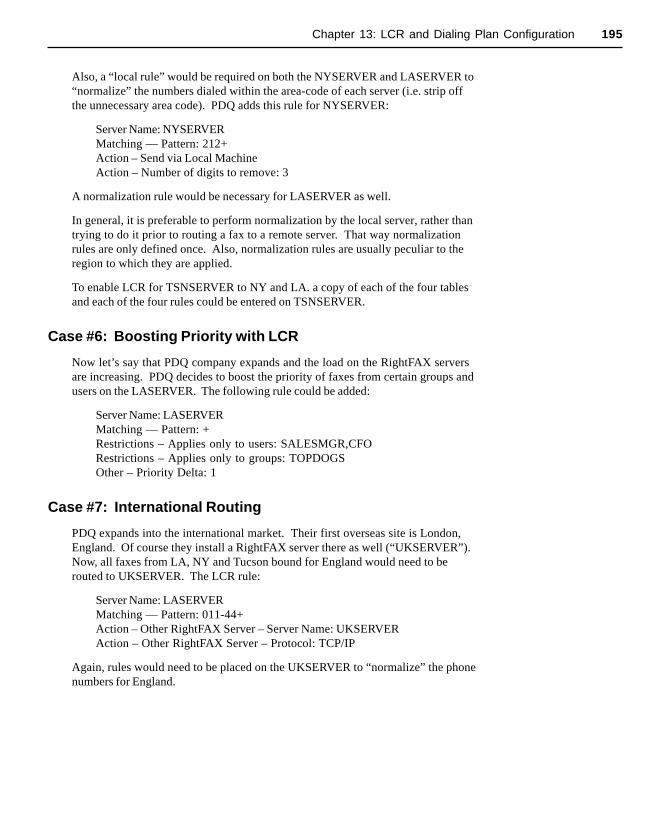
195Chapter 13: LCR and Dialing Plan Configuration
Also, a “local rule” would be required on both the NYSERVER and LASERVER to“normalize” the numbers dialed within the area-code of each server (i.e. strip offthe unnecessary area code). PDQ adds this rule for NYSERVER:
Server Name: NYSERVERMatching — Pattern: 212+Action – Send via Local MachineAction – Number of digits to remove: 3
A normalization rule would be necessary for LASERVER as well.
In general, it is preferable to perform normalization by the local server, rather thantrying to do it prior to routing a fax to a remote server. That way normalizationrules are only defined once. Also, normalization rules are usually peculiar to theregion to which they are applied.
To enable LCR for TSNSERVER to NY and LA. a copy of each of the four tablesand each of the four rules could be entered on TSNSERVER.
Case #6: Boosting Priority with LCR
Now let’s say that PDQ company expands and the load on the RightFAX serversare increasing. PDQ decides to boost the priority of faxes from certain groups andusers on the LASERVER. The following rule could be added:
Server Name: LASERVERMatching — Pattern: +Restrictions – Applies only to users: SALESMGR,CFORestrictions – Applies only to groups: TOPDOGSOther – Priority Delta: 1
Case #7: International Routing
PDQ expands into the international market. Their first overseas site is London,England. Of course they install a RightFAX server there as well (“UKSERVER”).Now, all faxes from LA, NY and Tucson bound for England would need to berouted to UKSERVER. The LCR rule:
Server Name: LASERVERMatching — Pattern: 011-44+Action – Other RightFAX Server – Server Name: UKSERVERAction – Other RightFAX Server – Protocol: TCP/IP
Again, rules would need to be placed on the UKSERVER to “normalize” the phonenumbers for England.

196 RightFAX Administrator's Guide
Case #8: Load Balancing
LCR can also be used to “load balance” two or more servers at a site. Let’s sayPDQ adds another server to the burgeoning NY site (“NYSERVER2”). Further-more, usage data indicates that during peak times, faxes on NYSERVER are takingseveral minutes longer waiting to be sent on the average. Upon analysis, PDQfinds that the users of NYSERVER are sending many more faxes than the ones ofNYSERVER2. This leads to outgoing fax channel tie-ups on NYSERVER.
By entering the four rules below, new faxes coming into each server will automati-cally be routed to the one with the least load:
Server Name: NYSERVERMatching — Pattern: +Action - Send via Local Machine
Server Name: NYSERVERMatching — Pattern: +Action – Other RightFAX Server – Server Name: NYSERVER2Action – Other RightFAX Server – Protocol: TCP/IP
Server Name: NYSERVER2Matching — Pattern: +Action – Send via Local Machine
Server Name: NYSERVER2Matching — Pattern: +Action – Other RightFAX Server – Server Name: NYSERVERAction – Other RightFAX Server – Protocol: TCP/IP
LCR uses “weighting” to determine the order of matching of rules. The weight isdetermined by the pattern that matches. When two identical patterns match, thenload balancing can occur. RightFAX looks to see which of the desired servers hasthe least load and the fax is queued for sending with the one with the least load.
Case #9: Backup Servers
PDQ’s S.A. for LASERVER gets wind of the new NYSERVER2 in New York. Hedecides to make use of the additional server by replicating all the rules onLASERVER for NYSERVER but this time referring them to NYSERVER2. Hedoes this because it will lead to a guaranteed path of low-cost routing should one orthe other of the NY servers fail for any reason.
Creating and Using CoverSheets
In this chapter:
• Creating Cover Sheets• Switching Cover Sheets• Customizing Cover Sheet Required Fields
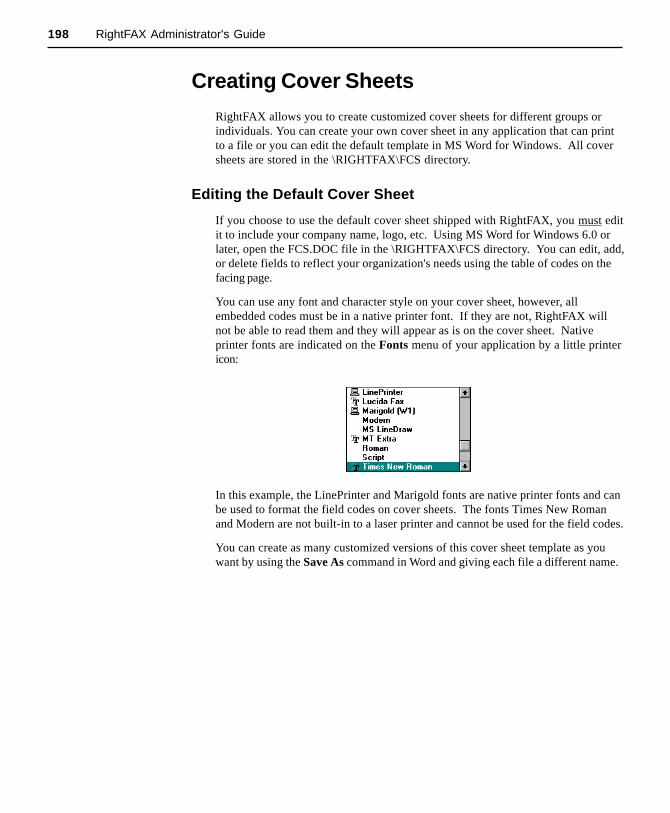
198 RightFAX Administrator's Guide
Creating Cover Sheets
RightFAX allows you to create customized cover sheets for different groups orindividuals. You can create your own cover sheet in any application that can printto a file or you can edit the default template in MS Word for Windows. All coversheets are stored in the \RIGHTFAX\FCS directory.
Editing the Default Cover Sheet
If you choose to use the default cover sheet shipped with RightFAX, you must editit to include your company name, logo, etc. Using MS Word for Windows 6.0 orlater, open the FCS.DOC file in the \RIGHTFAX\FCS directory. You can edit, add,or delete fields to reflect your organization's needs using the table of codes on thefacing page.
You can use any font and character style on your cover sheet, however, allembedded codes must be in a native printer font. If they are not, RightFAX willnot be able to read them and they will appear as is on the cover sheet. Nativeprinter fonts are indicated on the Fonts menu of your application by a little printericon:
In this example, the LinePrinter and Marigold fonts are native printer fonts and canbe used to format the field codes on cover sheets. The fonts Times New Romanand Modern are not built-in to a laser printer and cannot be used for the field codes.
You can create as many customized versions of this cover sheet template as youwant by using the Save As command in Word and giving each file a different name.

199Chapter 14: Creating and Using Cover Sheets
Co ve r Shee t Code Replaced w ith Max im umLength
<B ILL IN F O 1> Billing Info rma t io n #1 15 charac te rs
<B ILL IN F O 2> Billing Info rma t io n #2 15 charac te rs
<C A LL BA C K > "Yes" o r "N o " N /A
<C C TE X T> A ll Liste d Rec ipients o f theFa x
U p to 2 1 line s, 69chara c te rs e ach
< FA X D ID N U M > S end er's Fax N umb er 31 charac te rs
< FR O M _ N AM E > o r<F RO M N A M E> S ender's N ame 59 charac te rs
< FR O M _ P H O N E N U M >o r < FRO M P H O N E N U M > Send er 's P hone N umb er 31 charac te rs
< G E N ER A LFA X N U M > Se nd er's G enera l Fa x N umb e r 31 charac te rs
<N O T E TE XT> N o te s U p to 2 1 line s, 69chara c te rs e ach
<N U M PA G E S> N umber of Pa ge s (e xc lud ingco ve r sheet) N /A
<N U M PA G E SC > N umb e r o f Pa ge s (inc lud ingco ve r sheet) N /A
< O PE RATO R N U M > S end er's G enera l P honeN umb e r 31 charac te rs
< TO C ITY STAT E> Rec ip ie nt 's A dd re ss 59 charac te rs
< TO C O M PA N Y > Rec ipie nt's C om pany N ame 59 charac te rs
< T O C O N TA C T N U M > Rec ipie nt's Vo ic e N umb er 31 charac te rs
< TO FA X N U M > R ecip ie nt's Fa x N umb er 31 charac te rs
<T O N A M E> R ec ip ie nt's N ame 59 charac te rs
<W H E N FA X ED > o r< D AT E> D ate a nd Time C rea te d N /A
Each <NOTETEXT>code represents one
line of any notes to beplaced on the cover
sheet. A cover sheettemplate should include
21 of these codes toallow placement of all 21
possible lines of notetext. Text does not wrap
Date and Time Createdis different from the date
and time the fax isactually sent, which is
recorded on the TTI lineon each fax page
The <CCTEXT> codelists all recipients of afax (including CC andBC recipients) in the
formatname,faxnum;name,faxnumup to 69 characters per
line and 21 lines(represented by up to 21<CCTEXT> codes). Thecover sheet will only listas many fax recipients
as there is spaceallotted for

200 RightFAX Administrator's Guide
Creating Your Own Cover Sheet
You can use any application from which you can print to a file to create your owncover sheet from scratch. You may include the embedded codes which completethe cover sheet information for each fax. Choose from the list of valid codes aboveand remember to use a native printer font so RightFAX can read them.
Printing Cover Sheets to a PCL file
Once they are created, all cover sheets, regardless of the application in which theywere created, must be printed using a printer driver that generates PCL5 code, andmust be saved to the \RIGHTFAC\FCS directory on the RightFAX server with theextension .PCL. It is this PCL file that RightFAX uses to generate the cover sheetimage.
Most applications, including word processing applications, provide a Print to Fileoption that can be set in the Print dialog. You will be prompted for the file nameand extension. Be as descriptive as possible when naming the file (using the 8.3naming convention), as this is the name your users will see if they change coversheet models.
If your application does not have a built-in Print to File option, you will need tocreate a PCL5 printer with a Print to File property.
Switching Cover Sheets
Administrators can assign rights to users that allow them to switch cover sheets(see Chapter 10, Managing Users and Groups). Below are the rules whichdetermine the cover sheet that will be used:
1. If you select a specific cover sheet for a fax, RightFAX will use it.
2. If you have a default cover sheet for all faxes, RightFAX will use it.
3. If the group has a specified cover sheet, RightFAX will use it.
4. If no cover sheet was determined by rules 1-3, RightFAX will use thedefault cover sheet file FCS.PCL.

201Chapter 14: Creating and Using Cover Sheets
RightFAX is shippedwith the fields To Fax
Number and To Name/IDas required for outgoingor sent faxes. You can
turn off this requirementfor the To Name field,however the To Fax
Number field will alwaysbe required.
Customizing Cover Sheet Required Fields
In order to transmit an outgoing fax, RightFAX requires that certain information becompleted in the Fax Information dialog. The RightFAX administrator canspecify how much or how little information the user must complete before the faxis considered ready to send. To set these parameters, select the Customize FCSRequired Fields option in the Utility menu.
To require that a certain field be completed, check the box next to the field name. Ifyou place a check mark in the Sent column, users will not be able to send theirfaxes without completing the specified field. If you place a check mark in theReceived column, users will not be able to delete a received fax without completingthe specified field.
If all of the required fields on an outgoing fax are not completed, the fax will remainin the FaxUtil mailbox with the status "Info Not Complete." If all of the requiredfields on a received fax are not complete, the user will not be able to delete the faxfrom FaxUtil. This allows you to require that the fax recipient complete billingcodes or other fields for billing records.
In conjunction with the process of requiring certain fields, you may also validatethe customizable billing information fields. By toggling the Verify Billing Codesbox, the fax server will check all faxes against the Billing Code Table (see Chapter12: Printers and Billing Codes for more information). In the Billing CodeDescriptions field, you can enter descriptive names for your billing code fields(e.g. client, case, account, employee number, etc.). The descriptions will appear inthe Fax Information dialog, the FaxUtil window, and many other places where thefields are displayed and manipulated. The fax server is not affected by thedescriptions you enter here, so they can be modified at any time.

202 RightFAX Administrator's Guide

Generating Fax Reports
In this chapter:
• Installing Fax Reporter• Running Fax Reporter• Creating Data Sets• Generating a Fax Report• Creating Custom Reports• Data Set File Format• FaxDump

204 RightFAX Administrator's Guide
The RightFAX database stores a large amount of information about faxes forreporting and billing purposes. The RightFAX Fax Reporter utility lets you:
• Create fax information reports from new and existing data sets
• Save data sets as MS Access (.MDB) files
• Export reports to other file formats including HTML, Word, Excel, TXT,RTF, and e-mail through MAPI/Exchange.
• Generate graphs and/or lists of fax information
• Preview reports before printing
Fax Reporter can be run from either the RightFAX server or from a Windows NT4.0 or Windows 95 client workstation.
Installing Fax Reporter
Installing Fax Reporter to a Client WorkstationFax Reporter is installed as an optional component during the RightFAX clientinstallation. If you did not choose to automatically install it during the standardclient installation, re-run the client Setup program from the\RIGHTFAX\CLIENT\WINNT(or WIN95) directory, and check the Fax Reporteroption at the Select Options dialog.
Installing Fax Reporter to the RightFAX ServerTo install Fax Reporter to the RightFAX server, run the Setup program located inthe \RIGHTFAX\CLIENT\FAXRPT2 directory.
Uninstalling Fax ReporterFollow these steps to remove the Fax Reporter software from your computer:
1. Go to the Start menu and select Settings, then Control Panel.
2. Double click on Add/Remove Programs.
3. Select Fax Reporter and click Add/Remove.
The RightFAX Reporterinstalls components of
Seagate Software'sCrystal Reports 6.0 on
the client workstation. Ifyou have installed other
software that uses adifferent version of thissoftware, a conflict may
occur.

205Chapter 15: Generating Fax Reports
Running Fax Reporter
To run Fax Reporter, click the Start button on the task bar and select Programsthen Fax Reporter. This opens the Fax Report Generator dialog:
The top half of this dialog lists existing data sets. A data set is a compiled reportof fax data for a selected period of time.
The bottom half of this dialog lists available reports. Reports define the type andformat of data that is generated from the selected data set. Reports are organizedinto folders. Double-click on a folder to open it. The reports themselves areindicated by a black and white report icon.
Creating Data Sets
You can create two types of data sets: dynamic data sets, and absolute data sets.
A "dynamic" data set is a data set that represents a relative time range. Forexample, a data set representing "last month" can be created that automaticallycollects fax data for the last calendar month from the date of creation. This data setcan then be refreshed at any time and new data will be collected for the lastcalendar month from the date of the refresh.
The privilege to run FaxReporter can be editedin the User Permissions
in Enterprise FaxManager

206 RightFAX Administrator's Guide
An "absolute" data set is a data set that represents an absolute time range, from afixed start date to a fixed end date. Since the time period they represent neverchanges, absolute data sets cannot be refreshed.
Refreshing an Existing Data Set
To refresh an existing data set, highlight the data set in the Fax Report Generatordialog and click on the Refresh button. New data will be collected starting fromtoday.
Creating a New Data Set
To create a new data set, open the Fax Report Generator dialog and click on theNew button . This opens the Data Set dialog. Complete each of the fields, thenclick OK to collect the specified fax data.
Data Set NameEnter a descriptive name for the data set.
Database File NameEnter the location where the data set file will be saved. This file will always be anMDB (Microsoft Access) database file and the .MDB extension will be automati-cally appended.
Server NameEnter the name of the RightFAX server from which data will be collected.

207Chapter 15: Generating Fax Reports
ProtocolSelect the appropriate communication protocol for your network.
Date RangeThis is the time period for which you want data collected. You can only select oneof the Date Range options. All of these options represent dynamic time ranges(the actual date ranges can be updated by clicking the Refresh button) with theexception of Absolute. If you want a data set for a fixed date range only, click onAbsolute and enter the Start and End Dates.
Editing an Existing Data Set
To edit an existing data set, highlight the data set in the Fax Report Generatordialog and click on the Edit button. This opens the Data Set dialog (describedabove). You can change any of the fields on this dialog. Click OK to save yourchanges.
Deleting a Data Set
To delete a data set, highlight the data set to remove in the Fax Report Generatordialog and click on the Delete button.
Generating a Fax Report
Once you have created a data set for the desired time period, follow these steps togenerate a fax report.
1. In the Fax Report Generator dialog, highlight the desired data set. (Ifnecessary, click Refresh to update the existing fax information.)
2. Select the type of report you want to generate in the Reports section.Reports are organized into folders. Double-click on a folder to open it.Reports are indicated by a black and white report icon. If you highlight afolder (as opposed to an actual report file) no report will be generated.
3. To print the report, click on the Print button. To preview the report,click Preview. To print the report after previewing it, select the Printerbutton in the Preview window (this appears only if you have access to aprinter).
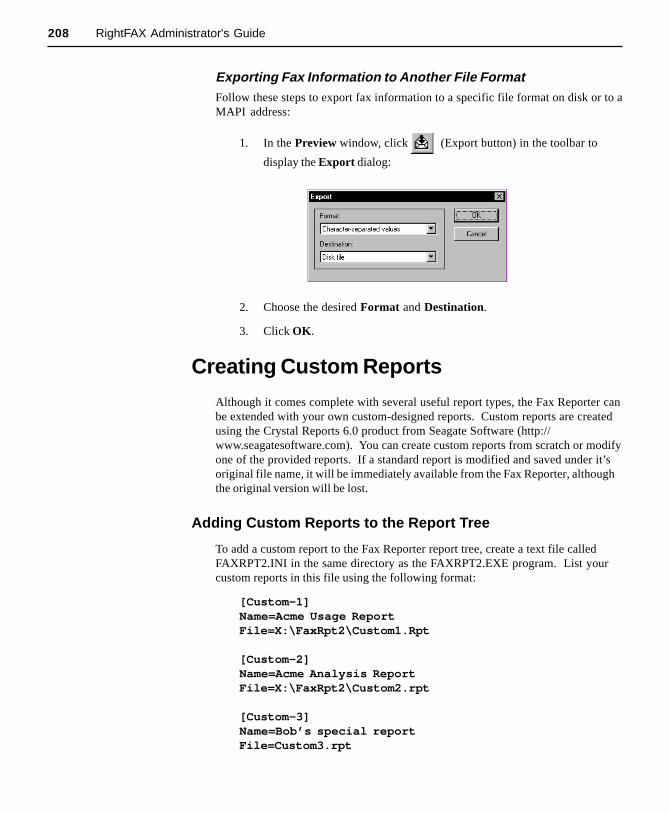
208 RightFAX Administrator's Guide
Exporting Fax Information to Another File FormatFollow these steps to export fax information to a specific file format on disk or to aMAPI address:
1. In the Preview window, click (Export button) in the toolbar to
display the Export dialog:
2. Choose the desired Format and Destination.
3. Click OK .
Creating Custom Reports
Although it comes complete with several useful report types, the Fax Reporter canbe extended with your own custom-designed reports. Custom reports are createdusing the Crystal Reports 6.0 product from Seagate Software (http://www.seagatesoftware.com). You can create custom reports from scratch or modifyone of the provided reports. If a standard report is modified and saved under it’soriginal file name, it will be immediately available from the Fax Reporter, althoughthe original version will be lost.
Adding Custom Reports to the Report Tree
To add a custom report to the Fax Reporter report tree, create a text file calledFAXRPT2.INI in the same directory as the FAXRPT2.EXE program. List yourcustom reports in this file using the following format:
[Custom-1]Name=Acme Usage ReportFile=X:\FaxRpt2\Custom1.Rpt
[Custom-2]Name=Acme Analysis ReportFile=X:\FaxRpt2\Custom2.rpt
[Custom-3]Name=Bob’s special reportFile=Custom3.rpt

209Chapter 15: Generating Fax Reports
Each report must have a header [Custom-#], where # is the number of the entry inthe file. The Name= parameter is the descriptive name for the report that will bedisplayed in the report tree. The File= parameter is the path and file name of thereport definition file. If the File= parameter does not specify the full path, thereport definition file is assumed to be located in the \FAXRPT2\REPORTSdirectory (the same directory where all the default reports are installed).
Custom reports are only read when the Fax Reporter is first started. If the .INI fileis edited, Fax Reporter must be restarted so it can read the changes.

210 RightFAX Administrator's Guide
Fax Reporter Database Tables
Table Name D escrip tion
F axes C onta ins the fax reco rds.
Histo ryC onta ins the history records fo r each fax. E ach outbound faxwill have zero or mo re history records, one fo r each sendattemp t. E ach inbound or rece ived fax will have one history.
NetF wdHisto ry
C onta ins a record fo r eve ry occurrence o f a fax be ingforwa rded to another netwo rk use r. There are zero or m oreforwa rd ing history records fo r each fax in the FA X E S tab le .These records do not record the occurrence o f a fax be ingforwa rded to a fax m achine .
RouteHistoryC onta ins a record fo r eve ry occurrence o f a fax be ing manuallyrouted between users. There are zero or mo re route histo ryrecords fo r each fax in the FA X E S tab le .
P rintHisto ry
C onta ins a record fo r eve ry occurrence o f a fax be ing printed toa network printer (e ither m anually or autom atica lly). There a reze ro or m ore route history records fo r each fax in the FA X E Stab le .
OcrHistoryC onta ins a record fo r eve ry occurrence o f a user requesting tha ta fax be run on the OC R eng ine . There are zero or m o re OC Rhistory records fo r each fax in the FA X E S tab le .
A pprovedHistoryC onta ins a record fo r eve ry occurrence o f a fax be ing approvedfor send ing.
D isapprovedHisto ryC onta ins a record fo r eve ry occurrence o f a fax be ingd isapp roved for send ing.
F axSta tStringsTab le to a llow transla tion o f the FA X E S .F axSta tus fie ld into ahum an readab le string .
F axE rrorStringsTab le to a llow transla tion o f the FA X E S .F axE rrorC ode fie ld intoa hum an readab le string .
F axS erverInfoC onta ins a sing le record tha t conta ins inform ation about the faxserve r from which the data se t was created.
Data Set File Format
Fax Reporter data sets are Access 97 databases. Each database contains a numberof tables. The following pages contain information about these Fax ReporterDatabase tables:

211Chapter 15: Generating Fax Reports
Faxes Table Field Descriptions
Field Name Type Size Description
FaxHandleNumber(Long)
4
Primary key for fax records. Fax handles are used bythe fax server to identify faxes at any particular point intime. A fax handle can be reused over time, so do notexpect two different data sets to have unique faxhandles.
OwnerID Text 21 ID of the owning fax server user who owns this fax.
GroupID Text 21 Group ID to which the fax owner belongs.
ToFaxNum Text 31
Phone number to which to send the fax. This isusually only valid for outbound faxes, though it ispossible for users to enter a value in this field onreceived faxes. This is not the final fax number dialedbecause the dialing plan on the fax server whoultimately sent the fax may have modified the numberin some way.
ToContactNum Text 31Information field. May be filled in by the fax owner withany data.
ToName Text 59Information field. May be filled in by the fax owner withany data.
ToCompany Text 59Information field. May be filled in by the fax owner withany data.
ToCityState Text 59Information field. May be filled in by the fax owner withany data.
FromName Text 50
On outbound faxes not originated via an e-mailgateway, the field may be filled in by the fax ownerwith any data, though it usually contains the name ofthe owner/sender. On outbound faxes originated viae-mail, this field contains the e-mail address of thesender. The address is used by the fax server tosend acknowledgements to the sender. On inboundfaxes, this field is usually blank unless the user entersinformation manually.

212 RightFAX Administrator's Guide
Faxes Table Field Descriptions (cont'd)
Field Name Type Size Description
FromPhoneNum Text 31Information field. May be filled in by the fax ownerwith any data.
BillInfo1 Text 15
Information field. May be filled in by the fax ownerwith any data. This is one of the customizablebilling fields. The actual description of the fieldmay be obtained by examining the BillDesc1 fieldof the FaxServerInfo table.
BillInfo2 Text 15
Information field. May be filled in by the fax ownerwith any data. This is one of the customizablebilling fields. The actual description of the fieldmay be obtained by examining the BillDesc1 fieldof the FaxServerInfo table.
UniqueID Text 15
Information field. This field is usually generated bythe fax server automatically, though it may bemodified/set via an API generated fax or a faxcontaining the <UNIQUEID:xxx> embedded code.While the field name implies uniqueness, none isguaranteed.
FaxDIDNum Text 31
Information field. May be filled in by the fax ownerwith any data. On outbound faxes, this field usuallycontains the human readable private fax number ofthe sender/owner.
RemoteID Text 21
The CSID of the last fax machine to which the faxwas sent or the CSID of the machine from whichthe fax was received. CSID's are not actuallyrequired to complete a fax transmission, so thisfield may be empty.
EmailTypeNumber(Long)
4
Valid only on outbound faxes. If the fax wasgenerated via a mail message, then this fieldcontains a number which indicates what type ofmail system originated the fax, else the field is null.Internally, the fax server uses this data so that areply may be sent to the fax originator via theproper mail system (the FromName field containsthe e-mail address of the fax sender when thisvalue is non-null).
FaxDateTime Date/Time 8Date and time the fax was created (in local time).This field is fully Year-2000 compliant.
FaxSendDateTime Date/Time 8
If the fax was time-delayed by the owner, i.e. it wasnot sent ASAP, then this field contains the originaldate and time scheduled by the owner. If the faxwas sent ASAP, then this field is null.
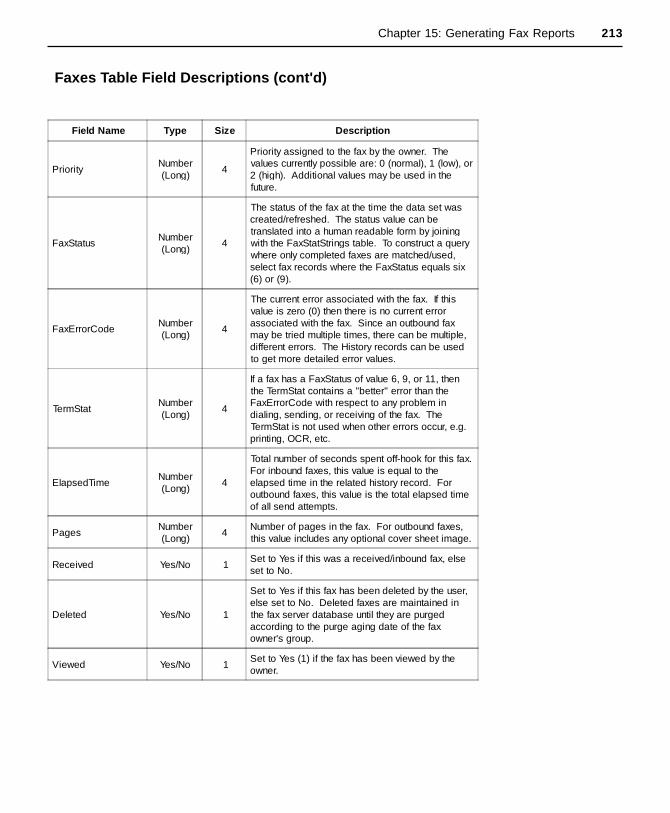
213Chapter 15: Generating Fax Reports
Faxes Table Field Descriptions (cont'd)
Field Name Type Size Description
PriorityNumber(Long)
4
Priority assigned to the fax by the owner. Thevalues currently possible are: 0 (normal), 1 (low), or2 (high). Additional values may be used in thefuture.
FaxStatusNumber(Long)
4
The status of the fax at the time the data set wascreated/refreshed. The status value can betranslated into a human readable form by joiningwith the FaxStatStrings table. To construct a querywhere only completed faxes are matched/used,select fax records where the FaxStatus equals six(6) or (9).
FaxErrorCodeNumber(Long)
4
The current error associated with the fax. If thisvalue is zero (0) then there is no current errorassociated with the fax. Since an outbound faxmay be tried multiple times, there can be multiple,different errors. The History records can be usedto get more detailed error values.
TermStatNumber(Long)
4
If a fax has a FaxStatus of value 6, 9, or 11, thenthe TermStat contains a "better" error than theFaxErrorCode with respect to any problem indialing, sending, or receiving of the fax. TheTermStat is not used when other errors occur, e.g.printing, OCR, etc.
ElapsedTimeNumber(Long)
4
Total number of seconds spent off-hook for this fax.For inbound faxes, this value is equal to theelapsed time in the related history record. Foroutbound faxes, this value is the total elapsed timeof all send attempts.
PagesNumber(Long)
4Number of pages in the fax. For outbound faxes,this value includes any optional cover sheet image.
Received Yes/No 1Set to Yes if this was a received/inbound fax, elseset to No.
Deleted Yes/No 1
Set to Yes if this fax has been deleted by the user,else set to No. Deleted faxes are maintained inthe fax server database until they are purgedaccording to the purge aging date of the faxowner's group.
Viewed Yes/No 1Set to Yes (1) if the fax has been viewed by theowner.

214 RightFAX Administrator's Guide
Faxes Table Field Descriptions (cont'd)
Field Name Type Size Description
Printed Yes/No 1Set to Yes (1) if the fax has been printed by theowner.
DoNotAudit Yes/No 1
Set to Yes (1) if the fax should be ignored for billingpurposes. The flag is set when a fax is forwardedbetween users on a network or when an outboundfax is used as a conduit for another operation likecreating a library document. If this flag were notpresent, then a fax sent on behalf of a "client"might be counted twice if that same fax wereforwarded to another network user.
NoCover Yes/No 1
Set to Yes (1) if this fax does not have anautomatically generated cover sheet. This field isalways set to No on inbound faxes because acover sheet is never generated for inbound faxes.
SmartResume Yes/No 1Set to Yes (1) if this fax has the Smart-Resumecapability enabled. By itself, it doesn't mean thatthe fax had to retry during sending.
WasApproved Yes/No 1
Set to Yes (1) if the fax needed approval and thenwas subsequently approved for sending. If a faxneeding approval is disapproved, then this flag willnot be set, the fax status will be set toFAXSTAT_DONE_ERROR and the fax error codewill be set to FAXERROR_DISAPPROVED.
NeedsApproval Yes/No 1
Set to Yes (1) if the fax needs approval beforebeing sent. This flag is NOT cleared when the faxis approved or disapproved, so merely looking atthis flag does not indicate which faxes are waitingfor approval (the fax status field should be used forsuch purposes).
HasTrxNotes Yes/No 1
Set to Yes (1) if the fax has a network-forward orroute history record with embedded notes. Thisflag is normally used by the fax mailbox utilitysoftware (FaxUtil) so that it can flag the existenceof the notes for the user.
BodyImage Text 14
Contains the file name of the fax body images asstored in the fax server Image subdirectory. Thepath is never included. An extension is notnormally given and should be ignored if it exists(the extension is used to represent the pagenumber). It is possible for a fax to not have a bodyimage because: one has yet to be generated, thefax is really a binary file transfer record, the fax is acover sheet only fax, or the fax record is a thermalfax record.

215Chapter 15: Generating Fax Reports
Faxes Table Field Descriptions (cont'd)
Field Name Type Size Description
FcsImage Text 14
Contains the file name of the fax cover sheetimage as stored in the fax server Imagesubdirectory. Neither the path nor the extension isever included. A fax may not have a cover sheetimage because: the fax is a received fax, the faxis a thermal fax record, the cover sheet has yet tobe generated, the fax is really a binary file transfer,or the user didn't want a cover sheet generated.
FlagsNumber(Long)
4A four-byte field where the bits are mapped tospecific meanings. The API should be examinedfor details on the various bits and their meaning.
FFRFlagsNumber(Long)
4A four-byte field where the bits are mapped tospecific meanings. The API should be examinedfor details on the various bits and their meaning.
FolderNumber(Long)
4
The folder number in which the fax lives. There area few predefined folder numbers. All othernumbers are defined by the owner's folderdefinitions. The predefined folder numbers are: 0(Main) and 0xFFFE (Trash).

216 RightFAX Administrator's Guide
Send/Receive History Table Field Descriptions
Field Name Type Size Description
FaxHandleNumber(Long)
4
The handle of the Fax record to which the historybelongs. This field serves as the foreign key forthe History table and should be used to join withthe Fax table.
HstDateTime Date/Time 8The date and time of the phone line operation, e.g.the date and time the fax was received.
HstChannelUsedNumber(Long)
4The channel number (0..N) on which the send orreceive event occurred.
HstServerUsed Text 47
The name of the fax server where the phone eventoccurred. This is normally set to null indicating thatthe event occurred on the fax server on which thefax was created, but can be non-null when leastcost routing or load balancing caused the event tooccur on or through another another fax servermachine.
HstElapsedTimeNumber(Long)
4The number of seconds of off-hook phone timeexpended on this event.
HstGoodPagesNumber(Long)
4The number of pages successfully transferred bythis event.
HstRemoteID Text 21The CSID of the fax machine with which the faxserver communicated.
HstBoardErrNumber(Long)
4
A board specific error code which gives details onwhat happened with this send or receive event.The HstBoardType can be used to decode themeaning of this field.
HstBoardErrString Text 74A human readable version of the HstBoardErrvalue.
HstSuccessfulSend Yes/No 1
Set to Yes (1) if this event represents a sendattempt and the attempt was successful. This fieldis a board-dependent interpretation of theHstBoardErr value. The field allows one to easilyfilter queries on successful versus unsuccessfulhistory events by using this simple field.
HstBoardTypeNumber(Long)
4
Indicates the type of board that executed this event.The possible values are: 0 (Brooktrout using oldererror reporting model); 1 (Gammalink); and 2(Brooktrout using newer error reporting model).

217Chapter 15: Generating Fax Reports
Network-Forward History (NetForwardHistory) Table FieldDescriptions
Field Name Type Size Description
FaxHandleNumber(Long)
4
The handle of the Fax record to which the historybelongs. This field serves as the foreign key forthe ForwardHistory table and should be used tojoin with the Fax table.
DateTime Date/Time 8 The date and time the fax was forwarded.
FlagsNumber(Long)
4A four-byte field where the bits are mapped tospecific meanings. The API should be examinedfor details on the various bits and their meaning.
Users Text 127A list of fax user ID's to whom the fax wasforwarded. Multiple ID's are separated bycommas.
PreviousOwnerID Text 21 The ID of the fax user who forwarded the fax.
Notes Text 127
Any notes about the forward operation. Thesenotes might be automatically generated by theserver in the case of an automatic forwarding ormay have been entered when a user manuallyforwarded a fax.
Route History (RouteHistory) Table Field Descriptions
Field Name Type Size Description
FaxHandleNumber(Long)
4
The handle of the Fax record to which the historybelongs. This field serves as the foreign key forthe RouteHistory table and should be used to joinwith the Fax table.
DateTime Date/Time 8 The date and time the fax was routed.
FlagsNumber(Long)
4A four-byte field where the bits are mapped tospecific meanings. The API should be examinedfor details on the various bits and their meaning.
PreviousOwnerID Text 21 The ID of the fax user who routed the fax.
Notes Text 127
Any notes about the route operation. These notesmight be automatically generated by the server inthe case of an automatic routing or may havebeen entered when a user manually routed a fax.
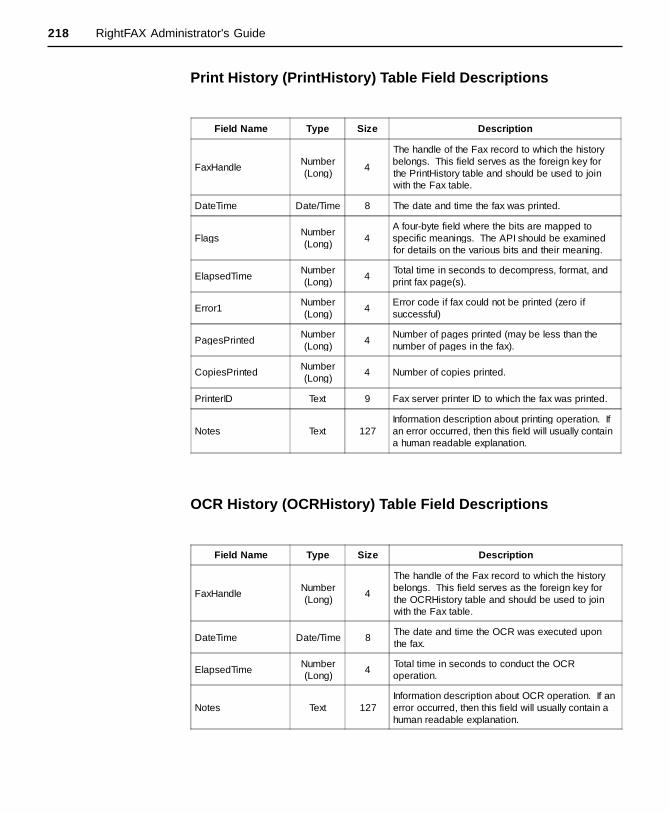
218 RightFAX Administrator's Guide
OCR History (OCRHistory) Table Field Descriptions
Field Name Type Size Description
FaxHandleNumber(Long)
4
The handle of the Fax record to which the historybelongs. This field serves as the foreign key forthe OCRHistory table and should be used to joinwith the Fax table.
DateTime Date/Time 8The date and time the OCR was executed uponthe fax.
ElapsedTimeNumber(Long)
4Total time in seconds to conduct the OCRoperation.
Notes Text 127Information description about OCR operation. If anerror occurred, then this field will usually contain ahuman readable explanation.
Print History (PrintHistory) Table Field Descriptions
Field Name Type Size Description
FaxHandleNumber(Long)
4
The handle of the Fax record to which the historybelongs. This field serves as the foreign key forthe PrintHistory table and should be used to joinwith the Fax table.
DateTime Date/Time 8 The date and time the fax was printed.
FlagsNumber(Long)
4A four-byte field where the bits are mapped tospecific meanings. The API should be examinedfor details on the various bits and their meaning.
ElapsedTimeNumber(Long)
4Total time in seconds to decompress, format, andprint fax page(s).
Error1Number(Long)
4Error code if fax could not be printed (zero ifsuccessful)
PagesPrintedNumber(Long)
4Number of pages printed (may be less than thenumber of pages in the fax).
CopiesPrintedNumber(Long)
4 Number of copies printed.
PrinterID Text 9 Fax server printer ID to which the fax was printed.
Notes Text 127Information description about printing operation. Ifan error occurred, then this field will usually containa human readable explanation.

219Chapter 15: Generating Fax Reports
Approval History (ApprovedHistory) Table Field Descriptions
Field Name Type Size Description
FaxHandleNumber(Long)
4
The handle of the Fax record to which the historybelongs. This field serves as the foreign key forthe ApprovedHistory table and should be used tojoin with the Fax table.
DateTime Date/Time 8 The date and time the fax was approved.
FlagsNumber(Long)
4A four-byte field where the bits are mapped tospecific meanings. The API should be examinedfor details on the various bits and their meaning.
ApproverID Text 21 User ID indicating who approved the fax.
Notes Memo 453 Notes entered by the approver.
Fax Status Strings (FaxStatStrings) Table Field Descriptions
Disapproval History (DisapprovedHistory) Table FieldDescriptions
Field Name Type Size Description
FaxStatusNumber(Long)
4The numeric value of the fax status. This field isthe foreign key for this table and should be joinedwith the Faxes.FaxStatus field.
FaxStatString Text 64The human readable description of the FaxStatusvalue.
Field Name Type Size Description
FaxHandleNumber(Long)
4
The handle of the Fax record to which the historybelongs. This field serves as the foreign key forthe disapprovedHistory table and should be usedto join with the Fax table.
DateTime Date/Time 8 The date and time the fax was disapproved.
FlagsNumber(Long)
4A four-byte field where the bits are mapped tospecific meanings. The API should be examinedfor details on the various bits and their meaning.
ApproverID Text 21 User ID indicating who disapproved the fax.
Notes Memo 453 Notes entered by the approver.

220 RightFAX Administrator's Guide
Fax Error Code Strings (FaxErrorStrings) Table FieldDescriptions
Field Name Type Size Description
FaxErrorCodeNumber(Long)
4The numeric value of the fax status. This field isthe foreign key for this table and should be joinedwith the Faxes.FaxErrorCode field.
FaxErrorString Text 64The human readable description of theFaxErrorCode value.
Termination Status Strings (TermStatStrings) Table FieldDescriptions
Field Name Type Size Description
TermStatValueNumber(Long)
4The numeric value of the fax termination status.This field is the foreign key for this table andshould be joined with the Faxes.TermStat field.
TermStatString Text 64The human readable description of the TermStatvalue.
Server Information (FaxServerInfo) Table Field Descriptions
Field Name Type Size Description
ServerName Text 64The name of the fax server from which the data setwas extracted.
BillDesc1 Text 15 The field label for the Faxes.BillInfo1 field
BillDesc2 Text 15 The field label for the Faxes.BillInfo2 field

221Chapter 15: Generating Fax Reports
FaxDump
As an alternative to Fax Reporter, you can use the command line utility,FAXDUMP.EXE (located in the \ADMUTILS directory on the fax server, toproduce ASCII text files of fax information which you can then import to anotherdatabase to produce reports. There is no user interface for FaxDump.
The syntax used to execute FaxDump is:
FaxDump [options]
Options:
-Fname Server name (Defaults to local machine)-Ulist User list (Multiple users should be separated
with commas)-Ofile Output file name (Defaults to screen display only)-Smm/dd/yy Date to begin search, can be set as an offset
from today, i.e. -# or +#-Emm/dd/yy Date to end search, can be set as an offset
from today, i.e. -# or +#-Tprotocol N=named pipes (default)
S=RPC/SPXT=RPC/TCP_IPX=RPC/IPX
-Q Prints a table containing field definitions for outputformats. Overrides all other options and causes programto do nothing.
-H Outputs field headers on the first line of the output file.-Llevel Information level (0 to 4)
By default, FaxDump reports on fax records for all users, but you can limit thescan by providing a user list with the -u option. For example,
faxdump -ubob,fred,george
scans fax records for only these three users. Do not use spaces when separating thenames in the list.
You can also limit the date range of the scan with the -s and -e options. Forexample,
faxdump -s010192
tells FaxDump to choose only records created on or after Jan. 1, 1992, and
faxdump -e123192
includes only records created on or before Dec. 31, 1992.

222 RightFAX Administrator's Guide
You can also use relative dates rather than exact dates. For example, to create areport about all fax activity last week, type
faxdump -s-7 -e0.
FaxDump sends its output to the screen unless you use the -o option to redirect itto a file, for example -oreport.out.
An example command line which demonstrates some of these options is:
faxdump2 -frightfax -odump.out -l1 -s010197 -e013197 -uadmin,bob
This command will produce a file called DUMP.OUT containing all fax transmis-sion records between January 1, 1997 and January 31, 1997 for the users ADMINand BOB fax mailboxes. The FaxDB program in this example is running on the faxserver RIGHTFAX.
FaxDump prints each fax record on a single line, with quotes around string fields,and all fields separated by commas. This is a common format which manydatabase tools can import.
FaxDump can also output five levels of information. Level 0 (the default) outputseach fax record without any transmission history information. Level 1 outputseach fax record along with a record of each transmission attempt. This meansoutgoing fax records will appear once for each transmission attempt, successful ornot. Level 2 produces level 1 information with the addition of file names of faximages and cover sheets. Level 3 produces basic fax information for quickreference. Level 4 produces a formatted output of failed sent faxes only. Informa-tion levels for each record are listed on the following pages:

223Chapter 15: Generating Fax Reports
Information Level 0
Produces one line per fax record. With sent faxes, only one record will be outputno matter how many times it had to be retried or resent, though the Send_Time willequal the total time taken for all retries and resends.
Field TypeMaxLength
Notes
User ID String 21 User ID of person who sent fax
TO_FAXNUM String 31 Destination fax number
TO_CONTACTNUM String 31 Destination phone number
TO_NAME String 59 Recipient's name
TO_COMPANY String 59 Recipient's company
TO_CITYSTATE String 59 Recipient's address
FROM_NAME String 59 Sender's name
FROM_PHONENUM String 31 Sender's phone number
BILLINFO1 String 15 Billing Code 1
BILLINFO2 String 15 Billing Code 2
FAXDIDNUM String 31 Sender's DID fax number
OPERATORNUM String 31 Sender's company phone number
GENERALFAXNUM String 31 Sender's general fax number
REMOTEID String 21 Name/number of remote fax machine
SEND_TIME IntegerTotal elapsed time on fax card, inseconds
FAX_STATUS Integer (See Fax Status Table)
FAX_TERMSTAT Integer (See TermStat Table)
NUMPAGES Integer Includes optional cover sheet, if any
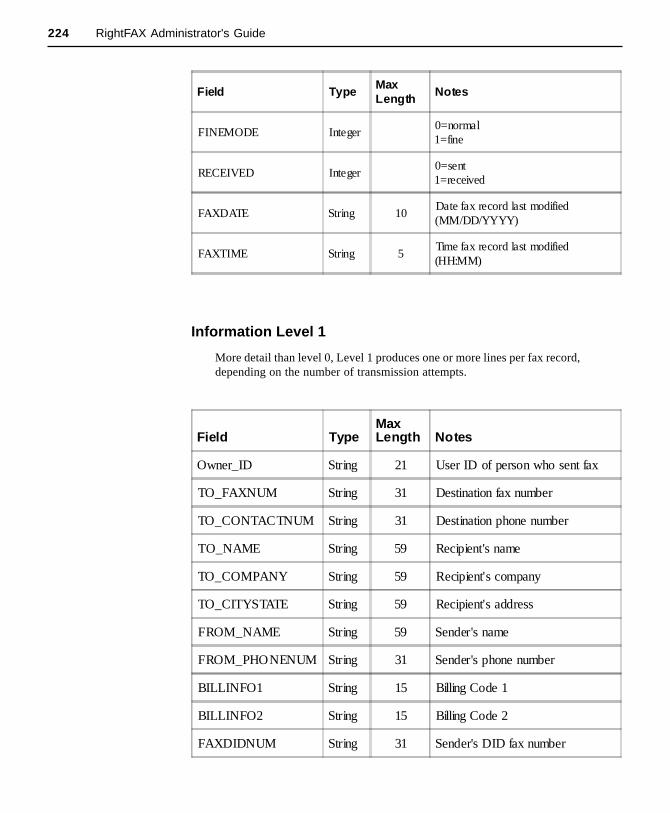
224 RightFAX Administrator's Guide
Information Level 1
More detail than level 0, Level 1 produces one or more lines per fax record,depending on the number of transmission attempts.
Field TypeMaxLength
Notes
FINEMODE Integer0=normal1=fine
RECEIVED Integer0=sent1=received
FAXDATE String 10Date fax record last modified(MM/DD/YYYY)
FAXTIME String 5Time fax record last modified(HH:MM)
Field TypeMaxLength Notes
Owner_ID String 21 User ID of person who sent fax
TO_FAXNUM String 31 Destination fax number
TO_CONTACTNUM String 31 Destination phone number
TO_NAME String 59 Recipient's name
TO_COMPANY String 59 Recipient's company
TO_CITYSTATE String 59 Recipient's address
FROM_NAME String 59 Sender's name
FROM_PHONENUM String 31 Sender's phone number
BILLINFO1 String 15 Billing Code 1
BILLINFO2 String 15 Billing Code 2
FAXDIDNUM String 31 Sender's DID fax number

225Chapter 15: Generating Fax Reports
Field TypeMaxLength Notes
OPERATORNUM String 31 Sender's company phone number
GENERALFAXNUM String 31 Sender's general fax number
NUMPAGES Integer Includes optional cover sheet, ifany
FINEMODE Integer 0=normal1=fine
RECEIVED Integer 0=sent1=received
TOTALTIME Integer Total elapsed time on fax card, inseconds
FAXDATE String 10 Date fax record last modified(MM/DD/YYYY)
FAXTIME String 5 Time fax record last modified(HH:MM)
TRXLENGTH Integer Elapsed seconds for transmission
HANGUP_STATUS Integer Internal board reporting
CHANNEL_USED Integer Channel used to send/receive
DISPOSITION Integer Internal board reporting
TERMSTAT Integer (See Termstat table)
REMOTEID String 21 Name/number of the remote faxmachines
TRXDATE String 10 Date of trx (MM/DD/YYYY)
TRXTIME String 5 Time of trx (HH:MM)
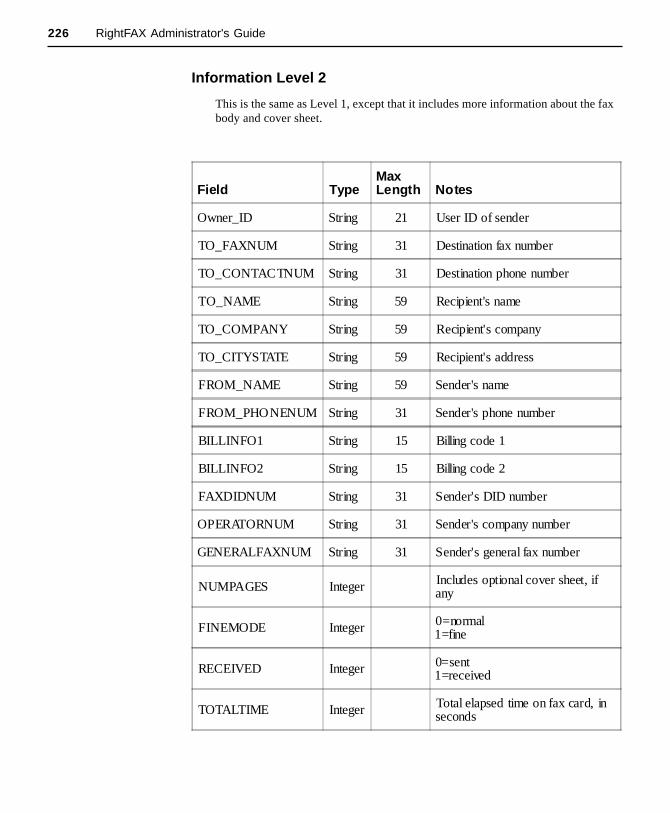
226 RightFAX Administrator's Guide
Information Level 2
This is the same as Level 1, except that it includes more information about the faxbody and cover sheet.
Field TypeMaxLength Notes
Owner_ID String 21 User ID of sender
TO_FAXNUM String 31 Destination fax number
TO_CONTACTNUM String 31 Destination phone number
TO_NAME String 59 Recipient's name
TO_COMPANY String 59 Recipient's company
TO_CITYSTATE String 59 Recipient's address
FROM_NAME String 59 Sender's name
FROM_PHONENUM String 31 Sender's phone number
BILLINFO1 String 15 Billing code 1
BILLINFO2 String 15 Billing code 2
FAXDIDNUM String 31 Sender's DID number
OPERATORNUM String 31 Sender's company number
GENERALFAXNUM String 31 Sender's general fax number
NUMPAGES Integer Includes optional cover sheet, ifany
FINEMODE Integer 0=normal1=fine
RECEIVED Integer 0=sent1=received
TOTALTIME Integer Total elapsed time on fax card, inseconds

227Chapter 15: Generating Fax Reports
Field TypeMaxLength Notes
FAXDATE String 10 Date fax record last modified(MM/DD/YYYY)
FAXTIME String 5 Time fax record last modified(HH:MM)
TRXLENGTH Integer Elapsed seconds for thistransmission
HANGUP_STATUS Integer Internal board reporting
CHANNEL_USED Integer Channel used to receive/send
DISPOSITION Integer Internal board reporting
TERMSTAT Integer (See TermStat Table)
REMOTEID String 21 Name/number of the remote faxmachine
TRXDATE String 10 Date of trx (MM/DD/YYYY)
TRXTIME String 5 Time of trx (HH:MM)
BODYFILENAME String 8 Fax body file name
FCSFILENAME String 8 Fax cover sheet file name
BODYUSECOUNT Integer Number of faxes linked to thatcover sheet
GOODPAGES Integer Number of pages successfully sent
UNIQUE_ID String 15 Unique number assigned to the fax
GROUP String 21 Group ID of the fax owner

228 RightFAX Administrator's Guide
Information Level 3
Produces basic fax information only for quick reference.
Field Type MaxLength Notes
Owner_ID String 21 User ID of sender
TO_FAXNUM String 31 Destination fax number
TO_NAME String 59 Recipient's name
TO_COMPANY String 59 Recipient's company
BILLINFO1 String 15 Billing code 1
BILLINFO2 String 15 Billing code 2
REMOTEID String 21 Name/number of the remote faxmachine
SEND_TIME Integer Time it took to send fax
FAX_STATUS Integer (See Fax Status Table)
FAX_TERMSTAT Integer (See TermStat Table)
NUMPAGES Integer Includes optional cover sheet
RECEIVED Integer 0=sent, 1=received
FAXDATE String 10 Date fax record last modified(MM/DD/YYYY)
FAXTIME String 5 Time fax record last modified(HH:MM)
UNIQUE_ID String 15 Unique number assigned to the fax
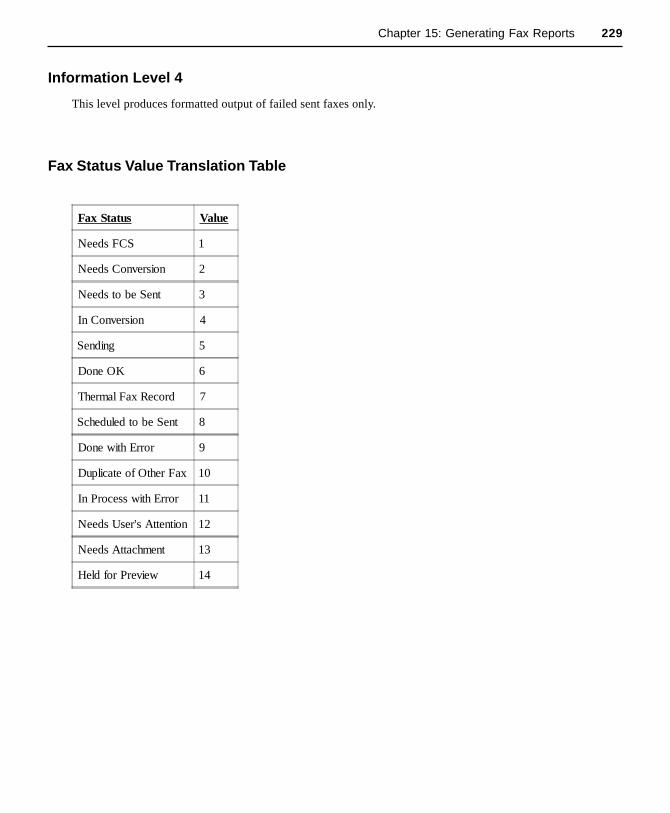
229Chapter 15: Generating Fax Reports
Fax Status Value Translation Table
Fax Status Value
Needs FCS 1
Needs Conversion 2
Needs to be Sent 3
In Conversion 4
Sending 5
Done OK 6
Thermal Fax Record 7
Scheduled to be Sent 8
Done with Error 9
Duplicate of Other Fax 10
In Process with Error 11
Needs User's Attention 12
Needs Attachment 13
Held for Preview 14
Information Level 4
This level produces formatted output of failed sent faxes only.

230 RightFAX Administrator's Guide
TermStat Value Translation Table
Status TermStat Value
Successful 160, 32
Transmission Error 161
Receive Error 162
Send File Error 163
Receive File Error 164
Aborted 165
Line Busy 1, 2, 3, 4, 5, 35
No Answer 8, 9, 25
Human Answered 16
Dead Line 28, 34
Unknown Error Anything Else

Advanced Server Features
In this chapter:
• Server-Side Application Conversion• Starting and Stopping the Fax Server• Scanner Integration• Standalone Fax Connector• Maintaining the RightFAX Database• Backing Up RightFAX and Data Files
232 RightFAX Administrator's Guide
Server-Side Application Conversion
By default, RightFAX uses a built-in conversion engine to generate fax images from"native document" file attachments. "Native document" attachments are filespassed directly to the RightFAX server in their original application-stored format(e.g.. Word, Excel, PowerPoint, etc.) instead of first being converted to printeroutput. Native document attachments are typically delivered to the RightFAXserver via one of the E-Mail Gateway modules (as mail message attachments) orthe Web Client.
While RightFAX's built-in conversion engine has some advantages (such as beingvery fast and efficient), there are occasionally variances between the fax image itgenerates and the original document. In most cases these variances are minor andacceptable. However, if the conversion quality of faxed file attachments isunacceptably low, your RightFAX server can be configured so that the applicationsassociated with certain native document types are automatically launched to allowfor direct (and therefore more accurate) conversion by attachments' nativeapplications.
Server-Side Application Conversion Features
Where possible, server-side application conversion supports multiple concurrentdocument conversions to save processing time and server resources. Also, blankpages are automatically removed from the fax image to save on fax costs andchannel resources.
Server-side application conversion is available when faxing from the Windows 95/98 and Windows NT desktops using the Send To menu option, when files areattached with the ADDDOC embedded codes, from the API, and from theExchange, SMTP, cc:Mail, and Lotus Notes e-mail gateways.
Note: Server-side application conversions do not currently work for files attachedto mail messages processed by the RightFAX E-Mail Gateway modules for NovellGroupWise or Microsoft Mail.
Important Considerations Before Setting up Server-SideApplication Conversion
Launching an application at the server each time a file attachment fax image isgenerated has some potential drawbacks. You should weigh these drawbacksagainst the benefits before configuring your RightFAX server to perform server-side application conversion.
Full applications are much larger and more processor-intensive than RightFAX'sbuilt-in conversion engine. You may need to upgrade your RightFAX server'smemory or processing capacity to support server-side application conversion,especially if your organization generates a lot of faxes with attached files.
Server-side applicationconversion does notapply to documentsprinted directly from
their native applicationsto the RightFAX print-to-
fax driver. This isbecause the conversion
to printer output ishandled by the native
application on theclient's computer before
being sent to the faxserver

233Chapter 16: Advanced Server Features
Also, most applications are not designed to be run completely without userintervention. Situations may arise in which an application stops while it waits foruser input (such as waiting for a password). RightFAX makes every attempt toprevent or bypass such occurrences, but cannot guarantee it will prevent all suchoccurrences. If one or more faxes being processed through server-side applicationconversion fail to send, you should check that the application on the server is notstalled waiting for input.
Finally, documents containing objects which the server does not have access to(such as special fonts, links to files on other machines, macros, or templates) maygenerate unpredictable results, from incorrect fax image output to conversionfailure. To minimize this, install as many TrueType fonts, document templates,macros, and other objects used by your organization to the machine(s) whereserver-side application conversion will execute.
Configuring the RightFAX Server to Perform Server-SideApplication Conversion
Server-side application conversion is performed by the Microsoft Office 97versions of Word, Excel, and PowerPoint. RightFAX does not support server-sideapplication conversion by the Office 95 (or earlier) versions of these applications.Although you can convert attached files created on the Office 95 (as well as earlier)versions, you must install the Office 97 versions on your server(s) to perform theconversions.
Configuring the RightFAX server to perform server-side application conversiononly requires correctly installing and configuring the applications onto theRightFAX server. When properly installed, RightFAX will automatically detectand launch an application on the server when one of its native file types is passedto the server as a fax attachment.
On each of your RightFAX servers and any other machines where RightFAXWorkServers will be executed, follow these steps to install the Microsoft Office 97versions of Word, Excel, and PowerPoint for server-side application conversion.
Note: You must install all of the components, and no others, as outlined in thesesteps. If you fail to follow these instructions exactly, server-side applicationconversion may work unpredictably or not at all.
1. If you have already installed the Microsoft Office 97 versions of Word,Excel, and/or PowerPoint on the RightFAX server, uninstall thoseapplications using the Add/Remove Programs applet in the ControlPanel.
2. On the RightFAX server, insert the Office 97 Installation CD into yourCD-ROM drive, select Run from the Start menu, and type:
D:\SETUP (where D: is the drive letter of your CD-ROM)
Click OK to start the Setup program.
For server-sideapplication conversionto work correctly, yourRightFAX server must
be installed on an NTFSpartition
If server-side applica-tion conversion fails due
to the application notstarting up correctly orreturning an error onstartup, RightFAX willautomatically revert toit's built-in conversion
engine

234 RightFAX Administrator's Guide
3. Click through and complete the initial license and ID screens. When theSetup program asks you for a destination folder, click OK to accept thedefault C:\Program Files\Microsoft Office.
4. A screen will appear asking you to select an installation type. Click onthe button next to the Custom option.
5. A screen will ask you to select the components you want to install:
An option may have a black check, a gray check, or no check. A blackcheck indicates that all "subcomponents" for the option will be installed.A gray check indicates that some "subcomponents" for the option will beinstalled. No check indicates that the option and all its subcomponentswill not be installed.
6. Click on the check boxes next to each of these options so that they arenot checked:
Microsoft BinderMicrosoft AccessMicrosoft OutlookWeb Authoring (HTML)Microsoft Bookshelf BasicsData AccessGetting Results Book
235Chapter 16: Advanced Server Features
This will leave only the following options checked:
x Excelx Wordx PowerPointx Office Toolsx Converters and Filters
7. Highlight Office Tools, then click the Change Option button. Checkthe Microsoft TrueType Fonts option. Uncheck all other options, thenclick OK .
8. Highlight Converters and Filters, then click the Change Optionbutton.
9. Highlight Text Converters, then click the Change Option button.Check all of the options except Converters for use with Lotus Notes,then click OK .
10. Highlight Graphics Filters, then click the Change Option button.Click on the Select All button to check all of the options, then click OKtwo times.
11. Highlight Microsoft Excel, then click the Change Option button.
12. Check the MS Excel Program Files and Spreadsheet Convertersoptions. Uncheck all other options.
13. Highlight Spreadsheet Converters, then click the Change Optionbutton. Click the Select All button then click OK two times.
14. Highlight Microsoft Word , then click the Change Option button.
15. Check the MS Word Program Files and Text Converters options.Uncheck all other options.
16. Highlight Text Converters, then click the Change Option button. Clickthe Select All button then click OK two times.
17. Highlight Microsoft PowerPoint, then click the Change Option button.
18. Check the MS PowerPoint Program Files and Presentation Transla-tors options. Uncheck all other options.
19. Highlight Presentation Translators, then click the Change Optionbutton. Click the Select All button then click OK two times.
20. Click Continue to begin the install. When the installation is complete,restart Windows.

236 RightFAX Administrator's Guide
21. Microsoft recommends reinstalling the latest service pack for your NTServer software after installing any MS Office applications. After thisfinal step is complete, your Office 97 applications may require someconfiguration to ensure that server-side application conversion worksproperly.
Configuring Word
Running the MS-Exchange Events service on the RightFAX server will causeserver-side application conversion through Word to fail. If you must run ExchangeServer on the same machine as your RightFAX Server, you must disable theExchange Events service.
Server-side application conversion through Word 97 automatically converts thesefile types:
Word for Windows (versions 2, 6, 7, 97, 1J, and 5J)RTF (Rich Text Format)Word for DOS (versions 4, 5, and 6)Word for Macintosh (versions 3, 4, 5, 6, and 97)
Configuring Excel
Server-side application conversion renders whatever print area is defined in theExcel Workbook.
Server-side application conversion through Excel 97 automatically converts thesefile types:
Excel for Windows (versions 3, 4, 5, and 97)Excel Workbook (versions 3 and 4)Excel for Macintosh (versions 4 and 5)Excel Workbook for Macintosh (version 4)
Configuring PowerPoint
Server-side application conversion through PowerPoint 97 automatically convertsthese file types:
PowerPoint for Windows (versions 95/97, 97, 3, 4, and 7)PowerPoint for Macintosh (versions 3, 4, B3, and B4)
Print options for creating the fax images are set by the user in each PowerPointpresentation, using the Print tab on the PowerPoint Options dialog.
Password protectedWord and Excel fileswill not be converted

237Chapter 16: Advanced Server Features
Override OptionsYou can force server-side application conversion to output all PowerPoint filesusing the same print settings and page layout (regardless of the settings onindividual workstations) create the following DWORD registry entries in:
HKEY_LOCAL_MACHINE\Software\RightFAX\WorkServer\WorkSrv#
(where WorkSrv# is the WorkServer number to modify.)
PowerPoint_ForceFitToPage0=Use setting from file1=Force "Scale to fit paper"
PowerPoint_ForceOutputType1=Slides2=Handouts (2 slides per page)3=Handouts (3 slides per page)4=Handouts (6 slides per page)5=Notes page6=Outline view
PowerPoint_ForceFrameSlides0=Use setting from file1=Force "Frame slides"
Controlling Server-Side Application Conversion
To control how and when server-side application conversion is used for specficdocument types, add the REG_MULTI_SZ registry key NativeDocControl in
HKEY_LOCAL_MACHINE\Software\RightFAX\WorkServer\WorkSrv#
(where WorkSrv# is the WorkServer number to modify.)
The value for the key contains one or more lines each controlling a specificdocument type. For each type, the following options may be configured:
VALUE MEANING
1 Attempt to convert document on the server. If this failsbecause the application is not installed, because the applicationcannot be started, or because the application returns an error,then attempt to convert the document using RightFAX's built-in conversion engine.
2 Attempt to convert the document on the server only. If thisfails for any reason, abort the fax.
3 Attempt to convert the document with RightFAX's built-inconversion engine. If this fails for any reason, abort the fax.
4 Do not attempt to convert this type document.

238 RightFAX Administrator's Guide
The following document types may be specified:
NAME MEANING CONVERTED WITH
WordPerfect 5 WordPerfect v.5 Word 97WPC5 WordPerfect v.5 Word 97WordPerfect 6 WordPerfect v.6 Word 97WPC6 WordPerfect v.6 Word 97WordPerfect WordPerfect - all versions Word 97WPC WordPerfect - all versions Word 97Word 97 Word 97 Word 97Word Word - all versions Word 97Excel 97 Excel 97 Excel 97Excel Excel - all versions Excel 971-2-3 Lotus 1-2-3 - all versions Excel 97AmiPro AmiPro - all versions Word 97Ami Pro AmiPro - all versions Word 97WordPro WordPro - all versions Word 97RTF Rich Text Files Word 97PowerPoint 97 PowerPoint 97 PowerPoint 97PowerPoint PowerPoint - all versions PowerPoint 97
An example NativeDocControl key might look like this:
WPC,2Word,3RTF,3
Starting and Stopping the Fax Server
The RightFAX Services are configured and started during installation. You shouldonly need to stop and restart RightFAX Services during server or networkmaintenance.
Starting RightFAX requires starting the separate processes. There are two easyways to do this. One is to go to the Services applet in the Control Panel. In thelist of Services, you will see several RightFAX Modules. To start RightFAX,highlight the RightFAX BoardServer Module and click Start. Next, highlight theRightFAX Server Module and click Start. This will start the RightFAX DatabaseModule, RightFAX Server Module and the RightFAX WorkServer Module(s).
The second way is to type the following at any prompt:
[C:\] NET START service short namei.e. NET START RFSERVER
RightF AX Services
RightFAX Server ModuleRightFAX BoardServer ModuleRightFAX Database ModuleRightFAX Queue HandlerRightFAX RPC Server ModuleRightFAX WorkServer Module(s)RightFAX E-mail Gateway (optional)
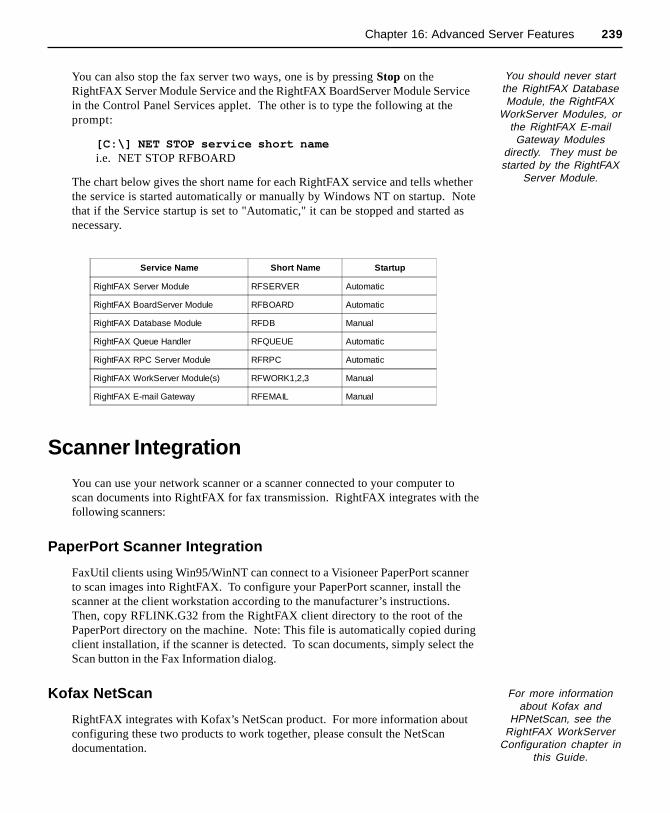
239Chapter 16: Advanced Server Features
You can also stop the fax server two ways, one is by pressing Stop on theRightFAX Server Module Service and the RightFAX BoardServer Module Servicein the Control Panel Services applet. The other is to type the following at theprompt:
[C:\] NET STOP service short namei.e. NET STOP RFBOARD
The chart below gives the short name for each RightFAX service and tells whetherthe service is started automatically or manually by Windows NT on startup. Notethat if the Service startup is set to "Automatic," it can be stopped and started asnecessary.
Service Name Short Name Startup
RightFAX Server Module RFSERVER Automatic
RightFAX BoardServer Module RFBOARD Automatic
RightFAX Database Module RFDB Manual
RightFAX Queue Handler RFQUEUE Automatic
RightFAX RPC Server Module RFRPC Automatic
RightFAX WorkServer Module(s) RFWORK1,2,3 Manual
RightFAX E-mail Gateway RFEMAIL Manual
Scanner Integration
You can use your network scanner or a scanner connected to your computer toscan documents into RightFAX for fax transmission. RightFAX integrates with thefollowing scanners:
PaperPort Scanner Integration
FaxUtil clients using Win95/WinNT can connect to a Visioneer PaperPort scannerto scan images into RightFAX. To configure your PaperPort scanner, install thescanner at the client workstation according to the manufacturer’s instructions.Then, copy RFLINK.G32 from the RightFAX client directory to the root of thePaperPort directory on the machine. Note: This file is automatically copied duringclient installation, if the scanner is detected. To scan documents, simply select theScan button in the Fax Information dialog.
Kofax NetScan
RightFAX integrates with Kofax’s NetScan product. For more information aboutconfiguring these two products to work together, please consult the NetScandocumentation.
For more informationabout Kofax and
HPNetScan, see theRightFAX WorkServer
Configuration chapter inthis Guide.
You should never startthe RightFAX DatabaseModule, the RightFAX
WorkServer Modules, orthe RightFAX E-mailGateway Modules
directly. They must bestarted by the RightFAX
Server Module.
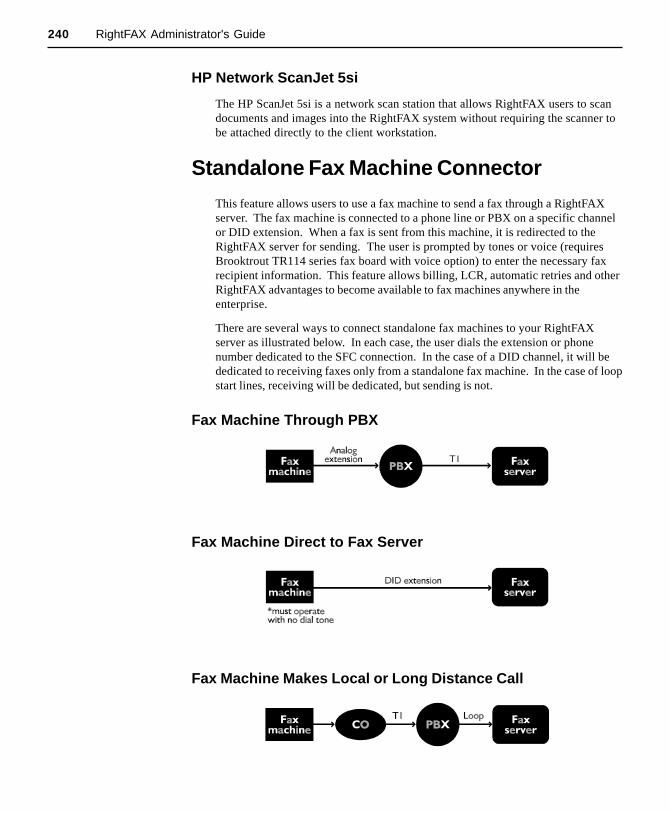
240 RightFAX Administrator's Guide
HP Network ScanJet 5si
The HP ScanJet 5si is a network scan station that allows RightFAX users to scandocuments and images into the RightFAX system without requiring the scanner tobe attached directly to the client workstation.
Standalone Fax Machine Connector
This feature allows users to use a fax machine to send a fax through a RightFAXserver. The fax machine is connected to a phone line or PBX on a specific channelor DID extension. When a fax is sent from this machine, it is redirected to theRightFAX server for sending. The user is prompted by tones or voice (requiresBrooktrout TR114 series fax board with voice option) to enter the necessary faxrecipient information. This feature allows billing, LCR, automatic retries and otherRightFAX advantages to become available to fax machines anywhere in theenterprise.
There are several ways to connect standalone fax machines to your RightFAXserver as illustrated below. In each case, the user dials the extension or phonenumber dedicated to the SFC connection. In the case of a DID channel, it will bededicated to receiving faxes only from a standalone fax machine. In the case of loopstart lines, receiving will be dedicated, but sending is not.
Fax Machine Through PBX
Fax Machine Direct to Fax Server
Fax Machine Makes Local or Long Distance Call
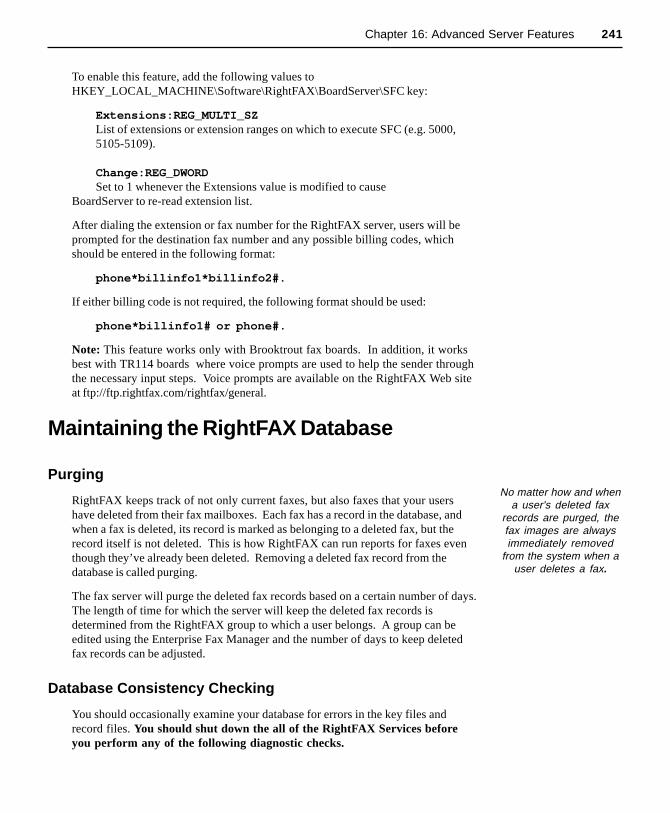
241Chapter 16: Advanced Server Features
To enable this feature, add the following values toHKEY_LOCAL_MACHINE\Software\RightFAX\BoardServer\SFC key:
Extensions:REG_MULTI_SZList of extensions or extension ranges on which to execute SFC (e.g. 5000,5105-5109).
Change:REG_DWORDSet to 1 whenever the Extensions value is modified to cause
BoardServer to re-read extension list.
After dialing the extension or fax number for the RightFAX server, users will beprompted for the destination fax number and any possible billing codes, whichshould be entered in the following format:
phone*billinfo1*billinfo2#.
If either billing code is not required, the following format should be used:
phone*billinfo1# or phone#.
Note: This feature works only with Brooktrout fax boards. In addition, it worksbest with TR114 boards where voice prompts are used to help the sender throughthe necessary input steps. Voice prompts are available on the RightFAX Web siteat ftp://ftp.rightfax.com/rightfax/general.
Maintaining the RightFAX Database
Purging
RightFAX keeps track of not only current faxes, but also faxes that your usershave deleted from their fax mailboxes. Each fax has a record in the database, andwhen a fax is deleted, its record is marked as belonging to a deleted fax, but therecord itself is not deleted. This is how RightFAX can run reports for faxes eventhough they’ve already been deleted. Removing a deleted fax record from thedatabase is called purging.
The fax server will purge the deleted fax records based on a certain number of days.The length of time for which the server will keep the deleted fax records isdetermined from the RightFAX group to which a user belongs. A group can beedited using the Enterprise Fax Manager and the number of days to keep deletedfax records can be adjusted.
Database Consistency Checking
You should occasionally examine your database for errors in the key files andrecord files. You should shut down the all of the RightFAX Services beforeyou perform any of the following diagnostic checks.
No matter how and whena user's deleted fax
records are purged, thefax images are alwaysimmediately removed
from the system when auser deletes a fax.
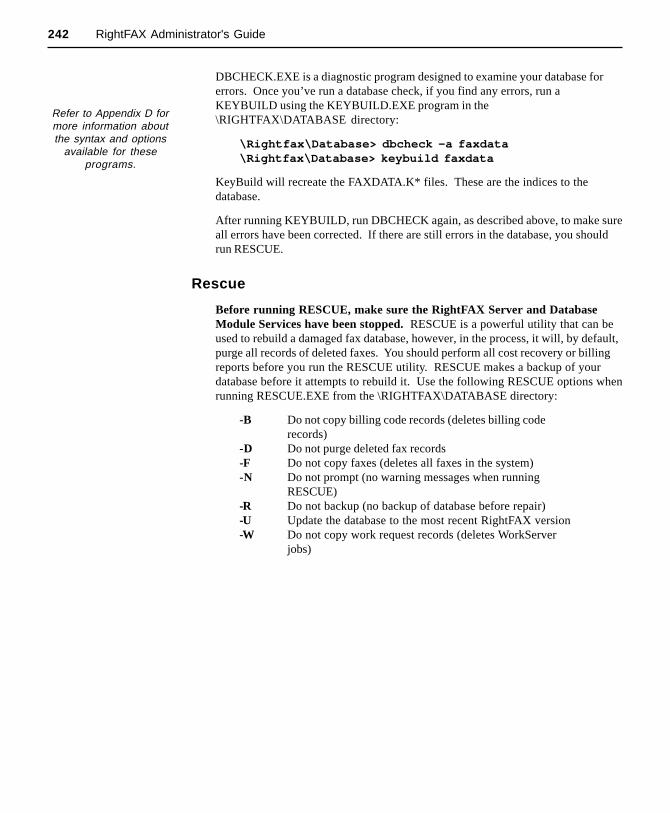
242 RightFAX Administrator's Guide
DBCHECK.EXE is a diagnostic program designed to examine your database forerrors. Once you’ve run a database check, if you find any errors, run aKEYBUILD using the KEYBUILD.EXE program in the\RIGHTFAX\DATABASE directory:
\Rightfax\Database> dbcheck -a faxdata\Rightfax\Database> keybuild faxdata
KeyBuild will recreate the FAXDATA.K* files. These are the indices to thedatabase.
After running KEYBUILD, run DBCHECK again, as described above, to make sureall errors have been corrected. If there are still errors in the database, you shouldrun RESCUE.
Rescue
Before running RESCUE, make sure the RightFAX Server and DatabaseModule Services have been stopped. RESCUE is a powerful utility that can beused to rebuild a damaged fax database, however, in the process, it will, by default,purge all records of deleted faxes. You should perform all cost recovery or billingreports before you run the RESCUE utility. RESCUE makes a backup of yourdatabase before it attempts to rebuild it. Use the following RESCUE options whenrunning RESCUE.EXE from the \RIGHTFAX\DATABASE directory:
-B Do not copy billing code records (deletes billing coderecords)
-D Do not purge deleted fax records-F Do not copy faxes (deletes all faxes in the system)-N Do not prompt (no warning messages when running
RESCUE)-R Do not backup (no backup of database before repair)-U Update the database to the most recent RightFAX version-W Do not copy work request records (deletes WorkServer
jobs)
Refer to Appendix D formore information aboutthe syntax and options
available for theseprograms.
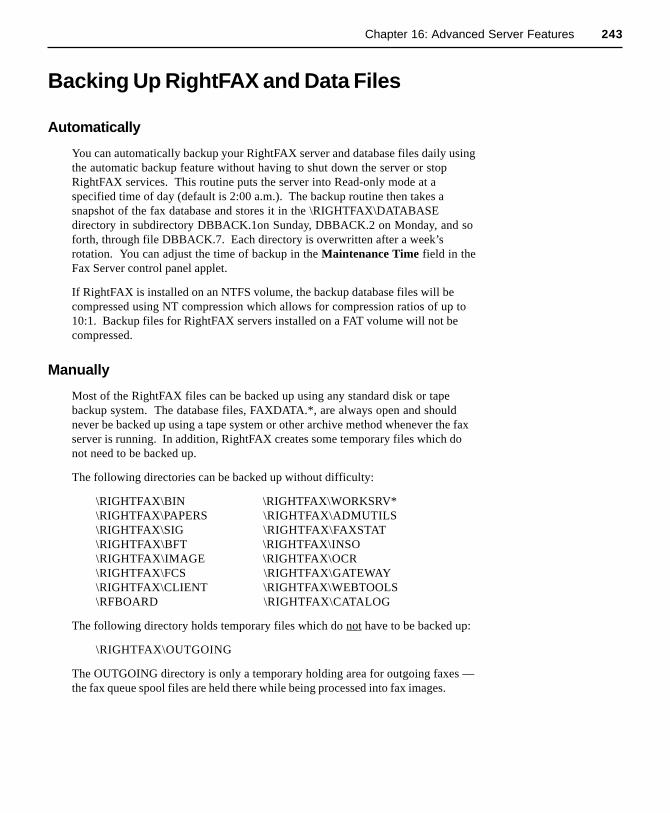
243Chapter 16: Advanced Server Features
Backing Up RightFAX and Data Files
Automatically
You can automatically backup your RightFAX server and database files daily usingthe automatic backup feature without having to shut down the server or stopRightFAX services. This routine puts the server into Read-only mode at aspecified time of day (default is 2:00 a.m.). The backup routine then takes asnapshot of the fax database and stores it in the \RIGHTFAX\DATABASEdirectory in subdirectory DBBACK.1on Sunday, DBBACK.2 on Monday, and soforth, through file DBBACK.7. Each directory is overwritten after a week’srotation. You can adjust the time of backup in the Maintenance Time field in theFax Server control panel applet.
If RightFAX is installed on an NTFS volume, the backup database files will becompressed using NT compression which allows for compression ratios of up to10:1. Backup files for RightFAX servers installed on a FAT volume will not becompressed.
Manually
Most of the RightFAX files can be backed up using any standard disk or tapebackup system. The database files, FAXDATA.*, are always open and shouldnever be backed up using a tape system or other archive method whenever the faxserver is running. In addition, RightFAX creates some temporary files which donot need to be backed up.
The following directories can be backed up without difficulty:
\RIGHTFAX\BIN \RIGHTFAX\WORKSRV*\RIGHTFAX\PAPERS \RIGHTFAX\ADMUTILS\RIGHTFAX\SIG \RIGHTFAX\FAXSTAT\RIGHTFAX\BFT \RIGHTFAX\INSO\RIGHTFAX\IMAGE \RIGHTFAX\OCR\RIGHTFAX\FCS \RIGHTFAX\GATEWAY\RIGHTFAX\CLIENT \RIGHTFAX\WEBTOOLS\RFBOARD \RIGHTFAX\CATALOG
The following directory holds temporary files which do not have to be backed up:
\RIGHTFAX\OUTGOING
The OUTGOING directory is only a temporary holding area for outgoing faxes —the fax queue spool files are held there while being processed into fax images.

244 RightFAX Administrator's Guide
All files in the \RIGHTFAX\DATABASE directory, with the exception of any filewith the base name of FAXDATA (e.g. FAXDATA.D01 or FAXDATA.K00), canbe backed up using normal network backup procedures. The FAXDATA.* filesmake up the RightFAX Database, and are always open during fax server operation.Backup systems should be programmed to skip these open files unless you stopthe fax server.
RightFAX servers have the ability to run 24 x 7 x 365 and do not require shutdownof the server for backup. Tape systems should simply backup the\RIGHTFAX\DBBACK.* and the directories listed above.
Appendix A:Troubleshooting
A
246 RightFAX Administrator's Guide
Appendix A: Troubleshooting
Although RightFAX is highly integrated with your network, determining the sourceof configuration and installation problems can be easy. Included in this section arethe most common situations encountered in different stages of RightFAX opera-tion, along with possible solutions.
To help track errors, all RightFAX server modules can be configured to record adetailed log of program information in the Application EventLog. When a problemoccurs, this should be your first source of information. Each entry will beattributed to the RightFAX Server Module, RightFAX Database Module, Right-FAX BoardServer Module, or RightFAX WorkServer Module.
Problems with Server Installation
The NT machine must operate as a normal server on the network before you installRightFAX. It should be able to net use to drives, copy files, run utilities, print tonetwork printers, etc. You MUST log on to the machine as a user with administra-tive rights.

247Appendix A: Troubleshooting
Problems with the BoardServer
Error 2140when startingthe RightFAXBoardServerservice withthe Brooktroutfax cards
An error 2140 can be caused by several things. Use this list ofsteps to diagnose the problem:
l Confirm that the Base I/O Address and the Interrupt in theBoard section of the BoardServer Control Panel match thephysical settings on the board.
l If the address and interrupt are configured correctly, use thistest to confirm that there are no other system conflicts withthose addresses. Note: The RightFAX BoardServer ModuleMUST be stopped for this test to work. Open a commandwindow and change to the \RFBOARD directory. Enter thefollowing: TYPE FAXINIT.CFG. You should see a line thatlooks like "addr xxx" or each channel you have configured. Ifthe addresses do not match the ones you have entered in theBoardServer Control Panel applet, edit the text file and fixthem. Once this is done, issue the following command at theprompt: FAXINIT FAXINIT.CFG. If the addresses are notsuccessfully found, then they are probably conflicting withsomething else on your system.
l If all of the addresses are successfully found in the abovetest and you are still getting a 2140 error when starting theBoardServer, there is probably an interrupt conflict. Confirmthat the interrupt on the board matches the interrupt setting inthe BoardServer Control Panel applet. If it does, you shouldtry another interrupt setting. To do this, first change theinterrupt in the BoardServer applet, then shut down the NTserver, power off the machine, and change the interrupt jumperon the fax board to match the BoardServer applet. Restart thesystem and try to restart the Service. Repeat this proceduretrying different settings until the Service starts successfully.
TheBoardServerservice is setto manual
The BoardServer is normally configured as an automaticservice. If it encounters problems starting (such asconfiguration errors), the BoardServer service sets itself tomanual. To reset the BoardServer service to automatic, fix thecause of the problem and then restart the BoardServermanually. On successful startup, the BoardServer will set itselfto automatic.

248 RightFAX Administrator's Guide
Problems with Client Software Installationand Configuration
The server isunavailable.
l Make sure that the RightFAX server services are actuallystarted on the RightFAX server. The services necessary tocommunicate with clients are: RightFAX Database Module andRightFAX RPC Server Module.
l Check to see if another type of client, i.e. Windows 95 orWindows NT, can communicate with the RightFAX server.
The server isusing differentnetworkprotocols.
l Check the Networking Control Panel applet on the NTserver and verify the protocols installed and enabled matchthose used by the clients.
The commonnetworkprotocol beingused is notroutedbetween LANsegments.
l Try a client on the same LAN segment as that of the server.Modify the appropriate bridge or routers to route the properprotocols.
l Update the server/clients to use a routed protocol.
l If the server machine has multiple network adaptersinstalled, try removing all but one of the adapters and allowother routers on the network to route the packets.
An IPX/SPXparameter ismissing from aWindows forWorkgroupsinitializationfile.
l Add DirectHost=NO to the [network] section of theSYSTEM.INI file.
Not EnoughMemory(Windows 3.x)
l Increase conventional memory by removing unnecessarydrivers and TSRs. Try loading drivers and TSRs into uppermemory. Remove programs launched by the Startup Group,the RUN=line in the WIN.INI file, and the LOAD=line in theWIN.INI. You need at least 500K of available conventionalmemory prior to starting Windows.
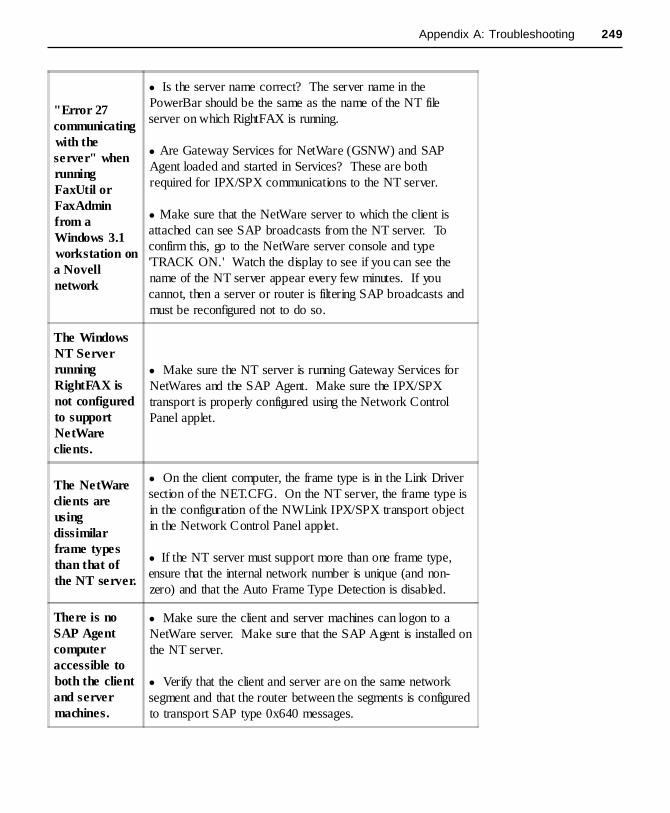
249Appendix A: Troubleshooting
"Error 27communicatingwith theserver" whenrunningFaxUtil orFaxAdminfrom aWindows 3.1workstation ona Novellnetwork
l Is the server name correct? The server name in thePowerBar should be the same as the name of the NT fileserver on which RightFAX is running.
l Are Gateway Services for NetWare (GSNW) and SAPAgent loaded and started in Services? These are bothrequired for IPX/SPX communications to the NT server.
l Make sure that the NetWare server to which the client isattached can see SAP broadcasts from the NT server. Toconfirm this, go to the NetWare server console and type'TRACK ON.' Watch the display to see if you can see thename of the NT server appear every few minutes. If youcannot, then a server or router is filtering SAP broadcasts andmust be reconfigured not to do so.
The WindowsNT ServerrunningRightFAX isnot configuredto supportNetWareclients.
l Make sure the NT server is running Gateway Services forNetWares and the SAP Agent. Make sure the IPX/SPXtransport is properly configured using the Network ControlPanel applet.
The NetWareclients areusingdissimilarframe typesthan that ofthe NT server.
l On the client computer, the frame type is in the Link Driversection of the NET.CFG. On the NT server, the frame type isin the configuration of the NWLink IPX/SPX transport objectin the Network Control Panel applet.
l If the NT server must support more than one frame type,ensure that the internal network number is unique (and non-zero) and that the Auto Frame Type Detection is disabled.
There is noSAP Agentcomputeraccessible toboth the clientand servermachines.
l Make sure the client and server machines can logon to aNetWare server. Make sure that the SAP Agent is installed onthe NT server.
l Verify that the client and server are on the same networksegment and that the router between the segments is configuredto transport SAP type 0x640 messages.

250 RightFAX Administrator's Guide
The client getsan RPC error33 whencommunicatingto the NTserver.
l Make sure that client and server machines all use the samemaximum IPX packet size. On DOS/Windows clients, themaximum IPX packet size is set using the IPX Packet SizeLimit=xxx parameter in the NET.CFG.
l On the NT server machine, the maximum packet size isdetermined by the MaxPktSize parameter in:KEY_LOCAL_MACHINE\SYSTEM\CurrentControlSet\Ser-vices\NWLINKIPX\NetConfig\<adaptername>. If the value isnon-existent or zero, the card driver determines the maximumpacket size. If the client and server machines use differenttopologies, i.e. Token-Ring versus Ethernet, then manuallysetting the maximum packet size may be necessary.
Unable to findFaxDBService.
l Does the user logged in have access to the RightFAX hostfile server? If the RightFAX host file server is not a member,backup, or primary domain controller, then the user may nothave access to the RightFAX files or resource \PIPE\FAXDB.You may have to assign GUEST privileges.
User ID wasnot found indatabase.
l RightFAX has its own list of fax users and the user ID is noton that list. You can use FaxAdmin to add users, eitherindividually or by reading them from the domain or file server.When RightFAX is first installed, the users"ADMINISTRATOR" and "DEFAULT" are loaded. Initially,both do not have a password.
The passwordsupplied isincorrect.
l You need to use the correct password for the user inquestion. If the user has lost his password, a fax adminstratorcan start FaxUtil as themselves, switch into the user's mailbox,and give them a new password without having to know the oldpassword. The password can also be reset in FaxAdmin.
The RightFAXFaxAddressingdialog popsup, yet nothingever appearsin FaxUtil.
l You are using a different user ID than expected. Check theRightFAX Client Control Panel applet to see what user ID thesoftware is using.
l On Windows NT, the port or Print To setting on the printermay have been modified or the setting may be incorrect. StartPrint Manager, select the printer, and choose Print To fieldshould contain a UNC name of the RightFAX fax queue on thefax server, i.e. \\SERVER\HPFAX.

251Appendix A: Troubleshooting
Graphics andline drawingsare notappearing onfax pages.
l Font downloading must be set to "bitmap" mode; printerresolution should be set to 300 DPI, not 600 DPI. It is alsopossible that the line might be too thin.
Receivingmessagesabout notbeing able tofind the faxserver.
l Use a 32-bit requester, i.e. Microsoft Client for NetWareNetworks, instead of NETX or VLM's. NETX and VLM'swere designed for DOS and Windows 3.1 both of which are16-bit systems.
The RightFAXFaxAddressingdialog neverpops up, butthe documentappears inFaxUtil as"Info NotComplete."
l The printer installed is not specified as a "Fax Printer" in theRightFAX Client Control Panel applet.

252 RightFAX Administrator's Guide
Problems Specific to Sending Faxes
After printingto a fax printqueue, the faxnever appearsin your faxmailbox.
l There was an error moving the print job from the networkspool directory to the \RIGHTFAX\OUTGOING directory(look in the Application EventLog, under RightFAX ServerModule for a specific error message).
l The print job contained a <WHO> code (the fax may havebeen moved into the mailbox of the user specified by theWHO code).
l The user used the wrong print queue or does not have thenecessary network permissions to access the print queue.
l The user is not linked to a fax print queue.
l The fax server is not running, has died, or some/all of theRightFAX Services have stopped.
l The fax server is low on disk space. The server stopsprocessing new faxes when free space drops below 50 MB.
Faxes are leftwith the status"Waiting forConversion"or "InConversion"
l There is no RightFAX WorkServer Module running, or therunning RightFAX WorkServer Module is not configured forthe kind of conversion in question. For example, you may besending PostScript print jobs to a RightFAX WorkServerModule that is configured to perform only PCL5 conversions.
l Someone has sent a very large fax job and it is taking thefax server a long time to convert it. You can add additionalWorkServers to redistribute the rest of the jobs.
Faxes failedwith "ED:ConversionFailed"
l Examine the Application EventLog under RightFAXWorkServer# Module.
l Verify that the document you are printing can actually beprinted on a real LaserJet III (the printer driver your softwareis using may be out of date or contain bugs).
l Try using a LaserJet III printer driver.

253Appendix A: Troubleshooting
Information inembeddedcodes is notpulled out ofthe document,and the codesare left on thefax image.
l The codes were formatted in a font which was rasterized bythe client workstation (i.e. the actual text of the code neverappeared in the print output). Make sure the codes areformatted in a native printer font.
l The codes are formatted in such a way that the code text isnot contiguous in the document (i.e. the word-processor splitthe code across a line or had to chang character sets to outputthe '<' and '>' characters).
Faxes convertOK but arenot sent, i.e."Phone LineProblems"
l The Dial Prefix or Postfix parameter is incorrect. The DialPrefix does not include a leading ",," or "w" to wait for a dialtone before dialing (on Brooktrout boards). The phonenumber or dial prefix did not include the required digits toaccess an outside line.
l For international calls, the call took too long to complete.You can increase the CD Timeout value.
l The phone line is not a standard analog phone line, as wouldbe usable by a Hayes compatible modem.
l The phone line is not connected to the board, or the line isdead (try dialing out on that line with a regular phone).
l You may be using an improper cable. Check to make surethat you have the proper phone cables for your fax board type.
l The fax board may be damaged.
Fax convertsOK but neverbegins tosend, i.e."Held forPreview" or"Info NotComplete"
l The fax was held for preview and never released. The usershould release the fax by using the Fax-Release option inFaxUtil.
l The cover sheet information is not complete. The usershould edit the fax and add values in all required fields(italicized). The fields required for sending a fax can also bechanged using FaxAdmin.
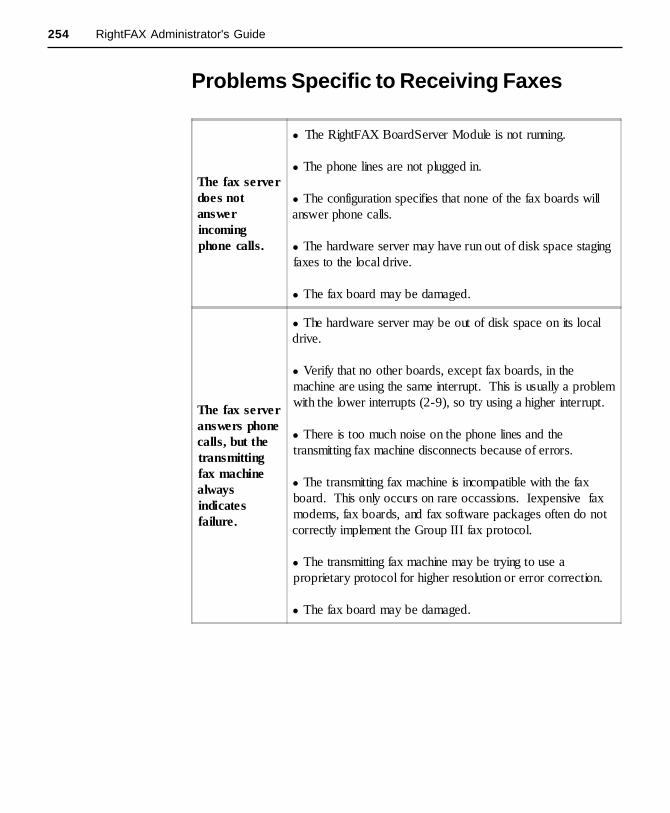
254 RightFAX Administrator's Guide
Problems Specific to Receiving Faxes
The fax serverdoes notanswerincomingphone calls.
l The RightFAX BoardServer Module is not running.
l The phone lines are not plugged in.
l The configuration specifies that none of the fax boards willanswer phone calls.
l The hardware server may have run out of disk space stagingfaxes to the local drive.
l The fax board may be damaged.
The fax serveranswers phonecalls, but thetransmittingfax machinealwaysindicatesfailure.
l The hardware server may be out of disk space on its localdrive.
l Verify that no other boards, except fax boards, in themachine are using the same interrupt. This is usually a problemwith the lower interrupts (2-9), so try using a higher interrupt.
l There is too much noise on the phone lines and thetransmitting fax machine disconnects because of errors.
l The transmitting fax machine is incompatible with the faxboard. This only occurs on rare occassions. Iexpensive faxmodems, fax boards, and fax software packages often do notcorrectly implement the Group III fax protocol.
l The transmitting fax machine may be trying to use aproprietary protocol for higher resolution or error correction.
l The fax board may be damaged.

255Appendix A: Troubleshooting
The fax servernever answersa phone callon a DIDtrunk.
l Many DID problems can be diagnosed by the phonecompany from their offices. Some of the most common are:
l The RightFAX BoardServer Module is not started.
l The DID trunk is not activated.
l The DID trunk is not really a DID trunk. (WARNING! If aphone line which can ring a standard phone is plugged intoyour DID port on the fax board, you have probably damagedthe fax board. This is NOT covered under warranty repair.)
l The DID power supply is faulty, not powered, has blown afuse, or is otherwise not supplying current.
l The tip and ring lines on the RJ-11 jack have been reversed.(WARNING! Do not reverse the leads on the DID powersupply line to correct this problem. This will damage the faxboard!)
l The DID line is misconfigured, i.e. Pulse instead of DTMFsignaling, Immediate instead of Wink Start, or an incorrectnumber of digits.
l The fax board may be damaged.
l To test hardware and configuration, plug one of the DIDcables coming from the board into a standard, non-PBX,analog phone. Pick up the phone and dial 4 or 5 digits. If youhear the digits as you dial them and then hear fax tone, theboard is working properly.
Receivedfaxes do notshow up in theexpected faxmailbox.
l The DID routing codes assigned in FaxAdmin are incorrector a DID routing code is duplicated.
l The DID number on which a fax is received is not assignedto any user (faxes would be going to the ADMINISTRATOR).
File routingand archivingjobs sent toNetWare fileservers arenot working
l The NT user that the RightFAX WorkServer Modules arestarting as must exist in NetWare and have the same password.This is necessary because every time you start the RightFAXWorkServer and try to access a Novell server, NT will use thisuser name to login to the Novell server you are accessing.
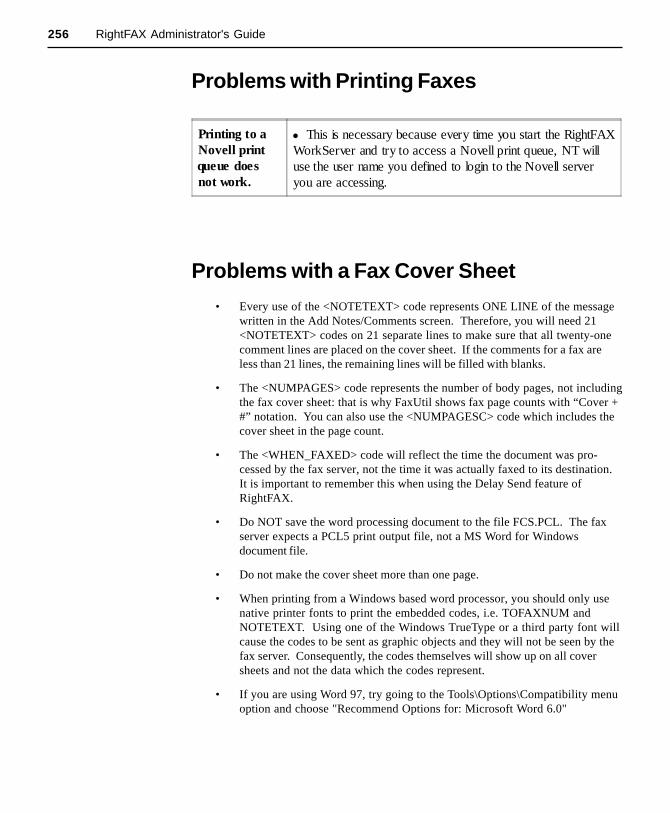
256 RightFAX Administrator's Guide
Problems with a Fax Cover Sheet
• Every use of the <NOTETEXT> code represents ONE LINE of the messagewritten in the Add Notes/Comments screen. Therefore, you will need 21<NOTETEXT> codes on 21 separate lines to make sure that all twenty-onecomment lines are placed on the cover sheet. If the comments for a fax areless than 21 lines, the remaining lines will be filled with blanks.
• The <NUMPAGES> code represents the number of body pages, not includingthe fax cover sheet: that is why FaxUtil shows fax page counts with “Cover +#” notation. You can also use the <NUMPAGESC> code which includes thecover sheet in the page count.
• The <WHEN_FAXED> code will reflect the time the document was pro-cessed by the fax server, not the time it was actually faxed to its destination.It is important to remember this when using the Delay Send feature ofRightFAX.
• Do NOT save the word processing document to the file FCS.PCL. The faxserver expects a PCL5 print output file, not a MS Word for Windowsdocument file.
• Do not make the cover sheet more than one page.
• When printing from a Windows based word processor, you should only usenative printer fonts to print the embedded codes, i.e. TOFAXNUM andNOTETEXT. Using one of the Windows TrueType or a third party font willcause the codes to be sent as graphic objects and they will not be seen by thefax server. Consequently, the codes themselves will show up on all coversheets and not the data which the codes represent.
• If you are using Word 97, try going to the Tools\Options\Compatibility menuoption and choose "Recommend Options for: Microsoft Word 6.0"
Problems with Printing Faxes
Printing to aNovell printqueue doesnot work.
l This is necessary because every time you start the RightFAXWorkServer and try to access a Novell print queue, NT willuse the user name you defined to login to the Novell serveryou are accessing.

257Appendix B: Error and Status Messages
Appendix B:Error and Status Messages
B
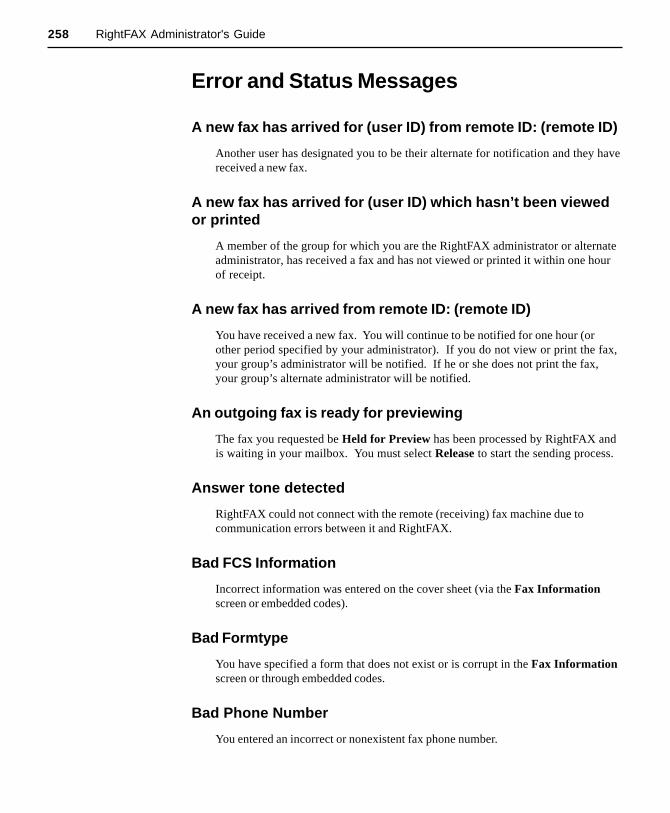
258 RightFAX Administrator's Guide
Error and Status Messages
A new fax has arrived for (user ID) from remote ID: (remote ID)
Another user has designated you to be their alternate for notification and they havereceived a new fax.
A new fax has arrived for (user ID) which hasn’t been viewedor printed
A member of the group for which you are the RightFAX administrator or alternateadministrator, has received a fax and has not viewed or printed it within one hourof receipt.
A new fax has arrived from remote ID: (remote ID)
You have received a new fax. You will continue to be notified for one hour (orother period specified by your administrator). If you do not view or print the fax,your group’s administrator will be notified. If he or she does not print the fax,your group’s alternate administrator will be notified.
An outgoing fax is ready for previewing
The fax you requested be Held for Preview has been processed by RightFAX andis waiting in your mailbox. You must select Release to start the sending process.
Answer tone detected
RightFAX could not connect with the remote (receiving) fax machine due tocommunication errors between it and RightFAX.
Bad FCS Information
Incorrect information was entered on the cover sheet (via the Fax Informationscreen or embedded codes).
Bad Formtype
You have specified a form that does not exist or is corrupt in the Fax Informationscreen or through embedded codes.
Bad Phone Number
You entered an incorrect or nonexistent fax phone number.
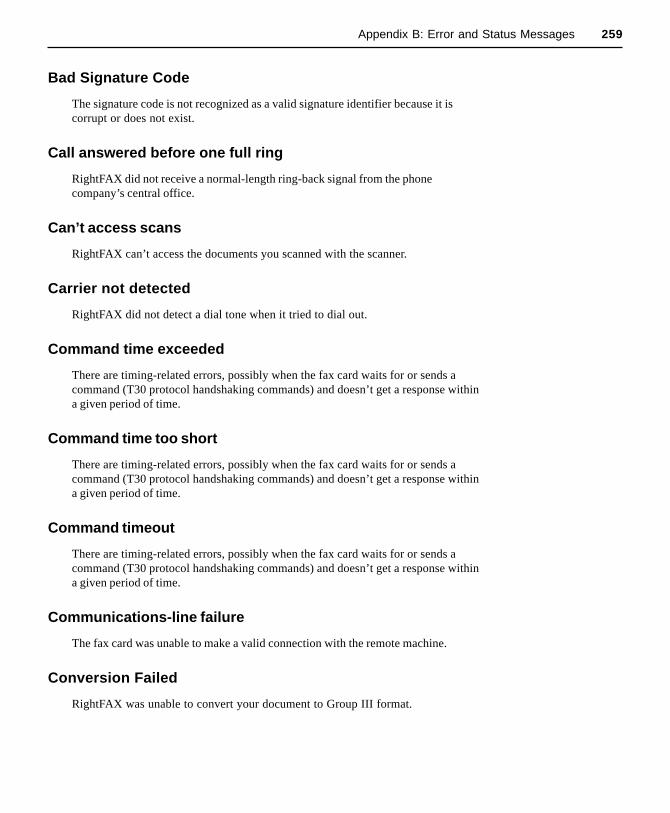
259Appendix B: Error and Status Messages
Bad Signature Code
The signature code is not recognized as a valid signature identifier because it iscorrupt or does not exist.
Call answered before one full ring
RightFAX did not receive a normal-length ring-back signal from the phonecompany’s central office.
Can’t access scans
RightFAX can’t access the documents you scanned with the scanner.
Carrier not detected
RightFAX did not detect a dial tone when it tried to dial out.
Command time exceeded
There are timing-related errors, possibly when the fax card waits for or sends acommand (T30 protocol handshaking commands) and doesn’t get a response withina given period of time.
Command time too short
There are timing-related errors, possibly when the fax card waits for or sends acommand (T30 protocol handshaking commands) and doesn’t get a response withina given period of time.
Command timeout
There are timing-related errors, possibly when the fax card waits for or sends acommand (T30 protocol handshaking commands) and doesn’t get a response withina given period of time.
Communications-line failure
The fax card was unable to make a valid connection with the remote machine.
Conversion Failed
RightFAX was unable to convert your document to Group III format.

260 RightFAX Administrator's Guide
Dial failure or no dial tone
RightFAX cannot detect a dial tone because there is a problem with the phone lineor the fax card is configured incorrectly.
Duplicate
The fax is a duplicate; it has been forwarded to you by another user.
Equipment busy tone detected
The remote (receiving) fax machine’s phone line is busy.
Fax Discarded
RightFAX threw your fax away. Contact your administrator.
Fax number busy
RightFAX has tried to send your fax the required number of times (default=5times) and each time the phone number was busy.
Fax to (name) abandoned, too many retries
RightFAX will try to successfully send your fax a specified number of times(determined by the administrator) then quit trying. The default value is 5 tries.
Fax to (name), (error)
Your outgoing fax encountered the error listed. (See the error listed for moreinformation.)
FCS Create Failed
The cover sheet of your fax could not be created due to a corrupt or incompatiblecover sheet format.
Function not implemented
An operation was attempted that is not currently supported by your fax cardsoftware.
G2 Fax Machine
You have attempted to send a fax to a Group II machine, rather than a Group IIImachine.
261Appendix B: Error and Status Messages
Held for Preview
You have specified in the Fax Information screen or through embedded codes thatyou want to preview this fax before sending it. You must select Release from theFax menu to start the sending process.
Human Answered
RightFAX detected an unknown sound after it dialed the fax number. Theunknown sound could be a human voice, recording, or line noise.
Illegal line number
You have attempted to send a fax on a fax channel that does not exist.
Illegal option in call
This error could occur if an invalid parameter is given for one of several differentcommands, including: LOG, DEBUG, XFER, SEND.
Illegal parameter value
This error could occur if an invalid parameter is given for one of several differentcommands, including: LOG, DEBUG, XFER, SEND.
Illegal Sig. Use
You have included a signature in your fax that you are not authorized to use.
Imaging error encountered, fax abandoned
RightFAX was unable to convert your document to Group III format for transmis-sion, and so quit trying.
In Conversion
RightFAX is converting your document to fax format for transmission.
In Validation
The signature and/or billing codes in your fax are being validated against theRightFAX database.
262 RightFAX Administrator's Guide
Info Not Complete
You have not completed all the required fields (in the Fax Information screen orthrough embedded codes) for RightFAX to send the fax.
Initial Processing
RightFAX is checking your document for embedded codes and counting the numberof pages in your fax.
Invalid Billing Code
You have entered a billing code that is incorrect or does not exist.
Invalid Embedded Code
You have included a misspelled or nonexistent embedded code in your fax.
Line in Use
RightFAX was not able to send your fax because there were no outgoing phonelines available.
Loop current detected
When RightFAX attempts to go off-hook to send a fax, it finds that the phone isalready off-hook. This can occur when two devices are sharing a phone line andattempt to use it at the same time. It might also be a fax card configuration error.
Loop current failed
The fax card did detect current on the line, but did not detect a valid value forLOOP CURRENT.
Loop current not detected
The fax card was looking for LOOP CURRENT before it attempted to dial the faxnumber, but didn’t find any.
Network congestion detected
The network may be running inefficiently and causing traffic, or an invalid faxnumber may have been dialed.

263Appendix B: Error and Status Messages
Network high and dry (no ring)
The fax card does not detect any type of telephone interface available. This is avery serious error; contact your RightFAX administrator immediately.
No Answer at Fax #
The fax machine at the receiving end didn’t answer or a wrong number was dialed.
No answer tone detected
The phone is ringing at the destination, but the fax machine is not answering withinthe specified time. This is especially prevalent in international calling when it cantake up to a minute to connect to the remote station.
Non-G3 Modem Detected
RightFAX has detected a non-Group III fax modem on the remote (receiving) faxmachine, and cannot communicate with it.
OCR Error
An error occurred while a document was being sent to or was at the OpticalCharacter Recognition module of RightFAX.
OCR in Process
Your fax has been queued and is being processed by the OCR module.
OK
RightFAX has successfully sent your fax over the phone lines. This does notguarantee successful receipt of the fax at its destination.
One of your outgoing faxes needs attention
You have not completed all the required fields in the Fax Information screen orthrough embedded codes for the fax to be sent.
P2 was not detected at the end of training
This is a training error indicating a performance problem with the fax server and thenumber of fax cards that it contains.

264 RightFAX Administrator's Guide
Phone Line Problems
There is a problem with the phone lines at the fax server.
Poor Quality
There was too much line noise for the fax to be transmitted correctly. The fax mayhave been sent, but it may be difficult to read.
Printing
Your fax is printing.
Printing Error
An error occurred while printing.
Protocol reject message
This is a generic protocol error code that could have several meanings. In general,your fax card is having difficulty talking to the remote fax machine because it isgetting the signals it expected.
Protocol timeout
This is a generic protocol error code that could have several meanings. In general,your fax card is having difficulty talking to the remote fax machine because it is notgetting the signals it expected in the appropriate time frame.
Queued for OCR
The fax has been queued and is waiting for the OCR module to convert it.
Queued for Printing
The fax has been queued and is waiting to be printed.
Ringback signal detected
A ringback signal was detected when it should not have been. This may be due tointerrupting a call in-process on a shared line, or could be caused by a lot of noiseon a T1 phone line.

265Appendix B: Error and Status Messages
Ringback, but no answer tone
The phone rang at the destination, but it was never answered. This might bebecause the receiving fax machine is off-line or unable to receive faxes.
Ringback, then busy condition
The fax number dialed went off-hook, then went on-hook very quickly, generating afast busy signal.
Scheduled for Send
Your fax was successfully converted to the RightFAX Group III format and is nowbeing sent to the fax card to await sending. If you specified a date and time to sendthe fax, RightFAX will wait to send it until then.
Scheduling Failed
Your fax was converted correctly, but it couldn’t be correctly queued to be sent.
Sending
RightFAX is transmitting your fax.
Sending fax to (name) at (faxnumber)
Your fax is being sent to the name and fax number specified.
Sig needs Authorization
You must be authorized to use the signature you have included in your fax.
Thermal Record
You have recorded a fax that was sent or received on a conventional fax machine fordatabase purposes only.
Training Algorithm detected FSK
This training error indicates a performance problem with the fax server and thenumber of fax cards it contains.
Training Algorithm found on PN
This training error indicates a performance problem with the fax server and thenumber of fax cards it contains.

266 RightFAX Administrator's Guide
Tx/Rx Error
This transmission/reception error indicates that the receiving fax machine wasexperiencing difficulties or excessive line noise.
Unknown Error
Undetermined error.
Unknown Error Code
Error condition is not known.
Unknown Status Code
An unknown status code has been returned to RightFAX from your fax card.
Voice response to call
RightFAX detected a sound that it didn’t expect after it dialed the fax number. Thesound could be a human voice, recording, or line noise.
Waiting for Conversion
RightFAX is busy with another process and has queued your fax to be converted.
Waiting to be Sent
The fax has not yet been scheduled for faxing.
Your fax has been successfully sent to (name) at (faxnumber)
Your fax was successfully sent over the phone lines. This does not guaranteesuccessful receipt of the fax at its destination.
Your outgoing fax contains an invalid billing code
You have either not entered a required billing code, or entered one that does notexist.
Appendix C:Native Document File Formats
C

268 RightFAX Administrator's Guide
Native Document File Formats
The following list shows native document file formats (and supportedversions) that can be automatically converted to faxes by RightFAX.
Word Processing Formats:
Generic
ASCII Text ............................................................................ All versions
ANSI Text ............................................................................. All versions
Unicode Text ......................................................................... All versions
HTML ..................................................................... Versions through 3.0
Microsoft Rich Text Format .................................... Versions through 2.0
DOS
Microsoft Word ...................................................... Versions through 6.0
WordPerfect ........................................................... Versions through 6.1
Windows
AMI/AMI Professional .......................................... Versions through 3.1
Microsoft Windows Works .................................... Versions through 4.0
Microsoft Windows Write ...................................... Versions through 3.0
Microsoft Word for Windows ................................. Versions through 97
Microsoft WordPad for Windows95 ...................................... Version 1.0
WordPerfect for Windows ...................................... Versions through 6.1
Macintosh
Microsoft Word ................................................. Versions 4.0 through 6.0
WordPerfect .................................................... Versions 1.02 through 3.0
Microsoft Works .................................................... Versions through 2.0
Spreadsheet Formats:
Lotus 1-2-3 (DOS & Windows) .............................. Versions through 5.0
Lotus 1-2-3 Charts (DOS & Windows) ................... Versions through 5.0
Lotus 1-2-3 (Windows) ........................................... Versions through 97
Microsoft Excel Windows .................................. Versions 2.2 through 97
Microsoft Excel Macintosh ............................... Versions 3.0 through 4.0

269Appendix C: Native Document File Formats
Microsoft Excel Charts ...................................... Versions 3.0 through 7.0
Microsoft Windows Works .................................... Versions through 4.0
Microsoft Works (Mac) .......................................... Versions through 2.0
QuattroPro for Windows ........................................ Versions through 6.0
Database Formats:
Access.................................................................... Versions through 2.0
dBASE.................................................................... Versions through 5.0
Paradox (Windows) ................................................ Versions through 1.0
Graphics Formats:
BMP (including RLE, ICO, CUR & OS/2 DIB).......................... Windows
GIF ....................................................................................... CompuServe
PICT1 & PICT2 (Raster)..........................................Macintosh Standard
PCX ................................................................................... PC Paintbrush
DCX (multi-page PCX)....................................................... Microsoft Fax
MAC ......................................................................................... MacPaint
DRW .......................................................................................Micrografx
WMF .......................................................................... Windows Metafile
TIFF ........................................................................ Versions through 6.0
JPEG...................................................................................... All versions
TIFF CCITT Group 3 & 4..................................................... Fax Systems
EPS (if TIFF image is embedded in it) ............... Encapsulated PostScript
CDR (if TIFF image is embedded in it) ........Corel Draw versions 2.0 - 5.0
Binary Group 3 Fax............................................................... All versions
WordPerfect Graphics [WPG and WPG2] .............. Versions through 2.0
Presentation Formats:
Microsoft PowerPoint for Windows........................ Versions through 97
Microsoft PowerPoint for Macintosh .................................... Version 4.0
Freelance for Windows ........................................................... Version 2.0

270 RightFAX Administrator's Guide

Appendix D:Command Line References
D

272 RightFAX Administrator's Guide
Overview
The command-driven administrative utilities IMPUSER, CHGUSER, PHNPRINT,FAXDUMP, and FAXAGE are 32-bit applications that may be used from anyWindows NT workstation or server on the network. The utilities are located in the\RIGHTFAX\ADMUTILS directory. In addition, the KEYBUILD andDBCHECK database utilities can be found in the \RIGHTFAX\DATABASEdirectory.
Syntax for CHGUSER
CHGUSER is a program that lets you change RightFAX privileges and options forall users or groups of users at a single time. Note that unless you use the -Uoption to specify individual users, commands will be applied to all users.
CHGUSER [options] [keywords]
Options:
-AprinterID Specify the printer ID to which received faxes should beautomatically printed
-BprinterID Specify the printer ID to which sent faxes should beautomatically printed
-Cfile Specify the cover sheet file (i.e. FCS.PCL) for user(s)
-Fserver Specify the name of RightFAX server
-GgroupID Name of group in which to place user(s); group must already exist
-PprinterID Specify the ID of the default printer for user(s)
-Rtype Specify routing types for user(s) using the following:
RF = RightFAX mailboxCC = cc:MailMS = MS MailGW = GroupWiseOCR = Optical Character RecognitionCX = Telephony ServerEXCH = MS ExchangeNOTE = NotesXRT = RightFAX InterconnectTRS = TRS NetComm ServerSMTP = SMTP mailFILE = network directory
The fax server must berunning when executing
this utility.
273Appendix D: Command Line References
-Tprotocol Force protocol to specific type (rather than assigningautomatically) using the following:
N = Named PipesS = SPXT = TCP/IP
-UuserIDs Comma delimited list of users to change
-V Display current values for user(s)
-1number Specify default fax number for user(s)
-2number Specify default voice number for user(s)
-3 Display a user list with ID, name, and routing code
-6 Display a tab-delimited user list with ID, name, routing code,and group ID
-7option Set auto-print options for user(s) using the following:
B = Print fax bodyC = Print fax cover sheetT = Print fax bodyF = Print fax bodyS = Print fax body
CHGUSER keywords must be used in conjunction with the many of the aboveoptions to set some of the permissions and attributes. For example, if you enableauto-printing of sent faxes using the Sautoprint keyword, you should specify theprinter ID using the -B option. For complete details on each permission, seeChapter 10: Managing Users and Groups.
Keywords:
Admin/Noadmin Enables/disables administrative privileges
Archive/NoArchive Enables/disables archiving of all sent faxes
Autoprint/Noautoprint Enables/disables auto-printing of received faxes; use -7 and -A options to set printer ID and options
Bodyfine/Bodynormal Sets resolution of fax body to fine or normal
Coverfine/Covernormal Sets resolution of fax cover sheet to fine or normal
Coverpage/Nocoverpage Enables/disables sending a cover page withevery fax; use -C option to set cover sheet file
Highp/Nohighp Enables/disables the availability of High Priorityfor user

274 RightFAX Administrator's Guide
Protected/Unprotected Sets user mailbox to protected (requires password) orunprotected (does not require password)
Sautoprint/Nosautoprint Enables/disables auto-printing of sent faxes; use-7 and -B options to set printer ID and options
Examples:
CHGUSER -FRIGHTFAX -V
CHGUSER -FRIGHTFAX -UBOB,FRED NOADMIN
CHGUSER -FSERVER2 -V -ALASER4 AUTOPRINT
CHGUSER -FSERVER2 -V -BLASER6 SAUTOPRINT
Syntax for DBCHECK
DBCHECK is a diagnostic program designed to examine your database for errors.Once you've run a database check, you should run a KEYBUILD if any errors arefound. DBCHECK is located in the \RIGHTFAX\DATBASE directory.
DBCHECK [options] faxdata
Options:
-C Print counts of objects scanned in the check
-A exhaustive check (all structures)
Example:
DBCHECK -A faxdata
Syntax for FAXAGE
FAXAGE is a utility that can be run to automatically cleanup users’ fax mailboxesbased on the age of faxes. For example, FAXAGE could be run every Friday tocleanup all faxes which are over two months old.
You can also use the Automatic Fax Aging feature in Enterprise Fax Manager todetermine the length of time faxes will be kept in a user's fax mailbox. AutomaticFax Aging is available only with the RightFAX Enterprise server.
FAXAGE [options]
Options:
-Dnumber Specify which faxes should be deleted: (1) only received faxes,(2) only sent faxes, (3) all faxes (default), (4) viewed or printed,(5) printed faxes, (6) non-approved faxes, or (7) approved faxes
The fax server must notbe running when
executing this utility.
The fax server must berunning when executing
this utility.
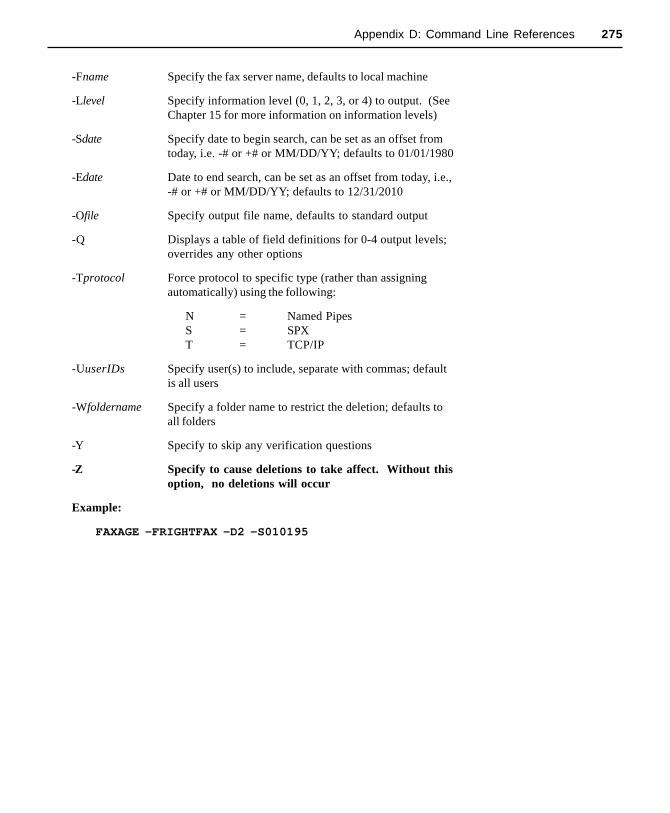
275Appendix D: Command Line References
-Fname Specify the fax server name, defaults to local machine
-Llevel Specify information level (0, 1, 2, 3, or 4) to output. (SeeChapter 15 for more information on information levels)
-Sdate Specify date to begin search, can be set as an offset fromtoday, i.e. -# or +# or MM/DD/YY; defaults to 01/01/1980
-Edate Date to end search, can be set as an offset from today, i.e.,-# or +# or MM/DD/YY; defaults to 12/31/2010
-Ofile Specify output file name, defaults to standard output
-Q Displays a table of field definitions for 0-4 output levels;overrides any other options
-Tprotocol Force protocol to specific type (rather than assigningautomatically) using the following:
N = Named PipesS = SPXT = TCP/IP
-UuserIDs Specify user(s) to include, separate with commas; defaultis all users
-Wfoldername Specify a folder name to restrict the deletion; defaults toall folders
-Y Specify to skip any verification questions
-Z Specify to cause deletions to take affect. Without thisoption, no deletions will occur
Example:
FAXAGE -FRIGHTFAX -D2 -S010195
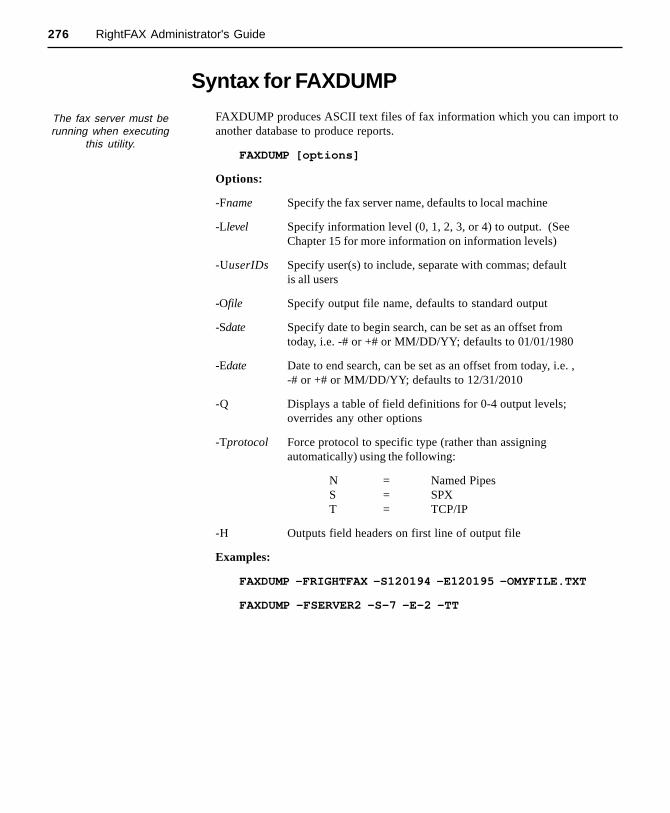
276 RightFAX Administrator's Guide
Syntax for FAXDUMP
FAXDUMP produces ASCII text files of fax information which you can import toanother database to produce reports.
FAXDUMP [options]
Options:
-Fname Specify the fax server name, defaults to local machine
-Llevel Specify information level (0, 1, 2, 3, or 4) to output. (SeeChapter 15 for more information on information levels)
-UuserIDs Specify user(s) to include, separate with commas; defaultis all users
-Ofile Specify output file name, defaults to standard output
-Sdate Specify date to begin search, can be set as an offset fromtoday, i.e. -# or +# or MM/DD/YY; defaults to 01/01/1980
-Edate Date to end search, can be set as an offset from today, i.e. ,-# or +# or MM/DD/YY; defaults to 12/31/2010
-Q Displays a table of field definitions for 0-4 output levels;overrides any other options
-Tprotocol Force protocol to specific type (rather than assigningautomatically) using the following:
N = Named PipesS = SPXT = TCP/IP
-H Outputs field headers on first line of output file
Examples:
FAXDUMP -FRIGHTFAX -S120194 -E120195 -OMYFILE.TXT
FAXDUMP -FSERVER2 -S-7 -E-2 -TT
The fax server must berunning when executing
this utility.
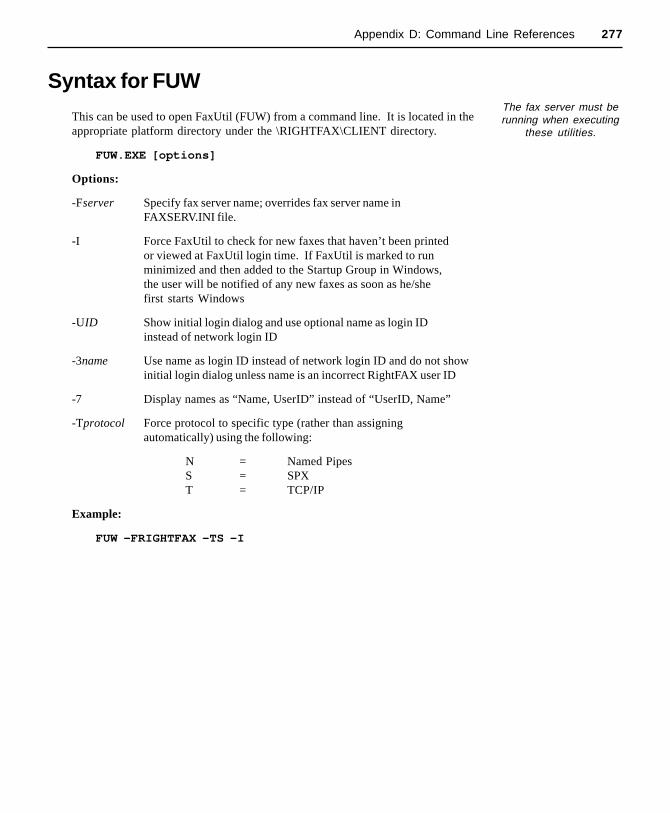
277Appendix D: Command Line References
Syntax for FUW
This can be used to open FaxUtil (FUW) from a command line. It is located in theappropriate platform directory under the \RIGHTFAX\CLIENT directory.
FUW.EXE [options]
Options:
-Fserver Specify fax server name; overrides fax server name inFAXSERV.INI file.
-I Force FaxUtil to check for new faxes that haven’t been printedor viewed at FaxUtil login time. If FaxUtil is marked to runminimized and then added to the Startup Group in Windows,the user will be notified of any new faxes as soon as he/shefirst starts Windows
-UID Show initial login dialog and use optional name as login IDinstead of network login ID
-3name Use name as login ID instead of network login ID and do not showinitial login dialog unless name is an incorrect RightFAX user ID
-7 Display names as “Name, UserID” instead of “UserID, Name”
-Tprotocol Force protocol to specific type (rather than assigningautomatically) using the following:
N = Named PipesS = SPXT = TCP/IP
Example:
FUW -FRIGHTFAX -TS -I
The fax server must berunning when executing
these utilities.

278 RightFAX Administrator's Guide
Syntax for IMPUSER
IMPUSER is a program that allows you to import users from a text file or an NTdomain.
IMPUSER [options]
Options:
-Ifile CSV file name from which to import users
-Nserver Name of the NT server from which to import NT domainaccounts
-GgroupID Name of an NT group from which to import users (used onlywith -N. Without -N, imports all users in the domain).
-Fserver Name of fax server to which users should be imported
-Tprotocol Force protocol to specific type (rather than assigningautomatically) using the following:
N = Named PipesS = SPXT = TCP/IP
-DuserID Model user; normally this is the user DEFAULT
Examples:
IMPUSER -INEWUSER.TXT -FSERVER1
IMPUSER -NOURORG -++ -DBOB
If using a Comma Separated Values (CSV) file, the file format is a comma-delimitedtext file with optional quoted fields (use quotations when the field may have anembedded comma). If a user already exists in RightFAX, their record will beupdated based on the data from the import file. If a user does not already exist,they will be added. The fields for the CSV file are shown in the following chart.Note that you must specify a value or the absence of a value for all 16 fieldsdescribed below. For example, to import only the User ID and User Name for BobJones' account, your CSV file would look like this:
BOB,Bob Jones,,,,,,,,,,,,,,
The fax server must berunning when executing
this utility.

279Appendix D: Command Line References
Field Type MaxLength Notes
User ID Alpha-numeric 21 Must be unique. If ID already exists, the existing userwill be changed.
User Name Alpha-numeric 29 The user's name.
Password Alpha-numeric 11 If empty, existing user password will be maintained.
Group Alpha-numeric 21 The group must already exist. If group does not exist,record will be skipped.
Route-Code Numeric 7 This should be unique, though uniqueness is notenforced.
Cover SheetModel Alpha-numeric 12
File name (no path) of FCS model for user. File namemust end with .PCL. Leave blank to use group's coversheet.
Flags Alpha 31 Each character in this field will change a particular userattribute. Possible flag characters are listed below.
Notify Type Numeric 2
0=Use group's type1-9=custom10=cc:Mail11=MS Mail12=GroupWise
Route Info Alpha 99
Formatted as: TYPE:INFO or +TYPE:INFOwhere TYPE must be one of the following:RF, CC, MS, FILE, OCR, GW, NOTES, RFIC, TRS,CX3, or EXCHand where INFO should be the routing information forthat particular type.The format +TYPE:INFO is identical except that itenables delete-after-routing.
Route Format Alpha 4 Format of the file to be routed. Must be one of thefollowing: PCX, DCX, TIFF-G3, or TIFF-G4
Subscriber ID Numeric 7 Voice mail subscriber ID, if CallXpress routing isenabled.
From Name Alpha 59 Default 'From Name' for cover sheet
From Phone Alpha 31 Default 'From Voice Number' for cover sheet
DID Fax Num Alpha 31 Default 'DID Fax Number' for cover sheet
General Fax Alpha 31 Default 'General Fax Number' for cover sheet
Operator Num Alpha 31 Default 'Operator Voice Number' for cover sheet
DistinguishedName Alpha 79 The MS-Exchange distinguished name, used to confirm
accurate RightFAX/Exchange user synchronization
DefaultBillInfo1 Alpha 15 Default Billing Code 1 setting
DefaultBillInfo2 Alpha 15 Default Billing Code 2 setting

280 RightFAX Administrator's Guide
Possible User Flag Characters
The following chart shows possible user flag characters. The ± character after theflag indicates that a plus (+) or minus (-) sign must be used to indicate whether toadd or remove the attribute. For example: 'A-H+C+' would remove AdministrativeAccess from the user, add the ability to use high priority when sending faxes, andallow the user to change his fax cover sheet.
A± Administrative Access
V± View first page only
P± Enable Auto-Purge
U± Unprotected mailbox
B± Bypass billing code verification
S± Sent Fax Archiving
C± Can change FCS
O± Can OCR faxes
D± Disallow fax deleting
H± Can use HIGH priority
M± Must have password
L± Can Add/Update Library Documents
F± Can Add/Update Forms
I± User cannot search billing codes
Syntax for KEYBUILD
KEYBUILD rewrites and repairs the key files in the RightFAX database.KEYBUILD is located in the \RIGHTFAX\DATABASE directory.
Example:
KEYBUILD faxdata
The fax server must notbe running when
executing this utility.
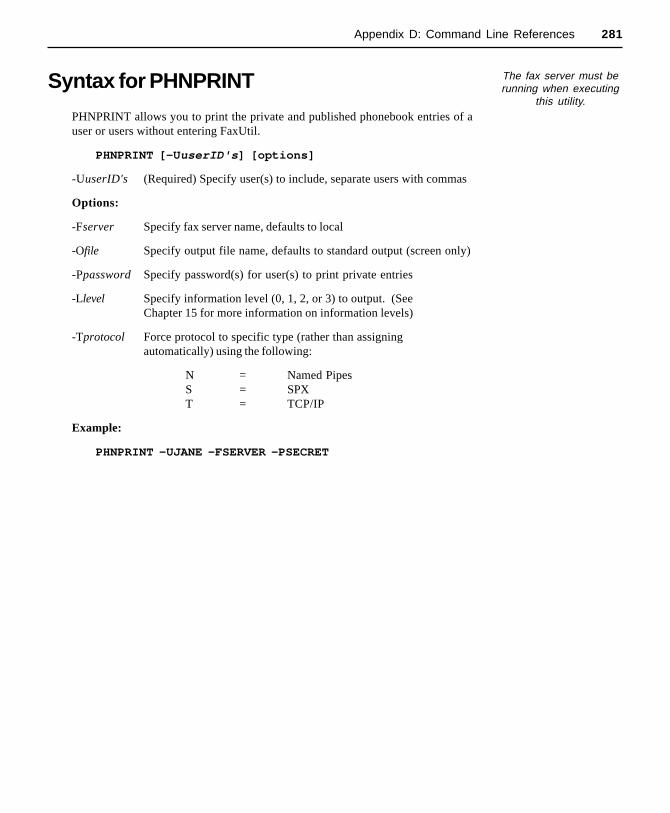
281Appendix D: Command Line References
Syntax for PHNPRINT
PHNPRINT allows you to print the private and published phonebook entries of auser or users without entering FaxUtil.
PHNPRINT [-U userID's ] [options]
-UuserID's (Required) Specify user(s) to include, separate users with commas
Options:
-Fserver Specify fax server name, defaults to local
-Ofile Specify output file name, defaults to standard output (screen only)
-Ppassword Specify password(s) for user(s) to print private entries
-Llevel Specify information level (0, 1, 2, or 3) to output. (SeeChapter 15 for more information on information levels)
-Tprotocol Force protocol to specific type (rather than assigningautomatically) using the following:
N = Named PipesS = SPXT = TCP/IP
Example:
PHNPRINT -UJANE -FSERVER -PSECRET
The fax server must berunning when executing
this utility.

282 RightFAX Administrator's Guide

Appendix E:Automatic Inbound Routing
E

284 RightFAX Administrator's Guide
RightFAX lets you choose from several different methods for routingreceived faxes to their intended recipients in your organization. The routingmethod you choose will be based primarily on the type of telephone serviceyou receive. Once RightFAX has determined who should receive anincoming fax, you then have several options for how that fax should bedelivered (i.e., to the FaxUtil mailbox, as an attachment to an e-mail message,etc.)
DID/DNIS Routing
These two methods are considered the best for fax routing. DID linessupport inbound phone service only, DNIS service supports bi-directionalfaxing.
A DID/DNIS interface assigns multiple telephone numbers to a single pairof wires (a telephone trunk). Often these numbers are sequential and allcontain the same prefix. For example, a single DID/DNIS line may have 20numbers associated with it ranging from 555-1001 to 555-1020. Your phonecompany will forward any or all of these dialed numbers to your systemalong with the call. RightFAX then uses these included numbers to routefaxes to the proper recipients.
Each RightFAX user is assigned a personal fax mailbox which is assigned aDID/DNIS number (routing code). When a call comes in with a valid DID/DNIS number, the fax is placed in the corresponding user's fax mailbox.
Routing codes should be assigned in accordance with the number of DID/DNIS digits for which your services are configured. For example, if youhave a set of DID/DNIS numbers of 555-1001 through 555-1020, and yourphone service is configured to forward the last four digits of the dialednumber, then you would assign the routing codes 1001 through 1020 toyour users. If you have three digit service, then you would assign therouting codes 001 through 020 to your users.
Configuring RightFAX for DID/DNIS Routing
Each fax board must me configured for DID/DNIS routing separately. Toconfigure RightFAX and your fax board(s) for DID/DNIS routing, run theRightFAX BoardServer applet from the Control Panel.

285Appendix E: Automatic Inbound Routing
Configuring Brooktrout Boards
For Brooktrout fax boards, highlight the board name listed under GlobalBoard Settings:
In the Number of Digits to Collect field, enter the number of dialed digitsthat will be forwarded to your system by the phone company. In theNumber of Digits for Routing field, enter the number of collected digitsthat you will use when assigning routing codes to your users. In the DIDService Type field, enter the service type your phone company is providing,either Immediate or Wink.
Configure DID/DNISsettings here
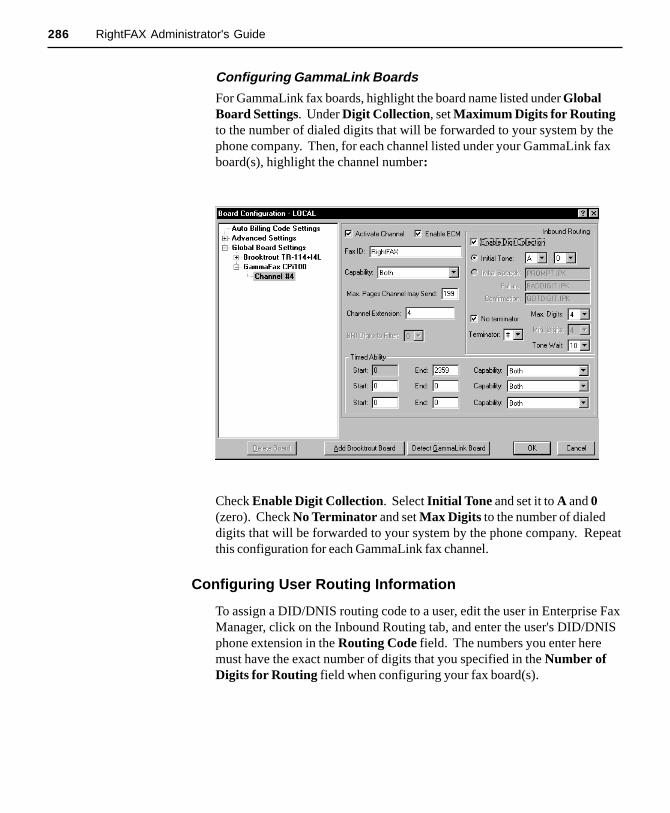
286 RightFAX Administrator's Guide
Configuring GammaLink Boards
For GammaLink fax boards, highlight the board name listed under GlobalBoard Settings. Under Digit Collection, set Maximum Digits for Routingto the number of dialed digits that will be forwarded to your system by thephone company. Then, for each channel listed under your GammaLink faxboard(s), highlight the channel number:
Check Enable Digit Collection. Select Initial Tone and set it to A and 0(zero). Check No Terminator and set Max Digits to the number of dialeddigits that will be forwarded to your system by the phone company. Repeatthis configuration for each GammaLink fax channel.
Configuring User Routing Information
To assign a DID/DNIS routing code to a user, edit the user in Enterprise FaxManager, click on the Inbound Routing tab, and enter the user's DID/DNISphone extension in the Routing Code field. The numbers you enter heremust have the exact number of digits that you specified in the Number ofDigits for Routing field when configuring your fax board(s).
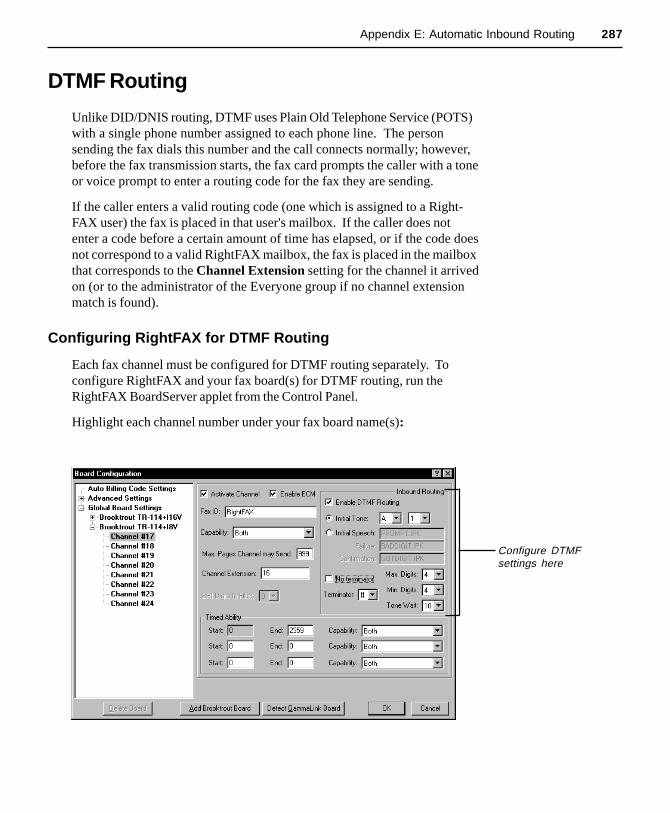
287Appendix E: Automatic Inbound Routing
DTMF Routing
Unlike DID/DNIS routing, DTMF uses Plain Old Telephone Service (POTS)with a single phone number assigned to each phone line. The personsending the fax dials this number and the call connects normally; however,before the fax transmission starts, the fax card prompts the caller with a toneor voice prompt to enter a routing code for the fax they are sending.
If the caller enters a valid routing code (one which is assigned to a Right-FAX user) the fax is placed in that user's mailbox. If the caller does notenter a code before a certain amount of time has elapsed, or if the code doesnot correspond to a valid RightFAX mailbox, the fax is placed in the mailboxthat corresponds to the Channel Extension setting for the channel it arrivedon (or to the administrator of the Everyone group if no channel extensionmatch is found).
Configuring RightFAX for DTMF Routing
Each fax channel must be configured for DTMF routing separately. Toconfigure RightFAX and your fax board(s) for DTMF routing, run theRightFAX BoardServer applet from the Control Panel.
Highlight each channel number under your fax board name(s):
Configure DTMFsettings here

288 RightFAX Administrator's Guide
Check Enable DTMF Routing. Select either Initial Tone or Initial Speech(speech is only available with Brooktrout fax boards) and configure thetone or speech parameters. Check No Terminator if you don't want torequire the caller to press [#] or [*] after entering the routing code. If thisoption is not checked, select the terminator character you want in theTerminator field. In the Max. Digits field, enter the maximum number ofdigits the caller must enter for a valid DTMF routing code. In the Min.Digits field, enter the minimum number of digits the caller must enter for avalid DTMF routing code. In the Tone Wait field, enter the length of time(in seconds) after the prompt for the caller to enter the routing code.
Configuring User Routing Information
To assign a DTMF routing code to a user, edit the user in Enterprise FaxManager, click on the Inbound Routing tab, and enter the user's DTMFcode in the Routing Code field. The digits entered here correspond directlyto the digits entered by the caller when prompted. Although each usermust have a unique DTMF routing code, the assigned codes can be ofvariable length.
OCR Routing
OCR (Optical Character Recognition) is an optional module (sold sepa-rately) that converts the first page of an incoming fax from a graphic formatto a text format and then scans it for specified words or phrases. Each wordor phrase is associated (using a routing table) with an individual RightFAXuser ID. When RightFAX matches a word or phrase on the fax cover sheetwith an entry in the routing table, the fax is routed to the user ID associatedwith that text. If no match is found, the fax remains in the RightFAXadministrator's fax mailbox.
For OCR routing, no special user configuration is required.
Configuring RightFAX for OCR Routing
To use OCR routing, you must first install the RightFAX OCR optionalmodule. For information on installing the OCR optional module, refer toyour RightFAX Optional Modules Guide.
In the WorkServer applet in the Control Panel, add the OCR function to atleast one of your WorkServers.
OCR routing is anexcellent "backup" forother routing methods.
With other routingmethods, mailboxes can
be configured thatreceive all "lost" faxes,
where the intendedrecipient cannot be
determined. These "lostfax" mailboxes can be
configured for OCRrouting to maximize your
automatic inboundrouting functionality.
However, because largeorganizations usually
have several memberswith the same or verysimilar names, OCRrouting is not recom-mended as a primary
routing method.

289Appendix E: Automatic Inbound Routing
On your RightFAX server, create an ASCII file called ROUTE.TXT in the\RIGHTFAX\WORKSRV# directory (where # is the WorkServer number youadded OCR functionality to). If you added OCR to multiple WorkServers,you must create this ASCII file in each WorkServer's directory.
The ROUTE.TXT file is your OCR routing table. Each line must contain aseparate entry in the format:
UserID MatchingText
where UserID is the RightFAX user ID to route to and MatchingTextis the OCR'ed text that, when found, will route to that user. The user ID andmatching text must be separated by a single space. The matching text maycontain spaces and other special characters. Here is an example of a shortOCR routing table:
ADJ AaronADJ Aaron JonesBDS Bill StreetDRR David RennerDRR Renner
The matching text must be matched exactly in order to route. In the aboveexample, a match on the word "Jones" would not be routed.
Configuring the Central Mailbox(es)
In order to route OCR'ed faxes to their intended recipients, the faxes mustarrive in one or more "central" mailboxes. These are fax mailboxes that allincoming faxes go to, get OCR’ed, and from there are routed to user'smailboxes.
For multiple central mailboxes, each mailbox should have a routing codethat corresponds to a channel extension set up in the BoardServer (seeChannel Routing later in this chapter). Usually, however, one mailboxperforming OCR routing is sufficient. To configure a single central mailbox,edit the mailbox owner's user ID in Enterprise Fax Manager, click on theInbound Routing tab, and enter 0 (zero) in the Routing Code field. This willcause as all incoming faxes to route into that mailbox by default.
For each central mailbox you create, edit the mailbox owner's user ID inEnterprise Fax Manager, click on the Inbound Routing tab, and select OCRin the Routing Type field. This tells the mailbox to perform OCR on eachreceived fax and route accordingly.
OCR is only performed on printed text and will not work on handwriting.
If you do not plan to usethe default OCR routingtable, ROUTE.TXT, youmust specify the nameof the routing table file
to be used in theRouting Info field

290 RightFAX Administrator's Guide
Channel Routing
With this type of routing, faxes are routed based on which phone line theycame in on. This can work well if you have, for example, four departmentsand four incoming fax lines (channels). Each department can give out adifferent fax number and all faxes to that department will end up in a singlefax mailbox. Each of the members of the department can then check theirdepartmental mailbox for faxes, the faxes can all be directed to a printerlocated in the department, or the faxes can be routed manually or via OCRrouting to the intended recipient.
Configuring RightFAX for Channel Routing
Each fax channel must be configured for channel routing separately. Toconfigure RightFAX and your fax board(s) for channel routing, run theRightFAX BoardServer applet from the Control Panel.
Highlight each channel number under your fax board name(s). For eachchannel, set the Channel Extension setting to a number 0-99. This settingwill correspond to the Routing Code of the mailbox that is to receive allfaxes coming in on this channel. You can also set two or more channels tothe same Routing Extension if you want a single mailbox to receive faxesfrom multiple channels.
Configuring Recipient Mailboxes
To assign channel extensions to mailboxes, edit the user ID for eachrecipient mailbox in Enterprise Fax Manager. Click on the Inbound Routingtab and enter the Channel Extension setting of the channel that you wantto receive faxes from in the Routing Code field.
291Appendix E: Automatic Inbound Routing
ANI Routing
ANI (Automatic Number Identification) is a service provided by yourtelephone service provider that precedes each incoming phone call with aseries of digits that tell you (among other things) the phone number callingyou. Although the actual ANI transmission format differs slightly fromcarrier to carrier, the basic format is:
KP + I + 7 or 10 digits + ST
where
KP = key pulseI = information digit7 or 10 digits = calling party station directory numberST = start signal
ANI routing lets you automatically route inbound faxes to a specific usermailbox based on the phone number that the fax originated from. UsingANI routing, all faxes from a certain fax number can be automatically routedto a specific recipient's routing code. Similarly, all faxes originating from aspecific area code or phone number prefix can be routed to a specificrecipient. This routing method can be useful to sales departments forrouting faxes according to sales territories.
292 RightFAX Administrator's Guide
Configuring RightFAX for ANI Routing
ANI data you receive from your service provider may include someinformation (such as DNIS) in addition to the dialed party’s phone number.To specify the pattern of the extra data so that it can be removed byRightFAX prior to ANI routing, run the RightFAX BoardServer applet fromthe Control Panel and click the Global Board Settings. Then, in the ANIPattern Matching field, enter the pattern of ANI data you receive using thefollowing key:
* Matches one or more “star” characters in the sourcestring
# Matches one or more “pound” characters in thesource string
X Matches one or more digits belonging to the ANInumber (this is the only number sequence that will beused for ANIrouting, all other information isignored)
Y Matches one or more digits belonging to the DNISnumber
Z Matches one or more extraneous digits which arediscarded
Max. Modifier A digit 1-9 that represents a maximum charactermatch for any of the above. (For example, “x2*y” willmatch x***...yyy... or xx***...yyy... )
0-9 & A-D valid phone digits (Literal digits. Separate literaldigits from max. modifiers with a space)
Examples:
“1x10*y” matches 1xxxxxxxxxx***...yyy...
“x2z*y2 2” matches xxzzz...***...yy2
Next, on your RightFAX server, create an ASCII file called ANI.TBL in the\RIGHTFAX\BIN directory. The ANI.TBL file is your ANI routing table.Each line must contain a separate entry in the format:
ANIString RoutingCode

293Appendix E: Automatic Inbound Routing
where ANIString is the ANI data represented by 'X' characters in yourANI pattern match (described above) and RoutingCode is the RoutingCode setting of the user to route to. The ANI string and routing code mustbe separated by a single space. Here is an example of a short ANI routingtable:
15205551212 100115205552345 100215205550982 100315203201000 1003
CSID Routing
CSID (Caller Subscriber Identification) routing automatically routesinbound faxes to a specific mailbox based on the ID of the sending device.Using CSID routing, all faxes from a certain fax number can be automaticallyrouted to a specific recipient. Similarly, all faxes originating from a specificarea code or phone number prefix can be routed to a specific recipient. Thisrouting method can be useful to sales departments for routing faxesaccording to sales territories.
CSID routing precludes some other routing types like DTMF and channelrouting. However, routing types that occur after arriving in a fax mailbox(like OCR routing) may still be used. If an ID for the sending device is nottransmitted or cannot be determined, the fax is placed in the mailbox thatcorresponds to the Channel Extension setting for the channel it arrived on(or to the administrator of the Everyone group if no channel extensionmatch is found).
Configuring RightFAX for Channel Routing
To configure RightFAX for CSID routing, run the RightFAX FaxServerapplet from the Control Panel. Click the General tab and check the optionEnable CSID routing.
On your RightFAX server, create an ASCII file called CSID.TBL in the\RIGHTFAX\BIN directory. The CSID.TBL file is your CSID routing table.Each line must contain a separate entry in the format:
RoutingCode CSID

294 RightFAX Administrator's Guide
where RoutingCode is the Routing Code setting of the user to route to,and CSID is the CSID information (may be either text or a phone number)that, when sent, will route to that user. The routing code and Fax ID mustbe separated by a single space. The Fax ID text may contain spaces andother special characters. Here is an example of a short CSID routing table:
1000 ACME1001 520-624-64871002 RIGHTFAX1003 520*1003 602*
The asterisk (*) wildcard can be used to represent any number of additionalcharacters. In the above example, all incoming faxes from area codes 520and 602 will be routed the RightFAX user with the routing code 1003.
Routing Destinations
Once you have configured a routing method for your organization, youhave several options for how users can receive the faxes routed to them.The routing type is configured individually for each user (or group). Toassign each user a routing type, edit the user in Enterprise Fax Manager,click on the Inbound Routing tab, and select the routing type you want inthe Routing Type field:
Fax Mailbox
When you select this routing type, incoming faxes will be routed to theuser's FaxUtil mailbox. For information on using the FaxUtil mailbox, see theRightFAX User's Guide, Chapter 2, FaxUtil Overview.
This routing type requires RightFAX E-mail Gateway optional module,purchased separately.
When you select this routing type, incoming faxes will be forwarded to theuser as an e-mail message. If you select this option, you must also providethe necessary post office routing information in the Routing Info field sothat RightFAX can find the correct e-mail mailbox. For information onrouting faxes to an e-mail mailbox, see the section specific to your e-mailtype in the RightFAX Optional Modules Guide.

295Appendix E: Automatic Inbound Routing
Network Directory
When you select this routing type, incoming faxes will be sent to a networkdirectory of your choice. If you select this option, you must also providethe path of the desired directory in the Routing Info field and/or choosefrom several macros as to how you would like the faxes stored (i.e. bymonth, day, billing code, etc.)
The following entry in the Routing Info field would route faxes to theRIGHTFAX\FAXIN directory on the \SYS volume of the FILESERV fileserver.
\\fileserv\sys\rightfax\faxin
In the above example, the RightFAX fax server would have to be attachedto FILESERV with sufficient privileges to write to the \FAXIN directory.RightFAX will automatically create any specified directories, assuming ithas the necessary network access privileges.
Available Macros
The destination path may also specify one or more directory macros whichcause directories to be created dynamically. Available macros are:
~1 =Date in the format YYYYMMDD~2 =Day of the week (SUN, MON, TUE, WED, THU, FRI, SAT)~3 =Month (JAN, FEB, MAR, APR, MAY, JUN, JUL, AUG, SEP, OCT, NOV, DEC)~4 =Year (YYYY)~5 =Day of the month (DD)~6 =Month as decimal (01, 02 ... 12)~7 =User ID (truncated to 11 characters, i.e. 8.3 FAT format)~8 =Week of year (00..51)~9 =Bill Code #1 (truncated to 11 characters, i.e. 8.3 FAT format)~0 =Bill Code #2 (truncated to 11 characters, i.e. 8.3 FAT format)~A = Remote ID (Left to Right in 8.3 FAT format)~B = Remote ID (Right to Left in 8.3 FAT format)
You may use one of these macros when specifying a destination directoryname in the Routing Info field. For example, the path"\\FILESERV\SYS\RIGHTFAX\~1” will cause the fax server to create adirectory “\\FILESERV\SYS\RIGHTFAX\19950101” when storing a faxreceived on January 1st, 1995.
The file name stored in this directory is a unique name assigned by theRightFAX server and cannot be automatically changed. The total pathlength, after macro replacement, cannot exceed 128 characters.
The macros ~A, ~7, ~9,and ~0 create directo-ries from data which
may be longer than 11characters. Since
RightFAX uses the DOS8.3 naming scheme fordirectories, directorynames longer than 11
characters will betruncated.

296 RightFAX Administrator's Guide
OCR
This routing type requires RightFAX OCR optional module, purchasedseparately.
When you select this routing type, incoming faxes will automatically beOCR'ed for recognizable character strings and routed, compared to a tableof RightFAX user ID's and matching strings, and, when a match is found,routed to the appropriate user. No additional routing information isnecessary if you plan to use the default OCR routing table ROUTE.TXT.
RightFAX Interconnect
This routing type requires RightFAX Enterprise.
When you select this routing type, incoming faxes will be automaticallyredirected from one RightFAX server to another. In the Routing Info field,enter the destination RightFAX server name. The Interconnect servicemust be enabled on at least one of the receiving RightFAX server's Work-Servers. The RightFAX user account of the fax recipient must exist on bothRightFAX servers.
Auto-printing, auto-OCR, and auto-forwarding are not available with thisrouting type as they are performed by the destination fax server only.
TRS NetComm Message Server
When you select this routing type, incoming faxes will be automaticallyrouted to your organization's TRS NetComm message server. No additionalrouting information is necessary.
Telephony Server
RightFAX can route incoming faxes to a CallXpress3 mailbox if you haveinstalled AVT's CallXpress3 on your server and client workstations. In theRouting Info field, enter the telephony server routing information in theformat:
{NP:/TCP:}server/sourcemailbox/sourcepassword/destmailbox
Use the NP: option if your network protocol uses named pipes. Use theTCP: option if your network protocol is TCP/IP.
Be sure to check theDelete After Routing
option unless you wishto create a duplicate of
the fax

INDEX
A
A4 paper 168Access 97 210activate channel 64, 69activation date, library document 163add
billing codes 170dialing rules 176groups 144prefix tables 187printers 167users 124WorkServers 38
administrator, group 145aging, fax 146alerts, paging 118, 136analysis options, OCR 52ANI
pattern match 56routing 291
answer-only 63, 64archive
delete after 44EquiTrac 44format 41history 41path 42settings 41
audit settings 57
authorization, channel 33auto billing codes 54auto-delete 133auto-forwarding 139auto-OCR received faxes 140auto-printing
outbound faxes 138received faxes 140
automated installation 78automatic
backup 243fax aging 146inbound routing 284
availability index, fax board 99available disk space 102
B
backupdata files 243maintanance 32
base I/OBrooktrout 62GammaLink 67
beeping 61billing codes
adding 112, 170adding auto billing codes 54auto settings 54copying 112
298 RightFAX Administrator's Guide
deleting 113editing 112import interval 40importing 170in Enterprise Fax Manager 112managing 169ODBC source 172user defaults 134validation 32
blocking, call 191board model 62BoardServers
availability index 102configuring 54installing remotely 71multiple 71remote 71running remotely 73troubleshooting 247
bodies, short 41BRI 21
BRI digits to filter 69Brooktrout
configuring boards 62configuring channels 64
bump 33
C
call blocking 191call grouping 60CallXpress 40, 145CD timeout 56channel
activate 69authorization 33capability 63, 64configuring GammaLink 68extension 65, 69information 103maximum pages 69maximum pages per 65routing 290timed ability 65
channelstimed ability 70
CHGUSER 272client installation, troubleshooting 248client workstation
installing 76requirements 19
closing servers in Enterprise FaxManager 94
command line utilities 272compress files 32configure
auto billing codes 54Brooktrout
channels 64fax boards 62
Excel 236fax notification 140fax server module 28GammaLink
channels 68fax boards 67
HP NetScan 49inbound routing 130Kofax NetScan 48LDAP data sources 88OCR 51ODBC data sources 88paging
alerts 118services 115
PeopleSoft 50PowerBar 82PowerPoint 236printers 46received faxes 139redundancy 71server-side application conversion
233tray icon 87Word 236Xerox 47
connector, standalone fax machine 240
299Index
consistency, database 241copy
dialing rules 96users 95
copy defaultsEnterprise Fax Manager 95
correction options, OCR 52cover sheets
creating 198customized 200customizing fields 121editing 198embedded codes 199group cover sheets 145printing to PCL file 200required fields 201requiring 146switching 200troubleshooting 256user defaults 133
covers, short 41create
cover sheets 198fax reporter data sets 206forms 158library documents 161signatures 156
Crystal Reports 208CSID routing
enable 28overview 293
custom fax reports 208customize messages 34
D
data setsfax reporter 205
databasemaintanance 241purge 241rescue 242threads settings 32
DBCHECK 274
Default user 124delay faxes 30delete
after archive 44fax reporter data sets 207forms 160groups 144library documents 163printers 168signatures 157users 125WorkServers 38
detect, GammaLink 66detection, loop current 62dialing prefix/postfix 60dialing rules
action 181adding 118, 176, 187copying 96, 119creating 176deleting 119editing 119in Enterprise Fax Manager 118managing 186matching 177priority delta 184restrictions 180testing 119, 188using prefix tables 187
DID 20number of digits to collect 63service type 63settings 63
DID/DNIS routing 284digit collection 70
GammaLink 68digital phone lines 21direct inward dial 20disk space, available 102distinguished name 126DNIS 21
recording DNIS information 29Docs on Demand 55

300 RightFAX Administrator's Guide
DTMFenable routing 65routing 287settings 65terminator 66, 70
E
E-1 21e-mail
notification 145routing 294
ECM, enable 64, 69edit
default cover sheet 198fax reporter data sets 207forms 160library documents 163printers 168signatures 157
EFM. See Enterprise Fax Managerembedded codes
cover sheet 199enable
auto billing codes 54channel 64CSID routing 28digit collection 70DTMF routing 65ECM 64, 69forced scheduling 147PeopleSoft 51quick headers 29smart fax distribution 149T.434BFT reception 61telephony routing 40
Enterprise Fax Manager 13adding
billing codes 112dialing rules 118prefix tables 120printers 111users 105
billing codes 112
channel information 103closing servers 94copy defaults 95copying
billing codes 112dialing rules 96, 119groups 107library documents 114prefix tables 120printers 111signatures 109users 95
creating groups 107defined 92deleting
billing codes 113dialing rules 119forms 110groups 107library documents 114printers 111signatures 109users 106
dialing rules 118editing
billing codes 112dialing rules 119forms 110groups 107library documents 114prefix tables 121printer properties 111signatures 108users 106
exiting 92forms 109groups 106importing users 105library documents 113Main screen 93objects 99opening servers 94paging 115
301Index
preferences 94prefix tables 120printers 110refresh 94server information 98services 101, 103signatures 108starting 92testing dialing rules 119users 104
Enterprise, RightFAX 10Enterprise Suite, RightFAX 10EquiTrac archive 44error correction mode 64error messages 258event queue 36, 101Excel, Microsoft
configure for server-side applicationconversion 236
exiting Enterprise Fax Manager 92expiration date, library document 163extension, channel 65, 69external systems, synchronizing 121
F
F.index 42Fax Board Guide 14fax boards
availability 99configuring 62requirements 20
fax broadcast 89fax distribution, smart 148fax ID 63, 64, 68, 69fax mailbox, routing to 294fax printers, creating new 88fax reporter
creating data sets 205data sets
creating 206deleting 207editing 207refreshing 206
database tables 210installing 204running 205
fax reportscustom 208generating 207
fax server requirements 18FaxAdmin, warning 92FAXAGE 274FAXDUMP 221, 276faxes
aging 146auto-printing 138delay sending 30forced scheduling 147notification 30notification options 140optimizing 41receive options 139received fax options 139reports 204resolution 133smart fax distribution 148troubleshooting 252
FaxServer service 28FaxStat 13FaxStat value translation table 229FaxUtil 12file formats, native document 268filter, BRI digits 69forced scheduling 147form code 159formats
archive 41native document 268
formscreating 158deleting 110, 160editing 110, 160form code 159image file 160in Enterprise Fax Manager 109managing 157

302 RightFAX Administrator's Guide
secure 160forwarding, automatic 139frequency, WorkServer 40FUW 277
G
GammaLinkconfiguring boards 67detecting 66
generate fax reports 207group administrator 145group ID 144grouping, call 60groups
adding 144copying in Enterprise Fax Manager
107cover sheets 145creating 107deleting 107, 144editing 107group administrator 145group ID 144in Enterprise Fax Manager 106managing 143notification 145properties 144smart fax distribution 148
H
heartbeat, server 138help, online 14history, archive 41HP NetScan 49HP Network ScanJet 5si 240
I
I/O address, base 62icon, tray 86import
billing codes 170billing codes interval 40
users 105, 142IMPUSER 278inbound routing
ANI routing 291channel routing 290configuring 130CSID routing 293DID/DNIS routing 284DTMF routing 287
settings 65e-mail 294fax mailbox 294GammaLink 70Interconnect 296network directory 295OCR 288, 296routing destinations 294
information levels 223initial speech 65initial tone 65, 70install
applications for server-side applica-tion conversio 233
automatic install of client workstation78
client workstations 76fax reporter 204manual install of client workstation
76PCL5 print driver 76PowerBar options 84preparing to install RightFAX 18printers to PowerBar 85remote BoardServers 71server software 24tray icon 86troubleshooting 246
integrating scanners 239Interconnect 176, 296
settings 41interrupt 62ISDN 21

303Index
K
KEYBUILD 280Kofax NetScan 48, 239
L
languagesOCR recognition 52
LCR. See least cost routingLDAP, configuring data sources 88least cost routing
load balancing 176overview 176sample scenarios 191
legal paper 168letter paper 168library documents
activation date 163copying 114creating 161deleting 114, 163document ID 162editing 114, 163expiration date 163image file 162in Enterprise Fax Manager 113managing 161passwords 163statistics 115
line, phone 20load balancing 176log, audit 58loop current detection, disable 62loop-start 20
M
maintainance, fax server 32manage
groups 143users 124
manualbackup 243
installation 76maximum pages per channel 65, 69messages
customizing 34error and status 258
moduleBoardServer 54FaxServer 28WorkServer 38
ModUser 149multiple BoardServers 71
N
native document file formats 268NetScan, HP 49NetScan, Kofax 48network broadcast 145network directory
routing 295notification
customizing 34e-mail 145fax arrival 30group notification 145method 141pager 135
NT, RightFAX 10number of digits to collect 63
O
objects, sorting 99OCR
analysis options 52auto-OCR 140auto-OCR of received faxes 140configuring 51correction options 52language recognition 52reading zone 52routing 288, 296spell checking 52
ODBC

304 RightFAX Administrator's Guide
billing codes 172configuring data sources 88
online help 14optical character recognition.See OCRoptimize faxing 41Optional Modules Guide 14
P
pager ID 135, 137paging
administrative alerts 136alerts, configuring 118configuring paging services 115fax notification 135in Enterprise Fax Manager 115modem settings 117pager ID 135, 137service ID 116service type 116SMTP server 116
PaperPort Scanner 239parameters
automated installation 79passwords 126
library documents 163path, archive 42pattern, ANI 56PCL5 print driver, installing 76PeopleSoft 50permissions, user 127PHNPRINT 281phone line requirements 20ping server 188point-to-multipoint 68point-to-point 67port, RFAX: 86postfix, dialing 60PowerBar 82PowerPoint, Microsoft
configure for server-side applicationconversion 236
preferencesEnterprise Fax Manager 94
prefix, dialing 60prefix tables
adding 120copying 120editing 121in Enterprise Fax Manager 120using in dialing rules 187
Presentation Manager 78PRI 21printer ID 167printers
adding 111, 167configuring 46copying 111deleting 111, 168editing 168editing properties 111in Enterprise Fax Manager 110installing to PowerBar 85managing 166printer ID 167printer type 167queue name 167troubleshooting 256
printers, faxcreating new 88
priority, default 133properties, group 144purge database 241
Q
queue, event 36, 101queue name 167quick fax 89quick headers
enabling 29format 59
Quick Reference Card 14
R
reading zone, OCR 52received fax options 139

305Index
reception, T.434BFT 61redundancy 71refresh in Enterprise Fax Manager 94remote
BoardServers 71WorkServers 39
report tree 208reports, fax 204required fields, cover sheet 201requirements
client workstation 19fax boards 20fax server 18phone line 20
Rescue 242resolution, fax 133retry, fax transmission 30RFAX: port 86RightFAX
client installation 76components 11Enterprise 10Enterprise Suite 10Fax Board Guide 14maintanance 32NT 10Optional Modules Guide 14overview 10preparing to install 18Quick Reference Card 14Satellite 10services 12Small Business Server 11training 14tray icon 86upgrading 24versions defined 10
routingCSID 28destinations 294telephony 40trace 188type 131
routing code 130routing, inbound.See inbound routingrouting information 132running remote BoardServers 73
S
Satellite, RightFAX 10SBS. See Small Business Serverscanner integration 239scanners
HP Network ScanJet 5si 240Kofax NetScan 239PaperPort 239
scheduling, forced 147select service account 45send-only 63, 64server
heartbeat 138information 98installing 24opening in Enterprise Fax Manager
94starting and stopping 238statistics 101test for downed servers 190
server-side application conversionconfiguring the RightFAX server 233features 232overview 232
serviceFaxServer 28WorkServer 38
service account, select 45service ID, paging 116service type
DID 63paging 116
servicesassigning to WorkServers 39BoardServer 54managing 101RightFAX 12starting and stopping 103

306 RightFAX Administrator's Guide
SETUP.INI 80short bodies 41short covers 41short messaging service.See pagingsignatures
copying 109creating 156deleting 109, 157editing 108, 157in copying in Enterprise Fax Manager
108managing 156
Small Business Server, RightFAX 11smart fax distribution 148smart-resume 133SMS. See pagingsorting objects 99specifications
client workstation 19fax board 20fax server 18phone line 20
speech, initial 65spell check, OCR 52SSA. See server-side application
conversionstandalone fax machine connector 240start
Enterprise Fax Manager 92fax server 238
statistics, server 101status messages 258stop fax server 238support, technical 15switches, automated installation 78synchronize external systems 121
T
T-1 21T.434BFT reception 61technical support 15TeleConnect 55telephony routing 40
terminal endpoint identifier 67terminator, DTMF 66, 70TermStat value translation table 230test dialing rules 119, 188this guide, using 13threads, maximum allowed 32timeout, CD 56tone, initial 65, 70trace fax routing 188training 14tray icon 86
operation 89TrayFax. See tray iconTRC NetComm message server 296troubleshooting 246
BoardServer 247client installation 248cover sheets 256printers 256receiving faxes 254sending faxes 252server installation 246
TRS NetComm Message Server 145TTI line
removing 159settings 59
U
upgrade RightFAX 24usage counts, library document 163user ID 126user name 126users
adding 105, 124copying 95Default user 124deleting 106, 125distinguished name 126editing 106editing multiple users 151importing 142in Enterprise Fax Manager 104managing 124
307Index
passwords 126permissions 127user ID 126user name 126user properties 125
User's Guide, RightFAX 13utilities
DBCHECK 274FAXAGE 274FAXDUMP 221, 276FUW 277IMPUSER 278KEYBUILD 280MODUSER 149overview 272PHNPRINT 281RESCUE 242
V
validate billing codes 32vioce mail subscriber ID 126VoiceResponse 40
W
Windows 3.x client requirements 19Windows 95 client requirements 19Windows NT client requirements 19Word, Microsoft
configure for server-side applicationconversion 236
WorkServeradding 38configuring 38deleting 38frequency 40remote 39
X
Xerox, configuring 47

308 RightFAX Administrator's Guide
Related Documents