Reviewer's Guide Reviewer’s Guide for HDX 3D Pro GPU virtualization with Citrix XenDesktop, using NVIDIA GRID graphics board on VMware vSphere 6 Citrix HDX 3D Pro supports NVIDIA GRID vGPU on both Citrix XenServer and VMware vSphere. Set up evaluation lab on VMware’s hypervisor using this guide.

Welcome message from author
This document is posted to help you gain knowledge. Please leave a comment to let me know what you think about it! Share it to your friends and learn new things together.
Transcript
Reviewer's Guide
Reviewer’s Guide for
HDX 3D Pro
GPU virtualization with Citrix XenDesktop, using NVIDIA
GRID graphics board on VMware vSphere 6
Citrix HDX 3D Pro supports NVIDIA GRID vGPU on both Citrix XenServer and
VMware vSphere. Set up evaluation lab on VMware’s hypervisor using this guide.
Audience NVIDIA GRID™ vGPU™ feature NVIDIA Kepler-based GPUs that, for the first time, allow hardware virtualization of the GPU, and Citrix HDX 3D Pro was the first solution to support this capability back in 2013. This means multiple users can share a single GPU, improving user density while providing true PC performance and application compatibility. Until 2015, Citrix XenServer was the only hypervisor to support GRID vGPU when VMware vSphere 6 added support. Citrix HDX 3D Pro is the first solution to support NVIDIA GRID vGPU on any platform: XenServer, vSphere, CloudPlatform, or Bare Metal. This Reviewer’s Guide will help you deploy the infrastructure to perform a hands-on evaluation of Citrix HDX 3D Pro on VMware vSphere 6. It is a companion to the Reviewer’s Guide for HDX 3D Pro on Citrix XenServer, available at www.citrix.com/xendesktop/3D. Hardware-accelerated GPU sharing for desktop and server workloads addresses the demand for virtualized design engineering workstations in industries like CAD, CAM, Manufacturing, GIS, Construction, Healthcare, Education, and even knowledge workers. This evaluation guide is intended to provide a simplified, self-service proof of concept. The next step, after this guide, is to conduct a more exhaustive technology assessment with the help of your local Citrix consultant. This guide walks through the following topics:
How to obtain the necessary components for the feature review
Install NVIDIA GRID vGPU, and configure vGPU in VMware vSphere 6
Assign vGPU-profiles to XenDesktop 7.6 Windows VM’s
Publish vGPU-accelerated Virtual Desktops (VDI) using Citrix Studio
Access hardware accelerated graphics apps using Citrix Receiver
Use benchmark and monitoring tools to validate 3D applications performance with vGPU Pre-requisites:
Knowledge of setting up vSphere 6 infrastructure including vCenter Server, virtual networking, and certificates
Working knowledge of Citrix XenDesktop and XenApp concepts, and NVIDIA GPU hardware
Expert knowledge of Windows domain administration, networking, and systems troubleshooting
Disclaimer of Liability While every effort has been made to ensure accuracy of information in this document, Citrix and authors make no warranty, whether direct or indirect, or responsibility for the accuracy, completeness, or usefulness of any information. This document is meant to be a quick start guide. Please visit the official documentation from respective vendors for the latest information.
Page 1 of 52
WHAT IS NVIDIA GRID VGPU?................................................................................................. 2
WHERE TO DOWNLOAD THE NECESSARY COMPONENTS? ....................................................... 3
FLOWCHART OF STEPS ........................................................................................................... 5
VMWARE VSPHERE INSTALLATION ......................................................................................... 7
NVIDIA GRID DRIVER INSTALLATION ON A VSPHERE HOST ...................................................... 8
CREATE A VDI BASE IMAGE ................................................................................................... 11
DISPLAY DRIVERS AND CITRIX AGENT INSTALLATION ON THE BASE IMAGE ............................ 14
PROVISIONING VIRTUAL DESKTOPS ...................................................................................... 19
USING CITRIX RECEIVER TO ACCESS VGPU-ENABLED DESKTOPS AND APPS ............................ 44
MORE TOOLS TO VALIDATE GPU IS BEING SHARED BY THE VIRTUAL DESKTOPS ..................... 49
CONCLUSION ....................................................................................................................... 49
RESOURCES AND FURTHER READING .................................................................................... 50
Page 2 of 52
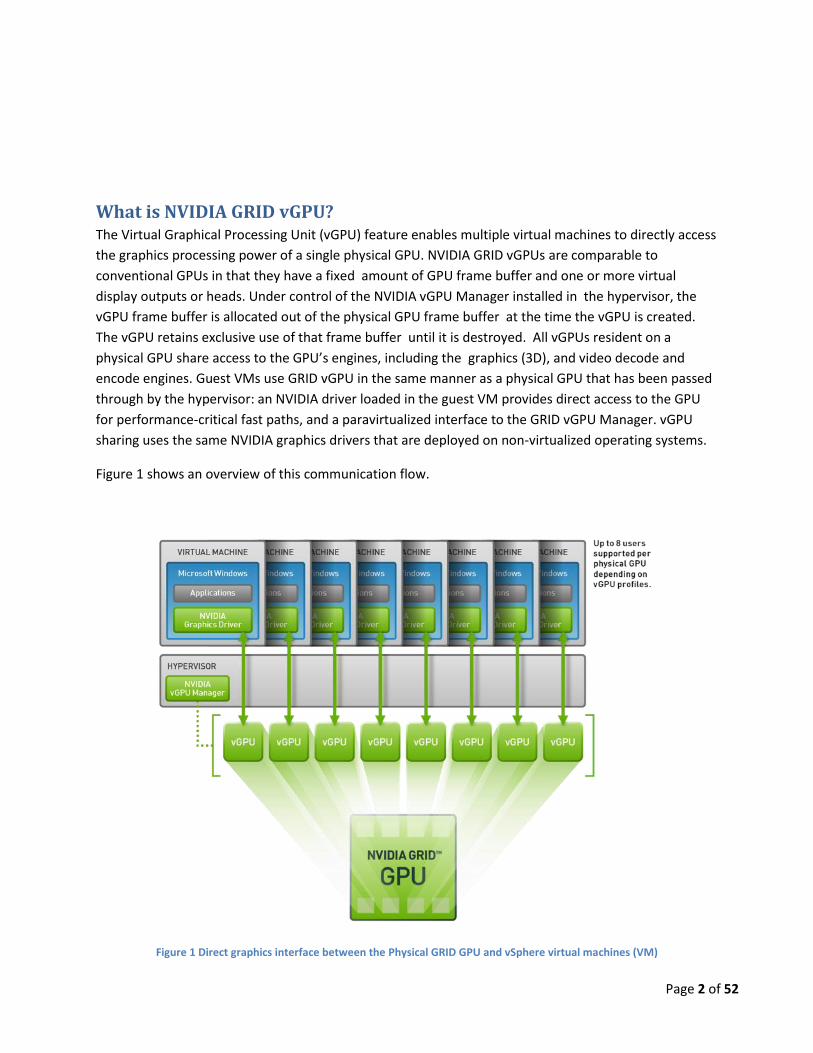
What is NVIDIA GRID vGPU? The Virtual Graphical Processing Unit (vGPU) feature enables multiple virtual machines to directly access
the graphics processing power of a single physical GPU. NVIDIA GRID vGPUs are comparable to
conventional GPUs in that they have a fixed amount of GPU frame buffer and one or more virtual
display outputs or heads. Under control of the NVIDIA vGPU Manager installed in the hypervisor, the
vGPU frame buffer is allocated out of the physical GPU frame buffer at the time the vGPU is created.
The vGPU retains exclusive use of that frame buffer until it is destroyed. All vGPUs resident on a
physical GPU share access to the GPU’s engines, including the graphics (3D), and video decode and
encode engines. Guest VMs use GRID vGPU in the same manner as a physical GPU that has been passed
through by the hypervisor: an NVIDIA driver loaded in the guest VM provides direct access to the GPU
for performance-critical fast paths, and a paravirtualized interface to the GRID vGPU Manager. vGPU
sharing uses the same NVIDIA graphics drivers that are deployed on non-virtualized operating systems.
Figure 1 shows an overview of this communication flow.
Figure 1 Direct graphics interface between the Physical GRID GPU and vSphere virtual machines (VM)
Page 3 of 52
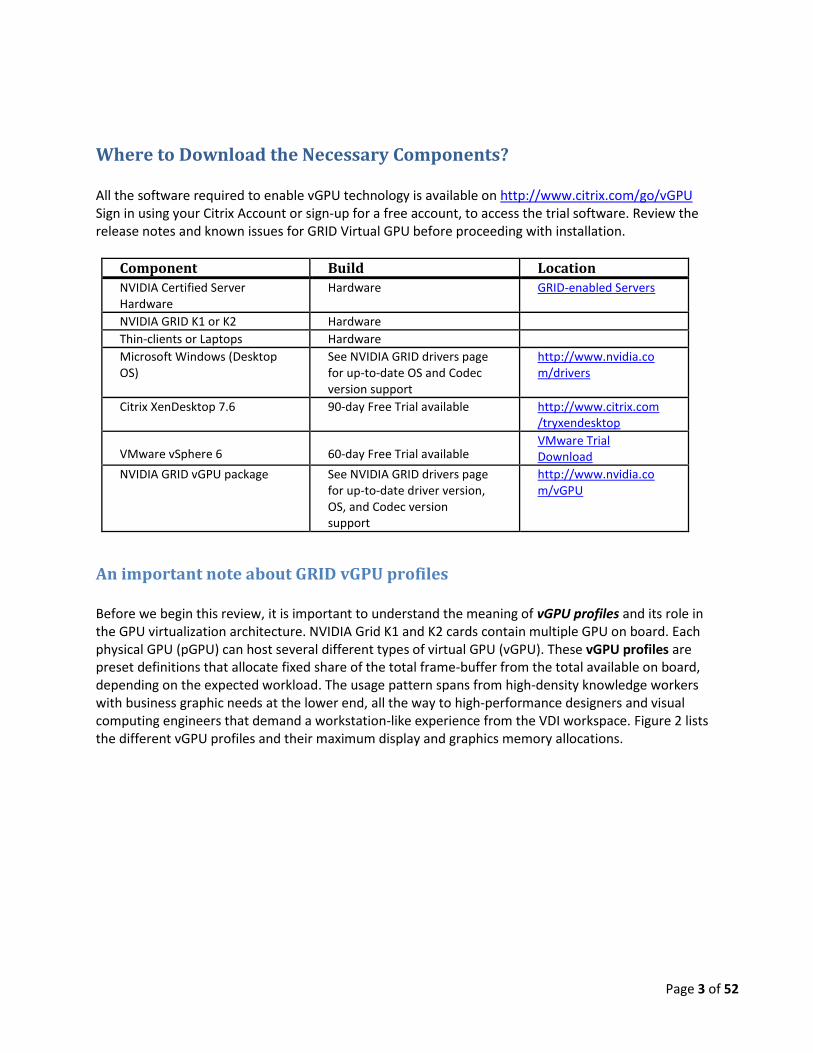
Where to Download the Necessary Components? All the software required to enable vGPU technology is available on http://www.citrix.com/go/vGPU Sign in using your Citrix Account or sign-up for a free account, to access the trial software. Review the release notes and known issues for GRID Virtual GPU before proceeding with installation.
Component Build Location
NVIDIA Certified Server Hardware
Hardware GRID-enabled Servers
NVIDIA GRID K1 or K2 Hardware
Thin-clients or Laptops Hardware
Microsoft Windows (Desktop OS)
See NVIDIA GRID drivers page for up-to-date OS and Codec version support
http://www.nvidia.com/drivers
Citrix XenDesktop 7.6 90-day Free Trial available http://www.citrix.com/tryxendesktop
VMware vSphere 6 60-day Free Trial available VMware Trial Download
NVIDIA GRID vGPU package See NVIDIA GRID drivers page for up-to-date driver version, OS, and Codec version support
http://www.nvidia.com/vGPU
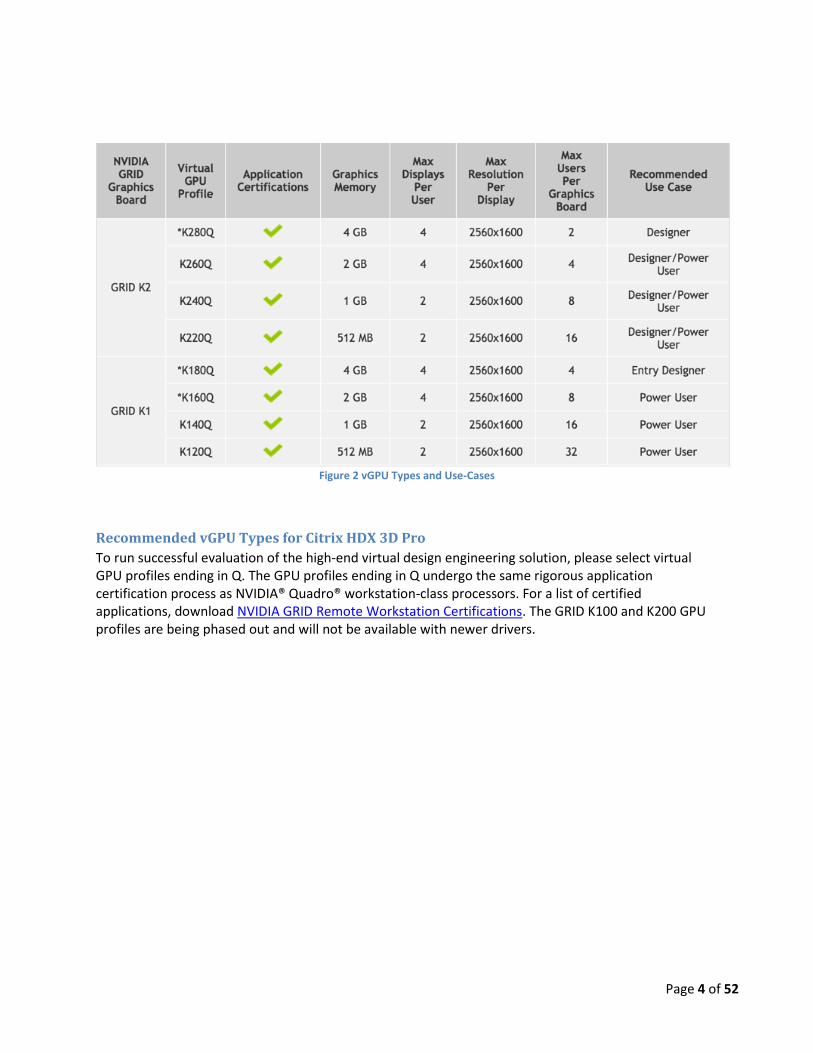
An important note about GRID vGPU profiles Before we begin this review, it is important to understand the meaning of vGPU profiles and its role in the GPU virtualization architecture. NVIDIA Grid K1 and K2 cards contain multiple GPU on board. Each physical GPU (pGPU) can host several different types of virtual GPU (vGPU). These vGPU profiles are preset definitions that allocate fixed share of the total frame-buffer from the total available on board, depending on the expected workload. The usage pattern spans from high-density knowledge workers with business graphic needs at the lower end, all the way to high-performance designers and visual computing engineers that demand a workstation-like experience from the VDI workspace. Figure 2 lists the different vGPU profiles and their maximum display and graphics memory allocations.
Page 4 of 52
Figure 2 vGPU Types and Use-Cases
Recommended vGPU Types for Citrix HDX 3D Pro
To run successful evaluation of the high-end virtual design engineering solution, please select virtual GPU profiles ending in Q. The GPU profiles ending in Q undergo the same rigorous application certification process as NVIDIA® Quadro® workstation-class processors. For a list of certified applications, download NVIDIA GRID Remote Workstation Certifications. The GRID K100 and K200 GPU profiles are being phased out and will not be available with newer drivers.
Page 5 of 52
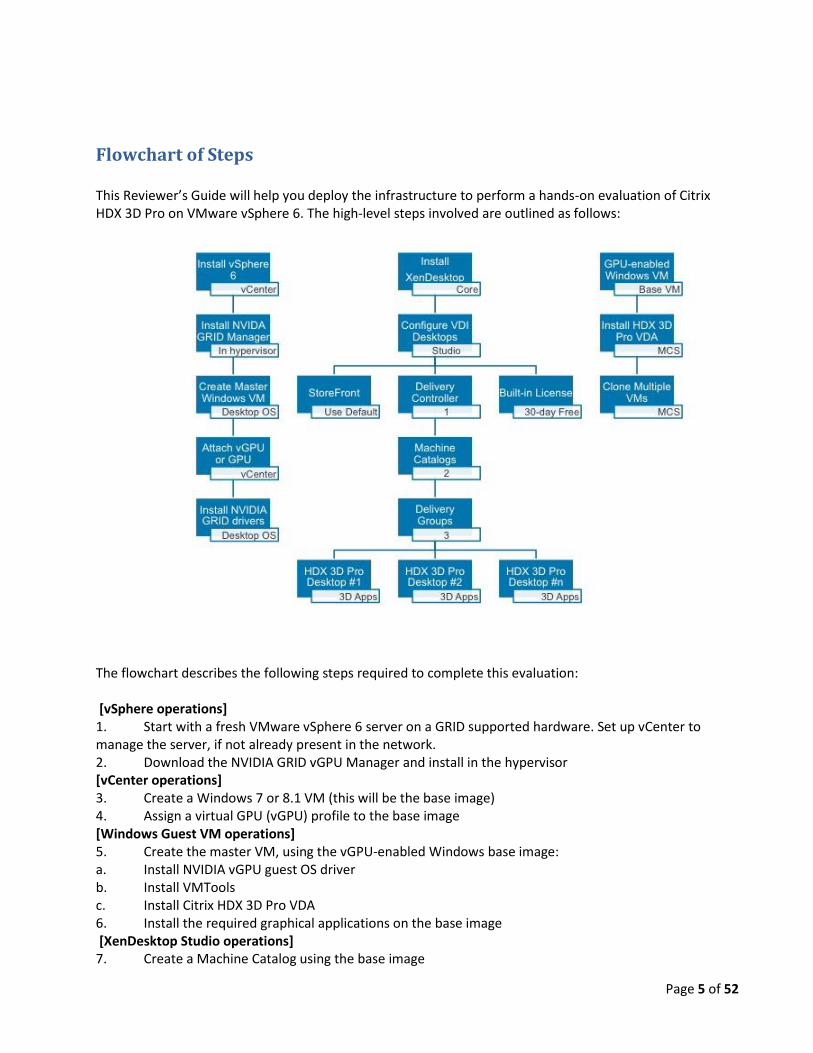
Flowchart of Steps This Reviewer’s Guide will help you deploy the infrastructure to perform a hands-on evaluation of Citrix HDX 3D Pro on VMware vSphere 6. The high-level steps involved are outlined as follows:
The flowchart describes the following steps required to complete this evaluation: [vSphere operations] 1. Start with a fresh VMware vSphere 6 server on a GRID supported hardware. Set up vCenter to manage the server, if not already present in the network. 2. Download the NVIDIA GRID vGPU Manager and install in the hypervisor [vCenter operations] 3. Create a Windows 7 or 8.1 VM (this will be the base image) 4. Assign a virtual GPU (vGPU) profile to the base image [Windows Guest VM operations] 5. Create the master VM, using the vGPU-enabled Windows base image: a. Install NVIDIA vGPU guest OS driver b. Install VMTools c. Install Citrix HDX 3D Pro VDA 6. Install the required graphical applications on the base image [XenDesktop Studio operations] 7. Create a Machine Catalog using the base image
Page 6 of 52
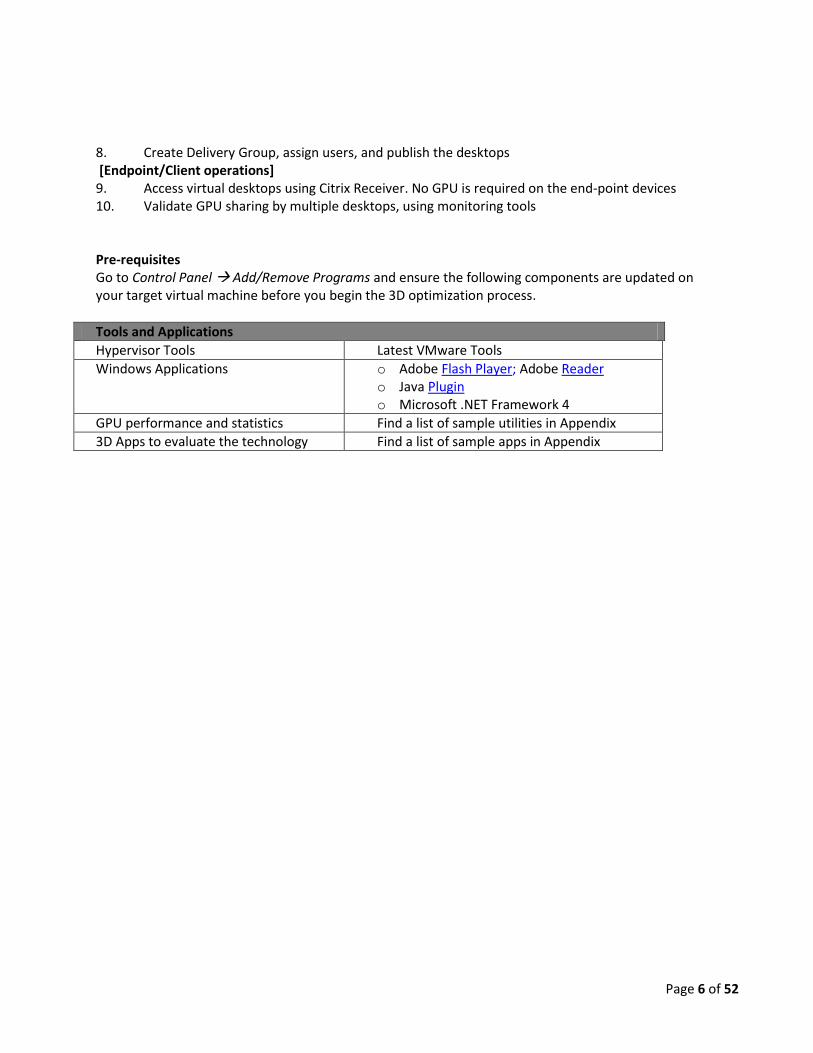
8. Create Delivery Group, assign users, and publish the desktops [Endpoint/Client operations] 9. Access virtual desktops using Citrix Receiver. No GPU is required on the end-point devices 10. Validate GPU sharing by multiple desktops, using monitoring tools Pre-requisites Go to Control Panel Add/Remove Programs and ensure the following components are updated on your target virtual machine before you begin the 3D optimization process.
Tools and Applications
Hypervisor Tools Latest VMware Tools
Windows Applications o Adobe Flash Player; Adobe Reader o Java Plugin o Microsoft .NET Framework 4
GPU performance and statistics Find a list of sample utilities in Appendix
3D Apps to evaluate the technology Find a list of sample apps in Appendix
Page 7 of 52
VMware vSphere Installation A working and correctly configured vSphere infrastructure is a pre-requisite to using this guide. The
instructions to set up the vSphere infrastructure, including the hypervisor, networking, vCenter server,
certificates, and operating system templates is outside the scope of this guide. Please refer VMware
Product Documentation for latest instructions on preparing a server for NVIDIA GRID vGPU and vSphere.
Page 8 of 52
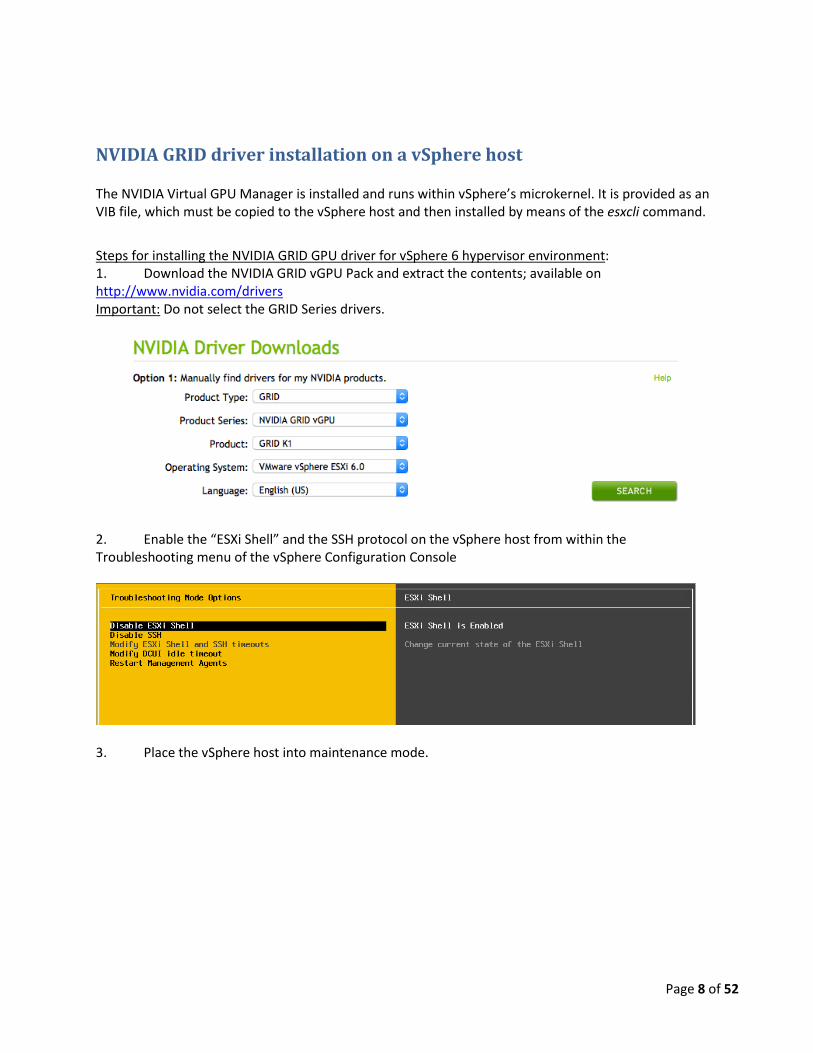
NVIDIA GRID driver installation on a vSphere host
The NVIDIA Virtual GPU Manager is installed and runs within vSphere’s microkernel. It is provided as an VIB file, which must be copied to the vSphere host and then installed by means of the esxcli command.
Steps for installing the NVIDIA GRID GPU driver for vSphere 6 hypervisor environment: 1. Download the NVIDIA GRID vGPU Pack and extract the contents; available on http://www.nvidia.com/drivers Important: Do not select the GRID Series drivers.
2. Enable the “ESXi Shell” and the SSH protocol on the vSphere host from within the Troubleshooting menu of the vSphere Configuration Console
3. Place the vSphere host into maintenance mode.

Page 9 of 52
4. Upload the NVIDIA driver (VIB file) to the /tmp directory on the vSphere host using a tool such as WinSCP 5. Log in as root to the vSphere console through SSH using a tool such as Putty 6. Issue the following command to install the NVIDIA vGPU drivers esxcli software vib install --no-sig-check -v /<path>/<filename>.VIB
Please note: Although the display states “Reboot Required: false”, a reboot is necessary for the vib to load and xorg to start. 7. Exit the vSphere host from maintenance mode, by means of the vSphere Web Client (see screenshot above) or by using the following command: esxcli system maintenanceMode set -e false Please note: The command will not return a response.
8. Reboot the host by means of the vSphere Web Client or by issuing the following command: reboot 9. After the host rebooted successfully, verify if the kernel module has loaded successfully, using following command:
Page 10 of 52
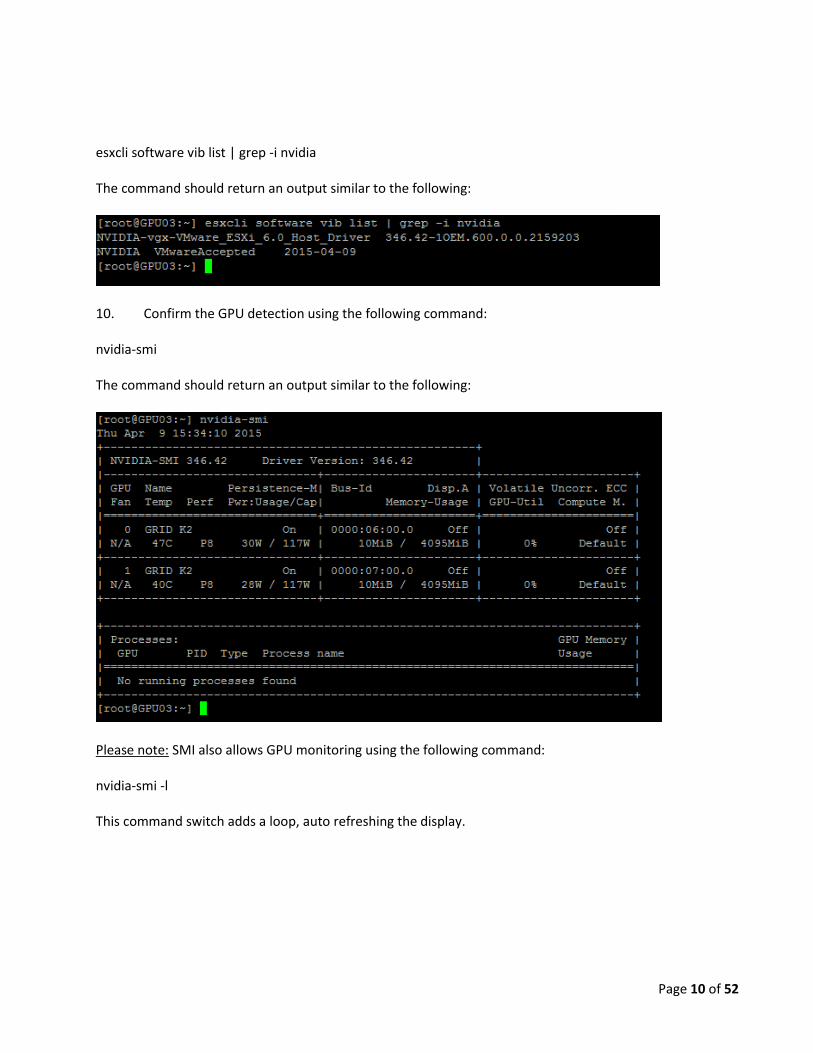
esxcli software vib list | grep -i nvidia The command should return an output similar to the following:
10. Confirm the GPU detection using the following command: nvidia-smi The command should return an output similar to the following:
Please note: SMI also allows GPU monitoring using the following command: nvidia-smi -l This command switch adds a loop, auto refreshing the display.
Page 11 of 52
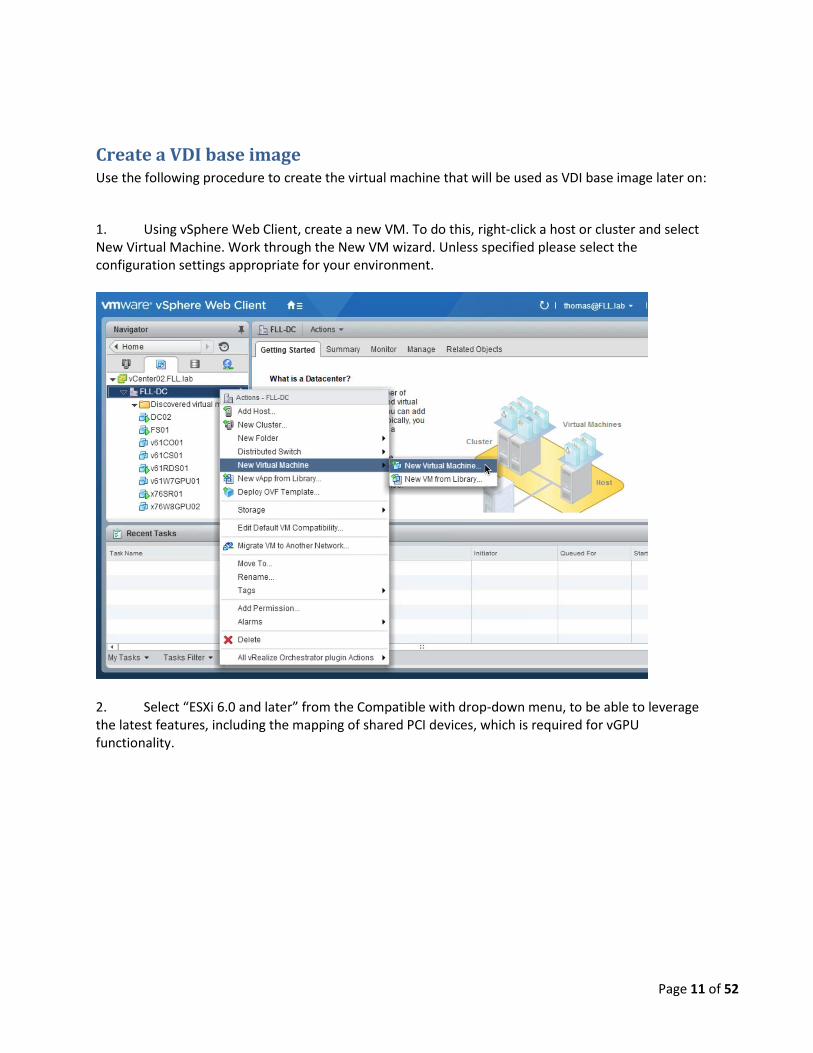
Create a VDI base image Use the following procedure to create the virtual machine that will be used as VDI base image later on:
1. Using vSphere Web Client, create a new VM. To do this, right-click a host or cluster and select New Virtual Machine. Work through the New VM wizard. Unless specified please select the configuration settings appropriate for your environment.
2. Select “ESXi 6.0 and later” from the Compatible with drop-down menu, to be able to leverage the latest features, including the mapping of shared PCI devices, which is required for vGPU functionality.
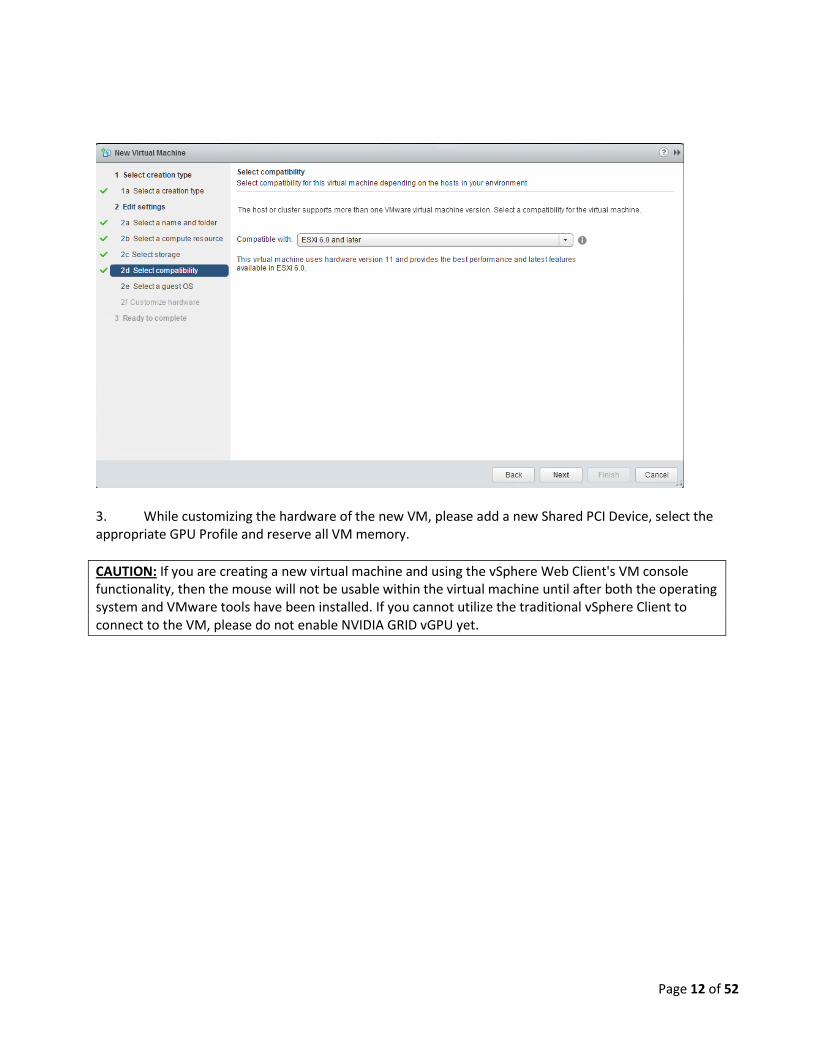
Page 12 of 52
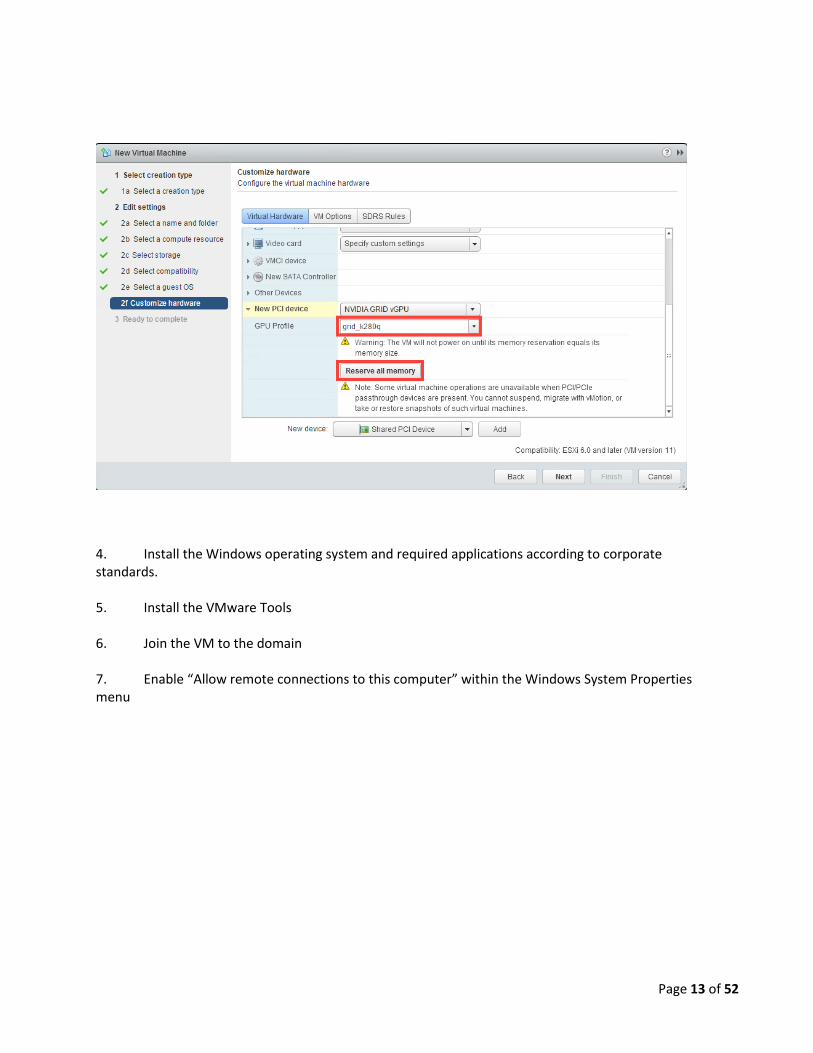
3. While customizing the hardware of the new VM, please add a new Shared PCI Device, select the appropriate GPU Profile and reserve all VM memory.
CAUTION: If you are creating a new virtual machine and using the vSphere Web Client's VM console functionality, then the mouse will not be usable within the virtual machine until after both the operating system and VMware tools have been installed. If you cannot utilize the traditional vSphere Client to connect to the VM, please do not enable NVIDIA GRID vGPU yet.
Page 13 of 52
4. Install the Windows operating system and required applications according to corporate standards. 5. Install the VMware Tools 6. Join the VM to the domain 7. Enable “Allow remote connections to this computer” within the Windows System Properties menu

Page 14 of 52
Display Drivers and Citrix Agent Installation on the base image Use the following procedure to install the NVIDIA GRID vGPU drivers within the master VM (base image),
followed by installation of the HDX 3D Pro virtual delivery agent (VDA) to prepare this VM to be
managed by Citrix XenDesktop controller.
1. Copy the Windows drivers from within the NVIDIA GRID vGPU Driver Pack downloaded earlier, to the master VM. Alternatively download the drivers from http://www.nvidia.com/drivers and extract the contents. Important: Do not select the GRID Series drivers.
Page 15 of 52
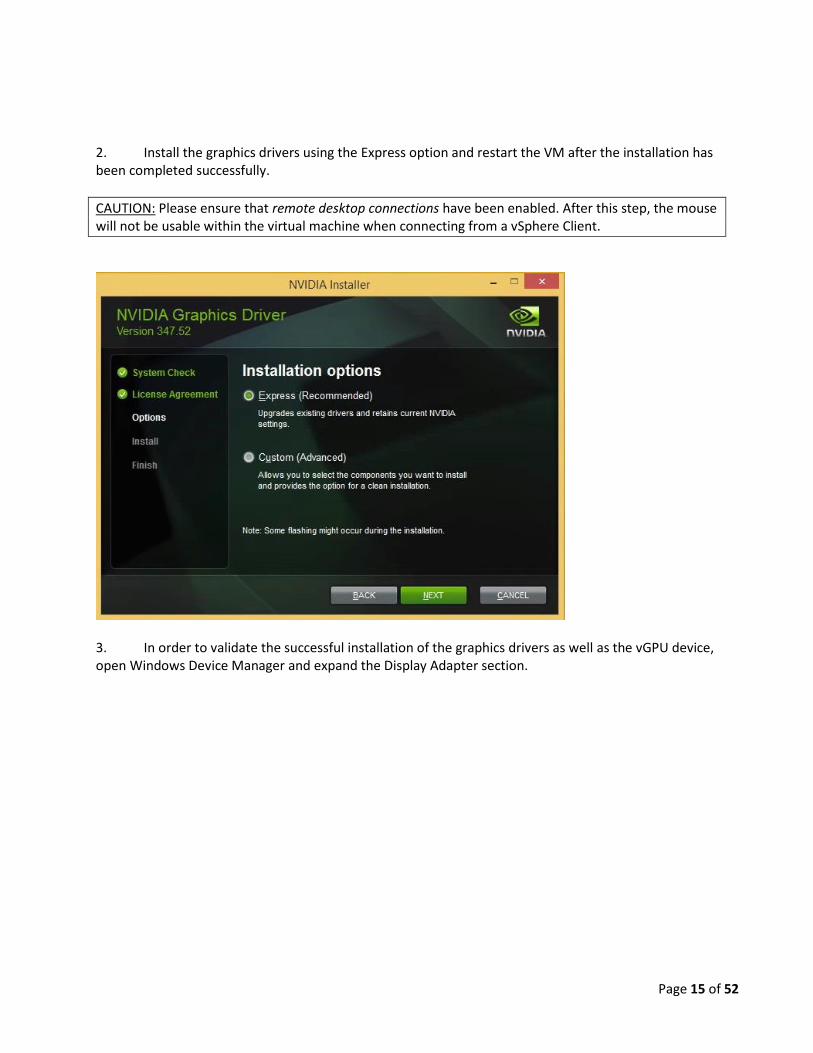
2. Install the graphics drivers using the Express option and restart the VM after the installation has been completed successfully.
CAUTION: Please ensure that remote desktop connections have been enabled. After this step, the mouse will not be usable within the virtual machine when connecting from a vSphere Client.
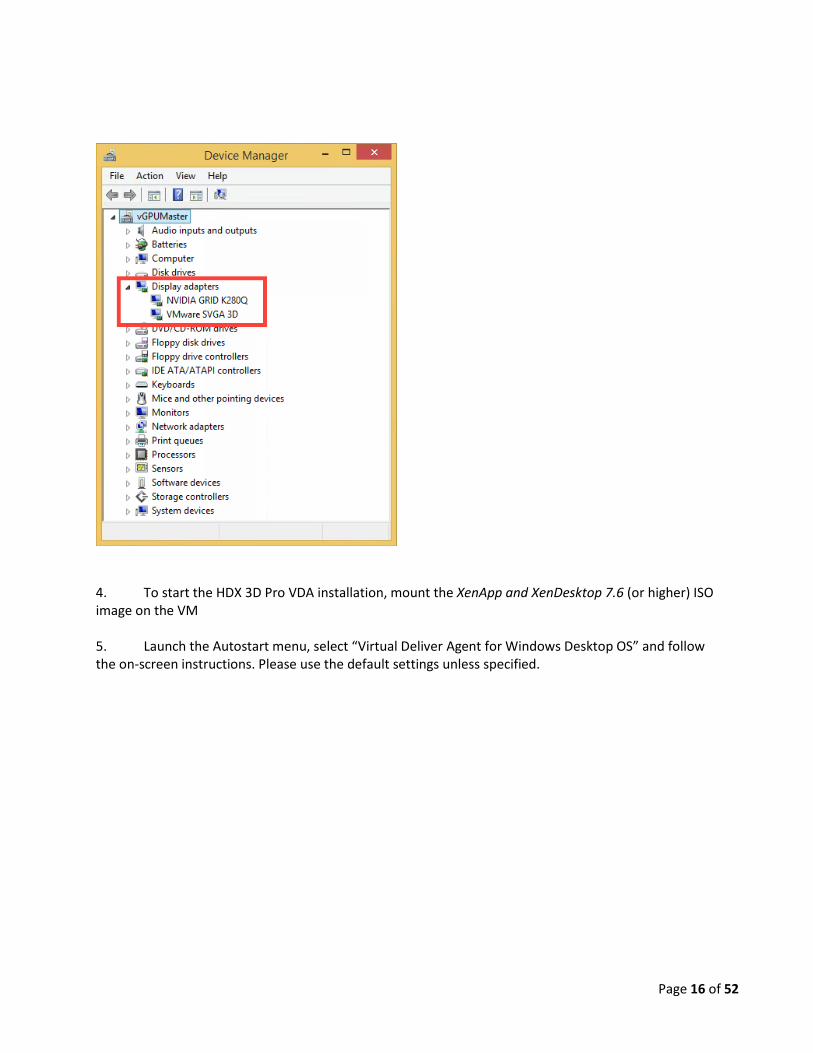
3. In order to validate the successful installation of the graphics drivers as well as the vGPU device, open Windows Device Manager and expand the Display Adapter section.
Page 16 of 52
4. To start the HDX 3D Pro VDA installation, mount the XenApp and XenDesktop 7.6 (or higher) ISO image on the VM 5. Launch the Autostart menu, select “Virtual Deliver Agent for Windows Desktop OS” and follow the on-screen instructions. Please use the default settings unless specified.

Page 17 of 52
6. Install the VDA for HDX 3D Pro
Page 18 of 52
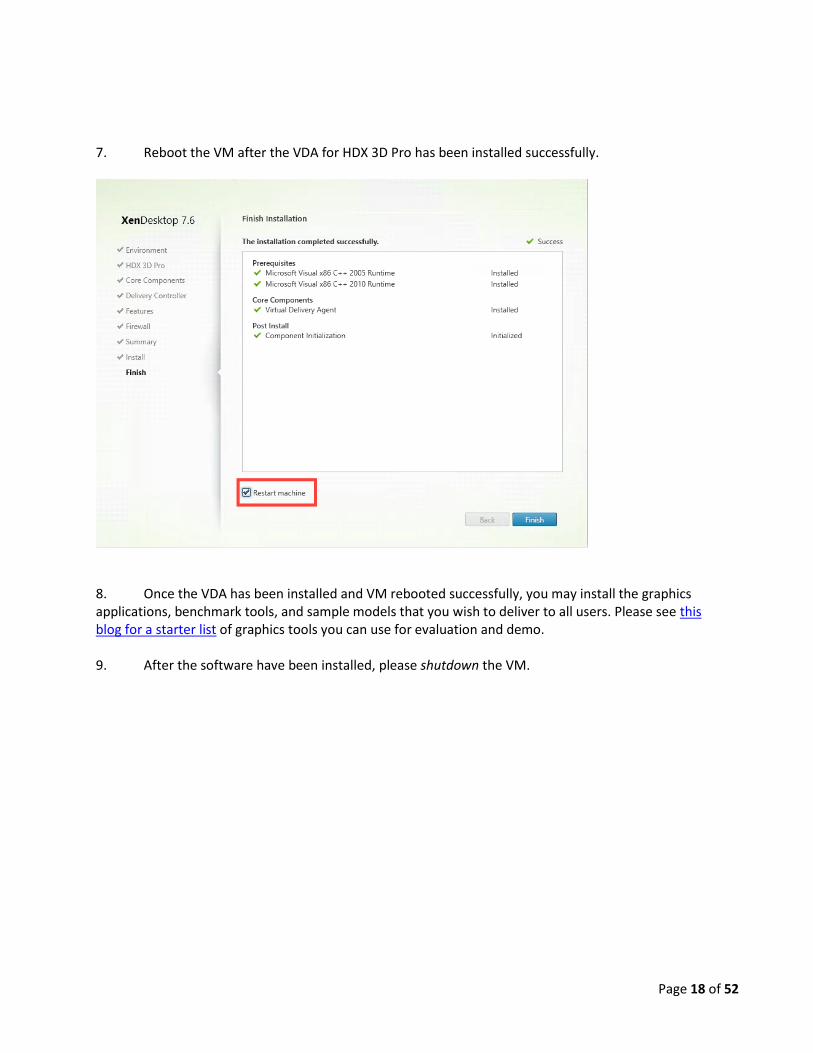
7. Reboot the VM after the VDA for HDX 3D Pro has been installed successfully.
8. Once the VDA has been installed and VM rebooted successfully, you may install the graphics applications, benchmark tools, and sample models that you wish to deliver to all users. Please see this blog for a starter list of graphics tools you can use for evaluation and demo. 9. After the software have been installed, please shutdown the VM.
Page 19 of 52
Provisioning Virtual Desktops Once we create a GPU enabled base image, as in the previous step, it is used as the source template to
create a pool of virtual machines known as the machine catalog. This is called image provisioning. There
are two ways to provision images: option 1 is using virtual machine cloning, and option 2 is using
Machine Creation Services (MCS).
Full MCS support for vSphere vGPU will be added in a future release. At this time, MCS is supported with
workaround, as discussed below. Please refer this article for the latest support statement:
http://support.citrix.com/article/CTX200969
Prerequisite for this step is the installation of a core XenApp / XenDesktop infrastructure, including a
Controller, StoreFront and License Server.
Download the free trial and Reviewer’s Guide for XenDesktop 7.6 from the XenDesktop Tech Info Page
for step-by-step instructions to set up the core infrastructure.
Further technical documentation is available on eDocs.citrix.com/xendesktop
Citrix Studio: Setting up the Host
Once the VDI infrastructure has been set up, we use Citrix Studio console to complete the following
steps:
1. Setting up the vSphere host connection to XenDesktop
2. Create a set of machines using clones (option 1) or machine creation services (option 2)
3. Assign users to the pool of machines, either one to one, or first available
4. Test the connection is working as expected, using Citrix Receiver
Use the following procedure to connect the XenApp or XenDesktop Controllers to the vSphere
environment, which is used to host the virtual desktops.
1. Logon to the Controller as a Citrix administrator and open Citrix Studio
Page 20 of 52
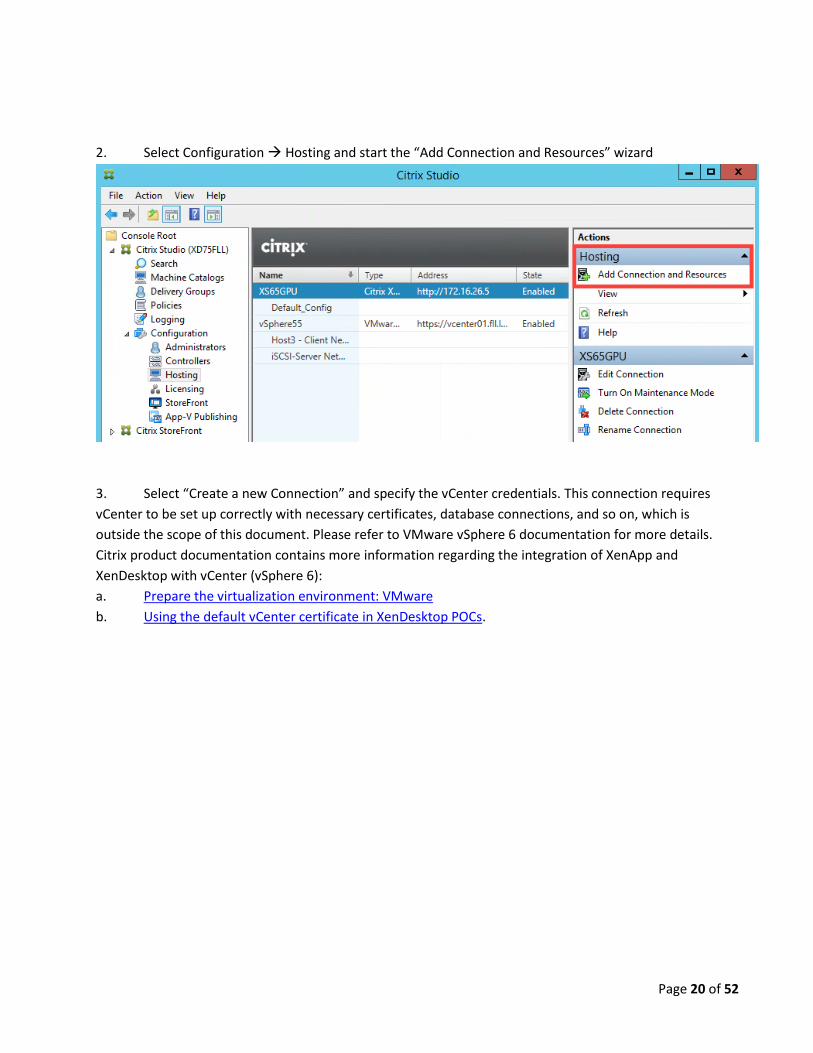
2. Select Configuration Hosting and start the “Add Connection and Resources” wizard
3. Select “Create a new Connection” and specify the vCenter credentials. This connection requires
vCenter to be set up correctly with necessary certificates, database connections, and so on, which is
outside the scope of this document. Please refer to VMware vSphere 6 documentation for more details.
Citrix product documentation contains more information regarding the integration of XenApp and
XenDesktop with vCenter (vSphere 6):
a. Prepare the virtualization environment: VMware
b. Using the default vCenter certificate in XenDesktop POCs.
Page 21 of 52
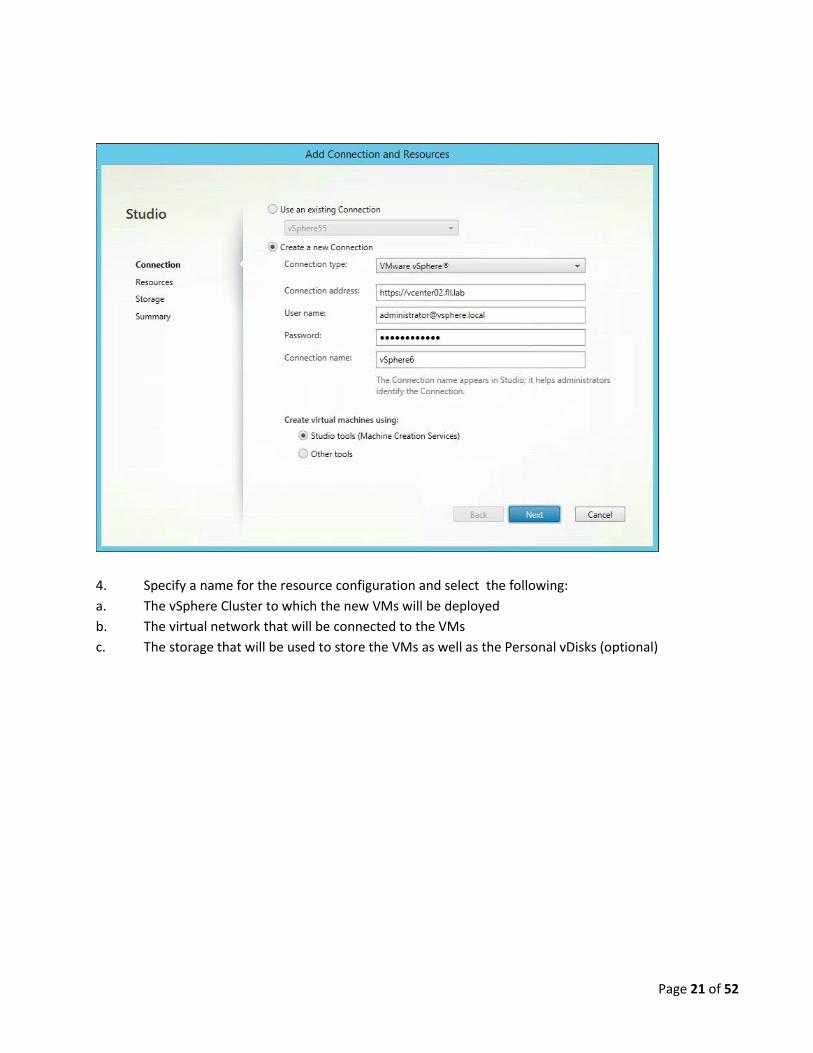
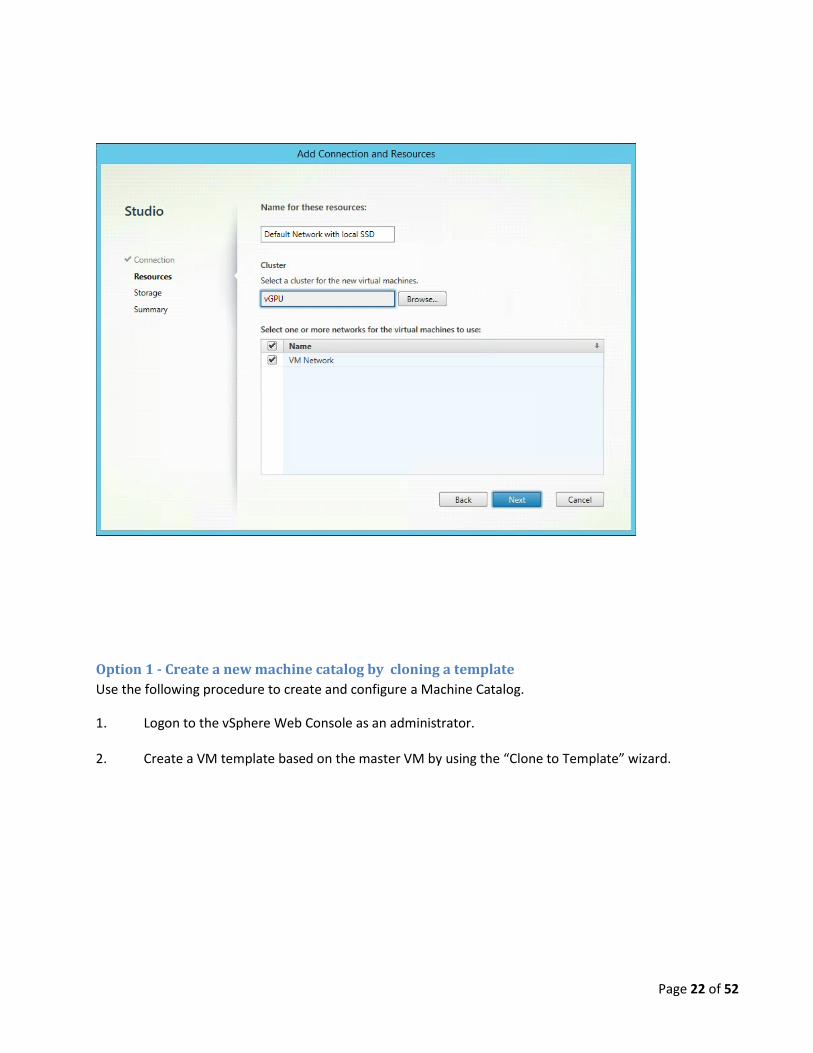
4. Specify a name for the resource configuration and select the following:
a. The vSphere Cluster to which the new VMs will be deployed
b. The virtual network that will be connected to the VMs
c. The storage that will be used to store the VMs as well as the Personal vDisks (optional)
Page 22 of 52
Option 1 - Create a new machine catalog by cloning a template
Use the following procedure to create and configure a Machine Catalog.
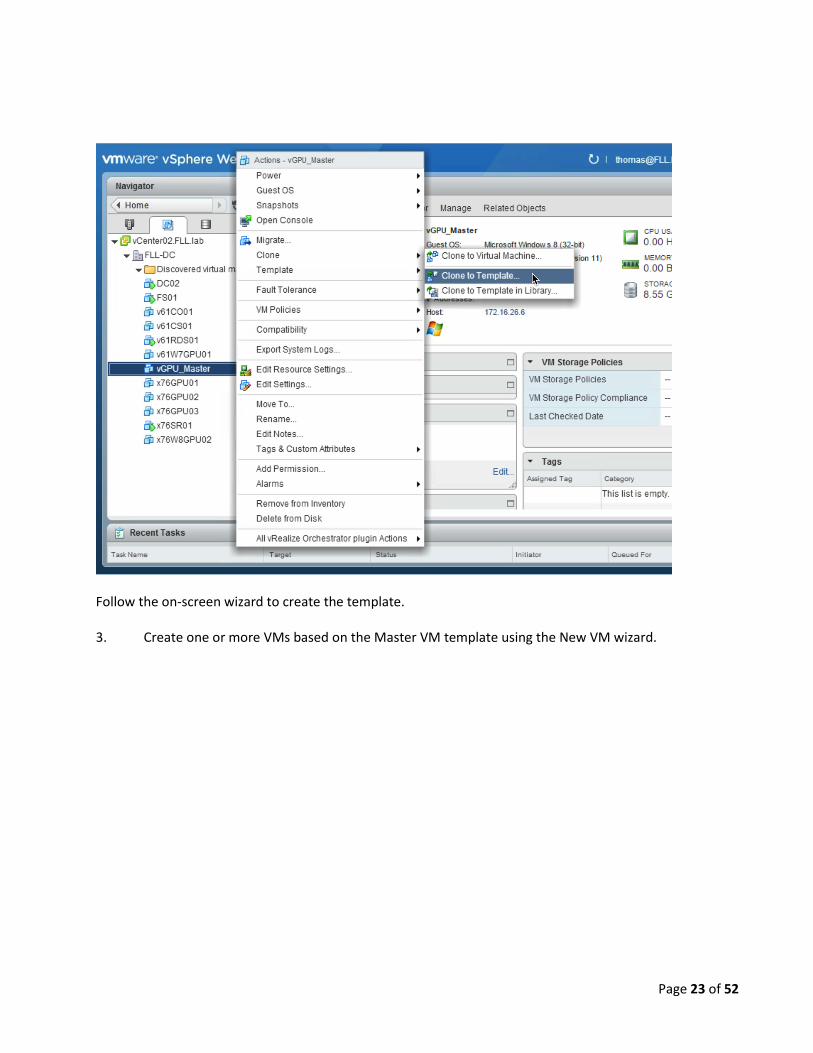
1. Logon to the vSphere Web Console as an administrator. 2. Create a VM template based on the master VM by using the “Clone to Template” wizard.
Page 23 of 52
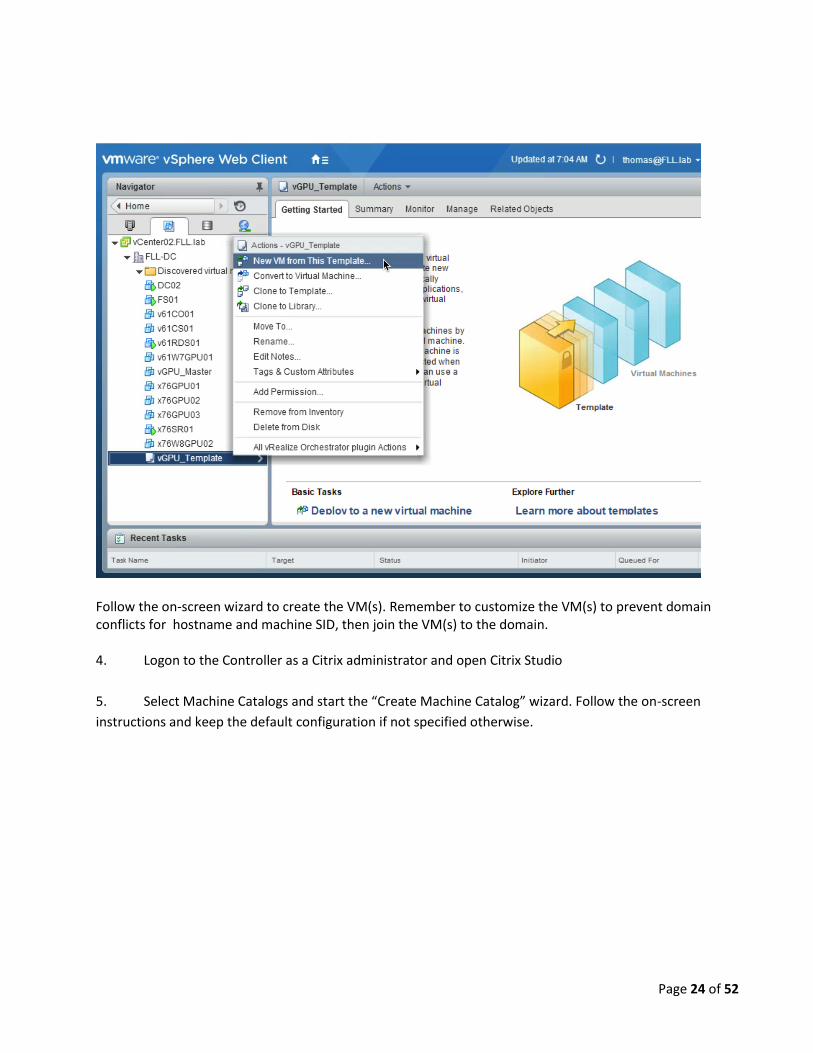
Follow the on-screen wizard to create the template. 3. Create one or more VMs based on the Master VM template using the New VM wizard.
Page 24 of 52
Follow the on-screen wizard to create the VM(s). Remember to customize the VM(s) to prevent domain conflicts for hostname and machine SID, then join the VM(s) to the domain. 4. Logon to the Controller as a Citrix administrator and open Citrix Studio
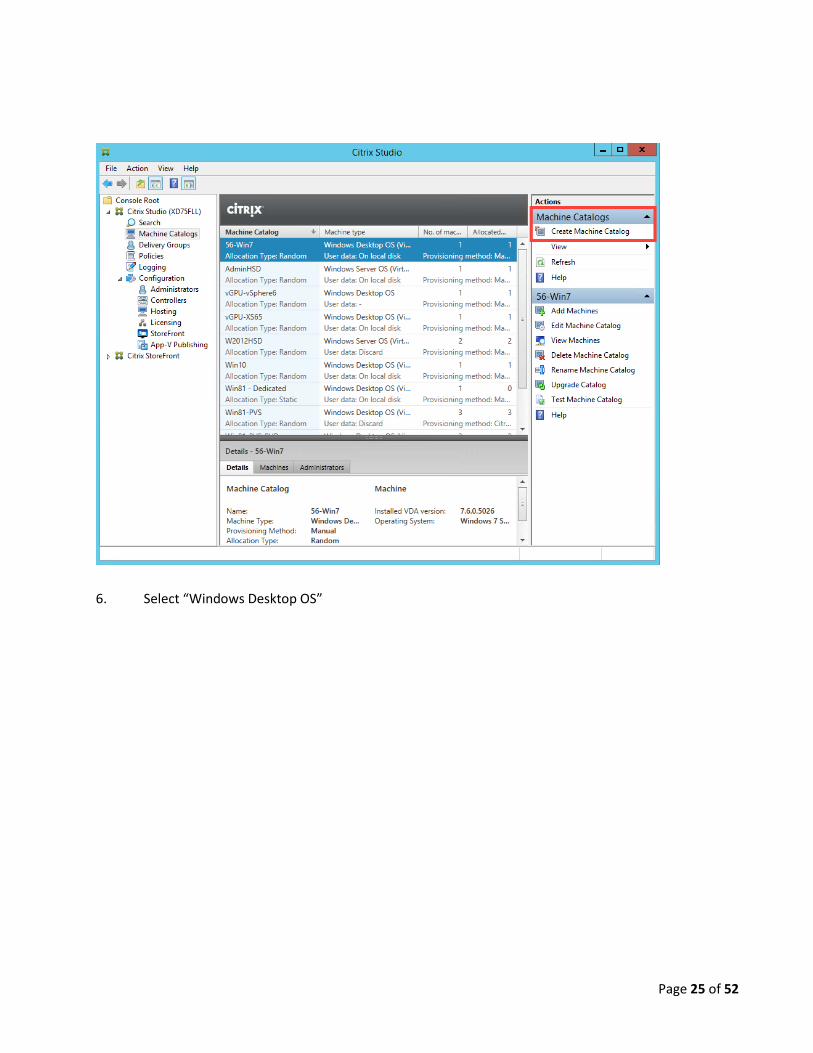
5. Select Machine Catalogs and start the “Create Machine Catalog” wizard. Follow the on-screen
instructions and keep the default configuration if not specified otherwise.
Page 25 of 52
6. Select “Windows Desktop OS”
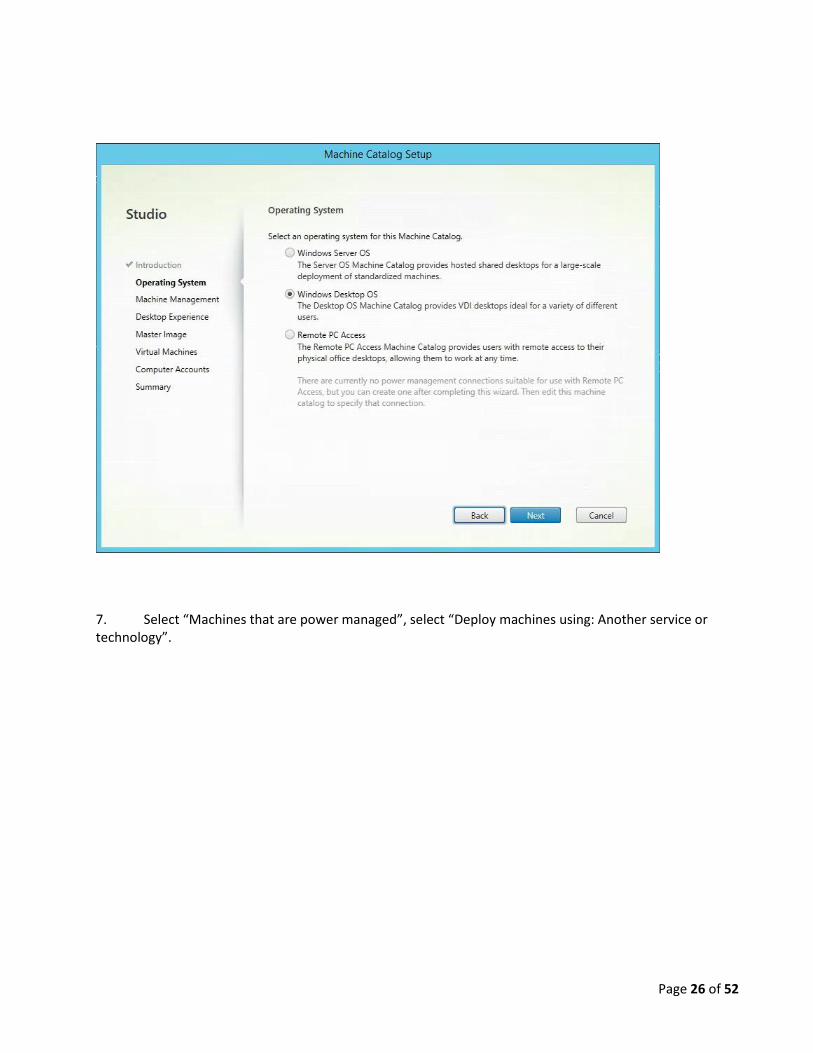
Page 26 of 52
7. Select “Machines that are power managed”, select “Deploy machines using: Another service or technology”.

Page 27 of 52
8. Select “I want users to connect to a new (random) desktop each time they log on”, unless there is a specific need for a different configuration. For evaluations, this optimizes the use of hardware and allows the simplest configuration.
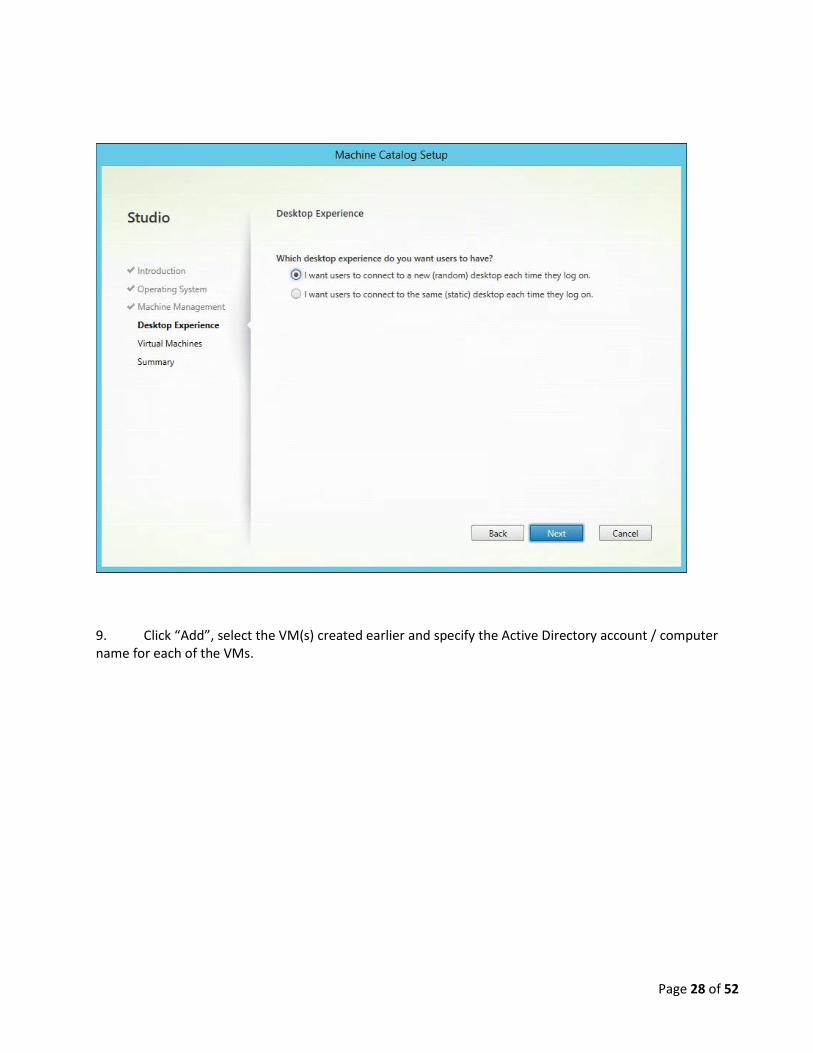
Page 28 of 52
9. Click “Add”, select the VM(s) created earlier and specify the Active Directory account / computer name for each of the VMs.
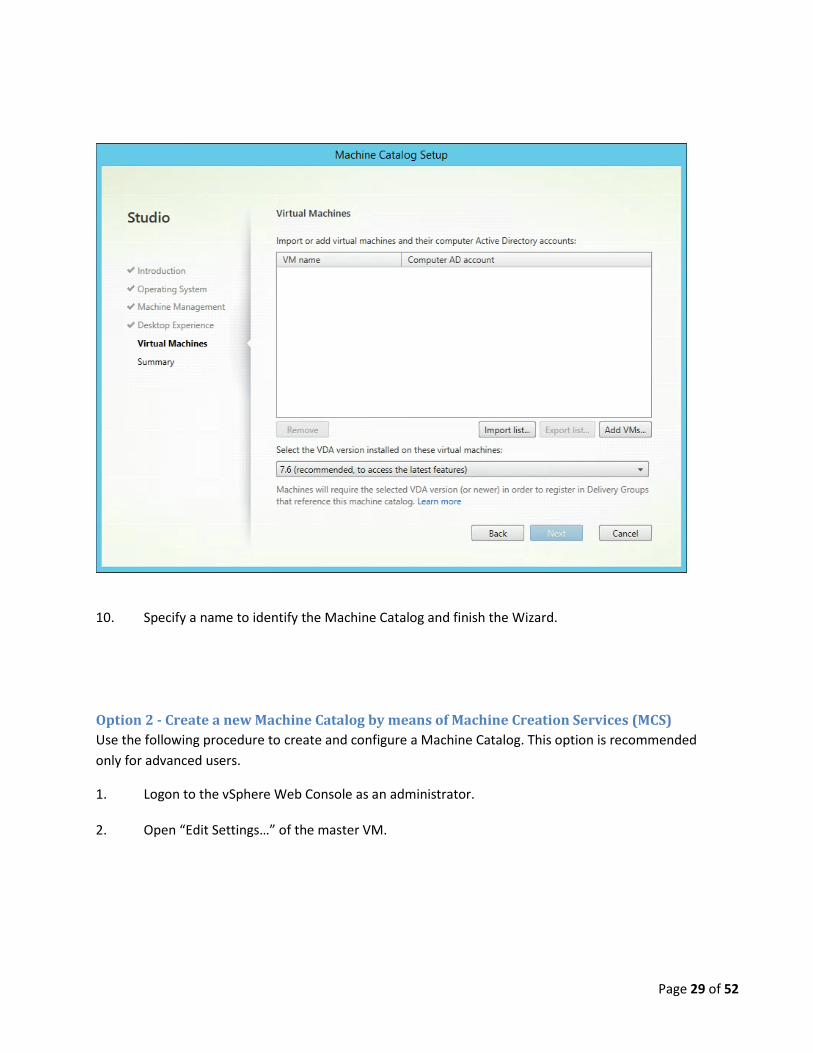
Page 29 of 52
10. Specify a name to identify the Machine Catalog and finish the Wizard.
Option 2 - Create a new Machine Catalog by means of Machine Creation Services (MCS)
Use the following procedure to create and configure a Machine Catalog. This option is recommended
only for advanced users.
1. Logon to the vSphere Web Console as an administrator. 2. Open “Edit Settings…” of the master VM.

Page 30 of 52
3. Remove the shared PCI device 0 (NVIDIA GRID vGPU) by clicking the X button and close the settings menu.

Page 31 of 52
Page 32 of 52
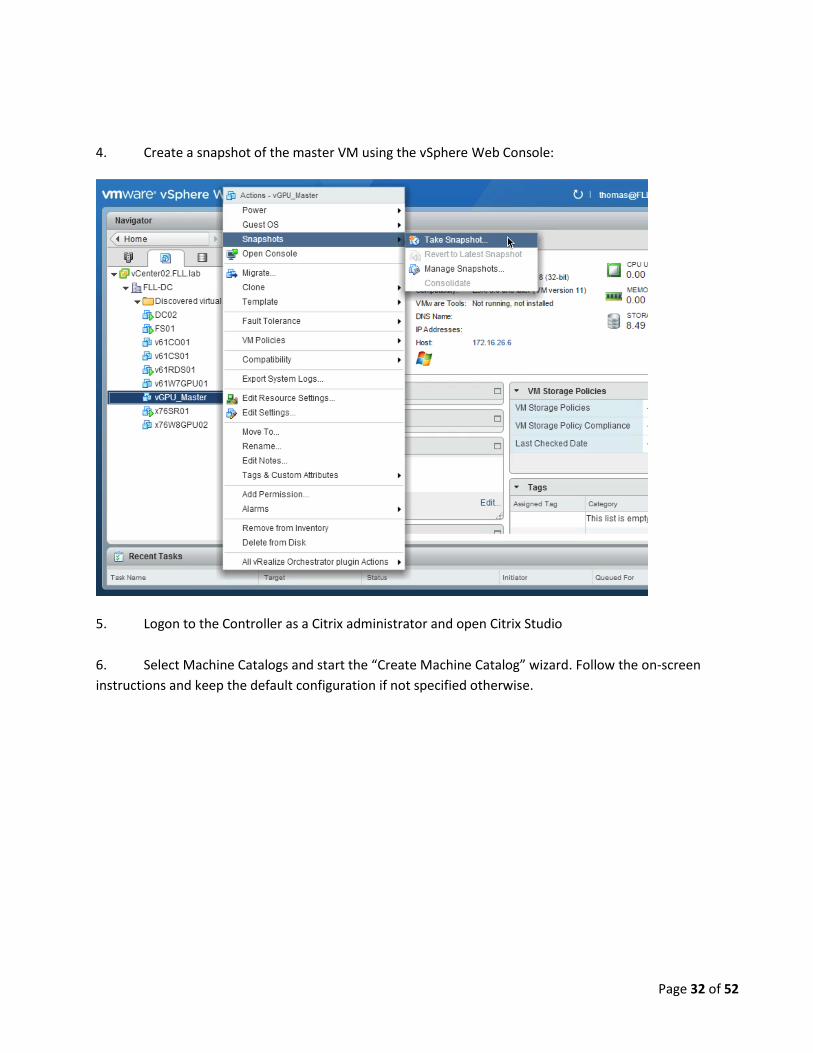
4. Create a snapshot of the master VM using the vSphere Web Console:
5. Logon to the Controller as a Citrix administrator and open Citrix Studio
6. Select Machine Catalogs and start the “Create Machine Catalog” wizard. Follow the on-screen
instructions and keep the default configuration if not specified otherwise.

Page 33 of 52
7. Select “Windows Desktop OS”
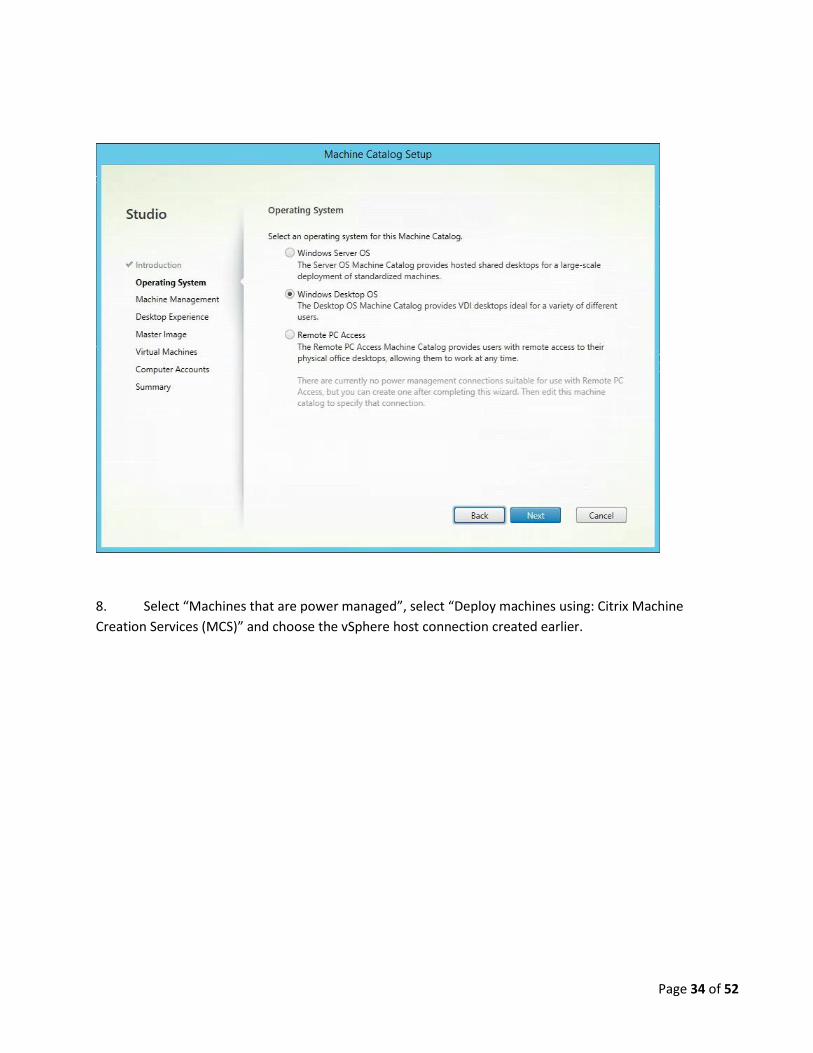
Page 34 of 52
8. Select “Machines that are power managed”, select “Deploy machines using: Citrix Machine
Creation Services (MCS)” and choose the vSphere host connection created earlier.

Page 35 of 52
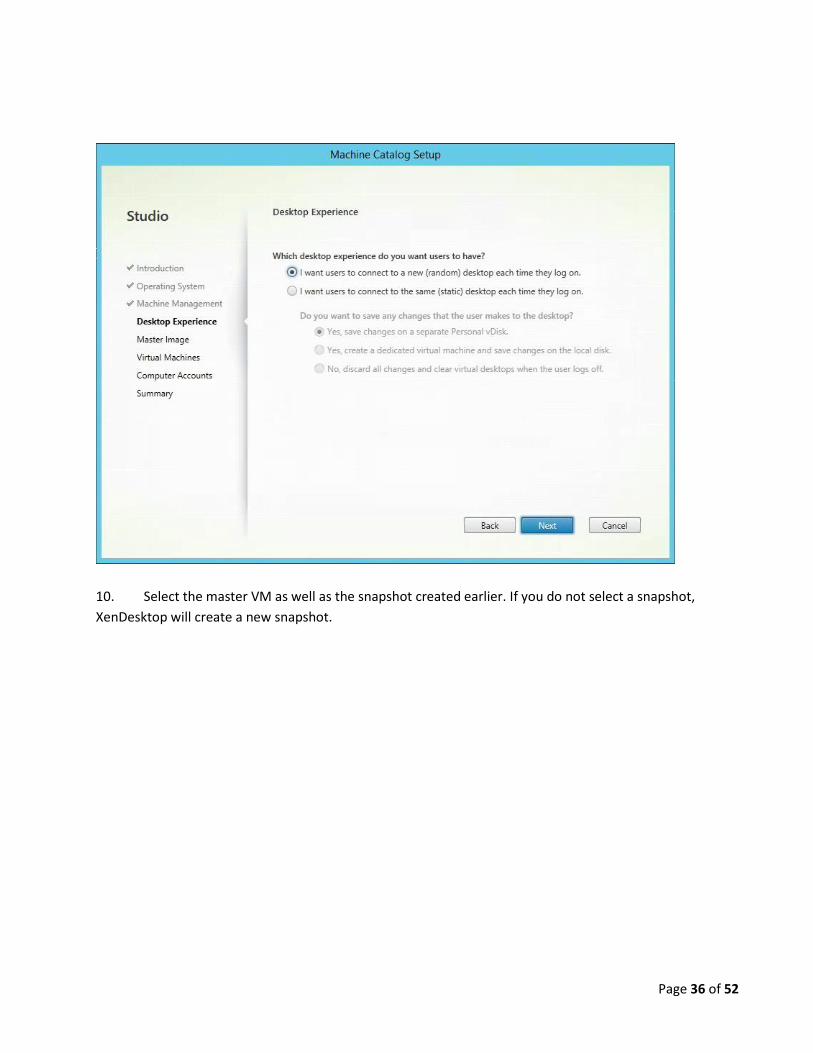
9. Select “I want users to connect to a new (random) desktop each time they log on”, unless there
is a specific need for a different configuration.
Page 36 of 52
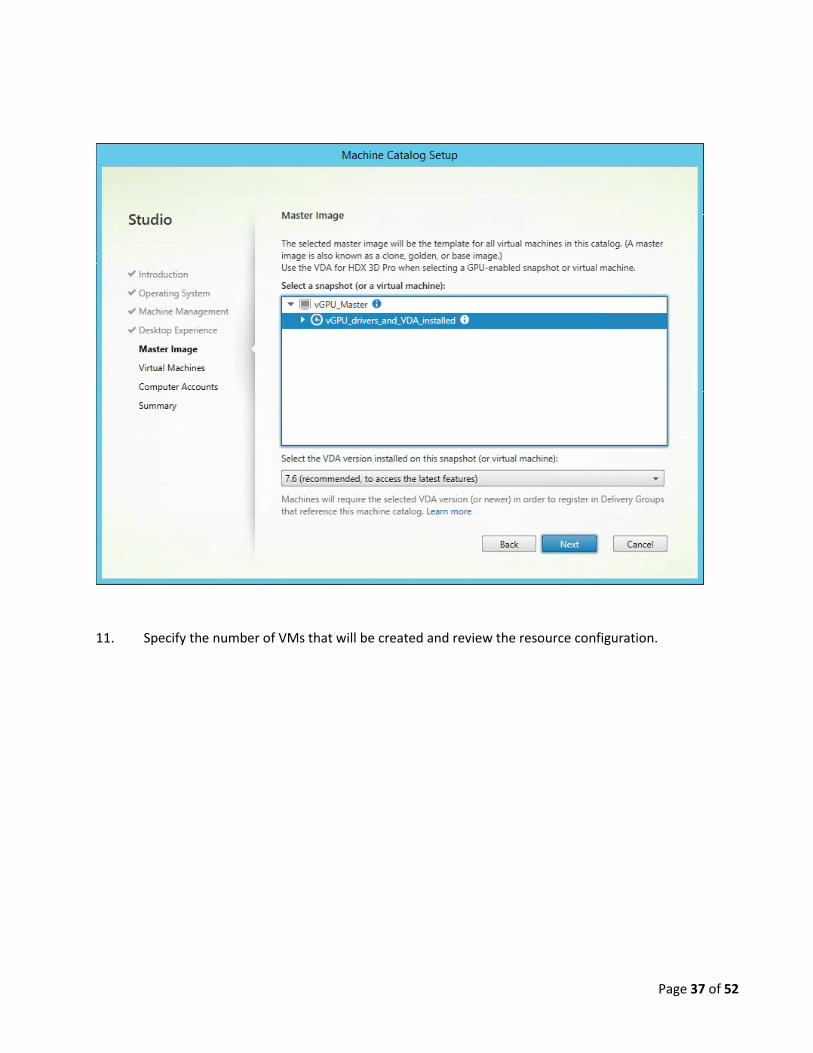
10. Select the master VM as well as the snapshot created earlier. If you do not select a snapshot,
XenDesktop will create a new snapshot.
Page 37 of 52
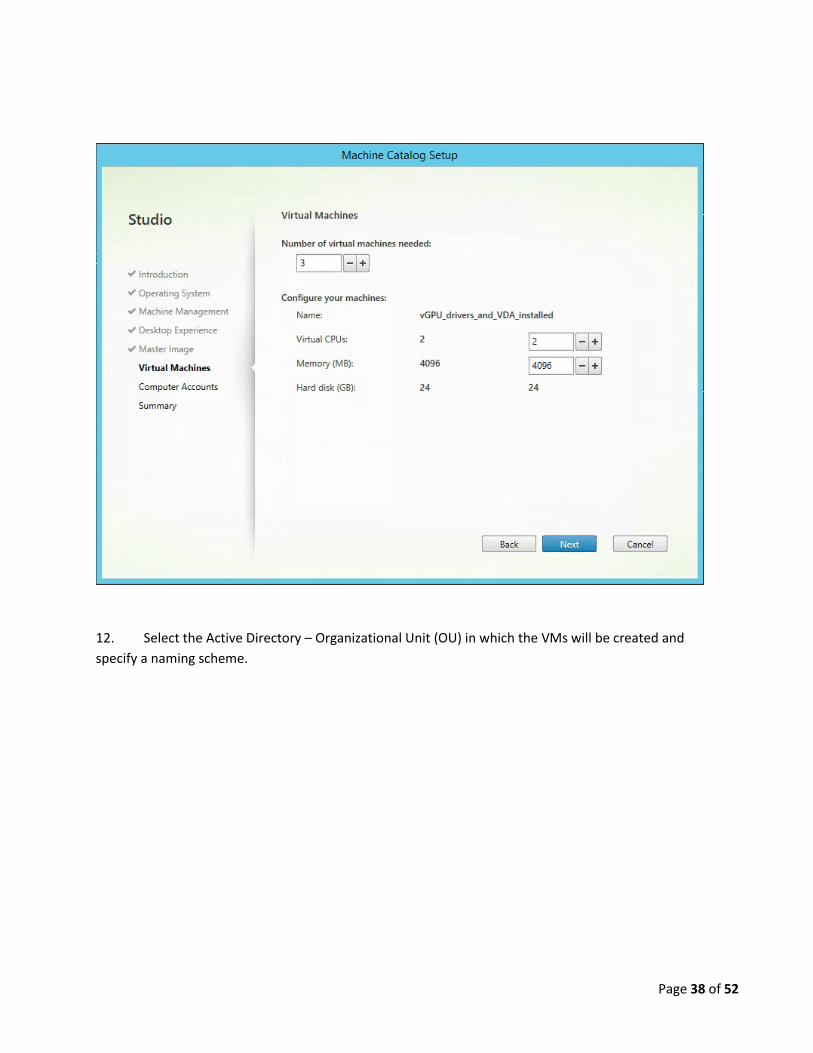
11. Specify the number of VMs that will be created and review the resource configuration.
Page 38 of 52
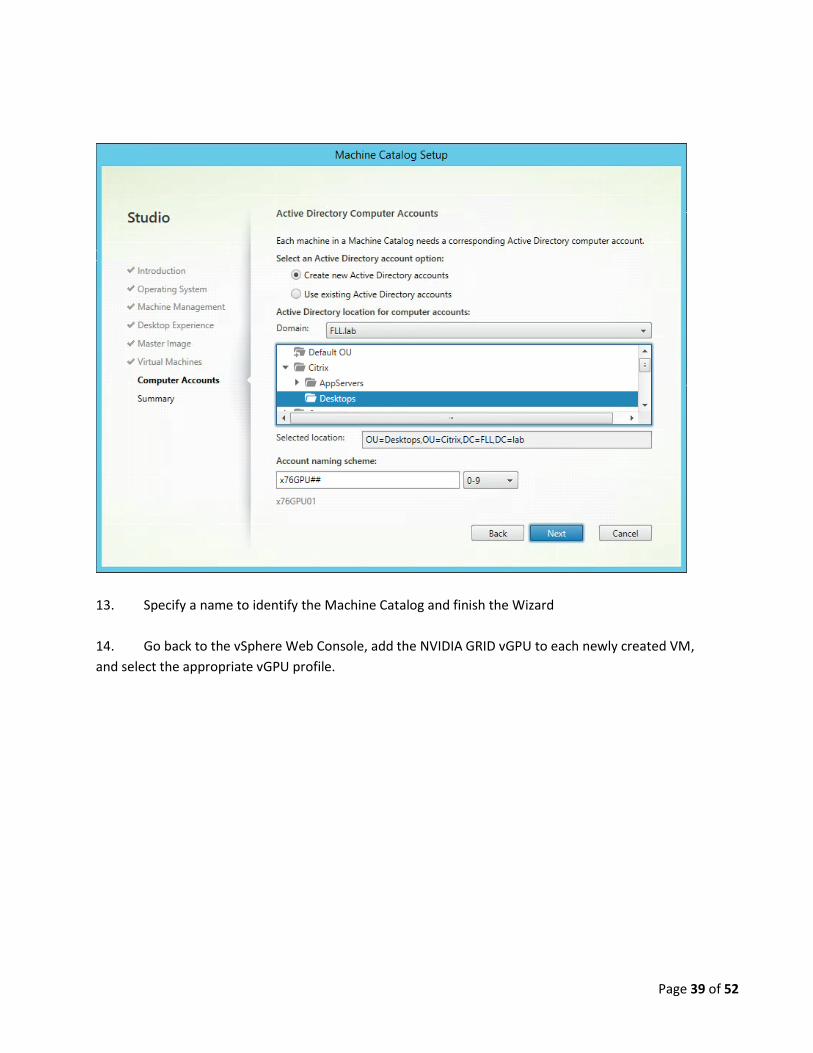
12. Select the Active Directory – Organizational Unit (OU) in which the VMs will be created and
specify a naming scheme.
Page 39 of 52
13. Specify a name to identify the Machine Catalog and finish the Wizard
14. Go back to the vSphere Web Console, add the NVIDIA GRID vGPU to each newly created VM,
and select the appropriate vGPU profile.

Page 40 of 52
Page 41 of 52
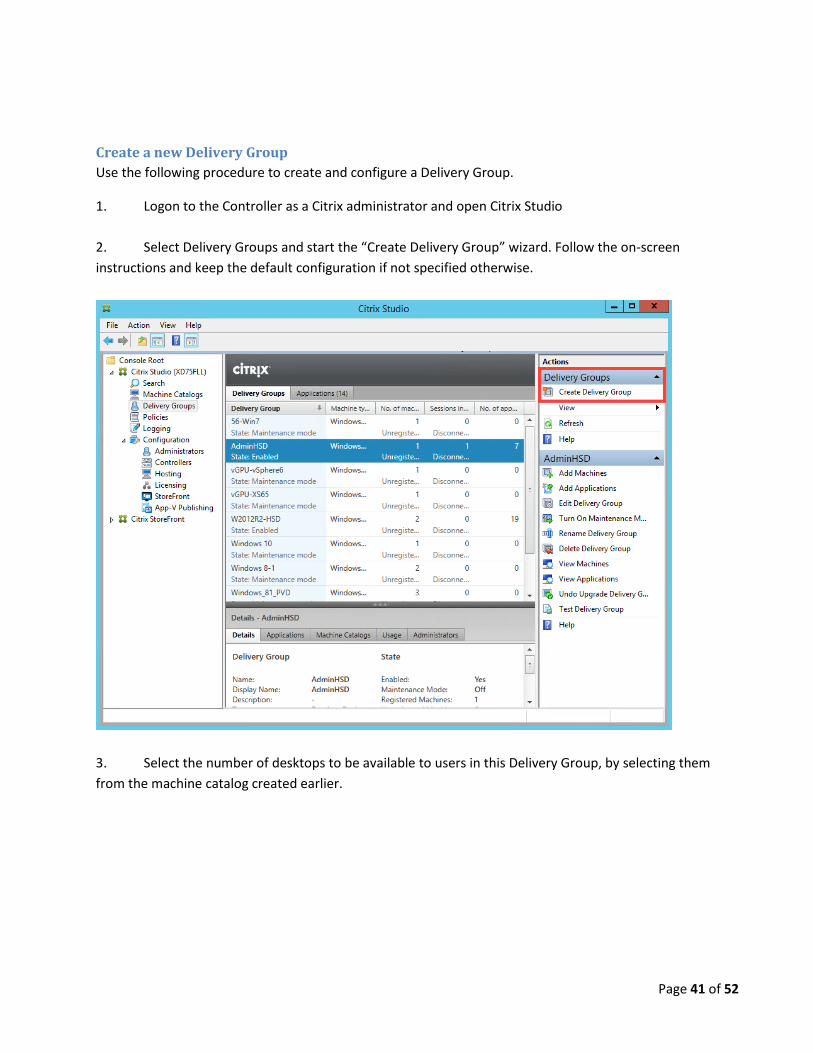
Create a new Delivery Group
Use the following procedure to create and configure a Delivery Group.
1. Logon to the Controller as a Citrix administrator and open Citrix Studio
2. Select Delivery Groups and start the “Create Delivery Group” wizard. Follow the on-screen
instructions and keep the default configuration if not specified otherwise.
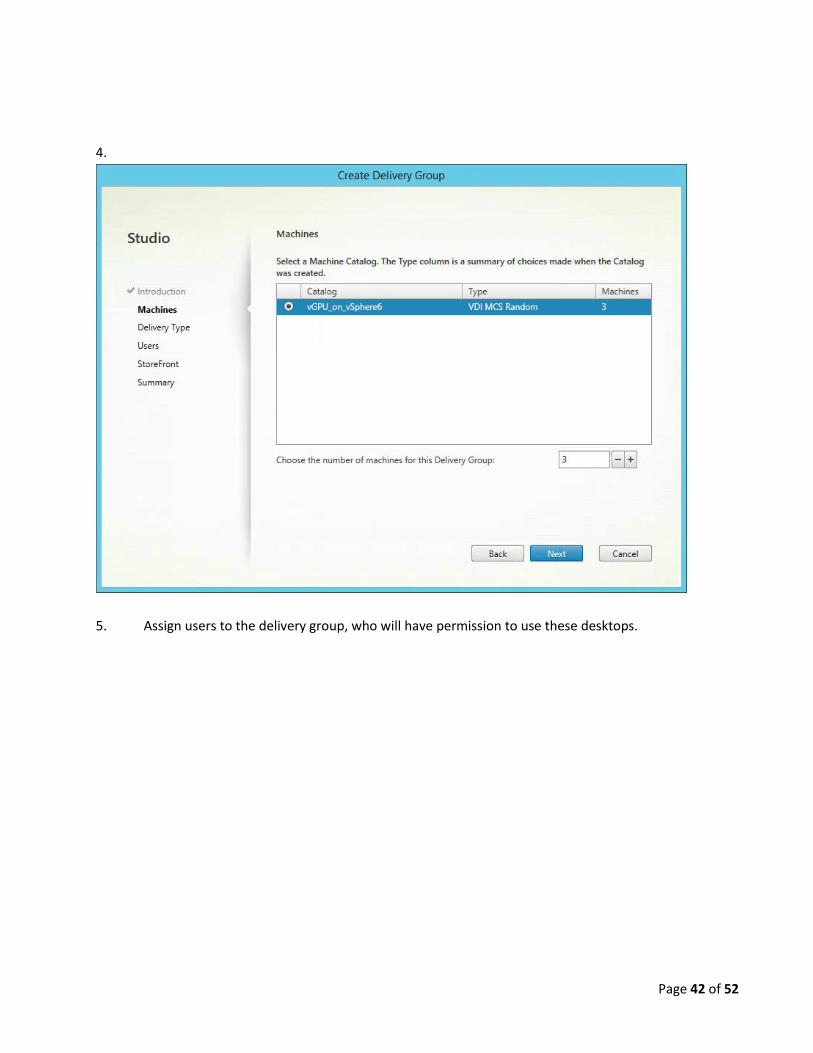
3. Select the number of desktops to be available to users in this Delivery Group, by selecting them
from the machine catalog created earlier.
Page 42 of 52
4.
5. Assign users to the delivery group, who will have permission to use these desktops.

Page 43 of 52
6. Specify a name to identify the Delivery Group and finish the Wizard.

Page 44 of 52
Using Citrix Receiver to Access vGPU-Enabled Desktops and Apps This section shows the users launching 3D applications from XenDesktop 7.6 published desktops (VDI) using Citrix Receiver on the end-point devices. A standard Windows 7 laptop with 4GB or more RAM is the recommended end-point for this testing. HDX 3D Pro supports a number of thin-clients, mobile devices, and fat-clients. See Citrix.com for details.
Launch desktops and applications on Windows client
Citrix Receiver is the unified access client to access applications and desktops published in XenDesktop
(and XenApp). Users connect to StoreFront, an enterprise app store installed as part of the XenDesktop
infrastructure, with a domain user account having permissions to access those applications and
desktops.
Screen` capture Instructions
On a client machine, Windows 7 in this case, open a browser and go to the default Storefront URL http://<XenDesktopDDC_IP_or_FQDN>/Citrix/StoreWeb
If Citrix Receiver is not already installed on the client, you are prompted to install it. Accept the EULA, Click Install and follow the installation process. Return to the login page once it is installed.
NOTE: These are NOT results of a performance test; the screenshots and values are merely indicative.
Page 45 of 52
Screen` capture Instructions
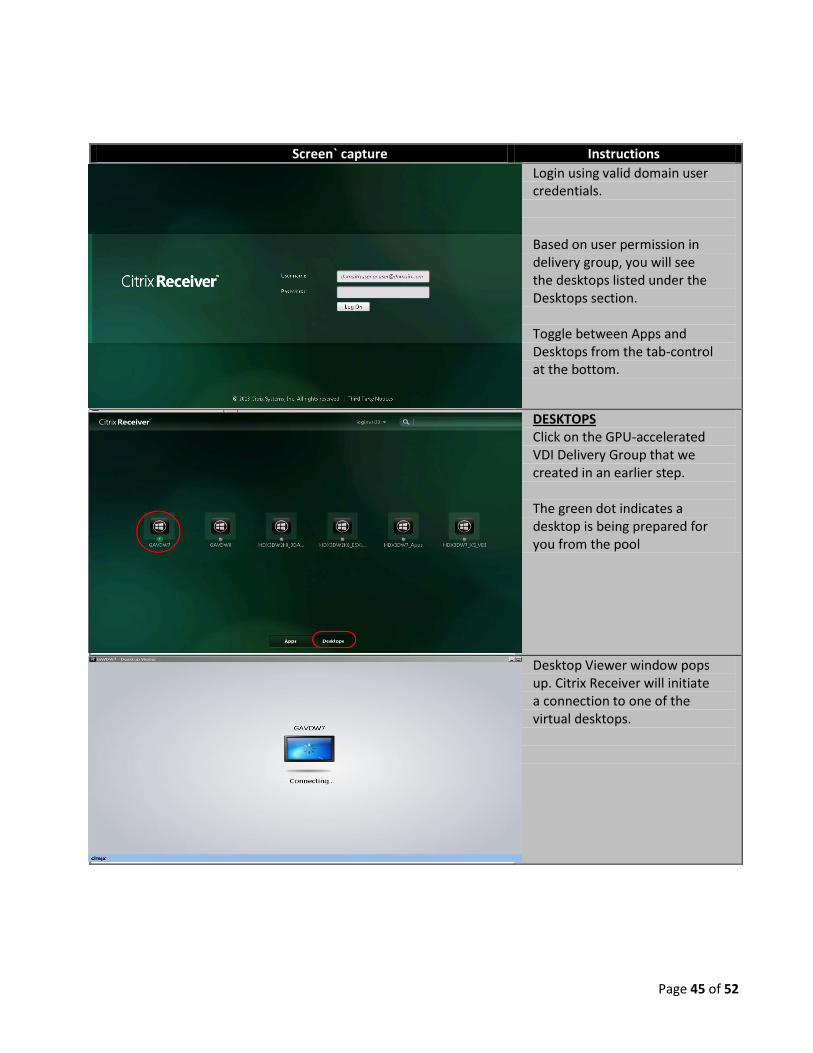
Login using valid domain user credentials. Based on user permission in delivery group, you will see the desktops listed under the Desktops section. Toggle between Apps and Desktops from the tab-control at the bottom.
DESKTOPS Click on the GPU-accelerated VDI Delivery Group that we created in an earlier step. The green dot indicates a desktop is being prepared for you from the pool
Desktop Viewer window pops up. Citrix Receiver will initiate a connection to one of the virtual desktops.
Page 46 of 52
Screen` capture Instructions
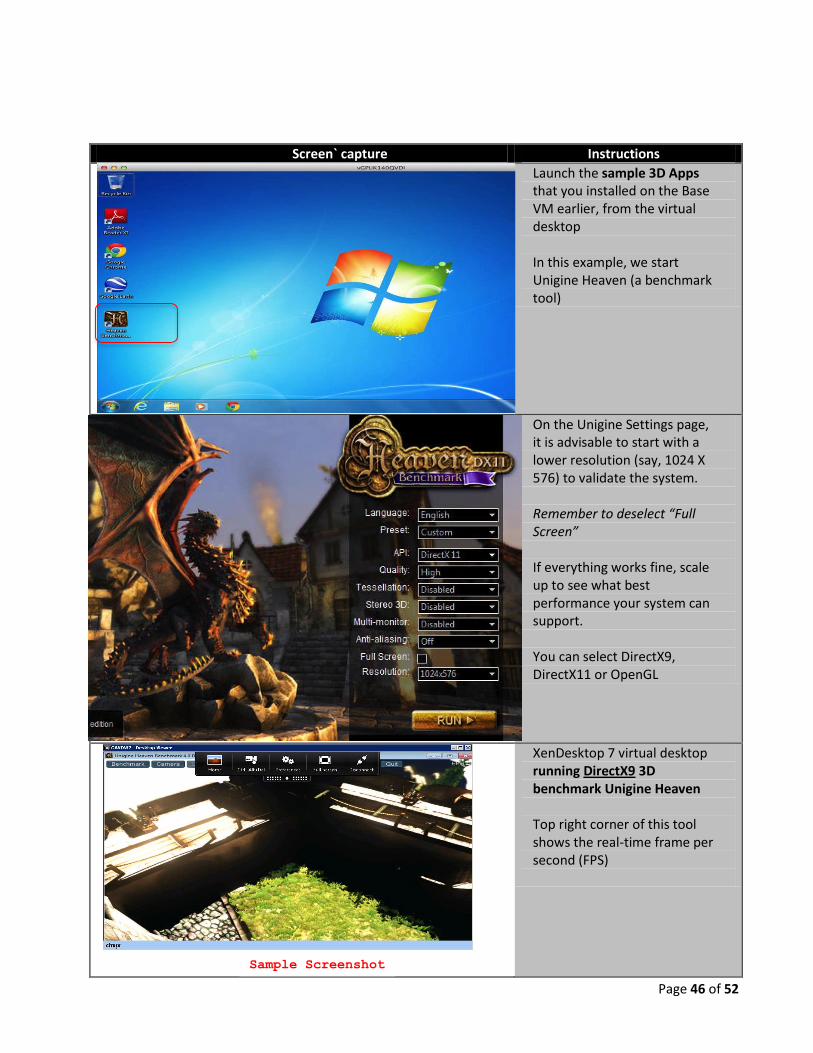
Launch the sample 3D Apps that you installed on the Base VM earlier, from the virtual desktop In this example, we start Unigine Heaven (a benchmark tool)
On the Unigine Settings page, it is advisable to start with a lower resolution (say, 1024 X 576) to validate the system. Remember to deselect “Full Screen” If everything works fine, scale up to see what best performance your system can support. You can select DirectX9, DirectX11 or OpenGL
XenDesktop 7 virtual desktop running DirectX9 3D benchmark Unigine Heaven Top right corner of this tool shows the real-time frame per second (FPS)
Sample Screenshot
Page 47 of 52
Screen` capture Instructions
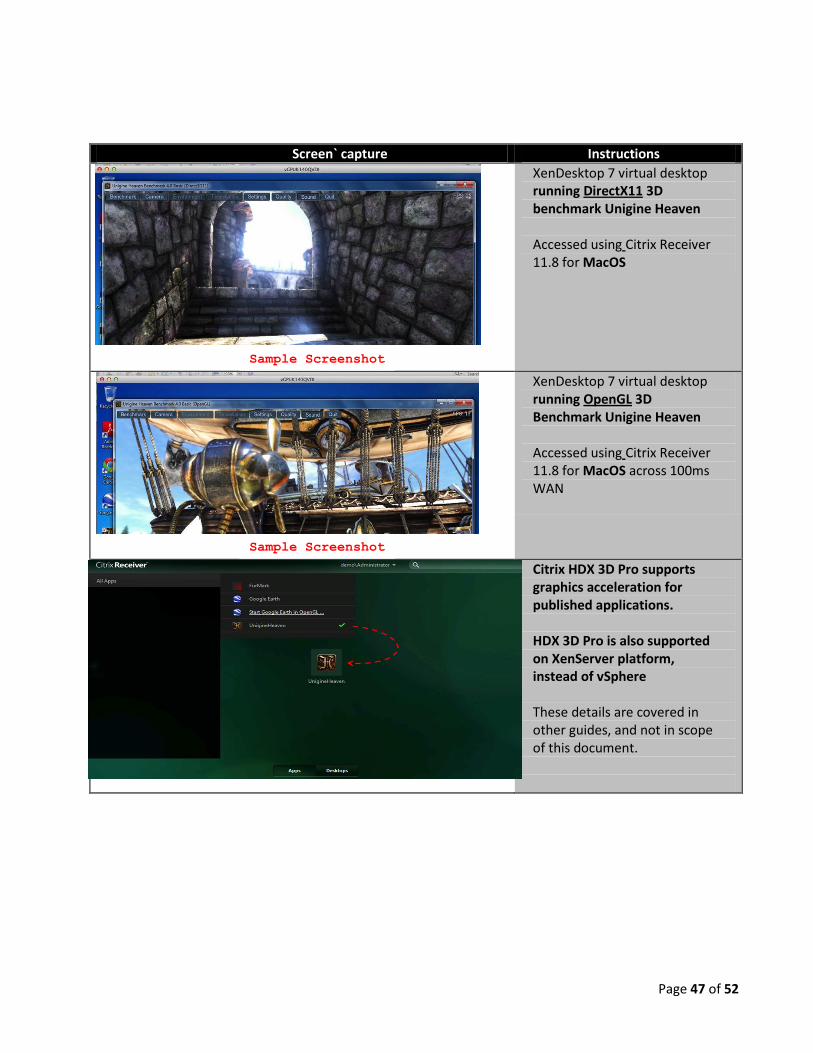
XenDesktop 7 virtual desktop running DirectX11 3D benchmark Unigine Heaven Accessed using Citrix Receiver 11.8 for MacOS
XenDesktop 7 virtual desktop running OpenGL 3D Benchmark Unigine Heaven Accessed using Citrix Receiver 11.8 for MacOS across 100ms WAN
Citrix HDX 3D Pro supports graphics acceleration for published applications. HDX 3D Pro is also supported on XenServer platform, instead of vSphere These details are covered in other guides, and not in scope of this document.
Sample Screenshot
Sample Screenshot

Page 48 of 52
Screen` capture Instructions
Go to www.citrix.com/xendesktop/3d Reviewer’s Guide for HDX 3D Pro – Part 1 (Shared GPU-enabled Applications) Reviewer’s Guide for HDX 3D Pro – Part 3 (Shared GPU-enabled Desktops on Citrix XenServer)
Page 49 of 52
More Tools to Validate GPU is being Shared by the Virtual Desktops
See this blog for a big list of demo apps and benchmark utilities, collated by Citrix field over the years.
These are neither supported nor endorsed by Citrix, but provided as suggestions to start your own
evaluation. Performance and results will vary significantly based on your hardware configuration and
graphic workload.
http://blogs.citrix.com/2014/08/13/citrix-hdx-the-big-list-of-graphical-benchmarks-tools-and-demos/
Please work with your Citrix representative to conduct a formal proof of concept testing, following the
best-practices for fine-tuning as per the requirements of your organization.
Conclusion This concludes your evaluation of the NVIDIA GRID vGPU hardware-accelerated graphics in XenDesktop
and XenApp 7.6.
Through this process, we set up a GRID compatible server with GRID K1/K2 cards from NVIDIA. Then we
configured VMware vSphere 6 with the necessary NVIDIA drivers to enable GRID vGPU feature. Once
that was done, we created a basic deployment of XenDesktop 7.6. Using Citrix Studio, we provisioned
multiple vGPU-enabled Desktops to share the same physical GRID GPU. Finally, we launched virtual
desktop and saw sample 3D apps in action, to validate multiple desktops are indeed sharing the GPU.
This is a simplified guide intended for a quick evaluation of the product features, using a narrow scope
of work. For more advanced use-cases and deep-dive into the new features, please visit
www.citrix.com/xendesktop/3d to find comprehensive documentation.
Page 50 of 52
Resources and Further Reading HDX 3D Pro documentation - http://www.citrix.com/xendesktop/3d
Technical Blogs on HDX 3D Pro - http://blogs.citrix.com/tag/hdx-3d-pro/
Interesting blogs:
http://blogs.citrix.com/2014/08/13/citrix-hdx-the-big-list-of-graphical-benchmarks-tools-and-demos/
http://blogs.citrix.com/2014/05/06/optimising-the-performance-of-hdx-3d-pro-lessons-from-the-field-
2/
About the authors Thomas Berger is a Senior Architect within the XenDesktop Product Marketing Team based out of Zurich, Switzerland. He started working in IT in 1999 as system admin and freelancing consultant. In 2004 he joined Citrix as Consultant within the EMEA Consulting organization, where he worked at numerous customer projects by assessing, designing and building enterprise-level architectures to successfully deliver desktops and applications using Citrix technologies. In 2011 he moved to Worldwide Consulting Solutions in order to focus on white paper and best practice development. In late 2013 he moved to Product Marketing in a technical capacity, now focusing on CI. Twitter @thomas_berger or blog http://blogs.citrix.com/author/thomasber/ Mayunk Jain is a Senior Technical Marketing Manager in the desktop and application virtualization
group at Citrix. His responsibilities include competitive intelligence, sales enablement, and creation of
technical collateral such as product demos, performance benchmarks, and white papers. He is a speaker
at major industry events and keenly involved in customer and partner enablement. Twitter @mayunkj
or blog http://blogs.citrix.com/author/mayunkj/
About Citrix Citrix (NASDAQ:CTXS) is leading the transition to software-defining the workplace, uniting virtualization, mobility management, networking and SaaS solutions to enable new ways for businesses and people to work better. Citrix solutions power business mobility through secure, mobile workspaces that provide people with instant access to apps, desktops, data and communications on any device, over any network and cloud. With annual revenue in 2014 of $3.14 billion, Citrix solutions are in use at more than 330,000 organizations and by over 100 million users globally. Learn more at http://www.citrix.com.
Related Documents