Tube, Solid State, Loudspeaker Technology April 2010 US $7.00/Canada $10.00 REVIEW: LEHMANN’S IMPROVED PHONO PREAMP www.audioXpress.com DIY Stuffing Effects on Speakers More About Personal Digital Recorders chnology tube power amp project

Welcome message from author
This document is posted to help you gain knowledge. Please leave a comment to let me know what you think about it! Share it to your friends and learn new things together.
Transcript

Tube, Solid State, Loudspeaker Technology
A p r i l 2 0 1 0US $7.00/Canada $10.00
REVIEW: LEHMANN’S IMPROVED PHONO PREAMP
www.audioXpress.com
DIY
Stuffing Effectson Speakers
More About Personal Digital Recorders
chnology
tube power amp project

4 audioXpress 4/10 www.audioXpress .com
LEGAL NOTICE
Each design published in audioXpress is the
intellectual property of its author and is offered to
readers for their personal use only. Any commercial
use of such ideas or designs without prior written
permission is an infringement of the copyright pro-
tection of the work of each contributing author.
SUBSCRIPTION/CUSTOMER
SERVICE INQUIRIES
A one-year subscription costs $37.00; a two year sub-scription costs $63.00. Canada please add $12 per year. Overseas rate is $72.00 for one year; $133.00 for two years. All subscriptions begin with the current issue. To subscribe, renew or change address write to the Customer Service Department (PO Box 876, Peterborough, NH 03458-0876) or telephone toll-free (US/Canada only) 888-924-9465 or (603) 924-9464 or FAX (603) 924-9467. E-mail: [email protected]. Or online at www.audioXpress.com
For gift subscriptions please include gift recipient’s name and your own, with remittance. A gift card will be sent.
EDITORIAL INQUIRIES
Send editorial correspondence and manuscripts to au-dioXpress, Editorial Dept., PO Box 876, Peterborough, NH 03458-0876. E-mail: [email protected]. No responsibility is assumed for unsolicited manu-scripts. Include a self-addressed envelope with return postage. The staff will not answer technical queries by telephone.
CLASSIFIEDS & WEB LISTINGS
Contact Janet Hensel, Advertising
Department, audioXpress, PO Box 876,
Peterborough, NH 03458, 603-924-7292,
FAX 603-924-6230,
E-mail [email protected].
Printed in the USA. Copyright © 2010 by Audio Amateur Corporation.
All rights reserved.
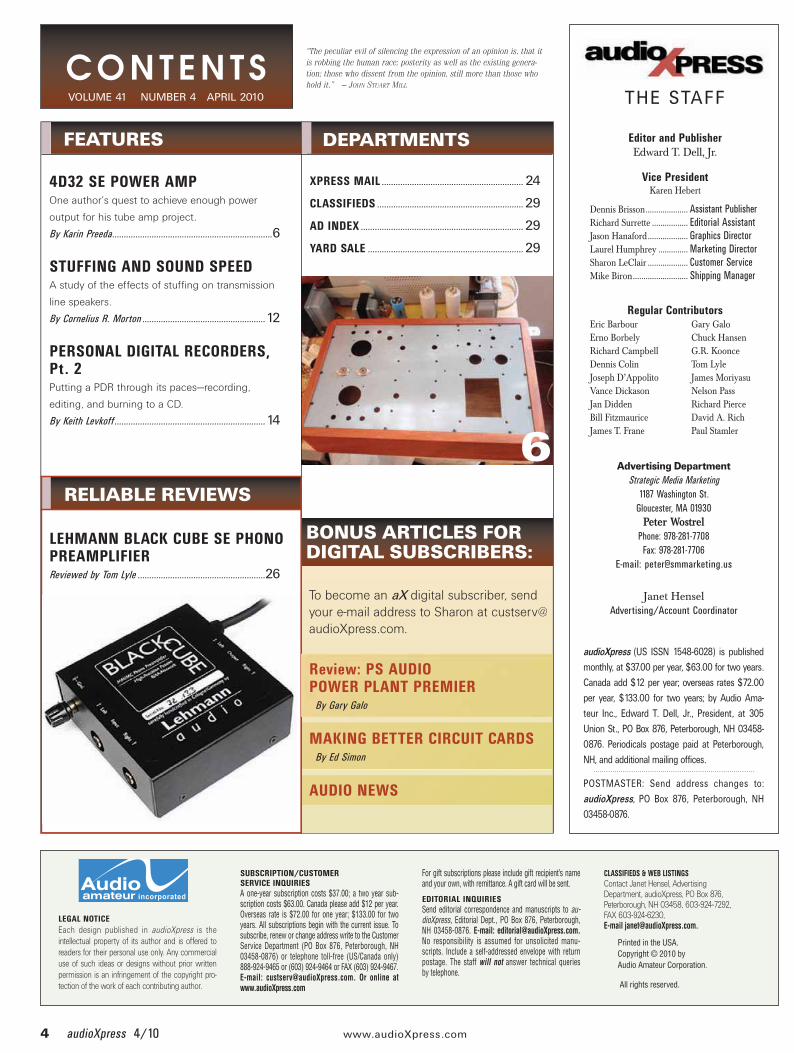
FEATURES
C O N T E N T SVOLUME 41 NUMBER 4 APRIL 2010 THE STAFF
audioXpress (US ISSN 1548-6028) is published
monthly, at $37.00 per year, $63.00 for two years.
Canada add $12 per year; overseas rates $72.00
per year, $133.00 for two years; by Audio Ama-
teur Inc., Edward T. Dell, Jr., President, at 305
Union St., PO Box 876, Peterborough, NH 03458-
0876. Periodicals postage paid at Peterborough,
NH, and additional mailing offices.
POSTMASTER: Send address changes to:
audioXpress, PO Box 876, Peterborough, NH
03458-0876.
Editor and Publisher
Edward T. Dell, Jr.
Vice PresidentKaren Hebert
Dennis Brisson .................... Assistant PublisherRichard Surrette ................. Editorial AssistantJason Hanaford ................... Graphics DirectorLaurel Humphrey .............. Marketing DirectorSharon LeClair ................... Customer ServiceMike Biron .......................... Shipping Manager
Regular ContributorsEric Barbour Gary GaloErno Borbely Chuck Hansen Richard Campbell G.R. KoonceDennis Colin Tom LyleJoseph D’Appolito James MoriyasuVance Dickason Nelson PassJan Didden Richard PierceBill Fitzmaurice David A. RichJames T. Frane Paul Stamler
Advertising DepartmentStrategic Media Marketing
1187 Washington St.Gloucester, MA 01930
Peter WostrelPhone: 978-281-7708Fax: 978-281-7706
E-mail: [email protected]
Janet HenselAdvertising/Account Coordinator
DEPARTMENTS
“The peculiar evil of silencing the expression of an opinion is, that it is robbing the human race; posterity as well as the existing genera-tion; those who dissent from the opinion, still more than those who hold it.” — JOHN STUART MILL
RELIABLE REVIEWS
4D32 SE POWER AMPOne author’s quest to achieve enough power
output for his tube amp project.
By Karin Preeda .....................................................................6
STUFFING AND SOUND SPEEDA study of the effects of stuffing on transmission
line speakers.
By Cornelius R. Morton .....................................................12
PERSONAL DIGITAL RECORDERS, Pt. 2Putting a PDR through its paces—recording,
editing, and burning to a CD.
By Keith Levkoff .................................................................14
LEHMANN BLACK CUBE SE PHONO PREAMPLIFIERReviewed by Tom Lyle .......................................................26
XPRESS MAIL ............................................................. 24
CLASSIFIEDS ...............................................................29
AD INDEX ......................................................................29
YARD SALE ...................................................................29
To become an aX digital subscriber, send
your e-mail address to Sharon at custserv@
audioXpress.com.
Review: PS AUDIO POWER PLANT PREMIER By Gary Galo
MAKING BETTER CIRCUIT CARDS By Ed Simon
AUDIO NEWS
BONUS ARTICLES FOR DIGITAL SUBSCRIBERS:
6


6 audioXpress 4/10 www.audioXpress .com
�fter a short conversation with Jack Elliano at Electra-Print early this year, I came up with the power amp shown in Photo
1. He told me, “You may wanna try 4D32. This thing is a pure triode when it’s triode wired. Very easy to drive and you can get about 20W out of it.” It sounded quite interesting. I checked out the Internet and saw some Japanese de-signs that use this tube in both tetrode mode and triode mode. So, I thought I should try this tube.
After some more research, I found 4D32 was the power tube for radio transmitters such as Collins 32V-1,
32V-2. The tetrode curve doesn’t look very promising for audio usage. It may need some negative feedback to gain linearity if used as a beam tetrode. A few weeks later, this tube showed up on eBay with the price of $19.99 apiece. So, I bought four to give them a try.
FIRST TRYI started with a simple triode driver stage. The 4D32 was biased at 420V, 95mA with Rk of 330 . So, cathode bias was 31.35V. For the driver tube, you can use 9AQ8/PCC85 in parallel sections with IXYS10M45 CCS IC (Fig. 1).
The 10M45’s current was set to 20mA, so the bias point of 9AQ8 was 180V, 20mA (10mA/section) and -1.2V cath-ode bias. Gain was about 45. The cou-pling topology was a simple RC coupling using 220nF capacitor and 100K grid leak resistor at 4D32’s grid. The output transformer was 3k primary impedance.
4D32 SE Power Amp
t ubes By Karin Preeda
etrode curve very promising e. It may need some back to gain linearity eam tetrode. A few weeks
showed up on eBay with 19.99 apiece. So, I bought em a try.
This Thai author offers another power amp
design featuring an interesting power tube.
PHOTO 1: Finished power amp.

GeneticallySoundCables
The design and manufacturing quality of the
audio cables you use can go a long way towards
determining the success of your project.
Select audio cables where the genetic code
is clear – SILVER SONIC® cables, designed
by DH Labs and made in the USA.
Utilizing a synergistic combination of silver
and oxygen-free copper conductors, SILVER
SONIC® cables are the most transparent way
of carrying musical signals between audio
components. Buy it by the foot, by the spool,
or terminated with our own high-conductivity
copper connectors.
Don’t settle for cable mutations of questionable
lineage. Insist on SILVER SONIC® cables for all
your work – think of it as genetic engineering for
audio. Visit our website for more information,
or to find a dealer near you.
9638 NW 153rd TerraceAlachua, FL 32615Tel: 386.418.0560
www.silversonic.com
™
AC POWER
SPEAKER
INTERCONNECT& DIGITAL
INTERNALPure Silver & Silver-coated OFHC Copper
HIGH CONDUCTIVITY COPPER CONNECTORS

8 audioXpress 4/10 www.audioXpress .com
The result wasn’t ver y impressive. I got 6W RMS before clipping. The driver clipped at 62V pp, which made sense, but the power output was far from the 20W that I expected. Although frequency response was quite good from 22Hz-21kHz, I want-ed to get more power from the 4D32. So, I decided to try again.
SECOND TRYBecause the driver clipped right at the cathode bias voltage, that meant I needed to drive 4D32 to class A2. There are many ways to drive power tubes to class A2, the easiest is using an interstage transformer. The key to using the transformer is the low DCR sec-ondary that will let current flow to the power tube’s grid. I find many interstage transformers are incapable of doing this. Check the transformer’s manufacture before buying the transformer if you want to drive the power tube to A2.
Going back to 9AQ8/PCC85, the plate resistance at 180V, 10mA bias is about 10K. Paralleling them makes a total of 5k output impedance, which equals the plate re-sistance due to the very high impedance of 10M45. Unfor-tunately, it was too high to drive 4D32’s grid to a positive region. So, I needed to look for other options.
My few choices of driver tubes at the time included the Raytheon 5842 and Russian 6C45pi. I could get a gain of 40-50 with about 1-2k of output impedance from these tubes. Then I recalled that I had a 7788/E810F pentode I bought cheaply some time ago. I tested this tube, which gave a pretty good result, but I never really used it. So, now it was time to put it to good use.
I connected 7788/E810F in triode mode and biased the tube at 150V, 20mA, -2.2V cathode bias. I got a gain of 50. The plate resistance was about 2.5k , using Jim Hager-man’s VacuTrace measurements.
Finally, I hooked it up to a 4W 1:1 parallel feed inter-stage transformer with a 5 F DC blocking capacitor. With a 27k resistor terminated at the transformer’s secondary, it could make 160Vpp output easily. And the result when driving the real power tube was. . . pretty much the same as the first try. There was no improvement. I still got 6W of power before hard clipping.
THIRD TRYI was puzzled with the result. Everything should work as planned, but it didn’t. I suspected the problem was the
ENGINEERED TO PERFORM...
��������������� � ���������������
����������
I frw22edfrde
SBclcath
����������������������� ������������������ �������������������
�� ������� ������������������������
���������� ������ ������� ����������������� �� ��� �!�"��#�� ����" !� ��
$ !����� ������%���&&�
������������ ��������
����
����������
��������������� �����!����"#$� ����������"������%��������� ���� ����� ��������� � �����! �� "#"#$$ � ����� � �� ��""� ��� ��� %%����
������� ����������!"�#!�
$%%&'��"�������� ����������
...THE BEAUTY OF MUSIC.
�
������ �������������������������������
���� ��������� � ���� ���������
& � �������� ���'�(��������MUNDORF • ������������� ������
����� ��� � ���� � �� ��� ����)*�������� ������� �����
'!����!$� ������� �'�# !����$�(���� ��)�* ���� �
�����������������������
& & �� ��������� ��� ''� �(��������� MUNDORF • ������ ����������� � �����
FIGURE 1: 10M45 con-nection.


10 audioXpress 4/10 www.audioXpress .com
output impedance of the driver stage, because when the power tube’s grid goes positive, its input impedance drops down to a few kilohms. Therefore, the 2.5k output impedance may be too high.
This made me take a step back and re-think the driver stage. One way to reduce the output impedance was using cathode-follower output. It wasn’t an option because I didn’t want a three-stage power amp. I also considered using mu-follower output from the driver’s active load. The ubiquitous mu-follower that has a high-transconductance tube on top seemed to be a good choice. But I abandoned this idea because I didn’t have enough space to put another tube on the chassis.
Many years ago, Gary Pimm put his cascode MOSFET constant-current source design on his website. The design
has been constantly updated to revision 5. I used his design in my preamp with great success. A nice feature of the de-sign is the mu-follower output that gives low output impedance. The schematic of CCS is shown in Fig. 2. Some com-ponents’ values are a little different from the original one on the website. You can find more details of the design at www.pimmlabs.com.
I finally achieved my goal. Using mu-follower output worked! I could drive 4D32 to A2, and the power output be-fore clipping was 17W.
SCHEMATIC AND PARTSThe completed schematic of the power amp is shown in Fig. 3. As you can see, it’s quite simple. Only one chan-nel is shown here. I built this power amp with a dual-mono concept in mind. The power transformer was a custom-wound unit with two sets of the secondary windings. I chose the 5R4 rectifier because of its availability and low price. The downside of 5R4 is its large dropping voltage. Because I use a custom power transformer, it’s not an issue for me. Interstage and output transformers were made by Electra-Print, while the 7788/E810F and 4D32 are available from several online dealers.
I didn’t use exotic parts at all. The resistors are regular carbon and metal oxide film type. The 30 F filter capaci-tors are motor-run caps that I took from another project. The 4 F 400V coupling capacitor was REL PPMXF type. You may try using your own favorite pre-mium parts.
CONSTRUCTIONI built the power amp in a tradition-al style. The frame, made from Maka wood, was very strong and able to carry heavy loads. Photo 2 shows the drilled chassis ready to have transformers and tube sockets mounted. The alumi-num plate’s thickness is 2mm with a brace in the middle to prevent bending because of the output transformer’s weight (Photo 3). 4D32’s cathode re-sistor (R10) and power supply’s drop-ping resistor (R9) require a heatsink due to their heat dissipation. I also kept parts that dissipate heat away from each other (Photo 4). The input
FIGURE 2: GPIMM CCS schematic.
FIGURE 3: Completed schematic.

audioXpress April 2010 11
jacks are located close to input tubes to minimize noise.
With a high-transconductance tube such as 7788/E810F, the grid stopper (R4) is a must. Do not omit it, because you may end up spending too much time chasing down the noise/hum and find out later that there is no grid stop-per. 1k works well here and it needs to be soldered as close as possible to the tube’s grid. The screen resistor for the triode connection of both 7788/E810F (R5) and 4D32 (R8) are also needed. Without the screen resistor, the tube may oscillate and cause unstable bias.
Before mounting the CCS board on the chassis, I recommend that you ad-just the CCS current to 20mA outside the chassis. When putting everything together, the voltage at CCS’s B+ ter-minal will be about 270V and voltage at 7788/E810F’s plate is 150V. There-fore, Q2 will dissipate heat around 2-3W.
To adjust the current, use 10k 10W power resistor-series with the CCS (Fig. 4). Then connect the power amp’s power supply to B+ terminal of the CCS. Monitor the voltage across the resistor. Adjust R2 until you read 200V, which means you get 20mA through the resis-tor. You should make the adjustment quickly because Q2 would dissipate heat about 5-6W at the moment. If your heatsink is good for 2-3W dissipation, the MOSFET may be damaged if you leave it running for too long.
SOUND QUALITYThe gain of this power amp is 16 or 24dB. My reference loudspeaker is Dick Olsher’s Basszilla Platinum (www.blackdahlia.com). With 96dB/W/m
loudspeakers, I find the power amp works well with a preamp that has a gain of 2 or 6dB. Using a higher gain preamp somehow gives congested sound. If you use lower sensitivity loudspeakers, you may need a preamp with the gain great-er than 2. So, gain matching is quite important.
My musical preference for evaluation is mostly jazz, along with some rock and classical. My reference SE power amp is a 300B that I built some time ago using Emissionlabs 300B-XLS driven by 801A/VT62 and Electra-Print par-tial silver secondary output transformer.
This 4D32 power amp gives a differ-ent flavor from the 300B. It doesn’t have a euphonic midrange. Its midrange can be described as crisp and clear. Bass is also tight, deep, and very well controlled, clearly better than my 300B power amp. It doesn’t sweeten treble like some di-rectly heated tubes, but detail is not as clear as my 300B power amp. That’s what I expect because the 4D32’s output transformers are regular copper second-ary version.
Well, this may be the SE power amp you’re looking for. It takes you away from mainstream directly heated triodes. With 17W RMS per channel, it should work quite well with several commer-cial loudspeakers that have sensitivity around 90dB/W/m. aX
SOURCES1. www.mouser.com for resistors, capacitors,
MOSFET
2. www.partconnexion.com for premium resis-
tors, capacitors
3. www.tubesandmore.com, www.esrcvacuumtubes.
com, www.vacuumtubes.net for tubes
4. www.electra-print.com for custom power
transformer, output and interstage transformer
FIGURE 4: How to adjust the CCS.
R1, R2 270K 2WR3 47K ½WR4 1K ½WR5 100 ½WR6 110 ½WR7 27K 2WR8 27 2WR9 10K 20WR10 330 15WC1 30 F 550VC2, C3 330 F 400VC4 5 F 400VC5 220 F 50VF1 3A fuseF2 300mA fuseV1 7788/E810FV2 4D32T1 910VCT 180mA, 5V 3.5A, 6.3VCT 5.5AT2 Output transformer 3K: 6 20WT3 1:1 4W parallel feed interstage transformer
Q1, Q2 IRF820BQ3, Q4 Supertex LND150R1 560 2WR2 25K potentiometer R3 15K ½WR4 27K ½WR5 4.7K ½WR6 2.2K ½WC1 0.1 F 250VC2 100 F 100VVR1, VR2 zener diode 18V ½W
POWER AMP PARTS LIST (ONE CHANNEL)
CCS PARTS LIST (ONE CHANNEL)
PHOTO 2: Chassis preparation. PHOTO 3: Under the chassis. PHOTO 4: Internal wiring.
12 audioXpress 4/10 www.audioXpress .com
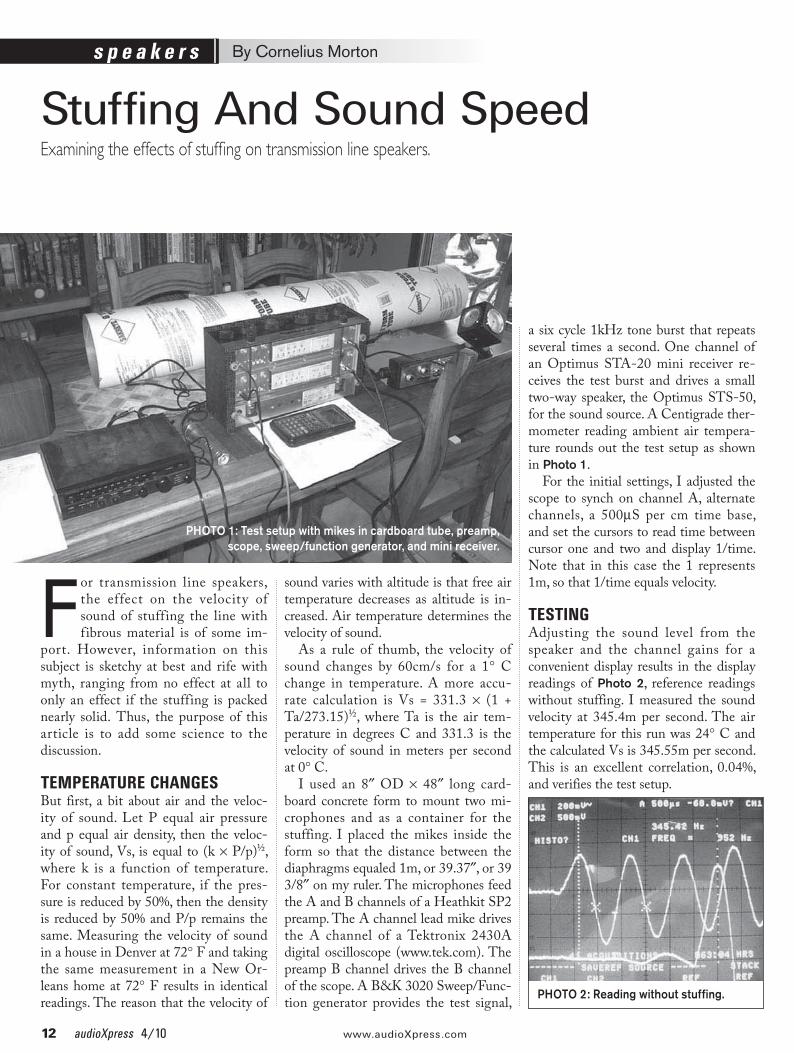
�or transmission line speakers, the effect on the velocity of sound of stuffing the line with fibrous material is of some im-
port. However, information on this subject is sketchy at best and rife with myth, ranging from no effect at all to only an effect if the stuffing is packed nearly solid. Thus, the purpose of this article is to add some science to the discussion.
TEMPERATURE CHANGESBut first, a bit about air and the veloc-ity of sound. Let P equal air pressure and p equal air density, then the veloc-ity of sound, Vs, is equal to (k P/p)½,
where k is a function of temperature. For constant temperature, if the pres-sure is reduced by 50%, then the density is reduced by 50% and P/p remains the same. Measuring the velocity of sound in a house in Denver at 72 F and taking the same measurement in a New Or-leans home at 72 F results in identical readings. The reason that the velocity of
sound varies with altitude is that free air temperature decreases as altitude is in-creased. Air temperature determines the velocity of sound.
As a rule of thumb, the velocity of sound changes by 60cm/s for a 1 C change in temperature. A more accu-rate calculation is Vs = 331.3 (1 + Ta/273.15)½, where Ta is the air tem-perature in degrees C and 331.3 is the velocity of sound in meters per second at 0 C.
I used an 8 OD 48 long card-board concrete form to mount two mi-crophones and as a container for the stuffing. I placed the mikes inside the form so that the distance between the diaphragms equaled 1m, or 39.37 , or 39 3/8 on my ruler. The microphones feed the A and B channels of a Heathkit SP2 preamp. The A channel lead mike drives the A channel of a Tektronix 2430A digital oscilloscope (www.tek.com). The preamp B channel drives the B channel of the scope. A B&K 3020 Sweep/Func-tion generator provides the test signal,
a six cycle 1kHz tone burst that repeats several times a second. One channel of an Optimus STA-20 mini receiver re-ceives the test burst and drives a small two-way speaker, the Optimus STS-50, for the sound source. A Centigrade ther-mometer reading ambient air tempera-ture rounds out the test setup as shown in Photo 1.
For the initial settings, I adjusted the scope to synch on channel A, alternate channels, a 500 S per cm time base, and set the cursors to read time between cursor one and two and display 1/time. Note that in this case the 1 represents 1m, so that 1/time equals velocity.
TESTINGAdjusting the sound level from the speaker and the channel gains for a convenient display results in the display readings of Photo 2, reference readings without stuffing. I measured the sound velocity at 345.4m per second. The air temperature for this run was 24 C and the calculated Vs is 345.55m per second. This is an excellent correlation, 0.04%, and verifies the test setup.
Examining the effects of stuffing on transmission line speakers.
Stuffing And Sound Speedspeake r s By Cornelius Morton
PHOTO 1: Test setup with mikes in cardboard tube, preamp, scope, sweep/function generator, and mini receiver.
PHOTO 2: Reading without stuffing.

audioXpress April 2010 13
For the second test run, I stuffed the tube with one-half pound of fiber fill, a crimped polyester fiber sold at many craft stores. The stuffing ran from be-hind the A microphone diaphragm to the front of the B microphone wind-screen, 36.5 , a volume of one cubic foot. The raw results are shown in Photo 3. The temperature at this time was 25 C requiring that the test Vs of 341.3m per second be reduced by 60cm to 340.7m per second. I added an additional one-half pound of stuffing and repeated the test. The raw results are shown in Photo 4. The ambient temperature for this test was 25.5 C decreasing the raw Vs of 334.45m per second by 90cm to 333.55m per second.
The velocity variation is –1.36% for run 2 and –3.43% for run 3, effective-ly increasing the length of a quarter wave tunnel tuned to 50Hz, 1.727m in length, by 5.9cm or a bit over 2 when stuffed to 1 lb per cubic foot. Does this mean that I can choose a stuffing density of 1 lb/ft3 and cut the tunnel
length by 3.43%? Not quite; the velocity change is not the purpose of the stuff-ing—only a secondary effect—the real purpose is to lower the Q of the driver and the quarter wave tunnel/transmis-sion line.
STUFFING THE LINEA transmission line speaker is made up of two coupled mechanical resonances and an electromagnetic motor. The reso-nances are1. The free air resonance of the driver,
consisting of the combined masses of the cone, voice coil, and air load, and the compliances of the surround and spider.
2. The resonance of the transmission line, which is determined by the line length and the velocity of sound within the line.
In the transmission line speaker both resonances are tuned to the same frequency, the line being tuned to the driver Fr. When the driver is ener-gized in an unstuffed line, two imped-ance peaks are found, one below the tuned frequency and one above, which is typical for an overcoupled system of two resonators tuned to the same frequency. Overcoupling occurs when the coefficient of coupling, k, exceeds a critical value, kc = 1/(Qd*Qt)0.5, where Qd is the Q of the driver at Fr and Qt is the Q of the transmission line at resonance. Note that Q is a magnitude only and represents the same in elec-tronics as mechanics; namely, the en-ergy stored in a cycle versus the energy lost in a cycle.
When the coupling value exceeds kc, the double beaked response occurs with the peaks increasing in value as the cou-pling is increased. The null in the im-pedance curve of the driver at Fr is due to both the driver and the transmission line acting as resistances at the tuned frequency, the line absorbing most of the back wave energy from the driver and controlling cone excursions. Below reso-nance the driver impedance is mostly a compliance, while the coupled imped-ance from the line is inverted and thus resembles a mass.
At a few cycles below resonance the coupled mass cancels the driver com-pliance, resulting in the low frequency
peak. Above resonance the driver im-pedance is mass while the coupled im-pedance resembles compliance. Again, at a few cycles above Fr, the impedances cancel, resulting in the high frequency peak. These two peaks are true reso-nances and therefore store and release energy, distorting the speaker sound. In the transmission line system the cou-pling is provided by the cone and is rela-tively large and fixed.
The Q of the driver is determined by the DC resistance of the voice coil, the frictional losses of the spider and surround, and the frictional losses of the air load including the transmission line. In free air the driver Q is typi-cally limited to values between 3 and 5 when driven by a modern amplifier. The Q of the transmission line is de-termined by the line length, circum-ference, and roughness of the inner surface.
To lower the peaks in the response around resonance requires that either the coefficient of coupling be de-creased, cutting holes in the cone(?), or increasing kc. Increasing kc may be accomplished by decreasing Qd or Qt. Stuffing the line does both, increasing the friction within the line and increas-ing the friction of the air load on the driver. Typically the line will be stuffed so that the peak to valley ratio of the two peaks and the null at Fr is not more than 2 to 3dB.
You might guess that the stuffing density will be between 0.5 and 1 lb/ft3 and cut the line 2.5% short. Will being a percent or two off hurt? Not much for a 50Hz Fr. If the line resonance is 49Hz, then the coupled resonance will be (50 + 49)/2 = 49.5Hz, and the line will stuff normally. Readers with sharp eyes and ears may have noticed that the Rayleigh open end correction has not been mentioned; it is the effective lengthening of a circular pipe due to the transition from the pipe to the open air and at low frequencies the added length is equal to 0.62 * r (where r is the pipe radius). For rectangular pipes r is calculated from the mouth area A, r = (A/3.1415)0.5. Fortunately the stuffing within the transmission will provide a two-way loss that is great enough that the correction coefficient approaches zero and may be ignored. aX
Run Stuffing Temp. Vs Amp. A Amp. B Loss/meter lb/cu ft Deg. C m/sec mv volts dB1 0 24 C 345.4 300 2.0 0.02 0.5 25 C 340.7 300 1.5 -2.73 1.0 25.5 C 333.55 300 0.750 -9.17
PHOTO 3: Test run 2 with stuffing.
PHOTO 4: Test run 3 with additional stuffing.

14 audioXpress 4/10 www.audioXpress .com
�n part 1, I explained what a PDR is, what it can do, and why I think you need one in your toolbox. In Part 2, while assuming that
you took my advice and bought one, I explain how to do some of the many tasks for which a PDR was intended. I’ll cover most of the basics involved in making a recording, editing it digitally on a computer, and finally burning it to a CD. Many good books and online sources are available for information about advanced editing.
My reference PDR is the Zoom H2 (Photo 1), but most of my descriptions apply as well to most PDRs. For the in-structions on digital editing, assume that you’re using a PC with either Windows XP or Vista. The editing instructions will work the same if you made your re-cordings using a sound card instead of a PDR, and won’t even be much differ-ent if you have an Apple computer—al-though the software will vary. These in-structions, however, do not apply to copy-
ing songs from a CD onto a computer, duplicating an audio CD, or producing music compilations from multiple CDs (there are better ways of doing those).
I use two different editing programs. Adobe Audition has every feature you can imagine (and costs about $300). I highly recommend it if you plan to be-come serious about digital editing. It is well thought out, has all sorts of handy features and shortcuts, and is an industry standard. Audacity, while it has fewer features and isn’t quite as intuitive, works quite well and does everything you need.
You can download a (limited) demo of Audition from Adobe’s website (www.adobe.com); Audacity is open-source software that you can download and use for free (http://audacity.source-forge.net). The editing features you’ll be using should produce audibly simi-lar results with any good audio editor. (However, some of the fancier process-ing options, such as dynamic proces-sors—which we won’t be using here—do
vary in audible quality between different programs.)
RECORD QUALITY SETTINGSMost PDRs support a variety of sample rates, bit depths, and formats. Lossy for-mats such as MP3, which sacrifice audio quality for file size, were designed for situations where storage size is impor-tant. Because I have plenty of storage space and I want the best quality pos-sible, I see no reason to record in MP3 mode. It makes sense to record and edit using a lossless format such as WAV; you can always make MP3 files from the masters later if you need them.
The actual settings I choose depend on the source material and the method I’m using to record. I usually choose the 96k sample rate for digitizing LPs and high-quality tapes. The improve-ment may or may not be audible, but I prefer to be safe rather than sorry. (The 96k sample rate offers a slight theo-retical improvement in high-frequency response and clarity over the CD stan-dard rate of 44.1k, but that will only matter with high-quality source material such as LPs or perhaps a piano recorded through really good microphones.)
I generally select the 44.1k rate when using the internal microphones on the Zoom H2 for live recordings. It’s easy enough to try different sample rates with your PDR and source material and see whether you notice a difference. (I don’t ever use the 48k sample rate, which offers no significant improvement over 44.1k.)
I suggest using a bit depth of 24 bits, for several reasons. First, it gives me more dynamic range, so I get less noise if I record at a level that’s too low. (You might think that the noise from the ana-log circuitry would obviate this advan-tage, but I can tell you from experience that if you need to raise the level a lot, a 24-bit recording will have less objection-
With our background information on PDRs, it’s time to take a closer look at what these handy devices can do.
Personal Digital Recorders, Part 2 r ev i ew By Keith Levkoff
PHOTO 1: Zoom H2.

audioXpress April 2010 15
able noise than a 16-bit recording.)Second, most editors recommend that
you edit at 24 bits (or 32 bits), and then reduce to 16 bits as the last step, be-cause it prevents the low-bit rounding errors that can occur during the editing process. (Any such errors occur in the lowest few bits, which become discarded when the audio is converted back to 16 bits.) It’s easiest just to record at 24 bits in the first place, and the 35% penalty in file size is no big deal. (Note that many editors will load 24-bit files as “32-bit float”—don’t worry; this is normal.)
BASIC SETTINGSThere are several basic settings that you will need to make when configuring a new PDR. On the Zoom H2, you will need to set the clock, tell it what type of batteries you plan to use (alkaline or NiMh), decide whether or not the me-ters read while in standby, and set the default bit depth and sample rate. You can also configure the display bright-ness, and how long the backlight stays on—but the defaults are fine. Most of these H2 settings are stored on the SD card in a configuration file. (The good news is that you can copy this file to other SD cards, and back it up on your computer. The bad news is that if you format the SD card or put in a differ-ent one, you must redo those settings.) You don’t need to reset the Zoom’s clock after changing the batteries, provided they aren’t out for too long.
CONTROLS AND DISPLAY (ZOOM H2)Most of the smaller PDRs, including the Zoom H2 (Photo 2), have rather tiny con-trols and displays (the Zoom H2 screen is 1 wide by high). The H2 front panel buttons are membrane switches, but they click when pressed and are raised so you can locate them by touch.
Other controls include several slide switches and some buttons. All of the connections on the Zoom H2 are via standard stereo plugs, and the mi-crophone and line inputs automatically become active when you insert a plug. The power switch and microphone level pad controls are also mechanical switch-es, located on the side of the unit.
The two arrow buttons on the top corners of the Zoom’s control panel se-lect which microphones are active—as indicated by the small LEDs in the row just above them. In addition, the Mic Active LEDs (just below the front and back grilles) indicate which set of microphones is active. (The LED will also flicker if the microphones are over-loaded.) The red button in the center of the control panel is the record button (which also acts as an enter button). To the left and right of it, the double arrow buttons act as fast forward and rewind while in play mode, and as record level controls while in record. (The output level control, a rocker button labeled vol-ume, is on the left side.)
The Zoom’s meters are calibrated in
dB (they’re clear but tiny), showing a bar plus a bouncing dot for peak level. There is also a tiny square box called the Clip indicator at the right end of each which fills solid if the signal clips. The peak and Clip indicators show true peak level (nothing is too fast for them to catch). Unfortunately, you can’t reset the Clip indicators during a session once they have tripped. I also have my Zoom set so that the meters read even when not in record mode, and so that the analog audio outputs are always on (like a tape monitor). Those are both menu settings.
A few things about the Zoom used to drive me crazy: First, when you’re in the menu, to move up and down be-tween items you use the FF and rewind keys—it feels odd to use left/right but-tons to move up/down. Second—and a bit harder to get used to—is the record/pause/stop control sequence. Pressing the record button once takes you into record/pause mode (and the record LED flashes). Pressing record again starts recording (and the LED lights solid). Pressing the pause button while you’re in record/pause mode cancels the record-
PHOTO 2: Zoom H2 display closeup.

16 audioXpress 4/10 www.audioXpress .com
ing (like Stop). However, pressing the pause button while actually recording does nothing (actually it sets a marker which is understood by some editors, but it doesn’t pause the recording).
To end a recording, you must press the record button (which acts like Stop). The pause button does initiate a pause when in playback mode. Finally, the Zoom’s analog output doesn’t have much gain; I often find that recordings that are a bit low in level aren’t loud enough on headphones plugged into the output, so I sometimes use a separate pocket head-phone amp. These are all minor issues, and you will become used to them.
MECHANICAL CONSIDERATIONSMost PDRs are small and delicate. The Zoom, for example, is made almost en-tirely of plastic, so you need to treat it carefully. Some of the more expensive models are bigger and more rugged. You can buy nice protective cases for the Zoom (and others), but note that some of them block the battery doors or SD card compartment when the PDR is in them. The silicon rubber armor case for the Zoom H2 is quite nice (and costs about $20).
The tripod mount on the Zoom H2 consists of a ¼ thread in a small plas-tic base plate. (It’s a standard camera-type tripod mount, which fits all sorts of camera tripods and mounting brackets. My favorite stand looks like a plastic C-clamp with extendable feet; it can stand on a table or clamp onto a seat back or beam. Look on eBay for mounts and tripods intended for small cameras.) I don’t recommend attaching the Zoom H2 to a heavy stand; if you pull too hard on it you will rip the bottom plate off. My Edirol R-09HR has a nice solid tripod mount which is part of the case (the drawback is that you must buy the optional $60 case).
Most PDRs don’t have much me-chanical isolation. I find it best to use the included foot, and then sit the Zoom on some sort of felt or fur pad. Avoid touching the unit or the controls during important recordings. My favor-ite placement in an audience setting is to lay a jacket on the seat next to me, fuzzy side up, draped over the back and cover-ing the seat as well. Then I put the stand on my Zoom and stand it on the seat on
top of the jacket (or just rest it there). The jacket damps the reflections from the seat back and cushions the stand from the seat bottom.
If you plan on using it on a table, cushion it with a small thick piece of felt, for example. Because a PDR is digi-tal and has no moving parts, you don’t need to worry about vibration at all if you use external microphones. (The Ed-irol R-09HR comes with a neat infrared remote control, so you can control some functions without touching it.)
Last, the audio connectors unplug easily, and can pick up crunchy noises if you move the wire while you’re record-ing. If you’re using external microphones that need adapters, I suggest you get adapter wires rather than adapters (hav-ing a big adapter sticking out of the side of the PDR is a sure recipe for trouble).
Also, be sure to start any live session with a fresh SD card and fresh batteries. Because the PDR is rather small, it can be difficult to change SD cards or bat-teries in a dark room (on the Zoom H2 you also lose your configuration when you change the SD card). It’s also hard to see the battery and SD card status on the tiny screen, and even more difficult if the unit is on a microphone stand a few feet away. I’d much rather have enough recording time, so that I don’t need to fiddle with batteries and SD cards once the lights go out and the ac-tion starts.
DIGITIZING A PHONO OR TAPE SOURCEI’ve always found digitizing a tape or record using a PDR to be much easier than recording onto tape. With tape, I needed to pick a level where the meters were just occasionally tipping into the red zone—any lower and there was too much hiss; any higher and the peaks started to sound nasty. Even good me-ters never seemed to catch all the fast peaks, and sometimes loud high-fre-quency content would distort even if the meters said the levels were safe.
All of these annoying issues are gone with digital recording. About the only worry is clipping. Virtually all digital re-corders remain perfectly clean until they clip, then they do so hard and solid at 0dB. (I’m referring to full signal as 0dB, which is how the Zoom H2 meters read.
Some digital equipment and some soft-ware use slightly different numbers—often +3dB or +6dB—to represent this value. Regardless of which number they use, a digital signal clips cleanly at some specific value, which is the point where the value is “all ones.”)
For a great recording, all you need to do is pick a level so that the loudest parts hit around -6dB on the meters. Digital recorders aren’t sensitive to any specific frequencies (no high-frequency saturation like tape), and the meters are what I would call “perfectly fast,” mean-ing that a single sample will show as a peak level. I prefer to leave about 6dB of safety margin (just in case I guessed wrong about the loudest level I might encounter). If, at the end of the record-ing, those Clip indicators aren’t lit, then I know that I didn’t overload even once. (Even if they are lit, the cause could have been a single click or pop. With digital editing it’s easy enough to look at the waveform display on the editor and see what happened.)
Most PDRs, including the Zoom H2, have one or more optional limiter and compressor functions, which I prefer not to use because they alter the sound (to varying degrees), and I simply don’t find them necessary. If you find them useful, experiment to find the choices that you prefer. Most editors offer all sorts of cool limiter functions, so if your goal is to reduce the dynamic range of your final product, it makes more sense to apply limiting in the editor (which probably has more control and does a better job of it) and keep your master recordings uncompressed.
The only connection you’ll really need is from your source to the line-level input on the Zoom H2. You can con-nect to your tape outputs, or directly to the output of a phono preamp. In most cases, this will require a cable that goes from a single stereo connector to a pair of RCA plugs. The Zoom offers a standard unbalanced input (and the cable is included).
I’m not a fan of fancy cables, and I prefer an adapter cable to a separate adapter because the adapter will put more strain on the little plastic con-nector in the PDR. The specified input impedance on the Zoom H2 is 10k , which should be fine for the output of

audioXpress April 2010 17
any solid-state equipment, but might be a problem for some un-buffered tube equipment. If you choose to monitor your recording, you can connect another cable from the Zoom’s Line Out jack to a tape monitor return (and be sure to turn on the Monitor output in the Zoom’s menu). The Line In is auto-matically selected when you insert the plug, and the Mike Gain pad setting is ignored for line inputs. I usually don’t bother to connect the monitor (I find the meters to be entirely trustworthy).
The Zoom H2 comes with an AC adapter, but I prefer to use batteries be-cause then I don’t need to worry about ground loops and wires. Either way, I suggest finding someplace to rest the PDR where it won’t be disturbed. Those
plugs do sometimes crackle if you wiggle them, and can become unplugged rather easily. It’s also a bit too easy to knock the PDR onto the floor by brush-ing against the wire (the Zoom weighs only a few ounces).
To make the recording, turn on the Zoom, making sure you have an SD card with plenty of space inserted (check the display), and verify in the menu that you have selected the 96k sample rate and 24-bit depth. (These will stay set if you haven’t changed them.) Set the Zoom into Record/Pause mode by pressing the Record button once (the Record LED blinks). Play some of the louder parts of your source, and set the level so the loudest portions hit about -6dB on the meters.
You change the level by using the re-wind and FF buttons (Rec Level minus and Rec Level plus). The setting goes from 1 to 127, and is more or less linear. The setting stays onscreen for only a few seconds, but quickly pressing either but-ton will bring it back for a second. Press Record again to go into Record mode (the Record LED lights steady), and press Record a third time to end the re-cording (remember that there is no way to pause recording on the Zoom).
Because of the ease of editing digital recordings, there is no reason to stop be-tween tracks, or to back up and restart to eliminate false starts or jumps. It’s much easier to simply eliminate them in edit. Always start the digital recorder first and stop it last (it’s trivial to clean up the lead-in and lead-out in edit). Whenever
you start recording, the Zoom automati-cally starts using a new file (the default is STE-00x.WAV). It will never record over a previous file; you must actually erase a file to reuse the space it occupies. (I’m pretty sure most PDRs act this way, but check your manual.)
There are all sorts of fancy options for entering names for each file, and sorting files into folders as they are recorded, but I don’t use them. It’s much easier to rename or edit files on a computer. If you plan to do a lot of recording in one sitting, it’s easier to keep track of things by order (files are always named sequen-tially), or to use one SD card for each project or album.
Recording will stop without warning if the SD chip fills up or the batteries die (there is a battery level indicator, but no alarm). Zoom warns that you should avoid either of these situations, and that you should never turn off or unplug the Zoom H2 while a recording is in progress. Doing so could result in file damage, which could render the en-tire recording unreadable. If this were to happen, a data recovery program might be able to recover the file—as with a digital camera in a similar situation.
If you think your batteries are dying, and you are at an obvious break point, it makes sense to stop and re-start the recording. This closes the current file and starts a new one. If the batteries fail while recording the second file, odds are good that the first file will survive undamaged.
INTERNAL MICROPHONESLive recording with a PDR is simple and convenient. You can place a small PDR such as the Zoom H2 most any-where (a microphone stand or the in-cluded plastic foot helps). Even though the isolation isn’t great, handholding works fine in a loud venue such as a nightclub. ( Just avoid handholding in quiet places where other options are available.) You should try and hold the recorder as still as possible, since moving the unit while making stereo recordings will cause wild gyrations of the sound field (yes, those two microphones only inches apart really make serious stereo). If you set the PDR on a table or seat, I suggest that you use some sort of pad-ding to improve the isolation a bit.

18 audioXpress 4/10 www.audioXpress .com
Most PDRs include both a level con-trol and some sort of microphone level pad (called Mike Gain on the Zoom H2). The level pad is in the analog sec-tion (part of the microphone preamp), while the Record Level control usually operates at line level (in the digital sec-tion). Refer to Fig. 1 for a block diagram of a typical PDR (including the Zoom H2). The level pad on the Zoom H2 has three settings; some units offer only two.
It is important to remember that the two controls work together. If you’re re-cording a quiet source and set the pad too low, it’s possible that you won’t be able to reach a reasonable record level even with the Record Level control all the way up. Alternately, with loud mate-rial, if the pad allows the signal to clip, the Record Level control won’t save you. The object is to set the pad to avoid overloading at the loudest points, but
not use it to actually set the level.On the Zoom H2, the Microphone
Active LED will flicker if the signal is overloading the input (at which point you need to set that pad control lower). On the Zoom, the pad settings describe gain, so you use H for quiet sources (High gain) and L for loud sources (Low gain). You must choose the high-est gain setting at which the Mike Ac-tive LED never flickers. (Try coughing or snapping your fingers near the micro-phones if you can’t get a sample on how loud things will be before you start.)
Once you have the Mike Gain pad set about right, use the Record Level control to set the actual level. Depend-ing on how much dynamic range you expect, I prefer to set the level so loud passages hit about -12dB on the me-ters. (Live events tend to have much wider dynamic range than recordings or records.) If you have no idea how loud things will become, you could go even a bit lower (remember that the Zoom and other PDRs have very low noise levels).
If that LED does start to flicker and you dive for the level control, it’s better
FIGURE 1: PDR block diagram.

audioXpress April 2010 19
to use the Mike Gain pad instead of the Record Level control if possible. (The reason for this is that the pad moves in steps. It’s easy to adjust the audio in the editor later to remove a step in level, but difficult to edit out a slow change.) I prefer to avoid using limiters and com-pressors when recording, but the Zoom H2 offers several options if you want to try them. I’ve also noticed that very brief periods of clipping don’t sound all that bad, and many editors are even able to repair clipping to some extent.
The Zoom H2 has one cool feature that most other PDRs don’t have: four microphones. This allows you to record four-channel audio (using two stereo files) and to record ambience in a large venue. Many editors will then allow you to produce surround-sound recordings, or to mix the ambience into the main channels later.
The Zoom also has the ability to edit and mix inside the unit itself (I’ve never tried that one). This feature is handy, however, for another reason. It allows you to position the Zoom so that you can see the display and still have the ac-tive microphones facing what you want to record, no matter which way you have the unit sitting. The two sets of micro-phones offer slightly different pickup patterns as well, but I don’t hear much difference between them (you might in certain situations).
After turning on the Zoom, select your preferred microphone mode using the two arrow buttons toward the top. For recording in stereo, I usually choose the microphones so that the display is toward me and the active microphones are toward what I’m recording (if the unit is sitting in front of me, I would be using the rear microphones). The Mike Active LED facing toward what you are recording should be lit. If you choose a Surround mode, then both Mike Ac-tive LEDs will be lit. (Remember that the Surround 4ch mode will halve your record time for a given size of SD card.)
Now press Record once to set the Zoom into Record/Pause mode. At this point I generally set the Record Level to a rough level of somewhere between 80 and 100. I set the Mike Gain level pad to the correct level; remember that the label H/M/L refers to the gain and not the attenuation. Either wait for something
loud or cough or snap your fingers. You want the highest gain setting that does not make the Mike Active LED flicker.
Finally, after you set the pad, set the Record Level control so that the meters show about -12dB on loud passages (or set to -6dB if you’re pretty sure that things won’t become any louder). Re-member that the PDR has plenty of dy-namic range if you set the levels too low, but will clip abruptly if you set them too high. If the situation requires, you can use one of the limiters or compressors as well (as I said, I prefer to avoid limiters if possible).
Now you can either exit Record/Pause mode (by pressing the Pause button) or start recording by pressing the Record button again. Press the Record button twice quickly to start recording from Stop mode. When you’re done record-ing, press Record again to Stop (remem-ber that Pause will not pause the record-ing). If you stop and restart, any settings you made will remain. (But—and this is important—your settings will be lost if you change the SD card, since, on the Zoom H2, this is where the settings are
stored.) Keep an eye on the meters during
recording, but don’t stop between songs unless you run short of battery life or storage space. Remember that editing is easy, and you probably have plenty of record time, so play it safe and start be-fore the music starts, and don’t stop until after the last encore. When you’re done recording, make sure to stop the re-cording, wait a few seconds, and switch Zoom Power to off.
A PDR uses battery power whenever it is on, and the backlight on the display uses more (in contrast to a tape recorder, which uses much less power when the motors aren’t running). Even if the PDR is just sitting on your lap “idling,” that time does count toward expected battery life.
EXTERNAL MICROPHONESFor most PDRs, using external micro-phones is very similar to using the inter-nal ones; they use the same level controls and pads. With the Zoom H2 you lose the four-channel options since it can’t mix internal and external microphones.
��������&�����������'���������&�����(���������&�� &�)�������������'��������*�������������+�������*�'�(��*�&����� +&�!��& ��� �������������*� &!�,����&�� &�)�������������+������������
The New High-Performance Catalog
Industry’s only full-featured online catalog
•Browse •Search •Check Stock •Buy
Try It Now at mouser.com
Stock •Buyk
()%%*�+,-�-).+
WARNING: #��(��(�����"��*�����6��������&!�7&������� ������&�)�����&��&(���

20 audioXpress 4/10 www.audioXpress .com
I hear their new deluxe model, the H2n (which is much larger), can mix them.
The Zoom H2 and most other PDRs provide the low voltage phantom power used by miniature electret microphones (the computer kind). This is only a few volts, and is not the same as the 48V phantom power used by professional mi-crophones. On the Zoom H2, you need to turn it on with a menu option (Plug-In). Most electret microphones require this—and it won’t hurt most others if you turn it on by mistake.
All sorts of microphones are avail-able for use with portable recorders, in-cluding separate ones and stereo sets. You may need an adapter if you use two separate microphones since most PDRs use a single stereo plug. On many PDRs, including the Zoom H2, plugging the microphone in automatically enables the microphone input (and disables the in-ternal microphones and the line input).
Everything else works the same as with the internal microphones. If you need more than two microphones, 48V phantom power, or XLR inputs that your PDR doesn’t have, you can always
use a small portable mixer connected to the line inputs. Even without the mi-crophones, a PDR is still a handy high-quality portable recorder.
HARDWARE FOR EDITINGBecause of the way audio is actually edited on a computer, there are almost no minimum hardware requirements. (Recording and digitizing require that the machine be able to process audio in real-time, while editing does not.) As long as the computer can run your editing program without actu-ally crashing, it will work. Even if your computer is so slow it can’t play dig-ital audio without stuttering, it can still do a perfect editing job, although you won’t be able to hear exactly what you’re doing.
That said, I think there are a few practical limits: I consider a 800MHz Pentium with 512mB of RAM as a practical minimum for a PC using Windows XP. If you’re running Vista, I recommend a bit more. For best perfor-mance, you want enough RAM to hold the files you are editing. Since you will
be working with quite large files, you really should have USB 2.0 ports (USB 1.0 ports are much slower). (A few hours of audio recorded at CD quality could take several hours to transfer using a USB 1.0 port.)
I also strongly suggest a separate hard drive partition for editing files. On Windows systems, the C drive is always fragmented. A nice large USB 2.0 hard drive is the best solution (I’ve always had good luck with the Western Digital MyBook 1 tB series of drives). Remem-ber, though, that you will need several times as much free space as the largest file you plan to edit—to store temporary files and such. For example, if you plan to edit a one-hour recording (which is about 1gB), plan on having at least 3gB of free disk space.
And, finally, you’ll want a CD writer so you can make copies of your music (al-most all newer computers include these). I suggest that if you have an old 2 or 4 CD writer, toss it and buy a nice new one (it costs about $30 for a 40 writer now). At a minimum, make sure that your writ-er has something called “burn proof ” or
PRAXIS audio measurement system
i n n n .
o i n
on in .
Visit our website for additional information, downloadable demos and freeware: www.libinst.com

audioXpress April 2010 21
“burn free.” This is a feature that pre-vents the write process from failing if the data flow to the drive hesitates for a split second (since all newer drives have this feature, they often don’t mention it any-more, but some very old drives may lack it). Incidentally, any DVD writer will also write CDs just fine.
EDITING SOFTWAREThere are many audio editors avail-able, ranging from free to several thou-sand dollars. As you might expect, the expensive ones have all sorts of fancy features, including the ability to accept plug-ins that add even more functional-ity. My personal favorite is Adobe Au-dition 3, which is well-designed and offers all sorts of sophisticated options as well as quite a few shortcuts to save you time and effort. A free trial ver-sion of Audition is available for down-load from Adobe (http://www.adobe.com/products/audition/). There are also many commercial alternatives, includ-ing Steinberg WaveLab (www.stein-berg.net), Protools (www.digidesign.com), and Sony Sound Forge (www. sonycreativesoftware.com).
Audacity is a free, open-source audio editor that will do everything you need, and will produce results equal to those produced by Audition. You should defi-nitely try Audacity before considering buying any low-cost audio editor. Au-dacity is better than most of the alterna-tives, and is totally free (http://audacity.sourceforge.net/). It is definitely my sec-ond choice after Audition.
I will describe how to perform the editing functions in both Audition and Audacity. Figures 2 and 3 show similar sample screens for Audition and Audac-ity (both can be customized and rear-ranged).
In both Audition and Audacity, changes you make affect whatever part of the file is selected (or highlighted), just like in a word processor, so be sure and select the entire file (Ctrl-A) if you want to adjust or normalize the entire song or recording. In my instructions, if I want you to select the Effects pull-down menu, then pick Amplitude and Compression, then pick Normalize, I’ll write: “select Effects > Amplitude and Compression > Normalize”
SCREEN INTERFACEI’ll not talk about the screen interfaces of editing programs in any great de-tail because they are quite complicated,
and the best way to familiarize yourself with them is practice. It’s a good idea to read the documentation that goes with the one you use because there are
FIGURE 2: Adobe Audition 3 (Waveform Display view).
22 audioXpress 4/10 www.audioXpress .com
often useful tips and shortcuts. You’ll notice that the main parts of the screen are about the same for almost all editing programs.
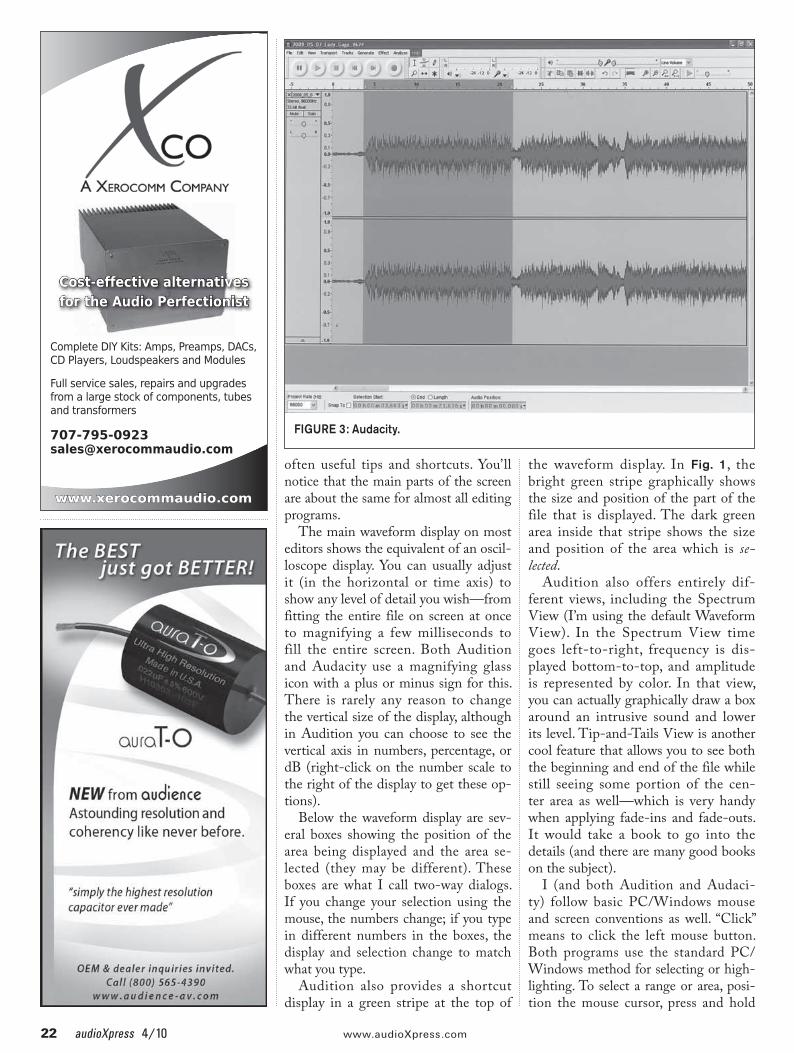
The main waveform display on most editors shows the equivalent of an oscil-loscope display. You can usually adjust it (in the horizontal or time axis) to show any level of detail you wish—from fitting the entire file on screen at once to magnifying a few milliseconds to fill the entire screen. Both Audition and Audacity use a magnifying glass icon with a plus or minus sign for this. There is rarely any reason to change the vertical size of the display, although in Audition you can choose to see the vertical axis in numbers, percentage, or dB (right-click on the number scale to the right of the display to get these op-tions).
Below the waveform display are sev-eral boxes showing the position of the area being displayed and the area se-lected (they may be different). These boxes are what I call two-way dialogs. If you change your selection using the mouse, the numbers change; if you type in different numbers in the boxes, the display and selection change to match what you type.
Audition also provides a shortcut display in a green stripe at the top of
the waveform display. In Fig. 1, the bright green stripe graphically shows the size and position of the part of the file that is displayed. The dark green area inside that stripe shows the size and position of the area which is se-lected.
Audition also offers entirely dif-ferent views, including the Spectrum View (I’m using the default Waveform View). In the Spectrum View time goes left-to-right, frequency is dis-played bottom-to-top, and amplitude is represented by color. In that view, you can actually graphically draw a box around an intrusive sound and lower its level. Tip-and-Tails View is another cool feature that allows you to see both the beginning and end of the file while still seeing some portion of the cen-ter area as well—which is very handy when applying fade-ins and fade-outs. It would take a book to go into the details (and there are many good books on the subject).
I (and both Audition and Audaci-ty) follow basic PC/Windows mouse and screen conventions as well. “Click” means to click the left mouse button. Both programs use the standard PC/Windows method for selecting or high-lighting. To select a range or area, posi-tion the mouse cursor, press and hold
FIGURE 3: Audacity.

audioXpress April 2010 23
the left mouse button, move the cur-sor so the highlight covers the area you want to select, then release the button. Ctrl-A selects the entire file. In Audi-tion, you can also do this by double-clicking on the waveform window. You’ll notice that each program handles func-tions a tiny bit differently, so practice makes perfect. Right-clicking often gives you configuration options or other choices.
EDITING WORKFLOWSWorkflow is just a fancy term for the order in which you do things. The workflow you choose in digital audio editing is important. Choosing an ef-ficient workflow will allow for good re-sults with a minimum of effort. Obvi-ously, the best workflow for a specific project depends on what you’re starting out with and what you hope to end up with.
Most editors have a feature called “undo,” which allows you to back-track and undo steps if you change your mind. This capability is powerful, but not absolute, so you should get in the habit of saving copies of the file you’re working on after successfully performing major steps in the process. You can always erase the intermediate copies later.
For more about digital audio and recording and editing audio using your PDR, read the author's com-ments on the aX website, www.audioXpress.com. aX
LINKSThe Zoom H2 product information page:
www.zoom.co.jp/english/products/h2/
The Zoom H2 manual (about halfway down the page):
www.zoom.co.jp/english/download/manual/english.php
The Adobe Audition product information page:
www.adobe.com/products/audition/
The Audacity product information page:
http://audacity.sourceforge.net/
The ImgBurn product page:
www.imgburn.com/
How to burn audio CDs using ImgBurn:
http://blog.wolf fmyren.com/2008/08/05/
imgburn-creating-an-audio-cd/
Karin Preeda (“4D32 SE Power Amp,” p. 6) is the chief test engineer for Celestica Thailand. His interests include building tube audio equipment, and playing bass or lead guitar in a band.
Cornelius Morton (“Stuffing and Sound Speed,” p. 12), worked in the military electronics field for 42 years, primarily with surveillance radar systems. He became interested in audio around 1958 and has been enjoying the audio field ever since.
Keith Levkoff (“Personal Digital Recorders, Pt. 2,” p. 14) is a self-employed computer product analyst and technical writer who has been an audio hobbyist for longer than he cares to admit. He has spent most of his life working in the electronics and computer industries, and has held positions ranging from Electronic Assembler and Prototype Technician to Production Engineer and Marketing Engineer. Keith is interested in speaker design, all sorts of amplifiers, and, of course, digital audio. His other hobbies include digital photography and computers.
Tom Lyle (Review: Lehmann Black Cube SE Phono Preamplifier, p. 26) has written for the web magazine Enjoy the Music.
Gary Galo (Review: PS Audio Power Plant Premier) is Audio Engineer at The Crane School of Music, SUNY Potsdam, where he also teaches courses in music literature. A contributor to AAC since 1982, he has authored over 230 articles and reviews on audio technology, music, and recordings. He has been the Sound Recording Reviews Editor of the ARSC Journal (Association for Recorded Sound Collections) since 1995, was co-chair of the ARSC Technical Committee from 1996 to 2004, and has given numerous presentations at ARSC conferences (www.arsc-audio.org). Mr. Galo is also a frequent book reviewer for Notes: Quarterly Journal of the Music Library Association, has written for the Newsletter of the Wilhelm Furtwängler Society of America, and is the author of the “Loudspeaker” entry in The Encyclopedia of Recorded Sound in the United States, 1st edition.
Ed Simon (“Making Better Printed Circuit Cards”) received his B.S.E.E. at Carnegie-Mellon University. He has installed over 500 sound systems at venues including Jacob’s Field, Cleveland, Ohio; MCI Center, Washington D.C.; Museum of Modern Art Restaurants, New York; The Coliseum, Nashville, Tenn.; The Forum, Los Angeles; Fisher Cats Stadium, Manchester, N.H.
CONTRIBUTORS
24 audioXpress 4/10 www.audioXpress .com
DISC PLAYERI enjoyed reading the Oppo digital DV-980 review (Dec. ’09, p. 35). I have had one of these great units for over a year. It does everything, from SACD to HDCD to DVDA to CD, and does it well. I was going to recommend it on my blog, but went to their site and found it was dis-continued.
They put some of the features into a $500 Blu-ray, but nothing like this. I used it mainly for my CD player 24-bit DACs, separate laser for CDS and DVDs. Oh, well.
The BDP80 appears to be a worthy suc-cessor to the DV980 at a MSRP of $289 (http://www.oppodigital.com/blu-ray.—ETD.
REACTIVE LOADSI read Dick Crawford’s article “Build a Reactive Load” in audioXpress August 2003. A reactive load should simulate a
real loudspeaker. One of the most dif-ficult loudspeakers to drive is the Quad ESL 63. You can build this load to simulate the speaker. L1 = 75mH 1 iron cored inductor. L2 = 0.64mH, L3 = 0.13mH, C1 = 40 F, C2 = 2 F, R1 = 8 50W, R2 = 4 50W.
Rickard BerglundHoor, Sweden
Dick Crawford responds:My thanks to Rickard Berglund for his comments on reactive loads. But if a reactive load is to simulate a real loud-speaker, then which loudspeaker? There are thousands of hard-to-drive loud-speakers, each one with different (and bad) combinations of impedance and phase angle, at different frequencies. I would rather test an amplifier with a reactive load that has a difficult phase angle at all audio frequencies. Having said that, I must admit that most of the amplifiers that I have built show only a small increase in distortion (2 to 1 or less), when driving my reactive load.
I appreciate Mr. Berglund’s simulation of the legendary Quad ESL electrostatic loudspeaker. This is indeed a difficult loudspeaker to drive. So if you want a “real life” reactive load that is difficult to drive (particularly at high frequencies where amplifiers are worst), then use Mr. Berglund’s simulation.
PREAMP MODSI read with great interest, and some “sor-row,” Mr. Tritschler’s article about his tube RIAA in the Jan. 2010 issue. With “sorrow,” because I have just completed two of his previous 2003 designs in the
XPRESSMail
FIGURE 1: Reactive Load

audioXpress April 2010 25
belief that I will never need or want to touch them again, just use them. I hap-pily installed them in my home studio environment and I like their sound very much, even compared to my other pas-sive and NF type tube RIAAs.
Naturally, if there is an improvement to their performance, I am in it, but I’d like to improve one of the RIAAs dif-ferently, hence my question: If I want to leave the original plate resistors R3 and R8, 22k intact, what change would that cause in the other compo-nents of this circuit? Would this be a viable alternative?
Joseph [email protected]
Joe Tritschler responds:I’m delighted that you are enjoying your preamplifiers. That earlier version served me well for many years, and I certainly wouldn’t consider your invest-ment obsolete. I personally would not attempt to use 22k plate resistors with LED bias in a 5842 circuit. One problem is that the LEDs drop quite a bit more bias voltage than the 1V or so specified in the older design. So if you want to keep the quiescent current sufficiently high to maintain high transconductance and low plate resistance (and low noise and good linearity), you will need to increase the plate voltage and the B+ power supply along with it, possibly by quite a lot; and both parameters will still be adversely affected because of the higher plate voltage.
Unfortunately, the equalization in this circuit is very strongly dependent on the operating points of the tubes and, even worse, strongly interactive. So to answer your question, you would need to rede-sign the whole thing, involving some pretty messy equations. Some folks have also suggested constant-current devices in place of the plate resistors altogether, which might be an interest-ing alternative as well. I didn’t feel the need to do this since the plate resistors are already five times the tubes’ dynamic plate resistance, but maybe it’s worth a shot; again, you’d need to redesign ev-erything else.
By the way, the commercial version of this preamplifier does use 22k plate resistors but a totally different tube and
operating point. For more information, please visit http://www.crazyjoe.org/tpad.html. Thanks for your interest and kind words.
VINTAGE SOLID-STATEAs a former subscriber, I have learned much from your magazine. Although I have an interest in DIY tube audio, I also greatly enjoy vintage solid-state equipment from the 60s and 70s. I am a subscribing member of the AudioKarma forum, and have learned a lot from the members there also.
I would like to see audioXpress offer a vintage solid-state section each issue that deals with repairing and upgrad-ing and how to buy vintage solid-state equipment, including receivers, amps, integrated amps, and so on. I know I would re-subscribe if those articles were offered, and I think many AK members would subscribe too.
aX

26 audioXpress 4/10 www.audioXpress .com
Reliable Reviews
You should be well aware that the Lehmann
Black Cube (sans SE) has been on the mar-
ket in some form for quite some time. Even
though much has changed, the Black Cube
phono stage has remained a very popular
unit. Some might even go so far as using the
phrase “giant killer” when comparing it to
other affordable phono preamps—and I agree.
But why should it be reviewed again? Be-
cause a couple of years ago, the Black Cube
was updated and improved to SE status, and
since I have been using it at times in my main
system for almost a year it has proven itself to
be one of the best solid-state phono stages in
its price class that I’ve ever heard.
NEW FEATURESThe SE version of the Black Cube is
equipped with the PWX power supply
for an even better sound than the already
great-sounding-for-the-price standard Black
Cube. Lehmann claims that the “special”
30VA toroidal transformer of the PWX
power supply is the main reason for the
exceptional sonic performance. This over-
sized transformer has a grounded isolation
coil between the primary and secondary
coil, which results, claims Lehmann, in
much more bass authority, a more liquid
midrange, and greater openness.
The user-adjustable output level, resis-
tance, and impedance controls make the
Black Cube SE compatible with just about
any moving magnet (MM) or moving coil
(MC) phono cartridge on the market. Four
user-adjustable gain settings are available at
36dB, 46dB, 56dB, and 66dB, with three
internal impedance settings at 47k 1k ,
and 100 . According to Lehmann, the Black
Cube SE includes input stages that are used
in top-quality mixing consoles and micro-
phone preamplifiers. The completely passive
RIAA equalization network contains “high pre-
cision” foil capacitors, and all of its low-noise
resistors are of the metal film type, which sug-
gests that they are of very high tolerance.
To top things off, the switches for the
gain and load settings have gold-plated
contacts. The cable that stretches from
the power supply to the main audio sec-
tion is shielded and uses Neutrik connec-
tors with gold-plated contacts at the power
supply side. The cases of both the power
supply and the audio section are made of
nonmagnetic material (aluminum) and are
equipped with a top cover coated with a
special anti-resonance treatment.
SETUPYou would think that the system in which
I tested the Black Cube SE would deserve
a more expensive phono preamplifier. Or
maybe not.
I’ve lived for quite some time using the
internal phono stage contained within the
Balanced Audio Technology VK-3i and VK-
3iX preamplifier. Its internal solid-state phono
stage certainly shouldn’t be considered state-
of-the-art, yet the sound I got out of it was
more than acceptable (I could hardly toler-
ate merely acceptable), amplifying the signal
virtually uncontaminated. It also has enough
audiophile persona to measure up to any sub-
$2000 outboard phono stage I tried during
the period it was part of the system.
Still, the Basis Debut V turntable (one
step behind the current Signature model)
and a Lyra Helikon cartridge mounted on
either Herb Papier’s last version of the Tri-
Planar tonearm, the model VI, or Tri Mai’s
current version of the arm, the Ultimate
VII, practically scream for the best phono
preamplifier on the market—or, at least, the
best you can afford. A parade of other line-
stage preamplifiers and power amplifiers
have been in my system since the inclusion
of the Lehmann Black Cube SE, but I stuck
with only two different pairs of speakers,
the THIEL 2.4SE, and my long-term refer-
ence, the hybrid electrostatic/dynamic
woofer Sound Lab DynaStat.
I started using the Black Cube SE sans
its beefy PWX external power supply, and
instead used the stock supply that’s provid-
ed with the non-SE model. Even though its
sound certainly didn’t bowl me over, I dare
say it was as good as any overachieving
budget phono stage that’s currently on the
market has a right to be. But, to be honest, I
hooked up the PWX soon after only a couple
of LP sides and started breaking in the review
combination before I really gave it a chance.
I think it is also important to mention that
the Cube SE took quite a while before it
started to sound its best—it was at least a
painful 100 hours. Painful, because I hardly
ever listen to LPs off-axis; LP listening is seri-
ous listening. So I used this time to listen to
some records with less than spectacular re-
cording quality. Only after it was fully broken
in did I put on my reviewer’s hat and attempt
Lehmann Black Cube SE Phono Preamplifier By Tom Lyle
Immedia (distributor)
1516 5th St.
Berkeley, CA 94710
(510) 559-2050
Fax: (510) 559-1855
www.immediasound.com
Price: $1,049 (includes Black Cube $699, PWX power supply $350)
“The Black Cube has proven to be one of the best solid-state phono stages in its price class.”

audioXpress April 2010 27
Reliable Reviews
to dissect the Black Cube SE’s sound.
Of course, I used the Black Cube SE in
moving coil mode at a healthy 66dB, which
should be enough for just about any MC
cartridge on the market. I selected a rather
standard impedance of 47k for most of my
listening. There was no surprise there—that’s
what I use for this cartridge 99% of the time
with other phono stages. The phono cable
from the Tri-Planar arm is hard-wired, and I
used a variety of cables coming out of the
Black Cube SE’s output, settling on MIT’s MI-
330 Plus for most of the review.
As far as power cords go, I was a bit
reluctant using an aftermarket power cord
that cost nearly the same as the retail price
of the phono stage itself, but since I had a
Virtual Dynamics cord available, I decided
to use it. The greatest improvement in its
sound was using the highfalutin’ power
cord in combination with a PS Audio Power
Plant AC Regenerator. Plugging the phono
preamp directly into the wall with its stock
cord didn’t “ruin” its sound, but like every
other piece of equipment in my system, bet-
ter power equals better sound. That’s just
the way it is around here in this dense sub-
urb with overhead power lines. Your mile-
age may vary, of course.
ANALOG-TO-ANALOGSpinning the latest reissue of The Jimi Hen-
drix Experience’s Axis: Bold As Love pressed
by Universal confirmed that this analog-to-
analog transfer joins Classic Record’s mon-
aural issue as the best vinyl pressing of this
album that has ever been released. Even
though it has taken more than 40 years
to fully realize its full analog potential, it is
a testament to Jimi, his bandmates, and
production team that this album has man-
aged to captivate me (and a few others, I’ve
heard) for all these years, even with the most
shoddy US pressing (and even on the most
elementary playback systems). So, when I
played this new pressing on the system that
included the Black Cube SE, Jimi’s “electric
church” bliss became quite obvious. OK,
Axis. . . is not an “audiophile” recording in
absolute terms primarily due to the psyche-
delic panning, flanging, and other tape ma-
nipulations by fourth Experience member
engineer Eddie Kramer. His experimentation
degrades the original signal significantly.
But the band’s artistic vision remains more
than intact—and it is brought to the fore
thanks to this pressing, and to the Black Cube
SE, it would seem. The SE has an extremely
detailed presentation, and with its quick tran-
sient response, it reacts to every snare hit
and cymbal crash, especially when a guitar
plectrum hits the strings on Jimi’s or Noel
Redding’s instrument. Added to this is the
welcome transparency of this phono pream-
plifier—you can hear into the mix and imagine
sitting behind the mixing console during one
of their late-night sessions.
On “Spanish Castle Magic,” the eight-
string bass underneath and on top of the
overdubbed distorted and clean guitars
can easily turn into sonic mush on some
systems, yet it was easy to differentiate

28 audioXpress 4/10 www.audioXpress .com
Reliable Reviews
each instrument’s contribution to the
wall-of-sound that results. Unfortunately,
as Kramer pushes the sonic envelope, ar-
tifacts such as compression and overload
occur during peaks, and with any decent
piece of modern high-end equipment
(which includes the Black Cube SE), these
blemishes become quite noticeable.
Although he hadn’t evolved yet into the
use of the expanded harmonic language
he would on his next album Giant Steps, John Coltrane’s Blue Train recorded in 1957
should be mandatory listening for all those
who have even the slightest interest in not
only jazz from this period, but in all art forms
from throughout mankind’s recorded histo-
ry. As with The Experience album, high-end
audio equipment is hardly needed for you
to appreciate the genius encoded within
the grooves of Blue Train. But boy, when you
finally attain a system that can either place
these musicians within the listening room
or provide a sonic window into the record-
ing session, rapture is almost certain.
The Black Cube SE did not disappoint, and
the cliché of being distracted by the music so
as not to be able to concentrate on the sound
quality of the equipment was certainly a fac-
tor here. With the Black Cube SE in the sys-
tem, Coltrane’s tenor sax as recorded by the
infamous Rudy Van Gelder is rendered with
focused veracity—that is, its outline is not only
clearly drawn in space in the right side of the
soundstage, and as you would expect from
any decent piece of high-quality gear, his
tonal signature is also instantly recognizable.
Details such as “Philly” Joe Jones’ cymbals
had the requisite ping and sizzle that demon-
strated that the Cube’s treble was as unlimit-
edly extended as the recording technology
available at the time would allow. In fact,
Mr. Jones’ entire kit was reproduced with
faithfulness, including the space in which it
was recorded. In his intro to “Locomotion,”
the Black Cube SE’s excellent midrange re-
sponse, combined with its considerable de-
tail retrieval, made the ambient sound of the
studio as clear as the drums themselves.
But that last point might be the downfall
of the Black Cube SE for some. If a system
already leans to the analytical side, the un-
apologetically “solid-state-edness” of this
phono preamplifier—transient-response- and
cleanliness-wise—might prove too much of
a good thing. Although, I can’t imagine any
better-than-average turntable connected
to a better-than-average system benefiting
from the SE’s amazingly clean, transparent,
and musical sound.
That said, I think it important to restate that
I’ve had this phono preamp in my system on
and off for over a year. And I’ve been using
phono preamps that have ranged from the in-
ternal model of Balanced Audio Technology’s
VK-3iX (a $750 option) to the Rossner Conofer
from Germany ($7200), among others, with a
turntable setup that I would consider much
better than average. And you know what? The
little Black Cube SE was not embarrassed one
bit when compared to any of them.
For the price, you are not going to get a
“perfect” phono preamplifier. It might be sur-
prising how important a phono preamp is in
determining the overall sound of a phono-
graph setup. I won’t go so far as saying that
it is the most important component—the
adage of garbage in/garbage out certainly
is applicable in this case, and that’s why all
the components of an analog system are im-
portant. So if you have a modern turntable/
tonearm/cartridge, it would be a shame not
to match it with a decent phono stage.
The Black Cube SE is a decent phono
stage—and I do not mean “decent” as mere-
ly acceptable, but as more than respect-
able, and certainly better than any “budget”
phono preamplifier I’ve ever heard. For quite
some time I wasn’t aware of the SE’s price—
I assumed it was $1500, and upon finally
realizing it sold for only a little over $1000 I
was more than pleasantly surprised.
Among its strong points, the Black Cube
SE’s background is dead quiet, plus, be-
cause of its excellent transient response,
sounds leap out of the silence leading to
practically explosive dynamics. You’ll not
experience the microdynamic refinement
or ultimate in top-to-bottom frequency re-
sponse at the extremes as with some mega-
buck units. But what you will get is the most
phono preamplifier that money can buy.
Plus, the law of diminishing returns has not
yet kicked in here—if you are using a phono
preamp that is, let’s say, built into a home
theater receiver, the Black Cube SE will be a
giant step up from that. rr
NeoCd3.0M 3" Ribbon
95dB, 2.5kHz to 40kHRibbon: 8 x 60 x 0.02mm, 18mg
NeoCd2.0M 5" Ribbon
98dB, 2kHz to 40kHzRibbon: 8 x 120 x 0.02mm, 34mg
Fountek ribbon tweeters are anexcellent choice for any high endspeaker system. Ribbon tweetersare known for their light andeffortless sound, described as beingopen and spacious.
The Fountek ribbons are aperfect choice for new speakerprojects and add on super tweeters.
Sandwich alloy diaphragmStrong neodymium magnetsBlack aluminum face plate
The new sandwich aluminum alloyribbons have higher power handling and won't stretch or sag.
$126 ea
$89 ea

audioXpress April 2010 29
VENDORS���1��2341��52�1���������#�$���&��������������&����7�'�������������8��������;���<&�)���� �6����1���������!������7��
"(��6����� &����)��*�����+�'���� +������7���� ����(��*�7���� ����� ,'!� ������8� #���������������� ���&=�>?����*�>���?����'��*�'������������������ ������&�&�=����&���'&,*��&������>��*����������������������
9 #������������?�!������''������&��������+&������++�&�������������@�������"(������&���B��&(��������D�+ ����EFF�GHI�HEGJ
�����66���6���'��(&��'����& +�)�����&��� &����(��86�����7�&����� �#��:;� #���;����
Ad Index
ACO Pacific Inc ................................................ 21Antique Radio Classified................................23Audience ............................................................22Audio Amateur Inc. audioXpress Subscription .........................25 audioXpress Digital Edition.......................18Audio Transformers .........................................15Avel Lindberg ....................................................24DH Labs Audio Cables .....................................7Front Panel Express, LLC ...............................29Goldpoint Level Controls................................29Hammond Manufacturing ...............................3Jantzen Audio Denmark ..................................5KAB Electro-Acoustics ....................................24Liberty Instruments, Inc. ...............................20Linear Integrated Systems ............................25Madisound Loudspeakers .............................28Mouser Electronics .........................................19Mundorf EB GmbH ...........................................8Parts Connexion .................................................9Parts Express Int’l., Inc. ..............................CV4
Salon Son & Image ......................................CV3SB Acoustics ..................................................CV2Solen, Inc. ......................................................... 17Tang Band Industries Co.,Ltd. .......................6The Tube Store, Inc. .......................................27Xerocomm, Inc. ...............................................22
AUDIO MARKETPLACEDynakit Vacuum Tube Audio Products ......30Marchand Electronics ....................................30Parts Connexion ...............................................30SUM R, Richard Sumner Technology.........30
CLASSIFIEDSAll Electronics ...................................................29Audio Classics Ltd. ........................................29Billington Export Ltd. .....................................29Borbely Audio ...................................................29Design Build Listen, Ltd. ..............................29Tempo Electric ................................................29
www.frontpanelexpress.com(206) 768 - 0602
Sample price:$ 43.78 plus S&H
• Cost-effective prototypes and production runs• Wide range of materials or customization of provided material• Automatic price calculation• Fabrication in 1, 3 or 7 days
FRONT PANELS & ENCLOSURESCustomized front panels can
be easily designed with our free software
Front Panel Designer
Classified
Yard SaleFree Ads For SubscribersYardsale Guidelines:1. Submissions accepted from
subscribers to audioXpress magazine only. You must include your subsciption account number with each submission.
2. Submit your ad to Yard Sale, PO Box 876, Peterborough, NH 03458. Or fax to (603) 924-9467, or e-mail to [email protected].
3. Please be sure your submission is legible. We are not responsible for changing obvious mistakes or misspellings or other errors contained in ads.
4. We will not handle submissions over the phone. Please do not call to verify acceptance or inquire about the status of your submission.
5. Each submission will be used until the next issue of the magazine subscribed to is published.
6. Maximum 50 words. No accompanying diagrams or illustrations or logos will be used.
“Yard Sale” is published in each issue of aX.
ADVERTISER PAGE

Reliable Reviews
E1 audioXpress 4/10 www.audioXpress .com
Traditional power line “conditioners” and “filters” do exactly what their descriptions imply—they take dirty AC from the power outlet and filter out high-frequency noise and garbage found on every AC power line.
Longtime readers of the predeces-sor to aX, The Audio Amateur (TAA), may recall three articles I wrote in the early 1990s covering Adcom’s ACE-515 power line filter, plus two genera-tions of Audio Power Industries’ Power Wedge products.1,2,3 In TAA 3/93 I at-tempted measurements on several of these filters. The Adcom ACE-515 was one of the first widely available power line filters specifically intended for au-dio use, with a common-mode choke and three capacitors connected hot-to-ground, hot-to-neutral, and neutral-to-ground. Typical of this type of filter, the Adcom has a 22dB resonance peak at
60kHz, followed by a rolloff in the RF region. The -3dB point for the Adcom is 110kHz, the highest frequency I was able to measure.
The ACE-515’s attenuation begins lower in frequency than the “black-box” power line filters sold by Corcom and others. A Corcom F2411 filter I tested peaked at 90kHz before rolling off, and a Hopkins F85089 was still ris-ing at 110kHz. Despite the peaks be-low 100kHz, the Adcom and Corcom filters both yielded a notable sonic im-provement, with the Adcom offering the best performance. That led me to conclude that the power line must be loaded with noise in the RF region, be-yond my measurement capabilities.
Audio Power Industries’ Power Wedge products use a proprietary fil-ter especially designed for audio appli-cations. The Power Wedge 116 includes
four high-current outlets connected directly to the output of this filter for power amplifiers, and six transformer-isolated outlets for low-level gear.
Unlike the Adcom, the Power Wedge 116 does not have any high-frequency peaks. The transformer-isolated out-lets begin rolloff above 10kHz, with the power amplifier outlets rolling off above 30kHz. The Power Wedge 110, which has only the high-current outlets (no transformers), rolls off exactly like the high current outlets on the 116. Adding the PE-1 Power Enhancer (es-sentially a shunt filter) to either the 116 or 110 adds another 5-6dB of attenua-tion above 30kHz.
The Power Wedge products are measurably and audibly superior to the Adcom ACE-515, but I found the sequenced switching provided by the ACE-515 to be an extremely conve-nient way to turn my entire system on and off. So, I tried cascading my ACE-515s with the Power Wedge 110 and 116. Measurably and audibly, this com-
PS Audio International
4826 Sterling Drive
Boulder, CO 80301
(720) 406-8946
www.psaudio.com
List price: $2199.99
PS Audio Power Plant Premier By Gary Galo
PHOTO 1: Front view of the PS Audio Power Plant Premier and the supplied remote control. You can toggle the front panel display between input voltage, out-put voltage, voltage difference, input THD, and output THD.

Reliable Reviews
audioXpress April 2010 E2
bination has worked well, with much steeper attenuation above 10kHz. Adding the PE-1 yields another 5-6dB of attenuation. So, for the past 16 years my system has been powered with a combination of Adcom ACE-515s and Power Wedge products. Each of my mono power amplifiers has been pow-ered by an ACE-515 feeding a Power Wedge 110 and PE-1 (two of each—one set per amplifier).
My low-level gear has been powered by another ACE-515 feeding a modi-fied Power Wedge 116. I paralleled the transformer secondaries in the 116 to get three higher-current outlets, rather than six lower-capacity ones as supplied by the factory. I also fed the high-current outlets on the 116 to a pair of Signal Corporation A41-175-230, 175VA, dual-bobbin, 1:1 isola-tion transformers which have powered my preamp and D/A converter. I have connected three other pieces of low-level equipment—my digital transports and sample rate converter to the three transformer-isolated outlets on the modified 116.
I switch the control cords on the three ACE-515s with a single Furman M-8, so one switch turns the entire sys-tem on and off. I use the Furman M-8 strictly as a master switch-box, and it plays no role in the power line filtering. This rather complicated arrangement has yielded excellent performance, and other passive line filters and condition-ers I’ve tried failed to offer any signifi-cant improvement.
AC REGENERATIONThe concept behind AC regeneration is simple. Rather than filtering the AC
power line, simply make a new one. An AC regenerator consists of a low-distortion oscillator operating at the power line frequency (50 or 60Hz, de-pending on your country), and a power amplifier to step the oscillator’s output up to 120 or 240V AC.
I designed a low-current regenera-tor back in the mid 1980s to power my belt-drive turntable, which I’m still us-ing.4 The turntable power supply has an oscillator based on an XR-2206 func-tion generator chip, which produces a 60Hz sine wave at about 0.4% THD. The oscillator output is amplified and stepped up to 110V AC with an audio amplifier and a toroidal transformer. But, this power supply was designed to operate a low-current synchronous turntable motor, not preamps and power amplifiers.
PS Audio built their first AC regen-erator—the P300—in 1998. At 300W, the P300 had relatively modest current capability. The line was expanded to include the P500, P600, P1000, and P1200, each offering progressively greater current capability. The P1200 could deliver 1200W of continuous power, enough to meet the demands of the high-current power amplifiers that had become increasingly popular. The P1200 had two disadvantages: they were large and heavy due to their relatively low efficiency. They generat-ed extremely clean AC, but produced a lot of heat in the process.
The Power Plant Premier is PS Au-dio’s latest AC regenerator, and rep-resents a breakthrough in efficiency (Photo 1). It’s still no lightweight, but it runs considerably cooler than its pre-decessors, and can supply 1500W con-
tinuous, with peak current delivery of over 50A (6000W). Output distortion is rated at 0.5% at 120V AC, regulated to within ±0.5V.
IMPROVED EFFICIENCYPS Audio President Paul McGowan offered this overview of how the im-proved efficiency was achieved: “The original Power Plant, which has an efficiency of around 50% (on a good day), had two power amplifiers—one for each half of the sine wave. Each of these power amplifiers ran on very high power supply rails (200V in total for each amp). When you have such high voltage rails, the amplifier’s out-put signal is moving between the rails—and this means there is a lot of voltage dropped across the output transis-tors—dropping voltage while delivering power creates heat.
“The new Power Plant Premier has only one power amplifier that handles the entire output voltage of the Power Plant. If we were to try this with the old technology, we’d have to have voltage rails of 400V! This would be even less efficient. PS Audio’s Chief Engineer Bob Stadtherr figured out another way, and received a patent for his work. The new way has a variable power supply that tracks (moves) with the output signal. This means that the output power amplifier actually rides up and down with an exact copy of the AC waveform—thus keeping the volt-age across the output power amplifier low—while allowing high output to the equipment.”
My aX colleague Chuck Hansen found Stadtherr’s complete pat-ent online at www.google.com/
Reliable Reviews
E3 audioXpress 4/10 www.audioXpress .com
patents?vid=USPAT7259705. The pat-ent includes schematic diagrams and a detailed description of its operation. According to the patent, a line synchro-nization circuit is used to convert the incoming AC into a 5V peak-to-peak square wave, precisely in-phase with the incoming signal. This square wave is then processed with a microprocessor to generate a digital representation of a sine wave which, in turn, is converted into a 2.5V peak-to-peak analog signal with a digital-to-analog converter. The sine wave is generated using DSS (Di-rect Digital Synthesis) techniques to produce a waveform with 16-bit preci-sion, accurate to ±0.001Hz with har-monic distortion of less than 0.01%.
The analog sine wave from the DAC remains precisely in-phase with the incoming AC. The analog signal is capacitor-coupled to the next stage, a third-order, low-pass filter. The capaci-tor coupling removes a DC component from the waveform, and the low-pass filter removes the sampling by-prod-ucts. The resulting low-distortion sine wave is then amplified to the desired output level using a unique topology.
The patent shows two dual-polarity power supplies in the schematic dia-grams. ±15V DC rails are used for the post-DAC analog filter and the ampli-fier output stage (referred to as the “current amplifier”). The voltage am-plifier stage is powered by ±30V DC rails.
Stadtherr describes four embodi-ments of the circuit—the last appears to be the one used in the Power Plant Pre-mier, and is the key to the high efficien-cy he has achieved. From the patent, this method consists of “superimposing
a dual direct current (“DC”) supply voltage on a source of alternating cur-rent (“AC”) power, and synchronizing the dual DC supply voltage with the AC power to produce a range of available tracking power supply voltages suf-ficient to feed a power amplifier pro-ducing a desired output voltage.” That source of AC power is the incoming AC line.
“The output signal can be adjusted (if desired) infinitely to any voltage, since the output waveform. . . is not simply a multiple of the input power. . . Also, since the output waveform is not de-pendent on the input waveform shape, distortion, noise and other anomalies can be eliminated. Further, since the DC voltages are superimposed on the incoming AC signal, the voltages seen by the power devices are much smaller than standard regenerators, thus im-proving efficiency and thus allowing high power systems to be achieved in a smaller, lighter package than traditional regenerators. Finally, since the active output stage drives the load directly, without the use of transformers, the source impedance is very low. The ac-tive output stage can have a source im-pedance that is actually lower than the original AC power source.”
A couple of things are apparent. Since the incoming AC is used to “modulate” the relatively low-voltage DC supply rails, it’s important that the regenerated AC be in-phase with the incoming AC power line, as noted in the patent. The supply rails for the Power Plant’s power amplifier must reach their peak level at the same mo-ment as the regenerated AC. Other-wise, the Power Plant would be unable
to output the required AC line voltage. The second half of the preceding para-graph is key to understanding how the improved efficiency has been achieved, and how the Power Plant Premier can actually deliver higher current than the power outlet it’s connected to for brief periods of time. The peak current ca-pability also depends on Power Plant’s own internal power supply, particularly the power transformer and capacitor bank. PS Audio claims 85% efficiency for the Power Plant Premier, an im-pressive achievement.
Several other reviews have described the Power Plant Premier as having a Class-D amplifier. This is incorrect. In a Class-D amplifier the output transis-tors are operated as switches, which is clearly not the case with the Power Plant Premier. In his patent, Stadtherr actually mentions Class-D amplifier op-eration as an alternative to the method he describes.
CONSTRUCTION AND OPERATIONThe Power Plant Premier is an attrac-tive and robust unit, measuring 17″ × 16.5″ × 4″ and weighing 35 pounds. It’s no surprise that it looks like a power amplifier, because it is! The front panel LCD display provides a variety of infor-mation. Mode buttons, accessible on the front panel or on the remote con-trol, toggle between input voltage, out-put voltage, voltage difference, input THD, and output THD. You can dim the display or turn it off altogether with another button on the front panel, or with the remote.
In addition to a low-distortion sine wave, the Power Plant Premier also

Reliable Reviews
audioXpress April 2010 E4
includes a MultiWave output, designed for PS Audio by Northrop Grumman scientist Doug Goldberg. MultiWave adds 3rd harmonic to the sine wave, producing a waveform with rounder peaks, which increases the charging time on power supply capacitors. The result is lower supply ripple. The pre-vious generation of Power Plants was supplied with a version of MultiWave called MultiWave II, which produced a frequency-modulated waveform along with the added 3rd harmonic. The Power Plant Premier has the added 3rd harmonic, but not the frequency modulation.
CleanWave is a modulated sine wave used for degaussing the power transformers in connected equipment. When CleanWave is activated, the front panel display counts down for five seconds, at which point the process is complete. CleanWave is not intended for listening. You must use the remote to activate the MultiWave and Clean-Wave functions.
ISOLATED OUTPUTS The Power Plant Premier has five pairs of isolated, color-coded outlets, which PS Audio calls “IsoZones” (Photo 2). The outlets themselves are PS Audio Power Port types, which they also sell separately for those who wish to up-grade existing wall outlets. As noted, isolation transformers can add distor-tion of their own, and can also limit the current capability of any power supply. PS Audio has a different approach.
The regenerated AC line to each pair of outlets is fed through one of PS Au-dio’s Nano-Crystalline filters (Photo
3). These differential-mode filters use
very short pieces of heavy gauge wire, wrapped around small high-perme-ability magnetics to achieve isolation between outlet pairs, preventing noise generated by one piece of equipment from degrading the performance of other connected equipment. This is
especially important if you have digital and analog equipment connected to the same source, since all digital devices generate noise.
According to PS Audio, the Nano Crystalline material has approximately ten times the permeability of any other
PHOTO 2: Rear view of the Power Plant Premier. You can set five pairs of isolated outlets, called “IsoZones,” for always on, switched, or delayed operation. The Power Plant Premier also provides passive, no-loss protection for telephones and television equipment.
PHOTO 3: PS Audio’s Nano-Crystalline filters feed each pair of isolated power outlets. These differential-mode filters achieve a high degree of isolation between the outlets, minimizing cross-contamination of noise generated by the connected equipment (Cour-tesy of PS Audio).

Reliable Reviews
E5 audioXpress 4/10 www.audioXpress .com
magnetic material. The high perme-ability means that an effective filter can be built with fewer turns of wire. The heavy, low-resistance wire used in these filters ensures that they will not limit the current capability of the Pow-er Plant. PS Audio also uses ¼″ thick,
solid copper power bars internally, to avoid compromising the Power Plant’s current capability.
Power sequencing is often desirable and sometimes necessary in order to ensure silent system power-up and power-down. Normally, you should
power up low-level gear (preamp, digital transport, D/A converter) first, turning on power amplifiers last. When powering down, turn power amps off first, followed by low-level equipment.
Some equipment, such as cable box-es and Tivos®, may require live AC all the time. Three rear-panel switches allow you to program the rear panel outlets for “always on” operation, switched operation, or a three-second power-on delay. Because there are five pairs of isolated outlets, switch A oper-ates IsoZones 1 and 2, switch B oper-ates IsoZones 3 and 4, and switch C operates IsoZone 5 (which is intended for power amplifiers, though it is elec-trically identical to the others).
The Power Plant Premier also con-tains no-loss telephone and CATV protection. Two in/out pairs of “F” connectors are included for users who have two television sources, such as cable TV, satellite, or a conventional antenna.
You can turn on the Power Plant Premier three ways—with the front panel power switch, the remote con-trol, or with a DC trigger voltage be-tween +5 and +15V DC. I prefer the trigger method. The rear panel has two 3.5mm phono jacks that you can con-nect to any equipment that produces the correct trigger voltage. Alternately, you can simply use a low-current 9 or 12V DC wall-wart fitted with a 3.5mm phono plug (tip must be positive!). I use a Radio Shack 9V/300mA adapter, #273-027, plugged into the Furman M-8 mentioned above, but you can also use a switched outlet on your preamp.
PS Audio supplies a 14-AWG IEC power cord with the Power Plant Pre-
PHOTO 4: The Power Plant Premier’s robust chassis hous-es a hefty toroidal power transform-er, two large aluminum heatsinks, plus the main PC board (Courtesy of PS Audio).
PHOTO 5: The power car-tridge is matched to the line voltage where the unit will be used and is field-replaceable, simplifying repairs should the unit be damaged by a lightning strike (Courtesy of PS Audio).
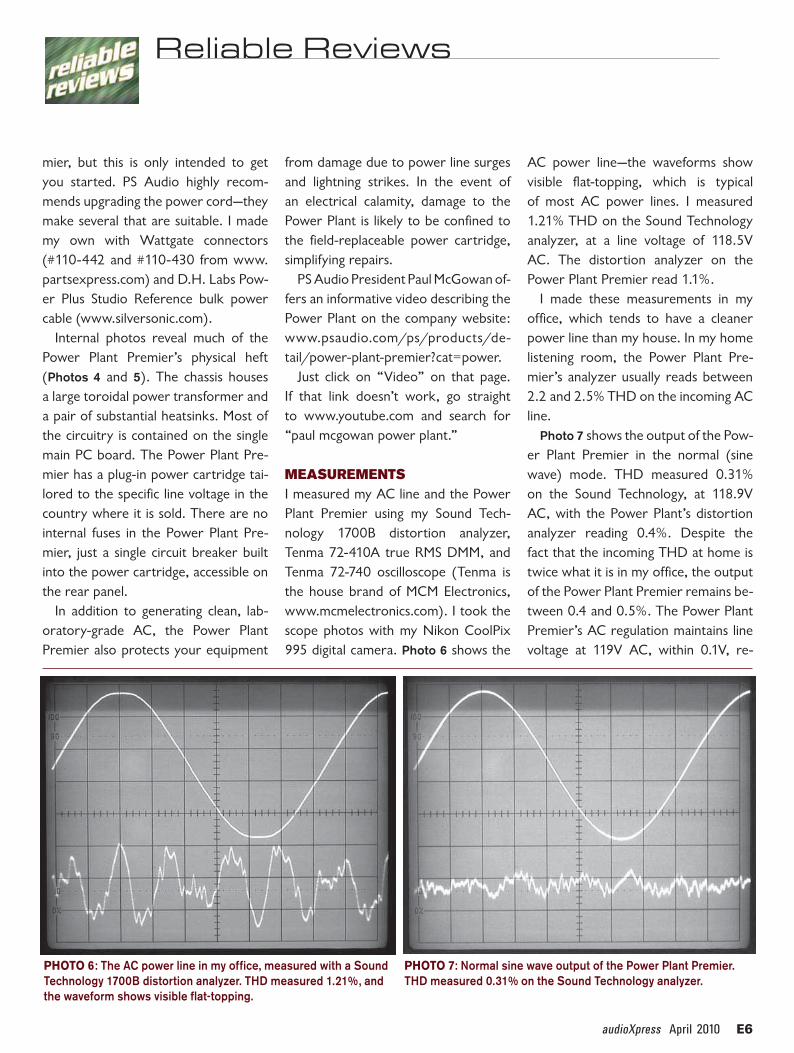
Reliable Reviews
audioXpress April 2010 E6
mier, but this is only intended to get you started. PS Audio highly recom-mends upgrading the power cord—they make several that are suitable. I made my own with Wattgate connectors (#110-442 and #110-430 from www.partsexpress.com) and D.H. Labs Pow-er Plus Studio Reference bulk power cable (www.silversonic.com).
Internal photos reveal much of the Power Plant Premier’s physical heft (Photos 4 and 5). The chassis houses a large toroidal power transformer and a pair of substantial heatsinks. Most of the circuitry is contained on the single main PC board. The Power Plant Pre-mier has a plug-in power cartridge tai-lored to the specific line voltage in the country where it is sold. There are no internal fuses in the Power Plant Pre-mier, just a single circuit breaker built into the power cartridge, accessible on the rear panel.
In addition to generating clean, lab-oratory-grade AC, the Power Plant Premier also protects your equipment
from damage due to power line surges and lightning strikes. In the event of an electrical calamity, damage to the Power Plant is likely to be confined to the field-replaceable power cartridge, simplifying repairs.
PS Audio President Paul McGowan of-fers an informative video describing the Power Plant on the company website: www.psaudio.com/ps/products/de-tail/power-plant-premier?cat=power.
Just click on “Video” on that page. If that link doesn’t work, go straight to www.youtube.com and search for “paul mcgowan power plant.”
MEASUREMENTSI measured my AC line and the Power Plant Premier using my Sound Tech-nology 1700B distortion analyzer, Tenma 72-410A true RMS DMM, and Tenma 72-740 oscilloscope (Tenma is the house brand of MCM Electronics, www.mcmelectronics.com). I took the scope photos with my Nikon CoolPix 995 digital camera. Photo 6 shows the
AC power line—the waveforms show visible flat-topping, which is typical of most AC power lines. I measured 1.21% THD on the Sound Technology analyzer, at a line voltage of 118.5V AC. The distortion analyzer on the Power Plant Premier read 1.1%.
I made these measurements in my office, which tends to have a cleaner power line than my house. In my home listening room, the Power Plant Pre-mier’s analyzer usually reads between 2.2 and 2.5% THD on the incoming AC line.
Photo 7 shows the output of the Pow-er Plant Premier in the normal (sine wave) mode. THD measured 0.31% on the Sound Technology, at 118.9V AC, with the Power Plant’s distortion analyzer reading 0.4%. Despite the fact that the incoming THD at home is twice what it is in my office, the output of the Power Plant Premier remains be-tween 0.4 and 0.5%. The Power Plant Premier’s AC regulation maintains line voltage at 119V AC, within 0.1V, re-
PHOTO 6: The AC power line in my office, measured with a Sound Technology 1700B distortion analyzer. THD measured 1.21%, and the waveform shows visible flat-topping.
PHOTO 7: Normal sine wave output of the Power Plant Premier. THD measured 0.31% on the Sound Technology analyzer.

Reliable Reviews
E7 audioXpress 4/10 www.audioXpress .com
gardless of the incoming line voltage.Photo 8 shows the Power Plant’s
output in the MultiWave mode. The waveform has been altered, produc-ing rounder peaks than a conventional sine wave. The Sound Technology read 5.0% THD, with the distortion wave-form dominated by the 3rd harmonic added to produce the modified wave-form. The Power Plant Premier’s dis-
tortion analyzer read 0.2% at 118.9V AC, so I assume that the Power Plant’s distortion analyzer compensates for the added 3rd harmonic when read-ing THD in the MultiWave mode (un-der load the MultiWave THD rises to around 0.4%).
Photo 9 shows the CleanWave used for equipment degaussing. The wave-form is modulated by a higher-frequen-
cy audio signal which appears to be centered around 2kHz.
PS Audio suggests connecting the Power Plant Premier to your current power line filter, and using its internal distortion analyzer to measure the AC coming out of other power line con-ditioners. The Adcom ACE-515 mea-sures around 2.2%. The high-current outlets on the Power Wedge 116 mea-
PHOTO 11: Raw DC preamp power supply with the Power Plant in MultiWave mode. Peak-to-peak ripple is about 40mV less than in Photo 10.
PHOTO 8: AC output of the Power Plant Premier in the MultiWave mode. The rounded peaks are achieved by adding 3rd harmonic, which increases the measured THD to 5.0%.
PHOTO 9: AC output with CleanWave activated. This degaussing feature modulates the 60Hz waveform with a higher frequency sig-nal centered around 2kHz.
PHOTO 10: Raw DC preamp power supply, with the scope set at 0.1V per division. The preamp was powered with the Power Plant’s sine wave output.
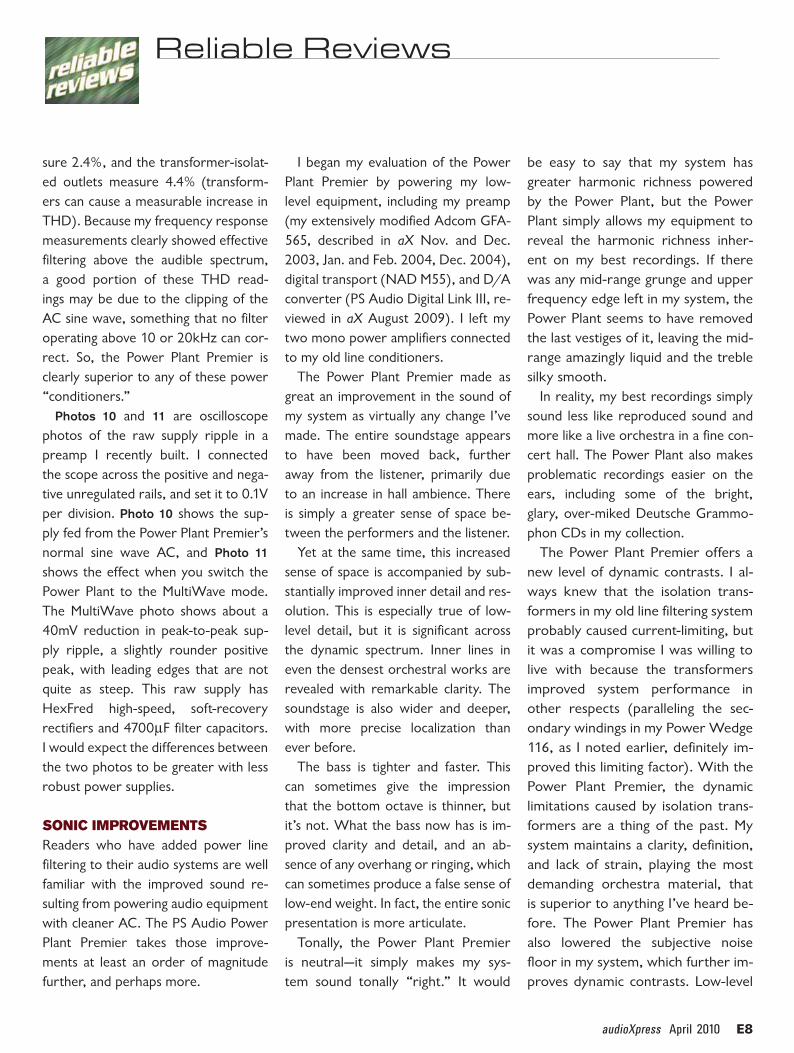
Reliable Reviews
audioXpress April 2010 E8
sure 2.4%, and the transformer-isolat-ed outlets measure 4.4% (transform-ers can cause a measurable increase in THD). Because my frequency response measurements clearly showed effective filtering above the audible spectrum, a good portion of these THD read-ings may be due to the clipping of the AC sine wave, something that no filter operating above 10 or 20kHz can cor-rect. So, the Power Plant Premier is clearly superior to any of these power “conditioners.”
Photos 10 and 11 are oscilloscope photos of the raw supply ripple in a preamp I recently built. I connected the scope across the positive and nega-tive unregulated rails, and set it to 0.1V per division. Photo 10 shows the sup-ply fed from the Power Plant Premier’s normal sine wave AC, and Photo 11
shows the effect when you switch the Power Plant to the MultiWave mode. The MultiWave photo shows about a 40mV reduction in peak-to-peak sup-ply ripple, a slightly rounder positive peak, with leading edges that are not quite as steep. This raw supply has HexFred high-speed, soft-recovery rectifiers and 4700μF filter capacitors. I would expect the differences between the two photos to be greater with less robust power supplies.
SONIC IMPROVEMENTSReaders who have added power line filtering to their audio systems are well familiar with the improved sound re-sulting from powering audio equipment with cleaner AC. The PS Audio Power Plant Premier takes those improve-ments at least an order of magnitude further, and perhaps more.
I began my evaluation of the Power Plant Premier by powering my low-level equipment, including my preamp (my extensively modified Adcom GFA-565, described in aX Nov. and Dec. 2003, Jan. and Feb. 2004, Dec. 2004), digital transport (NAD M55), and D/A converter (PS Audio Digital Link III, re-viewed in aX August 2009). I left my two mono power amplifiers connected to my old line conditioners.
The Power Plant Premier made as great an improvement in the sound of my system as virtually any change I’ve made. The entire soundstage appears to have been moved back, further away from the listener, primarily due to an increase in hall ambience. There is simply a greater sense of space be-tween the performers and the listener.
Yet at the same time, this increased sense of space is accompanied by sub-stantially improved inner detail and res-olution. This is especially true of low-level detail, but it is significant across the dynamic spectrum. Inner lines in even the densest orchestral works are revealed with remarkable clarity. The soundstage is also wider and deeper, with more precise localization than ever before.
The bass is tighter and faster. This can sometimes give the impression that the bottom octave is thinner, but it’s not. What the bass now has is im-proved clarity and detail, and an ab-sence of any overhang or ringing, which can sometimes produce a false sense of low-end weight. In fact, the entire sonic presentation is more articulate.
Tonally, the Power Plant Premier is neutral—it simply makes my sys-tem sound tonally “right.” It would
be easy to say that my system has greater harmonic richness powered by the Power Plant, but the Power Plant simply allows my equipment to reveal the harmonic richness inher-ent on my best recordings. If there was any mid-range grunge and upper frequency edge left in my system, the Power Plant seems to have removed the last vestiges of it, leaving the mid-range amazingly liquid and the treble silky smooth.
In reality, my best recordings simply sound less like reproduced sound and more like a live orchestra in a fine con-cert hall. The Power Plant also makes problematic recordings easier on the ears, including some of the bright, glary, over-miked Deutsche Grammo-phon CDs in my collection.
The Power Plant Premier offers a new level of dynamic contrasts. I al-ways knew that the isolation trans-formers in my old line filtering system probably caused current-limiting, but it was a compromise I was willing to live with because the transformers improved system performance in other respects (paralleling the sec-ondary windings in my Power Wedge 116, as I noted earlier, definitely im-proved this limiting factor). With the Power Plant Premier, the dynamic limitations caused by isolation trans-formers are a thing of the past. My system maintains a clarity, definition, and lack of strain, playing the most demanding orchestra material, that is superior to anything I’ve heard be-fore. The Power Plant Premier has also lowered the subjective noise floor in my system, which further im-proves dynamic contrasts. Low-level

Reliable Reviews
E9 audioXpress 4/10 www.audioXpress .com
details emerge from an absolutely si-lent background.
The real noise floor in my listen-ing room is also lower. The isolation transformers in my old power line filtering made a slight mechanical buzz, which could sometimes be au-dible during the very softest musical passages. The Power Plant Premier is silent in its operation. It does contain an internal fan that will turn on if the heatsink temperature warrants. But, powering my low-level gear, it runs slightly warm but never enough to turn on the fan (the fan does come on momentarily when you first turn on the unit, as a precaution, but turns off as soon as safe heatsink temperature is detected).
The MultiWave feature is an interest-ing and worthwhile enhancement. The most noticeable difference is in the low-end weight. On bass drums, it’s more a matter of the portion of the spectrum that you feel rather than hear. Multi-Wave also opens up the soundstage a bit further. The magnitude of the dif-ference will probably have a lot to do with how good the regulation is in your power supplies.
My preamplifier has Walt Jung’s “Im-proved Positive/Negative Regulators” described in Audio Electronics 4/2000, which have superior line rejection and better dynamic performance than any regulator I’ve used. With my low-level equipment, MultiWave was more like icing on the cake than another dramatic improvement. I suspect that the poor-er the supply regulation, the greater benefit that MultiWave will provide, with power amps probably benefiting the most (power amps generally have
unregulated power supplies, at least for their output stages; if regulation is used, it’s usually for the voltage-gain stages).
The effect of degaussing your con-nected components with CleanWave is subtle. If you run CleanWave on a daily basis, you may conclude that it’s not doing anything at all. However, if you haven’t run CleanWave for sev-eral weeks, you may find that it takes a slight edge off your system. Edginess is a characteristic I have associated with permeable metals in the signal path, especially resistors and capaci-tors with steel leads. If any residual magnetism has built up in your equip-ment’s power supplies, degaussing it can only help, and certainly can’t hurt.
After living with the Power Plant Premier operating only my low-level gear, I decided to connect my power amplifiers to the Power Plant (I am currently using a pair of Monarchy SM-70s, reviewed in Audio Electron-ics, Sept. 2000). Although I noted similar sonic improvements with the power amps fed by the Power Plant, the differences were not as dramatic as they were for my low-level equip-ment. I also noted one negative—the bass seemed thinner than before, lack-ing some of the weight and impact in the bottom octave.
I raised this issue with PS Audio’s Vice President of Sales and Market-ing, Dave Kakenmaster. With about 500W of current draw per amplifier, a pair of Monarchy pure Class-A pow-er amps combined with my low-level gear is running the Power Plant Pre-mier close to its constant-load limit.
Dave notes that they normally recom-mend a maximum continuous draw of 1000W, with the Power Plant Pre-mier’s maximum of 1500W reserved for occasional peak requirements. This makes sense to me, so I recon-nected my power amps to my old line conditioning equipment. But, I can’t help wonder how the power amps would perform with their own, dedi-cated Power Plant Premier. I should note that even adding the Monarchy Class-A power amps never generated enough heat to activate the fan.
During my evaluations of the Pow-er Plant Premier, I spent several eve-nings comparing the sound of my sys-tem using my old power conditioning scheme with that of the Power Plant Premier. This is a fairly simple thing to do. Simply listen to a reference re-cording with one source of AC pow-er, temporarily power your system down, and plug your equipment into the other AC source. Power up and listen again.
One advantage of this type of com-parison is that it doesn’t change any of the MAAD parameters (Mothers of All Audible Differences—level, frequency response, and absolute polarity, which some claim are the only factors that have an audible effect on the sound). Everything remains the same except the power source.
I was repeatedly shocked and dis-appointed with the sound of the line filtering scheme that has served me so well for more than 15 years. Every time I went back to my old line filter-ing, the sound became unrefined and inarticulate. “Mushy” is a good word to describe the relative lack of clarity

Reliable Reviews
audioXpress April 2010 E10
and definition with my old line filter-ing equipment. After a few evenings of back and forth comparisons, it was obvious that my old line filtering equip-ment had run its course.
CONCLUSIONSThe PS Audio Power Plant Premier will raise the performance of your audio system to a new level, and it should be equally well-suited to high-end home-theater applications. A clean AC power supply is an essen-tial part of a reference-quality music system, and the Power Plant Premier is the finest source of AC power that I’ve used. At a list price of $2200, it’s not cheap, but the design is so-phisticated and execution and quality of construction are first-rate. Once you’ve tried a Power Plant Premier, there’s no turning back. Highly rec-ommended!
Manufacturer’s Response:On behalf of everyone at PS Audio, I thank Mr. Galo for his very thor-ough and thoughtful review of the Power Plant Premier. We agree with his findings and it’s no wonder the PPP has become the reference AC product for so many audio- and vid-eophiles.
There is one thing I’d like to add. Consider this item an “Easter egg” of sorts. There are actually two Clean-Wave modes, short (5 seconds) and long (60 seconds). The instruction manual describes the short mode only. To access the longer and more effec-tive mode, start CleanWave and press the CleanWave button again within the 5 seconds that the short mode is
running. We recommend you run this long mode 2 or 3 times at the begin-ning of any serious listening session and here and there throughout, with the 5 second mode for “touch up” between discs or album sides.
Dave KakenmasterVP Sales & MarketingPS Audio International
REFERENCES1. Galo, Gary. “Ask TAA.” Essay on power
line noise, including review of Adcom’s ACE-
515 AC Enhancer. Audio Amateur, 2/91.
2. Galo, Gary. “Ask TAA.” Review of Au-
dio Power Industry’s Power Wedge II Power
Line Conditioner. Audio Amateur, 4/91.
3. Galo, Galo. “Ask TAA.” Review of New
Power Wedge Products—Power Wedge 116,
Power Wedge 110, and Power Enhancer I.
Audio Amateur, 3/93.
4. Galo, Gary. “An Electronic Speed Con-
trol,” Audio Amateur, 1/86. rr
TABLE 1: MANUFACTURER’S SPECIFICATIONS
Dimensions: 17″ W × 16.5″ D × 4″ H
Weight: 35 lbs
Nominal Input Voltage: 105-135V AC (US), 215-245V AC (Europe/Asia)
Max Continuous Load: 1200VA (US), 1500VA (Europe/Asia)
Dynamic Power Delivery: 0.5 second > 3600VA (US), 5000VA (Europe/Asia)
Voltage Regulation: ±0.5V AC (US), ±1V AC (Europe/Asia)
Output Distortion (Input 110-130V AC): 1200VA Resistive load < 0.5%
Output Distortion (Input 220-240V AC): 1200VA Resistive load < 0.9%
Output distortion (230V) 240V AC: 1200VA Reactive load < 0.9%
Output Impedance: < 0.015Ω
Noise Reduction (all zones): 100KHz-2MHz > 80dB
Efficiency (1200VA): > 80% (resistive load), > 85% (reactive load)
Input Frequency: 45-65Hz
Under Voltage Limit: 90V AC (US), 175V AC (Europe/Asia)
Over Voltage Limit: 145V AC (US), 275V AC (Europe/Asia)
Protection Modes: L-N, L-G, N-G
Energy Dissipation: 2160J (US), 2142J (Europe/Asia)
Peak Current Surge: 144,000A (US), 84,000A (Europe/Asia)
Max Surge: 6,000V
Clamp Level: 330V (US), 800V (Europe/Asia)
Telco Protection: 320 Joules, 395V
Coax Insertion Loss: < 1dB
DC Trigger Config Tip: positive
DC Trigger Voltage: 5-15V DC
E11 audioXpress 4/10 www.audioXpress .com
so l i d s t at e By Ed Simon
Making Better Printed Circuit Cards
�he late Bill C. was the best audio service tech I ever knew. When I first met him, he had a small shop
in a basement corner of the best stereo store in town. Just about every flat sur-face was covered in carpet remnants, preventing customers’ gear from getting scratched.
SOUND ADVICEHe had a reputation for gruffness, and so I was a bit surprised when he wel-comed me into his realm and taught me a few of the secrets to rapid repair of sound equipment:• Keep a diode in series with your sol-
dering iron so the tip doesn’t burn up.
• Hook a light bulb in series with the amplifier under test so you don’t blow fuses or semiconductors.
• Use a 300 TV antenna clip twisted to a 45° angle for speaker quick con-nection; I use two alligators.
• When an amplifier blows fuses, re-move and check the output transis-tors first. If they are good, start at the input (don’t forget the current source). But since they almost al-ways are bad, replace them and try the drivers. Keep going until you find good transistors.
• If the PC board has through-plated via holes, solder in jumpers.
• Always listen to the finished work.About the only really useful tip I
didn’t learn from him was that when the tube glows blue, replace the input capacitor. It was great being handed answers when sometimes I didn’t even know the questions.
I also had a mentor for making PC cards, but the actual layout was a dif-ferent story. I have read a few books and articles, cut rubylith, and applied tape-ups. Much to my delight, I no lon-ger need to stain just about everything in my wet sink with ferric chloride. The age of computer-assisted PC lay-out is firmly here. That does not mean I trust the computer to actually lay out my circuit.
CIRCUIT BASICSThe first step in any method of layout is to start with a well-drawn schematic. Convention says the input is on the left and the output on the right. There should be as few crossed lines as pos-sible. Where three lines connect, put a dot to show the connection. Never connect four lines, it is too easy to confuse this with a crossover. Figure
1 shows a typical schematic, which has only one crossover, a few four-way con-nections changed into two three-ways, and is generally ready to be turned into a PC card.
Using the program EXPRESSPCB, I can link the layout program to the sche-
Producing your own printed circuit boards is easy when you follow these tips.

audioXpress April 2010 E12
matic, place the component outlines into the workspace, and, when need-ed, produce new outlines. One quirk is that the pinout of semiconductors is not defined because the case can have different pinouts.
I like to place all the components onto the page and move them to where I think they should live. I place transistors that connect to the heatsink along the edge. The mounting holes in the heatsink line up with the center pin of the power transistor. You can then place emitter resistors.
Parts that become hot can have ex-tra room. Placing ICs allows you to put all the related parts in neat rows next to them. Allowing for where power supply buses go will influence some placement. Once the general layout is done, I place the mounting holes and board corners.
The program will guide you through which lead needs to connect to the oth-ers, or you can do this yourself. Some-times you will need to rotate a part. While you know it does not matter which end of the resistor goes which
way, the program does not. It thinks only of pins one or two. Double-check-ing anything with three leads is a good idea. And keeping signal and power lines short and straight is also a good idea.
I do not like to use traces thinner than 0.020 for audio circuits. Thin-ner traces are fine for digital circuits in
which you need to route signal traces between IC pins or other tight places. For audio, space should not limit you.
People who lay out radio frequency circuits often use thin long PC traces as circuit elements. Audio transistors often work to several hundred mega-hertz. Be careful not to accidentally make an RF oscillator yourself. This will
FIGURE 1: A typical amplifier schematic.
FIGURE 2: Typical bused PC layout.

E13 audioXpress 4/10 www.audioXpress .com
show up as, at best, a noisy circuit, at worst, smoke and flames.
The output, power, and ground bus-es should be thicker to minimize losses. There are also concerns that you have enough copper in a signal path to han-dle the current. There is a handy guide with the software that runs through the basics of layout and capabilities.
One standard of PC layout is to use different colors for different layers, top, bottom, silkscreen and, if used, inside layers.
Of course, you can use any PC layout program; the downside of EXPRESS-PCB is that you must use their service because the program does not port to the industry standards.
CIRCUIT DESIGNSFigure 2 is a typical layout for the cir-
FIGURE 3: Schematic with PC resistance.
FIGURE 4: Star design PC layout.
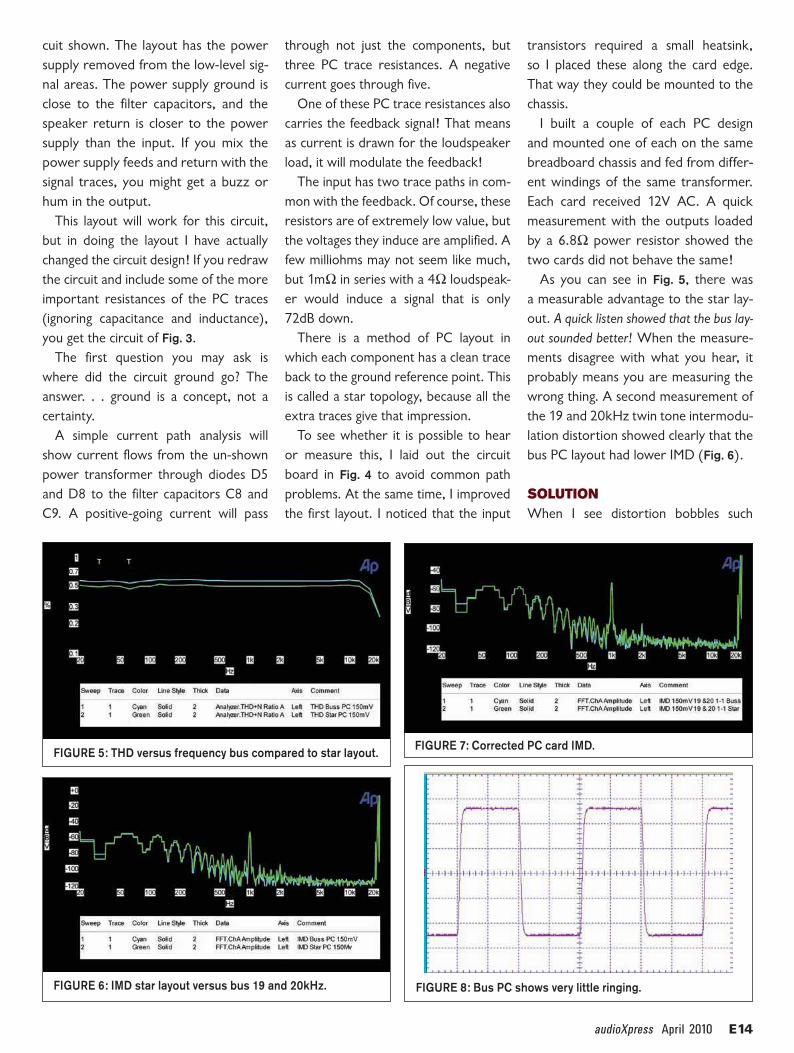
audioXpress April 2010 E14
cuit shown. The layout has the power supply removed from the low-level sig-nal areas. The power supply ground is close to the filter capacitors, and the speaker return is closer to the power supply than the input. If you mix the power supply feeds and return with the signal traces, you might get a buzz or hum in the output.
This layout will work for this circuit, but in doing the layout I have actually changed the circuit design! If you redraw the circuit and include some of the more important resistances of the PC traces (ignoring capacitance and inductance), you get the circuit of Fig. 3.
The first question you may ask is where did the circuit ground go? The answer. . . ground is a concept, not a certainty.
A simple current path analysis will show current flows from the un-shown power transformer through diodes D5 and D8 to the filter capacitors C8 and C9. A positive-going current will pass
through not just the components, but three PC trace resistances. A negative current goes through five.
One of these PC trace resistances also carries the feedback signal! That means as current is drawn for the loudspeaker load, it will modulate the feedback!
The input has two trace paths in com-mon with the feedback. Of course, these resistors are of extremely low value, but the voltages they induce are amplified. A few milliohms may not seem like much, but 1mΩ in series with a 4Ω loudspeak-er would induce a signal that is only 72dB down.
There is a method of PC layout in which each component has a clean trace back to the ground reference point. This is called a star topology, because all the extra traces give that impression.
To see whether it is possible to hear or measure this, I laid out the circuit board in Fig. 4 to avoid common path problems. At the same time, I improved the first layout. I noticed that the input
transistors required a small heatsink, so I placed these along the card edge. That way they could be mounted to the chassis.
I built a couple of each PC design and mounted one of each on the same breadboard chassis and fed from differ-ent windings of the same transformer. Each card received 12V AC. A quick measurement with the outputs loaded by a 6.8Ω power resistor showed the two cards did not behave the same!
As you can see in Fig. 5, there was a measurable advantage to the star lay-out. A quick listen showed that the bus lay-out sounded better! When the measure-ments disagree with what you hear, it probably means you are measuring the wrong thing. A second measurement of the 19 and 20kHz twin tone intermodu-lation distortion showed clearly that the bus PC layout had lower IMD (Fig. 6).
SOLUTIONWhen I see distortion bobbles such
FIGURE 5: THD versus frequency bus compared to star layout.
FIGURE 6: IMD star layout versus bus 19 and 20kHz.
FIGURE 7: Corrected PC card IMD.
FIGURE 8: Bus PC shows very little ringing.
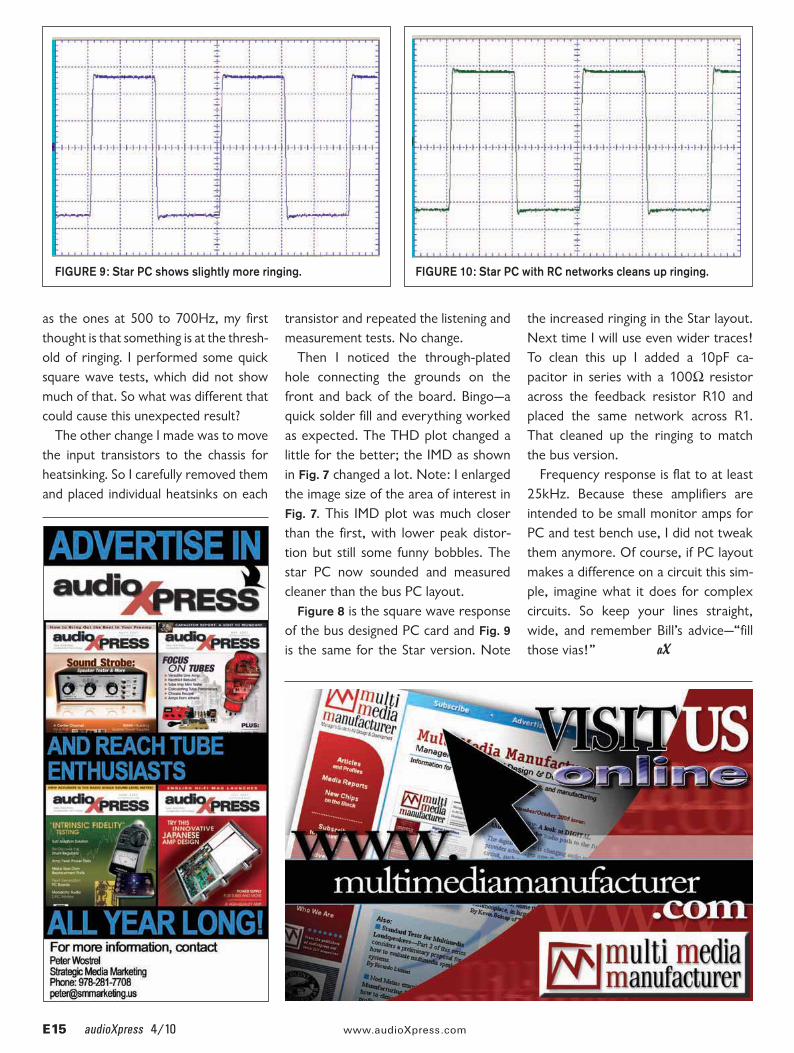
E15 audioXpress 4/10 www.audioXpress .com
as the ones at 500 to 700Hz, my first thought is that something is at the thresh-old of ringing. I performed some quick square wave tests, which did not show much of that. So what was different that could cause this unexpected result?
The other change I made was to move the input transistors to the chassis for heatsinking. So I carefully removed them and placed individual heatsinks on each
transistor and repeated the listening and measurement tests. No change.
Then I noticed the through-plated hole connecting the grounds on the front and back of the board. Bingo—a quick solder fill and everything worked as expected. The THD plot changed a little for the better; the IMD as shown in Fig. 7 changed a lot. Note: I enlarged the image size of the area of interest in Fig. 7. This IMD plot was much closer than the first, with lower peak distor-tion but still some funny bobbles. The star PC now sounded and measured cleaner than the bus PC layout.
Figure 8 is the square wave response of the bus designed PC card and Fig. 9 is the same for the Star version. Note
the increased ringing in the Star layout. Next time I will use even wider traces! To clean this up I added a 10pF ca-pacitor in series with a 100Ω resistor across the feedback resistor R10 and placed the same network across R1. That cleaned up the ringing to match the bus version.
Frequency response is flat to at least 25kHz. Because these amplifiers are intended to be small monitor amps for PC and test bench use, I did not tweak them anymore. Of course, if PC layout makes a difference on a circuit this sim-ple, imagine what it does for complex circuits. So keep your lines straight, wide, and remember Bill’s advice—“fill those vias!” aX
FIGURE 9: Star PC shows slightly more ringing. FIGURE 10: Star PC with RC networks cleans up ringing.

audio news
E16 audioXpress 4/10 www.audioXpress .com
Danley Sound Labs is offering its DTS10 subwoofer as a DIY kit, which ships with all the wood pre-cut and pre-drilled and includes two custom 12″ drivers, for a limited time. Delivering bass down to 11Hz, the DTS10 is 45″ × 60″ × 16″, and can be positioned in almost any orientation with no reduction in frequency response or SPL. To order, visit www.danleysoundlabs.com.
The 300i push-pull amplifier, from Nagra, features mains and output transformers completely separated from each other, the latter contained in a custom-made aluminum tubular casing that sits in the top of the chassis. Two versions of this amp are available, one being a straight power amp without multiple inputs or volume control. For more, please go to www.nagraaudio.com.
The G7.1f loudspeaker, from Genesis Advanced Technologies, was named as the CES Best of Innovations 2010 Design and Engineering Award Honoree. Having re-ceived one of the highest scores in its product category, this high-end audiophile loud-speaker gives full-range musical performance in a small-footprint enclosure. It features a built-in servo-controlled 8 subwoofer, which delivers bass down to 22Hz, while its Genesis ribbon tweeter ensures high frequencies to 36kHz. For more about Genesis, visit www.genesisloudspeakers.com.
From 3rd Power Amplification, the SV3015 Stereo Valve Power Amplifier is a 2RU unit featuring four EL34 and three 12AX7 vacuum tubes, with selectable output of 30 or 15W of pure tube power. It also incorporates two distinct gain stages, starting with a clean tube preamp stage, followed by a traditional tube output. Optimized for use as the output stage of a rack system, the SV3015 has a traditional ¼″ mono input jack to allow direct plug-in. To learn more, go to www.3rdpoweramps.com.
Designed to bring out subtle tonal characteristics of a tube by producing the shortest possible signal path from input to output, the Palmer PDI-CTC includes no vol-ume control. The PDI-CTC incorporates two vacuum tubes, an ECC83/12AX7, and an ECC82/12AU7, four musically voiced wideband filters, and a bell-shaped filter characteristic. Each filter band has a three-position tog-gle switch on the front panel, while the PDI-CTC itself offers an extended dynamic rung so no limiting occurs between signal levels of +30dBu at the line output. The company supplied parallel and buffered ¼″ unbalanced
Compiled by Richard Surrette

outputs on the front panel, and the PDI-CTC generates the required tube voltages from its integrated power supply. For more information, visit www.tsidistributing.com.
Audio-Technica introduces its AT-LP60-USB LP-to-Digital Turntable System, a complete USB turntable and software package that can transfer vinyl records to digital media files as well as play the records themselves. Featuring a phono cartridge, turntable, PC- and Mac-compatible software, a USB cable, and a built-in phono preamp, the AT-LP60-USB comes with RCA output cables and 3.5mm-to-RCA adapter cables and a removable dustcover. Its turntable is designed with a heavy-duty precision cast aluminum platter, a Dual Magnet stereo cartridge with replaceable stylus, and a pickup arm with soft damping control. The company also offers the LP120 direct-drive professional turntable. Learn more at www.audio-technica.com.
The MXA60 Integrated Audio System, in honor of the company’s 60th anniversary, is McIntosh Laboratory’s first-ever stand-alone integrated audio system. Featuring a 75W per channel amplifier, state-of-the-art CD/SACD/MP3 player, vac-uum tube preamp, two-way bass reflex loudspeaker system, and an AM/FM/RBDS tuner, the MXA60’s advanced hybrid transistor/tube design utilizes a dual triode tube design. For more, please go to www.mcintoshlabs.com.
Mouser Electronics, Inc. has entered into a distribution agreement with EPCOS, marketing products under TDK’s electronic components business, in the new TDK-EPC Corporation, manufacturing modules and systems. This distribu-tion agreement now includes Europe and Asia, allowing Mouser to provide EPCOS products worldwide. To learn more, visit www.mouser.com.
audioXpress April 2010 E17

30 audioXpress 4/10 Visit Audio Marketplace Online at www.audioXpress.com
for Direct Links to These Companies and More
Audio Marketplace
����������� ���������
���������������������������������������
��������������������������������������������������� �! "�#$ �#$#%��������&��������

MARCH 26TH THRU 28TH 2010HILTON BONAVENTURE
HILTON MONTREAL BONAVENTURE 900 de La Gauchetière West, Montreal, H5A 1E4 INFORMATION [email protected] SCHEDULEwww.salonsonimage.comFOLLOW US ON TWITTER! twitter.com/ssiexpo
> EXHIBITIONS SEMINARS DEMONSTRATIONS WORKSHOPS LIVE MUSIC CONFERENCES
> COME SEE AND LISTEN TO SOME OF THE BEST SOUND SYSTEMS IN THE WORLD
> MORE THAN 100 EXHIBITORS DISPLAYING OVER 300 OF THE BEST BRANDS
SHOWTIMEFRIDAY 11 a.m. – 9 p.m. SATURDAY 10 a.m. – 6 p.m. SUNDAY 10 a.m. – 5 p.m.
TICKETS REGULAR $15 STUDENT $10 SENIOR $10
EDITION23rd
In partnership with:
Join us in supporting:
Your High-Fidelity Rendez-Vous

For a complete listing of TC Sounds products visit parts-express.com/tcsounds
725 Pleasant Valley Dr.Springboro, OH 45066Tel: 800-338-0531
Exclusive Distributor:
The LMS-Ultra moves more air, with less distortion, than any other high-displacement sub-bass driver. For requirements that demand maximum SPLs, absolute linearity, and minimal coloration, specify the unbeatable LMS-Ultra.
LMS-UltraNothing better than the best
TC Sounds designs and manufactures the highest output, lowest distortion subwoofer drivers in the world. Period, end of story.
Thilo Stompler’s engineering brilliance and obsession with ultimate performance are responsible for the unrivaled capabilities
of TC Sounds subwoofers—no matter if the application is mobile audio, home theater,
or professional sound reinforcement.
Subwoofers Engineered for
Performance
LMS-RThe Ultra’s low-distortion/high Xmax sidekick
PRO 5100The very best sub-bass when your career depends on it
AXISSmall box/big output for home and mobile applications
EPICThe best value in high displacement - low distortion subs available anywhere
The LMS-R incorporates many of the attributes that made the LMS-Ultra a chest-collapsing success, like the patent pending LMS coil on a stainless steel former, dual spiders, and high power handling. The LMS-R is the runner-up that still wipes fl oors with its 1,000 watt competition.
The PRO 5100 is designed for no-excuses sound reinforcement applications. Thanks to its radial-NEO motor and fl at-wound coil/stainless steel former, the PRO 5100 possesses the high power handling required to produce deep, solid bass at extreme output levels—night after night.
High motor force, long excursion, and excellent power handling by design, not by accident. With its40+ pound motor and Quad fl at-wound coil on a triple reinforced heat sink former, AXIS can take the punishment and hand it right back.
The lowest cost way to experience the TC Sounds approach to high-displacement, low dis-tortion sub-bass. The EPIC is effi cient enough to be driven by as little as 300 watts, yet capable of astonishing output and clarity.
Related Documents