Revel Ultima Studio™ Loudspeaker

Welcome message from author
This document is posted to help you gain knowledge. Please leave a comment to let me know what you think about it! Share it to your friends and learn new things together.
Transcript

Revel Ultima Studio™ Loudspeaker
TABLE OF CONTENTSINTRODUCTION...............................................3
ABOUT THE MANUAL AND WARRANTY.................................3
DESCRIPTION .................................................4WOOFERS ........................................................................4MIDRANGE .......................................................................4TWEETERS........................................................................5CROSSOVER NETWORK .....................................................5CABINET...........................................................................5
UNPACKING....................................................6PLACEMENT ...................................................8
ROOM ACOUSTICS.............................................................9ROOM TREATMENT..........................................................10
INSTALLING SPIKES.......................................11CONNECTIONS..............................................12
SINGLE-WIRED SYSTEM CONNECTIONS ............................13BI-WIRED SYSTEM CONNECTIONS ....................................14BI-AMPLIFIED SYSTEM CONNECTIONS...............................15
SYSTEM OPTIMIZATION..................................17CABINET CARE..............................................18LOUDSPEAKERS AND POWER........................18PANEL REPLACEMENT...................................19SPECIFICATIONS............................................21SERVICE INFORMATION..................................23
REVEL ULTIMA STUDIO
Owner’s Manual
2
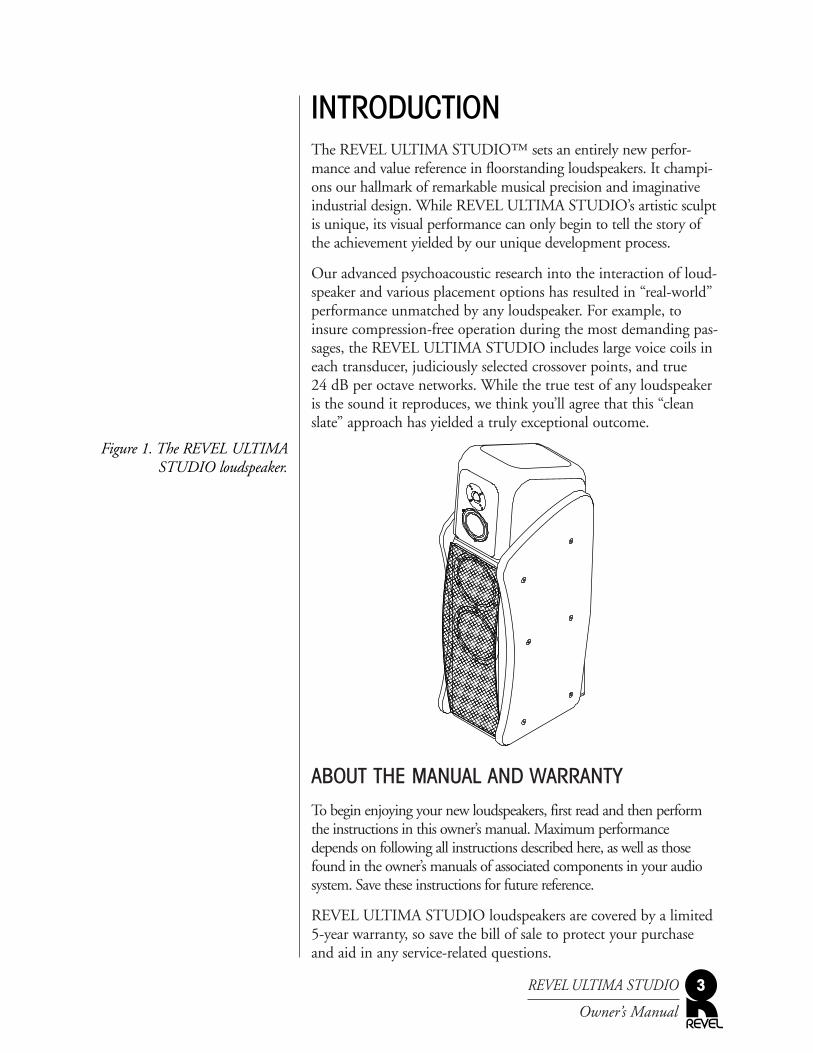
Figure 1. The REVEL ULTIMA STUDIO loudspeaker.
INTRODUCTIONThe REVEL ULTIMA STUDIO™ sets an entirely new perfor-mance and value reference in floorstanding loudspeakers. It champi-ons our hallmark of remarkable musical precision and imaginativeindustrial design. While REVEL ULTIMA STUDIO’s artistic sculptis unique, its visual performance can only begin to tell the story ofthe achievement yielded by our unique development process.
Our advanced psychoacoustic research into the interaction of loud-speaker and various placement options has resulted in “real-world”performance unmatched by any loudspeaker. For example, toinsure compression-free operation during the most demanding pas-sages, the REVEL ULTIMA STUDIO includes large voice coils ineach transducer, judiciously selected crossover points, and true24 dB per octave networks. While the true test of any loudspeakeris the sound it reproduces, we think you’ll agree that this “cleanslate” approach has yielded a truly exceptional outcome.
ABOUT THE MANUAL AND WARRANTYTo begin enjoying your new loudspeakers, first read and then performthe instructions in this owner’s manual. Maximum performancedepends on following all instructions described here, as well as thosefound in the owner’s manuals of associated components in your audiosystem. Save these instructions for future reference.
REVEL ULTIMA STUDIO loudspeakers are covered by a limited5-year warranty, so save the bill of sale to protect your purchaseand aid in any service-related questions.
REVEL ULTIMA STUDIO
Owner’s Manual
3
�
�����
������
������
������
�������
������
������
�������
�������
������
������
�������
�������
������
������
�������
�������
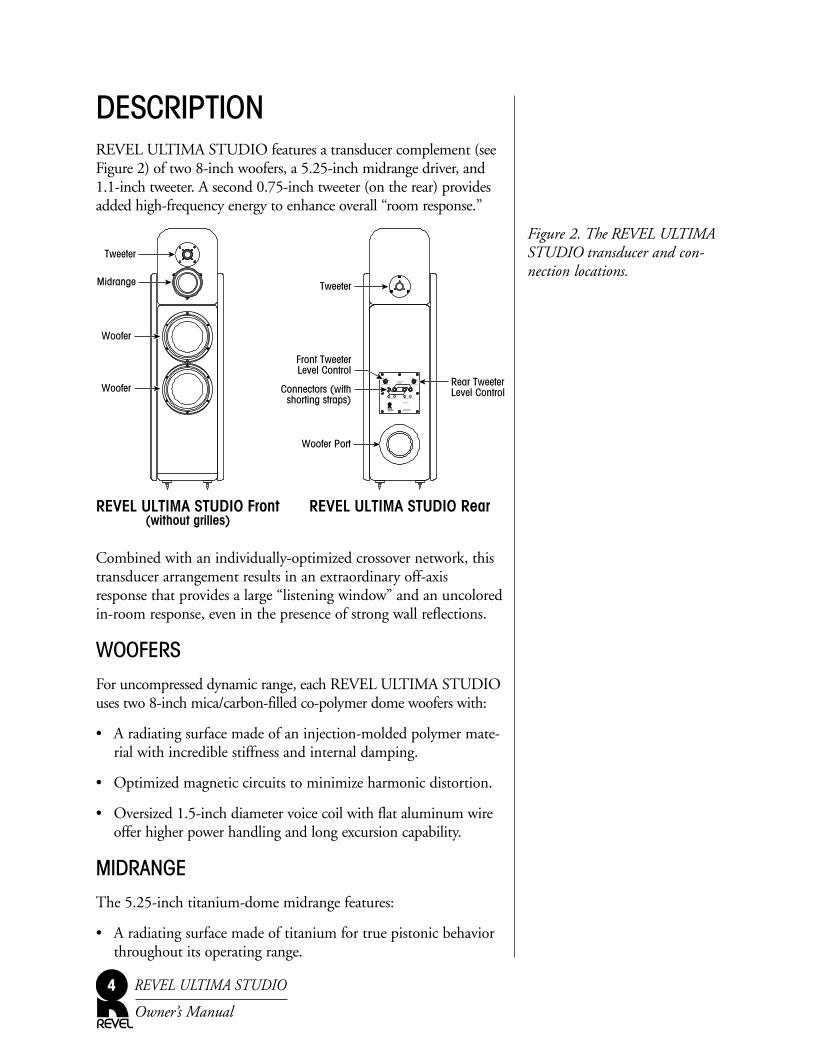
Figure 2. The REVEL ULTIMASTUDIO transducer and con-nection locations.
DESCRIPTIONREVEL ULTIMA STUDIO features a transducer complement (seeFigure 2) of two 8-inch woofers, a 5.25-inch midrange driver, and1.1-inch tweeter. A second 0.75-inch tweeter (on the rear) providesadded high-frequency energy to enhance overall “room response.”
Combined with an individually-optimized crossover network, thistransducer arrangement results in an extraordinary off-axisresponse that provides a large “listening window” and an uncoloredin-room response, even in the presence of strong wall reflections.
WOOFERSFor uncompressed dynamic range, each REVEL ULTIMA STUDIOuses two 8-inch mica/carbon-filled co-polymer dome woofers with:
• A radiating surface made of an injection-molded polymer mate-rial with incredible stiffness and internal damping.
• Optimized magnetic circuits to minimize harmonic distortion.
• Oversized 1.5-inch diameter voice coil with flat aluminum wireoffer higher power handling and long excursion capability.
MIDRANGEThe 5.25-inch titanium-dome midrange features:
• A radiating surface made of titanium for true pistonic behaviorthroughout its operating range.
REVEL ULTIMA STUDIO
Owner’s Manual
4
Remove straps for bi-wireor bi-amp
Low Frequency Input High Frequency Input
+1-1
0+.5-.5
Serial Numberxxxx
Front Tweeter Level Rear Tweeter Level
Revel CorporationNorthridge, CaliforniaMade in U.S.A.
-3 0
Off
REVEL ULTIMA STUDIO Front(without grilles)
REVEL ULTIMA STUDIO Rear
Tweeter
Woofer Port
Rear TweeterLevel Control
Front TweeterLevel Control
Midrange
Woofer
Woofer Connectors (withshorting straps)
Tweeter
• A motor system that utilizes neodymium magnets and a largevoice coil for exceptional performance.
• Oversized 2-inch diameter voice coils with flat aluminum wireoffer higher power handling than average-sized coils for greateraccuracy at high volume levels and during extended crescendos.
• The cast magnesium frame provides optimum voice coil coolingand minimum reflections, while offering excellent rigidity.
TWEETERSEach REVEL ULTIMA STUDIO also includes a pair of high-performance tweeters with these features:
• True pistonic behavior throughout its entire operating range fora new level of freedom from coloration.
• A front aluminum-alloy dome tweeter with a large voice coil andoversized surround roll for higher power handling and longerexcursion capability with extraordinarily low-harmonic distortion.
• A rear textile dome tweeter that flattens the “in-room” response,resulting in superior “air” and detail.
CROSSOVER NETWORKEach REVEL ULTIMA STUDIO has an individually-optimizedcrossover network with:
• A 3-way, 24 dB per octave crossover at 220 Hz and 2.2 kHz tooptimize the on- and off-axis response of the system.
• Hand-wired filter networks with air-core inductors and film capac-itors to match each loudspeaker to the reference standard.
• Provision for bi-amplified and bi-wired applications via remov-able external shorting straps on the gold-plated binding posts.
• External level controls for both the front and rear tweeters viacalibrated switched precision resistors for ideal imaging.
CABINETThe cabinet offers exquisite appearance and aids in overall systemperformance. The main enclosure and internal bracing aredesigned to act as an acoustically-inert platform for sound-wavegeneration. Interchangeable side panels are available in a full arrayof optional finishes when updating home decor (see PanelReplacement on page 19).
REVEL ULTIMA STUDIO
Owner’s Manual
5
WARNING
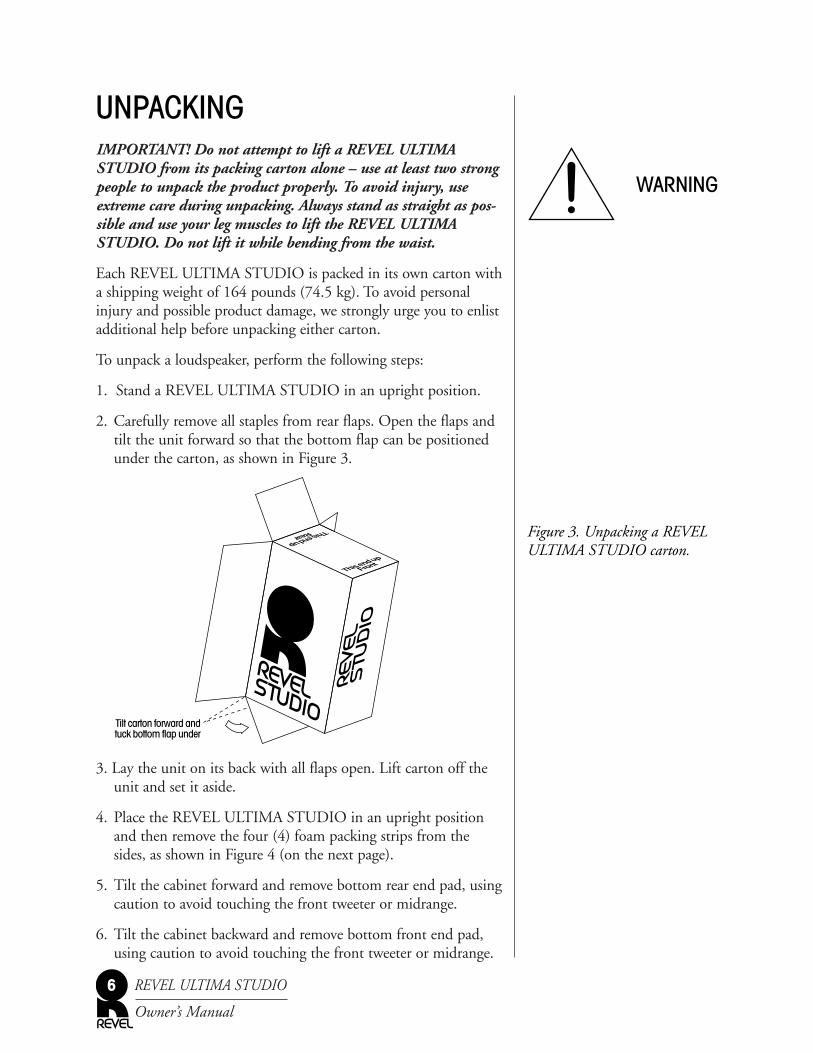
Figure 3. Unpacking a REVELULTIMA STUDIO carton.
UNPACKINGIMPORTANT! Do not attempt to lift a REVEL ULTIMA STUDIO from its packing carton alone – use at least two strongpeople to unpack the product properly. To avoid injury, useextreme care during unpacking. Always stand as straight as pos-sible and use your leg muscles to lift the REVEL ULTIMA STUDIO. Do not lift it while bending from the waist.
Each REVEL ULTIMA STUDIO is packed in its own carton witha shipping weight of 164 pounds (74.5 kg). To avoid personalinjury and possible product damage, we strongly urge you to enlistadditional help before unpacking either carton.
To unpack a loudspeaker, perform the following steps:
1. Stand a REVEL ULTIMA STUDIO in an upright position.
2. Carefully remove all staples from rear flaps. Open the flaps andtilt the unit forward so that the bottom flap can be positionedunder the carton, as shown in Figure 3.
3. Lay the unit on its back with all flaps open. Lift carton off theunit and set it aside.
4. Place the REVEL ULTIMA STUDIO in an upright positionand then remove the four (4) foam packing strips from thesides, as shown in Figure 4 (on the next page).
5. Tilt the cabinet forward and remove bottom rear end pad, usingcaution to avoid touching the front tweeter or midrange.
6. Tilt the cabinet backward and remove bottom front end pad,using caution to avoid touching the front tweeter or midrange.
REVEL ULTIMA STUDIO
Owner’s Manual
6
Tilt carton forward andtuck bottom flap under
This end upFront
This end upRear
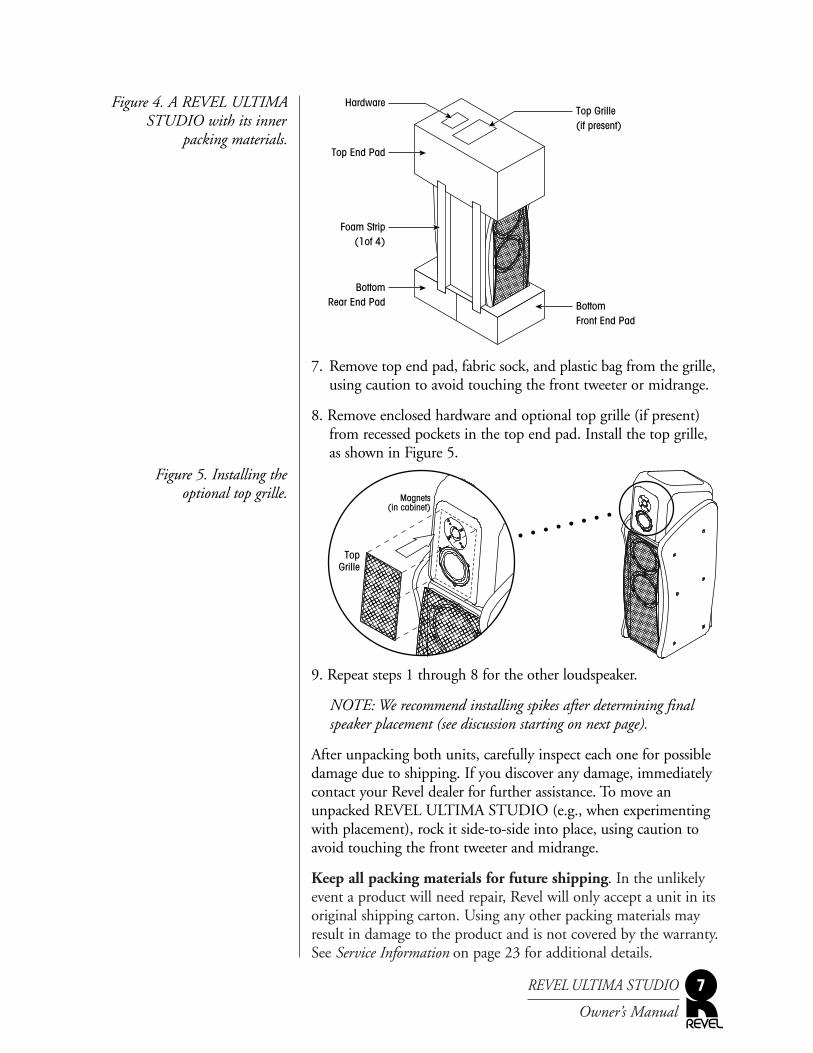
Figure 4. A REVEL ULTIMASTUDIO with its inner
packing materials.
Figure 5. Installing the optional top grille.
7. Remove top end pad, fabric sock, and plastic bag from the grille,using caution to avoid touching the front tweeter or midrange.
8. Remove enclosed hardware and optional top grille (if present)from recessed pockets in the top end pad. Install the top grille,as shown in Figure 5.
9. Repeat steps 1 through 8 for the other loudspeaker.
NOTE: We recommend installing spikes after determining finalspeaker placement (see discussion starting on next page).
After unpacking both units, carefully inspect each one for possibledamage due to shipping. If you discover any damage, immediatelycontact your Revel dealer for further assistance. To move anunpacked REVEL ULTIMA STUDIO (e.g., when experimentingwith placement), rock it side-to-side into place, using caution toavoid touching the front tweeter and midrange.
Keep all packing materials for future shipping. In the unlikelyevent a product will need repair, Revel will only accept a unit in itsoriginal shipping carton. Using any other packing materials mayresult in damage to the product and is not covered by the warranty.See Service Information on page 23 for additional details.
REVEL ULTIMA STUDIO
Owner’s Manual
7
�
����
������
������
�������
�������
������
������
�������
�������
������
������
�������
������
������
�������
�������
������
����
����
�����
�����
����
����
����
���
�������
������
������
������
�������
��
TopGrille
Magnets(in cabinet)
�
�����
������
������
������
�������
�������
������
������
�������
������
������
�������
�������
������
������
�������
������
Top End Pad
HardwareTop Grille(if present)
Foam Strip(1of 4)
BottomRear End Pad Bottom
Front End Pad
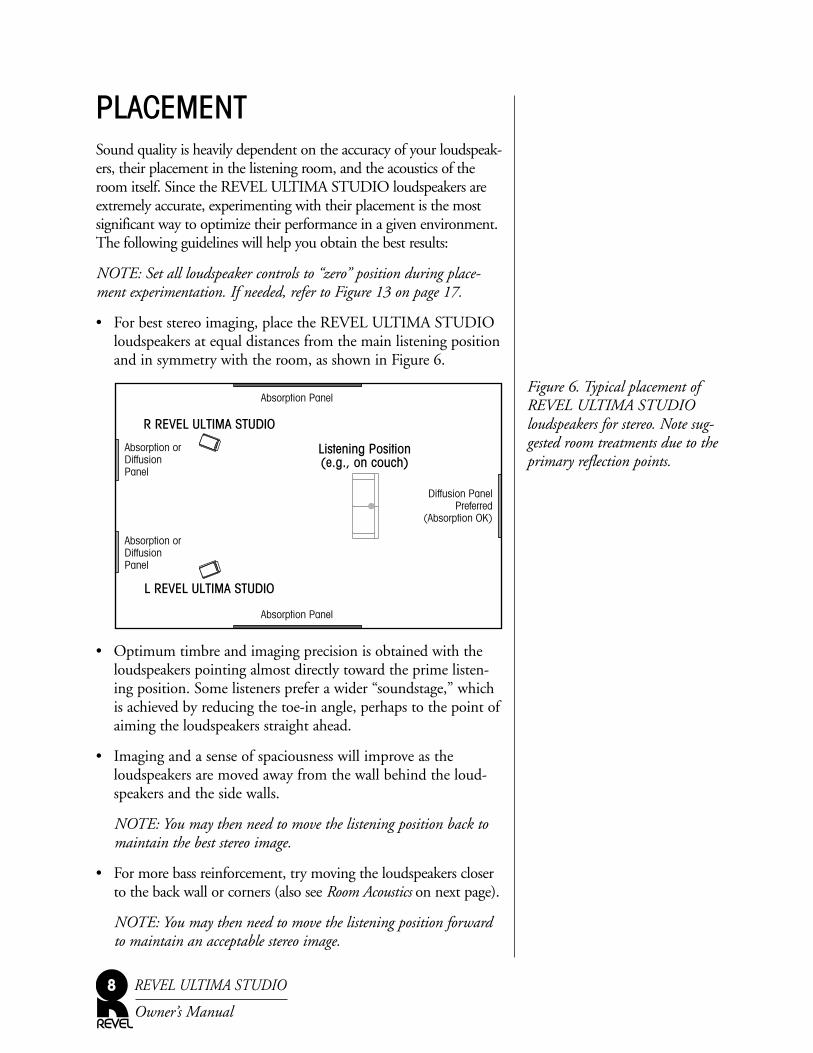
Figure 6. Typical placement ofREVEL ULTIMA STUDIOloudspeakers for stereo. Note sug-gested room treatments due to theprimary reflection points.
PLACEMENTSound quality is heavily dependent on the accuracy of your loudspeak-ers, their placement in the listening room, and the acoustics of theroom itself. Since the REVEL ULTIMA STUDIO loudspeakers areextremely accurate, experimenting with their placement is the mostsignificant way to optimize their performance in a given environment.The following guidelines will help you obtain the best results:
NOTE: Set all loudspeaker controls to “zero” position during place-ment experimentation. If needed, refer to Figure 13 on page 17.
• For best stereo imaging, place the REVEL ULTIMA STUDIOloudspeakers at equal distances from the main listening positionand in symmetry with the room, as shown in Figure 6.
• Optimum timbre and imaging precision is obtained with theloudspeakers pointing almost directly toward the prime listen-ing position. Some listeners prefer a wider “soundstage,” whichis achieved by reducing the toe-in angle, perhaps to the point ofaiming the loudspeakers straight ahead.
• Imaging and a sense of spaciousness will improve as the loudspeakers are moved away from the wall behind the loud-speakers and the side walls.
NOTE: You may then need to move the listening position back tomaintain the best stereo image.
• For more bass reinforcement, try moving the loudspeakers closerto the back wall or corners (also see Room Acoustics on next page).
NOTE: You may then need to move the listening position forwardto maintain an acceptable stereo image.
REVEL ULTIMA STUDIO
Owner’s Manual
8
Listening Position(e.g., on couch)
Diffusion PanelPreferred
(Absorption OK)
Absorption Panel
Absorption Panel
Absorption orDiffusionPanel
Absorption orDiffusionPanel
R REVEL ULTIMA STUDIO
L REVEL ULTIMA STUDIO
• For best results, make sure there are no objects between theREVEL ULTIMA STUDIO loudspeakers and the intended lis-tening area (e.g., a coffee table in front of the listener will degradetimbre and imaging). If possible, avoid placing the loudspeakersnear large objects, which can cause unwanted reflections.
• Ideally, the listening room should be acoustically neutral, nei-ther producing any distinct echoes nor sounding completely“dead” and lifeless (also see Room Treatment on the next page)
• After choosing a final placement, add the spikes (and covers, ifdesired) as described in Installing Spikes on page 11.
ROOM ACOUSTICSListening rooms have a profound impact on sound quality, espe-cially at low frequencies. In fact, a listening room can actuallydominate the sound quality below about 300 Hz. Ideally, a newroom being built from scratch would include optimized dimen-sional ratios to minimize the effects of standing waves.
However, most installations will be made in existing rooms. Inthese cases, your only solution is to take special care in selectingboth the speaker and prime listening locations, which will pay offin superior low frequency performance. Often the differencebetween poor and excellent results is the result of relatively smalladjustments in speaker and listener placements.
The interaction of loudspeakers and rooms is quite complex, as theloudspeaker and listener are affected by two mechanisms. First,nearby surfaces, or boundaries, cause large peaks and dips in lowfrequency response. These peaks and dips can often range 12 dB ormore. Second, the loudspeaker and listener locations interact withthe standing waves, or room modes. These standing waves, or reso-nances, also result in large response errors. There are no simple for-mulas that take both mechanisms into account. Even computerprograms that analyze one or both factors still may not provideyou with the proper speaker or listener placement values.
Here’s where real-world experience counts. We suggest consultingyour Revel dealer for help in determining the optimum loudspeak-er and listener placement for your listening room.
REVEL ULTIMA STUDIO
Owner’s Manual
9
PLACEMENT (CONTINUED)ROOM TREATMENTREVEL ULTIMA STUDIO loudspeakers have very accurate off-axis response, which minimizes any degradation caused by overly“live” rooms. However, far superior performance will be achievedby placing at least minimal acoustic treatment materials at the pri-mary reflection points. Ideally, special acoustic absorbers should beplaced at the first reflection points on the side and front wallsalong with either absorbers or diffusers at the first reflection pointson the rear wall. Short of using acoustic treatment materials, evensimple hanging rugs can be a great help in overly bright rooms.Carpeting the floor area between the speakers and listener andplacing irregular surfaces, such as bookcases, will also help breakup strong reflections.
Since our ears and eyes are located on the same plane, we can use amirror (also known as the “mirror method”) to accurately deter-mine the most important locations (the first reflection points) formaterial treatment, as follows:
1. After the loudspeakers are placed, the listener should sit in theprime listening position.
2. A second person should slide a mirror along the walls.
3. Note the locations at which the listener can see either of theloudspeakers. These will be the reflection points that wouldrequire acoustic treatment materials.
Using this method, find all treatment locations for side walls, frontwall, and rear wall with side walls taking priority. Where possible,also determine the treatment locations for first ceiling reflections.
Your Revel dealer can recommend acoustic treatment materials,and can help determine the best plan for your room. If it is a dedi-cated listening room, qualified room treatment manufacturers oreven acousticians may be consulted for optimum results.Remember, properly treated rooms provide dramatically betterresults with any loudspeakers than untreated rooms.
REVEL ULTIMA STUDIO
Owner’s Manual
10
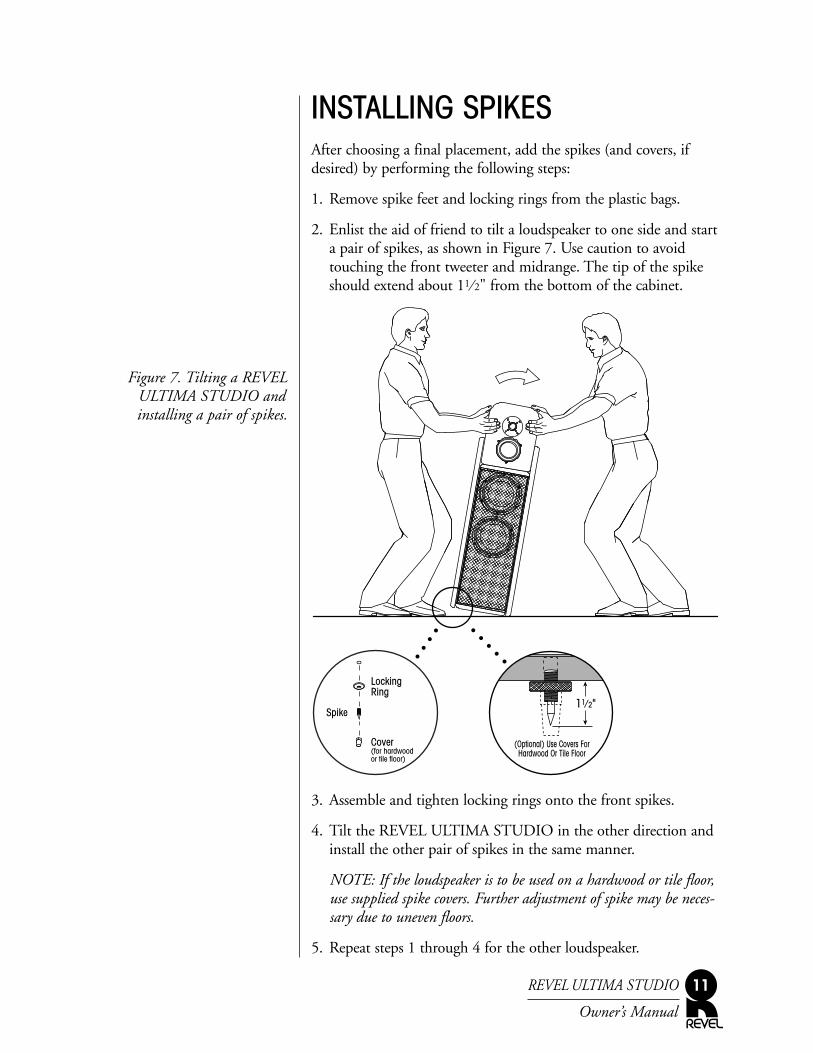
Figure 7. Tilting a REVELULTIMA STUDIO andinstalling a pair of spikes.
INSTALLING SPIKESAfter choosing a final placement, add the spikes (and covers, ifdesired) by performing the following steps:
1. Remove spike feet and locking rings from the plastic bags.
2. Enlist the aid of friend to tilt a loudspeaker to one side and starta pair of spikes, as shown in Figure 7. Use caution to avoidtouching the front tweeter and midrange. The tip of the spikeshould extend about 11 ⁄ 2" from the bottom of the cabinet.
3. Assemble and tighten locking rings onto the front spikes.
4. Tilt the REVEL ULTIMA STUDIO in the other direction andinstall the other pair of spikes in the same manner.
NOTE: If the loudspeaker is to be used on a hardwood or tile floor,use supplied spike covers. Further adjustment of spike may be neces-sary due to uneven floors.
5. Repeat steps 1 through 4 for the other loudspeaker.
REVEL ULTIMA STUDIO
Owner’s Manual
11
���
���������
��������
��������
��������
���������
���������
���������
��������
��������
��������
���������
���������
���������
��������
������
LockingRing
Spike
Cover(for hardwoodor tile floor)
(Optional) Use Covers ForHardwood Or Tile Floor
11⁄ 2"
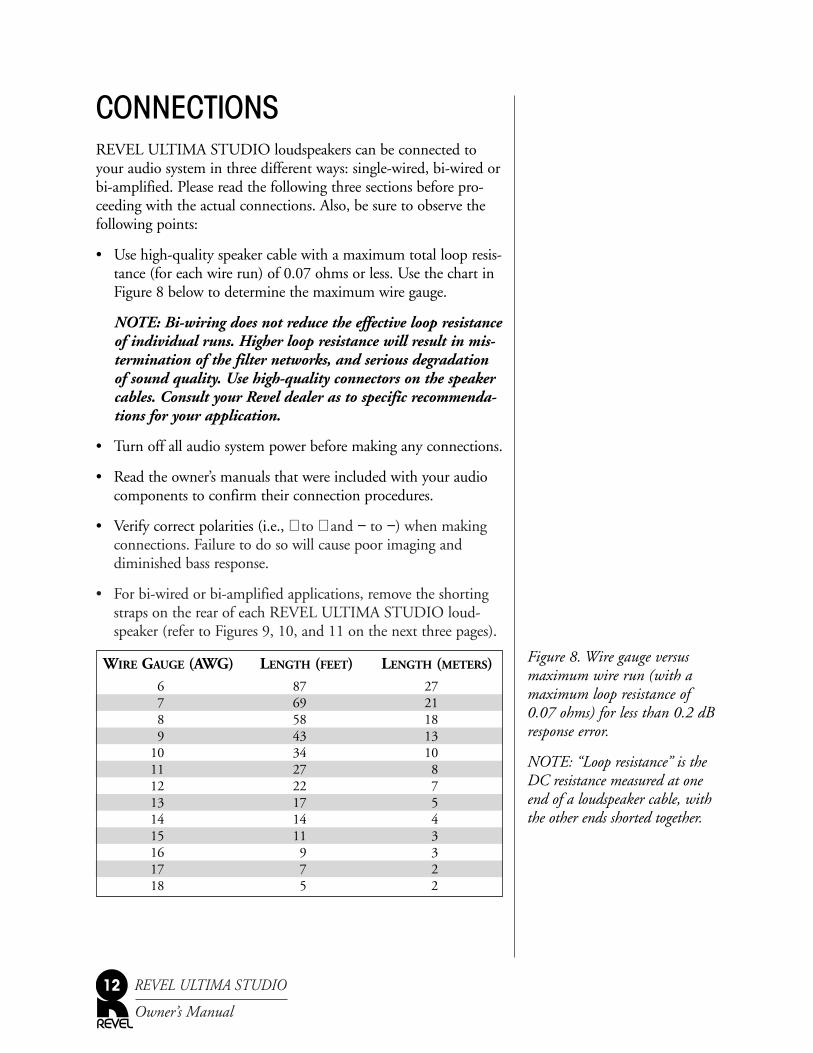
Figure 8. Wire gauge versusmaximum wire run (with amaximum loop resistance of0.07 ohms) for less than 0.2 dBresponse error.
NOTE: “Loop resistance” is theDC resistance measured at oneend of a loudspeaker cable, withthe other ends shorted together.
CONNECTIONSREVEL ULTIMA STUDIO loudspeakers can be connected toyour audio system in three different ways: single-wired, bi-wired orbi-amplified. Please read the following three sections before pro-ceeding with the actual connections. Also, be sure to observe thefollowing points:
• Use high-quality speaker cable with a maximum total loop resis-tance (for each wire run) of 0.07 ohms or less. Use the chart inFigure 8 below to determine the maximum wire gauge.
NOTE: Bi-wiring does not reduce the effective loop resistanceof individual runs. Higher loop resistance will result in mis-termination of the filter networks, and serious degradationof sound quality. Use high-quality connectors on the speakercables. Consult your Revel dealer as to specific recommenda-tions for your application.
• Turn off all audio system power before making any connections.
• Read the owner’s manuals that were included with your audiocomponents to confirm their connection procedures.
• Verify correct polarities (i.e., + to + and − to −) when makingconnections. Failure to do so will cause poor imaging anddiminished bass response.
• For bi-wired or bi-amplified applications, remove the shortingstraps on the rear of each REVEL ULTIMA STUDIO loud-speaker (refer to Figures 9, 10, and 11 on the next three pages).
REVEL ULTIMA STUDIO
Owner’s Manual
12
WIRE GAUGE (AWG) LENGTH (FEET) LENGTH (METERS)6 87 277 69 218 58 189 43 13
10 34 1011 27 812 22 713 17 514 14 415 11 316 9 317 7 218 5 2
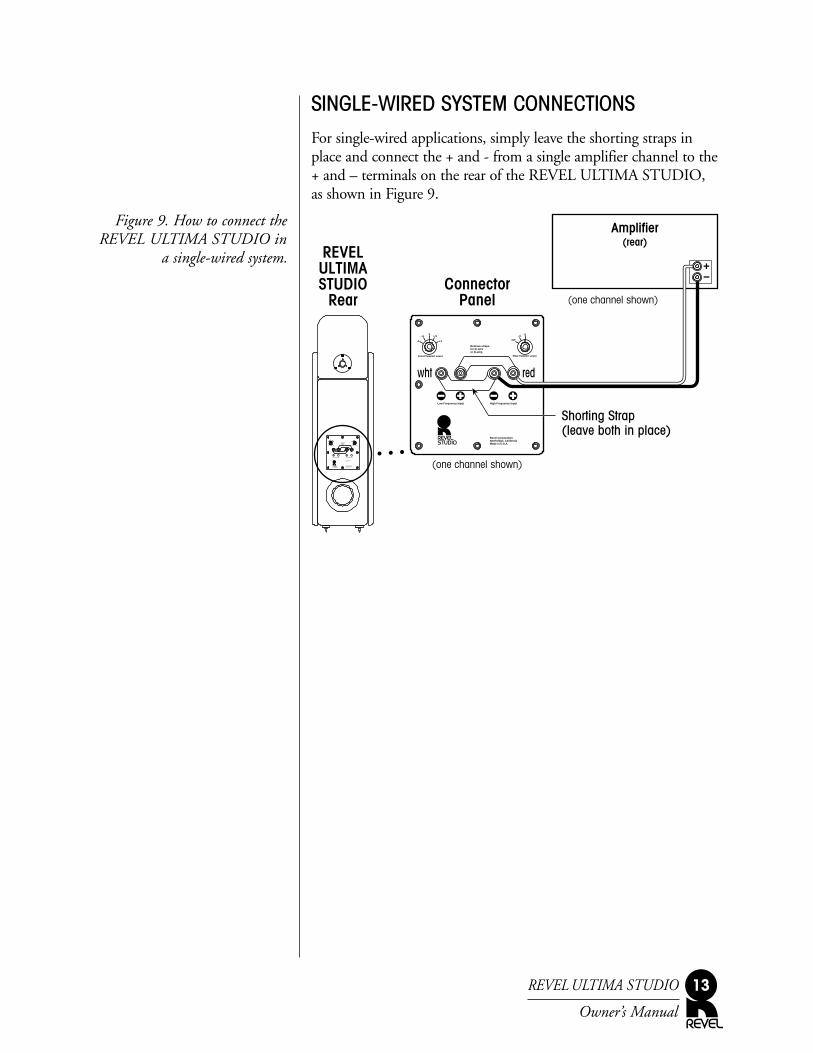
Figure 9. How to connect theREVEL ULTIMA STUDIO in
a single-wired system.
SINGLE-WIRED SYSTEM CONNECTIONSFor single-wired applications, simply leave the shorting straps inplace and connect the + and - from a single amplifier channel to the+ and – terminals on the rear of the REVEL ULTIMA STUDIO,as shown in Figure 9.
REVEL ULTIMA STUDIO
Owner’s Manual
13
Remove straps for bi-wireor bi-amp
Low Frequency Input High Frequency Input
+1-1
0+.5-.5
Serial Numberxxxx
Front Tweeter Level Rear Tweeter Level
Revel CorporationNorthridge, CaliforniaMade in U.S.A.
-3 0
Off
Remove straps for bi-wireor bi-amp
Low Frequency Input High Frequency Input
+1-1
0+.5-.5
Front Tweeter Level Rear Tweeter Level
Revel CorporationNorthridge, CaliforniaMade in U.S.A.
-3 0
Off
Shorting Strap(leave both in place)
redwht
REVELULTIMASTUDIO
RearConnector
Panel
Amplifier(rear)
(one channel shown)
(one channel shown)
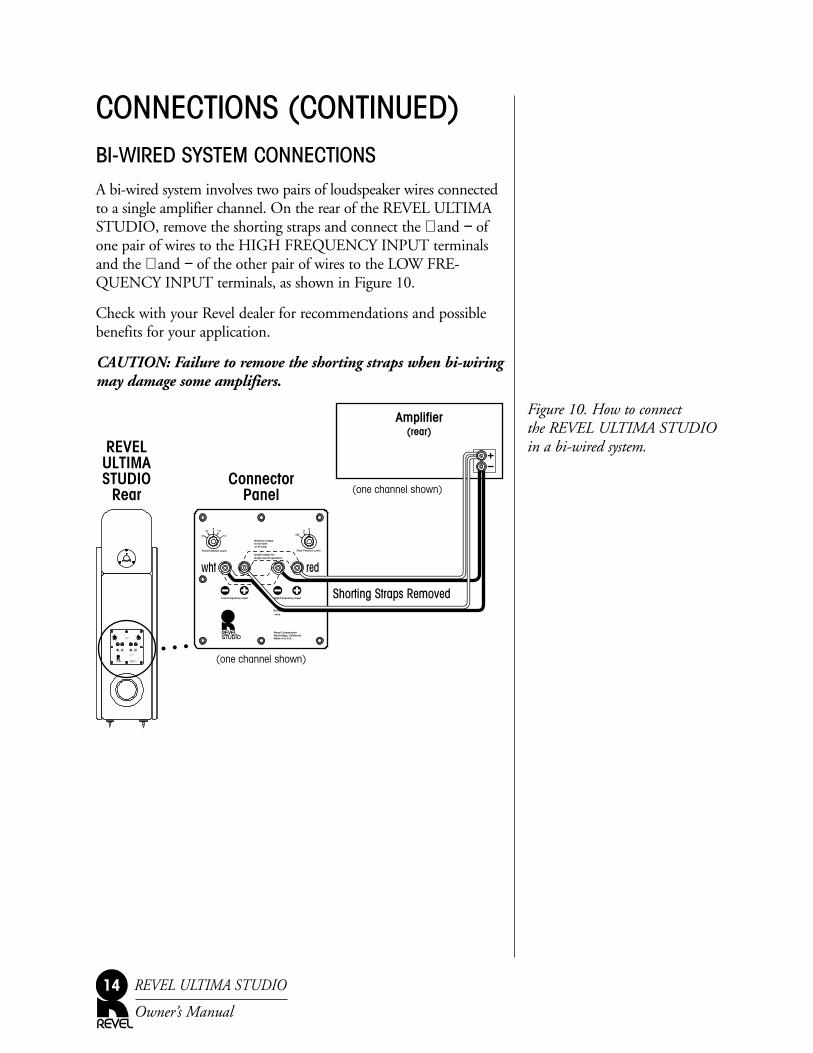
Figure 10. How to connect the REVEL ULTIMA STUDIOin a bi-wired system.
CONNECTIONS (CONTINUED)BI-WIRED SYSTEM CONNECTIONSA bi-wired system involves two pairs of loudspeaker wires connectedto a single amplifier channel. On the rear of the REVEL ULTIMA STUDIO, remove the shorting straps and connect the + and − ofone pair of wires to the HIGH FREQUENCY INPUT terminalsand the + and − of the other pair of wires to the LOW FRE-QUENCY INPUT terminals, as shown in Figure 10.
Check with your Revel dealer for recommendations and possiblebenefits for your application.
CAUTION: Failure to remove the shorting straps when bi-wiringmay damage some amplifiers.
REVEL ULTIMA STUDIO
Owner’s Manual
14
Remove straps for bi-wireor bi-amp
Low Frequency Input High Frequency Input
+1-1
0+.5-.5
Serial Numberxxxx
Front Tweeter Level Rear Tweeter Level
Revel CorporationNorthridge, CaliforniaMade in U.S.A.
-3 0
Off
Remove straps for bi-wireor bi-amp
Low Frequency Input High Frequency Input
+1-1
0+.5-.5
Serial Numberxxxx
Front Tweeter Level Rear Tweeter Level
Revel CorporationNorthridge, CaliforniaMade in U.S.A.
-3 0
Off
Install straps for single-wired operation
Amplifier(rear)
(one channel shown)
Shorting Straps Removed
redwht
ConnectorPanel
(one channel shown)
REVELULTIMASTUDIO
Rear

Figure 11. How to connect theREVEL ULTIMA STUDIO in
a vertical bi-amplified system.
BI-AMPLIFIED SYSTEM CONNECTIONSA bi-amplified system provides increased sonic performance,since independent amplifier channels separately drive each set ofhigh- and low-frequency transducers. You can connect a REVELULTIMA STUDIO in either a vertical or horizontal bi-amplifiedsystem without requiring an additional electronic crossover.
VERTICAL BI-AMPLIFIED SYSTEM
Using two identical amplifier channels, remove the shorting strapsfrom the rear panel; then connect the REVEL ULTIMA STUDIOloudspeakers, as shown in Figure 11.
CAUTION: Failure to remove the shorting straps when bi-amplifying may damage some amplifiers.
NOTE: When using two dissimilar amplifiers, connect the REVELULTIMA STUDIO loudspeakers in a horizontal bi-amplified system(see next section).
REVEL ULTIMA STUDIO
Owner’s Manual
15
Remove straps for bi-wireor bi-amp
Low Frequency Input High Frequency Input
+1-1
0+.5-.5
Serial Numberxxxx
Front Tweeter Level Rear Tweeter Level
Revel CorporationNorthridge, CaliforniaMade in U.S.A.
-3 0
Off
Remove straps for bi-wireor bi-amp
Low Frequency Input High Frequency Input
+1-1
0+.5-.5
Serial Numberxxxx
Front Tweeter Level Rear Tweeter Level
Revel CorporationNorthridge, CaliforniaMade in U.S.A.
-3 0
Off
Install straps for single-wired operation
Shorting Straps Removed
Amplifier(rear)
Ch.1 Ch.2
INPUT INPUT
redwht
ConnectorPanel
(one channel shown)
REVELULTIMASTUDIO
Rear
(Optional “Y” Adaptor)
(one channel shown)
Pre-Amplifier(rear) OUTPUTOUTPUT
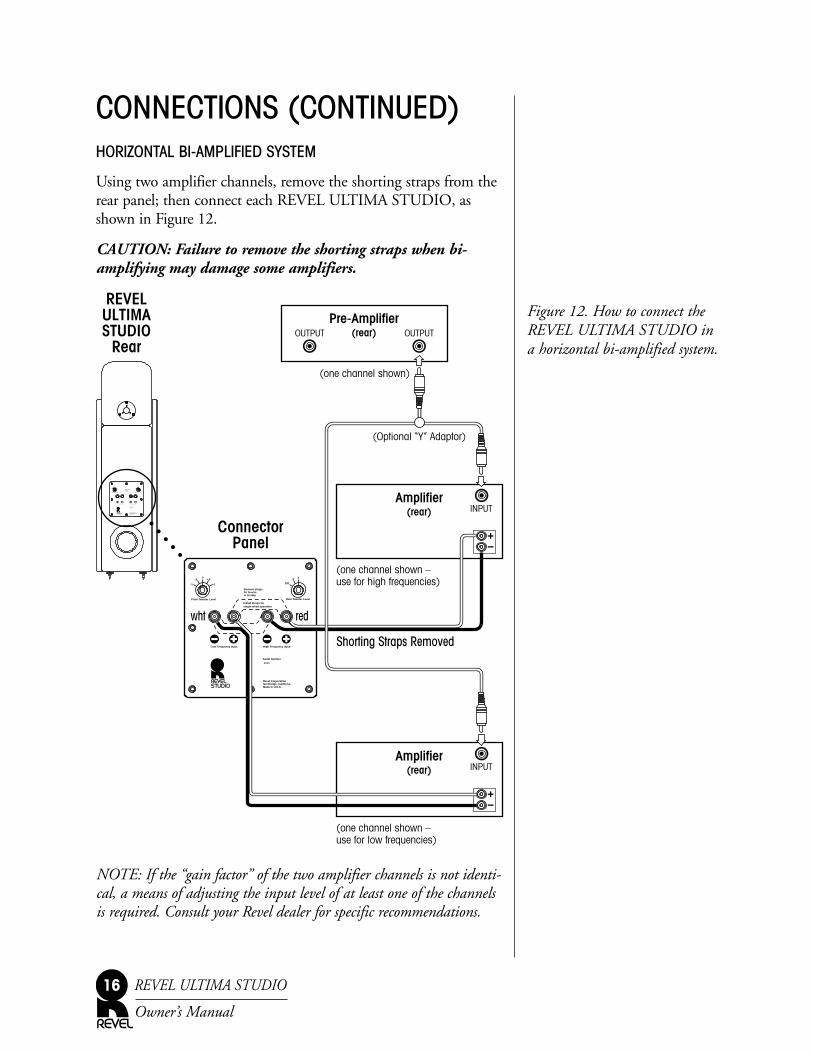
Figure 12. How to connect theREVEL ULTIMA STUDIO ina horizontal bi-amplified system.
CONNECTIONS (CONTINUED)HORIZONTAL BI-AMPLIFIED SYSTEM
Using two amplifier channels, remove the shorting straps from therear panel; then connect each REVEL ULTIMA STUDIO, asshown in Figure 12.
CAUTION: Failure to remove the shorting straps when bi-amplifying may damage some amplifiers.
NOTE: If the “gain factor” of the two amplifier channels is not identi-cal, a means of adjusting the input level of at least one of the channelsis required. Consult your Revel dealer for specific recommendations.
REVEL ULTIMA STUDIO
Owner’s Manual
16
Remove straps for bi-wireor bi-amp
Low Frequency Input High Frequency Input
+1-1
0+.5-.5
Serial Numberxxxx
Front Tweeter Level Rear Tweeter Level
Revel CorporationNorthridge, CaliforniaMade in U.S.A.
-3 0
Off
Remove straps for bi-wireor bi-amp
Low Frequency Input High Frequency Input
+1-1
0+.5-.5
Serial Numberxxxx
Front Tweeter Level Rear Tweeter Level
Revel CorporationNorthridge, CaliforniaMade in U.S.A.
-3 0
Off
Install straps for single-wired operation
Shorting Straps Removed
INPUT
(one channel shown –use for low frequencies)
Amplifier(rear)
INPUT
(one channel shown –use for high frequencies)
Amplifier(rear)
redwht
ConnectorPanel
REVELULTIMASTUDIO
Rear
Pre-Amplifier(rear) OUTPUTOUTPUT
(Optional “Y” Adaptor)
(one channel shown)
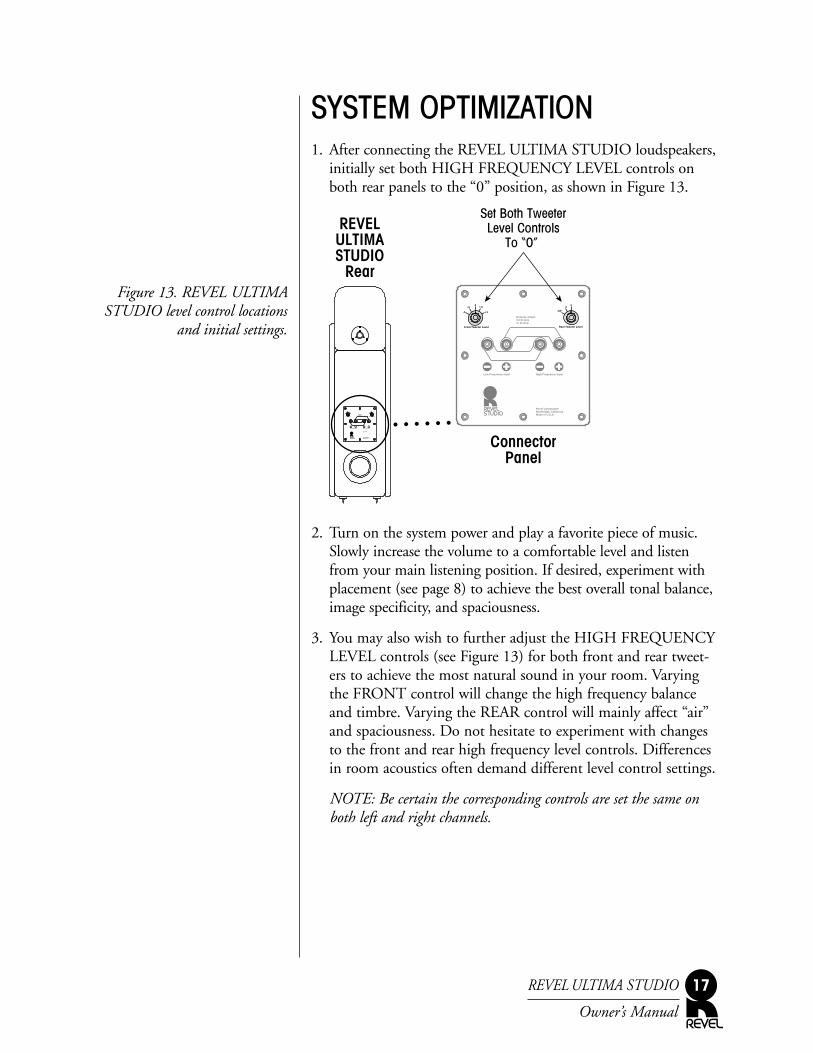
Figure 13. REVEL ULTIMASTUDIO level control locations
and initial settings.
SYSTEM OPTIMIZATION1. After connecting the REVEL ULTIMA STUDIO loudspeakers,
initially set both HIGH FREQUENCY LEVEL controls onboth rear panels to the “0” position, as shown in Figure 13.
2. Turn on the system power and play a favorite piece of music.Slowly increase the volume to a comfortable level and listenfrom your main listening position. If desired, experiment withplacement (see page 8) to achieve the best overall tonal balance,image specificity, and spaciousness.
3. You may also wish to further adjust the HIGH FREQUENCYLEVEL controls (see Figure 13) for both front and rear tweet-ers to achieve the most natural sound in your room. Varyingthe FRONT control will change the high frequency balanceand timbre. Varying the REAR control will mainly affect “air”and spaciousness. Do not hesitate to experiment with changesto the front and rear high frequency level controls. Differencesin room acoustics often demand different level control settings.
NOTE: Be certain the corresponding controls are set the same onboth left and right channels.
REVEL ULTIMA STUDIO
Owner’s Manual
17
Front Tweeter Level Rear Tweeter Level
Revel CorporationNorthridge, CaliforniaMade in U.S.A.Remove straps
for bi-wireor bi-amp
Low Frequency Input High Frequency Input
+1-1
0+.5-.5
Serial Numberxxxx
Front Tweeter Level Rear Tweeter Level
Revel CorporationNorthridge, CaliforniaMade in U.S.A.
-3 0
Off
Remove straps for bi-wireor bi-amp
Low Frequency Input High Frequency Input
+1-1
0+.5-.5 -3 0
Off
ConnectorPanel
REVELULTIMASTUDIO
Rear
Set Both TweeterLevel Controls
To “0”
CABINET CAREEach REVEL ULTIMA STUDIO loudspeaker cabinet has a paintfinish and does not require any routine maintenance. Use a softcloth, dampened with water only, to remove any fingerprints or towipe off dust. Clean the grille by gentle vacuuming.
For wood side panels, occasionally use a household furniture polishto maintain the beauty of the hardwood veneers.
For aluminum side panels, use a soft cloth, dampened with soapywater only. Wipe in the direction of the grain only.
LOUDSPEAKERS AND POWERREVEL ULTIMA STUDIO loudspeakers use high-order crossoverswith steep cut-offs to eliminate damage caused by “out of band” frequencies. Using this approach, in combination with carefullyselected components and transducers, gives us confidence that aREVEL ULTIMA STUDIO loudspeaker will not fail, even underextreme conditions. However, there is a limit to how loud anyspeaker can play continuously. A good rule of thumb is to avoidplaying the system at volume levels beyond where the sound is“clear.” If the sound becomes distorted or strained, reduce the volume level immediately to avoid damage.
If you are unsure of the suitability of current or planned amplifiercomponents, please ask your Revel dealer to review them beforeconnecting your REVEL ULTIMA STUDIO loudspeakers.
REVEL ULTIMA STUDIO
Owner’s Manual
18
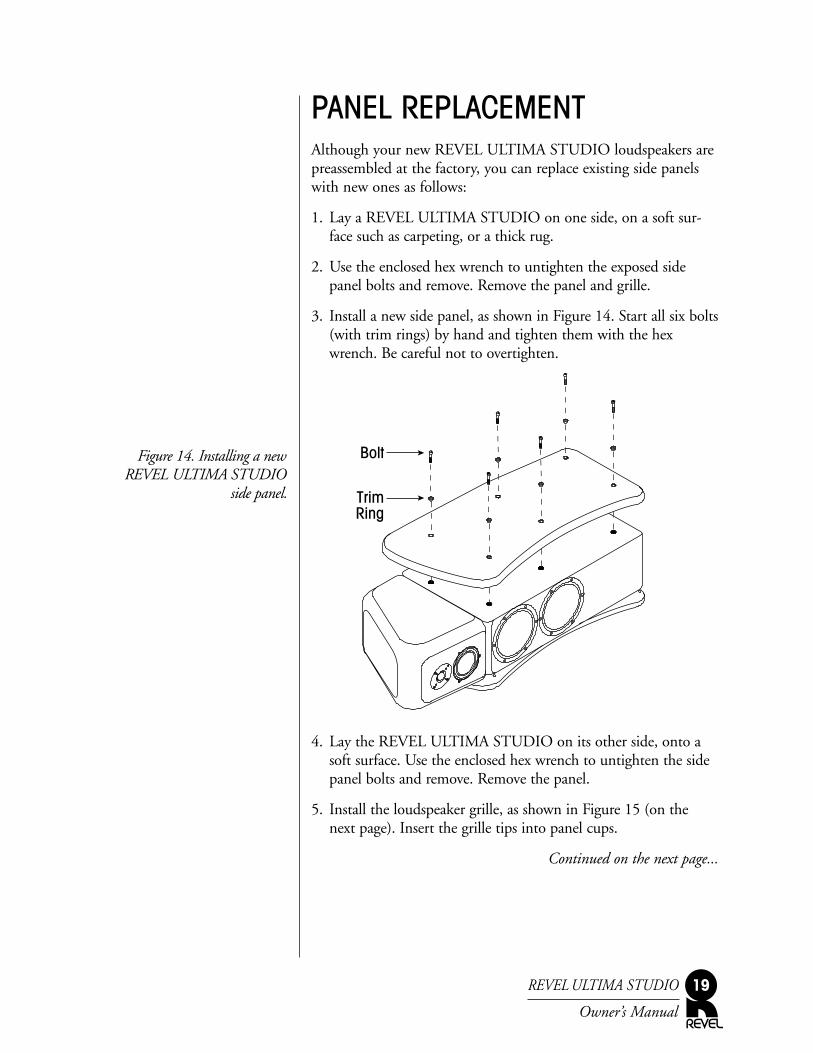
Figure 14. Installing a newREVEL ULTIMA STUDIO
side panel.
PANEL REPLACEMENTAlthough your new REVEL ULTIMA STUDIO loudspeakers arepreassembled at the factory, you can replace existing side panelswith new ones as follows:
1. Lay a REVEL ULTIMA STUDIO on one side, on a soft sur-face such as carpeting, or a thick rug.
2. Use the enclosed hex wrench to untighten the exposed sidepanel bolts and remove. Remove the panel and grille.
3. Install a new side panel, as shown in Figure 14. Start all six bolts(with trim rings) by hand and tighten them with the hexwrench. Be careful not to overtighten.
4. Lay the REVEL ULTIMA STUDIO on its other side, onto asoft surface. Use the enclosed hex wrench to untighten the sidepanel bolts and remove. Remove the panel.
5. Install the loudspeaker grille, as shown in Figure 15 (on thenext page). Insert the grille tips into panel cups.
Continued on the next page...
REVEL ULTIMA STUDIO
Owner’s Manual
19
Bolt
TrimRing
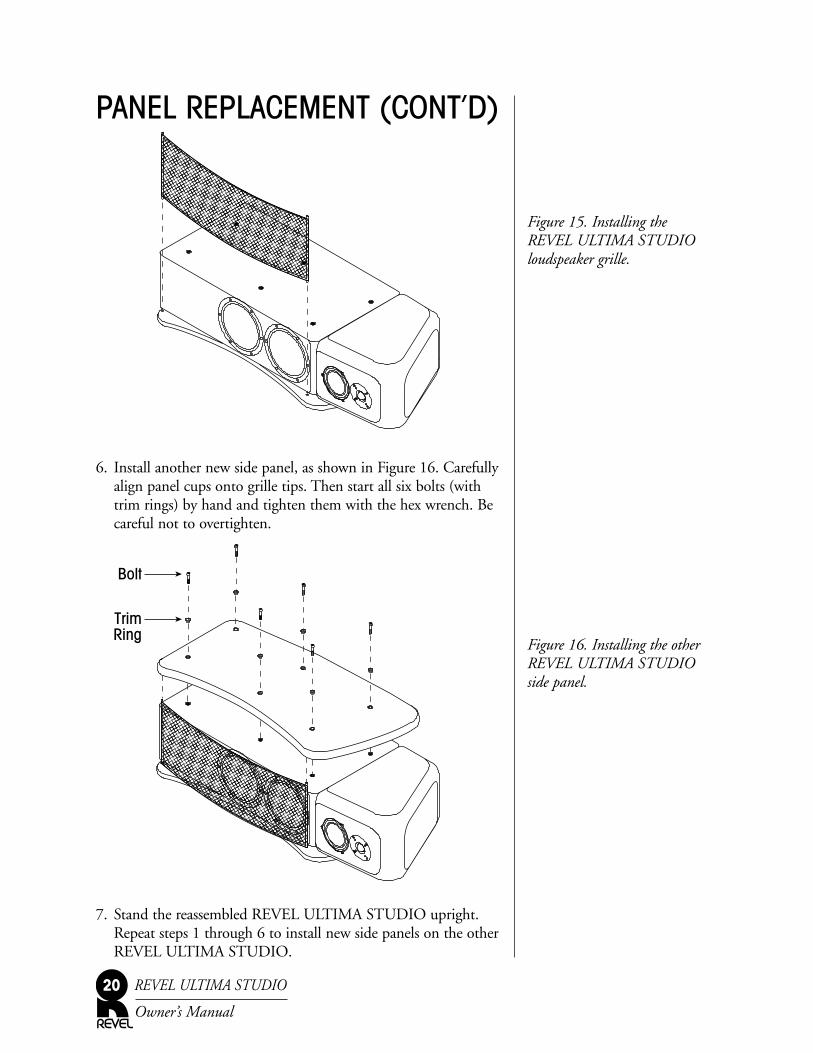
Figure 15. Installing the REVEL ULTIMA STUDIOloudspeaker grille.
Figure 16. Installing the otherREVEL ULTIMA STUDIOside panel.
PANEL REPLACEMENT (CONT’D)
6. Install another new side panel, as shown in Figure 16. Carefullyalign panel cups onto grille tips. Then start all six bolts (withtrim rings) by hand and tighten them with the hex wrench. Becareful not to overtighten.
7. Stand the reassembled REVEL ULTIMA STUDIO upright.Repeat steps 1 through 6 to install new side panels on the otherREVEL ULTIMA STUDIO.
REVEL ULTIMA STUDIO
Owner’s Manual
20
���
��������
�����������
�������������
�������������
��������������
�������������
�������������
��������������
��������������
�������������
�������������
�������������
���������
����
���
��������
�����������
�������������
�������������
��������������
�������������
�������������
��������������
��������������
�������������
�������������
�������������
���������
����
Bolt
TrimRing
SPECIFICATIONSRevel utilizes proprietary measurement methods in the design andspecification of our loudspeakers. Our research has developed aseries of tests that represent a great leap forward in making mea-surements that dramatically contribute to our goal of accuratelyreproducing music or film.
Sensitivity: 87 dB SPL, with 2.83 Vrms @ 1 m (4 pi anechoic)
Sensitivity provides an indication of how much amplifier power isrequired for the loudspeaker to play at satisfactory volume levels.This conservatively-rated specification indicates moderate sensitivityand denotes that REVEL ULTIMA STUDIO does not require hugeamplifiers to achieve realistic levels in all but the largest rooms.
Impedance: 6 ohms (nominal), 3 ohms (minimum)
Impedance indicates whether the speaker system presents a“hard” or “easy” load on the amplifier. A minimum impedancevalue of 3 ohms, together with moderate phase angles, signifiesthat any competently-designed amplifier can easily drive REVELULTIMA STUDIO.
Filters (Crossover): 3-way, 24 dB per octave, (4th-order) acoustic response at 220 Hz and 2.2 kHz
The steep filter slopes ensure good acoustical behavior in thecrossover regions, with a minimum of acoustical interference, alongwith low distortion and wide dynamic range. The filters featurepoint-to-point hand wiring with specially selected components.Woofer and tweeter filter boards are physically independent andinclude a provision for bi-amping or bi-wiring.
Frequency Responses: In-Room Response;+ 1 dB from 31 Hz to 12 kHz
In-room response is a breakthrough measurement that, in a singlecurve, closely correlates to sound quality and has been a goal ofloudspeaker engineers for years. Research, and simple observation,reveals that ubiquitous “on-axis” response curves often cannot distin-guish between two loudspeakers with radically different sound quali-ty. This REVEL ULTIMA STUDIO specification is even morepowerful when it is taken in context with the other measurementspresented here.
In-Room Response Relative to Target Response;+ 0.75 dB from 31 Hz to 12 kHz
A target response is the ideal response goal and is not flat at the fre-quency extremes and is used when the ideal reference is not a “flat”line. A target response must be tailored to the loudspeaker’s intendedapplication and takes into account the acoustic impact of the loud-speaker’s location, such as freestanding, or placement near a wall.
First-Reflections Response;+ 1 dB from 31 Hz to 12 kHz
First reflection response is a measure of the response a listenerhears that is contributed by the first reflections from the walls,floor, and ceiling. This superb specification indicates that REVELULTIMA STUDIO will remain accurate, even in the presence ofstrong reflections.
Continued on the next page...
REVEL ULTIMA STUDIO
Owner’s Manual
21
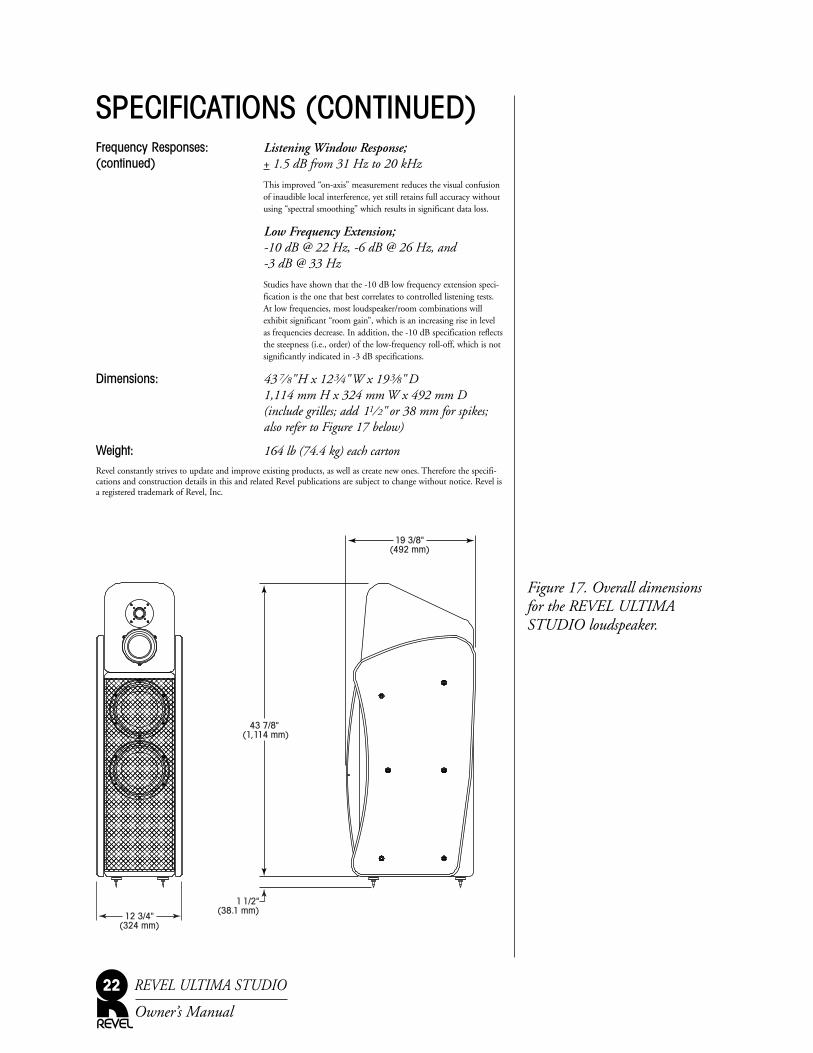
Figure 17. Overall dimensionsfor the REVEL ULTIMA STUDIO loudspeaker.
SPECIFICATIONS (CONTINUED)Frequency Responses: Listening Window Response; (continued) + 1.5 dB from 31 Hz to 20 kHz
This improved “on-axis” measurement reduces the visual confusionof inaudible local interference, yet still retains full accuracy withoutusing “spectral smoothing” which results in significant data loss.
Low Frequency Extension;-10 dB @ 22 Hz, -6 dB @ 26 Hz, and-3 dB @ 33 Hz
Studies have shown that the -10 dB low frequency extension speci-fication is the one that best correlates to controlled listening tests.At low frequencies, most loudspeaker/room combinations willexhibit significant “room gain”, which is an increasing rise in levelas frequencies decrease. In addition, the -10 dB specification reflectsthe steepness (i.e., order) of the low-frequency roll-off, which is notsignificantly indicated in -3 dB specifications.
Dimensions: 43 7⁄ 8"H x 123⁄4"W x 193⁄8" D1,114 mm H x 324 mm W x 492 mm D(include grilles; add 11⁄ 2" or 38 mm for spikes;also refer to Figure 17 below)
Weight: 164 lb (74.4 kg) each cartonRevel constantly strives to update and improve existing products, as well as create new ones. Therefore the specifi-cations and construction details in this and related Revel publications are subject to change without notice. Revel isa registered trademark of Revel, Inc.
REVEL ULTIMA STUDIO
Owner’s Manual
22
������������������������������������������������������������������������������������
19 3/8"(492 mm)
43 7/8" (1,114 mm)
1 1/2"(38.1 mm)
12 3/4"(324 mm)
SERVICE INFORMATIONIn the unlikely event that your Revel component requires service,please contact your Revel dealer for immediate assistance. Theywill determine if it can be serviced locally or requires shipment toour factory or other service repair facility.
IMPORTANT: If factory service is required, please obtain areturn authorization number before shipping the defective unitto us. Call the Revel Service Department at 1-818-830-8777 onany business day, from 9 A.M. to 5 P.M. PST.
• In order to repair the unit quickly, please provide us with theproduct’s serial number and detailed information about theproblem the unit is experiencing, especially if it is intermittent.
• If applicable, include a copy of the original bill of sale to verifythe unit’s warranty coverage.
IMPORTANT: Be sure to pack each unit to be returned in itsoriginal packing carton and mark the return authorizationnumber(s) on the outer carton(s) for identification.
Your Revel dealer can order a new set of shipping materials if youno longer have the original cartons. Since there will be a charge forthis service, we strongly recommend saving all packing materials.
REVEL ULTIMA STUDIO
Owner’s Manual
23

8500 BALBOA BOULEVARD
NORTHRIDGE, CA 91329
PH: (818) 830-8777 • FAX: (818) 892-4960www.revelspeakers.com
P/N 9301484-001
Related Documents