Retek ® Customer Order Management 10.0 User Guide

Welcome message from author
This document is posted to help you gain knowledge. Please leave a comment to let me know what you think about it! Share it to your friends and learn new things together.
Transcript

Retek® Customer Order Management
10.0
User Guide
Retek Customer Order Management
The software described in this documentation is furnished under a license agreement and may be used only in accordance with the terms of the agreement.
No part of this documentation may be reproduced or transmitted in any form or by any means without the express written permission of Retek Inc., Retek on the Mall, 950 Nicollet Mall, Minneapolis, MN 55403.
Information in this documentation is subject to change without notice.
Retek provides product documentation in a read-only-format to ensure content integrity. Retek Customer Support cannot support documentation that has been changed without Retek authorization. Corporate Headquarters: Retek Inc.
Retek on the Mall
950 Nicollet Mall
Minneapolis, MN 55403
888.61.RETEK (toll free US)
+1 612 587 5000
Retek
110 Wigmore Street
London
W1U 3RW
United Kingdom
Switchboard:
+44 (0)20 7563 4600
Sales Enquiries:
+44 (0)20 7563 46 46
Fax: +44 (0)20 7563 46 10
Retek® Customer Order Management™ is a trademark of Retek Inc.
Retek and the Retek logo are registered trademarks of Retek Inc.
©2002 Retek Inc. All rights reserved.
All other product names mentioned are trademarks or registered trademarks of their respective owners and should be treated as such. European Headquarters:
Printed in the United States of America.
Customer Support
Customer Support hours:
8AM to 5PM Central Standard Time (GMT-6), Monday through Friday, excluding Retek company holidays (in 2002: Jan. 1, May 27, July 4, July 5, Sept. 2, Nov. 28, Nov. 29, and Dec. 25).
Customer Support emergency hours:
24 hours a day, 7 days a week.
Contact Method Contact Information
Phone US & Canada: 1-800-61-RETEK (1-800-617-3835) World: +1 612-587-5000
Fax (+1) 612-587-5100
E-mail [email protected]
Internet www.retek.com/support Retek’s secure client Web site to update and view issues
Mail Retek Customer Support Retek on the Mall 950 Nicollet Mall Minneapolis, MN 55403
When contacting Customer Support, please provide:
• Product version and program/module name.
• Functional and technical description of the problem (include business impact).
• Detailed step by step instructions to recreate.
• Exact error message received.
• Screen shots of each step you take.


Contents i
Contents Chapter 1 – Introduction......................................................... 1
Introduction to Retek COM................................................................................. 1 Retek COM Features .................................................................................................. 1 Intended audience ....................................................................................................... 2
Navigation ........................................................................................................... 3 Overview .................................................................................................................... 3 Procedures ................................................................................................................ 15
Chapter 2 – Order Processing.............................................. 21
Overview ........................................................................................................... 21 Customer Profile Overview ...................................................................................... 22 Order Status Overview ............................................................................................. 24 Items Overview ........................................................................................................ 25 Order History Overview ........................................................................................... 26 No Charge Orders Overview .................................................................................... 26
Windows............................................................................................................ 27 Order Entry window ................................................................................................. 27 Field Descriptions..................................................................................................... 28 Customer Maintenance window ............................................................................... 37 Field Descriptions..................................................................................................... 38 Customer Lookup window ....................................................................................... 44 Item Search LOV window........................................................................................ 45 Shipping block.......................................................................................................... 46 Autoship and Subscription Orders window.............................................................. 47 Autoship History ...................................................................................................... 48 Existing New and Pending Orders window.............................................................. 49 Payment window ...................................................................................................... 50 Pending Orders window ........................................................................................... 52
Procedures ......................................................................................................... 53 Access an order from order history .......................................................................... 53 Cancel orders ............................................................................................................ 54 Standard Order Type ................................................................................................ 54 Autoship Order Type................................................................................................ 54 Change address ......................................................................................................... 55 Change the customer profile..................................................................................... 55 Copy an address........................................................................................................ 56 Copy orders .............................................................................................................. 56 Create an autoship order template ............................................................................ 57 Create a new bill to or ship to address...................................................................... 57 Create a subscription order ....................................................................................... 58 Create or update a customer profile.......................................................................... 58 Enter or review customer shipping information ....................................................... 59

ii Retek Customer Order Management
Enter or review order comments .............................................................................. 59 Look up a customer .................................................................................................. 60 Pend an order............................................................................................................ 60 Process an order........................................................................................................ 61 Process or review autoship information ................................................................... 61 Process or review no charge information ................................................................. 62 Process a no charge order ......................................................................................... 63 Query an item ........................................................................................................... 63 Release an order ....................................................................................................... 64 Retrieve and review orders ....................................................................................... 64 Return an order from order history........................................................................... 64 Review autoship history information ....................................................................... 65 Review a customer's legacy number......................................................................... 66 Review and resolve pending orders.......................................................................... 66 Review order audit information................................................................................ 66 Review order invoice amounts ................................................................................. 67 Review order shipping information .......................................................................... 67 Review order tax amounts ........................................................................................ 67 Review order totals................................................................................................... 68 Review point of sale order amounts ......................................................................... 68 Select another address for auto payments................................................................. 68 Select an item ........................................................................................................... 69 Select payments for authorization ............................................................................ 69 Set up a customer for auto pay ................................................................................. 70 Set up tax exemption for a customer ........................................................................ 70 Update an autoship order template ........................................................................... 71 View or enter notes................................................................................................... 71
Chapter 3 – Customer Service ............................................. 73
Overview ........................................................................................................... 73 Customer Adjustments Overview ........................................................................... 74 Order Returns Overview ......................................................................................... 74
Windows............................................................................................................ 75 Activity Management window ................................................................................ 75 Customer Service window ...................................................................................... 76 Notes Entry window................................................................................................ 77 Paymen History indowt wRequest Tracking window
........................................................................................ 78 ....................................................................................... 79
Request Manageme t windownShipment Tracking window
................................................................................ 80 .................................................................................... 81

Contents iii
Procedures ......................................................................................................... 82 Autho z an adjustment.......................................................................................... 82 ri eCreat a customer service activity ......................................................................... 83 eEnter a note for a customer ...................................................................................... 83 Manage tracking requests ......................................................................................... 84 Process a customer adjustment ................................................................................. 84 Review and manage activities .................................................................................. 85 Process an order return ............................................................................................. 85 Process a payment/refund......................................................................................... 86 Process a tracking request......................................................................................... 87 Review payment history information ....................................................................... 87 Review payment log history information ................................................................. 87 Release an order return for settlement ...................................................................... 88 Track a shipment ...................................................................................................... 88
Chapter 4 – Fulfillment Processing ..................................... 89
Overview ........................................................................................................... 89 Pick Tickets Overview.............................................................................................. 89 Pick Confirmation Overview.................................................................................... 89 Returns Inspection Overview ................................................................................... 89 Shipment Confirmation Overview............................................................................ 89
Procedures ......................................................................................................... 90 Change the carrier service on a shipment ................................................................. 90 Confirm a shipment .................................................................................................. 90 Review inventory balances....................................................................................... 91 Review inventory reservations ................................................................................. 91 View a summary of open orders............................................................................... 91
Windows............................................................................................................ 92 Open Pick Tickets View window ............................................................................. 93 Open Orders Summary window ............................................................................... 93 Order History window.............................................................................................. 94 Pick Ticket Reprint window..................................................................................... 95 Pick Confirmation window....................................................................................... 95 Inventory Balances window ..................................................................................... 96 Inventory Reservations window ............................................................................... 97 Shipment Tracking window...................................................................................... 98 Shipment Confirmation window .............................................................................. 99
iv Retek Customer Order Management
Chapter 5 – Inventory Management and Item Pricing...... 101
Inventory Management Overview................................................................... 101 Item Pricing and Discounting Overview ................................................................ 102
Procedures ....................................................................................................... 103 Add an item to an event price list ........................................................................... 103 Add a non-inventory item to the master item list ................................................... 104 Add a master item to a company item list .............................................................. 105 Change an item on-hand quantity per warehouse or location................................. 105 Copy an event price list .......................................................................................... 106 Enter phone numbers associated with an event price list ....................................... 106 Set up a discount..................................................................................................... 106 Set up an event price list......................................................................................... 107 Set up an event item price discount ........................................................................ 107 Set up an item relationship ..................................................................................... 109 Set up an item image .............................................................................................. 109 Set up a translation to a discount ............................................................................ 110 Set up a translation to an event price list ................................................................ 110 Review the location of an on-hand item................................................................. 110 Review order reserved quantities ........................................................................... 111 Review manual reservations................................................................................... 111 Set up an item for tax exemption............................................................................ 111
Windows.......................................................................................................... 112 Company Items window......................................................................................... 112 Company Item/Event Item Price window............................................................... 113 Discount Setup window.......................................................................................... 114 Event Price List Setup window .............................................................................. 115 Event Item Price/Discount window........................................................................ 116 Item Onhand (Locations) Quantities window......................................................... 117 Item Onhand Quantities window............................................................................ 118 Item Relationship window...................................................................................... 119 Item Tax Exemption window ................................................................................. 120 Manual Reservations window ................................................................................ 121 Master Item window............................................................................................... 123 Order Reserved Quantities window........................................................................ 124
Contents v
Chapter 6 – Reports ............................................................ 125
Reports Overview............................................................................................ 125 Order Reports ......................................................................................................... 125 Finance Reports ...................................................................................................... 126 Fulfillment Reports................................................................................................. 126 Report Cover Page.................................................................................................. 126 Last Cover Page...................................................................................................... 127 Using Reports ......................................................................................................... 127 Report Column Headings ....................................................................................... 128 Parameters .............................................................................................................. 132
Procedures ....................................................................................................... 135 Generate and print reports ...................................................................................... 135 Select a report from the report list .......................................................................... 135
Reports ............................................................................................................ 136 Batch Balance Detail report ................................................................................... 136 Payment Authorization report ................................................................................ 137 Payment Reauthorization report............................................................................. 137 Adjustment Detail report........................................................................................ 138 Pending Orders Detail report ................................................................................. 138 Pending Orders Summary report ............................................................................ 139 Daily Sales by Batch Detail report ......................................................................... 139 Daily Sales by Batch Summary report ................................................................... 140 Backorder Detail report .......................................................................................... 140 Backorder Summary report .................................................................................... 140 Returns Detail report .............................................................................................. 141 Returns Summary report ........................................................................................ 141 Return Line Items For Letters report ..................................................................... 141 Returns Issuance report .......................................................................................... 142 Return No Charge Audit report .............................................................................. 142 No Charge Shipped report ...................................................................................... 142 Daily Quantity Shipped report................................................................................ 143 Pick Ticket Audit report ......................................................................................... 143 Pick Tickets Report report...................................................................................... 143 Unshipped Items report .......................................................................................... 144
Chapter 7 – Utilities............................................................. 145
Order Utilities Overview................................................................................. 145 Fulfillment Utilities ................................................................................................ 146
Overview ......................................................................................................... 146
vi Retek Customer Order Management
Procedures ....................................................................................................... 147 Generate and release autoship orders ..................................................................... 147 Deposit a payment batch......................................................................................... 147 Review calls in the queue ....................................................................................... 147 Manually release backorders .................................................................................. 148 Resubmit electronic pick messages ........................................................................ 148
Windows.......................................................................................................... 149 Autoship Release window ...................................................................................... 149 Call Queue window ................................................................................................ 150 Payment Batch Deposit window............................................................................. 151 Payment History window ....................................................................................... 152 Manual Pick Release window................................................................................. 153 Manual Backorder Release window....................................................................... 155 Close Carrier Manifests window ............................................................................ 156 Resubmit Electronic Pick Messages window......................................................... 157
Chapter 8 – Order Maintenance ......................................... 159
Overview ......................................................................................................... 159 Define and support the Order Maintenance Setup tables ....................................... 159 Define and/or Customize the Criteria Support Maintenance Tables ...................... 160 Maintenance Navigation Processes ........................................................................ 161
Procedures ....................................................................................................... 162 Update maintenance tables ..................................................................................... 162 Set up a new order type .......................................................................................... 162 Set up a new order type amount ............................................................................. 162 Set up a new order type reason............................................................................... 163 Set up new order type rules .................................................................................... 163 Set up a new order status ........................................................................................ 163 Set up a new order status reason............................................................................. 164 Set up a new order priority ..................................................................................... 164 Set up a new autoship frequency ............................................................................ 164 Set up a new order line status ................................................................................. 165 Set up a payment method........................................................................................ 165 Set up a payment settled status ............................................................................... 166 Set up a payment posted status ............................................................................... 166 Set up a hold type ................................................................................................... 166 Set up an adjustment reason ................................................................................... 167 Set up an order volume reason ............................................................................... 167 Set up a status transition type ................................................................................. 167 Set up a status transition ......................................................................................... 168 Set up a payment vendor ........................................................................................ 168 Set up a marketing source....................................................................................... 169 Set up an order sequence ........................................................................................ 169 Set up a processed status ........................................................................................ 169 Set up an install type............................................................................................... 170

Contents vii
Windows.......................................................................................................... 170 Order Type window................................................................................................ 170 Order Type Amounts window ................................................................................ 171 Order Type Reason window................................................................................... 171 Order Type Rules window...................................................................................... 172 Order Status window .............................................................................................. 173 Order Status Reason window ................................................................................. 173 Order Priority window............................................................................................ 174 Autoship Frequency window.................................................................................. 175 Order Line Status window...................................................................................... 176 Payment Method window....................................................................................... 177 Payment Settled Status window ............................................................................. 179 Payment Posted Status window.............................................................................. 179 Hold Type window ................................................................................................. 180 Adjustment Reason window................................................................................... 180 Status Transition Type window.............................................................................. 181 Status Transition window ....................................................................................... 181 Payment Vendor window ....................................................................................... 182 Marketing Source window...................................................................................... 182 Processed Status window........................................................................................ 183 Order Sequence window......................................................................................... 183 Install Type window ............................................................................................... 184
Chapter 9 – Customer Maintenance .................................. 185
Customer Maintenance Overview................................................................... 185
Windows and Procedures ................................................................................ 186 Customer Status window........................................................................................ 186 Customer Status Reason window ........................................................................... 187 Customer Type window.......................................................................................... 188 Customer Marital Status window ........................................................................... 189 Customer Gender window...................................................................................... 190 Address Type window............................................................................................ 191 Telephone Type window ........................................................................................ 192 Demographic window ............................................................................................ 193 Name Suffix window.............................................................................................. 194 Name Title window ................................................................................................ 195 Bank Account Type window .................................................................................. 196 Bank and Branch window....................................................................................... 197
viii Retek Customer Order Management
Chapter 10 – Item Maintenance.......................................... 199
Item Maintenance Overview ........................................................................... 199
Windows and Procedures ................................................................................ 200 Product Segment window....................................................................................... 200 Item Type window.................................................................................................. 201 Item Category window ........................................................................................... 202 Parent Category Relationship ................................................................................. 202 Child Category Relationship .................................................................................. 203 Translation Maintenance ........................................................................................ 203 Item Relationship Type window............................................................................. 204 Subscription Frequency window ............................................................................ 205 Item Hazard Class window..................................................................................... 206 Harmonized Commodity window .......................................................................... 206 Item Packaging Group window .............................................................................. 207 Item Vendor window.............................................................................................. 207 Event Type.............................................................................................................. 209 Unit of Measure window ........................................................................................ 210 Reservation Type window...................................................................................... 210 Image Type window ............................................................................................... 211
Chapter 11– Workflow Maintenance.................................. 213
Workflow Maintenance Overview .................................................................. 213
Windows and Procedures ................................................................................ 214 Script window......................................................................................................... 214 Job Responsibility window..................................................................................... 215 Job Function Access window ................................................................................. 216 Audit Column window ........................................................................................... 217 Audit Type window................................................................................................ 219 Activity Source window ......................................................................................... 220 Script Type window ............................................................................................... 221 Activity Status window .......................................................................................... 222 Activity Type window............................................................................................ 223 Request Priority window ........................................................................................ 224 Request Type window ............................................................................................ 225 Request Status window........................................................................................... 226 Request Reason window......................................................................................... 227 Reason Category window....................................................................................... 228 Reason Item window .............................................................................................. 229 Reason Item Template window .............................................................................. 230 Navigation Script window...................................................................................... 231 Activity Request Item window............................................................................... 232 Report Type window .............................................................................................. 233

Contents ix
Chapter 12 – Tax Maintenance........................................... 235
Tax Maintenance Overview ............................................................................ 235
Windows and Procedures ................................................................................ 236 Tax Return Generation window ............................................................................. 236 Review the Tax Return Generation Status.............................................................. 238 Tax Return View window....................................................................................... 239 Location Segment window ..................................................................................... 240 Postal Codes window ............................................................................................. 241 Item Tax Exemption window ................................................................................. 242 Export Tax Returns................................................................................................. 243
Chapter 13 – Warehouse Maintenance.............................. 245
Warehouse Maintenance Overview................................................................. 245
Windows and Procedures ................................................................................ 247 Warehouse window ................................................................................................ 247 Pick Release Maintenance window ........................................................................ 250 Electronic Picking Parameters window.................................................................. 251 Warehouse Scale window....................................................................................... 252 Warehouse Printer window .................................................................................... 253 Ship Method window ............................................................................................. 254 Ship Container Status window ............................................................................... 255 Ship Line Status window........................................................................................ 256 Ship Batch Frequency window............................................................................... 257 Ship Request Status window .................................................................................. 258 Weight Variance window ....................................................................................... 259 Order Line Reason window.................................................................................... 260 Warehouse Ship Station window............................................................................ 261 Manifest Type window........................................................................................... 262
Chapter 14 – Carrier Maintenance ..................................... 263
Carrier Maintenance Overview ....................................................................... 263
Windows and Procedures ................................................................................ 264 Carrier Service window.......................................................................................... 264 Carrier window....................................................................................................... 265 Carrier Rate window............................................................................................... 266 Carrier Billing window........................................................................................... 267 Carrier Service Range Type window...................................................................... 267 Carrier Service Type window................................................................................. 268


Chapter 1 – Introduction 1
Chapter 1 – Introduction The Retek COM (Customer Order Management) is designed and built as a dedicated business-to-consumer solution and provides a completely integrated, Oracle-based and comprehensive enterprise solution for direct-to-consumer-order management needs.
Retek software integrates state-of-the-art order management functions; call handling, order-entry, customer service, fulfillment and accounting functions through a seamless, unified near real-time process.
Introduction to Retek COM The Retek COM application is designed and built as a dedicated business-to-consumer solution and provides a completely integrated, Oracle-based, comprehensive enterprise solution for all direct-to-consumer order management needs by integrating front and back office business processes.
Retek software integrates state-of-the-art call handling, order-entry, customer service, fulfillment and accounting functions through a seamless, unified near real-time process.
Retek COM has a highly responsive Graphical User Interface (GUI) that provides full point-and-click capability to quickly facilitate customer orders. The mouse or keyboard can be used to operate pull-down menus, buttons, pop-up lists, check boxes, or alternative regions.
Retek COM Features Customer Order Management is a high-speed, high-volume and multi-channel consumer order processing system. This Application features the following:
• API set to interface into warehouse management systems and merchandising systems
• Real-time sales activity
• Scripting and profiling
• Online payment processing
• Event pricing and flexible product discounting
• Consumer and order holds
• Returns processing, auto-ship and continuity programs
• Substitution
• Product up-selling (same as suggestive selling)
• Near real-time ATP checks - capture every sale with accurate inventory positions
Customer Order Management features many other robust features designed to maximize the potential of every transaction.
2 Retek Customer Order Management
Intended audience This Retek COM help project is a complete source of information about the Order Management application of Retek COM. It provides useful reference and assistance to:
• Customer Associates (Order Processors)
• Customer Service/Research Personnel
• Management
• System Administrators
• IT Personnel
Retek recognizes the integral role each department plays in its organization. Therefore, it is our recommendation that all areas review the Retek COM Introduction.
Chapter 1 – Introduction 3
Navigation
Overview This topic reviews the basic features of the Graphical User Interface (GUI) and the architecture of Retek COM. It will enable the user to navigate within Order Management retrieving and maintaining data.
The topics covered here are:
• Overview of Retek COM
• Starting the Retek COM
• Basic Graphical User Interface (GUI)
• Using menus
• Keyboard shortcuts
• Applications toolbar
• Navigating within a window (fields, records and blocks)
• Entering data
• Searching for data (queries and query operators)
Procedures The following procedures are described in this chapter:
• Start Retek Com
• Choose a value from a list
• Create Records
• Delete or Clear records
• Duplicate a field
• Edit a field
• Utilize navigation shortcuts
• Perform a Query
• Use the calendar to enter dates
• Save data
• Exit Retek COM

4 Retek Customer Order Management
RCOM Menus Navigation through the RCOM system is all performed using the following menus: File menu
Use the File menu to:
• Close the current form
• Close all open forms
• Save the current information to the database
• Save the current information and proceed
• Change connection
• Change password
• Print the current window or report
• Refresh the window
• Exit Retek COM Edit menu
Use the Edit menu to:
• Cut, copy and paste data between fields
• Clear data from fields, records or blocks
• Duplicate a field
• Display a List of Values for a field
• Invoke the editor for a field
• Delete or create a new record
• Toggle selections
• Select and de-select objects in a window
• Set the selection scope
• Clear a block or form
• Perform a query
• Go to the next/prev field, record, or block
• Set application preferences

Chapter 1 – Introduction 5
Order Management menu
Use the Order Management menu to:
• Create and maintain customer records
• Process orders
• Maintain Order utilities
• Maintain items and inventory
• View and print reports
• Maintain the Order, Customer, Item, Workflow, and Tax maintenance tables
• Maintain the Warehouse and Carrier maintenance tables
Note: Access to this menu is available only if the user is authorized. Customer Service menu
The Customer Service menu provides the following options:
• Customer Service
• Activity Management
• Request Management
• Request Tracking
• Notes Entry
• Order History
• Shipment Tracking
• Payment History
• Payment Log History
• Order Returns
• Customer Adjustments
• Payment/Refund Administration menu
Use the Administration menu to:
• Set up and maintain user accounts
• Review application/trace logs, user sessions, and batch processes
• Run Scripts/Reports
• Print Administration Reports
• Maintain Company parameters and Lookup, User Account, and Application Maintenance tables
• Access the Configurable Application Services modules

6 Retek Customer Order Management
Help menu
Use the Help menu to:
• Review Help information online, if available
• Display the keyboard shortcuts
• Display errors
• Turn the Scripting, Trace Session, Debug, and Module Feedback features on or off
• Record information
Chapter 1 – Introduction 7
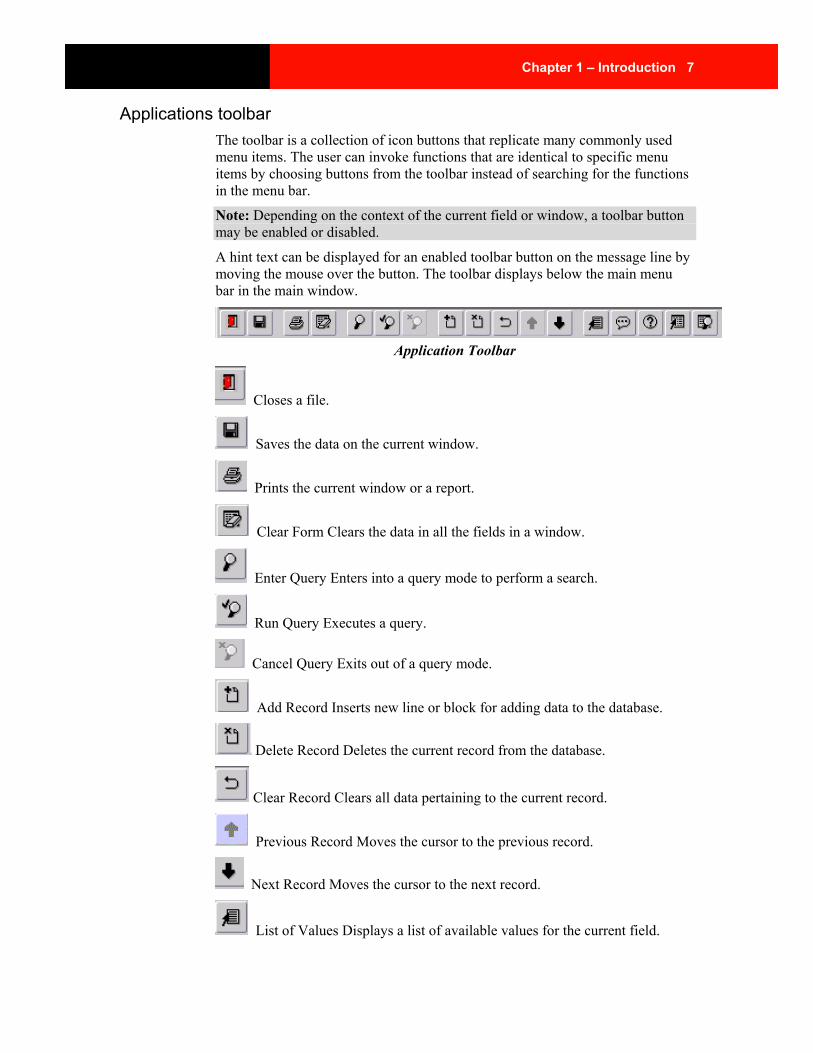
Applications toolbar The toolbar is a collection of icon buttons that replicate many commonly used menu items. The user can invoke functions that are identical to specific menu items by choosing buttons from the toolbar instead of searching for the functions in the menu bar.
Note: Depending on the context of the current field or window, a toolbar button may be enabled or disabled.
A hint text can be displayed for an enabled toolbar button on the message line by moving the mouse over the button. The toolbar displays below the main menu bar in the main window.
Application Toolbar
Closes a file.
Saves the data on the current window.
Prints the current window or a report.
Clear Form Clears the data in all the fields in a window.
Enter Query Enters into a query mode to perform a search.
Run Query Executes a query.
Cancel Query Exits out of a query mode.
Add Record Inserts new line or block for adding data to the database.
Delete Record Deletes the current record from the database.
Clear Record Clears all data pertaining to the current record.
Previous Record Moves the cursor to the previous record.
Next Record Moves the cursor to the next record.
List of Values Displays a list of available values for the current field.

8 Retek Customer Order Management
Edit Field Allows edits or maximized view of the current field.
Help Displays help for the current application.
Quick Navigation Displays a shortcut menu for related functions.
Query Form Displays multiple records in a single window.

Chapter 1 – Introduction 9
Basic GUI Terminology Before using Retek COM, the user should become familiar with the specifics of the Graphical User Interface (GUI) environment and how to perform basic tasks, such as using a menu or selecting an item. This will enable the user to become familiar with the following generic terms:
GUI Term Description
Alternative Region
A collection of blocks that occupy the same space in a window where only one block can be displayed at any time.
Field An area in a window that displays data or allows the user to enter data. Fields that require entry are displayed in blue. Fields with default values are displayed in gray. Optional fields are displayed in white.
Form One or more windows used to accomplish a business function
Block An area of information relative to a specific business function or entity.
Dialog Box A window that requires the user to act on its contents before continuing.
Option Button A button that indicates an individual selection is available.
Region A logical grouping of fields set apart from other fields by a box.
Window An area where the user interacts with a module. Many windows can be displayed simultaneously, overlap, or be adjacent to each other.
Window Title Text in the title bar that indicates the name of the window.
Button A graphic element that initiates a predefined action when chosen.
Check Box A box where it is possible to toggle between an on/off or yes/no state for a value.
10 Retek Customer Order Management
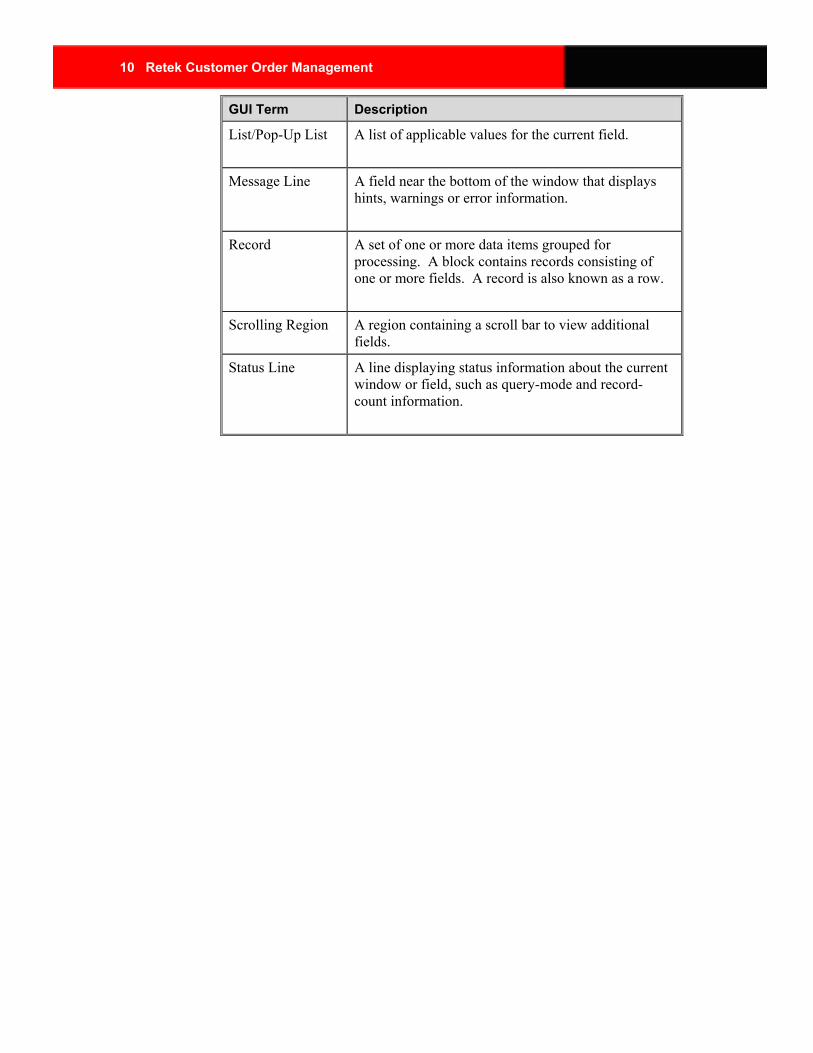
GUI Term Description
List/Pop-Up List A list of applicable values for the current field.
Message Line A field near the bottom of the window that displays hints, warnings or error information.
Record A set of one or more data items grouped for processing. A block contains records consisting of one or more fields. A record is also known as a row.
Scrolling Region A region containing a scroll bar to view additional fields.
Status Line A line displaying status information about the current window or field, such as query-mode and record-count information.

Chapter 1 – Introduction 11
Data Search Overview Retek COM provides easy-to-use search capabilities to access application information by enabling a user to:
• Search for existing data in an application.
• Use a Lookup window to simplify a search.
• Include wildcards and query operators in search criteria.
• Review records retrieved from a search.
Retek COM provides a user with easy-to-use search capabilities to access application information.
The user can quickly retrieve and review all available information in the database, without having to remember the information displayed in windows or without having to print lengthy reports. Instead, the user can run a search to obtain the desired information and then review the data on line in the same window used to enter the data.
With Retek COM the user can satisfy the following basic information search needs:
• Gain instant, on-line access to all of application information
• Search for a specific record or for a group of records based on entered criteria
• Search for information using criteria of different types or lengths, including a single letter, a single word or a group of characters
Data Entry The user can efficiently enter and manage data by using one of the following methods:
• Enter data in a form using various editing functions
• Copy data from one field to another
• Clear data from a form
• Delete data from a form or from the database
• Use a List of Values to simplify data entry
• Use the calendar to enter a date
• Save edits to the database
Note: Required fields must be filled in with appropriate data before the user can navigate from one portion of the form to another.

12 Retek Customer Order Management
List of Values A List of Values (LOV) provides a powerful and easy-to-use data entry method that increases accuracy and productivity.
Retek COM indicates that a list of acceptable input values is available for field by displaying <List of Values> on the status line. When the list is displayed, the values are displayed in a window with a title that describes the contents.
An LOV provides features that are required to satisfy several basic data entry needs:
• Data can be entered quickly and easily without the user having to memorize or look up valid data for each field. Data can be chosen from an online list of valid input choices whenever needed.
• Input can be validated during data entry. When data is entered incorrectly, the user will know right away so that the appropriate corrections can be made.
• Only company-specific terminology is available for industry-standard and user-defined fields.
Chapter 1 – Introduction 13
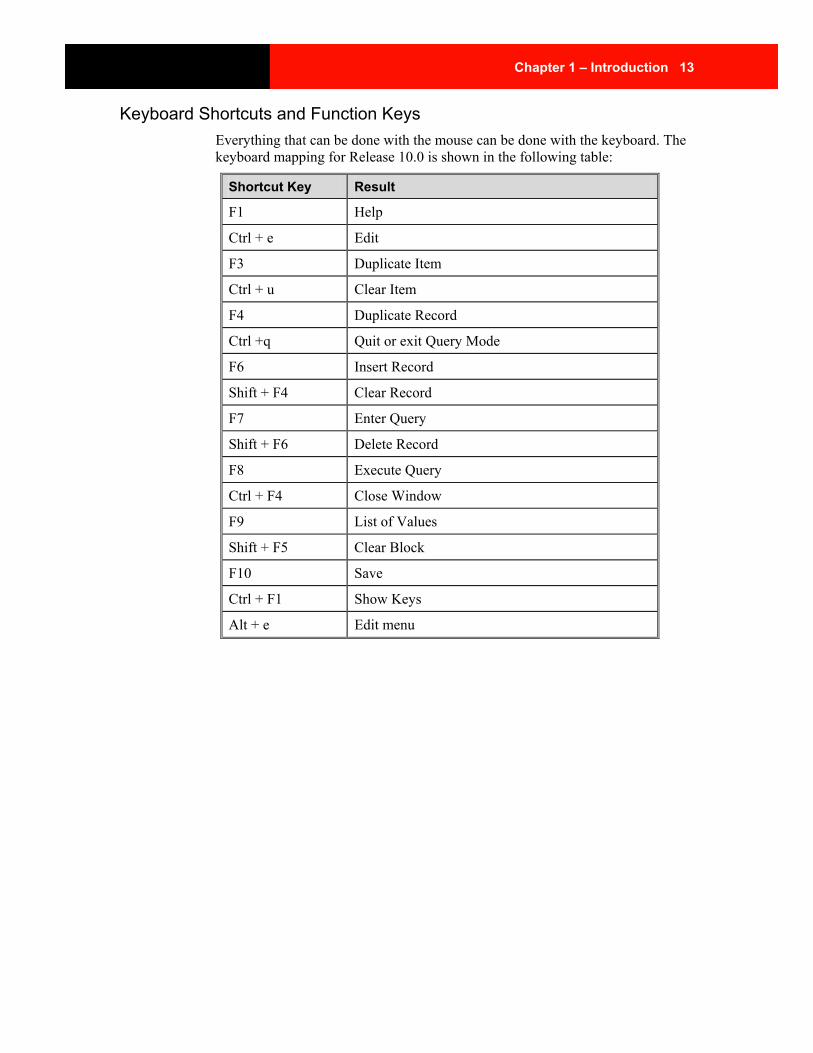
Keyboard Shortcuts and Function Keys Everything that can be done with the mouse can be done with the keyboard. The keyboard mapping for Release 10.0 is shown in the following table:
Shortcut Key Result
F1 Help
Ctrl + e Edit
F3 Duplicate Item
Ctrl + u Clear Item
F4 Duplicate Record
Ctrl +q Quit or exit Query Mode
F6 Insert Record
Shift + F4 Clear Record
F7 Enter Query
Shift + F6 Delete Record
F8 Execute Query
Ctrl + F4 Close Window
F9 List of Values
Shift + F5 Clear Block
F10 Save
Ctrl + F1 Show Keys
Alt + e Edit menu
14 Retek Customer Order Management
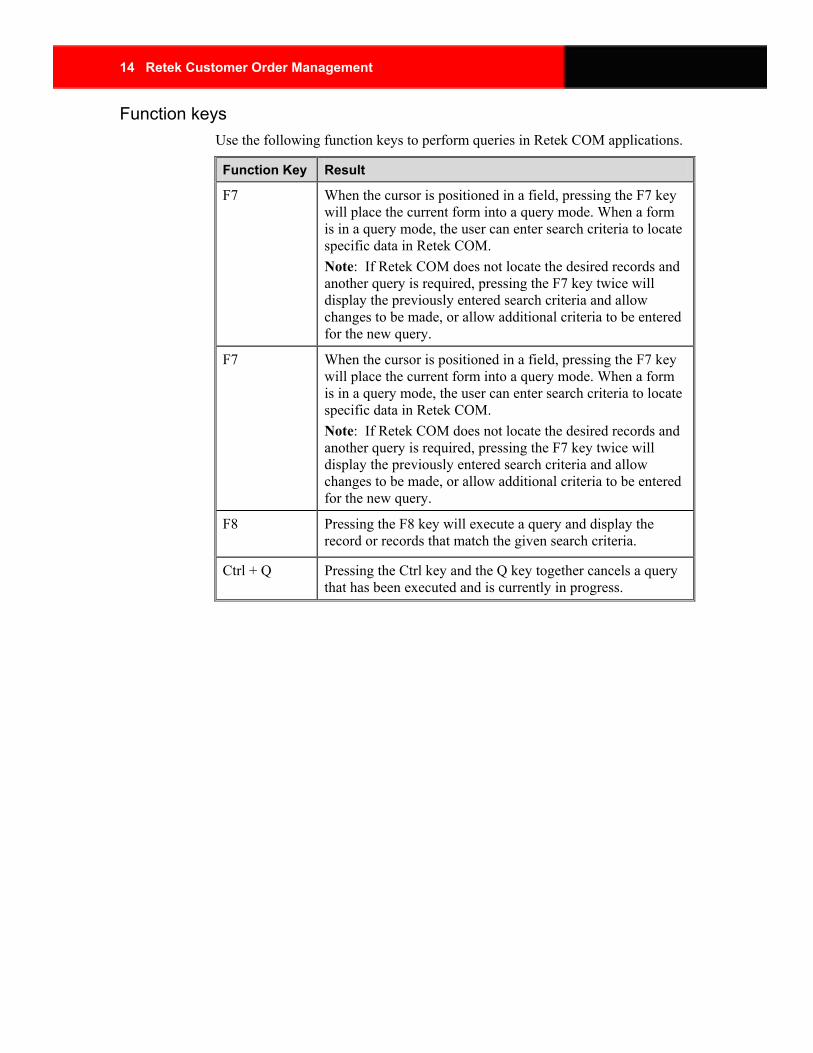
Function keys Use the following function keys to perform queries in Retek COM applications.
Function Key Result
F7 When the cursor is positioned in a field, pressing the F7 key will place the current form into a query mode. When a form is in a query mode, the user can enter search criteria to locate specific data in Retek COM. Note: If Retek COM does not locate the desired records and another query is required, pressing the F7 key twice will display the previously entered search criteria and allow changes to be made, or allow additional criteria to be entered for the new query.
F7 When the cursor is positioned in a field, pressing the F7 key will place the current form into a query mode. When a form is in a query mode, the user can enter search criteria to locate specific data in Retek COM. Note: If Retek COM does not locate the desired records and another query is required, pressing the F7 key twice will display the previously entered search criteria and allow changes to be made, or allow additional criteria to be entered for the new query.
F8
Pressing the F8 key will execute a query and display the record or records that match the given search criteria.
Ctrl + Q Pressing the Ctrl key and the Q key together cancels a query that has been executed and is currently in progress.

Chapter 1 – Introduction 15
Procedures
Start Retek COM
To begin using Retek COM
Navigate: From the desktop, open the Retek COM program group by double-clicking on the Retek COM icon. The Logon window is displayed.
Note: Retek COM security is based on each user’s account, which controls access to Retek COM applications, reports and data. To log on to Retek COM, use an assigned name and password authorization.
To start Retek COM Applications at the Operating System
Navigate: From the PC Desktop select the Retek COM Icon. The Logon Menu is displayed.
1 In the Password field, enter a password and click Connect.
Note: Notice the password is encrypted, preventing others from viewing it. The user should keep passwords confidential to prevent unauthorized access. If the user logon path is not linked to the database, username and password information must be entered at each logon.
Choose a value from a list Some List of Values (LOV) windows display only one column of information and others display more. The length of the list can be reduced. To choose a value from a list
Navigate: From the Edit menu, select List of Values, or press the F9 key to display a list.
1 Reduce the length of a list using one of two methods:
a Search for a value in the first column of a list by clicking in the Find field and then entering search criteria and clicking the Find button. If the search finds multiple values, restrict your search, or use one of the methods described in the next step to choose a specific value from the reduced list.
Note: A common set of values displays where the user keyed information into a field with two or more values matching the entry. To view all values available to that field, press F9.
2 A value can also be selected directly from a list using one of the following methods:
a Scroll through the list and double-click a value.
b Scroll through the list, select a value and click OK.
Note: Once a value is selected, the list window closes and inserts the value into the current field. To close a list window without choosing a value, click Cancel.

16 Retek Customer Order Management
Create records New records can be entered allowing new data to be added to the database. To create a new record from any data entry window in the application
Navigate: From the Edit menu, select New Record.
1 When the New Record menu item is selected in a multi-record block, the current record is moved down and a new blank row is inserted. A new record can be added by filling in this blank row.
Note: When the New Record is selected in a single-record block, a blank record is displayed in the current block so data can be entered for a new record.
2 When the data for a new record is completed, select Save from the File menu.
Delete or clear records Retek COM allows for deletion of records where the information is not required for historical purposes. You can also clear fields, records, and entire blocks and forms, before the data is saved. If the user is in the wrong window or has accidentally performed an unwanted action, the Clear Record option from the Edit menu clears the current record. To delete a record
Navigate: From the Edit menu, select Delete Record. This action initially clears the record from the window and returns the cursor to the first field of the next record.
1 From the File menu, select Save to delete the record from the database.
Note: If the user exits Retek COM without saving, the deletion will not be saved. To clear a field
• From the Edit menu, select Clear Field. The empty field is displayed. To clear a record
• From the Edit menu, select Clear Record. The record is cleared from the window and returns the cursor to the first field of the next record.
To clear all data from a form
A user can clear data from the window at any time. The cleared data is erased from the window, but not deleted from the database.
Note: If the data has never been saved to the database, it will be deleted permanently when it is cleared from the window.
• From the Edit menu, select Clear Form. The entire window is now cleared. To clear data from the current block
• From the Edit menu, select Clear Block. The empty block is displayed.
Chapter 1 – Introduction 17
Duplicate a field To minimize data entry time, the user may duplicate data from previous records. To copy a field value from the previous record
Navigate: From the Edit menu, select New record. A new row is added.
1 Enter a new record or query an existing record in the window.
2 From the Edit menu, select New Record to insert a new record after the existing record.
3 Navigate to the field value to be duplicated into the new record.
4 From the Edit menu, select Duplicate Field Above. To copy all field values from the previous record
1 Enter a new record or query an existing record in the window.
2 From the Edit menu, select Duplicate Record Above.
Note: If the current block requires all records to be unique, the Duplicate Record Above menu item will not be available. Also, if the user is on the first record of a block, the Duplicate Field Above and Duplicate Record Above menu items cannot be used.
Edit a field An Editor window can be displayed to view, enter or update the entire contents of a text field. The Editor window is especially useful for editing scrollable text fields. To use the Editor window for a field
Navigate: From the Edit menu, select Edit Field. The Editor window is displayed.
Note: If the current field is read-only, the Editor window displays in read-only mode.
1 Enter a new value or edit the existing value in the Editor window.
Note: The Search/Replace window is used to search for a phrase and/or replace it with another phrase.
2 Click Search in the Editor window. The Search/Replace window is displayed.
3 In the Search For field, enter a value, and if the value is to be replaced with another value, enter a value in the Replace With field.
4 Select Search to search for the value, or choose Replace or Replace All to search for the value and replace the first occurrence or all occurrences with the new value.
5 Select Cancel to close the Search/Replace window then select OK to close the window and insert the value into the field.

18 Retek Customer Order Management
Utilize navigation shortcuts The Quick Navigation button displays a shortcut menu for all related functions on the current window.
Navigate: Click the Quick Navigation button . The Quick Navigation Destination window is displayed that lists all the related application windows.
1 To select a form, highlight the form name and click OK. Retek COM displays the selected window.
2 After the accessed application window is closed, Retek COM returns to the original application window.
Note: If there is no shortcut menu for a given entry window, the Quick Navigation button will be disabled.
Perform a query To perform a query
Navigate: From the current window, press F7 to invoke a query. If a List window is displayed, proceed to Step 1. If a Lookup window is displayed, proceed to Step 2.
1 Select the desired record and click OK to retrieve the record into the current block.
2 If a Lookup window is displayed, enter search criteria in the appropriate fields, then press F8 to execute the query and display the records that match the search criteria.
Note: If a query is in progress, it can be canceled by pressing Ctrl + Q.
Save data When it is necessary to save data, Retek COM updates the underlying database with the data that has been entered since the last time data was saved and then indicates that the transaction is complete.
Retek COM always validates data entry upon saving it. If any of the data entered is invalid or missing, Retek COM displays a message describing the problem and does not save the data. To save entered data
• From the File menu, select Save, press F10, or click the Save icon.
Chapter 1 – Introduction 19
Use the calendar to enter dates A calendar can be used to enter a valid value in a date field if the field displays the <List of Values> on the status line.
To choose a date in the calendar window
Navigate: With the cursor in a date field, click the LOV menu button. Or, from the Edit menu, select List of Values to display the Calendar window.
1 To display the next or previous month, click the right arrow or left arrow button, respectively, in the upper-left corner of the window.
2 To display the next or previous year, click the right arrow or left arrow button, respectively, in the upper-right corner of the window.
3 Select a day.
Note: Disabled buttons that show dimmed text represent invalid days, which cannot be selected. Similarly, if a date field is display only, the Calendar window for the field can be displayed, but the date shown on the calendar cannot be changed.
4 Click OK to accept the selected date and close the window. Click Cancel to close the window without choosing a date.
Exit Retek COM When the user completes the required task(s), unsaved work can be saved or discarded in a window before exiting Retek COM. To exit Retek COM
Navigate: From the File menu, select Close. The current window is closed.
1 To close all open windows, select File > Close All. All open windows are closed.
2 To exit and return to the desktop, select File > Exit. The application is closed and the desktop is displayed.
Note: If there are no unsaved changes in any open windows, Retek COM will close. If there are unsaved changes, the user will be prompted to save changes before the exit occurs.
Query windows To query for records in the current block of a window, the user must activate the query mode. This places the window into a mode in which search criteria can be entered. Depending on the block or field from which a query is invoked, one of the following can be performed:
• Search criteria can be entered into any field on the current window that is in the query mode and the query executed.
• A List of Values (LOV) can be invoked from a field that has an LOV available and is in the query mode. Retek COM will either display a Lookup window or a List window.
20 Retek Customer Order Management
• Generally, a Lookup window is displayed for those blocks that have many records or for those blocks that can best be searched using criteria in more than one field. A Lookup window contains fields for entering search criteria. These fields are specific to the current block and often validate the search criteria entered against a list of valid values.
• A List window generally is displayed for those blocks that have just a few records or for those blocks where the user is searching for only one record. A List window shows all the possible records that can be retrieved for the block.
Note: Query fields are case-sensitive. Only specified fields can be queried. A message at the bottom of the screen indicates if a field can be queried.

Chapter 2 – Order Processing 21
Chapter 2 – Order Processing Overview
The Retek COM Order Processing module provides powerful capabilities for managing the task of Order Entry. At a minimum, to complete a basic order transaction, the following information is required:
• Customer Number
• Customer attributes and Order Type
• Bill To and Ship To Addresses
• Item Selection
• Payment Method and Authorization
• Ship Method(s) and Pricing
• Order Invoice and Totals, including Tax as applicable
• Release or Pend orders
Although these are the basic requirements, the topics in this section provide details about additional variables that can factor into making the Order Entry Process unique to a client, thus satisfying their business requirements.
The Customer Type identifies a company’s marketing or business sources by indicating who placed the order (for example, Customer or Employee). Customer and Order Types drive the Order Entry Process by requiring and/or defaulting specific information, as well as determining the pricing of items when processing an order.
The following table illustrates the Customer and Order type codes used in RCOM
Customer Types
Description Order Type Description
CR Customer Retail S Subscription
CW Customer Wholesale
NC No Charge
CM Employee R RX RU
Authorized Return Return Exchange Unauthorized Return

22 Retek Customer Order Management
Customer Profile Overview All customer profiles are stored in the Customer window to enable the ordering of goods and services pertinent to the client’s business.
When a customer profile is created, Retek COM assigns the customer a system-generated or predefined number. This number may consist of alphanumeric characters and is used to retrieve or record the customer’s information (for example, orders and call logs).
Note: Customers are required to have an assigned Customer Number for all activities.
Creating a customer’s profile requires minimum basic contact information for billing and shipping purposes, such as the customer’s name and address. Retek COM optionally supports statistical personal and purchasing demographic information (for example, birth date, gender, marital status, and e-mail address).
Additionally, based on business procedures, a customer may elect to establish tax exemption status and/or a stored method of payment (for example, automatic check draft from a checking account or credit card).
Customer Numbers Retek COM provides a client the flexibility to assign a Customer Number manually or systematically based on predefined parameters. The Customer Number stores a customer’s profile and can be used to retrieve their information for the purpose of processing an order and/or reviewing historical information. Specifically, the customer’s profile identifies the following:
• Name and Tax ID information
• Customer number information (for example, Password, Shipping and Legacy customer account numbers)
• Personal Demographics (for example, gender, birthday and marital status)
• Billing and Shipping address/
• Telephone numbers/Email addresses
• Notes on the customer’s orders
• Auto payment information (for example, preferred credit card/automatic draft account)
• Marketing Demographics
• Tax exempt information, if applicable
The Tax ID is typically the number a client (company) uses for tax reporting of transactions within Retek COM.
Depending on the type of business (for example, Sole Proprietorship, Corporation) or Tax ID (for example, Social Security number, Federal Tax ID), the Tax ID number may also be used to report sales commissions paid to a distributor.

Chapter 2 – Order Processing 23
Additionally, Retek COM maintains the relationships of a shared Tax ID number and allows the user to retrieve all associated records.
In a typical retail environment (for example, Non-Distributor, non-MLM), the Tax ID is that of the client. Therefore, when retrieving a Customer’s profile using the Tax ID number, if it is shared, Retek COM first displays a listing of all distributors and/or customers associated with the Tax ID number. This allows the user to select the correct customer profile prior to processing an order or retrieving historical information.

24 Retek Customer Order Management
Order Status Overview As orders are received and processed, Retek COM assigns a status to each step in the lifecycle of the order. The status primarily identifies:
• The stage of the order in the ordering process.
• The functions that can be performed on an order by either Order Processing or Order Fulfillment (Distribution Center).
Note: The Order Status can be tailored to any client’s requirements.
Order Status Description
New Order is currently being keyed.
Release Order has been authorized and released for fulfillment.
Released Subscription Subscription order has been authorized and released for incremental fulfillment.
Pending Order could not be released due to an outstanding issue.
Picking Items are currently being picked and packaged.
Backordered Items on an order are not available.
Closed Order has been picked up by a carrier and shipped.
Canceled Order has been canceled.
Chapter 2 – Order Processing 25
Items Overview Retek COM makes item selection fast and easy by maintaining a predefined list of all available items currently in inventory.
Item availability is confirmed “real time.” Depending on the availability of an item and predefined business parameters, Retek COM can initiate the option to backorder the item for future availability or display a message indicating the unavailability of the item. If the item is backordered, Retek COM can assist with real-time direct marketing (suggestive selling). This will allow the user to do side selling (comparative product), up selling (bigger product) and/or add-on selling (additional product that complements the current product).
Note: Backorder and up sell information is predefined at the item set-up level and works in conjunction with item Available to Sell (ATS), Available to Promise (ATP) and/or requisition/purchase order (RO/PO) and inventory.
Retek COM is capable of maintaining Ship Methods per line item. If any item is to be shipped to an address other than the default Ship To or via a different ship method, the change can be made at the line item level.
To ship multiple line items to the same address, it is recommended that the change be made in the Ship To Address area while the cursor in the item block is on a new line.
When an item number is entered or an item is selected from a List of Values, Retek COM automatically displays the item information in the Order Entry window. Item information (that is, price, discounts, tax, ship method, and shipping address) defaults from the Item Pricing set up with the exception of the Item Quantity, Warehouse, Ship Method, Ship To, and Comment.
26 Retek Customer Order Management
Order History Overview Orders assigned an order number can be retrieved regardless of the status in Order History. All orders, unless archived by the client, can be reviewed in the Order History window and depending on the order type, the following can be performed:
• Review in a summarized format
• Access and review more details in the Order Entry window
• Order copy
• Order/Item return (Return Merchandise Authorization – RMA)
• Order cancellation
Note: Orders are typically identified by their order type (that is, O = Standard Order, NC = No Charge, S = Subscription, A = Autoship, R = Authorized Return, RX = Return Exchange and RU = Unauthorized Return. See the Customer and Order Types topics in this chapter for more information.
Note: Orders that were generated from an Autoship are displayed with an order type of “O” and the Autoship check box selected. Returned orders are displayed with the original order number and the return order number that was assigned when the order was returned.
The Order History window can be accessed from several windows throughout the application (such as Order Processing, Customer Service and Request Tracking). The Order History windows function the same from the Customer Service menu, as they do in the Order Processing menu.
No Charge Orders Overview No charge order types are typically processed to fulfill an order at no charge to the Customer, but can be used to move merchandise between departments, companies or warehouses.
No charge order types are processed similar to standard orders with the exception that a reason for processing a no charge must be specified and a payment method is optional. In a no charge order for a Return/Exchange, the original order number can be referenced for audit/reconciliation purposes. No charge orders can also be used to send items at random discount rates not defined at the item setup level.
Chapter 2 – Order Processing 27
Windows Order Entry window
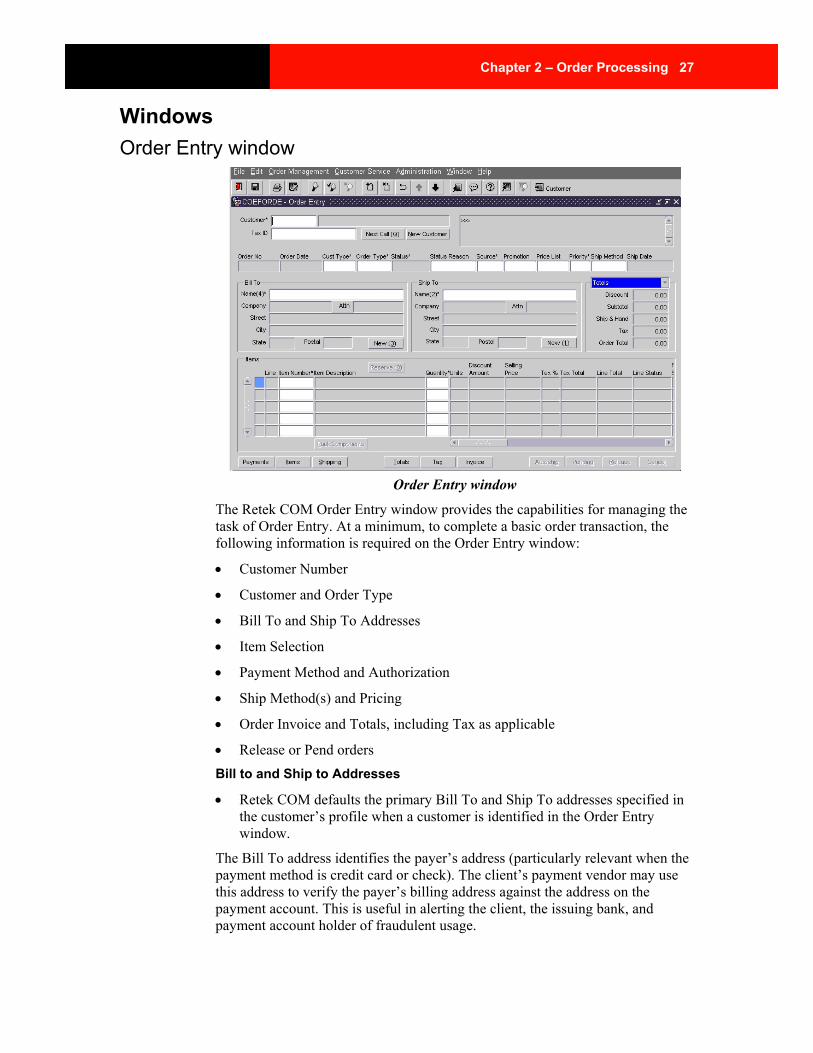
Order Entry window
The Retek COM Order Entry window provides the capabilities for managing the task of Order Entry. At a minimum, to complete a basic order transaction, the following information is required on the Order Entry window:
• Customer Number
• Customer and Order Type
• Bill To and Ship To Addresses
• Item Selection
• Payment Method and Authorization
• Ship Method(s) and Pricing
• Order Invoice and Totals, including Tax as applicable
• Release or Pend orders Bill to and Ship to Addresses
• Retek COM defaults the primary Bill To and Ship To addresses specified in the customer’s profile when a customer is identified in the Order Entry window.
The Bill To address identifies the payer’s address (particularly relevant when the payment method is credit card or check). The client’s payment vendor may use this address to verify the payer’s billing address against the address on the payment account. This is useful in alerting the client, the issuing bank, and payment account holder of fraudulent usage.

28 Retek Customer Order Management
The Ship To address identifies where the order will be shipped. Retek COM maintains multiple Ship To addresses. This allows customers to have individual items shipped to different locations on one order. Likewise, for the Bill To address, Retek COM allows multiple payments on an order.
At the customer’s request, the user can elect to change the Bill To or Ship To address or create one from the Order Entry window by clicking the New button located in either address section.
Note: If the user clicks New in the Bill To block, the default usage flag will cause the address to be displayed as Bill To. If the user clicks New in the Ship To block, the default usage flag will cause the address to be displayed as Ship To. Each New button functions independently; however, the information can be merged.
Field Descriptions
Customer This required field identifies the number assigned to a customer’s profile when initially created. The Customer Number can be used to retrieve the customer's information for the purpose of processing an order and/or reviewing historical data.
Tax ID The Tax ID is typically the number a client (company) uses to consolidate records for tax reporting of transactions within Retek COM.
Next Call (Q) When used in conjunction with a Computer Telephony Integration (CTI) System, the Next Call [Q] button allows the user to display the next customer’s profile information.
Note: This feature will only operate if Retek COM is linked to a CTI. If Retek COM is not linked to a CTI, the button functions as a refresh action to clear the window.
New The New button opens the Customer window, allowing the user to create a new customer profile. Once the profile is completed, saved, and closed, the newly created profile defaults into the Order Entry window.
[Script Box] The script box located at the top right corner of the Order Entry window displays prompts and/or suggestions to the user that facilitate the order process.
Scripting can specify an action or dialog to be conveyed to the customer by the user. It serves as an information tool when scripts are assigned to navigation points and/or specific items, item discounts, promotions, and so on.
Chapter 2 – Order Processing 29
Note: For detailed information that explains scripting and how to set up scripts, refer to the Order Maintenance topic and review the Workflow Maintenance procedures.
Order No Displays the number that identifies the current customer order.
Order Date Displays the date of the order.
Cust Type Displays the code that identifies the type of customer. The customer types are: CR-Customer Retail, CW-Customer Wholesale, and EM-Employee.
Order Type Displays the code that identifies the type of order. The Order Type determines the information required on the order and also determines assignment of an order or contract number. Order numbers are assigned to Standard and No Charge order types. Contract numbers are assigned to Subscription and Autoship order types. These order types create recurring orders from an Autoship template and need only be keyed once.
Order Types can be: O-Order, NC-No Charge, S-Subscription, A-Autoship.
Status Displays the code that identifies the status of the order. Refer to the Order Status Overview topic for more status code information.
Status Reason An explanation is required when orders are placed in a pending or canceled status. This explanation will facilitate the inquiry process.
Note: The client can define status reasons/codes.
Source This system-driven field identifies how the order was received (for example, Telephone, World Wide Web [WWW], or Interactive Voice Response [IVR]).
Promotion This optional field identifies the marketing tool that led to the customer’s order (for example, Catalog, Cable, Satellite TV).

30 Retek Customer Order Management
Price List This optional field identifies the price list from which the item is to be selected. When a price list is used in conjunction with specific customer types, it drives the pricing and/or discounts of the selected items for the order.
Priority This required field identifies the priority assigned to the processing of an order and is set to default to Low (L). It works in conjunction with Order Fulfillment by prioritizing the printing order of the pick tickets. It can be customized per client to prioritize other tables or fields (for example, Customer Type, Order Type).
(Bill To/Ship To) New The New button is used to create either a new Bill To and/or Ship To address. Once the address information is entered and saved, Retek COM will update the applicable address in the Order Entry window and store it in the customer’s profile.
Totals: Discounts
This field identifies the total amount of applied discounts at the line-item level and indicates any savings on regular item costs awarded to the customer.
Subtotal
This field identifies the calculated item(s) total minus any discounts.
Ship (Shipping) and Hand (Handling)
This field identifies the combined shipping and handling calculations based on order details. This field allows manual adjustments that affect the Order Total or Total Amount Due. It can be coded with security options to limit updates.
Tax
This field identifies the amount of taxes on the order based on a combination of line-item and applicable taxes calculated per item, shipping and/or handling charges.
Order Total
This field identifies the total including subtotal, shipping, handling and tax. It is the same as the Total Amount Due on the order.
Totals overview Retek COM provides the Totals drop-down menu feature to aid the user to view the following balances remaining throughout the payment process.
Chapter 2 – Order Processing 31
Adjustment This field identifies the total amount of adjustments applied to the order as outlined in the payment block inclusive of any credit balances. For historical purposes, the adjustment amount displayed could represent any refunds or adjustments made after the order has been released.
Payment and Remaining The Payment Amount field identifies the dollar amount applied to an order in a new or pending status. The Remaining Amount field identifies the balance due on an order after payments have been applied.
Point of Sale Totals Select Point of Sale from the Totals drop-down menu. The Point-of-Sale (POS) feature works in conjunction with the invoice feature and acts as a virtual receipt for an order transaction by detailing the following information:
Invoice No (Number) The Invoice Number field identifies the system-assigned invoice number for a sales receipt.
Batch No (Number) For the purpose of batch balancing, this field identifies the Client’s agreed-upon batch number definition, that is, two-digit month, two-digit date, and segment (4 six-hour segments per day).
National No (Number) and POS No (Number) The National Number field identifies the invoice number that is required in a country. The POS Number field identifies the number issued in a priority order to determine queue placement.
Change Due This field identifies the amount due back to the customer. It is applicable to an overage and works in conjunction with a cash register type set up.
Item Number and Description These fields identify the number and description of the selected item. The number and description information defaults from information established at the time of the item set-up and cannot be changed in the Order Entry window.

32 Retek Customer Order Management
Item Quantity This field denotes the quantity of the selected item to be ordered. At item setup, any quantity can be set as a default. The Available to Sell quantity can be viewed by positioning the cursor in the Quantity field and pressing the F9 key. The available quantity and the warehouse location(s) will be displayed in the Available to Promise window.
Units This field identifies the precise specified quantity (that is, EA = Each, PKG = Package, etc.) as established at the time of the item set up.
Note: If the item is available in multiple warehouses, the user can select the desired warehouse from which to ship the item. Retek COM supports the client’s option to default the fulfillment warehouse based on the customer’s Ship To address.
Discount Amount Displays the amount of the discount for the item.
Selling Price and Taxes These fields identify the pricing and taxing for each item and are based on the Customer and Order Type as well as the promotion and/or price list, if selected. Factors include discounts, selling prices, and taxes, among others.
Line Total This field identifies the total price inclusive of discount and taxes for the line item.
Line Status This field identifies processing status of the line item and is typically similar to the status of the order.
Note: Depending on the line items and/or quantities, the line item status may differ from the status of the order (for example, New, Back Ordered, Released, or Canceled).
Requested Ship Date This field identifies the date on which the item will ship. The requested ship date defaults to the current date. However, if a date is entered in the Ship Date field, located below the script block of the Order Entry window, it will override the current date and dictate when the item is to be shipped.
Chapter 2 – Order Processing 33
Warehouse This field identifies from which warehouse the item will ship. Based on warehouse setup, items default to the main warehouse unless specified at the item level.
Ship Method This field identifies the ship method for the item. Typically, the ship method defaults to the client’s preferred method of shipping. However, by positioning the cursor in the Ship Method field and displaying a List of Values (F9), the user can change the ship method.
Ship To Name This field identifies the addressee’s name for shipping the item(s). Retek COM supports the shipping of line items to multiple addresses by allowing the user to change the Ship To Name at the item level.
Note: Refer to the Bill To and Ship To Addresses topic in this section for detailed information explaining how to change or create a new shipping address.
Expiration Date This field identifies the date an item is no longer available, and is assigned when the event pricing is set up.
Unit Shipping, Handling, & Tax Amounts These fields identify the unit shipping/handling and tax amounts for the item. The shipping and handling amounts will be displayed only if the shipping is assigned at the item level. The unit tax amounts vary based on the item setup, tax tables, and shipping address.
Discount Code This field identifies the discount code for the item, where applicable. It defaults as set up in the Event Item Pricing and is specific per item.
Backordered Quantity and Backordered Date The Backordered Quantity field identifies the quantity of the item(s) on backorder. The Backordered Date field identifies when the item went on backorder. A backordered quantity is displayed if there is a lack of inventory.
Note: If an order is in a “New” status, the backordered date corresponds to when the item was entered. After the order is released and prior to fulfillment, if the item lacks inventory, the date displayed indicates when the item went on backorder.

34 Retek Customer Order Management
Shipped Quantity & Shipped Confirmed Date The Shipped Quantity field identifies the quantity of the item(s) shipped. The Shipped Confirmation Date field identifies when the item(s) shipped. The shipped quantity should be one and the same with the ordered quantity. A variance is possible in the event an item quantity was greater than one, and one or more of those items were unable to be fulfilled.
Comment This field is a free-window text field that can be used to enter comments at the item level for the purpose of relaying order fulfillment instructions or a gift message (such as Happy Birthday). It can be printed on a pick ticket, shipping label or wherever the client desires. Comments entered in this field are order-specific.
No Charge Orders The No Charge block is automatically displayed whenever a No Charge Order type is being newly processed and is used to identify a specific no charge order. Select No Charge from the Totals pull-down menu to see the following fields.
Reason This field identifies the reason for the no charge. The reason codes are pre-defined by the Client’s business needs. These values or codes can be referenced in the general ledger for the purpose of reconciliation of department costs and/or responsibilities, such as Damaged Package, Office Use, and Sales Promotion.
Ref (Reference) Order This field identifies the original order number or indicates a copied order. When an LOV is displayed for this field, Retek COM displays a list of the customer’s orders. Only order numbers relevant to the customer can be entered. This is an optional field, but system default values are indicated when an order is copied from the Order History window.
Ref (Reference) Date This field identifies the order status date of the referenced order. No
Audit Block The Audit block is used to record and track the dates on which specific activities were processed for the order and the user who generated the activity. Select Audit from the Totals pull-down menu to view the Audit block fields.
Created By This field identifies the user that created the order.
Chapter 2 – Order Processing 35
Released & Released By The Released field identifies the date the order was released. The Released By field identifies the user who released the order.
Closed This field identifies the date on which the manifest included this order and was closed. It ties in with the final fulfillment stage of the order status, including fulfillment of backorders.
Canceled By This field identifies the user who canceled the order, if applicable.
Tax Overview The Tax totals block displays the tax amounts for an order. Tax is calculated based on a combination of the customer type, discount amount, the item's selling price and/or the Ship To address. Select Tax from the Totals pull down menu.
Note: Taxes are calculated based upon the client’s predefined business structure and/or rules.
Taxable Total This field identifies the total amount of the order that is taxable, including shipping, handling and insurance inclusive of any discounts. Tax information is specific to the client’s distributors where products sold at a suggested retail price may not be exempt from tax if the product will be resold at a retail (selling) price. Therefore, the tax to be collected is based on the higher amount, Taxable Total, not the selling price.
Item Tax This field identifies the calculated amount of tax specific to item(s).
Shipping Tax & Handling Tax These fields identify the calculated amount of tax specific to shipping charges and handling fees.
Tax Total This field identifies the total amount of tax applied to the order.
Invoice Click Invoice to view an order’s invoice amounts.

36 Retek Customer Order Management
Pending Click Pending to identify an order as pending. Orders that cannot be released can be put on hold or pended until such time that the pending reason is resolved and the order can be released. The Pending button activates a List of Values (LOV) containing pending reasons, which are customizable. When a reason is selected, it assigns the order a status of pending with that reason. The order remains in a pending status per business rules defined by the client and can be systematically or manually changed.
Note: Refer to the Pending Reasons field topic for detailed information about pending reasons.
Release Click Release to release orders that are complete and ready for fulfillment in the Order Entry window. Retek COM systematically verifies the completion of an order and determines if the order can be released or if the order must be pended.
Cancel Click Cancel to cancel an entire order. Retek COM allows a user to cancel orders that are not yet fulfilled (new, pending or released status). Upon cancellation, the status of the order updates to Canceled.
Note: The client’s business processes govern order cancellation. Canceling an order is an irreversible action, as a canceled order cannot be restored. However, it can be copied to recreate the order. Reference the Copy Order topic for more information.

Chapter 2 – Order Processing 37
Customer Maintenance window
Customer Maintenance window
The Customer Maintenance window is used to create a customer profile.
With the exception of the postal code and system-driven fields, all fields within the Customer Maintenance window support updates and changes to the customer’s profile.
All customer profiles, whether created internally or via the World Wide Web (WWW)/Interactive Voice Response (IVR), are stored in the Customer window to enable the ordering of goods and services pertinent to the client’s business.
When a customer profile is created, Retek COM assigns the customer a system-generated or predefined number. This number may consist of alphanumeric characters and is used to retrieve or record the customer’s information (for example, orders and call logs).
Customers are required to have an assigned Customer Number for all activities. A Customer can be identified by their Customer, Tax ID, or Legacy number to directly access their Customer profile or account.
Note: Customers can also be identified by other search conditions, as outlined in the Look up a customer procedure.
38 Retek Customer Order Management
Field Descriptions
Customer Type This required field represents a code defining the Customer Type assigned to a customer, that is, a Distributor, Retail Customer, or Employee. It defaults to the client's majority customer.
Customer Number This required field identifies the number assigned to a customer’s profile when initially created. The Customer Number can be used to retrieve the customer's information for the purpose of processing an order and/or reviewing historical data. The Customer Number can be parametrically set for assignment by Retek COM or can be manually edited by a user.
Salutation This optional field indicates a customer's title, for example, Dr., Ms., and Mrs.
First Name This required field is used to capture the customer’s first name.
Middle This optional field identifies the customer’s middle initial and is limited to one character.
Last Name This required field is used to capture the customer’s last name. In the case of a hyphenated last name the entire name is entered in this field (for example, Douglas-Smith). It is at the client's discretion, for query purposes, to enter hyphenated last names in this field or choose to separate the two names between the Paternal Last Name field and the Maternal Last Name field.
Suffix This optional field identifies the customer's suffix. For example, M.D., Junior, III, etc.
Full Name This field displays the customer’s full name as defaulted from the data entered in the customer’s Salutation, First Name, Middle Initial, Last Name, and Suffix fields. The name appears in a letter format but can be edited to include additional information, as in the case of a customer with multiple suffixes.
Chapter 2 – Order Processing 39
Status This required field identifies the current status of the customer and parametrically defaults to “Active” when a new customer profile is created, but it can be changed at any time to reflect the current status (for example, inactive, on-hold, or take no order).
Reason This field identifies the specific details of a customer's status. For example: If a customer is on On-Hold status, the reason could be unauthorized credit card use. The Reason field correlates to the Status field and is optional depending on the customer’s noted status.
Date This system-driven field defaults to the date of the new customer profile creation and is not editable.
Primary Bill To/Primary Ship To Address section This section of the Customer Maintenance window supports and maintains customers’ primary billing and shipping addresses.
Retek COM works in conjunction with fraud prevention software and others that identify or verify postal codes and address types.
Within the customer profile, a user can edit or update an address record at any time with the exception of the city, state, postal code and country information. If changes are required to these fields, the address must first be copied to create a new one and activate the Postal Code field.
Note: Refer to the Copy an address topic for detailed instructions.
First/Middle/Last These fields identify the customer’s First Name, Middle Initial, and Last Name, respectively, and defaults as entered in the name block of the window when originally created. For all other addresses, with the exception of copying an order, the names must be individually entered.
Address Name This field identifies the customer’s full name and defaults from the Full Name field in the Name block. However, changes made in this field will not update the name in the Full Name field.
Note: To make name changes that will be updated in subsequent name fields, the user must make the changes to the name fields located at the top of the Customer profile window before getting to the Address block.
Address Line 1-3 These fields identify a customer’s street address information. For international addresses, Lines 2 and 3 are used to enter additional address directions.
40 Retek Customer Order Management
Attention This is a free-form text field that can be used to specify address or directional information such as an individual’s name, department or delivery instructions.
City/State These fields default based on the postal code entered and conform to taxing regulations to maintain consistency.
Postal This field identifies a postal zip code and extension (zip + 4). It works in conjunction with the Country field and is driven by a pre-defined List of Values (LOV) determined by the taxing software used by a client.
When the postal code data is entered, and an exact match is found, Retek COM will populate the respective City/State field. However, if an exact match is not found, the user can display a List of Values (LOV) to view any other associated cities and counties applicable to the selected postal code.
County/Country The name of the county and country code based on the postal code entered. The Country field defaults depending on where the software is being used. In the case of the U.S., the country is set to default to the Country Code: “USA.”
Note: If Country is other than USA, this field must be changed before entering a postal code.
Outside City Limits When selected, this check box indicates that collected tax will be overwritten on items based on tax percentages that differ from the selected city.
For example: A city borders on Counties A and B. If County A’s taxation is a combination of State, City, County, Local and Government tax, and if the taxation is higher than that of County B, the customer will receive the benefit of the lower tax rate when placing orders.
The County must be recognized by the client’s Taxing software as outside the jurisdiction of the higher tax rate. If it is not, the Tax field will display the higher rate.
Address Type This field indicates whether the address is a standard, business, mailing label, or residential type of address. Selecting one of these required address types provides more information about the address.
Chapter 2 – Order Processing 41
PO Box This check box indicates that the address is a Post Office Box. Selecting this check box helps both the order fulfillment process and/or carriers to ensure proper delivery. For example, if the address is listed as an international or outer-continent address but the choice of a ground service was selected on an order, Retek COM can deliver an error message indicating the need for other shipping options.
Military This check box indicates that the address is a military base or installation address where the delivery of items may be restricted to a particular shipping method and/or carrier.
Copy to Ship to Click the Copy to Ship to button to enable duplication of the billing address into the shipping address. It provides a quick way to recreate an address where the city, state, postal county or province was previously saved. When the button is selected, a dialog box confirming the creation of the new ship to address is displayed. The City, State, Zip, and County fields are displayed as active to make the necessary changes.
New Primary Bill-To Click the New Primary Bill to button to set up a new primary billing address for the customer.
Address tab Click the Address tab to open the Address block which supports and maintains customers’ addresses. Retek COM works in conjunction with fraud prevention software and others that identify or verify postal codes and address types. Within the customer profile, a user can edit or update an address record at any time.
Inactive
When selected, this check box deactivates the entire address from view and/or access in the Order Entry Process; however, it can be cleared to reactivate the address.
Note: The inactive check box is used when the customer no longer uses the address or if an error was made to the Postal Code/City/County/State combination.
Telephones/E-mail tab Click the Telephones/E-mail tab to open the Telephones/E-mail block, which records multiple telephone numbers and E-mail addresses for the customer. Each telephone number entered can be flagged by type (for example, home or fax).
Note: With Computer Telephony Integration (CTI), Retek COM supports the automatic dialing of multiple telephone numbers related to any customer.
42 Retek Customer Order Management
Country
Indicates the country code for the customer's telephone number.
Telephone Number
These fields list all of the telephone numbers related to the address.
Extension
These fields list all of the extensions associated with the customer's telephone numbers.
Telephone Type Code
This field indicates the type of phone (for example, home, work, fax, cell).
Primary
Select this checkbox to indicate this phone number is the customer's primary number.
Inactive
Select this checkbox to indicate the number is no longer active.
E-mail Address
This field indicates the customer’s e-mail address, which can be used to send messages to the customer (such as welcome letters and order confirmations).
Tax tab Click the Tax tab to open the Tax block. This is used to record tax exempt/resale certification for distributors and/or customers. Retek COM ties access to this block based on the customer type and can be determined by the client’s business processes.
Note: The information discussed regarding tax is based on the governing laws for each District, City, County, and State within the U.S. and may differ in other countries.
Tax ID
This field displays a customer's reporting Tax ID number.
Tax Certificate Number
This is the customer's Tax Certificate number and indicates that information is recorded and will override any taxes typically applicable on items for purchase during the Order Entry Process.

Chapter 2 – Order Processing 43
Demographics tab Click the Demographics tab to open the Demographics block, where the fields are determined by the client. The following demographics are specific to the customer and are optional within Retek COM. However, if the client accepts Internet order processing and requires this information, it can be defaulted in the customer’s profile.
Note: The Demographics block is an independent information source that works in conjunction with the Direct Marketing module for data warehousing and mining of customer or client information. It may be survey data or other marketing data.
Customer Gender
This field indicates the customer's gender as male or female.
Marital Status
This field indicates the marital status of the customer (that is, married, single, divorced or widowed).
Birth Day, Birth Month, Birth Year
These fields indicate the customer’s date of birth, which can be used for promotions.
Notes Tab Click the Notes tab to open the Notes block. This feature in the Customer window builds to a query-only window where a customer’s existing notes and/or tracking requests are presented chronologically. Each existing note, a summary view of the request, its resolution type, and date is displayed.
Cust No Password tab External Customer No
The external Customer number is the converted identifier from a client’s previous order processing system and is stored in the customer’s profile. This provides a historical link with the customer’s previous activities and allows a transparent transition between databases. During the Order Entry process, the external customer number can be retrieved by performing a query from the Customer Lookup window.
External System Description
The description of the client’s previous order processing system.
Password
This field identifies a password decided upon by the customer. The password can be set with a minimum or maximum number of characters.
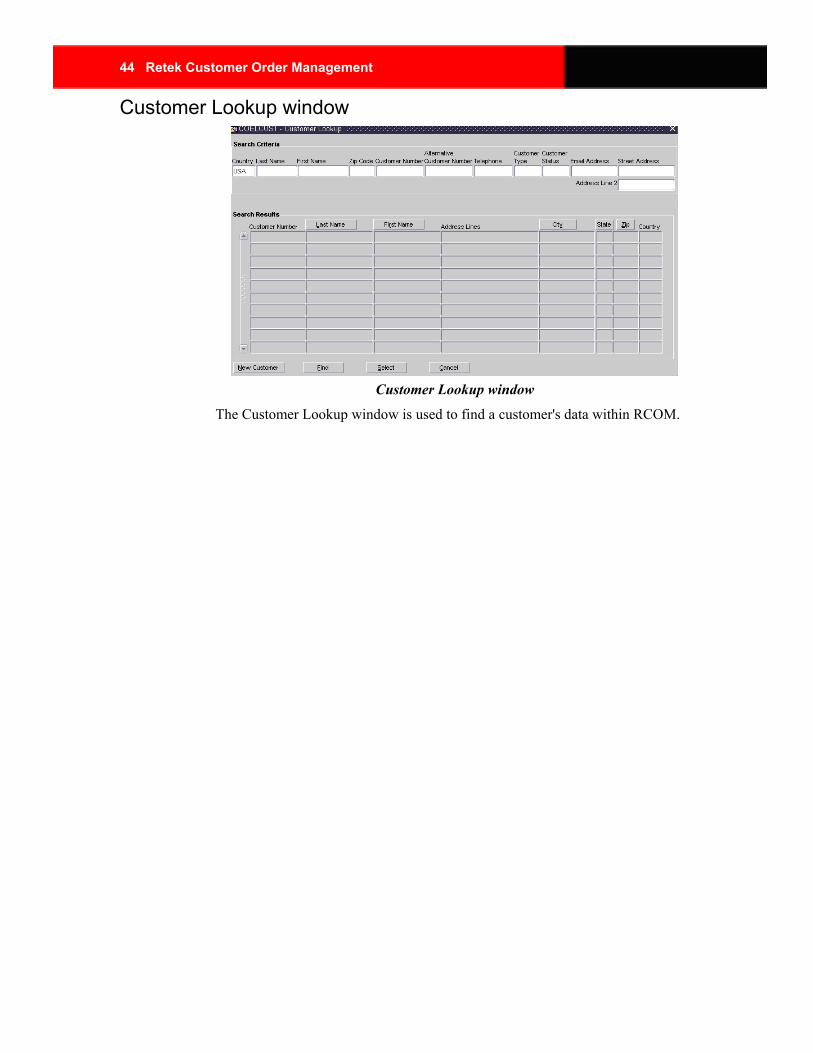
44 Retek Customer Order Management
Customer Lookup window
Customer Lookup window
The Customer Lookup window is used to find a customer's data within RCOM.
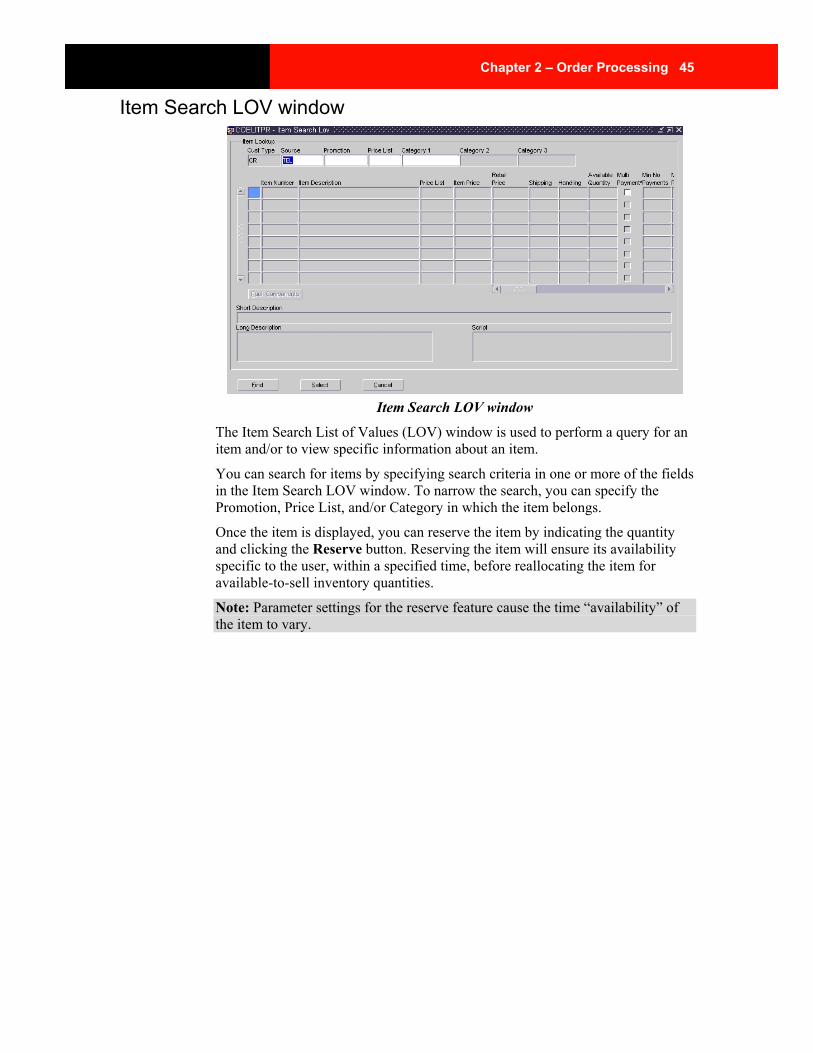
Chapter 2 – Order Processing 45
Item Search LOV window
Item Search LOV window
The Item Search List of Values (LOV) window is used to perform a query for an item and/or to view specific information about an item.
You can search for items by specifying search criteria in one or more of the fields in the Item Search LOV window. To narrow the search, you can specify the Promotion, Price List, and/or Category in which the item belongs.
Once the item is displayed, you can reserve the item by indicating the quantity and clicking the Reserve button. Reserving the item will ensure its availability specific to the user, within a specified time, before reallocating the item for available-to-sell inventory quantities.
Note: Parameter settings for the reserve feature cause the time “availability” of the item to vary.

46 Retek Customer Order Management
Shipping block
Shipping block of the Order Entry window
Shipping Overview The Shipping block will display the multiple ship methods and street address information as entered in the items block.
Retek COM defaults to the client’s preferred ship method on an order, unless it is overridden with a shipping preference indicated in the customer’s profile.
Retek COM allows changes to the ship method for the order or for individual line items. If a ship method has been preset at the item level, the ship method will override the system default ship method to that of the item selected.
Note: Retek COM enables a client to give customers the option of using a preferred carrier account.

Chapter 2 – Order Processing 47
Autoship and Subscription Orders window
Autoship block from Order Entry window
Overview Autoship and Subscription order types (for example, magazines or videos) are considered templates that indicate the generated frequency of an order. Recurring order templates are entered once and based on the order type (A = Autoship or S = Subscription), frequency, and start date. A standard order will be generated and released for Order Fulfillment.
The Autoship block becomes active when the selected order type is Autoship. It is used to identify or change the following information regarding the Autoship:
• Autoship Number
• Received
• Frequency
• Start Date
• End Date
Subscription Orders • Like an Autoship template, a Subscription order template is created once for
the purpose of generating a recurring order for each issue of the selected subscription item.
The processing of a Subscription order template is similar to that of an Autoship with the exception of the following:
• Payment method(s) requires authorization.
• If a free promotional item is being offered with the Subscription, Retek COM will automatically default it in the item block as established at item setup.
• The Subscription order template, as with a standard order, must be released. Once released, Retek COM will display a line item for each issue of the subscription, inclusive of the next issue.
Note: Only the first issue will be shipped when the order is released, referencing the original subscription order number. All subsequent issues will generate a new standard order number and reference the subscription number in the Reference No field. Canceling a subscription order will cancel all future issues and prorate refund adjustments.

48 Retek Customer Order Management
Autoship History
Autoship History block from Order Entry window
Overview The Autoship History feature acts as a log which records and tracks information about orders generated for the Autoship contract.

Chapter 2 – Order Processing 49
Existing New and Pending Orders window
Existing New and Pending Orders window
The Existing New and Pending Orders window is an optional feature that can be used to display a historical date range of a customer’s existing orders. It can also be used to avoid order duplication.
Depending on the parametric settings, the window is displayed once the user enters a Customer, Distributor, or Tax ID number, but only if the customer has existing new and/or pending orders. Being able to view a customer’s existing order(s) allows the user to go directly to a specific order for review, modification, and/or completion (release).
If there is no need to review any of the displayed orders, the window can be exited by clicking the Cancel button. Once the window is exited, Retek COM will proceed with the Order Entry Process by defaulting the required customer information in the Order Entry window.
Note: The Existing New and Pending Orders window is parameter-driven and can either be turned on or off at the client’s request.
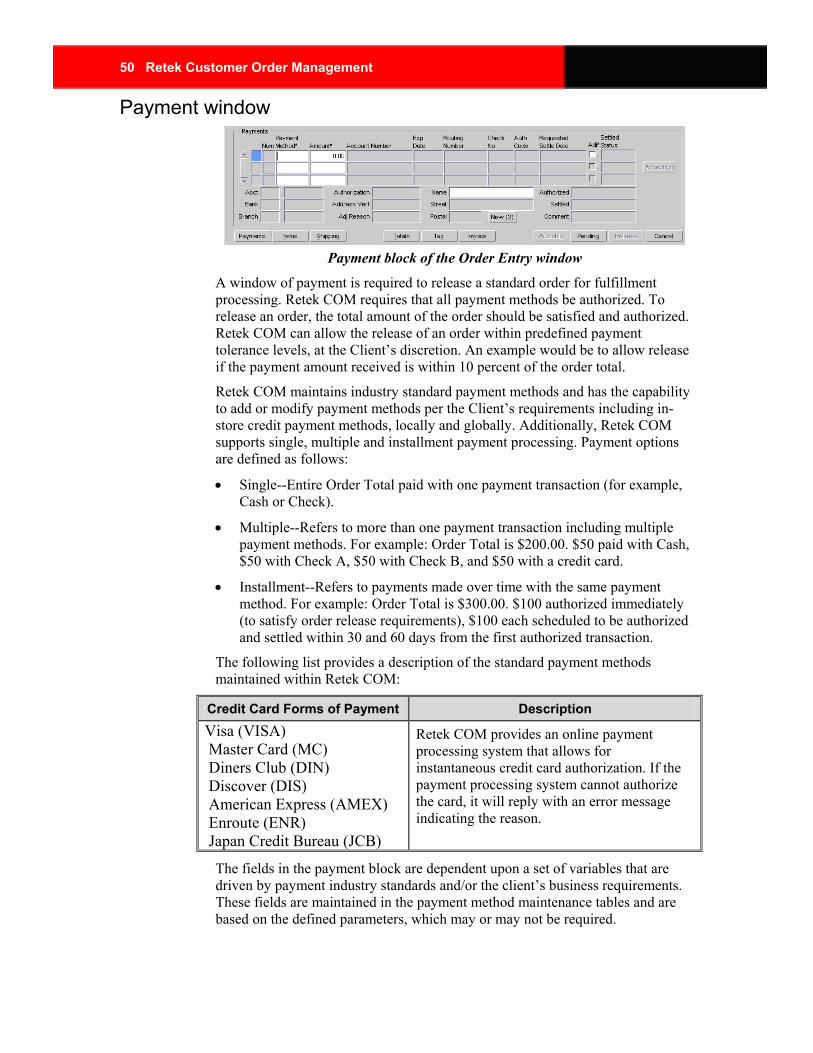
50 Retek Customer Order Management
Payment window
Payment block of the Order Entry window
A window of payment is required to release a standard order for fulfillment processing. Retek COM requires that all payment methods be authorized. To release an order, the total amount of the order should be satisfied and authorized. Retek COM can allow the release of an order within predefined payment tolerance levels, at the Client’s discretion. An example would be to allow release if the payment amount received is within 10 percent of the order total.
Retek COM maintains industry standard payment methods and has the capability to add or modify payment methods per the Client’s requirements including in-store credit payment methods, locally and globally. Additionally, Retek COM supports single, multiple and installment payment processing. Payment options are defined as follows:
• Single--Entire Order Total paid with one payment transaction (for example, Cash or Check).
• Multiple--Refers to more than one payment transaction including multiple payment methods. For example: Order Total is $200.00. $50 paid with Cash, $50 with Check A, $50 with Check B, and $50 with a credit card.
• Installment--Refers to payments made over time with the same payment method. For example: Order Total is $300.00. $100 authorized immediately (to satisfy order release requirements), $100 each scheduled to be authorized and settled within 30 and 60 days from the first authorized transaction.
The following list provides a description of the standard payment methods maintained within Retek COM:
Credit Card Forms of Payment Description Visa (VISA) Master Card (MC) Diners Club (DIN) Discover (DIS) American Express (AMEX) Enroute (ENR) Japan Credit Bureau (JCB)
Retek COM provides an online payment processing system that allows for instantaneous credit card authorization. If the payment processing system cannot authorize the card, it will reply with an error message indicating the reason.
The fields in the payment block are dependent upon a set of variables that are driven by payment industry standards and/or the client’s business requirements. These fields are maintained in the payment method maintenance tables and are based on the defined parameters, which may or may not be required.

Chapter 2 – Order Processing 51
The Payments block is accessed from the Payments button. It is used to process payment on an order. If a customer has an auto pay method of payment established, Retek COM will display the Auto Pay Lookup window from which a payment method can be selected. If a customer does not have an auto pay method of payment established, or chooses not to use one, the payment information can be entered manually.
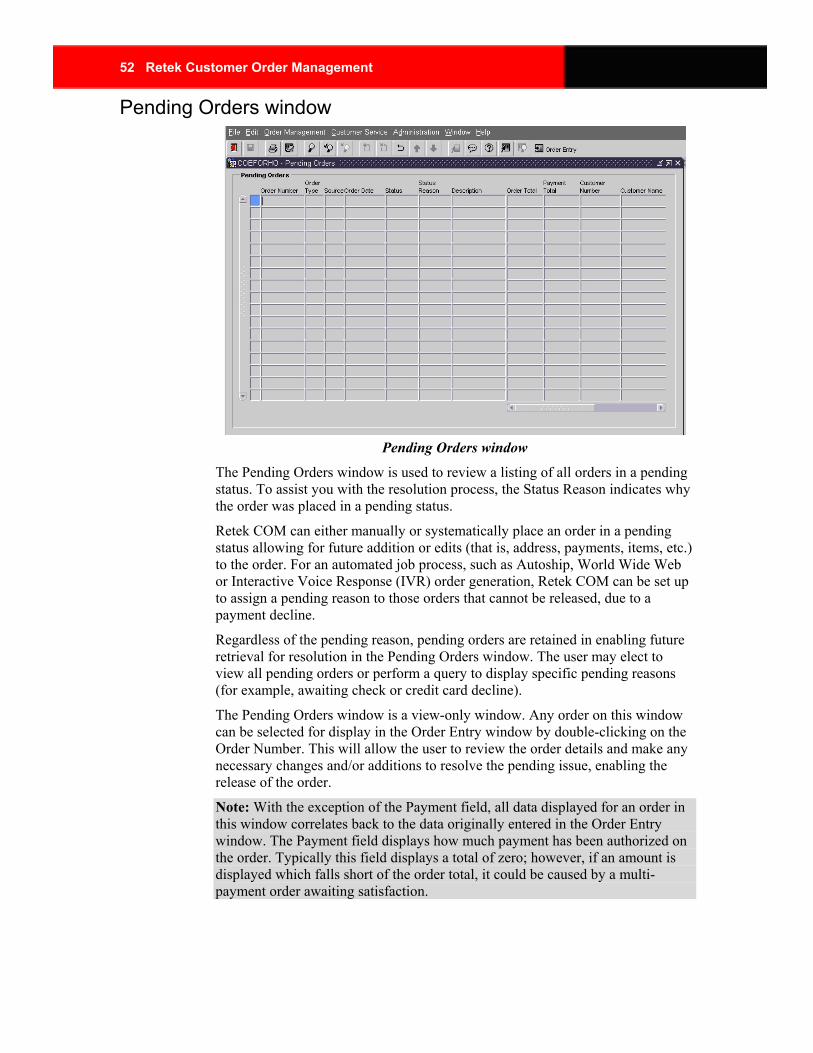
52 Retek Customer Order Management
Pending Orders window
Pending Orders window
The Pending Orders window is used to review a listing of all orders in a pending status. To assist you with the resolution process, the Status Reason indicates why the order was placed in a pending status.
Retek COM can either manually or systematically place an order in a pending status allowing for future addition or edits (that is, address, payments, items, etc.) to the order. For an automated job process, such as Autoship, World Wide Web or Interactive Voice Response (IVR) order generation, Retek COM can be set up to assign a pending reason to those orders that cannot be released, due to a payment decline.
Regardless of the pending reason, pending orders are retained in enabling future retrieval for resolution in the Pending Orders window. The user may elect to view all pending orders or perform a query to display specific pending reasons (for example, awaiting check or credit card decline).
The Pending Orders window is a view-only window. Any order on this window can be selected for display in the Order Entry window by double-clicking on the Order Number. This will allow the user to review the order details and make any necessary changes and/or additions to resolve the pending issue, enabling the release of the order.
Note: With the exception of the Payment field, all data displayed for an order in this window correlates back to the data originally entered in the Order Entry window. The Payment field displays how much payment has been authorized on the order. Typically this field displays a total of zero; however, if an amount is displayed which falls short of the order total, it could be caused by a multi-payment order awaiting satisfaction.
Chapter 2 – Order Processing 53
Procedures Access an order from order history
Order summaries displayed in the Order History window can also be displayed in the Order Entry window by clicking the Go To Order button. Clicking the Go To Order button will display the selected order in the Order Entry window. At this time, the user can then choose to review, update, release, and/or cancel the order from the Order Entry window.
Note: Retek COM also enables the user to go quickly to an order by positioning the cursor on the desired order number and double-clicking or selecting the Order Entry window from the Shortcuts icon.
To access an order from order history
Navigate: From the Order Management menu, select Order Processing > Order History. The Order History window is displayed.
1 Perform a search to display the desired order(s).
2 Position the cursor on the desired order number.
3 Click Go To Order, or double-click the order number. The selected order will be displayed in the Order Entry window.
54 Retek Customer Order Management
Cancel orders Canceling an order is dependant on the order type and status of the order. Retek COM offers security levels to access the Cancel feature, as the status (for example, new, released, or shipped) or stage (for example, picking or shipping) of the order at the time of cancellation determines additional processing of the order.
Standard Order Type Standard orders can be canceled entirely or by line item. In either case, the effect of the cancellation is dependent upon the status and processing stage of the order. An order can be canceled entirely by clicking the Cancel button. To cancel a single line item, the cursor must be positioned on the desired line item. This creates an adjustment specific to the canceled line item.
Note: Line items with a Backordered status can be canceled.
Autoship Order Type Canceled Autoship contracts are systematically assigned an end date by Retek COM. Canceling an Autoship will not allow any further generation of orders as of the assigned end date.
Note: Refer to the Autoship topic in this chapter for more information.
To cancel an order
Navigate: From the Order Management menu, select Order Processing Order History. The Order History window is displayed.
1 Retrieve the relevant order record in the Order History window.
2 Select the order to be canceled.
3 Click Cancel Order. Two message boxes are displayed: the first verifying the request to cancel the order, and the second confirming cancellation.
4 When prompted to confirm the cancellation, click Yes.
Note: This process cancels all line items in an order. Once canceled, the status of the order will be irreversibly changed to Canceled. Refer to the Cancel topic in this Guide for more options and details.
To cancel a line item on an order
Navigate: From the Order Management menu, select Order Processing Order Entry. The Order Entry window is displayed.
1 Open or query the order.
2 Position the cursor on the line item to be cancelled.
3 Click Cancel.
4 When prompted to confirm the cancel, click Yes.

Chapter 2 – Order Processing 55
Change address Existing Bill To and/or Ship To addresses can be displayed from either address section by displaying the Customer Address Lookup window. Once displayed, an address can be selected as the default Bill To and/or Ship To address.
To change a Bill To or Ship To address
Navigate: From the Order Management menu, select Order Processing > Order Entry. The Order Entry window is displayed.
1 In the Customer Number field, enter the customer number and press Enter, or press F9 and search for the customer on the Customer Lookup window.
2 If the desired address is displayed, select it from the list. If the address is not displayed, create the new address. To create a new address, see the Create a new bill to and ship to address topic in this section.
Note: Addresses in the Custom Profile that have been deactivated will not be displayed in the Customer Address lookup window.
Change the customer profile From the Customer window, click the Close button to exit the window. A dialog box displays, prompting the user to save any changes made to the customer profile. Clicking the Yes button will prompt another dialog box indicating the transaction was completed.
To change the customer profile
Navigate: From the Order Management menu, select Order Processing > Customer. The Customer Maintenance window is displayed.
1 Retrieve the customer’s record.
2 After making changes on a customer's record, click Close. A message confirming the save of the customer profile information is displayed.
3 Click Yes. Another message confirming the completion of the transaction is displayed.
4 Click OK to close the window.
56 Retek Customer Order Management
Copy an address The Copy Address button is used to enable duplication of any selected address. It provides the user a quick way to recreate an address where the city, state, postal county or province was previously saved.
When the button is selected, it will display a dialog box confirming the creation of the new address. At which time, the City, State, Zip, and County fields are displayed as active for the user to make the necessary changes.
To copy a customer’s address to create a new one
Navigate: From the Order Management menu, select Order Processing > Customer. The Customer Maintenance window is displayed.
1 Retrieve the customer’s record.
2 Position the cursor on any field in the Address tab of the Customer window.
3 Scroll to the address that is no longer valid or is to be changed.
4 Select the Inactive check box if it has been determined that the address is invalid and has errors that affect mail or delivery.
5 Click New Primary Bill To, to create a new billing address.
6 Make the necessary changes or additions to the address, (Clear the Inactive check box to activate the address.)
7 Click Copy to Ship To Address. A message indicating that the address record was copied successfully is displayed.
8 Click Save and exit the window.
9 Press F10 or click the Save icon to save the information.
Copy orders Retek COM facilitates the replication of orders from existing orders via the Order History window. The replicated order will generate a source of “COPY” and reference the original order in the Reference Order Number field of the No Charge block on the Order Entry window.
Note: The copied order can be modified to change addresses, items and/or quantities, and shipping and payment methods. The copy feature is useful at the point a pending order may have been canceled and payment is later received referencing the canceled order.
Note: Regardless of the status of the order, it can be copied. Copied orders maintain their Customer and Order type. Retek COM allows changes to the copied order with the exception of the Customer and Order Types.
To copy an order
Navigate: From the Order Management menu, select Order Processing Order History. The Order History window is displayed.
1 Retrieve the order to be copied in the Order History window.
Chapter 2 – Order Processing 57
2 Select the desired order and click Copy Order. The newly copied order is displayed in the Order Entry window.
3 From the Order Entry window, make changes as applicable.
4 Select and/or authorize the method of payment.
Note: When the copy feature is used, Retek COM also copies the payment method of the copied order, which can be changed. However, if the payment account information is masked, the line must be deleted and the payment method re-entered.
5 Click Release to release the copied order.
Create an autoship order template The Order Entry window is used to create an Autoship order template.
To create an Autoship order template
Navigate: From the Order Management menu, select Order Processing > Order Entry. The Order Entry window is displayed.
1 In the Customer Number field, enter the Customer Number and edit the Customer Type, if applicable.
2 Select the Autoship Order Type.
3 Edit the Bill To and/or Ship To address, if applicable.
4 Select the Frequency and Start Dates. Select an End Date, if applicable.
5 Select the item(s) for the Autoship template.
Note: Items exclusive for Autoship and Subscription type orders are specified at item set-up.
6 Select the payment method(s) that Retek COM is to use when an order is generated from the template. (Credit cards and electronic payment are suggested. Multi-pay items are excluded.)
7 Click the Save icon or press F10 to save the Autoship template.
Create a new bill to or ship to address To create a new Bill To or Ship To address
Navigate: From the Order Management menu, select Order Processing > Order Entry. The Order Entry window is displayed.
1 In the Customer Number field, enter the customer number and press Enter, or press F9 and search for the customer on the customer lookup window.
2 Click New from the desired address block. The Customer Address Setup window is displayed.
3 In the Address fields, enter the required address information and click the applicable usage flag(s).
4 Click Close to save the new address and to update the address block in the Order Entry window.
58 Retek Customer Order Management
Create a subscription order Use the Order Entry window to create a subscription order.
To create a subscription order/ template
Navigate: From the Order Management menu, select Order Processing > Order Entry. The Order Entry window is displayed.
1 Enter or query the Customer Number.
2 Edit the Customer Type, if applicable.
3 Select the Subscription order type.
4 Edit the Bill To and/or Ship To address, if applicable.
5 Select the item(s).
6 Click Payments and select and authorize the Payment Method(s) and amounts. Payment must be received in full for the order to be released for fulfillment.
7 Click Release to release the first issue for the subscription.
Create or update a customer profile To create a new customer profile
Navigate: From the Order Management menu, select Order Processing > Customer. The Customer Maintenance window is displayed.
1 In the Customer Type field, select the Customer Type and enter the Customer’s Salutation, First Name, Middle Name, Last Name, and Suffix as applicable.
2 In the Primary Bill To Address block, enter the customer's billing address information.
Note: If the customer's primary ship to address is the same as the billing address, click Copy to Ship To. If the shipping address is different than the billing address, enter the ship to address in the appropriate Primary Ship to Address fields.
3 In the Telephone/E-mail tab, enter the customer’s telephone information.
4 Enter the tax, demographic, or notes information as applicable, in the appropriate tabs. (optional)
5 Click Save to save the new Customer profile and exit the window.
To update a customer profile
Navigate: From the Order Management menu select Order Processing > Customer. The Customer window is displayed.
1 Perform a query to retrieve the customer’s profile.
2 Make the changes in the appropriate fields.
3 Click Close or Save to save the changes and exit the window.
Chapter 2 – Order Processing 59
Enter or review customer shipping information Retek COM provides the option of offering a customer a preferred shipping method. Once the preference is entered, this Ship Method will default in the Order Entry window and will override the client's default Ship Method.
To enter and/or review a customer's carrier account shipping information
Navigate: From the Order Management menu, select Order Processing > Order Entry. The Order Entry window is displayed.
1 In the Customer field, enter the customer number, or query the customer.
2 Click Shipping. The Shipping block is displayed at the bottom of the window.
3 Enter or review the customer's preferred Ship Method and/or Account Number.
Enter or review order comments The Comment feature serves as a commentary field unique to the current order. The user can use this comment section to record information specific to the order. (Information entered in this field is not displayed on any other window.)
To enter or review order-specific comments
Navigate: From the Order Management menu, select Order Processing > Order Entry. The Order Entry Window is displayed.
1 Enter an order number or query an order.
2 Select Comment from the Order Totals drop-down list.
3 Enter, change or review the applicable comments.
Note: Comments are updateable at any time and can be viewed only upon access of the order.
60 Retek Customer Order Management
Look up a customer To identify a Customer in Retek COM, a user can either enter the Customer number, or Tax ID number. However, if these numbers are unknown, a query can be performed.
Customers can also be queried by specifying data in one or more fields of the Customer Lookup window. If the customer’s information cannot be retrieved by the query, then a new customer profile should be established.
Note: Refer to the Customer section in this chapter for detailed information that explains how to create a new customer profile.
To look up a customer
Navigate: From the Order Management menu, select Order Processing > Order Entry. The Order Entry window is displayed.
1 Position the cursor in the Customer Number field and press the F9 key. The Customer Lookup window is displayed.
2 Enter the desired search criteria and press the F8 key to start the query.
3 Select the desired Customer record and click OK. The Order Entry window is displayed with the selected customer’s information.
Note: If the Customer record cannot be retrieved, exit the Customer Lookup window by clicking the Cancel button.
Pend an order To pend an order
Navigate: From the Order Management menu, select Order Processing > Order Entry. The Order Entry Window is displayed.
1 Complete all required order information.
2 Click Pending. Retek COM will display a Pending Reasons List of Values (LOV).
3 Select the applicable reason for pending the order.
4 Click OK. A confirmation window is displayed.
5 At the confirm pending window, click the Yes button to clear the window or No to remain open on the pended order.
Chapter 2 – Order Processing 61
Process an order Use the Order Entry window to process an order.
To enter a standard single-item order
Navigate: From the Order Management menu, select Order Processing > Order Entry. The Order Entry window is displayed.
1 Enter or query the Customer Number.
2 In the Customer Type, Order Type, and Source fields, edit the defaults if necessary.
3 In the Promotion, Price List, or Ship Method fields, enter the Promotion, Price List, or Ship Method.
4 If necessary, edit the default Bill To and Ship To addresses.
5 Select the item for the order.
6 If necessary, click Shipping, Totals, and Tax to update the applicable information.
7 Click Payments and process the payment methods and amounts.
8 Release or pend the order by clicking the applicable button.
Note: An order might require additional steps. Refer to the following topics for more information: Ship To Address; Autoship; Recurring Orders; No Charge Orders; Multi Pay and Multiple Payments; Promotion Pricing.
Process or review autoship information To process an order's autoship information
Navigate: From the Order Management menu, select Order Processing > Order Entry. The Order Entry Window is displayed.
1 Begin Order Entry and select the Autoship order type.
2 Once the Autoship block is displayed, position the cursor in the Frequency field and press F9 to display a List of Values.
3 In the Frequency field, accept the default frequency, or change as applicable.
4 In the Start Date field, change the date for the Autoship if it is different from the default.
5 Position the cursor in the End Date field and select a future end date for the Autoship. (Optional)
62 Retek Customer Order Management
To review an order's autoship information
Navigate: From the Order Management menu, select Order Processing >Order Entry. The Order Entry Window is displayed.
1 Query an Autoship order.
2 Select Autoship from the drop-down list, click Autoship, or press Alt+A.
3 Review the information displayed in the Autoship block.
4 Make changes to applicable fields as required.
Process or review no charge information With a new order entry, the No Charge block is displayed automatically when the No Charge order type is selected and before entering the items, as the No Charge reason is a required field. Selecting No Charge from the drop-down list can access the block manually.
To process an order's no charge information
Navigate: From the Order Management menu, select Order Processing > Order Entry. The Order Entry Window is displayed.
1 Begin order entry or query a pending order.
2 Once the No Charge block is displayed, position the cursor in the Reason field and press F9 to display the List of Values.
3 Select the applicable reason.
4 Optionally, position the cursor in the Reference Order field and display the LOV of customer-specific order numbers that may be referenced for the No Charge. This is an optional field.
To review an order's no charge information
Navigate: From the Order Management menu, select Order Processing > Order Entry. The Order Entry window is displayed.
1 Begin order entry or query a pending order.
2 Select No Charge from the drop-down list.
3 Review the information displayed in the No Charge block.
Chapter 2 – Order Processing 63
Process a no charge order Use the No Charge order type to process an order at no charge to the Customer.
To process a no charge order
Navigate: From the Order Management menu, select Order Processing > Order Entry. The Order Entry window is displayed.
1 Enter or query the Customer Number.
2 Edit the Customer Type, if applicable.
3 From the Order Type menu, select the No Charge order type.
4 In the reason field, select No Charge and select the Reference Order Number if applicable.
5 Edit the Ship To address, if applicable.
6 In the Item row, select the item(s).
7 If necessary, adjust discount amount, Payment Method(s) and amount(s).
8 Click Release to release the order.
Query an item To query an item
Navigate: From the Order Management menu, select Order Processing > Order Entry. The Order Entry window is displayed.
1 In the Customer Number field, enter the customer number and press Enter, or press F9 and search for the customer on the customer lookup window.
2 Position the cursor in the Item Number field and press the F9 key. The Item Search (LOV) window displays.
3 Press the F7 key and enter the desired search criteria in the applicable field(s).
4 Press the F8 key to execute the query.
Note: To narrow the search, select the Promotion, Price List and/or Category of the item prior to pressing the F7 key.
5 Select the desired item. Change the quantity if necessary, and reserve it by clicking Reserve.
6 Click OK. This will default the selected item(s) and quantity or quantities in the Order Entry window.
Note: Items can be queried and reserved in the same manner even if the Customer record does not yet exist.

64 Retek Customer Order Management
Release an order Orders that are complete and accurate can be released for fulfillment. Retek COM confirms the release of the order by displaying a dialog box indicating that the order has been released along with the order number.
To release an order
Navigate: From the Order Management menu, select Order Processing > Order Entry. The Order Entry Window is displayed.
1 Complete all required order information.
2 Click Release. A confirmation message window is displayed confirming the release of the order and the order number.
3 Click Yes to clear the window, or No to remain in the open order.
Note: Orders with incomplete information or errors cannot be released. Retek COM will display a dialog box indicating why the order cannot be released for processing. At that time, the user can make the necessary additions or changes and try releasing the order again. If the order cannot be released, the user can then click Pending to place the order in a pending status until such time that it can be completed and released.
Retrieve and review orders To retrieve an order from order history
Navigate: From the Order Management menu, select Order Processing > Order History. The Order History window is displayed.
1 Perform a search to display the desired order(s).
2 Select the order to view its summarized information.
Return an order from order history The Return Order button in Order History is used to generate an authorized item/order return or return/exchange for an order in a Closed status.
To return an order from order history
Navigate: From the Order Management menu, select Order Processing > Order History. The Order History window is displayed.
1 Retrieve the order containing the items to be returned.
2 Select the order.
3 Click Return Order.
Note: Retek COM will display three message dialog boxes to assist with the processing of either an Authorized Return or Return Exchange. Reply to the dialog boxes as applicable. Once all prompts in dialog boxes have been answered, the Order Returns window referencing the selected order is displayed.
Chapter 2 – Order Processing 65
4 Position the cursor in the Return Reason field and select the appropriate reason.
5 Verify the Refund To Ship From Name/Addresses. If the Ship From Address is different, select an address from the list of previous addresses or add a new address by clicking on New.
6 If all items in the selected order are to be returned, click Copy Items to have them entered into the Items block. If returning only a portion of the order, select the item(s) and quantity to be returned by positioning the cursor in the Item Number field to display a List of Values for the returnable items.
7 Once the item(s) have been selected, click Review. This updates the return order status to Review and assigns a Return Order number (RMA).
Note: The following step requires security privileges.
8 Determine if the order is eligible for Return Authorization and click Authorize or Reject.
Note: Authorizing the return places the return order in an Authorized status and allows for the generation of the return letters/label(s), recording of the returns inspection and processing of a payment refund to the customer. Rejecting an order return will enable the selection of a rejection reason and stop any further processing. Once the order return is placed in an authorized status, no changes can be made.
9 To make changes, the status must be changed back to Review by clicking Review.
Note: Once the return order has been authorized, the distribution center/order fulfillment center can retrieve the returned order authorization to record the inspection and receipt of the returned order. Refer to the Fulfillment Processing topic for instructions that explain how to record the inspection and receipt of returned orders.
Review autoship history information Display the Autoship History block to change or review historical information about an Autoship template.
To review Autoship history information
Navigate: From the Order Management menu, select Order Processing > Order Entry. The Order Entry Window is displayed.
1 Query an Autoship template (Autoship No).
2 Select Autoship History from the drop-down list.
3 Review or change the information displayed in the Autoship History block.
66 Retek Customer Order Management
Review a customer's legacy number The Legacy number is the number used to identify and locate a customer from a client’s previous order processing system. It is stored in the customer’s profile upon conversion and is used to maintain a historical link of the customer’s previous activities, providing a transparent transition between databases. Retek COM can store up to three previous customer legacy numbers
With the Legacy number recorded in the customer’s profile, a user can retrieve the required customer information by performing a query from the Customer Lookup window.
To review a customer's legacy number
Navigate: From the Order Management menu, select Order Processing > Customer. The Customer Maintenance window is displayed.
1 Select the Cust No/Password tab.
2 Review the Customer’s Legacy Number.
Review and resolve pending orders To review and resolve pending orders
Navigate: From the Order Management menu, select Order Processing > Pending Orders. The Pending Orders window is displayed.
1 Perform a query to retrieve the desired pending order(s).
2 Select an order from the list by double-clicking on the order number. The Order Entry window is displayed.
3 From the Order Entry window, review the details of the order to determine how it can be resolved.
4 Make the necessary edits or additions.
5 Click either Release, Cancel, or Pending for the order.
6 Close the Order Entry window to return to the Pending Order window.
Review order audit information Display the Audit block to review when an order was created, released and closed and to determine who released or canceled the order.
To review an order's audit information
Navigate: From the Order Management menu, select Order Processing > Order Entry. The Order Entry Window is displayed.
1 Query the order.
2 Select Audit from the Order Totals drop-down list.
3 Review the information displayed in the Audit block.

Chapter 2 – Order Processing 67
Review order invoice amounts Use the Invoice button or select Invoice from the drop-down list to view an order’s invoice amounts.
To review an order's invoice amounts
Navigate: From the Order Management menu, select Order Processing > Order Entry. The Order Entry window is displayed.
1 Enter or query the Order Number.
2 Click Invoice or press Alt+V.
3 Review the invoice amounts displayed in the Invoice block.
Review order shipping information The Shipping button is used to access the Shipping Charges block for review and/or update of ship method(s) during the order entry process.
To review an order's shipping information
Navigate: From the Order Management menu, select Order Processing > Order Entry. The Order Entry window is displayed.
1 Enter or query the Order Number.
2 Click Shipping, or press Alt+S. The Shipping Charges block is displayed.
3 Review the shipping information.
4 To change the ship method, position the cursor in the Ship Method field and press F9 to display the ship method List of Values, or, overwrite the displayed value if the code is known.
5 Click Close to save changes and/or exit the Shipping block.
Review order tax amounts The Tax button is used to view the tax breakdown of an order. Alternatively, select Tax from the drop-down list.
To review an order's tax amounts:
Navigate: From the Order Management menu, select Order Processing >Order Entry. The Order Entry window is displayed.
1 Enter or query the Order Number.
2 Click Tax or press Alt+X.
3 Review the tax amounts displayed in the tax block.
68 Retek Customer Order Management
Review order totals Totals defaults to the value on the Order Entry window, but the Totals button is used to view the Order Total Summary. This can also be achieved by selecting Totals from the drop-down list.
To review an order's totals
Navigate: From the Order Management menu, select Order Processing > Order Entry. The Order Entry window is displayed.
1 In the Order Number field, enter or query the Order Number.
2 Click Totals or press Alt+T.
3 Review the order totals displayed in the totals block.
4 Use the Ship & Hand field to modify the Order Total prior to accepting payment.
5 Click the Save icon to save the order.
Review point of sale order amounts Use the Point-of-Sale (POS) feature to review an order’s counter or cash register information.
To review point of sale numbers
Navigate: From the Order Management menu, select Order Processing > Order Entry. The Order Entry window is displayed.
1 From the Order Number field, enter or query the order number.
2 Select Point of Sale from the drop-down list.
3 Review the POS numbers displayed in the Point of Sale block.
Select another address for auto payments Customer’s billing address information as set up in the customer profile.
To select another address
Navigate: From the Order Management menu, select Order Processing > Customer. The Customer window is displayed.
1 Position the cursor in the Name field and query a List of Values (LOV).
2 If no other address exists, click Address.
3 Press F6, or click the down arrow, to enter a new address record to associate with the Payment Method being used in the Customer Auto Payments block.
Note: These fields are required with the selection of a checking of savings payment method. The information identified in the field facilitates electronic check/saving payments much like a transaction using a credit card.
Chapter 2 – Order Processing 69
Select an item The user can select an item by entering the exact item number, or by performing a query to retrieve the item.
To select an item
Navigate: From the Order Management menu, select Order Processing > Order Entry. The Order Entry window is displayed.
1 In the Customer Number field, enter the customer number and press Enter, or press F9 and search for the customer on the customer lookup window.
2 If the item number is known, position the cursor in the Item Number field and enter the item number. Otherwise, press the F9 key to perform a query.
Note: Refer to the Query an Item topic for more detailed information.
3 Once the item is displayed, change the quantity, warehouse, ship method, and/or ship to address for the item.
Select payments for authorization To enter a form of payment for authorization
Navigate: From the Order Management menu, select Order Processing > Order Entry. The Order Entry window is displayed.
1 In the Customer Number field, enter the customer number and press Enter, or press F9 and search for the customer on the customer lookup window.
2 In the Payment Method field, select or enter the customer’s payment method and complete the applicable fields (such as Account No/Check No., Routing number, and Authorization number).
Note: Retek COM defaults the order total, which can be changed when the payment total is to be disbursed among multiple windows of payment.
3 Verify that the name indicated in the Name on Acct field is correct. If not, click New to change or add a name on the account.
4 Click Accept to authorize the window of payment.
70 Retek Customer Order Management
Set up a customer for auto pay To set up a customer for Auto Payment
Navigate: From the Order Management menu, select Order Processing > Order Entry. The Order Entry window is displayed.
1 Retrieve the customer’s record.
2 Click Payments to view the Payments block.
3 In the Payment Method field, enter the Payment Method code, or press F9 and select the code from the LOV.
4 In the Account Number field, enter the required payment method account number.
5 In the Start Date and End Date fields, enter the effective Start Date and End Date, if applicable. The End Date indicates when this method of payment is to be terminated.
Note: Retek COM will not allow the use of this form of payment as of the end date.
6 Select the appropriate billing name and address and/or bank information correlating to the payment method entered.
7 Click Close to save the changes to the customer profile and exit the Customer window.
Set up tax exemption for a customer Customers exempt from tax (typically independent Distributors of the business) must provide their tax exemption information and have it recorded in their customer profile to exclude tax calculations from their orders.
To set up a customer for tax exemption
Navigate: From the Order Management menu, select Order Processing > Customer. The Customer Maintenance window is displayed.
1 Retrieve the customer’s record.
2 Select the Tax tab.
3 In the Tax ID number field, enter the customer's tax ID.
4 In the Legal Entity Type field, enter or select the entity type.
5 In the Taxing Jurisdiction field, enter or select the jurisdiction.
6 In the Tax Certificate field, enter the tax certificate number.
7 In the Received Date field, enter the received date.
8 In the Active date field, enter the active date.
9 In the Expiration Date field, enter the expiration date and press F10 or click save to save the information.
Chapter 2 – Order Processing 71
Update an autoship order template An Autoship order template can be updated by changing any or all of the following information:
• Bill To and/or Ship To address information
• Item(s) – Add, Delete or Change
• Frequency, Next Date or End Date
• Ship Method
• Payment Method(s)
To update an autoship order template
Navigate: From the Order Management menu, select Order Processing > Order History. The Order History window is displayed.
1 Query the Autoship Number if known, or query by the Customer (LOV) options, and A in the Order Type.
2 Perform a query to retrieve the customer’s Autoship contract to be updated.
3 Click Go To Order. The Autoship section in the Order Entry window is displayed, where edits and updates can be made.
4 Position the cursor in the field(s) to be updated and make the necessary changes, additions and/or deletions.
5 Click the Save icon or press F10 to save the changes to the Autoship.
View or enter notes To view the details of a note or tracking request
Navigate: From the Order Management menu select Order Processing > Customer. The Customer Maintenance window is displayed.
1 Select the Notes tab. The Notes block is displayed.
2 If a specific note or tracking request is not immediately displayed, use the scroll bar located to the left of the Notes block to scroll through the list or perform a query.
72 Retek Customer Order Management
To enter a new note
Navigate: From the Order Management menu select Order Processing > Customer. The Customer Maintenance window is displayed.
1 Click New Notes. The Notes Entry window is displayed.
2 Select a Request Type, Request Reason, and Priority and then enter the details of the note.
3 Select a Request Type, Request Reason, and Priority and then enter the details of the note.
Note: Notes and tracking requests can also be entered and reviewed by using the applicable option from the Customer Service menu or the Shortcut To Related Programs icon. For detailed information that explains Notes & Tracking Request, refer to the Request Management topic.

Chapter 3 – Customer Service 73
Chapter 3 – Customer Service Overview
Retek COM provides customer maintenance and tracking to assist the client in providing superior customer service by creating an audit (activity) trail each time an application window is accessed.
Retek COM audits entries or changes performed to all activities (such as processing an order, logging information, notes or research requests, or returns), which can be monitored or reviewed using the Activity Management window.
The following highlights the key functions that facilitate Customer Service:
• Customer Service
In Retek COM the Customer Service window is the primary tool used. Call entries can be systematically activated with a Computer Telephony Integration (CTI) system or logged manually identifying callers. An audit (activity) trail is generated from this window and can be reviewed historically.
• Activity Management
The Activity Management window displays all new entries generated from the Order Entry, Customer Service and Order Returns applications. This is a query only window.
• Request Management
Notes Entry and Request Tracking comments can be viewed in the Request Management window. Although this is a read-only window, it allows an end-user to directly access the Request Tracking window for more details and/or resolution.
• Request Tracking
The Request Tracking window is used to create a caller’s request needing additional action and/or resolution by another department or end-user.
Refer to the following window topics for more info:
• Customer Service window
• Activity Management
• Request Tracking
• Request Management

74 Retek Customer Order Management
Customer Adjustments Overview Within Retek COM, an adjustment represents a monetary value, either credit or debit amount(s) of the following:
• Over/under payment on an order
• Tax, shipping or miscellaneous charges after an order is Released
• Refunds
Depending on the client’s preferences and/or specifications, adjustments may be created systematically or manually.
Note: All adjustments require an approval or authorization to be active for use.
Order Returns Overview Retek COM supports authorized, unauthorized returns and return exchanges. The following table illustrates the return type codes used in RCOM.
Return Type Description R Authorized returns initiate approval of item returns
before receiving the product for payment or refund. RU Unauthorized returns indicate items returned without
prior approval (that is undeliverable or refused merchandise).
RX Return exchanges initiate approval of item returns by the client for an even or uneven exchange for like or unlike product.
Note: This order return type is typically used for Quality Assurance or fulfillment issues and settles the account with the customer by sending a No Charge (NC) order type for the product exchange.
Regardless of the return order type, all order returns require a review and authorization to allow the following:
• Generation of a letter/mailing label(s) for the customer
• Recording of the receipt/inspection of the returned product
• Release of the order return for settlement or processing of the payment refund or no charge order
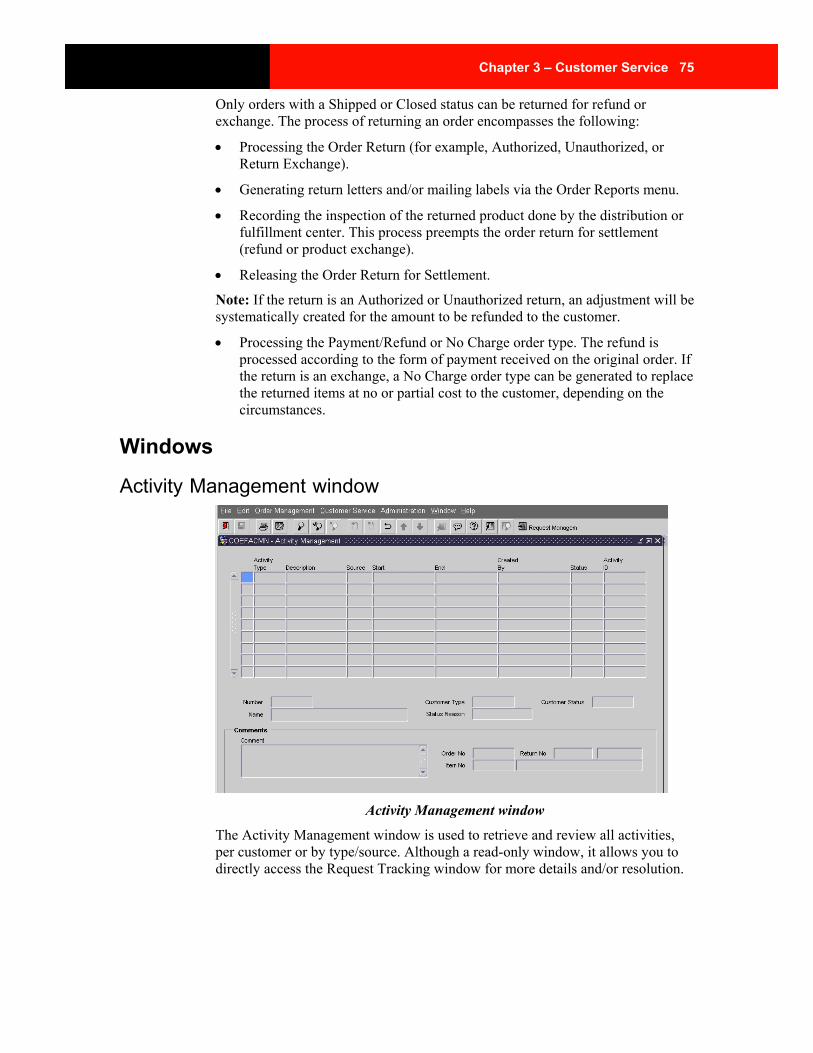
Chapter 3 – Customer Service 75
Only orders with a Shipped or Closed status can be returned for refund or exchange. The process of returning an order encompasses the following:
• Processing the Order Return (for example, Authorized, Unauthorized, or Return Exchange).
• Generating return letters and/or mailing labels via the Order Reports menu.
• Recording the inspection of the returned product done by the distribution or fulfillment center. This process preempts the order return for settlement (refund or product exchange).
• Releasing the Order Return for Settlement.
Note: If the return is an Authorized or Unauthorized return, an adjustment will be systematically created for the amount to be refunded to the customer.
• Processing the Payment/Refund or No Charge order type. The refund is processed according to the form of payment received on the original order. If the return is an exchange, a No Charge order type can be generated to replace the returned items at no or partial cost to the customer, depending on the circumstances.
Windows
Activity Management window
Activity Management window
The Activity Management window is used to retrieve and review all activities, per customer or by type/source. Although a read-only window, it allows you to directly access the Request Tracking window for more details and/or resolution.
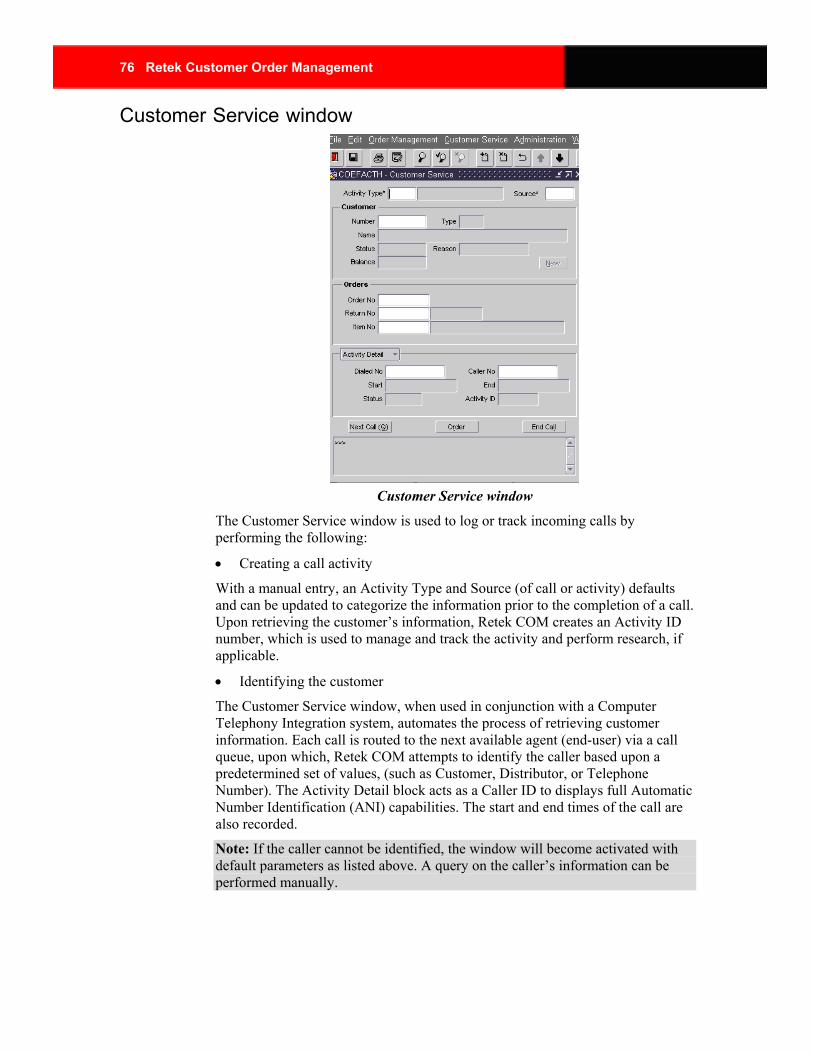
76 Retek Customer Order Management
Customer Service window
Customer Service window
The Customer Service window is used to log or track incoming calls by performing the following:
• Creating a call activity
With a manual entry, an Activity Type and Source (of call or activity) defaults and can be updated to categorize the information prior to the completion of a call. Upon retrieving the customer’s information, Retek COM creates an Activity ID number, which is used to manage and track the activity and perform research, if applicable.
• Identifying the customer
The Customer Service window, when used in conjunction with a Computer Telephony Integration system, automates the process of retrieving customer information. Each call is routed to the next available agent (end-user) via a call queue, upon which, Retek COM attempts to identify the caller based upon a predetermined set of values, (such as Customer, Distributor, or Telephone Number). The Activity Detail block acts as a Caller ID to displays full Automatic Number Identification (ANI) capabilities. The start and end times of the call are also recorded.
Note: If the caller cannot be identified, the window will become activated with default parameters as listed above. A query on the caller’s information can be performed manually.
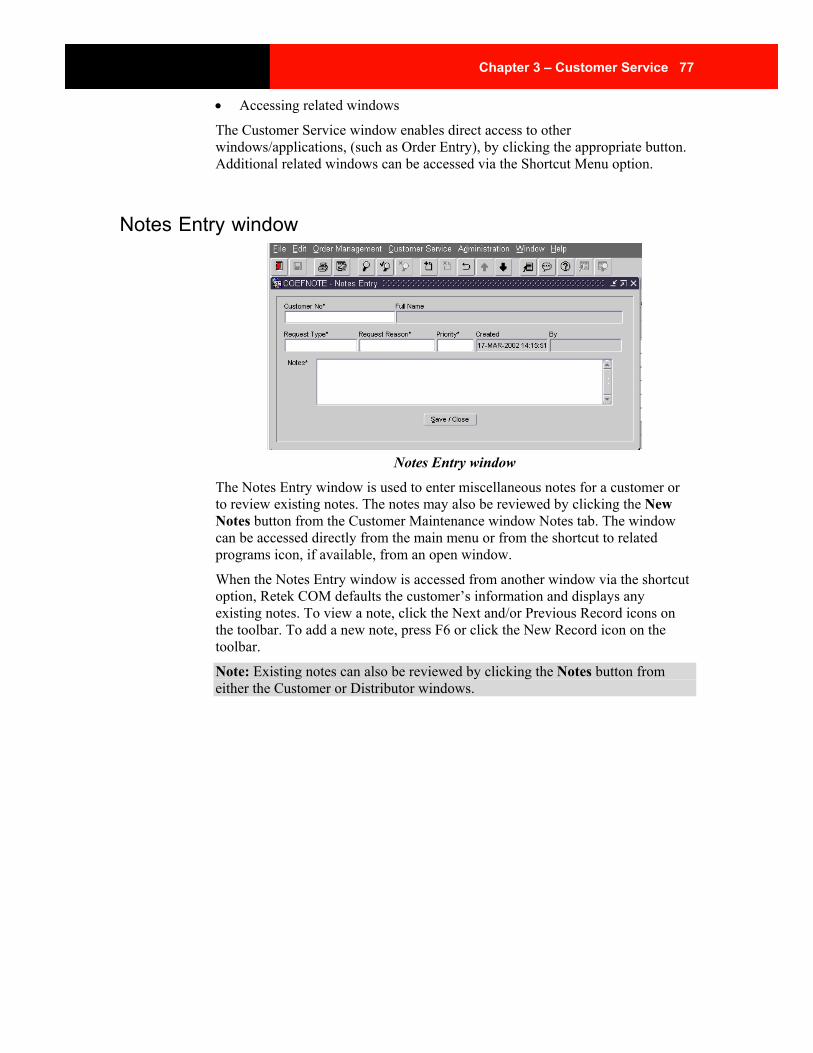
Chapter 3 – Customer Service 77
• Accessing related windows
The Customer Service window enables direct access to other windows/applications, (such as Order Entry), by clicking the appropriate button. Additional related windows can be accessed via the Shortcut Menu option.
Notes Entry window
Notes Entry window
The Notes Entry window is used to enter miscellaneous notes for a customer or to review existing notes. The notes may also be reviewed by clicking the New Notes button from the Customer Maintenance window Notes tab. The window can be accessed directly from the main menu or from the shortcut to related programs icon, if available, from an open window.
When the Notes Entry window is accessed from another window via the shortcut option, Retek COM defaults the customer’s information and displays any existing notes. To view a note, click the Next and/or Previous Record icons on the toolbar. To add a new note, press F6 or click the New Record icon on the toolbar.
Note: Existing notes can also be reviewed by clicking the Notes button from either the Customer or Distributor windows.

78 Retek Customer Order Management
Payment History window
Payment History window
Payment History displays transaction information for a specific order or payment log details. The Payment History and Payment Log History windows can be used to research payment information and/or review sales volume for reconciliation.
The following table explains the status transition of payments:
Status Payment Transaction Description
New Payment information has been entered.
Failed Reply from payment vendor of payment decline.
Authorized Reply from payment vendor for approved online banking transactions (such as credit/debit cards).
Note: All windows of payments, including cash, money orders, cashier’s checks, etc., require authorization.
Settled Indicates items are verified as shipped and funds are available for deposit.
Deposited Payments are processed and transferred through a Batch Deposit to the client’s bank.
Canceled Payment canceled.
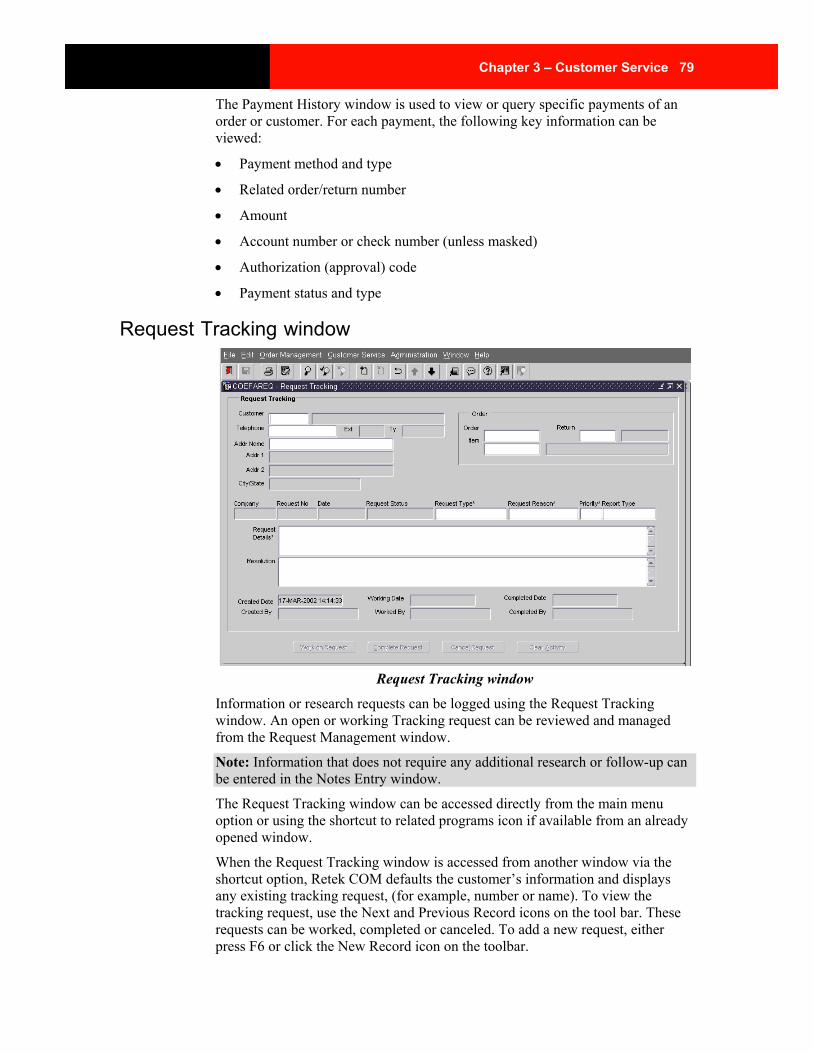
Chapter 3 – Customer Service 79
The Payment History window is used to view or query specific payments of an order or customer. For each payment, the following key information can be viewed:
• Payment method and type
• Related order/return number
• Amount
• Account number or check number (unless masked)
• Authorization (approval) code
• Payment status and type
Request Tracking window
Request Tracking window
Information or research requests can be logged using the Request Tracking window. An open or working Tracking request can be reviewed and managed from the Request Management window.
Note: Information that does not require any additional research or follow-up can be entered in the Notes Entry window.
The Request Tracking window can be accessed directly from the main menu option or using the shortcut to related programs icon if available from an already opened window.
When the Request Tracking window is accessed from another window via the shortcut option, Retek COM defaults the customer’s information and displays any existing tracking request, (for example, number or name). To view the tracking request, use the Next and Previous Record icons on the tool bar. These requests can be worked, completed or canceled. To add a new request, either press F6 or click the New Record icon on the toolbar.

80 Retek Customer Order Management
Request Management window
Request Management window
The Request Management window is used to review, display and manage all tracking requests and notes from the Notes Entry window. A query can be performed to retrieve specific information.
Regardless of the status, requests can be opened and displayed to the Request Tracking window. A Request Tracking in a working status can be reviewed and managed from this window.
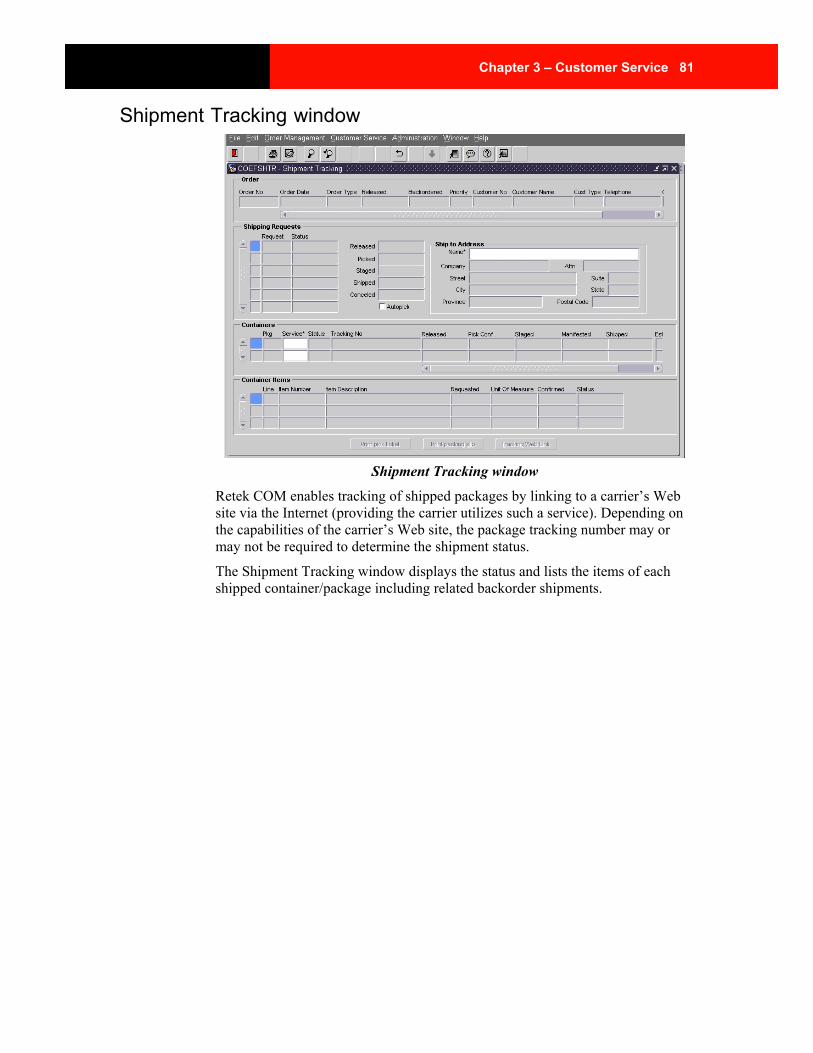
Chapter 3 – Customer Service 81
Shipment Tracking window
Shipment Tracking window
Retek COM enables tracking of shipped packages by linking to a carrier’s Web site via the Internet (providing the carrier utilizes such a service). Depending on the capabilities of the carrier’s Web site, the package tracking number may or may not be required to determine the shipment status.
The Shipment Tracking window displays the status and lists the items of each shipped container/package including related backorder shipments.
82 Retek Customer Order Management
Procedures
Authorize an adjustment Adjustments must be authorized for the purpose of settling the funds. Once an adjustment is authorized, it may be settled by either applying it as a payment/refund or by transferring it to an adjustment to credit or debit a distributor’s commissions, as applicable.
• Payment/ Refund. Adjustments settled in the Payment/Refund window will result in a debit to the customer’s credit card or check and/or credit for reimbursement to the customer as a refund.
• Move to Distributor Adjustment. Adjustments that are settled by transferring to distributor records result in an addition or deduction in a distributor’s commissions to settle the transaction.
To authorize an adjustment
Navigate: From the Customer Service menu, select Customer Adjustments. The Customer Adjustments window is displayed.
1 Perform a query to display all adjustments for the specified customer or for a specified order.
2 Select the desired adjustment and click Authorize. At this time, the adjustment can be settled by clicking the applicable button (Payment/Refund or Move to Distrib Adjustment).

Chapter 3 – Customer Service 83
Create a customer service activity Use the Customer Service window to create a customer activity and to identify a customer.
To create a customer service activity
Navigate: From the Customer Service menu, select Customer Service. The Customer Service (activity) window is displayed.
1 To begin a Customer Service activity, click Next Call to retrieve a call from the call queue (CTI) if applicable, or tab to the Customer Number field to use the default Activity Type and Source.
2 In the Customer Number field, enter the caller’s Customer Number, or perform a query (F9) to obtain the number.
3 Perform the necessary transaction(s) and update the Activity Type and Source, if applicable.
4 If necessary, scroll down to record any comments.
5 Click End Call to complete the activity.
Note: Retek COM tracks all activities by type, source and activity ID number. All activities can be viewed in the Activity Management window.
Enter a note for a customer The Notes Entry window is used to enter miscellaneous notes for a customer or to review existing notes. The notes may also be reviewed by clicking the Notes button from either the Customer or Distributor windows. The window can be accessed directly from the main menu or from the shortcut to related programs icon, if available, from an open window.
To enter a note for a customer
Navigate: From the Customer Service menu, select Notes Entry. The Notes window is displayed.
1 In the Customer Number field, enter the customer number. The customer's name fills in the Full Name field automatically.
2 In the Request Type field, enter the request type or, press F9 and select one from the LOV.
3 In the Request Reason field, enter the request reason code or, press F9 and select one from the LOV.
4 In the Priority field, enter the priority code or, press F9 and select one from the LOV.
5 In the Notes box, enter the appropriate notes about the customer.
84 Retek Customer Order Management
Manage tracking requests To manage tracking requests
Navigate: From the Customer Service menu, select Request Management. The Request Management window is displayed.
1 Perform a query to retrieve the desired request(s).
2 Select a request from the displayed list.
3 To open the request, click Open, or to cancel, click Cancel.
Note: If the request does not have a Completed status, it can be worked, completed, or canceled by clicking on the applicable button.
Process a customer adjustment To process a customer adjustment
Navigate: From the Customer Service menu, select Customer Adjustments. The Customer Adjustments window is displayed.
1 In the Customer Number field, enter the Customer Number or perform a query.
2 In the Order Number field, enter the Order Number or the Return Order number to which the adjustment will be applied (optional).
Note: All orders for the specified customer can be displayed by placing the cursor in the Order Number field displaying a list of values. The same is true for all return orders specific to the customer.
3 From the Payment Method field, select Adj as the payment method.
4 From the Adjustment Reason field, select the applicable Adjustment Reason.
5 In the Payment Amount field, enter the amount to be adjusted. To enter a credit, place a negative sign (-) in front of the dollar amount.
6 The Adjustment Expiration Date defaults with a Payment Method selection of coupon, gift certificate, award, etc. The date can be changed if applicable.
7 In the Comments field, enter required comments regarding the adjustment.
8 Click Authorize Adjustment to process the adjustment.
Note: Retek COM will change the Settled status of the adjustment to Authorized.
9 To apply the adjustment, click Payment/Refund, or Move to Distrib Adjustment (used in multi-level marketing, or business-to-business settings).
Note: To cancel an adjustment, select the relevant adjustment and click Cancel Adjustment. Note that this is an irreversible action. Refer to the Payment/Refund topic for detailed instructions.

Chapter 3 – Customer Service 85
Review and manage activities To review and manage activities
Navigate: From the Customer Service menu, select Activity Management. The Activity Management window is displayed.
1 Perform a search to display the desired activity.
2 Review the displayed activities.
Note: To view any tracking requests associated with a specific activity, double-click the Activity Type field.
Process an order return The Order Returns window is used to grant an RMA number (Returned Merchandise Authorization) to an authorized, unauthorized order return, or a return exchange.
To return an order
Navigate: From the Customer Service menu, select Order Returns. The Order Returns window is displayed.
1 Retrieve the Customer Record.
Note: If the customer had existing returns, a window listing all existing returns for the specified customer is displayed. Click Cancel to process a new order return.
2 Place the cursor in the Order Number field and press F9 to display a List of Values (LOV). The Returnable Orders window displays all closed orders that can be returned for the specified customer.
3 Select Order Number to be returned and click OK button. The Order Returns window is displayed again.
4 In the Order Type field, select the Order Type. “R” = Authorized Return, “RU” = Unauthorized Return, or “RX” = Return Exchange
Note: Code types can be customized.
5 In the Return Reason field, select the reason for the return from the preset LOV.
Note: The reason selected here represents the entire order return; however, more specific reasons can be selected for each returned item.
6 Verify the Refund To and Ship From Name addresses. If either is different, select an address from the list of previous addresses or add a new address by clicking New.
Note: Refer to the Change address topic for more information.
7 Select the items to be returned.

86 Retek Customer Order Management
Note: Items can be selected by either clicking Copy Item or by positioning the cursor in the Item Number field. When clicking Copy Item, Retek COM automatically selects all items for the order for return and displays them in the item section of the window. When a List of Values (LOV) is selected, the Returnable Items for this Order window is displayed allowing the user to select individual items for return.
8 In the Return Quantity field, enter the return quantity, if applicable.
Note: The item quantity defaults from the original order information.
9 Select a Return Reason for each line item, if other than the return reason selected for the order.
10 Once all items are selected, click Review. This will change the return order status to Review and assign the order a Return Number.
11 After the return has been reviewed, click the Authorize button. This places the return in an Authorized status.
12 If it is determined that the return cannot be authorized, click Reject to reject the return and select a rejection reason in the Status Reason field.
13 Generate RMA letter and label(s) from the Order Reports menu (optional).
Note: When an Order Return is placed in an authorized status or mode, no changes are allowed. To make changes, reset the return to a Review status by clicking Review.
14 Upon authorization of the return, the Distribution Center/Order Fulfillment Center can retrieve the returned order to record the inspection and receipt of the returned items.
Note: Refer to the Fulfillment Processing section of this User Reference Guide for detailed instructions that explain how to record the inspection and receipt of returned orders.
Process a payment/refund To process a payment/ refund
Navigate: From the Customer Service menu, select Payment/Refund. The Payment Refund window is displayed.
1 In the Customer No field, enter the Customer Number or perform a query to display a specific customer’s adjustments.
2 Select the correct adjustment to be settled (credited or debited) by positioning the cursor to relate the line adjustment.
3 Review the Payment/Refund block to ensure that the adjustment is being applied correctly. If any information is missing, make the necessary changes.
4 Click Authorize Payment to accept the credit or debit.
Note: To cancel a payment/refund, highlight the relevant refund and click Cancel Payment. Note that this is an irreversible action.
Chapter 3 – Customer Service 87
Process a tracking request To process a tracking request
Navigate: From the Customer Service menu, select Request Tracking. The Request Tracking window is displayed.
1 From the Request Type field enter a request type, or press F9 and select one from the LOV.
2 In the Request Reason field, enter the reason, or press F9 and select the reason from the LOV.
3 In the Priority field, change the priority as applicable (Low, Medium, or High).
4 In the Request Details field, enter the request details.
5 Save the request by clicking Work on Request.
Note: To complete the request, click Complete Request. If the Request Tracking was created in error, either exit the window or click Cancel Request.
Review payment history information To review specific payment history information
Navigate: From the Customer Service menu, select Payment History. The Payment History window is displayed.
1 Perform a query to display the relevant payment history/log.
2 Review the payment information.
3 Exit the window.
Note: If access to this window is made via the Shortcuts to Related Applications icon while it is open on a customer’s details, the information displayed will be customer-specific.
Review payment log history information The Payment Log History window is used to review all payments that have been authorized, deposited, and/or settled.
Note: The Payment Log is a useful tool when reviewing daily sales volume and/or reconciliation of payments.
To review the payment log
Navigate: From the Customer Service menu, select Payment Log History. The Payment Log History window is displayed.
1 Perform a query to display the relevant payment history log.
2 Review the payment information.
3 Exit the window.

88 Retek Customer Order Management
Release an order return for settlement Order returns, when received and logged via the Returns Inspection window, are systematically placed in a Pending Payment status.
To retrieve and settle an order in a Pending Payment status, use either the Returns Order window or the Order History window to release it for settlement (Payment/Refund or No Charge replacement).
To release a returned order for settlement
Navigate: From the Customer Service menu, select Order Returns. The Order Returns window is displayed.
1 Retrieve the Customer Record. All existing returns for the specified customer are displayed.
2 Select the returned order with the Pending Payment status.
3 Click Release Pay. A message indicating that the returned order has been released for settlement is displayed. The Order Return is set to a Closed status.
4 Access the Customer Adjustment window to process an adjustment for the refund amount on the order return or access the Order Entry window to process a No Charge order type for exchange.
Note: Refer to the Customer Adjustments section in this User Reference Guide for more instructions.
Track a shipment Use the Shipment and Tracking window to review package shipping and tracking information.
Note: Internet access is required on the user’s desktop to initialize the Tracking Web Link button.
To track a shipment
Navigate: From the Customer Service menu, select > Shipment Tracking. The Shipment Tracking window is displayed.
1 Enter the Order Number or perform a query.
2 Review the order shipping details.
3 To track a package, position the cursor on the applicable package and click the active Tracking Web Link button to display the carrier’s tracking Web page.
4 Trace the package via the carrier’s tracking system.
Note: When the Shipment Tracking window is opened via the shortcut option, Retek COM defaults the order information and displays the shipping details (for example, from Order History or Order Entry).
Chapter 4 – Fulfillment Processing 89
Chapter 4 – Fulfillment Processing Overview
Note: The majority of Fulfillment Processing functionality formerly handled through RCOM is now transferred and completed by the client's Warehouse Management System software.
Therefore, most of the fulfillment functionality is dependent on an Interface with Retek's Distribution Management (RDM 10.0) application.
When orders are authorized and released, Retek COM systematically transfers the data to The clients WMS to be picked, packed and shipped. Orders print as either a pick/pack ticket or invoice generated per shipping address/ship method and as needed by the distribution center(s) to fulfill and ship.
Pick Tickets Overview Note: The majority of Fulfillment Processing functionality formerly handled through RCOM is now transferred and completed by the client's Warehouse Management System software. Therefore, the pick ticket functionality is dependent on an Interface with Retek's Distribution Management (RDM 10.0) application.
Orders released from Order Entry are systematically transferred to fulfillment processing to print ship requests detailing the item quantity, availability, and ship method per item.
Pick Confirmation Overview Retek COM supports kiosks and customer point of sale (POS) by enabling the user to manually confirm the picking and shipment of items at time of pickup or POS. POS orders are processed with a ship method of “Pickup” and follow the same fulfillment process as orders to be delivered by a specified carrier. The only exception is that items are not confirmed as shipped until taken by the customer.
Returns Inspection Overview Return inspections are completed by the client's Warehouse Management System software.
Shipment Confirmation Overview Note: The majority of Fulfillment Processing functionality formerly handled through RCOM is now transferred and completed by the client's Warehouse Management System software. Therefore, the shipment confirmation functionality is dependent on an Interface with Retek's Distribution Management (RDM 10.0) application.
Order items in a pick confirmed stage and ready for shipping must be confirmed in Retek COM to include package details. The pick and release confirmation of each package/container is required before the shipment confirmation process can be successfully completed.
90 Retek Customer Order Management
Procedures Change the carrier service on a shipment
To change the carrier service on a shipment
Note: This procedure can only be performed before the order is released to the Warehouse Management System. (RDM 10.0)
Navigate: From the Order Management menu, select Fulfillment Processing Shipment Confirmation. The Shipment Confirmation window is
displayed.
1 In the Order Number field, enter the order number or, scan the barcode on the shipping label to retrieve the order (if a scanner is used).
2 Click Carrier Service. The Carrier Services window is displayed.
3 Select a ship method from the List of Values and click OK.
Confirm a shipment Note: The ability to perform this function is dependent on the integration into the client's WMS. This is only possible if using Retek RDM 10.0.
To confirm the shipment of an order
Navigate: From the Order Management menu, select Fulfillment Processing Shipment Confirmation. The Shipment Confirmation window is
displayed.
1 In the Order Number field, enter the order number, or scan the barcode on the shipping label to retrieve the order (if a scanner is used).
2 For those carriers that have an interface with Retek COM, ensure the weight and tracking number are displayed on the form. For carriers that do not have an interface with Retek COM, enter the weight and tracking number in the corresponding fields.
Note: If Retek COM is interfaced with a scale in the distribution center, Weigh, when clicked, would systematically enter the actual weight of the package rounded up to the nearest pound.
3 Prior to confirming the order as shipped, change the carrier service, if applicable:
Note: To change the carrier service, click Carrier Service and select a ship method from the List of Values.
4 Click Save or press the F10 key to confirm the order as shipped.
Chapter 4 – Fulfillment Processing 91
Review inventory balances To review inventory balances
Navigate: From the Order Management menu, select Fulfillment Processing Inventory Balances. The Inventory Balances window is displayed.
1 Perform a query to display all inventory balances for all items or enter search criteria to display the inventory balances for a specific item or location.
2 To view the on-hand locations, order reservations and/or manual reservations for a selected item, click the applicable button located at the bottom of the window.
3 Click Close to exit the window.
Review inventory reservations To review inventory reservations
Navigate: From the Order Management menu, select Fulfillment Processing > Inventory Reservations. The Inventory Reservation Window is displayed.
1 Perform a query to display all inventory reservations for all items or enter search criteria to display the inventory balances for a specific item.
2 Review the displayed information.
3 From the File menu, select Close to exit the window.
Note: This is a read-only window.
View a summary of open orders To view a summary of open orders
Navigate: From the Order Management menu, select Fulfillment Processing >Open Orders Summary. The Open Orders Summary window is displayed.
1 Perform a query to view all ship requests or enter a specified order status and/or ship request.
2 From the File menu, select Close to exit the window.

92 Retek Customer Order Management
Windows Manifest window
Note: The majority of Fulfillment Processing functionality formerly handled through RCOM is now transferred and completed by the client's Warehouse Management System software. Therefore, this window functionality is dependent on an Interface with Retek's Distribution Management (RDM 10.0) application.
Retek COM utilizes manifests to record shipping information for each package/container shipped from the client's distribution center(s), (that is, order number, ship to address, shipping cost, etc.). Opening a manifest for each warehouse, carrier, ship method and manifest type prior to shipment confirmation is required to manifest packages.
Note: Refer to the Confirm a Shipment procedure for more information.
Retek COM automates the manifest process by systematically updating the appropriate manifest with the shipping information of packages as they are shipped confirmed.
Note: If a manifest is not opened for a carrier, Retek COM will not allow the ship confirmation of packages at the shipping station.
The manifest for each carrier can be displayed on the window or directed to a printer. Upon completion of shipping for the business day and/or period, it is required that all manifests are closed. The closing of a manifest updates the inventory quantities and availability.
Note: If Federal Express™ and United Parcel Service™ (UPS) are carrier service providers, use the Close Manifest utility to electronically transfer the manifest data to each carrier. Refer to the Utilities topic in this User Reference Guide for more details.

Chapter 4 – Fulfillment Processing 93
Open Pick Tickets View window Note: The majority of Fulfillment Processing functionality formerly handled through RCOM is now transferred and completed by the client's Warehouse Management System software. Therefore, this window is view-only. For Retek Clients there is an interface with Retek Distribution Management (RDM 10.0)
Retek COM assists the fulfillment or distribution center in determining the stage of fulfillment by providing a view for monitoring all pick ticket requests. Open pick tickets represent orders released for ship requests and transferred to the distribution center. The Open Pick Tickets View is a read-only window displaying Shipment Requests printed and details the following:
• Batch Order Line(s) Number (query value only fields)
• Line and Item Number and Description
• Ship Method and Ship to Name
• Customer Type and Order Status
Open Orders Summary window The Open Orders Summary window is used to monitor the total number of orders and their order status not yet fulfilled. It is also useful in appraising the distribution center with forecasting of their projected workload and/or the fulfillment aging of orders.
The Open Orders Summary provides the following specific order information:
Order status
Ship request status
Total orders
Oldest orders
Order dates
Hours spent processing orders
Note: This is a read-only window.
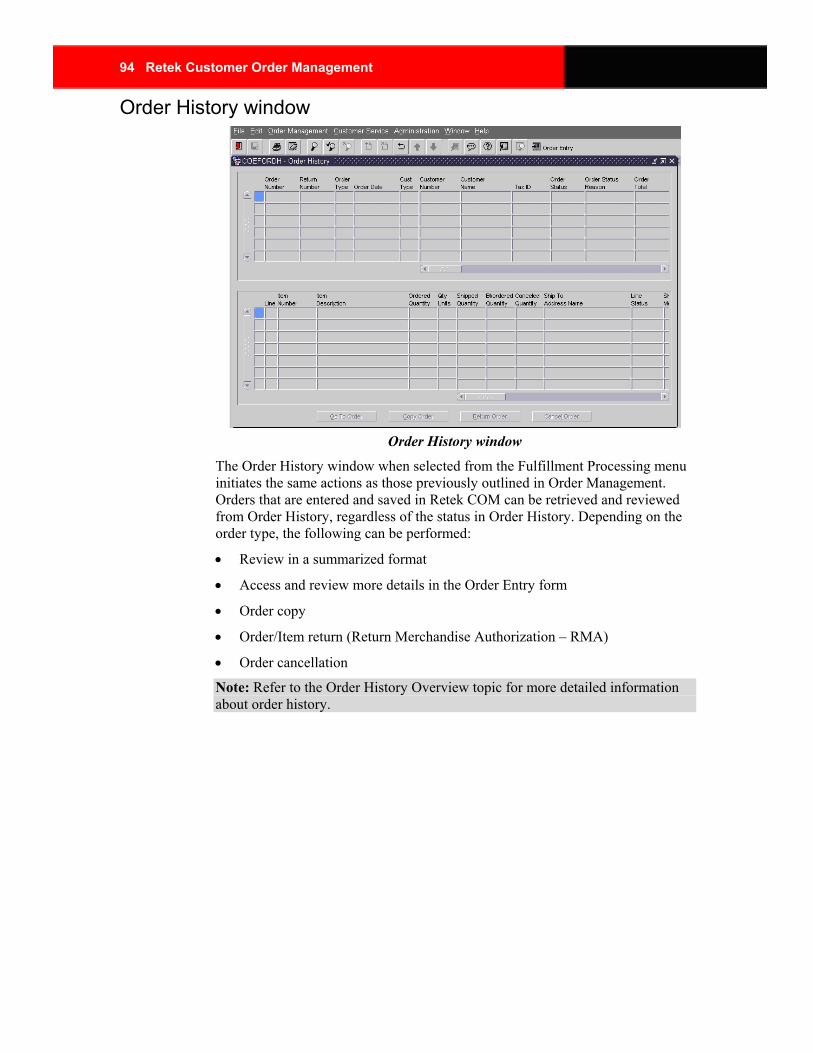
94 Retek Customer Order Management
Order History window
Order History window
The Order History window when selected from the Fulfillment Processing menu initiates the same actions as those previously outlined in Order Management. Orders that are entered and saved in Retek COM can be retrieved and reviewed from Order History, regardless of the status in Order History. Depending on the order type, the following can be performed:
• Review in a summarized format
• Access and review more details in the Order Entry form
• Order copy
• Order/Item return (Return Merchandise Authorization – RMA)
• Order cancellation
Note: Refer to the Order History Overview topic for more detailed information about order history.

Chapter 4 – Fulfillment Processing 95
Pick Ticket Reprint window Note: The majority of Fulfillment Processing functionality formerly handled through RCOM is now transferred and completed by the client's Warehouse Management System software. Therefore, this window is view-only and functionality is dependent on an Interface with Retek's Distribution Management (RDM 10.0) application.
The Pick Ticket Reprint window is used by a warehouse/distribution center supervisor/manager for resubmitting a “jammed” print job or individual pick tickets. A change in the original order information (for example, shipping address, item quantities, or ship method) after being released for printing may require a reprint of a pick ticket (ship request).
Pick Confirmation window The Pick Confirmation window is used at a pick station in the warehouse or distribution center to manually confirm the picking/shipment of an order. Typically a scanner is attached to the computer keyboard for scanning in the order/item number(s).

96 Retek Customer Order Management
Inventory Balances window
Inventory Balances window
The Inventory Balances window is read-only and displays on-hand, order/manual reserved, available to sell (ATS), backordered, and maximum backordered quantities for each inventory item. All items can be displayed, or a query can be performed to display the inventory balances for a specific item based on the last inventory synchronization.
Additionally, buttons provide options from the Inventory Balances window as follows:
• Item On-hand Locations – Warehouse locations of items
• Order Reservations – Displays all orders holding item reservation
• Manual Reservations – Displays all reservations that have been manually entered. It is also used for operator-level reservations before an order is released and/or to reserve a quantity of an item(s) to be used in the future (preventing over-sell if the item is later required).

Chapter 4 – Fulfillment Processing 97
Inventory Reservations window
Inventory Reservations window
The Inventory Reservations window is used by a supervisor, manager, or inventory specialist of a warehouse/distribution center to view product availability or requiring stock.
In the Order Reserved Quantities section of the window, the Sub-inventory and Locator Code fields interface with the inventory system. They represent the physical or logical location of product in the warehouse or distribution center.
Note: Physical and logical locations are defined per the client’s specifications.
98 Retek Customer Order Management
Shipment Tracking window Note: The majority of Fulfillment Processing functionality formerly handled through RCOM is now transferred and completed by the client's Warehouse Management System software. Therefore, this window functionality is dependent on an Interface with Retek's Distribution Management (RDM 10.0) application.
Depending on security privileges, changes in ship method and ship to address per package/container may be made in the Shipment Tracking window, provided that the package/container is not in the ship status as described earlier. In these stages of the Order Fulfillment process, retrieval of a specific package is almost impossible and changes in the staging/ship stages will result in manifest errors. This form can also be used to print an order's pick ticket or packing slip.
Retek COM enables tracking of shipped packages via the carrier’s Internet site, provided the carrier utilizes this service, from the Shipment Tracking window. Retek COM links to the carrier’s Web site on the Internet to retrieve the package delivery information. Depending on the capabilities of the carrier’s Web site, the package tracking number may or may not be required to determine the shipment status of a package.
The Shipment Tracking window displays fulfillment/shipment status, a list of item(s) in each package/container and the shipping history including related backorder and/or reshipments. The window is used to review an order's shipping information, print a pick ticket/packing slip and track a package.
Note: Internet access is required on the user’s desktop to initialize the Tracking Web Link button and a valid carrier's tracking number is required to successfully trace a package. Refer to the Shipment Tracking topic in the Customer Service chapter for more information.

Chapter 4 – Fulfillment Processing 99
Shipment Confirmation window Note: The majority of Fulfillment Processing functionality formerly handled through RCOM is now transferred and completed by the client's Warehouse Management System software. Therefore, this window functionality is dependent on an Interface with Retek's Distribution Management (RDM 10.0) application.
The Shipment Confirmation window is used at the ship station in the warehouse or distribution center to confirm the shipment of an order. This marks the container as fully picked, weighed and tagged with the carrier-specific barcode or label. As with the Pick Confirmation process, a scanner is typically used in the ship confirmation process.
Note: A package/container status of Pick Confirmed (PCKCNF) is required to successfully initiate shipment confirmation.
The Carrier Service button is used to change the ship method of an order prior to ship confirmation.

Chapter 5 – Inventory Management and Item Pricing 101
Chapter 5 – Inventory Management and Item Pricing Inventory Management Overview
This topic reviews the functions that are used to manage item inventories. The topics covered here are:
• Master Items
• Company Items
• Item Relationships
• Item Image
• Inventory Balances
Item inventory requires updating prior to making additions or performing maintenance in Retek COM. Updating synchronizes the inventory on-hand balances as well as depletes the reserved and shipped items from the on-hand quantity in the interfaced inventory system
Note: Refer to the Update Inventory topic in the Utilities section.
This topic outlines each of the following inventory functions:
• Add/Update master items
• Add items per company
• Define item relationships
• Review inventory balances
• Review the location of on-hand inventory items
• Review order reservations
• Review manual reservations
102 Retek Customer Order Management
Item Pricing and Discounting Overview Note: For 10.0 items are setup in Retek's merchandising system (RMS) and integrated into RCOM. Therefore, access to the inventory and item maintenance functions is limited.
This topic reviews the functions used to maintain the prices of items and setup of item discounts.
The topics covered here are:
• Company Item
• Company Item/Event Item Price
• Event Item Price/Discount
• Event Price List Setup
• Discount Setup
• Item Tax Exemptions
Retek COM Item Pricing features offers the ability to customize or personalize each Master Item with unique variables for individual handling per customer type.
Each item pricing can be established and/or maintained by:
• Adding Master Items as Translated or alternate item numbers to a Company Item List
• Individual or combination Event (Promotions) Item Prices and Discounts
• Setting Up Tax Exemptions for Items or Categories
Note: These functions are dependent upon data synchronization with an Inventory system. Refer to the Fulfillment Processing Topic for more information.
Chapter 5 – Inventory Management and Item Pricing 103
Procedures Note: For 10.0 items are setup in Retek's merchandising system (RMS) and integrated into RCOM. Therefore, access to the inventory and item maintenance functions is limited.
Add an item to an event price list To add an item to an event price list
Navigate: From the Order Management menu select Item Pricing > Company Item/Event Item Price
1 In the Company field, enter the company, or select it from the LOV.
2 In the Master Item field, enter the Master Item number, or select it from the LOV.
3 In the Currency and Start Date fields, enter or select the required Currency and Start Date.
4 In the End Date, Ship Method, and Script fields enter data as applicable. (Optional)
5 Select the appropriate usage flags, including Subscriptions as applicable. (Optional)
6 Link Image File names and descriptions as applicable. (Optional)
Note: The image file names are typically associated with internet or intranet Web-based graphics or descriptions. Refer to the Item Image topic in Topic 6 for more information.
7 Enter or select the desired Event Price List and Event Item Number for the selected Master Item.
Note: The Event Price List associated with the item must be previously established. Refer to the related topic in this topic to create or add a new Event Price List.
8 In the Item Price field, enter the required Item (selling) price. If needed, enter the Retail/Wholesale price, as well as Shipping/Handling Amounts and Show Start Time, as applicable.
9 Select or clear the No Autoship and Kit Only check boxes as appropriate.
10 In the Oversell % and Start/End Time fields, enter the Oversell Percentage and Start/End Time as applicable per Event.
11 Enter optional default/minimum/maximum order and maximum event quantities as applicable.
12 Select the Multi (install) Payment check box and set the minimum/maximum payments per item if applicable.
13 Enter optional Show/Show Grace End Times, Show Host, Image File names, Forecast/Actual Sales quantities and amounts if applicable.
Note: This information is typically associated with on-air type events.
104 Retek Customer Order Management
14 Enter or Select the desired Event Item Discount(s) for the selected Event Item.
Note: The Event Item Discount to be associated with the item must have been previously established. Refer to the Discount Setup topic in this topic for more information.
15 Multiple Discounts may be associated with an individual Event Item Number. (For example: Four or More Item Purchase, Five or More Item Purchase, etc.).
16 Although the Discount field is set to a required value, it is not an absolute requirement to associate the Event Item Number. If left blank the item will default to the established Item Price.
17 In the Event Item Discount block, enter a Marketing Source/Order Type/Override Amount Value/Percent. The Discounted Price is displayed.
18 Associate a script to the Discount as appropriate. (Optional)
19 Repeat steps 7-18 to add the Master/Translated Item to more events.
20 Click Save, or press the F10 key to save the entry.
Note: To change the parameters of an existing item, perform a query to retrieve the item. Position the cursor in the applicable field(s) and make any necessary changes.
Add a non-inventory item to the master item list To add a non-inventory item to the master item list
Navigate: From the Order Management menu, select Inventory > Master Item. The Master Item window is displayed.
1 In the Number, Default Description, Start Date, Product Segment, Item Vendor, and Type fields, enter the item, default description, start date, product segment, item vendor, and type.
2 Enter the default Order Quantity, Oversell %, and Unit of measure.
3 Enter any applicable Dimension and Subscription information and select the appropriate Usage Flags.
Note: See the Item Image section later in this topic for additional information about item images.
4 To categorize the item, click Item Category. The Item Category block is displayed at the bottom section of the window.
5 Select the appropriate Item Category by pressing F9 for a list of values. Complete the applicable optional information.
6 Click Save or press the F10 key to save the item information.
Note: To change or inactivate an existing item, perform a query to retrieve the item. Once displayed, position the cursor in the applicable field and make the necessary changes, or select the Inactive check box to inactivate the item.
Chapter 5 – Inventory Management and Item Pricing 105
Note: The application requires item descriptions to be entered in all capital letters. The application will force the user to enter the description in upper case but this will have to be systematically enforced if an external application is used to import items to the Retek COM application.
Add a master item to a company item list To add a master item to a company item list
Navigate: From the Order Management menu, select Inventory > Company Item. The Company Item window is displayed.
1 In the Company field, enter the company, or press F9 and select the Company to which the Master Item will be added from the LOV.
2 In the Master Item field, enter the master item number.
3 In the Default Selling Price and Shipping Method fields, enter the default selling price and shipping method as applicable.
Note: Leaving the Ship Method field blank will default the item to the company's preferred default ship method.
4 Scroll to the right of the window to access the usage flags. Select or clear the applicable usage flags. This will overwrite the usage flags selected in the Master Item window, but will not change the Master Item setup.
5 In the Local Currency field, select the local currency
6 In the Start Date field, enter the effective Start Date for the item.
7 Click Save or press the F10 key to save the addition of the master item to the Company Item list.
Note: To change the parameters of an existing item, perform a query to retrieve the item. Position the cursor in the applicable field(s) and make any necessary changes.
Change an item on-hand quantity per warehouse or location To change an item on-hand quantity per warehouse or location
Navigate: From the Order Management menu, select Inventory > Item Onhand Quantities. The Item Onhand Quantities window is displayed.
1 In the Warehouse Code field enter the warehouse code or press F9 to select the warehouse from the LOV.
2 In the Item Number field enter the item number or press F9 to select the item from the LOV.
3 In the Item Vendor field enter the item vendor, or press F9 to select the item vendor from the LOV.
4 In the Onhand Quantity field, change the quantity.
106 Retek Customer Order Management
Copy an event price list To copy an event price list
Navigate: From the Order Management menu, select Item Pricing > Event Price List Setup. The Event Price List Setup window is displayed.
1 Create a new event price list record.
2 In the Parent Price List field, enter or select a price list. Copy Event is now enabled.
3 Click Copy Event. The event item prices and event item discounts associated to the parent event price list are copied to the current event price list.
4 Make changes to the new event item prices/event item discounts as applicable.
5 Click Save or press the F10 key to save the copied event.
Enter phone numbers associated with an event price list To enter phone numbers associated with an event price list
Navigate: From the Order Management menu, select Item Pricing > Event Price List Setup. The Event Price List Setup window is displayed.
1 Perform a query to display the desired Event Price List and click on the Dialed Numbers tab. The Dialed Numbers tab is displayed on the window.
2 In the Display Code, Description, and Phone Number fields, enter the required data associated with the selected event. (Repeat this step as applicable.)
3 Click Save or press the F10 key to save the event data.
Set up a discount To set up a discount
Navigate: From the Order Management menu, select Item Pricing > Discount Setup. The Discount Setup window is displayed.
1 In the Company, Discount, Display Code, Description, Sort Order, and Amount Value fields, enter or select the appropriate discount data.
2 Select the applicable discount check boxes (that is, Display Before Threshold, and Item Price/Shipping/Handling discounts).
3 In the Local Currency field, select the required Local Currency to which the discount is available.
4 In the Maximum Discounts Per Order, Threshold Amount/Quantity, Unit of Measure, and/or Script fields, enter the data as needed. (Optional)
5 In the Event Item Discount fields, enter or select the items to which the discount will apply. (Optional – This can be done on the Company Item/Event Item Price or Event Item Price Discount forms.)

Chapter 5 – Inventory Management and Item Pricing 107
6 Click Save or press the F10 key to save the discount.
Set up an event price list To set up an event price list
Navigate: From the Order Management menu, select Item Pricing >Event Price List Setup. The Event Price List Setup window is displayed.
1 In the Company field, enter or select the company in which the Event Price List will apply.
2 In the Event Display Code, Description, and Event Type fields, enter the data for the Event Price List.
3 In the Start Time/Date field, select the effective start date and time for the price list.
4 Select the items and enter the Item Prices that will apply for the price list.
5 In the Oversell % and Start Time fields, enter the oversell percentage and start time for the event.
6 Click on the Customer Type Events tab to define the customer types applicable to the event price list.
7 In the Customer Type field, enter or select the customer type.
8 From the Marketing Source field, select the appropriate source. (Optional)
9 In the Minimum Order Amount field, enter the required amount and an optional Maximum Order Amount in the appropriate field.
10 In the Local Currency field, select the required local currency associated with the Customer Type.
Note: Multiple Customer Type/Local Currencies may be associated with an individual Event Item List. (For example: CR – Customer Retail may have US and Canadian dollars or English Pounds, etc., per Event. However, each currency/customer type combination requires individual set up).
11 Click Save or press the F10 key.
Set up an event item price discount To set up an event item price/discount
Navigate: From the Order Management menu, select Item Pricing > Event Item Price/Discount. The Event Item Price / Discount window is displayed.
1 In the Company field, enter or select the Company.
2 In the Event Price List and Event Item Number fields, enter or select the desired Event Price List and Event Item Number for the selected Master Item.
Note: The Event Price List associated with the item must be previously established. Refer to the related topic in this topic to create or add a new Event Price List.
108 Retek Customer Order Management
3 In the Item Price field, enter the required Item (selling) price. If needed, enter the Retail/Wholesale price, Shipping/Handling Amounts, and Show Start Time, as applicable.
4 Select or clear the No Autoship and Kit Only check boxes as appropriate.
5 In the Oversell % and Start/End Time fields, enter the oversell percentage and start/end time as applicable per event item.
6 Enter optional default/minimum/maximum order and maximum event quantities as applicable.
7 Select the Multi (install) Payment check box and set the minimum/maximum payments per item if applicable.
8 In the appropriate fields, enter Show/Show Grace End Times, Show Host, Image File names, Forecast/Actual Sales quantities and amounts if applicable.
Note: This information is typically associated with on-air type events.
9 In the Discount field, enter or select the desired Event Item Discount(s) for the selected Event Item.
Note: The Event Item Discount to be associated with the item must have been previously established. Refer to the Discount Setup topic in this topic for more information.
10 Multiple Discounts may be associated with an individual Event Item Number. (For example: Four or More Item Purchase, Five or More Item Purchase, etc.).
Note: Although the Discount field is set to a required value, it is not an absolute requirement to associate the Event Item Number. If left blank, the item will default to the established Item Price
11 In the appropriate fields, enter a Marketing Source/Order Type/Override Amount Value. The Discounted Price will display. (Optional)
Note: If the discount is a percentage, select the Override Amount % check box.
12 In the Script field, associate a script with the discount as appropriate. (Optional)
13 Repeat steps 1-12 to add the Master/Translated Item to more events.
14 Click Save, or press the F10 key to save the entry.
Note: To change the parameters of an existing item, perform a query to retrieve the item. Position the cursor in the applicable field(s) and make any necessary changes.
Retek COM highly recommends testing the event item in Order Entry to ensure all intended requirements are set up correctly (such as Price, Discounts, and no Autoship access).
Chapter 5 – Inventory Management and Item Pricing 109
Set up an item relationship To set up an item relationship
Navigate: From the Order Management menu, select Inventory > Item Relationship. The Item Relationship window is displayed.
1 In the Company field, select the company where the item relationship is to be defined.
2 In the Relationship Type field, select the relationship type.
3 Select the Parent Item Number and the related Child Item Number(s). If there is more than one child item, repeat steps 1-3 until all child items are defined.
4 Enter any applicable relationship attributes (for example, sale of a jacket and a matching shirt).
5 Click Save or press the F10 key to save the new item relationship(s).
Set up an item image To set up an item image
Navigate: From the Order Management menu, select Inventory > Item Image. The Item Image window is displayed.
1 In the Company field, select the company to which the Item Image is related.
2 From the Image Type field, select the image type.
3 In the Image Filename field, enter the filename (file path and/or name).
4 In the Start Time Date field, enter the required start date and time.
5 Select the Style/Color/Image/Elements as applicable (optional).
6 Select the Master/Company/Event Item and/or Item Category as applicable (optional).
7 In the Short and/or Long Descriptions field, enter the description associated with the image or text for the desired medium (Web/Internet, intranet, etc.)
8 Click Save or press F10 to save the new entry.
9 Exit the window.
Note: Using this window does not necessarily require an image link, but can be used solely for descriptive information. Graphic images stored on other independent application can integrate with the Image Filename field (as a file path or file name).

110 Retek Customer Order Management
Set up a translation to a discount To set up a translation to a discount
Navigate: From the Order Management menu, select Item Pricing > Discount Setup. The Discount Setup window is displayed.
1 Perform a query to display the desired discount and click Translations. The Lookup Code Translations block is displayed at the bottom of the window.
2 Enter or select the desired language from the LOV.
3 In the Display Code and Description fields, enter the applicable code and description.
4 Repeat steps 2 and 3 as applicable.
5 Click Save or press the F10 key to save the translation.
Set up a translation to an event price list To set up a translation to an event price list
Navigate: From the Order Management menu, select Item Pricing > Event Price List Setup. The Event Price List Setup window is displayed.
1 Perform a query to display the desired Event Price List and click on the Language Translations tab. The Language Translations tab is displayed on the window.
2 In the Language field, enter or select the desired language from the LOV.
3 In the Display Code and Description fields, enter the applicable code and description.
4 Repeat steps 2 and 3 as applicable.
5 Click Save or press the F10 key to save the event price list.
Review the location of an on-hand item To review the location of an on-hand item
Navigate: From the Order Management menu, select Inventory > Inventory Balances. The Inventory Balances window is displayed.
1 Perform a query to display the inventory balances for all items, or enter a search criterion for a specific item.
2 Highlight or select the item if there is more than one.
3 Click Item Onhand Locations. The Item Onhand Quantities window is displayed.
Chapter 5 – Inventory Management and Item Pricing 111
Review order reserved quantities To review order reserved quantities
Navigate: From the Order Management window, select Inventory > Inventory Balances. The Inventory Balances window is displayed.
1 Perform a query to display the inventory balances for all items, or enter a search criterion for a specific item.
2 Highlight or select the item if there is more than one.
3 Click Order Reservations. The Order Reserved Quantities window is displayed.
Review manual reservations To review manual reservations
Navigate: From the Order Management window, select Inventory > Inventory Balances. The Inventory Balances window is displayed.
1 Perform a query to display all inventory balances for all items, or enter search criteria to display the inventory balances for a specific item.
2 Select the item.
3 Click Manual Reservations. The Manual Reservations window is displayed.
Note: When Manual Reservation is clicked, The Manual Reservation window is displayed with a query for the selected item.
Set up an item for tax exemption To set up an item for tax exemption
Navigate: From the Order Management menu, select Item Pricing > Item Tax Exemption. The Item Tax Exemption window is displayed.
1 From the Type field, select the tax exemption type.
2 In the Location field, select the location (that is, State, County, City, etc.) for which the tax exemption will apply.
3 In the Item Category and/or Item Number fields, select the item category and/or item number.
4 In the Override Tax Rate field, enter the appropriate override tax rate for the location/jurisdiction.
Note: If an override tax rate is entered, the taxable flag must be selected.
5 Select the applicable check boxes to Exempt All Jurisdictions.
6 In the Extended Taxable Amount or Additional Range Tax fields, enter the qty by unit price or, over the limit taxable subtotal price.
7 In the Minimum/Maximum Taxable Amounts fields, enter the applicable amounts.
8 Click Save or press the F10 key to save the item tax exemption.

112 Retek Customer Order Management
Windows Company Items window
Note: For 10.0 items are setup in Retek's merchandising system (RMS) and integrated into RCOM. Therefore, access to the inventory and item maintenance functions is limited.
An item set up as a Master Item must also be set up as a Company Item. Items require setup as a Master Item before Company Items can be created. For this topic, Company may refer to departments or divisions within a country or may represent separate countries, depending on client specifications.
Note: Refer to the Master Item topic for instructions on the setup of a Master Item.
Setting up a Master Item as a Company Item accomplishes the following:
• Assigns the company or companies to offer the item.
• Defines the default selling price and ship method per company and/or translated item.
• Defines the item usage supporting the logic used by Retek COM when selected during the order entry process.
Note: The usage flags default from the Master Item, however, they can be overwritten at the Company or Event level.
• Defines the Commissionable Points/Volume received by a distributor or customer as applicable.
• Defines local currency for pricing and Commissionable Points/Volume. The Company Item window is used to add a master item to a predefined company’s item list or to change the parameters of an existing item.

Chapter 5 – Inventory Management and Item Pricing 113
Company Item/Event Item Price window Note: For 10.0 items are setup in Retek's merchandising system (RMS) and integrated into RCOM.
The Company Item/Event Item Price window is used to establish, define and maintain a company item for one or more Event Price lists (for example, Wholesale, Retail, Catalog, or TV Promotions). The Company Item must first be established from an already existing Master item prior to the setup of an event.
Note: Refer to the Master Items topic for instructions on the setup of a Master Item.
Associating a Company Item to an Event Price List accomplishes the following per event:
• Defines the item’s default selling price, order quantity or ship method.
• Assignment of Subscription, Autoship access and/or for use as a kit only.
• Defines the item usage supporting the logic by Retek COM when selected during the order entry process (such as Minimum/maximum order quantity, multi-payments allowed, and Show Start and End times).
Note: The usage flag check boxes default from the Master or Company Item and can be overwritten at the Event level.
• Defines the applicable discounts.
• Defines the local currency for pricing and Commissionable Points/Volume received by a distributor or customer as applicable.
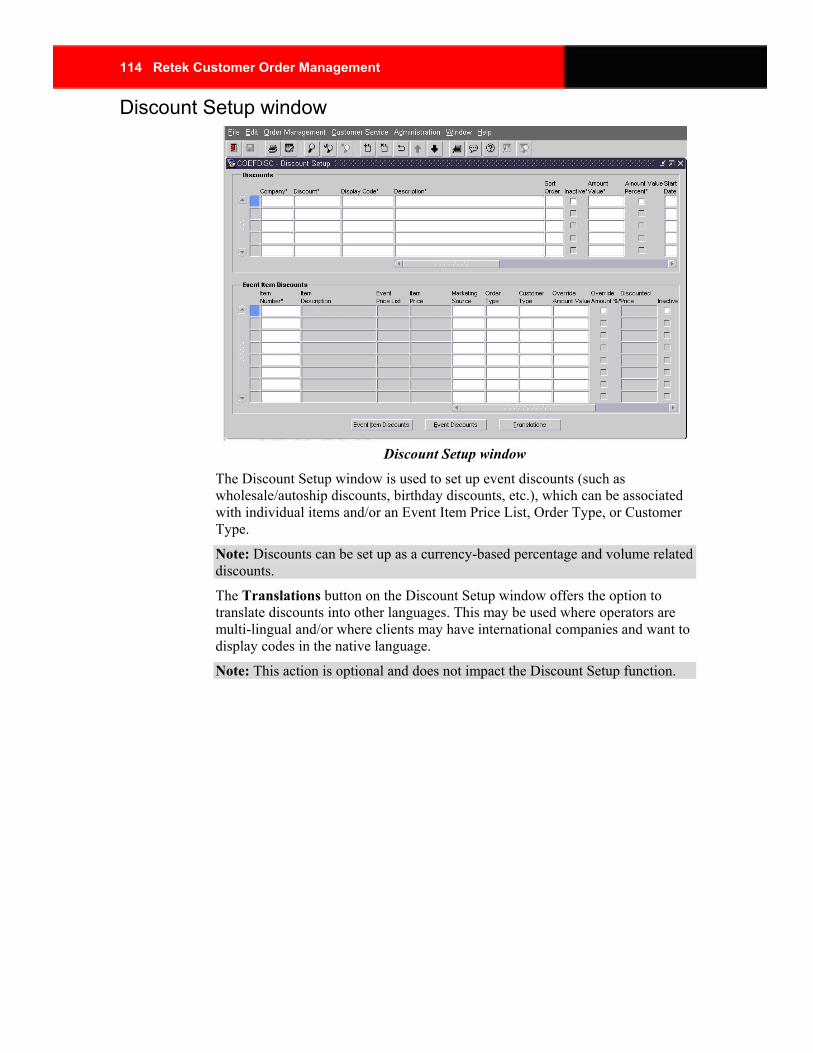
114 Retek Customer Order Management
Discount Setup window
Discount Setup window
The Discount Setup window is used to set up event discounts (such as wholesale/autoship discounts, birthday discounts, etc.), which can be associated with individual items and/or an Event Item Price List, Order Type, or Customer Type.
Note: Discounts can be set up as a currency-based percentage and volume related discounts.
The Translations button on the Discount Setup window offers the option to translate discounts into other languages. This may be used where operators are multi-lingual and/or where clients may have international companies and want to display codes in the native language.
Note: This action is optional and does not impact the Discount Setup function.
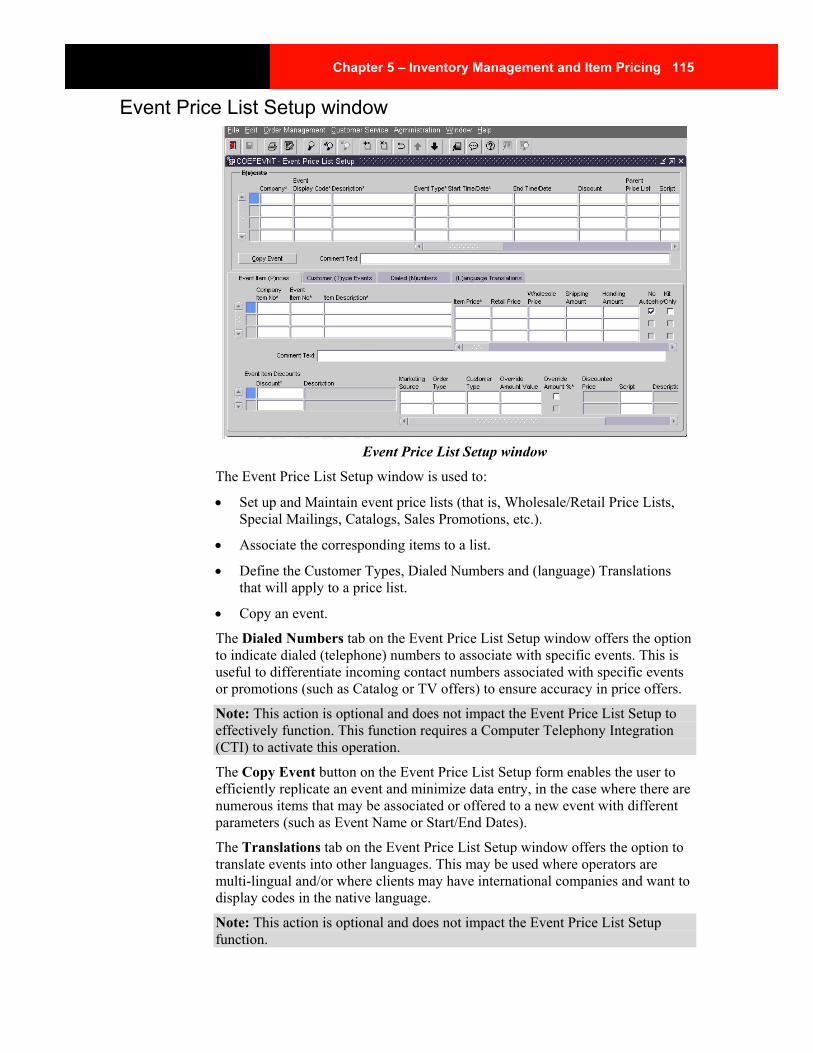
Chapter 5 – Inventory Management and Item Pricing 115
Event Price List Setup window
Event Price List Setup window
The Event Price List Setup window is used to:
• Set up and Maintain event price lists (that is, Wholesale/Retail Price Lists, Special Mailings, Catalogs, Sales Promotions, etc.).
• Associate the corresponding items to a list.
• Define the Customer Types, Dialed Numbers and (language) Translations that will apply to a price list.
• Copy an event.
The Dialed Numbers tab on the Event Price List Setup window offers the option to indicate dialed (telephone) numbers to associate with specific events. This is useful to differentiate incoming contact numbers associated with specific events or promotions (such as Catalog or TV offers) to ensure accuracy in price offers.
Note: This action is optional and does not impact the Event Price List Setup to effectively function. This function requires a Computer Telephony Integration (CTI) to activate this operation.
The Copy Event button on the Event Price List Setup form enables the user to efficiently replicate an event and minimize data entry, in the case where there are numerous items that may be associated or offered to a new event with different parameters (such as Event Name or Start/End Dates).
The Translations tab on the Event Price List Setup window offers the option to translate events into other languages. This may be used where operators are multi-lingual and/or where clients may have international companies and want to display codes in the native language.
Note: This action is optional and does not impact the Event Price List Setup function.

116 Retek Customer Order Management
Event Item Price/Discount window
Event Item Price Discount
The Event Item Price/Discount window is an alternate view/entry option to the Company Item/Event Item Price form and is used to associate an event price list/item number with one or more event item discounts.
As with the Company Item/Event Item Price setup, prior to assigning the Event Item Price/Discount, the Master Items and Company Items that will be used in conjunction with the event item price discount, must already be established.
Note: If the discount is to be associated with a particular price list, it is also required that the Event Price list be established prior to setting up the event item price/discount.
Refer to the applicable topics in this topic for step-by-step instructions on Master Item, Company Items and Company Items/Event Item Price setup.
The Event Item Price/Discount window is an alternate view/entry option used to associate one or more discounts to individual items, order/customer types (optional) and/or event item price lists.
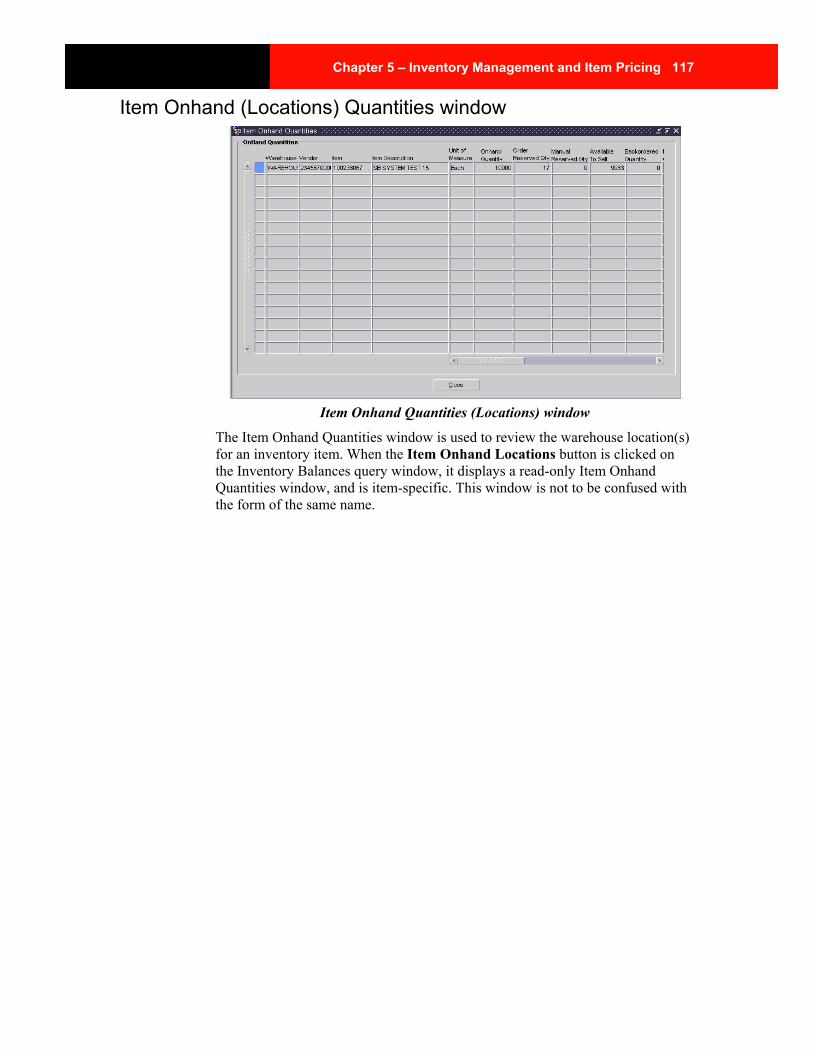
Chapter 5 – Inventory Management and Item Pricing 117
Item Onhand (Locations) Quantities window
Item Onhand Quantities (Locations) window
The Item Onhand Quantities window is used to review the warehouse location(s) for an inventory item. When the Item Onhand Locations button is clicked on the Inventory Balances query window, it displays a read-only Item Onhand Quantities window, and is item-specific. This window is not to be confused with the form of the same name.
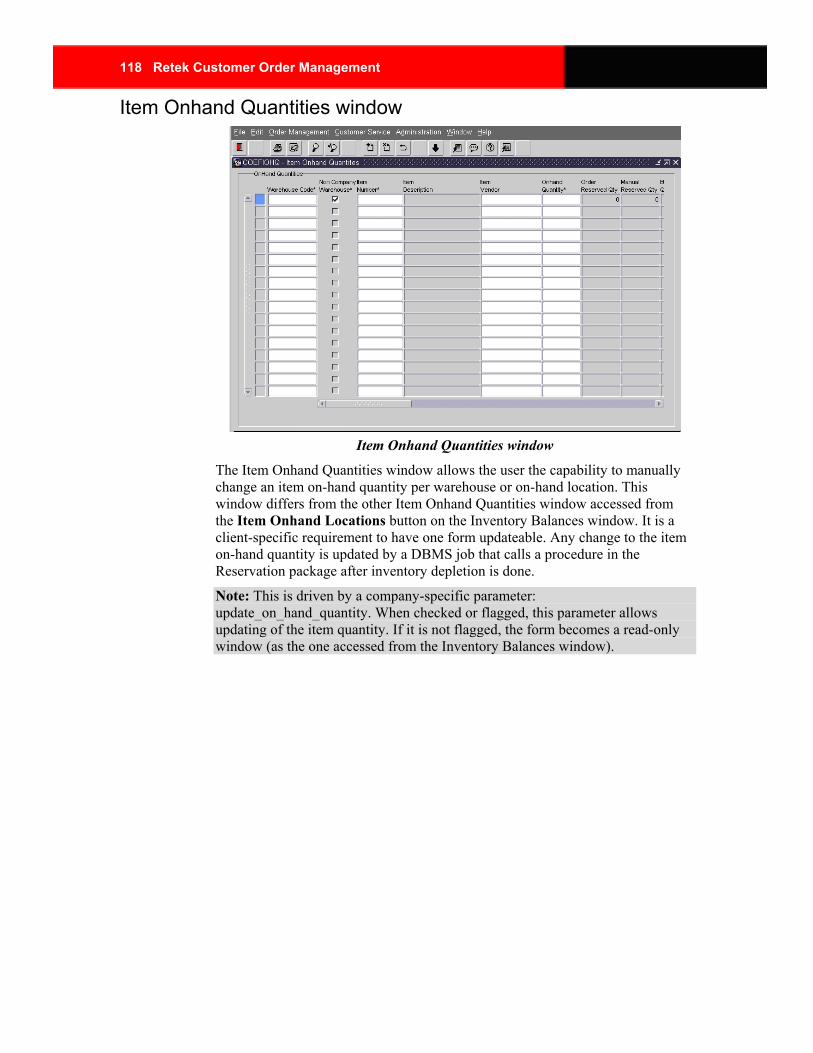
118 Retek Customer Order Management
Item Onhand Quantities window
Item Onhand Quantities window
The Item Onhand Quantities window allows the user the capability to manually change an item on-hand quantity per warehouse or on-hand location. This window differs from the other Item Onhand Quantities window accessed from the Item Onhand Locations button on the Inventory Balances window. It is a client-specific requirement to have one form updateable. Any change to the item on-hand quantity is updated by a DBMS job that calls a procedure in the Reservation package after inventory depletion is done.
Note: This is driven by a company-specific parameter: update_on_hand_quantity. When checked or flagged, this parameter allows updating of the item quantity. If it is not flagged, the form becomes a read-only window (as the one accessed from the Inventory Balances window).
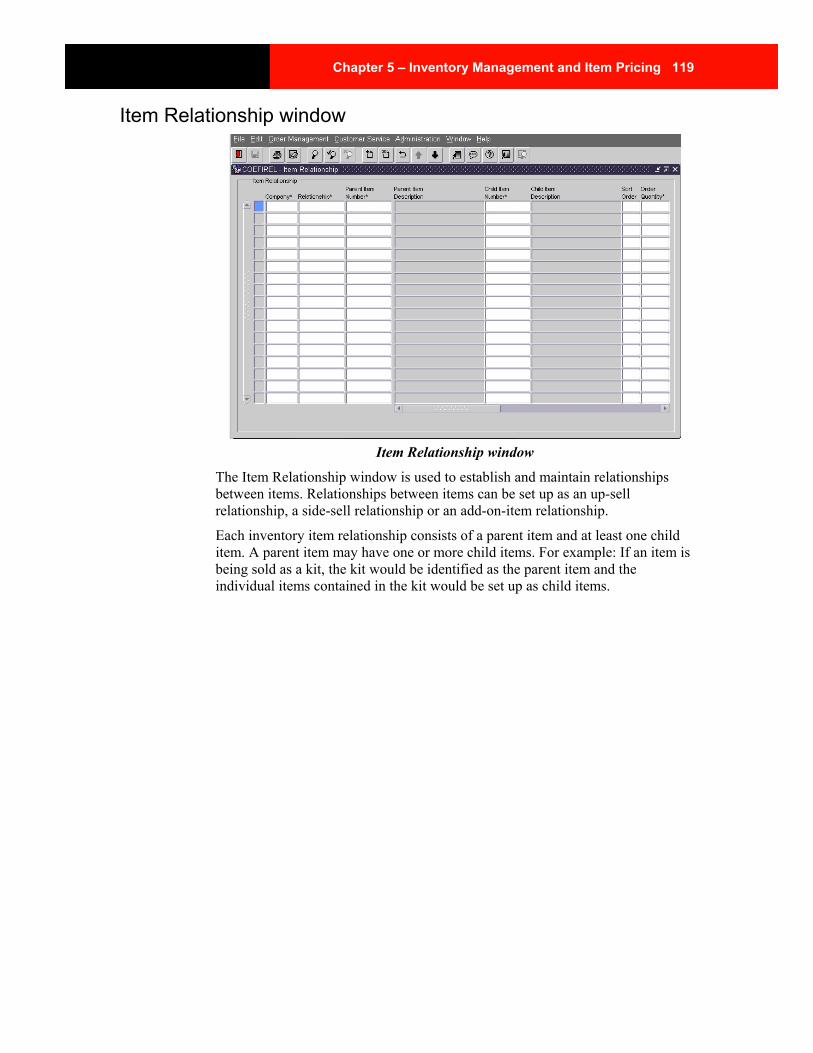
Chapter 5 – Inventory Management and Item Pricing 119
Item Relationship window
Item Relationship window
The Item Relationship window is used to establish and maintain relationships between items. Relationships between items can be set up as an up-sell relationship, a side-sell relationship or an add-on-item relationship.
Each inventory item relationship consists of a parent item and at least one child item. A parent item may have one or more child items. For example: If an item is being sold as a kit, the kit would be identified as the parent item and the individual items contained in the kit would be set up as child items.
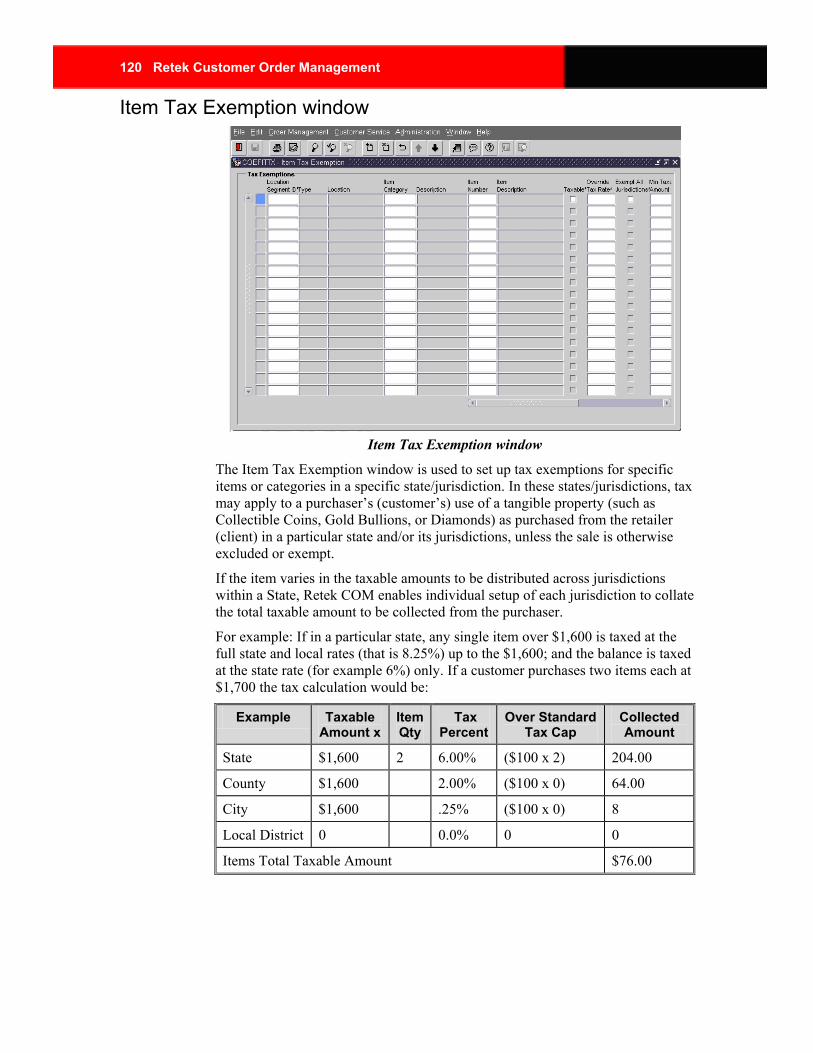
120 Retek Customer Order Management
Item Tax Exemption window
Item Tax Exemption window
The Item Tax Exemption window is used to set up tax exemptions for specific items or categories in a specific state/jurisdiction. In these states/jurisdictions, tax may apply to a purchaser’s (customer’s) use of a tangible property (such as Collectible Coins, Gold Bullions, or Diamonds) as purchased from the retailer (client) in a particular state and/or its jurisdictions, unless the sale is otherwise excluded or exempt.
If the item varies in the taxable amounts to be distributed across jurisdictions within a State, Retek COM enables individual setup of each jurisdiction to collate the total taxable amount to be collected from the purchaser.
For example: If in a particular state, any single item over $1,600 is taxed at the full state and local rates (that is 8.25%) up to the $1,600; and the balance is taxed at the state rate (for example 6%) only. If a customer purchases two items each at $1,700 the tax calculation would be:
Example Taxable Amount x
Item Qty
Tax Percent
Over Standard Tax Cap
Collected Amount
State $1,600 2 6.00% ($100 x 2) 204.00
County $1,600 2.00% ($100 x 0) 64.00
City $1,600 .25% ($100 x 0) 8
Local District 0 0.0% 0 0
Items Total Taxable Amount $76.00
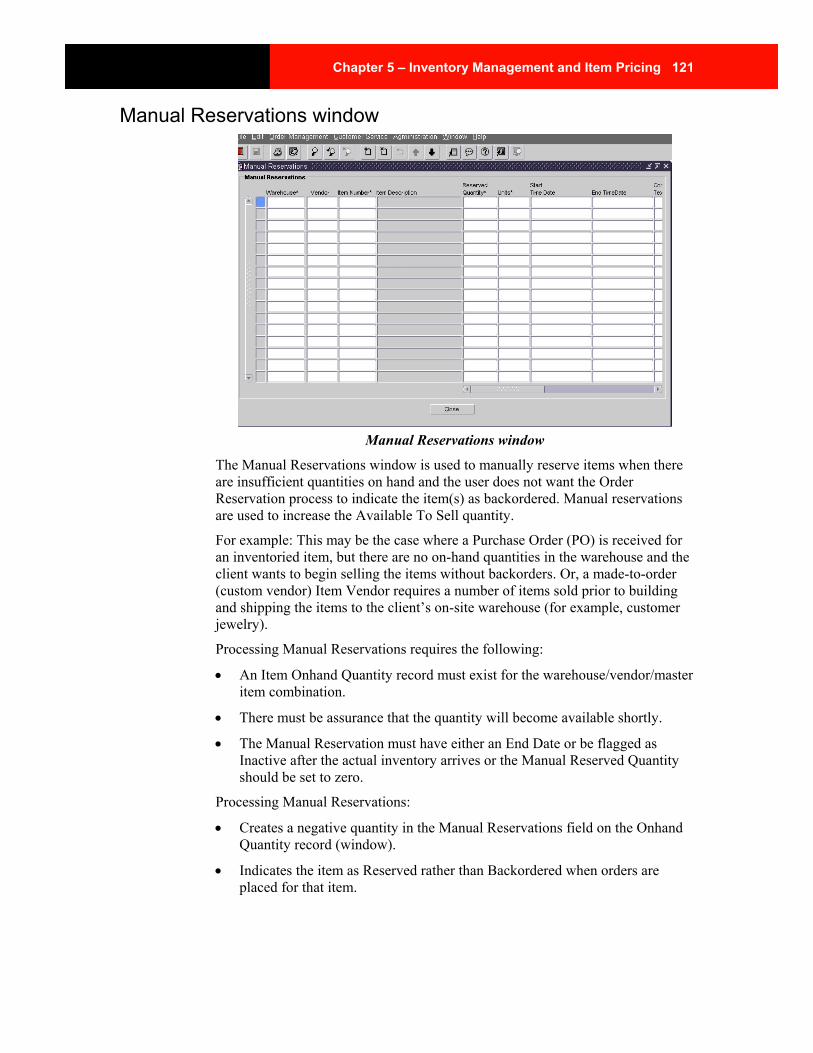
Chapter 5 – Inventory Management and Item Pricing 121
Manual Reservations window
Manual Reservations window
The Manual Reservations window is used to manually reserve items when there are insufficient quantities on hand and the user does not want the Order Reservation process to indicate the item(s) as backordered. Manual reservations are used to increase the Available To Sell quantity.
For example: This may be the case where a Purchase Order (PO) is received for an inventoried item, but there are no on-hand quantities in the warehouse and the client wants to begin selling the items without backorders. Or, a made-to-order (custom vendor) Item Vendor requires a number of items sold prior to building and shipping the items to the client’s on-site warehouse (for example, customer jewelry).
Processing Manual Reservations requires the following:
• An Item Onhand Quantity record must exist for the warehouse/vendor/master item combination.
• There must be assurance that the quantity will become available shortly.
• The Manual Reservation must have either an End Date or be flagged as Inactive after the actual inventory arrives or the Manual Reserved Quantity should be set to zero.
Processing Manual Reservations:
• Creates a negative quantity in the Manual Reservations field on the Onhand Quantity record (window).
• Indicates the item as Reserved rather than Backordered when orders are placed for that item.
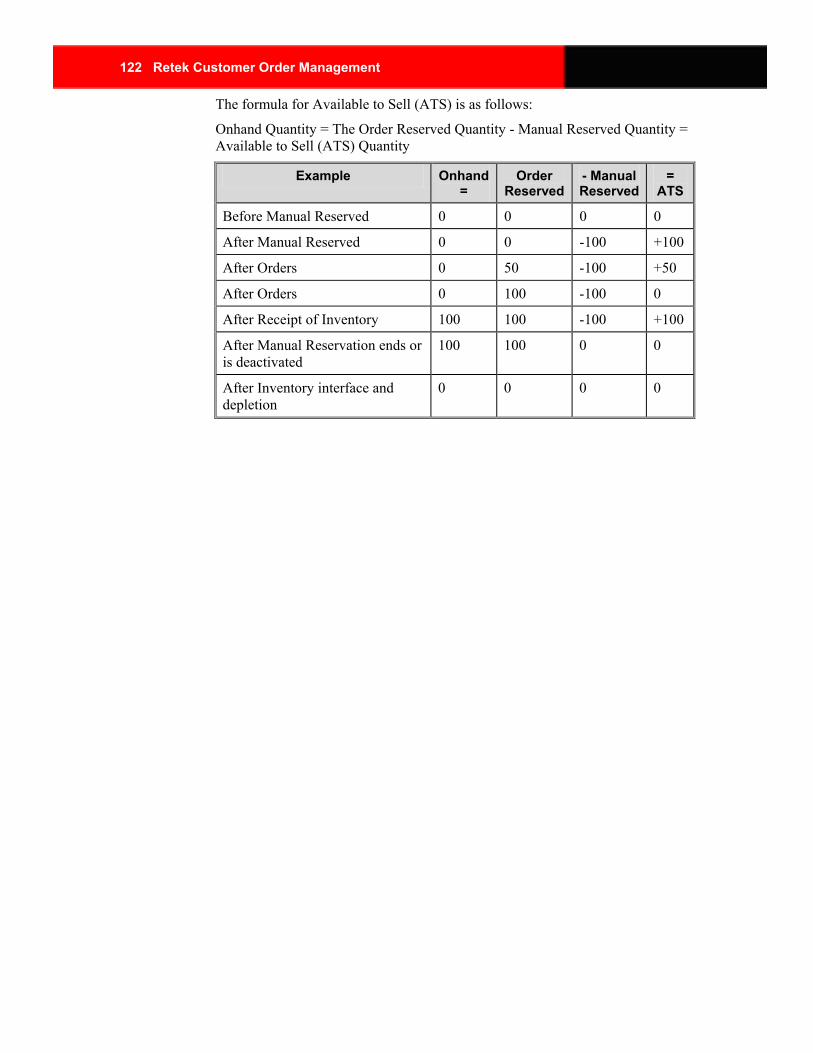
122 Retek Customer Order Management
The formula for Available to Sell (ATS) is as follows:
Onhand Quantity = The Order Reserved Quantity - Manual Reserved Quantity = Available to Sell (ATS) Quantity
Example Onhand =
Order Reserved
- Manual Reserved
= ATS
Before Manual Reserved 0 0 0 0
After Manual Reserved 0 0 -100 +100
After Orders 0 50 -100 +50
After Orders 0 100 -100 0
After Receipt of Inventory 100 100 -100 +100
After Manual Reservation ends or is deactivated
100 100 0 0
After Inventory interface and depletion
0 0 0 0

Chapter 5 – Inventory Management and Item Pricing 123
Master Item window
Master Item
Upon synchronization, items added to the inventory software system are systematically transferred and default to the Item Master window in Retek COM.
Adding a master item to the inventory item list creates a one-to-one relationship between Retek COM and the physical inventory at the distribution center. To copy new inventory items from the primary inventory system and update the Master Category list, the Update Inventory utility is used.
To add a non-inventoried item, specific item information (for example, item number, description, product segment, order quantity, oversell percent, dimensions, or subscription defaults) is required. Default usage flags define specific attributes of an item. Retek COM defaults the usage flags at the company item level when the item is initially set up from the Master Item form.
Each item requires a category to determine item references. For example: A diamond ring can be categorized as Gold, Jewelry, and/or Rings. Categorizing the item also determines the item listing and the display information for the end user to describe when placing orders by telephone or via the Internet.
The Master Item window is used to add, change or deactivate items from the inventory item list.
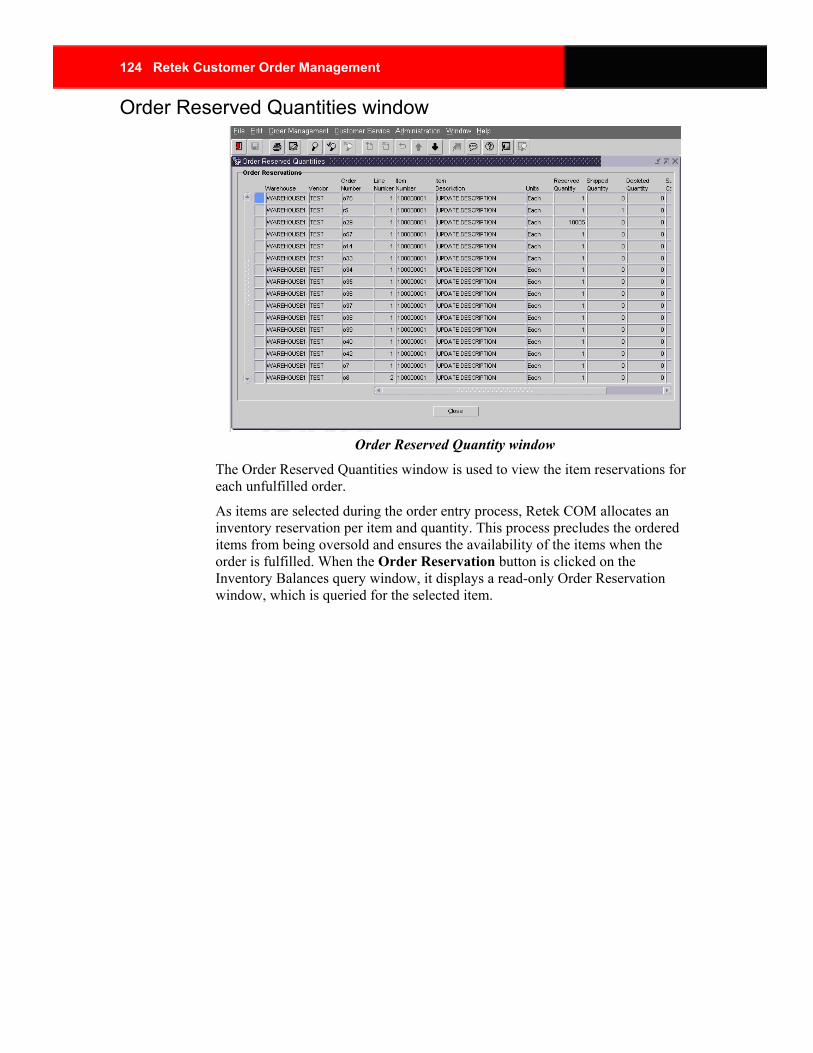
124 Retek Customer Order Management
Order Reserved Quantities window
Order Reserved Quantity window
The Order Reserved Quantities window is used to view the item reservations for each unfulfilled order.
As items are selected during the order entry process, Retek COM allocates an inventory reservation per item and quantity. This process precludes the ordered items from being oversold and ensures the availability of the items when the order is fulfilled. When the Order Reservation button is clicked on the Inventory Balances query window, it displays a read-only Order Reservation window, which is queried for the selected item.
Chapter 6 – Reports 125
Chapter 6 – Reports Reports Overview
A report generates a summarized or detailed view of data created within Retek COM. Reports provide the ability to generate and monitor this data as well as manage or reconcile processes in Retek COM.
Reports can be generated at any time or at the close of business each day to determine the overall success of the Client’s business.
Retek COM reports are GUI-based and can be processed onscreen for an instant view or directed to a local printer of the user’s choice. If the report is viewed onscreen, Retek COM displays the report in the Report Previewer screen. If a printed copy is requested, Retek COM will route the report to the user’s default printer.
Note: The Report Previewer also offers the option to produce a printed copy.
Note: String searches for a specific sequence of numbers are not intended. Retek COM allows parameter search changes in a report to suit immediate needs. Report information is standardized, however the user may limit the amount of information by changing the parameter settings prior to generating a report.
All Retek COM modules contain an extensive list of industry-standard reports based on predefined parameters. Retek COM also provides the user with a report list that contains a list of customized reports developed upon request that are specific to the Client’s business. The scope of this chapter covers the most widely used reports.
The Client may extract more details beyond the scope of the standard reports by using other report applications such as CrystalTM, PL/SQL Navigator, Business ObjectsTM, etc.
Note: Retek COM recognizes that each Client is unique and may require reports in addition to those offered in the standard package.
Retek COM provides direct menu access to three report categories: Order, Finance and Fulfillment.
Order Reports Order Reports cover information specific to Order Processing. The following reports are available in the Order category:
• Batch Balance Detail
• Batch Balance Summary
• Payment Authorization
• Payment Re-authorization
• Adjustment Detail
• Pending Orders Detail
126 Retek Customer Order Management
• Pending Orders Summary
• Daily Sales By Batch Detail
• Daily Sales By Batch Summary
• Backorder Detail
• Backorder Summary
• Returns Detail
• Returns Summary
• Return Line Items For Letters
• Returns Issuance
• Return / No Charge Audit
Finance Reports Finance Reports cover information that is accounting and financial in nature. All Finance reports generate data as interfaced via the general ledger application and Retek COM. The Finance category contains the following reports:
• Unshipped Items
• No Charge Shipped
Fulfillment Reports Fulfillment Reports provide information essential to the fulfillment of the orders that were processed, but it is tailored to the fulfillment function. The following is a list of the fulfillment reports:
• Daily Quantity Shipped
• Pick Ticket Audit
• Pick Ticket Reports
Report Cover Page The Report Cover Page is the first page of a report whether viewed onscreen or printed.
The page displays the Client’s logo, the category of the report, the name or initials of the user and the date and time the report was generated. This page also indicates the parameters specified when selecting required data. Where no parameters are specified, Retek COM displays no data.
Note: Multiple parameter entries limit the report search to specified data.

Chapter 6 – Reports 127
Last Cover Page The Last Page of the Report indicates the end of the report and is the final page viewed onscreen or printed. This page also indicates the system and the common names of the report.
Note: No data other than that which is indicated should appear on this page.
Using Reports Although each client is unique and has specific preferences, some reporting processes will be standard. Closing and reconciliation of sales will take place as needed to support the client. Below are examples of reports that may be generated on a daily basis to ensure a successful reconciliation process.
Daily Reconciliation Report Description
Batch Balance Summary Gives a summary of all sales via cash and non-cash.
(Batch Balance Detail) Detailed version of previous report for reconciliation.
Payment Authorization Report to reconcile non-cash receipts.
Daily Sales by Batch Gives summary of sales with price breakdowns.
Payments to be Deposited Reports charges that will be deposited.
GL Transaction Log Summary Gives a summary of all what was deposited.
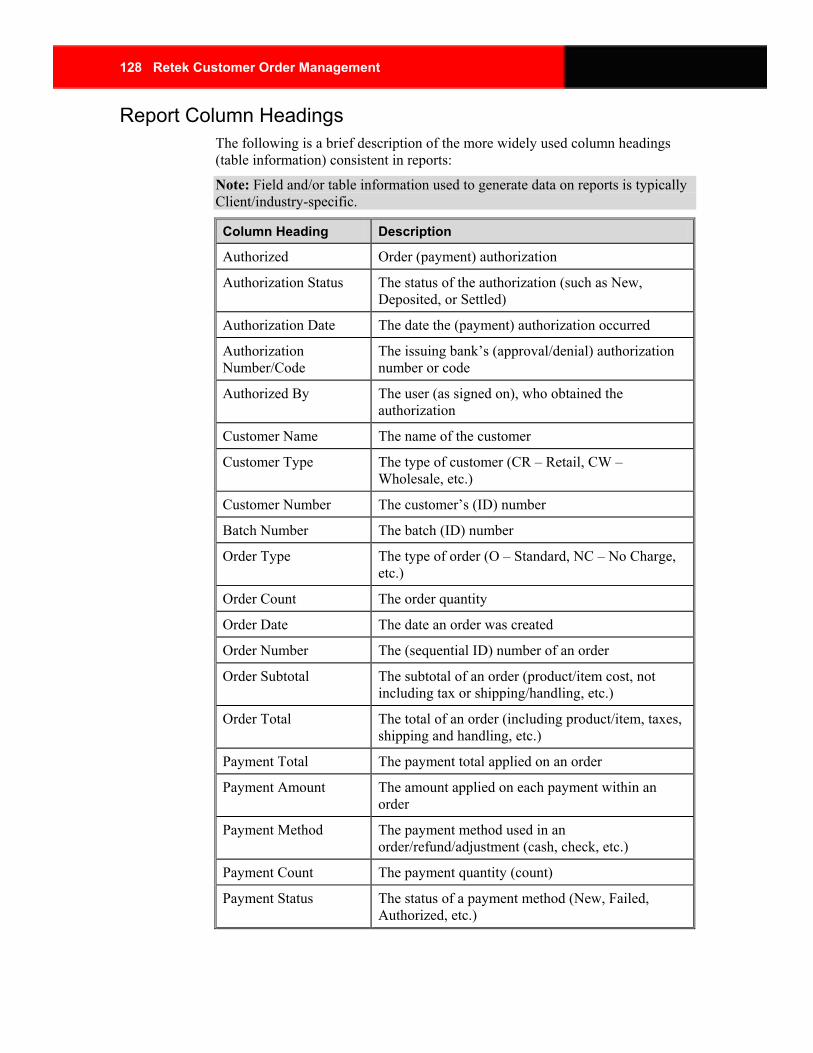
128 Retek Customer Order Management
Report Column Headings The following is a brief description of the more widely used column headings (table information) consistent in reports:
Note: Field and/or table information used to generate data on reports is typically Client/industry-specific.
Column Heading Description
Authorized Order (payment) authorization
Authorization Status The status of the authorization (such as New, Deposited, or Settled)
Authorization Date The date the (payment) authorization occurred
Authorization Number/Code
The issuing bank’s (approval/denial) authorization number or code
Authorized By The user (as signed on), who obtained the authorization
Customer Name The name of the customer
Customer Type The type of customer (CR – Retail, CW – Wholesale, etc.)
Customer Number The customer’s (ID) number
Batch Number The batch (ID) number
Order Type The type of order (O – Standard, NC – No Charge, etc.)
Order Count The order quantity
Order Date The date an order was created
Order Number The (sequential ID) number of an order
Order Subtotal The subtotal of an order (product/item cost, not including tax or shipping/handling, etc.)
Order Total The total of an order (including product/item, taxes, shipping and handling, etc.)
Payment Total The payment total applied on an order
Payment Amount The amount applied on each payment within an order
Payment Method The payment method used in an order/refund/adjustment (cash, check, etc.)
Payment Count The payment quantity (count)
Payment Status The status of a payment method (New, Failed, Authorized, etc.)

Chapter 6 – Reports 129
Column Heading Description
Credit Card Total The sum total of authorized/settled credit card payments
Non-Credit Card Total The sum total of authorized/settled non-credit cards
Adjustment Total The sum total of applied adjustments (credit/debit)
Cash Adjustment The sum total of cash (non-credit card) adjustments
Non-Cash Adjustment The sum total of non-cash (credit card, gift certificates, coupons, etc.) adjustments
Oldest Cash Adjustment
The oldest (aged) cash adjustment
Oldest Non-Cash Adjustment
The oldest (aged) non-cash adjustment
Cash Balance The (total) cash balance
Non-Cash Balance The (total) non-cash balance
Total Balance The total (cash and non-cash) balance
Return Refund Balance The (total) return refund balance
Pending Reason The pending (hold) reason (code)
Over/Under The over or under payment/balance amount
Deposited The electronically transmitted funds reply/verification status
Settled The status of a payment indicating the item/product fulfilled
Source The originating source of an order/call/activity (such as WEB, TEL., etc.)
Commission Period An allotted commission (payout assessment) period
Ship To Address The address to which an order is shipped
Ship To Name The recipient to whom the order is shipped
Telephone Telephone number of the customer/distributor
Postal Code The postal (zip) code used in address
State State (in US) used in address (shipping/mail)
Ship Method The shipping method (carrier service options) used
Released By User as signed on whom released the order
Order Line Sequence the items were entered on an order
Payment Type The payment type used (cash, check, Visa™, etc.)
Shipment Type The shipment type (carrier service/options)

130 Retek Customer Order Management
Column Heading Description
Tax Charged The tax charged (per item/order)
Taxable Item/product taxable amount (for example, SRP over actual wholesale)
Non-Taxable Non-taxable (items/product)
Ship Tax Amount The amount accessed as taxable on shipping
Line Total The line (item/product/tax less discounts) sum total
Inactive Specified data indicated as inactive
Return Reason The reason for an item/order return
Return Order Number The sequential (ID) of a returned item/product/order (RMA)
Return Total The total amount of the return for refund
Return Type The classification given to the return order such as authorized, unauthorized and return/exchange
Return Count The total number (quantity) of returns
Return Date The date the return was generated
Released/Canceled Date
The date the order was released or canceled
Closed Date The date the order transaction was finalized (fulfilled)
Transaction Date The date when funds (payments) are transacted
Commission Period Date
The date of the commission (assessing) period (begins/ends)
Pick Confirm Date The date an item is affirmed/acknowledge as picked (selected) in the fulfillment center
Backordered Quantity The (item/order) quantity that is on backorder
On-Hand Quantity The quantity of inventory (items/product) available to sell (ATS)
Undeposited Amount The total amount of funds/transactions not yet deposited
GL Code Segments Codes assigned (for table interface) in General Ledger/ accounting reconciliation
Description Details (of codes, reasons, abbreviations, etc.)
Total Debit Amount The total debit amount (payments outstanding to the client)
Total Credit Amount The total credit (payment amount for the client) transactions
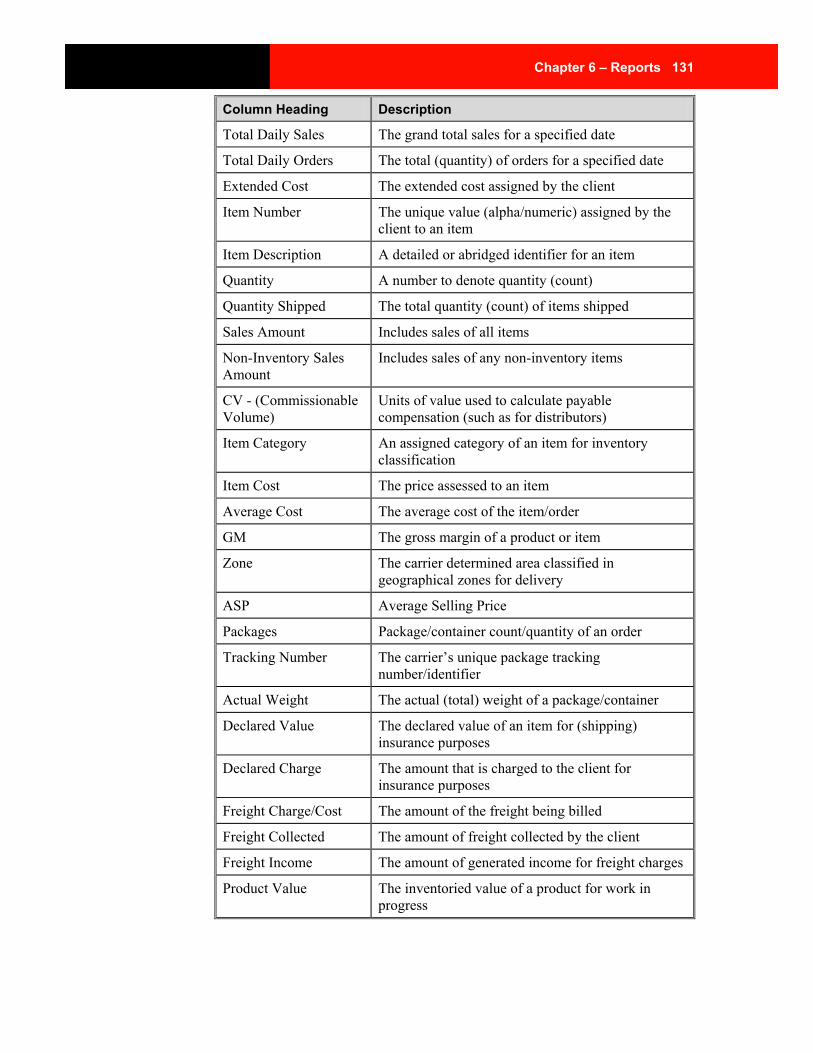
Chapter 6 – Reports 131
Column Heading Description
Total Daily Sales The grand total sales for a specified date
Total Daily Orders The total (quantity) of orders for a specified date
Extended Cost The extended cost assigned by the client
Item Number The unique value (alpha/numeric) assigned by the client to an item
Item Description A detailed or abridged identifier for an item
Quantity A number to denote quantity (count)
Quantity Shipped The total quantity (count) of items shipped
Sales Amount Includes sales of all items
Non-Inventory Sales Amount
Includes sales of any non-inventory items
CV - (Commissionable Volume)
Units of value used to calculate payable compensation (such as for distributors)
Item Category An assigned category of an item for inventory classification
Item Cost The price assessed to an item
Average Cost The average cost of the item/order
GM The gross margin of a product or item
Zone The carrier determined area classified in geographical zones for delivery
ASP Average Selling Price
Packages Package/container count/quantity of an order
Tracking Number The carrier’s unique package tracking number/identifier
Actual Weight The actual (total) weight of a package/container
Declared Value The declared value of an item for (shipping) insurance purposes
Declared Charge The amount that is charged to the client for insurance purposes
Freight Charge/Cost The amount of the freight being billed
Freight Collected The amount of freight collected by the client
Freight Income The amount of generated income for freight charges
Product Value The inventoried value of a product for work in progress
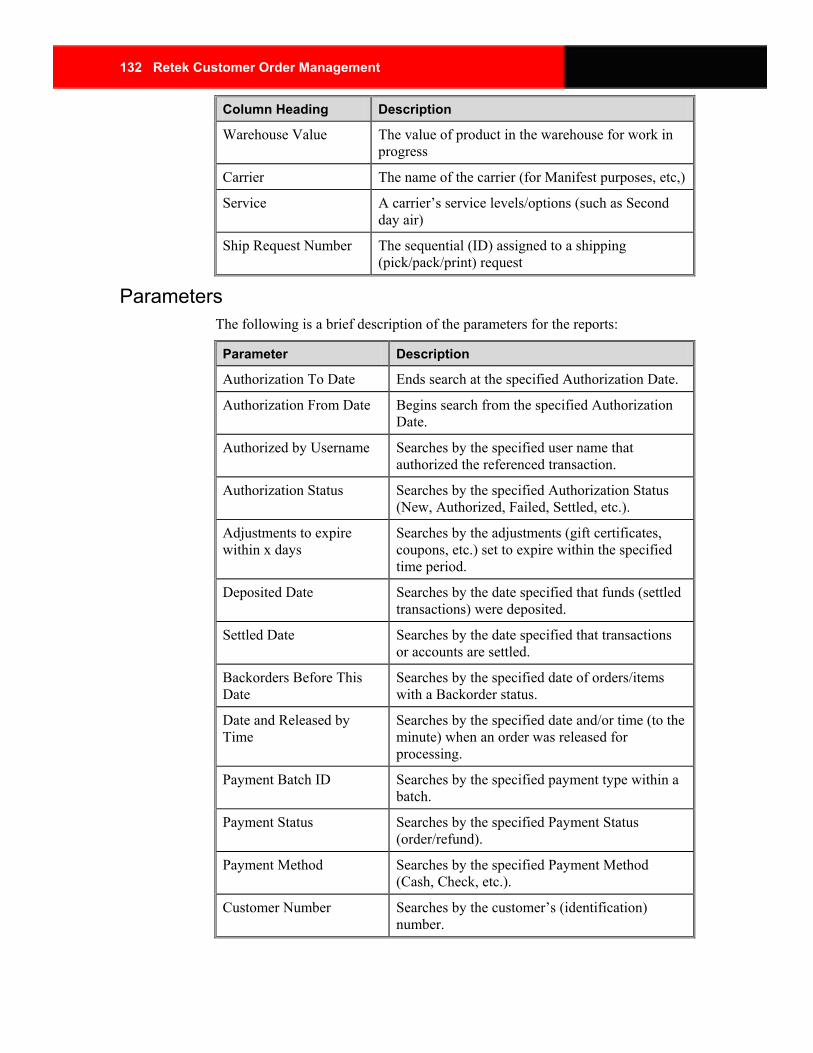
132 Retek Customer Order Management
Column Heading Description
Warehouse Value The value of product in the warehouse for work in progress
Carrier The name of the carrier (for Manifest purposes, etc,)
Service A carrier’s service levels/options (such as Second day air)
Ship Request Number The sequential (ID) assigned to a shipping (pick/pack/print) request
Parameters The following is a brief description of the parameters for the reports:
Parameter Description
Authorization To Date Ends search at the specified Authorization Date.
Authorization From Date Begins search from the specified Authorization Date.
Authorized by Username Searches by the specified user name that authorized the referenced transaction.
Authorization Status Searches by the specified Authorization Status (New, Authorized, Failed, Settled, etc.).
Adjustments to expire within x days
Searches by the adjustments (gift certificates, coupons, etc.) set to expire within the specified time period.
Deposited Date Searches by the date specified that funds (settled transactions) were deposited.
Settled Date Searches by the date specified that transactions or accounts are settled.
Backorders Before This Date
Searches by the specified date of orders/items with a Backorder status.
Date and Released by Time
Searches by the specified date and/or time (to the minute) when an order was released for processing.
Payment Batch ID Searches by the specified payment type within a batch.
Payment Status Searches by the specified Payment Status (order/refund).
Payment Method Searches by the specified Payment Method (Cash, Check, etc.).
Customer Number Searches by the customer’s (identification) number.
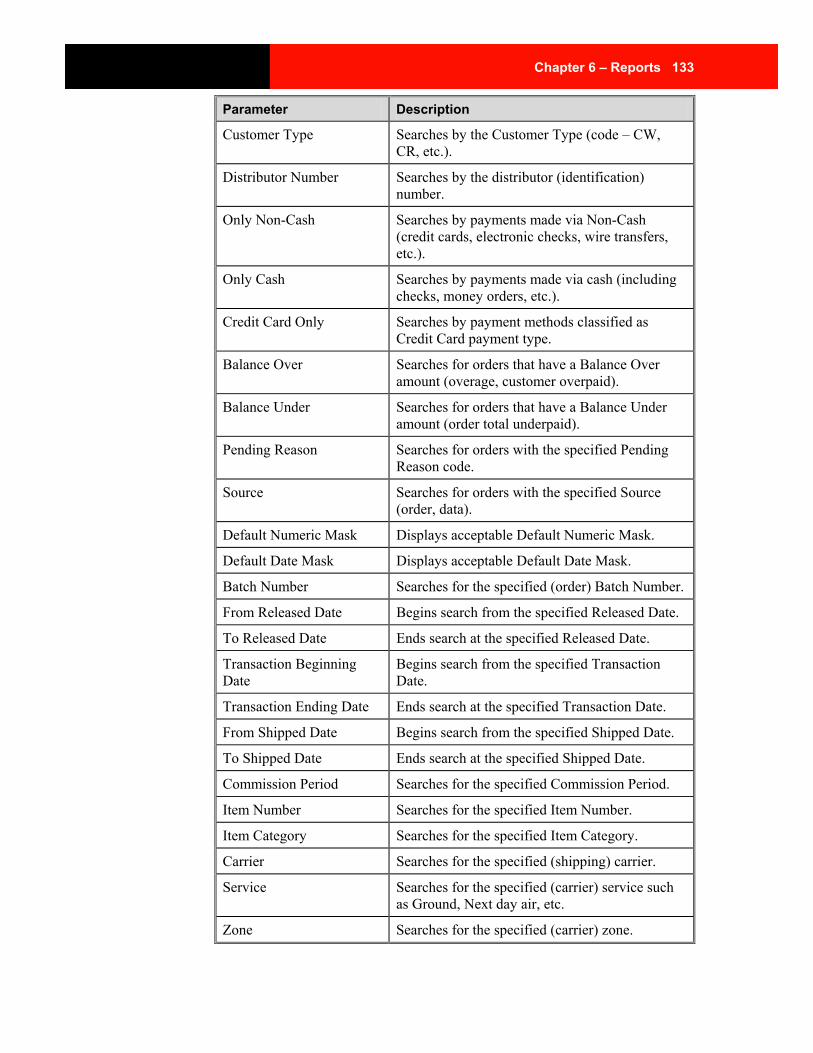
Chapter 6 – Reports 133
Parameter Description
Customer Type Searches by the Customer Type (code – CW, CR, etc.).
Distributor Number Searches by the distributor (identification) number.
Only Non-Cash Searches by payments made via Non-Cash (credit cards, electronic checks, wire transfers, etc.).
Only Cash Searches by payments made via cash (including checks, money orders, etc.).
Credit Card Only Searches by payment methods classified as Credit Card payment type.
Balance Over Searches for orders that have a Balance Over amount (overage, customer overpaid).
Balance Under Searches for orders that have a Balance Under amount (order total underpaid).
Pending Reason Searches for orders with the specified Pending Reason code.
Source Searches for orders with the specified Source (order, data).
Default Numeric Mask Displays acceptable Default Numeric Mask.
Default Date Mask Displays acceptable Default Date Mask.
Batch Number Searches for the specified (order) Batch Number.
From Released Date Begins search from the specified Released Date.
To Released Date Ends search at the specified Released Date.
Transaction Beginning Date
Begins search from the specified Transaction Date.
Transaction Ending Date Ends search at the specified Transaction Date.
From Shipped Date Begins search from the specified Shipped Date.
To Shipped Date Ends search at the specified Shipped Date.
Commission Period Searches for the specified Commission Period.
Item Number Searches for the specified Item Number.
Item Category Searches for the specified Item Category.
Carrier Searches for the specified (shipping) carrier.
Service Searches for the specified (carrier) service such as Ground, Next day air, etc.
Zone Searches for the specified (carrier) zone.
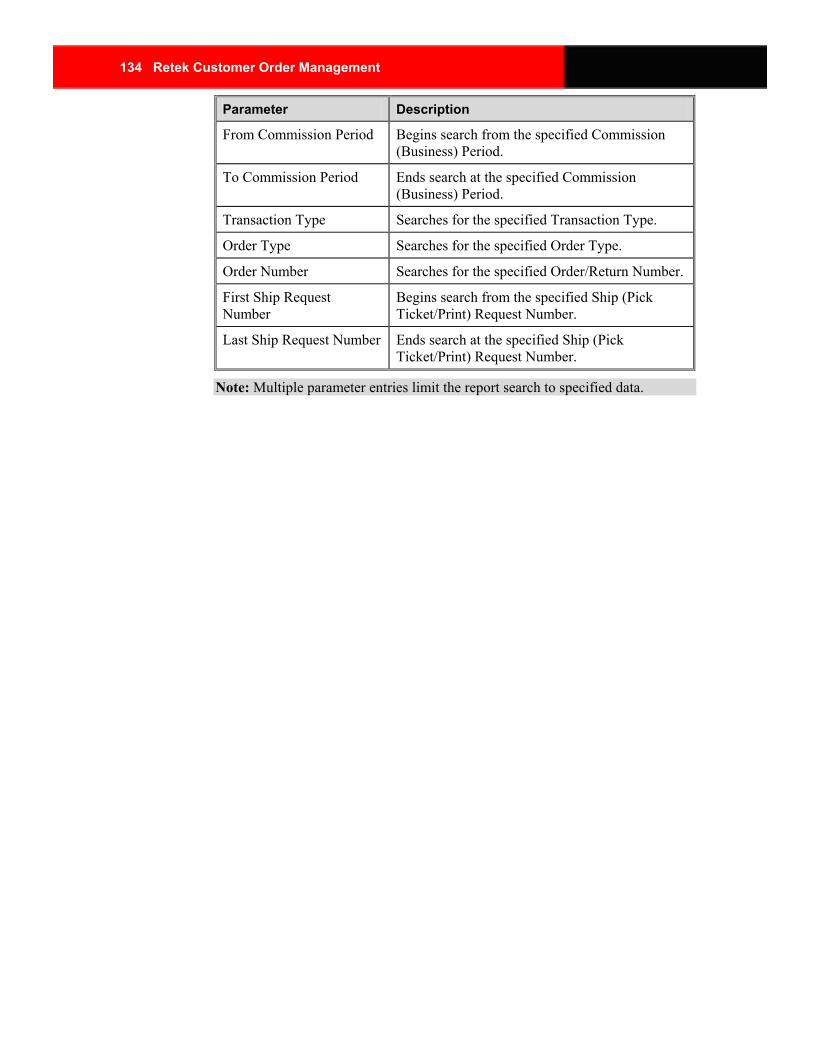
134 Retek Customer Order Management
Parameter Description
From Commission Period Begins search from the specified Commission (Business) Period.
To Commission Period Ends search at the specified Commission (Business) Period.
Transaction Type Searches for the specified Transaction Type.
Order Type Searches for the specified Order Type.
Order Number Searches for the specified Order/Return Number.
First Ship Request Number
Begins search from the specified Ship (Pick Ticket/Print) Request Number.
Last Ship Request Number Ends search at the specified Ship (Pick Ticket/Print) Request Number.
Note: Multiple parameter entries limit the report search to specified data.
Chapter 6 – Reports 135
Procedures Generate and print reports
The Report Launch window is triggered each time a report is selected and displays the predefined parameters to generate the selected report.
Each report has a Code that is used to identify and call the job process and a Title and Purpose, which describes the report. Print Orientation indicates the display view of the report, whether onscreen or in print.
To generate, view and/or print a report
Navigate: From the Order Management menu, select Order Reports, Finance Reports, or Fulfillment Reports. A list of reports is displayed.
1 Select one of the 3 report categories (Order, Finance, or Fulfillment) from the displayed list.
2 Select a report from the displayed list. The Report Launch Form window is displayed.
3 In the Parameter fields, enter the required parameters.
4 Click Run Report. The specified report will display.
Select a report from the report list The Report List window is used to list all reports available to the user based on assigned security levels developed per the Client’s specifications. The reports may also be accessed and viewed here.
To select a report for print from the report list
Navigate: From the Order Management menu, select > Report List. The Report List window is displayed.
1 Perform a query to display the list of reports available.
2 Highlight the desired report and click Select.
3 Enter the required parameters.
4 Click Run Report. You can view the report on screen, or click Print to direct the report to the default printer.
136 Retek Customer Order Management
Reports
Batch Balance Detail report The Batch Balance Detail report lists all orders and payments processed for a specified time period in detail. It is useful in the daily reconciliation of sales receipts.
Report parameters Authorization To Date, Authorization From Date, Authorized by Username, Payment Method, Order Type, Deposited Date, Settled Date, Payment Status, Credit Card Only, Payment Batch ID and Authorization Status.
Column headings Authorized, Deposited, Settled, Authorization Code, Authorized By, Order/Return, Customer Type, Customer Number, Customer Name, Order Total, Payment Total, Over/Under and Payment Amount.
Batch Balance Summary report The Batch Balance Summary report lists a summary of all orders and payments processed for a specified time period. It is useful in the reconciliation of sales receipts.
Report parameters Authorization To Date, Authorization From Date, Authorized by Username, Payment Method, Order Type, From Deposited Date, To Deposited Date, From Settled Date, To Settled Date, Payment Status, Credit Card Only (1/0/<blank>), Payment Batch ID and Authorization Status.
Column headings Order Type, Payment Method, Payment Status, Authorization Status, Authorized By, Payment Total, Order Count, Payment Count, Credit Card Total and Non-Credit Card Total.

Chapter 6 – Reports 137
Payment Authorization report The Payment Authorization report lists all payment authorizations processed for a specified time period. The report lists authorizations for all payment transactions. The report is useful in reconciliation of sales.
Report parameters Authorization To Date, Authorization From Date, Authorized by Username and Payment Method.
Column headings Authorized By, Batch Number, Order/Return Number, Source, Customer Number, Customer Name, Distributor Number, Payment Amount, Payment Method, Authorization Date and Authorization Number.
Payment Reauthorization report Note: Business/Client specific data is required to display a sample report.
The Payment Reauthorization report lists all payments that require a reauthorization, for either electronic Check or credit card transactions within the issuing bank’s specified valid authorization period. This report is designed to generate details of items not yet fulfilled (shipped) with a payment methods as listed.
Report parameters Payment Method, From Payment Creation Date, To Payment Creation Date, Customer Number, Order Status, Order Number and Authorization Code.
Column headings Based on the Client’s needs or industry guidelines.
138 Retek Customer Order Management
Adjustment Detail report The Adjustment Detail report lists all (active/non-expired) adjustments (that is gift certificates, miscellaneous, coupons, refunds, etc.).
Report parameters Customer Number, Payment Method, Payment Settled Status, Created By Adjustment Start Date, Adjustment End Date and Adjustment Reason.
Column headings Based on the Client’s needs or industry guidelines.
Pending Orders Detail report The Pending Orders Detail report lists all orders with a pending status for a specified date or pending reason.
Report parameters Pending Reason, Created By, Payment Method, Order Start Date, Order End Date, Source, Default Numeric Mask and Default Date Mask.
Column headings Pending Reason, Order Date, Order Number, Commission Period, Order Type, Source, Customer Type, Customer Number, Name, Ship To Address, Telephone, Order Total, Payment Total, Created By, Payment Method, Authorization Status and Authorization Code.

Chapter 6 – Reports 139
Pending Orders Summary report The Pending Orders Summary report gives a summary of all orders in a pending status for a specified date or pending reason.
Report parameters Pending Reason, Order Start Date, Order End Date, Payment Method and Activity Source.
Column headings Pending Reason (Code), Description, Order Type, Source, Customer Type, Payment Method, Order Total, Payment Total, Over/Under and Orders (Count).
Daily Sales by Batch Detail report The Daily Sales By Batch report lists all order batches for a specified date or date range. Additional details for each order as listed in the parameter specifications are provided and totaled at the end of the report for quick reference. This report is useful in reconciling sales receipts.
Report parameters Batch Number, From Released Date and To Released Date.
Column headings Order Type, Status, Order Number, Order Subtotal, Shipping Charged, Tax Charged, Over/Under, Payment Total, Source, Released By, Created By and Released/Canceled Date.

140 Retek Customer Order Management
Daily Sales by Batch Summary report The Daily Sales By Batch Summary report lists a summary of the orders for all batches for a specified date. This report is also useful in reconciling receipts.
Report parameters Order Batch Number, From Order Released Date and To Order Released Date.
Column headings Released/Cancel Date, Order Type, Status, Order Subtotal, Shipping Charged, Tax Charged, Over/Under, Payment Total and Order Count.
Backorder Detail report The Backorder Detail report is used to list items currently on backorder in detail.
Report parameters From Released Date, To Released Date, Item Number, Warehouse Code and Order Number.
Column headings Item Number, Description, Backordered Quantity, Order Number, Released Date and Customer.
Backorder Summary report The Backorder Summary report gives a summary of the items and quantities that are on backorder.
Report parameters Backorders Before This Date, Item Number and Warehouse Code.
Column headings Item Number, Description, Inactive, Backordered Quantity and Onhand Quantity.

Chapter 6 – Reports 141
Returns Detail report The Returns Detail report gives a detailed list of orders returned including return reason details.
Report parameters Return Status, Customer Type, Return Reason, Return Authorized By, Return Start Date, Return End Date, Closed Start Date and Closed End Date.
Column headings Return Order Number, Reference Order Number, Customer Number, Customer Type, Return Type, Return Reason, Return Date, Authorized Date, Authorized By, Closed Date, Order Total, Payment Total and Adjustment Total.
Returns Summary report The Returns Summary report gives a summary of items and quantities returned and aids in trend analysis.
Report parameters Returned Status, Customer Type, Return Reason, Return Start Date, Return End Date, Closed Start Date and Closed End Date.
Column headings Status, Customer Type, Return Type, Return Reason, Return Count, Return Total, Payment Total and Adjustment Total.
Return Line Items For Letters report The Return Line Items for Letters report identifies the products that are authorized for return per return (RMA) order number.
Report parameters Return Authorized From Date, Return Authorized To Date, Resignation Letters (0/1), Standard Return Letters (0/1), Exchange/Return Letters (0/1) and User Created By.
Column headings RMA Number, Authorized Quantity, Item Number and Description.

142 Retek Customer Order Management
Returns Issuance report The Returns Issuance report identifies the orders that have had return authorizations issued.
Report Parameters From Date, To Date, Rep, Return Reason, Return Code, Order Status, Order Total From, and Order Total To.
Column Headings User, RMA, Order Number, Customer Type, Order Status, Order Total, Reason Code, and Return Reason.
Return No Charge Audit report The Return / No Charge Audit report identifies the products that are authorized for return from No Charge orders.
Report parameters From Date, To Date, Rep, Return Reason, Return Code, Order Status, Order Total From, and Order Total To.
Column headings User, RMA, Order Number, Customer Type, Order Status, Order Total, Reason Code, and Return Reason.
No Charge Shipped report The No Charge Shipped report displays all No Charge (no cost to the recipient) orders verified as shipped in Retek COM.
Report parameters From Shipped Date and To Shipped Date.
Column headings Reason (No Charge), Order Number, Item Number, Item Description, Shipped Quantity, Frozen Cost, Extended Cost and (Customer) Full Name.

Chapter 6 – Reports 143
Daily Quantity Shipped report The Daily Quantity Shipped report lists the items and quantities shipped for a specified date.
Report parameter Date.
Column headings Company, Warehouse, Item Number, Description and Quantity Shipped.
Pick Ticket Audit report The Pick Ticket Audit report lists all printed tickets for a specified batch.
Report parameters Batch number.
Column Headings Based on the Client’s needs.
Pick Tickets Report report The Pick Tickets report lists all pick tickets printed for a specified batch and/or ship request number.
Report parameters Batch Number, First Ship Request Number and Last Ship Request Number.
Report fields Distributor PIN, Customer Number, Ship Method, Ship Zone, Order Number, Bill To Name, Bill To Address, Ship To Name, Ship To Address, Pick Ticket Print Time, Order Number, Date, Batch Number, Customer Name, Item Line Number, Item Number, Item Description, Item Quantity Ordered, Item Back Ordered Quantity, Items Shipped, Carton Size, Box Quantity of Quantity, Ship VIA, Estimated Weight, Discount, Subtotal, Taxable, Tax Amount, Shipping & Handling, and Grand Total.

144 Retek Customer Order Management
Unshipped Items report The Unshipped Items Report displays all items released for fulfillment processing and not yet verified as shipped (closed).
Report parameters None. Press the Run Report button to generate the report.
Column headings Item Number, Ordered Quantity, Shipped Quantity, Backordered Quantity, Canceled Quantity and Unshipped Value.

Chapter 7 – Utilities 145
Chapter 7 – Utilities Order Utilities Overview
Note: The majority of Order Utility functionality formerly handled through a G/L interface with RCOM is now initially interfaced and completed by Retek's Sales Audit (ReSA 10.0) software. Therefore, the order utilities functionality is dependent on an Interface with Retek's Sales Audit (ReSA 10.0) application.
The Order Utility menu is used to manually initialize batch programs specific to Order Processing as follows:
• Autoship Release
• Payment Batch Deposit
• Pick Tickets Report
• Call Queue
Processing of a utility batch program occurs in seamless background logic, thus allowing work continuation.
Note: The frequency and timing of utility batch initialization is determined by the Client's business requirements.
Depending on hardware/space capacities, initializing some of these utilities may halt or decrease processing speed of other applications running concurrently.
146 Retek Customer Order Management
Fulfillment Utilities OverviewNote: The majority of Fulfillment Processing functionality formerly handled through RCOM is now transferred and completed by the client's Warehouse Management System software. Therefore, the fulfillment utilities functionality is dependent on an Interface with Retek's Distribution Management (RDM 10.0) application.
Fulfillment Utilities are used to manually trigger the required batch programs specific to Fulfillment Processing.
When a Fulfillment Utility batch program is initialized, a seamless background logic occurs, enabling work continuation. The frequency and timing of the initialization of a batch program is determined by the Client's requirements.

Chapter 7 – Utilities 147
Procedures Generate and release autoship orders
The Autoship Release window is used to manually generate and release standard orders from a recurring Autoship template.
To manually release autoship orders
Navigate: From the Order Management menu select, > Order Utilities > Autoship Release. The Autoship Release window is displayed.
1 In the From Date and To Date fields, select a date range. Or, enter an Autoship Number, frequency or the quantity of autoships in the appropriate fields.
2 Click Autoship Release to generate the Autoship orders.
Note: The Refresh button will update the Autoship Summary block to display the selection progress.
Deposit a payment batch To deposit a payment batch
Navigate: From the Order Management menu, select > Order Utilities > Payment Batch Deposit. The Payment Batch Deposit window is displayed.
1 In the Payment Batch Number field, enter a payment batch number and/or a date range in the From and To Payment Authorized fields.
2 Click Start Deposit. The Deposit Status and Released Date fields are filled in.
Note: The time required to process payment batch deposits varies on the quantity of deposits. Exiting the window will not jeopardize the utility run. This utility may be repeated as often as required according to the Client's business specifications; however, the utility will run only if no other batch deposits are running. Each batch deposit has to be completed prior to beginning another deposit.
Note: Depending on hardware/space capacities initializing some of these utilities may halt or decrease processing speed of other applications running concurrently.
Review calls in the queue To review calls in the queue
Navigate: From the Order Management menu, select > Order Utilities > Call Queue. The Call Queue window is displayed.
1 Perform a query to display calls in the call queue.
Note: A query on a Client's specific telephone number can also be isolated.
2 From the File menu, select Close to exit the window.

148 Retek Customer Order Management
Manually release backorders To manually release backorders
Navigate: From the Order Management menu, select > Fulfillment Utilities > Manual Backorder Release. The Manual Backorder Release window is displayed.
1 To release all backorders, click Release Backorders.
2 In the Item Number or Order Number fields, enter the applicable number, and click Release Backorder to release an individual item or an individual backorder.
Note: Backorders can be released all at once or by individual items and/or orders. All three options cannot be performed simultaneously.
Resubmit electronic pick messages To resubmit electronic messages
Navigate: From the Order Management menu, select > Fulfillment Utilities > Resubmit Electronic Pick Messages. The Resubmit Electronic Pick Messages window is displayed.
1 In the Starting and/or Ending Request Number fields, enter a starting or ending pick number range. (Optional).
2 Click Submit. A message indicating that the process is finished is displayed.

Chapter 7 – Utilities 149
Windows Autoship Release window
Autoship Release window
Recurring orders created as Autoship templates are processed based on frequency (that is, Weekly, Biweekly, Monthly, etc.). To generate standard orders from these templates, the Autoship Release utility can be initialized manually.
Note: The Autoship Release utility can be processed manually or systematically. Manual release allows for individual order generation if needed.
Autoship orders are generated as determined by given parameters, such as:
• From and To Date Ranges
• Autoship Number or Autoship Frequency
• Max Orders to Release
To generate and release standard orders from Autoship templates, Retek COM takes the history of active Autoship numbers and initializes the noted payment method(s), flagging each with the Order Type of “O” and a source type of “AUT” (to distinguish the origination).
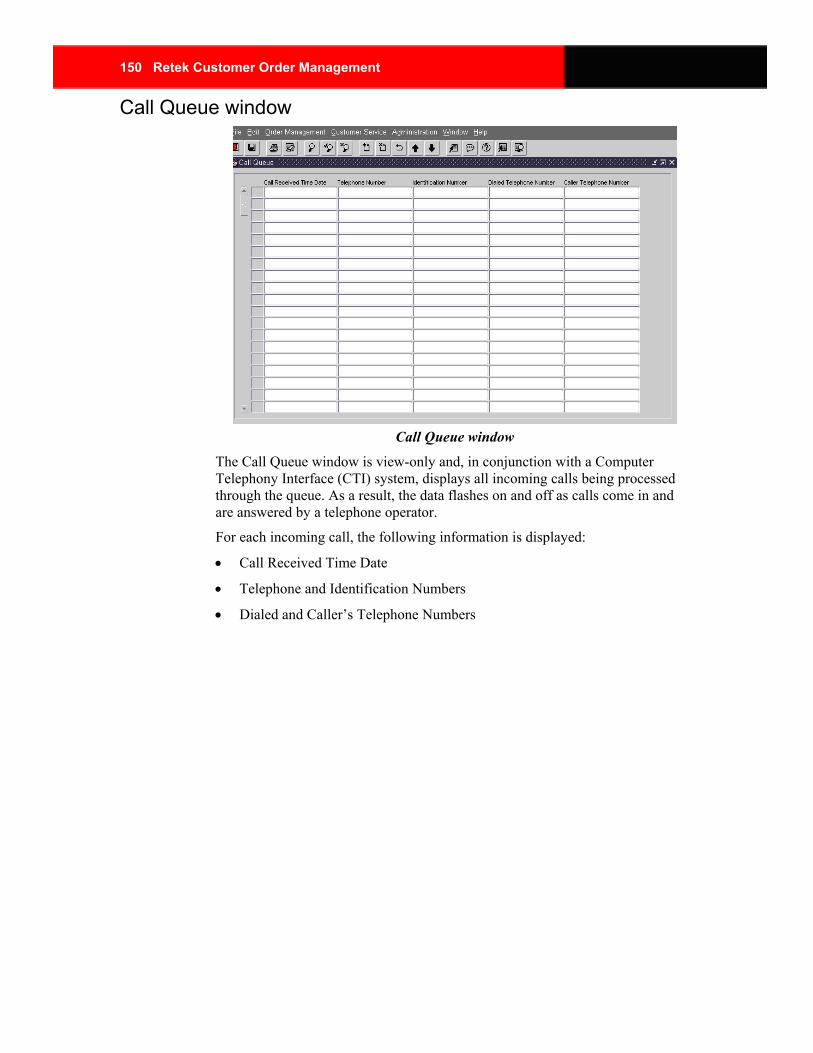
150 Retek Customer Order Management
Call Queue window
Call Queue window
The Call Queue window is view-only and, in conjunction with a Computer Telephony Interface (CTI) system, displays all incoming calls being processed through the queue. As a result, the data flashes on and off as calls come in and are answered by a telephone operator.
For each incoming call, the following information is displayed:
• Call Received Time Date
• Telephone and Identification Numbers
• Dialed and Caller’s Telephone Numbers
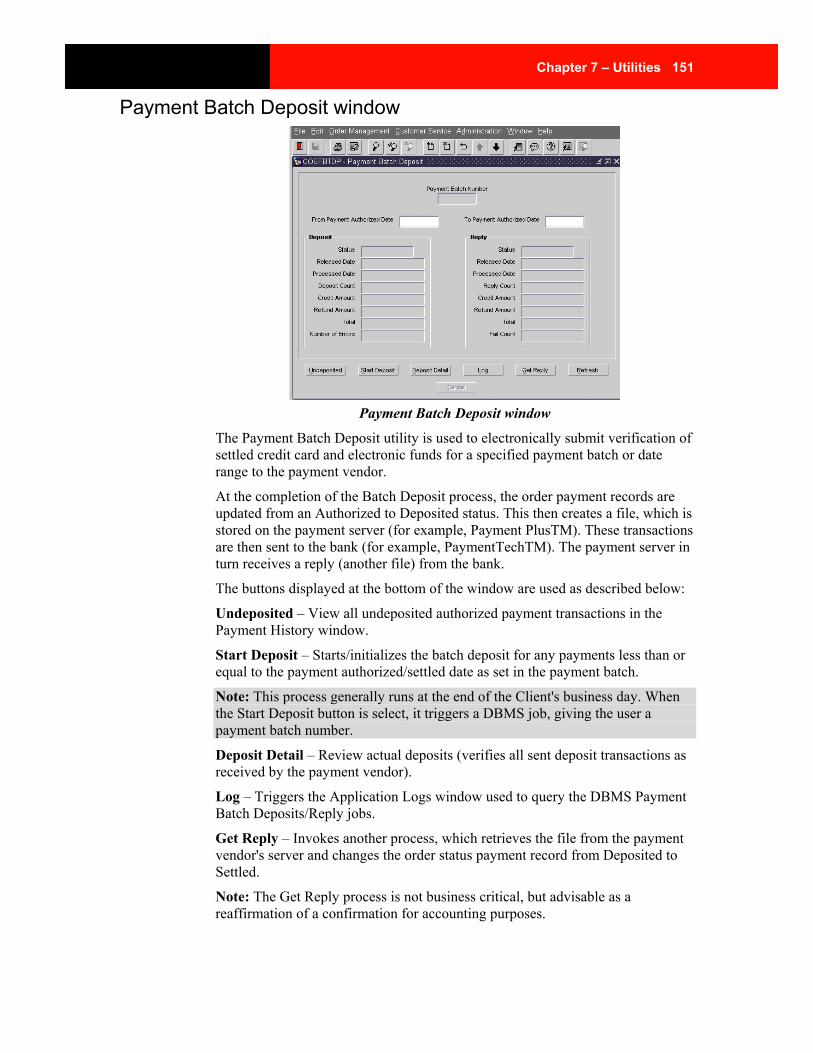
Chapter 7 – Utilities 151
Payment Batch Deposit window
Payment Batch Deposit window
The Payment Batch Deposit utility is used to electronically submit verification of settled credit card and electronic funds for a specified payment batch or date range to the payment vendor.
At the completion of the Batch Deposit process, the order payment records are updated from an Authorized to Deposited status. This then creates a file, which is stored on the payment server (for example, Payment PlusTM). These transactions are then sent to the bank (for example, PaymentTechTM). The payment server in turn receives a reply (another file) from the bank.
The buttons displayed at the bottom of the window are used as described below:
Undeposited – View all undeposited authorized payment transactions in the Payment History window.
Start Deposit – Starts/initializes the batch deposit for any payments less than or equal to the payment authorized/settled date as set in the payment batch.
Note: This process generally runs at the end of the Client's business day. When the Start Deposit button is select, it triggers a DBMS job, giving the user a payment batch number.
Deposit Detail – Review actual deposits (verifies all sent deposit transactions as received by the payment vendor).
Log – Triggers the Application Logs window used to query the DBMS Payment Batch Deposits/Reply jobs.
Get Reply – Invokes another process, which retrieves the file from the payment vendor's server and changes the order status payment record from Deposited to Settled.
Note: The Get Reply process is not business critical, but advisable as a reaffirmation of a confirmation for accounting purposes.

152 Retek Customer Order Management
Refresh – View the status and/or progress of the payment batch deposit process. When the process is complete, a summary of the number of transactions processed, the total credit and refund amounts are displayed.
Cancel – Cancels the Payment Batch Deposit job in progress.
Payment History window
Payment History window
When the Undeposited button is selected from the Payment Batch Deposit window, it builds to the Payment History window, which is used to view or query specific payments of an order or Customer. For each payment, the following key information can be viewed:
• Payment method and type
• Related order/return number
• Amount
• Account number or check number (unless masked)
• Authorization (approval) code
• Payment status and type
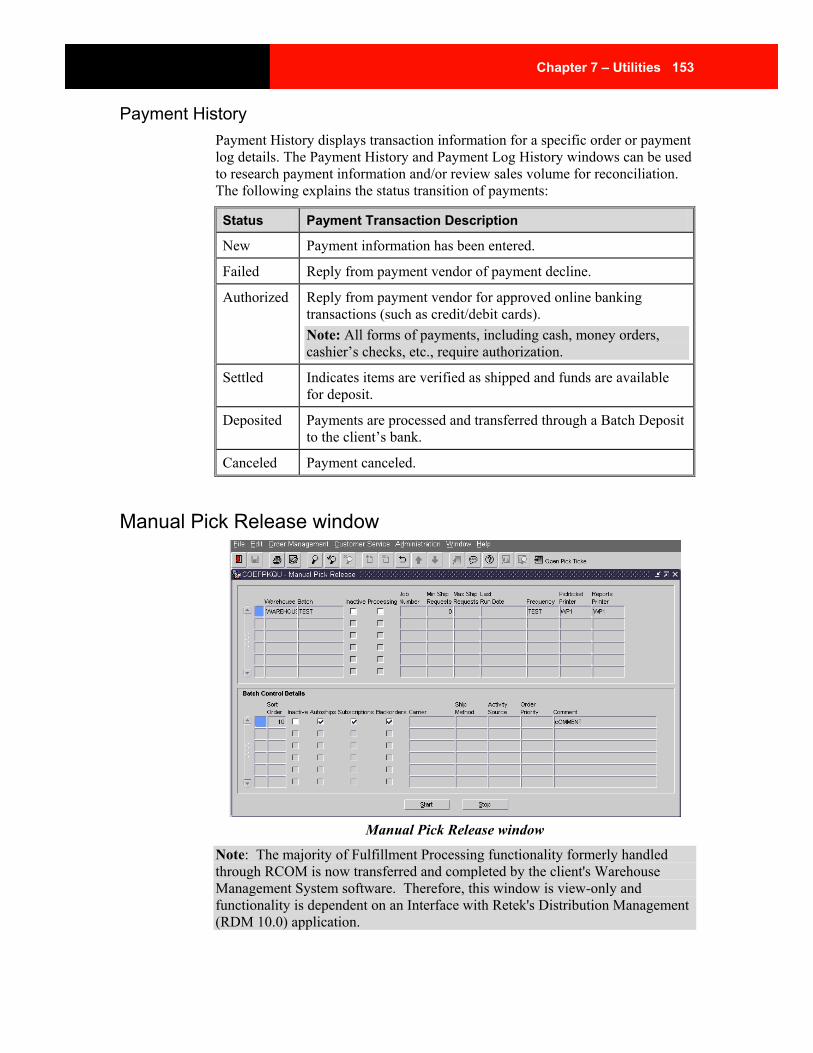
Chapter 7 – Utilities 153
Payment History Payment History displays transaction information for a specific order or payment log details. The Payment History and Payment Log History windows can be used to research payment information and/or review sales volume for reconciliation. The following explains the status transition of payments:
Status Payment Transaction Description
New Payment information has been entered.
Failed Reply from payment vendor of payment decline.
Authorized Reply from payment vendor for approved online banking transactions (such as credit/debit cards). Note: All forms of payments, including cash, money orders, cashier’s checks, etc., require authorization.
Settled Indicates items are verified as shipped and funds are available for deposit.
Deposited Payments are processed and transferred through a Batch Deposit to the client’s bank.
Canceled Payment canceled.
Manual Pick Release window
Manual Pick Release window
Note: The majority of Fulfillment Processing functionality formerly handled through RCOM is now transferred and completed by the client's Warehouse Management System software. Therefore, this window is view-only and functionality is dependent on an Interface with Retek's Distribution Management (RDM 10.0) application.
154 Retek Customer Order Management
The Manual Pick Release window is used to manually release an order to a pick ticket batch for printing and lists all batches to be released for printing. The window also indicates whether the ticket batch is inactive or in process, including the frequency with which each batch will print.
Retek COM generates, releases and prints pick tickets, invoices and packing slips in batches based on ship method and/or other predefined parameters as established by the Client (that is, carrier, ship method, source, priority, backorders, autoships, subscriptions, etc.). When a batch is released, any orders matching the criteria will be released for picking (pick ticket-generated).
Note: The ship method is used to determine the order and frequency that a pick ticket batch prints.
Pick ticket batches are systematically scheduled to print, but can be manually printed by selecting a specific batch and print ahead of schedule or stop a batch of tickets from printing.
Note: A report is generated and prints to a predefined printer to provide an audit of orders released for picking with each pick ticket batch.
Retek COM allows only one pick release per batch. Each batch must be completed before another can be initiated.
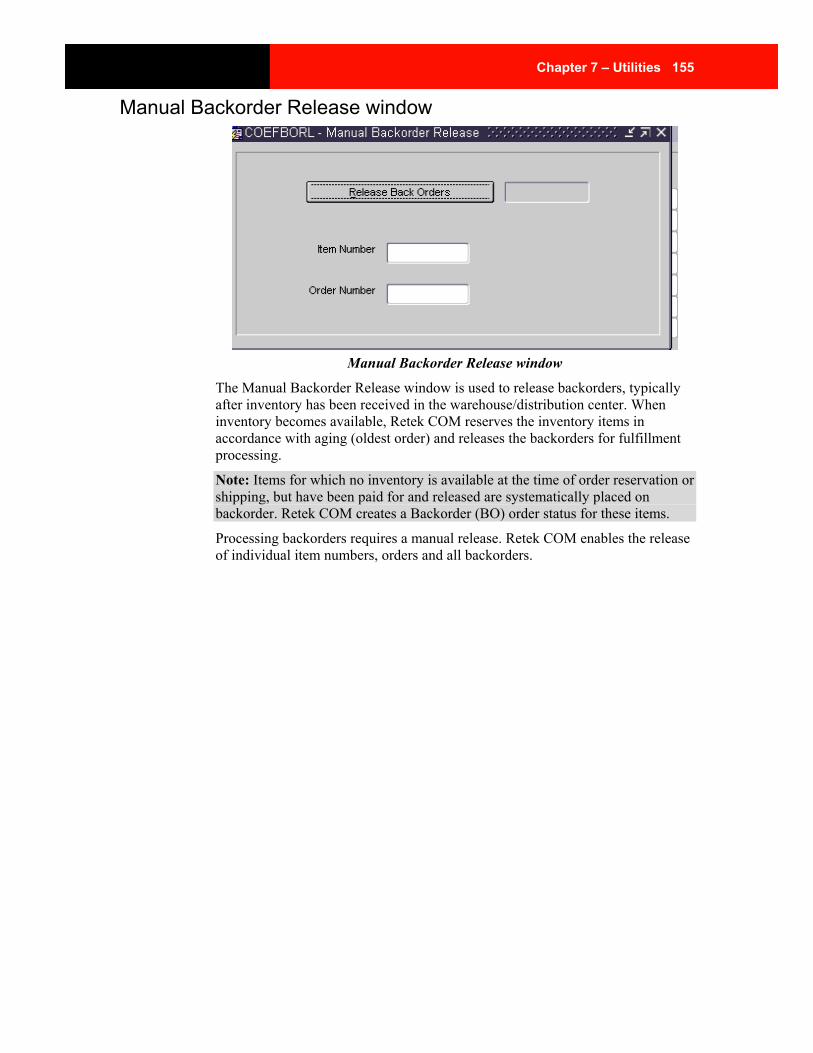
Chapter 7 – Utilities 155
Manual Backorder Release window
Manual Backorder Release window
The Manual Backorder Release window is used to release backorders, typically after inventory has been received in the warehouse/distribution center. When inventory becomes available, Retek COM reserves the inventory items in accordance with aging (oldest order) and releases the backorders for fulfillment processing.
Note: Items for which no inventory is available at the time of order reservation or shipping, but have been paid for and released are systematically placed on backorder. Retek COM creates a Backorder (BO) order status for these items.
Processing backorders requires a manual release. Retek COM enables the release of individual item numbers, orders and all backorders.
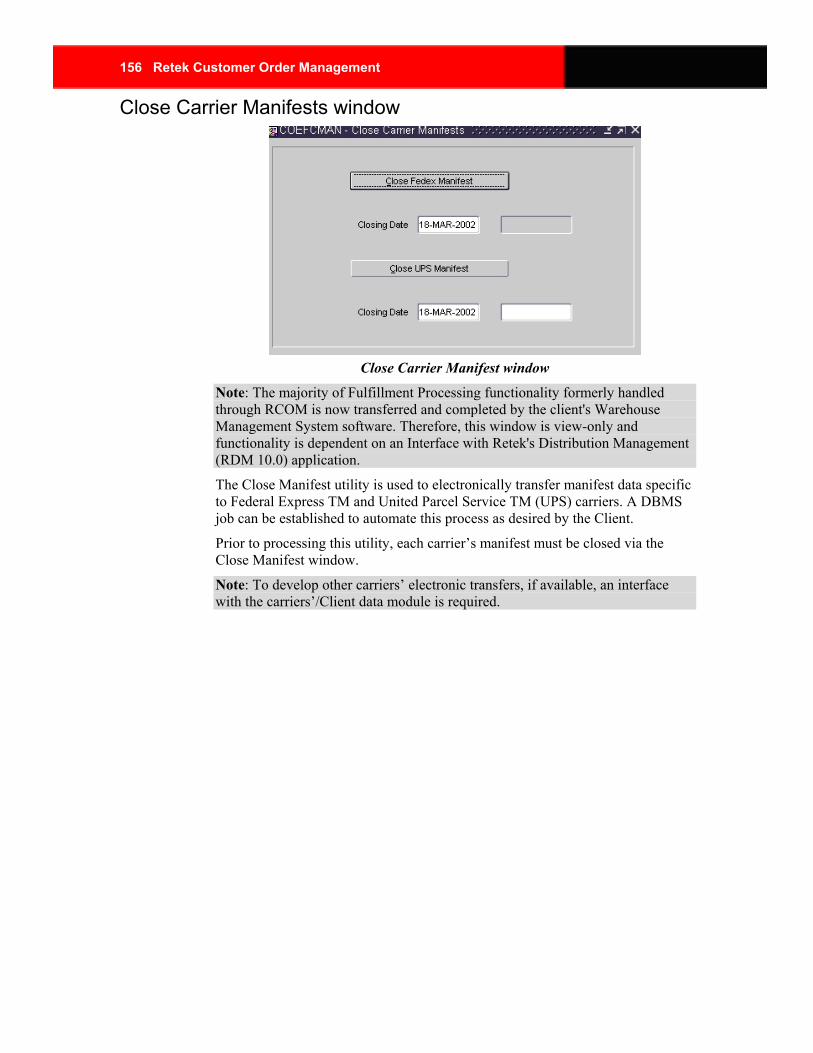
156 Retek Customer Order Management
Close Carrier Manifests window
Close Carrier Manifest window
Note: The majority of Fulfillment Processing functionality formerly handled through RCOM is now transferred and completed by the client's Warehouse Management System software. Therefore, this window is view-only and functionality is dependent on an Interface with Retek's Distribution Management (RDM 10.0) application.
The Close Manifest utility is used to electronically transfer manifest data specific to Federal Express TM and United Parcel Service TM (UPS) carriers. A DBMS job can be established to automate this process as desired by the Client.
Prior to processing this utility, each carrier’s manifest must be closed via the Close Manifest window.
Note: To develop other carriers’ electronic transfers, if available, an interface with the carriers’/Client data module is required.
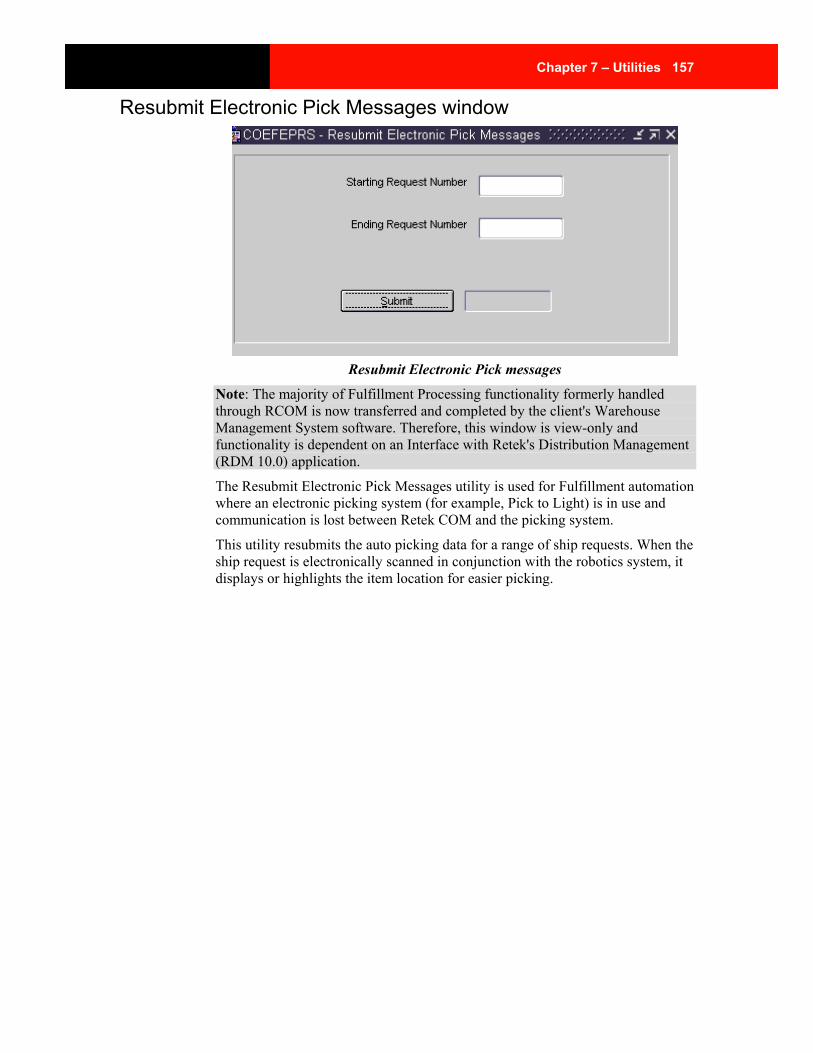
Chapter 7 – Utilities 157
Resubmit Electronic Pick Messages window
Resubmit Electronic Pick messages
Note: The majority of Fulfillment Processing functionality formerly handled through RCOM is now transferred and completed by the client's Warehouse Management System software. Therefore, this window is view-only and functionality is dependent on an Interface with Retek's Distribution Management (RDM 10.0) application.
The Resubmit Electronic Pick Messages utility is used for Fulfillment automation where an electronic picking system (for example, Pick to Light) is in use and communication is lost between Retek COM and the picking system.
This utility resubmits the auto picking data for a range of ship requests. When the ship request is electronically scanned in conjunction with the robotics system, it displays or highlights the item location for easier picking.

Chapter 8 – Order Maintenance 159
Chapter 8 – Order Maintenance Overview
This topic reviews the following Order Maintenance tables setup and functions that are a pre-requisite to using the applications in the Order Management module of Retek COM:
• Order Type/Amounts/Reason/Rules
• Order Status/Reason
• Order Priority
• Autoship Frequency
• Order Line Status
• Payment Method/Settled Status/Posted Status
• Hold Type
• Adjustment Reason
• Order Volume Reason
• Status Transition/Type
• Payment Vendor
• Processed Status
• Marketing Source
• Order Sequence
• Install Type
Define and support the Order Maintenance Setup tables Maintenance tables must be defined to enable Order Management processes and control pre-set parameters and lookup values to function to a Client’s specifications.
When Retek COM is initially installed, the Order Management maintenance tables are pre-defined with default values. Maintenance tables are customizable by adding new parameters, changing pre-defined parameters or deactivating existing parameters to meet a Client's needs.
Customizing the maintenance tables necessitate that all required parameter field descriptions and/or codes are completed including selecting the applicable processing flag check boxes. The flags are integral as they override the specified parameters and determine how the applications within Retek COM will utilize the defined parameters during the Order Management process and functions.
160 Retek Customer Order Management
Define and/or Customize the Criteria Support Maintenance Tables
Supporting the Order Management maintenance tables entails defining and/or customizing the following criteria within tables. The criteria are common in all the tables and can either be added, changed or deactivated to meet the business requirements for a specific table.
Element Description
Lookup Value The predefined value (information) displayed in a List of Values.
Parameter The rule that drive the way a Retek COM application or form functions. Applications logic prioritizes parameters to default information in the Retek COM forms.
Sort Order Determines the display order of a lookup value. The sort order is optional. However if a value is not assigned a sort order, it will be displayed in the order it was entered in the maintenance table. Sort orders can be assigned in any increments (such as 5, 10, 15, 20, etc.)
Scripting Text information that is displayed in a selected format in specific forms and is typically used to assist in directing a user in performing a Retek COM function (for example, entering an order).
Translation Lookup values/parameters translated into languages other than the client’s main language for use in other companies within the database or for service provisions in a multicultural setting. Most maintenance forms have a language block for parameter translations.
Chapter 8 – Order Maintenance 161
Maintenance Navigation Processes All maintenance tables within Retek COM utilize the same navigation process for either defining or supporting changes/updates. It is the intent of this volume to direct the end user through the varied maintenance menu paths and outline their purpose.
Note: Changing maintenance table information may have a direct impact on entire processes in the Retek COM applications and therefore require due diligence to ensure that the Client’s specifications and end objectives are met.
Retek COM makes the assumption that all required seeded data for table maintenance will be determined during the discovery process of specifications gathering and/or business analysis.
162 Retek Customer Order Management
Procedures
Update maintenance tables To change/update maintenance tables
Navigate: From the Order Management menu, select > Maintenance Menu of Choice > Maintenance Table of Choice. The specified maintenance window is displayed.
1 Perform a query to retrieve the desired maintenance table record.
2 Make the necessary/applicable changes.
3 Click Save, or press the F10 key to update and save.
Set up a new order type To set up a new order type
Navigate: From the Order Management menu, select > Order Maintenance > Order Type. The Order Type window is displayed.
1 In the Company and Order Type fields, enter the required Company/Order Type criteria and select the applicable processing flags.
2 In the Order Type Rules fields, enter the rules associated with the Order Type.
3 Click Order Type Amounts to establish additional criteria, as applicable. The Order Type Amount fields are displayed. (That is Ship Method, Customer Type, Currency, Minimum Order/Shipping Amounts, etc.). (Optional).
4 Click Event Discounts to establish pricing/discounts criteria, as applicable (such as Discount, Event Price List, and Marketing Source). (Optional).
5 Click Translations for Lookup Code Translations. (Optional).
6 Click Save, or press the F10 key to complete the transaction.
Set up a new order type amount To set up a new order type amount
Navigate: From the Order Management menu, select > Order Maintenance > Order Type Amount. The Order Type Amount window is displayed.
1 In the Company/Order Type fields, enter the required Company/Order Type Amount criteria and select the applicable processing flags.
2 Click Save, or press the F10 key to complete the transaction.
Chapter 8 – Order Maintenance 163
Set up a new order type reason To set up a new order type reason
Navigate: From the Order Management menu, select > Order Maintenance > Order Type Reason. The Order Type Reason window is displayed.
1 In the Company field, enter or select the company name from the LOV.
2 In the Order Type Reason, Display Code, Description and Order Type fields, enter the required data.
3 In the GL Account field, enter the associated General Ledger (GL) Account, as applicable. (Optional)
Note: Typically associated with No Charge Order Types.
In the Script field, select a script, as applicable. (Optional)
Click Save, or press the F10 key to complete the transaction.
Set up new order type rules To set up new order type rules
Navigate: From the Order Management menu, select > Order Maintenance > Order Type Rules. The Order Type Rule window is displayed.
1 In the Company field, enter or select the company name from the LOV.
2 In the Customer and Order Type fields, enter the required Customer and Order Type codes.
3 In the remaining Rule Fields, enter the Rules criteria, including the applicable processing flags.
4 Click Save, or press the F10 key to complete the transaction.
Set up a new order status To set up a new order status
Navigate: From the Order Management menu, select > Order Maintenance > Order Status. The Order Status window is displayed.
1 In the Company field, enter or select the company name from the LOV.
2 In the Order Status field, enter the required Order Status criteria.
3 In the remaining status fields, select all applicable processing flags. (Optional)
4 In the Script field, select a script, as applicable. (Optional)
5 In the Language field, associate an Order Status Reason and alternate language translation(s), if applicable. (Optional).
6 Click Save, or press the F10 key to complete the transaction.
164 Retek Customer Order Management
Set up a new order status reason To set up a new order status reason
Navigate: From the Order Management menu, select > Order Maintenance > Order Status Reason. The Order Status Reason window is displayed.
1 In the Company field, enter or select the company name from the LOV.
2 In the Order Status Reason, Display Code and Description fields, enter the appropriate data.
3 In the Order Status field enter the order status and/or select the optional Payment Method/Script to be associated with the Order Status Reason.
4 In the Language field, enter or select all alternate language translation(s), if applicable. (Optional).
5 Click Save, or press the F10 key to complete the transaction.
Set up a new order priority To set up a new order priority
Navigate: From the Order Management menu, select > Order Maintenance > Order Priority. The Order Priority window is displayed.
1 In the Company field, enter or select the company name from the LOV.
2 In the Order Priority, Display Code, Description and Priority Order (urgency sequence) fields enter the required data.
3 In the Script field, select the script to associate with the Order Priority, as applicable. (Optional)
4 In the Language field, enter or select all alternate language translation(s), if applicable. (Optional).
5 Click Save, or press the F10 key to complete the transaction.
Set up a new autoship frequency To set up a new autoship frequency
Navigate: From the Order Management menu, select > Order Maintenance > Autoship Frequency. The Autoship Frequency window is displayed.
1 In the Company field, enter or select the company name from the LOV.
2 In the Autoship Frequency, Display Code and Description fields, enter the appropriate data.
3 In the Frequency SQL Text field, enter the required Frequency SQL Text calculation. Example: Weekly Autoship Frequency = NVL(autoship_next_order_date,NVL(autoship_start_date,trunc(sysdate)))+7
4 Click Save, or press the F10 key to complete the transaction.
Chapter 8 – Order Maintenance 165
Set up a new order line status To set up a new order line status
Navigate: From the Order Management menu, select > Order Maintenance > Order Line Status. The Order Line Status window is displayed.
1 In the Company field, enter or select the company name from the LOV.
2 In the Order Line Status, Display Code and Description fields, enter the applicable data, or select it from the LOV.
3 Select or clear all applicable processing flags.
4 From the Script field, select a script as applicable. (Optional)
5 In the Translation field, associate an alternate language translation(s), as applicable. (Optional).
6 Click Save, or press the F10 key to complete the transaction.
Set up a payment method To set up a new payment method:
Navigate: From the Order Management menu, select > Order Maintenance > Payment Method. The Payment Method window is displayed.
1 In the Company field, enter or select the company name from the LOV.
2 In the Payment Method, Display Code and Description fields, enter or select the appropriate data.
3 Select the applicable processing flags.
4 In the appropriate fields, enter or select the optional Maximum Authorization Requests, Order Aging Days, Payment Vendor and/or script, as applicable.
Note: Enter the Payment Card Ranges, as applicable to the Payment Method denoted as a Credit/Debit Payment Type (that is acceptable Card Length and Low/High Digits).
5 Enter the optional Mask Display, and the Translations as applicable. (Optional).
7 Click Save, or press the F10 key to complete the transaction.
166 Retek Customer Order Management
Set up a payment settled status To set up a new payment settled status
Navigate: From the Order Management menu, select > Order Maintenance > Payment Settled Status. The Payment Settled Status window is displayed.
1 In the Payment Settled Status/Display Code and Description fields, enter the required data.
2 Select or clear the applicable processing flags.
3 In the Script field, select a script to associate with the Payment Settled Status, as applicable. (Optional)
4 In the language field, enter or select an alternate language translation(s), as applicable. (Optional).
5 Click Save, or press the F10 key to complete the transaction.
Set up a payment posted status To set up a new payment posted status
Navigate: From the Order Management menu, select > Order Maintenance > Payment Posted Status. The Payment Posted Status window is displayed.
1 In the Payment Posted Status, Display Code and Description fields, enter or select the required data.
2 Select the applicable processing flags.
3 In the Language field, enter or select an alternate language translation(s), as applicable. (Optional).
4 Click Save, or press the F10 key to complete the transaction.
Set up a hold type To set up a new hold type
Navigate: From the Order Management menu, select > Order Maintenance > Hold Type. The Hold Type window is displayed.
1 In the Company field, enter or select the company name from the LOV.
2 In the Hold Type, Display Code and Description fields, enter or select the required data.
3 In the Script field, select a script to associate with the Hold Type, as applicable. (Optional)
4 In the Language field, enter or select an alternate language translation(s), as applicable. (Optional)
5 Click Save, or press the F10 key to complete the transaction.

Chapter 8 – Order Maintenance 167
Set up an adjustment reason To set up a new adjustment reason
Navigate: From the Order Management menu, select > Order Maintenance > Adjustment Reason. The Adjustment reason window is displayed.
1 In the Company field, enter or select the company name from the LOV.
2 In the Adjustment Reason, Display Code and Description fields, enter the appropriate data.
3 Select the applicable processing flags.
4 In the Payables Invoice Type, Base/Max Adjustment Amounts, Exchange Rate/Date and/or script fields, enter or select data as applicable. (Optional).
Note: The Payables Invoice Type is defined and supported in the Commissions Maintenance table of the Consumer Global Commission (CGC) Module.
5 In the Language field, enter or select an alternate language translation(s), as applicable. (Optional).
6 Click Save, or press the F10 key to complete the transaction.
Set up an order volume reason To set up a new order volume reason
Navigate: From the Order Management menu, select > Order Maintenance > Order Volume Reason. The Order Volume Reason window is displayed.
1 In the Company field, enter or select the company name from the LOV.
2 In the Order Volume Reason, Display Code and Description fields enter or select the appropriate data.
3 Select or clear the applicable processing flags.
4 In the Language field, enter or select an alternate language translation(s), as applicable. (Optional).
5 Click Save, or press the F10 key to complete the transaction
Set up a status transition type To set up a new status transition type
Navigate: From the Order Management menu, select > Order Maintenance > Status Transition Type. The Status Transition Type window is displayed.
1 In the Status Transition Type/Display Codes and Description fields, enter or select the required data.
2 In the Language field, enter or select an alternate language translation(s), as applicable. (Optional).
3 Click Save, or press the F10 key to complete the transaction.
168 Retek Customer Order Management
Set up a status transition To set up a new status transition
Navigate: From the Order Management menu, select > Order Maintenance > Status Transition. The Status Transition window is displayed.
1 In the Company field, enter or select the company name from the LOV.
2 In the Status Transition Type, Next/Status Code and Description fields, enter or select the required information.
Note: The Status Transition Type other than preset in Retek COM must be established prior to creating additional Status Transitions. Refer to the Status Transition Type topic for setup information.
3 In the Sort Order field, enter/set the sort orders as applicable. (Optional)
4 Click Save, or press the F10 key to complete the transaction.
Set up a payment vendor To set up a new payment vendor
Navigate: From the Order Management menu, > Order Maintenance > Payment Vendor. The Payment Vendor window is displayed.
1 In the Company field, enter or select the company name from the LOV.
2 In the Payment Vendor, Display Code, Description and Merchant Account Number fields, enter the required data.
3 Select the Address Verification flag checkbox, if applicable.
4 In the Authorization/Display Codes and Descriptions field, enter any applicable data. (that is 000 – No Answer, 100 – Approved, etc.).
Note: Select the Authorization flag check box, if the authorization code is associated only upon a returned authorization from the Payment Vendor.
5 Click Pay Vendor Addresses to add Address/Display Codes and Descriptions, as applicable (that is l1 – Matched on Zip, Plus 4, and Locale; l2 – Matched on Zip and Plus4 only, etc.).
6 Click Pay Vendor Edits to add Edit/Display Codes and Descriptions, as applicable (that is 00000 – Transaction Passed Edit Check; l2 – Matched on Zip and Plus4 only, etc.).
Note: Select the Error flags, in the Pay Vendor Addresses/Edits sections as applicable, if either the Address or Edit codes is associated only upon a returned error notice from the Payment Vendor. Optional script associations may be added to either section of the form, as applicable.
7 Click Translations to enter or select an alternate language translation(s), as applicable. (Optional).
8 Click Save, or press the F10 key to complete the transaction.

Chapter 8 – Order Maintenance 169
Set up a marketing source To set up a new marketing source
Navigate: From the Order Management menu, select > Order Maintenance > Marketing Source. The Marketing Source window is displayed.
1 In the Company field, enter or select the company name from the LOV
2 In the Marketing Source, Display Code and Description fields, enter or select the required data.
3 In the Script field, select a script to associate with the Marketing Source, as applicable. (Optional)
4 In the Language field, enter or select an alternate language translation(s), as applicable. (Optional).
5 Click Save, or press the F10 key to complete the transaction.
Set up an order sequence To set up a new order sequence
Navigate: From the Order Management menu, select > Order Maintenance > Order Sequence. The order Sequence window is displayed.
1 In the Company field, enter or select the company name from the LOV.
2 In the Order, Return Order, Invoice, Autoship, National Invoice, Corp National Invoice, and Adjustment Number fields, enter the preferred order sequence criteria.
3 In the Prefix fields, enter the applicable prefix for the related numbers. (Optional).
Note: Entering a Start/End Date, Start/End Sequence Number, Sequence, Prefix, and/or selecting the related check boxes are optional.
4 Click Save, or press the F10 key to complete the transaction.
Set up a processed status To set up a new processed status
Navigate: From the Order Management menu, select > Order Maintenance > Processed Status. The Processed Status window is displayed.
1 In the Processed Status/Display Codes and Description fields, enter or select the required data.
2 Select all applicable processing flags and select a script, as applicable. (Optional).
3 In the Language field, associate alternate language translation(s), as applicable. (Optional).
4 Click Save, or press the F10 key to complete the transaction.
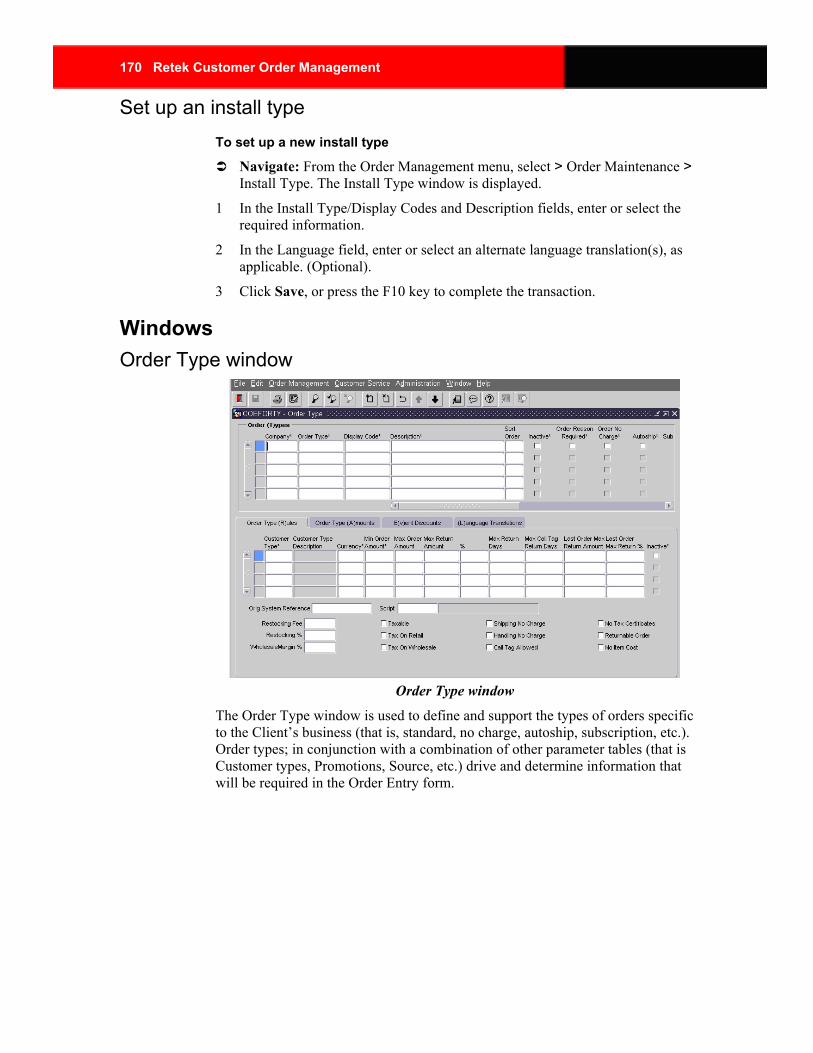
170 Retek Customer Order Management
Set up an install type To set up a new install type
Navigate: From the Order Management menu, select > Order Maintenance > Install Type. The Install Type window is displayed.
1 In the Install Type/Display Codes and Description fields, enter or select the required information.
2 In the Language field, enter or select an alternate language translation(s), as applicable. (Optional).
3 Click Save, or press the F10 key to complete the transaction.
Windows Order Type window
Order Type window
The Order Type window is used to define and support the types of orders specific to the Client’s business (that is, standard, no charge, autoship, subscription, etc.). Order types; in conjunction with a combination of other parameter tables (that is Customer types, Promotions, Source, etc.) drive and determine information that will be required in the Order Entry form.
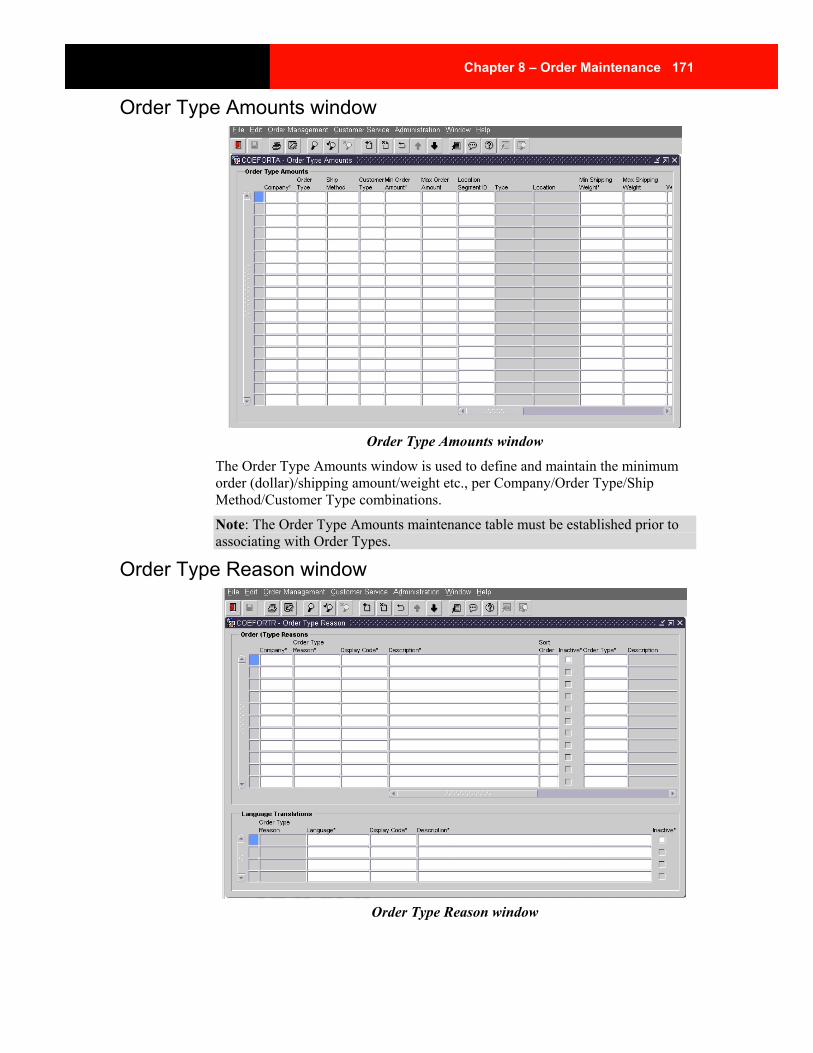
Chapter 8 – Order Maintenance 171
Order Type Amounts window
Order Type Amounts window
The Order Type Amounts window is used to define and maintain the minimum order (dollar)/shipping amount/weight etc., per Company/Order Type/Ship Method/Customer Type combinations.
Note: The Order Type Amounts maintenance table must be established prior to associating with Order Types.
Order Type Reason window
Order Type Reason window

172 Retek Customer Order Management
The Order Type Reason form is used to define and support processes requiring a reason to provide or associate additional information (that is, No Charge, Return, Unauthorized Return, etc.).
Note: The Order Type Reason provides a brief description explaining why an order is being processed with the selected order type.
Order Type Rules window
Order Type Rules window
The Order Type Rules window is used to define and support the rule(s) applying to a specific Customer/Order Type combination (that is maximum return amounts/ percentage/days, wholesale margin percentage, restocking fees, taxing, shipping, commissioning, etc.).
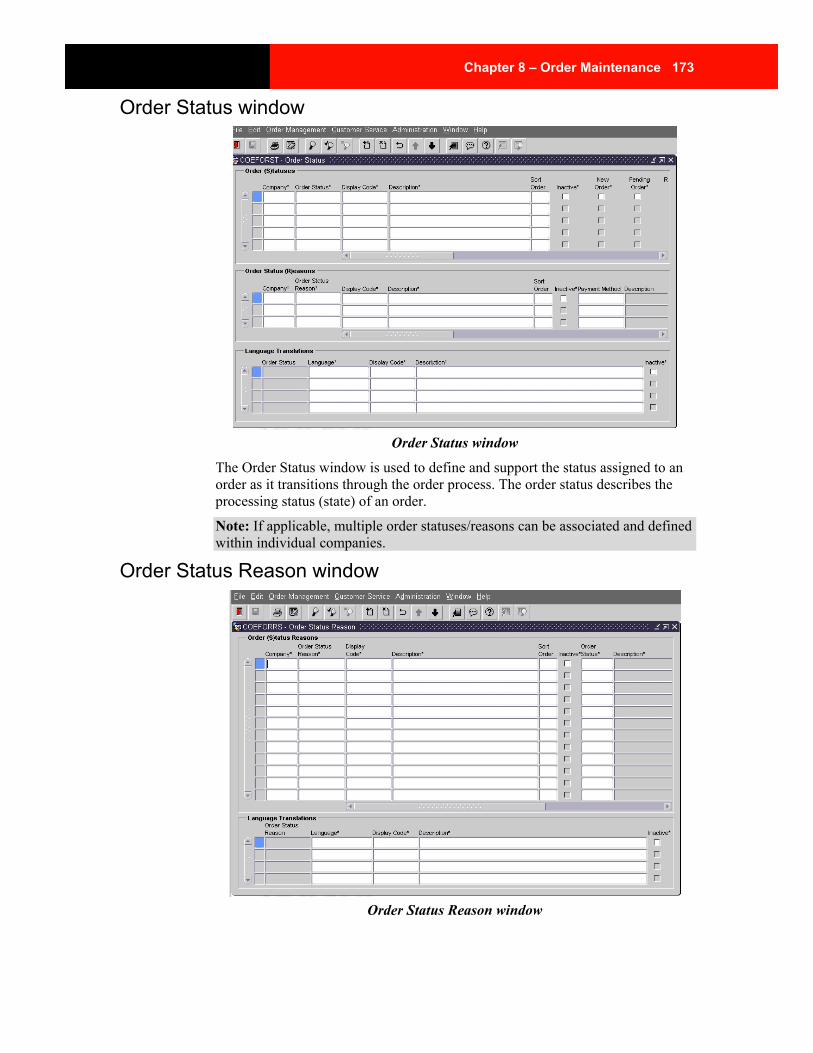
Chapter 8 – Order Maintenance 173
Order Status window
Order Status window
The Order Status window is used to define and support the status assigned to an order as it transitions through the order process. The order status describes the processing status (state) of an order.
Note: If applicable, multiple order statuses/reasons can be associated and defined within individual companies.
Order Status Reason window
Order Status Reason window
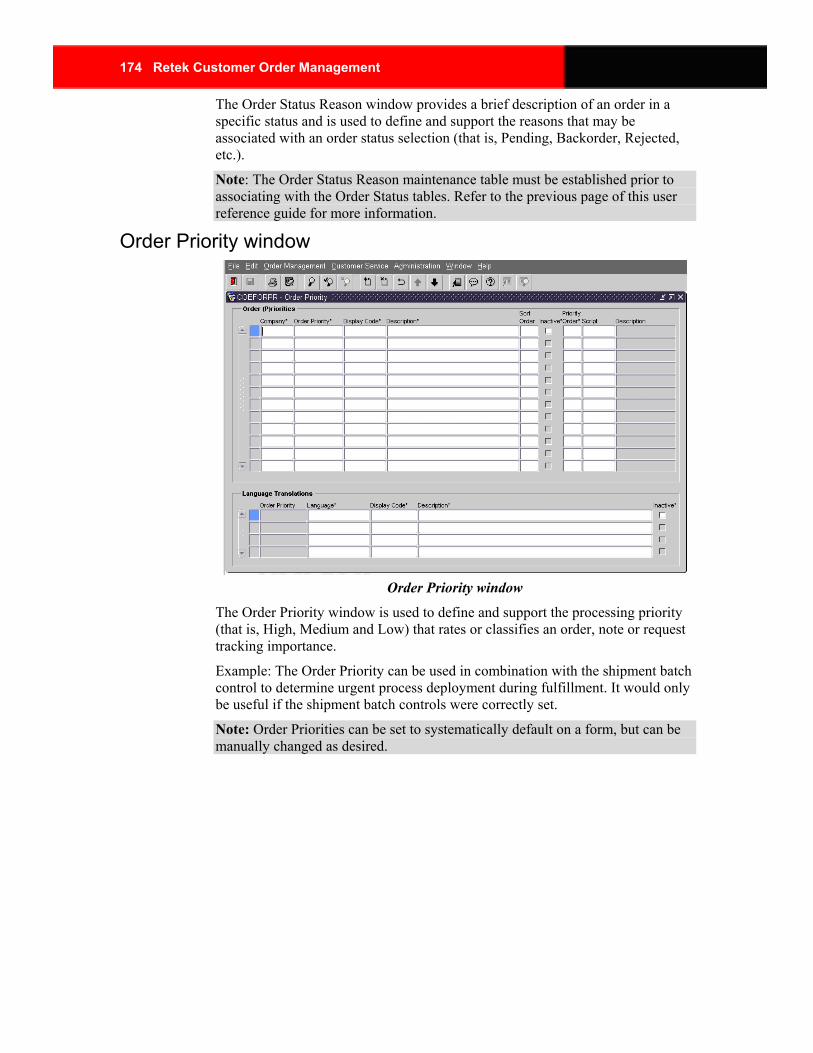
174 Retek Customer Order Management
The Order Status Reason window provides a brief description of an order in a specific status and is used to define and support the reasons that may be associated with an order status selection (that is, Pending, Backorder, Rejected, etc.).
Note: The Order Status Reason maintenance table must be established prior to associating with the Order Status tables. Refer to the previous page of this user reference guide for more information.
Order Priority window
Order Priority window
The Order Priority window is used to define and support the processing priority (that is, High, Medium and Low) that rates or classifies an order, note or request tracking importance.
Example: The Order Priority can be used in combination with the shipment batch control to determine urgent process deployment during fulfillment. It would only be useful if the shipment batch controls were correctly set.
Note: Order Priorities can be set to systematically default on a form, but can be manually changed as desired.
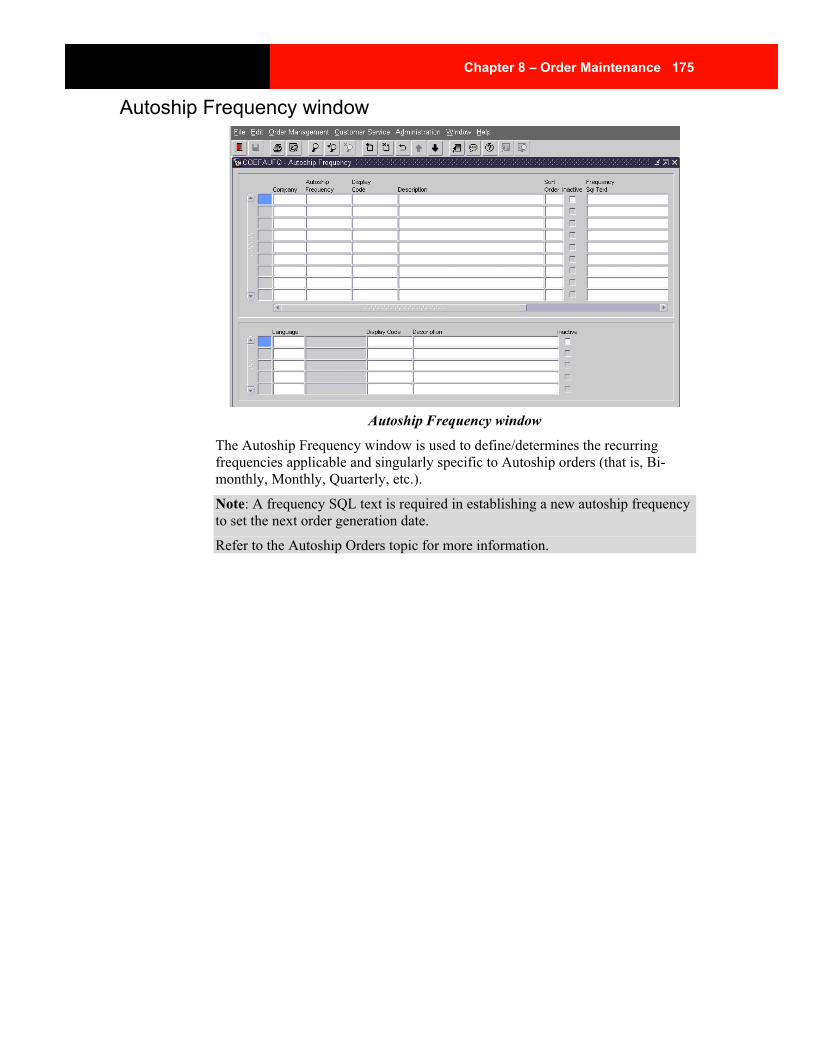
Chapter 8 – Order Maintenance 175
Autoship Frequency window
Autoship Frequency window
The Autoship Frequency window is used to define/determines the recurring frequencies applicable and singularly specific to Autoship orders (that is, Bi-monthly, Monthly, Quarterly, etc.).
Note: A frequency SQL text is required in establishing a new autoship frequency to set the next order generation date.
Refer to the Autoship Orders topic for more information.
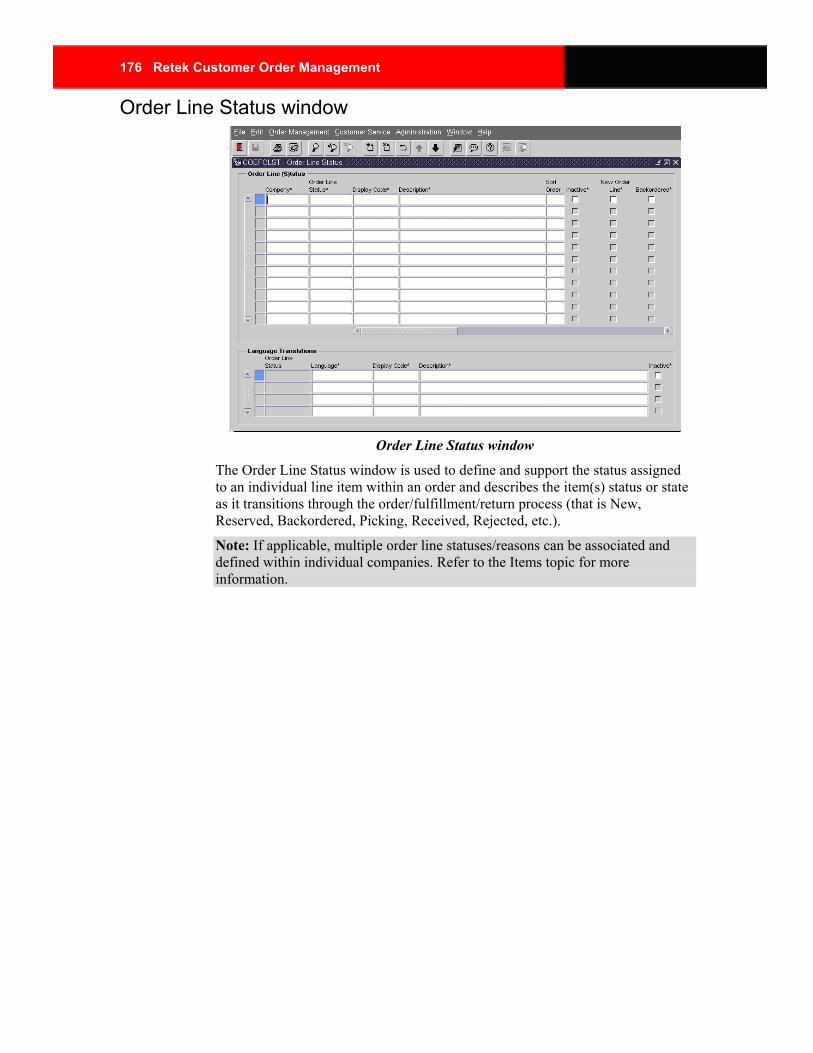
176 Retek Customer Order Management
Order Line Status window
Order Line Status window
The Order Line Status window is used to define and support the status assigned to an individual line item within an order and describes the item(s) status or state as it transitions through the order/fulfillment/return process (that is New, Reserved, Backordered, Picking, Received, Rejected, etc.).
Note: If applicable, multiple order line statuses/reasons can be associated and defined within individual companies. Refer to the Items topic for more information.

Chapter 8 – Order Maintenance 177
Payment Method window
Payment Method window
The Payment Method window is used to define and support the applicable payment method designations relevant or acceptable to specific order types.
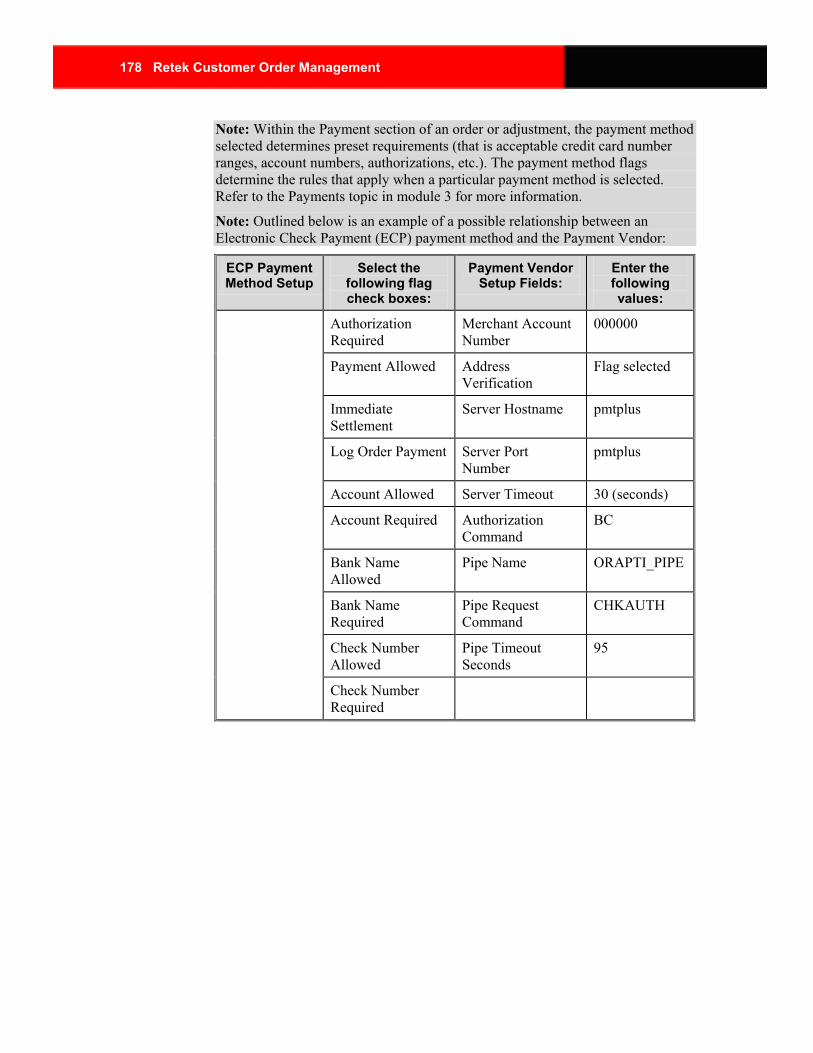
178 Retek Customer Order Management
Note: Within the Payment section of an order or adjustment, the payment method selected determines preset requirements (that is acceptable credit card number ranges, account numbers, authorizations, etc.). The payment method flags determine the rules that apply when a particular payment method is selected. Refer to the Payments topic in module 3 for more information.
Note: Outlined below is an example of a possible relationship between an Electronic Check Payment (ECP) payment method and the Payment Vendor:
ECP Payment Method Setup
Select the following flag check boxes:
Payment Vendor Setup Fields:
Enter the following values:
Authorization Required
Merchant Account Number
000000
Payment Allowed Address Verification
Flag selected
Immediate Settlement
Server Hostname pmtplus
Log Order Payment Server Port Number
pmtplus
Account Allowed Server Timeout 30 (seconds)
Account Required Authorization Command
BC
Bank Name Allowed
Pipe Name ORAPTI_PIPE
Bank Name Required
Pipe Request Command
CHKAUTH
Check Number Allowed
Pipe Timeout Seconds
95
Check Number Required

Chapter 8 – Order Maintenance 179
Payment Settled Status window
Payment Settled Status
The Payment Settled Status window is used to define and support the description/reply status systematically assigned by Retek COM and/or the authorized Payment Vendor of the applied payment method, either on an order or adjustment (that is New, Failed, Authorized, Deposited, etc.).
Note: Refer to the Payments topic in for more information.
Payment Posted Status window
Payment Posted Status window
The Payment Posted Status window is used to define and support the posted statuses systematically assigned by Retek COM to an payment during the order processing (that is New, On Account, Released, Posted, etc.).
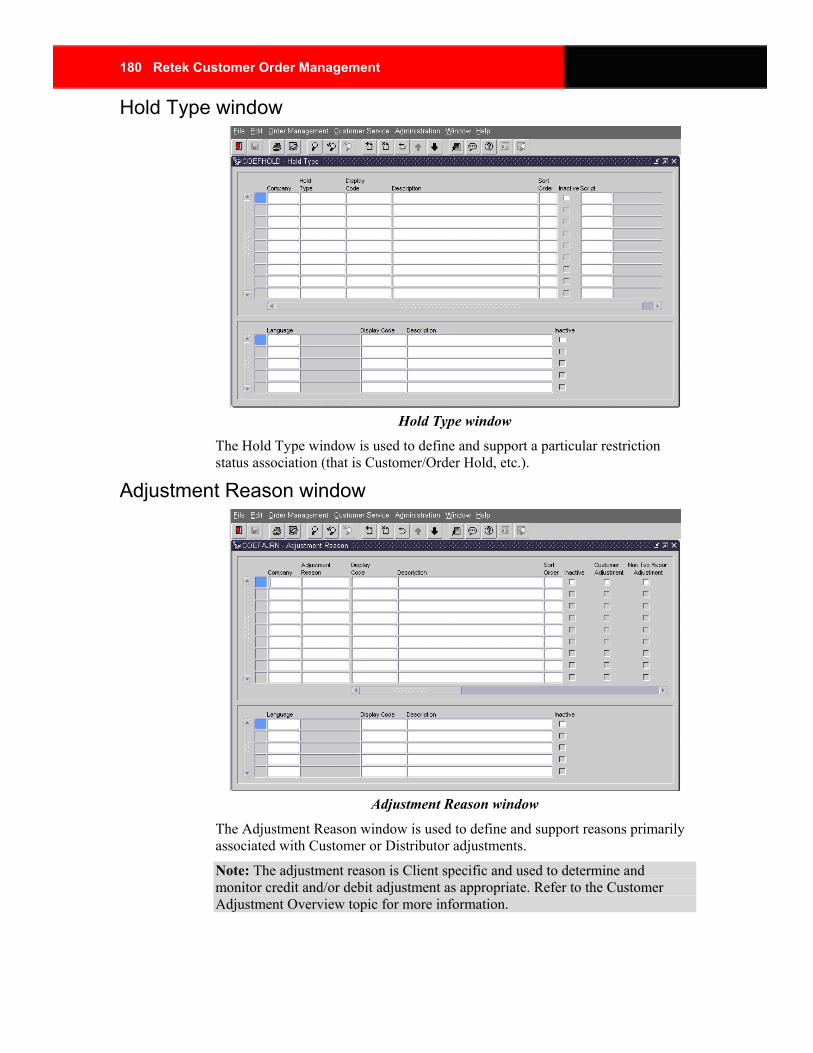
180 Retek Customer Order Management
Hold Type window
Hold Type window
The Hold Type window is used to define and support a particular restriction status association (that is Customer/Order Hold, etc.).
Adjustment Reason window
Adjustment Reason window
The Adjustment Reason window is used to define and support reasons primarily associated with Customer or Distributor adjustments.
Note: The adjustment reason is Client specific and used to determine and monitor credit and/or debit adjustment as appropriate. Refer to the Customer Adjustment Overview topic for more information.
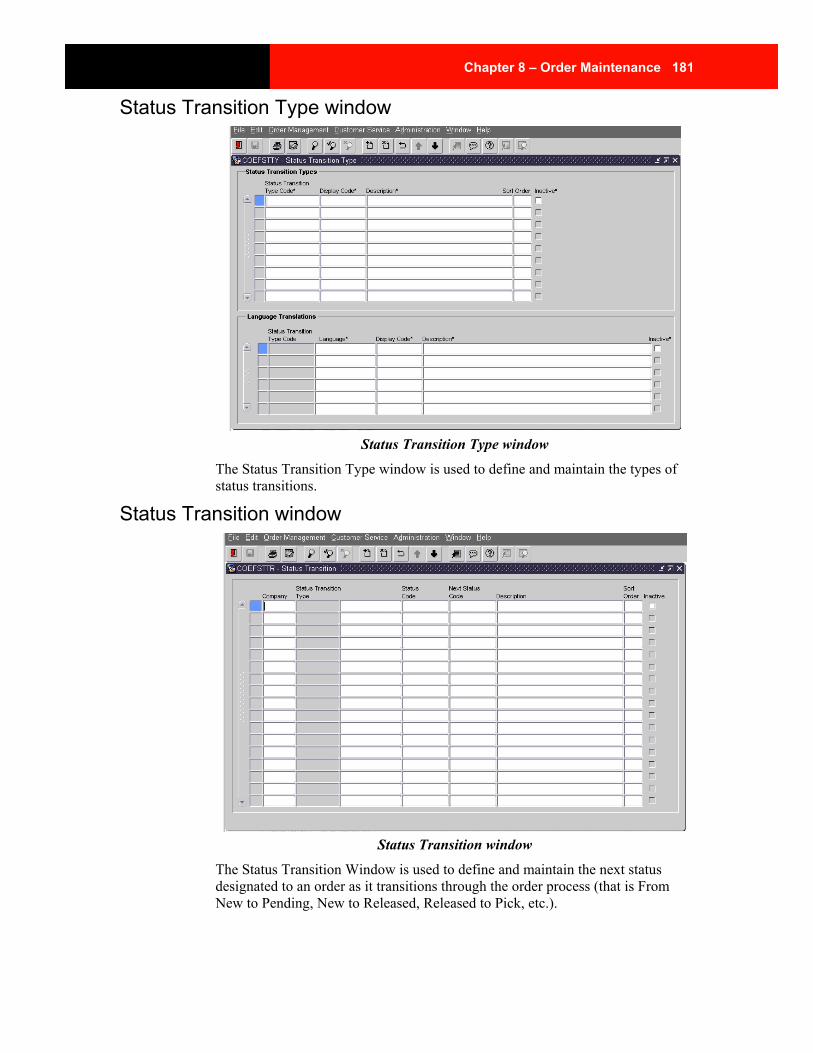
Chapter 8 – Order Maintenance 181
Status Transition Type window
Status Transition Type window
The Status Transition Type window is used to define and maintain the types of status transitions.
Status Transition window
Status Transition window
The Status Transition Window is used to define and maintain the next status designated to an order as it transitions through the order process (that is From New to Pending, New to Released, Released to Pick, etc.).
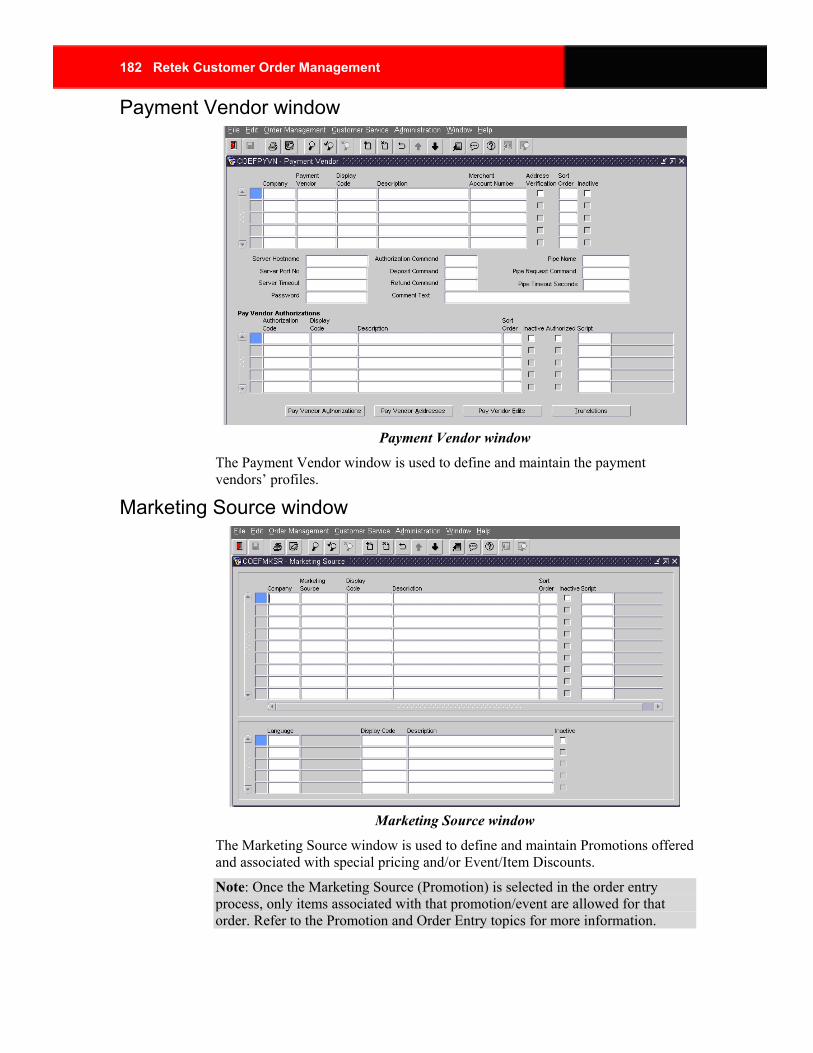
182 Retek Customer Order Management
Payment Vendor window
Payment Vendor window
The Payment Vendor window is used to define and maintain the payment vendors’ profiles.
Marketing Source window
Marketing Source window
The Marketing Source window is used to define and maintain Promotions offered and associated with special pricing and/or Event/Item Discounts.
Note: Once the Marketing Source (Promotion) is selected in the order entry process, only items associated with that promotion/event are allowed for that order. Refer to the Promotion and Order Entry topics for more information.
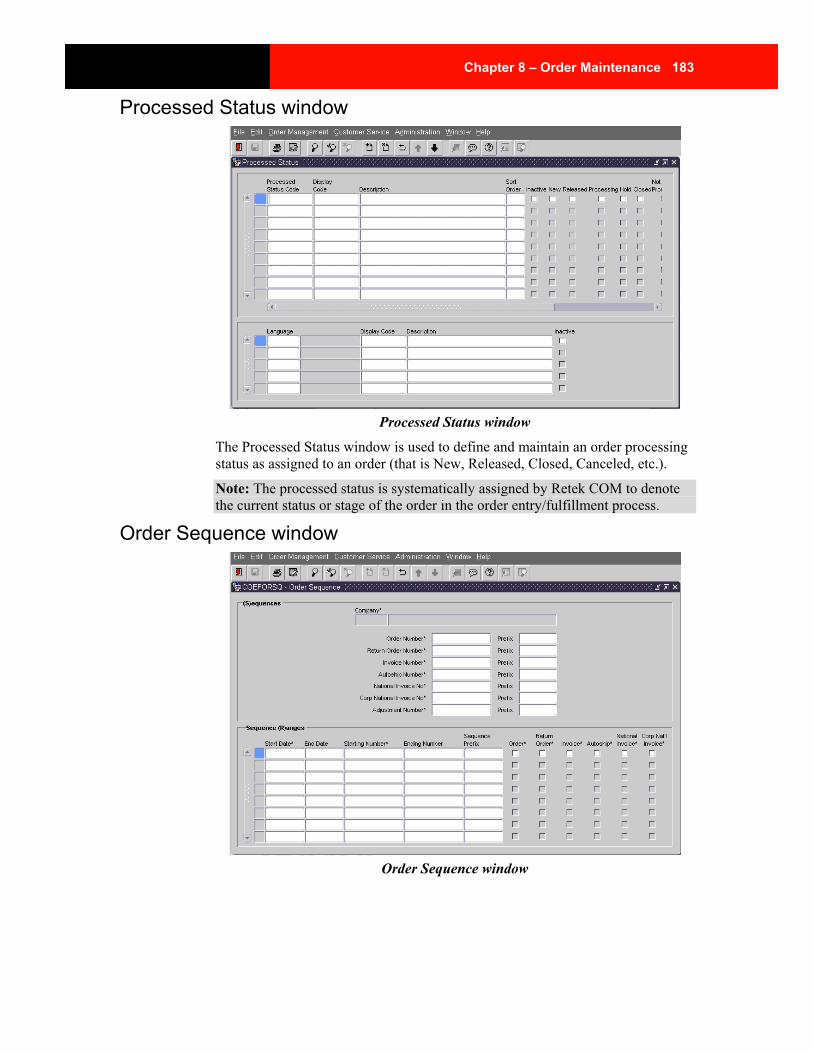
Chapter 8 – Order Maintenance 183
Processed Status window
Processed Status window
The Processed Status window is used to define and maintain an order processing status as assigned to an order (that is New, Released, Closed, Canceled, etc.).
Note: The processed status is systematically assigned by Retek COM to denote the current status or stage of the order in the order entry/fulfillment process.
Order Sequence window
Order Sequence window

184 Retek Customer Order Management
The Order Sequence window is used to define and maintain the numbering assignment for orders, return orders, invoices, autoships, national invoices corporate national invoices and adjustments per Company.
Note: The numbers displayed in the form are the current values and preset prefix options for each associated identification number.
Install Type window
Install Type window
The Install Type window is used primarily for the Warranty Setup process to define a warranty item’s installer (that is Self, Contractor, Other, Unknown, etc.).
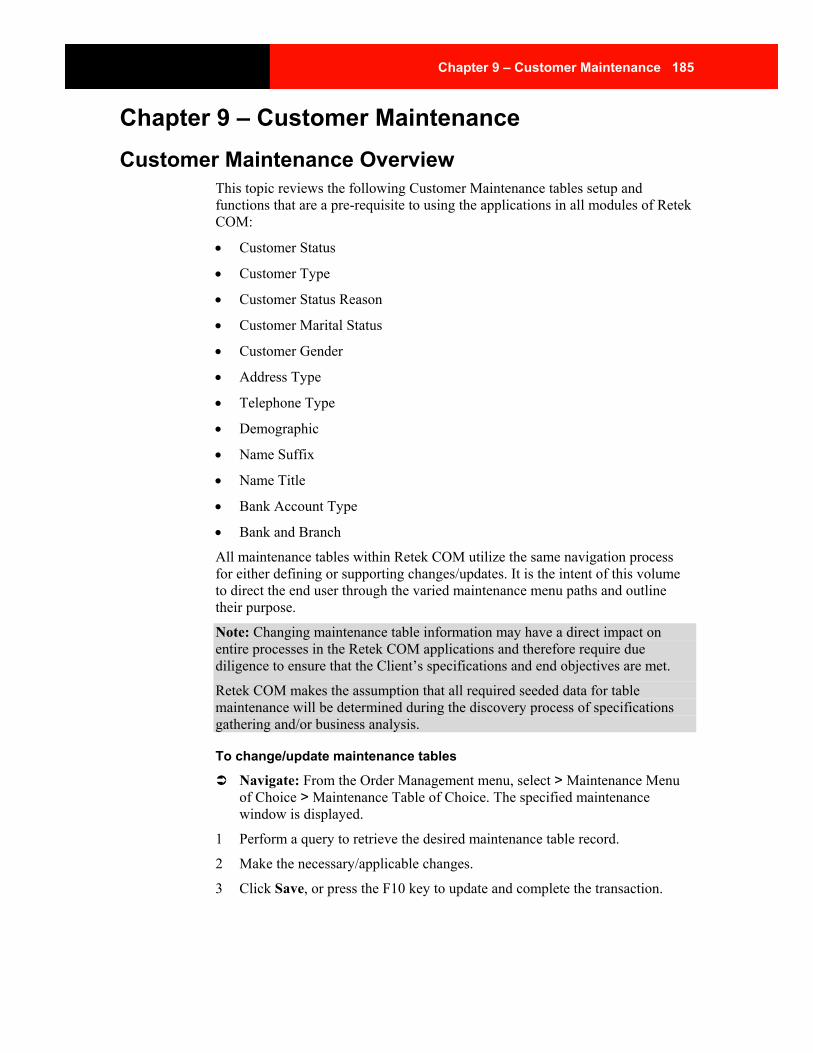
Chapter 9 – Customer Maintenance 185
Chapter 9 – Customer Maintenance Customer Maintenance Overview
This topic reviews the following Customer Maintenance tables setup and functions that are a pre-requisite to using the applications in all modules of Retek COM:
• Customer Status
• Customer Type
• Customer Status Reason
• Customer Marital Status
• Customer Gender
• Address Type
• Telephone Type
• Demographic
• Name Suffix
• Name Title
• Bank Account Type
• Bank and Branch
All maintenance tables within Retek COM utilize the same navigation process for either defining or supporting changes/updates. It is the intent of this volume to direct the end user through the varied maintenance menu paths and outline their purpose.
Note: Changing maintenance table information may have a direct impact on entire processes in the Retek COM applications and therefore require due diligence to ensure that the Client’s specifications and end objectives are met.
Retek COM makes the assumption that all required seeded data for table maintenance will be determined during the discovery process of specifications gathering and/or business analysis.
To change/update maintenance tables
Navigate: From the Order Management menu, select > Maintenance Menu of Choice > Maintenance Table of Choice. The specified maintenance window is displayed.
1 Perform a query to retrieve the desired maintenance table record.
2 Make the necessary/applicable changes.
3 Click Save, or press the F10 key to update and complete the transaction.
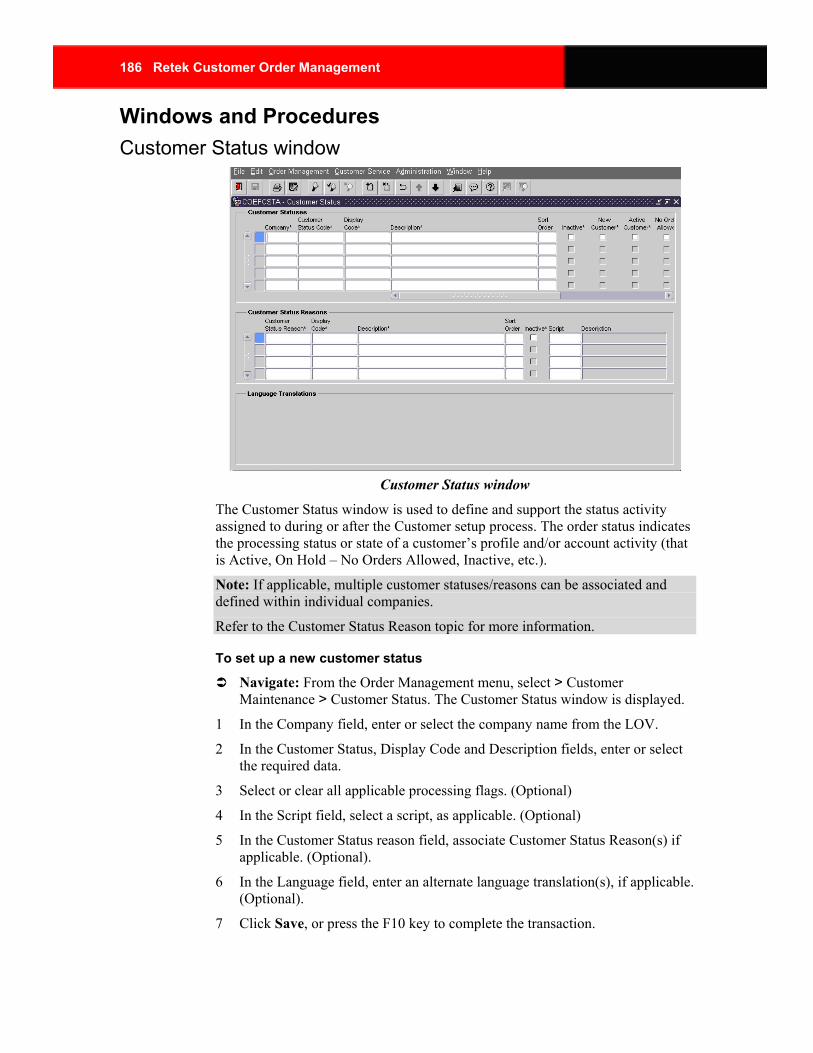
186 Retek Customer Order Management
Windows and Procedures Customer Status window
Customer Status window
The Customer Status window is used to define and support the status activity assigned to during or after the Customer setup process. The order status indicates the processing status or state of a customer’s profile and/or account activity (that is Active, On Hold – No Orders Allowed, Inactive, etc.).
Note: If applicable, multiple customer statuses/reasons can be associated and defined within individual companies.
Refer to the Customer Status Reason topic for more information.
To set up a new customer status
Navigate: From the Order Management menu, select > Customer Maintenance > Customer Status. The Customer Status window is displayed.
1 In the Company field, enter or select the company name from the LOV.
2 In the Customer Status, Display Code and Description fields, enter or select the required data.
3 Select or clear all applicable processing flags. (Optional)
4 In the Script field, select a script, as applicable. (Optional)
5 In the Customer Status reason field, associate Customer Status Reason(s) if applicable. (Optional).
6 In the Language field, enter an alternate language translation(s), if applicable. (Optional).
7 Click Save, or press the F10 key to complete the transaction.
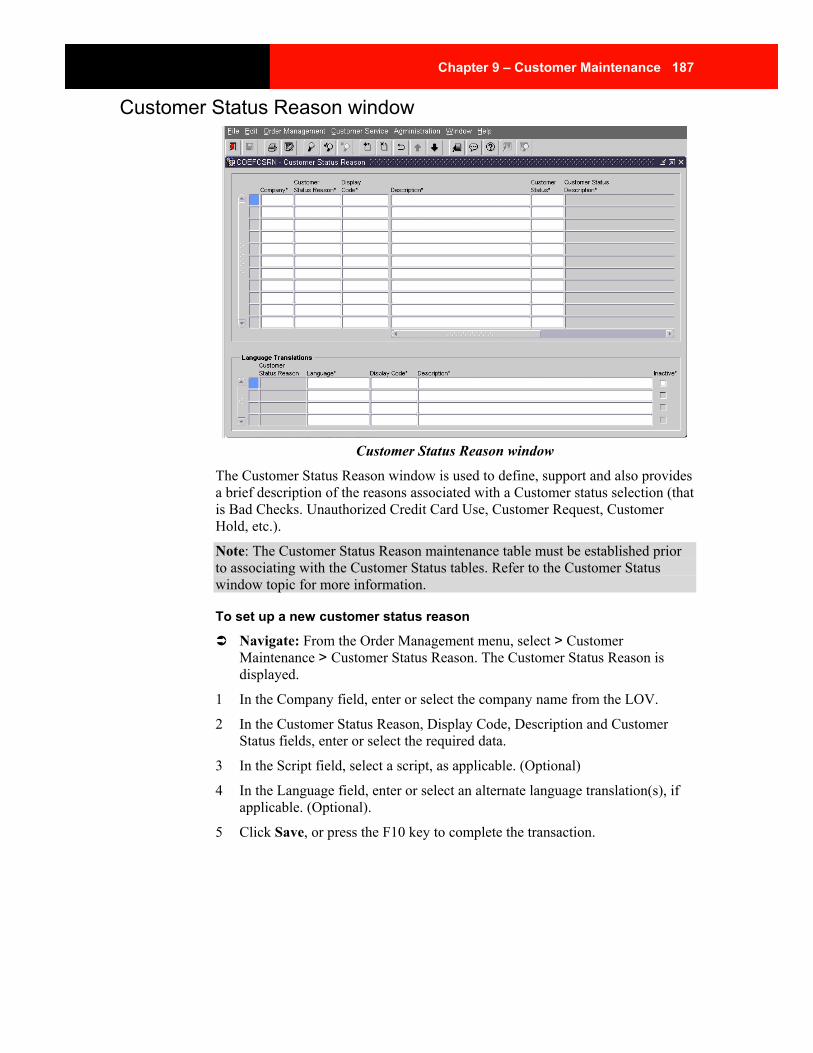
Chapter 9 – Customer Maintenance 187
Customer Status Reason window
Customer Status Reason window
The Customer Status Reason window is used to define, support and also provides a brief description of the reasons associated with a Customer status selection (that is Bad Checks. Unauthorized Credit Card Use, Customer Request, Customer Hold, etc.).
Note: The Customer Status Reason maintenance table must be established prior to associating with the Customer Status tables. Refer to the Customer Status window topic for more information.
To set up a new customer status reason
Navigate: From the Order Management menu, select > Customer Maintenance > Customer Status Reason. The Customer Status Reason is displayed.
1 In the Company field, enter or select the company name from the LOV.
2 In the Customer Status Reason, Display Code, Description and Customer Status fields, enter or select the required data.
3 In the Script field, select a script, as applicable. (Optional)
4 In the Language field, enter or select an alternate language translation(s), if applicable. (Optional).
5 Click Save, or press the F10 key to complete the transaction.
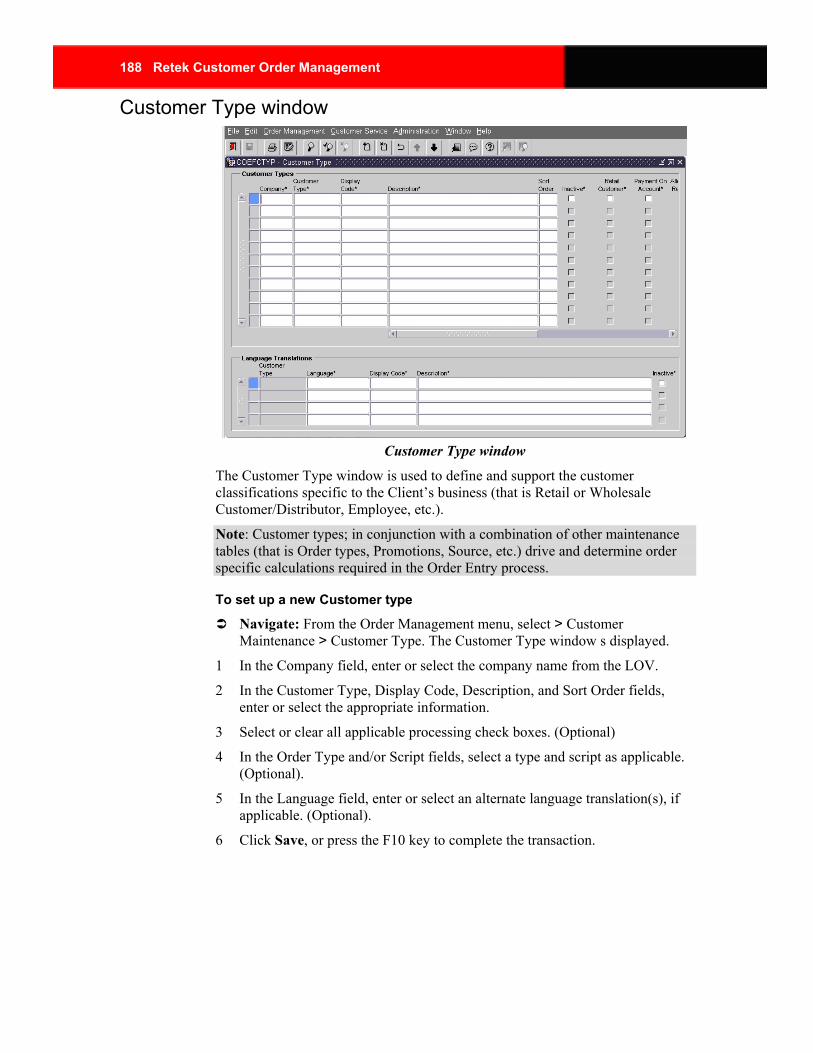
188 Retek Customer Order Management
Customer Type window
Customer Type window
The Customer Type window is used to define and support the customer classifications specific to the Client’s business (that is Retail or Wholesale Customer/Distributor, Employee, etc.).
Note: Customer types; in conjunction with a combination of other maintenance tables (that is Order types, Promotions, Source, etc.) drive and determine order specific calculations required in the Order Entry process.
To set up a new Customer type
Navigate: From the Order Management menu, select > Customer Maintenance > Customer Type. The Customer Type window s displayed.
1 In the Company field, enter or select the company name from the LOV.
2 In the Customer Type, Display Code, Description, and Sort Order fields, enter or select the appropriate information.
3 Select or clear all applicable processing check boxes. (Optional)
4 In the Order Type and/or Script fields, select a type and script as applicable. (Optional).
5 In the Language field, enter or select an alternate language translation(s), if applicable. (Optional).
6 Click Save, or press the F10 key to complete the transaction.
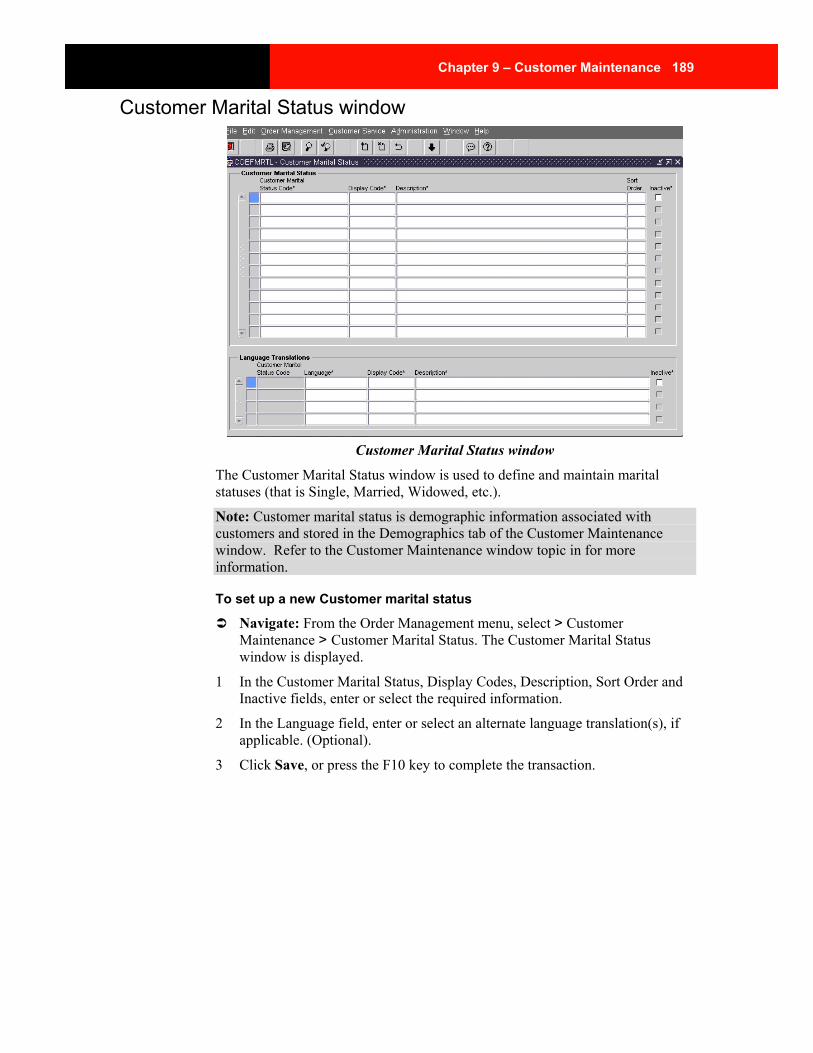
Chapter 9 – Customer Maintenance 189
Customer Marital Status window
Customer Marital Status window
The Customer Marital Status window is used to define and maintain marital statuses (that is Single, Married, Widowed, etc.).
Note: Customer marital status is demographic information associated with customers and stored in the Demographics tab of the Customer Maintenance window. Refer to the Customer Maintenance window topic in for more information.
To set up a new Customer marital status
Navigate: From the Order Management menu, select > Customer Maintenance > Customer Marital Status. The Customer Marital Status window is displayed.
1 In the Customer Marital Status, Display Codes, Description, Sort Order and Inactive fields, enter or select the required information.
2 In the Language field, enter or select an alternate language translation(s), if applicable. (Optional).
3 Click Save, or press the F10 key to complete the transaction.

190 Retek Customer Order Management
Customer Gender window
Customer Gender window
The Customer Gender window is used to define and maintain gender types (that is Male or Female).
Note: Customer gender is demographic information associated with customers and stored in the Demographics tab of the Customer Maintenance window. Refer to the Customer Maintenance window topic in for more information.
To set up a new customer gender
Navigate: From the Order Management menu, select > Customer Maintenance > Customer Gender. The Customer Gender window is displayed.
1 In the Customer Gender, Display Code, Description, Sort Order, and Inactive fields, enter or select the appropriate information.
2 In the Language field, enter or select an alternate language translation(s), if applicable. (Optional).
3 Click Save, or press the F10 key to complete the transaction.

Chapter 9 – Customer Maintenance 191
Address Type window
Address Type window
The Address Type window is used to define and maintain the classification of a Customer’s address for delivery and/or reporting information (that is Residential, Business, Standard, P.O. Box, Military, Mailing List, etc.).
Note: A Customer may have multiple addresses stored on record. When each address is created the Address Type defaults to Standard but can be assigned any other address type, as appropriate. Refer to the Address Type topic for more information.
To set up a new address type
Navigate: From the Order Management menu, select > Customer Maintenance > Address Type. The Address Type window is displayed.
1 In the Address Type field, enter an address type code or select one from the LOV.
2 In the Display Code, Description, Sort Order and Inactive fields, enter or select the required information.
3 In the Language field, enter or select an alternate language translation(s), if applicable. (Optional).
4 Click Save, or press the F10 key to complete the transaction.

192 Retek Customer Order Management
Telephone Type window
Telephone Type window
The Telephone Type window is used to define and maintain the distinction of telephone types for contact reference and/or reporting information (that is Home, Office, Pager, Cellular, etc.).
Note: A Customer may have multiple telephone numbers stored on record. When adding a telephone number to the Customer Telephones section in the Customer form, Retek COM requires a telephone type to distinguish each listed number. Refer to the Telephones Button topic for more information.
To set up a new telephone type
Navigate: In the Order Management menu, select > Customer Maintenance > Telephone Type. The Telephone Type window is displayed.
1 In the Telephone Type field, enter a telephone type code, or select one from the LOV.
2 In the Display Code, Description and Sort order fields, enter or select the required data.
3 Select the Format Telephone Number flag, if entering a Format Mask for the new telephone type (for example (999) AAA-AAAA, etc.). (Optional).
4 In the Script field, select a script, if applicable. (Optional).
5 In the Language field, enter or select an alternate language translation(s), if applicable. (Optional).
6 Click Save, or press the F10 key to complete the transaction.

Chapter 9 – Customer Maintenance 193
Demographic window
Demographic window
The Demographic window is used to define and maintain generic survey or demographic information that can be accumulated and tracked for Customer relationship management.
Note: The demographic information may be used in conjunction with the Marketing Source. Refer to the Marketing Source window topic for more information.
To set up a new demographic
Navigate: From the Order Management menu, select > Customer Maintenance > Demographics. The Demographic window is displayed.
1 In the Company field, enter the company, or select it from the LOV.
2 In the Demographic, Display Code, Description and Sort order fields, enter or select the required data.
3 Select or clear the applicable processing check boxes.
4 In the Script field, select a Script, if applicable. (Optional)
5 In the Language field, enter or select an alternate language translation(s), if applicable. (Optional).
6 Click Save, or press the F10 key to complete the transaction.
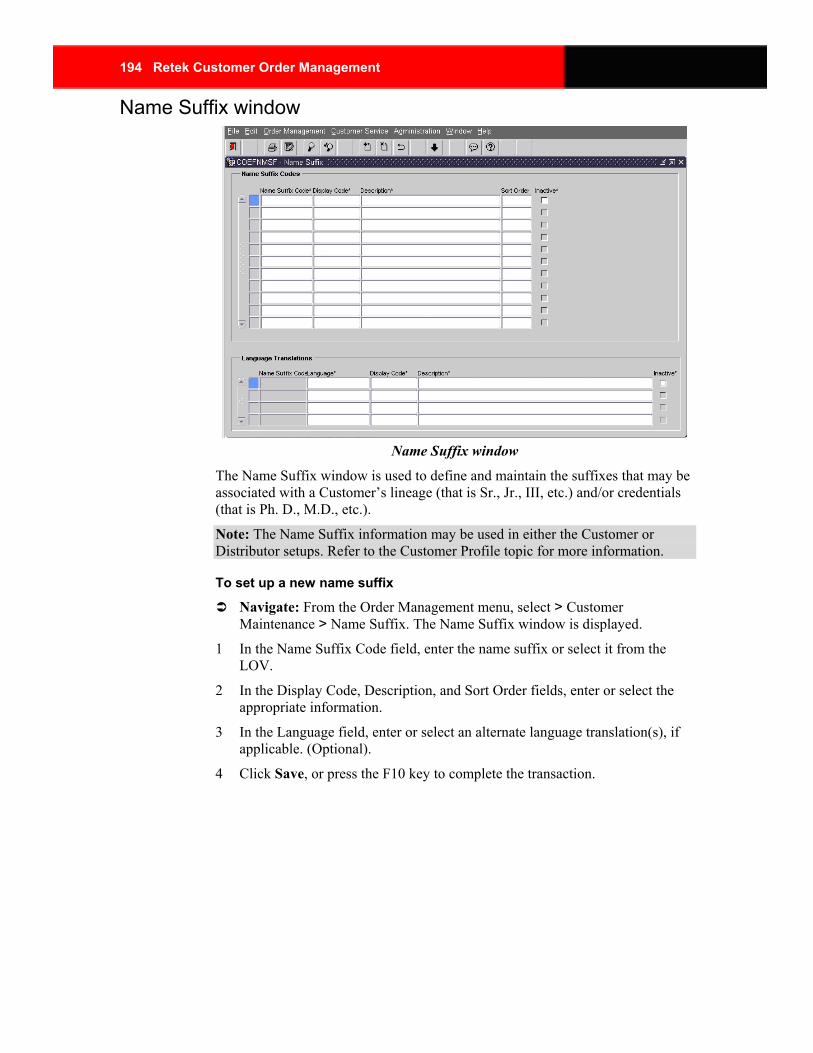
194 Retek Customer Order Management
Name Suffix window
Name Suffix window
The Name Suffix window is used to define and maintain the suffixes that may be associated with a Customer’s lineage (that is Sr., Jr., III, etc.) and/or credentials (that is Ph. D., M.D., etc.).
Note: The Name Suffix information may be used in either the Customer or Distributor setups. Refer to the Customer Profile topic for more information.
To set up a new name suffix
Navigate: From the Order Management menu, select > Customer Maintenance > Name Suffix. The Name Suffix window is displayed.
1 In the Name Suffix Code field, enter the name suffix or select it from the LOV.
2 In the Display Code, Description, and Sort Order fields, enter or select the appropriate information.
3 In the Language field, enter or select an alternate language translation(s), if applicable. (Optional).
4 Click Save, or press the F10 key to complete the transaction.
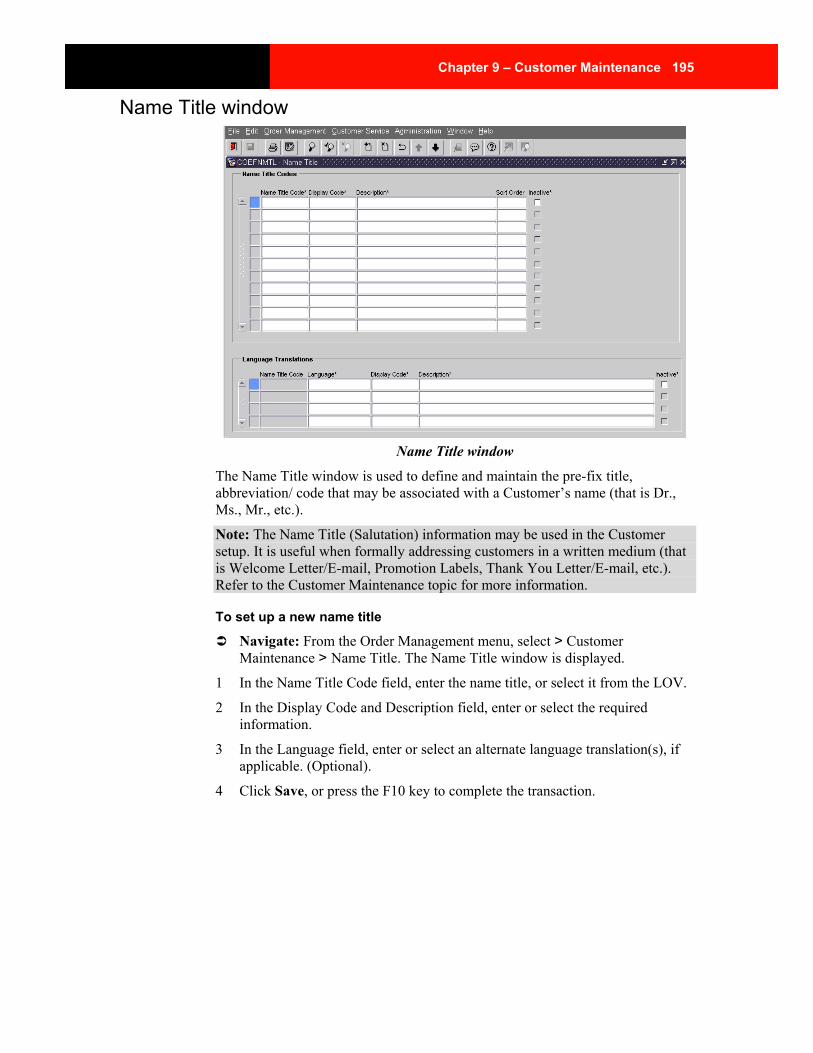
Chapter 9 – Customer Maintenance 195
Name Title window
Name Title window
The Name Title window is used to define and maintain the pre-fix title, abbreviation/ code that may be associated with a Customer’s name (that is Dr., Ms., Mr., etc.).
Note: The Name Title (Salutation) information may be used in the Customer setup. It is useful when formally addressing customers in a written medium (that is Welcome Letter/E-mail, Promotion Labels, Thank You Letter/E-mail, etc.). Refer to the Customer Maintenance topic for more information.
To set up a new name title
Navigate: From the Order Management menu, select > Customer Maintenance > Name Title. The Name Title window is displayed.
1 In the Name Title Code field, enter the name title, or select it from the LOV.
2 In the Display Code and Description field, enter or select the required information.
3 In the Language field, enter or select an alternate language translation(s), if applicable. (Optional).
4 Click Save, or press the F10 key to complete the transaction.

196 Retek Customer Order Management
Bank Account Type window
Bank Account Type window
The Bank Account Type window is used to define and maintain the type of bank account associated with an electronic, autopay or manual payment method of check (that is Checking, Savings, Money Market, etc.).
Note: The Bank Account Type/Code in conjunction with the Bank and Branch (names), complete the information required to process check payments electronically. Additional maintenance table combinations work cohesively to successfully transmit electronic transactions (that is Payment Methods and Payment Vendor, etc.). Refer to the Payments, Auto Payments, and the Payment Method topics for more information.
To set up a new bank account type
Navigate: Order Management > Customer Maintenance > Bank Account Type. The Bank Account Type window is displayed.
1 In the Company field, enter the company, or select it from the LOV.
2 In the Bank Account Type, Display Code, Description, Sort Order, and Inactive fields, enter or select the appropriate information.
3 In the Orig System Reference field, enter an Original (Legacy) System Reference, if applicable. (Optional)
4 In the Language field, enter or select an alternate language translation(s), if applicable. (Optional)
5 Click Save, or press the F10 key to complete the transaction.
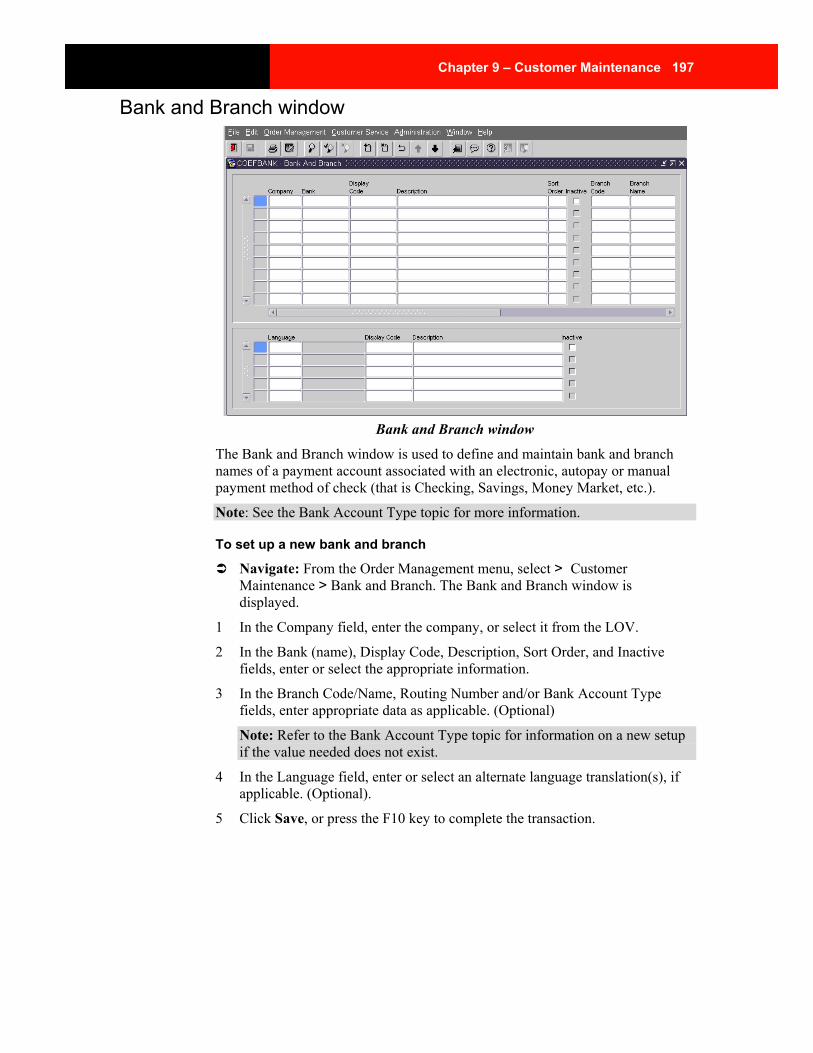
Chapter 9 – Customer Maintenance 197
Bank and Branch window
Bank and Branch window
The Bank and Branch window is used to define and maintain bank and branch names of a payment account associated with an electronic, autopay or manual payment method of check (that is Checking, Savings, Money Market, etc.).
Note: See the Bank Account Type topic for more information.
To set up a new bank and branch
Navigate: From the Order Management menu, select > Customer Maintenance > Bank and Branch. The Bank and Branch window is displayed.
1 In the Company field, enter the company, or select it from the LOV.
2 In the Bank (name), Display Code, Description, Sort Order, and Inactive fields, enter or select the appropriate information.
3 In the Branch Code/Name, Routing Number and/or Bank Account Type fields, enter appropriate data as applicable. (Optional)
Note: Refer to the Bank Account Type topic for information on a new setup if the value needed does not exist.
4 In the Language field, enter or select an alternate language translation(s), if applicable. (Optional).
5 Click Save, or press the F10 key to complete the transaction.


Chapter 10 – Item Maintenance 199
Chapter 10 – Item Maintenance Item Maintenance Overview
Note: For RCOM 10.0 items are setup in Retek Merchandising System (RMS) and integrated into RCOM via an interface.
This topic reviews the following Item Maintenance tables setup and functions that are a pre-requisite to using the applications in all modules of Retek COM:
• Product Segment
• Item Type/Category
• Item Category/Relationship Type
• Subscription Frequency
• Item Hazard Class
• Harmonized Commodity
• Item Packaging Group
• Item Matrix Style/Color/Size/Elements 4 & 5
• Item Vendor
• Event Type
• Unit of Measure
• Reservation Type
• Image Type
All maintenance tables within Retek COM utilize the same navigation process for either defining or supporting changes/updates. It is the intent of this topic to direct the end user through the varied maintenance menu paths and outline their purpose.
Note: Changing maintenance table information may have a direct impact on entire processes in the Retek COM applications and therefore require due diligence to ensure that the Client’s specifications and end objectives are met.
Retek COM makes the assumption that all required seeded data for table maintenance will be determined during the discovery process of specifications gathering and/or business analysis.
The standard throughout to change/update maintenance tables is as follows
Navigate: From the Order Management menu, select > Maintenance Menu of Choice > Maintenance Table of Choice.
1 Perform a query to retrieve the desired maintenance table record.
2 Make the necessary/applicable changes.
200 Retek Customer Order Management
3 Click Save, or press the F10 key to update. Then click Save, or press the F10 key to complete the transaction.
Windows and Procedures Product Segment window
Note: For RCOM 10.0 items are setup in Retek's Merchandising System (RMS) and integrated into RCOM via an interface.
The Product Segment window is used to define and maintain the product segment codes used to group inventory items into specific classifications.
Note: The Product Segment represents the more generic grouping of several different items that might be classed within that segment for tax purposes or exemptions (that is Vitamins, Jewelry, etc.
To set up a new product segment
Navigate: From the Order Management menu, select > Item Maintenance > Product Segment. The Product Segment window is displayed.
1 In the Product Segment/Display Codes and Description fields, enter or select the required data.
2 In the Product Segment Category and Script fields, select as applicable. (Optional)
3 In the Language field, associate an alternate language translation(s), if applicable. (Optional).
4 Click Save, or press the F10 key to complete the transaction.

Chapter 10 – Item Maintenance 201
Item Type window Note: For RCOM 10.0 items are setup in Retek's Merchandising System (RMS) and integrated into RCOM via an interface.
The Item Type window is used to define and maintain the item type codes that are assigned to inventory items for accounting or general ledger purposes.
To set up a new item type
Navigate: From the Order Management menu, select > Item Maintenance > Item Type. The Item Type window is displayed.
1 In the Item Type/Display Codes and Description fields, enter or select the required data.
2 Press F8 to see a list of all existing item types, or select New Record from the Edit menu, to create a new item type.
3 Select or clear the Subscription checkbox, as applicable. (Optional)
Note: Check only if the created item type classification is applicable to Subscription type orders. Refer to the Recurring Orders: Subscriptions topic for more information.
4 In the Script field, select a Script, as applicable. (Optional)
5 In the Language field, associate an alternate language translation(s), if applicable. (Optional).
6 Click Save, or press the F10 key to complete the transaction.

202 Retek Customer Order Management
Item Category window Note: For RCOM 10.0 items are setup in Retek's Merchandising System (RMS) and integrated into RCOM via an interface.
The Item Category window is used to define and maintain the category codes used to group like items and to map individual items to a Parent or Child relationship category.
To set up an item category
Navigate: From the Order Management menu, select > Item Maintenance > Item Category. The Item Category window is displayed.
1 In the Item Category/Display Codes and Description fields, enter the required data.
2 Press F8 to see a list of all existing item categories, or select New Record from the Edit menu, to create a new item category.
3 In the Item Category, Display Heading, Parent Category, Small/Image File Name, Small Image/Long Description, Original/Parent Flag System Reference fields, select the applicable data. (Optional)
4 In the Script field, select a script and/or select all applicable processing flags. (Optional)
5 In the Item Category Mapping section of the window, associate an item number, description etc., as applicable. (Optional).
Note: Item Category Mappings may also be added in the Order Management -Master Item window, from the Inventory or Item Pricing menu.
6 Click Save, or press the F10 key to complete the transaction.
Parent Category Relationship The Parent Category Relationships section of the Item Category form is used to define and maintain additional Child Item Category associations.
Note: This data entry operation is optional and although displayed as a required field bears no forced requirements to complete the addition of a new item category.
To set up an parent category relationship to an item category
Navigate: From the Order Management menu, select Item Maintenance > Item Category. The Item Category window is displayed.
1 Follow steps 1-4 on the previous page if adding a new item category or query an existing item category.
2 Click the Parent Category Relationships button. The Parent Category Relationship section appears at the bottom of the window.
3 In the Category Group and Child Item Category Code fields, enter or select the required data as applicable.
4 Click Save, or press the F10 key to complete the transaction.

Chapter 10 – Item Maintenance 203
Child Category Relationship The Child Category Relationships section of the Item Category form is used to define and maintain additional Parent Item Category associations.
Note: This data entry operation is optional and although displayed as a required field bears no forced requirements to complete the addition of a new item category.
To set up a child category relationship item category
Navigate: From the Order Management menu, select > Item Maintenance > Item Category. The Item Category window is displayed.
1 Follow steps 1-4 on the Item Category topic if adding a new item category or query an existing item category.
2 Click the Child Category Relationships button. The Child Category block appears at the bottom of the window.
3 In the Category Group and Child Item Category Code fields, enter or select the required data as applicable.
4 Click Save, or press the F10 key to complete the transaction.
Translation Maintenance The Translations section of the Item Category form is used to define and maintain additional language translations where the item category may be utilized for other companies, etc.
Note: This data entry operation is optional and although displayed as a required field bears no forced requirements to complete the addition of a new item category.
To set up a translation to an item category
Navigate: From the Order Management menu, select the > Item Maintenance > Item Category. The Item Category window is displayed.
1 Follow steps 1-4 on the Item Category topic if adding a new item category or query an existing category.
2 Click the Translations button. The Language fields appear at the bottom of the window.
3 In the Language field, associate an alternate language translation(s), as applicable.
4 Click Save, or press the F10 key to complete the transaction.

204 Retek Customer Order Management
Item Relationship Type window Note: For RCOM 10.0 items are setup in Retek's Merchandising System (RMS) and integrated into RCOM via an interface.
The Item Relationship Type window is used to define and maintain the relationship types that are assigned between items (that is Side-sell, Up-sell, required, etc.).
Note: Typically associated with kit assemblies or script associations with marketing promotions. Refer to the Item Relationships topic for more information.
To set up an item relationship type
Navigate: From the Order Management menu, select > Item Maintenance > Item Relationship Type. The Item Relationship Type window is displayed.
1 In the Company, Item Relationship Type, Display Code and Description fields, enter or select the required data.
2 Press F8 to see a list of all existing item relationship types, or select New Record from the Edit menu, to create a new item relationship type.
3 Select or clear all applicable processing flags. (Optional)
4 In the Script field, select a script, as applicable. (Optional)
5 In the Language field, associate an alternate language translation(s), if applicable. (Optional).
6 Click Save, or press the F10 key to complete the transaction.

Chapter 10 – Item Maintenance 205
Subscription Frequency window Note: For RCOM 10.0 items are setup in Retek's Merchandising System (RMS) and integrated into RCOM via an interface.
The Subscription Frequency window is used to define the recurring frequencies applicable and singularly specific to subscription orders (that is Per Issue, Bi-monthly, Monthly, Quarterly, etc.).
Note: A frequency SQL text is required in establishing a new subscription frequency to set the next order generation date. (Development code).
Refer to the Recurring Orders – Subscription topic for more information.
To set up a new subscription frequency Navigate: From the Order Management menu, select > Item Maintenance >
Subscription Frequency. The Subscription Frequency window is displayed.
1 In the Company, Subscription Frequency, Display Code and Description fields, enter the required data.
2 Press F8 to see a list of all existing subscription frequencies, or select New Record from the Edit menu, to create a new frequency.
3 In the Frequency SQL Text field, enter the required calculation. Example: Monthly = add_months(sysdate,1)
4 In the Script field, select a script as applicable. (Optional).
5 In the Language field, associate an alternate language translation(s), as applicable. (Optional).
6 Click Save, or press the F10 key to complete the transaction.
206 Retek Customer Order Management
Item Hazard Class window Note: For RCOM 10.0 items are setup in Retek's Merchandising System (RMS) and integrated into RCOM via an interface.
The Item Hazard Class form is used to define and maintain the classification codes assigned to denote the hazard level of items (that is flammable, toxic, etc.).
To set up an item hazard class Navigate: From the Order Management menu, select > Item Maintenance >
Item Hazard Class. The Item Hazard Class window is displayed.
1 In the Hazard Class/Display Codes and Description fields, enter or select the required data.
2 Press F8 to see a list of all existing Hazard Classes, or select New Record from the Edit menu, to create a new hazard class.
3 Select or clear the applicable processing flags.
4 In the Script field, select a script, if applicable. (Optional)
5 Enter or select all alternate language translation(s), as applicable. (Optional).
6 Click Save, or press the F10 key to complete the transaction.
Harmonized Commodity window Note: For RCOM 10.0 items are setup in Retek's Merchandising System (RMS) and integrated into RCOM via an interface.
The Harmonized Commodity window is used to define and maintain the indicators as used on international weigh bills that designate the type of product being shipped (that is animal and vegetable products, electronics, perishable items, etc.).
Note: For example: A particular country’s customs laws may restrict certain types of knives (that is hunting knives), from entering the country via most individual retail merchandise sales. While another may accept and tax that type of commodity at a particular rate due to the noted classification.
To set up a harmonized commodity
Navigate: From the Order Management menu, select > Item Maintenance > Harmonized Commodity. The Harmonized Commodity window is displayed.
1 In the Harmonized Commodity/Display Codes and Description fields, enter the required data.
Note: Press F8 to see a list of all existing harmonized commodities, or select New Record from the Edit menu, to create a new harmonized commodity.
2 Select or clear the Inactive flag.
3 In the Language field, associate an alternate language translation(s), if applicable. (Optional).
4 Click Save, or press the F10 key to complete the transaction.
Chapter 10 – Item Maintenance 207
Item Packaging Group window Note: For RCOM 10.0 items are setup in Retek's Merchandising System (RMS) and integrated into RCOM via an interface.
The Item Packaging Group window is used to define and maintain the group classifications of item packaging (that is cartons, biodegradable, etc.).
To set up an item packaging group Navigate: From the Order Management menu, select > Item Maintenance >
Item Packaging Group. The Item Packaging Group window is displayed.
1 In the Item Packaging Group/Display Codes and Description fields, enter the required data.
2 Press F8 to see a list of all existing packaging groups, or select New Record from the Edit menu, to create a new item-packaging group.
3 In the Language field, associate an alternate language translation(s), if applicable. (Optional).
4 Click Save, or press the F10 key to complete the transaction.
Item Vendor window Note: For RCOM 10.0 items are setup in Retek's Merchandising System (RMS) and integrated into RCOM via an interface.
The Item Vendor window is used to maintain the vendor/supplier names, addresses and ship methods with their specific inventory items.
To set up an item vendor
Navigate: From the Order Management menu, select > Item Maintenance > Item Vendor. The Item Vendor window is displayed.
1 In the Item Vendor/Display Codes and Description fields, enter or select the required data.
2 Press F8 to see a list of all existing item vendors, or select New Record from the Edit menu, to create a new item vendor.
3 Select or clear the EDI (Electronic Data Interchange) Enabled flag, if applicable to the vendor.
Note: Select only if the vendor is in a remote location and not associated with the Client’s warehouses, or if the vendor is listed as the Client and items are in an EDI warehouse.
Translations The Translations section of the Item Vendor form is used to define and maintain additional language translations where the item vendor information may be utilized for other companies, etc.
Note: This data entry operation is optional and although displayed as a required field bears no forced requirements to complete the addition of a vendor.
208 Retek Customer Order Management
To set up a translation for an item vendor
Navigate: From the Order Management menu, select > Item Maintenance > Item Vendor. The item vendor window is displayed.
1 Follow steps 1-5 on the Item Vendor topic if adding a new item vendor or query one already existing.
2 Click Translations. The Language field appears at the bottom of the window.
3 In the Language field, associate an alternate language translation(s), as applicable.
4 Click Save, or press the F10 key to complete the transaction.
5 In the Original (Legacy) System Reference and Comments fields, enter information if applicable. (Optional).
6 In the Vendor Address fields, enter the Vendor’s address. (Refer to the Adding an Address topic for more information).
7 Click Save, or press the F10 key to complete the transaction.
Vendor Items The Vendor Items section of the Item Vendor window is used to specifically maintain and identify the vendor/supplier inventory item(s), including start and end times.
Note: This data entry operation is optional and although displayed as a required field bears no forced requirements to complete the addition of a vendor.
To set up an vendor item
Navigate: From the Order Management menu, select > Item Maintenance > Item Vendor. The Item Vendor window is displayed.
1 Follow steps 1-5 on the Item Vendor procedure if adding a new item vendor or query one already existing.
2 Click Vendor Items. The Vendor Items fields appear at the bottom of the window.
3 In the Master Item and Start Time fields, enter the required data as applicable.
4 In the Vendor Item Number, Default Item Cost, End Time and Short/Long Descriptions fields, enter data as applicable. (Optional).
5 Click Save, or press the F10 key to complete the transaction.

Chapter 10 – Item Maintenance 209
Vendor Ship Methods The Vendor Ship Methods section of the Item Vendor form is used to define and maintain ship methods used and supported by the vendor/supplier.
Note: Applicable information for either EDI or non-EDI type vendors. This data entry operation is optional and although displayed as a required field bears no forced requirements to complete the addition of a vendor. Refer to the Item Vendor topic for more information on EDI vendors.
To set up a vendor ship method
Navigate: From the Order Management menu, select > Item Maintenance > Item Vendor. The Item Vendor window is displayed.
1 Follow steps 1-5 on the Item Vendor topic if adding a new item vendor or query one already existing.
2 Click Vendor Ship Methods. The Vendor Ship Method fields appear at the bottom of the window.
3 In the Ship Method and Start Time fields, enter or select the required data.
4 Press F8 to see a list of all valid ship methods.
5 In the Master Item Number/Description, enter data as applicable (Optional).
6 Click Save, or press the F10 key to complete the transaction.
Event Type Note: For RCOM 10.0 items are setup in Retek's merchandising system (RMS) and integrated into RCOM via an interface.
The Event Type window is used to define and maintain the event type codes used to identify a variety of sale events/promotions.
Note: Refer to the Item Pricing for more information on events/promotions.
To set up an event type
Navigate: From the Order Management menu, select > Item Maintenance > Event Type. The Event Type window is displayed.
1 In the Event Type/Display Codes and Description fields, enter or select the required data.
Note: Press F8 to see a list of all existing event types, or select New Record from the Edit menu, to create a new event type.
2 In the Script field, select a script if applicable. (Optional)
3 In the Language field, enter or select an alternate language translation(s), as applicable. (Optional).
4 Click Save, or press the F10 key to complete the transaction.
210 Retek Customer Order Management
Unit of Measure window Note: For RCOM 10.0 items are setup in Retek's Merchandising System (RMS) and integrated into RCOM via an interface.
The Unit of Measure window is used to define and maintain the lookup table for unit of measures, which can be assigned to an item to specify packaging or measurement of selling (that is, each, pack, pound, etc.).
To set up a unit of measure
Navigate: From the Order Management menu, select > Item Maintenance > Unit of Measure. The Unit of Measure window is displayed.
1 In the Unit of Measure, Display Code and Description fields, enter the required data.
2 Press F8 to see a list of all existing units of measure, or select New Record from the Edit menu, to create a unit of measure.
3 In the To UoM field, enter a Unit of Measure and associate a Conversion Rate, as applicable. (Optional).
Note: Used to indicate alternate units of measures, for example, pounds to ounces. These field are optional and although displayed as a required field, bears no forced requirements to add the new Unit of Measure.
4 In the Language field, associate an alternate language translation(s), if applicable. (Optional).
5 Click Save, or press the F10 key to complete the transaction.
Reservation Type window Note: For RCOM 10.0 items are setup in Retek's Merchandising System (RMS) and integrated into RCOM via an interface.
The Reservation type window is used to define and maintain the types of reservations assigned to an item when setting reservations, whether systematically or manually.
To set up reservation type
Navigate: From the Order Management menu, select > Item Maintenance > Reservation Type. The Reservation Type window is displayed.
1 In the Reservation Type, Display Code and Description fields, enter or select the required data.
2 Press F8 to see a list of all existing reservation types, or select New Record from the Edit menu, to create a reservation type.
3 In the language field, associate an alternate language translation(s), if applicable. (Optional).
4 Click Save, or press the F10 key to complete the transaction.

Chapter 10 – Item Maintenance 211
Image Type window Note: For RCOM 10.0 items are setup in Retek's Merchandising System (RMS) and integrated into RCOM via an interface.
The Image Type window is used to define and maintain a type of image file to store graphics as images and as setup on the Item Image form from the Inventory menu.
Note: Refer to the Item Image topic for more information.
To set up a new image type
Navigate: From the Order Management menu, select > Item Maintenance > Image Type. The Image Type window is displayed.
1 In the Company, Image Type, Display Code and Description fields, enter or select the required data.
2 Press F8 to see a list of all existing image types, or select New Record from the Edit menu, to create a new image type.
3 In the Language field, associate an alternate language translation(s), if applicable. (Optional).
4 Click Save, or press the F10 key to complete the transaction.


Chapter 11 – Workflow Maintenance 213
Chapter 11– Workflow Maintenance Workflow Maintenance Overview
This topic reviews the following Workflow Maintenance tables setup and functions that are a pre-requisite to using the applications in all modules of Retek COM:
• Script
• Job Responsibility/Function Access
• Audit Column/Type
• Activity Source
• Script Type
• Activity Status/Type
• Request Priority/Type/Status/Reason
• Reason Category/Item/Item Template
• Navigation Script
• Activity Request Item
• Report Type
All maintenance tables within Retek COM utilize the same navigation process for either defining or supporting changes/updates. It is the intent of this volume to direct the end user through the varied maintenance menu paths and outline their purpose.
Note: Changing maintenance table information may have a direct impact on entire processes in the Retek COM applications and therefore require due diligence to ensure that the Client’s specifications are met.
Retek COM makes the assumption that all required seeded data for table maintenance will be determined during the discovery process of specifications gathering and/or business analysis.
To change/update maintenance tables
Navigate: From the Order Management menu, select Maintenance Menu of Choice > Maintenance Table of Choice
1 Perform a query to retrieve the desired maintenance table record.
2 Make the necessary/applicable changes.
3 Click Save, or press the F10 key to update. Then click Save, or press the F10 key to complete the transaction.
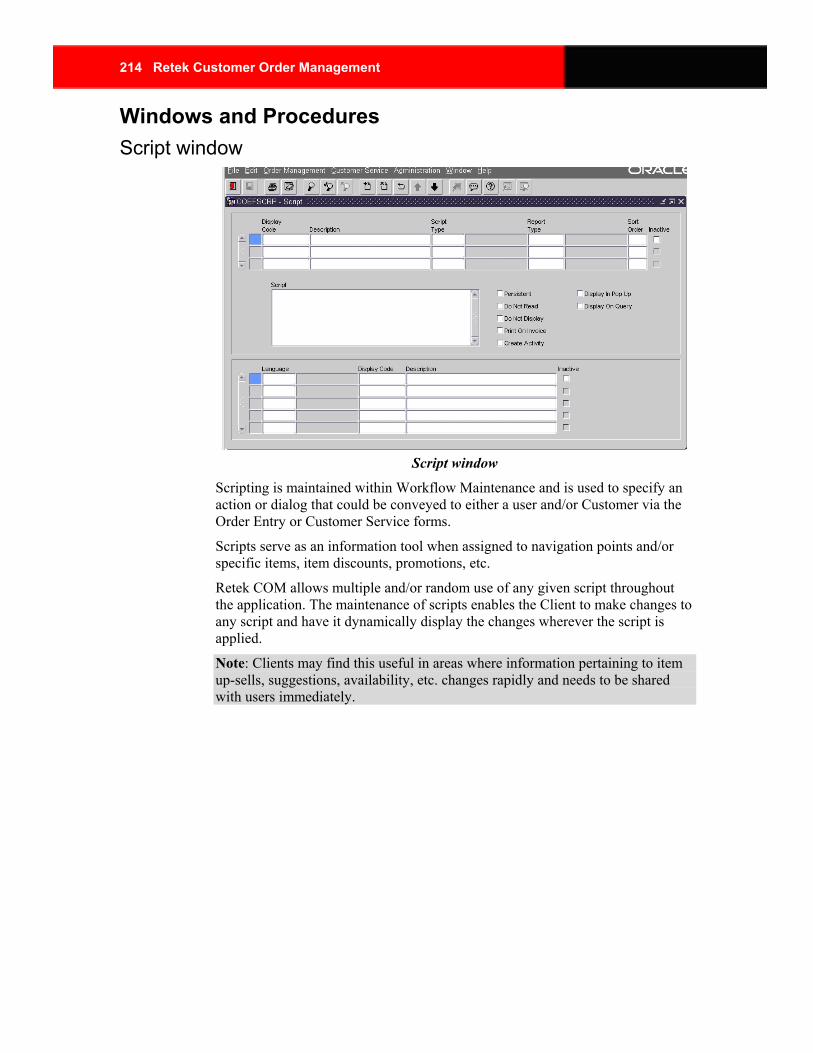
214 Retek Customer Order Management
Windows and Procedures Script window
Script window
Scripting is maintained within Workflow Maintenance and is used to specify an action or dialog that could be conveyed to either a user and/or Customer via the Order Entry or Customer Service forms.
Scripts serve as an information tool when assigned to navigation points and/or specific items, item discounts, promotions, etc.
Retek COM allows multiple and/or random use of any given script throughout the application. The maintenance of scripts enables the Client to make changes to any script and have it dynamically display the changes wherever the script is applied.
Note: Clients may find this useful in areas where information pertaining to item up-sells, suggestions, availability, etc. changes rapidly and needs to be shared with users immediately.

Chapter 11 – Workflow Maintenance 215
To create a script
Navigate: From the Order Management menu, select > Workflow Maintenance > Script. The Script window is displayed
1 In the Display Code field, enter an easily recognizable code for the script
2 In the Description field, enter the script header details for the display code.
3 In the Script Type field, press F9 and select the appropriate Script Type from the LOV.
4 If applicable, select the appropriate Report Type and/or enter a Sort Order. (Optional).
5 In the Script field, enter the information to be displayed.
6 Select or clear the applicable display/usage flag(s). (Optional)
7 In the Language field, enter or select an alternate language translation(s), if applicable. (Optional).
8 Click Save, or press the F10 key to complete the transaction.
Note: The script is now ready to be assigned in the script field of any form where applicable.
Job Responsibility window
Job Responsibility window
The Job Responsibility window is used to define and maintain specific rules of job functions that are assigned to User Accounts for security access or limitations.
Note: This window allows the option of full control to access and/or function ability as assigned to the Job Function. Example: A Client may decide to restrict a user with an Order Entry Level job function from releasing a No Charge Order Type. The user may key the order and apply all the other order entry functions, including pending the order, except for the Release.

216 Retek Customer Order Management
To set up a new job responsibility
Navigate: From the Order Management menu, select > Workflow Maintenance > Job Responsibility. The Job Responsibility window is displayed.
1 In the Company, Job Function and Request Status field, enter or select the required data.
Note: Press F8 to see a list of all existing companies and job responsibilities, or select New Record from the Edit menu, to create a new job.
2 Enter the following applicable field option(s) to achieve desired job function access and/or restrictions. Request Reason/Type/Priority, Reason Category/ Item, Customer Status/Reason/Type, Distributor Status/Reason/Type/Level, Order Status/Reason/Type/Priority/Line Status, Payment Settled Code, Ship Method, Hold Type, Adjustment Reason and Report Type.
3 In the Script field, select a script, as applicable. (Optional)
4 Click Save, or press the F10 key to complete the transaction.
Job Function Access window
Job Function Access window
The Job Function Access window is used to define and maintain user job function access to module and block levels for security access and/or restrictions similar to the function of the Job Responsibility window.
Note: Refer to the preceding Job Responsibility topic for more information. See also the Job Function topic in the System Administration user guide.
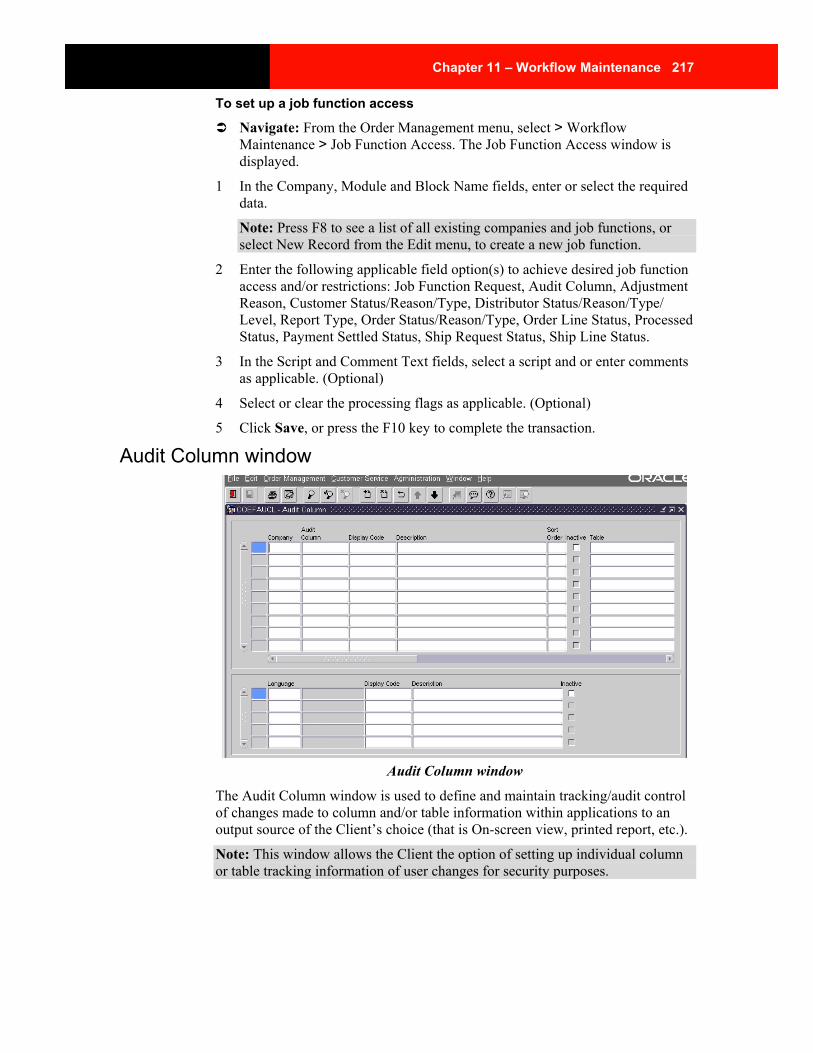
Chapter 11 – Workflow Maintenance 217
To set up a job function access
Navigate: From the Order Management menu, select > Workflow Maintenance > Job Function Access. The Job Function Access window is displayed.
1 In the Company, Module and Block Name fields, enter or select the required data.
Note: Press F8 to see a list of all existing companies and job functions, or select New Record from the Edit menu, to create a new job function.
2 Enter the following applicable field option(s) to achieve desired job function access and/or restrictions: Job Function Request, Audit Column, Adjustment Reason, Customer Status/Reason/Type, Distributor Status/Reason/Type/ Level, Report Type, Order Status/Reason/Type, Order Line Status, Processed Status, Payment Settled Status, Ship Request Status, Ship Line Status.
3 In the Script and Comment Text fields, select a script and or enter comments as applicable. (Optional)
4 Select or clear the processing flags as applicable. (Optional)
5 Click Save, or press the F10 key to complete the transaction.
Audit Column window
Audit Column window
The Audit Column window is used to define and maintain tracking/audit control of changes made to column and/or table information within applications to an output source of the Client’s choice (that is On-screen view, printed report, etc.).
Note: This window allows the Client the option of setting up individual column or table tracking information of user changes for security purposes.

218 Retek Customer Order Management
To set up an audit column
Navigate: From the Order Management menu, select > Workflow Maintenance > Audit Column. The Audit Column window is displayed.
1 In the Company, Audit Column, Display Code, Description, Sort Order, Table and Column Name fields, enter or select the required data.
Note: Press F8 to see a list of all existing companies and audit columns, or select New Record from the Edit menu, to create a new audit column.
2 In the Old/New Value fields, enter the values as appropriate. (Optional)
3 Select or clear the Audit on New/Old Value check boxes. (Optional)
4 In the Script field, select a script, as applicable. (Optional)
5 In the Language field, associate an alternate language translation(s), if applicable. (Optional)
6 Click Save, or press the F10 key to complete the transaction.

Chapter 11 – Workflow Maintenance 219
Audit Type window
Audit Type window
The Audit Type window is used to define and maintain tracking/audit type codes, which are used in the audit control process in identifying the type of change(s) made to a particular column or table.
To set up an audit type
Navigate: From the Order Management menu, select > Workflow Maintenance > Audit Type. The Audit Type window is displayed.
1 In the Audit Type/Display Codes, Sort Order and Description fields, enter or select the required information.
Note: Press F8 to see a list of all existing audit types, or select New Record from the Edit menu, to create a new audit type.
2 Select or clear the processing check boxes to indicate if the audit type will be used locally or globally, if applicable. (Optional).
3 In the Procedure Name field, enter a procedure name if the audit type is to be an automated process.
4 In the Language field, associate an alternate language translation(s), if applicable. (Optional).
5 Click Save, or press the F10 key to complete the transaction.
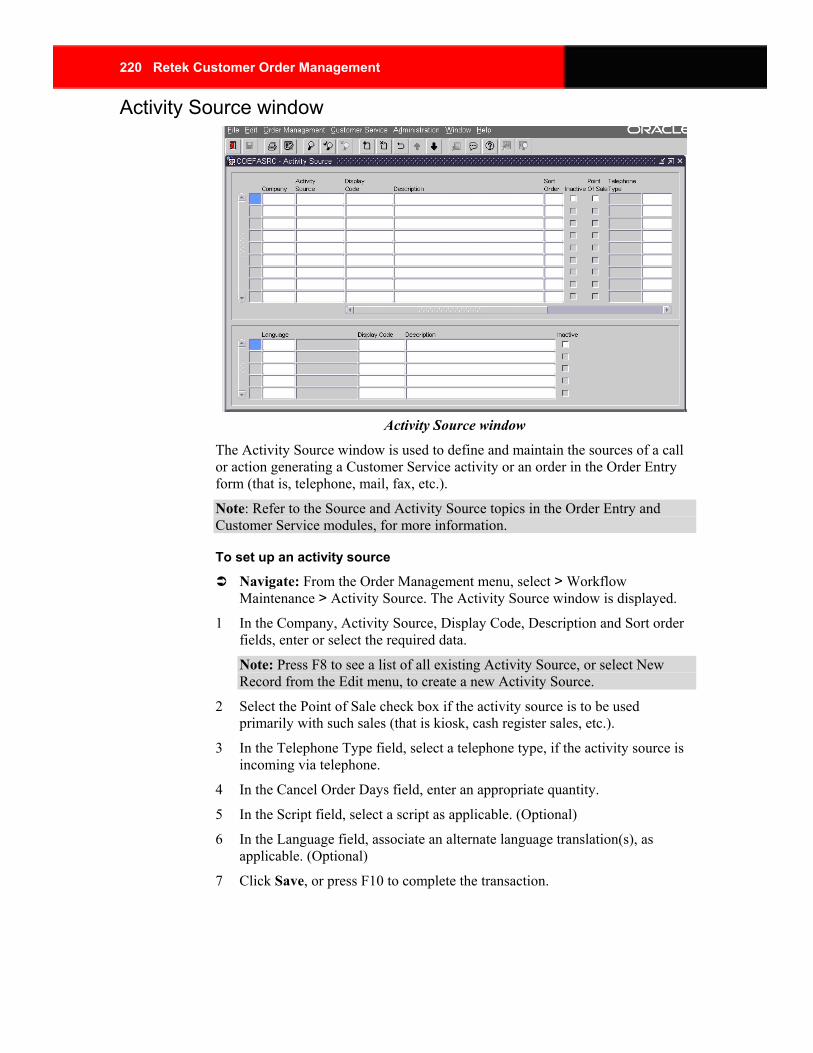
220 Retek Customer Order Management
Activity Source window
Activity Source window
The Activity Source window is used to define and maintain the sources of a call or action generating a Customer Service activity or an order in the Order Entry form (that is, telephone, mail, fax, etc.).
Note: Refer to the Source and Activity Source topics in the Order Entry and Customer Service modules, for more information.
To set up an activity source
Navigate: From the Order Management menu, select > Workflow Maintenance > Activity Source. The Activity Source window is displayed.
1 In the Company, Activity Source, Display Code, Description and Sort order fields, enter or select the required data.
Note: Press F8 to see a list of all existing Activity Source, or select New Record from the Edit menu, to create a new Activity Source.
2 Select the Point of Sale check box if the activity source is to be used primarily with such sales (that is kiosk, cash register sales, etc.).
3 In the Telephone Type field, select a telephone type, if the activity source is incoming via telephone.
4 In the Cancel Order Days field, enter an appropriate quantity.
5 In the Script field, select a script as applicable. (Optional)
6 In the Language field, associate an alternate language translation(s), as applicable. (Optional)
7 Click Save, or press F10 to complete the transaction.

Chapter 11 – Workflow Maintenance 221
Script Type window
Script Type window
The Script Type window is used to define and maintain script classifications or associations of scripts.
Note: Refer to the Script Maintenance topics in this module for more information.
To set up a script type
Navigate: From the Order Management menu, select > Workflow Maintenance > Script Type. The Script Type window is displayed.
1 In the Script Type/Display Codes and Description fields, enter or select the required data.
Note: Press F8 to see a list of all existing script types, or select New Record from the Edit menu, to create a new script type.
2 In the Language field, associate an alternate language translation(s), if applicable. (Optional)
3 Click Save, or press the F10 key to complete the transaction.

222 Retek Customer Order Management
Activity Status window
Activity Status window
The Activity Status window is used to define and maintain the statuses assigned to Customer Service activities (that is request tracking, notes, etc.).
Note: Refer to the Customer Service module for more information.
To set up an activity status
Navigate: From the Order Management menu, select Workflow Maintenance > Activity Status. The Activity Status window is displayed.
1 In the Company, Activity Status, Display Code, Description, and Sort Order fields, enter or select the required data.
Note: Press F8 to see a list of all existing activity status, or select New Record from the Edit menu, to create a new activity status.
2 Select or clear all applicable processing check boxes. (Optional)
3 In the Script field, select a script, as applicable. (Optional)
4 In the Language field, associate an alternate language translation(s), if applicable. (Optional).
5 Click Save, or press the F10 key to complete the transaction.

Chapter 11 – Workflow Maintenance 223
Activity Type window
Activity Type window
The Activity Type window is used to define and maintain the activity type codes used in Customer Service activities (that is request tracking, notes, etc.).
Note: Refer to the Customer Service module for more information.
To set up an activity type
Navigate: From the Order Management menu, select Workflow Maintenance > Activity Type. The Activity Type window is displayed.
1 In the Company, Activity Type, Display Code, Description and Sort Order fields, enter or select the required data.
Note: Press F8 to see a list of all existing activity types, or select New Record from the Edit menu, to create a new activity type.
2 In the Script field, select a script, as applicable. (Optional)
3 In the Language field, associate an alternate language translation(s), if applicable. (Optional).
4 Click Save, or press the F10 key to complete the transaction.
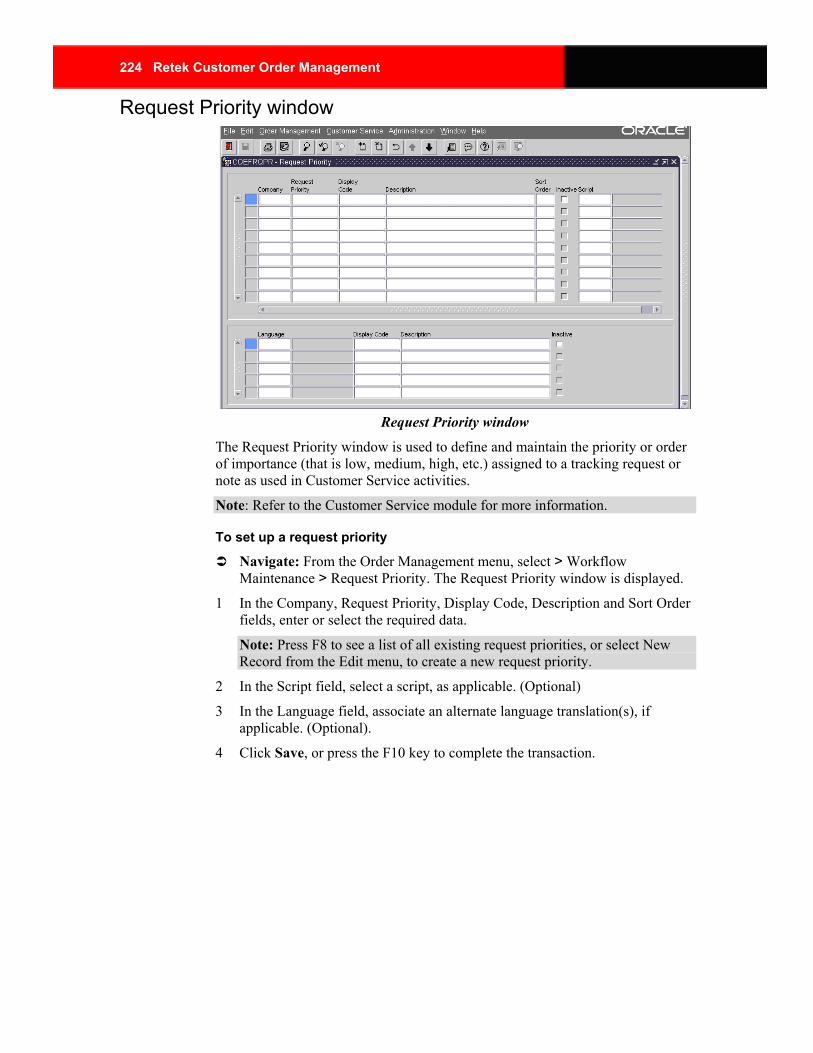
224 Retek Customer Order Management
Request Priority window
Request Priority window
The Request Priority window is used to define and maintain the priority or order of importance (that is low, medium, high, etc.) assigned to a tracking request or note as used in Customer Service activities.
Note: Refer to the Customer Service module for more information.
To set up a request priority
Navigate: From the Order Management menu, select > Workflow Maintenance > Request Priority. The Request Priority window is displayed.
1 In the Company, Request Priority, Display Code, Description and Sort Order fields, enter or select the required data.
Note: Press F8 to see a list of all existing request priorities, or select New Record from the Edit menu, to create a new request priority.
2 In the Script field, select a script, as applicable. (Optional)
3 In the Language field, associate an alternate language translation(s), if applicable. (Optional).
4 Click Save, or press the F10 key to complete the transaction.

Chapter 11 – Workflow Maintenance 225
Request Type window
Request Type window
The Request Type window is used to define and maintain the codes used to identify the varied types of request tracking or notes as used in the Customer Service activities (that is priority message, order processing, compliance, etc.).
Note: Refer to the Customer Service module for more information.
To set up a request type
Navigate: From the Order Management menu, select > Workflow Maintenance > Request Type. The Request Type window is displayed.
1 In the Company, Request Type, Display Code, Description and Sort Order fields, enter or select the required data.
Note: Press F8 to see a list of all existing request types, or select New Record from the Edit menu, to create a new request type.
2 In the Script field select a script, as applicable. (Optional)
3 In the Language field, associate an alternate language translation(s), if applicable. (Optional).
4 Click Save, or press the F10 key to complete the transaction.
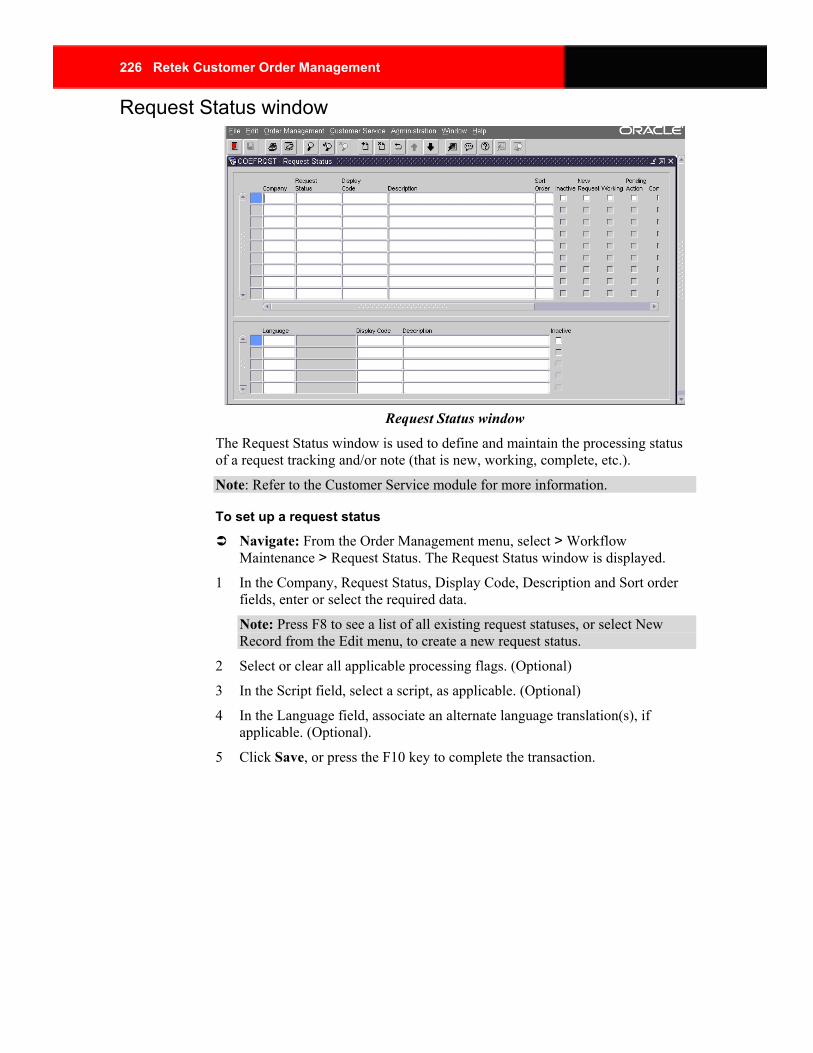
226 Retek Customer Order Management
Request Status window
Request Status window
The Request Status window is used to define and maintain the processing status of a request tracking and/or note (that is new, working, complete, etc.).
Note: Refer to the Customer Service module for more information.
To set up a request status
Navigate: From the Order Management menu, select > Workflow Maintenance > Request Status. The Request Status window is displayed.
1 In the Company, Request Status, Display Code, Description and Sort order fields, enter or select the required data.
Note: Press F8 to see a list of all existing request statuses, or select New Record from the Edit menu, to create a new request status.
2 Select or clear all applicable processing flags. (Optional)
3 In the Script field, select a script, as applicable. (Optional)
4 In the Language field, associate an alternate language translation(s), if applicable. (Optional).
5 Click Save, or press the F10 key to complete the transaction.
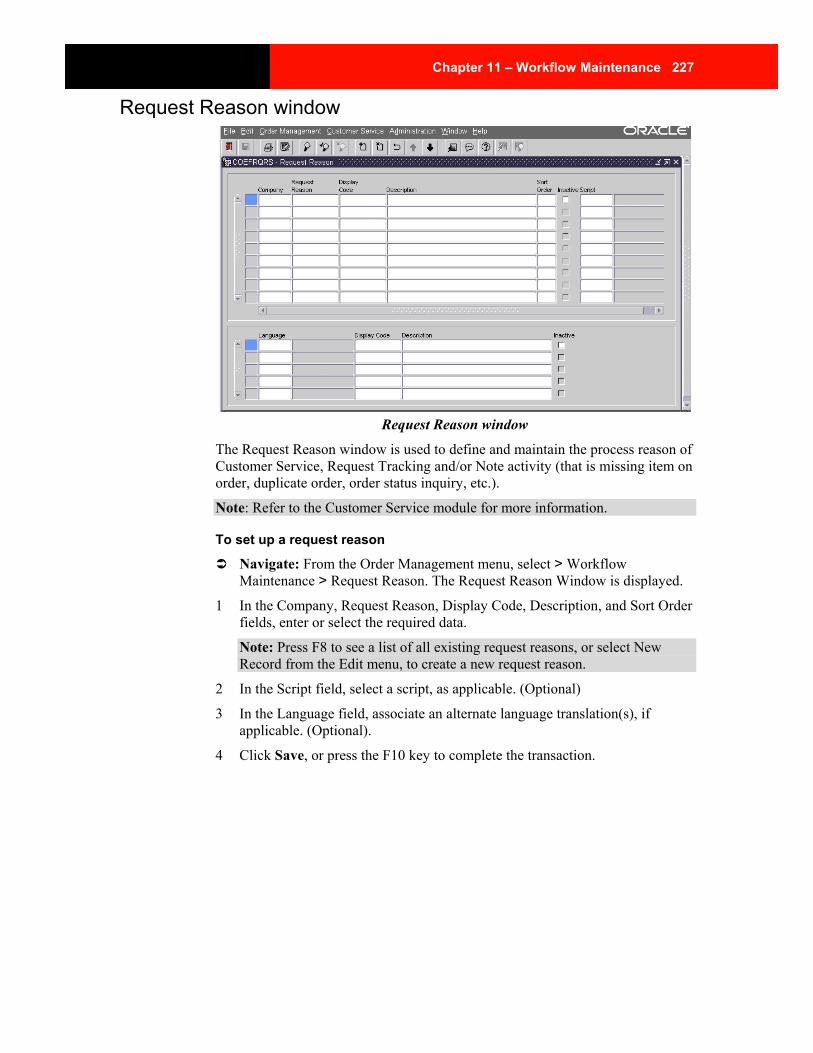
Chapter 11 – Workflow Maintenance 227
Request Reason window
Request Reason window
The Request Reason window is used to define and maintain the process reason of Customer Service, Request Tracking and/or Note activity (that is missing item on order, duplicate order, order status inquiry, etc.).
Note: Refer to the Customer Service module for more information.
To set up a request reason
Navigate: From the Order Management menu, select > Workflow Maintenance > Request Reason. The Request Reason Window is displayed.
1 In the Company, Request Reason, Display Code, Description, and Sort Order fields, enter or select the required data.
Note: Press F8 to see a list of all existing request reasons, or select New Record from the Edit menu, to create a new request reason.
2 In the Script field, select a script, as applicable. (Optional)
3 In the Language field, associate an alternate language translation(s), if applicable. (Optional).
4 Click Save, or press the F10 key to complete the transaction.
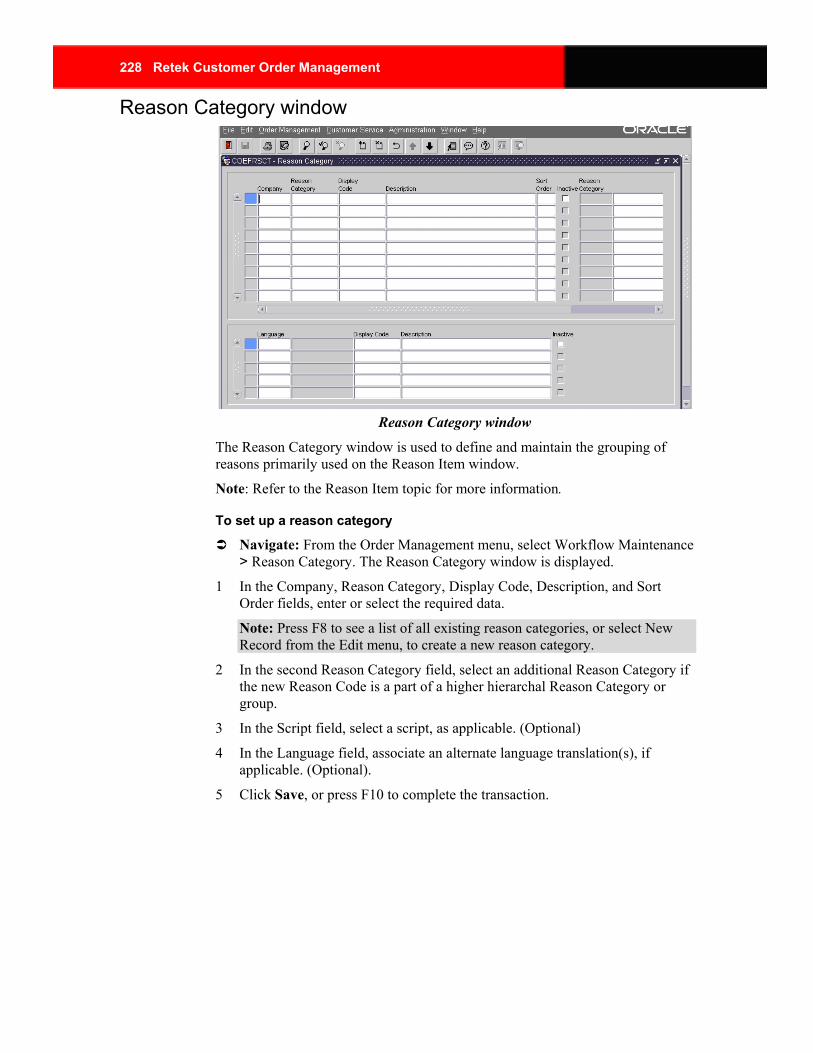
228 Retek Customer Order Management
Reason Category window
Reason Category window
The Reason Category window is used to define and maintain the grouping of reasons primarily used on the Reason Item window.
Note: Refer to the Reason Item topic for more information.
To set up a reason category
Navigate: From the Order Management menu, select Workflow Maintenance > Reason Category. The Reason Category window is displayed.
1 In the Company, Reason Category, Display Code, Description, and Sort Order fields, enter or select the required data.
Note: Press F8 to see a list of all existing reason categories, or select New Record from the Edit menu, to create a new reason category.
2 In the second Reason Category field, select an additional Reason Category if the new Reason Code is a part of a higher hierarchal Reason Category or group.
3 In the Script field, select a script, as applicable. (Optional)
4 In the Language field, associate an alternate language translation(s), if applicable. (Optional).
5 Click Save, or press F10 to complete the transaction.
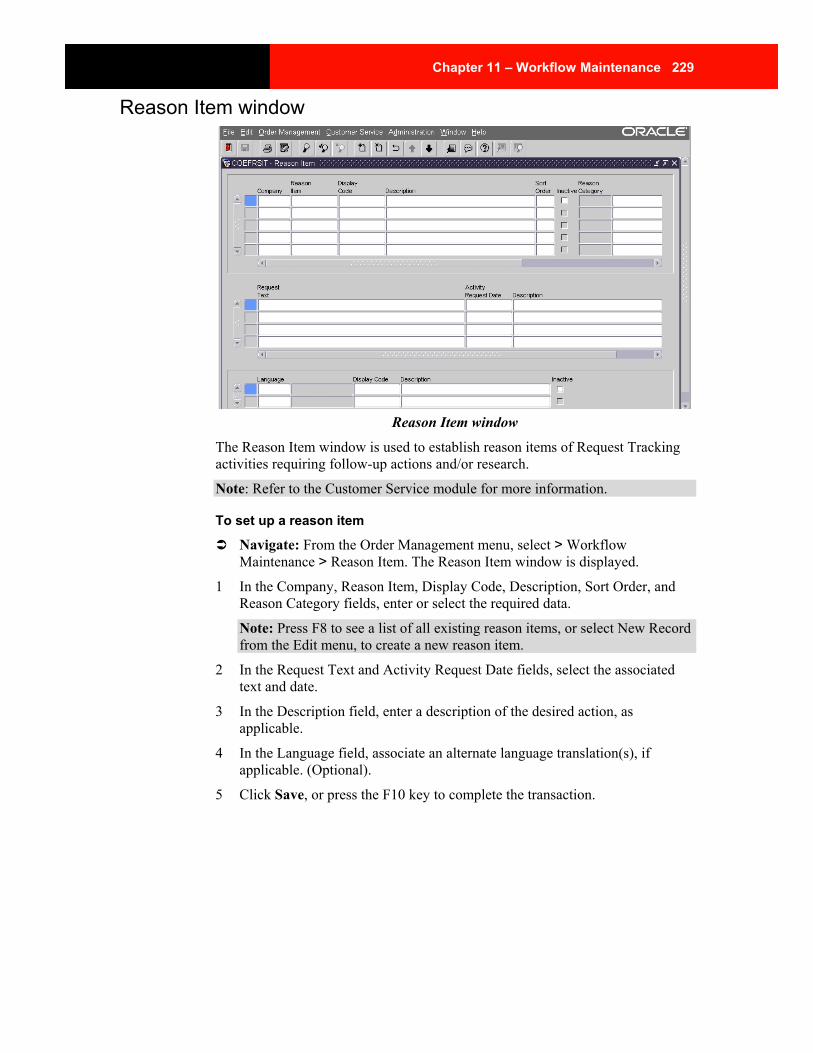
Chapter 11 – Workflow Maintenance 229
Reason Item window
Reason Item window
The Reason Item window is used to establish reason items of Request Tracking activities requiring follow-up actions and/or research.
Note: Refer to the Customer Service module for more information.
To set up a reason item
Navigate: From the Order Management menu, select > Workflow Maintenance > Reason Item. The Reason Item window is displayed.
1 In the Company, Reason Item, Display Code, Description, Sort Order, and Reason Category fields, enter or select the required data.
Note: Press F8 to see a list of all existing reason items, or select New Record from the Edit menu, to create a new reason item.
2 In the Request Text and Activity Request Date fields, select the associated text and date.
3 In the Description field, enter a description of the desired action, as applicable.
4 In the Language field, associate an alternate language translation(s), if applicable. (Optional).
5 Click Save, or press the F10 key to complete the transaction.
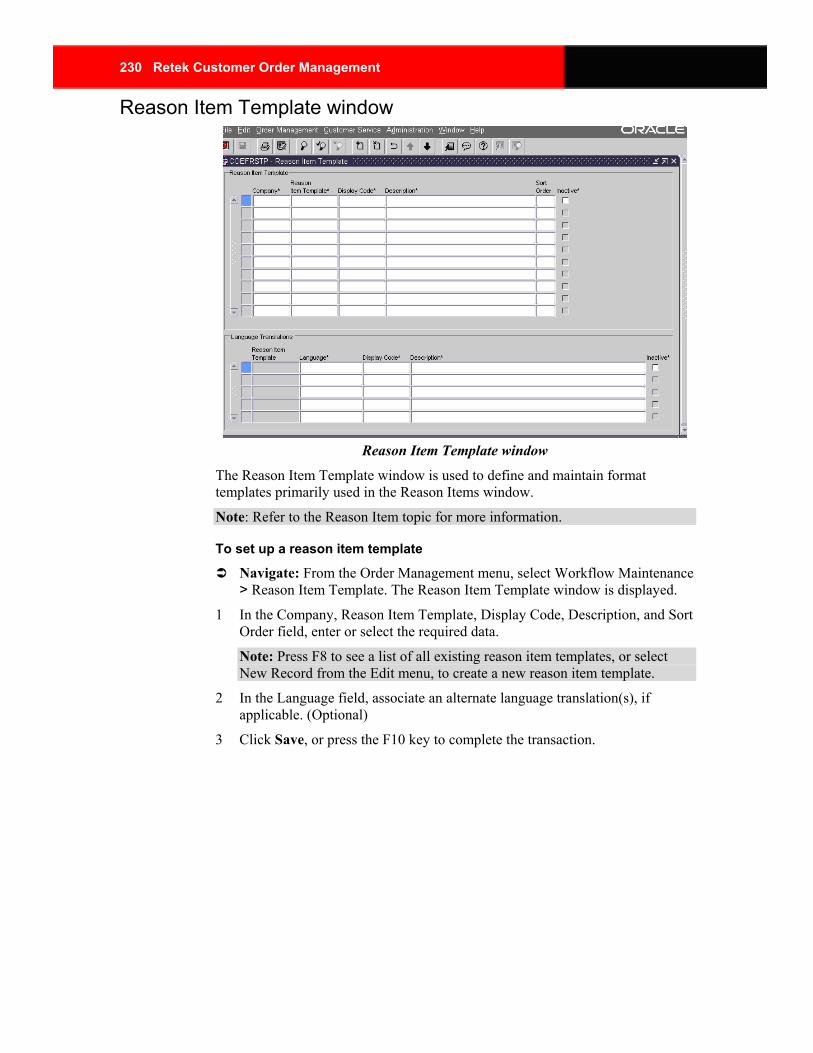
230 Retek Customer Order Management
Reason Item Template window
Reason Item Template window
The Reason Item Template window is used to define and maintain format templates primarily used in the Reason Items window.
Note: Refer to the Reason Item topic for more information.
To set up a reason item template
Navigate: From the Order Management menu, select Workflow Maintenance > Reason Item Template. The Reason Item Template window is displayed.
1 In the Company, Reason Item Template, Display Code, Description, and Sort Order field, enter or select the required data.
Note: Press F8 to see a list of all existing reason item templates, or select New Record from the Edit menu, to create a new reason item template.
2 In the Language field, associate an alternate language translation(s), if applicable. (Optional)
3 Click Save, or press the F10 key to complete the transaction.

Chapter 11 – Workflow Maintenance 231
Navigation Script window
Navigation Script window
The Navigation Script window is used to define and maintain scripts that are used internally when navigating between fields. The scripts function as help text prompting the user with information from field to field within the Order Entry or Customer Service windows.
Note: The help text appears in the script box in the Order Entry or Customer Service windows when the user selects help in a field, the hint text appears at the bottom of the screen.
To access the navigation script form
• From the Order Management menu, select > Workflow Maintenance > Navigation Script. The Navigation Script window is displayed.
Note: This form is in development.
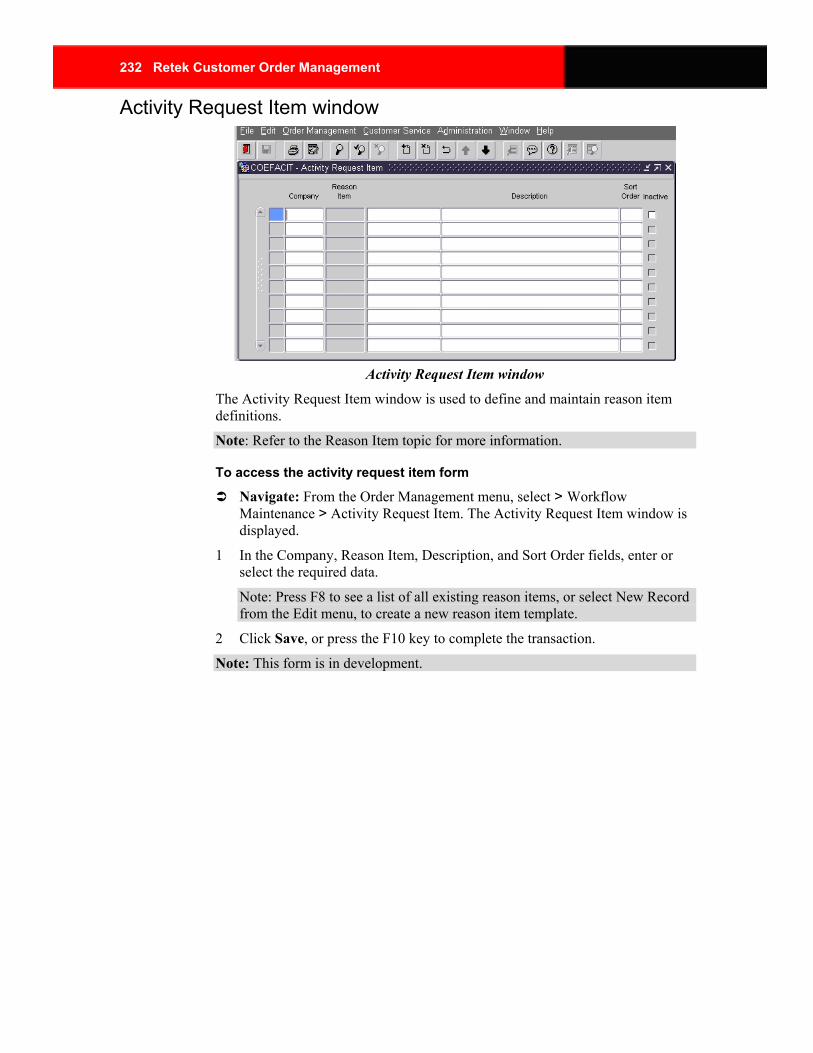
232 Retek Customer Order Management
Activity Request Item window
Activity Request Item window
The Activity Request Item window is used to define and maintain reason item definitions.
Note: Refer to the Reason Item topic for more information.
To access the activity request item form
Navigate: From the Order Management menu, select > Workflow Maintenance > Activity Request Item. The Activity Request Item window is displayed.
1 In the Company, Reason Item, Description, and Sort Order fields, enter or select the required data.
Note: Press F8 to see a list of all existing reason items, or select New Record from the Edit menu, to create a new reason item template.
2 Click Save, or press the F10 key to complete the transaction.
Note: This form is in development.

Chapter 11 – Workflow Maintenance 233
Report Type window
Report Type window
The Report Type window is used to define and maintain the types of report that can be sent to a Customer or Distributor for a charge per the Client’s business processes.
Note: Primarily applicable and used in the multi-level marketing (MLM) industries.
To set up a new report type
Navigate: From the Order Management menu, select Workflow Maintenance > Report Type. The Report Type window is displayed.
1 In the Company, Report Type, Display Code, Description, Sort Order, Currency, Report Fee and Minimum Quantity fields, enter or select the required data.
Note: Press F8 to see a list of all existing report types, or select New Record from the Edit menu, to create a new report types.
2 Select the Fully Qualified Filename flag, if the report is a standard report in Retek COM.
3 In the Maximum Quantity, Report Filename and/or Report Application fields, enter data if applicable. (Optional).
4 In the Language field, associate an alternate language translation(s), if applicable. (Optional).
5 Click Save, or press the F10 key to complete the transaction.


Chapter 12 – Tax Maintenance 235
Chapter 12 – Tax Maintenance Tax Maintenance Overview
This topic reviews the following Tax Maintenance table functions and setup that are a pre-requisite to using the applications in all modules of Retek COM:
• Tax Return Generation
• Tax Return View
• Location Segment
• Postal Codes
• Item Tax Exemption
• Tax Returns Report
• VAT Summary Report
• Tax Exempt Amount by Order (Report)
All maintenance tables within Retek COM utilize the same navigation process for either defining or supporting changes/updates. It is the intent of this volume to direct the end user through the varied maintenance menu paths and outline their purpose.
Note: Changing maintenance table information may have a direct impact on entire processes in the Retek COM applications and therefore require due diligence to ensure that the Client’s specifications and end objectives are met.
Retek COM makes the assumption that all required seeded data for table maintenance will be determined during the discovery process of specifications gathering and/or business analysis.
To change/update maintenance tables
Navigate: From the Order Management menu, select > Maintenance Menu of Choice > Maintenance Table of Choice
1 Perform a query to retrieve the desired maintenance table record.
2 Make the necessary/applicable changes.
Click Save, or press the F10 key to update and complete the transaction. 3

236 Retek Customer Order Management
Windows and Procedures Tax Return Generation window
Tax Return Generation window
Most global governing bodies require businesses to comply in reporting taxes collected for products sold per tax jurisdiction. Retek COM offers the a Client the ability to generate and export this data in a report via a third party tax vendor’s software (that is Vertex Quantum Returns, AVP Taxware, etc.).
The reported data on the amount of taxes collected is typically processed at the beginning of the current month for the previous month or as frequently as the Client’s tax governing authorities require this information by specifying a range of dates and/or state (locale). The user has the option to schedule a system generation by indicating a schedule start date and time. Whether manually or systematically processed, a batch number is generated to uniquely identify each tax return process.
Note: The batch number is the key to printing the tax return report and exporting the file to the tax vendor’s software.
Retek COM uses a series of programs in the tax return generation process that facilitates the creation of the batch file. The first program compiles the gross sale amount, taxable sale amount (state, county, city, district) and tax (state, county, city, district) for each order processed in the given date range and/or for a specified state. The second program summarizes the data by geocode and creates the batch file.
Note: The geocode is an abbreviation for geographical code that identifies a specific tax jurisdiction.
Upon completion of the Tax Return Generation process, the created batch displays in the Tax Returns Batches section of the Tax Return Generation window.

Chapter 12 – Tax Maintenance 237
Note: The frequency and timing of batch initialization is determined by the Client's business requirements.
Depending on hardware/space capacities, initializing this process may halt or decrease processing speed of other applications running concurrently.
To generate the tax returns
Navigate: From the Order Management menu, select > Tax Maintenance > Tax Return Generation. The Tax Return Generation window is displayed.
1
2
3
In the From Date, To Date, and State fields, enter the appropriate dates and state ID.
To schedule the tax return generation, in the Schedule Start Date/Hour fields, enter a Schedule Start Date, Schedule Start Hour/Minute (in military time) if applicable, and click Generate Tax Returns. The tax return batch process begins.
Click Generate Tax Returns. To display the created batch, place the cursor in the Company field and press the F8 key. The Tax Return Batch fields are displayed.

238 Retek Customer Order Management
Review the Tax Return Generation Status
DBMS Jobs View window
The DBMS Jobs View utility screen can be used to view the processing status of the tax return generation to determine completion.
Note: When the job process is completed, it will be removed from the displayed list. At this time, return to the Tax Return Generation screen to view the batch file information and take note of the batch number.
To review the processing status of the tax return generation
Navigate: From the Administration menu, select > Administration Utilities > DBMS Jobs View. The DBMS Jobs View window is displayed.
1
3
Press F8 to review the processing status of the tax return generation. When the process is completed, it will automatically be removed from the displayed list.
2 Navigate to either the Tax Return Generation or Tax Return View screens to view the batch file information.
From the Order Management menu, select > Tax Maintenance > Tax Return Generation, or Tax Return View.
Note: The batch number is used to print the tax return generation report and also to export the batch file to the tax vendor. Refer to the Tax Return Generation topic on the preceding page for more information.
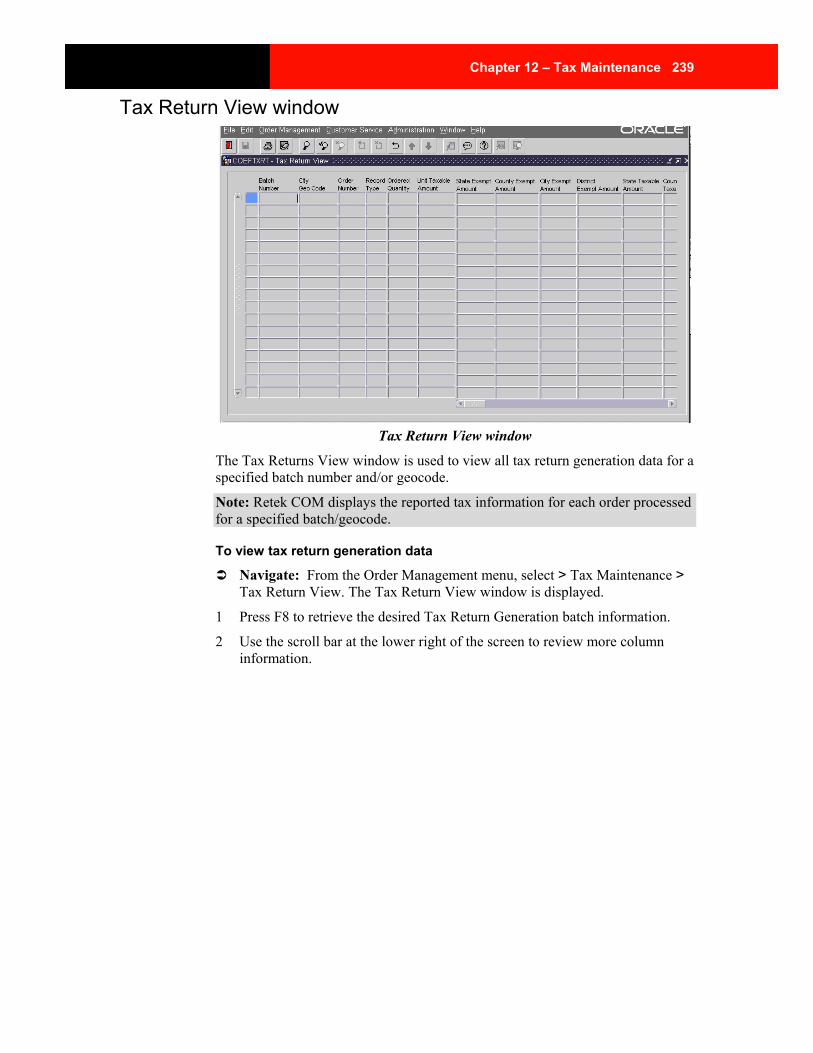
Chapter 12 – Tax Maintenance 239
Tax Return View window
Tax Return View window
The Tax Returns View window is used to view all tax return generation data for a specified batch number and/or geocode.
Note: Retek COM displays the reported tax information for each order processed for a specified batch/geocode.
To view tax return generation data
Navigate: From the Order Management menu, select > Tax Maintenance > Tax Return View. The Tax Return View window is displayed.
1 Press F8 to retrieve the desired Tax Return Generation batch information.
2 Use the scroll bar at the lower right of the screen to review more column information.
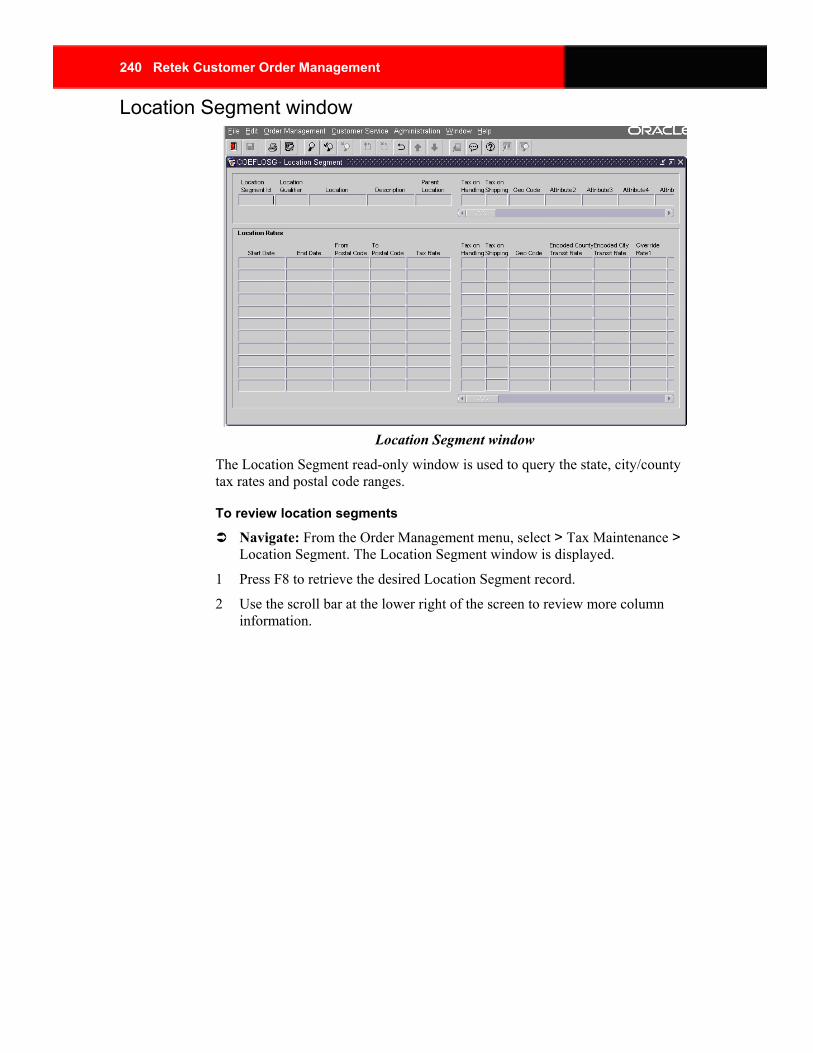
240 Retek Customer Order Management
Location Segment window
Location Segment window
The Location Segment read-only window is used to query the state, city/county tax rates and postal code ranges.
To review location segments
Navigate: From the Order Management menu, select > Tax Maintenance > Location Segment. The Location Segment window is displayed.
1 Press F8 to retrieve the desired Location Segment record.
2 Use the scroll bar at the lower right of the screen to review more column information.
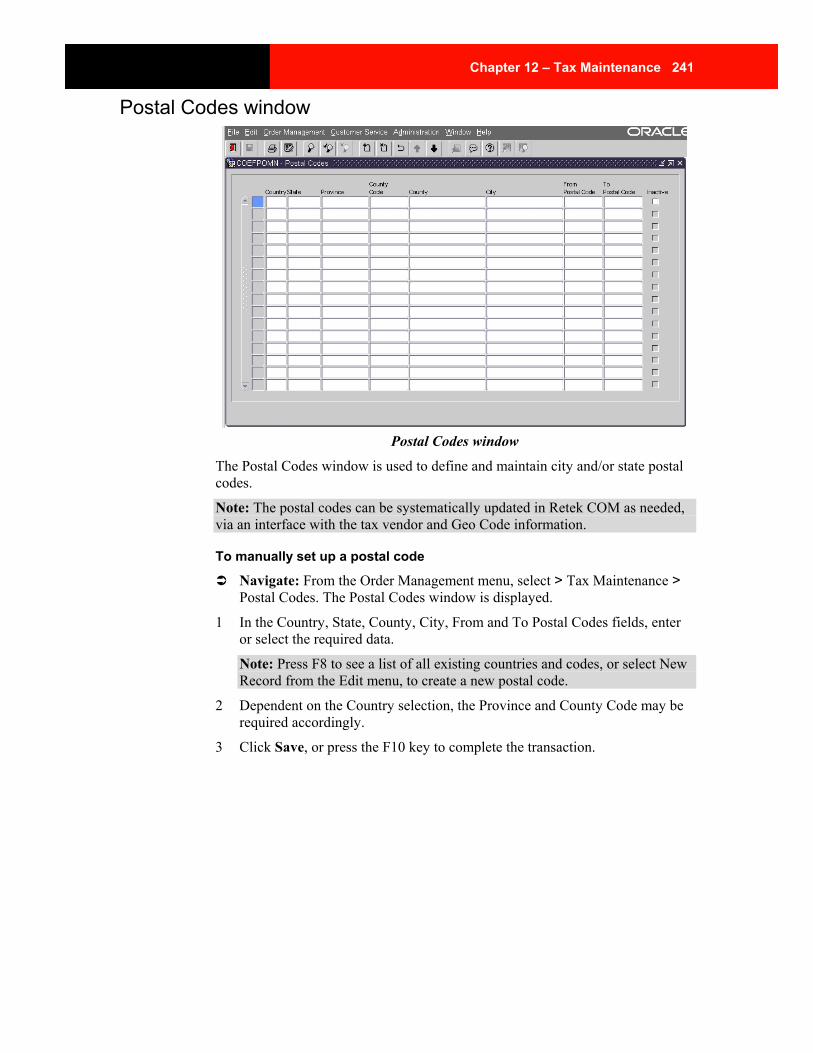
Chapter 12 – Tax Maintenance 241
Postal Codes window
Postal Codes window
The Postal Codes window is used to define and maintain city and/or state postal codes.
Note: The postal codes can be systematically updated in Retek COM as needed, via an interface with the tax vendor and Geo Code information.
To manually set up a postal code
Navigate: From the Order Management menu, select > Tax Maintenance > Postal Codes. The Postal Codes window is displayed.
1 In the Country, State, County, City, From and To Postal Codes fields, enter or select the required data.
Note: Press F8 to see a list of all existing countries and codes, or select New Record from the Edit menu, to create a new postal code.
2
3
Dependent on the Country selection, the Province and County Code may be required accordingly.
Click Save, or press the F10 key to complete the transaction.

242 Retek Customer Order Management
Item Tax Exemption window
Item Tax Exemption window
The Item Tax Exemption window is used to set up tax exemptions for specific items or categories in a specific state/jurisdiction. Where tax may apply to a purchaser’s (Customer’s) use of a tangible property (that is Collectible Coins, Gold Bullions, Diamonds, etc.) as purchased from the retailer (Client) in a particular State and/or it’s jurisdictions, unless the sale is otherwise excluded or exempt.
If the item varies in the taxable amounts to be distributed across jurisdictions within a State, Retek COM enables individual setup of each jurisdiction to collate the total taxable amount to be collected from the purchaser.
Example: If in a particular State, any single item, over $1,600 is taxed at the full state and local rates (that is 8.25%) up to the $1,600; and the balance is taxed at the state rate (for example 6%) only.
To set up an item for tax exemption
Navigate: From the Order Management menu, select > Tax Maintenance > Item Tax Exemption. The Item Tax Exemption window is displayed.
1 In the Type field, enter or select the tax exempt type.
Note: Press F8 to see a list of all existing tax exempt types and items, or select New Record from the Edit menu, to create a new tax exempt item.
2 In the Location field, (for example State, County, City, etc.) select the location for which the tax exemption will apply.
3 In the Item Category and/or Item Number field, select the item for which the tax exemption will apply.
4 In the Override Tax Rate field, enter the appropriate rate for the location/jurisdiction.
Chapter 12 – Tax Maintenance 243
Note: If an override tax rate is entered, the taxable flag must be selected.
5
6
7
Select or clear the applicable usage flags to Exempt All Jurisdictions, set Extended Taxable Amount (qty. by unit price) or Additional Range Tax (over the limit taxable subtotal price).
In the Minimum/Maximum Taxable Amount fields, enter the applicable amounts.
Click Save, or press F10 to complete the transaction.
Export Tax Returns When the tax generation report is processed, the COESTXFL.SQL script file is created and used to convert the tax return generation report into an ASCII file for export to the tax vendor’s software.
Note: The file created is a summary of all tax information (that is, gross, taxable and tax collected per state, county, city and district) by geocode.
To export the tax returns batch file to the vendor's software
Navigate: From the Administration menu, select Administration Utilities > Run Script/Report. The Run Script Report window is displayed.
1 Press F8 to query the Short Name of the script file (COESTXFL).
Click Select. The Report Parameter Form is displayed. 2
3
4
In the Batch Number field, select or enter the required (Tax Return) Batch Number.
Click Screen or Print. (This generates the PL/SQL script into the ASCII file.)
Note: Use with the Import Setup Feature of the Tax Vendor’s software to import the newly created PL/SQL file.

Chapter 13 – Warehouse Maintenance 245
Chapter 13 – Warehouse Maintenance Warehouse Maintenance Overview
Note: The majority of Warehouse Maintenance functionality formerly handled through RCOM is now transferred and completed by the client's Warehouse Management System software. Therefore, the warehouse maintenance functionality is dependent on an Interface with Retek's Distribution Management (RDM 10.0) application.
This topic reviews the following Warehouse setup and maintenance functions specific to Fulfillment Processing that are a pre-requisite to using the applications in the Order Management module of Retek COM:
• Warehouse
• Pick Release Maintenance
• Electronic Picking Parameters
• Warehouse Scale/Printer
• Container
• Container Type
• Ship Method/Container Status/Line Status
• Ship Batch Frequency
• Ship Request Status
• Weight Variance
• Order Line Reason
• Warehouse Ship Station
• Manifest Type
All maintenance tables within Retek COM utilize the same navigation process for either defining or supporting changes/updates. It is the intent of this volume to direct the end user through the varied maintenance menu paths and outline their purpose.
Note: Changing maintenance table information may have a direct impact on entire processes in the Retek COM applications and therefore require due diligence to ensure that the Client’s specifications and end objectives are met.
Retek COM makes the assumption that all required seeded data for table maintenance will be determined during the discovery process of specifications gathering and/or business analysis.
To change/update maintenance tables
Navigate: From the Order Management menu, select > Maintenance Menu of Choice > Maintenance Table of Choice
1 Perform a query to retrieve the desired maintenance table record.

246 Retek Customer Order Management
2
3
Make the necessary/applicable changes.
Click Save, or press the F10 key to update and complete the transaction.

Chapter 13 – Warehouse Maintenance 247
Windows and Procedures Warehouse window
Note: The majority of Warehouse Maintenance functionality formerly handled through RCOM is now transferred and completed by the client's Warehouse Management System software. Therefore, your warehouse maintenance functionality is dependent on an Interface with Retek's Distribution Management (RDM 10.0) application.
Warehouse window
The Warehouse window is used to define and maintain Electronic Data Interchange (EDI) /non-EDI warehouse names, address/telephone, carrier and company warehouses information where inventory is maintained and/or orders are distributed.
To set up a new warehouse
Navigate: From the Order Management menu, select > Warehouse Maintenance > Warehouse. The Warehouse window is displayed.
1 In the Display Code, Description, and Sort Order fields, enter or select the required data for the warehouse.
Note: Press F8 to see a list of all existing warehouses, or select New Record from the Edit menu, to create a new warehouse.
2 Select the Autopick flag, if the pick/pack tickets and/or invoices will be picked using a third party picking system, (that is Pick-to-Light, etc.).
3 In the corresponding fields, enter the appropriate values. (Optional)
4 In the Address fields, enter Address/Telephone information.

248 Retek Customer Order Management
Note: Multiple address records can be maintained per warehouse. To add a new address, press F6.
5
6
2
Select the relevant usage flags and enter the Original (Legacy) System Reference. (Optional)
Click Save, or press F10 to complete the transaction.
To add multiple warehouse phone numbers
Navigate: From the Order Management menu, select > Warehouse Maintenance > Warehouse. The Warehouse window is displayed.
1 Follow steps 1- 5 above from the warehouse setup procedure, if adding a new warehouse, or query an existing warehouse.
Click Phone. The Warehouse Telephones block displays at the bottom of the window.
3 In the Telephone Type and Number field, enter the required data.
Note: Select the Primary check box to indicate this is the primary warehouse phone number. The Extension and Comment fields are optional.
4 Click Save, or press F10 to complete the transaction.
To set up a warehouse carrier
Navigate: From the Order Management menu, select > Warehouse Maintenance > Warehouse. The Warehouse window is displayed.
1
5
4
5
Follow steps 1- 5 from the warehouse setup procedure, if adding a new warehouse, or query an existing warehouse.
2 Click Carriers. The Warehouse Carriers section appears at the bottom of the window.
3 In the Carrier Origination field, enter the required carrier origination number.
4 In the Account/ Purchase Order/Master Meter Number, Carrier Discount Percent, Sort Order, Server Host Name/Port Number/IP Address/Protocol Name fields, enter data as applicable. (Optional)
Click Save, or press F10 to complete the transaction.
To set up a company warehouse
Navigate: From the Order Management menu, select Warehouse Maintenance > Warehouse. The Warehouse window is displayed.
1 Follow steps 1- 5 from the warehouse setup procedure, if adding a new warehouse, or query an existing warehouse.
2 Click Company Warehouse. The Company Warehouse section displays at the bottom of the window.
3 In the Company field, select the required company.
Select the Default Warehouse, Sort Order, and Inactive check boxes as applicable.
Click Save, or press the F10 key to complete the transaction.
Chapter 13 – Warehouse Maintenance 249
To set up a warehouse language translation
Navigate: From the Order Management menu, select Warehouse Maintenance > Warehouse. The Warehouse window is displayed.
1 Follow steps 1- 5 from the warehouse setup procedure, if adding a new warehouse, or query an existing warehouse.
2 Click Translations. The Language block displays at the bottom of the window.
Note: This data entry operation is optional and although displayed as a required field bears no forced requirements to complete the addition of a vendor.
3
4
5
In the Language field, associate an alternate language translation(s), as applicable.
In the Display Code, Description, and Inactive fields, enter data as applicable.
Click Save, or press the F10 key to complete the transaction.
250 Retek Customer Order Management
Pick Release Maintenance window Note: The majority of Warehouse Maintenance functionality formerly handled through RCOM is now transferred and completed by the client's Warehouse Management System software. Therefore, your warehouse maintenance functionality is dependent on an Interface with Retek's Distribution Management (RDM 10.0) application.
The Pick Release Maintenance window is used to define and maintain the release controls of ship request batches. Ship requests are released based on the defined minimum/maximum ship request, batch frequency, and printer that will print the ship request.
To set up a pick release control
Navigate: From the Order Management menu, select > Warehouse Maintenance > Pick Release. The Pick Release Maintenance window is displayed.
1 In the Warehouse, Display Code, Description, Min/Max Ship Requests, Batch Frequency, Pick Ticket and Reports Printer fields, enter or select the required data.
Note: A list of all existing warehouses is displayed. Select New Record from the Edit menu, to create a new warehouse pick release schedule. Entering a value in the Maximum Ship Requests is optional, but recommended.
2
3
4
In the Batch Control Details section of the window, select the applicable processing check boxes and enter a Sort Order, Carrier, Ship Method, Customer Type, Activity Source, Order Priority and/or Comment Text, as appropriate. (Optional)
In the Language field, associate an alternate language translation(s), as applicable.
Click Save, or press the F10 key to complete the transaction.
Chapter 13 – Warehouse Maintenance 251
Electronic Picking Parameters window Note: The majority of Warehouse Maintenance functionality formerly handled through RCOM is now transferred and completed by the client's Warehouse Management System software. Therefore, your warehouse maintenance functionality is dependent on an Interface with Retek's Distribution Management (RDM 10.0) application.
The Electronic Picking Parameters window is used to maintain the warehouse parameters for Autopick (that is per warehouse, order types/status and products).
To set up an electronic picking parameter
Navigate: From the Order Management menu, select > Warehouse Maintenance > Electronic Picking Parameter. The Electronic Picking Parameters window is displayed.
1
2
3
In the Warehouse field, select a warehouse, or query all warehouses.
Select the Autopick flag of the desired parameter and/or enter values in the Autopick Minimum Subtotal/Item Quantity/Backorder Items, and Inactive checkbox fields, as applicable.
Click Save, or press the F10 key to complete the transaction.

252 Retek Customer Order Management
Warehouse Scale window Note: The majority of Warehouse Maintenance functionality formerly handled through RCOM is now transferred and completed by the client's Warehouse Management System software. Therefore, your warehouse maintenance functionality is dependent on an Interface with Retek's Distribution Management (RDM 10.0) application.
The Warehouse Scale window is used to define and maintain the scales equipment used to weigh packages for shipping.
To set up a warehouse scale
Navigate: From the Order Management menu, select > Warehouse Maintenance > Warehouse Scale. The Warehouse Scale window is displayed.
1 In the Warehouse, (scale) Display Code, Description, Sort Order and Inactive fields, enter or select the required data.
Note: Press F8 to see a list of all existing warehouse scales, or select New Record from the Edit menu, to create a new warehouse scale.
2
3
4
Enter a value in the optional Control String field, as applicable.
In the Language field, associate an alternate language translation, as applicable.
Click Save, or press the F10 key to complete the transaction.

Chapter 13 – Warehouse Maintenance 253
Warehouse Printer window Note: The majority of Warehouse Maintenance functionality formerly handled through RCOM is now transferred and completed by the client's Warehouse Management System software. Therefore, your warehouse maintenance functionality is dependent on an Interface with Retek's Distribution Management (RDM 10.0) application.
The Warehouse Printer window is used to define and maintain the look up table of available printers used at a warehouse to print ship request, reports, etc.
Note: The Printer Type, Names and Codes are set up and maintained in Administration menu, under Company Maintenance.
To set up a warehouse printer
Navigate: From the Order Management menu, select > Warehouse Maintenance > Warehouse Printer. The Warehouse Printer window is displayed.
1 In the Warehouse, Warehouse Printer/Display Codes, Description, Sort Order, and Inactive fields, enter or select the required data.
Note: Press F8 to see a list of all existing warehouse printers, or select New Record from the Edit menu, to create a new warehouse printer. Enter a value in the optional Network Name field, as applicable.
2
3
In the Language field, associate an alternate language translation, as applicable.
Click Save, or press F10 to complete the transaction.

254 Retek Customer Order Management
Ship Method window Note: The majority of Warehouse Maintenance functionality formerly handled through RCOM is now transferred and completed by the client's Warehouse Management System software. Therefore, your warehouse maintenance functionality is dependent on an Interface with Retek's Distribution Management (RDM 10.0) application.
The Ship Method window is used to define and maintain the ship methods including any order type amounts, shipping/handling combinations offered by Retek COM for shipping orders.
To set up a ship method
Navigate: From the Order Management menu, select Warehouse Maintenance > Ship Method. The Ship Method window is displayed.
1 In the Company, Ship Method, Display Code, Description, Sort Order, and Inactive fields, enter or select the required data.
Note: Press F8 to see a list of all existing ship methods, or select New Record from the Edit menu, to create a new ship method.
2
3
4
5
6
7
8
In the Carrier Service, and Estimated Delivery Days fields, enter related data as applicable. (Optional).
Select the applicable processing check boxes and/or select a Script. (Optional).
In the Order/Customer Types, Minimum/Maximum Order Amounts Shipping Weights, and Weight Units of Measure fields, enter or select the data as applicable.
Select the Additional Charge check box to override other applied charges in the order process as applicable.
In the Shipping and Handling fields, enter individual Minimum/Maximum Charges as a monetary or percentage base value.
Click Translations to associate alternate language translations, as applicable.
Click Save, or press the F10 key to complete the transaction.
Chapter 13 – Warehouse Maintenance 255
Ship Container Status window Note: The majority of Warehouse Maintenance functionality formerly handled through RCOM is now transferred and completed by the client's Warehouse Management System software. Therefore, your warehouse maintenance functionality is dependent on an Interface with Retek's Distribution Management (RDM 10.0) application.
The Ship Container Status window is used to define and maintain the statuses assigned to ship containers (packages) throughout the fulfillment process (that is staged, manifested, ship/delivery confirmed, etc.).
To set up a ship container status
Navigate: From the Order Management menu, select > Warehouse Maintenance > Ship Container Status. The Ship Container Status window is displayed.
1 In the Ship Container Status/Display Code and Description fields, enter or select the required data.
Note: Press F8 to see a list of all existing ship container status codes, or select New Record from the Edit menu, to create a new ship container status.
2
3
4
Select the applicable processing flags and/or select a Script. (Optional).
In the Language field, associate an alternate language translation, as applicable.
Click Save, or press F10 to complete the transaction.
256 Retek Customer Order Management
Ship Line Status window Note: The majority of Warehouse Maintenance functionality formerly handled through RCOM is now transferred and completed by the client's Warehouse Management System software. Therefore, your warehouse maintenance functionality is dependent on an Interface with Retek's Distribution Management (RDM 10.0) application.
The Ship Line Status window is used to define and maintain the statuses assigned to line items throughout the fulfillment process (that is released, picking, pick confirmed, shipped, etc.).
To set up a new ship line status
Navigate: From the Order Management menu, select > Warehouse Maintenance > Ship Line Status. The Ship Line Status window is displayed.
1 In the Ship Line Status/Display Code and Description fields, enter or select the required data.
Note: Press F8 to see a list of all existing ship line status codes, or select New Record from the Edit menu, to create a new ship line status code.
2
3
4
Select the applicable processing flags and/or select a Script. (Optional).
In the Language field, associate an alternate language translation, as applicable.
Click Save, or press the F10 key to complete the transaction.
Chapter 13 – Warehouse Maintenance 257
Ship Batch Frequency window Note: The majority of Warehouse Maintenance functionality formerly handled through RCOM is now transferred and completed by the client's Warehouse Management System software. Therefore, your warehouse maintenance functionality is dependent on an Interface with Retek's Distribution Management (RDM 10.0) application.
The Ship Batch Frequency window is used to define/determines the recurring frequencies applicable and singularly specific to a batch release for fulfillment processing (that is every minute, hourly, daily, weekly, etc.).
Note: A frequency SQL text is required in establishing a new autoship frequency to set the next order generation date. Refer to the Fulfillment Processing module for more information.
To set up a ship batch frequency
Navigate: From the Order Management menu, select > Warehouse Maintenance > Ship Batch Frequency. The Ship Batch Frequency window is displayed.
1 In the Batch Frequency/Display Codes, Description, Sort Order, and Inactive fields, enter or select the required data.
Note: Press F8 to see a list of all existing ship batch frequencies, or select New Record from the Edit menu, to create a new ship batch frequency.
2
3
4
In the Frequency SQL Text field, enter the required Frequency SQL Text calculation. Example: MIN – Every Minute = NVL(Last_Run_Date,sysdate-1/(24*60)) + 1/(24*60)
Select the Manual Release flag, as applicable.
Click Save, or press the F10 key to complete the transaction.
258 Retek Customer Order Management
Ship Request Status window Note: The majority of Warehouse Maintenance functionality formerly handled through RCOM is now transferred and completed by the client's Warehouse Management System software. Therefore, your warehouse maintenance functionality is dependent on an Interface with Retek's Distribution Management (RDM 10.0) application.
The Ship Request Status window is used to define and maintain the statuses assigned to ship request throughout the fulfillment process (that is released, printed, pick/ship confirmed, etc.).
To set up a new ship request status
Navigate: From the Order Management menu, select > Warehouse Maintenance > Ship Request Status. The Ship Request Status window is displayed.
1 In the Ship Request Status/Display Code, Description, and Sort Order fields, enter or select the required data.
Note: Press F8 to see a list of all existing ship request status codes, or select New Record from the Edit menu, to create a new ship request status.
2
3
4
Select the applicable processing check boxes and/or select a Script. (Optional).
In the Language field, associate an alternate language translation, as applicable.
Click Save, or press F10 to complete the transaction.
Chapter 13 – Warehouse Maintenance 259
Weight Variance window Note: The majority of Warehouse Maintenance functionality formerly handled through RCOM is now transferred and completed by the client's Warehouse Management System software. Therefore, your warehouse maintenance functionality is dependent on an Interface with Retek's Distribution Management (RDM 10.0) application.
The Weight Variance window is used to define and maintain the acceptable tolerance between the estimated and actual weight of packages relative to rounding up to the nearest unit of measure.
Note: The Weight Variance is a value used in shipping calculations per ship method, carrier and zoning, etc.
To set up a weight variance
Navigate: From the Order Management menu, select > Warehouse Maintenance > Weight Variance. The Weight Variance window is displayed.
1 In the Company, From/To Weight, Inactive and Unit of Measure fields, enter or select the required values.
Note: Press F8 to see a list of all existing weight variance, or select New Record from the Edit menu, to create a new weight variance.
2 In the Variance Percent/Weight Amount fields, enter values as applicable (Optional)
3 Click Save, or press F10 to complete the transaction.
260 Retek Customer Order Management
Order Line Reason window Note: The majority of Warehouse Maintenance functionality formerly handled through RCOM is now transferred and completed by the client's Warehouse Management System software. Therefore, your warehouse maintenance functionality is dependent on an Interface with Retek's Distribution Management (RDM 10.0) application.
The Order Line Reason window is used to define and maintain the reasons to explain the state of a returned item (that is product is sellable, cracked, crushed boxes, dirty product, etc.).
Note: Refer to the Return Inspection topic for more information.
To set up an order line reason
Navigate: From the Order Management menu, select > Warehouse Maintenance > Order Line Reason. The Order Line Reason window is displayed.
1 In the Company, Order Receipt Reason, Display Code, Description and Sort Order fields, enter or select the required data.
Note: Press F8 to see a list of all existing order line reasons, or select New Record from the Edit menu, to create a new order line reason.
2 Select the applicable processing checkboxes and/or select a Script. (Optional).
3 In the Language field, associate an alternate language translation, as applicable.
4 Click Save, or press F10 to complete the transaction.

Chapter 13 – Warehouse Maintenance 261
Warehouse Ship Station window Note: The majority of Warehouse Maintenance functionality formerly handled through RCOM is now transferred and completed by the client's Warehouse Management System software. Therefore, your warehouse maintenance functionality is dependent on an Interface with Retek's Distribution Management (RDM 10.0) application.
The Warehouse Ship Station window is used to define and maintain the ship stations located at the distribution warehouse.
To set up a warehouse ship station
Navigate: From the Order Management menu, select Warehouse Maintenance > Warehouse Ship Station. The Warehouse Ship Station window is displayed.
1 In the Warehouse, Display Code, Description, Machine Name, Sort Order and Inactive fields, enter or select the required data.
Note: Press F8 to see a list of all existing warehouse ship stations, or select New Record from the Edit menu, to create a new warehouse ship station.
2 In the Warehouse Printer and Scale fields, select a printer and scale as applicable. (Optional)
3 In the Language field, associate an alternate language translation, as applicable.
4 Click Save, or press F10 to complete the transaction.

262 Retek Customer Order Management
Manifest Type window Note: The majority of Warehouse Maintenance functionality formerly handled through RCOM is now transferred and completed by the client's Warehouse Management System software. Therefore, your warehouse maintenance functionality is dependent on an Interface with Retek's Distribution Management (RDM 10.0) application.
The Manifest Type window is used to define and maintain the types of manifests that can be opened for a carrier.
To set up a new manifest type
Navigate: From the Order Management menu, select > Warehouse Maintenance > Manifest Type. The Manifest Type window is displayed.
1 In the Manifest Type/Display Codes, Description, Sort Order, Inactive, From Weight and Units of Measure fields, enter or select the required values.
Note: Press F8 to see a list of all existing manifest types, or select New Record from the Edit menu, to create a new manifest type.
2 In the To Weight field, enter a value, as applicable. (Optional)
3 In the Language field, associate an alternate language translation, as applicable.
4 Click Save, or press F10 to complete the transaction.

Chapter 14 – Carrier Maintenance 263
Chapter 14 – Carrier Maintenance Carrier Maintenance Overview
Note: The majority of Carrier Maintenance functionality formerly handled through RCOM is now transferred and completed by the client's Warehouse Management System software. Therefore, your maintenance functionality is dependent on an Interface with Retek's Distribution Management (RDM 10.0) application.
This topic reviews the following Carrier Maintenance tables setup and functions that are a pre-requisite to using the applications in all modules of Retek COM:
• Carrier Service
• Carrier
• Carrier Rate
• Carrier Billing
• Carrier Service Range Type
• Carrier Service Type
All maintenance tables within Retek COM utilize the same navigation process for either defining or supporting changes/updates. It is the intent of this volume to direct the end user through the varied maintenance menu paths and outline their purpose.
Note: Changing maintenance table information may have a direct impact on entire processes in the Retek COM applications and therefore require due diligence to ensure that the Client’s specifications and end objectives are met.
Note: Retek COM makes the assumption that all required seeded data for table maintenance will be determined during the discovery process of specifications gathering and/or business analysis.
To change/update maintenance tables
Navigation: From the Order Management menu, select > Maintenance Menu of Choice > Maintenance Table of Choice
1
2
3
Perform a query to retrieve the desired maintenance table record.
Make the necessary/applicable changes.
Click Save, or press the F10 key to update and complete the transaction.
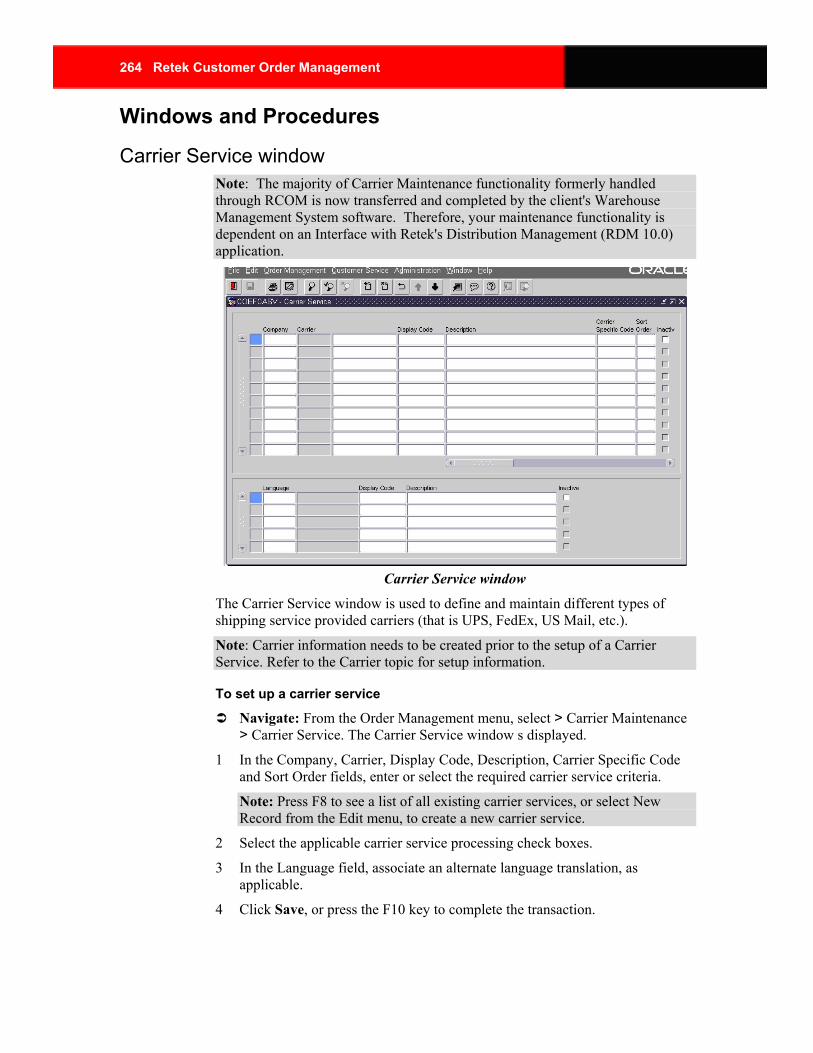
264 Retek Customer Order Management
Windows and Procedures
Carrier Service window Note: The majority of Carrier Maintenance functionality formerly handled through RCOM is now transferred and completed by the client's Warehouse Management System software. Therefore, your maintenance functionality is dependent on an Interface with Retek's Distribution Management (RDM 10.0) application.
Carrier Service window
The Carrier Service window is used to define and maintain different types of shipping service provided carriers (that is UPS, FedEx, US Mail, etc.).
Note: Carrier information needs to be created prior to the setup of a Carrier Service. Refer to the Carrier topic for setup information.
To set up a carrier service
Navigate: From the Order Management menu, select > Carrier Maintenance > Carrier Service. The Carrier Service window s displayed.
1 In the Company, Carrier, Display Code, Description, Carrier Specific Code and Sort Order fields, enter or select the required carrier service criteria.
Note: Press F8 to see a list of all existing carrier services, or select New Record from the Edit menu, to create a new carrier service.
2 Select the applicable carrier service processing check boxes.
3
4
In the Language field, associate an alternate language translation, as applicable.
Click Save, or press the F10 key to complete the transaction.

Chapter 14 – Carrier Maintenance 265
Carrier window Note: The majority of Carrier Maintenance functionality formerly handled through RCOM is now transferred and completed by the client's Warehouse Management System software. Therefore, your maintenance functionality is dependent on an Interface with Retek's Distribution Management (RDM 10.0) application.
Carrier window
The Carrier window is used to define and maintain the carrier profiles for the carriers used to ship packages.
To set up a carrier
Navigate: From the Order Management menu, select > Carrier Maintenance > Carrier. The Carrier window is displayed.
1 In the Company, Carrier/Display Codes, and Description fields, enter or select the required data.
Note: Press F8 to see a list of all existing carriers, or select New Record from the Edit menu, to create a new carrier.
2 Select or clear the Manifest Required/Locked and or Rate Based on Zone processing checkboxes, as applicable. (Optional).
3 In the corresponding fields, enter the values as appropriate. (Optional)
4 In the Address fields, enter the Address/Telephone information.
Note: Multiple address records can be maintained per warehouse. To add a new address, click the Insert icon or press the F6 key.
Click Save, or press F10 to complete the transaction. 5
266 Retek Customer Order Management
To add a carrier billing option
Navigate: From the Order Management menu, select Carrier Maintenance > Carrier. The Carrier window is displayed.
1 Follow steps 1-5 in the set up a carrier procedure if adding a new carrier, or select an existing carrier.
2 Click Billing Options. The Carrier Billing fields appear at the bottom of the window.
3 Press F9 and select from the list of existing billing option values available.
4 In the Sort Order and Inactive fields, enter values as appropriate. (Optional)
5 Click Save, or press F10 to complete the transaction.
Carrier Rate window Note: The majority of Carrier Maintenance functionality formerly handled through RCOM is now transferred and completed by the client's Warehouse Management System software. Therefore, your maintenance functionality is dependent on an Interface with Retek's Distribution Management (RDM 10.0) application.
The Carrier Rate window is used to define and maintain the rates charged by carriers to ship packages.
Note: The carrier rates can be loaded systematically by applying an ASCII file as a job process.
To set up a carrier rate
Navigate: From the Order Management menu, select > Carrier Maintenance > Carrier Rate. The Carrier Rate window is displayed.
1 Perform a query by Zone, Minimum Consolidated Weight, Service or Description.
Note: Press F8 to see a list of all existing carrier zone rates, or select New Record from the Edit menu, to create a new carrier zone rate.
2
3
In the corresponding fields, enter the values as appropriate. (Optional)
Click Save, or press F10 to complete the transaction.
Chapter 14 – Carrier Maintenance 267
Carrier Billing window Note: The majority of Carrier Maintenance functionality formerly handled through RCOM is now transferred and completed by the client's Warehouse Management System software. Therefore, your maintenance functionality is dependent on an Interface with Retek's Distribution Management (RDM 10.0) application.
The Carrier Billing window is used to define and maintain a selection of billing methods that may be used by carriers (that is Sender, Recipient, Third Party, Credit Card, etc.).
To set up a carrier billing method
Navigate: From the Order Management menu, select > Carrier Maintenance > Carrier Billing. The Carrier Billing window is displayed.
1 In the Carrier Billing/Display Codes, Description, Sort Order, and Inactive fields, enter the required data.
Note: Press F8 to see a list of all existing carrier billing codes, or select New Record from the Edit menu, to create a new carrier billing codes.
2 In the Language field, associate an alternate language translation, as applicable.
3 Click Save, or press F10 to complete the transaction.
Carrier Service Range Type window Note: The majority of Carrier Maintenance functionality formerly handled through RCOM is now transferred and completed by the client's Warehouse Management System software. Therefore, your maintenance functionality is dependent on an Interface with Retek's Distribution Management (RDM 10.0) application.
The Carrier Service Range Type window is used to define and maintain the range types used in part to calculate freight (that is postal, state, or country).
To set up a carrier service range type
Navigate: From the Order Management menu, select > Carrier Maintenance > Carrier Service Range Type. The Carrier Service Range Type window is displayed.
1 In the Display Code, Description, Sort Order and Inactive fields, enter the required carrier service range information.
Note: Press F8 to see a list of all existing carrier service ranges, or select New Record from the Edit menu, to create a new carrier service range type.
2 In the Language field, associate an alternate language translation, as applicable.
3 Click Save, or press F10 to complete the transaction.
268 Retek Customer Order Management
Carrier Service Type window Note: The majority of Carrier Maintenance functionality formerly handled through RCOM is now transferred and completed by the client's Warehouse Management System software. Therefore, your maintenance functionality is dependent on an Interface with Retek's Distribution Management (RDM 10.0) application.
The Carrier Service Type window is used to define and maintain the types of carrier service provided by carriers (that is Air Ground, International, etc.).
To set up a carrier service type
Navigate: From the Order Management menu, select > Carrier Maintenance > Carrier Service Type. The Carrier Service Type window is displayed.
1 In the Carrier Service Type/Display Codes, Description, Sort Order and Inactive fields, enter or select the required data.
Note: Press F8 to see a list of all existing carrier service types, or select New Record from the Edit menu, to create a new carrier service type.
2 In the Language field, associate an alternate language translation, as applicable.
3 Click Save, or press F10 to complete the transaction.
Related Documents


