M Reta i n Wa ll cha rt Ma nua l www.retaininternational.com

Welcome message from author
This document is posted to help you gain knowledge. Please leave a comment to let me know what you think about it! Share it to your friends and learn new things together.
Transcript

M
Retain Wallchart Manual
www.retaininternational.com

Contents
2
Table of Contents
1 Introduction 7
...................................................................................................................... 71.1 Introduction
...................................................................................................................... 81.2 About Retain
...................................................................................................................... 81.3 About Retain Manager
...................................................................................................................... 91.4 Retain Wallchart............................................................................................................................................................. 10User Interface
..............................................................................................................................................................10Toolbars
..............................................................................................................................................................10Sort, Selection & Fields etc.
..............................................................................................................................................................12Quick Selection
..............................................................................................................................................................13Page Navigation
..............................................................................................................................................................14Resource/Job Record Tips
..............................................................................................................................................................15Bookings Over Non-working Days
..............................................................................................................................................................15Field Descriptions
............................................................................................................................................................. 17Booking Creation & Editing
..............................................................................................................................................................17Adjusting Multiple Bookings
............................................................................................................................................................. 20Reports
..............................................................................................................................................................20Time Series Reports
..............................................................................................................................................................21Exporting Reports
............................................................................................................................................................. 21Configuration
..............................................................................................................................................................21Retain Settings
...................................................................................................................... 211.5 Contact Details
...................................................................................................................... 221.6 Scope of this userguide............................................................................................................................................................. 22How to use this guide
...................................................................................................................... 221.7 Conventions
...................................................................................................................... 231.8 Where to get support
2 Overview of Retain 24
...................................................................................................................... 242.1 Overview
...................................................................................................................... 242.2 Resources
...................................................................................................................... 242.3 Jobs
...................................................................................................................... 252.4 Bookings
...................................................................................................................... 252.5 Components
...................................................................................................................... 252.6 Notebooks and data
...................................................................................................................... 262.7 Notebook pages
3 Getting started 29
...................................................................................................................... 293.1 Installation
...................................................................................................................... 293.2 Initial set-up
...................................................................................................................... 303.3 Starting Retain
...................................................................................................................... 313.4 The Retain interface
...................................................................................................................... 323.5 Switching into edit mode
...................................................................................................................... 323.6 Changing the edit password
...................................................................................................................... 333.7 Exiting Retain
4 Quick start 34
...................................................................................................................... 344.1 Quick wallchart............................................................................................................................................................. 34Opening Retain
............................................................................................................................................................. 34Navigation
............................................................................................................................................................. 35Locating resources
............................................................................................................................................................. 36Booking bar tips
............................................................................................................................................................. 36Switching view
...................................................................................................................... 364.2 Quick bookings............................................................................................................................................................. 36Making bookings
............................................................................................................................................................. 37Using the clipboard
............................................................................................................................................................. 37Manipulation
...................................................................................................................... 374.3 Quick resources and jobs............................................................................................................................................................. 37Add edit delete
............................................................................................................................................................. 38Sort

Contents
3
............................................................................................................................................................. 38Select
............................................................................................................................................................. 39Using selection criteria
...................................................................................................................... 394.4 Quick notebooks............................................................................................................................................................. 39Notebooks and pages
............................................................................................................................................................. 40Saving and closing
............................................................................................................................................................. 40Opening
............................................................................................................................................................. 40Format booking bars
...................................................................................................................... 414.5 Quick reports............................................................................................................................................................. 41Report page
............................................................................................................................................................. 41Viewing
............................................................................................................................................................. 42Printing
...................................................................................................................... 424.6 Quick preferences............................................................................................................................................................. 42Preferences
............................................................................................................................................................. 42Toolbars
...................................................................................................................... 434.7 Quick reference............................................................................................................................................................. 43Jargon
............................................................................................................................................................. 44Icons
............................................................................................................................................................. 45Wallchart view
............................................................................................................................................................. 46Calendar view
............................................................................................................................................................. 47Report view
5 The wallchart view 48
...................................................................................................................... 485.1 Wallchart view overview
...................................................................................................................... 495.2 Working with the wallchart............................................................................................................................................................. 49Working with wallchart overview
............................................................................................................................................................. 49Rotating the wallchart
............................................................................................................................................................. 49Changing the wallchart date scales
............................................................................................................................................................. 50Navigating around the wallchart
............................................................................................................................................................. 51Finding a particular resource or job
............................................................................................................................................................. 51The project view
...................................................................................................................... 525.3 Wallchart display options............................................................................................................................................................. 52Wallchart display options overview
............................................................................................................................................................. 52Gridlines and shading
............................................................................................................................................................. 53Customising date scale settings
............................................................................................................................................................. 54Week display
............................................................................................................................................................. 54Display diary
...................................................................................................................... 555.4 Statutory holidays
...................................................................................................................... 555.5 Booking display options............................................................................................................................................................. 55Booking display options overview
............................................................................................................................................................. 56Booking bar formats
............................................................................................................................................................. 59Booking bar fields
............................................................................................................................................................. 61Booking bar tips
...................................................................................................................... 615.6 Row label fields and layout
6 The calendar view 65
...................................................................................................................... 656.1 The calendar view overview
...................................................................................................................... 666.2 Rotating the calendar
...................................................................................................................... 666.3 Changing the calendar date scales
...................................................................................................................... 676.4 Moving between calendar records
...................................................................................................................... 676.5 Navigating within the current record
...................................................................................................................... 676.6 Calendar display options
...................................................................................................................... 686.7 Making bookings in calendar
7 Resources, jobs and components 69
...................................................................................................................... 697.1 General principles
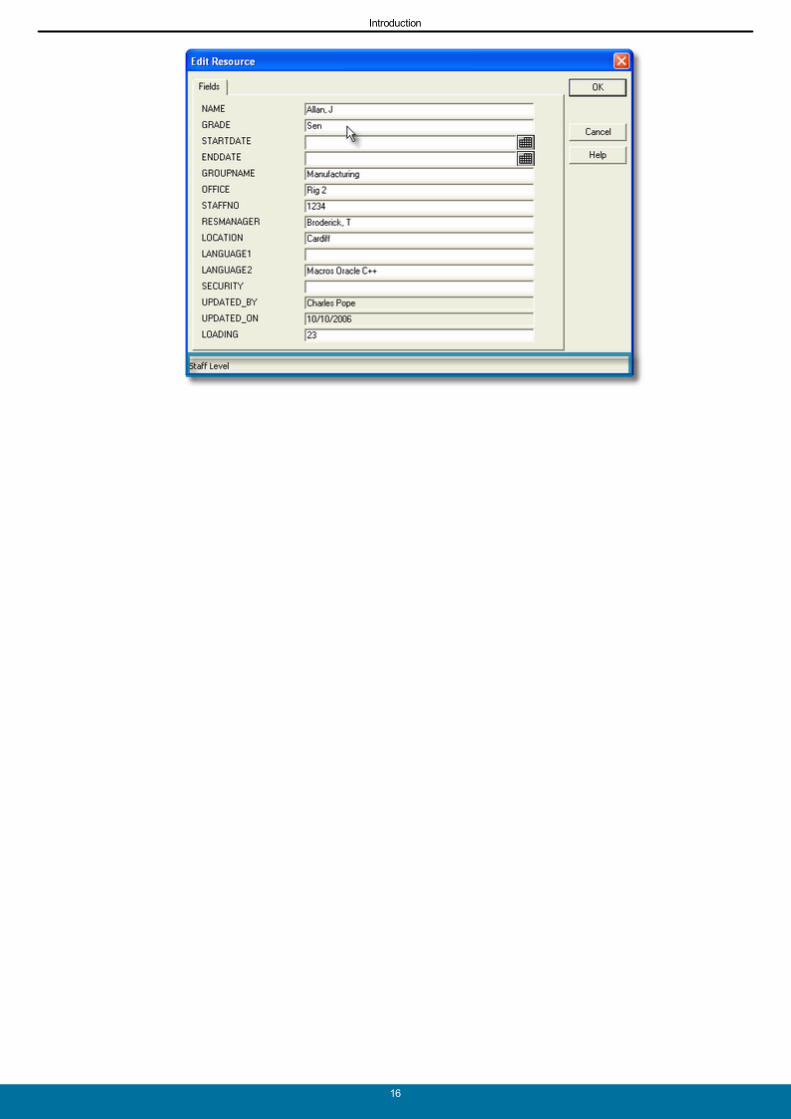
...................................................................................................................... 697.2 Resources............................................................................................................................................................. 69What are resources?
............................................................................................................................................................. 69The modify record dialog
............................................................................................................................................................. 70Adding resources
............................................................................................................................................................. 71Editing record details
............................................................................................................................................................. 72Deleting resources
............................................................................................................................................................. 72Hiding resources from view
...................................................................................................................... 737.3 Jobs

Contents
4
............................................................................................................................................................. 73What are jobs
............................................................................................................................................................. 73Adding jobs
............................................................................................................................................................. 74Editing job details
............................................................................................................................................................. 75Hiding jobs from view
............................................................................................................................................................. 75Deleting jobs
...................................................................................................................... 767.4 Components............................................................................................................................................................. 76What are components
............................................................................................................................................................. 76Adding components
............................................................................................................................................................. 77Editing component names
............................................................................................................................................................. 77Deleting components
............................................................................................................................................................. 78Job-specific components
8 Sorting and selecting 79
...................................................................................................................... 798.1 Sorting and selecting overview
...................................................................................................................... 798.2 Changing the sort order
...................................................................................................................... 818.3 Collapsing records
...................................................................................................................... 828.4 Selecting marked records
...................................................................................................................... 828.5 Special selections using date ranges............................................................................................................................................................. 82Special selections overview
............................................................................................................................................................. 83The ‘Special selections’ dialog
............................................................................................................................................................. 84Hiding the 'Special selections' dialog
............................................................................................................................................................. 84Deactivating special selections
............................................................................................................................................................. 84Clearing special selections
...................................................................................................................... 858.6 Defining selection criteria............................................................................................................................................................. 85Selection criteria overview
............................................................................................................................................................. 85The selection dialog
............................................................................................................................................................. 86Selection operators and conditions
............................................................................................................................................................. 88Cross-reference view selections
............................................................................................................................................................. 88Booking selection filters
............................................................................................................................................................. 89Removing selection filters
............................................................................................................................................................. 89Locking selection filters
............................................................................................................................................................. 89Importing and exporting selections
9 Working with bookings 91
...................................................................................................................... 919.1 Bookings overview
...................................................................................................................... 919.2 Making a basic booking............................................................................................................................................................. 91Make bookings overview
............................................................................................................................................................. 91Marking an area
............................................................................................................................................................. 92Entering the booking details
............................................................................................................................................................. 93Making multiple resource bookings
............................................................................................................................................................. 93Selecting a booking component
............................................................................................................................................................. 93Choosing a different booking colour
...................................................................................................................... 949.3 Adding additional booking details............................................................................................................................................................. 94Additional booking details overview
............................................................................................................................................................. 95Amending the start and end of a booking
............................................................................................................................................................. 96Making proportional bookings
............................................................................................................................................................. 97Changing the booking charge rate
............................................................................................................................................................. 99Entering actual times
............................................................................................................................................................. 100Assigning scenario names
...................................................................................................................... 1019.4 Viewing bookings
...................................................................................................................... 1019.5 Inspecting bookings
...................................................................................................................... 1029.6 Editing bookings
...................................................................................................................... 1059.7 Changing booking colours
...................................................................................................................... 1059.8 Duplicating bookings
...................................................................................................................... 1079.9 Splitting bookings
...................................................................................................................... 1079.10 Cutting bookings
...................................................................................................................... 1089.11 Using the colour key
...................................................................................................................... 1099.12 Deleting bookings
...................................................................................................................... 1099.13 Using the clipboard
...................................................................................................................... 1109.14 Using scenarios
...................................................................................................................... 1119.15 Rolling bookings forward
...................................................................................................................... 1139.16 Undo-ing a booking
Contents
5
10 Working with notebooks 114
...................................................................................................................... 11410.1 Notebooks overview
...................................................................................................................... 11410.2 Creating a new notebook
...................................................................................................................... 11410.3 Opening an existing notebook
...................................................................................................................... 11510.4 Saving the notebook
...................................................................................................................... 11510.5 Closing the notebook
...................................................................................................................... 11610.6 Importing/Exporting pages
...................................................................................................................... 11710.7 Notebook windows
11 Working with notebook pages 118
...................................................................................................................... 11811.1 Notebook pages overview
...................................................................................................................... 11911.2 Adding a page
...................................................................................................................... 11911.3 Inserting a page
...................................................................................................................... 12011.4 Copying a page
...................................................................................................................... 12011.5 Deleting a page
...................................................................................................................... 12011.6 Navigating between pages
...................................................................................................................... 12111.7 Switching to wallchart or calendar view
...................................................................................................................... 12111.8 Setting the opening date
12 The Retain Report Writer 123
...................................................................................................................... 12312.1 Report writer overview
...................................................................................................................... 12312.2 Creating a report
...................................................................................................................... 12412.3 Report fields
...................................................................................................................... 12612.4 Special report fields
...................................................................................................................... 12812.5 Report date range
...................................................................................................................... 13012.6 Report selection criteria
...................................................................................................................... 13112.7 Report sort orders and subtotals............................................................................................................................................................. 131Report sort overview
............................................................................................................................................................. 131The report sort dialog
............................................................................................................................................................. 132Sort titles and outline
...................................................................................................................... 13212.8 Viewing the report............................................................................................................................................................. 132Viewing report overview
............................................................................................................................................................. 133Expanding and collapsing report sections
............................................................................................................................................................. 134Report display options
............................................................................................................................................................. 136Recalculating the report
............................................................................................................................................................. 136Refreshing the report
...................................................................................................................... 13612.9 Report headers and footers............................................................................................................................................................. 136Headers and footers overview
............................................................................................................................................................. 136Editing the header
............................................................................................................................................................. 137Editing the footer
............................................................................................................................................................. 138Hiding and showing the header
............................................................................................................................................................. 138Hiding and showing the footer
...................................................................................................................... 13912.10 Saving and exporting reports
13 Printing 140
...................................................................................................................... 14013.1 Printing overview
...................................................................................................................... 14013.2 General rules for printing
...................................................................................................................... 14013.3 Printing the current page............................................................................................................................................................. 141Previewing the current page
...................................................................................................................... 14213.4 Printing wallcharts
...................................................................................................................... 14213.5 Print configuration options............................................................................................................................................................. 142Print configuration overview
............................................................................................................................................................. 143Print headers
............................................................................................................................................................. 144Print footers
............................................................................................................................................................. 144Print setup
14 Customising the desktop 146
...................................................................................................................... 14614.1 Retain preferences............................................................................................................................................................. 146Retain preferences overview
............................................................................................................................................................. 146General preferences
............................................................................................................................................................. 147Bookings preferences
Contents
6
............................................................................................................................................................. 148Palette preferences
............................................................................................................................................................. 149Availability preferences
............................................................................................................................................................. 150General printing settings
...................................................................................................................... 15014.2 Customising the toolbar............................................................................................................................................................. 150Toolbar customising overview
............................................................................................................................................................. 150Toolbar types
............................................................................................................................................................. 151Adding and removing toolbar icons
15 Reference 154
...................................................................................................................... 15415.1 Icon reference
...................................................................................................................... 15615.2 Hot-key reference
...................................................................................................................... 15615.3 Glossary
...................................................................................................................... 15815.4 Example reports
16 Support 160
...................................................................................................................... 16016.1 Support services
Index 161

Introduction
7
1 Introduction
1.1 Introduction
Retain Wallchart Manual
Retain Planner editionRetain Corporate edition
www.retaininternational.com
© 2007 ... Retain International Limited
Introduction
8
1.2 About Retain
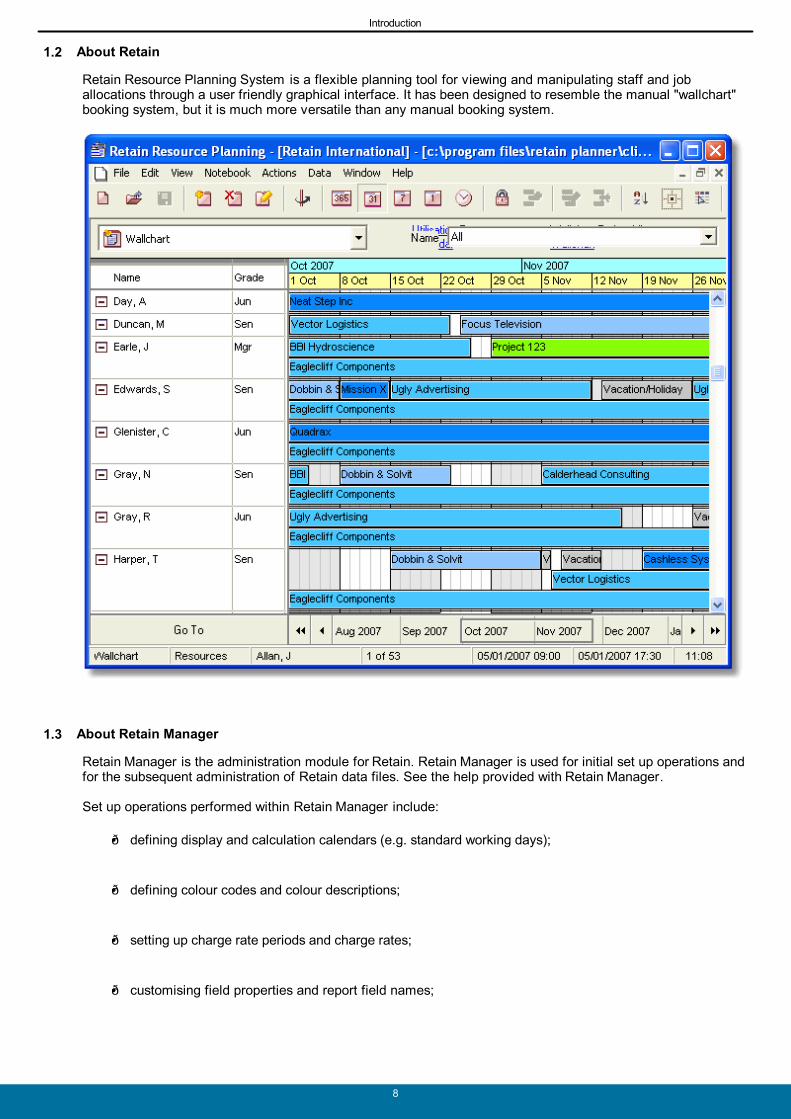
Retain Resource Planning System is a flexible planning tool for v iewing and manipulating staff and joballocations through a user friendly graphical interface. It has been designed to resemble the manual "wallchart"booking system, but it is much more versatile than any manual booking system.
1.3 About Retain Manager
Retain Manager is the administration module for Retain. Retain Manager is used for initial set up operations andfor the subsequent administration of Retain data files. See the help provided with Retain Manager.
Set up operations performed within Retain Manager include:
defining display and calculation calendars (e.g. standard working days);
defining colour codes and colour descriptions;
setting up charge rate periods and charge rates;
customising field properties and report field names;

Introduction
9
defining statutory holidays.
Administration functions include packing, purging and reindexing the data files and performing databaseconsistency checks.
1.4 Retain Wallchart
Retain Resource Planning System version 4 introduces the following enhancements:
Retain Wallchart - New Features
User Interface
Toolbars
Sort, Selection & Fields etc.
Quick Selection
Page Navigation
Resource/Job Record Tips
Bookings Over Non-working Days
Field Descriptions
Booking Creation & Editing
Adjusting Multiple Bookings
Reports
Time Series Reports
Exporting Reports
Configuration
Retain Settings (RDB)

Introduction
10
User Interface
Toolbars
The design and colour scheme of user interface has been updated to take advantage of the latest displayresolutions.
Sort, Selection & Fields etc.
The 'Sort, Selection, Fields etc.' setup dialog has been renamed to 'Setup Wallchart' and 'Setup Report'accordingly. It is now organised in a logical order:
Select the fields you would like to v iew in the wallchart page or in a report:
Introduction
11
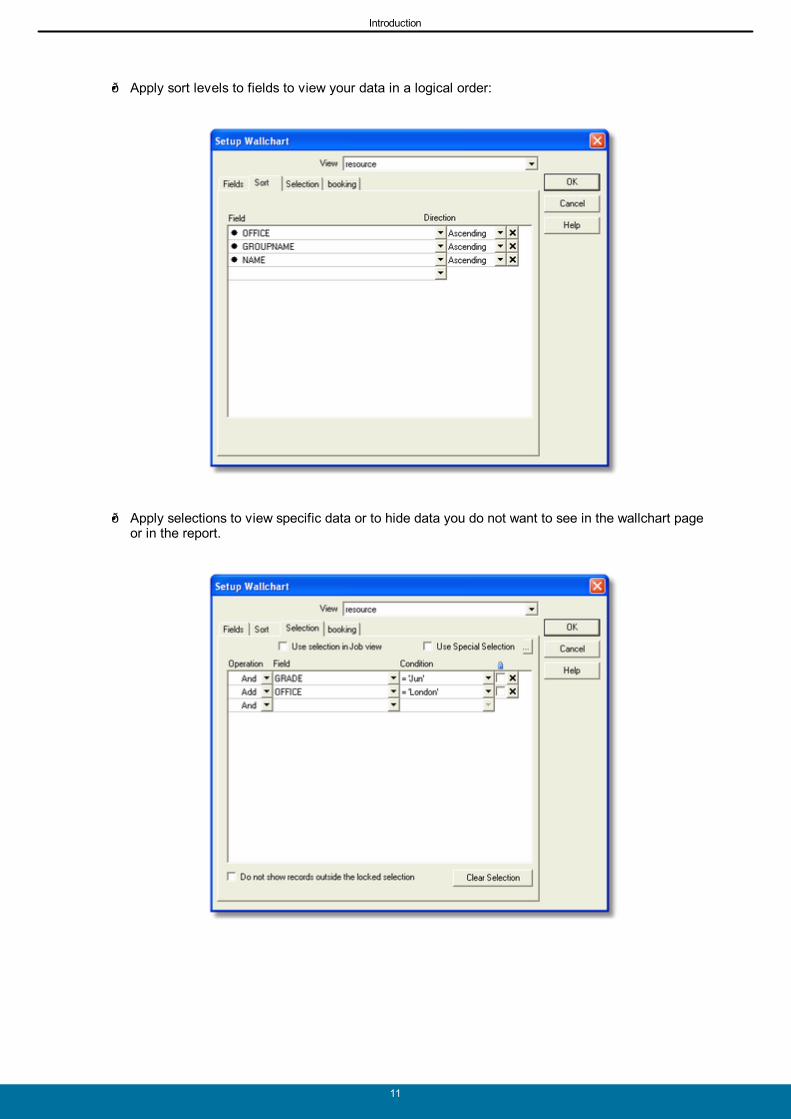
Apply sort levels to fields to v iew your data in a logical order:
Apply selections to v iew specific data or to hide data you do not want to see in the wallchart pageor in the report.

Introduction
12
Fields, sort order and selections can be applied to the resource view and in the job v iew. The relevant v iew isnow selected from the dropdown box:
You can also sort bookings by fields and apply selections to show or hide certain bookings. A separate 'booking'tab now exists for each view:
Quick Selection
To quickly select specific resources or jobs according to a sort field in a wallchart page, you can use theselection dropdown:

Introduction
13
The quick selection dropdown allows you to select resource or job records according to the first sort field:
Page Navigation
Pages in notebooks are accessed from a drop-down list, conserving screen space.
To the right of the dropdown are links providing quick access to the four most recently opened pages.

Introduction
14
Resource/Job Record Tips
A record tip appears displaying further information about a resource or job when the mouse pointer hovers on arecord.
The record tip appears when multiple fields are selected through the 'Sort, Selection & Fields etc.' dialog.
Introduction
15
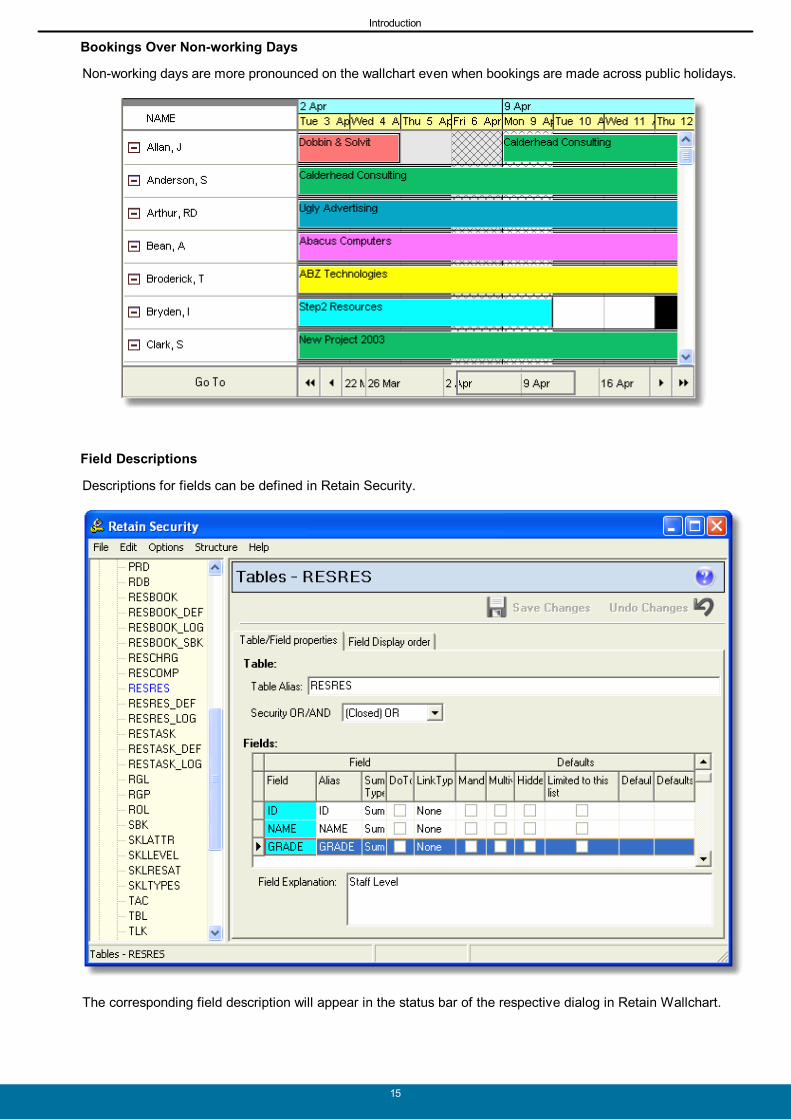
Bookings Over Non-working Days
Non-working days are more pronounced on the wallchart even when bookings are made across public holidays.
Field Descriptions
Descriptions for fields can be defined in Retain Security.
The corresponding field description will appear in the status bar of the respective dialog in Retain Wallchart.
Introduction
16
Introduction
17
Booking Creation & Editing
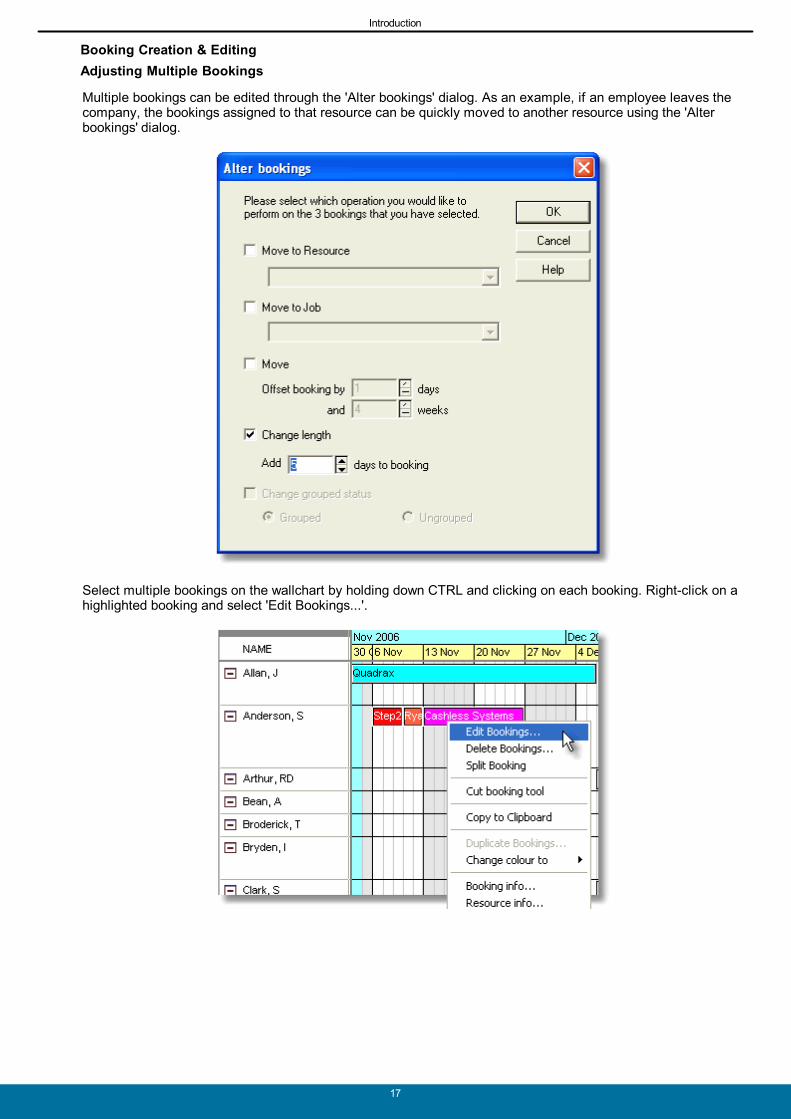
Adjusting Multiple Bookings
Multiple bookings can be edited through the 'Alter bookings' dialog. As an example, if an employee leaves thecompany, the bookings assigned to that resource can be quickly moved to another resource using the 'Alterbookings' dialog.
Select multiple bookings on the wallchart by holding down CTRL and clicking on each booking. Right-click on ahighlighted booking and select 'Edit Bookings...'.

Introduction
18
The 'Alter bookings' dialog will appear. You can select one or more of the following options in 'Alter bookings' toedit the bookings:
Move to Resource - reassign the currently selected bookings to another resource:
Move to Job - reassign the currently selected bookings to another jobs:

Introduction
19
Move - move the bookings backwards or forwards by a number of days/weeks:
Change length - increase or decrease the duration of the currently selected bookings by a numberof days:
Change grouped status - group or ungroup the currently selected bookings.
Introduction
20
Reports
Time Series Reports
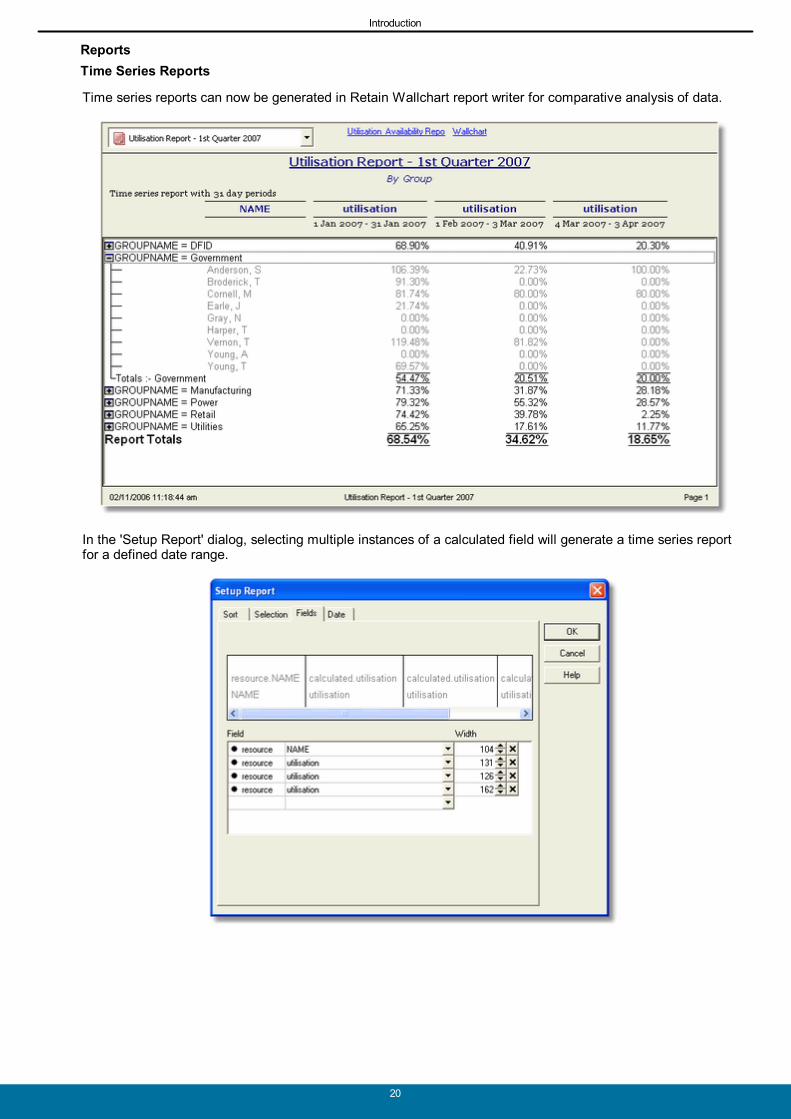
Time series reports can now be generated in Retain Wallchart report writer for comparative analysis of data.
In the 'Setup Report' dialog, selecting multiple instances of a calculated field will generate a time series reportfor a defined date range.

Introduction
21
Exporting Reports
Reports can be exported directly into Microsoft Excel, copied to the clipboard or saved as a text (TXT) file.
Export report - This will export the whole report including the header and footer.
Export data - This will export data only from the report.
Configuration
Retain Settings
Retain settings are now saved in the database. In previous editions, settings such as the length of your workingday, colour codes, field properties were saved in the RDB file. These settings were changed through RetainManager. This is no longer the case. In version 4, these settings are managed through the Retain Securityapplication.
1.5 Contact Details
retaininternational
USA: 1 877 819 8820 (toll free) UK: 0845 458 8660 World: +44 20 7538 4774 USA fax: 1 928 563 5137 World fax: +44 (0)845 458 8661 E-mail: [email protected]
Support: [email protected] Address: Retain International
33 Beaufort CourtAdmirals WayLondonE14 9XLUnited Kingdom

Introduction
22
1.6 Scope of this userguide
Refer to this User Guide if you are using Retain to make bookings or to v iew staff plans or reports.
This User Guide is for the following editions of Retain:
Retain Standard Retain DBI Retain for Notes Retain Corporate Retain Enterprise
Refer to the separate Retain Manager Guide if you are doing any of the following:
installing Retain setting Retain up for the first time performing database administration jobs
Retain Corporate and Retain Enterprise editions also have a Retain Security Manager guide and a DefaultsManager guide.
How to use this guide
This guide is aimed at new users of Retain, who want to take a step-by-step approach of learning to work withthe software. Although manuals are often used for reference, it is assumed that people looking for a specifictopic will use either the Help file available in the program, or the Index or Contents of this manual to find whatthey need. This leaves the structure of the manual open to be used as an approach to understanding thesoftware.
The manual starts with an overview of the different elements and structure of the program. This chapter isrecommended for all users who have not used the program before. It is followed by a Quick Start guide thatprovides users with a working knowledge of the program's basic functionality. Often users will start using theprogram from here, returning to the manual when they run into unknown features. The later chaptersexhaustively cover all of Retain's functionality, precisely describing all required actions, as would a referencemanual.
The steps followed in both the Quick Start guide and the rest of the manual is aimed at learning to work with thesoftware directly, so that users become productive as soon as possible. It starts with the basic, often usedfeatures and covers all related topics before moving to other areas of the software's functionality.
It is assumed that new users start with an existing database, either from their organisation or an example file,already containing resources and jobs. Those starting from scratch are advised to read 'Resources, jobs andcomponents' chapter and create a number of resources and jobs before working through the 'Bookings' chapter.
1.7 Conventions
The following conventions are used throughout this user guide:
Data file types are referred to as follows:'.RTN' files are referred to as Retain Notebook files- The collection of data files that make up the database:
Retain Standard: DBF files are referred to as data filesRetain DBI: Linked via ADO to the database platformsRetain for Notes: .NSF files are referred to as data filesRetain Corporate: Linked to the database via Retain Server applicationRetain Enterprise: Linked to the database via Retain Server application
Details you must enter from the keyboard are in bold typeface, for example:
Type A: as the run command.
Menu options, options within dialog boxes and special terms are expressed in single quotes, for

Introduction
23
example:
Select Data | Edit from the menus.
Keyboard strokes are represented by capitals, for example:
ENTER represents the Enter or carriage return key (also referred to as the RETURN key insome computer manuals). ESC represents the Escape key. F1, F2 etc., represent the function keys. SHIFT represents the Shift key.
A plus sign between two key presses indicates a combination of key presses, for example:
CTRL+S represents the action of holding down the Control key and pressing the S key.
1.8 Where to get support
If you have any problems with Retain which you are unable to resolve through this user guide or through yourlocal support contacts, please contact your support service provider.

Overview of Retain
24
2 Overview of Retain
2.1 Overview
The Retain concept is all about managing a limited supply of resources in order to perform a defined populationof jobs. The exact meaning of the terms 'resources' and 'jobs' varies from organisation to organisation, but theprocess of allocating resources to jobs in the form of 'bookings' is the same in each. Retain is primarily a resource management (as opposed to a project management) tool. It is therefore notgreatly concerned with the indiv idual activ ities being performed within each job. Nevertheless, bookings againsta particular job can be usefully explained to indicate the nature of the specific booking. In Retain these sub-jobsare called 'components'. Retain allows you to maintain resource, job and component information. You are encouraged to recorddescriptive information about the jobs and resources, to help you in the resource planning process. You willneed to balance the benefit to the planning process of recording this information in Retain with the time taken tocapture and maintain this information. The resources, jobs and components data files can be updated on acontinual basis throughout the resource management process. You can build these details up from scratch ifyou prefer, but it is usually helpful if the starting position can be established as a one-off exercise, before youstart making bookings.
You may want to consider transferring data automatically into Retain from other systems as part of this set-upexercise. There are certain issues you need to consider if you choose this route, as explained in the separate Manager Guide.
Related topics:
ResourcesJobsBookingsComponentsNotebooks and dataNotebook pages
2.2 Resources
Retain uses the term 'resources' as a general description for the people or entities that can be applied to theprocess of completing a job.
In many organisations the term 'resources' simply refers to staff. However, you can also use Retain to plan othertypes of resource, such as plant and machinery or training rooms. Indeed any item with a finite capacity thatgoes into the performance of a Retain 'job' can be considered a resource.
2.3 Jobs
Retain uses the term 'job' as a general description for any project, product or assignment being planned usingthe Retain resource planning approach. What constitutes a job in your organisation depends on the nature of your business and what you consider to bethe 'unit' level of your planning in Retain. Some organisations may set up a separate job for each indiv idualproject, while others may group together projects under a single 'umbrella' job, since that is the level at whichthey carry out planning work on Retain. Since every booking in Retain must be made against a job, jobs should also include non-project activ ities, suchas vacation or sick leave or, in a manufacturing context, machine down-time. You can use analysis fields within the job data file to combine jobs for v iewing and reporting purposes. Forexample, if you have several jobs relating to ABC plc then you might enter 'ABC' in one of the job fields againsteach relevant job. You can then filter on this field to obtain v iews and reports relating to the ABC plc group ofjobs. You can also use components to analyse bookings within a job. Components are usually defined in general
Overview of Retain
25
terms applicable to most jobs, such as 'planning', 'fieldwork' and 'reporting' (see Components for details).
2.4 Bookings
In Retain each booking represents an allocation of an indiv idual resource against a specific job, covering adefined date range and a measurable number of hours. In order to allocate resources to jobs in Retain you will need to make bookings. You can make bookings oneither a wallchart page or a calendar page, although it is usually easier to make them on a wallchart page. Retain treats all allocations to the wallchart as 'bookings', regardless of their nature. This means that 'non-jobs',such as vacation and sick leave also need to be entered as bookings. You can use the fields associated with thejob to treat bookings against these special types of jobs differently from other types (see Adding jobs).
2.5 Components
In Retain components are sub-jobs, providing information regarding the nature of each booking made against ajob. Components provide an element of project planning within Retain, since you can select a component foreach booking you make and analyse the job into its component parts for reporting purposes.
Components take the form of a simple pick-list of descriptive names, available for selection each time youmake a booking. They are usually defined in general terms applicable to most jobs, such as 'planning','fieldwork' and 'reporting', although you can enter components relating to specific types of job if desired, such as'stock take', 'branch visit', or 'security review', for example.
The level at which you define components should correspond to that at which you make bookings in Retain. Forexample, if your planning on Retain takes the form of bookings of two or more weeks each, your componentsshould not represent the half-day elements within each booking.
2.6 Notebooks and data
Retain uses a database structure to store its data. Resources, jobs, components and bookings are all stored inseparate tables that together form a set of data files. The files used by the Retain user program are calledRetain Notebook ('.RTN' files). Notebook contain v iews of your Retain data. They allow you to display and edityour Retain data in various ways and to define report formats used by the Retain Report Writer. Each Notebook points to a particular set of data files. In most organisations, you are likely to have a single setof data files, but you may have several Notebookpointing to that data. In a network environment, your Retaindata may be stored on a network drive and shared by many users. Each user may have their own Notebookfiles, or you may even have Notebook files which are shared by several users.
If you intend to share Notebook files, the Notebook file is changed each time someone saves it. You mayprefer to make shared Notebook files read only so that they cannot be amended. It is essential, when working with a Retain Notebook, to appreciate that the underlying data is the same acrossall pages, Notebook files and even users of that data. For example, if you amend a booking in a particularNotebook view the booking itself is amended, not just the v iew. Conversely, if you amend a view, for exampleby excluding certain jobs from the display, you affect the current v iew, but not the records currently hidden fromthat v iew.

Overview of Retain
26
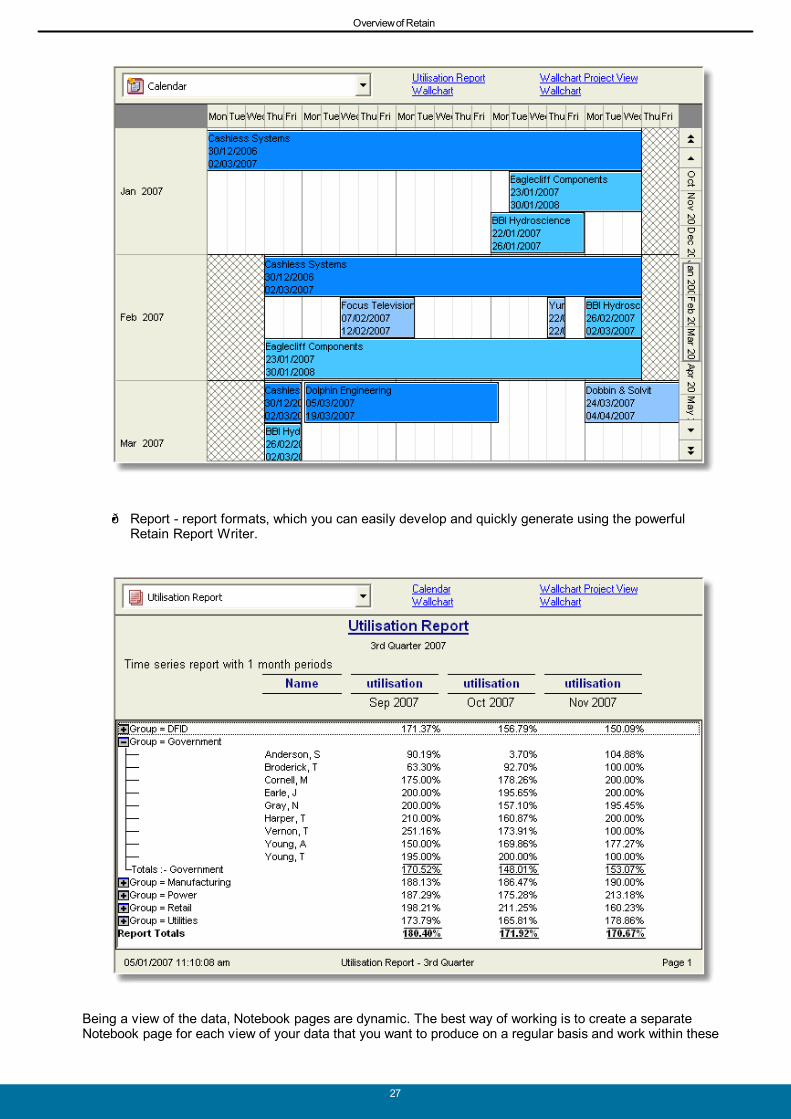
2.7 Notebook pages
A Notebook contains one or more notebook pages, each page representing a different v iew of your data. Thecharacteristics of each Notebook page can be defined and maintained independently, using the various sort,selection and other display features in Retain. In this way you can create an almost unlimited number of v iewsof your data. (See Working with notebook pages.) Each Notebook is of one of the following 3 types:
Wallchart - the traditional wallchart v iew, with resources or jobs listed down the side of the pageand a continuous time bar along the top. Each booking is represented as a coloured rectangularblock on the wallchart.
Calendar - a calendar v iew where each screen page represents the bookings for one indiv idualresource or job. Time is represented in a calendar style grid and special navigation features allowyou to move between resources or jobs.
Overview of Retain
27
Report - report formats, which you can easily develop and quickly generate using the powerfulRetain Report Writer.
Being a v iew of the data, Notebook pages are dynamic. The best way of working is to create a separateNotebook page for each view of your data that you want to produce on a regular basis and work within these
Overview of Retain
28
existing Notebook pages, rather than creating a separate page for every unique view.

Getting started
29
3 Getting started
3.1 Installation
This guide assumes that the Retain has already been installed on your personal computer or network drive andis available to you. If it is not, either consult your local support contacts or refer to the separate TechnicalImplementation Guide for instructions on installing Retain.
3.2 Initial set-up
After the software has been installed, the following initial set-up tasks should have been carried out prior to Retain going 'live' in your organisation:
1. For network versions, user names and access rights should be defined.
2. The Retain database file should be set up, including:
specifying the location of your data files; setting up initial charge rates and charge periods; defining standard working diaries, for both calculation and display purposes; and setting up colours and defining colour conventions and alias names.
For Retain Corporate please refer to Retain Manager help file.
3. The Retain Notebook files should be set up, including:
amending the standard data file structures, if desired; clearing out any sample or test data; and loading resources and jobs from other applications, if desired.

Getting started
30
3.3 Starting Retain
Select the Retain icon and double click on it, or press ENTER, to launch the program.
After a second you will arrive at the main Retain screen:
At this screen you can:
create a new Retain Notebook;
open an existing Retain Notebook;
set up environment preferences;
customise the toolbar;
access the Retain help files;
exit the software.
You will usually want to start by creating or opening a Retain Notebook, which gives you access to yourplanning information. See Working with notebooks for guidance on creating or opening Notebook files.

Getting started
31
3.4 The Retain interface
Once you have created or opened a Notebook, the Notebook will be displayed on the main screen:
The screen is div ided into the following areas:
1. The menu bar - Located at the top of the screen, this area provides access to all Retain functions,although you may prefer to use short-cuts where possible.
2. The toolbar - This is usually located immediately below the menu bar and contains several iconbuttons. These buttons provide quick access to many of the commonly used features in Retain.
3. The page navigation toolbar - This toolbar consists of a drop-down which allows you to select pageswithin your existing Notebook. Links to the four most recently opened pages are also displayed tothe right of the drop-down. A further drop-down is available which allows you to filter the recordsdisplayed on the wallchart according to the first sort criteria.
4. The Notebook area - The main part of the screen, this area contains one or more Retain Notebookfiles. Think of a Notebook as rather like a document or a spreadsheet; you can open a number ofNotebook files in Retain and each will reside in its own window. You can manipulate each Notebook window in the usual way. The left-hand side of the Notebook gives you the list of all orselected resources or jobs and the right-hand side shows the bookings.
5. The status bar - Located at the foot of the screen, this area displays information about the currentstatus, such as the name of the currently selected resource and the date range covered by theselected booking. It changes according to the context. For example, it will give you a hint at a menuor a tool bar item that you are pointing to.
Getting started
32
3.5 Switching into edit mode
When you first enter Retain you will always be in read-only mode. In read-only mode you can move aroundyour Retain Notebook in the normal way and produce reports, but you cannot change any data.
To amend any data you have to be in 'Edit' mode. (In a network environment you will also need edit accessrights, which should have been set up by your Retain administrator). To enter 'Edit' mode:
1. Select Edit | Edit mode... from the menu.
Short-cuts: Edit mode button or press CTRL+E.
2. Enter the edit password at the 'Password' dialog.
The default password is 'abc' (case sensitive), but you can change this password (see Changing theedit password).
3. Click on OK or press ENTER to accept the password.
On entering the correct password, the 'Toggle edit-mode' button will be depressed and the 'Make booking'button will become enabled. You can now make changes to the Retain data.
If the edit icon is greyed out, it means you do not have the appropriate access rights to switch into editmode.
You will remain in 'Edit' mode until you choose to return to read-only mode. You may want to switch back toread-only mode at the end of an editing session, or if you move away from your PC, to make sure you do notmake changes accidentally. Click on the 'Toggle edit-mode' button again.
3.6 Changing the edit password
An edit password provides a simple access control mechanism for users of Retain who have full access to thesystem. (Access for network users is also controlled by user access rights, as defined by your Retainadministrator). When you enter the correct password and enter 'edit mode' you can amend all the data heldwithin Retain.
When Retain is first installed the edit password is set to 'abc'. If you are relying on this password to controlaccess to edit facilities in Retain then you should change this password at regular intervals.
To change the edit password:
1. Select 'Edit', 'Change password' from the menus.
2. At the 'Password' dialog enter the current password, then choose 'OK'.
3. Enter your new password, then choose 'OK'.
4. Enter the new password again to confirm the initial entry, then choose 'OK'.
Your new password will be saved and will be required whenever you switch into edit mode in the future.
Each Retain user with full edit access rights should maintain their own edit password.
Note that the password is case sensitive and is held locally. If you forget your password, contact your supportprov ider.
Getting started
33
3.7 Exiting Retain
To close the current notebook(s) and exit Retain entirely:
Select 'File', 'Exit' from the menus.
Short-cut: ALT+F4.
You do not need to save changes to Retain data before exiting Retain, since changes are saved to disk as yougo along. However, you may be prompted to save changes to your notebooks, such as new or modifiednotebook pages (see Working with notebooks).

Quick start
34
4 Quick start
4.1 Quick wallchart
Opening Retain
Locate the Retain icon on your workspace or launch from the Start Menu. Double click on it with your leftmouse-button. You will see a blank screen from where you must create a new notebook or open an existingone.
Notebooks
Retain has been set up to resemble a personal notebook consisting of notebook pages that constitute a set ofpersonalised views of one set of Retain data files. Each notebook can contain one or more notebook pages,each of which represent different v iews of the data (you can add up to forty notebook pages).
Altering resource, job or booking information within a notebook will change the information held in theunderlying data files directly. Altering selection criteria, sort order or fields displayed only affects the notebookyou are currently working with. By saving a notebook you will be saving these settings.
The .RDB file
Each notebook must point to a particular database, the location and configuration of which is defined via aRetain database (.RDB) file. To create a new notebook, you must open this .RDB file e.g. Retain.rdb.
Creating a notebook
Click on 'File' -> 'New'. From the Select Data Source dialog box, specify the location of the file e.g.C:\RETAIN36\EXAMPLES\AUDIT\DEMO.RDB and click on 'OK'.
A basic notebook is opened which can be set up to your preferences. The first notebook page is set up as aWallchart v iew.
Wallchart v iew
The wallchart v iew has resources listed on the left hand side. The time frame is shown at the top of the screen.Bookings are shown in the main part of the screen.
Navigation
Menu options can be accessed from any part of the screen by right-clicking once with your mouse. Thecontents of the drop down menus vary depending on which part of the wallchart the mouse cursor is positionedin.
There are two ways in which you can navigate around the wallchart:
Scroll bars
The scroll bars at the right of the wallchart enable you to scroll up and down the staff members. The scroll bars at the bottom of the wallchart enable you to move backwards and forwards through time.The single arrow moves single days in time (can be more according to the grid units set).The double arrows move whole screens in time.
Transparent frame
The transparent rectangular frame at the bottom of the wallchart can be grabbed and moved, orextended/condensed. The time period displayed on the wallchart corresponds to that contained within therectangle. Clicking on the 'Go To' button at the bottom left hand side of the screen brings you back to thepresent date or to any day of your choice.
To change the time scale displayed on the wallchart, right-click anywhere on the booking area of the wallchart. Choose the 'Zoom...' option. Click on the date scale by which you want to v iew the data. Click on 'OK'.
Otherwise, you can use the smart icons for years, months, weeks, days and hours on your toolbar.

Quick start
35
Locating resources
Start typing the resource name to locate that staff member on the wallchart v iew (the same procedure can beused to locate jobs in the Job View). A pick list appears from which you can select the required resource.
Double-click on a resource to v iew resource details.
If the wallchart is sorted by a field other than resource name, then the first of these fields, if there is more thanone, will also be shown, allowing users to navigate v ia that attribute.
Quick start
36
Booking bar tips
Booking bar tips are displayed when you hover over a booking with the mouse arrow. These tips can bechanged and added to suit the indiv idual user.
Switching view
Right click anywhere within the wallchart v iew and choose Job View. Job View shows jobs down the left handside of the screen and the related bookings on the wallchart. Right click anywhere in the wallchart v iew andchoose Resource View to change back to the resource view.
4.2 Quick bookings
Making bookings
Switching to edit mode
You must be in edit mode in order to make any changes to Retain data files. This includes amending resourceand job details, bookings and components. From the Edit menu, choose Edit Mode. Key in the password(default 'abc'). You can now make a booking.
Marking the wallchart
Mark the time period on the wallchart for which you wish to make a booking to book a staff member as follows:
On the line next to the resource, left-click on the start date for the booking and drag the mouse until you reachthe end date.
The booking period should now be highlighted on the wallchart.
Right-click anywhere on the wallchart and from the drop-down menu choose 'Make Booking'.
Booking dialog
Multiple bookings can be made in the Make Booking dialog box by adding staff from to the Resources box.Select a job name from the Job box. Select an assignment (Enterprise only) or a component (components aresub-jobs, providing information regarding the nature of each booking made against a job. Usually defined ingeneral terms applicable to most jobs, such as 'Reporting, 'Fieldwork' etc).
Click on the 'Show More' button. Here you can alter the start and end date for the booking, start and end times,enter actual booking time or the percentage of time the booking takes up.
Changing the start/end of a booking on wallchart
Position the mouse over the start or end of the booking, until the cursor changes to a double-headed arrow. Left-click and drag the end of the booking to the new start/end date.
Moving bookings
To move bookings on the wallchart, left-click on the booking. Drag the booking to the new location. Releasemouse button.
Copying a booking
Press the <CTRL> key while left-clicking and dragging the booking.
Quick start
37
Using the clipboard
Clipboard is useful when you want to move/copy bookings beyond the currently displayed area of the wallchart.Located at top left hand side of wallchart v iew. The clipboard is similar to the normal clipboard facility providedby other Windows applications as you can paste from the clipboard. However:
A number of bookings can be stored at any one time;
Clipboard only deals with bookings;
Each notebook page has its own clipboard - the bookings in one page's clipboard are unavailable in anyother pages' clipboard.
Cutting bookings
Left-click on the booking to select it. Holding down the left mouse button, drag it to the clipboard (at top lefthand side of screen).
Copying bookings
This enables you to copy bookings between resources. To copy a booking to the clipboard, hold down the<CTRL> key while you left-click and drag the booking to the clipboard. In addition to moving/copying bookingsto the clipboard, you can move/copy bookings in the same manner from the clipboard.
Moving up/down clipboard
When the clipboard fills up, arrow keys appear to the right to enable you to scroll up and down the bookings onthe clipboard.
Manipulation
Selecting multiple bookings
To select a number of bookings in order to move or copy them to another area on the wallchart or the clipboard,hold down the <CTRL> key while you left-click on the required bookings to select them.
Copying or moving bookings
To move the selected bookings drag all the highlighted bookings to the new destination.To copy the selected bookings hold down the <CTRL> key while dragging all the highlighted bookings to thenew destination.
Deleting bookings
To delete a booking (not using the clipboard), select the booking by left clicking once on it and click on the'Delete Booking' smart icon. Choose the 'Delete Booking' option. Click on 'Yes' to confirm the deletion.
4.3 Quick resources and jobs
Add edit delete
Switching to edit mode
Ensure you are in edit mode before attempting to alter record details. You can tell whether you are in edit modeby checking the 'Edit' menu, there should be a tick next to the 'Edit Mode' option.
Adding a resource/job
Right-click over the resource column at the left hand side of the screen. Choose the 'Modify Resources' option,and click on the 'New' button. Input the staff details in the Add Resource dialogue box. Click on the 'Add'button. Click on the 'Close' button.
Editing a resource/job
Right-click over the resource column at the left hand side of the screen. Choose the 'Modify Resources' option.

Quick start
38
Locate the staff member you wish to edit in the pick list provided by type-ahead. Click on the 'Edit' button. Editthe staff member details in the Edit Resource dialogue box. Click on the 'OK' button. Click on the 'Close'button in the 'Modify Resource' box.
Deleting a resource/job
Right-click over the resource column at the left hand side of the screen. Choose the 'Modify Resources' option. Locate the staff member you wish to delete. Click on the 'Delete' button. When asked if you are sure you wishto delete this resource, click on 'OK', or cancel if you wish to keep the resource. Click on the 'Close' button.
Sort
Why sort?
Suppose you wish to sort your staff members alphabetically by grade or office...
Sorting
Right-click over the resource column at the left hand side of the screen. Choose the 'Sort...' option. Ensure aradio button is next to 'Resource' if you wish to sort by staff member in the Resource screen.
You can choose to sort by a number of different resource fields, as listed in the Database Fields box. Highlightthe field(s) by which you wish to sort (by clicking on the field) and click on the 'Add' button to add it to the SortCriteria box.
Sort by grade and name
You can choose whether to sort in ascending or descending order by clicking on the appropriate radio button inthe 'Direction' box. Click on the 'OK' button.
Don't forget to clear the sort when you have finished.
Select
Why select?
Suppose you want to v iew only resources of Grade 'Manager'…...or you want a v iew consisting only of staff members in the London Group......or you want to see all the jobs for which Alice Jardine is the manager...Use one of the selection options.
You can sort and select using any fields in your Retain database. You can sort the resource view by anyresource field and the job v iew by any job field. Resources can be sorted independently from the jobs and eachnotebook page can be sorted differently. This means that you can create a number of different v iews of thebooking information, simply by setting a different sort order in each page.
Selecting – Marked records
You can decide only to v iew randomly selected resources or jobs. Holding down the <CTRL> key, click withyour left mouse button on the resources you want in your selection (from the resource column on the left handside of the screen). Right-click over the resource column and choose the 'Select marked records' option.
To clear this selection, right-click over the resource column and choose the 'Clear entire selection' option.
Selecting – Availability
To show all resources that are available during a particular time period...Mark the time period anywhere on the wallchart (as if you were going to make a booking). Right-click anywhereon the wallchart. Choose 'Special Selections', 'Add'.
From the 'Special Selections' dialogue box, you can edit the start and end date of the preferred time frame. Enter an availability percentage (the default is 80%). Click on the 'OK' button. To clear the availabilityselection, right-click over the resource column and choose the 'Special Selections', 'Clear' option.

Quick start
39
Using selection criteria
Right-click over the resource column at the left hand side of the screen. You can input many different selectioncriteria in the Selection Dialogue box. Click on the 'Add' button to add an expression to the Selection Criteriabox. The following operators are used to build expressions:
ANDselects all records which satisfy the expression. This is the basic selection operator to which you can addother expressions. For instance, if you wish to v iew resources with grades equal to Manager then theexpression would be 'AND Resource.Grade = Man'.
SUBexcludes all records which satisfy the expression (subtract). 'SUB Resource.Grade = Man' will show aview with no members of grade Manager.
ADDadds records which satisfy the expression. Multiple selection criteria using the ADD operator will selectrecords which satisfy any of the criteria, as opposed to using the AND operator, which will only returnrecords matching all the criteria.
To clear this selection, right-click over the resource region and choose the 'Clear entire selection' option.
4.4 Quick notebooks
Notebooks and pages
You can add up to forty notebook 'pages' to your notebook, each page containing a different v iew of your data.You can add a wallchart, calendar or report page to your notebook. The characteristics of each notebook pagecan be defined and maintained independently using the various display features in Retain.
Adding a basic wallchart page
To add a new notebook page, left-click on the 'Add Page' smart icon in the tool bar. In the Add Page dialogbox, choose what type the new page will be (Wallchart, Calendar or Report) and input a page name in the PageName box then click on 'OK'. A new page will be added to your notebook.
Select the new page from the dropdown box. The new page sort and selection default to all resources sorted byname. Once in your new notebook page, use the appropriate sort and selection criteria to arrange the v iew.
Adding a calendar page
The calendar v iew shows bookings for one indiv idual resource or job. Time is represented in a calendar stylegrid and special navigation features allow you to move between resources or jobs. To add a calendar page,click on the radio button next to Calendar in the Add Page dialog box and key in the page name then click on'OK'. Note, you must select which resource you want to v iew using the selection criteria (Data, Selection).
Adding a report page
Reports gives you a summary of jobs against resources for a specific selection. To add a report page, click onthe radio button next to Report in the Add Page dialog box and key in the page name then click on 'OK'. In theSort, Selection, Fields etc. dialog box select the fields you want to show in the report and choose a date rangein Date tab.
Deleting a notebook page
To delete a page, select the page from the dropdown box. Click on the 'Delete Page' smart icon. Click on 'OK'to confirm deletion of active page.

Quick start
40
Saving and closing
Saving your notebook
From the 'File' menu, choose 'Save as'. In the 'Drives' box, select the drive and then the directory to which youwish to save your notebook. Type in a file name for your notebook (notebookname.rtn). Click on the 'OK'button. Note, by doing so you will preserve the v iew settings such as the sort order or selection of fields of thedata in this notebook. The actual data such as bookings would have been saved into database while you edit iton the wallchart.
Closing your notebook
From the 'File' menu, choose 'Close'. If you forget to save your notebook, you will be prompted to save whenyou go to exit the notebook or Retain.
Opening
Opening a notebook
When you open a notebook previously saved, the underlying data displayed is the current data. The views you
set up before closing the notebook are saved. To open a notebook, click on the 'Open' smart icon in thetool bar. From the Open dialog box, specify the location of the notebook. Input drive, directory and filenamedetails and click on 'OK'.
Format booking bars
Bookings are shown as colourful bars on the wallchart. You can customise the following features of bookingbars.
Booking bar height
To change the height of the booking bars on the wallchart, select and right-click over a booking. From thedrop-down menu, choose 'Booking Bar', 'Depth'. Choose the bar size you want.
You may manually set the size of the booking bars, using the arrows to the left of the text boxes. You can alsodetermine in this dialogue box whether to display constant size booking bars or proportional booking bars byclicking the radio button next to the preferred option.
Booking bar layout
To change the layout of your booking bars, right-click over a highlighted booking bar and choose 'Booking Bar','Layout'. Here you can choose whether to show bookings separate or stacked, the look of the bar (Plain,Embossed or Recessed) and show continuation arrows when the bookings go beyond the edge of the currentlyvisible screen.
Booking bar tips fields
To change the details displayed on the booking bars, right-click over a highlighted booking bar and choose'Booking Bar', 'Bar Fields...' From here you can add or delete fields in the booking bar. You can change the fontby choosing 'Bar font'.
Booking bar tips fields
To change the details displayed on the booking bar tips boxes, right-click over a highlighted booking bar andchoose 'Booking Bar', 'Tips Fields...' From here you can add or delete fields in the tips box. You can change thefont by choosing 'Tip font'.

Quick start
41
4.5 Quick reports
Report page
Report page
Add a report page to your notebook following the steps detailed in the 'Adding a New Page' section, with a radiobutton next to the 'Report' option.
Report fields
Fields are displayed on each row of the report. In the Fields screen, input the fields you want to display in yourreport by double-clicking on the fields in the Database Fields list, or clicking and dragging them to the Columnfields box.
You can select any of the fields from the resource, job and bookings tables, plus a number of special reportfields (calculated fields).
Report sort criteria
Click on the 'Sort...' tab to sort the records listed in your report (see sort).
Report selection criteria
Click on the 'Selection...' tab and input selection criteria to choose the records for your report.
Report date selection
You must specify the time period over which you want your report to be generated. Click on the 'Date' tab.Click in the Date Type box and choose the time range you require. If you want to input a manual date range,choose the 'Manual Date Range' option at the top the Date Type pick list and use the calendar buttons to selecta start and end date for your report. When you are satisfied with your report specifications, click on the 'OK'button.
Viewing
Viewing your report page
Click on the new report page to v iew your report. If you have entered sort criteria, the report will be groupedunder sort headings.
To view all records' details, right-click once anywhere within the main report area and choose the 'Open AllDetail' option.
Report header/footer
To edit the report header and footer, right-click once anywhere over the Title area and choose the 'EditHeader...' option. The Header/Footer Configuration dialogue box will open, from where you can edit either theheader or the footer.
You may edit the following header details: title, sub-title, date of report generation, page number, date rangecovered by report, surrounding frame, column titles. You can also choose whether or not to show a header atall.
You can edit the following footer details: footnote, date of report generation, page number, surrounding frame,fonts for footer elements. Click on the Footer tab to edit footer details. When you have finished, click on the'OK' button.

Quick start
42
Printing
Print preview
It is always a good idea to v iew the screen before printing it. From the 'File' menu, choose 'Print Preview...'When you have finished viewing the page, click on 'Close'.
Printing
To print the active page, from the 'File' menu, choose 'Print'. A dialogue box is opened from which you candefine your margins, header and footer information and the date range you want displayed in your printout. Editheader and footer information by clicking on the relevant tab (similar to header and footer for reports).
4.6 Quick preferences
Preferences
Retain preferences are the default settings which will be applied in various areas of the wallchart application.You can set preferences in several areas:
Setting preferences
From the 'File' menu, choose 'Preferences'.
Preference options
General: These options will apply to all your Retain notebooks.For example, you can choose whether or not to display booking bar tips and whether you can makeblock bookings.
Bookings: These options will apply to bookings.For example, whether to display field names on booking bars and booking tips.
Palette: These options will apply to the priority colours palette.For example, the number of colours you want to display on the colour key.
Availability: These options will apply to availability selections.For example, the default availability percentage.
Printing: These options will apply to printing.For example, whether or not the printing should be in colour.
Toolbars
Like most windows applications, Retain provides a 'toolbar', a panel of icon buttons usually located at the top ofthe screen. These icons provide quick access to most of the commonly used features in Retain. You may wishto customise the toolbar to include the options you use most frequently.
Customising your toolbar
From the 'View' menu, choose 'Toolbar options'.
To remove an icon from your current toolbar, left-click on the offending icon (in the icon list on the right) anddrag to the Available Buttons list on the left.
To add an icon to your current toolbar, left-click and drag the icon from the Available Buttons list to the toolbar.
To add spaces between smart icons on your toolbar, click on the icon in your toolbar before which you want toinsert a space and click on the 'Separator' button.
Buttons can be rearranged by left-clicking and dragging buttons to new positions. When you are finished, clickon the 'OK' button.

Quick start
43
4.7 Quick reference
Jargon
Retain notebookNotebooks contain v iews settings of your Retain data. They allow you to display your Retain wallchart invarious ways and to define report formats used by the Retain Report writer.
Notebook pageNotebooks can hold up to forty notebook pages, each containing different v iews of the underlying data.
WallchartThis is the traditional wallchart v iew, with resources or jobs listed down the side of the page and acontinuous time bar along the top. Each booking is represented as a coloured rectangular block on thewallchart.
CalendarA calendar v iew shows bookings for one indiv idual resource or job, where time is represented in acalendar style grid.
Project v iewThe project v iew separates bookings against a resource or job into a separate row for a specifiedsub-field.
Menu BarLocated at the top of the screen, this area provides access to all Retain functions, although you mayprefer to use short-cuts where possible.
ToolbarUsually located immediately below the menu bar and contains several icon buttons which provide quickaccess to the commonly used features in Retain.
Scroll barsScroll bars located at the right hand side of the screen enable users to move up and down resources,while those at the bottom of the screen move backwards and forwards through time.
Status barThis is located at the foot of the screen and displays information about the current status, for example,name of currently selected resource and the date range covered by the selected booking.
Drop-down menusRight-clicking anywhere on the screen will produce a drop-down menu relevant to the area of the screenyou happen to be in at the time.
Job colourThe colour code of a job defines the default colour of bookings made against that job. The colourdetermines what type of job it is.
AnalysisThe analysis field can be used to pick up default charge rates based on different job types, usually incombination with the resource grade. For example, you might enter 'C' for chargeable jobs, 'N' fornon-chargeable jobs and 'U' for unavailable jobs.
RecoveryUsed for calculated fields in reports. When inputting job details, the recovery field is the value the scalecost must be multiplied by to obtain the recovery rate... which is the fee expected rather than thestandard rate for the job.
ComponentIn Retain components are sub-jobs, providing information regarding the nature of each booking madeagainst a job. Components provide an element of project planning within Retain, since you can select acomponent for each booking you make and analyse the job into its component parts for reportingpurposes. Components are usually defined in general terms applicable to most jobs, such as 'planning','fieldwork' and 'reporting'.
ScenarioScenarios give users control over tentative bookings. Bookings assigned to a scenario are displayed with
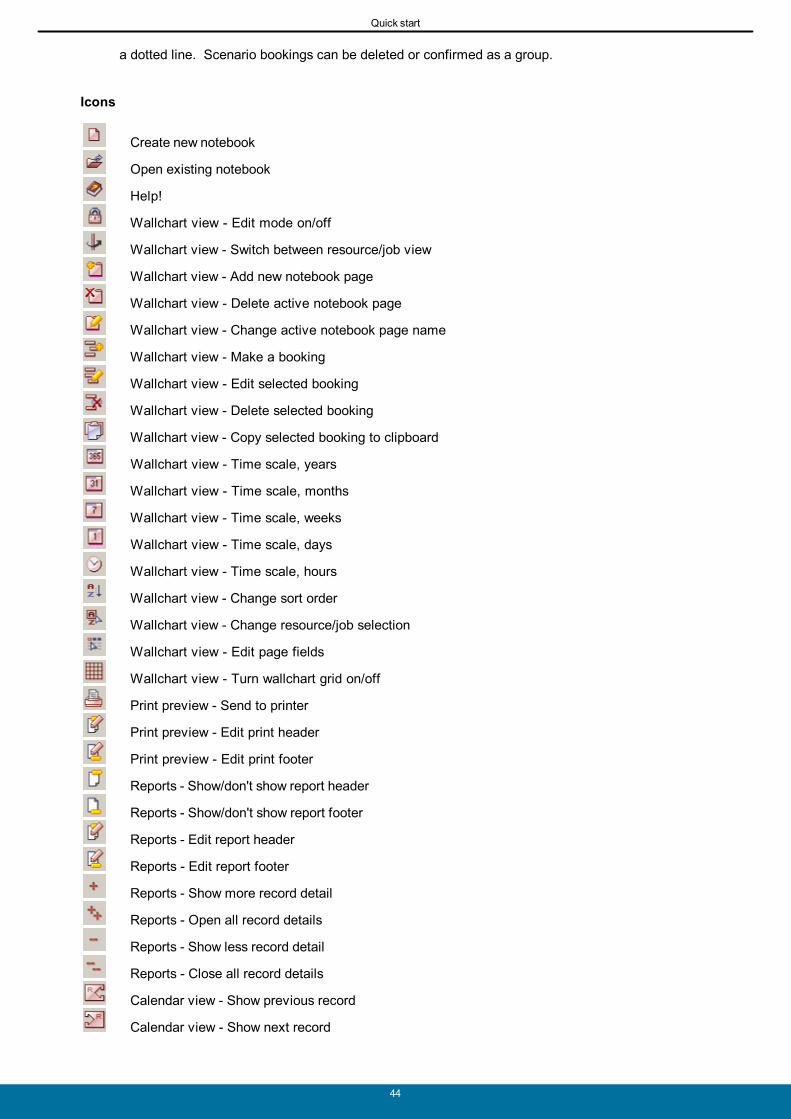
Quick start
44
a dotted line. Scenario bookings can be deleted or confirmed as a group.
Icons
Create new notebook
Open existing notebook
Help!
Wallchart v iew - Edit mode on/off
Wallchart v iew - Switch between resource/job v iew
Wallchart v iew - Add new notebook page
Wallchart v iew - Delete active notebook page
Wallchart v iew - Change active notebook page name
Wallchart v iew - Make a booking
Wallchart v iew - Edit selected booking
Wallchart v iew - Delete selected booking
Wallchart v iew - Copy selected booking to clipboard
Wallchart v iew - Time scale, years
Wallchart v iew - Time scale, months
Wallchart v iew - Time scale, weeks
Wallchart v iew - Time scale, days
Wallchart v iew - Time scale, hours
Wallchart v iew - Change sort order
Wallchart v iew - Change resource/job selection
Wallchart v iew - Edit page fields
Wallchart v iew - Turn wallchart grid on/off
Print preview - Send to printer
Print preview - Edit print header
Print preview - Edit print footer
Reports - Show/don't show report header
Reports - Show/don't show report footer
Reports - Edit report header
Reports - Edit report footer
Reports - Show more record detail
Reports - Open all record details
Reports - Show less record detail
Reports - Close all record details
Calendar v iew - Show previous record
Calendar v iew - Show next record

Quick start
45
Tips on the smart icon options can be obtained by hovering over the smart icon with your mouse. Moreinformation is available in the reference chapter on icons and hot-keys.
Wallchart view

Quick start
46
Calendar view

Quick start
47
Report view

The wallchart view
48
5 The wallchart view
5.1 Wallchart view overview
Wallchart pages in Retain look similar to a traditional "wallchart" booking system. They have a date scale alongthe top and a list of resources down the left-hand side, with a number of coloured bars on the grid representingbookings or commitments to work. Here is an example:
Of course, you can do much more with a Retain wallchart than with any manual wallchart. For example, youcan:
rotate the v iew to see bookings against jobs instead of resources;
sort the resources (or jobs) in different ways and filter out unwanted records from your current v iew of thewallchart;
manipulate the scale of the booking bars and of the wallchart as a whole, and change which information isdisplayed on each booking bar;
select several bookings at the same time and make changes to all the selected bookings at once;
examine additional information about the resources and jobs listed on the wallchart;
add statutory holidays and have bookings incorporate their effects.
Features explained in this section include:
1. Working with the wallchart - common features for regular use in the wallchart, such as navigating andzooming;
2. Row label fields and layout - customising the resource or job information displayed for rows;
3. Wallchart display options - options for setting up the display of the wallchart, such as date scales anddiaries;

The wallchart view
49
4. Statutory holidays - their use within the wallchart;
5. Booking display options - define format, fields and tips of bookings in the wallchart.
5.2 Working with the wallchart
Working with wallchart overview
A number of features relating to the wallchart v iew are used regularly in the common process of planningresources, as opposed to display options which are likely to be set up once and for all.
These features include rotating the wallchart, changing the wallchart date scales, navigating around thewallchart, finding a particular resource or job and using the project v iew.
Rotating the wallchart
The wallchart page can be displayed in two basic v iews:
Resource view - lists resources down the left hand side. Bookings represent jobs allocated against theresource.
Job view - lists the jobs down the left hand side. Bookings represent resources booked to the displayed job.
To switch between these two views:
1. Click on a booking, if desired.
This fixes the axis on which the v iew will be rotated, so that the selected booking will be displayed as part ofthe rotated view.
2. Select 'View, Rotate v iew' from the menu.
Short-cuts: The Rotate icon or press CTRL+R. Alternatively right-click anywhere over the booking gridand select either 'Job view' or 'Resource view' as appropriate.
Within these two basic v iews, there are numerous further options which allow you to manipulate the wallchartpage on screen. See Display options and Row label fields and layout.
Changing the wallchart date scales
The wallchart can be displayed using a very wide range of date scales. You can work in units as small asfractions of an hour and as large as months or even years.
You can amend the date scales at any time. This does not affect any of the underlying data and you can switchbetween date scales as often as you like.
To select one of the standard date scales do one of the following:
Select 'View', 'Zoom' from the menus and then choose a view.
Click on one of the pre-defined date scale icons.
The date scale icons.
The standard date scales are displayed approximately as follows:
Year 3 years displayed. Each cell represents 1 month. Month 3 months displayed. Each cell represents 1 day. Week 3 weeks displayed. Each cell represents 1 day.

The wallchart view
50
Day 3 days displayed. Each cell represents 1 hour. Hour 3 hours displayed. Each cell represents 5 minutes.
You might use the 'year' or 'month' v iew to display long-term planning overviews and the 'week' and 'day' v iewsfor short-term planning. You are unlikely to need the 'hour' v iew in most cases.
You can customise the settings associated with these standard date ranges.
You can also manipulate the date ranges manually by re-sizing the 'custom date scale' bar below the wallchartgrid. To do this:
1. Move the mouse pointer over one end of the custom date scale bar, so that the pointer changes to adouble-headed arrow ''.
2. Click the left mouse button, holding the button down.
3. Move the mouse pointer horizontally to a new position in the date panel. 'Stretch' the custom date scale barto increase the date range covered, or 'shrink' it to reduce the date range covered.
4. Release the left mouse button.
Repeat steps 1 to 4 as desired until you obtain the date scale you require.
The 'Go To' button located at the bottom left hand corner of the wallchart can be used to navigate straight to aspecific date.
Navigating around the wallchart
There are lots of techniques you can use in order to navigate around the wallchart. These include:
The date scale below the wallchart grid. The transparent rectangle in the centre section of this date scalecan be 'grabbed' and moved to a new position.
The 'Go To' button. This allows you to select a date to display. As the current date is the default value,clicking 'OK' moves you back to today's date (indicated by a coloured line).
The single and double arrow buttons either side of the date scale. These move you forwards and backwardsin time along the wallchart.
The scroll bar on the right hand side of the screen. This allows you to scroll through the list of resource orjob records listed in the left hand column of the screen.
Cursor keys. Once you have clicked on the wallchart grid you can use the cursor keys to move between thecells on the grid.
Changing the date scales. Increasing the date range covered by the wallchart displays more information onthe grid. You can then click on the wallchart to move to a different date.

The wallchart view
51
Finding a particular resource or job
You can scroll up and down the resource (or job) list on the wallchart to find a particular record. However, aquicker way to find a particular resource (or job, in the job v iew) in the wallchart is usually as follows:
1. Type the first letter of the name. The 'Select record' dialog will appear.
Alternative: 'Select record' icon.
2. At the 'Select record' dialog, type or select the name you wish to go to.
3. Click on 'OK' to go to the selected record, or 'Close' to cancel without going to the selected record.
Short-cut: Double-click on the name to go to that record.
The cursor will jump straight to the selected record on the wallchart.
The project view
The project v iew separates bookings into sub-fields. Often the project v iew is used to display bookings againsta resource into a separate row for each job, as in the example.
There are many ways of using the project v iew. Some of the more frequently used views have bookingsseparated into rows:
In resource view, each resource will have a separate row for:
each job;
each job manager.

The wallchart view
52
In job view, each job will have a separate row for:
each resource booked to the job;
each grade of resource booked to the job.
The project v iew can be useful when you have several bookings on the screen and you want to separate themout v isibly on screen.
To turn the project v iew on or off:
Select 'View', 'Project v iew' from the menus.
Short-cuts: Project v iew icon or press CTRL+J.
Repeat the process to return the v iew to its previous state.
5.3 Wallchart display options
Wallchart display options overview
Retain provides various display options to allow you to v iew wallchart and calendar pages in different ways. Display options include:
grid lines - turn the vertical grid lines on or off;
date scale settings - change standard date settings, grid lines and shading for a more convenient display;
display diary - change the displayed time per day and days per week;
week display - change how weeks are displayed in the date bar.
The current display options will also be reflected whenever you print out a wallchart or calendar page.
All of these display options are specific to one particular page in a notebook and cannot be overridden globallyfor all pages. If you wish to maintain consistent settings across all pages, then create one page with the desiredsettings and copy this page to establish the basic settings.
To amend the display of bookings see 'Working with bookings', 'Booking display options'.
Gridlines and shading
Vertical grid lines on the wallchart and calendar pages help to identify the indiv idual cells of the booking area. Thick black grid lines indicate the main div iders within the current screen (e.g. weeks) and grey grid linesindicate the indiv idual cells within each main div ider (e.g. days). Broken grey grid lines indicate the lowest levelof time div ision, if in use. For further help in identifying indiv idual cells, shading can be applied to the grid.
You may find that grid lines and shading make the booking area look cluttered. You may also want to excludethem when printing out the current v iew of the wallchart or calendar page.
To turn the vertical grid lines and shading on or off:
Select 'View', 'Grid' from the menus.
Short-cuts: Grid lines icon or press CTRL+G. Alternatively right-click over the wallchart area and select'Grid' from the menu.
Repeat the process to return both the grid lines and the shading to their original state.

The wallchart view
53
Customising date scale settings
Select 'View', 'Display settings...', 'Date scale settings' tab from the menu.
Short-cut: 'Display settings' icon, 'Date scale settings' tab.
Short-cut: Right-click anywhere over the date scale and select 'Date Settings', 'Date scale settings' tab.
For the different date scale buttons available (Year, Month, Week, Day, Hour), this allows you to set up:
the scaling;
the time information shown in the calendar bars at the top of the resource screen;
where the grid lines are displayed;
where shading is applied;
how booking start and end times should snap to the grid;
the scrolling unit.
Select the scale by choosing the appropriate scale from the drop-down list.
Scale valueThe 'Scale factor' field represents the scale value. The larger the number, the greater the amount of timeshown on screen. It represents the number of seconds for each pixel on screen. As a general rule, youdo not need to adjust these numbers.
Date barsChoose which scales you wish to appear in the date bar.
Grid linesChoose at what time intervals you want the grid lines to appear.
ShadeChoose which time intervals you wish to shade.
Snap toChoose the smallest unit you wish to plan to in this particular scale.

The wallchart view
54
Unit scrollChoose how much the screen should scroll if you shift the resource screen left or right by one step.
You can edit these settings for each different date scale for the current page in the notebook.
Week display
Weeks can be displayed in the date bar using either dates or week numbers, depending on usage within yourorganisation. To change display settings:
1. Select 'View', 'Display settings', 'Week display mode' tab from the menus.
Short-cut: 'Display settings' icon, 'Week display mode' tab.
2. Select the appropriate week display mode:
'Show Date' to display weeks using the date of its starting day. 'Show Week' to display weeks using week numbers. 'Show Both' to use both dates and week numbers.
Display diary
The default diary settings show the length of your working day.
To use a display diary other than the default as defined in Retain Manager:
1. Select 'View', 'Display settings', 'Display diary' tab from the menus.
Short-cut: 'Display settings' icon, 'Display diary' tab.
2. Amend the start and end time for the display diary by typing in the 'Start of day' and 'End of day' fields.Alternatively use the up/down arrows to change the displayed time in 5 minute increments.
3. Check the 'Show weekends' box to display weekends (7 days per week).

The wallchart view
55
5.4 Statutory holidays
Statutory holidays are added in Retain Manager (see the separate Retain Manager Guide) . Statutory holidaysare visible in the wallchart as a crossed-out day. Not only are they clearly marked in the wallchart, they areaccounted for in booking operations and calculations.
In terms of calculations, statutory holidays are similar to weekends:
Making a booking overlapping a statutory holiday gives a booking time of one day less than without thestatutory holiday (for example, if one day is 7.5 hours, then a five day booking overlapping a statutoryholiday has 30 hours).
Making a booking starting or ending on a statutory holiday includes the statutory holiday in the booking time(for example, if the five day booking starts or ends on a statutory holiday, it would have a booking time of37.5 hours).
Note that Retain treats consecutive statutory holidays (as with Christmas) not as one holiday. A four daybooking starting on the first of two consecutive holidays would have a booking time of 30 hours, including thefirst but excluding the second holiday.
For utilisation and availability calculations, holidays are excluded from standard time. A month that wouldnormally have 22 working days but has two statutory holidays uses 20 working days for its calculations.
Booking operations such as moving, copying, using the clipboard, rolling forward, duplicating and splittingbookings all take account of any statutory holidays by adjusting the booking details, depending on its settings:
A five-day fixed-loading booking moved to a date range overlapping a statutory holiday would adjust the timeto 30 hours to keep its loading at 100%.
A five-day fixed-time booking moved to a date range overlapping a statutory holiday would change itsloading to 125% to keep booking time at 37.5 hours.
Splitting a booking where the 'split' would occur on a statutory holiday will have the resulting bookings end oneither side of the holiday.
Though these calculations are what will be most often used for Retain's purposes, it is recommended toexplicitly book statutory holidays and have overlapping bookings split into one booking ending before and onestarting after the holiday, to ensure the bookings behave as is used.
5.5 Booking display options
Booking display options overview
Retain provides various display options to allow you to v iew bookings in different ways. Display options include:
booking bar formats - change the depth, layout and font of the booking bars.
booking bar fields - change the fields displayed on the booking bars and in the booking tips.
booking tips - display or hide booking tips when moving the mouse over a booking bar and the font of thebooking tips.
Like wallchart display options, the current booking display options will also be reflected whenever you print out awallchart or calendar page.
All of these booking display options are specific to one particular page in a notebook and cannot be overriddenglobally for all pages. If you wish to maintain consistent settings across all pages, then create one page with thedesired settings and copy this page to establish the basic settings.

The wallchart view
56
Booking bar formats
The format of the booking bars can be amended for depth, layout and font. You can also change the fieldsdisplayed on the booking bars (see Booking bar fields).
Booking bar depth
The depth of booking bars is their vertical height when displayed in wallchart and calendar pages. You maywant to increase the depth of the booking bars to see more information within each booking bar, for example, oryou may want the depth of the bookings to reflect their percentage commitment over the booked period.
To change the booking bar depth:
1. Select 'Booking bars', 'Depth' from the 'View' menu.
Short-cuts: Right-click over a booking and select 'Booking bars', 'Depth' from the menu. There are also iconsfor indiv idual depth settings as described below.
2. Set the depth settings as desired (see below).
3. Click on 'OK' to accept your changes.
The 'Depth' tab on the 'Booking bars' screen allows you to edit the various depth settings:
Booking bar depth is set in terms of both:
standard depth - the absolute height of the booking bars measured in pixels.
relational depth - the depth relative to the commitment ('loading') of the booking.
To select a standard depth setting:
1. Make sure you are in the 'Depth' tab of the 'Booking bars' dialog.
2. Click on the desired standard depth setting.
Short-cuts:
Large booking bars;
Medium booking bars;
Small booking bars;

The wallchart view
57
Booking bars to fit fields.
The 'Fit fields' option sets the standard depth of booking bars with respect to the fields displayed within eachbooking bar (see Booking bar fields). This option needs to be re-selected if fields are added to the bookingbar.
3. Optionally change the unit measurement associated with each standard depth setting.
To select the relational depth setting:
1. Make sure you are in the 'Depth' tab of the 'Booking bars' dialog.
2. Click on the desired relational depth setting.
Short-cut: Booking depth proportional to loading.
The 'Proportional to loading' option sets the depth of booking bars in relation to the percentage commitment ofeach booking (see Proportional bookings). For example, a 50% booking will be half the height of a fullcommitment booking. The 'Constant' option displays all booking bars at the same height.
Booking bar layout
The layout of the booking bars in Retain comprises:
bar stacking - what happens when bookings overlap in time for the same resource or job.
Short-cuts: Booking bar stacking icon.
3-D look - plain, embossed or recessed format.
continuation arrows - what happens when bookings go beyond the edge of the currently v isible screen.
To change the booking bar layout:
1. Select 'Booking bars', 'Layout' from the 'View' menu.
Short-cuts: Right-click over a booking and select 'Booking bars', 'Layout' from the menu.
2. Set the layout settings as desired (see below).
3. Click on 'OK' to accept your changes.
The 'Layout' tab at the 'Booking bars' screen allows you to edit the various layout settings:

The wallchart view
58
The bar stacking options define how bookings are to be displayed when they overlap against the same resource(in the resource view) or job (in the job v iew):
Separate - the bookings are displayed separately. Where bookings overlap the overall depth of the resourcerow will be increased.
Tip: Remember that the depth of the booking bars can also be set to either 'constant' or 'proportional toloading'.
Stacked - the overlapping bookings are stacked like a deck of cards, with only one booking fully displayed.This reduces screen usage when there are many overlapping bookings, as will often be the case in the jobview.
Short-cuts: Bar stacking icon.
The 3D-look options change the look of all the booking bars in the current v iew as follows:
Plain - no 3D effect.
Embossed - the booking bars give the appearance of being laid on top of the booking screen.
Recessed - the booking bars give the appearance of being inset into the booking screen.
The 'Show continuation arrows' option defines how bookings are to be displayed when they start before and/orfinish after the currently displayed date range of the booking screen.
Set the checkbox - to display continuation arrows.
Booking bar font
The booking bar font is the font used for the text displayed within the booking bars. To change the booking barfont:
1. Select 'Booking bars', 'Font' from the 'View' menu.
Short-cuts: Right-click over a booking and select 'Booking bars', ' Bar Font' from the menu.
2. Set the new font as desired (see below).
3. Click on 'OK' to accept your changes.
The 'Font' dialog allows you to edit the various font settings:
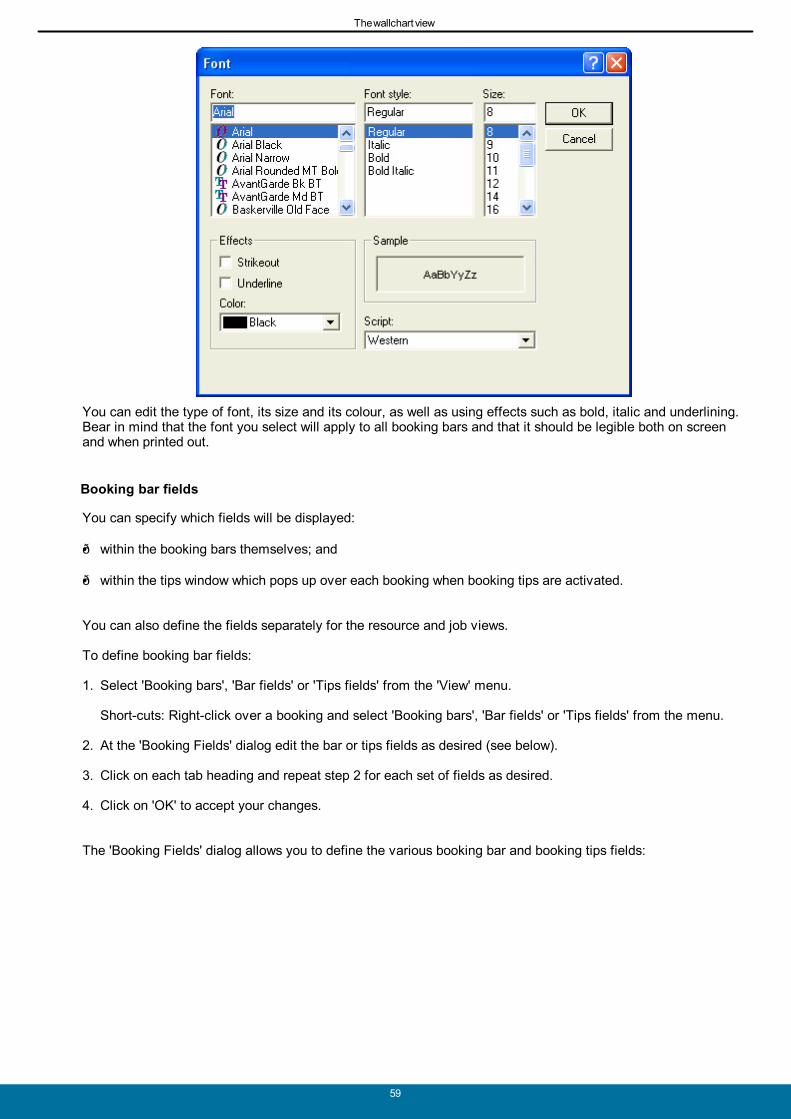
The wallchart view
59
You can edit the type of font, its size and its colour, as well as using effects such as bold, italic and underlining. Bear in mind that the font you select will apply to all booking bars and that it should be legible both on screenand when printed out.
Booking bar fields
You can specify which fields will be displayed:
within the booking bars themselves; and
within the tips window which pops up over each booking when booking tips are activated.
You can also define the fields separately for the resource and job v iews.
To define booking bar fields:
1. Select 'Booking bars', 'Bar fields' or 'Tips fields' from the 'View' menu.
Short-cuts: Right-click over a booking and select 'Booking bars', 'Bar fields' or 'Tips fields' from the menu.
2. At the 'Booking Fields' dialog edit the bar or tips fields as desired (see below).
3. Click on each tab heading and repeat step 2 for each set of fields as desired.
4. Click on 'OK' to accept your changes.
The 'Booking Fields' dialog allows you to define the various booking bar and booking tips fields:

The wallchart view
60
Fields can be defined independently under each of the four tab headings:
Bars (Res) - Fields displayed inside each booking bar when in the resource view.
Bars (Job) - Fields displayed inside each booking bar when in the job view.
Tips (Res) - Fields displayed within the pop-up booking bar tips when you move the mouse pointer over abooking in the resource view.
Tips (Job) - Fields displayed within the pop-up booking bar tips when you move the mouse pointer over abooking in the job view.
At the 'Booking Fields' dialog:
1. Select a field in the left hand list and click on the 'Add' button to add it to the displayed fields for the currenttab.
Short-cut: Double-click on the selected item.
Tip 1: You can include information relating to the booked resource and job in your displayed fields. In thefields list, resource fields are preceded by 'resource' and job fields by 'job'. Note that adding resource andjob fields may affect the speed of the software.
Tip 2: A useful field only available for booking fields and tips is 'calcPriorityAlias' which shows the aliasdefined for the priority field, instead of just priority numbers.
2. Select a field in the right hand list and click on the 'Remove' button to remove it from the displayed fields forthe current tab.
Short-cut: Double-click on the selected item.
3. Select a field in the right hand list and click on the 'Up' and 'Down' buttons to reposition it within the displayedfields for the current tab.
4. Click on the tab heading to move between tabs.
5. Click on 'OK' when done.
The wallchart view
61
Booking bar tips
Booking tips are windows which pop up when you move the mouse pointer over each booking, providingadditional information about that booking.
Booking tips can be very useful when you want to look at bookings in greater detail than is displayed within thebooking bars themselves, but you may find that always displaying the tips slows you down when navigatingaround the booking screen.
To turn the booking tips on or off:
1. Select 'File' -> 'Preferences' from the menus.
Short-cuts: Right-click over the booking area (not over a booking) and select 'Booking Tips' from the menu.
2. At the 'Preference' screen, select the 'General' tab and then mark or clear the 'Booking bar tips' checkbox asdesired.
Repeat the process to return the booking tips setting to its original state.
See Booking fields if you want to change the fields displayed within the booking tips window.
Note: You can hide the fields displayed in the booking bar tips by unchecking 'Show booking field names' in the'Booking' tab of the above menu.
5.6 Row label fields and layout
You can specify which fields will be displayed as the row labels to the left of each page in the Wallchart in bothresource and job v iews. You can also customise the position and width of these fields. This can be used totailor the wallchart v iew to the requirements of your organisation, for example displaying resources with theirdiv ision or jobs with their location.
You must specify resource fields for row labels in the resource view and job fields for row labels in the job v iew. You can also specify a booking field to act as the label for subsidiary rows when displaying the wallchart in theproject v iew (see Project v iew).
Like other display options, fields are specific to each notebook page. To maintain consistent settings throughoutyour notebook, create one page with the desired settings and copy this page to establish the basic settings.
To define the fields to be used as the wallchart row labels:
1. Select 'Data' -> 'Fields' from the menus.
Short-cuts: Fields icon.
2. In the 'Fields' tab, add or remove the column fields for both resource and job to change the row label fields(see below).
3. Click on 'OK' to accept your changes.
The 'Fields' panel in the 'Setup Wallchart' dialog allows you to define the row labels for both the resource viewand the job view:

The wallchart view
62
Note:
1. The 'Fields' panel contains the current row label definition for the current v iew. The width of each column inthis panel indicates the width of the column as it will be displayed in the row labels.
2. The 'Fields' list contains all the fields that you may include in the row labels. The current value in the 'SubProject Field' drop down list indicates the label that will be used for subsidiary rows when in the project v iew.
To switch between resource and job view labels:
Select either 'resource' or 'job' from the 'View' drop-down list.
Resource fields are used as row labels in the resource view and job fields in the job v iew.
To add a field to the row labels:
1. Select the field from the drop-down box.
2. Adjust the width of the column by changing the number under 'Width' or by dragging the line which separateseach field in the top box.
3. Adjust the order in which fields are displayed by clicking on the black dot and dragging the line up or down.
4. Repeat steps 1 to 3 for each field as desired.
To remove a field from the row labels, click on the X button against the field row or:
1. Move the mouse pointer over a field in the top box.
2. Click the left mouse button, holding the mouse button down.
3. Drag the mouse pointer (the pointer changes to a crossed-arrows sign) anywhere outside of the box.
4. Release the mouse button.
5. Repeat steps 1 to 4 for each field as desired.

The wallchart view
63
To amend the sequence of a field within the row labels, click on the black dot and drag the line up ordown or:
1. Move the mouse pointer over the field in the 'Column Fields' list.
2. Click the left mouse button, holding the mouse button down.
3. Drag the mouse pointer (the pointer changes to a crossed-arrows sign) to the new location in the box.
Tip: Fields are positioned to the left of the current position on the list, or at the right hand end of the list ifthey are dropped beyond the end of the list.
4. Release the mouse button.
5. Repeat steps 1 to 4 to move each field as desired.
To change the width of a field within the row labels definition, change the number under 'Width' or:
1. Move the mouse pointer to the right edge of the field in the top box, so that the mouse pointer changes to a "
" sign.
2. Click the left mouse button, holding the mouse button down.
3. Move the mouse pointer until the desired width is indicated in the box.
4. Release the mouse button.
5. Repeat steps 1 to 4 to change the width of each field as desired.
Short-cut: Resize the label column widths directly within the wallchart v iew.
To select a different sub project view label:
1. Click on the 'Sub Project Field' drop-down list.
A list of booking fields is displayed for selection.
2. Select the new field as desired.
Tip: Select a job field such as 'Job Name' for the resource view and a resource field such as 'Name' for thejob view. See The project v iew.
Graphical View Fonts
You can define the following fonts of the wallchart and calendar display separately:
expanded records;
collapsed records;
sub fields; and
date bar.
To change the display fonts:
1. Select 'Fonts' from the 'View' menu.
Short-cut: 'Fonts' icon.
The wallchart view
64
2. At the 'Edit Graphical View Fonts' dialog select an item from the list then click on the 'Set font' button.
Short-cut: Double-click on the report item.
3. At the 'Font' dialog set the new font as desired, then click on 'OK' to accept your changes.
4. Repeat steps 2 to 3 for each report font as desired.
5. Click on 'OK' to accept your changes.
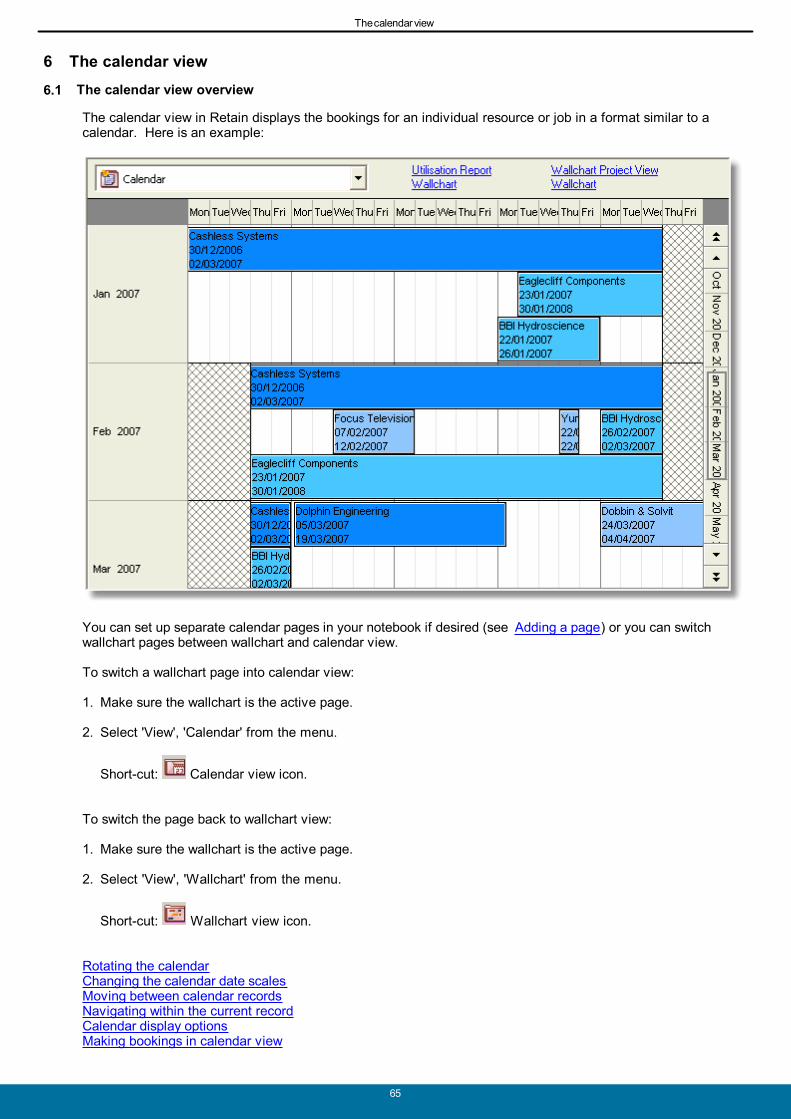
The calendar view
65
6 The calendar view
6.1 The calendar view overview
The calendar v iew in Retain displays the bookings for an indiv idual resource or job in a format similar to acalendar. Here is an example:
You can set up separate calendar pages in your notebook if desired (see Adding a page) or you can switchwallchart pages between wallchart and calendar v iew.
To switch a wallchart page into calendar v iew:
1. Make sure the wallchart is the active page.
2. Select 'View', 'Calendar' from the menu.
Short-cut: Calendar v iew icon.
To switch the page back to wallchart v iew:
1. Make sure the wallchart is the active page.
2. Select 'View', 'Wallchart' from the menu.
Short-cut: Wallchart v iew icon.
Rotating the calendarChanging the calendar date scalesMoving between calendar recordsNavigating within the current recordCalendar display optionsMaking bookings in calendar v iew

The calendar view
66
6.2 Rotating the calendar
The calendar page can be displayed in two basic v iews:
Resource view - displays one resource per screen. Bookings represent jobs allocated against the resource.
Job view - displays one job per screen. Bookings represent resources booked to the displayed job.
To switch between these two views:
1. Click on a booking, if desired.
This fixes the axis on which the v iew will be rotated, so that the selected booking will be displayed as part ofthe rotated view.
2. Select 'View', 'Rotate v iew' from the menu.
Short-cuts: The Rotate icon or press CTRL+R. Alternatively right-click anywhere over the booking gridand select either 'Job view' or 'Resource view' as appropriate.
6.3 Changing the calendar date scales
The calendar can be displayed using a very wide range of date scales. You can work in units as small asfractions of an hour and as large as months or even years.
You can amend the date scales at any time. This does not affect any of the underlying data and you can switchbetween date scales as often as you like.
To select one of the standard date scales do one of the following:
Select 'View', 'Zoom' from the menus and then choose a view.
Click on one of the pre-defined date scale icons.
The date scale icons.
The standard date scales are displayed as follows in the calendar v iew:
Year Year per row. Each cell represents 1 month. Month Month per row. Each cell represents 1 day. Week Week per row. Each cell represents 1 day. Day Day per row. Each cell represents 1 hour. Hour Hour per row. Each cell represents 10 minutes.
You might use the 'year' v iew to display long-term planning overviews and the 'week' and 'day' v iews forshort-term planning. You are unlikely to need the 'hour' v iew in most cases.
You can customise the settings associated with standard date ranges.

The calendar view
67
6.4 Moving between calendar records
In calendar v iew only one resource (in resource view) or job (in job v iew) is displayed on screen at a time. Thecurrently selected resource or job is displayed in the status bar at the bottom of the screen.
To move to the next record:
Right-click over the booking area and choose 'Next record' from the menu.
Short-cut: Next record icon or CTRL+SHIFT+N.
To move to the previous record:
Right-click over the booking area and choose 'Previous record' from the menu.
Short-cut: Previous record icon or CTRL+SHIFT+P.
To move to a particular record:
1. Right-click over the booking area and choose 'Select record' from the menu.
Short-cut: Select record icon or type the first letter(s) of the name you are seeking and then use the upor down cursor keys to navigate to the correct record.
2. Select the name at the 'Select Record' dialog.
3. Choose 'OK' to move to the selected record.
6.5 Navigating within the current record
Use the following features to navigate within the current record in the calendar:
Cursor keys. Once you have clicked on the calendar grid you can use the cursor keys to move between thecells on the grid.
The date scale to the right of the calendar grid. The transparent rectangle in the centre section of this datescale can be 'grabbed' and moved to a new position.
The single and double arrows either side of this date scale. Click on the up arrows to move back in time orthe down arrows to move forward in time.
Changing the date scales. Increasing the date range covered by the calendar displays more information onthe grid. You can then click on the calendar to move to a different date.
6.6 Calendar display options
Most of the display options in the calendar v iew are the same as those for wallchart pages. The only differenceis:
Project view is not available in the calendar v iew.
See Display options.

The calendar view
68
6.7 Making bookings in calendar
You can make bookings in calendar v iew in much the same way as in wallchart v iew (see Making bookings).
However the following restrictions apply when making bookings in calendar v iew:
You can only mark an area for a single resource when in resource view. (You can still, however, select morethan one resource in the 'Make Booking' dialog).
You cannot move or copy the bookings graphically, and you cannot use the clipboard.
For these reasons you may find it easier to make all your bookings through a wallchart page and to use thecalendar v iew only for v iewing purposes.
Resources, jobs and components
69
7 Resources, jobs and components
7.1 General principles
The Retain concept is all about managing a limited supply of resources in order to perform a definedpopulation of jobs. The exact meaning of the terms 'resources' and 'jobs' varies from organisation toorganisation, but the process of allocating resources to jobs in the form of 'bookings' is the same ineach.
Retain assists the planning process by offering several levels of classifying bookings in terms of jobs,components, resources and . The time taken to capture and maintain this information must bebalanced against the benefit to the planning process.
Retain is primarily a resource management, (as opposed to a project management), tool. It istherefore not greatly concerned with the indiv idual activ ities being performed within each job. Retaindoes however have a useful hierarchy to define bookings against a particular client, job and anindiv idual assignment which can be utilised to indicate the nature of the specific booking.
It is best to first determine the level of detail required to maximise planning effectiveness andsecondly to establish the initial setup before making bookings. Naturally the data files for each ofthese categories can be updated on a continuing basis. In order to make a booking at least oneresource and one job is required. Note:
1. You may want to consider transferring data automatically into Retain from other systems as partof this set-up exercise. There are certain issues you need to consider if you choose this route, asexplained in the separate Security Manager Guide.
7.2 Resources
What are resources?
Retain uses the term 'resources' as a general description for the people or entities that can be applied to theprocess of completing a job.
In many organisations the term 'resources' simply refers to staff. However, you can also use Retain to planother types of resource, such as plant and machinery or training rooms. Indeed any item with a finite capacitythat goes into the performance of a Retain 'job' can be considered a resource.
Adding resourcesEditing resource detailsChanging the name of a resourceDeleting resourcesHiding resources from view
The modify record dialog
Operations affecting resources, jobs or components can be accessed through the Modify Records dialog (forexample, Modify Resources for resources, Modify Jobs for jobs).
To display the Modify Records dialog do one of the following:
Select 'Actions' -> 'Modify Record' -> 'Resource...' or 'Job...' or 'Component...'.
Right click on the Resource list on the left-hand side of the screen (in Resource View) and select 'ModifyResources' from the context menu. In the Job View, right-click the Job list and select 'Modify Jobs'.
Click the 'Modify resources', the 'Modify jobs' or the 'Modify components' icon to bring up therequired Modify Records dialog.
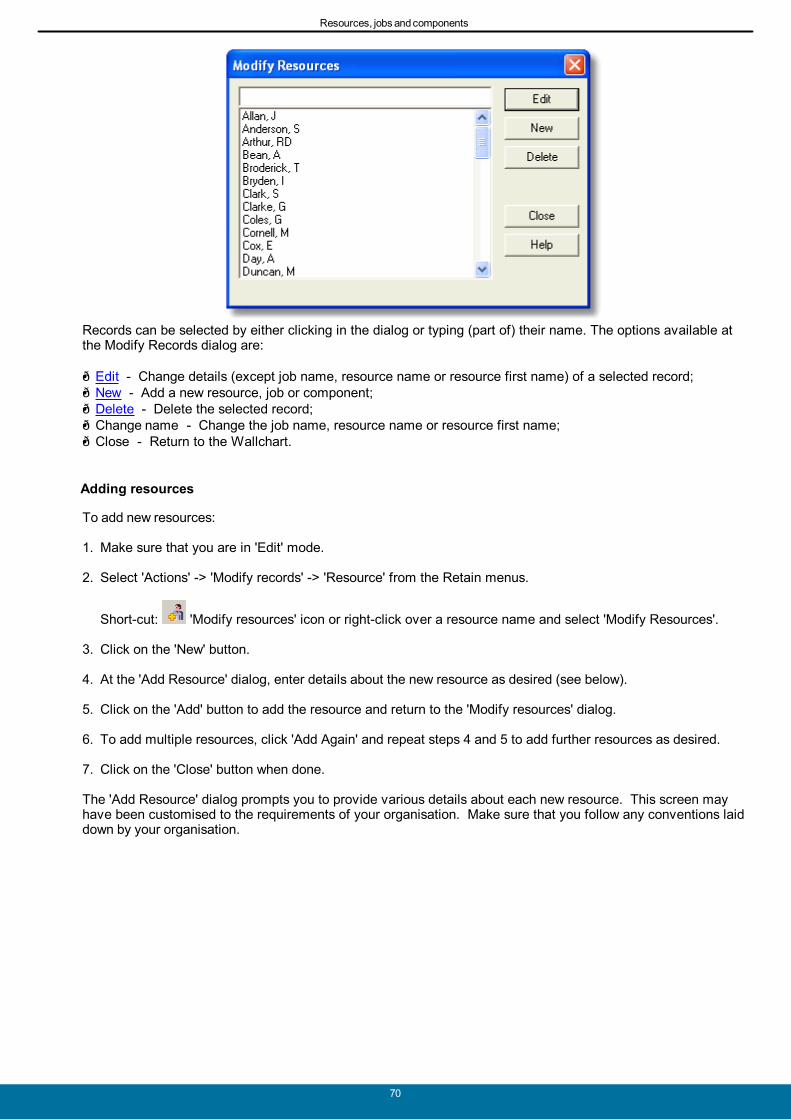
Resources, jobs and components
70
Records can be selected by either clicking in the dialog or typing (part of) their name. The options available atthe Modify Records dialog are:
Edit - Change details (except job name, resource name or resource first name) of a selected record; New - Add a new resource, job or component; Delete - Delete the selected record; Change name - Change the job name, resource name or resource first name; Close - Return to the Wallchart.
Adding resources
To add new resources:
1. Make sure that you are in 'Edit' mode.
2. Select 'Actions' -> 'Modify records' -> 'Resource' from the Retain menus.
Short-cut: 'Modify resources' icon or right-click over a resource name and select 'Modify Resources'.
3. Click on the 'New' button.
4. At the 'Add Resource' dialog, enter details about the new resource as desired (see below).
5. Click on the 'Add' button to add the resource and return to the 'Modify resources' dialog.
6. To add multiple resources, click 'Add Again' and repeat steps 4 and 5 to add further resources as desired.
7. Click on the 'Close' button when done.
The 'Add Resource' dialog prompts you to provide various details about each new resource. This screen mayhave been customised to the requirements of your organisation. Make sure that you follow any conventions laiddown by your organisation.

Resources, jobs and components
71
Note that the following resource fields have special usage in Retain:
Name and Initials - The combination of name and initials uniquely identifies each resource in Retain. Enter aunique name; if you enter a duplicate resource name an error message will tell you that this resource cannotbe added. In Retain Standard, the initials are held in a separate file, which is used in combination with thename field, ('Initials' may be called 'First name' in your organisation).
Grade - The resource grade is used by Retain to automatically pick up the associated charge rate, often incombination with the job analysis code. Make sure that the grade you enter here corresponds to that definedin the charge rates table (see the Manager Guide for further details).
Use other resource fields as instructed by your organisation.
Editing record details
To edit the details associated with a resource, job or component:
1. Make sure that you are in 'Edit' mode.
2. Select 'Actions' -> 'Modify records' and 'Resource' or 'Job' or 'Component' from the Retain menus.
Short-cut: 'Modify resources', 'Modify jobs' and 'Modify components' icons or right-click over aresource or job name and select 'Modify Resources' or 'Modify Jobs' (from now on both are referred to as'Modify Records').
3. At the 'Modify Record' dialog, select a record and then click on 'Edit' to edit its details.
Short-cut: Double-click on a resource or job to edit its details directly.
4. At the 'Edit Record' dialog, edit the record details as desired. Then click on 'OK' to accept your changes or'Cancel' to abandon your changes.
5. Repeat steps 3 and 4 to edit further records as desired.
6. Click on the 'Close' button to close the 'Modify Record' dialog.
Editing the resource grade, the job priority colour or analysis code, or the component name does not affect the

Resources, jobs and components
72
grade applied to any existing bookings for this record. Either edit these bookings separately or use the specialdatabase administration functions in Retain Manager to update these bookings. See the Manager Guide forhelp on updating bookings in this way.
Updating multiple records with one value
You can update one field of all records within a selection with one value. To do this:
1. Select the records you want to update in the resource or job view. (See Making Selections.)
Tip: for quick manual selection, select multiple records by holding CTRL and clicking on them, thenright-click and select 'Select marked records'. After updating, select 'Clear entire selection' to display allrecords.
2. Select 'Actions' -> 'Modify selected records' from the menus.
3. Select the field you want to update, and press 'OK'.
4. Enter the desired value.
Retain will prompt you with the number of records it will update, which you will need to confirm.
Deleting resources
You will want to delete resources when they leave your organisation or are no longer part of your Retaindatabase for planning purposes.
To delete a resource:
1. Make sure that you are in 'Edit' mode.
2. Select 'Actions' -> 'Modify Record' -> 'Resource' from the Retain menus.
Short-cut: 'Modify resources' icon or right-click over a resource name and select 'Modify Resources'.
3. At the 'Modify Resources' dialog, select a resource and then click on 'Delete' to delete the resource.
4. Click on 'OK' to confirm your actions or 'Cancel' to abandon your actions.
5. Repeat steps 3 and 4 to delete further resources as desired.
6. Click on the 'Close' button when you have finished deleting resources.
Note: When you delete a resource, any bookings against the resource will also be deleted. Do not deleteresources until you are sure that you no longer need to include their bookings on screen or in reports. Generally it is better to give a leaving date and / or to change a resource to a group such as "left" till youare certain there are no bookings remaining for that resource. (Giving a leaving date (end date) meansthat Retain cross-hatches the time after the leaving date).
Hiding resources from view
You can filter the wallchart v iews or reports to include or exclude resources based on any of the fields in theresources data file.
See Sorting and selection for further details. Hiding would typically be used to filter out resources that have left.

Resources, jobs and components
73
7.3 Jobs
What are jobs
Retain uses the term 'job' as a general description for any project, product or assignment being planned usingthe Retain resource planning approach.
What constitutes a job in your organisation depends on the nature of your business and what you consider to bethe 'unit' level of your planning in Retain. Some organisations may set up a separate job for each indiv idualproject, while others may group together projects under a single 'umbrella' job, since that is the level at whichthey carry out planning work on Retain.
Since every booking in Retain must be made against a job, jobs should also include non-project activ ities, suchas staff vacation or sick leave or, in a manufacturing context, machine down-time.
You can use analysis fields within the job data file to combine jobs for v iewing and reporting purposes. Forexample, if you have several jobs relating to ABC plc then you might enter 'ABC' in one of the job fields againsteach relevant job. You can then filter on this field to obtain v iews and reports relating to the ABC plc group ofjobs.
You can also use components to analyse bookings within a job. Components are usually defined in generalterms applicable to most jobs, such as 'planning', 'fieldwork' and 'reporting' (see What are components?).
Adding jobsEditing job detailsChanging the name of a jobDeleting jobsHiding jobs from view
Adding jobs
To add new jobs:
1. Make sure that you are in 'Edit' mode.
2. Select 'Actions' -> 'Modify Record' -> 'Job' from the Retain menus.
Short-cut: 'Modify Jobs' icon or right-click over a job name and select 'Modify Jobs'.
3. Click on the 'New' button.
4. At the 'Add Job' dialog, enter details about the new job as desired (see below).
5. Click on the 'Add' button to add the new job and return to the 'Modify jobs' dialog.
6. Click 'Add Again' and repeat steps 4 and 5 to add further jobs as desired.
7. Click on the 'Close' button when done.
The 'Add Job' dialog prompts you to provide various details about each new job. This screen may have beencustomised to the requirements of your organisation. Make sure that you follow any conventions laid down byyour organisation.
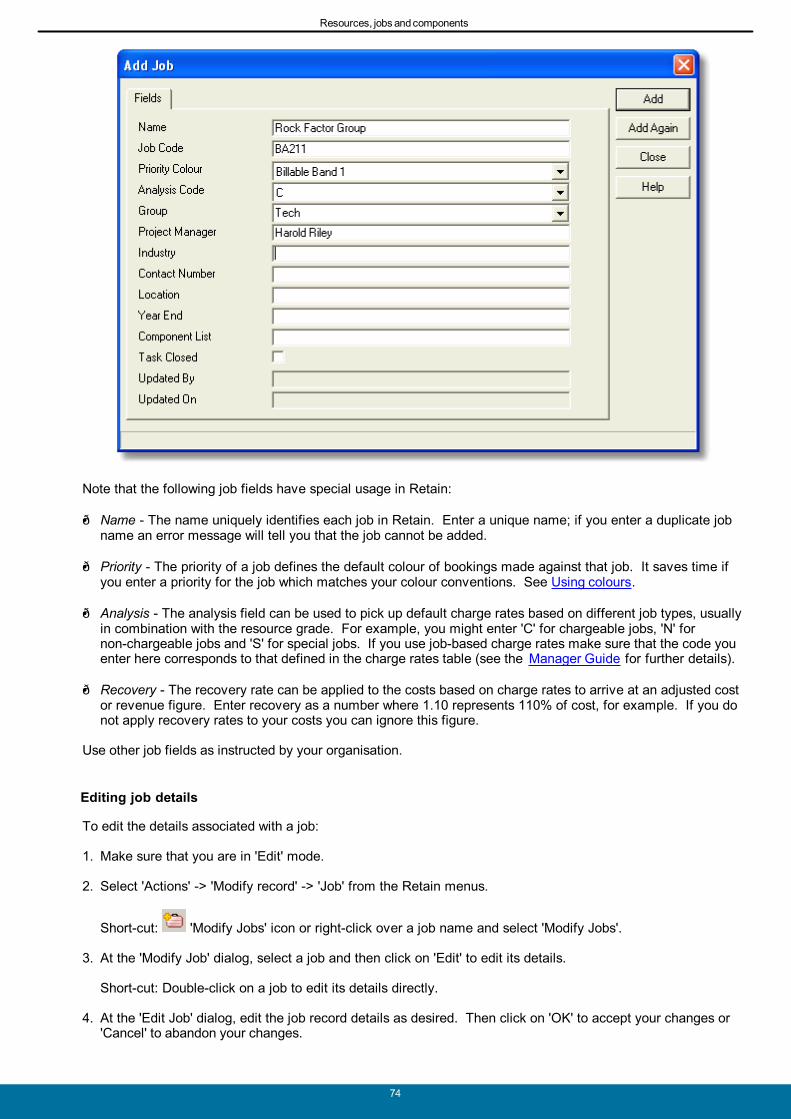
Resources, jobs and components
74
Note that the following job fields have special usage in Retain:
Name - The name uniquely identifies each job in Retain. Enter a unique name; if you enter a duplicate jobname an error message will tell you that the job cannot be added.
Priority - The priority of a job defines the default colour of bookings made against that job. It saves time ifyou enter a priority for the job which matches your colour conventions. See Using colours.
Analysis - The analysis field can be used to pick up default charge rates based on different job types, usuallyin combination with the resource grade. For example, you might enter 'C' for chargeable jobs, 'N' fornon-chargeable jobs and 'S' for special jobs. If you use job-based charge rates make sure that the code youenter here corresponds to that defined in the charge rates table (see the Manager Guide for further details).
Recovery - The recovery rate can be applied to the costs based on charge rates to arrive at an adjusted costor revenue figure. Enter recovery as a number where 1.10 represents 110% of cost, for example. If you donot apply recovery rates to your costs you can ignore this figure.
Use other job fields as instructed by your organisation.
Editing job details
To edit the details associated with a job:
1. Make sure that you are in 'Edit' mode.
2. Select 'Actions' -> 'Modify record' -> 'Job' from the Retain menus.
Short-cut: 'Modify Jobs' icon or right-click over a job name and select 'Modify Jobs'.
3. At the 'Modify Job' dialog, select a job and then click on 'Edit' to edit its details.
Short-cut: Double-click on a job to edit its details directly.
4. At the 'Edit Job' dialog, edit the job record details as desired. Then click on 'OK' to accept your changes or'Cancel' to abandon your changes.
Resources, jobs and components
75
5. Repeat steps 3 and 4 to edit further jobs as desired.
6. Click on the 'Close' button to close the 'Modify Job' dialog.
Editing the job priority colour or analysis code does not affect existing bookings against this job. Either editthese bookings separately or use the special database administration functions in Retain Manager to updatethese bookings. See the Manager Guide for help on updating bookings in this way.
Updating multiple jobs with one value
You can update one field of all jobs within a selection with one value. To do this:
1. Select the jobs you want to update in the job view. (See Making Selections.)
2. Select 'Actions', 'Modify selected records' from the menus.
3. Select the field you want to update, and press 'OK'.
4. Enter the desired value.
Retain will prompt you with the number of records it will update, which you will need to confirm.
Hiding jobs from view
You can filter the wallchart v iews or reports to include or exclude jobs based on any of the fields in the jobs datafile.
See Sorting and selection for further details.
Deleting jobs
You will want to delete jobs from time to time, when they are no longer part of your Retain planning cycle.
To delete a job:
1. Make sure that you are in 'Edit' mode.
2. Select 'Actions', 'Modify Record', 'Job' from the Retain menus.
Short-cut: 'Modify Jobs' icon or right-click over a job name and select 'Modify Jobs'.
3. At the 'Modify Jobs' dialog, select a job and then click on 'Delete' to delete the job.
4. Click on 'OK' to confirm your actions or 'Cancel' to abandon your actions.
5. Repeat steps 3 and 4 to delete further jobs as desired.
6. Click on the 'Close' button when you have finished deleting jobs.
Note: When you delete a job, any bookings against the job will also be deleted. Do not delete jobs until youare sure that you no longer need to include their bookings on screen or in reports, for historical costpurposes, for example.

Resources, jobs and components
76
7.4 Components
What are components
In Retain, components are sub-jobs, providing information regarding the nature of each booking made against ajob. Components provide an element of project planning within Retain, since you can select a component foreach booking you make and analyse the job into its component parts for reporting purposes.
Components take the form of a simple pick-list of descriptive names, available for selection each time youmake a booking. They are usually defined in general terms applicable to most jobs, such as 'planning','fieldwork' and 'reporting', although you can enter components relating to specific types of job if desired, such as'stock take', 'branch visit', or 'security review', for example.
The level at which you define components should correspond to that at which you make bookings in Retain. Forexample, if your planning on Retain takes the form of bookings of two or more weeks each, your componentsshould not represent the half-day elements within each booking.
Adding components
To add new components:
1. Make sure that you are in 'Edit' mode.
2. Select 'Actions' -> 'Modify Record' -> 'Component' from the Retain menus.
Short-cut: 'Modify Component' icon.
3. Click on the 'New' button.
4. At the 'Add Component' dialog, enter a unique name for the new component.

Resources, jobs and components
77
5. Click on the 'Add' button to add the new component and return to the 'Modify Component' dialog.
6. Click 'Add Again' and repeat steps 4 and 5 to add further components as desired.
7. Click on the 'Close' button when done.
Editing component names
To edit the name of a component:
1. Make sure that you are in 'Edit' mode.
2. Select 'Actions' -> 'Modify Record' -> 'Component' from the Retain menus.
Short-cut: 'Modify Component' icon.
3. At the 'Modify Components' dialog, select a component and then click on 'Edit' to edit its name.
4. At the 'Modify Components' dialog, edit the name as desired. Then click on 'OK' to accept your changes or'Cancel' to abandon your changes.
5. Repeat steps 3 and 4 to edit further component names as desired.
6. Click on the 'Close' button to close the 'Modify Components' dialog.
Amending the name of a component does not update existing bookings with this component name. To updatebookings to reflect a changed component name you must edit each booking separately.
Deleting components
To delete a component:
1. Make sure that you are in 'Edit' mode.
2. Select 'Actions' -> 'Modify Records' -> 'Component' from the Retain menus.
Short-cut: 'Modify Component' icon.
3. At the 'Modify Components' dialog, select the existing component and then click on 'Delete' to delete thecomponent.
4. Click on 'OK' to confirm your actions or 'Cancel' to abandon your actions.
5. Repeat steps 3 and 4 to delete further components as desired.
6. Click on the 'Close' button when you have finished deleting components.
Deleting components removes them from the components data file, but does not affect existing bookings withthis component name. The component will no longer appear in the pick list for components.

Resources, jobs and components
78
Job-specific components
You can set up component lists specific to a job as well as have a general shared list. The component listdisplayed in the booking dialog will adjust depending on the jobs selected.
1. Ensure the 'Edit Job' dialog is displayed, by selecting 'Actions', 'Modify record', 'Job' from the menus ordouble clicking on a job in the job list.
2. In the 'COMPONENT LIST' field (maybe aliased differently in your organisation), type the comma separatednames you want to use instead of the standard component list when you make a booking in Retain.
An example entry would be: [COMPONENT LIST] Review, Plan, Meeting.
3. To add the standard component list to the custom list, add the entry '_default' to your custom component list.
An example entry would be: [COMPONENT LIST] Delta Implementation, Strategy, _default.
If 'COMPONENT LIST' is left blank the standard component list will be used.

Sorting and selecting
79
8 Sorting and selecting
8.1 Sorting and selecting overview
One of the most powerful features of Retain is the ability to sort and select (i.e. filter) each notebook page inany way you choose. Using these features you can obtain many powerful v iews of your data. You could, forexample:
Display only resources that are available in a specified time period.
Display only those jobs belonging to a particular project manager.
Sort your wallchart in descending order by resource grade.
Produce reports by group or div ision, sub-totalled by manager.
You can sort and select using any fields in your Retain database. If your organisation has customised thestandard data file structures, these customised fields are also available for sort and selection purposes.
Sorting
Change the sort order to sort the records in each notebook page, report or wallchart, based on any of the fieldsin its underlying view.
Selecting
There are a number of ways in which you can select or filter the records you want to display in the current v iew. You can filter the current v iew by:
collapsing records from the display
selecting marked records;
using special selections with date ranges;
defining selection criteria.
8.2 Changing the sort order
You can sort the records in each notebook page based on any of the fields in its underlying view. For example,you can sort the resource view by any resource field and the job v iew by any job field. You can sort theresources independently from the jobs. Each notebook page can be sorted differently. This means you cancreate a number of different v iews of the booking information, simply by setting a different sort order in eachpage. When booking against multiple resources, sorting can be used to group resources logically beforeselecting multiple ones. It is also possible to sort on booking fields, in case of concurrent bookings for a singleresource or job, but this is not used often.
To sort the active notebook page:
1. Select 'Data', 'Sort' from the menus.
Short-cuts: Sort order icon.
2. At the 'Sort' dialog specify sort criteria as desired by selecting the sort field from the drop-down list (seebelow).
3. Choose 'OK' to accept your changes.
The 'Sort' panel of the 'Setup Wallchart' dialog allows you to specify the sort order applying to both the resourceand job v iew for the active page:

Sorting and selecting
80
If there is more than one item in this list, the view will be sorted initially by the first item on the list then, withineach item, by the second item and so on.
To switch between resource and job view:
Select either 'resource' or 'job' from the 'View' drop-down list.
You can also sort the order in which bookings are displayed in each view:
Click on the 'booking' tab and and select the field to sort by from the drop-down.
To add an item to the sort order criteria:
1. Select a field from the drop-down list.
2. Choose 'Ascending' or 'Descending' as the sort order for the selected field.
3. Repeat steps to add further sort items as desired.
To remove an item from the current sort criteria, click on the X button.
You also need to consider the sequence of items in the sort criteria carefully. For example, sorting by resourcegrade and then name should produce a meaningful result, but sorting by resource name and then grade maynot.
To amend the sequence of items in the current sort criteria, click on the black dot and drag the line upor down.
Further sort options are available when dealing with report pages. See Report sort orders and subtotals.
You can also select records from the drop-down menu in the wallchart page by the first sort field:

Sorting and selecting
81
8.3 Collapsing records
In wallchart pages, you can collapse one or more rows in the wallchart grid. Collapsing the records greys themout and hides their associated bookings. Collapsed records appear like this:
To collapse a resource (or job) record:
Click on the blue icon to the left of the record name.
The blue icon changes to a '+' sign to indicate that the record has been collapsed.
To collapse all the resource (or job) records at once:
Choose 'View', 'Close all records' from the menus.
Short-cut: Right-click over the records list and choose 'Close all records' from the menus.
To expand a resource (or job) record which has been previously collapsed:
Click on the blue icon to the left of the record name.
Sorting and selecting
82
The blue icon changes to a '-' sign to indicate that the record has been expanded.
To expand all the resource (or job) records at once:
Choose 'View', 'Open all records' from the menus.
Short-cut: Right-click over the records list and choose 'Open all records' from the menus.
8.4 Selecting marked records
In wallchart pages you can mark one or more resource or job records and then filter the v iew to show only themarked records. To do this:
1. Select the first record by clicking on the resource or job names displayed to the left of the booking grid.
2. Hold the CTRL key down and click on further records to select or deselect them as desired.
3. Release the CTRL key.
4. Right-click over the records list and select 'Select marked records' from the menu.
Short-cut: Select marked records icon.
Marked records will be displayed and all other records will be excluded from the display.
Clearing the marked records selection
To clear the marked records selection:
Select 'Data', 'Clear selection' from the menus.
Short-cut: Clear selection icon or right-click over the records list and choose 'Clear entire selection' fromthe menu.
All records will again be displayed in the current v iew.
8.5 Special selections using date ranges
Special selections overview
A number of frequent planning requirements refer to time periods, for example finding out which resources areavailable to perform a job during a specified time period. In Retain there are a number of special functions toperform these searches. These selections are independent of other selections using selection criteria.
To select resource or job records based on time periods:
1. Make sure that you are in a wallchart page, either in the resource or job v iew.
2. Mark an area anywhere on the booking grid.
Tip: It doesn't matter which resource record the marked area covers, but the start and end dates shouldmatch the time period in which you are interested.
3. Select 'Data', 'Special selections', 'Add' from the menus. This will use the default selection criteria.
Short-cut: 'Add special selection' icon or right-click over the records list or wallchart and select 'Specialselections', 'Add' from the menu.

Sorting and selecting
83
4. Amend your special selection using the 'Special Selections' dialog if required and click 'OK'.
Records matching the criteria will be displayed and all other records will be excluded from the display. When aspecial selection is already active, an additional selection line will be applied using the same procedure. Remember this when using the icon - it adds an additional selection line to the dialog when used.
To edit the current special selection:
Select 'Data', 'Special selections', 'Edit' from the menus, or right-click, 'Special selections', 'Edit'.
This allows you to edit the current special selection. If no special selection is active, 'Edit' takes you to anempty 'Special selections' dialog.
The ‘Special selections’ dialog
The 'Special selections' dialog allows you to enter special selection criteria, based on parameters such asavailability percentage and available days for resources, or adjusted revenue for jobs. All criteria use their owndate range to which the criteria is applied.
Special selections consist of a (number of) selection criteria. The steps in creating a criteria are:
1. Select the field you want to use, for example 'availability' for resources, that selects based on availabilitypercentage.
There are 13 different calculated fields for resources you can use, 5 for jobs. For a full description of all ofthem see 'Special report fields' in the Reports section.
2. Select the start and end date for the date range of the booking. Note that each line has its own date range.If you marked an area before displaying the dialog, this will automatically populate these values.
3. Select the condition to use for this field, either '=' (equal to), '>=' (greater than or equal to), '<' (less than) and'Contains' (containts text string). For example '>=' for all fields with a minimum availability.
4. Enter the value to compare the field to, for example 80 for availability, which will select all resources thathave at least 80% availability in the selected date range.
5. Press 'OK'.
The above example will display all resources that have at least 80% availability in the marked area. (80% istypically used to ensure that a week with one day of client work or one day's holiday can still be booked).
To add a selection line:

Sorting and selecting
84
Click the 'Add Line' button to add a selection line.
When using multiple lines, the resources displayed are those for which each line is true, i.e. the lines arecombined using an AND operator.
To remove a selection line:
Click the 'X' to the right of the line to be removed.
Further options
Hide the dialog window with 'Hide for availability' (resource view only). (De)activate special selections with 'Special Selection Active'.
Hiding the 'Special selections' dialog
For people primarily using the default availability selection, it is possible to hide the 'Special selection' dialogwhen using 'Special Selections', 'Add' from the menus or its icon. This is only available for the resource view. When used, this will add a default line to the current selection and will directly apply the selection. When thereis no current selection this is equivalent to directly applying the default selection. Criteria can still be editedusing 'Edit'.
To hide the dialog:
1. Go to the 'Special selection' dialog via the menus or right-click.
2. Check the 'Hide for availability' checkbox to hide or uncheck to display.
The default selection can be defined using the Availability preferences dialog, which is also an alternative wayto select 'Hide for availability'.
Deactivating special selections
It is possible to deactivate a special selection, using either the 'Special selections' dialog or the menus:
1. Make sure the 'Special selections' dialog is displayed, using the menus or right-clicking.
2. Uncheck the 'Special Selection Active' checkbox.
Alternatively, select 'Data', 'Special selections' from the menus or using right-click and uncheck 'Use'.
This will keep the selection criteria in memory (as opposed to clearing the selection) but does not apply theselection to the resources displayed. This allows you to change any other selection criteria independently.
To activate the special selection again, check the 'Special Selection Active' checkbox in the 'Special selections'dialog or check 'Use' from the 'Special selections' menu.
Clearing special selections
To clear the availability selection:
Select 'Data', 'Special selections', 'Clear' from the menus.
Short-cut: Clear special selection icon or right-click over the booking grid and choose 'Specialselections', 'Clear' from the menu.
All records will again be displayed in the current v iew. This will empty the 'Special selection' dialog. Totemporarily deactivate the selection and reactivate it later, uncheck 'Special Selection Active' in the dialog.

Sorting and selecting
85
8.6 Defining selection criteria
Selection criteria overview
You can perform quick searches on the current v iew by either Selecting marked records or Special selections.To perform other types of searches you will need to define selection criteria.
To define selection criteria for the active notebook page:
1. Select 'Data', 'Selection' from the menus.
Short-cuts: Selection icon.
2. At the 'Selection' dialog specify selection criteria as desired (see below).
3. Choose 'OK' to accept your changes.
The selection dialogSelection operators and conditionsCross-referencing resource and job view selectionsBooking selection filtersRemoving selection filtersLocking selection filtersImporting and exporting selections
The selection dialog
The 'Selection' panel of the 'Setup Wallchart' dialog, available from the menus by selecting 'Data', 'Selection'allows you to specify the selection criteria applying to both the resource and job v iew for the active page. Youcan also cross reference your selections between resource and job v iews and include booking fields in yourselection criteria:
The current selection criteria is displayed in the 'Selection Criteria' list.
To switch between resource and job view:
Select either 'resource' or 'job' from the 'View' drop-down list.

Sorting and selecting
86
You can also apply selections to bookings:
Click on the 'booking' tab and and set selection.
Switch between the resource, job and bookings options to define selection criteria as follows:
Resource - set resource view selection criteria and cross-reference these criteria to the job view if desired.
Job - set job v iew selection criteria and cross-reference these criteria to the resource view if desired.
Booking tab - set criteria relating to the bookings. This criteria will be applied to the currently selected view.
To add an item to the selection criteria:
1. Choose an 'Operation' setting to apply to this item from the drop-down list.
2. Select a field in the 'Fields' list.
3. Choose a 'Condition' followed by a value in the pop-up box. (For operations, conditions and values, seeSelection operators and conditions.)
4. Repeat steps 1 to 3 to add further selection criteria as desired.
To remove an item from the current selection criteria, click on the X button against the row.
You also need to consider the sequence of items in the selection criteria carefully. The order of items candetermine the meaning of the selection. To amend the sequence of items in the current selection criteria, clickon the black dot and drag the line up or down.
You can also lock selections which allows you to clear selections up to the last locked selection. Tick the boxunder the 'Lock' icon against the line you would like to lock.
Do not show records outside the locked selection
Checking this box will allow you to execute selections within the locked selection(s). For example, if you arelooking for 'Auditors' in the 'New York' office then locking 'OFFICE = New York' and checking the 'Do not showrecords outside the locked selection' box will mean the 'GRADE = Auditor' selection is done within all recordswhich match 'OFFICE = New York'.
Selection operators and conditions
Selection filters in Retain are derived from selection operations and conditions applied to one or more of theunderlying database fields. For example, the selection criteria that you would use to display all resources with agrade of 2 comprises the following elements:
Operation Selection Field Condition Condition ValueAND resource.GRADE = 2
In most cases your searches will probably be very simple, like the one above.
However, Retain allows you to build up complex selection criteria using these elements. For complex criteria itis important to understand the usage of these elements in Retain.
Operations
Each item in your selection criteria must use one of these three operations:
And - Includes records which satisfy the expression.
Sorting and selecting
87
Subtract - Excludes records which satisfy the expression.
Add - Adds records which satisfy the expression (usually to the previous item in the selection criteria). It issimilar to an 'OR' operation.
Useful examples:
Example 1: Display only resources of grade 2 and in the 'Lond' div ision:
Operation Selection Field Condition Condition ValueAND resource.GRADE = 2AND resource.DIVISION = Lond
Example 2: Display resources of grade 2, excluding those in the 'Lond' div ision:
Operation Selection Field Condition Condition ValueAND resource.GRADE = 2SUB resource.DIVISION = Lond
Example 3: Display resources of grade 2 or grade 3:
Operation Selection Field Condition Condition ValueAND resource.GRADE = 2ADD resource.GRADE = 3
Conditions
Each item in your selection criteria must use one of these five conditions:
= The value in the database field equals the condition value.
>= The value in the database field is greater than or equal to the condition value.
Contains The value in the database field contains the condition value (the text string).
< The value in the database field is less than the condition value.
Is blank The database field is blank.
Useful examples
Example 1: Display only resources of grade 2 or above:
Operation Selection Field Condition Condition ValueAND resource.GRADE >= 2
Example 2: Display only jobs containing the text 'ABC Group':
Operation Selection Field Condition Condition ValueAND job.NAME Contains ABC Group
Example 3: Display resources with the same security settings as the currently selected resource:
Note: For this to work, the user must have the selected resource set up in Security.
Operation Selection Field Condition Condition ValueAND resource.Security = $MY_VAL
Sorting and selecting
88
Cross-reference view selections
Using basic selection criteria you can filter the resource and job v iews independently. For example, you canfilter the resource view to display only resources of grade 1 and the job v iew to display jobs with manager name'Smith'.
The 'Selection' dialog also allows you to cross-reference your selection filters. In this way you can apply yourresource selection criteria to the bookings displayed in the job v iew and vice-versa.
For example, you can display resources of grade 1 in the resource view and the bookings relating to grade 1resources when you rotate the screen to the job view. Likewise, you can display jobs belonging to manager'Smith' in the job view and the bookings relating to manager 'Smith' jobs when you rotate the screen to theresource view.
To apply resource selection criteria to the job view:
1. Switch to the 'resource' v iew in the 'Setup Wallchart' dialog.
2. Define your resource selection criteria in the usual way under the 'Selection' tab.
3. Mark the 'Use selection in Job view' checkbox.
To apply job selection criteria to the resource view:
1. Switch to the 'Job' v iew in the 'Setup Wallchart' dialog.
2. Define your job selection criteria in the usual way under the 'Selection' tab.
3. Mark the 'Use selection in Resource view' checkbox.
Remember to reset these cross-reference checkboxes when you have finished filtering in this way. If you don'tyou may continue working from a filtered view without realising it.
Booking selection filters
You can restrict the bookings that are displayed on the wallchart in two ways:
By specifying bookings selection criteria.
By setting up cross-references between your resource and/or job selection criteria (see above).
Selection criteria in respect of bookings hides the booking bars that do not meet the selection criteria, but doesnot restrict the rows displayed on the wallchart grid. Booking selection filters therefore operate differently toresource and job selection filters. For example:
If you ThenSelect resources with grade = 1. The resource view only displays rows for grade 1 resources. All
bookings are displayed for these resources.As above & cross-refer to the job view. As above, but in the job v iew only bookings in respect of grade 1
resources are displayed.Select bookings with resgrade = 1. All resources are displayed in the resource view. Only bookings with
resgrade 1 are displayed in either resource or job view.
Use check boxes which appear for bookings view only:
Filter Res / Jobs Takes out Resources (in resource view) or takes out Jobs (in job v iew) for which there are nobookings.
Show All Bookings For the Jobs or Resources on view, displays all the bookings.
Furthermore, since in Retain you can set details such as the resource grade or job priority on a booking bybooking basis, the information stored in bookings level fields such as 'resgrade' is not necessarily the same as

Sorting and selecting
89
that in the underlying resources or jobs. In the above example, information in 'resgrade' in the bookings tableneed not be the same as the current 'grade' of the underlying resource.
Using "$MY_VAL" to filter resources
Removing selection filters
To remove your selection filters:
Select 'Data', 'Clear selection' from the menus.
Short-cuts: Clear selection icon or right-click over records list and select 'Clear entire selection' from themenu.
This will remove all the selections applied to the current v iew. If selections are locked then it will removeselections up to the last locked level.
Remember that resource and job view selections can be set independently. Therefore they must also beremoved independently.
Locking selection filters
You can lock selections at a particular level, so that you always display the intended selection for a group orother categorisation after clearing selections. To do this:
1. Select the selection line within the selection dialog you wish to lock (lines below this line are removed whenclearing a selection).
2. Tick the box under the 'Lock' icon.
When clearing a selection the locked selection will still be displayed.
To unlock a selection:
1. Display the selection dialog, either by right-click, 'Selection...' or 'Data', 'Selection...' from the menus.
2. Uncheck the box under the 'Lock' icon.
Importing and exporting selections
Any set of selection criteria can be exported to be used as a standard selection, to use for other notebookpages, other users or for use at a later date. Selections are saved as .SEL files. Note that report selections arealso exported as .SEL files, but report and wallchart selections cannot be used interchangeably.
To export a selection:
1. Select 'Data', 'Export selection...' from the menus.
2. Select a directory to put the selection file in, if required.
3. Enter a suitable filename or select an existing file to overwrite it, and click 'OK'.
Note that this exports the selection criteria as accessible using 'Data', 'Selection...'. It does not include anyactive special selections or the selection of marked records.
To import a selection:
1. Select 'Data', 'Import selection...' from the menus.
2. Select the directory of the required selection file, if necessary.

Sorting and selecting
90
3. Select the required file, and click 'OK' or double click in the file window.
Working with bookings
91
9 Working with bookings
9.1 Bookings overview
In Retain each booking represents an allocation of an indiv idual resource against a specific job, covering adefined date range and a measurable number of hours.
In order to allocate resources to jobs in Retain you will need to make bookings. You can make bookings oneither a wallchart page or a calendar page, although it is usually easier to make them on a wallchart page.
Retain treats all allocations to the wallchart as 'bookings', regardless of their nature. This means that 'non-jobs',such as vacation and sick leave also need to be entered as bookings. You can use the fields associated withthe job to treat bookings against these special types of jobs differently from other types (see Adding jobs).
Bookings are often tentative. For greater control over tentative bookings, they can be assigned a scenarionumber. These bookings will be displayed with dotted lines, and you can modify all bookings of a scenario as agroup.
Making a bookingAdding additional booking detailsViewing bookingsInspecting bookingsEditing bookingsDuplicating bookingsUsing the colour keyDeleting bookingsUsing the clipboardUsing scenariosRolling bookings forward
9.2 Making a basic booking
Make bookings overview
In order to make bookings you must first be in edit mode. See Switching to edit mode if you are not surewhether you are in edit mode.
In Retain you make bookings graphically on the wallchart (or calendar) page. To make a booking involves:
1. Marking an area on the wallchart.
2. Displaying the 'Make Booking' dialog and entering required information.
3. Entering optional details such as a component, priority colour or other details if desired.
4. Accepting the booking.
Marking an area
There are two distinct methods of marking an area on the wallchart, in preparation for making a booking:
Using the mouse
1. Find the resource (or job) against which you want to make the booking.
2. Move the mouse pointer to the start date of the booking, adjacent to the required resource or job.
3. Click and hold down the left mouse button.
4. Move the mouse pointer to the end date of the booking.
5. Release the mouse button.

Working with bookings
92
Using the keyboard
1. Find the resource (or job) against which you want to make the booking.
2. Using the cursor keys, move the black rectangle to the start date of the booking adjacent to the requiredresource or job.
3. Hold down the SHIFT key while using the cursor keys to move to the end date of the booking.
4. Release the SHIFT key.
A black bar marks the scope of the booking you are about to make. Make sure that you have selected thecorrect resource (or job) and that the start and end dates covered by the marked area correspond to theduration of the proposed booking by checking the status bar at the bottom of the screen.
Entering the booking details
Once you have marked an area on the wallchart you are ready to make a booking. To do this:
1. Select 'Actions', 'Make booking' from the menu.
Short-cuts: The 'Make booking' icon or right-click on the booking grid and select 'Make booking' or pressCTRL+K.
2. At the 'Make Booking' dialog enter the required details.
One job and at least one resource must be selected. If you are in a resource view then the 'SelectedResources' box will already contain the resource(s) selected when you marked the booking area. If you arein a job v iew then the marked job will be selected in the 'Job' box.
3. Optionally enter further booking details (see Optional booking details).
4. Click on 'OK' to accept the booking.
The booking will appear on the wallchart at the position corresponding to the area you originally marked.
If you selected more than one resource when making the booking then a separate booking will have beencreated against each selected resource.
If you make a booking against a resource that has either left or not started, a message box will warn you, andask if you want to continue.

Working with bookings
93
Making multiple resource bookings
You can book several resources to the same job simultaneously (effectively creating several identical bookingsat once). There are three ways to select or remove resources which will be allocated in the current booking:
Using the 'Make booking' dialog:
Add resources to the 'Selected Resources' list by clicking on the resource name and then clicking on the'Add' button.
Remove resources from the 'Selected Resources' list by clicking on the selected resource and clicking on the'Remove' button.
Short-cut: Double-click on the resource name in either list.
Marking an area:
When marking an area using either mouse or keyboard, you can extend the area to multiple resources. Allresources marked will appear in the 'Selected Resources' list.
Making block bookings:
Make a selection of all resources for which you want to make the booking (See Making Selections), or clearthe selection to book for all resources.
Select 'Actions', 'Make block booking' from the menus. All currently displayed resources will appear in the'Selected Resources' list.
Selecting a booking component
You can select a component to further describe the booking. Components are usually generic 'sub-jobs' whichbreak down a job into its component parts. They might include 'planning', 'fieldwork' and 'reporting' for example.You can also define job-specific components or use a custom booking name.
To select a component to describe this booking:
Click on the component name in the list.
If the component isn't listed at the 'Make Booking' dialog, you can type in a name for the component needed forthe booking. If you want to use a component that you would like to be available for all further bookings:
1. Click the 'Add component' button.
2. At the 'Add Component' dialog, enter the new component name.
3. Choose 'Add' to add the new component.
The new component will be automatically selected at the 'Make Booking' dialog.
Choosing a different booking colour
The colour of each booking is determined by its priority code. When you add a new booking, the colour willdefault to the priority code associated with the booked job. However, you can change the colour on a bookingby booking basis if you prefer.
To choose a different booking colour at the 'Make Booking' dialog:
1. Select the job you want to book.
The drop-down list of priority codes is unavailable until a job has been selected.
2. Click on the drop-down list in the 'Priority Colour' panel.

Working with bookings
94
3. Select a new priority code.
Tip: Use the up and down cursor keys to scroll through the priority colour list. Each colour will be displayedin the 'Priority Colour' panel.
4. Repeat steps 2 and 3 if you want to choose a different colour.
If you choose a booking colour other than the default associated with the corresponding job, a reset buttonbecomes available in the 'Priority Colour' panel, labelled with an 'X'. To return the booking to its default colour:
Click on the 'X' button in the 'Priority Colour panel'.
When the booking colour is the default colour, this button will be unavailable and will be labelled with a 'D'.
9.3 Adding additional booking details
Additional booking details overview
You can show or hide the following booking details at the 'Make Booking' dialog:
charge rate information;
start and end dates and times;
loading details (for proportional bookings);
booking notes;
actual booking times;
scenario names;
any user-defined additional fields;

Working with bookings
95
To view or amend these additional booking details:
1. Click on the 'Show More' button in the 'Make Booking' dialog.
The dialog is expanded and the 'Show More' button becomes a 'Hide More' button.
2. Amend the details as desired.
To hide these additional booking details again:
Click on the 'Hide More' button in the 'Make Booking' dialog.
The dialog is collapsed and the 'Hide More' button becomes a 'Show More' button.
You can determine whether the view is expanded or collapsed by default by marking or clearing the 'Alwaysopen maximized' checkbox.
Amending the start and end of a booking
The easiest way to define the start and end of a booking is to mark the area on the wallchart accurately in thefirst instance. Thereafter it is usually easier to amend the booking graphically on the wallchart (see Moving andcopying bookings), rather than amending the booking dates and times manually.
Nevertheless, the start and end dates and times can be edited at the 'Make Booking' dialog if required. Thecurrent information is displayed in a panel at the 'Make Booking' dialog such as this:
To edit these details manually:
1. At the 'Make Booking' dialog, make sure that the dialog has been expanded (see Showing or hidingadditional booking details).
2. Click on the 'Start Date' and 'End Date' boxes and amend the start and end dates as desired.
Tip: Click on the calendar button to the right of each date box to select a date from the pop-up calendar.
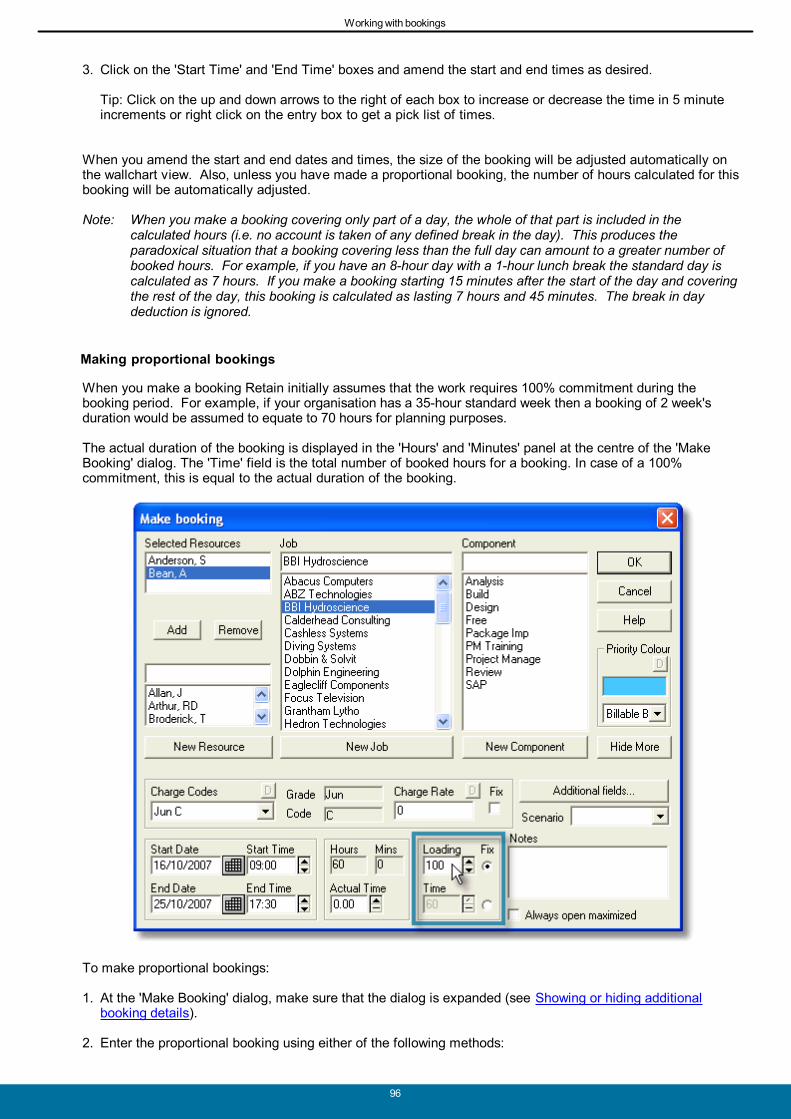
Working with bookings
96
3. Click on the 'Start Time' and 'End Time' boxes and amend the start and end times as desired.
Tip: Click on the up and down arrows to the right of each box to increase or decrease the time in 5 minuteincrements or right click on the entry box to get a pick list of times.
When you amend the start and end dates and times, the size of the booking will be adjusted automatically onthe wallchart v iew. Also, unless you have made a proportional booking, the number of hours calculated for thisbooking will be automatically adjusted.
Note: When you make a booking covering only part of a day, the whole of that part is included in thecalculated hours (i.e. no account is taken of any defined break in the day). This produces theparadoxical situation that a booking covering less than the full day can amount to a greater number ofbooked hours. For example, if you have an 8-hour day with a 1-hour lunch break the standard day iscalculated as 7 hours. If you make a booking starting 15 minutes after the start of the day and coveringthe rest of the day, this booking is calculated as lasting 7 hours and 45 minutes. The break in daydeduction is ignored.
Making proportional bookings
When you make a booking Retain initially assumes that the work requires 100% commitment during thebooking period. For example, if your organisation has a 35-hour standard week then a booking of 2 week'sduration would be assumed to equate to 70 hours for planning purposes.
The actual duration of the booking is displayed in the 'Hours' and 'Minutes' panel at the centre of the 'MakeBooking' dialog. The 'Time' field is the total number of booked hours for a booking. In case of a 100%commitment, this is equal to the actual duration of the booking.
To make proportional bookings:
1. At the 'Make Booking' dialog, make sure that the dialog is expanded (see Showing or hiding additionalbooking details).
2. Enter the proportional booking using either of the following methods:

Working with bookings
97
Click on the 'Loading' box and enter a percentage commitment for this booking.
The corresponding fixed hours will be calculated automatically. For example, a 50% commitmentover a 70-hour period would produce a 35-hour booking.
Or
Click on the 'Time' box and enter a fixed number of hours for the booking.
The corresponding loading percentage will be calculated automatically. For example, 35 hours overa 105-hour booking period would represent a loading percentage of 33%.
3. Click on the 'Fix' radio button next to 'Loading' or 'Time' to store the booking as either a fixed percentagecommitment or a fixed number of hours. Changing the duration of a booking (by stretching or shrinking thebooking in the wallchart, for example) will keep this field fixed and adjust the other field.
Fixed Loading or Time is important for the way bookings are handled on statutory holidays. For moreinformation see 'Statutory Holidays'.
In wallchart or calendar pages, if you view bookings with the booking bar depth set to 'proportional to loading'the height of each booking graphically represents the percentage commitment of the booking (see Booking bardisplay options).
Changing the booking charge rate
Retain derives the charge rate applied to each booking automatically, based on its 'charge code'. The chargecode is arrived at through a combination of:
the grade of the resource selected;
the analysis code of the job selected; and
the date range of the booking.
The current charge rate information is displayed in a panel at the 'Make Booking' or 'Edit Bookings' dialog suchas this:

Working with bookings
98
When you select a resource and job for the booking, the corresponding charge rate should already be entered,so you need do no more. However, you can select a different charge code for the booking, or even amend thecharge rate itself, so that every booking can have a unique charge rate if desired.
To select a different charge code for the current booking:
1. At the 'Make Booking' dialog, make sure that the dialog is expanded (see Showing or hiding additionalbooking details).
2. If you have selected more than one resource for this booking, click on a resource at the 'Selected Resources'list.
3. Click on the 'Charge Codes' drop-down list to see the available codes.
The charge codes are listed as the resource grade and then the job code.
4. Select the desired charge code.
The rate corresponding to the selected charge code will be automatically updated in the 'Charge Rate' box.
5. Repeat steps 2 to 4 for each resource as desired.
To select a different charge rate for the current booking, without changing the charge code:
1. Click on the 'Charge Rate' box.
2. Enter the desired charge rate.
The charge rate should be expressed as a value per hour. You may enter rates with up to 2 decimal places.
3. Repeat steps 1 and 2 for each selected resource as desired.
To fix the charge rate, such that it keeps its value when moving bookings to other resources, check the 'Fix'

Working with bookings
99
checkbox.
If you set a customised charge code or charge rate, a reset button becomes available next to the correspondingbox, labelled with an 'X'. To return the booking to its default:
Click on the 'X' button at the 'Charge Codes' box to restore the charge code to its default value.
The charge rate will automatically be adjusted to the corresponding rate.
Click on the 'X' button at the 'Charge Rate' box to restore the rate to its default value based on the currentlyselected charge code.
The charge code will not be returned to the default value unless you click on the button at the 'Charge Codes' box.
When the booking is using its default charge code and rate, these buttons will be unavailable and will belabelled with a 'D'.
Note that if you move a booking entered with a manual charge code or rate, it will be updated to the defaultcharge code or rate, unless the 'Fix' box is checked. Other details about the booking remain the same.
Note that the relationship between charge rates, resource grades and job codes is defined in the separateRetain Manager application. Contact your Retain administrator or see the separate Manager Guide for moreinformation.
Entering actual times
You may enter actual hours against each booking in Retain. To enter actual hours against a booking:
1. Create or edit a booking.
2. At the 'Make Booking' dialog, make sure that the dialog is expanded (see Showing or hiding additionalbooking details).
3. Click on the 'Actual Time' panel and enter the number of hours.
Tip: You can use the up and down arrows to the right of this box to adjust the actual hours in 1 hourincrements.
Retain is not a time recording system and there are obvious limitations to entering actual times againstbookings. These include:
You can only enter an actual time if a corresponding booking exists.
You can only enter one figure for actual time against each booking, so you may not be able to representdifferences in timing across the booking.
You might consider integrating Retain with your own time recording system. Alternatively a separate timerecording module is available, which is closely integrated with Retain. Contact your supplier for moreinformation.
Some organisations alias the actual time field so it can be used as any numeric field of information.

Working with bookings
100
Assigning scenario names
Each Retain booking can be assigned a scenario name for use with scenarios (see Using scenarios). Allbookings with the same name can be modified (accepted or deleted) as a group.
To assign a name:
1. At the 'Make Booking' dialog, make sure that the dialog is expanded (see Showing or hiding additionalbooking details).
2. Click on the 'Scenario' drop-down list to see the scenario names currently in use.
3. Either select the desired name or enter a different name for a new scenario.
Scenario bookings will be displayed with a dotted line:

Working with bookings
101
9.4 Viewing bookings
To view a Retain booking:
1. Locate the booking on the wallchart (see Navigating around the wallchart).
The booking bar itself displays some information. See Booking bar fields if you want to customise thebooking bar fields.
2. Move the mouse pointer over the booking so that the mouse pointer changes to a 'hand' icon.
If booking tips are activated a pop-up window will display information about the booking. See Booking tips.
3. Click on the booking to select it.
4. Select 'Actions', 'Booking Info' from the menus to see all the details of the booking.
Short-cuts: Double click on the booking or 'View booking' icon or right-click and then select 'Booking info'from the menu.
5. Select 'Actions', 'Resource info' or 'Job info' from the menus to see details relating to the underlying resourceor job of the selected booking.
Short-cuts: 'Resource info' or 'Job info' icons, or right-click over the selected booking and thenselect 'Resource info' or 'Job Info' from the menu.
You can view the details relating to all the bookings in a specified range of the wallchart by using the 'Inspect'function. Selecting multiple bookings and using any of the 'View booking', 'resource info' or 'job info' icons bringsup the 'Inspect' dialog containing the selected bookings.
9.5 Inspecting bookings
A special 'Inspect' function allows you to examine all of the bookings contained within a marked area of thewallchart v ia a simple dialog format. This option can be useful where you have a lot of bookings squeezed intoa particular area of the booking grid, or where you have proportional bookings with such a low loadingpercentage that they are not currently v isible on screen.
To inspect all of the bookings in a specified range of the wallchart:
1. Mark an area on the wallchart using the mouse.
Tip: Ensure Block booking in Retain preferences is enabled if you want to inspect bookings across a range ofresources in the resource view.
2. Select 'Actions' 'Inspect bookings' from the menus.
Short-cuts: Inspect bookings icon, or press CTRL+I. Alternatively right-click over the marked area andchoose 'Inspect' from the menu.
3. At the 'Inspector' dialog, v iew and edit the booking details as desired (see below).
4. Choose 'Done' when you have finished inspecting bookings.
The inspector dialog
The 'Inspector' dialog displays all bookings contained within a selected range of the wallchart (includingbookings outside the current display diary) when you run the 'Inspect' function:
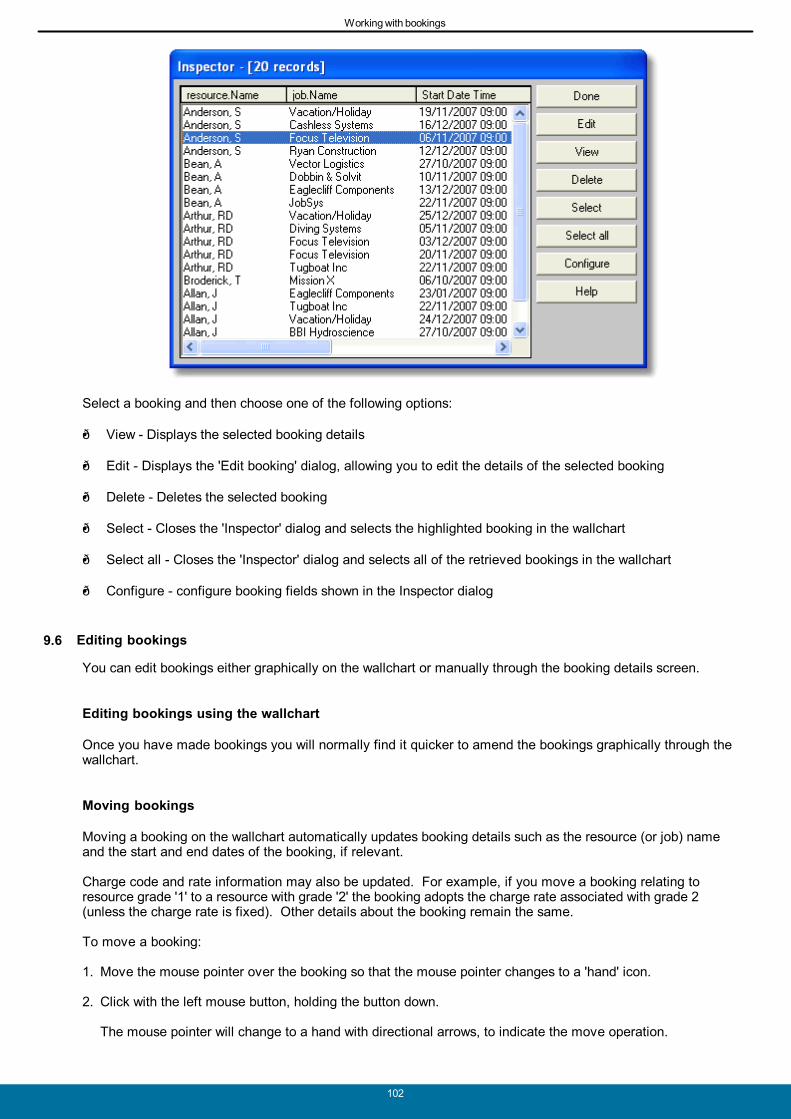
Working with bookings
102
Select a booking and then choose one of the following options:
View - Displays the selected booking details
Edit - Displays the 'Edit booking' dialog, allowing you to edit the details of the selected booking
Delete - Deletes the selected booking
Select - Closes the 'Inspector' dialog and selects the highlighted booking in the wallchart
Select all - Closes the 'Inspector' dialog and selects all of the retrieved bookings in the wallchart
Configure - configure booking fields shown in the Inspector dialog
9.6 Editing bookings
You can edit bookings either graphically on the wallchart or manually through the booking details screen.
Editing bookings using the wallchart
Once you have made bookings you will normally find it quicker to amend the bookings graphically through thewallchart.
Moving bookings
Moving a booking on the wallchart automatically updates booking details such as the resource (or job) nameand the start and end dates of the booking, if relevant.
Charge code and rate information may also be updated. For example, if you move a booking relating toresource grade '1' to a resource with grade '2' the booking adopts the charge rate associated with grade 2(unless the charge rate is fixed). Other details about the booking remain the same.
To move a booking:
1. Move the mouse pointer over the booking so that the mouse pointer changes to a 'hand' icon.
2. Click with the left mouse button, holding the button down.
The mouse pointer will change to a hand with directional arrows, to indicate the move operation.

Working with bookings
103
3. Move the outlined booking to the new location. You will see a transparent copy of the booking floating overthe wallchart behind your mouse pointer, indicating where the booking would end up if you were to let go ofthe mouse button at any given moment.
(See Booking preferences for different 'snap to' settings.)
4. Release the left mouse button.
The booking will be moved to the new location. Repeat the process if the booking isn't exactly where youwanted it.
Use the clipboard to move bookings to resources, jobs or time periods outside the current v iew of the bookinginformation (see Using the clipboard).
Copying bookings
Copying a booking creates a new booking with identical characteristics to the first, but with new details such asthe resource (or job) name and the start and end dates of the booking, if relevant, based on the location of thenew booking.
Charge code and rate information may also be updated. For example, if you copy a booking relating toresource grade '1' to a resource with grade '2' the new booking adopts the charge rate associated with grade 2. If the booking was originally entered with a manual charge code or rate, it will be updated to the default chargecode or rate. Other details about the booking remain the same.
To copy a booking:
1. Move the mouse pointer over the booking so that the mouse pointer changes to a 'hand' icon.
2. Hold the CTRL key down and then click with the left mouse button, also holding the button down.
The mouse pointer will change to a hand with directional arrows. A '+' sign inside the hand indicates that thisis a copy operation.
3. Move the outlined booking to the new location.
Tip: Concentrate on placing the bottom left corner of the booking into the cell into which you want to copy thebooking. (See Booking preferences for different 'snap to' settings.)
4. Release the left mouse button and then the CTRL key.
The booking will be copied to the new location. You can now move the new booking, if it isn't exactly where youwanted it.
Use the clipboard to copy bookings to resources, jobs or time periods outside the current v iew of the bookinginformation (see Using the clipboard).
Resizing a booking
Resizing a booking on the wallchart automatically updates its start or end date, depending on which end of the
Working with bookings
104
booking you move.
Unless the booking is for a fixed number of hours (see Making proportional bookings) resizing also changes thenumber of hours allocated to the booking; 'stretching' the booking increases the booked hours and 'shrinking' thebooking reduces the booked hours. Other details about the booking remain the same.
To resize a booking:
1. Move the mouse pointer over either the left or right end of the booking, so that the mouse pointer changes toa '' icon.
2. Click with the left mouse button, holding the button down.
3. Move the mouse pointer to the new location.
A marked area will indicate the scale of the amended booking.
4. Release the left mouse button.
The booking will be resized to the new location. Repeat the process if the booking isn't exactly where youwanted it.
Selecting multiple bookings
You can select multiple bookings and then move, copy or delete them in one go. You can only resize onebooking at a time.
To select multiple bookings:
1. Click on the first booking.
2. Hold the CTRL key down and click on further bookings to select or deselect them as desired.
Bookings change colour (inversion) to indicate when they are currently selected.
3. Release the CTRL key.
4. Perform the desired operation on the selected bookings.
This facility is particularly useful when there is a relationship between the bookings which you want to preserve. For example, you can use this function when an entire job has been rescheduled, by selecting all bookingsagainst the job and moving them with reference to the new start date.
An alternative method of selecting multiple bookings is available through the booking inspector (see Inspectingbookings).
Editing a booking through the booking details screen
To editing a booking through the booking details screen:
1. Click on the booking in the wallchart.
2. Select 'Actions', 'Edit booking' from the menus.
Short-cuts: The 'Edit selected booking' icon or right-click over the booking and choose 'Edit booking'from the menu.
3. At the 'Edit Booking' dialog, amend the booking details as desired.
This dialog is similar to the one you see when first making a booking. See Making a booking for help onentering booking details.

Working with bookings
105
4. Click on 'OK' to accept your changes to the current booking.
Amendments through this booking details dialog will be automatically reflected in the wallchart.
Note that all booking operations (editing, duplicating, splitting and so on) are affected by statutory holidays. (Seethe Wallchart section.)
9.7 Changing booking colours
Users can change the colour of a booking by right-clicking on the booking in the Wallchart v iew and selectingthe new colour from a visual display of all the colours available.
9.8 Duplicating bookings
A duplication wizard is available to help create recurring bookings.
To repeat a booking across time or resources:
1. Select 'Actions', 'Duplicate bookings' from the menus to start the Duplicate Bookings wizard.

Working with bookings
106
Short Cut: 'Duplicate bookings' icon or right click on a booking.
2. Select whether to repeat bookings across, time, resources or both by clicking the appropriate checkboxes.
3. If repeating across resources, select the resources desired by highlighting them in the 'Available' list andmoving them to the 'Selected' list using the '>' button. You can move a resource from the 'Selected' listusing the '<' button, add all resources using '>>' and remove all resources using the '<<' button.
4. Check to see if your settings are correct and click on 'Finish' to duplicate the bookings.
Duplicating over time follows a different procedure depending on the duplication period selected.
1. Select 'Actions', 'Duplicate bookings' from the menus to start the Duplicate Bookings wizard.
Short Cut: Right click on a booking and select 'Duplicate bookings'.
2. Select whether to repeat bookings across, time, resources or both by clicking the appropriate checkboxes.
3. If repeating across time, select duplication period, either yearly, monthly, weekly, daily or custom.
4. For yearly, monthly or weekly bookings, select the duplication interval (every .. years/months/weeks).
5. Select the dates the duplicating bookings should start, depending on the period:Yearly: Select which day of the year.Monthly: Select which day of the month or 'Last day of the month'.Weekly: Select which day(s) of the week.

Working with bookings
107
Custom: Select the exact dates.
6. Select when to start duplicating. Default is the first day after the selected booking ends.
7. Select when to stop duplicating. The 'Duplicates' field will show the number of duplications to be made withinthat period. Default is one duplication. Alternatively, type or use the up/down arrows to change the requirednumber of duplications.
Note: Daily and weekly duplication will not copy to weekends, but copies for yearly or monthly duplicationmight end up in weekends or on statutory holidays. Afterwards, check the duplicates and move them toweekdays if necessary.
8. Check to see if your settings are correct and click on 'Finish' to duplicate the bookings.
9.9 Splitting bookings
This function will split a booking in half, rounding each half to the current 'snap to' settings (see Customisingdate scale settings for the wallchart). This is useful for spreading bookings over resources or out in time whilefixing the number of hours.
To split a booking:
1. Click on the booking in the wallchart.
2. Select 'Action', 'Split booking' from the menus.
Short-cuts: Right-click over the booking and choose 'Split booking' from the menu.
A booking smaller than the current 'snap to' settings will split in two halves with minute precision. It isrecommended to do the splitting on a smaller date scale in that case (from months to weeks for example).
9.10 Cutting bookings
Users now have the ability to div ide one booking into two by visually cutting the booking in the wallchart v iew atany point along the it's length. The two newly created ends of the bookings will 'snap to' as defined in yourpreferences. (see Customising date scale settings for the wallchart).
Select 'Actions' -> 'Cut booking tool'
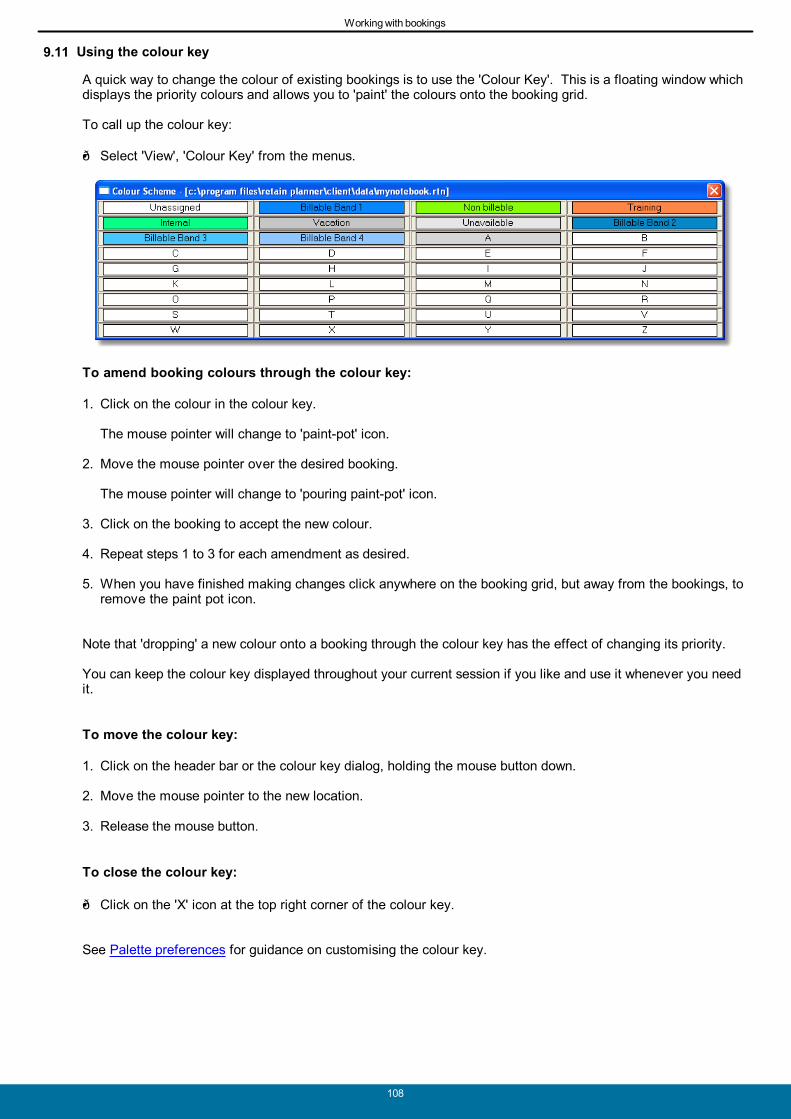
Working with bookings
108
9.11 Using the colour key
A quick way to change the colour of existing bookings is to use the 'Colour Key'. This is a floating window whichdisplays the priority colours and allows you to 'paint' the colours onto the booking grid.
To call up the colour key:
Select 'View', 'Colour Key' from the menus.
To amend booking colours through the colour key:
1. Click on the colour in the colour key.
The mouse pointer will change to 'paint-pot' icon.
2. Move the mouse pointer over the desired booking.
The mouse pointer will change to 'pouring paint-pot' icon.
3. Click on the booking to accept the new colour.
4. Repeat steps 1 to 3 for each amendment as desired.
5. When you have finished making changes click anywhere on the booking grid, but away from the bookings, toremove the paint pot icon.
Note that 'dropping' a new colour onto a booking through the colour key has the effect of changing its priority.
You can keep the colour key displayed throughout your current session if you like and use it whenever you needit.
To move the colour key:
1. Click on the header bar or the colour key dialog, holding the mouse button down.
2. Move the mouse pointer to the new location.
3. Release the mouse button.
To close the colour key:
Click on the 'X' icon at the top right corner of the colour key.
See Palette preferences for guidance on customising the colour key.

Working with bookings
109
9.12 Deleting bookings
Deleting one or more bookings removes them permanently from the wallchart and all reports.
To delete bookings:
1. Click on the bookings in the wallchart.
2. Select 'Actions', 'Delete booking' from the menus.
Short-cuts: The 'Delete selected booking' icon or press DEL. Alternatively right-click over a booking andchoose 'Delete booking' from the menu.
3. The 'Delete Booking' dialog will appear. Choose 'Yes' to delete the displayed booking, 'No' not to delete thedisplayed booking, 'Yes to All' to delete all bookings selected or 'Cancel' not to delete the remaining selectedbookings.
9.13 Using the clipboard
The rectangular area immediately above the left hand column of resource or job names is called the Retain'clipboard'. It appears white when containing no bookings. The size of the clipboard area can be changed bydragging the borders to the right and downwards to show more bookings.
You can hide and unhide the clipboard from the 'View' menu and selecting 'Booking Clipboard'.
The clipboard is particularly useful when you want to move or copy bookings beyond the currently displayedarea of the wallchart.
The Retain clipboard is similar to a normal Windows clipboard, in that you can cut (move) and copy bookings tothe clipboard and paste them back into the wallchart.
The Retain clipboard is different from other clipboards, however, in that:
A number of bookings can be stored in the clipboard at any one time.
The clipboard only deals with bookings.
The processes are slightly different from the standard cut, copy and paste features of other Windowsapplications.
Each notebook page has its own clipboard and the bookings in one page's clipboard are not available in anyother page's clipboard.
To move or copy a booking to the clipboard:
1. To copy a booking to the clipboard, right-click on a booking and select 'Copy to Clipboard' in the context

Working with bookings
110
menu. Alternatively click on a booking and click on the Short-cut in the tool bar.
2. To move a booking to the clipboard, drag the booking to the clipboard directly and release the booking withinthe clipboard area. Note, if you do undo now the booking will re-appear on the wallchart but the clipboard willkeep a copy.
Bookings remain on the clipboard until you move them back to the wallchart. If you have several bookings onthe clipboard at the same time scroll bars will appear to allow you to navigate between bookings.
To move or copy a booking from the clipboard:
There are two options for this action. The more straightforward option is:
1. Move the mouse pointer over the booking in the clipboard.
2. Drag the booking to move the booking in the usual way, or press CTRL and then drag to copy the booking.
3. Release the booking within the desired location of the wallchart.
An alternative option locates the booking at the current block position in the wallchart:
1. Use the mouse or keyboard to mark the date you want to place the booking.
2. Select the booking you want in the clipboard with the left mouse button.
3. Right-click and select 'Move to wallchart' to move or 'Copy to wallchart' to copy the booking to the wallchart.
Note: the original start time of the booking is maintained, the 'Snap to' settings are ignored. This is useful fordifferent date scales.
To remove bookings from the clipboard:
1. Move the mouse pointer over the clipboard area.
2. Right click with the mouse.
3. Choose 'Delete selected' to delete a selected booking.
4. Choose 'Flush clipboard' to remove all bookings from the clipboard.
9.14 Using scenarios
Scenarios allow more control over tentative bookings, especially for use with the roll forward functionality. Scenarios allow tentative bookings to be grouped and be modified as such.
When rolling forward bookings, you can select or type in a scenario name that will be assigned to all rolledforward bookings.
Existing bookings can be assigned to a scenario in the booking details dialog, accessible by right clicking on abooking and choosing 'Edit Booking' or when making a new booking.
All scenario bookings are displayed with a dotted line.
Scenarios can be used as criteria when selecting bookings.
Modifying a scenario
In the end a scenario will no longer be tentative, it will either become an actual project or it won't. To modify ascenario, converting scenario bookings into actual bookings or deleting them:
1. Select 'Actions', 'Modify scenario...' from the menus.
2. Select the desired scenario from the drop-down list or by typing its name.
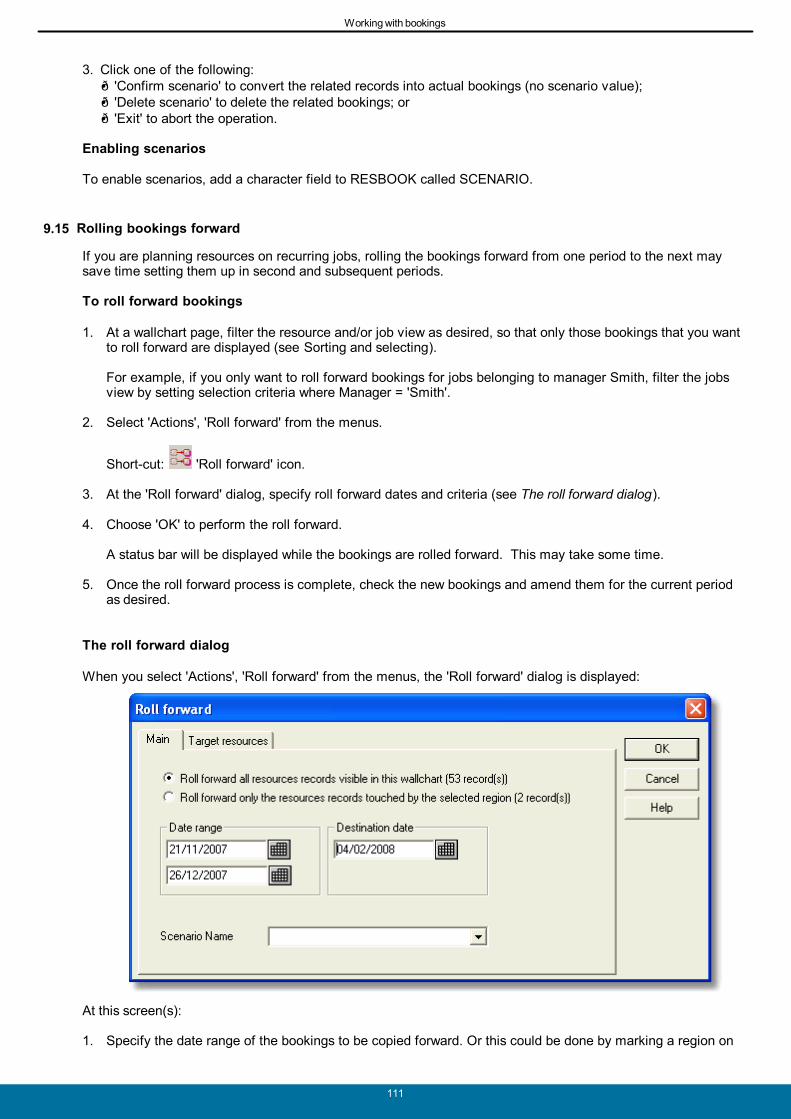
Working with bookings
111
3. Click one of the following: 'Confirm scenario' to convert the related records into actual bookings (no scenario value); 'Delete scenario' to delete the related bookings; or 'Exit' to abort the operation.
Enabling scenarios
To enable scenarios, add a character field to RESBOOK called SCENARIO.
9.15 Rolling bookings forward
If you are planning resources on recurring jobs, rolling the bookings forward from one period to the next maysave time setting them up in second and subsequent periods.
To roll forward bookings
1. At a wallchart page, filter the resource and/or job v iew as desired, so that only those bookings that you wantto roll forward are displayed (see Sorting and selecting).
For example, if you only want to roll forward bookings for jobs belonging to manager Smith, filter the jobsview by setting selection criteria where Manager = 'Smith'.
2. Select 'Actions', 'Roll forward' from the menus.
Short-cut: 'Roll forward' icon.
3. At the 'Roll forward' dialog, specify roll forward dates and criteria (see The roll forward dialog).
4. Choose 'OK' to perform the roll forward.
A status bar will be displayed while the bookings are rolled forward. This may take some time.
5. Once the roll forward process is complete, check the new bookings and amend them for the current periodas desired.
The roll forward dialog
When you select 'Actions', 'Roll forward' from the menus, the 'Roll forward' dialog is displayed:
At this screen(s):
1. Specify the date range of the bookings to be copied forward. Or this could be done by marking a region on
Working with bookings
112
the wallchart.
All bookings starting within the date range specified (and matching the current selection settings) will berolled forward.
2. Specify the destination date for the new bookings.
The new bookings will start from a date that is either before or after the destination date (by an offset of theoriginal start date and start date of the date range), depending on whether the start date of the originalbooking is before or after the date range.
For example, a booking between 1/5/2005 and 6/5/2005 with an offset of 2 days and destination date on10/7/2005 will result in a new booking between 12/7/2005 and 17/7/2005.
Hint: Use the same day of the week for the destination date to avoid creating weekend bookings.
3. Select one of the following 'Copy bookings to resource' options:
Same resources if same grade.
A booking will be rolled forward to the same resource only if the current resource grade is the sameas the grade for the booking. Otherwise the booking will be rolled forward to a dummy resource ofthe same grade.
Where assignments are allocated primarily based on resource grade, this option helps to isolatebookings which need to be reassigned to different resources, where grades change through staffpromotions, for example.
Same resource irrespective of grade.
All bookings will be rolled forward to the same resource. Use this option where staff continuity ismore important than resource grade.
Temporary resources with same grade.
A dummy resource will be added for each grade covered by the selected bookings and the bookingswill be rolled forward to these temporary resources. Temporary resources are given namesbeginning 'zzTemp' so that they are easily identifiable.
Use this option on assignments where there is little staff continuity from one period to the next.Move bookings from the temporary resources to real resources as desired. Delete the temporaryresources when done.
4. Specify an optional scenario name for the selected bookings.
All bookings will be assigned to the same scenario and later displayed with dotted lines. They can bemodified as a group. This can be done either by selecting an existing name from the drop-down list ortyping a new name in the scenario field.
5. Choose 'OK' to execute the roll forward.Rolling forward bookings is normally only the starting point for your planning on recurring jobs. Move, copy andresize the new bookings in the usual way to take into account differences in timing and duration of theassignments and reallocate bookings to different resources as desired. Rolling forward to weekends or statutoryholidays affects this as well.
Although it resembles duplicating bookings, rolling bookings forward works with multiple bookings and providesonly a single copy.
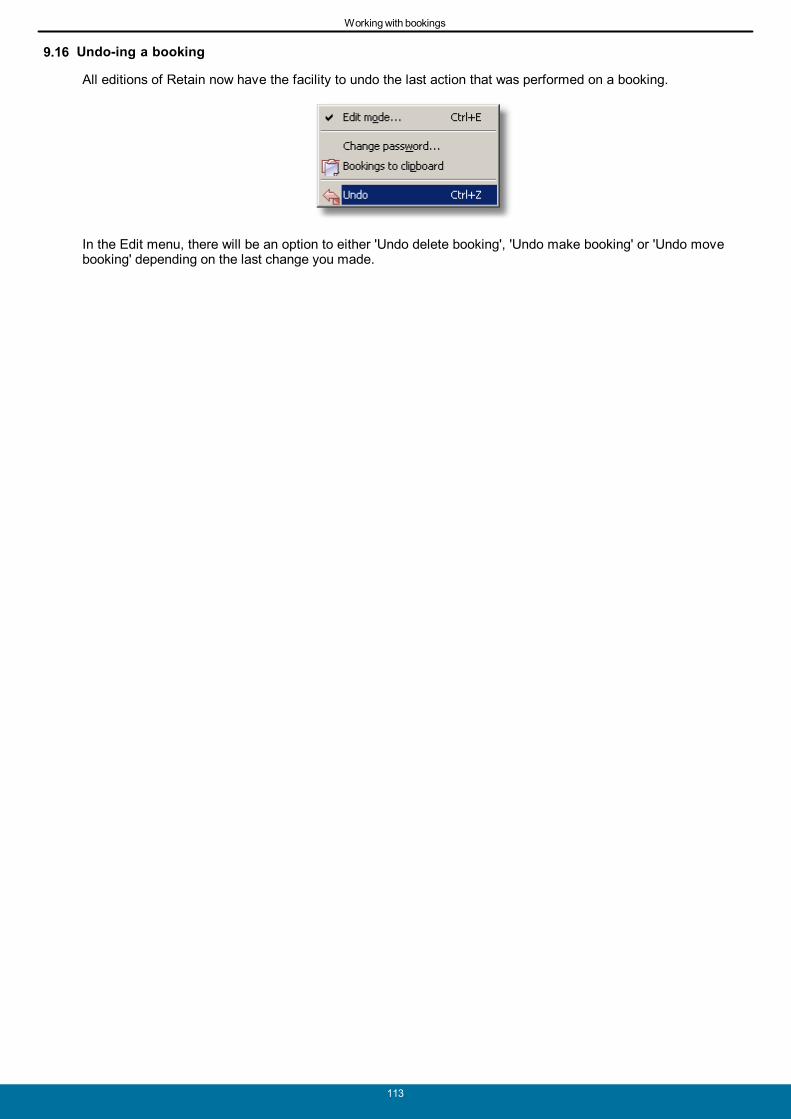
Working with bookings
113
9.16 Undo-ing a booking
All editions of Retain now have the facility to undo the last action that was performed on a booking.
In the Edit menu, there will be an option to either 'Undo delete booking', 'Undo make booking' or 'Undo movebooking' depending on the last change you made.

Working with notebooks
114
10 Working with notebooks
10.1 Notebooks overview
Notebooks contain views of your Retain data. They allow you to display your Retain wallchart in various waysand to define report formats used by the Retain Report Writer.
Each notebook can contain one or more notebook pages, each page representing a different v iew of your data.Each notebook page may be either a wallchart, calendar or report type page and can be defined independently(see Working with notebook pages).
Each notebook points to a particular set of data files. In most organisations, you are likely to have a single setof data files, but you may have several notebooks pointing to that data. In a network environment, your Retaindata may be stored on a network drive and shared by many users. Each user may have their own notebooks, oryou may even have notebooks which are shared by several users. (Note: If you intend to share notebooks thenotebook file is changed each time someone saves it. You may prefer to make shared notebook files read onlyso that they cannot be amended.)
It is essential, when working with Retain notebooks, to appreciate that the underlying data is the same across allpages, notebooks and even users of that data. For example, if you amend a booking in a particular notebookview the booking itself is amended, not just the v iew. Conversely, if you amend a v iew, for example byexcluding certain tasks from the display, you affect the current v iew, but not the records currently hidden fromthat v iew.
Creating a new notebookOpening an existing notebookSaving the notebookClosing the notebookNotebook windows
10.2 Creating a new notebook
To create a new notebook:
Select 'File' -> 'New' from the menus.
Short-cuts: New file icon or press CTRL+N.
The new notebook file will be created with a temporary name such as 'ntbk1' and a default 'Resource' page willbe provided. You can now work with the notebook as desired.
The temporary notebook name given to a new notebook is equivalent to an untitled document in a wordprocessing application or unsaved workbook in a spreadsheet application. Remember to save your newnotebook under a meaningful name and to save changes to your notebooks from time to time, such as whenyou add new notebook pages. See Saving the notebook.
10.3 Opening an existing notebook
To open an existing notebook in Retain:
1. Select 'File', 'Open' from the menus.
Short-cuts: The Open File icon or press CTRL+O. The four most recently opened notebooks are alsolisted in the 'File' menu.
2. Select or type the name of the notebook file you want to open.
Use the 'Drives' and 'Directories' boxes to navigate to files in different locations. In Retain notebook filesusually have an .RTN file extension.
3. Click on 'OK' to open the notebook, or 'Cancel' to cancel without opening the notebook.

Working with notebooks
115
Generally you should only need to have one notebook open at any one time, since you may be working withseveral pages within that notebook (see Working with notebook pages). Close one notebook before openinganother.
You can open more than one notebook simultaneously, but only if all the notebooks point to the same database.You must close notebooks pointing to one data source before attempting to open a notebook pointing to adifferent data source. See Selecting a different data source.
10.4 Saving the notebook
To save the current notebook:
Select 'File', 'Save' from the menus.
Short-cuts: The Save File icon or press CTRL+S.
If the notebook has not previously been named you will then be prompted to enter a name for the newnotebook.
To save the current notebook under a different name, or to save a notebook which has not previously beennamed:
1. Select 'File', 'Save As' from the menus.
2. Enter the new name of the notebook file.
Retain notebook files should be given an .RTN file extension. If you want to save the file in a differentlocation, enter the full path of the file or use the Drives and Directories boxes to navigate to the desiredlocation.
3. Click on 'OK' to save the notebook under this new name.
If you enter an existing filename, Retain will ask if you want to overwrite the existing notebook. Click on'Yes' to overwrite the existing notebook or 'No' to enter a different filename.
When you save a notebook, remember that you are saving your views of the Retain data, including any pagesadded or deleted and any changes to the formats of existing pages. You are not saving the data itself. Changes to your bookings, jobs, resources and components are saved to the underlying database as you goalong, so you do not need to worry about saving these changes separately.
10.5 Closing the notebook
To close the current notebook:
Select 'File', 'Close' from the menus.
Short-cut: Double-click on the control icon at the top left of the notebook window or use CTRL+F4.
If you have made changes to your notebook you will be prompted to save these changes before closing the file(see Saving the notebook).
When you exit Retain you will automatically close any open notebooks. See Exiting Retain.

Working with notebooks
116
10.6 Importing/Exporting pages
You can import and export indiv idual notebook pages so that pages can be easily moved between differentnotebooks. Select 'Notebook' -> 'Export page . . .' to export and 'Notebook' -> 'Import page . . .'.
For example if two users are each working on a sperate notebook but one user wants to use a report page thatthe other user has designed, then the first user can select 'Notebook' -> 'Export page . . .'
The second user can then navigate to that file and import it to their own notebook by selecting 'Notebook' ->'Import page . . .'

Working with notebooks
117
10.7 Notebook windows
In Retain you can open several notebooks at once, as long as they point to the same underlying database (see Opening an existing notebook).
Each notebook you open in Retain is contained in its own window.
Resizing notebook windows
You can manipulate each notebook window as follows:
To expand the notebook window to its maximum size, click on the maximise button at the top right of thewindow.
To restore a maximised window to its original size, click on the restore button at the top right of the window.
To reduce the notebook window to an icon, click on the minimise button at the top right of the window.
To manually resize a window, move the mouse pointer to the border of the window you want to size, so thatthe pointer changes to a double-headed arrow ''. Then drag the border, until the window is the size youwant, and then release the mouse button.
To close a notebook window, double-click on the control icon at the top left of the window.
Window menu options
Any open notebook windows are listed in the 'Window' menu. To switch to a different window either clickanywhere on the window area or select the name of the notebook from the 'Window' menu.
The following options are also available from the 'Window' menu:
Cascade - overlays your open notebook windows one on top of another, each window having the samedimensions.
Tile vertically - tiles your open notebook windows side by side, each window being the same width.
Tile horizontally - tiles your open notebook windows on top of each other, each window being the sameheight.
Arrange icons - arranges the icons of minimised notebook windows evenly across the foot of the notebookarea of the screen.
Close all - closes all open notebook windows.
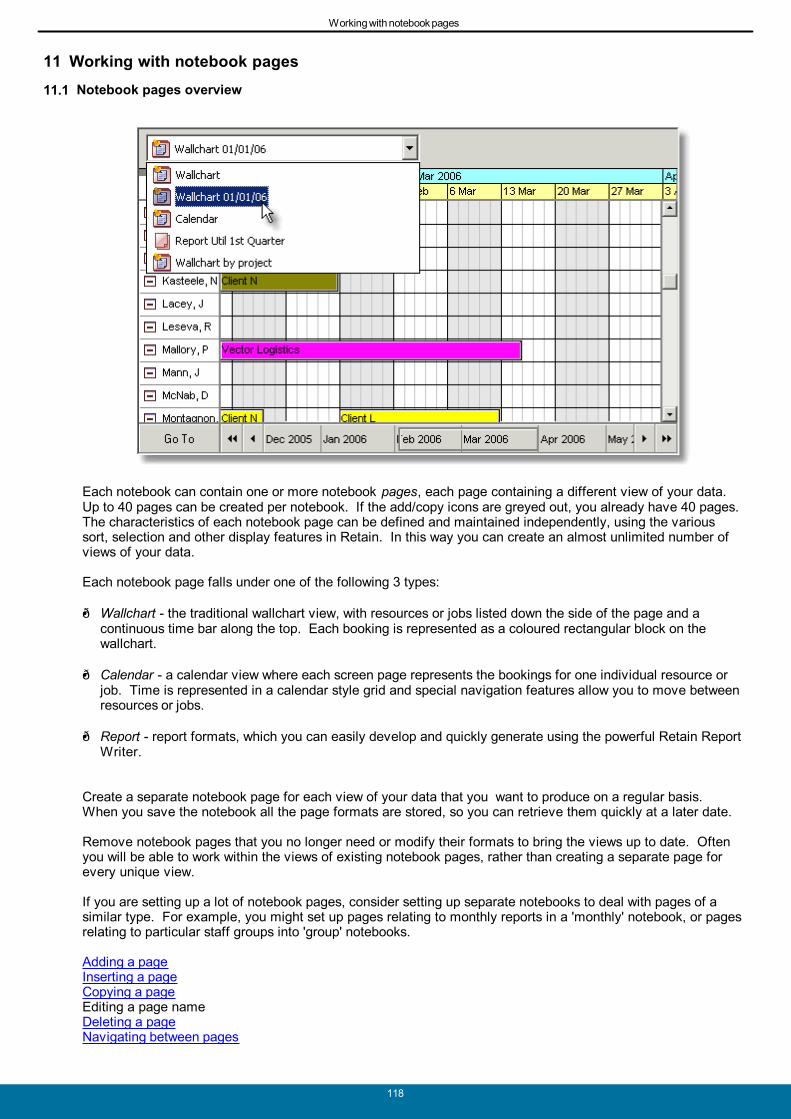
Working with notebook pages
118
11 Working with notebook pages
11.1 Notebook pages overview
Each notebook can contain one or more notebook pages, each page containing a different v iew of your data.Up to 40 pages can be created per notebook. If the add/copy icons are greyed out, you already have 40 pages. The characteristics of each notebook page can be defined and maintained independently, using the varioussort, selection and other display features in Retain. In this way you can create an almost unlimited number ofviews of your data.
Each notebook page falls under one of the following 3 types:
Wallchart - the traditional wallchart v iew, with resources or jobs listed down the side of the page and acontinuous time bar along the top. Each booking is represented as a coloured rectangular block on thewallchart.
Calendar - a calendar v iew where each screen page represents the bookings for one indiv idual resource orjob. Time is represented in a calendar style grid and special navigation features allow you to move betweenresources or jobs.
Report - report formats, which you can easily develop and quickly generate using the powerful Retain ReportWriter.
Create a separate notebook page for each view of your data that you want to produce on a regular basis. When you save the notebook all the page formats are stored, so you can retrieve them quickly at a later date.
Remove notebook pages that you no longer need or modify their formats to bring the views up to date. Oftenyou will be able to work within the views of existing notebook pages, rather than creating a separate page forevery unique view.
If you are setting up a lot of notebook pages, consider setting up separate notebooks to deal with pages of asimilar type. For example, you might set up pages relating to monthly reports in a 'monthly' notebook, or pagesrelating to particular staff groups into 'group' notebooks.
Adding a pageInserting a pageCopying a pageEditing a page nameDeleting a pageNavigating between pages

Working with notebook pages
119
Switching to wallchart or calendar v iewSetting the opening date
11.2 Adding a page
To add a new page at the end of the current notebook:
1. Select the 'Add page' option from the 'Notebook' menu.
Short-cuts: The 'Add page' icon.
2. Select the page type by clicking on the appropriate radio button.
3. Type in a descriptive name for the new notebook page.
4. Select 'OK' to add the page to your notebook.
Note: When adding a report page you will be prompted to define the report format for the new report. SeeReports for more details.
The new page will be added as the last page in the dropdown box. See Inserting a page if you want to add apage elsewhere in the current notebook.
Select the page from the dropdown box to make it the active page. See Navigating between pages. Thenmodify the page formats and work with the new page as desired.
If you already have 40 pages, then the option to add a page will be greyed out, as 40 pages is the maximum.
Renaming a page
To edit the name of a notebook page:
1. If it isn't already the active page, click on the page you want to modify.
2. Select the 'Rename page' option from the 'Notebook' menu.
Short-cuts: The 'Rename page' icon.
3. Type in the new name for the page.
4. Select 'OK' to accept your changes.
11.3 Inserting a page
To insert a new page at the current location in the notebook:
1. Click on the page before which you want to insert the new page, if it isn't already the active page.
2. Select the 'Insert page' option from the 'Notebook' menu.
Short-cuts: The 'Insert page' icon.
3. Select the page type by clicking on the appropriate radio button.
4. Type in a descriptive name for the new notebook page.
5. Select 'OK' to insert the new page to your notebook.
Note: When adding a report page you will be prompted to define the report format for the new report. SeeReports for more details.

Working with notebook pages
120
The new page will be inserted immediately before the currently active page in the notebook. See Adding apage if you want to add a page at the end of the current notebook.
Select the page from the dropdown box to make it the active page. See Navigating between pages. Thenmodify the page formats and work with the new page as desired.
11.4 Copying a page
To create a new page by copying the currently active page in the notebook:
1. Click on the page which you want to use as the basis for the new page, if it isn't already the active page.
2. Select the 'Copy page' option from the 'Notebook' menu.
Short-cuts: The 'Copy page' icon.
3. Select 'OK' to add the new page to your notebook.
The new page will be added as the last page in the current notebook. It will contain all the characteristics of theoriginal page, but can now be amended independently of the original page.
Select the page from the dropdown box to make it the active page. See Navigating between pages. Thenmodify the page name and formats and work with the new page as desired.
11.5 Deleting a page
To delete a notebook page:
1. Click on the page you want to delete, if it isn't already the active page.
2. Select the 'Delete page' option from the 'Notebook' menu.
Short-cuts: The 'Delete page' icon.
3. Select 'OK' to confirm that you want to delete the current page.
4. Deleting a page does not affect any of the underlying data, such as the resources, jobs or bookings whichwere displayed in the deleted page.
A notebook needs to have at least one page - you will not be able to delete the last page.
11.6 Navigating between pages
To switch to a different page there are two options:
Using the mouse - Select the page from the dropdown box.
Using the keyboard - Use CTRL+PageUp and CTRL+PageDown to move through your pages in thedropdown box.
This page will now become the active page and the page name will appear in the dropdown box accordingly.
Moving pages
You can change the order of notebook pages by moving them up or down. This is useful when your notebookhas many pages. To move a page:
Working with notebook pages
121
1. Select the page you want to move from the dropdown box, if it isn't already the active page.
2. Select the 'Move page up' or 'Move page down' option from the 'Notebook' menu.
11.7 Switching to wallchart or calendar view
For wallchart and calendar pages you can switch the page between wallchart and calendar v iew.
To switch a wallchart page into calendar view:
1. Make sure the wallchart is the active page.
2. Select 'View', 'Calendar' from the menu.
Short-cut: Calendar v iew icon.
To switch a calendar page into wallchart view:
1. Make sure the calendar is the active page.
2. Select 'View', 'Wallchart' from the menu.
Short-cut: Wallchart v iew icon.
If you are using both views regularly you may find it more convenient to create separate pages for yourwallchart and your calendar.
Report pages cannot be converted to wallchart or calendar v iews.
11.8 Setting the opening date
Each notebook page can have its own opening date, being the date at which the focus is set when the page isfirst displayed during the current session. For example, you may want to set the opening date for the page as:
today's date.
a position relative to today's date.
a fixed date.
the date at which the page was pointing when the notebook was last closed.
To set the opening date for the current notebook page:
1. Select 'View', 'Opening date' from the menus.
2. At the 'Opening Date' dialog, set the opening date for the current page as desired (see below).
3. Choose 'OK' to accept your changes.
The Opening Date dialog
The 'Opening Date' dialog allows you to set the opening date for the current page.
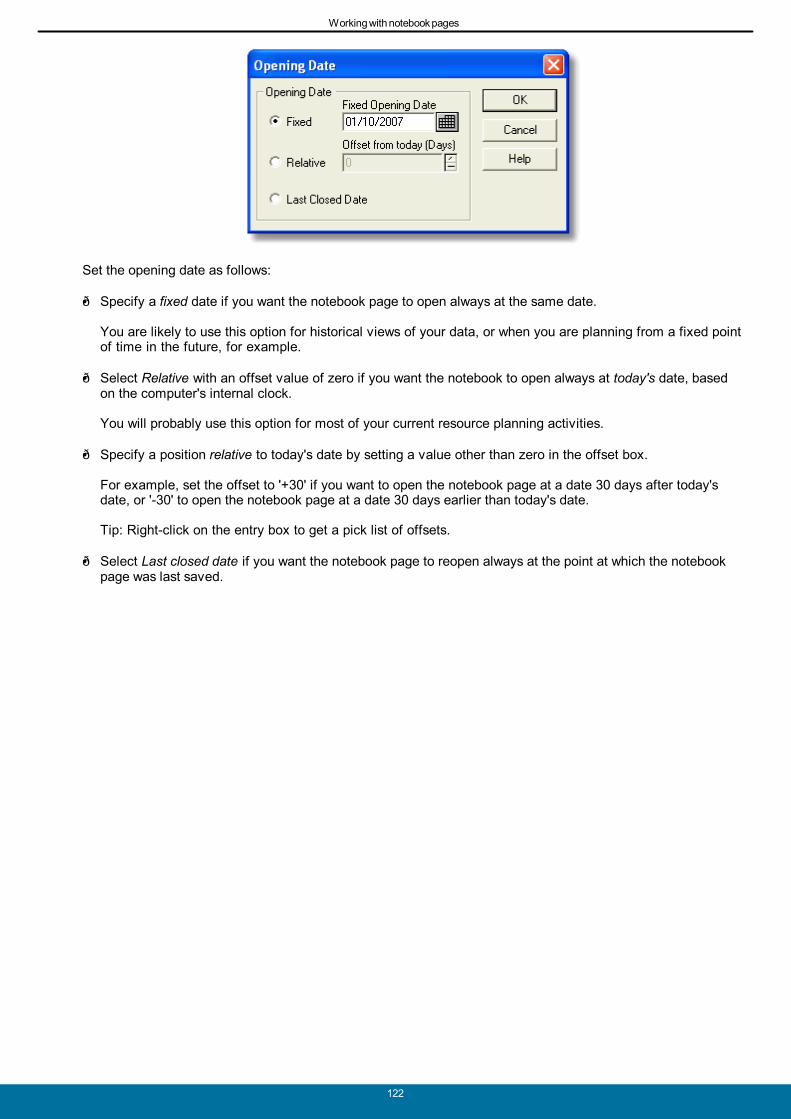
Working with notebook pages
122
Set the opening date as follows:
Specify a fixed date if you want the notebook page to open always at the same date.
You are likely to use this option for historical v iews of your data, or when you are planning from a fixed pointof time in the future, for example.
Select Relative with an offset value of zero if you want the notebook to open always at today's date, basedon the computer's internal clock.
You will probably use this option for most of your current resource planning activ ities.
Specify a position relative to today's date by setting a value other than zero in the offset box.
For example, set the offset to '+30' if you want to open the notebook page at a date 30 days after today'sdate, or '-30' to open the notebook page at a date 30 days earlier than today's date.
Tip: Right-click on the entry box to get a pick list of offsets.
Select Last closed date if you want the notebook page to reopen always at the point at which the notebookpage was last saved.
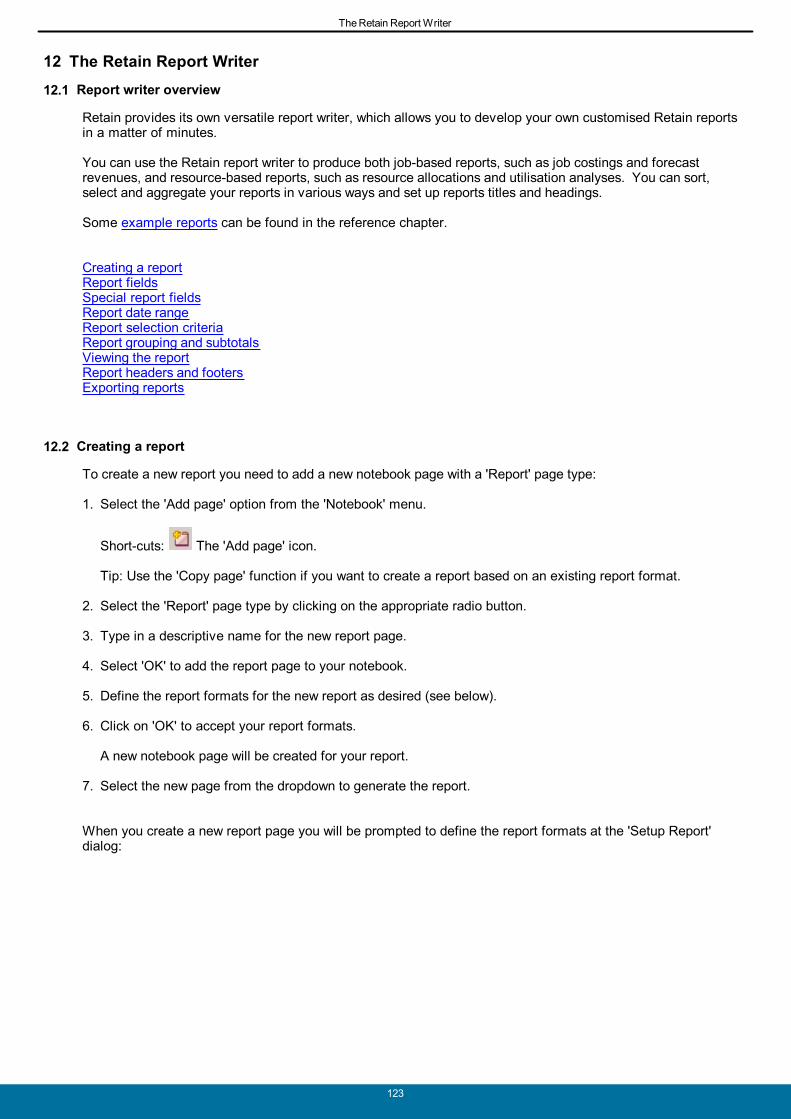
The Retain Report Writer
123
12 The Retain Report Writer
12.1 Report writer overview
Retain provides its own versatile report writer, which allows you to develop your own customised Retain reportsin a matter of minutes.
You can use the Retain report writer to produce both job-based reports, such as job costings and forecastrevenues, and resource-based reports, such as resource allocations and utilisation analyses. You can sort,select and aggregate your reports in various ways and set up reports titles and headings.
Some example reports can be found in the reference chapter.
Creating a reportReport fieldsSpecial report fieldsReport date rangeReport selection criteriaReport grouping and subtotalsViewing the reportReport headers and footersExporting reports
12.2 Creating a report
To create a new report you need to add a new notebook page with a 'Report' page type:
1. Select the 'Add page' option from the 'Notebook' menu.
Short-cuts: The 'Add page' icon.
Tip: Use the 'Copy page' function if you want to create a report based on an existing report format.
2. Select the 'Report' page type by clicking on the appropriate radio button.
3. Type in a descriptive name for the new report page.
4. Select 'OK' to add the report page to your notebook.
5. Define the report formats for the new report as desired (see below).
6. Click on 'OK' to accept your report formats.
A new notebook page will be created for your report.
7. Select the new page from the dropdown to generate the report.
When you create a new report page you will be prompted to define the report formats at the 'Setup Report'dialog:
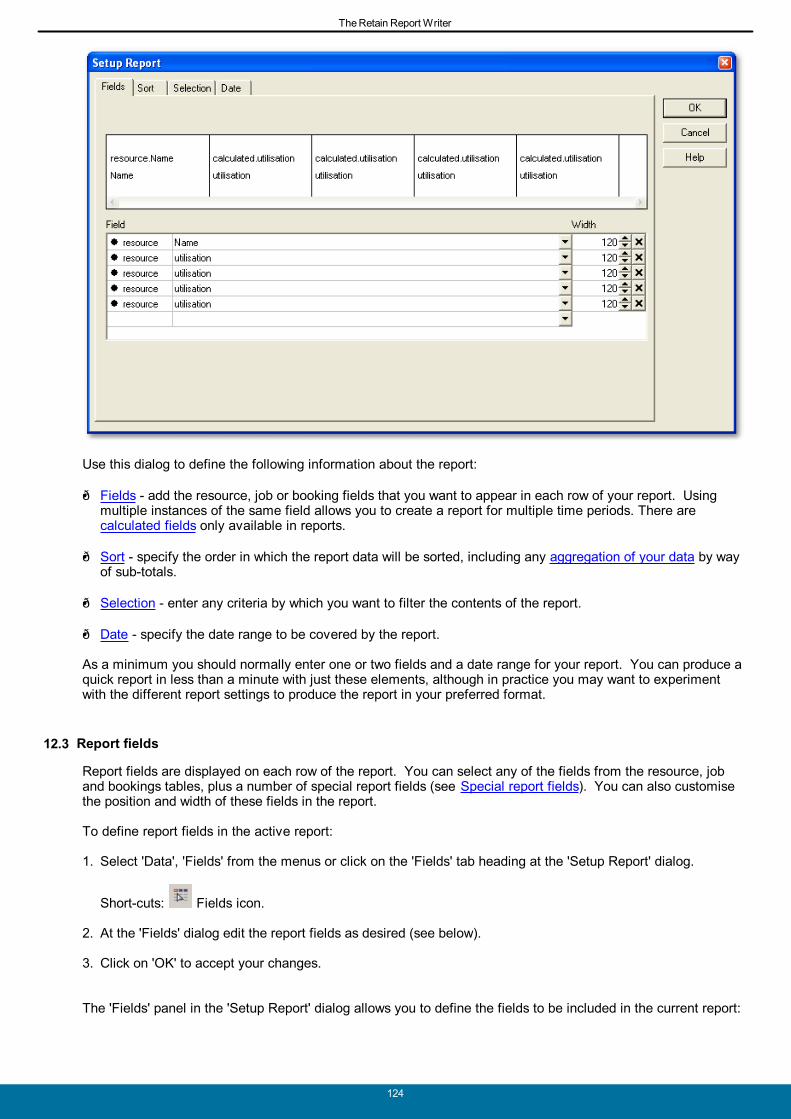
The Retain Report Writer
124
Use this dialog to define the following information about the report:
Fields - add the resource, job or booking fields that you want to appear in each row of your report. Usingmultiple instances of the same field allows you to create a report for multiple time periods. There are calculated fields only available in reports.
Sort - specify the order in which the report data will be sorted, including any aggregation of your data by wayof sub-totals.
Selection - enter any criteria by which you want to filter the contents of the report.
Date - specify the date range to be covered by the report.
As a minimum you should normally enter one or two fields and a date range for your report. You can produce aquick report in less than a minute with just these elements, although in practice you may want to experimentwith the different report settings to produce the report in your preferred format.
12.3 Report fields
Report fields are displayed on each row of the report. You can select any of the fields from the resource, joband bookings tables, plus a number of special report fields (see Special report fields). You can also customisethe position and width of these fields in the report.
To define report fields in the active report:
1. Select 'Data', 'Fields' from the menus or click on the 'Fields' tab heading at the 'Setup Report' dialog.
Short-cuts: Fields icon.
2. At the 'Fields' dialog edit the report fields as desired (see below).
3. Click on 'OK' to accept your changes.
The 'Fields' panel in the 'Setup Report' dialog allows you to define the fields to be included in the current report:

The Retain Report Writer
125
The fields panel contains the current report fields definition. The width of each column in this panel indicatesthe width of the column as it will be displayed in the report.
To add a field to the report:
1. Select the field from the drop-down box.
2. Adjust the width of the column by changing the number under 'Width' or by dragging the line which separateseach field in the top box.
3. Adjust the order in which fields are displayed by clicking on the black dot and dragging the line up or down.
4. Repeat steps 1 to 3 for each field as desired.
Tip:You do not need to include fields which you plan to use to sort or aggregate the report here. Fields youadd to the sort dialog are already displayed in the report.
Only combine report fields if they have a logical relationship. Generally this means producing reports based oneither resource fields or job fields or bookings fields, but not on a combination of fields across these tables. Forexample, the resource grade field and the job priority field do not have a logical relationship.
Since the bookings table contains information across both resources and jobs you can often use this table toproduce sensible results. For bookings level reports, for example, you can use the 'Name' and 'Job name' fieldsin the bookings table rather than extracting the name fields separately from the job and resource tables. Specifically, the following bookings table fields will normally contain the same information as held in thecorresponding resource and job tables:
Booking field: Equates to:Name Resource nameRESINIT Resource initialsJob Name Job namePRIORITY Job priority (colour)RESGRADE Resource gradeCHARGETYPE Job analysis code
If using booking level fields rather than the values held in the corresponding resource or job tables, bear in mindthat Retain allows you to change the priority colour, resource grade and charge type on a booking by bookingbasis. You may observe differences between reports using these fields at a booking level to those using the

The Retain Report Writer
126
fields at the resource/job level.
To remove a field from the report, click on the X button against the field row or:
1. Move the mouse pointer over a field in the top box.
2. Click the left mouse button, holding the mouse button down.
3. Drag the mouse pointer (the pointer changes to a crossed-arrows sign) anywhere outside of the box.
4. Release the mouse button.
5. Repeat steps 1 to 4 for each field as desired.
To reposition a field within the report definition, click on the black dot and drag the line up or down or:
1. Move the mouse pointer over the field in the 'Column Fields' list.
2. Click the left mouse button, holding the mouse button down.
3. Drag the mouse pointer (the pointer changes to a crossed-arrows sign) to the new location in the box.
Tip: Fields are positioned to the left of the current position on the list, or at the right hand end of the list ifthey are dropped beyond the end of the list.
4. Release the mouse button.
5. Repeat steps 1 to 4 to move each field as desired.
To change the width of a field within the report definition, change the number under 'Width' or:
1. Move the mouse pointer to the right edge of the field in the top box, so that the mouse pointer changes to a "
" sign.
2. Click the left mouse button, holding the mouse button down.
3. Move the mouse pointer until the desired width is indicated in the box.
4. Release the mouse button.
5. Repeat steps 1 to 4 to change the width of each field as desired.
Short-cut: You can resize the report fields widths directly within the report v iew.
12.4 Special report fields
Standard report fields are preceded by 'resource', 'job' or 'booking' to indicate to which table they relate. Forexample:
resource.Name - the name field in the resource table;
job.Name - the name field in the job table;
booking.Startdate - the booking start date.
In addition to these standard table fields, the Retain report writer provides a number of special fields for use inthe reports, preceded by 'calculated'.
Definitions
Utilisation Bookings with non-zero charge rate.

The Retain Report Writer
127
Utilisable Standard time minus availability-excluded time.Availability Time with no bookings.
Note that availability is not the same as standard minus utilised.
It is important to note that the definition of these fields can be modified in Retain Manager for different prioritycodes. It can be defined whether a code is included in utilisation calculations, availability calculations andutilisable time calculations, for example for part-time workers. The definitions should be made clear across theorganisation.
Resource table fields Usagecalculated.utilisation Utilisation % by resource based on utilised (or chargeable) hours / total
utilisable time.
calculated.availability Availability % by resource based on available hours / total standard time.
calculated.utilised Utilised hours within period by resource.
calculated.available Available hours within period by resource.
calculated.utilisableTime Hours available to be utilised within period.
calculated.resourceTime Total booking hours assigned to a given resource within period.
calculated.maxBooked Maximum % booked in a day within period.
calculated.standardTime Number of hours a resource should be working in a given time period.Taken from the calculation diary set up in Retain Manager, excludesholidays.
calculated.utilisedDays Utilised days within period by resource.
calculated.availableDays Available days within period for a resource.
calculated.resourceDays Total amount of days booked to a given resource within period.
calculated.standardDays Number of working days in a selected period. Taken from the calculationdiary set up in Retain Manager. Added field for the functionality ofexporting reports to Excel.
calculated.resourceBookingcount Number of bookings within period for a given resource.
calculated.blank Blank spacer field.
Job table fields Usagecalculated.jobRevenue Booked hours (calculated.jobTime) x charge rates for each job.
calculated.adjustedRevenue The job recovery rate applied to calculated.jobRevenue.
calculated.jobTime Total number of hours within period assigned to a job.
calculated.jobDays Total number of days within period assigned to a job.
calculated.jobBookingcount Number of bookings within period for a given job.
calculated.blank Blank spacer field.
Booking table fields Usagebooking.Time Field for internal calculations, use of booking.calcBookingTime is
recommended.
booking.calcBookingTime Total hours of entire booking (not related to report date range).
booking.PLANNEDTME Field for internal calculations, use of booking.calcBookingTime is

The Retain Report Writer
128
recommended.
booking.calcCost Calculated cost per booking, based on booking.calcBookingTime x chargerate.
booking.calcActualCost Actual cost per booking, based on booking.ActualTime x charge rate.
booking.calcHoursPerWeek Hours per week of booking, based on loading and calculation diary.
booking.calcBookingDays Total amount of days of entire booking (not related to report date range).
booking.calcPriorityAlias Alias of work type (i.e. 'Unavailable' instead of '6'), for display purposes.
calculated.bookingTime Calculated hours per booking within the selected period and fixed orvariable booking hours.
calculated.bookingCost Calculated cost per booking within the selected period, based oncalculated.bookingTime x booking charge rate.
calculated.priority Field for backward compatibility, booking.calcPriorityAlias is recommended.
calculated.bookingDays Days per booking based on the selected period.
calculated.maxBookingConflict Maximum total loading for the resource during the booking, within theselected period, used to produce booking based conflict reports.
calculated.bookingBookingcount Number of bookings overlapping in time with the booking, within theselected period.
calculated.blank Blank spacer field.
Please note the difference between the 'booking.calc...' and 'calculated.booking...' fields:
The 'booking.calc...' fields refer to the entire booking.
The 'calculated.booking...' fields refer to the part of the booking included in the report date range.
Also note that some fields are for internal purposes or backward compatibility.
12.5 Report date range
All reports, except mere listings of the resources and jobs tables, will need a date range. The date range of thereport determines the cut off points for all calculations in the report, including utilisation percentages, bookedhours and job costings.
Where bookings span across the specified date range then they will be time apportioned for the purposes oneach report. For example, if only 1 week of a 3-week booking is included in the date range of a report, then33.3% of the booking will be included in the report for the purposes of generating time and cost figures.
To define the date range of the active report:
1. Select 'Data', 'Date range' from the menus or click on the 'Date' tab heading at the 'Setup Report' dialog.
Short-cuts: Date range icon.
2. At the 'Date' dialog edit the date range as desired (see below).
3. Click on 'OK' to accept your changes.
The 'Date' panel in the 'Setup Report' dialog for reports allows you to define the date range of the current report:
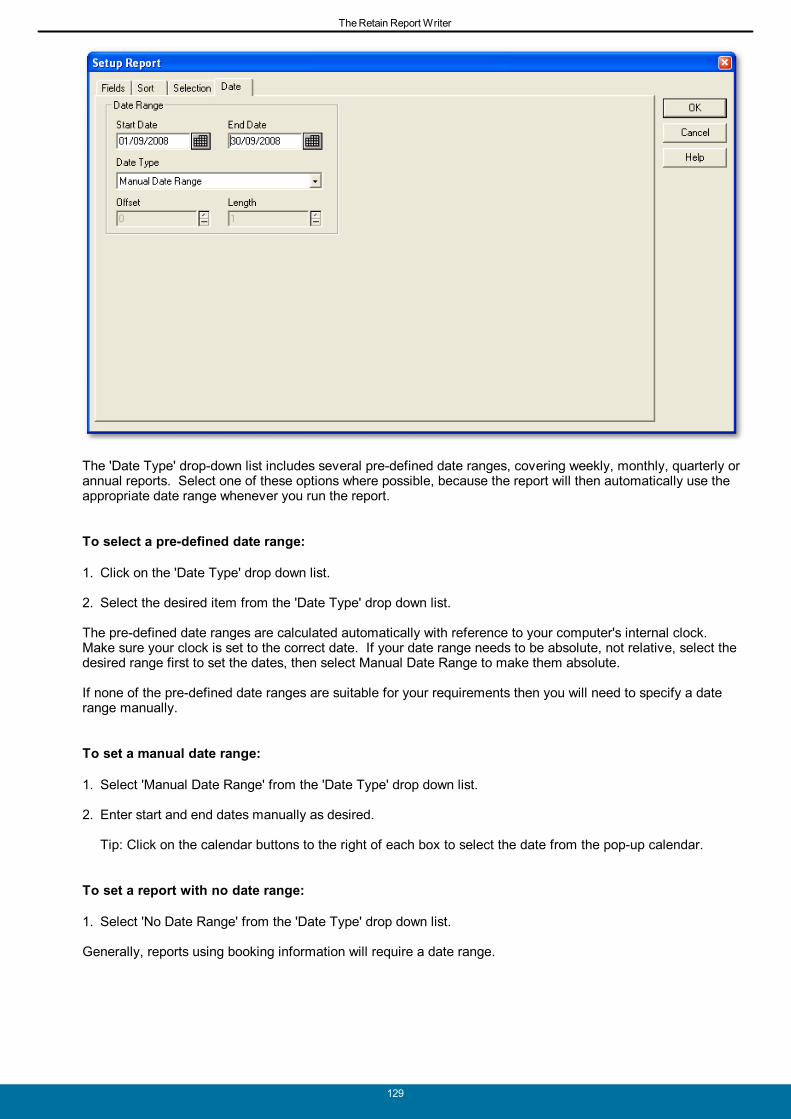
The Retain Report Writer
129
The 'Date Type' drop-down list includes several pre-defined date ranges, covering weekly, monthly, quarterly orannual reports. Select one of these options where possible, because the report will then automatically use theappropriate date range whenever you run the report.
To select a pre-defined date range:
1. Click on the 'Date Type' drop down list.
2. Select the desired item from the 'Date Type' drop down list.
The pre-defined date ranges are calculated automatically with reference to your computer's internal clock. Make sure your clock is set to the correct date. If your date range needs to be absolute, not relative, select thedesired range first to set the dates, then select Manual Date Range to make them absolute.
If none of the pre-defined date ranges are suitable for your requirements then you will need to specify a daterange manually.
To set a manual date range:
1. Select 'Manual Date Range' from the 'Date Type' drop down list.
2. Enter start and end dates manually as desired.
Tip: Click on the calendar buttons to the right of each box to select the date from the pop-up calendar.
To set a report with no date range:
1. Select 'No Date Range' from the 'Date Type' drop down list.
Generally, reports using booking information will require a date range.

The Retain Report Writer
130
12.6 Report selection criteria
Use report selection criteria to filter the contents of your report in much the same way as you filter the display ofa wallchart or calendar v iew.
To define selection criteria for your report:
1. Select 'Data', 'Selection' from the menus or click on the 'Selection' tab heading at the 'Setup Report' dialog.
Short-cuts: Selection icon.
2. At the 'Selection' dialog specify criteria as desired (see below).
3. Choose 'OK' to accept your changes.
The report selection dialog
The 'Selection' panel of the 'Setup Report.' dialog allows you to specify the selection criteria applying to theactive report page:
The current selection criteria is displayed in the 'Selection Criteria' list. If there is more than one item in this listthe criteria is combined using an operator such as 'add' or 'subtract'.
To add an item to the report selection criteria:
1. Choose an 'Operation' setting to apply to this item. See Selection operators and conditions.
2. Select a field from the 'Field' drop-down list.
3. Choose a 'Condition' followed by a value in the pop-up box. See Selection operators and conditions.
4. Repeat steps 1 to 3 to add further selection criteria as desired.
Your report selection criteria should form a logical relationship with the rest of the report definition. Forexample, if your report contains resource based fields you should not attempt to filter the report based on jobselection criteria.
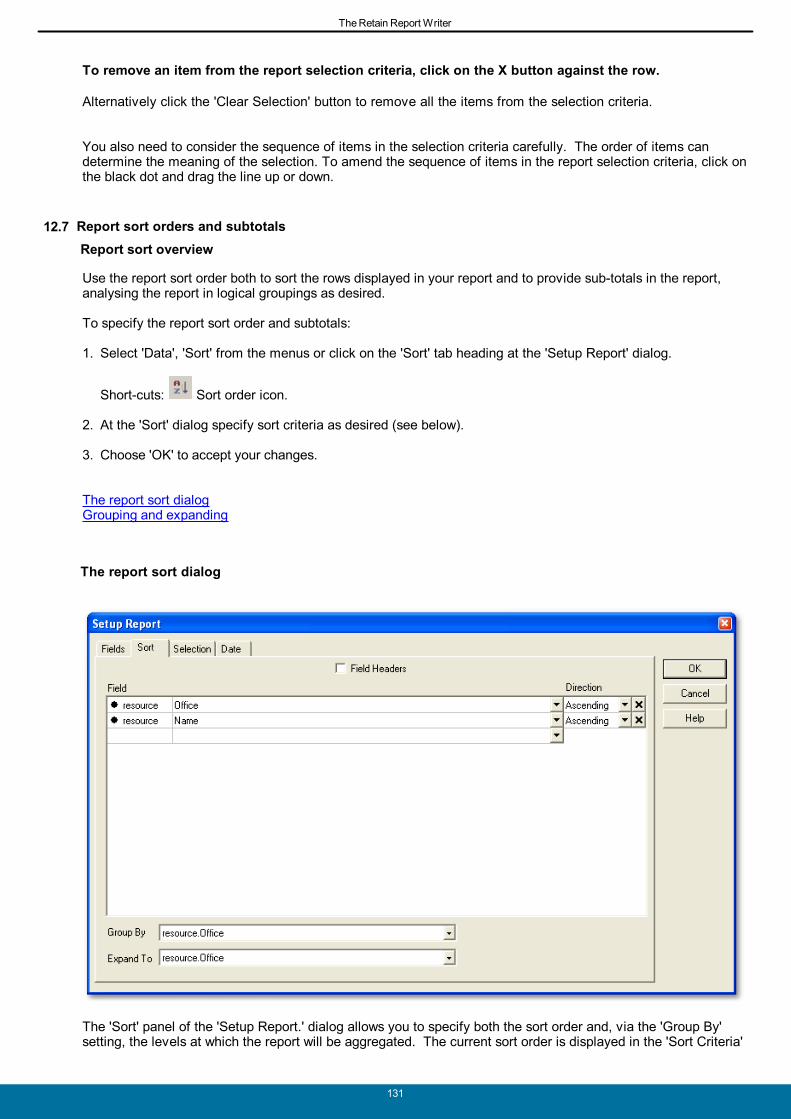
The Retain Report Writer
131
To remove an item from the report selection criteria, click on the X button against the row.
Alternatively click the 'Clear Selection' button to remove all the items from the selection criteria.
You also need to consider the sequence of items in the selection criteria carefully. The order of items candetermine the meaning of the selection. To amend the sequence of items in the report selection criteria, click onthe black dot and drag the line up or down.
12.7 Report sort orders and subtotals
Report sort overview
Use the report sort order both to sort the rows displayed in your report and to provide sub-totals in the report,analysing the report in logical groupings as desired.
To specify the report sort order and subtotals:
1. Select 'Data', 'Sort' from the menus or click on the 'Sort' tab heading at the 'Setup Report' dialog.
Short-cuts: Sort order icon.
2. At the 'Sort' dialog specify sort criteria as desired (see below).
3. Choose 'OK' to accept your changes.
The report sort dialogGrouping and expanding
The report sort dialog
The 'Sort' panel of the 'Setup Report.' dialog allows you to specify both the sort order and, v ia the 'Group By'setting, the levels at which the report will be aggregated. The current sort order is displayed in the 'Sort Criteria'

The Retain Report Writer
132
list at the lower left of the screen. If there is more than one item in this list the v iew will be sorted initially by thefirst item on the list then, within each item, by the second item and so on.
To add an item to the report sort order criteria:
1. Select a field from the drop-down list.
2. Choose 'Ascending' or 'Descending' as the sort order for the selected field.
3. Repeat steps to add further sort items as desired.
To remove an item from the report sort criteria, click on the X button.
You also need to consider the sequence of items in the sort criteria carefully. For example, sorting by resourcegrade and then name should produce a meaningful result, but sorting by resource name and then grade maynot. To amend the sequence of items in the sort criteria, click on the black dot and drag the line up or down.
You can also remove the field headings ('Field =' labels) for sub-totals. This is determined by the 'FieldHeaders' tick box.
Sort titles and outline
You can use 'Group By' and 'Expand To' to control how your report looks:
Group By - determines which sort fields will be displayed as titles and subtotals in the report for expandingand collapsing.
The sort fields you include here need not be defined in the 'Fields' tab, otherwise they will appear twice.
Expand To - defines the level of detail at which the report will open when first generated.
12.8 Viewing the report
Viewing report overview
Select the report page from the dropdown box.
If the report has not been generated during your current session then a progress bar will indicate that the reportis being generated. If the report has been generated before, and you want to make sure you have the latestreport data, you will need to refresh the report.
Expanding and collapsing report sectionsReport display optionsRecalculating the reportRefreshing the report

The Retain Report Writer
133
Expanding and collapsing report sections
If your report has one or more sort titles (see Sort titles and outline) you can expand and collapse the sectionsof the report as defined by those titles. or icons adjacent to the report sort titles will indicate that they canbe expanded or collapsed. Here is an example:
Expanded report sections are indicated by a . Collapsed sections are indicated by a .
To expand or collapse an individual report section:
Double-click on the report section row; or
Click on the report section and press the SPACEBAR.
To expand all the nodes in the report by one section level:
Select 'Actions', 'Show more detail' from the menus.
Short-cut: Increment open nodes icon or right-click over the report area and select 'Show more detail'from the menu.
To expand all the nodes in the report fully:
Select 'Actions', 'Open all details' from the menus.
Short-cut: Open all nodes icon or right-click over the report area and select 'Open all details' from themenu.

The Retain Report Writer
134
To collapse all the nodes in the report by one section level:
Select 'Actions', 'Show less detail' from the menus.
Short-cut: Decrement open nodes icon or right-click over the report area and select 'Show less detail'from the menu.
To collapse all the nodes in the report fully:
Select 'Actions', 'Close all details' from the menus.
Short-cut: Close all nodes icon or right-click over the report area and select 'Close all details' from themenu.
The level of expansion of the report on screen will be used when the report is printed out or exported.
Note: It is generally preferable to use these icons to modify the report outline level rather than editing thesettings in the 'report sort dialog'. Using the 'report sort dialog' results in a full recalculation of the report. For large complex reports this may take some time.
Report display options
The following display options are available for report pages:
Grid lines - turn the report record grid lines on or off.
Fonts - set the fonts for different elements of the report as desired.
Indent totals - choose whether to indent report totals or to have them appear directly beneath theircorresponding report entries.
Report column widths - resize the report columns as desired.
Grid lines
Grid lines surrounding the records in the report can help to identify the indiv idual fields in the report. However,you may find that grid lines make the report look cluttered. You may also want to exclude the grid lines whenprinting out the current v iew of the report page.
To turn the report grid lines on or off:
Select 'View', 'Grid' from the menus.
Short-cuts: Grid lines icon or press CTRL+G. Alternatively right-click over the report area and select'Grid' from the menu.
Repeat the process to return the grid lines to their original state.
Fonts
You can define different fonts for each of the following elements of the report:
report details.
report totals.
report sort levels (up to 5 levels).

The Retain Report Writer
135
To change the report fonts:
1. Select 'Fonts' from the 'View' menu.
Short-cut: 'Fonts' icon or right-click over the report page header and select 'Format', 'Font' from themenu.
2. At the 'Edit Report Fonts' dialog select an item from the list then click on the 'Set font' button.
Short-cut: Double-click on the report item.
3. At the 'Font' dialog set the new font as desired, then click on 'OK' to accept your changes.
4. Repeat steps 2 to 3 for each report font as desired.
5. Click on 'OK' to accept your changes.
Indent totals
You can indent the sub-totals and totals in the report or have them appear directly underneath their respectivecolumns. Indented totals may look more pleasing to the eye, although they do take up more room; withindented totals you may also need to adjust the width of the report columns.
To turn the indent totals on or off:
Select 'View', 'Indent Totals' from the menus.
Short-cuts: Right-click over the report area and select 'Indent totals' from the menu.
Repeat the process to return the indentation to its original state.
Report column widths
You may need to adjust the widths of the columns in your report in order to accommodate large numbers orindented totals, or perhaps merely for cosmetic purposes. You can also adjust the column widths as a way oftemporarily hiding columns in the view.
To adjust the report columns widths:
1. Move the mouse pointer over the right side of the title of the column you wish to change, so that the mouse
pointer changes to a "" icon.
2. Click the left mouse button, holding the mouse button down.
3. Move the mouse pointer horizontally to the desired new position.
4. Release the left mouse button.
5. Repeat steps 1 to 4 for each column as desired.
You can also adjust the report column widths through the fields definition (see Report fields).
Hint: If you see ****** in a column, it means that the column is too narrow for the data in that field. Make thecolumn wider.
The Retain Report Writer
136
Recalculating the report
When you first define or v iew a report in your current Retain session it will be calculated based on the latestavailable data. However, once you have viewed a report once it will not be calculated again until you require itto be updated, as calculating a report takes some time.
To recalculate the report:
Select 'Actions', 'Refresh' from the menus.
Short-cuts: Refresh icon or press F5.
Refreshing the report
If you are running Retain in a network environment and other users have made changes to the data you can usethe refresh command to ensure all the latest changes are reflected in your report. This command takes longerthan recalculating.
Press F5 to refresh a report.
12.9 Report headers and footers
Headers and footers overview
To customise the layout of the report to include page numbers, dates, titles and so on, headers and footers areavailable. Each has various elements that can be adjusted, and they can be easily toggled using Retain.
Editing the headerEditing the footerHiding and showing the headerHiding and showing the footer
Editing the header
To edit the report header:
1. Select 'View', 'Header...' from the menus.
Short-cuts: Header icon or right-click over report header area and choose 'Edit Header' from the menu.
2. At the 'Header configuration' dialog, define the report header details as desired (see below).
3. Click on 'OK' to save your changes.
The 'Header configuration' dialog allows you to define various items in the report header:
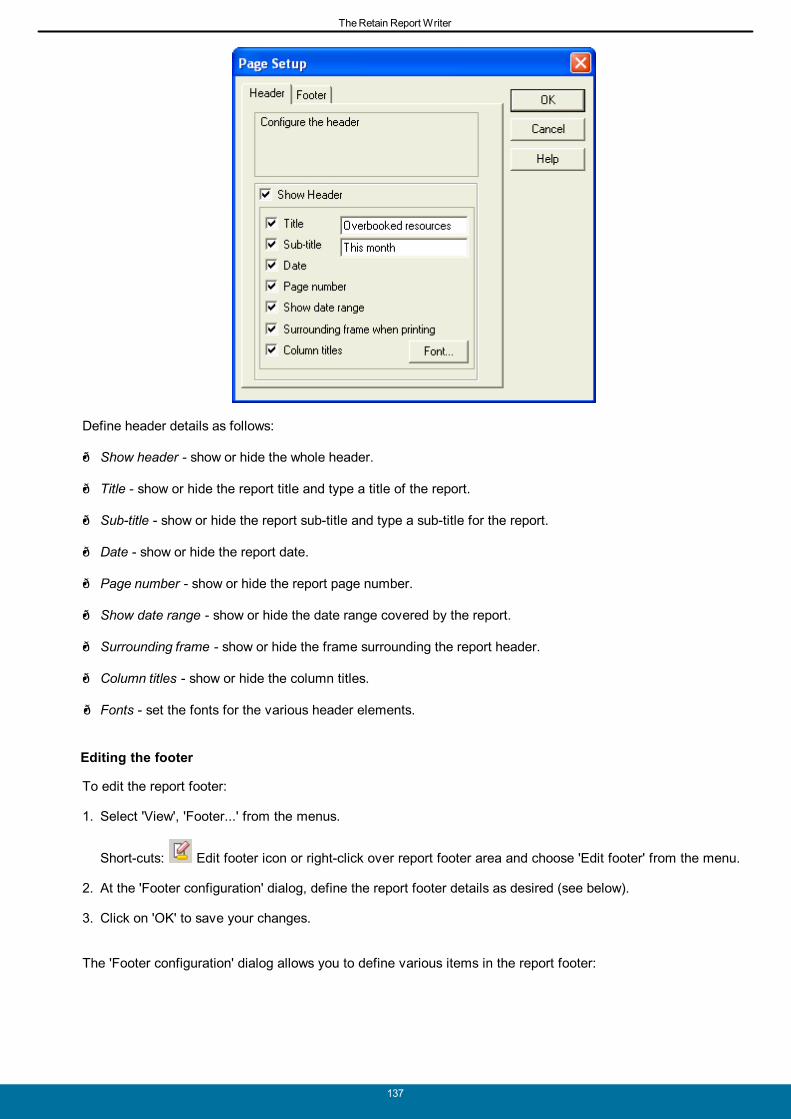
The Retain Report Writer
137
Define header details as follows:
Show header - show or hide the whole header.
Title - show or hide the report title and type a title of the report.
Sub-title - show or hide the report sub-title and type a sub-title for the report.
Date - show or hide the report date.
Page number - show or hide the report page number.
Show date range - show or hide the date range covered by the report.
Surrounding frame - show or hide the frame surrounding the report header.
Column titles - show or hide the column titles.
Fonts - set the fonts for the various header elements.
Editing the footer
To edit the report footer:
1. Select 'View', 'Footer...' from the menus.
Short-cuts: Edit footer icon or right-click over report footer area and choose 'Edit footer' from the menu.
2. At the 'Footer configuration' dialog, define the report footer details as desired (see below).
3. Click on 'OK' to save your changes.
The 'Footer configuration' dialog allows you to define various items in the report footer:

The Retain Report Writer
138
Define report footer details as follows:
Show footer - show or hide the whole footer.
Footnote - show or hide the report footnote and type a footnote for the report.
Date - show or hide the report date.
Page number - show or hide the report page number.
Surrounding frame - show or hide the frame surrounding the report footer.
Font - set the fonts for the various footer elements.
Hiding and showing the header
To show or hide the report header:
At the 'Header configuration' dialog click the 'Show header' checkbox.
Short-cuts: Toggle header icon or right-click over the report header area and choose 'Header...' from themenu.
Hiding and showing the footer
To show or hide the report footer:
At the 'Footer configuration' dialog click the 'Show footer' checkbox.
Short-cuts: Toggle footer icon or right-click over the report footer area and choose 'Footer...' from themenu.

The Retain Report Writer
139
12.10Saving and exporting reports
Your report definitions are stored along with all your other notebook pages in your Retain notebook. Althoughyou can produce reports very quickly with the Retain report writer, it is worthwhile saving any report formats thatyou intend to use on a regular basis. See Saving your notebook.
Exporting your reports
Reports created using the Retain report writer can be exported in spreadsheet format and hence transferred toother applications such as popular spreadsheet packages.
You can either:
export the report to clipboard, for immediate transfer; or
export the report to a file, for later use.
The exported report file will contain separate rows and columns for each report record and field respectively andso can be easily manipulated using a spreadsheet application.
Exporting to clipboard
Exporting a report to clipboard copies the contents of the current report to the Windows clipboard.
To export a report to clipboard:
1. Generate the report and customise the view on screen as desired.
2. Select 'Edit', 'Export to clipboard' from the menus.
The report will remain on the Windows clipboard until replaced by another cut or copy operation. Switch toanother application such as Excel and paste the report contents into the application using the normal Windows'Paste' functions.
Exporting to file
Exporting a report to file copies the contents of the current report to a text file.
To export a report to file:
1. Generate the report and customise the view on screen as desired.
2. Select 'Edit', 'Export to file' from the menus.
3. Enter a name and path for the report file and save it in the usual way.
Open the TXT file in another application, such as Notepad, in the usual way. You may need to specify that tabsdelimit the fields if you use Lotus 1-2-3 or Excel.

Printing
140
13 Printing
13.1 Printing overview
Retain enables you to print both reports and wallcharts for use within your company. There are various settingsavailable to enable you to produce the printout you require. However, it is easy to overlook certain settings andit is recommended to take note of the general rules for printing.
General rules for printingPreviewing the current pagePrinting the current pagePrinting WallchartsPrint configuration optionsPrinter setup
13.2 General rules for printing
When printing from Retain always bear in mind the following general rules:
Retain prints the active notebook page.
If you want to print a particular report then first make sure that the report is the active page, or if you want toprint your wallchart then make that page the active page.
Retain printing is based on the current view of your data.
Set your sort and selection criteria as desired and consider recalculating the view before producing the printout. Do a print preview before producing a hard copy to check you have all the correct settings.
Retain printing takes the current display options into account.
If you are printing a wallchart v iew then set grid lines, date scales, booking bar formats and so on beforeprinting the wallchart. Likewise, when printing a report, open or close sections of the report, set columnwidths and so on before printing the report.
Graphical printing can take some time.
Use a fast printer with a large printer memory if possible. If you are using a shared printer then try to dographical printing outside peak hours. Do a print preview to check you have the correct settings.
Resource planning information usually goes out of date very quickly.
Instead of printing things out consider making Retain available on-line to those who need to see it. That wayusers know they are always looking at up to date information.
13.3 Printing the current page
Retain always prints the currently active notebook page. If the page you want to print is not currently displayedthen select the page from the dropdown box to make it the active page before printing.
To print out the current page:
1. Set sort, selection and other display options as desired.
2. Recalculate/refresh the v iew if desired.
3. Select 'File', 'Print' from the menus.
Short-cut: Print icon or press CTRL+P.
4. At the 'Print Configuration' dialog set configuration options as desired (see Print configuration options).

Printing
141
5. Click on 'OK' to begin printing.
Previewing the current page
It is usually a good idea to preview the current page before printing it out, so you can check that the format ofthe print out is what you require.
Retain always prints the currently active notebook page. If the page you want to preview is not currentlydisplayed then select the page from the dropdown box to make it the active page.
To preview the current page:
1. Set sort, selection and other display options as desired.
2. Refresh the v iew if desired.
3. Select 'File', 'Print preview' from the menus.
Short-cut: Print preview icon or press CTRL+V.
4. Use the icons to set configuration options as desired (see Print configuration options).
A print preview dialog is displayed, showing how the current notebook page will look when it is printed. Here isan example:
The following options are available at the print preview screen:
Display the previous print page (if more than one page).
Display the next print page (if more than one page).
Display one page.
Display two pages side by side.
Magnify the view (display half page). Short-cut: Click on previewed page.

Printing
142
Reduce magnification (display full page). Short-cut: Click on previewed page.
Print the previewed page(s).
Edit the print margins.
Edit the print header.
Edit the print footer.
Edit the print breaks.
Edit page numbering.
13.4 Printing wallcharts
When printing Wallcharts, the date range is significant. The date range specifies the span of the print. Thenumber of pages affects how much time is printed on each page. In the screen shot above, three months willbe on one page. Don't forget that all resources/jobs, not just the ones visible on the screen, will be printed,which could mean many pages.
The date range can be set in the 'Print Configuration' dialog.
13.5 Print configuration options
Print configuration overview
From the Print dialog, clicking on the Page Set-up button will bring up the Page Set-up dialog where you can setthe following options:
Header - edit the header details.
Footer - edit the footer details.
Numbering - set horizontal or vertical page numbering when dealing with adjacent pages (reports only).
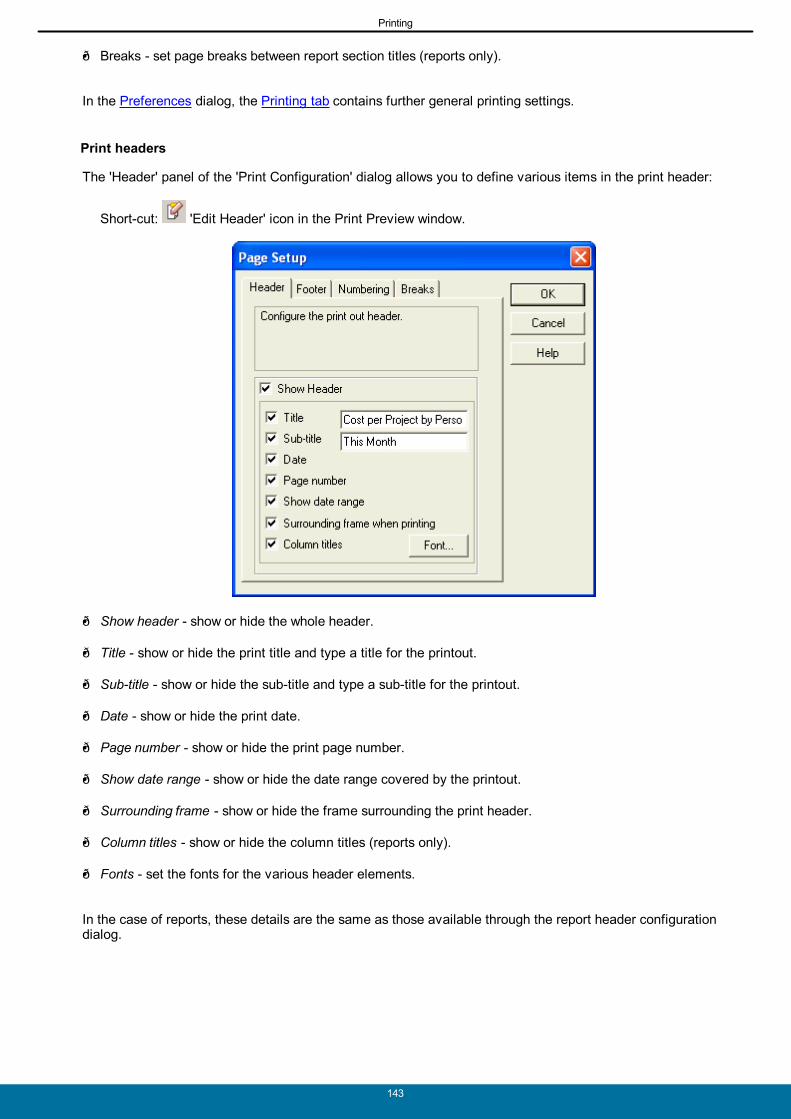
Printing
143
Breaks - set page breaks between report section titles (reports only).
In the Preferences dialog, the Printing tab contains further general printing settings.
Print headers
The 'Header' panel of the 'Print Configuration' dialog allows you to define various items in the print header:
Short-cut: 'Edit Header' icon in the Print Preview window.
Show header - show or hide the whole header.
Title - show or hide the print title and type a title for the printout.
Sub-title - show or hide the sub-title and type a sub-title for the printout.
Date - show or hide the print date.
Page number - show or hide the print page number.
Show date range - show or hide the date range covered by the printout.
Surrounding frame - show or hide the frame surrounding the print header.
Column titles - show or hide the column titles (reports only).
Fonts - set the fonts for the various header elements.
In the case of reports, these details are the same as those available through the report header configurationdialog.
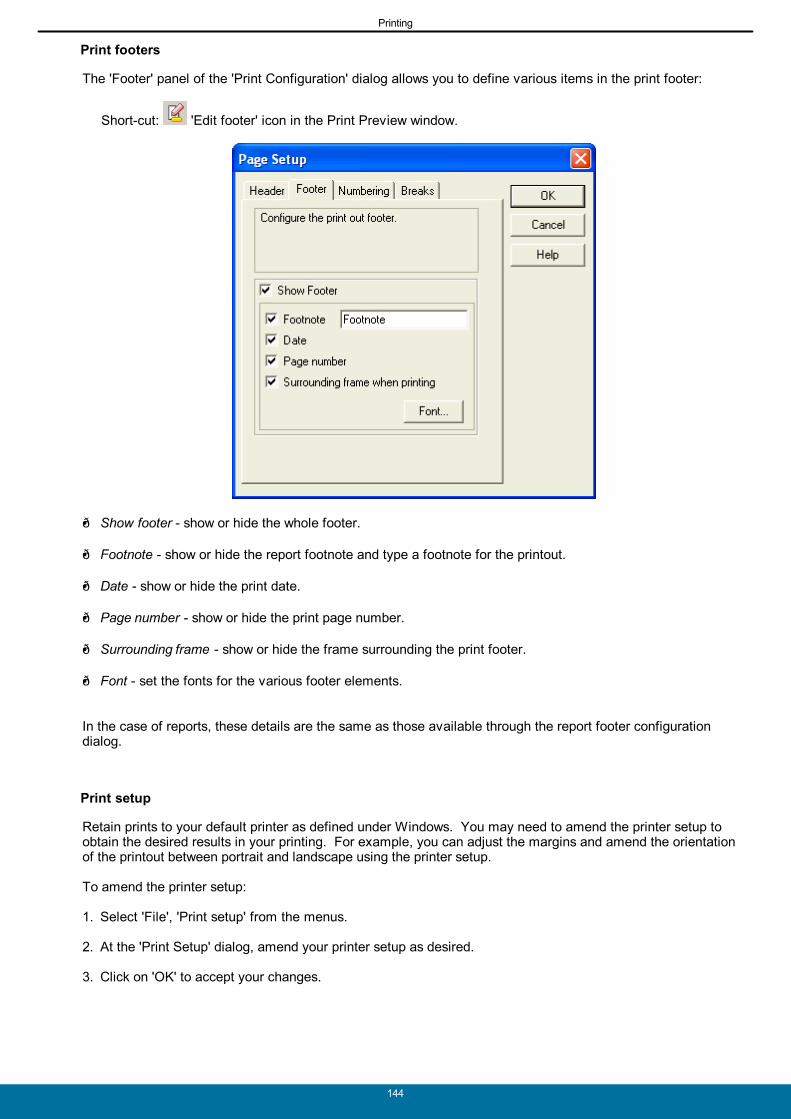
Printing
144
Print footers
The 'Footer' panel of the 'Print Configuration' dialog allows you to define various items in the print footer:
Short-cut: 'Edit footer' icon in the Print Preview window.
Show footer - show or hide the whole footer.
Footnote - show or hide the report footnote and type a footnote for the printout.
Date - show or hide the print date.
Page number - show or hide the print page number.
Surrounding frame - show or hide the frame surrounding the print footer.
Font - set the fonts for the various footer elements.
In the case of reports, these details are the same as those available through the report footer configurationdialog.
Print setup
Retain prints to your default printer as defined under Windows. You may need to amend the printer setup toobtain the desired results in your printing. For example, you can adjust the margins and amend the orientationof the printout between portrait and landscape using the printer setup.
To amend the printer setup:
1. Select 'File', 'Print setup' from the menus.
2. At the 'Print Setup' dialog, amend your printer setup as desired.
3. Click on 'OK' to accept your changes.

Printing
145

Customising the desktop
146
14 Customising the desktop
14.1 Retain preferences
Retain preferences overview
Retain preferences are the default settings which will be applied in various areas of the software. You can setpreferences for your use of Retain in several areas as follows:
General - Set whether booking bar tips are displayed, what happens when you drag bookings in project v iewand whether you can make block bookings.
Bookings - Set where bookings will 'snap to' when moved graphically and whether to display fields names onbooking bars and booking tips.
Palette - Set the scope and format of the priority colour palette.
Availability - Set the default percentage to apply when performing a special selection and whether to displaythe special selection dialog when adding special selections.
Printing - Set the general printing options.
Technical note: These settings are personal to each retain user and are stored in each user's local Windowsdirectory as 'retain.cfg'.
To set these Retain preferences:
1. Select 'File', 'Preferences' from the menus.
2. At the 'Preferences' dialog amend the default settings as desired.
3. Click on 'OK' to accept your changes.
General preferences
The 'General' tab of the 'Preferences' dialog allows you to define various settings which will apply to all yourRetain notebooks.
Booking bar tips - Mark this checkbox if you want booking bar tips to be displayed when you move the mousepointer over booking bars in wallchart or calendar v iews. Clear the checkbox if you do not want booking tipsdisplayed.

Customising the desktop
147
Short-cut: Right-click over booking area (but not a booking) and choose 'Booking tips' from the menu.
Dragging booking bars in wallchart - This defines what happens when you drag bookings to a differentsub-booking line when in project v iew. If you mark these checkboxes then:
Job project view - when dragging a booking from one job to another, if you move the booking onto adifferent resource sub-line at the new job then the booking will also be moved to that new resource.
Resource project view - when dragging a booking from one resource to another, if you move thebooking onto a different job sub-line at the new resource then the booking will also be moved to thatnew job.
Block bookings - Mark this checkbox if you want to be able to make block bookings by marking a rectangularblock vertically across adjacent resources. The block bookings facility only applies to the resource view onwallchart pages. If you clear this checkbox you will only be able to mark an area horizontally across oneresource.
Date range popup - When 'marking an area' on the grid a little window appears showing the date range of thearea being marked. If you clear this checkbox, the date range window is no longer v isible.
Bookings preferences
The 'Bookings' tab of the 'Preferences' dialog allows you to define settings relating to bookings:
Snap to - Set this option to determine where bookings will 'snap to' when moved graphically in the wallchart.
For example, if you set the 'snap to' option to 'Left' then when you move a booking on the wallchart it will bepositioned to the cell which contains the left edge of the booking when you release the mouse button.
Field names - Mark the 'Bar field names' checkbox if you want to display fields names on booking bars andmark the 'Tip field names' checkbox if you want to display field names on booking tips.
Visual - Mark the 'Visually indicate which bookings I can edit' checkbox if you want to have a v isual indicationon screen of bookings that you have the authority to edit while 'edit mode' is turned on.
Confirmations - Mark the 'Confirm dragged bookings' checkbox if you want a dialog to appear which checks'are you sure?' if you try to move a booking by dragging it on the wallchart. This checkbox is disabled.
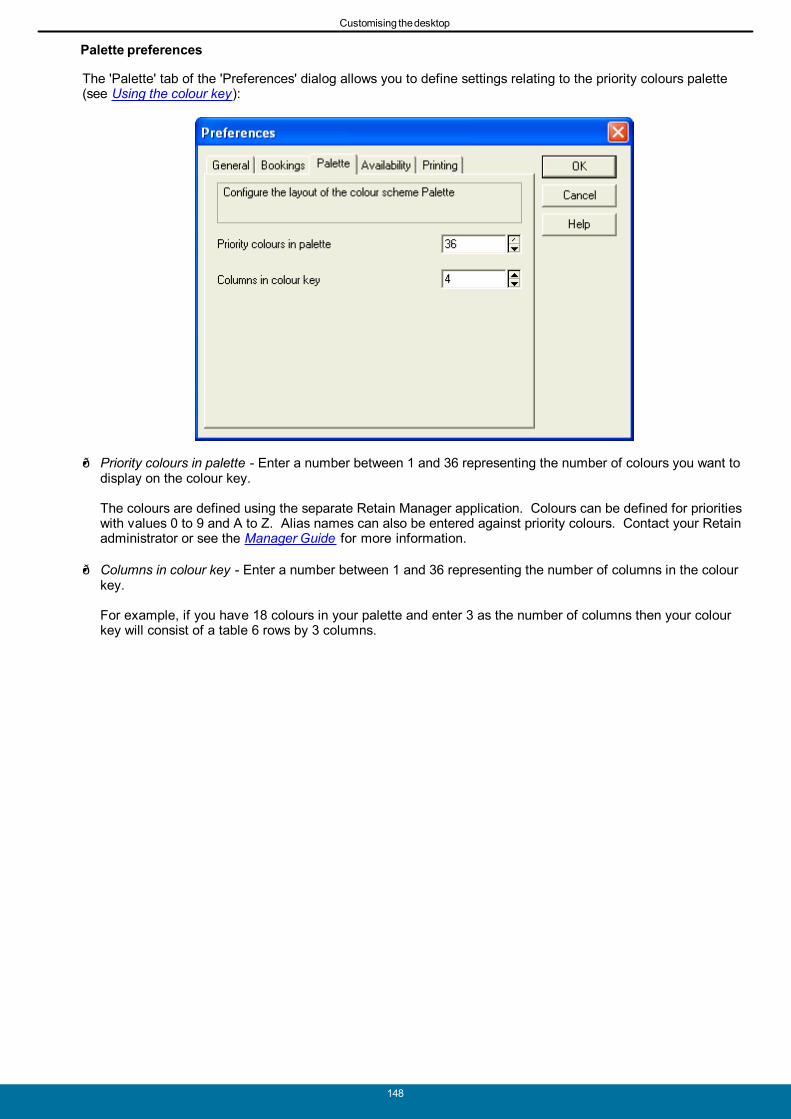
Customising the desktop
148
Palette preferences
The 'Palette' tab of the 'Preferences' dialog allows you to define settings relating to the priority colours palette(see Using the colour key):
Priority colours in palette - Enter a number between 1 and 36 representing the number of colours you want todisplay on the colour key.
The colours are defined using the separate Retain Manager application. Colours can be defined for prioritieswith values 0 to 9 and A to Z. Alias names can also be entered against priority colours. Contact your Retainadministrator or see the Manager Guide for more information.
Columns in colour key - Enter a number between 1 and 36 representing the number of columns in the colourkey.
For example, if you have 18 colours in your palette and enter 3 as the number of columns then your colourkey will consist of a table 6 rows by 3 columns.

Customising the desktop
149
Availability preferences
The 'Availability' tab of the 'Preferences' dialog allows you to define settings relating to availability selections(see Special selections using date ranges):
Availability limit - This is the default percentage criteria to apply to the availability searches.
For example, if the availability percentage is 80% then records will be displayed if they are at least 80%available during the selected period.
Hide availability dialog - Mark this checkbox if you want to hide the availability dialog when makingavailability selections.
Unless you frequently perform searches based on different availability percentages you will probably want tohide the availability dialog.
Alternative access: You can hide the availability dialog by marking the relevant checkbox from within theavailability dialog itself.

Customising the desktop
150
General printing settings
The 'Printing' panel of the 'Preferences' dialog allows you to set various general printing options:
Set or remove colours when printing using the checkbox provided.
To print all calendars in one session, tick the relevant box.
To use the alternative printing mode, tick the relevant box.
Only use colours if printing to a colour printer. The colours of booking bars on your wallchart or calendar v iewmay not be exactly represented in your printouts, depending on the resolution of your colour printer.
You may find that with certain printers, use of the alternative printing mode is necessary to achieve the desiredresults.
14.2 Customising the toolbar
Toolbar customising overview
Like most Windows applications, Retain provides a 'toolbar'; a panel of icon buttons, usually located at the topof the screen. The icons on the toolbar provide quick access to most of the commonly used features in Retain. See Appendix 1 for a complete list of the Retain icons.
Toolbar typesAdding and removing toolbar iconsHiding and displaying the toolbarHiding and displaying toolbar tips
Toolbar types
There are 4 separate toolbars in Retain:
No Windows - The toolbar that is displayed when you do not have any open notebooks.
Wallchart - The toolbar that is displayed when the currently active notebook page is a wallchart v iew.
Calendar - The toolbar that is displayed when the currently active notebook page is a calendar v iew.
Reports - The toolbar that is displayed when the currently active notebook page is a report page.

Customising the desktop
151
Each toolbar should contain only those icons relevant to the current context. For example, the 'No Windows'toolbar contains only the icons to create or open a notebook; the 'Reports' toolbar contains icons that arespecific to the preparation of reports.
Adding and removing toolbar icons
The software is supplied with a default set of icons in each toolbar. You may wish to customise the toolbar toinclude the options you use most frequently.
To customise the toolbar:
1. Select 'View', 'Toolbar Options...' from the menus.
Short-cut: Right-click over the toolbar area and choose 'Toolbar Options...' from the menu.
2. At the 'Customise Toolbar' dialog, add and remove toolbar icons as desired (see below).
3. Click on 'OK' to accept your changes.
The Customise Toolbar dialog
The 'Customise Toolbar' dialog allows you to add and remove icons for each of the toolbars, set the location ofthe toolbar and show or hide tooltips:
The full list of available icons is displayed on the left side of the screen and the icons currently defined for theselected toolbar are displayed on the right side of the screen.
To select a different toolbar:
1. Click on the 'Selected Toolbar' drop down list.
2. Select the toolbar.
To add an icon to the selected toolbar:
Customising the desktop
152
1. Click on the position in the current toolbar above which you wish to add the icon.
2. Select the new icon in the 'Available Buttons' list.
3. Click on the '>' button to add the item to the end of the current toolbar.
Short-cuts: Double-click on the selected item or 'drag and drop' the item to the desired location on the currenttoolbar.
4. Repeat steps 1 to 3 to add further icons to the toolbar as desired.
To remove an icon from the selected toolbar:
1. Select the icon in the current toolbar.
2. Click on the '<' button to remove the icon from the toolbar.
Short-cut: Double-click on the selected item or 'drag and drop' the item back to the 'Available Buttons' list.
3. Repeat steps 1 and 2 to remove further icons as desired.
To add a separator (gap) to the selected toolbar:
1. Click on the position in the current toolbar above which you wish to add the separator.
2. Click on the 'Separator' button to add the separator to the current toolbar.
3. Repeat steps 1 and 2 to add further gaps in the toolbar as desired.
Tip: Use the gaps in the toolbar to group icon buttons by type and to distinguish between different types oficon function.
To remove a separator (gap) from the selected toolbar:
1. Select the separator in the current toolbar.
2. Click on the '<' button to remove the separator from the toolbar.
Short-cut: Double-click on the selected item or 'drag and drop' the item back to the 'Available Buttons' list.
3. Repeat steps 1 and 2 to remove further separators as desired.
To move items within the selected toolbar:
1. Select the item in the current toolbar.
2. Click on the 'Up' button to promote the item in the toolbar or 'Down' to demote the item.
Short-cut: 'Drag and drop' the selected item to a new position in the toolbar.
3. Repeat steps 1 and 2 to move further items within the selected toolbar as desired.
To change the location of the toolbars:
1. Click on the 'Location' button.
2. At the 'Toolbar location' dialog, select the toolbar location as desired.
3. Choose 'OK' to accept your changes.
Customising the desktop
153
Changing the location of the toolbars affects all the toolbars, not just the currently selected toolbar.

Reference
154
15 Reference
15.1 Icon reference
Icon Menu Description Hot key
File | New Creates a new notebook Ctrl + N
File | Open Opens an existing notebook Ctrl + O
File | Save Save this document Ctrl + S
File | Print Print this document Ctrl + P
File | Print preview Print preview Ctrl + V
Edit | Edit mode Toggle edit mode Ctrl + E
Actions | Make booking Make a new booking Ctrl + K
Actions | Edit booking Edit currently selected booking
Actions | Delete booking Delete the selected booking(s) Delete
Actions | Inspect bookings Inspect selected booking(s) Ctrl + I
View | Zoom | Year Set the scale to years Ctrl + Y
View | Zoom | Month Set the scale to months Ctrl + M
View | Zoom | Week Set the scale to weeks Ctrl + W
View | Zoom | Day Set the scale to days Ctrl + D
View | Zoom | Hour Set the scale to hours Ctrl + H
View | Grid Toggles the grid lines Ctrl + G
View | Project view Project view Ctrl + J
View | Rotate view Toggle resource and job view Ctrl + R
Actions | Recalculate Reload data and recalculate F5
Move to the next record Ctrl + Shift + N
Move to the previous record Ctrl + Shift + P
Stack bookings above each other
Set booking depth proportional
Use large bookings bars
Use medium-sized booking bars
Use small booking bars
Match booking bar depth
Actions | Booking info View current booking
Actions | Job info View job info for current booking
Actions | Resource info View resource info for current booking
Modify Components
Modify Jobs
Modify Resources
Data | Sort Specify the sort order
Data | Selection Specify the selection criteria
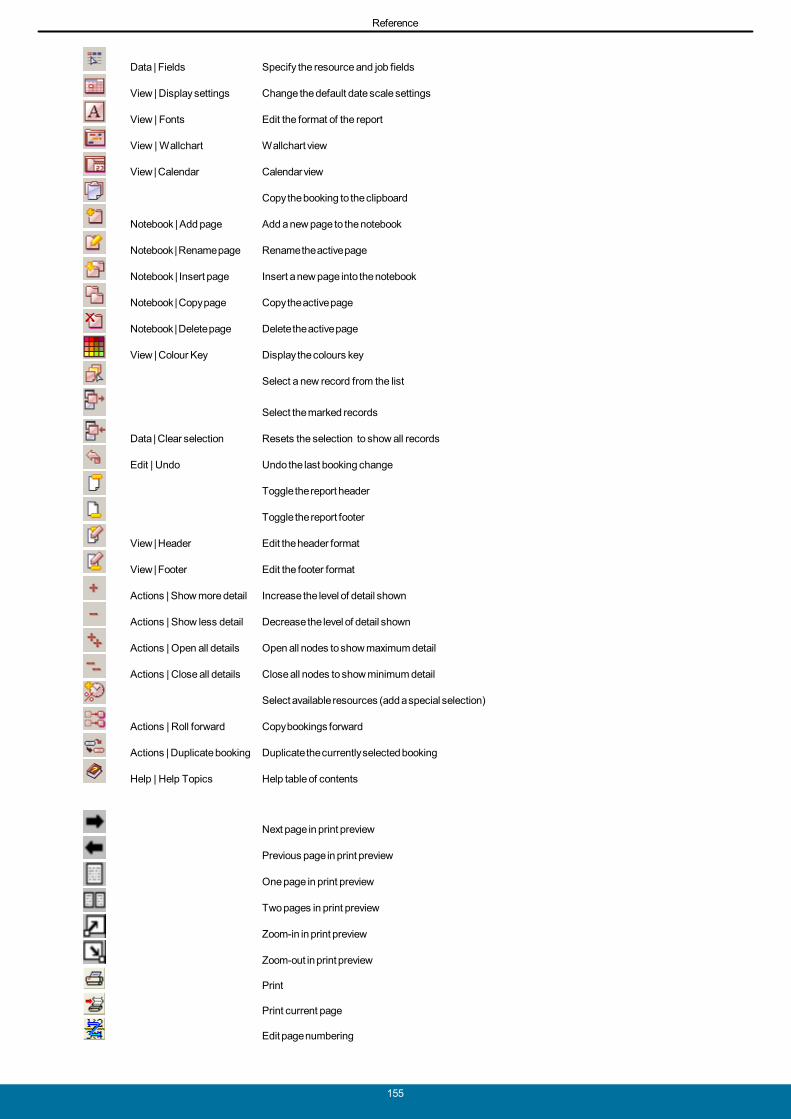
Reference
155
Data | Fields Specify the resource and job fields
View | Display settings Change the default date scale settings
View | Fonts Edit the format of the report
View | Wallchart Wallchart view
View | Calendar Calendar view
Copy the booking to the clipboard
Notebook | Add page Add a new page to the notebook
Notebook | Rename page Rename the active page
Notebook | Insert page Insert a new page into the notebook
Notebook | Copy page Copy the active page
Notebook | Delete page Delete the active page
View | Colour Key Display the colours key
Select a new record from the list
Select the marked records
Data | Clear selection Resets the selection to show all records
Edit | Undo Undo the last booking change
Toggle the report header
Toggle the report footer
View | Header Edit the header format
View | Footer Edit the footer format
Actions | Show more detail Increase the level of detail shown
Actions | Show less detail Decrease the level of detail shown
Actions | Open all details Open all nodes to show maximum detail
Actions | Close all details Close all nodes to show minimum detail
Select available resources (add a special selection)
Actions | Roll forward Copy bookings forward
Actions | Duplicate booking Duplicate the currently selected booking
Help | Help Topics Help table of contents
Next page in print preview
Previous page in print preview
One page in print preview
Two pages in print preview
Zoom-in in print preview
Zoom-out in print preview
Print current page
Edit page numbering

Reference
156
Page breaks
15.2 Hot-key reference
Icon Menu Description Hot Key
File | New Creates a new notebook Ctrl + N
File | Open Opens an existing notebook Ctrl + O
File | Save Save current page Ctrl + S
File | Print Print current page Ctrl + P
File | Print preview Print preview Ctrl + V
Edit | Edit mode Toggle edit mode Ctrl + E
Actions | Make booking Make a new booking Ctrl + K
Actions | Delete booking Delete the selected booking(s) Delete
Actions | Inspect bookings Inspect the selected booking(s) Ctrl + I
Edit | Undo Undo the last booking change Ctrl + Z
Set the scale to years Ctrl + Y
Set the scale to months Ctrl + M
Set the scale to weeks Ctrl + W
Set the scale to days Ctrl + D
Set the scale to hours Ctrl + H
View | Grid Toggles the grid lines Ctrl + G
View | Project view Toggles project view Ctrl + J
View | Rotate view Toggle resource and job view Ctrl + R
Actions | Recalculate Reload data and recalculate F5
Move to the next record Ctrl + Shift + N
Move to the previous record Ctrl + Shift + P
Move left to next page Ctrl + PgUp
Move right to next page Ctrl + PgDown
15.3 Glossary
AnalysisThe analysis field can be used to pick up default charge rates based on different job types, usually incombination with the resource grade. For example, you might enter 'C' for chargeable jobs, 'N' fornon-chargeable jobs and 'U' for unavailable jobs.
BookingBookings are allocations of a resource to a job for a specific period, shown as rectangular coloured barsin the wallchart or calendar v iew. Every 'aspect' of work that takes up a specified amount of time shouldbe booked, including part-time work, vacation, management duties etc.
CalendarA calendar v iew shows bookings for one indiv idual resource or job, where time is represented in acalendar style grid.
Charge rate

Reference
157
Charge rates for bookings combine resource grades with job charge codes to calculate revenues andcosting.
ComponentIn Retain, components are sub-jobs, providing information regarding the nature of each booking madeagainst a job. Components provide an element of project planning within Retain, since you can select acomponent for each booking you make and analyse the job into its component parts for reportingpurposes. Components are usually defined in general terms applicable to most jobs, such as 'planning','fieldwork' and 'reporting'.
Drop-down menusRight-clicking anywhere on the screen will produce a drop-down menu relevant to the area of the screenyou happen to be in at the time.
JobJobs can refer to clients, projects, tasks or assignments - anything that resources are assigned to.
Manager, RetainRetain Manager is the administration module for Retain. Retain Manager is used for initial set upoperations and for the subsequent administration of Retain data files.
Menu BarLocated at the top of the screen, this area provides access to all Retain functions, although you may oftenprefer to use short-cuts where possible.
NotebookNotebooks contain v iews of one set of Retain data. They allow you to display your Retain wallchart invarious ways and to define report formats used by the Retain Report writer.
Notebook pageNotebooks can hold up to forty notebook pages, each containing different v iews of the underlying data.
PriorityThe colour code of a job or priority defines the default colour of bookings made against that job. Thecolour determines what type of job it is.
Project v iewThe project v iew separates bookings against a resource or job into a separate row for a specifiedsub-field.
RecoveryUsed for calculated fields in reports. When inputting job details, the recovery field is the value the scalecost must be multiplied by to obtain the recovery rate... which is the fee expected rather than thestandard rate for the job.
ReportA special type of notebook page that displays resource, job or booking data in aggregated form, includingcalculated fields. Used for presentations and external programs.
ResourceRetain uses the term 'resources' as a general description for the people or entities that can be applied tothe process of completing a job.
Retain notebookNotebooks contain v iews of your Retain data. They allow you to display your Retain wallchart in variousways and to define report formats used by the Retain Report writer.
ScenarioScenarios give users control over tentative bookings. Bookings assigned to a scenario are displayed witha dotted line. Scenario bookings can be deleted or confirmed as a group.
Scroll barsScroll bars located at the right hand side of the screen enable users to move up and down resources,while those at the bottom of the screen move backwards and forwards through time.
Selecting

Reference
158
More than just highlighting, selecting in Retain means filtering resources, tasks and bookings based oncertain criteria. Selections are used for v iewing or collective manipulation.
Status barThis is located at the foot of the screen and displays useful information about the current status, forexample, the name of the currently selected resource and the date range covered by the selectedbooking.
ToolbarUsually located immediately below the menu bar and contains several icon buttons which provide quickaccess to the commonly used features in Retain.
WallchartThis is the traditional wallchart v iew, with resources or jobs listed down the side of the page and acontinuous time bar along the top. Each booking is represented as a coloured rectangular block on thewallchart.
15.4 Example reports
1. Planned revenue report.
2. Utilisation percentage by Group.
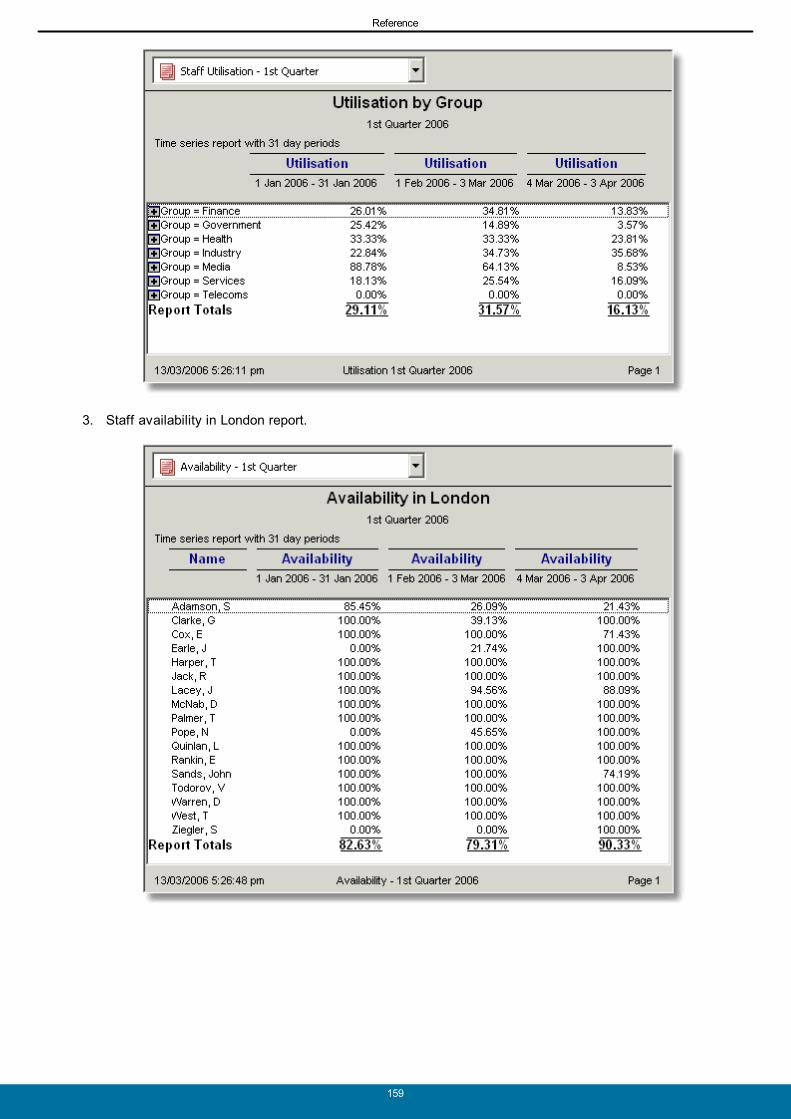
Reference
159
3. Staff availability in London report.

Support
160
16 Support
16.1 Support services
Support for Retain is available worldwide. This topic is linked to your support provider's information: SupportService Provider
retaininternational
USA: 1 877 819 8820 (toll free) UK: 0845 458 8660 Australia: +61 8 8346 2333World: +44 20 7538 4774
USA fax: 1 928 563 5137Australia fax: +61 8 8346 2133 World fax: +44 (0)845 458 8661
E-mail: [email protected]
Support: [email protected]
Address: 33 Beaufort CourtAdmirals WayLondonE14 9XLUnited Kingdom

Index
161
Index
- A -About
Retain 8
Retain Manager 8
Adding
components 76
jobs 73
page 119
quick 37
resources 70
toolbar icons 151
Adjusting Multiple Bookings 17
Amending the start and end of a booking 95
Assignments
general 69
Availability
activate 84
clearing the selection 84
dialog 83
hide 84
preferences 149
selecting 82
use 84
- B -Booking 17
Bookings 25, 91
actual times 99
additional details 94
bar fields 59
bar formats 56
bars 56, 59
bars quick 36, 40
calendar view 68
charge rate 97
choosing a different colour 93
deleting 109
duplicate 105
editing 102
entering details 92
inspecting 101
making 91
making multiple resource bookings 93
marking an area 91
optional details 92
preferences 147
proportional 96
quick 36
rolling forward 111
selecting a component 93
selection filters 88
split 107
start and end 95
tips 61
using the palette 108
viewing 101
- C -calculated
fields 126
Calendar 66, 121
bookings 68
date scales 66
display options 67
moving between records 67
pages 118
quick 39
quick view 46
view 65
Changing
booking charge rate 97
calendar date scales 66
edit password 32
sort order 79
wallchart date scales 49
Charge rate 97
Choosing a different booking colour 93
Clearing
availability selection 84
Clients
general 69
Clipboard 109
quick 37
Closing
notebook 115
quick 40
Collapsing
records 81
report sections 133
Colour 150
Components 76
adding 76
deleting 77
editing names 77
general 24, 25, 69
job-specific 78
Conditions 86
Conventions 22
Copying a page 120
Creating
new notebook 114
report 123
time series 123
Criteria 85
quick 39
Cross-reference resource and job selections 88
Customising the toolbar 150
- D -Dates 95
calendar 53, 66
opening 121
report 128
wallchart 49
Defining
selection criteria 85
standard date ranges 53
Deleting
bookings 109
components 77
jobs 75
page 120
quick 37
resources 72
Display
diary 54
Display options 54, 67
reports 134
Duplicate 105
Index
162
- E -Editin
job details 71
Editing
bookings 102
component names 77
jobs details 74
mode 32
password 32
quick 37
report footer 137
report header 136
resource details 71
switching to 32
Entering
actual times 99
booking details 92
Example reports 158
Exiting Retain 33
Expanding report sections 133
Export
selections 89
Exporting 21
reports 139
- F -Field Descriptions 15
fields 10
calculated 126
report 124, 126
time series 124
Finding a particular resource or task 51
Footers 137, 138
printing 144
- G -General
preferences 146
principles 24
rules on printing 140
General principles 69
Gridlines 52
Guide 22
- H -Headers 136, 138
printing 143
Help 160
Hiding
additional booking details 94
jobs from view 75
report footer 138
report header 138
resources from view 72
Hot-keys 156
How to use this guide 22
- I -Icons 151, 154
quick 44
Import
selections 89
Initial set-up 29
Inserting a page 119
Inspecting bookings 101
Installation 29
- J -Jargon
quick 43, 156
Jobs 73
adding 73
deleting 75
editing 71, 74
finding 51
general 24, 69
hiding 75
quick 37
job-specific
components 78
- L -Lock
selection filter 89
- M -Making
booking 91
bookings in calendar view 68
multiple resource bookings 93
proportional bookings 96
Manager
Retain 8
Margins 150
Marking an area 91
Moving
between calendar records 67
page 120
within the current record 67
- N -Navigating
between pages 120
quick 34
wallchart 50
New
notebook 114
Non-working Days 15
Notebook 25, 117
closing 115
creating 114
new 114
opening 114
pages 118
quick 39
saving 115
windows 117
notebook files 114
notebook overview 114
Notebook Settings 21
notebooks 114
- O -Open
existing notebook 114
quick 34, 40
Operators 86
overview 24, 114
- P -Page 13
adding 119

Index
163
Page 13
calendar 118
copying 120
deleting 120
Exporting 116
Importing 116
inserting 119
moving 120
navigating between 120
notebook 118
quick 39, 41
report 118
wallchart 118
Palette 93, 108
preferences 148
priority 108
Password 32
Preferences 146, 147, 148, 149
quick 42
Preview
current page 141
Printer set-up 144
Printing 143
colour 150
configuration options 142
current page 140
footers 144
general rules 140
headers 143
margins 150
preview 141
quick 42
set-up 144
wallcharts 142
Priority 108
palette 108
Project view 51
Proportional bookings 96
- Q -Quick
add 37
booking bar tips 36
booking bars format 40
bookings 36
calendar 39
clipboard 37
close 40
criteria selection 39
delete 37
edit 37
format booking bars 40
icons 44
jargon 43, 156
jobs 37
locating resources 35
making bookings 36
manipulation 37
navigation 34
notebooks 39
open 34, 40
pages 39
preferences 42
printing 42
reference 43, 44, 156
reports 41
resources 35, 37
save 40
selection 38
selection criteria 39
sort 38
switching view 36
tips booking bar 36
toolbars 42
view calendar 46
view report 47
view switching 36
view wallchart 45
viewing 41
wallchart 34
- R -Recalculating the report 136
Record Tips 14
Records 67
collapsing 81
selecting 82
Reference
example reports 158
hot-keys 156
icons 154
quick 43, 44, 156
Refreshing the report 136
Removing
selection filters 89
toolbar icons 151
report 39
report page 39
Reports 20, 21, 123
collapsing sections 133
creating 123
date range 128
display options 134
examples 158
expand to 132
expanding sections 133
exporting 139
fields 124, 126
footers 137, 138
group by 132
headers 136, 138
pages 118
quick 41
quick view 47
recalculating 136
refreshing 136
saving 139
selection criteria 130
sorting 131
special fields 126
subtotals 131
viewing 132
Resources 69, 93
adding 70
deleting 72
editing 71
finding 51
general 24, 69
hiding 72
left 92
not started 92
quick 35, 37
Retain 30
about 8
exit 33
interface 31
Manager 8
preferences 146
Index
164
Retain 30
Report Writer 123
Rolling bookings forward 111
Rotating
calendar 66
wallchart 49
Row label fields and layout 61
- S -Save
notebook 115
quick 40
reports 139
Selecting 88, 89
clearing availability selection 84
criteria 85
dialog 85
marked records 82
on availability 82
operators and conditions 86
quick 38, 39
report criteria 130
Selection 10, 12
Setting the opening date 121
Set-up 29
printer 144
Showing
additional booking details 94
report footer 138
report header 138
Sort 10, 12
Sorting 79, 131
features 79
group by and expand to 132
quick 38
titles and outline 132
Special report fields 126
Special selection 84
Special selections
activate 84
dialog 83
hide 84
use 84
Split
bookings 107
Starting Retain 30
Support 23, 160
Switching
quick view 36
to calendar view 121
to edit mode 32
to wallchart view 121
- T -Time Series 20
Times 99
Tips
bookings 61
quick 36
Toolbar 10
adding and removing icons 151
customising 150
quick 42
types 150
Types
general 69
- U -User Interface 10, 12, 13, 14, 15
Using
clipboard 109
priority palette 108
- V -Viewing
bookings 101
calendar quick 46
quick 36, 41
report 132
report quick 47
wallchart quick 45
- W -Wallchart 53, 54, 121
changing date scales 49
date scales 49
navigating 50
pages 118
printing 142
quick 34
quick view 45
rotating 49
view 48
Week
display 54
what are
bookings? 91
components? 76
jobs? 73
pages? 118
resources? 69
what are notebooks 114
Where to get support 23

© 2007 ... Retain International Limited
retaininternational33 Beaufort Court
Admirals WayLondonE14 9XL
United Kingdom
1 877 819 8820 toll free (USA)0845 458 8660 (UK)
+44 20 7538 4774 (World)
Related Documents