MD0003-065 Revision F January 17, 2006 Page 1 of 306 Restaurant Enterprise Series (RES) Version 3.2 – Service Pack 7 ReadMe First About This Document ReadMe First is a comprehensive guide to the new features, enhancements, and revisions added since the Version 3.2 Service Pack 5 release of the MICROS Restaurant Enterprise Series (RES 3000) software. For ease of use, text has been organized as follows: Service Pack 7 — Revision F Service Pack 6 — Revision E Due to the size constraints, documentation of Service Packs 1-5 are contained under separate cover, as Restaurant Enterprise Series (RES) Version 3.2 —Service Pack 5 ReadMe First, MD0003-065, Revision D. This document is available in pdf format from the MICROS website (res_sp_rmf.pdf).

Welcome message from author
This document is posted to help you gain knowledge. Please leave a comment to let me know what you think about it! Share it to your friends and learn new things together.
Transcript

Restaurant Enterprise Series (RES)Version 3.2 – Service Pack 7ReadMe First
About This Document
ReadMe First is a comprehensive guide to the new features, enhancements, and revisions added since the Version 3.2 Service Pack 5 release of the MICROS Restaurant Enterprise Series (RES 3000) software. For ease of use, text has been organized as follows:
Service Pack 7 — Revision F
Service Pack 6 — Revision E
Due to the size constraints, documentation of Service Packs 1-5 are contained under separate cover, as Restaurant Enterprise Series (RES) Version 3.2 —Service Pack 5 ReadMe First, MD0003-065, Revision D. This document is available in pdf format from the MICROS website (res_sp_rmf.pdf).
MD0003-065Revision F
January 17, 2006Page 1 of 306

About This Document
MD0003-065Revision FJanuary 17, 2006Page 2 of 306

Service Pack 7
Service Pack 7
In keeping with the original RES 3.2 ReadMe First, information is divided into self-contained chapters, one for each of the following RES products:
3700 Point-of-Sale (POS) System
Kitchen Display System (KDS)
Cash Management (CM)
Guest Services Solution (GSS)
Product Management (PM)
Labor Management (LM)
Financial Management (FM)
RES Platform
For clarity, product information is further divided into three sections:
What’s New
What’s Enhanced
What’s Revised
Each section begins with an introduction and includes a table that summarizes the features and functionality incorporated in this version of the software. The table provides hypertext links to supplementary text and graphics about the selected topics.
For more information on these features, and step-by-step instructions for configuring them, refer to the product’s Online Reference Manual, installed with the MICROS Documentation and available on the RES CD.
MD0003-065Revision F
January 17, 2006Page 3 of 306
3700 POSWhat’s New
3700 POS
What’s New A new feature is defined as one that provides capabilities that were not available in previous versions of the application.
New Features Summarized
The table below summarizes the new features included in this version.
Module Feature Page
Credit Cards Address Verification Support (AVS) for Credit Card Transactions
5
Card Verification Values (CVV) Support 7
Conditional Credit Card Approval 8
POS Operations
Change Menu Level for Selected Menu Items
9
Full Inclusive Tax Support 12
Merge With Parent Order Device Output 13
Multiple Check Review Order Panel 15
Workstation Order Device Routing Profiles
18
MD0003-065Revision FJanuary 17, 2006Page 4 of 306
3700 POSWhat’s New
New Features Detailed
Credit Cards
Address Verification Support for Credit Card TransactionsMany credit card providers are now offering better transaction rates to merchants who provide the customer’s address and/or zip code during a credit authorization. Typically, this occurs when the credit card’s magnetic stripe cannot be read — either because of problems with the device or the card itself, or because the cardholder is not present during the transaction.
The Address Verification Support (AVS) feature allows sites to prompt for additional data when a credit card transaction is submitted for authorization. Options are programmed at the revenue center level, for each credit card tender that requires it.
If programmed, operators must enter the required data before the authorization will be submitted for approval. Only privileged employees will be allowed to override the options and submit an authorization without the appropriate AVS entries.
New OptionsTo support this feature, the following options were added in POS Configurator:
Employees | Employee Classes | Transactions | Transaction Control
Submit Blank AVS — If checked, allows members of the selected employee class to override the AVS options and approve a credit card transaction without supplying address verification data. Also allows non-privileged employees to submit credit card authorizations without providing AVS information.
Note To use this feature, sites must be running a compatible credit card driver. At present, the Chip and Pin driver is the only one that supports it. Current US drivers are not compatible.
MD0003-065Revision F
January 17, 2006Page 5 of 306
3700 POSWhat’s New
Revenue Center | RVC Credit Cards | AVS (new tab)
Depending on the driver, a conditional authorization may be returned if some or all of the required AVS information does not match. In this situation, the user will be prompted to accept or decline the returned authorization.
Require AVS for Manual Entry — When checked, prompts the user for the card holder’s zip code before submitting a manual credit card authorization.
Require Full AVS for Manual Entry — When checked, prompts the user for the cardholder’s address AND zip code before submitting a manual credit card authorization.
This option is only enabled if Require AVS for Manual Entry and the Require Full AVS when Card is not present are also checked.
Require Full AVS when Card is not present — When checked, prompts the user to determine whether the credit card is present before proceeding. If it is, the system will prompt for the zip code only. If it is not, the system will prompt for the cardholder’s complete address and zip code.
This option is only enabled if Require AVS for Manual Entry was also selected.
Require AVS for Swiped Entry — When checked, prompts the user for the cardholder’s zip code before proceeding with a swiped credit card transaction.
Require Full AVS for Swiped Entry — When checked, prompts the user for the cardholder’s address AND zip code before proceeding with a swiped credit card authorization.
This option is only enabled if Require AVS for Swiped Entry has been checked.
Note Secondary authorizations, though manual, will not send AVS information.
MD0003-065Revision FJanuary 17, 2006Page 6 of 306
3700 POSWhat’s New
Sales | Tender/Media | CC Tender
Do not prompt for AVS — When checked, overrides the revenue center options requiring AVS information for manually entered credit cards when using this tender.
Card Verification Values (CVV) SupportIn addition to the credit card number and expiration dates, most credit cards include a 3- or 4-digit card verification number. This number is referred to as the CVV / CVV2 / CID / CVC, depending on the card issuer. To reduce fraud, more credit card providers are requiring operators to enter this number when the card is submitted for authorization.
The length and location of the CVV number varies by credit card. For Visa and MasterCard, it is a 3-digit number, located on the signature tape on the back. For American Express cards, a 4-digit number is printed on the front, above the account number.
How It WorksWhen paying by credit card, the operator may need to manually enter the account number, either because the cardholder is not present (e.g., a delivery order), or because the magnetic card reader cannot read the track data when swiped. With this feature enabled, the system displays the following menu of options after the card number has been entered:
(1) Intentionally not provided.(2) Present and will be provided.(3) Present but is illegible.(4) Not present.
The operator selects the appropriate option and is prompted to enter a value and/or continue. The transaction is forwarded to the credit card processor, who then returns an authorization or declines the payment.
Note To use this feature, sites must be running a compatible credit card driver. At present, the Chip and Pin driver is the only one that supports it. Current US drivers are not compatible.
MD0003-065Revision F
January 17, 2006Page 7 of 306
3700 POSWhat’s New
New OptionsTo support this feature, the following options were added in POS Configurator:
Employees | Employee Classes | Transactions | Transaction Control
Submit Blank CVV — If checked, allows members of the selected employee class to override the CVV options and approve a credit card transaction without supplying card verification data. Also allows non-privileged employees to submit credit card authorizations without providing CVV information.
Sales | Tender/Media | CC Tender
Prompt for CVV on Manual Entry — If enabled, displays a menu of options when a credit card is manually entered. To proceed, the user must select one and respond accordingly.
Prompt for CVV on Swiped Entry — If enabled, displays a menu of options when a credit card is swiped. To proceed, the user must select one and respond accordingly.
Conditional Credit Card ApprovalOccasionally, when swiping or scanning a credit card, a mismatch will occur between the values entered (e.g., account number, postal code, or CVV) and the cardholder’s records. When this happens, the processor will not authorize immediately, but will request card verification from the merchant — who typically confirms the customer’s identity via a driver’s license. A prompt will display on the screen, requiring the merchant to accept or decline before proceeding.
If the merchant agrees, he accepts responsibility for the transaction. That is, he accepts the conditions whereby the credit card provider approves the charge. To control this function and limit the approval privilege, the following option was added in POS Configurator:
Authorize conditional approval (Employees | Employee Classes | Transactions | Transaction Control)
MD0003-065Revision FJanuary 17, 2006Page 8 of 306
3700 POSWhat’s New
POS Operations
Change Menu Level for Selected Menu ItemsThe ability to change the menu level of current round items (without voiding and adding back) has been added to POS Operations. Using preprogrammed touch keys, operators can change both main and sub menu levels. If menu items are highlighted when the touch key is pressed, only those menu item will be affected. If menu items are not selected, all current round menu items will be changed to the selected menu level.
Employees must be privileged to use the feature.
BackgroundIn some cafeteria-style restaurants, different prices may be charged for the same menu item, depending on the customer. Typically, this occurs when an establishment is subsidized by an organization for its employees, but is also open to the general public (e.g., hospital cafeteria). It can also be used to adjust prices based on order type decisions (i.e., “Eat-In” versus “To Go”). The adjustments are generally made at the end of the transaction, after all the items have been rung up.
In the past, price-level adjustments could be an awkward and inefficient process, requiring the customer to declare an order type or identify their employee before the first menu item was rung. Once the check was started, price changes could only be made by voiding the original items and re-ringing them at the correct level.
MD0003-065Revision F
January 17, 2006Page 9 of 306
3700 POSWhat’s New
The SolutionTo improve service, several new menu level function keys have been added — one for each of the 20 main and sub menu levels that may be programmed in the system. When added to the touchscreen, these keys function as macros, in that they allow the cashier to automatically change the menu level of current round menu items. This is done by highlighting one or more entries and pressing a menu level touch key. POS Operations will automatically switch the menu level (and prices) from the current main or sub level to the new one. If no menu items are highlighted, the system will switch all menu items in the current round.
Specific menu level macros are used when the price change is linked to the order type, or when the restaurant has one or two customer groups to accommodate. At some point, however, it may be impractical to have several menu level touch keys on the display.
To conserve touchscreen space, two additional functions were included. These functions allow the cashier to change the main or sub level of the menu items by using a dialog format to prompt for current (FROM) and proposed (TO) menu level selections. As with individual menu level macros, changes made using the FROM/TO keys will be applied only to highlighted items (if they are specified) or to all current round items (if they are not).
Note Not all menu items are subject to changes in their menu level (see list of limitations, below).
In the event that restricted menu items are included among those menu items to be changed, the system will simply change the items that it can and ignore the rest.
MD0003-065Revision FJanuary 17, 2006Page 10 of 306
3700 POSWhat’s New
LimitationsDuring operations, menu level changes cannot be applied to the following:
Previous round items.
Open-priced menu items.
Weighted items.
Refillable items.
Menu items that are not in the active filter (if using seat filtering).
Discounted menu items.
Menu items with an applied price override.
After a partial tender has been applied in the current round.
After a percentage service charge has been applied in the current round.
Fixed-Price Meal course items.
New OptionsTo support this feature, the following options were added in POS Configurator:
(Devices | Touchscreen Designer) — New function keys
Category — Function: TransactionFunction — Menu Level Select Main Lvl — Allows the cashier to change the main menu level by specifying the current (FROM) and preferred (TO) levels.
Category — Function: TransactionFunction — Menu Level Select Main Lvl 1 (to 10) — Changes the menu level of current round items to the specified main menu level.
MD0003-065Revision F
January 17, 2006Page 11 of 306
3700 POSWhat’s New
Category — Function: TransactionFunction — Menu Level Select Sub Lvl — Allows the cashier to change the sub menu level by specifying the current (FROM) and preferred (TO) levels.
Category — Function: TransactionFunction — Menu Level Select Sub Lvl 1 (to 10) — Changes the menu level of current round items to the specified sub menu level.
Change main menu level (Employees | Employee Classes | Options) — Allows members of the selected class to change the main menu level using the designated touch keys.
Change sub menu level (Employees | Employee Classes | Options) — Allows members of the selected class to change the sub menu level using the designated touch keys.
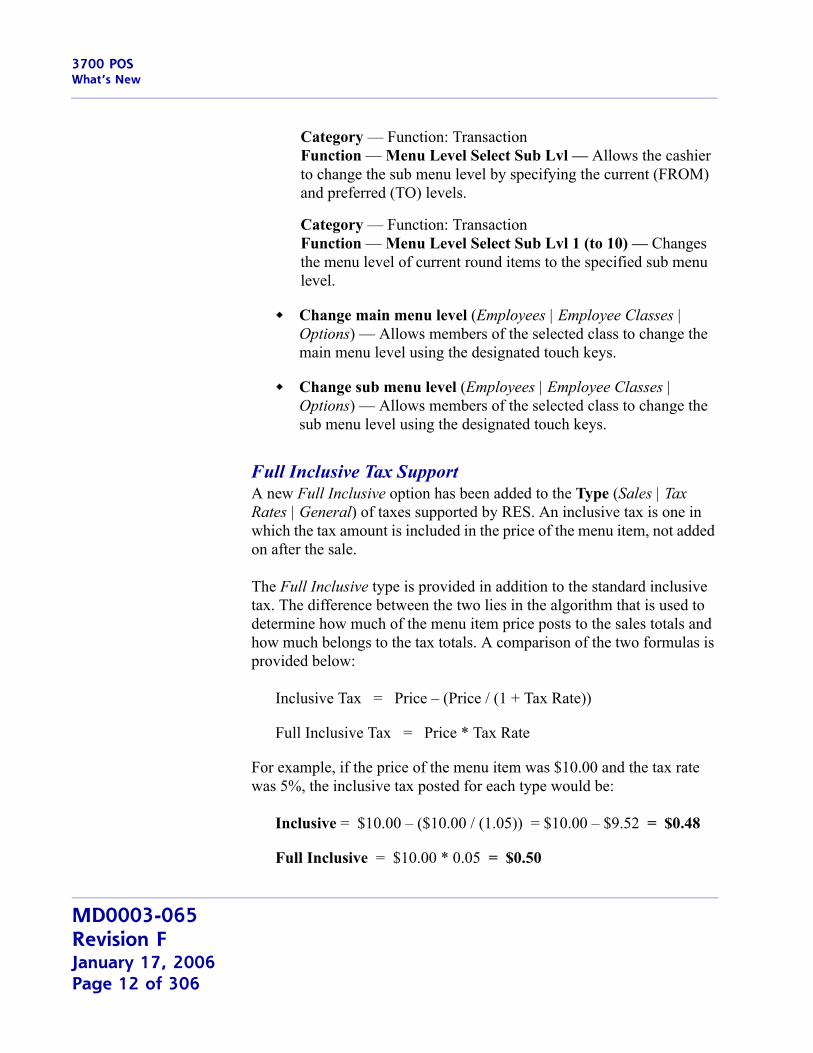
Full Inclusive Tax SupportA new Full Inclusive option has been added to the Type (Sales | Tax Rates | General) of taxes supported by RES. An inclusive tax is one in which the tax amount is included in the price of the menu item, not added on after the sale.
The Full Inclusive type is provided in addition to the standard inclusive tax. The difference between the two lies in the algorithm that is used to determine how much of the menu item price posts to the sales totals and how much belongs to the tax totals. A comparison of the two formulas is provided below:
Inclusive Tax = Price – (Price / (1 + Tax Rate))
Full Inclusive Tax = Price * Tax Rate
For example, if the price of the menu item was $10.00 and the tax rate was 5%, the inclusive tax posted for each type would be:
Inclusive = $10.00 – ($10.00 / (1.05)) = $10.00 – $9.52 = $0.48
Full Inclusive = $10.00 * 0.05 = $0.50
MD0003-065Revision FJanuary 17, 2006Page 12 of 306
3700 POSWhat’s New
Merge With Parent Order Device OutputWhen preparing a menu item with sides, the kitchen staff needs to know which condiments belong with the main menu item. In the past, condiment side items were only printed with the main item on the Expo device or if both items were made at the same prep station.
To correct this problem, an option was added that allows parent menu items to be printed with condiment side items and then sent to all relevant prep stations.
ExampleThe Mike Rose Cafe offers a Meat Loaf dinner with a choice of side item that includes Mashed Potatoes (Hot Line) or Cole Slaw (Cold Line). In this kitchen, the Meat Loaf is prepared by the Chef (Grill Prep).
Previously, when a Meat Loaf dinner was ordered, the meat loaf item would be displayed on the Grill Prep and, depending on the condiment choice, the side item would be sent to the Hot or Cold station. None of the prep staff would have the full order, and it would be up to the expediter to plate the items for the server.
Now, when a Meat Loaf order with Cole Slaw is rung, both the Grill and Cold Line receive the merged order. The Chef prepares the meat loaf and passes it down to the Cold Line assistant, who adds the Cole Slaw. The Hot Line never displays the order and is therefore not distracted by it.
Similarly, if the customer orders Meat Loaf with Mashed Potatoes, the merged items are sent to the Grill and Hot Line devices only. Again, once the Chef prepares the meat loaf (main) item. Because the condiment side is listed, he knows to pass it to the Hot Line assistant, who in turn, knows that the mashed potatoes side item sent to his station belongs with the Meat Loaf order.
This option is ignored if the order contains a condiment that overrides the parent’s print class.
MD0003-065Revision F
January 17, 2006Page 13 of 306
3700 POSWhat’s New
Enabling the FeatureTo support this feature, the following option was added in POS Configurator:
Merge with Parent order device output (Sales | Menu Item Classes | Print/Display) — When enabled, prints the parent and condiment menu items together, and sends the output to both order output devices (parent and condiment). If selected, it will override the option Print without parent on order chit.
This option is grayed out unless the:
Condiment option (Sales | Menu Item Classes | General Options) is checked, and the
Condiment override order device output option is disabled.
Also, this feature will be ignored if the parent item is linked to another condiment with the following configuration setting:
Condiment override order device output (Sales | Menu Items | Print/Display) — This option is used to prevent a parent menu item from being sent to its designed order device (e.g., to stop an order) or to redirect the item based on how is prepared (e.g., hot or cold pasta salad).
MD0003-065Revision FJanuary 17, 2006Page 14 of 306
3700 POSWhat’s New
Multiple Check Review Order PanelA new touchscreen template has been added that allows workstations to display two review orders simultaneously. Previous templates provided for one review order only.
By default, the review panels will show the last and next to last orders rung up on the POS terminal. However, custom templates can be added that modify the system’s configuration file and determines how far behind the current order each review panel should be.
BackgroundIn a quick-service environment, food expediters often share a POS terminal with the order taker, bagging orders as soon as they are entered. The review order panel facilitates order handling by allowing the expediter to view the last 25 transactions posted at that workstation.
When a new order is entered, the previous order becomes part of the transaction queue. The just-completed order is moved to the review panel where it can be viewed while the next order is rung. When that order is finalized, it bumps the previous order, replacing it as the last transaction in the queue and in the review order display.
During peak times of business, orders may be entered faster than the expediter can bag them for the customer. Expediters can recall an order to the review display area by scrolling forward and back through the queue. By adding a second review panel to the touchscreen, sites can double the amount of time an order is on the screen, reducing the need to toggle between them.
Configuration ChangesTo support this feature, the following Touchscreen Template (Devices | Touchscreens) was added to POS Configurator:
QSR Order/Multi Review Detail
MD0003-065Revision F
January 17, 2006Page 15 of 306
3700 POSWhat’s New
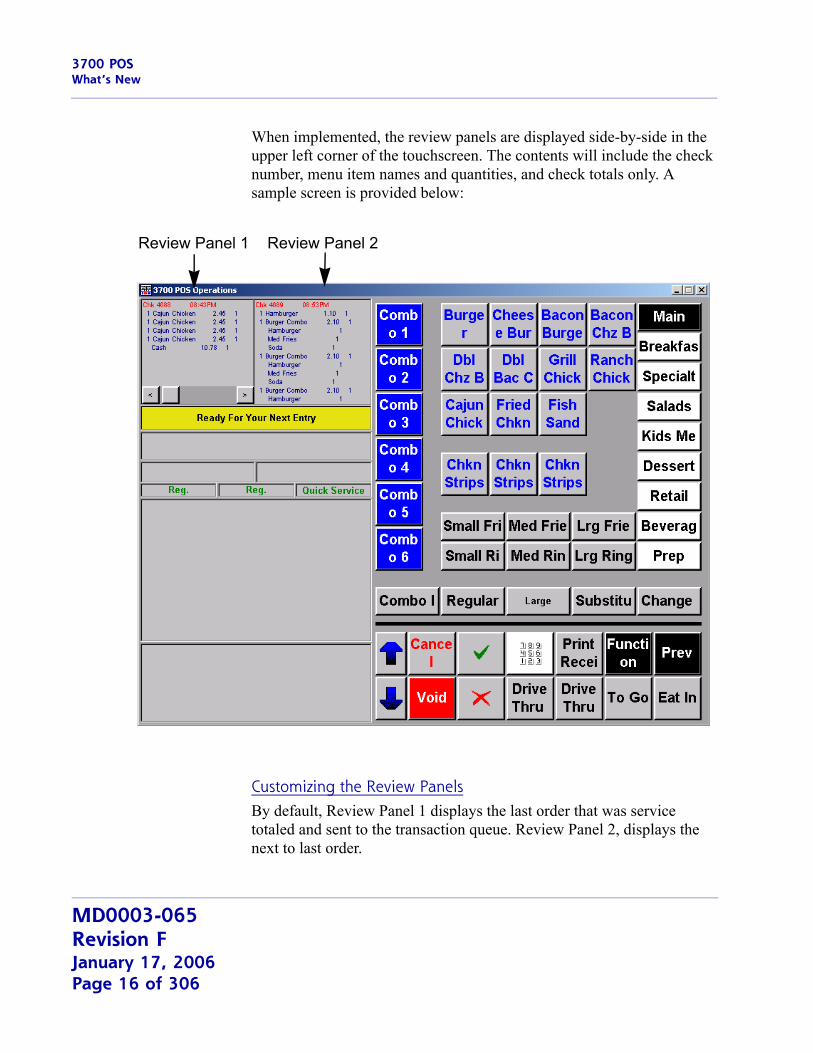
When implemented, the review panels are displayed side-by-side in the upper left corner of the touchscreen. The contents will include the check number, menu item names and quantities, and check totals only. A sample screen is provided below:
Customizing the Review PanelsBy default, Review Panel 1 displays the last order that was service totaled and sent to the transaction queue. Review Panel 2, displays the next to last order.
Review Panel 1 Review Panel 2
MD0003-065Revision FJanuary 17, 2006Page 16 of 306
3700 POSWhat’s New
Operators with more extensive knowledge, can create a custom template and specify which orders they want to display in each panel. This is done by editing the display’s configuration file (OpsDisplayUser.cfg) and changing the variable that indicates which order will be displayed. (For information about this process, refer to Restaurant Enterprise Series, Editing the OPS Display Users Configuration File, MD0003-064, April 2003, available on the MICROS website.)
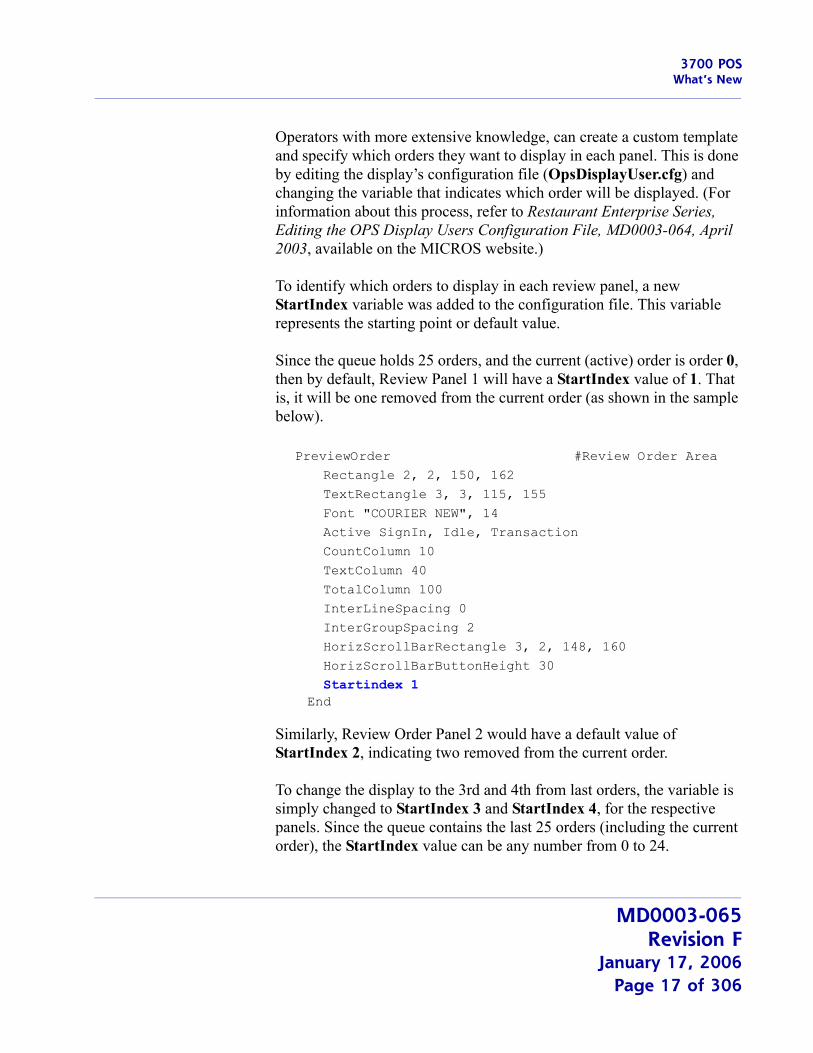
To identify which orders to display in each review panel, a new StartIndex variable was added to the configuration file. This variable represents the starting point or default value.
Since the queue holds 25 orders, and the current (active) order is order 0, then by default, Review Panel 1 will have a StartIndex value of 1. That is, it will be one removed from the current order (as shown in the sample below).
PreviewOrder #Review Order Area Rectangle 2, 2, 150, 162 TextRectangle 3, 3, 115, 155 Font "COURIER NEW", 14 Active SignIn, Idle, Transaction CountColumn 10 TextColumn 40 TotalColumn 100 InterLineSpacing 0 InterGroupSpacing 2 HorizScrollBarRectangle 3, 2, 148, 160 HorizScrollBarButtonHeight 30 Startindex 1 End
Similarly, Review Order Panel 2 would have a default value of StartIndex 2, indicating two removed from the current order.
To change the display to the 3rd and 4th from last orders, the variable is simply changed to StartIndex 3 and StartIndex 4, for the respective panels. Since the queue contains the last 25 orders (including the current order), the StartIndex value can be any number from 0 to 24.
MD0003-065Revision F
January 17, 2006Page 17 of 306
3700 POSWhat’s New
Workstation Order Device Routing ProfilesFunctionality has been added that would allow an operator to override the local workstation’s default setting and route its orders to a different order output device. The option was designed to ensure that orders do not overload individual prep stations and that customer’s are served as quickly and efficiently as possible.
BackgroundIn many restaurants, separate food prep lines are used to process orders from different sides of the business. For example, a quick-service restaurant may have two prep lines — one to expedite and bag Drive-Thru orders, and one to handle Eat-In orders. Although both lines produce the same menu items, each serves it own segment of the customers.
To ensure that orders are sent to the appropriate prep stations, each workstation is linked to a specific order output device (KDS or printer). This is referred to as the workstation order device routing profile.
The ProblemOnce set, a workstation’s profile remains in effect until changed in the database. But this was not always practical. There are times in the business day when certain workstations are closed down or when one side (Eat-In) is busier than the other (Drive-Thru). With fixed profiles, there was no way to balance the workload by temporarily directing orders to a less busy prep line.
MD0003-065Revision FJanuary 17, 2006Page 18 of 306
3700 POSWhat’s New
The SolutionTo correct this problem, a new touchscreen function was added in POS Configurator. This function can be linked to a preprogrammed touch key that, when pressed, lists all of the workstations currently in the system. To change the order routing, the operator selects the number/name of a workstation that sends to the preferred order device. When the OK button is pressed, the local workstation overrides its default settings and sends its order to the other’s prep line.
Enabling the FeatureTo support this feature, the following options were added in POS Configurator:
Enable Order Routing Profile Selection (Devices | User Workstations | Options | General) — When checked, this option allows the workstation to redirect its order to another workstation’s order output device.
(Devices | Touchscreen Designer) — New function key:
Category — Function: TransactionFunction — Order Device Routing Profile List
LimitationsDuring operations, the following rules and limitations will be enforced:
Workstations must be authorized to use this feature. This is done by checking the new Enable Order Routing Profile Selection option in POS Configurator.
Workstations cannot be excluded from the routing list.
Note Sites can simplify this process by creating a macro key to automatically change the routing profile. Besides reducing keystrokes, this eliminates the need for operators to know which workstation to select to reach a particular order device.
MD0003-065Revision F
January 17, 2006Page 19 of 306
3700 POSWhat’s New
If the routing profile is changed in the middle of a transaction, it will only be active within that transaction. Once the check is service totaled, the system will revert to the workstation’s default order device settings.
If the order routing is changed before the check is started, the profile will be active until the function key is pressed and it is switched again by the operator.
In a non-DOM environment, profile changes inside a transaction can only be done until the first item is sent to the kitchen. After that, attempts to change the order routing will result in an error message.
In a DOM environment, profile changes are not allowed after the first item has been ordered. Once an item has been sent to an order device, the remainder of that order cannot be sent elsewhere.
This feature is not valid with delayed or future orders.
MD0003-065Revision FJanuary 17, 2006Page 20 of 306
3700 POSWhat’s Enhanced
What’s Enhanced An enhancement is defined as a change made to improve or extend the functionality of the current 3700 POS application. To qualify as an enhancement, the change must satisfy the following criteria:
The basic feature or functionality already exists in the previous release of the software.
The change adds to or extends the current process. This differs from a revision (i.e., a bug fix) which corrects a problem not caught in the previous release of the software.
Enhancements Summarized
The table below summarizes the enhancements included in this version.
Module Feature Page
Confidence Test
PINPad “Abort Test” Button Renamed 23
Database Tax Additions/Changes to Database Tables 24
HHT Symbol MC50 Mag Stripe Driver Support 25
Peripherals PINPad Support Added for the WS4 25
POS Configurator
Menu Item Search and Filter Bar 26
POS Split-Screen Configuration Options Added to User Interface
30
POS Operations
Allow 12-Digit Account Numbers for Debit Transactions
31
Allow Voids of Touch Item Discounts 31
Combo Sizing by Combo Meal Only 32
EAN Random Weight Price Scanning 39
Extended Restrictions to Subtotal Discounts
40
Limit Charged Tip by Percentage 41
Multiple Inclusive Tax Support 42
MD0003-065Revision F
January 17, 2006Page 21 of 306
3700 POSWhat’s Enhanced
POS Operations (cont’d.)
QSR Tray Totals 42
Touch Item Discounts Support Depleted Amounts Option
54
Updated Support for Unencrypted OPSDisplaySys.cfg File
54
VAT Net Totals by Menu Items and Order Type
56
SIM Modified @dtl_dining_course to Make Assignable
59
Module Feature Page
MD0003-065Revision FJanuary 17, 2006Page 22 of 306
3700 POSWhat’s Enhanced
Enhancements Detailed
Confidence Test
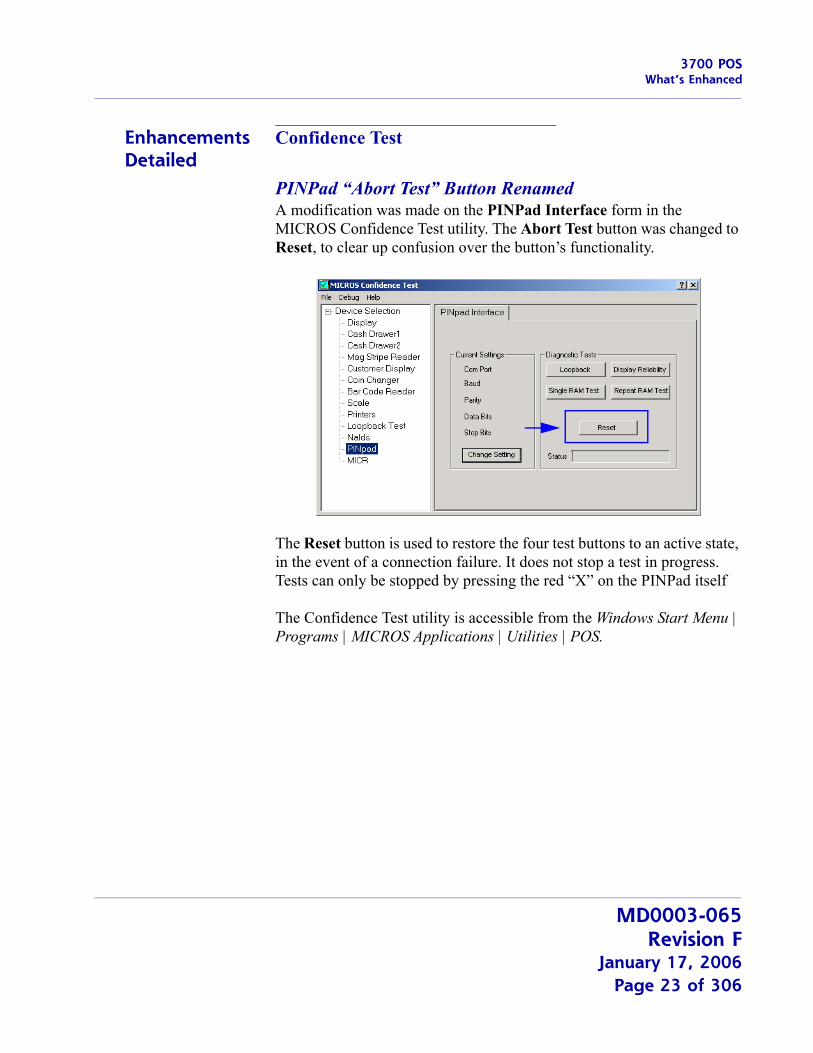
PINPad “Abort Test” Button RenamedA modification was made on the PINPad Interface form in the MICROS Confidence Test utility. The Abort Test button was changed to Reset, to clear up confusion over the button’s functionality.
The Reset button is used to restore the four test buttons to an active state, in the event of a connection failure. It does not stop a test in progress. Tests can only be stopped by pressing the red “X” on the PINPad itself
The Confidence Test utility is accessible from the Windows Start Menu | Programs | MICROS Applications | Utilities | POS.
MD0003-065Revision F
January 17, 2006Page 23 of 306
3700 POSWhat’s Enhanced
Database
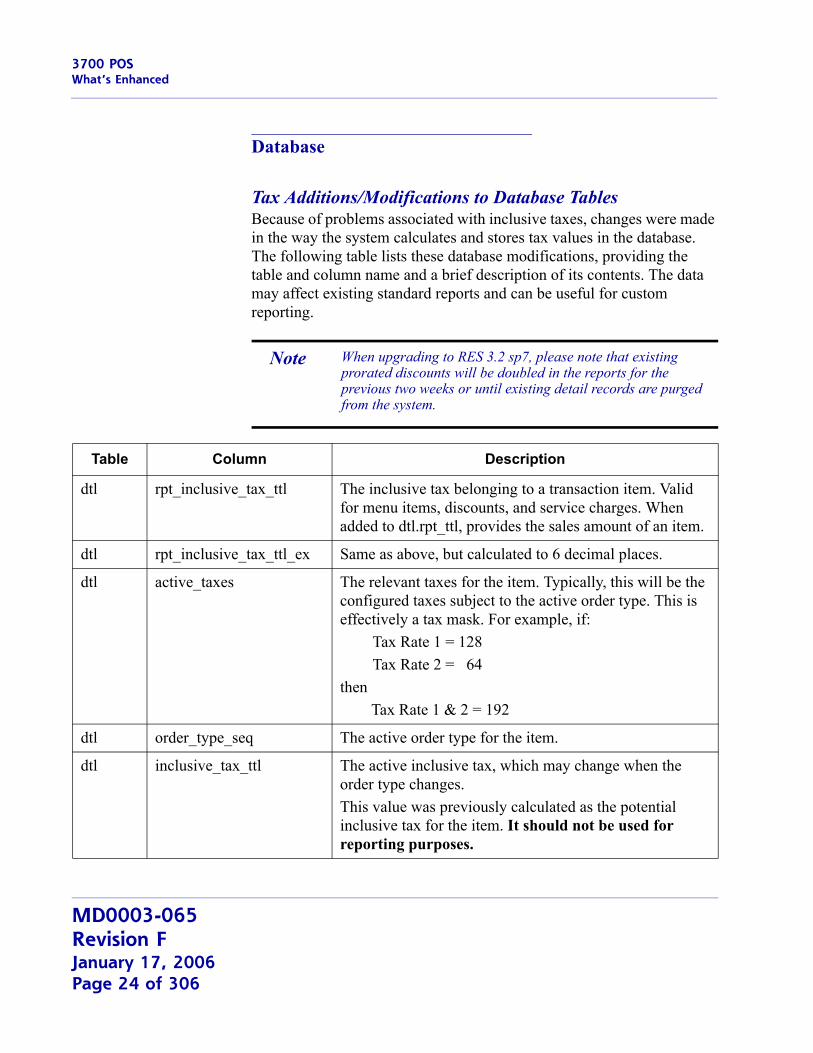
Tax Additions/Modifications to Database TablesBecause of problems associated with inclusive taxes, changes were made in the way the system calculates and stores tax values in the database. The following table lists these database modifications, providing the table and column name and a brief description of its contents. The data may affect existing standard reports and can be useful for custom reporting.
Note When upgrading to RES 3.2 sp7, please note that existing prorated discounts will be doubled in the reports for the previous two weeks or until existing detail records are purged from the system.
Table Column Description
dtl rpt_inclusive_tax_ttl The inclusive tax belonging to a transaction item. Valid for menu items, discounts, and service charges. When added to dtl.rpt_ttl, provides the sales amount of an item.
dtl rpt_inclusive_tax_ttl_ex Same as above, but calculated to 6 decimal places.
dtl active_taxes The relevant taxes for the item. Typically, this will be the configured taxes subject to the active order type. This is effectively a tax mask. For example, if:
Tax Rate 1 = 128Tax Rate 2 = 64
thenTax Rate 1 & 2 = 192
dtl order_type_seq The active order type for the item.
dtl inclusive_tax_ttl The active inclusive tax, which may change when the order type changes.This value was previously calculated as the potential inclusive tax for the item. It should not be used for reporting purposes.
MD0003-065Revision FJanuary 17, 2006Page 24 of 306
3700 POSWhat’s Enhanced
Hand-Held Terminals
Symbol MC50 Mag Stripe Driver SupportChanges were made to the Symbol magnetic stripe reader (MSR) driver to support use on the new MC50 hand-held terminal (HHT). The modifications are internal to the MSRDriver.ARM.CAB and are implemented as part of an Active Sync connection. No additional programming is required.
Peripherals
PINPad Support Added for the WS4The PINPad.dll has been modified to support full functionality on a WS4. The change will allow the CE-based workstations to handle transactions involving NaBANCO NB and NDC debit cards (US only).
As a result of these changes, PINPad functionality is no longer supported on Win 95 clients.
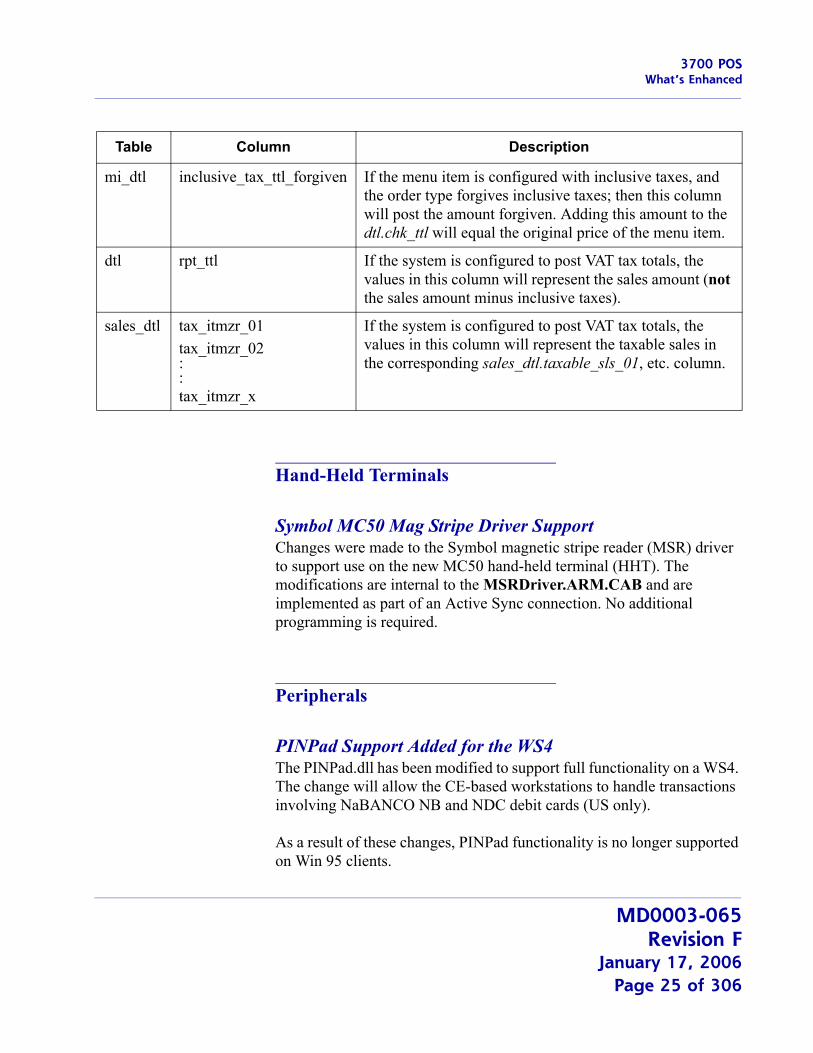
mi_dtl inclusive_tax_ttl_forgiven If the menu item is configured with inclusive taxes, and the order type forgives inclusive taxes; then this column will post the amount forgiven. Adding this amount to the dtl.chk_ttl will equal the original price of the menu item.
dtl rpt_ttl If the system is configured to post VAT tax totals, the values in this column will represent the sales amount (not the sales amount minus inclusive taxes).
sales_dtl tax_itmzr_01tax_itmzr_02::.tax_itmzr_x
If the system is configured to post VAT tax totals, the values in this column will represent the taxable sales in the corresponding sales_dtl.taxable_sls_01, etc. column.
Table Column Description
MD0003-065Revision F
January 17, 2006Page 25 of 306
3700 POSWhat’s Enhanced
POS Configurator
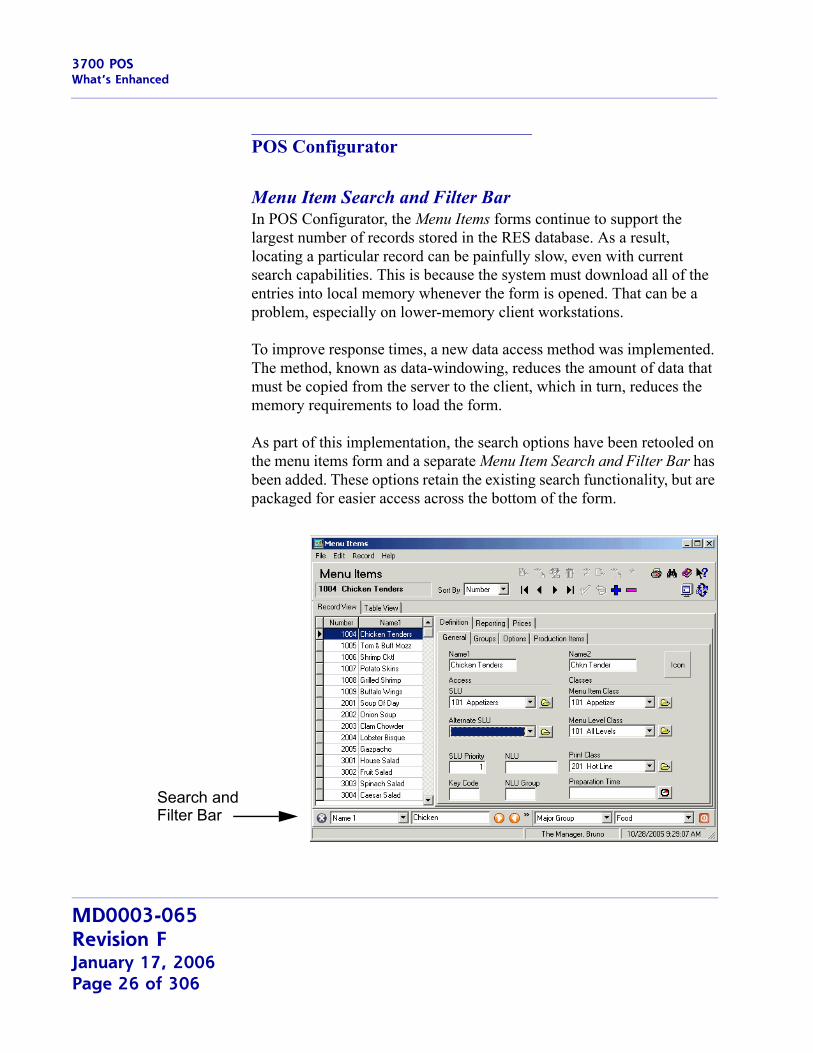
Menu Item Search and Filter BarIn POS Configurator, the Menu Items forms continue to support the largest number of records stored in the RES database. As a result, locating a particular record can be painfully slow, even with current search capabilities. This is because the system must download all of the entries into local memory whenever the form is opened. That can be a problem, especially on lower-memory client workstations.
To improve response times, a new data access method was implemented. The method, known as data-windowing, reduces the amount of data that must be copied from the server to the client, which in turn, reduces the memory requirements to load the form.
As part of this implementation, the search options have been retooled on the menu items form and a separate Menu Item Search and Filter Bar has been added. These options retain the existing search functionality, but are packaged for easier access across the bottom of the form.
Search andFilter Bar
MD0003-065Revision FJanuary 17, 2006Page 26 of 306
3700 POSWhat’s Enhanced
Activating the FeatureThere are three ways to activate the Search and Filter Bar from the Menu Items forms:
Select Record | Find from the menu bar.
Click the Binoculars Icon ( )
Press [Cntl]+[Shift]+[F] (keyboard shortcut)
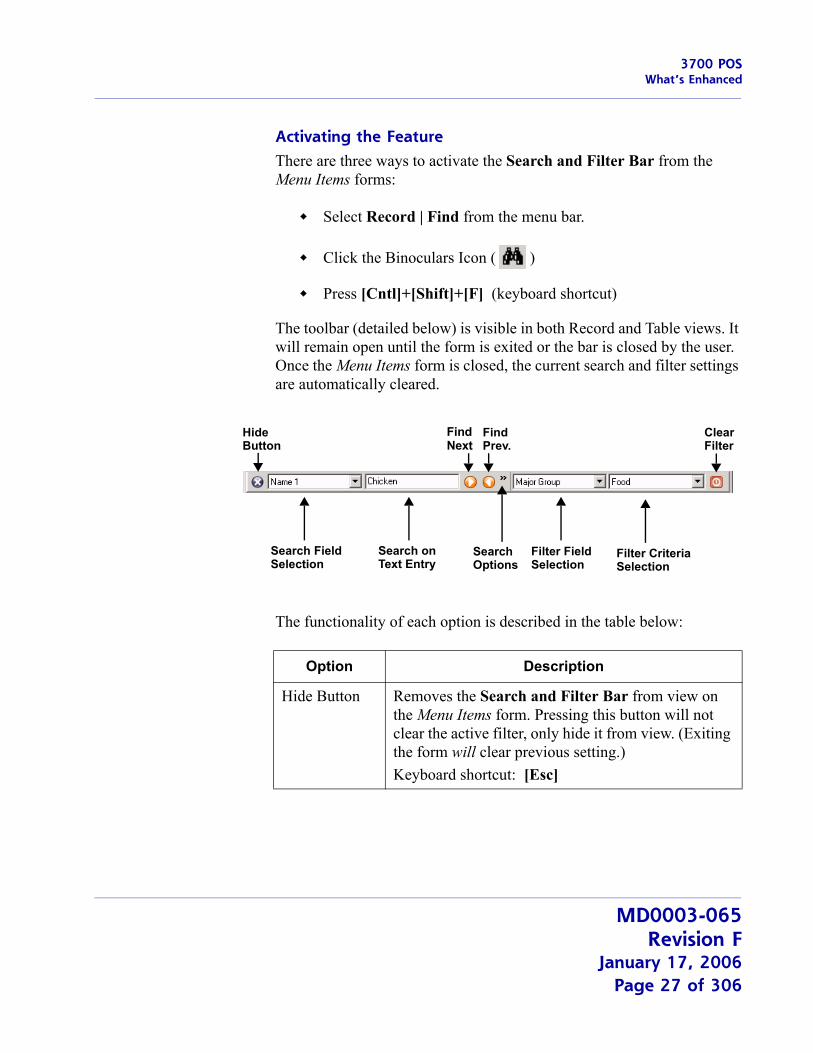
The toolbar (detailed below) is visible in both Record and Table views. It will remain open until the form is exited or the bar is closed by the user. Once the Menu Items form is closed, the current search and filter settings are automatically cleared.
The functionality of each option is described in the table below:
HideButton
Search FieldSelection
Search onText Entry
SearchOptions
Filter FieldSelection
Filter CriteriaSelection
ClearFilter
FindNext
FindPrev.
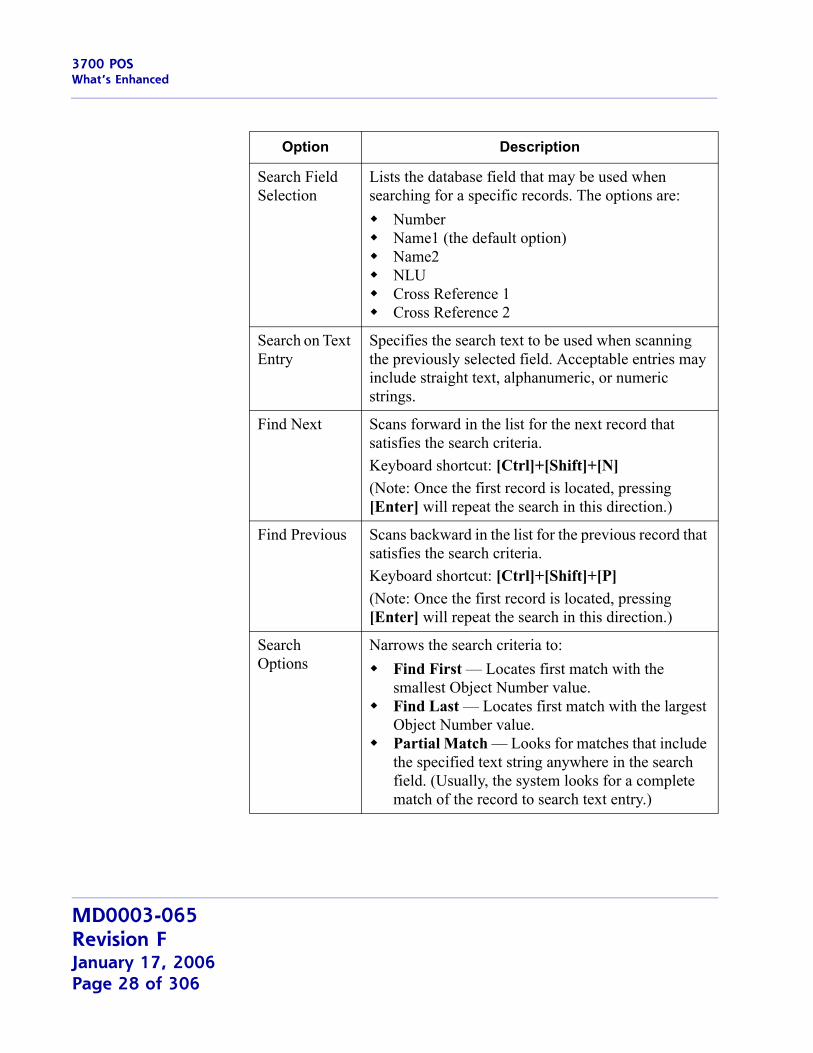
Option Description
Hide Button Removes the Search and Filter Bar from view on the Menu Items form. Pressing this button will not clear the active filter, only hide it from view. (Exiting the form will clear previous setting.)Keyboard shortcut: [Esc]
MD0003-065Revision F
January 17, 2006Page 27 of 306
3700 POSWhat’s Enhanced
Search Field Selection
Lists the database field that may be used when searching for a specific records. The options are:
NumberName1 (the default option)Name2NLUCross Reference 1Cross Reference 2
Search on Text Entry
Specifies the search text to be used when scanning the previously selected field. Acceptable entries may include straight text, alphanumeric, or numeric strings.
Find Next Scans forward in the list for the next record that satisfies the search criteria.Keyboard shortcut: [Ctrl]+[Shift]+[N](Note: Once the first record is located, pressing [Enter] will repeat the search in this direction.)
Find Previous Scans backward in the list for the previous record that satisfies the search criteria.Keyboard shortcut: [Ctrl]+[Shift]+[P](Note: Once the first record is located, pressing [Enter] will repeat the search in this direction.)
Search Options
Narrows the search criteria to:Find First — Locates first match with the smallest Object Number value.Find Last — Locates first match with the largest Object Number value. Partial Match — Looks for matches that include the specified text string anywhere in the search field. (Usually, the system looks for a complete match of the record to search text entry.)
Option Description
MD0003-065Revision FJanuary 17, 2006Page 28 of 306
3700 POSWhat’s Enhanced
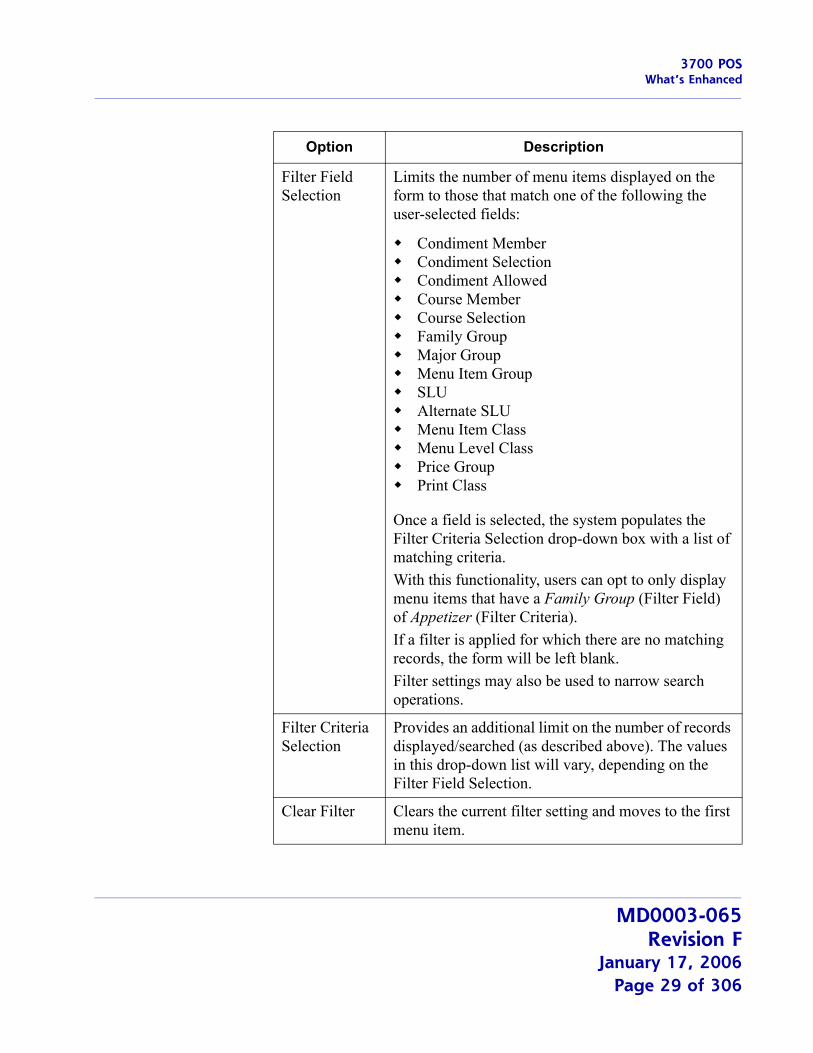
Filter Field Selection
Limits the number of menu items displayed on the form to those that match one of the following the user-selected fields:
Condiment MemberCondiment SelectionCondiment AllowedCourse MemberCourse SelectionFamily GroupMajor GroupMenu Item GroupSLUAlternate SLUMenu Item ClassMenu Level ClassPrice GroupPrint Class
Once a field is selected, the system populates the Filter Criteria Selection drop-down box with a list of matching criteria.With this functionality, users can opt to only display menu items that have a Family Group (Filter Field) of Appetizer (Filter Criteria).If a filter is applied for which there are no matching records, the form will be left blank.Filter settings may also be used to narrow search operations.
Filter Criteria Selection
Provides an additional limit on the number of records displayed/searched (as described above). The values in this drop-down list will vary, depending on the Filter Field Selection.
Clear Filter Clears the current filter setting and moves to the first menu item.
Option Description
MD0003-065Revision F
January 17, 2006Page 29 of 306

3700 POSWhat’s Enhanced
POS Split-Screen Configuration Options Added to User InterfaceIn the previous release, RES introduced the split-screen feature to support running two application, side-by-side, on the same order device screen. The feature was designed to allow operators to view POS Operations and another program (usually, KDS) simultaneously, and to switch focus between the two without losing sight of either.
To support this feature, users needed to override the size of the POS Operations window and to anchor it to a specific location on the display screen. In the original release, this was done by entering changes directly into the system Registry.
To improve useability, options for setting the size and location of the POS Operations window have now been added in POS Configurator. The new fields were added to Devices | User Workstations | Options, which was reorganized and subdivided into two tabs (General and Display) to accommodate the change.
The following POS Window Configuration options were added to the new Display tab:
Resolution (defines the size of the POS Operations (OPS) window; e.g., 800 x 600)
Width — Specifies the width of the OPS screen, in pixels.
Height — Specifies the height of the OPS screen, in pixels.
Enable Location Configuration — When checked, overrides the default location of the OPS window on the order device screen.
MD0003-065Revision FJanuary 17, 2006Page 30 of 306
3700 POSWhat’s Enhanced
Location (defines the x.y coordinates for positioning the OPS window on the order device screen)
From Top — Specifies how far down (in pixels), the OPS window will be placed on the display screen. This value represents the distance from the top of the screen to the top of the OPS window.
From Left — Specifies how far to the right (in pixels), the OPS window will be placed . This value represents the distance from the left of the screen to the left-side of the OPS window.
POS Operations
Allow 12-Digit Account Numbers for Debit TransactionsTo accommodate the range of debit cards supported by the FDMS credit/debit card drivers, POS Operations was modified to allow 12-digit account numbers. In the past, the system was hard-coded to accept a minimum of 13 digits.
Allow Voids of Touch Item DiscountsTo improve useability, touch item discounts are now voided automatically when the discounted menu item is deleted from the check. Previously, operators were prompted to remove the discount before the menu item void was allowed.
This change does not apply to subtotal discounts, which are based on the sum of all menu items rather than applied to a specific menu item. As before, operators will have to remove the subtotal discount before voiding the relevant menu item.
Note For information on running KDS as the second application, refer to the topic information beginning on page 90.
MD0003-065Revision F
January 17, 2006Page 31 of 306
3700 POSWhat’s Enhanced
Combo Sizing by Combo Meal OnlyThe combo meal ordering process was updated to include modifications to the combo sizing function. When implemented, this enhancement prevents operators from ringing up a combo meal with mixed-sized items (e.g., regular burger, medium side item, large drink). This is done by tagging the combo parent as a sized meal and then filtering the selections to only display main and side items of the same size.
Combo meals are not sized automatically, but must be designated by the operator. Once tagged as a sized combo meal, the combo will be treated as such for the duration of the order. Sized combo meals may be upsized or downsized, but only as a unit. If a menu item substitution is made, the system will automatically limit selections to items of the same size.
Combo sizing may be used with both manual and auto-combo recognition. When building a combo from current check detail, the system will only consider same-sized items that fulfill the requirements of the combo meal.
This enhancement provides an alternative to traditional combo meal ordering. It does not replace existing functionality.
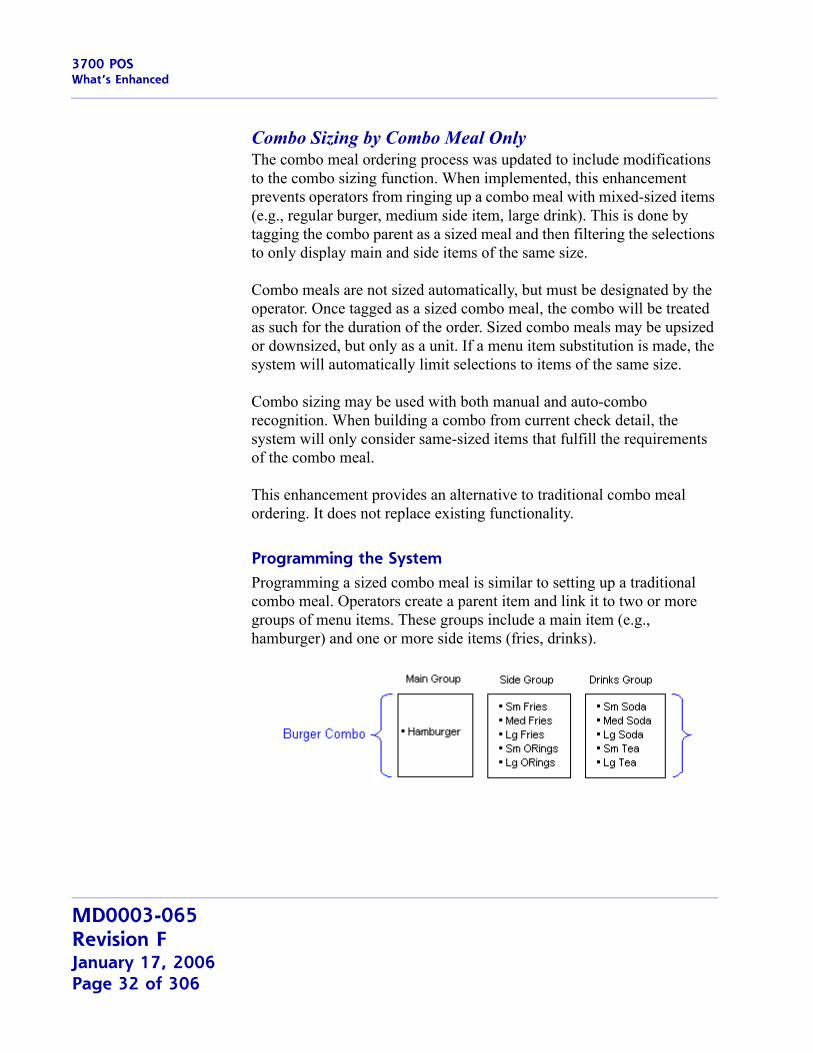
Programming the SystemProgramming a sized combo meal is similar to setting up a traditional combo meal. Operators create a parent item and link it to two or more groups of menu items. These groups include a main item (e.g., hamburger) and one or more side items (fries, drinks).
MD0003-065Revision FJanuary 17, 2006Page 32 of 306
3700 POSWhat’s Enhanced
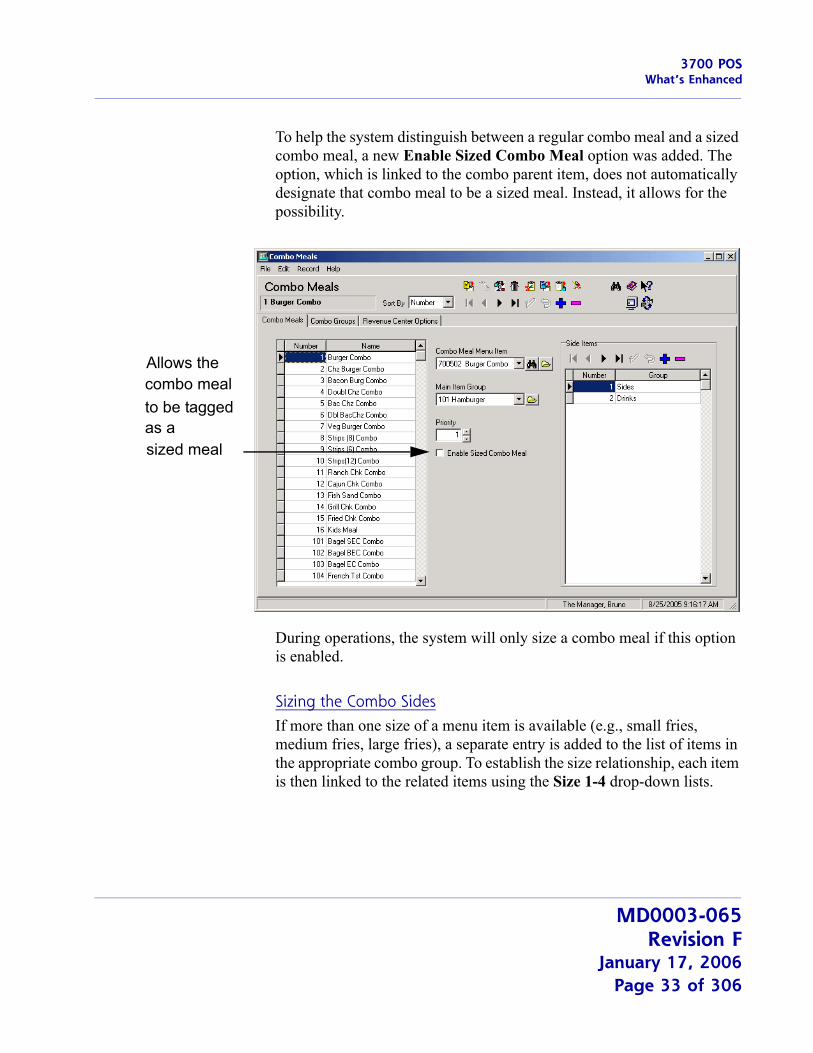
To help the system distinguish between a regular combo meal and a sized combo meal, a new Enable Sized Combo Meal option was added. The option, which is linked to the combo parent item, does not automatically designate that combo meal to be a sized meal. Instead, it allows for the possibility.
During operations, the system will only size a combo meal if this option is enabled.
Sizing the Combo SidesIf more than one size of a menu item is available (e.g., small fries, medium fries, large fries), a separate entry is added to the list of items in the appropriate combo group. To establish the size relationship, each item is then linked to the related items using the Size 1-4 drop-down lists.
Allows thecombo mealto be taggedas a sized meal
MD0003-065Revision F
January 17, 2006Page 33 of 306
3700 POSWhat’s Enhanced
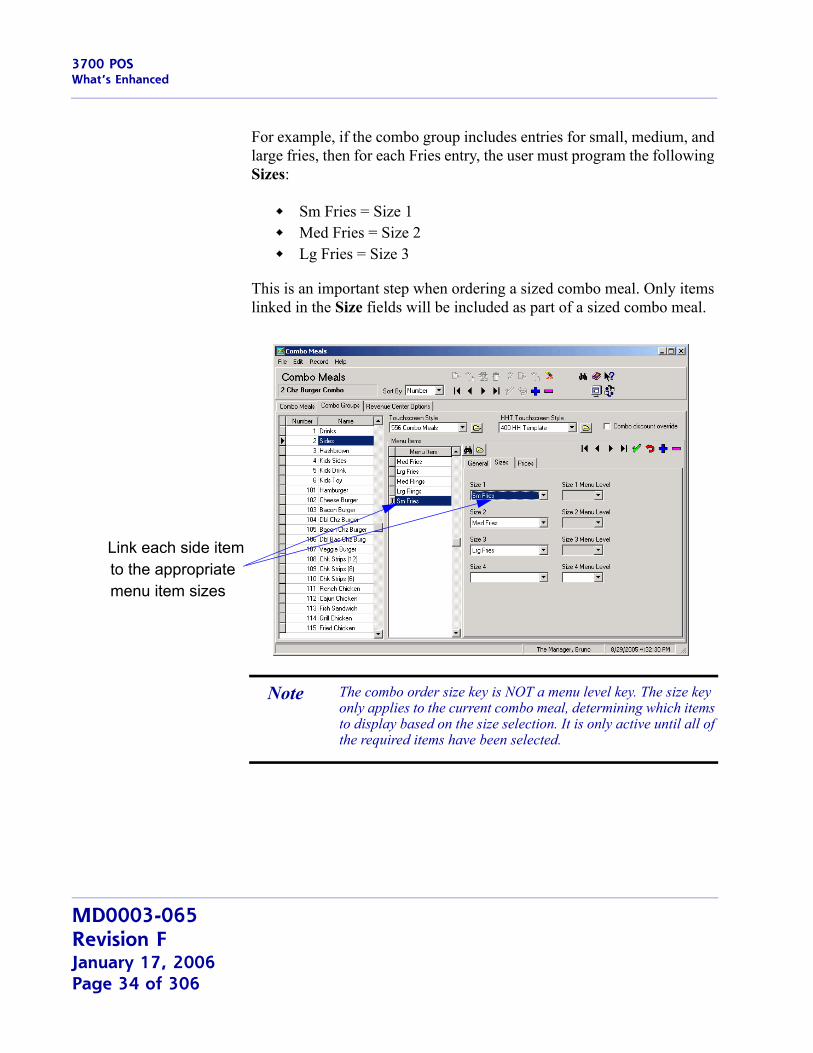
For example, if the combo group includes entries for small, medium, and large fries, then for each Fries entry, the user must program the following Sizes:
Sm Fries = Size 1Med Fries = Size 2Lg Fries = Size 3
This is an important step when ordering a sized combo meal. Only items linked in the Size fields will be included as part of a sized combo meal.
Link each side itemto the appropriatemenu item sizes
Note The combo order size key is NOT a menu level key. The size key only applies to the current combo meal, determining which items to display based on the size selection. It is only active until all of the required items have been selected.
MD0003-065Revision FJanuary 17, 2006Page 34 of 306
3700 POSWhat’s Enhanced
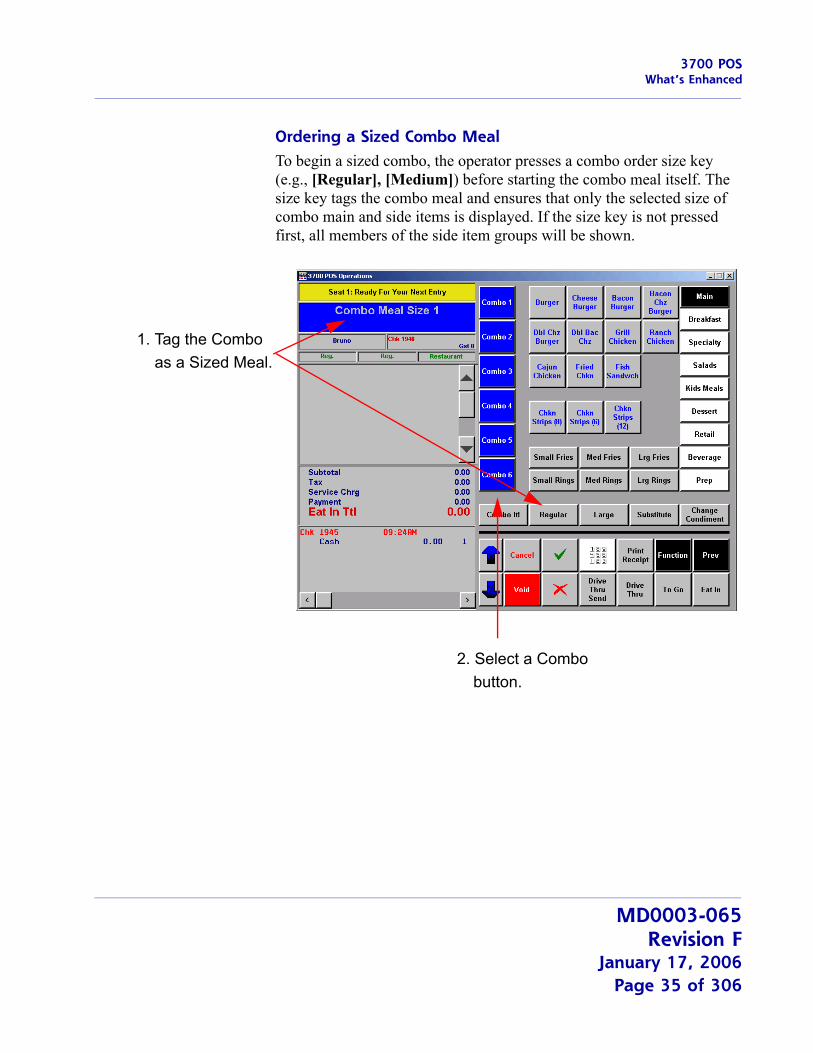
Ordering a Sized Combo MealTo begin a sized combo, the operator presses a combo order size key (e.g., [Regular], [Medium]) before starting the combo meal itself. The size key tags the combo meal and ensures that only the selected size of combo main and side items is displayed. If the size key is not pressed first, all members of the side item groups will be shown.
1. Tag the Combo as a Sized Meal.
2. Select a Combo button.
MD0003-065Revision F
January 17, 2006Page 35 of 306
3700 POSWhat’s Enhanced
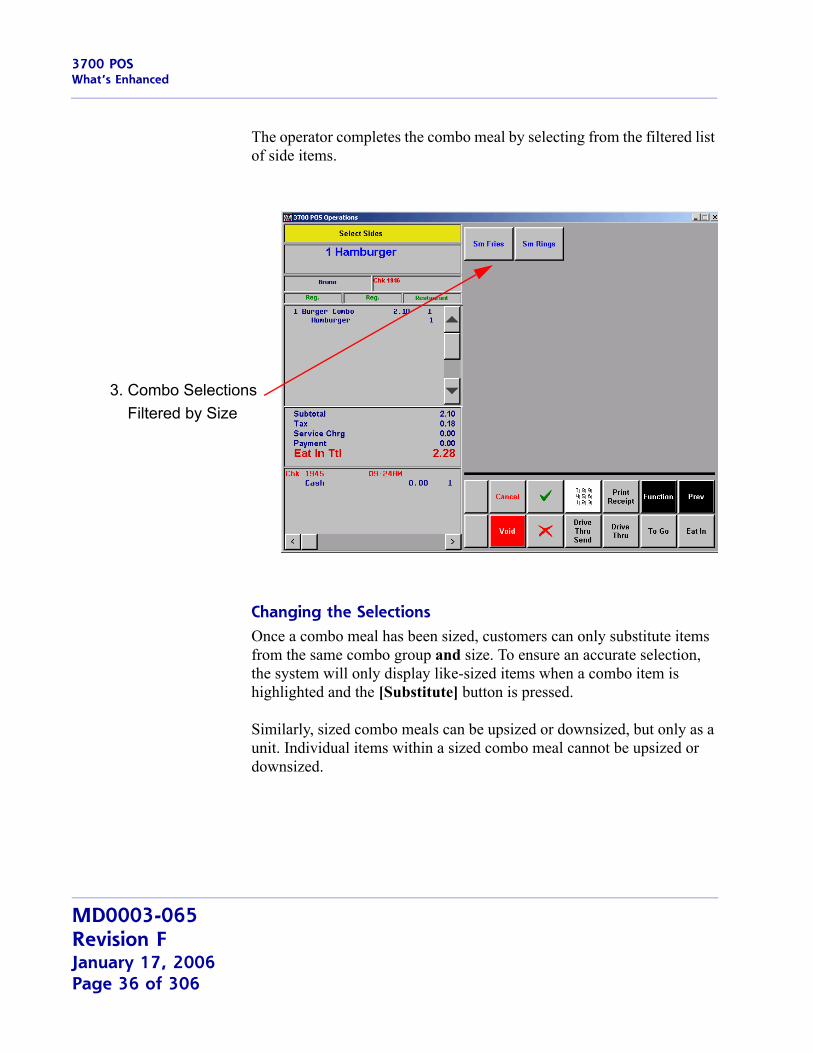
The operator completes the combo meal by selecting from the filtered list of side items.
Changing the SelectionsOnce a combo meal has been sized, customers can only substitute items from the same combo group and size. To ensure an accurate selection, the system will only display like-sized items when a combo item is highlighted and the [Substitute] button is pressed.
Similarly, sized combo meals can be upsized or downsized, but only as a unit. Individual items within a sized combo meal cannot be upsized or downsized.
3. Combo Selections Filtered by Size
MD0003-065Revision FJanuary 17, 2006Page 36 of 306
3700 POSWhat’s Enhanced
Combo RecognitionThe combo sizing feature can be used with both manual (Combo It) and auto-combo recognition.
When building a combo meal from current detail, the system will give precedence to combo main items that belong to a sized combo meal. That is, if the items listed include a combo parent with the Enable Sized Combo Meal option set, the system will only build that combo as a sized combo meal.
For example, if the operator rings up:
HamburgerMed FriesSmall FriesSmall SodaSmall Tea
and presses the [Auto Combo] key, the system will generate the following:
Hamburger ComboHamburgerSmall FriesSmall Soda
Med FriesSmall Tea
In this case, the system was able to build a regular-sized (small) Hamburger Combo using the first set of same-sized items in the check detail (hamburger, small fries, small soda).
In determining which items to use, the system looks first for Size 1 (Small) menu items that satisfy the combo meal criteria. If a complete size match is not found, Size 2 (Medium) will be considered, followed by Size 3, and then Size 4.
MD0003-065Revision F
January 17, 2006Page 37 of 306
3700 POSWhat’s Enhanced
Note, also, that small tea was not included. If the check detail includes two side items of the same size (Small Soda, Small Tea), the first item that satisfy the requirement will be the one included in the combo.
New OptionsTo support this feature, the following options were added to POS Configurator:
Enable Sized Combo Meal (Sales | Combo Meals | Combo Meals) — When checked, limits the combo meal’s selections and substitutions to items of the same size. When using the auto-combo function key, the system will not recognize this combo meal unless the order contains all of the required combo menu items AND they are of the same size.
Combo Order Sizes 1-4 (Devices | Touchscreen Designer | Category \ Function: Transactions) — When one of these functions keys is pressed before a combo meal is ordered, the system designates it to be a sized combo meal. Menu item selections will be automatically limited to combo items of the same size. Once a sized combo meal is ordered, it remains a sized meal for the life of the check.
MD0003-065Revision FJanuary 17, 2006Page 38 of 306
3700 POSWhat’s Enhanced
EAN Random Weight Price ScanningPOS Operations has been modified to support random price scanning of a 13-digit EAN barcode. With random price scanning, the price of an item is included in the barcode and is extracted by the barcode reader interface when it is scanned. Previously, only the 12-digit UPC format was recognized.
The new EAN format involved a minor difference in the barcode structure; i.e., lengthening the price portion of the code from four digits to five. As a result, the EAN barcode was displayed as follows:
2 aaaaa bccccc d
where:
2 = The product code for this type of barcode.
a = The menu item’s product (NLU) number.
b = Not used by the 3700 POS System, except to calculate the check digit.
c = The price of the item, which is treated as a number in the base currency with its decimal removed. For example, 12345 is read as $123.45.
d = A check digit.
Required OptionsTo read 13-digit random weight barcodes, the option Barcode has check digit (Revenue Center | RVC Transactions | Retail) must be enabled in POS Configurator.
MD0003-065Revision F
January 17, 2006Page 39 of 306
3700 POSWhat’s Enhanced
Extended Restrictions to Subtotal DiscountsDiscount restrictions, which are used to limit the number of discounts allowed per check, can now be applied to subtotal discounts. Previously, these limitations were only applicable to touch item discounts.
Enabling the OptionTo set limitations for subtotal discounts, the option Enable Touch Item Discounting must be selected in POS Configurator | System | Restaurant | Options. When checked, the following radio buttons are enabled in the Restrictions box on the Sales | Discount/Service | Discount tab:
No restrictions — The discount imposes no limits on itself or on the number of times it may be applied to a seat or check. Restrictions may be imposed by other discounts, however.
One discount per check — Imposes its own per check limit of one discount, period. Once this discount is taken, no additional discounts will be allowed. If another discount was applied to the check already, this subtotal discount will not be allowed.
One discount per seat — Imposes its own per seat limit of one discount, period. Once this discount is taken, no additional discounts will be allowed. If another discount was applied to the seat already, this subtotal discount will not be allowed.
One discount of this type per check — Applies the discount once per check and ignores any attempt to apply the discount again.
One discount of this type per seat — Applies the discount once per seat and ignores any attempt to apply the discount again.
MD0003-065Revision FJanuary 17, 2006Page 40 of 306
3700 POSWhat’s Enhanced
Limit Charged Tip by PercentageAn option was added that allows sites to limit the amount of charged tip that can be posted before a manager authorization is required. The option is defined as a percentage and is calculated against the gross check total. This prevents servers from inflating the tip amount charged to a customer’s credit card by either over tendering the check or manually entering a larger than normal tip.
For example, if the tip limit was set at 25% and the check total was $10.00, then the server could tender the check for $12.50 or enter up to $2.50 in tip amount before being prompted for manager authorization.
New OptionsTo support this functionality the following options were added in POS Configurator:
Charged Tips Limit (Revenue Center | RVC Credit Cards | General) — Limits the amount of charged tip that may be posted to a customer’s credit card when a service charge is applied. The entry represents the maximum percentage allowed and is only used when a non-zero value is specified.
This option is only applicable if the service charge is configured to Post to charged tips total (Sales | Discount/Service | Service).
Override Charged Tips Limit (Employees | Employee Classes | Options) — Allows members of the selected employee class to override the charged tip limit.
Note The service charge and tender media payment code were updated to record the authorizing employee, but ONLY when the charged tip limit is exceeded.This information is not included in the standard reports, but is available through Transaction Analyzer.
MD0003-065Revision F
January 17, 2006Page 41 of 306

3700 POSWhat’s Enhanced
Multiple Inclusive Tax SupportTax calculations have been modified to include support for multiple inclusive taxes (both US and VAT). The change is handled internally, based on the following algorithms:
US Taxes — Calculates the tax amount based on the combined rates. For example, if there are two inclusive taxes (5% and 10%), the system would use the combined rate of 15% to calculate the tax and then prorate this amount across the tax rates.
VAT — Determines each tax individually, subtracting the first tax amount from the menu item price, then using the subtotal as the basis for calculating the next inclusive tax amount.
QSR Tray TotalsThe Tray Totals feature allows operators to ring multiple orders as a single transaction and print individual receipts without splitting the guest check. Each order (as defined by seat number) can be selected and subtotaled with discounts, service charges, tax and tip. Payments can be posted for the entire check or by seat with the change due displayed.
The feature builds on existing seat handling options and an enhanced edit check functionality. The changes do not affect exisitng function keys, but may allow users to reduce the number of programmed touch keys required.
BackgroundIn a quick-service environment, it is common for an operator to ring up multiple orders on a single transaction only to have the customer request a separate receipt for each. The most common example is the drive-thru window. A car pulls up and the driver places orders for himself and several passengers. The same situation occurs with carry-out orders, where one person is delegated to pick up lunch for a group. In both cases, a pool of money is collected, but individual receipts are needed in order to provide change.
MD0003-065Revision FJanuary 17, 2006Page 42 of 306
3700 POSWhat’s Enhanced
Another common scenario is a cafeteria-style dining room, where a group of people are in line together, but are ordering and paying separately. To ensure that the food is prepared at the same time, the operator must be able to ring up the first order and pay the total while leaving the check open for the next person in line (i.e., the next “tray”). The process needs to be repeatable until everyone in the group has placed and paid for their order. At that point, the operator could then close the check, sending all of the orders to the kitchen at the same time.
The ProblemIn the past, operators had two ways to handle multiple orders for a single customer. The first, and obvious method, was to ring each order as a separate check. Though direct, this was time-consuming and could be a frustrating process for others waiting in line.
The second method was for the operator to ring up everything on a single check, then use seat functionality to differentiate the orders for payment and receipt printing. This method was more efficient for order entry, but still required the menu items be filtered by seat before payments could be specifically posted to them.
Neither process allowed the operator to ring up a group of orders, pay each individually, and then send them as a group to the prep stations. Also, when paid separately, neither method provided the customer with a summary check with all of the orders listed.
The SolutionTo address these gaps in service, seat handling was expanded to include two new functions: 1) Edit by Seat, and 2) Allow Tray Totals. Both functions build on existing seat filtering capabilities, while offering alternatives to the way orders are entered, viewed, and paid. For clarity, a brief description of the new and existing function are provided below. These include (in order of complexity):
View by SeatFilter SeatEdit by SeatAllow Tray Totals
MD0003-065Revision F
January 17, 2006Page 43 of 306
3700 POSWhat’s Enhanced
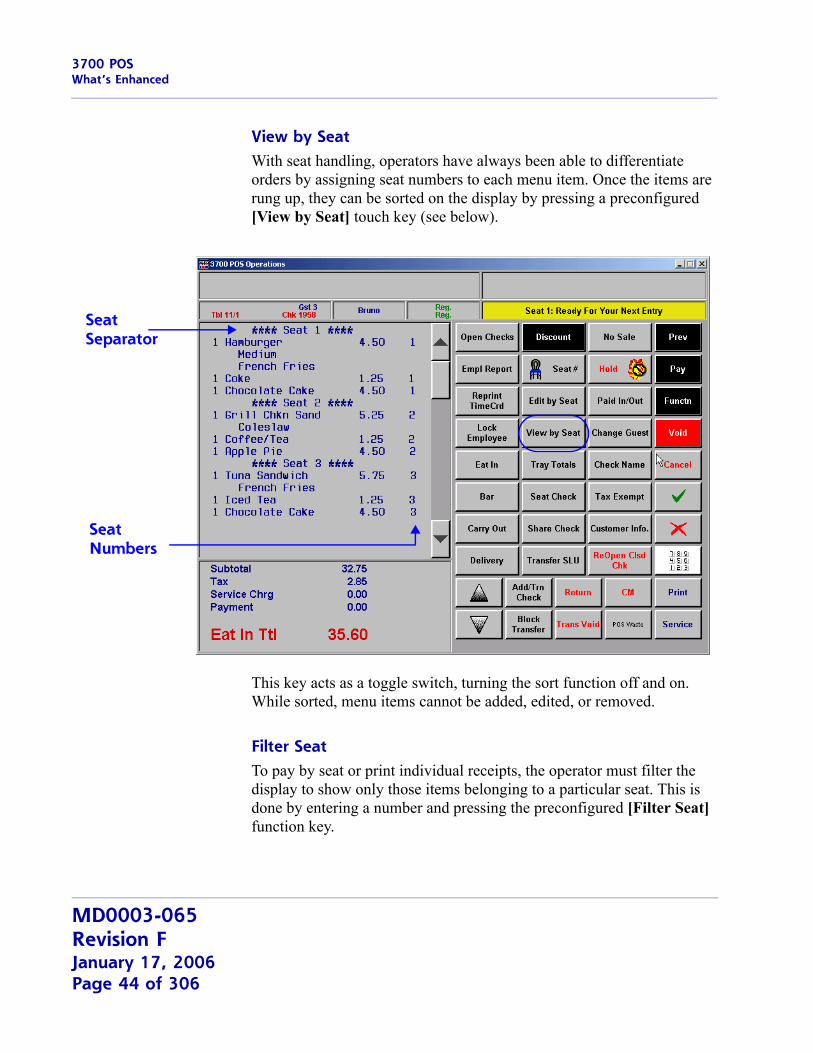
View by SeatWith seat handling, operators have always been able to differentiate orders by assigning seat numbers to each menu item. Once the items are rung up, they can be sorted on the display by pressing a preconfigured [View by Seat] touch key (see below).
This key acts as a toggle switch, turning the sort function off and on. While sorted, menu items cannot be added, edited, or removed.
Filter SeatTo pay by seat or print individual receipts, the operator must filter the display to show only those items belonging to a particular seat. This is done by entering a number and pressing the preconfigured [Filter Seat] function key.
SeatSeparator
SeatNumbers
MD0003-065Revision FJanuary 17, 2006Page 44 of 306
3700 POSWhat’s Enhanced
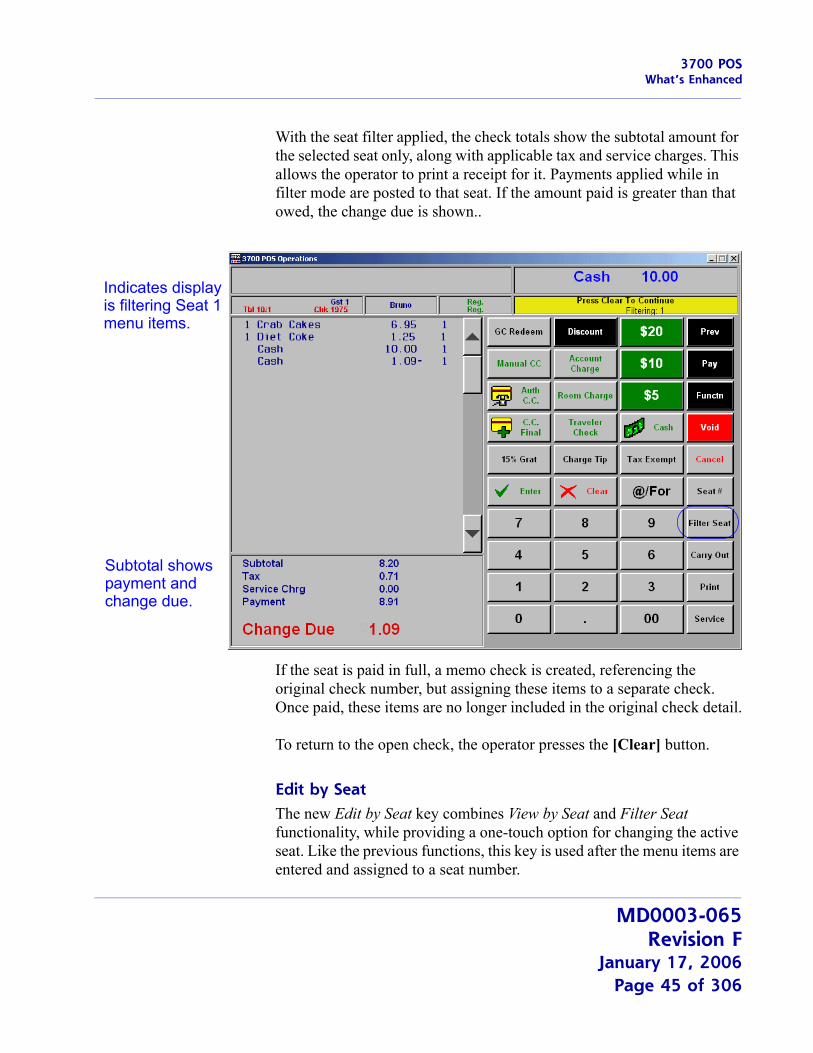
With the seat filter applied, the check totals show the subtotal amount for the selected seat only, along with applicable tax and service charges. This allows the operator to print a receipt for it. Payments applied while in filter mode are posted to that seat. If the amount paid is greater than that owed, the change due is shown..
If the seat is paid in full, a memo check is created, referencing the original check number, but assigning these items to a separate check. Once paid, these items are no longer included in the original check detail.
To return to the open check, the operator presses the [Clear] button.
Edit by SeatThe new Edit by Seat key combines View by Seat and Filter Seat functionality, while providing a one-touch option for changing the active seat. Like the previous functions, this key is used after the menu items are entered and assigned to a seat number.
Indicates display is filtering Seat 1menu items.
Subtotal showspayment andchange due.
MD0003-065Revision F
January 17, 2006Page 45 of 306
3700 POSWhat’s Enhanced
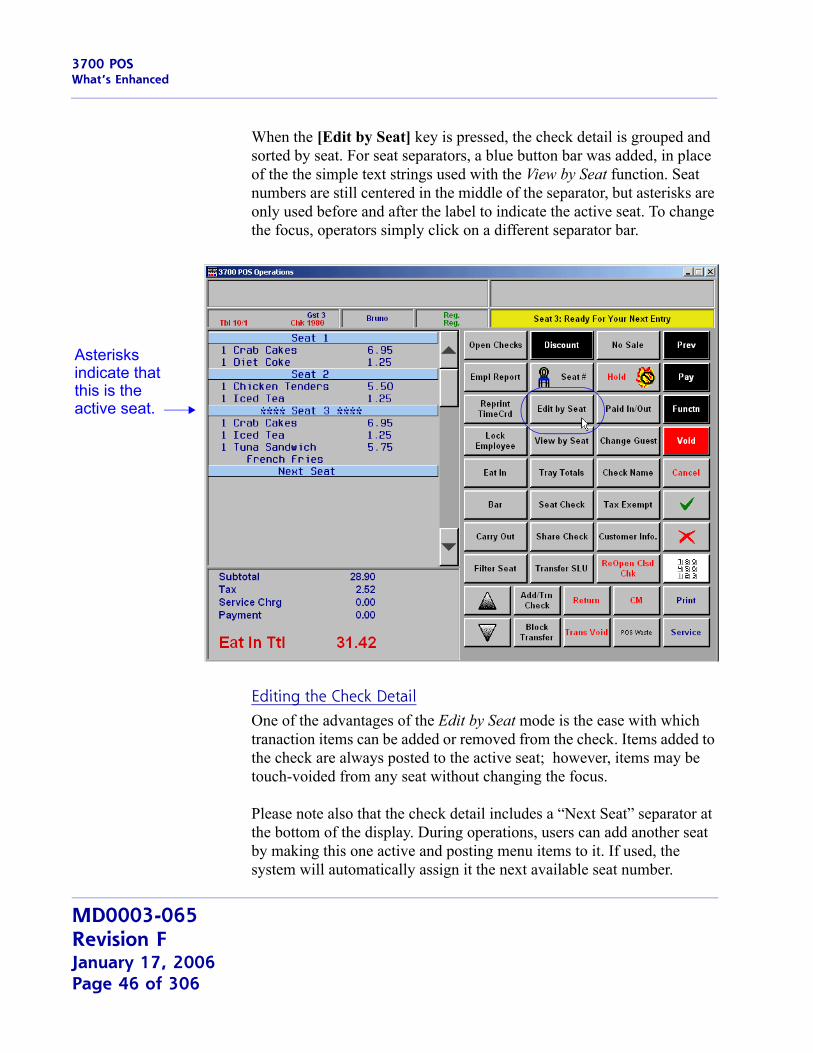
When the [Edit by Seat] key is pressed, the check detail is grouped and sorted by seat. For seat separators, a blue button bar was added, in place of the the simple text strings used with the View by Seat function. Seat numbers are still centered in the middle of the separator, but asterisks are only used before and after the label to indicate the active seat. To change the focus, operators simply click on a different separator bar.
Editing the Check DetailOne of the advantages of the Edit by Seat mode is the ease with which tranaction items can be added or removed from the check. Items added to the check are always posted to the active seat; however, items may be touch-voided from any seat without changing the focus.
Please note also that the check detail includes a “Next Seat” separator at the bottom of the display. During operations, users can add another seat by making this one active and posting menu items to it. If used, the system will automatically assign it the next available seat number.
Asterisksindicate thatthis is theactive seat.
MD0003-065Revision FJanuary 17, 2006Page 46 of 306
3700 POSWhat’s Enhanced
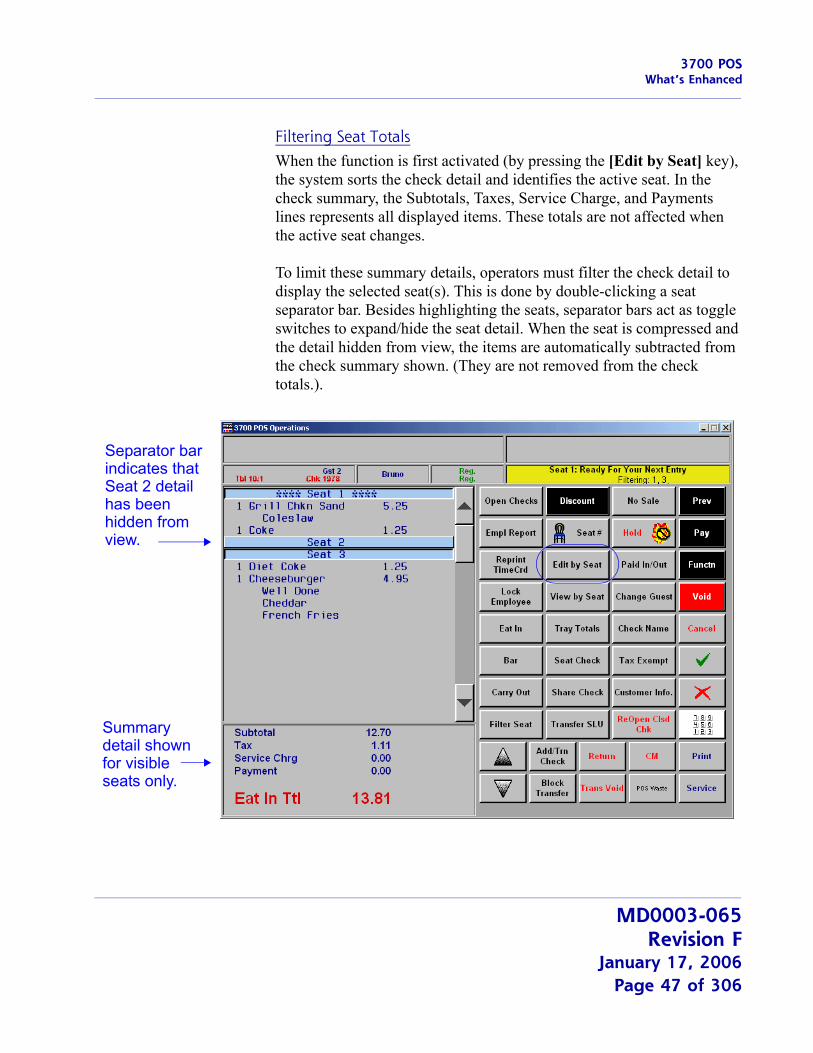
Filtering Seat TotalsWhen the function is first activated (by pressing the [Edit by Seat] key), the system sorts the check detail and identifies the active seat. In the check summary, the Subtotals, Taxes, Service Charge, and Payments lines represents all displayed items. These totals are not affected when the active seat changes.
To limit these summary details, operators must filter the check detail to display the selected seat(s). This is done by double-clicking a seat separator bar. Besides highlighting the seats, separator bars act as toggle switches to expand/hide the seat detail. When the seat is compressed and the detail hidden from view, the items are automatically subtracted from the check summary shown. (They are not removed from the check totals.).
Separator barindicates thatSeat 2 detailhas been hidden fromview.
Summarydetail shownfor visibleseats only.
MD0003-065Revision F
January 17, 2006Page 47 of 306
3700 POSWhat’s Enhanced
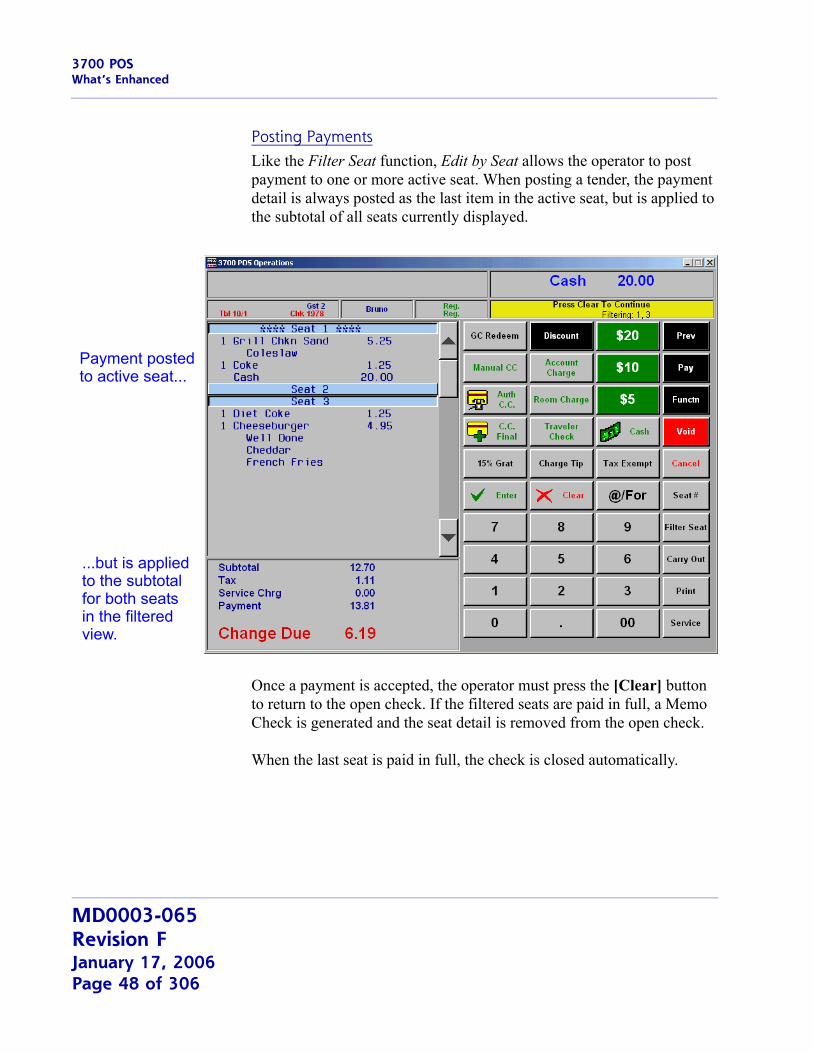
Posting PaymentsLike the Filter Seat function, Edit by Seat allows the operator to post payment to one or more active seat. When posting a tender, the payment detail is always posted as the last item in the active seat, but is applied to the subtotal of all seats currently displayed.
Once a payment is accepted, the operator must press the [Clear] button to return to the open check. If the filtered seats are paid in full, a Memo Check is generated and the seat detail is removed from the open check.
When the last seat is paid in full, the check is closed automatically.
Payment postedto active seat...
...but is appliedto the subtotalfor both seatsin the filtered view.
MD0003-065Revision FJanuary 17, 2006Page 48 of 306

3700 POSWhat’s Enhanced
Allow Tray TotalsThe new Allow Tray Totals function is similar in look and feel to the Edit by Seat function. When the function key is activated, menu items that are posted to a seat number are listed under blue separator button bars. Asterisks are used to indicate the active seat, which may be changed by simply clicking a different bar in the check detail.
As with Edit by Seat, menu items can be added, edited, or deleted to any of the seats while the Allow Tray Totals function is active. Additions are always posted to the active seat, but changes and deletions can be made by touch-selecting any item without affecting the seat focus.
The main difference with tray totals, is that it allows seats to be paid as soon as they are rung up. That is, each person in the line can order and pay without closing the main check.
The following steps illustrate how a multi-order transaction would be handled using the tray totals function:
1. Start a check and ring menu items for the first tray.
2. Press the [Allow Tray Totals] function key. The blue seat separator bar is added above the menu items with the Seat 1 label. A second separator is added below the menu items with the label Next Seat. Notice however, that the asterisks surround the Seat 1 label, indicating that this is still the active seat.
3. If the order is complete, the operator can either pay this tray, based on the subtotal shown, or press the Next Seat bar to add items for the next person/tray.
MD0003-065Revision F
January 17, 2006Page 49 of 306
3700 POSWhat’s Enhanced
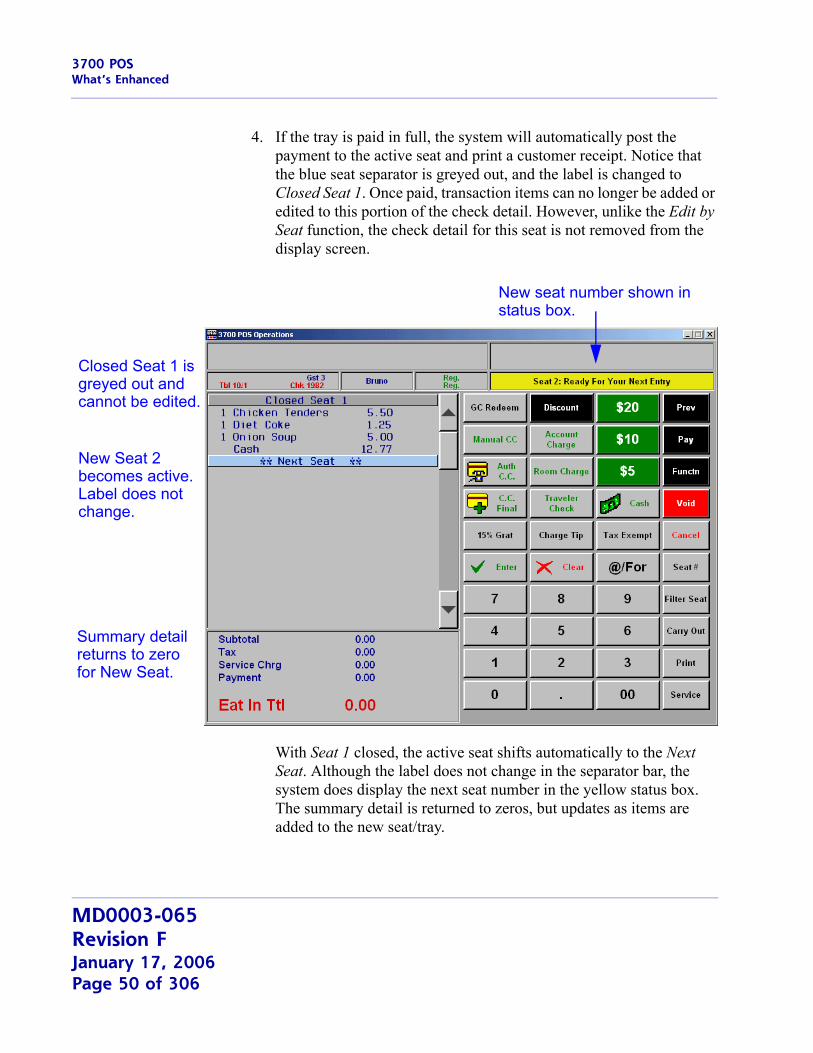
4. If the tray is paid in full, the system will automatically post the payment to the active seat and print a customer receipt. Notice that the blue seat separator is greyed out, and the label is changed to Closed Seat 1. Once paid, transaction items can no longer be added or edited to this portion of the check detail. However, unlike the Edit by Seat function, the check detail for this seat is not removed from the display screen.
With Seat 1 closed, the active seat shifts automatically to the Next Seat. Although the label does not change in the separator bar, the system does display the next seat number in the yellow status box. The summary detail is returned to zeros, but updates as items are added to the new seat/tray.
Closed Seat 1 is greyed out andcannot be edited.
New Seat 2 becomes active.Label does notchange.
New seat number shown instatus box.
Summary detailreturns to zerofor New Seat.
MD0003-065Revision FJanuary 17, 2006Page 50 of 306

3700 POSWhat’s Enhanced
When all of the menu items for this seat/tray have been entered, the operator can close the seat by posting the payments, discounts, and/or service charges for this tray. As before, payments in full result in a Closed Seat 2, and shift the focus to the Next Seat (3). This process may be repeated until all of the individual orders have been posted and/or paid to the current check.
5. When the last order has been entered and paid, the operator presses the [Service Total] key. If dynamic order mode is not enabled, this sends all of the menu items to the remote devices and closes the check.
As with the Edit by Seat function, customers can opt to pay one or more seats at a time, or tender payment for the entire check. To pay multiple seats, the operator would double-click on the separator bars to expand/collapse the check detail. The summary detail subtotals the displayed orders.
Status box indicates which seats are included in the filter.
Summary detail displayed for both filtered seat entries.
MD0003-065Revision F
January 17, 2006Page 51 of 306
3700 POSWhat’s Enhanced
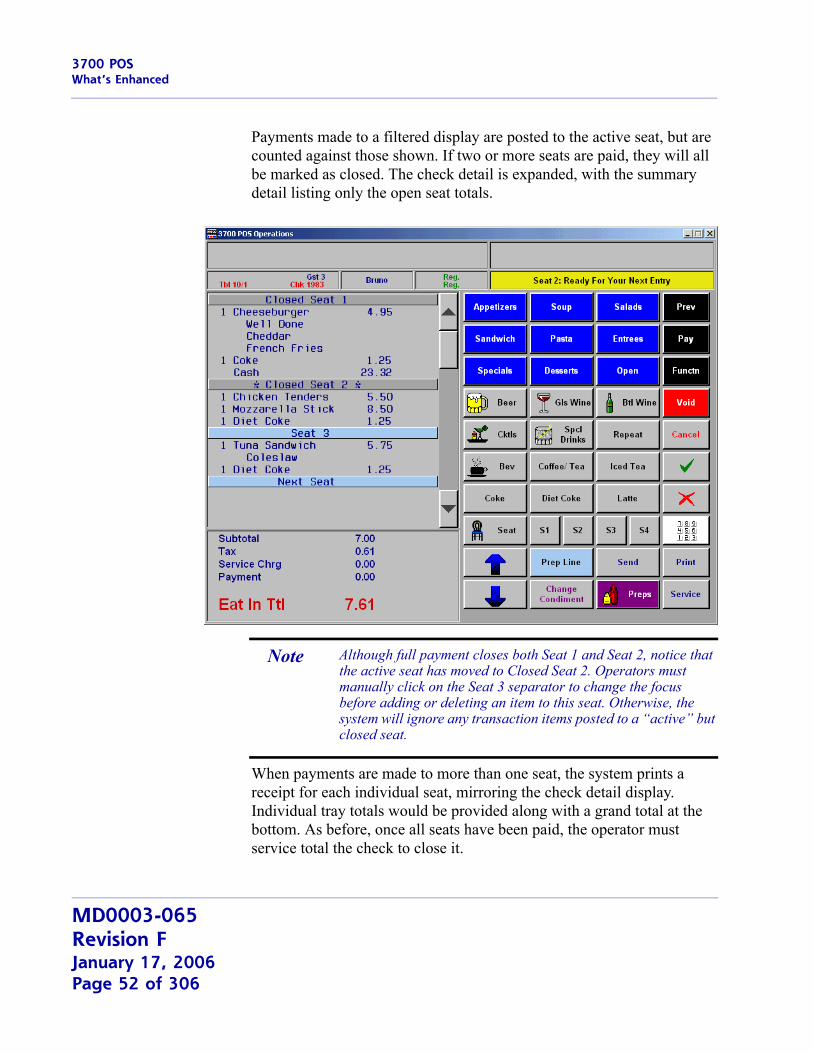
Payments made to a filtered display are posted to the active seat, but are counted against those shown. If two or more seats are paid, they will all be marked as closed. The check detail is expanded, with the summary detail listing only the open seat totals.
When payments are made to more than one seat, the system prints a receipt for each individual seat, mirroring the check detail display. Individual tray totals would be provided along with a grand total at the bottom. As before, once all seats have been paid, the operator must service total the check to close it.
Note Although full payment closes both Seat 1 and Seat 2, notice that the active seat has moved to Closed Seat 2. Operators must manually click on the Seat 3 separator to change the focus before adding or deleting an item to this seat. Otherwise, the system will ignore any transaction items posted to a “active” but closed seat.
MD0003-065Revision FJanuary 17, 2006Page 52 of 306

3700 POSWhat’s Enhanced
Feature ComparisonThe following table provides a comparison of the seat filtering functions described in this section:
View by Seat Edit by Seat Tray Totals
Existing touch key function.
Can be toggled on/off at any time while the check is open.
Sorts menu items by seat in check detail.
Items are not editable.
Payments post to the entire check.
New touch key function.
Can be toggled on/off at any time while the check is open.
Sorts menu items by seat in check detail.
Allows user to select the active seat by pressing the blue seat separator bar.
Can expand/collapse display to show all items or active seat only with tax and subtotals.
Allows edit of menu items.
Payments post to the active seat and are subtracted from the check total.
If a seat is paid in full, a memo tender is generated and the seat separator and menu items are removed from the check detail.
Check closes automatically when the last open seat is paid in full.
New touch key function.
May be activated at any time after the check is started. Remains on until the check is closed.
Sorts menu items by seat in check detail.
Allows user to select the active seat by pressing the seat separator bar.
Can expand/collapse display to show all items or active seat only with tax and subtotals.
Allows edit of menu items.
Payments post to the active seat and are subtracted from the check total.
If a seat is paid in full, a memo tender is generated. The seat separator is greyed out and menu items are no longer editable. Closed seats are not removed from the check detail display.
To close check, user must service total after all seats have been paid in full.
Filter Seat
Existing touch key function.
Displays menu items for selected seat only.
Allows edit of menu items.
Payments posted to the active seat are subtracted from the check total.
If the filtered seat is paid in full, a Memo Check is created, referencing the original check number, but assigning a new check number to this transaction. A memo tender is also generated.
Does not return automatically to open check after filtered seat is paid in full.
MD0003-065Revision F
January 17, 2006Page 53 of 306
3700 POSWhat’s Enhanced
Touch Item Discounts Supports Depleted Amounts OptionPreviously, users had the option of calculating subtotal discounts based on the full menu item prices or on the subtotal minus discounts (i.e., the depleted amount). This option has been extended to touch item discounts as well.
Now, when the Item discount option is selected (POS Configurator | Sales | Discount/Service | Discounts), the system will calculate the touch item discount against the balance remaining after any other discounts have been applied.
Updated Support for Unencrypted OPSDisplaySys.cfg FileIn the previous release (RES 3.2 sp6), RES added the ability to resize and reposition the POS Operations (OPS) screen in order to support side-by-side views of OPS and another application (e.g., KDS), and to switch focus between the two without losing sight of either.
To support this functionality, users had to first access the Registry and add the following value:
REGEDIT4[HKEY_Local_Machine\Software\MICROS\3700\Ops]“allowunencryptedcfgfile”=dword:00000001
After that, other Registry changes were needed, including the addition of Resolution and WindowLocation keys to determine the size and positioning of the OPS window. To work properly, these values also required a matching template in the OpsDisplaySys.cfg file. Otherwise, an error message would display and the system would default to the nearest matching resolution.
MD0003-065Revision FJanuary 17, 2006Page 54 of 306
3700 POSWhat’s Enhanced
In the past, changes to the configuration file necessitated help from a qualified MICROS support representative. With the release of the side-by-side (or split screen) feature, this is no longer practical. To accommodate the number of sites requesting this capability, access to the unencrypted OPSDisplaySys.cfg file has been made easier. This change eliminates the modifications to the Registry and provides a more direct way to modify the screen configuration. As always, users are cautioned to exercise care when implementing system changes.
ProceduresFollow these steps to install an unencrypted configuration file:
1. From the Windows Explorer, navigate to the \micros\res\pos\etc folder on the Server and locate the OPSDisplaySys.cfg file. Copy this file to a safe location. This file will need to be reinstalled before upgrading the system.
2. Retrieve the OPSDisplaySys.txt file from the DISK2\Support\sdk\ OPS Display User Configuration folder on CD 2 of the RES 3.2 GR release. This is an unencrypted version of the configuration file.
3. Open the file in a text editor and edit as needed.
4. Rename the text file to OPSDisplaySys.cfg and copy to the \micros\res\pos\etc directory. When prompted, select YES to overwrite the existing .cfg file.
MD0003-065Revision F
January 17, 2006Page 55 of 306
3700 POSWhat’s Enhanced
VAT Net Totals by Menu Items and Order TypePrevious database limitations prevented sites from reporting menu item totals when the items were configured with multiple VAT taxes linked by order type.
To correct this problem, changes were made in the way taxable totals are calculated and posted to the database, and in the way discounts are handled. A new table (dly_rvc_fixed_prd_mi_ot_ttl) was added to collect sales detail by menu item and order type. The table also posts VAT tax information not previously tracked by the system. This includes VAT tax percentages (a 2 decimal place value) for both menu items and discounts, along with the actual VAT tax amount (up to 6 decimal places).
Since all discounts are now mapped to a menu item, a subtotal discount column is also included.
Changing Order TypesWith this redesign, operators will be able change the order type during a transaction and rely on the system to adjust the totals quickly and accurately. The following restrictions will apply:
Split Check operations are not allowed once the order type has been changed.
Edit Seat operations are not allowed if the order type has been changed and there are previous round items.
The order type may not be changed after a Split Check operation.
The order type may not be changed after an Edit Seat operation if there are previous round items.
The order type may not be changed prior to an Add Check operation if there are previous round items.
A memo tender is not allowed after the order type has been changed and if there are previous round items.
MD0003-065Revision FJanuary 17, 2006Page 56 of 306
3700 POSWhat’s Enhanced
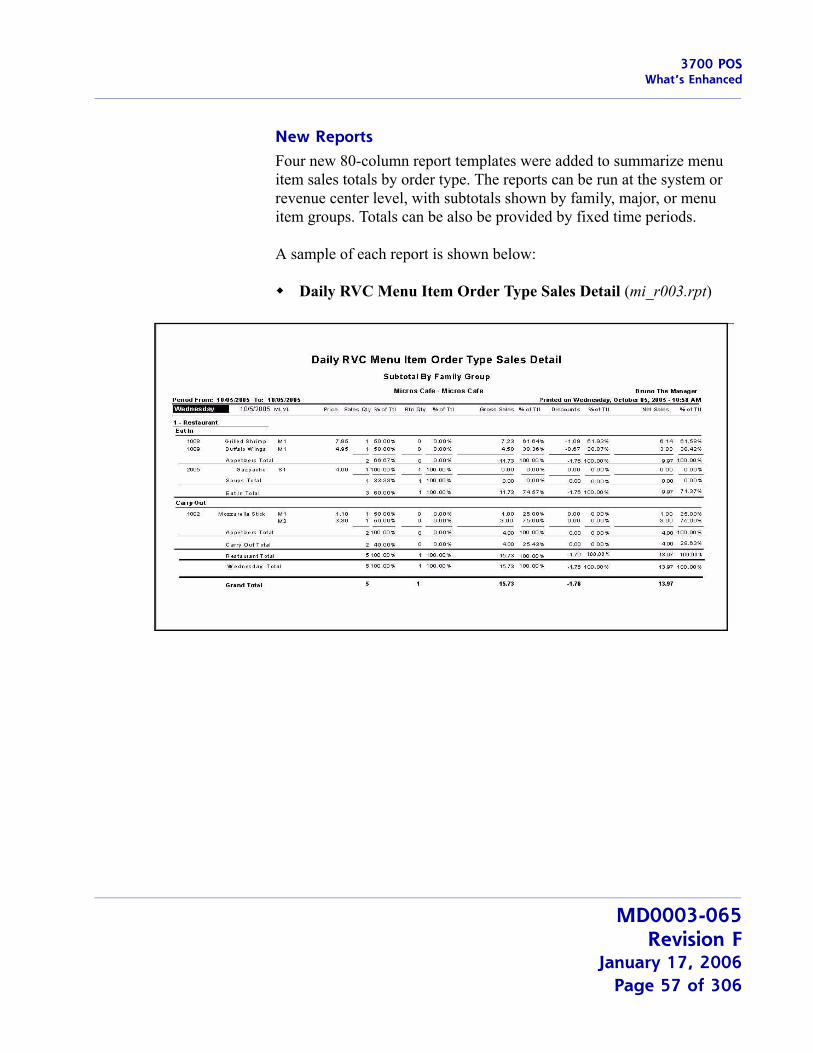
New ReportsFour new 80-column report templates were added to summarize menu item sales totals by order type. The reports can be run at the system or revenue center level, with subtotals shown by family, major, or menu item groups. Totals can be also be provided by fixed time periods.
A sample of each report is shown below:
Daily RVC Menu Item Order Type Sales Detail (mi_r003.rpt)
MD0003-065Revision F
January 17, 2006Page 57 of 306
3700 POSWhat’s Enhanced
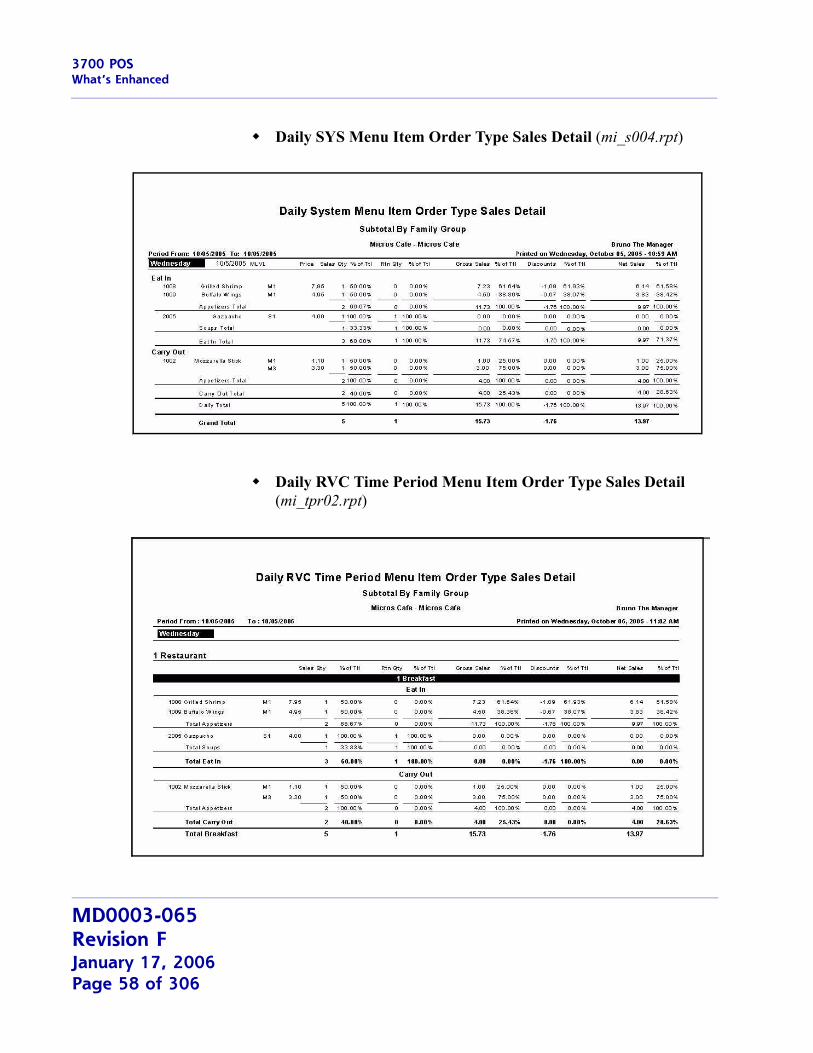
Daily SYS Menu Item Order Type Sales Detail (mi_s004.rpt)
Daily RVC Time Period Menu Item Order Type Sales Detail (mi_tpr02.rpt)
MD0003-065Revision FJanuary 17, 2006Page 58 of 306
3700 POSWhat’s Enhanced
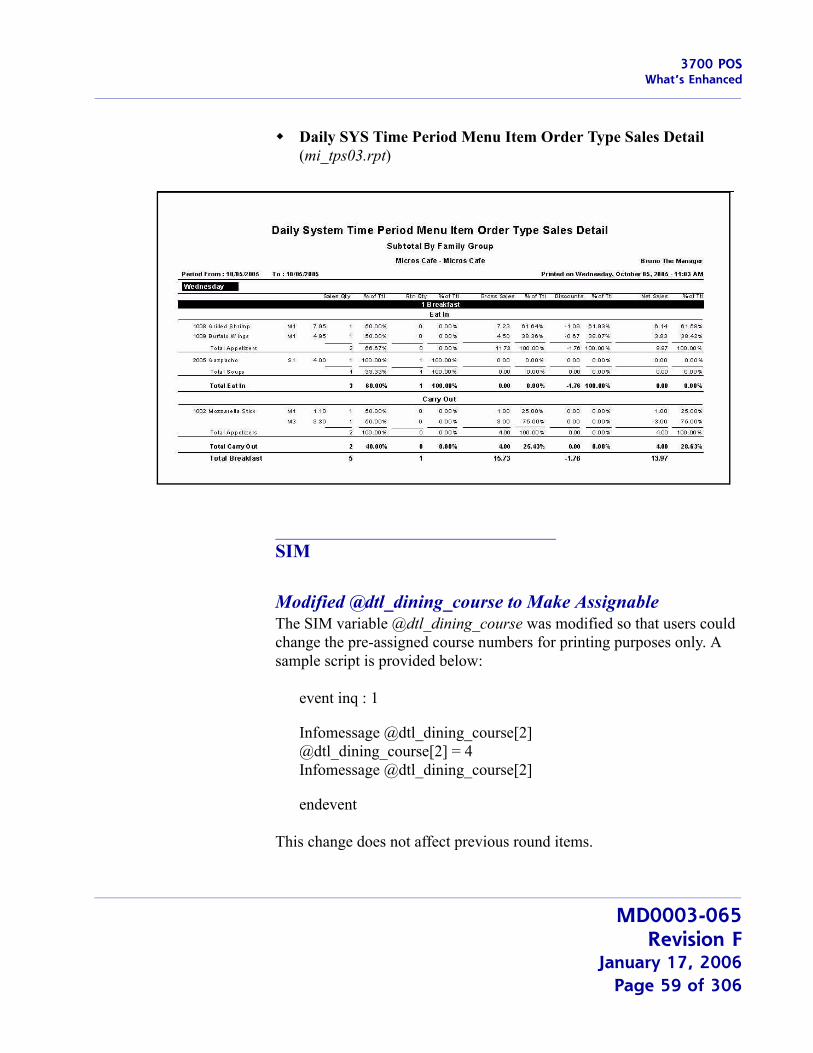
Daily SYS Time Period Menu Item Order Type Sales Detail (mi_tps03.rpt)
SIM
Modified @dtl_dining_course to Make AssignableThe SIM variable @dtl_dining_course was modified so that users could change the pre-assigned course numbers for printing purposes only. A sample script is provided below:
event inq : 1
Infomessage @dtl_dining_course[2]@dtl_dining_course[2] = 4Infomessage @dtl_dining_course[2]
endevent
This change does not affect previous round items.
MD0003-065Revision F
January 17, 2006Page 59 of 306
3700 POSWhat’s Enhanced
MD0003-065Revision FJanuary 17, 2006Page 60 of 306
3700 POSWhat’s Revised
What’s Revised A revision is defined as a correction made to any existing form, feature, or function currently resident in the 3700 POS software. To qualify as a revision, the change must satisfy the following criteria:
The basic form, feature, or functionality must be part of the previous version of the software.
The change must replace the current item or remove it from the application.
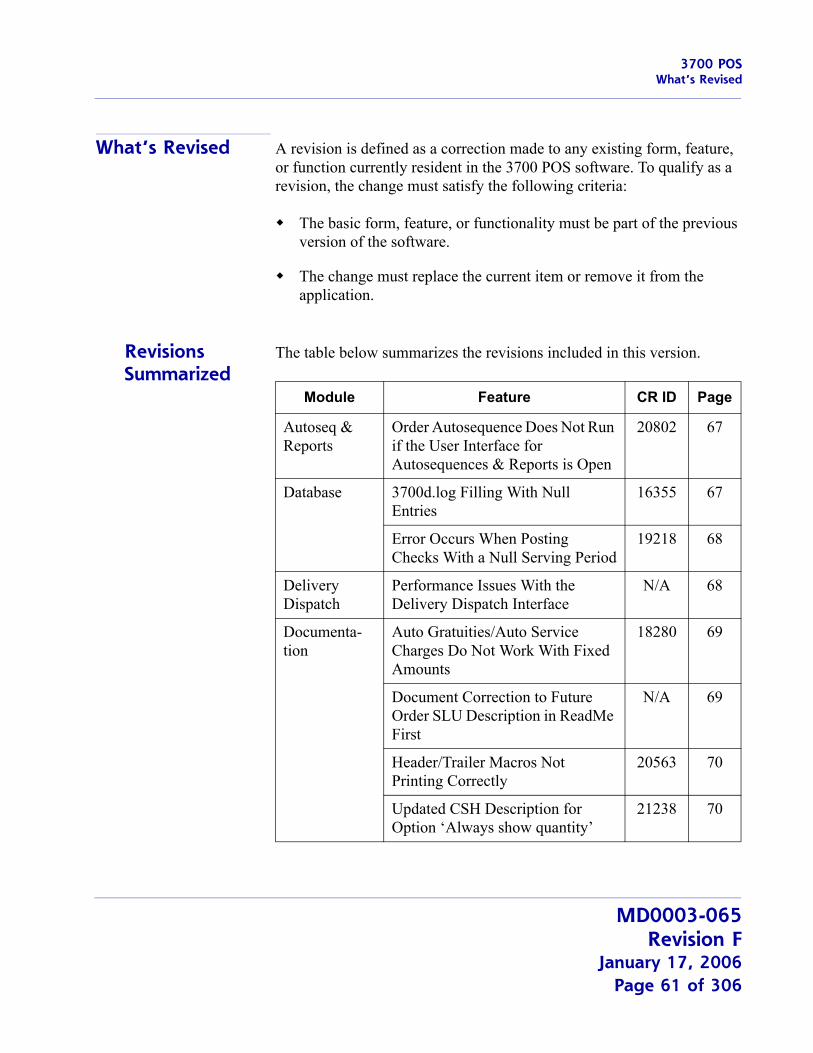
Revisions Summarized
The table below summarizes the revisions included in this version.
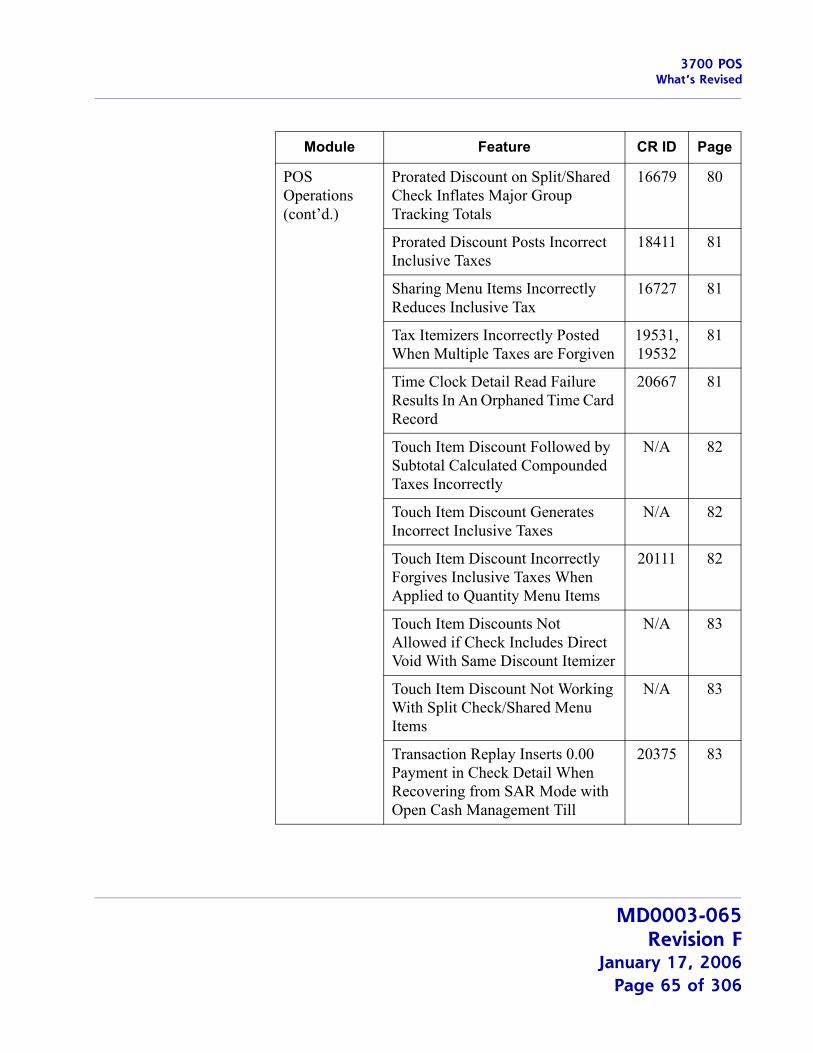
Module Feature CR ID Page
Autoseq & Reports
Order Autosequence Does Not Run if the User Interface for Autosequences & Reports is Open
20802 67
Database 3700d.log Filling With Null Entries
16355 67
Error Occurs When Posting Checks With a Null Serving Period
19218 68
Delivery Dispatch
Performance Issues With the Delivery Dispatch Interface
N/A 68
Documenta-tion
Auto Gratuities/Auto Service Charges Do Not Work With Fixed Amounts
18280 69
Document Correction to Future Order SLU Description in ReadMe First
N/A 69
Header/Trailer Macros Not Printing Correctly
20563 70
Updated CSH Description for Option ‘Always show quantity’
21238 70
MD0003-065Revision F
January 17, 2006Page 61 of 306
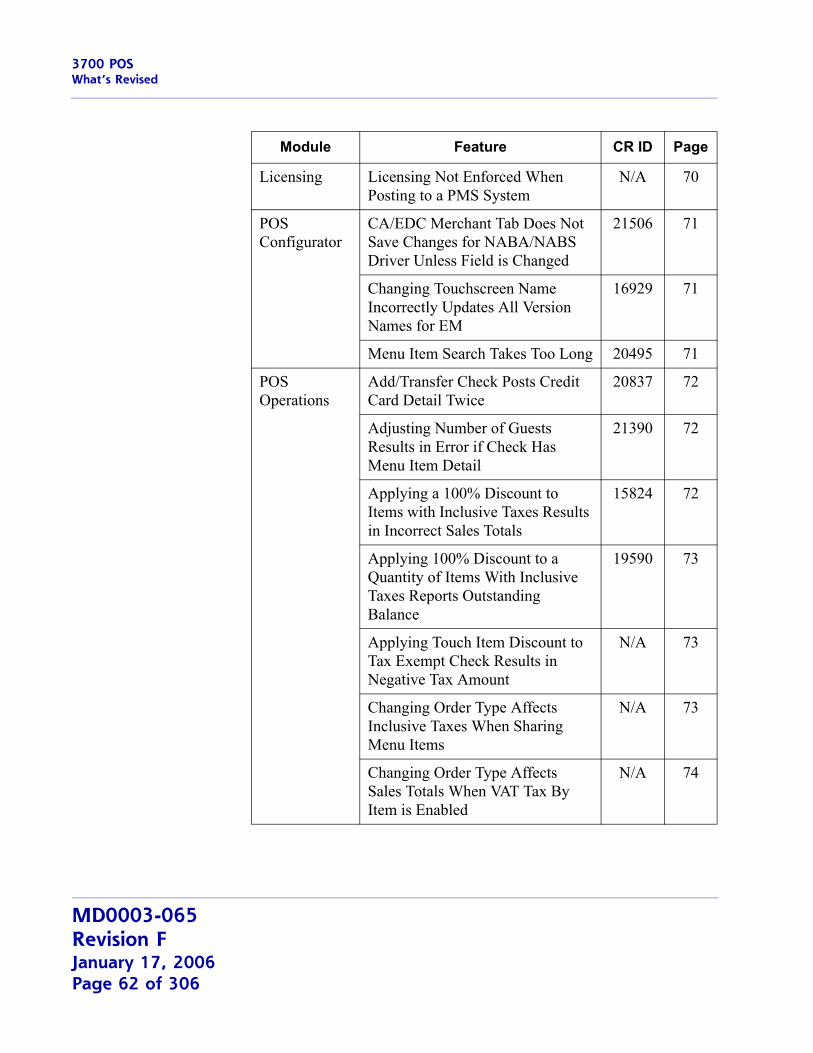
3700 POSWhat’s Revised
Licensing Licensing Not Enforced When Posting to a PMS System
N/A 70
POS Configurator
CA/EDC Merchant Tab Does Not Save Changes for NABA/NABS Driver Unless Field is Changed
21506 71
Changing Touchscreen Name Incorrectly Updates All Version Names for EM
16929 71
Menu Item Search Takes Too Long 20495 71
POS Operations
Add/Transfer Check Posts Credit Card Detail Twice
20837 72
Adjusting Number of Guests Results in Error if Check Has Menu Item Detail
21390 72
Applying a 100% Discount to Items with Inclusive Taxes Results in Incorrect Sales Totals
15824 72
Applying 100% Discount to a Quantity of Items With Inclusive Taxes Reports Outstanding Balance
19590 73
Applying Touch Item Discount to Tax Exempt Check Results in Negative Tax Amount
N/A 73
Changing Order Type Affects Inclusive Taxes When Sharing Menu Items
N/A 73
Changing Order Type Affects Sales Totals When VAT Tax By Item is Enabled
N/A 74
Module Feature CR ID Page
MD0003-065Revision FJanuary 17, 2006Page 62 of 306
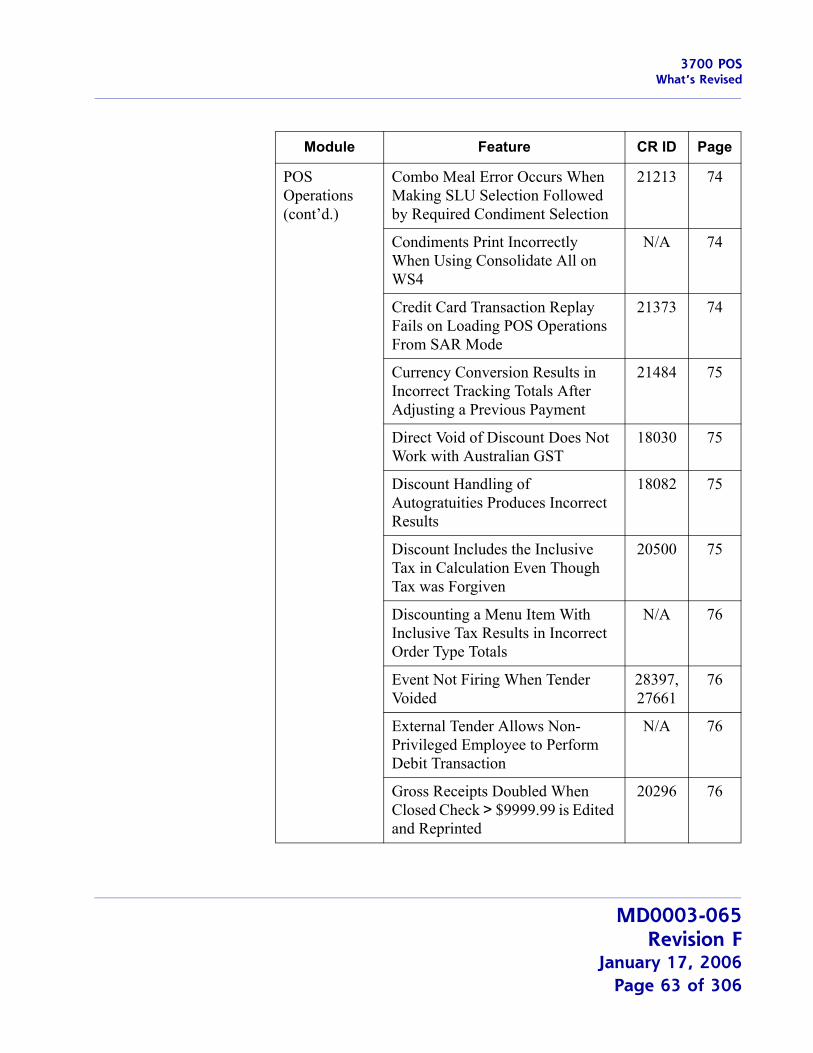
3700 POSWhat’s Revised
POS Operations (cont’d.)
Combo Meal Error Occurs When Making SLU Selection Followed by Required Condiment Selection
21213 74
Condiments Print Incorrectly When Using Consolidate All on WS4
N/A 74
Credit Card Transaction Replay Fails on Loading POS Operations From SAR Mode
21373 74
Currency Conversion Results in Incorrect Tracking Totals After Adjusting a Previous Payment
21484 75
Direct Void of Discount Does Not Work with Australian GST
18030 75
Discount Handling of Autogratuities Produces Incorrect Results
18082 75
Discount Includes the Inclusive Tax in Calculation Even Though Tax was Forgiven
20500 75
Discounting a Menu Item With Inclusive Tax Results in Incorrect Order Type Totals
N/A 76
Event Not Firing When Tender Voided
28397, 27661
76
External Tender Allows Non-Privileged Employee to Perform Debit Transaction
N/A 76
Gross Receipts Doubled When Closed Check > $9999.99 is Edited and Reprinted
20296 76
Module Feature CR ID Page
MD0003-065Revision F
January 17, 2006Page 63 of 306
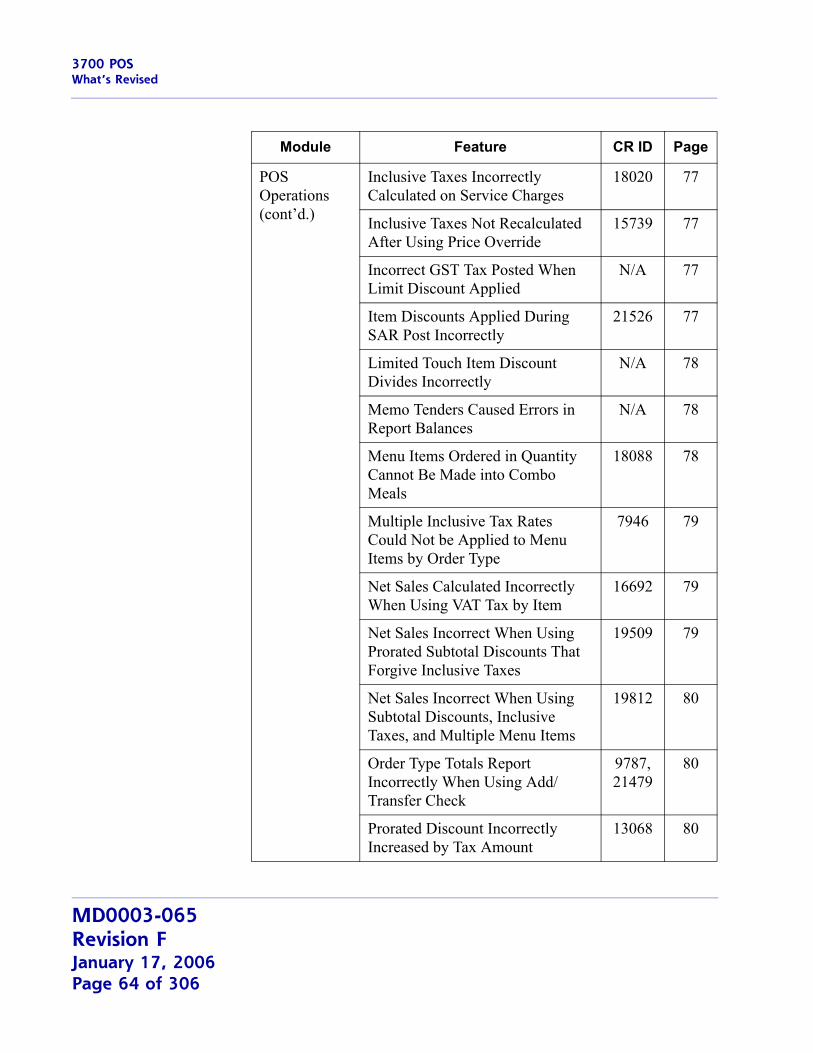
3700 POSWhat’s Revised
POS Operations (cont’d.)
Inclusive Taxes Incorrectly Calculated on Service Charges
18020 77
Inclusive Taxes Not Recalculated After Using Price Override
15739 77
Incorrect GST Tax Posted When Limit Discount Applied
N/A 77
Item Discounts Applied During SAR Post Incorrectly
21526 77
Limited Touch Item Discount Divides Incorrectly
N/A 78
Memo Tenders Caused Errors in Report Balances
N/A 78
Menu Items Ordered in Quantity Cannot Be Made into Combo Meals
18088 78
Multiple Inclusive Tax Rates Could Not be Applied to Menu Items by Order Type
7946 79
Net Sales Calculated Incorrectly When Using VAT Tax by Item
16692 79
Net Sales Incorrect When Using Prorated Subtotal Discounts That Forgive Inclusive Taxes
19509 79
Net Sales Incorrect When Using Subtotal Discounts, Inclusive Taxes, and Multiple Menu Items
19812 80
Order Type Totals Report Incorrectly When Using Add/Transfer Check
9787, 21479
80
Prorated Discount Incorrectly Increased by Tax Amount
13068 80
Module Feature CR ID Page
MD0003-065Revision FJanuary 17, 2006Page 64 of 306
3700 POSWhat’s Revised
POS Operations (cont’d.)
Prorated Discount on Split/Shared Check Inflates Major Group Tracking Totals
16679 80
Prorated Discount Posts Incorrect Inclusive Taxes
18411 81
Sharing Menu Items Incorrectly Reduces Inclusive Tax
16727 81
Tax Itemizers Incorrectly Posted When Multiple Taxes are Forgiven
19531, 19532
81
Time Clock Detail Read Failure Results In An Orphaned Time Card Record
20667 81
Touch Item Discount Followed by Subtotal Calculated Compounded Taxes Incorrectly
N/A 82
Touch Item Discount Generates Incorrect Inclusive Taxes
N/A 82
Touch Item Discount Incorrectly Forgives Inclusive Taxes When Applied to Quantity Menu Items
20111 82
Touch Item Discounts Not Allowed if Check Includes Direct Void With Same Discount Itemizer
N/A 83
Touch Item Discount Not Working With Split Check/Shared Menu Items
N/A 83
Transaction Replay Inserts 0.00 Payment in Check Detail When Recovering from SAR Mode with Open Cash Management Till
20375 83
Module Feature CR ID Page
MD0003-065Revision F
January 17, 2006Page 65 of 306
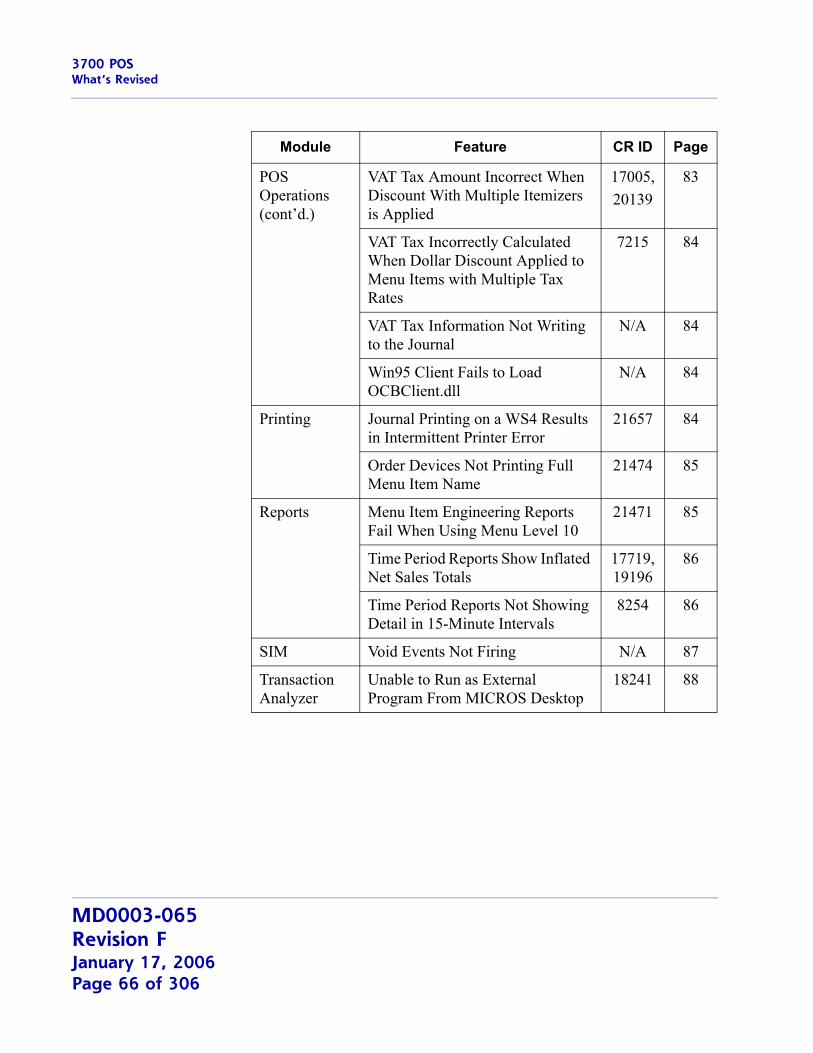
3700 POSWhat’s Revised
POS Operations (cont’d.)
VAT Tax Amount Incorrect When Discount With Multiple Itemizers is Applied
17005,20139
83
VAT Tax Incorrectly Calculated When Dollar Discount Applied to Menu Items with Multiple Tax Rates
7215 84
VAT Tax Information Not Writing to the Journal
N/A 84
Win95 Client Fails to Load OCBClient.dll
N/A 84
Printing Journal Printing on a WS4 Results in Intermittent Printer Error
21657 84
Order Devices Not Printing Full Menu Item Name
21474 85
Reports Menu Item Engineering Reports Fail When Using Menu Level 10
21471 85
Time Period Reports Show Inflated Net Sales Totals
17719, 19196
86
Time Period Reports Not Showing Detail in 15-Minute Intervals
8254 86
SIM Void Events Not Firing N/A 87
Transaction Analyzer
Unable to Run as External Program From MICROS Desktop
18241 88
Module Feature CR ID Page
MD0003-065Revision FJanuary 17, 2006Page 66 of 306
3700 POSWhat’s Revised
Revisions Detailed
Autosequences and Reports
Order Autosequence Does Not Run if the User Interface for Autosequences & Reports is OpenCR ID #: 20802
During setup, the Production Management (PM) application allows a user to configure an autosequence to run as soon as an order is created, placed, and approved (PM | Setup | PM Parameters | Ordering \ Run ordering autosequence). When activated, this option initiates an external program that exports the order data for E-Ordering purposes.
In the past, PM order configuration was at odds with the way RES handled the Autosequences and Reports module. That is, an autosequence could not be run as an external process as long as the Autosequences and Reports module was open on the desktop. To correct this problem, an exception was made for a PM ordering autosequence.
Database
3700d.log Filling With Null EntriesCR ID #: 16355
If a client was configured to be a backup server (not currently in BSM), and was either not running POS Operations or configured for use as a workstation, the system would log the following error every 3 seconds:
SQL Execution error [sp_GetUwsSeq]: Item Not Found
This was causing the 3700d.log to overload with unnecessary null entries. The problem has been corrected.
MD0003-065Revision F
January 17, 2006Page 67 of 306
3700 POSWhat’s Revised
Error Occurs When Posting Check with Null Serving PeriodsCR ID #: 19218
When posting checks to the database, the system would display the error message ‘Cursor not open when Serving Period posting, sp_post_srv_prd_cum.’ even though serving periods were not part of the configuration. The error message would also display if a check was transferred from a revenue center that used Serving Periods to a revenue center that did not. This has been corrected.
Delivery Dispatch
Performance Issues With the Delivery Dispatch InterfaceCR ID #: N/A
During operations, the Delivery Dispatch module failed to protect Check and Driver lists from overwriting at inappropriate times. Also, if a Check or Driver Status dialog box displayed, and the user closed the box without then paying the check, the system would leave that check in an invalid state. These problems have been corrected.
MD0003-065Revision FJanuary 17, 2006Page 68 of 306
3700 POSWhat’s Revised
Documentation
Auto Gratuities/Auto-Service Charges Do Not Work With Fixed AmountsCR ID #: 18280
When configuring service charges and gratuities, the system will only add the charge automatically if it is configured as a percentage. Fixed amounts are not supported by the feature. To clear up confusion, the following POS Configurator help files have been revised to include this information:
Amount (Sales | Discount/Service | General)
Amount (Sales | Discount/Service | Options)
Auto Service Charge (Revenue Center | RVC Discount/Service)
Document Correction to Future Order SLU Description in ReadMe FirstCR ID #: N/A
The description of the Future Order feature on page 177 of the RES ReadMe First document, MD0003-065, Revision D, (September 27, 2005), stated that after pressing the Future Order SLU key, the user would be prompted for a business date to filter the display of future orders. This is incorrect. When the SLU key is pressed, the system will list all future orders (in ascending order), with a display limit of 500 orders. Additional orders will not be shown until a future order is activated and space is made in the queue.
MD0003-065Revision F
January 17, 2006Page 69 of 306
3700 POSWhat’s Revised
Header/Trailer Macros Not Printing CorrectlyCR ID #: 20563
Documentation regarding the addition of macros to guest check headers and trailers incorrectly included the following elements, which were only intended for use with personal check tender:
^^ACCT — Personal checking account number^^AMT — Total amount of the tender^^PCHK — Check number of the personal check^^RT — Bank routing number^^TMED — Tender type
The references have been removed from the online documentation.
Updated CSH Description for Option ‘Always show quantity’CR ID #: 21238
The context-sensitive help for the option Always show quantity (Devices | Order Devices | Options) incorrectly stated that it must be enabled in order to print a quantity of 1 for all menu items. In fact, this option only affects the count of condiments and combo meal main and side items. The POSCfg.hlp file has been corrected.
Licensing
Licensing Not Enforced When Posting to PMS SystemCR ID #: N/A
Previously, the system failed to check for valid licensing codes when posting transactions to a PMS System. This problem has been corrected.
MD0003-065Revision FJanuary 17, 2006Page 70 of 306
3700 POSWhat’s Revised
POS Configurator
CA/EDC Merchant Tab Does Not Save Changes for NABA/NABS Driver Unless Field is ChangedCR ID #: 21506
When configuring the NABA or NABS credit card drivers, users were unable to enter and save changes in a previously blank field on the Merchant tab (POS Configurator | Devices | CA\EDC Drivers) using the
icon. To save, the data had to be entered into a field and the focus shifted to another field before the save button was pressed. This has been corrected.
Changing Touchscreen Name Incorrectly Updates All Version Names for EMCR ID #: 16929
Previously, when the user changed the name of a touchscreen in POS Configurator (Devices | Touchscreens), the system would change the version name for all records (cfg_version_def.version_name) in the database, instead of updating the default record only. This has been corrected.
Menu Item Search Takes Too LongCR ID #: 20495
When searching for a menu item on a database with a large (150,000+ items), the system would take an unacceptably long time to locate the required entry. The larger the database, the longer the wait. To correct this problem, a new Search and Filter bar was implemented. Refer to page 26 for a complete description of this feature enhancement.
MD0003-065Revision F
January 17, 2006Page 71 of 306
3700 POSWhat’s Revised
POS Operations
Add/Transfer Check Posts Credit Card Detail TwiceCR ID #: 20837
After posting a credit card payment before closing a check, if the user reopened the check, performed an add/transfer, and then closed the check again, the system would post two credit card transactions for the same amount. These transactions would be picked up during a Credit Card Batch settlement, causing a double-billing of the customer’s account. This has been corrected.
Adjusting Number of Guests Results in Error if Check Has Menu Item DetailCR ID #: 21390
Previously, if the option Seat count cannot exceed cover count is enabled (Revenue Center | RVC Seats), operators could not change the number of guests on a check once a menu item was added to it. This occurred even if the number of seats used was less than the number of covers entered. This problem has been corrected.
Applying a 100% Discount to Items with Inclusive Taxes Results in Incorrect Sales TotalsCR ID #: 15824
When applying a 100% discount to menu items with inclusive taxes, the system was showing a discrepancy between the net sales totals and the outstanding balance when the sales detail reports were run. The problem only occurred when using subtotal discounts, which produced different results when calculating the menu item prices and tax rates. Now that all discounts are being treated as item discounts, this is no longer an issue.
MD0003-065Revision FJanuary 17, 2006Page 72 of 306
3700 POSWhat’s Revised
Applying 100% Discount to a Quantity of Items With Inclusive Taxes Reports Outstanding BalanceCR ID #: 19590
Applying a 100% discount on items that were rung in as a quantity and that have inclusive tax can leave an outstanding amount. This will not be apparent from Operations, because the check will be closed to a zero balance. However, because the tax was calculated individually for the sale and as a total for the discount, there was a discrepancy between the values posted to the database. The discrepancy showed up in the reports and grew as the totals increased. This problem has been corrected.
Applying Touch Item Discount to Tax Exempt Check Results in Negative Tax AmountCR ID #: N/A
After applying a tax exempt status to a check, adding a touch item discount that forgives taxes would result in a negative tax amount. The problem occurred because items added after the tax exemption were not included in the exemption. To correct this problem, the functionality has been changed. Now, if a transaction item is posted after a tax exemption has been applied to a check, the tax exemption will be deleted.
Changing Order Type Affects Inclusive Taxes When Sharing Menu ItemsCR ID #: N/A
After splitting a check, if a menu item with inclusive taxes is shared, the system allocates the tax portion to the shared item on the original check. This means that when the order type forgives inclusive taxes, the tax amount is subtracted from only one of the split checks.
Previously, if the user then changed the order type to one that did NOT forgive inclusive taxes, the system would incorrectly add the original tax amount to each portion of the shared menu item. This was causing the menu item price to be larger than it should have been. The problem has been corrected.
MD0003-065Revision F
January 17, 2006Page 73 of 306
3700 POSWhat’s Revised
Changing Order Type Affects Sales Totals When VAT TAX By Item is EnabledCR ID #: N/A
During operations, sales totals were posted incorrectly if the user changed the check’s order type from one that did not use VAT taxes, to one that calculated VAT by the item (System | Restaurant | Taxes). This problem has been corrected.
Combo Meal Error Occurs When Making SLU Selection Followed by Required Condiment SelectionCR ID #: 21213
When ringing up a combo meal, a "No Entries Exist" error would be generated if one part of the meal was selected from a SLU and the next part had a required condiment. To correct this problem, the system was modified to ignore a staydown SLU status when ordering combo meals. If set, the system will revert to staydown mode once the combo meal is completed.
Condiments Print Incorrectly When Using Consolidate All on WS4CR ID #: N/A
When ordering a large number of items with condiments from a WS4, the order output is incorrect if the option Consolidate All (Devices | Order Devices | Options) is enabled. This problem has been corrected.
Credit Card Transaction Replay Fails on Loading POS Operations From SAR ModeCR ID #: 21373
If a client is in Stand Alone Resiliancy (SAR) Mode and a guest check is paid using a manually authorized credit card tender, the Standalone Transaction Replay process failed to post the payment to the database when the workstation was rebooted. This problem has been corrected.
MD0003-065Revision FJanuary 17, 2006Page 74 of 306
3700 POSWhat’s Revised
Currency Conversion Results in Incorrect Tracking Totals After Adjusting a Previous Payment CR ID #: 21484
When using foreign currency conversions, if the site attempted to correct a partially paid check by voiding the payment or posting a negative transaction, the system failed to remove the original payment from the tracking totals. Instead, the converted amount, whether positive or negative, was added to the tracking totals, which caused the daily sales totals to be inflated. This problem has been corrected.
Direct Void of Discount Does Not Work with Australian GSTCR ID #: 18030
Direct void of a discount causes the inclusive tax to post incorrectly on sites where the Australian GST is enabled (System | Restaurant | Taxes). The tax on the voided discount is posted twice as a negative value, instead of adding back for a net total of 0. This has been corrected.
Discount Handling of Autogratuities Produces Incorrect ResultsCR ID #: 18082
Previously, if a discount was applied to a check that included an autogratuity and was configured for Canadian GST, the wrong amount of tax and/or autogratuity would be subtracted from the total. This problem has been corrected.
Discount Includes the Inclusive Tax in Calculation Even Though Tax was Forgiven CR ID 20500
When using a touch item discount that is setup to forgive inclusive taxes, the system would apply the discount to the full menu item price (i.e., with inclusive tax), even though the tax was not collected. This caused the discount amount to be higher than it should have been. It has been corrected.
MD0003-065Revision F
January 17, 2006Page 75 of 306
3700 POSWhat’s Revised
Discounting a Menu Item With Inclusive Tax Results in Incorrect Order Type TotalsCR ID #: N/A
When applying a menu item discount that forgives inclusive taxes, the system failed to reduce the applicable taxes by the correct amount. Consequently, if the site was also configured to Post gross sales to order type totals (Revenue Center | RVC Posting | Options), the order type totals would be reported incorrectly. This problem has been corrected.
Event Not Firing When Tender VoidedCR ID #: 28397, 27661
When using a PMS interface, attempts by the user to void a partial payment failed to fire the appropriate SIM event. This has been corrected.
External Tender Allows Non-Privileged Employee to Perform Debit TransactionsCR ID #: N/A
Previously, an employee who was not privileged to pay transactions could still use the external tender function to perform a debit transaction. To correct this problem, the system now checks the employee privileges when the external payment key is pressed and, if necessary, prompts for an authorized employee before continuing.
Gross Receipts Doubled When Closed Check > $9999.99 is Edited and ReprintedCR ID #: 20296
After tendering a check where the total sales was greater than or equal to $10K, reopening the closed check to edit or reprint it would cause the system to repost the totals to net sales. This would cause the gross receipts for that check to be reported twice. This has been corrected.
MD0003-065Revision FJanuary 17, 2006Page 76 of 306
3700 POSWhat’s Revised
Inclusive Taxes Incorrectly Calculated on Service ChargesCR ID #: 18020
When using inclusive taxes, the system would add service charges to the taxable totals but failed to collect sales tax on the additional amount. This problem has been corrected.
Inclusive Taxes Not Recalculated After Using Price OverrideCR ID #: 15739
After using the Price Override function on a menu item linked to an inclusive tax rate, the system failed to recalculate the tax collected to match the overridden menu item price. The tax collected remained that of the original menu item price. This has been corrected.
Incorrect GST Tax Posted When Limit Discount AppliedCR ID #: N/A
When using Australian GST (System | Restaurant | Taxes), applying a discount with the Limit discount option enabled (Sales | Discount/Service | Discounts) resulted in the wrong the GST tax amount. This problem has been corrected.
Item Discounts Applied During SAR Post IncorrectlyCR ID #: 21526
Item discounts that were applied to a check while a workstation was in Standalone Recovery (SAR) mode were not always posting correctly when replayed to the database. When the transactions were posted back, the discount would receive a parent_trans_seq equal to the trans_seq of the current round. Therefore, if a discount was applied to a menu item from a previous round, the parent_trans_seq would be incorrect. This problem has been fixed.
MD0003-065Revision F
January 17, 2006Page 77 of 306
3700 POSWhat’s Revised
Limited Touch Item Discount Divides IncorrectlyCR ID #: N/A
The Limit discount option (Sales | Discount/Service | Discounts) allows a user to place a maximum value on the amount or percentage that can be taken when a discount is applied. In the past, when limiting the amount of a touch item discount, the system would calculate this value relative to each menu item rather than the total check discounts. This has been corrected. Limited touch item discounts are now split among the menu items by their proportion of the subtotal.
Memo Tenders Caused Errors in Report BalancesCR ID #: N/A
When posting a menu item that was configured with two add-on taxes (one for Eat-In, one for Carry Out), the system determines the applicable tax based on the current order type. However, once the check was service totaled, if the user picked it back up and changed the order type, the add-on tax was corrected on the check, but not in the database. When a sales report was run, both taxes would be included in the totals, with an outstanding balance due in the amount of the original tax. To prevent these problems, order type changes are no longer allowed after an edit seat operation when there are previous round entries on a check.
Menu Items Ordered in Quantity Cannot Be Made into Combo MealsCR ID #: 18088
Previously, menu items ordered in quantity and then modified with a condiment could not be made into combo meals using the auto-combo feature. Attempts to do so, would cause an error message display.
This problem occurred when the number of condiments did not equal the number of menu items ordered. For example, if a user rang up a quantity of [3] [Hamburgers] and added the condiment [Ketchup], the system did not know to which item(s) the condiment should be applied. This has been corrected. Now, when ordering a menu item in quantity, if the user applies a condiment to that line item, the system will assume that the condiment applies to all of them.
MD0003-065Revision FJanuary 17, 2006Page 78 of 306
3700 POSWhat’s Revised
Multiple Inclusive Tax Rates Could Not be Applied to Menu Items by Order TypeCR ID #: 7946
In the past, a configuration error would occur when ringing up menu items where the menu item class was linked to a tax class with multiple active tax rates that, in turn, varied according to the order type selected. The system was not equipped to make the requisite calculations without implementing an extensive work-around. This has been corrected.
Also, as part of the correction, users can ring up a menu item with two inclusive tax rates linked to it and use Order Type tax masking to have only one rate active at any time.
Net Sales Calculated Incorrectly When Using VAT Tax by ItemCR ID #: 16692
When using the VAT Tax Method, VAT by the item (Sales | Restaurant | Taxes), the net sales on an up-sized combo meal were being calculated incorrectly. This problem has been corrected.
Net Sales Incorrect When Using Prorated Subtotal Discounts That Forgive Inclusive TaxesCR ID #: 19509
When using inclusive taxes, the system would report incorrect net sales on its menu item reports if a prorated subtotal discount that forgave inclusive taxes was applied. The problem occurred because the entire amount (including the forgiven tax) was posted rather than the discounted amount only. This has been corrected.
MD0003-065Revision F
January 17, 2006Page 79 of 306
3700 POSWhat’s Revised
Net Sales Incorrect When Using Subtotal Discounts, Inclusive Taxes, and Multiple Menu ItemsCR ID #: 19812
Previously, the system posted incorrect net sales totals when inclusive taxes were being used and subtotal discounts were applied to multiple menu items on a check. The errors were caused by problems in the rounding algorithm which has since been corrected.
Order Type Totals Report Incorrectly When Using Add/Transfer CheckCR ID #: 9787, 21479
After enabling the option to Post all totals to current order type (Revenue Center | RVC Posting), the system failed to report totals correctly on checks that were combined using the Add/Transfer function and where the order type was changed before tendering. That is, the pre-tax totals from the first check (the one that was transferred) were still reported under its original order type, while the totals from the second check were correctly posted under the new order type. This problem has been corrected.
Prorated Discount Incorrectly Increased by Tax AmountCR ID #: 13068
Prorated discounts were posting incorrect totals when applied to menu items with VAT. The amount of the discount was increased by the inclusion of the tax amount in the calculation. This problem has been corrected.
Prorated Discount on Split/Shared Check Inflates Major Group Tracking TotalsCR ID #: 16679
Previously, if a prorated discount was applied to a check that has just been split/shared, the discount was not subtracted from the major group tracking sales. This caused the system to show inflated sales totals on system reports. The problem (which did not occur if the split checks were service totaled before the discounts were applied) has been corrected.
MD0003-065Revision FJanuary 17, 2006Page 80 of 306
3700 POSWhat’s Revised
Prorated Discount Posts Incorrect Inclusive TaxesCR ID #: 18411
When applying a prorated subtotal discount to a check, the system was posting the entire inclusive tax amount for each item, instead of posting only the amount of inclusive tax for the item that was discounted. This resulted in incorrect totals in the System and Revenue Center sales detail reports. The problem has been corrected.
Sharing Menu Items Incorrectly Reduces Inclusive TaxCR ID #: 16727
Previously, when sharing menu items between seats or checks, the inclusive tax was only reported on 1/2 of the split items. This problem has been corrected.
Tax Itemizers Incorrectly Posted When Multiple Taxes are ForgivenCR ID #: 19531, 19532
When applying a discount that forgives multiple taxes, the itemizers associated with the taxes (both the active and inactive) were posted incorrectly in the database. As a result, the wrong tax itemizers were being passed to the PMS system which resulted in incorrect system totals and reports. This problem has been corrected.
Time Clock Detail Read Failure Results In An Orphaned Time Card RecordCR ID #: 20667
After clocking out of the system on one workstation, if an employee attempted to clock in on another workstation before the time card finished printing, a Time Clock Detail Read Failure would occur, implying that the clock-in had failed. Once the printing was complete, the employee could then clock back into the system without incident. However, when running a time card report, there would be two open time card records for the same employee -- the failed (orphan) attempt and the current (valid) entry. This problem has been corrected.
MD0003-065Revision F
January 17, 2006Page 81 of 306
3700 POSWhat’s Revised
Touch Item Discount Followed by Subtotal Calculated Compounded Taxes IncorrectlyCR ID #: N/A
When using Canadian Taxes where the PST is configured to Compound tax with GST (Sales | Tax Rates | Canadian Tax), applying a touch item discount to a check with subtotals would cause the system to calculate the compounded PST tax incorrectly. This has been corrected.
Touch Item Discount Generates Incorrect Inclusive TaxesCR ID #: N/A
Previously, when applying a touch item discount to a menu item with inclusive taxes, the system was using the wrong algorithm to calculate the tax changes, which resulted in rounding errors. Instead of multiplying the discount amount by the tax rate (the incorrect method), the system should have applied the discount first, recalculated the inclusive taxes, and reported the difference as shown in the example below:
Incl Tax on $6.50 = $0.43Incl Tax on $6.50-$3.25 = $0.21Incl Tax to Post = $0.21-$0.43 = -$0.22
This problem has been corrected.
Touch Item Discount Incorrectly Forgives Inclusive Taxes When Applied to Quantity Menu ItemsCR ID #: 20111
When applying a touch item discount to menu items rung up as a quantity, the system would post the wrong amounts when forgiving the inclusive taxes associated with the menu item. This problem has been corrected.
MD0003-065Revision FJanuary 17, 2006Page 82 of 306
3700 POSWhat’s Revised
Touch Item Discount Not Allowed if Check Includes Direct Void With Same Discount ItemizerCR ID #: N/A
Previously, if a check included both menu items and direct voids of menu items with the same discount itemizer, the user could not apply a touch item discount to the remaining menu items. The problem occurred because the system was not distinguishing between the positive and negative priced items. This has been corrected.
Touch Item Discount Not Working With Split Check/Shared Menu ItemsCR ID #: N/A
After splitting a check and sharing a menu item between them, users were unable apply a touch item discount to the shared menu item. This problem has been corrected.
Transaction Replay Inserts 0.00 Payment in Check Detail When Recovering from SAR Mode with Open Cash Management TillCR ID #: 20375
After entering SAR mode with an open Cash Management till, any transactions recorded during the SAR period would be posted incorrectly in the database when the transaction detail was recovered. Basically, the system would insert a 0.00 payment in the check detail and amount due totals. The checks would not be closed properly or the actual payments recorded in the system database. This problem has been corrected.
VAT Tax Amount Incorrect When Discount With Multiple Itemizers is Applied17005, 20139
When using a discount with multiple discount itemizers on a check, the VAT tax does not calculate correctly. This problem has been corrected.
MD0003-065Revision F
January 17, 2006Page 83 of 306
3700 POSWhat’s Revised
VAT Tax Incorrectly Calculated When Dollar Discount Applied to Menu Items with Multiple Tax RatesCR ID 7215
Sales totals were posted incorrectly when a dollar amount subtotal discount was applied to a check that had multiple items with different VAT tax rates. The problem occurred because the system was not dividing the discount properly (i.e., by percentage of check total) among the menu items. This has been corrected.
VAT Tax Information Not Writing to the JournalCR ID #: N/A
On a system configured to use VAT taxes, VAT tax information was not being written to the electronic journal. This problem has been corrected.
Win95 Client Fails to Load OCBClient.dllCR ID #: N/A
When starting POS Operations on a Win95 (Eclipse) Client, the error message ‘Failed to load OCCBClient.dll’ would display. This problem has been corrected.
Printing
Journal Printing on a WS4 Results in Intermittent Printer ErrorCR ID #: 21657
Periodically, a printer error would occur on sites where the WS4s were configured to print to Local Journal File and then upload the files from the client to the Server. The error was caused by a failure to load the Transport.dll. This has been corrected.
MD0003-065Revision FJanuary 17, 2006Page 84 of 306
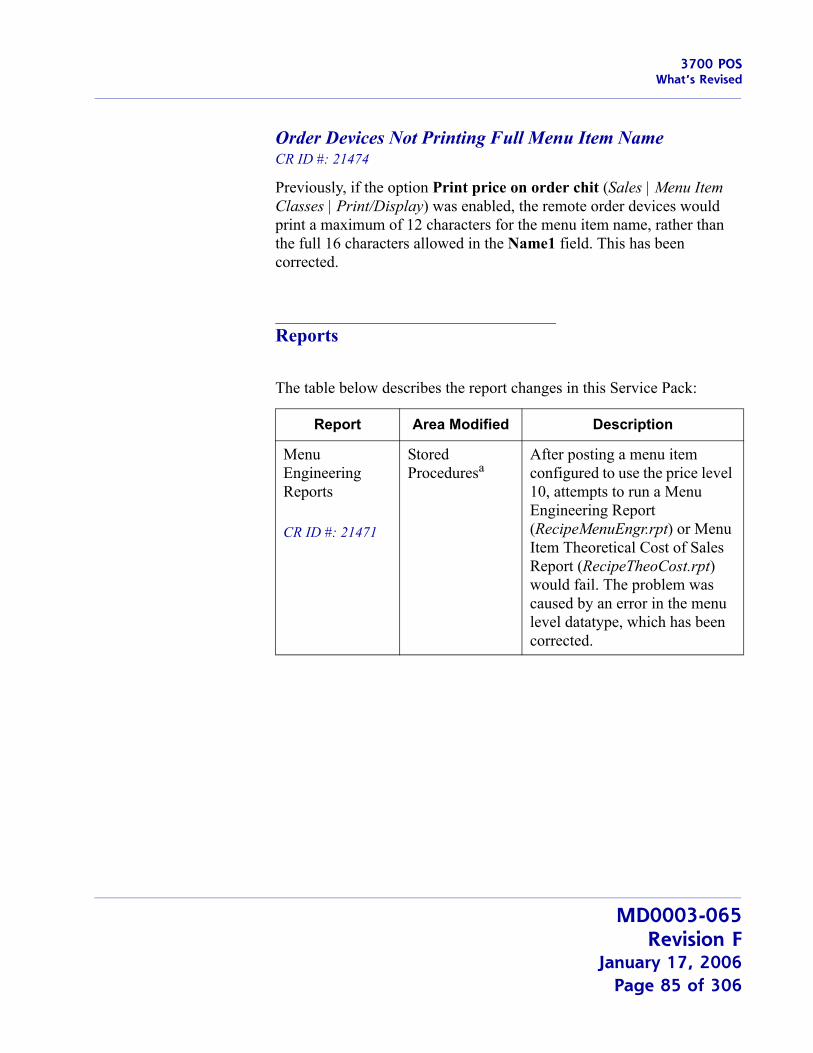
3700 POSWhat’s Revised
Order Devices Not Printing Full Menu Item NameCR ID #: 21474
Previously, if the option Print price on order chit (Sales | Menu Item Classes | Print/Display) was enabled, the remote order devices would print a maximum of 12 characters for the menu item name, rather than the full 16 characters allowed in the Name1 field. This has been corrected.
Reports
The table below describes the report changes in this Service Pack:
Report Area Modified Description
Menu Engineering Reports
CR ID #: 21471
Stored Proceduresa
After posting a menu item configured to use the price level 10, attempts to run a Menu Engineering Report (RecipeMenuEngr.rpt) or Menu Item Theoretical Cost of Sales Report (RecipeTheoCost.rpt) would fail. The problem was caused by an error in the menu level datatype, which has been corrected.
MD0003-065Revision F
January 17, 2006Page 85 of 306
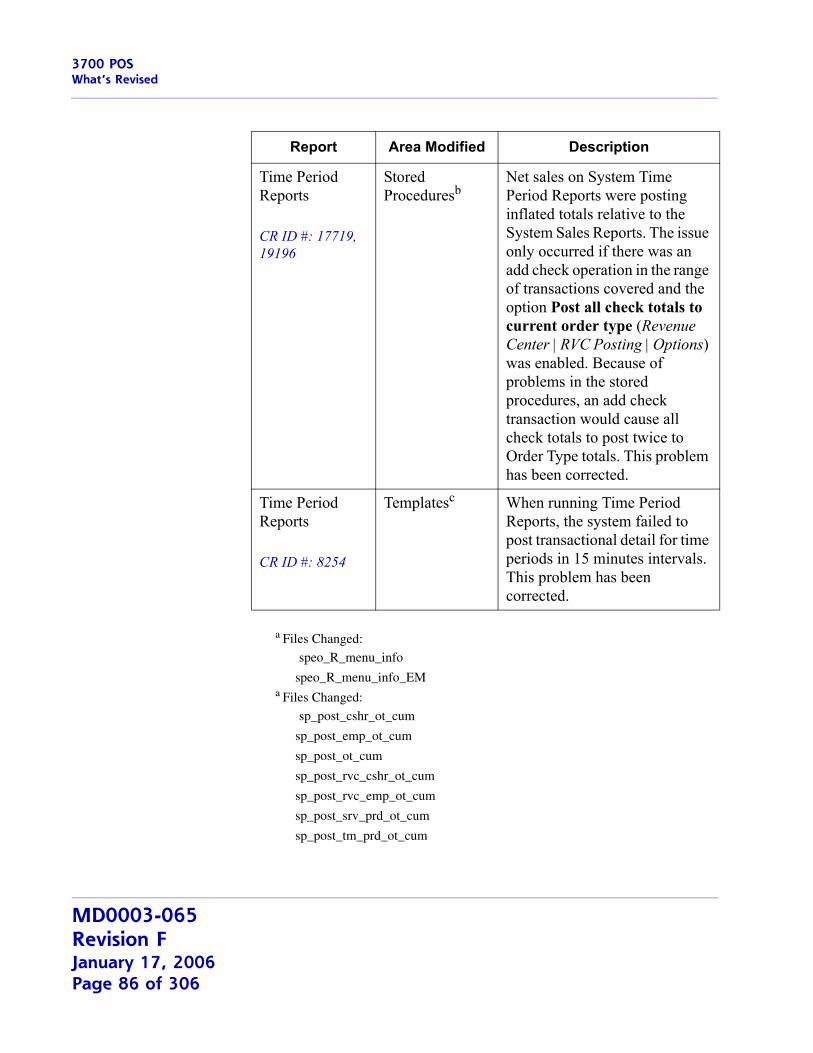
3700 POSWhat’s Revised
a Files Changed:
speo_R_menu_info
speo_R_menu_info_EMa Files Changed:
sp_post_cshr_ot_cum
sp_post_emp_ot_cum
sp_post_ot_cum
sp_post_rvc_cshr_ot_cum
sp_post_rvc_emp_ot_cum
sp_post_srv_prd_ot_cum
sp_post_tm_prd_ot_cum
Time Period Reports
CR ID #: 17719, 19196
Stored Proceduresb
Net sales on System Time Period Reports were posting inflated totals relative to the System Sales Reports. The issue only occurred if there was an add check operation in the range of transactions covered and the option Post all check totals to current order type (Revenue Center | RVC Posting | Options) was enabled. Because of problems in the stored procedures, an add check transaction would cause all check totals to post twice to Order Type totals. This problem has been corrected.
Time Period Reports
CR ID #: 8254
Templatesc When running Time Period Reports, the system failed to post transactional detail for time periods in 15 minutes intervals. This problem has been corrected.
Report Area Modified Description
MD0003-065Revision FJanuary 17, 2006Page 86 of 306
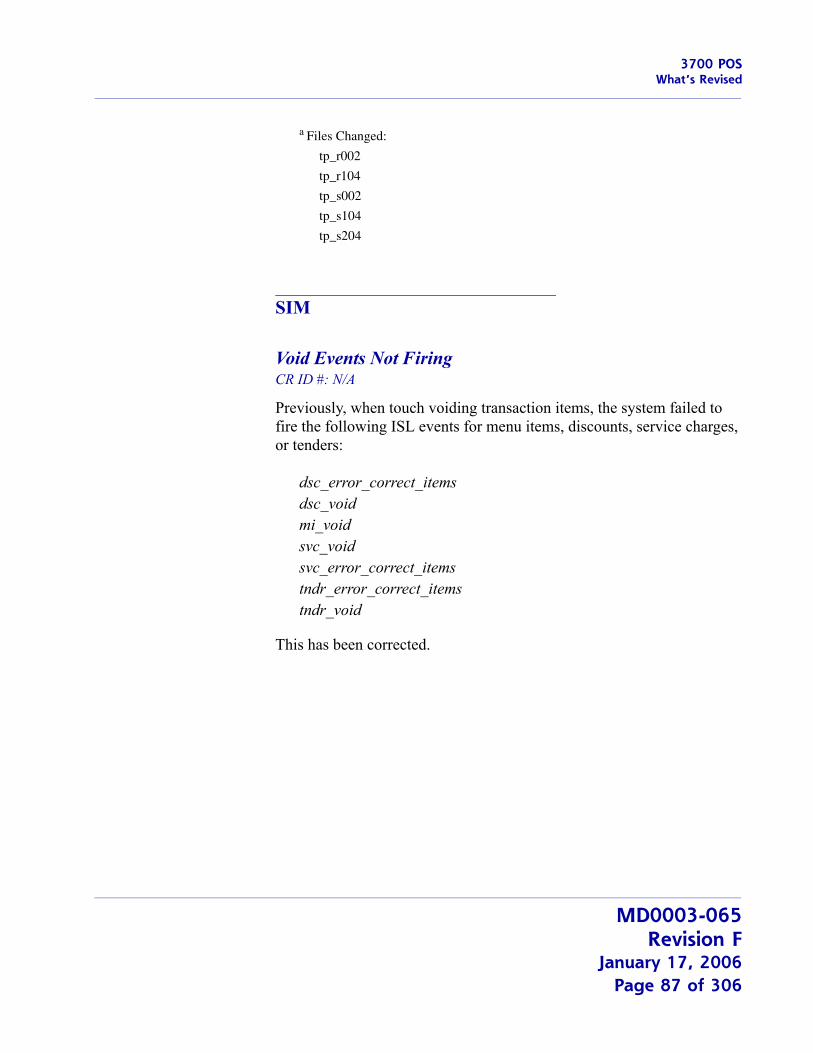
3700 POSWhat’s Revised
a Files Changed:
tp_r002
tp_r104
tp_s002
tp_s104
tp_s204
SIM
Void Events Not FiringCR ID #: N/A
Previously, when touch voiding transaction items, the system failed to fire the following ISL events for menu items, discounts, service charges, or tenders:
dsc_error_correct_items dsc_voidmi_voidsvc_voidsvc_error_correct_itemstndr_error_correct_itemstndr_void
This has been corrected.
MD0003-065Revision F
January 17, 2006Page 87 of 306

3700 POSWhat’s Revised
Transaction Analyzer
Unable to Run as External Program From MICROS DesktopCR ID #: 18241
Transaction Analyzer failed to run on the MICROS Desktop when included as an external program in an autosequence. Instead, the following error message was displayed:
'While the Micros desktop is running, plug-in applications may not run in stand alone mode. Try again using the desktop to start the application.’
To correct this problem, the user must add the following command line parameters to the configuration of the external program:
'/Cn' — Specifies the desired configuration, and
'/_IGNOREDESK_' — Directs the desktop to allow the application to run standalone.
MD0003-065Revision FJanuary 17, 2006Page 88 of 306
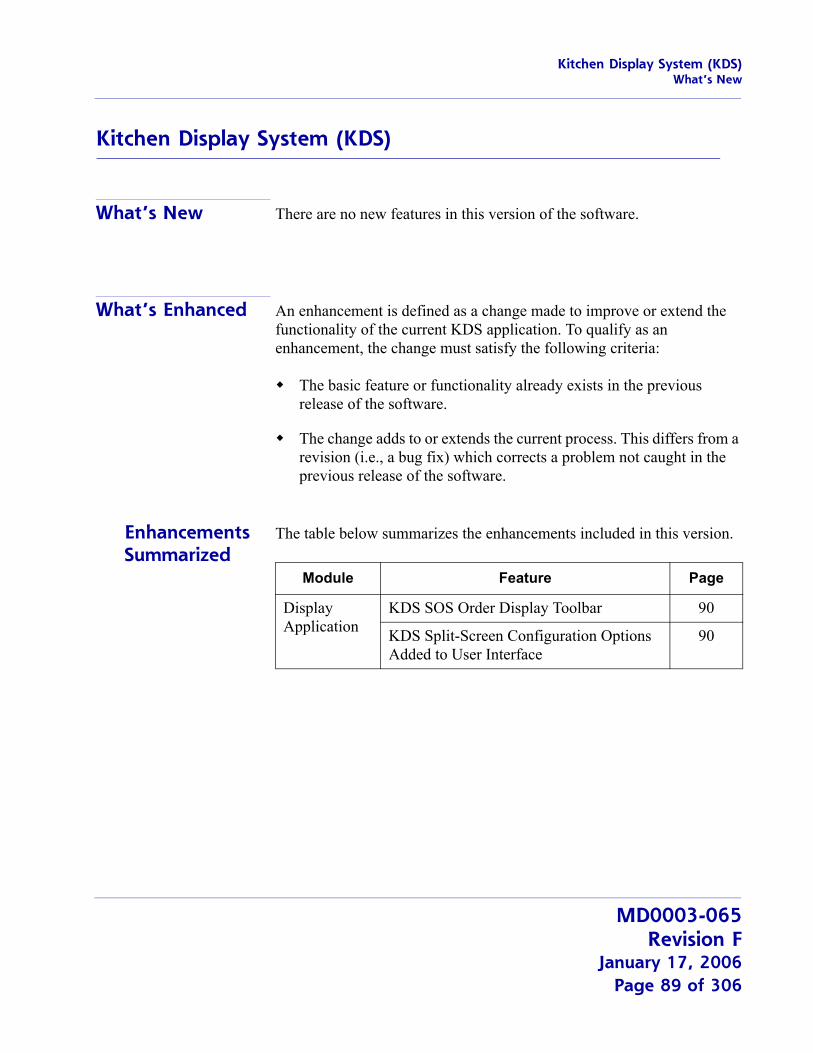
Kitchen Display System (KDS)What’s New
Kitchen Display System (KDS)
What’s New There are no new features in this version of the software.
What’s Enhanced An enhancement is defined as a change made to improve or extend the functionality of the current KDS application. To qualify as an enhancement, the change must satisfy the following criteria:
The basic feature or functionality already exists in the previous release of the software.
The change adds to or extends the current process. This differs from a revision (i.e., a bug fix) which corrects a problem not caught in the previous release of the software.
Enhancements Summarized
The table below summarizes the enhancements included in this version.
Module Feature Page
Display Application
KDS SOS Order Display Toolbar 90
KDS Split-Screen Configuration Options Added to User Interface
90
MD0003-065Revision F
January 17, 2006Page 89 of 306
Kitchen Display System (KDS)What’s Enhanced
Enhancements Detailed
Display Enhancements
KDS SOS Order Display ToolbarPreviously, when configuring a KDS SOS order device, users could select toolbar layouts for the main KDS display only. Once a table was selected, and the orders were displayed, the system automatically limited the toolbar options to a few hard-coded choices. Often, these choices did not have the functionality needed by the customer.
To resolve this problem, a new layout option was added. The Table Detail Toolbar Layout (POS Configurator | Devices | Devices | Kitchen Display | Toolbar/Bumpbar) allows users to choose an alternate toolbar from the current list of toolbar entries or create (and select) their own custom layout. By default, the sample toolbar is pre-selected.
KDS Split-Screen Configuration Options Added to User InterfaceIn the previous release, RES introduced the split-screen feature to support running two application, side-by-side, on the same order device screen. The feature was designed to allow operators to view POS Operations and another program (usually, KDS) simultaneously, and to switch focus between the two without losing sight of either.
To support running KDS as the second application, users needed to override the size of the KDS window and to anchor it to a specific location on the display screen. In the original release, this was done by entering changes to the KDSDisplayApp.properties file (\Micros\RES\ KDS\DisplayApp).
To improve useability, options for setting the size and location of the KDS window have now been added in POS Configurator. The new fields were added to the new Devices | Devices | Kitchen Display | Display | Layout tab. Please note that, as part of this change, many of the options on the Devices | General tab were moved to a new Display tab. This tab was further subdivided into three smaller tabs (General, Toolbar/Bumpbar, and Layout). The change was made to reduce crowding on the forms and to provide a more logical organization for the configuration options. The functionality of the options is unchanged.
MD0003-065Revision FJanuary 17, 2006Page 90 of 306
Kitchen Display System (KDS)What’s Enhanced
New OptionsIn support of this feature, following KDS Window Configuration options are now available on the new Display | Layout tab:
Resolution (defines the size of the KDS window; e.g., 800 x 600)
Width — Specifies the width of the KDS screen, in pixels.
Height — Specifies the height of the KDS screen, in pixels.
Enable Location Configuration — When checked, overrides the default location of the KDS window on the order device screen.
Location (defines the x.y coordinates for positioning the KDS window on the order device screen)
From Top — Specifies how far down (in pixels), the KDS window will be placed on the display screen. This value represents the distance from the top of the screen to the top of the KDS window.
From Left — Specifies how far to the right (in pixels), the KDS window will be placed . This value represents the distance from the left of the screen to the left-side of the KDS window.
Note For information on configuring the POS Operations screen, refer to the topic information beginning on page 30.
MD0003-065Revision F
January 17, 2006Page 91 of 306
Kitchen Display System (KDS)What’s Revised
What’s Revised A revision is defined as a correction made to any existing form, feature, or function currently resident in the KDS software. To qualify as a revision, the change must satisfy the following criteria:
The basic form, feature, or functionality must be part of the previous version of the software.
The change must replace the current item or remove it from the application.
Revisions Summarized
The table below summarizes the revisions included in this version.
Module Feature CR ID Page
Display Application
Cannot Clear Error Message Using Bump Bar on a Win 32 Device
21480 93
Display Application Unable to Hide Title Bar
N/A 94
Error Message Hidden When Running KDS In Side-by-Side Mode
N/A 94
Page Up/Page Down Function Keys Do Not Work Correctly in List Mode
N/A 94
Performance Issues With KDS Display
N/A 95
MD0003-065Revision FJanuary 17, 2006Page 92 of 306
Kitchen Display System (KDS)What’s Revised
Revisions Detailed
Display Application
Cannot Clear Error Messages Using Bump Bar on Win 32 DeviceCR ID #: 21480
After clearing a print error message (e.g., the printer has run out of paper) on the KDS Display, operators were unable to clear a second error message using a bump bar on a Win 32 device. To do this, a touch screen or mouse was required. This has been corrected.
KDS Controller
Chits Do Not Display on Expo Station After Reload of KDS Controller
20702 95
Controller Crashes at Random Intervals
N/A 95
Controller Crashes When Orders Doned on an SEI Device
N/A 95
Reports Consolidated Menu Item Prep Times
N/A 96
Module Feature CR ID Page
MD0003-065Revision F
January 17, 2006Page 93 of 306
Kitchen Display System (KDS)What’s Revised
Display Application Unable to Hide Title BarCR ID #: N/A
When running KDS on a Win 32 platform, in a resolution other than full screen, a second Java window would display even though the HideCaptionBar option had been set. In addition to being a distraction, the operator could mistakenly shut down the KDS application by pressing the “X” button to close this second window.
To correct this problem, a new (case-sensitive) variable was made available to the DisplayApp.properties file. The variable, displayTitleBar, allows the following values:
0 — Prevents the title bar window from displaying. To suppress the window, you must add this code to the DisplayApp.properties file.
1 — Displays the window in the background. This is the default state, which means KDS will assume this condition when the variable is not added to the DisplayApp.properties file.
Error Message Hidden When Running KDS In Side-by-Side ModeCR ID #: N/A
After resizing KDS to run side-by-side with another application (e.g., POS Operations), error messages on the KDS side were being posted behind the other application’s display window. To view the error message, operators had to Alt-Tab to regain focus. This problem has been corrected.
Page Up/Page Down Function Keys Do Not Work Correctly in List ModeCR ID #: N/A
When displaying chits in List Mode on a KDS station, pressing the Page Up/Page Down function keys would shift the display up/down by one chit only, instead of displaying the next group of chits. For example, if the screen was configured to show 8 chits at a time, pressing the page keys should display the previous/next 8 chits in the queue (as it does in Chit Mode). This problem has been corrected.
MD0003-065Revision FJanuary 17, 2006Page 94 of 306
Kitchen Display System (KDS)What’s Revised
Performance Issues with KDS DisplayCR ID #: N/A
The KDS was taking an unusually long time to refresh orders on the screen and would periodically lock up, displaying an out-of-memory error message. The problem seemed to occur when the system was configured to use DOM and menu items were being rung more quickly than the KDS could process. This has been corrected.
KDS Controller
Chits Do Not Display on Expo Station After Reload of KDS ControllerCR ID #: 20702
Previously, when reloading the KDS Controller (e.g., after changing the kitchen theme), operators were unable to bump a chit from the Expo station, even though the order was complete and the check had been paid. This problem has been corrected.
Controller Crashes at Random IntervalsCR ID #: N/A
The KDS Controller would unexpectedly crash during operations, particularly when running multiple clients and displays, or during print operations. The problem has been corrected.
Controller Crashes When Order Doned on an SEI DeviceCR ID #: N/A
When running KDS on a Select Electronics (SEI) platform, the controller would occasionally crash after an order was bumped from the display. The problem has been corrected.
MD0003-065Revision F
January 17, 2006Page 95 of 306
Kitchen Display System (KDS)What’s Revised
Reports
The table below describes the report changes in this Service Pack:
a Files Changed:
spkds_R_mi_kitchen_performance
Report Area Modified Description
Consolidated Menu Item Prep TimesCR ID #: N/A
Stored Procedurea
When run, the Consolidated Menu Item Prep Times report (KDS_014.rpt) was not calculating the Actual (avg) time for menu items without modifiers or with modifiers that do not have prep times. This has been corrected.
MD0003-065Revision FJanuary 17, 2006Page 96 of 306
Cash Management (CM)What’s New
Cash Management (CM)
What’s New There are no new feature in this version of the software.
What’s Enhanced There are no enhancements in this version of the software.
What’s Revised There are no revisions in this version of the software.
MD0003-065Revision F
January 17, 2006Page 97 of 306
Guest Services Solution (GSS)What’s New
Guest Services Solution (GSS)
What’s New There are no new feature in this version of the software.
What’s Enhanced There are no enhancements in this version of the software.
What’s Revised There are no revisions in this version of the software.
MD0003-065Revision FJanuary 17, 2006Page 98 of 306
Product Management (PM)What’s New
Product Management (PM)
What’s New A new feature is defined as one that provides capabilities that were not available in previous versions of the application.
New Features Summarized
The table below summarizes the new features included in this version.
New Features Detailed
Setup
Restrict Price ModificationsIn the past, employees were able to change the inventory item price on orders or receipts, which caused the inventory cost of sales to be posted incorrectly. This was particularly bothersome in an EM environment, where inconsistencies at multiple stores would result in inaccurate inventory reports and create unnecessary work to correct the count variances.
To correct this problem, the option Prevent price modifications when ordering/receiving (PM | Setup | PM Access) has been added. When checked, this option prevents members of the designated employee class from making price modifications on purchase orders, packing slips, and invoices received at the store level.
Module Feature Page
Setup Restrict Price Modifications 99
Note When setting this option, keep in mind that members of this employee class will not be able to save items that are not already priced in the system. This means employees cannot receive an order containing that item until it has an associated vendor bid.
MD0003-065Revision F
January 17, 2006Page 99 of 306
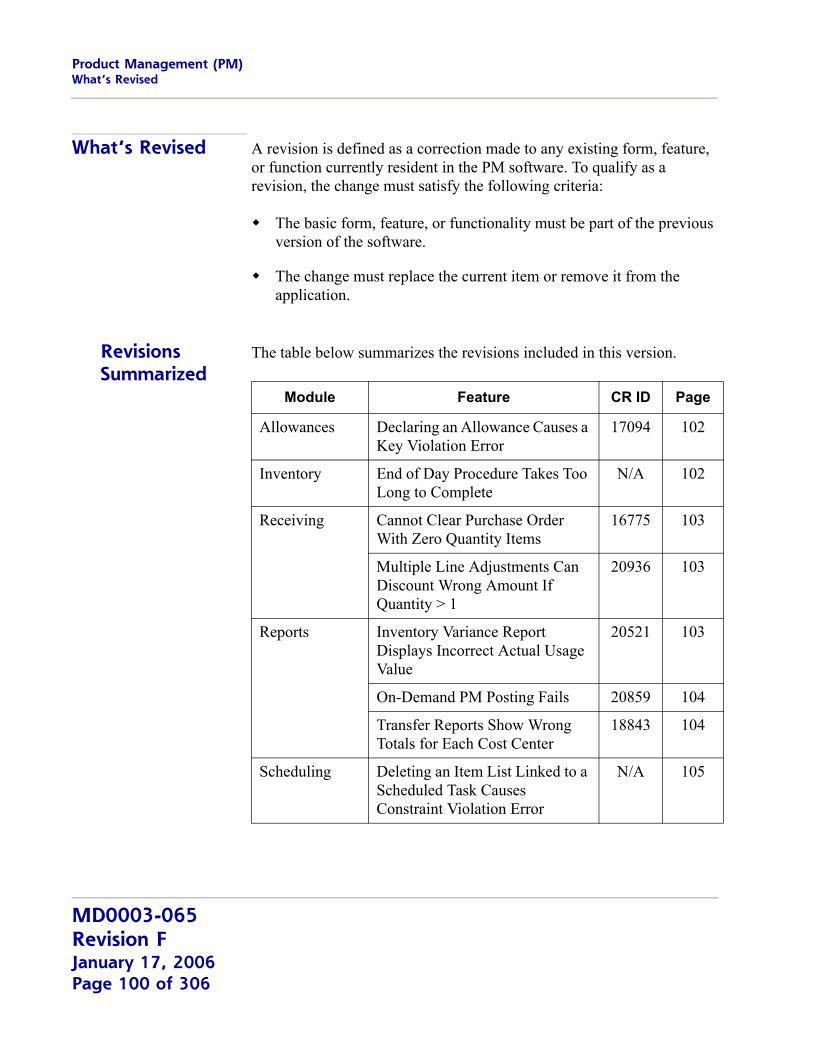
Product Management (PM)What’s Revised
What’s Revised A revision is defined as a correction made to any existing form, feature, or function currently resident in the PM software. To qualify as a revision, the change must satisfy the following criteria:
The basic form, feature, or functionality must be part of the previous version of the software.
The change must replace the current item or remove it from the application.
Revisions Summarized
The table below summarizes the revisions included in this version.
Module Feature CR ID Page
Allowances Declaring an Allowance Causes a Key Violation Error
17094 102
Inventory End of Day Procedure Takes Too Long to Complete
N/A 102
Receiving Cannot Clear Purchase Order With Zero Quantity Items
16775 103
Multiple Line Adjustments Can Discount Wrong Amount If Quantity > 1
20936 103
Reports Inventory Variance Report Displays Incorrect Actual Usage Value
20521 103
On-Demand PM Posting Fails 20859 104
Transfer Reports Show Wrong Totals for Each Cost Center
18843 104
Scheduling Deleting an Item List Linked to a Scheduled Task Causes Constraint Violation Error
N/A 105
MD0003-065Revision FJanuary 17, 2006Page 100 of 306
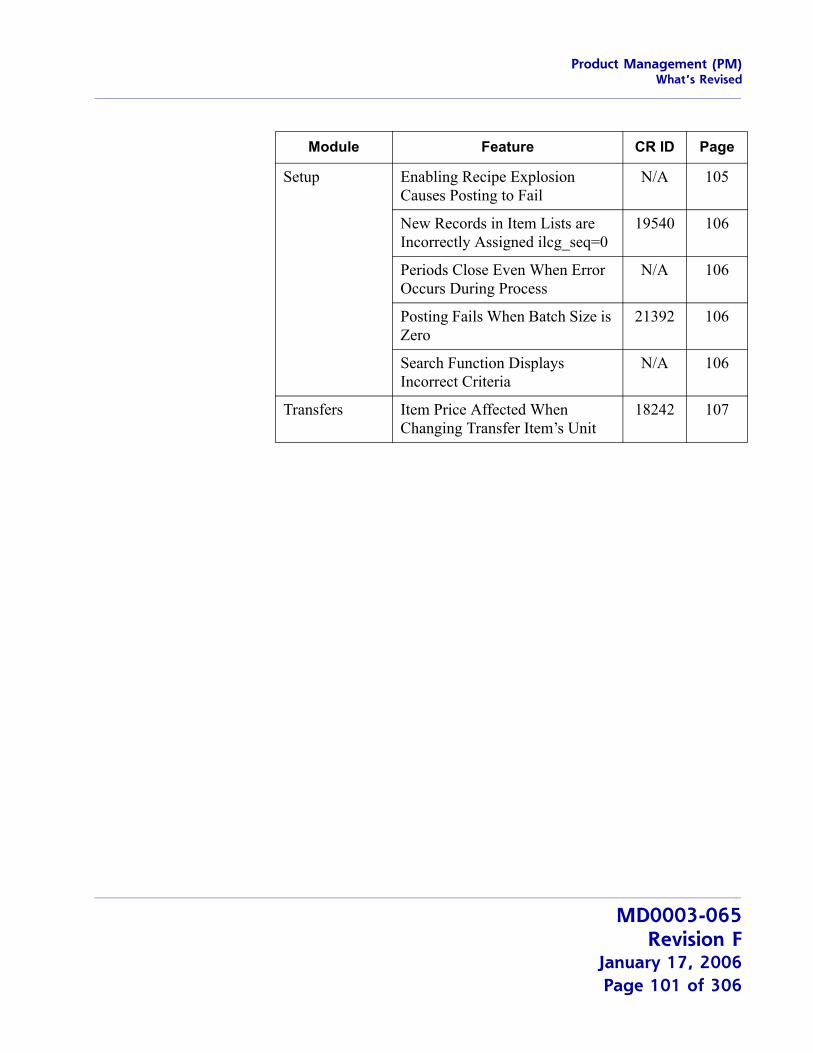
Product Management (PM)What’s Revised
Setup Enabling Recipe Explosion Causes Posting to Fail
N/A 105
New Records in Item Lists are Incorrectly Assigned ilcg_seq=0
19540 106
Periods Close Even When Error Occurs During Process
N/A 106
Posting Fails When Batch Size is Zero
21392 106
Search Function Displays Incorrect Criteria
N/A 106
Transfers Item Price Affected When Changing Transfer Item’s Unit
18242 107
Module Feature CR ID Page
MD0003-065Revision F
January 17, 2006Page 101 of 306
Product Management (PM)What’s Revised
Revisions Detailed
Allowances
Declaring an Allowance Causes a Key Violation ErrorCR ID #: 17094
When declaring an allowance on a recipe that includes a sub-recipe the same ingredients as the main recipe, the following error message would display:
Key violation. [Sybase][ODBC Driver][Adaptive Server Anywhere] Integrity constraint violation: Primary key for table 'inven_itm_trans_dtl' is not unique.
The problem occurred because the system was not consolidating the inventory item quantities from the two locations. This has been corrected.
Inventory
End-of-Day Procedures Takes Too Long to CompleteCR ID #: N/A
When running the end-of-day procedures, the system was taking an unusually large amount of time to complete the days postings. The problem was caused by repetitive calls procedure calls for the same information and was exacerbated when more than one cost center was involved. Although this has been corrected, some slow downs will be observed as the number of cost centers increases.
MD0003-065Revision FJanuary 17, 2006Page 102 of 306
Product Management (PM)What’s Revised
Receiving
Cannot Clear Purchase Order With Zero Quantity ItemsCR ID #: 16775
When receiving items with a purchase order (PO), users were unable to save the PO if any of the listed items were missing and the quantity received was blank. If the zero-quantity item is the only item on the PO, or the only item remaining on a PO that has been left open, the PO could not be closed. This problem has been corrected.
Multiple Line Adjustments Can Discount Wrong Amount If Quantity > 1CR ID # 20936
When receiving without a purchase order, if the selected item had a quantity greater than 1, then applying more than one Line Item Adjustment would result in incorrect receipt totals. This occurred if the Allocation method for the second adjustment was to Distribute by Adjusted Total. The problem has been corrected.
Reports
The table below describes the PM report changes in this Service Pack:
Report Area Modified Description
Inventory Variance Report
CR ID #: 20521
Stored Procedurea
The Inventory Variance Report would display the Actual usage value as $0 if the last action posted was an item return that set the quantity on hand value of the menu item to 0. This problem has been corrected.
MD0003-065Revision F
January 17, 2006Page 103 of 306
Product Management (PM)What’s Revised
a File Changed: speo_inven_do_itm_rcptb Files Changed: speo_post_on_demand-set speo_post_on_demand_release speo_inven_on_demand_testc Files Changed: TransferDestSumm.rpt TransferSrcSumm.rpt
On-Demand PM Posting Fails
CR ID #: 20859
Stored Procedureb
When running On-Demand PM Posting for the first time, the process failed due to missing columns in the posting procedures. This has been corrected.
Transfer Summary Reports
CR ID #: 18843
Templatesc The Transfer Destination Summary (TransferDestSumm.rpt) and Transfer Source Summary (TransferSrcSumm.rpt) displayed incorrect totals when the reports were run. The cost centers were not subtotaled individually, but displayed the total for all cost centers on the report. A grand total line was also missing. These problems have been corrected.
MD0003-065Revision FJanuary 17, 2006Page 104 of 306
Product Management (PM)What’s Revised
Scheduling
Deleting an Item List Linked to a Scheduling Task Causes Constraint Violation ErrorCR ID #: N/A
After setting up a recurring task and creating a scheduled order, attempts to delete the original item list resulted in an integrity constraint violation error. The problem occurred because the item list could not be removed while it was linked to a scheduled order, and the system was only deleting scheduled orders from the current day forward, rather than removing all occurrences of the scheduled task. This has been corrected.
Setup
Enabling Recipe Explosion Causes Posting to FailCR ID #: N/A
During setup, if a user selected the Recipe Explosion option (Setup | PM Parameters | Inventory) as the site’s perpetual inventory method, the system would display a prompt asking ‘Are you going live with PM today?’ If the user response was ‘No’, the system would automatically post the last 14 days of POS transactions which, in turn, caused database posting to fail. To correct the problem, the prompt was removed and the system was reprogrammed to only post the most recent transaction in the trans_dtl table.
MD0003-065Revision F
January 17, 2006Page 105 of 306
Product Management (PM)What’s Revised
New Records in Item Lists are Incorrectly Assigned ilcg_seq=0CR ID #: 19540
When adding a new record in the Item Lists form (PM | Setup), the system would incorrectly assign it a default ilcg_seq of 0. As a result, the item would be displayed in the form multiple times and attempts to deleted any of the records would result in the error message
This Item list is used as Default inventory item list by one of its items.
This problem has been corrected.
Periods Close Even When Error Occurs During ProcessCR ID #: N/A
Previously, if an error occurred while closing a period, the system would still set the period to closed, instead of keeping it open until the problem could be fixed. This has been corrected.
Posting Fails When Batch Size is Zero21392
When defining batch recipes (PM | Setup | Recipes | Production), setting the batch size to zero (a valid entry) would cause posting to fail when the program was run. To correct this problem, the system no longer accepts 0 as a valid batch size. Attempts to save a record with this value will cause an error message to display.
Search Function Displays Incorrect CriteriaCR ID #: N/A
When using the PM | Setup | Vendors | Items search function, the criteria used to define a search were incorrectly listed as Item and Purchase Unit, rather than Item and Vendor Item ID. This has been corrected.
MD0003-065Revision FJanuary 17, 2006Page 106 of 306
Product Management (PM)What’s Revised
Transfers
Item Price Affected When Changing Transfer Item’s UnitCR ID #: 18242
Previously, when transferring an item between cost centers, the price of the item was incorrect if the unit of measure was modified during the transfer. The problem occurred even though the option Allow modification of item transfer price (PM | Setup | PM Access) was disabled. This has been corrected.
MD0003-065Revision F
January 17, 2006Page 107 of 306

Labor Management (LM)What’s New
Labor Management (LM)
What’s New A new feature is defined as one that provides capabilities that were not available in previous versions of the application.
New Features Summarized
The table below summarizes the new features included in this version.
New Features Detailed
Forecasting
New Forecast DriversTwo new historical drivers were added that allows managers to generate forecasts based on the following data:
System Average Check Sales — Calculates requirements based on net sales per check count for each 15-minute interval.
System Sales by Order Type — Calculates requirements using sales associated with one or more order types over a fixed period.
As always, drivers must be setup through LM | Forecasting | Historical Information, and then linked to a forecast element in LM | Forecast Setup | Forecasting Explorer | General.
Module Feature Page
Forecasting New Forecast Drivers 108
Reports Employee Request Scheduling Exceptions 109
Premium Pay Detail 110
Scheduling Efficiency 111
Skill Level Requirements Configuration 113
Scheduling Approve Schedule 115
MD0003-065Revision FJanuary 17, 2006Page 108 of 306
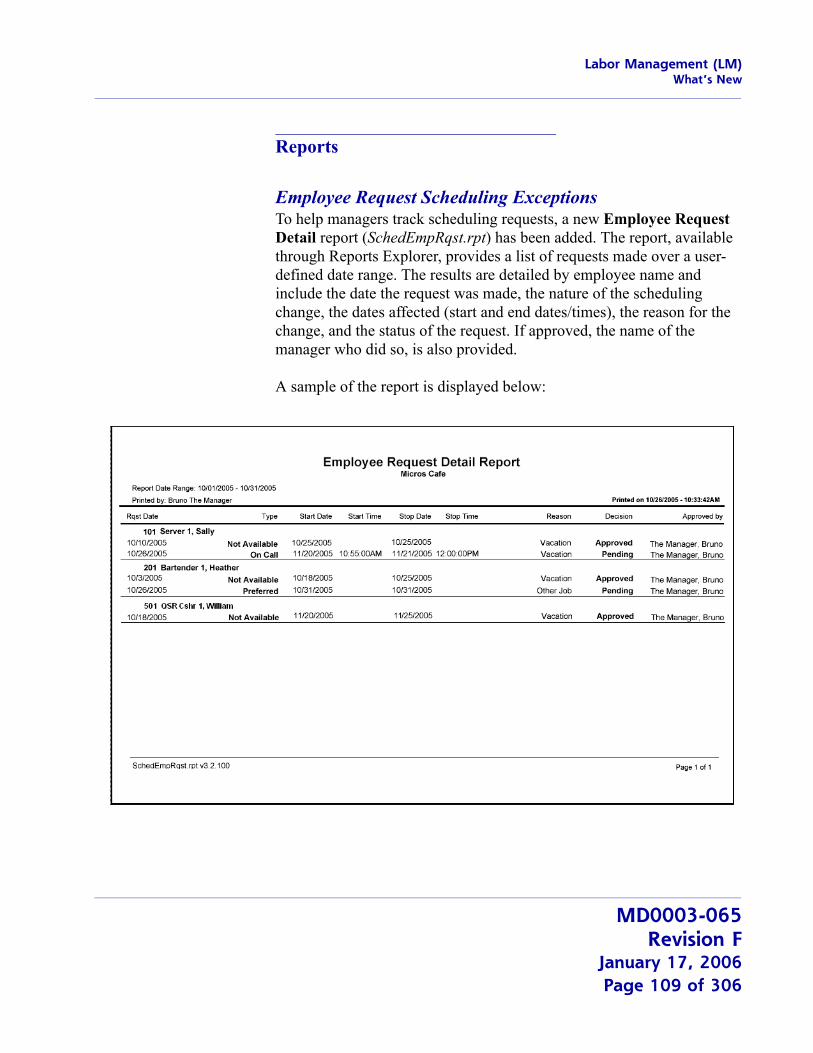
Labor Management (LM)What’s New
Reports
Employee Request Scheduling ExceptionsTo help managers track scheduling requests, a new Employee Request Detail report (SchedEmpRqst.rpt) has been added. The report, available through Reports Explorer, provides a list of requests made over a user-defined date range. The results are detailed by employee name and include the date the request was made, the nature of the scheduling change, the dates affected (start and end dates/times), the reason for the change, and the status of the request. If approved, the name of the manager who did so, is also provided.
A sample of the report is displayed below:
MD0003-065Revision F
January 17, 2006Page 109 of 306

Labor Management (LM)What’s New
Premium Pay DetailA new report has been added that breaks down premium pay earned by type and amount. This differs from existing reports which includes premium pay as a summarized total only.
The new report provides details and subtotals for each employee, divided by business date and pay type. Grand totals are also listed for each pay definition, and a sum of all totals is provided.
A sample of the new report is provided below:
MD0003-065Revision FJanuary 17, 2006Page 110 of 306
Labor Management (LM)What’s New
Scheduling EfficiencyTwo new Scheduling Efficiency reports were added to determine how well managers are handling their scheduling functions:
Scheduling Efficiency Detail (SchedEfficiencyDtl.rpt)
Consolidated Scheduling Efficiency (ConsSchedEfficiency.rpt)
The reports take the generated staff requirements (based on forecasted average check sales) and the actual staff requirements, and compares the data to the employee schedule created by the manager. The result is an efficiency rating that allows store (and corporate) managers to determine how well the scheduling needs are being met.
Reports are available through Reports Explorer and are run for a user-defined date range. Data are broken down in 15-minute increments over an entire business day. On the detail report, users may limit the data to one or more job type. Results are printed separately for each job and subtotaled. A grand total of all jobs is also provided.
A sample of the Scheduling Efficiency Detail Report is shown below. (Results have been truncated to fit on a single page.) The Consolidated Efficiency Report (not shown) is similar in structure but provides the cumulative data by time period for all job types.
MD0003-065Revision F
January 17, 2006Page 111 of 306

Labor Management (LM)What’s New
MD0003-065Revision FJanuary 17, 2006Page 112 of 306
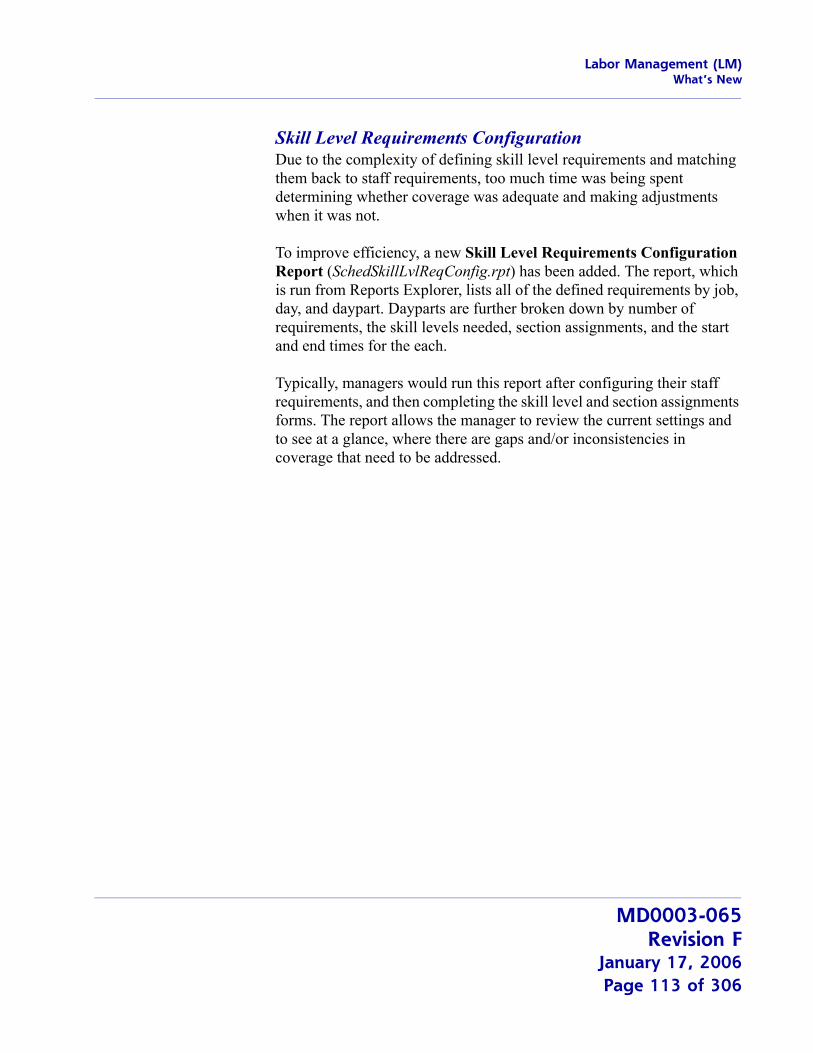
Labor Management (LM)What’s New
Skill Level Requirements ConfigurationDue to the complexity of defining skill level requirements and matching them back to staff requirements, too much time was being spent determining whether coverage was adequate and making adjustments when it was not.
To improve efficiency, a new Skill Level Requirements Configuration Report (SchedSkillLvlReqConfig.rpt) has been added. The report, which is run from Reports Explorer, lists all of the defined requirements by job, day, and daypart. Dayparts are further broken down by number of requirements, the skill levels needed, section assignments, and the start and end times for the each.
Typically, managers would run this report after configuring their staff requirements, and then completing the skill level and section assignments forms. The report allows the manager to review the current settings and to see at a glance, where there are gaps and/or inconsistencies in coverage that need to be addressed.
MD0003-065Revision F
January 17, 2006Page 113 of 306
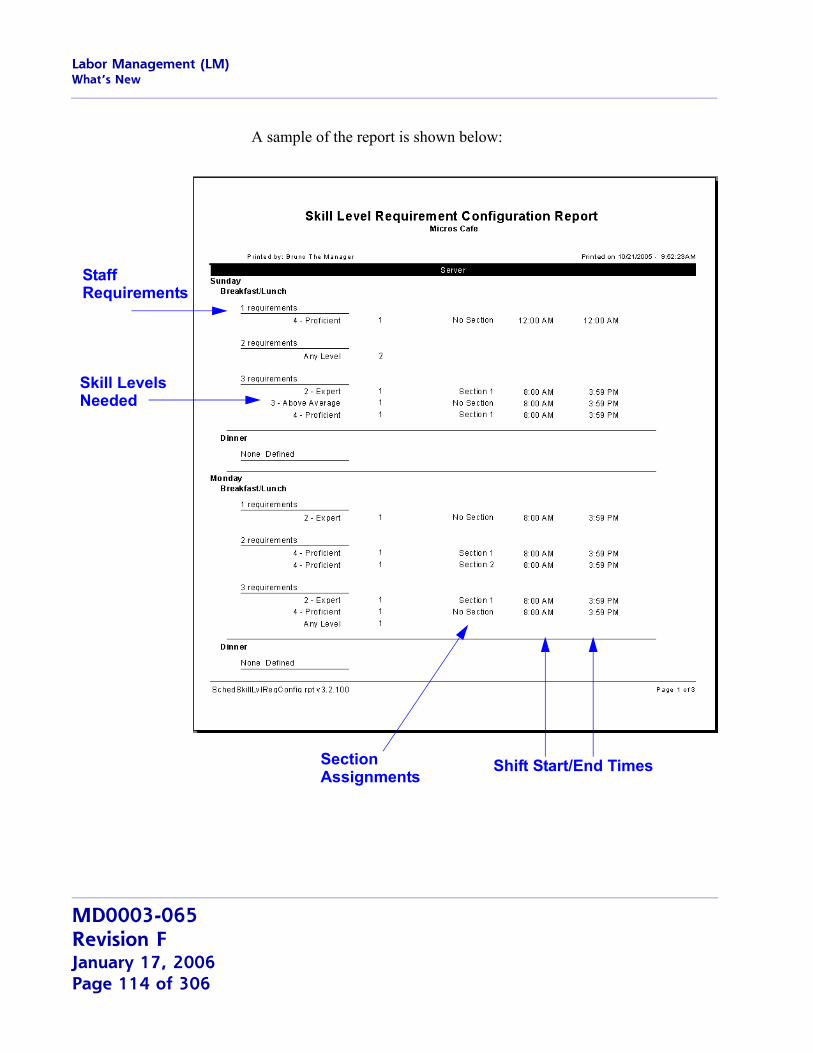
Labor Management (LM)What’s New
A sample of the report is shown below:
StaffRequirements
Skill LevelsNeeded
SectionAssignments
Shift Start/End Times
MD0003-065Revision FJanuary 17, 2006Page 114 of 306
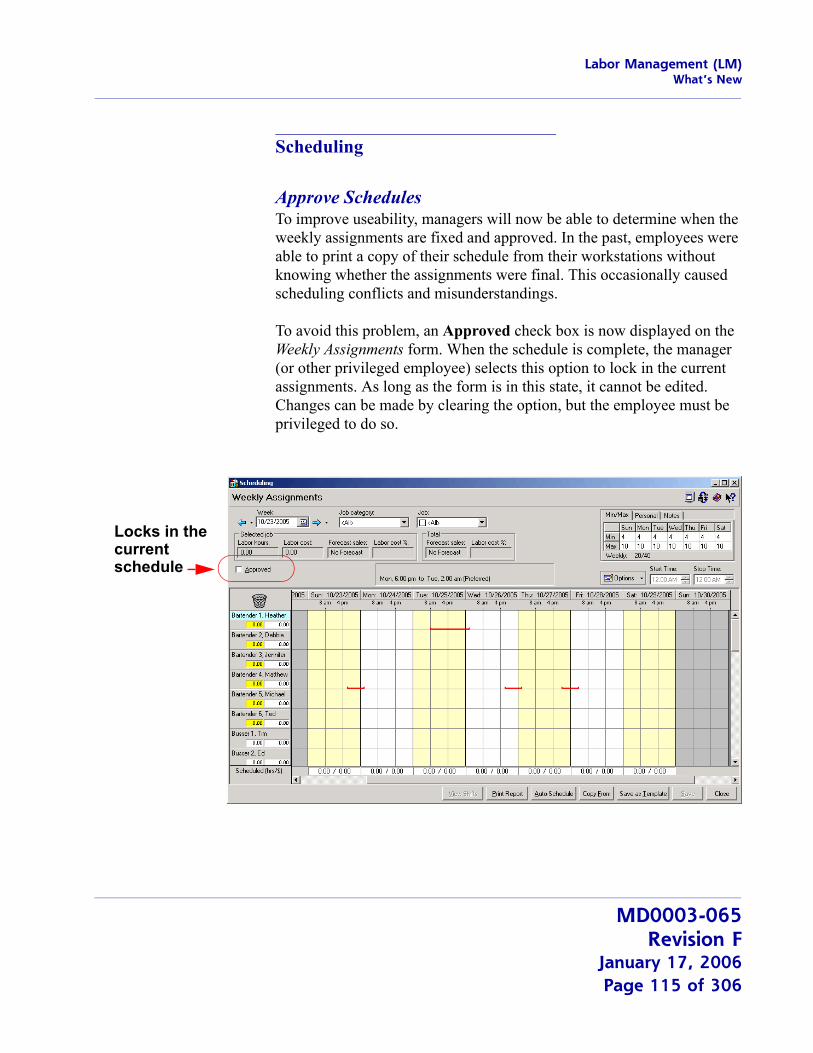
Labor Management (LM)What’s New
Scheduling
Approve SchedulesTo improve useability, managers will now be able to determine when the weekly assignments are fixed and approved. In the past, employees were able to print a copy of their schedule from their workstations without knowing whether the assignments were final. This occasionally caused scheduling conflicts and misunderstandings.
To avoid this problem, an Approved check box is now displayed on the Weekly Assignments form. When the schedule is complete, the manager (or other privileged employee) selects this option to lock in the current assignments. As long as the form is in this state, it cannot be edited. Changes can be made by clearing the option, but the employee must be privileged to do so.
Locks in thecurrentschedule
MD0003-065Revision F
January 17, 2006Page 115 of 306
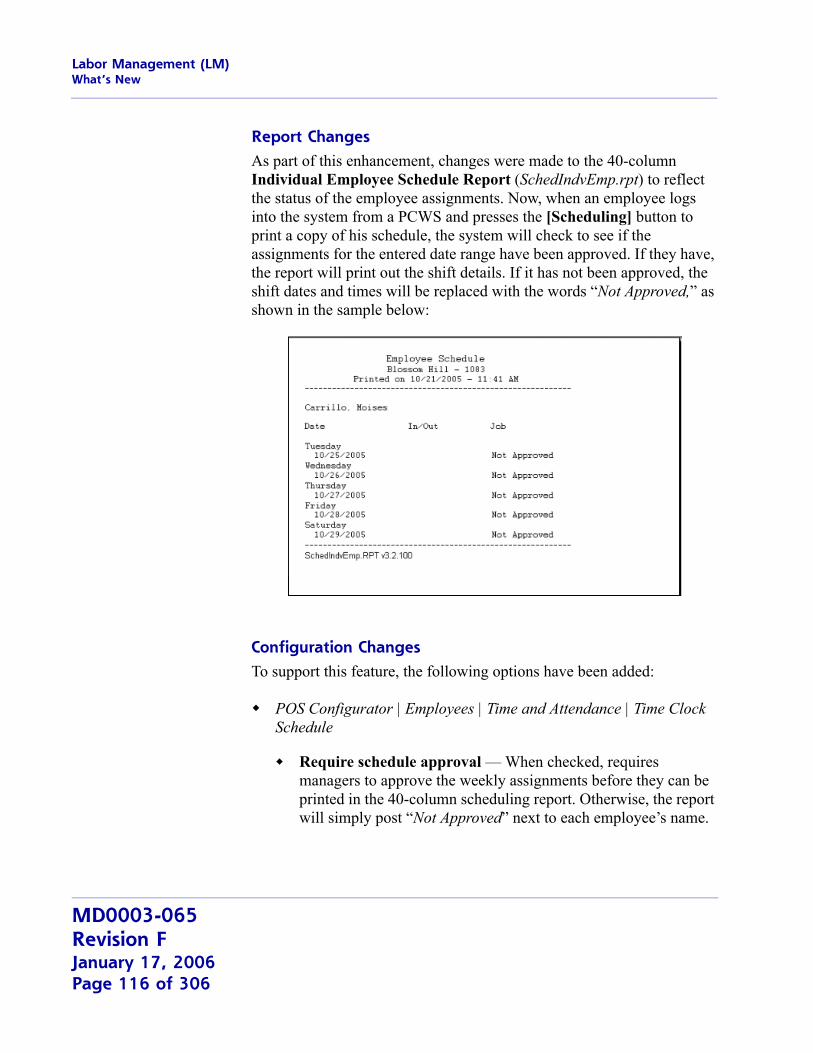
Labor Management (LM)What’s New
Report ChangesAs part of this enhancement, changes were made to the 40-column Individual Employee Schedule Report (SchedIndvEmp.rpt) to reflect the status of the employee assignments. Now, when an employee logs into the system from a PCWS and presses the [Scheduling] button to print a copy of his schedule, the system will check to see if the assignments for the entered date range have been approved. If they have, the report will print out the shift details. If it has not been approved, the shift dates and times will be replaced with the words “Not Approved,” as shown in the sample below:
Configuration ChangesTo support this feature, the following options have been added:
POS Configurator | Employees | Time and Attendance | Time Clock Schedule
Require schedule approval — When checked, requires managers to approve the weekly assignments before they can be printed in the 40-column scheduling report. Otherwise, the report will simply post “Not Approved” next to each employee’s name.
MD0003-065Revision FJanuary 17, 2006Page 116 of 306

Labor Management (LM)What’s New
LM Setup | General | LM Access
Scheduling – Approve Schedule — Specifies the access level associated with this feature. The options are: Full Access (read/write access), View (only), and None.
Scheduling | Weekly Assignments
Approved — When checked, indicates that the scheduled assignments have been approved. It also prevents employees from making changes to the current schedule. To edit the screen, the option must be cleared first by an employee who is privileged to do so.
This option will not be displayed (visible) unless the Require schedule approval option (described above) has been checked. If displayed, the option is grayed out unless: 1) the employee belongs to a class with Full Access privileges; and 2) both the Job Category and Jobs fields are set to All.
MD0003-065Revision F
January 17, 2006Page 117 of 306
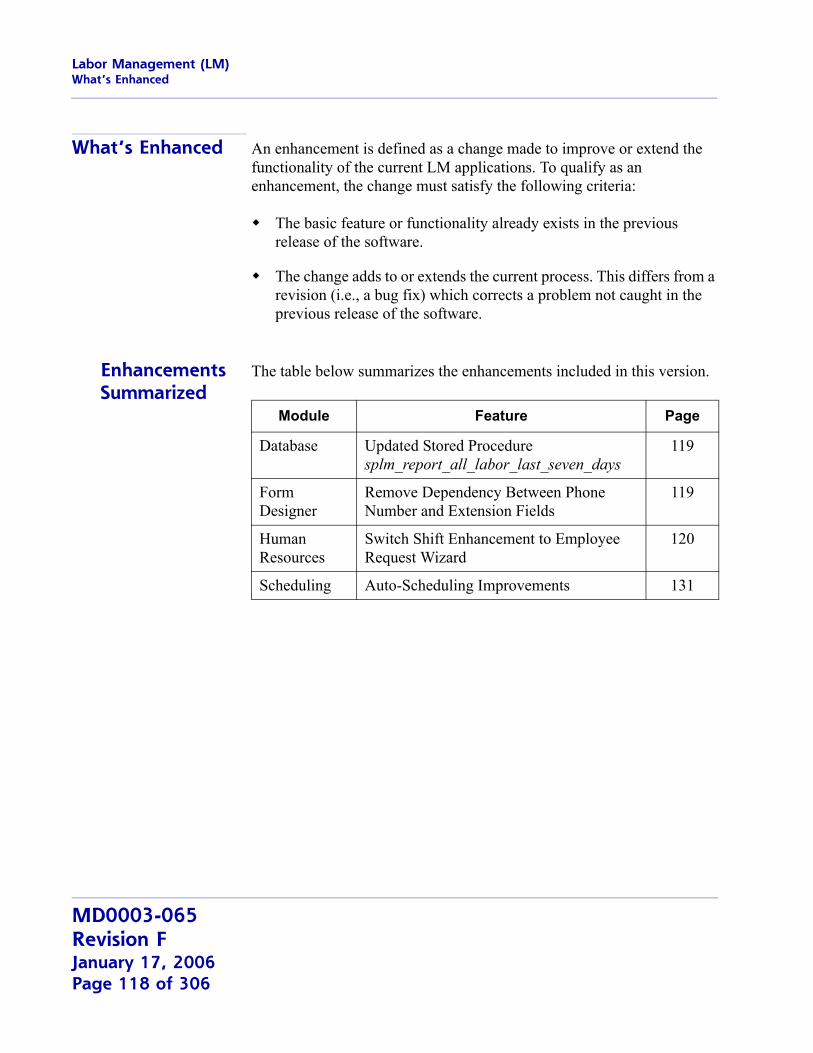
Labor Management (LM)What’s Enhanced
What’s Enhanced An enhancement is defined as a change made to improve or extend the functionality of the current LM applications. To qualify as an enhancement, the change must satisfy the following criteria:
The basic feature or functionality already exists in the previous release of the software.
The change adds to or extends the current process. This differs from a revision (i.e., a bug fix) which corrects a problem not caught in the previous release of the software.
Enhancements Summarized
The table below summarizes the enhancements included in this version.
Module Feature Page
Database Updated Stored Procedure splm_report_all_labor_last_seven_days
119
Form Designer
Remove Dependency Between Phone Number and Extension Fields
119
Human Resources
Switch Shift Enhancement to Employee Request Wizard
120
Scheduling Auto-Scheduling Improvements 131
MD0003-065Revision FJanuary 17, 2006Page 118 of 306
Labor Management (LM)What’s Enhanced
Enhancements Detailed
Database
Updated Stored Procedure splm_report_all_labor_last_seven_daysThe stored procedure splm_report_all_labor_last_seven_days was designed to address labor discrepancies between the Time Card Detail, Job Code, and Fixed Period Total database tables.
When posting to the Job Code and Fixed Period Total tables, the system would perform an update to the existing data rather than an insert — as is the case with the Time Card Detail table. To avoid inflating totals every time the procedure was run, the update would set labor columns to zero and repost for the period of time defined in the procedure.However, not all of the columns were zeroed out and updated. This change corrects that oversight.
Form Designer
Remove Dependency Between Phone Number and Extension FieldsThe Form Designer feature (HR | Edit | Enable Form Designer) was updated to remove the connection between a phone number field and its optional extension. In the past, the two fields were treated as a single object for design purposes. That is, the fields were added/removed as a group, and were subject to the same limitations. If the phone number was required, the extension would also be required.
The problem with linking phone numbers and extensions is that most people do not have extensions in their homes. So, while a phone number may be required, in most cases, an extension is not. Removing the dependency between the two fields eliminates this problem. Now, when making changes through Form Designer, the Extension field can be deleted from the form, moved from view, or simply made optional.
MD0003-065Revision F
January 17, 2006Page 119 of 306
Labor Management (LM)What’s Enhanced
This change affects the following fields on the HR | Employee Setup | Contact Information form:
Phone Number / Extension
Pager Number / Extension
Form Designer is only available with fully-licensed Back Office Software. Employees must be privileged to use the Form Designer feature.
Changes made through Human Resources will also apply to the Employee Setup forms in POS Configurator.
Human Resources
Switch Shift EnhancementThe Employee Request Wizard was modified to support shift-related changes to the posted weekly schedule. Through a series of prompts, employees can now specify the shift assignment they would like to change, and identify their replacement from a list of similarly skilled co-workers.
Once the request is entered in the system, the recipient co-worker can use the same mechanism to register his/her willingness to accept the shift. Periodically, the manager can review the list of requests and either approve or disapprove them. If approved, the schedule is updated immediately. These updates are automatically incorporated into related labor forecasts, scheduling, and overtime reports.
Shift changes cannot be made until the schedule is actually approved and posted. Once entered, shift changes can only be approved by an employee who is privileged to do so.
MD0003-065Revision FJanuary 17, 2006Page 120 of 306
Labor Management (LM)What’s Enhanced
BackgroundIn the past, an employee’s input to the scheduling process was to indicate his or her availability for future assignments. Once the weekly assignments were posted, any conflicts that a worker might have with the schedule (e.g., last minute appointments, child-care problems, family emergencies) had to be taken to the manager personally. The manager then had to revisit the schedule, locate a suitable replacement, and then post the schedule again. The results were not always satisfactory.
For one thing, employees who were already scheduled might be unwilling or unable to change their plans. Conflicts could also arise if more than one person wanted the same shift off or if both had counted on the same co-worker to cover their shift. This could cause unnecessary problems and frustrations, not to mention the time wasted trying to accommodate competing requests.
The SolutionTo simplify the process, options were added to the Employee Request Wizard to manage the request and approval process from the user workstation. This reduces the amount of time spent discussing and negotiating changes to the schedule. Employees do not have to wait to see the manager, but can log their requests directly into the system.
To improve the chance for approval, the requestor can contact a co-worker directly to discuss covering his shift and, if agreeable, can specify that person when the request is logged. In any case, the person accepting the shift does not have to be tracked down, but can use the Wizard to register his willingness to accept a change in his schedule.
Managers also benefit by limiting the number of interruptions for scheduling requests. Periodically, they can pull up a list of outstanding change requests, review them as a group, and approve or disapprove the assignments.
MD0003-065Revision F
January 17, 2006Page 121 of 306
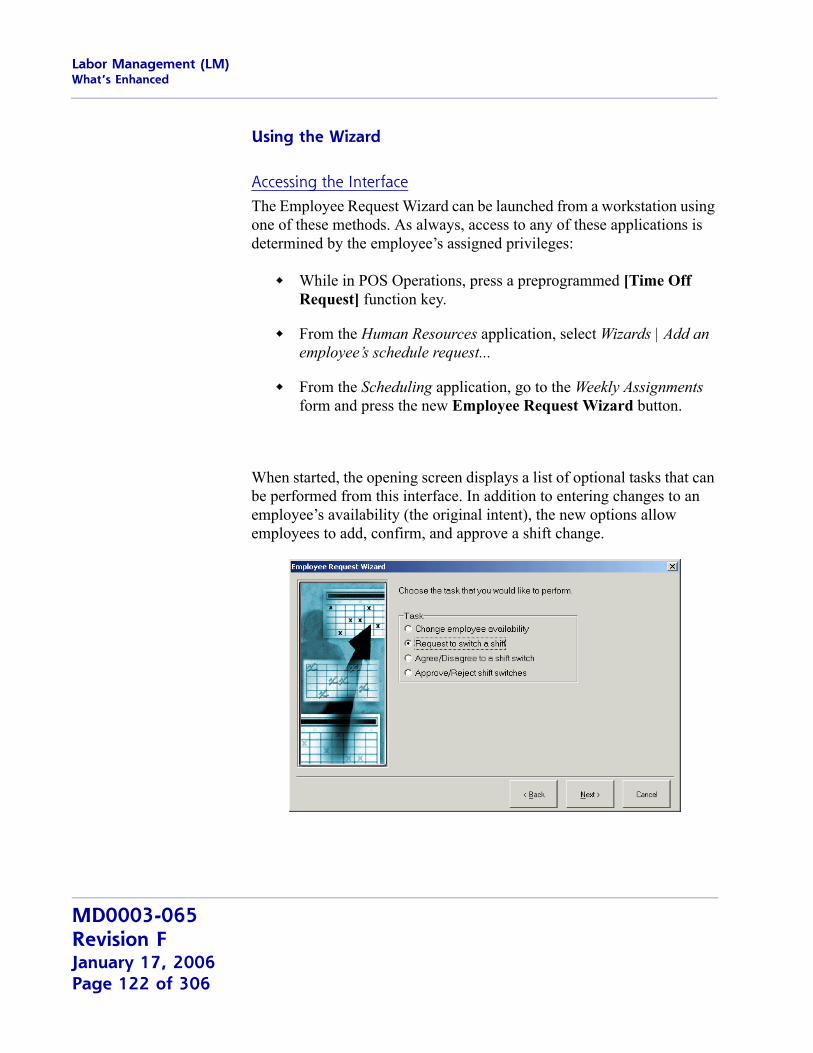
Labor Management (LM)What’s Enhanced
Using the Wizard
Accessing the InterfaceThe Employee Request Wizard can be launched from a workstation using one of these methods. As always, access to any of these applications is determined by the employee’s assigned privileges:
While in POS Operations, press a preprogrammed [Time Off Request] function key.
From the Human Resources application, select Wizards | Add an employee’s schedule request...
From the Scheduling application, go to the Weekly Assignments form and press the new Employee Request Wizard button.
When started, the opening screen displays a list of optional tasks that can be performed from this interface. In addition to entering changes to an employee’s availability (the original intent), the new options allow employees to add, confirm, and approve a shift change.
MD0003-065Revision FJanuary 17, 2006Page 122 of 306
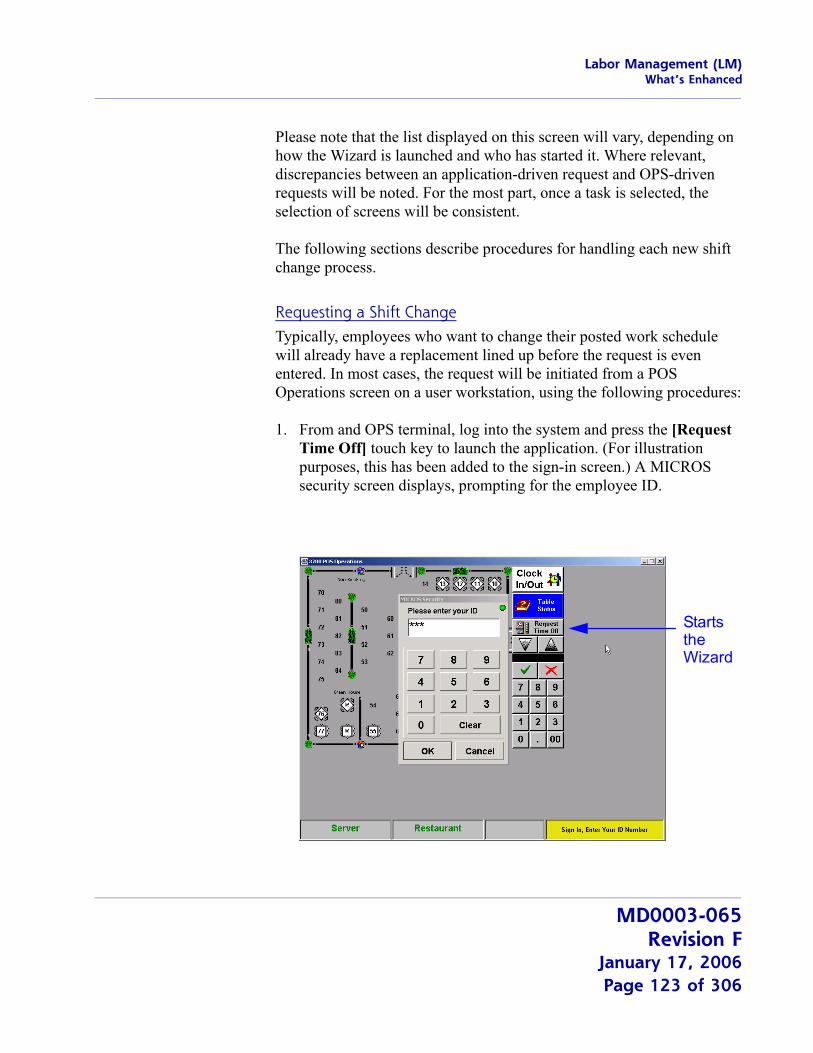
Labor Management (LM)What’s Enhanced
Please note that the list displayed on this screen will vary, depending on how the Wizard is launched and who has started it. Where relevant, discrepancies between an application-driven request and OPS-driven requests will be noted. For the most part, once a task is selected, the selection of screens will be consistent.
The following sections describe procedures for handling each new shift change process.
Requesting a Shift ChangeTypically, employees who want to change their posted work schedule will already have a replacement lined up before the request is even entered. In most cases, the request will be initiated from a POS Operations screen on a user workstation, using the following procedures:
1. From and OPS terminal, log into the system and press the [Request Time Off] touch key to launch the application. (For illustration purposes, this has been added to the sign-in screen.) A MICROS security screen displays, prompting for the employee ID.
StartstheWizard
MD0003-065Revision F
January 17, 2006Page 123 of 306
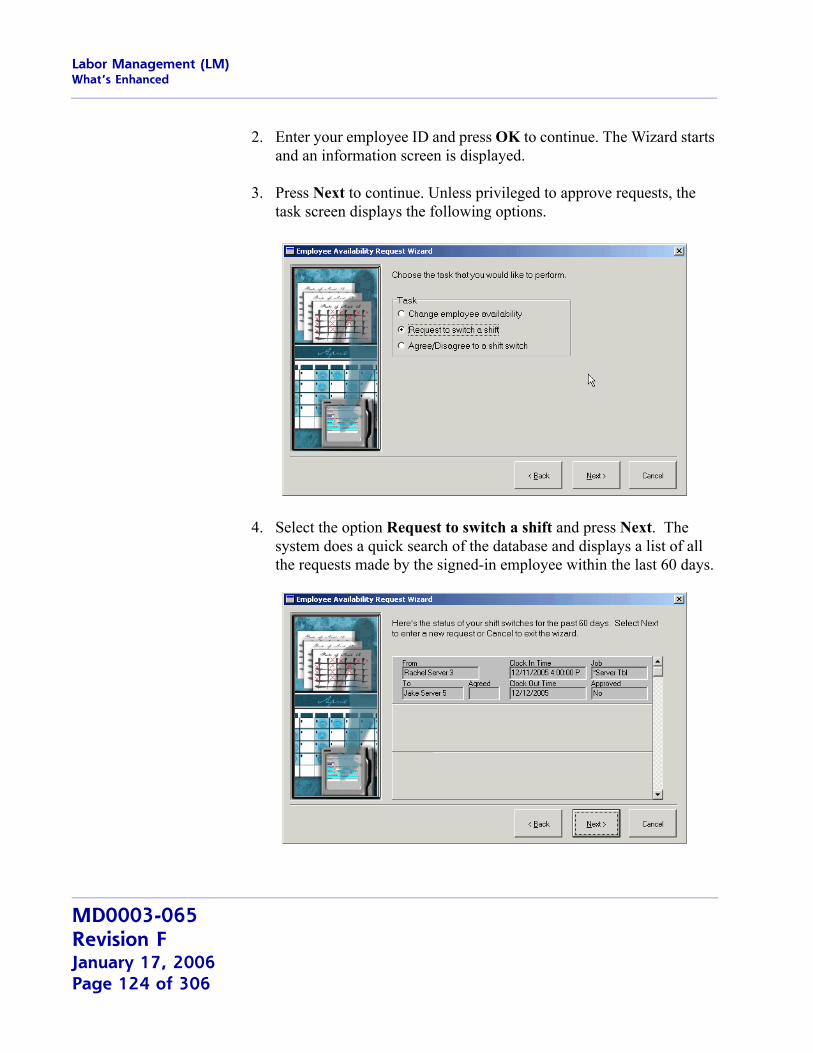
Labor Management (LM)What’s Enhanced
2. Enter your employee ID and press OK to continue. The Wizard starts and an information screen is displayed.
3. Press Next to continue. Unless privileged to approve requests, the task screen displays the following options.
4. Select the option Request to switch a shift and press Next. The system does a quick search of the database and displays a list of all the requests made by the signed-in employee within the last 60 days.
MD0003-065Revision FJanuary 17, 2006Page 124 of 306
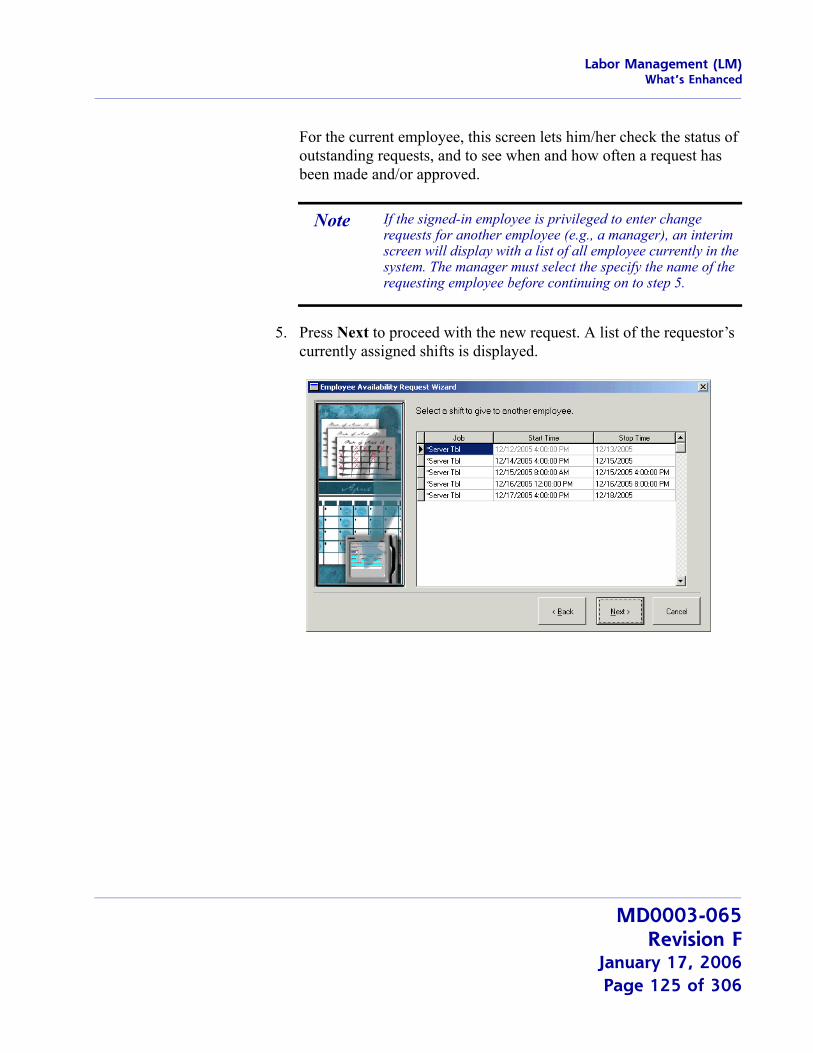
Labor Management (LM)What’s Enhanced
For the current employee, this screen lets him/her check the status of outstanding requests, and to see when and how often a request has been made and/or approved.
5. Press Next to proceed with the new request. A list of the requestor’s currently assigned shifts is displayed.
Note If the signed-in employee is privileged to enter change requests for another employee (e.g., a manager), an interim screen will display with a list of all employee currently in the system. The manager must select the specify the name of the requesting employee before continuing on to step 5.
MD0003-065Revision F
January 17, 2006Page 125 of 306
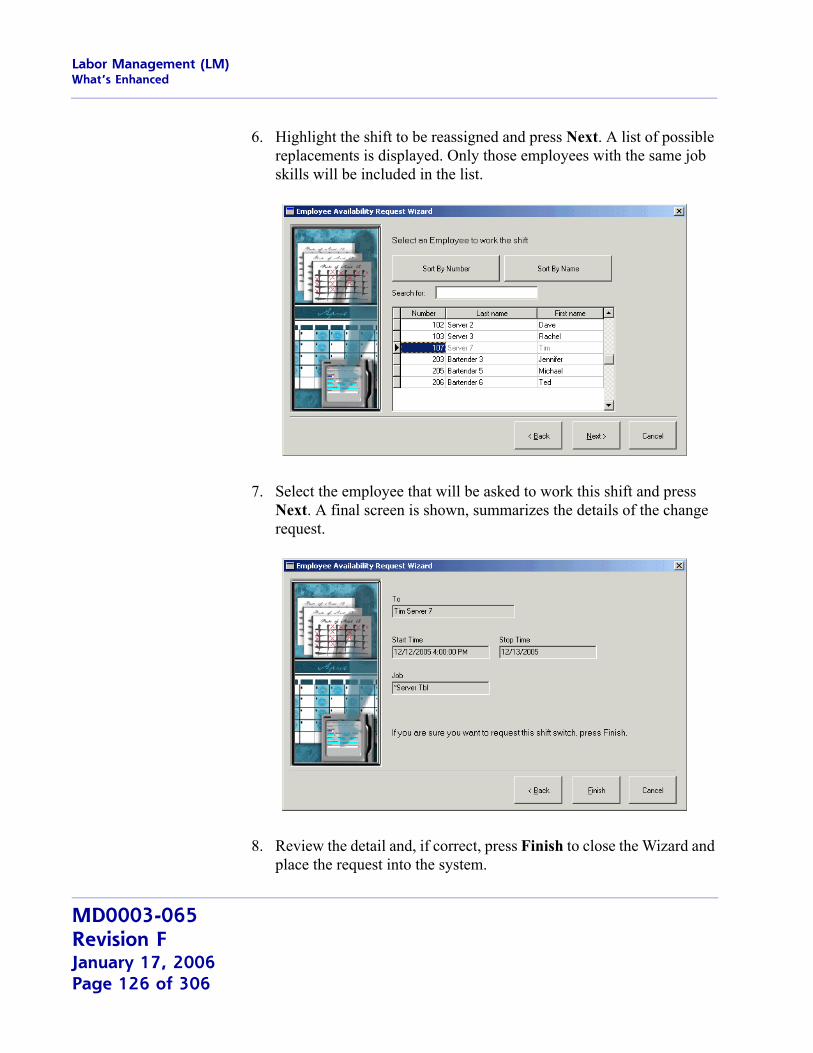
Labor Management (LM)What’s Enhanced
6. Highlight the shift to be reassigned and press Next. A list of possible replacements is displayed. Only those employees with the same job skills will be included in the list.
7. Select the employee that will be asked to work this shift and press Next. A final screen is shown, summarizes the details of the change request.
8. Review the detail and, if correct, press Finish to close the Wizard and place the request into the system.
MD0003-065Revision FJanuary 17, 2006Page 126 of 306
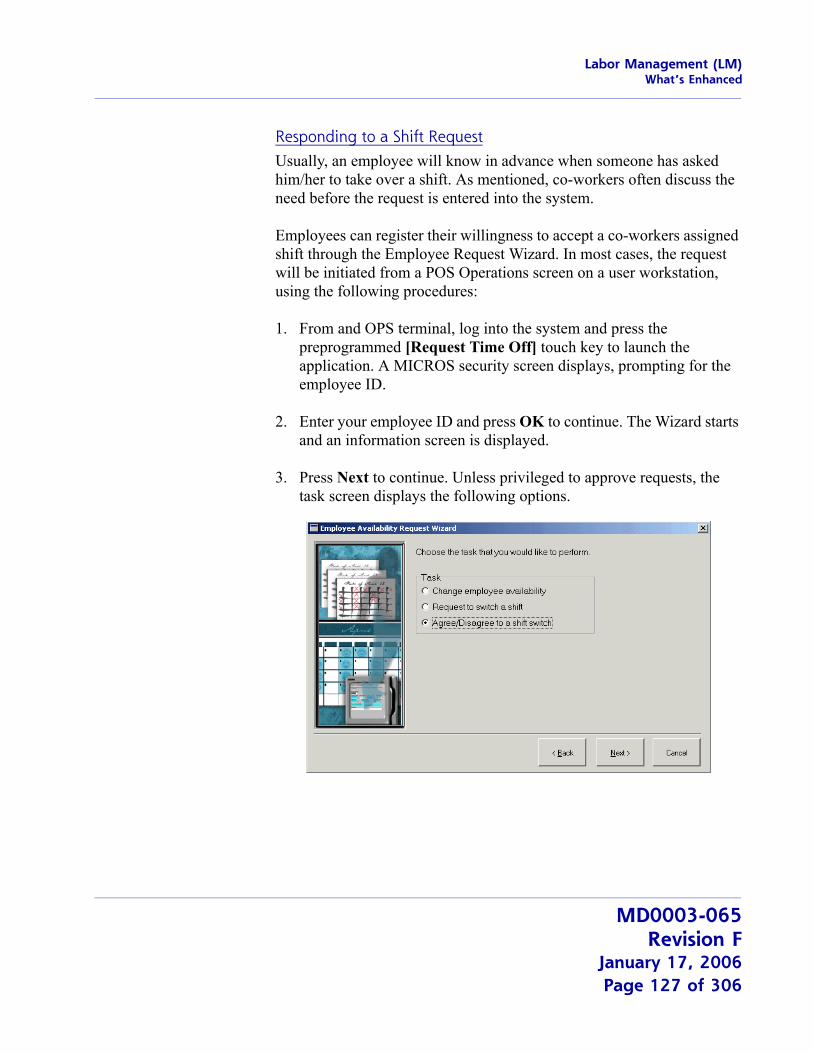
Labor Management (LM)What’s Enhanced
Responding to a Shift RequestUsually, an employee will know in advance when someone has asked him/her to take over a shift. As mentioned, co-workers often discuss the need before the request is entered into the system.
Employees can register their willingness to accept a co-workers assigned shift through the Employee Request Wizard. In most cases, the request will be initiated from a POS Operations screen on a user workstation, using the following procedures:
1. From and OPS terminal, log into the system and press the preprogrammed [Request Time Off] touch key to launch the application. A MICROS security screen displays, prompting for the employee ID.
2. Enter your employee ID and press OK to continue. The Wizard starts and an information screen is displayed.
3. Press Next to continue. Unless privileged to approve requests, the task screen displays the following options.
MD0003-065Revision F
January 17, 2006Page 127 of 306
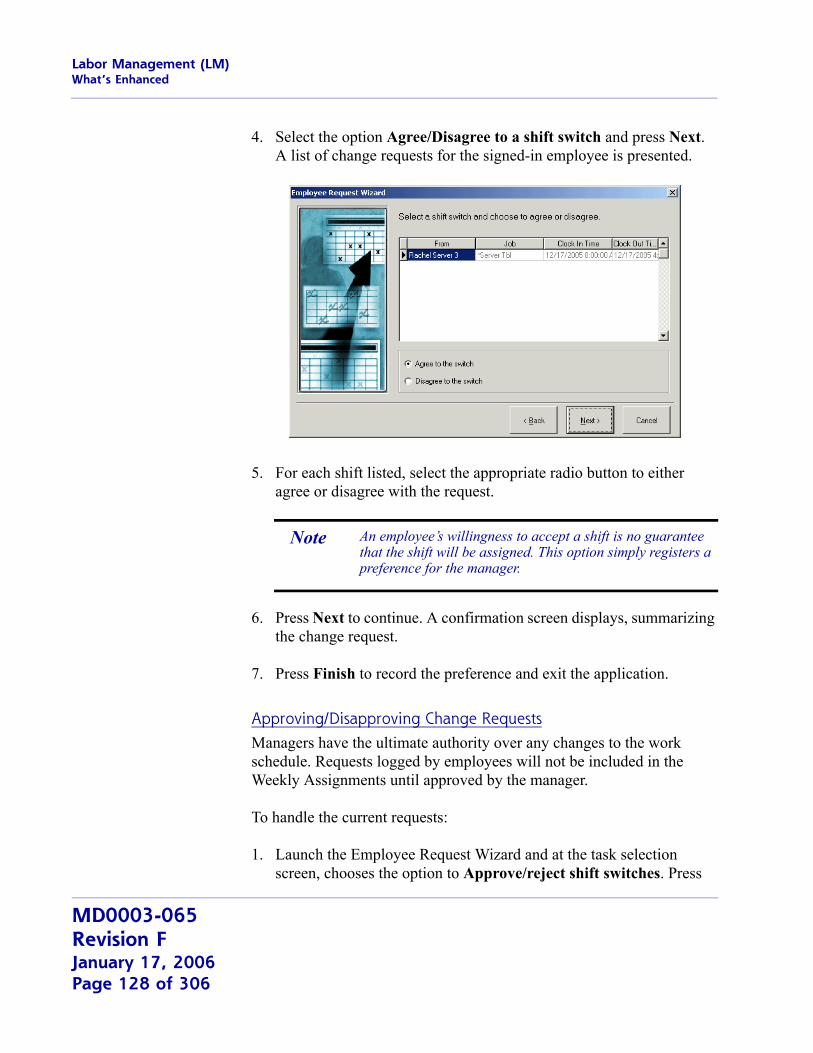
Labor Management (LM)What’s Enhanced
4. Select the option Agree/Disagree to a shift switch and press Next. A list of change requests for the signed-in employee is presented.
5. For each shift listed, select the appropriate radio button to either agree or disagree with the request.
6. Press Next to continue. A confirmation screen displays, summarizing the change request.
7. Press Finish to record the preference and exit the application.
Approving/Disapproving Change RequestsManagers have the ultimate authority over any changes to the work schedule. Requests logged by employees will not be included in the Weekly Assignments until approved by the manager.
To handle the current requests:
1. Launch the Employee Request Wizard and at the task selection screen, chooses the option to Approve/reject shift switches. Press
Note An employee’s willingness to accept a shift is no guarantee that the shift will be assigned. This option simply registers a preference for the manager.
MD0003-065Revision FJanuary 17, 2006Page 128 of 306
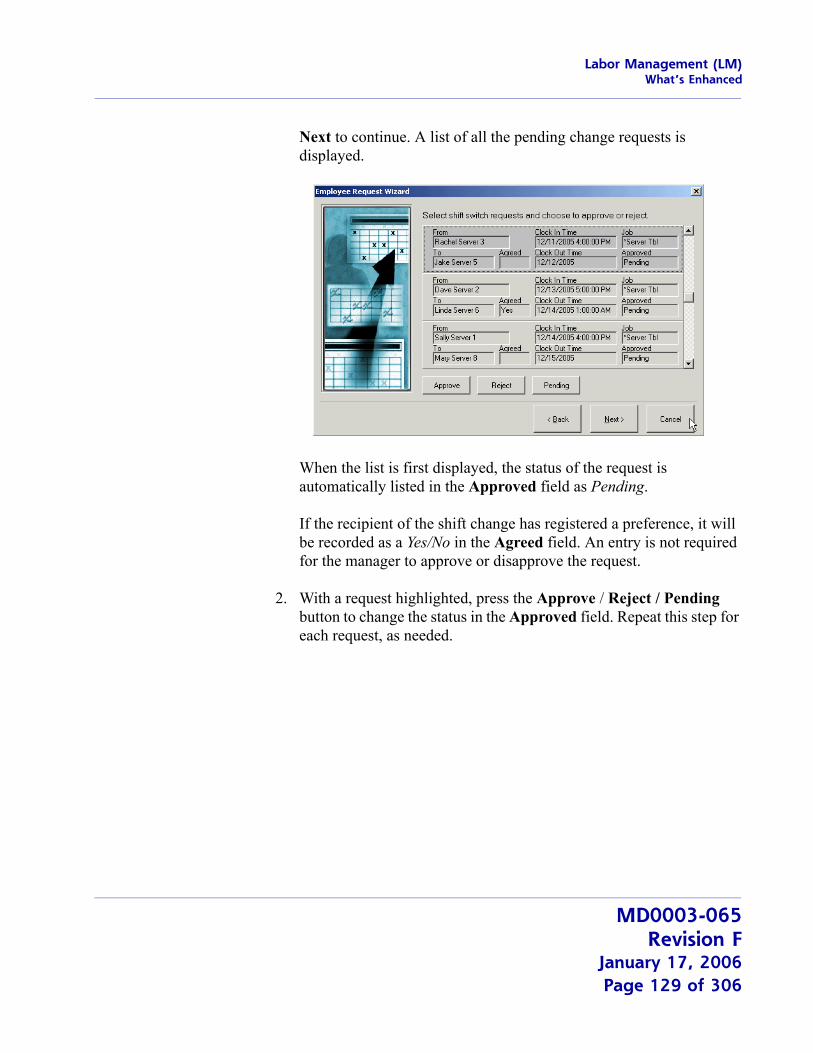
Labor Management (LM)What’s Enhanced
Next to continue. A list of all the pending change requests is displayed.
When the list is first displayed, the status of the request is automatically listed in the Approved field as Pending.
If the recipient of the shift change has registered a preference, it will be recorded as a Yes/No in the Agreed field. An entry is not required for the manager to approve or disapprove the request.
2. With a request highlighted, press the Approve / Reject / Pending button to change the status in the Approved field. Repeat this step for each request, as needed.
MD0003-065Revision F
January 17, 2006Page 129 of 306
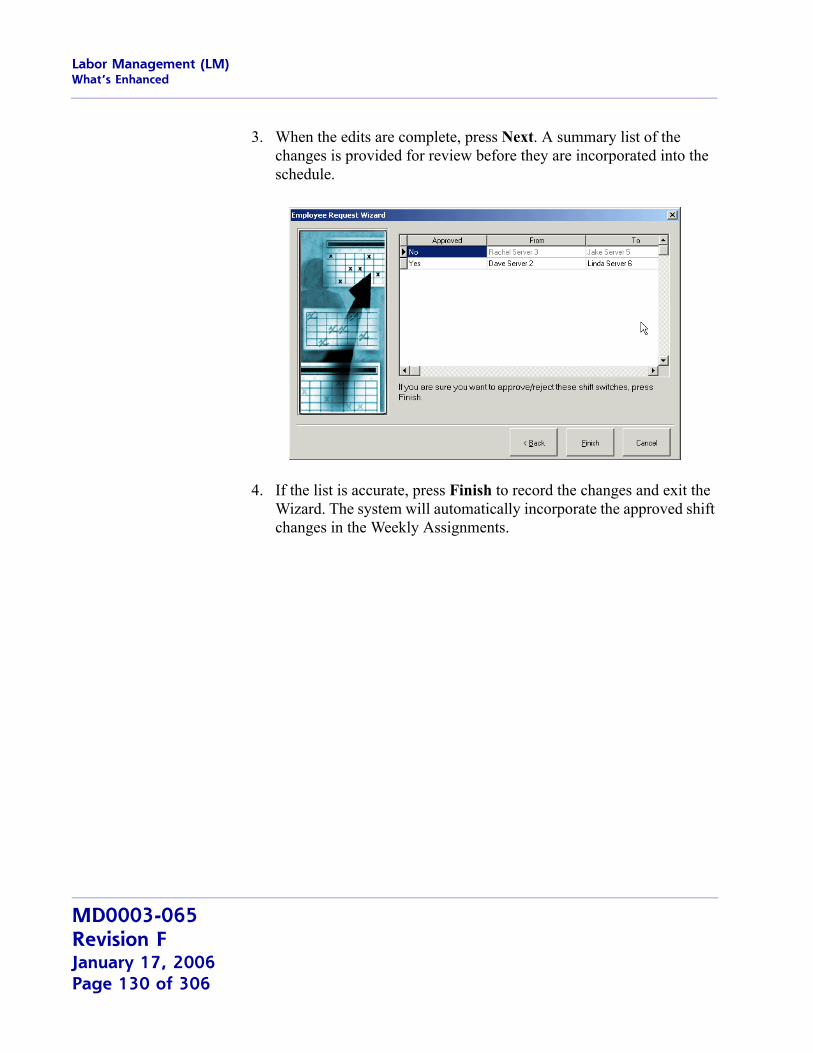
Labor Management (LM)What’s Enhanced
3. When the edits are complete, press Next. A summary list of the changes is provided for review before they are incorporated into the schedule.
4. If the list is accurate, press Finish to record the changes and exit the Wizard. The system will automatically incorporate the approved shift changes in the Weekly Assignments.
MD0003-065Revision FJanuary 17, 2006Page 130 of 306
Labor Management (LM)What’s Enhanced
Scheduling
Auto-Scheduling ImprovementsWith the addition of shift and section assignments, scheduling employees has become more a complex and, occasionally, confusing procedure. To streamline the process, the following enhancements were made to the forms and functionality used when generating weekly assignments:
Auto-schedule by skill level selectionsDefine skill level order of precedencePrevent scheduling of unavailable employeesEdit assignments through SRG Shifts Schedule variable shift lengthsProvide warning if overtime violation is triggered
An explanation of each of these changes is provided below.
Auto-Schedule by Skill Level SelectionsDuring auto-scheduling, the system scans the employment roster and automatically generates work assignments based on job type, availability, and need. In the past, this meant choosing an employee whose skill level exactly matched the stated requirement. If the system could not find such a person, that portion of the schedule would be left blank. It was then up to the manager to go back and fill in the gaps in coverage.
To reduce the number of manual updates, an option was added to expand the range of employees that can be selected when auto-generating the schedule. The option, which is set in LM Setup | Time and Attendance | Time and Attendance | Staff Requirements, directs the system to:
Fill requirements with employees of
The same skill level only.The same skill level or higher only.The same skill level or lower only.
MD0003-065Revision F
January 17, 2006Page 131 of 306
Labor Management (LM)What’s Enhanced
Define Skill Level Order of PrecedenceDuring setup, LM users can create up to 20 skill level definitions in the Skill Levels form (LM Setup | Time and Attendance | Skill Levels). Typically, skill level records are entered in a logical order, where record 1 is the highest ability and record 20 is the lowest, or 1 is the lowest and 20 is the highest.
Since order is determined by the end-user, the system had to be told how to rank the entries. This was done by adding a Skill Level Precedence option to the LM Setup | Time and Attendance | Time and Attendance | Staff Requirements form. The option specifies whether the records were entered in Ascending or Descending order. During auto-scheduling, this allows the system to correctly fill requirements for employees with the same skills or higher versus same skills or lower.
Prevent Scheduling of Unavailable EmployeesAn option was added that prevents managers from assigning employees to work a particular shift, if doing so would violate labor restrictions on overtime hours. When enabled, any attempt to add or send a shift node to a non-available region in the Weekly Assignments form will cause an error message to display. Managers will not be able to save the form until the shift is reassigned.
The option Cannot schedule unavailable employees can be configured through POS Configurator | Employees | Time and Attendance | Time Clock Schedule or through LM Setup | Time and Attendance | Time and Attendance | Time Clock Schedule.
Edit Assignments through SRG ShiftsManagers can now edit shift assignments through the SRG Shifts form. This form is accessed by pressing the [View Shifts] button at the bottom of the Scheduling | Weekly Assignments form. Previously, once an assignment was made, it could not be altered in this form. Instead, the user had to close SRG Shifts, delete the node from the schedule, and then manually add the correct employee to the form.
MD0003-065Revision FJanuary 17, 2006Page 132 of 306
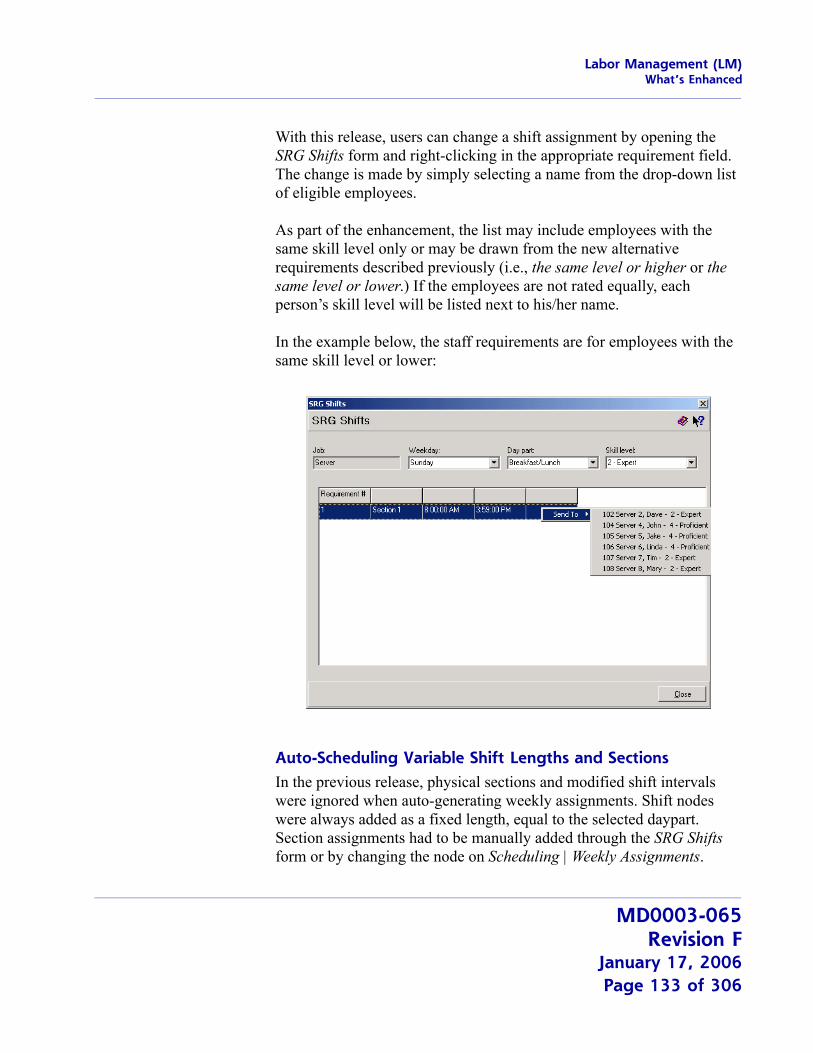
Labor Management (LM)What’s Enhanced
With this release, users can change a shift assignment by opening the SRG Shifts form and right-clicking in the appropriate requirement field. The change is made by simply selecting a name from the drop-down list of eligible employees.
As part of the enhancement, the list may include employees with the same skill level only or may be drawn from the new alternative requirements described previously (i.e., the same level or higher or the same level or lower.) If the employees are not rated equally, each person’s skill level will be listed next to his/her name.
In the example below, the staff requirements are for employees with the same skill level or lower:
Auto-Scheduling Variable Shift Lengths and SectionsIn the previous release, physical sections and modified shift intervals were ignored when auto-generating weekly assignments. Shift nodes were always added as a fixed length, equal to the selected daypart. Section assignments had to be manually added through the SRG Shifts form or by changing the node on Scheduling | Weekly Assignments.
MD0003-065Revision F
January 17, 2006Page 133 of 306
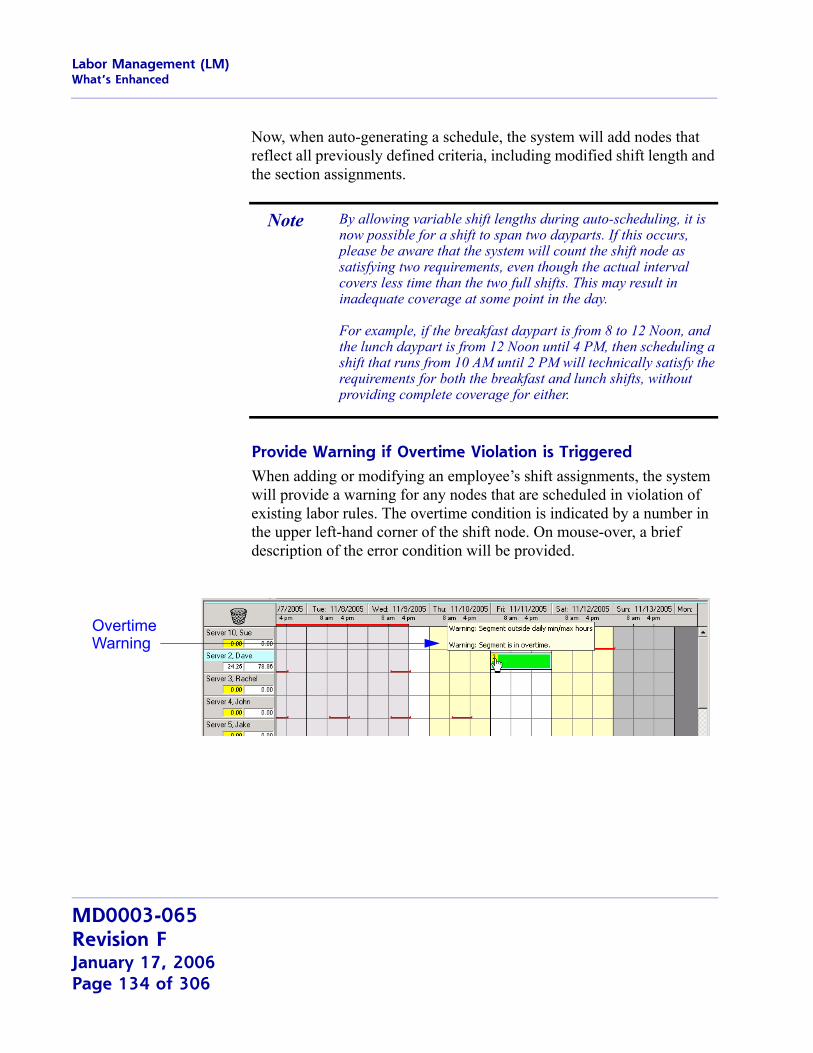
Labor Management (LM)What’s Enhanced
Now, when auto-generating a schedule, the system will add nodes that reflect all previously defined criteria, including modified shift length and the section assignments.
Provide Warning if Overtime Violation is TriggeredWhen adding or modifying an employee’s shift assignments, the system will provide a warning for any nodes that are scheduled in violation of existing labor rules. The overtime condition is indicated by a number in the upper left-hand corner of the shift node. On mouse-over, a brief description of the error condition will be provided.
Note By allowing variable shift lengths during auto-scheduling, it is now possible for a shift to span two dayparts. If this occurs, please be aware that the system will count the shift node as satisfying two requirements, even though the actual interval covers less time than the two full shifts. This may result in inadequate coverage at some point in the day.
For example, if the breakfast daypart is from 8 to 12 Noon, and the lunch daypart is from 12 Noon until 4 PM, then scheduling a shift that runs from 10 AM until 2 PM will technically satisfy the requirements for both the breakfast and lunch shifts, without providing complete coverage for either.
OvertimeWarning
MD0003-065Revision FJanuary 17, 2006Page 134 of 306

Labor Management (LM)What’s Revised
What’s Revised A revision is defined as a correction made to any existing form, feature, or function currently resident in the LM software. To qualify as a revision, the change must satisfy the following criteria:
The basic form, feature, or functionality must be part of the previous version of the software.
The change must replace the current item or remove it from the application.
Revisions Summarized
The table below summarizes the revisions included in this version.
Module Feature CR ID Page
Forecasting Edits to Associated Forecast Produce Incorrect Results
N/A 137
Overwriting an Associated Forecast Results in Key Violation Error
N/A 137
Unable to Overwrite an Approved Forecast if Part of an Associated Group
N/A 137
Human Resources
Closing Form From “X” box on Windows Frame While Drop-Down Causes Error
N/A 138
Date Format Inconsistent When Using European Regional Settings
21462 138
Employee Scheduling Request Wizard Incorrectly Allows Null Values
21554 138
MD0003-065Revision F
January 17, 2006Page 135 of 306
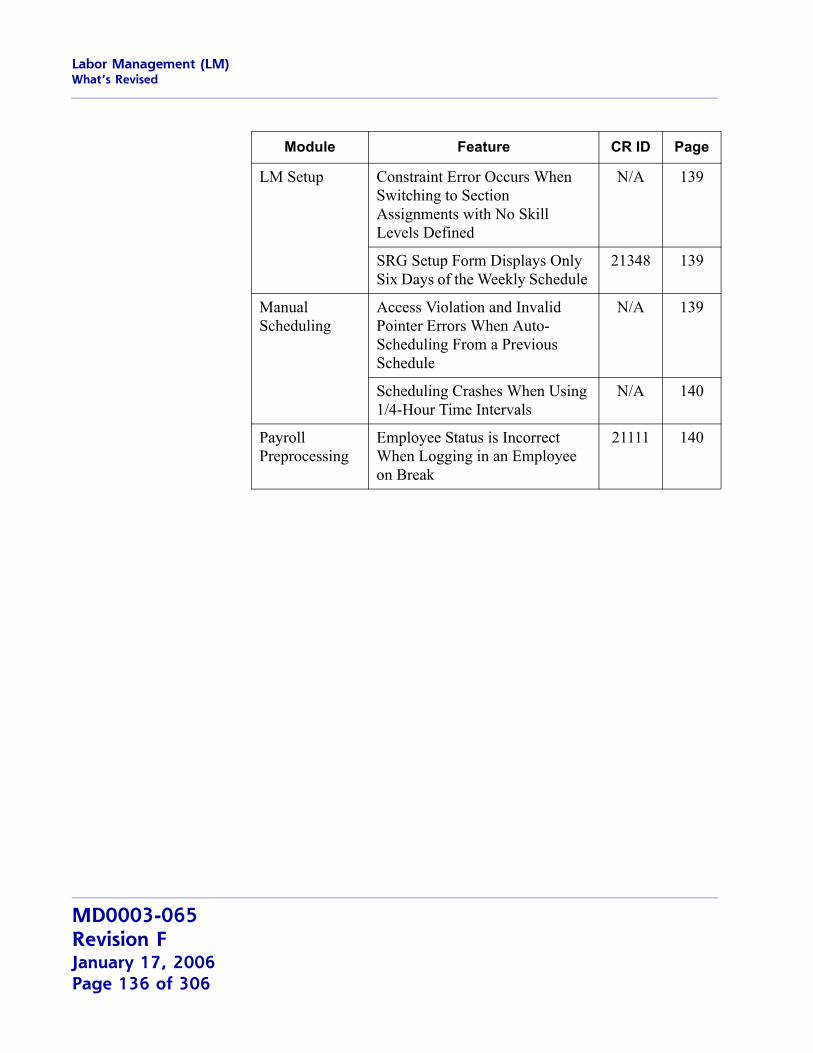
Labor Management (LM)What’s Revised
LM Setup Constraint Error Occurs When Switching to Section Assignments with No Skill Levels Defined
N/A 139
SRG Setup Form Displays Only Six Days of the Weekly Schedule
21348 139
Manual Scheduling
Access Violation and Invalid Pointer Errors When Auto- Scheduling From a Previous Schedule
N/A 139
Scheduling Crashes When Using 1/4-Hour Time Intervals
N/A 140
Payroll Preprocessing
Employee Status is Incorrect When Logging in an Employee on Break
21111 140
Module Feature CR ID Page
MD0003-065Revision FJanuary 17, 2006Page 136 of 306
Labor Management (LM)What’s Revised
Revisions Detailed
Forecasts
Edits to Associated Forecasts Produce Incorrect ResultsCR ID #: N/A
When editing a cell in a forecast that belongs to a group of associated forecasts, the system failed to correctly update the rest of the group members. This resulted in incorrect subtotals in the associated forecasts. That problem has been corrected.
In addition, users found that if the forecast element was reduced significantly, a rounding error would occur and the changes made to one forecast element (e.g., sales) would cause another forecast element (e.g., item counts) to be so small that the the value was reported as zero.
To correct this problem, users are advised to set the Display precision option (Forecast Setup | Forecasting Explorer | General) to 3 decimal places. This will ensure that values are not lost when editing forecasts whose elements are based on different metrics.
Overwriting an Associated Forecast Results in Key Violation ErrorCR ID #: N/A
Attempts to regenerate a forecast that was part of an associated group would fail, with a primary key violation error displayed. The problem occurred because the system was trying to delete the forecasts for all members of the associated group, rather than overwriting the forecasts one at a time.
Unable to Overwrite an Approved Forecast if Part of an Associated GroupCR Id #: N/A
After creating an associated group of forecasts, attempts to regenerate an approved forecast would result in an lm_mtx_dtl error. In addition, the system failed to delete all future forecasts based on the associated group elements. These problems have been corrected.
MD0003-065Revision F
January 17, 2006Page 137 of 306
Labor Management (LM)What’s Revised
Human Resources
Closing Form From “X” box on Windows Frame While Drop-Down Causes ErrorCR ID #: N/A
During employee setup, an error message would display, followed by an access violation, if the user closed any of the HR forms by clicking the “X” button in the upper corner of the Windows frame while one of the drop-down boxes was open. The problem was caused by confusion over which control should have system focus. This has been corrected.
Date Format Inconsistent When Using European Regional SettingsCR ID #: 21462
After configuring the operating system to use the European date format of DDMMYY (Windows Start Menu | Settings | Control Panel | Regional Options | General \ Your locale' ), the system failed to displays date formats consistently within the Human Resources application. For example, when adding an Exceptions record, the Request date, Start date, Stop date, and Approval dates would display in the European format while the field was selected, but would shift to the US format (MMDDYY) as soon as the focus moved to another field. This problem has been corrected.
Employee Scheduling Request Wizard Incorrectly Allows Null ValuesCR ID #: 21554
When adding an availability record via the Employee Scheduling Request wizard, quickly pressing the [Back]/[Next] buttons would cause the system to click through the form and save the entry without completing all the necessary fields. As a result, attempts to generate Weekly Assignments would fail. This problem has been corrected.
MD0003-065Revision FJanuary 17, 2006Page 138 of 306
Labor Management (LM)What’s Revised
LM Setup
Constraint Error Occurs When Switching to Section Assignments With No Skill Levels DefinedCR ID #: N/A
When adding a record in the LM | Staff Requirements | Skill Level Requirements form, an error would occur if the user tried to access the Section Assignments tab before configuring skill levels (LM | Time and Attendance | Skill Level). This problem has been corrected.
SRG Setup Form Displays Only Six Days of the Weekly Schedule CR ID #: 21348
When opening the SRG Setup form (LM Setup | Staff Requirements), only six days were visible in the read-only field displaying the start/stop times for each day of the week. The scroll bars were also inactive, making it impossible to read all of the entries. Both problems have been corrected.
Manual Scheduling
Access Violation and Invalid Pointer Errors When Auto- Scheduling From a Previous Schedule CR ID #: N/A
When auto-generating weekly schedules based on the last previous schedule, access violations would occur and the system would display the error message "invalid pointer operation.” This problem has been corrected.
MD0003-065Revision F
January 17, 2006Page 139 of 306
Labor Management (LM)What’s Revised
Scheduling Crashes When Using 1/4-Hour Time IntervalsCR ID #: N/A
Previously, managers were unable to generate a schedule would when the option Requirements time interval (LM Setup | Time and Attendance | Time and Attendance | Staff Requirements) was configured for 1/4-hour shifts. Attempts to do so would cause the system to hang. This has been corrected.
Payroll Preprocessing
Employee Status is Incorrect When Logging in an Employee on BreakCR ID #: 21111
Previously, if a user inserted a time card record for an employee and set the clock out status to ‘On Break,’ the system failed to post the correct status. The problem only occurred if the record was the active (i.e., most recent) time card entry. It has been corrected.
MD0003-065Revision FJanuary 17, 2006Page 140 of 306
Financial Management (FM)What’s New
Financial Management (FM)
What’s New There are no new features in this version of the software.
What’s Enhanced There are no enhancements in this version of the software.
What’s Revised There are no revisions in this version of the software.
MD0003-065Revision F
January 17, 2006Page 141 of 306
RES PlatformIntroduction
RES Platform
Introduction This chapter comprises changes made to RES Platform, which includes the following applications:
MICROS Desktop
License Manager
Reports Explorer
Language Translation Utility
What’s New There are no new features in this version of the software.
What’s Enhanced There are no enhancements in this version of the software.
MD0003-065Revision FJanuary 17, 2006Page 142 of 306
RES PlatformWhat’s Revised
What’s Revised A revision is defined as a correction made to any existing form, feature, or function currently resident in the LM software. To qualify as a revision, the change must satisfy the following criteria:
The basic form, feature, or functionality must be part of the previous version of the software.
The change must replace the current item or remove it from the application.
Revisions Summarized
The table below summarizes the revisions included in this version.
Revisions Detailed
MICROS Desktop
HTML Buttons Not RespondingCR ID #: N/A
When using the MICROS Desktop, attempts to open applications by clicking one of the HTML buttons would fail. This was an intermittent problem which has been corrected.
Module Feature CR ID Page
MICROS Desktop
HTML Buttons Not Responding N/A 143
MD0003-065Revision F
January 17, 2006Page 143 of 306

RES PlatformWhat’s Revised
MD0003-065Revision FJanuary 17, 2006Page 144 of 306
Service Pack 6
Service Pack 6
In keeping with the original RES 3.2 ReadMe First, information is divided into self-contained chapters, one for each of the following RES products:
3700 Point-of-Sale (POS) System
Kitchen Display System (KDS)
Cash Management (CM)
Guest Service Solutions (GSS)
Product Management (PM)
Labor Management (LM)
Financial Management (FM)
RES Platform
For clarity, product information is further divided into three sections:
What’s New
What’s Enhanced
What’s Revised
Each section begins with an introduction and includes a table that summarizes the features and functionality incorporated in this version of the software. The table provides hypertext links to supplementary text and graphics about the selected topics.
For more information on these features, and step-by-step instructions for configuring them, refer to the product’s Online Reference Manual, installed with the MICROS Documentation and available on the RES CD.
MD0003-065Revision F
January 17, 2006Page 145 of 306
306
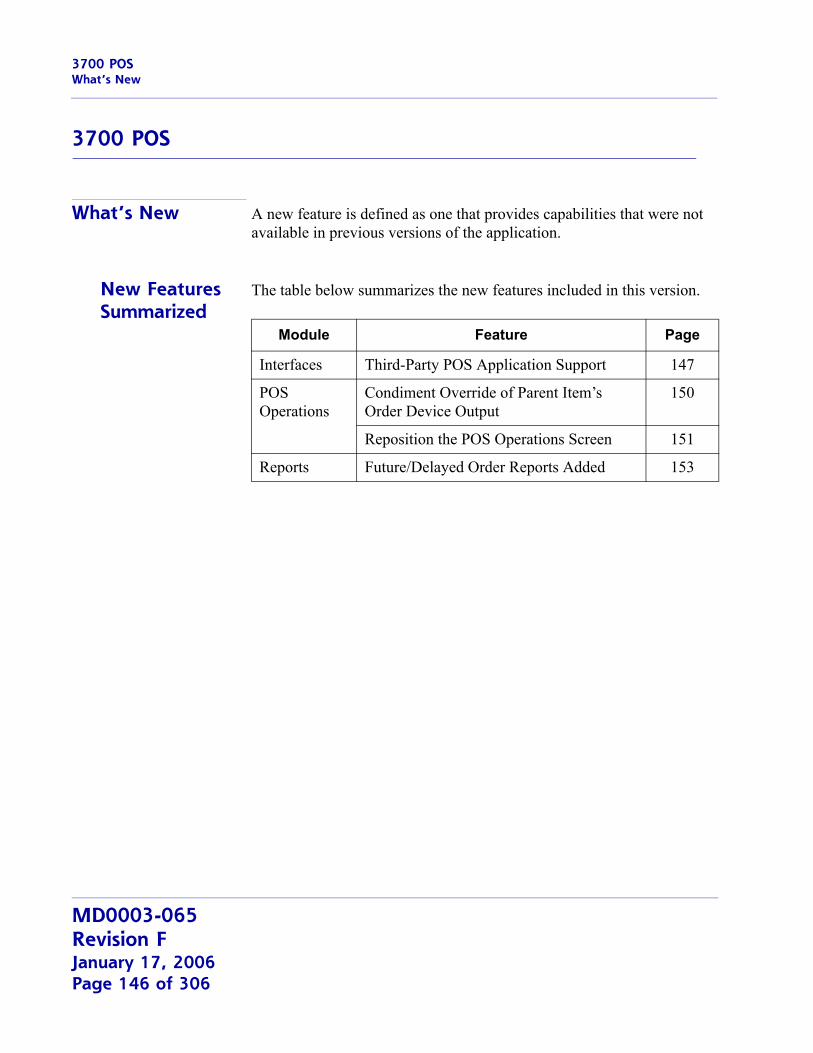
3700 POSWhat’s New
3700 POS
What’s New A new feature is defined as one that provides capabilities that were not available in previous versions of the application.
New Features Summarized
The table below summarizes the new features included in this version.
Module Feature Page
Interfaces Third-Party POS Application Support 147
POS Operations
Condiment Override of Parent Item’s Order Device Output
150
Reposition the POS Operations Screen 151
Reports Future/Delayed Order Reports Added 153
MD0003-065Revision FJanuary 17, 2006Page 146 of 306
3700 POSWhat’s New
New Features Detailed
Interfaces
Third Party POS Application SupportWith this release, third-party developers will be able to implement their own POS Client Applications using the MICROS RES POS API.
To do this, an interface was added that provides access to RES 3700 POS Transaction Services through the use of specialized POS clients. The API allows these clients to access certain POS functions such as opening tables and guest checks, starting orders, and applying payments and discounts.
Examples of specialized POS clients are:
Remote or local guest ordering from Kiosks
Remote guest ordering or centralized order dispatch utilizing Web Services
Open table/guest check control and guest experience time management via Table Management Systems
Guest payment approval using mobile phones or PDAs
POS Transaction services are accessible on a local client PC using a COM interface or on a remote client using a Web Service. Licensing is required. Third-party clients will require a RES 3700 activation code in order to connect to the API and post transactions to the database.
For more on this feature or information about the POS API Developers Program, please contact your local MICROS representative.
MD0003-065Revision F
January 17, 2006Page 147 of 306
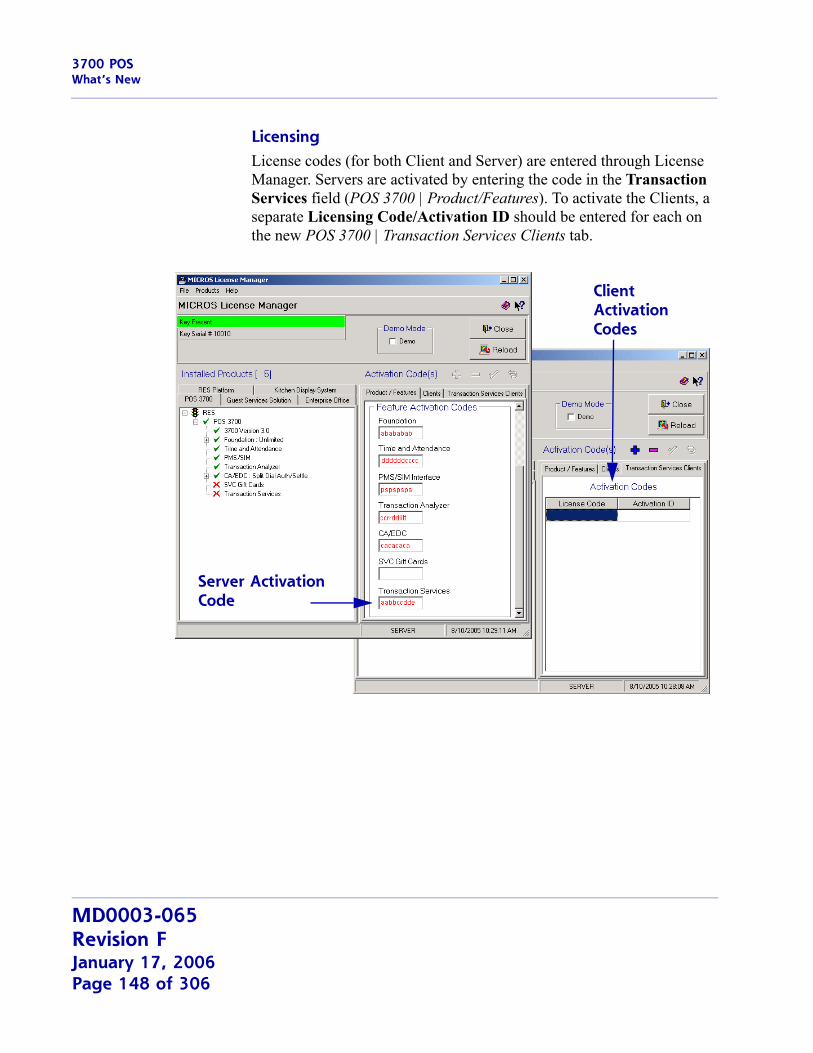
3700 POSWhat’s New
LicensingLicense codes (for both Client and Server) are entered through License Manager. Servers are activated by entering the code in the Transaction Services field (POS 3700 | Product/Features). To activate the Clients, a separate Licensing Code/Activation ID should be entered for each on the new POS 3700 | Transaction Services Clients tab.
Server ActivationCode
ClientActivationCodes
MD0003-065Revision FJanuary 17, 2006Page 148 of 306
3700 POSWhat’s New
Additional Options
To use this feature, workstations must be configured as third-party devices in the Device Type field in POS Configurator (Devices | Devices | General). To support this, two new options were added to the drop-down list:
PosAPI Client — Select this option to identify local clients connecting through a COM interface.
PosAPI Web Service — Select this option to identify remote clients connecting through a web service.
In addition, employees must be privileged to enter sales through the third-party POS interface. To do this, the following option was added in POS Configurator (Employees | Employee Classes | Transactions | Transaction Control):
POS API Employee — Allows members of the selected employee class to enter sales though the specialized POS client.
When checked, this option will disable all other RES options, except for the accounting method defined through the Cash Management application (Configuration | Options | Main). By default, Server Banking will be enabled.
If checked, one or more dialog boxes will display asking for confirmation of the selection.
MD0003-065Revision F
January 17, 2006Page 149 of 306
3700 POSWhat’s New
POS Operations
Condiment Override of Parent Item’s Order Device OutputAn operator can use condiments to change the order output of a parent menu item. The new feature can be used to prevent certain orders from being sent to the order device (KDS and remote printing), or to redirect items to different prep stations based on how the customer wants them prepared.
This feature is not supported in Dynamic Order Mode.
Enabling the FeatureTo support this functionality, the option Condiment override order device output (Sales | Menu Item Classes | Print/Display) was added in POS Configurator. When enabled, the option will override the parent menu item’s print class settings with those of the condiment.
This option is greyed out unless the Condiment option (Sales | Menu Item Classes | General Options) is checked.
In addition, the feature will be ignored unless following options are disabled:
Enable Dynamic Order Mode (Devices | Order Devices | Dynamic Order Mode)
Print line by line (Devices | Order Devices | Options | Sorting/Formatting)
MD0003-065Revision FJanuary 17, 2006Page 150 of 306
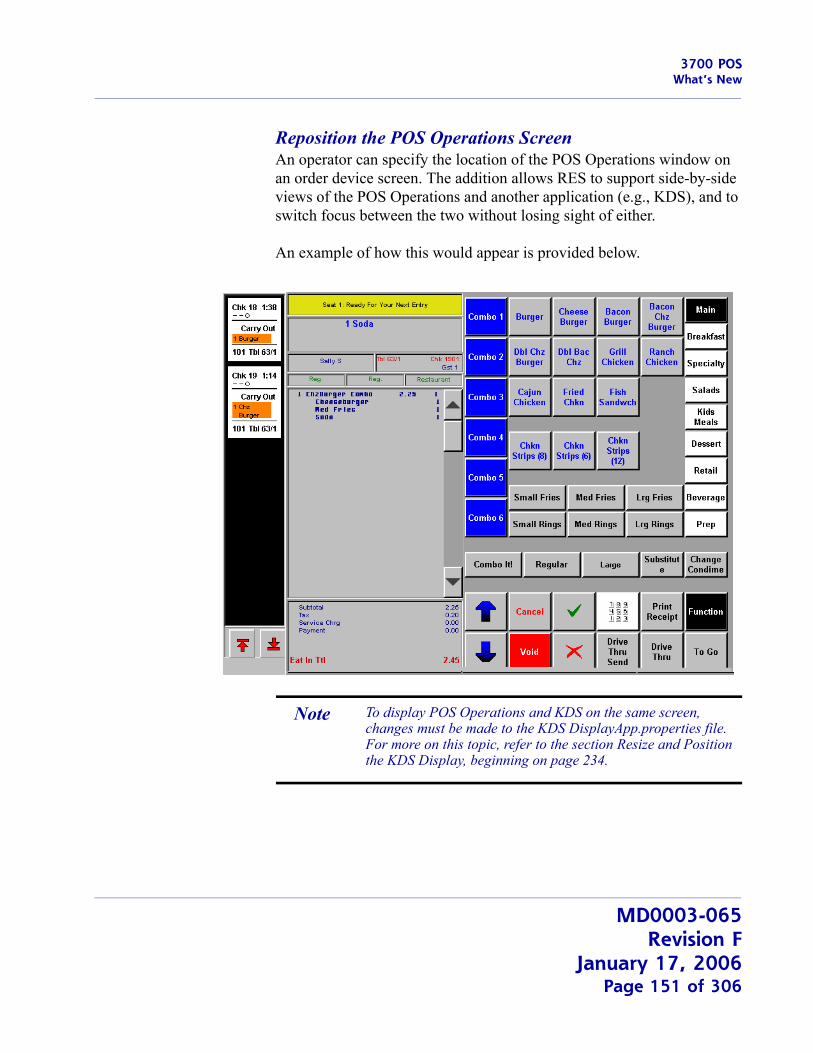
3700 POSWhat’s New
Reposition the POS Operations ScreenAn operator can specify the location of the POS Operations window on an order device screen. The addition allows RES to support side-by-side views of the POS Operations and another application (e.g., KDS), and to switch focus between the two without losing sight of either.
An example of how this would appear is provided below.
Note To display POS Operations and KDS on the same screen, changes must be made to the KDS DisplayApp.properties file. For more on this topic, refer to the section Resize and Position the KDS Display, beginning on page 234.
MD0003-065Revision F
January 17, 2006Page 151 of 306
3700 POSWhat’s New
Enabling the FeatureTo support this functionality, users will need to open the Registry to \\HKLM\Software\MICROS\3700\OPS and add or modify the following keys:
WindowLocation — Add a key with a STRING value containing the x, y coordinates of the POS Operations screen. (In the previous example, the coordinates would be 600, 200 — placing the OPS screen just to the right of the KDS display.)
This setting will override the (default) registry key LocateUpperLeft.
Resolution — Modify the existing key by changing the STRING value to the preferred width, height (e.g., 800, 600 pixels) of the OPS window.
HideCaption — Add a key with a DWORD value indicating whether or not the Windows® title bar will be shown across the top of the OPS screen. The acceptable values are:
0 — Display the caption bar.
1 — Hide the caption bar.
Note To work, resolution values must have a matching template in the Opsdisplaysys.cfg file. Otherwise, an error message will display and the system will default to the nearest matching resolution.
MD0003-065Revision FJanuary 17, 2006Page 152 of 306

3700 POSWhat’s New
Reports
Future/Delayed Order Reports AddedFive new Future/Delayed report templates have been added in this release. The reports provide information on the number and type of menu items that have been entered into the system as delayed or future orders. Typically, these reports will be run by employees at the start of the work shift or business day in preparation for the coming day.
The new reports templates include:
Daily System Time Period Future Menu Item Sales (mi_tps02.rpt) — Both 80- and 40-column reports are available. This report provides a daily consolidated list of menu items, separated by fixed time periods.
Daily System Future Menu Item Sales Detail (mi_s003.rpt) — This is an 80-column report only. It provides a daily consolidated list of menu items for the date range specified.
Future Order Menu Items by Check (chk_106.rpt) — Both 80- and 40- column reports are available. This report groups menu items by date and check number.
MD0003-065Revision F
January 17, 2006Page 153 of 306
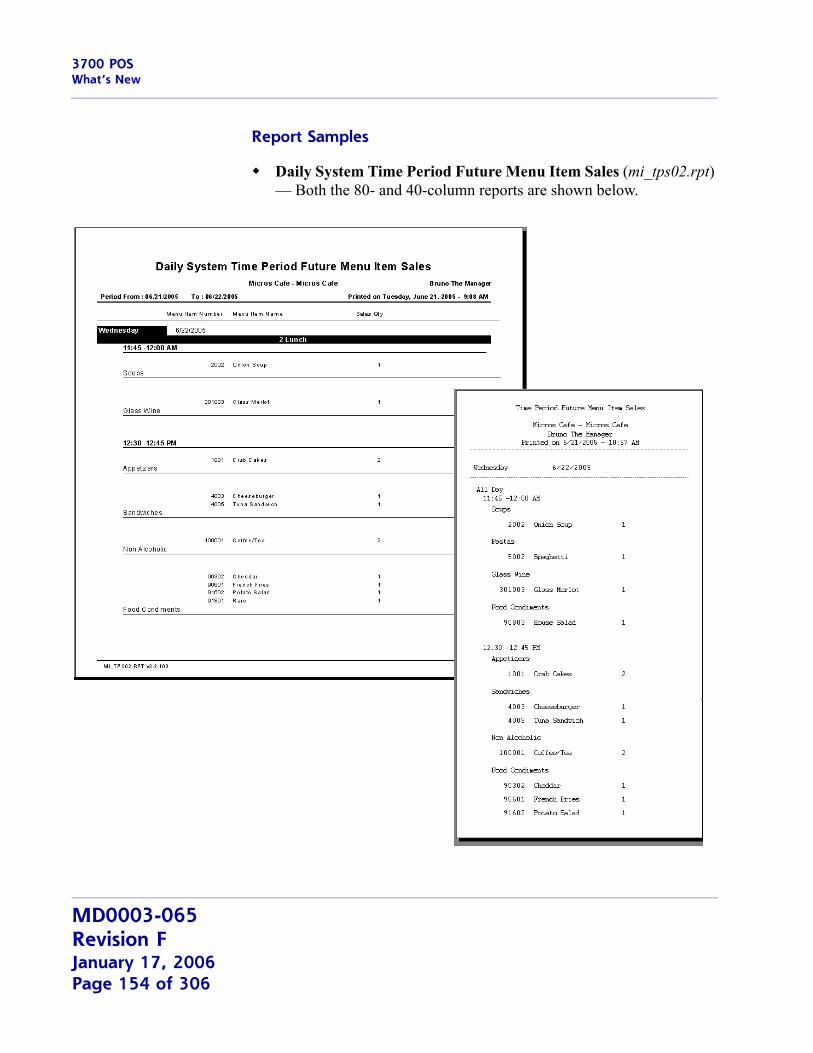
3700 POSWhat’s New
Report Samples
Daily System Time Period Future Menu Item Sales (mi_tps02.rpt) — Both the 80- and 40-column reports are shown below.
MD0003-065Revision FJanuary 17, 2006Page 154 of 306
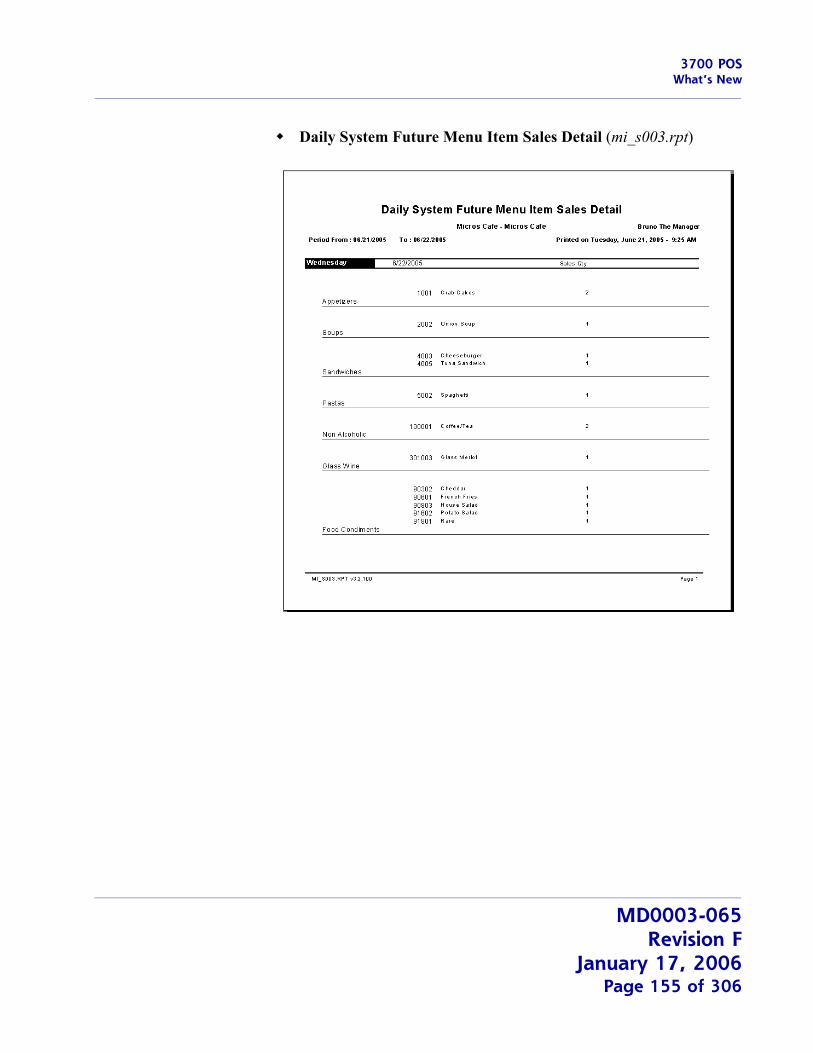
3700 POSWhat’s New
Daily System Future Menu Item Sales Detail (mi_s003.rpt)
MD0003-065Revision F
January 17, 2006Page 155 of 306
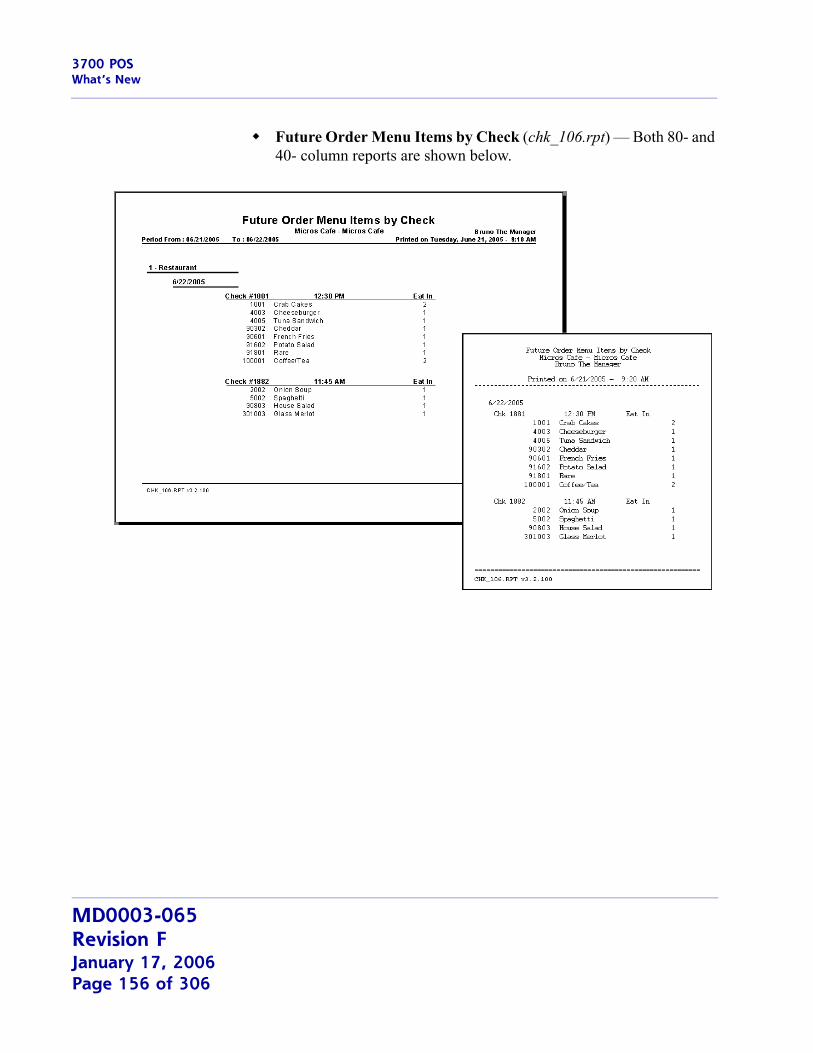
3700 POSWhat’s New
Future Order Menu Items by Check (chk_106.rpt) — Both 80- and 40- column reports are shown below.
MD0003-065Revision FJanuary 17, 2006Page 156 of 306
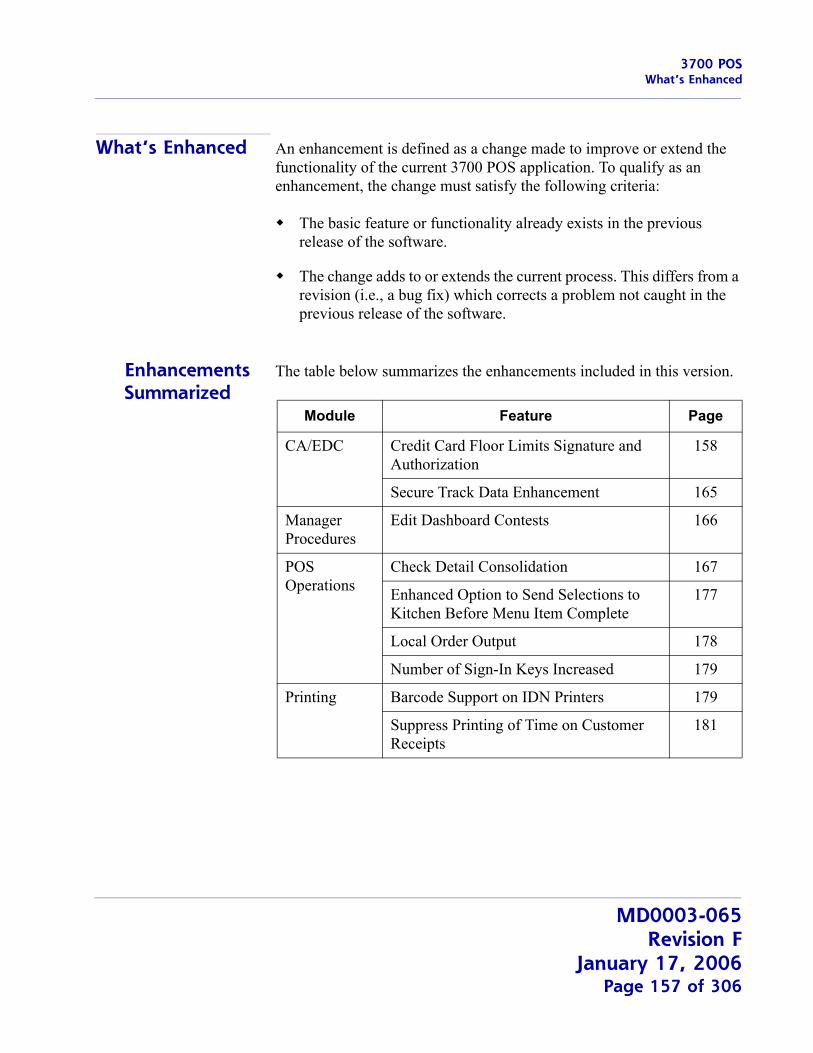
3700 POSWhat’s Enhanced
What’s Enhanced An enhancement is defined as a change made to improve or extend the functionality of the current 3700 POS application. To qualify as an enhancement, the change must satisfy the following criteria:
The basic feature or functionality already exists in the previous release of the software.
The change adds to or extends the current process. This differs from a revision (i.e., a bug fix) which corrects a problem not caught in the previous release of the software.
Enhancements Summarized
The table below summarizes the enhancements included in this version.
Module Feature Page
CA/EDC Credit Card Floor Limits Signature and Authorization
158
Secure Track Data Enhancement 165
Manager Procedures
Edit Dashboard Contests 166
POS Operations
Check Detail Consolidation 167
Enhanced Option to Send Selections to Kitchen Before Menu Item Complete
177
Local Order Output 178
Number of Sign-In Keys Increased 179
Printing Barcode Support on IDN Printers 179
Suppress Printing of Time on Customer Receipts
181
MD0003-065Revision F
January 17, 2006Page 157 of 306
3700 POSWhat’s Enhanced
Enhancements Detailed
CA/EDC
Credit Card Floor Limits Signature and AuthorizationRecently, credit card companies have introduced programs that allow merchants to skip the authorization and/or signature requirements on smaller purchases. An operator can program two separate base floor limits for each credit card accepted. A list of current credit card companies and their programs is provided below:
VISA Programs
Express Pay
Floor limits based on merchant type (for QSR and TSR merchants, it is $25).
Authorization is NOT required.
Printing a receipt/voucher is optional, but if it does print, it should state “Signature Not Required”.
Small Ticket
Floor limit based on merchant type (for QSR and TSR merchant, it is $25).
Authorization is required.
Printing a receipt/voucher is optional, but if it does print, it should state “Signature Not Required”.
MasterCard Programs
Quick Pay
Floor limit based on merchant type (currently only available for QSR merchants, not TSR).
Authorization is required.
MD0003-065Revision FJanuary 17, 2006Page 158 of 306
3700 POSWhat’s Enhanced
Printing a receipt/voucher is optional, but if it does print, it should state “Signature Not Required”.
From a merchant fee/discount rate perspective, this is comparable to Visa’s Express Pay Program, except that authorization is always required.
This program REQUIRES the merchant to sign up with MasterCard in advance to receive the special rates this program offers.
Convenience Rate
From a merchant fee/discount rate perspective, this is comparable to VISA’s Small Ticket Program.
Authorization is required.
Printing a receipt/voucher is optional, but if it does print, it should state “Signature Not Required”.
American Express Programs
AMEX has no formal program at this time.
Summary. These programs have different discount rates and transaction fees associated with them. Merchants may experience lower total costs if their transaction profile supports program use. Be advised that it is the merchant’s responsibility to contact the credit card company to apply for these programs.
Base Floor LimitsTo take advantage of quick pay programs, the system must be able to determine when an authorization is required. This is done by establishing base floor limits for processing credit card transactions. A base floor limit is the maximum amount that may be tendered before the authorization and signature requirements change.
MD0003-065Revision F
January 17, 2006Page 159 of 306
3700 POSWhat’s Enhanced
With this release, users can program two separate base floor limits for each credit card accepted. This allows the merchant to stack the program requirements — i.e., to apply one set for transactions from $0–$20 and another set for transactions from $20–$40. If two entries are defined, the second floor limit amount must be greater than the first.
Besides amount, each floor limit has its own authorization and signature requirements. For example, checks less than $20 may be accepted without authorization or a customer signature, while checks in the $20–$40 range might require an authorization, but not a signed voucher.
VouchersTraditionally, when a credit card tender is approved, the system generates a customer voucher with a signature block in the trailer. For quick pay transactions, users will want to create a new trailer indicating that a “Customer Signature Not Required”. This becomes the alternate credit card trailer.
To differentiate between standard and alternate credit card vouchers, the system needs to know which trailer to use for each type of transaction. Since current programming already provides for a standard voucher, options were added in POS Configurator to accommodate the alternate trailer and to link it to quick pay transactions.
The process of creating and implementing alternate vouchers can be summarized as follows:
1. Create the new trailer in the Sales | Descriptors | Trailers form.
Note To assist in trouble-shooting, transactions involving base floor limits will be written to the 3700d.log file, provided that the CaClient.dll has a Verbosity setting of 4 or higher.
Note By default, the standard trailer will be used on all credit card transactions. The alternate trailer is only used if the transaction is below the base limits specified AND the alternate trailer options have been selected.
MD0003-065Revision FJanuary 17, 2006Page 160 of 306
3700 POSWhat’s Enhanced
2. Select the alternate trailer from the drop-down lists in the new Customer Alternate Trailer and Merchant Alternate Trailer fields (Revenue Center | RVC Credit Cards | Trailers).
3. Enable the Print Alternate Voucher option for each of the Base Floor Limits defined (Sales | Tender/Media | Credit Auth).
Printing the CC VoucherOccasionally, customers will request a credit card voucher even in quick pay situations where a voucher is not required (i.e., when the amount is below the floor limits and the option to print the Alternate Trailer has not been set). For this reason, a new function key was added that allows users to print vouchers on demand.
Typically, voucher requests are made after the transaction is completed and prior to the start of the next check. When this occurs, the user simply presses the [On Demand Voucher] key, which directs the system to look up and print a voucher for the last transaction finalized on the workstation. Once another transaction is started, pressing the key will cause the system to display the error message “Not Allowed Within a Transaction.”
If required, the function key can be used to print a voucher for a previous (closed) transaction. To do this, the user must sign in, enter the closed check number, and press the [On Demand Voucher] key. The system will automatically retrieve the closed check, print a voucher, and then close the check again.
The function key does not work in SAR.
MD0003-065Revision F
January 17, 2006Page 161 of 306
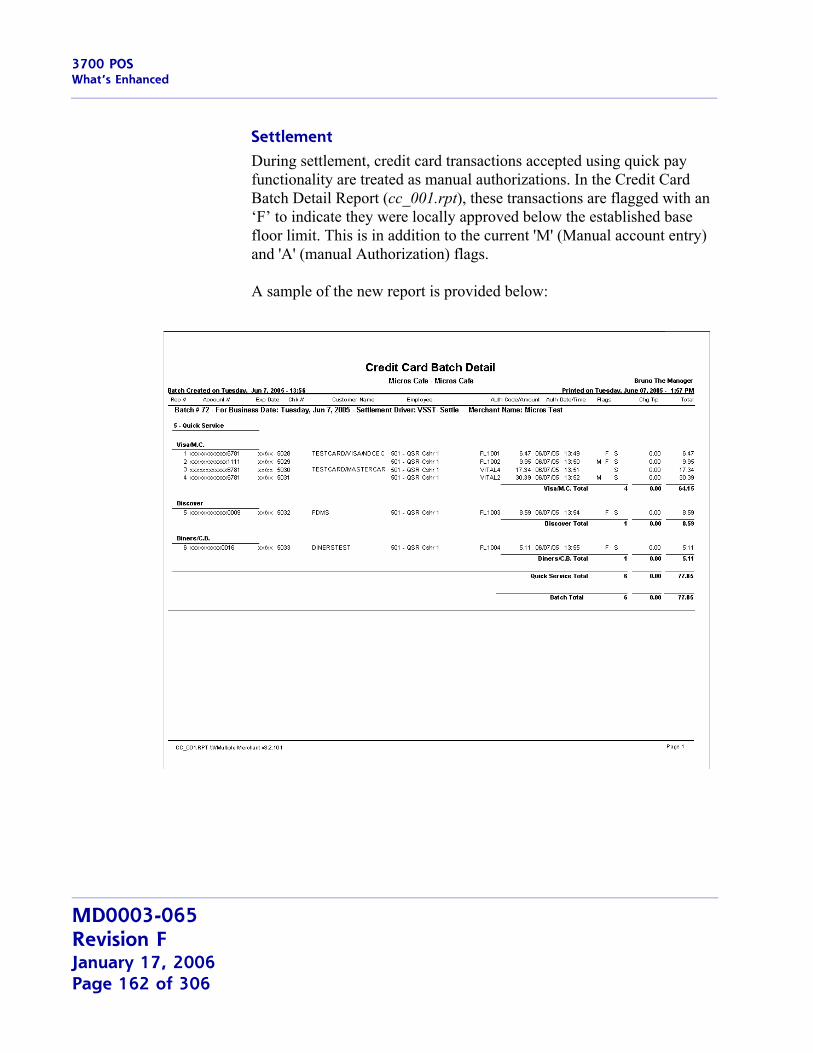
3700 POSWhat’s Enhanced
SettlementDuring settlement, credit card transactions accepted using quick pay functionality are treated as manual authorizations. In the Credit Card Batch Detail Report (cc_001.rpt), these transactions are flagged with an ‘F’ to indicate they were locally approved below the established base floor limit. This is in addition to the current 'M' (Manual account entry) and 'A' (manual Authorization) flags.
A sample of the new report is provided below:
MD0003-065Revision FJanuary 17, 2006Page 162 of 306
3700 POSWhat’s Enhanced
Enabling the FeatureFloor limits are defined by tender, but are implemented at the revenue center level. This allows merchants to control where quick pay transactions are allowed within their establishments (e.g., at the carryout window but not at the bar).
To support this feature, the following options were added in POS Configurator. Please note the limitations that have been added to ensure Floor Limits are not programmed out of sequence:
Revenue Center | RVC Credit Cards | Floor Limits
Enable base floor limit 1 — Activates the Base Floor Limit 1 options on the Sales Tender/Media Credit Auth tab. Applies the requirements to credit card transactions processed in the selected revenue center.
Use this option if only one base floor limit is required.
Enable base floor limit 2 — Activates the Base Floor Limit 2 options on the Sales Tender/Media Credit Auth tab. Applies the requirements to credit card transactions processed in the selected revenue center.
Sales | Tender/Media | Credit Auth
Base Floor Limit 1
Amount — Specifies the threshold amount for Base Floor Limit 1. Credit card transactions below this amount will be processed according to the authorization and signature requirements associated with Limit 1.
Do Not Go Online For Authorization — When checked, allows the system to authorize credit card tenders that fall below Base Floor Limit 1.
Print Alternate Voucher — When checked, directs the system to print a voucher using the trailer specified in the Customer/Merchant Alternate Trailer fields (Revenue Center | RVC Credit Cards | Trailers)
MD0003-065Revision F
January 17, 2006Page 163 of 306
3700 POSWhat’s Enhanced
Base Floor Limit 2 (These options are disabled until an entry is made the in Base Floor Limit 1 Amount field.)
Amount — Specifies the threshold amount for Base Floor Limit 2. Credit card transactions below this amount will be processed according to the authorization and signature requirements associated with Limit 2.
If used, the amount entered in this field must be greater than Base Floor Limit 1 Amount.
Do Not Go Online For Authorization — When checked, allows the system to authorize credit card tenders that fall below Base Floor Limit 2.
Print Alternate Voucher — When checked, directs the system to print a voucher using the trailer specified in the Customer/Merchant Alternate Trailer fields (Revenue Center | RVC Credit Cards | Trailers).
Revenue Center | RVC Credit Cards | Trailers
Customer Alternate Trailer — Specifies the trailer that will be printed at the bottom of a credit card voucher (in lieu of the Customer CC Trailer) when Base Floor Limits are applied. This option will not work unless the option Print Alternate Voucher (described above) has also been checked.
Merchant Alternate Trailer — Specifies the trailer that will be printed at the bottom of a credit card voucher (in lieu of the Merchant CC Trailer) when Base Floor Limits are applied. This option will not work unless the option Print Alternate Voucher (described above) has also been checked.
MD0003-065Revision FJanuary 17, 2006Page 164 of 306
3700 POSWhat’s Enhanced
Devices | Devices | Touchscreen Designer
Function : Transaction | On-Demand CC Voucher — Function key. When pressed, allows the user to print a voucher for the last transaction finalized on the workstation. The voucher will include the selected trailer and will be based on the print options specified.
The key can also be used to print a voucher for a previous closed check by entering a check number before the key is pressed. POS Operations will open the request check number, print the voucher, and immediately close the check again.
Secure Track Data Enhancement To improve credit card security, the Secure Track Data option (System | Restaurant | Security) has been removed from POS Configurator.
The option, which prevented credit card track data from being stored in the database, has been hard-coded into the system. As part of this process:
Track 1 data will be completely cleared from the record.
Track 2’s discretionary data will be masked out with zeros.
All secondary authorizations will be treated as manually swiped authorizations and no track data will be transmitted.
MD0003-065Revision F
January 17, 2006Page 165 of 306

3700 POSWhat’s Enhanced
Manager Procedures
Edit Dashboard ContestsContest entries shown on the Dashboard utility can now be edited through Manager Procedures.
New OptionsTo support these changes, a new Edit Contests option was added to the list of Dashboard privileges in POS Configurator (Employees | Employee Classes | Procedures).
When checked, members of selected employee classes will have access to the new [Edit Contest] button, added to the Dashboard form in Manager Procedures. When pressed, the button launches the following new form. If a contest has been defined, the data fields will already be populated. Only one contest may be configured at a time.
MD0003-065Revision FJanuary 17, 2006Page 166 of 306
3700 POSWhat’s Enhanced
To create a new contest (or change the existing variables):
1. Select one of the radio buttons to specify the List Type. When a selection is made, the Select [Family Group/Major Group/Menu Item/Menu Item Group] List will update automatically with all the entries available in that category.
2. Add/remove selections by highlighting items and using the directional arrow to move them to/from the Contest List.
To search for a specific item, begin typing in the Locate by Name field. The system will perform a dynamic search as the characters are entered until a match is found.
3. Use the Comments text box to add optional notations relevant to this Contest.
4. Press OK to save the changes and close the form.
POS Operations
Check Detail ConsolidationThis enhancement provides new configuration option on how check detail is shown on workstation displays, guest checks, and remote order devices. A new POS function key has been added to allow operators to toggle between the selected display consolidation mode and no consolidation.
Note Order devices configured as KDS clients have not changed and do not use the new consolidation methods. KDS consolidation will continue to use the existing options with minor modifications. For more on this topic refer to KDS Consolidation Code Changes beginning on page 247.
MD0003-065Revision F
January 17, 2006Page 167 of 306
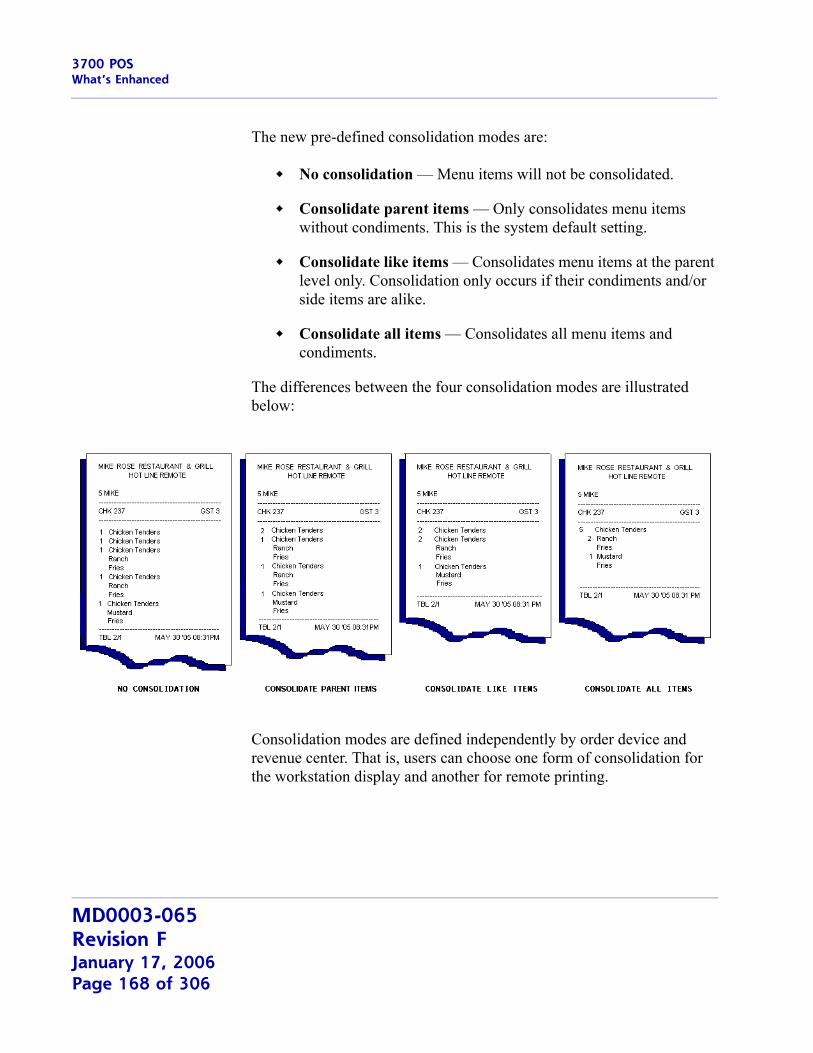
3700 POSWhat’s Enhanced
The new pre-defined consolidation modes are:
No consolidation — Menu items will not be consolidated.
Consolidate parent items — Only consolidates menu items without condiments. This is the system default setting.
Consolidate like items — Consolidates menu items at the parent level only. Consolidation only occurs if their condiments and/or side items are alike.
Consolidate all items — Consolidates all menu items and condiments.
The differences between the four consolidation modes are illustrated below:
Consolidation modes are defined independently by order device and revenue center. That is, users can choose one form of consolidation for the workstation display and another for remote printing.
MD0003-065Revision FJanuary 17, 2006Page 168 of 306
3700 POSWhat’s Enhanced
LimitationsCheck detail will not consolidate under the following circumstances, regardless of the mode selected:
Order device is configured to Print seat number and Print seat # on menu item.
Menu item is a price by weight.
Updating the Check Detail DisplayIn previous releases, the display screen was programmed to consolidate one item behind (fire on next). In other words, if a second item with the same parent was ordered, the two would not consolidate until the next parent item was rung. This allowed a user to finish entering a menu item with condiments or a combo meal before the system determined when and how the menu item should be consolidated.
With this release, the display was modified to consolidate “on the fly.” For example, if a user presses the [Coffee] key three times with consolidation enabled, the quantity of menu items will directly update with each selection. That is, when the third coffee is rung up, the screen immediately displays:
3 Coffee
rather than
2 Coffee1 Coffee
until the next menu item is selected.
MD0003-065Revision F
January 17, 2006Page 169 of 306
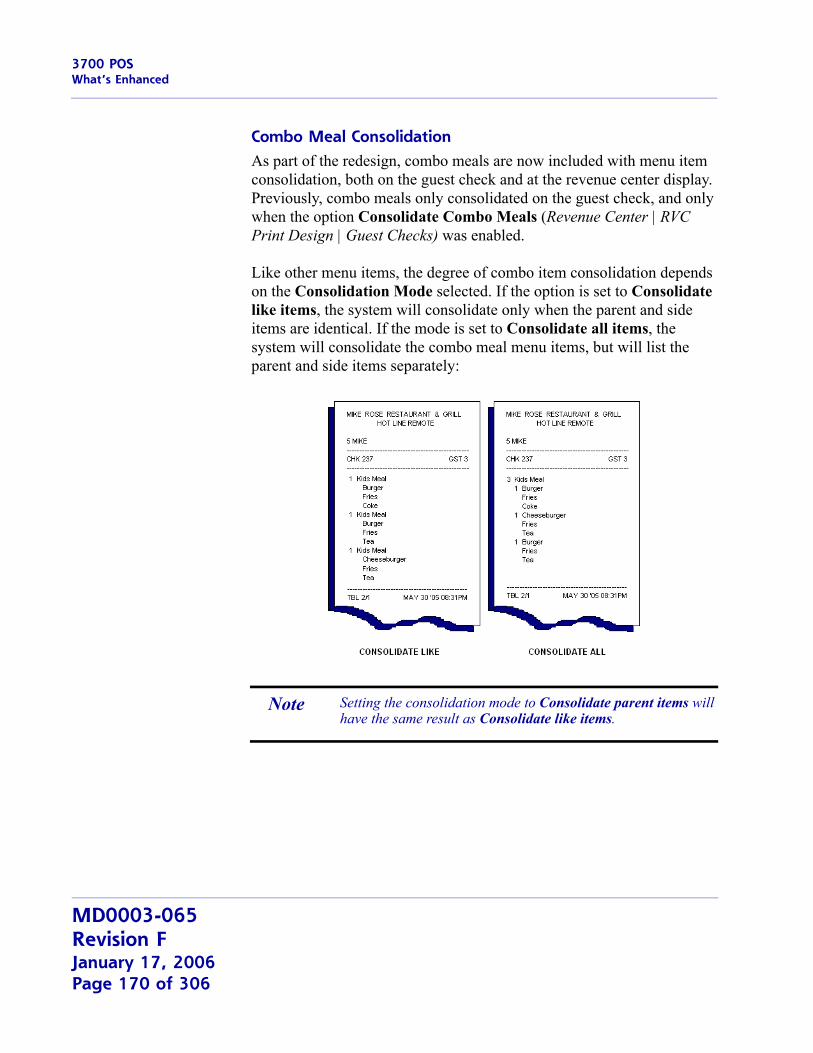
3700 POSWhat’s Enhanced
Combo Meal ConsolidationAs part of the redesign, combo meals are now included with menu item consolidation, both on the guest check and at the revenue center display. Previously, combo meals only consolidated on the guest check, and only when the option Consolidate Combo Meals (Revenue Center | RVC Print Design | Guest Checks) was enabled.
Like other menu items, the degree of combo item consolidation depends on the Consolidation Mode selected. If the option is set to Consolidate like items, the system will consolidate only when the parent and side items are identical. If the mode is set to Consolidate all items, the system will consolidate the combo meal menu items, but will list the parent and side items separately:
Note Setting the consolidation mode to Consolidate parent items will have the same result as Consolidate like items.
MD0003-065Revision FJanuary 17, 2006Page 170 of 306
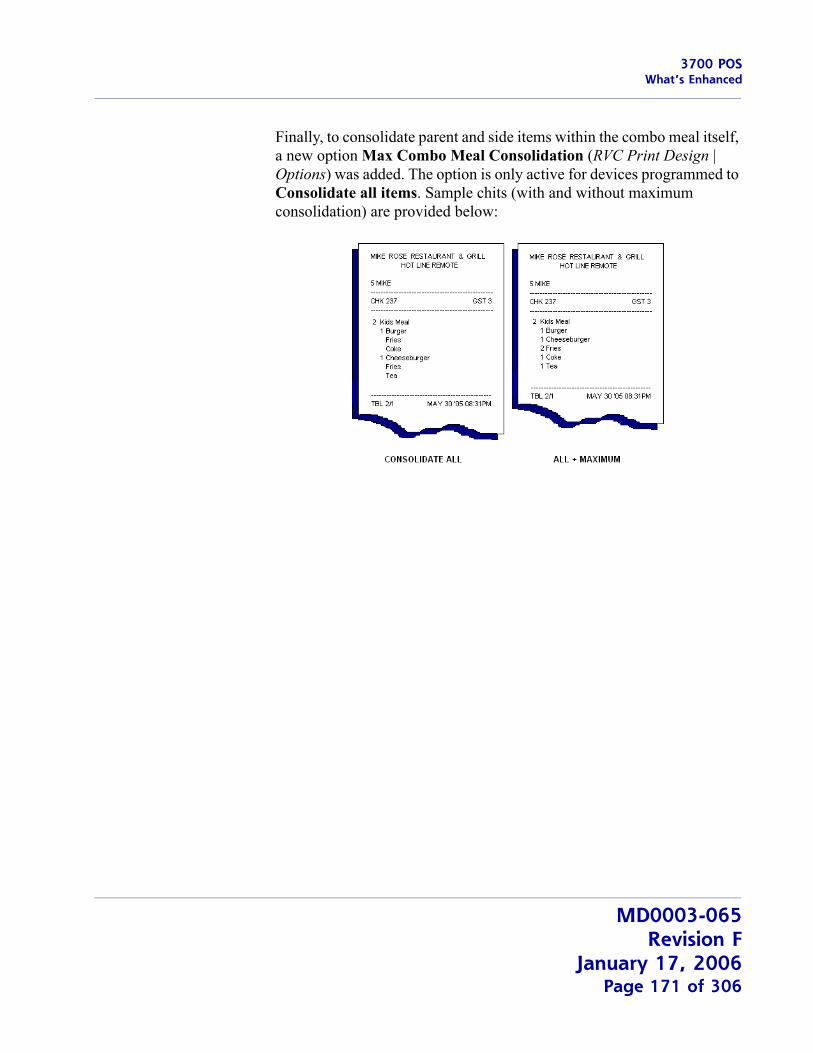
3700 POSWhat’s Enhanced
Finally, to consolidate parent and side items within the combo meal itself, a new option Max Combo Meal Consolidation (RVC Print Design | Options) was added. The option is only active for devices programmed to Consolidate all items. Sample chits (with and without maximum consolidation) are provided below:
MD0003-065Revision F
January 17, 2006Page 171 of 306
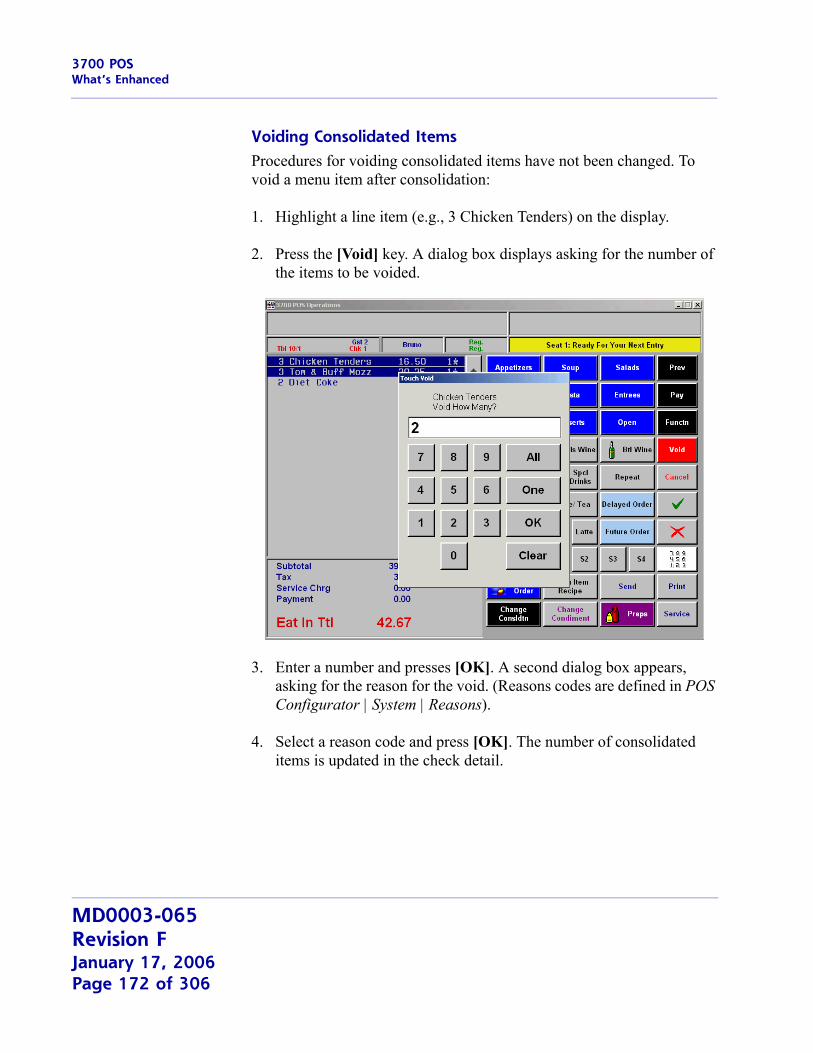
3700 POSWhat’s Enhanced
Voiding Consolidated ItemsProcedures for voiding consolidated items have not been changed. To void a menu item after consolidation:
1. Highlight a line item (e.g., 3 Chicken Tenders) on the display.
2. Press the [Void] key. A dialog box displays asking for the number of the items to be voided.
3. Enter a number and presses [OK]. A second dialog box appears, asking for the reason for the void. (Reasons codes are defined in POS Configurator | System | Reasons).
4. Select a reason code and press [OK]. The number of consolidated items is updated in the check detail.
MD0003-065Revision FJanuary 17, 2006Page 172 of 306
3700 POSWhat’s Enhanced
To save keystrokes, users can highlight more than one consolidated line item at a time. When the [Void] key is pressed, the dialog box prompts for the number of voids for the first item listed. After the entry is made and the [OK] button is pressed, the system prompts for the number of voids in the next consolidated item. The reason code dialog only displays after all the void items have been entered.
Voiding Consolidated Items with CondimentsWith this release, the same procedure can now be applied to menu items with condiments. When a parent item is selected, all of the related condiments will be selected also. Pressing the [Void] key will prompt the user for the number of parent items to be voided. When the check detail is updated, the system adjusts the quantity, voiding condiments in reverse order in which the parent items were entered (i.e., last item voids).
For example, a customer order 3 Burgers, Medium Well, with Fries, and 2 Burgers, Rare, with Fries. If the option, Consolidate all items is enabled, the items will be displayed as follows:
5 Burger 3 Medium Well Fries 2 Rare Fries
When the user highlights the Burger parent and presses [Void], all of the condiments will be highlighted and the system will ask how many of the parent item are to be voided. If the user enters 1, the system will delete the last Burger/condiment combination entered and adjust the quantities accordingly. If the last item entered was a Burger, Medium Well, Fries; the display will read:
4 Burger 2 Medium Well Fries 2 Rare Fries
MD0003-065Revision F
January 17, 2006Page 173 of 306
3700 POSWhat’s Enhanced
If the last item was a Burger, Rare, Fries, the display will read:
4 Burger 3 Medium Well Fries 1 Rare Fries
If the last item was a Burger, Rare, Fires; and the customer wanted to void a Burger, Medium Well, Fries; the user would have to unconsolidate the display to select and void that parent/condiment combination.
Turning Off ConsolidationUsers can turn consolidation on and off by adding a [Consolidation Mode] function key to the touchscreen. During POS Operations, pressing this key will toggle the check detail between the selected mode and no consolidation. This is valuable because there are situations when the user will need to turn off consolidation in order to complete a menu item selection. These include:
Inserting condiments
Changing condiments
Substituting items in combo meal
Resizing a combo meal item
Placing items on hold — Held items will not consolidate with items that have printed or will print. This only applies to the display. As a result, items in the previous round will not consolidate with items in the current round. Consolidated items will all “Hold” or “Fire” together, as requested by the user.
Reordering/Refilling consolidated items — In this case, only the first item will be refilled/reordered.
MD0003-065Revision FJanuary 17, 2006Page 174 of 306

3700 POSWhat’s Enhanced
Quantity EntriesThis function key does not affect menu items entered as a quantity. Only items rung up individually and consolidated by the system will be unconsolidated. For example, 3 burgers entered individually will unconsolidate to:
1 Burger1 Burger1 Burger
However, if the user enters:
2 Burger1 Burger
the system will consolidate to 3 Burger, but will toggle back to the original entry of 2 Burger, 1 Burger.
This is also relevant when voiding menu items. Although the order is displayed as 3 Burger (consolidated), it is recorded as only two line items. This means the user cannot highlight the consolidated item, press [Void], and enter “2” to delete 2 of the 3 Burgers. Doing this will remove both entries or all three burgers.
To void 2 Burgers only, the user must unconsolidate the entries, highlight the 2 Burger line item and press [Void]. Notice that in this case, the system does not prompt for the number of items to void, because (technically) only one item has been selected.
Changes in POS ConfiguratorAs part of the redesign, the following additions and changes were made in POS Configurator:
Devices | Order Devices | Options | Sorting/Formatting
Consolidation Mode — Specifies the consolidation method that will be used when displaying check detail at the selected order device.
MD0003-065Revision F
January 17, 2006Page 175 of 306
3700 POSWhat’s Enhanced
Do not consolidate — Moved to Devices | Order Devices | KDS | Options tab.
Revenue Center | RVC Display Design
Consolidation Mode — Specifies the consolidation method that will be used when displaying check detail in the selected revenue center.
Do not consolidate display — Deleted.
Do not sort display — Changed label to Sort items. When checked, this option forces items entered in the previous round(s) to be sorted by print class.
Sort current round items — When checked, includes items from the current round when sorting by print class. This option is disabled unless the Sort items option is checked.
Consolidate current round items — When checked, applies the selected consolidation mode to items from the current round. This option is ignored if the Consolidation Mode is set to ‘No Consolidation.’
Revenue Center | RVC Print Design | Guest Checks
Consolidation Mode — Specifies the consolidation method that will be used when printing guest checks and customer receipts in the selected revenue center.
Consolidate Combo Meals — Deleted.
Note Sort current round items and Consolidate current round items are ignored when the option Print line-by-line (Devices | Order Devices | Options | Sorting/Formatting) is enabled.
MD0003-065Revision FJanuary 17, 2006Page 176 of 306
3700 POSWhat’s Enhanced
Revenue Center | RVC Print Design | Options
Max Combo Meal Consolidation — When checked, consolidates the parent items and side items within consolidated combo meals. This option only applies when the Consolidation Mode is set to Consolidate all items.
Devices | Touchscreen Designer
Function: Transaction | Toggle Consolidation Mode — Touch key function that allows the user to turn consolidation on and off. When used in POS Operations, toggles the device between the selected consolidation mode and no consolidation at all.
Enhanced Option to Send Selections to Kitchen Before Menu Item Complete In a previous release, a programming change was made to the way in which the system handled menu items and combo meals in a dynamic order mode (DOM) environment. To improve overall system performance, menu items were no longer sent on condiment entry or side item entry when using DOM Fire-on-Next (FON) and Fire-on-Fly (FOF). Instead, all related items were held until the parent menu item or combo meal was complete.
For some quick-service customers, the time between entries represented an unacceptable delay in the kitchen. To support their need for rapid response, the option Send Before Menu Items Complete (Revenue Center | RVC Transactions | Quick Service) has been added to POS Configurator. The option has no effect unless dynamic order mode is enabled.
MD0003-065Revision F
January 17, 2006Page 177 of 306
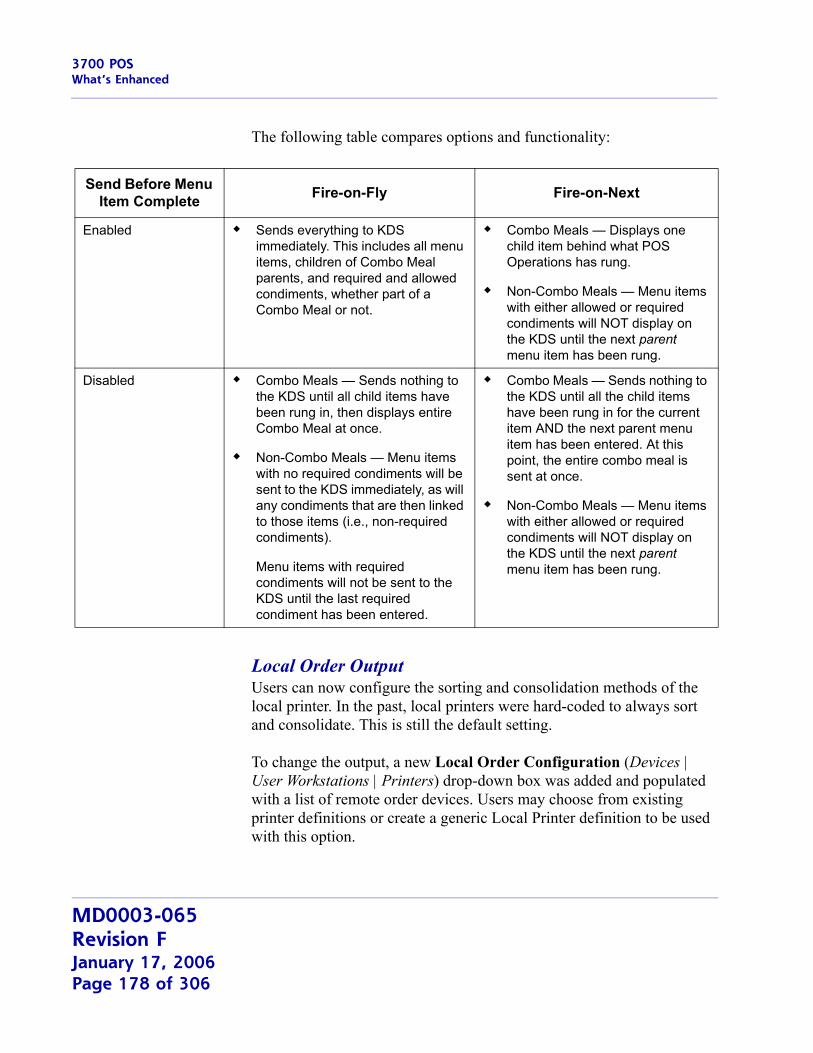
3700 POSWhat’s Enhanced
The following table compares options and functionality:
Local Order OutputUsers can now configure the sorting and consolidation methods of the local printer. In the past, local printers were hard-coded to always sort and consolidate. This is still the default setting.
To change the output, a new Local Order Configuration (Devices | User Workstations | Printers) drop-down box was added and populated with a list of remote order devices. Users may choose from existing printer definitions or create a generic Local Printer definition to be used with this option.
Send Before Menu Item Complete Fire-on-Fly Fire-on-Next
Enabled Sends everything to KDS immediately. This includes all menu items, children of Combo Meal parents, and required and allowed condiments, whether part of a Combo Meal or not.
Combo Meals — Displays one child item behind what POS Operations has rung.
Non-Combo Meals — Menu items with either allowed or required condiments will NOT display on the KDS until the next parent menu item has been rung.
Disabled Combo Meals — Sends nothing to the KDS until all child items have been rung in, then displays entire Combo Meal at once.
Non-Combo Meals — Menu items with no required condiments will be sent to the KDS immediately, as will any condiments that are then linked to those items (i.e., non-required condiments).
Menu items with required condiments will not be sent to the KDS until the last required condiment has been entered.
Combo Meals — Sends nothing to the KDS until all the child items have been rung in for the current item AND the next parent menu item has been entered. At this point, the entire combo meal is sent at once.
Non-Combo Meals — Menu items with either allowed or required condiments will NOT display on the KDS until the next parent menu item has been rung.
MD0003-065Revision FJanuary 17, 2006Page 178 of 306
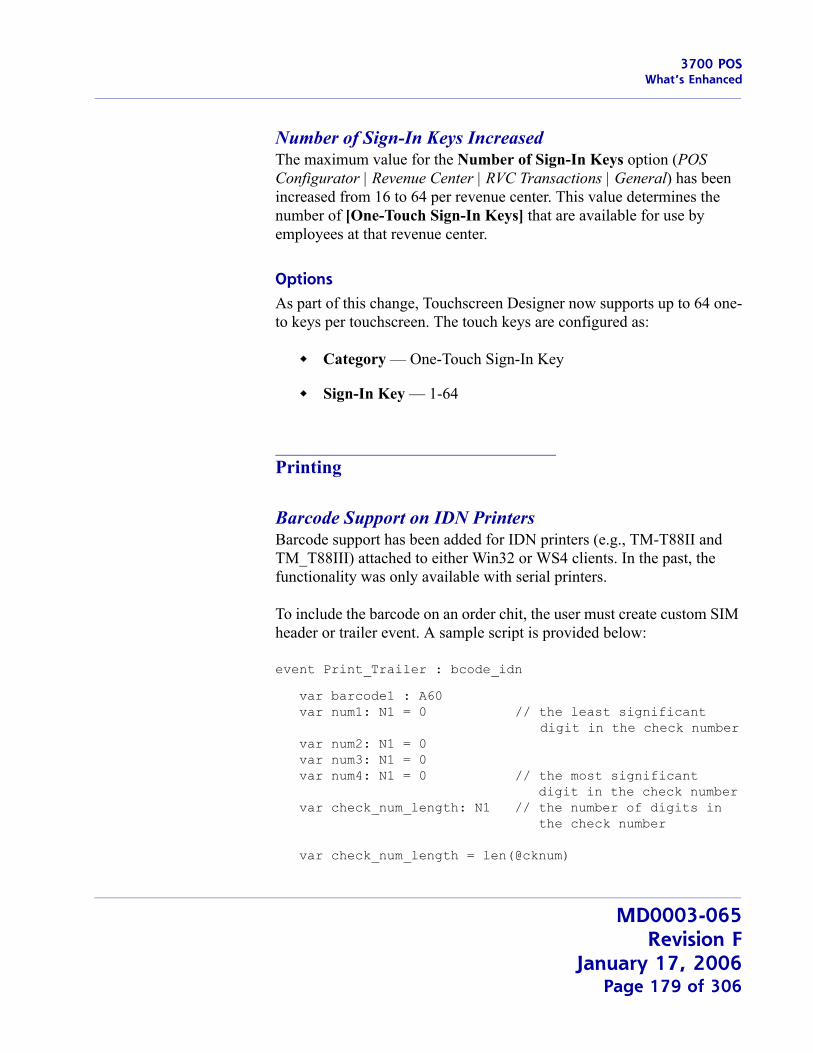
3700 POSWhat’s Enhanced
Number of Sign-In Keys IncreasedThe maximum value for the Number of Sign-In Keys option (POS Configurator | Revenue Center | RVC Transactions | General) has been increased from 16 to 64 per revenue center. This value determines the number of [One-Touch Sign-In Keys] that are available for use by employees at that revenue center.
OptionsAs part of this change, Touchscreen Designer now supports up to 64 one-to keys per touchscreen. The touch keys are configured as:
Category — One-Touch Sign-In Key
Sign-In Key — 1-64
Printing
Barcode Support on IDN PrintersBarcode support has been added for IDN printers (e.g., TM-T88II and TM_T88III) attached to either Win32 or WS4 clients. In the past, the functionality was only available with serial printers.
To include the barcode on an order chit, the user must create custom SIM header or trailer event. A sample script is provided below:
event Print_Trailer : bcode_idn
var barcode1 : A60var num1: N1 = 0 // the least significant
digit in the check numbervar num2: N1 = 0var num3: N1 = 0var num4: N1 = 0 // the most significant
digit in the check numbervar check_num_length: N1 // the number of digits in
the check number
var check_num_length = len(@cknum)
MD0003-065Revision F
January 17, 2006Page 179 of 306
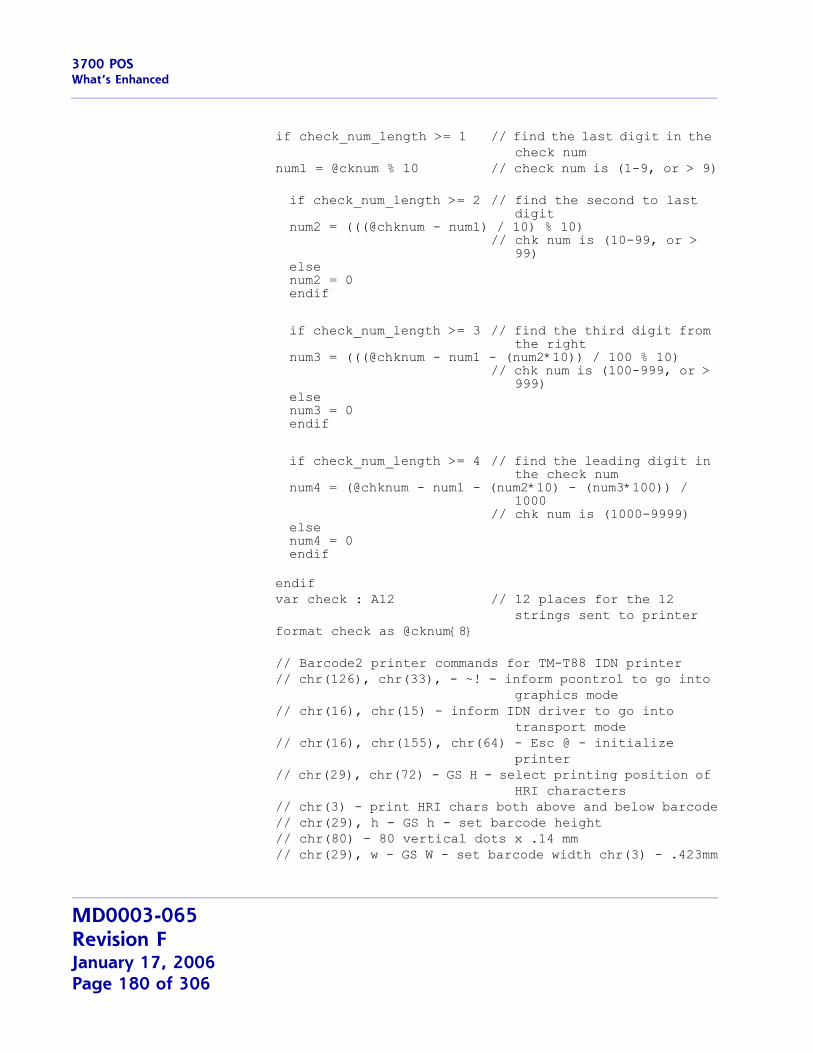
3700 POSWhat’s Enhanced
if check_num_length >= 1 // find the last digit in the check num
num1 = @cknum % 10 // check num is (1-9, or > 9)
if check_num_length >= 2 // find the second to last digit
num2 = (((@chknum - num1) / 10) % 10)// chk num is (10-99, or >
99)elsenum2 = 0endif
if check_num_length >= 3 // find the third digit from the right
num3 = (((@chknum - num1 - (num2*10)) / 100 % 10)// chk num is (100-999, or >
999)elsenum3 = 0endif
if check_num_length >= 4 // find the leading digit in the check num
num4 = (@chknum - num1 - (num2*10) - (num3*100)) / 1000
// chk num is (1000-9999)elsenum4 = 0endif
endifvar check : A12 // 12 places for the 12
strings sent to printer format check as @cknum{8}
// Barcode2 printer commands for TM-T88 IDN printer// chr(126), chr(33), - ~! - inform pcontrol to go into
graphics mode// chr(16), chr(15) - inform IDN driver to go into
transport mode// chr(16), chr(155), chr(64) - Esc @ - initialize
printer// chr(29), chr(72) - GS H - select printing position of
HRI characters// chr(3) - print HRI chars both above and below barcode// chr(29), h - GS h - set barcode height// chr(80) - 80 vertical dots x .14 mm// chr(29), w - GS W - set barcode width chr(3) - .423mm
MD0003-065Revision FJanuary 17, 2006Page 180 of 306
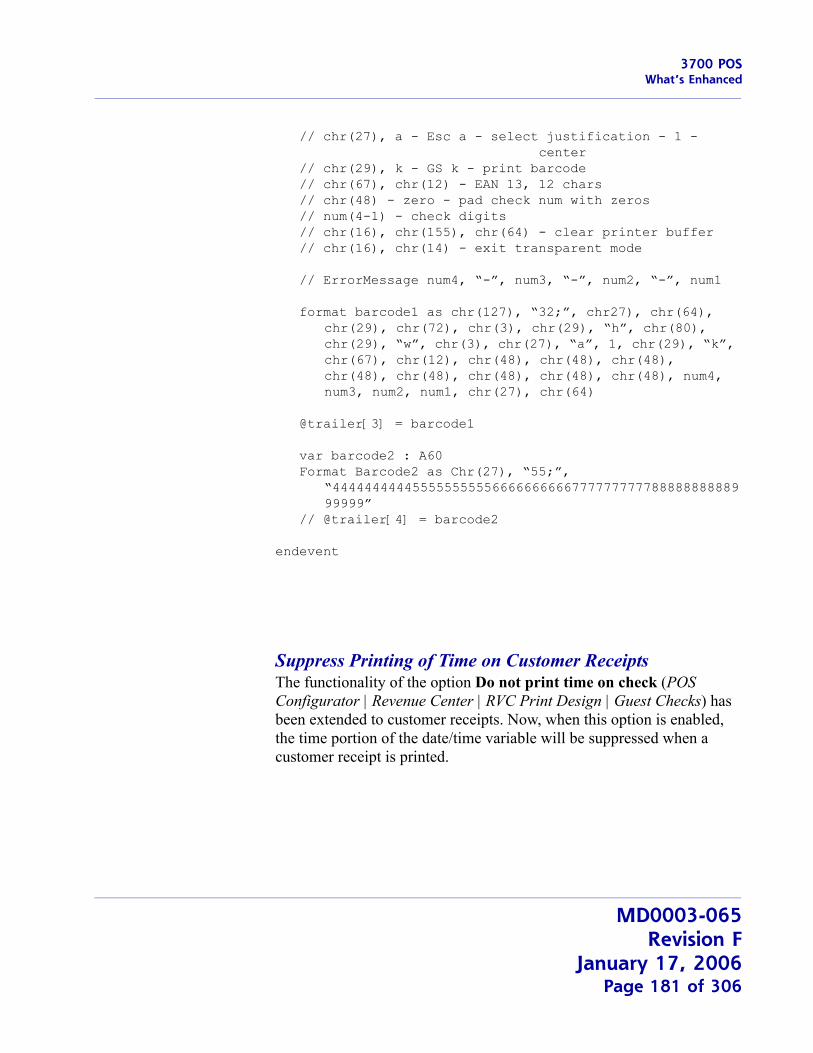
3700 POSWhat’s Enhanced
// chr(27), a - Esc a - select justification - 1 - center
// chr(29), k - GS k - print barcode// chr(67), chr(12) - EAN 13, 12 chars// chr(48) - zero - pad check num with zeros// num(4-1) - check digits// chr(16), chr(155), chr(64) - clear printer buffer// chr(16), chr(14) - exit transparent mode
// ErrorMessage num4, “-”, num3, “-”, num2, “-”, num1
format barcode1 as chr(127), “32;”, chr27), chr(64), chr(29), chr(72), chr(3), chr(29), “h”, chr(80), chr(29), “w”, chr(3), chr(27), “a”, 1, chr(29), “k”, chr(67), chr(12), chr(48), chr(48), chr(48), chr(48), chr(48), chr(48), chr(48), chr(48), num4, num3, num2, num1, chr(27), chr(64)
@trailer[3] = barcode1
var barcode2 : A60Format Barcode2 as Chr(27), “55;”,
“44444444445555555555666666666677777777778888888888999999”
// @trailer[4] = barcode2
endevent
Suppress Printing of Time on Customer ReceiptsThe functionality of the option Do not print time on check (POS Configurator | Revenue Center | RVC Print Design | Guest Checks) has been extended to customer receipts. Now, when this option is enabled, the time portion of the date/time variable will be suppressed when a customer receipt is printed.
MD0003-065Revision F
January 17, 2006Page 181 of 306
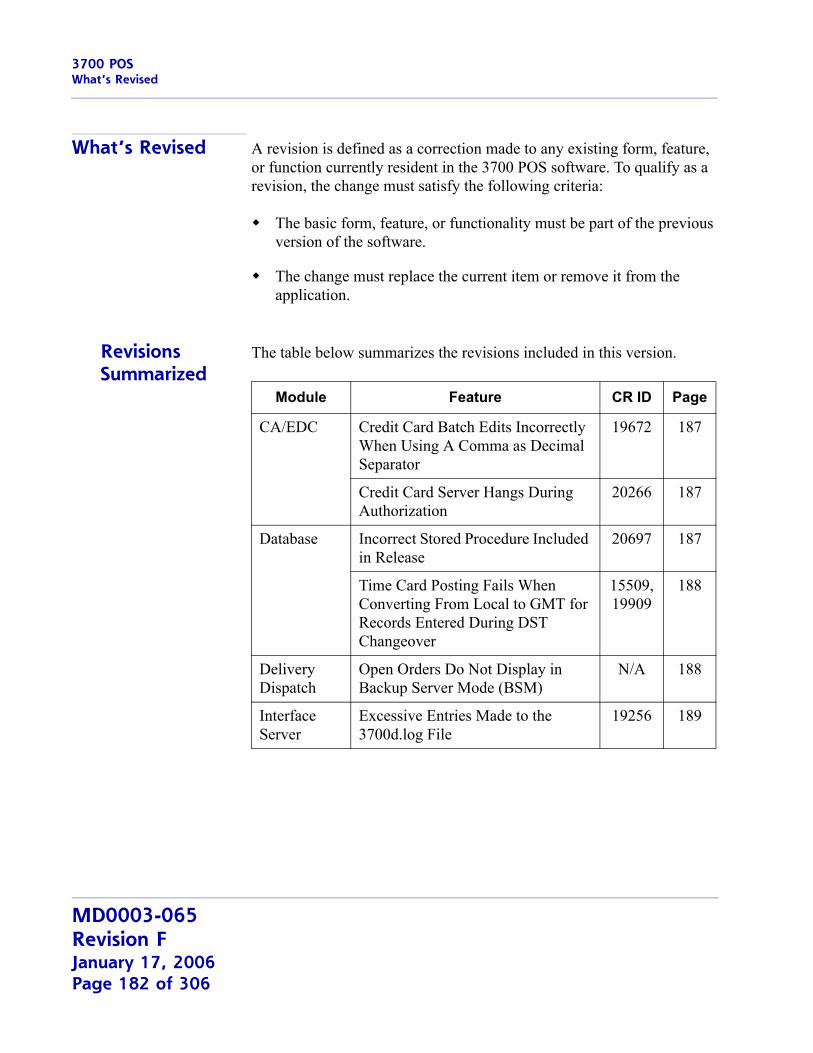
3700 POSWhat’s Revised
What’s Revised A revision is defined as a correction made to any existing form, feature, or function currently resident in the 3700 POS software. To qualify as a revision, the change must satisfy the following criteria:
The basic form, feature, or functionality must be part of the previous version of the software.
The change must replace the current item or remove it from the application.
Revisions Summarized
The table below summarizes the revisions included in this version.
Module Feature CR ID Page
CA/EDC Credit Card Batch Edits Incorrectly When Using A Comma as Decimal Separator
19672 187
Credit Card Server Hangs During Authorization
20266 187
Database Incorrect Stored Procedure Included in Release
20697 187
Time Card Posting Fails When Converting From Local to GMT for Records Entered During DST Changeover
15509, 19909
188
Delivery Dispatch
Open Orders Do Not Display in Backup Server Mode (BSM)
N/A 188
Interface Server
Excessive Entries Made to the 3700d.log File
19256 189
MD0003-065Revision FJanuary 17, 2006Page 182 of 306

3700 POSWhat’s Revised
Manager Procedures
Edit Menu Item Allowed Even Though Access Restricted in POS Configurator
20827 189
Manager Procedures Does Not Use Full Screen on WS4 if Employee Not Signed in First
N/A 189
Unable to Edit Quick Counts From Screen Keypad
16691 190
POS Configurator
CA/EDC Driver Form Fails to Save Last Entry on Merchant Tab
N/A 190
Disabling Dynamic Order Mode Does Not Activate ‘Print line by line’ Option
N/A 190
Error Message Incorrectly Displays When Changing to OPOS Printer
N/A 191
Override Rates Set to Zero Saves as Null
N/A 191
POS Operations
Barcode Scanner Does Not Ring Menu Items Consistently
16807 191
Change Due in Foreign Currency Reports Incorrectly
18443 191
Combo Meals Not Sent to KDS Immediately When in DOM
20324 192
Combo Meals Prompt for Extra Side Item After Voiding Min/Max Condiment
19982 192
Currency Conversion Incorrect When Using Zero Decimal Places
19180 192
Delayed Orders That Are Prepaid Not Sent to Order Devices
20362 193
Module Feature CR ID Page
MD0003-065Revision F
January 17, 2006Page 183 of 306
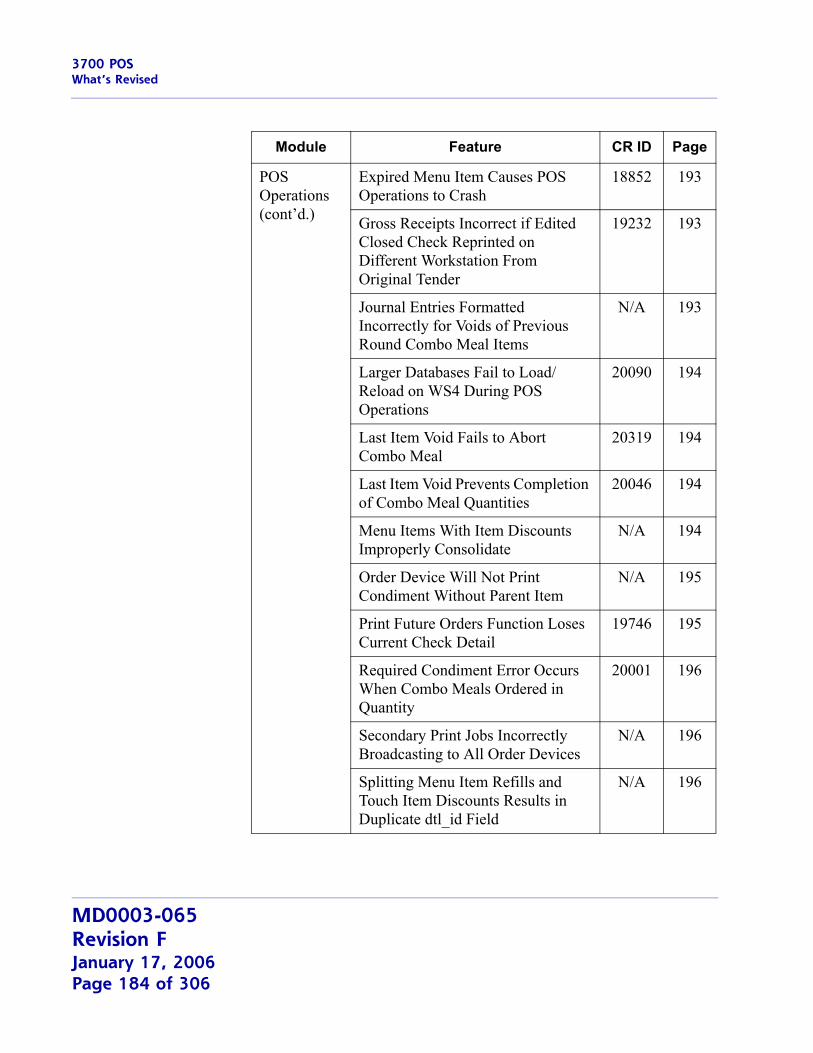
3700 POSWhat’s Revised
POS Operations (cont’d.)
Expired Menu Item Causes POS Operations to Crash
18852 193
Gross Receipts Incorrect if Edited Closed Check Reprinted on Different Workstation From Original Tender
19232 193
Journal Entries Formatted Incorrectly for Voids of Previous Round Combo Meal Items
N/A 193
Larger Databases Fail to Load/Reload on WS4 During POS Operations
20090 194
Last Item Void Fails to Abort Combo Meal
20319 194
Last Item Void Prevents Completion of Combo Meal Quantities
20046 194
Menu Items With Item Discounts Improperly Consolidate
N/A 194
Order Device Will Not Print Condiment Without Parent Item
N/A 195
Print Future Orders Function Loses Current Check Detail
19746 195
Required Condiment Error Occurs When Combo Meals Ordered in Quantity
20001 196
Secondary Print Jobs Incorrectly Broadcasting to All Order Devices
N/A 196
Splitting Menu Item Refills and Touch Item Discounts Results in Duplicate dtl_id Field
N/A 196
Module Feature CR ID Page
MD0003-065Revision FJanuary 17, 2006Page 184 of 306
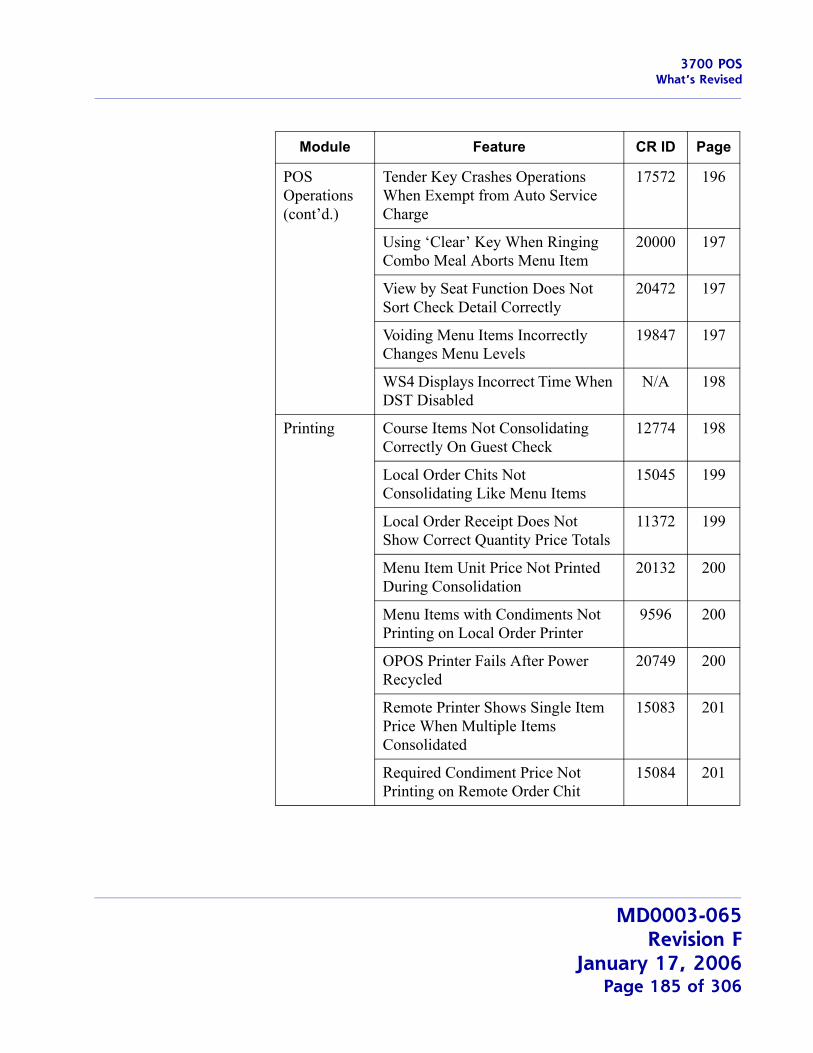
3700 POSWhat’s Revised
POS Operations (cont’d.)
Tender Key Crashes Operations When Exempt from Auto Service Charge
17572 196
Using ‘Clear’ Key When Ringing Combo Meal Aborts Menu Item
20000 197
View by Seat Function Does Not Sort Check Detail Correctly
20472 197
Voiding Menu Items Incorrectly Changes Menu Levels
19847 197
WS4 Displays Incorrect Time When DST Disabled
N/A 198
Printing Course Items Not Consolidating Correctly On Guest Check
12774 198
Local Order Chits Not Consolidating Like Menu Items
15045 199
Local Order Receipt Does Not Show Correct Quantity Price Totals
11372 199
Menu Item Unit Price Not Printed During Consolidation
20132 200
Menu Items with Condiments Not Printing on Local Order Printer
9596 200
OPOS Printer Fails After Power Recycled
20749 200
Remote Printer Shows Single Item Price When Multiple Items Consolidated
15083 201
Required Condiment Price Not Printing on Remote Order Chit
15084 201
Module Feature CR ID Page
MD0003-065Revision F
January 17, 2006Page 185 of 306
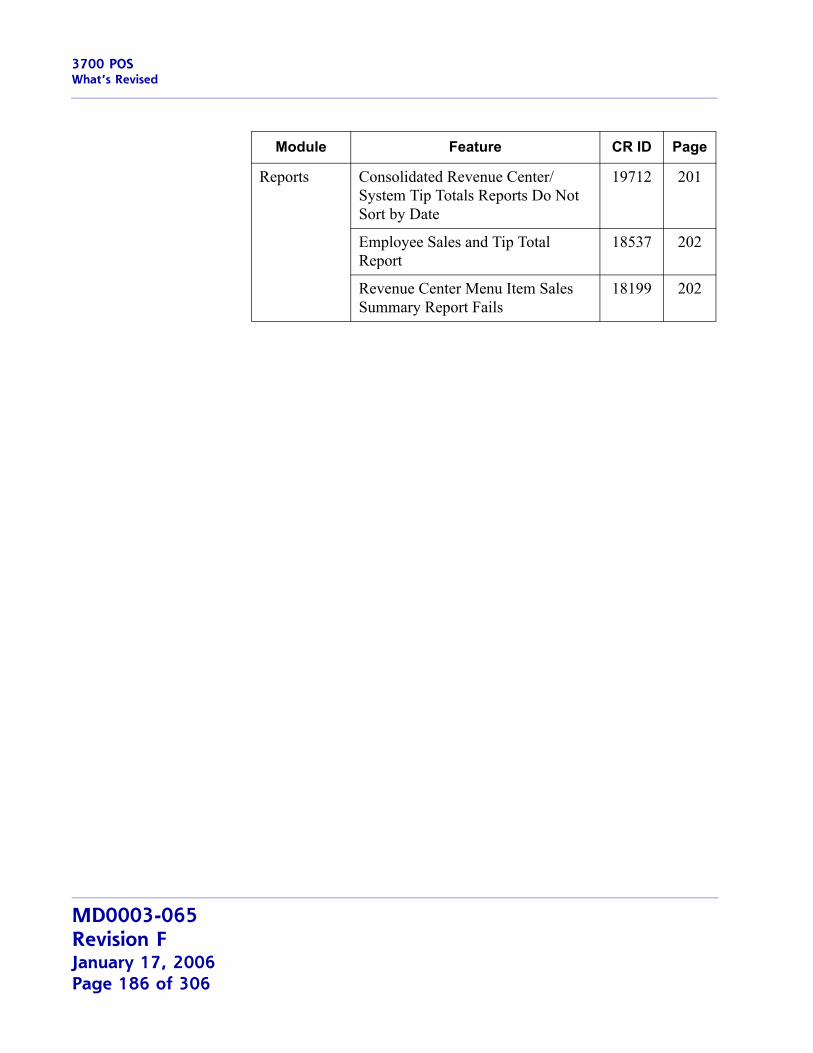
3700 POSWhat’s Revised
Reports Consolidated Revenue Center/System Tip Totals Reports Do Not Sort by Date
19712 201
Employee Sales and Tip Total Report
18537 202
Revenue Center Menu Item Sales Summary Report Fails
18199 202
Module Feature CR ID Page
MD0003-065Revision FJanuary 17, 2006Page 186 of 306
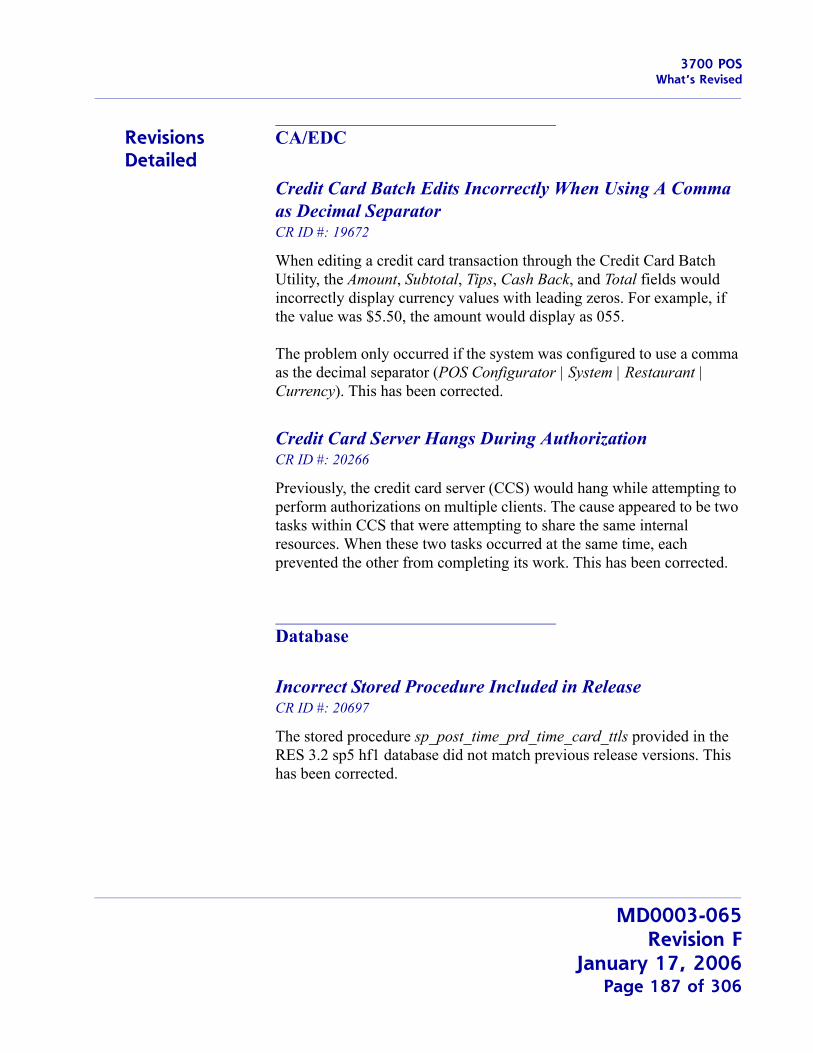
3700 POSWhat’s Revised
Revisions Detailed
CA/EDC
Credit Card Batch Edits Incorrectly When Using A Comma as Decimal SeparatorCR ID #: 19672
When editing a credit card transaction through the Credit Card Batch Utility, the Amount, Subtotal, Tips, Cash Back, and Total fields would incorrectly display currency values with leading zeros. For example, if the value was $5.50, the amount would display as 055.
The problem only occurred if the system was configured to use a comma as the decimal separator (POS Configurator | System | Restaurant | Currency). This has been corrected.
Credit Card Server Hangs During AuthorizationCR ID #: 20266
Previously, the credit card server (CCS) would hang while attempting to perform authorizations on multiple clients. The cause appeared to be two tasks within CCS that were attempting to share the same internal resources. When these two tasks occurred at the same time, each prevented the other from completing its work. This has been corrected.
Database
Incorrect Stored Procedure Included in ReleaseCR ID #: 20697
The stored procedure sp_post_time_prd_time_card_ttls provided in the RES 3.2 sp5 hf1 database did not match previous release versions. This has been corrected.
MD0003-065Revision F
January 17, 2006Page 187 of 306
3700 POSWhat’s Revised
Time Card Posting Fails When Converting From Local to GMT for Records Entered During DST ChangeoverCR ID #: 15509, 19909
Previously, if a site was configured to auto-adjust for daylight savings time (DST), an error message would be generated when attempting to convert local time to GMT for records entered during the hour of the changeover. Time card posting would subsequently fail for these records which, in turn, affected job report data. This problem has been corrected.
Delivery Dispatch
Open Orders Do Not Display in Backup Server Mode (BSM)CR ID #: N/A
During operations, open orders did not display on the Delivery Dispatch screen if the primary server failed and the workstation was placed in Backup Server Mode (BSM).
To resolve this issue, it was determined that whenever:
Totals are cleared, orA new workstation is designated as the backup server
the following procedures should be followed to ensure a smooth transition into and out of BSM:
1. In the MICROS Control Panel, bring the Restaurant to OFF.
2. Reboot the new Backup Server client as well as the old one (if applicable).
3. Return the Restaurant to Front of House.
MD0003-065Revision FJanuary 17, 2006Page 188 of 306
3700 POSWhat’s Revised
Interface Server
Excessive Entries Made to the 3700d.log File CR ID #: 19256
The 3700d.log was recording an excessive number of IFS messages, recording three entries for each transaction at the register. The problem occurred although the verbosities were set to zero and interface logging was disabled. This has been corrected.
Manager Procedures
Edit Menu Item Allowed Even Though Access Restricted in POS ConfiguratorDR ID #: 20827
Previously, users were able to edit menu item records through Manager Procedures even though the option No access in Mgr Procedures (Sales | Menu Items | Definition | Options) had been checked in POS Configurator. To do this, the user simply had to do one of the following:
1. open/close a valid menu item in the Edit screen, or
2. initiate a search for a non-existent menu item.
In either case, when the system returned to the main menu item screen, the list box would include all current menu item records and the Edit button would be enabled. This problem has been corrected.
Manager Procedures Does Not Use Full Screen on WS4 if Employee Not Signed in First CR ID #: N/A
Previously, if Manager Procedures was launched from a touchscreen key in POS Operations before an employee was signed in, the system would not open the application in full-screen mode. This has been corrected.
MD0003-065Revision F
January 17, 2006Page 189 of 306

3700 POSWhat’s Revised
Unable to Edit Quick Counts From Screen KeypadCR ID #: 16691
While in Manager Procedures, users were unable to update a quick count value (Others | Edit Quick Counts) without access to an attached keyboard. Using the touchscreen numeric keypad would result in data posting to the wrong field in the data grid. This problem has been corrected.
POS Configurator
CA/EDC Driver Form Fails to Save Last Entry on Merchant TabCR ID #: N/A
When adding a credit card driver in POS Configurator (Devices | CA/EDC Drivers), the last option entered on the Merchant tab was consistently dropped when the record was saved. The problem occurred regardless of which field was entered last or which driver was being configured. This has been corrected.
Disabling Dynamic Order Mode Does Not Activate ‘Print line by line’ OptionCR #: N/A
After unchecking the Enable Dynamic Order Mode option in POS Configurator (Devices | Order Devices | Dynamic Order Mode), the system failed to enable the non-DOM option Print line-by-line (Devices | Order Devices | Options | Sorting/Formatting). The check box would remain greyed out until POS Configurator was closed and reopened. This has been corrected.
MD0003-065Revision FJanuary 17, 2006Page 190 of 306
3700 POSWhat’s Revised
Error Message Incorrectly Displays When Changing to OPOS Printer CR ID #: N/A
After reconfiguring an existing printer to be an OPOS device (Devices | Devices | Printer Definition / Printer Interface Type), attempts to change other required fields (e.g., Data lines per block, Line feeds, or Columns), would cause the error message “Com Port is already used by a Printer Device.” to display. This problem has been corrected.
Override Rates Set to Zero Saves as NullCR ID #: N/A
Previously, if the value entered for a job’s hourly Overtime rate (Employees | Employees | Hourly Rate) was set to 0.00, the system would record a null in the database and leave the form’s data-entry field blank. This has been corrected.
POS Operations
Barcode Scanner Does Not Ring Menu Items ConsistentlyCR ID #: 16807
When using a Metrologic 9540 barcode scanner on a WS4, menu items were not added to the check consistently. Occasionally, the scanner would beep but the item was not posted. This has been corrected.
Change Due in Foreign Currency Reports IncorrectlyCR ID #: 18443
When using foreign currency conversion, change can be given to the customer in either the local currency or the foreign currency. Previously, when change was given in the foreign currency, editing the closed check would result in reporting errors. Voiding the tender would not void the converted 'change due' amount correctly. This has been corrected.
MD0003-065Revision F
January 17, 2006Page 191 of 306
3700 POSWhat’s Revised
Combo Meals Not Sent to KDS Immediately When in DOMCR ID #: 20324
When using dynamic order mode (DOM) with the Fire-on-Fly (FOF) or Fire-on-Next (FON) option enabled, combo meals were not being sent to the kitchen until the last condiment or side item was entered and the combo meal was completed.
To correct this problem, a new option Send Before Menu Item Complete (Revenue Center | RVC Transactions | Quick Service) was added in POS Configurator. When checked, this option ensures that each selection (menu item or condiment) is sent to the KDS immediately (FOF) or one item behind (FON) the next user entry.
For more on this option, see Enhanced Option to Send Selections to Kitchen Before Menu Item Complete, beginning on page 177.
Combo Meals Prompt for Extra Side Item After Voiding Min/Max CondimentCR ID #: 19982
If a combo meal’s side items were programmed with min/max condiments, and a user rang up, then voided several side item condiments, the system would lose track and prompt for more sides than was allowed. This problem has been corrected.
Currency Conversion Incorrect When Using Zero Decimal PlacesCR ID #: 19180
When converting payment to a second currency, POS Operations would display misleading amounts if no decimal places were used. Specifically, when paying to cash, the system would convert the amount due then round the total to the nearest whole number. When the payment was posted, the amount would be applied to the non-rounded total, leaving a remainder after tender. This problem has been corrected.
MD0003-065Revision FJanuary 17, 2006Page 192 of 306
3700 POSWhat’s Revised
Delayed Orders That are Prepaid Not Sent to Order DevicesCR ID #: 20362
Previously, if a delayed check was created and then paid to cash before its autofire time, the system would show a prompt at the appointed time, but would not send the items to the proper order devices. This has been corrected.
Expired Menu Item Causes POS Operations to CrashCR ID #: 18852
Previously, if a menu item was rung up on a check, service totaled, and then the menu item's effectivity date/time was reached, POS Operations would crash when the user attempted to pick the check up again. The problem occurred because the system was automatically deleting the menu item definition from the client’s operational memory as soon as the expiration time had passed. This prevented the system from locating the item when the user picked up the check to continue the transaction. The problem has been corrected.
Gross Receipts Incorrect if Edited Closed Check Reprinted on Different Workstation From Original TenderCR ID #: 19232
After final tendering a check on a workstation, gross receipts would be skewed if the check was reopened, edited, and reprinted on a different workstation that had not yet performed a tender payment. This problem has been corrected.
Journal Entries Formatted Incorrectly for Voids of Previous Round Combo Meal ItemsCR ID #: N/A
When printing to the journal, menu items on a voided combo meal were not being indented and did not have their prices rolled up into the parent combo meal price. This has been corrected.
MD0003-065Revision F
January 17, 2006Page 193 of 306

3700 POSWhat’s Revised
Larger Databases Fail to Load/Reload on WS4 During POS OperationsCR ID #: 20090
Attempts to load/reload a database to a WS4 while running POS Operations would fail if the database included a large number of records. The problem was due to an insufficient and ineffective allocation of memory, which also affected performance times. This has been corrected.
Last Item Void Fails to Abort Combo MealCR ID #: 20319
After ringing up a menu item and pressing the “Combo It” key, the system would not allow use of the last item void to back out of the combo meal process. Instead, the user would have to complete the combo meal selection, void the combo meal, and start again. This has been corrected.
Last Item Void Prevents Completion of Combo Meal QuantitiesCR ID #: 20046
When ordering Combo Meals in quantity, using the Last Item Void to correct an entry would prevent the system from completing the remaining Combo Meal selections. This has been corrected.
Menu Items With Item Discounts Improperly ConsolidateCR ID #: N/A
With consolidation enabled, if item discounts (e.g., $1.00 off coupons) were applied to a quantity of menu items (3 hamburgers), the system would incorrectly consolidate the discounts and apply the total amount to the first of the menu item quantity. This would allow the remaining menu items to be deleted without removing their discounts. This problem has been corrected.
MD0003-065Revision FJanuary 17, 2006Page 194 of 306
3700 POSWhat’s Revised
Order Device Will Not Print Condiment Without Parent ItemCR ID #: N/A
Previously, order devices would not print condiments without their parent menu item even when the following options were enabled:
Print without Parent on order chit (Sales | Menu Item Classes | Print/Display)
Print condiments on menu item line (Revenue Center | RVC Print Design | Options)
A blank chit would be produced instead. This has been corrected.
Print Future Orders Function Loses Current Check DetailCR ID #: 19746
When using the function 'Print Future Orders' during order entry, the current order would be service totaled, and all current round check detail would be lost. Although the transaction was recorded in the database as an open check, it could not be recalled and closed.
Additional problems occurred, if the Print Future Order function was called from a workstation using DOM. In this case, the current round menu items will have already been sent to the kitchen. Since the check cannot be recalled, they cannot be cleared; but if these items are re-entered, they will be posted twice to the kitchen.
To correct these problems, the Print Future Orders function was modified to prevent its use during order entry. Now, if the user presses this button in an open check, the system will display the error message “Check must be service totaled.”
MD0003-065Revision F
January 17, 2006Page 195 of 306
3700 POSWhat’s Revised
Required Condiment Error Occurs When Combo Meals Ordered in QuantityCR ID #: 20001
When ordering Combo Meals in quantity, where the last side item had required condiments, a "Condiment Entry Required" error would display after the first Combo Meal was ordered. Once the condiment was entered, the rest of the combo meals in the specified quantity would not be rung in. This has been corrected.
Secondary Print Jobs Incorrectly Broadcasting to All Order DevicesCR ID #: N/A
Previously, order devices that were configured to not print secondary menu items were incorrectly sending those items to all other order device printers whenever the check was service totaled. This has been corrected.
Splitting Menu Item Refills and Touch Item Discounts Results in Duplicate dtl_id FieldCR ID #: N/A
Menu item refills and touch item discounts rely on the dtl_id field being unique for each item on the check. When splitting an item in Edit Seat or Split Check mode, the system would simply duplicate this number. To avoid potential reporting problems, the system will now create two new dtl_id entries when these functions occur.
Tender Key Crashes Operations When Exempt from Auto Service ChargeCR ID #: 17572
When paying a check, POS Operations would crash if the user pressed a tender key that was programmed with the option Exempt auto service charge (Sales | Tender/Media | Tender) enabled. This has been corrected.
MD0003-065Revision FJanuary 17, 2006Page 196 of 306
3700 POSWhat’s Revised
Using ‘Clear’ Key When Ringing Combo Meal Aborts Menu ItemCR ID #: 20000
Previously, if a [Clear] key was selected at any time while ringing in a Combo Meal, the current working meal would be removed from the check. This problem has been corrected.
View by Seat Function Does Not Sort Check Detail CorrectlyCR ID #: 20472
Check detail did not sort correctly when using the [View by Seat] function key on an order device where the Sort by seat (Devices | Order Devices | Options) was enabled. The system simply listed the menu items as entered, instead of sorting under seat headers as shown below:
EAT IN
**** Seat 1****1 Clam Chowder
**** Seat 2****1 Onion Soup
This problem has been corrected.
Voiding Menu Items Incorrectly Changes Menu Levels CR ID #: 19847
After ringing up two or more menu items with different menu level prices, if the user touch voided one of them, the system would immediately change to the menu level of the first item on the check instead of remaining at the main or sub-level selected by the user. This problem has been corrected.
MD0003-065Revision F
January 17, 2006Page 197 of 306
3700 POSWhat’s Revised
WS4 Displays Incorrect Time When DST DisabledCR ID #: N/A
Previously, WS4 OPS clients would display the wrong time when the Windows option to automatically adjust for Daylight Savings Time (DST) was disabled. This has been corrected.
Printing
Course Items Not Consolidating Correctly On Guest CheckCR ID #: 12774
When printing a guest check, the system failed to consolidate like side items under their consolidated parent items, if a different menu item was rung up between the two combo meal entries. For example, if the user entered item in the following order:
1. 2-Item Combo, GB Taco, GB Taco2. House Salad3. 2-Item Combo, GB Taco, GB Taco
the system would consolidate the two combo parent items, but would print the second set of side items after the House Salad:
2 2-Item ComboGB TacoGB Taco
1 House SaladGB TacoGB Taco
This problem has been corrected.
MD0003-065Revision FJanuary 17, 2006Page 198 of 306
3700 POSWhat’s Revised
Local Order Chits Not Consolidating Like Menu ItemsCR ID #: 15045
Local order printers were not consolidating menu items when printing the order chit. Instead, like menu items were printed separately. This has been corrected. In addition, the print options were enhanced to allow for configuration of the sort and consolidation options. For more on these changes refer to the Check Detail Consolidation topic beginning on page 167 of this document.
Local Order Receipt Does Not Show Correct Quantity Price TotalCR ID #: 11372
After ringing up a quantity of menu items, the local order printer failed to print the consolidated menu item price totals for all like items. Instead, the system would consolidate the quantity of items, but would print the menu item price of the first selection.
For example, if the server rang up:
3 Coffee 3.751 Coffee 1.251 Coffee 1.25
the local order chit would be printed as:
5 Coffee 3.75
instead of
5 Coffee 6.25 (the correct answer)
This has been corrected.
MD0003-065Revision F
January 17, 2006Page 199 of 306

3700 POSWhat’s Revised
Menu Item Unit Price Not Printed During ConsolidationCR ID #: 20132
Previously, with the option Print menu item unit price (Revenue Center | RVC Print Design | Options) enabled, the system would incorrectly print the unit price for menu item with a quantity of 1. For example, if the user rang up an Apple Pie, an Apple Pie, and an Ice Cream, the system would print as:
2 Apple Pie @ 4.50 9.00 1 Ice Cream @ 4.25 4.50
instead of
2 Apple Pie @ 4.50 9.00 1 Ice Cream @ 4.50
This has been corrected.
Menu Items with Condiments Not Printing on Local Order PrinterCR ID #: 9596
After ringing up menu items with condiments (required or non-required), the customer receipt failed to print on the local order printers when using print on demand. This problem has been corrected.
OPOS Printer Fails After Power RecycledCR ID #: 20749
When linking to an OPOS printer using a wired ethernet connection, the system was unable to print to the device once the printer was turned off and then re-powered on. This has been corrected.
MD0003-065Revision FJanuary 17, 2006Page 200 of 306
3700 POSWhat’s Revised
Remote Printer Shows Single Item Price When Multiple Items ConsolidatedCR ID #: 15083
Previously, if a menu item was configured to Print price on order chit (Sales | Menu Item Classes | Print/Display), the system would print the single-item price even when multiple items were ordered and consolidated. This problem has been corrected.
Required Condiment Price Not Printing on Remote Order ChitCR ID #: 15084
Previously, the system failed to print the price of a required condiment on the remote order chit, even though the menu item class was configured to do so. This has been corrected.
Reports
The table below describes the report changes in this Service Pack:
Report Area Modified Description
Consolidated Revenue Center/System Tip Totals Report
CR ID #: 19712
Templatea When running the Consolidated Revenue Center Tip Totals Report (tip_r001.rpt) or the Consolidated System Tip Totals Report (tip_s001.rpt) for a range of business dates, the system failed to impose a chronological sort order on the records. This has been corrected.
MD0003-065Revision F
January 17, 2006Page 201 of 306
3700 POSWhat’s Revised
a Files Changed:
tip_r001.rpttip_s001.rpt
b Files Changed:
emp_221.rptc Files Changed:
mi_r101.rpt
Employee Sales and Tip Totals
CR ID #: 18537
Templateb When running the Employees Sales and Tip Totals report (emp_221.rpt), the leading digits in the tip percentage field (both total and line item) would be cut off if the percentage had two or more characters (not including a "1" in the ones or tens position) to the left of the decimal. To correct this problem, the field has been modified to allow up to 3 characters to the left of the decimal.
Revenue Center Menu Item Sales Summary
CR ID # 18199
Templatec When running a Revenue Center Menu Item Sales Summary report (mi_r101.rpt) for a group that contains only 0.00 dollar menu items, a divide by zero error would occur. This has been corrected.
MD0003-065Revision FJanuary 17, 2006Page 202 of 306
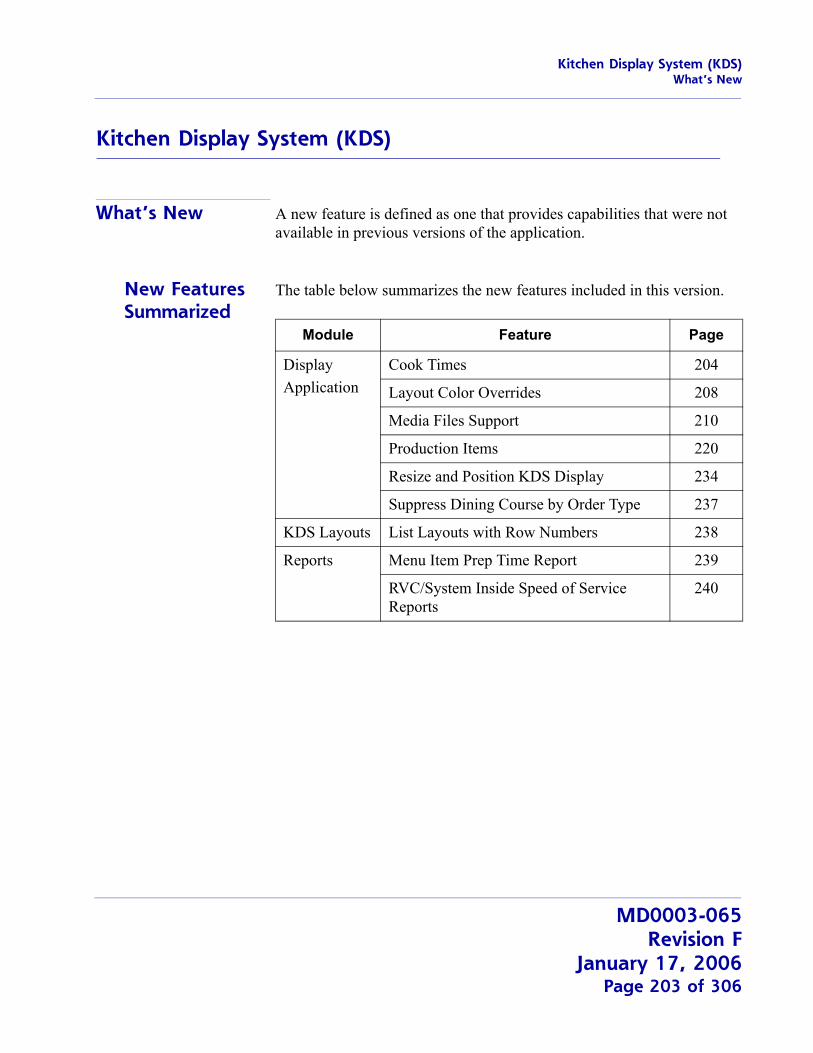
Kitchen Display System (KDS)What’s New
Kitchen Display System (KDS)
What’s New A new feature is defined as one that provides capabilities that were not available in previous versions of the application.
New Features Summarized
The table below summarizes the new features included in this version.
Module Feature Page
DisplayApplication
Cook Times 204
Layout Color Overrides 208
Media Files Support 210
Production Items 220
Resize and Position KDS Display 234
Suppress Dining Course by Order Type 237
KDS Layouts List Layouts with Row Numbers 238
Reports Menu Item Prep Time Report 239
RVC/System Inside Speed of Service Reports
240
MD0003-065Revision F
January 17, 2006Page 203 of 306
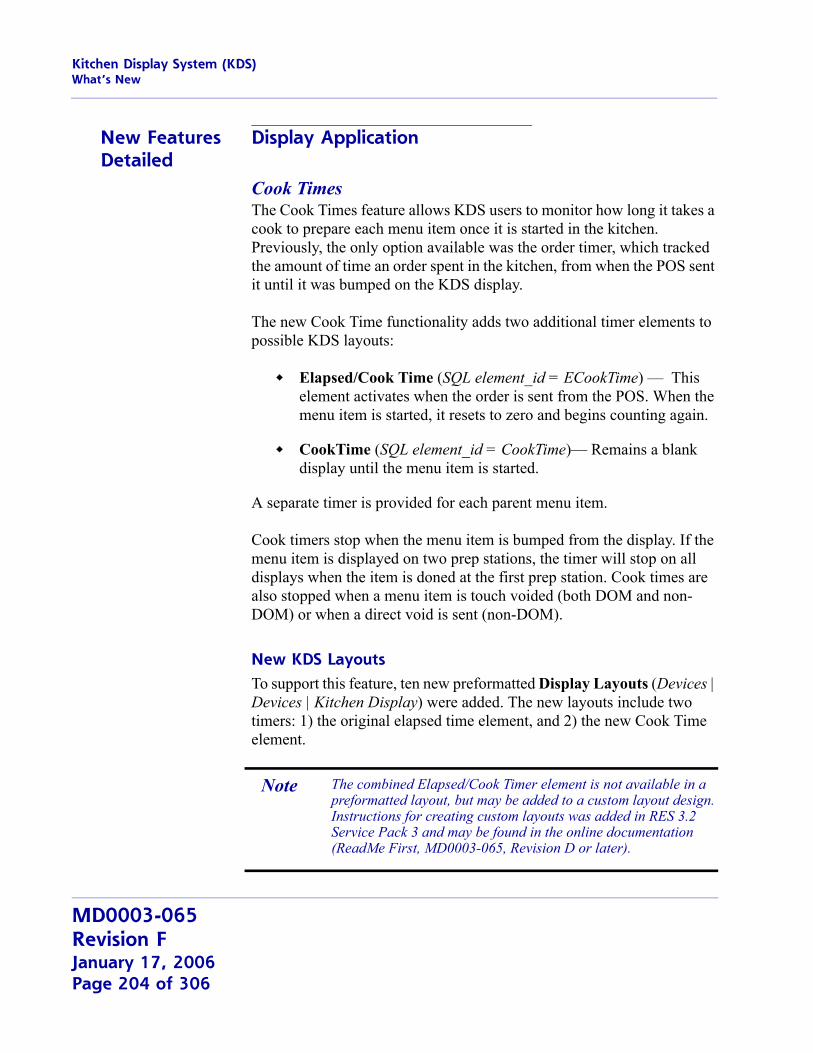
Kitchen Display System (KDS)What’s New
New Features Detailed
Display Application
Cook TimesThe Cook Times feature allows KDS users to monitor how long it takes a cook to prepare each menu item once it is started in the kitchen. Previously, the only option available was the order timer, which tracked the amount of time an order spent in the kitchen, from when the POS sent it until it was bumped on the KDS display.
The new Cook Time functionality adds two additional timer elements to possible KDS layouts:
Elapsed/Cook Time (SQL element_id = ECookTime) — This element activates when the order is sent from the POS. When the menu item is started, it resets to zero and begins counting again.
CookTime (SQL element_id = CookTime)— Remains a blank display until the menu item is started.
A separate timer is provided for each parent menu item.
Cook timers stop when the menu item is bumped from the display. If the menu item is displayed on two prep stations, the timer will stop on all displays when the item is doned at the first prep station. Cook times are also stopped when a menu item is touch voided (both DOM and non-DOM) or when a direct void is sent (non-DOM).
New KDS LayoutsTo support this feature, ten new preformatted Display Layouts (Devices | Devices | Kitchen Display) were added. The new layouts include two timers: 1) the original elapsed time element, and 2) the new Cook Time element.
Note The combined Elapsed/Cook Timer element is not available in a preformatted layout, but may be added to a custom layout design. Instructions for creating custom layouts was added in RES 3.2 Service Pack 3 and may be found in the online documentation (ReadMe First, MD0003-065, Revision D or later).
MD0003-065Revision FJanuary 17, 2006Page 204 of 306
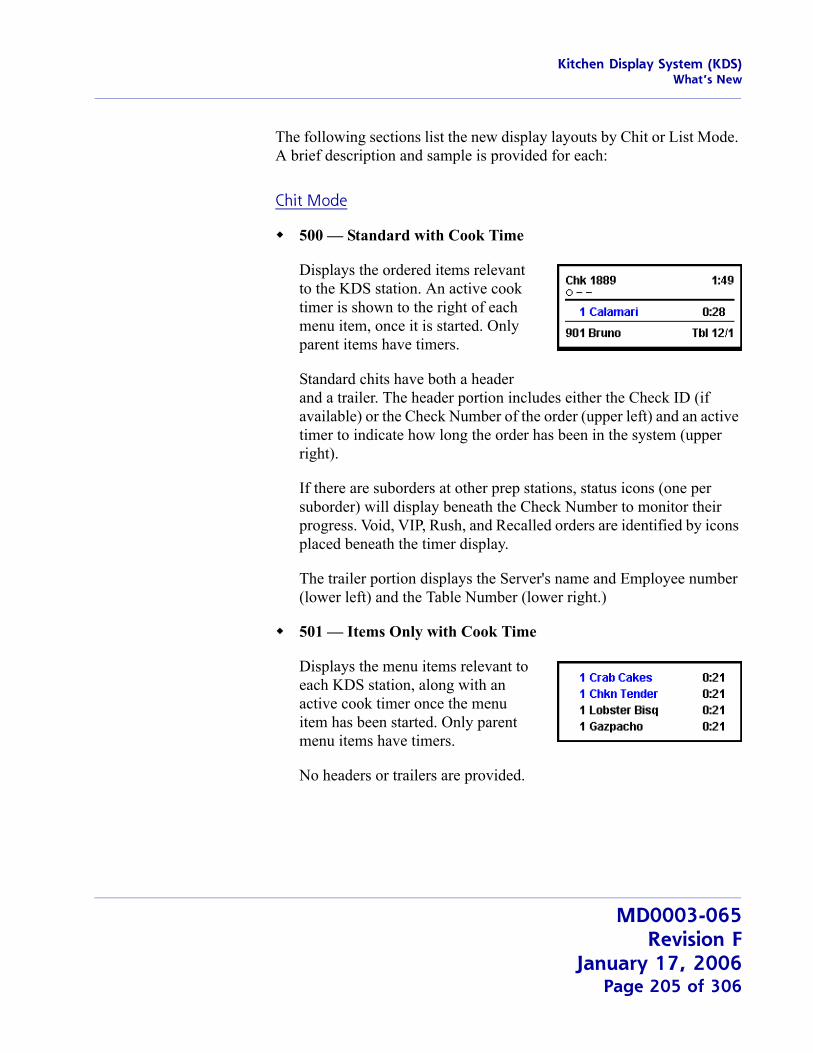
Kitchen Display System (KDS)What’s New
The following sections list the new display layouts by Chit or List Mode. A brief description and sample is provided for each:
Chit Mode
500 — Standard with Cook Time
Displays the ordered items relevant to the KDS station. An active cook timer is shown to the right of each menu item, once it is started. Only parent items have timers.
Standard chits have both a header and a trailer. The header portion includes either the Check ID (if available) or the Check Number of the order (upper left) and an active timer to indicate how long the order has been in the system (upper right).
If there are suborders at other prep stations, status icons (one per suborder) will display beneath the Check Number to monitor their progress. Void, VIP, Rush, and Recalled orders are identified by icons placed beneath the timer display.
The trailer portion displays the Server's name and Employee number (lower left) and the Table Number (lower right.)
501 — Items Only with Cook Time
Displays the menu items relevant to each KDS station, along with an active cook timer once the menu item has been started. Only parent menu items have timers.
No headers or trailers are provided.
MD0003-065Revision F
January 17, 2006Page 205 of 306
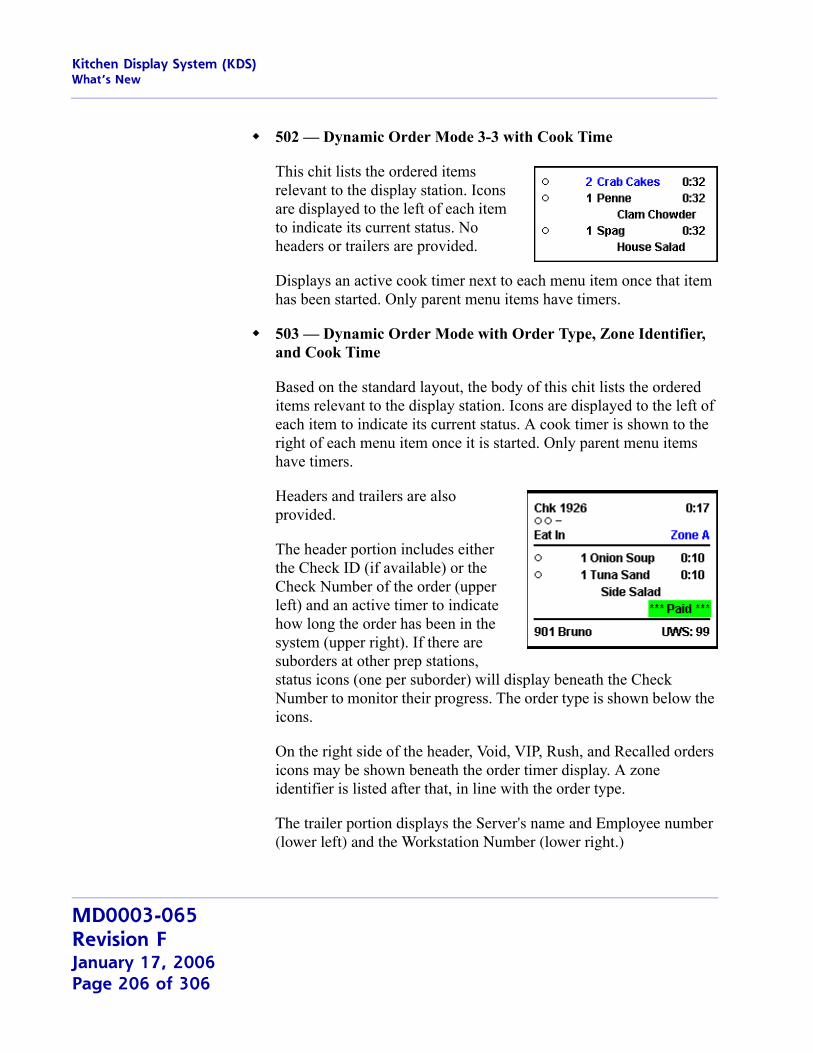
Kitchen Display System (KDS)What’s New
502 — Dynamic Order Mode 3-3 with Cook Time
This chit lists the ordered items relevant to the display station. Icons are displayed to the left of each item to indicate its current status. No headers or trailers are provided.
Displays an active cook timer next to each menu item once that item has been started. Only parent menu items have timers.
503 — Dynamic Order Mode with Order Type, Zone Identifier, and Cook Time
Based on the standard layout, the body of this chit lists the ordered items relevant to the display station. Icons are displayed to the left of each item to indicate its current status. A cook timer is shown to the right of each menu item once it is started. Only parent menu items have timers.
Headers and trailers are also provided.
The header portion includes either the Check ID (if available) or the Check Number of the order (upper left) and an active timer to indicate how long the order has been in the system (upper right). If there are suborders at other prep stations, status icons (one per suborder) will display beneath the Check Number to monitor their progress. The order type is shown below the icons.
On the right side of the header, Void, VIP, Rush, and Recalled orders icons may be shown beneath the order timer display. A zone identifier is listed after that, in line with the order type.
The trailer portion displays the Server's name and Employee number (lower left) and the Workstation Number (lower right.)
MD0003-065Revision FJanuary 17, 2006Page 206 of 306

Kitchen Display System (KDS)What’s New
List Mode
504 — Standard with Cook Time
Standard layouts display orders in spreadsheet or table format. In addition to the two time elements (order and cook time), the layout includes the table number, check ID/number, employee ID and name, as well as the quantity and name of each menu item and/or modifier relevant to the KDS station. Status icons are listed in the Prep column, while special needs icons (Void, VIP, Rush) are displayed in the Attn column.
505 — Standard with Order Type and Cook Time
Displays all the elements of a standard layout along with columns for the order type and cook time.
506 — Dynamic Order Mode 3 with Cook Time
Provides an abbreviated table of current orders relevant to the KDS station. Includes only one time element — the cook timer. This option does not reference any part of an order that may be displayed at another workstation.
MD0003-065Revision F
January 17, 2006Page 207 of 306
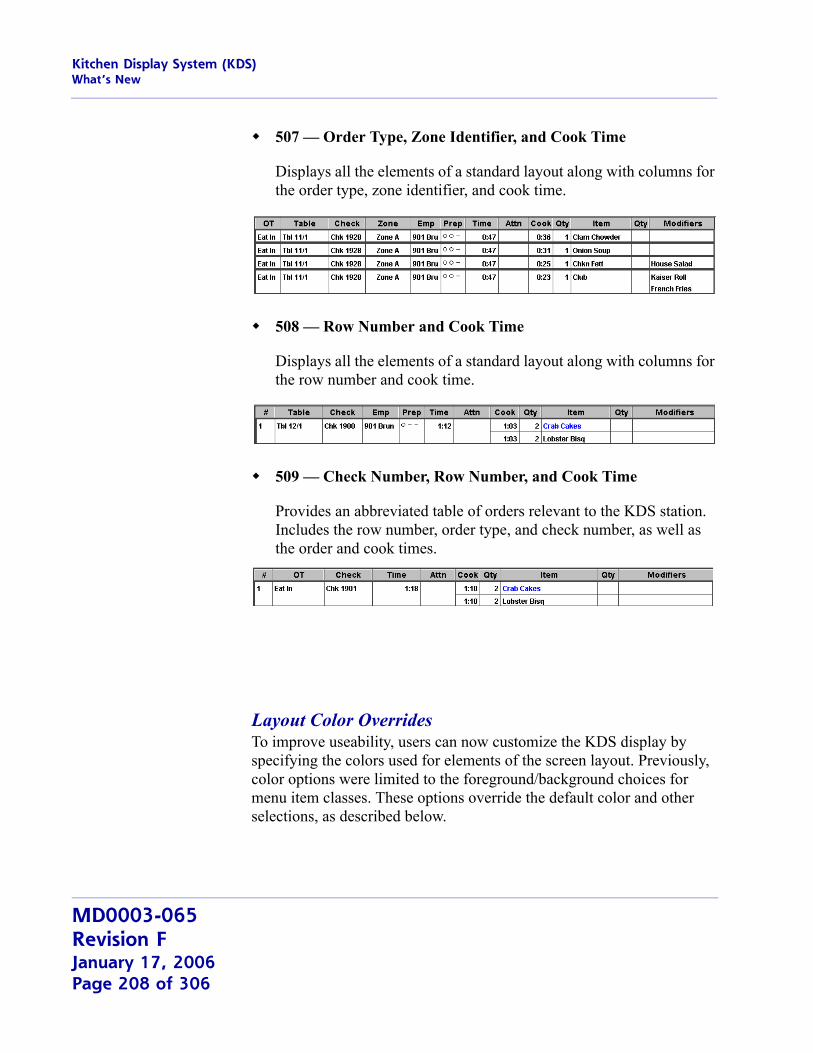
Kitchen Display System (KDS)What’s New
507 — Order Type, Zone Identifier, and Cook Time
Displays all the elements of a standard layout along with columns for the order type, zone identifier, and cook time.
508 — Row Number and Cook Time
Displays all the elements of a standard layout along with columns for the row number and cook time.
509 — Check Number, Row Number, and Cook Time
Provides an abbreviated table of orders relevant to the KDS station. Includes the row number, order type, and check number, as well as the order and cook times.
Layout Color OverridesTo improve useability, users can now customize the KDS display by specifying the colors used for elements of the screen layout. Previously, color options were limited to the foreground/background choices for menu item classes. These options override the default color and other selections, as described below.
MD0003-065Revision FJanuary 17, 2006Page 208 of 306
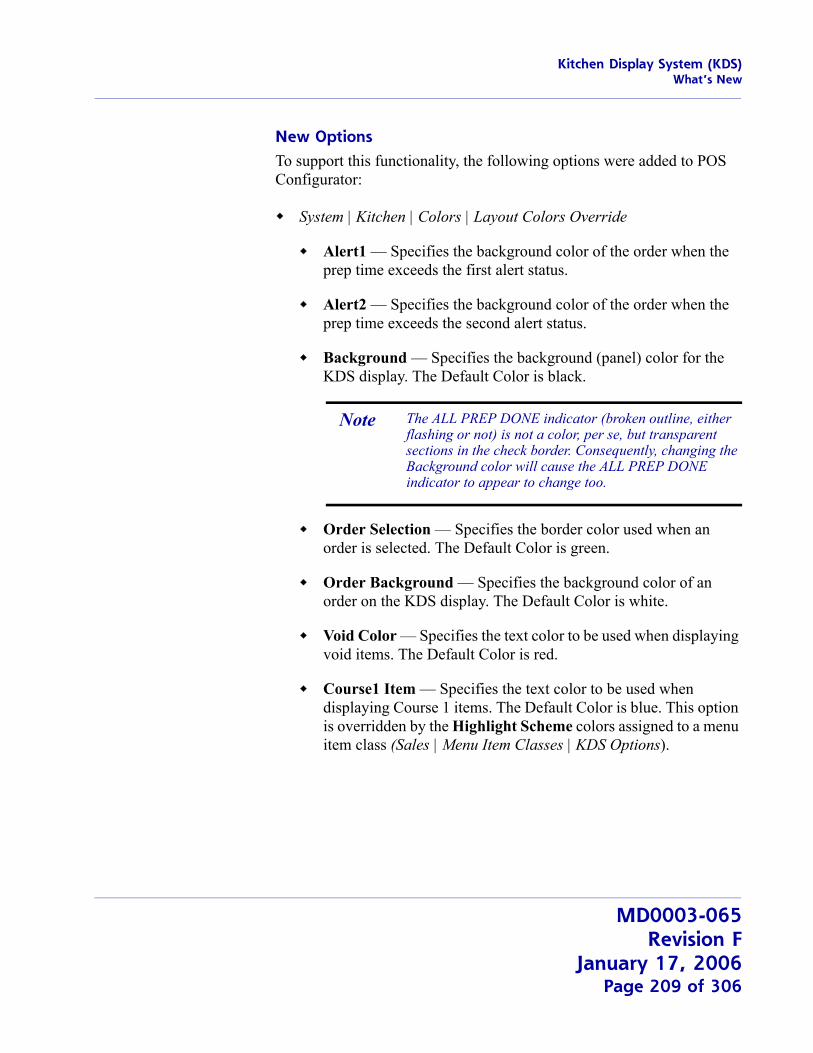
Kitchen Display System (KDS)What’s New
New OptionsTo support this functionality, the following options were added to POS Configurator:
System | Kitchen | Colors | Layout Colors Override
Alert1 — Specifies the background color of the order when the prep time exceeds the first alert status.
Alert2 — Specifies the background color of the order when the prep time exceeds the second alert status.
Background — Specifies the background (panel) color for the KDS display. The Default Color is black.
Order Selection — Specifies the border color used when an order is selected. The Default Color is green.
Order Background — Specifies the background color of an order on the KDS display. The Default Color is white.
Void Color — Specifies the text color to be used when displaying void items. The Default Color is red.
Course1 Item — Specifies the text color to be used when displaying Course 1 items. The Default Color is blue. This option is overridden by the Highlight Scheme colors assigned to a menu item class (Sales | Menu Item Classes | KDS Options).
Note The ALL PREP DONE indicator (broken outline, either flashing or not) is not a color, per se, but transparent sections in the check border. Consequently, changing the Background color will cause the ALL PREP DONE indicator to appear to change too.
MD0003-065Revision F
January 17, 2006Page 209 of 306
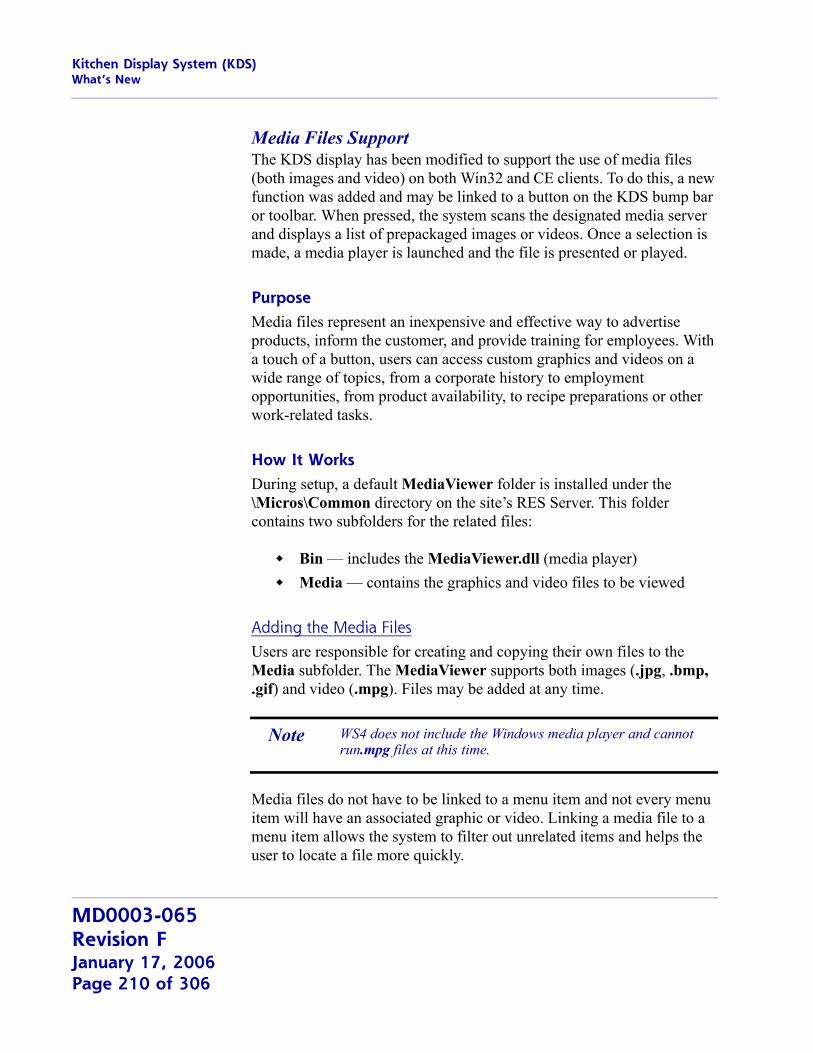
Kitchen Display System (KDS)What’s New
Media Files SupportThe KDS display has been modified to support the use of media files (both images and video) on both Win32 and CE clients. To do this, a new function was added and may be linked to a button on the KDS bump bar or toolbar. When pressed, the system scans the designated media server and displays a list of prepackaged images or videos. Once a selection is made, a media player is launched and the file is presented or played.
PurposeMedia files represent an inexpensive and effective way to advertise products, inform the customer, and provide training for employees. With a touch of a button, users can access custom graphics and videos on a wide range of topics, from a corporate history to employment opportunities, from product availability, to recipe preparations or other work-related tasks.
How It WorksDuring setup, a default MediaViewer folder is installed under the \Micros\Common directory on the site’s RES Server. This folder contains two subfolders for the related files:
Bin — includes the MediaViewer.dll (media player)Media — contains the graphics and video files to be viewed
Adding the Media FilesUsers are responsible for creating and copying their own files to the Media subfolder. The MediaViewer supports both images (.jpg, .bmp, .gif) and video (.mpg). Files may be added at any time.
Media files do not have to be linked to a menu item and not every menu item will have an associated graphic or video. Linking a media file to a menu item allows the system to filter out unrelated items and helps the user to locate a file more quickly.
Note WS4 does not include the Windows media player and cannot run.mpg files at this time.
MD0003-065Revision FJanuary 17, 2006Page 210 of 306
Kitchen Display System (KDS)What’s New
To link files, users must assign the media file the same name as that of the menu item — as defined in POS Configurator (Sales | Menu Items | Definition | General). Since menu items may have two names (Name1 and Name2), the media filename must match the one used by the KDS display (Sales | Menu Item Class | Print/Display — Print on Order Device).
For example, to link a picture of a cheeseburger to a Cheeseburger menu item (Name1), the .jpg must be called Cheeseburger.jpg. On the other hand, if the KDS display is configured to show Name2, and the cheeseburger has a Name2 entry of ChzBurger, then the image must be called Chzburger.jpg.
Because file name conventions do not support certain characters (e.g., \ / : * ? " < > | ), those characters should not be included as part of a menu item Name1 or Name2 entry. Otherwise, that item cannot be linked to a media file of the same name.
Note Filenames are not case-sensitive. However, MediaViewer will not make the connection between the two unless the spelling and spacing of the media filename matches the menu item name exactly.
Using the example cited above, to link a media file to the menu item
Chz Burger
the media file must be named one of the following:
Chz Burger.jpgChz burger.jpgchz Burger.jpgchz burger.jpg
The media file could still be run if the space was removed (ChzBurger.jpg) or the spelling changed (Cheese Burger.jpg). The difference is that it would not be linked to the menu item selection.
MD0003-065Revision F
January 17, 2006Page 211 of 306
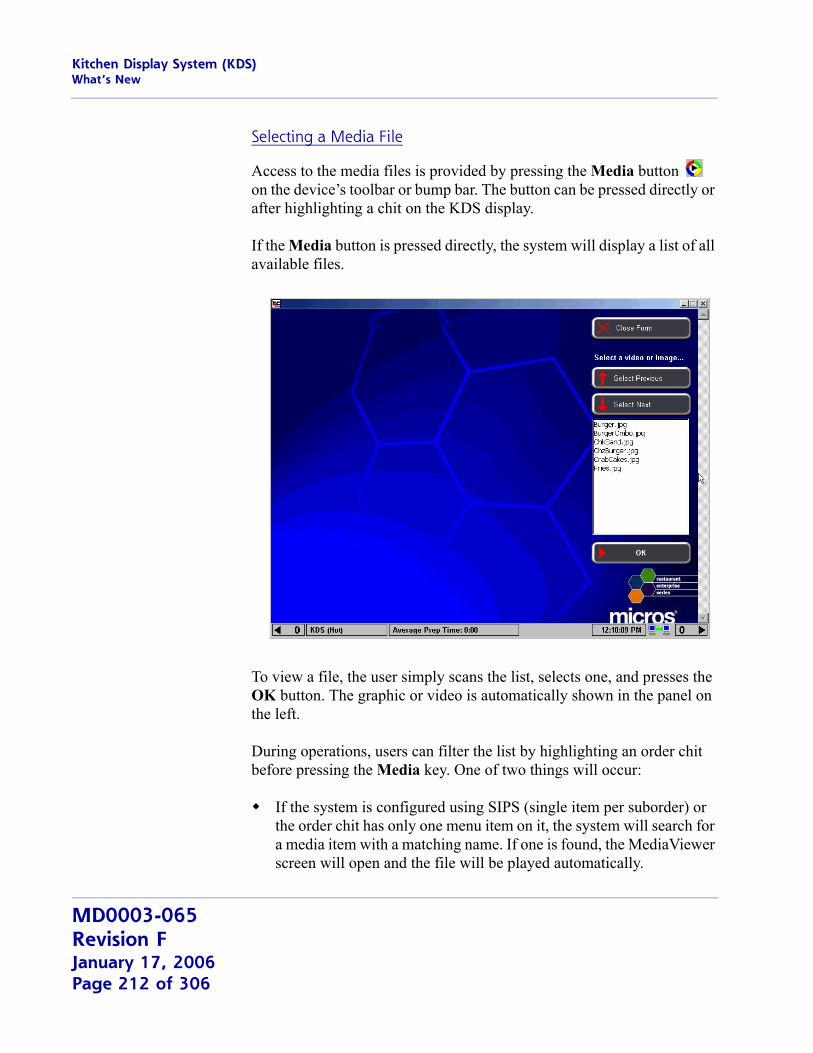
Kitchen Display System (KDS)What’s New
Selecting a Media File
Access to the media files is provided by pressing the Media button on the device’s toolbar or bump bar. The button can be pressed directly or after highlighting a chit on the KDS display.
If the Media button is pressed directly, the system will display a list of all available files.
To view a file, the user simply scans the list, selects one, and presses the OK button. The graphic or video is automatically shown in the panel on the left.
During operations, users can filter the list by highlighting an order chit before pressing the Media key. One of two things will occur:
If the system is configured using SIPS (single item per suborder) or the order chit has only one menu item on it, the system will search for a media item with a matching name. If one is found, the MediaViewer screen will open and the file will be played automatically.
MD0003-065Revision FJanuary 17, 2006Page 212 of 306
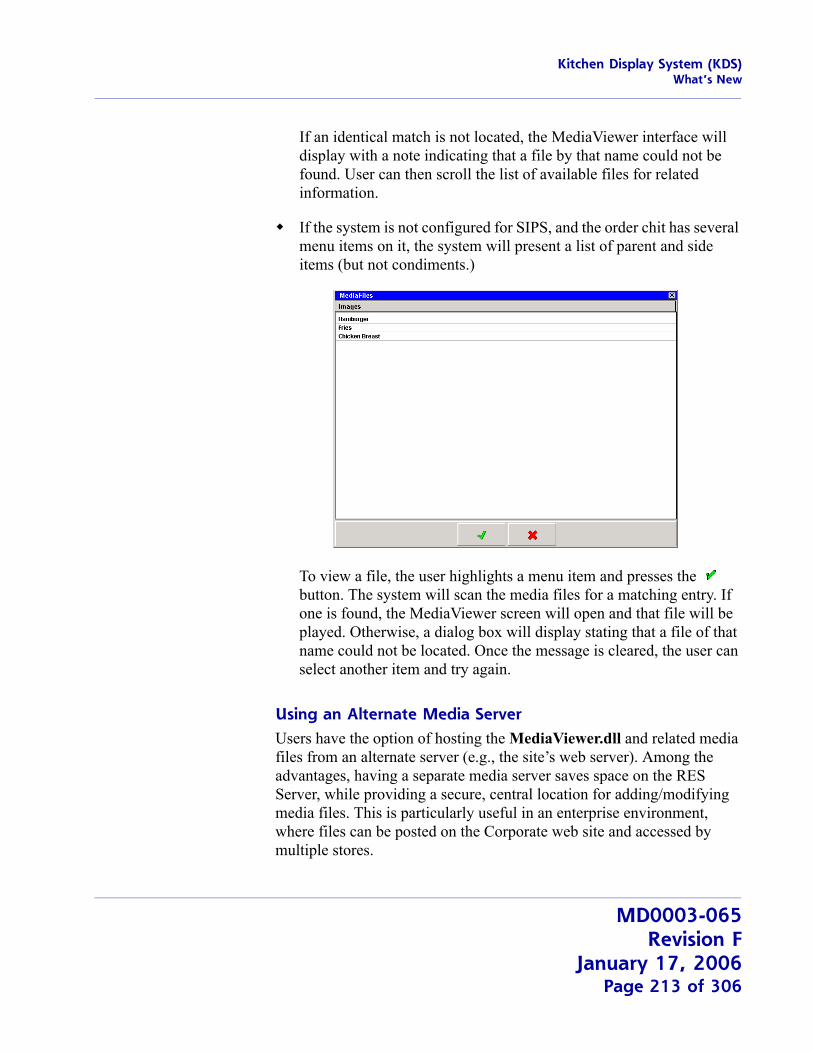
Kitchen Display System (KDS)What’s New
If an identical match is not located, the MediaViewer interface will display with a note indicating that a file by that name could not be found. User can then scroll the list of available files for related information.
If the system is not configured for SIPS, and the order chit has several menu items on it, the system will present a list of parent and side items (but not condiments.)
To view a file, the user highlights a menu item and presses the button. The system will scan the media files for a matching entry. If one is found, the MediaViewer screen will open and that file will be played. Otherwise, a dialog box will display stating that a file of that name could not be located. Once the message is cleared, the user can select another item and try again.
Using an Alternate Media ServerUsers have the option of hosting the MediaViewer.dll and related media files from an alternate server (e.g., the site’s web server). Among the advantages, having a separate media server saves space on the RES Server, while providing a secure, central location for adding/modifying media files. This is particularly useful in an enterprise environment, where files can be posted on the Corporate web site and accessed by multiple stores.
MD0003-065Revision F
January 17, 2006Page 213 of 306
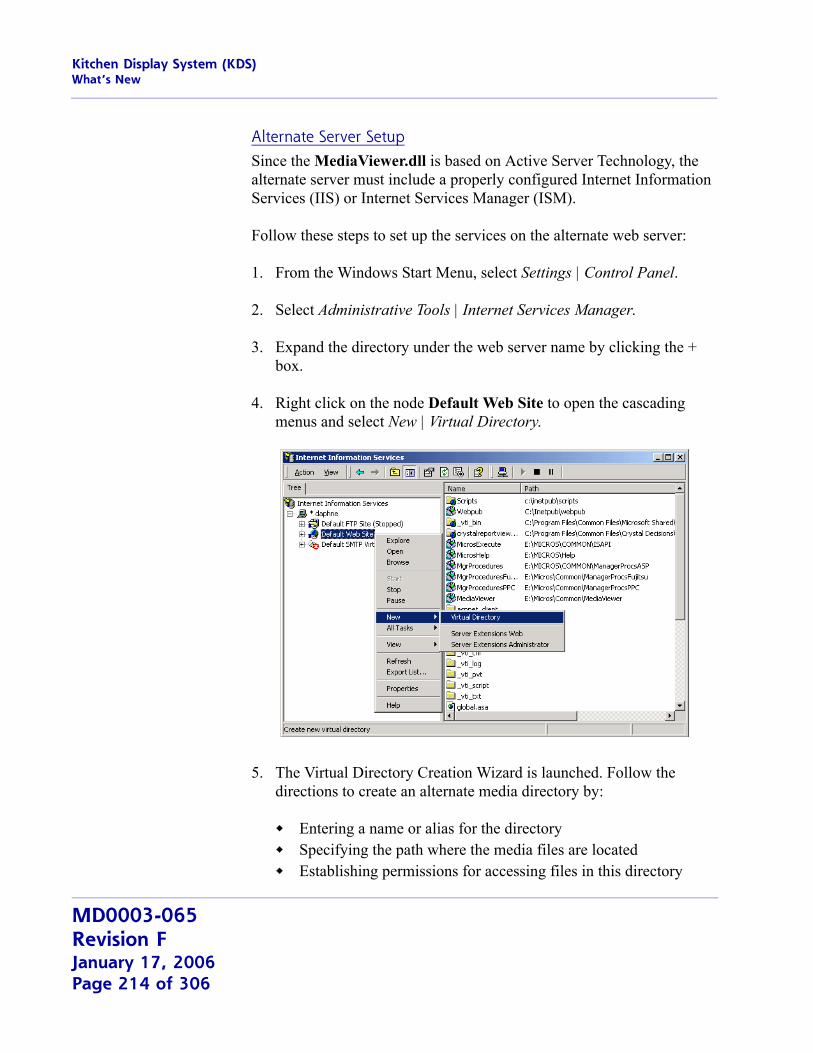
Kitchen Display System (KDS)What’s New
Alternate Server SetupSince the MediaViewer.dll is based on Active Server Technology, the alternate server must include a properly configured Internet Information Services (IIS) or Internet Services Manager (ISM).
Follow these steps to set up the services on the alternate web server:
1. From the Windows Start Menu, select Settings | Control Panel.
2. Select Administrative Tools | Internet Services Manager.
3. Expand the directory under the web server name by clicking the + box.
4. Right click on the node Default Web Site to open the cascading menus and select New | Virtual Directory.
5. The Virtual Directory Creation Wizard is launched. Follow the directions to create an alternate media directory by:
Entering a name or alias for the directorySpecifying the path where the media files are locatedEstablishing permissions for accessing files in this directory
MD0003-065Revision FJanuary 17, 2006Page 214 of 306
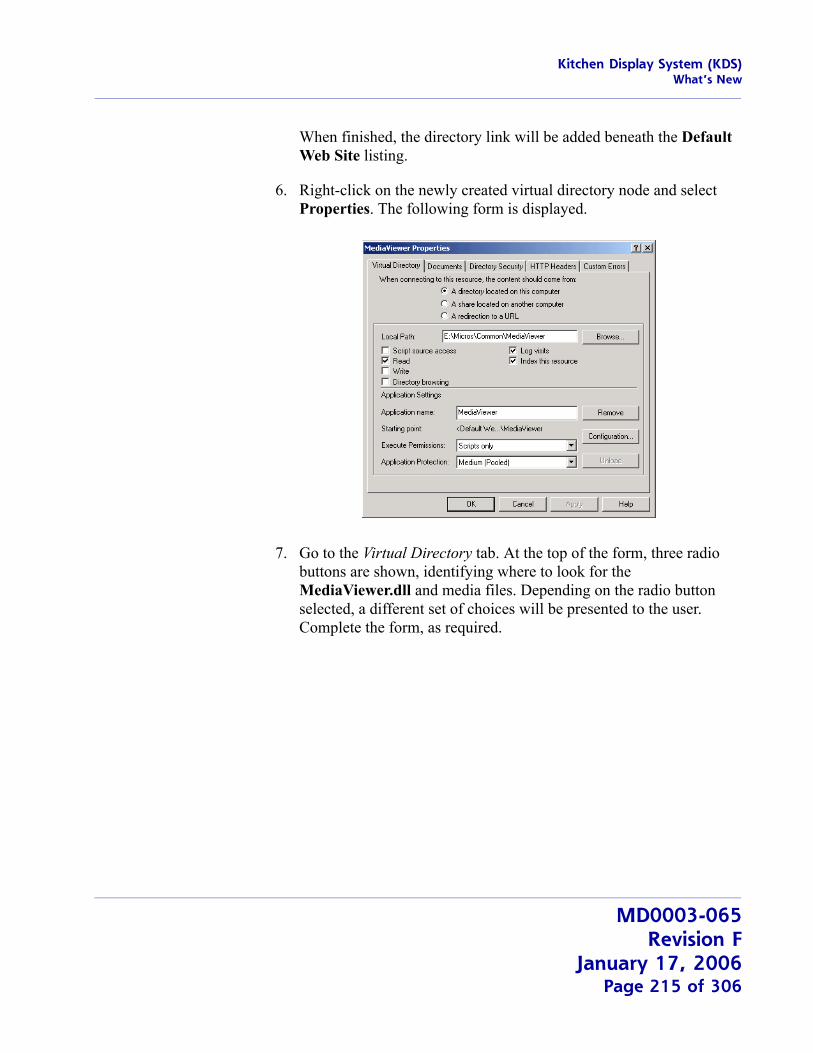
Kitchen Display System (KDS)What’s New
When finished, the directory link will be added beneath the Default Web Site listing.
6. Right-click on the newly created virtual directory node and select Properties. The following form is displayed.
7. Go to the Virtual Directory tab. At the top of the form, three radio buttons are shown, identifying where to look for the MediaViewer.dll and media files. Depending on the radio button selected, a different set of choices will be presented to the user. Complete the form, as required.
MD0003-065Revision F
January 17, 2006Page 215 of 306
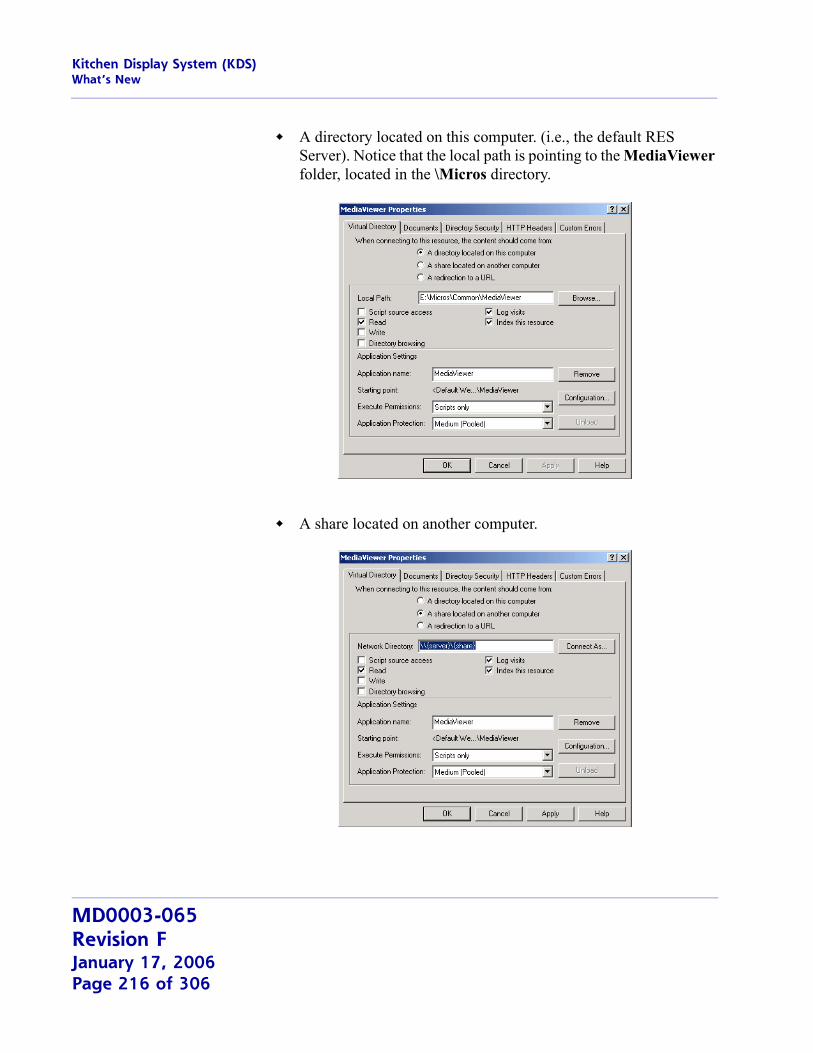
Kitchen Display System (KDS)What’s New
A directory located on this computer. (i.e., the default RES Server). Notice that the local path is pointing to the MediaViewer folder, located in the \Micros directory.
A share located on another computer.
MD0003-065Revision FJanuary 17, 2006Page 216 of 306
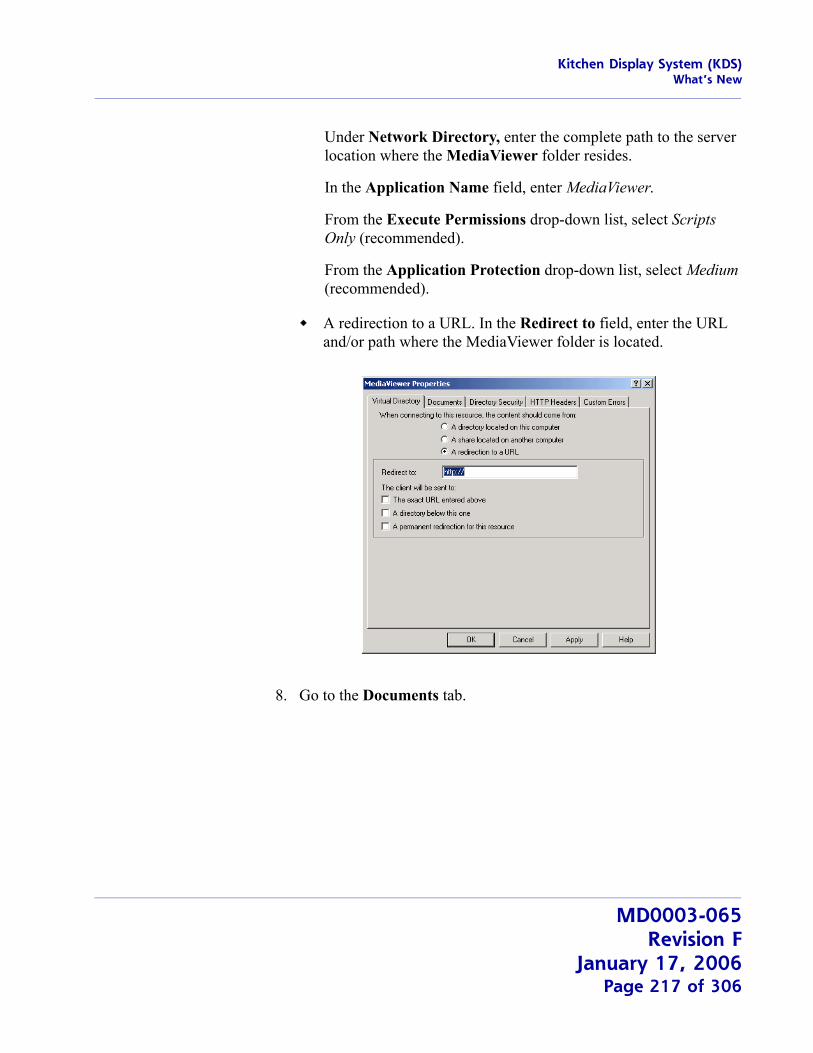
Kitchen Display System (KDS)What’s New
Under Network Directory, enter the complete path to the server location where the MediaViewer folder resides.
In the Application Name field, enter MediaViewer.
From the Execute Permissions drop-down list, select Scripts Only (recommended).
From the Application Protection drop-down list, select Medium (recommended).
A redirection to a URL. In the Redirect to field, enter the URL and/or path where the MediaViewer folder is located.
8. Go to the Documents tab.
MD0003-065Revision F
January 17, 2006Page 217 of 306
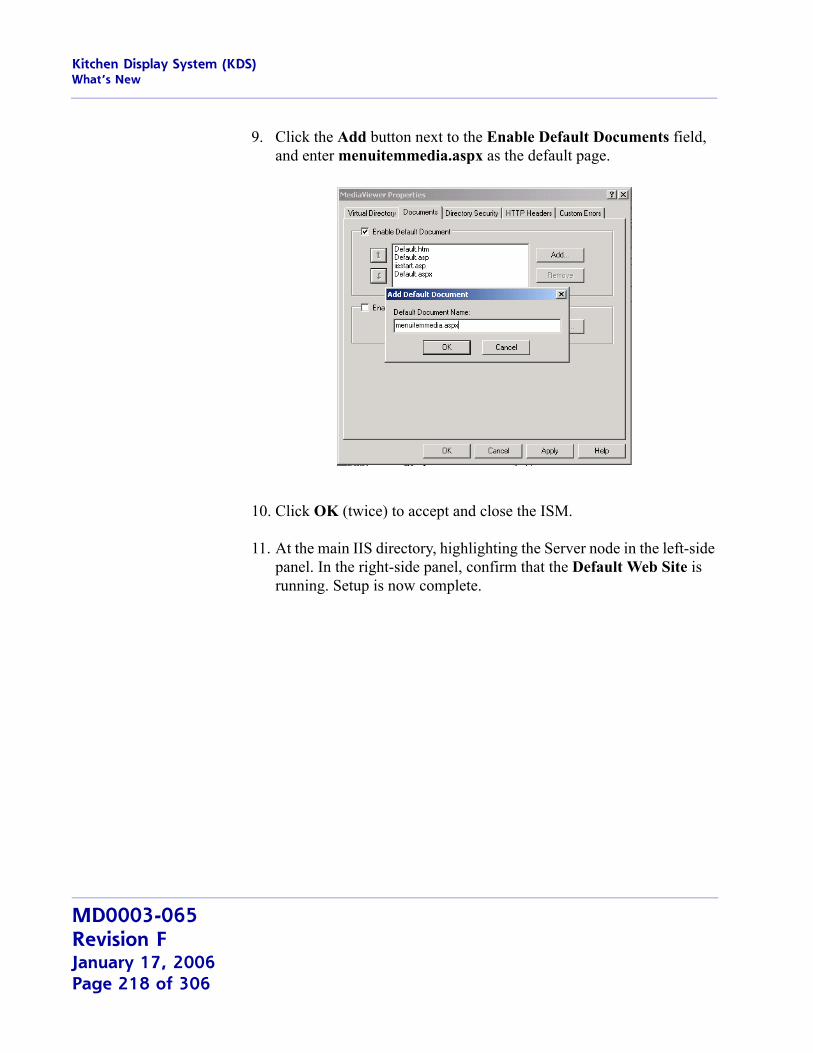
Kitchen Display System (KDS)What’s New
9. Click the Add button next to the Enable Default Documents field, and enter menuitemmedia.aspx as the default page.
10. Click OK (twice) to accept and close the ISM.
11. At the main IIS directory, highlighting the Server node in the left-side panel. In the right-side panel, confirm that the Default Web Site is running. Setup is now complete.
MD0003-065Revision FJanuary 17, 2006Page 218 of 306
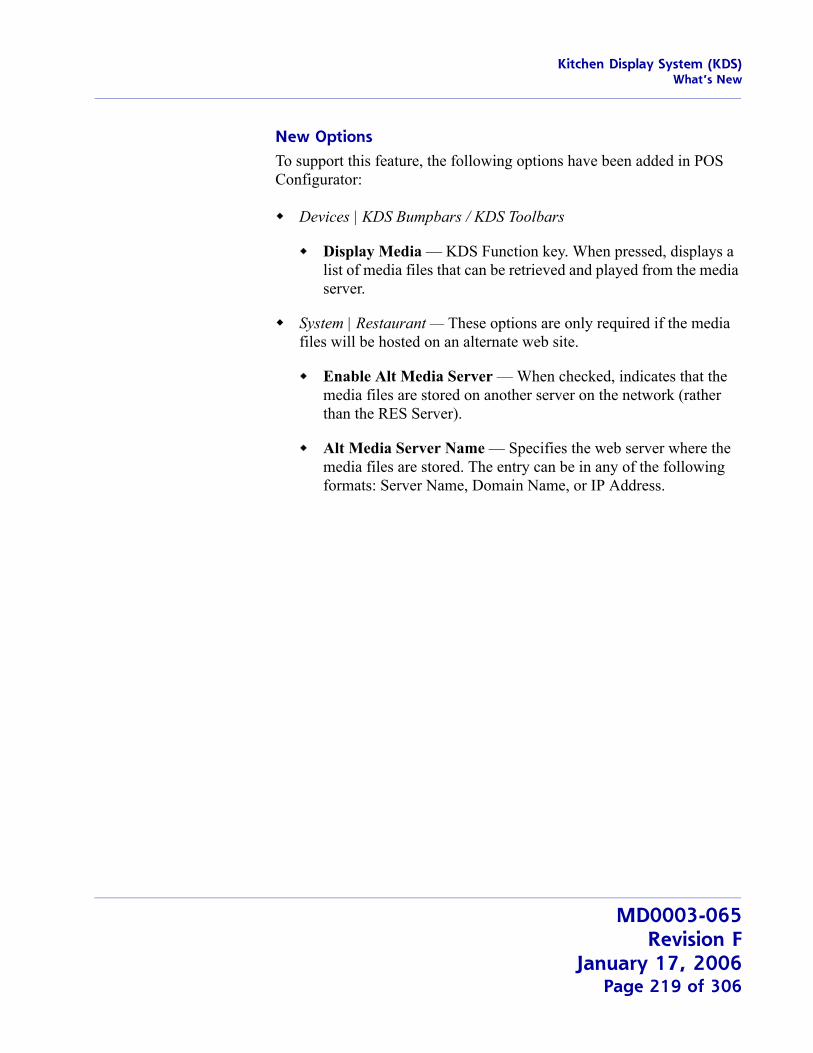
Kitchen Display System (KDS)What’s New
New OptionsTo support this feature, the following options have been added in POS Configurator:
Devices | KDS Bumpbars / KDS Toolbars
Display Media — KDS Function key. When pressed, displays a list of media files that can be retrieved and played from the media server.
System | Restaurant — These options are only required if the media files will be hosted on an alternate web site.
Enable Alt Media Server — When checked, indicates that the media files are stored on another server on the network (rather than the RES Server).
Alt Media Server Name — Specifies the web server where the media files are stored. The entry can be in any of the following formats: Server Name, Domain Name, or IP Address.
MD0003-065Revision F
January 17, 2006Page 219 of 306
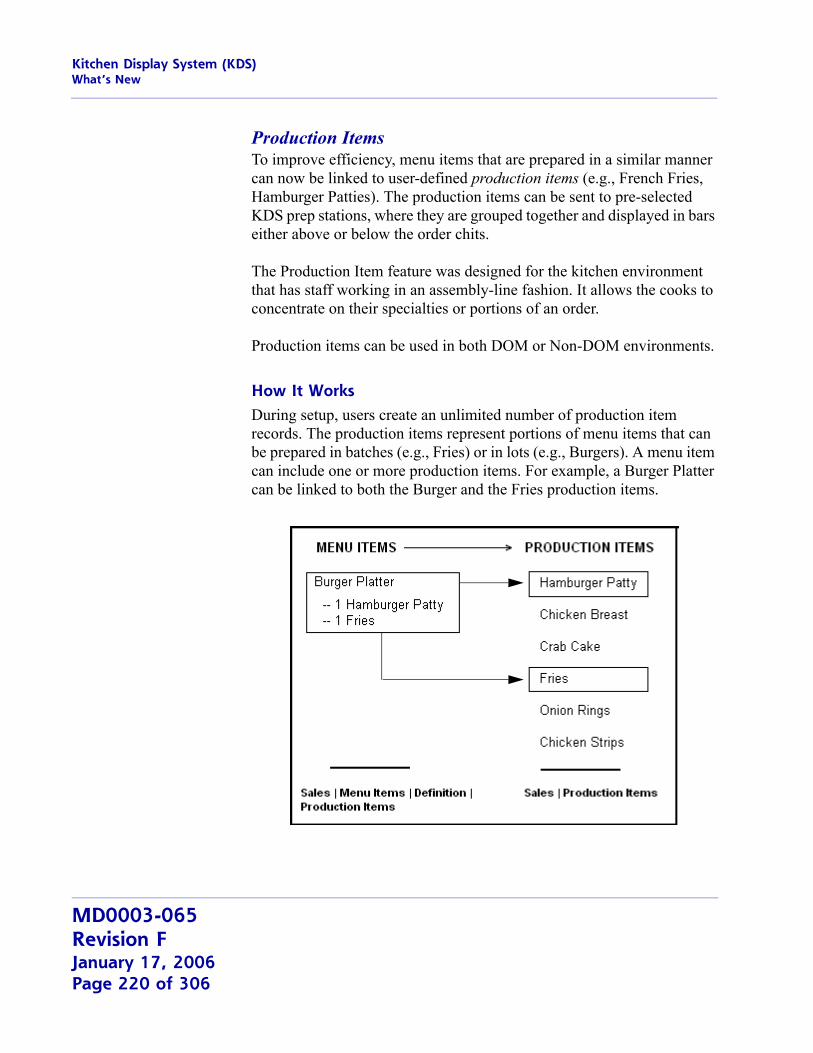
Kitchen Display System (KDS)What’s New
Production ItemsTo improve efficiency, menu items that are prepared in a similar manner can now be linked to user-defined production items (e.g., French Fries, Hamburger Patties). The production items can be sent to pre-selected KDS prep stations, where they are grouped together and displayed in bars either above or below the order chits.
The Production Item feature was designed for the kitchen environment that has staff working in an assembly-line fashion. It allows the cooks to concentrate on their specialties or portions of an order.
Production items can be used in both DOM or Non-DOM environments.
How It WorksDuring setup, users create an unlimited number of production item records. The production items represent portions of menu items that can be prepared in batches (e.g., Fries) or in lots (e.g., Burgers). A menu item can include one or more production items. For example, a Burger Platter can be linked to both the Burger and the Fries production items.
MD0003-065Revision FJanuary 17, 2006Page 220 of 306
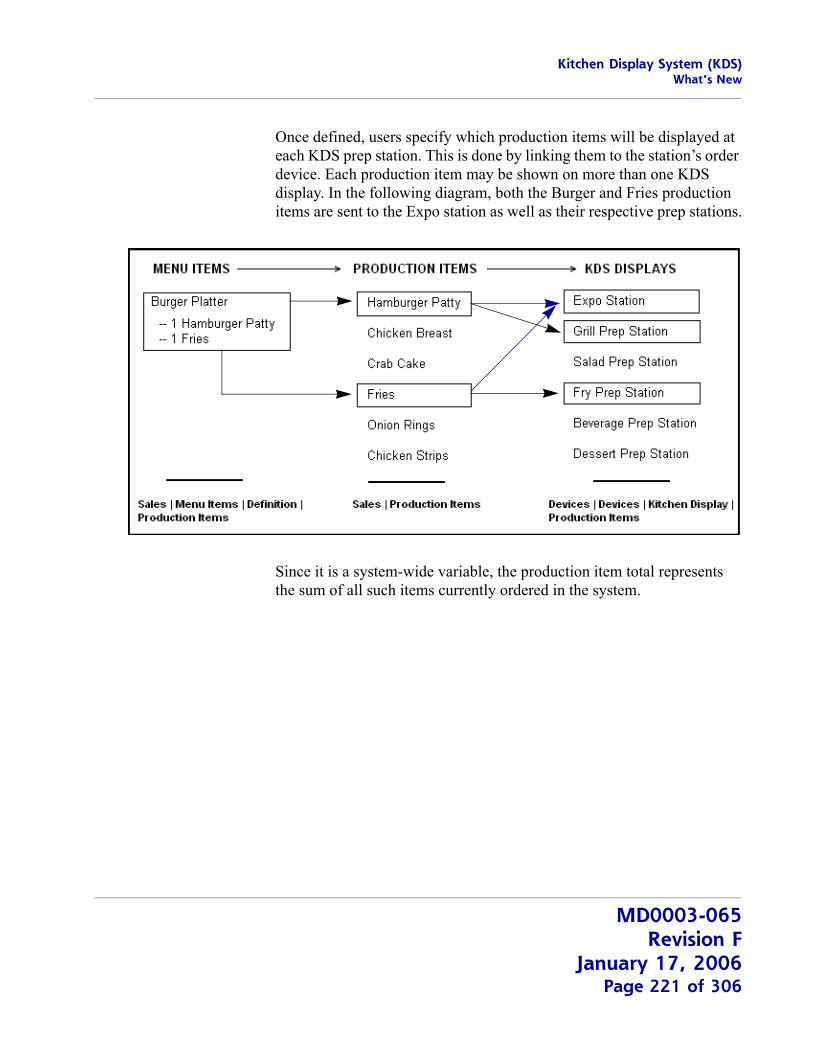
Kitchen Display System (KDS)What’s New
Once defined, users specify which production items will be displayed at each KDS prep station. This is done by linking them to the station’s order device. Each production item may be shown on more than one KDS display. In the following diagram, both the Burger and Fries production items are sent to the Expo station as well as their respective prep stations.
Since it is a system-wide variable, the production item total represents the sum of all such items currently ordered in the system.
MD0003-065Revision F
January 17, 2006Page 221 of 306
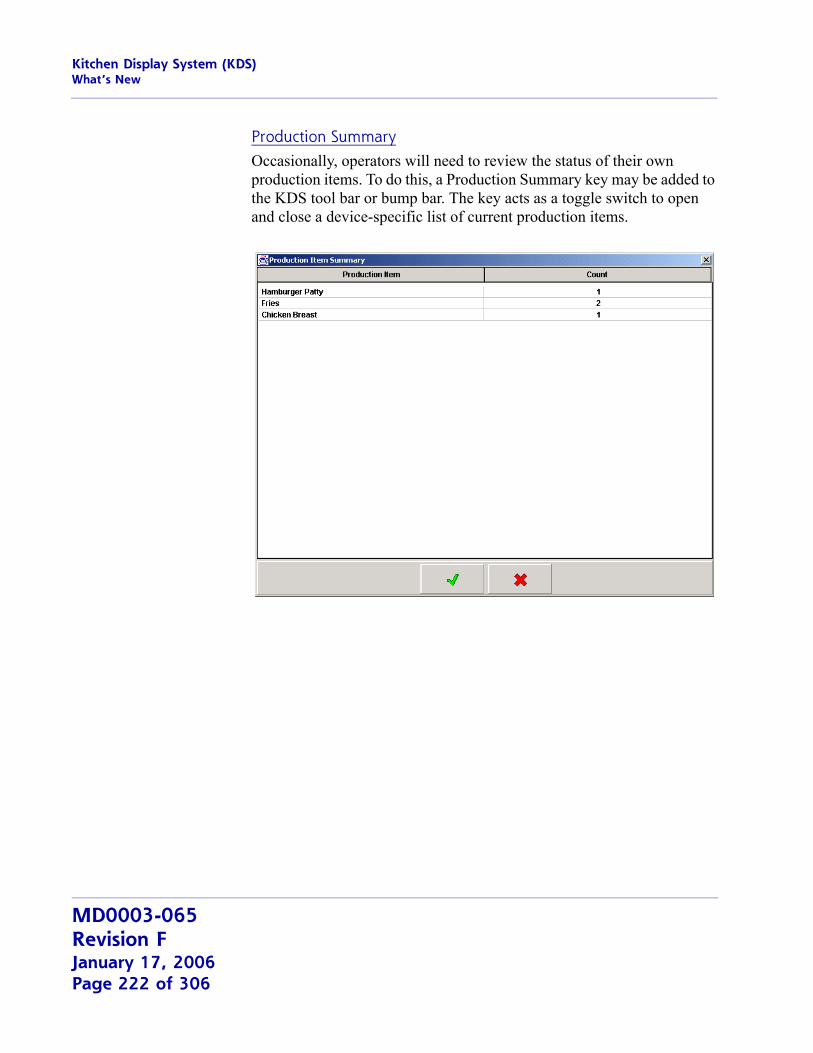
Kitchen Display System (KDS)What’s New
Production SummaryOccasionally, operators will need to review the status of their own production items. To do this, a Production Summary key may be added to the KDS tool bar or bump bar. The key acts as a toggle switch to open and close a device-specific list of current production items.
MD0003-065Revision FJanuary 17, 2006Page 222 of 306
Kitchen Display System (KDS)What’s New
Production BarsOn the KDS device, production items are grouped together in bars that span the width of the screen. As part of setup, users specify whether the bars will display above or below the order chits. To conserve space, up to 5 production items can be shown per Production Bar, with the following guidelines:
If the number of columns configured is less than the number of production items sent, the system will simply start another production bar.
If the number of columns configured is greater than the number of production items sent, the system will fill the bar with the number of columns that it has.
For example, if the device allows up to 5 production items to display per production bar, but only 3 production items are sent to the display, the system will space the three bars to fill out the entire horizontal width of the display. It will not insert blank columns just to fulfill the 5-column maximum.
Similarly, if the defined maximum is 4 production items, and the number sent is 7 production items, the system will display 4 columns in the first line, then the remaining 3 on the second line. The columns on the second line will retain the column widths from the first row, inserting (in this case) a blank 4th column to complete the bar.
Production names may be truncated to allow adequate spacing for the production item counters.
MD0003-065Revision F
January 17, 2006Page 223 of 306

Kitchen Display System (KDS)What’s New
The number of production items per bar is set at the KDS device level.
To differentiate between them, users can set the foreground and background colors for each production item in the KDS display. This is a system-wide option and cannot be changed at the device level.
Production Item CountersThe production items listed on the KDS display include a name and at least one counter to track the number of portions that the prep cook must make. The number of counters depends on whether the production items are tracked individually or relative to other items on the check (i.e., using item prep times).
Single CounterA single counter is used when a simple count of production items is required. All items are started immediately and the count is incremented and decremented when those production items are added or bumped from the screen. This is the method described in Example 1, below. It can be used in both DOM and Non-DOM environments.
Production ItemCounters
MD0003-065Revision FJanuary 17, 2006Page 224 of 306
Kitchen Display System (KDS)What’s New
Example 1The kitchen in the Mike Rose Grill has a designated grill station that is responsible for making hamburgers. The restaurant offers several menu items made with a grilled hamburger patties, including:
#1 Burger Combo (1 patty)
Cheeseburger Deluxe (1 patty)
Burger Platter (1 patty)
Double Burger Platter (2 patties)
All of these menu items are linked to a production item called “Hamburger Patty”. The option Single item per suborder (Devices | Order Devices | KDS | Options) is also enabled.
During lunch, a check is started that includes one of each item. When the order is sent to the kitchen, chits for each menu items appear on the Grill station’s KDS display. At the top of the screen, the Hamburger Patty production item counter is automatically incremented by 5.
The prep cook responds by putting 5 patties on the broiler. When the burgers are finished, the prep cook bumps them from his display and the production count is decremented by 5. At this point, the expediter makes the sandwiches and plates the rest of the orders for the server.
Over/Under CountersWhen item prep times are used, a single counter is no longer sufficient. This is because the production items are no longer tracked as individual events, but as part of a larger order. To ensure that all parts of the order are served at their best, it may be necessary to wait before starting the production item while other parts of the order are prepared. In this case, two counters are required. These are referred to as Under/Over counters. During operations, the Over counter shows how many portions should be started immediately, while the Under counter indicates how many will be needed soon.
This method works best in a non-DOM environment.
MD0003-065Revision F
January 17, 2006Page 225 of 306
Kitchen Display System (KDS)What’s New
Shelf Life. The mechanism for determining when a production item should be started is the item’s shelf life. This is similar to an item prep time, in that it specifies the amount of time needed to prepare the production item before the order is plated.
The difference, in this case, is that the production item is not a separate menu item, per se. It is part of another menu item. In this sense, the shelf life represents a portion of the menu item’s prep time. It is the amount of time needed to prepare the production item before it’s parent item is completed.
Example 2The Mike Rose Bar & Grill offers several menu items that include a single portion of fries, among them are:
Burger Platter — Item Prep Time = 5 minutes
Chicken Sandwich Deluxe — Item Prep Time = 6 minutes
Rib-Eye Special — Item Prep Time = 10 minutes
All of these menu items are linked to a production item called “Fries”, which have a shelf life of 4 minutes. The option Single item per suborder (Devices | Order Devices | KDS | Options) is also enabled.
During dinner, a check is started containing all three of these menu items. When the check is service totaled, the system calculates the target done time (TDT) for the order by looking for the longest item prep time. In this case, the longest prep time is 10 minutes (Rib-Eye Special). This becomes the TDT for the entire order.
When the order is sent to the Fry prep station, the system compares the shelf life of the Fries to the TDT and determines that it is too soon to start cooking. The Over counter is incremented by 3 portions. At the 6-minute mark, the order is 4 minutes from being plated, which means the threshold for preparing the Fries has been reached.
MD0003-065Revision FJanuary 17, 2006Page 226 of 306
Kitchen Display System (KDS)What’s New
The system subtracts 3 Fries from the Over counter and adds them to the Under counter. This is the fry cook’s alert to drop 3 portions of Fries. When finished, the cook bumps the chits, subtracting 3 portions from the Under counter.
Incrementing/Decrementing the CountersIn the preceding examples, production counters were incremented as soon as the check was service totaled, and decremented when the suborder was bumped from the display. Other options are available. These are set at the system level, applying to all KDS devices.
Incrementing Counters — Users have two ways to increase the production item counters on a KDS display:
Sent from POS — The production counters increase as soon as the check is service totaled. If an order contained two or more production items (e.g., Burger Platter = hamburger patty, portion of fries), the chits would display on all prep stations (and could be started) simultaneously.
Fired from Expo — The production counters increase when the check is sent to the KDS. This option is used with the item timing feature, in a non-DOM environment. When applied to checks with two or more menu items, each having it’s own production items, it controls when the production item over/under counters will actually be incremented.
For example, using the item prep times listed in Example 2, you would expect the Rib-Eye Special to be fired as soon as the check is service totaled. Four minutes later, the Chicken Sandwich should be fired, and one minute after that — at the 5-minute mark — the Burger Platter should display.
This is, in fact, what occurs. When the order is sent to the KDS, the chit for the Rib-Eye Special is displayed immediately — along with its portion of Fries. Notice that a separate chit is not provided for the Fries. In this scenario, Fries are simply an attribute of the Rib-Eye Special, more than a condiment, but not exactly a side item.
MD0003-065Revision F
January 17, 2006Page 227 of 306
Kitchen Display System (KDS)What’s New
When the chit is displayed at the KDS stations, the Over counter for Fries production items increments by 1. Four minutes later, the chit for the Chicken Sandwich displays, increasing the Fries Over counter to 2. At the five-minute mark, the chit for the Burger Patter appears. Once again, the Fries Over counter increments, indicating that 3 portions of Fries will be needed soon.
At the 7-minute mark, the Fries need to be started and the count of three Fries is deleted from the Over Counter and added to the Under counter.
Decrementing Counters — There are three methods for decreasing production item counters on a KDS display. For illustration purposes, the following descriptions refer to a single menu item (Burger Platter) with two production items (hamburger patty, fries), displayed on three prep stations (Grill, Fries, Expo):
First Prep is Done — The production counters decrement on all three devices when any of the three prep station bumps the chit from his display. This only affects the production counter -- not the chit itself.
For example, if the fries are finished first, the production counters will be decremented on all stations as soon as the Fry prep cook dones his chit. The chit will continue to display on the Grill and Expo stations until doned at those stations.
If Fries bumped first, the system will.... Grill Fries Expo
Clear Chit No Yes No
Decrement Counter Yes Yes Yes
MD0003-065Revision FJanuary 17, 2006Page 228 of 306
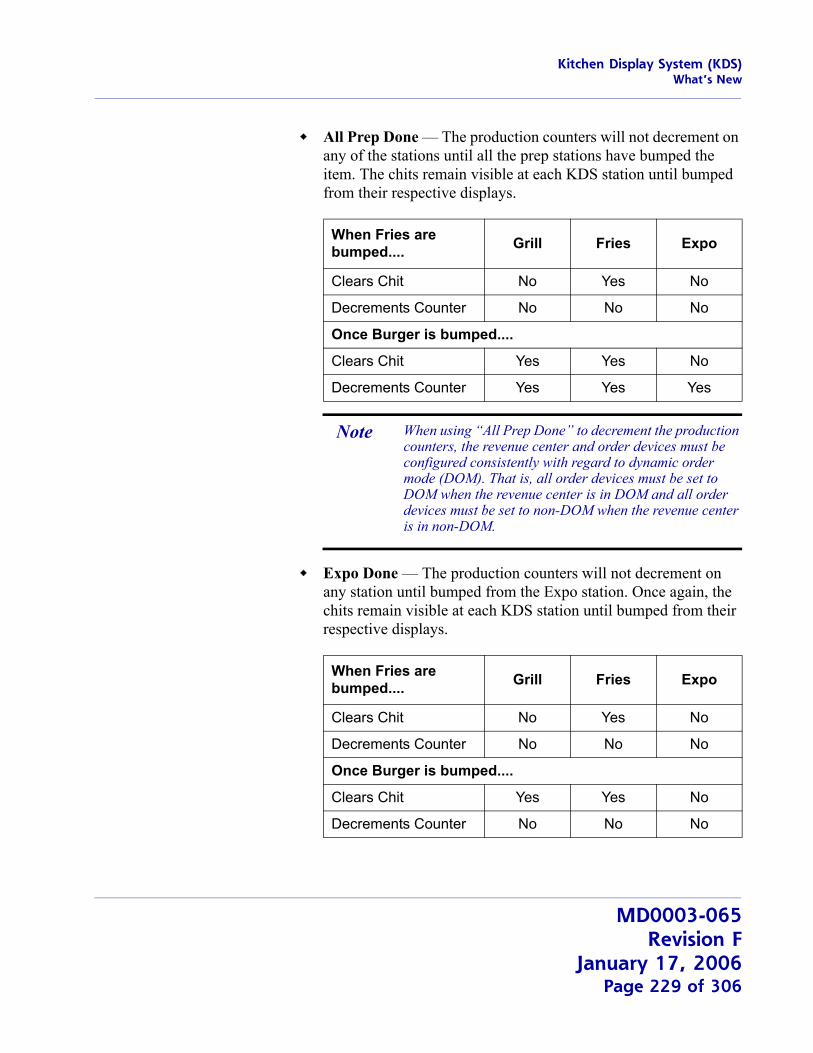
Kitchen Display System (KDS)What’s New
All Prep Done — The production counters will not decrement on any of the stations until all the prep stations have bumped the item. The chits remain visible at each KDS station until bumped from their respective displays.
Expo Done — The production counters will not decrement on any station until bumped from the Expo station. Once again, the chits remain visible at each KDS station until bumped from their respective displays.
When Fries are bumped.... Grill Fries Expo
Clears Chit No Yes No
Decrements Counter No No No
Once Burger is bumped....
Clears Chit Yes Yes No
Decrements Counter Yes Yes Yes
Note When using “All Prep Done” to decrement the production counters, the revenue center and order devices must be configured consistently with regard to dynamic order mode (DOM). That is, all order devices must be set to DOM when the revenue center is in DOM and all order devices must be set to non-DOM when the revenue center is in non-DOM.
When Fries are bumped.... Grill Fries Expo
Clears Chit No Yes No
Decrements Counter No No No
Once Burger is bumped....
Clears Chit Yes Yes No
Decrements Counter No No No
MD0003-065Revision F
January 17, 2006Page 229 of 306
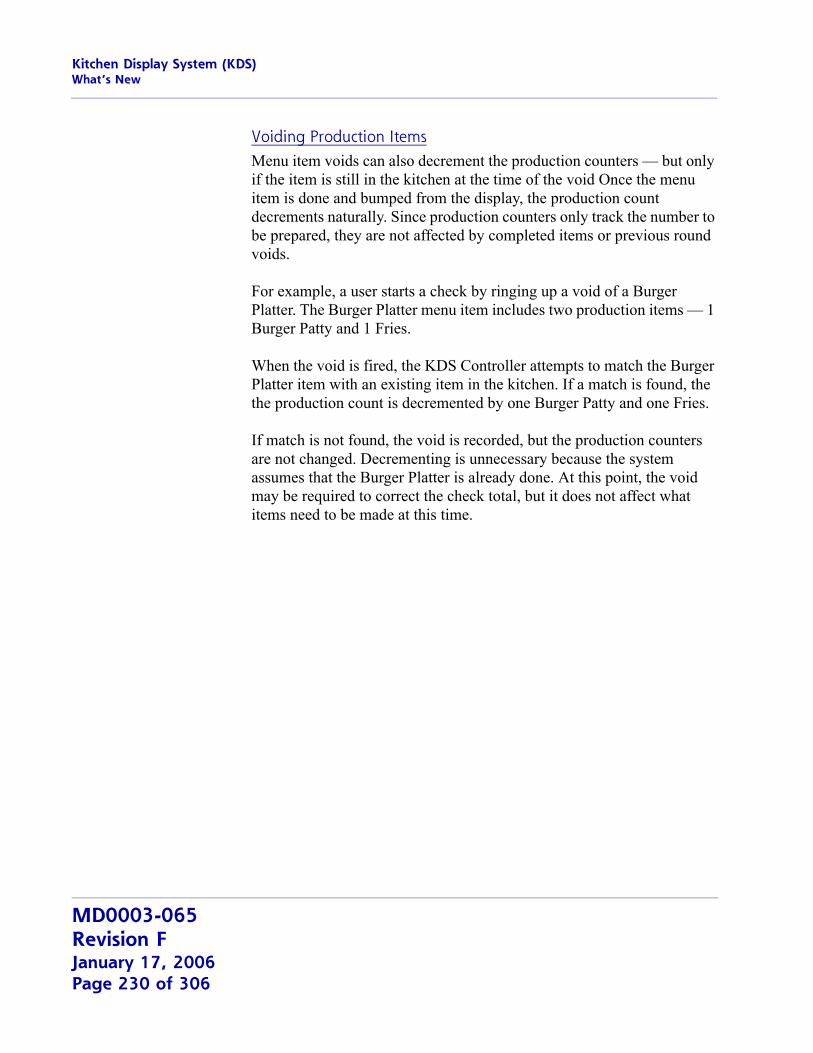
Kitchen Display System (KDS)What’s New
Voiding Production ItemsMenu item voids can also decrement the production counters — but only if the item is still in the kitchen at the time of the void Once the menu item is done and bumped from the display, the production count decrements naturally. Since production counters only track the number to be prepared, they are not affected by completed items or previous round voids.
For example, a user starts a check by ringing up a void of a Burger Platter. The Burger Platter menu item includes two production items — 1 Burger Patty and 1 Fries.
When the void is fired, the KDS Controller attempts to match the Burger Platter item with an existing item in the kitchen. If a match is found, the the production count is decremented by one Burger Patty and one Fries.
If match is not found, the void is recorded, but the production counters are not changed. Decrementing is unnecessary because the system assumes that the Burger Platter is already done. At this point, the void may be required to correct the check total, but it does not affect what items need to be made at this time.
MD0003-065Revision FJanuary 17, 2006Page 230 of 306
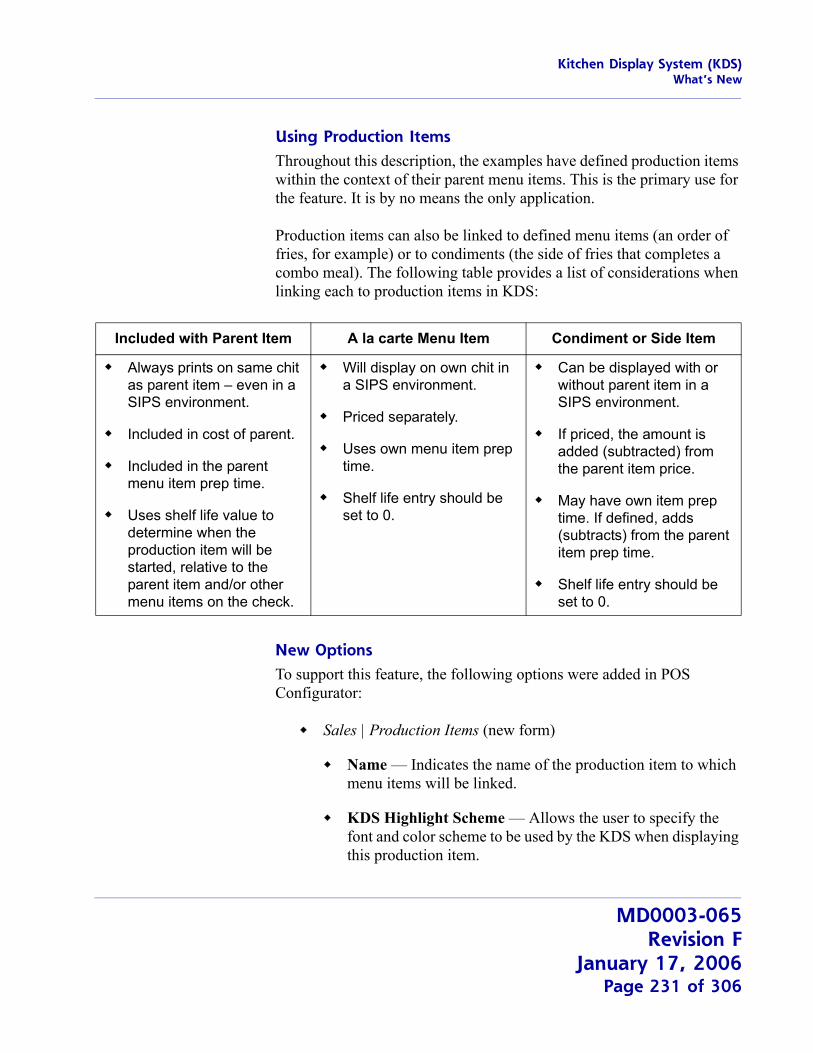
Kitchen Display System (KDS)What’s New
Using Production ItemsThroughout this description, the examples have defined production items within the context of their parent menu items. This is the primary use for the feature. It is by no means the only application.
Production items can also be linked to defined menu items (an order of fries, for example) or to condiments (the side of fries that completes a combo meal). The following table provides a list of considerations when linking each to production items in KDS:
New OptionsTo support this feature, the following options were added in POS Configurator:
Sales | Production Items (new form)
Name — Indicates the name of the production item to which menu items will be linked.
KDS Highlight Scheme — Allows the user to specify the font and color scheme to be used by the KDS when displaying this production item.
Included with Parent Item A la carte Menu Item Condiment or Side Item
Always prints on same chit as parent item – even in a SIPS environment.
Included in cost of parent.
Included in the parent menu item prep time.
Uses shelf life value to determine when the production item will be started, relative to the parent item and/or other menu items on the check.
Will display on own chit in a SIPS environment.
Priced separately.
Uses own menu item prep time.
Shelf life entry should be set to 0.
Can be displayed with or without parent item in a SIPS environment.
If priced, the amount is added (subtracted) from the parent item price.
May have own item prep time. If defined, adds (subtracts) from the parent item prep time.
Shelf life entry should be set to 0.
MD0003-065Revision F
January 17, 2006Page 231 of 306
Kitchen Display System (KDS)What’s New
Shelf Life — Specifies the amount of time needed to prepare this production item portion before the order is plated. This option controls whether one or two counters will be displayed with the production item.
If the value is set to 0, a single counter is displayed. The prep cook starts the item as soon as it is displayed and bumps when finished.
If the value is greater than 0, an Over/Under counter is used. The Over counter indicates how many items should be started immediately, while the Under counter indicates how many will be needed soon. The counts are based on the production item’s shelf life, relative to the longest prep time in the order. As the order times progress, the system uses this shelf life value to determine when to move the items from the Over counter (prepare soon) to the Under counter (prepare now).
Sales | Menu Items | Definition | Production Items (new form)
Name — Links the menu item to a production item.
Count — Specifies how many portions of the production item will be needed to complete the order.
Devices | Devices | Kitchen Display | General
KDS Production Location — Allows the user to specify where the bars will be displayed on the KDS screen. The options are:
Top = Top (above order chits)
Bottom = Bottom (below order chits and above the tool bar, if used)
KDS Production Columns — Specifies the number of production items that will be included per production bar. Up to 5 is allowed.
MD0003-065Revision FJanuary 17, 2006Page 232 of 306
Kitchen Display System (KDS)What’s New
Devices | Devices | Kitchen Display | Production Items (new form)
Name — Identifies the production items that will be tracked on the selected KDS device.
System | Kitchen | Options
Production Count Increment Type — Specifies when an ordered item will be added to the production counter. The options are:
Sent from POS
Fired from Expo (Not Recommended for use in DOM)
Production Count Decrement Type — Specifies when a doned item will be subtracted from the production counter. The options are:
First Prep Done — For menu items that appear on two or more prep stations, decrements the count when the item is bumped from any of the prep stations.
All Prep Done — Decrements the count when all prep stations have bumped the item. To work, the revenue center and all of its order devices must be set to either DOM or non-DOM mode.
Expo Done — Decrements the count when the order is bumped from the expo station.
Devices | KDS Bump Bars / KDS Tool Bars
Production Summary — KDS Function key. When pressed, displays a list (name and count) of all device-specific production items currently in the kitchen.
MD0003-065Revision F
January 17, 2006Page 233 of 306
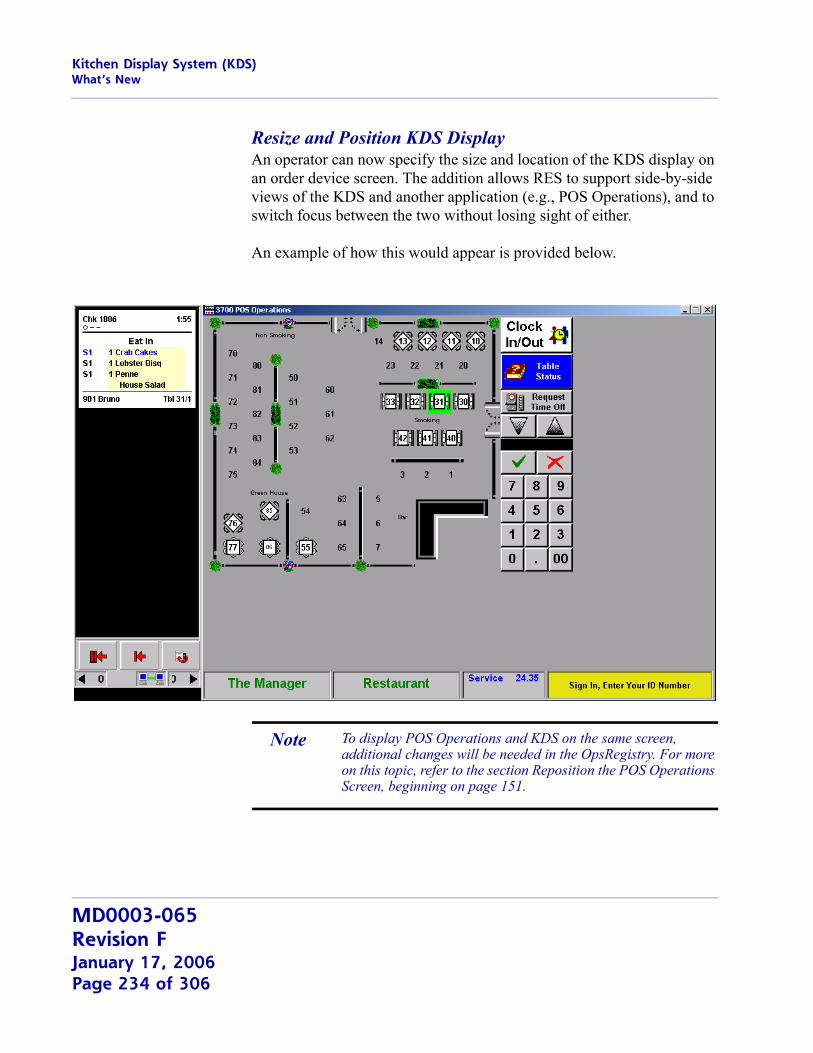
Kitchen Display System (KDS)What’s New
Resize and Position KDS DisplayAn operator can now specify the size and location of the KDS display on an order device screen. The addition allows RES to support side-by-side views of the KDS and another application (e.g., POS Operations), and to switch focus between the two without losing sight of either.
An example of how this would appear is provided below.
Note To display POS Operations and KDS on the same screen, additional changes will be needed in the OpsRegistry. For more on this topic, refer to the section Reposition the POS Operations Screen, beginning on page 151.
MD0003-065Revision FJanuary 17, 2006Page 234 of 306
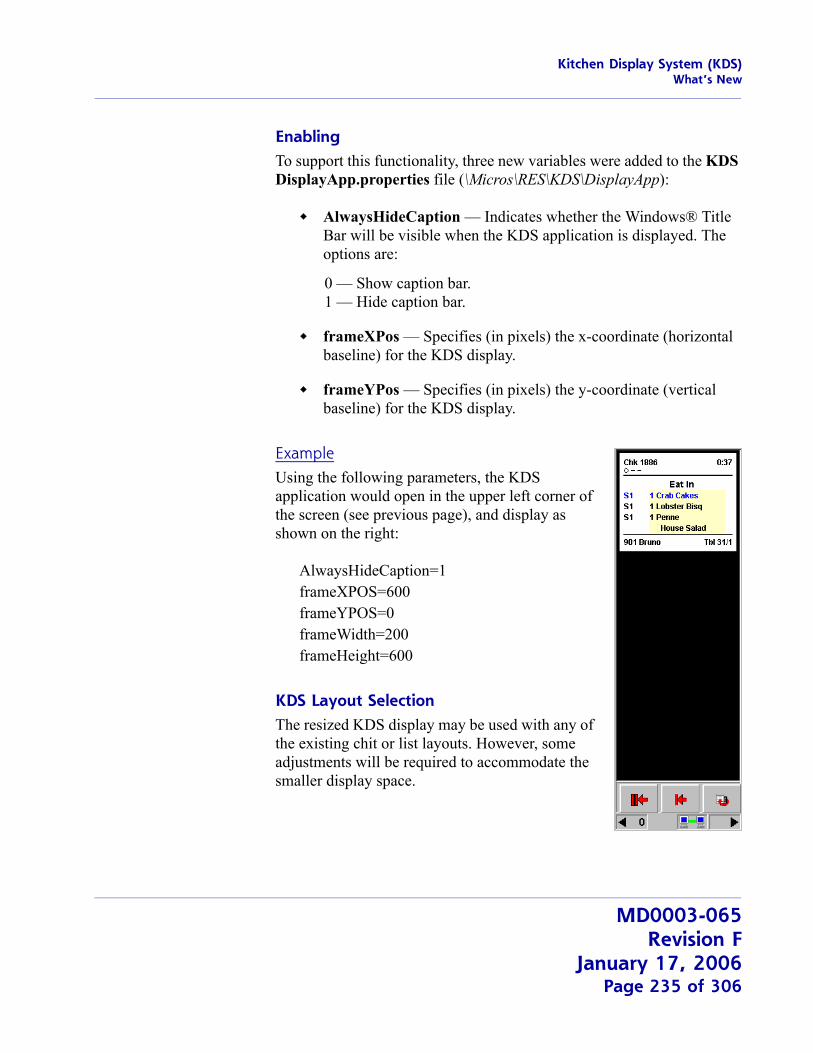
Kitchen Display System (KDS)What’s New
EnablingTo support this functionality, three new variables were added to the KDS DisplayApp.properties file (\Micros\RES\KDS\DisplayApp):
AlwaysHideCaption — Indicates whether the Windows® Title Bar will be visible when the KDS application is displayed. The options are:
0 — Show caption bar.1 — Hide caption bar.
frameXPos — Specifies (in pixels) the x-coordinate (horizontal baseline) for the KDS display.
frameYPos — Specifies (in pixels) the y-coordinate (vertical baseline) for the KDS display.
ExampleUsing the following parameters, the KDS application would open in the upper left corner of the screen (see previous page), and display as shown on the right:
AlwaysHideCaption=1frameXPOS=600frameYPOS=0frameWidth=200frameHeight=600
KDS Layout SelectionThe resized KDS display may be used with any of the existing chit or list layouts. However, some adjustments will be required to accommodate the smaller display space.
MD0003-065Revision F
January 17, 2006Page 235 of 306
Kitchen Display System (KDS)What’s New
In the example provided, the standard chit layout was modified to display a single column of chits (POS Configurator | Devices | Devices | Kitchen Display | General). As always, users may program as many columns as can reasonably fit in the space provided. Keep in mind that the width of the chits will narrow as the number of columns increases.
KDS Tool BarsTool bar buttons will be limited in number by the size of the display. If more buttons are programmed than can be viewed, the system will show only as many as will fit in the available space. The rest will be unavailable to the user.
KDS Status BarWhen the width of the KDS window cannot display all of the status icons, only the counter panels (indicating the number of orders to the left/right of the visible chits) and the status panel will be dynamically added and removed. The remaining panels will be hidden.
In the event that the KDS window cannot support both the counter and status icons, the system will determine which to display based on the following priorities:
If disconnected, the Status icon will always have priority.
If connected, the Counter panels (Right and Left) will have priority.
If connected, and there is insufficient room for both Counters, the Right Counter will have priority.
MD0003-065Revision FJanuary 17, 2006Page 236 of 306
Kitchen Display System (KDS)What’s New
Suppress Dining Course by Order TypeDining Courses were designed for use in table-service restaurants as a way to organize menu items into logical serving groups (e.g., drinks, appetizers, entrées, desserts). To do this, each course is assigned a numerical value which is used to control when the menu items are sent to the kitchen. The feature can be used with or without menu item prep times to ensure that the courses are served serially, and that each course of items is prepared fresh and served as soon as it is completed.
While this feature works well if the customer is dining in the restaurant, it is problematic for other order types. Customers that place Delivery, Carry Out, or To Go orders do not intend to eat their meals in-house, but want the entire order prepared and ready to go at the same time.
To accommodate this requirement, the option Suppress Dining Course (System | Order Types) has been added. When checked, this option overrides Display next course after previous course done (System | Kitchen | Options) and sends all menu items (from all of the courses) to the kitchen at the same time.
Since all items are treated as Course 1, KDS displays them in the color assigned to Course 1 Items (System | Kitchen | Colors | Layout Colors Override). By default, this color is blue.
Similarly, if menu item prep times are used, the system will course ignore times and fire each item at the appropriate interval to ensure that everything is prepared and ready to go at the same time.
MD0003-065Revision F
January 17, 2006Page 237 of 306
Kitchen Display System (KDS)What’s New
KDS Layouts
List Layouts with Row NumbersThe ability to select an order by row number has been added to KDS, which allows for one-touch order number bumping. New KDS List Mode layouts have been added that include row numbers for each list order displayed. Row (or queue) numbers are based on where an order is on the KDS monitor. These numbers will change as orders are added or bumped from the display, or as the user pages up/down through a list of checks. The row numbers make it easier to identify and bump orders using preprogrammed touch keys.
New List LayoutsTo support this feature, five new Display Layouts (Devices | Devices | Kitchen Display) were added for KDS:
400 — List Standard with Row Number
401 — List Standard with Order Type and Row Number
402 — List Standard with Check Number, Order Type, and Row Number
403 — List Standard with Order Type, Zone Identifier, and Row Number
404 — Dynamic Order Mode with Row Number
The new layouts are identical to current layouts of a similar name, except that a column has been included for the row identifier.
MD0003-065Revision FJanuary 17, 2006Page 238 of 306
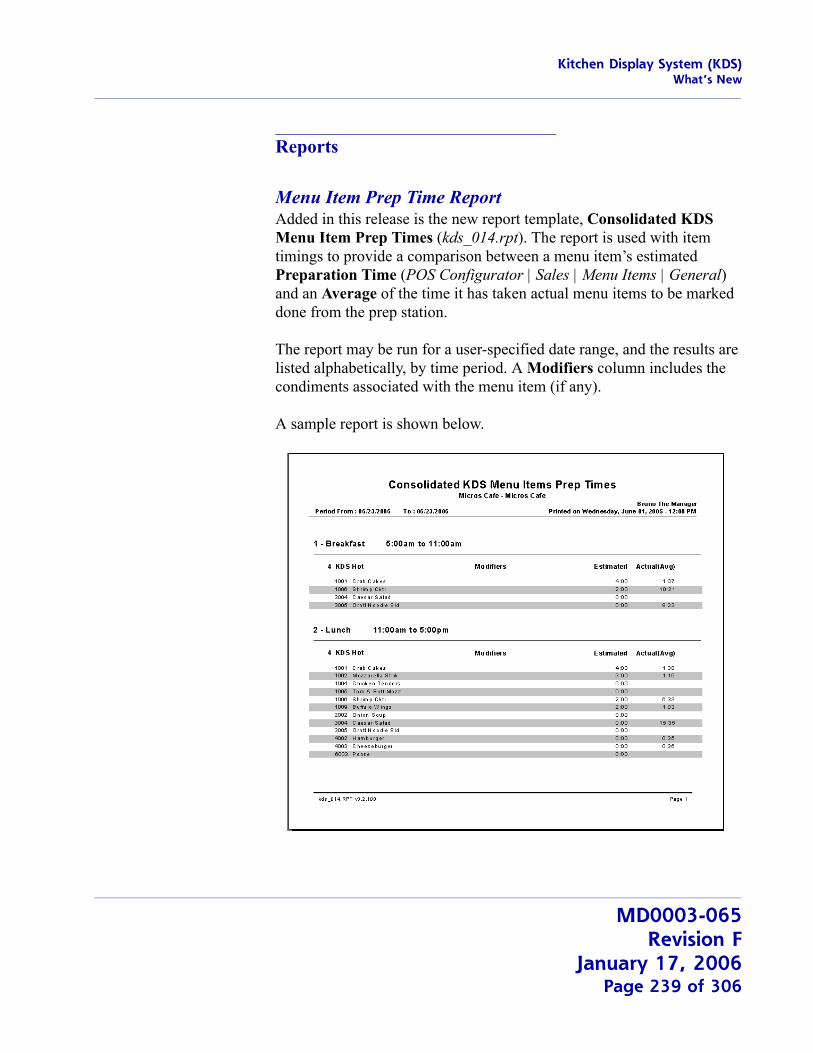
Kitchen Display System (KDS)What’s New
Reports
Menu Item Prep Time ReportAdded in this release is the new report template, Consolidated KDS Menu Item Prep Times (kds_014.rpt). The report is used with item timings to provide a comparison between a menu item’s estimated Preparation Time (POS Configurator | Sales | Menu Items | General) and an Average of the time it has taken actual menu items to be marked done from the prep station.
The report may be run for a user-specified date range, and the results are listed alphabetically, by time period. A Modifiers column includes the condiments associated with the menu item (if any).
A sample report is shown below.
MD0003-065Revision F
January 17, 2006Page 239 of 306
Kitchen Display System (KDS)What’s New
RVC/System Inside Speed of Service ReportsFour new KDS speed-of-service report templates have been added in this release. These reports were designed for use in quick-service restaurants as an alternative to existing reports. Specifically, these reports provide an alternate view of employee response times based on the following intervals:
Menu Time — Tracks the order from the time it is started (i.e., the first menu item is posted) until the check is totaled. (In other KDS reports, this is referred to as Order Time).
Queue Time — Tracks the order from final service total until final tender.
Tender Time — Tracks the amount of time that the register is open This is measured from final tender, when the drawer is first opened until the drawer is closed.
NOTE: If the user is filtering seats on a check and tendering to cash, only the final cash drawer open and close will be recorded. Interim opening and closing of the drawer are not included in the total time.
Counter Time — Tracks the order time from the moment the cash drawer is closed until it is bumped from a KDS expo station.
NOTE: A negative time will be posted if the order is bumped from the expo before the cash drawer is closed.
Configuration
Except for the new report templates, all programming for these reports has been handled internally. However, to support data collection, the following option must be enabled:
Require Cash Drawer Closure (Devices | User Workstations | Cashier)
MD0003-065Revision FJanuary 17, 2006Page 240 of 306
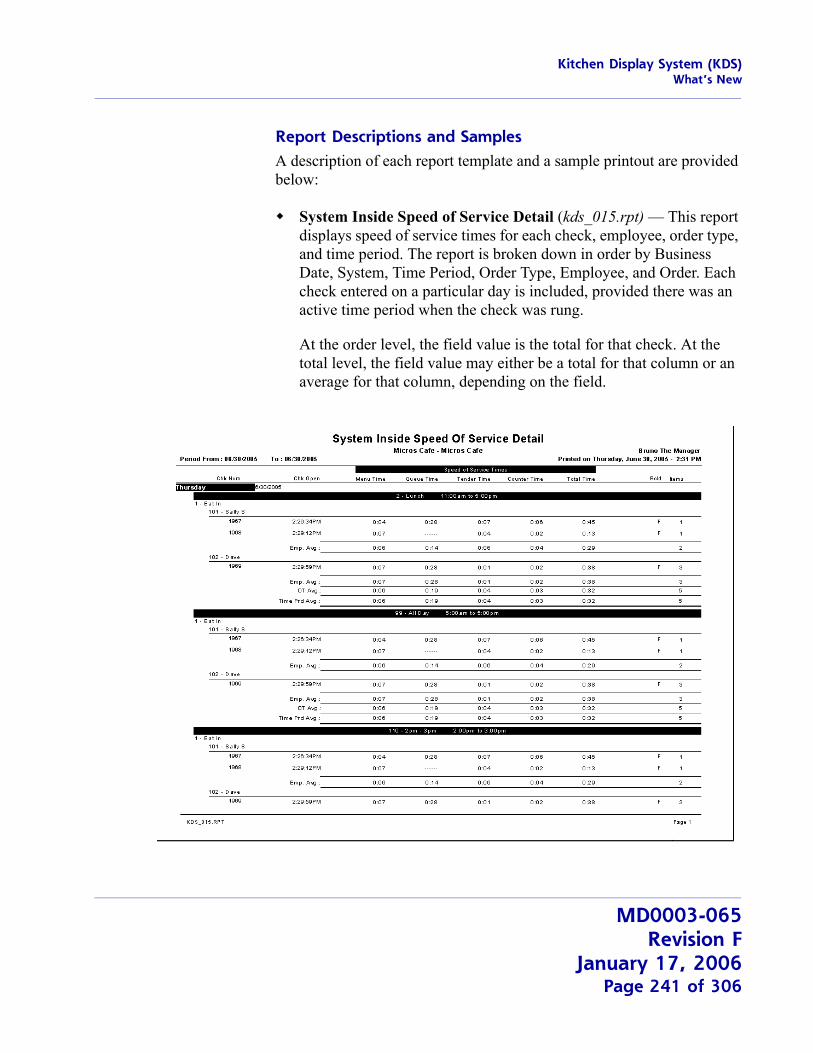
Kitchen Display System (KDS)What’s New
Report Descriptions and SamplesA description of each report template and a sample printout are provided below:
System Inside Speed of Service Detail (kds_015.rpt) — This report displays speed of service times for each check, employee, order type, and time period. The report is broken down in order by Business Date, System, Time Period, Order Type, Employee, and Order. Each check entered on a particular day is included, provided there was an active time period when the check was rung.
At the order level, the field value is the total for that check. At the total level, the field value may either be a total for that column or an average for that column, depending on the field.
MD0003-065Revision F
January 17, 2006Page 241 of 306
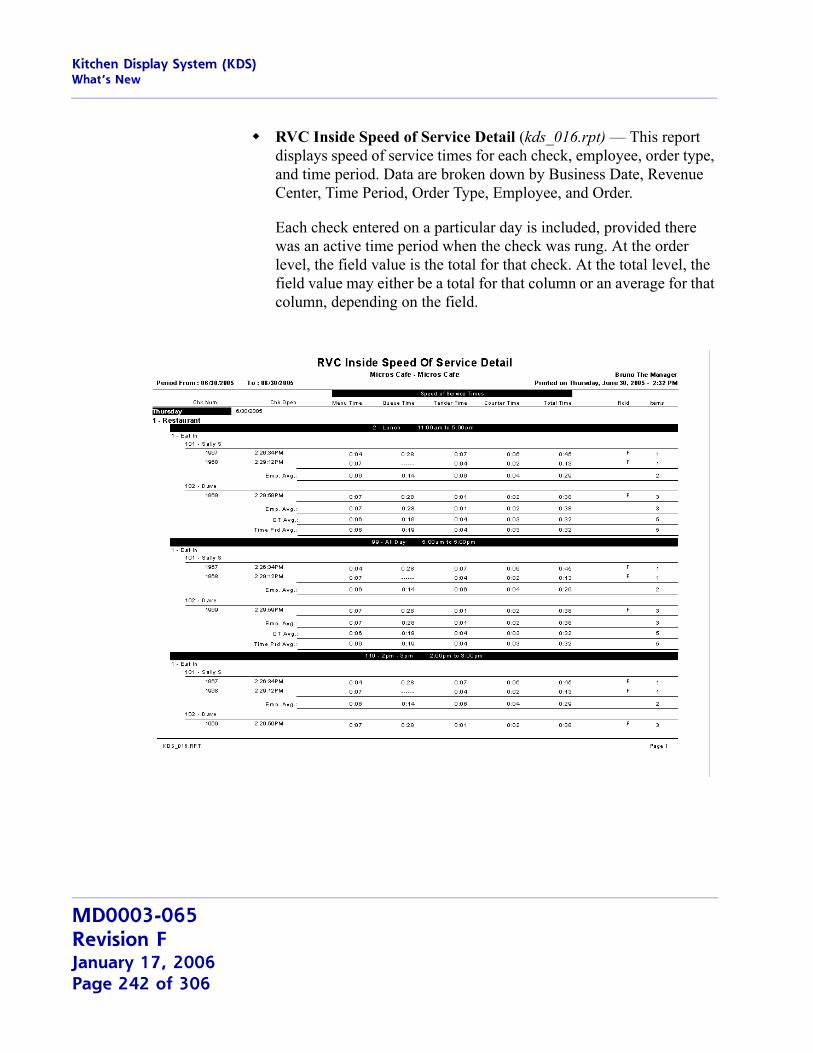
Kitchen Display System (KDS)What’s New
RVC Inside Speed of Service Detail (kds_016.rpt) — This report displays speed of service times for each check, employee, order type, and time period. Data are broken down by Business Date, Revenue Center, Time Period, Order Type, Employee, and Order.
Each check entered on a particular day is included, provided there was an active time period when the check was rung. At the order level, the field value is the total for that check. At the total level, the field value may either be a total for that column or an average for that column, depending on the field.
MD0003-065Revision FJanuary 17, 2006Page 242 of 306
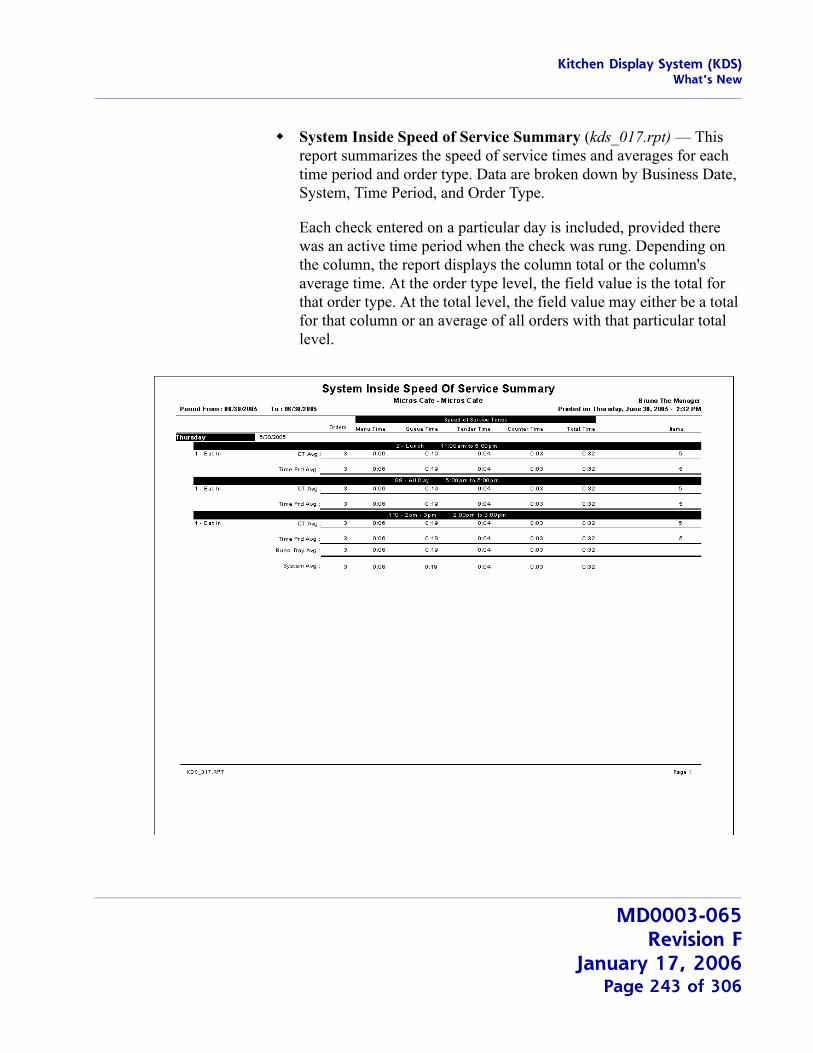
Kitchen Display System (KDS)What’s New
System Inside Speed of Service Summary (kds_017.rpt) — This report summarizes the speed of service times and averages for each time period and order type. Data are broken down by Business Date, System, Time Period, and Order Type.
Each check entered on a particular day is included, provided there was an active time period when the check was rung. Depending on the column, the report displays the column total or the column's average time. At the order type level, the field value is the total for that order type. At the total level, the field value may either be a total for that column or an average of all orders with that particular total level.
MD0003-065Revision F
January 17, 2006Page 243 of 306

Kitchen Display System (KDS)What’s New
RVC Inside Speed of Service Summary (kds_018.rpt) — This report summarizes the speed of service times and averages for each time period and order type. Data are broken down in order by Business Date, Revenue Center, Time Period, and Order Type.
Each check entered on a particular day is included, provided there was an active time period when the check was rung. Depending on the column, the report displays the column total or the column’s average time. At the order type level, the field value is the total for that order type. At the total level, the field value may either be a total for that column or an average of all orders with that particular total level.
MD0003-065Revision FJanuary 17, 2006Page 244 of 306

Kitchen Display System (KDS)What’s Enhanced
What’s Enhanced An enhancement is defined as a change made to improve or extend the functionality of the current KDS application. To qualify as an enhancement, the change must satisfy the following criteria:
The basic feature or functionality already exists in the previous release of the software.
The change adds to or extends the current process. This differs from a revision (i.e., a bug fix) which corrects a problem not caught in the previous release of the software.
Enhancements Summarized
The table below summarizes the enhancements included in this version.
Module Feature Page
Display Application
Change Font Size 246
KDS Consolidation Code Changes 247
Item Started Affects Prep Times 248
Item Status Color 251
Order Selection Color 253
Order Selection Keys 255
Perpetual Selection 256
Support Shared Items on KDS Display 256
Support Time Synchronization on DC Clients
257
MD0003-065Revision F
January 17, 2006Page 245 of 306
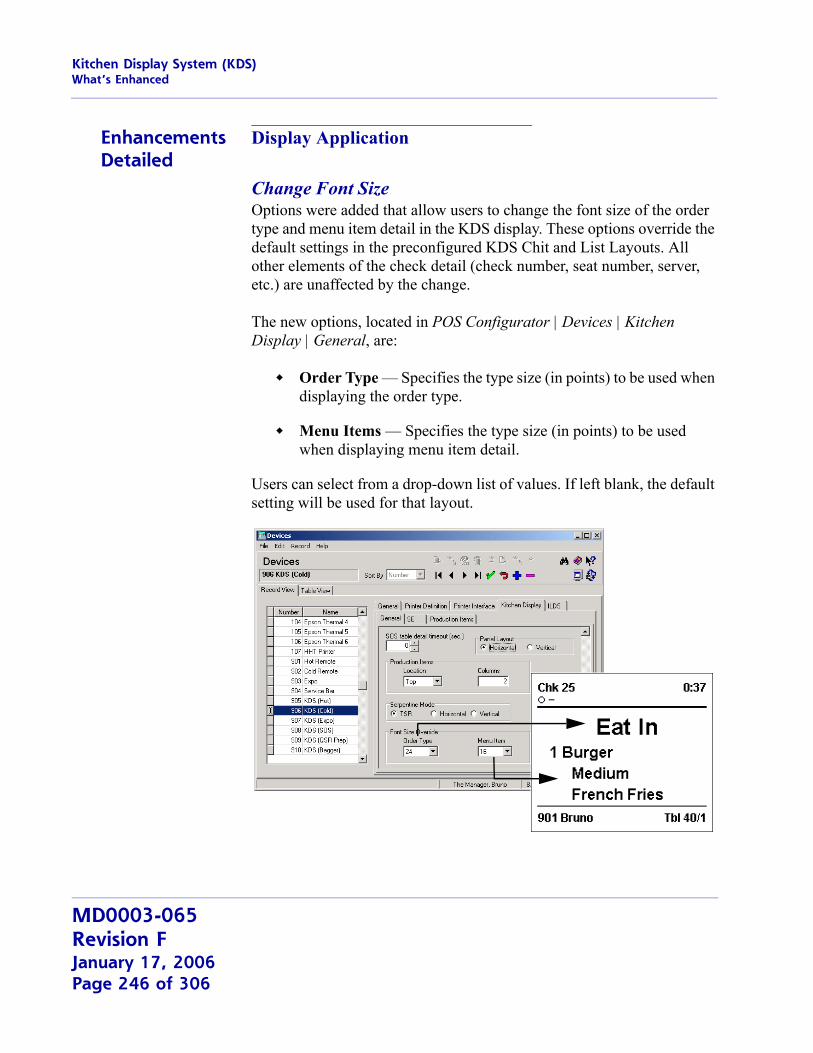
Kitchen Display System (KDS)What’s Enhanced
Enhancements Detailed
Display Application
Change Font SizeOptions were added that allow users to change the font size of the order type and menu item detail in the KDS display. These options override the default settings in the preconfigured KDS Chit and List Layouts. All other elements of the check detail (check number, seat number, server, etc.) are unaffected by the change.
The new options, located in POS Configurator | Devices | Kitchen Display | General, are:
Order Type — Specifies the type size (in points) to be used when displaying the order type.
Menu Items — Specifies the type size (in points) to be used when displaying menu item detail.
Users can select from a drop-down list of values. If left blank, the default setting will be used for that layout.
MD0003-065Revision FJanuary 17, 2006Page 246 of 306
Kitchen Display System (KDS)What’s Enhanced
KDS Consolidation Code ChangesIn an effort to standardize the consolidation feature throughout RES, the KDS Controller now has complete responsibility for handling KDS consolidation. In the past, this was shared between the POS and KDS modules.
Operationally, the modifications are internal and should be transparent to the end user. During the upgrade process, the system will review the existing configuration and reset options (if necessary) to maintain traditional KDS functionality. Consequently:
If the options Do not consolidate and Enable KDS Consolidation were both disabled in the previous version, the upgrade will automatically check the Enable KDS Consolidation and Unconsolidate After Condiment options.
If the options Do not consolidate and Enable KDS Consolidation were both enabled in the previous version, the upgrade will automatically clear the Enable KDS Consolidation option.
Configuration ChangesAs part of this process, the following KDS-related option has been moved:
Devices | Order Devices | Options | Sorting/Formatting
Do not consolidate — Moved to Devices | Order Devices | KDS | Options tab.
REMINDER: KDS consolidation only works if the Enable KDS Consolidation option (Devices | Order Devices | KDS | Options) is enabled.
(For more on the POS changes, refer to Check Detail Consolidation, beginning on page 167.)
MD0003-065Revision F
January 17, 2006Page 247 of 306
Kitchen Display System (KDS)What’s Enhanced
Item Started Affects Prep TimesItem start times can be adjusted based on when the menu item with the longest prep time is started, not when it was fired from the POS. With this feature, KDS can manage the orders that are sent to the kitchen based on when the cook starts the first item on the order versus when the POS sent the order. This allows the kitchen to maintain efficiency even when extremely busy..
This feature only affects item timings for menu items in the same course. It does not affect the Coursing feature, which is unchanged.
BackgroundThe Item Timings feature was designed to ensure that all items in an order were prepared and ready to go at the same time. To do this, a preparation time was assigned to each menu item. When an order was rung up, the system would automatically calculate the target done time (TDT)
TDT = Fire Time + Longest Item Prep Time
Item prep times were then used to determine when each order item should be fired so that all items would be completed at the same TDT. This is the traditional implementation of item timings.
The problem with this method is that it assumes items fired to the kitchen will be started immediately. This is not always possible. In a busy kitchen, a temporary equipment problem (for example) could cause newly sent items to wait while previous orders are completed. In the meantime, the KDS Controller — having no way to compensate for the situation — continues to process orders as scheduled, firing the next items at their designated intervals.
Over time, entire orders will end up in the kitchen, with some items ready and waiting while the rest of the order catches up. Inevitably, multiple items will reach alert status, increasing confusion over which items to prepare first. This not only defeats the purpose of item timings, but distorts totals posted in the Kitchen Performance Reports. To get back on track, the system needed a way to compensate for temporary backlogs.
MD0003-065Revision FJanuary 17, 2006Page 248 of 306
Kitchen Display System (KDS)What’s Enhanced
Using the Item Start FunctionThe Item Start function (added in RES 3.2 sp3) was designed to address the gap between when an item was fired to the kitchen and when it was actually started. To use the feature, an [Order Started] function key is added to the KDS bump bar or tool bar display and pressed when the item is physically started. This starts a separate timer which allows the system to track the actual time spent preparing the menu item.
For purposes of this release, a new option Enable Item Started Timings (System | Kitchen/KDS | Options) was added. When enabled, the option allows the system to compensate for delays by using the Item Start function in the calculation of timed orders.
The option does not affect how orders are originally processed. That is, when sent to the kitchen, the system will still determine the TDT based on the original formula. The longest prep time item will be fired immediately and the rest of the items will be scheduled accordingly.
Once the longest item prep time is started, the TDT will be recalculated as follows:
TDT = Start Time + Longest Item Prep Time
Fire times for all items will be immediately adjusted to ensure that all items are finished at the same time.
Production ItemsThis option also affects the over/under counter for production items. When an item with the longest prep time is started, the TDT changes and the fire times for the menu items are updated. This includes the point at which the count is moved from the Over counter to the Under counter on the KDS display.
Note The system only performs a recalculation when the item with the longest prep time is started. Starting other menu items from the same order will not affect the TDT.
MD0003-065Revision F
January 17, 2006Page 249 of 306
Kitchen Display System (KDS)What’s Enhanced
Handling VoidsDuring operations, each course of items is handled separately, subject to its own TDT calculations. Before a course is fired, the system identifies its longest prep time item, and determines when to fire each menu item based on the TDT for that course.
If an item is voided from a course before the previous course is bumped, the KDS Controller will (correctly) prevent the voided item from being included when the course is sent to the KDS prep station. This has no effect on the TDT or the fire times for the rest of the menu items — with one exception.
If the item voided is the one with the longest prep time, the system will not automatically recalculate the TDT based on the next longest item prep time. Instead, the KDS Controller will ignore item timings for that course. When the maximum prep time for the course is reached, all of the remaining items will be fired together.
Enabling the FeatureTo use this feature, the system must be in non-DOM mode and using the Item Timings feature. In addition, the following options should be enabled:
Enable Item Started Timings (System | Kitchen/KDS | Options)
Single Item Per Suborder (Devices | Order Devices | KDS | Options)
Order Started function key (Devices | KDS Toolbars or KDS Bumpbars)
MD0003-065Revision FJanuary 17, 2006Page 250 of 306
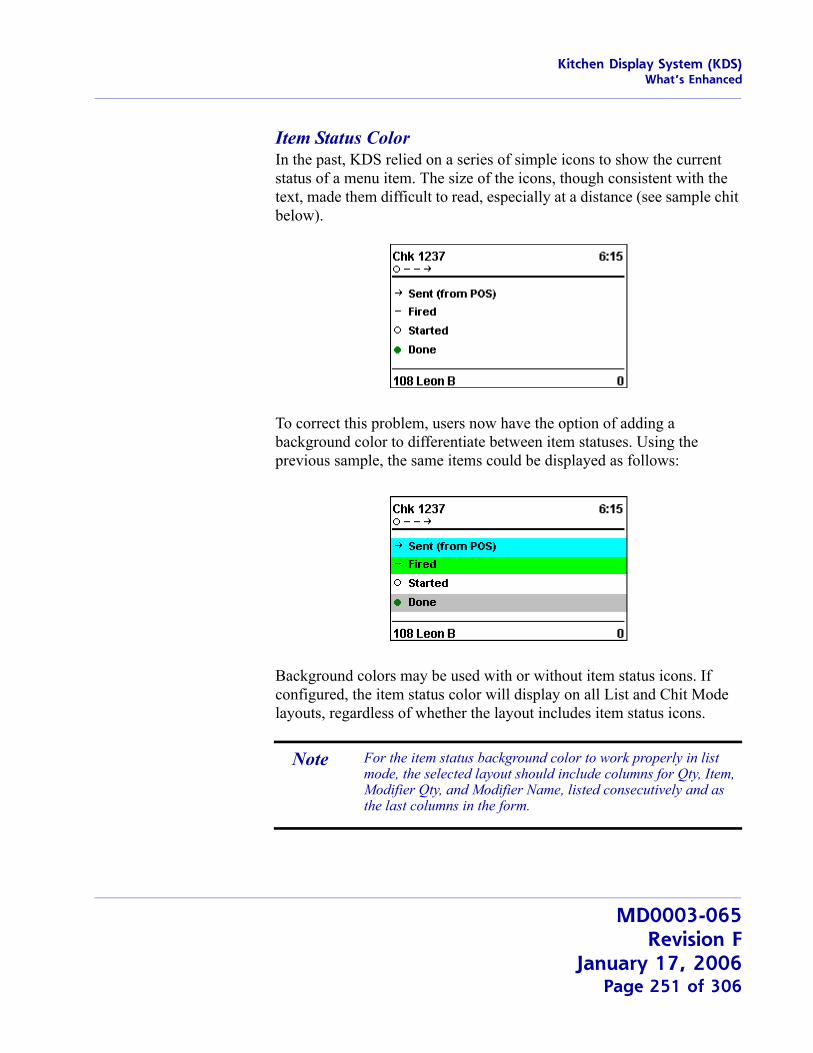
Kitchen Display System (KDS)What’s Enhanced
Item Status ColorIn the past, KDS relied on a series of simple icons to show the current status of a menu item. The size of the icons, though consistent with the text, made them difficult to read, especially at a distance (see sample chit below).
To correct this problem, users now have the option of adding a background color to differentiate between item statuses. Using the previous sample, the same items could be displayed as follows:
Background colors may be used with or without item status icons. If configured, the item status color will display on all List and Chit Mode layouts, regardless of whether the layout includes item status icons.
Note For the item status background color to work properly in list mode, the selected layout should include columns for Qty, Item, Modifier Qty, and Modifier Name, listed consecutively and as the last columns in the form.
MD0003-065Revision F
January 17, 2006Page 251 of 306
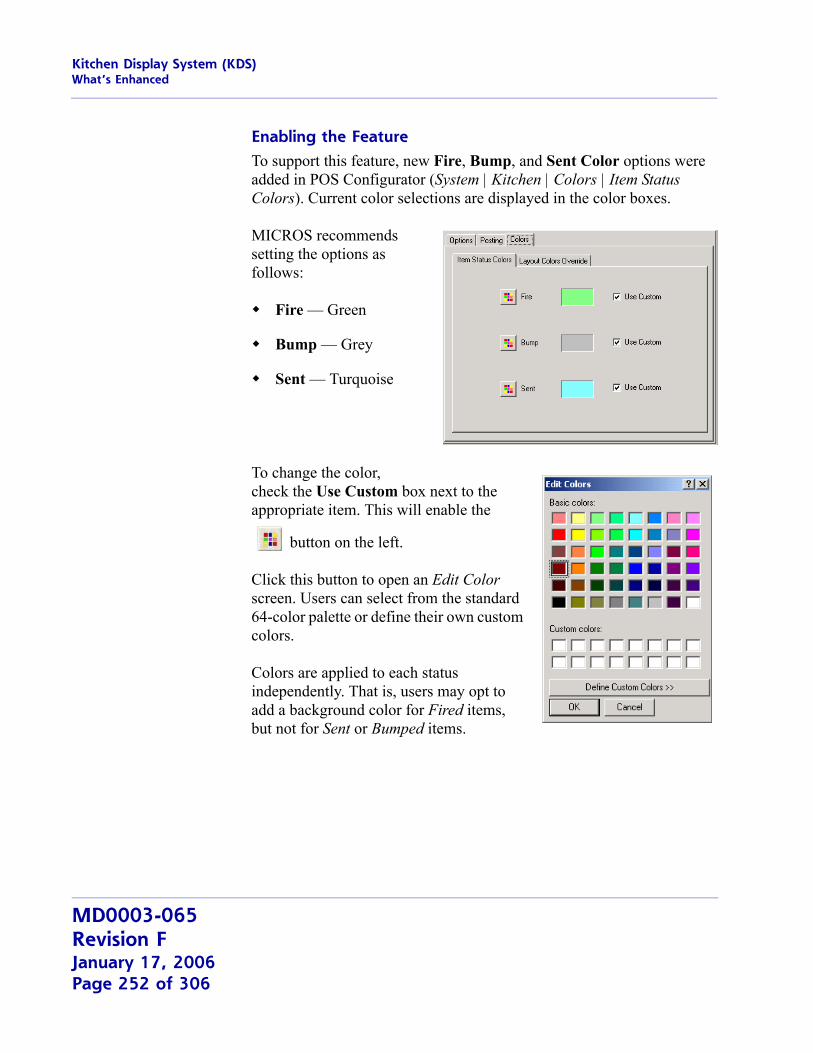
Kitchen Display System (KDS)What’s Enhanced
Enabling the FeatureTo support this feature, new Fire, Bump, and Sent Color options were added in POS Configurator (System | Kitchen | Colors | Item Status Colors). Current color selections are displayed in the color boxes.
MICROS recommends setting the options as follows:
Fire — Green
Bump — Grey
Sent — Turquoise
To change the color, check the Use Custom box next to the appropriate item. This will enable the
button on the left.
Click this button to open an Edit Color screen. Users can select from the standard 64-color palette or define their own custom colors.
Colors are applied to each status independently. That is, users may opt to add a background color for Fired items, but not for Sent or Bumped items.
MD0003-065Revision FJanuary 17, 2006Page 252 of 306
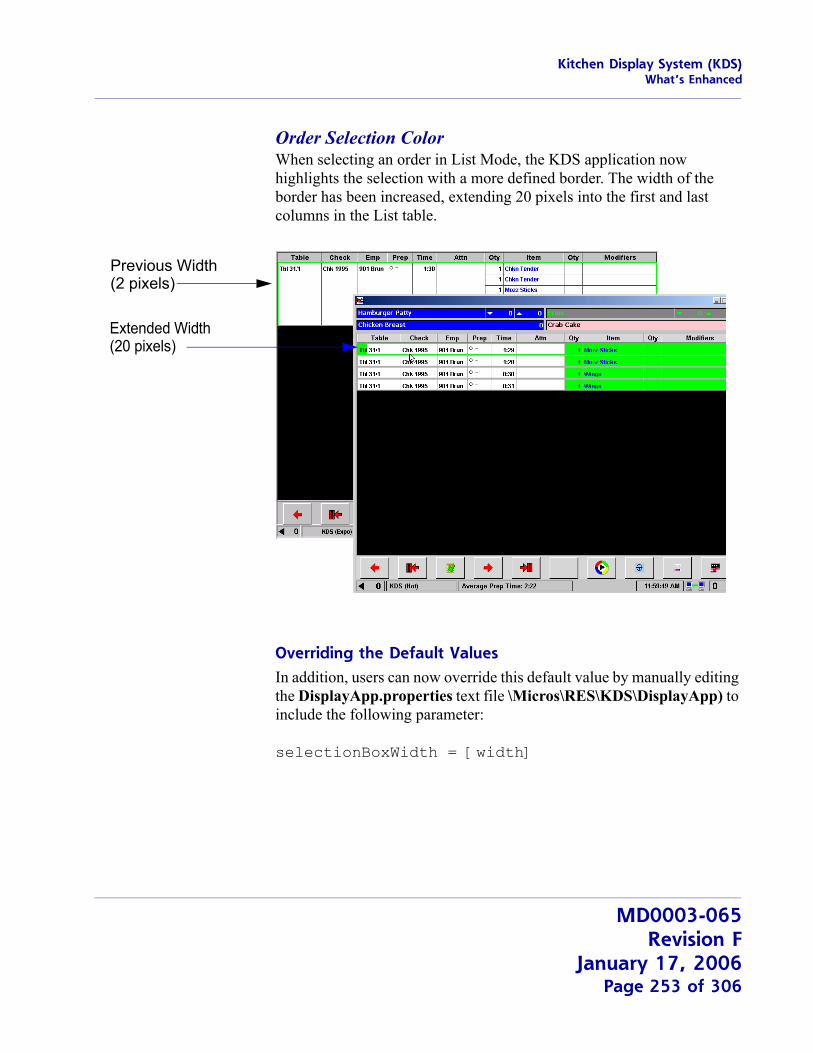
Kitchen Display System (KDS)What’s Enhanced
Order Selection ColorWhen selecting an order in List Mode, the KDS application now highlights the selection with a more defined border. The width of the border has been increased, extending 20 pixels into the first and last columns in the List table.
Overriding the Default Values
In addition, users can now override this default value by manually editing the DisplayApp.properties text file \Micros\RES\KDS\DisplayApp) to include the following parameter:
selectionBoxWidth = [width]
Previous Width(2 pixels)
Extended Width(20 pixels)
MD0003-065Revision F
January 17, 2006Page 253 of 306
Kitchen Display System (KDS)What’s Enhanced
where [width] equals the number of color pixels used to highlight the selected order item.
Users can assign a value up to the width of the first or last column (whichever is smaller). If a larger value is entered, the system will override the entry, using the smaller column width.
For example, a standard list layout may have a first column width of 90 pixels and a last column width of 120 pixels. If the user adds a selection width of 100 to the DisplayApp.properties file, the actual border width will be 90 pixels — or the smallest of the three defined variables (border width, first and last column width).
Choosing the Highlight ColorBesides changing the width, users can now specify the border color that will be used for item selections. To do this, a new Order Selection option was added in POS Configurator (System | Kitchen | Colors | Layout Override Colors). Users can change the configuration by choosing from a drop-down list of pre-defined colors.
Note These highlights only affect the left and right sides of the border. Top and bottom highlights remain a slender 2 pixels.
MD0003-065Revision FJanuary 17, 2006Page 254 of 306
Kitchen Display System (KDS)What’s Enhanced
Order Selection KeysFour new Order Selection keys have been added for the KDS display. These function keys reduce the number of keystrokes required to select, start, and/or done the current order, before moving to the next started or unstarted order in the display.
Enabling the FunctionTo support this feature, the following choices were added to the KDS Function drop-down list in the Devices | KDS Bump Bars and KDS Toolbars forms in POS Configurator.
Select Next Unstarted — Moves to the next unstarted order after the current order.
Done and Select Next — Bumps the current order and selects the next available order.
Select First Unstarted — Moves to the first unstarted order in the current display. The order may be before or after the current selection.
Start and Select First Unstarted — Starts the current order (if not already started) then moves to the next unstarted order in the display.
In all cases, these options only affect orders on the current screen. The system will not scroll down for additional orders but it will cycle back to the top of the display.
MD0003-065Revision F
January 17, 2006Page 255 of 306
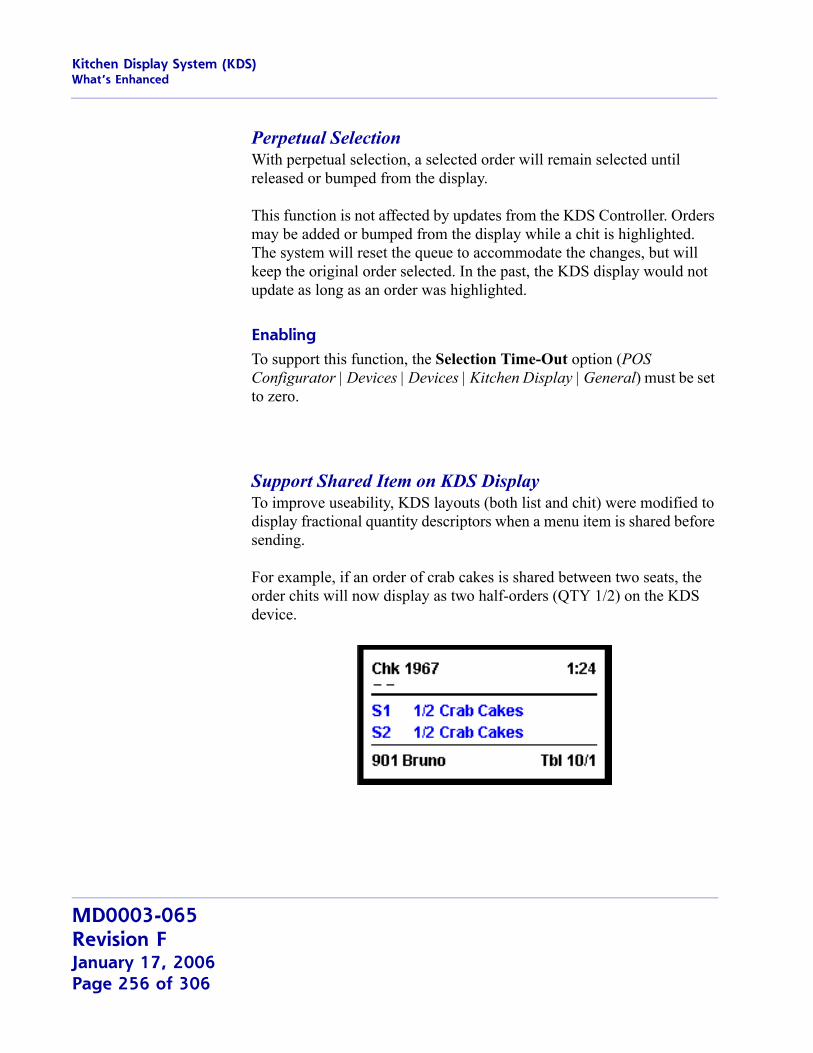
Kitchen Display System (KDS)What’s Enhanced
Perpetual SelectionWith perpetual selection, a selected order will remain selected until released or bumped from the display.
This function is not affected by updates from the KDS Controller. Orders may be added or bumped from the display while a chit is highlighted. The system will reset the queue to accommodate the changes, but will keep the original order selected. In the past, the KDS display would not update as long as an order was highlighted.
EnablingTo support this function, the Selection Time-Out option (POS Configurator | Devices | Devices | Kitchen Display | General) must be set to zero.
Support Shared Item on KDS DisplayTo improve useability, KDS layouts (both list and chit) were modified to display fractional quantity descriptors when a menu item is shared before sending.
For example, if an order of crab cakes is shared between two seats, the order chits will now display as two half-orders (QTY 1/2) on the KDS device.
MD0003-065Revision FJanuary 17, 2006Page 256 of 306
Kitchen Display System (KDS)What’s Enhanced
Support Time Synchronization of DC ClientsTo ensure that KDS applications running on Display Controller (DC) Clients are in sync with the Server clock, a change was made to one of the system’s registry functions. This change ensures that the CAL will update the workstations time on startup and approximately every 12 hours thereafter.
This update will NOT automatically adjust for changes in daylight savings time. Operators will need to manually reset the clients when the time change is initially made.
MD0003-065Revision F
January 17, 2006Page 257 of 306
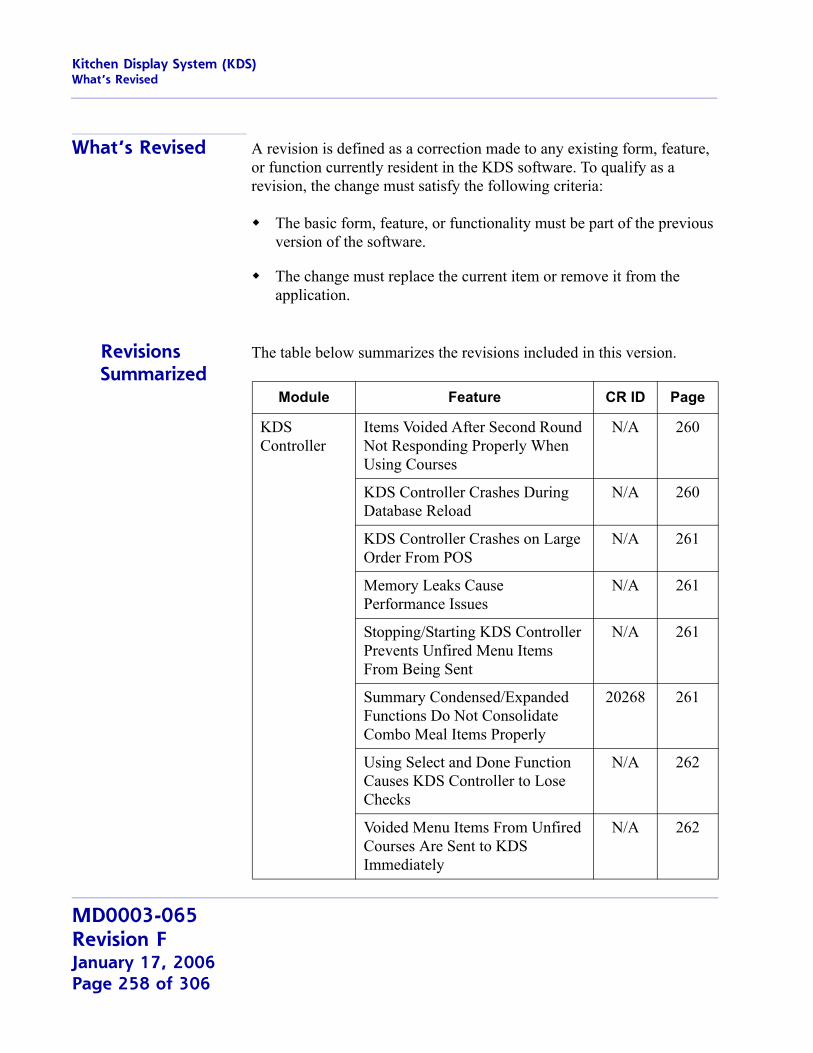
Kitchen Display System (KDS)What’s Revised
What’s Revised A revision is defined as a correction made to any existing form, feature, or function currently resident in the KDS software. To qualify as a revision, the change must satisfy the following criteria:
The basic form, feature, or functionality must be part of the previous version of the software.
The change must replace the current item or remove it from the application.
Revisions Summarized
The table below summarizes the revisions included in this version.
Module Feature CR ID Page
KDS Controller
Items Voided After Second Round Not Responding Properly When Using Courses
N/A 260
KDS Controller Crashes During Database Reload
N/A 260
KDS Controller Crashes on Large Order From POS
N/A 261
Memory Leaks Cause Performance Issues
N/A 261
Stopping/Starting KDS Controller Prevents Unfired Menu Items From Being Sent
N/A 261
Summary Condensed/Expanded Functions Do Not Consolidate Combo Meal Items Properly
20268 261
Using Select and Done Function Causes KDS Controller to Lose Checks
N/A 262
Voided Menu Items From Unfired Courses Are Sent to KDS Immediately
N/A 262
MD0003-065Revision FJanuary 17, 2006Page 258 of 306
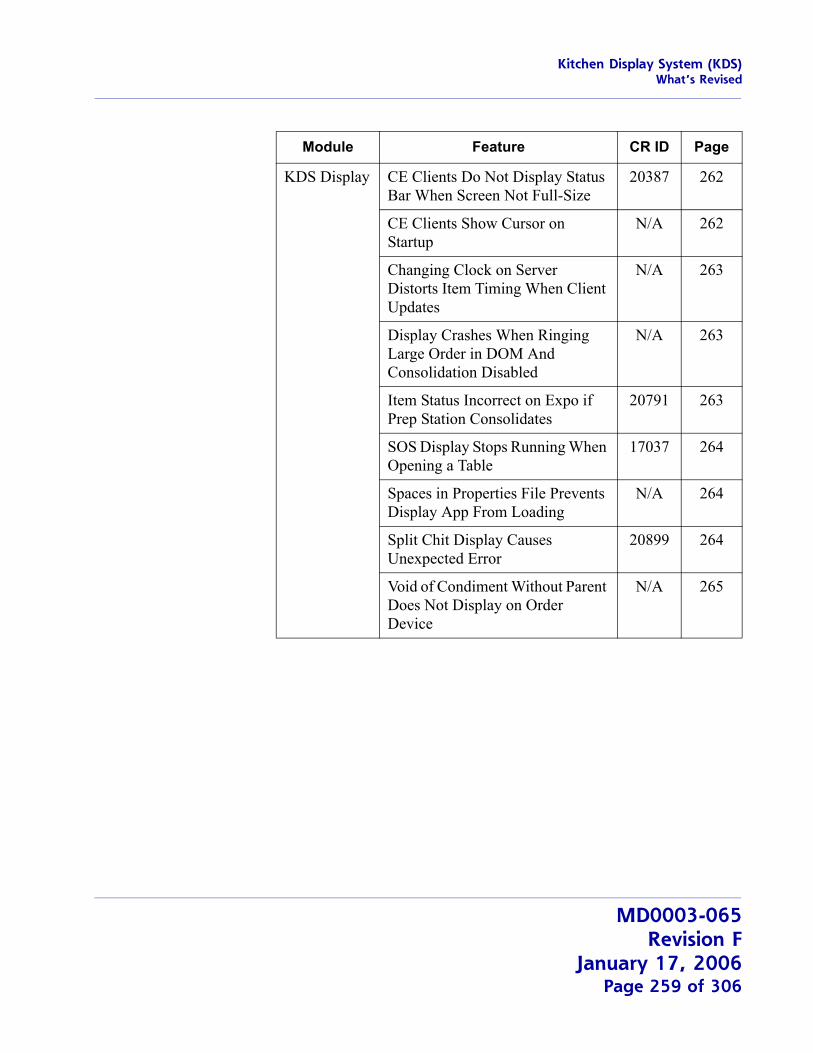
Kitchen Display System (KDS)What’s Revised
KDS Display CE Clients Do Not Display Status Bar When Screen Not Full-Size
20387 262
CE Clients Show Cursor on Startup
N/A 262
Changing Clock on Server Distorts Item Timing When Client Updates
N/A 263
Display Crashes When Ringing Large Order in DOM And Consolidation Disabled
N/A 263
Item Status Incorrect on Expo if Prep Station Consolidates
20791 263
SOS Display Stops Running When Opening a Table
17037 264
Spaces in Properties File Prevents Display App From Loading
N/A 264
Split Chit Display Causes Unexpected Error
20899 264
Void of Condiment Without Parent Does Not Display on Order Device
N/A 265
Module Feature CR ID Page
MD0003-065Revision F
January 17, 2006Page 259 of 306
Kitchen Display System (KDS)What’s Revised
Revisions Detailed
KDS Controller
Items Voided After Second Round Not Responding Properly When Using CoursesCR ID #: N/A
When using Dining Courses, menu item voids were not handled properly if performed in the third round or later.
For example, a group of friends meets at their favorite restaurant for dinner. As people arrive, a round or two of drinks is ordered. When the last friend arrives, they place their order for appetizers, entrées, and desserts. The items are added to the check in the third round. Later, during the appetizers, one of the friends changes his mind and decides he doesn’t want the dessert after all. The server picks up the check again (fourth round), and voids the item before the Dessert Course is fired to the kitchen. Technically, this should delete that item from the order, since it has not been sent to the KDS display. Instead, when the Dessert Course is sent, the KDS device would incorrectly display chits for both the original item and the void.
This problem has been corrected.
KDS Controller Crashes During Database ReloadCR ID #: N/A
When using WS4 and DC clients, the KDS Controller would crash when the system was started, the database was reloaded, or a new KDS display unit was brought online. The problem occurred because of a mismatch in the message format between the clients and this server. This has been corrected.
MD0003-065Revision FJanuary 17, 2006Page 260 of 306

Kitchen Display System (KDS)What’s Revised
KDS Controller Crashes on Large Order From POSCR ID #: N/A
Previously, the KDS Controller would crash if an order containing a large number of items was sent from POS Operations. The problem only occurred if the system was configured in List Mode with the option Multiple condiments per line enabled, and an order that contained a parent item with many condiments was sent. The cause was insufficient memory allocation for the size of the data. This has been corrected.
Memory Leaks Cause Performance IssuesCR ID #: N/A
In previous releases, a memory leak in KDS Controller slowed response times and eventually resulted in system failure. This problem has been corrected.
Stopping/Starting KDS Controller Prevents Unfired Menu Items From Being SentCR ID #: N/A
When using item prep times, if the KDS Controller was stopped then restarted, the interruption would prevent the system from sending any remaining unfired items to the kitchen. This has been corrected.
Summary Condensed/Expanded Functions Do Not Consolidate Combo Meal Items ProperlyCR ID #: 20268
After entering separate checks containing combo meals with similar parent items, the KDS display failed to consolidate the menu items in the list view when the [Summary Condensed] or [Summary Expanded] function keys were pressed. The problem occurred with both parent and side items. It has been corrected.
MD0003-065Revision F
January 17, 2006Page 261 of 306
Kitchen Display System (KDS)What’s Revised
Using Select and Done Function Causes KDS Controller to Lose ChecksCR ID #: N/A
When using the [Select and Done] function to bump multiple chits from a KDS display, not all the chits would be removed from the screen, making it impossible for the workstation to recall some of the closed checks. This problem only occurred when there were more active chits than would fit on the KDS display and the extra chits were to the left of the visible screen when the orders were bumped. This has been corrected.
Voided Menu Items from Unsent Courses Are Sent to KDS ImmediatelyCR ID #: N/A
After ringing up and service totaling several courses on a guest check, if the user reopened and deleted one or more of the unsent items, the system would immediately fire the voids to the appropriate KDS prep station, instead of simply removing the item from the guest check. This problem has been corrected.
KDS Display
CE Clients Do Not Display Status Bar When Screen Not Full-Size CR ID #: 20387
Previously, if the size of the KDS Display was changed from full size (i.e., the default setting of 800 x 600), the KDS status bar would not display on CE clients. This has been corrected.
CE Clients Show Cursor on StartupCR ID #: N/A
When starting KDS on a WS4 or DC client, the system would incorrectly display a mouse cursor by default. This has been corrected.
MD0003-065Revision FJanuary 17, 2006Page 262 of 306
Kitchen Display System (KDS)What’s Revised
Changing Clock on Server Distorts Item Timing When Client UpdatesCR ID #: N/A
When using item timings, changes made to the server clock would skew the item prep times on the KDS display when the client was updated. For example, if the time was set backward, the elapsed time on the chit would stop working by the amount of time the server was set backwards, and resume only when the client’s clock caught up to the order’s timestamp. This could result in orders spending more time in the kitchen than planned. On the other hand, if the chit was bumped before the chit timer resumed, the system would record a negative item prep time, which in turn distorted the recorded average prep times. These problems have been corrected.
Display Crashes When Ringing Large Order in DOM And Consolidation DisabledCR ID #: N/A
When ringing a large order in DOM mode with consolidation disabled, the KDS display would fail when the size of the order chit exceeded a single column length. This occurred because the system was unable to determine which items needed to be kept together and where to break the chit in order to wrap to the top of the next column. This has been corrected.
Item Status Incorrect on Expo if Prep Station ConsolidatesCR ID #: 20791
After ringing in two of the same menu item (consecutively, not as a quantity), the chit would display mismatched item status icons on the Expo station once the order was bumped from the Prep Station. That is, instead of updating the status icons to Done for both of the menu items, one item would listed as Started (arrow icon), while the other would shown as Done (green circle icon).
The problem only occurred if the Prep Station was configured to consolidate, but the Expo was not. This was corrected during the redesign of the consolidation options.
MD0003-065Revision F
January 17, 2006Page 263 of 306
Kitchen Display System (KDS)What’s Revised
SOS Display Stops Running When Opening a TableCR ID #: 17037
When accessing chits by pressing the table icon on a KDS SOS display, the application would occasionally close and revert to the Desktop. This problem primarily occurred when running Win2K on Dell GX60 hardware. It has since been corrected.
Spaces in Properties File Prevents Display App From LoadingCR ID #: N/A
After making changes to the KDS display application’s Properties file (DisplayApp.properties), KDS device failed to load if a space had been added before or after the equal sign in any of the data fields; e.g., from
#<!-- range from 0 to 10 -->verbosityLevel=0
to
#<!-- range from 0 to 10 -->verbosityLevel= 10
To correct this problem, the system will now check to make sure all properties are correct. If an error is found, the application will display a message directing the user to check the DisplayApp.properties file and restart the application.
Split Chit Display Causes Unexpected ErrorCR Id #: 20899
When running KDS on a WS4 or Display Controller Unit (DCU) device with a resolution of 800x600 pixels, the application would occasionally crash when a chit was split between two columns on the display. The problem occurred when the jagged edge (signifying a split order) ran too close to the top or bottom boundaries, which interferred with the way the chits were painted on the screen. This problem has been corrected.
MD0003-065Revision FJanuary 17, 2006Page 264 of 306
Kitchen Display System (KDS)What’s Revised
Void of Menu Item Does Not Display on Prep Station Configured to Show Condiment Without ParentCR ID #: N/A
When voiding a menu item with condiments configured to Print without parent on order chits (Sales | Menu Item Classes | Print/Display), the system would show the void at the station where the parent item was displayed, but not at the condiment’s prep station. This has been corrected.
MD0003-065Revision F
January 17, 2006Page 265 of 306
Cash Management (CM)What’s New
Cash Management (CM)
What’s New There are no new feature in this version of the software.
What’s Enhanced There are no enhancements in this version of the software.
What’s Revised There are no revisions in this version of the software.
MD0003-065Revision FJanuary 17, 2006Page 266 of 306
Guest Services Solution (GSS)What’s New
Guest Services Solution (GSS)
What’s New There are no new features in this version of the software.
What’s Enhanced There are no enhancements in this version of the software.
MD0003-065Revision F
January 17, 2006Page 267 of 306
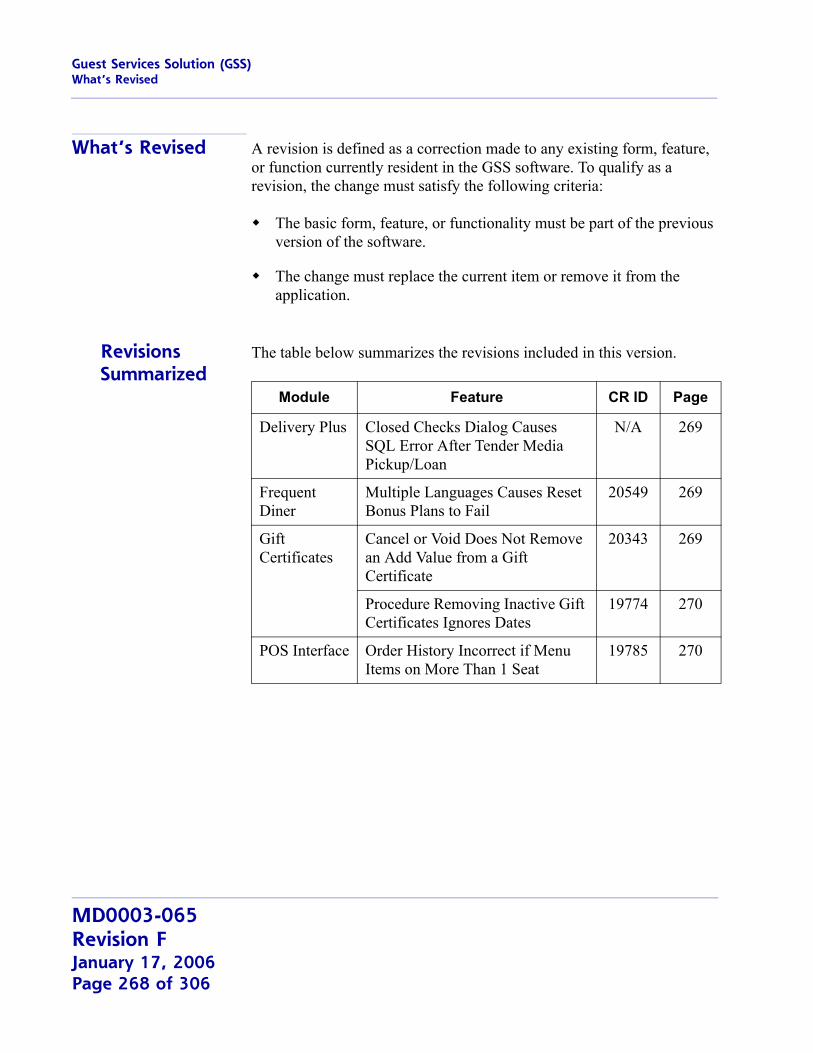
Guest Services Solution (GSS)What’s Revised
What’s Revised A revision is defined as a correction made to any existing form, feature, or function currently resident in the GSS software. To qualify as a revision, the change must satisfy the following criteria:
The basic form, feature, or functionality must be part of the previous version of the software.
The change must replace the current item or remove it from the application.
Revisions Summarized
The table below summarizes the revisions included in this version.
Module Feature CR ID Page
Delivery Plus Closed Checks Dialog Causes SQL Error After Tender Media Pickup/Loan
N/A 269
Frequent Diner
Multiple Languages Causes Reset Bonus Plans to Fail
20549 269
Gift Certificates
Cancel or Void Does Not Remove an Add Value from a Gift Certificate
20343 269
Procedure Removing Inactive Gift Certificates Ignores Dates
19774 270
POS Interface Order History Incorrect if Menu Items on More Than 1 Seat
19785 270
MD0003-065Revision FJanuary 17, 2006Page 268 of 306
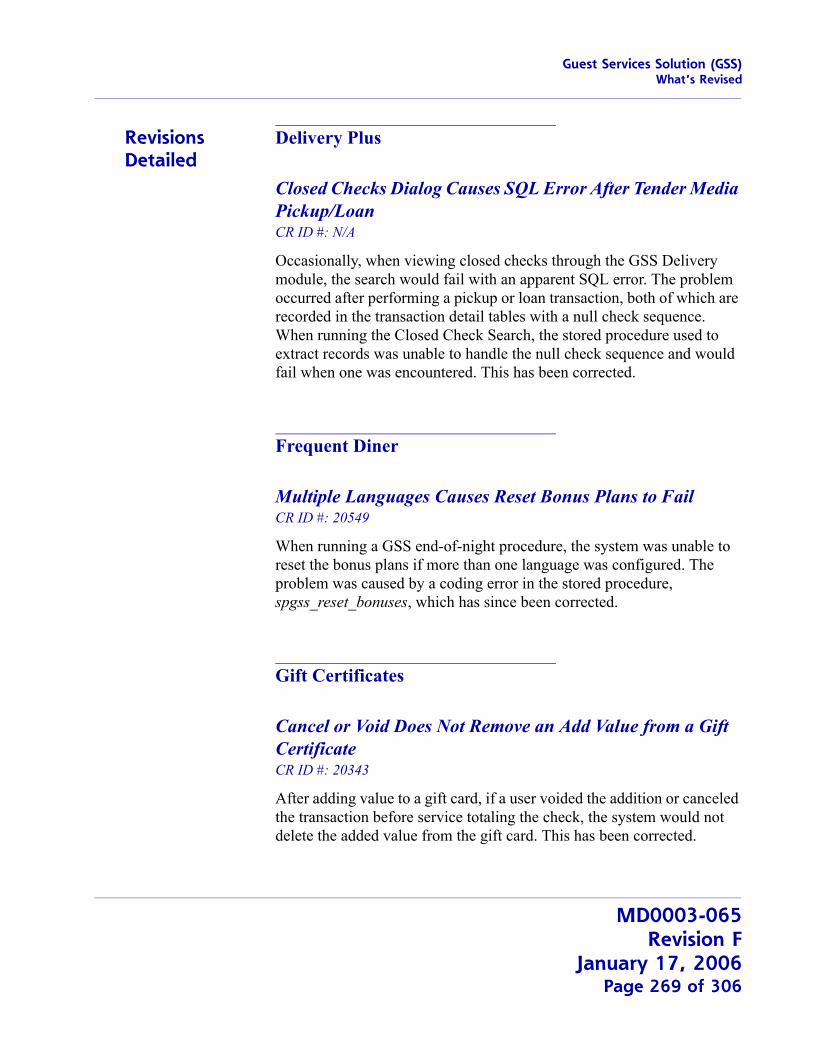
Guest Services Solution (GSS)What’s Revised
Revisions Detailed
Delivery Plus
Closed Checks Dialog Causes SQL Error After Tender Media Pickup/Loan CR ID #: N/A
Occasionally, when viewing closed checks through the GSS Delivery module, the search would fail with an apparent SQL error. The problem occurred after performing a pickup or loan transaction, both of which are recorded in the transaction detail tables with a null check sequence. When running the Closed Check Search, the stored procedure used to extract records was unable to handle the null check sequence and would fail when one was encountered. This has been corrected.
Frequent Diner
Multiple Languages Causes Reset Bonus Plans to FailCR ID #: 20549
When running a GSS end-of-night procedure, the system was unable to reset the bonus plans if more than one language was configured. The problem was caused by a coding error in the stored procedure, spgss_reset_bonuses, which has since been corrected.
Gift Certificates
Cancel or Void Does Not Remove an Add Value from a Gift CertificateCR ID #: 20343
After adding value to a gift card, if a user voided the addition or canceled the transaction before service totaling the check, the system would not delete the added value from the gift card. This has been corrected.
MD0003-065Revision F
January 17, 2006Page 269 of 306
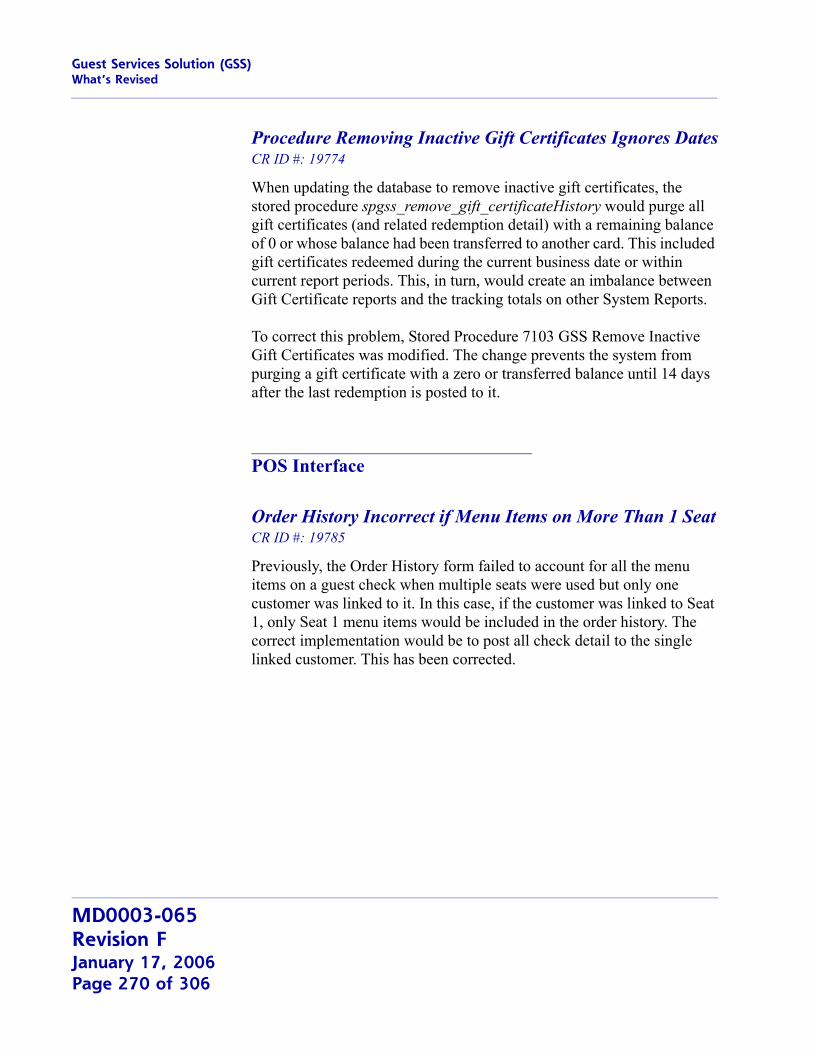
Guest Services Solution (GSS)What’s Revised
Procedure Removing Inactive Gift Certificates Ignores DatesCR ID #: 19774
When updating the database to remove inactive gift certificates, the stored procedure spgss_remove_gift_certificateHistory would purge all gift certificates (and related redemption detail) with a remaining balance of 0 or whose balance had been transferred to another card. This included gift certificates redeemed during the current business date or within current report periods. This, in turn, would create an imbalance between Gift Certificate reports and the tracking totals on other System Reports.
To correct this problem, Stored Procedure 7103 GSS Remove Inactive Gift Certificates was modified. The change prevents the system from purging a gift certificate with a zero or transferred balance until 14 days after the last redemption is posted to it.
POS Interface
Order History Incorrect if Menu Items on More Than 1 SeatCR ID #: 19785
Previously, the Order History form failed to account for all the menu items on a guest check when multiple seats were used but only one customer was linked to it. In this case, if the customer was linked to Seat 1, only Seat 1 menu items would be included in the order history. The correct implementation would be to post all check detail to the single linked customer. This has been corrected.
MD0003-065Revision FJanuary 17, 2006Page 270 of 306
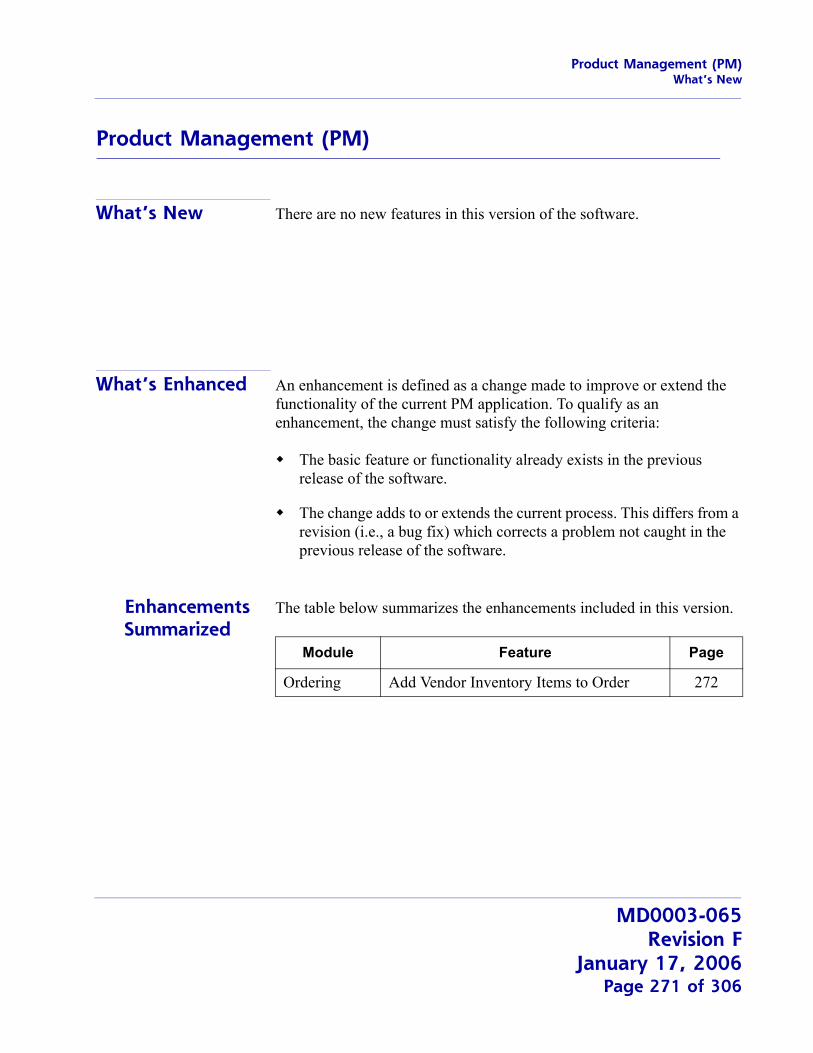
Product Management (PM)What’s New
Product Management (PM)
What’s New There are no new features in this version of the software.
What’s Enhanced An enhancement is defined as a change made to improve or extend the functionality of the current PM application. To qualify as an enhancement, the change must satisfy the following criteria:
The basic feature or functionality already exists in the previous release of the software.
The change adds to or extends the current process. This differs from a revision (i.e., a bug fix) which corrects a problem not caught in the previous release of the software.
Enhancements Summarized
The table below summarizes the enhancements included in this version.
Module Feature Page
Ordering Add Vendor Inventory Items to Order 272
MD0003-065Revision F
January 17, 2006Page 271 of 306
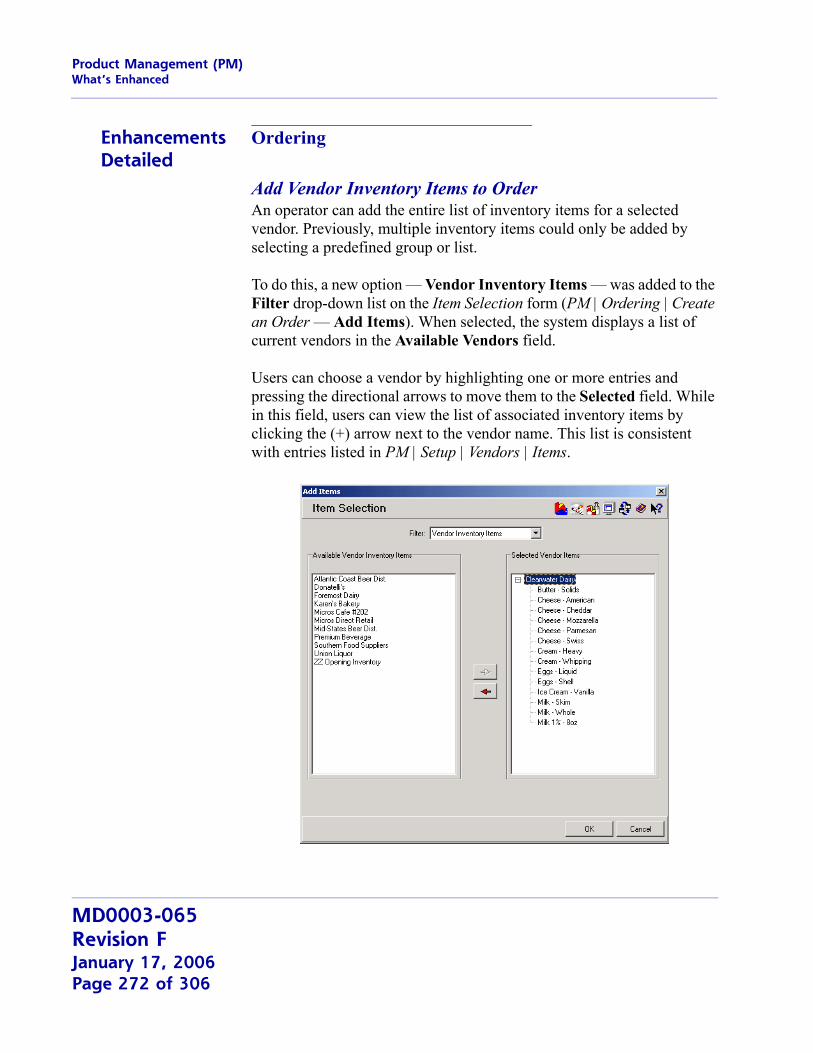
Product Management (PM)What’s Enhanced
Enhancements Detailed
Ordering
Add Vendor Inventory Items to OrderAn operator can add the entire list of inventory items for a selected vendor. Previously, multiple inventory items could only be added by selecting a predefined group or list.
To do this, a new option — Vendor Inventory Items — was added to the Filter drop-down list on the Item Selection form (PM | Ordering | Create an Order — Add Items). When selected, the system displays a list of current vendors in the Available Vendors field.
Users can choose a vendor by highlighting one or more entries and pressing the directional arrows to move them to the Selected field. While in this field, users can view the list of associated inventory items by clicking the (+) arrow next to the vendor name. This list is consistent with entries listed in PM | Setup | Vendors | Items.
MD0003-065Revision FJanuary 17, 2006Page 272 of 306
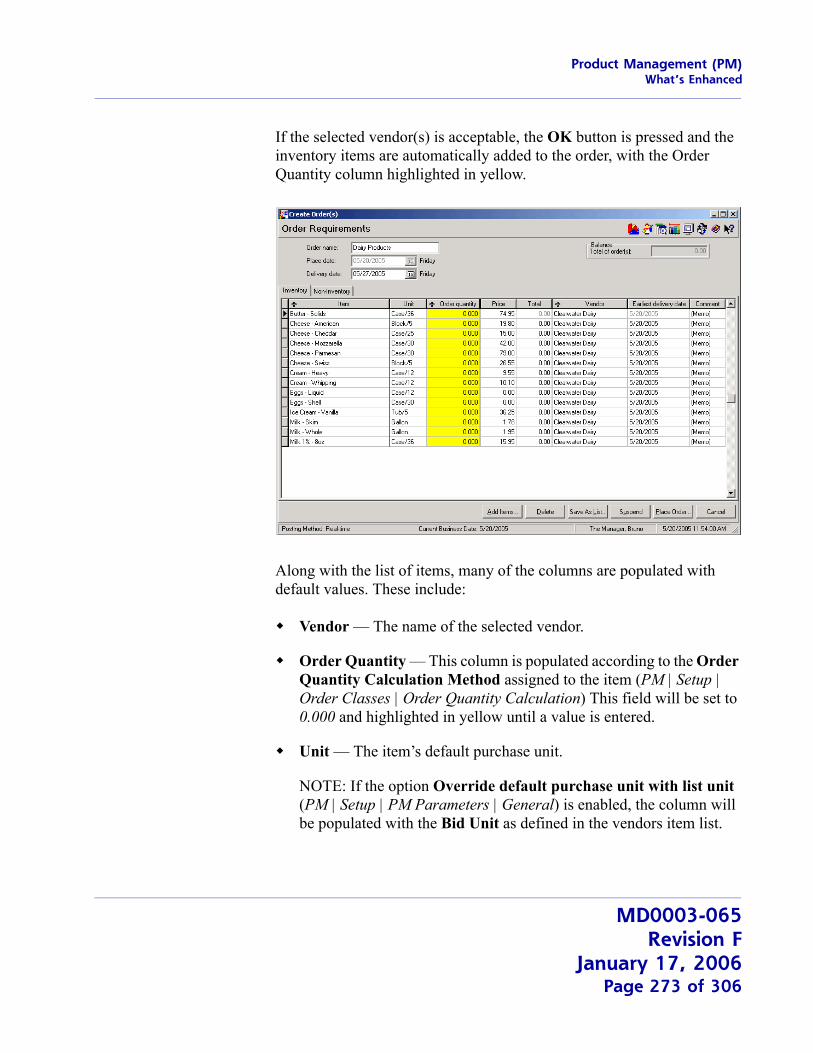
Product Management (PM)What’s Enhanced
If the selected vendor(s) is acceptable, the OK button is pressed and the inventory items are automatically added to the order, with the Order Quantity column highlighted in yellow.
Along with the list of items, many of the columns are populated with default values. These include:
Vendor — The name of the selected vendor.
Order Quantity — This column is populated according to the Order Quantity Calculation Method assigned to the item (PM | Setup | Order Classes | Order Quantity Calculation) This field will be set to 0.000 and highlighted in yellow until a value is entered.
Unit — The item’s default purchase unit.
NOTE: If the option Override default purchase unit with list unit (PM | Setup | PM Parameters | General) is enabled, the column will be populated with the Bid Unit as defined in the vendors item list.
MD0003-065Revision F
January 17, 2006Page 273 of 306
Product Management (PM)What’s Revised
What’s Revised A revision is defined as a correction made to any existing form, feature, or function currently resident in the PM software. To qualify as a revision, the change must satisfy the following criteria:
The basic form, feature, or functionality must be part of the previous version of the software.
The change must replace the current item or remove it from the application.
Revisions Summarized
The table below summarizes the revisions included in this version.
Module Feature CR ID Page
Hand-Held Device
PM Procedures Fails Login When Using German Regional Settings
N/A 275
Unable to Start PM Procedures After Assigning a Till in CM
N/A 275
Ordering Quantities Not Updating Properly When Using Multiple Cost Centers
N/A 275
Receiving Distributed Line Item Adjustments Cause Receipt Failure If Some Item Quantities Left Blank
20269 276
Reports Improperly Closed Period Causes Report Errors
N/A 276
Inventory Item Usage Analysis Does Not Display Data
20800 277
Setup Copy/Paste Function Keys Not Working Properly With Inventory Items
20724 277
Error Occurs When Changing the Default Storage Location
20726 277
MD0003-065Revision FJanuary 17, 2006Page 274 of 306
Product Management (PM)What’s Revised
Revisions Detailed
Hand-Held Devices
PM Procedures Fails Login When Using German Regional SettingsCR ID #: N/A
Previously, users were unable to launch PM Procedures on a hand-held unit if the device was a German Win2K unit, configured with German Regional Settings. Attempts to do so would cause login to fail and an error message to display. This problem has been corrected.
Unable to Start PM Procedures After Assigning a Till in CMCR ID #: N/A
After assigning a till to an employee through the Cash Management application, managers were unable to start PM Procedures without restarting CM services. The problem, which only occurred if the device was configured with German Regional Settings, was due to changes made to the decimal separator when the CM client logs in. This has been corrected.
Ordering Quantities Not Updating Properly When Changing Cost CentersCR ID #: N/A
When creating an order in a multiple cost center environment, attempts to change an item’s cost center would result in the following errors:
Minimum Stock failed to display the Minimum Stock Override value from Par Levels (when used).
Minimum Stock was not updated with the value from the selected cost center.
Quantity On Order reported total quantity on order, not the quantity on order for the selected cost center.
This problem has been corrected.
MD0003-065Revision F
January 17, 2006Page 275 of 306
Product Management (PM)What’s Revised
Receiving
Distributed Line Item Adjustments Cause Receipt Failure If Some Item Quantities Left BlankCR ID #: 20269
When receiving items without a purchase order, a Foreign Key violation error would occur if the user added a group of items, did not include a quantity for each (i.e., left one or more blank), and then applied a distributed line item adjustment before saving.
When the Save button was pressed, the user would be prompted to remove the blank line items. If the response was yes, the system would delete the items from the form, but was unable to correct the adjustment records. This has been corrected.
Reports
Improperly Closed Periods Causes Report ErrorsCR ID #: N/A
When closing multiple periods, the procedure moves records one business date at a time, instead of attempting to move ALL transactions in one large batch. After each closed business date, the records are committed, which means that — if the process is interrupted — a period could have records posted in both the closed and open transaction tables at the same time.
When running a report, if the date range included an improperly closed period, the system would only post data for the closed transactions. This resulted in incomplete report totals. It has been corrected.
MD0003-065Revision FJanuary 17, 2006Page 276 of 306
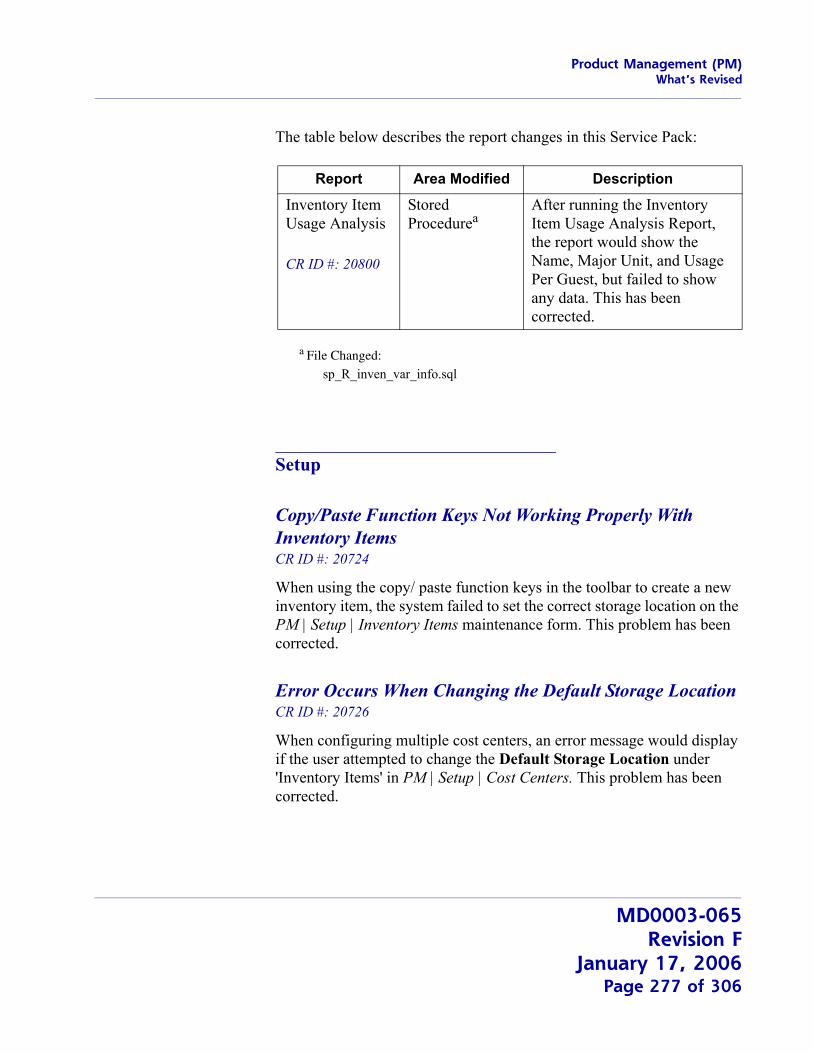
Product Management (PM)What’s Revised
The table below describes the report changes in this Service Pack:
a File Changed:
sp_R_inven_var_info.sql
Setup
Copy/Paste Function Keys Not Working Properly With Inventory ItemsCR ID #: 20724
When using the copy/ paste function keys in the toolbar to create a new inventory item, the system failed to set the correct storage location on the PM | Setup | Inventory Items maintenance form. This problem has been corrected.
Error Occurs When Changing the Default Storage LocationCR ID #: 20726
When configuring multiple cost centers, an error message would display if the user attempted to change the Default Storage Location under 'Inventory Items' in PM | Setup | Cost Centers. This problem has been corrected.
Report Area Modified Description
Inventory Item Usage Analysis
CR ID #: 20800
Stored Procedurea
After running the Inventory Item Usage Analysis Report, the report would show the Name, Major Unit, and Usage Per Guest, but failed to show any data. This has been corrected.
MD0003-065Revision F
January 17, 2006Page 277 of 306
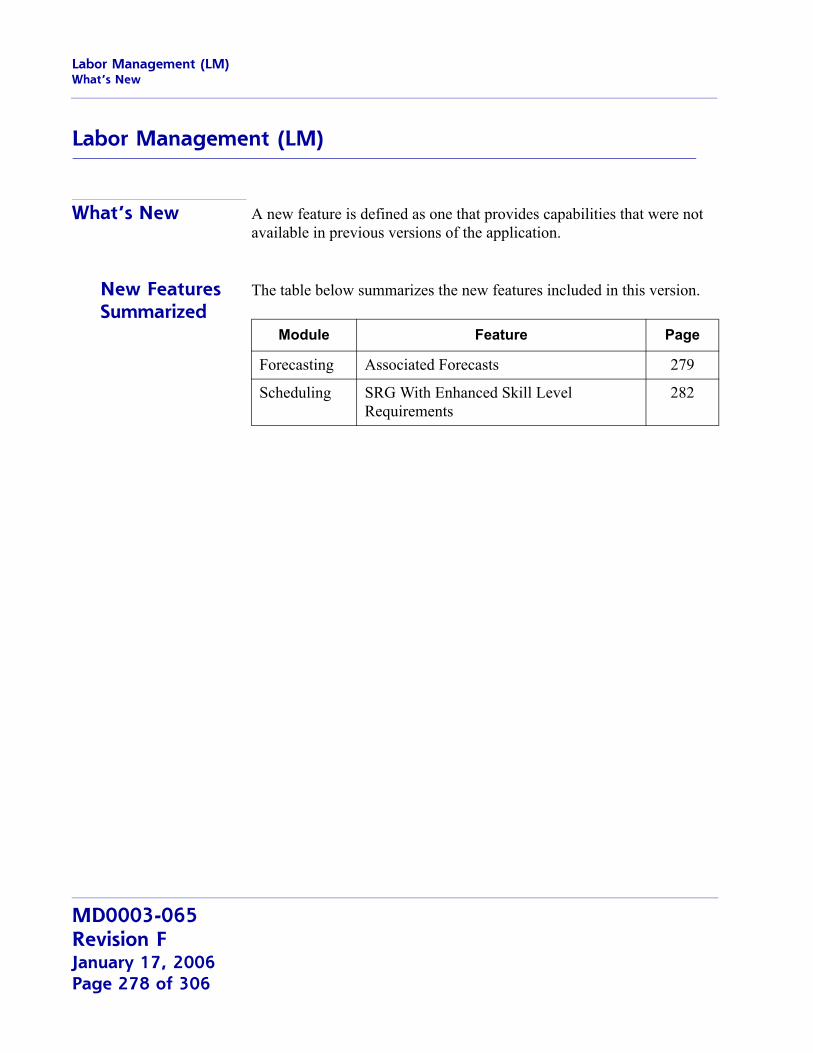
Labor Management (LM)What’s New
Labor Management (LM)
What’s New A new feature is defined as one that provides capabilities that were not available in previous versions of the application.
New Features Summarized
The table below summarizes the new features included in this version.
Module Feature Page
Forecasting Associated Forecasts 279
Scheduling SRG With Enhanced Skill Level Requirements
282
MD0003-065Revision FJanuary 17, 2006Page 278 of 306
Labor Management (LM)What’s New
New Features Detailed
Forecasts
Associated ForecastsTo improve efficiency, the concept of associated forecasts has been developed. This feature allows sites to group together forecasts from different drivers. Once grouped, a change made to one forecast will automatically propagate to the rest of the forecasts.
ExampleForecasts derived from system sales are linked to forecasts derived from check counts by order type (i.e., Sales Dollars = Number of Check Counts). A relationship is established between the two forecasts such that 1 Check Count = $9.75 in Sales Dollars.
Once the forecasts are generated, if the user edits the Count Forecast to increase it by 10, the Sales Forecast will be adjusted automatically to $97.50. Similarly, if the user reduces the Sales Forecast by $300.00, the Count Forecast will drop to 31 (or more precisely, a value of 30.8, rounded up to 31).
Enabling the FeatureTo configure this feature, the Forecast Setup | Forecast Explorer | Day Parts tab was enhanced and renamed the Group Options tab. Options were added to define the variables associated with all elements of a Forecast Group, including the period and row intervals, number of periods, and number of days to store. (These are the same variables displayed on the General tab that are used to configure the forecast elements individually.)
To link the groups, an additional option — Associate Group Elements — is included. When checked, this option overwrites the values set on the General tab, replacing individual entries with the group variables. While this option is enabled, the fields are linked such that changes made to any of the fields — whether it is on the General tab or the Group Options tab — will automatically propagate to the rest of the forecast element records.
MD0003-065Revision F
January 17, 2006Page 279 of 306
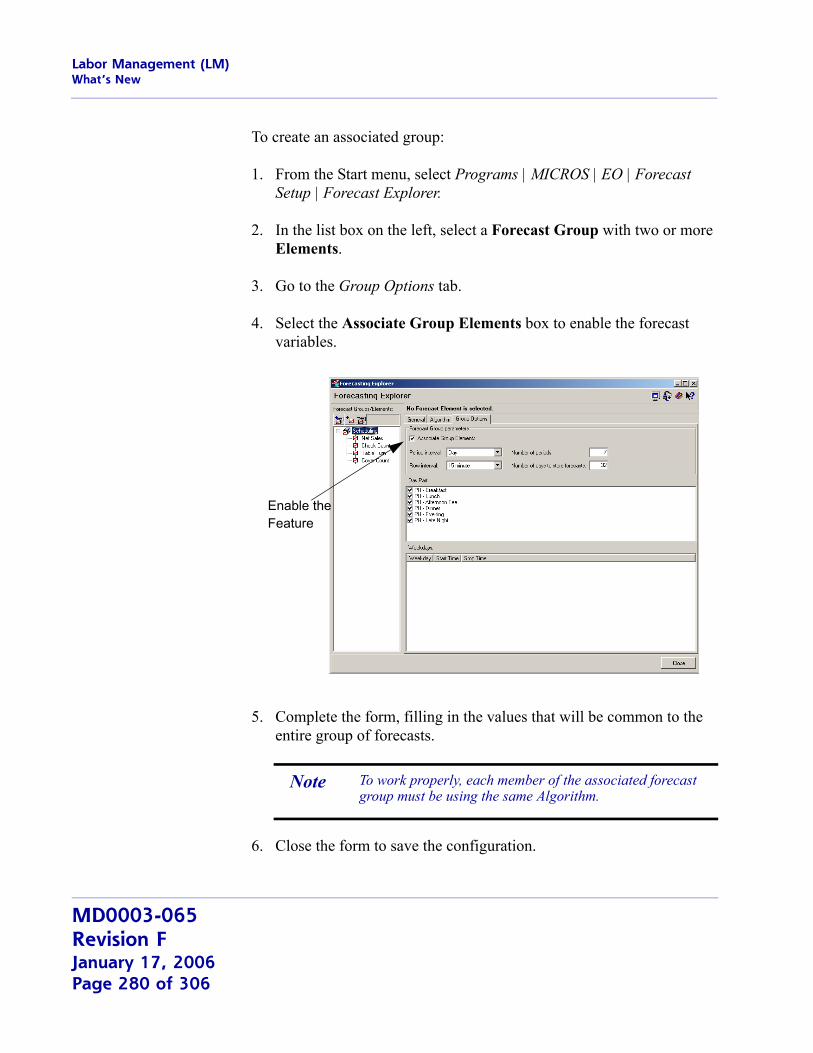
Labor Management (LM)What’s New
To create an associated group:
1. From the Start menu, select Programs | MICROS | EO | Forecast Setup | Forecast Explorer.
2. In the list box on the left, select a Forecast Group with two or more Elements.
3. Go to the Group Options tab.
4. Select the Associate Group Elements box to enable the forecast variables.
5. Complete the form, filling in the values that will be common to the entire group of forecasts.
6. Close the form to save the configuration.
Note To work properly, each member of the associated forecast group must be using the same Algorithm.
Enable theFeature
MD0003-065Revision FJanuary 17, 2006Page 280 of 306
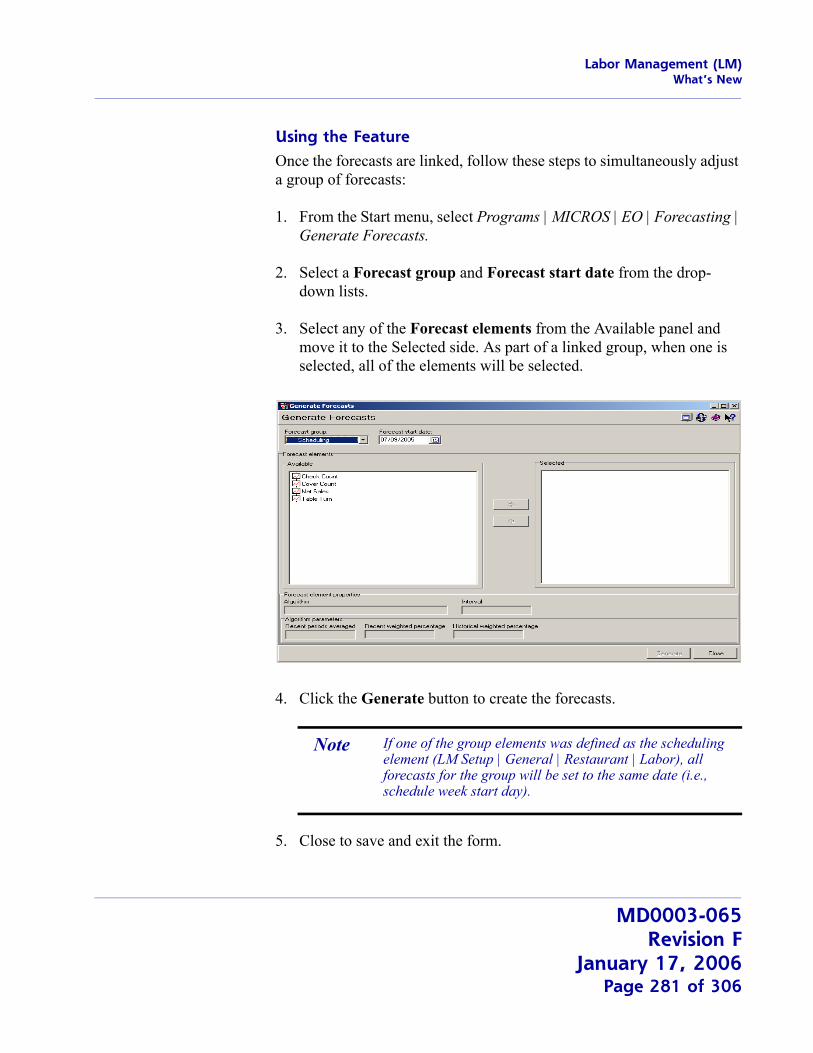
Labor Management (LM)What’s New
Using the FeatureOnce the forecasts are linked, follow these steps to simultaneously adjust a group of forecasts:
1. From the Start menu, select Programs | MICROS | EO | Forecasting | Generate Forecasts.
2. Select a Forecast group and Forecast start date from the drop-down lists.
3. Select any of the Forecast elements from the Available panel and move it to the Selected side. As part of a linked group, when one is selected, all of the elements will be selected.
4. Click the Generate button to create the forecasts.
5. Close to save and exit the form.
Note If one of the group elements was defined as the scheduling element (LM Setup | General | Restaurant | Labor), all forecasts for the group will be set to the same date (i.e., schedule week start day).
MD0003-065Revision F
January 17, 2006Page 281 of 306
Labor Management (LM)What’s New
Once the forecasts are generated, group revision can be made through the Forecasting | Edit Forecast form. Changes made to any cell total, row total, or column total will change the corresponding values (as a direct percentage) for all associated forecasts.
Scheduling
SRG With Enhanced Skill Level RequirementsWhen scheduling weekly assignments, managers can reduce setup time by adding shift nodes that are already linked to criteria defined in the Skill Level Requirements form. These criteria can include the physical location and length of shift interval as well as the skill level needed.
(For more on configuring the shift nodes, refer to the discussion on enhanced Skill Level Requirements, beginning on page 286.)
MD0003-065Revision FJanuary 17, 2006Page 282 of 306
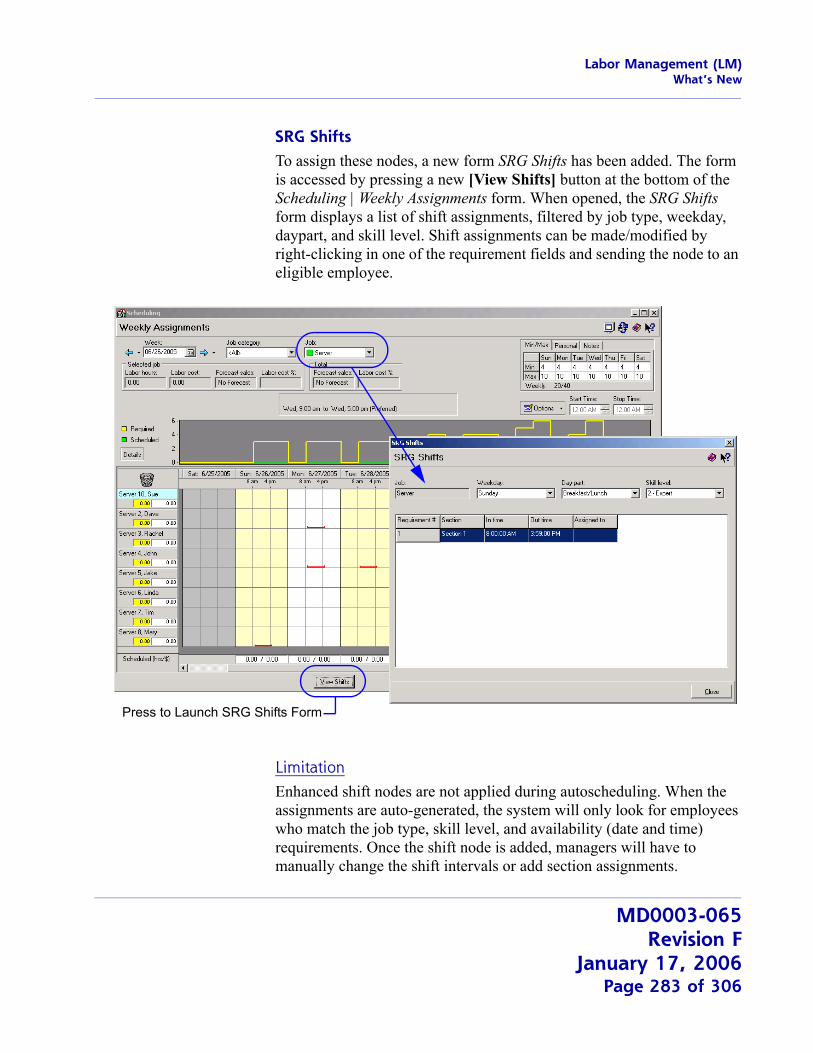
Labor Management (LM)What’s New
SRG ShiftsTo assign these nodes, a new form SRG Shifts has been added. The form is accessed by pressing a new [View Shifts] button at the bottom of the Scheduling | Weekly Assignments form. When opened, the SRG Shifts form displays a list of shift assignments, filtered by job type, weekday, daypart, and skill level. Shift assignments can be made/modified by right-clicking in one of the requirement fields and sending the node to an eligible employee.
LimitationEnhanced shift nodes are not applied during autoscheduling. When the assignments are auto-generated, the system will only look for employees who match the job type, skill level, and availability (date and time) requirements. Once the shift node is added, managers will have to manually change the shift intervals or add section assignments.
Press to Launch SRG Shifts Form
MD0003-065Revision F
January 17, 2006Page 283 of 306
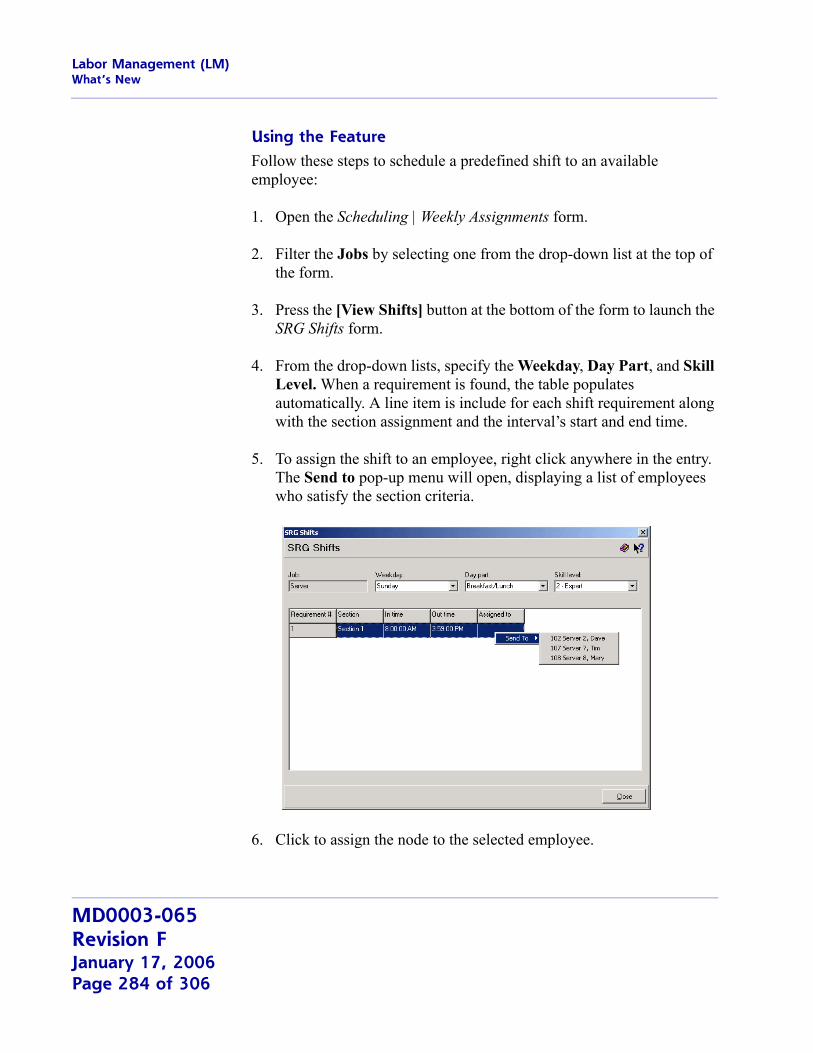
Labor Management (LM)What’s New
Using the FeatureFollow these steps to schedule a predefined shift to an available employee:
1. Open the Scheduling | Weekly Assignments form.
2. Filter the Jobs by selecting one from the drop-down list at the top of the form.
3. Press the [View Shifts] button at the bottom of the form to launch the SRG Shifts form.
4. From the drop-down lists, specify the Weekday, Day Part, and Skill Level. When a requirement is found, the table populates automatically. A line item is include for each shift requirement along with the section assignment and the interval’s start and end time.
5. To assign the shift to an employee, right click anywhere in the entry. The Send to pop-up menu will open, displaying a list of employees who satisfy the section criteria.
6. Click to assign the node to the selected employee.
MD0003-065Revision FJanuary 17, 2006Page 284 of 306
Labor Management (LM)What’s Enhanced
What’s Enhanced An enhancement is defined as a change made to improve or extend the functionality of the current LM applications. To qualify as an enhancement, the change must satisfy the following criteria:
The basic feature or functionality already exists in the previous release of the software.
The change adds to or extends the current process. This differs from a revision (i.e., a bug fix) which corrects a problem not caught in the previous release of the software.
Enhancements Summarized
The table below summarizes the enhancements included in this version.
Module Feature Page
LM Setup Enhanced Skill Level Requirements to Include Shift Changes and Physical Sections
286
MD0003-065Revision F
January 17, 2006Page 285 of 306
Labor Management (LM)What’s Enhanced
Enhancements Detailed
LM Setup
Enhanced Skill Level Requirements to Include Shift Changes and Physical SectionsIn the previous release (RES 3.2 Service Pack 5), LM users were introduced to the Skill Level Requirements form. This form allowed managers to specify the number of employees required at each skill level, for each day of the week, daypart, and job type. During autoscheduling, these values were used to populate weekly assignments with employees who not only met the job type and availability criteria, but also matched the skill levels specified.
In this release, the original requirements form has been reorganized and expanded to include two additional attributes — physical sections and variable shifts. The sections option allows managers to specify the physical location (as defined in POS Configurator | Revenue Center | RVC Table Seating | Seating Sections) where each skilled employee will be assigned. Shift times are used to override the default shift length with the actual hours that the skilled employee will be needed.
Both of these attributes — section assignments and modified shifts — were available in previous releases, but as manual adjustments to a generated schedule. That process is still available. In adding these fields to the requirements form, LM users have another way to refine the scheduling process and reduce the number of adjustments needed once the Weekly Assignments are generated.
Use of these enhancements is entirely optional. If used, section and shift variables must be assigned to each record individually, as needed. Physical sections do not have to be assigned in order to modify the shift length.
Configuration ChangesThe Skill Level Requirements form provides drop-down lists for selecting a Job type, Day of the Week, and Daypart. These options are unchanged from the previous release and must be configured for every requirement record.
MD0003-065Revision FJanuary 17, 2006Page 286 of 306
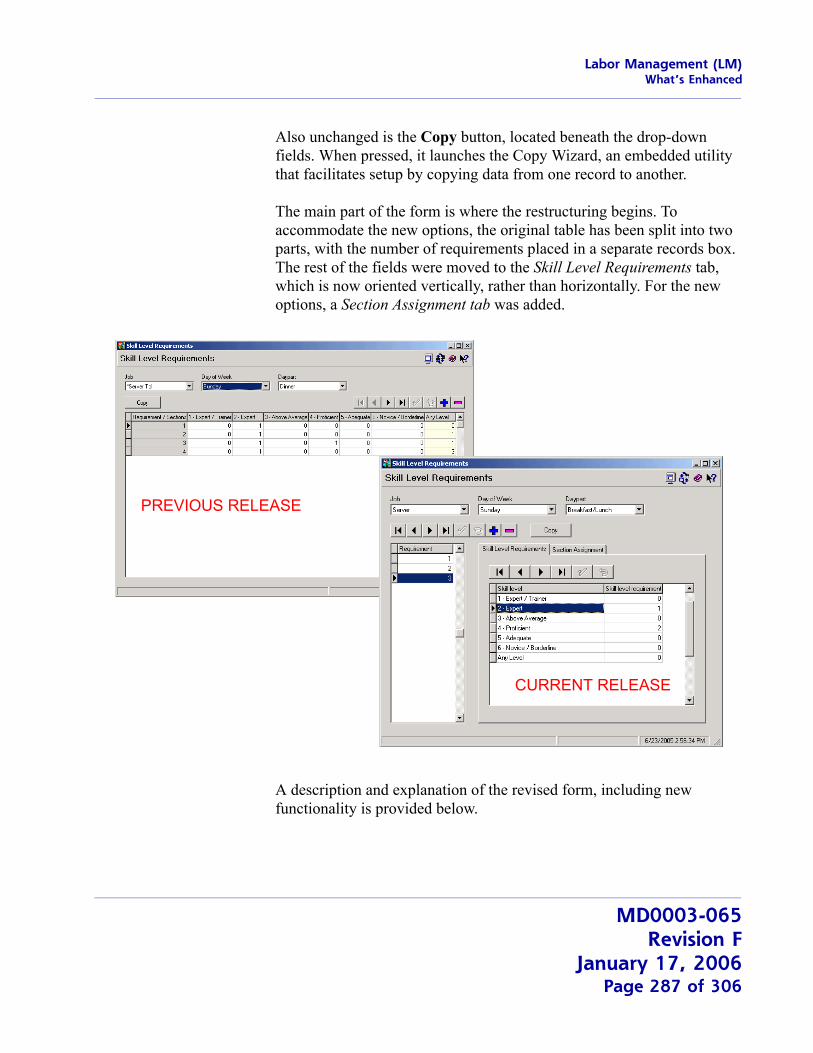
Labor Management (LM)What’s Enhanced
Also unchanged is the Copy button, located beneath the drop-down fields. When pressed, it launches the Copy Wizard, an embedded utility that facilitates setup by copying data from one record to another.
The main part of the form is where the restructuring begins. To accommodate the new options, the original table has been split into two parts, with the number of requirements placed in a separate records box. The rest of the fields were moved to the Skill Level Requirements tab, which is now oriented vertically, rather than horizontally. For the new options, a Section Assignment tab was added.
A description and explanation of the revised form, including new functionality is provided below.
PREVIOUS RELEASE
CURRENT RELEASE
MD0003-065Revision F
January 17, 2006Page 287 of 306
Labor Management (LM)What’s Enhanced
RequirementsThe Requirements table establishes the range of employees that could be needed, depending on the business forecast. For example, the breakfast shift might generate three levels of requirement: an average morning where only one person is needed, a moderately busy day, where two people are required, or a breakfast rush, when a third person is necessary. A separate record should be entered for each incremental increase in personnel.
Skill Level RequirementsThe Skill Level Requirements tab determines the breakdown of skills by the number of employees required. For example, if projected sales on Sunday morning are low — only one employee is needed — the manager might schedule someone with a skill level of Expert. Working alone, it makes sense to have someone who can handle tasks quickly and proficiently.
On the other hand, if the morning is expected to be busy, 3 servers might be needed. All three employees do not have to be experts, however. To save labor costs (without sacrificing efficiency), the manager may want to schedule one employee who has Expert skills and two who are simply Proficient.
Setup. When a Requirement value is highlighted, a set of default values is displayed in the Skill Levels table. A row is included for each of the skill levels defined in LM Setup | Time and Attendance | Skill Levels form. An additional row, labeled Any Level, is added to the bottom of the list.
Initially, the system assigns all employee requirements to the Any Level row. The value changes dynamically as entries are added to/deleted from other rows. The total for this column may not exceed the number specified in the highlighted Requirement record.
MD0003-065Revision FJanuary 17, 2006Page 288 of 306
Labor Management (LM)What’s Enhanced
Section AssignmentThe new Section Assignment tab contains options for linking an employee with the specified skill level to a physical section (station) and shift time.
Linking Sections. Suppose, for example, that Sunday’s schedule indicates 3 servers will be needed for breakfast. From experience, the manager already knows where the employees will be assigned — two in the dining room (designated Section 1) and one at the breakfast counter (Section 2). Since the counter person also handles the register for the entire restaurant, the manager also knows that this is where he needs to post the more skilled employee.
To link the sections, then, the manager highlights the Requirement record for 3 people. As described earlier, the Skill Level Requirements tab populates automatically, indicating that 1 Expert and 2 Proficient employees are needed.
MD0003-065Revision F
January 17, 2006Page 289 of 306
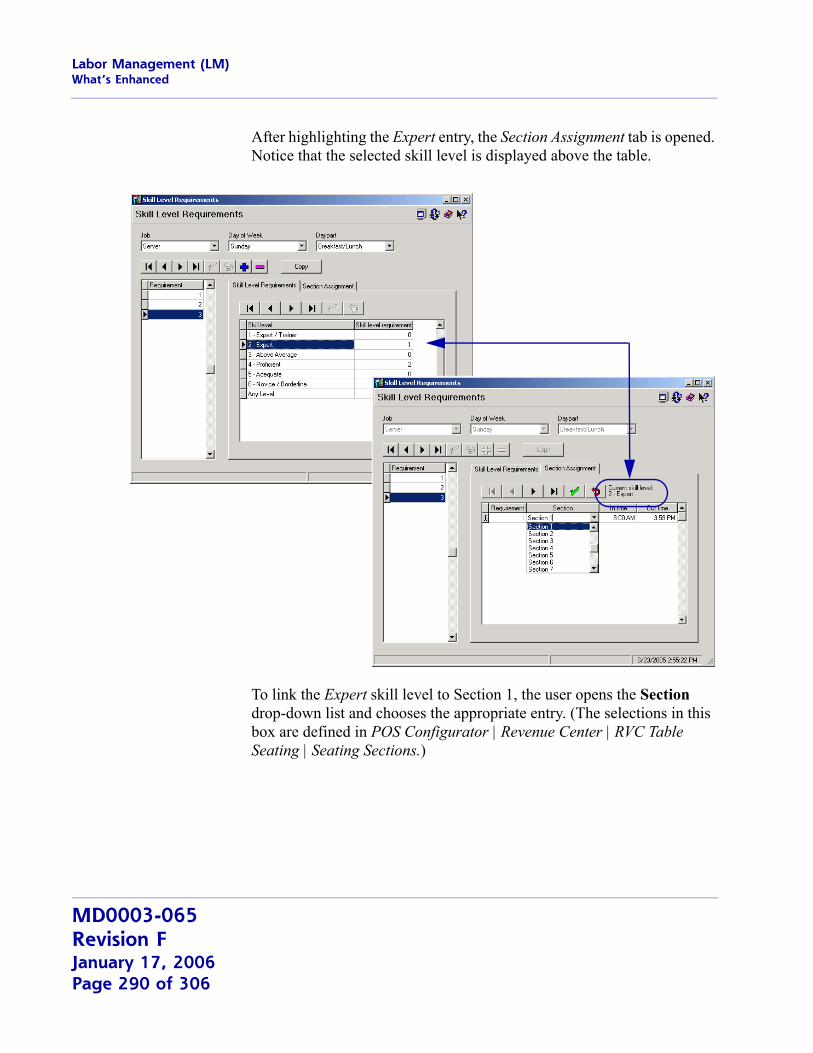
Labor Management (LM)What’s Enhanced
After highlighting the Expert entry, the Section Assignment tab is opened. Notice that the selected skill level is displayed above the table.
To link the Expert skill level to Section 1, the user opens the Section drop-down list and chooses the appropriate entry. (The selections in this box are defined in POS Configurator | Revenue Center | RVC Table Seating | Seating Sections.)
MD0003-065Revision FJanuary 17, 2006Page 290 of 306
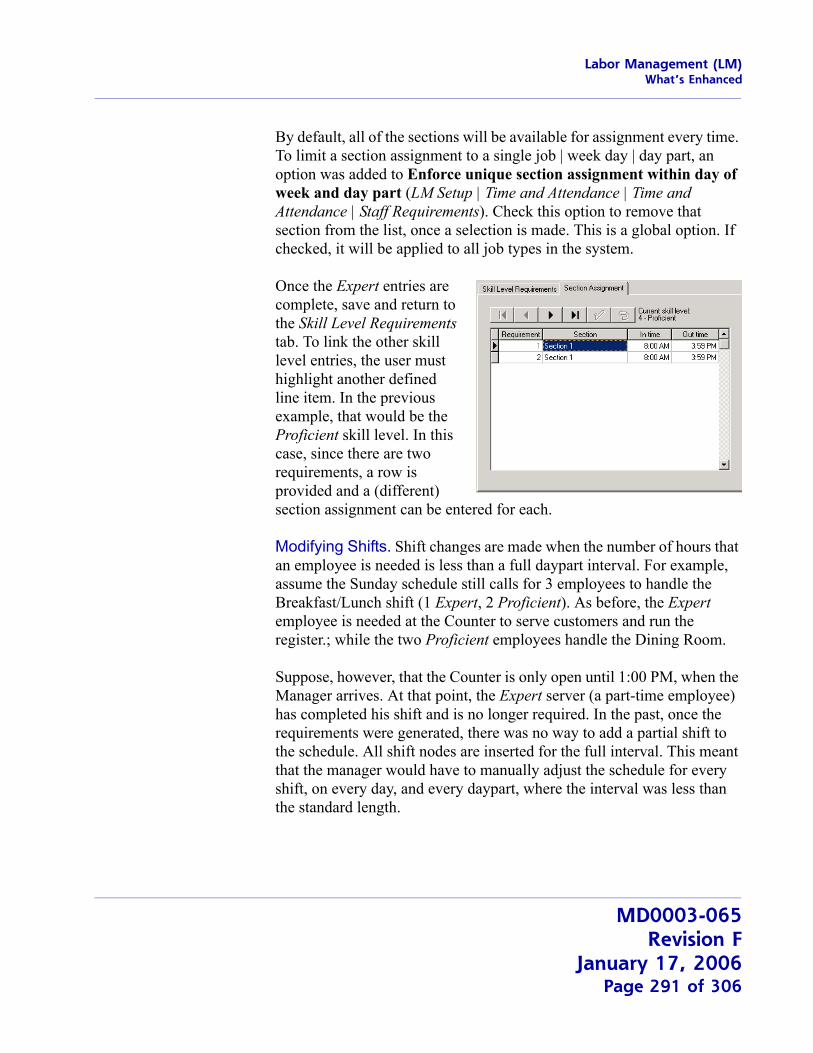
Labor Management (LM)What’s Enhanced
By default, all of the sections will be available for assignment every time. To limit a section assignment to a single job | week day | day part, an option was added to Enforce unique section assignment within day of week and day part (LM Setup | Time and Attendance | Time and Attendance | Staff Requirements). Check this option to remove that section from the list, once a selection is made. This is a global option. If checked, it will be applied to all job types in the system.
Once the Expert entries are complete, save and return to the Skill Level Requirements tab. To link the other skill level entries, the user must highlight another defined line item. In the previous example, that would be the Proficient skill level. In this case, since there are two requirements, a row is provided and a (different) section assignment can be entered for each.
Modifying Shifts. Shift changes are made when the number of hours that an employee is needed is less than a full daypart interval. For example, assume the Sunday schedule still calls for 3 employees to handle the Breakfast/Lunch shift (1 Expert, 2 Proficient). As before, the Expert employee is needed at the Counter to serve customers and run the register.; while the two Proficient employees handle the Dining Room.
Suppose, however, that the Counter is only open until 1:00 PM, when the Manager arrives. At that point, the Expert server (a part-time employee) has completed his shift and is no longer required. In the past, once the requirements were generated, there was no way to add a partial shift to the schedule. All shift nodes are inserted for the full interval. This meant that the manager would have to manually adjust the schedule for every shift, on every day, and every daypart, where the interval was less than the standard length.
MD0003-065Revision F
January 17, 2006Page 291 of 306
Labor Management (LM)What’s Enhanced
The addition of shift length variables improves useability of the feature by allowing managers to adjust the nodes before they are inserted into the schedule.
By default, the values in the In time/Out time fields display the start and end time for the Daypart selected. Managers can change these values by clicking in one of the fields and using the spin controls to change the hours and minutes.
LimitationsChanges in the shift intervals only affects the current values. Values outside the designated time frame (i.e., before the In time or after the Out time), will not be allowed.
In addition, these fields are not designed to split the hours for a skilled employee between two different sections. That is, if the daypart is 8 hours long, but the employee is only needed in Section 1 for 4 hours (from 8 AM to 12:00 NOON), the system does not consider this to be 1/2 a requirement. The manager cannot, for example, add another record to the table for the partial shift of 12:01 PM until 4:00 PM, and assign it to Section 2.
Finally, it should be noted that physical sections and modified shift intervals are ignored when auto generating weekly assignments. To take advantage of these attributes during scheduling, a new View Shifts feature has been added to the Scheduling | Weekly Assignments form. Refer to the discussion of SRG with Enhanced Skill Level Requirements, beginning on page 282, for more on this topic.
MD0003-065Revision FJanuary 17, 2006Page 292 of 306
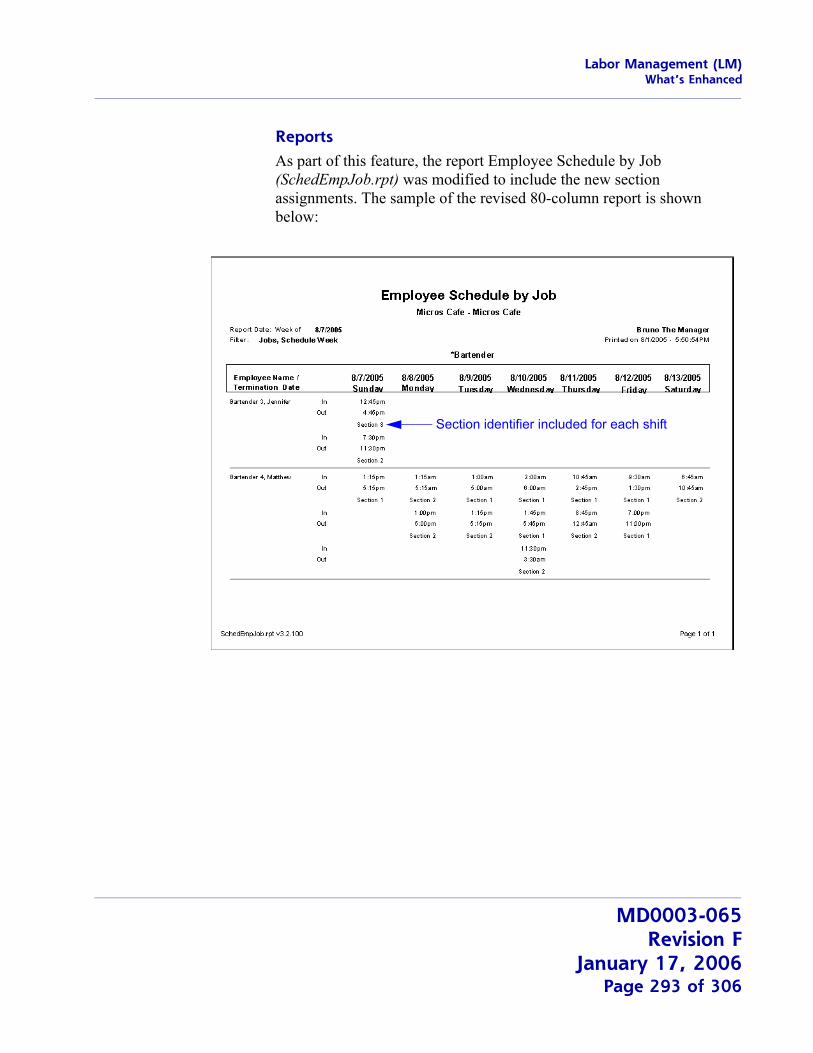
Labor Management (LM)What’s Enhanced
ReportsAs part of this feature, the report Employee Schedule by Job (SchedEmpJob.rpt) was modified to include the new section assignments. The sample of the revised 80-column report is shown below:
Section identifier included for each shift
MD0003-065Revision F
January 17, 2006Page 293 of 306

Labor Management (LM)What’s Revised
What’s Revised A revision is defined as a correction made to any existing form, feature, or function currently resident in the LM software. To qualify as a revision, the change must satisfy the following criteria:
The basic form, feature, or functionality must be part of the previous version of the software.
The change must replace the current item or remove it from the application.
Revisions Summarized
The table below summarizes the revisions included in this version.
Module Feature CR ID Page
Documentation Terminating a Salaried Employee N/A 296
Forecasting Forecasts Incorrect If Daypart Spans Midnight
N/A 296
Human Resources
Primary Job Incorrectly Unchecked After Error Cleared
N/A 296
Salaried Employees Not Posting Hours As Expected
N/A 297
LM Setup Posted Salary Information Not Amended for Terminated Employee
N/A 298
Skill Level Form Incorrectly Lists Non-Clock Jobs and Unrelated Dayparts
N/A 298
User Permission Not Enforced for Auto Scheduling
N/A 298
Reports Employee Payroll Summary Does Not Handle Duplicate Names
N/A 299
Employee Schedule Not Sorting Clock-In/Out Times Correctly
17200 299
MD0003-065Revision FJanuary 17, 2006Page 294 of 306
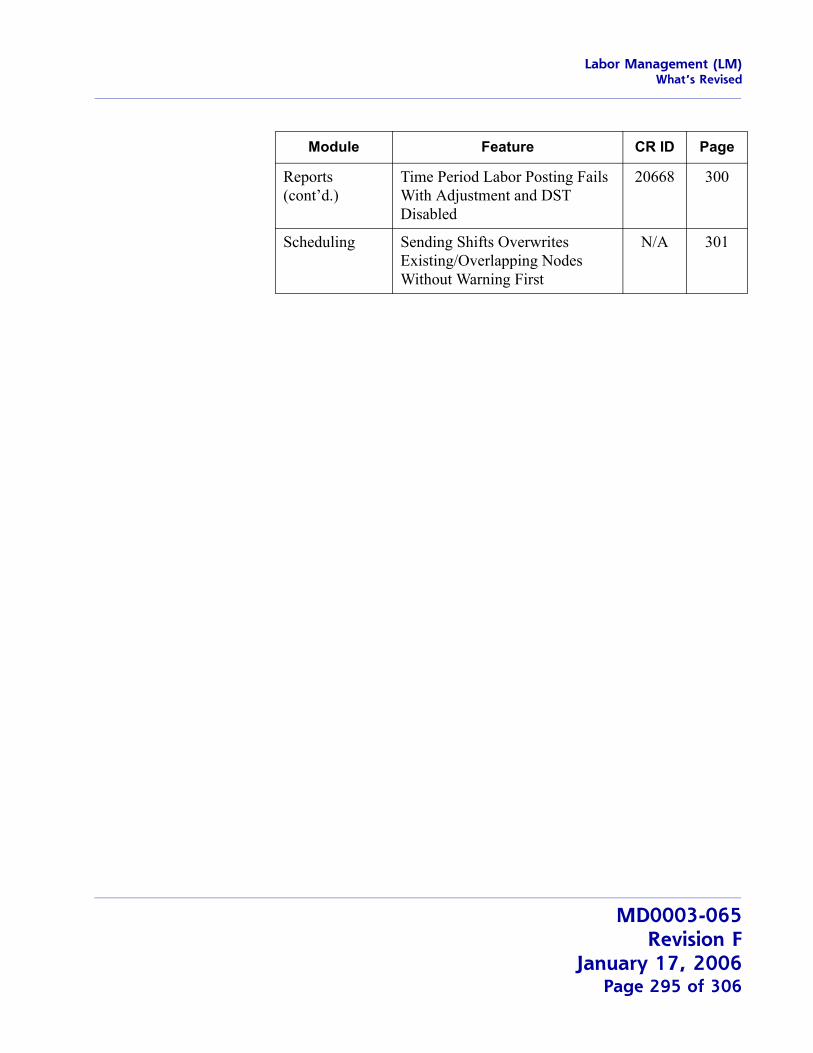
Labor Management (LM)What’s Revised
Reports (cont’d.)
Time Period Labor Posting Fails With Adjustment and DST Disabled
20668 300
Scheduling Sending Shifts Overwrites Existing/Overlapping Nodes Without Warning First
N/A 301
Module Feature CR ID Page
MD0003-065Revision F
January 17, 2006Page 295 of 306
Labor Management (LM)What’s Revised
Revisions Detailed
Documentation
Terminating a Salaried EmployeeCR ID #: N/A
When a salaried employee is terminated before the weekly salary data is posted, the employee will only be paid up to the day before the date entered on the Employee Setup form. Although this has caused some confusion, it is by design. The system does not consider the Termination Date to be a work day.
To avoid short-changing the employee’s pay, users are reminded to enter the day AFTER the last day of paid employment in the Termination Date field (Employee Setup | Employee Status).
Forecasting
Forecast Incorrect if Daypart Spans MidnightCR ID #: N/A
When generating a forecast, the system failed to include data for any daypart whose time spanned two calendar days (i.e., before and after midnight of the same day). This problem has been corrected.
Human Resources
Primary Job Incorrectly Unchecked After Error ClearedCR ID #: N/A
During employee setup, when a user assigns an override rate for an employee’s primary job that is higher than the maximum rate, an error message is posted. This is correct. In the past, however, when the OK button was pressed to close the dialog box, the system would improperly uncheck the box for the primary job selection. This has been corrected.
MD0003-065Revision FJanuary 17, 2006Page 296 of 306
Labor Management (LM)What’s Revised
Salaried Employees Not Posting Hours As ExpectedCR ID #: N/A
In previous releases, there was some confusion about how the system calculated hours in the labor category fields when a salaried employee was required to clock in and out of the POS.
To clarify, salaried wages are allocated across the labor week based on the value entered in Number of hours in a salaried labor week (POS Configurator | Employees | Time and Attendance | General). This field is used to allocate the annual pay of a salaried employee over the number of hours that the employee is expected to work -- not the number of hours they are physically present on the job. In other words, salaried wages neither increase nor decrease if the employee works more or less hours than the expected total for the year.
In calculating the labor totals, users often contributed to the confusion by posting values to the database in the wrong order. To correct this problem, MICROS recommends adding the following stored procedures to the End-of-Night Autosequence, and running them in the order listed:
#133 — Post Time Card Totals#132 — Post Job Code Totals#142 — Post Time Period Labor Totals#9700 — Post Employee Salary
MD0003-065Revision F
January 17, 2006Page 297 of 306
Labor Management (LM)What’s Revised
LM Setup
Posted Salary Information Not Amended for Terminated EmployeeCR ID #: N/A
Pay information on terminated employees did not update properly if the person was fired after the weekly salary data had been posted. For example, if the projected salaries were posted for the Labor Week running from Sunday to Saturday, and the employee was fired on Tuesday, the system did not remove pay data for the days not worked (i.e., Tuesday through Saturday).
To correct this problem, the stored procedure splm_PostWeeklySalary has been modified to correct for terminated employees. To implement, users must manually rerun posting once the employee’s status has been changed in the database.
Skill Level Requirements Form Incorrectly Lists Non-Clock Jobs and Unrelated DaypartsCR ID #: N/A
When making selections in the Skill Level Requirements form (LM | Staff Requirements), the Jobs drop-down list failed to filter out non-clock type entries while the Dayparts drop-down included dayparts that were not linked to the selected weekday. Both filters have been corrected.
User Permissions Not Enforced for Auto-SchedulingCR ID #: N/A
After generating requirements for the next schedule week, LM users were able to make changes in the Edit Requirements form even though the Scheduling option Edit Requirements was set to ‘None’ (LM | General | Security Access) for their back office employee class. This has been corrected.
MD0003-065Revision FJanuary 17, 2006Page 298 of 306
Labor Management (LM)What’s Revised
Reports
The table below describes the report changes in this Service Pack:
Report Area Modified Description
Employee Payroll Summary
CR ID #: N/A
Templatea When running the Employee Payroll Summary Report, if the database included two employees with the same first and last names, but different employee IDs, the system would group both of their hours and earnings under the first one listed (i.e., lowest object number) in the database. This problem has been corrected.
Employee Schedule
CR ID #: 17200
Stored Procedureb
When using split shifts, the Employee Schedule (EmpSched.rpt) report was not sorting the clock-in and clock out times correctly for individual days. This has been corrected.
MD0003-065Revision F
January 17, 2006Page 299 of 306
Labor Management (LM)What’s Revised
a File Changed:
PPEmpPayrollSummary.rptb File Changed:
speo_R_sched_info.sqlc File Changed:
sp_post_time_prd_time_card_ttls.sql
Time Period Labor Posting Fails During EON Sequence
CR ID #: 20668
Stored Procedurec
When running an End-of-Night Sequence, the system would produce the following error: “fixed_period_seq in dly_svc_ fixed_prd_ttl cannot be null”.
The problem occurred when the business day ended in the first fixed time period (Midnight to 12:15 AM). If a time card spanned the entire business date or longer, the system would attempt to post an extra full day to that employees time card record.
This problem has been corrected.
MD0003-065Revision FJanuary 17, 2006Page 300 of 306
Labor Management (LM)What’s Revised
Scheduling
Sending Shifts Overwrites Existing/Overlapping Nodes Without Warning FirstCR ID #: N/A
When generating weekly schedules (Scheduling | Weekly Assignments), users could right-click on an existing shift node and send it to an employee who already had a job scheduled (whole or in part) for that shift. When this occurred, the system would simply overwrite the existing data, replacing it with the new shift requirements. This would result in some jobs not being scheduled properly.
To correct the overwrite problem, the system will now display a message and prompt for confirmation before overwriting a job scheduled during that period. For more on this topic, refer to the new feature SRG by Physical Sections, beginning on page 282.
MD0003-065Revision F
January 17, 2006Page 301 of 306

Financial Management (FM)What’s New
Financial Management (FM)
What’s New There are no new features in this version of the software.
What’s Enhanced There are no enhancements in this version of the software.
What’s Revised There are no revisions in this version of the software.
MD0003-065Revision FJanuary 17, 2006Page 302 of 306
RES PlatformIntroduction
RES Platform
Introduction This chapter comprises changes made to RES Platform, which includes the following applications:
MICROS Desktop
License Manager
Reports Explorer
Language Translation Utility
What’s New There are no new features in this version of the software.
What’s Enhanced An enhancement is defined as a change made to improve or extend the functionality of the current 3700 POS application. To qualify as an enhancement, the change must satisfy the following criteria:
The basic feature or functionality already exists in the previous release of the software.
The change adds to or extends the current process. This differs from a revision (i.e., a bug fix) which corrects a problem not caught in the previous release of the software.
MD0003-065Revision F
January 17, 2006Page 303 of 306
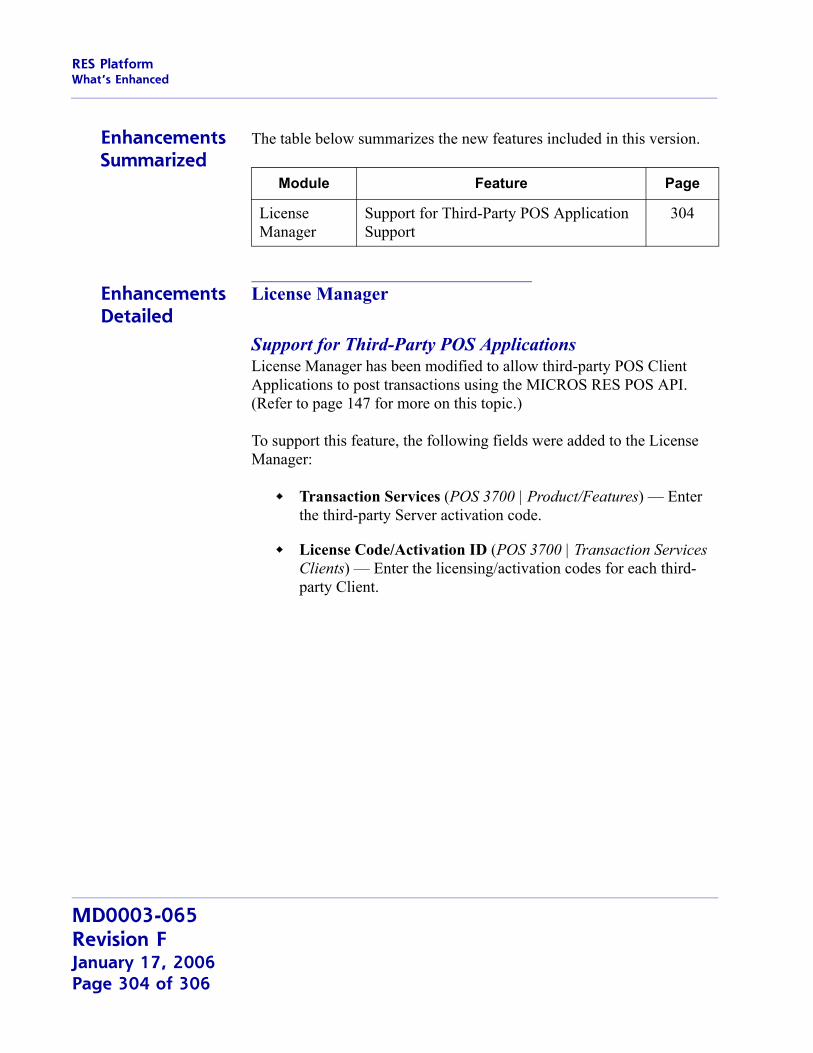
RES PlatformWhat’s Enhanced
Enhancements Summarized
The table below summarizes the new features included in this version.
Enhancements Detailed
License Manager
Support for Third-Party POS ApplicationsLicense Manager has been modified to allow third-party POS Client Applications to post transactions using the MICROS RES POS API. (Refer to page 147 for more on this topic.)
To support this feature, the following fields were added to the License Manager:
Transaction Services (POS 3700 | Product/Features) — Enter the third-party Server activation code.
License Code/Activation ID (POS 3700 | Transaction Services Clients) — Enter the licensing/activation codes for each third-party Client.
Module Feature Page
License Manager
Support for Third-Party POS Application Support
304
MD0003-065Revision FJanuary 17, 2006Page 304 of 306
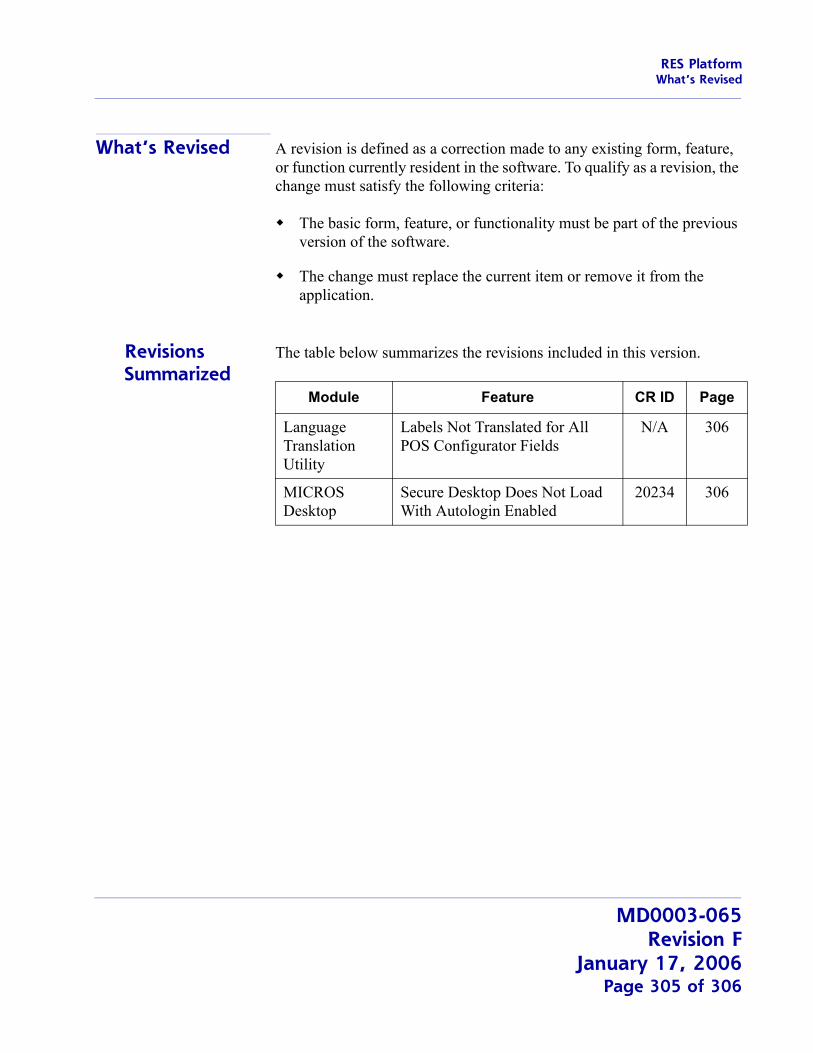
RES PlatformWhat’s Revised
What’s Revised A revision is defined as a correction made to any existing form, feature, or function currently resident in the software. To qualify as a revision, the change must satisfy the following criteria:
The basic form, feature, or functionality must be part of the previous version of the software.
The change must replace the current item or remove it from the application.
Revisions Summarized
The table below summarizes the revisions included in this version.
Module Feature CR ID Page
Language Translation Utility
Labels Not Translated for All POS Configurator Fields
N/A 306
MICROS Desktop
Secure Desktop Does Not Load With Autologin Enabled
20234 306
MD0003-065Revision F
January 17, 2006Page 305 of 306

RES PlatformWhat’s Revised
Revisions Detailed
Language Translation Utility
Labels Not Translated for All POS Configurator FieldsCR ID #: N/A
When running the language translation utility (Start | Programs | MICROS Applications | Utilities | Language Administration), not all of the POS Configurator fields were being translated or linked correctly. This problem has been corrected.
MICROS Desktop
Secure Desktop Does Not Load With Autologin EnabledCR ID #: 20234
On machines that have many services set to auto-start, the MICROS Desktop would not automatically launch in secure mode when the system was configured for autologin at startup. This problem has been corrected.
MD0003-065Revision FJanuary 17, 2006Page 306 of 306
Related Documents


![Restaurant Enterprise Series (RES) Version 3.1 … · methods — one for standard debit transactions ... Menu Item Waste 8 ... prefix condiments, such as [NO], [EXTRA], and ...](https://static.cupdf.com/doc/110x72/5b677db17f8b9af77c8b5b3d/restaurant-enterprise-series-res-version-31-methods-one-for-standard.jpg)