Owner’s Guide Residential Hydraulic Elevator Series 114 116

Welcome message from author
This document is posted to help you gain knowledge. Please leave a comment to let me know what you think about it! Share it to your friends and learn new things together.
Transcript

HYDRAULIC ELEVATOR OWNER’S GUIDE 1
Owner’s GuideResidential
Hydraulic Elevator
Series 114116

HYDRAULIC ELEVATOR OWNER’S GUIDE 2
HYDRAULIC ELEVATOR OWNER’S GUIDE 3
Introduction..................................................................................................................................................................4Serial Number .............................................................................................................................................................4Maintenance and Service ........................................................................................................................................4Important Operating Note........................................................................................................................................5Safety Features & Assumption of Risk....................................................................................................................6Basic Elevator Operating Instructions..............................................................................................................7Descriptive Features.............................................................................................................................................8-10Basic Troubleshooting.......................................................................................................11Emergency Procedures..................................................................................................................................12-16Description of Programs....................................................................................................................................17-22Limited Warranty.......................................................................................................................................................23Limited Upgrade Warranty.................................................................................................................................24Is My Elevator safe? True or False Form.....................................................................................................25-27 Your Elevator 101......................................................................................................................................................28Notes......................................................................................................................................................29
Table of Contents
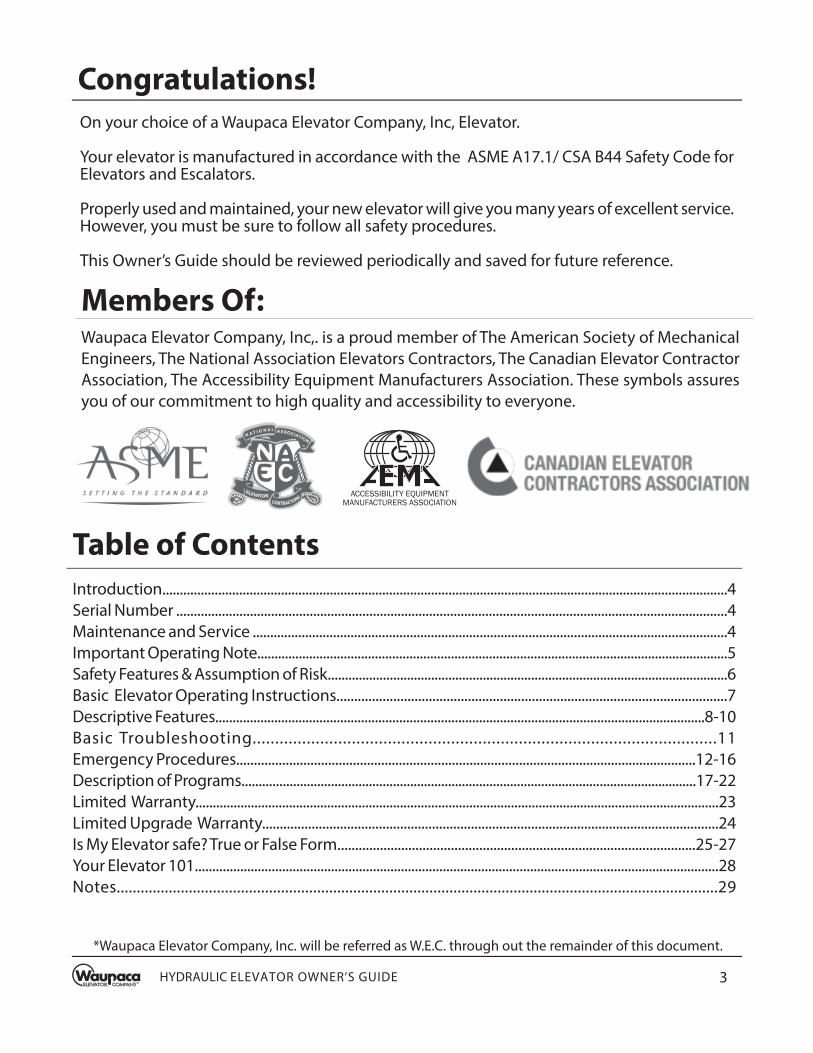
On your choice of a Waupaca Elevator Company, Inc, Elevator.
Your elevator is manufactured in accordance with the ASME A17.1/ CSA B44 Safety Code for Elevators and Escalators.
Properly used and maintained, your new elevator will give you many years of excellent service. However, you must be sure to follow all safety procedures.
This Owner’s Guide should be reviewed periodically and saved for future reference.
*Waupaca Elevator Company, Inc. will be referred as W.E.C. through out the remainder of this document.
Congratulations!
Waupaca Elevator Company, Inc,. is a proud member of The American Society of Mechanical Engineers, The National Association Elevators Contractors, The Canadian Elevator Contractor Association, The Accessibility Equipment Manufacturers Association. These symbols assures you of our commitment to high quality and accessibility to everyone.
Members Of:
4
Elevator Dealer Information
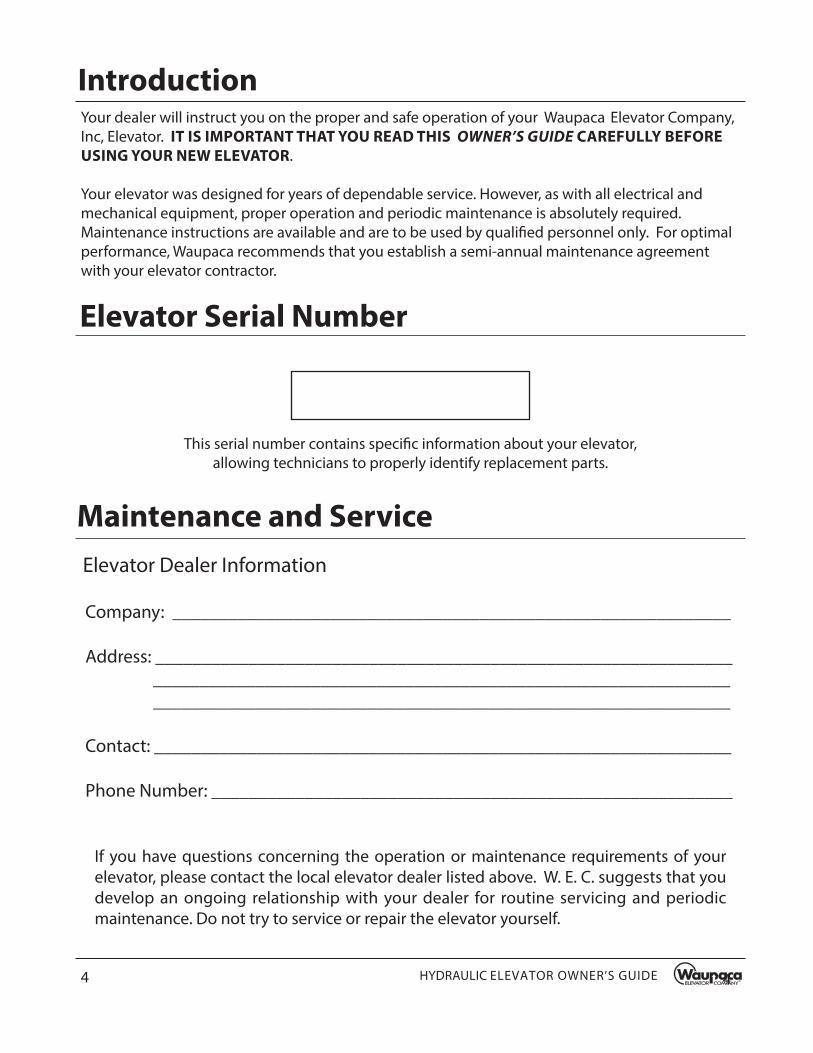
IntroductionYour dealer will instruct you on the proper and safe operation of your Waupaca Elevator Company, Inc, Elevator. IT IS IMPORTANT THAT YOU READ THIS OWNER’S GUIDE CAREFULLY BEFORE
USING YOUR NEW ELEVATOR.
Your elevator was designed for years of dependable service. However, as with all electrical and mechanical equipment, proper operation and periodic maintenance is absolutely required. Maintenance instructions are available and are to be used by qualifi ed personnel only. For optimal performance, Waupaca recommends that you establish a semi-annual maintenance agreement with your elevator contractor.
This serial number contains specifi c information about your elevator, allowing technicians to properly identify replacement parts.
Elevator Serial Number
Maintenance and Service
If you have questions concerning the operation or maintenance requirements of your elevator, please contact the local elevator dealer listed above. W. E. C. suggests that you develop an ongoing relationship with your dealer for routine servicing and periodic maintenance. Do not try to service or repair the elevator yourself.
Company: ____________________________________________________________
Address: ______________________________________________________________ ______________________________________________________________ ___ ___________________________________________________________
Contact: ______________________________________________________________
Phone Number: ________________________________________________________
HYDRAULIC ELEVATOR OWNER’S GUIDE 4
HYDRAULIC ELEVATOR OWNER’S GUIDE 5
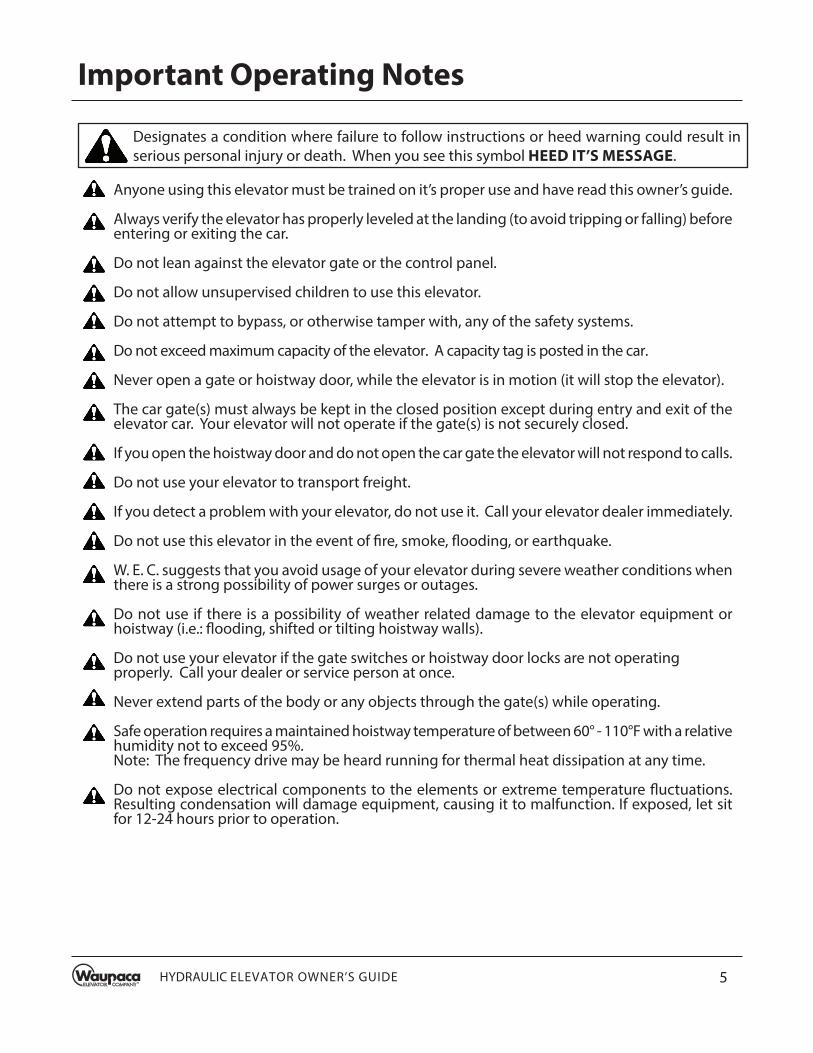
Anyone using this elevator must be trained on it’s proper use and have read this owner’s guide.
Always verify the elevator has properly leveled at the landing (to avoid tripping or falling) before entering or exiting the car.
Do not lean against the elevator gate or the control panel.
Do not allow unsupervised children to use this elevator.
Do not attempt to bypass, or otherwise tamper with, any of the safety systems.
Do not exceed maximum capacity of the elevator. A capacity tag is posted in the car.
Never open a gate or hoistway door, while the elevator is in motion (it will stop the elevator).
The car gate(s) must always be kept in the closed position except during entry and exit of the elevator car. Your elevator will not operate if the gate(s) is not securely closed.
If you open the hoistway door and do not open the car gate the elevator will not respond to calls.
Do not use your elevator to transport freight.
If you detect a problem with your elevator, do not use it. Call your elevator dealer immediately.
Do not use this elevator in the event of fi re, smoke, fl ooding, or earthquake.
W. E. C. suggests that you avoid usage of your elevator during severe weather conditions when there is a strong possibility of power surges or outages.
Do not use if there is a possibility of weather related damage to the elevator equipment or hoistway (i.e.: fl ooding, shifted or tilting hoistway walls).
Do not use your elevator if the gate switches or hoistway door locks are not operating properly. Call your dealer or service person at once.
Never extend parts of the body or any objects through the gate(s) while operating.
Safe operation requires a maintained hoistway temperature of between 60° - 110°F with a relative humidity not to exceed 95%.Note: The frequency drive may be heard running for thermal heat dissipation at any time.
Do not expose electrical components to the elements or extreme temperature fl uctuations. Resulting condensation will damage equipment, causing it to malfunction. If exposed, let sit for 12-24 hours prior to operation.
Important Operating Notes
Designates a condition where failure to follow instructions or heed warning could result in serious personal injury or death. When you see this symbol HEED IT’S MESSAGE.
6
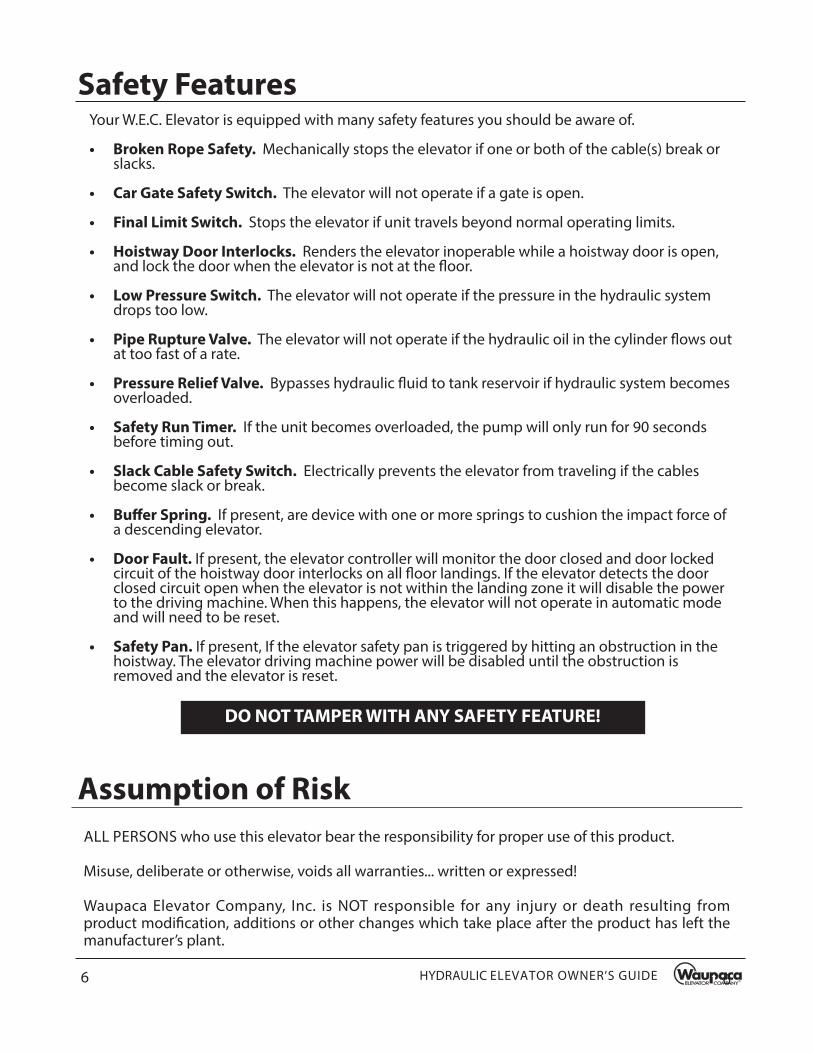
Assumption of Risk
ALL PERSONS who use this elevator bear the responsibility for proper use of this product.
Misuse, deliberate or otherwise, voids all warranties... written or expressed!
Waupaca Elevator Company, Inc. is NOT responsible for any injury or death resulting from product modifi cation, additions or other changes which take place after the product has left the manufacturer’s plant.
DO NOT TAMPER WITH ANY SAFETY FEATURE!
Your W.E.C. Elevator is equipped with many safety features you should be aware of. • Broken Rope Safety. Mechanically stops the elevator if one or both of the cable(s) break or
slacks.
• Car Gate Safety Switch. The elevator will not operate if a gate is open. • Final Limit Switch. Stops the elevator if unit travels beyond normal operating limits.
• Hoistway Door Interlocks. Renders the elevator inoperable while a hoistway door is open, and lock the door when the elevator is not at the fl oor.
• Low Pressure Switch. The elevator will not operate if the pressure in the hydraulic system drops too low.
• Pipe Rupture Valve. The elevator will not operate if the hydraulic oil in the cylinder fl ows out at too fast of a rate.
• Pressure Relief Valve. Bypasses hydraulic fl uid to tank reservoir if hydraulic system becomes overloaded.
• Safety Run Timer. If the unit becomes overloaded, the pump will only run for 90 seconds before timing out.
• Slack Cable Safety Switch. Electrically prevents the elevator from traveling if the cables become slack or break.
• Buff er Spring. If present, are device with one or more springs to cushion the impact force of a descending elevator.
• Door Fault. If present, the elevator controller will monitor the door closed and door locked circuit of the hoistway door interlocks on all fl oor landings. If the elevator detects the door closed circuit open when the elevator is not within the landing zone it will disable the power to the driving machine. When this happens, the elevator will not operate in automatic mode and will need to be reset.
• Safety Pan. If present, If the elevator safety pan is triggered by hitting an obstruction in the hoistway. The elevator driving machine power will be disabled until the obstruction is removed and the elevator is reset.
Safety Features
HYDRAULIC ELEVATOR OWNER’S GUIDE 6

HYDRAULIC ELEVATOR OWNER’S GUIDE 7
Basic Elevator Operating Instructions
Note: The descriptions and specifi cations contained in this guide were in eff ect at the time the guide was approved for printing. Waupaca Elevator Company, Inc., reserves the right to discontinue models without notice and without incurring obligation. The equipment described within this guide may not be identifi ed as either standard or optional and the various illustrations may not all be applicable to your particular unit. If you have questions, always check with your Elevator Dealer.
1. Press the Call Button - This will call the elevator to your fl oor and allow you to open the hoistway door.
2. Open the Hoistway Door - Open the door or the auto door will open once the elevator has come to a complete stop at your fl oor.
3. Check for Leveling - Visually verify the elevator has leveled properly, to avoid tripping or falling.
4. Open the Gate. Automatic Gate Operation: The gate will automatically open. Manual Gate Operation: Slide the gate open. Always use the gate handle.
5. Enter the Elevator.
6. Close the Hoistway Door - Manually close the door or the auto door will close after you. The elevator will not operate unless the hoistway door is completely closed.
7. Close the Gate. Automatic Gate Operation: The gate operator will automatically close the gate once the hoistway door is
closed. Manual Gate Operation: Slide the gate closed. Always use the gate handle.
8. Press the Desired Floor Button.
9. Complete Travel - Wait for the elevator to complete its travel to the desired fl oor and come to a complete stop.
10. Open the Gate. Automatic Gate Operation: The gate will automatically open. Manual Gate Operation: Slide the gate open. Always use the gate handle.
11. Check for Leveling - Visually verify the elevator has leveled properly before stepping out of the elevator to avoid tripping or falling.
12. Open the Hoistway Door - Open the door or the auto door will open once the elevator has come to a complete stop at your fl oor.
13. Exit Elevator
14. Close Gate Automatic Gate Operation: The gate operator will automatically close the gate once the hoistway door
is closed. Manual Gate Operation: Firmly close the gate before the hoistway door as you exit the elevator.
15. Close the Hoistway Door - Manually close the door securely or the auto door will close for you as you exit the elevator.
Note: The elevator will not respond to another call if the gate to the hoistway door is not completely closed.
If you open the hoistway door and do not open the gate the elevator will not respond to calls.
8
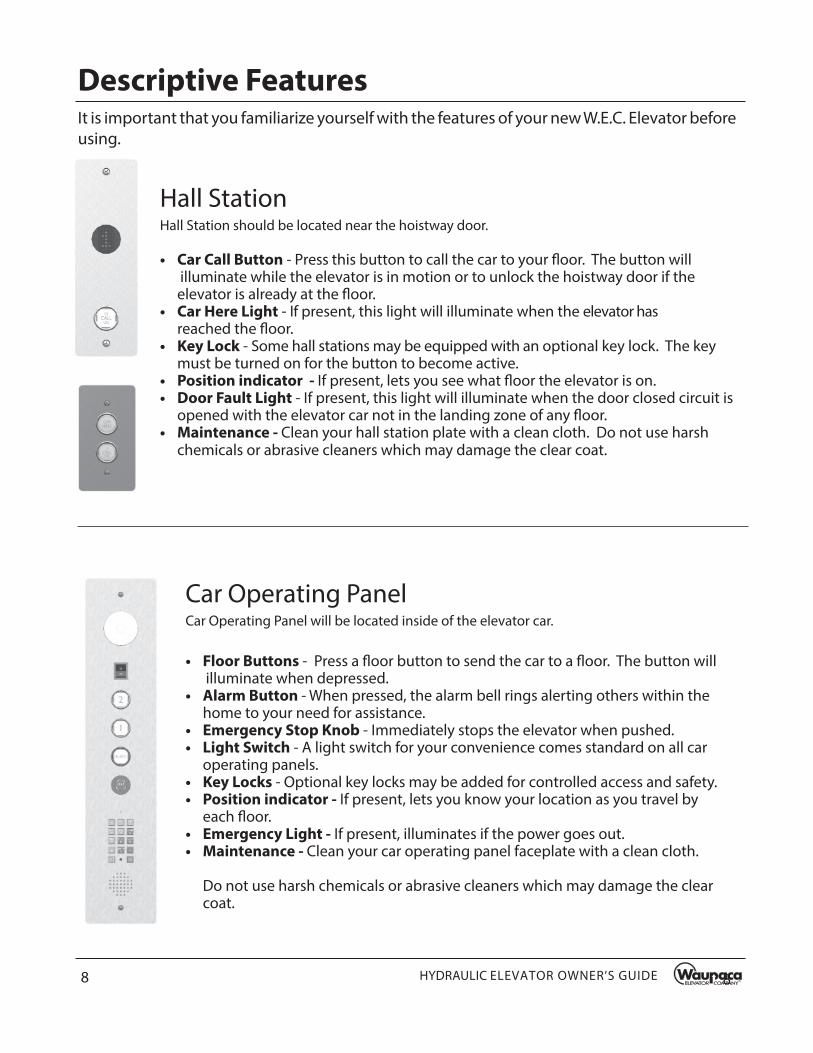
Descriptive FeaturesIt is important that you familiarize yourself with the features of your new W.E.C. Elevator before using.
Hall StationHall Station should be located near the hoistway door.
• Car Call Button - Press this button to call the car to your fl oor. The button will illuminate while the elevator is in motion or to unlock the hoistway door if the
elevator is already at the fl oor.• Car Here Light - If present, this light will illuminate when the elevator has
reached the fl oor. • Key Lock - Some hall stations may be equipped with an optional key lock. The key
must be turned on for the button to become active.• Position indicator - If present, lets you see what fl oor the elevator is on.• Door Fault Light - If present, this light will illuminate when the door closed circuit is
opened with the elevator car not in the landing zone of any fl oor. • Maintenance - Clean your hall station plate with a clean cloth. Do not use harsh
chemicals or abrasive cleaners which may damage the clear coat.
HYDRAULIC ELEVATOR OWNER’S GUIDE 8
Car Operating PanelCar Operating Panel will be located inside of the elevator car.
• Floor Buttons - Press a fl oor button to send the car to a fl oor. The button will illuminate when depressed.• Alarm Button - When pressed, the alarm bell rings alerting others within the
home to your need for assistance.• Emergency Stop Knob - Immediately stops the elevator when pushed.• Light Switch - A light switch for your convenience comes standard on all car
operating panels.• Key Locks - Optional key locks may be added for controlled access and safety.• Position indicator - If present, lets you know your location as you travel by
each fl oor. • Emergency Light - If present, illuminates if the power goes out.• Maintenance - Clean your car operating panel faceplate with a clean cloth. Do not use harsh chemicals or abrasive cleaners which may damage the clear
coat.
HYDRAULIC ELEVATOR OWNER’S GUIDE 9
Descriptive Features Continued...
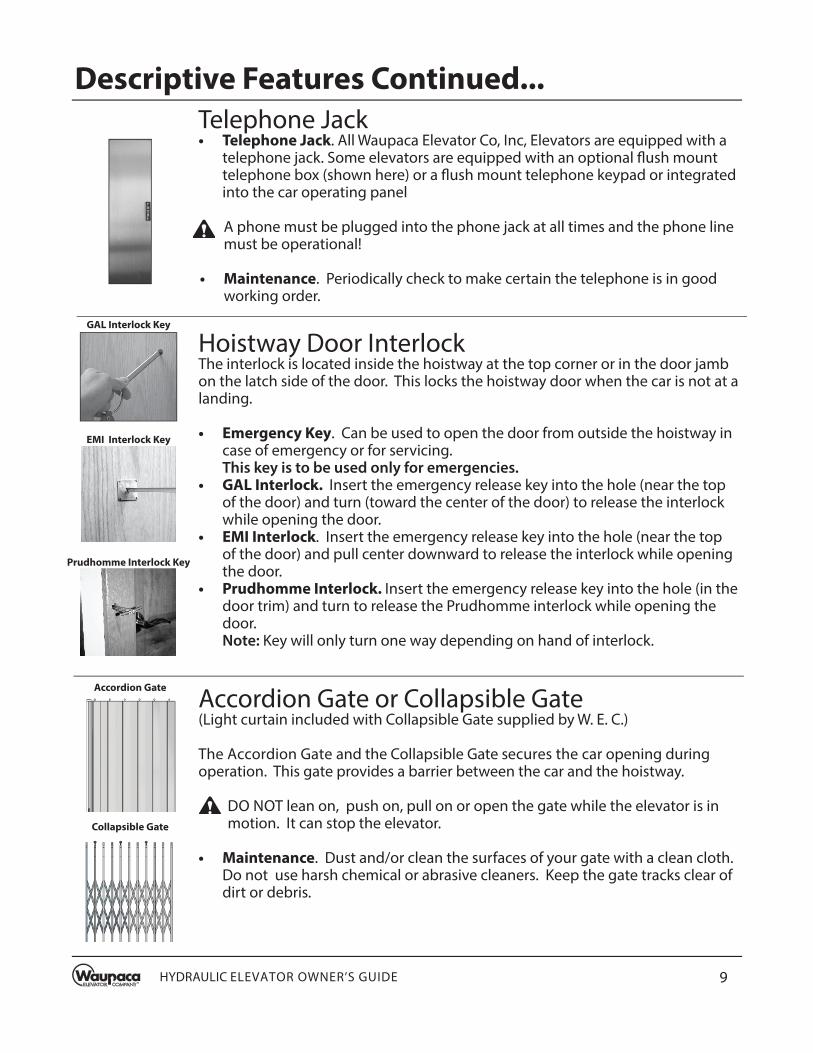
Telephone Jack• Telephone Jack. All Waupaca Elevator Co, Inc, Elevators are equipped with a
telephone jack. Some elevators are equipped with an optional fl ush mount telephone box (shown here) or a fl ush mount telephone keypad or integrated into the car operating panel
A phone must be plugged into the phone jack at all times and the phone line must be operational!
• Maintenance. Periodically check to make certain the telephone is in good working order.
GAL Interlock Key
EMI Interlock Key
Accordion Gate
Collapsible Gate
Hoistway Door Interlock The interlock is located inside the hoistway at the top corner or in the door jambon the latch side of the door. This locks the hoistway door when the car is not at alanding.
• Emergency Key. Can be used to open the door from outside the hoistway in case of emergency or for servicing. This key is to be used only for emergencies.
• GAL Interlock. Insert the emergency release key into the hole (near the top of the door) and turn (toward the center of the door) to release the interlock while opening the door.
• EMI Interlock. Insert the emergency release key into the hole (near the top of the door) and pull center downward to release the interlock while opening the door.
• Prudhomme Interlock. Insert the emergency release key into the hole (in the door trim) and turn to release the Prudhomme interlock while opening the door.
Note: Key will only turn one way depending on hand of interlock.
Accordion Gate or Collapsible Gate(Light curtain included with Collapsible Gate supplied by W. E. C.)
The Accordion Gate and the Collapsible Gate secures the car opening during operation. This gate provides a barrier between the car and the hoistway.
DO NOT lean on, push on, pull on or open the gate while the elevator is in motion. It can stop the elevator.
• Maintenance. Dust and/or clean the surfaces of your gate with a clean cloth. Do not use harsh chemical or abrasive cleaners. Keep the gate tracks clear of dirt or debris.
Prudhomme Interlock Key

10
Automatic Door OperatorAutomatically opens and closes the Hoistway Door of the elevator.
• Convenience. One less step to remember during the operation of your new elevator.
• Hands Free. Very helpful for those with limited mobility and strength.• Versatile . Can be used with interior or exterior doors.
Automatic Gate OperatorAutomatically opens and closes the accordion car gate of the elevator. This option is only available with accordion gates.
• Convenience. One less step to remember during the operation of your new elevator.
• Hands Free. Very helpful for those with limited mobility and strength.• Out of Sight. The automatic gate operator is mounted on the top of the
elevator car.
Descriptive Features Continued...
HYDRAULIC ELEVATOR OWNER’S GUIDE 10

HYDRAULIC ELEVATOR OWNER’S GUIDE 11
Before Calling for Service...
Verify the elevator has power.
If you open the hoistway door and do not open the gate the elevator will not respond to calls.
Check the red emergency knob on car operating panel by pushing and then pulling the knob back into proper running position.
Verify that all gates and hoistway doors are securely closed by opening and closing the doors and gates. The elevator will not operate if a gate or door is partially open.
Pushing call buttons or fl oor buttons repeatedly will delay operation and potentially shut down controls. Wait 7 seconds between calls.
Do not attempt to repair the elevator yourself.
If your elevator still will not function call your elevator dealer immediately.
Basic Troubleshooting

12
Emergency Battery Lowering of CarIn the case of a power failure, the battery backup allows the elevator’s occupant(s) to travel to any chosen fl oor below the elevators current position. Select the desired fl oor by pushing the appropriate fl oor button after 7 seconds.
Follow your standard elevator exiting procedures.
Call your dealer for service if the elevator has not reset itself after power is restored and/or if the battery back up systems did not work.
Emergency Procedures
Push the Alarm Button to alert others in home that you’re in need of help.
Stay calm and call for help on the telephone.
This procedure must only be used during an emergency. If the elevator is experiencing stalling call for service immediately.
Push the emergency stop knob on COP before starting the manually lower procedures.
The main elevator service disconnect (located in the control space) must be in the “OFF” position and the main elevator circuit breaker for the elevator circuits must be “OFF”.
Emergency Manual Lowering of Elevator Car
If you are unable to send the elevator to a lower fl oor, you can manually lower the car by using the Emergency Manual Lowering Knob:
1. Verify that the service disconnect is in the “OFF” position.
2. Push the Emergency Stop Knob on the Car Operating Panel inside the elevator car.
3. On the hyrdaulic valve there is a bright red Emergency Manual Lowering Knob.
4. Slowly turn the knob counter-clockwise until the car moves at a controlled rate.
5. Turn the knob clockwise to stop the elevator car from lowering at the nearest fl oor below the stalled location.
6. Manually open the gate and hoistway door to exit the elevator car.
7. Call for immediate service of the elevator before continuing to operate the unit.
Note: Car occupant(s) and rescuer(s) will need to work together.
Note: If the elevator car is not going down go to the manual rising page
SEVERE INJURY COULD RESULT IF THE ELEVATOR SHOULD START UP OR ENERGIZE IN THE MIDDLE OF AN EMERGENCY EXTRACTION.
Note: It is normal if you hear a hissing when Emergency Manual Lowering
Knob is being turned and the elevator car is
moving.
Emergency Manual
Lowering Knob
HYDRAULIC ELEVATOR OWNER’S GUIDE 12
HYDRAULIC ELEVATOR OWNER’S GUIDE 13
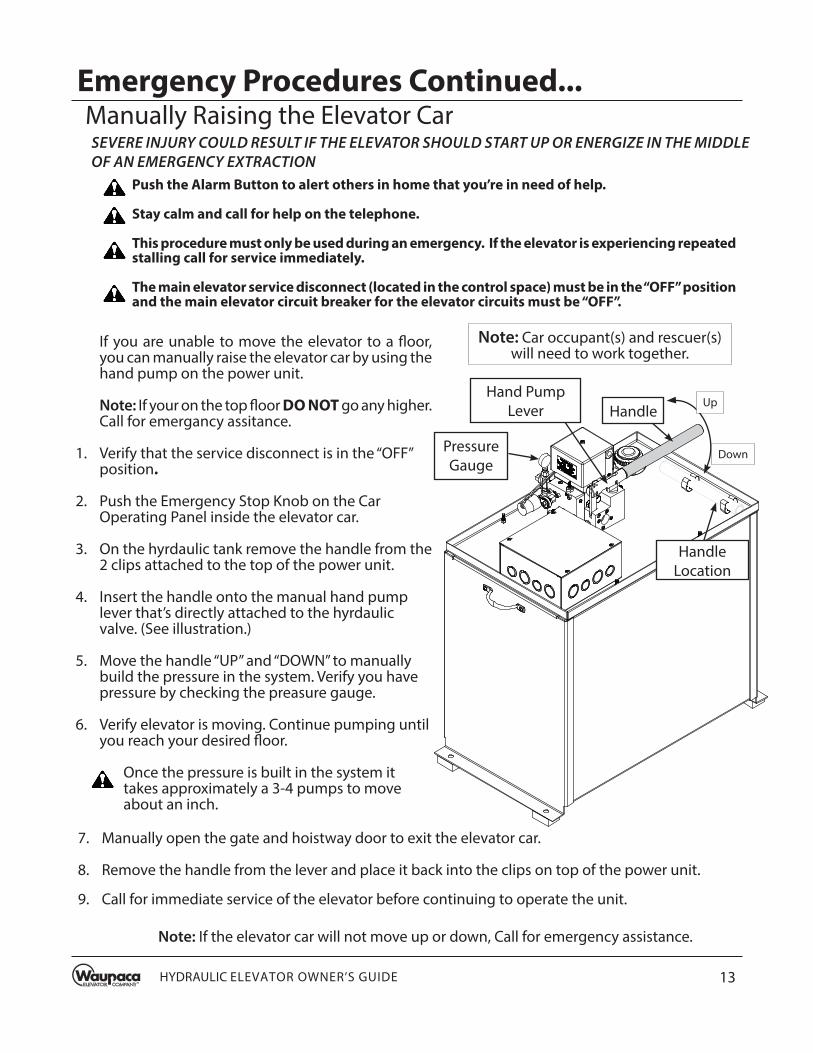
Manually Raising the Elevator Car
Push the Alarm Button to alert others in home that you’re in need of help.
Stay calm and call for help on the telephone.
This procedure must only be used during an emergency. If the elevator is experiencing repeated stalling call for service immediately.
The main elevator service disconnect (located in the control space) must be in the “OFF” position and the main elevator circuit breaker for the elevator circuits must be “OFF”.
Up
If you are unable to move the elevator to a fl oor, you can manually raise the elevator car by using the hand pump on the power unit.
Note: If your on the top fl oor DO NOT go any higher. Call for emergancy assitance.
1. Verify that the service disconnect is in the “OFF” position.
2. Push the Emergency Stop Knob on the Car Operating Panel inside the elevator car.
3. On the hyrdaulic tank remove the handle from the 2 clips attached to the top of the power unit.
4. Insert the handle onto the manual hand pump lever that’s directly attached to the hyrdaulic valve. (See illustration.)
5. Move the handle “UP” and “DOWN” to manually build the pressure in the system. Verify you have pressure by checking the preasure gauge.
6. Verify elevator is moving. Continue pumping until you reach your desired fl oor.
Once the pressure is built in the system it takes approximately a 3-4 pumps to move about an inch.
SEVERE INJURY COULD RESULT IF THE ELEVATOR SHOULD START UP OR ENERGIZE IN THE MIDDLE OF AN EMERGENCY EXTRACTION
Down
HandleLocation
Hand Pump Lever Handle
Note: Car occupant(s) and rescuer(s) will need to work together.
7. Manually open the gate and hoistway door to exit the elevator car.
8. Remove the handle from the lever and place it back into the clips on top of the power unit.
9. Call for immediate service of the elevator before continuing to operate the unit.
Pressure Gauge
Emergency Procedures Continued...
Note: If the elevator car will not move up or down, Call for emergency assistance.

14
Emergency Procedures Continued...
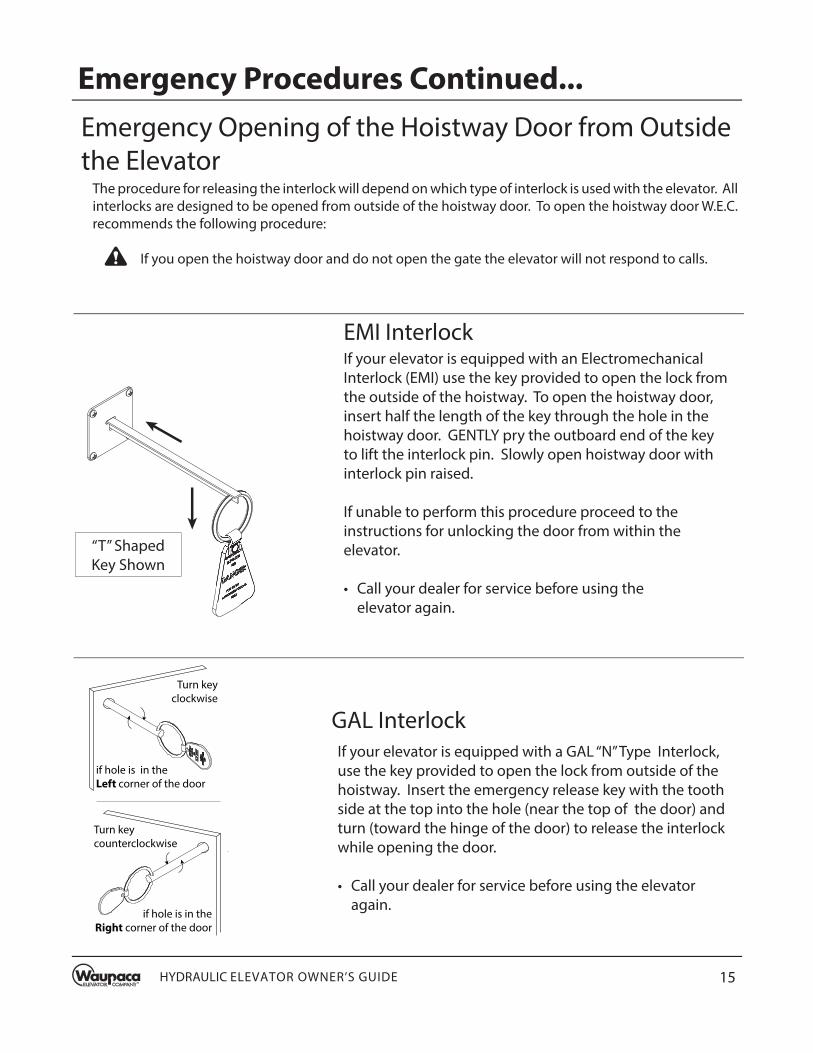
The procedure for releasing the interlock will depend on which type of interlock is used with the elevator. All interlocks are designed to be opened from outside of the hoistway door. To open the hoistway door W.E.C. recommends the following procedure:
If you open the hoistway door and do not open the gate the elevator will not respond to calls.
Emergency Opening of the Hoistway Door from Outside the Elevator
Prudhomme Interlock If your elevator is equipped with a Prudhomme Interlock, use the Emergency key provided to open the lock from outside of the hoistway. Insert the emergency key into the hole (in the door frame), interlocking the triangle shapes, and turn key to release the interlock while opening the door.
• Call your dealer for service before using the elevator again.
HYDRAULIC ELEVATOR OWNER’S GUIDE 14
HYDRAULIC ELEVATOR OWNER’S GUIDE 15
Emergency Procedures Continued...
The procedure for releasing the interlock will depend on which type of interlock is used with the elevator. All interlocks are designed to be opened from outside of the hoistway door. To open the hoistway door W.E.C. recommends the following procedure:
If you open the hoistway door and do not open the gate the elevator will not respond to calls.
EMI Interlock
Emergency Opening of the Hoistway Door from Outside the Elevator
GAL Interlock
If your elevator is equipped with an Electromechanical Interlock (EMI) use the key provided to open the lock from the outside of the hoistway. To open the hoistway door, insert half the length of the key through the hole in the hoistway door. GENTLY pry the outboard end of the key to lift the interlock pin. Slowly open hoistway door with interlock pin raised.
If unable to perform this procedure proceed to the instructions for unlocking the door from within the elevator.
• Call your dealer for service before using the elevator again.
If your elevator is equipped with a GAL “N” Type Interlock, use the key provided to open the lock from outside of the hoistway. Insert the emergency release key with the tooth side at the top into the hole (near the top of the door) and turn (toward the hinge of the door) to release the interlock while opening the door.
• Call your dealer for service before using the elevator again.
“T” ShapedKey Shown
Turn keycounterclockwise
Turn keyclockwise
if hole is in theRight corner of the door
if hole is in theLeft corner of the door
16
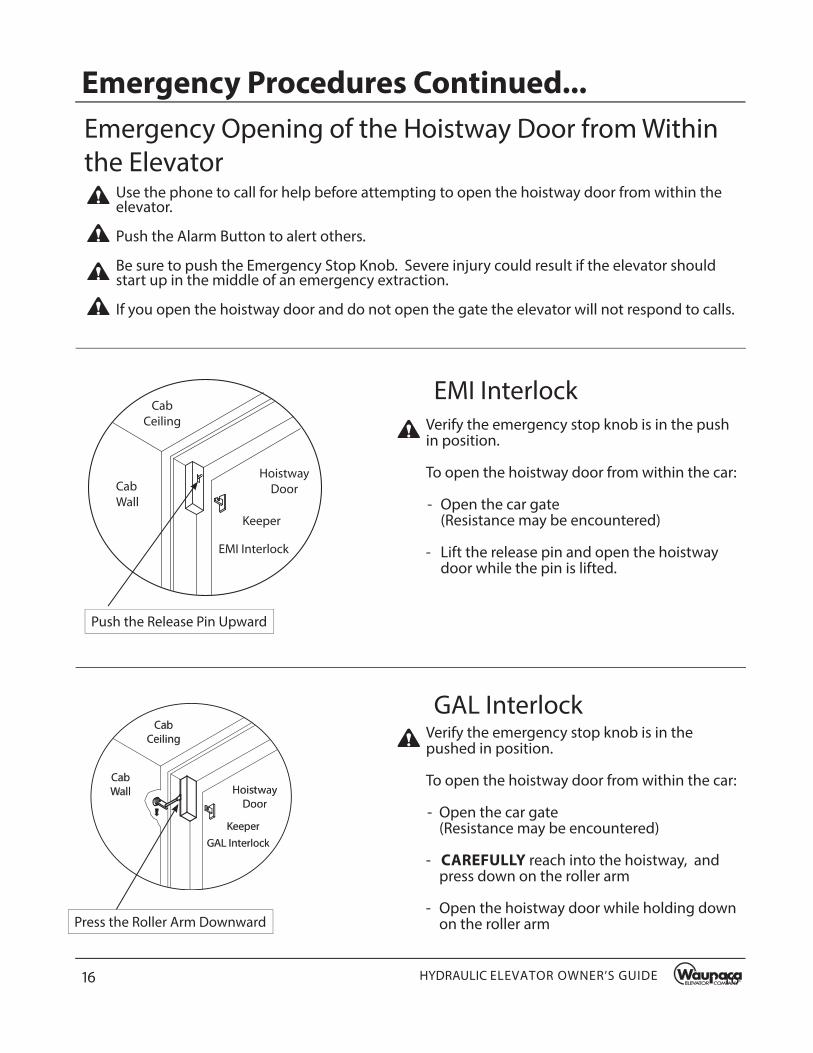
Use the phone to call for help before attempting to open the hoistway door from within the elevator.
Push the Alarm Button to alert others.
Be sure to push the Emergency Stop Knob. Severe injury could result if the elevator should start up in the middle of an emergency extraction.
If you open the hoistway door and do not open the gate the elevator will not respond to calls.
Verify the emergency stop knob is in the push in position.
To open the hoistway door from within the car:
- Open the car gate (Resistance may be encountered)
- Lift the release pin and open the hoistway door while the pin is lifted.
EMI Interlock
Emergency Opening of the Hoistway Door from Within the Elevator
Verify the emergency stop knob is in the pushed in position.
To open the hoistway door from within the car:
- Open the car gate (Resistance may be encountered)
- CAREFULLY reach into the hoistway, and press down on the roller arm
- Open the hoistway door while holding down on the roller arm
GAL Interlock
CabCeiling
CabWall
EMI Interlock
HoistwayDoor
Keeper
Push the Release Pin Upward
CabCeiling
CabCeiling
HoistwayDoor
HoistwayDoor
CabWallCabWall
GAL InterlockGAL InterlockKeeperKeeper
Press the Roller Arm Downward
Emergency Procedures Continued...
HYDRAULIC ELEVATOR OWNER’S GUIDE 16

HYDRAULIC ELEVATOR OWNER’S GUIDE 17
Description of Elevator Programs
Automatic Elevator ProgramAutomatic elevator operation is a program which operates the elevator automatically. This allows use without operating electric switches, and is an built in program.
How does the Automatic Elevator Program work?
When the Automatic Elevator Program is turned “ON”, the elevator will stop automatically at every fl oor allowing people to step in and out without having to press any buttons. The elevator will circulate to every fl oor, with a 5-minute interval between fl oors, in a continuous loop until the program is turned “OFF” automatically after 30 hours. When the elevator reaches a fl oor, the door and the gate will open. The door and gate will stay open for an adjustable time of 10 - 120 seconds. While the timer is running you may enter or leave the elevator car. After the timer expires, the door will automatically close followed by the gate. The door or gate must not be obstructed at this time. The elevator will continue the remaining 5-minute fl oor interval, and will cycle the door and gate one last time before sending off to the next fl oor. The elevator will continue to run automatically in a continuous program loop.
How does the Automatic Elevator Program aff ect the elevator when running in Homing
Mode?
When the Automatic Elevator Program is activated, the Homing, Mode will be ignored until the Automatic Elevator Program is deactivated.
How will manual fl oor calls eff ect the Automatic Elevator Program?
Manual fl oor calls can be placed when the Automatic Elevator Program is activated. The elevator will interrupt the program and travel to the desired destination(s). The elevator will then return to the last fl oor before the interruption, without cycling the door and gate, and continue the same program loop.
What happens if the automatic gate closing is interrupted?
When the automatic gate operator closes the gate and the gate closing is stopped/obstructed or the break-away is tripped, the elevator program will continue to run but the elevator will not move until the program reaches that fl oor again internally. The break-away will reconnect itself and continue on with the Automatic Elevator Program.
How does my elevator light work?
When the Automatic Elevator Program is activated the car light will always remain “ON”as long as the light switch on the car operating panel is “ON”.
How may I adjust the time period my door stays open?
Please contact your local dealer if you require your interlock timer to be adjusted.
18
Description of Elevator Programs Continued...
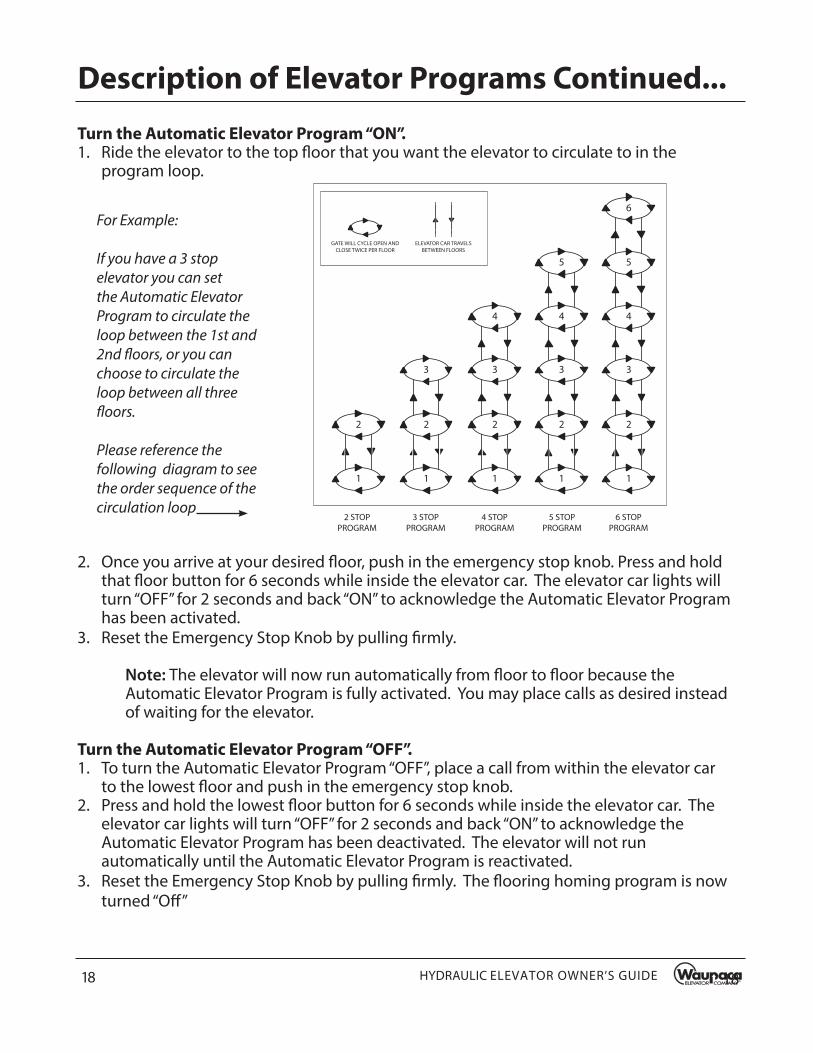
Turn the Automatic Elevator Program “ON”.1. Ride the elevator to the top fl oor that you want the elevator to circulate to in the
program loop.
2. Once you arrive at your desired fl oor, push in the emergency stop knob. Press and hold that fl oor button for 6 seconds while inside the elevator car. The elevator car lights will turn “OFF” for 2 seconds and back “ON” to acknowledge the Automatic Elevator Program has been activated.
3. Reset the Emergency Stop Knob by pulling fi rmly.
Note: The elevator will now run automatically from fl oor to fl oor because the Automatic Elevator Program is fully activated. You may place calls as desired instead of waiting for the elevator.
Turn the Automatic Elevator Program “OFF”.1. To turn the Automatic Elevator Program “OFF”, place a call from within the elevator car
to the lowest fl oor and push in the emergency stop knob. 2. Press and hold the lowest fl oor button for 6 seconds while inside the elevator car. The
elevator car lights will turn “OFF” for 2 seconds and back “ON” to acknowledge the Automatic Elevator Program has been deactivated. The elevator will not run automatically until the Automatic Elevator Program is reactivated.
3. Reset the Emergency Stop Knob by pulling fi rmly. The fl ooring homing program is now turned “Off ”
2
1
2
3
1 1
2
3
4
1
2
3
4
5
1
2
3
4
5
6
GATE WILL CYCLE OPEN AND CLOSE TWICE PER FLOOR
ELEVATOR CAR TRAVELS BETWEEN FLOORS
2 STOPPROGRAM
3 STOPPROGRAM
4 STOPPROGRAM
5 STOPPROGRAM
6 STOPPROGRAM
For Example:
If you have a 3 stop elevator you can set the Automatic Elevator Program to circulate the loop between the 1st and 2nd fl oors, or you can choose to circulate the loop between all three fl oors.
Please reference thefollowing diagram to see the order sequence of the circulation loop
HYDRAULIC ELEVATOR OWNER’S GUIDE 18

HYDRAULIC ELEVATOR OWNER’S GUIDE 19
Leveling Program
When the elevator sits for extended time periods, the hydraulic elevator system will weep hydraulic oil back into the tank. This will cause the elevator car to sink down to a maximum of 1/2 inch below the current fl oor before the unit will re-level with that fl oor. Leveling up or down may also occur when the elevator car becomes heavily loaded or unloaded.
Note : If your elevator re-levels more than 1 time per hour with out being used call your dealer.
Description of Elevator Programs Continued...
Alarm
G
1
2
A
2 lowest fl oor Car
Opereating Panel buttons
may not belabeled with a
1 & 2
Automatic Homing Feature
After a time of 30 minutes with no fl oor calls this feature allows the elevator to home to a fl oor of your choice. All gates and doors are required to be in the fully closed position for the timer to begin counting. The automatic homing feature will not work if you open the hoistway door and do not open the gate.
Turn Automatic Homing Feature “On”.
1. Call unit to the lowest fl oor, and open the door and gate.2. Push the Emergency Stop Knob.3. Press & hold 2 lowest fl oor Car Operating Panel buttons (simultaneously)
until they illuminate and release.4. Immediately press the desired home fl oor call button while the 2 lowest
fl oor Car Operating Panel buttons are illuminated. (They will time out in about 6 seconds). This tells the controller which fl oor will become the home location.
5. The selected automatic homing fl oor will fl ash multiple times to acknowledge the homing program has been accepted. If this does not occur repeat previous steps.
6. Reset the Emergency Stop Knob by pulling fi rmly.7. Close all gates and doors to start the homing timer.
Turn Automatic Homing Feature “Off ”.
1. Call unit to the lowest fl oor, and open the door and gate.2. Push the Emergency Stop Knob.3. Press & hold the 2 lowest fl oor Car Operating Panel buttons until they are
illuminated. Keep holding them until they turn “Off ”. 4. Reset the Emergency Stop Knob by pulling fi rmly. The fl ooring homing
program is now turned “Off ”5. Close all gates and doors.

20
Elevator Entry Monitoring
The elevator control system monitors the car gate(s) and hoistway door locks.
Every time the hoistway door opens the elevator car gate must open. If this does not happen the elevator will no longer except calls. The elevator car can move between fl oors up to four times before the hoistway door and elevator car gate must be opened and closed. If either an elevator car gate or hoistway door is left open the elevator will not except calls until either an elevator car gate or hoistway door is closed.
Alarm
G
1
2
A
2Lowest Floor
Buttonsmay not
be labeled with a1 & 2
Description of Elevator Programs Continued...
Exercise Program
The exercise program is a maintenance feature for residents that leave for an extended time or rarely use their elevator. This will help to keep the hydraulic system lubricated and prevent seals from drying out. This is achieved by cycling the elevator between the fi rst two fl oors every two weeks. Once the timer expires the unit calls itself to fl oor 2, waits 120 seconds, and calls itself down to fl oor one. Then the two-week timer starts over. If a call is placed during the two-week timer, the elevator will function normally, and the timer will restart after the call is complete. This feature is enabled by default when the elevator
ships. To stop this feature the program must be deactivated.
To Turn “OFF” or “ON”
1. Call unit to the second stop.2. Once elevator arrives at the second stop, open gate and push emergency
stop knob.3. Press and hold the 2 lowest fl oor Car Operating Panel buttons
simultaneously until both illuminate and then release.4. While the 2 lowest fl oor Car Operating Panel buttons are illuminated (they
will time out in about 6 seconds), Push 2 to enable or Push 1 to disable the exercise program.
5. Reset the Emergency Stop Knob by pulling fi rmly.
Watch “How to Turn the Automatic Homing ON and OFF” instructional Video Watch “How to Turn the Automatic Homing ON and OFF” instructional Video
on YouTube on YouTube https://youtu.be/7ydxeM6Fms4https://youtu.be/7ydxeM6Fms4
Safety Run Timer
If the unit can not make it to the called upper fl oor because of being overloaded or the oil in the tank is low, the pump will only run for 90 seconds before timing out. The elevator car will call itself to the lowest fl oor, and the car lights will fl ash. If this occurs, contact your local dealer for service.
HYDRAULIC ELEVATOR OWNER’S GUIDE 20
HYDRAULIC ELEVATOR OWNER’S GUIDE 21
Electromechanical Interlock
Timer EMI (Pot 1) The interlock timer is an adjustable timer that controls the time period that an Electromechanical Interlock (EMI) will remain unlocked allowing for the door to open. When the unit arrives at the fl oor, the interlock will remain unlocked for a time period of 10 to 120 seconds. The user will be required to press the immediate fl oor call button to open the door after the set time period has expired. This feature pertains to the residentialelevator program that is equipped with Electromechanical Interlocks (EMI). Some residential applications are equipped with mechanical interlocks that work independently and ignore the interlock timer. Please contact your local dealer if you require your interlock timer to be adjusted.
Car Light Time-Out (Pot 2)
If the car light switch is in the “ON” position and the hoistway door is closed; The car light time-out pot can be set to turn the lights off anywhere from 5-30 mins. The car light timer pot can be adjusted inside the controller. If the hoistway door is left open; the lights will stay “ON” until switched “OFF” on your Car Operating Panel or the hoistrway door is closed.
5 MIN 30 MIN
CAR LIGHT TIMER(Pot 2)
10 SEC 120 SEC
EMI TIMEOUT TIMER
(Pot 1)
Alarm
G
1
2
A
“On” and “Off ” Light
Switch on the Car
Operating Panel
Description of Elevator Programs Continued...

22
IN
CALL
USE
IN
CALL
USE
DOOR
FAULT
Hallstationwith red
“Door Fault” light
Hallstation Position
Indicator (PI) that displays
an “X”
“Door Fault” Light and Resetting the Elevator
(Per State Requirement)
The elevator controller will monitor the door closed and door locked circuit of the hoistway door interlocks on all fl oor landings. If the elevator detects the door closed circuit opens when the elevator is not within the landing zone it will disable the power to the driving machine. When this happens the elevator will not operate in automatic mode.
In the case of a door fault, check that the hoistway is clear above and below the elevator car from any obstructions and hoistway doors are closed on all fl oor landings before resetting the system. The elevator can be reset with the master key at the key switch which is located on the lower right outside corner of the controller cabinet in the machine room.
Important Notes:
• If you have a “Door Fault” light on the hallstations; it will turn red when the elevator needs to be reset. Once the elevator is reset, the red “Door Fault” light will turn off immediately.
• If you have a Hallstation Position Indicator (PI), an “X” will appear on the display informing you that the elevator will need to be reset. Once the elevator is reset, the “X” will remain on the display until the elevator reaches a fl oor landing.
Key Switch
Note: Turn the master key to reset the elevator. Once the elevator is reset; place master key in a safe location.
Description of Elevator Programs Continued...
HYDRAULIC ELEVATOR OWNER’S GUIDE 22
1726 North Ballard Road, Suite 1- Appleton, WI 54911 - 920.991.9082
Technical Support 855.804.5774 - [email protected]
WEPTS70005-E
05 MAR 2020
Product__________________ Serial Number__________________
Warranty to Original End User: Waupaca Elevator Company, Inc. (Waupaca) warrants to the original end user that its products are free from defects in materials and workmanship under normal use and service. This warranty extends for three (3) years from the date the product is shipped from our factory, except for an extended fi ve (5) year warranty for the components specifi cally listed below. THIS WARRANTY APPLIES ONLY TO THE ORIGINAL END USER AND IS NOT TRANSFERABLE. Extended Warranty Period for Certain Components: Waupaca warrants the following components for fi ve years: buff ers, cable clamps, cams, drum, hydraulic cylinder, limit switches, Mitsubishi drive, pedestal, pedestal base, pulleys, rail, rail brackets, shackles, sling, travel cable.
What the Warranty Covers:Waupaca’s entire liability under this warranty is limited to the repair or replacement in kind of any defective product or component within the term of this warranty, as Waupaca in its sole discretion determines and deems appropriate. No oral or written information or advice given by Waupaca, its distributors, agents or employees shall create any diff erent or additional warranties or in any way increase the scope of this warranty.This warranty does not cover labor charges for the removal, repair, or replacement of warranty parts unless specifi cally authorized in advance by Waupaca. All warranty service work must be performed by an authorized Waupaca service technician.
Revocation and Nullifi cation of Warranty: Waupaca’s warranty is null and void if the product is not inspected and serviced by a Waupaca authorized service representative at least annually. For optimal performance, Waupaca recommends that you establish a semi-annual maintenance agreement with your elevator contractor. In addition, the warranty will be revoked and nullifi ed with respect to the following claims:
1. Claims resulting from normal wear and tear, including batteries, panels, gates, glass, acrylic, trim, and consumable parts.
2. Claims resulting from abuse, misuse, or alteration or modifi cation of the product or any component thereof.3. Claims that are due to a failure to install, maintain, lubricate, inspect and maintain the product in accordance with
Waupaca’s instructions, and verifi ed by written records of all inspections and maintenance.4. Claims resulting from maintenance, repairs, or replacement performed by anyone other than a Waupaca authorized
service technician.5. Claims resulting from malfunction or damage caused by vandalism, a structural condition of the building or
hoistway, overloading, and Acts of God.
Waupaca Dealers;Any defective parts covered by this warranty should be returned to Waupaca, after fi rst contacting Waupaca for a return shipping authorization and RMA Number, and mailing to the following address:
Waupaca Elevator Company, Inc.1726 North Ballard Road, Suite 1
Appleton, WI 54911(800) 238-8739
THIS WARRANTY IS THE ONLY WARRANTY APPLICABLE TO OUR PRODUCTS AND IS IN LIEU OF ALL OTHER WARRANTIES AND LIABILITIES, EXPRESSED OR IMPLIED. WAUPACA EXPRESSLY EXCLUDES AND DISCLAIMS ANY IMPLIED WARRANTIES OF MERCHANTABILITY OR FITNESS FOR A PARTICULAR PURPOSE, AND SHALL NOT BE LIABLE FOR INCIDENTAL OR CONSEQUENTIAL DAMAGES OF ANY NATURE, INCLUDING WITHOUT LIMITATION, LOST PROFITS, REVENUES, OR PRODUCTIVITY, OR FOR BODILY INJURY OR DEATH OR LOSS OR DAMAGE TO PROPERTY, UNDER ANY THEORY OF LIABILITY, INCLUDING WITHOUT LIMITATION, CONTRACT, WARRANTY, STRICT LIABILITY, TORT (INCLUDING NEGLIGENCE) OR OTHER LEGAL OR EQUITABLE THEORY.
LIMITED WARRANTY

1726 North Ballard Road, Suite 1- Appleton, WI 54911 - 920.991.9082
Technical Support 855.804.5774 - [email protected]
WEPTS70073-B
09 March 2020
Product__________________ Serial Number__________________
Upgrade Warranty to Original End User: Waupaca Elevator Company, Inc. (Waupaca) warrants to the original end user only, for a period of 18 months after the date of shipment from the factory, that the upgraded components specifi ed in this paragraph are free from defects in materials and workmanship when installed in the following units:
Series 010: Controller, Car Top Box, Tape Reader, and Powerhead. Series 015, 016, and 018: Controller, Car Top Box, and Tape Reader.Series 011: Controller, Car Top Box, Tape Reader, and Powerhead.
Series 014: (Jack, if needed) Controller, Car Top Box, Tape Reader, and Power UnitThis warranty is the exclusive warranty applicable to this unit and replaces any prior warranty that might otherwise cover this
unit.
What the Warranty Covers:
Waupaca’s entire liability under this warranty is limited to the repair or replacement in kind of any defective product or component within the term of this warranty, as Waupaca in its sole discretion determines and deems appropriate. No oral or written information or advice given by Waupaca, its distributors, agents or employees shall create any diff erent or additional warranties or in any way increase the scope of this warranty.This warranty does not cover labor charges for the removal, repair, or replacement of warranty parts unless specifi cally authorized in advance by Waupaca. All warranty service work must be performed by an authorized Waupaca service technician.
Revocation and Nullifi cation of Warranty: Waupaca’s warranty is null and void if the product is not inspected and serviced by a Waupaca authorized service representative at least annually. For optimal performance, Waupaca recommends that you establish a semi-annual maintenance agreement with your elevator contractor. In addition, the warranty will be revoked and nullifi ed with respect to the following claims:
1. Claims resulting from normal wear and tear.2. Claims resulting from abuse, misuse, or alteration or modifi cation of the product or any component thereof.3. Claims that are due to a failure to install, maintain, lubricate, inspect and maintain the product in accordance with
Waupaca’s instructions, and verifi ed by written records of all inspections and maintenance.4. Claims resulting from maintenance, repairs, or replacement performed by anyone other than a Waupaca authorized
service technician.5. Claims resulting from malfunction or damage caused by vandalism, a structural condition of the building or
hoistway, overloading, and Acts of God.
Waupaca Dealers:
Any defective parts covered by this warranty should be returned to Waupaca, after fi rst contacting Waupaca for a return shipping authorization and RMA Number, and mailing to the following address:
Waupaca Elevator Company, Inc.1726 North Ballard Road, Suite 1
Appleton, WI 54911(800) 238-8739
THIS WARRANTY IS THE ONLY WARRANTY APPLICABLE TO OUR PRODUCTS AND IS IN LIEU OF ALL OTHER WARRANTIES AND LIABILITIES, EXPRESSED OR IMPLIED. WAUPACA EXPRESSLY EXCLUDES AND DISCLAIMS ANY IMPLIED WARRANTIES OF MERCHANTABILITY OR FITNESS FOR A PARTICULAR PURPOSE, AND SHALL NOT BE LIABLE FOR INCIDENTAL OR CONSEQUENTIAL DAMAGES OF ANY NATURE, INCLUDING WITHOUT LIMITATION, LOST PROFITS, REVENUES, OR PRODUCTIVITY, OR FOR BODILY INJURY OR DEATH OR LOSS OR DAMAGE TO PROPERTY, UNDER ANY THEORY OF LIABILITY, INCLUDING WITHOUT LIMITATION, CONTRACT, WARRANTY, STRICT LIABILITY, TORT (INCLUDING NEGLIGENCE) OR OTHER LEGAL OR EQUITABLE THEORY.
LIMITED UPGRADE WARRANTY

HYDRAULIC ELEVATOR OWNER’S GUIDE 25
PLEASE REFERENCE THE “YOUR ELEVATOR 101” DIAGRAM
IN THE BACK OF THE OWNERS GUIDE.
IF YOU ANSWERED FALSE OR NEED HELP TO ANSWER THE ABOVE
QUESTIONS, PLEASE CONTACT YOUR ELEVATOR DEALER.
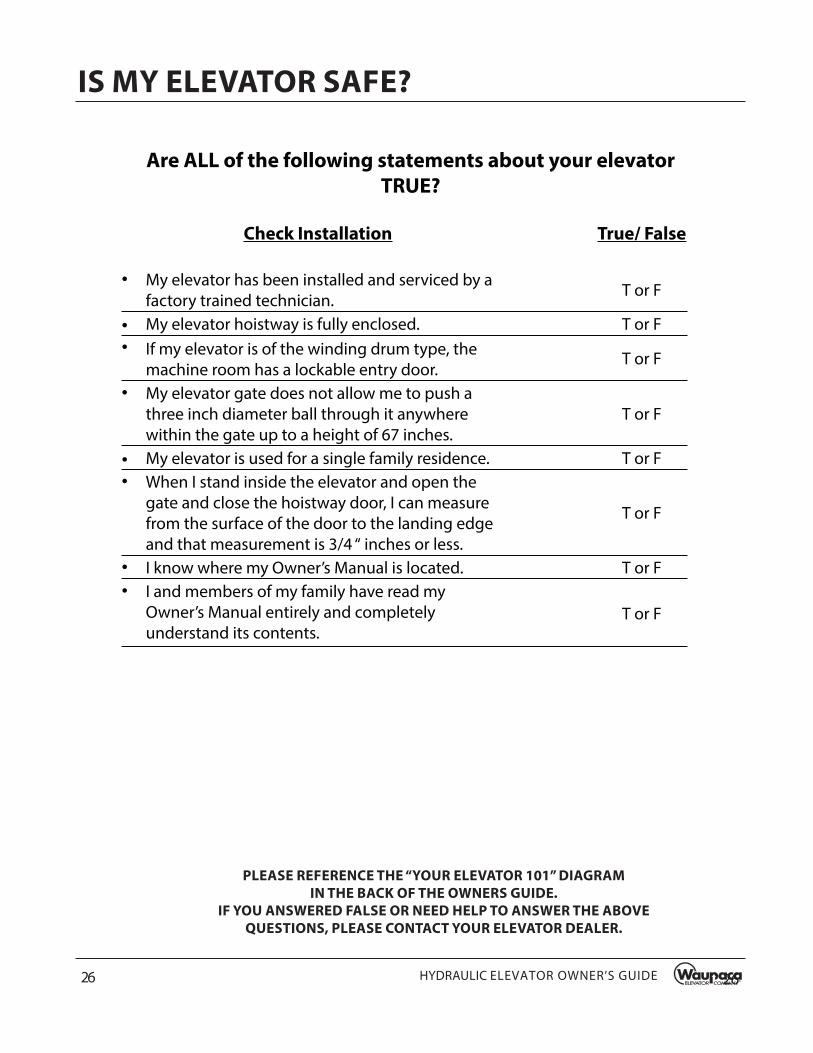
IS MY ELEVATOR SAFE?
Are ALL of the following statements about your elevator TRUE?
Check Saftey Features True/ False
• I cannot open any of the hoistway doors unless the elevator is at that fl oor landing. T or F
• If any other doors, access panels, windows, or other access points to my elevator hoistway are opened then my elevator is automatically disabled.
T or F
• My elevator has the required working phone. T or F• My elevator’s alarm bell rings when the alarm button is pressed. T or F• My elevator emergency stop button disables my elevator? T or F• My elevator runs only with the gate(s) closed and all the
hoistway doors closed. T or F
• If my elevator has a light curtain, my elevator stops when the light curtain is obstructed. T or F
26
PLEASE REFERENCE THE “YOUR ELEVATOR 101” DIAGRAM
IN THE BACK OF THE OWNERS GUIDE.
IF YOU ANSWERED FALSE OR NEED HELP TO ANSWER THE ABOVE
QUESTIONS, PLEASE CONTACT YOUR ELEVATOR DEALER.
HYDRAULIC ELEVATOR OWNER’S GUIDE 26
IS MY ELEVATOR SAFE?
Are ALL of the following statements about your elevator
TRUE?
Check Installation True/ False
• My elevator has been installed and serviced by a factory trained technician. T or F
• My elevator hoistway is fully enclosed. T or F• If my elevator is of the winding drum type, the
machine room has a lockable entry door.T or F
• My elevator gate does not allow me to push a three inch diameter ball through it anywhere within the gate up to a height of 67 inches.
T or F
• My elevator is used for a single family residence. T or F• When I stand inside the elevator and open the
gate and close the hoistway door, I can measure from the surface of the door to the landing edge and that measurement is 3/4 “ inches or less.
T or F
• I know where my Owner’s Manual is located. T or F• I and members of my family have read my
Owner’s Manual entirely and completely understand its contents.
T or F
HYDRAULIC ELEVATOR OWNER’S GUIDE 27
PLEASE REFERENCE THE “YOUR ELEVATOR 101” DIAGRAM
IN THE BACK OF THE OWNERS GUIDE.
IF YOU ANSWERED FALSE OR NEED HELP TO ANSWER THE ABOVE
QUESTIONS, PLEASE CONTACT YOUR ELEVATOR DEALER.
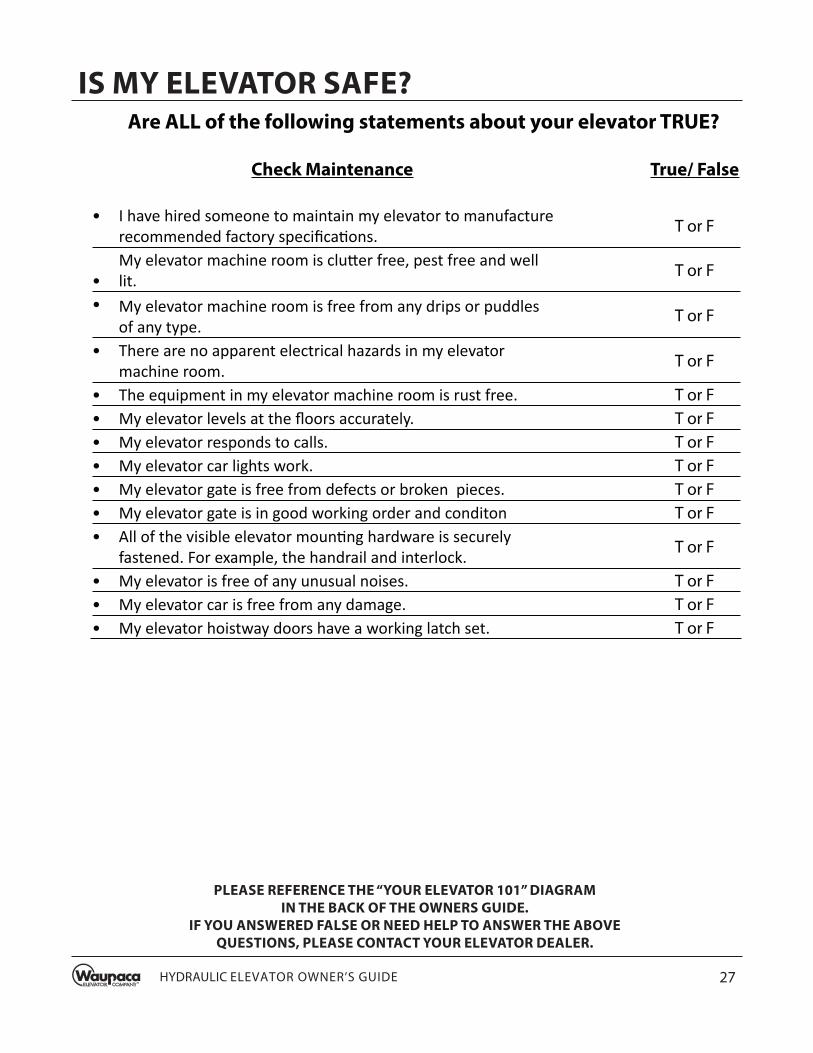
IS MY ELEVATOR SAFE?Are ALL of the following statements about your elevator TRUE?
Check Maintenance True/ False
• I have hired someone to maintain my elevator to manufacture recommended factory specifi ca ons. T or F
•My elevator machine room is clu er free, pest free and well lit. T or F
• My elevator machine room is free from any drips or puddles of any type. T or F
• There are no apparent electrical hazards in my elevator machine room. T or F
• The equipment in my elevator machine room is rust free. T or F• My elevator levels at the fl oors accurately. T or F• My elevator responds to calls. T or F• My elevator car lights work. T or F• My elevator gate is free from defects or broken pieces. T or F• My elevator gate is in good working order and conditon T or F• All of the visible elevator moun ng hardware is securely
fastened. For example, the handrail and interlock. T or F
• My elevator is free of any unusual noises. T or F• My elevator car is free from any damage. T or F• My elevator hoistway doors have a working latch set. T or F

Your Elevator 101
A 3” ball indiameter
can NOT fi t through
anywhere within the gate.
Floor Landing ButtonsBy pressing the fl oor landing buttons
on the C.O.P. inside the elevator car; The elevator car will take you to the desired
fl oor landing.
Emergency Light
The emergency light illuminates if the power goes out.
Hoistway Door Often referred to as hall door, the hoistway door allows
access to the hoistway and is prevented from opening unless
the elevator stopped at that particluar fl oor
landing.
Pit Floor
Electromechanical InterlockOften referred to as an EMI, is an
electromechanical safety lock that prevents the hoistway door (hall door) from opening if the elevator is not at
that fl oor landing.
TelephoneThe phone is to place a call during an
emergency.
Emergency StopWhen disabled it prevents the user from
moving an elevator or initiating movement of the elevator.
Alarm ButtonWhen you push the alarm button on the
C.O.P. inside the elevator car the alarm bell rings alerting others within the home to your need for assistance.
Private Residence A separate dwelling or separate apartment in a multiple dwelling
that is occupied only by themembers of a single family unit.
Access Door
C.O.P. The Car Operating Panel (C.O.P.) is the control panel inside the elevator that houses the fl oor landing buttons, the
light switch, the alarm button, the emergency stop switc.h
Hall Station “Calling the Elevator” or Call ButtonPressing the call button in the hallway
will “call the elevator” to you.
Elevator Car The elevator car transports
passengers from one fl oor landing to another.
Floor Landing A term used to describe each fl oor on
which the elevator will open.
Service Disconnect Located near the controller in the machine room. The
disconnect is the main power switch to the elevator.
ControllerThe controller houses the electrical
control circuits of the elevator.
RailThe rail is steel track that guides the
elevator when it travels up and down.
Sling The Sling is an L- shaped
steel support that holds theelevator car and is attached
to the rail system.
Hydraulic Power UnitThis drive system utilizes a
hydraulic jack and wire rope to raise and lower the
passengers car.
PitThe pit provides
clearance for support components that are below the fl oor of the elevator car allowing the elevator fl oor to level with the lowest
landing.
HoistwayAn opening through a
building or structure for the
travel of elevators and dumbwaiters
extending from the pit fl oor to the roof or
fl oor above.
Note: Distance between
the face of the hoistway door and
the edge of the landing sill not to
exceed 3/4”.
Gate The gate secures the opening of
the car while the elevator is in
operation.

HYDRAULIC ELEVATOR OWNER’S GUIDE 29
________________________________________________________________________________________________________________________________________________________________________________________________________________________________________________________________________________________________________________________________________________________________________________________________________________________________________________________________________________________________________________________________________________________________________________________________________________________________________________________________________________________________________________________________________________________________________________________________________________________________________________________________________________________________________________________________________________________________________________________________________________________________________________________________________________________________________________________________________________________________________________________________________________________________________________________________________________________________________________________________________________________________________________________________________________________________________________________________________________________________________________________________________________________________________________________________________________________________________________________________________________________________________________________________________________________________________________________________________________________________________________________________________________________________________________________________________________________________________________________________________________________________________________________________________________________________________________________________________________________________________________________________________________________________________________________________________________________________________________________________________________________________________________________________________________________________________________________________________________________________________________________________________________________________________________________________________________________________________________________________________________________________________________________________________________________________________________________________________________________________________________________________________________________________________________________________________________________________________________________________________________________________________________________________________________________________________________________________________________________________________________________________________________________________________________________________________________________________________________________________________________________________________________________________________________________________________________________________________________________________________________________________________________________________________________________________________________________________________________________________________________________________________
Notes

HYDRAULIC ELEVATOR OWNER’S GUIDE 30

HYDRAULIC ELEVATOR OWNER’S GUIDE 31

1726 North Ballard Road, Suite 1 • Appleton, WI 54911-2404Phone 920-991-9082 • www.waupacaelevator.com
PM0008-L05 AUG 2020
Related Documents