UID Authority of India Resident Enrolment Process Version 2.2.1 Process Owner: Sujata Chaturvedi, Deputy Director General Release Date: 12 th December, 2014 Resident Enrolment Process Document is for the use of Registrars and Enrolment Agencies. This document will work as a process aid and guideline for the Enrolment Agency in collection of Demographic and Biometric Data.

Welcome message from author
This document is posted to help you gain knowledge. Please leave a comment to let me know what you think about it! Share it to your friends and learn new things together.
Transcript

UID Authority of India
Resident Enrolment Process Version 2.2.1
Process Owner: Sujata Chaturvedi, Deputy Director General
Release Date: 12th December, 2014
Resident Enrolment Process Document is for the use of Registrars and Enrolment Agencies. This document will work as a process aid and guideline for the Enrolment Agency in collection of Demographic and Biometric Data.

UID Authority of India
Resident Enrolment Process ver 2.2.1 Page 2 of 53
ER 1. Table of Contents ER 1. Table of Contents ............................................................................ 2
ER 2. Document Control ........................................................................... 4
ER 2.1 Document Statistics...................................................................... 4
ER 2.2 How to Read This Document .......................................................... 4
ER 2.3 Legends ...................................................................................... 5
ER 2.4 Abbreviations used ....................................................................... 5
ER 3. Process Overview ............................................................................ 7
ER 3.1 Goals and Objectives .................................................................... 7
ER 3.2 Scope ......................................................................................... 7
ER 3.3 Prerequisites for Process ............................................................... 7
ER 3.4 End of Process ............................................................................. 7
ER 3.5 Roles and Responsibilities ............................................................. 8
ER 4. Process Details ............................................................................... 9
ER 4.1 Resident Enrolment Process Flow ................................................... 9
ER 4.2 Resident Enrolment Process Description ........................................ 10
ER 4.3 Setup Enrolment Centre Sub Process Flow..................................... 11
ER 4.4 Setup Enrolment Centre Sub Process Description ........................... 12
ER 4.5 Capture Demographic and Biometric Data and Ready for Transfer Sub
Process Flow ......................................................................................... 20
ER 4.6 Capture Demographic and Biometric Data and Ready for Transfer Sub
Process Description ............................................................................... 21
ER 4.7 Verification Sub Process Flow ....................................................... 32
ER 4.8 Verification Sub Process Description ............................................. 33
ER 5. Annexure ..................................................................................... 39
ER 5.1 Standards and Guidelines ............................................................ 39
ER 5.1.1 KYR Standards for Collecting Demographic Data ....................... 39
ER 5.1.2 Detailed Guidelines for Recording Demographic Data ................ 40
ER 5.1.3 Documents for Verifying PoI, PoA, DoB & PoR .......................... 44
ER 5.1.4 Detailed Guidelines for Collecting Biometric Data ...................... 46
ER 5.1.5 Handling of Exceptions .......................................................... 50
ER 5.1.6 Do’s and Don’t for EA ............................................................ 51
ER 5.1.7 Layouts ............................................................................... 51
ER 5.1.8 Guidelines on Storage of Documents ....................................... 51

UID Authority of India
Resident Enrolment Process ver 2.2.1 Page 3 of 53
ER 5.1.9 Enrolment Centre Beginning and End of Day(BOD,EOD) activities
51
ER 5.2 Formats, Templates and Checklists ............................................... 53
ER 5.2.1 Checklist for Setting up Enrolment Centre................................ 53
ER 5.2.2 Enrolment Form ................................................................... 53
ER 5.2.3 Acknowledgement and Consent for Enrolment .......................... 53
ER 5.2.4 Language for Consents .......................................................... 53
ER 5.2.5 DMS Formats ....................................................................... 53
ER 5.3 References ................................................................................ 53

UID Authority of India
Resident Enrolment Process ver 2.2.1 Page 4 of 53
ER 2. Document Control
ER 2.1 Document Statistics
Type of Information Document Data
Title Resident Enrolment Process
Document Revision # 2.2.1
Change Requested As per child enrolment policy, for child below
5 years only Name, DOB, Gender and
UID/EID of Parent/Relation is captured and
preferably of mother if both the parents are alive. Rest of the fields are optional.
Document Owner Sujata Chaturvedi, DDG (E&U)
Document Author(s) Pragati Rawat, Manager Process
Revision Update Author Lily Prasad, Manager Process
Document Change Reviewers Ashok Kumar ADG (E&U)
Document Approver Sujata Chaturvedi, Deputy Director
General(E&U)
ER 2.2 How to Read This Document
This process document is organised into three sections as given below:
1. Process Overview
a) Goals and Objectives: The section provides a description of what this
process document intends to accomplish. The objectives represent
specific measurable outcomes of this process document.
b) Scope: This section lists the key activities covered in this process
document.
c) Prerequisites for Process: This section lists out the criteria that are
required to be fulfilled before the enrolment process begins.
d) End of Process: This section informs about the output of the Resident
Enrolment Process.
2. Process Details
a) Process Flowcharts: Flowchart diagrams are used to define the process
as involved in resident enrolment, showing the steps as boxes of
various kinds, and their order by connecting these with arrows. This
diagrammatic representation gives a step-by-step process flow.
Process step is represented in these boxes, and arrows connecting
them represent flow / direction of flow of data/information. Refer the

UID Authority of India
Resident Enrolment Process ver 2.2.1 Page 5 of 53
Legends section to understand the significance of various symbols used
in flowchart.
b) Process Description: Process description is used for each flowchart to
convey to the reader a detailed description of each process step and
references to annexure/other processes and sub processes. Refer
Abbreviations used section for deciphering abbreviations used in the
descriptions.
3. Annexure
a) Standards and Guidelines: This section describes the standards
recommended by UIDAI that need to be referred to during the
enrolment process. Guidelines are provided to streamline the
processes and help achieve better quality output.
b) Formats, Templates and Checklists: This section consists of sample
formats of various forms and checklists used in the scope of this
process.
ER 2.3 Legends
Signifies Start /End of Process
Signifies Activity/Task
Signifies an off page reference of a Sub Process
Signifies a Decision Box
Signifies a Reference to either a Guideline(G), Form(F) or Quality
Check point (Q) depending on the text used inside the circle
Signifies an external process being referred
ER 2.4 Abbreviations used
UID - Unique Identification
UIDAI - Unique Identification Authority of India
DDSVP - Demographic Data Standards and Verification Procedure
KYR - Know Your Resident

UID Authority of India
Resident Enrolment Process ver 2.2.1 Page 6 of 53
KYR+ - Fields required in addition to KYR fields required by the
Registrars
UIDIC - UID Implementation Committee
PoI - Proof of Identity
PoA - Proof of Address
DoB - Date of Birth
RGI - Registrar General of India
NSR - Non- State Registrar
NPR - National Population Register
NGO - Non Government Organisation
CSO - Civil Society Outreach
FI - Financial Inclusion
HOF - Head of Family

UID Authority of India
Resident Enrolment Process ver 2.2.1 Page 7 of 53
ER 3. Process Overview
ER 3.1 Goals and Objectives
This document is intended to provide necessary inputs to the Enrolment
Agency to ensure that the data capture is done in a proper manner and also
the verification of the details given is done as prescribed for the process of
issuing AADHAAR.
The objective is to provide detailed guidelines for the enrolment process
which consists of setting up enrolment centres, capturing demographic and
biometric data, handling exceptions and storage of data.
ER 3.2 Scope
Readiness of Enrolment Centres in terms of logistics, devices,
hardware, software and trained operators
Verification of Resident’s information according to prescribed
verification procedure
The exercise of collection of demographic data, biometric data and
storage
Readiness for submission of enrolment data by Enrolment Agencies
ER 3.3 Prerequisites for Process
Enrolment Agencies appointed by Registrars
Registrar ID and enrolment agency code provided (Registrar On-Boarding
Process)
Introducers identified (Introducer Enrolment and Monitoring Process)
Client enrolment software shared with enrolment agencies (Registrar On-
Boarding Process)
Grievance handling and technical support for enrolment agencies and
residents in place (Grievance Handling Process)
Training and certification modules for enrolment agencies in place
Communication content and methodology for residents defined (Resident
Awareness and Demand Generation Process)
ER 3.4 End of Process
UID data and biometrics for residents captured and ready at a designated
location for transfer to CIDR (ready for 1st Mile Logistics Process)

UID Authority of India
Resident Enrolment Process ver 2.2.1 Page 8 of 53
ER 3.5 Roles and Responsibilities
Role Organizati
on Responsibilities
Management
Enrolment
Agency
Refer below documents:
1. EA Roles and Responsibility
2. Enrolment Centre Setup Checklist
3. EA Checklist in Refresh Phase
Registrar Registrar Refer below documents:
1. Registrar Roles and Responsibility
2. Registrar Readiness Checklist
3. Registrar Checklist in Refresh Phase
Enrolment
Centre
Supervisor
Enrolment
Agency
Refer Supervisor Roles and Responsibility document
Enrolment
Operator
Enrolment
Agency
Refer Operator Roles and Responsibility document
Registrar’s
Supervisor/
Verifier
Registrar Refer Verifier Roles and Responsibility document
Introducer Registrar Refer Introducer Roles and Responsibility document
UIDAI point of
contact
UIDAI Make Enrolment software available
Make process documents available
Empanel Enrolment Agencies to facilitate speedy on-
boarding of Enrolment Agencies by Registrars
Facilitate certification of biometric devices
Provide training content
Appoint training and certification agency and provide
testing content to this agency
Provide required standards and guidelines
Vet awareness and publicity content
Provide solution for document storage
Resident -- Provide demographic and biometric information
Provide authentic documentation or be introduced by
an Introducer

UID Authority of India
Resident Enrolment Process ver 2.2.1 Page 9 of 53
ER 4. Process Details
ER 4.1 Resident Enrolment Process Flow
Enrolment Process – L1 Flow
Enrolment Agency UIDAI & Registrar
Exe
cu
tio
n O
wn
ersh
ip: E
nro
lme
nt C
en
tre
Start
1. Setup
Enrolment
Center Sub
Process
2. Capture
Demographic &
Biometrics Data
Sub Process &
Ready for
Transfer
End
3. Process ,
Sample Data
Audit and
feedback

UID Authority of India
Resident Enrolment Process ver 2.2.1 Page 10 of 53
ER 4.2 Resident Enrolment Process Description
S.No Step Responsibility Reference
Start
This process begins when an Enrolment Agency is
ready to start enrolling residents. To begin
enrolments, Enrolment Agency needs to Setup
Enrolment Centre. Go to Step 1.
1. Setup Enrolment Centre
Initiate sub process ER 4.3 Setup Enrolment
Centre. This contains details on setting up an
enrolment centre.
Enrolment
Agency
ER 4.3
Setup
Enrolment
Centre
2. Capture Demographic and Biometric Data and
Ready for Transfer
After an enrolment centre is ready, Enrolment
Agencies can begin the process of capturing
residents’ demographic and biometric data. For
details on how to capture data, go to sub process
ER 4.5 Capture Demographic and Biometric Data.
After Data Capture, Data files are ready at
identified/specified location for transfer to CIDR.
The data files can be transferred to CIDR either
through online SFTP mode or using physical hard
disks/ pen drives. SFTP client is provided by
UIDAI that should be installed by EA for use of
online mode of data transfer.
Refer external process for 1st Mile logistics which
prescribes the methods by which the data has to
be transferred to the Authority.
Enrolment
Agency
ER 4.5
Capture
Demograph
ic and
Biometric
Data and
Ready for
Transfer
Sub
Process
External
process for
1st Mile
logistics
Process
3. Process , Sample Data Audit and feedback
UIDAI may undertake process and sample data
audits for quality. This will reduce the chances of
enrolment failures/rejections later due to poor
data quality.
Enrolment agency shall be subject to monitoring
and audit by UIDAI, Registrar, and their
representative from time to time. Based on the
feedback, Enrolment Agency may be required to
make adjustments/changes in its process.
UIDAI and
Registrar
End

UID Authority of India
Resident Enrolment Process ver 2.2.1 Page 11 of 53
ER 4.3 Setup Enrolment Centre Sub Process Flow
Setup Enrolment Centre Sub Process Flow
Enrolment Agency Registrar UIDAI
Exec
uti
on
Ow
ner
ship
: En
rolm
ent
Cen
tre
Start
1. Identify Suitable Locations for
Centre
2. Decide No. of Stations for Each
Centre
5. Share Pre-Enrolment Data
4. Deploy Required Devices, Hardware
& Software
10. Ensure availability of
Active Operators, Supervisors
12. Ensure Site Readiness As Per
Checklist
13. Audit Site Readiness As Per
Checklist
End
Q
Q
7. Load Pre-enrolment Data, If
Applicable
9. Create Awareness
8.Share Awareness and Publicity
Content
11. On boarding of OSI
3. Approve Station
deployment plan
6. Check Pin Code Data

UID Authority of India
Resident Enrolment Process ver 2.2.1 Page 12 of 53
ER 4.4 Setup Enrolment Centre Sub Process
Description
S.No Step Responsibility Reference
Start
To setup enrolment centers, activities that are
required to be initiated are:
Step 1 Identify suitable locations for Enrolment
Step 5 Share Pre-Enrolment Data, if used
Step 6 Check Pin Code Data
Step 8 Share Awareness and Publicity Content
Step 10 Ensure Availability of Certified Operators,
Supervisors
1. Identify Suitable Locations for Centre
Registrar must identify suitable locations where
enrolment centres may be setup as follows:
Assess details of the area including the terrain,
local weather conditions, law and order situation,
logistics support etc.
The enrolment Centre selected must be secured
and protected from the natural elements so that
there is no damage or loss of devices and data.
Co-ordinate with the local district administration
right from the planning stage to the actual roll-
out of the enrolment.
In order to cover difficult-to-reach areas and
villages where proper premises are not available,
it may be necessary to have mobile enrolment
centres. The list of difficult areas will be available
with the State Government.
In case of mobile enrolment centres/stations, the
decision on frequency/period of availability shall
be decided by the Registrar based on the density
of population, geographical terrain etc.
Site selection also involves taking into
consideration issues of power availability,
approach/access to the area, lighting etc.
NSRs should have enrolment centres only in and
around their premises to ensure close
supervision. Enrolment activities outside their
premises need to be approved by UIDIC
Registrars should plan for setting up long
term/permanent enrolment centres at
taluk/block/municipality level for continuous
enrolment and updation activities.
Registrar
2. Decide Number of Stations for Each Centre
The number of stations can be decided based on the
target number of days for completion of enrolment in
Registrar ER 5.1.7
Layouts

UID Authority of India
Resident Enrolment Process ver 2.2.1 Page 13 of 53
S.No Step Responsibility Reference
the particular area or the district and the expected
number of enrolees in the area.
Model RFP published on UIDAI website provides an
excel sheet for facilitating calculation of number of
stations
Tables, lighting, backdrops, height of table, chairs,
positioning of resident and operator, and issue of
direct sunlight for photo capture, all these need to be
considered for enrolment station setup.
Two layouts are shown in ER 5.1.7
External
Document
Model RFP on
UIDAI website
3. Approve Station Deployment Plan
Enrolment agencies will have to undergo an on-
boarding process for enrolment stations. ROs will
coordinate the on-boarding process with the
Registrars and EAs. The on-boarding process will
inter alia include the following:
EAs will declare enrolment station deployment
plans i.e. when and where the centers will be
established.
EAs will also demonstrate that they have certified
and active operators, requisite machines and
hardware available to be deployed.
EAs will also demonstrate that they have the
requisite infrastructure for supervision of the
enrolment centre.
EA will Prepare roll out plan and machine deployment
plan with Registrar and share with UIDAI regional
office/nodal officer who will then approve the
deployment plan.
EA will update Enrolment Centre information on the
UIDAI portal http://qamis.uidai.gov.in/es/. (Always
Confirm latest url from your nodal officer). Fill
information of approved centres only. The Registrar
will approve the centre plan and UIDAI RO will
monitor the same and may intervene where required.
Any enrolment centre not listed on the portal will be
deemed to be unauthorized and illegal.
UIDAI RO,
Registrar and
EA
4. Deploy Hardware, Software for Enrolment
Ensure all hardware and software as mentioned in
the ER 5.2.1 are deployed at the enrolment centre.
Test the hardware / software for proper working.
The Enrolment software client needs to be installed,
configured and registered with CIDR. The Enrolment
Agency needs Auth User and Auth Code from UIDAI
Enrolment
Agency
ER 5.2.1
Checklist for
Setting up
Enrolment
Centre
External
document
UIDAI
Application

UID Authority of India
Resident Enrolment Process ver 2.2.1 Page 14 of 53
S.No Step Responsibility Reference
technology team to register its clients.
The person performing the system configuration is
typically a representative of the registrar. Normally
the Registrar may ask the EA to perform the
installation and configuration. In such a case, the
configuration and Registration may be done in
presence of Registrar’s representatives.
The Registrar Name, Enrolment Agency Name will be
selected from a drop down menu. On selecting the
Names, their corresponding Codes will be populated
and will be in read only format. The station codes - 5
digit (numeric 0-9), need to be assigned by the EA
and must be unique for an EA. EA must maintain
unique station codes even across Registrars.
The auth code and password are then entered to
register the client. Once successfully registered, the
above fields become non-editable.
The EA must also import the Registrar certificate
(where applicable) before client Registration.
A Client Location field has been provided to facilitate
the Registrars in marking client locations and thus
identifying enrolment location for each resident’s
data packet. The Registrars can mark each of the
enrolment schedules with a location code and enter
this location code at client level. A report can be
pulled later by location codes for calculating schedule
wise payments. The registrar will select the
appropriate local language in the AADHAAR
application.
The registrar can select the appropriate address
display format in the AADHAAR client application. The
address can be the either: Default, Simple (for rural
areas) and Complete (for urban areas).
The client Address Field displays can be configured
according to the needs of the registrar where the
registrar can change the label names. These labels
will then get reflected on the landing screen
(demographic capture) once saved.
Aadhaar admin client also requires downloading of
master data files like Pin code, documents list and
user credentials into the client from the portal. The
master files need to be updated on the client from
time to time.
Some registrars involved in enrolment may require
KYR+ data in encrypted format. Similarly some
registrars may use encrypted pre-enrolment data
files for importing pre-enrolment data to enrolment
client. In both scenarios, the encryption and
decryption engine has to be provided by registrars
and the administrator has to set the configurations
Installation
Manual
User
Manageme
nt toolkit
document
Administra
tor Manual
For
Configurin
g
Enrolment
Client

UID Authority of India
Resident Enrolment Process ver 2.2.1 Page 15 of 53
S.No Step Responsibility Reference
for these engines in this section of the client security
screen.
To identify the physical location of the enrolment
station, GPS (Global Positioning System) is integrated
with enrolment client. GPS will provide latitude,
longitude and altitude of the current location of the
enrolment station.
GPS dongle must be attached to the system before
starting the GPS. GPS co-ordinates must be
captured once in every 24 hrs, preferably beginning
of each day.
There is also a proposal to prescribe hardware keys
for enrolment stations on security considerations by
October 2012.
Refer ‘Administrator Manual For Configuring
Enrolment Client’ for details of Registration and
configuration of administration client
5. Share Pre-enrolment Data Available, if Used
Where applicable, share the pre-enrolment data /
beneficiary database with Enrolment Agencies for
carrying out the enrolments. The details of the
database need to be discussed and sent to UIDAI in
advance in prescribed format and aligned to UIDAI
requirements as per technology integration toolkit.
UIDAI Client Installation manuals have detailed
process document on Registrar Integration.
Registrar ER 5.1.1
KYR Standards
for Collecting
Demographic
Data
External
document
UIDAI
Application
Installation
Manual
6. Check Pin Code Data
Ensure that Pin code data for planned enrolment
locations is checked in Pin Master of Aadhaar
software and is correct and complete. Review and
Report missing/incorrect Pin codes to UIDAI and get
these corrected using Pin code correction process.
Registrars/EAs must also report transliteration errors
in local language PIN code data and get it corrected
in the Pin Code master.
Registrar
7. Load Pre-enrolment Residents Data on the
Enrolment Station Laptop
Load and test beneficiary database on enrolment
centre laptops / desktops and ensure it is accessible /
searchable. Pre enrolment data helps in reducing the
cycle time for enrolment at centre significantly.
An Independent demographic client provided by
Enrolment
Agency
(Technical
administrator)
External
Document
AADHAAR_Re
gistrar_Integr
ation Manual

UID Authority of India
Resident Enrolment Process ver 2.2.1 Page 16 of 53
S.No Step Responsibility Reference
UIDAI will allow an operator to pre-enrol a resident.
An operator needs to enter the resident details on
the demographic screen from the Enrolment Form
filled by the resident and on saving the details the
application stores the resident data on a local file
system in a predefined location. Operator should be
able to import the file created into the enrolment
station to start the actual enrolment process.
The demographic client can also be used to clean and
complete an already existing database and make it
ready for enrolments.
Registrar may use their existing database to pre-
enrol residents for UID. All the details are checked for
validity at this time including name, address, date of
birth etc.; the pre-enrolment data is then made
available on the enrolment station.
Also ensure that if KYR+ fields are to be captured,
then KYR+ software and pre-enrolment data
integration is completed and tested on enrolment
centre laptops/desktops.
8. Share Awareness and Publicity Content
Share awareness and publicity content, as detailed in
the external process, with the Registrar. Guide them
in adapting the content / communication.
UIDAI
9. Create Awareness in Target Beneficiaries / Residents
Ensure that the right communication reaches the
target resident groups with respect to timing and
location for enrolment centres, benefits of enrolling
etc.
'-Aadhaar Banners may be put up at prominent
places near the enrolment centre
-Banners should also be used outside the enrolment
centres clearly indicating the time and place and the
documents required for enrolment
-details that are subject to change such as venues
and dates, should be replaceable
-EAs may also be advised to deploy mobile IEC
elements such as standees as they are economical
options
-They should also consider prolific usage of mic-ing in
catchment areas
Registrar

UID Authority of India
Resident Enrolment Process ver 2.2.1 Page 17 of 53
S.No Step Responsibility Reference
-EAs must ensure that important information relating
to consent and operator responsibilities are displayed
prominently inside the enrolment centres
-A 'combined' hoarding with information on what
Aadhaar is, what its benefits are and how it may be
obtained should be placed outside the enrolment
centre
-EAs should be encouraged to share feedback
received from residents with the IEC team so that
creative elements can be modified to broadcast
information that is most relevant
Enrolment Agency needs to assist the Registrar in
communication and generating resident awareness.
The role of the enrolment agency should be limited to
publicising the content provided by the UIDAI/
Registrars. The EA should not add / modify /delete
the content provided by Registrar/ UIDAI.
10. Ensure Availability of Active Operators, Supervisors
The Operator/Supervisors need to be certified and
have their Aadhaar Numbers generated to be eligible
for activation at portal.
Enrolment Agency must activate its Operators/
Supervisors at technology portal viz. https://portal.uidai.gov.in/uidwebportal/dashboard.do
The EA is required to have a unique Operator ID for
each, to activate them.
Any Name mismatch between the enrolment and Sify
data needs to be approved by RO for activation.
Appropriate actions need to be taken by EA for
Operator/Supervisors listed in the Incomplete
Records bucket at tech portal by working with UIDAI
tech support.
Training is not mandatory but desirable. However
certification is mandatory. Ensure certified Operators
and Supervisors are available at enrolment centres.
The no. of active Operators should be more than the
no. of stations for job rotation and avoiding Operator
fatigue.
The supervisor is required to handle any situation
that requires immediate attention and handle
exceptions at the enrolment centre itself and inform
the Registrar subsequently.
Operator, Supervisor user management at windows
Enrolment
Agency
External
Document
User
Manageme
nt toolkit
document

UID Authority of India
Resident Enrolment Process ver 2.2.1 Page 18 of 53
S.No Step Responsibility Reference
and client level needs to be done appropriately to
avoid setback during operations. Refer user
management toolkit.
Technical personnel for attending power /system /
biometric instrument related maintenance problems
should be available on call in a centrally located place
covering about six enrolment centres so that the
downtime can be minimized.
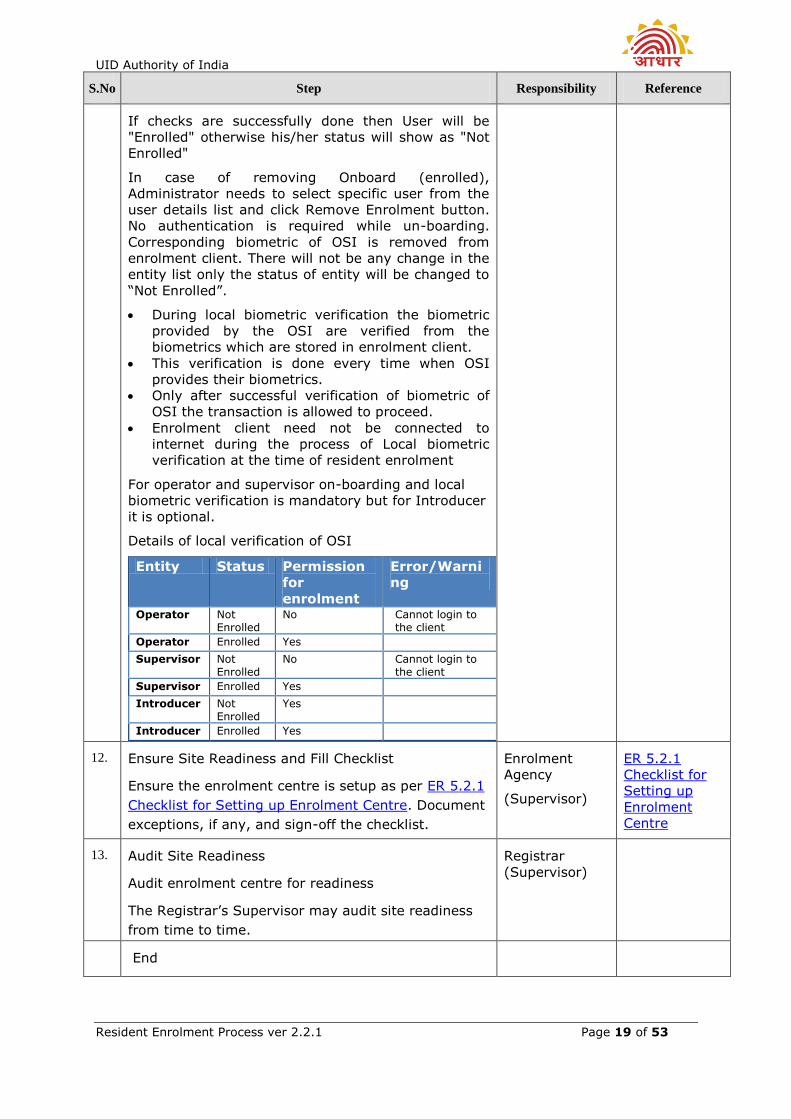
11. On boarding of OSI(Operator, Supervisor and
Introducer)
During the on-boarding, biometrics of OSI are stored
into enrolment client after authentication. Enrolment
client needs to be connected to internet during the
process of on-boarding.
Before on boarding any user, download the user
credential file from the portal and import it into the
application. The user-credential file is a digitally
signed .xml file.
Client also ensures that after master data download
for suspended operators, such operators cannot
enrol/ on –board after that point.
To on-board OSI, EA administrator needs to select
corresponding operator, supervisor or introducer in
the “Local Biometric Enrolment” in enrolment client.
User Details appears with UID, User Name, Type
(Operator/Supervisor/Introducer) and Status. There
are two statuses: On Board (Enrolled), Not Enrolled.
On-board (Enrolled) User – If user’s biometric
details verification is successfully completed and
stored in local database.
Not Enrolled – If user needs to be boarded. If
user’s biometric details verification is not
successfully completed and not stored in local
database. It will appear as ‘Not Enrolled’ in
status.
One user at a time from the list is onboarded.
Operator/Supervisor and Introducer to be onboarded
will provide their fingerprints (left slap, right slap and
two thumbs)
When the quality of biometric is above threshold,
pass indicator will be shown to user.
User will get unlimited number of attempt to
capture biometric that passes the required
threshold.
Once Biometrics are captured, user sends a request
to CIDR server for authentication.During
authentication at server, biometric of the OSI are
compared against the biometric provided by same
OSI at the time of enrolment.
Enrolment Agency
UID Authority of India
Resident Enrolment Process ver 2.2.1 Page 19 of 53
S.No Step Responsibility Reference
If checks are successfully done then User will be
"Enrolled" otherwise his/her status will show as "Not
Enrolled"
In case of removing Onboard (enrolled),
Administrator needs to select specific user from the
user details list and click Remove Enrolment button.
No authentication is required while un-boarding.
Corresponding biometric of OSI is removed from
enrolment client. There will not be any change in the
entity list only the status of entity will be changed to
“Not Enrolled”.
During local biometric verification the biometric
provided by the OSI are verified from the
biometrics which are stored in enrolment client.
This verification is done every time when OSI
provides their biometrics.
Only after successful verification of biometric of
OSI the transaction is allowed to proceed.
Enrolment client need not be connected to
internet during the process of Local biometric
verification at the time of resident enrolment
For operator and supervisor on-boarding and local
biometric verification is mandatory but for Introducer
it is optional.
Details of local verification of OSI
Entity Status Permission
for
enrolment
Error/Warni
ng
Operator Not Enrolled
No Cannot login to the client
Operator Enrolled Yes
Supervisor Not Enrolled
No Cannot login to the client
Supervisor Enrolled Yes
Introducer Not Enrolled
Yes
Introducer Enrolled Yes
12. Ensure Site Readiness and Fill Checklist
Ensure the enrolment centre is setup as per ER 5.2.1
Checklist for Setting up Enrolment Centre. Document
exceptions, if any, and sign-off the checklist.
Enrolment
Agency
(Supervisor)
ER 5.2.1
Checklist for
Setting up
Enrolment
Centre
13. Audit Site Readiness
Audit enrolment centre for readiness
The Registrar’s Supervisor may audit site readiness
from time to time.
Registrar
(Supervisor)
End

UID Authority of India
Resident Enrolment Process ver 2.2.1 Page 20 of 53
ER 4.5 Capture Demographic and Biometric Data and
Ready for Transfer Sub Process Flow
16. Scan Documents
Capture Demographic & Biometrics Data & Ready for Transfer Sub Process
Enrolment Agency (Operator) Resident Registrar
Exec
utio
n O
wne
rshi
p: E
nrol
men
t A
genc
y
Yes
Start
1. Provide Paper Form
5. Is Resident’s Age < 5yrs?
6. Enroll Based on Parent/Guardian
details
4. Enter Demographic
Details in software
3. Verification Sub-process
No
10. Capture Biometrics -Facial
Image, Exception(if any), IRIS,
Fingerprints
End
15. Acknowledgement
& Consent
14. Sign-off the Data Capture
11. Show Data to Resident
2. Fill form and get
Demographic Data verified
12. Is any Correction Required?
13. Correct Data Yes
17. EoD, Data Export, Sync and
Backup
Q
No
8. Check and Record any Missing
Eye/Finger
7. Record Resident’s consent for
Information Sharing
9. Record Resident’s consent to participate in FI
18. Correction Process

UID Authority of India
Resident Enrolment Process ver 2.2.1 Page 21 of 53
ER 4.6 Capture Demographic and Biometric Data and
Ready for Transfer Sub Process Description
S.No Step Responsibility Reference
Start
This is the sub-process where actual resident
enrolment begins. This process begins when a
resident approaches an Enrolment Centre for
enrolment.
1. Provide Paper Form
Aadhaar Enrolment/Correction form (containing
KYR fields) is provided to the resident.
A Registrar can have a separate form for
capturing KYR+ fields.
The data can also be extracted from a pre-filled
database. Filling Aadhaar Enrolment/Correction
form is mandatory and will be required - even in
case of prefilled data.
If enrolment forms are distributed and filled in
advance, it will help speed up enrolment at the
Centre. The enrolment forms can be used as a
tool for crowd management by controlled
distribution. Planning can be done in advance for
the number of people that can be enrolled in a
day depending on the number of stations at the
centre. Each resident can be informed of the day
and time he/she should come for enrolment
during distribution of forms. Token system may
be followed by EAs to reduce waiting time by
residents at centre.
Online Appointment scheduling should be
encouraged along with token based system.
Enrolment
Agency
(Operator)
ER 5.2.2
Enrolment
Form
2. Fill Form and Get Demographic Data Filled Up
Resident needs to fill up the form as per the
instructions provided in the form. If the Resident
is unable to fill the form himself / herself, he/she
may take assistance from local support such as
(but not limited to) Verifier, Village Accountant,
Field Inspector, Introducer, NGOs / CSOs etc.
Resident needs to get the demographic data
provided by him/her verified. Resident must
carry Original documents and a photocopy of
PoI, PoA, DoB,PoR for verification. The EA must
provide facility of photocopy for the documents.
Photocopying may not be required where
documents are being scanned.
In instances where original documents are not
available, copies attested / certified by a public
Resident ER 5.1.1.
KYR
Standards for
Collecting
Demographic
Data
ER 5.1.2.
Detailed
Guidelines
for Recording
Demographic
Data

UID Authority of India
Resident Enrolment Process ver 2.2.1 Page 22 of 53
notary / gazetted officer will be accepted.
UIDAI shall have the right to alter / amend the
guidelines in exception handling from time to
time.
Refer standard ER 5.1.1 for details on capturing
the KYR field.
Refer guideline ER 5.1.2 for guidelines on
capturing resident demographic information.
3. Verification Sub Process
Refer Verification Sub Process Flow for details
Registrar
4. Enter Demographic Details in Software
Enter the verified demographic details in the
enrolment software. The software has built-in
features to ensure completion of mandatory data
fields.
Resident’s demographic data may also be pulled
using any existing database for example if the
resident is already a part of the Registrar’s
beneficiary database, retrieve resident’s
demographic details using the Pre-Enrolment ID.
Some examples are (but not limited to)
Ration card no (Food and Civil Supplies
Department as Registrar)
Job card no (Rural Development
Department as Registrar)
Policy no (LIC as Registrar)
TIN (RGI as Registrar)
EPIC no (Election Commission as Registrar)
PAN no (Income Tax Department as
Registrar)
In case data has been retrieved using Pre-
Enrolment ID, then check and correct/complete
the demographic data.
Pre-enrolment of residents may also involve a
web-based UID registration that the residents
will do themselves. Resident logs in to the web
portal provided by UIDAI for pre enrolment.
Resident enters his/her demographic details and
references. At the end of the pre enrolment,
resident receives a pre enrolment id.
Resident then approaches an enrolment Centre
and provided his/her pre enrolment id. Operator
enters the pre enrolment id in the enrolment
client and click on web search button.
Demographic and reference tabs were filled with
information provided by resident during pre-
enrolment.
The RGI official has provided NPR Receipt
Number / schedule no. to the household /
Enrolment
Agency
(Operator)
ER 5.1.2.
Detailed
Guidelines
for Recording
Demographic
Data

UID Authority of India
Resident Enrolment Process ver 2.2.1 Page 23 of 53
individual. Capture the same in the enrolment
software. Operator can inform the resident that
this will be used for sharing resident’s AADHAAR
number with RGI. The Registrar can make TIN
books available at centres. This will help EA to
update the TIN numbers of residents in this
field.
Capture the names of the proof documents
submitted by the resident, as applicable, in the
client.
5. Is Resident’s Age< 5yrs?
Check if the resident’s age is less than 5 years.
If yes, proceed to Step 6. Enrol based on
Parent/Guardian Details
If no, proceed to Step 7. Record Resident’s
Consent for information sharing
Enrolment
Agency
(Operator)
6. Enrol based on Parent/Guardian Details
In case of child below the age of 5 years,
following data should only be captured:
Name
Date of Birth to be precise and should not be a
declared one
Gender and
UID/EID of relation preferably mother in case both
the parents are alive
The above fields are mandatory for enrolment of
the child below 5 years.
As the address field and the consent for data
sharing for the child below 5 years is not
captured and so during Aadhaar processing, the
field values for address and consent for sharing
are to be populated from the field values of the
linked parent/relative EID/UID, preferably with
the mother in case both parents are alive.
The biometric of the parent/guardian has to be
captured during the enrolment for backend
verification.
In case of children below the age of 5 years one
of the parents’ or guardian’s UID or Enrolment
ID (either of the two numbers) shall be
recorded. This is mandatory. The name of the
parent/relative is optional.
If the child is being enrolled along with his father
/mother / guardian, first enrol the parent /
guardian and record the parent’s enrolment ID
in the child’s form. Enrolment ID field on
demographic screen is split in two sub fields:
Enrolment
Agency
(Operator)

UID Authority of India
Resident Enrolment Process ver 2.2.1 Page 24 of 53
first to capture enrolment number and second to
capture enrolment date & time both as printed
on acknowledgement.
If the father /mother / guardian of the child has
either not enrolled or does not possess
AADHAAR number at the time of enrolment, the
enrolment of that child cannot be done unless
the above requirements are fulfilled.
7. Record Resident’s consent for Information
Sharing
Check Resident’s consent for information sharing
in the enrolment form and capture in software
accordingly. Information sharing consent field is
to check with the resident whether it is alright
with the resident if the information captured is
shared with organisations engaged in delivery of
welfare services.
Enrolment
Agency
(Operator)
8. Check and Record any Eye/ Finger Missing
Check resident’s eyes and fingers for fitness
(missing/amputated). If the resident has any
deformities due to which it is not possible to
take fingerprints/iris, these also have to be
captured as a biometric exception.
Enter Details of “Missing Eye Indication” or
“Missing Finger Indication” as appropriate.
Enrolment
Agency
(Operator)
9. Record Resident’s consent to participate in FI
Go to Banking tab. Check in the enrolment form
if resident wants to participate in the scheme of
financial inclusion (FI) and enter in the client
accordingly. Resident can do so either by linking
his current Bank A/C to his Aadhaar Number or
by giving his/her consent that he/she has no
objection in sharing his/her information for the
purpose of UIDAI facilitating opening a new
Bank/ Post Office A/C linked to his Aadhaar
number.
In case of consent for new account, operator will
capture the resident’s preferred Bank Name from
the available drop down list. The bank account
will be opened with the partner banks of UIDAI.
UIDAI will facilitate opening a bank/post office
account for the resident. This account will be
linked to Resident’s Aadhaar number.
Resident can choose to link his/her existing bank
account to Aadhaar number by providing their
existing bank details. In this case, the operator
should capture the name of the State where
Bank Account exists, Bank Name, Branch Name
Enrolment
Agency
(Operator)

UID Authority of India
Resident Enrolment Process ver 2.2.1 Page 25 of 53
and the account number. IFSC code will get auto
populated by software. Else it can be entered
manually. This is an optional field.
10. Capture Biometrics - Facial Image, Exception(if
any) IRIS and Fingerprints
Guide the resident to occupy the chair in front of
the enrolment station for capturing face
photograph. The resident should be instructed to
be seated properly with their back upright and
their face towards the camera. The Operator can
visually verify facial image quality. Apart from
this in-built quality checks in the software
indicate the quality of biometrics at each stage.
If any biometric exceptions have been specified
on the demographic screen, these should be
captured as photographs on the Photograph
screen.
The images of all the ten fingers are to be
captured. The fingerprints must be captured in
the sequence of slaps of four fingers of left hand,
right hand followed by the two thumbs. If
required, ask resident to clean hands on towel
and/or help to apply little more pressure on
hand while taking image again. Similarly, guide
resident to get appropriate quality of iris and
facial images.
The software forces re-captures for a fixed
number of times when quality is not OK. Even if
the quality flag is green but the Operator is able
to judge that a better picture can be taken, then
same should be attempted. However, it should
be borne in mind that recapture should not
become harassment for the resident.
Application will not allow the Operator to capture
biometrics if maximum attempts are exhausted.
Each time quality image is not captured,
Operator must look at the list of actionable
feedbacks provided on the screen.
Only facial image is captured for children below
5 years. Iris and fingerprint screens will not get
activated for children below 5 years
If any biometric exception is specified in the
demographic screen, then the same should be
captured as photograph in the Exception
Photograph screen. One photograph is enough
for multiple exceptions. The exceptions
photograph window will be enabled only if any
biometric exception is declared in the
demographics screen. The exception photograph
should capture resident’s face with show of both
hands irrespective of the type of exception.
Enrolment
Agency
(Operator)
ER 5.1.4
Biometric
Data Capture
Standards
ER 5.1.5
Detailed
Guidelines
for Collecting
Biometric
Data

UID Authority of India
Resident Enrolment Process ver 2.2.1 Page 26 of 53
Policies for biometric capture:
Iris - above 5 yrs mandatory (also used for de-
duplication)
Fingerprint - above 5 yrs capture
Fingerprint - above 15, treated like adult
Face - all mandatory including infants
Below 5 yrs – Parent/Relation EID/UID is
mandatory, after that optional
Any biometric exception (any finger missing, any
eye missing) - extra photo as well as supervisor
signature
AADHAAR Enrolment Client software
automatically takes care of enforcing these
policies. UIDAI may, from time to time, make
modifications to these policies
11. Show Data to Resident
The Operator shows the data entered to the
resident on a monitor facing the resident and if
required, reads out the content to the enrolee,
to ensure that all details captured are correct.
Enrolment
Agency
(Operator)
12. Correction Required?
The resident will ensure that all details entered
in Demographic form are correct.
In case any errors are pointed out to the
Operator, go to step no.13, Correct Data
Else go to step no. 14, Sign off the data capture.
Resident
13. Correct Data
The EA Operator then corrects the errors pointed
out and again shows the data to the resident.
Enrolment
Agency
(Operator)
14. Sign-off the data capture
The Operator will then provide own Fingerprint
to sign-off the data captured of the resident.
In case of Biometric exceptions the Supervisor
screen gets activated for sign off. The Supervisor
will sign off any biometric exceptions observed in
Resident Data Collection by providing own
fingerprint.
In case the verification type is selected as
Introducer/HOF get the Introducer/HOF to sign
off on the review screen. If the Introducer is not
physically present at the time of enrolment
select the check box "Attach later" so that the
enrolment can be verified by the Introducer at
the End of the Day.
Enrolment
Agency
(Operator)

UID Authority of India
Resident Enrolment Process ver 2.2.1 Page 27 of 53
15. Acknowledgement & Consent
Operator can select the language in which the
legal/declaration text on print receipt shall be
printed both in new enrolment as well as
Correction of an enrolment. Operator must ask
the resident his/her preferred language in which
the receipt must be printed. On selection of any
of the declaration language option, the print
receipt will be printed in the selected language
i.e. any local language set on the configuration
screen.
Consent for Enrolment and Acknowledgement
are printed in one A4 sheet. Tear off the sheet
from centre.
Sign and Provide Acknowledgement to resident.
While handing over the acknowledgement to the
Resident, the Operator must inform resident that
the Enrolment Number printed on
acknowledgement is not the Aadhaar number
and that the Resident’s Aadhaar number will be
communicated through a letter subsequently.
This message is also printed in
acknowledgement.
Operator will take Resident’s consent
(signature/thumb impression) and file/scan this
copy.
In case the child is below 5 years, consent of the
parent/relative whose EID/UID has been
captured will automatically be populated during
processing.
If Documents are being scanned, go to step No.
16.
Else go to step No.17
Enrolment
Agency
(Operator)
ER 5.2.3
Acknowledge
ment and
Consent for
Enrolment
(draft
format)
16. Scan Documents
Once the acknowledgement and consent is
printed, an option is provided to attach / scan
documents selected in the reference tab during
enrolment of the resident. Irrespective of the
type of enrolment, option to attach enrolment
form and consent shall be available in the
enrolment client.
Enrolment client shall provide an option to either
attach a previously scanned document or an
option to directly scan from the scanner. The
previously scanned documents file name should
be <Name/EID><document type> where
document type is PoI/PoA/DoB/PoR.
Enrolment
Agency
(Operator/Su
pervisor)

UID Authority of India
Resident Enrolment Process ver 2.2.1 Page 28 of 53
17. EoD, Data Export, Sync and Backup
The EA Supervisor needs to review all the
resident data packets generated during the day
to ensure that data entered in the Aadhaar client
is correct for each resident. Review can be done
by supervisors or any fellow operator on boarded
in the same enrolment station.
Reviewer can Approve, Reject a packet or put a
packet on HOLD for Correction by giving a valid
reason for same. Reviewer must sign off by
giving his/her biometric after End of Day Review.
For the packets on Hold for Correction, EA must
inform the resident to come to the enrolment
centre within 96hrs of enrolment for data
correction process. Once correction is done to
the resident's data, the Reviewer will again
manually Approve/ Reject the Resident's packet
put on Hold earlier for correction, with
appropriate reason if rejected. At the time of
Export, those packets will be considered which
have either been approved or rejected by
supervisor. Packets on Hold for Correction will
get auto Rejected and exported after correction
window timeframe have elapsed and no action
been taken on packet status.
Packets Rejected by Introducer will not be
available to the Supervisor for Review and vice
versa is also true. These packets will get
exported when Export is called.
Operator/Supervisor takes backup of data
captured at least twice a day and maintains it for
a period of minimum 60 days (or as specified by
UIDAI form time to time).
Whenever enrolment client is registered for a
new Registrar, no enrolments can be started
without successful pre sync.
The enrolment client after successful enrolments
needs to be synched up with the server every
24-48 hrs. The Client will stop enrolments if the
client is not synched at least once in 10 days.
The synch process requires network
connectivity. The synch typically happens only at
the start of the client if there are any exported
packets with status “Exported” and it’s a
backend process with less of manual
intervention. During synchronization, the
operator may not be able to do any other work.
If there are no packets with the status
Enrolment
Agency
(Operator/Su
pervisor)
External
Process
Refer
AADHAAR_In
stallation
_Setup
ManualFor
Backup and
Restore
Refer 1st Mile
Logistics
Process for
Data Transfer
flow and
Guidelines

UID Authority of India
Resident Enrolment Process ver 2.2.1 Page 29 of 53
“Exported” on the enrolment client system, a
user friendly message is displayed to indicate
that the synch program has been completed.
The synch is a start up activity and not a
continuous process. Based on the response from
the server, the client does an appropriate action
to the packets for which enrolment IDs have
been synched.
Operator exports data to a memory stick or any
folder and keeps it ready for transfer at a
specified location. EAs can transfer data to CIDR
either through online SFTP mode using Aadhaar
SFTP client or by sending data through memory
stick/hard disks. EA must upload data packets
within 20 days of enrolment. The enrolment
client will freeze if packet pending for uploads
exceeds 1000 on the enrolment station.
Refer 1st Mile Logistics Process for Data Transfer
flow and Guidelines
18. Correction Process
The following requests for changes are included
in the scope of the Correction Process:
All demographic fields i.e., Name, Address,
Gender, Date of Birth / Age*
Information sharing consent
Relationship to resident
Mobile
Email Address
NPR Receipt Number
Relationship Details(Relation type, Name and
EID/UID)
Introducer Name and UID
*If originally the resident was enrolled as a child
below 5 years of age it is invalid to correct the
resident age to above 5 years because for above
5 we require biometric data as well which would
not have been captured during enrolment.
For correction in any of the above data of a
resident, use Correction menu on software
client. The EA can correct data within 96 hours
of the resident’s enrolment and in the presence
of the resident.
The EA must restrict all corrections in a
Residents data to only one time.
The resident must carry his/her
acknowledgement letter for correction. PoI, PoA
and Parent/Guardian’s acknowledgement letter
will also be required at the time of correction
Enrolment
Agency
(Operator)
ER 5.2.4
Acknowledge
ment of
Correction
and Consent
for Correction

UID Authority of India
Resident Enrolment Process ver 2.2.1 Page 30 of 53
process depending on the type of correction.
A change in Name would require either a verified
Enrolment Form and PoI document or an
Introducer’s Name and UID. A change in Address
would require either a verified Enrolment Form
and PoA document or an Introducer’s Name and
UID. A change in verified DoB would require a
verified Enrolment Form and DoB certificate. If
the correction is in data for a child below 5 years
of age, then EID/UID of parent/relative is
mandatory while details of relationship type and
relative name of parent/guardian is optional.
The previous Enrolment ID of the resident needs
to be entered for correction of resident’s data.
The Name of the resident whose data is to be
corrected must be entered mandatorily even if
the correction is not in the name itself. Only the
fields that need a correction are entered in the
Correction menu of the software. Fields that are
good in original enrolment are not to be retyped
during Correction.
The resident’s photo is also captured during
correction process. The correction in data will be
reviewed with the resident and any one of the
biometrics of the resident (provided in drop
down menu on client) will also be taken to
confirm that the resident is OK with corrections.
In case the resident is child below 5 years, the
biometric of the parent/guardian whose details
are entered in the relationship fields, has to be
taken. The Operator will sign off the enrolment
and Supervisor, Introducer sign off will be
required in biometric exceptions and Introducer
based verification respectively.
An acknowledgement of correction and consent
for correction will be printed at the end of
correction process along with the Resident’s
photo. The acknowledgement of correction will
be signed by Operator and handed over to
Resident. The consent for correction will be
signed by resident and operator should file the
same along with the verified Form and copy of
documents submitted for correction.
In case Aadhaar letter is already sent to resident
and correction is processed later, an Aadhaar
Letter for Corrections will be sent to Resident.

UID Authority of India
Resident Enrolment Process ver 2.2.1 Page 31 of 53
End

UID Authority of India
Resident Enrolment Process ver 2.2.1 Page 32 of 53
ER 4.7 Verification Sub Process Flow
Verification Sub Process
Registrar Enrollment AgencyIntroducer/Head of
Family
Exe
cu
tio
n O
wn
er:
Re
gis
tra
r
Start
5. Endorse
Resident by Giving
Fingerprint
Document Based
End
2. Verify
documents
1. Type of
Verification?Introducer/HOF Based
4. Store Documents
3. Capture Demographic and Biometrics Data and Ready for Transfer Sub
Process

UID Authority of India
Resident Enrolment Process ver 2.2.1 Page 33 of 53
ER 4.8 Verification Sub Process Description
S. No Step Responsibility Reference
Start
It is essential that key demographic
data is verified properly.
1. Type of Verification
3 Distinct methods of verification
are discussed in this document
Based on supporting
documents
Based on introducer system
HoF based enrolment
Registrar
2. Verify Documents
For Verification based on
Documents, the Registrar’s
supervisor present at the Enrolment
Centre will verify the documents.
It is mandatory for the Verifier to
be available at the centre during
the operational hours of the centre.
Refer Verifier’s Roles and
Responsibility document for details
of verification.
List of Approved PoI, PoA, DoB and
HoF documents is listed in this
document section ER 5.1.3. UIDAI
and Registrars shall have the
authority to amend and enlarge the
list of PoI and PoA documents as
and when necessary.
The Registrar can add documents to
the list of PoI, PoA, DoB, HoF at the
technology portal after consultation
with RO, and EA can download the
master for documents at the client
machines for use in their area.
PoI requires a document containing
the resident’s name and
photograph, whereas the PoA
contains the name and address.
Even if pre-enrolment data is used -
Verifier will verify the Enrolment
Form details and photocopies
against PoI/PoA/DoB/HoF
documents.
Verification after enrolment may be
done to ensure that the data
Registrar ER 5.1.3.
Documents for
Verifying PoI,
PoAand DoB
External Document
Demographic Data
Standards and
Verification
Procedure (DDSVP)
Committee Report
Verifier’s Roles and
Responsibility

UID Authority of India
Resident Enrolment Process ver 2.2.1 Page 34 of 53
entered in software matches the
previously verified data. This can be
done by verifying the details in
acknowledgement, with PoI, PoA
documents or enrolment form. In
case of any errors, the resident can
immediately get these rectified by
the operator as per correction
process. This will improve overall
data quality of enrolments.
In case verification is done later and
an error is found in data after the
Resident has left the centre, then
the EA has to call the Resident for
correction process.
3. Capture Demographic and
Biometrics Data and Ready for
Transfer Sub Process
After verification, the Operator will
follow the process of capturing
Demographic and Biometrics Data
on enrolment software and keeps it
ready for transfer to CIDR.
Refer ER 4.5 Capture Demographic
and Biometrics Data and Ready for
Transfer Sub Process
Enrolment
Agency
(Operator)
ER 4.5 Capture
Demographic and
Biometrics Data and
Ready for Transfer
Sub Process
Operator Roles and
Responsibility
4. Store Documents
The EA can scan the enrolment
form, consent and resident’s proof
documents in the client or attach
pre-scanned documents while
enrolling the resident as described
in previous section ER 4.6.
If scanners are not being used and
hard copies of documents are being
collected, then UIDAI has a
document storage and management
strategy in place.
Each stakeholders roles and
responsibility documents define
DMS related activities. Refer those
documents for details.
Pickup lists for DMS are reports
generated in Aadhaar client by EA
for every Batch. Print copy Pickup
list is printed and is kept inside the
box/polythene/cover for every
batch. Pickup list CSV file is to be
exported from the machine and
Enrolment
Agency
(Operator,
Supervisor),
Registrar ,
DMS service
provider
ER 5.1.9
Guidelines for
Storage of
documents
ER 5.2.6 DMS
formats
Registrar,
EA,Verifier,
Operator,Supervsior
Roles and
Responsibility

UID Authority of India
Resident Enrolment Process ver 2.2.1 Page 35 of 53
sent to DMS agency along with
pickup request without any
modifications.
For best practices on document
storage refer ER 5.1.9 Guidelines
for storage of documents
For DMS, Registrar (or Registrar's
representatives) must do the
following:
Registrar must Create batches
of documents (preferred Batch
size is approximately 250 EID
dockets) accompanied by a
manifest with a unique batch
number.
Registrar will log their request
for a pickup to DMS service
provider using any of the
channels eg. Email or on Portal
when a minimum of 50000 EID
sets (+/- 10%) are ready at one
site. CSV files for all Batches of
a pickup must be zipped
together & uploaded on the
portal or sent by email to
complete the pickup initiation
request.
Pick up points will be the District
Headquarters in the State.
These locations needs to be
designated in advance and shall
not be changed without prior
notice and approval from UIDAI.
In case of pickup from the EA’s
site, the Registrar must
authorize & coordinate the
pickup schedule & ensure the
readiness of the Batches as
mentioned.
Obtain a confirmation from DMS
service provider on pickup
schedule along with date and
time. DMS service provider will
arrange a pickup within 7 days
of intimation.
The pickup list of all documents
per enrolment, a declaration
cum manifest by Registrar is
attached with each pickup. For
formats of these refer ER 5.2.6.
The DMS Service Provider will
report at the pickup location
with proper ID Proof (of UID
AADHAR DMS Project). Registrar
will then handover documents to

UID Authority of India
Resident Enrolment Process ver 2.2.1 Page 36 of 53
DMS service provider and obtain
sign-off.
The Registrar staff will prepare
the declaration cum manifest in
duplicate, with box-wise details.
A joint signoff will happen with
name, designation, seal of the
company. EA officials can
signoff on the same incase of
pickup from the EA’s site. One
copy of manifest will be given to
Registrar.
In event of change in
manifest/documents at the time
of sign-off, resend the manifest
by e-mail /portal upload to DMS
service provider.
The DMS Service Provider will
transport the documents to the
storage location in a secured way.
Upon receipt of documents at DMS
centre, verification of batches and
manifest is done and exceptions are
raised in case of mismatch.
Documents Q.C. is done and
exceptions are raised if required.
Documents are scanned and
indexed as per UIDAI requirements
Documents are securely stored for
future retrieval.
The DMS service provider will be
thereafter responsible for storage &
preservation of documents for
prescribed period as defined by
UIDAI.
Else End.
5 Endorse Resident by Giving
Fingerprint
The Introducer ensures that all the
residents that he is about to
endorse are known and given
particulars are correct. The concept
of inclusiveness should not take
away the credibility of the
Introducer system. Any false
verification by Introducer shall
make him liable for legal action.
Introducer’s name and UID is
entered during resident enrolment.
The Introducer must verify Name
and Address details of the resident,
Introducer’s own Name in the
Introducer/Head
of Family
ER 5.1.3; 2. Head
Of Family based
Enrolment
External Process –
Introducer
Enrolment and
Monitoring
Introducer Roles
and Responsibility

UID Authority of India
Resident Enrolment Process ver 2.2.1 Page 37 of 53
Enrolment form, and provide
his/her UID, signature/thumbprint
on the Form of the resident.
The head of the family (HoF) can
also verify the identity and address
of the family members in specific
circumstances. For this, the Head of
Family is first enrolled on the basis
of valid PoI, PoA from the list of
approved documents while the
dependent family members can be
enrolled through any of the
specified relationship documents as
long as the relationship revealing
document (PoR) is unambiguous
and both the documents (PoI, PoA
of Head of Family and the
Relationship documents for the
dependent family members) record
the same address.
For valid HoF documents Refer ER
5.1.3; section 2.
The copy of the Relationship
document submitted as proof
should be signed by the Head of the
family and countersigned by the
Registrar authorized verifier at the
enrolment centre.
In case of HOF based enrolment,
the documentary proof for
Relationship to HOF needs to be
selected. Only those family
members can be enrolled based on
the relationship document, whose
names are recorded on relationship
document. Relationship Details also
become mandatory. The
relationship of resident to HOF is
selected. HOF’s name, enrolment
Number and Date & time is also
entered. If UID of HOF is available,
then UID is entered during resident
enrolment.
The Introducer/HOF can endorse
the resident and vouch for the
validity of Resident’s information by
giving his/her fingerprint in the
enrolment software's “Review” tab.
In addition Introducer/HOF should
sign/provide thumbprint on the
Consent for Enrolment endorsing
the resident.
Introducer can also review list of all

UID Authority of India
Resident Enrolment Process ver 2.2.1 Page 38 of 53
pending for his/her verification at
the End of Day and Approve/Reject
the enrolment. Introducer needs to
give his/her fingerprint for all
Approved records.
The Introducer/HOF can verify the
details on the acknowledgment of
the resident. In case of any errors,
the resident can immediately get
these rectified by the operator as
per correction process. This will
improve overall data quality of
enrolments.
In case verification is done later and
an error in data is found after
Resident has left the centre, then
the EA has to call the Resident for
correction of data. In case the
correction is in Name or address,
the Introducer/HOF presence is also
required.
End

UID Authority of India
Resident Enrolment Process ver 2.2.1 Page 39 of 53
ER 5. Annexure
ER 5.1 Standards and Guidelines
ER 5.1.1 KYR Standards for Collecting Demographic Data Information Fields Verification
Required
Verification Procedure
Personal
Details
Name Yes Any of the POI documents
Introducer for people who
have no documents
In case child is below 5
years of age, verification
of POI is not required.
Date of Birth ## No ---
Gender No ---
Address Details
Residential
Address(For UID
letter delivery and
other
communications)
Yes
Any of the -PoA
documents
Introducer for people who
have no documents
Address will be physically
verified during UID letter
delivery. But Resident’s
physical presence not
required during letter
delivery.
For child below 5 years of
age, this field need not be
captured.
Parent/
Guardian Details
Father’s/
Husband’s/
Guardian’s Name*
Conditional Name of either
Father/Husband/Guardian
or Mother/Wife/Guardian
is mandatory for all. But,
an option will be provided
to not specify in the case
the adult is not in a
position or does not want
to disclose.
In the case of child below
5 years, UID/Enrolment
ID(any one of the two) of
at least one
parent/guardian is
mandatory.
No Verification of Father/
Husband/ Guardian in the
case of adults
No Verification of Mother/
Wife/ Guardian in the case
of adults
Father’s/
Husband’s/
Guardian’s UID*
Conditional
Mother’s/ Wife’s/
Guardian’s Name*
Conditional
Mother’s/ Wife’s/
Guardian’s UID*
Conditional
Introducer
Details
Introducer
Name**
Yes
Introducer’s Name, UID on
the form
Introducer’s thumbprint
endorsing the resident in
the Review tab of the
Introducer’s UID**

UID Authority of India
Resident Enrolment Process ver 2.2.1 Page 40 of 53
enrolment software.
Contact Details Mobile Number No ---
Email Address No ---
## A flag is maintained to indicate if Date of Birth (DoB) is verifiedIf Resident
informs their DoB without any documentary proof,the system considers it as
declared. . In case exact DoB is not known, resident should indicate the age only.
Enrolment software has the provision to capture age & calculate the year of birth.
* For children below 5 years, Father/ Mother/ Guardian’s UID/Enrolment ID is
mandatory.
* For children under 5 yrs of age, biometric de-duplication will not be done. Hence
their UID will be flagged as such until they are biometrically de-duplicated at a later
age. Their UID has to be be linked to at least one of the parent’s UID.
* In the case the adult is not in a position or does not want to disclose, name of
either Father/ Husband/ Guardian or Mother/ Wife/ Guardian, select the flag in the
enrolment software to indicate that resident has not given the relationship details.
** For residents with no document proof, an “Introducer” should certify his/ her
identity.
ER 5.1.2 Detailed Guidelines for Recording Demographic Data
1. Pre-Enrolment ID
1. This field is used for retrieving pre enrolment data using pre-enrolment ID.
Enter the pre-enrolment ID and click on “Go”. Pre-enrolment data will get
populated in the respective fields.
2. This pre-enrolment data may require correction. Make corrections as
appropriate.
2. Name
1. Verify the proof of identity documents produced by the individual before
recording the name in case of document based verification. If any of the above
documents submitted do not contain the photograph of the resident, then it will
not be accepted as a valid PoI. In order to be inclusive and free of harassment,
documents with older photographs are acceptable.
2. If document furnished is not in the drop down list of PoI in enrolment client,
then it is not an acceptable PoI document. In such case resident either would
require a valid PoI or an Introducer for enrolment.
3. The name of the person in full should be entered in the field provided for this
purpose. It should not include salutations or titles like Mr., Miss, Mrs., Major,
Retd. Etc
4. It is very important to write the person’s name very carefully and correctly. For
example, the respondent may tell that his name is V. Vijayan whereas his full
name may be Venkatraman Vijayan and similarly R. K. Srivastava’s full name
may actually be Ramesh Kumar Srivastava. Similarly, a female enrolee may tell
her name as K. S. K. Durga while her full name may be Kalluri Surya Kanaka
Durga.
5. Ascertain from her/him the expansion of her/his initials and check the same in
the documentary evidence produced before recording the name in full.
6. In case of difference in the name declared and the one in document (PoI), the
name as declared by the resident may be recorded by the Enrolment Agency
provided the difference is only in spelling and/or last name to be written prior to
first name.

UID Authority of India
Resident Enrolment Process ver 2.2.1 Page 41 of 53
7. If two documentary proofs produced by the enrolee have variation in the same
name (i.e., with initials and full name), the enrolee’s full name should be
recorded.
8. Sometimes the infants and children may not have been named yet. Please try
to ascertain the intended name for the child by explaining to the enrolee the
importance of capturing the name of the individual for allotting UID.In case of
non availability of supporting documents for PoI, the name should be recorded
with the assistance of the Introducer. In case of child below 5 years, POI/POA is
not required.
9. It is observed that some transliterations to local language are not ok,due to
phonetics and other reasons,and therefore need manual correction.
3. Date of Birth (DoB)
1. Record date of birth of Resident, indicating day, month and year in the relevant
field. Record the day (2 digits), month (2 digits) and year (4 digits).
2. If the Resident provides documentary evidence of Date of Birth, then check the
box “Verified” When resident declares the DoB without any documentary
evidence, record date of birth but do not check the “Verified” box.
3. In case of “Verified” DoB, select the name of the document provided by the
resident in the drop down provided for DoB documents.
4. When the resident is unable to give exact date of birth and only age is
mentioned by the resident or approximated by the operator, record age in the
field provided. The software will automatically calculate year of birth and same
will be printed in acknowledgement and consent letter.
4. Gender:
1. Gender has to be recorded by the Enrolment Agency as declared by the enrolee
in the box provided by recording Male, Female or Transgender ‘M’ or ‘F’ or ‘T’
respectively.
5. Residential Address:
1. Verify the proof of address document produced by the individual before
recording the address in case of document based verification
2. Record the residential address in the boxes provided. In case of child below 5
years, address field values will not be captured.
3. Ascertain the Postal Index Number Code(PIN code) and record in the boxes.
4. The address should be recorded as available in the documentary evidence
produced by the enrolee. Leave space between two words. Please ensure that
the particulars are filled up correctly.
5. If document furnished is not in the drop down list of PoA in enrolment client,
then it is not an acceptable PoA document. In such case resident either would
require a valid PoA or an Introducer for enrolment.
6. In line 1 of the address capture “care of” persons name if any. (Usually this has
to be captured for children and old age people living with parents and children
respectively). If not available, leave the Address line 1 blank.
7. Generally in rural areas, Building number, House number etc. are not available.
If not available leave the address line 2 blank.
8. Write the Street Name, if any, in Address line 3, otherwise leave it blank.
9. Write major/minor landmark if any in address line 4 otherwise leave it blank.

UID Authority of India
Resident Enrolment Process ver 2.2.1 Page 42 of 53
10. Write name of Mohalla/Locality/Post Office in address line 5, otherwise leave it
blank.
11. Name of the village/town/city(VTC) and Post Office field gets automatically
populated when Pin Code of the region is entered. VTC field is non editable. The
default post office can be changed, if required, by selecting another post office
form the drop down list. The drop down has all Branch Office, Head Office and
Sub Office Post Office Names for a particular Pincode plus VTC combination.
12. Name of District and State in address gets auto populated when Pin Code of the
region is entered.This field is non editable . Registrar/EA should ensure
beforehand that the Pin Numbers of the region in which enrolment is to be
carried out are completely and correctly captured in software PIN Master. Else,
they should inform the correct PIN to CIDR so that PIN Mater can be corrected
before enrolments start.
13. The resident may be allowed to add minor fields such as House No., Lane No.,
Street Name, correcting typographic errors, minor changes/ corrections to pin
code etc. to the address listed in the PoA as long as these
additions/modifications do not alter the base address mentioned in the PoA
document. If the changes requested are substantial and change the base
address that is listed in the PoA, the resident will require to provide an alternate
PoA or enrol through an Introducer.
14. Save Address checkbox is provided for address fields. If checked, it saves the
address for next enrolment thus saving time to rewrite the address.
15. It is observed that some transliterations to local language are not ok, due to
phonetics and other reasons, and therefore need manual correction.
6. Verification :
1. If Verification type is Documents based, appropriate PoI, PoA document is to be
selected from the drop downs depending on the document produced by the
resident and verified by verifier.
2. If Verification type is Introducer based, Name and UID of the Introducer has to
be recorded. When the enrolee depends on Introducer for proof of verification,
the UID of the Introducer is mandatory.
3. For HoF based verification Name, EID of HoF and Relationship Details of the
family member to HoF become mandatory.
4. In case of child below 5 years, POI and POA document for verification is not
required.
7. Relationship to Resident (Conditional):
1. Filling the father / husband / guardian or Mother / Wife / Guardian field is
conditional. If they are enrolled their Enrolment ID/UID should be recorded.
2. In case the adult is not in a position or does not want to disclose,. Then select
checkbox “Not Given” in “Relationship to Resident”.
3. In case of child below 5 years, the EID/UID of parent/relative has to be linked
and preferably mother if both the parents are alive.
4. If the child’s father /mother / guardian has / have not enrolled and / or do /
does not possess UID at the time of enrolment, the enrolment of that child
cannot be done unless the above requirements are fulfilled.
8. Mobile Number (optional):

UID Authority of India
Resident Enrolment Process ver 2.2.1 Page 43 of 53
1. If the enrolee possesses and is willing to provide his/her mobile/ number, this
optional field can be filled in.
9. Email address (optional):
1. If the enrolee possesses and is willing to provide his/her e-mail ID, this optional
field can be filled in.
10. NPR Receipt Number:
1. If Resident possesses NPR receipt then the receipt number should be recorded in
the field. Else mark as N/A.
11. Information sharing Consent (mandatory):
1. Ask Resident’s consent to whether it is alright with the resident if the
information captured is shared with other organisations for the purpose of
welfare services. Select appropriate circle to capture resident’s response as
“Yes/No”.
2. For child below 5 years, the field need not be captured as the values have to
populated from the linked parent/relative EID/UID.
12. Banking
1. Banking details can be captured with the click on Banking tab. Ask resident’s
consent to whether it is OK if UIDAI shares his/her information to facilitate
opening of a new Bank/Post Office Account. Select appropriate circle to capture
resident’s response as “Yes/No”.
2. If Resident says “No” to option 1.,ask the resident if he/she wishes to link his
existing bank account to UID. If the answer is “Yes”, then select State and Bank
Name from drop down list and mention Bank Branch and Account Number.
3. In case the child is below 5 years this field is optional.
13. Review
1. During Review of the enrolment data with resident, Operator must read out
critical fields to the resident before the Operator Finishes the Enrolment.
2. The Operator must reconfirm below fields :
Spellings of Resident’s Name
Correct Gender
Correct Age/Date of Birth
Address – Pin Code; Building; Village/ Town /City; District; State
Relationship Details – Parent/Spouse/Guardian ; Relative Name
Accuracy and Clarity of Photograph of the resident"
3. The EA Supervisor must ensure that every Operator has a copy of the
critical points to be reviewed at the station.
4. Ensure that no such text like NA,N/A,ND is entered in fields that do not
have any information. Leave those non-mandatory fields blank where no
data is provided by resident.
14. Operator/Supervisor/Introducer signoff
1. Operator needs to sign off every enrolment by providing their fingerprint.
Although any fingerprint is OK, but it is advisable to use either thumb or index
finger of either hand for sign off. Use the Indicators on fingerprint devices for
positioning of fingers. The fingers should be placed in right direction on the
device.

UID Authority of India
Resident Enrolment Process ver 2.2.1 Page 44 of 53
2. Make sure that the Operator that has logged in the client and has carried on the
enrolment is the Operator that signs off.
3. Supervisor’s sign off is activated in the software in case of biometric exceptions.
4. For child below 5 years, the biometric of linked parent/relative has to be
captured.
5. Introducer’s/HoF sign off is activated in case of Introducer/HoF based
verification. Introducer can also review list of all pending for his/her verification
at the End of Day and Approve/Reject the enrolment. Introducer needs to give
his/her fingerprint for Approved records.
15. Data Aesthetics
Follow attached guidelines on Data Aesthetics
Guidlines to EAs0001.pdf
ER 5.1.3 Documents for Verifying PoI, PoA, DoB & PoR
1. List of Documents in DDSVP Committee Report
Supported PoI Documents Containing Name and Photo
1. Passport 2. PAN Card
3. Ration/ PDS Photo Card 4. Voter ID 5. Driving License
6. Government Photo ID Cards/ service photo identity card issued by PSU 7. NREGS Job Card 8. Photo ID issued by Recognized Educational Institution 9. Arms License
10. Photo Bank ATM Card 11. Photo Credit Card 12. Pensioner Photo Card 13. Freedom Fighter Photo Card 14. Kissan Photo Passbook 15. CGHS / ECHS Photo Card 16. Address Card having Name and Photo issued by Department of Posts
17. Certificate of Identify having photo issued by Gazetted Officer or Tehsildar on letterhead 18. Disability ID Card/handicapped medical certificate issued by the respective State/UT Governments/Administrations
Supported PoA Documents Containing Name and Address
1. Passport 2. Bank Statement/ Passbook 3. Post Office Account Statement/Passbook 4. Ration Card 5. Voter ID
6. Driving License 7. Government Photo ID cards 8. Electricity Bill (not older than 3 months) 9. Water bill (not older than 3 months) 10. Telephone Landline Bill (not older than 3 months) 11. Property Tax Receipt (not older than 3 months)
12. Credit Card Statement (not older than 3 months) 13. Insurance Policy

UID Authority of India
Resident Enrolment Process ver 2.2.1 Page 45 of 53
14. Signed Letter having Photo from Bank on letterhead 15. Signed Letter having Photo issued by registered Company on letterhead
16. Signed Letter having Photo issued by Recognized Educational Institution on letterhead 17. NREGS Job Card 18. Arms License
19. Pensioner Card 20. Freedom Fighter Card 21. Kissan Passbook 22. CGHS / ECHS Card 23. Certificate of Address having photo issued by MP or MLA or Gazetted Officer or Tehsildar on letterhead
24. Certificate of Address issued by Village Panchayat head or its equivalent authority (for rural areas) 25. Income Tax Assessment Order 26. Vehicle Registration Certificate 27. Registered Sale / Lease / Rent Agreement
28. Address Card having Photo issued by Department of Posts 29. Caste and Domicile Certificate having Photo issued by State Govt.
30. Disability ID Card/handicapped medical certificate issued by the respective State/UT Governments/Administrations
31. Gas Connection Bill (not older than 3 months) 32. Passport of Spouse 33. Passport of Parents(in case of Minor)
Supported Proof of DoB Documents
1. Birth Certificate 2. SSLC Book/Certificate 3. Passport 4. Certificate of Date of Birth issued by Group A Gazetted Officer on letterhead
UIDAI and Registrars shall have the authority to amend and enlarge the
list of valid documents as and when necessary.
2. Supported documents for PoR
To facilitate enrolment where all members are not able to show proof of
identity with a photograph at the time of Aadhaar enrolment, it has been
decided that the Head of Family will be enrolled on the basis of valid PoI, PoA
from the list of approved documents while the dependent family members can
be enrolled through any of the following relationship documents as long as the
relationship revealing document(PoR) is unambiguous and both the documents
(PoI, PoA of Head of Family and the Relationship documents for the dependent
family members) record the same address:
-PDS Card
-MNREGA Job Card
-CGHS/State Government/ECHS/ESIC Medical card
-Pension Card
-Army Canteen Card
-Passport
-Birth Certificate issued by Registrar of Birth, Municipal Corporation and other
notified local govt. bodies like Taluk, Tehsil etc.
-Any other Central/State government issued family entitlement document.
As far as possible Family should come together for enrolment. In case all the
members cannot make it on the same day then head of the family should

UID Authority of India
Resident Enrolment Process ver 2.2.1 Page 46 of 53
always accompany the family member whenever he/she comes for the
enrolment.
ER 5.1.4 Detailed Guidelines for Collecting Biometric Data Enrolment Agencies must use Biometric Devices certified by UIDAI for capturing
Biometric data. The list of certified biometric devices are available at STQC website
http://www.stqc.nic.in/
i. Fingerprint Capture
a. The fingerprints need to be captured in order of all four fingers of Left
Hand followed by all four fingers of Right Hand and then the two thumbs.

UID Authority of India
Resident Enrolment Process ver 2.2.1 Page 47 of 53
b. The fingers have to be positioned correctly on the platen to enable
capture.There should be no direct light shining on the platen. Use the Indicators
on fingerprint devices for positioning of fingers.The fingers should be placed in
right direction on the device.
c. Use a lint free cloth periodically to clean the platen of the device.
d. Check devices periodically for scratches, out of focus images, only partial
images getting captured.
e. Fingerprints cut off, wet/smudged fingerprints,very light prints due to
insufficient pressure will result in poor quality. The resident’s hands should be
clean(no mud,oil etc.). Ask resident to wash hands with water and soap,if
necessary.
f. The fingers should not be excessively dry or wet. Moisten with a wet cloth
or dry finger with a dry cloth
g. The Enrolee should be requested to place all four fingers of the left
hand/right hand/two thumbs to platen of the fingerprint scanner for the
four-finger capture to ensure good contact and maximize the area of the
captured fingerprints. Ensure that the fingers are placed flat and till the top joint
of the finger is placed well on the scanner.
h. If automatic capture does not happen, the operator should force the
capture when force capture tab is enabled in the enrolment software.
i. The operator should check the actionable feedback when capture fails.
Some actionable feedbacks provided by software are:
Number of fingers present does not match with expected number of
fingers
Finger not positioned correctly
Too much Pressure (duty cycle)
Too little pressure
Central region missing
Excessive moisture (wetness)
Excessive dryness
j. The operator should visually check the image for quality and for typical
problems. In case there are problems go back to steps above to retry the
capture.
k. When image quality is pass or if maximum number of captures are
exhausted , move on to the next step .
l. Fingerprints are best captured in standing position
m. In case of additional fingers, ignore the additional finger and capture the
main five fingers.
n. Refer attached pdf document for correct placement of fingers during
fingerprint capture
ii. Facial Image Capture
a. Enrolee Position: For capturing facial image, it is advisable for the
operator to adjust the camera instead of the Enrolee to position herself/himself

UID Authority of India
Resident Enrolment Process ver 2.2.1 Page 48 of 53
at the right distance or in the right posture. Frontal pose needs to be captured
i.e. no head rotation or tilt.
b. Focus: The capture device should use auto focus and auto-capture
functions. The output image should not suffer from motion blur, over or under
exposure, unnatural coloured lighting, and radial distortion.
c. Expression: Expression strongly affects the performance of automatic
face recognition and also affects
accurate visual inspection by humans.
It is strongly recommended that the
face should be captured with neutral
(non-smiling) expression, teeth
closed and both eyes open.
d. Illumination: Poor illumination
has a high impact on the performance
of face recognition. It is difficult for
human operators to analyze and
recognize face images with poor
illumination. Proper and equally
distributed lighting mechanism should be
used such that there are no shadows over the face, no shadows in eye sockets,
and no hot spots. No light exactly above the enrolee should be used since it can
cause shadows. Light should be diffused and placed in front of the enrolee so
that there are no shadows under the eye.
e. Eye Glasses: If the person normally wears glasses, it is recommended
that the photograph be taken with glasses. However, the glasses should be clear
and transparent
f. Accessories: Use of accessories that cover any region of the face is not
permitted.
g. However, accessories like eye patches are allowed due to medical reasons.
This would also mean an exception needs to be recorded for Iris, because only
one Iris can be captured.
h. Further, accessories like turban are also allowed as religious, traditional
practices.
i. Operators need to be trained to obtain the best possible face images that
satisfy requirements.
j. For children,it is acceptable that the child sits on parents laps, but it needs
to be ensured that parent’s face is not captured along with child’s face. The
background may get rejected due to non white screen in case of children but
two faces should not get captured in one picture.
k. Actionable feedback needs to be checked for captures that fail. Some of
the actionable feedbacks in software are:
No face Found
Enrollee too far (eye distance in input image is less than 90)
Enrollee too close (eye distance in input image is greater than one
third of image width)
Pose (Look Straight)
Insufficient lighting
Very low face confidence (faceness, object not identified as human
face)
Pose (yaw angle in output image is greater than 11.5 deg)
Non-uniform lighting (of face in output image)

UID Authority of India
Resident Enrolment Process ver 2.2.1 Page 49 of 53
Incorrect background (in output image)
Insufficient lighting (bad gray values in face area of output image)
iii. Iris Capture
a. Iris pattern of each eye is not correlated, and gives two independent
biometric feature sets. It assures correct assignment of left and right eyes and
allows for more accurate estimation of
roll angle.
b. Children can be told that it is
like taking photos/pictures so that
they are not apprehensive.
c. The operator and not the
Enrolee will handle the capture
device,generally.
d. The Enrolee will be required
to sit in a fixed position, like
taking a portrait photograph.
e. The software is able to measure
the iris image quality. An initial image quality assessment would be done to
provide feedback to the operator during the capture process. The software alerts
the operator with actionable feedbacks, if the captured iris image is of
insufficient quality. Some actionable feedbacks provided by software are:
Occlusion(significant part of iris is not visible)
Iris not in focus
Gaze incorrect(resident looking away)
Pupil dilation
f. The iris capture process is sensitive to ambient light. No direct or artificial
light should directly reflect off Enrolee’s eyes.
g. The device should be held steady. Incase device requires to be held by
resident, the enrolment operator/supervisor may help the resident to hold the
device steady.
h. Tablelight used for facial image capture should be switched off during iris
capture. Direct sunlight or any other bright light shining on resident’s eye will
create reflections and result in poor quality image.
i. Operator must instruct the resident to look straight into the camera, open
eyes wide open(one easy way to do this is to ask the resident look angry) and
do not blink during iris capture. Resident has to be stationary.
j. If resident is experiencing difficulty during Iris scan and recapture is
required, then the operator may navigate to next screen to capture other details
and then return to Iris capture. This will relax the resident from constant
pressure to keep eyes wide open during iris capture.

UID Authority of India
Resident Enrolment Process ver 2.2.1 Page 50 of 53
k. The Operator needs to be patient during capture and wait for the device
response instead of scrolling, navigating back and forth on screen.
ER 5.1.5 Handling of Exceptions
There would be instances where the enrolee would not be in a position to give complete
set of biometrics as required by the UIDAI owing to reasons such as injury, amputation
of the fingers / hands and similar problems with the eyes. The following sets of
guidelines are to be borne in mind while handling such exceptions.
i. Exceptions in capturing Facial Image capture
S.No Problem Suggestions
a. Unable to capture
image due to poor
light:--this is actionable
feedback
a. No flash is to be used.
b. If there is inadequate lighting because of low voltage, use the
generator backup to improve the lighting.
c. Consider moving the enrollment station to a location in the
room with better light.
d. The non-capture could be because of bright light behind the
backdrop. The backdrop should be preferably placed against an
opaque wall/partition.
b. Unable to crop image
because of turban /
head scarf:
a. If the headgear can be removed this may be requested politely by
the operator.
b. In the case of lady enrollees, it would be advisable for a lady
operator, or volunteer to undertake this process.
c. Enrollee unable to keep
head / torso still and
vertical:
Assistance may be provided to the enrollee. In case of lady enrollees,
assistance is to be provided by the lady operators or volunteers.
ii. Exceptions in handling Fingerprint Image capture S.No Problem Suggestions
a. Missing /
amputated /
bandaged fingers
i. The same is noted in the data as provided in the software
ii. The fingerprints of remaining fingers are captured by the operator
b. Unable to crop
image because of
turban / head scarf
i. If the headgear can be removed this may be requested politely by
the operator.
ii. In the case of lady enrollees, it would be advisable for a lady
operator, or volunteer to undertake this process.
c. Fingerprint
captured is not of
the requisite quality
i. The Operator should check the actionable feedback
ii. If standard image of the finger prints are not possible for an
enrollee due to dryness, the operator should politely ask the
enrollee to wash his hands. The operator can also provide a wet
sponge or towel available in the centre.
iii. The operator can request the enrollee to apply pressure on the
platen to increase the area of contact and thereby obtain image of
the requisite quality.
iv. For applying pressure he would firstly rely on efforts of the
enrollee. If not successful, the operator can take the permission of
the enrollee and assist her/him in applying the pressure to capture
the image.
v. It has to be ensured that assistance to women enrollees has to be
provided by women operators / volunteers.
vi. The operator would make a reasonable number of attempts to
capture the biometrics of the resident. The maximum number of
attempts that can be made is built into the software.
d. Inability to flatten i. The operator with due permission from the enrollee may assist the

UID Authority of India
Resident Enrolment Process ver 2.2.1 Page 51 of 53
S.No Problem Suggestions
the fingers enrollee in order to attempt capture of the fingerprints.
ii. In case this is not successful, the operator may try to obtain
fingerprints to the extent that the enrollee is able to flatten and
place her / his fingers on the platen.
e. Worn out ridges or
hands blackened
through mehendi or
any other substance
a. Capture as normal. In case of worn out ridges, the resident may be
asked to rub his/her hands.
iii. Exceptions in handling Iris Image capture
If capturing Iris image is not possible due to non-existence of one or both eyes or
bandage across one or both eyes / any other deformity or disease the same has to be
recorded in the system.
S.No Problem Suggestions
a. Squint / disoriented
eye
a. If the capture of both eyes at a time is not possible, operator may
attempt recapture.
b. Inability to open the
eyes properly
a. Guide the enrollee to open the eyes wide to enable the capture
b. Do the best you can to capture a good quality image. Use
recapture.
iv. General exceptions
The enrolee may not be in a position to keep herself / himself in correct posture for
reaching biometric instruments or for photograph due to old age or sickness. In such
cases the operator should arrange to take the biometric data by moving the equipment
close to the enrolee.
If the finger/iris of the resident has a temporary damage and it is not possible to capture
the biometric, the Operator will record it in exceptions. The resident should later get
his/her biometric updated.
ER 5.1.6 Do’s and Don’t for EA
Microsoft Office Excel 97-2003 Worksheet
ER 5.1.7 Layouts
Microsoft Office PowerPoint 97-2003 Presentation
ER 5.1.8 Guidelines on Storage of Documents
Microsoft Office Word 97 - 2003 Document
ER 5.1.9 Enrolment Centre Beginning and End of Day(BOD,EOD) activities
i. Beginning of Day(BOD) Activities

UID Authority of India
Resident Enrolment Process ver 2.2.1 Page 52 of 53
1. Review Setting up Enrolment Centre Checklist and ensure all
requirements are in place. Enrolment Agency Supervisor should sign
off the checklist.
ii. End of Day Activities
1. EoD Review by EA Export Data for transfer to CIDR
2. Maintain a register for data exported. Record date, station number
and packets exported at each station.
3. Take End of Day back up(note that backup is required twice a day
preferable one during lunch time and another at end of day. Backup
needs to be maintained for at least 60 days) and record in Register.
Record date and station number where backup done.
4. Correlate consent for enrolments to number of packets exported. Both
numbers should match.
5. End of Day meeting at centre for sharing learnings of the day and
issues faced.
6. Make arrangements for replacements of faulty devices, hardware and
other logistics for next day enrolments.
7. Hand over completed documents (Enrolment Form, PoI,PoA,DoB, PoR
and Consent) to Registrar’s Supervisor with pickup list of documents.
8. Ensure all devices and laptop are shut down. Check power off to avoid
accidents. Ensure security arrangements for devices and other
equipments.
9. Specific End of Day Reports are available on the client, for selected
time period, to facilitate EA Operations. This includes Hold and Reject
Reports for Enrolment Station.

UID Authority of India
Resident Enrolment Process ver 2.2.1 Page 53 of 53
ER 5.2 Formats, Templates and Checklists
ER 5.2.1 Checklist for Setting up Enrolment Centre
Microsoft Office Excel 97-2003 Worksheet
ER 5.2.2 Enrolment Form
Microsoft Office Word 97 - 2003 Document
ER 5.2.3 Acknowledgement cum Consent for Enrolment
HTML Document
ER 5.2.4 Language for Consents
Microsoft Office Excel 97-2003 Worksheet
ER 5.2.5 DMS Formats
Microsoft Office Word 97 - 2003 Document
ER 5.3 References Demographic Data Standards and Verification Procedure (DDSVP) Committee
Report
Model RFP on UIDAI website
1st Mile logistics Process
UIDAI Application Installation Manual
User Management toolkit document
AADHAAR_Registrar_Integration Manual
Related Documents