BC407 Reporting: QuickViewer, InfoSet Query and SAP Query SAP NetWeaver Date Training Center Instructors Education Website Participant Handbook Course Version: 2006 Q3 Course Duration: 2 Day(s) Material Number: 50084721 An SAP course - use it to learn, reference it for work

Welcome message from author
This document is posted to help you gain knowledge. Please leave a comment to let me know what you think about it! Share it to your friends and learn new things together.
Transcript
BC407Reporting: QuickViewer, InfoSet
Query and SAP QuerySAP NetWeaver
Date
Training Center
Instructors
Education Website
Participant HandbookCourse Version: 2006 Q3Course Duration: 2 Day(s)Material Number: 50084721
An SAP course - use it to learn, reference it for work
Copyright
Copyright © 2007 SAP AG. All rights reserved.
No part of this publication may be reproduced or transmitted in any form or for any purposewithout the express permission of SAP AG. The information contained herein may be changedwithout prior notice.
Some software products marketed by SAP AG and its distributors contain proprietary softwarecomponents of other software vendors.
Trademarks
� Microsoft®, WINDOWS®, NT®, EXCEL®, Word®, PowerPoint® and SQL Server® areregistered trademarks of Microsoft Corporation.
� IBM®, DB2®, OS/2®, DB2/6000®, Parallel Sysplex®, MVS/ESA®, RS/6000®, AIX®,S/390®, AS/400®, OS/390®, and OS/400® are registered trademarks of IBM Corporation.
� ORACLE® is a registered trademark of ORACLE Corporation.� INFORMIX®-OnLine for SAP and INFORMIX® Dynamic ServerTM are registered
trademarks of Informix Software Incorporated.� UNIX®, X/Open®, OSF/1®, and Motif® are registered trademarks of the Open Group.� Citrix®, the Citrix logo, ICA®, Program Neighborhood®, MetaFrame®, WinFrame®,
VideoFrame®, MultiWin® and other Citrix product names referenced herein are trademarksof Citrix Systems, Inc.
� HTML, DHTML, XML, XHTML are trademarks or registered trademarks of W3C®, WorldWide Web Consortium, Massachusetts Institute of Technology.
� JAVA® is a registered trademark of Sun Microsystems, Inc.� JAVASCRIPT® is a registered trademark of Sun Microsystems, Inc., used under license for
technology invented and implemented by Netscape.� SAP, SAP Logo, R/2, RIVA, R/3, SAP ArchiveLink, SAP Business Workflow, WebFlow, SAP
EarlyWatch, BAPI, SAPPHIRE, Management Cockpit, mySAP.com Logo and mySAP.comare trademarks or registered trademarks of SAP AG in Germany and in several other countriesall over the world. All other products mentioned are trademarks or registered trademarks oftheir respective companies.
Disclaimer
THESE MATERIALS ARE PROVIDED BY SAP ON AN "AS IS" BASIS, AND SAP EXPRESSLYDISCLAIMS ANY AND ALL WARRANTIES, EXPRESS OR APPLIED, INCLUDINGWITHOUT LIMITATION WARRANTIES OF MERCHANTABILITY AND FITNESS FOR APARTICULAR PURPOSE, WITH RESPECT TO THESE MATERIALS AND THE SERVICE,INFORMATION, TEXT, GRAPHICS, LINKS, OR ANY OTHER MATERIALS AND PRODUCTSCONTAINED HEREIN. IN NO EVENT SHALL SAP BE LIABLE FOR ANY DIRECT,INDIRECT, SPECIAL, INCIDENTAL, CONSEQUENTIAL, OR PUNITIVE DAMAGES OF ANYKIND WHATSOEVER, INCLUDING WITHOUT LIMITATION LOST REVENUES OR LOSTPROFITS, WHICH MAY RESULT FROM THE USE OF THESE MATERIALS OR INCLUDEDSOFTWARE COMPONENTS.
g200763042517

About This HandbookThis handbook is intended to complement the instructor-led presentation of thiscourse, and serve as a source of reference. It is not suitable for self-study.
Typographic ConventionsAmerican English is the standard used in this handbook. The followingtypographic conventions are also used.
Type Style Description
Example text Words or characters that appear on the screen. Theseinclude field names, screen titles, pushbuttons as wellas menu names, paths, and options.
Also used for cross-references to other documentationboth internal (in this documentation) and external (inother locations, such as SAPNet).
Example text Emphasized words or phrases in body text, titles ofgraphics, and tables
EXAMPLE TEXT Names of elements in the system. These includereport names, program names, transaction codes, tablenames, and individual key words of a programminglanguage, when surrounded by body text, for exampleSELECT and INCLUDE.
Example text Screen output. This includes file and directory namesand their paths, messages, names of variables andparameters, and passages of the source text of aprogram.
Example text Exact user entry. These are words and characters thatyou enter in the system exactly as they appear in thedocumentation.
<Example text> Variable user entry. Pointed brackets indicate that youreplace these words and characters with appropriateentries.
2006/Q3 © 2007 SAP AG. All rights reserved. iii
About This Handbook BC407
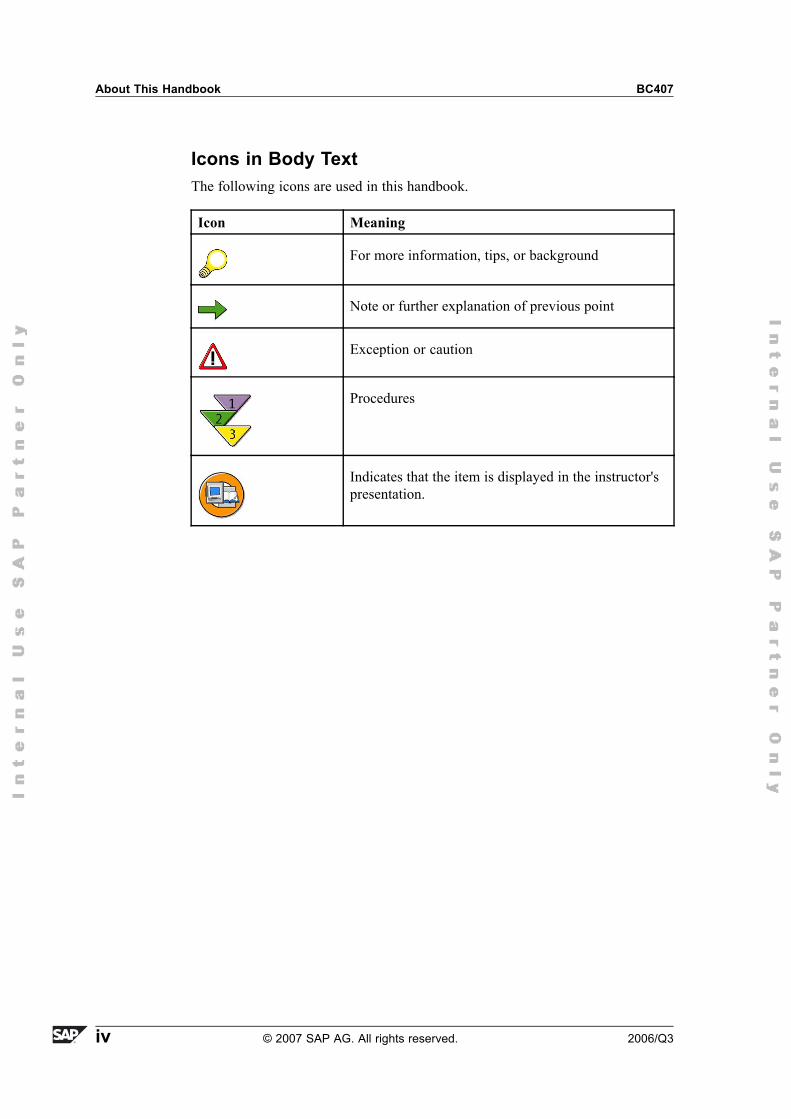
Icons in Body TextThe following icons are used in this handbook.
Icon Meaning
For more information, tips, or background
Note or further explanation of previous point
Exception or caution
Procedures
Indicates that the item is displayed in the instructor'spresentation.
iv © 2007 SAP AG. All rights reserved. 2006/Q3
ContentsCourse Overview ..... . . . . . . . . . . . . . . . . . . . . . . . . . . . . . . . . . . . . . . . . . . . . . . . . . . . . vii
Course Goals .. . . . . . . . . . . . . . . . . . . . . . . . . . . . . . . . . . . . . . . . . . . . . . . . . . . . . . . . . .viiCourse Objectives ... . . . . . . . . . . . . . . . . . . . . . . . . . . . . . . . . . . . . . . . . . . . . . . . . . .vii
Unit 1: Overview..... . . . . . . . . . . . . . . . . . . . . . . . . . . . . . . . . . . . . . . . . . . . . . . . . . . . . . . . 1Overview ... . . . . . . . . . . . . . . . . . . . . . . . . . . . . . . . . . . . . . . . . . . . . . . . . . . . . . . . . . . . . . .2
Unit 2: QuickViewer ..... . . . . . . . . . . . . . . . . . . . . . . . . . . . . . . . . . . . . . . . . . . . . . . . . . . 7QuickViewer .. . . . . . . . . . . . . . . . . . . . . . . . . . . . . . . . . . . . . . . . . . . . . . . . . . . . . . . . . . . .8
Unit 3: SAP Query ..... . . . . . . . . . . . . . . . . . . . . . . . . . . . . . . . . . . . . . . . . . . . . . . . . . . 35SAP Query .. . . . . . . . . . . . . . . . . . . . . . . . . . . . . . . . . . . . . . . . . . . . . . . . . . . . . . . . . . . . 36
Unit 4: InfoSet Query..... . . . . . . . . . . . . . . . . . . . . . . . . . . . . . . .. . . . . . . . . . . . . . . . 85InfoSet Query.. . . . . . . . . . . . . . . . . . . . . . . . . . . . . . . . . . . . . . . . . . . . . . . . . . . . . . . . . 86
Unit 5: Comparing the Tools ... .. . . . . . . . . . . . . . . . . . . . . . . . . . . . . . . . . . . . . 111Comparing the Tools.. . . . . . . . . . . . . . . . . . . . . . . . . . . . . . . . . . . . . . . . . . . . . . . . 112
Unit 6: ABAP Statements in InfoSet Creation ..... . . . . . . . . . . . . . . . 117ABAP Statements in InfoSet Creation... . . . . . . . . . . . . . . . . . . . . . . . . . . 118
Unit 7: Creating InfoSets .... . . . . . . . . . . . . . . . . . . . . . . . . . . . . . . . . . . . . . . . . . . 143Creating InfoSets .. . . . . . . . . . . . . . . . . . . . . . . . . . . . . . . . . . . . . . . . . . . . . . . . . . .144
Unit 8: User administration ..... . . . . . . . . . . . . . . . . . . . . . . . . . . . . . . . . . . . . . . 173User Management ... . . . . . . . . . . . . . . . . . . . . . . . . . . . . . . . . . . . . . . . . . . . . . . . .174
Unit 9: Transporting Query Components ..... . . . . . . . . . . . . . . . . . . . . 187Transporting Query Components ... . . . . . . . . . . . . . . . . . . . . . . . . . . . . . . .188
Appendix 1: Appendix ..... . . . . . . . . . . . . . . . . . . . . . . . . . . . . . . . . . . . . . . . . . 199
Index ..... . . . . . . . . . . . . . . . . . . . . . . . . . . . . . . . . . . . . . . . . . . . . . . . . . . . . . . . . . . . . . . . . . . 205
2006/Q3 © 2007 SAP AG. All rights reserved. v

Contents BC407
vi © 2007 SAP AG. All rights reserved. 2006/Q3
Course OverviewIn this course you will learn how to use the QuickViewer, SAP Query and InfoSetQuery reporting tools
Target AudienceThis course is intended for the following audiences:
� Query developers� Query administrators
Course PrerequisitesRequired Knowledge
� Basic knowledge of a programming language� Experience with an SAP system
Course GoalsThis course will prepare you to:
� Use the QuickViewer, SAP Query and InfoSet Query reporting tools
Course ObjectivesAfter completing this course, you will be able to:
� Create and execute QuickViews� Create and execute SAP Queries� Create and execute InfoSet Queries� Maintain InfoSets� Administer users for SAP Queries and InfoSet Queries
SAP Software Component InformationThe information in this course pertains to the following SAP Software Componentsand releases:
2006/Q3 © 2007 SAP AG. All rights reserved. vii

Course Overview BC407
viii © 2007 SAP AG. All rights reserved. 2006/Q3
Unit 1Overview
Unit OverviewThis unit provides information that is valid for all reporting tools and that youwill need for the whole course.
Unit ObjectivesAfter completing this unit, you will be able to:
� Explain the principle according to which all reporting tools work
Unit ContentsLesson: Overview.... . . . . . . . . . . . . . . . . . . . . . . . . . . . . . . . . . . . . . . . . . . . . . . . . . . . . . . . . . . . . . .2
2006/Q3 © 2007 SAP AG. All rights reserved. 1
Unit 1: Overview BC407
Lesson: Overview
Lesson OverviewThis lesson provides information that is valid for all reporting tools and that youwill need for the whole course.
Lesson ObjectivesAfter completing this lesson, you will be able to:
� Explain the principle according to which all reporting tools work
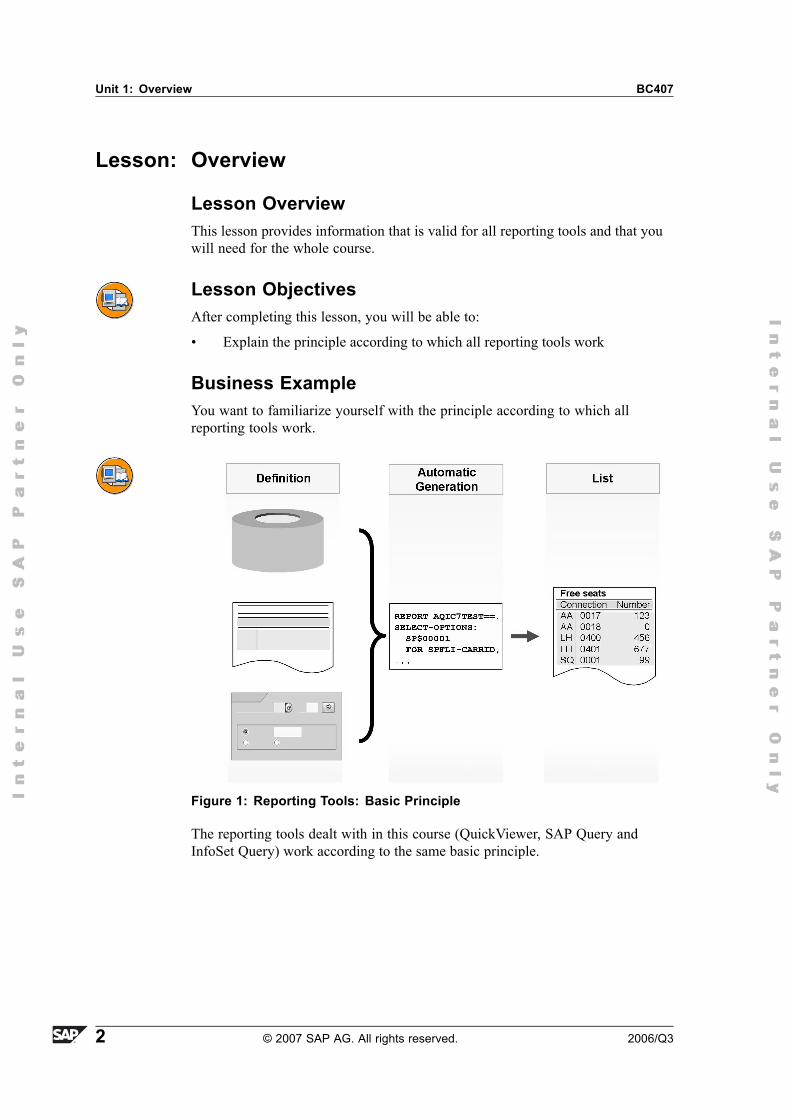
Business ExampleYou want to familiarize yourself with the principle according to which allreporting tools work.
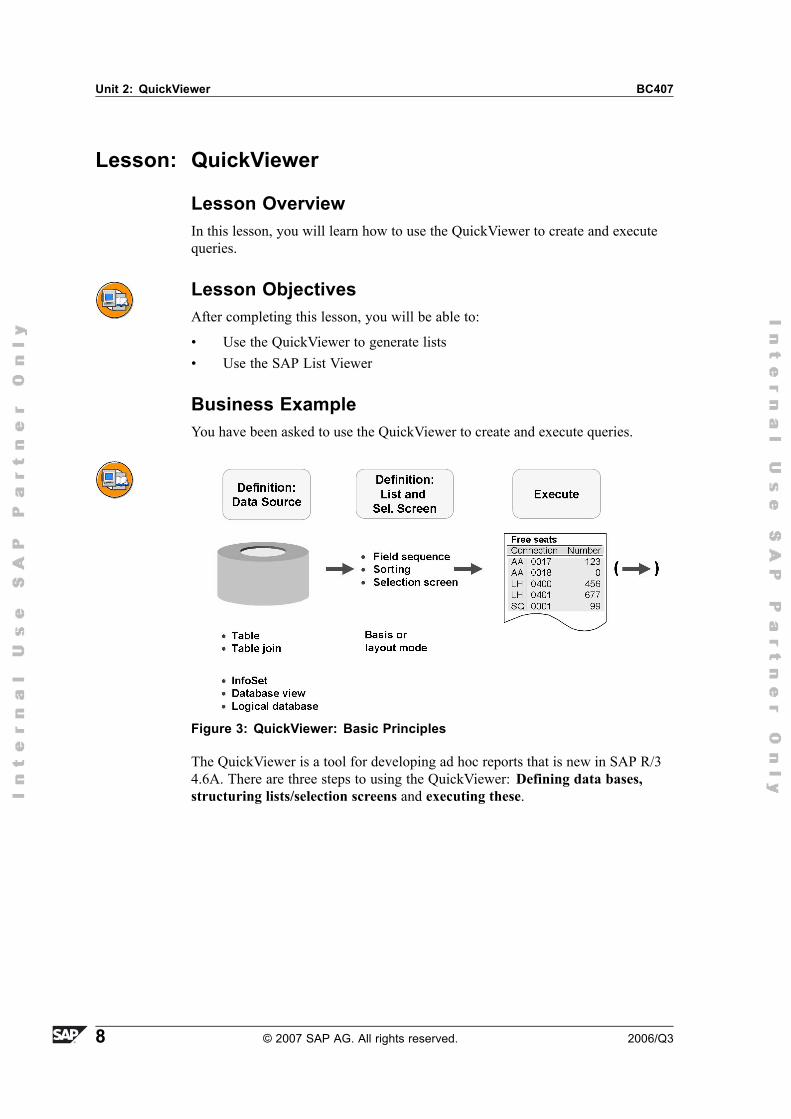
Figure 1: Reporting Tools: Basic Principle
The reporting tools dealt with in this course (QuickViewer, SAP Query andInfoSet Query) work according to the same basic principle.
2 © 2007 SAP AG. All rights reserved. 2006/Q3
BC407 Lesson: Overview
The user must:
� Specify the data basis (for example, the tables from which the data is tobe read)
� Determine the appearance of the list� Define a selection screen for predefining data
The thing that is actually executed is a report (that is, an ABAP program) created(generated) by the system. Therefore, a reporting tool is also described as areport generator.
The user does not require any ABAP knowledge to be able to use the reportingtools.
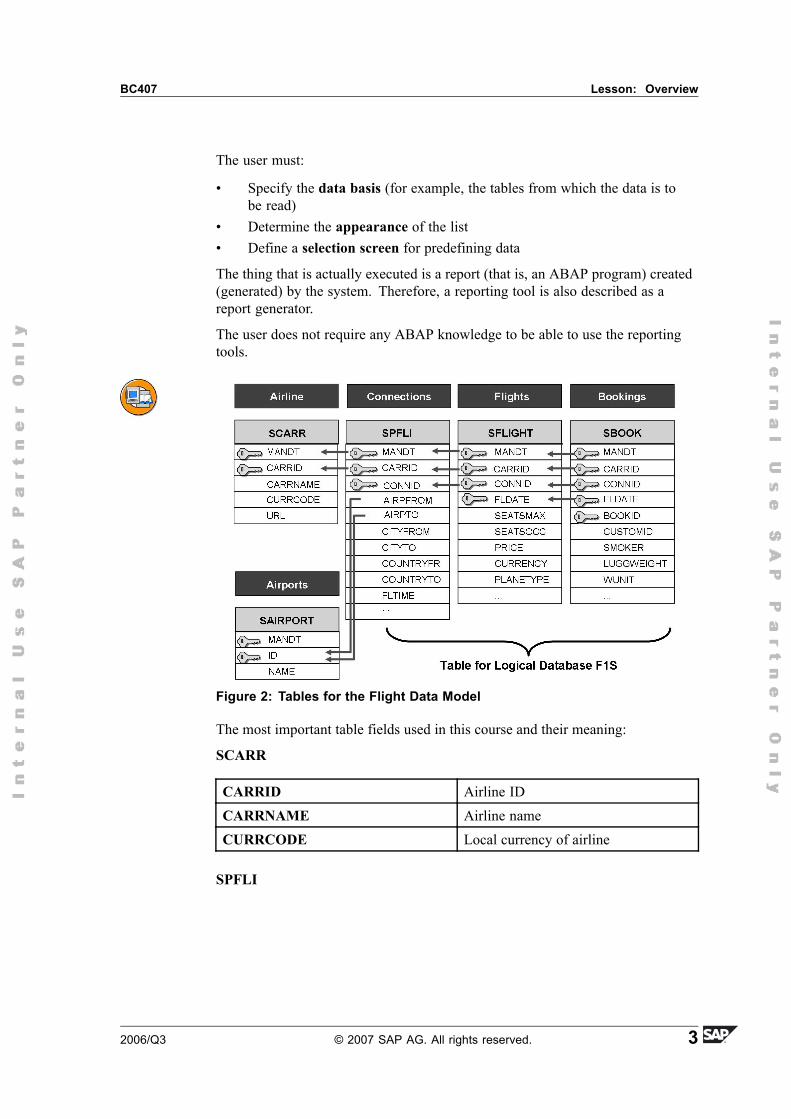
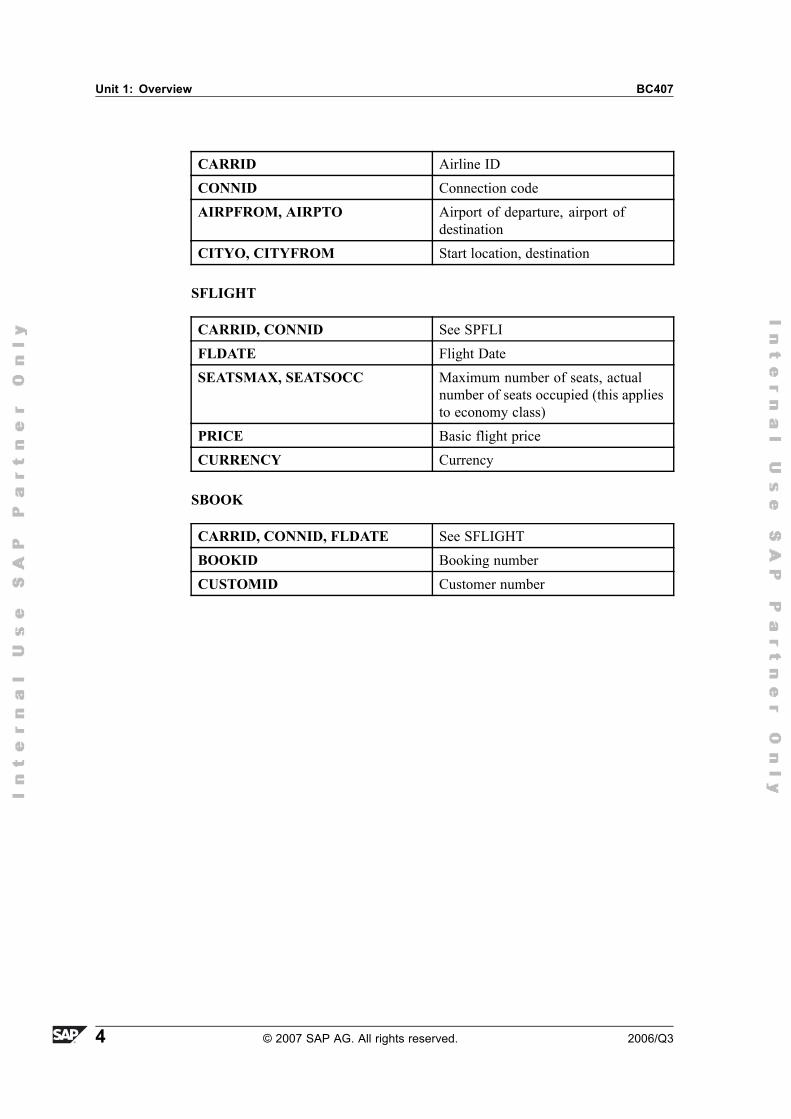
Figure 2: Tables for the Flight Data Model
The most important table fields used in this course and their meaning:
SCARR
CARRID Airline IDCARRNAME Airline nameCURRCODE Local currency of airline
SPFLI
2006/Q3 © 2007 SAP AG. All rights reserved. 3
Unit 1: Overview BC407
CARRID Airline IDCONNID Connection codeAIRPFROM, AIRPTO Airport of departure, airport of
destinationCITYO, CITYFROM Start location, destination
SFLIGHT
CARRID, CONNID See SPFLIFLDATE Flight DateSEATSMAX, SEATSOCC Maximum number of seats, actual
number of seats occupied (this appliesto economy class)
PRICE Basic flight priceCURRENCY Currency
SBOOK
CARRID, CONNID, FLDATE See SFLIGHTBOOKID Booking numberCUSTOMID Customer number
4 © 2007 SAP AG. All rights reserved. 2006/Q3

BC407 Lesson: Overview
Lesson Summary
You should now be able to:� Explain the principle according to which all reporting tools work
2006/Q3 © 2007 SAP AG. All rights reserved. 5
Unit Summary BC407
Unit SummaryYou should now be able to:� Explain the principle according to which all reporting tools work
6 © 2007 SAP AG. All rights reserved. 2006/Q3
Unit 2QuickViewer
Unit OverviewIn this unit, you will learn how to use the QuickViewer to create and executequeries.
Unit ObjectivesAfter completing this unit, you will be able to:
� Use the QuickViewer to generate lists� Use the SAP List Viewer
Unit ContentsLesson: QuickViewer ... . . . . . . . . . . . . . . . . . . . . . . . . . . . . . . . . . . . . . . . . . . . . . . . . . . . . . . . . . . .8
Exercise 1: Creating a QuickView with a Table.. . . . . . . . . . . . . . . . . . . . . . . . . 23Exercise 2: Optional Exercise: Creating a QuickView with a TableJoin ... . . . . . . . . . . . . . . . . . . . . . . . . . . . . . . . . . . . . . . . . . . . . . . . . . . . . . . . . . . . . . . . . . . . . . . . . . 27
2006/Q3 © 2007 SAP AG. All rights reserved. 7
Unit 2: QuickViewer BC407
Lesson: QuickViewer
Lesson OverviewIn this lesson, you will learn how to use the QuickViewer to create and executequeries.
Lesson ObjectivesAfter completing this lesson, you will be able to:
� Use the QuickViewer to generate lists� Use the SAP List Viewer
Business ExampleYou have been asked to use the QuickViewer to create and execute queries.
Figure 3: QuickViewer: Basic Principles
The QuickViewer is a tool for developing ad hoc reports that is new in SAP R/34.6A. There are three steps to using the QuickViewer: Defining data bases,structuring lists/selection screens and executing these.
8 © 2007 SAP AG. All rights reserved. 2006/Q3
BC407 Lesson: QuickViewer
There are different types of data source for you to choose from:
� In the simplest case, you access a table� You can also connect several tables for your QuickView in a table join.� If you use several tables regularly with the same connection in different
QuickViews or Queries, you can connect these centrally. InfoSets, data baseviews from the ABAP dictionary or logical databases are all possible sources.
� You can structure the list and selection screen in two different ways: Usingthe basic mode (described in this unit) or the more complex layout mode(described in the SAP Query unit).
You do not have to do anything apart from define the QuickView to execute it,not even save it.
You can edit the list you created, for example, you can forward it to a wordprocessing system or save it with the list definition to display it again later.
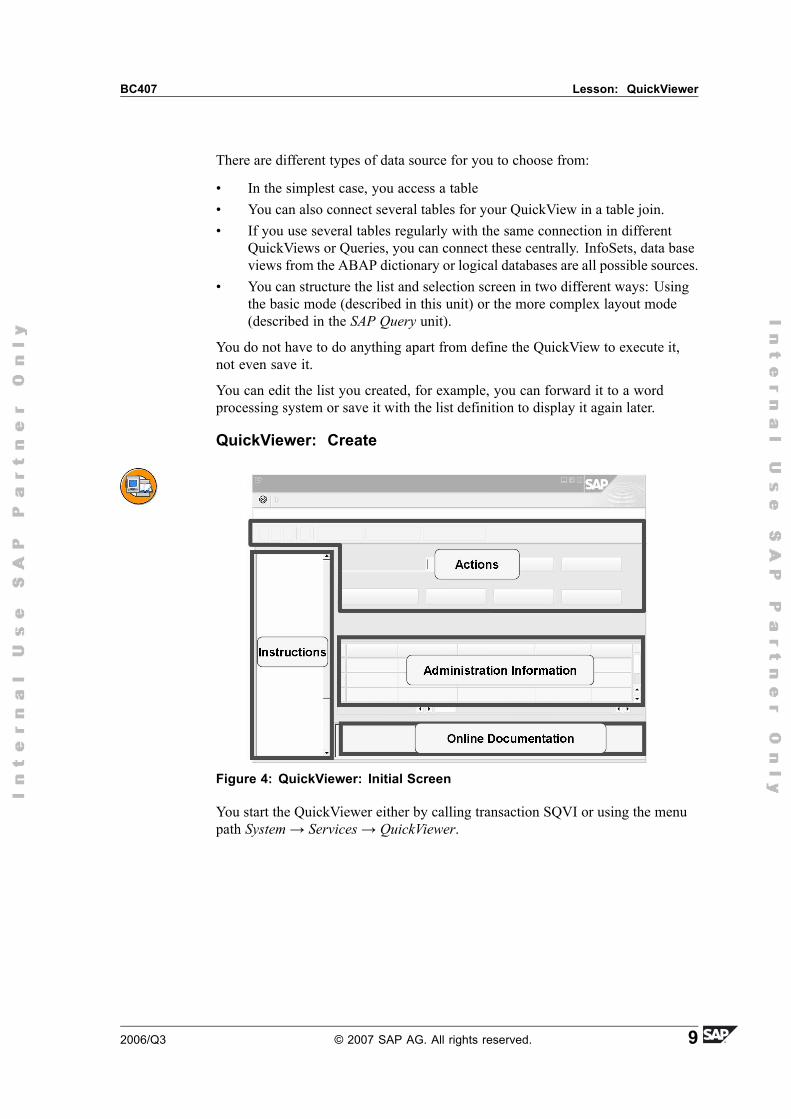
QuickViewer: Create
Figure 4: QuickViewer: Initial Screen
You start the QuickViewer either by calling transaction SQVI or using the menupath System→ Services→ QuickViewer.
2006/Q3 © 2007 SAP AG. All rights reserved. 9
Unit 2: QuickViewer BC407
The initial screen is made up of four screen areas:
� In the instructions, you can see a short introduction to the QuickViewerwith links to the online documentation
� You use the pushbuttons to reach the various editing modes of the quickviewer, for example, the display or maintain mode.
� In the administration area, you can see a list of QuickViews that youcreated yourself, along with information such as the title or the data basis.
� Finally, in the lower right area, you see links to the most important helptopics.
You can change the width of the instructions area by clicking on the separatingwall with your right mouse button and, keeping the right mouse button presseddown, dragging the wall to the required position. You can change the height of theonline documentation area in the same way.
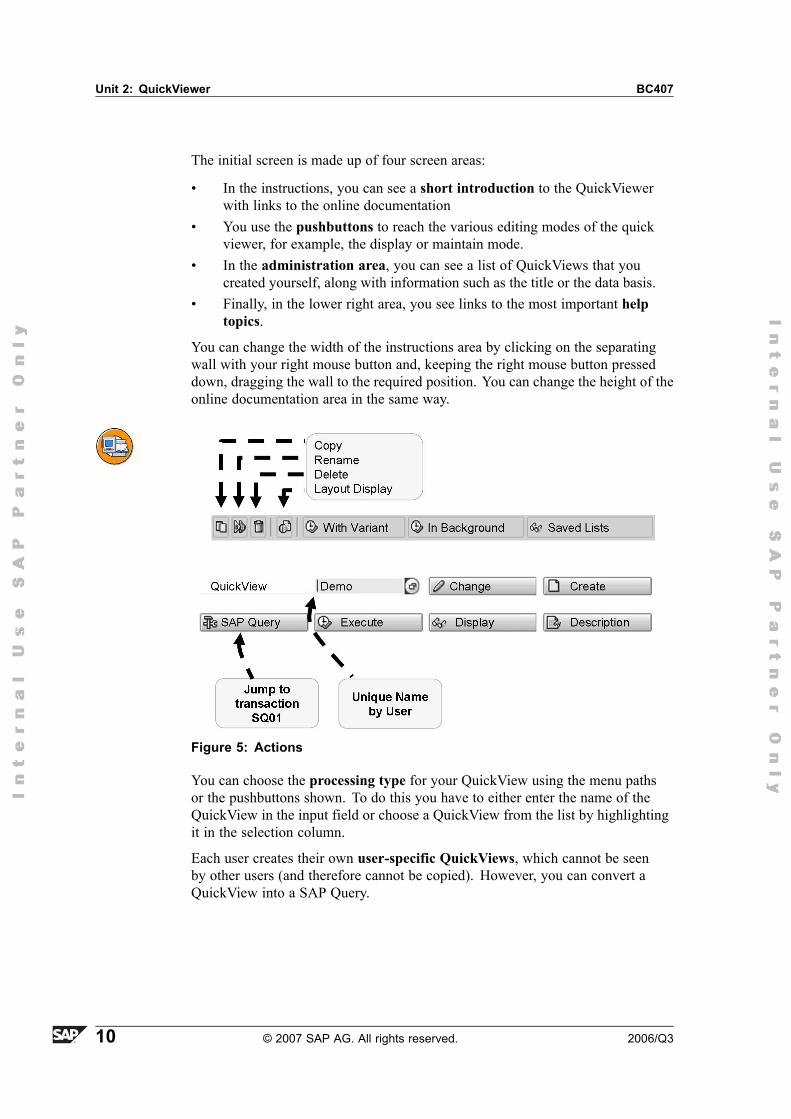
Figure 5: Actions
You can choose the processing type for your QuickView using the menu pathsor the pushbuttons shown. To do this you have to either enter the name of theQuickView in the input field or choose a QuickView from the list by highlightingit in the selection column.
Each user creates their own user-specific QuickViews, which cannot be seenby other users (and therefore cannot be copied). However, you can convert aQuickView into a SAP Query.
10 © 2007 SAP AG. All rights reserved. 2006/Q3
BC407 Lesson: QuickViewer
Since QuickViews are not connected to the change and transport system, acustomer namespace is not required. You can therefore choose any name thatyou wish � only the usual restrictions for query objects apply: Letters, hyphensand underscores only.
You can execute QuickViews directly, with a variant (that is, by predefining theselection screen) or in the background.
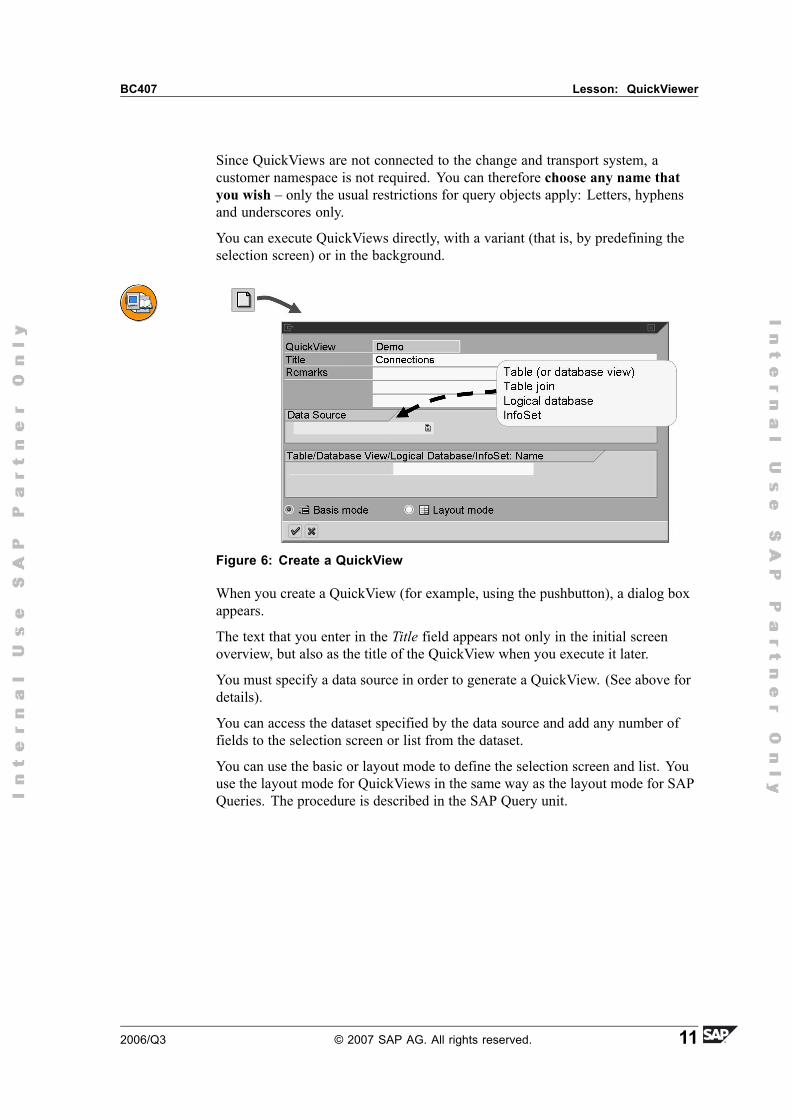
Figure 6: Create a QuickView
When you create a QuickView (for example, using the pushbutton), a dialog boxappears.
The text that you enter in the Title field appears not only in the initial screenoverview, but also as the title of the QuickView when you execute it later.
You must specify a data source in order to generate a QuickView. (See above fordetails).
You can access the dataset specified by the data source and add any number offields to the selection screen or list from the dataset.
You can use the basic or layout mode to define the selection screen and list. Youuse the layout mode for QuickViews in the same way as the layout mode for SAPQueries. The procedure is described in the SAP Query unit.
2006/Q3 © 2007 SAP AG. All rights reserved. 11
Unit 2: QuickViewer BC407
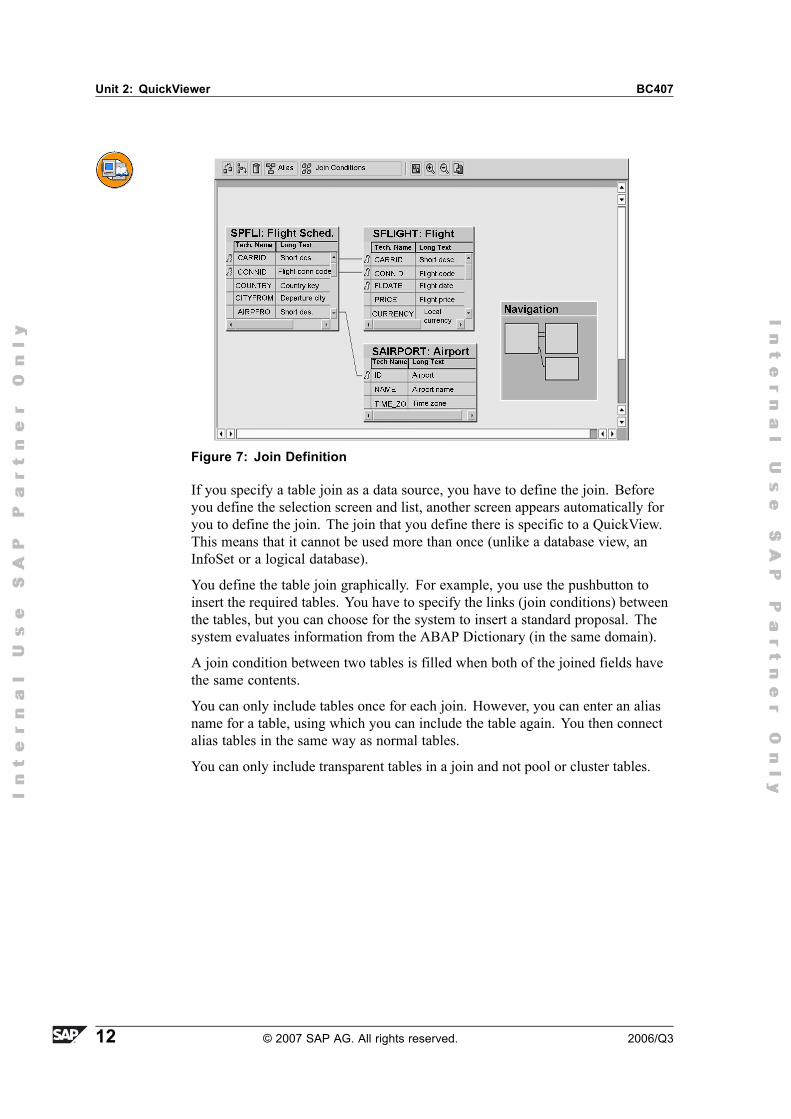
Figure 7: Join Definition
If you specify a table join as a data source, you have to define the join. Beforeyou define the selection screen and list, another screen appears automatically foryou to define the join. The join that you define there is specific to a QuickView.This means that it cannot be used more than once (unlike a database view, anInfoSet or a logical database).
You define the table join graphically. For example, you use the pushbutton toinsert the required tables. You have to specify the links (join conditions) betweenthe tables, but you can choose for the system to insert a standard proposal. Thesystem evaluates information from the ABAP Dictionary (in the same domain).
A join condition between two tables is filled when both of the joined fields havethe same contents.
You can only include tables once for each join. However, you can enter an aliasname for a table, using which you can include the table again. You then connectalias tables in the same way as normal tables.
You can only include transparent tables in a join and not pool or cluster tables.
12 © 2007 SAP AG. All rights reserved. 2006/Q3
BC407 Lesson: QuickViewer
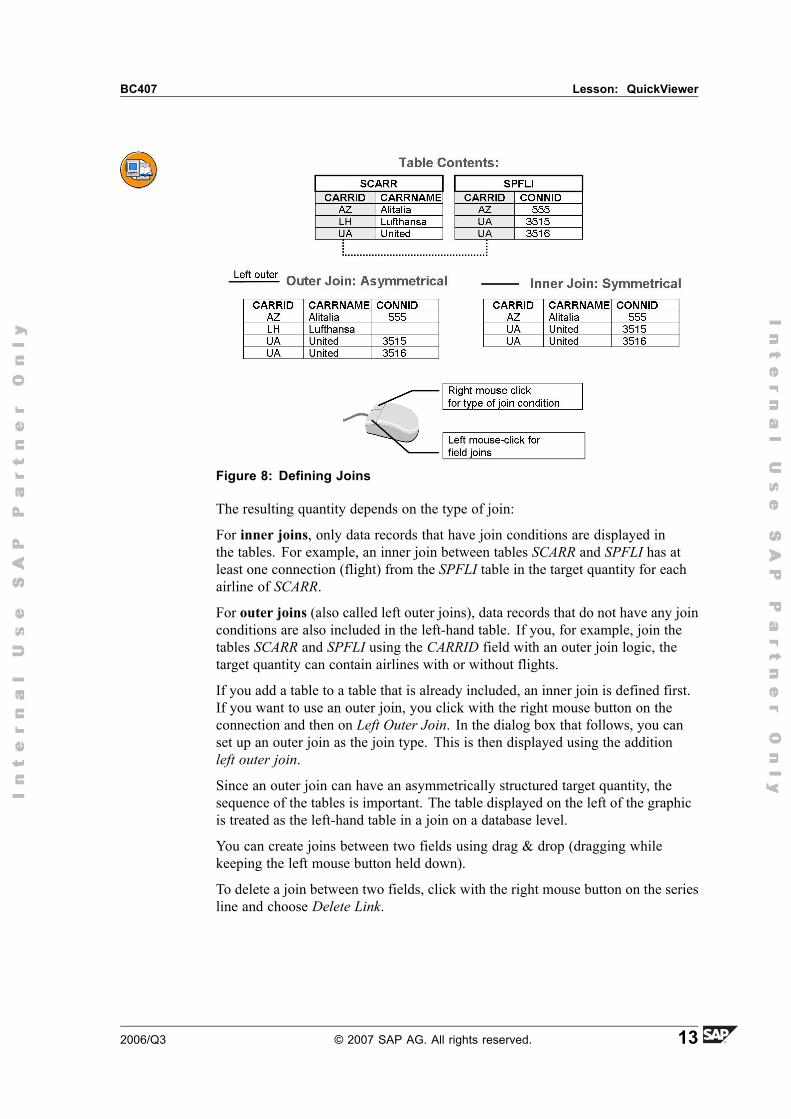
Figure 8: Defining Joins
The resulting quantity depends on the type of join:
For inner joins, only data records that have join conditions are displayed inthe tables. For example, an inner join between tables SCARR and SPFLI has atleast one connection (flight) from the SPFLI table in the target quantity for eachairline of SCARR.
For outer joins (also called left outer joins), data records that do not have any joinconditions are also included in the left-hand table. If you, for example, join thetables SCARR and SPFLI using the CARRID field with an outer join logic, thetarget quantity can contain airlines with or without flights.
If you add a table to a table that is already included, an inner join is defined first.If you want to use an outer join, you click with the right mouse button on theconnection and then on Left Outer Join. In the dialog box that follows, you canset up an outer join as the join type. This is then displayed using the additionleft outer join.
Since an outer join can have an asymmetrically structured target quantity, thesequence of the tables is important. The table displayed on the left of the graphicis treated as the left-hand table in a join on a database level.
You can create joins between two fields using drag & drop (dragging whilekeeping the left mouse button held down).
To delete a join between two fields, click with the right mouse button on the seriesline and choose Delete Link.
2006/Q3 © 2007 SAP AG. All rights reserved. 13
Unit 2: QuickViewer BC407
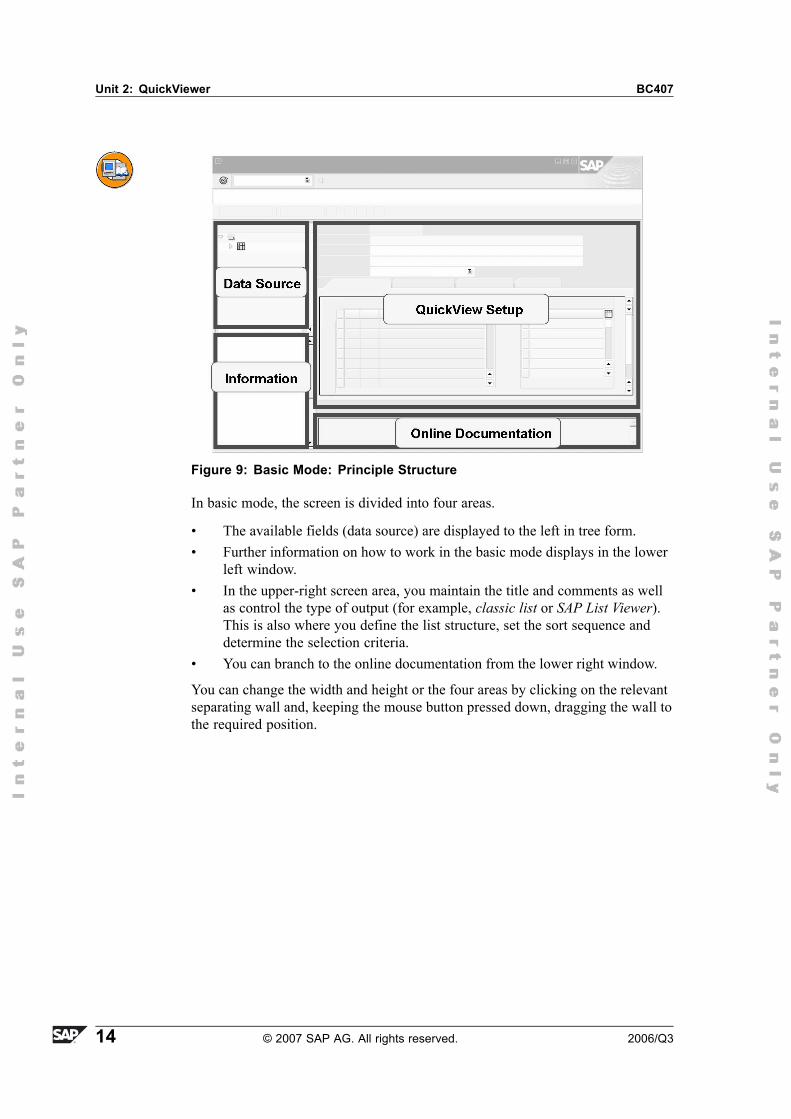
Figure 9: Basic Mode: Principle Structure
In basic mode, the screen is divided into four areas.
� The available fields (data source) are displayed to the left in tree form.� Further information on how to work in the basic mode displays in the lower
left window.� In the upper-right screen area, you maintain the title and comments as well
as control the type of output (for example, classic list or SAP List Viewer).This is also where you define the list structure, set the sort sequence anddetermine the selection criteria.
� You can branch to the online documentation from the lower right window.
You can change the width and height or the four areas by clicking on the relevantseparating wall and, keeping the mouse button pressed down, dragging the wall tothe required position.
14 © 2007 SAP AG. All rights reserved. 2006/Q3
BC407 Lesson: QuickViewer
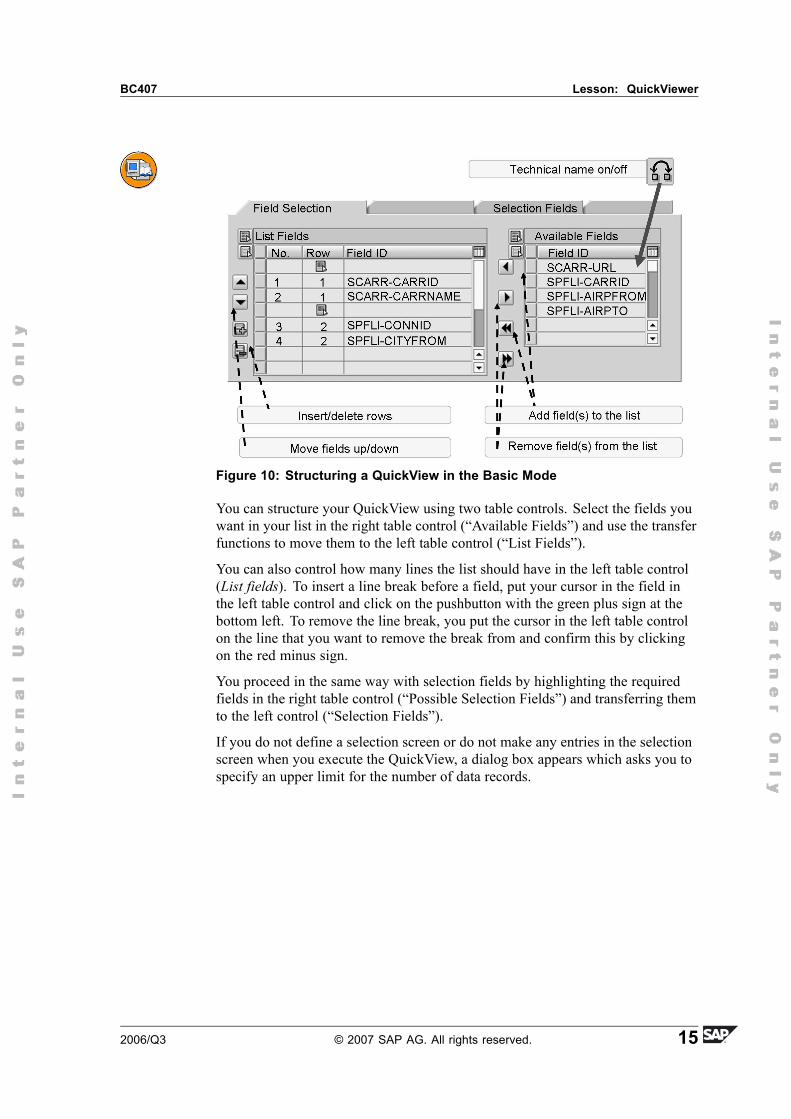
Figure 10: Structuring a QuickView in the Basic Mode
You can structure your QuickView using two table controls. Select the fields youwant in your list in the right table control (�Available Fields�) and use the transferfunctions to move them to the left table control (�List Fields�).
You can also control how many lines the list should have in the left table control(List fields). To insert a line break before a field, put your cursor in the field inthe left table control and click on the pushbutton with the green plus sign at thebottom left. To remove the line break, you put the cursor in the left table controlon the line that you want to remove the break from and confirm this by clickingon the red minus sign.
You proceed in the same way with selection fields by highlighting the requiredfields in the right table control (�Possible Selection Fields�) and transferring themto the left control (�Selection Fields�).
If you do not define a selection screen or do not make any entries in the selectionscreen when you execute the QuickView, a dialog box appears which asks you tospecify an upper limit for the number of data records.
2006/Q3 © 2007 SAP AG. All rights reserved. 15
Unit 2: QuickViewer BC407
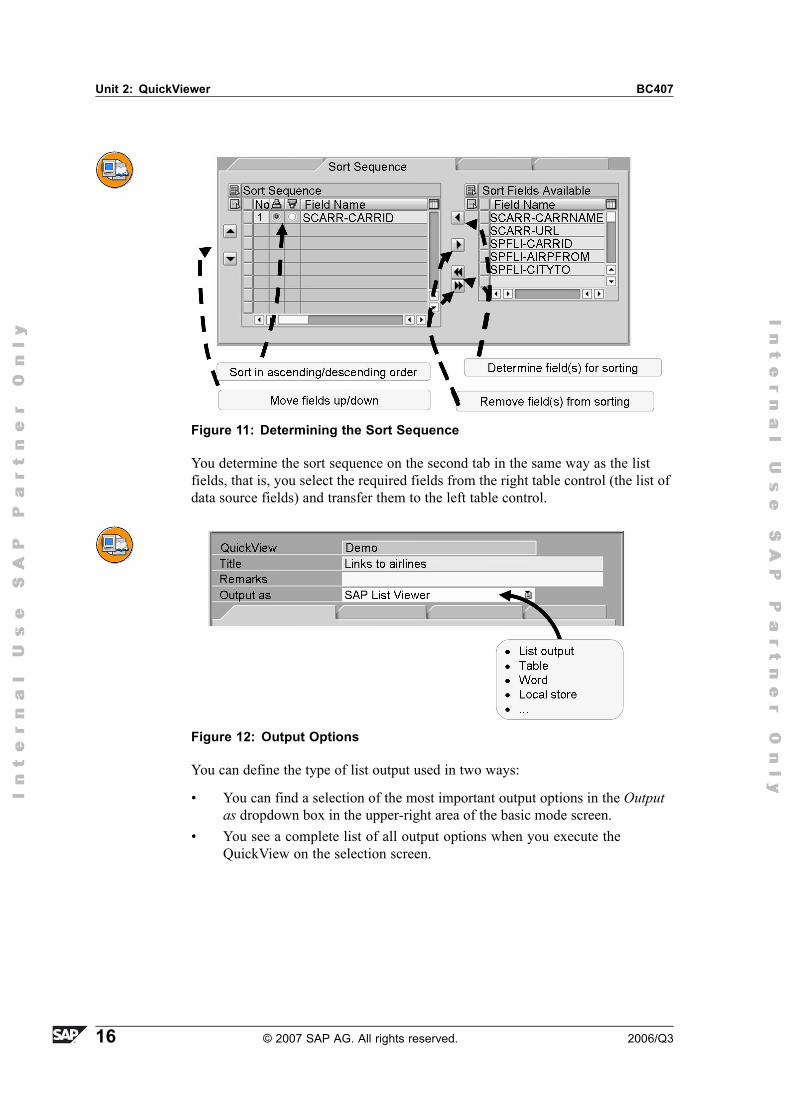
Figure 11: Determining the Sort Sequence
You determine the sort sequence on the second tab in the same way as the listfields, that is, you select the required fields from the right table control (the list ofdata source fields) and transfer them to the left table control.
Figure 12: Output Options
You can define the type of list output used in two ways:
� You can find a selection of the most important output options in the Outputas dropdown box in the upper-right area of the basic mode screen.
� You see a complete list of all output options when you execute theQuickView on the selection screen.
16 © 2007 SAP AG. All rights reserved. 2006/Q3
BC407 Lesson: QuickViewer
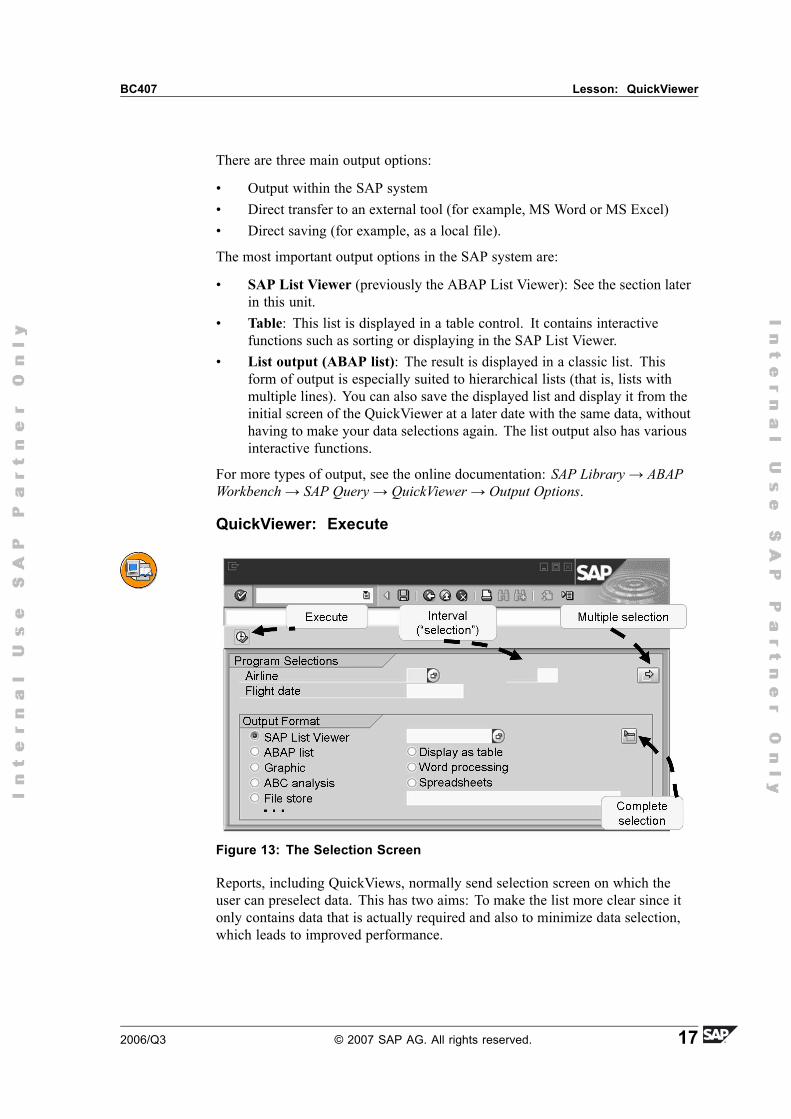
There are three main output options:
� Output within the SAP system� Direct transfer to an external tool (for example, MS Word or MS Excel)� Direct saving (for example, as a local file).
The most important output options in the SAP system are:
� SAP List Viewer (previously the ABAP List Viewer): See the section laterin this unit.
� Table: This list is displayed in a table control. It contains interactivefunctions such as sorting or displaying in the SAP List Viewer.
� List output (ABAP list): The result is displayed in a classic list. Thisform of output is especially suited to hierarchical lists (that is, lists withmultiple lines). You can also save the displayed list and display it from theinitial screen of the QuickViewer at a later date with the same data, withouthaving to make your data selections again. The list output also has variousinteractive functions.
For more types of output, see the online documentation: SAP Library→ ABAPWorkbench→ SAP Query→ QuickViewer→ Output Options.
QuickViewer: Execute
Figure 13: The Selection Screen
Reports, including QuickViews, normally send selection screen on which theuser can preselect data. This has two aims: To make the list more clear since itonly contains data that is actually required and also to minimize data selection,which leads to improved performance.
2006/Q3 © 2007 SAP AG. All rights reserved. 17

Unit 2: QuickViewer BC407
On the selection screen you can have simple input fields (parameters) or complex(selections) as well as radio buttons and checkboxes.
In the upper area of the selection screen (�Program Selections�) when you executea QuickView, you see the fields that you filled when you created the QuickView.In the lower screen area, you can decide on one of the possible output forms. Thisdoes not have to be the same one as you set in the QuickView definition.
Figure 14: Selection Screen: Selections
Selections give you the options of entering complex, multiple selections. Youcan enter one or more values or intervals. You can also exclude single values orintervals from the selection. If multiple selections are made, the color of the arrowchanges from white to green.
The context menu (right mouse button) allows you to enter comparative operators(�Options�), to enter several values, to delete a single value or interval (�DeleteLines�) or to delete all entries.
18 © 2007 SAP AG. All rights reserved. 2006/Q3
BC407 Lesson: QuickViewer
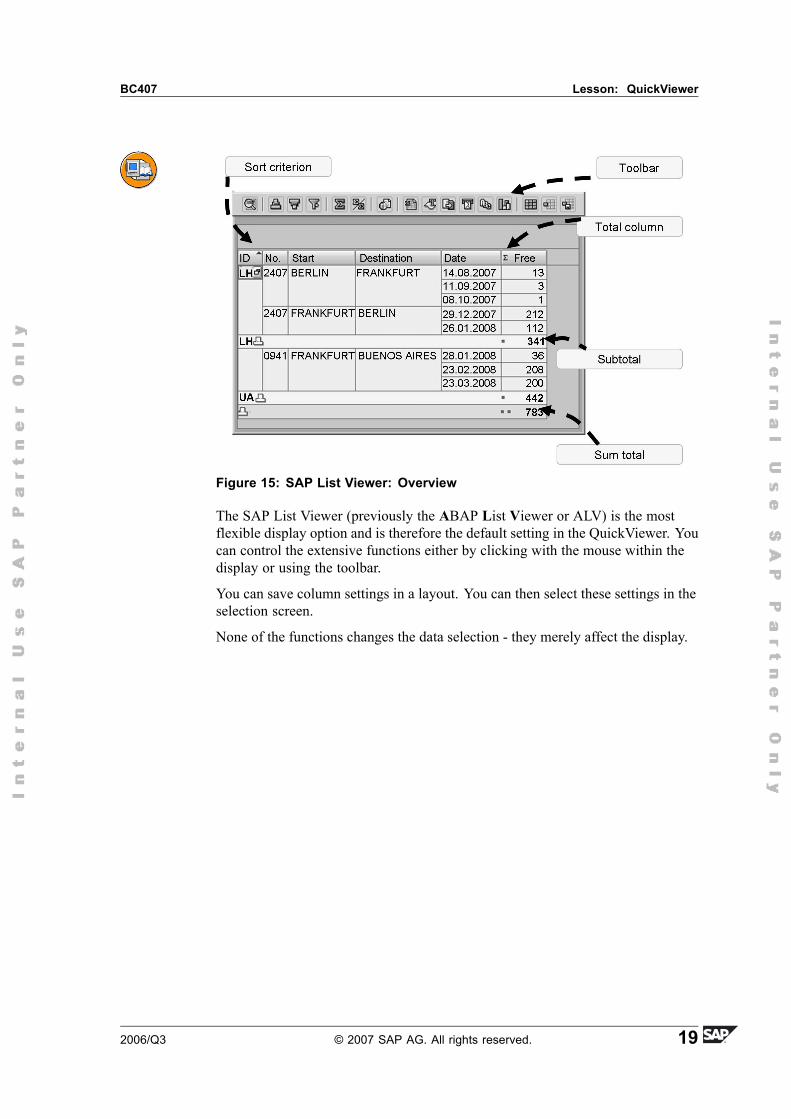
Figure 15: SAP List Viewer: Overview
The SAP List Viewer (previously the ABAP List Viewer or ALV) is the mostflexible display option and is therefore the default setting in the QuickViewer. Youcan control the extensive functions either by clicking with the mouse within thedisplay or using the toolbar.
You can save column settings in a layout. You can then select these settings in theselection screen.
None of the functions changes the data selection - they merely affect the display.
2006/Q3 © 2007 SAP AG. All rights reserved. 19
Unit 2: QuickViewer BC407
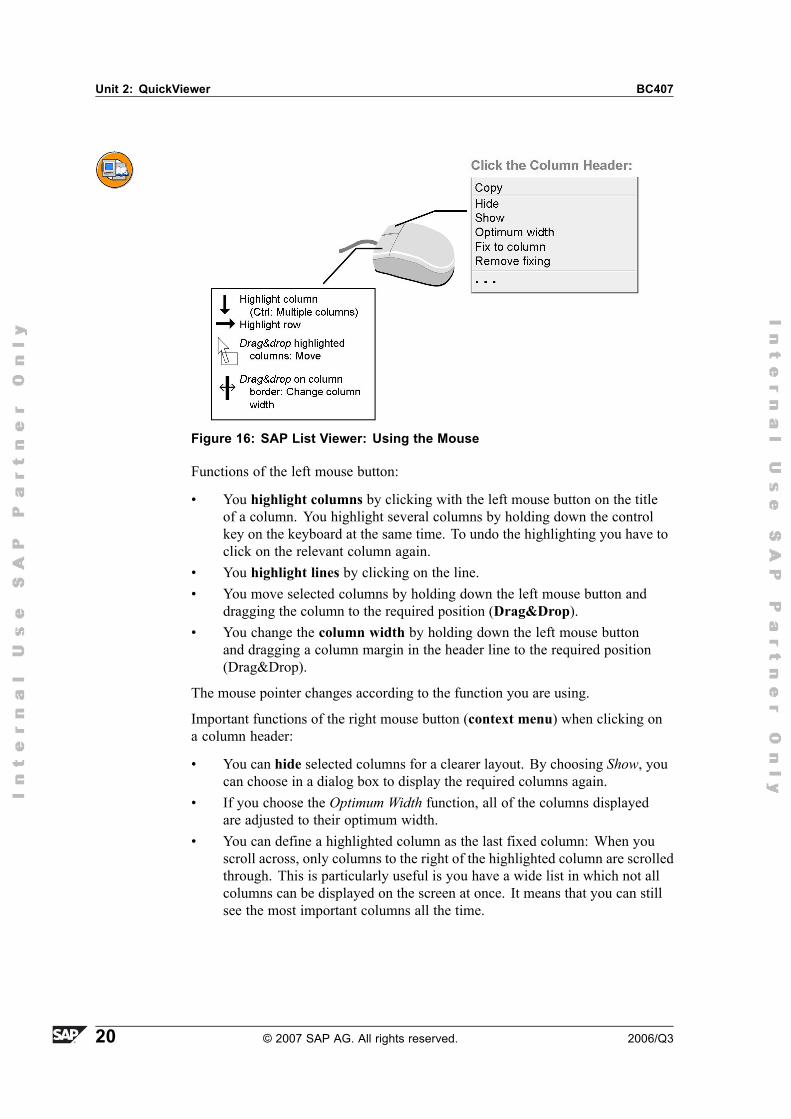
Figure 16: SAP List Viewer: Using the Mouse
Functions of the left mouse button:
� You highlight columns by clicking with the left mouse button on the titleof a column. You highlight several columns by holding down the controlkey on the keyboard at the same time. To undo the highlighting you have toclick on the relevant column again.
� You highlight lines by clicking on the line.� You move selected columns by holding down the left mouse button and
dragging the column to the required position (Drag&Drop).� You change the column width by holding down the left mouse button
and dragging a column margin in the header line to the required position(Drag&Drop).
The mouse pointer changes according to the function you are using.
Important functions of the right mouse button (context menu) when clicking ona column header:
� You can hide selected columns for a clearer layout. By choosing Show, youcan choose in a dialog box to display the required columns again.
� If you choose the Optimum Width function, all of the columns displayedare adjusted to their optimum width.
� You can define a highlighted column as the last fixed column: When youscroll across, only columns to the right of the highlighted column are scrolledthrough. This is particularly useful is you have a wide list in which not allcolumns can be displayed on the screen at once. It means that you can stillsee the most important columns all the time.
20 © 2007 SAP AG. All rights reserved. 2006/Q3
BC407 Lesson: QuickViewer
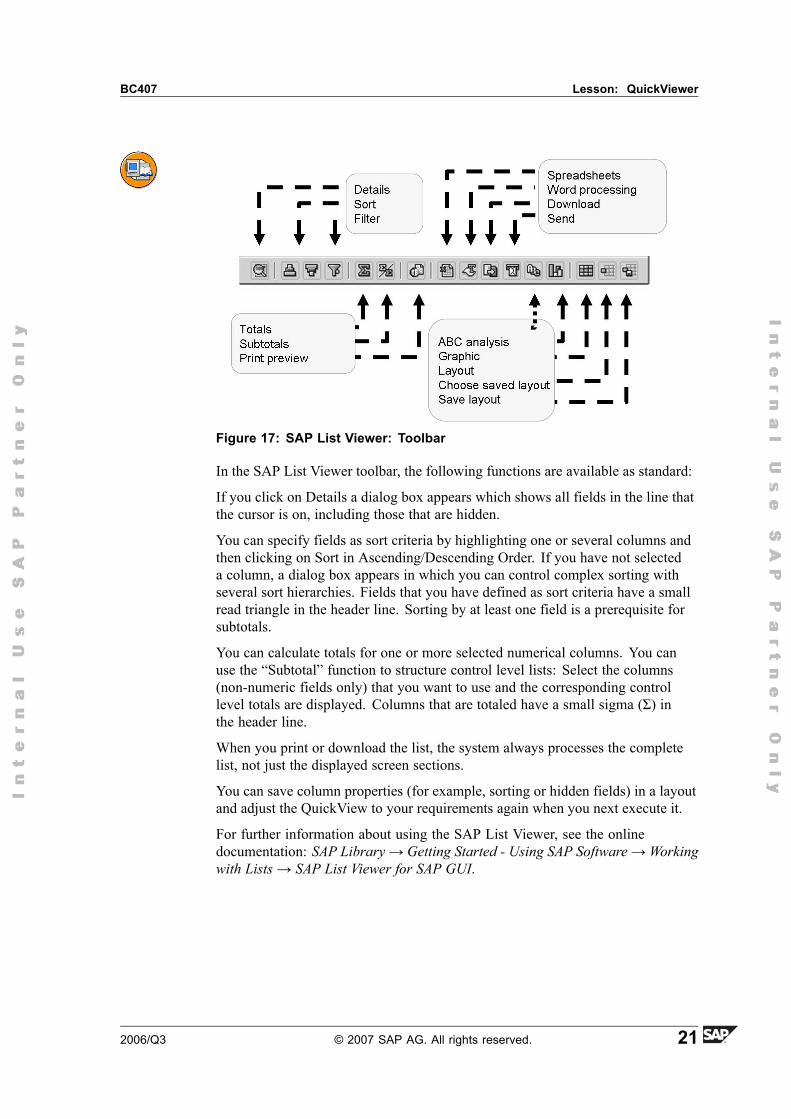
Figure 17: SAP List Viewer: Toolbar
In the SAP List Viewer toolbar, the following functions are available as standard:
If you click on Details a dialog box appears which shows all fields in the line thatthe cursor is on, including those that are hidden.
You can specify fields as sort criteria by highlighting one or several columns andthen clicking on Sort in Ascending/Descending Order. If you have not selecteda column, a dialog box appears in which you can control complex sorting withseveral sort hierarchies. Fields that you have defined as sort criteria have a smallread triangle in the header line. Sorting by at least one field is a prerequisite forsubtotals.
You can calculate totals for one or more selected numerical columns. You canuse the �Subtotal� function to structure control level lists: Select the columns(non-numeric fields only) that you want to use and the corresponding controllevel totals are displayed. Columns that are totaled have a small sigma (Σ) inthe header line.
When you print or download the list, the system always processes the completelist, not just the displayed screen sections.
You can save column properties (for example, sorting or hidden fields) in a layoutand adjust the QuickView to your requirements again when you next execute it.
For further information about using the SAP List Viewer, see the onlinedocumentation: SAP Library→ Getting Started - Using SAP Software→ Workingwith Lists→ SAP List Viewer for SAP GUI.
2006/Q3 © 2007 SAP AG. All rights reserved. 21
Unit 2: QuickViewer BC407
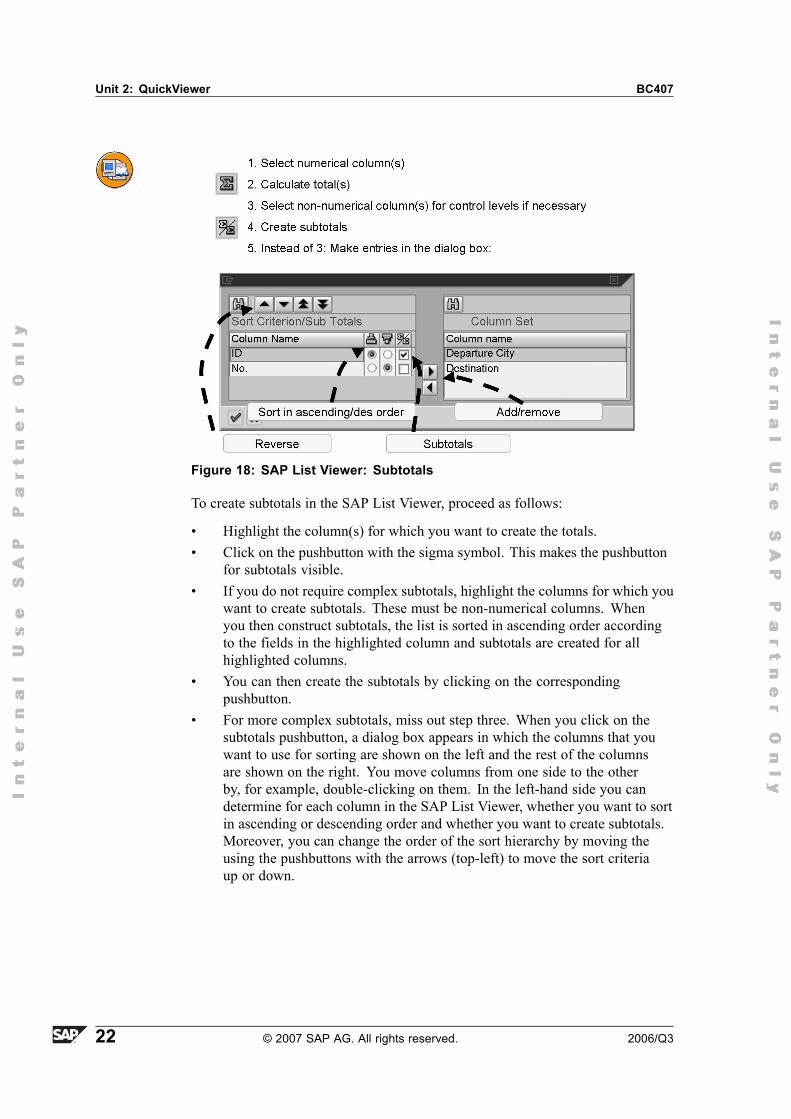
Figure 18: SAP List Viewer: Subtotals
To create subtotals in the SAP List Viewer, proceed as follows:
� Highlight the column(s) for which you want to create the totals.� Click on the pushbutton with the sigma symbol. This makes the pushbutton
for subtotals visible.� If you do not require complex subtotals, highlight the columns for which you
want to create subtotals. These must be non-numerical columns. Whenyou then construct subtotals, the list is sorted in ascending order accordingto the fields in the highlighted column and subtotals are created for allhighlighted columns.
� You can then create the subtotals by clicking on the correspondingpushbutton.
� For more complex subtotals, miss out step three. When you click on thesubtotals pushbutton, a dialog box appears in which the columns that youwant to use for sorting are shown on the left and the rest of the columnsare shown on the right. You move columns from one side to the otherby, for example, double-clicking on them. In the left-hand side you candetermine for each column in the SAP List Viewer, whether you want to sortin ascending or descending order and whether you want to create subtotals.Moreover, you can change the order of the sort hierarchy by moving theusing the pushbuttons with the arrows (top-left) to move the sort criteriaup or down.
22 © 2007 SAP AG. All rights reserved. 2006/Q3
BC407 Lesson: QuickViewer
Exercise 1: Creating a QuickView with aTable
Exercise ObjectivesAfter completing this exercise, you will be able to:� Create a QuickView in the basis mode that uses a table as its data source
Business ExampleYou have been asked to create a QuickView based on a table.
Task:Create a QuickView that displays a standard list of flight bookings.
1. Create a QuickView
Create a QuickView and give it an appropriate name. Select Table as the datasource and specify table SBOOK. Choose the basis mode.
2. Structure the list
The following fields are to be displayed: Airline Code, Flight ConnectionNumber, Flight Date, Booking Number, Customer Number, Booking Dateand Weight of Luggage.
3. Sort the list
Sort the list by Airline Code, in ascending order.
4. Selection screen
You want to provide fields Airline Code and Flight Connection Number inthe selection screen.
5. Execute
Choose List Output (ABAP list) as the type of output.
2006/Q3 © 2007 SAP AG. All rights reserved. 23
Unit 2: QuickViewer BC407
Solution 1: Creating a QuickView with aTableTask:Create a QuickView that displays a standard list of flight bookings.
1. Create a QuickView
Create a QuickView and give it an appropriate name. Select Table as the datasource and specify table SBOOK. Choose the basis mode.
a) Start the QuickViewer either by calling transaction SQVI or using themenu path System→ Services→ QuickViewer. Create a QuickView,for example, by entering a name of your choice and clicking on theCreate button.
Hint: There is no specific naming convention sinceQuickViews are user-dependent and cannot be transported.
Select Table as the data source. Choose SBOOK as the table name.Select Basis Mode as the processing mode.
2. Structure the list
The following fields are to be displayed: Airline Code, Flight ConnectionNumber, Flight Date, Booking Number, Customer Number, Booking Dateand Weight of Luggage.
a) The list is structured in the right-hand area and on the List FieldSelection tab.
Select the fields specified in the exercises in the right table control(Available Fields). Use the arrows between the table controls to addor remove fields from the QuickView. Use Column Left to add theselected fields to the list (Fields in list table control).
3. Sort the list
Sort the list by Airline Code, in ascending order.
a) Go to the next tab: Sort Sequence. In the right table control (AvailableSort Fields), highlight the Airline Code field. Use Column Left toinclude the field in the list (Selected Sort Sequence table control).
4. Selection screen
Continued on next page
24 © 2007 SAP AG. All rights reserved. 2006/Q3
BC407 Lesson: QuickViewer
You want to provide fields Airline Code and Flight Connection Number inthe selection screen.
a) Now switch to the Selection Fields tab. Select the fields specified inthe exercises in the right table control (Possible Selection Fields). UseColumn Left, to add the selected field to the selection screen (SelectionFields table control).
5. Execute
Choose List Output (ABAP list) as the type of output.
a) Above the tab page, you can choose the output form: Display as List.To execute, choose Execute (shortcut: F8).
Hint: You do not need to save the QuickView to execute it.
2006/Q3 © 2007 SAP AG. All rights reserved. 25

Unit 2: QuickViewer BC407
26 © 2007 SAP AG. All rights reserved. 2006/Q3
BC407 Lesson: QuickViewer
Exercise 2: Optional Exercise: Creating aQuickView with a Table Join
Exercise ObjectivesAfter completing this exercise, you will be able to:� Create a QuickView that uses a table join as its data source� Use the SAP List Viewer
Business ExampleCreate a QuickView that displays information about flight connections, theairports used and the occupancy of the flights in the SAP List Viewer.
Task 1:Create a QuickView
1. Create a QuickView and give it an appropriate name. Choose Table Join asthe data source. Choose the basis mode.
Task 2:Define the data source: Table join
1. First define a table join over two tables. The tables are SPFLI andSAIRPORT. Implement the links using table fields SPFLI-AIRPFROMand SAIRPORT-ID.
2.
Caution: When you define a table join you can only specify a tableonce.
Therefore, create an alias table with the name SAIRPORT2 thatrefers to table SAIRPORT.
3. Now link the alias table with table SPFLI using fields SPFLI-AIRPTO andSAIRPORT2-ID.
4. Add a fourth table: SFLIGHT. Join the fields SPFLI-CARRID withSFLIGHT-CARRID and SPFLI-CONNID with SFLIGHT-CONNID.
Hint: Use the suggestions made by the join condition.
Continued on next page
2006/Q3 © 2007 SAP AG. All rights reserved. 27
Unit 2: QuickViewer BC407
Task 3:Structure the list
1. The following fields are to be displayed: Airline Code, Flight ConnectionNumber, Departure Airport Code and Name, Arrival Airport Code andName, Flight Date, Occupied Seats.
Hint: So that you give the airport names for the departure airportand arrival airport that are the same as their identifiers, use thetechnical names.
Task 4:Selection Screens
1. You want to provide fields Airline Code and Flight Connection Number inthe selection screen.
Task 5:Execute
1. Choose the SAP List Viewer (=ABAP List Viewer) as the output type.Create a total for the occupied seats. Create a subtotal for each airline. Hidethe column with the airport identifier.
28 © 2007 SAP AG. All rights reserved. 2006/Q3
BC407 Lesson: QuickViewer
Solution 2: Optional Exercise: Creating aQuickView with a Table JoinTask 1:Create a QuickView
1. Create a QuickView and give it an appropriate name. Choose Table Join asthe data source. Choose the basis mode.
a) Start the QuickViewer either by calling transaction SQVI or using themenu path System→ Services→ QuickViewer.
Create a QuickView and give it an appropriate name. Choose TableJoin as the data source and Basis Mode as the processing mode. Enter asuitable title (mandatory field entry).
Task 2:Define the data source: Table join
1. First define a table join over two tables. The tables are SPFLI andSAIRPORT. Implement the links using table fields SPFLI-AIRPFROMand SAIRPORT-ID.
a) After the dialog box for determining the title and data source, you reachthe screen for defining joins. Choose Insert table to add table SPFLI asthe first table. Now add table SAIRPORT. The system links the twotables through fields SPFLI-AIRPFROM and SAIRPORT-ID
2.
Caution: When you define a table join you can only specify a tableonce.
Therefore, create an alias table with the name SAIRPORT2 thatrefers to table SAIRPORT.
a) Define an alias table by choosing Alias table. Now choose Create inthe subsequent dialog box. Enter SAIRPORT as the table name andenter the alias name SAIRPORT2.
Continued on next page
2006/Q3 © 2007 SAP AG. All rights reserved. 29
Unit 2: QuickViewer BC407
3. Now link the alias table with table SPFLI using fields SPFLI-AIRPTO andSAIRPORT2-ID.
a) Now add the alias table as the third table in the table join. The systemlinks SAIRPORT-ID and SAIRPORT2-ID. You do not want this link �you have to delete it. To do this, position the cursor on the joining lineand click the right mouse button. Choose Delete Link from the menu.Now drag and drop (left mouse button) to add a join condition betweenfields SAIRPORT-ID2 and SPFLI-AIRPTO.
4. Add a fourth table: SFLIGHT. Join the fields SPFLI-CARRID withSFLIGHT-CARRID and SPFLI-CONNID with SFLIGHT-CONNID.
Hint: Use the suggestions made by the join condition.
a) Add SFLIGHT as the fourth table. If the system cannot find a join,create the join manually by dragging the field SFLIGHT-CARRIDto SPFLI-CARRID and SFLIGHT-CONNID to SPFLI-CONNID.Alternatively, click on Propose Join Condition and enter SFLIGHT asthe first table and SPFLI as the second.
Hint: You can position the tables anywhere on the screen(Drag&Drop).
The green arrow in the standard toolbar (shortcut: F3) takes you to thebasis mode for structuring the list.
Task 3:Structure the list
1. The following fields are to be displayed: Airline Code, Flight ConnectionNumber, Departure Airport Code and Name, Arrival Airport Code andName, Flight Date, Occupied Seats.
Hint: So that you give the airport names for the departure airportand arrival airport that are the same as their identifiers, use thetechnical names.
a) Proceed as in the previous exercise, point 3.
Continued on next page
30 © 2007 SAP AG. All rights reserved. 2006/Q3
BC407 Lesson: QuickViewer
Task 4:Selection Screens
1. You want to provide fields Airline Code and Flight Connection Number inthe selection screen.
a) Proceed as in the previous exercise, point 4.
Task 5:Execute
1. Choose the SAP List Viewer (=ABAP List Viewer) as the output type.Create a total for the occupied seats. Create a subtotal for each airline. Hidethe column with the airport identifier.
a) Above the tab page, you can select the type of output: SAP List Viewer(=ABAP List Viewer). To execute, choose Execute (shortcut: F8).
All numerical fields (in this case: Occupied Seats) are totaledautomatically. The small sigma sign (∑) in the column header indicatesthis. If necessary, scroll down to the bottom to see the totals. (You totalnumerical fields in the SAP List Viewer by highlighting the columnand clicking on Totals).
Select both columns with the airport codes by holding down the controlkey on the keyboard and clicking on the column headers. To hide thecolumns, click with the right mouse button on one of the two columnsand choose Hide from the context menu.
2006/Q3 © 2007 SAP AG. All rights reserved. 31

Unit 2: QuickViewer BC407
Lesson Summary
You should now be able to:� Use the QuickViewer to generate lists� Use the SAP List Viewer
32 © 2007 SAP AG. All rights reserved. 2006/Q3
BC407 Unit Summary
Unit SummaryYou should now be able to:� Use the QuickViewer to generate lists� Use the SAP List Viewer
2006/Q3 © 2007 SAP AG. All rights reserved. 33

Unit Summary BC407
34 © 2007 SAP AG. All rights reserved. 2006/Q3
Unit 3SAP Query
Unit OverviewIn this unit, you will learn about all the options for SAP Query.
Unit ObjectivesAfter completing this unit, you will be able to:
� Use SAP Query to create basic lists, statistics and ranked lists� Use the interactive functions of these lists� Save query lists and call them up again
Unit ContentsLesson: SAP Query .. . . . . . . . . . . . . . . . . . . . . . . . . . . . . . . . . . . . . . . . . . . . . . . . . . . . . . . . . . . . 36
Exercise 3: Basic Lists and Local Fields ... . . . . . . . . . . . . . . . . . . . . . . . . . . . . . . 65Exercise 4: Basic Lists and Local Fields (optional) .. . . . . . . . . . . . . . . . . . . . 71Exercise 5: Statistics .. . . . . . . . . . . . . . . . . . . . . . . . . . . . . . . . . . . . . . . . . . . . . . . . . . . . . . . 75Exercise 6: Ranked List (Optional) . . . . . . . . . . . . . . . . . . . . . . . . . . . . . . . . . . . . . . . 79
2006/Q3 © 2007 SAP AG. All rights reserved. 35
Unit 3: SAP Query BC407
Lesson: SAP Query
Lesson OverviewIn this lesson, you will learn about all the options for SAP Query.
Lesson ObjectivesAfter completing this lesson, you will be able to:
� Use SAP Query to create basic lists, statistics and ranked lists� Use the interactive functions of these lists� Save query lists and call them up again
Business ExampleYou have been asked to use SAP Query to create a query that is comprised ofseveral sublists (a basic list and several statistics).
Introduction to XML
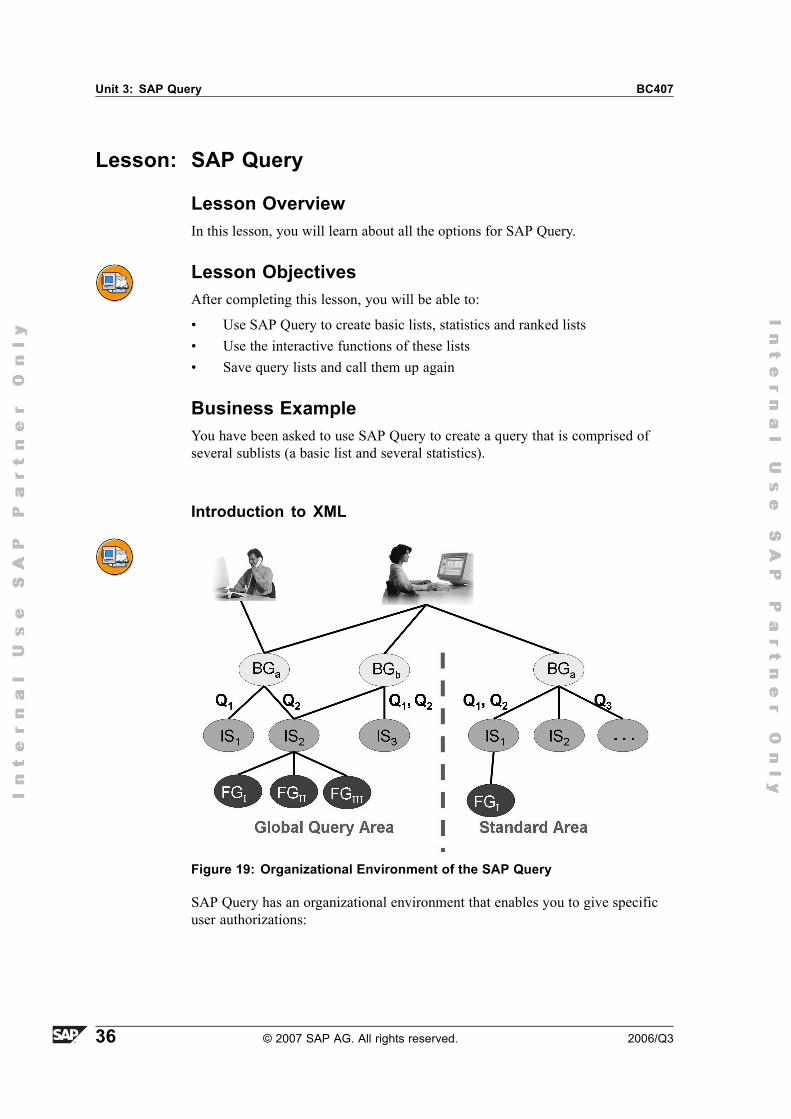
Figure 19: Organizational Environment of the SAP Query
SAP Query has an organizational environment that enables you to give specificuser authorizations:
36 © 2007 SAP AG. All rights reserved. 2006/Q3
BC407 Lesson: SAP Query
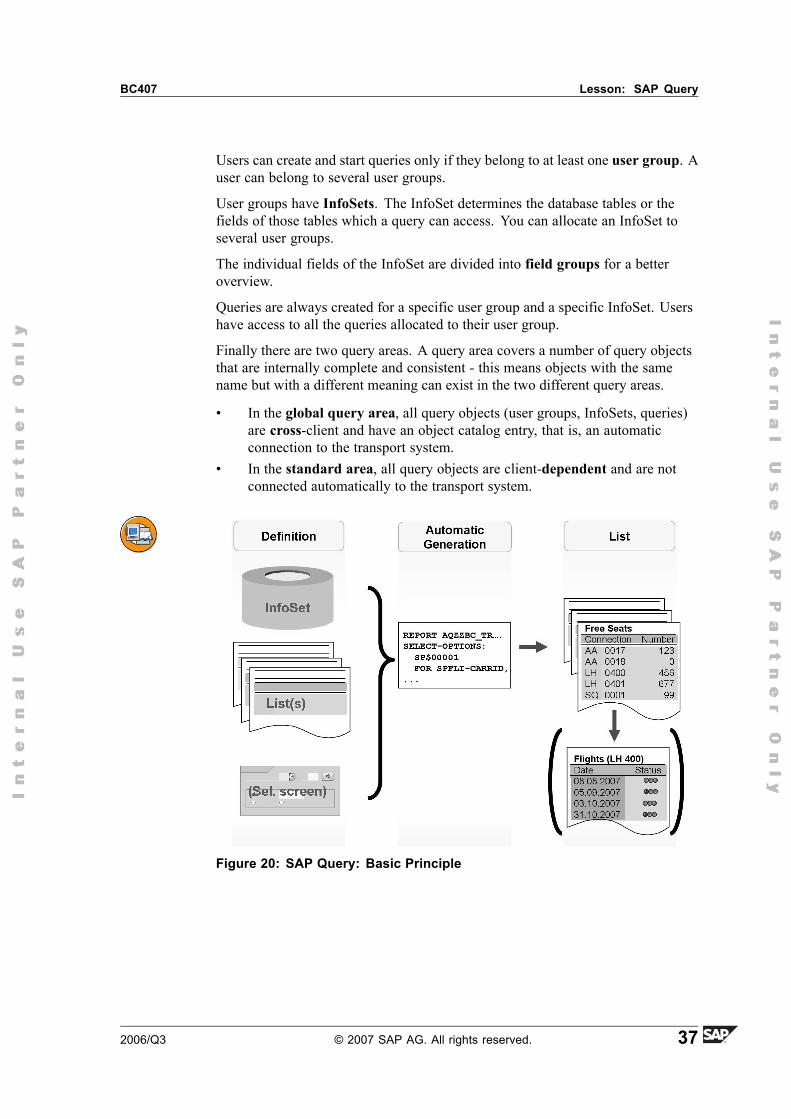
Users can create and start queries only if they belong to at least one user group. Auser can belong to several user groups.
User groups have InfoSets. The InfoSet determines the database tables or thefields of those tables which a query can access. You can allocate an InfoSet toseveral user groups.
The individual fields of the InfoSet are divided into field groups for a betteroverview.
Queries are always created for a specific user group and a specific InfoSet. Usershave access to all the queries allocated to their user group.
Finally there are two query areas. A query area covers a number of query objectsthat are internally complete and consistent - this means objects with the samename but with a different meaning can exist in the two different query areas.
� In the global query area, all query objects (user groups, InfoSets, queries)are cross-client and have an object catalog entry, that is, an automaticconnection to the transport system.
� In the standard area, all query objects are client-dependent and are notconnected automatically to the transport system.
Figure 20: SAP Query: Basic Principle
2006/Q3 © 2007 SAP AG. All rights reserved. 37
Unit 3: SAP Query BC407
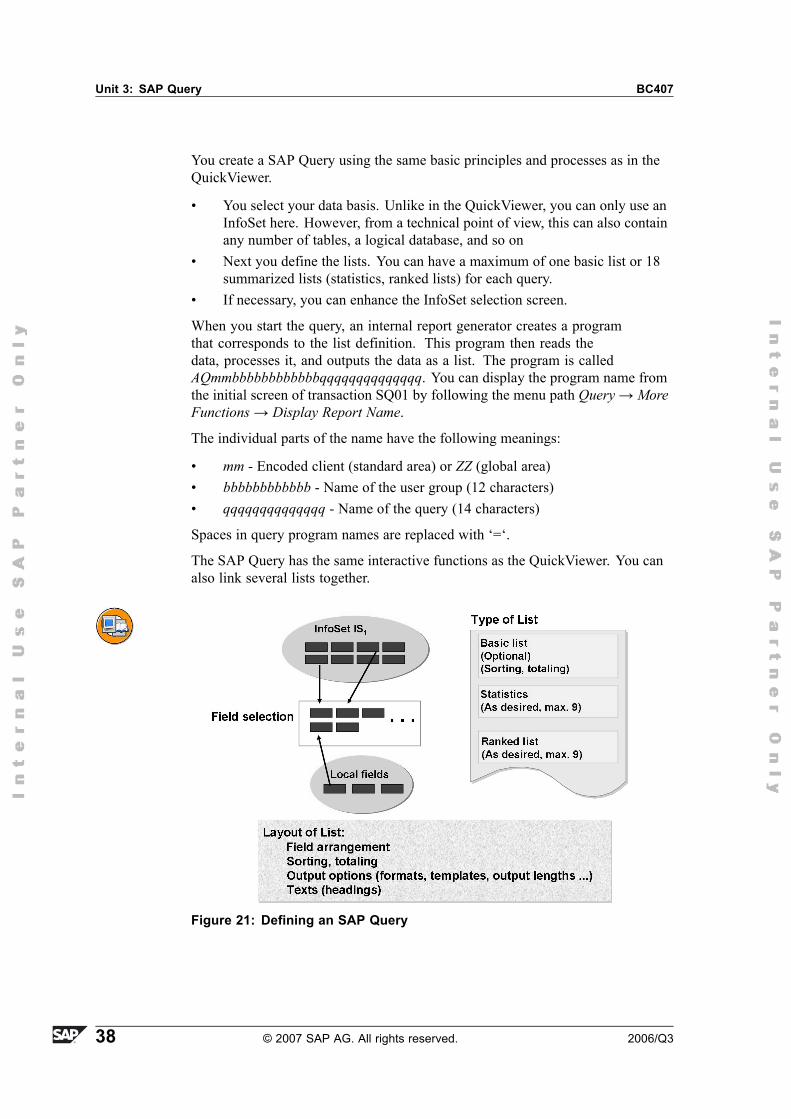
You create a SAP Query using the same basic principles and processes as in theQuickViewer.
� You select your data basis. Unlike in the QuickViewer, you can only use anInfoSet here. However, from a technical point of view, this can also containany number of tables, a logical database, and so on
� Next you define the lists. You can have a maximum of one basic list or 18summarized lists (statistics, ranked lists) for each query.
� If necessary, you can enhance the InfoSet selection screen.
When you start the query, an internal report generator creates a programthat corresponds to the list definition. This program then reads thedata, processes it, and outputs the data as a list. The program is calledAQmmbbbbbbbbbbbbqqqqqqqqqqqqqq. You can display the program name fromthe initial screen of transaction SQ01 by following the menu path Query→ MoreFunctions→ Display Report Name.
The individual parts of the name have the following meanings:
� mm - Encoded client (standard area) or ZZ (global area)� bbbbbbbbbbbb - Name of the user group (12 characters)� qqqqqqqqqqqqqq - Name of the query (14 characters)
Spaces in query program names are replaced with �=�.
The SAP Query has the same interactive functions as the QuickViewer. You canalso link several lists together.
Figure 21: Defining an SAP Query
38 © 2007 SAP AG. All rights reserved. 2006/Q3
BC407 Lesson: SAP Query
The SAP Query takes you through a sequence of screen fields in which, by
� Selecting (checkboxes)� Assigning numbers (sequence, sorting and so on)� Retrieving texts (headers, group level texts)
you determine the line structure and the list layout.
You can use the Query Painter to create basic lists graphically.
An SAP Query can have different lists:
� Basic list: Single line or multiline. You can compress multiline basic lists.� Statistics and ranked lists: Compressed data records.� You can combine different sublists, but with a maximum of one basic list,
nine statistics and nine ranked lists.
You can also define local fields within a query, which means you can calculatenew values from the data read (as a enhancement to the InfoSet).
Standard interactive functions are offered for a Query list. For example, youcan process the query elsewhere (in MS Excel or an ABC analysis), displaythe query graphically (SAP Graphic), save the query or link it to another query(report/report interface).
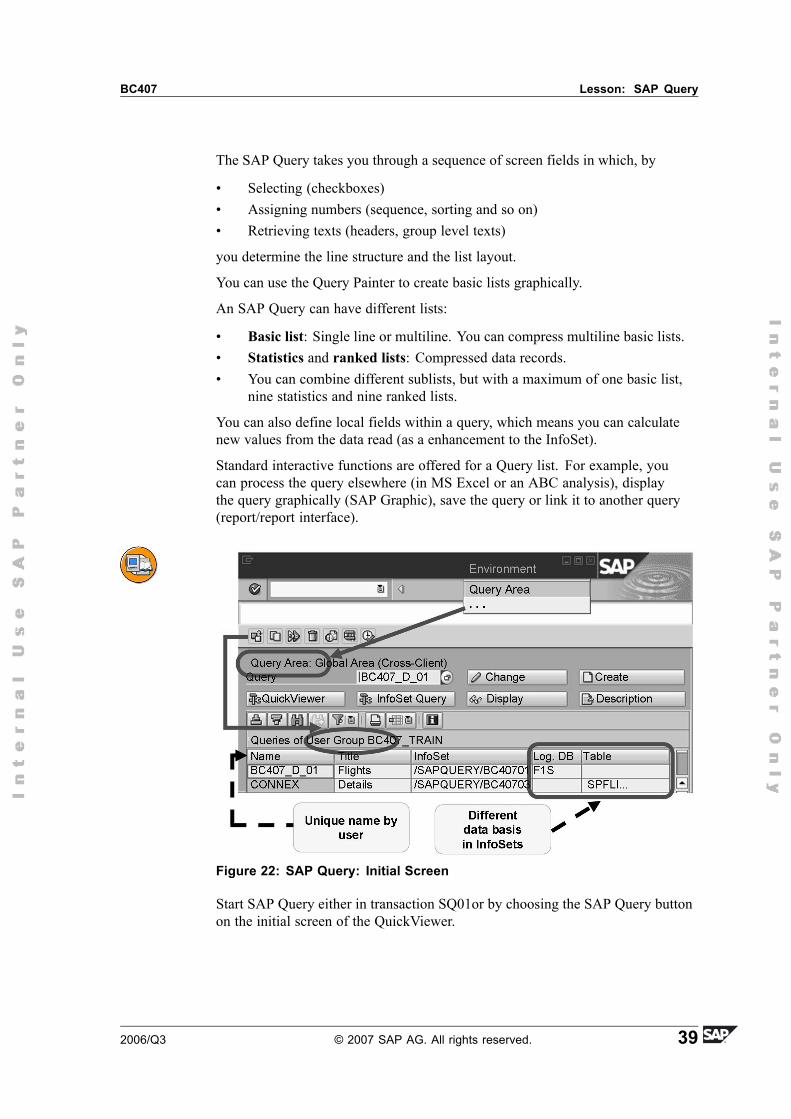
Figure 22: SAP Query: Initial Screen
Start SAP Query either in transaction SQ01or by choosing the SAP Query buttonon the initial screen of the QuickViewer.
2006/Q3 © 2007 SAP AG. All rights reserved. 39
Unit 3: SAP Query BC407
Decide on the query area that you want to use: Menu Environment→ QueryArea. (If you always work in the global query area, you can set this in your userprofile: Parameter AQW with the value G. You can go to your user profile byfollowing the menu path System→ User Profile→ Own Data).
Specify one of the user groups to which you are assigned. To do this, choose Edit→ Change User Group or choose the relevant pushbutton. (You can also set theuser group in your user profile: The relevant parameter is AQB.)
Field Selection and Basic Lists
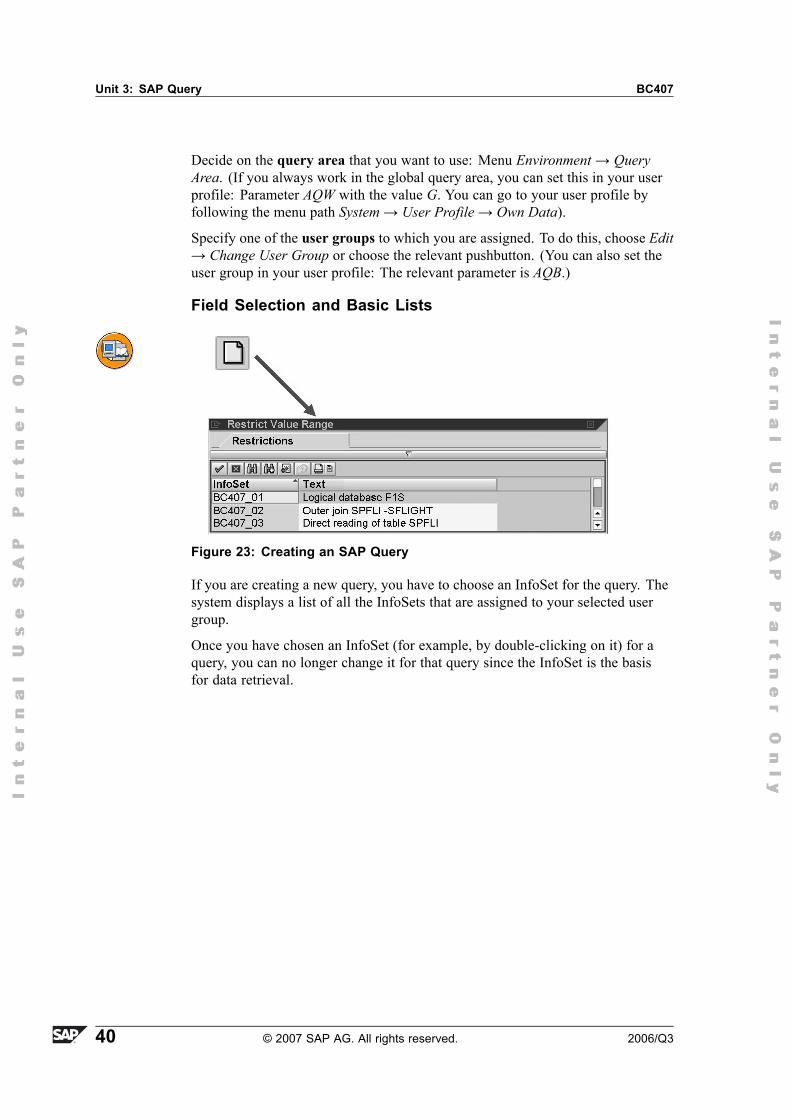
Figure 23: Creating an SAP Query
If you are creating a new query, you have to choose an InfoSet for the query. Thesystem displays a list of all the InfoSets that are assigned to your selected usergroup.
Once you have chosen an InfoSet (for example, by double-clicking on it) for aquery, you can no longer change it for that query since the InfoSet is the basisfor data retrieval.
40 © 2007 SAP AG. All rights reserved. 2006/Q3
BC407 Lesson: SAP Query
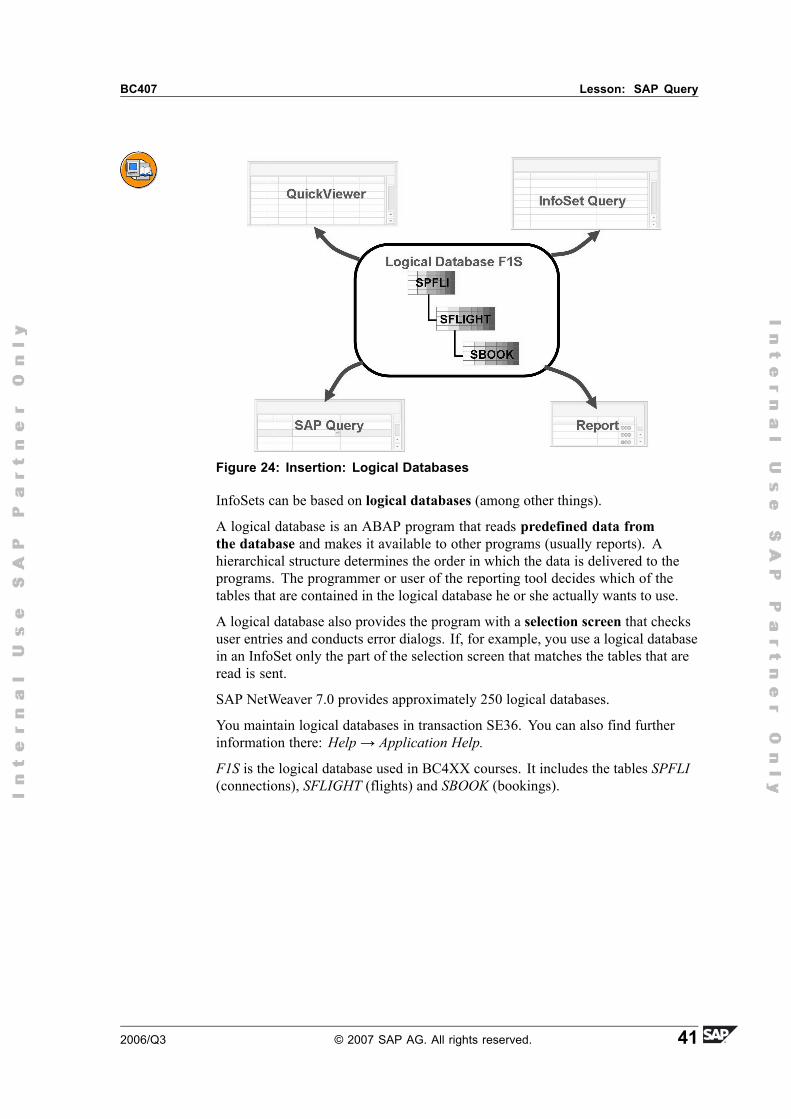
Figure 24: Insertion: Logical Databases
InfoSets can be based on logical databases (among other things).
A logical database is an ABAP program that reads predefined data fromthe database and makes it available to other programs (usually reports). Ahierarchical structure determines the order in which the data is delivered to theprograms. The programmer or user of the reporting tool decides which of thetables that are contained in the logical database he or she actually wants to use.
A logical database also provides the program with a selection screen that checksuser entries and conducts error dialogs. If, for example, you use a logical databasein an InfoSet only the part of the selection screen that matches the tables that areread is sent.
SAP NetWeaver 7.0 provides approximately 250 logical databases.
You maintain logical databases in transaction SE36. You can also find furtherinformation there: Help→ Application Help.
F1S is the logical database used in BC4XX courses. It includes the tables SPFLI(connections), SFLIGHT (flights) and SBOOK (bookings).
2006/Q3 © 2007 SAP AG. All rights reserved. 41
Unit 3: SAP Query BC407
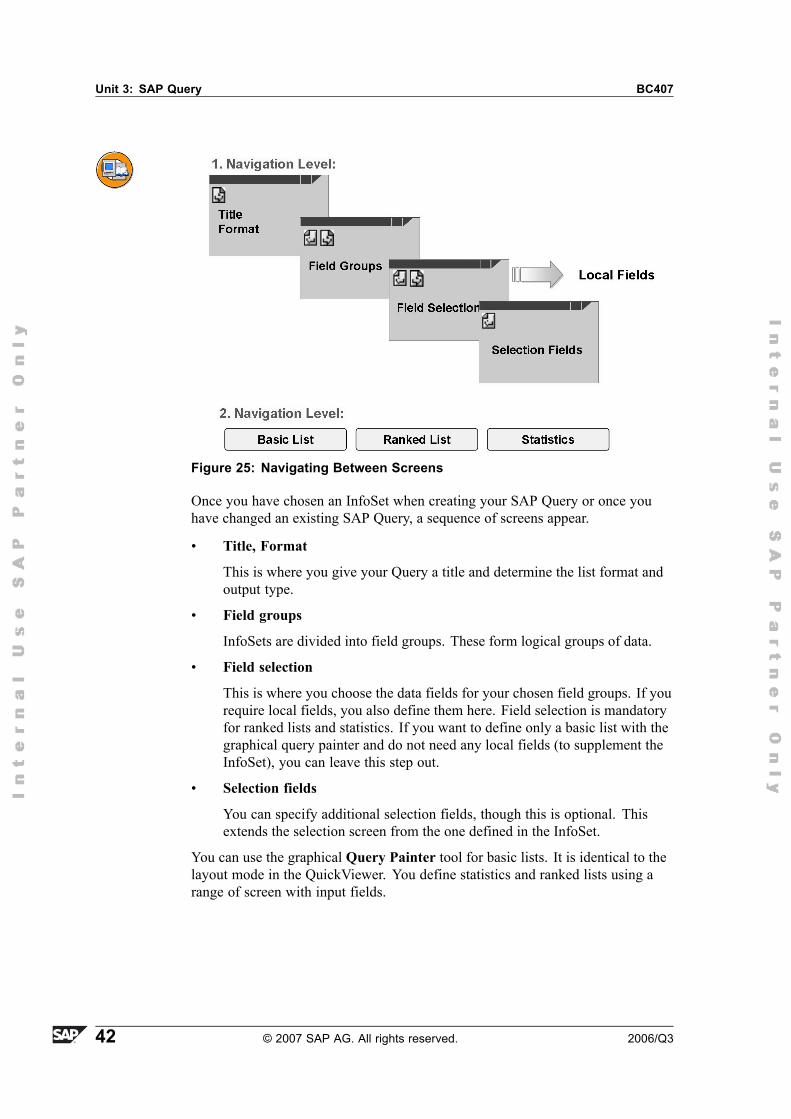
Figure 25: Navigating Between Screens
Once you have chosen an InfoSet when creating your SAP Query or once youhave changed an existing SAP Query, a sequence of screens appear.
� Title, Format
This is where you give your Query a title and determine the list format andoutput type.
� Field groups
InfoSets are divided into field groups. These form logical groups of data.
� Field selection
This is where you choose the data fields for your chosen field groups. If yourequire local fields, you also define them here. Field selection is mandatoryfor ranked lists and statistics. If you want to define only a basic list with thegraphical query painter and do not need any local fields (to supplement theInfoSet), you can leave this step out.
� Selection fields
You can specify additional selection fields, though this is optional. Thisextends the selection screen from the one defined in the InfoSet.
You can use the graphical Query Painter tool for basic lists. It is identical to thelayout mode in the QuickViewer. You define statistics and ranked lists using arange of screen with input fields.
42 © 2007 SAP AG. All rights reserved. 2006/Q3
BC407 Lesson: SAP Query
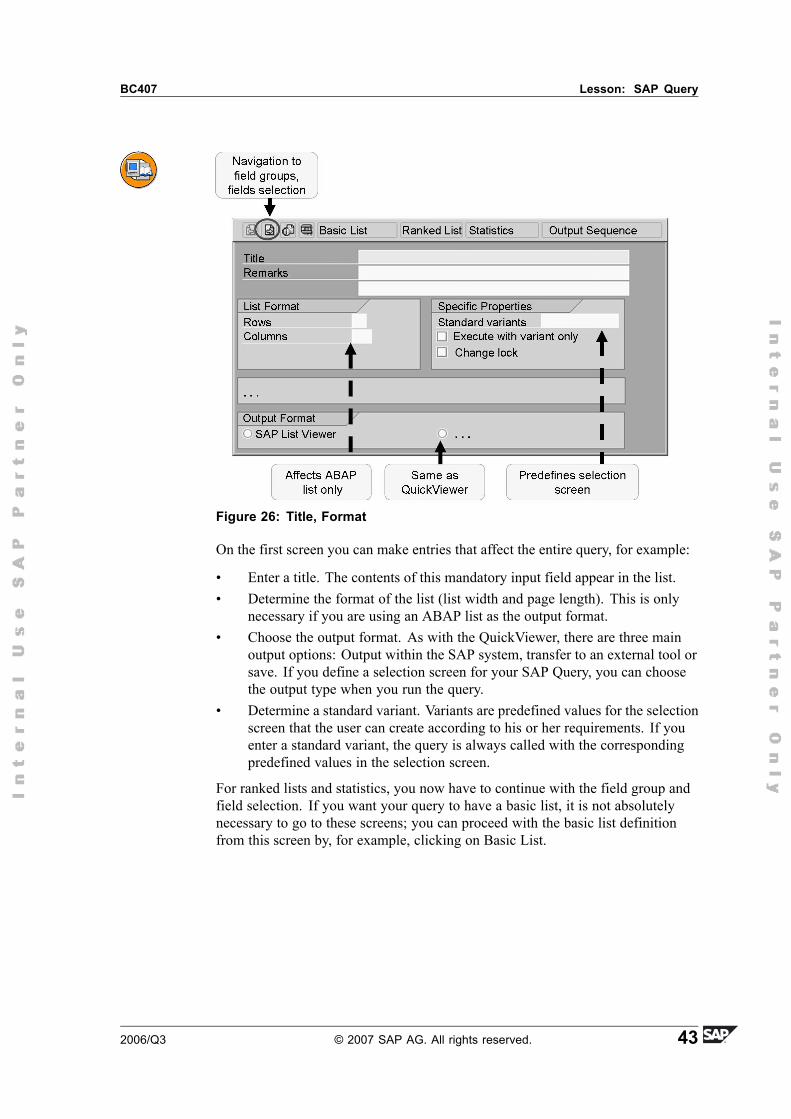
Figure 26: Title, Format
On the first screen you can make entries that affect the entire query, for example:
� Enter a title. The contents of this mandatory input field appear in the list.� Determine the format of the list (list width and page length). This is only
necessary if you are using an ABAP list as the output format.� Choose the output format. As with the QuickViewer, there are three main
output options: Output within the SAP system, transfer to an external tool orsave. If you define a selection screen for your SAP Query, you can choosethe output type when you run the query.
� Determine a standard variant. Variants are predefined values for the selectionscreen that the user can create according to his or her requirements. If youenter a standard variant, the query is always called with the correspondingpredefined values in the selection screen.
For ranked lists and statistics, you now have to continue with the field group andfield selection. If you want your query to have a basic list, it is not absolutelynecessary to go to these screens; you can proceed with the basic list definitionfrom this screen by, for example, clicking on Basic List.
2006/Q3 © 2007 SAP AG. All rights reserved. 43
Unit 3: SAP Query BC407
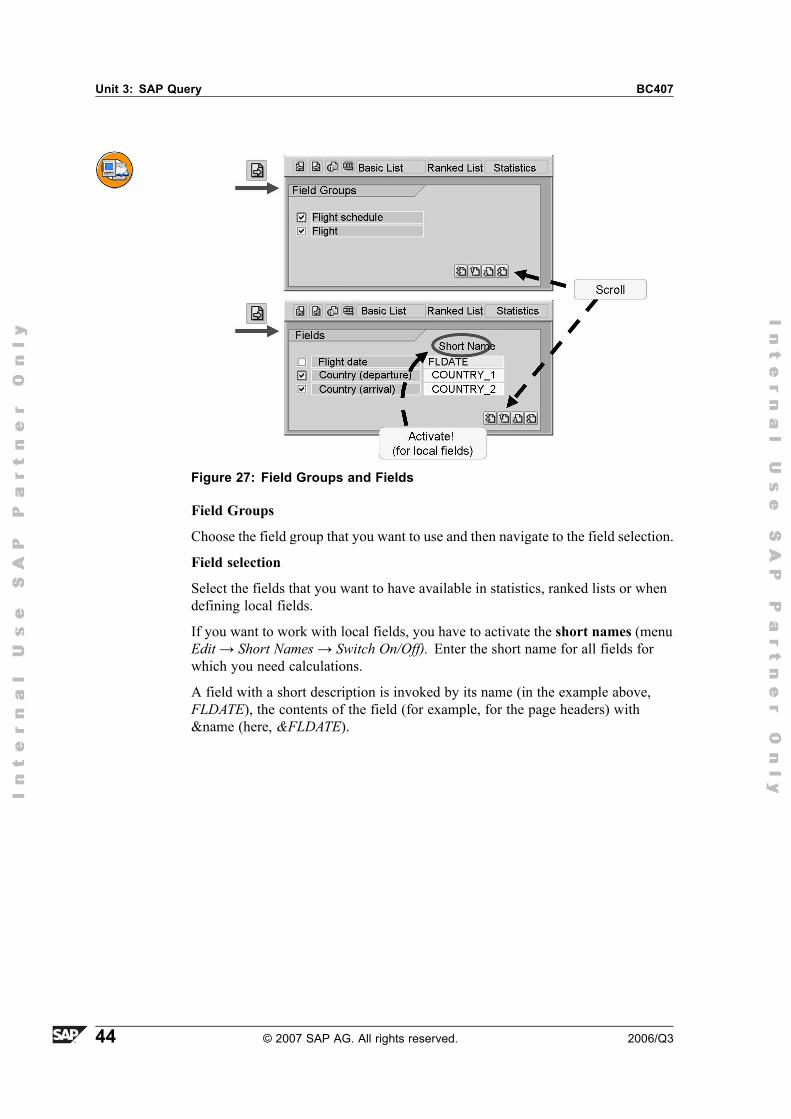
Figure 27: Field Groups and Fields
Field Groups
Choose the field group that you want to use and then navigate to the field selection.
Field selection
Select the fields that you want to have available in statistics, ranked lists or whendefining local fields.
If you want to work with local fields, you have to activate the short names (menuEdit→ Short Names→ Switch On/Off). Enter the short name for all fields forwhich you need calculations.
A field with a short description is invoked by its name (in the example above,FLDATE), the contents of the field (for example, for the page headers) with&name (here, &FLDATE).
44 © 2007 SAP AG. All rights reserved. 2006/Q3
BC407 Lesson: SAP Query
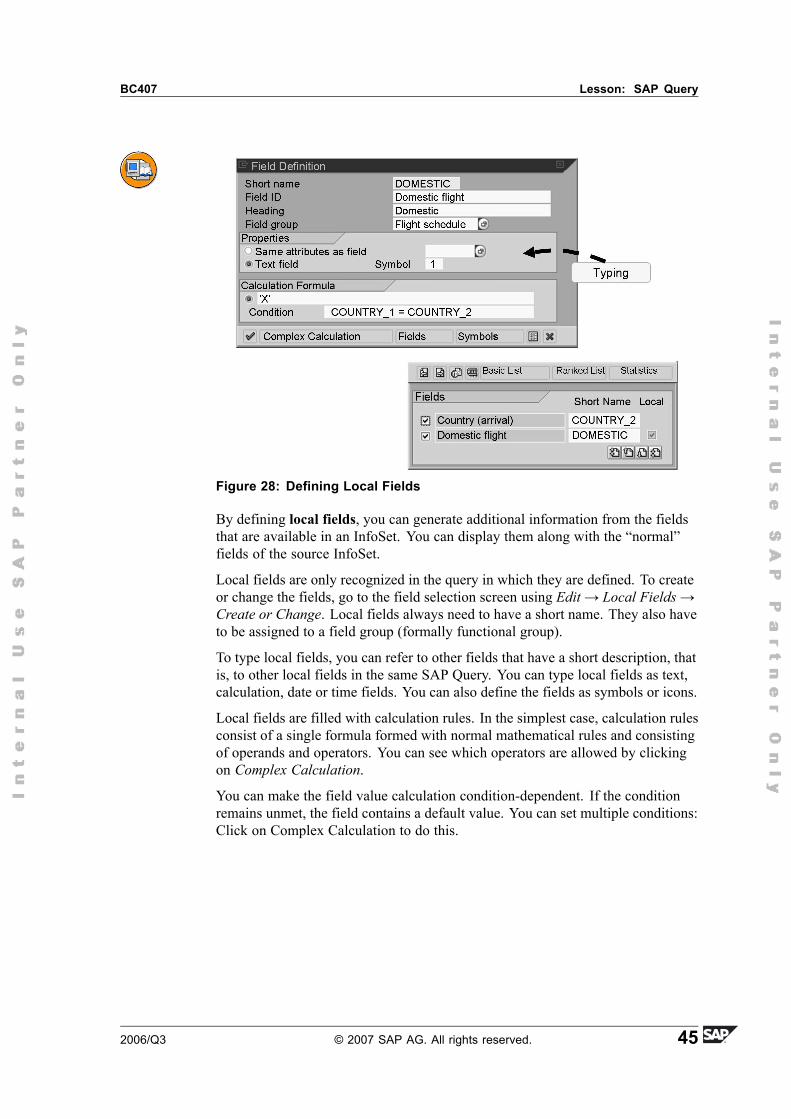
Figure 28: Defining Local Fields
By defining local fields, you can generate additional information from the fieldsthat are available in an InfoSet. You can display them along with the �normal�fields of the source InfoSet.
Local fields are only recognized in the query in which they are defined. To createor change the fields, go to the field selection screen using Edit→ Local Fields→Create or Change. Local fields always need to have a short name. They also haveto be assigned to a field group (formally functional group).
To type local fields, you can refer to other fields that have a short description, thatis, to other local fields in the same SAP Query. You can type local fields as text,calculation, date or time fields. You can also define the fields as symbols or icons.
Local fields are filled with calculation rules. In the simplest case, calculation rulesconsist of a single formula formed with normal mathematical rules and consistingof operands and operators. You can see which operators are allowed by clickingon Complex Calculation.
You can make the field value calculation condition-dependent. If the conditionremains unmet, the field contains a default value. You can set multiple conditions:Click on Complex Calculation to do this.
2006/Q3 © 2007 SAP AG. All rights reserved. 45
Unit 3: SAP Query BC407
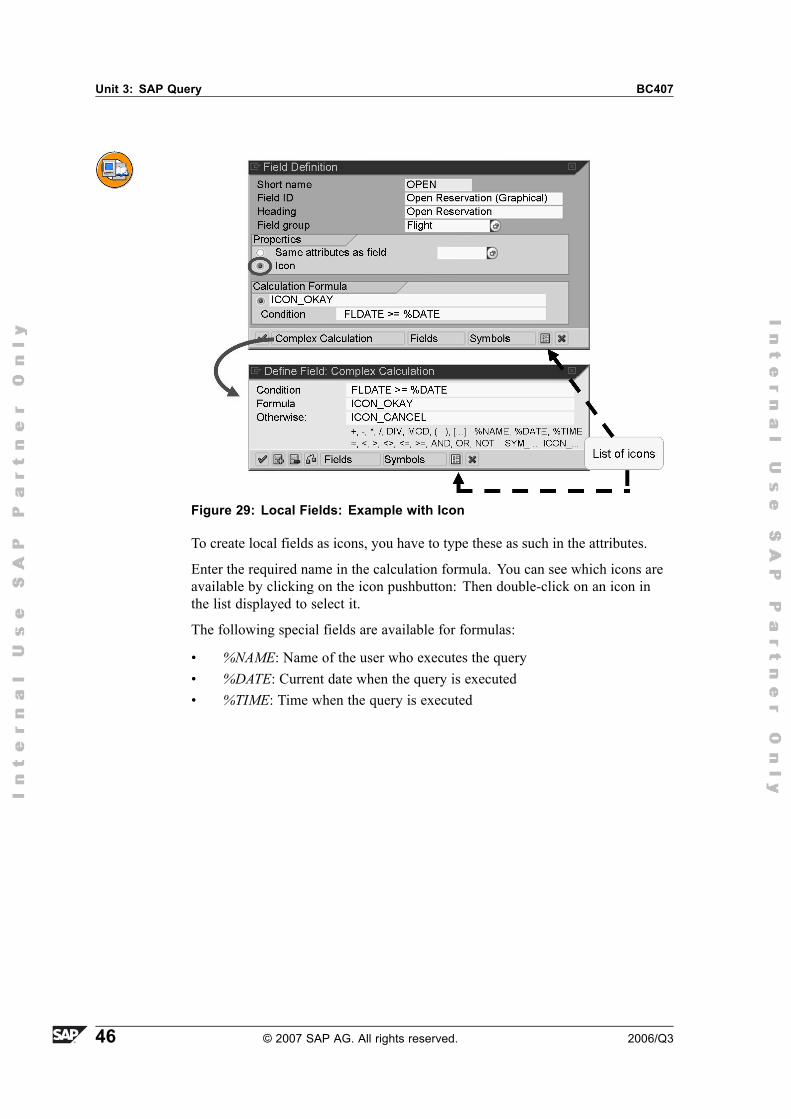
Figure 29: Local Fields: Example with Icon
To create local fields as icons, you have to type these as such in the attributes.
Enter the required name in the calculation formula. You can see which icons areavailable by clicking on the icon pushbutton: Then double-click on an icon inthe list displayed to select it.
The following special fields are available for formulas:
� %NAME: Name of the user who executes the query� %DATE: Current date when the query is executed� %TIME: Time when the query is executed
46 © 2007 SAP AG. All rights reserved. 2006/Q3
BC407 Lesson: SAP Query
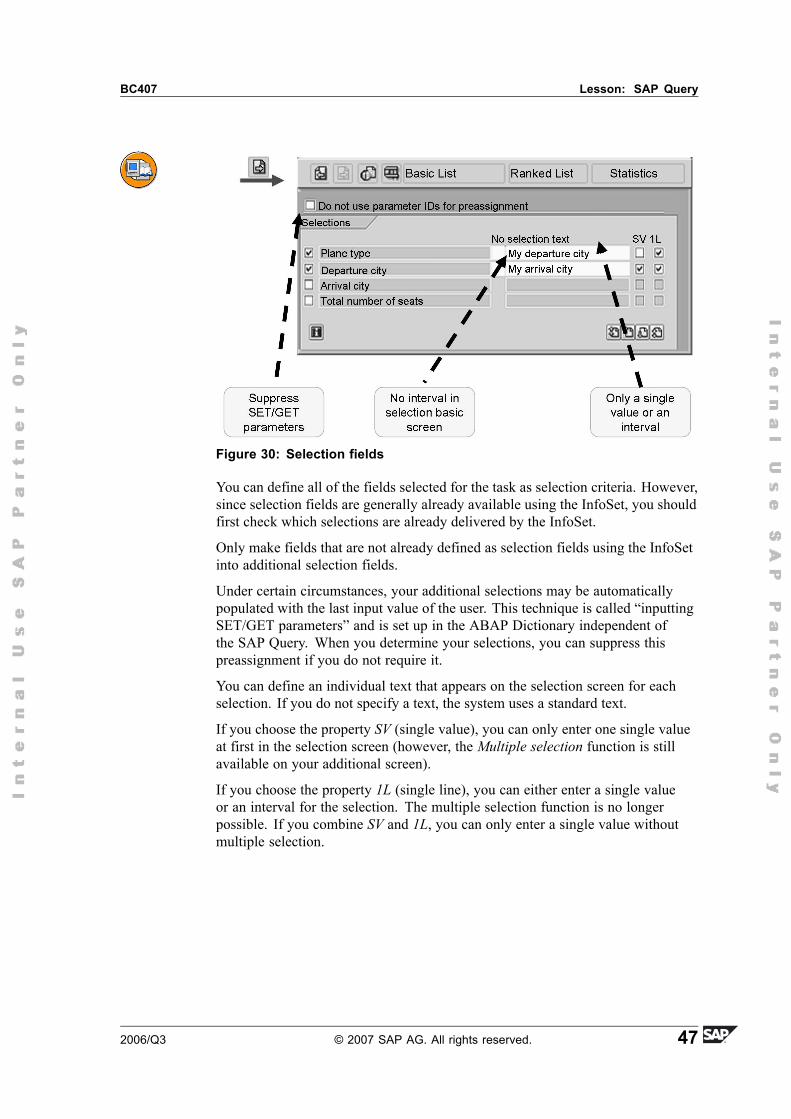
Figure 30: Selection fields
You can define all of the fields selected for the task as selection criteria. However,since selection fields are generally already available using the InfoSet, you shouldfirst check which selections are already delivered by the InfoSet.
Only make fields that are not already defined as selection fields using the InfoSetinto additional selection fields.
Under certain circumstances, your additional selections may be automaticallypopulated with the last input value of the user. This technique is called �inputtingSET/GET parameters� and is set up in the ABAP Dictionary independent ofthe SAP Query. When you determine your selections, you can suppress thispreassignment if you do not require it.
You can define an individual text that appears on the selection screen for eachselection. If you do not specify a text, the system uses a standard text.
If you choose the property SV (single value), you can only enter one single valueat first in the selection screen (however, the Multiple selection function is stillavailable on your additional screen).
If you choose the property 1L (single line), you can either enter a single valueor an interval for the selection. The multiple selection function is no longerpossible. If you combine SV and 1L, you can only enter a single value withoutmultiple selection.
2006/Q3 © 2007 SAP AG. All rights reserved. 47
Unit 3: SAP Query BC407
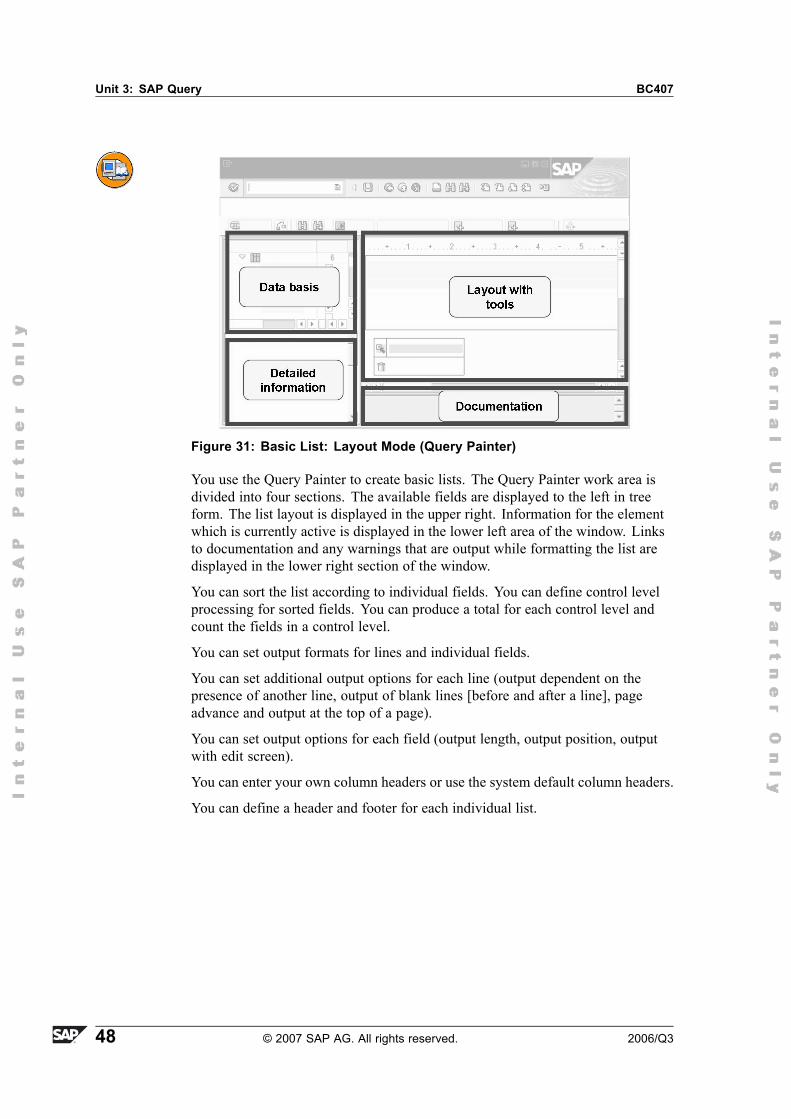
Figure 31: Basic List: Layout Mode (Query Painter)
You use the Query Painter to create basic lists. The Query Painter work area isdivided into four sections. The available fields are displayed to the left in treeform. The list layout is displayed in the upper right. Information for the elementwhich is currently active is displayed in the lower left area of the window. Linksto documentation and any warnings that are output while formatting the list aredisplayed in the lower right section of the window.
You can sort the list according to individual fields. You can define control levelprocessing for sorted fields. You can produce a total for each control level andcount the fields in a control level.
You can set output formats for lines and individual fields.
You can set additional output options for each line (output dependent on thepresence of another line, output of blank lines [before and after a line], pageadvance and output at the top of a page).
You can set output options for each field (output length, output position, outputwith edit screen).
You can enter your own column headers or use the system default column headers.
You can define a header and footer for each individual list.
48 © 2007 SAP AG. All rights reserved. 2006/Q3

BC407 Lesson: SAP Query
Figure 32: Constructing Basic Lists
Selecting a field in the upper left window automatically adds that field to the list(appended at the end of the current line). The individual fields are represented byfield values. Sample data records are read from the source. If this is not possible,field values are simulated. The structure of the layout determines the structureof the subsequent list - that is, it contains the order of the fields, the headers, thecolors, totals lines, and so on. To display the list structure for multiline hierarchylists, several sample records are read.
You can also use Drag&Drop to edit the list. Example: You want to change thefield sequence. To do this, highlight the field you want to move with the mouse (aborder appears), click and hold the left mouse button (the cursor changes), dragthe field to the desired location, and release the mouse button. You delete a field inthe same way by dragging it to the trash.
To change a field output length, select the field and drag the left or right-handborder to the required position.
You can also change the output position and output length with entries in the lowerleft window. Choose Apply to apply your values to the list structure.
There are also tools available for designing the list. You can change thearrangement of the tools with Drag&Drop (by clicking on the tool title). Youchange the size in the same way as the output length for fields.
2006/Q3 © 2007 SAP AG. All rights reserved. 49
Unit 3: SAP Query BC407
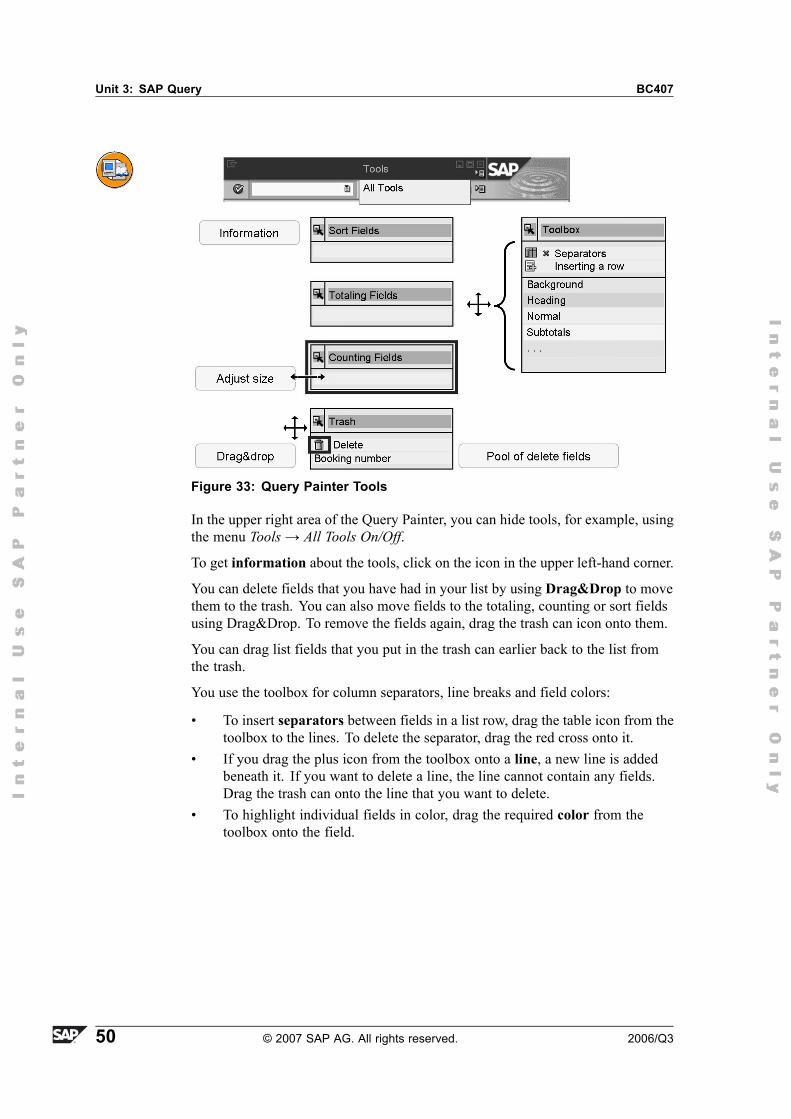
Figure 33: Query Painter Tools
In the upper right area of the Query Painter, you can hide tools, for example, usingthe menu Tools→ All Tools On/Off.
To get information about the tools, click on the icon in the upper left-hand corner.
You can delete fields that you have had in your list by using Drag&Drop to movethem to the trash. You can also move fields to the totaling, counting or sort fieldsusing Drag&Drop. To remove the fields again, drag the trash can icon onto them.
You can drag list fields that you put in the trash can earlier back to the list fromthe trash.
You use the toolbox for column separators, line breaks and field colors:
� To insert separators between fields in a list row, drag the table icon from thetoolbox to the lines. To delete the separator, drag the red cross onto it.
� If you drag the plus icon from the toolbox onto a line, a new line is addedbeneath it. If you want to delete a line, the line cannot contain any fields.Drag the trash can onto the line that you want to delete.
� To highlight individual fields in color, drag the required color from thetoolbox onto the field.
50 © 2007 SAP AG. All rights reserved. 2006/Q3
BC407 Lesson: SAP Query
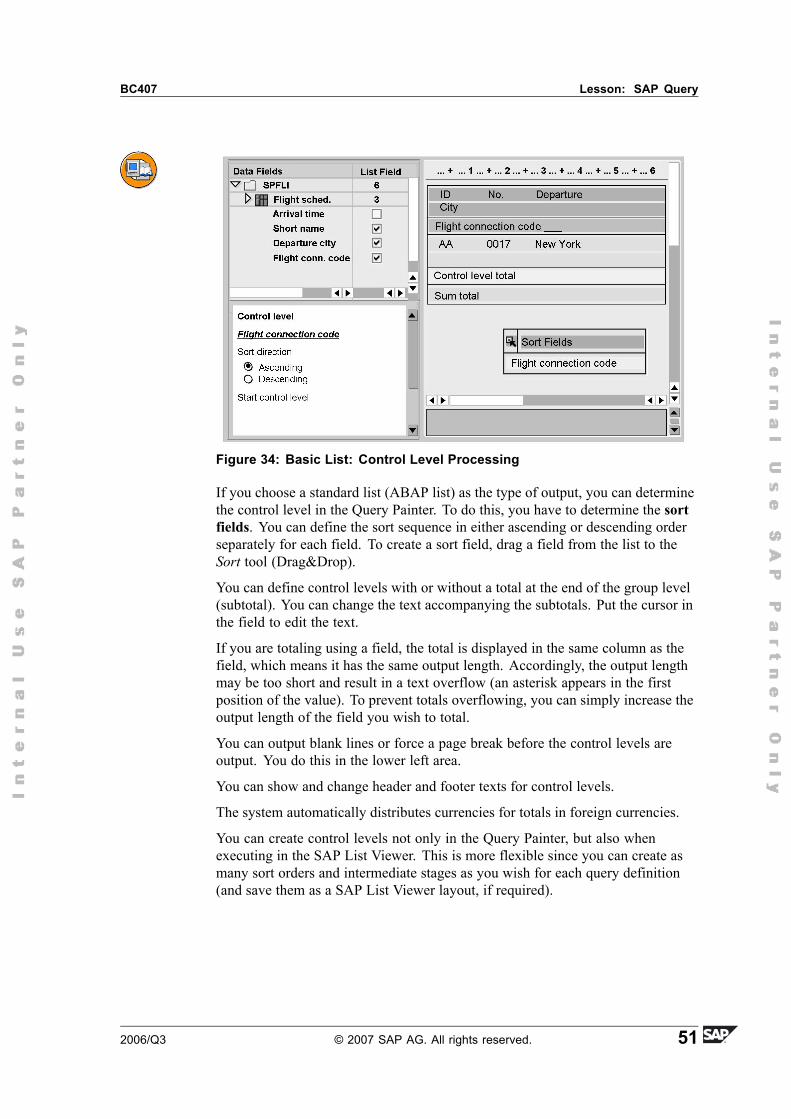
Figure 34: Basic List: Control Level Processing
If you choose a standard list (ABAP list) as the type of output, you can determinethe control level in the Query Painter. To do this, you have to determine the sortfields. You can define the sort sequence in either ascending or descending orderseparately for each field. To create a sort field, drag a field from the list to theSort tool (Drag&Drop).
You can define control levels with or without a total at the end of the group level(subtotal). You can change the text accompanying the subtotals. Put the cursor inthe field to edit the text.
If you are totaling using a field, the total is displayed in the same column as thefield, which means it has the same output length. Accordingly, the output lengthmay be too short and result in a text overflow (an asterisk appears in the firstposition of the value). To prevent totals overflowing, you can simply increase theoutput length of the field you wish to total.
You can output blank lines or force a page break before the control levels areoutput. You do this in the lower left area.
You can show and change header and footer texts for control levels.
The system automatically distributes currencies for totals in foreign currencies.
You can create control levels not only in the Query Painter, but also whenexecuting in the SAP List Viewer. This is more flexible since you can create asmany sort orders and intermediate stages as you wish for each query definition(and save them as a SAP List Viewer layout, if required).
2006/Q3 © 2007 SAP AG. All rights reserved. 51
Unit 3: SAP Query BC407
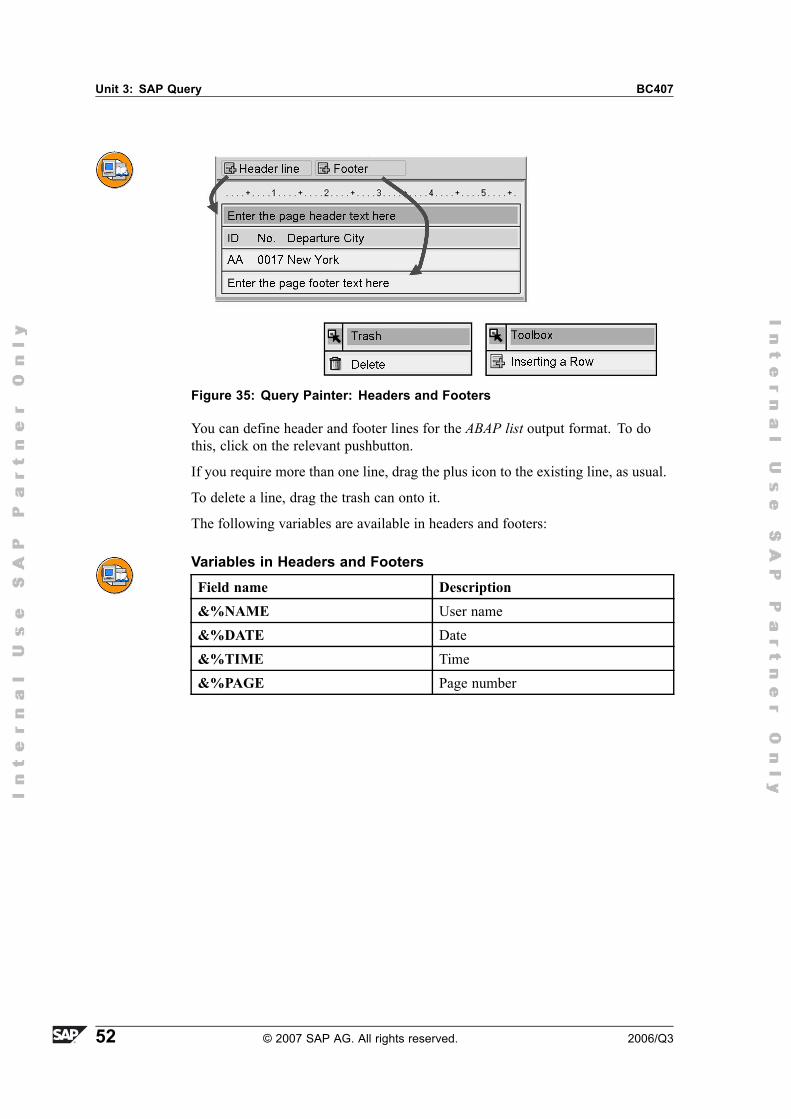
Figure 35: Query Painter: Headers and Footers
You can define header and footer lines for the ABAP list output format. To dothis, click on the relevant pushbutton.
If you require more than one line, drag the plus icon to the existing line, as usual.
To delete a line, drag the trash can onto it.
The following variables are available in headers and footers:
Variables in Headers and FootersField name Description&%NAME User name&%DATE Date&%TIME Time&%PAGE Page number
52 © 2007 SAP AG. All rights reserved. 2006/Q3
BC407 Lesson: SAP Query
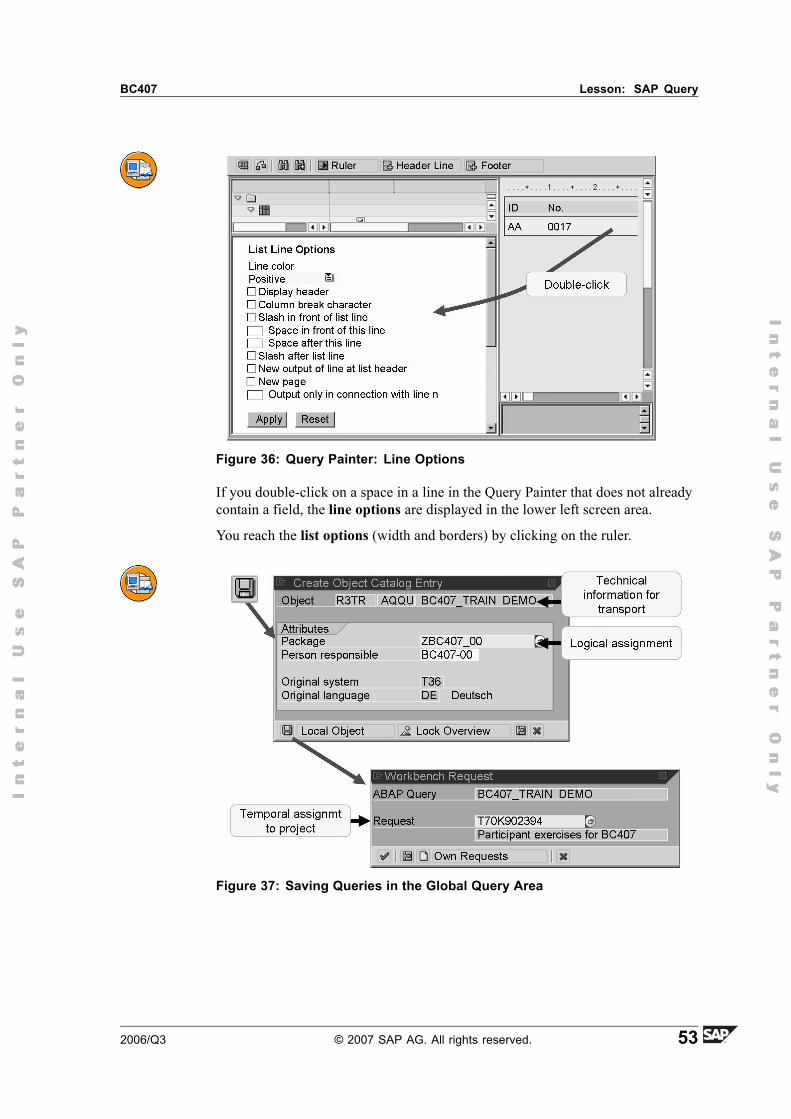
Figure 36: Query Painter: Line Options
If you double-click on a space in a line in the Query Painter that does not alreadycontain a field, the line options are displayed in the lower left screen area.
You reach the list options (width and borders) by clicking on the ruler.
Figure 37: Saving Queries in the Global Query Area
2006/Q3 © 2007 SAP AG. All rights reserved. 53
Unit 3: SAP Query BC407
The first time that you save a query object in the global query area, you areasked to specify a package. This is a logical collection of programming objects,for example, queries, other programs or database table definitions. You can, forexample, assign all programming objects that relate to flight reservations to thesame package.
Assigning a package is a prerequisite for a transport, for example, from adevelopment system to a test or a productive system. If you choose Local Object(which corresponds to the pseudo-package $TMP), this prerequisite is not fulfilled.
You create packages in transaction SE80. They have to be in the customernamespace (begin with Z or Y).
As well as the logical collection of query objects, you also require a temporalassignment to a workbench request. All objects in an workbench request aretransported from one system to the next at the same time.
Every project team member has a task. This task is a subcategory of a workbenchrequest.
Project leaders create the workbench requests and their corresponding tasks in theTransport Organizer (transaction SE09).
Each programming object has exactly one package but usually belongs to differentworkbench requests (at different points in time).
Query objects in the standard area are not connected automatically to the transportsystem. Refer to the RSAQR3TR report documentation.
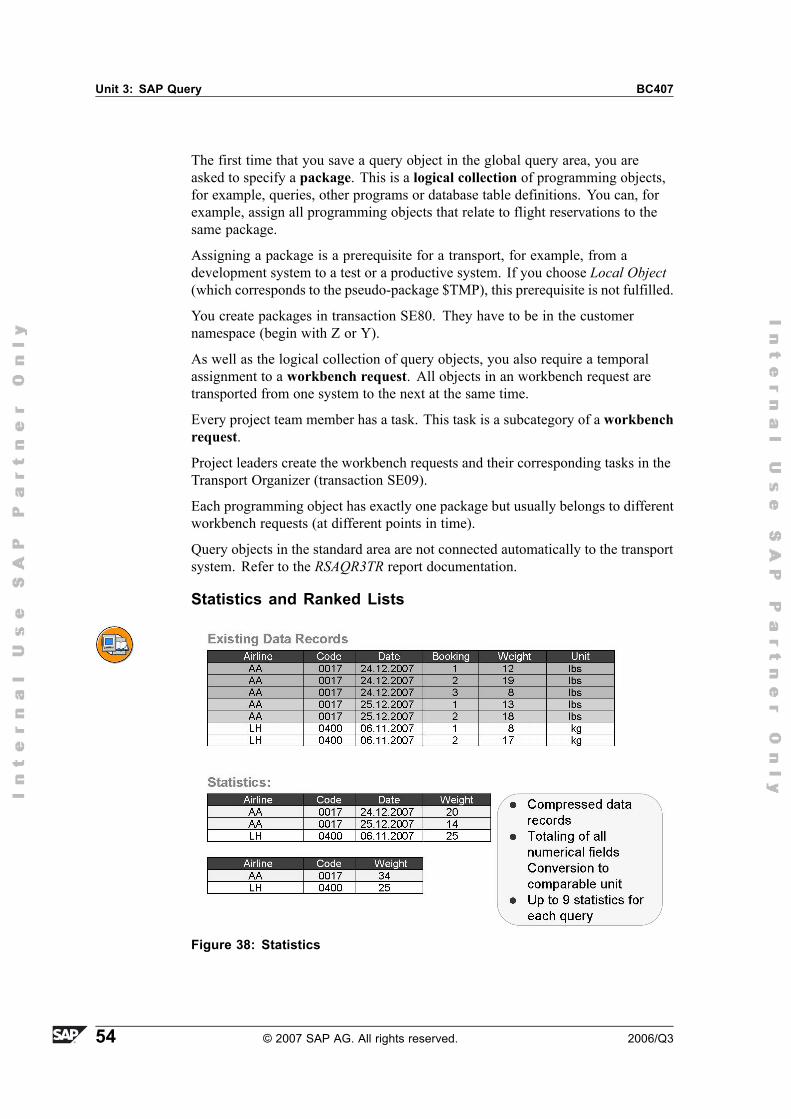
Statistics and Ranked Lists
Figure 38: Statistics
54 © 2007 SAP AG. All rights reserved. 2006/Q3
BC407 Lesson: SAP Query
Statistics return data records in compressed form. They group several datarecords together in the same key and create one information line for the key. Allnon-numerical fields automatically belong to the key. If the output format is theStandard List, the key fields are highlighted in color.
Column totals are calculated for all numerical fields.
For each query, you can define up to nine statistics separately or as an additionto basic lists or ranked lists.
If you work with different currency or quantity fields within statistics, you haveto enter a reference currency or a reference unit for each field, so that the systemcan convert it into that currency or unit. If you choose the List output format, allconversions are displayed at the end. In the event of an error, the system logs anyconversions that did not take place. In addition, the system highlights the currencyor quantity fields affected within the statistics.
You can also define subtotal lines to appear within statistics. If you compress thestatistics, the system displays only the subtotal lines and the grand total.
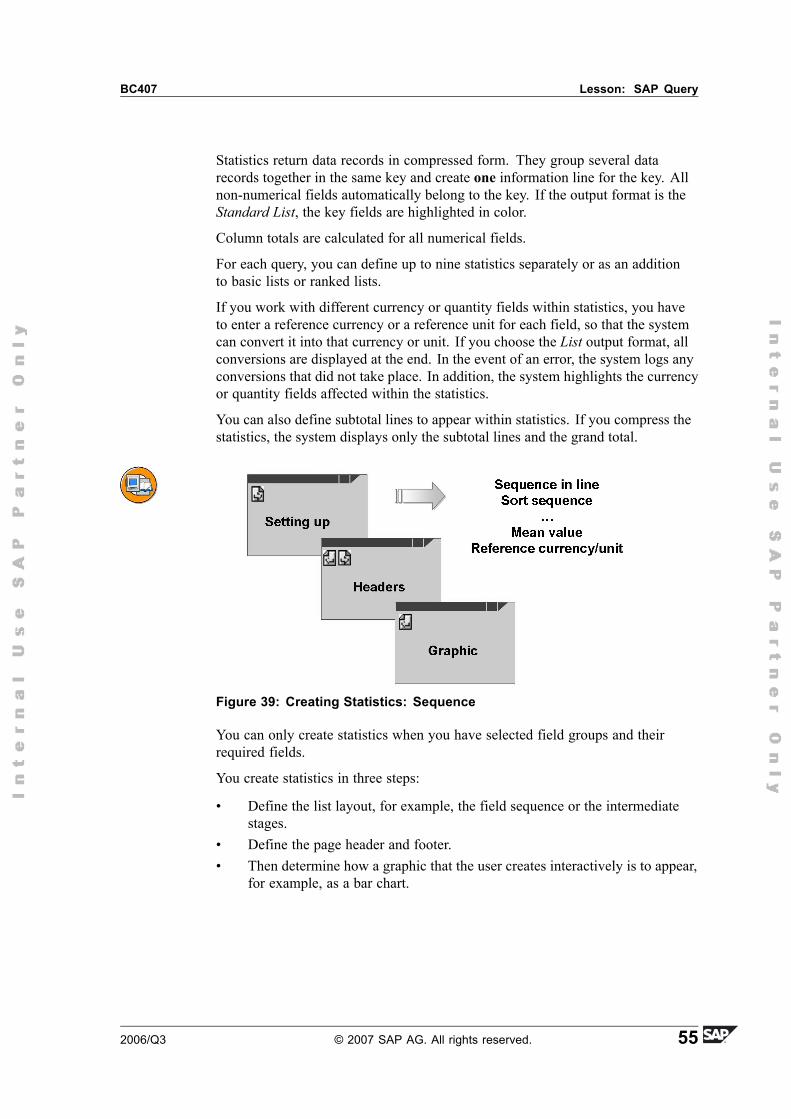
Figure 39: Creating Statistics: Sequence
You can only create statistics when you have selected field groups and theirrequired fields.
You create statistics in three steps:
� Define the list layout, for example, the field sequence or the intermediatestages.
� Define the page header and footer.� Then determine how a graphic that the user creates interactively is to appear,
for example, as a bar chart.
2006/Q3 © 2007 SAP AG. All rights reserved. 55
Unit 3: SAP Query BC407
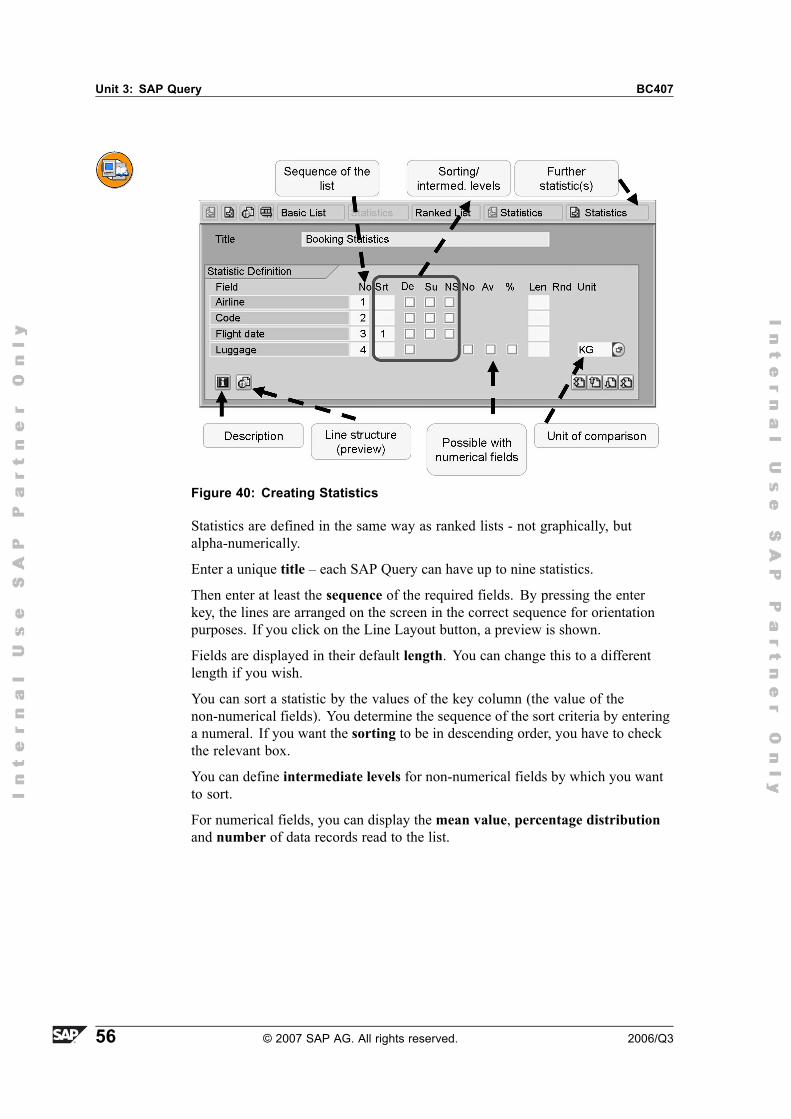
Figure 40: Creating Statistics
Statistics are defined in the same way as ranked lists - not graphically, butalpha-numerically.
Enter a unique title � each SAP Query can have up to nine statistics.
Then enter at least the sequence of the required fields. By pressing the enterkey, the lines are arranged on the screen in the correct sequence for orientationpurposes. If you click on the Line Layout button, a preview is shown.
Fields are displayed in their default length. You can change this to a differentlength if you wish.
You can sort a statistic by the values of the key column (the value of thenon-numerical fields). You determine the sequence of the sort criteria by enteringa numeral. If you want the sorting to be in descending order, you have to checkthe relevant box.
You can define intermediate levels for non-numerical fields by which you wantto sort.
For numerical fields, you can display the mean value, percentage distributionand number of data records read to the list.
56 © 2007 SAP AG. All rights reserved. 2006/Q3
BC407 Lesson: SAP Query
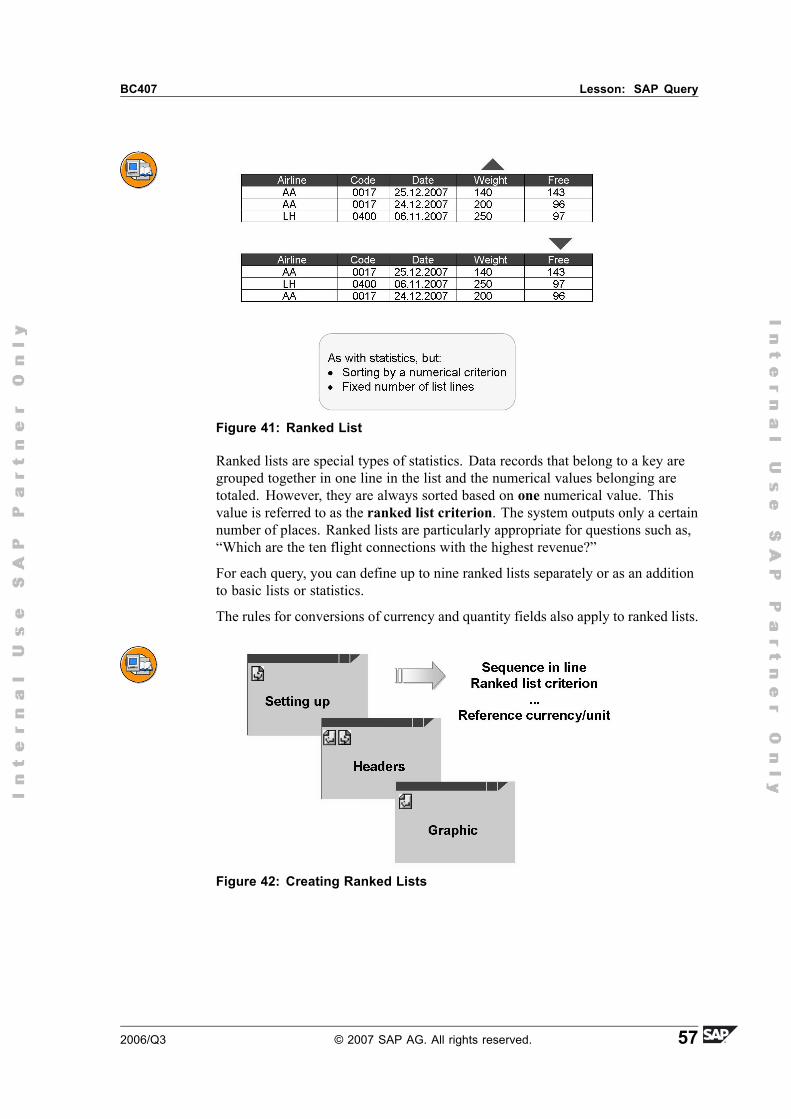
Figure 41: Ranked List
Ranked lists are special types of statistics. Data records that belong to a key aregrouped together in one line in the list and the numerical values belonging aretotaled. However, they are always sorted based on one numerical value. Thisvalue is referred to as the ranked list criterion. The system outputs only a certainnumber of places. Ranked lists are particularly appropriate for questions such as,�Which are the ten flight connections with the highest revenue?�
For each query, you can define up to nine ranked lists separately or as an additionto basic lists or statistics.
The rules for conversions of currency and quantity fields also apply to ranked lists.
Figure 42: Creating Ranked Lists
2006/Q3 © 2007 SAP AG. All rights reserved. 57
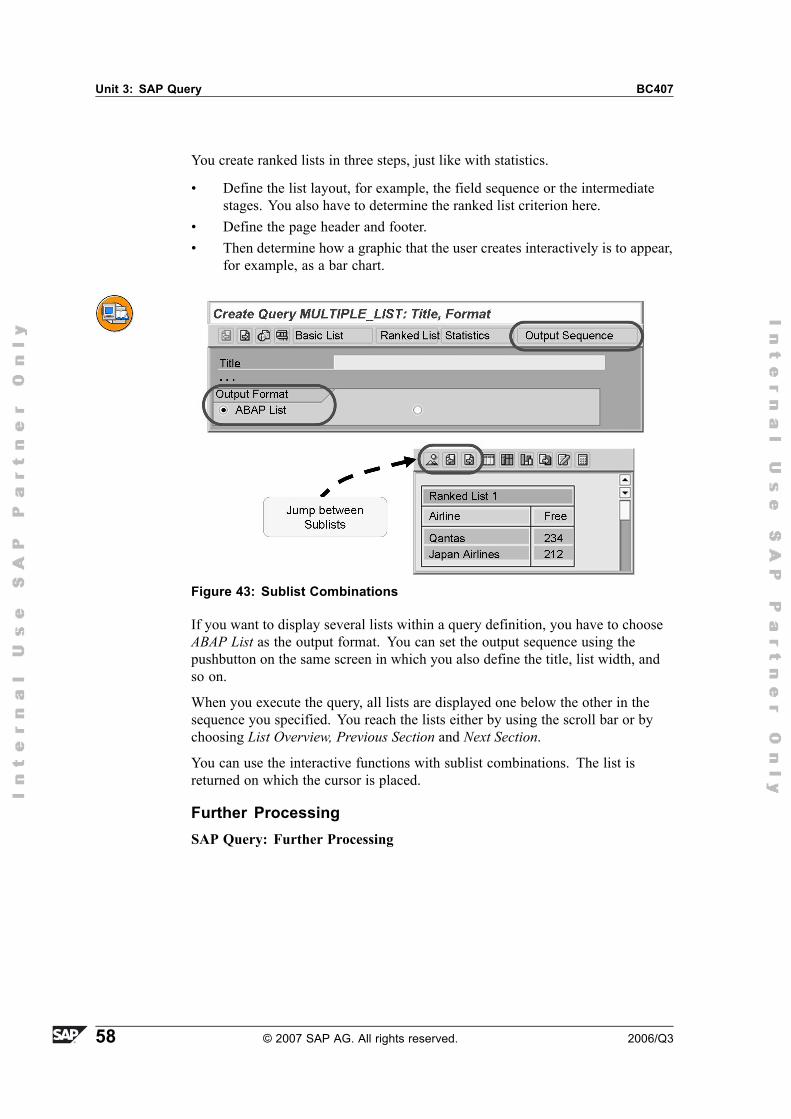
Unit 3: SAP Query BC407
You create ranked lists in three steps, just like with statistics.
� Define the list layout, for example, the field sequence or the intermediatestages. You also have to determine the ranked list criterion here.
� Define the page header and footer.� Then determine how a graphic that the user creates interactively is to appear,
for example, as a bar chart.
Figure 43: Sublist Combinations
If you want to display several lists within a query definition, you have to chooseABAP List as the output format. You can set the output sequence using thepushbutton on the same screen in which you also define the title, list width, andso on.
When you execute the query, all lists are displayed one below the other in thesequence you specified. You reach the lists either by using the scroll bar or bychoosing List Overview, Previous Section and Next Section.
You can use the interactive functions with sublist combinations. The list isreturned on which the cursor is placed.
Further ProcessingSAP Query: Further Processing
58 © 2007 SAP AG. All rights reserved. 2006/Q3
BC407 Lesson: SAP Query
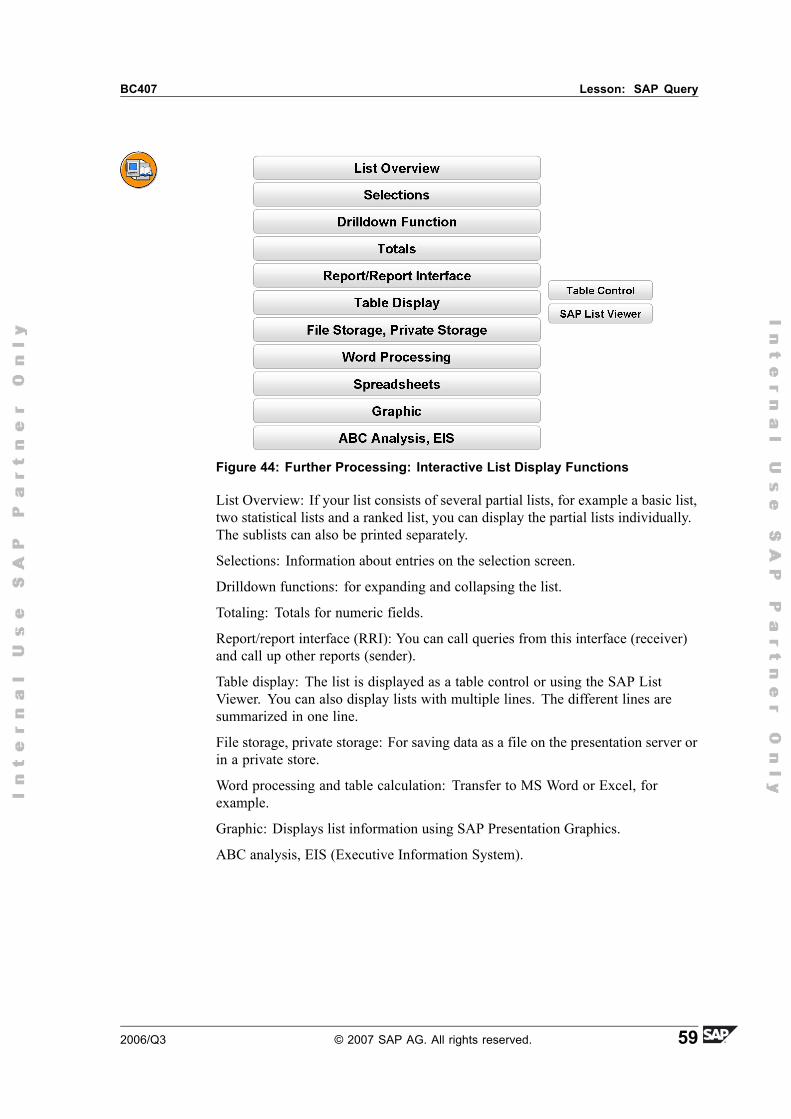
Figure 44: Further Processing: Interactive List Display Functions
List Overview: If your list consists of several partial lists, for example a basic list,two statistical lists and a ranked list, you can display the partial lists individually.The sublists can also be printed separately.
Selections: Information about entries on the selection screen.
Drilldown functions: for expanding and collapsing the list.
Totaling: Totals for numeric fields.
Report/report interface (RRI): You can call queries from this interface (receiver)and call up other reports (sender).
Table display: The list is displayed as a table control or using the SAP ListViewer. You can also display lists with multiple lines. The different lines aresummarized in one line.
File storage, private storage: For saving data as a file on the presentation server orin a private store.
Word processing and table calculation: Transfer to MS Word or Excel, forexample.
Graphic: Displays list information using SAP Presentation Graphics.
ABC analysis, EIS (Executive Information System).
2006/Q3 © 2007 SAP AG. All rights reserved. 59
Unit 3: SAP Query BC407
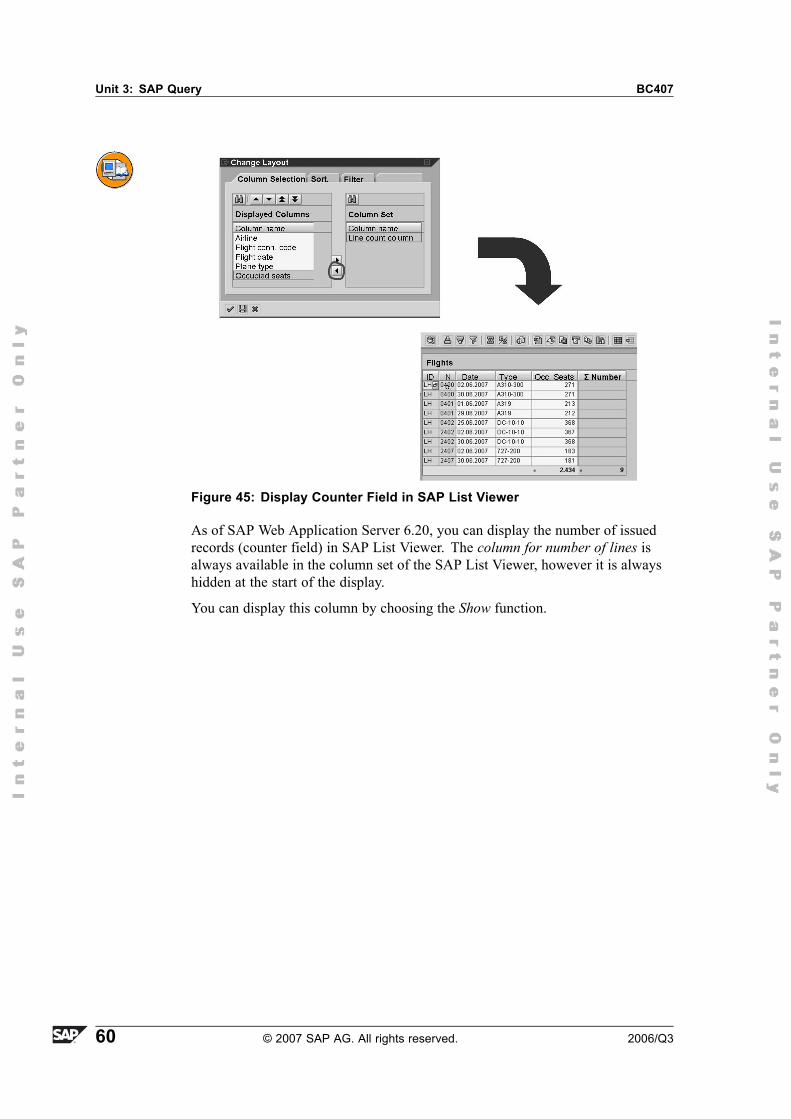
Figure 45: Display Counter Field in SAP List Viewer
As of SAP Web Application Server 6.20, you can display the number of issuedrecords (counter field) in SAP List Viewer. The column for number of lines isalways available in the column set of the SAP List Viewer, however it is alwayshidden at the start of the display.
You can display this column by choosing the Show function.
60 © 2007 SAP AG. All rights reserved. 2006/Q3
BC407 Lesson: SAP Query
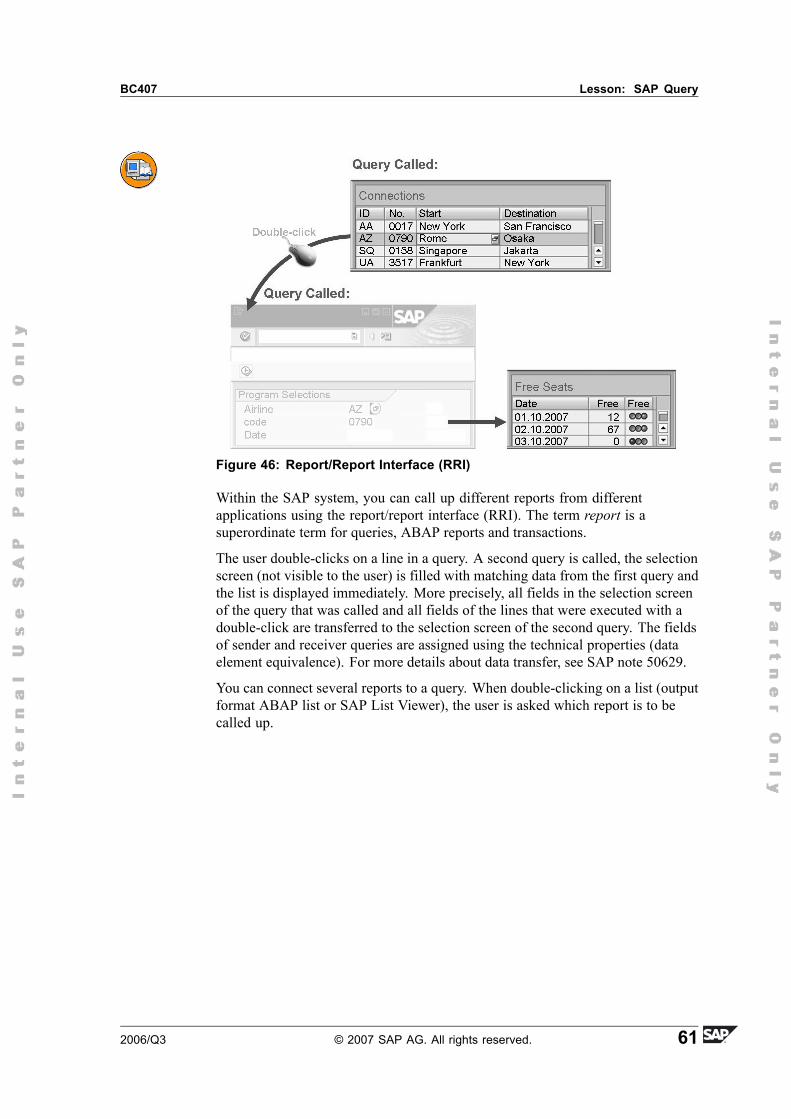
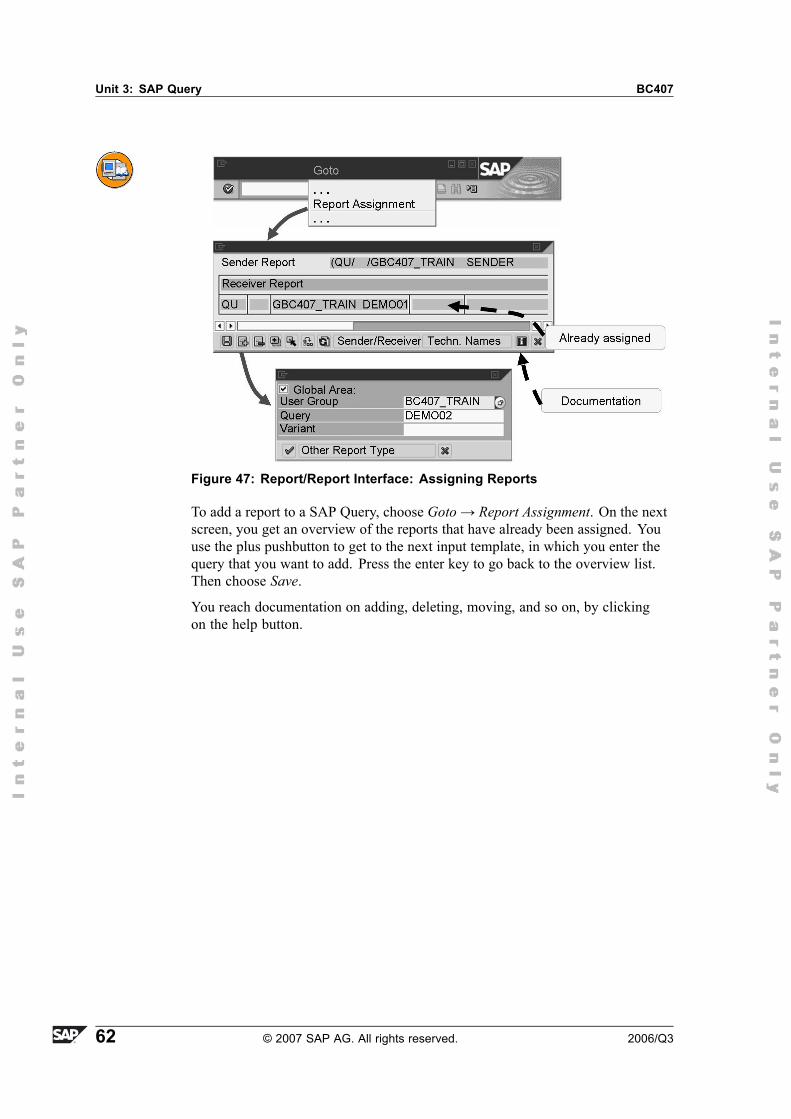
Figure 46: Report/Report Interface (RRI)
Within the SAP system, you can call up different reports from differentapplications using the report/report interface (RRI). The term report is asuperordinate term for queries, ABAP reports and transactions.
The user double-clicks on a line in a query. A second query is called, the selectionscreen (not visible to the user) is filled with matching data from the first query andthe list is displayed immediately. More precisely, all fields in the selection screenof the query that was called and all fields of the lines that were executed with adouble-click are transferred to the selection screen of the second query. The fieldsof sender and receiver queries are assigned using the technical properties (dataelement equivalence). For more details about data transfer, see SAP note 50629.
You can connect several reports to a query. When double-clicking on a list (outputformat ABAP list or SAP List Viewer), the user is asked which report is to becalled up.
2006/Q3 © 2007 SAP AG. All rights reserved. 61
Unit 3: SAP Query BC407
Figure 47: Report/Report Interface: Assigning Reports
To add a report to a SAP Query, choose Goto→ Report Assignment. On the nextscreen, you get an overview of the reports that have already been assigned. Youuse the plus pushbutton to get to the next input template, in which you enter thequery that you want to add. Press the enter key to go back to the overview list.Then choose Save.
You reach documentation on adding, deleting, moving, and so on, by clickingon the help button.
62 © 2007 SAP AG. All rights reserved. 2006/Q3
BC407 Lesson: SAP Query
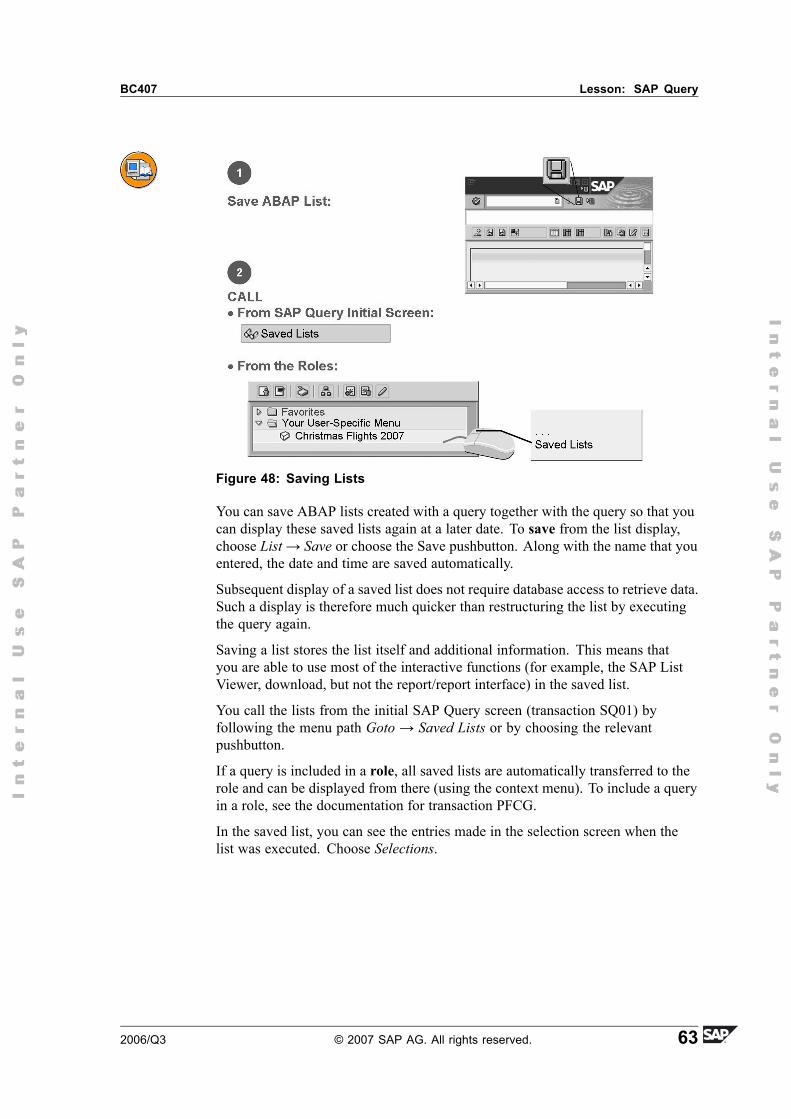
Figure 48: Saving Lists
You can save ABAP lists created with a query together with the query so that youcan display these saved lists again at a later date. To save from the list display,choose List→ Save or choose the Save pushbutton. Along with the name that youentered, the date and time are saved automatically.
Subsequent display of a saved list does not require database access to retrieve data.Such a display is therefore much quicker than restructuring the list by executingthe query again.
Saving a list stores the list itself and additional information. This means thatyou are able to use most of the interactive functions (for example, the SAP ListViewer, download, but not the report/report interface) in the saved list.
You call the lists from the initial SAP Query screen (transaction SQ01) byfollowing the menu path Goto → Saved Lists or by choosing the relevantpushbutton.
If a query is included in a role, all saved lists are automatically transferred to therole and can be displayed from there (using the context menu). To include a queryin a role, see the documentation for transaction PFCG.
In the saved list, you can see the entries made in the selection screen when thelist was executed. Choose Selections.
2006/Q3 © 2007 SAP AG. All rights reserved. 63

Unit 3: SAP Query BC407
64 © 2007 SAP AG. All rights reserved. 2006/Q3
BC407 Lesson: SAP Query
Exercise 3: Basic Lists and Local Fields
Exercise ObjectivesAfter completing this exercise, you will be able to:� Create a multiline (hierarchical), basic list with local fields for a query
Business ExampleYour task: Create an SAP Query that shows flight connections and free seats.
Model solution: BC407_S_01 in the global query area, user groupBC407_LEARN
Task 1:Create the query
1. Check whether you are in the global query area and go there if necessary.
Create Query BC407##_01 for user group BC407_LEARN. ## standsfor your (two-digit) group number.
As the data basis, choose InfoSet /SAPQUERY/BC407_01.
When you save your query (after step 1-2 at the earliest), enter packageZBC407_##.
Task 2:Maintain the query properties
1. Maintain the title and comments for the query and set the column width to 90columns. Choose ABAP List as the output format.
Task 3:Select the field groups
1. You need the first two field groups Flight Schedule and Flight.
Task 4:Create local fields
1. Assign short names for the fields Occupied seats (OCC) and MaximumCapacity (MAX).
Continued on next page
2006/Q3 © 2007 SAP AG. All rights reserved. 65
Unit 3: SAP Query BC407
2. In field group Flights, create a local field, Free Seats with short name FREEand header Free. The field should have the same attributes as theMaximumCapacity field.
3. Calculate the number of free seats for this field as the difference between themaximum capacity and the number of occupied seats.
Task 5:Create a multiline basic list in the Query Painter (layout mode).
1. Line 1 Airline Code, text: Airline (this is the airline name that is determinedautomatically), flight connection number.
Line 2: Departure and arrival cities, departure and arrival times, distance.
Line 3: Flight date, occupied seats, free seats, maximum capacity, airfare.
Task 6:Structure the list
1. Output the list with frames.
2. Select the following colors:
Line 1: Color Heading (intensified) with an empty line before the line
Line 2: Color Heading
Line 3: Color Normal
Field Free seats: Color Positive
3. Adjust the output lengths for the following fields: occupied seats, free seatsand maximum number of seats to 8 characters and the airfare (includingcurrency) to 20 characters.
4. Change the heading of the field Maximum Capacity to Max.
Task 7:Save and test the query
1. If you have not yet saved the query, save it now (in package ZBC407_##).
66 © 2007 SAP AG. All rights reserved. 2006/Q3
BC407 Lesson: SAP Query
Solution 3: Basic Lists and Local FieldsTask 1:Create the query
1. Check whether you are in the global query area and go there if necessary.
Create Query BC407##_01 for user group BC407_LEARN. ## standsfor your (two-digit) group number.
As the data basis, choose InfoSet /SAPQUERY/BC407_01.
When you save your query (after step 1-2 at the earliest), enter packageZBC407_##.
a) Start SAP Query in transaction SQ01. Make sure that you are in theglobal query area: This was displayed in the initial screen. Otherwise,follow the menu path Environment→ Query Areas to go to the globalwork area.
Set the user group to BC407_LEARN: Menu path Edit→ Other UserGroup. Create a query named BC407##_01 (## stands for the groupnumber).
When you click on Create, you are asked to enter an InfoSet(the data basis) in another input template. Double-click on/SAPQUERY/BC407_01.
Task 2:Maintain the query properties
1. Maintain the title and comments for the query and set the column width to 90columns. Choose ABAP List as the output format.
a) Maintain the title (mandatory field!) and list width in the initial screen.
Task 3:Select the field groups
1. You need the first two field groups Flight Schedule and Flight.
a) Choose Next Screen or follow the menu path Goto→ Next Screen. Youreach the Field Groups screen. Mark the top two field groups.
Continued on next page
2006/Q3 © 2007 SAP AG. All rights reserved. 67
Unit 3: SAP Query BC407
Task 4:Create local fields
1. Assign short names for the fields Occupied seats (OCC) and MaximumCapacity (MAX).
a) Choose Next Screen or follow the menu path Goto→ Next Screen. Youreach the Fields screen.
Activate the short names under menu Edit→ Short names and entershort names for all specified fields.
2. In field group Flights, create a local field, Free Seats with short name FREEand header Free. The field should have the same attributes as theMaximumCapacity field.
a) Under Edit→ Local Field, create the required field. The field has tobelong to the function group Flight. Enter the short name MAX inthe field Same attributes as field.
3. Calculate the number of free seats for this field as the difference between themaximum capacity and the number of occupied seats.
a) Define MAX - OCC as the calculation formula. Save the local fieldby pressing the enter key.
Task 5:Create a multiline basic list in the Query Painter (layout mode).
1. Line 1 Airline Code, text: Airline (this is the airline name that is determinedautomatically), flight connection number.
Line 2: Departure and arrival cities, departure and arrival times, distance.
Line 3: Flight date, occupied seats, free seats, maximum capacity, airfare.
a) Now choose the Basic list pushbutton. This starts the Query Painter.
You can see the data fields available in the upper left area of the QueryPainter. For the fields specified in the task, mark the List Fieldscheckbox. Make sure that you set up the list in the order in whichyou selected the fields. Otherwise, you have to sort the fields in theupper-right area again. Click on the field that you want to move anddrag it to the required position.
To insert a new line, click on the plus icon in the toolbox and drag itto an existing line.
You can find the field Text: Airline Code under Additional fields.
Continued on next page
68 © 2007 SAP AG. All rights reserved. 2006/Q3
BC407 Lesson: SAP Query
Task 6:Structure the list
1. Output the list with frames.
a) Click on the ruler. In the lower left area, you determine that the list is tohave a border. Do not forget to choose Apply.
2. Select the following colors:
Line 1: Color Heading (intensified) with an empty line before the line
Line 2: Color Heading
Line 3: Color Normal
Field Free seats: Color Positive
a) To change the colors of the lines, double-click on an area in the currentline that does not contain a field. You then set the required color in thelower left area from the dropdown list. Do not forget to choose Apply.
3. Adjust the output lengths for the following fields: occupied seats, free seatsand maximum number of seats to 8 characters and the airfare (includingcurrency) to 20 characters.
a) To change the attributes of a field, select the field. This displays thefield and its details in the lower left window, and you can now changeits attributes. Press Apply to activate your changes.
4. Change the heading of the field Maximum Capacity to Max.
a) You change the header text of a field by double-clicking on it. Thismakes the text field ready for input.
Task 7:Save and test the query
1. If you have not yet saved the query, save it now (in package ZBC407_##).
a) When you save the query, enter ZBC407_## as the package. ## standsfor your group number. In the next screen, click on Own Requests andselect you request by double clicking on it.
To test it, choose the Execute pushbutton (shortcut: F8).
2006/Q3 © 2007 SAP AG. All rights reserved. 69

Unit 3: SAP Query BC407
70 © 2007 SAP AG. All rights reserved. 2006/Q3
BC407 Lesson: SAP Query
Exercise 4: Basic Lists and Local Fields(optional)
Exercise ObjectivesAfter completing this exercise, you will be able to:� Define local fields as icons� Sort a list
Business ExampleYour task:
Copy your SAP Query, sort it and enhance it with a traffic-light icon.
Model solution
BC407_S_01_OPT in the global query area, user group BC407_LEARN
Task 1:Copy the query
1. In the global query area for user group BC407_LEARN, copy your QueryBC407##_01 to BC407##_01_OPT. ## stands for your (two-digit) groupnumber.
Save the new query in package ZBC407_##.
Task 2:Create local fields
1. In field group Flights, create a local field, Free Seats with short nameFREE_ICON and header Free Seats (graphically). Type the field as an icon.
2. Determine the icon for the field FREE_ICON using a complex calculation:
ICON_GREEN_LIGHT (green light) when there are more than 100 free seats,
ICON_GREEN_LIGHT (yellow light), when there are more than 10 freeseats,
ICON_RED_LIGHT (red light) otherwise.
3. Display the icon after the FREE field in the basic list.
Continued on next page
2006/Q3 © 2007 SAP AG. All rights reserved. 71
Unit 3: SAP Query BC407
Task 3:Determine sorting
1. Sort the list in descending order by Airline Code and Flight ConnectionNumber. Do not include any subtotals.
Test your query with airline code SQ.
72 © 2007 SAP AG. All rights reserved. 2006/Q3
BC407 Lesson: SAP Query
Solution 4: Basic Lists and Local Fields(optional)Task 1:Copy the query
1. In the global query area for user group BC407_LEARN, copy your QueryBC407##_01 to BC407##_01_OPT. ## stands for your (two-digit) groupnumber.
Save the new query in package ZBC407_##.
a) Start SAP Query in transaction SQ01. If you have not logged off sincethe last exercise, your query area and user group should still be setcorrectly.
In the table control, select your query BC407##_01 and choose Query→ Copy. On the next screen, enter the name of the copy for To:BC407_##_01_OPT. Then enter the package ZBC407_## and chooseyour task on the screen that follows.
Task 2:Create local fields
1. In field group Flights, create a local field, Free Seats with short nameFREE_ICON and header Free Seats (graphically). Type the field as an icon.
a) Branch to the maintenance of the local fields (see above). Create alocal field with the name FREE_ICON and identify it as an Icon inthe properties.
2. Determine the icon for the field FREE_ICON using a complex calculation:
ICON_GREEN_LIGHT (green light) when there are more than 100 free seats,
ICON_GREEN_LIGHT (yellow light), when there are more than 10 freeseats,
ICON_RED_LIGHT (red light) otherwise.
a) Press the Complex calculations pushbutton. Enter FREE > 100under the first condition and enter ICON_GREEN_LIGHT under thecorresponding formula. Enter FREE > 10 under the second conditionand enter ICON_YELLOW_LIGHT under the corresponding formula.For Otherwise enter ICON_RED_LIGHT.
Continued on next page
2006/Q3 © 2007 SAP AG. All rights reserved. 73
Unit 3: SAP Query BC407
3. Display the icon after the FREE field in the basic list.
a) In the Query Painter, mark the List Fields checkbox for thenewly-defined field and position the field using Drag&Drop.
Task 3:Determine sorting
1. Sort the list in descending order by Airline Code and Flight ConnectionNumber. Do not include any subtotals.
Test your query with airline code SQ.
a) In the Query Painter, click on the Airline Code field and drag it tothe Sort Fields tool.
The subtotals are set automatically for sort levels for all numericalfields. To delete them, drag the trash can onto the heading of thesubtotals.
Proceed in the same way with field Flight Connection Number.
74 © 2007 SAP AG. All rights reserved. 2006/Q3
BC407 Lesson: SAP Query
Exercise 5: Statistics
Exercise ObjectivesAfter completing this exercise, you will be able to:� Create a statistic
Business ExampleYour task:
Create a statistic the gives you information about the luggage from flights.
Model Solution:
BC407_S_02 in the global query area, user group BC407_LEARN.
Task 1:Create the query
1. In the global query area, create query BC407##_02 for the user groupBC407_LEARN. ## stands for your (two-digit) group number.
As the data basis, choose the InfoSet /SAPQUERY/BC407_05.
When you save your query (after step 1-2 at the earliest), enter packageZBC407_##.
Task 2:Maintain the query properties
1. Maintain the title and the comments for the query. Choose ABAP List asthe output format.
Task 3:Select the field groups
1. You need all three field groups.
Task 4:Field selection
1. You need Airline Code, Flight Connection Number, Flight Date and Weightof Luggage.
Continued on next page
2006/Q3 © 2007 SAP AG. All rights reserved. 75
Unit 3: SAP Query BC407
Task 5:Define the statistics
1. Choose Airline Code, Flight Connection Number, Flight Date and Weightof Luggage for the statistic, along with the mean value and the amount ofluggage.
Sort the statistic in descending order by luggage. Enter KG (kilogram) asthe comparative unit.
When you are testing, enter 10000 for Number of data records to be read.
76 © 2007 SAP AG. All rights reserved. 2006/Q3
BC407 Lesson: SAP Query
Solution 5: StatisticsTask 1:Create the query
1. In the global query area, create query BC407##_02 for the user groupBC407_LEARN. ## stands for your (two-digit) group number.
As the data basis, choose the InfoSet /SAPQUERY/BC407_05.
When you save your query (after step 1-2 at the earliest), enter packageZBC407_##.
a) See the previous task.
Task 2:Maintain the query properties
1. Maintain the title and the comments for the query. Choose ABAP List asthe output format.
a) See the previous exercise.
Task 3:Select the field groups
1. You need all three field groups.
a) See the previous exercise.
Task 4:Field selection
1. You need Airline Code, Flight Connection Number, Flight Date and Weightof Luggage.
a) In the Fields screen, mark the required fields.
Task 5:Define the statistics
1. Choose Airline Code, Flight Connection Number, Flight Date and Weightof Luggage for the statistic, along with the mean value and the amount ofluggage.
Sort the statistic in descending order by luggage. Enter KG (kilogram) asthe comparative unit.
Continued on next page
2006/Q3 © 2007 SAP AG. All rights reserved. 77
Unit 3: SAP Query BC407
When you are testing, enter 10000 for Number of data records to be read.
a) Choose Define Statistic. In the input field No., enter the followingnumbers:
Airline Code 1Flight Connection Number 2Flight Date 3Weight of Luggage 4
For luggage, mark the fields No. and Av as well.
Sort the statistics in descending order by entering 1 for Luggage in theinput field Srt and selecting De.
If you enter only the standard value of 100 for Number of records tobe read, even though the system reads 100 records from the database,it may only issue one line in the statistics if the first flight alreadyhas 100 bookings or more.
78 © 2007 SAP AG. All rights reserved. 2006/Q3
BC407 Lesson: SAP Query
Exercise 6: Ranked List (Optional)
Exercise ObjectivesAfter completing this exercise, you will be able to:� Create a ranked list� Create a SAP Query with two lists� Use the report/report interface (RRI)
Business ExampleEnhance your SAP Query with a ranked list for reservation revenue and addanother query using the RRI.
Model Solution:
BC407_S_02_OPT in the global query area, user group BC407_LEARN
Task 1:Enhance the query
1. Enhance query BC407##_02 from the previous exercise. You do not needto make a copy of it.
Task 2:Field selection
1. In addition to the fields already selected, you need the price of the booking inlocal currency.
Task 3:Define the ranked list
1. Create a ranked list. Use Airline Code, Flight Connection Code and Price ofbooking in local currency in the ranked list.
You want to display the five connections with the highest revenues in theranked list. Therefore define Price of booking in local currency as ranked listcriterion. Choose USD (US dollars) as the reference unit.
Task 4:Determine the list sequence
1. Specify that you want to display first the ranked list and then the statisticwhen the query is executed.
Continued on next page
2006/Q3 © 2007 SAP AG. All rights reserved. 79

Unit 3: SAP Query BC407
Task 5:Add a report
1. Add the query BC407_CONNEX from the global query area, user groupBC407_LEARN.
80 © 2007 SAP AG. All rights reserved. 2006/Q3
BC407 Lesson: SAP Query
Solution 6: Ranked List (Optional)Task 1:Enhance the query
1. Enhance query BC407##_02 from the previous exercise. You do not needto make a copy of it.
a) Process your solution to the last exercise further.
Task 2:Field selection
1. In addition to the fields already selected, you need the price of the booking inlocal currency.
a) In the Fields screen, mark the required fields.
Task 3:Define the ranked list
1. Create a ranked list. Use Airline Code, Flight Connection Code and Price ofbooking in local currency in the ranked list.
You want to display the five connections with the highest revenues in theranked list. Therefore define Price of booking in local currency as ranked listcriterion. Choose USD (US dollars) as the reference unit.
a) Choose Ranked List. Determine the sequence of the fields in the samewas as with the statistic.
Define the Number of Seats as 10. As the ranked list criterion, markPrice of booking in local currency and enter USD as the referenceunit in the input field Unit.
Task 4:Determine the list sequence
1. Specify that you want to display first the ranked list and then the statisticwhen the query is executed.
a) Go back to the first navigation level using F3 (green arrow). Clickon the Output Sequence button and enter the lists you have alreadydefined, 2 and 1.
Continued on next page
2006/Q3 © 2007 SAP AG. All rights reserved. 81

Unit 3: SAP Query BC407
Task 5:Add a report
1. Add the query BC407_CONNEX from the global query area, user groupBC407_LEARN.
a) Choose Goto→ Report Assignment
Click on the plus icon. In the next screen, mark Global Area and enterthe User Group and the Query.
Confirm your entries by pressing the enter key and then Save.
82 © 2007 SAP AG. All rights reserved. 2006/Q3
BC407 Lesson: SAP Query
Lesson Summary
You should now be able to:� Use SAP Query to create basic lists, statistics and ranked lists� Use the interactive functions of these lists� Save query lists and call them up again
2006/Q3 © 2007 SAP AG. All rights reserved. 83
Unit Summary BC407
Unit SummaryYou should now be able to:� Use SAP Query to create basic lists, statistics and ranked lists� Use the interactive functions of these lists� Save query lists and call them up again
84 © 2007 SAP AG. All rights reserved. 2006/Q3
Unit 4InfoSet Query
Unit OverviewIn this unit, you will learn about all the options for the InfoSet Query.
Unit ObjectivesAfter completing this unit, you will be able to:
� Use InfoSet Query to create basic lists, statistics and ranked lists
Unit ContentsLesson: InfoSet Query .. . . . . . . . . . . . . . . . . . . . . . . . . . . . . . . . . . . . . . . . . . . . . . . . . . . . . . . . . 86
Exercise 7: Creating Basic Lists... . . . . . . . . . . . . . . . . . . . . . . . . . . . . . . . . . . . . . . . . 97Exercise 8: Ranked List with the InfoSet Query.. . . . . . . . . . . . . . . . . . . . . . .101Exercise 9: Statistics with the InfoSet Query (optional) . . . . . . . . . . . . . . .105
2006/Q3 © 2007 SAP AG. All rights reserved. 85
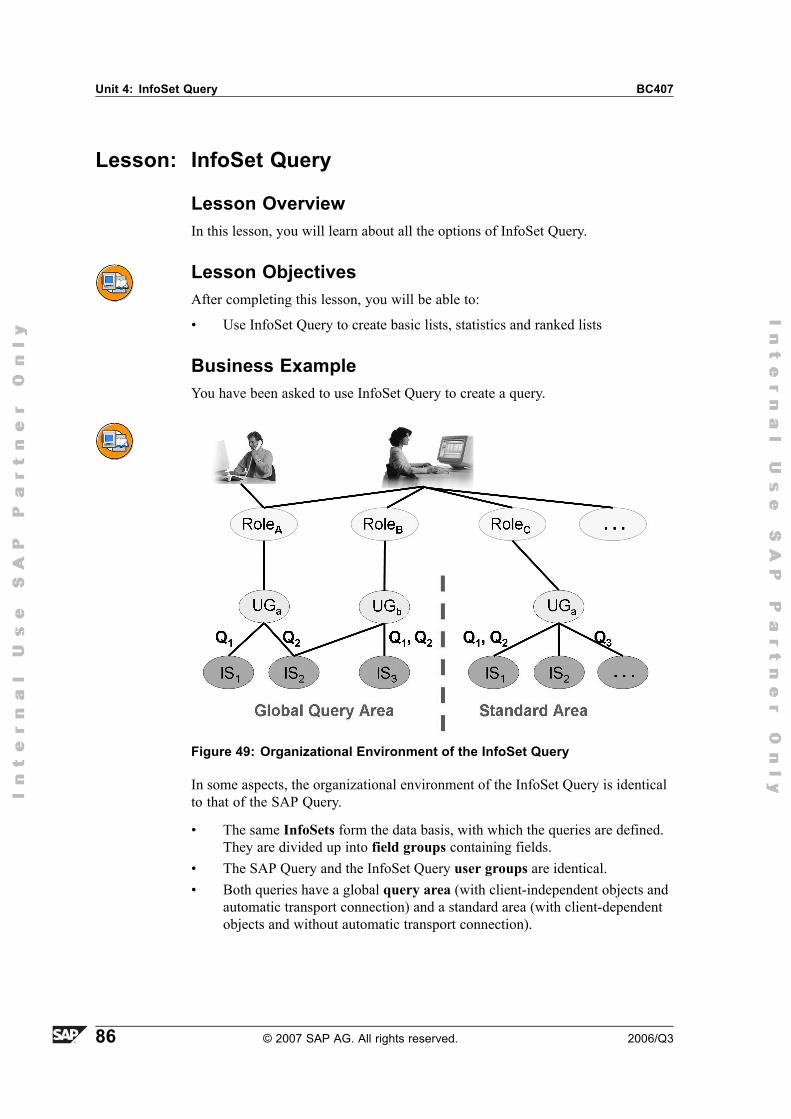
Unit 4: InfoSet Query BC407
Lesson: InfoSet Query
Lesson OverviewIn this lesson, you will learn about all the options of InfoSet Query.
Lesson ObjectivesAfter completing this lesson, you will be able to:
� Use InfoSet Query to create basic lists, statistics and ranked lists
Business ExampleYou have been asked to use InfoSet Query to create a query.
Figure 49: Organizational Environment of the InfoSet Query
In some aspects, the organizational environment of the InfoSet Query is identicalto that of the SAP Query.
� The same InfoSets form the data basis, with which the queries are defined.They are divided up into field groups containing fields.
� The SAP Query and the InfoSet Query user groups are identical.� Both queries have a global query area (with client-independent objects and
automatic transport connection) and a standard area (with client-dependentobjects and without automatic transport connection).
86 © 2007 SAP AG. All rights reserved. 2006/Q3
BC407 Lesson: InfoSet Query
However, users are not assigned to user groups directly, but using a role. Eachperson can have several roles but each role can only have one user group.
Figure 50: Starting the InfoSet Query
You can start InfoSet Query from role menus, from the SAP menu, or from SAPQuery (SQ01).
Depending on your role:
� The query is created in the global query area or the standard area and� maybe a query is used as a processing template or� an InfoSet is specified as the data basis.
For details on role administration for the InfoSet Query, see the UserAdministration unit.
When you start SAP Query (SQ01), all queries are displayed, regardless of whetherthey were created as a SAP Query or an InfoSet Query. If you choose InfoSetQuery, you can also edit all queries as InfoSet Queries. However, do not edit aSAP Query as an InfoSet Query if it contains the following objects: Several lists, amultiline basic list or local fields. If you use a query with one of these propertiesin the InfoSet Query, the system displays only single line lists without local fields.If you overwrite the query, these special SAP Query properties are lost.
2006/Q3 © 2007 SAP AG. All rights reserved. 87
Unit 4: InfoSet Query BC407
Figure 51: InfoSet Query Areas
In the InfoSet Query, the screen is divided into three areas.
� The fields available from the source InfoSet (the data source) are displayedto the left in tree form. You determine here, using a checkbox, which of thesefields you want to display in the selection screen or on the list.
� The selection screen is on the right-hand side of the screen.� In the lower screen area, the results list is displayed using the SAP List
Viewer (list preview). This is where, for example, you determine the columnsequence.
You can drag and drop (holding the left mouse button down) fields from the datapool into the list or the selection screen.
You can change the width and height of the three areas by clicking on the relevantseparating wall and, keeping the mouse button pressed down, dragging the wall tothe required position.
88 © 2007 SAP AG. All rights reserved. 2006/Q3
BC407 Lesson: InfoSet Query
Figure 52: InfoSet Query Templates
What you are offered when you call the InfoSet Query
� The system displays either an existing query as a template. (You learnin the User Administration unit, which query is used as a template.) Thefield groups of the source InfoSet are shown along with this query. You canfurther process the query and save it under a new name, if necessary.
� Or the system simply offers an InfoSet (In the User Administration unit, youlearn how to define an InfoSet as a default setting.) You can create a newInfoSet Query based on this InfoSet.
In the upper left area, the fields groups and fields are always displayed. To findout the name of the InfoSet (and query), choose Extras→ Template Information.
If a standard selection screen is defined in the source InfoSet, then the systemdisplays these selections.
If you have an existing query as a template, example data is displayed in the lowerscreen area.
2006/Q3 © 2007 SAP AG. All rights reserved. 89
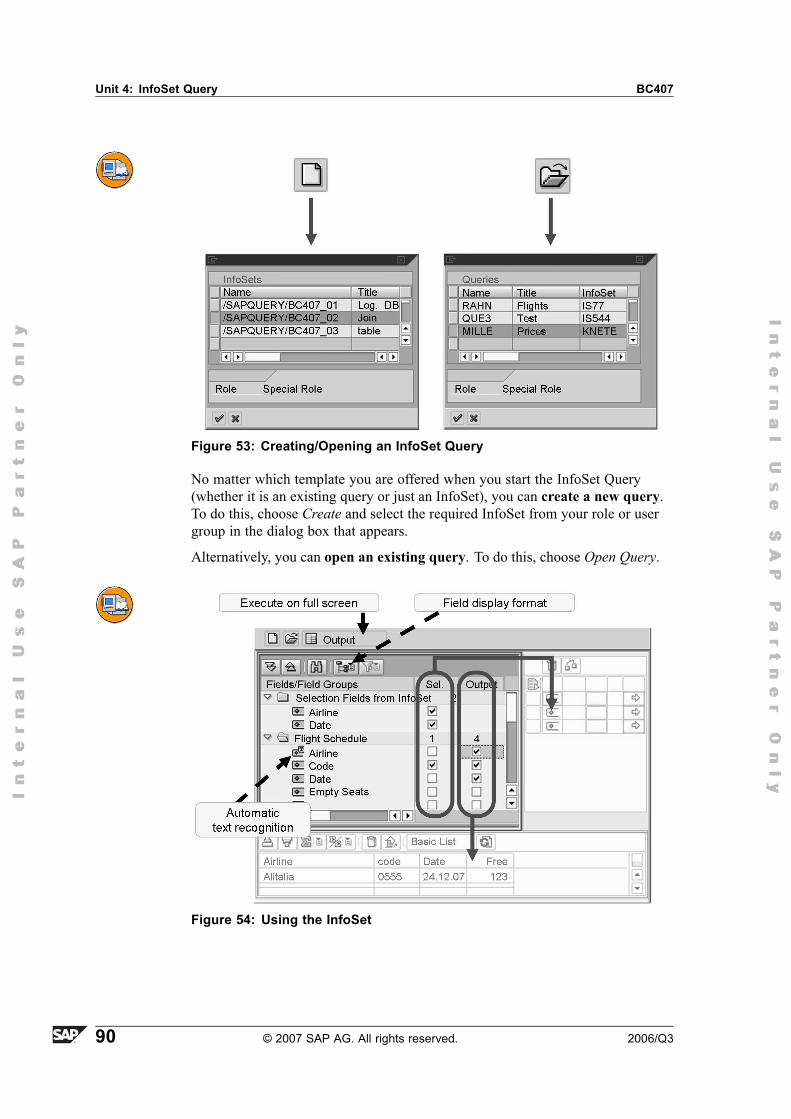
Unit 4: InfoSet Query BC407
Figure 53: Creating/Opening an InfoSet Query
No matter which template you are offered when you start the InfoSet Query(whether it is an existing query or just an InfoSet), you can create a new query.To do this, choose Create and select the required InfoSet from your role or usergroup in the dialog box that appears.
Alternatively, you can open an existing query. To do this, choose Open Query.
Figure 54: Using the InfoSet
90 © 2007 SAP AG. All rights reserved. 2006/Q3
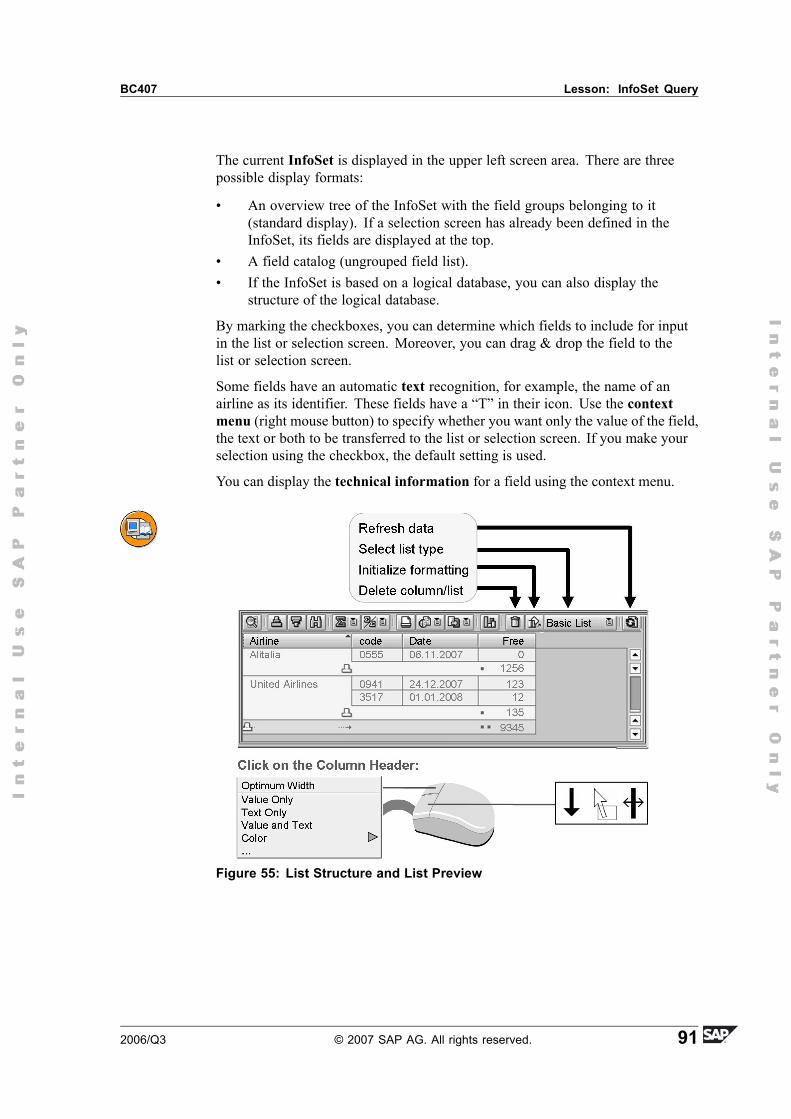
BC407 Lesson: InfoSet Query
The current InfoSet is displayed in the upper left screen area. There are threepossible display formats:
� An overview tree of the InfoSet with the field groups belonging to it(standard display). If a selection screen has already been defined in theInfoSet, its fields are displayed at the top.
� A field catalog (ungrouped field list).� If the InfoSet is based on a logical database, you can also display the
structure of the logical database.
By marking the checkboxes, you can determine which fields to include for inputin the list or selection screen. Moreover, you can drag & drop the field to thelist or selection screen.
Some fields have an automatic text recognition, for example, the name of anairline as its identifier. These fields have a �T� in their icon. Use the contextmenu (right mouse button) to specify whether you want only the value of the field,the text or both to be transferred to the list or selection screen. If you make yourselection using the checkbox, the default setting is used.
You can display the technical information for a field using the context menu.
Figure 55: List Structure and List Preview
2006/Q3 © 2007 SAP AG. All rights reserved. 91
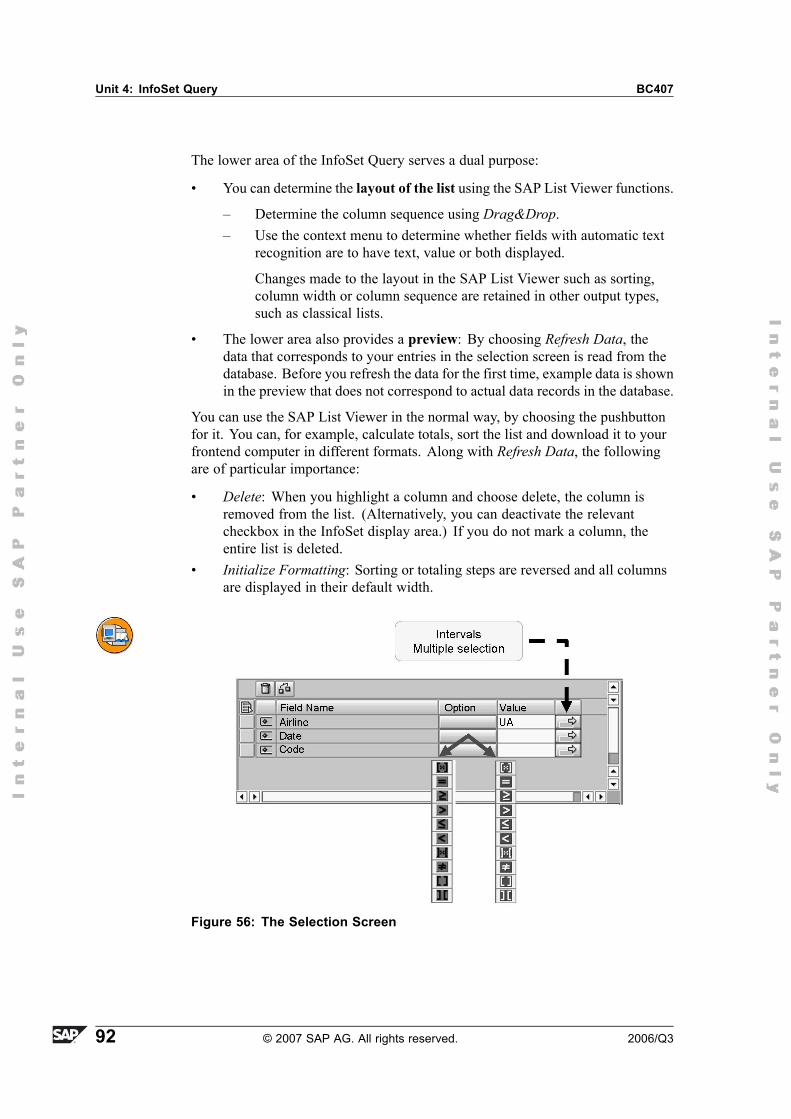
Unit 4: InfoSet Query BC407
The lower area of the InfoSet Query serves a dual purpose:
� You can determine the layout of the list using the SAP List Viewer functions.
� Determine the column sequence using Drag&Drop.� Use the context menu to determine whether fields with automatic text
recognition are to have text, value or both displayed.
Changes made to the layout in the SAP List Viewer such as sorting,column width or column sequence are retained in other output types,such as classical lists.
� The lower area also provides a preview: By choosing Refresh Data, thedata that corresponds to your entries in the selection screen is read from thedatabase. Before you refresh the data for the first time, example data is shownin the preview that does not correspond to actual data records in the database.
You can use the SAP List Viewer in the normal way, by choosing the pushbuttonfor it. You can, for example, calculate totals, sort the list and download it to yourfrontend computer in different formats. Along with Refresh Data, the followingare of particular importance:
� Delete: When you highlight a column and choose delete, the column isremoved from the list. (Alternatively, you can deactivate the relevantcheckbox in the InfoSet display area.) If you do not mark a column, theentire list is deleted.
� Initialize Formatting: Sorting or totaling steps are reversed and all columnsare displayed in their default width.
Figure 56: The Selection Screen
92 © 2007 SAP AG. All rights reserved. 2006/Q3
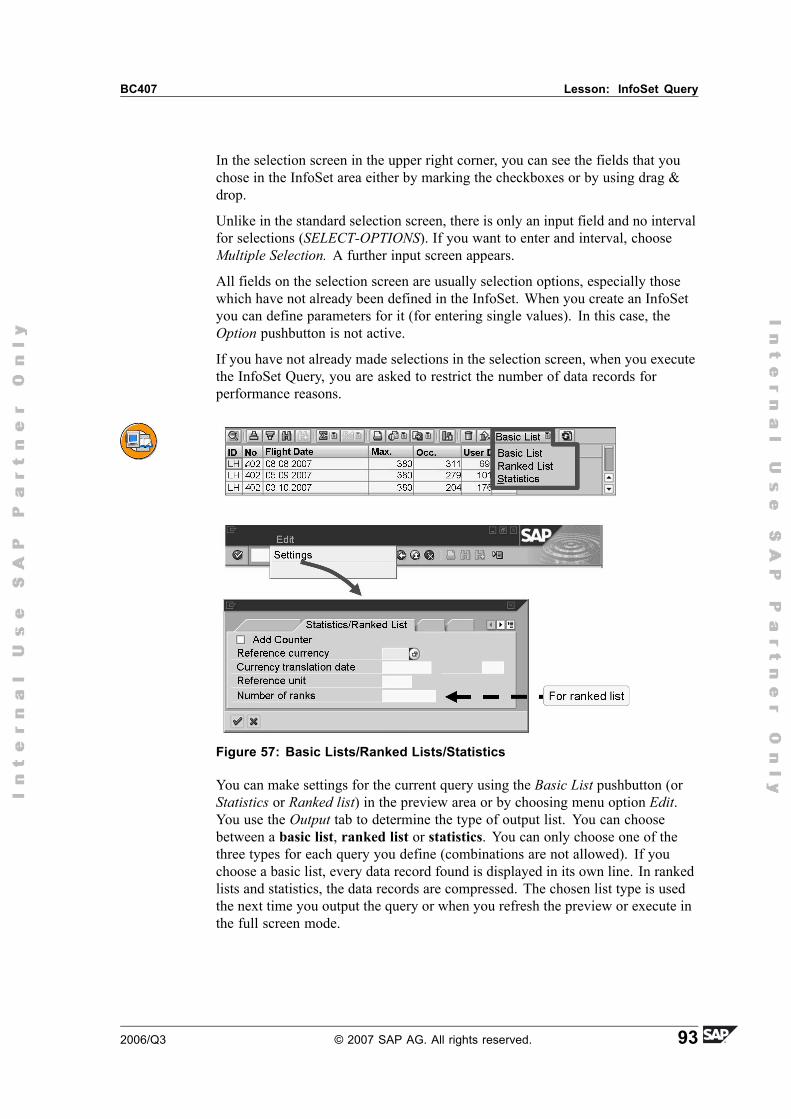
BC407 Lesson: InfoSet Query
In the selection screen in the upper right corner, you can see the fields that youchose in the InfoSet area either by marking the checkboxes or by using drag &drop.
Unlike in the standard selection screen, there is only an input field and no intervalfor selections (SELECT-OPTIONS). If you want to enter and interval, chooseMultiple Selection. A further input screen appears.
All fields on the selection screen are usually selection options, especially thosewhich have not already been defined in the InfoSet. When you create an InfoSetyou can define parameters for it (for entering single values). In this case, theOption pushbutton is not active.
If you have not already made selections in the selection screen, when you executethe InfoSet Query, you are asked to restrict the number of data records forperformance reasons.
Figure 57: Basic Lists/Ranked Lists/Statistics
You can make settings for the current query using the Basic List pushbutton (orStatistics or Ranked list) in the preview area or by choosing menu option Edit.You use the Output tab to determine the type of output list. You can choosebetween a basic list, ranked list or statistics. You can only choose one of thethree types for each query you define (combinations are not allowed). If youchoose a basic list, every data record found is displayed in its own line. In rankedlists and statistics, the data records are compressed. The chosen list type is usedthe next time you output the query or when you refresh the preview or execute inthe full screen mode.
2006/Q3 © 2007 SAP AG. All rights reserved. 93

Unit 4: InfoSet Query BC407
You have to specify a reference currency on the Statistics/Ranked List settings tab.All currency amounts are converted into this currency so that they are comparable.
The reference unit behaves in the same way: You need a reference unit into whichamounts are converted for amount fields in statistics and ranked lists. If youchoose the Standard List output format, you see which conversions took place atthe end of the statistic or ranked list.
You can add a counter to your statistic or ranked list. (The checkbox does notappear on this tab if the InfoSet used is based on a logical database.)
Figure 58: Statistics
The principle of statistics is identical for both SAP Query and InfoSet Query:They return data records in a compressed form. They group several data recordstogether in the same key and create one information line for the key. Allnon-numerical fields automatically belong to the key. If the output format is theStandard List, the key fields are highlighted in color.
Column totals are calculated for all numerical fields. You can enhance statisticswith mean values, percentage share and number of processed data records. Youreach these functions in the SAP List Viewer by choosing one of the followingfrom the context menu of the relevant column: Output Mean Value, OutputProportion in % or Output Total Number.
94 © 2007 SAP AG. All rights reserved. 2006/Q3
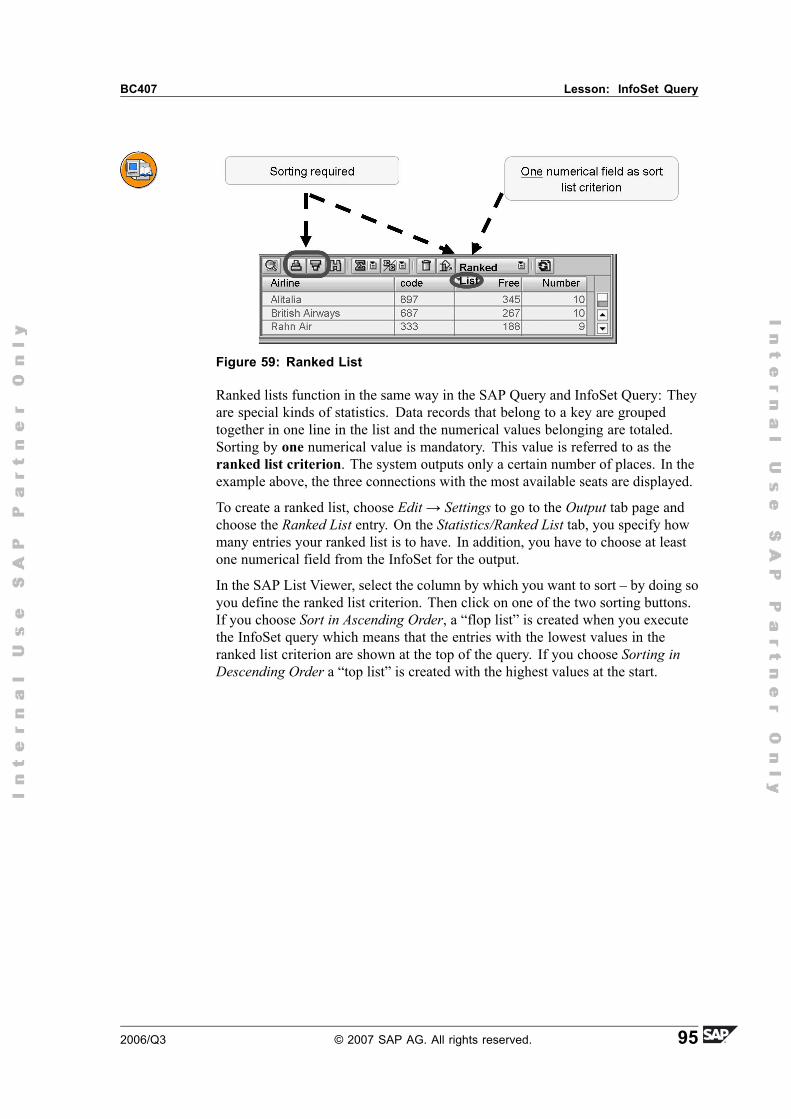
BC407 Lesson: InfoSet Query
Figure 59: Ranked List
Ranked lists function in the same way in the SAP Query and InfoSet Query: Theyare special kinds of statistics. Data records that belong to a key are groupedtogether in one line in the list and the numerical values belonging are totaled.Sorting by one numerical value is mandatory. This value is referred to as theranked list criterion. The system outputs only a certain number of places. In theexample above, the three connections with the most available seats are displayed.
To create a ranked list, choose Edit→ Settings to go to the Output tab page andchoose the Ranked List entry. On the Statistics/Ranked List tab, you specify howmany entries your ranked list is to have. In addition, you have to choose at leastone numerical field from the InfoSet for the output.
In the SAP List Viewer, select the column by which you want to sort � by doing soyou define the ranked list criterion. Then click on one of the two sorting buttons.If you choose Sort in Ascending Order, a �flop list� is created when you executethe InfoSet query which means that the entries with the lowest values in theranked list criterion are shown at the top of the query. If you choose Sorting inDescending Order a �top list� is created with the highest values at the start.
2006/Q3 © 2007 SAP AG. All rights reserved. 95
Unit 4: InfoSet Query BC407
Figure 60: Other Settings
As well as the type of list, you can also determine the type of output in thesettings. The SAP List Viewer is the default setting. Other types of output suchas Standard List (ABAP List) correspond to the formats in the Quick Viewer orSAP Query. This settings that you make here only take effect when you executethe InfoSet Query on the full screen.
You can decide whether you want the system to display or skip over the selectionscreen when executing the query in the full screen. This means that you have theoption of determining the type of output when you execute the InfoSet Query.
On the Default: Value/Text tab, you determine which field contents are to bedisplayed in the list and on the selection screen. This setting is valid for all fieldsthat have the icon Field with Text, which means those fields which have automatictext recognition. You can override this setting for each column when you selectthe fields from the InfoSet or in the preview (SAP List Viewer) using the contextmenu. This is the only place where you can specify that you want the value andtext field to be displayed in the list together.
96 © 2007 SAP AG. All rights reserved. 2006/Q3
BC407 Lesson: InfoSet Query
Exercise 7: Creating Basic Lists
Exercise ObjectivesAfter completing this exercise, you will be able to:� Create basic lists using the InfoSet Query
Business ExampleYour task:
Create an InfoSet Query that shows flight connections and occupied seats foryour flights.
Model Solution:
BC407_S_03 in the global query area, user group BC407_LEARN
Task 1:Create the query
1. From your user menu start InfoSet Query.
2. Create a new query based on the InfoSet /SAPQUERY/BC407_01.
Task 2:Configure the InfoSet Query.
1. Create a basic list. Choose the SAP List Viewer as the default output. Youdo not want to display a selection screen when you execute the query.
2. As default values for the selection screen and the list, choose to displayvalues but not text.
Task 3:Structure the list
1. Include the following fields in the list:
Airline code, flight code, flight date, departure city, arrival city, flight time,maximum capacity, and number of occupied seats. Display the short nameand the full name of the airline.
Task 4:Save the query
1. Save the query under the name BC407##_03 in package ZBC407_##. ##stands for your group number.
2006/Q3 © 2007 SAP AG. All rights reserved. 97
Unit 4: InfoSet Query BC407
Solution 7: Creating Basic ListsTask 1:Create the query
1. From your user menu start InfoSet Query.
a) Navigate back to the initial screen of your system (for example, byentering /N in the OK code field). From your user menu start InfoSetQuery.
2. Create a new query based on the InfoSet /SAPQUERY/BC407_01.
a) Choose Create new query, then InfoSet /SAPQUERY/BC407_01 fromthe selection.
Task 2:Configure the InfoSet Query.
1. Create a basic list. Choose the SAP List Viewer as the default output. Youdo not want to display a selection screen when you execute the query.
a) Choose Edit→ Settings. Choose the Output tab. Under Type of OutputList choose the entry Basic List and under Type of Output choose SAPList Viewer. Deactivate the Start via Selection Screen checkbox.
2. As default values for the selection screen and the list, choose to displayvalues but not text.
a) Now go to the Default: Value/Text tab. Select the Value radio buttonboth for the selection screen and the list. Confirm your entries bypressing the enter key.
Task 3:Structure the list
1. Include the following fields in the list:
Continued on next page
98 © 2007 SAP AG. All rights reserved. 2006/Q3
BC407 Lesson: InfoSet Query
Airline code, flight code, flight date, departure city, arrival city, flight time,maximum capacity, and number of occupied seats. Display the short nameand the full name of the airline.
a) Drag&Drop the required fields from the upper left screen area to thepreview. Alternatively, check the boxes in the list to include the fields.In this case, ensure that you have selected Output and not Selection.
If you place the fields in the list in the wrong order by mistake, movethe columns by clicking on their headers in the preview and holdingdown the left mouse button to reposition them.
To display the Airline code field with its short and full names, from thecontext menu (right mouse button) of the Airline code column, chooseValue and Text.
Task 4:Save the query
1. Save the query under the name BC407##_03 in package ZBC407_##. ##stands for your group number.
a) Click on the Save pushbutton (shortcut: Ctrl-S) to save the query. Enterthe name BC407##_03. ## stands for your group number. Enter atitle. Confirm your entries.
In the input template that follows, enter ZBC407_## as the package.Confirm your entries.
In the next screen, choose Own Requests and select your request bydouble clicking it.
2006/Q3 © 2007 SAP AG. All rights reserved. 99

Unit 4: InfoSet Query BC407
100 © 2007 SAP AG. All rights reserved. 2006/Q3
BC407 Lesson: InfoSet Query
Exercise 8: Ranked List with the InfoSetQuery
Exercise ObjectivesAfter completing this exercise, you will be able to:� Create ranked lists using the InfoSet Query
Business ExampleCreate an InfoSet Query that displays the 10 fight connections with the highestnumber of free seats.
Task 1:Create the query
1. From your user menu start InfoSet Query.
2. Create a new query based on the InfoSet /SAPQUERY/BC407_02.
Task 2:Configure the InfoSet Query.
1. Create a ranked list with 10 entries. Choose the SAP List Viewer as thestandard output.
2. As default values for the selection screen and the list, choose to displayvalues but not text.
Task 3:Determine the selection screen
1. Display the Departure City on the selection screen along with the two fieldsAirline Code and Flight Date (which were defined in the InfoSet templateas selection fields).
Task 4:Structure the list
1. Include the following fields in the list:
Airline code, flight code, departure city, arrival city, free seats (numerical)and maximum capacity.
Continued on next page
2006/Q3 © 2007 SAP AG. All rights reserved. 101
Unit 4: InfoSet Query BC407
Task 5:Define the ranked list criterion
1. Determine the top 10 for free seats.
Task 6:Save the query
1. Save the query under the name BC407##_04 in development classZBC407_##. ## stands for your group number.
102 © 2007 SAP AG. All rights reserved. 2006/Q3
BC407 Lesson: InfoSet Query
Solution 8: Ranked List with the InfoSetQueryTask 1:Create the query
1. From your user menu start InfoSet Query.
a) Navigate back to the initial screen of your system (for example, byentering /N in the OK code field). From your user menu start InfoSetQuery.
2. Create a new query based on the InfoSet /SAPQUERY/BC407_02.
a) Choose Create new query, then InfoSet /SAPQUERY/BC407_02from the selection.
Task 2:Configure the InfoSet Query.
1. Create a ranked list with 10 entries. Choose the SAP List Viewer as thestandard output.
a) Choose Edit→ Settings. Choose the Output tab. Under Type of OutputList choose the entry Ranked List and under Type of Output choose SAPList Viewer. Deactivate the Start via Selection Screen checkbox.
On the Statistics/Ranked List tab, enter a reference currency and areference unit (unimportant for this statistic since seats do not havea unit and therefore do not have to be converted). For the Numberof Ranks, enter 10
2. As default values for the selection screen and the list, choose to displayvalues but not text.
a) Now go to the Default: Value/Text tab. Select the Value radio buttonboth for the selection screen and the list. Confirm your entries bypressing the enter key.
Continued on next page
2006/Q3 © 2007 SAP AG. All rights reserved. 103
Unit 4: InfoSet Query BC407
Task 3:Determine the selection screen
1. Display the Departure City on the selection screen along with the two fieldsAirline Code and Flight Date (which were defined in the InfoSet templateas selection fields).
a) Drag&Drop the Departure City field from the upper left area to theselection screen in the upper right area.
Task 4:Structure the list
1. Include the following fields in the list:
Airline code, flight code, departure city, arrival city, free seats (numerical)and maximum capacity.
a) Drag&Drop the required fields from the upper left screen area to thepreview.
Task 5:Define the ranked list criterion
1. Determine the top 10 for free seats.
a) Select the Free Seats column in the preview then sort in descendingorder.
Task 6:Save the query
1. Save the query under the name BC407##_04 in development classZBC407_##. ## stands for your group number.
a) See the previous task.
104 © 2007 SAP AG. All rights reserved. 2006/Q3
BC407 Lesson: InfoSet Query
Exercise 9: Statistics with the InfoSetQuery (optional)
Exercise ObjectivesAfter completing this exercise, you will be able to:� Create statistics using the InfoSet Query
Business ExampleUse an InfoSet Query to create a statistic for luggage
Task 1:Create the query
1. From your user menu start InfoSet Query.
2. Create a new query based on the InfoSet /SAPQUERY/BC407_01.
Task 2:Configure the InfoSet Query.
1. Create a statistic. The reference unit is KG (kilograms). Choose the SAPList Viewer as the standard output.
2. As default values for the selection screen and the list, choose to displaythe values but not the texts.
Task 3:Structure the list.
1. Include the following fields in the list:
Airline Code, Flight Connection Number, Flight Date and Weight ofLuggage. You also want to see the mean value for the weight.
Task 4:Save the query.
1. Save the query under the name BC407##_04_OPT in package ZBC407_##.## stands for your group number.
2006/Q3 © 2007 SAP AG. All rights reserved. 105
Unit 4: InfoSet Query BC407
Solution 9: Statistics with the InfoSetQuery (optional)Task 1:Create the query
1. From your user menu start InfoSet Query.
a) See the previous exercise.
2. Create a new query based on the InfoSet /SAPQUERY/BC407_01.
a) See the previous exercise.
Task 2:Configure the InfoSet Query.
1. Create a statistic. The reference unit is KG (kilograms). Choose the SAPList Viewer as the standard output.
a) Choose Edit→ Settings. Choose the Output tab. Under Type of OutputList choose the entry Statistics and under Type of Output choose SAPList Viewer.
On the Statistics/Ranked List tab, enter a reference currency. ChooseKG as the reference unit.
2. As default values for the selection screen and the list, choose to displaythe values but not the texts.
a) See the previous exercise.
Task 3:Structure the list.
1. Include the following fields in the list:
Airline Code, Flight Connection Number, Flight Date and Weight ofLuggage. You also want to see the mean value for the weight.
a) Drag&Drop the required fields from the upper left screen area to thepreview.
To issue the mean value, you must select the column, right-click andchoose the Output mean value entry.
Continued on next page
106 © 2007 SAP AG. All rights reserved. 2006/Q3
BC407 Lesson: InfoSet Query
Task 4:Save the query.
1. Save the query under the name BC407##_04_OPT in package ZBC407_##.## stands for your group number.
a) See the previous exercise.
2006/Q3 © 2007 SAP AG. All rights reserved. 107

Unit 4: InfoSet Query BC407
Lesson Summary
You should now be able to:� Use InfoSet Query to create basic lists, statistics and ranked lists
108 © 2007 SAP AG. All rights reserved. 2006/Q3
BC407 Unit Summary
Unit SummaryYou should now be able to:� Use InfoSet Query to create basic lists, statistics and ranked lists
2006/Q3 © 2007 SAP AG. All rights reserved. 109

Unit Summary BC407
110 © 2007 SAP AG. All rights reserved. 2006/Q3
Unit 5Comparing the Tools
Unit OverviewIn this unit we will compare the three tools QuickViewer, SAP Query and InfoSetQuery from different perspectives.
Unit ObjectivesAfter completing this unit, you will be able to:
� Describe the differences between the three reporting tools with regard to use,types of list, data sources and functions
Unit ContentsLesson: Comparing the Tools .. . . . . . . . . . . . . . . . . . . . . . . . . . . . . . . . . . . . . . . . . . . . . . . .112
2006/Q3 © 2007 SAP AG. All rights reserved. 111
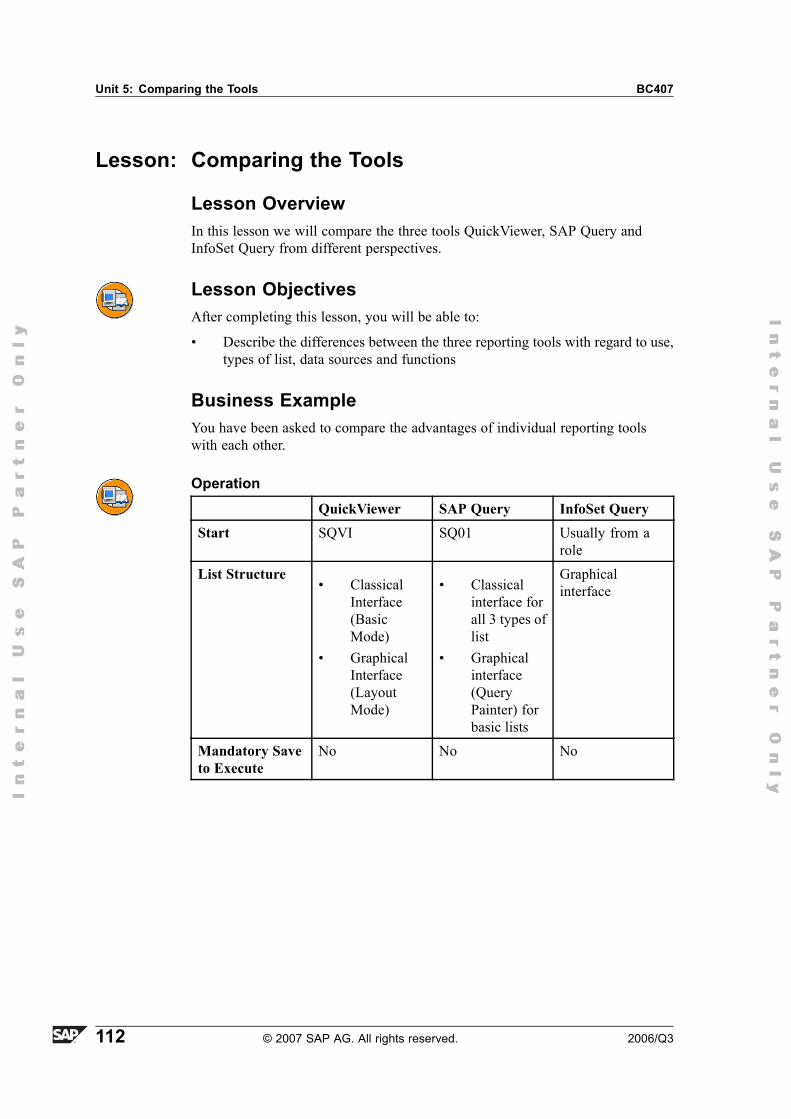
Unit 5: Comparing the Tools BC407
Lesson: Comparing the Tools
Lesson OverviewIn this lesson we will compare the three tools QuickViewer, SAP Query andInfoSet Query from different perspectives.
Lesson ObjectivesAfter completing this lesson, you will be able to:
� Describe the differences between the three reporting tools with regard to use,types of list, data sources and functions
Business ExampleYou have been asked to compare the advantages of individual reporting toolswith each other.
OperationQuickViewer SAP Query InfoSet Query
Start SQVI SQ01 Usually from arole
List Structure� Classical
Interface(BasicMode)
� GraphicalInterface(LayoutMode)
� Classicalinterface forall 3 types oflist
� Graphicalinterface(QueryPainter) forbasic lists
Graphicalinterface
Mandatory Saveto Execute
No No No
112 © 2007 SAP AG. All rights reserved. 2006/Q3
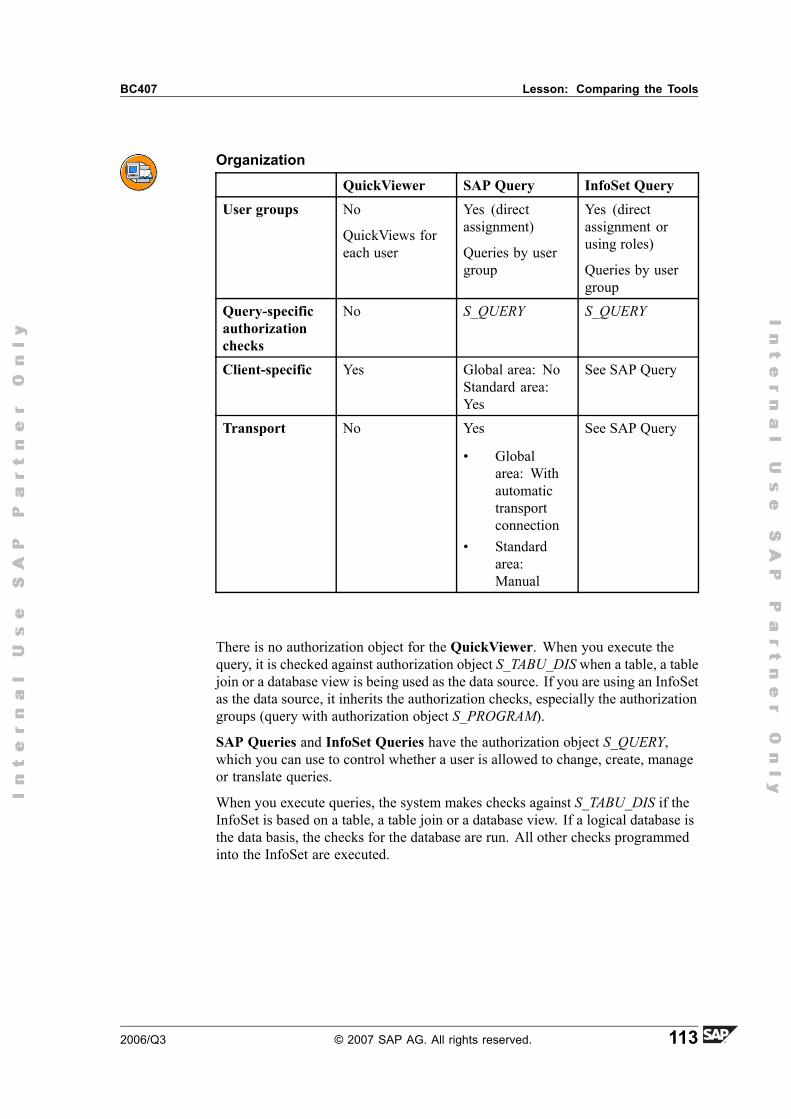
BC407 Lesson: Comparing the Tools
OrganizationQuickViewer SAP Query InfoSet Query
User groups No
QuickViews foreach user
Yes (directassignment)
Queries by usergroup
Yes (directassignment orusing roles)
Queries by usergroup
Query-specificauthorizationchecks
No S_QUERY S_QUERY
Client-specific Yes Global area: NoStandard area:Yes
See SAP Query
Transport No Yes
� Globalarea: Withautomatictransportconnection
� Standardarea:Manual
See SAP Query
There is no authorization object for the QuickViewer. When you execute thequery, it is checked against authorization object S_TABU_DIS when a table, a tablejoin or a database view is being used as the data source. If you are using an InfoSetas the data source, it inherits the authorization checks, especially the authorizationgroups (query with authorization object S_PROGRAM).
SAP Queries and InfoSet Queries have the authorization object S_QUERY,which you can use to control whether a user is allowed to change, create, manageor translate queries.
When you execute queries, the system makes checks against S_TABU_DIS if theInfoSet is based on a table, a table join or a database view. If a logical database isthe data basis, the checks for the database are run. All other checks programmedinto the InfoSet are executed.
2006/Q3 © 2007 SAP AG. All rights reserved. 113

Unit 5: Comparing the Tools BC407
Data Sources, ListsQuickViewer SAP Query InfoSet Query
Data basis Table, DB view,LDB, InfoSet:Can create a join
InfoSet (has to beavailable)
See SAP Query
Local Fields No Yes NoAutomatic TextRecognition
No Yes Yes
Lists 1 basic list max. 1 basic list+ max. 9 statistics+ max. 9 rankedlists
Basic list orstatistic or rankedlist
HierarchicalLists
Yes (if outputas ABAP listand definitionin layout mode)
Yes (if usingABAP list asoutput format)
No
Functions, OtherQuickViewer SAP Query InfoSet Query
InteractiveFunctions
Yes Yes Yes
Report/ReportInterface (RRI)
No Yes Yes (Assignmentonly; call usingSQ01)
Save List inMenu/Roles
No Yes No
Other Can be convertedinto query
Can be processedfurther as anInfoSet Query(but not: sublistcombination,hierarchical lists,local fields)
Can be processedfurther as a SAPQuery
114 © 2007 SAP AG. All rights reserved. 2006/Q3

BC407 Lesson: Comparing the Tools
Lesson Summary
You should now be able to:� Describe the differences between the three reporting tools with regard to use,
types of list, data sources and functions
2006/Q3 © 2007 SAP AG. All rights reserved. 115

Unit Summary BC407
Unit SummaryYou should now be able to:� Describe the differences between the three reporting tools with regard to use,
types of list, data sources and functions
116 © 2007 SAP AG. All rights reserved. 2006/Q3
Unit 6ABAP Statements in InfoSet Creation
Unit OverviewIn this unit, you will learn about the important ABAP statements that you requireto take advantage of all the options of the InfoSet.
Unit ObjectivesAfter completing this unit, you will be able to:
� Define data in an ABAP program� Create simple selection screens� Check Data� Explain the event concept� Create simple SELECT statements
Unit ContentsLesson: ABAP Statements in InfoSet Creation ... . . . . . . . . . . . . . . . . . . . . . . . . . .118
Exercise 10: ABAP Statements in InfoSet Creation (optional) . . . . . . .135
2006/Q3 © 2007 SAP AG. All rights reserved. 117
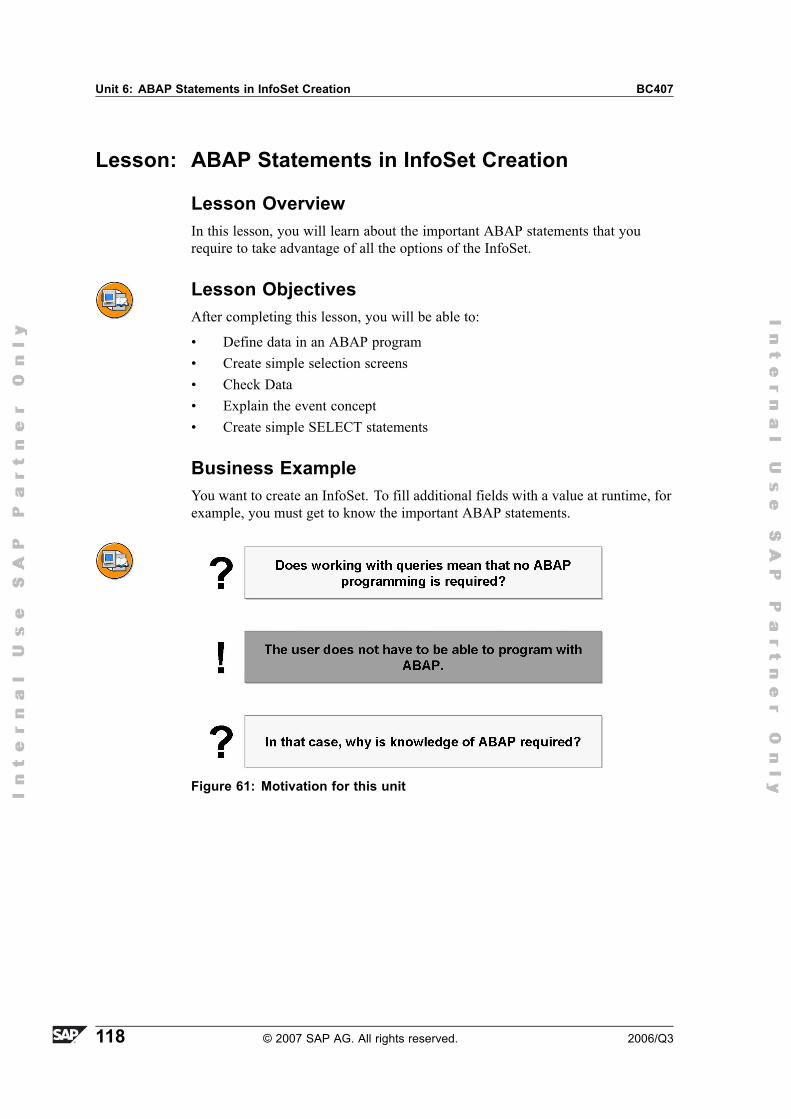
Unit 6: ABAP Statements in InfoSet Creation BC407
Lesson: ABAP Statements in InfoSet Creation
Lesson OverviewIn this lesson, you will learn about the important ABAP statements that yourequire to take advantage of all the options of the InfoSet.
Lesson ObjectivesAfter completing this lesson, you will be able to:
� Define data in an ABAP program� Create simple selection screens� Check Data� Explain the event concept� Create simple SELECT statements
Business ExampleYou want to create an InfoSet. To fill additional fields with a value at runtime, forexample, you must get to know the important ABAP statements.
Figure 61: Motivation for this unit
118 © 2007 SAP AG. All rights reserved. 2006/Q3
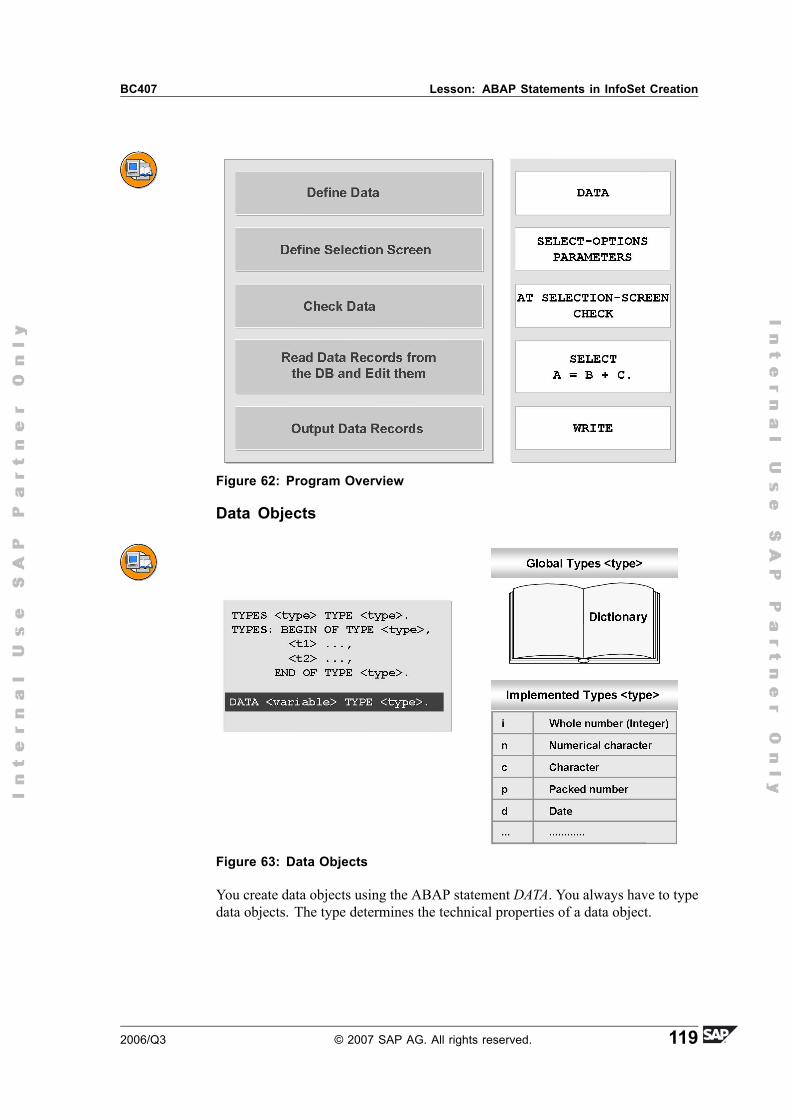
BC407 Lesson: ABAP Statements in InfoSet Creation
Figure 62: Program Overview
Data Objects
Figure 63: Data Objects
You create data objects using the ABAP statement DATA. You always have to typedata objects. The type determines the technical properties of a data object.
2006/Q3 © 2007 SAP AG. All rights reserved. 119
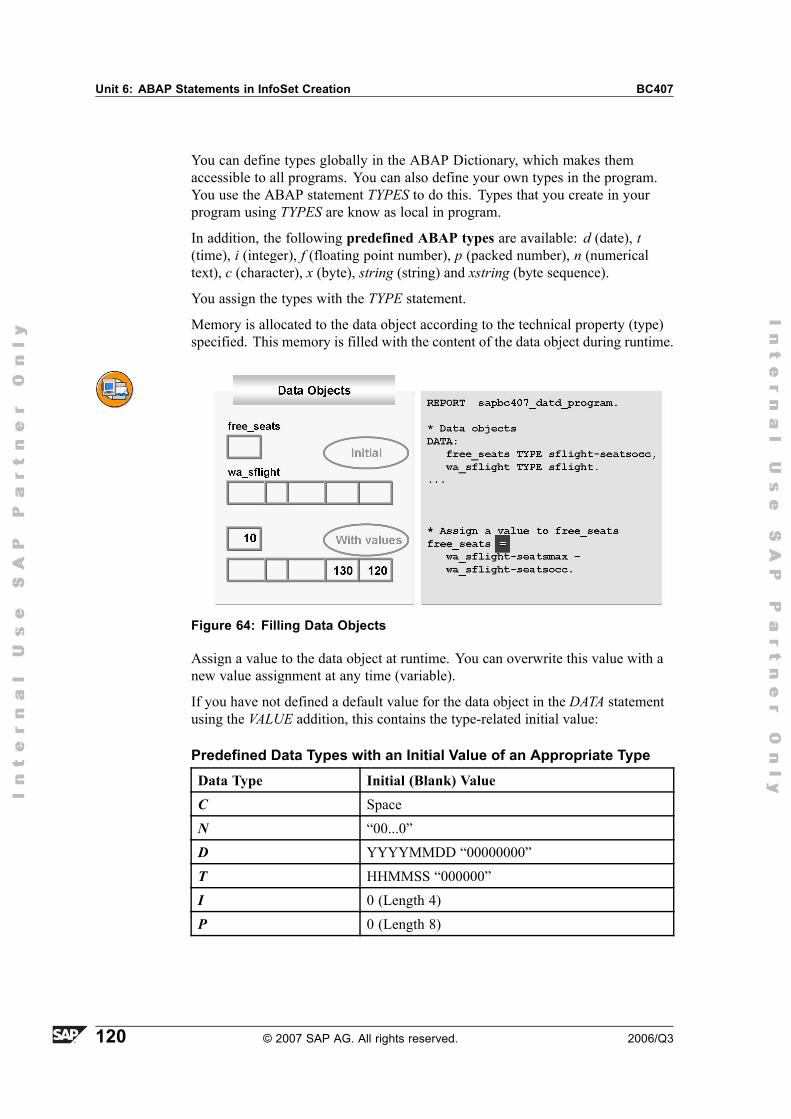
Unit 6: ABAP Statements in InfoSet Creation BC407
You can define types globally in the ABAP Dictionary, which makes themaccessible to all programs. You can also define your own types in the program.You use the ABAP statement TYPES to do this. Types that you create in yourprogram using TYPES are know as local in program.
In addition, the following predefined ABAP types are available: d (date), t(time), i (integer), f (floating point number), p (packed number), n (numericaltext), c (character), x (byte), string (string) and xstring (byte sequence).
You assign the types with the TYPE statement.
Memory is allocated to the data object according to the technical property (type)specified. This memory is filled with the content of the data object during runtime.
Figure 64: Filling Data Objects
Assign a value to the data object at runtime. You can overwrite this value with anew value assignment at any time (variable).
If you have not defined a default value for the data object in the DATA statementusing the VALUE addition, this contains the type-related initial value:
Predefined Data Types with an Initial Value of an Appropriate TypeData Type Initial (Blank) ValueC SpaceN �00...0�D YYYYMMDD �00000000�T HHMMSS �000000�I 0 (Length 4)P 0 (Length 8)
120 © 2007 SAP AG. All rights reserved. 2006/Q3
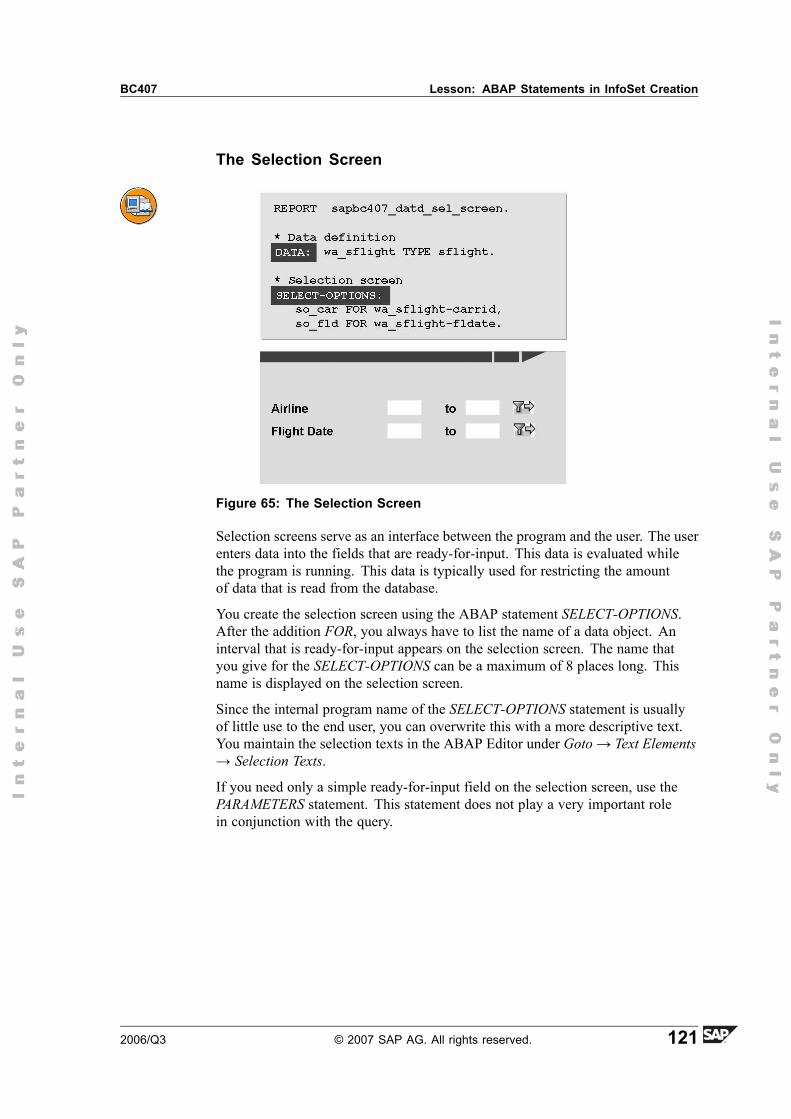
BC407 Lesson: ABAP Statements in InfoSet Creation
The Selection Screen
Figure 65: The Selection Screen
Selection screens serve as an interface between the program and the user. The userenters data into the fields that are ready-for-input. This data is evaluated whilethe program is running. This data is typically used for restricting the amountof data that is read from the database.
You create the selection screen using the ABAP statement SELECT-OPTIONS.After the addition FOR, you always have to list the name of a data object. Aninterval that is ready-for-input appears on the selection screen. The name thatyou give for the SELECT-OPTIONS can be a maximum of 8 places long. Thisname is displayed on the selection screen.
Since the internal program name of the SELECT-OPTIONS statement is usuallyof little use to the end user, you can overwrite this with a more descriptive text.You maintain the selection texts in the ABAP Editor under Goto→ Text Elements→ Selection Texts.
If you need only a simple ready-for-input field on the selection screen, use thePARAMETERS statement. This statement does not play a very important rolein conjunction with the query.
2006/Q3 © 2007 SAP AG. All rights reserved. 121
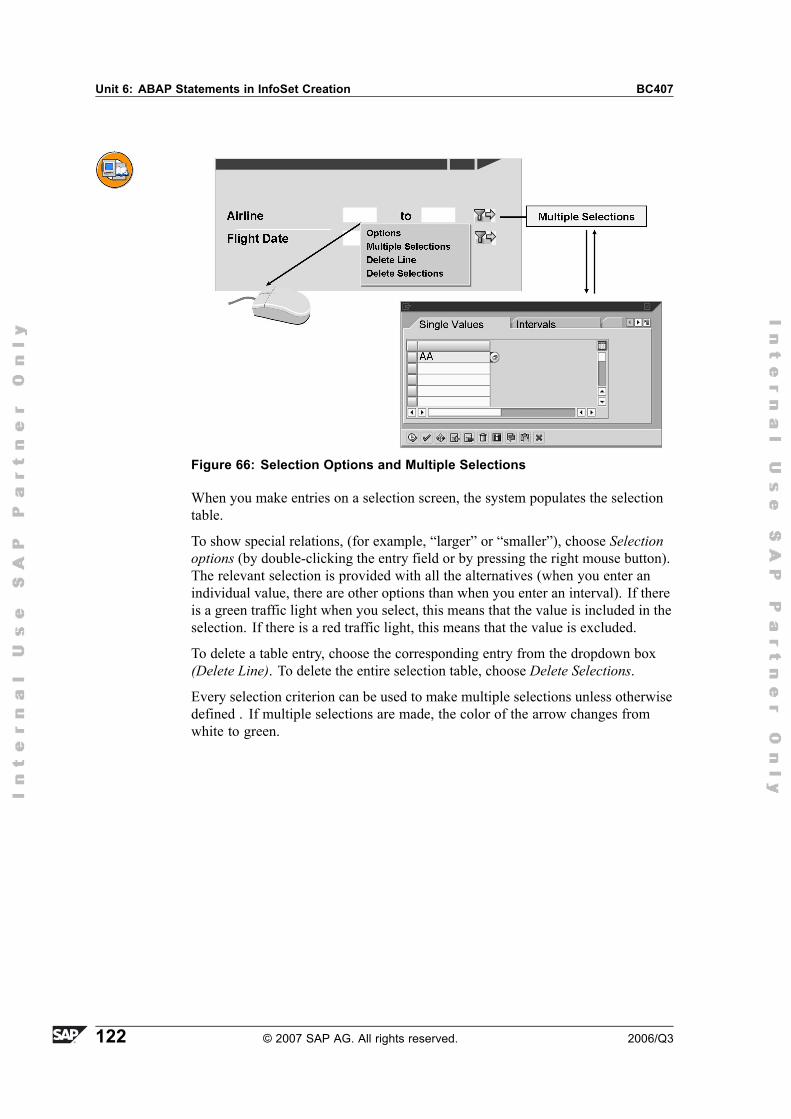
Unit 6: ABAP Statements in InfoSet Creation BC407
Figure 66: Selection Options and Multiple Selections
When you make entries on a selection screen, the system populates the selectiontable.
To show special relations, (for example, �larger� or �smaller�), choose Selectionoptions (by double-clicking the entry field or by pressing the right mouse button).The relevant selection is provided with all the alternatives (when you enter anindividual value, there are other options than when you enter an interval). If thereis a green traffic light when you select, this means that the value is included in theselection. If there is a red traffic light, this means that the value is excluded.
To delete a table entry, choose the corresponding entry from the dropdown box(Delete Line). To delete the entire selection table, choose Delete Selections.
Every selection criterion can be used to make multiple selections unless otherwisedefined . If multiple selections are made, the color of the arrow changes fromwhite to green.
122 © 2007 SAP AG. All rights reserved. 2006/Q3
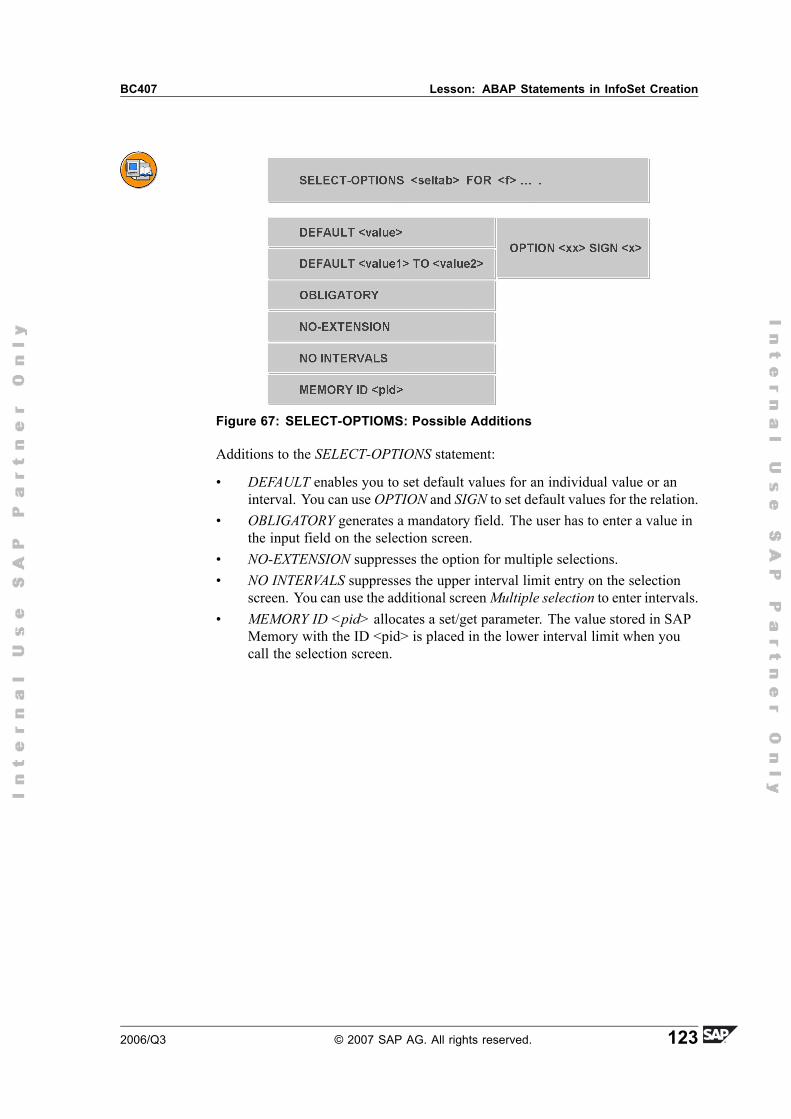
BC407 Lesson: ABAP Statements in InfoSet Creation
Figure 67: SELECT-OPTIOMS: Possible Additions
Additions to the SELECT-OPTIONS statement:
� DEFAULT enables you to set default values for an individual value or aninterval. You can use OPTION and SIGN to set default values for the relation.
� OBLIGATORY generates a mandatory field. The user has to enter a value inthe input field on the selection screen.
� NO-EXTENSION suppresses the option for multiple selections.� NO INTERVALS suppresses the upper interval limit entry on the selection
screen. You can use the additional screenMultiple selection to enter intervals.� MEMORY ID <pid> allocates a set/get parameter. The value stored in SAP
Memory with the ID <pid> is placed in the lower interval limit when youcall the selection screen.
2006/Q3 © 2007 SAP AG. All rights reserved. 123
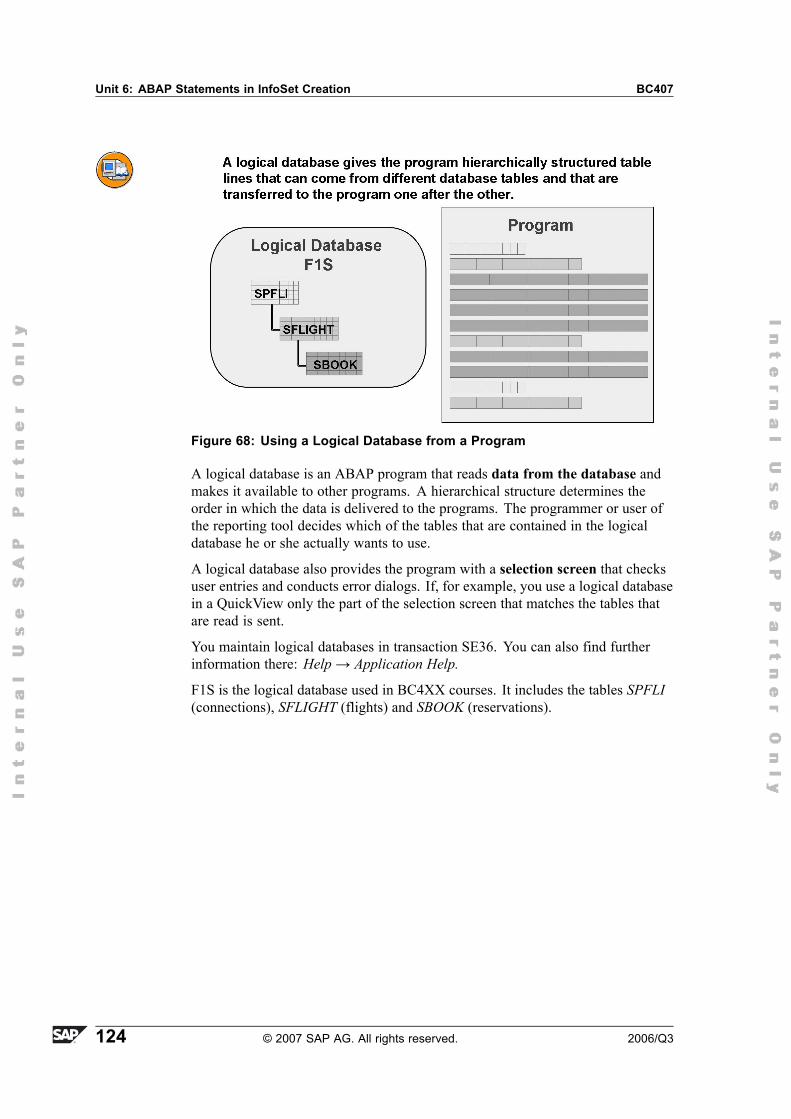
Unit 6: ABAP Statements in InfoSet Creation BC407
Figure 68: Using a Logical Database from a Program
A logical database is an ABAP program that reads data from the database andmakes it available to other programs. A hierarchical structure determines theorder in which the data is delivered to the programs. The programmer or user ofthe reporting tool decides which of the tables that are contained in the logicaldatabase he or she actually wants to use.
A logical database also provides the program with a selection screen that checksuser entries and conducts error dialogs. If, for example, you use a logical databasein a QuickView only the part of the selection screen that matches the tables thatare read is sent.
You maintain logical databases in transaction SE36. You can also find furtherinformation there: Help→ Application Help.
F1S is the logical database used in BC4XX courses. It includes the tables SPFLI(connections), SFLIGHT (flights) and SBOOK (reservations).
124 © 2007 SAP AG. All rights reserved. 2006/Q3
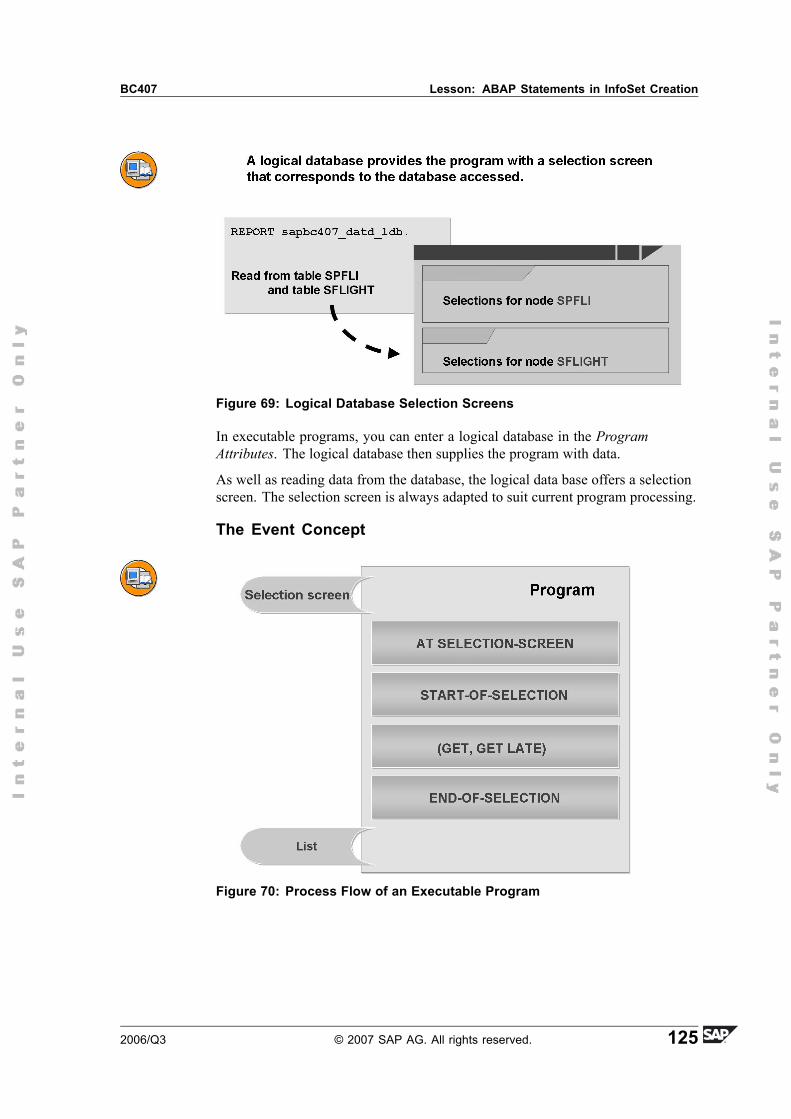
BC407 Lesson: ABAP Statements in InfoSet Creation
Figure 69: Logical Database Selection Screens
In executable programs, you can enter a logical database in the ProgramAttributes. The logical database then supplies the program with data.
As well as reading data from the database, the logical data base offers a selectionscreen. The selection screen is always adapted to suit current program processing.
The Event Concept
Figure 70: Process Flow of an Executable Program
2006/Q3 © 2007 SAP AG. All rights reserved. 125
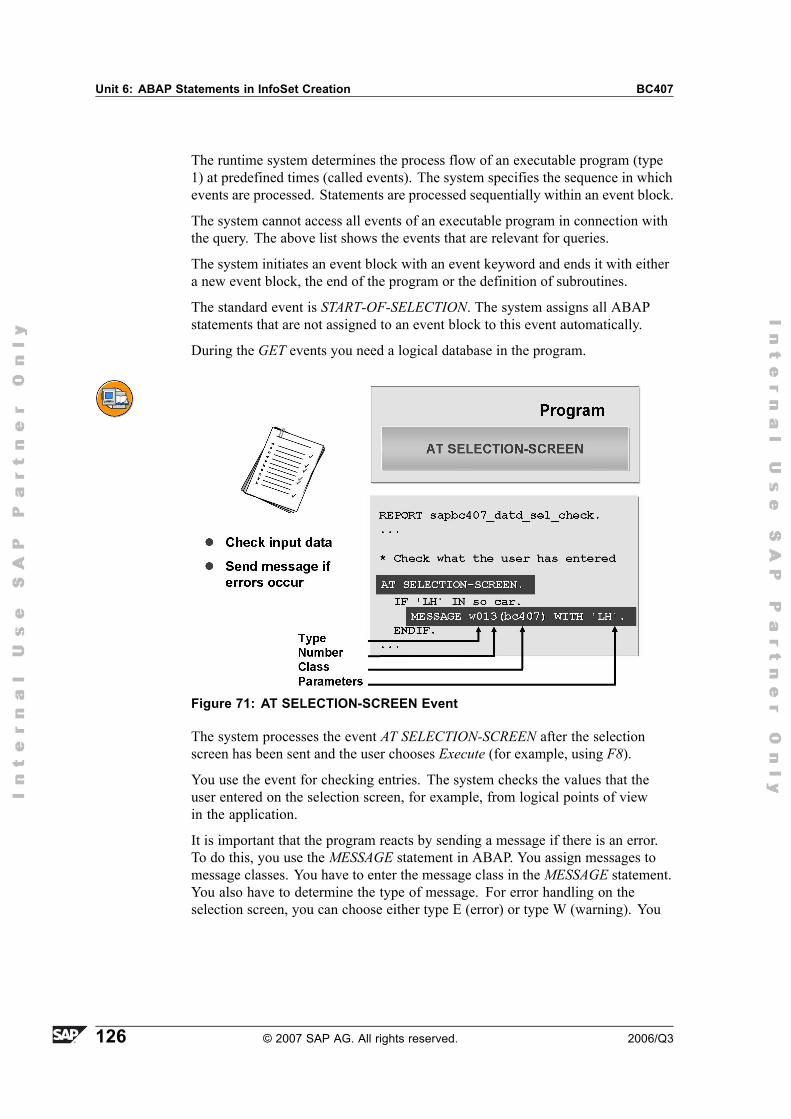
Unit 6: ABAP Statements in InfoSet Creation BC407
The runtime system determines the process flow of an executable program (type1) at predefined times (called events). The system specifies the sequence in whichevents are processed. Statements are processed sequentially within an event block.
The system cannot access all events of an executable program in connection withthe query. The above list shows the events that are relevant for queries.
The system initiates an event block with an event keyword and ends it with eithera new event block, the end of the program or the definition of subroutines.
The standard event is START-OF-SELECTION. The system assigns all ABAPstatements that are not assigned to an event block to this event automatically.
During the GET events you need a logical database in the program.
Figure 71: AT SELECTION-SCREEN Event
The system processes the event AT SELECTION-SCREEN after the selectionscreen has been sent and the user chooses Execute (for example, using F8).
You use the event for checking entries. The system checks the values that theuser entered on the selection screen, for example, from logical points of viewin the application.
It is important that the program reacts by sending a message if there is an error.To do this, you use the MESSAGE statement in ABAP. You assign messages tomessage classes. You have to enter the message class in the MESSAGE statement.You also have to determine the type of message. For error handling on theselection screen, you can choose either type E (error) or type W (warning). You
126 © 2007 SAP AG. All rights reserved. 2006/Q3
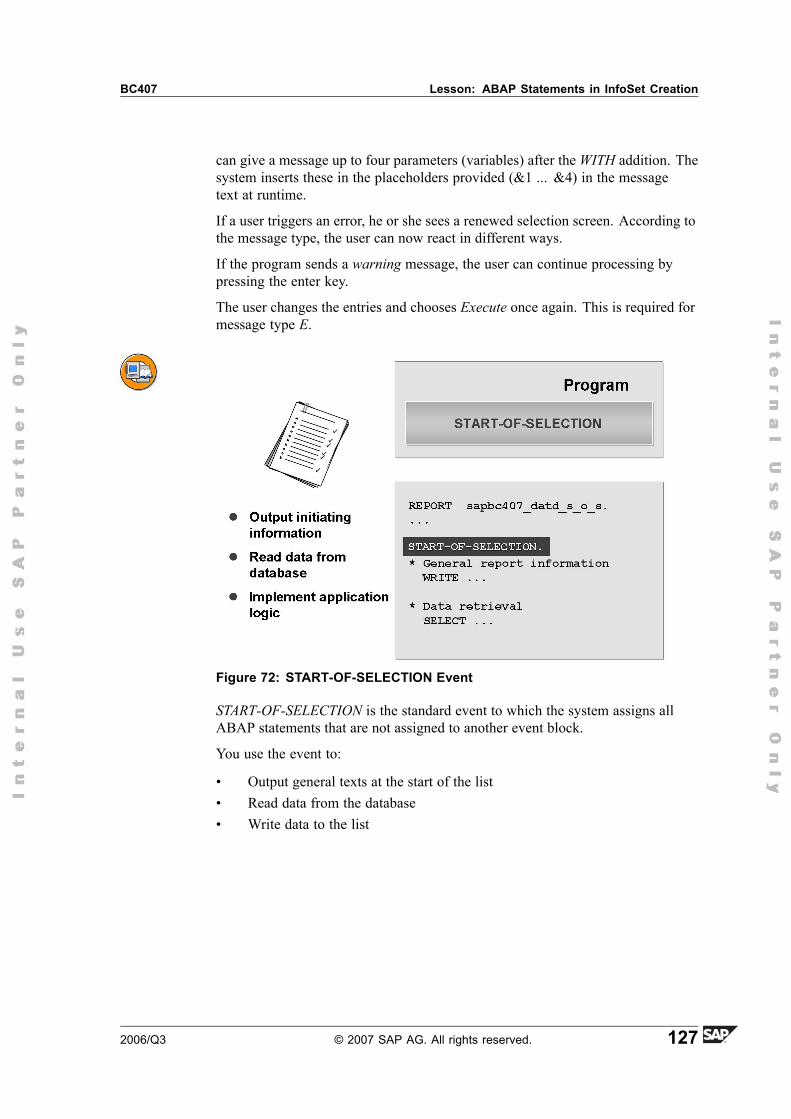
BC407 Lesson: ABAP Statements in InfoSet Creation
can give a message up to four parameters (variables) after theWITH addition. Thesystem inserts these in the placeholders provided (&1 ... &4) in the messagetext at runtime.
If a user triggers an error, he or she sees a renewed selection screen. According tothe message type, the user can now react in different ways.
If the program sends a warning message, the user can continue processing bypressing the enter key.
The user changes the entries and chooses Execute once again. This is required formessage type E.
Figure 72: START-OF-SELECTION Event
START-OF-SELECTION is the standard event to which the system assigns allABAP statements that are not assigned to another event block.
You use the event to:
� Output general texts at the start of the list� Read data from the database� Write data to the list
2006/Q3 © 2007 SAP AG. All rights reserved. 127
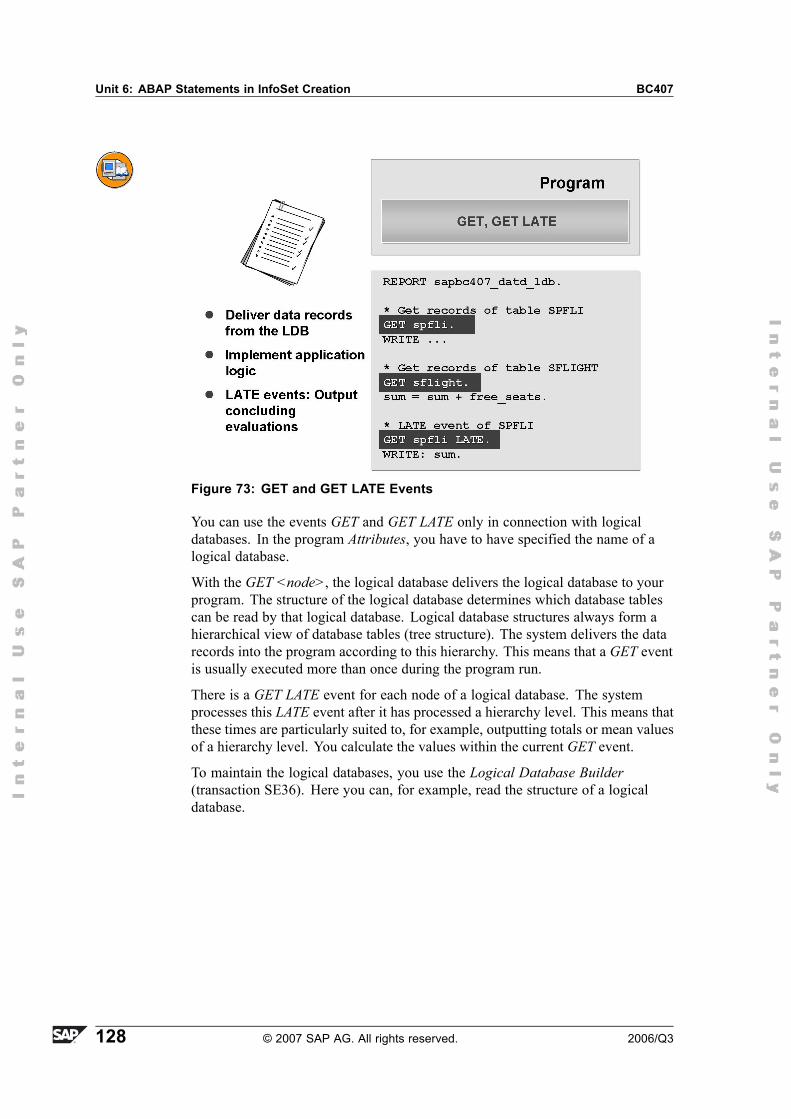
Unit 6: ABAP Statements in InfoSet Creation BC407
Figure 73: GET and GET LATE Events
You can use the events GET and GET LATE only in connection with logicaldatabases. In the program Attributes, you have to have specified the name of alogical database.
With the GET <node>, the logical database delivers the logical database to yourprogram. The structure of the logical database determines which database tablescan be read by that logical database. Logical database structures always form ahierarchical view of database tables (tree structure). The system delivers the datarecords into the program according to this hierarchy. This means that a GET eventis usually executed more than once during the program run.
There is a GET LATE event for each node of a logical database. The systemprocesses this LATE event after it has processed a hierarchy level. This means thatthese times are particularly suited to, for example, outputting totals or mean valuesof a hierarchy level. You calculate the values within the current GET event.
To maintain the logical databases, you use the Logical Database Builder(transaction SE36). Here you can, for example, read the structure of a logicaldatabase.
128 © 2007 SAP AG. All rights reserved. 2006/Q3
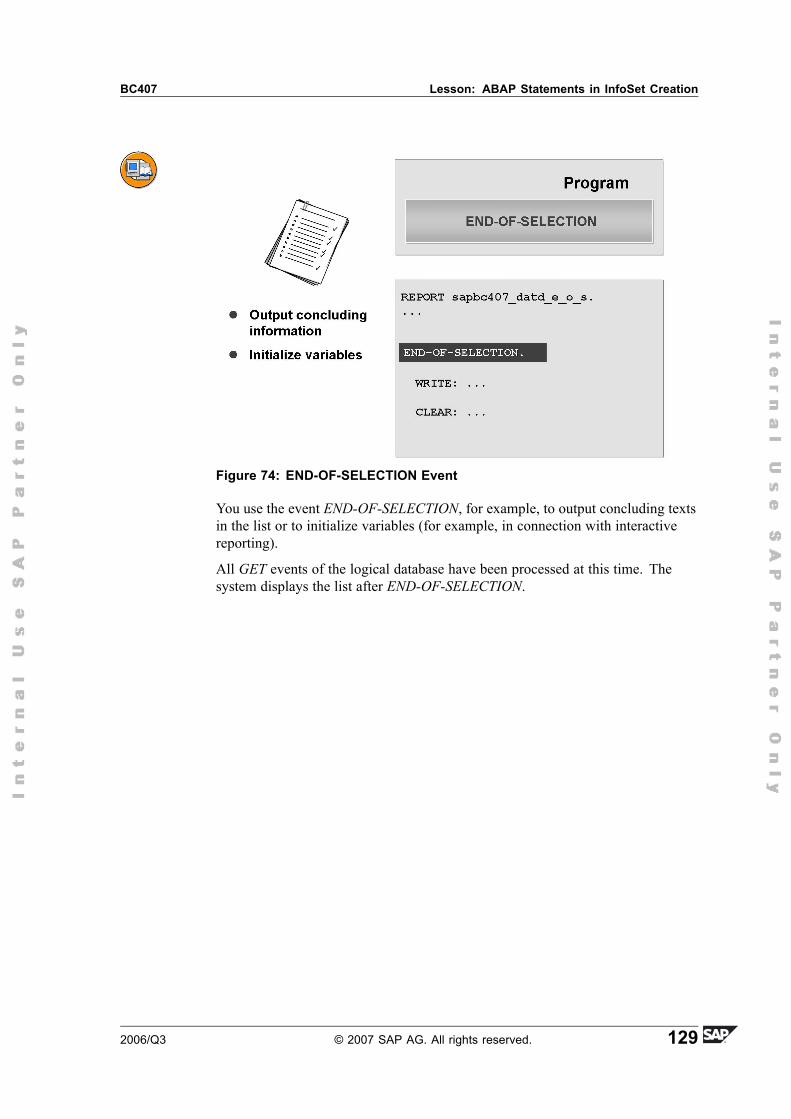
BC407 Lesson: ABAP Statements in InfoSet Creation
Figure 74: END-OF-SELECTION Event
You use the event END-OF-SELECTION, for example, to output concluding textsin the list or to initialize variables (for example, in connection with interactivereporting).
All GET events of the logical database have been processed at this time. Thesystem displays the list after END-OF-SELECTION.
2006/Q3 © 2007 SAP AG. All rights reserved. 129
Unit 6: ABAP Statements in InfoSet Creation BC407
Reading from the Database
Figure 75: Read Options
In general, the system reads data that is to appear in a list from the database.
You can use OPEN SQL statements to read data from the database. You programthe SELECT statement for this.
The use of a logical database program provides you with an excellent alternativeto programming the data retrieval yourself. Logical databases retrieve data recordsand make them available to ABAP programs for the GET events.
130 © 2007 SAP AG. All rights reserved. 2006/Q3
BC407 Lesson: ABAP Statements in InfoSet Creation
Figure 76: Structure of the SELECT Statement
The SELECT statement is structured in the following way:
In the SELECT clause, you name the fields of the database table that you want toread. If you program SELECT * this means that for each data record, the systemdelivers all columns of the database table to your program.
You specify the name of the database table to be read in the FROM clause. Youcan also list the name of a database view defined in the dictionary here.
In the INTO clause, you specify the target area in your ABAP program. The datarecords that are read are copied into here. If the target area does not correspond tothe entry in the SELECT clause, runtime errors occur.
In theWHERE clause, you specify the conditions that are valid for the data recordswhich are to be read. From the total of all saved data records, the system filters outthose that correspond to these conditions. In this way, you restrict the number ofdata records returned. This is very important with regards to program performance.
You close single record processing using the ENDSELECT statement.
2006/Q3 © 2007 SAP AG. All rights reserved. 131
Unit 6: ABAP Statements in InfoSet Creation BC407
Figure 77: Reading Data Records - Example
In this example, the system is reading data from the SFLIGHT database table. Allcolumns of the table are copied to the specified area wa_sflight, record by record.
Figure 78: Connection with the Selection Screen
To restrict datasets, program the WHERE clause.
The WHERE clause is structured so that you list on the left the names of the tablecolumns for which you want to formulate conditions. You then choose a relationaloperator. If you are making a comparison with a single value, use either EQ or =.If you are making a comparison with the contents of a selection table, you haveto use the IN operator.
The user fills the selection table on the selection screen. The user indicates therecords that he or she is interested in here.
132 © 2007 SAP AG. All rights reserved. 2006/Q3
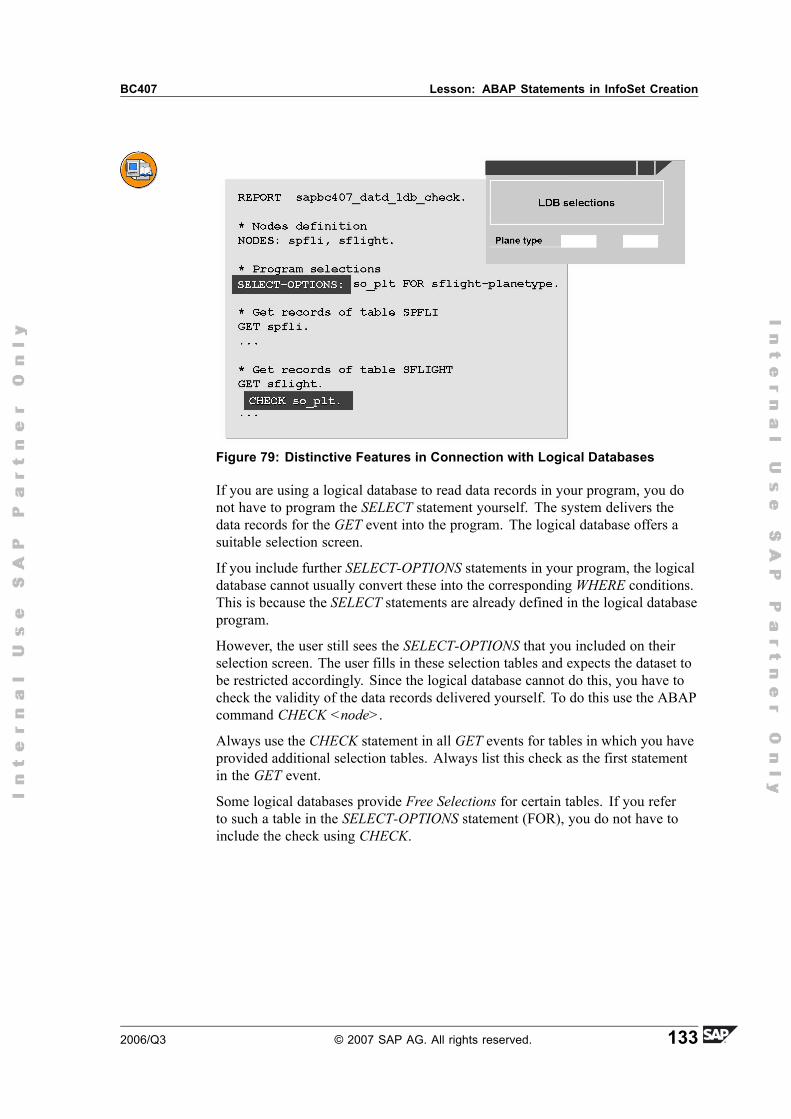
BC407 Lesson: ABAP Statements in InfoSet Creation
Figure 79: Distinctive Features in Connection with Logical Databases
If you are using a logical database to read data records in your program, you donot have to program the SELECT statement yourself. The system delivers thedata records for the GET event into the program. The logical database offers asuitable selection screen.
If you include further SELECT-OPTIONS statements in your program, the logicaldatabase cannot usually convert these into the corresponding WHERE conditions.This is because the SELECT statements are already defined in the logical databaseprogram.
However, the user still sees the SELECT-OPTIONS that you included on theirselection screen. The user fills in these selection tables and expects the dataset tobe restricted accordingly. Since the logical database cannot do this, you have tocheck the validity of the data records delivered yourself. To do this use the ABAPcommand CHECK <node>.
Always use the CHECK statement in all GET events for tables in which you haveprovided additional selection tables. Always list this check as the first statementin the GET event.
Some logical databases provide Free Selections for certain tables. If you referto such a table in the SELECT-OPTIONS statement (FOR), you do not have toinclude the check using CHECK.
2006/Q3 © 2007 SAP AG. All rights reserved. 133

Unit 6: ABAP Statements in InfoSet Creation BC407
134 © 2007 SAP AG. All rights reserved. 2006/Q3
BC407 Lesson: ABAP Statements in InfoSet Creation
Exercise 10: ABAP Statements in InfoSetCreation (optional)
Exercise ObjectivesAfter completing this exercise, you will be able to:� Program basic ABAP report commands
Business ExampleYour task: Enhance a program template so that, in accordance with the userentries on the selection screen, data records of the flight table FLIGHT are read.
Template Program ZBC407_PROGRAM_##
Model Solution: Program SAPBC407_DATS_1_OPT
Task:Start Editor
1. Start the ABAP Editor using transaction SE38. In the Program field, enterZBC407_PROGRAM_## . ## stands for your group number.
Hint: The program is already created for you in packageZBC407_## and you can continue to edit it directly. You do nothave to copy the template.
You choose Change to reach program maintenance.
The most important rules for ABAP commands:
� You end every ABAP command with a period.� Upper-case and lower-case is irrelevant.
Exception: Text literals in quotation marks.
� An * in the first column of a line indicates this as a comment.
The most important keyboard shortcuts are:
� Ctrl-S: Save� Ctrl-F2: Syntax check� F8:Test program� Ctrl-F8: ABAP help
2. Declare data
Continued on next page
2006/Q3 © 2007 SAP AG. All rights reserved. 135
Unit 6: ABAP Statements in InfoSet Creation BC407
You need a work area for reading data from the SFLIGHT database table.Create a work area with the name WA_SFLIGHT and type it accordingly.
Hint: An English comment indicates the places where you have toinclude ABAP statements in the program.
3. Define selection screen
The user has to be able to enter one or more airlines on the selection screen.Create a selection called SO_CAR for this and type it with reference to thefield CARRID of the work area you created. Make sure that the user hasto enter at least one airline.
4. Validate user input
One of the airlines you specified is on strike. When a user selects this airline,a warning message should be displayed: �Airline XYZ is on strike.�
Implement the check for event AT SELECTION-SCREEN using an IFstatement. Send message 012 of message class BC407 if the airline which ison strike is implied in the selection table. Use the MESSAGE statement togive the name of the airline as a parameter.
5. Read data from the database. Program the data selection for the eventSTART-OF-SELECTION. All data that matches the user entries on theselection screen is to be read from the table SFLIGHT to the work areaWA_SLFIGHT. Program a SELECT command with a suitable FROM-,INTO- and WHERE clause.
6. Output data
Within the SELECT ... ENDSELECT statement, output the following workarea fields: CARRID, CONNID, FLDATE, PLANETYPE, SEATSMAXand SEATSOCC
Hint: Use the command WRITE: / wa_sflight...
7. Predefine the selection screen
Provide an interval of your choice on the selection screen as a default.
8. Create Variant
Create a variant for your program. Start the program with this variant.
136 © 2007 SAP AG. All rights reserved. 2006/Q3
BC407 Lesson: ABAP Statements in InfoSet Creation
Solution 10: ABAP Statements in InfoSetCreation (optional)Task:Start Editor
1. Start the ABAP Editor using transaction SE38. In the Program field, enterZBC407_PROGRAM_## . ## stands for your group number.
Hint: The program is already created for you in packageZBC407_## and you can continue to edit it directly. You do nothave to copy the template.
You choose Change to reach program maintenance.
The most important rules for ABAP commands:
� You end every ABAP command with a period.� Upper-case and lower-case is irrelevant.
Exception: Text literals in quotation marks.
� An * in the first column of a line indicates this as a comment.
The most important keyboard shortcuts are:
� Ctrl-S: Save� Ctrl-F2: Syntax check� F8:Test program� Ctrl-F8: ABAP help
a) Start the ABAP Editor using transaction SE38. In the Program field,enter ZBC407_PROGRAM_## . ## stands for your group number.
The complete program is as follows:
REPORT sapbc407_dats_1_opt.
* Data declarations
* Datendeklarationen
DATA:
wa_sflight TYPE sflight.
* Selection-screen
* Selektionsbild
SELECT-OPTIONS:
Continued on next page
2006/Q3 © 2007 SAP AG. All rights reserved. 137
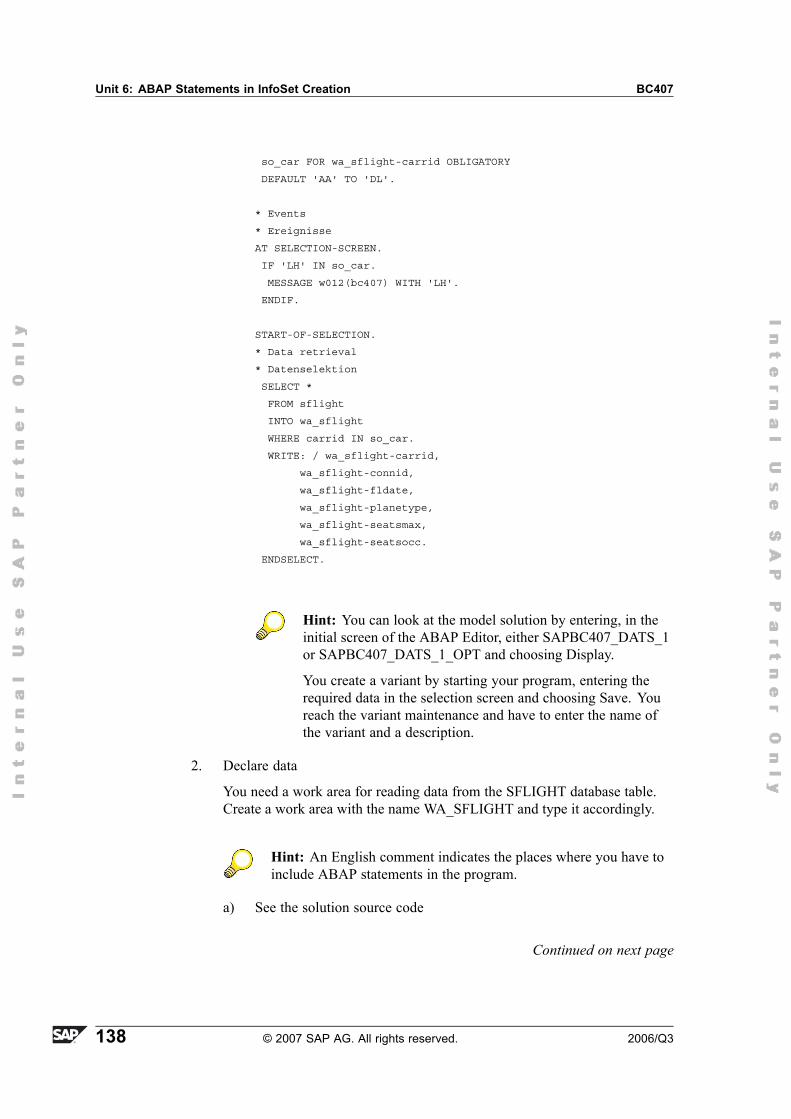
Unit 6: ABAP Statements in InfoSet Creation BC407
so_car FOR wa_sflight-carrid OBLIGATORY
DEFAULT 'AA' TO 'DL'.
* Events
* Ereignisse
AT SELECTION-SCREEN.
IF 'LH' IN so_car.
MESSAGE w012(bc407) WITH 'LH'.
ENDIF.
START-OF-SELECTION.
* Data retrieval
* Datenselektion
SELECT *
FROM sflight
INTO wa_sflight
WHERE carrid IN so_car.
WRITE: / wa_sflight-carrid,
wa_sflight-connid,
wa_sflight-fldate,
wa_sflight-planetype,
wa_sflight-seatsmax,
wa_sflight-seatsocc.
ENDSELECT.
Hint: You can look at the model solution by entering, in theinitial screen of the ABAP Editor, either SAPBC407_DATS_1or SAPBC407_DATS_1_OPT and choosing Display.
You create a variant by starting your program, entering therequired data in the selection screen and choosing Save. Youreach the variant maintenance and have to enter the name ofthe variant and a description.
2. Declare data
You need a work area for reading data from the SFLIGHT database table.Create a work area with the name WA_SFLIGHT and type it accordingly.
Hint: An English comment indicates the places where you have toinclude ABAP statements in the program.
a) See the solution source code
Continued on next page
138 © 2007 SAP AG. All rights reserved. 2006/Q3
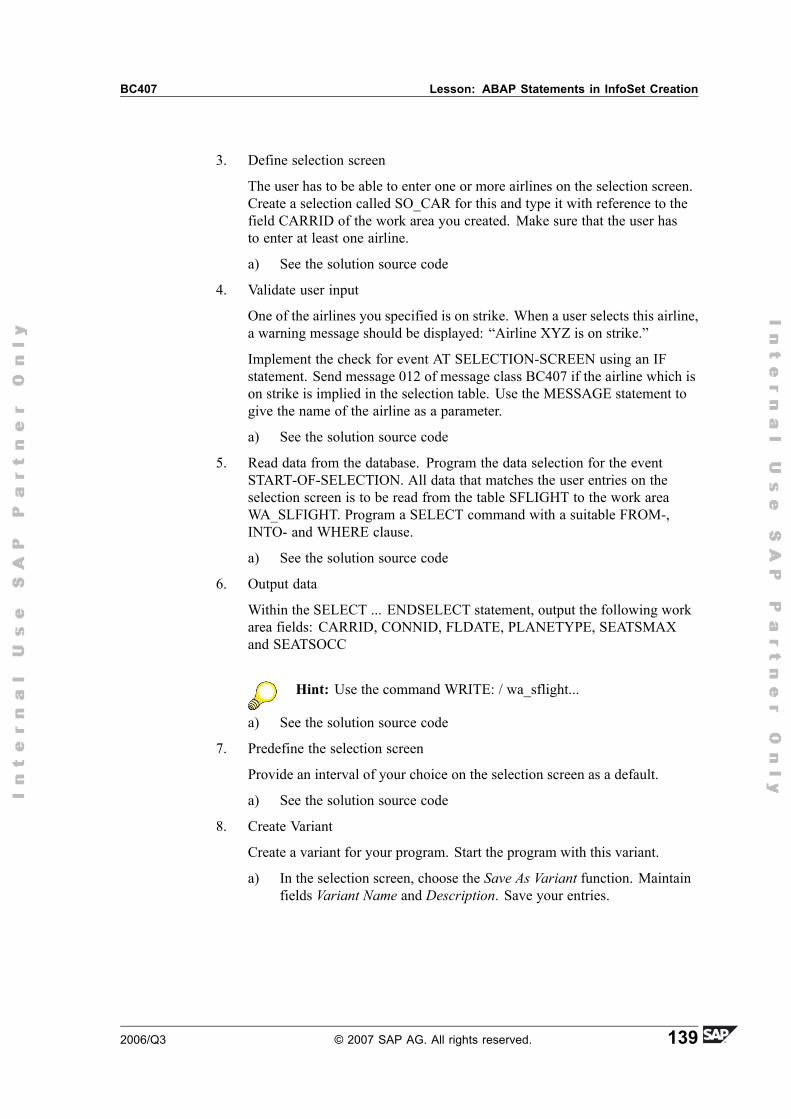
BC407 Lesson: ABAP Statements in InfoSet Creation
3. Define selection screen
The user has to be able to enter one or more airlines on the selection screen.Create a selection called SO_CAR for this and type it with reference to thefield CARRID of the work area you created. Make sure that the user hasto enter at least one airline.
a) See the solution source code
4. Validate user input
One of the airlines you specified is on strike. When a user selects this airline,a warning message should be displayed: �Airline XYZ is on strike.�
Implement the check for event AT SELECTION-SCREEN using an IFstatement. Send message 012 of message class BC407 if the airline which ison strike is implied in the selection table. Use the MESSAGE statement togive the name of the airline as a parameter.
a) See the solution source code
5. Read data from the database. Program the data selection for the eventSTART-OF-SELECTION. All data that matches the user entries on theselection screen is to be read from the table SFLIGHT to the work areaWA_SLFIGHT. Program a SELECT command with a suitable FROM-,INTO- and WHERE clause.
a) See the solution source code
6. Output data
Within the SELECT ... ENDSELECT statement, output the following workarea fields: CARRID, CONNID, FLDATE, PLANETYPE, SEATSMAXand SEATSOCC
Hint: Use the command WRITE: / wa_sflight...
a) See the solution source code
7. Predefine the selection screen
Provide an interval of your choice on the selection screen as a default.
a) See the solution source code
8. Create Variant
Create a variant for your program. Start the program with this variant.
a) In the selection screen, choose the Save As Variant function. Maintainfields Variant Name and Description. Save your entries.
2006/Q3 © 2007 SAP AG. All rights reserved. 139
Unit 6: ABAP Statements in InfoSet Creation BC407
Lesson Summary
You should now be able to:� Define data in an ABAP program� Create simple selection screens� Check Data� Explain the event concept� Create simple SELECT statements
140 © 2007 SAP AG. All rights reserved. 2006/Q3
BC407 Unit Summary
Unit SummaryYou should now be able to:� Define data in an ABAP program� Create simple selection screens� Check Data� Explain the event concept� Create simple SELECT statements
2006/Q3 © 2007 SAP AG. All rights reserved. 141

Unit Summary BC407
142 © 2007 SAP AG. All rights reserved. 2006/Q3
Unit 7Creating InfoSets
Unit OverviewIn this unit, you will learn how to create InfoSets and make them available forquery developers.
Unit ObjectivesAfter completing this unit, you will be able to:
� Creating InfoSets� Insert additional tables and fields� Define the selection field� Check Data� Program ABAP in the InfoSet
Unit ContentsLesson: Creating InfoSets ... . . . . . . . . . . . . . . . . . . . . . . . . . . . . . . . . . . . . . . . . . . . . . . . . . .144
Exercise 11: Creating an InfoSet Using a Table Join ... . . . . . . . . . . . . . . .159Exercise 12: Creating an InfoSet Using a Logical Database .. . . . . . . .165
2006/Q3 © 2007 SAP AG. All rights reserved. 143
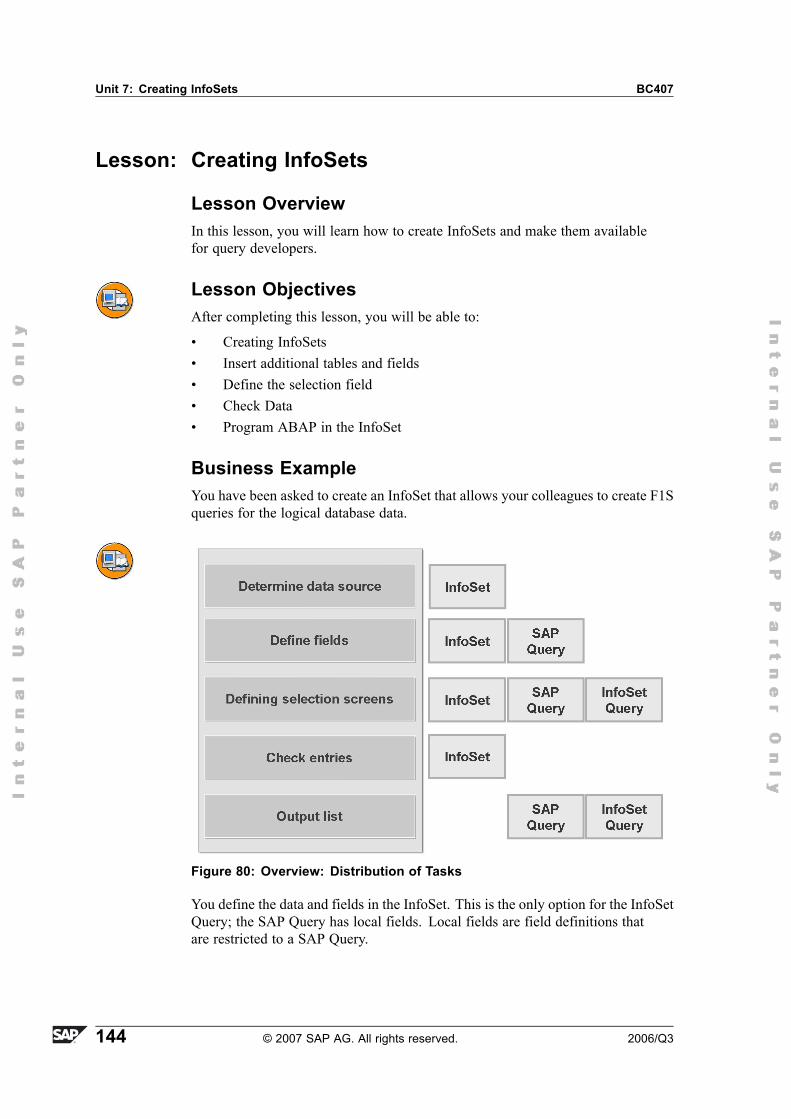
Unit 7: Creating InfoSets BC407
Lesson: Creating InfoSets
Lesson OverviewIn this lesson, you will learn how to create InfoSets and make them availablefor query developers.
Lesson ObjectivesAfter completing this lesson, you will be able to:
� Creating InfoSets� Insert additional tables and fields� Define the selection field� Check Data� Program ABAP in the InfoSet
Business ExampleYou have been asked to create an InfoSet that allows your colleagues to create F1Squeries for the logical database data.
Figure 80: Overview: Distribution of Tasks
You define the data and fields in the InfoSet. This is the only option for the InfoSetQuery; the SAP Query has local fields. Local fields are field definitions thatare restricted to a SAP Query.
144 © 2007 SAP AG. All rights reserved. 2006/Q3
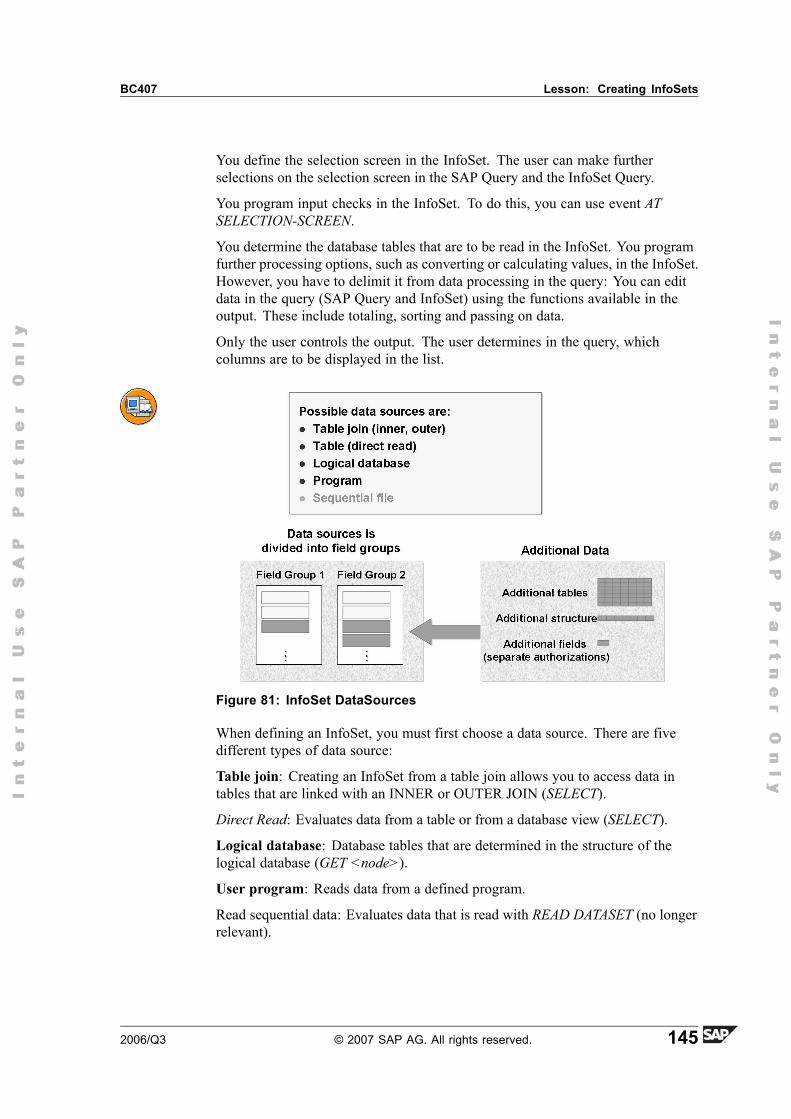
BC407 Lesson: Creating InfoSets
You define the selection screen in the InfoSet. The user can make furtherselections on the selection screen in the SAP Query and the InfoSet Query.
You program input checks in the InfoSet. To do this, you can use event ATSELECTION-SCREEN.
You determine the database tables that are to be read in the InfoSet. You programfurther processing options, such as converting or calculating values, in the InfoSet.However, you have to delimit it from data processing in the query: You can editdata in the query (SAP Query and InfoSet) using the functions available in theoutput. These include totaling, sorting and passing on data.
Only the user controls the output. The user determines in the query, whichcolumns are to be displayed in the list.
Figure 81: InfoSet DataSources
When defining an InfoSet, you must first choose a data source. There are fivedifferent types of data source:
Table join: Creating an InfoSet from a table join allows you to access data intables that are linked with an INNER or OUTER JOIN (SELECT).
Direct Read: Evaluates data from a table or from a database view (SELECT).
Logical database: Database tables that are determined in the structure of thelogical database (GET <node>).
User program: Reads data from a defined program.
Read sequential data: Evaluates data that is read with READ DATASET (no longerrelevant).
2006/Q3 © 2007 SAP AG. All rights reserved. 145
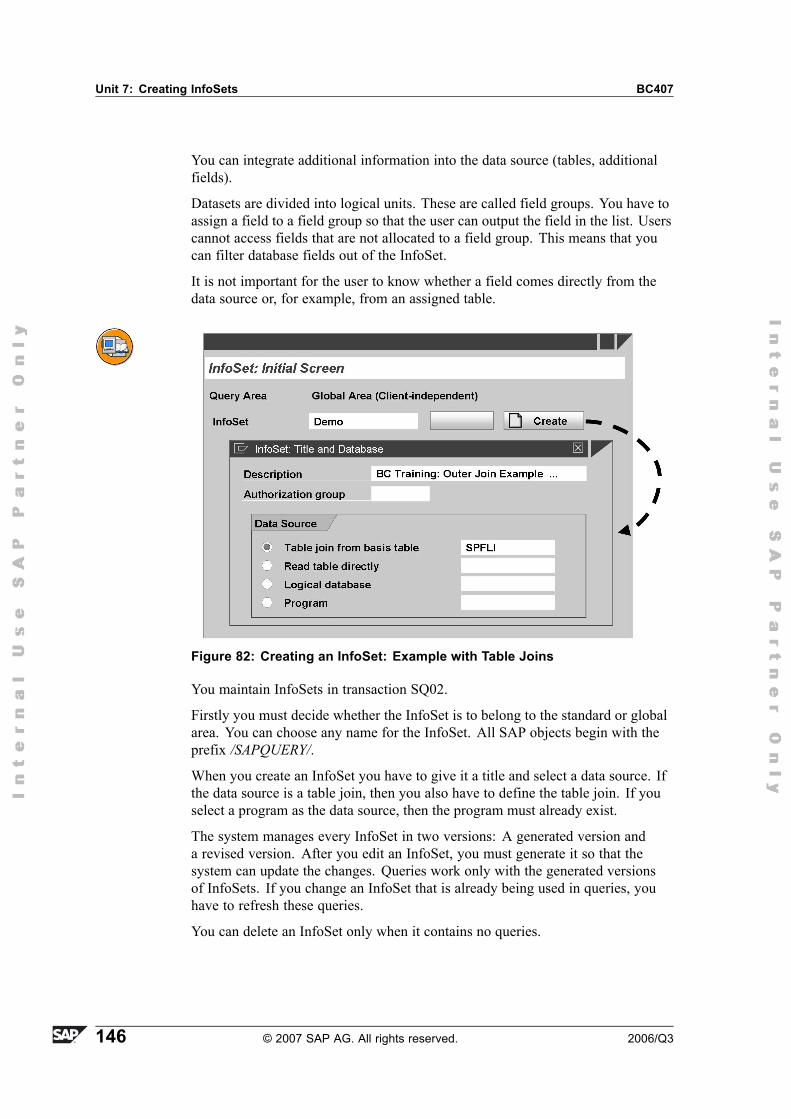
Unit 7: Creating InfoSets BC407
You can integrate additional information into the data source (tables, additionalfields).
Datasets are divided into logical units. These are called field groups. You have toassign a field to a field group so that the user can output the field in the list. Userscannot access fields that are not allocated to a field group. This means that youcan filter database fields out of the InfoSet.
It is not important for the user to know whether a field comes directly from thedata source or, for example, from an assigned table.
Figure 82: Creating an InfoSet: Example with Table Joins
You maintain InfoSets in transaction SQ02.
Firstly you must decide whether the InfoSet is to belong to the standard or globalarea. You can choose any name for the InfoSet. All SAP objects begin with theprefix /SAPQUERY/.
When you create an InfoSet you have to give it a title and select a data source. Ifthe data source is a table join, then you also have to define the table join. If youselect a program as the data source, then the program must already exist.
The system manages every InfoSet in two versions: A generated version anda revised version. After you edit an InfoSet, you must generate it so that thesystem can update the changes. Queries work only with the generated versionsof InfoSets. If you change an InfoSet that is already being used in queries, youhave to refresh these queries.
You can delete an InfoSet only when it contains no queries.
146 © 2007 SAP AG. All rights reserved. 2006/Q3
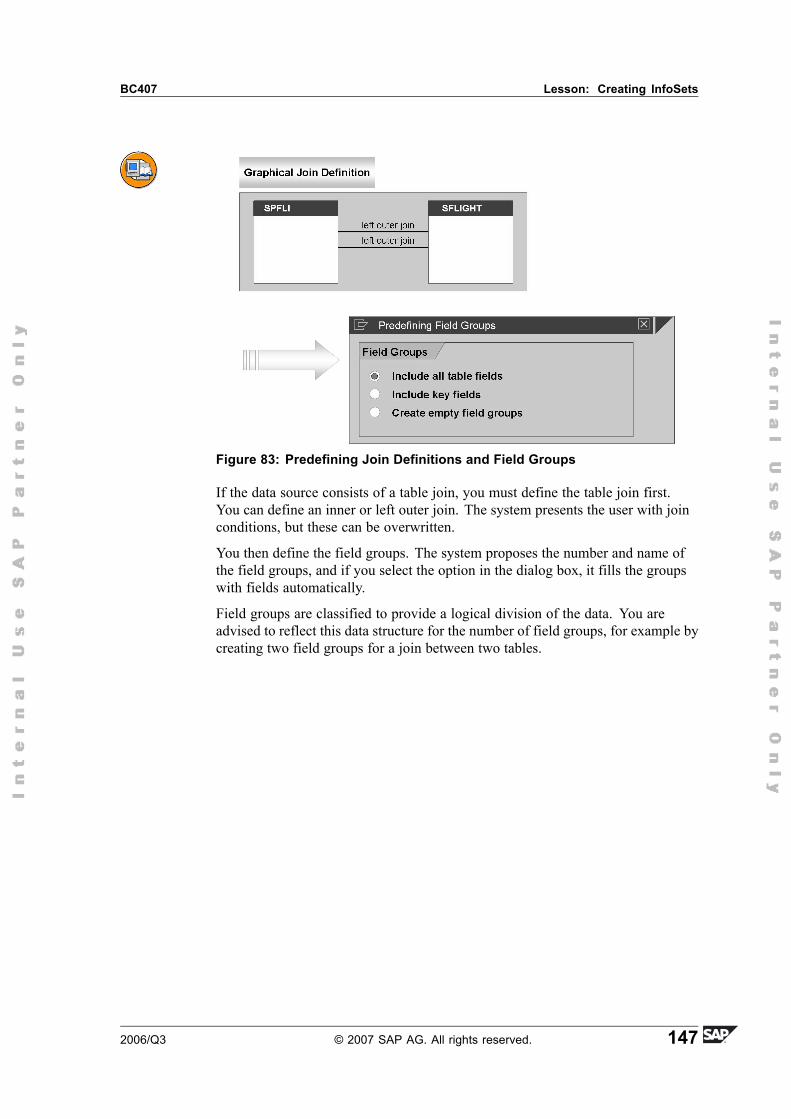
BC407 Lesson: Creating InfoSets
Figure 83: Predefining Join Definitions and Field Groups
If the data source consists of a table join, you must define the table join first.You can define an inner or left outer join. The system presents the user with joinconditions, but these can be overwritten.
You then define the field groups. The system proposes the number and name ofthe field groups, and if you select the option in the dialog box, it fills the groupswith fields automatically.
Field groups are classified to provide a logical division of the data. You areadvised to reflect this data structure for the number of field groups, for example bycreating two field groups for a join between two tables.
2006/Q3 © 2007 SAP AG. All rights reserved. 147
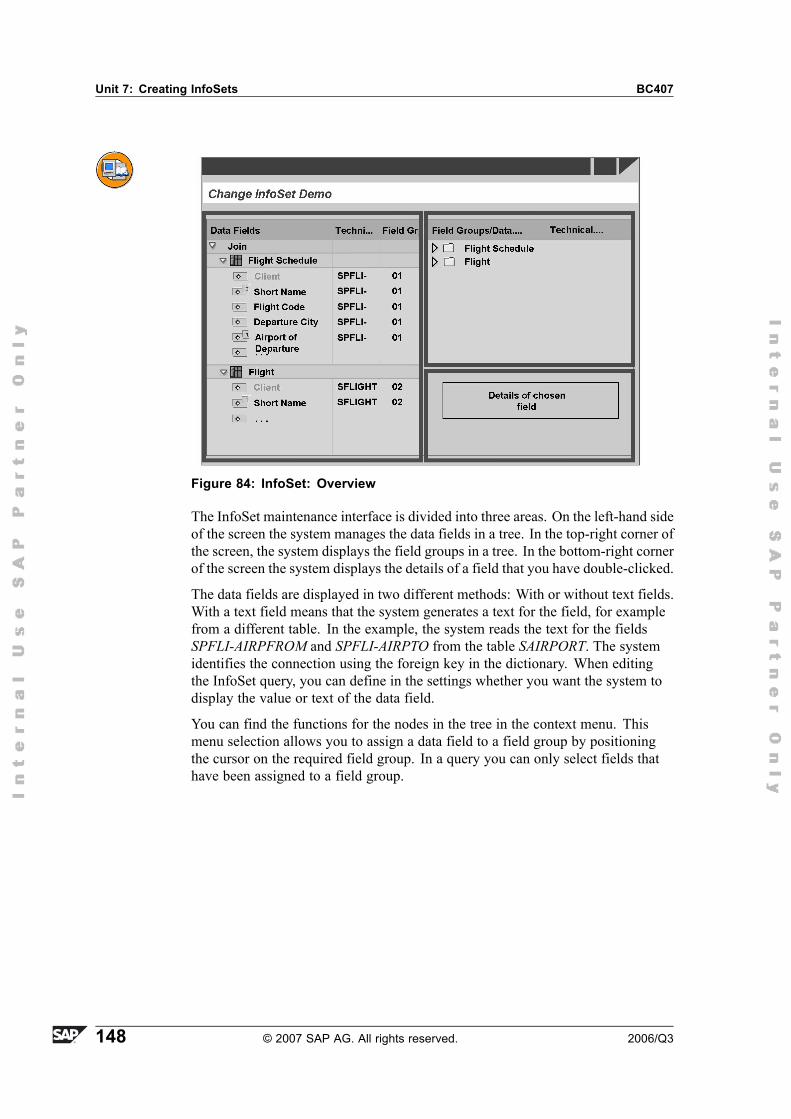
Unit 7: Creating InfoSets BC407
Figure 84: InfoSet: Overview
The InfoSet maintenance interface is divided into three areas. On the left-hand sideof the screen the system manages the data fields in a tree. In the top-right corner ofthe screen, the system displays the field groups in a tree. In the bottom-right cornerof the screen the system displays the details of a field that you have double-clicked.
The data fields are displayed in two different methods: With or without text fields.With a text field means that the system generates a text for the field, for examplefrom a different table. In the example, the system reads the text for the fieldsSPFLI-AIRPFROM and SPFLI-AIRPTO from the table SAIRPORT. The systemidentifies the connection using the foreign key in the dictionary. When editingthe InfoSet query, you can define in the settings whether you want the system todisplay the value or text of the data field.
You can find the functions for the nodes in the tree in the context menu. Thismenu selection allows you to assign a data field to a field group by positioningthe cursor on the required field group. In a query you can only select fields thathave been assigned to a field group.
148 © 2007 SAP AG. All rights reserved. 2006/Q3
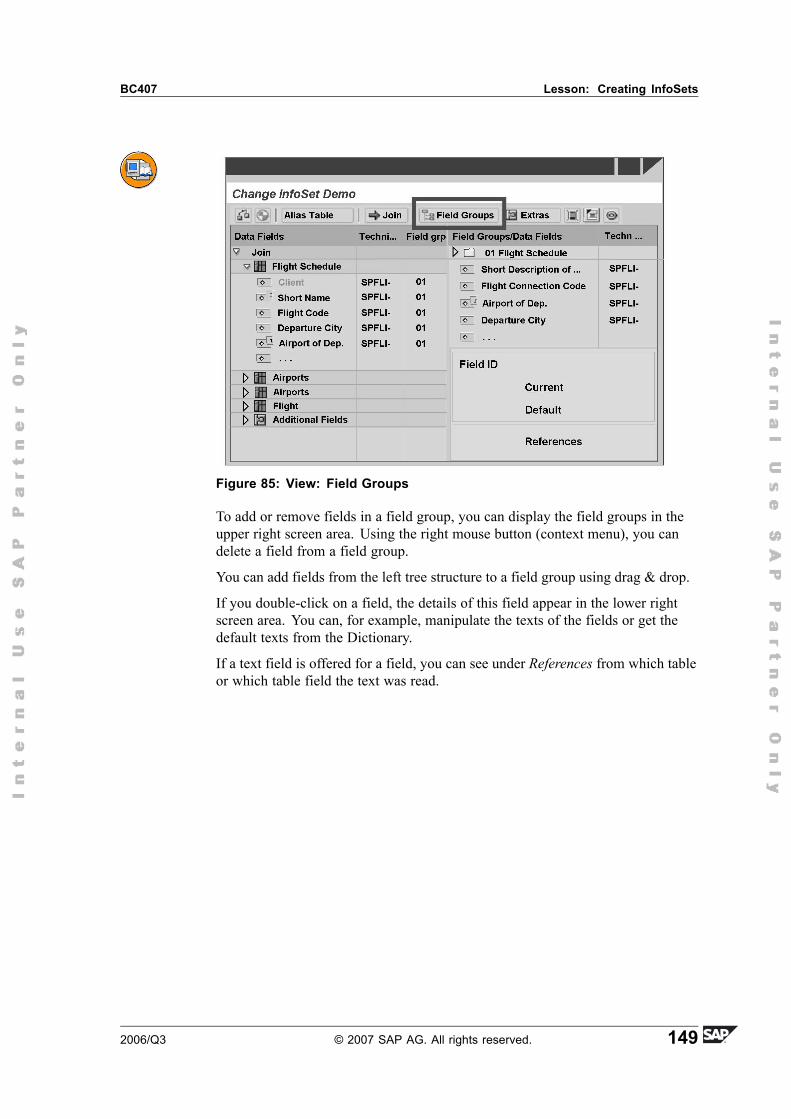
BC407 Lesson: Creating InfoSets
Figure 85: View: Field Groups
To add or remove fields in a field group, you can display the field groups in theupper right screen area. Using the right mouse button (context menu), you candelete a field from a field group.
You can add fields from the left tree structure to a field group using drag & drop.
If you double-click on a field, the details of this field appear in the lower rightscreen area. You can, for example, manipulate the texts of the fields or get thedefault texts from the Dictionary.
If a text field is offered for a field, you can see under References from which tableor which table field the text was read.
2006/Q3 © 2007 SAP AG. All rights reserved. 149
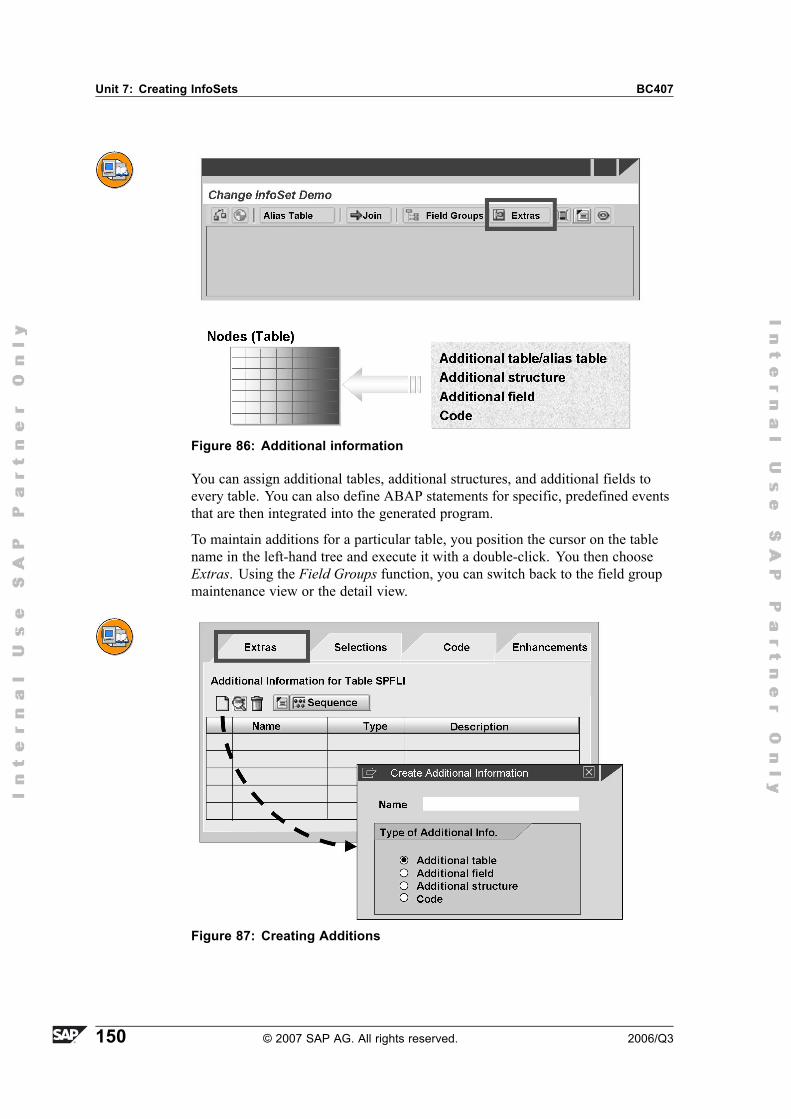
Unit 7: Creating InfoSets BC407
Figure 86: Additional information
You can assign additional tables, additional structures, and additional fields toevery table. You can also define ABAP statements for specific, predefined eventsthat are then integrated into the generated program.
To maintain additions for a particular table, you position the cursor on the tablename in the left-hand tree and execute it with a double-click. You then chooseExtras. Using the Field Groups function, you can switch back to the field groupmaintenance view or the detail view.
Figure 87: Creating Additions
150 © 2007 SAP AG. All rights reserved. 2006/Q3
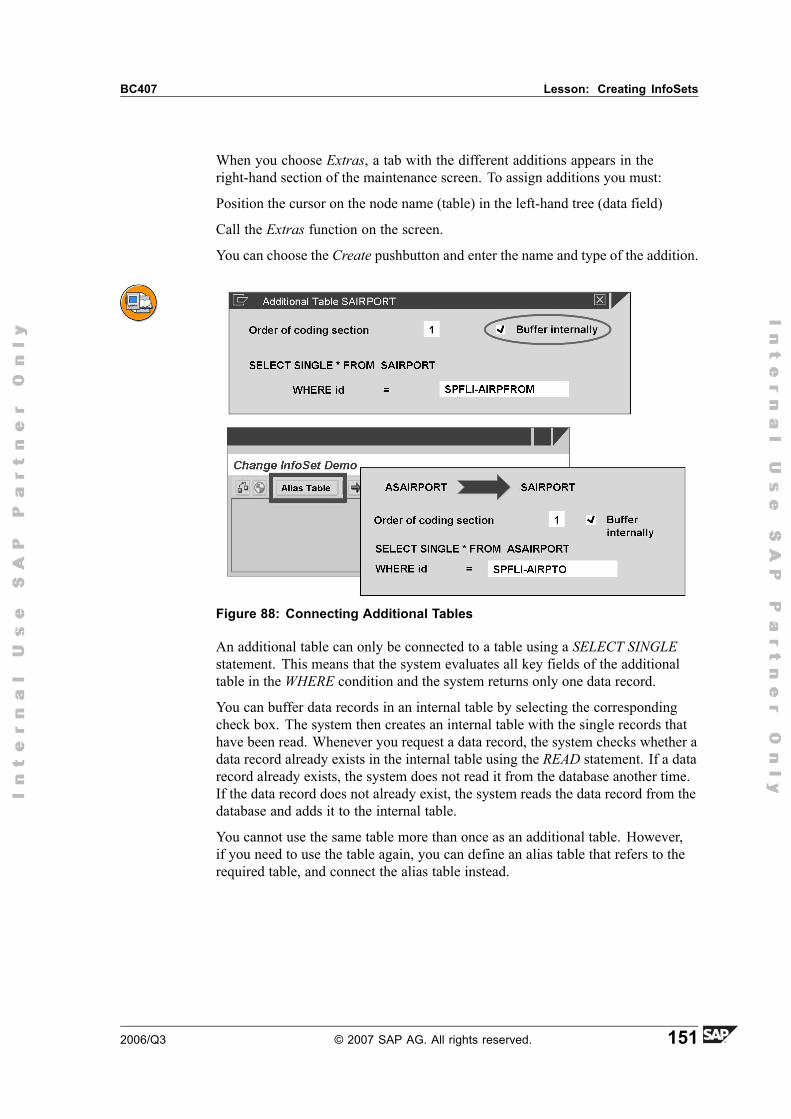
BC407 Lesson: Creating InfoSets
When you choose Extras, a tab with the different additions appears in theright-hand section of the maintenance screen. To assign additions you must:
Position the cursor on the node name (table) in the left-hand tree (data field)
Call the Extras function on the screen.
You can choose the Create pushbutton and enter the name and type of the addition.
Figure 88: Connecting Additional Tables
An additional table can only be connected to a table using a SELECT SINGLEstatement. This means that the system evaluates all key fields of the additionaltable in the WHERE condition and the system returns only one data record.
You can buffer data records in an internal table by selecting the correspondingcheck box. The system then creates an internal table with the single records thathave been read. Whenever you request a data record, the system checks whether adata record already exists in the internal table using the READ statement. If a datarecord already exists, the system does not read it from the database another time.If the data record does not already exist, the system reads the data record from thedatabase and adds it to the internal table.
You cannot use the same table more than once as an additional table. However,if you need to use the table again, you can define an alias table that refers to therequired table, and connect the alias table instead.
2006/Q3 © 2007 SAP AG. All rights reserved. 151
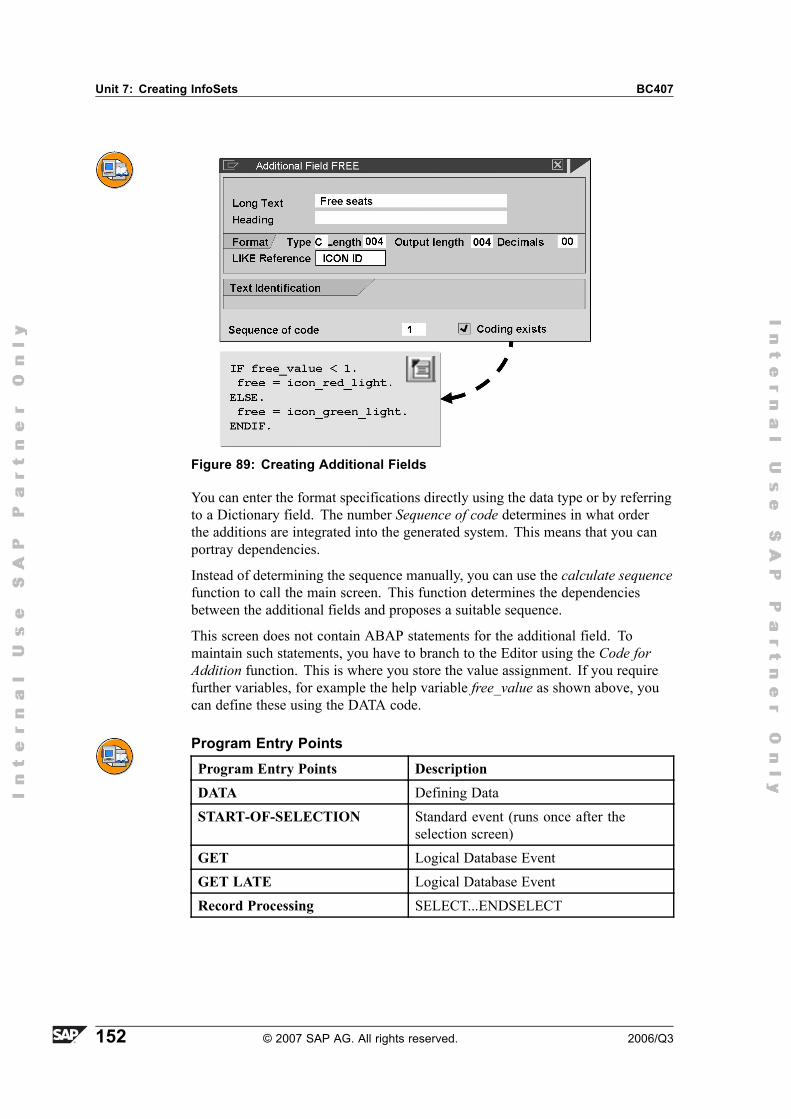
Unit 7: Creating InfoSets BC407
Figure 89: Creating Additional Fields
You can enter the format specifications directly using the data type or by referringto a Dictionary field. The number Sequence of code determines in what orderthe additions are integrated into the generated system. This means that you canportray dependencies.
Instead of determining the sequence manually, you can use the calculate sequencefunction to call the main screen. This function determines the dependenciesbetween the additional fields and proposes a suitable sequence.
This screen does not contain ABAP statements for the additional field. Tomaintain such statements, you have to branch to the Editor using the Code forAddition function. This is where you store the value assignment. If you requirefurther variables, for example the help variable free_value as shown above, youcan define these using the DATA code.
Program Entry PointsProgram Entry Points DescriptionDATA Defining DataSTART-OF-SELECTION Standard event (runs once after the
selection screen)GET Logical Database EventGET LATE Logical Database EventRecord Processing SELECT...ENDSELECT
152 © 2007 SAP AG. All rights reserved. 2006/Q3
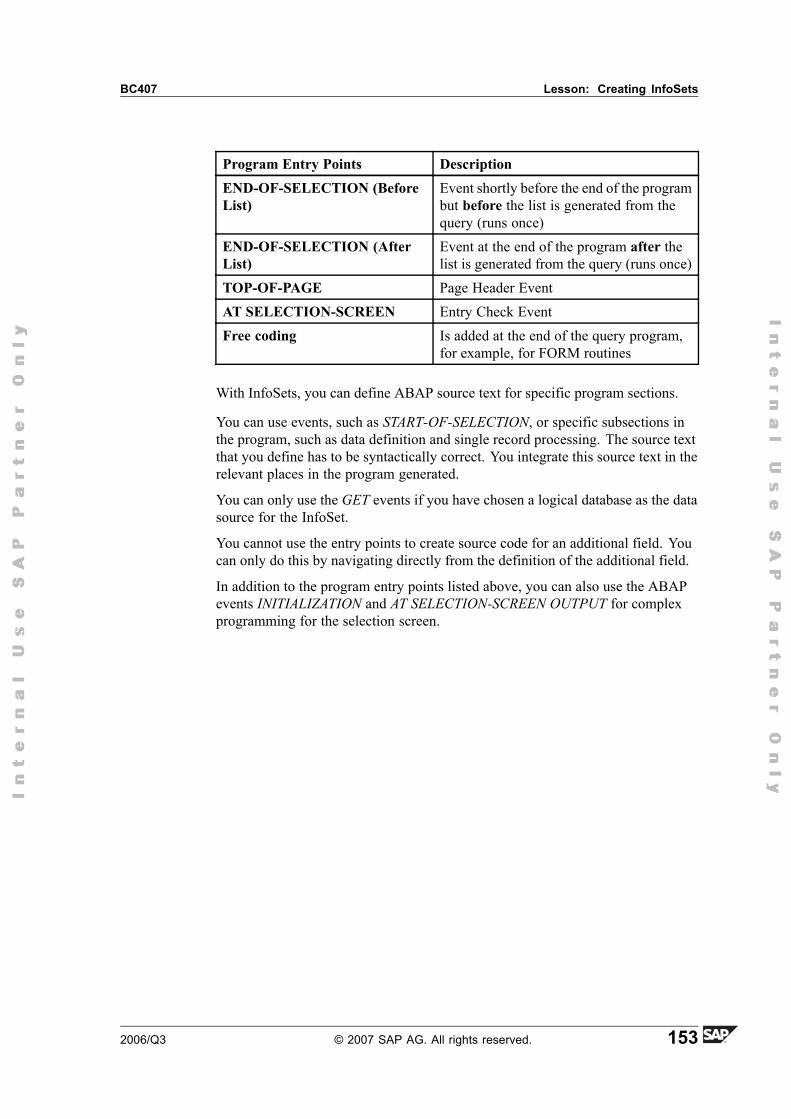
BC407 Lesson: Creating InfoSets
Program Entry Points DescriptionEND-OF-SELECTION (BeforeList)
Event shortly before the end of the programbut before the list is generated from thequery (runs once)
END-OF-SELECTION (AfterList)
Event at the end of the program after thelist is generated from the query (runs once)
TOP-OF-PAGE Page Header EventAT SELECTION-SCREEN Entry Check EventFree coding Is added at the end of the query program,
for example, for FORM routines
With InfoSets, you can define ABAP source text for specific program sections.
You can use events, such as START-OF-SELECTION, or specific subsections inthe program, such as data definition and single record processing. The source textthat you define has to be syntactically correct. You integrate this source text in therelevant places in the program generated.
You can only use the GET events if you have chosen a logical database as the datasource for the InfoSet.
You cannot use the entry points to create source code for an additional field. Youcan only do this by navigating directly from the definition of the additional field.
In addition to the program entry points listed above, you can also use the ABAPevents INITIALIZATION and AT SELECTION-SCREEN OUTPUT for complexprogramming for the selection screen.
2006/Q3 © 2007 SAP AG. All rights reserved. 153
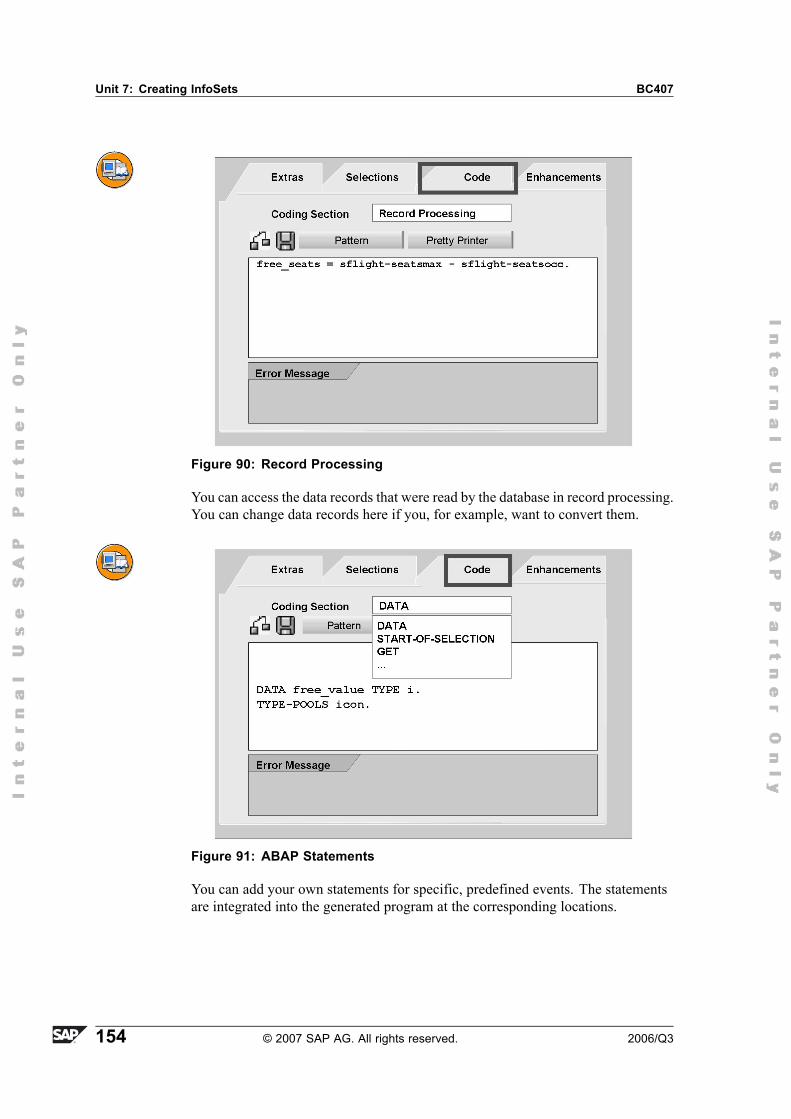
Unit 7: Creating InfoSets BC407
Figure 90: Record Processing
You can access the data records that were read by the database in record processing.You can change data records here if you, for example, want to convert them.
Figure 91: ABAP Statements
You can add your own statements for specific, predefined events. The statementsare integrated into the generated program at the corresponding locations.
154 © 2007 SAP AG. All rights reserved. 2006/Q3
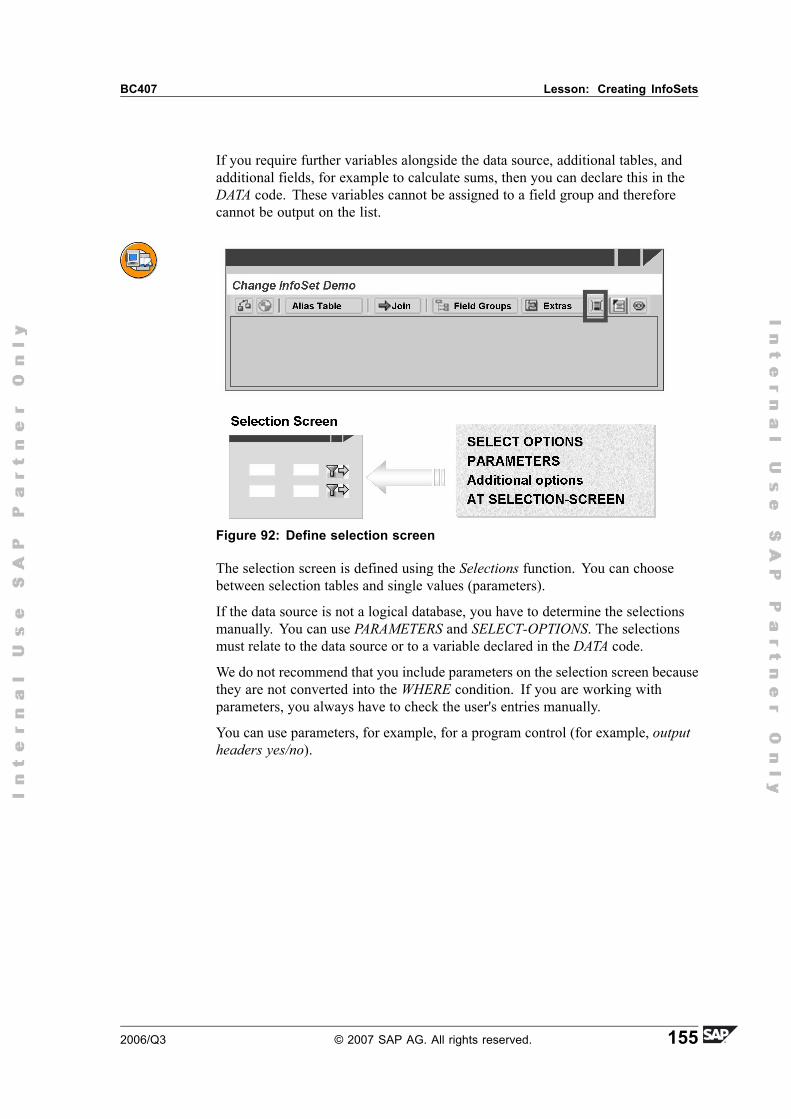
BC407 Lesson: Creating InfoSets
If you require further variables alongside the data source, additional tables, andadditional fields, for example to calculate sums, then you can declare this in theDATA code. These variables cannot be assigned to a field group and thereforecannot be output on the list.
Figure 92: Define selection screen
The selection screen is defined using the Selections function. You can choosebetween selection tables and single values (parameters).
If the data source is not a logical database, you have to determine the selectionsmanually. You can use PARAMETERS and SELECT-OPTIONS. The selectionsmust relate to the data source or to a variable declared in the DATA code.
We do not recommend that you include parameters on the selection screen becausethey are not converted into the WHERE condition. If you are working withparameters, you always have to check the user's entries manually.
You can use parameters, for example, for a program control (for example, outputheaders yes/no).
2006/Q3 © 2007 SAP AG. All rights reserved. 155
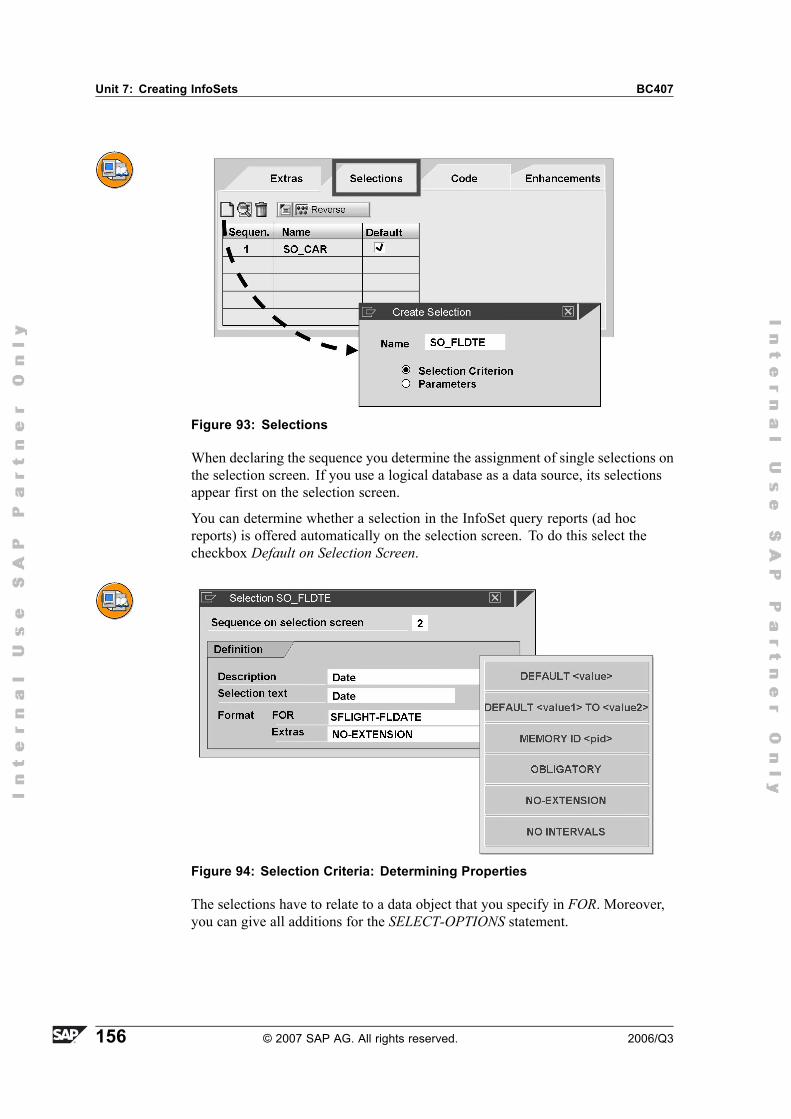
Unit 7: Creating InfoSets BC407
Figure 93: Selections
When declaring the sequence you determine the assignment of single selections onthe selection screen. If you use a logical database as a data source, its selectionsappear first on the selection screen.
You can determine whether a selection in the InfoSet query reports (ad hocreports) is offered automatically on the selection screen. To do this select thecheckbox Default on Selection Screen.
Figure 94: Selection Criteria: Determining Properties
The selections have to relate to a data object that you specify in FOR. Moreover,you can give all additions for the SELECT-OPTIONS statement.
156 © 2007 SAP AG. All rights reserved. 2006/Q3
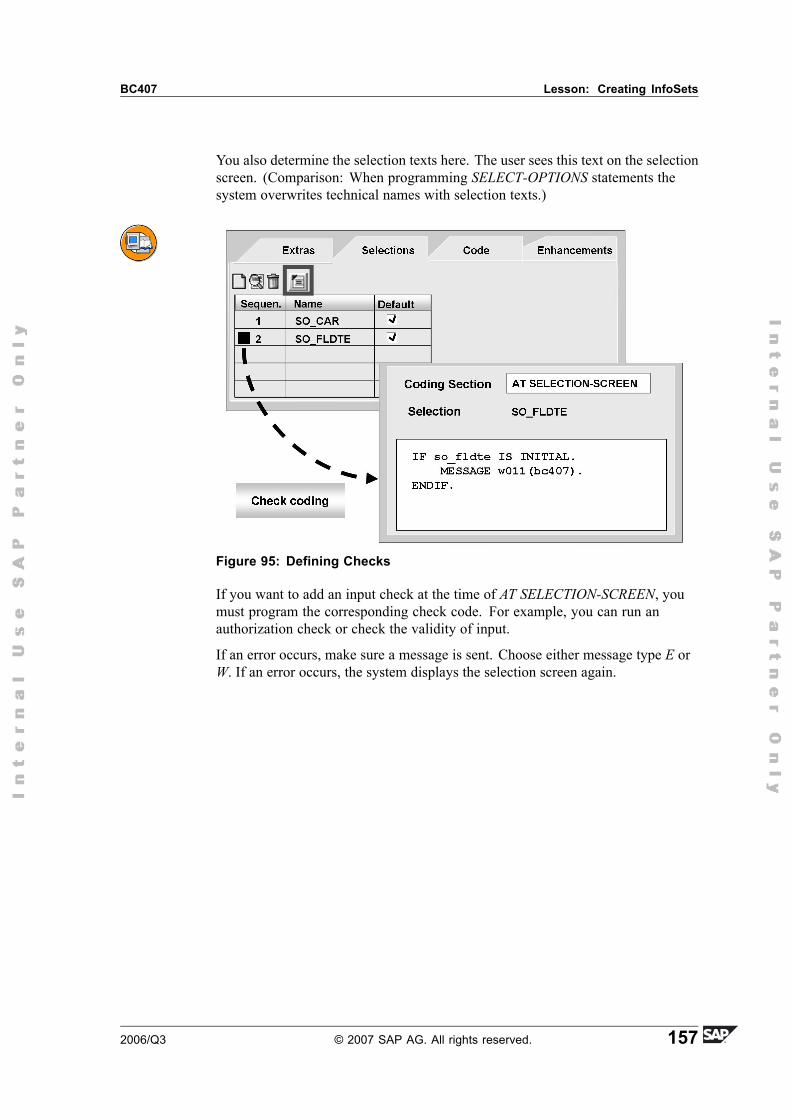
BC407 Lesson: Creating InfoSets
You also determine the selection texts here. The user sees this text on the selectionscreen. (Comparison: When programming SELECT-OPTIONS statements thesystem overwrites technical names with selection texts.)
Figure 95: Defining Checks
If you want to add an input check at the time of AT SELECTION-SCREEN, youmust program the corresponding check code. For example, you can run anauthorization check or check the validity of input.
If an error occurs, make sure a message is sent. Choose either message type E orW. If an error occurs, the system displays the selection screen again.
2006/Q3 © 2007 SAP AG. All rights reserved. 157

Unit 7: Creating InfoSets BC407
158 © 2007 SAP AG. All rights reserved. 2006/Q3

BC407 Lesson: Creating InfoSets
Exercise 11: Creating an InfoSet Using aTable Join
Exercise ObjectivesAfter completing this exercise, you will be able to:� Create InfoSets built on a table join� Define additional fields� Insert additional coding� Define the selection screen
Business ExampleCreate an InfoSet BC407##_01, with a table join in the global query area (where## corresponds to your group number).
Model solution: /SAPQUERY/BC407_S1 in the global query area.
Task 1:
1. Create InfoSet BC407##_01 and maintain the description. Structure theInfoSet with a left outer join between the database tables SFLIGHT andSBOOK. Choose SFLIGHT as the left table. Adopt the join conditionssuggested by the system.
2. The system asks whether you want to create field groups. Accept thissuggestion. Select the setting which states that you want to transfer all fieldsin the field group.
3. Make sure that the fields that appear in both database tables are assignedonly once to a field group. To do this, delete the redundant fields from one ofthe field groups. Which field group should you remove the fields from?
4. Create a variable (for example, free_seats) under the DATA coding. You needthis variable to calculate the available seats (in economy class) on a flight.Type this variable in accordance with SFLIGHT-SEATSOCC.
Task 2:Create an additional field (for example, Status). Is it important which of the twodatabase tables you assign this additional field to?
1. Assign a long text (for example, Display Reservation Status) and a headertext (for example, Status). Make sure that the technical properties correspondto those if ICON-ID.
Continued on next page
2006/Q3 © 2007 SAP AG. All rights reserved. 159
Unit 7: Creating InfoSets BC407
2. You have to assign a value to this additional field. Write the relevant ABAPcoding in accordance with the following description:
a) Compute the difference between SFLIGHT-SEATSMAX andSFLIGHT-SEATSOCC. Assign this to the variable (free_seats).
b) Program the following logic using IF � ELSE � ENDIF:
If a flight does not have any free seats, assign the ICON_RED_LIGHT iconor the ICON_GREEN_LIGHT icon to the additional field Status.
c) To ensure that the names of the icons are interpreted correctly, you mustinclude the statement TYPE-POOLS icon. in the DATA source code.
3. Assign the additional field to the field group which includes the fieldSFLIGHT-SEATSMAX and SFLIGHT-SEATSOCC.
Task 3:
1. Define the selection screen. Create three selections of the type SelectionCriterion. Choose the following attributes:
Name Reverse Meaning/Header Reference (FOR)SO_CAR 1 Airline SFLIGHT-
CARRIDSO_CON 2 Connection SFLIGHT-
CONNIDSO_FLD 3 Date SFLIGHT-
FLDATE
2. All of the selection criteria have to appear on the selection screen of anInfoSet Query automatically.
Task 4:
1. Change the text Airline Code to Airline.
2. Check and generate the InfoSet. Assign the InfoSet to user group BC407_LEARN. Stay in the assignment screen only as long as is absolutelynecessary. Only one user can assign InfoSets to a user group at any onetime (the system sets a lock).
3. Create an SAP Query to test your new InfoSet. You can use queryBC407_S_05 from user group BC407_LEARN as a reference. Enter fieldsfrom both tables.
160 © 2007 SAP AG. All rights reserved. 2006/Q3

BC407 Lesson: Creating InfoSets
Solution 11: Creating an InfoSet Using aTable JoinTask 1:
1. Create InfoSet BC407##_01 and maintain the description. Structure theInfoSet with a left outer join between the database tables SFLIGHT andSBOOK. Choose SFLIGHT as the left table. Adopt the join conditionssuggested by the system.
a) Start transaction SQ02 and create the InfoSet BC407##_01. Make surethat you are in the global query area. Enter a short text and in the DataSource section, select Table Join using Basis Table. Enter the tableSFLIGHT and confirm your entries. Add the table SBOOK and changethe join conditions. To do this, position the cursor on one of the serieslines and click the right mouse button. Change to left outer. Leave thescreen by choosing the green arrow.
2. The system asks whether you want to create field groups. Accept thissuggestion. Select the setting which states that you want to transfer all fieldsin the field group.
a) The system asks whether you want to create field groups. Accept thissuggestion. Select the setting which states that you want to transfer allfields in the field group.
3. Make sure that the fields that appear in both database tables are assignedonly once to a field group. To do this, delete the redundant fields from one ofthe field groups. Which field group should you remove the fields from?
a) From the Flight Bookings field group, remove the fields Airline, FlightConnection Code and Flight Date. By doing this, the user sees therelevant key fields in the first field group. You can find the functionRemove Field from Field Group in the context menu (right mousebutton).
4. Create a variable (for example, free_seats) under the DATA coding. You needthis variable to calculate the available seats (in economy class) on a flight.Type this variable in accordance with SFLIGHT-SEATSOCC.
a) Change the right-hand side of the screen by choosing Extras. Choosethe Coding tab. In the Code Section field, select DATA. Implement thefollowing ABAP coding:
DATA: free_seats TYPE sflight-seatsocc.
Continued on next page
2006/Q3 © 2007 SAP AG. All rights reserved. 161
Unit 7: Creating InfoSets BC407
Task 2:Create an additional field (for example, Status). Is it important which of the twodatabase tables you assign this additional field to?
1. Assign a long text (for example, Display Reservation Status) and a headertext (for example, Status). Make sure that the technical properties correspondto those if ICON-ID.
a) Choose the Extras tab. Create the addition field Status. It does notmatter with which table you create this field in since the same (join!)data record is delivered to the program from either of the tablesSFLIGHT and SBOOK.
b) Assign the long text Display Reservation Status and the header textStatus. For the LIKE reference, enter ICON-ID. Leave the screen.
2. You have to assign a value to this additional field. Write the relevant ABAPcoding in accordance with the following description:
a) Compute the difference between SFLIGHT-SEATSMAX andSFLIGHT-SEATSOCC. Assign this to the variable (free_seats).
b) Program the following logic using IF � ELSE � ENDIF:
If a flight does not have any free seats, assign the ICON_RED_LIGHT iconor the ICON_GREEN_LIGHT icon to the additional field Status.
c) To ensure that the names of the icons are interpreted correctly, you mustinclude the statement TYPE-POOLS icon. in the DATA source code.
a) Place the cursor on the name of the additional field and choose Codingfor Addition (icon).
b) Implement the following ABAP coding:
free_seats = sflight-seatsmax - sflight-seatsocc.
IF free_seats < 1.
status = ICON_RED_LIGHT.
ELSE.
status = ICON_GREEN_LIGHT.
ENDIF.
c) Choose the Coding tab. In the Code Section field, select DATA.Implement the following ABAP coding: TYPE-POOLS icon.
3. Assign the additional field to the field group which includes the fieldSFLIGHT-SEATSMAX and SFLIGHT-SEATSOCC.
a) Assign the additional field to the Flight field group.
Continued on next page
162 © 2007 SAP AG. All rights reserved. 2006/Q3
BC407 Lesson: Creating InfoSets
Task 3:
1. Define the selection screen. Create three selections of the type SelectionCriterion. Choose the following attributes:
Name Reverse Meaning/Header Reference (FOR)SO_CAR 1 Airline SFLIGHT-
CARRIDSO_CON 2 Connection SFLIGHT-
CONNIDSO_FLD 3 Date SFLIGHT-
FLDATE
a) Choose Selections (icon). Create three selections of the type SelectionCriterion.
2. All of the selection criteria have to appear on the selection screen of anInfoSet Query automatically.
a) For all three selections, mark the checkbox As Default on SelectionScreen.
Task 4:
1. Change the text Airline Code to Airline.
a) Change the right-hand side of the screen by choosing Field Groups.When you double-click the Airline Code field, the detail view for thefield appears in the lower right area. Change the text to Airline andchoose Copy.
2. Check and generate the InfoSet. Assign the InfoSet to user group BC407_LEARN. Stay in the assignment screen only as long as is absolutelynecessary. Only one user can assign InfoSets to a user group at any onetime (the system sets a lock).
a) Check and generate the InfoSet. Assign the InfoSet to the user groupBC407_LEARN.
3. Create an SAP Query to test your new InfoSet. You can use queryBC407_S_05 from user group BC407_LEARN as a reference. Enter fieldsfrom both tables.
a) If you only enter fields from table SFLIGHT, you will receive recordsthat appear identical.
2006/Q3 © 2007 SAP AG. All rights reserved. 163

Unit 7: Creating InfoSets BC407
164 © 2007 SAP AG. All rights reserved. 2006/Q3
BC407 Lesson: Creating InfoSets
Exercise 12: Creating an InfoSet Using aLogical Database
Exercise ObjectivesAfter completing this exercise, you will be able to:� Create InfoSets built on a logical database� Define additional tables� Insert additional coding� Define the selection screen
Business ExampleYour task: Create an InfoSet BC407##_02, with logical database F1S in theglobal query area where ## is your group number.
Model solution: /SAPQUERY/BC407_S2 in the global query area.
Task 1:
1. Create the InfoSet BC407##_02 and maintain the long text. Structure theInfoSet using the database F1S.
Task 2:The system automatically creates empty field groups that correspond to thestructure of the logical database.
1. Transfer all of the fields of table SPFLI to the first node of the field group.Transfer all of the fields of the table SFLIGHT, without the fields that areredundant for table SPFLI, to the second node of the field group. Transfer allof the fields of the table SBOOK, without the fields that are redundant fortable SFLIGHT, to the third node of the field group.
2. Create a further (new) field group with the name Flight Customer.
Task 3:
1. Create the table SCUSTOM as an additional table for table SBOOK.
2. Create a connection between the two tables SBOOK-CUSTOMID andSCUSTOM-ID. Ensure optimum performance.
3. Add fields from the additional table to the Flight Customer field group.Continued on next page
2006/Q3 © 2007 SAP AG. All rights reserved. 165
Unit 7: Creating InfoSets BC407
Task 4:
1. Define the selection screen. Create a selections of the type Selection Table.Hide the multiple selection (addition of statement SELECT-OPTIONS).Where do the selections that are already defined come from?
Name Reverse Meaning/Header ReferenceSO_PRICE 1 Airfare SFLIGHT-PRICE
Task 5:
1. You have an InfoSet that is based on a logical database. You have alsodefined a selection criterion (price) that relates to the node SFLIGHT fromthe logical database. Consider whether the logical database can evaluate theprice entries made by the user. What can you do?
2. Check and generate the InfoSet. Assign the InfoSet to the user groupBC407_LEARN.
3. Create an InfoSet Query to test your new InfoSet. You can use queryBC407_S_06 from user group BC407_LEARN as a reference.
4. Optional
Consider whether it is worthwhile querying only the price on the selectionscreen, without offering the user a reference currency. If you want to use areference currency, what do you have to do in ABAP?
166 © 2007 SAP AG. All rights reserved. 2006/Q3
BC407 Lesson: Creating InfoSets
Solution 12: Creating an InfoSet Using aLogical DatabaseTask 1:
1. Create the InfoSet BC407##_02 and maintain the long text. Structure theInfoSet using the database F1S.
a) Call transaction SQ02 and create the InfoSet BC407##_02. Makesure that you are in the global query area. Enter a short text and in theData Source section, select Logical Database and enter the logicaldatabase F1S.
Task 2:The system automatically creates empty field groups that correspond to thestructure of the logical database.
1. Transfer all of the fields of table SPFLI to the first node of the field group.Transfer all of the fields of the table SFLIGHT, without the fields that areredundant for table SPFLI, to the second node of the field group. Transfer allof the fields of the table SBOOK, without the fields that are redundant fortable SFLIGHT, to the third node of the field group.
a) Proceed as described in the previous task.
2. Create a further (new) field group with the name Flight Customer.
a) Proceed as described in the previous task. Create the new field groupby choosing Create.
Task 3:
1. Create the table SCUSTOM as an additional table for table SBOOK.
a) In the left-hand tree, double-click on the table name SBOOK. Changethe right-hand side of the screen by choosing Extras. Choose the Extrastab. Create additional table SCUSTOM for table SBOOK.
2. Create a connection between the two tables SBOOK-CUSTOMID andSCUSTOM-ID. Ensure optimum performance.
a) In the screen that follows, the SELECT SINGLE statement is displayed.The WHERE condition is suggested correctly. Mark the Internal Buffercheckbox.
Continued on next page
2006/Q3 © 2007 SAP AG. All rights reserved. 167
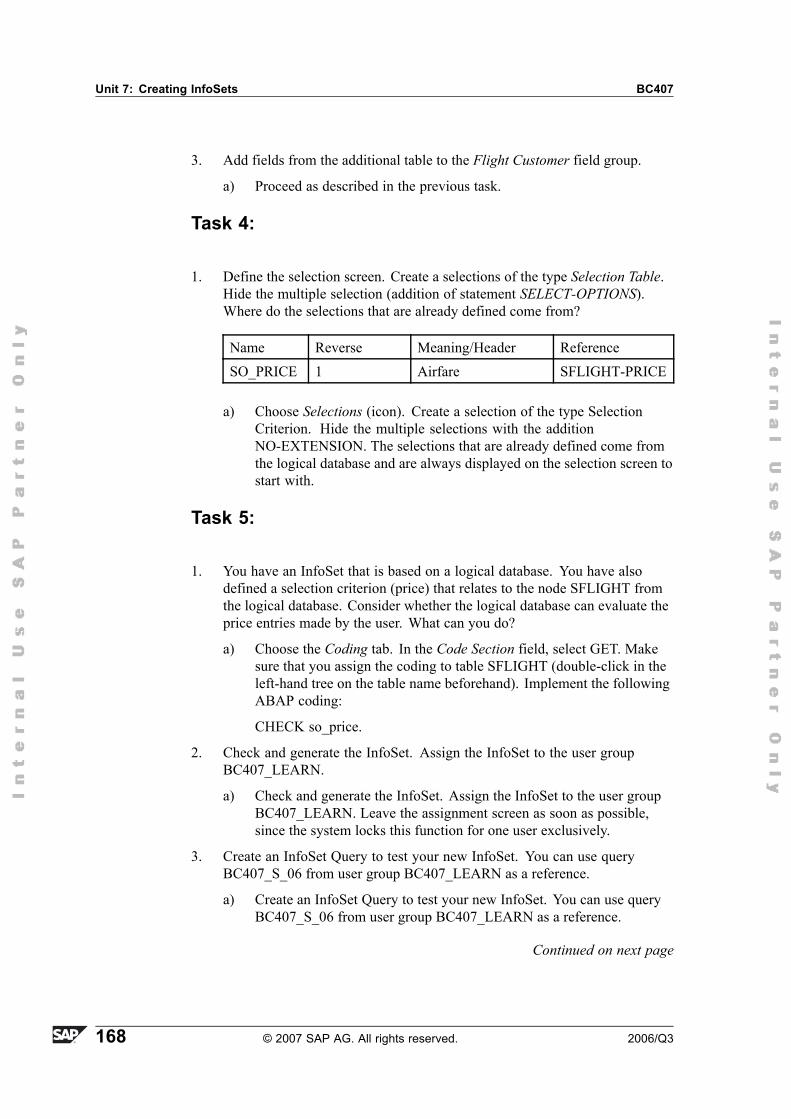
Unit 7: Creating InfoSets BC407
3. Add fields from the additional table to the Flight Customer field group.
a) Proceed as described in the previous task.
Task 4:
1. Define the selection screen. Create a selections of the type Selection Table.Hide the multiple selection (addition of statement SELECT-OPTIONS).Where do the selections that are already defined come from?
Name Reverse Meaning/Header ReferenceSO_PRICE 1 Airfare SFLIGHT-PRICE
a) Choose Selections (icon). Create a selection of the type SelectionCriterion. Hide the multiple selections with the additionNO-EXTENSION. The selections that are already defined come fromthe logical database and are always displayed on the selection screen tostart with.
Task 5:
1. You have an InfoSet that is based on a logical database. You have alsodefined a selection criterion (price) that relates to the node SFLIGHT fromthe logical database. Consider whether the logical database can evaluate theprice entries made by the user. What can you do?
a) Choose the Coding tab. In the Code Section field, select GET. Makesure that you assign the coding to table SFLIGHT (double-click in theleft-hand tree on the table name beforehand). Implement the followingABAP coding:
CHECK so_price.
2. Check and generate the InfoSet. Assign the InfoSet to the user groupBC407_LEARN.
a) Check and generate the InfoSet. Assign the InfoSet to the user groupBC407_LEARN. Leave the assignment screen as soon as possible,since the system locks this function for one user exclusively.
3. Create an InfoSet Query to test your new InfoSet. You can use queryBC407_S_06 from user group BC407_LEARN as a reference.
a) Create an InfoSet Query to test your new InfoSet. You can use queryBC407_S_06 from user group BC407_LEARN as a reference.
Continued on next page
168 © 2007 SAP AG. All rights reserved. 2006/Q3
BC407 Lesson: Creating InfoSets
4. Optional
Consider whether it is worthwhile querying only the price on the selectionscreen, without offering the user a reference currency. If you want to use areference currency, what do you have to do in ABAP?
a) A worthwhile procedure would be to offer a reference currency onthe selection screen and convert all delivered data records into thiscurrency under the GET event and then run the validity check.
2006/Q3 © 2007 SAP AG. All rights reserved. 169
Unit 7: Creating InfoSets BC407
Lesson Summary
You should now be able to:� Creating InfoSets� Insert additional tables and fields� Define the selection field� Check Data� Program ABAP in the InfoSet
170 © 2007 SAP AG. All rights reserved. 2006/Q3
BC407 Unit Summary
Unit SummaryYou should now be able to:� Creating InfoSets� Insert additional tables and fields� Define the selection field� Check Data� Program ABAP in the InfoSet
2006/Q3 © 2007 SAP AG. All rights reserved. 171

Unit Summary BC407
172 © 2007 SAP AG. All rights reserved. 2006/Q3
Unit 8User administration
Unit OverviewIn this unit, you will learn how to administer query users. You will learn how tocreate user groups and how to call the InfoSet Query directly from a menu entryfor a role.
Unit ObjectivesAfter completing this unit, you will be able to:
� Manage users for SAP Queries and InfoSet Queries� Set up the user menu so that the user can access the InfoSet Query
Unit ContentsLesson: User Management.. . . . . . . . . . . . . . . . . . . . . . . . . . . . . . . . . . . . . . . . . . . . . . . . . . .174
Exercise 13: Creating User Groups and Recording Logs (optional).183
2006/Q3 © 2007 SAP AG. All rights reserved. 173
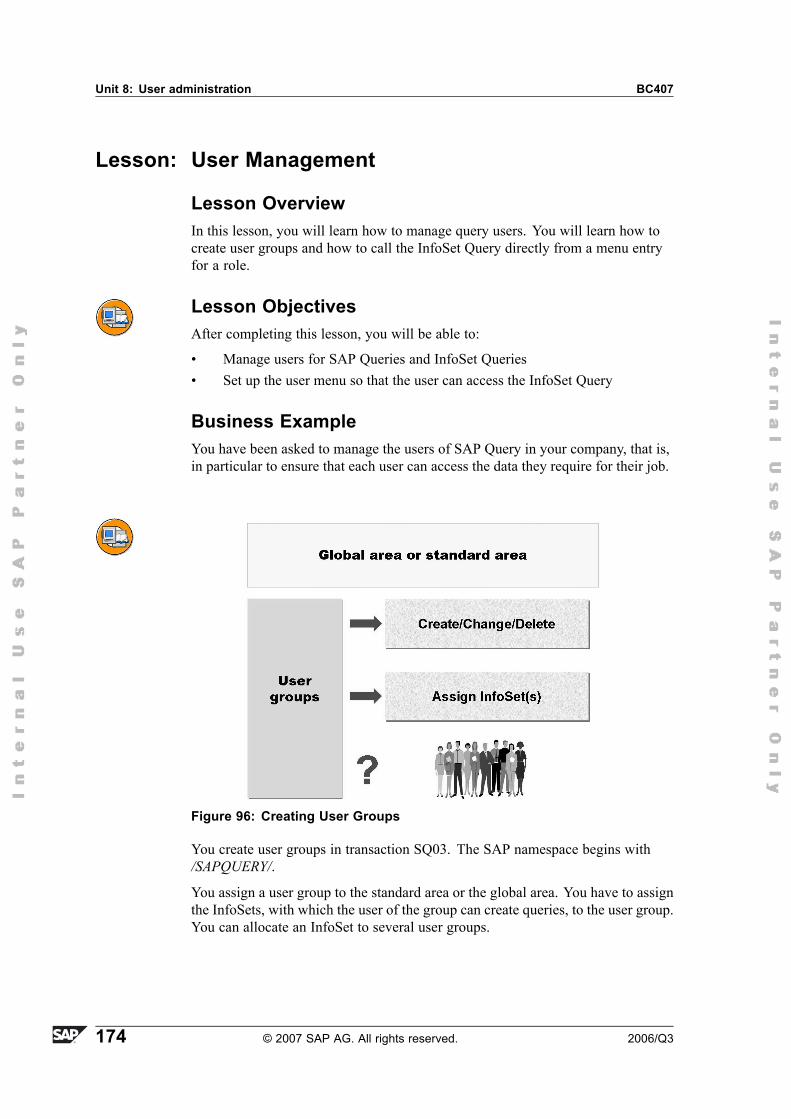
Unit 8: User administration BC407
Lesson: User Management
Lesson OverviewIn this lesson, you will learn how to manage query users. You will learn how tocreate user groups and how to call the InfoSet Query directly from a menu entryfor a role.
Lesson ObjectivesAfter completing this lesson, you will be able to:
� Manage users for SAP Queries and InfoSet Queries� Set up the user menu so that the user can access the InfoSet Query
Business ExampleYou have been asked to manage the users of SAP Query in your company, that is,in particular to ensure that each user can access the data they require for their job.
Figure 96: Creating User Groups
You create user groups in transaction SQ03. The SAP namespace begins with/SAPQUERY/.
You assign a user group to the standard area or the global area. You have to assignthe InfoSets, with which the user of the group can create queries, to the user group.You can allocate an InfoSet to several user groups.
174 © 2007 SAP AG. All rights reserved. 2006/Q3
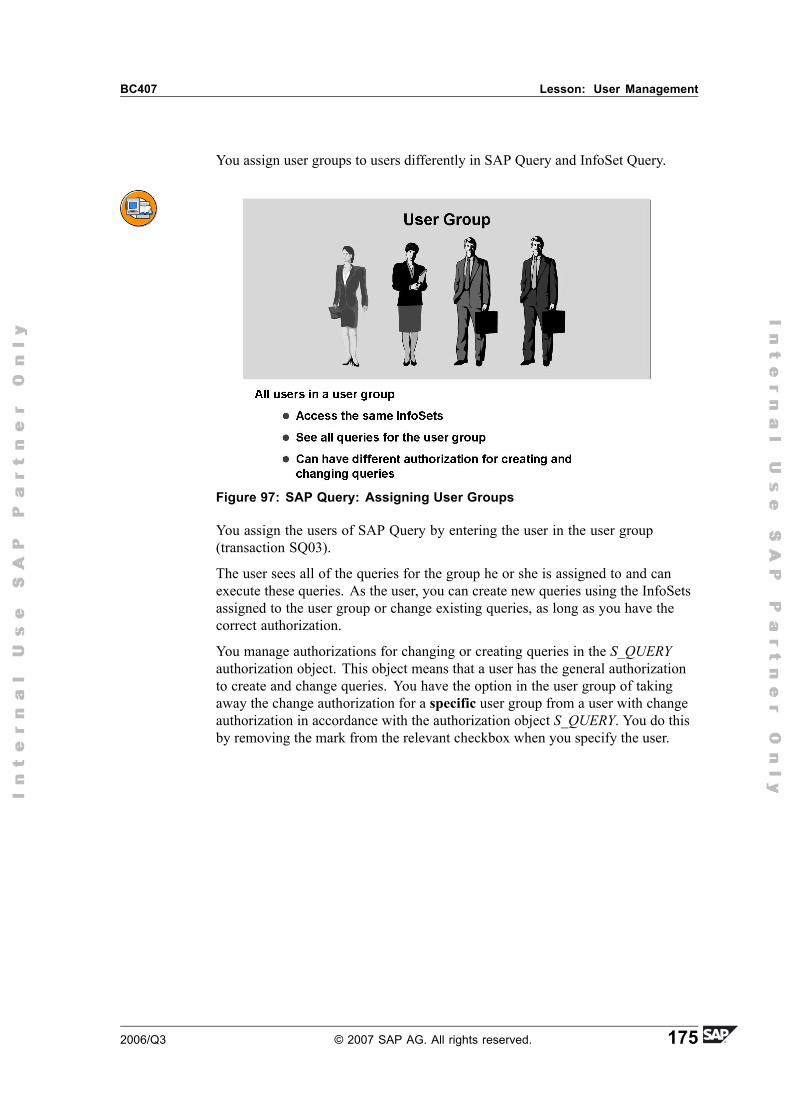
BC407 Lesson: User Management
You assign user groups to users differently in SAP Query and InfoSet Query.
Figure 97: SAP Query: Assigning User Groups
You assign the users of SAP Query by entering the user in the user group(transaction SQ03).
The user sees all of the queries for the group he or she is assigned to and canexecute these queries. As the user, you can create new queries using the InfoSetsassigned to the user group or change existing queries, as long as you have thecorrect authorization.
You manage authorizations for changing or creating queries in the S_QUERYauthorization object. This object means that a user has the general authorizationto create and change queries. You have the option in the user group of takingaway the change authorization for a specific user group from a user with changeauthorization in accordance with the authorization object S_QUERY. You do thisby removing the mark from the relevant checkbox when you specify the user.
2006/Q3 © 2007 SAP AG. All rights reserved. 175
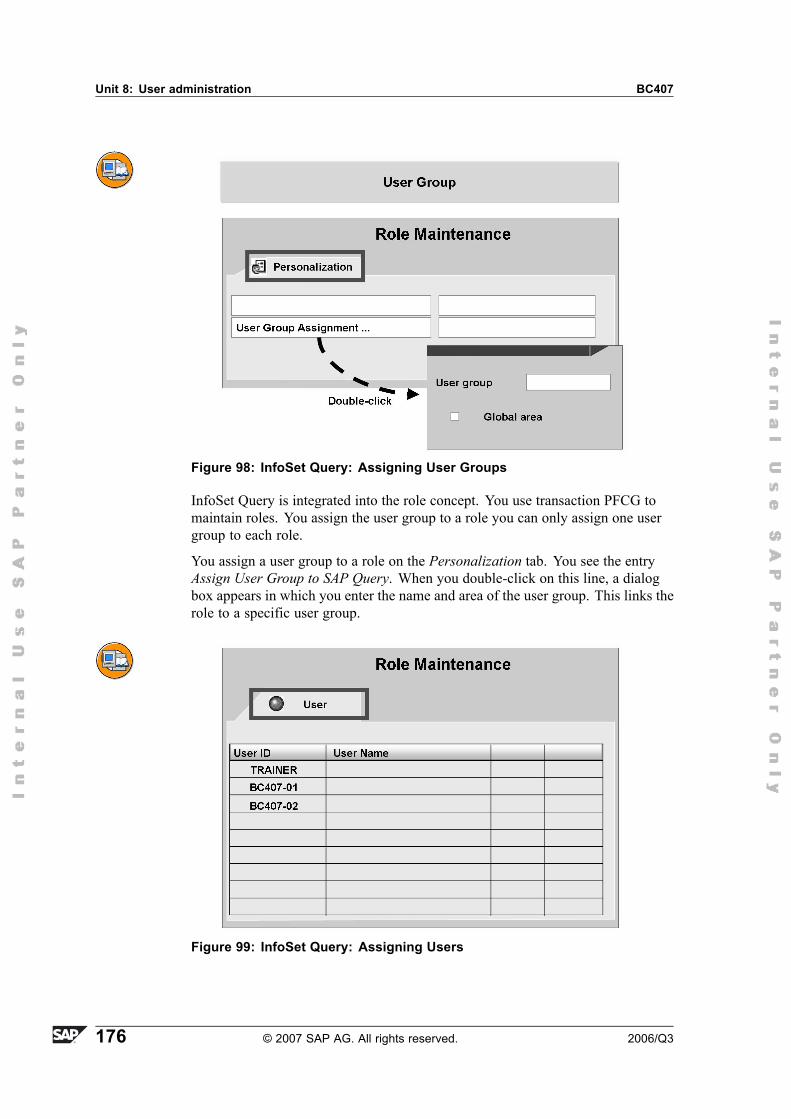
Unit 8: User administration BC407
Figure 98: InfoSet Query: Assigning User Groups
InfoSet Query is integrated into the role concept. You use transaction PFCG tomaintain roles. You assign the user group to a role you can only assign one usergroup to each role.
You assign a user group to a role on the Personalization tab. You see the entryAssign User Group to SAP Query. When you double-click on this line, a dialogbox appears in which you enter the name and area of the user group. This links therole to a specific user group.
Figure 99: InfoSet Query: Assigning Users
176 © 2007 SAP AG. All rights reserved. 2006/Q3
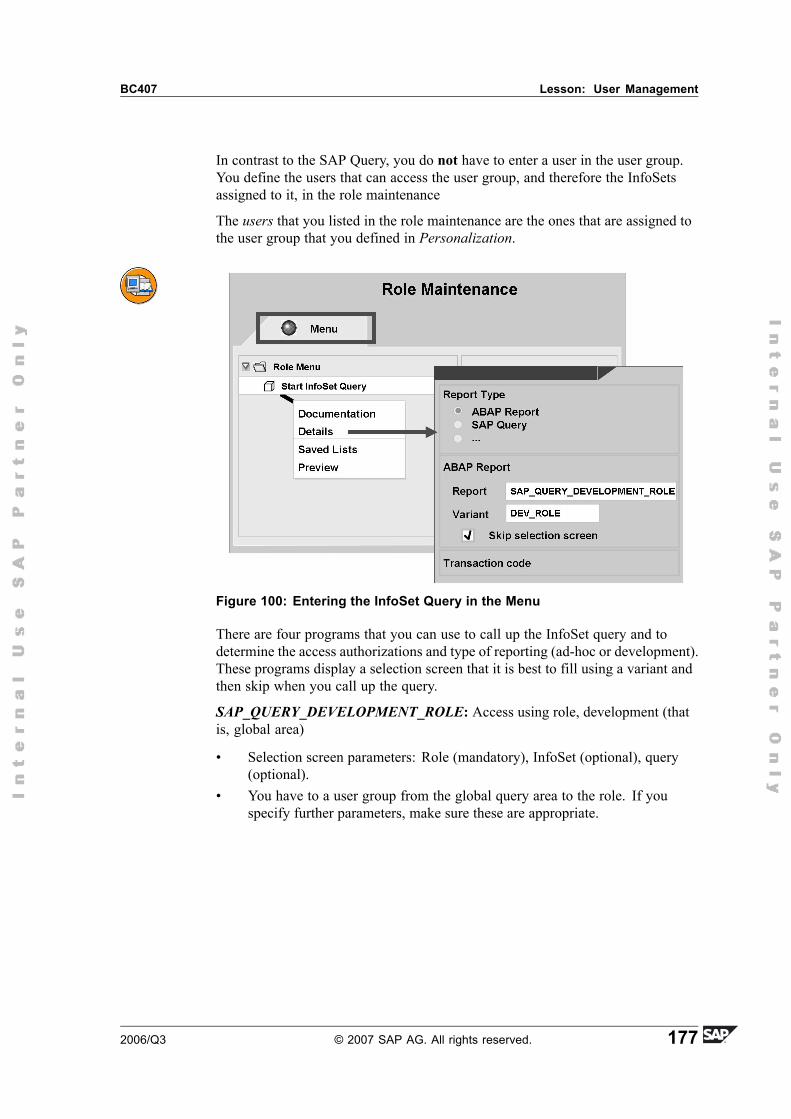
BC407 Lesson: User Management
In contrast to the SAP Query, you do not have to enter a user in the user group.You define the users that can access the user group, and therefore the InfoSetsassigned to it, in the role maintenance
The users that you listed in the role maintenance are the ones that are assigned tothe user group that you defined in Personalization.
Figure 100: Entering the InfoSet Query in the Menu
There are four programs that you can use to call up the InfoSet query and todetermine the access authorizations and type of reporting (ad-hoc or development).These programs display a selection screen that it is best to fill using a variant andthen skip when you call up the query.
SAP_QUERY_DEVELOPMENT_ROLE: Access using role, development (thatis, global area)
� Selection screen parameters: Role (mandatory), InfoSet (optional), query(optional).
� You have to a user group from the global query area to the role. If youspecify further parameters, make sure these are appropriate.
2006/Q3 © 2007 SAP AG. All rights reserved. 177
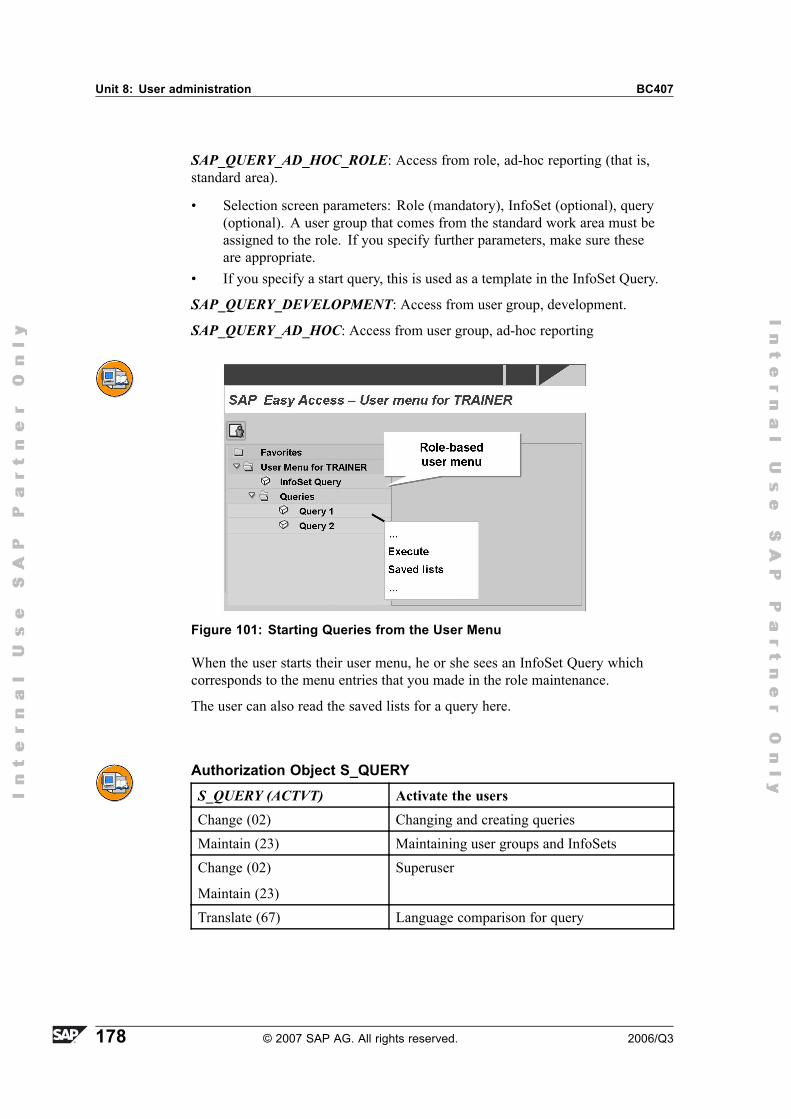
Unit 8: User administration BC407
SAP_QUERY_AD_HOC_ROLE: Access from role, ad-hoc reporting (that is,standard area).
� Selection screen parameters: Role (mandatory), InfoSet (optional), query(optional). A user group that comes from the standard work area must beassigned to the role. If you specify further parameters, make sure theseare appropriate.
� If you specify a start query, this is used as a template in the InfoSet Query.
SAP_QUERY_DEVELOPMENT: Access from user group, development.
SAP_QUERY_AD_HOC: Access from user group, ad-hoc reporting
Figure 101: Starting Queries from the User Menu
When the user starts their user menu, he or she sees an InfoSet Query whichcorresponds to the menu entries that you made in the role maintenance.
The user can also read the saved lists for a query here.
Authorization Object S_QUERYS_QUERY (ACTVT) Activate the usersChange (02) Changing and creating queriesMaintain (23) Maintaining user groups and InfoSetsChange (02)
Maintain (23)
Superuser
Translate (67) Language comparison for query
178 © 2007 SAP AG. All rights reserved. 2006/Q3
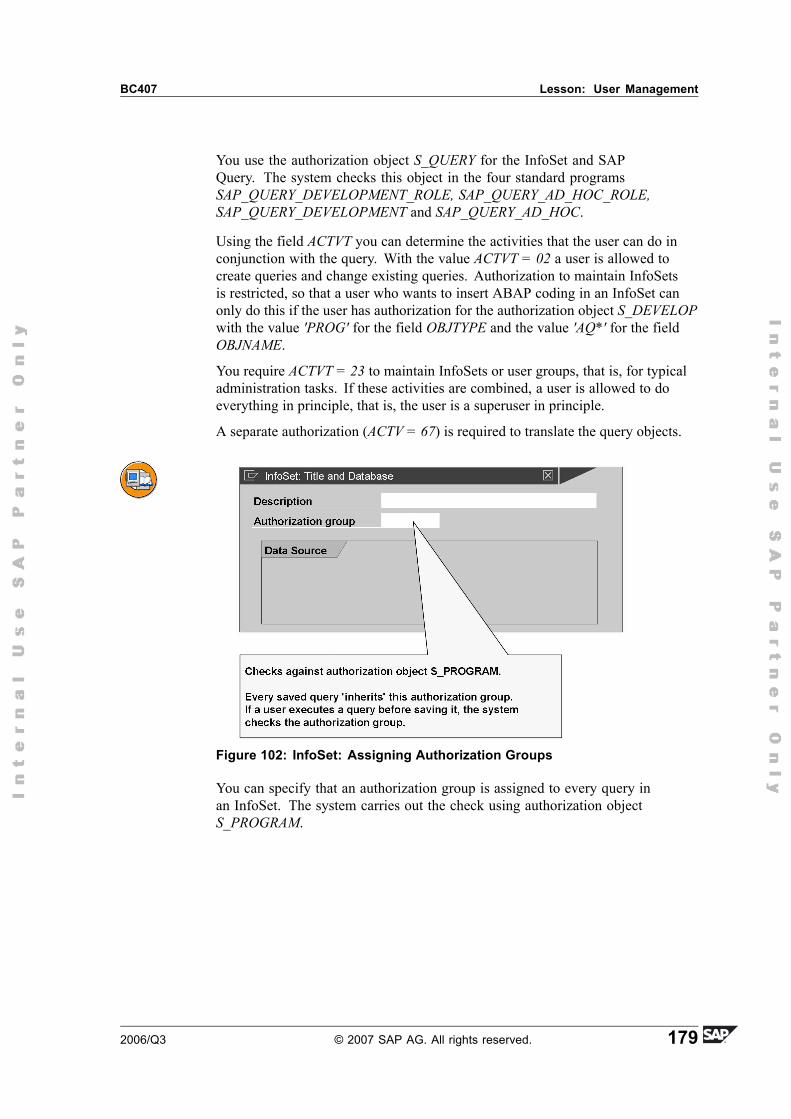
BC407 Lesson: User Management
You use the authorization object S_QUERY for the InfoSet and SAPQuery. The system checks this object in the four standard programsSAP_QUERY_DEVELOPMENT_ROLE, SAP_QUERY_AD_HOC_ROLE,SAP_QUERY_DEVELOPMENT and SAP_QUERY_AD_HOC.
Using the field ACTVT you can determine the activities that the user can do inconjunction with the query. With the value ACTVT = 02 a user is allowed tocreate queries and change existing queries. Authorization to maintain InfoSetsis restricted, so that a user who wants to insert ABAP coding in an InfoSet canonly do this if the user has authorization for the authorization object S_DEVELOPwith the value 'PROG' for the field OBJTYPE and the value 'AQ*' for the fieldOBJNAME.
You require ACTVT = 23 to maintain InfoSets or user groups, that is, for typicaladministration tasks. If these activities are combined, a user is allowed to doeverything in principle, that is, the user is a superuser in principle.
A separate authorization (ACTV = 67) is required to translate the query objects.
Figure 102: InfoSet: Assigning Authorization Groups
You can specify that an authorization group is assigned to every query inan InfoSet. The system carries out the check using authorization objectS_PROGRAM.
2006/Q3 © 2007 SAP AG. All rights reserved. 179
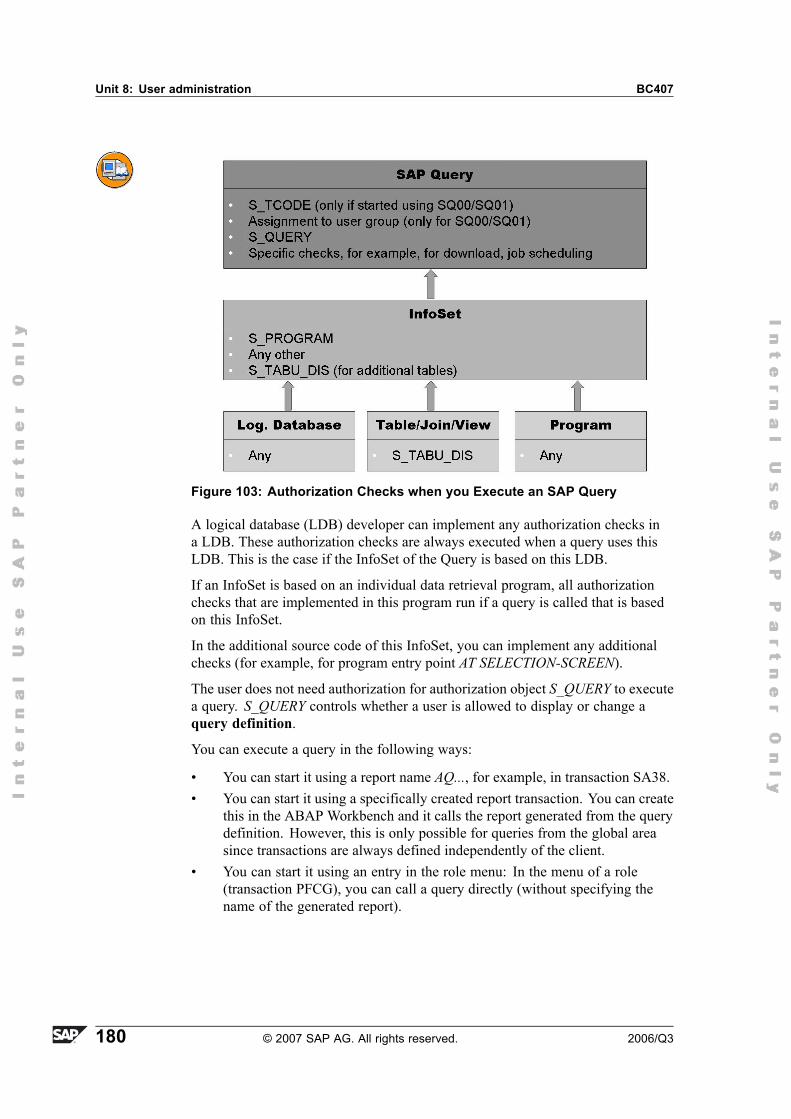
Unit 8: User administration BC407
Figure 103: Authorization Checks when you Execute an SAP Query
A logical database (LDB) developer can implement any authorization checks ina LDB. These authorization checks are always executed when a query uses thisLDB. This is the case if the InfoSet of the Query is based on this LDB.
If an InfoSet is based on an individual data retrieval program, all authorizationchecks that are implemented in this program run if a query is called that is basedon this InfoSet.
In the additional source code of this InfoSet, you can implement any additionalchecks (for example, for program entry point AT SELECTION-SCREEN).
The user does not need authorization for authorization object S_QUERY to executea query. S_QUERY controls whether a user is allowed to display or change aquery definition.
You can execute a query in the following ways:
� You can start it using a report name AQ..., for example, in transaction SA38.� You can start it using a specifically created report transaction. You can create
this in the ABAP Workbench and it calls the report generated from the querydefinition. However, this is only possible for queries from the global areasince transactions are always defined independently of the client.
� You can start it using an entry in the role menu: In the menu of a role(transaction PFCG), you can call a query directly (without specifying thename of the generated report).
180 © 2007 SAP AG. All rights reserved. 2006/Q3
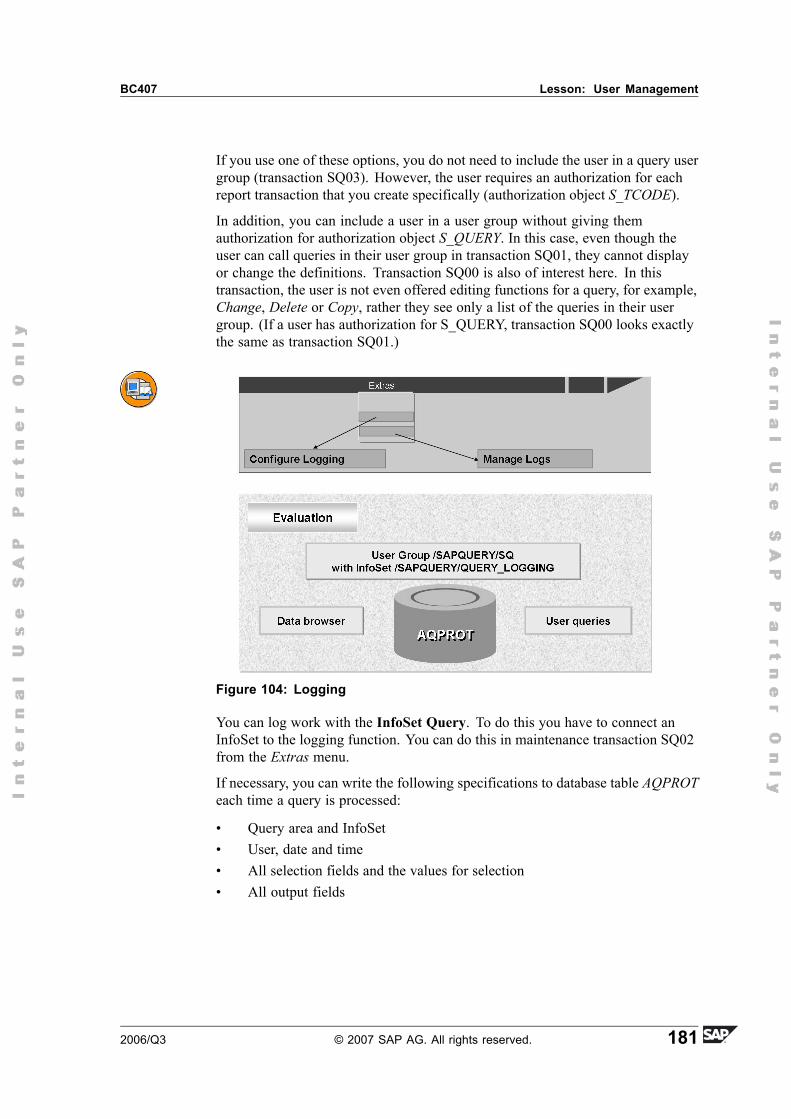
BC407 Lesson: User Management
If you use one of these options, you do not need to include the user in a query usergroup (transaction SQ03). However, the user requires an authorization for eachreport transaction that you create specifically (authorization object S_TCODE).
In addition, you can include a user in a user group without giving themauthorization for authorization object S_QUERY. In this case, even though theuser can call queries in their user group in transaction SQ01, they cannot displayor change the definitions. Transaction SQ00 is also of interest here. In thistransaction, the user is not even offered editing functions for a query, for example,Change, Delete or Copy, rather they see only a list of the queries in their usergroup. (If a user has authorization for S_QUERY, transaction SQ00 looks exactlythe same as transaction SQ01.)
Figure 104: Logging
You can log work with the InfoSet Query. To do this you have to connect anInfoSet to the logging function. You can do this in maintenance transaction SQ02from the Extras menu.
If necessary, you can write the following specifications to database table AQPROTeach time a query is processed:
� Query area and InfoSet� User, date and time� All selection fields and the values for selection� All output fields
2006/Q3 © 2007 SAP AG. All rights reserved. 181
Unit 8: User administration BC407
You can find a similar function in Customizing. The function leads to a tablecontrol in which you can maintain entries for database table AQPROTCUST. Thedatabase table contains the fields Query Area (possible values are SPACE for thestandard area and G for the global area) and InfoSet.
You can delete logs in the maintenance transaction SQ02 from the Extras menu bychoosing Manage logs. You reach a selection screen in which you, for example,restrict the selection to a user, which means that you can delete all logs for this user.
182 © 2007 SAP AG. All rights reserved. 2006/Q3
BC407 Lesson: User Management
Exercise 13: Creating User Groups andRecording Logs (optional)
Exercise ObjectivesAfter completing this exercise, you will be able to:� Create a user group� Assign InfoSets to the user group� Activate and read the logs
Business Example
Task 1:
1. Create a user group BC407_## in the global query area.
2. Assign the InfoSets you created in the exercise in the unit Creating InfoSetsto the user group.
Task 2:Open an InfoSet from the exercise in the unit Creating InfoSets in the logmechanism. This InfoSet should have (at least) one query.
1. Execute this query.
2. Use the Data Browser (transaction SE16) to verify that the log records havebeen recorded.
2006/Q3 © 2007 SAP AG. All rights reserved. 183
Unit 8: User administration BC407
Solution 13: Creating User Groups andRecording Logs (optional)Task 1:
1. Create a user group BC407_## in the global query area.
a) Start transaction SQ03 and create the user group BC407_## in theglobal query area.
2. Assign the InfoSets you created in the exercise in the unit Creating InfoSetsto the user group.
a) Choose Assign Users and InfoSets. Assign the InfoSets you createdin the exercise in the unit Creating InfoSets.
Task 2:Open an InfoSet from the exercise in the unit Creating InfoSets in the logmechanism. This InfoSet should have (at least) one query.
1. Execute this query.
a) Change to transaction SQ02. Choose Extras→ Set Logs. ChooseNew Entries. Enter the query area G and the name of your InfoSetthat has a query.
b) Start the InfoSet Query and refresh the data.
2. Use the Data Browser (transaction SE16) to verify that the log records havebeen recorded.
a) Read the log using transaction SE16.
184 © 2007 SAP AG. All rights reserved. 2006/Q3
BC407 Lesson: User Management
Lesson Summary
You should now be able to:� Manage users for SAP Queries and InfoSet Queries� Set up the user menu so that the user can access the InfoSet Query
2006/Q3 © 2007 SAP AG. All rights reserved. 185
Unit Summary BC407
Unit SummaryYou should now be able to:� Manage users for SAP Queries and InfoSet Queries� Set up the user menu so that the user can access the InfoSet Query
186 © 2007 SAP AG. All rights reserved. 2006/Q3
Unit 9Transporting Query Components
Unit OverviewIn this lesson, you will learn how you can transport query components fromthe development system to follow-up systems, how you can transport querycomponents from the standard area to other clients, and how you can copy querycomponents between the standard area and the global area.
Unit ObjectivesAfter completing this unit, you will be able to:
� Transporting Query Components
Unit ContentsLesson: Transporting Query Components.. . . . . . . . . . . . . . . . . . . . . . . . . . . . . . . . . .188
Exercise 14: Transporting Between the Global Area and the StandardArea (optional) . . . . . . . . . . . . . . . . . . . . . . . . . . . . . . . . . . . . . . . . . . . . . . . . . . . . . . . . . . . . . .193
2006/Q3 © 2007 SAP AG. All rights reserved. 187
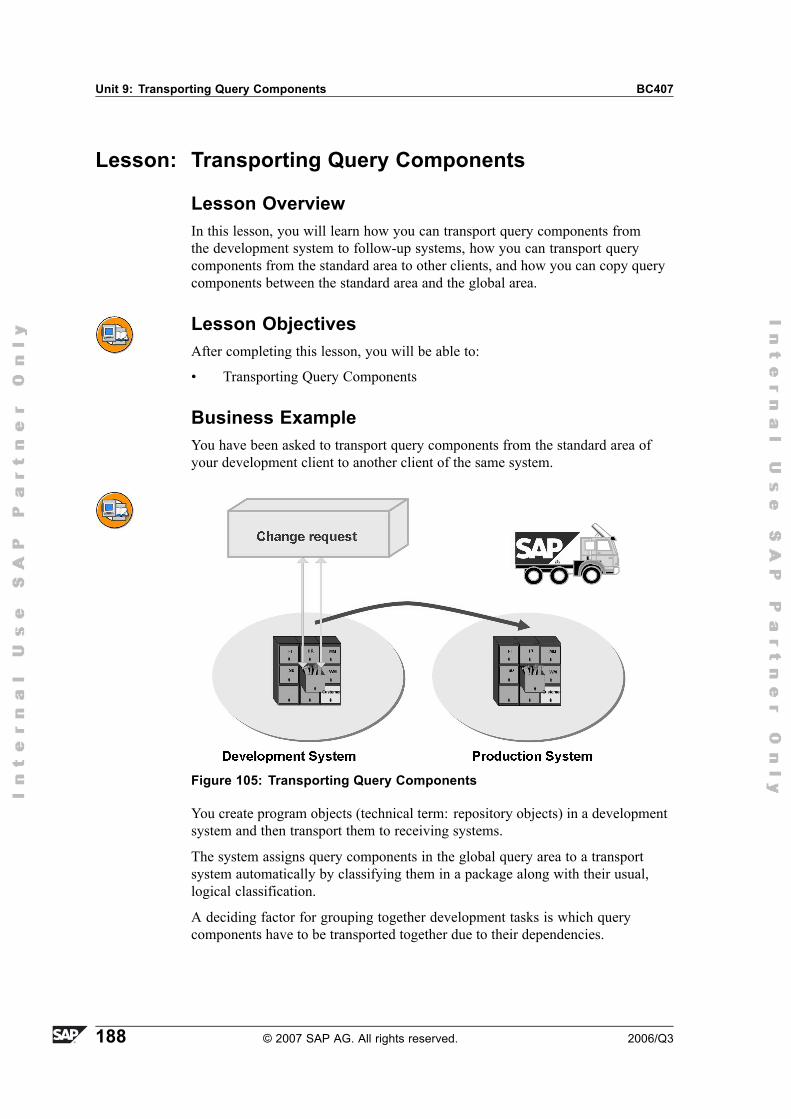
Unit 9: Transporting Query Components BC407
Lesson: Transporting Query Components
Lesson OverviewIn this lesson, you will learn how you can transport query components fromthe development system to follow-up systems, how you can transport querycomponents from the standard area to other clients, and how you can copy querycomponents between the standard area and the global area.
Lesson ObjectivesAfter completing this lesson, you will be able to:
� Transporting Query Components
Business ExampleYou have been asked to transport query components from the standard area ofyour development client to another client of the same system.
Figure 105: Transporting Query Components
You create program objects (technical term: repository objects) in a developmentsystem and then transport them to receiving systems.
The system assigns query components in the global query area to a transportsystem automatically by classifying them in a package along with their usual,logical classification.
A deciding factor for grouping together development tasks is which querycomponents have to be transported together due to their dependencies.
188 © 2007 SAP AG. All rights reserved. 2006/Q3
BC407 Lesson: Transporting Query Components
You organize common transports of query components using a change request.
Figure 106: Development Project: Schedule
Scheduling a development project using a change request covers the followingaspects:
� All team members being at a fixed time.
Each team member can trace and check his or her activities separately.
� All project team members can edit the affected programming objects. Forthose developers who do not belong to the team, the repository objectsremain locked until the project is completed.
� All programming objects affected are triggered to be transported together.
2006/Q3 © 2007 SAP AG. All rights reserved. 189
Unit 9: Transporting Query Components BC407
Figure 107: Development Projects in the Transport Organizer
When a project leader starts a project, he or she creates a change request in theTransport Organizer (transaction SE09). The project leader assigns the projectteam members to the change request and creates a task for each developer.
If a team member assigns a programming object to this change request (forexample, the first time the team member saves the project), it is entered into thatteam member's tasks. In this way, all repository objects that an employee editsduring the development project are collected in the task. The repository objectsare therefore locked for all developers who do not belong to this particular project.
Unlike the logical selection of objects through development classes, the changelog deals with a project-related (and therefore time-related) selection. While aprogram or a query always belongs to a development class, it can belong todifferent projects at different times.
190 © 2007 SAP AG. All rights reserved. 2006/Q3

BC407 Lesson: Transporting Query Components
Figure 108: Database Tables for the Different Areas
To be able to understand each of the transport options, you have to know how theobject is stored on the database.
The system stores the objects from the standard area in the client-dependent tableAQLDB. The objects from the global query area are in the table AQGDB.
Objects in the global area are assigned to development classes. You transport theseobjects using the Transport Organizer.
Figure 109: Transporting Using Export/Import
To transfer objects from the standard area into another standard area in the sameor a different SAP system, create the relevant client-independent objects. You dothis either by copying them into the global area or exporting them to the tableAQTDB. This assigns the objects to a transport request. You can either copy theobjects in the target system from the global area into the target client or importthem from the table AQTDB.
2006/Q3 © 2007 SAP AG. All rights reserved. 191

Unit 9: Transporting Query Components BC407
In the initial screen of transactions SQxx, choose Transports. You can also startthe program RSAQR3TR directly. You can carry out the following actions:
� Export: Create a transport dataset in the table AQTDB.� Import: Read a transport dataset from table AQTDB.� Display: Display the transport dataset in table AQTDB.� Delete: Delete the transport dataset from table AQTDB.� Copy Standard Area→ Global Area: Copy objects from table AQLDB to
table AQGDB.� Copy Global Area→ Standard Area: Copy objects from table AQGDB
to table AQLDB.
Figure 110: Transporting in the Global Area
The second option is copying the objects from the standard area into the globalquery area. Copying objects between different query areas is the same astransporting objects between two system clients. Therefore, copying is seen as atransport in the standard area.
The transport action Copy Standard Area→ Global Area copies objects fromthe standard area to the global area. This is the same as exporting objects fromthe standard area and importing them into the global area. Note the followingregarding packages for copied objects in the global area:
� If an object in the global area is overwritten, the copied object inherits thepackage of the overwritten object.
� If the copied object in the global area is a new object, a window usuallyappears, in which you have to assign a package to the object.
192 © 2007 SAP AG. All rights reserved. 2006/Q3
BC407 Lesson: Transporting Query Components
Exercise 14: Transporting Betweenthe Global Area and the Standard Area(optional)
Exercise ObjectivesAfter completing this exercise, you will be able to:� Transport query components
Business ExampleYou want to transport query components (user groups, InfoSets and queries).
Task:
1. Start the transport from transaction SQ02 or start the program RSAQR3TR.
2. Copy the user group BC407_## from the exercise in User Administrationfrom the global area to the standard area. First do a test run. If you getthe return code 0, make the copy.
3. Copy the InfoSets BC407##_01 and BC407##_02 from the global area intothe standard area. Also copy the queries created for these InfoSets. First do atest run. If you get the return code 0, make the copy.
4. Note the Information button that is offered in the transport program. You canread about the different transports modes (for example, REPLACE) in detail.
2006/Q3 © 2007 SAP AG. All rights reserved. 193

Unit 9: Transporting Query Components BC407
Solution 14: Transporting Betweenthe Global Area and the Standard Area(optional)Task:
1. Start the transport from transaction SQ02 or start the program RSAQR3TR.
a) Start the transport from transaction SQ02 or start the programRSAQR3TR (transaction SE38). In Transport Actions, choose CopyGlobal Area→ Standard Area. Mark the Test Run checkbox.
2. Copy the user group BC407_## from the exercise in User Administrationfrom the global area to the standard area. First do a test run. If you getthe return code 0, make the copy.
a) Choose Transport User Groups and enter the name of your user group.Select the import option REPLACE. If the return code 0 is sent, removethe mark from the Text Run checkbox and execute the transport.
3. Copy the InfoSets BC407##_01 and BC407##_02 from the global area intothe standard area. Also copy the queries created for these InfoSets. First do atest run. If you get the return code 0, make the copy.
a) Turn Test Run on again. Execute the same actions for your InfoSetsand queries.
4. Note the Information button that is offered in the transport program. You canread about the different transports modes (for example, REPLACE) in detail.
a) Read the documentation provided by choosing Information.
194 © 2007 SAP AG. All rights reserved. 2006/Q3

BC407 Lesson: Transporting Query Components
Lesson Summary
You should now be able to:� Transporting Query Components
2006/Q3 © 2007 SAP AG. All rights reserved. 195

Unit Summary BC407
Unit SummaryYou should now be able to:� Transporting Query Components
196 © 2007 SAP AG. All rights reserved. 2006/Q3
BC407 Course Summary
Course SummaryYou should now be able to:
� Create and execute QuickViews� Create and execute SAP Queries� Create and execute InfoSet Queries� Maintain InfoSets� Administer users for SAP Queries and InfoSet Queries
2006/Q3 © 2007 SAP AG. All rights reserved. 197

Course Summary BC407
198 © 2007 SAP AG. All rights reserved. 2006/Q3
Appendix 1Appendix
Transaction CodesTransaction code DescriptionSQVI QuickViewerSQ01 QueriesSQ02 InfoSetsSQ03 User groupsPFCG Role maintenanceSE09 Transport OrganizerSE36 Logical Database BuilderSM36 Define jobSE80 Object Navigator
Create packages
2006/Q3 © 2007 SAP AG. All rights reserved. 199
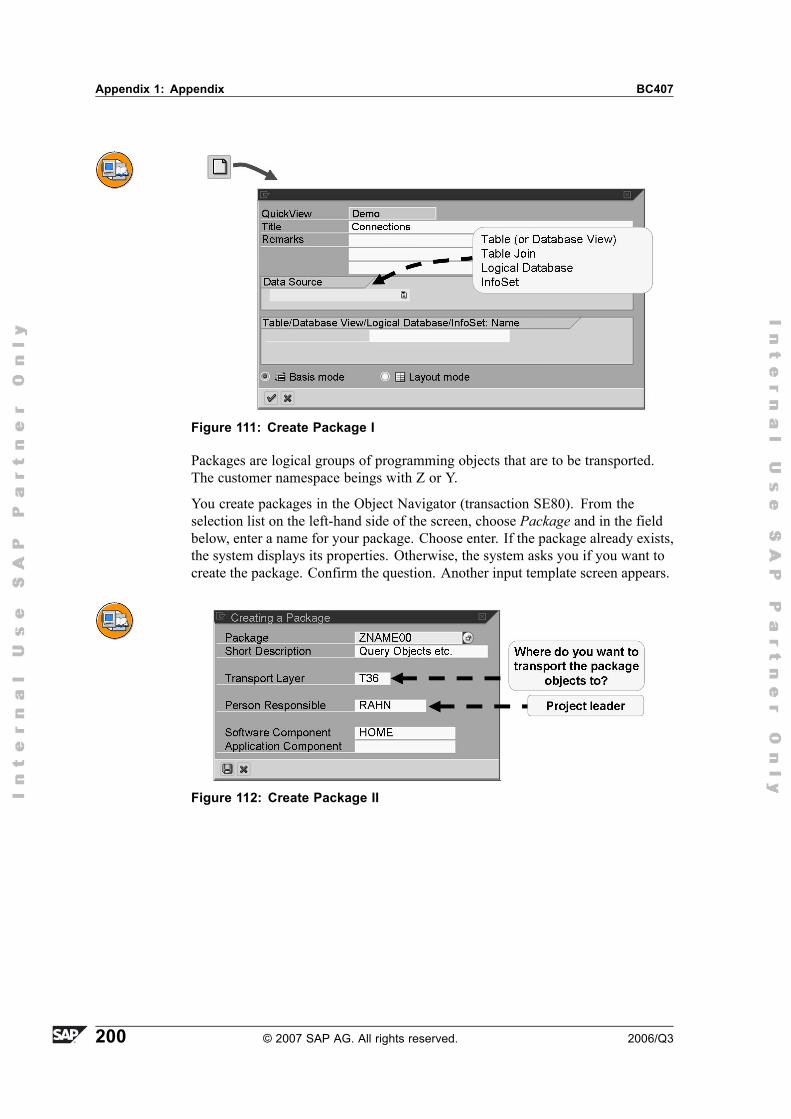
Appendix 1: Appendix BC407
Figure 111: Create Package I
Packages are logical groups of programming objects that are to be transported.The customer namespace beings with Z or Y.
You create packages in the Object Navigator (transaction SE80). From theselection list on the left-hand side of the screen, choose Package and in the fieldbelow, enter a name for your package. Choose enter. If the package already exists,the system displays its properties. Otherwise, the system asks you if you want tocreate the package. Confirm the question. Another input template screen appears.
Figure 112: Create Package II
200 © 2007 SAP AG. All rights reserved. 2006/Q3
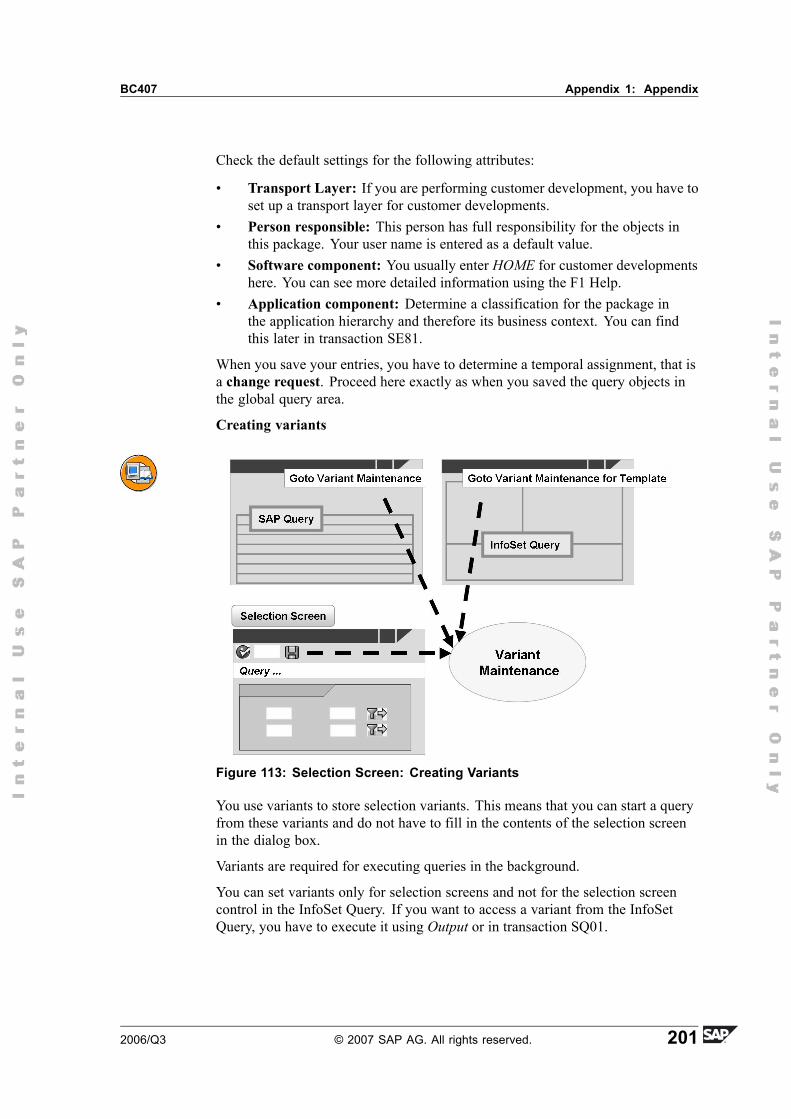
BC407 Appendix 1: Appendix
Check the default settings for the following attributes:
� Transport Layer: If you are performing customer development, you have toset up a transport layer for customer developments.
� Person responsible: This person has full responsibility for the objects inthis package. Your user name is entered as a default value.
� Software component: You usually enter HOME for customer developmentshere. You can see more detailed information using the F1 Help.
� Application component: Determine a classification for the package inthe application hierarchy and therefore its business context. You can findthis later in transaction SE81.
When you save your entries, you have to determine a temporal assignment, that isa change request. Proceed here exactly as when you saved the query objects inthe global query area.
Creating variants
Figure 113: Selection Screen: Creating Variants
You use variants to store selection variants. This means that you can start a queryfrom these variants and do not have to fill in the contents of the selection screenin the dialog box.
Variants are required for executing queries in the background.
You can set variants only for selection screens and not for the selection screencontrol in the InfoSet Query. If you want to access a variant from the InfoSetQuery, you have to execute it using Output or in transaction SQ01.
2006/Q3 © 2007 SAP AG. All rights reserved. 201
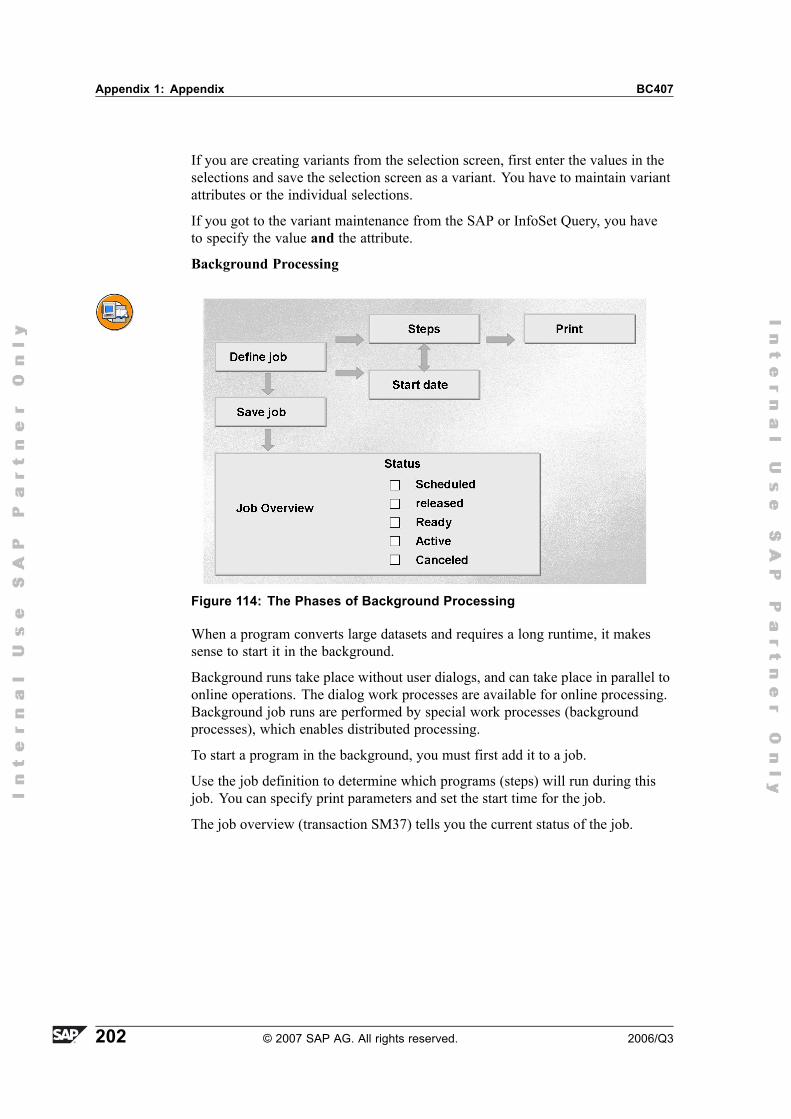
Appendix 1: Appendix BC407
If you are creating variants from the selection screen, first enter the values in theselections and save the selection screen as a variant. You have to maintain variantattributes or the individual selections.
If you got to the variant maintenance from the SAP or InfoSet Query, you haveto specify the value and the attribute.
Background Processing
Figure 114: The Phases of Background Processing
When a program converts large datasets and requires a long runtime, it makessense to start it in the background.
Background runs take place without user dialogs, and can take place in parallel toonline operations. The dialog work processes are available for online processing.Background job runs are performed by special work processes (backgroundprocesses), which enables distributed processing.
To start a program in the background, you must first add it to a job.
Use the job definition to determine which programs (steps) will run during thisjob. You can specify print parameters and set the start time for the job.
The job overview (transaction SM37) tells you the current status of the job.
202 © 2007 SAP AG. All rights reserved. 2006/Q3
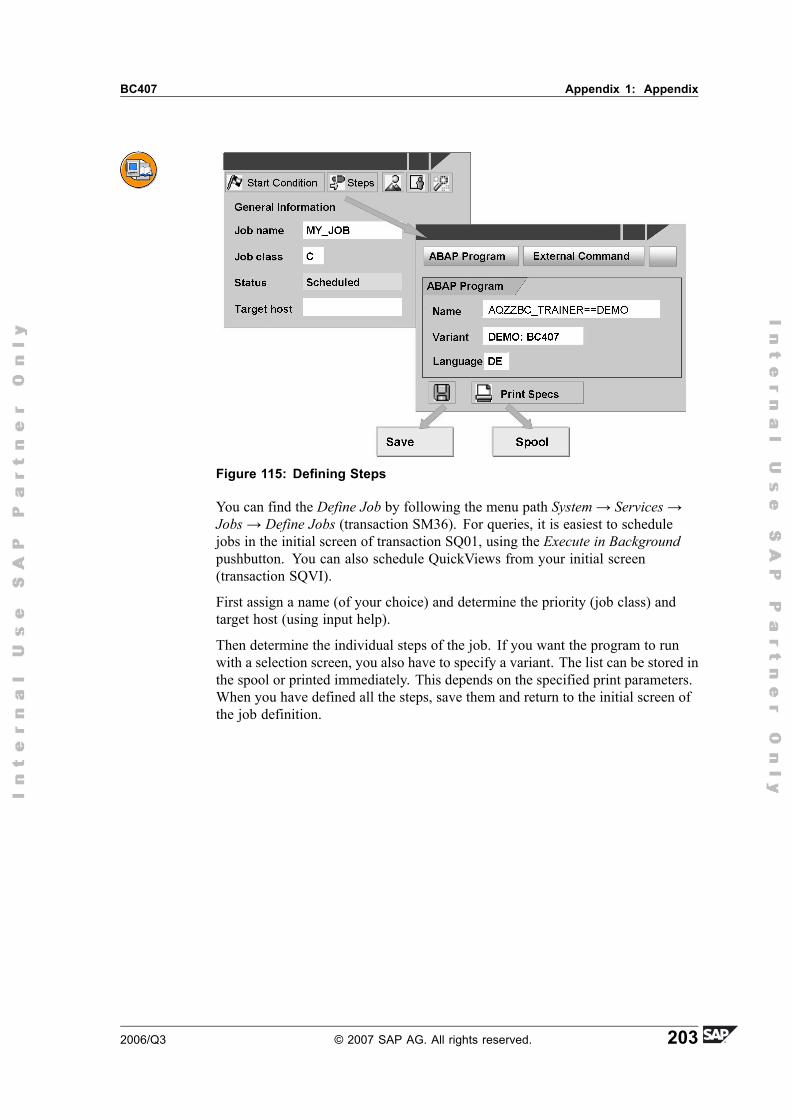
BC407 Appendix 1: Appendix
Figure 115: Defining Steps
You can find the Define Job by following the menu path System→ Services→Jobs→ Define Jobs (transaction SM36). For queries, it is easiest to schedulejobs in the initial screen of transaction SQ01, using the Execute in Backgroundpushbutton. You can also schedule QuickViews from your initial screen(transaction SQVI).
First assign a name (of your choice) and determine the priority (job class) andtarget host (using input help).
Then determine the individual steps of the job. If you want the program to runwith a selection screen, you also have to specify a variant. The list can be stored inthe spool or printed immediately. This depends on the specified print parameters.When you have defined all the steps, save them and return to the initial screen ofthe job definition.
2006/Q3 © 2007 SAP AG. All rights reserved. 203
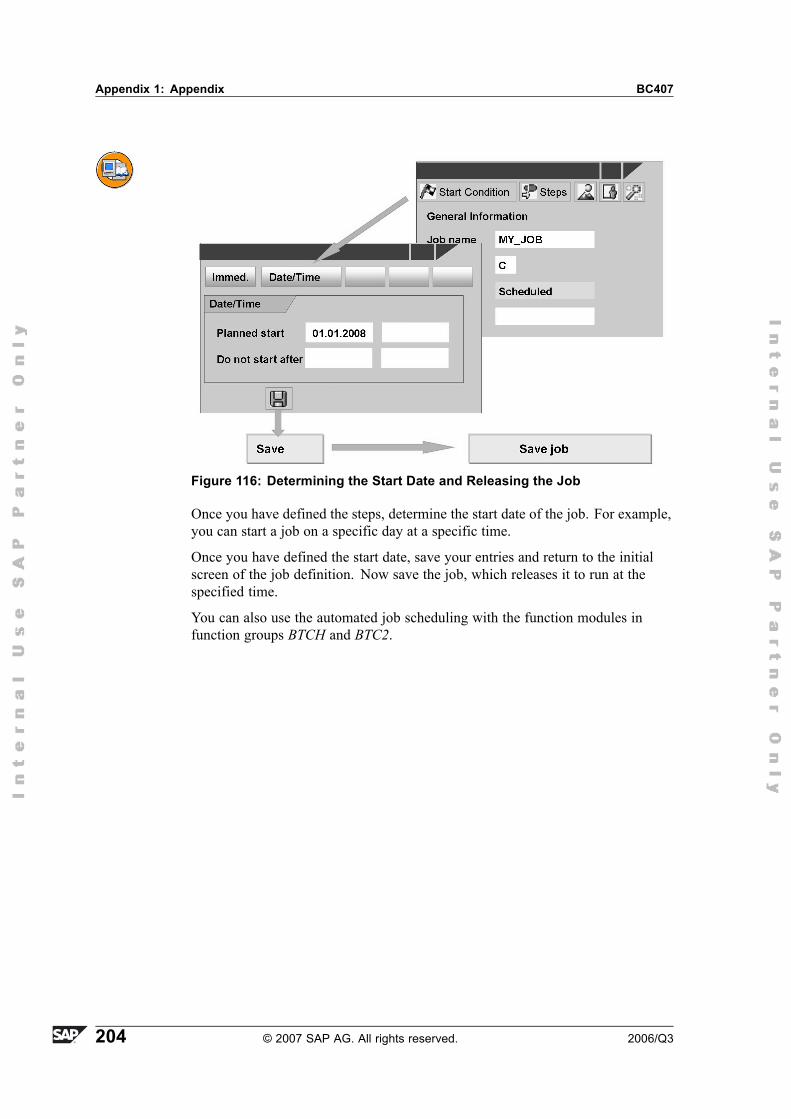
Appendix 1: Appendix BC407
Figure 116: Determining the Start Date and Releasing the Job
Once you have defined the steps, determine the start date of the job. For example,you can start a job on a specific day at a specific time.
Once you have defined the start date, save your entries and return to the initialscreen of the job definition. Now save the job, which releases it to run at thespecified time.
You can also use the automated job scheduling with the function modules infunction groups BTCH and BTC2.
204 © 2007 SAP AG. All rights reserved. 2006/Q3

IndexAABAPABAP Statements inInfoSet Creation, 119
ABAP Event Concept, 126AT SELECTION-SCREENUsage in InfoSet, 157
AT SELECTION-SCREEN(ABAP), 126
Authorization Checks whenyou Execute an SAP QueryAuthorization Checks,180
BBasic Mode: PrincipleStructure, 14
CComparing the ReportingTools, 112
Control Level Processing(SAP Query), 51
DData Objects (ABAP), 119Define Query Area, 39EEND-OF-SELECTION, 129FField Groups, 44, 146GGET Events (ABAP), 128Global Query Area, 37IInfoSet DataSources, 145InfoSet Query, 86InfoSet Query Templates, 89
InfoSet Query: AssigningUser Groups, 176
InfoSet Query: Define ListType, 93
InfoSetsCreating InfoSets, 144
InfoSets: Additional Fields,152
InfoSets: AdditionalInformationAdditional Information,150
InfoSets: Define SelectionScreen, 155
InfoSets: Field GroupsField Groups, 149
InfoSets: Program EntryPointsProgram Entry Points, 152
Inner Join, 13Interactive Functions (ABAPList), 59
LLayout mode (SAP Query)Layout mode, 48
Line Options (Basic List), 53List Structure and ListPreview (InfoSet Query),92
Local Fields, 44Logging, 181Logical Database SelectionScreens (ABAP), 125
Logical Databases, 41, 124,145
OOrganizational Environment(InfoSet Query), 86
2006/Q3 © 2007 SAP AG. All rights reserved. 205
Index BC407
Outer joinleft outer join, 13
PPackage, 54, 200PFCG (transaction formaintaining roles), 176
Predefined ABAP Types, 120QQuickViewBasis Mode, 15Determine Sort Sequence,16Output Options, 16
QuickViewer, 8RRanked List (InfoSet Query),95
Ranked List (SAP Query), 57Ranked list criterion, 57Reading from the Database(ABAP), 130
Report/Report Interface(RRI), 61
RSAQR3TR, 192SS_QUERYAuthorization objectS_QUERY, 178
SAP List ViewerALV, 19
SAP List Viewer: Subtotals,22
SAP List Viewer: Toolbar, 21SAP QueryCounter Field in SAP ListViewer, 60Headers and Footers, 52
SAP Query: Basic List, 48SAP Query: Choosing UserGroups, 40
SAP Query: Data Basis, 38SAP Query: Definition, 39SAP Query: Field Selection,44
SAP Query: List Types, 39SAP Query: OrganizationalEnvironment, 36
SAP Query: Query Area, 37SAP Query: Sorting the BasicList, 51
Saving Lists (SAP Query), 63SELECT statement, 131SELECT-OPTIOMS:Possible Additions(ABAP), 123
Selection fields (SAP Query),47
selection screen, 17Selection Screen (ABAP),121
Selection Screen (InfoSetQuery), 93
Standard Area, 37START-OF-SELECTION(ABAP), 127
Statistics (InfoSet Query), 94Statistics (SAP Query), 55Sublist Combinations, 58TTable join, 12alias table, 12define graphically(QuickViewer), 12
Transporting QueryComponents, 188
Transporting UsingExport/Import, 191
UUser groups, 174User Management, 174Using the InfoSet (InfoSetQuery), 91
WWorkbench RequestRequest, 54
206 © 2007 SAP AG. All rights reserved. 2006/Q3

FeedbackSAP AG has made every effort in the preparation of this course to ensure theaccuracy and completeness of the materials. If you have any corrections orsuggestions for improvement, please record them in the appropriate place in thecourse evaluation.
2006/Q3 © 2007 SAP AG. All rights reserved. 207
Related Documents