Replacing/Upgrading Mac Pro Processors (Early 2008) The steps in this procedure illustrate how to remove the lower processor (CPU B). The instructions are the same for removing the upper processor (CPU A). If you have a Mac Pro with only one processor it can be upgraded to two. All motherboards in the 2008 Yazan: Joshua Byrne Replacing/Upgrading Mac Pro Processors (Early 2008) © iFixit — CC BY-NC-SA tr.iFixit.com Sayfa 1/ 32

Welcome message from author
This document is posted to help you gain knowledge. Please leave a comment to let me know what you think about it! Share it to your friends and learn new things together.
Transcript

Replacing/Upgrading Mac Pro Processors(Early 2008)
The steps in this procedure illustrate how to remove the lower processor (CPU B). The instructionsare the same for removing the upper processor (CPU A). If you have a Mac Pro with only one
processor it can be upgraded to two. All motherboards in the 2008
Yazan: Joshua Byrne
Replacing/Upgrading Mac Pro Processors (Early 2008)
© iFixit — CC BY-NC-SA tr.iFixit.com Sayfa 1/ 32

GİRİŞ
Welcome, you will learn that replacing or installing a new processor/s is by far the more difficultprocedure to complete. Once complete you will have a faster computer and a stronger understandingof your Mac Pro.
ARAÇLAR:Phillips #1 Screwdriver (1)
Phillips #1 Screwdriver "long-handled" (1)
Magnetized jeweler's #1 Phillips screwdriver(1)
Right-angle, magnetized #1 Phillipsscrewdriver (1)
Long-handled, magnetized 3 mm flatheadhex screwdriver (1)
Anti-Static Wrist Strap (1)
Arctic Silver Thermal Paste (1)
High Content Rubbing Alcohol (1)
Lint-Free Cloth (1)
PARÇALAR:2.8GHz, 3.0GHz, or 3.2GHz Quad-Core
Intel Xeon 5400 series (2)Processors
Replacing/Upgrading Mac Pro Processors (Early 2008)
© iFixit — CC BY-NC-SA tr.iFixit.com Sayfa 2/ 32

Adım 1 — Opening the Computer (Early 2008)
Shut down the computer.
Warning: Always shut down the computer before opening it to avoid damaging its internalcomponents or the components you are installing. Do not open the computer or attempt to installitems inside it while it is on.
Wait 5 to 10 minutes to allow the computer’s internal components to cool.
Warning: After you shut down the system, the internal components can be very hot. You must letthe computer cool down before continuing.
Unplug all external cables from the computer except the power cord.
Touch the metal PCI access covers on the back of the computer to discharge any static electricityfrom your body.
Unplug the power cord.
Put on an ESD wrist strap.
Replacing/Upgrading Mac Pro Processors (Early 2008)
© iFixit — CC BY-NC-SA tr.iFixit.com Sayfa 3/ 32

Adım 2
1) Hold the side access panel andlift the latch on the back of thecomputer.
Warning: The edges of the accesspanel and the enclosure can besharp. Be very careful whenhandling them.
2) Remove the access panel andplace it on a flat surface covered bya soft, clean cloth.
Replacement Note: Make sure thelatch is in the up position beforereplacing the access panel. If thelatch is down, the access panel willnot seat correctly in the enclosure.
Adım 3 — Hard drives and hard drive carriers (Early 2008)
The hard drives must meet thefollowing specifications:
Type: Serial Attached SCSI (SAS)or Serial ATA (SATA) 3 Gb/s
Width: 3.9 inches (102 mm)
Depth: 5.7 inches (147 mm)
Height: 1.0 inch
Replacing/Upgrading Mac Pro Processors (Early 2008)
© iFixit — CC BY-NC-SA tr.iFixit.com Sayfa 4/ 32

Adım 4
Important: To install SAS drives in aMac Pro (Early 2008) computer, youmust also install the optional MacPro RAID Card.
Adım 5
Before you begin, open thecomputer, and lay it on its side withthe access side facing up.
Important: Make sure the latch onthe back panel is in the up position.When the latch is down, the harddrives and carriers are locked inplace and you will not be able toremove them.
Replacing/Upgrading Mac Pro Processors (Early 2008)
© iFixit — CC BY-NC-SA tr.iFixit.com Sayfa 5/ 32

Adım 6
Make sure the latch on the backpanel is up, so that the drives andcarriers are unlocked.
Pull the hard drive out of the drivebay.
Adım 7
If you are replacing the hard drivewith a new drive, remove the fourscrews that mount the 3. drive to thecarrier and mount the new drive inthe carrier.
Important: Hold the drive by itssides. Be careful not to touch theprinted circuit board on the bottomof the drive.
Replacement Note: Slide the carrierand drive over the guides and intothe drive bay, until you feel the drivesnap into place.
Replacing/Upgrading Mac Pro Processors (Early 2008)
© iFixit — CC BY-NC-SA tr.iFixit.com Sayfa 6/ 32

Adım 8 — Graphic Card for Mac Pro (Early 2008)
This procedure explains how to remove a standard card and a card that includes a booster cable.Before you can remove either type of card, however, you must first loosen the two captive screwsthat secure the PCI bracket to the enclosure and remove the bracket.
Replacing/Upgrading Mac Pro Processors (Early 2008)
© iFixit — CC BY-NC-SA tr.iFixit.com Sayfa 7/ 32

Adım 9
Handle the card only by theedges.Do not touch its connectorsor any of the components.Lift thecard straight out from the connectorto remove it, and insert it straightinto the connector to install it.Do notrock the card from side to side anddon’t force the card into theslot.Once the replacement card isinstalled, pull on it gently to check.
1) Release the small locking clip atthe front of the card’s logic boardconnector by pushing the clip uptoward the media shelf.
2) Holding the card by the topcorners, pull up the card and removeit from its expansion slot.
Replacing/Upgrading Mac Pro Processors (Early 2008)
© iFixit — CC BY-NC-SA tr.iFixit.com Sayfa 8/ 32

Adım 10 — Card with Booster Cable
Some graphics cards require either one or two booster cables connecting the card to the auxillarypower connectors on the logic board.
The graphics card NVIDIA GeForce 8800 GT requires one booster cable; the graphics cardNVIDIA Quadro FX 5600 requires two booster cables.
Disconnect the booster cable(s) from the logic board.
Release the small locking clip at the front of the card’s logic board connector by pushing the clip uptoward the media shelf.
Holding the card by the top corners, gently pull up the card and remove it from its expansion slot.
If you are replacing a booster cable with a new one, disconnect the cable from the card.
Replacing/Upgrading Mac Pro Processors (Early 2008)
© iFixit — CC BY-NC-SA tr.iFixit.com Sayfa 9/ 32

Adım 11
Replacement Note for Card UsingOne Booster Cable: Be sure toconnect the card’s booster cable tothe correct auxillary powerconnector on the logic board.Connect the booster cable for a cardin PCI slot 1 to the lower connector.Connect the booster cable for a cardin PCI slot 2 to the upper connector.
Replacement Note for Card UsingTwo Booster Cables: Connect bothcables to the two auxillary powerconnectors.
Adım 12 — PCI Express Cards (Early 2008)
The procedure to remove thegraphic cards is the same for PCIExpress Cards for exception ofminor card differences.
Important: Combined maximumpower consumption for all four PCIExpress slots must not exceed 300W.
Replacing/Upgrading Mac Pro Processors (Early 2008)
© iFixit — CC BY-NC-SA tr.iFixit.com Sayfa 10/ 32

Adım 13 — Processor Heatsink Cover (Early 2008)
Remember to check that all the PCI Express cards have been removed and properly stowed.
Note: The heatsink cover is held in place by a number of tabs and magnets on the underside of thecover. You must release the tabs before you can remove the cover from the enclosure.
Place the fingers of one hand under the lip of the heatsink cover nearest the logic board. Lift the lipslightly toward the media shelf to release the tabs and magnets under the top face of the cover.
With your fingers still under the cover’s bottom lip, lift the cover straight up to release the remainingtabs and magnets under the front face of the cover
Remove the cover from the enclosure.
Replacing/Upgrading Mac Pro Processors (Early 2008)
© iFixit — CC BY-NC-SA tr.iFixit.com Sayfa 11/ 32

Adım 14
Replacement Note: Whenreinstalling the processor heatsinkcover, make sure the tabs on theunderside of the cover align with theslots directly below them. (The slotsare on the front fan and memorycage on either side of the heatsinkcover.)
Adım 15 — Front Fan Assembly (Early 2008)
Remember: Before removing the Front Fan Assembly ensure that the first two bays of the harddrives are removed, All PCI express cards removed, and placed in a safe location.
Using a long-handled, magnetized #1 Phillips screwdriver, remove the screw at the top rear of thefront fan assembly that mounts the assembly to the logic board.
Replacing/Upgrading Mac Pro Processors (Early 2008)
© iFixit — CC BY-NC-SA tr.iFixit.com Sayfa 12/ 32
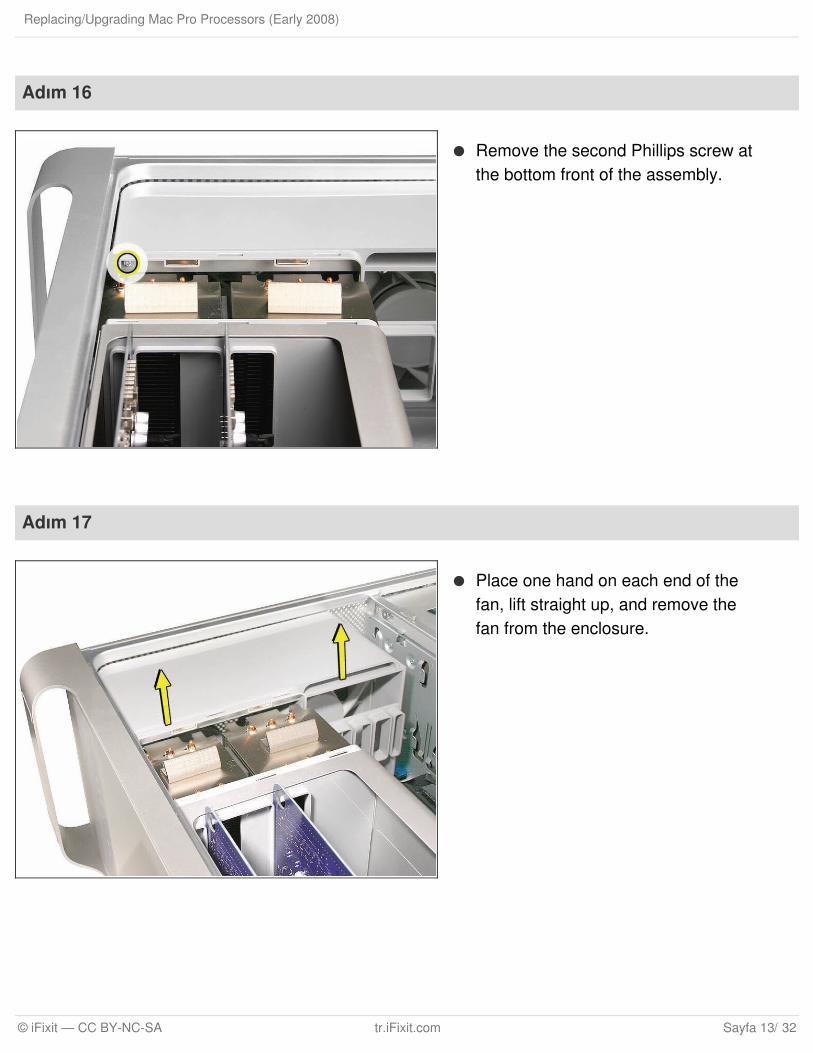
Adım 16
Remove the second Phillips screw atthe bottom front of the assembly.
Adım 17
Place one hand on each end of thefan, lift straight up, and remove thefan from the enclosure.
Replacing/Upgrading Mac Pro Processors (Early 2008)
© iFixit — CC BY-NC-SA tr.iFixit.com Sayfa 13/ 32

Adım 18
Replacement Note: Before re-installing the front fan assembly in the enclosure, make sure that thefan cables are routed correctly in the fan channel.
Replacement Note: Make sure all AirPort and Bluetooth antenna wires are out of the way beforelowering the fan assembly onto the logic board.
Replacement Note: When lowering the front fan into the enclosure, slide the guide on the base ofthe fan assembly into the channel on the speaker assembly.
Adım 19
Replacement Note: Also make surethe latch on the inside top left edgeof the fan assembly engages withthe slot on the inside lip of theenclosure
Replacing/Upgrading Mac Pro Processors (Early 2008)
© iFixit — CC BY-NC-SA tr.iFixit.com Sayfa 14/ 32

Adım 20 — Memory (FB-DIMMs) and Memory Riser Cards (Early 2008)
Additional pairs of 1 GB, 2 GB, or 4GB FB-DIMMs can be installed inthe open DIMM slots. Maximummemory is 32 GB.
DIMMs must be installed as pairs ofidentical size and type, from thesame vendor. Use the providedillustration, like-colored DIMMs mustmatch.
DIMMs for Mac Pro (Early 2008)must fit these specifications:
800 MHz, DDR2, FB-DIMMS
72-bit wide, 240-pin modules
36 memory ICs maximum perDIMM
Error-correcting code (ECC)
Important: For proper operation ofMac Pro (Early 2008) computers,Apple recommends using onlyApple-approved Mac Pro (Early2008) FB-DIMMs
Replacing/Upgrading Mac Pro Processors (Early 2008)
© iFixit — CC BY-NC-SA tr.iFixit.com Sayfa 15/ 32

Adım 21
Warning: Always wait 5–10 minutesfor the computer to cool down beforeyou remove or install memory. TheDIMMs may be very hot.
Adım 22
Holding the memory riser card bythe two finger holes, pull it out of thememory cage and place the cardDIMM side up on a soft, clean cloth.
Replacing/Upgrading Mac Pro Processors (Early 2008)
© iFixit — CC BY-NC-SA tr.iFixit.com Sayfa 16/ 32

Adım 23
Open the ejectors on the DIMM slotby pushing them out to the sides,and remove the DIMM from the risercard.
Adım 24
Replacement Note: Align the DIMMin the slot on the riser card and pushboth ends of the DIMM down untilthe ejectors snap back up intoplace.
Warning: FB-DIMMs carry heatsinkson either side of the DIMM. Neverattempt to remove the heatsinksfrom the DIMMs. Doing so coulddamage the DIMM.
Replacing/Upgrading Mac Pro Processors (Early 2008)
© iFixit — CC BY-NC-SA tr.iFixit.com Sayfa 17/ 32

Adım 25 — Memory Cage with Rear Fan (Early 2008)
Disconnect the rear fan cable from the logic board.
Adım 26
Using a long-handled, magnetized#1 Phillips screwdriver, loosen thefour captive screws that mount thememory cage to the logic board.
Rotate the computer so that it isstanding vertically. Using amagnetized short-handled or right-angled jeweler’s #1 Phillipsscrewdriver, carefully remove thetwo short screws that mount thememory cage to the bottom panel ofthe enclosure.
Replacing/Upgrading Mac Pro Processors (Early 2008)
© iFixit — CC BY-NC-SA tr.iFixit.com Sayfa 18/ 32
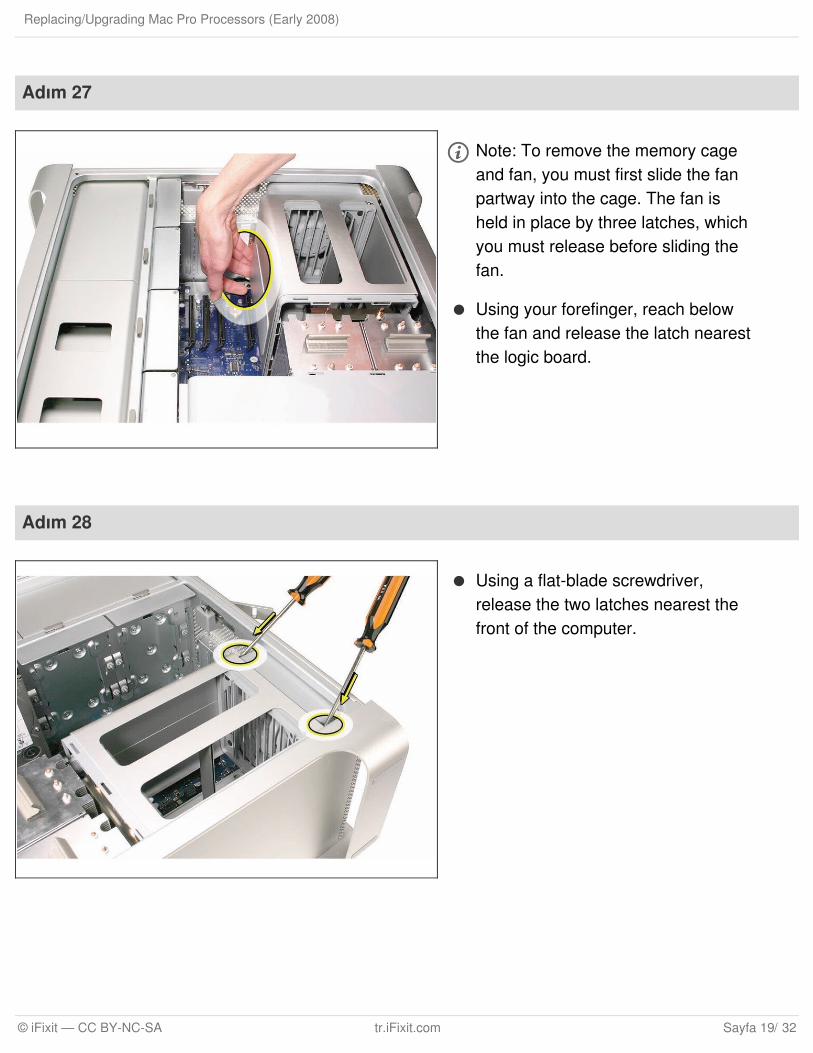
Adım 27
Note: To remove the memory cageand fan, you must first slide the fanpartway into the cage. The fan isheld in place by three latches, whichyou must release before sliding thefan.
Using your forefinger, reach belowthe fan and release the latch nearestthe logic board.
Adım 28
Using a flat-blade screwdriver,release the two latches nearest thefront of the computer.
Replacing/Upgrading Mac Pro Processors (Early 2008)
© iFixit — CC BY-NC-SA tr.iFixit.com Sayfa 19/ 32

Adım 29
Slide the rear fan into the memorycage.
Replacing/Upgrading Mac Pro Processors (Early 2008)
© iFixit — CC BY-NC-SA tr.iFixit.com Sayfa 20/ 32

Adım 30
Slide the memory cage and fantoward the power supply far enoughthat the cage clears the bottom edgeof the enclosure. Then lift thememory cage and fan out of theenclosure.
Replacing/Upgrading Mac Pro Processors (Early 2008)
© iFixit — CC BY-NC-SA tr.iFixit.com Sayfa 21/ 32
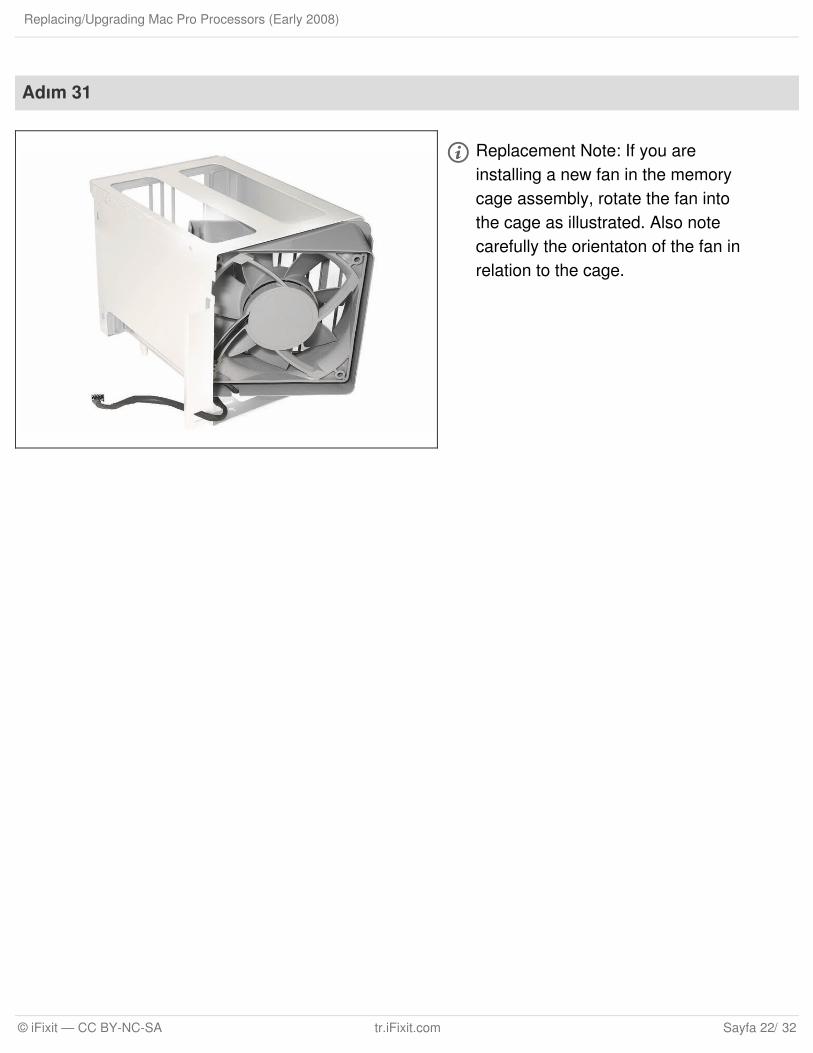
Adım 31
Replacement Note: If you areinstalling a new fan in the memorycage assembly, rotate the fan intothe cage as illustrated. Also notecarefully the orientaton of the fan inrelation to the cage.
Replacing/Upgrading Mac Pro Processors (Early 2008)
© iFixit — CC BY-NC-SA tr.iFixit.com Sayfa 22/ 32

Adım 32
Important: Before you install the cage in the enclosure, the fan should always be inserted partwayinto the cage.
Replacement Note: Before installing the memory cage and fan, make sure all logic board cablesbelow the cage are out of the way so that the cage sits properly and the cables are not pinched ordamaged when you tighten the screws.
Replacement Note: To install the memory cage and fan, maneuver the cage into position in theenclosure. Tighten at least two of the captive mounting screws. Then slide the fan toward the backpanel, until you hear it snap into place.
Replacing/Upgrading Mac Pro Processors (Early 2008)
© iFixit — CC BY-NC-SA tr.iFixit.com Sayfa 23/ 32

Adım 33 — 2.8 / 3.0 / 3.2 GHz Processors
This procedure applies to 2.8 GHzand 3.0 GHz configurations of theMac Pro (Early 2008). For the 3.2GHz configuration, see the notesthat mention “Processors, 3.2 GHz.”
Adım 34
The steps in this procedure illustratehow to remove the lower processor(CPU B). The instructions are thesame for removing the upperprocessor (CPU A).
Every time you remove a processor,you must replace the thermal greaseon the processor heatsink. Newgrease and alcohol wipes forremoving the previous grease areincluded with replacementprocessors. Instructions for applyingthe grease are included with theprocessor heatsinks procedure.
Replacing/Upgrading Mac Pro Processors (Early 2008)
© iFixit — CC BY-NC-SA tr.iFixit.com Sayfa 24/ 32

Adım 35
Disconnect the 2-pin cable for the upper processor (CPU A) heatsink from the logic board.
Adım 36
Using a long-handled, magnetized 3mm flathead hex screwdriver, loosenthe four captive mounting screws forthe upper processor heatsink in theorder indicated below.
Lift the heatsink straight up and outof the enclosure.
Replacing/Upgrading Mac Pro Processors (Early 2008)
© iFixit — CC BY-NC-SA tr.iFixit.com Sayfa 25/ 32

Adım 37
Disconnect the cable connector forthe lower processor (CPU B)heatsink.
Adım 38
Using a long-handled, magnetized 3 mm flathead hex screwdriver, loosen the four captivemounting screws for the lower processor heatsink in the order indicated below.
Carefully tilt the heatsink so that it clears the bottom lip of the enclosure and then lift the heatsinkout of the computer.
Replacing/Upgrading Mac Pro Processors (Early 2008)
© iFixit — CC BY-NC-SA tr.iFixit.com Sayfa 26/ 32

Adım 39 — Replacement Note: Existing Heatsink
Perform the following steps onceyou have installed the newprocessors and ready to re-installthe heatsinks.
Preparing an EXISTING Heatsinkfor Re-installation. If you have a newheatsink, follow the NEW Heatsinkprocedure.
Using the alcohol pad includedwith the logic board or processorreplacement part, clean off anyused thermal grease from theprocessor and the bottom of theheatsink.
Using the thermal greaseincluded with the logic board orprocessor replacement part,apply one dot of fresh grease tothe raised square area on thebottom of the heatsink.
Spread the grease evenly acrossthe square to a thickness ofapproximately 1 mm.
Warning: Do not apply moregrease than recommended. Thegrease must not overflow theheatsink and come in contact withthe processor connector.
Replacing/Upgrading Mac Pro Processors (Early 2008)
© iFixit — CC BY-NC-SA tr.iFixit.com Sayfa 27/ 32

Adım 40 — Replacement Note: New Heatsink
Perform the following steps once you have installed the new processors and ready to re-install theheatsinks.
Preparing a New Heatsink for Re-installation. If you have a existing heatsink, follow the EXISTINGHeatsink procedure.
Apply the top gasket included in the parts box to the top of the heatsink.
If you are replacing the lower processor heatsink with a new heatsink, install the bumperincluded in the parts box on the side of the heatsink.
Do not apply thermal grease to a new heatsink. It comes with thermal grease already in place,covered by a cap over the bottom of the heatsink. Before installation, remove the cap.
Replacing/Upgrading Mac Pro Processors (Early 2008)
© iFixit — CC BY-NC-SA tr.iFixit.com Sayfa 28/ 32

Adım 41 — Replacement Note: 3.2 GHz Processors Heatsink
The Mac Pro (Early 2008 Dual 3.2GHz) computer uses a specialcoating on the processor heatsinkand processor to manage thetemperature in the computer. Thesilver-colored coating comes appliedto the underside of the heatsink andthe top of the processor.
Use the following guidelines whenhandling the processor heatsinkand/or processor:
Wear disposable nitrile or latexgloves
Avoid touching the silver-coloredcoating on the underside of theheatsink and the top of theprocessor.
Always make a visual inspectionof new or existing heatsinks andprocessors before installing themin the computer.
When removing or replacing theheatsink and/or processor, do notallow the heatsink to beseparated from the processor formore than 30 minutes. Thespecial coating on the heatsinkand processor degrades withexposure to air; more than 30minutes exposure could result indamage to the computer and arepeat, multi-part repair.
Replacing/Upgrading Mac Pro Processors (Early 2008)
© iFixit — CC BY-NC-SA tr.iFixit.com Sayfa 29/ 32

Adım 42 — Replacement Note: 3.2 GHz Processors Heatsink 2
Before installing a new or existingheatsink, check that the gasket thatsurrounds the silver colored coatingon the underside of the heatsink is ingood condition, as shown in thegraphic. Replace the gasket if itshows obvious damage, such ascracks, folds, and broken-offsurfaces, or if it is dislocated fromthe heatsink.
The gasket is available through GSXas part of the Mac Pro Grease Kit,part number 076-1258.
Adım 43
Release the latch on the metal processor holder.
You may want to use a flat-blade screwdriver to help release the latches.
Replacing/Upgrading Mac Pro Processors (Early 2008)
© iFixit — CC BY-NC-SA tr.iFixit.com Sayfa 30/ 32

Adım 44
Rotate the top of the holder to the open position.
Lift the processor out of the holder.
Important: When removing or installing a processor, always hold the processor by the edges. Beextremely careful not to touch the gold pins on the bottom of the processor, as this type ofconnector is very sensitive to contamination. Also be careful not to touch the gold pins in theprocessor socket on the logic board.
You can identify the processor by the speed etched on the processor. You must clean off thethermal grease from installed processors to see the speed.
Adım 45
Replacement Note: Before installinga replacement processor, removethe protective cap covering the newprocessor’s connector.
Replacing/Upgrading Mac Pro Processors (Early 2008)
© iFixit — CC BY-NC-SA tr.iFixit.com Sayfa 31/ 32

To reassemble your device, follow these instructions in reverse order.
Bu belge en son % 1'de oluşturuldu.
Adım 46
Replacement Note: When installingthe processor on the logic board,align the processor notch with thetab on the processor holder, asillustrated. Then lower the processorstraight down onto the socket.
Note: Unlike in earlier Power MacG5 computers, replacing aprocessor in Mac Pro (Early 2008)does not require running AppleService Diagnostic for thermalcalibration.
Replacing/Upgrading Mac Pro Processors (Early 2008)
© iFixit — CC BY-NC-SA tr.iFixit.com Sayfa 32/ 32
Related Documents