i REDUCING PERFORMANCE ANXIETY IN WOODWIND PLAYING THROUGH THE APPLICATION OF THE ALEXANDER TECHNIQUE PRINCIPLES By ANNELIE HOBERG Submitted in fulfillment of the requirements for the degree of Master of Music In the Department of Music Of the Faculty of Humanities University of Pretoria Supervisor: Prof. J. de C. Hinch Pretoria April 2008 © University of Pretoria

Welcome message from author
This document is posted to help you gain knowledge. Please leave a comment to let me know what you think about it! Share it to your friends and learn new things together.
Transcript

i
REDUCING PERFORMANCE ANXIETY IN WOODWIND PLAYING THROUGH THE
APPLICATION OF THE ALEXANDER TECHNIQUE PRINCIPLES
By
ANNELIE HOBERG
Submitted in fulfillment of the requirements for the degree of
Master of Music
In the
Department of Music
Of the
Faculty of Humanities
University of Pretoria
Supervisor: Prof. J. de C. Hinch
Pretoria
April 2008
©© UUnniivveerrssiittyy ooff PPrreettoorriiaa

ii
Abstract
Many musicians are forced to scale down or even abandon their profession due to injuries
caused by playing and practicing their instruments for long hours in unnatural body positions;
also, the competition and the high standard expected of performers in the industry causes
anxiety and tension in their lives. Increasingly, music schools, conservatories and colleges
attempt to cater for these problems by including classes in the Alexander Technique. But young
learners can also fall prey to these problems.
Performance anxiety is potentially a threat to any musician’s career and can be experienced at
all levels of expertise. In the light of this the following research question was tested: Is it possible
to substantially reduce performance anxiety (stage fright) in instrumental playing by
implementing Alexander Technique principles? The study included a group of twelve school-
going children who had been identified as being prone to performance anxiety. They were
divided into two groups of six each, one being the experimental group and the other the control
group. The experimental group consisted of six flute students who were exposed to selected
Alexander Technique principles in their lessons, while the control group consisted of six flute
students that were taught by different teachers, who provided no exposure.
Both groups were tested at the beginning of the research, before they played an examination, to
ascertain the level of performance anxiety they experienced. Eighteen months later, after the
experimental group had been exposed to Alexander principles, both groups played another
examination and were then tested again to ascertain whether or not the experimental group’s
levels of anxiety had been significantly reduced, compared to the control group. The control
groups’ second testing was very similar to their first testing and performance anxiety was still a
big drawback to their musical performance. Not only was performance anxiety markedly reduced
in the experimental group, but their self-esteem and self-confidence were increased as well. As
a result it was deduced that young learners can benefit tremendously from learning and applying
Alexander Technique principles to the playing of a musical instrument.
iii
Keywords
Alexander, F.M. Alexander Technique Alexander Principle Stage fright Performance anxiety Flute Woodwind Awareness Primary Control Musical performance
iv
Index
Abstract ii
Keywords iii
1. Introduction 1-1
2. A brief history of F.M. Alexander 2-1
3. Terms and concepts underlying the Alexander Technique 3-1
3.1 An explanation of terms relating to the Alexander Technique 3-1
3.2 Basic concepts relating to the Alexander technique 3-6
4. The Alexander Technique: What it is 4-1
4.1 What it is 4-1
4.2 Stimulus and reaction 4-2
4.3 Posture 4-5
4.4 Breathing 4-5
4.5 Cardiovascular health 4-6
4.6 The self 4-6
4.7 RSI 4-7
4.8 Use 4-7
4.9 Fear 4-8
4.10 Effects on performance 4-9
4.11 What is learnt in an Alexander Technique class 4-9
4.11.1 Directions 4-10
4.11.2 How to walk 4-11
4.11.3 How to stand 4-12
4.11.4 How to sit 4-12
4.11.5 Sitting down from a standing position 4-12
4.11.6 The semi-supine position 4-13
4.11.7 The whispered ‘ah’ exercise 4-15
4.11.8 The monkey 4-16

v
4.11.9 The lunge 4-16
4.12 What the Technique does 4-17
4.13 Quotations 4-18
4.14 Summary 4-20
5. Performance Anxiety 5-1
5.1 Introduction 5-1
5.2 The phenomenon of performance anxiety 5-2
5.3 Symptoms 5-4
5.3.1 Physiological symptoms 5-5
5.3.2 Behavioural symptoms 5-6
5.3.3 Mental symptoms 5-7
5.4 Causes 5-8
5.5 Brain function during anxiety 5-10
5.6 Cures 5-11
5.6.1 Physical techniques 5-11
5.6.1.1 Relaxation through respiration 5-11
5.6.1.2 Progressive relaxation 5-12
5.6.1.3 Biofeedback 5-13
5.6.1.4 The quieting response 5-14
5.6.1.5 Physical fitness 5-14
5.6.1.6 Pilates 5-15
5.6.1.7 Feldenkrais 5-15
5.6.1.8 Rolfing 5-16
5.6.1.9 The Alexander Technique / principle 5-17
5.6.2 Drugs 5-18
5.6.2.1 Lifestyle drugs 5-18
• Alcohol 5-19
• Caffeine 5-19
• Nicotine 5-20
5.6.2.2 Prescription drugs 5-20
• Antidepressants 5-20
• Beta-Blockers 5-21
• Tranquilisers 5-22

vi
5.6.2.3 Illicit drugs 5-23
5.6.3 Practice strategies 5-23
5.7 Mental / psychological techniques 5-24
5.8.1 NLP 5-24
5.8.2 Inner game 5-25
5.8.3 Systematic desensitisation 5-26
5.8.4 Cognitive behaviour therapy 5-27
5.8.5 Stress inoculation 5-27
5.8.6 Psychotherapy 5-28
5.8.7 Imagery 5-28
5.8.8 Lazarus BASIC ID 5-29
5.8 Summary 5-31
6. The Application of the Alexander Technique to woodwind playing 6-1
6.1 The unity of the self 6-1
6.2 Procedures that can be applied to woodwind playing 6-2
6.2.1 The monkey and the lunge 6-2
6.2.1.1 The monkey 6-3
6.2.1.2 The lunge 6-5
6.2.2 Sitting down and standing up 6-6
6.2.3 The whispered ‘ah’ exercise 6-7
6.2.4 Arms and hands 6-9
6.2.5 Hands-on-the-back-of-the-chair 6-10
6.2.6 Breathing 6-11
6.2.7 Table Work 6-14
6.3 Summary 6-15
7. Studies in the application of Alexander Technique principles 7-1
7.1 Introduction 7-1
7.2 Experimental group 7-1
7.2.1 Results of the first questionnaire 7-3
7.2.2 Lessons based on Alexander Technique principles 7-6
7.2.3 Research 7-13
7.2.4 Results of the second questionnaire of the experimental group 7-22

vii
7.2.5 Results of the tests of the experimental group 7-26
7.3 The control group 7-26
7.3.1 Results of the first questionnaire of the control group 7-27
7.3.2 Results of the second questionnaire of the control group 7-30
7.3.3 Results of the tests of the control group 7-34
7.4 Summary and comparison of tests 7-34
7.5 Conclusions drawn from tests 7-38
8. Lessons 1-12 8-1
8.1 Lesson one Balance and Posture 8-2
8.2 Relaxing the shoulders and the arms 8-7
8.3 Lesson Three: The jaw, the tongue and the larynx 8-11
8.4 Lesson Three: The jaw, the tongue and the larynx 8-15
8.5 Standing and sitting 8-19
8.6 Breathing A 8-24
8.7 Breathing B 8-29
8.8 Breathing C 8-34
8.9 The semi-supine position 8-38
8.10 Kinaesthetic awareness 8-40
8.11 Stage fright A 8-43
8.12 Stage fright B 8-47
9. Summary, conclusions and recommendations 9-1
9.1 Summary 9-1
9.2 Conclusion 9-2
9.3 Recommendations 9-2
Sources 10-1
Appendix A: Questionnaires and permission letter A-1
Permission letter A-1
Questionnaire 1 A-2
Questionnaire 2 Control group A-4
Questionnaire 3 Experimental group A-6

1-1
1 Introduction / Background to the study / Personal motivation
Having been in the teaching profession for a number of years as a flute teacher, I have come
across a number of students who are excellent flute players, but when they have to perform in
front of an audience or play an examination, they do not achieve the required results. They
arrive at the venue pale and tense, start trembling, knees as well as lips start shaking, and
sometimes they even burst into tears. Performance anxiety seriously damages their
performance. Performance anxiety is said to be “…the experience of persisting, distressful,
apprehension about [,] and / or actual impairment of, performance skills in a public context to a
degree unwarranted given the individual’s musical aptitude, training, and level of preparation”
(Salmon 1990:3). It is a pity that these players cannot perform to their full potential and obtain
the marks or results they deserve and have worked hard for. They then feel that the long, hard
hours of preparation were a waste. I used to be in this category many years ago, both during my
musical studies and after starting a career as a professional musician, where I used to freeze
with fear whenever I had to go on stage. After years of struggling with this problem, all of this
ended because of my introduction to the Alexander Technique.
I was introduced to the Alexander Technique after I had a back injury approximately fifteen years
ago, and ended up in hospital for a few weeks. Because of the injury I was not able to perform
everyday tasks like sitting down, getting out of bed and even lying in bed without extreme
discomfort. After numerous visits to doctors, radiologists, chiropractors and physiotherapists,
someone recommended the Alexander Technique to me and I started researching it. It was
before the days of Internet and I did not know where to find a teacher, therefore I went to a local
bookshop and bought a few books on the subject. I started applying what I read in the books
and combined it with regular exercise, specifically exercises to strengthen the back. Within a few
months of learning how to use my back correctly I recovered completely, although I still have to
be careful how I hold my spine and how I perform physical tasks in order to be totally pain-free.
By applying the Alexander Technique to my own life, as well as to my flute playing, I found that
my performance on flute became better. I used to become extremely fearful when I had to
perform, but found that my stage fright was reduced tremendously, and my tone improved by
applying the Technique. Through this application, a kinaesthetic awareness of the body starts to
develop. This shifts the focus away from the ‘self’ and the debilitating fear to other things, for
1-2
example the way the instrument (in my case, the flute) is held, correct breathing, posture,
relaxation, being grounded and balanced, and so forth.
After I had experienced a number of satisfactory performances, I realized that any situation can
be changed if addressed correctly. This led to the realisation that I could share my knowledge
with my students to teach them to control performance anxiety and perform better. “Body control
and body relaxation will influence the mind just as much as mind control will influence body
tension or relaxation. Co-ordinated body control will remove tension-producing anxieties, and
this is one of the principal attributes of the Alexander Technique” (Gruner 1995:62).
I began this research project with a literature survey, including books, articles and websites,
involving current literature on two topics: the Alexander Technique as well as performance
anxiety in music performance. I ascertained whether research has been done and what has
been written on these subjects. As my research progressed I became aware that there are many
other disciplines and methods that can also be used to help control performance anxiety. Many
of these are also discussed in this dissertation (see Chapter 5: Performance Anxiety).
2 Research question
In the light of the above scenario the following research question arises:
• Is it possible to substantially reduce performance anxiety (stage fright) in instrumental
playing by implementing the Alexander Technique principles?
Sub-questions that arise are:
• What are the causes of performance anxiety?
• What are the cures for performance anxiety, and are they consistent or permanent?
• What other disciplines address performance anxiety?
3 Stating the problem
In my experience as a flute teacher, I have observed that almost all students suffer from
performance anxiety (stage fright) to some degree. Younger students tend to have less

1-3
performance anxiety than the older ones. Some very sensitive and shy students even
experience anxiety during their lessons. As a teacher and a mother, I felt obliged to help my
pupils as well as my own child control or minimize this phenomenon, in order to be able to reach
their full potential.
Personal knowledge of the Alexander Technique was necessary before I started my research
project and also because of my interest in helping my students perform better. According to
Nelly Ben-Or (1995:85), reading about the Technique is not enough to gain sufficient knowledge.
Classes with a qualified, registered teacher are the only way to acquire sufficient knowledge
about the Technique. I started taking Alexander Technique classes, with a registered Alexander
Technique teacher, Thea Kreft, in order to gain deeper insight and practical experience. After
having had lessons for a year with Thea Kreft, I changed teachers and started lessons with
Alexander teacher Nanette Anderson, who had lived, studied and taught the Technique in
Denmark for several years. It was interesting to notice that different teachers have different
approaches. Nanette lives permanently in South Africa now, has an Alexander Technique
practice at her home in Johannesburg and also trains students to become Alexander Technique
teachers. She also teaches the Buskaid String Ensemble in Soweto. Nanette believes a
minimum of 30 lessons in the Technique will change a person’s life. I have certainly found it a
life-changing experience.
Charles Stein (1996:1) defines the Technique in the following way: “…it is an educational
process that uses verbal and tactile feedback to teach improved use of the student’s body by
identifying and changing poor and inefficient habits that cause stress, fatigue and pain.” It is a
way of “using” the body correctly and effortlessly, by keeping the spine and head in balance,
therefore being in a more relaxed state, which is exactly what is required to reduce performance
anxiety. A tense or stressed body cannot perform at its full potential. When the body is in perfect
balance, it can work at its optimum (Bosch & Hinch 1999:245). The Technique teaches proper
alignments and balances in stationary positions as well as in movement. Self-discipline and
conscious effort are needed to change bad postural habits. No state of relaxation can ever be
more than temporary as long as the body posture, balance and “use” are poor (Reubart
1985:154).
The aim of musical study is to perform, whether in front of family, friends, an audience, an
audition board or an examiner. If this main goal cannot be achieved, due to performance anxiety,

1-4
the whole study process is diminished. Music is a gift that should be shared with others. Thus I
decided that there was a need for my students to overcome their performance anxiety. I
investigated this situation further, to learn more about the Alexander Technique and how to
apply its principles to my teaching situation and to ascertain whether it can help reduce
performance anxiety in others.
4 Methodology
Two groups of students between the ages of eleven and eighteen were used in this study, one
as an experimental group, which was exposed to the Alexander Technique, and the other as a
control group with no exposure. Each group consisted of six students with extreme performance
anxiety. The students in the experimental group had lessons with me, while the students in the
control group were taught by other teachers. I included students from the school where I taught,
as well as a few private students. The hypothesis that the Alexander Technique can help reduce
performance anxiety in musicians was tested and researched. The students in both groups were
exposed to two stressful performance situations; in this case an examination situation was used.
Here the above-mentioned hypothesis was tested in the experimental group before and after
they had exposure to Alexander Technique principles in their lessons, by means of
questionnaires and informal interviews. The six case studies of the experimental group will be
discussed in Chapter 7 (Studies in the application of Alexander Technique principles) and in
Chapter 9 (Summary, conclusions and recommendations).
As the majority of this study was done through observation, questionnaires and personal
interviews, the “qualitative paradigm will be used to assess what is going on in both groups with
the focus on the insider perspective” (Mouton 2001:194). Action research was done in my
situation as a flute teacher at a primary / secondary school. Permission from both the school and
the parents was obtained before the study began.
I started my research project, which took approximately three years, by handing out informed
consent letters to all the students that were involved. Each parent had to sign this letter giving
consent to my including his or her child in the research. After permission from the parents was
obtained, I had to approach the Executive Headmistress of the private school where I teach for
permission to use the school premises for my research (copies of these letters are included in

1-5
Appendix A). The Headmistress gave permission to proceed, and the next step was to hand out
the questionnaires that I had prepared, to the students.
The purpose of these questionnaires was to ascertain which anxiety symptoms the students had
experienced, if any, and to ascertain what the level of nervousness they experienced was
(according to the Lickert scale1). The first testing was done on students in September / October
2005, when both the experimental and control groups participated in a formal examination
(Associated Board of the Royal Schools of Music) that was held at our school, and the second
testing took place in September / October 2007 at a similar examination, after the experimental
group had exposure to Alexander Technique principals. I did not help them fill in the
questionnaires, although I asked some of the younger students’ parents to help them fill it in.
After the experimental group had had training in Alexander Technique principles, both the
experimental and control groups were tested again at a second examination session. The
experimental group received a second questionnaire at the examination, to ascertain whether
their performance anxiety was reduced as a result of being exposed to Alexander Technique
principles, and which principles the students could applied to their playing during the
examination. The control group also received a second questionnaire which necessarily differed
slightly from the one of the experimental group. This was to ascertain whether their levels of
anxiety were reduced or similar to the first testing.
After reading through the results of the first questionnaire, I realized that some of the students
did not fully understand what was asked. I realized that the language being used was too
advanced for the younger ones, although the older ones understood what was asked. Therefore,
I decided to conduct informal interviews with the younger students as well and combined these
results with the results of the questionnaires.
After finishing the interviews I started applying Alexander Technique principles in the
experimental group’s lessons. Initially I started with ten students in each group, but because it
took me longer to finish this study than expected, some of the students left the school or ended
flute lessons and I was left with six students in each group.
1 The Lickert Scale is a way of generating a quantitative value (numerical) to a qualitative questionnaire (poor,
fair, good, very good, excellent). Incremental values are assigned to each category for an ascending five point scale.

1-6
The following concepts were addressed in the experimental group:
• Body Posture
• Breath and embouchure control
• Position of the head
• Learning body awareness
• Transferring body awareness to flute playing.
I divided these concepts of the Alexander Technique into 12 lessons2. The students were given
copies of these lessons to keep. I used the word ‘lessons’ to organize the different units, while
structuring my application of the different Alexander principles to flute playing, in the order that I
deemed necessary. Relevant pictures, diagrams and drawings were included in the lessons to
help the students understand the work better, and refer back to at home when practicing. The
lessons are set out in the following order:
Lesson One: Posture and balance.
Lesson Two: Relaxing the shoulders and the arms
Lesson Three: The jaw, tongue and the larynx
Lesson Four: Legs, hips, pelvis, knees and feet
Lesson Five: Standing and sitting
Lesson Six: Breathing A
Lesson Seven: Breathing B
Lesson Eight: Breathing C
Lesson Nine: The semi-supine position and the whispered ‘ah’ exercise
Lesson Ten: Kinaesthetic awareness
Lesson Eleven: Stage fright A
Lesson Twelve: Stage fright B
2 A full account of how the lessons were compiled and applied is found in Chapter 8.

2-1
2 A brief history of the Alexander Technique
Frederick Matthias Alexander was an Australian actor and a Shakespearean orator who
developed the educational process that is today called the Alexander Technique. He was the
eldest of eight children of John and Betsy Alexander, born in 1869 on a large isolated farm
called Wynyard, on the northwest coast of Tasmania. He spent a great deal of time on his
grandfather’s country estate, where he developed his life-long love of horses. (de Alcantara
1997:283.) He moved to Melbourne when he was twenty years old, with only five hundred
pounds, which he had saved up, to live with his uncle James Pearce. During his first few months
in Melbourne he visited art galleries, attended music concerts, and went to the theatre as much
as he could. He became a very successful actor with a special interest in reciting, especially
Shakespeare, and prepared himself for a career as a recitalist. (Barlow 1991:235.)
Regrettably, he developed problems in his early twenties, with hoarseness and lowered vitality
when on stage. His stage career came to an untimely close because of his continuous loss of
voice when performing, and the fact that in those days there were no speech therapists or
speech training specialists to seek help from. Doctors and vocal experts were unable to help
him. He started to search for a method to cure and prevent his affliction (a full account of his
research appears in his book The Use of the Self (1932) and in The Alexander Journal, No.7,
1972). Because he found no doctors or therapists that could help him, he had to resort to other
means to research and investigate his problem, seeking answers and a cure. Ten years of
careful self-observation eventually led to his discoveries that became the cornerstone of the
Alexander Technique. (Barlow 1991:27.)
Alexander, in desperation, started analysing and observing the way in which he used his
muscles when he spoke, by looking closely in a mirror. The unintended movements that took
place around his neck and head as he spoke struck him. There were quite a few, but he picked
the most common one, which consisted of a tightening of his head backwards on his neck and
downwards into the chest, thus depressing his larynx. This action made him suck in his breath in
a gasping manner. He discovered that he was creating a pattern of tension that was interfering
with the correct relationship between his head, neck and torso. After further observation, he
found that his whole body “collapsed”, reducing his overall length, his shoulders narrowed when
pulling back his head, and he tensed his legs and feet. (Chance 2001:6.)

2-2
Alexander realised that this tension in his neck, which caused the pulling back and down of his
head, was not isolated from the rest of his body. The tension was affecting his breathing and his
voice, and seemed connected to tension throughout his body. He became aware of other traits:
how muscle tension in his feet and legs, which was brought about through his effort to act well,
made his back and neck tense and impeded the natural balance of the head, causing the
pressure on his vocal mechanism and restricting the free flow of air in and out of his lungs. He
realised that the way he used his body before and during a recital determined the functioning of
his breathing and his voice. The quality of his skills as an actor was effected by the way he
‘used’1 himself. After months of research, he found a way of correcting this problem with the
result that his voice problems cleared up. By 1912 the term ‘Primary Control’ was coined by
Alexander to indicate the delicate balance between the head, neck and torso, bringing about the
lengthening of stature. (Mackie 1990)
Two contemporaries of Alexander, made similar discoveries in different fields to Alexander. The
first, Professor Rudolph Magnus at the University of Utrecht, was doing research on head / neck
reflexes in animals, and came to the conclusion that their mechanisms work in such a way that
the head leads movement, and the body follows. The second, George Coghill, an American
biologist, researched the development of movement in primitive vertebrates, and discovered that
movement is controlled and integrated by the total pattern of the head, neck and torso, which
dominates partial movement of the limbs. (Mackie 1990)
Alexander had also made the discovery that breathing and vocalization are a part of how the
body functions as a whole. Habitual breathing and vocal patterns are parts of habitual patterns of
general co-ordination. Many problems that we see as isolated, e.g. RSI (Repetitive Strain Injury)
or lower back pain, are symptoms of larger habitual patterns of mal-co-ordination. He realised
that the functioning of the voice depended entirely on the correct balance of tension in the whole
neuromuscular system of the body. This balance could be maintained through conscious
attention and control.
After clearing up his vocal trouble, Alexander settled in Auckland, where he combined his
reciting career with teaching, and employed his technique that enabled changed and improved
use. Initially, the main focus was on re-educating the breathing mechanism, and many of his
1 The word ‘used’ and others coined and utilized by Alexander to discuss and describe his Technique are listed and
defined in Chapter 3.1.

2-3
early students reported that their respiratory ailments had improved. Medical doctors recognized
these improvements and started referring their patients to Alexander. Soon his students found
that Alexander’s technique helped them not only with their respiratory problems, but also with
other physical problems. Alexander developed a method to consciously change maladaptive
habits of co-ordination, which include movement, posture, breathing, and tension patterns. He
came to the conclusion that the mind and body functions as an integrated entity, with both
physical and mental habits being psychophysical in nature (Goldberg 2007). After years of
experimenting, a technique emerged which infiltrated all disciplines of life.
While in Auckland, teaching his method became his main career. In 1894 he moved to
Melbourne to build up a practice, doing both individual and group teaching. He started teaching
in Sydney as well, and both practices flourished. Nevertheless, he continued to give recitals. In
1899 he moved to Sydney where he became firmly established as a teacher of his method.
From 1900-1904 he directed the Sydney Dramatic and Operatic Conservatorium. (Barlow
1991:236.)
On the recommendation of one of his friends in Sydney, Dr. McKay, he moved to London in
1904, in the years before World War I, in order to gain more recognition for his Technique. In
London he worked with famous actors like Sir Henry Irving, Viola Tree, Lily Langtry, Constance
Collier, Oscar Asche and Mattheson Lang. He also wrote his first book, Man’s Supreme
Inheritance, which was published in 1910. From 1914 - 1924 he spent half his time in England
and half in the USA, writing two further books, Conscious Control and Constructive Conscious
Control of the Individual, which had a preface written by the American educational philosopher,
John Dewey. These two books were later amalgamated and republished under the second title.
His third book The Use of Self, was written in 1932. (de Alcantara 1997:283.)
Alexander’s reputation grew rapidly during his stay in London. Many doctors supported him and
endorsed his work by referring patients to him. Later, in 1939, a number of doctors tried to get
Alexander’s principles integrated into medical training by writing about it in the Medical Journal.
After having launched a successful teaching career he established a teachers’ training class in
1930 at 16 Ashley Place, London. This lasted until 1940 when, after a few bankruptcies, he
moved his school to America. His three year training courses were kept running until his death at

2-4
age 86. In 1941 he wrote his fourth book The Universal Constant in Living. The time he spent in
the USA was not happy and he returned to England in 1943, embittered by the refusal of
medicine and education to recognize his ideas. The very qualities that led him to his scientific
discoveries – single-mindedness and questioning – tended now towards suspiciousness. This
was not helped by an attack on his work in South Africa, culminating in a libel action, which he
brought successfully against the South African Government in 1948. Although he won large
damages in the case, the drawn-out trial caused him much suffering. The summing up was fair:
briefly, that his method was sound but that his presentation of it was misleading. Fortunately the
judges saw past his mode of presentation to the value of what he was actually doing. (Barlow
1991:238.)
Alexander taught his technique at Ashley Place, London until he died at the age of 86 in 1955
and retained to the last his immense teaching skill and patience. Only a few years before his
death, his hard life had taken its toll, and he began doubting that his ideas would ever be
accepted without being watered down. He was one of the century’s great creative thinkers, and
his discoveries are of universal importance. ‘End-gaining’2 and faulty sensory awareness lead to
problems that are self-inflicted, but through his discoveries an improved quality of life, through
better ‘use of the self’, and therefore a healthier lifestyle are possible. Although he did not
succeed in his attempts to convince the scientific world during his lifetime, his principles have
been accepted in recent years in almost all disciplines of human activity. (Barlow 1991:238.)
Alexander is seen as one of the great freethinkers of the 20th century. His four books are
intermittently reprinted in both American and British editions (de Alcantara 1997:285). Three
years after his death, in 1958, his graduates founded the Society of Teachers of the Alexander
Technique (STAT), to preserve and continue Alexander’s work according to his standards and
methods. Alexander, as well as teachers trained in his technique, has been demonstrating
empirically over the past hundred years how to change patterns of tension and establish in their
place calm and poise, even in stressful situations. The Technique has lasted and grown through
the years and has now approximately 2500 teachers worldwide (Barlow 1991:238.)
2 End-gaining means the focus is on the outcome and not the process of reaching the goal, explained in detail in
Chapter 3.

3-1
3 An explanation of terms and concepts underlying the Alexander
Technique
F.M. Alexander created his own language of terms to elucidate his ideas and original
concepts, based on his unique research and findings.
3.1 An explanation of terms relating to the Alexander Technique
The following list of Alexander Technique terms was compiled from different sources, as well
as from my experience in Alexander lessons, and is organised in alphabetical order. Some of
the most important terms and concepts used in the Alexander Technique are listed below
followed by an explanation. For ease of immediate recognition, they appear in italic form
throughout the chapter.
• Awareness: Having a clear kinaesthetic perception of the body, whether static or in
movement. A few synonyms: cognisance, consciousness, appreciation, perception.
As we learn to inhibit and direct, awareness of the self is deepened, thus expanding
the field of attention.
• Bilateral transfer: The use of one arm will tend to effect and influence the use
(functioning) of the other. It can be either beneficial or harmful. An example of this is
when the head is tapped with the left hand and the stomach is rubbed with the right
hand, an action that very few people can do successfully. There is a mutual influence
between the right and left arms, which is called bilateral transfer. Musicians
sometimes wrongly think that they have a problem with the technique of the left hand,
when it is actually the misuse of the right hand that causes the left hand to err.
• Constructive conscious control: This is the intelligent conscious correct use of the self
by controlling every action of the body, whether static or in movement, through the
application of inhibition and direction.
• Direct / direction / directing: Directing is giving mental instructions, not manipulating or
controlling the body, but commanding and trusting a certain body part to relax,
release, widen or lengthen. It is an act of imagination and creativity, an act that brings
together specific conscious thought, sensation, movement, knowledge, perception
and awareness. To direct is to will — to intend, to choose, to decide. One way of
inhibiting is by giving orders, or directions, sending messages to the brain. Direction
exists independently from movement. (Fischer 2001.)

3-2
• Doing: When told to give directions to a certain body part, for example to widen or
lengthen, the natural tendency would be to try and do it, thereby tensing the muscles
instead of just mentally directing the specific body part (King n.d.) (Also see the
opposite of ‘Doing’, ‘Non-doing’).
• End-gaining: End-gaining is habitually rushing into an activity with the focus on the
outcome, no matter what the consequences are for the individual. It is a form of
thoughtlessness where the individual grasps for results, often in a driven manner,
without thoughtful attention to the process or the means-whereby. Both hesitation and
eagerness are forms of end-gaining behaviour. In the first there is timidity, insecurity,
and feeble gestures that fall short of the goal, a false kind of relaxation. In the second
there is brusqueness, excess effort and tension, hurry, and angular motions that
overreach their goal. (Fischer 2001.)
• Faulty sensory awareness: Here the individual does not receive accurate sensory
feedback about the physical condition and use of the body through kinaesthetic and
proprioceptive sense mechanisms. This is a result of years of misuse, bad habits and
wrongdoing. “I had proved in my own case and in that of others that instinctive control
and direction of use had become so unsatisfactory, and the associated feeling so
untrustworthy as a guide, that it could lead us to do the very opposite of what we
wished to do or thought we were doing” (Alexander 1932:23). It is the gap between
what an individual thinks he is doing and what he is really doing. One loses the ability
to accurately gauge what is going on because of all the tension, especially in the neck
area. Sensory awareness needs to be re-educated.
• Forwards and up: Refers to dropping the nose or forehead slightly and lifting the top
back of the head, as if a string attached of the top of the head is pulling the head up
(like a puppet). It is perhaps the most confusing of directions. ‘Up’ always refers to the
lengthening of the spine, therefore even when lying down, ‘up’ means to lengthen the
spine, what Alexander stated as the lengthening of stature. Patrick Macdonald
(2001:78) refers to ‘forward’ as “an unlocking of the head at the atlanto-occipital joint
(between the skull and the spine) by refraining from tightening and pulling it
backwards in the accustomed way, and the ‘up’ as a tiny extension of the spine,
which is achieved following the unlocking. The movement, if any, is, in an
experienced pupil, so small as to be hardly a movement at all. It is a directed flow of
force or a kind of pulsation, no more than a heartbeat”.
• Free: This does not imply a relaxed, sluggish state, but a state where the release of
muscle tension allows the body to become balanced. Free refers to a light and alert

3-3
release of muscle tension, which allows the body to balance and co-ordinate itself
without interference (King n.d.)
• Function / functioning: The ability to perform according to design.
• Grounding: Attention should be given to the awareness that the feet should be firmly
on the ground. This is in opposition to the rest of the upper body. Where pianists and
orchestral musicians are concerned, they should be grounded on their sitting bones
on the chair to keep the legs free and mobile. (Stein 1996:2.)
• Habit / habitual: “The influence of the manner of use is a constant one upon the
general functioning of the organism in every reaction and during every moment of life
… From this there is not any escape. Hence this influence can be said to be a
universal constant in a technique for living” (Alexander 2000:1). Ingrained bad habits
are encountered as one tries to re-educate sensory awareness.
• Inhibit / inhibition: This is one of the central points of the Alexander Technique. It is
not associated with the term Sigmund Freud used meaning suppression of natural
emotions. Inhibition is the power to choose, before doing a habitual wrong action,
what we will not do. One should pause and think before reacting to a given habitual
stimulus that can create unnecessary tension, and then direct / act in the correct way.
To inhibit is to delay the instant gratification of a desire, the power to choose what we
will not do. It is a form of self-denial. Inhibition is the ceasing of neurological activity,
thus relieving the muscles of their tension. (King n.d.)
• Kinaesthetic / kinaesthesia: “Kinaesthesia means ‘feeling of motion’. Kinaesthesia is
used to refer to the sensations that originate in our muscles, tendons and joints that
enable us to sense our movements, the position of our body in space and the weight
of our limbs” (King n.d.)
• Means-whereby: The antithesis of the end-gaining principle is called the means-
whereby. The focus should be on the appropriate process to achieve a goal and not
on just attaining the goal and forcing oneself towards it at all costs. Primary Control
should be executed throughout the appropriate process. The process always takes
priority over the end goal. (Fischer 2001.)
• Misuse: Misuse is the incorrect way in which the body is used and includes poor
muscle tone and co-ordination which interferes with the body’s intrinsic balance and
functioning (King n.d.). The ultimate cause of misuse is the habit of end-gaining. It is
one’s failure to make the correct choices about the means-whereby to reach a
specific goal because of faulty sensory awareness. By inhibiting end-gaining, misuse
is also inhibited.
3-4
• Non-doing: Avoiding interference with reflex functioning by inhibiting the old incorrect
habitual action, thereby allowing the directed action to take place. It does not mean
flabby or collapsed. The means-whereby to change a habit and increase the ability to
rely on sensory awareness is via non-doing. This is what distinguishes the Alexander
Technique from other systems where we may be instructed to ‘do this exercise’, ‘eat
that food’ or ‘take these medications’ to foster change (King n.d.)
• Opposition: This is space created by opposing forces lengthening the body. When the
head is lengthening away from the sacrum, and the legs are flowing down and are
being grounded to the earth, space is created between the vertebrae. The legs and
torso are in opposition. (Stein 1996:1.)
• Poise: Roget’s Thesaurus (2002:1016) includes the following synonyms for poise:
balance, steadiness, uprightness, equilibrium, grace, calmness, composure,
elegance, presence, savoir-faire, tranquillity, self-assurance and serenity. All these
qualities can accrue as a result of lessons in the Alexander Technique. The
Technique helps restore the natural poise that is a typical characteristic of small
children and babies; the poise that we lost when we grew up. “She was poised in her
chair, effortlessly upright. Her short haircut highlighted the delicate forward balance of
her head over her spine. Though the music was fast and demanding, her instrument
seemed to float in her hands. Her bearing was elegant, her body expressive” (Arnold
2004).
• Primary Control: The dynamic relationship between the head and neck, and the
relationship of the head and neck to the rest of the spine influences and co-ordinates
the whole body mechanism. The Alexander Technique teaches one to stop
interference with this delicate balance, by unlearning habitual patterns of misuse
causing unnecessary tension, therefore allowing the head-neck-back relationship to
re-establish itself and function correctly (King n.d.). This procedure organizes
movement and alertness in all vertebrates. The head is prevented from going back
and down by going forwards and up, and the torso lengthens and widens.
• Prone / pronate: To pronate the arms is when a person is standing with the arms
hanging along the side of the body and the palms of the hands are facing backwards
or downwards. Musicians usually pronate the arms when playing a musical
instrument. To lie down on the stomach is prone; the opposite of being supine.
• Proprioception: Muscles, joints and tendons have sense organs called proprioceptors
(sensory systems in the body giving information about position, location, orientation
and movement). They send feedback to the nervous system about the position of a
limb or body part to the rest of the body, and the effort being made to achieve,

3-5
maintain, or change that position. The neck muscles are particularly well supplied
with proprioceptors. Information that originates from the inside is processed in the
body; in contrast to the senses, which process information that originates from
outside of the body, like hearing, seeing, and smelling.
• Psycho-physical re-education: The discipline of unlearning maladaptive habits of use.
“Through the hands-on help of a qualified Alexander teacher, the student learns to
improve Primary Control by using non-doing tools of inhibition and direction. As one’s
kinaesthetic awareness increases, one begins to understand the unity of the self and
pays more attention to the means-whereby, and one’s habits change, thus paving the
way for relief of pain, increasing ease and range of motion, avoidance of deterioration
or injury, and increased co-ordination and skill building. Eventually one’s sensory
awareness becomes more reliable, and students of the Technique can then depend
on their own ability to continue making conscious choices that improve and maintain
function. They have not been treated or cured; they received a psycho-physical
education (or re-education)” (Rootberg 2005:17-18).
• Psycho-physical unity: Nature works as a whole, not in parts. Alexander made no
distinction between mental and physical sides of a human being, and refers to this
unity as the self. The body functions and responds to stimuli as a whole and the
physical and mental sides are totally interdependent.
• Quadrilateral transfer: This refers to the interplay between all limbs. The use of the
legs can influence the use of the arms and vice-versa. It is impossible to have well
co-ordinated arms and hands when the legs and feet are misdirected.
• Self: Alexander made no distinction between the body and the mind, and saw it as a
complete unity and called it the self. It is the inseparable complex of body, mind and
emotion, a psycho-physical unity.
• Semi-supine: Semi-supine position means lying on the back with the legs bent. This
position is used in an Alexander Technique lesson during a table work session.
Inhibition is required before lying down and correct directions provided and applied for
lying down. The teacher will indicate how many books should be placed under the
head, to help the head go forward and up, and to correctly align the spine. During a
table work session in a lesson, the teacher gives verbal directions to help correct
misuse, and also use the hands to help the student to let go of bad habits. Students
of the Technique are required to lie down in this position daily at home on a carpeted
floor rather than a bed, for between ten and twenty minutes, and to carry on doing it
after discontinuing lessons, for the rest of their lives. At home students give the same
3-6
directions taught in the lesson, to themselves, in order to bring about the necessary
changes. (King n.d.)
• Sensory appreciation: Kinaesthetic awareness or proprioception is the body’s ability
to sense itself: for example, sensing tension levels in a certain muscle or groups of
muscles, location of the limbs. The more this awareness is practised, the more
natural it becomes to be mindful of the body and have an accurate awareness of
one’s co-ordination. (Fischer 2001.)
• Startle pattern: The prototypical biomechanical response to fear, beginning with
contraction of the neck muscles.
• Supine / supination: To supinate the arms is when a person is standing with the arms
hanging along the side of the body and the palms are facing forwards or upwards (c.f.
pronate). To lie down flat on the back is supine. To lie down on the back with the
knees bent and the feet flat on the floor is called the semi-supine position.
• Unreliable sensory appreciation: Distortion of the senses, kinaesthetic and
proprioceptive, caused by years of misuse.
• Use: Describes the process of control over all those actions that we have the
potential to control. The way in which we conduct any action or rest in any posture
demonstrates our ‘manner’ and ‘condition’ of use. Good use includes an overall
lengthening of the stature, and improvement in the head / neck / back relationship
(Primary Control). Use refers to the habitual and characteristic manner in which a
person moves and uses their body, whatever they are doing. The way we use
ourselves affects the functioning of the whole body. (King n.d.)
3.2 Basic concepts relating to the Alexander technique
Catherine Kettrick (1992:1-4), a certified Alexander teacher, compiled a brochure for her
Alexander Technique workshops taught in Switzerland, to help the students understand
certain basic concepts of the functioning of the body while exercising the Technique. It was
intended for the use of students who only had one or two lessons and not for the ones who
had many lessons. These explanations of the concepts were based on frequently asked
questions and were meant to assist the students in experiencing the same kinaesthetic
results at home as they did in class.

3-7
Kettrick (1992:1-4) included the following thirteen basic concepts in her explanatory brochure
to her pupils:
• Muscles can only pull: When the arm is bent, muscles contract and shorten; they
can never lengthen. All skeletal muscles function in this way.
• The body has a natural resting length: The body is compared to a spring which
has a natural resting length. If the spring is pushed, it gets shorter; let it go, and it
returns to the natural resting length. Therefore, contracting muscles will shorten
the body’s length, and relaxed muscles allow the body to return to its original
natural resting length.
• There are only two ways the head can move in relation to the rest of the body:
down and not down. The tightening of the neck muscles interferes with the
balance of the head, which is delicately poised on top of the spine. When
contracting the neck muscles, the head moves back and down into the neck. The
head will return to its natural poise when the neck muscles are relaxed.
• The head moves first: movement of the head precedes every movement a person
makes. Alexander found in his research that movement in all vertebrates starts
with the head moving first, and the body follows. When starting to reach for
something across a table, it is the head that moves first. The most probable error
would be pulling the head back and down by unnecessarily contracting the neck
muscles.
• Balance and co-ordination are determined by the poise of the head on the spine:
The head is balanced lightly on top of the spine and moves freely with every
movement of the body. Over-tensing the neck muscles jeopardises this free
movement of the head and interferes with the balance and co-ordination of the
body.
• People are born with the ability to move naturally, gracefully and easily: The over-
tensing of muscles restricts this free movement. Muscular stiffness or pain
prevents natural co-ordination and easy movements.
• What we are used to feels right because we are used to it: Because of years of
wrong movement and the incorrect use of the self, everything we do incorrectly -
walk, talk, sit, play and run - feels right because it has been repeated many times.
• What feels right is probably not right: Nerve-endings send messages (feedback)
to the brain after a movement is completed, telling it whether or not the movement
was successfully executed. Unfortunately, this judgement is most often incorrect.
After being used to moving in a certain incorrect way for years, the wrong

3-8
movement feels right. Therefore, the way the nerve endings interpret the
information it gets from the muscle sense, is incorrect. Accurate judgements
cannot be made from inaccurate interpretations. An example, from my own life: as
a new student of the Alexander Technique, is that I was taught new ways to use
the self; and in my case, putting my feet parallel, where my feet were naturally
turned out like a duck’s. At first it felt as if my knees were turned in too much, but I
was told that the wrong position was the reason for my knee problems. I was also
told to walk with my feet parallel, and since I started doing this the problems that I
had with my knees are something of the past. For the first few weeks it felt wrong
and I had to consciously remind myself all the time to do it. I had to learn a new
habit.
• Feelings come last: Movement is to a large extent automatic, but when analysing
it, it becomes evident that there must be a stimulus first before movement
happens, for example, one is thirsty, acts upon the stimulus and gets something
to drink. The stimulus happens first, then the movement is executed and then
feedback of the muscle endings is given to the brain to inform it how the
movement was executed.
• Directions during movement are always done: Movements that are made
subconsciously are called habitual movements. The Alexander Technique
teaches how to start consciously thinking about what you are doing and then
changing the habitually wrong way of doing this movement (see Inhibiting).
• To change movement, ways of thinking should be changed: Habitual movement is
usually an immediate reaction to a stimulus. To change a habitual movement,
stop for a moment and do nothing, and then think about what to do before doing
it, direct and then make the movement. It is to realise that the old way of doing
was wrong, even though it felt right, and to change it before actually doing it. After
years of experimentation, Alexander devised a series of directions, which did not
interfere with his co-ordination. One of the most important directions is: Relax the
neck, so that the head can go forward and up, so that the back can lengthen and
widen.
• Learning a new way of thinking takes practice: The more the new way of thinking
is practised, even though it might not feel right yet or no results are yet
experienced, the easier it will become, leading to further results which will be seen
and felt in time. The previous wrong way of thinking is usually stronger than the
new way because of years of repetition, but consistent practice will make the new
way easier.

3-9
• Not interfering with the natural working of the self will improve the quality of
everything done: To stop doing the wrong movement will allow the right
movement to happen naturally. If these concepts are practised regularly, any
performance task will be executed with a higher level of co-ordination and will
become a new better habit.
The explanations of the various terms and concepts fundamental to the Alexander Technique
are vital to the understanding of the Technique, this dissertation, and any other discussion
involving aspects of the Alexander Technique.
4-1
4 About the Alexander Technique
4.1 What it is
“We can throw away the habits of a lifetime in a few minutes, if we use our brains” (Alexander
1932:197).
“The Technique…has been developed throughout from the premise that, if something is wrong
with us, it is because we have been guided by unreliable sensory appreciation, leading to
incorrect sensory experiences and resulting in misdirected activities” (Alexander 1997:95).
The Alexander Technique is probably one of the most difficult subjects to define. One simple
sentence will not suffice. Nelly Ben-Or (1995:85) refers to an ancient saying: “the way that can
be told, is not the real way; the word that can be spoken, is not the real word”, when somebody
asks her to describe the Alexander Technique. It is comparable to learning to play an instrument,
where books or the written word are not enough; an actual teacher is needed. In his book The
Alexander Technique, Jeremy Chance refers to the Technique as a sensation or a feeling
(Chance 2001:12). Reference is also made to the famous metaphor coined by Aldous Huxley
coined: “Understanding Alexander’s discoveries without experiencing a lesson, is similar to a
life-long blind person’s understanding of the colour red. A meaning is invented, but it is only an
approximation of the experience” (Chance 2004:12). John Dewey wrote some introductory
words to F. M. Alexander’s book Constructive Conscious Control of the Individual (1997:xvii)
where he states the following: “…I stated that his [Alexander’s] procedure and conclusions meet
all the requirements of the strictest scientific method and that he has applied the method in a
field in which it has never been used before….”
The Technique is a combination of physical relaxation, posture, and the use of the body, which
Alexander called ‘the self’ (de Alcantara 1997:11). Alexander did not distinguish any separation
of the body and the mind, but rather referred to the human being as a whole, as ‘the self’. The
Technique is not so much something that is learnt, as something that is unlearnt. It is a way of
learning how to get rid of harmful tension and stress in the body, and cultivate relaxation
(Kirchner 2004:32), a method for changing habits (movements) in everyday activities and for
improving ease and freedom of movement, balance, support and co-ordination. It is a practical
technique for changing reactions to given stimuli (Chance 2001:4). Alexander used to say that

4-2
people translate everything, spiritual, mental and physical, into muscular tension. The Alexander
Technique deals with all the causes of misuse, including false perceptions, faulty sensory
awareness, bad postural habits, fatigue, injury, and mental states such as anxiety and fear. It is
a scientifically verified method for changing habitual behaviour and promoting the integration of
mind and body (Jones 1976:101).
Alexander Technique teachers use their hands to guide a person to an improved kinaesthetic
experience of the required physical activity. This method of teaching is mainly through non-
verbal communication (Barlow 1991:238). Faulty movement patterns, a result of faulty sensory
perception, are identified through an increased sensory perception and stopped through what
Alexander called inhibition. This most often relates to inhibiting the tightening of the muscles in
the neck and shoulder area, which interferes with Primary Control, i.e. the optimal relationship of
the head, neck and back.
The Alexander Technique can help students to prevent repetitive strain injury (see Chapter 4.7)
as they learn to exert a constructive influence over their wrong habitual practicing skills which
induced injury in the past. Increased self confidence, an increased sense of self-reliance and a
fresh perspective on how to prevent injury have been reported by students of the Technique,
contributing to a less anxious and more resilient mental state, helping them cope better with
challenging work and performance situations. When musicians’ quality of physical movements
involved in the playing of their instrument improve through Alexander lessons, the quality of tone
production and the music improve as well. Tension in any part of the body will influence the
performance and tone negatively. Students of the Technique learn to play their instruments in a
fluid, lively, more relaxed way because undue tension in their bodies has been resolved,
resulting in improved performances.
The Alexander Technique has grown in popularity through the years and is now taught at many
universities and colleges’ performing arts departments worldwide as part of their course,
including the following: the Julliard School of Performing Arts in New York, the Los Angeles
Philharmonic, the Royal Academy of Dramatic Art in London, the American Dance Festival and
the Stratford Shakespearian Festival. People from all walks of life make use of the Technique to
improve their quality of life. Famous people that make or made use of the Alexander Technique,
are the actors Kevin Kline, Paul Newman, Robin Williams and John Cleese, the Nobel prize-
winning scientist Nikolaas Tinbergen, the philosopher John Dewey, the scientist Raymond Dart,
4-3
authors Aldous Huxley, Roald Dahl and George Bernard Shaw, and musicians James Galway,
Julian Bream, Paul McCartney, Sting and Yehudi Menuhin.
(http://www.alexandertechnique.com/at.htm).
Alexander used to say that a person who learns to ‘work to a principle’ in doing one exercise, will
have learnt to do all exercises, but the person who learns just to do one exercise will most
assuredly have to go on learning to ‘do exercises’ ad infinitum. Therefore, in the Alexander
Technique one learns a series of constants, which create the working principle to which
Alexander refers (de Alcantara 1999:1). The Alexander Technique is sometimes compared to
other hands-on methods such as massage, acupressure, osteopathy and chiropractice. There
may be a few points of contact between these disciplines and the Alexander Technique, but the
main difference is that the Technique is educational and a long-term cure, whereas the other
disciplines are therapeutic and short-term cures (de Alcantara n.d.)
What the Technique basically proposes, is to let the neck be free, to let the head go forward and
up, to let the back lengthen and widen, altogether, one after the other (the directions for Primary
Control). When the neck muscles do not overwork, the head balances lightly at the top of the
spine and the delicate balance between the head and spine is restored. “The delicate poise of
the head sparks the body’s anti-gravity response and invites the spine to lengthen instead of
compress” (Arnold 2004:1).
The human body has the most amazing ability to bend in any direction by choice. When a
human baby is still in the womb, the spinal chord follows a curve, which is known as the primary
curve. Once born, we can bend in the any direction as well as curl ourselves up, by choice. As
we grow up, secondary curves are formed in the opposing directions in the neck and the small of
the back. In other words, humans have muscle systems to curl up or to bend backwards if we
choose, and balance means to achieve equilibrium between the pulls of these two systems.
(Langford 1999:48-49.)
Children under the age of four have a natural poise, and an alertness that allows them to curl up,
sit, stand and move gracefully without strain. Toddlers usually have a very straight spine, which
is flexible, and strong, free joints and a large head balancing on a little neck. Everyone begins as
a toddler with a regal spine, but spontaneity and ease are lost into adult life through bad habits,
like slouching and end-gaining (Arnold n.d.). The young individual becomes accustomed to all

4-4
these unnatural ways of sitting, standing, moving, and breathing. Such patterns of behaviour, or
postural habits, become so normal to us that we no longer notice how unnaturally we use our
bodies. Excessive tension can start early in childhood and can give rise to a number of common
ailments in later life, like arthritis, back and neck pain, migraines, hypertension, breathing
difficulties, fatigue, sciatica, insomnia and depression, to name only a few. (Arnold 2004.)
In the course of our stressful and pressured lives our initial natural posture is lost. Our stressful
lives lead to unnecessary muscle tension, resulting in insomnia and ineffective rest, using far
more energy than needed by upholding the bodies and virtually drive our bodies from one place
to the next instead of allowing it to take us there. ‘By stopping to do the incorrect thing, then the
correct thing does itself’, is the motto used by Alexander Technique teachers. Lessons in the
Alexander Technique help to restore the correct muscle tone and skeletal alignment that we
initially had as toddlers. (Arnold 2004.)
4.2 Stimulus and reaction
In his article Forward and Up: An Introduction to the Alexander Technique, Pedro de Alcantara
(de Alcantara n.d.) comments that “…to be alive is a never-ending succession of reactions to a
never-ending succession of stimuli.” One’s reaction to the stimuli is not necessarily always
correct, exactly what Alexander discovered through his lengthy experimentations. People who
end-gain will react hastily, strongly and most of the time negatively to stimuli. This negative
reaction is what Alexander called misuse, and if done over a long period of time, the results will
initially be aches and pains, and eventually end in illness and even disability. End-gaining and
misuse are a result of a hurried, stressful lifestyle, where life is a race against time, with no time
to think of how to react to stimuli. Most people are unaware of their misuse and consider it
normal. Alexander substituted “the ‘end-gaining principle’ with the ‘means-whereby principle’,
which was his term for a series of intermediate steps and indirect procedures that allow us to
achieve our goals in the manner best suited to each situation” (de Alcantara n.d.).
4.3 Posture
The Alexander Technique is often erroneously only associated with posture, whereas posture is
but only one element of the Technique and “encompasses posture and goes beyond it” (de
Alcantara 1997:13). What we understand as posture is a bodily position we hold, consciously or

4-5
unconsciously, good or bad. At the mention of the words ‘good posture’ to any individual, they
will immediately over-straighten the back and excessively push the shoulders back, in a very
uncomfortable and unnatural way, with little understanding of what they are actually doing. “They
do not realize that posture (the visible arrangement of bodily parts) is inextricably linked to a set
of attitudes, moods, thoughts, and feelings, because there is no separation between the physical
and mental, the body and the mind. Posture is tantamount to attitude and an aspect of the whole
being” (de Alcantara 1997:13). Health and well being are vastly influenced by an individual’s
good or bad postural habits.
Posture should not be conceived as a static bodily position, with an assumption that there is
opposition between position and movement. George Coghill, an American biologist and a
supporter of the Alexander Technique, wrote in the preface of one of Alexander’s books: “the
distinction between mobility and immobility is relative, and no absolute distinction can be made
between them” (Alexander 2000:xxi). He also believed that unless one is physically restrained,
posture and movement are just two aspects of the same state of mobility. Good posture entails
latent mobility and latent or realised resistance. Latent mobility means being able to move easily
and elegantly at all times, or being comfortable not moving at all for extended periods of time (de
Alcantara 1999:13-14).
4.4 Breathing
Alexander was known as the ‘breathing man’ early in his career (de Alcantara 1997:90). People
still make the association today of the Alexander Technique being a method for better breathing.
Alexander had a keen understanding of the importance of breathing, and lessons in the
Technique may mitigate or eliminate breathing problems, but the Technique is much more than
a method for better breathing.
Austin and Ausubel (1992:486-490) showed a significant improvement in lung capacity and peak
expiratory flow rate after Alexander lessons, while Robinson and Garlick (1985:256) found that
breathing slows down and becomes deeper after Alexander lessons.

4-6
4.5 Cardiovascular health
Dr. Leone Malan from the University of Potcefstroom conducted a study in 1993, as part of her
BSc Hons degree, on 20 music students, both male and female, to establish the effect of twelve
Alexander Technique lessons on the cardiovascular system. She found that after lessons in the
Alexander Technique students exhibited lower systolic and diastolic blood pressure as well as
lower heart rate frequency. A more relaxed state of control was acquired over negative stimuli.
The conclusion was that after only twelve lessons in the Alexander Technique, stimuli and
stressful situations could be handled in a more relaxed manner, thereby placing less stress on
the cardiovascular system (Malan 2006:23-24).
4.6 The self
As previously mentioned, Alexander saw the individual as an indivisible unity, and did not make
a distinction between the spirit, the mind and the body. He spoke simply of the ‘self’ and its use
and functioning. For Alexander the body does not control the mind (or vice versa); neither does
the subconscious control the conscious (or vice versa). Alexander’s understanding of how the
self works invalidates the common metaphor of the body as a car, and the brain as its driver. He
often writes of the self as something ‘in use’, which ‘functions’ and ‘reacts’ (de Alcantara
1997:11).
Most people who apply the Alexander Technique are performers, whose quality of use directly
influences their ability to make a living, like musicians, actors and dancers, who either have
pains in their bodies that they want to get rid of, or who just want to improve their performance
(Gelb 1994:27). The composer and pianist Robert Schumann wrote in his biographical notes in
1839 that some of his fingers became too weak to use possibly caused by over use from writing
and playing too much in his earlier years. He permanently injured his right hand in his anxious
quest for perfect execution (http://www.alexandertechnique.com/musicians.htm).
4.7 RSI
Musicians, sometimes referred to as ‘upper-extremity athletes’, do some of the most complex
and demanding physical movements of any profession and therefore are at high risk for injury.
The upper extremities, the neck, the back and the facial musculature, are affected by performing
4-7
the same complex muscular actions over and over again, every day, and sometimes for many
hours a day without a break. Musicians, like athletes, tend toward the philosophy of practice of
‘no pain, no gain’. This can lead to Repetitive Strain Injury (RSI), a term that has come into
popular use and affects the small muscles in the hands. RSI comprises a number of musician’s
injuries, like carpal tunnel syndrome, tendonitis, and peripheral nerve entrapment syndromes, and
can also be called playing-related musculoskeletal disorder (PRMD) (Zaza n.d.). “Musicians’
injuries are as numerous as their instruments: fiddler’s neck, tuba lips, violinist’s jaw, horn
player’s palsy – even guitar nipples and harpist’s cramp …and the flute is a biomechanically
impossible instrument to play” says Scott Brown, musician and chief of the department of
physical medicine and rehabilitation at Sinai Hospital in Baltimore (Mencimer 2003:2).
4.8 Use
The word ‘use’ was employed by Alexander to describe the process of control over all actions
that have the potential to be controlled and ‘use’ is also a term Alexander coined to describe co-
ordination. He called the power of choice ‘Man’s Supreme Inheritance’, and the way in which
one uses this power will influence all levels of functioning, physical, emotional and mental, which
Alexander called the ‘self’ (Gelb 1994:2-3). Through practicing the Alexander Technique, it is
possible to lose the bad habits that have been acquired over the years, heighten self-awareness
and use thought patterns to restore original poise. Therefore, new things are not learnt;
everything learnt has already been known previously in one’s life as a toddler.
Through learning the Technique conscious awareness is increased and awareness of exactly
what is being done incorrectly in everyday ‘use’ can be heightened. Alexander’s version of ‘use’
was a psychophysical use of self, becoming more aware of balance, posture, breathing and co-
ordination while performing everyday tasks, like sitting down, standing up, bending down,
walking and talking. The Technique teaches one to carry out these actions in ways that use less
energy and effort, cause far less strain on the bones, joints and muscles, thus making the body
work more efficiently. Then, when everyday activities are performed, it is amazing to see how
bodies are frequently subjected to undue tension, simply by not being aware of what is done and
how it is done. Tension starts in one area and gradually spreads to the rest of the body, affecting
us in more ways than we consciously realize.

4-8
4.9 Fear
Fear is the one of the major obstructions to integral learning. It interferes psychologically and
physiologically with an individual’s ability to respond freely and to function naturally, abilities
essential to integral learning. For many years fear has been used as a tool in the education
process, armed services and sports coaching. Short-term results are achieved, but in the long-
term it can have a crippling effect. People have various fears, like fear of the dark, fear of
heights, fear of failing, fear of performing a musical instrument in front of people, and whether
the fear is rational or irrational, it operates on a subconscious level and is very real to the
individual. Fear prevents people from acknowledging mistakes and asking for help, making
continuous improvement impossible (Gelb 1994:142).
The Alexander Technique helps make fears more accessible to the conscious mind and
increase awareness to stereotyped responses to fear. It reveals the inner secrets that allow fear
and stage fright to be transformed into confidence and enthusiasm. It awakens a sense of poise
that translates into a commanding presence. It increases the ability to give attention freely, and
attention is always reflected in the state of the muscle tone and balance. The ability to monitor
attention and performance in any activity improves with the awareness of these previously
mentioned factors. This awareness is the first step in understanding and resolving fear and in
stopping it from stifling the ability to learn.
The Alexander Technique provides the means to effectively manage and free ourselves from
fear by concentrating more on the process than on the results. This process is what Alexander
called the means-whereby. End-gaining, focusing only on the results and not on the process of
getting there, will produce immediate results, but it is often obtained by sacrificing poise, and in
the course of time it will take its toll (Gelb 1994:95-96).
4.10 Effects on performance
Dr. Wilfred Barlow (1956: 670-674) did a study with music students at the Royal College of
Music. He had the students adopt a standard standing position and photographed them from all
sides. He analysed the photographs and scored each on a grid system. He arranged them into
two groups and compared them before and after receiving training. The one group received
lessons in the Alexander Technique and the other group received exercises to help improve their

4-9
posture. In the group, that received Alexander lessons, there was a significant reduction in their
postural faults and in the other group there was no noticeable change. Barlow concluded that
there is a correlation between objective postural changes and performance.
The teachers of the above mentioned students reported that there was a marked change in the
students who had received Alexander Technique lessons: they were easier to teach, they
became psychologically more balanced, all students improved physically in their singing and
acting abilities, and performing at competitions and concerts, and they experienced far greater
success than expected. The teachers thought the Technique was the best method they had
experienced in aiding performance and should be included in the training of all music students
(Barlow 1956:670-674).
In his article ‘Voice Production as a Function of Head Balance in Singers’, Jones (1972:209-215)
suggested that listeners also felt that breathing and voice production improved after Alexander
lessons, and a spectral analysis indicated a measurable change in the voice quality. In a more
recent study, Doyle showed marked improvements in violin players after Alexander training
(Doyle 1984:32).
4.11 What is learnt in an Alexander Technique class
After carefully choosing a teacher, the first lesson will be attended. A certified Alexander teacher
will have had one thousand six hundred hours or more of professional training, compiled into a
three-year fulltime course. Training courses are overseen by the Society for Teachers of the
Alexander Technique (STAT). The teacher learns to use his / her hands according to a
sophisticated and precise method under the supervision of an experienced director of training.
As the student’s learning is impaired because of faulty sensory awareness, the teacher uses his
/ her hands to teach and guide the student. Alexander teachers can, by using their hands to
‘listen’ to the student’s body, pick up an incredible amount of information about the student’s co-
ordination. The body is transformed non-verbally into a more relaxed, tension-free state without
the student ‘doing’ anything (Chance 2001:16). Alexander (1932:195) used to say about the
Technique: “You can’t tell a person what to do, because the thing you have to do is a sensation”.
4-10
In an Alexander lesson one will be taught to improve movements by controlling them. The
process of sensory awareness, inhibition and direction that precede and accompany every
movement are of paramount importance; the movement itself is incidental, a means to an end,
and not an end in itself (de Alcantara 1997:84). A lesson is about changing the state of one’s
consciousness through three processes: observation, interpretation and experimentation. A
lesson has two important ingredients: the primary ingredient of ‘sensation’, facilitated by the
hands of the teacher, leads a person to an improved kinaesthetic experience of the required
physical action. The secondary ingredient is verbal instruction, which includes explanation,
description, analogy, metaphor and direction. The use of verbal instruction is to clarify the notion
of direction and to cultivate the links between sensation, thought, direction and action (de
Alcantara n.d.).
The teacher observes students in everyday situations and helps them understand and sense
what they are doing, in order to help them learn what they can do to improve themselves.
Through the increased sensory awareness that this brings about, faulty movement patterns are
identified that can be stopped through inhibition (Louw 2005:15).
Alexander (1932:10) wrote: “I wish it to be understood that throughout my writings I use the term
conscious guidance and control to indicate, primarily, a plane to be reached rather than a
method of reaching it.” In seeking to restore the correct muscle tone and skeletal alignment that
we originally had as toddlers, an Alexander Technique teacher will pinpoint the ways in which a
student habitually uses the body incorrectly. Using the simple actions of sitting, standing, walking
and lying down, the student learns how to stop such harmful habits. The teacher will ‘listen’ to
the student’s body with his / her hands, by touching the student. Ordinary, everyday activities will
be taught, like sitting down and standing up, walking, bending down, and standing.
4.11.1 Directions
“There is no such thing as a right position, but there is such a thing as a right direction”
(Alexander 1932:207). Direction does not necessarily instil movement, it prepares for a specific
movement. Alexander (1932:13) spoke of directions as “the process involved in projecting
messages from the brain to the mechanisms and in conducting the energy necessary to the use
of these mechanisms”. These commands specify a state of postural readiness to allow body
segments to expand relative to one another, for example to allow the spine to lengthen
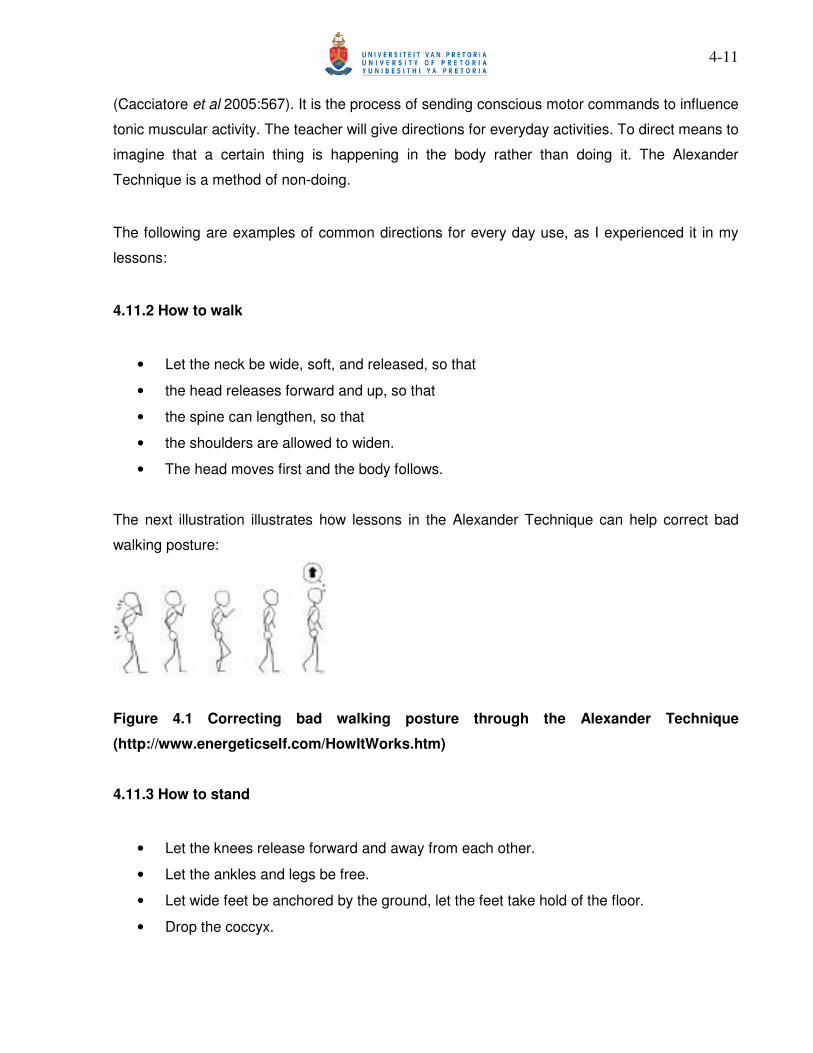
4-11
(Cacciatore et al 2005:567). It is the process of sending conscious motor commands to influence
tonic muscular activity. The teacher will give directions for everyday activities. To direct means to
imagine that a certain thing is happening in the body rather than doing it. The Alexander
Technique is a method of non-doing.
The following are examples of common directions for every day use, as I experienced it in my
lessons:
4.11.2 How to walk
• Let the neck be wide, soft, and released, so that
• the head releases forward and up, so that
• the spine can lengthen, so that
• the shoulders are allowed to widen.
• The head moves first and the body follows.
The next illustration illustrates how lessons in the Alexander Technique can help correct bad
walking posture:
Figure 4.1 Correcting bad walking posture through the Alexander Technique
(http://www.energeticself.com/HowItWorks.htm)
4.11.3 How to stand
• Let the knees release forward and away from each other.
• Let the ankles and legs be free.
• Let wide feet be anchored by the ground, let the feet take hold of the floor.
• Drop the coccyx.

4-12
• Point the shoulders sideways and apart.
• Point the elbows out and away from the body as well as the shoulders.
4.11.4 How to sit
• Sit directly on top of the ‘sitting bones’ (wide sitting bones), enjoying sitting on the sitting
bones, and lengthening the torso.
• Let the elbows float out and away from the body to widen the shoulders.
• Allow the knees to move forward and away from each other so the hip joints move freely.
• Use the whole back as a unit, bending from the hip joint rather than always at the waist.
4.11.5 Sitting down from a standing position
• Stand in front of the chair and give directions for standing (see above)
• Bend the legs at the knees as if squatting and bend the head and neck down as if looking
at the feet
• Sit down on the chair while looking down at the feet
• Give directions for sitting (see above).
Figure 4.2 has two illustrations: the left hand example indicates the perfect head-neck-back
relationship, which is taught in Alexander training. The right hand example illustrates how a
person normally, without consciously realising it, pulls the head back when going into the sitting
position. This incorrect way, should be avoided as far as possible and indicates the unnecessary
stress put on the neck vertebrae that leads to unnecessary tension in the neck muscles when
the head is pulled back (see right hand example in Figure 4.2). Training in the Alexander
Technique teaches one how to keep the head in the correct position throughout the sitting down
process. The same principle applies when standing up from the sitting position, but in reverse.
When standing up, one should move the head and upper body forward while lowering the head
and looking down at the feet, and keeping the head down until the momentum of the forward
movement allows the body to straighten up into the standing position.

4-13
Figure 4.2 Pulling the head back when sitting down (Williamon 2004:183)
4.11.6 The semi-supine position
Alexander Technique lessons usually include a session on the table, also called ‘table work’.
New habits are taught in order to cultivate and become aware of ‘Conscious Constructive
Thinking’. Students are asked to lie down on a table, and helped by the teacher’s guiding hands
into the semi-supine position, also called constructive rest. This procedure should be done at
home, on the floor, for 15 - 20 minutes every day. It initiates the process of undoing years of
tension. It creates favourable conditions for the spine to lengthen and for the body to release
unnecessary tension, and by this means the body can heal and regenerate itself. This position
engineers the spine to be at maximum rest, allowing its curves to lengthen, and assisting any
unnecessarily tight and contracted muscles to release. The inter vertebral discs of the spine,
which act as shock absorbers and are under considerable pressure while in the upright position,
have a chance to rejuvenate themselves and this teaches students to become aware of
excessive tension and how to release it. Kalka (2005:1) describes the semi-supine position as
follows:

4-14
Lie on the floor with a comfortable number of books under the head. The neck and head should feel balanced and free. Place the feet wider than the pelvis and as close to the torso as is comfortable, allowing the knees to bend. Feel the body expand onto the floor while placing the hands on the abdomen to feel the breathing. The spine should maintain its natural curve. Be aware of the body and how it feels, while gradually directing the body to release any unnecessary tension. When you stand upright again, use awareness, inhibition and direction to attain the same relaxed feeling that was felt on the floor.
The head resting on the books enables the atlanto-occipital joint1, between the top of the spine
and the head, to release enabling the whole spine to lengthen. This allows the back to soften,
widen and rest, thus improving the inner environment of the torso, encouraging the organs to
function more efficiently. The body is given a chance to revive and revitalize itself and to heal.
This process is very valuable directly before a performance, examination, competition or any
stress-inducing situation, to help relax and restore calm to the body.
While doing table work in the semi-supine position, the Alexander teacher constantly reminds
the student to become aware of the external support, the ground or bed under one’s body and
every part of the body that is in contact with the bed, allowing the bed to carry the body. One is
told to relax and enjoy the time of rest on the bed, and to remember that there is nowhere you
have to be at that moment. If there is any discomfort or pain, one should not resist it, but allow it
as it is only temporary while the body reorganises and adjusts itself to the new, relaxed
positions. This daily practice is invaluable to better health and quality of life.
The following illustration, Figure 4.3, was taken from the book Body Learning: An Introduction to
the Alexander Technique (Gelb 1994:163). It shows how the semi-supine position should be
executed.
1 The atlanto-occipital joint is the joint that is formed where the scull and the cervical spine connects.

4-15
Figure 4.3 The semi-supine position (Gelb 1994:163)
4.11.7 The whispered ‘ah’ exercise
Alexander created this exercise to help actors enhance freedom in the jaw, the lips and the
tongue. By doing the exercise, sound is released without creating tension and pressure on the
vocal mechanism, creating a very gentle and non-restrictive flow of air and a subtle ‘ah’ sound
(McEvenue 2001:96-97). A detailed description of how the whispered ‘ah’ should be executed, is
found in Chapter eight, 8.9.3.
4.11.8 The monkey
The monkey is a basic, universal Alexander procedure. De Alcantara (1997:100) gives a
motivation for the monkey:
It is a position of mechanical advantage. It coordinates the use of the back and the legs, a precondition to improving other parts of the self, such as the upper limbs or the lips, tongue, and jaw. The monkey is also somewhat easier to perform than the “hands-on-the-back-of-the-chair” or the whispered ‘Ah’. It is, therefore, logical to learn it before other procedures. The Monkey is an apt way of examining issues of tension, relaxation, balance, posture, position, movement, control, inhibition, and direction. Besides being effective in developing co-ordination on a general basis, the monkey is useful when you need to lower yourself: to wash your face, iron clothes, sign a cheque or credit card slip on a shop counter, to pick up an object off the floor, and so on. Since there are countless such situations in daily life, (and in the life of a practicing musician), the monkey is indeed an indispensable coordinate procedure.

4-16
Because of our faulty sensory awareness, this procedure, like so many others, needs to be
learnt with the help of a qualified Alexander teacher; otherwise it can be harmful.
The monkey is executed as follows (de Alcantara 1997:101):
• Stand up and place the feet at a shoulder width apart, or slightly wider and pointing the toes outwards slightly.
• Bend the knees slightly.
• Lean forwards from the hip joint.
• Practical need should determine where the feet are placed, how far the knees are bent and how far to lean forward.
• Monkeys of any height should be done with equal ease.
4.11.9 The lunge
The lunge is also a position of mechanical advantage and is a variation of the monkey. De
Alcantara gives the following description of the lunge (1997:108):
Again the body is lowered in space, but now the feet are placed asymmetrically and one of the legs is bent, the other one straight. Otherwise its basic principle is the same as the monkey’s: bending the joints (of hips, knees and ankles) while keeping the relationship between the head, neck and back constant—the neck always free, the head leading forwards and up, and the back lengthening and widening. Within the lunge there is infinite variation of movement and relativity of parts. The lunge can be adapted to a huge number of practical tasks, both in daily life and in music-making.
The many variations of the lunge can be adapted to everyday life as well as music making. de
Alcantara (1997:108-109) describes the lunge as containing the greatest number of
opportunities for inhibiting, directing and ‘thinking up’. He describes the process as follows (this
can be done with the right or the left foot):
• Stand up and place your feet side by side.
• Put the heel of the left foot on the hollow of the right foot—that is, advance the left foot forwards slightly and put the left foot at an angle of forty-five degrees to the right foot.
• Turn your head and trunk so that you are facing in the same direction as your left toes.
• Lift the left knee up in the air, so that the foot is clear of the floor.
• Lean forwards and let the left foot drop, away from the right foot.
• Bend the left knee slightly.
• Lean the trunk forwards, from the hips.

4-17
In all three above described procedures, the monkey, the lunge and the whispered ‘ah’, the
means-whereby is as important as the action itself. Frank Pierce Jones defines the means-
whereby principle as “… a coordinated series of intermediate steps which must be accomplished
in order to attain an end” (Jones 1976:195). Various Alexander teachers have slightly different
methods of teaching the Technique. Some teachers like to teach aspects, like the whispered ‘ah’
exercise, the monkey and the lunge, separately, while others integrate them.
4.12 What the Technique does
In the process of learning the Technique, kinaesthetic awareness, the body’s internal feedback
or sensory system, becomes a more accurate guide so that new activities can be taken on, as
well as old ones, with greater ease, freedom and control. The technique is not a series of
treatments and exercises, but rather a re-education of how to use the body in such a way that
the psychophysical equilibrium can be restored. Excessive tension in the body can debilitate
performance in all levels of life.
John Dewey, a philosopher, believed the Technique to be emotionally enlightening. He found
that after having Alexander Technique classes he could hold a philosophical position more
calmly once he had taken it, or change it just as easily if new evidence came up warranting a
change. That was in contrast to other academics thinkers who rigidly held their position early in
their career and then spent their lives using their intellects to defend the position (Jones
1976:97). To cope with a complex world, one needs adaptive and creative habits. Improved use
results in a mind-body co-ordination, which creates a practical framework in which intelligence
can work. We have a choice in how we employ our minds, bodies and spirits, and the most
fundamental form of misuse is the failure to make conscious, intelligent choices (Gelb1994:33).
Gelb (1994:32) comments on the characteristic physical manifestations in the body of various
emotional states, like being depressed, afraid, nervous, insincere, happy, or attentive, and how
the Alexander Technique can teach one to counteract each of these stereotyped and immature
behaviours. Gelb himself used to be characterised by a raised chest, tight stomach, set jaw and
hunched shoulders - the classic male defensive-aggressive posture - but is now free of it. The
Technique provides the knowledge and freedom to change. Habitual tensions that have been
maintained for years prevent free expression and limit the development of personality.
4-18
The scientist Raymond Dart, who was physically disabled, attended Alexander lessons with
Irene Tasker. He found through Irene’s manipulative demonstrations how exaggerated spinal
curvature (more commonly known as ‘round shoulders’) was due to fixation because of improper
or uncoordinated management of his own deformation. He devised his own supplementary
exercises to the Technique to help with the treatment of physically and mentally impaired
individuals. (Wheelhouse and Smithford 2001:222-224.)
There is a long list of conditions that have been improved favourably through taking Alexander
lessons. Dewey believed the Technique to be emotionally enlightening. According to the
Alexander Technique International’s website, medical studies have shown the Technique to be
as effective in lowering blood pressure as the normally prescribed beta-blocking drugs.
(www.alexandertechnique.com/musicians.htm).
The following quotations were made by famous people about the Technique: Nikolaas Tinbergen
(1974) devoted half of his Nobel Prize acceptance speech (for Medicine and Physiology) to the
Alexander Technique. In it he said: “The Alexander Technique is based on exceptionally
sophisticated observation, not only by means of vision, but to a surprising extent by using the
sense of touch. I noticed with growing amusement, very striking improvements in such diverse
things as high blood pressure, breathing, depth of sleep, overall cheerfulness, mental alertness,
resilience against outside pressures and also refined skills such as the playing of stringed
instruments.” (www.stat.org.uk/pages/overview.htm).
Sir Charles Sherrington (1857-1955), neurophysiologist and Nobel Prize winner for Medicine
(1932) said: “Mr. Alexander has done a service to the subject [of the study of reflex and
voluntary movement] by insistently treating each act as involving the whole integrated individual,
the whole psychophysical man. To take a step is an affair, not of this or that limb solely, but of
the total neuromuscular activity of the moment, not least of the head and neck.”
(www.stat.org.uk/pages/overviewpage.htm).
Prof. John Dewey, philosopher, educator and author stated “As one goes on, new areas are
opened, new possibilities are seen and then realized; one finds himself continually growing,
and realizes there is an endless process of growth initiated.” (http://www.ati-net.com/ati-
alex.php).

4-19
“The Alexander Technique does not cure illness. Rather, it aims to change the constant
influence of use upon functioning, thereby changing all manifestations of this constant” (de
Alcantara 1997:24).
In his article “What’s the use?”, Robert Rickover (n.d.) describes the effect of the Technique on
his life:
All the approaches to the Technique I’ve experienced produced significant improvements in changing long-standing imbalances in my muscle tone, alignment, and in the co-ordination of my head, back and neck relationship, although they varied dramatically in their attention to how I was to succeed on my own. The Alexander Technique is by far the most powerful way I have encountered for using conscious direction to improve one’s manner of use. For me, that is what ‘man’s supreme inheritance’, ‘constructive conscious control of the individual’, ‘the use of the self’ and ‘the universal constant in living’ are all about….
Alexander himself wrote (1932:199) “When an investigation comes to be made, it will be found
that every single thing we are doing in the Work is exactly what is being done in Nature where
the conditions are right, the difference being that we are learning to do it consciously.”
4.13 Summary
The Alexander Technique aims to re-educate a person’s use of the self, and teaches how to
react differently to stimuli. The Technique can be applied to every situation in life and can be
learnt by anyone. By applying the Technique into one’s life, a balance and a feeling of being
grounded is achieved in the physical realm, thereby also creating a balance in one’s emotional
life. Many aspects of one’s life appear to become sorted out and fall into place.
5-1
5 Performance anxiety
5.1 Introduction
Musicians are prone to occupational illnesses that threaten their career and livelihood.
Complaints vary from backache, to pains in the shoulder or upper limb, to wrist pain or
numbness in the fingers or other upper body parts, believed to be occupationally related. These
complaints are usually connected to bad posture and / or inappropriate technique. But all too
often excessive muscle tension due to performance anxiety or depression is the cause. (James
1994:631.)
One of the most exhilarating experiences for a musician is performing in public, being so well
prepared that you become one with music and instrument, and as a result, experience the
gratification and sheer joy of sharing with others the rewards of an aesthetic experience.
Nevertheless, a factor that can and does make public performing less pleasurable - to a greater
or lesser degree - is the incidence of performance anxiety. From professional and personal
experience, few performing artists escape it entirely. Some have learned to deal with it
successfully through therapy of one kind or another; others have merely accepted it as a way of
life, while it is documented that others have experienced debilitating agony because of it,
eventually ending their careers. If stage fright were the only return on the investment, dedication
to the art would be pointless, but in many cases, musicians keep performing for the satisfaction
and joy that is experienced during and after a successful performance1.
A degree of performance anxiety is encountered by all performing artists, and especially by
those who are prone to anxiety. As performance anxiety is closely related to personal feelings
and perceptions about oneself, insecurities will trigger feelings of doubt about one’s abilities.
Personal perception of the importance of a performance plays a significant role. One musician
may have the perception that it is just another performance, while for another it may be the most
important performance of their career and perceived as a ‘matter of life and death’. If greater
1 Tension through expectation and excitement should not be totally lacking, as the right amount adds electricity and
edge to a performance.

5-2
pressure is perceived, for example, at a hugely important performance, even confident and
experienced performers may experience a bout of anxiety.
Simple tasks can benefit from high levels of anxiety, like rapid responses, but more complex
tasks like problem solving and fine muscle control are badly affected. Low levels of anxiety are
needed to improve a musical performance, whereas high levels can have disastrous
consequences. Musical performance as a psycho-motor task is self-initiated and requires
physical actions to perform tasks in order to achieve a predetermined goal. Anxiety not only
affects psycho-motor control, but also affects the way information is processed, for example it
expands one’s sense of time - pauses seem very long. (West 2004: 271-272.)
Performance anxiety covers a wide range of physical and psychological disturbances that
interfere with performance. It is more frequent in persons who have a natural tendency to anxiety
and manifests in physical problems that can hinder a musician’s performance ability. Most of
these physical problems related to performance anxiety are rooted in mental or emotional issues
(Workman 1999:50). Workman states that performing artists can be helped to overcome their
fear of performance if they are taught to incorporate a few simple tools to help them bridle it.
However, if anxiety manifests in panic, professional help is essential.
5.2 The phenomenon of performance anxiety
Jonás (1999:398) refers to performance anxiety as ‘Neurasthenia, the American disease’, but it
is by no means only confined to American musicians. Musicians can rarely trace the cause or
nature of their nervousness, which may comprise any combination of the following: heredity,
environment, personal habits and mental attitude. Where heredity is concerned, not much can
be done about it, because of genetic predisposition, but environment can be controlled and bad
habits can be unlearned. Musicians need to realize that the cure for nervousness does not lie in
a ‘quick fix’ from a bottle, but in meticulous preparation, enough sleep and rest, healthy eating
habits and the right state of mind. Musicians should create correct eating habits, as dyspepsia
and nervousness are related.
Marchant-Haycox and Wilson (1992:134) found in a study of various groups of performing
artists, that the highest frequency of anxiety sufferers were found among instrumental musicians
(47%) (no distinction was made between male and female), followed by singers (38%), dancers

5-3
(35%) and actors (33%). The reason for the higher numbers among musicians may be that they
spend many years developing performance skills, but training does not usually include
psychological preparation for the stresses of performance. Technical and musical abilities alone
do not guarantee a flawless performance if the student has not been sufficiently trained in
psychological development and management of performance anxiety.
An interesting fact is that the physical symptoms of performance anxiety manifest differently in
males and females. Performance anxiety is found to correlate with neuroticism and introversion,
two traits more common in females; therefore it is more predominant in females than in males.
Unsurprisingly, therefore, there are more cases reported of debilitating performance anxiety in
women than in men. Abel and Larkin (1990:176) evaluated stress in eight male and fourteen
female musicians, by measuring their heart rate and blood pressure in the run-up to a
performance in front of a jury. Increased heart rate and blood pressure, as well as higher levels
of self-reported anxiety were reported in anticipation to performing in front of a jury. Greater
increases in blood pressure were measured in the men, while feelings of anxiety were more
prominent in the women.
Many students’ careers as professional musicians are derailed due to the obstacle of fear of
public performance and lack of training on how to overcome it (Salmon & Meyer 1992:19-20).
Performance anxiety is usually reduced with age and experience but mostly it is experienced
throughout an artist’s career. Salmon and Meyer (1992:19-20) suggest that performing artists be
subjected to the BASIC ID test. This test was developed by psychologist Arnold Lazarus, and
gives an overview of seven dimensions of the psychological make-up of a performer. The Basic
ID assists performers in problem-solving concerning performance skills and provides
perspectives on their psychological strengths and weaknesses, and will be discussed in more
detail later in this chapter (see 5.9.8).
Workman (1999:50-55) divides performance anxiety into three categories: unpleasant
apprehension, panic and chronic anxiety. Unpleasant apprehension, probably the most common
form that precedes public appearance, can be indicated by one or more of the following
symptoms: increased heart and breathing rate, heavy perspiring, cold skin, restlessness,
memory loss, irritable stomach and more, and is the most easily overcome. Panic is a more
severe form of performance anxiety, indicated by fears of a catastrophic type. Chronic anxiety is
a long-term, often lower-grade anxiety that leads to withdrawal from society in general. This form

5-4
of anxiety which includes all the above problems is a more serious form and professional help is
necessary in order to overcome it.
Performance anxiety is usually rooted in self-consciousness, where the performer is excessively
self aware. It is a matter of being more conscious of personal appearance and approval by the
audience than with entertaining the audience and portraying the mood of the music. The
performer will assume that the audience will immediately sense this self-absorbedness resulting
in his / her shame and embarrassment after every small inaccuracy in the performance.
Focusing on more important factors like enjoying music making and expressing the inner
meaning, and creating beautiful music that will move the audience’s soul, will make it a more
worthwhile experience for both artist and audience (Workman 1999:53). In my opinion
performance anxiety is almost always present where performers suffer from a low self-esteem.
Performance anxiety is not solely found in performing artists; most people experiences it in one
way or another in everyday life, in any aspect of our lives where we perform and put ourselves
under pressure to do our best. At school-level it is experienced when giving a speech, reciting a
poem, or when writing a difficult examination for which inadequate preparation has been done.
Music students experience it outside of the school context, when performing at music concerts
and examinations. Executives experience it when doing presentations in front of their
colleagues, athletes when competing. While pressure has a negative effect on our emotional,
physical and mental abilities, a certain amount of anxiety is good if governed correctly. It can
provide the edge needed to bring out the best in us by helping focus our minds and bodies on
what we are doing.
5.3 Symptoms
An accurate definition of performance anxiety is given by Wilson and Roland (2002:47):
“Performance anxiety, sometimes called stage fright, is an exaggerated, often incapacitating fear
of performing in public. The symptoms are those produced by activation of the body’s
emergency system, including all the well known effects of adrenaline in the bloodstream”.
The symptoms of performance anxiety can be categorized into three kinds: physiological,
behavioural and mental (Valentine 2002:168).
5-5
5.3.1 Physiological symptoms
The human body has a very complex nervous system, consisting of an autonomic nervous
system, operating in two modes: parasympathetic mode and sympathetic mode. The body is in
parasympathetic mode when relaxed and in a non-exited state; when one is sleeping, relaxing or
meditating. The heart rate and brain activity are slow when in this state, which aids thought
resolution and imagination. The blood is pooled toward the centre of the body for ordinary
functions like digestion. However, when something excites or threatens us, we switch into
sympathetic mode and both body and mind become alert and ready for action. Blood is directed
to the brain and muscles, both the heart and breathing rate increase, and the body is ready for
the ‘fight-or flight’ reaction; this is the state that the body is in when performance anxiety is
experienced. Spending too much time in this mode can be harmful to health, resulting in
digestive and blood pressure problems and damaging stress responses (Wilson 1997:229).
According to Wilson, many of the symptoms which cause impairment to musical performance
can be understood as after-effects of some adaptive bodily function. He gives the following
examples:
• Heart rate increases to supply additional oxygen to the muscles and is experienced by
performers as palpitations.
• The feeling of ‘edginess’ is a result of the liver releasing stored energy.
• Breathlessness is a result of increased activity of the lungs and the widening of the
airways.
• Visual disturbances; either the sharpening of vision or blurred vision.
• ‘Butterflies’ and nausea are caused by the digestive tract being shut down to divert
energy to the muscles.
• Saliva is redirected into the bloodstream resulting in a dry mouth and difficulty in
swallowing.
• The skin sweats to cool down the working muscles, resulting in sweaty palms and
forehead.
• The feeling of ‘pins and needles’ is a result of calcium being discharged from the tense
muscles.

5-6
Muller (2001:6-7) adds a few more symptoms to the above list:
• Breathing becomes shallow because of accelerated heartbeat and blood flowing faster
through the veins, therefore a greater need for oxygen.
• Blood vessels contract to keep the body from losing too much blood in an emergency
situation where the person is wounded.
• Muscle tension is raised to protect the body.
• The gallbladder contracts and excretes a thicker, darker coloured gall.
• Small muscle co-ordination is reduced due to the fact that the bigger muscles are
supplied with more blood to be able to flee from the danger.
The above-mentioned symptoms that would have saved our lives in a real danger situation are
of no value to a soloist and are counterproductive to performance (Wilson and Roland 2002:47).
Muscles are the mechanism that moves the body, and tight muscles are one of the most
common responses to stress in the body. The jaw, neck, shoulders and back are the most
common areas, but unfortunately this tightness goes unnoticed as it is a subconscious stress
response. Only when pain in a body part is observed, it is realized that the reason therefore
must be the tensing of muscles. The muscles tighten as if to remove the body rapidly away from
the (assumed) danger, resulting in opposing muscle pulls, which inhibit the fine muscular co-
ordination needed for playing a musical instrument. These elements can all work together to
jeopardise a performance.
Certain symptoms of performance anxiety have the greatest negative effect on wind players, for
example dry mouth, shortness of breath, trembling hands or lips, while other symptoms will
affect percussionists, pianists and string players more adversely, like sweaty palms or shaking
legs. These reactions in the body would be beneficial if there was danger to fight or from which
to flee. But unfortunately, human pride is such a powerful motive that the fear of public
humiliation or disgrace often produces the same degree of emotional panic as would a real
danger situation, which can be highly disadvantageous to instrumental performance.
5.3.2 Behavioural symptoms
Anne Petrovitch (2003:25) also classifies performance anxiety as a type of social phobia in the
‘Anxiety Disorders’ section of the Diagnostic and Statistical Manual of Mental Disorders of the
5-7
American Psychiatric Association. She states that a certain amount of stage fright is a necessary
and normal part of any performance. She refers to a state of heightened mental and physical
alertness that can enhance a performance and is needed to provide an ‘edge’. She lists the
following disabling behavioural symptoms that can be caused by performance anxiety:
• Anticipation of failure and fear of humiliation or exposure.
• Intense anxiety and, sometimes, panic attacks.
• Awareness that the fear is excessive.
• Avoidance of performance situations or enduring performances with intense distress.
• Impaired performance.
• Shyness, sensitivity to criticism, increased anxiety in situations other than performing and lowered self-esteem.
5.3.3 Mental symptoms
As mentioned in the previous paragraph, fear of performing in public is better understood as a
form of social phobia, as it includes a fear of both negative evaluation by people and public
humiliation. It is not only a form of social phobia, but is also connected with other forms of
anxiety and neuroticism and is a component of general trait anxiety (Wilson 1997:231). It
includes a variant of negative thoughts, like “…‘catastrophising’ and the irrational exaggeration
of the likelihood of a disastrous performance.” (Valentine 2002:169). Karp (1988:17) lists ten
common distortions among music students in performing situations:
• All or nothing thinking: The student perceives the performance as a total failure if one little mishap occurs during a performance.
• Overgeneralization: Where a single negative experience is seen as a never ending pattern of defeat.
• Mental filter: A single negative aspect is dwelled on exclusively, thus viewing the whole performance as negative.
• Disqualifying the positive: Positive experiences are rejected; when praised they think the person is only being nice to them.
• Jumping to conclusions: Jumping to negative conclusions for no reason and assuming the worst without checking the facts.
• Magnification or minimization: Bad aspects are magnified and good points are minimized.
• Emotional reasoning: Emotional reactions are taken as evidence of truth, for instance, a student feels overwhelmed by a difficult part in his piece, and then thinks it is unplayable.
• ‘Should’ statements: The words “I should do this” can make a student feel pressured and resentful. A teacher directing ‘should statements’ can de-motivate a student because the teacher’s expectations might be too high for the student.
• Labeling and mislabeling: Teachers label students, and as a result students label themselves as a ‘bad interpreter of Mozart’ or ‘an insensitive flautist’ and this is self-defeating and irrational.
5-8
• Assuming personal responsibility: Assuming responsibility for a negative event without any reason, for instance when a student does not perform well, the teacher assumes it is because of his / her bad teaching and this usually leads to guilt.
When the self-esteem is closely identified with performance perfection, the perceived success or
otherwise of the performance determines self-worth. Worry leads to poor concentration, diverting
attention and wasting valuable resources, therefore leading to more anxiety. (Valentine
2002:168-169.)
5.4 Causes
The following three aspects contribute to performance anxiety: the individual, the task and the
situation. They mutually interact, where the effect of the one depends on the level of the others
(Valentine 2002:173). Certain personality traits can also be instrumental in aggravating
performance anxiety; examples are perfectionism and personal control. Liston, Frost and Mohr
(2003:120-125) conducted studies in perfectionism, and list six dimensions that comprise
perfectionism:
• Self-orientated perfectionism (high personal standards).
• Socially prescribed perfectionism (concern over mistakes).
• Parental expectations.
• Parental criticism.
• Doubts about actions.
• Organization.
Perfectionism and anxiety are closely related. Perfectionism can lead to debilitating performance
anxiety if performers have very high expectations of themselves and are self-critical, resulting in
low self-esteem. Their low self-esteem renders them unable to focus on the bigger picture of a
musical performance, and then they allow small insignificant flaws and mistakes to distract them.
Therefore they perceive the whole performance as a failure, thereby alienating (in the
performer’s mind) the audience, their peers and critics.
Mor, Day and Flett (1995:207-225) conducted studies with performing artists - including classical
musicians, dancers and actors - with a tendency towards perfectionism and personal control,
and found that they exhibit high levels of performance anxiety and are unable to fully succeed in

5-9
unpredictable circumstances. In this study eighty-seven professional performers completed the
Multidimensional Perfectionism Scale. In this study of the interaction between perfectionism and
personal control, and debilitating and facilitating performance anxiety, where perfectionism and
control are closely related to debilitating and facilitating performance anxiety. It was found that
performers who exhibited a combination of high levels of perfectionism and low personal control
were most prone to the debilitating effects of performance anxiety and suffered greatly from
dissatisfaction with their performances.
Moderate levels of anxiety are required for a good performance. A certain amount of arousal is
essential for a performance. It is widely agreed that there is an inverted u-shaped relationship
between emotional arousal and performance, with low arousal producing a dull, lifeless
performance, and over-arousal leading to detrimental stress manifestations and jeopardizing a
performance. R.M Yerkes and J.D. Dodson came to the conclusion years ago that the effective
realization of a task increases as the anxiety level increases up to a point, and then after that
certain point it starts to deteriorate. This is the well-known principle in psychology called the
Yerkes-Dodson Law (Wilson 1997:233). High levels of anxiety (arousal) cause deterioration of
performance quality because symptoms of performance anxiety occur, such as loss of
concentration, memory lapses, and body parts that start trembling and shaking. In this next
diagram, a curved line represents the relationship between the two factors, activation / arousal
level (horizontal) and task efficiency / performance (vertical).

5-10
Figure 5.1 The Yerkes-Dodson Relationship (Salmon and Meyer 1992:131)
Task efficiency changes as a function of activation. Activation and the feeling that we associate
with anxiety are closely related here. According to the Yerkes-Dodson relationship, low levels of
activation tend to be reflected by relatively low efficiency. In other words, low levels of activation
result in a dull, lifeless performance. On the other hand, high levels of activation can lead to a
catastrophic performance. An optimal state lies somewhere in between these two extremes.
(Salmon and Meyer 1992:130-131.)
5.5 Brain functions during anxiety
The University College of London have execute recent studies on brain functions during anxiety,
and found that brain activity during anxiety moves from the front of the brain (the rational side
where decisions are made) to the mid brain (where the ‘fight or flight’ or instinctive survival
mechanisms originate from). This phenomenon was detected through brain scans where higher
blood flow to the active section of the brain was observed. (Barry 2008.)

5-11
The brain is programmed to respond in a specific way during panic attacks or severe anxiety,
which was used in pre-historic times to respond quickly to a perceived physical threat. When the
body is in this mode of anxiety, caused by severe performance anxiety, the mental activity
moves to the mid brain. When the body is in this perceived state of fear and anxiety, it is difficult
to get out of this state, as the brain functions are not in the front or rational part of the brain, but
in the impulsive mid brain. The brain activity must be changed to the rational side of the brain
before the individual can calm down. The brain as the control centre is where the change must
take place. Joe Barry (2008) coined a technique born from traditional psychology, called “Panic
Away”, where he teaches students to apply an advanced cognitive technique, where they can
instantly change the brain function from mid-brain to the front rational part of the brain.
5.6 Cures
Numerous cures for performance anxiety have been developed and explored by a variety of
disciplines. These cures can be divided into physical, mental, and psychological techniques.
Research has found that different strategies deal with different aspects of performance anxiety,
varying from physical to more psychological techniques, while some are a combination of both
(Valentine 2002:174).
5.6.1 Physical techniques
There are numerous techniques available in this category, of which the following four will be
discussed in this chapter: Relaxation through respiration, Progressive Relaxation, Biofeedback
and the Quieting Response.
5.6.1.1 Relaxation through respiration
Relaxation through respiration is more commonly known as deep breathing. Many diverse
disciplines have associated breathing with relaxation. Awareness of breath and breathing holds
a central position in nearly all of the physical disciplines, whether the primary focus of the
discipline is on stretching (lengthening), muscular exercise (contracting / strengthening) or
posture. The oxygen levels in the bloodstream are regulated by breathing and the lungs, and
constitute a critical determinant in stress and anxiety; shallow breathing, a symptom of anxiety,
results in low oxygen levels in the bloodstream. Many of the practices being considered in

5-12
Chapter 5.7 include separate exercises in breathing (Feldenkrais2 and Rolfing3). Special
breathing exercises are prescribed by a Feldenkrais teacher to promote relaxation and stress
reduction. Bad breathing habits exacerbate anxiety. (Reubart 1985:153.)
Stress levels can be lowered remarkably by simply changing one’s breathing patterns from
shallow to deep breathing. Thus abdominal breathing should be implemented and not chest
breathing (Kirchner 2004:33). Full and rapid exhalations for purposes of relaxation can often
bring a quick momentary relief from tension. Feldenkrais, the Alexander Technique and Rolfing
tell us that no state of relaxation can ever be permanent while body posture, balance and ‘use’
are poor. The forces of gravity work on our bodies all through our lives and influence posture
negatively. If properly balanced and aligned vertically, the bones absorb most of the pressure,
while the skeletal muscles contract only enough to maintain posture and create movement.
There is thus no excessive tension, relaxation is more possible, and the state of relaxation can
be maintained effectively for longer periods. Proper respiration is essential for optimum balance
and ‘use’.
5.6.1.2 Progressive Relaxation
Of the numerous relaxation techniques available to musicians, one that is favoured by a number
of clinical psychologists is Jacobson’s progressive muscle relaxation. According to Andrew
Steptoe (1982:537) this teaches relaxation as a skill in muscular control, which has secondary
effects on the brain through the reduction of sensory inputs. This is a form of self-hypnosis, also
known as autogenic training, where an individual repeats a series of demands in progressive
order until the particular body part responds; commanding a certain part to relax. A study was
conducted on anxious instrumentalists and has proved that after only six sessions of progressive
relaxation training, their heart rate was reduced substantially and their self-reported anxiety
reduced (Valentine 2002:174).
In his book Progressive Relaxation (1929:87), Edmund Jacobson contributed the earliest
western scientific publication hypothesizing personal control over autonomic processes.
Jacobson demonstrated that a person could both administrate the amount of residual tension in
2 Feldenkrais is a gentle system of movement education, a way of working with the awareness of the body to improve
movement and enhance functioning. 3 Rolfing Structural Integration is a method of physically manipulating the body’s soft connective tissue, the fascia, to
structurally realign the body and harmonizing its movement patterns.

5-13
the larger muscle groups as well as regulate tension in groups of very small muscles - muscles
normally beyond conscious control, that is muscles that can be controlled only by the subtlest
intentional means. This procedure comprises two parts: firstly, deliberately tensing a certain
group of muscles, and secondly, relaxing the same group afterwards to distinguish the two types
of resulting feelings. Reubart (1985:165) gives a detailed description of the procedure:
The subject is asked to recline, with eyes closed, legs uncrossed and arms resting at the sides. After a period of time when he has had a chance to survey the tension in his body (insofar as he is able to experience it), he is asked to contract, forcibly, one or more of the larger muscle groups (flexor muscles in the forearms), to experience the tension in those muscle groups in the extreme, and then, by stages, to relax the same muscles, experiencing the difference as they are progressively relaxed. When the individual believes he has fully relaxed, he is asked to cut the remaining tension in half. Generally, he is then asked to repeat the same process, with the same muscle groups, endeavouring to reach lower and lower levels of tension each time.
An individual can be taught over time to identify and differentiate the feelings connected with
tense muscles. The following muscle groups are involved, beginning with the feet, and
progressing upward (Kirchner 2004:33):
• Right foot
• Right lower leg and foot
• Entire right leg
• Left foot
• Left lower leg and foot
• Entire left leg
• Right hand
• Right forearm and hand
• Entire right arm
• Left hand
• Left forearm and hand
• Entire left arm
• Abdomen
• Chest
• Neck and shoulders
• Face.
5.6.1.3 Biofeedback
Biofeedback, developed in 1969, is a recognized proven method used over time by numerous
musicians with excessive muscle tension to receive feedback in order to help them develop
relaxation and stress management skills. This method trains the individual to effectively self-
5-14
control certain physical functions. Even minimal training leads to the extensive reduction of
tension and resultant enhancement in performance (Steptoe 1982:540). Physiological changes,
such things as the levels of muscle tension, skin temperature, skin conductance, heart rate,
blood pressure, blood flow and even brainwaves are monitored by electronic devises.
Electromyography (EMG)4, temperature5 and electrodermal response (EDR)6 are some of the
kinds of muscle-relaxation biofeedback methods that have been successfully used (Reubart
1985:166-167). A muscle’s disturbed activity can be measured electronically and transformed
into a visual or auditory signal, which can be perceived by the subject. The musician is thereby
able to ‘see’ or ‘hear’ the unnaturally high tension in a muscle and learn to regulate it. Deep
breathing, relaxation and visualization are often used in conjunction with biofeedback. Several
instrumentalists have proved this method effective. (Steptoe 1982:540.)
5.6.1.4 The Quieting Response
The quieting response is a relatively easy exercise and can be used in a variety of situations that
evoke excessive tension or anxiety. It can be performed in a few minutes or seconds if needed,
and can be done just before going on stage, immediately before performing (Salmon and Meyer
1992:172-173). According to Salmon and Meyer the Quieting Response is performed as follows:
• Begin by taking a deep and relaxing breath.
• Allow the eyes to close slowly.
• Let go of excessive muscle tension.
• Contemplate a pleasant, relaxing image.
Even though these four steps seem simple, it should be well rehearsed to get the desired effect.
It is necessary to allow the body to relax and not to try to force it.
4 An Electromyograph (EMG) is conducted with a special machine and censors to record muscle contractions and
skin temperature. This machine gives feedback on processes that take place in the body due to stress. Students are taught to control involuntary processes such as heart rate and blood pressure in stressful situations. 5 Temperature Biofeedback device measures the skin temperature, where skin temperature drops in stressful
situations as blood is directed inward to muscles and internal organs. 6 Electrodermal Response (EDR) measures the activity of the sweat glands in the skin, which is more active during
stressful situations.

5-15
5.6.1.5 Physical fitness
Physical fitness and muscle strengthening are hugely important in any individual’s life, whether
in the music profession or not, for optimal health, well-being, and maximizing one’s chances of
functioning optimally as a human being. A musician’s activities take up most of their time and
energy, and for this reason many fail to stay fit. The hours needed for practice and rehearsals
sometimes take up the majority of their working hours, thus leading musicians into a sedentary
existence, much to their eventual disadvantage. In reality, a musician needs to be physically fit
to be able to play his / her instrument for long hours. The benefits of physical exercise for a
musician are numerous: perspiration helps with detoxification (which helps to clear the mind), a
physically fit person has more energy and endurance (needed for long hours of practice);
cardiovascular exercise can assist the process of breathing (for wind players); and in general,
exercise relieves stress.
Jonás (1999:398) points out that the body comprises hundreds of millions of nerve cells, each
functioning independently, and at the same time all mysteriously connected with one another, as
well as with the brain and spinal chord. To keep the nerve cells in excellent working order,
nutrition is imperative and is dependent on the blood supply. Blood supply can be enhanced by
regular exercise. Short practice sessions interspersed with an activity; a brisk walk around the
block is recommended, to keep the nerves in perfect working order.
Several forms of exercise will be undesirable for musicians because of the muscle shortening
effect these exercises have on the body. Examples of these are: weightlifting, wrestling and
gymnastics. While many sports offer excellent opportunities for aerobic conditioning, they can
also cause the undesirable ‘locking’ of large to small muscle groups (for instance in tennis). The
musician has to decide which exercises will be beneficial on the basis of his / her own tolerance
level and upon whether or not the activity will disadvantage critical muscles used for playing his /
her specific instrument. Logically, the emphasis upon muscle shortening by any means would
seem to be counterproductive where muscular relaxation is concerned. (Reubart 1985:162.)
5.6.1.6 Pilates
Pilates, pioneered at the beginning of the 20th century by the late Joseph Pilates (1880-1967), is
a mind-body exercise system designed to strengthen the weak and challenge the strong. He

5-16
developed a series of exercises and innovative equipment to help prisoners of war regain
strength and mobility. His exercises create an evenly conditioned body, build long muscles and
flexible joints, and train efficient patterns of motion. His conditioning techniques have helped
ballet dancers prevent injury and improve strength while maintaining long, even muscle tone.
(www.pilates.co.za/whatispilates.htm).
Pilates teaches body awareness, good posture and easy, graceful movement. It improves
flexibility, agility and economy of motion, and alleviates back pain. It develops a strong ‘core’, or
centre of the body (comprising the deep abdominal muscles along with the muscles closest to
the spine, integrating the trunk, pelvis and shoulder girdle.) Pilates gets the mind in tune with the
body. Proper breathing is an essential part of this therapy, helping to reduce stress.
(www.pilates.com/pilatesfitness.html).
5.6.1.7 Feldenkrais
Feldenkrais, a method of somatic education, was developed by a Ukrainian Jewish physicist,
Moshe Feldenkrais (1904-1984), who was also a judo-expert, mechanical engineer and
educator. As a physicist he worked on sonar during World War 2, introduced Judo into the West,
was educated at the Sorbonne and worked with the Curies in Paris. His method accentuates,
like the Alexander Technique, the individual’s posture, use of the body and balance. Although
posture, which is a static concept, is important, it is not enough to merely focus on this when
doing something that is dynamic and requires constant change, such as playing a musical
instrument. The Feldenkrais method deals with movement functionally, as a dynamic, constantly
readjusting relationship with gravity. (www.feldenkrais.nlpinformation.com/).
Feldenkrais is a movement-based system of education, which teaches students to move with
more ease and grace, and to overcome habitual patterns of tension. There are two forms of
experiencing this work, the hands-on version, also known as Functional Integration (FI) and
Awareness Through Movement (ATM). Functional Integration entails lying on a table while the
practitioner guides you through easy, gentle movements designed to re-educate the nervous
system to a higher level of organization. The quality of touch involved is the key to this aspect.
The art of a truly effective practitioner lies in not only providing a real change, but also in
facilitating integration at unconscious core levels. (www.feldenkrais.nlpinformation.com/).
5-17
Awareness Through Movement entails being verbally led through a sequence of movements,
again designed to re-educate the nervous system. Usually these lessons are performed lying
down. This is a useful way of freeing up the habitual holding patterns within the field of gravity
and frees one up for new patterns to be developed. All the exercises are based on slow, small
movements, which release tension. The outcomes, for those who participate in Feldenkrais, are
a more fluid, balanced elegant presence, developing a core sense of movement so that one is
released from unuseful habits that tend to result in injuries, stiffness and awkward movement.
Special classes are held for musicians to teach them to enhance their performance.
(www.feldenkrais.nlpinformation.com/).
Feldenkrais’s consummate knowledge of the body’s skeleton and musculature, and the
mechanics involved in its posture and movement, together with his ability to discuss the complex
issues involved lucidly and succinctly, lend both credence to his point of view and attractiveness
to his methods. His rationale is similar to the Alexander Technique and Rolfing (see next
paragraph), although his methods for correcting postural defects differ. (Reubart 1985:157.)
5.6.1.8 Rolfing
Rolfing Structural Integration, or Rolfing, is named after Dr. Ida P. Rolf who began her
investigation more than fifty years ago. She devoted her time and energy to creating a holistic
system of soft tissue manipulation and movement education that organized the whole body in
gravity. She and her protégés in principle reorganize the posture and the structural
interrelationship of the skeleton by manipulation of the myofascia7. In her book Rolf (1978:34)
describes this as follows:
In Rolfing we work in terms of alignment. We align the myofascial structure, which is the connective tissue system. Facial connective tissue is the organ of structure. Facial layers comprise the organ of structure; the organ that holds the body appropriately in the three-dimensional material world….This organ of structure is a very resilient, elastic, plastic medium. Adding energy can change it. In Rolfing, one of the ways in which we add energy is by pressure. The practitioner deliberately contributes energy to the person with whom he is working. This is not energy in the sense in which the meta-physicians throw the word around. This is energy as they talk about it in the physics laboratory. When you press on a given point, you literally are adding energy to structures under that point. You can change human beings. You can change their structure, and in changing their structure, you are able to
7 Myofascia is a thin translucent film that wraps around the muscle tissue, giving it shape and support.

5-18
change their function. Structure determines function to a very great degree and to a degree we can utilize. The basic law of Rolfing is that you add structure to the body.
Structural integration is achieved in approximately ten lessons. Essentially the treatment
achieves the same thing as do the Alexander Technique and Feldenkrais, but in quite a different
way. The main goals are to create a more efficient use of the muscles, to allow the body to
conserve energy and to create more economical and refined patterns of movement. Rolfing
reduces chronic stress and promotes changes in the body structure.
5.6.1.9 The Alexander Technique / Principle
The Alexander Technique is seen as one of the relaxation techniques most used by musicians to
overcome performance anxiety, although it is much more than a relaxation technique; it is a way
of life. The Technique involves changing habitual reactions and replacing them with consciously
directed ones, called directions. The Alexander Technique, like all the other therapies and
disciplines under survey, has its own unique way of correcting postural problems. The
Technique achieves it through ‘re-education’ of postural 'mis-use' and the substitution of proper
alignments and balances (in stationary positions as well as in movement) by lengthening
muscles that, through mis-use, have been shortened or contracted. (Barlow 1991:85.) Barlow
also states:
The lengthening of anatomical muscles can be brought about not simply by stopping of the activity that originally made that muscle contract, but by learning voluntarily to lengthen muscles until they achieve better resting length.
The Technique involves doing, on the part of the one learning the technique, rather than
massage or manipulation (as does Rolfing). A well-trained teacher with an acute eye for
misalignments, imbalances and mis-use is required. A great deal of self-discipline is
presupposed, together with a great deal of conscious effort. The Alexander Technique is the
oldest of the modern Western procedures concerned with posture and balance, and remains the
most popular.
5.6.2 Drugs
The surest and quickest way to relieve physiological arousal due to performance anxiety is by
using artificial aids such as drugs. Both alcohol and tranquilizers, readily available, reduce these

5-19
symptoms; but they also impair psychomotor performance, cognitive function and concentration.
There is a wide variety of drugs on the market that affect the mind and hence performance.
These drugs can be divided into the following categories (Williamon 2004:273):
• Sedative: Induce drowsiness, sleepiness, and relieve anxiety / agitation.
• Stimulant: Increase alertness, wakefulness and can cause anxiety because of the increase in heart rate.
• Anxiolytic: Relieve anxiety.
• Antidepressant: Help relieve depression.
• Hallucinogen: Induce distorted perceptions.
• Cholinergic: Mimic a neurotransmitter called acetylcholine.
• Adrenergic: Mimic adrenaline.
Simplifying these divisions, Williamon (2004:273) divides drugs into two categories: Lifestyle and
prescription drugs.
5.6.2.1 Lifestyle drugs
The three most common socially acceptable lifestyle drugs are alcohol, caffeine and nicotine.
Alcohol
Alcohol can easily become a part of a musician’s life because of high stress levels before
performances. Many musicians rely on alcohol to help them cope with their anxiety and stress
and this can become harmful to their health. Alcohol induces a wide variety of effects besides
easing feelings of anxiety: it dulls the senses, intoxicates, sedates (impairs performance) and
increases impulsiveness. Large amounts consumed over a long period of time cause chronic
anxiety (which achieves the exact opposite effect of what was originally intended by using the
alcohol) and neurophysical problems. This creates a vicious cycle: alcohol is consumed to calm
the nerves, which leads to a reliance on alcohol, leading to alcohol dependence; and prolonged
use leads to more anxiety.
Alcohol unfavourably affects concentration, technique, co-ordination, memory and muscle
control. Excessive drinking (bingeing) can be harmful to the health—causing liver damage, heart
disease and other organ damage. It can also lead to accidental injury and death, due to loss of
inhibitions. While moderate drinking can have beneficial psychological and physical effects, such

5-20
as reducing the risk of heart disease, alcohol should not be considered by musicians as a
remedy, being harmful in the long run. (Williamon 2004:274.)
Caffeine
Caffeine is a mild nervous stimulant and an ergogenic which increases the capacity for mental or
physical labor. Caffeine is probably the world’s most widely consumed legal psychoactive
stimulant. It is a member of the group chemically related to alkaloids—methylxanthines. In
moderation (less than 400mg per day—one cup of ‘real’ coffee contains about 100mg) it
improves vigilance and endurance, reduces fatigue, and opens up airways and eases breathing
difficulties. Higher doses can increase feelings of anxiety, impair fine muscular control, and have
adverse effects on the cardiovascular system and calcium levels. It can affect fertility and foetal
development in pregnant women. Coffee is consumed to stimulate the individual and to help stay
awake, but it is not necessarily harmless. If high dosages of caffeine are consumed, it can lead
to withdrawal symptoms in the form of headaches, nausea, fatigue, drowsiness and mild
depression. Moderate use can be a potentially useful tool when a musician needs to be alert and
awake. (Williamon 2004:275.)
Nicotine
Nicotine affects the central and peripheral nervous systems. The effects on the body are
complex, and there are a number of misunderstandings about these effects. It is a mild stimulant
causing an increase in heart rate, blood pressure, perspiration and feelings of agitation. The
hands of smokers tremble more than those of non-smokers, a symptom which is unwanted by
instrumentalists. Contrary to common belief, smoking does not calm the nerves. The idea
probably arises from the fact that in between cigarettes, the body experiences withdrawal
symptoms (namely irritability, restlessness and impaired ability to concentrate—which could be a
problem for musicians). These symptoms are relieved after smoking a cigarette, and by the deep
breathing which has a relaxing effect when inhaling the smoke. Smokers experience diseases of
old age up to twelve years earlier than non-smokers and die an average of eight years earlier.
Lung-cancer and heart diseases are associated with smoking, as well as chronic obstructive
pulmonary disease (progressive deterioration in the ability to breathe), which will certainly affect
wind players negatively. (Williamon 2004:277.)

5-21
5.6.2.2 Prescription drugs
Prescription drugs include the following: antidepressants, beta-blockers, and tranquilizers. Of
these three types, beta-blockers are commonly accepted for their perceived ability to improve
performance. Many people make use of antidepressants; not necessarily to enhance
performance, but to help them cope with depression.
Antidepressants
Depression is as common in the music industry as in any other career path. One in seven
people suffer from this illness and take prescription drugs to alleviate the symptoms. Inability to
motivate oneself, a sense of hopelessness, suicidal thoughts and feelings of worthlessness are
common. This is an unfavourable position to be in if you are a performing artist who has to walk
on stage and effectively perform before an audience. Most cases of depression resolve
themselves within a period of three months. However, for the more serious cases (performers
who cannot cope without the help of drugs), there are three types of antidepressants available
on the market.
The first ones, the tricyclics (so named because the chemical structure includes three
hydrocarbon rings) are nortriptyline (Pamelor, Aventyl) and imipramine (Tofranil). Twenty to thirty
percent of patients recover on this medication within three months. This type is also effective
against anxiety but has side effects (dry mouth, slight tremor, faster heartbeat, constipation,
sleepiness and weight gain) that can influence a musician’s playing adversely. (Williamon
2004:227.)
The second class, and probably the most popular one, is the selective serotonin re-uptake
inhibitors (SSIRs), where the most well known one is fluoxetine (Prozac), and the lesser known
ones paroxetine (Seroxat) and fluvoxamine (Luvox). The difference between this class and the
tricyclics is that the SSIRs have more tolerable side effects. (Williamon 2004:228.)
The third and last class of antidepressants is known as monoamine oxidase inhibitors (MAO
inhibitors). These drugs do not impair psycho-motor performance and block the breakdown of
the neurotransmitters dopamine, noradrenaline, and serotonin, making them more readily
available in the central nervous system. Musicians have no reason to use antidepressants as

5-22
performance enhancers or to control anxiety, as they clearly only help alleviate depression.
(Williamon 2004:278.)
Beta-Blockers
The most commonly used drug is the beta-adrenergic blocker. Beta-blockers are used to treat
certain heart conditions, but were also found to alleviate some of the symptoms of acute anxiety
reported by performers. Mechanical factors like increased pulse rate, tremor and excessive
tension that impair performance, are reduced by this drug: “… [beta-blockers] act at the
peripheral nerve terminals mediating sympathetic nervous arousal. They prevent transmission
over these pathways, hence reducing the physical symptoms of performance anxiety without
having sedative effects” (Steptoe 1984:539). They are very popular amongst musicians.
Propranolol, also known as Inderal, is the most commonly used beta-blocker amongst
musicians. This is usually administered in a small dose of ten to twenty milligrams one to two
hours prior to the performance. Opinions of this therapy are mixed. Most agree that it is effective
in the short term, and justified in many cases, but like all drugs, it also has negative side effects.
It can trigger asthma attacks, cause drowsiness, dizziness, constipation, sleep disturbances and
dry mouth. This chemical blocks the autonomic nervous system and its anxiety signs without
reducing the anxiety itself, and is not a permanent cure. Many doctors use it when performing
microsurgery to help keep their hands from shaking and trembling. Controlled clinical trials,
independently judged, show that they do reduce heart rate and tremor, but they have a minimal
effect on subjective anxiety and do not consistently improve the quality of musical performance.
(Ely 1991:37.)
One of the many downsides to this drug is that it keeps the heart rate from increasing and
thereby reduces one’s athletic ability (which is especially important for certain instrumentalists,
like drummers). The drug is not addictive, but musicians can become psychologically dependent
on it, believing that they cannot perform without it. The negative side of using these drugs is that
they mask the symptoms of anxiety and do not cure the problem. There are many arguments in
favour of a seeking a psychological rather than a medical solution for performance anxiety.
According to Salmon and Meyer (1992:76-77) beta-blockers should only be used under certain
circumstances: firstly, when other measures have failed to produce the desired effects, and
secondly, when a performer’s career or development is dependant on the performance.

5-23
Tranquillisers
Musicians sometimes make use of tranquillisers to try and control their debilitating performance
anxiety. They certainly help relieve anxiety, but also dull the senses and impair cognitive and
psycho-motor functions, which is detrimental to concentration and performance. They mostly
also induce sleepiness or drowsiness, which is the opposite of what is required for optimum
performance.
Public performance is amongst the most difficult and demanding human activities and requires a
very high degree of concentration and cognitive ability. Thoughts are focused on sound
production, the expression of the words or music, their meaning and emotional content, the
transmission of these qualities to the audience, integration with other performers, and the
judgment of the overall effect. The use of sedatives will impair all these functions, and optimum
performance will not be possible. Some performers attempt self-medication with anxiety-
reducing drugs such as Valium and Librium. These ‘anxiolytic’ drugs operate on emotional brain
centres such as the amygdala of the limbic system and reduce both the acquisition and
expression of conditioned emotional responses. Because they are inclined to be general
cerebral depressants, impeding all brain processes simultaneously, the fine edge needed for
performance is lost. Furthermore, these drugs reduce judgement and induce a mild degree of
euphoria, so the performers themselves are apt to believe they are doing better than they in fact
are. (Williamon 2004:279-280.)
5.6.2.3 Illicit drugs
Amphetamines, cannabis, cocaine, ecstasy, hallucinogens, and opiates are a number of
examples of illicit drugs and will not be discussed in this dissertation. Their long-term effects are
well documented, and they are not to be used or encouraged under any circumstances.
5.6.3 Practice and performance strategies
“Practice makes a relaxed performer” (Ely 1991:39). Being well prepared is in all probability the
best ‘relaxation technique’. The better a performer is prepared, the more confident he or she will
5-24
be. Soloists must study (and perhaps memorize) their own part and that of the accompanist /
orchestra during preparation, in order to gain full confidence. Starting to practice well in advance
also builds confidence, rather than cramming hours of work in the last few days before the
performance. Nothing should be left to chance. Even the greatest performers may write various
instructions and symbols in the music.
For solo wind performances, practice also includes rehearsals with the accompanist, which
should be maintained until the performers feel comfortable and each knows exactly how the
other is interpreting. Playing and performing with the same accompanist is essential so that each
get used to playing with the other. A dress rehearsal before the time will get both acclimated to
the hall and will help them feel more comfortable during the actual performance. For novice
performers a ‘pre-concert’ for friends or family, prior to the performance can also be helpful.
Performing regularly will help minimising performance anxiety. Being periodically exposed to the
feelings associated with public performance will not only give one more time to get used to them,
but will teach what feelings to expect and how to cope with them. Frequent performances will
also afford more opportunities to find one’s own methods of coping with any anxiety.
5.7 Mental / psychological techniques
5.7.1 NLP
Neuro-linguistic programming, the study of how language affects thoughts, attitudes and
behaviour of groups and individuals, was developed in the 1970’s by a student in psychology,
Richard Bandler and John Grinder, an assistant professor in linguistics at the University of
California, Santa Cruz. ‘Neuro’ refers to the mind, its working and how it is organized, and
‘linguistic’ to the way in which verbal and non-verbal language is used and its effects on
individuals. ‘Programming’ is the sequence of repetitive behaviour and how we act with purpose.
(O’Connor and McDermot 2001:2.) Thoughts affect behaviour and behaviour affects results.
The objective of NLP is to increase choices for the individual to be able to have a more flexible
life with more desired results.

5-25
O’Connor and McDermot (2001:5-7) describe NLP’s four pillars of wisdom:
1. Relationships: the relationship of mutual trust and responsiveness known as rapport:
• Physical rapport: the greater the degree of physical rapport with self, the better the health and well-being.
• Mental rapport: the greater the mental rapport with self, the more one feels at peace with oneself.
• Spiritual rapport: gives a sense of belonging to a larger whole.
2. To know what you want: setting goals and outcomes. 3. Sensory acuity: using the senses; looking at, listening to, and feeling what is actually happening. 4. Behavioural flexibility: There are choices of action. The more choices, the more the chances of success. “Keep changing what you do, until you get what you want.”
NLP uses the terminology ‘state’ as the state a person is in at any moment. It can vary in
intensity, length and familiarity. Some states have names: love, infatuation, fascination,
alertness, anger, jealousy, fatigue and excitement. The state that a person is in is very
important. It can affect health, quality of decisions, and how successfully a task is carried out.
Any state can be changed at will and NLP provides the individual with techniques to do this more
effectively.
Two important NLP principles as delineated by O’Connor and McDermot (2001:29) are:
• Having choice is better than not having choice. When you have choice about your state, you have emotional freedom.
• Become aware of your state (before it can be changed). Give it a name.
Through NLP one gains the ability to create an experience or state on the inside: a broad smile,
looking up, and standing up straight will change the state. Therefore, musicians can with
training, change their state of anxiety before a performance to a more relaxed state. A state of
insecurity can be changed to one of self-confidence, which is needed for excellence in
performance. NLP’s main aim is to help individuals in all the different areas of life achieve
success and provides tools to use these processes to understand how success is produced.
5-26
5.7.2 Inner Game
Barry Green and Timothy Gallwey, the authors of the book the Inner Game of Music, realized
that while a musical instrument is being played (this is referred to as the ‘outer game’), a second
game is being played on another level in the arena of the mind. The subtler ‘inner game’, which
has the power to jeopardize the outer game, is played simultaneously with the more obvious
outer game. The inner game refers to inner dialogue which takes place and detracts from the
performance. This inner game includes nervousness, triggered by thoughts of self-doubt, fear of
failure and anxiety. The Inner Game was initially written for various sports games, but as both
sport and music are similar disciplines and involve intensive training, and hours of hard work and
discipline, it can be applied to music making as well. Both require a balance of “…spontaneity
and structure, technique and inspiration…” and are forms of self-expression. (Green & Gallwey
1986:7.)
In their book, Green and Gallwey explain how to develop natural skills, such as awareness, trust
and willpower, and natural learning. The teaching milieu should be conducive to reaching one’s
source of creativity and full potential of self expression. Musicians are taught, through a specific
set of exercises, a way in which to achieve exact intonation, artistic phrasing and improved
technique. Since the age of 15, Timothy Gallwey had been fascinated with the problem of how
human beings interfere with their own ability to achieve, learn and reach their full potential. His
search for practical ways to overcome obstacles and establish maximum performance has led
him to write a number of books.
According to the Inner Game of Music (1986:248):
Peak performance only comes when our mind is so focused that it is still and at one with what the body is doing. The key to the inner game and to better performance, is achieving this state of relaxed concentration so that we are playing out of ‘our mind’ and therefore not worrying about the how, where and when.
Green and Gallwey explore how to overcome mental obstacles—lapses of concentration,
nervousness and self-doubt, improve concentration and reduce anxiety for a better performance
at every level.

5-27
Briefly, the Inner Game is about learning to avoid, or at least quieten inner dialogue while
performing. Such dialogue will only leave the individual feeling distracted and flustered. Should a
performer become engaged in an inner dialogue during a performance, it is imperative to
immediately return the focus to the music.
5.7.3 Systematic desensitisation
This method is used to help overcome phobias and other anxiety disorders and is based on the
premise that anxiety symptoms result from a learned response and are incompatible with
relaxation. The patient is firstly taught relaxation skills to help control learned responses to
phobias and anxieties. A hierarchy of anxiety provoking items is designed according to their
degrees of potency. Imagination is used to recall an anxiety-producing situation. Then, when the
patient applies the relaxation skills and is both physically and mentally relaxed, he or she is
presented with the elements of the phobia in gradations according to their anxiety provoking
power. The patient counteracts the feelings of anxiety with the relaxed state. By doing this
degree-by-degree, the patient’s response to the anxiety-producing situation is reconditioned.
This procedure aims to replace the anxiety response to performance settings by more relaxed
responses. (http://www.minddisorders.com/Py-Z/Systematic-desensitization.html).
In a controlled test situation, systematic desensitisation was compared using two performance
groups, a musical analysis and performance rehearsal group, and a control group (Steptoe
1982:540). According to Steptoe the group that was treated with systematic desensitisation,
performed at lower subjective anxiety levels, exhibited lower pulse rates, and made fewer
performance errors. The musical analysis and performance rehearsal group also showed fewer
errors (due to practice effects), but anxiety and physiological responses were unaffected.
5.7.4 Cognitive behaviour therapy
There are a variety of procedures that fall under the rubric of cognitive behaviour therapy. These
procedures may include relaxation as a coping response, but focus mainly on the cognitive
processes underlying tension in performance (Steptoe 1982:540). This involves analysing the
cognitive reactions to aspects of performance, and restructuring these thought processes
through rational means. The individual may then be able to redefine anxiety-provoking stimuli as
encouragement to positive action and commitment. Musicians with high levels of performance

5-28
anxiety are inclined to exaggerate the consequences of minor mishaps, and fear complete loss
of control; there is then liable to be an element of self-fulfilling prophecy involved. (Steptoe
1982:540.)
According to Steptoe (1982:540), the healthiest cognitive strategy is labelled “realistic appraisal”,
typified by self-statements such as “I am bound to make a few mistakes, but so does
everybody”, and “Although the audience wants me to play well, they will make allowance for a
few slips.” Such statements recognize the likelihood of some blemishes but maintain an
optimistic overall picture. In their book The Inner Game of Music, Green and Gallwey (1986:46-
47) have developed an exercise called “permission to fail”, which is based on the same
principles. They suggest that you choose a task that is difficult to execute under pressure and to
allow yourself to fail. If you don’t fail the first time, keep repeating the piece until you make a
mistake. Their conclusion is that if you give yourself permission to fail, you actually don’t fail.
When the focus is shifted from giving a perfect performance to allowing yourself to make
mistakes, attention can be given to making music and mistakes fall away. (Green and Gallwey
1986:46-47.)
5.7.5 Stress inoculation
A specific form of cognitive restructuring that may be included in therapeutic programmes is
called stress inoculation (Wilson 1997:241). The idea is that developing realistic expectations is
just as important as replacing negative self-statements with positive ones. Performers are
therefore taught to anticipate the symptoms of anxiety that are bound to arise before important
public appearances and to turn them to constructive use. The performer is taught to reappraise
the adrenaline effects (pounding heart, perspiring, shallow breathing) as normal emotional
reactions that are not conspicuous to the audience and which can contribute to a livelier, more
exciting musical interpretation.
5.9.6 Psychotherapy
Psychotherapy is used by a trained therapist (only a clinical psychologist or a psychiatrist may
administer it) for the treatment of emotional and psychological problems, like neurosis or
personality disorder, through verbal and non-verbal communication. New ways are taught to
help the individual cope with his / her problems and to help them become more conscious of
5-29
their unconscious feelings, thoughts and motives. The long-term goal of psychotherapy is to help
the individual exchange old destructive habits with new constructive ones. (Schonbeck 2005.)
Psychotherapy involves verbal and non-verbal exchanges between a patient and a
psychotherapist that help reveal the patient’s internal, mental and emotional experiences. Its aim
is to find the specific thoughts and feelings underlying the causes of distress. These exchanges
provide the patient with new insights into the existing areas of conflict and anxiety. Ultimately,
this knowledge can lead to revisions of the patient’s attitudes and behaviours (Steptoe
1982:541). Nevertheless, according to Steptoe there is no systematic evidence that
psychotherapy has any impact on solving the problem of performance anxiety.
5.7.7 Imagery
“Imagery is also a term used to refer to the making (or re-creation) of any experience in the mind
— auditory, visual, tactile, olfactory, gustatory, organic and kinaesthetic. It is a cognitive process
employed by most, if not all, humans.” (Thomas 1997). Imagery is sometimes used in
conjunction with relaxation. The patient is instructed to imagine scenes or events of
accomplishment and adequacy which will evoke positive responses. Abstract or concrete, real or
imaginary images can be evoked. They can include pleasurable events, objects, body
sensations, people and emotions. The patient practices concentrating on these positive images.
Negative images fade when the individual’s attention is focused on these positive images. (Ely
1991:37.)
5.7.8 Lazarus BASIC ID
Arnold Lazarus, a psychologist, developed a framework to overview seven different
psychological aspects of a performer (Salmon and Meyer 1992:46-85). Lazarus called this
model the BASIC ID, an acronym that encompasses seven areas of a person’s psychological
and physical makeup. This model, used for occupational stress management, is used to identify,
analyse and assess the specific manifestations of a performer’s performance-related problems,
and thereafter it can be treated by a ‘multimodal’ approach. The following seven modalities
comprise the BASIC ID: Behaviour, Affect, Sensation, Imagery, Cognition, Interpersonal factors,
and Drugs / psychological components. (Salmon and Meyer 1992:46-85.)

5-30
The following is a summary of the technique, as extensively described by Salmon and Meyer
(1992:46-85):
Behaviour refers to the visible aspects of performing: what the audience perceives on stage.
Behaviour related to stage fright can include the following: shaking / trembling, idiosyncratic
mannerisms / movements, physical appearance, patterns of movement, grimacing after a
mistake, any other facial contortions, and postural constrictions. Videotaping is an excellent way
of assessing auditory and visual behaviour.
Affect is the way in which we express our emotions, the momentary changes in a person’s
emotional state / mood, such as laughing, crying, fearfulness and anger. Affect and mood are
two very important aspects of performance, especially for musical expression. Emotional
expressiveness is closely related to a performer’s temperament. The most important
performance problems related to affect and mood are stage fright (which is the affective state of
fear and anxiety) and depression.
Sensation refers to sensory perceptual experiences, like the sense of hearing, and hyper
vigilance (a heightened state of alertness and perception which performers sometimes
experience during a performance due to heightened autonomic nervous system activation).
Sensations connected to anxiety can include: breathing difficulties, increase in heart rate (to the
extent that it feels as if the heart is going to burst out of the ribcage), nausea, dizziness,
hallucinations (often a symptom of severe mental disorders), and an out-of body experience
(where people feel they are floating or hovering and looking down on themselves while
performing). These are all characteristics of an altered state of consciousness. Another common
sensory experience is called synesthesia, where in some musicians one sensory modality
triggers another. For instance, hearing and vision; upon hearing a certain pitch, it is associated
with a particular colour.
Imagery refers to mental pictures created by people in their minds. Especially musicians and
artists are prone to imagery. Imagery can be a powerful tool for the reinforcement of
performance goals, and unwanted imagery can have a negative effect. Performers who
experience performance anxiety are more likely to imagine unpleasant images of catastrophic
failure before a performance. Persistent distressing imagery can strongly affect our feelings
negatively.

5-31
Cognition is a term used by psychologists in two ways. Firstly, there are cognitive skills, which
refer to the basic building blocks of performance skills, such as memory. Secondly, is how
performers think about what they are doing. This includes the inner dialogue that takes place in
daily activities and also when performing. These thoughts are shaped by the way people are
brought up to think about themselves and can make a significant contribution to feelings of
anxiety. Anxious cognitions (self-talk) divert attention from the task being done and intensify a
performer’s anxiety. This is similar to the skills the Inner Game teaches performers.
Inter-personal factors of performing are important, and they are reflected in the performance as
well as in the choice of programme. Performing as a soloist can be a very lonely, solitary career,
and therefore it is important to have inter-personal relationships with colleagues as well as other
people and family. If the good inter-personal factors are in balance, it will be easier to connect
with the audience. Performers who are disconnected from their audience make little eye contact,
their movements seem guarded and they display a careful, defensive manner. Their self-
consciousness is perceptible to the audience, making everybody feel uneasy. They usually
dislike other people and sometimes use their practise time as an escape to isolate themselves.
The main issue of performing should be to share yourself through your performance with others
and to communicate something special through the music to them. The choice of programme
also reflects the performer’s attitude towards the audience, and is clearly reflected by social
considerations.
Drugs (biological / physiological factors): the last component of the BASIC ID is the biological
and physiological makeup of musical performance skills. Many performers have experimented
with drugs, like tranquillisers, alcohol and beta-blockers, to help overcome performance anxiety
(This subject was discussed in great detail in Chapter 5.6.2.2 and will not be discussed again
here.)
5.8 Summary
In this chapter several different disciplines and techniques for relieving the stresses of
performance anxiety were briefly discussed. Human beings are unique individuals and their
reactions to performance anxiety are as diverse. Performance anxiety sufferers should explore

5-32
different techniques or combinations of techniques to find a suitable cure, or cures, to help bring
about the desired result, namely optimum performance.
6-1
6 The application of Alexander Technique principles to woodwind
playing.
6.1 The unity of the self
Pedro de Alcantara gives a detailed description of the Alexander Technique applied to
musicians in his book Indirect procedures: A Musician’s Guide to the Alexander Technique
(1997). The Alexander Technique’s principles and procedures can be applied to every area
of life, including musical activities, both instrumental and vocal, for sound production and
interpretation, daily practice, rehearsal routines, the mitigation of stage fright and music
related health problems (de Alcantara 1997:171).
De Alcantara, a famous cellist, wrote several books on the Alexander Technique and how
musicians can apply the Technique to their playing. He had to end his professional career as
a cellist and soloist early in his life because of Repetitive Strain Injury (RSI), a condition that
thousands of musicians have to live with, caused by long hours of practice in sometimes
unnatural and uncomfortable bodily positions. Later in his life he was introduced to the
Alexander Technique, which changed his life and gave him back his career as a cellist. He is
currently living and working in Paris both as a cellist and as a trained Alexander Technique
teacher (de Alcantara n.d.). His book Indirect Procedures (1997) gives specific guidance to
musicians on how to apply the Technique to the playing of a musical instrument. He views
musicians’ injuries as what they do to themselves, instead of blaming only outside factors
influencing them. Outside factors include working conditions, stress, and instrument and
furniture design, and are, nevertheless, important factors that influence instrumentalists.
Most of the time the following simple factor is overlooked: one can correct oneself. With the
guidance of a trained Alexander Technique teacher, all misuse can be corrected in time.
The belief of Alexandrians1 is that there is no separation between the mind and the body, but
that it is a unity, referred to as the ‘self’. The way an instrumentalist interprets the word
technique will influence the way the instrument will be practiced. A common definition of
technique, although believed by numerous musicians, is a misconception: “Technique is the
physical means by which one actualises one’s musical concepts” (de Alcantara 1997:171).
This statement implies a separation between body and mind, which is incorrect according to
Alexandrians. If this definition is followed, the body will be trained in a machine-like way,
1 A term referring to people who use and believe in the Alexander Technique.

6-2
mechanical and repetitive, without any reflection or attentiveness. This is a form of end-
gaining, and musicians using this method of thinking will never achieve full technical or
musical mastery. They often end up with RSI (Repetitive Strain Injury), which is a common
problem among musicians. Instead of just routinely training the body during daily practice,
this practice should rather be thought of as restoring and refining the connections that exist
between body and mind.
Struckenschmidt (1970:71), in the biography Ferrucio Busoni, discusses Busoni’s view on
technique as being principally seated in the brain, and not being solely dependent on fingers,
wrists, strength and persistence. The Alexandrian definition of technique will be the opposite
of the previously quoted incorrect one (see previous paragraph): it is a psychophysical
means of actualising a musical conception. In this instance a musician will not mechanically
train the body but will use the connections that exist between the brain and the body, called
directions. Technique is synonymous with direction (de Alcantara 1997:172).
Technique has often been equated with co-ordination, and co-ordination with the ability to
play fast. Technique comprises all the aspects of playing, not only finger dexterity. It includes
attitude, self-awareness, bilateral and quadrilateral transfer, speed, accuracy, clarity of tone,
evenness, intonation, sound quality, musicality, interpretation, and many others.
6.2 Procedures that can be applied to woodwind playing
Alexander developed diverse procedures in his Technique. The following procedures can be
applied to the playing of an instrument: the monkey, the lunge, sitting down / standing up,
arms and hands, hands-on-the-back-of-a-chair, the whispered ‘ah’ and table work. All these
positions of ‘mechanical advantage’ are a means to an end and not an end in themselves.
These positions can be used by all practising musicians, and address all aspects of co-
ordinating the whole self. If all the procedures are executed correctly, there will be no
limitation of one’s capabilities. Woodwind players can gain as much – if not more – from
these procedures as any other musician.
6.2.1 The monkey and the lunge
The monkey and the lunge (see Chapter 4.11.8 and 4.11.9) are both preferred positions that
are generally taught in Alexander Technique lessons. Each illustrates the anti-gravity
principle, which is what the Technique is all about. It is in essence a stretch, which lets the
hips bend and the pelvis straighten itself. The monkey is an appropriate way of determining
6-3
issues of relaxation, balance, posture, position, movement, control, inhibition and direction.
(Hodgkinson 1988:80-81.)
Alexander used to say that there is no such thing as a right position, but only a right direction.
If directed correctly, any position can become right, and vice versa, if directed incorrectly, any
position can become wrong. Therefore, the Alexander Technique does not concentrate on a
set of exercises or wrong positions, but teaches the pupil to direct the whole self upwards
regardless of position. Alexander (Maisel:1974:4) used to say: “You are not here to do
exercises or to learn to do something right, but to get able to meet a stimulus that always
puts you wrong and to learn to deal with it”. According to de Alcantara (1997:84), one can
react in a normal way to a stimulus or in a natural way, as one should do. Some of the
positions can become quite awkward, if the whole self is not directed correctly. While doing
the monkey or the lunge, one should constantly think ‘up’, then thinking ‘up’ in everyday life
becomes easier. A woodwind player’s general co-ordination improves, and then music
making will improve automatically as a result, as well as other abilities like performance in
games and sports, digestion, breathing, circulation and interpersonal skills. One becomes
centred and balanced, resulting in an everyday life that is also centred and balanced.
6.2.2 The monkey
The monkey is a basic procedure that is taught by the majority of Alexander teachers. Some
teachers prefer to integrate the monkey and the lunge into other everyday procedures, like
sitting down and standing up, and not teach them as separate entities. The purpose of the
monkey is to examine the issues of tension, relaxation, balance, posture, position,
movement, control, inhibition and direction. It develops co-ordination in a musician and is
useful in everyday life to lower oneself, for example when sitting down, and therefore also in
the life of a musician. This procedure should not be attempted without the help of a qualified
teacher. The execution of the monkey is described in detail in Chapter 4.11.8.
Directions for Primary Control should be adhered to throughout the whole procedure while
keeping the torso upright. A very low monkey becomes a squat, therefore, thinking of
squatting while doing the monkey will be extremely be helpful.
Although this procedure seems simple, it is quite difficult to perform to perfection. Even
though it sounds easy to understand and simple to do, the difficulty is due to the conflict
between direction and movement. Humans tend to give more attention to the movement that
sets up the position (referred to as end-gaining in Alexandrian terms) than to the directions
6-4
that would free the movement. ‘Free’ in this sense never means sloppy. When bending the
knees, the body naturally moves forward and down, and while going all the way down one
should think forward and up, or in Alexandrian terms, direct the body upwards and
backwards before, during and after movement. (de Alcantara 1997:101-102.)
When the monkey is executed correctly it is a position of great stability and strength, where
the legs give much needed support to the whole body, and the torso becomes firm and
elongated. Breathing is enhanced, as there is a natural tendency for the back to widen and
the ribcage to expand. When the legs support the body properly, the upper limbs are not
needed for balance, and are free to engage in whatever activity the situation demands from
them. This is an invaluable position for wind instrument players when practicing or playing.
Therefore they can use this position to practice in. (de Alcantara 1997:104.)
Richard Shepherd Rockstro (1967:420) makes the following statement concerning excessive
bodily movement during performance in his book A Treatise on the Flute:
The player should stand or sit as still as possible; there must be no swaying of the head, or the body in cadence with the music, nor must there be any of the ungainly and ridiculous rolling and contortions too often substituted for musical expression. A true musician will endeavour to produce an effect by his artistic rendering of the music of which he is the exponent; not by any acting or attitudinising.
Children find it much easier than adults to go into the monkey position, as they naturally go in
and out of the monkey while playing. Adults use it for other purposes like skiing, lowering
oneself to sit down, or the playing of a musical instrument. It is useful for musicians,
especially wind players, upper-string soloists and singers, to practice their instrument or sing
in the monkey position. The effect it has on sound is profound and startling. The sound
becomes more focused and well-projected, with rhythm and articulation more reliable, and
the performer’s appearance more professional and authoritative. Performers who sway and
move excessively on stage while playing an instrument, can also benefit from practising their
instrument in the monkey position, as unnecessary movements are a waste of precious
energy, which could rather have been directed at music-making. Practising with the back
against a wall can also help in teaching musicians to stop excessive upper body movement.
The lunge, which is described in the next section, can also help remedy excessive
movement.

6-5
6.2.3 The lunge
As stated previously, the lunge is similar to the monkey, but is a variation of the monkey. A
detailed description of the Monkey can be found in Chapter 4.11.9.
There is not just one fixed way of doing the lunge (such as the step-by-step description in
Chapter 4.11.9), but much simpler movements are also counted as a lunge. A simple step
forward and to the side is also a lunge. A close footed lunge is a comfortable, balanced and
natural way of standing and can be readily altered with ease and speed. It is not a fixed
position, but a useful preparation for walking and a resting point in between steps.
Nancy Toff (1985:81) describes a form of the lunge in her treatise on flute playing, The Flute
Book: “One foot should be a bit in front of the other to ensure balance”, referring to the way
to stand when playing the flute. Hotteterre-le-Romain advised flautists, oboists and recorder
players ca. 1700 about posture (Rockstro 1967:427); he basically describes a close footed
lunge:
If standing the player should be well balanced on the legs, with the left foot advanced, and the weight of the body resting chiefly on the right hip. This position must be maintained without the least constraint…These directions, carefully followed, will promote a very graceful attitude, which will not be less pleasing to the eye that the tone of the instrument will be agreeably soothing to the ear.
Bodily movement is necessary and natural in music making; but if a student’s movements
are excessive, the lunge can help improve them. The lunge helps the student become aware
of these movements, and change them. De Alcantara (1997:118) states that the lunge will
free a musician’s mobility, even though it may feel in the beginning as if it is jeopardising
freer movement. The lunge is well grounded but lays the seeds for true, natural mobility. The
lunge co-ordinates motions, ensuring that the playing of any woodwind instrumentalist can
become freer than before.
6.2.4 Sitting down and standing up
Musicians, and especially orchestral musicians sit down to play, therefore it is imperative to
learn how to do it correctly, as they spend hours on end rehearsing and practising in a sitting
position. The lunge is preparation for sitting down, as one should go into a lunge before
sitting down. The following is a description of the procedure as I was taught in Alexander
Technique lessons:

6-6
• Stand in a close-footed lunge next to a chair, facing away from it.
• Direct the neck to be free, to let the head go forward and up, to let the back lengthen and widen, one after the other.
• While still thinking up, let the hips move back in space, and bend the knees. While bending the head and the body, look at the feet, at the same time as bending the knees until going into a sitting position on the chair. Become aware of sitting on the sitting bones.
• Standing up firstly involves upwards direction of the body. Then the head goes forward and down until the toes can be seen, arms hanging loosely next to the body, and then going forward, effortlessly getting up, letting gravity do the work.
• Let the floor support and carry the body while thinking of being centred to the centre of the earth.
6.2.5 The whispered ‘ah’ exercise
As stated before, the whispered ‘ah’ exercise was developed by Alexander to help with
breathing and helps relax the jaw, lips and tongue (see Chapter 4.11.7 for detailed
description). This is an invaluable exercise for all woodwind players as tension in these parts
of the head influences sound production negatively. “The sound ‘ah’, like in father, is a long
vowel sound, which keeps the air passages open and clear. When you whisper, you can
hear if something in the voice is not working properly” (MacDonald 1994:58). The whispered
‘ah’ is a coordinative procedure, where one is taught to firstly think up, and then to relax all
facial mechanisms.
The whispered ‘ah’ is a complex procedure for a beginner to learn therefore it is better to
learn it lying down in the semi-supine position. This exercise should only be done with the
help of a professional Alexander teacher, otherwise it may create tension and even be
harmful, which is the opposite of what it is supposed to do, namely relaxation.
The following is a description by de Alcantara (1997:144-145) of how the whispered ‘ah’
should be done, is a different perspective of the same exercise and differs slightly from the
description by McEvenue (2001:96-97) in Chapter 4.11.7:
• Inhibit your desire to do what you feel to be the right thing. Give up the idea of performing well, or of being in command of the situation, or of pleasing the teacher. Think up along the spine. Let the neck be free, to let the head go forwards and up, to let the back lengthen and widen, all together, one after the other. … [D]o not concentrate, do not hypnotize yourself, and carry on watching, listening, and breathing.
• While thinking up along the spine, smile or grimace, thereby exposing the upper teeth…. [T]he upper lip should move independently of the other facial muscles,
6-7
and above all independently from the neck: smiling or grimacing should not cause the neck to tighten.
• While thinking up and smiling, move your lower jaw forwards---place the lower teeth slightly in front of the upper ones, rather than behind them (where they are normally placed). Moving the jaw forward is difficult for many beginners. To do so while smiling and without tightening the neck, seems nearly impossible at first, which demonstrates the lack of independence between the lips, tongue, jaw and neck.
• While thinking up and smiling, and without letting your lower jaw recede, open your mouth. Here most students usually move their heads back in space, stiffen their necks, retract the jaws, and lose their smiles. You should be able to open your mouth by dropping your lower jaw away from the upper, rather than by lifting the upper jaw away from the lower.
• While thinking up and smiling, and without letting your jaw recede and your mouth close, exhale on a nearly silent, whispered ‘ah’ vowel. Most students will be completely out of breath even before they exhale, proving that they concentrate on ‘doing the right thing’ to the extent of forgetting to breathe normally. After they realize that they run out of breath before performing the whispered ‘ah’, they set on the strategy of puffing themselves up like great frogs, in order to have lots of air in reserve for the big moment. They are simply substituting a wrong act for another, as the whispered ‘ah’ is not a chest capacity contest, but a procedure to coordinate the whole self. When you execute a series of whispered ‘ah’s’ well, you need not save up air; you need not take an extra breath at the last minute, before exhaling; you will always have enough air in your lungs to whisper an ‘ah’ of some length [his Italics]. Do not try to control the breath, and it will be perfectly controlled! Another common misuse consists in forcibly squeezing all the breath out of the lungs…you can and should perform your whispered ‘ah’ without forcing or squeezing all the breath out of the lungs. This is achieved by a wilful contraction of the ribcage, during which most students shorten their spines, narrow their backs, and contract the neck, shoulders and arms.
• After having exhaled, and while still thinking up, close your mouth without contracting the jaw or snapping the teeth, relax your upper lip, and breathe in through your nose. The cycle of the whispered ‘ah’ is complete.
The whole cycle can be performed in two seconds or in two minutes, depending on the need.
It is important to keep the throat free and the tongue relaxed. De Alcantara (1997:144)
mentions a variation of the whispered ‘ah’. When a student does the exercise of the
whispered ‘ah’, just before inhaling letting him speak a phrase before doing the next
whispered ‘ah’, to ensure that all the air is not totally expelled from the lungs.
The whispered ‘ah’ can help control pre-concert nervousness to a certain extent. As pre-
concert nerves are a form of fear, the breathing becomes shallow and slow. The regulated
breathing helps calm the nerves and forces one to breathe slower and deeper, as it is
common knowledge that nervousness results in shallow and fast breathing. The muscle
organisations of the human body are closely associated with moods and personality. This is
reflected in everyday language: a troubled person looking as if he ‘carries the weight of the
world’ on his shoulders. There is therefore no distinction in between mind and body. By just
6-8
looking at a person’s outward appearance, one can often determine the mood the person is
in, for example a person that is down and depressed will walk slowly, dragging the feet, and
most often with the head down. There is a definite unity between the ‘inner’ and ‘outer’
states. (Langford 1999:51.)
The whispered ‘ah’ addresses issues of emotional identification and personal growth, as
students‘ reactions to doing this exercise are usually extreme. They exhibit fear, hesitation,
panic, doubt, displeasure, over eagerness, amusement, and sometimes even elation. It is
therefore not possible to dissociate so-called ‘body-mechanics’ from so-called ‘mental
states’. By regularly being guided through this exercise, students can be helped to get rid of
unnecessary fears, phobias and vulnerabilities. (de Alcantara 1997:147.)
The whispered ‘ah’ addresses emotional conditions but also has many advantages for
woodwind players, as it addresses many of the problems that they encounter: breathing,
facial tension and Temporal Mandibular Joint2 Syndrome.
• Breathing: Another advantage of doing the whispered ‘ah’ regularly, is that the ‘use’ of
the breathing or the respiratory system gets better. If there is ‘misuse’ in breathing, it
will be exaggerated when doing the whispered ‘ah’, making it easy to detect and
correct.
• Facial tension and Temporal Mandibular Joint Syndrome: This technique (the
whispered ‘ah’) helps students to get rid of unnecessary facial tension by dropping
and relaxing the jaw. It also helps with the relief of tension headaches, migraines and
the discomfort of clenched teeth. This release of tension helps relax facial, neck and
shoulder muscles. (de Alcantara 1997:149.)
Woodwind instrumentalists need independence of lips, tongue and jaw. Nancy Toff (1985:93)
writes in The Flute Book on the interplay of lips, tongue, and jaw in flute playing, where she
compares the published methods of two great flute players from the previous century, Paul
Taffanel and Phillippe Gaubert (1958:18), with those of Marcel Moyse (1934:3-6,8) on the
use of the jaw to control the air stream. Paul Taffanel and Phillippe Gaubert were very much
against it, because they thought it would lead to the tightening of facial muscles and the
throat, and would discourage concentration on lip flexibility. Moyse (1934:6), on the other
hand stated, “Do use jaw techniques to supplement lip action…the important point to
remember is that the jaw is merely an auxiliary tool; it should not be regarded as a substitute
2 Temporal Mandibular Joint is the joint where the jaw bone connects to the rest of the bones of the scull, in front
of the ears.
6-9
for embouchure control”. Different flautists have different opinions on this matter. I support a
relaxed, dropped jaw, producing a bigger resonance cavity, and therefore better tone
production. Playing with a relaxed free jaw, inculcates a free, relaxed ‘use’ of the shoulders,
neck, arms and hands; this is in line with Alexander’s principles.
6.2.6 Arms and hands
Galamian (1985:5) states: “Technique is the ability to direct mentally and to execute
physically all of the necessary playing movements of the left and right hands, arms and
fingers.” This is a common definition accepted by most musicians, but any Alexander teacher
will strongly disagree with this. The most important facet of disagreement is that it fails to
consider the use of the arms and hands in relation to the rest of the body. A musician’s upper
limbs, arms and hands are the most important body parts that are used to play an
instrument, therefore correct use is of paramount importance. Misuse frequently leads to
RSI, which is a common condition among musicians.
The arms and hands are largely used incorrectly, according to Alexander. When asked to lift
up both arms and hands to shoulder height, the majority of people will pull the head back and
down, lift the shoulders up and in towards the neck, shorten the spine, narrow the upper
back, hollow the lower back, sway the upper body backwards and stick the pelvis forwards,
stop breathing and stare vacantly into space (de Alcantara 1997:141). This is a sign of
misdirected concentration and is a very common problem, and the way musicians such as
conductors, string players, pianists, trombonists and flautists misuse their bodies when
making music. The Alexander Technique has produced ways to use the arms and hands so
as not to interfere with Primary Control but positively enhance the working of it. Alexander
developed a procedure where the use of the arms and hands will not interfere with Primary
Control. He called it ‘Hands-on-the-back-of-the-chair’ which is discussed in great detail in his
book Constructive Conscious Control of the Individual (1997).
6.2.7 Hands-on-the-back-of-the-chair
According to de Alcantara (1997:122), this procedure can be done standing up, sitting down,
in the monkey or in the lunge, and this is his description of how it is done:
• Two chairs are needed, the type of chair is not important, it should just be high enough for the hips not to be lower than the knees, with a firm seat that does not slope forwards or backwards, and without a rim that will cut into the thighs.
6-10
The student sits on the one chair, towards the edge of the chair, facing the back of the second chair, on the sitting bones rather than on the thighs.
• Having decided to work on the pupil’s arms and hands, the Alexander teacher proceeds not to work on the arms and hands…the teacher handles the seated pupil and looks for a balance between tension and relaxation, strength and flexibility, mobility and stability. … [T]he back should be firm and upright, the spine not slack, and yet the hip joints should be perfectly free, allowing the trunk to lean forwards and backwards easily, without any loss of length in the spine. The head, too, should be mobile on top of the spine, yet not floppy….
• Once the pupil has obtained...a degree of co-ordination between head, neck and back, the teacher proceeds on to the student’s shoulders…. [The student usually] tends to tighten his shoulders, raise them up, contract them in towards each other, and rotate them forwards and backwards. The teacher’s work consists in inhibiting, with her hands, these harmful tendencies…and in cultivating opposite tendencies, releasing and widening the shoulders….
• Once the shoulders start releasing and widening, the teacher may continue to the arms. She moves and stretches each arm in turn…the priority is to free the arms from unneeded tension, all the while ensuring that the neck remains free, the back strong, and the shoulders released. Besides freeing the arms, the teacher points them out, away from the shoulders.
• Once the teacher obtains the right conditions in the head, neck, back, shoulders, and arms, she puts the pupil’s hand on the back of the chair. This consists of taking each arm in turn, stretching it, pronating it, and bending it at the elbow and the wrist; while continuing to stretch the arm, stretching the hand and fingers, and bringing them around the back railing of the chair in front of the pupil; and, finally, asking the pupil to take hold on the railing of the chair with his fingers, all the while ensuring that the pupil is primarily thinking up along his spine, and only secondarily concerning himself with the chair in front of him [his Italics].
Some teachers verbalise the different directions, while others do it silently. Verbalising helps
the pupil to memorise the order of the directions to be able to do it outside of the teacher’s
studio. This whole procedure is about the means-whereby, in other words the different steps
or directions, and not the end, holding the chair with the fingertips. Every step is as important
as the next or the previous, and should be completed before attempting the next. Throughout
the process, Primary Control should be the foremost thought, and if it is neglected while
focusing on the shoulders, then one should go back to the basics of the neck which should
release so that the head can go forward and up. The procedure is a co-ordinated relationship
between the head, neck, back, shoulders, arms, elbows, wrists, hands and fingers.
There are a number of benefits to this procedure, for example the giving of multiple
directions, dealing with correct ‘use’ and estimating the amount of tension used in the
process.
6-11
6.2.8 Breathing
Breathing is an intrinsic part of being, especially to wind players and singers. The latter are
referred to by Alexandrians as ‘professional breathers’, with unstable breathing patterns due
to bad ‘use’ (Dias 2006). Alexander was well known for his extensive research on breathing,
and was wrongly known as ‘the breathing man’ from early in his career. Many people thought
that the Alexander Technique was a technique only concerned with inculcating better
breathing methods. Lessons in the Technique do mitigate breathing problems, but to refer to
his work as a method of breathing only, is a total misconception of what the Technique, as
well as breathing, is about.
Alexander’s views on breathing contradict most current views. He distinguishes between
‘normal’ (according to statistical average) and ‘natural’ (‘ideal’) breathing. His view that
breathing is an effect and not a cause puts the Technique in direct opposition to schools of
direct control of breathing, like yoga and much contemporary vocal teaching. Breathing is
mostly a natural process, an effect rather than a cause, and should not be forced. When
breathing happens as a natural process, the lungs are emptied and the chest cavity semi-
collapses; when inhalation occurs, the atmospheric pressure ensures that air rushes in and
fills the lungs. Breathing is a function of ‘use’ and is therefore outside direct control.
Alexander (1996:202) discusses the misuses of a person who makes breathing primary and
voluntary rather than subordinate and involuntary. He states the following views about
breathing, taken from his various books:
Inspiration is not a sucking of air into the lungs but an inevitable instantaneous rush of air into the partial vacuum caused by the automatic expansion of the thorax (Alexander 1996:139). If the thorax is expanded correctly the lungs will at once be filled with air by atmospheric pressure, exactly as a pair of bellows is filled when the handles are pulled apart (Alexander 1996:195). It is not necessary…even to think of taking a breath; in fact, it is more or less harmful to do so (Alexander 1997:201).
Correct breathing and good posture are closely related, as the lungs need space to expand
to their full capacity, which is not possible if posture is bad. Through implementing Primary
Control, which brings about the lengthening of stature and improved posture, breathing can
be maximised. ‘The head leads and the body follows’ is a concept that is frequently used in
the Technique. The head which is a heavy mass of between eight and fifteen kilogram,
should be perfectly balanced on the spine, with the neck muscles relaxed so that the head

6-12
can tilt forward. After studying other species, Alexander came to the conclusion that all
animals with vertebrae move in this way: the head moves first and then the body follows.
As tension in the neck mostly prevents the head being balanced on the spine, pulling it
backwards and down, the neck muscles should be relaxed so that the head can go forward
and up. The Technique teaches one to perfect these gentle nods forward which initiate a
huge release of tension in the neck muscles. As the neck muscles release and lengthen one
experiences relief and a feeling of lightness and well-being. This procedure is focused on the
upper limbs, but the aim of the Alexander Technique is that the whole body should feel light
and springy, not stiff and tense. Tightening and collapsing causes inflexibility and rigidity, the
opposite of the view of the Technique. (Macdonald 1994:16-17.)
Most people get passionate when discussing breathing, because it is directly linked to
emotional identification (de Alcantara 1997:91). If there is any unnecessary tension in any
part of the body, it will directly affect breathing. Performance anxiety creates substantial
tension which impairs the depth and rhythm of breathing, which in turn creates more tension
and more stage fright. Tension in the legs also impairs free breathing, as certain upper leg
muscles are attached to the diaphragm. (Dias 2006.)
Glynn Macdonald writes in her book The Alexander Technique (1994:11-12) the following
about breathing:
Humans do not give much thought to it, because it is such a basic part of us. Breath is life. The process of breathing or respiration happens at an autonomic level. Although this process is going on all the time, often it is not working as efficiently as it could. This can lead to feelings of tiredness and a general lack of energy. The cells of the body may not be getting enough oxygen, and there can be an excess of carbon dioxide present. The lungs become like a stuffy room with all the windows shut, full of stale air. Breathing should ventilate every corner of the room. Conversely, we tend to over breathe in the upper chest, which requires great effort, and furnishes us with a comparatively small amount of air. We need to repeat the in breath too frequently to get sufficient air. This is called ‘hyperventilation’, and means that the air is being circulated, but only in the top half of the lungs.
The Alexander Technique addresses the problem of ‘overbreathing’ as well as the bad habit
of ‘underbreathing’ in a very direct way, by the simple instruction to breathe out. When over
breathing one tends to take a deep in-breath, but forget to completely empty the lungs when
breathing out. Another problem that the Technique addresses is breathing through the
mouth. Breathing through the mouth can be harmful, as the air should first be warmed by the
nasal passages, and the nose and nasal passages should clean the air of dirt and moisten it

6-13
before it enters the lungs. The Alexander Technique gives specific directions for use
(Macdonald 1994:13):
• Remember to breathe out
• Do not take a breath and hold it
• Do not only breathe in the upper part of the chest
• Do not breathe in through the mouth
• Breathe in through the nose.
In his book Check Up, Twenty Basic Studies for Flutists (1992:6-8), Peter-Lukas Graf
developed breathing exercises for flute players on the same basis. A long note is played,
making a crescendo followed by a decrescendo, until the breath is totally exhausted and the
abdomen hardens. The player stays in that position without moving or breathing for
approximately two and a quarter seconds, and then after ‘suddenly relaxing’ (letting go),
experiences the filling up of the lungs with air, as a natural process in approximately three-
quarters of a second. The next long note is started immediately after the lungs are filled,
where the air will last for approximately fifteen seconds. The whole process is repeated until
the end of the exercise. The procedure that Graf describes as ‘passive breathing’, is what
Alexander refers to as ‘natural breathing’.
Patrick Macdonald (2001:6) says in his book, The Alexander Technique: As I See It, the
following: “One does not need exercises in order to breathe. In fact, breathing exercises are
usually harmful. If you allow the ribs to move, as Nature intended, you will breathe properly.
What you have to learn is to let them move. Let is the operative word”.
6.2.9 Table Work
One of the most distinguishing features of the Alexander Technique is table work. The length
of time a teacher spends on table work differs. Some will spend half the lesson doing table
work, and others less. In this procedure, directing on the table is more important than moving
or positioning oneself. The time spent on table work, is extremely soothing and relaxing. The
teacher will manipulate different parts of the body in succession and in alternation, with the
aim of teaching one how to release and direct each part on its own and in relation to the rest
of the body. Verbalising the session helps with learning the different directions, assisting with
the releasing and lengthening of muscles, resulting in the ultimate lengthening of the spine.
When table work is done, or when lying down alone at home, the semi-supine position
should be used. Students of the Alexander Technique are expected to lie down in this

6-14
position for ten to fifteen minutes everyday, to rid them of unnecessary tension. Alexander
believed that lying in this position, the body has time to heal itself. John and Lynn Nicholls
(1983) describe the semi-supine as follows:
Lie on your back on a firm surface—a carpeted floor is best—with knees bent so that the feet are drawn up as near to the body as is comfortable. Feet should be far enough apart to enable the legs to balance with minimum effort (about shoulder width). The knees should neither be falling apart, nor be together, but pointing up to the ceiling and away from each other. Place some paperback books under the head, so that they are supporting the bony bump at the back of the head (the occiput). The books should not be in contact with the neck. The height of the pile of books varies from person to person, depending on many factors such as the length of the neck, the size of the head, and the curvature of the spine. Pronate the arms; move the elbows out, away from the ribcage, and place them on the table; let the hands rest on the torso. Allow the floor to carry the body.
The head resting on the books enables the atlanto-occipital joint between the top of the spine
and the head to release, enabling the whole spine to release. This happens without one
‘feeling’ it happening. It allows the back to soften and widen and rest, thus improving the
inner environment of the torso encouraging the organs to function more efficiently. The body
gets a chance to revive and revitalize itself and to heal.
According to de Alcantara (1997:154), table work can be applied in the following ways in
daily life:
• Working on oneself: The first application is simply working on your use, by inhibiting and giving directions. While lying on your back, you can challenge yourself in many ways. Try to bend or unbend one of your legs without disturbing the back. See what happens to your whole self when you speak, recite or sing. Do some whispered ‘ah’s’.
• Rest and Relaxation: To inhibit and direct in the semi-supine position is an effective way of resting and restoring your energies. It is also referred to as ‘constructive rest’. Whenever tired or overworked, one should lie down. After a long day of practicing an instrument, or before a concert, one can lie down to restore energy
• Preparation for sleep: The average person misuses himself badly in sleep. In sleep, as elsewhere, we must distinguish between position and direction. It is possible to sleep in a so-called ‘good position’—on your back for instance—and misuse yourself by contracting the head into the neck, the shoulders into the back, and so on. Nevertheless, it is easier to have a well-directed sleep when lying supine—on your back, your legs straightened and supported by small pillows—and with arms pronated, hands resting on the trunk or the hips, than when lying prone on your stomach. Lying on your back and directing before sleep can have remarkable effects on the quality of sleep itself, and in the restfulness it entails.

6-15
• Prevention of fatigue and injury: Take frequent breaks when practicing for long hours, and lie down for a few moments in the semi-supine, and finish the work session more energized than when you started. Lying on your back becomes preventative as well as restorative.
• Healing and soothing: Directing turns lying down in the semi-supine position into an effective way of tapping into the body’s self-healing powers.
• Mental Practice: You can learn a piece at the instrument or away from it, with or without the music. A good way of working on pieces and technical exercises is by lying on your back and practicing mentally. It allows you to conceive of the music you are studying separately from your habits of playing or singing, and to cultivate good use in conjunction with artistic conception. Finally, lying in the semi-supine position is useful in memorizing scores, and in dealing with stage fright.
6.3 Summary
Throughout this chapter it becomes evident that the Alexander Technique can be applied to
all aspects of an instrumentalist’s playing and that every aspect of a performer’s life can
improve if the Technique is applied correctly and under the supervision of a qualified
Alexander teacher. The quality of a musician’s life improves greatly as this Technique helps
to mitigate tension in instrumental practice, as well as in performance. The woodwind player
can benefit enormously from all the exercises and procedures outlined above.
7-1
7 Studies in the application of Alexander Technique principles
7.1 Introduction
As explained in Chapter One, two groups of six students each were used for this study, one as
an experimental group, which was exposed to Alexander Technique principles, and the other as
a control group with no exposure. The time span of this research was approximately three years
in total. Both groups consisted of students with performance anxiety. The students in the
experimental group all had lessons with me and I chose the ones who suffered from debilitating
performance anxiety whenever they had to perform in public. I became aware of their fear of
performing every time they either had to play an examination or play in a concert. Some of the
students shared their feelings of anxiety with me, while I perceived that the others became very
tense, pale and / or quiet, and did not perform well in the concert or examination. The students in
the control group had lessons with other teachers and were chosen because their teachers
perceived them as intensely anxious when performing in public. Both the testings were executed
in the following way: The students in the experimental and control groups were given
questionnaires to fill out after they played an examination.
The two sets of questionnaires were compiled, which were given to the students to fill in before a
stressful situation (in this case, an examination) at two different phases of the research. The first
questionnaire was given to the students in the beginning of the research in 2005, before the
control group was exposed to Alexander Technique principles and the second questionnaire at
the second testing in 2007, again when they played an examination. The first questionnaire was
given to both the experimental and control groups, before the experimental group was exposed
to Alexander Technique training.
The second questionnaire was given only to the experimental group as this questionnaire was
only applicable to students that had Alexander Technique training. The control group was also
given a second questionnaire at the second testing, which was similar to the first questionnaire,
and only deviated from the first questionnaire in two aspects. A second section was added to
question four, that asked if the level of anxiety was more, less or the same as with the previous
testing and question ten was left out, as it was not applicable to the second testing. The results
of the questionnaires of the two groups are discussed separately in different paragraphs, dealing

7-2
firstly in paragraph 7.2 with the results of the experimental group and in paragraph 7.3 with the
results of the control group.
7.2 Experimental group
I compiled the first questionnaire to ascertain whether the students experienced performance
anxiety. Question 5 deals with the anxiety symptoms that they experienced while performing. I
compiled a list of symptoms that I thought is commonly experienced by performing artists; my
own experience as a professional flautist, and my experience as a flute teacher, was included.
The results of the experimental group’s first questionnaire are set out in Table 7.1 and
percentages are given to show how many students experienced symptoms, and which
symptoms were most commonly experienced. The results of the control group’s first
questionnaire are set out in later in this Chapter, in Table 7.4. The questionnaire indicates
according to the Lickert scale1 the degree of the anxiety experienced on an ascending five point
scale, where 1 represents no or little symptoms and 5 severe symptoms (see Appendix A for a
copy of the questionnaire).
Table 7.1 Results of the first questionnaire of the experimental group
Questions % of students
1. General feeling of anxiety when
performing in public
100%
2. Anxiety affects playing of an instrument:
100%
3. Affects playing: Positively
Negatively
17%
83%
4. Nervousness experienced in this
examination
100%
5. Symptoms: Dry mouth 83%
Tight stomach 50%
Sweaty palms / fingers 67%
1 The Lickert Scale is a way of generating a quantitative value (numerical) to a qualitative questionnaire (poor, fair,
good, very good, excellent). Incremental values are assigned to each category for an ascending five point scale.

7-3
Palpitations 83%
Trembling: Hands
Fingers
Knees
Lips
83%
67%
67%
67%
Lifted / Tight shoulders 50%
Stiff back 67%
Listlessness 50%
Memory lapses 67%
Loss of concentration 83%
Shortness of breath 83%
Butterflies 100%
Distorted senses 17%
Dizziness 50%
Nausea 50%
Hyperventilation 17%
Fatigue 50%
Loss of appetite 50%
Diarhoea 17%
6. Did you experience any other
symptoms?
17%
7. Do you have a way of coping with this
nervousness?
17%
7. If answer at 7 was yes, give a
description of coping mechanisms
17%
9. Are these methods (mentioned in 8)
consistently effective?
17%
10. Interested in becoming part of this
research
100%

7-4
7.2.1 Results of the first questionnaire
I ascertained through this questionnaire that all the students involved had varying degrees of
performance anxiety and that shortness of breath, the most obvious and dreaded symptom
when playing a wind instrument, was most prevalent. A dry mouth, the second most dreaded
symptom for wind players, was the second most present. These two anxiety symptoms could
possibly also be present with other instrumentalists, like keyboard players, drummers and string
players, but is probably not as noticeable or detrimental to their performance as is the case with
wind players.
Question 1: Do you get nervous or feel anxious when asked to play your instrument in
front of other people?
The answer to this question was a unanimous yes. All of the students experienced a degree of
nervousness when performing in public (100%).
Question 2: Does it affect your playing in any way?
Everybody’s answer to this question was a yes (100%).
Question 3: If your answer in 2 was yes, did it affect you in a negative or a positive way?
One of the six students said the anxiety affects them positively (17%), and the other five
experienced it in a negative way (83%).
Question 4: Did you experience any nervousness during your performance today?
The answer to this question was also a unanimous yes (100%).
Question 5: This question gave a list of symptoms which the students had to mark if they
experienced the symptom.
There are symptoms which affect flute playing or any performance negatively, and then other
symptoms like butterflies and palpitations which are almost always present in a performance
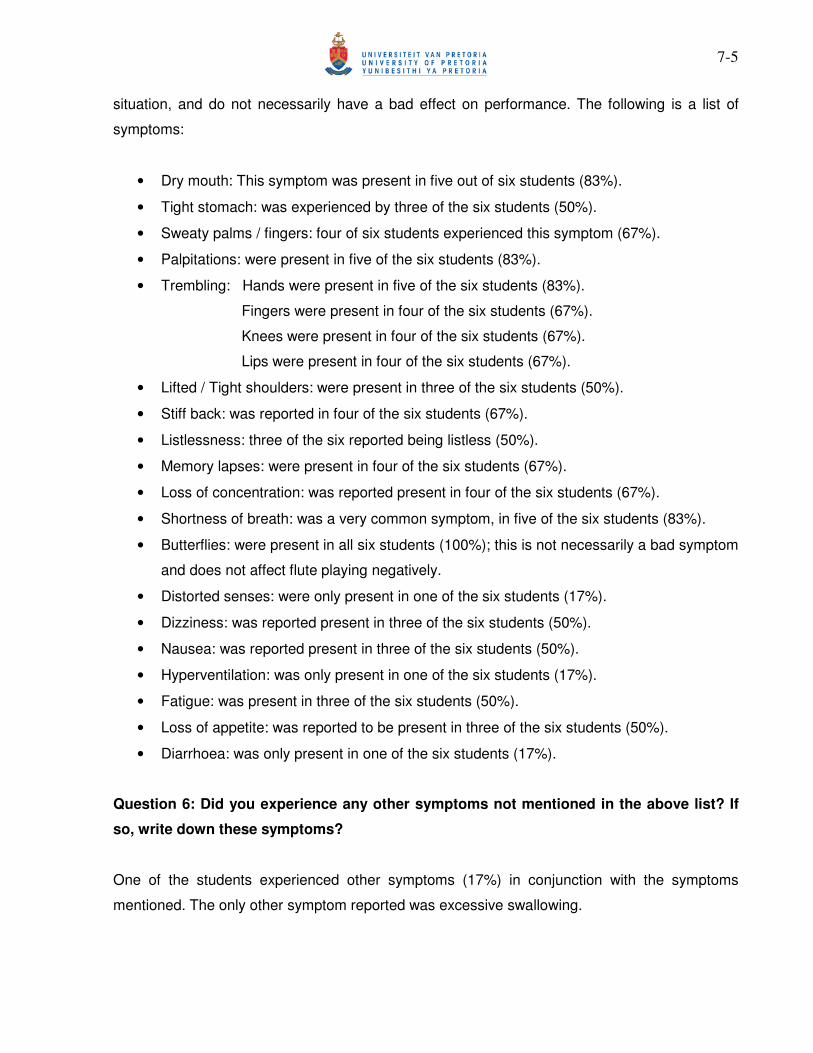
7-5
situation, and do not necessarily have a bad effect on performance. The following is a list of
symptoms:
• Dry mouth: This symptom was present in five out of six students (83%).
• Tight stomach: was experienced by three of the six students (50%).
• Sweaty palms / fingers: four of six students experienced this symptom (67%).
• Palpitations: were present in five of the six students (83%).
• Trembling: Hands were present in five of the six students (83%).
Fingers were present in four of the six students (67%).
Knees were present in four of the six students (67%).
Lips were present in four of the six students (67%).
• Lifted / Tight shoulders: were present in three of the six students (50%).
• Stiff back: was reported in four of the six students (67%).
• Listlessness: three of the six reported being listless (50%).
• Memory lapses: were present in four of the six students (67%).
• Loss of concentration: was reported present in four of the six students (67%).
• Shortness of breath: was a very common symptom, in five of the six students (83%).
• Butterflies: were present in all six students (100%); this is not necessarily a bad symptom
and does not affect flute playing negatively.
• Distorted senses: were only present in one of the six students (17%).
• Dizziness: was reported present in three of the six students (50%).
• Nausea: was reported present in three of the six students (50%).
• Hyperventilation: was only present in one of the six students (17%).
• Fatigue: was present in three of the six students (50%).
• Loss of appetite: was reported to be present in three of the six students (50%).
• Diarrhoea: was only present in one of the six students (17%).
Question 6: Did you experience any other symptoms not mentioned in the above list? If
so, write down these symptoms?
One of the students experienced other symptoms (17%) in conjunction with the symptoms
mentioned. The only other symptom reported was excessive swallowing.
7-6
Question 7: Do you have a way of coping with this nervousness?
There was only one student whose answer was yes (17%).
Question 8: If your answer at 7 was yes, give a brief description of what you do.
The student that answered yes to the previous question said that she prayed before she had to
perform in public and that helped her cope with her performance anxiety.
Question 9: If you have a way of dealing with performance anxiety, is it consistently
effective for you?
Only one student (17%) had a consistent way of coping with her levels of anxiety and reported
that it was consistently effective for her, the same student that answered yes to question 7.
Question 10: Would you be interested in discovering a more reliable, consistent way of
dealing with the problem of nervousness during performance?
All six students were interested in becoming involved in this study (100%).
7.2.2 Research
Initially for each of the six students in the experimental group (comprising students between the
ages of ten and seventeen, and musical grades two to eight), their problem areas had to be
located, the causes identified and then appropriate cures chosen and put into practice; bearing
in mind that the students in the experimental group were of different ages and development. In
the first week I analyzed their posture while playing, in order to ascertain their problem areas.
The Alexander Technique is not a quick cure for problems and cannot be learnt in a matter of
days, but rather weeks, or months. The Technique must be given time to slowly develop, letting
the connections and applications emerge and grow of their own accord.
The students that were involved in the research included students that attend an all-girls private
school with a very high academic standard, as well as students that attend government schools.
My observation was that when the students get to the higher school grades, they have hardly

7-7
any free time. Therefore, I established that a few of the students found the Alexander Technique
principles tedious, time-consuming and thought it was a waste of time. When they only have half
an hour to practice the flute at home, that is what they wanted to do. They saw it as a waste of
their precious time to apply “new and strange things” to their flute playing. Most of them were not
interested in becoming professional flautists, and just wanted to play the flute for fun. Some of
the students did not have the patience to do as I told them, and did not believe me when they
were told that they have bad posture or are slouching. I then had to place them in front of a full-
length mirror on my classroom wall so that they could look at their posture and observe their own
mistakes. Other students were keen to change and were happy to help analyze their own ‘use’ in
the process to become better flautists. These students were serious about their playing and
usually wanted to carry on playing the flute as a hobby after finishing school.
Being teenagers, who most of the time have a low self-esteem and are self-conscious about
physical changes in their bodies, did not like the way the focus was placed on their bodies and
felt uneasy about looking at themselves in the mirror. They then became very uncomfortable and
embarrassed with the situation, especially when they had to lie down in the semi-supine position.
This could, potentially, have led to situations where students in the experimental group rejected
the ‘new and strange things’. As the focus of this research is to establish the efficacy (or
otherwise) of the Alexander Technique, it was decided to only apply the very basic Alexander
Technique principles; those that would not result in complete rejection. Copies of the Lessons
(see Chapter 8) were handed out to the students.
Case one:
Case one was eighteen years old and started playing the flute when she was twelve years old
(six years ago), with another teacher. She attended lessons with her first teacher for two years
and then came to me for lessons. I started applying Alexander Technique principles when she
was sixteen. She had a thin, strained and extremely soft tone, and did not like to, and could not
play loud at all. Her tone did not project, lacked harmonics and she played with no dynamic
contrasts. While playing the flute, she stood with her feet facing forward, her elbows tightly
pressed against her body, and her head tilted extremely far towards the right shoulder. Because
of the heavy workload at school and her being one of the top students in her class, she came to
most of her lessons feeling tired. Whenever she was tired, her body posture reflected it. Her

7-8
shoulders would hang; she appeared to be listless and had hardly enough energy to play
through one phrase. I suggested that we incorporate Alexander Technique principles into her
lessons and both she and her parents agreed to this.
Firstly, we started correcting her posture, as that was the most obvious problem. We worked on
her support and balance when standing, balancing the head on the spine according to the
Alexander Technique, locating the A.O. joint and relaxing the neck. Her tone production and
projection of sound improved immediately and remarkably after the first lesson.
Once the head-neck relationship was established, I noticed that her breath control improved
considerably. Better breath control resulted in her playing with a bigger, warmer tone. Case one
was really impressed with her own improvement after one lesson and became more enthusiastic
and eager to learn more about the Alexander Technique. Everything was going very well for a
while until she had a break during the holidays and missed a few weeks of having lessons. On
returning to flute lessons I observed that she fell back into most of her old habits, although these
habits were not as serious as they had been in the beginning when we started with Alexander
Technique principles. Fortunately the bad habits were easily corrected in the lesson and she
returned to playing with a much stronger tone. We spent quite a lengthy period of time on
learning body awareness, as this was her weakness. Once this concept was assimilated, her
problems with posture diminished.
Case two:
Case two was seventeen years old and started flute lessons with another teacher when she was
eleven years old. She started lessons with me at the age of twelve when she changed schools,
and I started applying Alexander Technique principles when she was fifteen. Her body posture
was reasonably balanced, although she tended to tilt her head far to the right when playing the
flute and not lift her arms up high enough to hold the flute up in the playing position.
This student had a problematic home situation where there were marital problems and being a
very sensitive child it caused her a lot of stress. She was also exposed to parental pressure and
was driven to achieve. In spite of her high academic standard, she still managed to find time to
practice and after suggesting that music is actually therapeutic, she started experiencing her

7-9
flute playing as remedial. It became her ‘own world to escape to’ from the bad situation at home
and her inability to cope with it.
Case two had a very small build, was underweight and tended to be very tense and stressed
most of the time. When a stressful situation, such as a music examination, came up, she would
be absent from school a day or two before the examination, and would arrive on the day and
play a substandard examination, always having the ‘good’ excuse of not feeling well. I focused
on helping her to relax her whole body and it took a long time to teach her the concept of
Primary Control and of applying it to her everyday life. She was eager to learn the new
Alexander Technique principles in the process of becoming a better flautist. She spent many
hours, both at home and in class, in the semi-supine position and had to work hard to keep a
relaxed stance when playing. She found the whispered ‘ah’ exercise a great help in the
relaxation process.
As she progressed with incorporating the Alexander Technique principles, I noted small but very
significant changes starting to take place. She started noticing the changes in her general
appearance and an improvement in her tone; that helped her to gain self-confidence which
reflected in her playing. Examinations and concerts became less stressful and her marks started
to increase. She started playing better than one of her peers that were doing a musical grade
higher than her. Her technical ability improved rapidly as well. Other teachers and students
started making remarks at concerts where she performed about her improvement in tone and
technical skill. Alexander used to say that once one stops doing the wrong thing the right thing
starts to happen. In this case, where she was eager to learn the new principles, and apply them
to her playing, many right things started falling into place.
Case two suffered from depression and was on medication for most of her senior school career.
In the last year of my research she was in matric, played grade eight on flute and achieved
excellent results in her examination. Her marks went up by ten percent to 90%, and her self
confidence increased remarkably. She appears to be much happier and more outgoing than she
was earlier in her senior school career.

7-10
Case three:
Case three was eleven years old, started flute lessons at the age of eight, and I started applying
Alexander Technique principles in her lessons when she was nine, after the first testing. After
reading through her answers to the first questionnaire that she filled in two years ago, I realized
that she was too young to understand all the questions asked and therefore I had a personal
interview with her as well to ascertain her level of performance anxiety.
Case three was a sensitive, exceptionally musical child. When she first started lessons with me,
she was quite keen to perform in concerts and eisteddfods and did not seem to be nervous at
all. As she grew older she became more self-conscious and started getting anxious, not only at
performances, but also in general and especially where her school work was concerned. She
tended to become very nervous before and during concerts, and then started panicking. She
once arrived at a concert without the accompaniment to her piece and did not realize it until she
was standing on stage with the accompanist asking for it. She seemed like she was in a haze
and did not know what was going on around her. She then suddenly panicked and started
running around looking for her music. When she eventually located the music and went on stage
for the second time, she was flustered and had memory lapses, stopping and starting several
times. It was an enormous contrast to her standard of playing during a lesson. I later discovered
that her parents had marital problems and that she became upset every time there was a
confrontation. She became absent minded and cried often during her lessons for no apparent
reason.
We initially started working on body posture, including Primary Control as well as the relaxation
of the whole body. Her progress with inculcating Alexander principles was slow due to her
absent mindedness and inability to even concentrate for short periods of time. She did
eventually master some of the principles and but had a limited understanding of Primary Control
as she found it hard to remember from one week to the next what we did in the previous class.
After months of struggling, her anxiety eventually diminished noticeably, but not as much as
desired. She still appeared to be very nervous and was definitely not in control of her
performance at all. Nevertheless, her performance in the next examination improved
substantially compared to previous ones, which was evident in her excellent results.

7-11
Case four:
Case four was thirteen years old, started flute lessons at the age of ten, and I started applying
Alexander principles to her lessons when she was eleven. She used to be a very nervous and
anxious little girl, and it reflected in her examination performance. She was a typical end-gainer,
who rushed into things without considering the process of getting there. In spite of her
performance anxiety she loved being in the limelight and the centre of attention. She volunteered
many times to perform for school assemblies or concerts, but just before the actual performance,
she would be overcome with performance anxiety, started trembling and then her performance
suffered negatively. Afterwards she was extremely embarrassed and apologetic for not playing
up to the expected standard.
She had postural problems and tended to pull her head back and down into the neck, which
created a huge amount of unnecessary tension in her upper body. She used to hold her flute too
tightly due to this tension in her upper body. This led to unnecessarily large finger movements
and her technique suffered.
Case four was a student who thought, after a few lessons, that she knew everything about flute
playing and started teaching her cousin what she learnt on the flute. She was constantly trying to
take over the flute ensemble classes by answering the students’ questions as if she was the
teacher, trying to impress her peers and implying that she knew more than them, and was more
important than them. She found it hard to learn the very basics of the Alexander principles and
never corrected any of her bad habits. She would constantly fall back into her old habits and
would become irritated with me if I insisted on her at least trying to learn and apply some of the
principles in her lessons. She frequently had excuses why she could not practice the Alexander
principles at home.
Case four did eventually succumb to learning to play in the monkey position. This helped her
tremendously with her breathing and support, and relaxing her lower body. She attempted to
balance her head on her spine and not pull the head back and down into the neck.
After her second testing, there were only minimal changes in her levels of anxiety. However, her
examination marks did go up by three percent, and she was pleased at her own achievement.
7-12
Case five:
Case five was thirteen, having started playing the fife when she was nine, the flute at ten, and
being introduced to Alexander principles when she was eleven. After playing the flute for two
years, she received braces and her tone suffered terribly. All she could produce for weeks was a
windy unfocused tone. This, and most probably the fact that she was at an age where she
started growing into adolescence, negatively affected her self-esteem, resulting in her starting to
experience performance anxiety. She became self-conscious, avoided playing in concerts and
refused to do any examinations. After many tone exercises and changing her embouchure to
adapt to a new way of playing with braces, she adjusted, but she unfortunately never achieved
the brilliant, pure tone that she had before.
Case five was a headstrong student, had concentration problems, and did not listen to me or to
any of her other teachers, which led to many of them complaining about this problem. She also
tended to be forgetful and left either her flute or her books at home numerous times. One could
ask her to do a certain task every week, and she would arrive at her next lesson not having done
what she was asked to do. It made the process of teaching her very difficult. I later learnt that
her parents were divorced during my research period and that she was traumatized by this
event.
I found it very difficult to teach her the basic Alexander Technique principles, but did fortunately
succeed in teaching her a few. Her posture mirrored her inner emotional state, which appeared
to be depression. She was always tired, her shoulders drooped and she slouched. It was as if
she did not care about life anymore. Her playing also reflected this emotional state, and totally
lacked energy and warmth.
The main aim was to correct her posture so that she could produce a decent tone. Eventually
she succumbed to my incessant demands to chance her posture, and her tone improved
substantially. I do not know whether her change in posture only took place during her lessons in
my class, or if she actually applied it at other times too. After correcting her head-neck
relationship and noticing the difference in her sound, she appeared to be more interested in
learning the Alexander principles in her lessons and she focused on improving her tone
production.
7-13
Case five did manage to accomplish the application of a number of Alexander principles in each
lesson, but at each succeeding lesson it was obvious that very little had become permanent in
her playing, and I had to start the process again. However, she enjoyed playing her instrument in
the monkey position, which helped her keep her knees, ankles and leg muscles relaxed while
playing her flute. Her breath control improved as a result and this had a positive influence on her
sound.
In spite of her emotional problems and resistance to learning new concepts, her playing did
improve remarkably, although she was not yet a good flautist. Her marks in her examination did
improve (by four percent), but not as much as the other students’ did. In my opinion she became
more in control of her life more towards the end of the research period, probably also because
she adapted to her new home situation. Even though her progress with the application of the
Alexander Technique was slow during the course of the research period, she became more in
control of her life again and did manage to master a few basic principles closer towards the end
of the research. However, I believe that if I persist in teaching her Alexander principles, she will,
by the end of her school career, have learnt to apply more of these procedures to her flute
playing as well as her life.
Case six:
Case six was fifteen, started flute lessons when she was ten years old with a different teacher,
and lessons with me at age twelve. We started to incorporated Alexander Technique principles
when she was thirteen. She had problems with breath control as well as difficulty producing the
low notes on the flute. She was not able to play long phrases in one breath, but would quickly
run out of breath. She is an exceptionally sensitive, shy and outstandingly clever student, and
the best mathematics student in her grade, achieving 100% in her tests and examinations.
Unfortunately she had a very low self-esteem, which, I suspected, was the result of parental
pressure. She used to be paralyzed with fear before a performance. She is an enormously gifted
flute student and far ahead of her peers. Her insight into the interpretation and style of her
pieces was astounding for her age. Her playing in my class, compared to in a concert or
examination, differed so much that it did not sound like the same person playing. Her sound in
an examination was lifeless, without any harmonics, did not project, and lacked musicality or
dynamics. Her breathing was shallow and inefficient, and therefore her intonation changed
7-14
repeatedly in a single piece, especially in soft and loud passages, where the intonation was flat
in the soft parts, and sharp in the loud parts.
I realized that she was very tense and stressed, even in my class during her lessons. Being a
perfectionist, she did not allow herself any mistakes, and would cringe and lower her head for a
few seconds after a mistake, as if expecting me to shout at her or scold her. I perceived her as
getting despondent after every mistake. I tried my best to be as gentle as possible, assuring her
that it was fine to make mistakes, and complimenting her on the good aspects of her playing.
When we started working on Alexander principles in her lessons, she was antagonistic towards
the concept of change. She found it difficult to get out of her comfort zone and it took her a long
time to learn the basic Alexander concepts.
I had to find a way to help her relax more in her lessons and to trust me. Initially, before starting
with Alexander principles in her lessons, I tried to inject humour into her lessons, thereby helping
her to become more relaxed. Her being more relaxed made learning the Alexander principles
easier. Gradually she started trusting me and did not perceive the Alexander principles as a
threat any more, but started working with me. Together with our work on the Alexander
principles we now laugh whenever she makes a mistake and the atmosphere is relaxed. I also
created a warm and welcome atmosphere and gave mostly positive feedback to her playing. It
took a while to reach a point where she knew that I would not become angry or shout at her for
making mistakes. In the beginning she had feelings of insecurity when applying Alexander
principles and I had to positively affirm and reassure her many times during her lessons to
convince her that her playing was very fine and that she was correctly applying the Alexander
principles she had been taught.
Initially I noticed that her whole body posture reflected her insecurity: hanging shoulders, the
lowering of the head and looking down, and not standing upright. The first concept we worked on
was body awareness, as she seemed to be oblivious of her body posture and the effect it had on
her flute playing. It took a long time to teach her to become aware of posture, but she eventually
grasped that her sound production and sound projection changed for the better every time she
applied the relevant Alexander principles to her playing. She had to learn the importance of
balancing the head on the spine, and the correct relationship of the head to the spine. After she
played an internal examination, and was heavily penalized for her lack of breath control and
varying intonation, she was convinced and agreed to work with me toward change. Much time
7-15
was spent on the lessons 6, 7 and 8 (Breathing), until she realized the value of learning to
expand the lung capacity.
After she started going to the Senior School, and the first term’s concert was approaching, I was
waiting expectantly to see what her reaction to the new situation would be. These concerts were
very prestigious and place the students under a lot of pressure, as they have to play an audition
before the concert, and only the best ones are chosen to perform. She was ecstatic when she
was chosen to play, and on the night of the concert I was pleasantly surprised to see that she
seemed to be more relaxed and in control of the situation than before, and played exceptionally
well. Her extremely difficult runs were played with astonishing ease, intonation was stable and
breathing was a long forgotten problem. After this concert her self-confidence grew, and she
gradually became a stronger player.
She still reported being nervous before performances, and especially before the examination of
the second testing, but her performance anxiety did not jeopardize her playing in the way it had
previously. Her marks for this examination improved by eleven percent to 87%. In my opinion
she needs more time, maybe another year or two, of applying Alexander Technique principles to
her playing in order for her to become an excellent performer and flautist.
7.2.3 Results of the second questionnaire of the experimental group
After the experimental group’s exposure to Alexander Technique principles for a number of
months, both the students in the experimental and control groups took part in an examination,
and were given a second, slightly different questionnaire to fill in before and after playing. The
results of the six students in the experimental group’s second questionnaire were set out in
Table 7.2.
Table 7.2 Results of second questionnaire of the experimental group
Questions % of students
1. Did you experience any nervousness? 83%
2. Were you more or less nervous than the
previous time, or was the level of anxiety
the same?
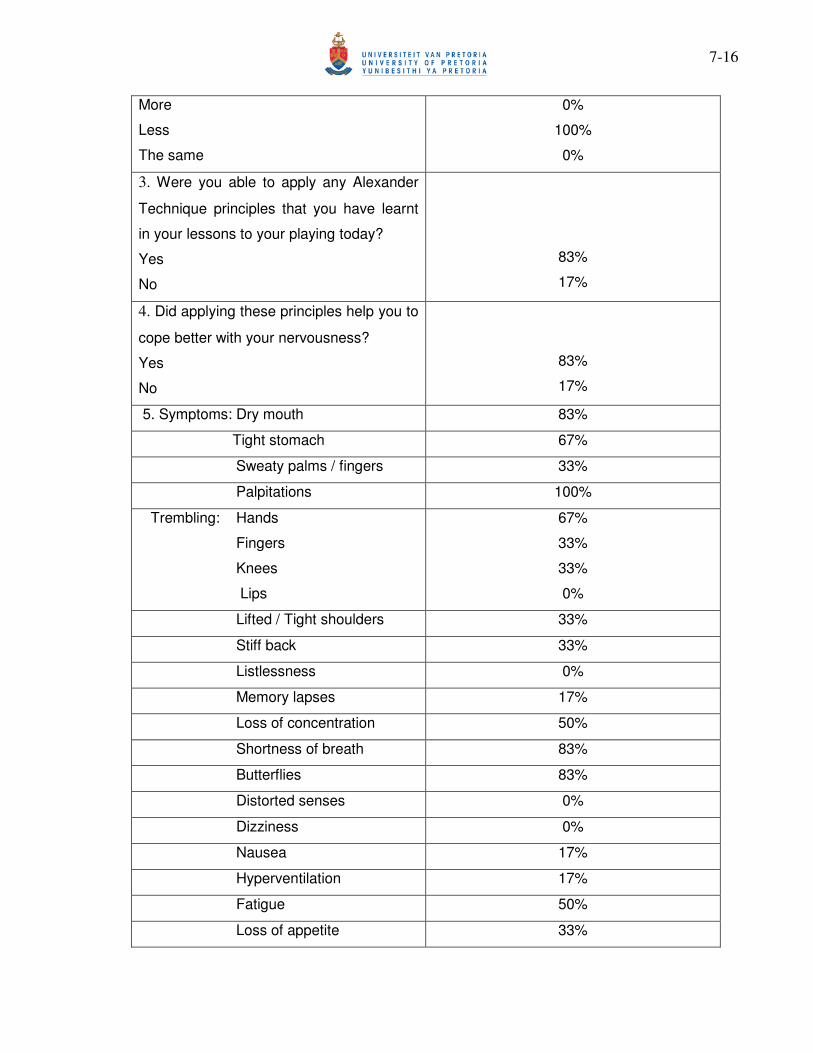
7-16
More
Less
The same
0%
100%
0%
3. Were you able to apply any Alexander
Technique principles that you have learnt
in your lessons to your playing today?
Yes
No
83%
17%
4. Did applying these principles help you to
cope better with your nervousness?
Yes
No
83%
17%
5. Symptoms: Dry mouth 83%
Tight stomach 67%
Sweaty palms / fingers 33%
Palpitations 100%
Trembling: Hands
Fingers
Knees
Lips
67%
33%
33%
0%
Lifted / Tight shoulders 33%
Stiff back 33%
Listlessness 0%
Memory lapses 17%
Loss of concentration 50%
Shortness of breath 83%
Butterflies 83%
Distorted senses 0%
Dizziness 0%
Nausea 17%
Hyperventilation 17%
Fatigue 50%
Loss of appetite 33%

7-17
Diarhoea 17%
6. Which of the Alexander Technique
principles were you able to apply to your
playing during today’s performance? List
them all.
This will be discussed below individually
according to each student’s personal
answers.
Question one: Did you experience any nervousness today?
Only five of the six students reported being nervous (83%).
Question two: Were you more or less nervous than the previous time when tested, or was
the level of anxiety the same?
All the girls reported being less nervous than the previous time (100%).
Question three: Were you able to apply any Alexander Technique principles that you have
learnt in your lessons to your playing today?
Five of the six students (83%) reported having applied Alexander principles to their playing, and
one (17%) did not.
Question four: Did applying these principles help you to cope better with your
nervousness?
As per Question three, the same five (83%) replied yes, and the one (17%) no.
Question five: A list of symptoms experienced:
• Dry mouth: This symptom was still present in most of the students, comprising five of the
six students (83%) and can seriously jeopardize a performance.
• Tight stomach: was experienced by four of the six students (67%).
• Sweaty palms / fingers: two of the six students (33%) experienced this symptom.
• Palpitations: all six students experienced this symptom (100%).
• Trembling: Hands - in four of the six students (67%).

7-18
Fingers - in two of the six students (33%).
Knees - in two of the six students(33%).
Lips - none of the six students.
• Lifted / Tight shoulders: were present in two of the six students (33%).
• Stiff back: was reported by two of the six students (33%).
• Listlessness: none of the students reported being listless (0%).
• Memory lapses: were present in one of the six students (17%).
• Loss of concentration: was reported present by three of the six students (50%).
• Shortness of breath: was still a very common symptom in five of the six students (83%).
• Butterflies: were present in five of the six students (83%).
• Distorted senses: totally absent this time (0%).
• Dizziness: was totally absent (0%).
• Nausea: was reported by one student (17%).
• Hyperventilation: was only present in one student (17%).
• Fatigue: was present in three of the six students (50%).
• Loss of appetite: was reported by two of the six students (33%).
• Diarhoea: was only present in one case (17%).
Question six: Which of the Alexander principles were you able to apply to your playing
during today’s performance? List them all.
Case one:
Case one listed the following principles: Primary Control: head-neck relationship, relaxing the
neck muscles, shoulders and arms; inclusive attention; relaxing the legs and knees slightly bent
(monkey position); abdominal breathing; did whispered ‘ahs’ and lay in semi-supine before the
examination.
Case two:
Case two concentrated on standing correctly: feet anchored and grounded, knees relaxed and in
the monkey position; inclusive attention; and Primary Control.

7-19
Case three:
Case three reported the following principles: body awareness, head-neck relationship; keeping
the legs, knees and ankles relaxed (the monkey position); abdominal breathing.
Case four:
Case four reported that she concentrated on balancing her head on her spine, thereby relaxing
her neck muscles, and relaxing her legs and knees while playing, keeping the knees slightly bent
throughout the examination (the monkey position) .
Case five:
Case five reported that she balanced her head on her spine and played with slightly bent knees
(even though her answer to Question three of the experimental group’s second questionnaire
was that she did not apply any Alexander Technique principles).
Case six:
Case six reported the following principles: Primary Control; balancing the head on the spine and
relaxing the muscles in the neck; lengthening of the spine; relaxing the legs and keeping the
knees bent (monkey position); relaxing the throat and the jaw; abdominal breathing; relaxing the
shoulders and the arms.
7.2.4 Results of the tests of the experimental group
I ascertained by means of the second questionnaire that most of the girls learnt some Alexander
principles during the course of this research, approximately three years. None of them perfected
these principles, but they did learn a certain amount that could be applied to their playing during
the examination. As it was seen in the above discussion (see question six) that each of the five
students (who claimed to have applied Alexander principles to their playing), learnt and applied
different aspects of the principles. These principles are listed in the order that they found them
most effective for themselves. The effectiveness of their application of the Alexander principles
is difficult to measure, but in general they all achieved higher marks in their examinations than in
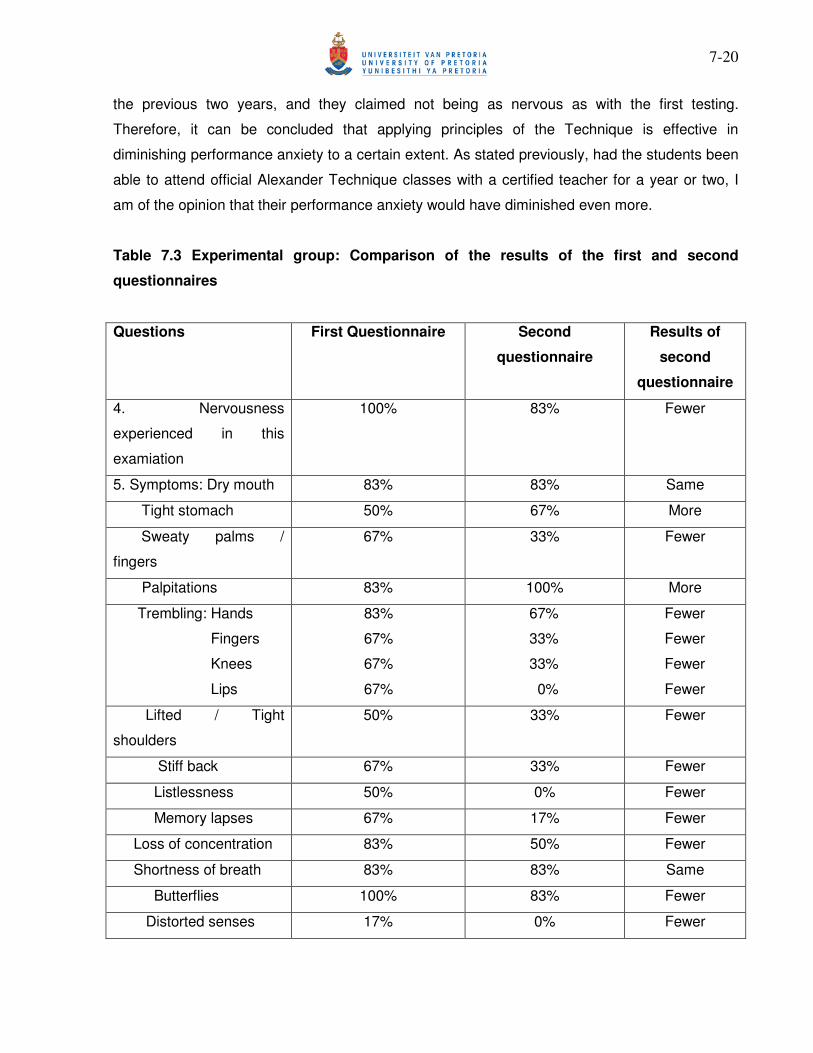
7-20
the previous two years, and they claimed not being as nervous as with the first testing.
Therefore, it can be concluded that applying principles of the Technique is effective in
diminishing performance anxiety to a certain extent. As stated previously, had the students been
able to attend official Alexander Technique classes with a certified teacher for a year or two, I
am of the opinion that their performance anxiety would have diminished even more.
Table 7.3 Experimental group: Comparison of the results of the first and second
questionnaires
Questions First Questionnaire Second
questionnaire
Results of
second
questionnaire
4. Nervousness
experienced in this
examiation
100% 83% Fewer
5. Symptoms: Dry mouth 83% 83% Same
Tight stomach 50% 67% More
Sweaty palms /
fingers
67% 33% Fewer
Palpitations 83% 100% More
Trembling: Hands
Fingers
Knees
Lips
83%
67%
67%
67%
67%
33%
33%
0%
Fewer
Fewer
Fewer
Fewer
Lifted / Tight
shoulders
50% 33% Fewer
Stiff back 67% 33% Fewer
Listlessness 50% 0% Fewer
Memory lapses 67% 17% Fewer
Loss of concentration 83% 50% Fewer
Shortness of breath 83% 83% Same
Butterflies 100% 83% Fewer
Distorted senses 17% 0% Fewer

7-21
Dizziness 50% 0% Fewer
Nausea 50% 17% Fewer
Hyperventilation 17% 17% Same
Fatigue 50% 50% Same
Loss of appetite 50% 33% Fewer
Diarhoea 17% 17% Same
The results of the second testing demonstrate that the experimental group’s anxiety diminished
markedly. Of the twenty three sections, they experienced fewer symptoms in sixteen sections,
the same in five sections and more in two sections. In their answer to Question two of the
questionnaire (see Table 7.2), all six students reported feeling less nervous than at the previous
testing.
7.3 The control group
This group comprised of six students between the ages of eleven and eighteen. The students in
the control group were given exactly the same questionnaire as the experimental group to fill in
after they had played an examination at the beginning of this research. Question ten was
removed from their questionnaire, as they were not going to be exposed to Alexander Technique
principles. Three years later, at the same time I tested the experimental group to ascertain
whether Alexander Technique principles would lessen the effect of performance anxiety, the
control group was given exactly same questionnaire. The control group’s answers to the second
questionnaire were similar to their answers to the first questionnaire. The students still suffered
from performance anxiety, still had no cure for their anxiety and the level of their performance,
was on a similar level as two years ago.
7.3.1 Results of the first questionnaire of the control group
The results of the control group’s first questionnaire were set out in Table 7.4.
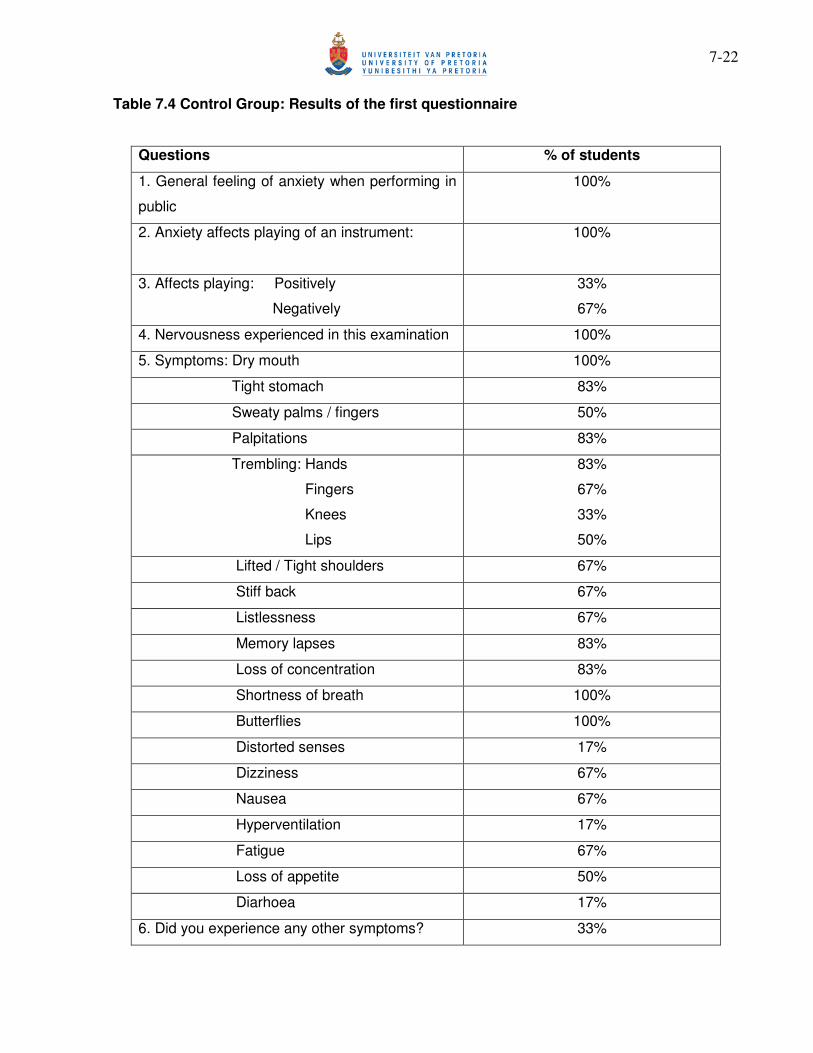
7-22
Table 7.4 Control Group: Results of the first questionnaire
Questions % of students
1. General feeling of anxiety when performing in
public
100%
2. Anxiety affects playing of an instrument: 100%
3. Affects playing: Positively
Negatively
33%
67%
4. Nervousness experienced in this examination 100%
5. Symptoms: Dry mouth 100%
Tight stomach 83%
Sweaty palms / fingers 50%
Palpitations 83%
Trembling: Hands
Fingers
Knees
Lips
83%
67%
33%
50%
Lifted / Tight shoulders 67%
Stiff back 67%
Listlessness 67%
Memory lapses 83%
Loss of concentration 83%
Shortness of breath 100%
Butterflies 100%
Distorted senses 17%
Dizziness 67%
Nausea 67%
Hyperventilation 17%
Fatigue 67%
Loss of appetite 50%
Diarhoea 17%
6. Did you experience any other symptoms? 33%

7-23
7. Do you have a way of coping with this
nervousness?
17%
8. If answer at 7 was yes, give a description of
coping mechanisms
17%
9. Are these methods (mentioned in 8)
consistently effective?
0%
Question 1: Do you get nervous or feel anxious when asked to play your instrument in
front of other people?
The answer to this question was a unanimous yes. All of the students (100%) experienced some
degree of nervousness when performing in public.
Question 2: Does it affect your playing in any way?
Everybody’s answer to this question was a yes (100%).
Question 3: If your answer in 2 was yes, did it affect you in a negative or a positive way?
Two of the two students said the anxiety affects them positively (33%), and the other four
experienced it in a negative way (67%).
Question 4: Did you experience any nervousness during your performance today?
The answer to this question was also a unanimous yes (100%).
Question 5: This question gave a list of symptoms which the students had to mark if they
experienced the symptom.
• Dry mouth: This symptom was present in all of the students, comprising 100%.
• Tight stomach: was experienced by five of the six students (83%).
• Sweaty palms / fingers: three of six students experienced this symptom (50%).
• Palpitations: were present in five of the six students (83%).
• Trembling: Hands - were present in five of the six students (83%).

7-24
Fingers - were present in four of the six students (67%).
Knees - were present in two of the six students (33%).
Lips - were present in three of the six students (50%).
• Lifted / Tight shoulders: were present in four of the six students (67%).
• Stiff back: was reported in four of the six students (67%).
• Listlessness: five of the six reported being listless (83%).
• Memory lapses: were present in five of the six students (83%).
• Loss of concentration: was reported present in five of the six students (83%).
• Shortness of breath: was a very common symptom, and all the students experienced it
(100%).
• Butterflies: were present in all six students (100%).
• Distorted senses: was reported in one of the students (17%).
• Dizziness: was reported present in four of the six students (67%).
• Nausea: was reported present in four of the six students (67%).
• Hyperventilation: was present in one student (17%).
• Fatigue: was present in four of the six students (67%).
• Loss of appetite: was reported to be present in three of the six students (50%).
• Diarrhoea: was only present in one of the six students (17%).
Question 6: Did you experience any other symptoms not mentioned in the above list? If
so, write down these symptoms?
Only one of the students (17%) experienced other symptoms in conjunction with the symptoms
mentioned. She reported having insomnia and nightmares.
Question 7: Do you have a way of coping with this nervousness?
There was only one student whose answer was yes (17%).
Question 8: If your answer at 7 was yes, give a brief description of what you do.
The student that answered yes to the previous question said that she took long, deep breaths
when she felt anxious

7-25
Question 9: If you have a way of dealing with performance anxiety, is it consistently
effective for you?
The student reported her deep breathing not being consistently effective (17%).
7.3.2 List of results of both the experimental and control groups
Table 7.5 Experimental and control groups: List of results of the first questionnaires
Questions Experimental group Control group
1. General feeling of anxiety
when performing in public
100% 100%
2. Anxiety affects playing of an
instrument:
100%
100%
3. Affects playing: Positively
Negatively
17%
83%
33%
67%
4. Nervousness experienced in
this examination
100% 100%
5. Symptoms: Dry mouth 83% 100%
Tight stomach 50% 83%
Sweaty palms /
fingers
67% 50%
Palpitations 83% 83%
Trembling: Hands
Fingers
Knees
Lips
83%
67%
67%
67%
83%
67%
33%
50%
Lifted / Tight
shoulders
50% 67%
Stiff back 67% 67%
Listlessness 50% 67%
Memory lapses 67% 83%

7-26
Loss of concentration 83% 83%
Shortness of breath 83% 100%
Butterflies 100% 100%
Distorted senses 17% 17%
Dizziness 50% 67%
Nausea 50% 67%
Hyperventilation 17% 17%
Fatigue 50% 67%
Loss of appetite 50% 50%
Diarhoea 17% 17%
6. Did you experience any other
symptoms?
17% 33%
7. Do you have a way of coping
with this nervousness?
17% 17%
7. If answer at 7 was yes, give a
description of coping
mechanisms
17% 17%
9. Are these methods
(mentioned in 8) consistently
effective?
17% 0%
7.3.4 Results of the second questionnaire of the control group
The second questionnaire was given to the control group at the same time as the experimental
group, approximately three years after I started the research. These students were not exposed
to Alexander principles in their lessons at all. The results of the control group’s second
questionnaire are set out in Table 7.6.
Table 7.6 Results of second questionnaire of the control group
Questions % of students
1. General feeling of anxiety when
performing in public
100%

7-27
2. Anxiety affects playing of an instrument: 100%
3. Affects playing: Positively
Negatively
17%
83%
4.1 Nervousness experienced in this
examination
4.2 Were you more or less nervous than
previous time, or was it the same?
More
Less
The same
100%
17%
0%
83%
5. Symptoms: Dry mouth 83%
Tight stomach 67%
Sweaty palms / fingers 67%
Palpitations 83%
Trembling: Hands
Fingers
Knees
Lips
83%
83%
67%
67%
Lifted / Tight shoulders 67%
Stiff back 83%
Listlessness 67%
Memory lapses 67%
Loss of concentration 67%
Shortness of breath 83%
Butterflies 83%
Distorted senses 17%
Dizziness 50%
Nausea 50%
Hyperventilation 33%
Fatigue 50%
Loss of appetite 50%
Diarhoea 33%
6. Did you experience any other 17%
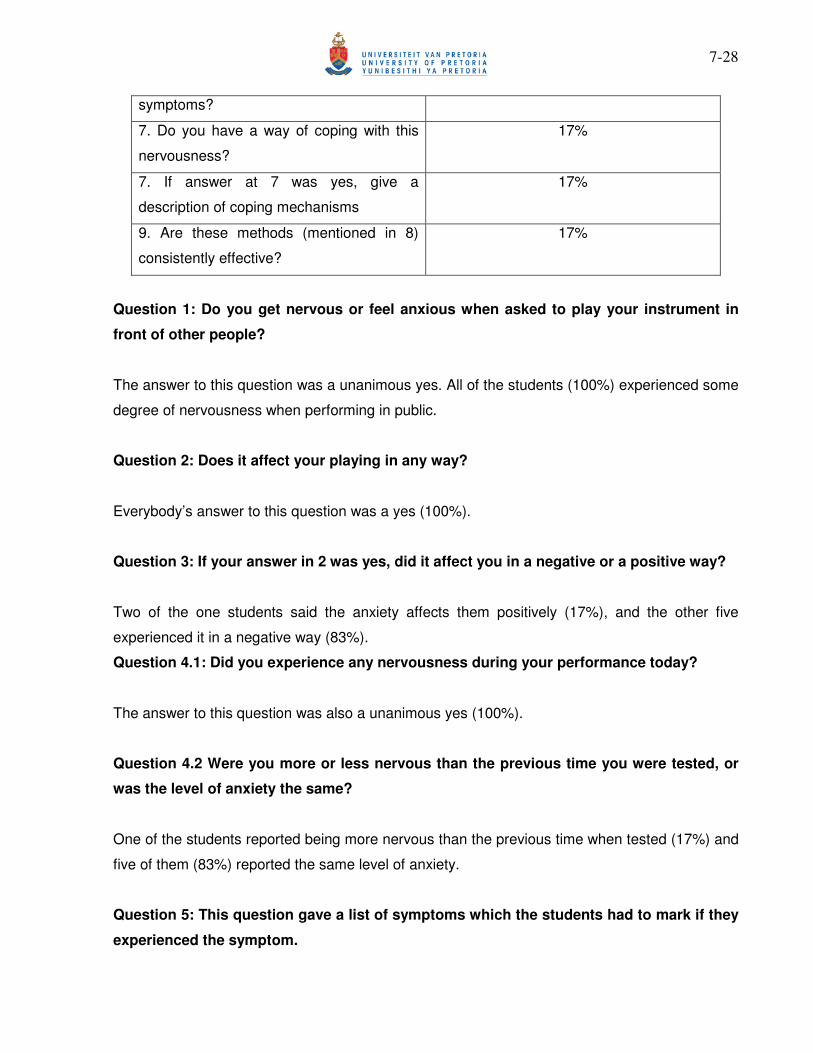
7-28
symptoms?
7. Do you have a way of coping with this
nervousness?
17%
7. If answer at 7 was yes, give a
description of coping mechanisms
17%
9. Are these methods (mentioned in 8)
consistently effective?
17%
Question 1: Do you get nervous or feel anxious when asked to play your instrument in
front of other people?
The answer to this question was a unanimous yes. All of the students (100%) experienced some
degree of nervousness when performing in public.
Question 2: Does it affect your playing in any way?
Everybody’s answer to this question was a yes (100%).
Question 3: If your answer in 2 was yes, did it affect you in a negative or a positive way?
Two of the one students said the anxiety affects them positively (17%), and the other five
experienced it in a negative way (83%).
Question 4.1: Did you experience any nervousness during your performance today?
The answer to this question was also a unanimous yes (100%).
Question 4.2 Were you more or less nervous than the previous time you were tested, or
was the level of anxiety the same?
One of the students reported being more nervous than the previous time when tested (17%) and
five of them (83%) reported the same level of anxiety.
Question 5: This question gave a list of symptoms which the students had to mark if they
experienced the symptom.

7-29
• Dry mouth: This symptom was present in five of the six students (83%).
• Tight stomach: was experienced by four of the six students (67%).
• Sweaty palms / fingers: experienced this symptom four of six students (67%).
• Palpitations: were present in five of the six students (83%).
• Trembling: Hands were present in five of the six students (83%).
Fingers were present in five of the six students (83%).
Knees were present in four of the six students (67%).
Lips were present in four of the six students (67%).
• Lifted / Tight shoulders: were present in four of the six students (67%).
• Stiff back: was reported in five of the six students (83%).
• Listlessness: four of the six reported being listless (67%).
• Memory lapses: were present in four of the six students (67%).
• Loss of concentration: was reported present in four of the six students (67%).
• Shortness of breath: was a present in five of the six students (100%).
• Butterflies: were present in five of the six students (83%).
• Distorted senses: was reported in one of the students (17%).
• Dizziness: was reported present in four of the six students (67%).
• Nausea: was reported present in three of the six students (50%).
• Hyperventilation: was present in two students (33%).
• Fatigue: was present in three of the six students (50%).
• Loss of appetite: was reported to be present in three of the six students (50%).
• Diarrhoea: was only present in two of the six students (33%).
Question 6: Did you experience any other symptoms not mentioned in the above list? If
so, write down these symptoms?
Again, the same student as in the first questionnaire, experienced other symptoms (17%) in
conjunction with the symptoms mentioned. She reported having insomnia and nightmares.
Question 7: Do you have a way of coping with this nervousness?
There was only the one student whose answer was yes (17%).

7-30
Question 8: If your answer at 7 was yes, give a brief description of what you do.
This student said that she took long, deep breaths when she felt anxious.
Question 9: If you have a way of dealing with performance anxiety, is it consistently
effective for you?
The student reported her deep breathing not being consistently effective (17%).
7.3.5 Results of the tests of the control group
In comparison to Table 7.4, the results of the control group’s first questionnaire, the results as
set out in Table 7.6 are not dramatically different. There are small changes in the results, but in
general the students were still not able to control or cope with their debilitating performance
anxiety. The results of this way of testing can never be a 100% correct, but it can give a broad
indication of whether there is progress towards a better performance, for example, the results of
a second examination. The control group’s results of the second testing compared to their
previous examination, the first testing, did not change dramatically. Their marks varied by a few
percent either up or down and they all still complained about being excessively nervous when
they had to do their second examination.
7.4 Summary and comparison of tests
In the next table the results of the second testing of both the experimental and control groups
are compared. Due to the different ways the questions of the second questionnaires had to be
formulated, only three questions could be compared. Firstly, the question of whether
performance anxiety was experienced during this examination session, secondly the symptoms
experienced, and thirdly if they were more or less nervous than the previous time of testing,
were compared in table form
Table 7.7 Comparison of the results of three of the questions of the second
questionnaires of experimental and control groups
• Was any nervousness experienced in today’s performance?

7-31
• What were the symptoms?
• Were you more or less nervous than the previous time, or was the level of anxiety the
same?
Questions Experimental group Control group Control
Group:
More, fewer
or the same
as
experimental
group
Nervousness experienced
in this examination
83%
100% More
5. Symptoms: Dry mouth 83% 83% Same
Tight stomach 67% 67% Same
Sweaty palms /
fingers
33% 67% More
Palpitations 100% 83% Fewer
Trembling: Hands
Fingers
Knees
Lips
67%
33%
33%
0%
83%
83%
67%
67%
More
More
More
More
Lifted / Tight
shoulders
33% 67% More
Stiff back 33% 83% More
Listlessness 0% 67% More
Memory lapses 17% 67% More
Loss of concentration 50% 67% More
Shortness of breath 83% 83% Same
Butterflies 83% 83% Same
Distorted senses 0% 17% More
Dizziness 0% 50% More
Nausea 17% 50% More

7-32
Hyperventilation 17% 33% More
Fatigue 50% 50% Same
Loss of appetite 33% 50% More
Diarhoea 17% 33% More
Were you more or less
nervous than the previous
time, or was the level of
anxiety the same?
More
Less
The same
0%
100%
0%
17%
0%
83%
More
More
More
The answers to the first comparable question show that both groups reported being nervous in
this examination.
From answers to the second comparable question, where the symptoms are compared, the
observation can be made that in general the control group experienced more anxiety symptoms
than the experimental group. Of the twenty six sections, the control group had experienced more
anxiety in twenty sections, in four sections, the experimental and control groups were on the
same level, and in one section the control group had fewer symptoms than the experimental
group (see the right hand column in Table 7.7).
Viewing the results of the third comparable question, it can be observed that the general feeling
of anxiety was less in the experimental than in the control group.
Table 7.8 Control group: Comparison of the results of questionnaires one and two
Questions First questionnaire Second questionnaire Second
questionnaire:
more, fewer
or the same
1. General feeling of
anxiety when
100% 100% Same

7-33
performing in public
2. Anxiety affects
playing of an
instrument:
100%
100% /
3. Affects playing:
Positively
Negatively
33%
67%
17%
83%
Less
More
4.1 Nervousness
experienced in this
examination
4.2 Were you more or
less nervous than
previous time, or was it
the same?
More
Less
The same
100% 100%
17%
0%
83%
Same
5. Symptoms:
Dry mouth
100% 83% Fewer
Tight stomach 83% 67% Fewer
Sweaty palms /
fingers
50% 67% More
Palpitations 83% 83% Same
Trembling: Hands
Fingers
Knees
Lips
83%
67%
33%
50%
83%
83%
67%
67%
Same
More
More
More
Lifted / Tight
shoulders
67% 67% Same
Stiff back 67% 83% More
Listlessness 67% 67% Same
Memory lapses 83% 67% Fewer

7-34
Loss of concentration 83% 67% Fewer
Shortness of breath 100% 83% Fewer
Butterflies 100% 83% Fewer
Distorted senses 17% 17% Same
Dizziness 67% 50% Fewer
Nausea 67% 50% Fewer
Hyperventilation 17% 33% More
Fatigue 67% 50% Fewer
Loss of appetite 50% 50% Same
Diarhoea 17% 33% More
6. Did you experience
any other symptoms?
33% 17% Fewer
7. Ways of coping with
performance anxiety
17% 17% Same
7. If answer at 7 was
yes, give a description
of coping mechanisms
17% 17% Same
9. Are these methods
(mentioned in 8)
consistently effective?
0% 17% More
In table 7.8, where the results of both questionnaires one and two of the control group are
compared, it is clear that the differences are minimal and the results do not differ markedly. Of
the thirty four sections, the control group displayed more anxiety symptoms in nine sections,
fewer in eleven sections and the same in eleven sections, and three sections were not
applicable. The sections where there were fewer symptoms experienced, the percentages
differed minimally (usually one student had experienced fewer symptoms). Therefore, it can be
concluded that the control group still had debilitating performance anxiety at the time of the
second testing.
7.5 Conclusions drawn from tests
The conclusions that can be drawn from the above tests are that implementing the Alexander
Technique principles to one’s life and in this instance, the playing of a musical instrument, can

7-35
categorically diminish performance anxiety, although it is not a complete cure. The levels of the
students’ anxiety diminished to the extent that they had more control over their playing than
before the research began. After receiving their examination results of the second testing, they
exhibited a general feeling of positivity towards Alexander principles and were excited to learn
and perfect it even more in their lives.
8-1
8 Lessons 1-12 The following chapter includes the twelve lessons used in this research, that was compiled
from different sources, including What every Musician Needs To Know About The Body, by
C. Conable (2000), Bodymapping for Flutists, by Lea Pearson (2002), Check Up by Peter-
Lukas Graf (1992), Muscle Type and Innervation of the Diaphragm by J. Messmer (1998),
The Art of Flute Playing by E. Putnik (1970), Indirect Procedures: A Musician’s Guide to the
Alexander Technique by P. de Alcantara (1997), Using the Alexander Technique by S.
Kalka (2005), The Actor and the Alexander Technique by K. McEvenue (2001), Notes from
the Green Room: Coping with Stress and anxiety in Musical Performance by P. Salmon and
G. Meyer (1992), A Description and Application of Robert Aitken’s Concept of the Physical
Flute by Dr. Robert Billington (2000), as well as my personal experience with Alexander
Technique lessons and my personal experience as a professional flautist and having been
in the music teaching profession for several years. A number of the drawings were obtained
from the following websites: http://www.nlm.nih.gov/medlineplus/encyclopedia.html and
www.3Dmedical.com.
The procedures applicable to woodwind playing were compiled in the order that I deemed
necessary. These lessons were not taught in twelve weeks. ‘Lesson’ is a term I used to
group specific concepts or principles together and one ‘lesson’ was not learnt in one week. It
sometimes took the students a few weeks or in some cases, months to learn a single
principle. These lessons need not to be done exactly in the order that I placed them.
However, it is essential to start with lessons one and two first to establish Primary Control
and then one may deviate from this order. These lessons include relevant pictures, drawings
and diagrams for the students’ benefit, so that they can refer back to it while practising their
instrument at home.
The lessons were set out as follows:
Lesson One: Posture and balance.
Lesson Two: Relaxing the shoulders and the arms
Lesson Three: The jaw, tongue and the larynx
Lesson Four: Legs, hips, pelvis, knees and feet
Lesson Five: Standing and sitting
Lesson Six: Breathing A

8-2
Lesson Seven: Breathing B
Lesson Eight: Breathing C
Lesson Nine: The semi-supine position and the whispered ‘ah’ exercise
Lesson Ten: Kinaesthetic awareness
Lesson Eleven: Stage fright A
Lesson Twelve: Stage fright B
8.1 Lesson One: Posture and balance
One of the most important things to establish before learning to play the flute is posture and
balance. The first lesson that we shall learn is the balancing of the head on the spine, and
the correct relationship of the head to the spine, one of the most crucial Alexander
principles. The spine, which includes the vertebrae of the neck, ends much higher than most
of us think. The picture shows six important places of balance when standing to play an
instrument.
Figure 8.1.1 Support for standing and places of balance (Pearson 2002:27)
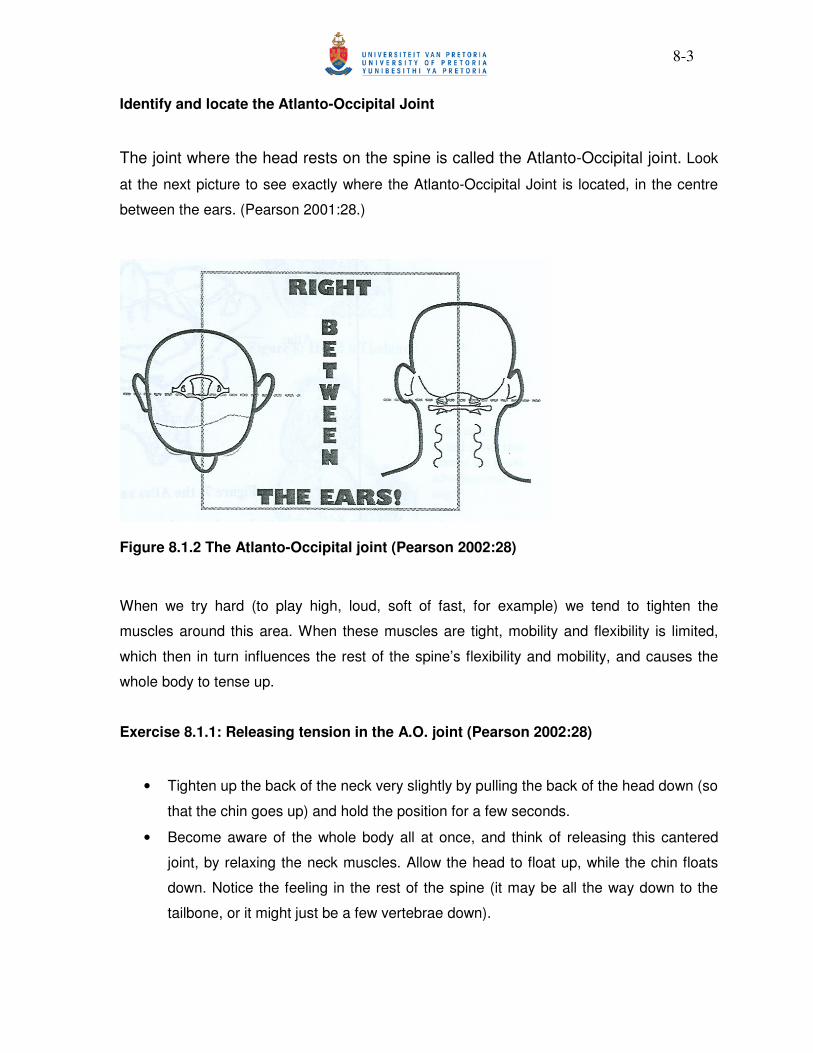
8-3
Identify and locate the Atlanto-Occipital Joint
The joint where the head rests on the spine is called the Atlanto-Occipital joint. Look
at the next picture to see exactly where the Atlanto-Occipital Joint is located, in the centre
between the ears. (Pearson 2001:28.)
Figure 8.1.2 The Atlanto-Occipital joint (Pearson 2002:28)
When we try hard (to play high, loud, soft of fast, for example) we tend to tighten the
muscles around this area. When these muscles are tight, mobility and flexibility is limited,
which then in turn influences the rest of the spine’s flexibility and mobility, and causes the
whole body to tense up.
Exercise 8.1.1: Releasing tension in the A.O. joint (Pearson 2002:28)
• Tighten up the back of the neck very slightly by pulling the back of the head down (so
that the chin goes up) and hold the position for a few seconds.
• Become aware of the whole body all at once, and think of releasing this cantered
joint, by relaxing the neck muscles. Allow the head to float up, while the chin floats
down. Notice the feeling in the rest of the spine (it may be all the way down to the
tailbone, or it might just be a few vertebrae down).

8-4
• The more often this exercise is practiced the lower down the spine the feeling will be
experienced.
Exercise 8.1.2: Loosening tension in the neck muscles
• Sit in a comfortable position and drop the head at the A.O. joint and let it hang for a
few minutes, allowing it to drop more as the muscles release. Feel the response in
the rest of the spine.
• Allow the head to float back up and keep the neck muscles (front, side and back)
long and free.
• This exercise should be done a few times every day.
The next picture shows how tension is created in the neck muscles by pulling the head back
and down:
Figure 8.1.3 Tight versus free neck (Conable 2000:13)
The neck muscles need to be kept free from tension in order to produce a strong, rich,
beautiful tone on the flute. Any tension in this area will have a negative effect on the flute
sound. The neck should float freely on top of the spine. If the head is pulled back when
playing an instrument, it will affect the balance of the embouchure negatively and thereby
the intonation and quality of sound.
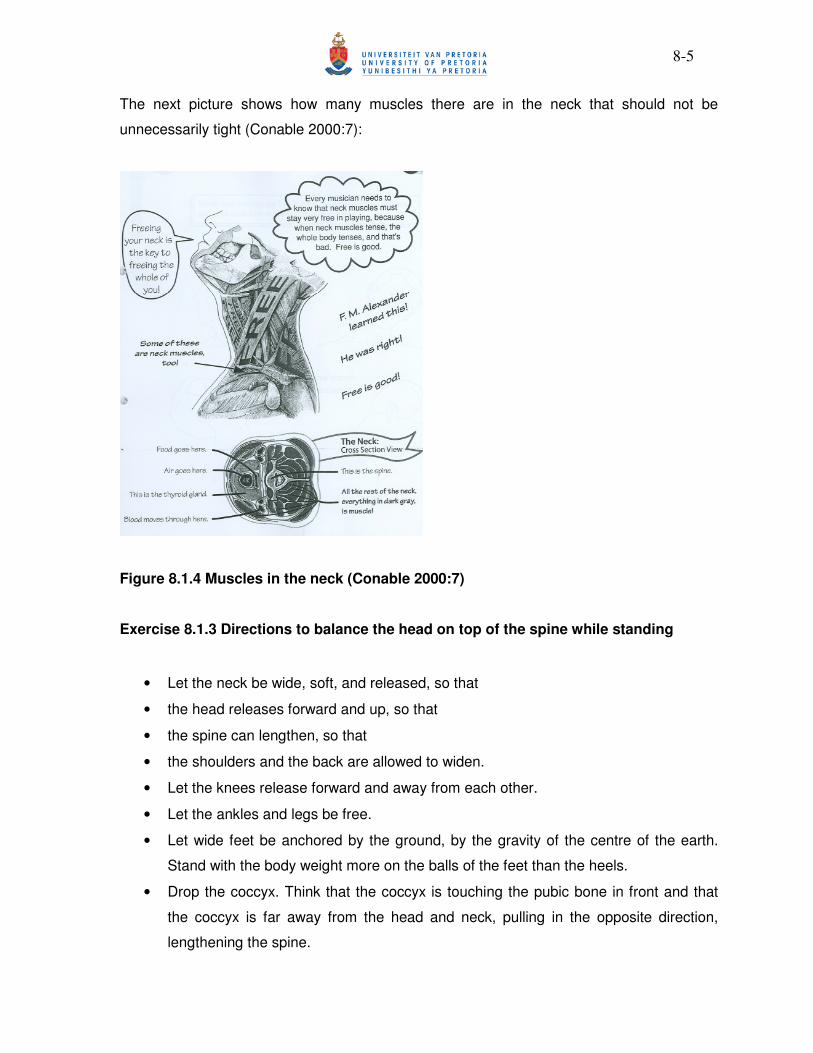
8-5
The next picture shows how many muscles there are in the neck that should not be
unnecessarily tight (Conable 2000:7):
Figure 8.1.4 Muscles in the neck (Conable 2000:7)
Exercise 8.1.3 Directions to balance the head on top of the spine while standing
• Let the neck be wide, soft, and released, so that
• the head releases forward and up, so that
• the spine can lengthen, so that
• the shoulders and the back are allowed to widen.
• Let the knees release forward and away from each other.
• Let the ankles and legs be free.
• Let wide feet be anchored by the ground, by the gravity of the centre of the earth.
Stand with the body weight more on the balls of the feet than the heels.
• Drop the coccyx. Think that the coccyx is touching the pubic bone in front and that
the coccyx is far away from the head and neck, pulling in the opposite direction,
lengthening the spine.

8-6
• Point the shoulders sideways and apart, shoulders away from the ears, elbows away
from the shoulders, hands away from the elbows. Think of all the muscles
lengthening.
• Point the elbows out and away from the body as well as the shoulders.
Remember: Balance the neck lightly on the spine without any unnecessary tension. Keep
the neck muscles relaxed and free, which will assist in the loosening of any tension in the
rest of the spine. The head should not be pulled back into the neck, because doing this
creates tension in the neck muscles. The head should go forwards and up; forwards is to
drop the nose slightly, and up is as if there is a string tied to the top back of our heads
pulling it up at the back like a puppet. This action will help the spine to lengthen.
Application of Lesson One:
In Lesson One I started teaching them about Primary Control (see Figure 8.1.1): the
inherent set of postural reflexes in the body which allows for effortless uprightness (postural,
in this sense, means what keeps us upright, erect and balanced, but not in a rigid position).
The first concept was the head: balancing the head on top of the spine (forwards and up).
This is the most important place of balance. In this lesson the students had to locate their
Atlanto-Occipital (A.O.) joint, which is at the top of the spine, right in the centre between the
ears (Figure 8.1.2). Flexibility at this joint and in the neck is essential for embouchure work,
pitch control, and varying tone colour. A copy of the lesson with sketches and diagrams was
handed out to each student, to show them exactly what this joint looks like and how to locate
it. This is where the head is balanced on the spine and is supported by it. They were taught
to drop the nose, and to turn the head as freely as possible, very relaxed, with no
unnecessary tension. The object of the Alexander Technique is free movement where
muscles contract or extend without unnecessary resistance. (Pearson 2001:15.)
After locating the A.O. joint, exercises were given to release tension in the A.O. joint and to
loosen unnecessary tension in the neck. Two pictures were added to the lesson from the
book What Every Musician Needs to Know about the Body by Barbara Conable, indicating a
tight versus a relaxed neck, and the huge number of muscles in the neck that need to be in
balance.

8-7
8.2 Lesson Two: Relaxing the shoulders and the arms
The shoulders
• Shoulders play an extremely important role in flute playing. Both arms are lifted for
flute playing into a very unnatural position, which can cause a lot of tension and pain
if not properly balanced.
• Shoulders should not be pulled up. Tension in the shoulders can spread to other
parts of the body and can impair technical development.
• Think (imagine) that the shoulders should drop away from the ears and that the
distance between the shoulders and ears is huge. Think head (and ears) up, and
shoulders down and away from the ears. This will also help lengthening the spine. It
also helps to think of heavy elbows pulling the shoulders away from the ears.
• The sternoclavicular joint (No. 1 in Figure 8.2.5) is an important joint that is used in
flute playing for bringing the instrument into the playing position, and for moving the
instrument up and down (Pearson 2002:54.)
Figure 8.2.1: The sternoclavicular joint (Pearson 2002:53)

8-8
Figure 8.2.1 illustrates the three places where the arm rotates:
• 1: Rotation of the shoulder blade over the ribs moves the whole arm structure
forward or back at the sternoclavicular joint.
• 2: The rotation at the shoulder joint turns the arm without changing the bend or the
rotation at the elbow.
• 3: The rotation at the elbow turns the hand over.
• The left shoulder blade and the collarbone must move significantly forward to bring
the flute into playing position and for the left hand to be able to reach the keys
comfortably. If flute players do not use the sternoclavicular joint properly when lifting
their instrument, there will be pressure on the left rotator cuff and breathing will be
inhibited (Conable 2003:53).
Make sure that only the arms lift, and keep the shoulders down. Stand in front of a mirror
and make sure that the shoulders are not lifting with the arms.
Exercise 8.2.1: Raising the arms without tightening other muscles (Pearson 2002:60)
• Stand comfortably and well balanced.
• Take a deep relaxed breath and allow the left arm to float up to the side as you
exhale. Allow it to go up only as far as is comfortable—maybe only a few inches. As
soon as you lose the sense of free movement, stop there.
• Inhale again, and on the next inhalation allow the arm to float up a little more. Keep
the arm long, feeling the width of the upper arm structure and the connection to the
back (look in the mirror to see if the arm is moving freely, or if the shoulder is being
lifted up, which shows that you are trying to move it from the collarbone).
• Repeat the above step until it is no longer comfortable, if you are already free, it will
be easy to lift the arm all the way up to the head, then with a sigh allow the arm to
drop.
• Repeat the exercise with the right arm. Each arm may rise different distances due to
differing amounts of freedom on each side.
• If this exercise is done a few times during each lesson or practice session, one will
soon have more mobility. Eventually the arms should be raised all the way up above
the head without tightening any other muscles in the body.

8-9
Exercise 8.2.2: Lifting the arms into playing position
• Hold the flute in both hands, arms down in front of the body.
• Lift the hands and let the arms follow until the arms are in the playing position.
• Notice how little effort it takes to keep the arms in this position, and that the arms do
not get tired quickly.
The next exercise teaches how to transfer free arm movement (obtained from the previous
exercise) to playing the flute.
Exercise 8.2.3: Bringing the flute into playing position with support from the back
muscles (Pearson 2002:61-62)
• With the flute in the right hand, hold the left arm straight out in front of the body.
Keep it there until you begin to feel it supported by your back muscles, feeling the
connection from pinkie to tailbone. (See Figure 8.2.2 below how the latissimus dorsi
muscle goes around the sides).
• Then bend your arm at the elbow and place the flute in the left hand in its proper
playing position. (At this point, you may want to rest the flute on your left shoulder.)
• Take your right arm and reach it straight out to the side. When you begin to feel the
connection to the back muscles, bend it and put your fingers on the flute.
• Keep your arms feeling long and your upper arm structure wide. This should give you
a good playing position for the arms. You can experiment with the angle of the flute
to the torso by turning the head and neck slightly and moving the right arm forward.
(Note that the rest of the spine will respond to the head turning.) For many people a
forty-five degree flute / torso angle is comfortable, but if you have short arms or need
more room in the front, you can bring the right arm forward more. This movement is
crucial for comfortable support of the flute. Any angle between thirty and sixty
degrees should be workable if your arms are free.
• Remember that the collarbone and the free-floating rotation of the shoulder blade
over the rib cage is part of this movement.

8-10
Figure 8.2.2 Back muscles of the upper torso (Pearson 2002:59)
To make sure that the left shoulder blade is rotating far enough forward, stretch the flute too
far to the right with a straight arm, and then ease it back into playing position. Notice how
this creates more width in the upper arm structure.
Application of Lesson Two
In this lesson the students were taught how to raise their arms without contracting the
muscles in the shoulders unnecessarily (Exercise 8.2.4). This is an extremely important
aspect of playing the flute, as it can become uncomfortable and even painful to hold the
arms in the playing position when practicing for long periods of time, and can lead to RSI
(Repetitive Strain Injury). A picture of the sternoclavicular joint was included; this joint helps
bring the flute into playing position (Figure 8.2.1). Two more exercises were included to
teach them how to raise the arms without tightening other muscles in the shoulders, and to
bring the flute into playing position using support from the back muscles (Exercises 8.2.2
and 8.2.3). A picture was included to show the structure of the back muscles (Figure 8.2.2).

8-11
8.3 Lesson Three: The jaw, the tongue and the larynx
One of the most important aspects of playing the flute is the production of a beautiful,
singing tone. The proper positioning of the jaw, the tongue, the chin and the larynx is crucial
for tone production. The following Alexander Technique procedures focuses on the jaw, the
tongue, the chin and the larynx as applied to woodwind playing.
8.3.1 The jaw
The jaw is very important for the control of intonation and dynamics when playing the flute. It
should be moved forwards and up when playing softly, and backwards and down when
playing loud; forwards when the pitch is too low (flat), and backwards when it is too high
(sharp). Students should learn to move the jaw with as little tension as possible, because
the tightening of the jaw can lead to tension in the neck, and vice versa; tension in the neck
can create tension in the jaw. To help release tension in the jaw, the whispered ah exercise
can be utilized (see paragraph 8.9.3 for a detailed description of this exercise). The jaw
consists of a single part, where the bottom teeth are housed. The upper teeth are anchored
in the skull. The jaw moves at two joints, one on each side of the head, called the
temporomandibular joints.
Dr. Robert David Billington (2000) wrote in his doctoral thesis, A Description and Application
of Robert Aitken’s Concept of the Physical Flute, about the results of a study where the
effects of opening the jaw and throat were measured. This activity of opening the jaw and
throat increases the resonance cavities in the mouth and throat, thereby increasing the
number of harmonics in the sound produced on the flute. It was found that the listener
experienced the sound as fuller and brighter.
8.3.2 The tongue
The tongue is a composite muscle, consisting of many muscles, therefore it can move very
quickly to different places in the mouth cavity, and also enables humans to talk and
articulate fast. The tongue is situated right above the hyoid bone and is a large piece of
muscle (see Figure 8.3.2, The Larynx). The tongue must be free and without unnecessary
tension to be able to move fast, especially in the use of single, double, triple and flutter

8-12
tonguing on wind instruments, each of which can become an extremely fast action. When
the neck is free, the tongue will also be free. A tightening of the neck will result in a tight
tongue. Figure 8.3.1 illustrates precisely where the tongue is placed in the mouth and where
it might be placed for tonguing when playing the flute.
Figure 8.3.1 A general example of the placement of the tongue when playing the flute
(Billington 2000)
8.3.3 The larynx
The back of the throat should be relaxed and open, feeling as if one is yawning. When
relaxed like this, it makes it easier to breathe in as much air as possible in the shortest
possible time, and breathing will be noiseless. Dropping the back of the throat as if yawning
or saying ‘ah’ has a relaxing effect on the neck and creates a larger mouth cavity, which
results in a bigger and fuller sound. Floyd (1990:56-58) writes in The Gilbert Legacy that this
relaxing of the throat also helps to free the airflow and “with proper breath pressure, the
sound will vibrate freely on its own.”

8-13
Figure 8.3.2 The Larynx (http://www.nlm.nih.gov/medlineplus/encyclopedia.html)
Figure 8.3.2 shows the relative position of the larynx. The larynx plays an important role in
flute playing. Sometimes students will try to sing while playing, or make sounds with their
vocal chords, which indicate that the throat / larynx is tight. This has an undesirable effect on
flute tone. In his book, Check Up, Peter-Lukas Graf (1992:18) incorporated an exercise
where the player sings and plays simultaneously, to learn to relax the larynx.

8-14
Exercise 8.3.2: Relaxed optimum position of the larynx while playing (singing and
playing) (Graf 1992:18-19)
Graf (1992:18) gives the following instructions concerning this exercise:
• Sing in a register you find most comfortable (in unison or in octaves).
• Sing legato on the vowel ‘o’ as in German ‘schön’ or Schoenberg, or articulate the
French word ‘deux’. In this way the tongue will always be in a position to articulate,
even in tone production exercises.

8-15
Application of Lesson Three
Lesson Three on the jaw, the tongue and the larynx showed the students that each of these
elements plays an important role in the playing of any woodwind instrument and, especially
in this case, the playing of the flute. Here they were taught the essence of free movement of
both the jaw and the tongue, as unnecessary tension in either can lead to tension in the
neck. The opposite is also true: a free neck guarantees a free tongue and jaw. The results of
a study done by Dr. Robert David Billington (2000) for his doctoral thesis, A Description and
Application of Robert Aitken's Concept of the Physical Flute, where he measured the effects
of opening the jaw and throat on the sound of the flute was also mentioned. I included
pictures to illustrate the correct positioning of the tongue in the mouth when playing the flute
(Figure 8.3.1), and details of the tongue, a relatively large muscle (Figure 8.3.2).
The next subject discussed was the larynx. Exercises by Floyd and Graf were included in
this lesson. Floyd (1990:56-58) gives an exercise (Exercise 8.3.1) to find the correct
positioning of the chin in relation to the movement of the lower lip. An exercise by Graf
(1991:18) was included, (Exercise 8.3.2) and this exercise teaches flautists how to find the
relaxed optimum position of the larynx while playing the flute. He calls this exercise ‘Singing
and playing’. Both exercises teach the student to relax the throat and the jaw.
8.4 Lesson Four: Legs, pelvis, knees and feet
8.4.1 The legs
The legs should not be fixed, planted or stiffened while standing and playing the flute.
Support comes up from the floor through the legs. The legs have six joints: two hip joints,
two knee joints and two ankle joints. It is important for flute playing that these joints should
be free and relaxed. The following lesson is about learning how to relax the legs at these six
joints. (Pearson 2002:31.)

8-16
Figure 8.4.1: The leg with the hip joint, the knee, the ankle joint and the foot (Pearson
2002:31)
8.4.2 The pelvis
The pelvis is designed for spreading the weight of the upper body onto the legs, ensuring
that the whole torso will have a dynamic and fluid support through all of the six leg joints
(hips, knees, and ankles). See Figure 8.4.2.
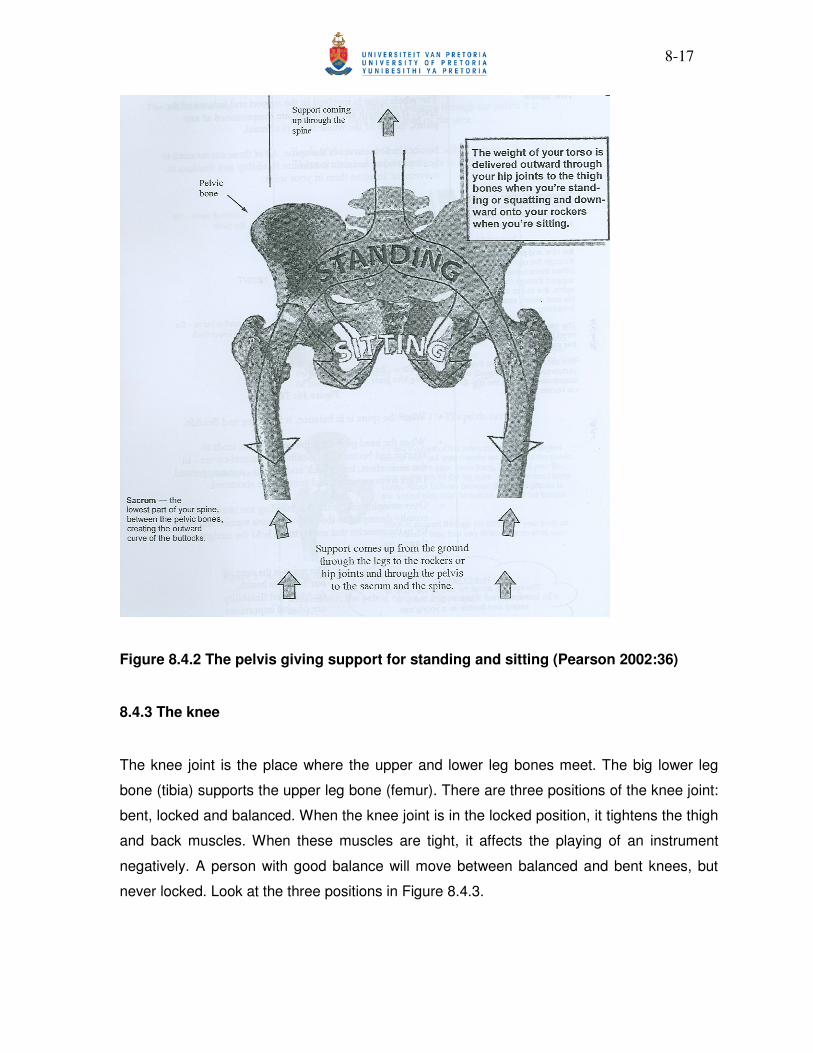
8-17
Figure 8.4.2 The pelvis giving support for standing and sitting (Pearson 2002:36)
8.4.3 The knee
The knee joint is the place where the upper and lower leg bones meet. The big lower leg
bone (tibia) supports the upper leg bone (femur). There are three positions of the knee joint:
bent, locked and balanced. When the knee joint is in the locked position, it tightens the thigh
and back muscles. When these muscles are tight, it affects the playing of an instrument
negatively. A person with good balance will move between balanced and bent knees, but
never locked. Look at the three positions in Figure 8.4.3.

8-18
Figure 8.4.3 Knee positions (Conable 2000:31)
8.4.4 The feet
Figure 8.4.4 Support and weight delivery through the foot and ankle (Conable
2000:33)
Balance should be through the front of the leg bone to the arch of the feet. The ankle joints,
where the leg bones meet the top bones of the feet, should be flexible and free to allow the

8-19
leg and the knee free range of motion while standing (Pearson 2002:32). Let the feet grab
hold of the floor. Stand on wide spread feet.
Observe your balance: Do not lean back too much, that will be balancing through the heels
of the feet, instead of through the arch. Think of support through the front of the leg bone
(the shin bone). That will shift the balance forward. (Pearson 2002:32.)
Application of Lesson Four
In this lesson the students were taught how to employ the legs, pelvis, knees and feet in a
relaxed manner when playing a musical instrument. The first sketch shows the structure of
the hip joint, the leg, the knee, the ankle joint and the foot (Figure 8.4.1).
The discussion of the pelvis included a picture (Figure 8.4.2) of the structure of the pelvis
and how it supports weight in both sitting and standing.
The knee was discussed thereafter and a diagram was included (Figure 8.4.3), showing
three positions of the knee: locked, balanced and bent. Students should move between the
balanced and the bent positions of the knee, and not the locked knee position, otherwise
unnecessary tension will occur in the legs, which will transfer this tension to a number of
other parts of the body, influencing the sound adversely. Figure 8.4.4 is an illustration of the
foot with the support and weight of the body delivered through the foot and ankle. An
instrumentalist, when standing to play, should stand with the weight evenly spread onto both
feet. The feet anchor the body securely to the floor, while the ankles should be flexible and
free.
8.5 Lesson Five: Standing and sitting
A very important aspect that one learns in Alexander Technique classes is how to sit down
(from a standing position), how to sit on a chair and how to stand up (from a sitting position),
as well as how to stand correctly. It is important to think about the neck in all these
situations. The neck must not be pulled back and down into the neck (see Lesson One
Figure 8.1.3: Tight versus relaxed neck). This is essential knowledge for the playing of a

8-20
musical instrument, because it is played both standing up, when practicing or performing as
a soloist, and sitting down, in orchestral or ensemble playing.
8.5.1 Standing
Before starting any of the exercises, make sure that your neck is free and remains free from
unnecessary tension throughout the duration of the exercise, and that it is not pulled back
and down, but goes forward and up.
.
Exercise 8.5.1: Finding a good standing balance (Pearson 2002:40)
• Keeping the head and the neck as free as possible, and thinking of support through the
core of the body, allow the floor to support you. This may release some muscles that
were unnecessarily working to hold you up.
• With the feet parallel and about a hip distance apart, begin to sway in small circles from
the ankle joints. Leading with the head, move the whole body as one unit from the
ankles. Keep hips and head in line.
• Allow the circles to get bigger, but not so big that you feel you will fall over. Keep feeling
the fluidity of the ankle joints and dynamic support throughout the body.
• Gradually decrease the size of the circles, until you come back into a standing position.
Notice where you are now balanced and see if it is different from your habitual balance.
• Notice also if the arm structure is comfortably balanced over the middle of the body, with
the arms hanging along the side seams of the clothes.
It is very important to find your balance before finding a stance to play in. Once you find your
balance, you can put one foot slightly in front of the other if you find it more comfortable. See
Lesson Four, Figure 8.4.2, for a sketch of the architecture of the pelvis, where one can see
how the weight is distributed outward through the hip joints to the thighbones, both in
standing and in sitting positions.

8-21
Exercise 8.5.2: To find a good playing position for flute players adapted from Pearson
(2002)
• Hold your flute by placing your fingers on the keys.
• Lift the flute above your head (with both hands) and straighten your arms.
• Do not arch your lower back when stretching your arms.
• Lower the flute slowly into the playing position, keeping your arms long and your upper
torso wide. Your arms will balance automatically over the midline of your body.
8.5.2 Sitting
Orchestral musicians need to find a comfortable sitting position, as they spend many hours
in orchestral rehearsals. They must find a way of sitting that will not jeopardize their
breathing or movement. We all can benefit from learning to sit correctly; as it is something
we all do every day.
Exercise 8.5.3: The basic principles of comfortable sitting are
• Balance on the sitting bones (see Figure 8.5.1 where the sitting bones are clearly
delineated), not forward or back of them.
• Drop and relax the coccyx.
• Let the chair support the bony structure.
• Allow dynamic support to come up through the front of the spine, the ribs and sternum
and into the arms.
• Keep breathing comfortably and free.
• Keep the head balanced and the neck free.
Study the two sketches at Figure 8.5.1. Figure 8.5.1 B shows a picture of the head
supported by the spine, therefore the back muscles can stay free to help with breathing and
to hold up your instrument. If the back muscles must work unnecessary to hold up the back,
as in Figure 8.5.1 A, the result will be back pain and limited breathing. Another negative
result of sitting off-balance is that the arms are pulled in and down, thereby limiting finger
movement and sometimes causing tendonitis and carpal tunnel syndrome.

8-22
Figure 8.5.1 A: Head not supported by spine
Figure 8.5.1 B: Head supported by spine (Pearson 2002:42)
If you are in a balanced standing or sitting position the arms will rest evenly on top of the
ribs, with the upper arm bones equidistant from the back and front. When sitting in a well-
supported way, the legs are free to move or stay in place. The upper body can move around
on the sitting bones in many directions, but always in a way that allows
• the back and abdominal muscles to be free,
• the arm structure to move freely,
• the head to be balanced on top of the spine.
Exercise 8.5.4: Sitting down, from a standing position, and standing up
• Stand in front of a chair, as if to sit down. Release any tension in the neck, so that the
head can go forward and up, and the back can lengthen and widen.
• Stand, with the weight of the body spread evenly between the two feet, over the arches
or the middle of the feet. The ankles and knees should be free and relaxed.
• Lower the eyes and bend the knees as if going into a squatting position.
• Bend the torso forward while the head goes down until the feet can be seen.
• Sit down on the edge of the chair and release the coccyx, while thinking forward and up.
• Enjoy sitting / feel grounded on the chair on the sitting bones.
• Move the feet closer to the chair.
8-23
• Lower the head, and let the whole upper body go forward. Bend the head down until it is
right over the knees, and you can see your toes. Let the arms hang loosely next to the
body. Let the gravity do the work, and stand up.
It is important to learn this procedure as it is applicable in everyday life, not only for playing
an instrument.
Application of Lesson Five
Important aspects learnt in an Alexander Technique class include how to sit down (from a
standing position), how to sit on a chair and then to stand up from the sitting position, as well
as how to stand correctly. It is important to think about the delicate head - neck relationship
(Primary Control) in all these cases. The head must never be pulled back and down into the
neck (see Lesson One Figure 8.1.3: Tight versus relaxed neck). This is essential knowledge
for playing a musical instrument, since instruments can be played both standing up, when
practicing or performing as a soloist and sitting down, in orchestral and ensemble playing.
Therefore, students should learn how to sit and stand correctly, as they spend many hours
either sitting or standing while performing and while rehearsing.
In Lesson Five the students were given exercises to teach them how to sit and stand
correctly when playing their instrument, and also how to sit down from a standing position
and then to stand up again from a sitting position. Exercise 8.5.1 is about finding a good
standing balance, and 8.5.2 about finding a good playing position.
In the second section, basic principles of sitting were discussed and a diagram included
showing a picture of a head not supported by the spine, and one supported by the spine,
and the importance of having a head balanced on the spine when playing. Exercise 8.5.3
teaches the students how to sit down from a standing position, and then to stand up again. It
is extremely important to find balance before finding a good playing stance. Once this is
found, one foot may be placed slightly in front of the other if this is found to be more
comfortable.

8-24
8.6 Lesson Six: Breathing A
Breath is the foundation of good flute playing, because it is the generator of tone. Playing a
woodwind instrument requires considerable physical effort and therefore a sufficient supply
of oxygen is needed. Breathing involves our whole body, especially the thorax (chest),
abdomen (stomach) and the pelvic areas. For wind instrument players breathing is a two-
step process: fast optimum inhalation (inspiration), and slow exhalation (expiration).
Exhalation, or blowing, activates the air column in the flute, thereby producing sound. The
ability to control that exhalation with the lungs and the abdominal muscles before the air
stream reaches the embouchure is essential (Toff 1985:81). Good posture is associated
with breathing. The two principal factors in proper breathing for the flutist are a sufficient
quantity of air and adequately controlled pressure or support to ensure a steady air stream.
Firstly, working on acquiring an adequate supply of air will be necessary.
Exercise 8.6.1: Breathing exercise (Pearson 2002:82)
• Exhale, allowing as much air to go out as is comfortable.
• Imagine there is a 50-kilogram weight on the chest, preventing breathing.
• Hold this for as long as possible, feeling the constriction.
• Now imagine the weight is taken off, and just let the air flow in. There will be a lot of
rib and lower body movement as the lungs fill naturally with air. See how effortless
this is.
The following six anatomical areas that are used in the breathing process, as well as
support for breathing and development of longer exhalations will be discussed in Lessons
Six, Seven and Eight:
• Diaphragm.
• Intercostal muscles.
• Lungs.
• Abdominal wall.
• Pelvic floor.
• Spine.
8-25
• Support.
• Development of longer exhalations.
In Lesson six the first three aspects, diaphragm, intercostals muscles and the lungs will be
dealt with; in Lesson seven the abdominal wall, pelvic floor and spine; and in Lesson eight
support and how to develop longer inhalations and exhalations
Diaphragm
The diaphragm is a thin, muscular membrane extending horizontally across the torso and
separating the chest and abdominal cavities. The three-dimensional picture at Figure 6.1
shows precisely where the diaphragm is situated in the body. Many people imagine the
diaphragm to be lower in the body than it actually is. The diaphragm is a thin skeletal
muscle, and is not considered to be voluntary or involuntary. There are no sympathetic or
parasympathetic nerves (like in the lungs) to the diaphragm. A person can determine
whether the diaphragm is at rest, contracted or forced up into the thoraces by the
proprioceptive sensation in the abdominal and chest walls and the nocioceptive (bad feeling)
sensation in the intestines and lungs. When it is contracted, the abdominal organs are
pushed down and the abdominal walls are pushed out. When relaxed, this reverses. To
exhale fully, one contracts the abdominal wall muscles and the intercostal muscles (between
the ribs), since the diaphragm cannot move any higher than when fully relaxed. The
diaphragm is attached to the spine; therefore, how the spine is used for support has a direct
effect on breathing. (Messmer 1998:1.)
A very important fact about the diaphragm is that it is associated, through continuous
muscle fibres, with the long internal pelvic muscle, psoas major, which attaches to the inside
of the thighbone. Therefore, the tightening or relaxing of the legs has an effect on breathing:
tight or crossed legs result in limited breathing. When the legs are free and flexible, more air
and support are available, because the diaphragm is freer to move. The diaphragm does
about 75% of the muscular work in the breathing process, contracting down for inhalation,
releasing up for exhalation. (Pearson 2002:74.)

8-26
Figure 8.6.1 The diaphragm (www.3Dmedical.com)
Intercostal muscles
These are the muscles between the ribs and are closely related to breathing. They do about
25% of the breathing work (raising and lowering the ribs). They are active in vibrato playing
on the flute. As the student increases the speed of vibrato, the intercostal or rib muscles will
basically control the pulsation (Putnik 1970:17). The ribs can only move to their optimum if
the arms are free and away from the body. If held too close to the body, they will constrict
the movement of the ribs.
Exercise 8.6.2: Feeling rib movement in breathing
• Put both hands on the lower part of the ribcage with thumbs facing to the front and
fingers to the back
• Take a deep breath. The fingers should separate slightly if breathing correctly.
• Breathe out, forcing the last bit of air out of the lungs with the help of the hands.
• Stay in that position for as long as possible. Let go to take another breath. The lungs
will fill up automatically.
• Repeat the whole process.

8-27
Lungs
The function of the lungs in the breathing process is that they hold the air. The lungs curve
around the spine. How the spine is used, influences breathing directly. The lungs expand
downwards when breathing in, and push the diaphragm down and outwards within the chest
cavity or ribcage.
Figure 8.6.2 The lungs (http://www.nlm.nih.gov/medlineplus/encyclopedia.html)
Exercise 8.6.3: Thinking about the upper tips of the lungs when breathing (Pearson
2002:77)
Look closely at Figure 8.16 where the tips of the lungs are situated in the ribcage. Feel the
indentations behind the collarbone: behind that is the tip of the lung. Now imagine this on
your own body and take a full breath. One might find that the breath capacity expands when
including that part of your lungs as well. Think of the lungs up high, like the oxygen tanks of
divers.

8-28
Figure 8.6.3 The lungs and the diaphragm in the ribcage (www.3Dmedical.com)
Application of Lesson Six
Breath is the generator of tone and therefore the foundation of good flute playing. Playing a
woodwind instrument requires considerable physical effort and therefore a sufficient supply
of oxygen is needed. Breathing involves the whole body, especially the thorax (chest),
abdomen (stomach) and the pelvic areas. For wind instrument players breathing is a two-
step process: quick inhalation (inspiration) and slow exhalation (expiration). Exhalation, or
blowing, activates the air column in the instrument thereby producing sound. The ability to
control a slow exhalation with the lungs and the abdominal muscles before the air stream
reaches the embouchure is essential (Toff 1985:81). The two principal factors in proper tone
control – especially for the flutist - are a sufficient quantity of air and adequately controlled
pressure or support to ensure a steady air stream.
Lesson Six focused on breathing. Firstly, an explanation of all the parts of the body being
used in the process of breathing was given. Pictures were included in the lesson to help the
students better understand the working of the different parts involved. The body parts and
their use (see 8.6 above) were discussed in Lessons Six, Seven and Eight.
8-29
In Lesson Six the first three aspects, the diaphragm, the intercostal muscles and the lungs
were dealt with; in Lesson Seven the abdominal wall, the pelvic floor and the spine; and in
Lesson Eight support and development of longer exhalations.
Firstly, the diaphragm was discussed. The diaphragm is a thin, muscular membrane
extending horizontally across the torso and separating the chest and abdominal cavities.
The three-dimensional picture in Figure 8.6.1 illustrates where the diaphragm is situated in
the body.
Secondly, the intercostal muscles were discussed. These are the muscles between the ribs
and are closely related to breathing. An exercise was included to feel the movement of the
ribs (Exercise 8.6.2).
In the third place, the students were taught about the lungs. A diagram of the lungs was
included in this lesson to show the structure of the lungs (Figure 8.6.2). An exercise was
included to teach students to think about the upper tips of the lungs when breathing, to help
expand breathing capacity (Exercise 8.6.3), as well as a three dimensional picture of the
lungs and the diaphragm in the ribcage (Figure 8.6.3).
8.7 Lesson Seven: Breathing B
Abdominal wall
The abdominal wall includes all the muscles that surround the abdominal cavity. Both the
abdominal wall and the pelvic floor work synergistically with the diaphragm. The abdominal
muscles should be free of unnecessary tension when taking a breath for the playing of a
wind instrument. Tensed muscles limit breathing capacity. When inhaling, the diaphragm
contracts down and the viscera (intestines) push the abdominal wall outward in all
directions. With exhalation, the diaphragm releases up and the muscles of the abdominal
wall contract inward. Wind players and singers should avoid unnecessary tension in the
abdominal wall, as it restricts free breathing. In shallow everyday breathing, the abdominal
wall does little work, but in deep breathing for long slow exhalation (when playing a wind
instrument), much more work is involved. On inhalation, the abdomen expands and the
pelvic floor is pushed down. On exhalation, the pelvic floor rises slowly while the spine

8-30
lengthens slowly; simultaneously the abdominal muscles slowly return to their original
position. (Conable 2000:86 and Pearson 2002:83.)
The next exercise will help discover how to release the abdominal muscles.
Exercise 8.7.1: Learning to release the abdominal muscles (Pearson 2002:84)
• Free your mind from worries and lie on your back in the ‘constructive rest position’ (semi-
supine). Find the easiest way of breathing. Allow your body to feel totally supported by
the floor.
• As you become more relaxed, notice how your abdominal muscles move naturally and
your back feels more in contact with the floor. You may also find your ribs moving more
easily (especially at their joints with the spine) as well as feel air filling the upper lobes of
the lungs.
• Now try to recreate the breathing you habitually use when playing the flute. If it creates
tension in the chest, abdomen or back, see if you can go back and forth between the two
kinds of breathing until you really understand the difference and can make a choice.
• Then try the same thing standing up. When you take your first truly relaxed and free
deep breath, there will be a release all the way through the hips and into the legs. Then
you will be able to experience movement of the pelvic floor. (If the abdomen and back
muscles are tense, they must also be freed in order to feel the pelvic floor movement.)
The gluteal muscles also play a crucial role in breathing. As previously stated, when they
are tense, free breathing is restricted. Tight gluteal muscles restrict abdominal and pelvic
floor movement, limit breath capacity and inhibit full support. Look at Figure 8.8.1 to see
exactly where the gluteal muscles are situated. (Pearson 2002:86.)

8-31
Figure 8.7.1 Gluteal and leg muscles (Pearson 2002:86)
Exercise 8.7.2: How the legs help with breathing (Pearson 2002:86)
• Sit comfortably in a chair and tighten the legs and gluteal muscles. Now breathe and
play. Notice how the breathing feels.
• Now release the legs and gluteals, feeling the weight supported by the chair and the
floor, and breathe again. A deeper breath should be possible.
Exercise 8.7.3: To release gluteal muscles (Pearson 2002:87)
• Think of them dropping to the floor.
• Imagine wearing a wet, heavy nappy.
• Think of the hips as wide and low.
• Imagine there is space in the leg just above the knees.
• Let the heels sink into the floor (keeping the weight balanced through the core of the
body and arch of the foot).
8-32
Exercise 8.7.4: Playing an instrument in the monkey position (de Alcantara 1997:101):
• Hold the flute in one hand.
• Stand up and place the feet at a shoulder width apart, or slightly wider and pointing
the toes outwards slightly.
• Bend the knees slightly.
• Lean forwards from the hip joint.
• Lift up the flute into playing position.
• Play a slow scale on the flute.
• Notice the difference in sound quality.
This exercise can also be done to assist students in relaxing their gluteal and leg muscles.
Relaxing these muscles has a hugely positive impact on sound production.
Pelvic floor
The pelvic cavity includes the pelvic floor, which consists of muscles that line the inside of
the cavity, between the pubic- and the tailbones. These muscles are secured onto the bones
of the pelvis. The shape of the pelvic floor is a mirror image of the diaphragm. These
muscles need to be relaxed and free for optimum breathing and good balance when sitting
and playing (Conable 2000:79). Even though the pelvic floor is hardly ever discussed in
educational material on breathing, it plays a hugely important role in the process of
breathing.
Exercise 8.7.5: Finding the pelvic floor (Pearson 2002:89)
• Cough. Notice what moves. Cough again, a strong cough, and notice again what
moves. Movement all the way into the legs should be experienced (more proof that
the legs are important in breathing). Also feel the pelvic floor muscles move down.
• Yell. Give a few deep, good yells, and feel what moves. That is the pelvic floor.
• Tighten the pelvic floor muscles, as if you need to go to the bathroom but have to
hold it in. Then release them. Experiment with this until you can really feel those
muscles move.
8-33
Learning to use the pelvic floor in breathing is, along with the lengthening and gathering of
the spine, the final key to finding breathing that is free, responsive, with sufficient capacity
and able to provide the required support.
Spine
As previously mentioned, breathing and balance of the spine go hand in hand. Effective,
free breathing cannot take place if the body is not perfectly balanced. The spine supports
the breathing structures and lengthens and gathers reflexively. The spine gathers slightly on
inhalation and lengthens on exhalation. The head moves slightly with each movement.
Exercise 8.7.6: To feel the lengthening and gathering of the spine (Pearson 2002:90)
• Lie on your right side with your head on your right hand. Breathe deeply, releasing
your back and abdominal muscles and feel the movement of your head on your
hand. Try the same exercise also lying on your left side.
• Lie on your stomach (prone position) with one or two pillows under your stomach (if
you can, in front of a mirror where you can watch how your whole body moves).
Breathe normally. See how the whole body moves. The spine gathers when inhaling,
and lengthens when exhaling. If you are free, you will notice the head moving closer
on inhaling, and away when exhaling. This is the basis of free breathing (Conable
2000:81).
8.7.4 Summary
Inhalation: The ribs move up and out; the diaphragm contracts down; the abdomen, sides,
back and buttocks, move out; the pelvic floor descends; and the spine gathers slightly. This
is the movement of inspiration.
Exhalation: The ribs move down and in; the diaphragm releases up; the entire abdominal
wall (front, sides and back) tenses; the pelvic floor rises; and the spine lengthens slightly as
the gluteals release down and out. This is the movement of expiration (Pearson 2002:91.)

8-34
Application of Lesson Seven
In Lesson Seven the abdominal muscles’ role in breathing was discussed. The discussion
was followed by an exercise (Exercise 8.8.1) teaching the students how to release the
abdominal muscles.
The second aspect discussed was the gluteal muscles. The gluteal muscles also play a
crucial role in breathing. Two exercises were included (Exercise 8.8.2 and 8.8.3), to show
how relaxed legs help with breathing and how to release the gluteal muscles (Pearson
2002:86). Then exercise 8.8.4 taught them how to play their instrument in the monkey
position, where the knees are bent and relaxed, and demonstrated the positive effect it has
on sound production and breathing.
The next subject of discussion in this lesson was the pelvic floor, which consists of muscles
that span the considerable space between the pubis and the tailbone. An exercise (Exercise
8.8.5) was included in this lesson to teach the students how to find the pelvic floor. This is
an important key to free breathing.
The last aspect that was discussed in this lesson was the function of the spine in the
breathing process. The last exercise, exercise 8.8.6 was included to teach the students how
to feel the lengthening and gathering of the spine.
8.8 Lesson Eight: Breathing C
8.8.1 Support
Support is essential in woodwind playing in order to obtain and control long exhalations,
help with breathing and give vibrancy to the tone. The following two definitions of support
are applicable to woodwind playing: “to bear, or hold up, a structure or mass”, and “to
uphold by aid; back up; second” (Conable 2000:88). You need something to bear you up as
you breathe, and you need something to aid or back-up your breathing. The different
supports that are needed to bear you up are the following (Conable 2000:88):

8-35
• For the whole of the body - the floor, the body’s bony structures and postural reflexes.
• For the torso (body) – the legs.
• For the thorax (chest) – the lumbar spine.
• For the head – the whole spine.
• For breathing – the lengthening and gathering of the spine; the resiliency of the abdominal wall; the resiliency of the pelvic floor; and engaging the deep musculature of the pelvis as you move into length on exhalation.
With all of the above support structures in place, we will be free to breathe, play and make
music. The body should be in balance to work most efficiently and effectively. Any
unnecessary tension in the body will hamper this freedom. A woodwind player who plays
with balance and support has the most freedom of movement, technique and tone colour. A
musician (especially a flute or violin player with their asymmetrical playing positions) that is
unbalanced puts pressure on the torso, arm, leg, gluteal and breathing muscles and limits
his / her playing. In Lesson One, Figure 8.1.1 shows a picture of a perfectly balanced body.
It shows six important places of support in the body. Notice the line of support that goes all
the way through the core of the skeleton.
Exercise 8.8.1: To discover free breathing with core support (Pearson 2002:93)
• Find balance at the feet; let the feet take hold of the floor.
• Free the knees and hips.
• Free the gluteal muscles.
• Free the abdominal muscles.
Exercise 8.8.2: To develop longer inhalations (Pearson 2002:93)
• Get into a comfortable sitting, lying or standing position.
• Take a deep slow breath.
• When you get to full inhalation, ask yourself: What stops the movement from going
further? Can I find an area in my body that prevents expansion?
• Breathe in even more.
• Notice how much deeper you can breathe.

8-36
Exercise 8.8.3: To develop longer exhalations (Pearson 2002:93)
• When you can feel the resiliency of the pelvic floor and the lengthening and
gathering of the spine, try some long tones on your instrument. As you exhale,
imagine the pelvic floor muscles are still going down. This will make your phrases
longer. It also triggers the reflex that lengthens the spine.
• The lengthening begins slowly, but as the exhalation progresses, the lengthening
moves faster, ending with a slight release of the head at the A.O. joint (see Lesson 1,
Figure 2). This drops the chin slightly, putting it in the perfect position for ending a
phrase and beginning the next inhalation.
Do the next exercise while playing the flute:
Exercise 8.8.4: Abdominal breathing (Graf 1992:6)
This exercise aims to control and experience the breathing process while playing the flute,
and to breathe in without moving the chest.
• Play until your breath is exhausted: the abdominal muscles will tighten.
• Remain in that position without moving or breathing in (c. 2 ¼ seconds).
• Relax suddenly (‘letting go’): air enters the lungs (c. ¾ second).
• Immediately continue playing: the air should last for about 10-15 seconds.

8-37
Figure 8.8.1 Abdominal breathing (Graf 1991:6)

8-38
Application of Lesson Eight
Lesson Eight firstly dealt with support for breathing. Directives were given to support
structures, since a balanced body works most efficiently and is free to breathe properly.
Exercise 8.8.1 was included to help students discover free breathing with core support.
Exercises 8.8.2 and 8.8.3 respectively dealt with the issue of deeper inhalations and longer
exhalations. The last exercise, 8.8.4, was to teach students abdominal breathing, was taken
from the book Check Up by Peter-Lukas Graf (Figure 8.8.1). This exercise should be done
while playing the flute.
8.9 Lesson Nine: The semi-supine position and the whispered ‘ah’ exercise
The whispered ‘ah’ exercise is a distinguishing feature of the Alexander Technique. It not
only helps with correct breathing, but also with relaxation. Many people apply a similar
technique, slow breathing, to help them relax and calm them down when they are tense or
anxious. The whispered ‘ah’ is easiest learnt in the semi-supine position, although it is not in
this position that the greatest benefit is obtained from it. The following exercise teaches how
to learn the whispered ‘ah’ in the semi-supine position.
Exercise 8.9.1: How to lie down in the semi-supine position (Kalka 2005:1)
• Lie on a fairly hard surface, e.g. a carpeted floor and not a bed, with a comfortable
number of books under the head.
• The neck and head should feel balanced and free.
• Place the feet wider than the pelvis and as close to the torso as is comfortable,
allowing the knees to bend.
• Feel the body expand onto the floor while pronating (turn in) the arms.
• Move the elbows out and away from the ribcage and rest them on the floor.
• Place the hands on the abdomen to feel the breathing.
• The spine should maintain its natural curve.
• Be aware of the body and how it feels, while gradually directing the body to release
any unnecessary tension.
• Lie in this position for ten to fifteen minutes a day as often as possible.

8-39
• When the desired time has passed, get up and when standing upright again, use
awareness, inhibition and direction to attain the same relaxed feeling that was felt
while on the floor.
Now that lying in the semi-supine position is learnt, start with the whispered ‘ah’ exercise.
Exercise 8.9.2: The whispered ‘ah’ (de Alcantara 1997:146-148)
• Think up along the spine. Let the neck be free, to let the head go forward and up, to
let the back lengthen and widen.
• Smile or grimace, exposing the upper teeth, the lips should move independently from
the neck. In other words, do not tighten the neck in the process.
• Move the lower jaw forwards, in other words, place the lower teeth slightly in front of
the upper teeth. Do this again without tightening the neck.
• Open the mouth by dropping the lower jaw away from the upper jaw. Keep the neck
free and relaxed.
• While doing all of the above mentioned, exhale on a nearly silent whispered ‘ah’
vowel until you run out of breath.
• Hold this position for as long as possible, let go and feel the air streaming into the
lungs filling them up, as a reflex-facilitated process (natural breathing).
• Repeat this 5-10 times before an examination or a concert if feeling nervous or
tense, until feeling more relaxed. Once the whispered ‘ah’ exercise is mastered in the
semi-supine position, it can be done sitting down or standing up.
Exercise 8.9.3: The whispered ‘ah’ exercise according to McEvenue (2001:96-97) that
can be done sitting down or standing up
• See out with the eyes open and alert.
• Free the neck by thinking of the freedom at the occipital joint, located at the top of
the spine, directly behind the uvula.
• Allow the tongue to relax and rest on the floor of the mouth.
• Place the tip of the tongue at ease behind the bottom front teeth.

8-40
• Check the jawbone adjacent to the earlobe and do not clench or hold the jaw shut.
The back molar teeth should not be touching.
• Check breathing.
• Smile when freeing the jaw to open the mouth. The tip of the tongue continues to
contact the lower teeth.
• Release a very gentle, soft ‘ah’ sound.
• Sustain the gentle ‘ah’ sound until you come to the end of your breath.
• Simply allow the lips to close gently.
• When closing the lips, sense how freely and easily the breath comes in through the
nose and into the body.
• Relax. Don’t rush this process. Breathe and repeat the steps.
• Observe how the soft palate opens as the jaw releases to create a more open space
at the back of the throat.
• Keep smiling.
• Maintain the freedom in the neck.
• Allow the breath to release at its own pace and rhythm.
• Don’t push the sound out.
• Are the ribs swinging freely?
• Do this 6-8 times.
Application of Lesson Nine
In this lesson the Alexander Technique’s infamous whispered ‘ah’ exercise was taught.
Since it is easier to learn it in the semi-supine position, the students were first taught how to
lie down in this position in Exercise 8.9.1. After being taught the process of lying down in the
semi-supine position, they were taught how to do the whispered ‘ah’ exercise (Exercise
8.9.2). This lesson is crucial in helping reduce performance anxiety.
8.10 Lesson Ten: Kinaesthetic awareness
Kinaesthesia means the perception of movement. The word kinaesthesia is derived from the
Greek words ‘kinema’, which means movement and ‘aesthesia’, which means perception
(Pearson 2002:20). Kinaesthetic awareness is sometimes referred to as the sixth sense.
8-41
Through kinaesthetic awareness one becomes aware of the body and how it moves.
Musicians move to produce sound; especially, instrumentalists need kinaesthetic awareness
to prevent injury to the body and to “determine the quality of movement, which determines
the quality of sound” (Conable 2000:41). Flute and violin players especially need to be
aware of how they ‘use’ their bodies, because of the unnatural unbalanced position required
for playing their instrument.
Most people have impaired kinaesthetic awareness due to years of mis-‘use’ of the body.
Because of this mis-‘use’ of the body, incorrect posture becomes a habit and starts to feel
natural. If a student learns to play the flute with incorrect posture, it could take a long time to
relearn the correct way, because of this impaired kinaesthetic awareness. The guidance of a
qualified teacher is needed in order to learn to become accurately aware of one’s body and
bodily movements until the level of kinaesthetic awareness has been improved.
The body has six sense receptors: Vision (the eyes), hearing (the ears), smell (the nose),
taste (the tongue), touch (the skin), and movement (the muscles and connective tissue).
Connective tissue consists of ligaments, tendons, and fascia (the membrane that covers the
muscles) (Pearson 2002:20).
Musicians use the following three brain functions when playing an instrument: the sensory,
the motor and the cognitive. The Alexander Technique teaches one to think (inhibit) before
performing an incorrect act that has become a habit. ”Bringing awareness to movement
begins its immediate improvement” (Conable 2000:40). Conable also refers to kinaesthetic
awareness as a ‘body map’ that the brain contains, which delineates structure, function and
size of movement. This ‘map’ governs any movement, and if it is inaccurate, the concomitant
habitual movement can be harmful. An inaccurate, inadequate body map can be corrected
with the right training with a qualified teacher, e.g. an Alexander Technique teacher. Where
the body map is accurate and adequate the movement is free, efficient, effective, expressive
and fluid.

8-42
Exercise 8.10.1: To experience how you can feel (through kinaesthetic awareness)
different body parts (Pearson 2002:20)
• Hold one hand above the head where it cannot be seen.
• You know it is there, even if you cannot see it.
• You know how big it is, where it moves and how it moves, and whether the
movement is free and fluid, or with stiffness.
There are sense receptors in all the muscles and connective tissues near the joints, called
proprioceptors. The kinaesthetic sense can be developed, and the better it is developed, the
clearer and more accurate the body map becomes. A well-developed kinaesthetic sense
can pick up small variations in balance, tension and movement, and in a musical sense,
even small variations in pitch, embouchure and tone quality. Usually a full, rich, free sound
is produced when movement is well supported and fluid; tight or rigid movements result in a
sound that lacks depth and the full range of tone colours.
To be able to develop a better kinaesthetic awareness while playing an instrument, one has
to develop an inclusive attention. Inclusive attention includes a myriad of things to do
simultaneously, like posture, tone production, rhythm, pitch, tempo, phrasing, articulation,
dynamics, style and interpretation. Musicians tend to be well trained in the auditory and
visual senses but usually lack good kinaesthetic awareness, which includes inclusive
attention. Inclusive attention allows awareness of as much information as possible of the
world around one at a specific moment, as well as using all the senses (Pearson 2002:20-
21).
Exercise 8.10.2: How to develop inclusive attention (Pearson 2002:22)
• Try concentrating on just one thing – a piece of music, for example – and blocking
out all other things. You may notice yourself feeling a little narrower.
• Open up your attention to everything around you as well – your other senses, how
you are sitting or standing, the room you are in, the building you are in or anybody
else that is in the room – you may feel a small release, an easing into a more
comfortable state. In this state you have more access to Primary Control and to the
use of your whole body.
8-43
• If you do this at least once a day for a week, you will begin to develop your inclusive
attention.
The opposite of inclusive attention is narrow attention. Narrow attention is when a person
only concentrates on one thing at a time, and this is not desirable for any instrumentalist. If a
musician is only aware of for example the page of music in front if him / her, the range of
movement is limited and tension is experienced in the upper body. This is especially bad for
flute players, as they need the upper body muscles to be free for easy breathing and finger
mobility. On the other hand, inclusive attention onstage during a performance includes
everything around the instrumentalist: stage lights, the audience, the conductor, the
orchestra or the accompanist, and moving the attention fluidly from the one to the other
without losing a sense of the whole. Inclusive attention can enhance a performance through
being aware of all the senses - touch, smell, sight, hearing, taste and movement; being
aware of pitch, intonation, tone, style, dynamics, phrasing, articulation, ensemble, notes,
rhythm, the floor, the lights, the audience, the people around you, how you stand, where the
music stand is situated, how many steps you are away from the stand, facial expressions,
and more. In a state of inclusive attention, one has better access to Primary Control and the
use of the whole body; this can reduce performance anxiety by showing specific ways to
keep muscles free from tension and to enhance support.
Application of Lesson Ten
Lesson Ten discussed the need for musicians to develop their kinaesthetic awareness.
Firstly the word kinaesthesia was discussed, including the origin of the word from the Greek
language. Kinaesthetic awareness is sometimes also referred to as the sixth sense or
intuition, and is an aspect which is crucial for ensemble playing. An exercise (Exercise
8.10.1) was included to show the students an example of kinaesthetic awareness. Inclusive
attention is a part of kinaesthetic awareness and needs to be developed in musicians in
order for them to become better performers.
8.11 Lesson Eleven: Stage fright A
De Alcantara (1997:262-266) lists the following short-term direct strategies to help combat
stage fright:

8-44
• Inner preparation
• The anticipation of stage fright
• The use of rituals
• Green room conduct.
Inner preparation
De Alcantara (1997:263) suggests that inner preparation will include psycho-physical
exercises in imagination and visualisation. You will have to imagine yourself as an
accomplished performer before becoming one.
Exercise 8.11.1: Inner preparation - in conjunction with the Alexander Technique (de
Alcantara 1997:263)
• Place yourself in a position of mechanical advantage (the monkey, the lunge or the
semi-supine position).
• Send upward and outward directions for the whole self.
• Carry on with these directions as you visualise, thereby creating a connection
between your good use and the images of a successful performance (use all the
common techniques for visualising: imagine yourself performing, imagine yourself as
a member of the audience watching you perform, imagine the audience’s pleasure in
your performance, and imagine yourself free from stage fright).
Anticipating stage fright
Exercise 8.11.2: Anticipating stage fright (de Alcantara 1997:264)
• Place yourself in a position of mechanical advantage, or pace the room, sit or stand
as you wish.
• Give your directions (as taught in Lesson One).
• Imagine yourself in a concert situation, suffering from stage fright: whatever the
symptoms you experience.

8-45
• Carry on visualising and renew your directions upward and outward.
• Think of the elasticity of your spine and the strength in your back and legs, the
looseness in your jaw and tongue, the natural expansion of your ribcage as you
breathe. In other words, think up, even as you imagine suffering from stage fright.
• Do this deliberately and conscientiously, well in advance of the examination or
concert. Do this every day, even though it may be a ‘painful’ experience.
De Alcantara (1997:264) states: “…the rewards of this discipline justify the effort. Two things
may well happen. First, your upward and outward directions slowly become more present
and powerful than your imagined stage fright, and end by overcoming it. Second, by the time
the concert occasion arrives, you will have spent all your capacity for fearing stage fright and
worrying about it”.
8.11.3 Rituals
Every person has his / her own personal rituals before a concert or examination, for
example cleaning and polishing the instrument, warming up or praying. There are two types
of rituals: ones that help the mind to concentrate and are beneficial, and ones that are
superstitious in nature and may increase the risk of greater stage fright. Useful rituals can
strengthen the purposes of self-discipline, and of finding inner strength to respond to this
extraordinary situation, whereas superstitious rituals are an attempt to escape from the risks
and responsibilities that you face when you go on stage, based on wishful thinking and not
on directing and inhibiting. Pre-concert rituals should be used not to focus the attention on
performing, but to acquire a heightened awareness of use, which will assist the
performance. Therefore focus on directions for use of the whole self. The difference
between concentration and awareness is that concentration is exclusive, focusing on one
thing, while awareness is total and excludes nothing. “A concentrated mind is not an
attentive mind, but a mind that is in a state of awareness can concentrate”. De Alcantara
suggests using pre-concert rituals to acquire a heightened awareness of ‘use’ which will
undeniably assist performing (de Alcantara 1997:265.)
8-46
8.11.4 Green room conduct
The ‘green room’ is a term well known to performers. It is the place where they wait their
entrance into examination room or to go onstage, and is associated with anxiety and tension
(Salmon and Meyer 1992:vii). The name green room is derived from the unlovely hue of
many performers’ faces before a concert / examination. Once you have succumbed to the
green room effect, it may be too late to be able to combat it. Nevertheless, apply the
Alexander Technique directions for use of the whole self up to the moment that you walk
into the examination room or onto the concert stage.
Many people think that the remedy for tension that causes stage fright is only relaxation.
However, this is a total misunderstanding of the nature of tension, and relaxation is definitely
not the only answer. Tension in the right proportion is needed for a vibrant, energetic and
lively performance. It is necessary, inevitable and desirable. A well co-ordinated performer is
not relaxed but collected, i.e. “possessed of calmness and composure often through
concentrated effort” (Mirriam-Webster’s Dictionary). The object should be not to eliminate
tension, but to harness and direct it. (de Alcantara 1997:266.)
Instead of doing relaxation and breathing exercises before going on stage, rather do a
series of vigorous monkeys, lunges and whispered ah’s. The whispered ‘ah’ exercise is not
a breathing exercise but a coordinative procedure, which only affects breathing indirectly.
For whispered ah’s to be effective in the green room, you have to give up the idea of
controlling breathing, or of using breathing to control your emotions. The working of your
Primary Control is paramount in this situation and should be worked at until the concert or
examination. (de Alcantara 1997:268.)
Application of Lesson Eleven
This lesson discussed short-term direct strategies to combat stage fright, including
• Inner preparation
• The anticipation of stage fright
• The use of rituals
• Green room conduct.

8-47
Exercise 8.11.1 dealt with inner preparation in conjunction with Alexander Technique
principles and Exercise 8.11.2 with anticipating stage fright.
The next subject discussed was the importance of rituals before an examination or a
concert, where students have to distinguish between rituals that help the mind to
concentrate and are beneficial, and superstitious rituals that may instigate greater stage
fright.
The green room conduct deals with the feelings of anxiety experienced in the ‘green room’,
the place where performers usually await their entrance onto the stage or into the
examination room. In all of the aspects discussed in this lesson, the bottom line is to focus
on directions for use of the self, rather than on deep breathing or other relaxation
techniques. In other words, Primary Control should be the point of focus, and not the anxiety
or tension itself.
8.12 Lesson Twelve: Stage fright B
Everyone who performs suffers to a greater or lesser degree from stage fright at some stage
in his or her life. It is important to discover the causes of stage fright and try to find a
permanent remedy for it. The following aspects can be the source of stage fright, and are
easily correctable:
1. When you have not practiced enough and do not know your work sufficiently.
2. When you have not done proper pre-examination / -concert preparation.
3. Unexpected circumstances during the performance.
These aspects are corrected in the following ways:
1. The first aspect is probably the easiest to cure; by practicing more for the next concert
and making sure that you know the piece very well.
2. The second aspect is also relatively easy to cure, by making sure that you do the
following things before an examination or concert (at least a week or more in advance):
• Get enough rest and sleep.

8-48
• Get enough physical exercise.
• Eat balanced meals.
• Reduce the intake of sugar, caffeine, alcohol and nicotine.
• Know the accompanist’s part as well as your part.
• Find a recording of the music, listen to it and play along with the recorded artist on
the CD.
• Mock recitals before an important performance are a good idea, for instance, play
your piece in front of family or friends, at school, club or church, as often as possible.
• Posture and stage presence are important factors, as one wants to look calm and
elegant when performing. Facial expression should be calm and serene. Stand very
poised, the way you have learned through the Alexander Technique.
• Practise the pieces only slowly, especially the difficult parts.
• Mentally picture the performance as if you have done it a hundred times before.
On the day of the examination / concert:
• Arrive at the venue well in advance of the performance, and if time permits, have a
quick run through one or two pieces or parts of pieces.
• Make sure that you have all your books, the necessary copies of the music for the
examiner / adjudicator, your instrument, a music stand and anything else that you
might need.
• Warm up properly before entering the venue.
• Avoid a heavy meal right before the concert or examination.
• Minimise the intake of sugar, caffeine, alcohol and nicotine.
• Wear comfortable shoes and clothing.
• Take time to tune your instrument properly before playing.
• Play whole-heartedly and look forward to sharing your interpretation of the music
with everyone in the room.
• Trust your ‘automatic pilot’ to do the work for you.
• Do not judge yourself if you made a mistake; only observe and motivate.
• Do not second-guess any audience member’s reaction.
• Feel the music; become one with the music.
• Most important, enjoy!

8-49
3. All the above elements play a role in reducing stress before and during a concert. The
third aspect, abnormal circumstances during the performance, can also play a role in
aggravating stage fright. Examples are:
• A flickering light.
• A squeaking floor.
• A draft
• A person coughing in the audience.
• A storm with thunder and lightning.
One should try to include unnatural circumstances in one’s daily practice to get used to not
being distracted easily. Practise in front of family or friends as often as possible. The more
you practice doing the Alexander Technique in your everyday life, the less the stage fright
will become.
Application of Lesson Twelve
Lesson Twelve dealt with three more practical aspects that can be the root of performance
anxiety: insufficient practice, insufficient pre-concert / examination preparation, and
abnormal circumstances during performance. A number of practical solutions to these
problems were identified. It is the matter of abnormal circumstances during performance that
is the most difficult to solve. To include unnatural circumstances in the practice sessions will
help a student to learn to cope with distraction. Then, if anything out of the ordinary happens
during an examination or performance, one will be better prepared to control it.
The lessons in the next part of this chapter are printed exactly as they were handed out to
the six students in the experimental group. Quotations are in 1 ½ spacing for the students’
ease of reading. The lessons were compiled as follows:
1 9-
9 Summary, conclusions and recommendations
9.1 Summary
This research took longer than anticipated, but the extra time was necessary for the
integration of my own learning process of the Alexander Technique principles and the
application of it to my own flute playing, and then teaching what I have learnt to my students
took longer than expected.
The Research questions asked, “Is it possible to substantially reduce performance anxiety
(stage fright) in instrumental playing by implementing the Alexander Technique principles?
The tests carried out using the experimental and control groups demonstrate that the
implementation of Alexander Technique principles can definitely diminish performance
anxiety, but it is a slow cure and students should be given time to be re-educated. It is time
consuming to unlearn years of bad habits and use, and to be re-educated. It is not something
that can be learnt and mastered in a few days or weeks, but rather takes many months or
even years to perfect. The concept that it should become a lifestyle and that it is not
applicable only to the playing of an instrument, were not easily grasped by all the students. It
would have been better for them to attend individual Alexander Technique classes, away
from their instruments and music lessons, in order to fully grasp that every aspect of life,
whether moving or static, can be positively affected and changed.
My own experience of the Technique was that it is a life changing experience and both my
own and my students’ playing improved remarkably in a relatively short period of time. I
waited with eager anticipation to ascertain whether it helped the students cope and reduce
their performance anxiety. The final performance when they would be tested for the second
time was going to be an examination. The students did not know that they were going to be
tested. The second testing was done in the form of second a questionnaire, slightly different
from the first, combined with a personal interview.
Before the examination they were each given the second questionnaire to complete in my
presence, and straight after the examination again, to make sure they did not miss any
symptoms that they experienced, and to adjust their answers if needed. I interviewed them to
ascertain whether the questionnaire had been filled in correctly, in case they were confused
due to the stressful situation induced by the examination.

2 9-
While only five of the six students of the experimental group actively reported that they had
“applied the Alexander Technique”, the sixth student admitted that in her performances she
had “balanced her head” and played with “slightly bent knees” - both fundamental elements
of the Alexander Technique principles. All these students were amazed at how much more
in control of the examination situation they felt. Although most of them still had a feeling of
excitement, and had experienced a certain degree of anxiety - which is quite natural for most
performers - they realized that they were not as anxious and stressed as they had been
previously.
A number of students stated that they were relatively calm and in control, while the others
still experienced performance anxiety, but on a lower level than previously experienced.
Statistically, all students in the experimental group reported that they felt “less nervous”. The
degree and level of anxiety were still different for the each student. Sixteen of the listed
twenty-three symptoms had been, on average, reduced since the first examination – many
significantly.
Importantly, all the students in the experimental group obtained manifestly higher marks than
previously (although the degree varied from student to student), whereas the marks of all the
students in the control group were very similar to those in their previous examination.
Qualified Alexander teachers spend years training and are more experienced than I am. Had
the students been able to experience Alexander Technique classes from a registered
Alexander teacher, the results would probably have been even better and achieved sooner.
In my opinion as a professional flautist and flute teacher, the Alexander Technique has
amazing results on individuals’ lives and if they are musicians, on the playing of their
instruments. It not only reduces performance anxiety in students, but helps builds self-
esteem and confidence, especially in adolescent students that feel uncomfortable about the
changes in their bodies, including hormonal changes with corresponding emotional changes.
9.2 Conclusions
The conclusion that can be drawn from this study is that the Alexander Technique cannot
cure performance anxiety completely, but can diminish it remarkably. Most of the students’
anxiety levels dropped significantly after the principles were applied in their lessons. The
students that were committed to learning and applying the Technique’s principles, and willing
to exchange their bad habits for better more efficient ones, exhibited even less anxiety than
the one’s who were not as fully committed.

3 9-
One of the research sub-questions posed the question whether or not other disciplines might
exist that successfully address performance anxiety. My research has pinpointed, listed and
investigated a number of these that may be useful to a woodwind teacher. My conclusion
would be that, in the absence of the availability of an acknowledged Alexander teacher, one
(or more?) of these disciplines might well be investigated by the teacher concerned.
9.3 Recommendations
The students involved in this research gained much from learning Alexander Technique
principles, even though I am not a qualified Alexander teacher. However, in my opinion, had
they had individual Alexander lessons with a qualified teacher, their performance anxiety
might even have been eradicated. I would thus recommend that, wherever possible,
woodwind students follow this route.
I shall continue to implement, with the existing students of the experimental group, the
principles that we have been working on in the respective students’ lessons, and definitely
involve, to a greater or lesser extent (depending on each student's situation and perspective),
all my other students as well. It is recommended that other teachers of woodwind
instruments do likewise. It is further recommended that teachers investigate the Alexander
Technique, taking classes wherever possible, inculcate the principles into their teaching
methods, and implement Alexander Technique principles in their lessons.

S-1
SOURCES
Abel, J.L. & Larkin, K.T. 1990. Anticipation of Performance Among Musicians: Physiological
Arousal, confidence and State Anxiety. Psychology of Music, 18: 171-182.
Alexander, F. M. 1932. The Use of Self. London: Gollancz.
Alexander, F.M. 1996. Man’s Supreme Inheritance (1910). London: Mouritz.
Alexander, F.M. 1997. Constructive Conscious Control of the Individual (1923). London: Mouritz.
Alexander, F.M. 2000. The Universal Constant in Living (1941). London: Mouritz.
Arnold, J. 2004. Poise in Performance: Alexander Technique for Musicians.
www.alexandertechnique.com/articles/musicians/ [Accessed 2007/12/30].
Arnold, J. n.d. The Alexander Technique.
www.alexandertechnique.com/at/ [Accessed 2005/03/11].
Austin J.H. and Ausubel, P. 1992. Enhanced Respiratory Muscular Function in Normal Adults
After Lessons in Proprioceptive Education Without Exercises. Chest, 102(2): 486-490.
Barlow, W. 1956. Postural deformity. Proceedings Royal Social Med, 49: 670-674.
Barlow, W. 1991. The Alexander Principle. London: Victor Gollancz.
Barry, J. 2008. Panic Away: Free your life from Panic Attacks.
www.panicaway.com [Accessed 2008/03/16].
Ben-Or, N. 1995. The Alexander Technique. In: Tensions in the Performance of Music, C.
Grindea (ed.). London: Kahn and Averill.
Billington, R.D. 2000. A Description and Application of Robert Aitken's Concept of the Physical
Flute. Doctoral Essay. www.rdbflute.com [Accessed 2007-08-16].

S-2
Bosch, A.J. & Hinch, J. 1999. The Application of the Alexander Technique to Flute Teaching:
Two Case Studies. British Journal of Music Education, 16(3): 245-251.
Cacciatore, T.W., Horak, F.B. and Henry, S.M. 2005. Improvement in Automatic Postural
Coordination Following Alexander Technique Lessons in a Person With Lower Back Pain.
Physical Therapy, June 2005, 85, (6): 565-578.
Chance, J. 2001. The Alexander Technique. London: Thorsons.
Chance, J. 2004. The Alexander Technique.
www.alexandertechnique.com/articles/chance/ [Accessed 2005/03/11].
Conable, B. & Conable B. 2000. What every Musician Needs To Know About The Body.
Portland: Andover Press.
de Alcantara, P. 1997. Indirect Procedures: A Musician’s Guide to the Alexander Technique.
Oxford: Clarendon Press.
de Alcantara, P. 1999. The Alexander Technique. A Skill for Life. Ramsbury: The Crowood
Press.
de Alcantara, P. n.d. Forward and Up: An Introduction to the Alexander Technique.
www.pedrodealcantara.com/forward_body.htm [Accessed 2005/12/16].
Dias, G. 2006. Breathing, mother of rhythm.
www.bodyandmind-at.nl [Accessed 2007/06/26].
Doyle, J. 1984. The Task of the Violinist: Skill, Stress and the Alexander Technique. PhD Thesis,
University of Lancaster.
Ely, M.C. 1991. Stop Performance Anxiety. Music Educators Journal, October, (78)2: 35-40.

S-3
Fischer, J.M.O. 2001. Introduction to the Mouritz Selection of Key Concept Quotations.
www.mouritz.co.uk/6.00.Quotations.index.html [Accessed 2005/10/06].
Floyd, A.S. 1990. The Gilbert Legacy. Methods, Exercises and Techniques for the Flutist.
Winzer Press: Iowa.
Galamian, I. 1985. Principles of Violin Playing and Teaching. Second edition. Englewood Cliffs,
NJ: Prentice-Hall.
Gelb, M. 1994. Body Learning: An Introduction to the Alexander Technique. London: Aurum
Press.
Graf, P-L. 1992. Flute Check-Up. Frankfurt: Schott.
Green, B. and Gallwey, T. 1986. The Inner Game of Music. London: Pan Macmillan.
Goldberg, M. 2007. The F.M. Alexander Technique.
www.alexandercenter.com/#1Anchor [Accessed 2008/01/07].
Gruner, W. 1995. Voice Production and Body Coordination. In: Tensions in the Performance of
Music, C. Grindea (ed.). London: Kahn and Averill.
Hodgkinson, L. 1988. The Alexander Technique. London: Judy Piatkus Publishers.
Jacobson, E. 1929. Progressive Relaxation. Chicago: Univ. of Chicago Press.
James, I. 1994. When the Music has to Stop. The Lancet, September, 334(8923): 631-632.
Jonás, A. 1999. Nervousness in Piano Playing. In: Great Pianists on Piano Playing, J.F. Cooke
(ed.). New York: Dover Publications.
Jones, F.P. 1972. Voice Production as a Function of Head Balance in Singers. Psychology, 82:
209-215.

S-4
Jones, F.P. 1976. A Study of the Alexander Technique: Body Awareness in Action. New York:
Schocken Books.
Kalka, S. F. 2005. Using the Alexander Technique. Flute Talk, 24(8): 25.
Kettrick, C. 1992. “I’ve had my first Alexander lesson – what do I do now?”
www.ati-net.com/orphans/kettrick2.php [Accessed 2006/06/19].
King, H. n.d. Alexander Technique Glossary of Terms.
(www.hilaryking.net/glossary/ [Accessed 2007/12/29].
Kirchner, J. 2004. Managing Musical Performance Anxiety. American Music Teacher, December
/ January, 54(3): 31-33.
Langford, E. 1999. Mind and Muscle - An Owner’s Handbook. Leuven / Apeldoorn: Garant.
Liston, M., Frost, A.A.M. and Mohr, P.B. 2003. The Prediction of Musical Performance Anxiety.
Medical Problems of Performing Artists, 18 (3): 120-125.
Louw, M. 2005. Exploring Parallels: the new approach and the Alexander Technique. Suid-
Afrikaanse Musiekonderwyser, November 2005, 142: 14-15.
Macdonald, G. 1994. The Alexander Technique. London: Harper and Collins.
Macdonald, P. 2001. The Alexander Technique as I See It. Brighton: Rahula Books.
Mackie, V. 1990. The Alexander Technique and the Professional Musician.
www.alexandertechnique.com/articles/mackie/ [Accessed 2007/07/04].
McEvenue, K. 2001. The Actor and the Alexander Technique. New York: Palgrave Macmillan.
Maisel, E. 1974. The Resurrection of the body: The Essential Writings of F. Matthias Alexander.
New York: Dell Publishing Company.
S-5
Malan, L. 2006. Die invloed van die Alexandertegniek op die kardiovaskulêre gesondheid van
musiekstudente. South African Music Teacher. May 2006, 143: 23-24.
Marchant-Haycox, S.E. and Wilson, G.D. 1992. Personality and Stress in Performing Artists.
Personality and Individual Differences, 13: 1061-1068.
Mencimer, S. 2003. Tuba Lips, Guitar Nipples and other Musical Maladies.
www.washingtonpost.com/ac2/wp-dyn [Accessed 2005/07/25].
Messmer, J. 1998. Muscle Type and Innervation of the Diaphragm.
http://chanteur.net/contribu/cJMdiaph.htm [Accessed 2008-03-04].
Mirriam-Webster’s Dictionary. http://mw1.merriam-webster.com/. [Accessed 2007/09/09].
Mor, S., Day, H. and Flett, G. 1995. Perfectionism, control, and components of performance
anxiety in professional artists. Cognitive Therapy and Research, 19 (2): 207-225.
Mouton, J. 2001. How to Succeed in Your Master’s and Doctoral Studies: A South African Guide
and Resource Book. Pretoria: Van Schaik Publishers.
Moyse, M. 1934. De la Sonorité: Art et Technique. Paris: Alphonse Leduc.
Muller, A-M. 2001. Verhoogvrees by Blaasinstrumentspelers: Oorsake en Oplossings. B. Mus
Hons Dissertation, University of Pretoria, Pretoria.
Nicholls, J. and Nichols, L. 1983. The Alexander Technique: The semi-supine position. Pamphlet
published by Nanette Andersen, Fairwood, Johannesburg.
O’Connor, J. and McDermot, I. 2001. NLP. London: Harper & Collins.
Pearson, L. 2002. Bodymapping for Flutists. Columbus: Flutibia.
Petrovich, A. 2003. Performance Anxiety: How Teachers can help. American Music Teacher,
December, 53(3): 24-28.

S-6
Putnik, E. 1970. The Art of Flute Playing. USA: Warner Bros. Publications.
Reubart, D. 1985. Anxiety and Musical Performance. New York: Da Capo Press.
Rickover, R. n.d. What’s the use?
www.alexandertechnique.com/ats/use/ [Accessed 2007-08-15].
Robinson, L. and Garlick, D. 1985. Comparison of Respiratory Movements and Frequencies in
Normal and Trained Subjects. Proceedings of the Australian Physiology and Pharmceutical
Society, 16: 256.
Rockstro. R. 1967. A Treatise on The Flute. London: Musica Rara.
Roget’s Thesaurus. 2002. London: Penguin Books.
Rolf, I.P. 1978. Rolfing: The Integration of Human Structures. New York: Harper & Row.
Rootberg, R. 2005. The Alexander Technique in Tertiary Education. Suid-Afrikaanse
Musiekonderwyser, 142: 16-18.
Salmon, P.G. 1990. A psychological perspective on music performance anxiety: a review of the
literature. Medical Problems of Performing Artists, 5: 3.
Salmon, P. and Meyer, G. 1992. Notes from the Green Room: Coping with Stress and Anxiety in
Musical Performance. New York: Lexington Books.
Schonbeck, J. 2005. Psychotherapy.
http://www.healthline.com/galecontent/psychotherapy [Accessed 2008-03-05].
Stein, C.J. 1996. To Schlep or not to Schlep: Alexander Technique Guidelines for Music
Performance Teachers.
www.bodymap.org/articles/artyschlepstein.html [Accessed 2006/03/15].
S-7
Steptoe, A. 1982. Performance Anxiety. Recent developments in its Analyses and Management.
Musical Times, August, 132(1674): 537-541.
Struckenschmidt, F. 1970. Ferrucio Busoni: A Chronicle of a European. Translated by Sandra
Morris. London: Calder and Boyars.
Taffanel, P. and Gaubert, P. 1958. Methodé complête de Flûte. Paris: Alphonse Leduc.
Thomas, N.J.T. 1997. Mental Imagery.
http://plato.stanford.edu/entries/mental-imagery/ [Accessed 2008/02/02].
Toff, N. 1985. The Flute Book. New York: Charles Schribner’s Sons.
Valentine, E. 2002. The fear of Performance. In: Musical Performance: A Guide to
Understanding, J. Rink (ed.). New York: Cambridge University Press.
West, R. 2004. Drugs and Musical Performance. In: Musical Excellence: Strategies and
techniques to enhance performance, A. Williamon (ed.). New York: Oxford University Press.
Wheelhouse, F. and Smithford, K.S. 2001. Dart: Scientist and Man of Grit. Australia:
Transpareon Press.
Williamon, A. 2004. Musical Excellence: Strategies and Techniques. New York: Oxford
University Press.
Wilson, G.D. 1997. Performance Anxiety. Social Psychology of Music. New York: Oxford
University Press.
Wilson, G.D. and Roland, D. 2002. Performance Anxiety. In: The Science and Psychology of
Music Performanc, R. Parncut and G.E. McPherson (eds.). New York: Oxford University Press.
Workman, D. 1999. The Roadblock for Auditions: Stage Fright. Percussive Notes, August, 37(4):
50-55.

S-8
Zaza, C. 1997. Playing related musculoskeletal disorders in musicians: a systematic review of
incidence and prevalence.
www.pubmedcentral.nih.gov/picrender.fcgi?artid=1229223&blobtype=pdf
[Accessed 2008/02/17].
www.3Dmedical.com [Accessed 2006/04/10].
www.alexandertechnique.com/at.htm [Accessed 2007/11/09].
www.alexandertechnique.com/musicians.htm [Accessed 2006/03/23].
www.ati-net.com/ati-alex.htm [Accessed 2008/03/30].
www.energeticself.com/HowItWorks.htm [Accessed 2007/12/20].
www.feldenkrais.nlpinformation.com/ [Accessed 2007/03/03}.
www.minddisorders.com/Py-Z/Systematic-desensitization.html [Accessed 2007/07/09].
www.nlm.nih.gov/medlineplus/encyclopedia.html [Accessed 2006/07/15].
www.pedrodealcantara.com/forward_body.htm [Accessed 2007/09/11].
www.pilates.com/pilatesfitness.html [Accessed 2007/09/27].
www.pilates.co.za/whatispilates.htm [Accessed 2007/09/27].
www.stat.org.uk/pages/overviewpage.htm [Accessed 2006/07/24].
Additional recommended bibliography
Anderson, R.K. 1980. Piano Technique: Piano Playing Based on the Principles of F.M.
Alexander. Musical Times, 121(1650): 502-503.

S-9
Arnold, J. n.d. Frequently Asked Questions.
www.alexandertech.org/misc/faq.html [Accessed 2005/03/17].
Barrett, C.E. n.d. Using Body Mapping Techniques in Middle School Orchestra Class.
www.bodymap.org/articles/artsmmid.html [Accessed 2005/03/15].
Bosanquet, R.C. 1987. The Alexander Principle and its Importance to Music Education. British
Journal of Music Education, November 1987, 4(3): 229-242.
Bosch, A.J. 1997. The Use of the Alexander Technique in The Improvement of Flute Tone.
M.Mus Dissertation, University of Pretoria, Pretoria.
Brennan, R. 2004. What is the Alexander Technique?
www.alexandertechnique.com/articles/brennan/ [Accessed 2005/03/11].
Cole, G. 1978. Music and tension. Musical Times, October, 119(1628): 861-862.
Conable, B. n.d. What to do about Performance Anxiety.
www.bodymap.org/articles/artperformanceanxiety.html [Accessed 2005/03/15].
Conable, W. n.d. Origins and Theory of Body Mapping.
www.bodymap.org/articles/artmaporigins.html [Accessed 2005/03/15].
Dewey, J. 1932. Introduction to The Use of the Self by F.M. Alexander.
www.alexandercenter.com/jd/johndeweyus.html [Accessed 2006/10/04].
Engel, F. 2004. The Alexander Technique: What it is.
www.alexandertechnique.com/articles/engel/ [Accessed 2005/03/11].
Epstein, D. 1995. Shaping Time: Music, the Brain and Performance. New York: Schirmer Books.
Feitis, R. 1978. Ida Rolf Talks about Rolfing and Physical reality. New York: Harper & Row.
S-10
Furstenau, D. 1992. Body Centered Learning. Fluting and Dancing: Articles and Reminiscences
for Betty Bang Mather on her 65th Birthday. New York: McGinnis & Marx.
Galatas, R.A. 1989. Stage Fright: A Survey of Techniques in Imagery Training for the Treatment
of Musical Performance Anxiety. Doctoral Thesis, University of Miami.
Galway, J. 1982. The Flute. London: Kahn & Averill.
Gratto, S.D. 1998. The Effectiveness of an Audition Anxiety Workshop in Reducing Stress.
Medical Problems of Performing Artists, March, 13(1): 29-34.
Green, D. 2001. Audition Success. New York: Routledge.
Green, D. 2002. Performance success: Performing your best under pressure. New York:
Routledge.
Grossman, D.T. n.d. What Every Musician Needs to Know.
www.bodymap.org/articles/artwem.html [Accessed 2006/03/15].
Haid, K. 1999. Coping with Performance Anxiety. Teaching Music, August, 7(1): 40.
Havas, K. 1973. Stage Fright: Its Causes and Cures. London: Bosworth.
Iammatteo, E. 1996. The Alexander Technique: Improving Balance. Performing Arts and
Entertainment in Canada, Fall, 30(3): 37.
Jay, D. n.d. The Alexander Technique for Musicians: Playing in the Key of Ease.
www.alexandertech.org/misc/musician.html [Accessed 2005/03/17].
Jones, F. P. 2004. A Technique for Musicians. Part 1: Awareness, Freedom and Muscular
Control.
www.alexandertechnique.com/articles/jones2/ [Accessed 2006/05/14].

S-11
Jones, F.P. The Alexander Technique: A Lecture given by Frank Pierce Jones at the Indiana
University School of Music.
www.alexandertechnique.com/articles/jones1/ [Accessed 2006/05/14].
Kalka, S.F. 2007. Teaching Flute Lessons with Alexander Principles, an excerpt from Stephanie
Kalka’s Final Paper.
www.energeticself.com/articles.htm [Accessed 2007-07-04].
Karp, D. 1988. Understanding Performance Anxiety. Clavier, XXVII (1): 16-19.
Kiefer, S. 2002. Origins and history of the Alexander Technique.
www.stat.org.uk/pages/overviewpage.htm [Accessed 2005/07/25].
LeBlanc, A. A. 1994. A Theory of Musical Performance Anxiety. The Quarterly Journal of Music
Teaching and Learning, Winter, 5(4): 60-68.
Leedy, P.D. & Ormrod, J.E. 2001. Practical Research Planning and Design. Seventh Edition.
Upper Saddle River: Merrill Prentice Hall.
Likar, A. n.d. Understanding Musicians as Movers: Body Mapping for Musicians and Music
Educators.
www.bodymap.org/articles/artmusmovers.html [Accessed 2006/03/15].
Macdonald, G. 2002. Illustrated Elements of the Alexander technique. London: Harper and
Collins.
Mackie, V. 1987. Just Play Naturally. (Video).
Munro, M. 2005. How We Move. South African Music Teacher, November, 142: 23-24.
Nesmith, D. 2001. How Bodymapping and the Alexander Technique will improve your playing.
www.bodymap.org/articles/artbodymapalextech.html [Accessed 2006/03/15].
Nesmith, D. 2002. What Every Musician Needs to Know About the Body.

S-12
www.bodymap.org/articles/artwemhc.html [Accessed 2006/03/15].
Nichols, T.R. 2004. Scientific Basis of Body Mapping.
www.bodymap.org/articles/artscientificbasis.html [Accessed 2006/03/15].
Nideffer, R.M. & Hessler, N.D. 1978. Controlling Performance Anxiety. College Music
Symposium, Spring, XVIII (1): 148-154.
N.F.A., Inc. 1998. The Flutist’s Handbook: A Pedagogy Anthology. National Flute Association.
Parncutt, R. & McPherson, G.E. 2002. The Science and Psychology of Music Performance. New
York: Oxford University Press.
Reitman, A.D. 2001. The Effects of Music-Assisted Coping Systematic Desensitization on
Musical Performance Anxiety. Medical Problems of Performing Artists, September, 16(3): 115-
125.
Rickover, R. 2004. Some Misconceptions about the Alexander Technique.
www.alexandertechnique.com/articles/misconceptions/ [Accessed 2005/03/11].
Stein, C. J. n.d. The Alexander Technique for Musicians.
www.alexandertechnique.com/articles/stein/ [Accessed 2006/05/14].
Sumera, M. n.d. The Healing Power of Music.
www.bodymap.org/articles/arthealingpower.html [Accessed 2006/03/15].
Valentine, E., Fitzgerald, D.F.P., Gorton, T.L., Hudson, J.A. & Symonds, E.R.C. 1995. The Effect
of Lessons in the Alexander Technique on Musical performance in High and Low Stress
Situations. Psychology of Music, 23(2): 129-141.
Westby, D.L. 1960. The Career Experience of the Symphony Musician. Social Forces, March,
38(3): 223-230.
What is the Alexander Technique?

S-13
www.alexandertech.org/misc/whatisat.html [Accessed 2005/03/17].
What is the Alexander Technique? What are the benefits of Lessons or Classes?
www.alexandertechnique.com/at.htm [Accessed 2005/03/11].
Wye, T. 1999. Practice Books for the Flute. Omnibus Edition. London: Novello.
Related Documents