Redis Labs Enterprise Cluster Documentation Version 4.2.1-30 – September 21, 2015

Welcome message from author
This document is posted to help you gain knowledge. Please leave a comment to let me know what you think about it! Share it to your friends and learn new things together.
Transcript
Redis Labs Enterprise Cluster
Documentation
Version 4.2.1-30 – September 21, 2015

Copyright© 2015 Redis Labs Ltd. All rights reserved.
No part of this publication may be reproduced, stored in a retrieval system or transmitted in any form
by any means, electronic, mechanical, photocopying, recording or otherwise without the prior written
permission of Redis Labs Ltd.
Redis Labs Ltd. reserves the right to change or improve its products and accompanying technical
literature without specific notice of changes or improvements.
Redis Labs Enterprise Cluster Documentation Page 1
Table of Contents
Overview ....................................................................................................................................................... 4
The technology behind RLEC ................................................................................................................ 5
Installing and Upgrading ............................................................................................................................... 8
Hardware and software requirements ....................................................................................................... 8
Accessing and installing the setup package............................................................................................ 10
Uninstalling .............................................................................................................................................. 11
Upgrading ................................................................................................................................................ 11
Initial setup – creating a new cluster ........................................................................................................... 13
How to set the cluster name (FQDN) ...................................................................................................... 14
Cluster Administration ................................................................................................................................. 16
Joining a new node to a cluster ............................................................................................................... 16
Replacing a faulty node ........................................................................................................................... 17
Removing a node .................................................................................................................................... 17
Taking a node offline............................................................................................................................ 17
Permanently removing a node ............................................................................................................. 18
Replacing a faulty node ....................................................................................................................... 18
Replacing a healthy node .................................................................................................................... 18
Rebalancing nodes .................................................................................................................................. 19
Viewing and defining cluster settings ...................................................................................................... 19
Managing general settings ................................................................................................................... 19
Managing users ................................................................................................................................... 20
Managing cluster alerts ........................................................................................................................ 21
Viewing cluster metrics ............................................................................................................................ 21
Viewing node metrics .............................................................................................................................. 21
Viewing the log ........................................................................................................................................ 22
Best practices .......................................................................................................................................... 22
Configuration of AWS instances .......................................................................................................... 22
Using a single DNS server ................................................................................................................... 23
Persistent and ephemeral storage ....................................................................................................... 23
Disk size requirements for extreme write scenarios ............................................................................ 23
Synchronizing cluster server clocks to Network Time Protocol (NTP) ................................................ 24
Updating web server SSL certificates .................................................................................................. 24
Performance optimization .................................................................................................................... 24
Redis Labs Enterprise Cluster Documentation Page 2
Machine ports configuration ................................................................................................................. 25
CentOS / RHEL 7 firewall configuration............................................................................................... 26
Client prerequisites for mDNS ............................................................................................................. 26
Multi-IP & IPv6 support ........................................................................................................................ 27
Database configuration ............................................................................................................................... 29
Creating a new database......................................................................................................................... 29
Database memory limit ............................................................................................................................ 30
Database replication ................................................................................................................................ 31
Database persistence .............................................................................................................................. 31
Database clustering ................................................................................................................................. 31
Database eviction policy .......................................................................................................................... 34
Replica of ................................................................................................................................................. 35
Database backup ..................................................................................................................................... 38
Periodic backup ................................................................................................................................... 38
Ad-hoc backup - Export ....................................................................................................................... 38
Backup of a sharded database ............................................................................................................ 38
Database alerts ....................................................................................................................................... 38
Importing data to a database ................................................................................................................... 39
Exporting data from a database .............................................................................................................. 39
Updating database configuration ............................................................................................................. 40
Deleting a database ................................................................................................................................. 40
Viewing database metrics........................................................................................................................ 40
Database metrics ................................................................................................................................. 40
Shard metrics ....................................................................................................................................... 41
Viewing Redis Slow Log .......................................................................................................................... 41
Rack-zone awareness ................................................................................................................................. 44
rladmin Command Line Interface (CLI) ....................................................................................................... 45
System architecture .................................................................................................................................... 46
Node ........................................................................................................................................................ 47
RLEC compatibility ...................................................................................................................................... 49
Compatibility with open source Redis ..................................................................................................... 49
Compatibility with open source Redis Cluster ......................................................................................... 50
FAQs ........................................................................................................................................................... 51
I use open source Redis. Why should I switch to RLEC? ....................................................................... 51
What happens when my database fills up? ............................................................................................. 51

Redis Labs Enterprise Cluster Documentation Page 3
Can I keep my data safe and always available? ..................................................................................... 51
What am I allowed to do with the free version?....................................................................................... 51
What do you mean by the term Shard? ................................................................................................... 51
How many Redis databases can I create and manage? ......................................................................... 52
What client can I use to connect to the databases in RLEC? ................................................................. 52
Why should I care about Memcached reliability since it is just a cache? ................................................ 52
What are the RLEC payment schedule and terms? ................................................................................ 52
Troubleshooting .......................................................................................................................................... 53
Network configuration .............................................................................................................................. 53
Installation in environments with no Internet connection ......................................................................... 53
Replica of repeatedly fails ....................................................................................................................... 53
Database metrics are blank during resharding........................................................................................ 54
Creating a support package .................................................................................................................... 54
Subscription agreement .............................................................................................................................. 55
Release notes ............................................................................................................................................. 56
4.2.1-30 – September 21, 2015 ........................................................................................................... 56
4.0.0-30 – May 20, 2015 ...................................................................................................................... 58
0.99.5-24 - February 15, 2015 ............................................................................................................. 60
0.99.5-11 - January 5, 2015 ................................................................................................................. 61
Redis Labs Enterprise Cluster Documentation Page 4
Overview
What is Redis Labs Enterprise Cluster (RLEC)?
Redis Labs Enterprise Cluster (RLEC) enables you to install an enterprise-grade cluster that acts as a
container for managing and running multiple Redis databases in a highly available and scalable
manner, with predictable and stable top performance.
RLEC is based on the proven technology behind the Redis Cloud offering, already used by
thousands of customers.
You can install RLEC in your environment of choice, whether in an on-premises data-center or your
preferred cloud platform, giving you full control of your data and configuration.
What does RLEC enable?
RLEC’s architecture supports multiple databases created by multiple users across the same cluster
infrastructure while keeping the databases completely isolated from one another.
In addition, RLEC gives you the flexibility to run your Redis database in multiple configurations to
accommodate your specific performance and availability needs.
Each such Redis database can separately conform to one of the following deployment templates:
Standalone (a single master Redis server)
Highly-available (a single master with a single slave)
Cluster (multiple master shards)
Highly-available cluster (multiple master and slave shards)
RLEC avoids the "noisy neighbor" phenomenon (common in virtualized or dockerized environments)
by constantly monitoring every shard in the cluster. When a shard exhibits abnormal performance,
RLEC will automatically migrate it to an isolated and less-burdened node in the cluster.
Features Seamless scalability
With RLEC, a dataset can grow beyond the largest node in the cluster and be processed by any
number of cores. By creating a Redis cluster and sharding your dataset across multiple nodes (using
a sharding policy of choice), RLEC overcomes the memory limitations of a single node and the
performance limitations of a single core. Dynamic scaling is easy; you can increase your dataset’s
maximum size by simply changing the memory limit setting, or increase the number of shards with the
click of a button. Scaling, upgrades and downgrades do not incur any downtime.
True high-availability
In addition to replicating a database within the same data-center, one can also replicate a dataset
across data-centers and across regions, to achieve high-availability, disaster recovery and
performance benefits. If a node fails, the data is seamlessly served from a replacement node in the
cluster – without human intervention. RLEC technology is capable of automatically handling node
failures, OSS Redis failures and proxy failures. Auto-failover is carried out in a matter of a few
seconds.

Redis Labs Enterprise Cluster Documentation Page 5
Built-in data persistence, backups and replication RLEC enables the use of Redis AOF (Append Only File) every second, or snapshots of your dataset
every 1, 6 or 12 hours to persistent storage. In addition, you can back up your dataset periodically or
ad-hoc to an FTP server or to AWS S3. Other cloud storage options, such as Azure Geo-Redundant
Storage, SoftLayer Object Storage and Google Cloud Storage will be added in a future release.
Predictable high-performance Datasets are processed by multiple cores to guarantee the best performance. In addition, RLEC uses
advanced mechanisms to guarantee high-performance, even during intensive disk-access scenarios.
It employs a real-time migration mechanism to isolate high-load databases from other databases
running on the same node.
Multiple dedicated databases You can run multiple databases over a single RLEC deployment, each running in a dedicated process
and in a non-blocking manner.
Unlimited database connections Use as many database connections as you want.
Full-featured management UI RLEC provides a full-featured and easy-to-use management user interface (UI) for setting up,
configuring and monitoring the cluster and each database. In addition, RLEC provides configurable
alert notifications for important events at the single database level as well as the cluster level.
Cluster automation RLEC’s fully-managed solution takes care of all your database scaling, data-persistence tuning,
shards migration and auto-failover needs.
24/7 support Paying customers enjoy our premium 24/7 support via Redis Labs’ online or phone helpdesk.
The technology behind RLEC
RLEC’s unique and patented technology was developed to meet these main objectives:
Decouple data-path from cluster management
Ensure consistent top performance
Simplify and automate operations
Decouple data-path from cluster management
RLEC’s architecture completely decouples the data path from the cluster management in order to optimize the operations of each.
Redis Labs Enterprise Cluster Documentation Page 6
Data-path
The data path is based on multiple zero-latency, multi-threaded proxies that reside on each of the
cluster's nodes to mask the system’s underlying complexity. This model supports multiple proxies per
Redis database and permits the use of any regular or cluster-aware Redis client. This allows the
user’s code base to work as-is. Each proxy forwards clients’ requests to the relevant Redis servers
(shards). When new shards are added to a database, the proxy handles the new routing rules for the
application's requests transparently – immediately scaling the database performance and memory
capacity without any changes to the application itself.
The proxies also support Memcached’s text and binary protocols and perform in-flight translation
between Memcached and Redis protocol semantics. This allows Memcached users to enjoy many of
the features that are not available with open source Memcached, such as built-in replication, auto-
failover, data-persistence and backups and scaling (out/in) without losing data.
Cluster management
The cluster manager is a sophisticated governing function that provides capabilities such as re-sharding, rebalancing, auto-failover, rack-awareness, database provisioning, resource management, data-persistence configuration, backup and recovery. The cluster manager employs multiple watchdog mechanisms at the cluster’s node level and at the process level, which guarantee an instant response to events such as node, rack and data center failures, and can handle multiple failover events at the same time. Because the cluster manager is entirely decoupled from the data path components, changes to its software components do not affect the data path components.
Ensure consistent top performance
Multiple techniques are implemented by RLEC to provide consistent top performance for Redis:
A shared-nothing architecture maximizes the performance of each database. Automatic
migration of shards between nodes is performed when needed.
The zero-latency proxy utilizes several mechanisms for improving performance, including
just-in-time pipelining, socket connections, connection pooling and multiplexing.
Improvements to AOF data persistence and optimized rewrite algorithms.
File system-level improvements enable optimal access to storage and support burst write
operations without degrading (or blocking) database performance.
Simplified and automated operations
RLEC boosts productivity of developers and DevOps by simplifying and automating certain complex
and time-consuming ops-related tasks such as provisioning new databases, updating database
configuration, re-sharding existing databases and rebalancing shards across cluster nodes.
RLEC’s homogeneous, symmetric cluster architecture enables the underlying infrastructure to be fully
heterogeneous, where each node in the cluster can be physical or virtual, with variations in RAM
capacity, storage devices, and number of compute cores. This freedom of configuration allows the
operator to roll out clusters that make the most efficient use of the resources, with minimal system
limitations. For example, a cluster may be based on a few permanent bare-metal servers with
additional virtual servers for scaling out (or in) when load increases or decreases. Built-in configurable
monitoring functions help the operator keep an eye on a cluster's resources’ utilization levels.
RLEC also ensures uninterrupted operation of Redis databases by protecting against out-of-memory
events and tuning memory fragmentation automatically.

Redis Labs Enterprise Cluster Documentation Page 7
All of the above is complemented by an easy-to-use web-based user interface, CLI tools and APIs.
No special experience or knowledge is required to create, manage and monitor Redis clusters, nodes
and databases in RLEC.
You can read more on RLEC’s architecture in the System architecture section.
Redis Labs Enterprise Cluster Documentation Page 8
Installing and Upgrading
This section explains how to install, upgrade and uninstall RLEC.
Hardware and software requirements
Hardware requirements
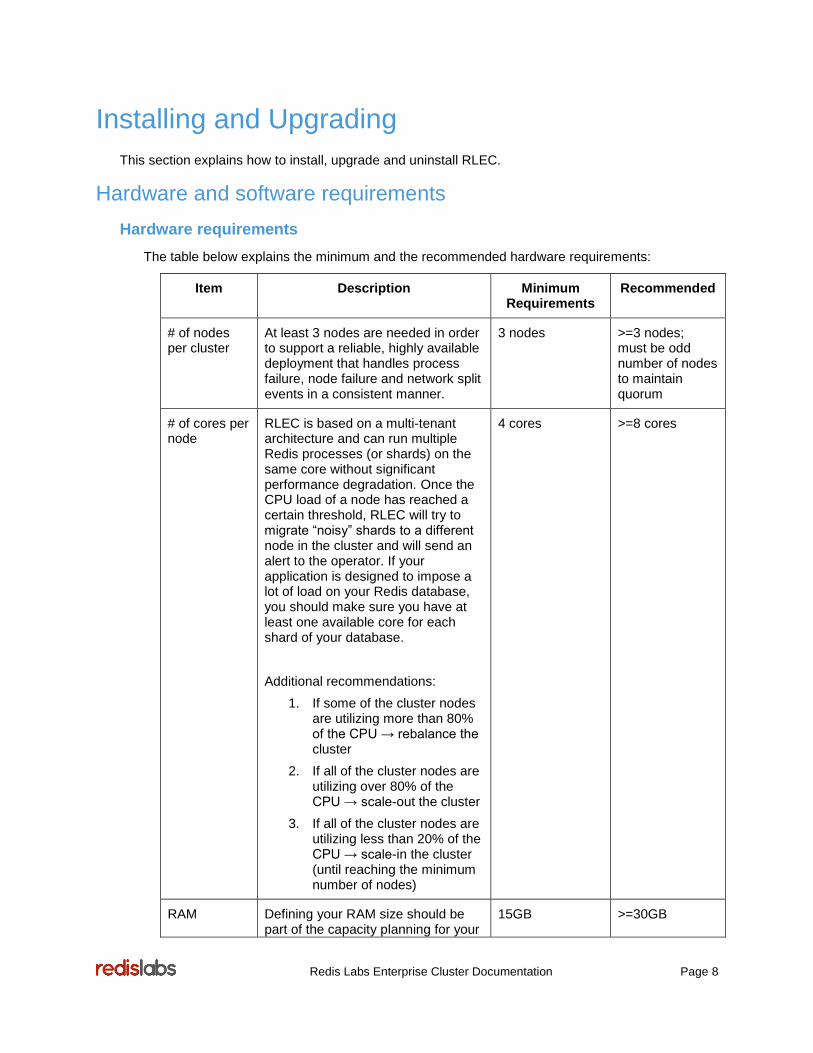
The table below explains the minimum and the recommended hardware requirements:
Item Description Minimum Requirements
Recommended
# of nodes per cluster
At least 3 nodes are needed in order to support a reliable, highly available deployment that handles process failure, node failure and network split events in a consistent manner.
3 nodes >=3 nodes; must be odd number of nodes to maintain quorum
# of cores per node
RLEC is based on a multi-tenant architecture and can run multiple Redis processes (or shards) on the same core without significant performance degradation. Once the CPU load of a node has reached a certain threshold, RLEC will try to migrate “noisy” shards to a different node in the cluster and will send an alert to the operator. If your application is designed to impose a lot of load on your Redis database, you should make sure you have at least one available core for each shard of your database.
Additional recommendations:
1. If some of the cluster nodes are utilizing more than 80% of the CPU → rebalance the cluster
2. If all of the cluster nodes are utilizing over 80% of the CPU → scale-out the cluster
3. If all of the cluster nodes are utilizing less than 20% of the CPU → scale-in the cluster (until reaching the minimum number of nodes)
4 cores >=8 cores
RAM Defining your RAM size should be part of the capacity planning for your
15GB >=30GB

Redis Labs Enterprise Cluster Documentation Page 9
Redis usage. Since Redis uses a relatively large amount of buffers (i.e. for slave communication, for the client communication and for pub/sub commands) the operator should take extra care to leave at least 20% of the RAM “unused”.
Additional recommendations:
1. If some of the cluster nodes are utilizing over 80% of the RAM → rebalance the cluster
2. If all the cluster nodes are utilizing over 80% of the RAM → scale-out the cluster
3. If all the cluster nodes are utilizing less than 20% of the RAM → scale-in the cluster (until reaching the recommended minimum number of nodes)
Storage For better I/O performance, RLEC enables two storage systems to be connected to each node in the cluster (as described below). It is also highly recommended to use SSD-based storage to avoid performance issues when persisting data to disk.
Ephemeral Storage
Used for storing replication files (RDB format) and cluster log files.
Refer to Persistent and ephemeral storage for more information.
2x node’s RAM size
>=4x node’s RAM size
Persistent Storage
Used for storing snapshot (RDB format) and AOF files over a persistent storage media, which (unlike ephemeral storage) doesn’t get deleted in cases of node failure.
Refer to Persistent and ephemeral storage for more information.
Example of persistent storage devices:
AWS Elastic Block Storage (EBS)
Azure Data Disk
3x node’s RAM size
>=6x node’s RAM size
For extreme ‘write’ scenarios please refer to the Disk size requirements for extreme write scenarios
section to determine the right Persistent Storage size.
Network We recommend running RLEC over a low-latency high-throughput network, wherein each NIC can support a few hundred thousand packets per second.
1G >=10G

Redis Labs Enterprise Cluster Documentation Page 10
That said, RLEC can still perform very well over a single 1Gbps interface network that is used for processing application requests, inter-cluster communication and storage access.
Software requirements
Server
Ubuntu 14.04, 64 bit, Server or Desktop. The Server version is recommended for production
deployments.
CentOS / RHEL 6.5, 64 bit. Requires at least “Minimal Install” configuration.
CentOS / RHEL 7, 64 bit. Requires at least “Minimal Install” configuration. Refer to CentOS /
RHEL 7 firewall configuration for additional considerations.
Client
The following web browsers are supported:
On Windows 7 and Windows 8:
Chrome version 30 and up
Firefox version 35 and up
Internet Explorer version 11 and up
Opera 27 and up
On Ubuntu 14.04:
Chrome version 35 and up
Firefox version 35 and up
Opera 27 and up
Accessing and installing the setup package
Navigate to https://www.redislabs.com/redis-enterprise-downloads and select one of the following
options:
Installation package – Click on the download button for the OS you would like to use in
order to download the .tar file installation package.
AMI – Click on the AWS AMI button for the option you would like to use in order to launch an
instance on Amazon Web Services (AWS).
Note: If you are using the AMI option, or are installing a .tar file package, on an AWS instance, review
the guidelines in Configuration of AWS instances.
If you downloaded the .tar file installation package, install the package on a machine that will serve as
one of the nodes in the cluster by performing the following steps:

Redis Labs Enterprise Cluster Documentation Page 11
1. In the operating system command-line-interface (CLI), also referred to as Terminal, use the
cd command to change the location to the directory where you saved the .tar file.
2. Extract the package by using the following command in the CLI:
tar vxf <tarfile name>
3. To initiate the installation in the CLI, use the following command:
./install.sh
4. The installation process begins, and prompts you for input several times.
If you do not run the installation in sudo mode, the installation process prompts you for the
administrator password in order to use sudo mode.
5. After installation is completed successfully, the CLI displays the URL of the page from which
you can initiate cluster setup (refer to Initial setup – creating a new cluster). The URL is in
the following format:
https://<IP address of machine on which you installed the package>:8443
Make sure to save this URL.
If you would like to automate the installation script, there are two options you can use that would
result in a “silent” installation that speeds the process:
1. Run the install script with “-y” as a parameter (i.e. ./install.sh -y), which will silently use
“Y” as a default response to all questions.
2. Run the install script with “-c” and an answers file path as parameters (i.e. ./install.sh –c
<answers file path and name>), which will use the answers provided in your answers file.
Here is sample content for the answers file: systune=yes
ntp=no
firewall=no
Uninstalling
To uninstall RLEC from a server, use the following command in the operating system CLI:
In Ubuntu:
sudo apt-get purge redislabs
In CentOS / RHEL:
sudo yum remove redislabs
After you approve, the uninstall process will run and clean the server of the RLEC installation.
Upgrading
Upgrading RLEC consists of upgrading the software on each of the nodes, in any order you wish.
Upgrading nodes
To upgrade the nodes’ software you need to install the RLEC installation package on all the machines
on which RLEC is installed. Refer to Accessing and installing the setup package for instructions.

Redis Labs Enterprise Cluster Documentation Page 12
During the node upgrade process the services running RLEC are restarted. This may result in a short
interruption to the node itself and the databases running on it.
It is important to upgrade the nodes one by one, and not try to upgrade more than one node at the
same time, in order to ensure cluster and databases’ availability.
If you have the RLEC management UI open in the browser while you are upgrading the nodes you
should make sure to refresh the browser before trying to work again with the UI.
Upgrading databases
Some RLEC upgrades add support for new Redis versions. In these cases, we recommend you
upgrade the databases to the new Redis version, although this is not mandatory because RLEC
upgrades are backwards compatible. RLEC also supports a mix of Redis database versions.
To check whether your Redis database versions match the latest Redis version supported by
RLEC:
In the rladmin CLI, run the status command (refer to rladmin Command Line Interface
(CLI)). If the Redis version is not the latest supported, it will be indicated in the command
output next to the database’s status.
In the Management UI, go to the Cluster > Configuration page. The page lists the latest
Redis version supported.
If the Redis database versions are older than the version supported by RLEC, we recommend
you upgrade your Redis databases.
To upgrade your database:
1. Make sure all the nodes in the RLEC cluster have been upgraded, as described in Upgrading
nodes. You can upgrade the databases only after all nodes in the cluster have been
upgraded.
2. In the rladmin CLI run the upgrade db command for each database. For more information
refer to rladmin Command Line Interface (CLI).
During the database upgrade process the database will be restarted. As a result:
For databases that have replication enabled (refer to Database replication) a failover occurs
prior to restarting the database to ensure that there is no downtime.
For databases that do not have replication enabled, some downtime occurs while the
database is restarting.
For databases that have neither replication nor persistence enabled (refer to Database
persistence), the database loses all its data after it is restarted.

Redis Labs Enterprise Cluster Documentation Page 13
Initial setup – creating a new cluster
A cluster typically consists of several nodes. For production deployment, we recommend an uneven
number of nodes with a minimum of three.
Note: In a cluster that includes only one node some features and capabilities are not enabled, such
as database replication that enables failover to ensure high availability.
To setup a new cluster, you must first install the installation package as described in the previous
section, and then set up the cluster as described below. After the cluster is created you can add
multiple nodes to the cluster (refer to Joining a new node to a cluster).
To create a cluster:
1. In a browser, navigate to https://<name or IP address of machine on which you installed
the package>:8443. For example, if you installed RLEC on a machine with IP address
1.2.3.4, then navigate to https://1.2.3.4:8443.
Note: The RLEC management UI uses SSL encryption. For more information, refer to
Updating web server SSL certificates.
Note: If the machine has both an internal IP address and an external IP address, you should
use the external IP address to access the setup UI.
2. In the window that appears, click Setup.
3. In the Node Configuration page that appears:
a. Enter a path for Persistent storage, or leave the default path. Refer to Persistent and
ephemeral storage.
b. You can enter a path for Ephemeral storage, or leave the default path. Refer to
Persistent and ephemeral storage.
c. In Cluster configuration, select Create new cluster.
d. In Cluster name (FQDN), enter a unique name for the cluster. For guidelines, refer to
How to set the cluster name (FQDN).
e. Choose whether to Enable rack-zone awareness. If you choose to enable it then you
must set the Rack-zone ID for the node. Refer to Rack-zone awareness.
f. Click Next.
4. In the Cluster authentication page, enter a cluster key if you purchased one. Read the
product Terms and Conditions and click Next.
5. In the Cluster registration page you have the option of entering your contact information.
This is needed if you wish to receive upgrade notifications.
6. In the Set admin credentials page, enter the credentials of the cluster administrator. You will
need these credentials in order to add nodes to the cluster, and to regularly login to the
cluster management UI.
After a short wait your cluster is created, and the cluster management UI appears.

Redis Labs Enterprise Cluster Documentation Page 14
7. You can now access any of the management capabilities. You will probably want to create a
database (refer to Creating a new database), or add a new node (refer to Joining a new
node to a cluster).
How to set the cluster name (FQDN)
FQDN (Fully Qualified Domain Name) is the unique cluster identifier name that enables clients to
connect to the different components that are part of the Redis Labs Enterprise Cluster (RLEC). The
FQDN is a crucial component of the high-availability mechanism in RLEC because it is used by the
internal DNS to enable the automatic and transparent failover of nodes, databases shards, and
endpoints, by automatically updating their IP addresses. For more information on these components
and their roles, refer to System architecture.
Once you set the cluster's FQDN it cannot be updated.
The FQDN must always comply with the IETF’s RFC 952 standard and section 2.1 of the RFC 1123
standard.
You have three options for naming the cluster FQDN:
1. DNS
Use this option if you already have your own domain, would like to make the cluster part of your
domain, and are able to update the DNS.
If you choose this option then it is up to you to make sure that the cluster and at least one node
(preferably all nodes) in the cluster are correctly configured in the DNS with the appropriate NS
entries.
For example:
Your domain is: "mydomain.com"
You would like to name the Redis Labs Enterprise Cluster: "redislabscluster"
You have two nodes in the cluster:
"node1" with IP 1.1.1.1
"node2" with IP 2.2.2.2
Then
In the FQDN field you should enter the value: "redislabscluster.mydomain.com", and
you should add the following records in the DNS for mydomain.com:
redislabscluster.mydomain.com NS node1.redislabscluster.mydomain.com
node2.redislabscluster.mydomain.com
node1.redislabscluster.mydomain.com A 1.1.1.1
node2.redislabscluster.mydomain.com A 2.2.2.2
2. Zero-configuration using mDNS
mDNS (Multicast DNS) is a standard protocol that provides DNS-like name resolution and service
discovery capabilities to machines on local networks with minimal to no configuration. Not all clients
support mDNS, so you need to make sure first that the clients that will be connecting to the cluster

Redis Labs Enterprise Cluster Documentation Page 15
actually have mDNS support, and that the network infrastructure permits mDNS / multicasting
between them and the cluster nodes.
In order to configure the cluster to support mDNS you need to give it a ".local" name in the FQDN.
For example:
You would like to name the Redis Labs Enterprise Cluster: "redislabscluster "
Then
In the FQDN field you should enter the value "redislabscluster.local"
3. No DNS
Use this option only if you do not have a DNS or you have no way to configure your DNS.
Please note that when using this option, failover is not transparent, meaning that when a failure
occurs and the cluster promotes a slave to be a master, the IP used to connect to the new master will
change. When using the DNS or mDNS option, failover can be done transparently and the DNS is
updated automatically to point to the IP of the new master.
When you use this option, the FQDN does not need to have any special format because clients will
use IP addresses instead of hostnames to access the databases so you are free to choose whatever
name you wish.

Redis Labs Enterprise Cluster Documentation Page 16
Cluster Administration
After creating a cluster (as described in Initial setup – creating a new cluster), you can join new
nodes to the cluster, or remove nodes from the cluster.
In the management UI you can remove existing nodes, view and change various cluster settings, as
well as view a wide variety of metrics for the different cluster components.
Joining a new node to a cluster
You can add as many nodes as you wish to a cluster.
To add a node:
8. Install the installation package on the machine that will serve as the new node. Refer to
Accessing and installing the setup package.
9. In a browser, navigate to https://<name or IP address of machine on which you installed
the package>:8443. For example, if you installed the RLEC installation package on a
machine with IP address 5.6.7.8, then navigate to https://5.6.7.8:8443.
Note: The RLEC management UI uses SSL encryption. For more information, refer to
Updating web server SSL certificates.
10. In the window that appears, click Setup.
11. In the Node configuration page:
a. Enter a path for Persistent storage, or leave the default path. Refer to Persistent and
ephemeral storage.
b. You can enter a path for Ephemeral storage, or leave the default path. Refer to
Persistent and ephemeral storage.
c. In Cluster configuration, select Join cluster.
d. Enter the cluster name (refer to Viewing the cluster name), or an IP address of a node
in the cluster.
Note: if you enter the IP address of a node, you must use the internal IP address.
e. Enter the credentials of the cluster administrator, which you defined when you created
the cluster.
f. Click Next.
g. If the cluster is configured to support rack-zone awareness, you are redirected to a page
in which you must set the node’s Rack-zone ID. Refer to Rack-zone awareness.
After a short wait, the node is added to the cluster, and the cluster management UI appears,
displaying the Nodes page. This page lists all the cluster nodes, including the new node you just
added.
Note: The clocks on all nodes must always be synchronized. If the clock in the node you are trying to
join to the cluster is not synchronized with the nodes already in the cluster the action will fail and an
error message will appear indicating that you must synchronize the clocks first. For guidelines, refer
to Synchronizing cluster server clocks to Network Time Protocol (NTP).

Redis Labs Enterprise Cluster Documentation Page 17
Replacing a faulty node
If a node is faulty, its status appears as Failed in the Status column of the Nodes page, and in the
Cluster > Configuration page.
To replace a faulty node:
1. Add a new node, as described in Joining a new node to a cluster.
Make sure the new node has as much available memory as the faulty node.
2. A message appears, informing you that the cluster has a faulty node and that the new node
will replace the faulty node.
3. If the new node has insufficient memory, you will be requested to add a different node, one
with sufficient memory.
Note that if there is a faulty node in the cluster and you are adding a new node, RLEC will enforce
using the new node to replace the faulty one.
Removing a node
There are various reasons why you may want to remove a node:
You would like to temporarily take the node offline for maintenance.
You no longer need the extra capacity, meaning you wish to permanently remove the node.
You would like to replace a faulty node with a healthy node.
You would like to replace a healthy node with a different node.
The following section explains how each of these actions can be achieved, as well as their impact
and considerations.
Make sure to read through these explanations thoroughly before taking any action.
Taking a node offline
Taking a node offline means that you intend to temporarily remove the node from the cluster and
restore it in the near future. As a general rule, when a node is taken offline, the cluster does not try to
migrate all resources off the node, as it would when a node is permanently removed, because the
assumption is that the resources will soon come back online. There are some exceptions to this rule,
as detailed below.
When a node is taken offline the following occurs:
For databases with replication enabled, if a master shard or endpoint is currently on the
node being taken offline, the cluster first failovers the master shard / endpoint and promotes
the slave residing on another node to be the new master. Only then is the node taken offline
to ensure there is no downtime.
Note, that while the node is offline, the cluster does not create alternative slaves because it
assumes that the node will shortly be brought back online. As a result high-availability is not
ensured during this time.
For databases without replication, the cluster first creates new shards and endpoints on a
different node, promotes the newly created shards and endpoints to be the active ones, and

Redis Labs Enterprise Cluster Documentation Page 18
only then takes the node offline. This is practically a migration process to ensure databases’
availability.
Note, that in this case, before trying to take the node offline, you must first ensure that the
cluster has enough capacity for all the resources that will be migrated from the node,
otherwise you will not be able to take the node offline.
Permanently removing a node
Permanently removing a node means you are decreasing the cluster capacity. Before trying to
remove a node you must ensure that the cluster has enough capacity for all resources without that
node, otherwise you will not be able to remove the node.
If there is not enough capacity in the cluster to enable removing the node, you can either delete
databases or add another node instead of the one you wish to remove.
During the removal process, the cluster migrates all resources from the node being removed to other
nodes in the cluster. In order to ensure database connectivity, and database high-availability (when
replication is enabled), the cluster first creates replacement shards or endpoints on one of the other
nodes in the cluster, initiates failover as needed, and only then removes the node.
If a cluster has only two nodes (which is not recommended for production deployments) and some
databases have replication enabled, you will not be able to remove a node.
Replacing a faulty node
If the cluster has a faulty node that you would like to replace, all you need to do is add a new node to
the cluster. The cluster recognizes the existence of a faulty node and automatically replaces it with
the new node.
For guidelines, refer to Replacing a faulty node.
Replacing a healthy node
If you would like to replace a healthy node with a different node, you must first add the new node to
the cluster, migrate all the resources from the node you would like to remove, and only then remove
the node.
For further guidance, refer to Joining a new node to a cluster.
You can migrate resources using the rladmin Command Line Interface (CLI). For guidelines, refer to
rladmin Command Line Interface (CLI).
To take a node offline:
1. Click Take Offline at the top of the Node page of the node to be taken offline.
2. Approve the action.
3. RLEC examines the node and the cluster and takes the needed actions to take the node
offline.
4. At any point you can click the Abort button to stop the process. When aborted, the current
internal action will be completed, and then the process stops.
5. Once the process finishes, the node’s status shows as Offline.
Redis Labs Enterprise Cluster Documentation Page 19
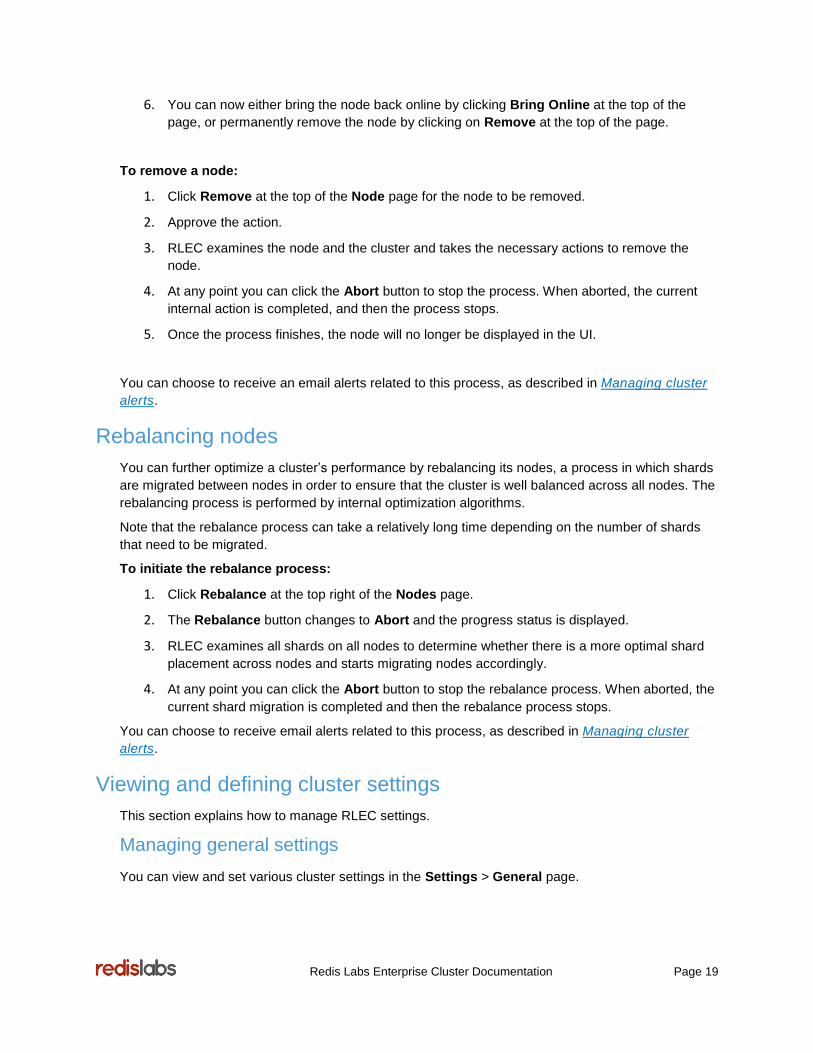
6. You can now either bring the node back online by clicking Bring Online at the top of the
page, or permanently remove the node by clicking on Remove at the top of the page.
To remove a node:
1. Click Remove at the top of the Node page for the node to be removed.
2. Approve the action.
3. RLEC examines the node and the cluster and takes the necessary actions to remove the
node.
4. At any point you can click the Abort button to stop the process. When aborted, the current
internal action is completed, and then the process stops.
5. Once the process finishes, the node will no longer be displayed in the UI.
You can choose to receive an email alerts related to this process, as described in Managing cluster
alerts.
Rebalancing nodes
You can further optimize a cluster’s performance by rebalancing its nodes, a process in which shards
are migrated between nodes in order to ensure that the cluster is well balanced across all nodes. The
rebalancing process is performed by internal optimization algorithms.
Note that the rebalance process can take a relatively long time depending on the number of shards
that need to be migrated.
To initiate the rebalance process:
1. Click Rebalance at the top right of the Nodes page.
2. The Rebalance button changes to Abort and the progress status is displayed.
3. RLEC examines all shards on all nodes to determine whether there is a more optimal shard
placement across nodes and starts migrating nodes accordingly.
4. At any point you can click the Abort button to stop the rebalance process. When aborted, the
current shard migration is completed and then the rebalance process stops.
You can choose to receive email alerts related to this process, as described in Managing cluster
alerts.
Viewing and defining cluster settings
This section explains how to manage RLEC settings.
Managing general settings
You can view and set various cluster settings in the Settings > General page.
Redis Labs Enterprise Cluster Documentation Page 20
Entering a Cluster Key
After purchasing a cluster key, you can enter the key in the Cluster key field, either during initial
cluster creation or at any time afterwards. The key defines various cluster settings, such as the
maximum number of shards you can have in the cluster.
The page also displays general key details.
Viewing the maximum number of allowed shards
The maximum number of allowed shards, which is determined by the Cluster Key, appears in the
Max number of shards field.
Viewing the cluster name
The cluster name appears in the Cluster name field.
Setting your time zone
You can set your time zone in the Timezone field. This is recommended to ensure metrics and log
entries are shown in your preferred time zone.
Managing users
You can view and update the cluster users in the Settings >Team page.
User roles
A user has one of the following roles:
Admin – has full access to view and update anything in the system.
Member – has full access to databases management and read-only access to other parts of
the system.
Viewer – has read-only access to the system.
Adding a user
To add a user:
1. Click the + (plus) sign at the bottom of the table.
2. Enter the name, email, and password of the new user.
3. Select the user role.
4. Mark whether the user will receive email alerts.
5. Click Save.
Updating a user
To update a user:
1. Click the Edit icon at the far right of the user row.
2. You can edit any user details or delete the user.
Redis Labs Enterprise Cluster Documentation Page 21
Managing cluster alerts
On the Settings > Alerts page you can designate which cluster-level events will trigger alert
notifications.
Some alerts can only be turned on or off, such as Node failed or Node rebalance succeeded /
failed. Some alerts require setting a threshold, such as Node memory has reached a certain
percentage of its capacity.
Configured alerts appear in the relevant Cluster or Node Status fields, in the Log page, and can
also be sent via email.
To receive email alerts, you must both mark the checkbox at the bottom of the Alerts page, and mark
the relevant users in the Team page (as described in Managing users).
Viewing cluster metrics
On the Cluster > Metrics page you can view detailed real-time graphs of various metrics for the
entire cluster, as well as specific nodes.
You can choose which resource and metric are shown in each of the two detailed graphs at the top of
the page, as follows:
Below the top two graphs there are two groups of smaller graphs:
The first group displays all available resources: the cluster itself, and each of the cluster
nodes.
The second group displays all available metrics, such as CPU utilization, operations per
second, etc.
In each of the resources graphs, you can click the left arrow to display that resource in the
top left graph, and you can click the right arrow to display that resource in the top right graph.
In each of the metrics graphs, you can choose which metric to show for the two chosen
resources.
Thus, you can compare the same metric for two different resources.
In addition, the scale selector at the top of the page allows you to set the scale of the graphs’ X-axis
(time).
Viewing node metrics
On the Node > Metrics page you can view detailed graphs of various node metrics in real-time.
You can choose which metrics are shown in each of the two graphs at the top of the page, as follows:
Below the top two graphs there is a group of smaller graphs that displays all available
metrics, such as CPU utilization, operations per second, etc.
In each of the bottom graphs, you can click the left arrow to display that metric in the top left
graph; you can click the right arrow to display that metric in the top right graph.
In addition, the scale selector at the top of the page allows you to set the scale of the graphs’ X-axis
(time).
Redis Labs Enterprise Cluster Documentation Page 22
Viewing the log
The Log page displays the following system and user events: alerts, notifications, and configurations.
For each log entry a timestamp is displayed, as well as a description of the event.
Best practices
This section discusses various best practices for RLEC configuration.
Configuration of AWS instances
When installing RLEC on an AWS instance it is important to take the following points into
consideration:
Choose an instance type that has enough free memory and disk space to meet RLEC
software requirements, as described in Hardware and software requirements.
If you want to have a persistent storage location that is always persistent, it should be located
outside of the instance, so make sure to add a new EBS volume connected to the instance
when you set up the instance in the AWS management console, and later, when setting up
RLEC on the instance, make sure the persistence storage (refer to Persistent and
ephemeral storage) is configured to this volume.
Note that after installing the RLEC package on the instance (refer to Accessing and
installing the setup package) and before running through the setup process (refer to Initial
setup – creating a new cluster), you must give the group ‘redislabs’ permissions to the EBS
volume by running the following command from the OS command-line-interface (CLI): chown
redislabs:redislabs /<ebs folder name>.
When configuring the Security Group:
Define a custom TCP rule for port 8443 to allow web browser access to the RLEC
management UI.
Depending on which cluster naming option you use (refer to How to set the cluster
name (FQDN)):
o If you are using the DNS resolving option, define a DNS UDP rule for port 53 to
allow access to the databases’ endpoints using DNS resolving mechanism.
o Alternatively, if you are using the mDNS option, define a custom UDP rule for
port 5353 to allow mDNS access.
If you would like to create a cluster that has multiple nodes all running as instances on
AWS, you need to define a security group that has an All TCP rule for all ports, 0 –
65535, and add it to all the instances that are part of the cluster. This will ensure that all
the nodes are able to communicate with each other. If you would not like to open all TCP
ports and instead define specific ports and ports ranges, refer to Machine ports
configuration for an comprehensive list of ports being used.
If you would like to have SSH access to the instance, you need to define an SSH TCP
rule for port 22.
After successfully launching the instance, setup the cluster as described in Initial setup – creating a
new cluster.

Redis Labs Enterprise Cluster Documentation Page 23
Using a single DNS server
RLEC deployment includes a DNS server for managing various internal cluster functionalities, such
as automatic failover or automatic migration. Therefore the machine on which an RLEC node is
provisioned should not run any other DNS server except for the one included with the RLEC
installation. The existence of another DNS server on the same machine might cause unexpected and
erroneous behavior.
Persistent and ephemeral storage
For each node in the cluster you can configure both a persistent storage and an ephemeral storage
path.
Persistent storage is mandatory; it is used by the cluster to store information that needs to
persist even if a shard or a node fails. For example, if you choose any type of persistence for
a database, then the persistence information is stored in this location.
Ephemeral storage is optional. If defined, it is used by the cluster to store information that
does not need to persist. This aids in optimization and helps to reduce the load on the
persistent storage.
For disk size requirements refer to the Hardware and software requirements section for general
guidelines regarding the ideal disk size each type of storage, and to the Disk size requirements for
extreme write scenarios section for special considerations when dealing with a high rate of write
commands.
Disk size requirements for extreme write scenarios
For disk size requirements in standard usage scenarios, refer to the Hardware and software
requirements section.
In extreme write scenarios, when AOF is enabled, the AOF rewrite process might require much larger
persistent disk space.
To estimate the required persistent disk space in such cases, use the formula described below.
The required persistent disk space for AOF rewrite purposes in extreme write scenarios,
assuming identical shard sizes:
X (1 + 3Y +Y2)
where:
X = each shard size
Y = number of shards
Following are examples of database configurations and the persistence disk space they would require
in this scenario:
Example 1 Example 2 Example 3 Example 4
Database size (GB) 10 10 40 40
Number of shards 4 16 5 15
Shard size (GB) 2.5 0.625 8 2.67

Redis Labs Enterprise Cluster Documentation Page 24
Required disk space (GB) 73 191 328 723
Synchronizing cluster server clocks to Network Time Protocol (NTP)
It is important to ensure that the clocks of all cluster servers are synchronized.
When you initially install RLEC the install script asks you for permissions to configure a scheduled
Cron job that makes sure the server clock is always synchronized.
If you did not approve configuring this job during the installation process, then you should regularly
use the Network Time Protocol (NTP) to ensure all server clocks are synchronized.
You should use the command for your specific operating system to synchronize the server clock. For
example, in Ubuntu, the following command can be used to synchronize a server’s clock to an NTP
server:
/etc/network/if-up.d/ntpdate
We recommend configuring a scheduled Cron job that executes this command daily on all servers, if
you did not approve the install script to automatically do so.
Updating web server SSL certificates
The RLEC management UI uses a self-signed SSL certificate for HTTP encryption. As a result, when
you open the management UI in the browser you receive a notification stating that the connection is
untrusted. Depending on the browser you might be able to allow the connection for this specific
session, or add an exception so that this site is trusted in future sessions as well.
You can also replace the default certificates with your own certificate using the following steps.
Note: If you choose to update the certificates you must follow these steps on all machines that are
part of the cluster, and on all machines that you add to the cluster in the future.
1. On a cluster machine, navigate to the /etc/opt/redislabs folder.
2. Replace the following files with your own files and rename them with the same exact names
as the original files:
cm_server.key
cm_server.crt
3. If you are using a certificate issued by an intermediate certificate authority (CA), you can also
add to the same folder the chain file with the following name: chain_certs.pem.
4. Run the following command from the OS CLI to restart the service:
service cm_server restart
Repeat these steps on all other machines in the cluster.
Performance optimization
RLEC employs various algorithms to optimize performance. As part of this process RLEC examines
usage characteristics and load and adjusts its run-time configuration accordingly. Depending on your

Redis Labs Enterprise Cluster Documentation Page 25
specific usage characteristics and load, it might take RLEC some time to adjust itself to optimal
performance.
To ensure optimal performance, you must run your workload several times and for a long duration
until performance stabilizes.
In addition, RLEC can be optimized for two different environments:
Cloud environment
Local-network environment
Depending on which configuration you choose, RLEC will use different thresholds to make operation
related decisions.
The default configuration is for cloud environments. If you are running RLEC on a non-cloud
environment then we recommend changing the configuration.
How to change the environment configuration
In the rladmin command line interface (CLI), use the following command:
rladmin tune watchdog profile [default | local-network]
Use default for a cloud environment and local-network for a non-cloud environment.
If after following all of the instructions above, you find that RLEC still does not meet your performance
expectations, contact us at [email protected] to help you optimize RLEC to your specific needs.
Machine ports configuration
Machines that are used as RLEC nodes should ideally have all ports open between them for internal
cluster communication purposes. If for some reason you cannot leave all ports open between the
machines, see below the list of ports and port ranges that are used by RLEC.
In addition, you should make sure that the ICMP protocol is enabled for communications between the
nodes.
By default, the cluster assigns ports in the range of 10,000 – 19,999 to database endpoints. If you
assign a specific port for a database when creating it, even outside of this range, the cluster will only
verify that the assigned port is not already in use.
List of ports and port ranges used by RLEC
Port Description
3333, 3334, 3335, 3336, 36379, 36380
Internal cluster usage
8443 Used to access the management UI
8080, 9443 Used to expose a REST API for the management UI
10000-19999 Used to expose databases externally
20000-29999 Used for internal communications with database shards

Redis Labs Enterprise Cluster Documentation Page 26
CentOS / RHEL 7 firewall configuration
CentOS / RHEL7 distributions have, by default, a restrictive firewall mechanism based
on firewalld (which in turn configures the standard iptables system). The default configuration
assigns the network interfaces to the public zone and blocks all ports, except 22 (SSH).
RLEC installation on CentOS / RHEL 7 automatically creates two firewalld system services:
A service named redislabs, which includes all ports and protocols needed for
communications between cluster nodes.
A service named redislabs-clients, which includes the ports and protocols needed for
communications external to the cluster.
These services are defined but not allowed through the firewall by default. As part of the
installation process, the installer prompts you to confirm auto-configuration of a default (public) zone
to allow the redislabs service.
This behavior makes the installation process simple and straightforward, but may be insecure if the
machine's network environment is not secured (for example by means of an external firewall, EC2
security groups, etc.). You can use firewalld configuration tools such as firewall-cmd (command line)
or firewall-config (UI) to create more specific firewall policies that allow these two services through
the firewall, as necessary.
Note: If databases are created with non-standard RLEC ports (refer to Machine ports configuration),
you need to explicitly configure firewalld to make sure those ports are not blocked.
Client prerequisites for mDNS
If you choose to use the mDNS protocol when How to set the cluster name (FQDN), then you need
to make sure the required configurations and perquisites are met in order to be able to resolve
databases’ endpoints. These configurations and perquisites are needed on the client machines, as
well as the machines you are using as RLEC nodes in case you are using the Replica of feature.
First, you need to ensure that the machines acting as clients and the machines acting as the nodes
are on the same physical network, or have the networking infrastructure configured to allow
multicasting between them.
Second, you need to install the prerequisite packages, which are different depending on the operating
system you are using:
In Ubuntu:
apt-get install libnss-mdns
In RHEL / CentOS 6.5:
rpm -ivh http://download.fedoraproject.org/pub/epel/6/x86_64/epel-release-6-8.noarch.rpm
yum install nss-mdns
service avahi-daemon start
In RHEL / CentOS 7:
rpm -ivh http://download.fedoraproject.org/pub/epel/7/x86_64/e/epel-release-7-5.noarch.rpm
yum install nss-mdns

Redis Labs Enterprise Cluster Documentation Page 27
service avahi-daemon start
If you are using mDNS along with IPv6 addresses (see more details in Multi-IP & IPv6 support), you
should also make the following update to the “/etc/nsswitch.conf” file:
Update the hosts line to: hosts: files mdns4_minimal [NOTFOUND=return] mdns
Multi-IP & IPv6 support
RLEC supports machines that have multiple IP addresses, some of which can be IPv6 type
addresses.
RLEC related traffic can be logically and physically divide into internal traffic and external traffic:
“Internal traffic” refers to internal cluster communications, such as communications between
the nodes for cluster management purposes.
“External traffic” refers to communications between the clients and the databases, as well as
connections to the management UI in the browser.
When only one IP address exists on a machine serving as an RLEC node, it is used for both internal
and external traffic.
When more than one IP address exists on a machine serving as an RLEC node, the following occurs:
One of the IPv4 addresses is used for internal traffic
Other IPs may be used only for external traffic
At the end of the node bootstrap process, one of the machine’s IPv4 addresses is selected for
internal traffic use.
If you would like to use a different IPv4 address for internal traffic you can change it using the rladmin
Command Line Interface (CLI) node set | add | remove commands.
Note: The internal address can only be updated when the node is in the offline state.
When manually configuring an internal address for a node, make sure the address is valid and bound
to an active interface on the node. Failure to do so will prevent the node from coming back online and
rejoining the cluster.
When configuring external addresses, it is possible to list external addresses that are not bound to an
active interface, but are otherwise mapped or configured to route traffic to the node (e.g., AWS Elastic
IPs, a load balancer VIP, etc.).
rladmin node address commands syntax:
node <id> addr set <addr>
node <id> external_addr set <addr 1> <addr N>
node <id> external_addr [ add | remove ] <addr>
Where
addr - the internal address (can be used only when the node is offline)
external_addr - the external address(es)
Note: While Joining a new node to a cluster during the node bootstrap process, when asked to supply the Cluster Name (FQDN) or an IP of an existing node in the cluster, if you use the node’s IP, then you should supply the node’s internal IP address.

Redis Labs Enterprise Cluster Documentation Page 28
Redis Labs Enterprise Cluster Documentation Page 29
Database configuration
This section explains various aspects of database configuration.
Creating a new database
You can create as many databases as you wish in the cluster, so long as you do not exceed the
available memory or the number of shards you purchased in your subscription.
To create a new database:
1. On the Databases page, click the + (plus) sign underneath the table.
2. Select the type of database to create: a Redis database or a Memcached database.
3. Enter a name for the database.
The database name should adhere to the following rules:
Length: up to 63 characters.
Characters: only letters, digits, and hyphen (‘-‘) are allowed.
Must start with a letter and end with a letter or digit.
Case insensitive: note that uppercase and lowercase letter are treated exactly the same.
4. Set the memory limit of the database. The application displays the total amount of memory
available in the cluster. Refer to Database memory limit for relevant considerations.
Note: The name and the memory limit are the only mandatory parameters.
5. Specify whether to enable replication. For a full explanation, refer to Database replication.
Note that enabling replication affects the total database size, as explained in Database
memory limit.
a. If the cluster is configured to support rack-zone awareness, once you enable
replication you can also choose whether to enable rack-zone awareness for the
database. Refer to Rack-zone awareness.
6. Specify whether to enable data persistence, and if so, what type to employ. For a full
explanation, refer to Database persistence.
7. Next, you can specify security settings:
If you are creating a Redis database, enter a Redis password.
If you are creating a Memcached database, enter a username and password for SASL
Authentication.
8. If you would like to define the port number that will be part of the endpoint used to connect to
the database, you can insert it in the endpoint port number field. If you do not define it the
system will allocate a randomly selected free port. Note that the port number cannot be
changed once defined during database creation. For more information, refer to Machine
ports configuration.

Redis Labs Enterprise Cluster Documentation Page 30
9. Select whether to enable database clustering. If you enable it, select the number of
database shards. For a Redis database, select also the hashing policy. For more information,
refer to Database clustering.
10. Set the data eviction policy (refer to Database eviction policy). This policy is applied when
the total size of the database reaches its memory limit.
11. If you would like the database to be a replica of one or more databases, you can define the
source databases with which this database synchronizes with on an ongoing basis. For more
information, refer to Replica of.
12. Specify whether to perform a periodic back up of the database. For more information, refer
to Database backup. If you specify periodic backup, set the interval and specify the backup
location parameters, as appropriate.
13. Configure database alerts. For more information, refer to Database alerts.
14. Click Activate.
Database memory limit
When you set a database’s memory limit you define the maximum size the database can reach in
the cluster, across all database replicas and shards, including:
Slave shards (if database replication is enabled)
Database shards (if database clustering is enabled)
If the total size of the database in the cluster reaches the memory limit then the data eviction policy
that was defined for the database is applied.
The following examples show how different database configurations affect the total database size.
Example 1
You create a database and:
Set the memory limit to 4 GB
Enable database replication in order to ensure high-availability
The cluster will create 2 shards: a master and a slave. Each of the shards will have a maximum size
of 2 GB. In this case, the maximum dataset size that you will be able to store in the database is 2 GB.
Example 2
You create a database and:
Set the memory limit to 6 GB
Enable database clustering and configure the database to have 3 shards
Do not enable replication
The cluster will create 3 shards. Each of these shards can have a different size depending on the
amount of data stored in it, as long as the total size across all shards does not exceed 6 GB. In this
case, the maximum dataset size you will be able to store in the database is 6 GB.

Redis Labs Enterprise Cluster Documentation Page 31
Example 3
You create a database and:
Set the memory limit to 6 GB
Enable database clustering and configure the database to have 3 shards
Enable database replication in order to ensure high-availability
The cluster will create 6 shards in total - 3 master shards and 3 slave shards. Each of these shards
can have a different size depending on the amount of data stored in it, as long as the total size across
all master shards does not exceed 3 GB. In this case, the maximum dataset size you will be able to
store in the database is 3 GB.
Note: If you edit an existing database that already has data in it, some updates might fail, as they
could cause the total database size to exceed the memory limit. For example, enabling replication
doubles the existing database size, which may then exceed the memory limit. In these cases you
must update the memory limit before you can make the desired change.
Database replication
Database replication provides a mechanism to ensure high availability. When replication is enabled,
your dataset is replicated to a slave node, which is constantly synchronized with the master node. If
the master node fails, an automatic failover occurs and the slave node is promoted to be the new
master node. When the old master node recovers, it becomes the slave node of the new master
node. This auto-failover mechanism guarantees data is served with minimal to no interruption.
When rack-zone awareness is used, there is additional and more advanced logic used to determine
which nodes gets designated as the master or slave, as explained in Rack-zone awareness.
Note that enabling replication has implications for the total database size, as explained in Database
memory limit.
Database persistence
Similarly to open source Redis, RLEC provides several persistence options:
RDB persistence, which performs point-in-time snapshots of your dataset every 1, 6 or 12
hours.
AOF (Append Only File) persistence, which logs every write operation so that it can be
replayed again at server startup, if needed, to reconstruct the original dataset. Commands
are logged using the same format as the Redis protocol itself, in an append-only fashion.
Redis is able to rewrite the log when it gets too big, as a background task.
Database clustering
Redis is (mostly) a single-threaded process. This is a design decision that allows it be extremely
performant, while keeping its implementation simple. However, the downside of that architectural
choice is that Redis cannot be easily scaled. A single Redis process is ultimately bound by the CPU
core it is running on, as well as the amount of memory the server has.
To overcome these limitations, Redis Labs Enterprise Cluster (RLEC) supports database clustering.
A database cluster is a set of Redis processes, in which each process manages a subset of the

Redis Labs Enterprise Cluster Documentation Page 32
database's keyspace. This allows you to overcome scaling challenges via horizontal scaling by using
multiple cores and multiple servers' RAM resources.
In a Redis database cluster, the keyspace is partitioned into hash slots. At any given time a slot
resides on, and is managed by, a single node. Each node that belongs to a Redis database cluster
can manage multiple slots. This division of the key space, a.k.a. sharding, is achieved by hashing the
keys' names, or parts of these (key hash tags), to obtain the slot in which a key should reside.
Despite running multiple Redis processes, database clustering is nearly transparent to the application
using it. The database cluster is accessible via a single endpoint that automatically routes all
operations to the relevant shards, without requiring a cluster-aware Redis client. This allows
applications to benefit from using the database clustering without performing any code changes, even
if they were not designed beforehand to use it.
Abbreviations
Tag / Hash Tag A part of the key that is used in the hash calculation.
Slot / Hash Slot The result of the hash calculation.
Shard Redis process that is part of the Redis clustered database.
When to use sharding
Sharding the keyspace is an efficient way of scaling Redis that should be employed when:
The dataset is large enough that it would benefit from using the RAM resources of more than
one server. Redis Labs recommends sharding a dataset once it reaches a size of 50-100 GB.
The operations performed against the database are CPU intensive, causing performance
degradation. By having multiple CPU cores manage the database's shards, the load of
operations is distributed among them.
Number of shards
When enabling database clustering, you can set the number of database shards. The minimum
number of shards per database is 2 and the maximum depends on the subscription you purchased.
Note: Once database clustering has been enabled and the number of shards has been set, you
cannot disable database clustering or reduce the number of shards. You can only increase the
number of shards by a multiple of the original number of shards. For example, if the original number
of shards was 3, then you can increase to 6, 9,12, etc.
Supported sharding policies
Standard hashing policy
When using the standard hashing policy, a clustered database behaves just like a standard, open-
source, Redis cluster:
Keys with a hash tag: a key's hash tag is any substring between '{' and '}' in the key's name.
That means that when a key's name includes the pattern '{...}', the hash tag is used as input
for the hashing function. For example, the following key names have the same hash tag and
would therefore be mapped to the same slot: foo{bar}, {bar}baz, foo{bar}baz.
Keys without a hash tag: when a key does not contain the '{...}' pattern, the entire key’s
name is used for hashing.

Redis Labs Enterprise Cluster Documentation Page 33
You can use the '{...}' pattern to direct related keys to the same hash slot so that multi-key operations
can be executed on these keys. On the other hand, not using a hash tag in the key's name results in
a (statistically) even distribution of keys across the keyspace's shards. If your application does not
perform multi-key operations then you do not need to construct key names with hash tags.
Custom hashing policy
A clustered database can be configured to use a custom hashing policy. A custom hashing policy is
required when different keys need to be kept together on the same shard to allow multi-key
operations. The custom hashing policy is provided via a set of Perl Compatible Regular Expressions
(PCRE) rules that describe the dataset's key name patterns.
To configure a custom hashing policy, enter the regular expression (RegEx) rules that identify the
substring in the key's name - hash tag - on which hashing will be done. The hashing tag is denoted in
the RegEx by the use of the `tag` named sub-pattern. Different keys that have the same hash tag will
be stored and managed in the same slot.
Once you enable the custom hashing policy, the following default RegEx rules are implemented. You
should update these rules to fit your specific logic:
RegEx Rule Description
.*\{(?<tag>.*)\}.* Hashing is done on the substring between the curly braces.
(?<tag>.*) The entire key's name is used for hashing.
You can modify existing rules, add new ones, delete rules, or change their order to suit your
application's requirements.
Custom hashing policy notes and limitations
1. You can define up to 32 RegEx rules, each up to 256 characters.
2. RegEx rules are evaluated in their order and the first rule matched is used. Therefore, strive
to place common key name patterns at the beginning of the rule list.
3. Key names that do not match any of the RegEx rules will trigger an error.
4. The '.*(?<tag>)' RegEx rule forces keys into a single slot because the hash key will always be
empty. Therefore, when used, this should be the last, catch-all rule.
5. The following flag is enabled in the regular expression parser:
PCRE_ANCHORED: the pattern is constrained to match only at the start of the string being
searched.
Changing the sharding policy
The sharding policy of a clustered database can be changed. However, most sharding policy changes
trigger the deletion (i.e., FLUSHDB) of the data before they can be applied.
Examples of such changes include:
Redis Labs Enterprise Cluster Documentation Page 34
Changing the hashing policy from standard to custom, or vice versa.
Changing the order of custom hashing policy rules.
Adding new rules in the custom hashing policy.
Deleting rules from the custom hashing policy.
Note: The recommended workaround for updates that are not enabled, or require flushing the
database is to back-up the database and import the data to a newly configured database.
Multi-Key operations
Operations on multiple keys in a clustered database are supported with the following limitations:
Multi-key commands: Redis offers several commands that accept multiple keys as
arguments. In a clustered database, most multi-key commands are not allowed across tags.
The following multi-key commands are allowed across tags: DEL, MSET, MGET, KEYS,
HMGET, HMSET, FLUSHALL.
Please note that when using these commands in a sharded setup, the command is
distributed across multiple shards and the responses from all shards are combined into a
single response.
All other multi-key commands are not allowed across tags and if used across tags will return
an error.
Examples of such commands are: BITOP, BLPOP, BRPOP, BRPOPLPUSH, MSETNX,
RPOPLPUSH, SDIFF, SDIFFSTORE, SINTER, SINTERSTORE, SMOVE, SORT, SUNION,
ZINTERSTORE, ZUNIONSTORE.
Transactions: All operations within a WATCH / MULTI / EXEC block should be performed on
keys that have the same tag.
Lua scripts: All keys used by a Lua script must have the same tag and must be provided as
arguments to the EVAL / EVALSHA commands (as per the Redis specification). Using keys
in a Lua script that were not provided as arguments might violate the sharding concept but
will not result in the proper violation error being returned.
Renaming keys: The use of the RENAME / RENAMENX commands is allowed only when
the key's original and new values are mapped to the same tag.
Database eviction policy
The eviction policy designates a data eviction method to use when the database size reaches its limit.
You can select any of the following:
noeviction: returns an error if the memory limit has been reached when trying to insert more
data
allkeys-lru: evicts the least recently used keys out of all keys
allkeys-random: randomly evicts keys out of all keys
volatile-lru: evicts the least recently used keys out of all keys with an "expire" field set
volatile-ttl: evicts the shortest time-to-live and least recently used keys out of all keys with an
"expire" field set
volatile-random: randomly evicts keys with an "expire" field set
Redis Labs Enterprise Cluster Documentation Page 35
Replica of
The Replica of feature enables you to designate a database to be a replica (destination) of one or
more databases (sources). Once you have done so and the initial data load is completed, all write
commands are synchronized from the source(s) to the destination. This allows you to keep a
database (destination) that is an exact replica of other databases.
This configuration can be very useful, for example, if you would like to distribute the read load of your
application across multiple databases. In addition, this feature can be used to do a one-time
synchronization of a database, either within RLEC or external to RLEC, to a database in RLEC.
The “Replica of” is defined in the context of the destination database by specifying the source
databases.
A destination database can have a maximum of five source databases.
If only one source is defined, then the command execution order in the source is kept in the
destination. However, when multiple sources are defined, commands that are replicated from the
source databases are executed in the order in which they reach the destination database. As a result,
commands that were executed in a certain order when compared across source databases might be
executed in a different order on the destination database.
Note: The Replica of feature should not be confused with the In-memory Database replication
feature, which is used to create a master / slave configuration that ensures database high availability.
Replica of sources
RLEC has a security mechanism in which an internal admin password is assigned to each database.
This password helps protect the database from being used as a replica source and is required in
order to define another database as a replica target of this database.
The source databases can be located in the same Redis Labs Enterprise Cluster (RLEC) as the
destination database, in a different RLEC, or they can be Redis databases that are not part of an
RLEC.
When a source database is from within RLEC, the source URL has the following format:
<database name>: redis://admin:<internal database password>@<database endpoint
with port> where the internal database password is the password is automatically assigned
and populated by RLEC. In the RLEC management UI, when you enter the textbox to define
a replica source from within the target database page, the list of existing databases is shown
with the appropriate URL, including the internal admin password, already set up.
When a source database is from a different RLEC, the source URL has the same exact
format as indicated above (except for the <database name>: prefix), but in this case the URL
does not show up as an option in the UI. In order to configure the target database as a replica
of a database from a different RLEC you need to extract the source database URL, including
the internal admin password, from the source database. This can be done in the UI from the
source database page by clicking on the “Get Replica of source URL” link next to the
Endpoint field. In addition, you can regenerate the internal admin password from the same
UI. If you regenerate the internal admin password, any existing replica destinations already
configured will stop working until you update them.
Compression: when a source database is located on a different RLEC, there is also an
option to enable compression of the data being replicated. Refer to the “Replica of” data
compression section for additional details.
Redis Labs Enterprise Cluster Documentation Page 36
When a source database is external to RLEC, the source URL has the following format:
redis://:<redis password>@<hostname>:<port> where the password is the Redis
password assigned by the user, represented with URL encoding escape characters. If no
password was defined for the database then the following format should be used:
redis://hostname:port
When multiple sources are defined there is no meaning to the order in which they are defined or
presented.
If you make changes to the definition of the sources (such as edit, add or delete a source), then the
synchronization process is restarted from scratch for all the source databases.
Note: If you used the mDNS protocol when naming the cluster name (FQDN), then you must ensure
the client mDNS perquisites are installed in order for the Replica of feature to work. Refer to the
Client prerequisites for mDNS for additional details.
Replication process
When a database is defined as a replica of other databases, all its existing data is deleted and
replaced by data that is loaded from the source databases.
Once the initial data load is completed, an ongoing synchronization process takes place to keep the
destination synchronized with its sources. During the ongoing synchronization process there is a
certain delay between the time when a command was executed on the source and when it is
executed on the destination. This delay is referred to as the Lag.
When a synchronization error occurs, then depending on the error type, the process might stop,
or it might continue running on the assumption that the error will be automatically resolved (more
details below).
In addition, the user can manually stop the synchronization process.
When the process is in the stopped state – whether stopped by the user or by the system – the user
can restart the process. Restarting the process causes the synchronization process to be
restarted from the beginning.
Replica of status
The replication process can have the following statuses:
Syncing - indicates that the synchronization process has started from scratch. Progress is
indicated in percentages (%).
Synced - indicates that the initial synchronization process was completed and the destination
is synchronizing changes on an ongoing basis. The Lag delay in synchronization with the
source is displayed as a duration of time.
Sync stopped - indicates that the synchronization process is not currently running and the
user needs to restart it in order for it to resume. This status occurs if the user stops the
process, or if certain errors arose that prevent synchronization from continuing without
manual intervention (more details below).
The statuses above are displayed for each source database. In addition, a timestamp is shown for
each source indicating when the last command from the source was executed on the destination.
The system also displays the destination database status as an aggregate of the statuses of all the
sources.
Redis Labs Enterprise Cluster Documentation Page 37
Note: Please refer to the troubleshooting section Replica of repeatedly fails if you encounter issues
with the Replica of process.
Synchronization errors
Certain errors that occur during the synchronization process require user intervention for their
resolution. When such errors occur the synchronization process is automatically stopped.
For other errors the synchronization process continues running on the assumption that the error will
be automatically resolved.
Examples of errors that require user intervention for their resolution, and cause the synchronization
process to stop, include:
Error authenticating with the source database
Cross-slot violation error while executing a command on a sharded destination database
Out-of-memory error that occurs on a source or on the destination database
Example of an error that does not stop the synchronization process:
Connection error with the source database. Occasionally a connection error may result from
temporary network issues that resolve themselves. Depending on the connection error and its
duration, the process might be able to start syncing from the last point it reached (partial
sync), or require a complete resynchronization across all sources (full sync).
“Replica of” data compression
When the Replica of is defined across different RLEC clusters, it may be beneficial to compress the
data flowing through the network (depending on where the clusters physically reside and the available
network).
Compressing the data reduces the traffic and can help:
Resolve throughput issues
Reduce network traffic costs
Compressing the data has drawbacks as well, which is why it should not always be turned on by
default. For example:
It uses CPU resources to compress the data before sending it to the network and
decompress it on the other side
It takes time to compress and decompress the data which can increase latency
If traffic is too fast and the compression takes too much time it can cause the replication
process to fail and be restarted
In the RLEC management UI, when designating a Replica of source from a different RLEC, there is
also an option to enable compression. When enabled, gzip compression with level -6 is utilized.
Database clustering (sharding) implications
If a source database is sharded, the entire database is treated as a single source for the destination
database.

Redis Labs Enterprise Cluster Documentation Page 38
If the destination database is sharded, then when the commands replicated from the source are
executed on the destination database and the destination database’s hashing function is executed to
determine to which shard/s the command refers.
Database backup
You can back up your dataset to an FTP server, Amazon S3, or OpenStack Object Storage (“Swift”),
periodically, or ad-hoc. You cannot back up to the local machine. Other cloud storage options, such
as Azure Geo-Redundant Storage, SoftLayer Object Storage and Google Cloud Storage will be
added in a future release.
The backup process creates compressed (.gz) RDB files.
Note that it is your responsibility to manage the backup location; RLEC does not delete old backups
or monitor the amount of space left in the folder.
FTP location
To backup to FTP you must ensure permissions to read and write to the FTP location.
If needed, you can specify the username and password for the FTP location as part of the path with
the following structure: ftp://user:password@host:port/path/
Amazon S3 or OpenStack Swift location
To backup to Amazon S3 or OpenStack Swift, you simply select the location type and enter the details in relevant fields. You should make sure you have all these details from your chosen platform first.
Periodic backup
You can configure the database to be periodically backed up to a chosen location. If you do so,
specify the interval of how often to back up the database: every 4, 12, or 24 hours.
Ad-hoc backup - Export
You can, at any time, backup any database as described in Exporting data from a database.
Backup of a sharded database
If you backup a database configured for database clustering, the system creates a backup file for
each shard, and places all these backup files in the specified backup location.
Database alerts
In the Alerts section of the database page, you can designate which database events will trigger alert
notifications.
Some alerts can only be turned on or off, such as Periodic back-up failed. Some alerts require
setting a threshold, such as Dataset size has reached a certain percentage of its limit.
Configured alerts appear in the database Status field, in the Log page, and can also be sent by
email.
To enable receiving email alerts you must both mark the checkbox at the bottom of the section, and
mark the relevant users in the Team page (as described in Managing users).

Redis Labs Enterprise Cluster Documentation Page 39
Importing data to a database
You can import data into a Redis database from an HTTP location, FTP server, Amazon S3, or
OpenStack Object Storage (“Swift”).
You can either import from a single file, or from multiple files in case you are importing from a backup
of a sharded database, refer to the Backup of a sharded database section in Database backup.
To import data into a database:
1. Click the relevant database row in the Databases page. The selected database page
appears.
2. Select the Configuration tab.
3. Click Import at the bottom of the page.
4. A warning appears, informing you that importing a dataset into the database will erase all
existing database content. Click Continue.
5. In the popup that appears, select the location type and populate the relevant fields. The RDB
file path / object name should have an RDB format or a compressed RDB format file. To
import from multiple files, enter each file path in a new line.
6. You can also choose whether you would like to receive email notifications related to the
import process.
7. Click Import.
FTP location
To import from FTP you must ensure permissions to read from the FTP location.
If needed, you can specify the username and password for the FTP location as part of the path with
the following structure: ftp://user:password@host:port/path/
Amazon S3 or OpenStack Swift location
To backup to Amazon S3 or OpenStack Swift, you simply select the location type and enter the details in relevant fields. You should make sure you have all these details from your chosen platform first.
Exporting data from a database
Using the Export option, you can back up a database at any time to an FTP server, Amazon S3, or
OpenStack Object Storage (“Swift”). You cannot back up to the local machine. Other cloud storage
options, such as Azure Geo-Redundant Storage, SoftLayer Object Storage and Google Cloud
Storage will be added in a future release.
To perform database export:
1. Click the relevant database row in the Databases page. The selected database page
appears.
2. Select the Configuration tab.
3. Click Export at the bottom of the page.
4. In the popup that appears, choose the location type and populate the relevant fields.

Redis Labs Enterprise Cluster Documentation Page 40
5. You can also choose whether you would like to receive email notifications related to the
export process
6. Click Export.
FTP location
To export to FTP you must ensure permissions to read and write to the FTP location.
If needed, you can specify the username and password for the FTP location as part of the path with
the following structure: ftp://user:password@host:port/path/
Amazon S3 or OpenStack Swift location
To export to Amazon S3 or OpenStack Swift, you simply select the location type and enter the details in relevant fields. You should make sure you have all these details from your chosen platform first.
Updating database configuration
You can change the configuration of a database at any time.
To edit the configuration of a database:
1. Click the relevant database row in the Databases page. The selected database page
appears.
2. Select the Configuration tab.
3. Click Edit at the bottom of the page.
4. The database settings appear. You can edit any of the configurable parameters. For
explanation, refer to Creating a new database.
5. Click Update.
Deleting a database
To delete a database:
1. Click the relevant database row in the Databases page. The selected database page
appears.
2. Select the Configuration tab.
3. Click Delete at the bottom of the page.
4. Confirm the deletion.
Viewing database metrics
On the Database > Metrics page you can view detailed real-time graphs of various database metrics,
as well as shard-related metrics.
Database metrics
You can choose which metrics are shown in each of the two detailed graphs at the top of the page, as
follows:

Redis Labs Enterprise Cluster Documentation Page 41
Below the top two graphs there is a group of smaller graphs which display all available
metrics, such as CPU utilization, operations per second, etc.
In each of the bottom graphs, you can click the left arrow to display that metric in the top left
graph, and the right arrow to display that metric in the top right graph.
In addition, the scale selector at the top of the page allows you to set the scale of the graphs’ X-axis
(time).
Shard metrics
You can choose which resource and metric are shown in each of the two detailed graphs at the top of
the page, as follows:
Below the top two graphs there are two groups of smaller graphs:
The first group displays all available resources: the database itself, and each of the
database shards. These can be master shards, slave shards (if Database replication is
enabled), or shards that take part of a clustered database (refer to Database clustering).
The shard name refers to the shard role (whether master or slave).
Each small shard graph also lists the node it is located on, and the hash slot to which it is
mapped, if it is part of a clustered database.
Note that corresponding master / slave shards in a clustered database have the same
hash slot.
The second group displays all available metrics, such as operations per second, used
memory, etc.
In each of the resources graphs, you can click the left arrow to display that resource in the
top left graph, and the right arrow to display that resource in the top right graph.
In each of the metrics graphs, you can click the left arrow to display that metric in the top left
graph, and the right arrow to display that metric in the top right graph.
In addition, the scale selector at the top of the page allows you to set the scale of the graphs’ X-axis
(time).
Viewing Redis Slow Log
On the Database > Slow Log page, you can view Slow Log details for Redis databases.
Redis Slow Log is one of the best tools for debugging and tracing your Redis database, especially if
you experience high latency and high CPU usage with Redis operations. Because Redis is based on
a single threaded architecture, Redis Slow Log can be much more useful than slow log mechanisms
of multi-threaded database systems such as MySQL Slow Query Log.
Unlike tools that introduce lock overhead (which makes the debugging process very complex) Redis
Slow Log is highly effective at showing the actual processing time of each command.
Redis Labs Enterprise Cluster (RLEC) includes enhancements to the standard Redis Slow Log
capabilities that enable you to analyze the execution time complexity of each command. This
enhancement can help you better analyze Redis operations, allowing you to compare the differences
between execution times of the same command, observe spikes in CPU usage, and more.
This is especially useful with complex commands such as ZUNIONSTORE, ZINTERSTORE, and
ZRANGEBYSCORE.

Redis Labs Enterprise Cluster Documentation Page 42
The enhanced RLEC Slow Log adds the Complexity Info field to the output data.
View the Complexity Info data by its respective Command in the table below:
Command Value of interest Complexity
LINSERT N - list len O(N)
LREM N - list len O(N)
LTRIM N - number of removed elements O(N)
PUBLISH N - number of channel subscribers
M - number of subscribed patterns
O(N+M)
PSUBSCRIBE N - number of patterns client is subscribed to
argc - number of arguments passed to the command
O(argc*N)
PUNSUBSCRIBE N - number of patterns client is subscribed to
M - total number of subscribed patterns
argc - number of arguments passed to the command
O(argc*(N+M))
SDIFF N - total number of elements in all sets O(N)
SDIFFSTORE N - total number of elements in all sets O(N)
SINTER N - number of elements in smallest set
argc - number of arguments passed to the command
O(argc*N)
SINTERSTORE N - number of elements in smallest set
argc - number of arguments passed to the command
O(argc*N)
SMEMBERS N - number of elements in a set O(N)
SORT N - number of elements in the list/set/zset
M - number of elements in result
O(N+M*log(M))O(N)
when no sorting
SUNION N - total number of elements in all sets O(N)
SUNIONSTORE N - total number of elements in all sets O(N)
UNSUBSCRIBE N - total number of clients subscribed to all channels O(N)
ZADD N - number of elements in the zset O(log(N))
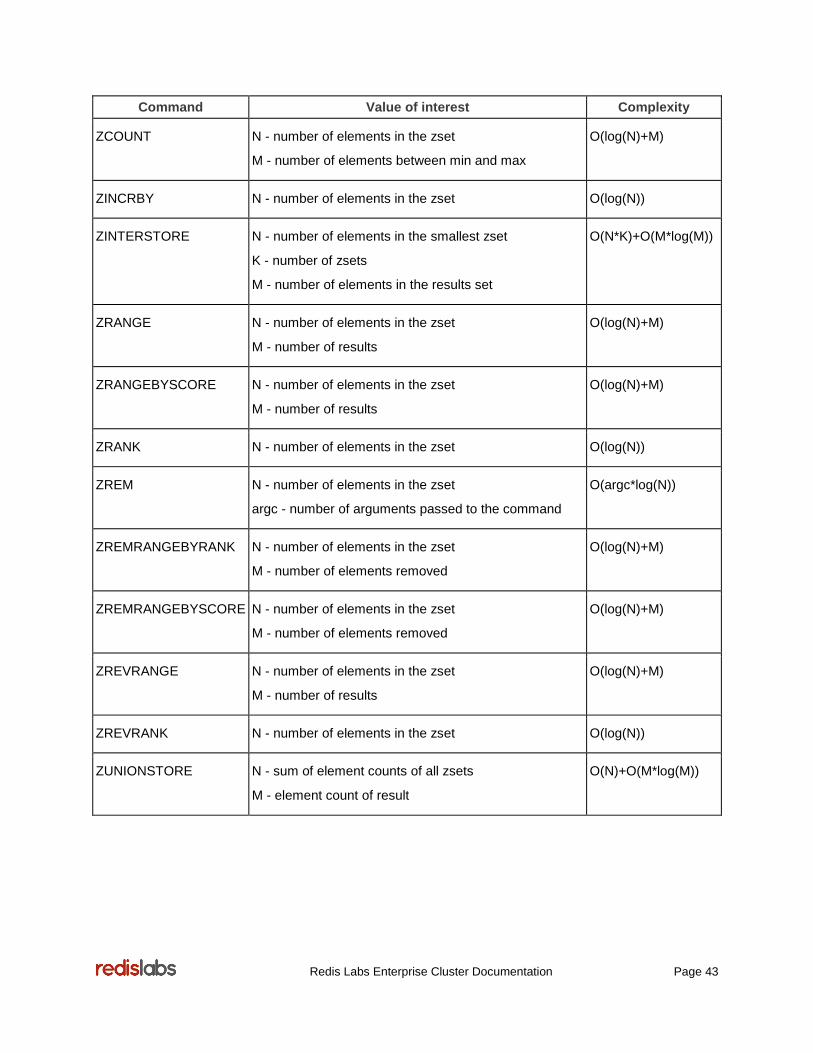
Redis Labs Enterprise Cluster Documentation Page 43
Command Value of interest Complexity
ZCOUNT N - number of elements in the zset
M - number of elements between min and max
O(log(N)+M)
ZINCRBY N - number of elements in the zset O(log(N))
ZINTERSTORE N - number of elements in the smallest zset
K - number of zsets
M - number of elements in the results set
O(N*K)+O(M*log(M))
ZRANGE N - number of elements in the zset
M - number of results
O(log(N)+M)
ZRANGEBYSCORE N - number of elements in the zset
M - number of results
O(log(N)+M)
ZRANK N - number of elements in the zset O(log(N))
ZREM N - number of elements in the zset
argc - number of arguments passed to the command
O(argc*log(N))
ZREMRANGEBYRANK N - number of elements in the zset
M - number of elements removed
O(log(N)+M)
ZREMRANGEBYSCORE N - number of elements in the zset
M - number of elements removed
O(log(N)+M)
ZREVRANGE N - number of elements in the zset
M - number of results
O(log(N)+M)
ZREVRANK N - number of elements in the zset O(log(N))
ZUNIONSTORE N - sum of element counts of all zsets
M - element count of result
O(N)+O(M*log(M))
Redis Labs Enterprise Cluster Documentation Page 44
Rack-zone awareness
The rack-zone awareness feature enables more sophisticated placement of database shards and
endpoints in high-availability scenarios, compared to non-rack-zone aware configuration.
When you enable rack-zone awareness in the cluster, you need to assign to each node a rack-zone
ID. This ID is used to map the node to a physical rack or a logical zone (which itself is mapped to a
physical rack). The cluster can then ensure that master shards and corresponding slave shards, and
similarly endpoints, are placed on nodes in different racks. Thus, if a rack fails and master / slave
failover takes place, the slaves are much more likely to be available because they reside on different
racks.
There is no limitation on the number of racks-zones per cluster; each node can belong to a different
rack or multiple nodes can belong to the same rack.
Rack-zone awareness affects various cluster, node and database related actions, such as: node
rebalancing, node removal, nodes being taken offline, node replacement, database failover, shard
and endpoint migration, etc.
To benefit from rack-zone awareness, you need to configure it at the cluster, node and database
levels.
Cluster/node configuration
In order for the cluster to support rack-zone awareness, you need to enable it when initially creating
the cluster. Afterwards, every time you add a new node to the cluster you need to define a “rack-zone
ID” for the node.
The rack-zone ID must adhere to the following rules:
Length: up to 63 characters.
Characters: only letters, digits and hyphen (‘-‘) are allowed.
Must start with a letter and end with a letter or a digit.
Case insensitive: note that uppercase and lowercase letter are treated exactly the same.
Database configuration
Once the cluster has been configured to support rack-zone awareness, and it includes nodes with at
least two different rack-zone IDs, then you can create a rack-zone aware database.
Rack-zone awareness is only relevant for databases that have slave shards, meaning that the
database has replication enabled. After you enable replication for the database you can choose to
also enable rack-zone awareness.
If you do not enable rack-zone awareness for the database, the cluster does not ensure that the
nodes on which the masters and corresponding slaves are placed, reside in different racks. However,
the cluster still ensures master and slaves are placed on different nodes, in order to ensure high-
availability, as it would in a non-rack-zone aware cluster.

Redis Labs Enterprise Cluster Documentation Page 45
rladmin Command Line Interface (CLI)
RLEC includes a Command Line Interface (CLI), called rladmin that can be used for various
advanced administrative tasks. Some of these tasks can also be performed through the management
UI and some are unique to the CLI.
The following are examples of tasks that can be performed through the CLI:
View the detailed status of the cluster, including information about each node, each
database, each shard, etc.
Execute failover between a master and its slave shard or a master and its slave’s endpoint.
Migrate a specific shard or endpoint between nodes.
Tune specific internal parameters of a database.
Upgrade the version of a database to the most current version supported by the cluster.
Accessing the rladmin CLI
To open the rladmin CLI:
1. Open the operating system CLI.
2. Change user to root using the following command: sudo su -
3. Enter the following command in the CLI: rladmin
Note that if the CLI does not recognize the rladmin command then you might need to run the
following command to load the needed configuration first: bash –l
4. A message confirms that you are now running rladmin.
rladmin features
In the rladmin CLI you can:
Enter “?“ to view the full list of available commands.
Type “help“ followed by the name of a command to view a detailed explanation of the
command and its usage.
Use the Tab key for automatic command completion.
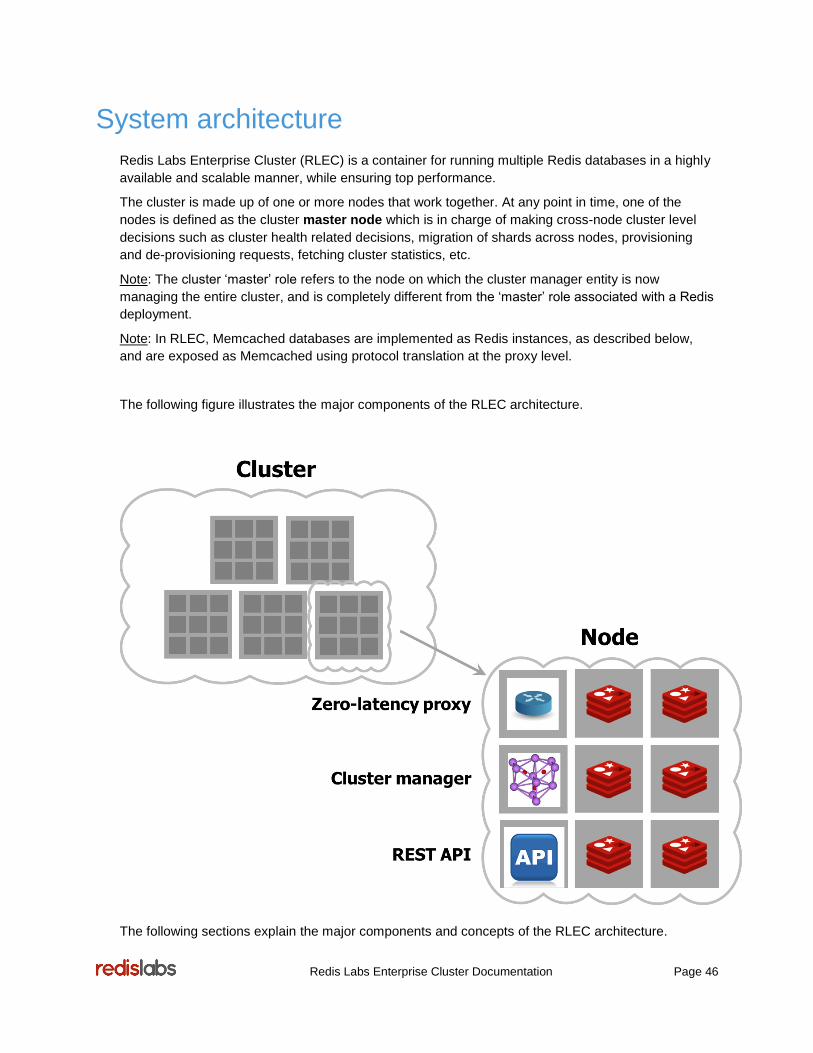
Redis Labs Enterprise Cluster Documentation Page 46
System architecture
Redis Labs Enterprise Cluster (RLEC) is a container for running multiple Redis databases in a highly
available and scalable manner, while ensuring top performance.
The cluster is made up of one or more nodes that work together. At any point in time, one of the
nodes is defined as the cluster master node which is in charge of making cross-node cluster level
decisions such as cluster health related decisions, migration of shards across nodes, provisioning
and de-provisioning requests, fetching cluster statistics, etc.
Note: The cluster ‘master’ role refers to the node on which the cluster manager entity is now
managing the entire cluster, and is completely different from the ‘master’ role associated with a Redis
deployment.
Note: In RLEC, Memcached databases are implemented as Redis instances, as described below,
and are exposed as Memcached using protocol translation at the proxy level.
The following figure illustrates the major components of the RLEC architecture.
The following sections explain the major components and concepts of the RLEC architecture.

Redis Labs Enterprise Cluster Documentation Page 47
Node
A node is a physical or virtual machine on which the RLEC installation package was installed and the
setup process was run in order to make the machine part of the cluster.
Each node is a container for running multiple open source Redis instances, referred to as “shards”.
The recommended configuration for a production cluster is an uneven number of nodes, with a
minimum of three. Other configurations should not be used for production purposes. Note that in
some configurations, certain functionalities might be blocked. For example, if a cluster has only one
node you cannot enable database replication, which helps to achieve high availability.
A node is made up of several components, as detailed below, and works together with the other
cluster nodes.
Redis Instance – Shard
As indicated above, each node serves as a container for hosting multiple database instances,
referred to as “shards”.
RLEC supports various database configurations:
Standard Redis database – A single Redis shard with no replication or data sharding.
Highly available Redis database – Every database master shard has a replicated slave
shard, so that if the master shard fails, the cluster can automatically failover to the slave
shard with minimal to no impact. Master and slave shards are always placed in separate
nodes to ensure high availability.
Clustered Redis database – The data stored in the database is split across a number of
shards. The number of shards can be defined by the user. Various performance optimization
algorithms define where shards are placed within the cluster. During the lifetime of the cluster
these algorithms might migrate a shard between nodes.
Clustered & highly available Redis database – Each master shard in the clustered
database has a slave shard, enabling failover if the master shard fails.
Proxy
Each node includes one or more zero-latency multithreaded proxies (written in low level C) that mask
the underlying system complexity. The proxies are in charge of forwarding Redis operations to the
database shards.
The proxy simplifies the cluster operation, from the application or Redis client point of view enabling
the use of a standard Redis client. The zero-latency proxy is built over a cut-through architecture and
employs various optimization methods. For example, to help ensure high-throughput and low-latency
performance, the proxy might use instruction pipelining even if not instructed to do so by the client.
Database Endpoint
Each database is served by a database endpoint that is managed by the proxy. The endpoint is in
charge of forwarding Redis operations to specific database shards. If database replication is enabled,
then each database has two endpoints: a master endpoint and a slave endpoint.
If the master shard fails and the slave shard is promoted to master, the master endpoint is updated to
point to the new master shard.

Redis Labs Enterprise Cluster Documentation Page 48
If the master endpoint fails, the slave endpoint is promoted to be the new master endpoint, and is
updated to point to the master shard.
Similarly, if both the master shard and the master endpoint fail, then both the slave shard and the
slave endpoint are promoted to be the new master shard and master endpoint.
As can be understood from the above, a shard and its endpoint do not have to reside within the same
node in the cluster.
In the case of a clustered database with multiple database shards, only one master endpoint acts as
the master endpoint for all master shards, forwarding Redis operations to all shards as needed.
Cluster Manager
The cluster manager is in charge of all node management related tasks, and the cluster manager in
the master node is also in charge of all the cluster related tasks.
The cluster manager (written in Python) is designed in a way that is totally decoupled from the Redis
operation. This enables RLEC to react in a much faster and accurate manner to failure events, so
that, for example, a node failure event will trigger mass failover operations of all the master endpoints
and master shards that are hosted on the failed node. In addition, this architecture guarantees that
each Redis shard is only dealing with processing Redis commands in a shared-nothing architecture,
thus maintaining the inherent high-throughput and low-latency of each Redis process. Lastly, this
architecture guarantees that any change in the cluster manager itself does not affect the Redis
operation.
Some of the main functionalities of the cluster manager include:
Deciding where shards will be created
Deciding when shards will be migrated and to where
Monitoring database size
Monitoring databases and endpoints across all nodes
Running the database re-sharding process
Running the cluster rebalancing process
Running the database provisioning and de-provisioning processes
Gathering operational statistics
Enforcing licensing limitations
Management UI
Each node runs a web server that is used to provide the user with access to the management user
interface (UI). The management UI enables viewing and managing the entire cluster, so it does not
matter which node is used to access the UI.
REST API
Each node exposes a REST API to the cluster. Using the REST API you can automate various tasks
that are managed through the management UI.
For example, using the REST API you can instruct the cluster to create a new database, update an
existing database, or fetch various statistics.
Redis Labs Enterprise Cluster Documentation Page 49
RLEC compatibility
This section explains RLEC’s compatibility with the open source technology.
Compatibility with open source Redis
Redis Labs Enterprise Cluster (RLEC) is fully compatible with open source Redis. Redis Labs
contributes extensively to the open source Redis project and employs it in RLEC. As a rule, Redis
Labs adheres to the open source’s specifications and makes every effort to update RLEC with the
latest version of Redis.
Any standard Redis client can be used with RLEC.
That said, some of Redis’ functionality is not applicable in the context of RLEC, as follows:
Shared databases are not supported in RLEC given their potential negative impact on
performance. We recommend using dedicated databases instead. Therefore, the following
commands are blocked and will produce an error when executed:
MOVE
SELECT
Data persistency and backups are managed from RLEC’s management UI, so the following
commands are blocked:
BGREWRITEAOF
BGSAVE
SAVE
LASTSAVE
Because replication is managed automatically by RLEC and because it could present a
security risk, the following commands are blocked:
MIGRATE
REPLCONF
SLAVEOF
SYNC/PSYNC
Commands that are not relevant for a hosted Redis instance are blocked:
DEBUG OBJECT/SEGFAULT
OBJECT
SHUTDOWN
Lastly, only a subset of Redis’ configuration settings (via CONFIG GET/SET) is applicable to
RLEC. Attempts to get or set a configuration parameter that is not included in the following
list will result in an error:
Redis Labs Enterprise Cluster Documentation Page 50
hash-max-ziplist-entries
hash-max-ziplist-value
list-max-ziplist-entries
list-max-ziplist-value
lua-time-limit (value must be between 0 and 60000)
notify-keyspace-events
set-max-intset-entries
slowlog-log-slower-than (value must be larger than 1000)
slowlog-max-len (value must be between 128 and 1024)
zset-max-ziplist-entries
zset-max-ziplist-value
Compatibility with open source Redis Cluster
RLEC works with any standard Redis client, both standalone Redis clients and Redis Cluster clients.
For details regarding the RLEC architecture, refer to the System architecture section.
Redis Labs Enterprise Cluster Documentation Page 51
FAQs
This section includes various frequently asked questions.
I use open source Redis. Why should I switch to RLEC?
RLEC helps you overcome the limitations of open source Redis. It provides scalable Redis
databases, even for datasets larger than the largest server. Moreover, it scales without the hassle of
setting up or dealing with nodes and clusters, while maintaining the same endpoints.
Achieving true high-availability is very easy with RLEC. At the click of a button, you can set up in-
memory replication, data persistence, and remote backups.
RLEC also shields your Redis dataset from virtual environment noises, resulting in stable and
predictable top performance.
And last but not least – it is fully automated, so you do not need to worry about scaling or recovery
from failures.
What happens when my database fills up?
As detailed in the open source Redis FAQ, under “What happens if Redis runs out of memory?”:
…[you] can use the “maxmemory” option in the config file to put a limit to the memory
Redis can use. If this limit is reached Redis will start to reply with an error to write
commands (but will continue to accept read-only commands), or you can configure it
to evict keys when the max memory limit is reached in the case you are using Redis
for caching.
You can set the maxmemory value of each RLEC database in the management UI using the
Memory limit property, as well as configure an eviction policy by setting it to any of the standard
Redis behaviors, without interrupting database operations.
Can I keep my data safe and always available?
RLEC offers a comprehensive suite of high-availability provisions, including in-memory replication,
persistent storage and backups.
What am I allowed to do with the free version?
You can use the full capabilities of RLEC, but you cannot deploy RLEC to production. In addition, the
free version allows a maximum of four shards. The free version does not provide the same support
options as the paid version. Finally, no SLA is provided with the free version.
What do you mean by the term Shard?
A shard is any type of provisioned Redis instance, such as a master copy, slave copy, database
shard that is part of a clustered database, etc.
Redis Labs Enterprise Cluster Documentation Page 52
How many Redis databases can I create and manage?
The number of databases is unlimited. The limiting factor is the available memory in the cluster, and
the number of shards in the subscription (refer to What do you mean by the term Shard?).
Note the impact of the specific database configuration on the number of shards it consumes. For
example:
Enabling database replication, without enabling database clustering, creates two shards: a
master shard and a slave shard.
Enabling database clustering creates as many database shards as you configure.
Enabling both database replication and database clustering creates double the number of
database shards you configure.
What client can I use to connect to the databases in RLEC?
RLEC works with all existing standard Redis clients; it does not require you to use any special clients.
Why should I care about Memcached reliability since it is just a
cache?
Developers use Memcached because they care about their application performance. However, with
the unreliable nature of Memcached, you may lose some or all of your Memcached data (part of
which may have taken your app hours or days to calculate), due to a node failure, scaling event,
software upgrade, or process restart.
If memory loss occurs, your main database will be overloaded with queries, which may result in
dramatic performance degradation or even a complete outage of your application.
Furthermore, many web applications and popular platforms such as Magento, Drupal, and Joomla
store session-cookies in Memcached without backing them up to persistent storage. Session losses
due to Memcached failures could have severe implications on your business. For example, if you are
running an e-commerce site, users might be forced to immediately logout and their shopping carts
would be emptied.
Memcached is not just a cache, but rather a cornerstone of your application’s performance. Its
reliability should be your concern. RLEC provides Memcached in-memory replication capability, a
storage engine and an instant auto-failover mechanism, which guarantee highly available
Memcached.
What are the RLEC payment schedule and terms?
Contact us at [email protected] to learn about RLEC pricing.
Redis Labs Enterprise Cluster Documentation Page 53
Troubleshooting
This section includes various troubleshooting tips and tricks.
Network configuration
Nodes in the same cluster must be on the same VLAN. If you cannot host the nodes on the same
VLAN then you must configure all ports between them to be open. For more information, refer to
Machine ports configuration.
Installation in environments with no Internet connection
By default, the installation process requires an Internet connection to enable installing dependency
packages, and for synchronizing the operating system clock against an NTP server (refer to
Synchronizing cluster server clocks to Network Time Protocol (NTP)).
If you install RLEC on a machine with no Internet connection you need to perform these two tasks
manually, as follows:
First, you need to install the required dependency packages. When RLEC is installed on a machine
that is not connected to the Internet, the installation process fails and displays an error message
informing you it failed to automatically install dependencies. Review the installation steps in the
console to see which missing dependencies the process attempted to install. Install all these
dependency packages and then run the installation again.
At the end of the installation the process asks you whether you would like to setup NTP time
synchronization. If you choose Yes while you are not connected to the Internet then the action fails
and shows the appropriate error message, but the installation still completes successfully. Although
the installation completes successfully, you should still configure all nodes for NTP time
synchronization as described in Synchronizing cluster server clocks to Network Time Protocol
(NTP).
Replica of repeatedly fails
There might be instances in which the Replica of process repeatedly fails and restarts itself. This can
result from the Redis “client-output-buffer-limit” setting on the source database being configured to a
relatively small value, which causes the connection to be dropped.
To identify this issue you can review the Redis log of the source database and find an entry in the log
describing this issue.
In order to resolve this issue you should reconfigure the buffer on the source database to a bigger
value using the following instructions:
If the source database is a Redis that is part of RLEC, you should use the following command
in rladmin Command Line Interface (CLI) to increase the slave buffer size of the source
database: tune db <db:id | name> slave_buffer <value>
If the source database is a Redis that is not part of RLEC, you should use the config set
command through Redis CLI to increase the client output buffer size of the source database:
Redis Labs Enterprise Cluster Documentation Page 54
config set client-output-buffer-limit "slave <hard limit> <soft limit> <soft
seconds>"
You can refer to the following blog post to learn more about this issue and configuration: Top Redis
Headaches for Devops – Replication Buffer.
Database metrics are blank during resharding
Because data is being moved around across shards during the resharding process, it is impossible to
report the values of some of the metrics in an accurate manner. Therefore, several database metrics
are not collected, and as a result the graph is blank when you view the database or shard metrics.
Examples of metrics that are not collected during the resharding process are:
Used memory
Memory usage
Total keys
Write misses/sec
Read misses/sec
Expired objects/sec
Evicted objects/sec
Incoming traffic
Outgoing traffic
Creating a support package
If you encounter any issues that you are not able to resolve yourself and need to contact Redis Labs
support for assistance, you can create a support package that gathers all essential information to help
us debug your issues.
To create a support package:
1. Click Support at the top right of the management UI.
2. Click Create Support Package at the bottom of the page, and approve the action.
The package is created and downloaded to your browser.
Note that creating a support package might take several minutes and might overload the system, so
do not attempt to initiate this process unless it is necessary.
Redis Labs Enterprise Cluster Documentation Page 55
Subscription agreement
You can view the subscription agreement on the following link:
https://redislabs.com/company/terms#software

Redis Labs Enterprise Cluster Documentation Page 56
Release notes
4.2.1-30 – September 21, 2015
Overview
If you are upgrading from a previous version, make sure to review the upgrade instructions before
beginning the upgrade process.
New features
rsyslog logging support – RLEC now writes by default to syslog, which enables monitoring
through rsyslog.
Profile support for tuning cloud and non-cloud environments - enables the administrator to
configure RLEC to run with different performance profiles that are optimized for either cloud
or non-cloud environments. Refer to the Performance optimization section for more details.
SLA for AOF rewrite - enables the administrator to configure database parameters, using the
rladmin tune command, related to when AOF rewrite is triggered based on the time it would
take to load the database from the AOF file, and on the maximum AOF rewrite file size. In
addition, updates to the AOF rewrite mechanism minimize chances of the disk getting full.
New warning and alerts related to AOF rewrite mechanism – a warning is shown during the
setup process in case the disk size is lower than twice the size of the RAM. New cluster level
alerts added to alert when node available disk space is lower than the needed disk space for
AOF rewrite purposes, and when node performance is degraded due to reaching disk I/O
limits.
Replica of support for multiple sources – the Replica of feature is enhanced to support
creating a database that is a replica of multiple source databases. Refer to the Replica of
section for more details
Cross cluster Replica of – the Replica of feature now supports defining a database that is a
replica of databases that belong to a different RLEC cluster. Refer to the Replica of section
for more details.
Multi-IP support – on a node that has multiple IPs, enables the administrator to specify which
IP address is used for internal traffic and which IP addresses are used for external traffic.
Refer to Multi-IP & IPv6 support for more details.
IPv6 support for external traffic – on a node that has multiple IPs, external IP addresses can
be of IPv6 type. Refer to Multi-IP & IPv6 support section or more details.
Support for OpenStack Object Store (“Swift”) location for import / export / backup. Refer to
Database backup and Importing data to a database sections for more details.
Import of a sharded database – support for importing data of a sharded database by
indicating multiple files paths. Refer to the Importing data to a database section for more
details.
Redis Labs Enterprise Cluster Documentation Page 57
Enable running the install script in silent mode using “-y” parameter for default answers (“Y”)
or “-c” for file path parameters for custom answers. Refer to Accessing and installing the
setup package section for more details.
New rladmin command-line-interface “info” command allows for fetching current value of
tunable parameters.
Changes
rladmin command-line-interface can only be run under user root or redislabs. Refer to the
rladmin Command Line Interface (CLI) section.
Import / export / backup to/from Amazon S3 requires supplying the credentials per usage
instance; it does not use central cloud credentials that used to be supplied in the Settings ->
General page.
Fields related to storing Amazon S3 Cloud credentials have been removed from Settings ->
General page.
Performance optimization in the database resharding mechanism.
Persistent and ephemeral storage cluster level alerts are enabled by default and set to 70%.
Various enhancements to rladmin command-line-interface (CLI) to support new commands.
Redis version updated to 2.8.21 that addresses CVE-2015-4335/DSA-3279 – Redis Lua
Sandbox Escape.
Port 3336 added to the list of ports being used by RLEC.
Node “Network utilization” alert measured in percentages (%) has been updated to “Network
throughput” alert measured in MBps. If the alert was defined then it will be disabled when
upgrading to this version and the user needs to reconfigure it with a new value.
Performance improvements to the database Import to make the process much faster.
Enhancements to the support package to include additional details.
Removed support for SSL 2.0/3.0 protocols due to security vulnerabilities.
Disabled “dofile” functionality in Redis to solve a possible security vulnerability.
rladmin CLI “tune watchdog profile" command syntax updated to "tune cluster
watchdog_profile”.
Fixed issues
Support for relative path for backup and import functionalities.
Fix issue with TLS configuration of email server settings.
Email alerts not sent for database export and import processes.
Fix erroneous entries in the Log page.
Sometimes a wrong value is reported in the UI for node used ephemeral storage space.
Sometime the wrong Replica of Lag value is reported in the UI.
RLEC-6875 - email server settings not working when using port 587.
RLEC-5498 - Improve rladmin response time when a node is down.
Redis Labs Enterprise Cluster Documentation Page 58
Validation of Replica of source definition did not fail in the UI and would only fail in runtime if it
was using the Cluster Name (FQDN) and the FQDN was not properly configured in the DNS.
Various improvements to error messages reported by rladmin.
Known issues
Issue: In the Replica of process, if the target database does not have replication enabled and
it is restarted or fails for any reason, the data on target database might not be in sync with the
source database, although the status of the Replica of process indicates it is.
Workaround: You need to manually stop and restart the synchronization process in order to
ensure the databases are in sync.
Issue: In the Replica of process, if the source database is resharded while the replica of
process is active, the synchronization process will fail.
Workaround: You need to manually stop and restart the synchronization process after
resharding of the source database is done.
Issue: In the replica of process, if there is very high traffic on the database the replica of
process might be restarted frequently as result of the “slave buffer” being exceeded. In this
case you see the status of the replica of process as “Syncing” frequently.
Workaround: You need to manually reconfigure the “slave buffer” through rladmin and set
the buffer size to a new size. In order to find the appropriate buffer size please contact
support at: [email protected].
Issue: In a cluster that is configured to support rack-zone awareness, if the user forces
migration of a master or slave shard, through rladmin, to a node on the same rack-zone as its
corresponding master or slave shard, and later runs the rebalance process, the rebalance
process will not migrate the shards to ensure rack-zone awareness compliance.
Workaround: In the scenario described above, you need to manually migrate the shard,
through rladmin, to a node on a valid rack-zone in order to ensure rack-zone awareness
compliance.
4.0.0-30 – May 20, 2015
Overview
If you are upgrading from a previous version, make sure to review the upgrade instructions before
running through the upgrade process.
In addition, when running the install.sh script to upgrade the software, you might be prompted to
approve changes to a configuration file named ccs-redis.conf. It is crucial that you choose Yes
when asked whether to update this file.
New features
Support for Red Hat Enterprise Linux (RHEL) and CentOS 6.5 and 7 operating systems.
Support for additional AWS AMIs for RHEL, CantOS, Ubuntu and Amazon Linux, on multiple
AWS regions.
Redis Labs Enterprise Cluster Documentation Page 59
Support for additional browsers and operating systems for the management UI.
Replica of feature, which enables creating a Redis database that keeps synchronizing data
from another Redis database.
Rack-zone awareness feature which enables mapping nodes to racks/zones to ensure a
more sophisticated high-availability mechanism.
Database related alerts and email alerts.
Auto-configuration of synchronization of cluster server clocks with NTP as part of installation
script.
Database Export functionality.
Email alerts on database Export and Import.
Changes
Database Backup Now functionality replaced with Export functionality.
Database performance improvements to increase throughput and reduce latency.
Improvement to AOF rewrite mechanism to deal with extreme-write scenarios and limited disk
space configurations.
Enhancements to rladmin CLI to support additional commands.
Fixed issues
Cluster stability improvements related to removing nodes and taking nodes offline.
rladmin CLI bug fixes.
Known issues
Issue: RLEC-6819 - Uninstall on Red Hat Enterprise Linux does not stop all services and if
you try to install the software again on the same machine the new installation might use prior
installation data.
Workaround: Before installing the software again restart the machine or verify that all
services are down.
Issue: In the replica of process, if the source database is resharded while the replica of
process is active, the synchronization process will fail.
Workaround: You need to manually stop and restart the synchronization process after
resharding of the source database is done.
Issue: In the replica of process, if there is very high traffic on the database the replica of
process might be restarted frequently as result of the “slave buffer” being exceeded. In this
case you see the status of the replica of process as “Syncing” frequently.
Workaround: You need to manually reconfigure the “slave buffer” through rladmin and set
the buffer size to a new size. In order to find the appropriate buffer size please contact
support at: [email protected].
Redis Labs Enterprise Cluster Documentation Page 60
Issue: In a cluster that is configured to support rack-zone awareness, if the user forces
migration of a master or slave shard, through rladmin, to a node on the same rack-zone as its
corresponding master or slave shard, and later runs the rebalance process, the rebalance
process will not migrate the shards to ensure rack-zone awareness compliance.
Workaround: In the scenario described above, you need to manually migrate the shard,
through rladmin, to a node on a valid rack-zone in order to ensure rack-zone awareness
compliance.
Issue: In case you deploy a cluster and use the DNS option for the cluster name (see details
in How to set the Cluster Name (FQDN)), do not configure the DNS entries for the cluster
nodes, and try to configure a database that is a replica of another database within the cluster,
then the UI allows you to configure the source database but the replica of process fails in
runtime.
Workaround: The configuration indicated in this issue is not a valid cluster configuration. If
you choose to use the DNS option for the cluster name then you must configure DNS entries
for the nodes, otherwise the cluster does not operate correctly. You should either update the
DNS accordingly, or recreate the cluster and use the mDNS option for the cluster name as
described in How to set the Cluster Name (FQDN).
Issue: When taking a node offline or removing a node, if the node being taken offline or
removed is currently serving as the web server for the web browser being used to view the
management UI, then the management UI appears down while the node is down.
Workaround: If you are using the cluster name in order to connect to the management UI in
the browser, and the cluster name is registered in your external DNS or you are using the
mDNS option, then the DNS entries will be updated to point to another node in the cluster
after a few seconds and the UI will open properly. If you are not using the cluster name but
rather the node IP in order to connect to the management UI in the web browser, then you
should simply use the IP of another node in the cluster to access the management UI.
0.99.5-24 - February 15, 2015
Overview
If you are upgrading from a previous version, make sure to review the upgrade instructions before
running through the upgrade process.
If you are upgrading from version 0.99.5-11:
1. You must restart the services after the upgrade using the following command with user root (sudo
su). From the operating system’s CLI, run the following command:
cnm_ctl restart
2. After the upgrade, rladmin status command will report that the databases are from an old version.
It is recommended that you upgrade the databases as soon as possible, as described in the
upgrade instructions.

Redis Labs Enterprise Cluster Documentation Page 61
New features
None.
Changes
Enhancements to memtier_benchmark tool that is included in the installation package. You
can find more details in the GitHub project.
Fixed issues
Improvements and fixes related to node failover, remove node and take node offline
functionality.
Known issues
Issue: When taking a node offline or removing a node, if the node being taken offline or
removed is currently serving as the web server for the web browser being used to view the
management UI, then the management UI appears down while the node is down.
Workaround: If you are using the cluster name in order to connect to the management UI in
the browser, and the cluster name is registered in your external DNS or you are using the
mDNS option, then the DNS entries will be updated to point to another node in the cluster
after a few seconds and the UI will open properly. If you are not using the cluster name but
rather the node IP in order to connect to the management UI in the web browser, then you
should simply use the IP of another node in the cluster to access the management UI.
0.99.5-11 - January 5, 2015
New features
Initial release, everything is new!
Changes
Initial release, no changes!
Fixed issues
None.
Known issues
Issue: When taking a node offline or removing a node, if the node being taken offline or
removed is currently serving as the web server for the web browser being used to view the
management UI, then the management UI appears down while the node is down.
Workaround: If you are using the cluster name in order to connect to the management UI in
the browser, and the cluster name is registered in your external DNS or you are using the
mDNS option, then the DNS entries will be updated to point to another node in the cluster
after a few seconds and the UI will open properly. If you are not using the cluster name but

Redis Labs Enterprise Cluster Documentation Page 62
rather the node IP in order to connect to the management UI in the web browser, then you
should simply use the IP of another node in the cluster to access the management UI.
Related Documents