12 SAP Netweaver 7.3 on Amazon Cloud RedHat 6 Install Thusjanthan Kubendranathan M.Sc.

Welcome message from author
This document is posted to help you gain knowledge. Please leave a comment to let me know what you think about it! Share it to your friends and learn new things together.
Transcript

12
SAP Netweaver 7.3 on
Amazon Cloud RedHat 6 Install
Thusjanthan Kubendranathan M.Sc.
Table of Contents Amazon EC2 Setup ...................................................................................................................................... 4
RedHat EC2 Instance ............................................................................................................................... 4
AWS Dashboard .................................................................................................................................. 4
Launch an EC2 Instance ...................................................................................................................... 4
EC2 Instance Wizard ........................................................................................................................... 5
EC2 Instance Details ............................................................................................................................ 5
Create Key Pair .................................................................................................................................... 7
Configuring the firewall....................................................................................................................... 8
EC2 Summary ...................................................................................................................................... 8
AWS EC2 Dashboard ............................................................................................................................... 9
My Instances ....................................................................................................................................... 9
AWS Volume Management ..................................................................................................................... 9
Volumes .............................................................................................................................................. 9
Attaching a Volume ........................................................................................................................... 10
NTFS Volumes on Linux ..................................................................................................................... 10
Mount Appropriate Directories......................................................................................................... 11
SwapFile ............................................................................................................................................ 13
AWS Network Setup ............................................................................................................................. 14
Elastic IP ............................................................................................................................................ 14
AWS Tools ......................................................................................................................................... 14
Setup Hostname ............................................................................................................................... 14
Firewall ............................................................................................................................................. 15
Installation ................................................................................................................................................ 15
Oracle Install ......................................................................................................................................... 15
User/Group Accounts ....................................................................................................................... 15
Environment Variables ...................................................................................................................... 15
Folder Permissions ............................................................................................................................ 16
Installer ............................................................................................................................................. 16
SAP Netweaver Install ........................................................................................................................... 16
Windows Remote Install ................................................................................................................... 16
Connect to the remote Server .......................................................................................................... 16

Package Selection ............................................................................................................................. 18
Parameter Setting ............................................................................................................................. 18
SAP System Parameter ...................................................................................................................... 19
DNS Domain Name ........................................................................................................................... 20
Master Password .............................................................................................................................. 20
SAP System Administrator Password ................................................................................................ 21
Oracle Database Parameter .............................................................................................................. 21
Prerequisites Checker ....................................................................................................................... 22
Media Browser .................................................................................................................................. 22
Oracle Database Schema .................................................................................................................. 23
Oracle Database Parameters ............................................................................................................ 23
Oracle Database Accounts ................................................................................................................ 24
Oracle Listener .................................................................................................................................. 24
Database Import Jobs ....................................................................................................................... 25
Database Statistics ............................................................................................................................ 25
PAS & ABAP Instances ....................................................................................................................... 26
ABAP message Server Ports .............................................................................................................. 26
ICM Password ................................................................................................................................... 27
Oracle Client ..................................................................................................................................... 27
Unpack Archives................................................................................................................................ 28
Diagnostics Agent ............................................................................................................................. 28
DAA Password ................................................................................................................................... 29
DAA Instance ..................................................................................................................................... 29
System Landscape Directory for Diagnostics..................................................................................... 30
Install Summary ................................................................................................................................ 30
Installation Screen ............................................................................................................................ 31

Amazon EC2 Setup To setup an EC2 instance, you need to first create an account on http://aws.amazon.com. Once you
have created an account and logged in, please follow these steps in setting up an EC2 Server.
RedHat EC2 Instance
AWS Dashboard
In your dashboard, there will be an EC2 Hyperlink. Select that to go into the EC2 dashboard to
launch/edit instances.
Figure 1 - Creating an EC2 Instance
Launch an EC2 Instance
- Once you are in the EC2 Console Dashboard, click on the Launch Instance. This will allow you to
create a cloud based server on AWS.
Figure 2 - Launch an EC2 Instance

EC2 Instance Wizard
- On the instance wizard, select the RH 6.3 Server 64 Bit.
Figure 3 - EC2 Instance Wizard
EC2 Instance Details
- When selecting the Instance Type, its best to pick the Large type as that will provide ample
resources for the installation.
- Note: when picking the availability zones, pick the one that is closest to you and make sure you
keep the same zones across other instances and volumes. In particular volumes as you won’t be
able to mount volumes from one zone to another zone.
Figure 4 - Instance Details

- In the next portion of the Instance Details, adjust some of the advanced features if you so wish.
However for the average user, these fields do not need to be adjusted.
Figure 5 - Instance Details (Cont'd)
- The third screen of the Instance Details details with the storage configuration. You can edit
these to add more EBS. However, we’ll be discussing how to do that later in this document.
Figure 6 - Instance Details ( Storage )

- You can Tag your EC2 instances so that you can identify that easily down the road. This is
optional only if you have many EC2 systems in your dashboard.
Figure 7 - Instance Details (Tagging)
Create Key Pair
- To login to a *nix system, you need to create a keypair and use the keypair in your ssh
commands. Here I have already created a key pair. Creating a key pair is as simple as clicking on
the radio box and hitting next. You’ll be prompted to download a .pem file which you should
keep in a secure location. You can then use this to ssh –i pem_file to the machine or use the
software AWS provides to login to the machine using the pem file.
Figure 8 - Key Pair
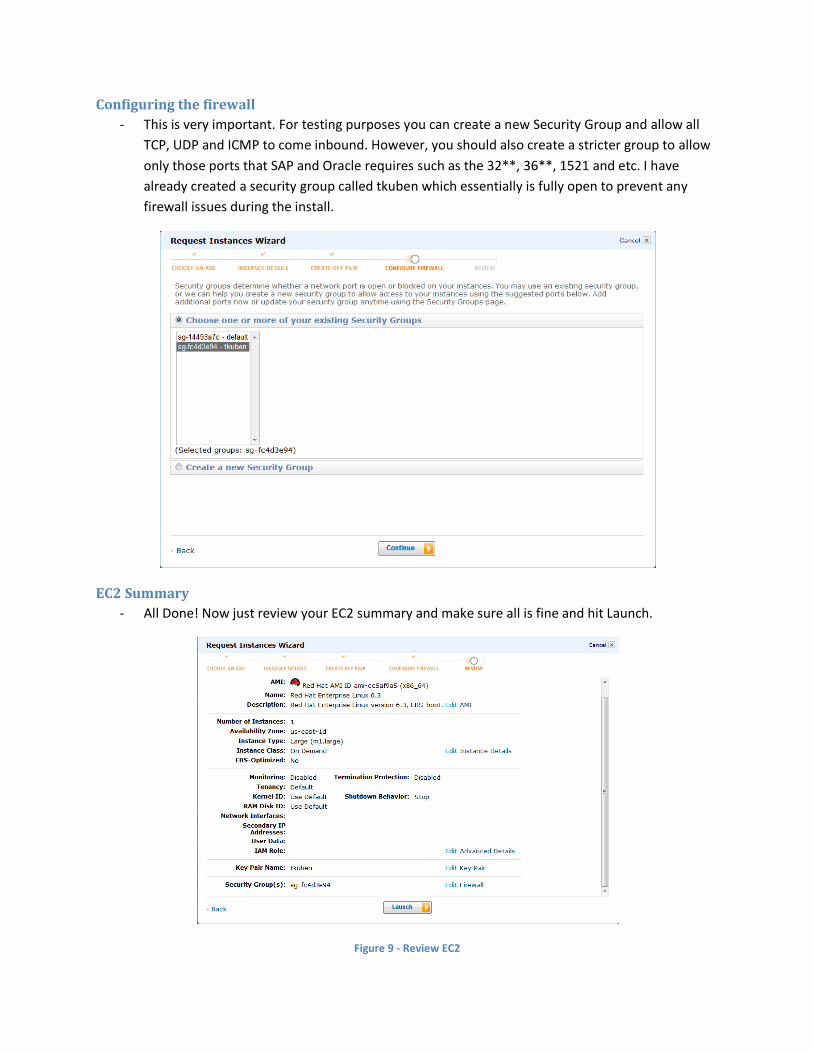
Configuring the firewall
- This is very important. For testing purposes you can create a new Security Group and allow all
TCP, UDP and ICMP to come inbound. However, you should also create a stricter group to allow
only those ports that SAP and Oracle requires such as the 32**, 36**, 1521 and etc. I have
already created a security group called tkuben which essentially is fully open to prevent any
firewall issues during the install.
EC2 Summary
- All Done! Now just review your EC2 summary and make sure all is fine and hit Launch.
Figure 9 - Review EC2

AWS EC2 Dashboard
My Instances
- This interface shows you all the EC2 instances you currently have. As you can see I have 4
instances. The notable instances are the ones with the arrows. You’ll need to create another
windows based instance. There are two reasons you’ll need the windows box.
1. Since Redhat is a console based system, you’ll need to run the sapinst in non GUI mode
and connect the sapgui from your windows box to the linux box to continue with the
installation.
2. You can sit there downloading your SAP media on your local and uploading it to the
server slowly! OR, you can create an EBS Volume with the SAP media, attach it to your
windows box, install the SAP download manager and download all the media to the
attached volume. Once you have the media on the drive, de-attach it from the windows
box and attach it to your linux box and away you go. Please note, you’ll also need to
download the Windows version of the media as well. You will need this to do the GUI
install from the windows box to the linux box.
Figure 10 - My Instances
AWS Volume Management
Volumes
- Volumes are essentially blocks of disks that you can take online/offline between any instances.
So as you can see, this can be quite useful when you want to share media between multiple
machines. Its best to create a volume to contain all your Media files. Based on Figure 11, we
have used the 50 GB volume as a a Media Drive. We had already mounted this to a windows
instance and downloaded the SAP Linux Media to it. The 20 GB, we are using as a /tmp location

to boost the /tmp dir. The 100 GB drive, we’ll use to split it 60/40 for SAP instance/Oracle
Instance respectively.
Figure 11 - Volumes
Attaching a Volume
- The following figure shows how to attach a particular volume to an instance. Note: that this is
where setting the same Zone is mandatory. You cannot allocate a volume to instance that is in a
different zone. Also, you might need to adjust the Device from /dev/sdg to another device if the
one defaulted to is already in use. Once attached, it will take a few seconds to actually attach to
the machine.
Figure 12 - Attaching a Volume
NTFS Volumes on Linux
- By Default, the RedHat instance will not allow you to mount an NTFS partition let alone edit files
within it. Thus, you’ll need to install the ntfs-3g package to allow to mount the device. Figure 13
shows how to add the repo and use yum to install the ntfs-3g package on your RedHat instance.
In short, you’ll need to run:
rpm -Uvh http://dl.fedoraproject.org/pub/epel/6/x86_64/epel-release-6-7.noarch.rpm yum install dkms ntfs-3g
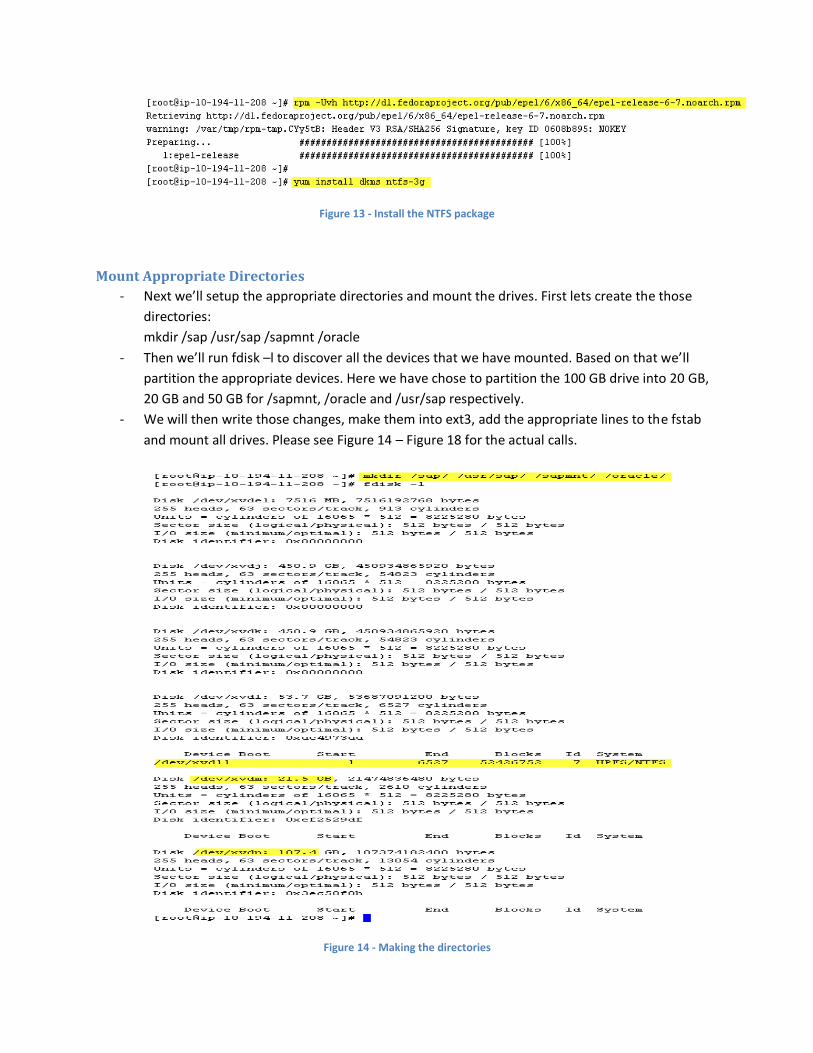
Figure 13 - Install the NTFS package
Mount Appropriate Directories
- Next we’ll setup the appropriate directories and mount the drives. First lets create the those
directories:
mkdir /sap /usr/sap /sapmnt /oracle
- Then we’ll run fdisk –l to discover all the devices that we have mounted. Based on that we’ll
partition the appropriate devices. Here we have chose to partition the 100 GB drive into 20 GB,
20 GB and 50 GB for /sapmnt, /oracle and /usr/sap respectively.
- We will then write those changes, make them into ext3, add the appropriate lines to the fstab
and mount all drives. Please see Figure 14 – Figure 18 for the actual calls.
Figure 14 - Making the directories

Figure 15 - Fdisk Utility to create partitions
Figure 16 - Making the partitions to ext3

Figure 17 - Modify and mount /etc/fstab
/etc/fstab:
/dev/xvdm1 /sap ntfs defaults 0 0
/dev/xvdl1 /oracle ext3 defaults 0 0
/dev/xvdl2 /usr/sap ext3 defaults 0 0
/dev/xvdl3 /sapmnt ext3 defaults 0 0
SwapFile
- We are going to create a 16 GB swap file. While writing this, I had increased the size of the
/sapmnt to 50 GB and we created a swap file within there. To create a swapfile, follow these
commands:
[root@saplinux ~]# dd if=/dev/zero of=/sapmnt/swapfile bs=1024 count=16777216
16777216+0 records in
16777216+0 records out
17179869184 bytes (17 GB) copied, 418.528 s, 41.0 MB/s
[root@saplinux ~]#
[root@saplinux ~]# mkswap /sapmnt/
lost+found/ swapfile
[root@saplinux ~]# mkswap /sapmnt/swapfile
mkswap: /sapmnt/swapfile: warning: don't erase bootbits sectors
on whole disk. Use -f to force.

Setting up swapspace version 1, size = 16777212 KiB
no label, UUID=4d802f71-1921-4e5a-ae21-ffb6ae488eb6
[root@saplinux ~]# chown root:root !$
chown root:root /sapmnt/swapfile
[root@saplinux ~]# swapon /!$
swapon //sapmnt/swapfile
[root@saplinux ~]#
AWS Network Setup
Elastic IP
- For this install, we have created an elastic IP, which is a static public IP that we can use to access
the server. One additional step we had done here is to create a Anchor DNS entry for our IP to
point to saplinux.thusjanthan.com.
Figure 18 - Elastic IP
AWS Tools
- AWS provides a command line interface to updating its services. There are two documents that
you’ll need to follow to set the elastic IP permanently on your machine.
1. http://www.idevelopment.info/data/AWS/AWS_Tips/AWS_Management/AWS_8.shtml
- used to install the AWS Tools
2. http://www.idevelopment.info/data/AWS/AWS_Tips/AWS_Management/AWS_14.sht
ml - used to set the static ip and dns for the linux machine.
Setup Hostname
- With the setup above you’ll probably not need to do this but you’ll still want to set your hosts
file. Set the /etc/hosts file and /etc/sysconfig/network files accordingly:

Figure 19 - Hostname changes
Firewall
- Make sure that the security group on AWS has all ports open for the time being and also disable
the iptables firewall on linux by running: chkconfig iptables off; /etc/init.d/iptables stop
Installation
Oracle Install
User/Group Accounts
groupadd -g 1001 oinstall ## software inventory groupadd -g 1002 dba ## database groupadd -g 1003 oper ## database groupadd -g 1004 asmadmin ## ASM, if needed groupadd -g 1005 asmdba ## ASM, if needed groupadd -g 1006 asmoper ## ASM, if needed useradd -u 1002 -g dba -G dba,oper,asmadmin,asmdba,asmoper orabwd
Environment Variables
Vi /etc/bashrc export DB_SID=BWD export ORACLE_HOSTNAME=saplinux export ORACLE_UNQNAME=DB11G export ORACLE_BASE=/oracle export ORACLE_HOME=$ORACLE_BASE/BWD/11203 export ORACLE_SID=BWD export ORACLE_STAGE=/home/orabwd/database export PATH=/usr/sbin:$PATH; export PATH=$ORACLE_HOME/bin:$PATH
export LD_LIBRARY_PATH=$ORACLE_HOME/lib:/lib:/usr/lib export CLASSPATH=$ORACLE_HOME/jlib:$ORACLE_HOME/rdbms/jlib
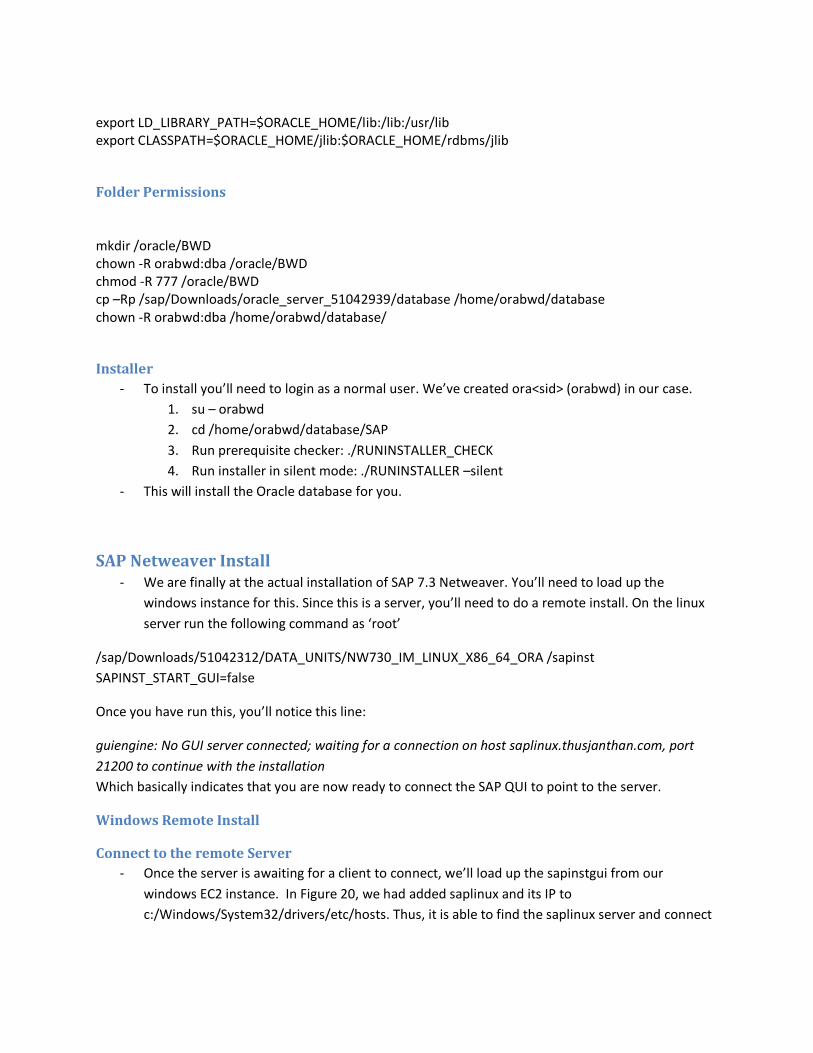
Folder Permissions
mkdir /oracle/BWD chown -R orabwd:dba /oracle/BWD chmod -R 777 /oracle/BWD cp –Rp /sap/Downloads/oracle_server_51042939/database /home/orabwd/database chown -R orabwd:dba /home/orabwd/database/
Installer
- To install you’ll need to login as a normal user. We’ve created ora<sid> (orabwd) in our case.
1. su – orabwd
2. cd /home/orabwd/database/SAP
3. Run prerequisite checker: ./RUNINSTALLER_CHECK
4. Run installer in silent mode: ./RUNINSTALLER –silent
- This will install the Oracle database for you.
SAP Netweaver Install - We are finally at the actual installation of SAP 7.3 Netweaver. You’ll need to load up the
windows instance for this. Since this is a server, you’ll need to do a remote install. On the linux
server run the following command as ‘root’
/sap/Downloads/51042312/DATA_UNITS/NW730_IM_LINUX_X86_64_ORA /sapinst
SAPINST_START_GUI=false
Once you have run this, you’ll notice this line:
guiengine: No GUI server connected; waiting for a connection on host saplinux.thusjanthan.com, port
21200 to continue with the installation
Which basically indicates that you are now ready to connect the SAP QUI to point to the server.
Windows Remote Install
Connect to the remote Server
- Once the server is awaiting for a client to connect, we’ll load up the sapinstgui from our
windows EC2 instance. In Figure 20, we had added saplinux and its IP to
c:/Windows/System32/drivers/etc/hosts. Thus, it is able to find the saplinux server and connect

to the service that is awaiting the connect. Accept the Authentication. Figure 21, shows the
authentication screen which is looking for the root login of the linux server.
Figure 20 - Connect to Remote Server
Figure 21 - Authentication of the Linux Server

Package Selection
- In this screen, we are going to pick which SAP product we are going to install. For our setup, we
are going to install the Standard System
Figure 22 - Package Selection
Parameter Setting
- The parameter mode we wish to install using. Typical option will select many of the default
settings. Whereas the custom mode allows you to configure many aspects of the installation
ranging from ports, domain, drives and etc. For our install, we have chosen custom to show all
the screens that are available to the end user.

Figure 23 - Parameter Setting
SAP System Parameter
- Here you’ll set the SID of the SAP install. The SID is exactly three uppercase alphanumeric unique
character set. The following reserved sets that should not be used:
- ADD ADM ALL AMD AND ANY ARE ASC AUX AVG BIT CDC COM CON DBA END EPS FOR GET GID IBM INT KEY LOG LPT
MAP MAX MIN MON NIX NOT NUL OFF OLD OMS OUT PAD PRN RAW REF ROW SAP SET SGA SHG SID SQL SUM SYS
TMP TOP UID USE USR VAR
Figure 24 - SAP System parameter
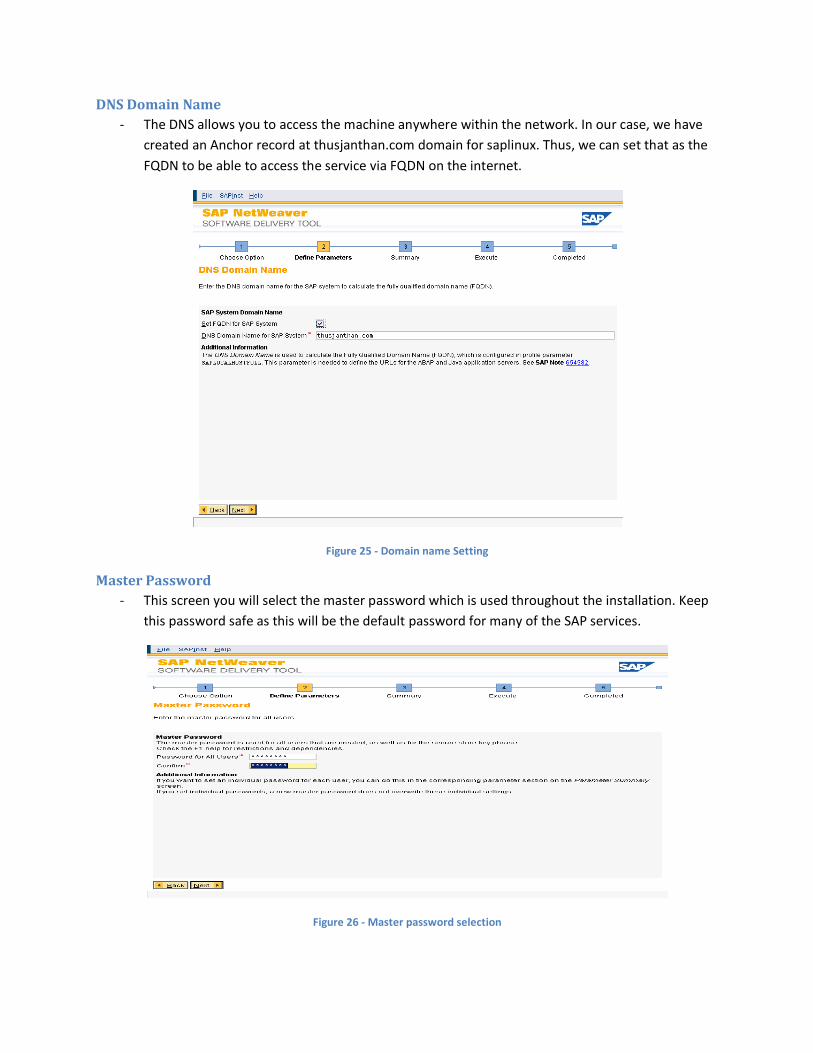
DNS Domain Name
- The DNS allows you to access the machine anywhere within the network. In our case, we have
created an Anchor record at thusjanthan.com domain for saplinux. Thus, we can set that as the
FQDN to be able to access the service via FQDN on the internet.
Figure 25 - Domain name Setting
Master Password
- This screen you will select the master password which is used throughout the installation. Keep
this password safe as this will be the default password for many of the SAP services.
Figure 26 - Master password selection
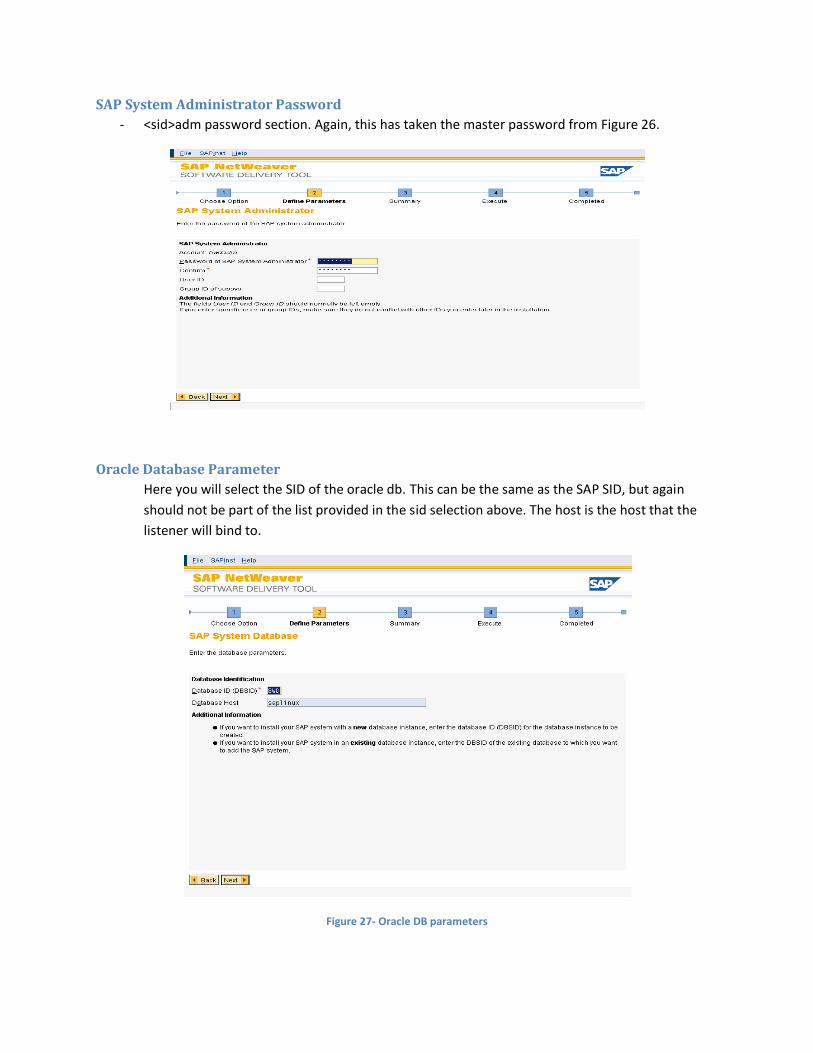
SAP System Administrator Password
- <sid>adm password section. Again, this has taken the master password from Figure 26.
Oracle Database Parameter
Here you will select the SID of the oracle db. This can be the same as the SAP SID, but again
should not be part of the list provided in the sid selection above. The host is the host that the
listener will bind to.
Figure 27- Oracle DB parameters

Prerequisites Checker
- As per SAP, you should keep this file up to date. Always download the latest version of the
prerequisite checker. This will check against system parameters such as SWAP size.
Figure 28 - Prerequisites checker
Media Browser
- The required software packages are detected using the LABEL.ASC. You will want to point to the
NW73 file you downloaded and point to the EXP1 directory.

Oracle Database Schema
- Here you will set the instance RAM and select the Schema for the ABAP stack.
Figure 29 - Oracle DB Schema
Oracle Database Parameters
- Here you can set many of the parameters. Here you’ll notice how we are using Oracle 11.2 with
a 10.2 client on a 64 bit system.
Figure 30 - Oracle Parameter Settings
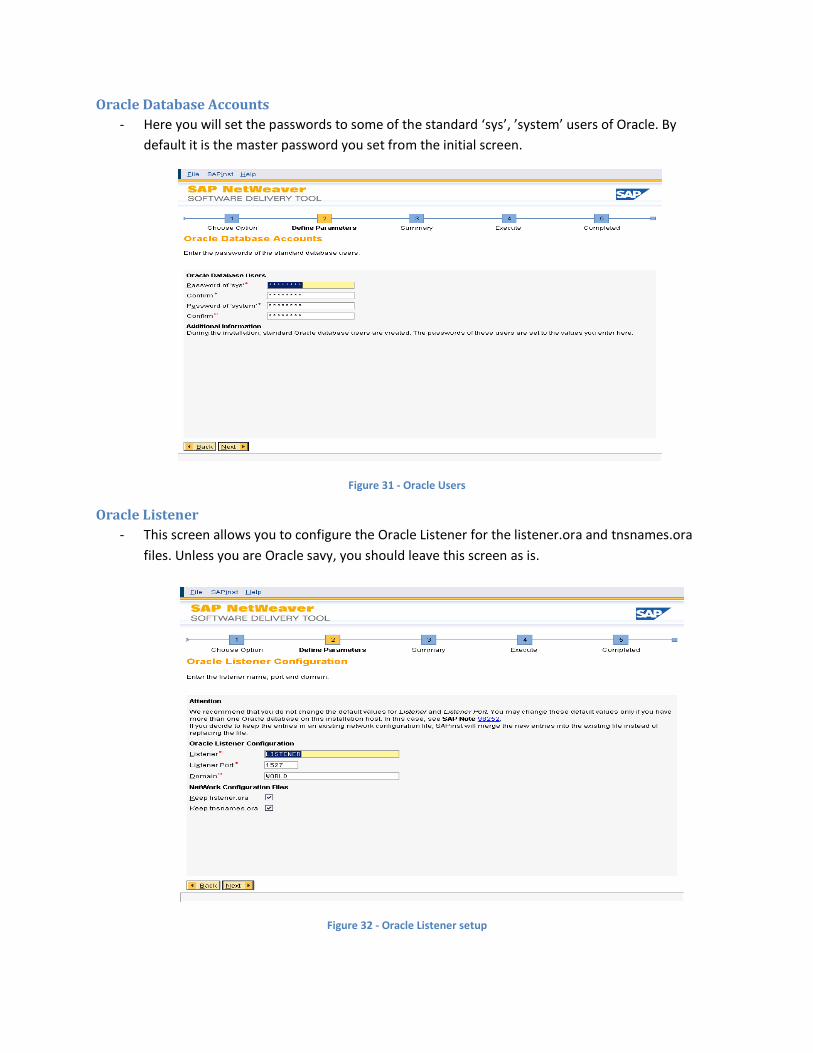
Oracle Database Accounts
- Here you will set the passwords to some of the standard ‘sys’, ’system’ users of Oracle. By
default it is the master password you set from the initial screen.
Figure 31 - Oracle Users
Oracle Listener
- This screen allows you to configure the Oracle Listener for the listener.ora and tnsnames.ora
files. Unless you are Oracle savy, you should leave this screen as is.
Figure 32 - Oracle Listener setup

Database Import Jobs
- This screen allows you to configure how many threads of the CPU to run simultaneously to
import the data into the database. Typically this is 3 jobs. However, if your CPU can handle more
then by all means set this higher as the install will go much faster. Too high, and you’ll be
getting warnings/errors.
Figure 33 - Parallel Jobs
Database Statistics
- Create statistics on the schema to provide caching and faster calls to the database server.
Figure 34 - Database Statistics

PAS & ABAP Instances
- Set the identifier number of the PAS and ABAP instances here. Remember the instances
correlate with the port numbers. In our case, PAS will run on 3600 and ASCS will run on 3601.
Figure 35 - PAS & ABAP Instances
ABAP message Server Ports
- Here you can configure the message server ports
Figure 36 - Message Server Ports

ICM Password
- Set the ICM password. An admin uses the webadm account to interface with the ICM and the
web dispatcher.
Figure 37 - ICM Password
Oracle Client
- Here you will provide the media for the Oracle client. Based on Figure 30, you’ve set the oracle
client version to 10.2. Thus, we will need to provide the client files for the 10.2 version.
-
Figure 38 - Oracle Client 10.2

Unpack Archives
- Unpack the SAR archive files for the client and dba tools.
Figure 39 - Unpack SAR Files for DB
Diagnostics Agent
- A Diagnostics Agent is a standalone Java program that runs on each of the systems managed by
SAP Solution Manager Diagnostics. It gathers information and reports to the SAP Solution
Manager system. Provide a SID for that as well. Generally it is DAA.
Figure 40 - DAA SID

DAA Password
- Defaults to the same as the master password.
Figure 41 - DAA Password
DAA Instance
- By default it will choose the 97 instance as 00 and 01 are taken.
Figure 42 - DAA Instance

System Landscape Directory for Diagnostics
- Register the DAA to an existing SLD or not. We have chosen not to.
Figure 43 - SLD Register
Install Summary
- Here you can customize any of the parameter you have set above before giving the final go
ahead to install.
Figure 44 - Install Summary

Installation Screen
- This is what the installation screen will look like as it continues through each of the install
procedures.
Figure 45 - Install Screen
Related Documents