Welcome message from author
This document is posted to help you gain knowledge. Please leave a comment to let me know what you think about it! Share it to your friends and learn new things together.
Transcript


flast.indd xviiiflast.indd xviii 1/8/2013 10:40:14 AM1/8/2013 10:40:14 AM

Red Hat®
Enterprise Linux® 6 Administration
Real World Skills for Red Hat Administrators
Sander van Vugt
ffirs.indd iffirs.indd i 1/8/2013 10:39:59 AM1/8/2013 10:39:59 AM
Dow
nlo
ad fro
m W
ow
! eBook
<w
ww
.wow
ebook.
com
>

Senior Acquisitions Editor: Jeff KellumDevelopment Editor: Gary SchwartzTechnical Editors: Floris Meester, Erno de KorteProduction Editor: Rebecca AndersonCopy Editor: Kim WimpsettEditorial Manager: Pete GaughanProduction Manager: Tim TateVice President and Executive Group Publisher: Richard SwadleyVice President and Publisher: Neil EddeBook Designer: Judy Fung and Bill GibsonProofreaders: Louise Watson and Jennifer Bennett, Word One New YorkIndexer: J & J IndexingProject Coordinator, Cover: Katherine CrockerCover Designer: Ryan SneedCover Image: © Jacob Wackerhausen / iStockPhotoCopyright © 2013 by John Wiley & Sons, Inc., Indianapolis, Indiana
Published simultaneously in Canada
ISBN: 978-1-118-30129-6ISBN: 978-1-118-62045-8 (ebk.)ISBN: 978-1-118-42143-7 (ebk.)ISBN: 978-1-118-57091-3 (ebk.)
No part of this publication may be reproduced, stored in a retrieval system or transmitted in any form or by any means, electronic, mechanical, photocopying, recording, scanning or otherwise, except as permitted under Sections 107 or 108 of the 1976 United States Copyright Act, without either the prior written permission of the Publisher, or authorization through payment of the appropriate per-copy fee to the Copyright Clearance Center, 222 Rosewood Drive, Danvers, MA 01923, (978) 750-8400, fax (978) 646-8600. Requests to the Publisher for permission should be addressed to the Permissions Department, John Wiley & Sons, Inc., 111 River Street, Hoboken, NJ 07030, (201) 748-6011, fax (201) 748-6008, or online at http://www.wiley.com/go/permissions.
Limit of Liability/Disclaimer of Warranty: The publisher and the author make no representations or warranties with respect to the accuracy or completeness of the contents of this work and specifically disclaim all warranties, including without limitation warranties of fitness for a particular purpose. No warranty may be created or extended by sales or promotional materials. The advice and strategies contained herein may not be suitable for every situation. This work is sold with the understanding that the publisher is not engaged in rendering legal, accounting, or other professional services. If professional assistance is required, the ser-vices of a competent professional person should be sought. Neither the publisher nor the author shall be liable for damages arising herefrom. The fact that an organization or Web site is referred to in this work as a citation and/or a potential source of further information does not mean that the author or the publisher endorses the information the organization or Web site may provide or recommendations it may make. Fur-ther, readers should be aware that Internet Web sites listed in this work may have changed or disappeared between when this work was written and when it is read.
For general information on our other products and services or to obtain technical support, please contact our Customer Care Department within the U.S. at (877) 762-2974, outside the U.S. at (317) 572-3993 or fax (317) 572-4002.
Wiley publishes in a variety of print and electronic formats and by print-on-demand. Some material included with standard print versions of this book may not be included in e-books or in print-on-demand. If this book refers to media such as a CD or DVD that is not included in the version you purchased, you may download this material at http://booksupport.wiley.com. For more information about Wiley products, visit www.wiley.com.
Library of Congress Control Number: 2012954397
TRADEMARKS: Wiley, the Wiley logo, and the Sybex logo are trademarks or registered trademarks of John Wiley & Sons, Inc. and/or its affiliates, in the United States and other countries, and may not be used without written permission. Red Hat is a registered trademark of Red Hat, Inc. Linux is a registered trademark of Linus Torvalds. All other trademarks are the property of their respective owners. John Wiley & Sons, Inc. is not associated with any product or vendor mentioned in this book.
10 9 8 7 6 5 4 3 2 1
ffirs.indd iiffirs.indd ii 1/8/2013 10:40:01 AM1/8/2013 10:40:01 AM

Dear Reader,
Thank you for choosing Red Hat Enterprise Linux 6 Administration: Real World Skills for Red Hat Administrators. This book is part of a family of premium-quality Sybex books, all of which are written by outstanding authors who combine practical experience with a gift for teaching.
Sybex was founded in 1976. More than 30 years later, we’re still committed to producing consistently exceptional books. With each of our titles, we’re working hard to set a new standard for the industry. From the paper we print on to the authors we work with, our goal is to bring you the best books available.
I hope you see all that refl ected in these pages. I’d be very interested to hear your com-ments and get your feedback on how we’re doing. Feel free to let me know what you think about this or any other Sybex book by sending me an email at [email protected]. If you think you’ve found a technical error in this book, please visit http://sybex.custhelp.com. Customer feedback is critical to our efforts at Sybex.
Best regards,
Neil Edde Vice President and Publisher Sybex, an Imprint of Wiley
ffirs.indd iiiffirs.indd iii 1/8/2013 10:40:01 AM1/8/2013 10:40:01 AM

To Florence, my loving wife of 20 years who supports me and believes in
everything I do. Chérie, I’m looking forward to spending the next 60 years
of our lives together.
ffirs.indd ivffirs.indd iv 1/8/2013 10:40:02 AM1/8/2013 10:40:02 AM

About the AuthorSander van Vugt is an author of more than 50 technical books. Most of these books are in his native language of Dutch. Sander is also a technical instructor who works directly for major Linux vendors, such as Red Hat and SUSE. He specializes in high availability and performance issues in Linux. He has also built up a lot of experience in securing serv-ers with SELinux, especially on platforms that don’t support it natively. Sander has applied his skills in helping many companies all over the world who are using Linux. His work has taken him to amazing places like Greenland, Utah, Malaysia, and more.
When not working, Sander likes to spend time with his two sons, Franck and Alex, and his beautiful wife, Florence. He also likes outdoor sports, in particular running, hiking, kayaking, and ice-skating. During these long hours of participating in sports, he thinks through the ideas for his next book and the projects on which he is currently working, which makes the actual writing process a lot easier and the project go more smoothly.
ffirs.indd vffirs.indd v 1/8/2013 10:40:02 AM1/8/2013 10:40:02 AM

AcknowledgmentsBooks of this size and depth succeed because of all the hard work put in by a team of pro-fessionals. I’m grateful for all the hard work put in by several people at Sybex on this proj-ect. Gary Schwartz was a great developmental editor. He helped keep things on track and provided excellent editorial guidance. The technical editors, Floris Meester and Erno de Korte, provided insightful input throughout the book. I appreciated the meticulous atten-tion to detail provided by Rebecca Anderson, the production editor for this book. Last, but certainly not least, I want to thank Jeff Kellum, the acquisitions editor, for having the faith in me to write this book for Sybex.
ffirs.indd viffirs.indd vi 1/8/2013 10:40:02 AM1/8/2013 10:40:02 AM
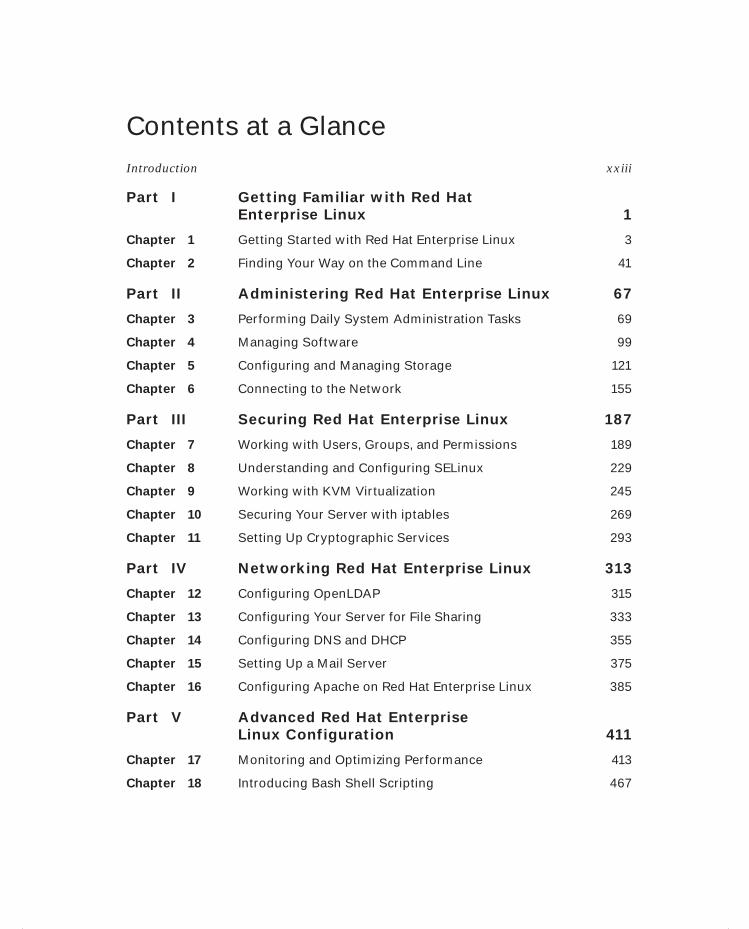
Contents at a GlanceIntroduction xxiii
Part I Getting Familiar with Red Hat Enterprise Linux 1
Chapter 1 Getting Started with Red Hat Enterprise Linux 3
Chapter 2 Finding Your Way on the Command Line 41
Part II Administering Red Hat Enterprise Linux 67
Chapter 3 Performing Daily System Administration Tasks 69
Chapter 4 Managing Software 99
Chapter 5 Configuring and Managing Storage 121
Chapter 6 Connecting to the Network 155
Part III Securing Red Hat Enterprise Linux 187
Chapter 7 Working with Users, Groups, and Permissions 189
Chapter 8 Understanding and Configuring SELinux 229
Chapter 9 Working with KVM Virtualization 245
Chapter 10 Securing Your Server with iptables 269
Chapter 11 Setting Up Cryptographic Services 293
Part IV Networking Red Hat Enterprise Linux 313
Chapter 12 Configuring OpenLDAP 315
Chapter 13 Configuring Your Server for File Sharing 333
Chapter 14 Configuring DNS and DHCP 355
Chapter 15 Setting Up a Mail Server 375
Chapter 16 Configuring Apache on Red Hat Enterprise Linux 385
Part V Advanced Red Hat Enterprise Linux Configuration 411
Chapter 17 Monitoring and Optimizing Performance 413
Chapter 18 Introducing Bash Shell Scripting 467
ffirs.indd viiffirs.indd vii 1/8/2013 10:40:02 AM1/8/2013 10:40:02 AM

Chapter 19 Understanding and Troubleshooting the Boot Procedure 505
Chapter 20 Introducing High-Availability Clustering 529
Chapter 21 Setting Up an Installation Server 561
Appendix A Hands-On Labs 577
Appendix B Answers to Hands-On Labs 589
Glossary 607
Index 625
ffirs.indd viiiffirs.indd viii 1/8/2013 10:40:02 AM1/8/2013 10:40:02 AM

ContentsIntroduction xxiii
Part I Getting Familiar with Red Hat Enterprise Linux 1
Chapter 1 Getting Started with Red Hat Enterprise Linux 3
Linux, Open Source, and Red Hat 4Origins of Linux 4Distributions 5Fedora 6
Red Hat Enterprise Linux and Related Products 7Red Hat Enterprise Linux Server Edition 7Red Hat Enterprise Linux Workstation Edition 8Red Hat Add-Ons 8Red Hat Directory Server 9Red Hat Enterprise Virtualization 9JBoss Enterprise Middleware 9Red Hat Cloud 9
Installing Red Hat Enterprise Linux Server 9Exploring the GNOME User Interface 33
Exploring the Applications Menu 34Exploring the Places Menu 35Exploring the System Menu 36
Summary 39
Chapter 2 Finding Your Way on the Command Line 41
Working with the Bash Shell 42Getting the Best of Bash 42Useful Bash Key Sequences 43Working with Bash History 44
Performing Basic File System Management Tasks 45Working with Directories 45Working with Files 46
Piping and Redirection 50Piping 50Redirection 51
ftoc.indd ixftoc.indd ix 1/8/2013 10:38:40 AM1/8/2013 10:38:40 AM
Dow
nlo
ad fro
m W
ow
! eBook
<w
ww
.wow
ebook.
com
>

x Contents
Finding Files 55Working with an Editor 56
Vi Modes 57Saving and Quitting 57Cut, Copy, and Paste 58Deleting Text 58Replacing Text 58Using sed for the Replacement of Text 59
Getting Help 61Using man to Get Help 61Using the --help Option 65Getting Information on Installed Packages 65
Summary 66
Part II Administering Red Hat Enterprise Linux 67
Chapter 3 Performing Daily System Administration Tasks 69
Performing Job Management Tasks 70System and Process Monitoring and Management 72
Managing Processes with ps 73Sending Signals to Processes with the kill Command 74Using top to Show Current System Activity 76Managing Process Niceness 80
Scheduling Jobs 82Mounting Devices 83Working with Links 87Creating Backups 88Managing Printers 89Setting Up System Logging 91
Setting Up Rsyslog 92Common Log Files 94Setting Up Logrotate 96
Summary 98
Chapter 4 Managing Software 99
Understanding RPM 100Understanding Meta Package Handlers 101
Creating Your Own Repositories 103Managing Repositories 104RHN and Satellite 106
Installing Software with Yum 109Querying Software 115Extracting Files from RPM Packages 118Summary 119
ftoc.indd xftoc.indd x 1/8/2013 10:38:40 AM1/8/2013 10:38:40 AM
Contents xi
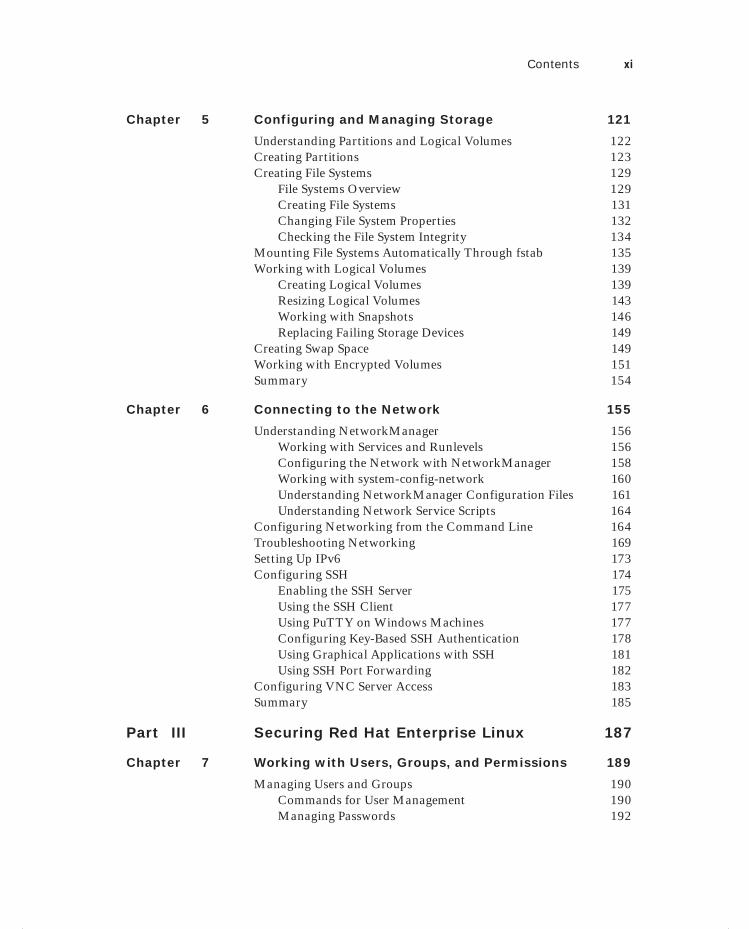
Chapter 5 Configuring and Managing Storage 121
Understanding Partitions and Logical Volumes 122Creating Partitions 123Creating File Systems 129
File Systems Overview 129Creating File Systems 131Changing File System Properties 132Checking the File System Integrity 134
Mounting File Systems Automatically Through fstab 135Working with Logical Volumes 139
Creating Logical Volumes 139Resizing Logical Volumes 143Working with Snapshots 146Replacing Failing Storage Devices 149
Creating Swap Space 149Working with Encrypted Volumes 151Summary 154
Chapter 6 Connecting to the Network 155
Understanding NetworkManager 156Working with Services and Runlevels 156Configuring the Network with NetworkManager 158Working with system-config-network 160Understanding NetworkManager Configuration Files 161Understanding Network Service Scripts 164
Configuring Networking from the Command Line 164Troubleshooting Networking 169Setting Up IPv6 173Configuring SSH 174
Enabling the SSH Server 175Using the SSH Client 177Using PuTTY on Windows Machines 177Configuring Key-Based SSH Authentication 178Using Graphical Applications with SSH 181Using SSH Port Forwarding 182
Configuring VNC Server Access 183Summary 185
Part III Securing Red Hat Enterprise Linux 187
Chapter 7 Working with Users, Groups, and Permissions 189
Managing Users and Groups 190Commands for User Management 190Managing Passwords 192
ftoc.indd xiftoc.indd xi 1/8/2013 10:38:40 AM1/8/2013 10:38:40 AM

xii Contents
Modifying and Deleting User Accounts 193Behind the Commands: Configuration Files 194Creating Groups 198
Using Graphical Tools for User and Group Management 201
Using External Authentication Sources 203Understanding the Authentication Process 208
Understanding sssd 208Understanding nsswitch 209
Understanding Pluggable Authentication Modules 210Managing Permissions 212
Understanding the Role of Ownership 212Basic Permissions: Read, Write, and Execute 214Advanced Permissions 216Working with Access Control Lists 220Setting Default Permissions with umask 225Working with Attributes 226
Summary 227
Chapter 8 Understanding and Configuring SELinux 229
Understanding SELinux 230What Is SELinux? 231Understanding the Type Context 231
Selecting the SELinux Mode 233Working with SELinux Context Types 235Configuring SELinux Policies 237Working with SELinux Modules 238Setting Up SELinux with system-config-selinux 239Troubleshooting SELinux 239Summary 244
Chapter 9 Working with KVM Virtualization 245
Understanding the KVM Virtualization Architecture 246Red Hat KVM Virtualization 246Red Hat Enterprise Virtualization 247
Preparing Your Host for KVM Virtualization 248Installing a KVM Virtual Machine 249Managing KVM Virtual Machines 255
Managing Virtual Machines with Virtual Machine Manager 256
Managing Virtual Machines from the virsh Interface 262
Understanding KVM Networking 263Summary 268
ftoc.indd xiiftoc.indd xii 1/8/2013 10:38:40 AM1/8/2013 10:38:40 AM
Contents xiii
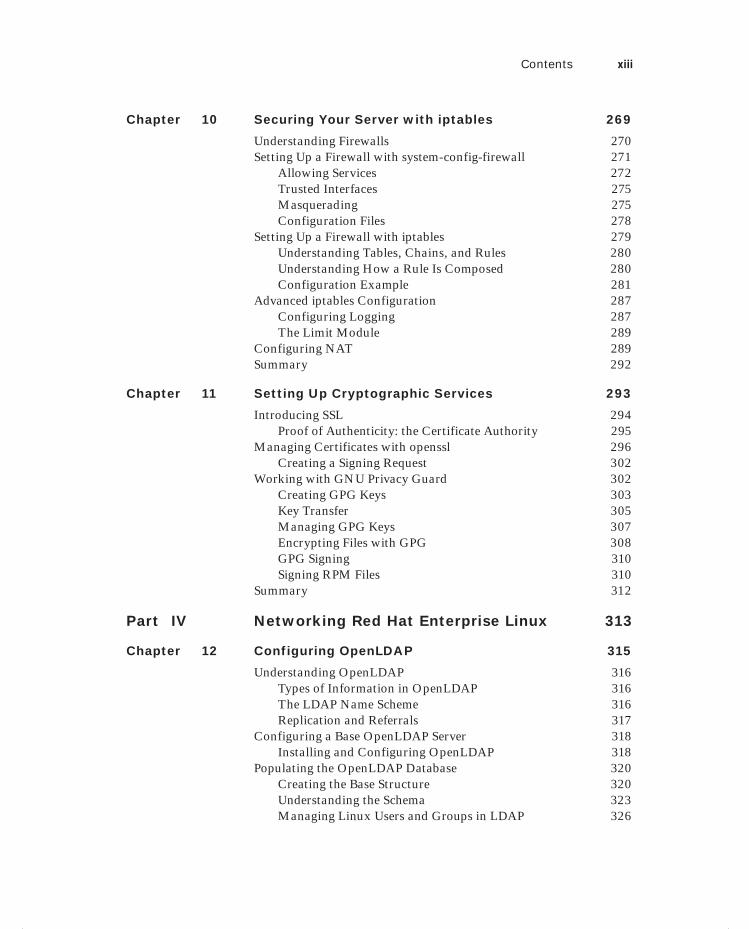
Chapter 10 Securing Your Server with iptables 269
Understanding Firewalls 270Setting Up a Firewall with system-config-firewall 271
Allowing Services 272Trusted Interfaces 275Masquerading 275Configuration Files 278
Setting Up a Firewall with iptables 279Understanding Tables, Chains, and Rules 280Understanding How a Rule Is Composed 280Configuration Example 281
Advanced iptables Configuration 287Configuring Logging 287The Limit Module 289
Configuring NAT 289Summary 292
Chapter 11 Setting Up Cryptographic Services 293
Introducing SSL 294Proof of Authenticity: the Certificate Authority 295
Managing Certificates with openssl 296Creating a Signing Request 302
Working with GNU Privacy Guard 302Creating GPG Keys 303Key Transfer 305Managing GPG Keys 307Encrypting Files with GPG 308GPG Signing 310Signing RPM Files 310
Summary 312
Part IV Networking Red Hat Enterprise Linux 313
Chapter 12 Configuring OpenLDAP 315
Understanding OpenLDAP 316Types of Information in OpenLDAP 316The LDAP Name Scheme 316Replication and Referrals 317
Configuring a Base OpenLDAP Server 318Installing and Configuring OpenLDAP 318
Populating the OpenLDAP Database 320Creating the Base Structure 320Understanding the Schema 323Managing Linux Users and Groups in LDAP 326
ftoc.indd xiiiftoc.indd xiii 1/8/2013 10:38:40 AM1/8/2013 10:38:40 AM
xiv Contents
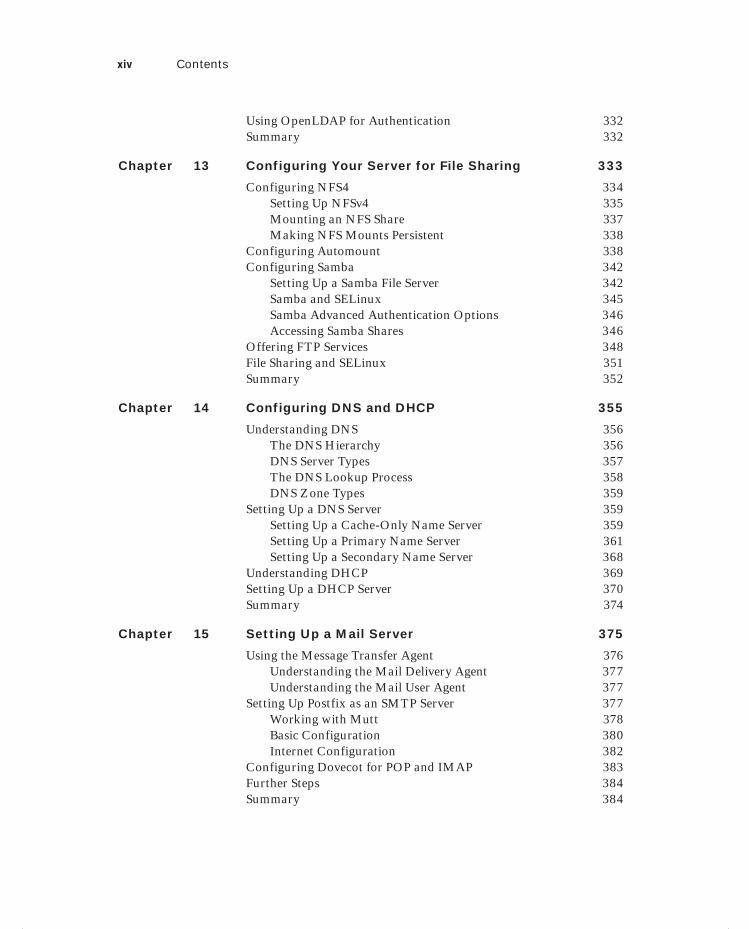
Using OpenLDAP for Authentication 332Summary 332
Chapter 13 Configuring Your Server for File Sharing 333
Configuring NFS4 334Setting Up NFSv4 335Mounting an NFS Share 337Making NFS Mounts Persistent 338
Configuring Automount 338Configuring Samba 342
Setting Up a Samba File Server 342Samba and SELinux 345Samba Advanced Authentication Options 346Accessing Samba Shares 346
Offering FTP Services 348File Sharing and SELinux 351Summary 352
Chapter 14 Configuring DNS and DHCP 355
Understanding DNS 356The DNS Hierarchy 356DNS Server Types 357The DNS Lookup Process 358DNS Zone Types 359
Setting Up a DNS Server 359Setting Up a Cache-Only Name Server 359Setting Up a Primary Name Server 361Setting Up a Secondary Name Server 368
Understanding DHCP 369Setting Up a DHCP Server 370Summary 374
Chapter 15 Setting Up a Mail Server 375
Using the Message Transfer Agent 376Understanding the Mail Delivery Agent 377Understanding the Mail User Agent 377
Setting Up Postfix as an SMTP Server 377Working with Mutt 378Basic Configuration 380Internet Configuration 382
Configuring Dovecot for POP and IMAP 383Further Steps 384Summary 384
ftoc.indd xivftoc.indd xiv 1/8/2013 10:38:40 AM1/8/2013 10:38:40 AM
Contents xv
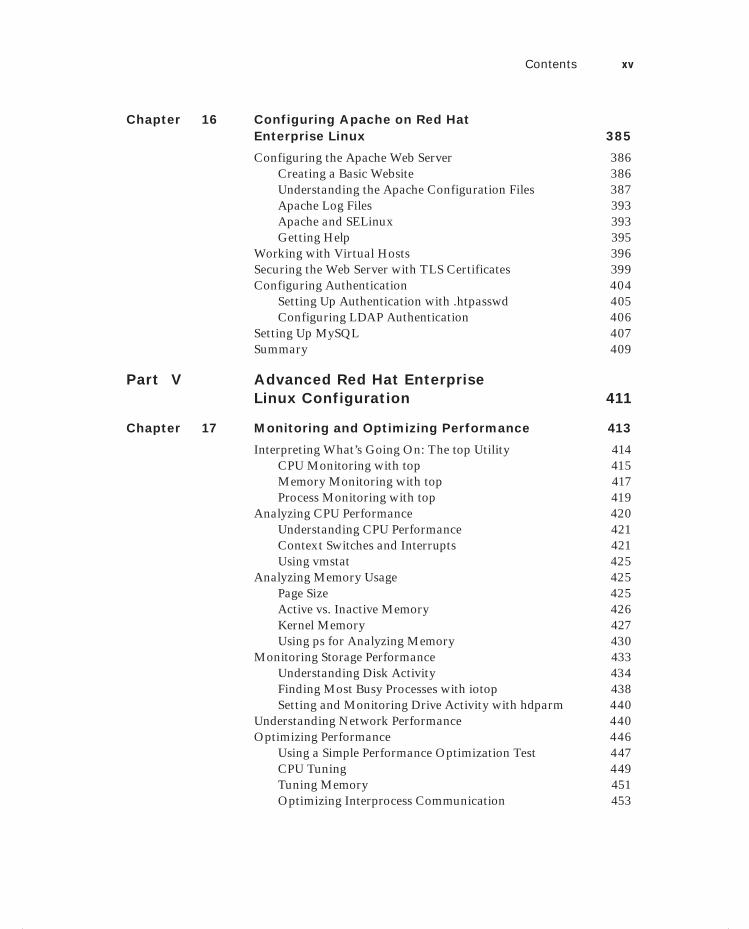
Chapter 16 Configuring Apache on Red Hat Enterprise Linux 385
Configuring the Apache Web Server 386Creating a Basic Website 386Understanding the Apache Configuration Files 387Apache Log Files 393Apache and SELinux 393Getting Help 395
Working with Virtual Hosts 396Securing the Web Server with TLS Certificates 399Configuring Authentication 404
Setting Up Authentication with .htpasswd 405Configuring LDAP Authentication 406
Setting Up MySQL 407Summary 409
Part V Advanced Red Hat Enterprise Linux Configuration 411
Chapter 17 Monitoring and Optimizing Performance 413
Interpreting What’s Going On: The top Utility 414CPU Monitoring with top 415Memory Monitoring with top 417Process Monitoring with top 419
Analyzing CPU Performance 420Understanding CPU Performance 421Context Switches and Interrupts 421Using vmstat 425
Analyzing Memory Usage 425Page Size 425Active vs. Inactive Memory 426Kernel Memory 427Using ps for Analyzing Memory 430
Monitoring Storage Performance 433Understanding Disk Activity 434Finding Most Busy Processes with iotop 438Setting and Monitoring Drive Activity with hdparm 440
Understanding Network Performance 440Optimizing Performance 446
Using a Simple Performance Optimization Test 447CPU Tuning 449Tuning Memory 451Optimizing Interprocess Communication 453
ftoc.indd xvftoc.indd xv 1/8/2013 10:38:40 AM1/8/2013 10:38:40 AM

xvi Contents
Tuning Storage Performance 455Network Tuning 459Optimizing Linux Performance Using cgroups 464
Summary 466
Chapter 18 Introducing Bash Shell Scripting 467
Getting Started 468Elements of a Good Shell Script 468Executing the Script 471
Working with Variables and Input 472Understanding Variables 472Variables, Subshells, and Sourcing 474Working with Script Arguments 476Asking for Input 480Using Command Substitution 482Substitution Operators 483Changing Variable Content with Pattern Matching 485
Performing Calculations 489Using Control Structures 491
Using if...then...else 493Using case 496Using while 498Using until 499Using for 500
Summary 503
Chapter 19 Understanding and Troubleshooting the Boot Procedure 505
Introduction to Troubleshooting the Boot Procedure 506
Configuring Booting with GRUB 507Understanding the grub.conf Configuration File 507Changing Boot Options 510Using the GRUB Command Line 513Reinstalling GRUB 514GRUB behind the Scenes 514
Common Kernel Management Tasks 516Analyzing Availability of Kernel Modules 517Loading and Unloading Kernel Modules 518Loading Kernel Modules with Specific Options 519Upgrading the Kernel 521
Configuring Service Startup with Upstart 521Basic Red Hat Enterprise Linux Troubleshooting 524Summary 527
ftoc.indd xviftoc.indd xvi 1/8/2013 10:38:40 AM1/8/2013 10:38:40 AM

Contents xvii
Chapter 20 Introducing High-Availability Clustering 529
Understanding High-Availability Clustering 530The Workings of High Availability 530High-Availability Requirements 531Red Hat High-Availability Add-on Software
Components 534Configuring Cluster-Based Services 535
Setting Up Bonding 535Setting Up Shared Storage 537
Installing the Red Hat High Availability Add-On 541Building the Initial State of the Cluster 542Configuring Additional Cluster Properties 546Configuring a Quorum Disk 549Setting Up Fencing 551
Creating Resources and Services 554Troubleshooting a Nonoperational Cluster 558
Configuring GFS2 File Systems 559Summary 560
Chapter 21 Setting Up an Installation Server 561
Configuring a Network Server As an Installation Server 562Setting Up a TFTP and DHCP Server for PXE Boot 563
Installing the TFTP Server 564Configuring DHCP for PXE Boot 565Creating the TFTP PXE Server Content 565
Creating a Kickstart File 568Using a Kickstart File to Perform an Automated
Installation 568Modifying the Kickstart File with
system-config-kickstart 570Making Manual Modifications to the Kickstart File 573
Summary 576
Appendix A Hands-On Labs 577
Appendix B Answers to Hands-On Labs 589
Glossary 607
Index 625
ftoc.indd xviiftoc.indd xvii 1/8/2013 10:38:40 AM1/8/2013 10:38:40 AM

flast.indd xviiiflast.indd xviii 1/8/2013 10:40:14 AM1/8/2013 10:40:14 AM

Table of ExercisesExercise 1.1 Installing Linux on Your Machine . . . . . . . . . . . . . . . . . . . . . . . . . . . . . . . . . 11
Exercise 2.1 Discovering the Use of Pipes. . . . . . . . . . . . . . . . . . . . . . . . . . . . . . . . . . . . . 50
Exercise 2.2 Using grep in Pipes. . . . . . . . . . . . . . . . . . . . . . . . . . . . . . . . . . . . . . . . . . . . . 51
Exercise 2.3 Redirecting Output to a File. . . . . . . . . . . . . . . . . . . . . . . . . . . . . . . . . . . . . . 51
Exercise 2.4 Using Redirection of STDIN. . . . . . . . . . . . . . . . . . . . . . . . . . . . . . . . . . . . . . 52
Exercise 2.5 Separating STDERR from STDOUT . . . . . . . . . . . . . . . . . . . . . . . . . . . . . . . 53
Exercise 2.6 Replacing Text with vi . . . . . . . . . . . . . . . . . . . . . . . . . . . . . . . . . . . . . . . . . . 59
Exercise 2.7 Working with man -k. . . . . . . . . . . . . . . . . . . . . . . . . . . . . . . . . . . . . . . . . . . . 64
Exercise 3.1 Managing Jobs . . . . . . . . . . . . . . . . . . . . . . . . . . . . . . . . . . . . . . . . . . . . . . . . 71
Exercise 3.2 Managing Processes with ps and kill . . . . . . . . . . . . . . . . . . . . . . . . . . . . . . 75
Exercise 3.3 Using nice to Change Process Priority . . . . . . . . . . . . . . . . . . . . . . . . . . . . . 80
Exercise 3.4 Running a Task from cron . . . . . . . . . . . . . . . . . . . . . . . . . . . . . . . . . . . . . . . 83
Exercise 3.5 Mounting a USB Flash Drive . . . . . . . . . . . . . . . . . . . . . . . . . . . . . . . . . . . . . 86
Exercise 3.6 Creating Links . . . . . . . . . . . . . . . . . . . . . . . . . . . . . . . . . . . . . . . . . . . . . . . . . 88
Exercise 3.7 Archiving and Extracting with tar . . . . . . . . . . . . . . . . . . . . . . . . . . . . . . . . . 89
Exercise 3.8 Configuring Logging. . . . . . . . . . . . . . . . . . . . . . . . . . . . . . . . . . . . . . . . . . . . 97
Exercise 4.1 Setting Up Your Own Repository . . . . . . . . . . . . . . . . . . . . . . . . . . . . . . . . 103
Exercise 4.2 Working with yum. . . . . . . . . . . . . . . . . . . . . . . . . . . . . . . . . . . . . . . . . . . . . 105
Exercise 4.3 Installing Software with yum . . . . . . . . . . . . . . . . . . . . . . . . . . . . . . . . . . . 115
Exercise 4.4 Finding More Information About Installed Software . . . . . . . . . . . . . . . . 118
Exercise 4.5 Extracting Files from RPM Packages . . . . . . . . . . . . . . . . . . . . . . . . . . . . . 119
Exercise 5.1 Creating Partitions . . . . . . . . . . . . . . . . . . . . . . . . . . . . . . . . . . . . . . . . . . . . 124
Exercise 5.2 Creating a File System . . . . . . . . . . . . . . . . . . . . . . . . . . . . . . . . . . . . . . . . . 131
Exercise 5.3 Setting a File System Label . . . . . . . . . . . . . . . . . . . . . . . . . . . . . . . . . . . . . 134
Exercise 5.4 Mounting Devices Through /etc/fstab . . . . . . . . . . . . . . . . . . . . . . . . . . . . 137
Exercise 5.5 Fixing /etc/fstab Problems. . . . . . . . . . . . . . . . . . . . . . . . . . . . . . . . . . . . . . 138
Exercise 5.6 Creating LVM Logical Volumes . . . . . . . . . . . . . . . . . . . . . . . . . . . . . . . . . . 140
Exercise 5.7 Extending a Logical Volume . . . . . . . . . . . . . . . . . . . . . . . . . . . . . . . . . . . . 144
Exercise 5.8 Extending a Volume Group . . . . . . . . . . . . . . . . . . . . . . . . . . . . . . . . . . . . . 145
Exercise 5.9 Reducing a Logical Volume . . . . . . . . . . . . . . . . . . . . . . . . . . . . . . . . . . . . . 146
Exercise 5.10 Managing Snapshots . . . . . . . . . . . . . . . . . . . . . . . . . . . . . . . . . . . . . . . . . . 147
Exercise 5.11 Creating a Swap File . . . . . . . . . . . . . . . . . . . . . . . . . . . . . . . . . . . . . . . . . . . 150
Exercise 5.12 Creating an Encrypted Device . . . . . . . . . . . . . . . . . . . . . . . . . . . . . . . . . . . 152
flast.indd xixflast.indd xix 1/8/2013 10:40:14 AM1/8/2013 10:40:14 AM
Dow
nlo
ad fro
m W
ow
! eBook
<w
ww
.wow
ebook.
com
>
xx Table of Exercises
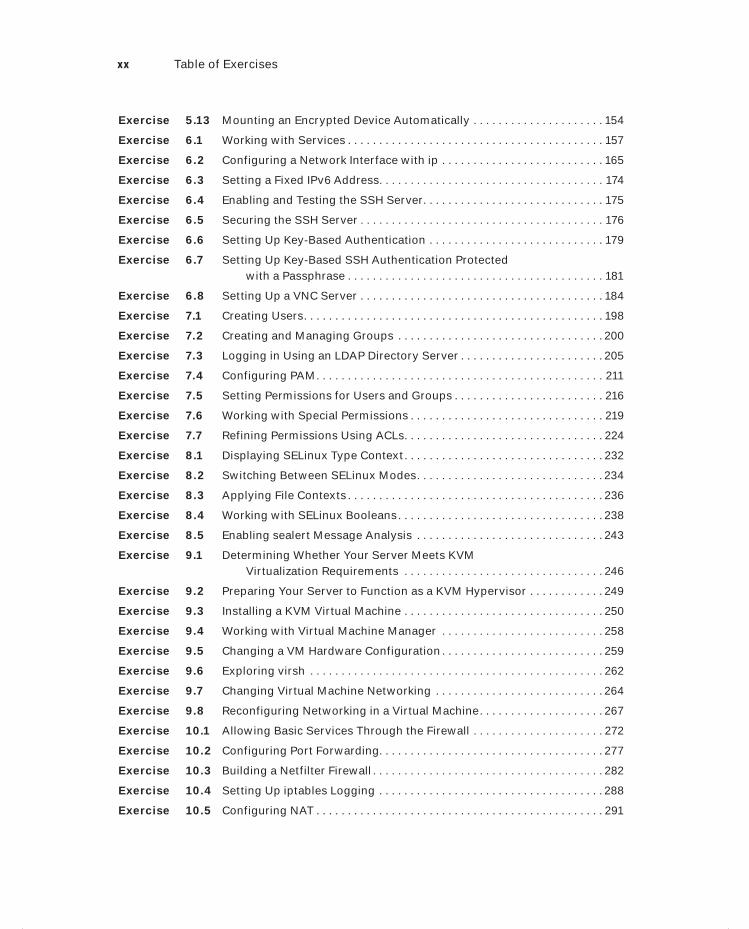
Exercise 5.13 Mounting an Encrypted Device Automatically . . . . . . . . . . . . . . . . . . . . . 154
Exercise 6.1 Working with Services . . . . . . . . . . . . . . . . . . . . . . . . . . . . . . . . . . . . . . . . . 157
Exercise 6.2 Configuring a Network Interface with ip . . . . . . . . . . . . . . . . . . . . . . . . . . 165
Exercise 6.3 Setting a Fixed IPv6 Address. . . . . . . . . . . . . . . . . . . . . . . . . . . . . . . . . . . . 174
Exercise 6.4 Enabling and Testing the SSH Server. . . . . . . . . . . . . . . . . . . . . . . . . . . . . 175
Exercise 6.5 Securing the SSH Server . . . . . . . . . . . . . . . . . . . . . . . . . . . . . . . . . . . . . . . 176
Exercise 6.6 Setting Up Key-Based Authentication . . . . . . . . . . . . . . . . . . . . . . . . . . . . 179
Exercise 6.7 Setting Up Key-Based SSH Authentication Protected with a Passphrase . . . . . . . . . . . . . . . . . . . . . . . . . . . . . . . . . . . . . . . . . 181
Exercise 6.8 Setting Up a VNC Server . . . . . . . . . . . . . . . . . . . . . . . . . . . . . . . . . . . . . . . 184
Exercise 7.1 Creating Users. . . . . . . . . . . . . . . . . . . . . . . . . . . . . . . . . . . . . . . . . . . . . . . . 198
Exercise 7.2 Creating and Managing Groups . . . . . . . . . . . . . . . . . . . . . . . . . . . . . . . . . 200
Exercise 7.3 Logging in Using an LDAP Directory Server . . . . . . . . . . . . . . . . . . . . . . . 205
Exercise 7.4 Configuring PAM. . . . . . . . . . . . . . . . . . . . . . . . . . . . . . . . . . . . . . . . . . . . . . 211
Exercise 7.5 Setting Permissions for Users and Groups . . . . . . . . . . . . . . . . . . . . . . . . 216
Exercise 7.6 Working with Special Permissions . . . . . . . . . . . . . . . . . . . . . . . . . . . . . . . 219
Exercise 7.7 Refining Permissions Using ACLs. . . . . . . . . . . . . . . . . . . . . . . . . . . . . . . . 224
Exercise 8.1 Displaying SELinux Type Context. . . . . . . . . . . . . . . . . . . . . . . . . . . . . . . . 232
Exercise 8.2 Switching Between SELinux Modes. . . . . . . . . . . . . . . . . . . . . . . . . . . . . . 234
Exercise 8.3 Applying File Contexts . . . . . . . . . . . . . . . . . . . . . . . . . . . . . . . . . . . . . . . . . 236
Exercise 8.4 Working with SELinux Booleans. . . . . . . . . . . . . . . . . . . . . . . . . . . . . . . . . 238
Exercise 8.5 Enabling sealert Message Analysis . . . . . . . . . . . . . . . . . . . . . . . . . . . . . . 243
Exercise 9.1 Determining Whether Your Server Meets KVM Virtualization Requirements . . . . . . . . . . . . . . . . . . . . . . . . . . . . . . . . 246
Exercise 9.2 Preparing Your Server to Function as a KVM Hypervisor . . . . . . . . . . . . 249
Exercise 9.3 Installing a KVM Virtual Machine . . . . . . . . . . . . . . . . . . . . . . . . . . . . . . . . 250
Exercise 9.4 Working with Virtual Machine Manager . . . . . . . . . . . . . . . . . . . . . . . . . . 258
Exercise 9.5 Changing a VM Hardware Configuration . . . . . . . . . . . . . . . . . . . . . . . . . . 259
Exercise 9.6 Exploring virsh . . . . . . . . . . . . . . . . . . . . . . . . . . . . . . . . . . . . . . . . . . . . . . . 262
Exercise 9.7 Changing Virtual Machine Networking . . . . . . . . . . . . . . . . . . . . . . . . . . . 264
Exercise 9.8 Reconfiguring Networking in a Virtual Machine. . . . . . . . . . . . . . . . . . . . 267
Exercise 10.1 Allowing Basic Services Through the Firewall . . . . . . . . . . . . . . . . . . . . . 272
Exercise 10.2 Configuring Port Forwarding. . . . . . . . . . . . . . . . . . . . . . . . . . . . . . . . . . . . 277
Exercise 10.3 Building a Netfilter Firewall . . . . . . . . . . . . . . . . . . . . . . . . . . . . . . . . . . . . . 282
Exercise 10.4 Setting Up iptables Logging . . . . . . . . . . . . . . . . . . . . . . . . . . . . . . . . . . . . 288
Exercise 10.5 Configuring NAT . . . . . . . . . . . . . . . . . . . . . . . . . . . . . . . . . . . . . . . . . . . . . . 291
flast.indd xxflast.indd xx 1/8/2013 10:40:14 AM1/8/2013 10:40:14 AM

Table of Exercises xxi
Exercise 11.1 Creating a Self-signed Certificate . . . . . . . . . . . . . . . . . . . . . . . . . . . . . . . . 298
Exercise 11.2 Creating and Exchanging GPG Keys. . . . . . . . . . . . . . . . . . . . . . . . . . . . . . 306
Exercise 11.3 Encrypting and Decrypting Files. . . . . . . . . . . . . . . . . . . . . . . . . . . . . . . . . 309
Exercise 11.4 Signing RPM Packages with GPG Keys . . . . . . . . . . . . . . . . . . . . . . . . . . . 311
Exercise 12.1 Changing the Base LDAP Configuration . . . . . . . . . . . . . . . . . . . . . . . . . . 319
Exercise 12.2 Creating the Base LDAP Directory Structure. . . . . . . . . . . . . . . . . . . . . . . 323
Exercise 12.3 Installing the Schema File for DHCP. . . . . . . . . . . . . . . . . . . . . . . . . . . . . . 324
Exercise 12.4 Creating an LDAP User. . . . . . . . . . . . . . . . . . . . . . . . . . . . . . . . . . . . . . . . . 329
Exercise 12.5 Adding an LDAP Group . . . . . . . . . . . . . . . . . . . . . . . . . . . . . . . . . . . . . . . . 330
Exercise 13.1 Creating NFS Shares . . . . . . . . . . . . . . . . . . . . . . . . . . . . . . . . . . . . . . . . . . 336
Exercise 13.2 Mounting an NFS Share . . . . . . . . . . . . . . . . . . . . . . . . . . . . . . . . . . . . . . . . 337
Exercise 13.3 Using /net to Access an NFS Share . . . . . . . . . . . . . . . . . . . . . . . . . . . . . . 339
Exercise 13.4 Creating an Automount Indirect Map. . . . . . . . . . . . . . . . . . . . . . . . . . . . . 340
Exercise 13.5 Creating an Automount Configuration for Home Directories . . . . . . . . . 341
Exercise 13.6 Setting Up a Samba Server . . . . . . . . . . . . . . . . . . . . . . . . . . . . . . . . . . . . . 344
Exercise 13.7 Setting SELinux Labels for Samba . . . . . . . . . . . . . . . . . . . . . . . . . . . . . . . 345
Exercise 13.8 Mounting a Samba Share Using /etc/fstab . . . . . . . . . . . . . . . . . . . . . . . . 348
Exercise 13.9 Enabling an Anonymous FTP Server . . . . . . . . . . . . . . . . . . . . . . . . . . . . . 351
Exercise 14.1 Configuring a Cache-Only Name Server . . . . . . . . . . . . . . . . . . . . . . . . . . 360
Exercise 14.2 Setting Up a Primary DNS Server. . . . . . . . . . . . . . . . . . . . . . . . . . . . . . . . 367
Exercise 14.3 Setting Up a DHCP Server . . . . . . . . . . . . . . . . . . . . . . . . . . . . . . . . . . . . . . 374
Exercise 15.1 Getting to Know Mutt. . . . . . . . . . . . . . . . . . . . . . . . . . . . . . . . . . . . . . . . . . 378
Exercise 15.2 Sending a Message to an External User . . . . . . . . . . . . . . . . . . . . . . . . . . 379
Exercise 15.3 Opening Your Mail Server for External Mail . . . . . . . . . . . . . . . . . . . . . . . 381
Exercise 15.4 Creating a Base Dovecot Configuration . . . . . . . . . . . . . . . . . . . . . . . . . . . 383
Exercise 16.1 Creating a Basic Website . . . . . . . . . . . . . . . . . . . . . . . . . . . . . . . . . . . . . . . 386
Exercise 16.2 Configuring SELinux for Apache. . . . . . . . . . . . . . . . . . . . . . . . . . . . . . . . . 394
Exercise 16.3 Installing and Using the Apache Documentation . . . . . . . . . . . . . . . . . . . 396
Exercise 16.4 Configuring Virtual Hosts . . . . . . . . . . . . . . . . . . . . . . . . . . . . . . . . . . . . . . 397
Exercise 16.5 Setting Up an SSL-Based Virtual Host . . . . . . . . . . . . . . . . . . . . . . . . . . . . 401
Exercise 16.6 Setting Up a Protected Web Server . . . . . . . . . . . . . . . . . . . . . . . . . . . . . . 406
Exercise 16.7 Installing MySQL and Creating User Accounts. . . . . . . . . . . . . . . . . . . . . 407
Exercise 17.1 Monitoring Buffer and Cache Memory . . . . . . . . . . . . . . . . . . . . . . . . . . . 418
Exercise 17.2 Analyzing CPU Performance . . . . . . . . . . . . . . . . . . . . . . . . . . . . . . . . . . . . 420
Exercise 17.3 Analyzing Kernel Memory . . . . . . . . . . . . . . . . . . . . . . . . . . . . . . . . . . . . . . 430
flast.indd xxiflast.indd xxi 1/8/2013 10:40:14 AM1/8/2013 10:40:14 AM
xxii Table of Exercises
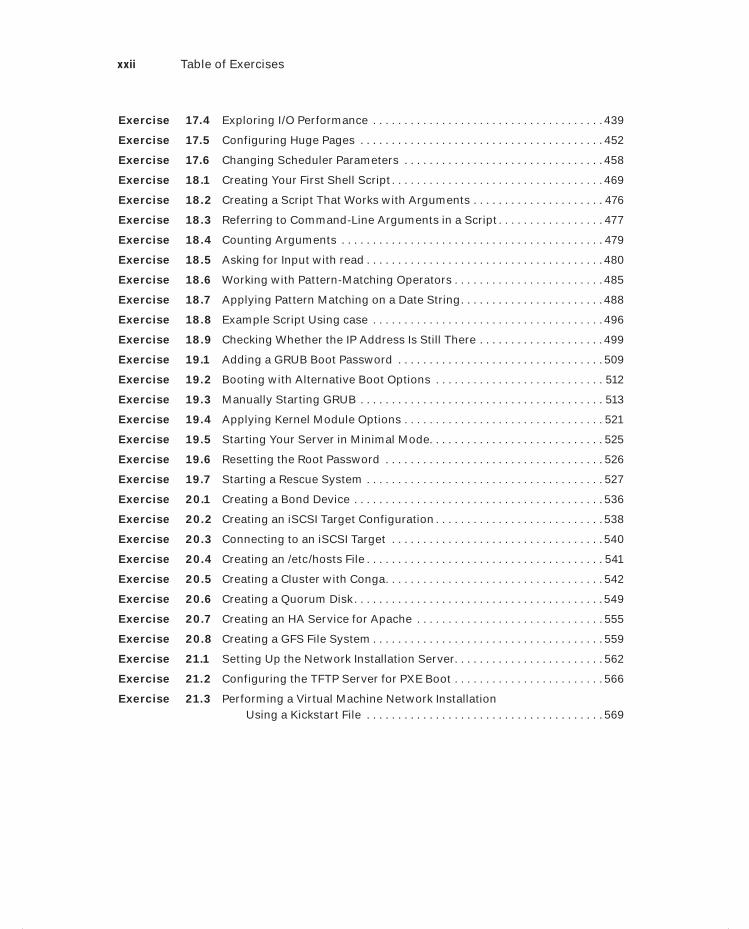
Exercise 17.4 Exploring I/O Performance . . . . . . . . . . . . . . . . . . . . . . . . . . . . . . . . . . . . . 439
Exercise 17.5 Configuring Huge Pages . . . . . . . . . . . . . . . . . . . . . . . . . . . . . . . . . . . . . . . 452
Exercise 17.6 Changing Scheduler Parameters . . . . . . . . . . . . . . . . . . . . . . . . . . . . . . . . 458
Exercise 18.1 Creating Your First Shell Script . . . . . . . . . . . . . . . . . . . . . . . . . . . . . . . . . . 469
Exercise 18.2 Creating a Script That Works with Arguments . . . . . . . . . . . . . . . . . . . . . 476
Exercise 18.3 Referring to Command-Line Arguments in a Script . . . . . . . . . . . . . . . . . 477
Exercise 18.4 Counting Arguments . . . . . . . . . . . . . . . . . . . . . . . . . . . . . . . . . . . . . . . . . . 479
Exercise 18.5 Asking for Input with read . . . . . . . . . . . . . . . . . . . . . . . . . . . . . . . . . . . . . . 480
Exercise 18.6 Working with Pattern-Matching Operators . . . . . . . . . . . . . . . . . . . . . . . . 485
Exercise 18.7 Applying Pattern Matching on a Date String. . . . . . . . . . . . . . . . . . . . . . . 488
Exercise 18.8 Example Script Using case . . . . . . . . . . . . . . . . . . . . . . . . . . . . . . . . . . . . . 496
Exercise 18.9 Checking Whether the IP Address Is Still There . . . . . . . . . . . . . . . . . . . . 499
Exercise 19.1 Adding a GRUB Boot Password . . . . . . . . . . . . . . . . . . . . . . . . . . . . . . . . . 509
Exercise 19.2 Booting with Alternative Boot Options . . . . . . . . . . . . . . . . . . . . . . . . . . . 512
Exercise 19.3 Manually Starting GRUB . . . . . . . . . . . . . . . . . . . . . . . . . . . . . . . . . . . . . . . 513
Exercise 19.4 Applying Kernel Module Options . . . . . . . . . . . . . . . . . . . . . . . . . . . . . . . . 521
Exercise 19.5 Starting Your Server in Minimal Mode. . . . . . . . . . . . . . . . . . . . . . . . . . . . 525
Exercise 19.6 Resetting the Root Password . . . . . . . . . . . . . . . . . . . . . . . . . . . . . . . . . . . 526
Exercise 19.7 Starting a Rescue System . . . . . . . . . . . . . . . . . . . . . . . . . . . . . . . . . . . . . . 527
Exercise 20.1 Creating a Bond Device . . . . . . . . . . . . . . . . . . . . . . . . . . . . . . . . . . . . . . . . 536
Exercise 20.2 Creating an iSCSI Target Configuration . . . . . . . . . . . . . . . . . . . . . . . . . . . 538
Exercise 20.3 Connecting to an iSCSI Target . . . . . . . . . . . . . . . . . . . . . . . . . . . . . . . . . . 540
Exercise 20.4 Creating an /etc/hosts File . . . . . . . . . . . . . . . . . . . . . . . . . . . . . . . . . . . . . . 541
Exercise 20.5 Creating a Cluster with Conga. . . . . . . . . . . . . . . . . . . . . . . . . . . . . . . . . . . 542
Exercise 20.6 Creating a Quorum Disk . . . . . . . . . . . . . . . . . . . . . . . . . . . . . . . . . . . . . . . . 549
Exercise 20.7 Creating an HA Service for Apache . . . . . . . . . . . . . . . . . . . . . . . . . . . . . . 555
Exercise 20.8 Creating a GFS File System . . . . . . . . . . . . . . . . . . . . . . . . . . . . . . . . . . . . . 559
Exercise 21.1 Setting Up the Network Installation Server. . . . . . . . . . . . . . . . . . . . . . . . 562
Exercise 21.2 Configuring the TFTP Server for PXE Boot . . . . . . . . . . . . . . . . . . . . . . . . 566
Exercise 21.3 Performing a Virtual Machine Network Installation Using a Kickstart File . . . . . . . . . . . . . . . . . . . . . . . . . . . . . . . . . . . . . . 569
flast.indd xxiiflast.indd xxii 1/8/2013 10:40:15 AM1/8/2013 10:40:15 AM

IntroductionRed Hat is the number-one Linux vendor on the planet. Even though offi cial fi gures have never been released, as the fi rst open source, one-billion dollar company, Red Hat is quite successful in enterprise Linux. More and more companies are installing Red Hat servers every day, and with that, there’s an increasing need for Red Hat skills. That is why I wrote this book.
This book is a complete guide that contains real-world examples of how Red Hat Enterprise Linux should be administered. It targets a broad audience of both beginning and advanced Red Hat Enterprise Linux administrators who need a reference guide to learn how to perform complicated tasks.
This book was also written as a study guide, which is why there are many exercises included in the book. Within each chapter, you’ll fi nd step-by-step exercises that lead you through specifi c procedures. Also, in Appendix A at the end of the book, you’ll fi nd lab exercises that help you wrap up everything you’ve learned in the chapter.
Red Hat offers two certifi cations that are relevant for system administrators: Red Hat Certifi ed System Administrator (RHCSA) and Red Hat Certifi ed Engineer (RHCE). This book does not prepare for either the Red Hat RHCSA or RHCE exams, but it does cover most of the objectives of both exams. For those interested in taking RHCSA and RHCE exams, it is recommended that you also attend a Red Hat training course, where the learner risks meeting the author of this book who has been a Red Hat Certifi ed Instructor for many years now.
Who Should Read This Book?This book was written for Red Hat administrators. The book is for beginning administra-tors as well as those who already have a couple of years of experience working with Red Hat systems. For the advanced administrators, it is written as a reference guide that helps them set up services such as web servers, DNS and DHCP, clustering, and more. It also contains advanced information, such as a long chapter on performance optimization.
What You Need
To work with this book, you need a dedicated computer on which you can install Red Hat Enterprise Linux. If this is not feasible, a virtual machine can be used as an alternative, however this is absolutely not recommended, as you won’t be able to do all the exercises on virtualization. To install Red Hat Enterprise Linux and use it as a host for KVM virtualiza-tion, make sure that your computer meets the following minimum criteria:
64-bit CPU with support for virtualization.
At least 2GB of RAM is recommended. (It will probably work with 1GB, but this is not recommended.)
flast.indd xxiiiflast.indd xxiii 1/8/2013 10:40:15 AM1/8/2013 10:40:15 AM

xxiv Introduction
A DVD drive.
A hard disk that is completely available and at least 40GB in size.
A network card and connection to a network switch.
What Is Covered in This Book?Red Hat Linux Enterprise 6 Administration is organized to provide the knowledge that you’ll need to administer Red Hat Enterprise Linux 6. It includes the following chapters:
Part I: Getting Familiar with Red Hat Enterprise Linux
Chapter 1, “Getting Started with Red Hat Enterprise Linux” This chapter introduces Red Hat Enterprise Linux and explains its particulars. You’ll also learn about the value added by this commercial Linux distribution as compared to free Linux distributions. In the sec-ond part of this chapter, you’ll learn how to install Red Hat Enterprise Linux. You’ll also get a quick introduction to the workings of the graphical user interface.
Chapter 2, “Finding Your Way on the Command Line” This chapter introduces you to working on the command line, the most important interface you’ll use to manage your Red Hat Enterprise Linux server.
Part II: Administering Red Hat Enterprise Linux
Chapter 3, “Performing Daily System Administration Tasks” In this chapter, you’ll learn about some common system administration tasks. This includes mounting and unmount-ing fi le systems, setting up and managing a printing environment, and scheduling jobs with cron. You’ll also learn how to do process administration and make backups.
Chapter 4, “Managing Software” In this chapter, you’ll learn how to install software. You’ll also read how to manage software, which includes querying software packages to fi nd out everything you need to know about installed software. You’ll also read how to set up the repositories that you’ll need for an easy way to install and manage software.
Chapter 5, “Configuring and Managing Storage” This chapter teaches you how to set up storage. It includes information about managing partitions, logical volumes, and encrypted volumes. You’ll also learn how to set up automatic mounting of volumes through fstab and how to create and manage swap space.
Chapter 6, “Connecting to the Network” Here you’ll learn how to connect your server to the network. The chapter addresses setting up the network interface, both from the com-mand line and from the confi guration fi les. You’ll set up normal network connections, and you will also learn how to create a bonded network interface. Finally, you’ll learn how to test your network using common utilities such as ping and dig.
flast.indd xxivflast.indd xxiv 1/8/2013 10:40:15 AM1/8/2013 10:40:15 AM
Introduction xxv
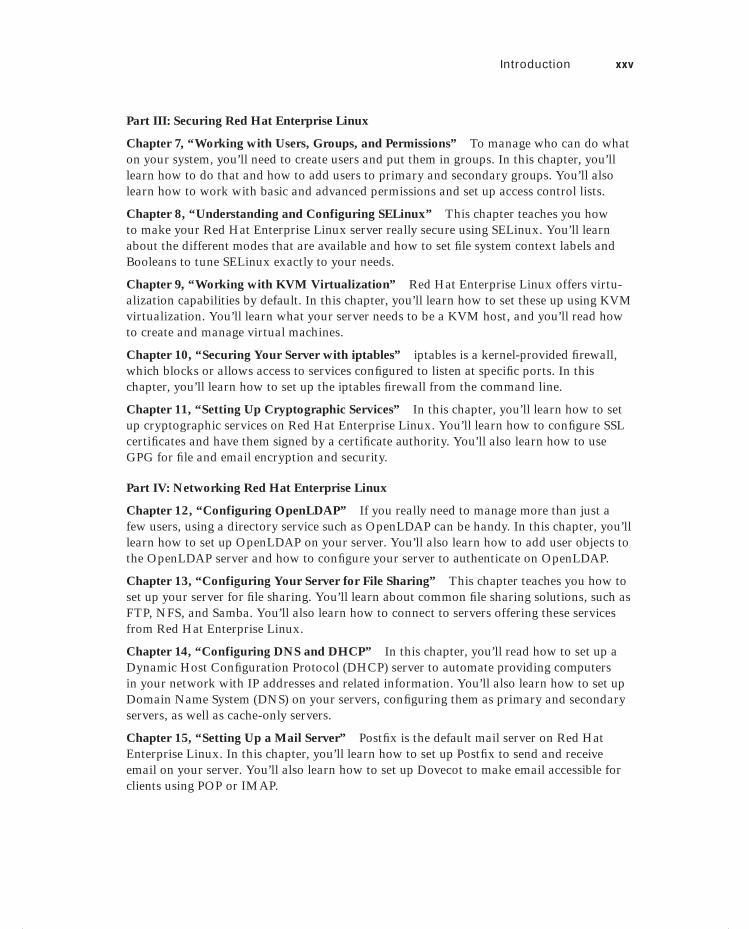
Part III: Securing Red Hat Enterprise Linux
Chapter 7, “Working with Users, Groups, and Permissions” To manage who can do what on your system, you’ll need to create users and put them in groups. In this chapter, you’ll learn how to do that and how to add users to primary and secondary groups. You’ll also learn how to work with basic and advanced permissions and set up access control lists.
Chapter 8, “Understanding and Configuring SELinux” This chapter teaches you how to make your Red Hat Enterprise Linux server really secure using SELinux. You’ll learn about the different modes that are available and how to set fi le system context labels and Booleans to tune SELinux exactly to your needs.
Chapter 9, “Working with KVM Virtualization” Red Hat Enterprise Linux offers virtu-alization capabilities by default. In this chapter, you’ll learn how to set these up using KVM virtualization. You’ll learn what your server needs to be a KVM host, and you’ll read how to create and manage virtual machines.
Chapter 10, “Securing Your Server with iptables” iptables is a kernel-provided fi rewall, which blocks or allows access to services confi gured to listen at specifi c ports. In this chapter, you’ll learn how to set up the iptables fi rewall from the command line.
Chapter 11, “Setting Up Cryptographic Services” In this chapter, you’ll learn how to set up cryptographic services on Red Hat Enterprise Linux. You’ll learn how to confi gure SSL certifi cates and have them signed by a certifi cate authority. You’ll also learn how to use GPG for fi le and email encryption and security.
Part IV: Networking Red Hat Enterprise Linux
Chapter 12, “Configuring OpenLDAP” If you really need to manage more than just a few users, using a directory service such as OpenLDAP can be handy. In this chapter, you’ll learn how to set up OpenLDAP on your server. You’ll also learn how to add user objects to the OpenLDAP server and how to confi gure your server to authenticate on OpenLDAP.
Chapter 13, “Configuring Your Server for File Sharing” This chapter teaches you how to set up your server for fi le sharing. You’ll learn about common fi le sharing solutions, such as FTP, NFS, and Samba. You’ll also learn how to connect to servers offering these services from Red Hat Enterprise Linux.
Chapter 14, “Configuring DNS and DHCP” In this chapter, you’ll read how to set up a Dynamic Host Confi guration Protocol (DHCP) server to automate providing computers in your network with IP addresses and related information. You’ll also learn how to set up Domain Name System (DNS) on your servers, confi guring them as primary and secondary servers, as well as cache-only servers.
Chapter 15, “Setting Up a Mail Server” Postfi x is the default mail server on Red Hat Enterprise Linux. In this chapter, you’ll learn how to set up Postfi x to send and receive email on your server. You’ll also learn how to set up Dovecot to make email accessible for clients using POP or IMAP.
flast.indd xxvflast.indd xxv 1/8/2013 10:40:15 AM1/8/2013 10:40:15 AM
xxvi Introduction
Chapter 16, “Configuring Apache on Red Hat Enterprise Linux” In this chapter, you’ll learn how to set up Apache on your server. You’ll learn how to confi gure basic hosts, virtual hosts, and SSL secured hosts. The chapter also teaches you how to set up fi le-based or LDAP-based user authentication.
Part V: Advanced Red Hat Enterprise Linux Configuration
Chapter 17, “Monitoring and Optimizing Performance” For your server to function prop-erly, it is important that it performs well. In this chapter, you’ll learn how to analyze server performance and how to fi x it if there are problems. You’ll also read some hints about setting up the server in a way that minimizes the chance of having performance-related problems.
Chapter 18, “Introducing Bash Shell Scripting” Every Linux administrator should at least know the basics of shell scripting. This chapter teaches you how it works. You’ll learn how to set up a shell script and how to use common shell scripting structures to handle jobs in the most ideal manner.
Chapter 19, “Understanding and Troubleshooting the Boot Procedure” Many tasks are executed sequentially when your server boots. In this chapter, you’ll learn about everything that happens during server startup, including GRUB confi guration and the way Upstart is used. You’ll also learn how to troubleshoot common issues that you may encounter while booting your server.
Chapter 20, “Introducing High-Availability Clustering” In a mission-critical environ-ment, the Red Hat High Availability add-on can be a valuable addition to your datacen-ter. In this chapter, you’ll learn how to design and set up high availability on Red Hat Enterprise Linux.
Chapter 21, “Setting Up an Installation Server” In a datacenter environment, you don’t want to set up every server manually. This is why it makes sense to set up an installation server. This chapter teaches you how to automate the installation of Red Hat Enterprise Linux completely. It includes setting up a network installation server and confi guring a TFTP server that hands out boot images to clients that perform a PXE boot. You’ll also learn how to create a kickstart confi guration fi le, which passes all parameters that are to be used for the installation.
Glossary This contains defi nitions of the relevant vocabulary terms in this book.
How to Contact the AuthorIf you want to provide feedback about the contents of this book or if you’re seeking a helping hand in setting up an environment or fi xing problems, you can contact me directly. The easi-est way to get in touch with me is by sending an email to [email protected]. You can
flast.indd xxviflast.indd xxvi 1/8/2013 10:40:15 AM1/8/2013 10:40:15 AM

Introduction xxvii
also visit my website at www.sandervanvugt.com. If you’re interested in the person behind the book, you’re also more than welcome to visit my hobby site at www.sandervanvugt.org.
Sybex strives to keep you supplied with the latest tools and information you need for your work. Please check their website at www.sybex.com, where we’ll post additional content and updates that supplement this book if the need arises. Enter search terms in the Search box (or type the book’s ISBN: 978-1-118-30129-6), and click Go to get to the book’s update page.
flast.indd xxviiflast.indd xxvii 1/8/2013 10:40:15 AM1/8/2013 10:40:15 AM

flast.indd xxviiiflast.indd xxviii 1/8/2013 10:40:15 AM1/8/2013 10:40:15 AM
Getting Familiar with Red Hat
Enterprise Linux
PART
I
c01.indd 1c01.indd 1 1/7/2013 5:43:16 PM1/7/2013 5:43:16 PM

c01.indd 2c01.indd 2 1/7/2013 5:43:18 PM1/7/2013 5:43:18 PM
Getting Started with Red Hat Enterprise Linux
TOPICS COVERED IN THIS CHAPTER:
Linux, Open Source, and Red Hat
Red Hat Enterprise Linux and Related Products
Installing Red Hat Enterprise Linux Server
Exploring the GNOME User Interface
Chapter
1
c01.indd 3c01.indd 3 1/7/2013 5:43:18 PM1/7/2013 5:43:18 PM
Red Hat Enterprise Linux is in use at most Fortune 500 com-panies, and it takes care of mission-critical tasks in many of them. This chapter introduces Red Hat Enterprise Linux. It
begins with a brief history, where you’ll learn about Linux in general and the role of Red Hat in the Linux story. Following that, it provides an overview of Red Hat Enterprise Linux (RHEL) and its related products. Finally, you’ll learn how to install RHEL so that you can start building your RHEL skills.
Linux, Open Source, and Red HatIf you want to work with Red Hat, it helps to understand a little bit about its background. In this introduction, you’ll learn about the rise of UNIX, the Linux kernel and open source, and the founding of Red Hat.
Origins of Linux
The late 1960s and early 1970s were the dawn of the modern computing era. It was the period of proprietary stacks, where a vendor would build a “closed” computer system and create the operating software to run on it. Computers were extremely expensive and rare among businesses. In that period, scientists were still looking for the best way to operate a computer, and that included developing the best programming language. It was normal for computer programmers to address the hardware directly, using very complex assembly pro-gramming languages.
An important step forward was the development of the general-purpose programming language C by Dennis Richie at Bell Telephone Laboratories in 1969. This language was developed for use with the UNIX operating system.
The UNIX operating system was the fi rst operating system where people from different companies tried to work together to build instead of competing with each other, keeping their efforts secret. This spirit brought UNIX to scientifi c, government, and higher-education institutions. There it also became the basis for the rise of another phenomenon, the Internet Protocol (IP) and the Internet. One of the huge contributors to the success of UNIX was the spirit of openness of the operating system. Everyone could contribute to it, and the specifi cations were freely available to anyone.
c01.indd 4c01.indd 4 1/7/2013 5:43:19 PM1/7/2013 5:43:19 PM
Linux, Open Source, and Red Hat 5
Because of the huge success of UNIX, companies started claiming parts of this operat-ing system in the 1970s. They succeeded fairly well, and that was the beginning of the development of different fl avors of UNIX, such as BSD, Sun Solaris, and HP AIX. Instead of working together, these UNIX fl avors worked beside one another, with each sponsoring organization trying to develop the best version for a specifi c solution.
As a reaction to the closing of UNIX, Richard Stallman of MIT announced in 1984 the GNU operating system project. The goal of this project was to develop “a suffi cient body of free software [...] to get along without any software that is not free.”
During the 1980s, many common Unix commands, tools, and applications were devel-oped until, in 1991, the last gap was fi lled in with the launch of the Linux kernel by a stu-dent at the University of Helsinki in Finland, Linus Torvalds. The interesting fact about the Linux kernel is that it was never developed to be part of the GNU project. Rather, it was an independent initiative. Torvalds just needed a license to ensure that the Linux kernel would be free software forever, and he chose to use the GNU General Public License (GPL) for this purpose. The GPL is a copyleft license, which means that derived works can be distrib-uted only under the same license terms. Using GPL made it possible to publish open source software where others could freely add to or modify lines of code.
Torvalds also made an announcement on Usenet, a very popular news network that was used to communicate information about certain projects in the early 1990s. In his Usenet message, Torvalds asked others to join him working on the Linux kernel, a challenge that was very soon taken up by many programmers around the world.
Distributions
With the adoption of the Linux kernel, fi nally everything that was needed to create a com-plete operating system was in place. There were many GNU utilities to choose from, and those tools, together with a kernel, made a complete operating system. The only thing enthusiastic users still needed to do was to gather this software, compile it from source code, and install the working parts on a computer. Because this was a rather complicated task, some initiatives started soon to provide ready-to-install Linux distributions. Among the fi rst was MCC Interim Linux, a distribution made available for public download in February 1992, shortly after the release of the Linux kernel itself. In 1993, Patrick Volkerding released a distribution called Slackware, a distribution that could be downloaded to fl oppy disk images in the early days. It is still available and actively being developed today.
In 1993, Marc Ewing and Bob Young founded Red Hat, the fi rst Linux distributor operating as a business. Since then, Red Hat has acquired other companies to integrate specifi c Linux-related technologies.
Red Hat went public in 1999, thus becoming the fi rst Linux-based company on Wall Street. Because of the publicity stemming from its IPO, Red Hat and Linux received great exposure, and many companies started using it for their enterprise IT environments. It was
c01.indd 5c01.indd 5 1/7/2013 5:43:19 PM1/7/2013 5:43:19 PM
6 Chapter 1 Getting Started with Red Hat Enterprise Linux
initially used for applications, such as intranet web servers running Apache software. Soon Linux was also used for core fi nancial applications.
Today Linux in general and Red Hat Linux in particular is at the heart of the IT orga-nization in many companies. Large parts of the Internet operate on Linux, using popular applications such as the Apache web server or the Squid proxy server. Stock exchanges use Linux in their real-time calculation systems, and large Linux servers are running essential business applications on top of Oracle and SAP. Linux has largely replaced UNIX, and Red Hat is a leading force in Linux.
One reason why Red Hat has been so successful since the beginning is the level of sup-port the company provides. Red Hat offers three types of support, and this gives companies the confi dence they need to run vital business applications on Linux.
The three types of Linux support provided by Red Hat are as follows:
Hardware Support Red Hat has agreements with every major server hardware vendor to make sure that whatever server a customer buys, the hardware vendor will assist them in fi xing hardware issues, when Red Hat is installed on it.
Software Support Red Hat has agreements with every major enterprise software vendor to make sure that their software runs properly on top of the Red Hat Linux operating system and that the enterprise software is also guaranteed to run on Red Hat Linux by the vendor of the operating system.
Hands-on Support This means that if a customer is experiencing problems accomplish-ing tasks with Red Hat software, the Red Hat Global Support organization is there to help them by fi xing bugs and providing technical assistance.
It is also important to realize that Red Hat is doing much more than just gathering the software pieces and putting them together on the installation media. Red Hat employs hundreds of developers who work on developing new solutions that will run on Red Hat Enterprise Linux in the near future.
Fedora
Even as Red Hat is actively developing software to be part of Red Hat Linux, it still is largely involved in the open source community. The most important approach to do this is by sponsoring the Fedora project. Fedora is a freely available Linux distribution that is completely comprised of open source software, and Red Hat is providing the funds and people to tackle this project. Both Red Hat and Fedora are free of charge; with Red Hat you pay only for updates and support.
Fedora is used as a development platform for the latest and greatest version of Linux, which is provided free of charge for users who are interested. As such, Fedora can be used as a test platform for features that will eventually be included in Red Hat Enterprise Linux. If you want to know what will be included in future versions of Red Hat Linux, Fedora is the best place to look. Also, Fedora makes an excellent choice to install on your personal computer, because it offers all the functions you would expect from a modern operating system—even some functions that are of interest only to home users.
c01.indd 6c01.indd 6 1/7/2013 5:43:19 PM1/7/2013 5:43:19 PM
Red Hat Enterprise Linux and Related Products 7
Red Hat Enterprise Linux and Related ProductsRed Hat offers several products, of which Red Hat Enterprise Linux and JBoss are the most important solutions. There are other offerings in the product catalog as well. In the follow-ing sections, you can read about these products and their typical application.
Red Hat Enterprise Linux Server Edition
The core of the Red Hat offering is Red Hat Enterprise Linux. This is the basis for two editions: a server edition and a workstation edition. The RHEL Server edition is the highly successful Red Hat product that is used in companies around the globe.
At the time of this writing, the current RHEL release is version 6.2.
With the Red Hat Enterprise Linux Server edition, there is a major new release about every three to four years. In between the major updates, there are minor ones, represented by the number after the dot in the version number. Apart from these releases, Red Hat pro-vides patches to fi x bugs and to apply security updates. Typically, these patches are applied by using the Red Hat Network, a certifi ed collection of repositories where Red Hat makes patches available after verifying them.
To download and install repositories from the Red Hat Network (RHN), a current subscription is required. Without a current subscription, you can still run RHEL, but no updates will be installed through RHN. As an alternative to connecting each server directly to RHN, Red Hat provides a solution called Satellite. Satellite works as a proxy to RHN, and just the Satellite server is confi gured to fetch updates from RHN, after which the Red Hat nodes in the network connect to Satellite to access their updates. Be aware that there is also a product called RHN Proxy, which is a real caching proxy, whereas Satellite is a versioning and deployment tool.
Red Hat Enterprise Linux for Free
If you want updates and support, you have to pay for Red Hat Enterprise Linux, so how come people have to buy licenses for GPL software that is supposed to be available for free? Well, the fact is that the sources of all the software in RHEL are indeed available for free. As with any other Linux vendor, Red Hat provides source code for the software in RHEL. What customers typically buy, however, is a subscription to the compiled version of the software that is in RHEL. In the compiled version, the Red Hat logo is included.
c01.indd 7c01.indd 7 1/7/2013 5:43:20 PM1/7/2013 5:43:20 PM
8 Chapter 1 Getting Started with Red Hat Enterprise Linux
This is more than just a logo; it’s the guarantee of quality that customers expect from the leader in Linux software.
Still, the fact is that the sources of the software contained in RHEL are available for free. Some Linux distributions have used these sources to create their own dis-tributions. The two most important distributions are CentOS (short for Community Enterprise Operating System) and Scientifi c Linux. Because these distributions are built upon Red Hat Linux with the Red Hat logo removed, the software is basically the same. However, small binary differences do exist, such as the integration of the software with RHN. The most important difference, however, is that these dis-tributions don’t offer the same level of support as in in RHEL. So, you’re better off going for the real thing.
You can download a free version of RHEL with 30 days of access to RHN at www.redhat.com. Alternatively, you can download CentOS at www.centos.org or Scientifi c Linux at www.scientificlinux.org.
Red Hat Enterprise Linux Workstation Edition
The other product that falls under Red Hat Enterprise Linux is the Workstation edition. This solution is based on the same code as RHEL Server. Also, the same license conditions apply for RHEL Workstation as for RHEL Server, and you need a current subscription to access and install updates from RHN. To date, Red Hat Linux Workstation hasn’t experi-enced the same level of success as Red Hat Linux Enterprise Server.
Red Hat Add-Ons
RHEL includes everything most people need to run a Linux server. Some components require an extra effort, though, and for that reason they are offered as add-ons in RHEL. The two most signifi cant kinds of add-on are the Enterprise File System (XFS) and Red Hat Cluster Services.
Enterprise File System (XFS) The Enterprise File System offers full scalability for large environments where many fi les or very large fi les have to be handled on large fi le systems. Even though ext4, the default fi le system in Red Hat Enterprise Linux, has been optimized signifi cantly over time, it still doesn’t fi t well in environments that have very specifi c storage needs, such as the need to stream multimedia fi les or to handle hundreds of thousands of fi les per day.
Red Hat Cluster Services (RHCS) RHCS offers high-availability clustering to vital ser-vices in the network. In an RHCS cluster, you run specialized cluster software on multiple nodes that are involved in the cluster, and that software monitors the availability of vital services. If anything goes down with such a service, Red Hat Cluster Services takes over and makes sure that the service is launched on another node.
c01.indd 8c01.indd 8 1/7/2013 5:43:21 PM1/7/2013 5:43:21 PM
Installing Red Hat Enterprise Linux Server 9
Red Hat Directory Server
In a corporate environment where many user accounts have to be managed, it doesn’t make sense to manage these accounts in stand-alone databases on individual servers. One solution is to have servers handle their authentication on external directory servers. An example of this approach is to connect RHEL to Microsoft Active Directory, an approach that is used fre-quently by many Red Hat customers. Another approach is to use Red Hat Directory Server, a dedicated LDAP directory service that can be used to store and manage corporate identities.
Red Hat Enterprise Virtualization
Red Hat Enterprise Virtualization (RHEV) provides a virtualization platform that can be compared with other solutions, such as VMware vSphere. In RHEV, several dedicated serv-ers running the KVM hypervisor are managed through RHEV-M, the management server for the virtual environment. In the RHEV infrastructure, fully installed RHEL servers as well as dedicated on-iron hypervisors (the RHEV-H) can be used. A major reason why companies around the world are using RHEV is because it offers the same functionality as VMware vSphere, but for a fraction of the price.
JBoss Enterprise Middleware
JBoss Enterprise Middleware is an application layer that can be installed on top of any operating system, including RHEL. The platform is used to build custom-made applica-tions which can offer their services to perform any tasks you can think of. JBoss is an open platform, and therefore its adoption level is high. Red Hat has had huge success selling JBoss solutions on top of Red Hat Enterprise Linux.
Red Hat Cloud
Red Hat Cloud is the solution where everything comes together. In the lower layers of the cloud infrastructure, Red Hat can offer Platform as a Service services that are based on RHEV or any other virtualization platform. At the PaaS layer, Red Hat Cloud helps deploy virtual machines on demand easily. In the higher layers of the cloud, combined with JBoss Enterprise Middleware, Red Hat Cloud delivers software as a service, thus helping custom-ers build a complete cloud infrastructure on top of Red Hat software.
Installing Red Hat Enterprise Linux ServerThere is a version of RHEL Server for almost any hardware platform. That means you can install it on a mainframe computer, a mid-range system, or PC-based server hardware using a 64- or 32-bit architecture. Currently, the 64-bit version of Red Hat Enterprise Linux is
c01.indd 9c01.indd 9 1/7/2013 5:43:21 PM1/7/2013 5:43:21 PM
10 Chapter 1 Getting Started with Red Hat Enterprise Linux
the most used version, and that is why, in this chapter, you can read about how to install this software version on your computer. The exact version you need is Red Hat Enterprise Linux Server for 64-bit x86_64. If you don’t have the software yet, you can download a free evaluation copy at www.redhat.com.
The ideal installation is on server-grade hardware. However, you don’t have to buy actual server hardware if you just want to learn how to work with Red Hat Enterprise Linux. Basically, any PC will do as long as it meets the following minimum requirements:
A CPU capable of handling 64-bit instructions
1GB of RAM
20GB of available hard disk space
A DVD drive
A network card
Make sure your computer meets these minimum requirements. To work your way through the exercises in this book, I’ll assume you have a com-puter or virtual machine that meets them.
You can run Red Hat Enterprise Linux with less than this, but if you do, you’ll miss certain functionality. For instance, you can install RHEL on a machine that has 512MB of RAM, but you’ll lose the graphical user interface. You could also install RHEL on a 32-bit CPU or on a VMware or VirtualBox virtual machine, but within these environments you cannot confi gure KVM virtualization. Because this book includes some exercises that work directly on the hard disk of your computer and you don’t want to risk destroying all of your data by accident, it is strongly recommended that you do not install a dual-boot RHEL and other OS confi guration.
If you don’t have a dedicated computer on which to install RHEL, a virtual machine is the second-best choice. RHEL can be installed in most virtual environments. If you want to run it on your own computer, VMware Worksta-tion (fee-based software) or VMware Player (free software but with fewer options) works fine. You can download this software from www.vmware.com. Alternatively, you can use VirtualBox, a free virtualization solution provided by Oracle. You can download it from www.virtualbox.org.
You’ll be working with Red Hat Enterprise Linux in a graphical environment in this book. RHEL offers some very good graphical tools, and for now, you’ll need a graphical environment to run them. A typical Linux server that provides services in a datacenter does not offer a graphical environment. Rather, it runs in console mode. That is because servers in a datacenter normally are accessed only remotely. The administrator of such a server can still use graphical tools with it but will start them over an SSH session, accessing the server remotely. Later in this book, you will learn how to confi gure such an environment.
In Exercise 1.1, you will install Red Hat Linux on your computer.
c01.indd 10c01.indd 10 1/7/2013 5:43:21 PM1/7/2013 5:43:21 PM
Installing Red Hat Enterprise Linux Server 11
E X E R C I S E 1 .1
Installing Linux on Your Machine
This procedure describes how to install Red Hat Enterprise Linux on your computer. This is an important exercise, because you will use it to set up the demo system that you’ll use throughout this book. It is important that you perform the steps exactly as described here, to match the descriptions in later exercises in this book.
To perform this exercise successfully, you’ll need to install on a physical computer that meets the following requirements:
An entire computer that can be dedicated to using Red Hat Enterprise Linux
A minimum of 1GB of RAM (2GB is recommended)
A dedicated hard disk of 40GB or more
A DVD drive
A network card
Apart from these requirements, other requirements relate to KVM virtualization as well. The most important of these is that the CPU on your computer needs virtualization sup-port. If you can enable virtualization from the computer BIOS, you are probably OK. Read Chapter 6, “Connecting to the Network,” for more details about the requirements for vir-tualization.
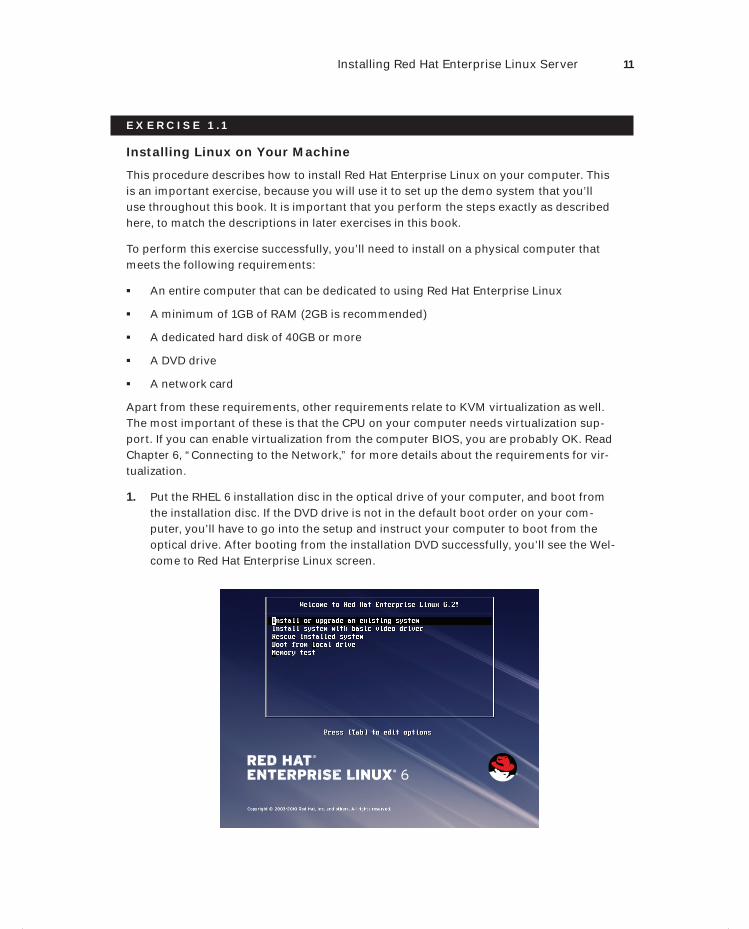
1. Put the RHEL 6 installation disc in the optical drive of your computer, and boot from the installation disc. If the DVD drive is not in the default boot order on your com-puter, you’ll have to go into the setup and instruct your computer to boot from the optical drive. After booting from the installation DVD successfully, you’ll see the Wel-come to Red Hat Enterprise Linux screen.
c01.indd 11c01.indd 11 1/7/2013 5:43:22 PM1/7/2013 5:43:22 PM
12 Chapter 1 Getting Started with Red Hat Enterprise Linux
E X E R C I S E 1 .1 ( c ont inue d )
2. From the graphical installation screen, select Install Or Upgrade An Existing System. In case you’re experiencing problems with the graphical display, you can choose to install using the basic video driver. However, in most cases that isn’t necessary. The other options are for troubleshooting purposes only and will be discussed in later chapters in this book.
3. After beginning the installation procedure, a Linux kernel is started, and the hardware is detected. This normally takes about a minute.
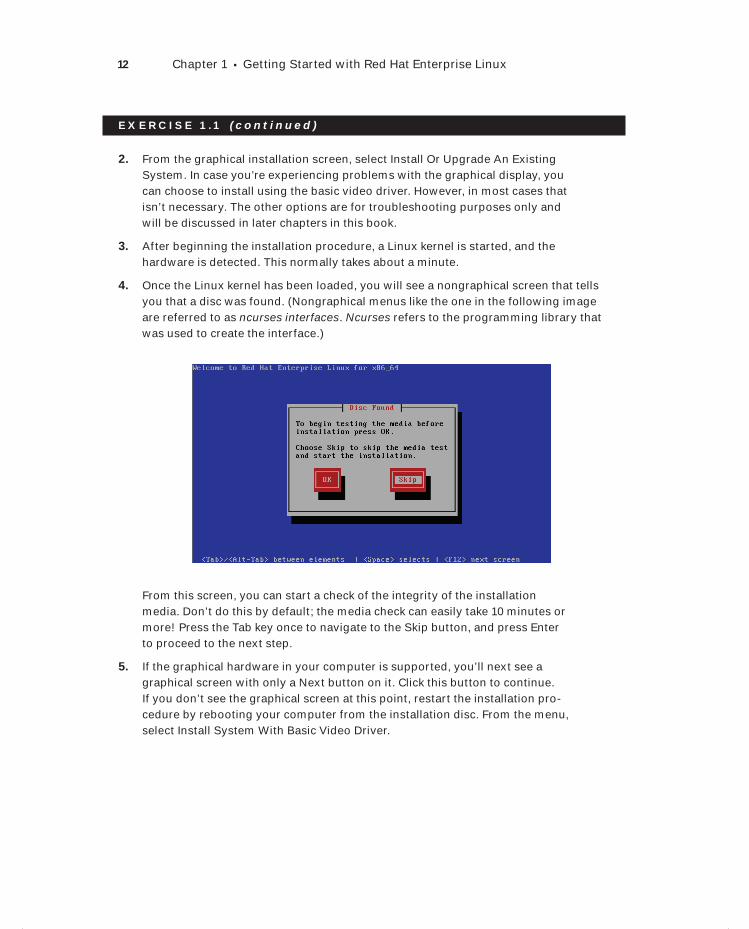
4. Once the Linux kernel has been loaded, you will see a nongraphical screen that tells you that a disc was found. (Nongraphical menus like the one in the following image are referred to as ncurses interfaces. Ncurses refers to the programming library that was used to create the interface.)
From this screen, you can start a check of the integrity of the installation media. Don’t do this by default; the media check can easily take 10 minutes or more! Press the Tab key once to navigate to the Skip button, and press Enter to proceed to the next step.
5. If the graphical hardware in your computer is supported, you’ll next see a graphical screen with only a Next button on it. Click this button to continue. If you don’t see the graphical screen at this point, restart the installation pro-cedure by rebooting your computer from the installation disc. From the menu, select Install System With Basic Video Driver.
c01.indd 12c01.indd 12 1/7/2013 5:43:23 PM1/7/2013 5:43:23 PM
Installing Red Hat Enterprise Linux Server 13
E X E R C I S E 1 .1 ( c ont inue d )
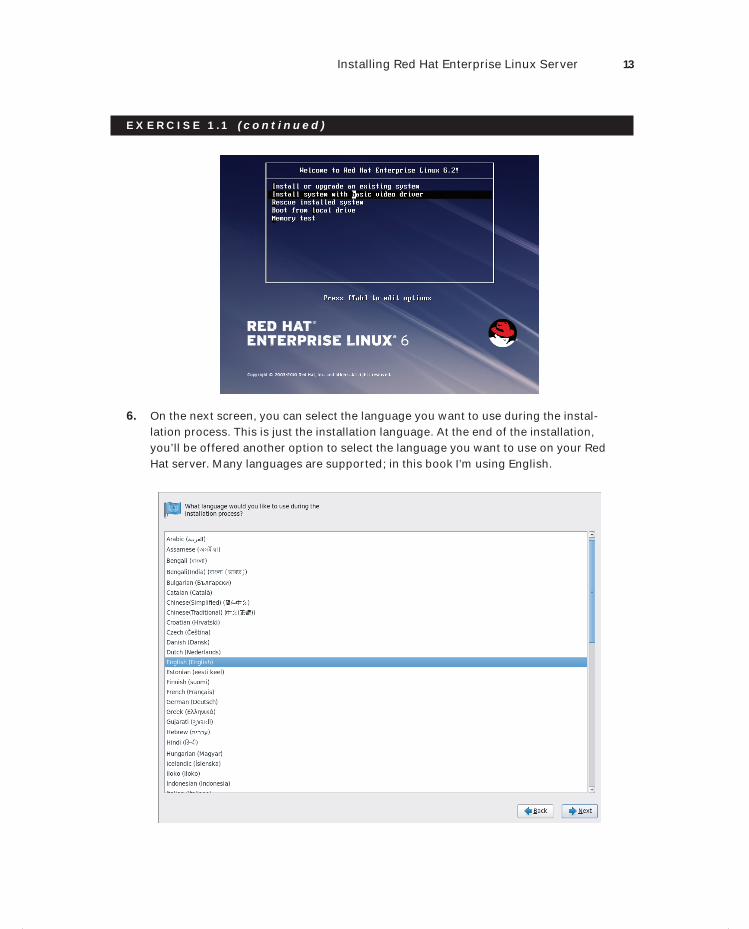
6. On the next screen, you can select the language you want to use during the instal-lation process. This is just the installation language. At the end of the installation, you’ll be offered another option to select the language you want to use on your Red Hat server. Many languages are supported; in this book I’m using English.
c01.indd 13c01.indd 13 1/7/2013 5:43:23 PM1/7/2013 5:43:23 PM
14 Chapter 1 Getting Started with Red Hat Enterprise Linux
E X E R C I S E 1 .1 ( c ont inue d )
7. After selecting the installation language, on the next screen, select the appropri-ate keyboard layout, and then click Next to continue.
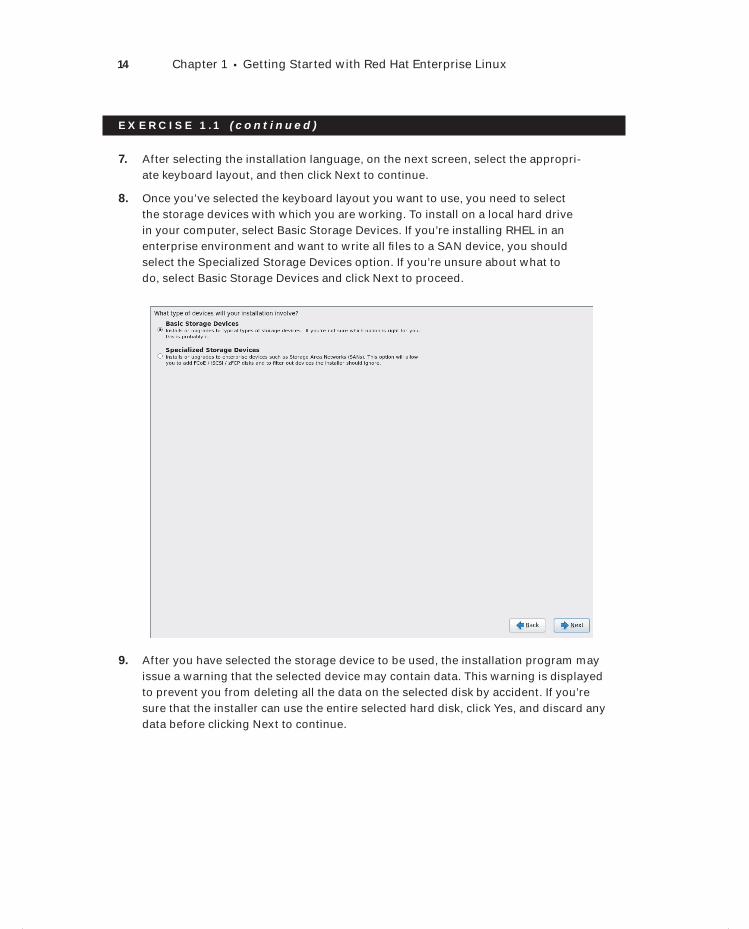
8. Once you’ve selected the keyboard layout you want to use, you need to select the storage devices with which you are working. To install on a local hard drive in your computer, select Basic Storage Devices. If you’re installing RHEL in an enterprise environment and want to write all fi les to a SAN device, you should select the Specialized Storage Devices option. If you’re unsure about what to do, select Basic Storage Devices and click Next to proceed.
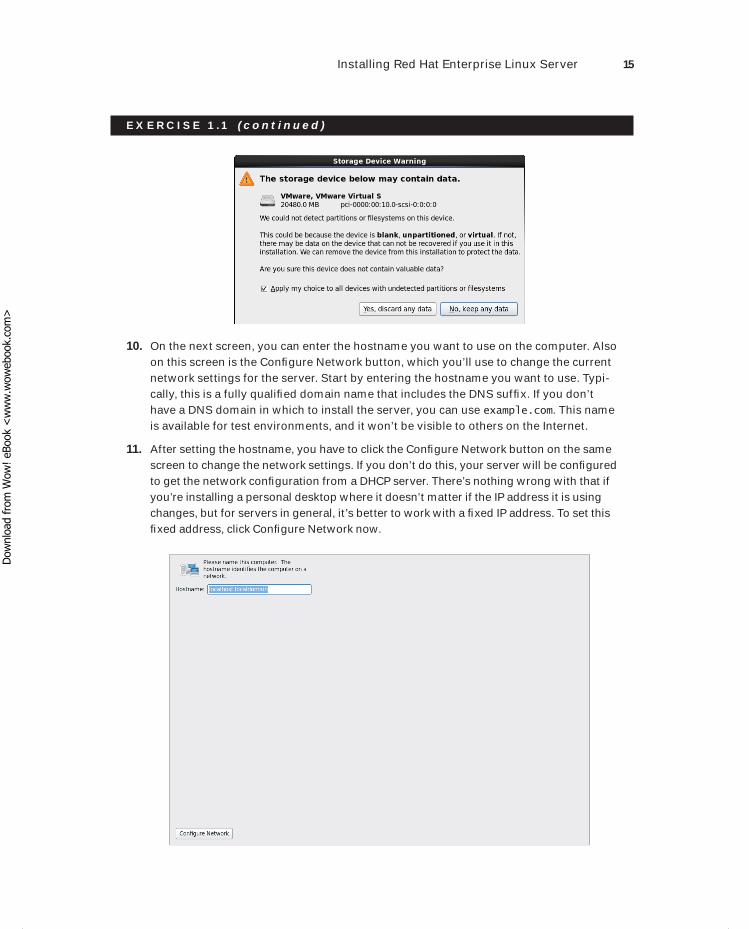
9. After you have selected the storage device to be used, the installation program may issue a warning that the selected device may contain data. This warning is displayed to prevent you from deleting all the data on the selected disk by accident. If you’re sure that the installer can use the entire selected hard disk, click Yes, and discard any data before clicking Next to continue.
c01.indd 14c01.indd 14 1/7/2013 5:43:24 PM1/7/2013 5:43:24 PM
Installing Red Hat Enterprise Linux Server 15
E X E R C I S E 1 .1 ( c ont inue d )
10. On the next screen, you can enter the hostname you want to use on the computer. Also on this screen is the Confi gure Network button, which you’ll use to change the current network settings for the server. Start by entering the hostname you want to use. Typi-cally, this is a fully qualifi ed domain name that includes the DNS suffi x. If you don’t have a DNS domain in which to install the server, you can use example.com. This name is available for test environments, and it won’t be visible to others on the Internet.
11. After setting the hostname, you have to click the Confi gure Network button on the same screen to change the network settings. If you don’t do this, your server will be confi gured to get the network confi guration from a DHCP server. There’s nothing wrong with that if you’re installing a personal desktop where it doesn’t matter if the IP address it is using changes, but for servers in general, it’s better to work with a fi xed IP address. To set this fi xed address, click Confi gure Network now.
c01.indd 15c01.indd 15 1/7/2013 5:43:24 PM1/7/2013 5:43:24 PM
Dow
nlo
ad fro
m W
ow
! eBook
<w
ww
.wow
ebook.
com
>
16 Chapter 1 Getting Started with Red Hat Enterprise Linux
E X E R C I S E 1 .1 ( c ont inue d )
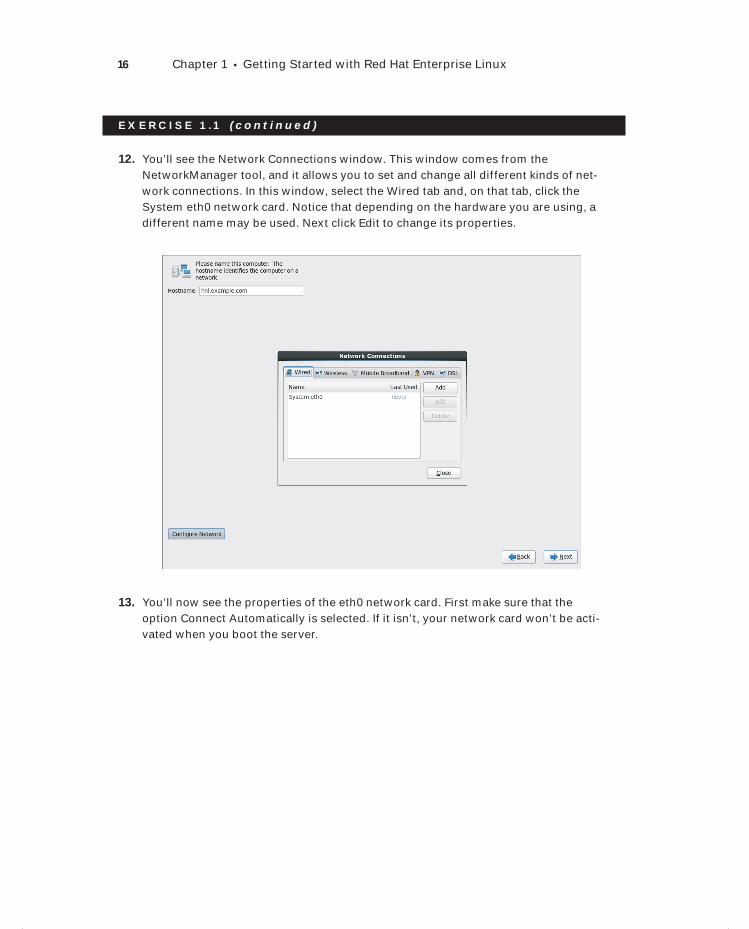
12. You’ll see the Network Connections window. This window comes from the NetworkManager tool, and it allows you to set and change all different kinds of net-work connections. In this window, select the Wired tab and, on that tab, click the System eth0 network card. Notice that depending on the hardware you are using, a different name may be used. Next click Edit to change its properties.
13. You’ll now see the properties of the eth0 network card. First make sure that the option Connect Automatically is selected. If it isn’t, your network card won’t be acti-vated when you boot the server.
c01.indd 16c01.indd 16 1/7/2013 5:43:25 PM1/7/2013 5:43:25 PM

Installing Red Hat Enterprise Linux Server 17
E X E R C I S E 1 .1 ( c ont inue d )
14. Select the IPv4 Settings tab, and in the Method drop-down list, select Manual.
15. Click Add to enter the IP address you want to use. You need at least an IP address and a netmask. Make sure that the address and netmask you’re using here do not confl ict with anything else that is in use on the network to which you are connecting. In this book I’ll assume your server uses the IP address 192.168.0.70. If you want to commu-nicate with other computers and the Internet, you’ll have to enter the address of the gateway and the address of at least one DNS server. You need to consult the docu-mentation of the network to which you’re connecting to fi nd out which addresses to use here. For the moment, you don’t have to enter anything here.
16. After entering the required parameters, click Apply to save and apply these settings.
17. Click Close to close the NetworkManager window. Back on the main screen where you set the hostname, click Next to continue.
18. At this point, you’ll confi gure the time settings for your server. The easiest way to do this is just to click the city nearest to your location on the world map that is dis-played. Alternatively, you can choose the city that is nearest to you from the drop-down list.
c01.indd 17c01.indd 17 1/7/2013 5:43:25 PM1/7/2013 5:43:25 PM
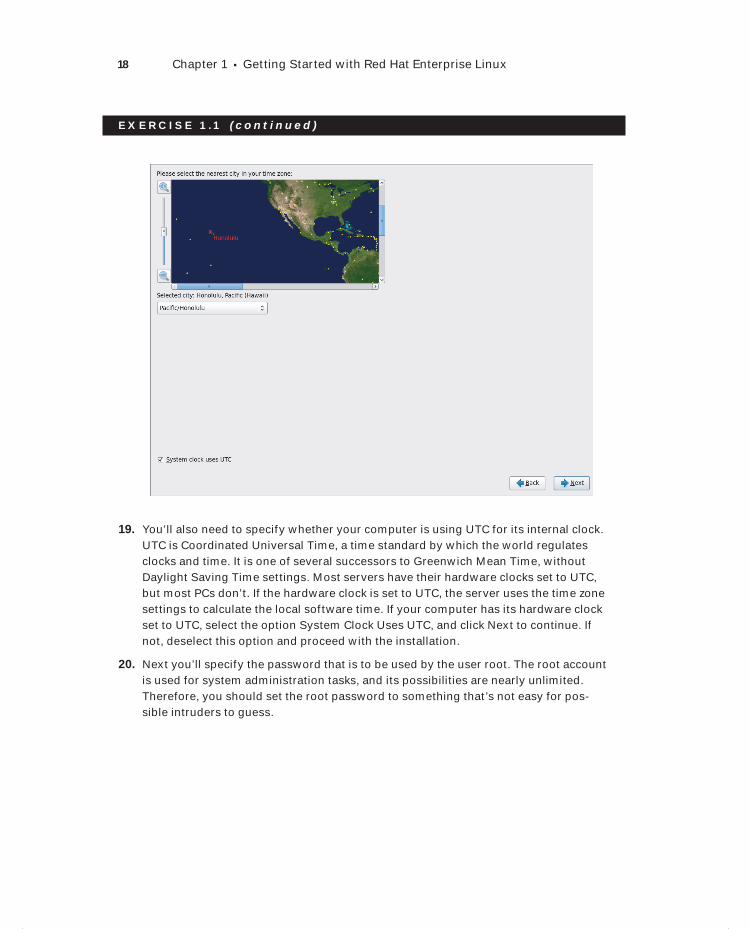
18 Chapter 1 Getting Started with Red Hat Enterprise Linux
E X E R C I S E 1 .1 ( c ont inue d )
19. You’ll also need to specify whether your computer is using UTC for its internal clock. UTC is Coordinated Universal Time, a time standard by which the world regulates clocks and time. It is one of several successors to Greenwich Mean Time, without Daylight Saving Time settings. Most servers have their hardware clocks set to UTC, but most PCs don’t. If the hardware clock is set to UTC, the server uses the time zone settings to calculate the local software time. If your computer has its hardware clock set to UTC, select the option System Clock Uses UTC, and click Next to continue. If not, deselect this option and proceed with the installation.
20. Next you’ll specify the password that is to be used by the user root. The root account is used for system administration tasks, and its possibilities are nearly unlimited. Therefore, you should set the root password to something that’s not easy for pos-sible intruders to guess.
c01.indd 18c01.indd 18 1/7/2013 5:43:26 PM1/7/2013 5:43:26 PM
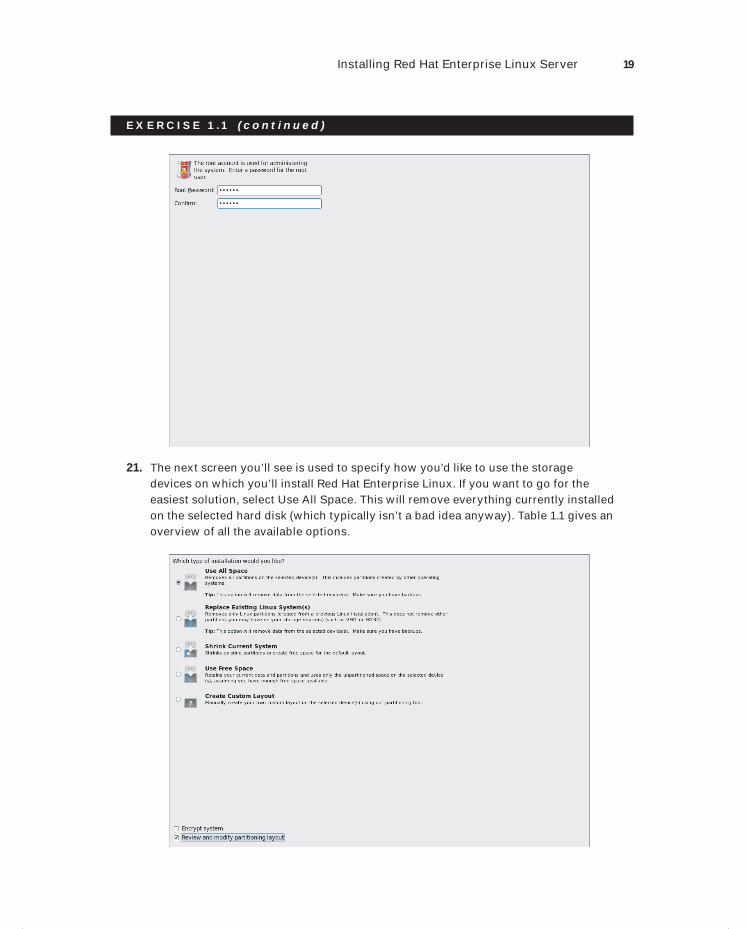
Installing Red Hat Enterprise Linux Server 19
E X E R C I S E 1 .1 ( c ont inue d )
21. The next screen you’ll see is used to specify how you’d like to use the storage devices on which you’ll install Red Hat Enterprise Linux. If you want to go for the easiest solution, select Use All Space. This will remove everything currently installed on the selected hard disk (which typically isn’t a bad idea anyway). Table 1.1 gives an overview of all the available options.
c01.indd 19c01.indd 19 1/7/2013 5:43:26 PM1/7/2013 5:43:26 PM
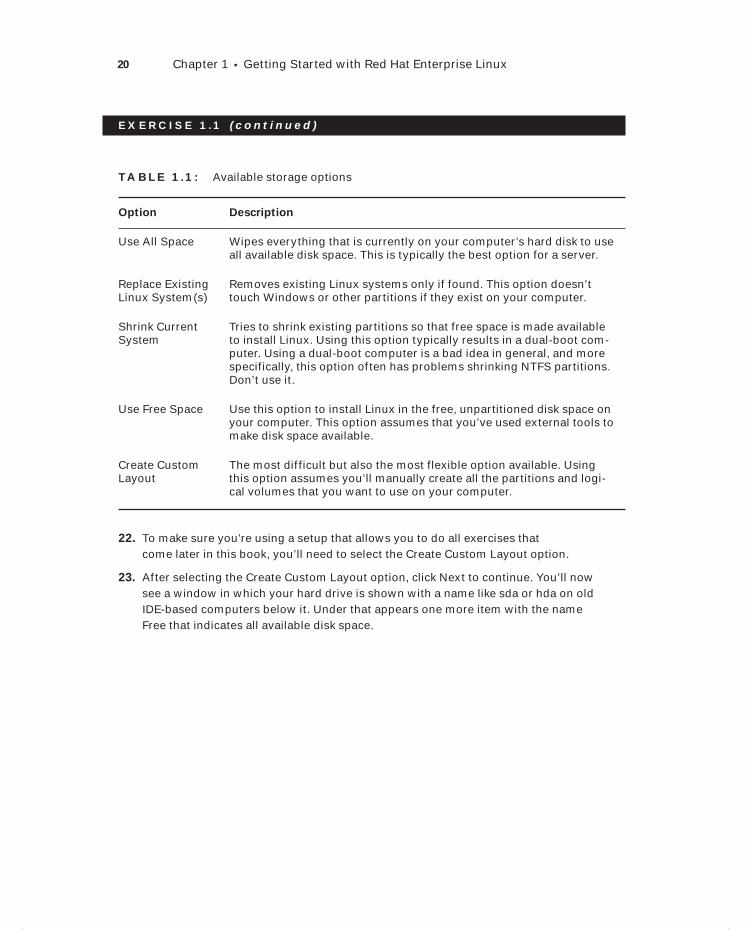
20 Chapter 1 Getting Started with Red Hat Enterprise Linux
E X E R C I S E 1 .1 ( c ont inue d )
TA B LE 1.1 : Available storage options
Option Description
Use All Space Wipes everything that is currently on your computer’s hard disk to use all available disk space. This is typically the best option for a server.
Replace Existing Linux System(s)
Removes existing Linux systems only if found. This option doesn’t touch Windows or other partitions if they exist on your computer.
Shrink Current System
Tries to shrink existing partitions so that free space is made available to install Linux. Using this option typically results in a dual-boot com-puter. Using a dual-boot computer is a bad idea in general, and more specifically, this option often has problems shrinking NTFS partitions. Don’t use it.
Use Free Space Use this option to install Linux in the free, unpartitioned disk space on your computer. This option assumes that you’ve used external tools to make disk space available.
Create Custom Layout
The most difficult but also the most flexible option available. Using this option assumes you’ll manually create all the partitions and logi-cal volumes that you want to use on your computer.
22. To make sure you’re using a setup that allows you to do all exercises that come later in this book, you’ll need to select the Create Custom Layout option.
23. After selecting the Create Custom Layout option, click Next to continue. You’ll now see a window in which your hard drive is shown with a name like sda or hda on old IDE-based computers below it. Under that appears one more item with the name Free that indicates all available disk space.
c01.indd 20c01.indd 20 1/7/2013 5:43:30 PM1/7/2013 5:43:30 PM
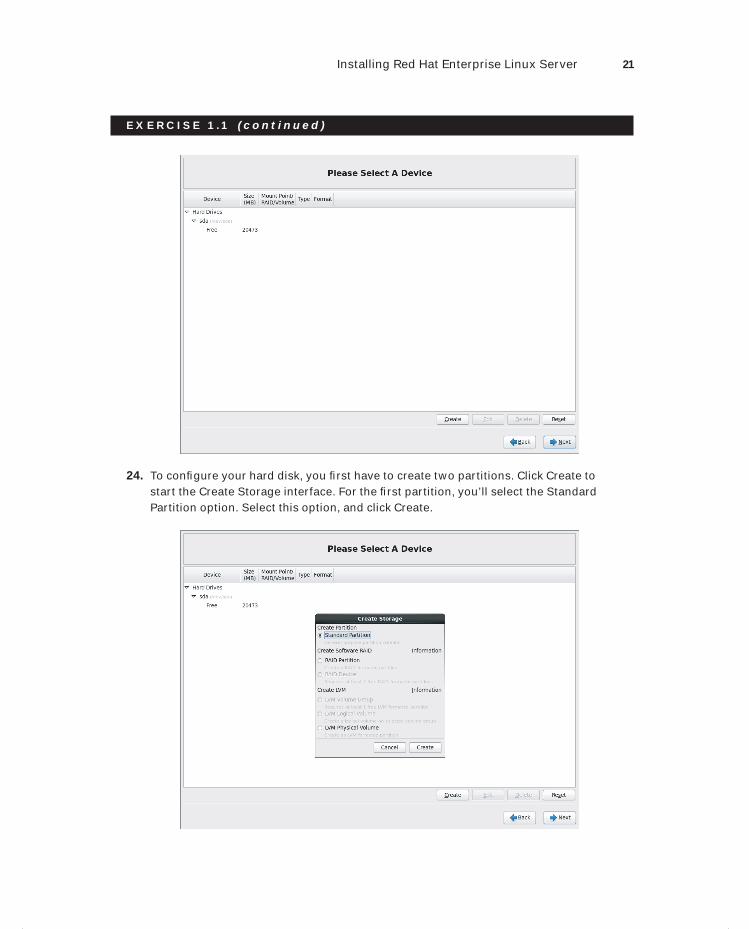
Installing Red Hat Enterprise Linux Server 21
E X E R C I S E 1 .1 ( c ont inue d )
24. To confi gure your hard disk, you fi rst have to create two partitions. Click Create to start the Create Storage interface. For the fi rst partition, you’ll select the Standard Partition option. Select this option, and click Create.
c01.indd 21c01.indd 21 1/7/2013 5:43:30 PM1/7/2013 5:43:30 PM
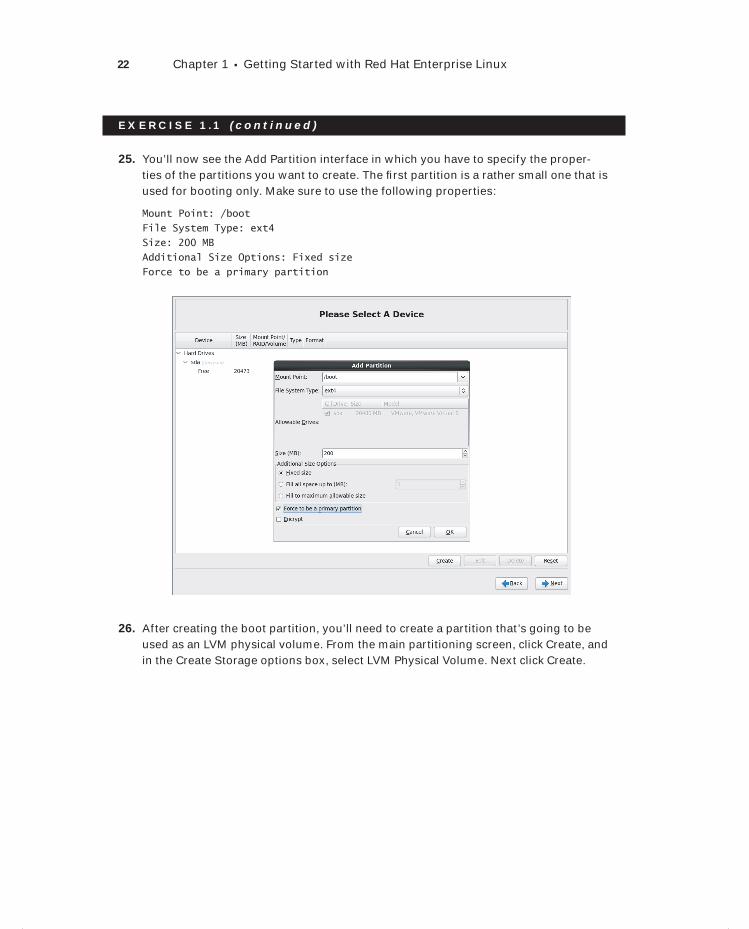
22 Chapter 1 Getting Started with Red Hat Enterprise Linux
E X E R C I S E 1 .1 ( c ont inue d )
25. You’ll now see the Add Partition interface in which you have to specify the proper-ties of the partitions you want to create. The fi rst partition is a rather small one that is used for booting only. Make sure to use the following properties:
Mount Point: /boot
File System Type: ext4
Size: 200 MB
Additional Size Options: Fixed size
Force to be a primary partition
26. After creating the boot partition, you’ll need to create a partition that’s going to be used as an LVM physical volume. From the main partitioning screen, click Create, and in the Create Storage options box, select LVM Physical Volume. Next click Create.
c01.indd 22c01.indd 22 1/7/2013 5:43:31 PM1/7/2013 5:43:31 PM
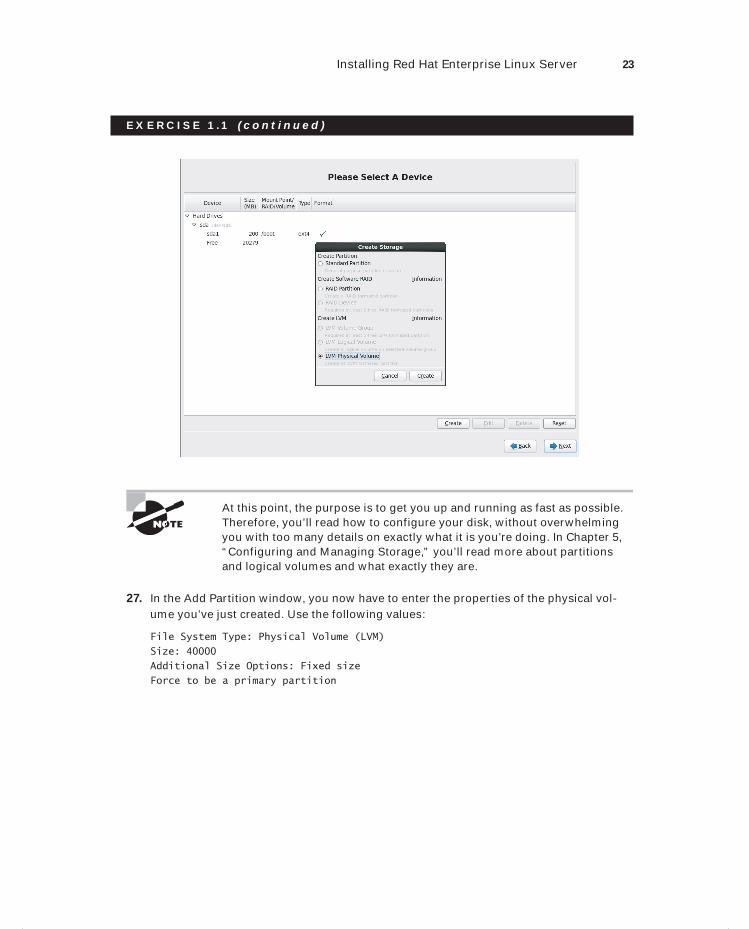
Installing Red Hat Enterprise Linux Server 23
E X E R C I S E 1 .1 ( c ont inue d )
At this point, the purpose is to get you up and running as fast as possible. Therefore, you’ll read how to configure your disk, without overwhelming you with too many details on exactly what it is you’re doing. In Chapter 5, “Configuring and Managing Storage,” you’ll read more about partitions and logical volumes and what exactly they are.
27. In the Add Partition window, you now have to enter the properties of the physical vol-ume you’ve just created. Use the following values:
File System Type: Physical Volume (LVM)
Size: 40000
Additional Size Options: Fixed size
Force to be a primary partition
c01.indd 23c01.indd 23 1/7/2013 5:43:31 PM1/7/2013 5:43:31 PM
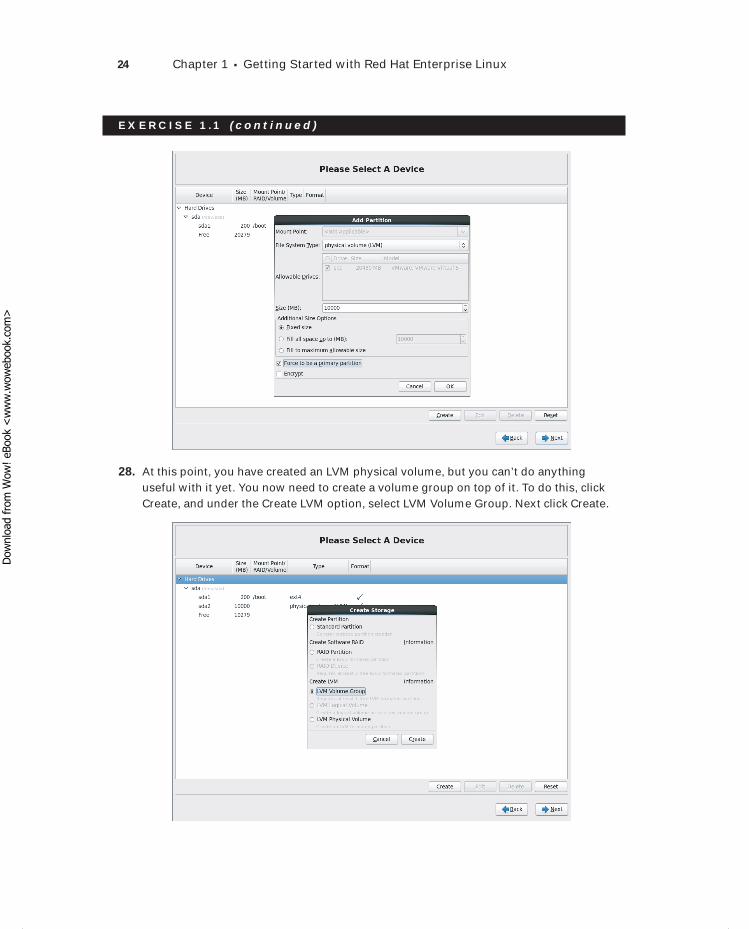
24 Chapter 1 Getting Started with Red Hat Enterprise Linux
E X E R C I S E 1 .1 ( c ont inue d )
28. At this point, you have created an LVM physical volume, but you can’t do anything useful with it yet. You now need to create a volume group on top of it. To do this, click Create, and under the Create LVM option, select LVM Volume Group. Next click Create.
c01.indd 24c01.indd 24 1/7/2013 5:43:31 PM1/7/2013 5:43:31 PM
Dow
nlo
ad fro
m W
ow
! eBook
<w
ww
.wow
ebook.
com
>
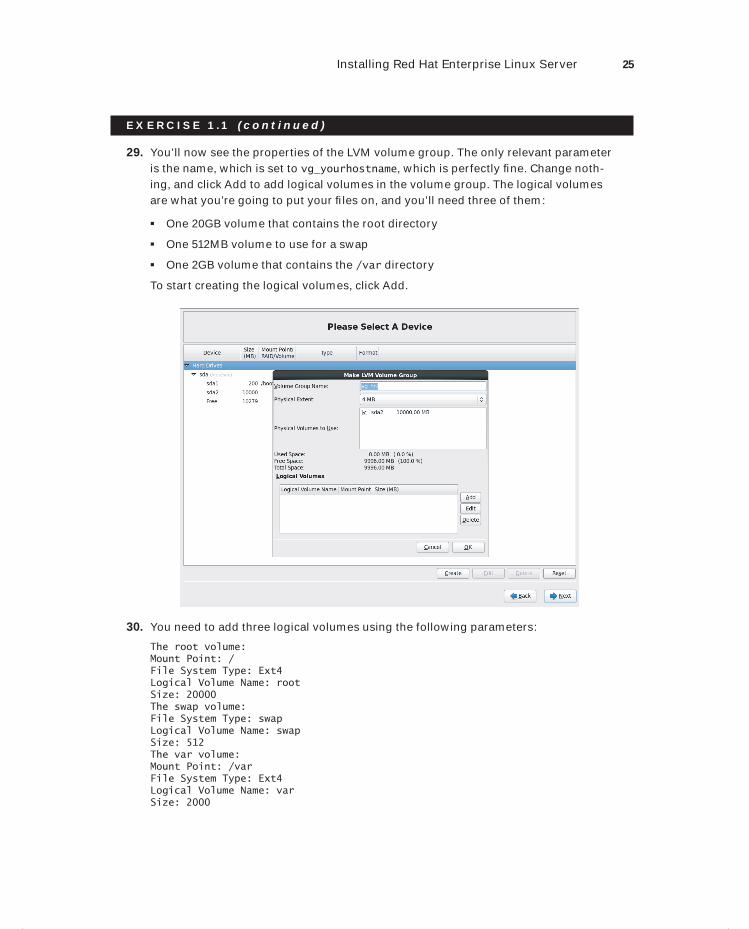
Installing Red Hat Enterprise Linux Server 25
E X E R C I S E 1 .1 ( c ont inue d )
29. You’ll now see the properties of the LVM volume group. The only relevant parameter is the name, which is set to vg_yourhostname, which is perfectly fi ne. Change noth-ing, and click Add to add logical volumes in the volume group. The logical volumes are what you’re going to put your fi les on, and you’ll need three of them:
One 20GB volume that contains the root directory
One 512MB volume to use for a swap
One 2GB volume that contains the /var directory
To start creating the logical volumes, click Add.
30. You need to add three logical volumes using the following parameters:
The root volume:Mount Point: /File System Type: Ext4Logical Volume Name: rootSize: 20000The swap volume:File System Type: swapLogical Volume Name: swapSize: 512The var volume:Mount Point: /varFile System Type: Ext4Logical Volume Name: varSize: 2000
c01.indd 25c01.indd 25 1/7/2013 5:43:32 PM1/7/2013 5:43:32 PM
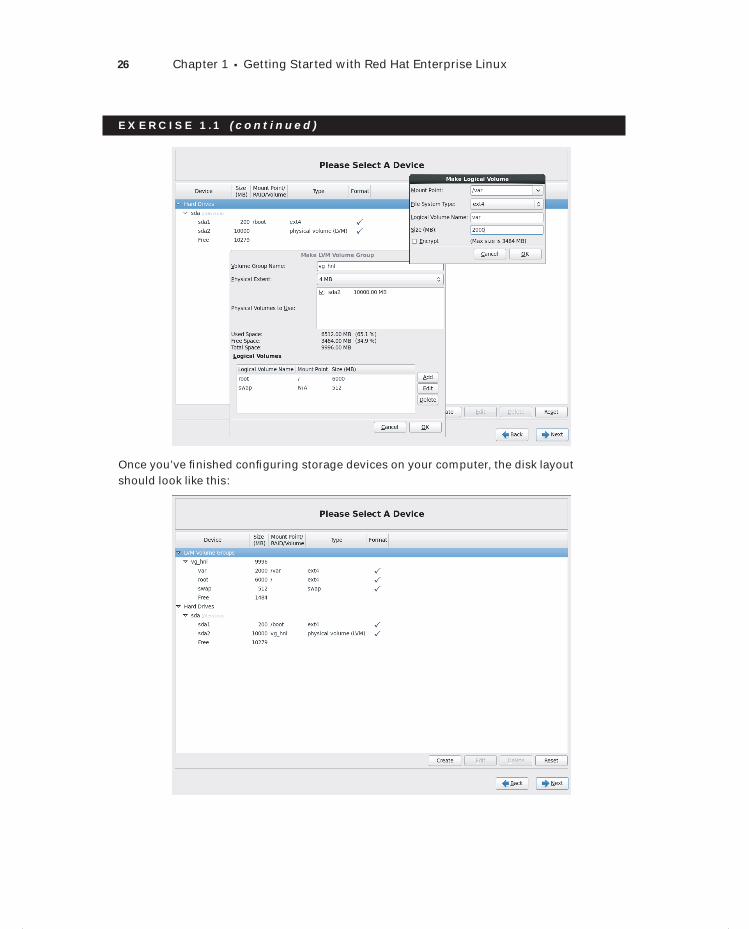
26 Chapter 1 Getting Started with Red Hat Enterprise Linux
E X E R C I S E 1 .1 ( c ont inue d )
Once you’ve fi nished confi guring storage devices on your computer, the disk layout should look like this:
c01.indd 26c01.indd 26 1/7/2013 5:43:32 PM1/7/2013 5:43:32 PM
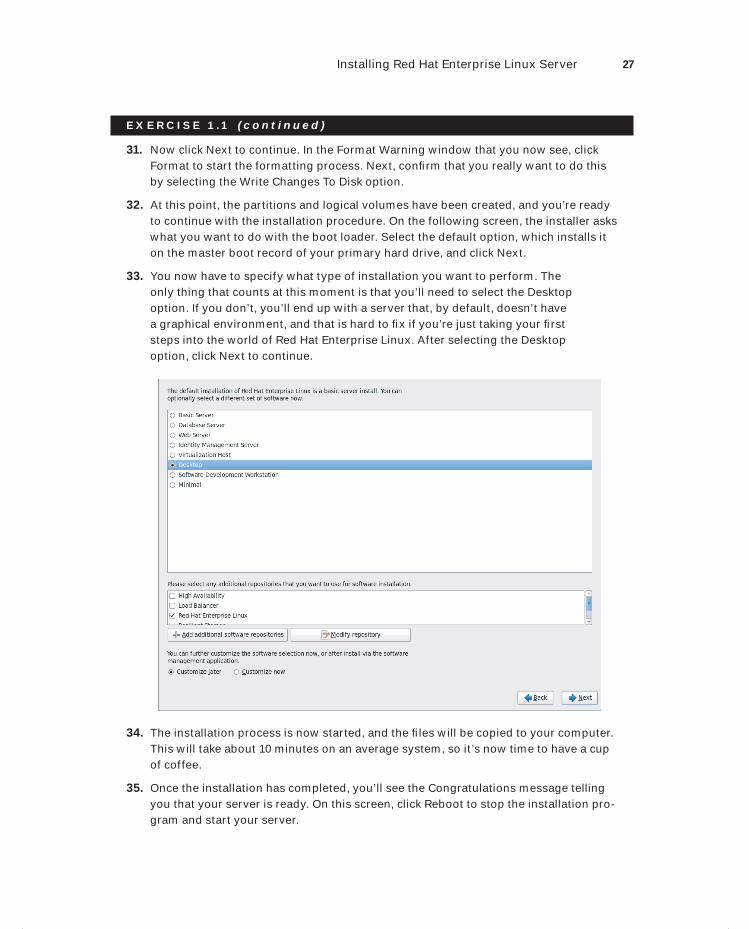
Installing Red Hat Enterprise Linux Server 27
E X E R C I S E 1 .1 ( c ont inue d )
31. Now click Next to continue. In the Format Warning window that you now see, click Format to start the formatting process. Next, confi rm that you really want to do this by selecting the Write Changes To Disk option.
32. At this point, the partitions and logical volumes have been created, and you’re ready to continue with the installation procedure. On the following screen, the installer asks what you want to do with the boot loader. Select the default option, which installs it on the master boot record of your primary hard drive, and click Next.
33. You now have to specify what type of installation you want to perform. The only thing that counts at this moment is that you’ll need to select the Desktop option. If you don’t, you’ll end up with a server that, by default, doesn’t have a graphical environment, and that is hard to fi x if you’re just taking your fi rst steps into the world of Red Hat Enterprise Linux. After selecting the Desktop option, click Next to continue.
34. The installation process is now started, and the fi les will be copied to your computer. This will take about 10 minutes on an average system, so it’s now time to have a cup of coffee.
35. Once the installation has completed, you’ll see the Congratulations message telling you that your server is ready. On this screen, click Reboot to stop the installation pro-gram and start your server.
c01.indd 27c01.indd 27 1/7/2013 5:43:33 PM1/7/2013 5:43:33 PM

28 Chapter 1 Getting Started with Red Hat Enterprise Linux
E X E R C I S E 1 .1 ( c ont inue d )
36. Once the server has successfully started for the fi rst time, you’ll see the Wel-come screen that guides you through the remainder of the installation proce-dure. From this screen, click Forward. Next you’ll see the License Information screen in which you have to agree to the license agreement. After doing so, click Forward to proceed.
39. Now you’ll see the Set Up Software Updates screen where you can connect to the Red Hat Network.
a. If you have credentials for Red Hat Network, you can connect now.
b. If you don’t and just want to install a system that cannot download patches and updates from Red Hat Network, select the No, I Prefer To Register At A Later Time option, and click Forward.
In this book, RHN access is not required, so select No, I Prefer To Register At A Later Time. You’ll see a window informing you about all the good things you’ll miss with-out RHN. In this window, click No Thanks, I’ll Connect Later to confi rm your selection. Now click Forward once more to proceed to the next step.
c01.indd 28c01.indd 28 1/7/2013 5:43:34 PM1/7/2013 5:43:34 PM

Installing Red Hat Enterprise Linux Server 29
E X E R C I S E 1 .1 ( c ont inue d )
If you don’t connect your server to RHN, you cannot update it. This means it’s not a good idea to use this server as a production system and provide services to external users; you’ll be vulnerable if you do. If you need to configure a Red Hat system that does provide public services, you have to purchase a subscription to Red Hat Enterprise Linux. If you don’t want to do that, use Scientific Linux or CentOS instead.
40. At this point, you’ll need to create a user account. In this book, we’ll create the user “student,” with the full name “student” and the password “redhat” (all lowercase). You can safely ignore the message that informs you that you’ve selected a weak password.
c01.indd 29c01.indd 29 1/7/2013 5:43:34 PM1/7/2013 5:43:34 PM
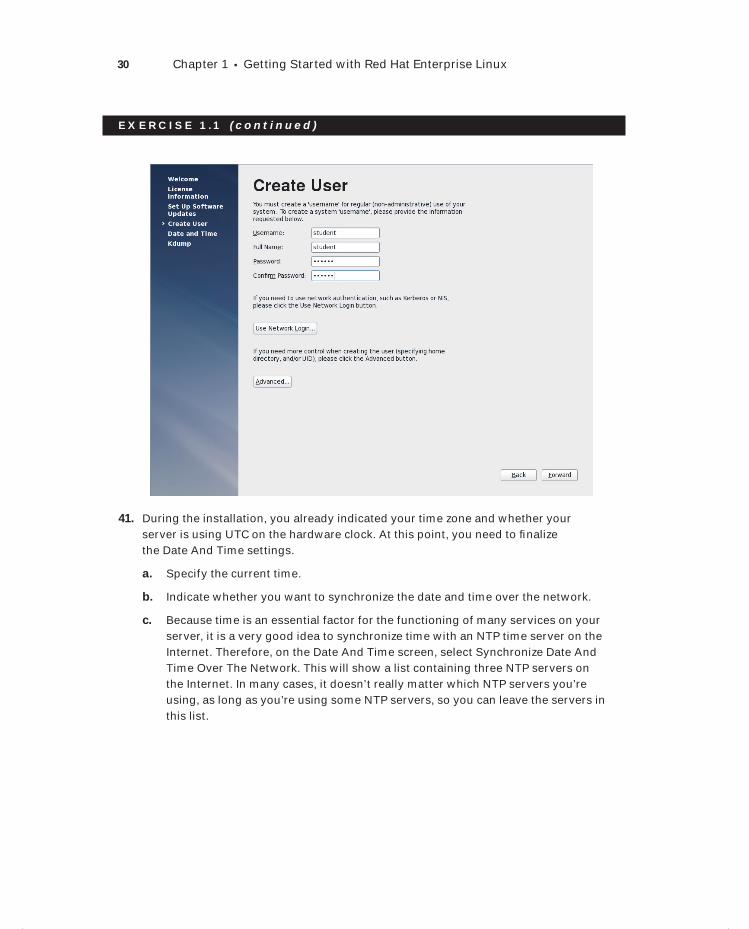
30 Chapter 1 Getting Started with Red Hat Enterprise Linux
E X E R C I S E 1 .1 ( c ont inue d )
41. During the installation, you already indicated your time zone and whether your server is using UTC on the hardware clock. At this point, you need to fi nalize the Date And Time settings.
a. Specify the current time.
b. Indicate whether you want to synchronize the date and time over the network.
c. Because time is an essential factor for the functioning of many services on your server, it is a very good idea to synchronize time with an NTP time server on the Internet. Therefore, on the Date And Time screen, select Synchronize Date And Time Over The Network. This will show a list containing three NTP servers on the Internet. In many cases, it doesn’t really matter which NTP servers you’re using, as long as you’re using some NTP servers, so you can leave the servers in this list.
c01.indd 30c01.indd 30 1/7/2013 5:43:34 PM1/7/2013 5:43:34 PM
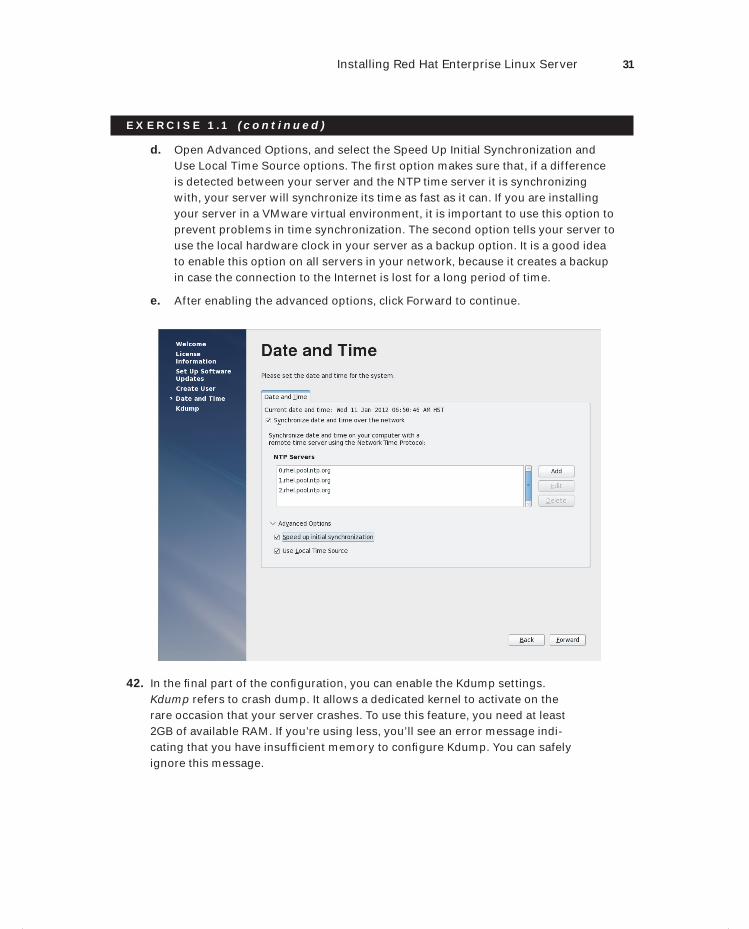
Installing Red Hat Enterprise Linux Server 31
E X E R C I S E 1 .1 ( c ont inue d )
d. Open Advanced Options, and select the Speed Up Initial Synchronization and Use Local Time Source options. The fi rst option makes sure that, if a difference is detected between your server and the NTP time server it is synchronizing with, your server will synchronize its time as fast as it can. If you are installing your server in a VMware virtual environment, it is important to use this option to prevent problems in time synchronization. The second option tells your server to use the local hardware clock in your server as a backup option. It is a good idea to enable this option on all servers in your network, because it creates a backup in case the connection to the Internet is lost for a long period of time.
e. After enabling the advanced options, click Forward to continue.
42. In the fi nal part of the confi guration, you can enable the Kdump settings. Kdump refers to crash dump. It allows a dedicated kernel to activate on the rare occasion that your server crashes. To use this feature, you need at least 2GB of available RAM. If you’re using less, you’ll see an error message indi-cating that you have insuffi cient memory to confi gure Kdump. You can safely ignore this message.
c01.indd 31c01.indd 31 1/7/2013 5:43:35 PM1/7/2013 5:43:35 PM
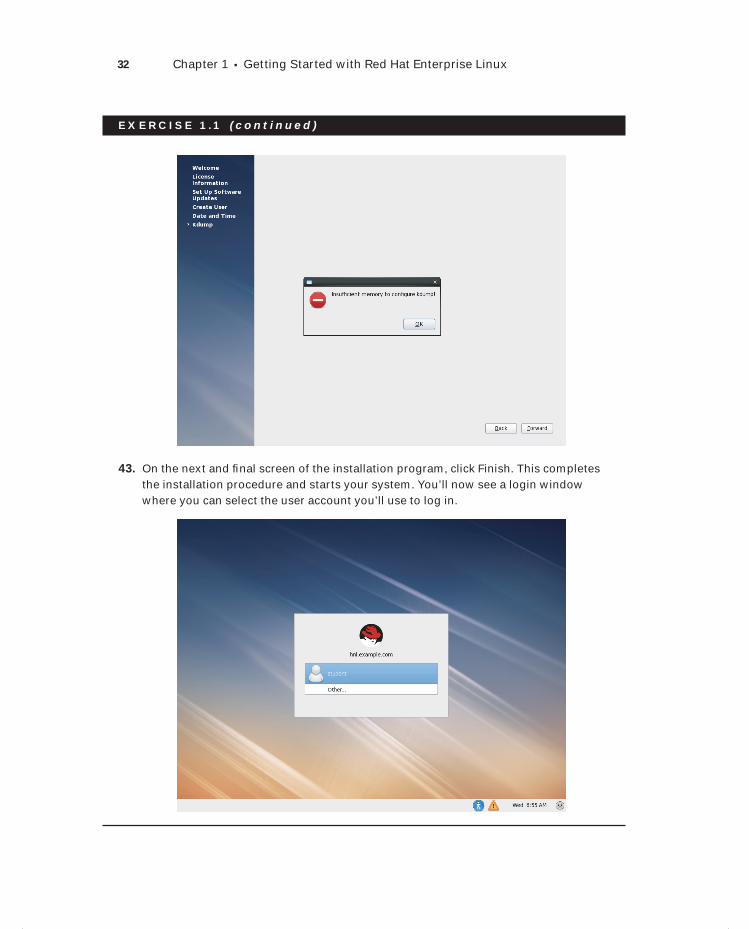
32 Chapter 1 Getting Started with Red Hat Enterprise Linux
E X E R C I S E 1 .1 ( c ont inue d )
43. On the next and fi nal screen of the installation program, click Finish. This completes the installation procedure and starts your system. You’ll now see a login window where you can select the user account you’ll use to log in.
c01.indd 32c01.indd 32 1/7/2013 5:43:35 PM1/7/2013 5:43:35 PM

Exploring the GNOME User Interface 33
Exploring the GNOME User InterfaceNow that your server is installed, it’s time to get a bit familiar with the GNOME user interface. As indicated, on most servers, the graphical user interface (GUI) is not enabled. However, to get familiar with RHEL, it is a good idea to use the GNOME interface anyway.
To make yourself known to your Red Hat server, you can choose between two options. The best option is to click the name of the user account that you’ve created while installing the server and enter the password of that user. It’s easy to pick the username—a list of all user accounts that exist on your server is displayed on the graphical login screen. Selecting a username from the graphical login screen connects you with normal user credentials to the server. That means you’ll enter the server as a nonprivileged user, who faces several restrictions on the server.
Alternatively, from the graphical login screen, you can click Other to enter the name of another user you want to use to log in. You can follow this approach if you want to log in as user root. Because there are no limitations to what the user root can do, it is a very bad idea to log in as root by default. So, at this point, click the name of the user that you’ve created, and enter the password. After successful authentication, this shows the default GNOME desktop with its common screen elements, as shown in Figure 1.1.
F I GU R E 1.1 The default GNOME graphical desktop
c01.indd 33c01.indd 33 1/7/2013 5:43:36 PM1/7/2013 5:43:36 PM
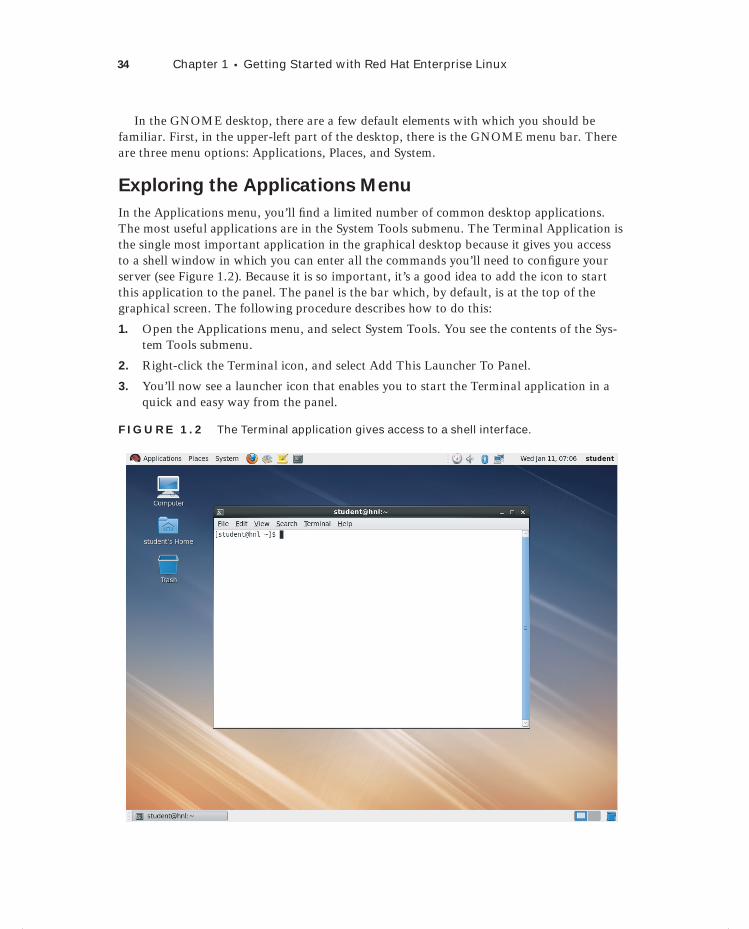
34 Chapter 1 Getting Started with Red Hat Enterprise Linux
In the GNOME desktop, there are a few default elements with which you should be familiar. First, in the upper-left part of the desktop, there is the GNOME menu bar. There are three menu options: Applications, Places, and System.
Exploring the Applications Menu
In the Applications menu, you’ll fi nd a limited number of common desktop applications. The most useful applications are in the System Tools submenu. The Terminal Application is the single most important application in the graphical desktop because it gives you access to a shell window in which you can enter all the commands you’ll need to confi gure your server (see Figure 1.2). Because it is so important, it’s a good idea to add the icon to start this application to the panel. The panel is the bar which, by default, is at the top of the graphical screen. The following procedure describes how to do this:
1. Open the Applications menu, and select System Tools. You see the contents of the Sys-tem Tools submenu.
2. Right-click the Terminal icon, and select Add This Launcher To Panel.
3. You’ll now see a launcher icon that enables you to start the Terminal application in a quick and easy way from the panel.
F I GU R E 1. 2 The Terminal application gives access to a shell interface.
c01.indd 34c01.indd 34 1/7/2013 5:43:38 PM1/7/2013 5:43:38 PM
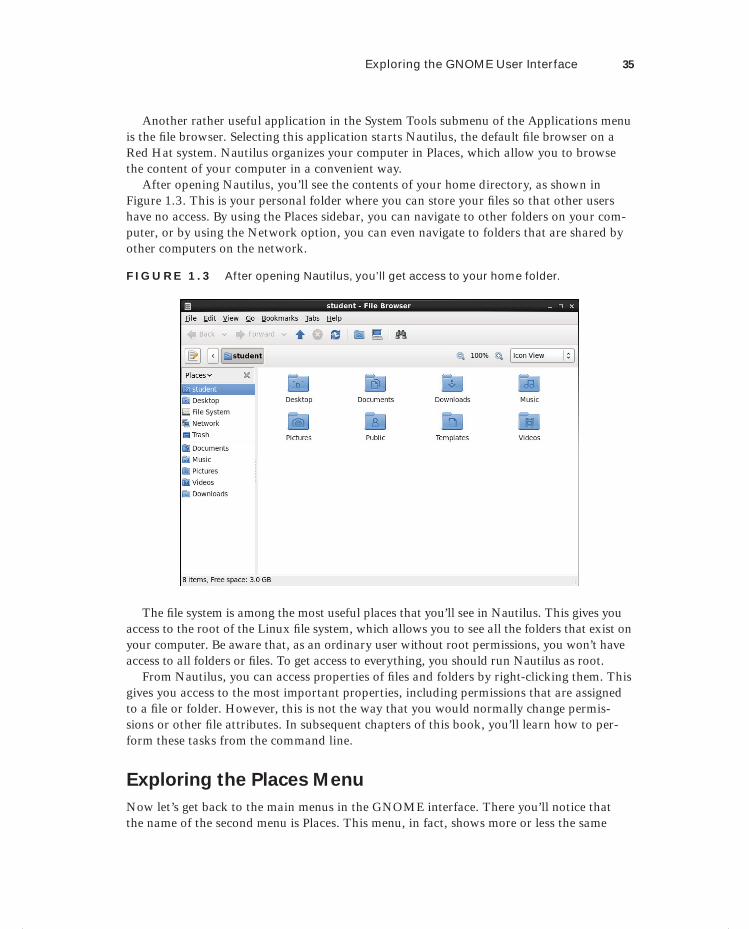
Exploring the GNOME User Interface 35
Another rather useful application in the System Tools submenu of the Applications menu is the fi le browser. Selecting this application starts Nautilus, the default fi le browser on a Red Hat system. Nautilus organizes your computer in Places, which allow you to browse the content of your computer in a convenient way.
After opening Nautilus, you’ll see the contents of your home directory, as shown in Figure 1.3. This is your personal folder where you can store your fi les so that other users have no access. By using the Places sidebar, you can navigate to other folders on your com-puter, or by using the Network option, you can even navigate to folders that are shared by other computers on the network.
F I GU R E 1. 3 After opening Nautilus, you’ll get access to your home folder.
The fi le system is among the most useful places that you’ll see in Nautilus. This gives you access to the root of the Linux fi le system, which allows you to see all the folders that exist on your computer. Be aware that, as an ordinary user without root permissions, you won’t have access to all folders or fi les. To get access to everything, you should run Nautilus as root.
From Nautilus, you can access properties of fi les and folders by right-clicking them. This gives you access to the most important properties, including permissions that are assigned to a fi le or folder. However, this is not the way that you would normally change permis-sions or other fi le attributes. In subsequent chapters of this book, you’ll learn how to per-form these tasks from the command line.
Exploring the Places Menu
Now let’s get back to the main menus in the GNOME interface. There you’ll notice that the name of the second menu is Places. This menu, in fact, shows more or less the same
c01.indd 35c01.indd 35 1/7/2013 5:43:38 PM1/7/2013 5:43:38 PM
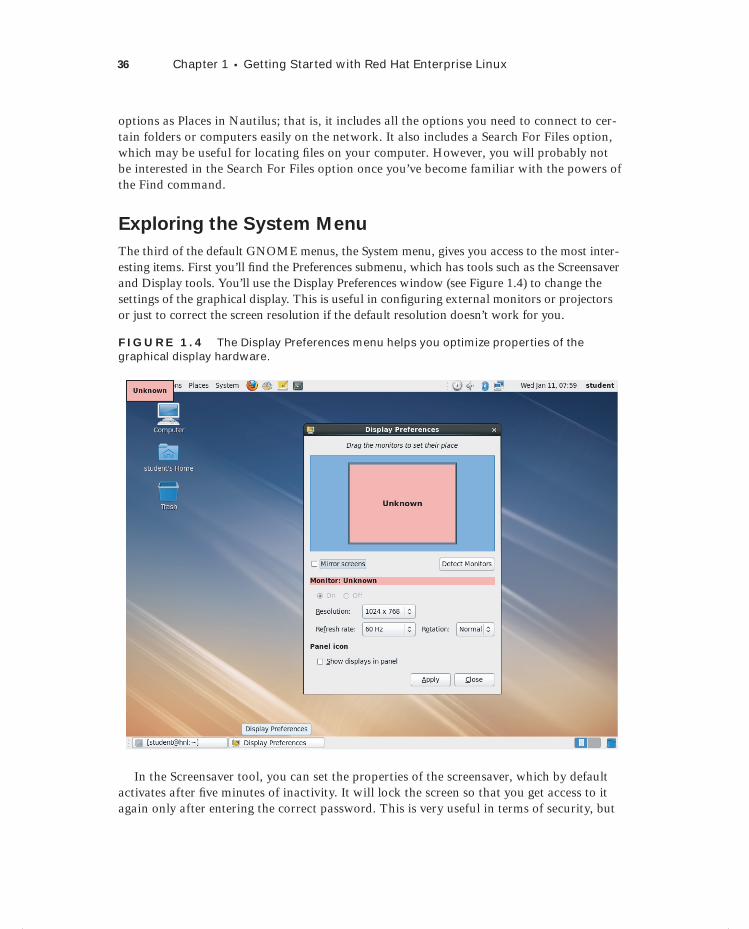
36 Chapter 1 Getting Started with Red Hat Enterprise Linux
options as Places in Nautilus; that is, it includes all the options you need to connect to cer-tain folders or computers easily on the network. It also includes a Search For Files option, which may be useful for locating fi les on your computer. However, you will probably not be interested in the Search For Files option once you’ve become familiar with the powers of the Find command.
Exploring the System Menu
The third of the default GNOME menus, the System menu, gives you access to the most inter-esting items. First you’ll fi nd the Preferences submenu, which has tools such as the Screensaver and Display tools. You’ll use the Display Preferences window (see Figure 1.4) to change the settings of the graphical display. This is useful in confi guring external monitors or projectors or just to correct the screen resolution if the default resolution doesn’t work for you.
F I GU R E 1. 4 The Display Preferences menu helps you optimize properties of the graphical display hardware.
In the Screensaver tool, you can set the properties of the screensaver, which by default activates after fi ve minutes of inactivity. It will lock the screen so that you get access to it again only after entering the correct password. This is very useful in terms of security, but
c01.indd 36c01.indd 36 1/7/2013 5:43:39 PM1/7/2013 5:43:39 PM
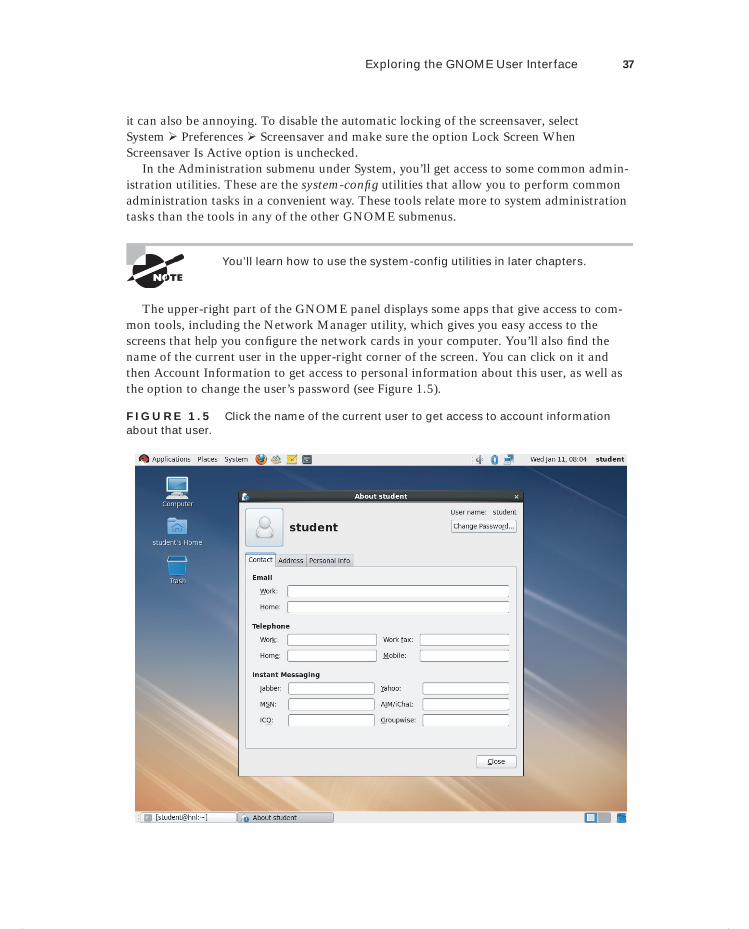
Exploring the GNOME User Interface 37
it can also be annoying. To disable the automatic locking of the screensaver, select System Preferences Screensaver and make sure the option Lock Screen When Screensaver Is Active option is unchecked.
In the Administration submenu under System, you’ll get access to some common admin-istration utilities. These are the system-confi g utilities that allow you to perform common administration tasks in a convenient way. These tools relate more to system administration tasks than the tools in any of the other GNOME submenus.
You’ll learn how to use the system-config utilities in later chapters.
The upper-right part of the GNOME panel displays some apps that give access to com-mon tools, including the Network Manager utility, which gives you easy access to the screens that help you confi gure the network cards in your computer. You’ll also fi nd the name of the current user in the upper-right corner of the screen. You can click on it and then Account Information to get access to personal information about this user, as well as the option to change the user’s password (see Figure 1.5).
F I GU R E 1.5 Click the name of the current user to get access to account information about that user.
c01.indd 37c01.indd 37 1/7/2013 5:43:39 PM1/7/2013 5:43:39 PM

38 Chapter 1 Getting Started with Red Hat Enterprise Linux
The menu associated with the current user also gives you access to the Lock Screen tool. Use it whenever you walk away from the server to lock the desktop in order to make sure that no one can access the fi les on the server without your supervision. Another useful tool is Switch User, which allows you to switch between two different user accounts that are both logged in.
The last part of the screen gives access to all open applications. Just click the applica-tion that you want to use to access it again. A very useful element in this taskbar is the Workspace Switcher (see Figure 1.6). This screen is one of the two workspaces that are acti-vated by default. If you want to open many applications, you can use multiple workspaces to work in a more organized way. You can put specifi c application windows on those work-spaces where you really need them. By default, Red Hat Enterprise Linux shows two work-spaces, but you can increase the number of workspaces to an amount that is convenient for you. To activate another workspace, just click the miniature of the workspace as it is shown in the taskbar.
F I GU R E 1.6 Increasing the number of workspaces
c01.indd 38c01.indd 38 1/7/2013 5:43:40 PM1/7/2013 5:43:40 PM
Dow
nlo
ad fro
m W
ow
! eBook
<w
ww
.wow
ebook.
com
>

Summary 39
SummaryIn this chapter, you became familiar with Red Hat Enterprise Linux (RHEL). You learned about what Linux is and where it comes from. You read that Linux comes from a tradition of open source software, and it is currently in use in most of the Fortune 500 companies. Next you will read about the Red Hat company and its product offerings.
You then learned how to install Red Hat Enterprise Linux on your computer. If all went well, you now have a usable version of RHEL that is available to you while working your way through this book.
Finally, the chapter introduced you to the GNOME graphical desktop. You learned that using it makes the process of learning Linux easier. You also saw where some of the most interesting applications are located in the different menus of the GNOME interface.
c01.indd 39c01.indd 39 1/7/2013 5:43:41 PM1/7/2013 5:43:41 PM

c01.indd 40c01.indd 40 1/7/2013 5:43:41 PM1/7/2013 5:43:41 PM

Chapter
2Finding Your Way on the Command Line
TOPICS COVERED IN THIS CHAPTER:
Working with the Bash Shell
Performing Basic File System Management Tasks
Piping and Redirection
Finding Files
Working with an Editor
Getting Help
c02.indd 41c02.indd 41 1/8/2013 10:42:18 AM1/8/2013 10:42:18 AM

Although Red Hat Enterprise Linux provides the system-confi g tools as a convenient way to change parameters on your server, as a Linux administrator you will need to work from
the command line from time to time. Even today, the most advanced management jobs are issued from the command line. For this reason, this chapter introduces you to the basic skills needed to work with the command line.
Working with the Bash ShellTo communicate commands to the operating system kernel, an interface is needed that sits between the kernel and the end user issuing these commands. This interface is known as the shell. Several shells are available on RHEL. Bash (short for the Bourne Again Shell) is the one that is used in most situations. This is because it is compatible with the Bourne shell, which is commonly found on UNIX servers. You should, however, be aware that Bash is not the only shell that can be used. A partial list of other shells follows:
tcsh A shell with a scripting language that works like the C programming language. It is very popular with C programmers.
zsh A shell that is compatible with Bash but offers even more features.
sash This stands for stand-alone shell. This is a minimal-feature shell that runs in almost all environments. Therefore, it is very well suited for system troubleshooting.
Getting the Best of Bash
Basically, from the Bash environment, an administrator is working with commands. An example of such a command is ls, which can be used to display a list of fi les in a given directory. To make working with these commands as easy as possible, Bash has some use-ful features to offer. Some of the most used Bash features are automatic completion and the history mechanism.
In this chapter, you need a Terminal window to enter the commands with which you’d like to work. To open a Terminal window, from the Applica-tions menu in the GNOME interface, select System Tools Terminal.
c02.indd 42c02.indd 42 1/8/2013 10:42:19 AM1/8/2013 10:42:19 AM

Working with the Bash Shell 43
Some shells offer the option to complete a command automatically. Bash also has this feature, but it goes beyond the option of simply completing commands. Bash can complete almost everything, not just commands. It can also complete fi lenames and shell variables.
Variables
A shell variable is a common value that is used often by the shell and commands that work from that shell, and it is stored with a given name. An example of such a variable is PATH, which stores a list of directories that should be searched when a user enters a com-mand. To refer to the contents of a variable, prepend a $ sign before the name of the vari-able. For example, the command echo $PATH would display the contents of the current search path that Bash is using.
To use this nice feature of completion, use the Tab key. An example of how this works follows. In this example, the cat command is used to display the contents of an ASCII text fi le. The name of this fi le, which is in the current directory, is this_is_a_file. To open this fi le, the user can type cat thi and then immediately hit the Tab key. If there is just one fi le that starts with the letters thi, Bash will automatically complete the name of the fi le. If there are more options, Bash will complete the name of the fi le as far as possible. This hap-pens, for example, when in the current directory there is a fi le with the name this_is_a_text_file and thisAlsoIsAFile. Since both fi les start with this, Bash completes only up to this and doesn’t go any further. To display a list of possibilities, you can then hit the Tab key again. This allows you to enter more information manually. Of course, you can then use the Tab key to use the completion feature again.
Useful Bash Key Sequences
Sometimes, you will enter a command from the Bash command line and nothing, or some-thing totally unexpected, will happen. If that occurs, it is good to know that some key sequences are available to perform basic Bash management tasks. Here is a short list of the most useful of these key sequences:
Ctrl+C Use this key sequence to quit a command that is not responding (or simply is tak-ing too long to complete). This key sequence works in most scenarios where the command is active and producing screen output.
Ctrl+D This key sequence is used to send the end-of-fi le (EOF) signal to a command. Use this when the command is waiting for more input. It will indicate this by displaying the sec-ondary prompt >.
Ctrl+R This is the reverse search feature. When used, it will open the reverse-i-search prompt. This feature helps you locate commands you have used previously. The feature is especially useful when working with longer commands. Type the fi rst characters of the command, and you will immediately see the last command you used that started with the same characters.
c02.indd 43c02.indd 43 1/8/2013 10:42:20 AM1/8/2013 10:42:20 AM
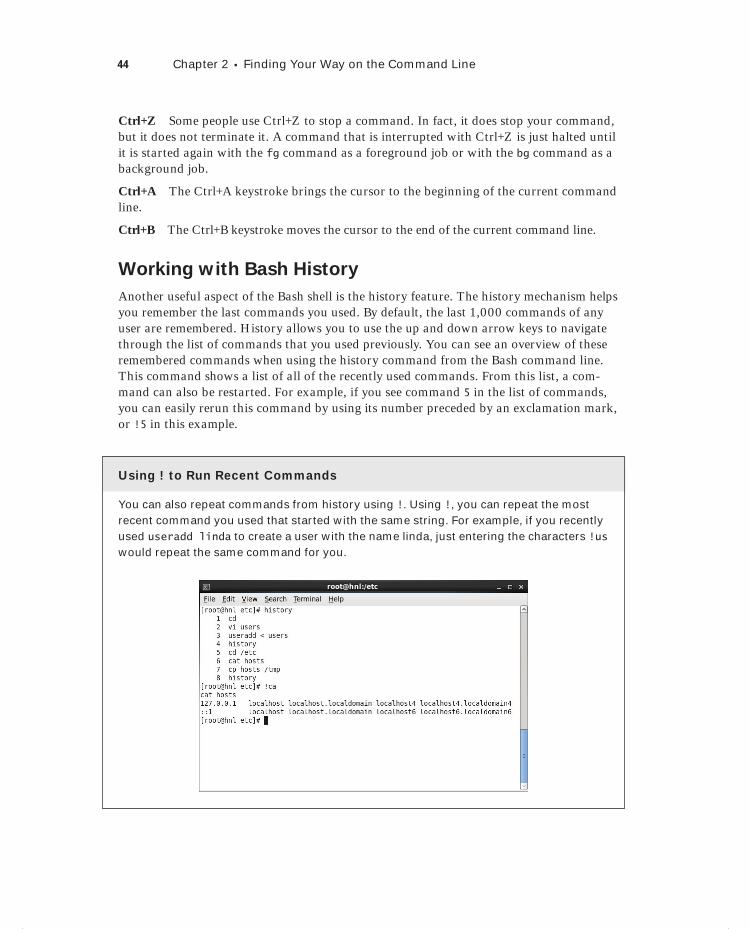
44 Chapter 2 Finding Your Way on the Command Line
Ctrl+Z Some people use Ctrl+Z to stop a command. In fact, it does stop your command, but it does not terminate it. A command that is interrupted with Ctrl+Z is just halted until it is started again with the fg command as a foreground job or with the bg command as a background job.
Ctrl+A The Ctrl+A keystroke brings the cursor to the beginning of the current command line.
Ctrl+B The Ctrl+B keystroke moves the cursor to the end of the current command line.
Working with Bash History
Another useful aspect of the Bash shell is the history feature. The history mechanism helps you remember the last commands you used. By default, the last 1,000 commands of any user are remembered. History allows you to use the up and down arrow keys to navigate through the list of commands that you used previously. You can see an overview of these remembered commands when using the history command from the Bash command line. This command shows a list of all of the recently used commands. From this list, a com-mand can also be restarted. For example, if you see command 5 in the list of commands, you can easily rerun this command by using its number preceded by an exclamation mark, or !5 in this example.
Using ! to Run Recent Commands
You can also repeat commands from history using !. Using !, you can repeat the most recent command you used that started with the same string. For example, if you recently used useradd linda to create a user with the name linda, just entering the characters !us would repeat the same command for you.
c02.indd 44c02.indd 44 1/8/2013 10:42:20 AM1/8/2013 10:42:20 AM
Performing Basic File System Management Tasks 45
As an administrator, you sometimes need to manage the commands that are in the his-tory list. There are two ways of doing this.
First you can manage the file .bash_history (note that the name of this file starts with a dot), which stores all of the commands you have used before. Every user has such a file, which is stored in the home directory of the user. If, for example, you want to delete this file for the user joyce, just remove it with the command rm /home/joyce/.bash_history. Notice that you must be at the root to do this. Since the name of the file begins with a dot, it is a hidden file, and normal users cannot see hidden files.
A second way of administering history files, which can be accomplished by regular users, is by using the history command. The most important option offered by this Bash inter-nal command is the option -c. This will clear the history list for the user who uses this command. So, use history -c to make sure that your history is cleared. In that case, however, you cannot use the up arrow key to access commands used previously.
In the command history, everything you enter from the command line is saved. Even passwords that are typed in plain text are saved in the com-mand history. For this reason, I recommend never typing a plain-text pass-word on the command line because someone else might be able to see it.
Performing Basic File System Management TasksEssentially, everything on your RHEL server is stored in a text or ASCII fi le. Therefore, working with fi les is a very important task when administering Linux. In this section, you learn about fi le system management basics.
Working with Directories
Since fi les are normally organized within directories, it is important that you know how to handle these directories. This involves a few commands.
cd Use this command to change the current working directory. When using cd, make sure to use proper syntax. First, names of commands and directories are case-sensitive; there-fore, /bin is not the same as /BIN. Next, you should be aware that Linux uses a forward slash instead of a backslash. So, use cd /bin and not cd \bin to change the current direc-tory to /bin.
pwd The pwd command stands for Print Working Directory. You can often see your cur-rent directory from the command line, but not always. If the latter is the case, pwd offers help.
c02.indd 45c02.indd 45 1/8/2013 10:42:20 AM1/8/2013 10:42:20 AM

46 Chapter 2 Finding Your Way on the Command Line
mkdir If you need to create a new directory, use mkdir. With Linux mkdir, it is possible to create a complete directory structure in one command using the -p option, something that you cannot do on other operating systems. For example, the command mkdir/some/directory will fail if /some does not exist beforehand. In that case, you can force mkdir to create /some as well if it doesn’t already exist. Do this by using the mkdir -p /some/directory command.
rmdir The rmdir command is used to remove directories. Be aware, however, that it is not the most useful command available, because it will work only on directories that are already empty. If the directory still has fi les and/or subdirectories in it, use rm -r instead, as explained below.
Working with Files
An important command-line task is managing the fi les in the directories. A description of the four important commands used for this purpose follows.
Using ls to List Files
To manage fi les on your server, you must fi rst know what fi les are available. For this pur-pose, the ls command is used. If you just use ls to show the contents of a given directory, it will display a list of fi les. These fi les, however, also have properties. For example, every fi le has a user who is the owner of the fi le, some permissions, a size that is stored in the fi le system, and more. To see this information, use ls -l.
ls has many other options as well. One useful option is -d. The example that follows shows clearly why this option is so useful. Wildcards can be used when working with the ls command. For example, ls * will show a list of all fi les in the current directory, ls /etc/*a.* will show a list of all fi les in the directory /etc that have an a followed by a . (dot) somewhere in the fi lename, and ls [abc]* will show a list of all fi les where the name starts with either a, b, or c in the current directory. Now without the option –d, something strange will happen. If a directory matches the wildcard pattern, the entire contents of that directory are displayed as well. This isn’t very useful, and for that reason, the -d option should always be used with the ls command when using wildcards.
When displaying fi les using ls, note that some fi les are created as hidden fi les. These are fi les where the name starts with a dot. By default, hidden fi les are not shown. To display hidden fi les, use the ls -a command.
A hidden file is one where the name starts with a dot. Most configuration files that are stored in user home directories are created as hidden files. This prevents the user from deleting the file by accident.
Removing Files with rm
Cleaning up the fi le system is a task that also needs to be performed on a regular basis. The rm command is used for this purpose. For example, use rm /tmp/somefile to remove somefile from the /tmp directory. If you are at the root and have all the proper permissions
c02.indd 46c02.indd 46 1/8/2013 10:42:21 AM1/8/2013 10:42:21 AM

Performing Basic File System Management Tasks 47
for this fi le (or if you are the root), you will succeed without any problem. Since removing fi les can be delicate (imagine removing the wrong fi les), the shell will ask your permission by default (see Figure 2.1). Therefore, it may be necessary to push the rm command a little. You can do this by using the -f (force) switch. For example, use rm -f somefile if the command states that some fi le cannot be removed for some reason.
In fact, on Red Hat, the rm command is an alias for the command rm -i, which makes rm interactive and prompts for confirmation for each file that is going to be removed. This means that any time you use rm, the option -i is used automatically. You’ll learn how to create an alias later in this chapter.
F I GU R E 2 .1 By default, rm asks for confirmation before it removes files.
The rm command can also be used to wipe entire directory structures. In this case, the -r option has to be used. When this option is combined with the -f option, the command becomes very powerful. For example, use rm -rf /somedir/* to clear out the entire con-tents of /somedir. This command doesn’t remove the directory itself, however. If you want to remove the directory in addition to the contents of the directory, use rm -rf /somedir.
You should be very careful when using rm this way, especially since a small typing mis-take can result in very serious consequences. Imagine, for example, that you type rm -rf / somedir (with a space between / and somedir) instead of rm -rf /somedir. As a result, the rm command will fi rst remove everything in /, and when it is fi nished with that, it will remove somedir as well. Note that the second part of the command is actually no longer required once the fi rst part of the command has completed.
Copying Files with cp
If you need to copy fi les from one location on the fi le system to another location, use the cp command. This straightforward command is easy to use. For example, use cp ~/* /tmp to copy all fi les from your home directory (which is referred to with the ~ sign) to the
c02.indd 47c02.indd 47 1/8/2013 10:42:21 AM1/8/2013 10:42:21 AM

48 Chapter 2 Finding Your Way on the Command Line
directory /tmp. If subdirectories and their contents need to be included in the copy com-mand, use the option -r. You should, however, be aware that cp normally does not copy hidden fi les where the name starts with a dot. If you need to copy hidden fi les as well, make sure to use a pattern that starts with a .(dot). For example, use cp ~/.* /tmp to copy all fi les where the name starts with a dot from your home directory to the directory /tmp.
Moving Files with mv
An alternative method for copying fi les is to move them. In this case, the fi le is removed from its source location and placed in the target location. For example, use mv ~/somefile /tmp/otherfile to move the fi lename somefile to /tmp. If a subdirectory with the name otherfile exists in /tmp, somefile will be created in this subdirectory. If, however, no directory with this name exists in /tmp, the command will save the contents of the original fi le somefile under its new name, otherfile, in the directory /tmp.
The mv command is not just used to move fi les. You can also use it to rename directories or fi les, regardless of whether there are any fi les in those directories. For example, if you need to rename the directory /somedir to /somethingelse, use mv /somedir /somethingelse.
Viewing the Contents of Text Files
When administering your RHEL server, you will very often fi nd that you are modifying confi guration fi les, which are all ASCII text fi les. Therefore, the ability to browse the con-tent of these fi les is very important. Different methods exist to perform this task.
cat This command displays the contents of a fi le by dumping it to the screen. This can be useful if the contents of the fi le do not fi t on the screen. You will see some text scrolling by, and as the fi nal result, you will see only the last lines of the fi le being displayed on the screen.
tac This command does the same thing as cat but inverts the result; that is, not only is the name of tac the opposite of cat, but the result is the opposite as well. This command will dump the contents of a fi le to the screen, but with the last line fi rst and the fi rst line last.
tail This command shows only the last lines of a text fi le. If no options are used, this command will show the last 10 lines of a text fi le. The command can also be modifi ed to show any number of lines on the bottom of a fi le. For example, tail -n 2 /etc/passwd will show you the last two lines of the confi guration fi le where usernames are stored. The option to keep tail open on a given log fi le is also very useful for monitoring what happens on your system. For example, if you use tail -f /var/log/messages, the most generic log fi le on your system is opened, and when a new line is written to the bottom of that fi le, you will see it immediately, as shown in Figure 2.2.
head This command is the opposite of tail. It displays the fi rst lines of a text fi le.
less The last command used to monitor the contents of text fi les is less. This command will open a plain-text fi le viewer. In the viewer, you can browse the fi le using the Page Down key, Page Up key, or spacebar. It also offers a search capability. From within the less viewer, use /sometext to fi nd sometext in the fi le. To quit less, use q.
more This command is similar to less but not as advanced.
c02.indd 48c02.indd 48 1/8/2013 10:42:22 AM1/8/2013 10:42:22 AM
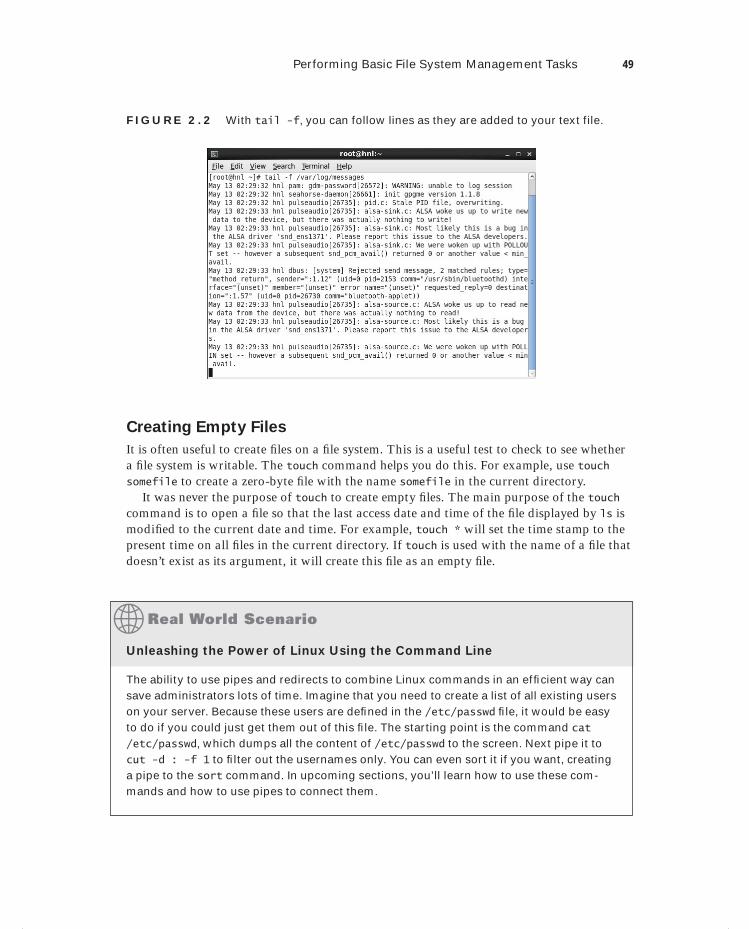
Performing Basic File System Management Tasks 49
F I GU R E 2 . 2 With tail -f, you can follow lines as they are added to your text file.
Creating Empty Files
It is often useful to create fi les on a fi le system. This is a useful test to check to see whether a fi le system is writable. The touch command helps you do this. For example, use touch somefile to create a zero-byte fi le with the name somefile in the current directory.
It was never the purpose of touch to create empty fi les. The main purpose of the touch command is to open a fi le so that the last access date and time of the fi le displayed by ls is modifi ed to the current date and time. For example, touch * will set the time stamp to the present time on all fi les in the current directory. If touch is used with the name of a fi le that doesn’t exist as its argument, it will create this fi le as an empty fi le.
Unleashing the Power of Linux Using the Command Line
The ability to use pipes and redirects to combine Linux commands in an effi cient way can save administrators lots of time. Imagine that you need to create a list of all existing users on your server. Because these users are defi ned in the /etc/passwd fi le, it would be easy to do if you could just get them out of this fi le. The starting point is the command cat /etc/passwd, which dumps all the content of /etc/passwd to the screen. Next pipe it to cut -d : -f 1 to fi lter out the usernames only. You can even sort it if you want, creating a pipe to the sort command. In upcoming sections, you’ll learn how to use these com-mands and how to use pipes to connect them.
c02.indd 49c02.indd 49 1/8/2013 10:42:22 AM1/8/2013 10:42:22 AM
50 Chapter 2 Finding Your Way on the Command Line
Piping and RedirectionThe piping and redirection options are among the most powerful features of the Linux command line. Piping is used to send the result of a command to another command, and redirection sends the output of a command to a fi le. This fi le doesn’t necessarily need to be a regular fi le, but it can also be a device fi le, as you will see in the following examples.
Piping
The goal of piping is to execute a command and send the output of that command to the next command so that it can do something with it. See the example described in Exercise 2.1.
E X E R C I S E 2 .1
Discovering the Use of Pipes
In this exercise, you’ll see how a pipe is used to add functionality to a command. First you’ll execute a command where the output doesn’t fi t on the screen. Next, by piping this output through less, you can see the output screen by screen.
1. Open a shell, and use su - to become the root. Enter the root password when prompted.
2. Type the command ps aux. This command provides a list of all the processes that are currently running on your computer. You’ll notice that the list doesn’t fi t on the screen.
3. To make sure you can see the complete result page by page, use ps aux | less. The output of ps is now sent to less, which outputs it so that you can browse it page by page.
Another very useful command that is often used in a pipe construction is grep. This command is used as a fi lter to show just the information that you want to see and noth-ing else. Imagine, for example, that you want to check whether a user with the name linda exists in the user database /etc/passwd. One solution is to open the fi le with a viewer like cat or less and then browse the contents of the fi le to check whether the string you are seeking is present in the fi le. However, that’s a lot of work. A much easier solution is to pipe the contents of the fi le to the fi lter grep, which would select all of the lines that contain the string mentioned as an argument of grep. This command would read cat /etc/passwd | grep linda.
In Exercise 2.2, I will show you how to use grep and pipes together.
c02.indd 50c02.indd 50 1/8/2013 10:42:22 AM1/8/2013 10:42:22 AM
Piping and Redirection 51
E X E R C I S E 2 . 2
Using grep in Pipes
In this procedure, you’ll use the ps aux command again to show a list of all processes on your system, but this time you’ll pipe the output of the command through the grep utility, which selects the information you’re seeking.
1. Type ps aux to display the list of all the processes that are running on your computer. As you see, it’s not easy to fi nd the exact information you need.
2. Now use ps aux | grep blue to select only the lines that contain the text blue. You'll now see two lines, one displaying the name of the grep command you used and another one showing you the name of the Bluetooth applet.
3. In this step, you’re going to make sure you don’t see the grep command itself. To do this, the command grep -v grep is added to the pipe. The grep option -v excludes all lines containing a specifi c string. The command you’ll enter to get this result is ps aux | grep blue | grep -v grep.
Redirection
Whereas piping is used to send the result of a command to another command, redirection sends the result of a command to a fi le. While this fi le can be a text fi le, it can also be a spe-cial fi le, such as a device fi le. The following exercise shows an example of how redirection is used to redirect the standard output (STDOUT), which is normally written to the current console to a fi le.
In Exercise 2.3, fi rst you’ll use the ps aux command without redirection. The results of the command will be written to the terminal window in which you are working. In the next step, you’ll redirect the output of the command to a fi le. In the fi nal step, you’ll display the contents of the fi le using the less utility.
E X E R C I S E 2 . 3
Redirecting Output to a File
1. From a console window, use the command ps aux. You’ll see the output of the com-mand on the current console.
2. Now use ps aux > ~/psoutput.txt. You don’t see the actual output of the com-mand, because it is written to a fi le that is created in your home directory, which is designated by the ~ sign.
3. To show the contents of the fi le, use the command less ~/psoutput.txt.
c02.indd 51c02.indd 51 1/8/2013 10:42:23 AM1/8/2013 10:42:23 AM
52 Chapter 2 Finding Your Way on the Command Line
Do not use the single redirector sign (>) if you don’t want to overwrite the content of existing fi les. Instead, use a double redirector sign (>>). For example, who > myfile will put the result of the who command (which displays a list of users currently logged in) in a fi le called myfile. If then you want to append the result of another command, for example the free command (which shows information about memory usage on your system), to the same fi le myfile, then use free >> myfile.
Aside from redirecting output of commands to fi les, the opposite is also possible with redirection. For example, you may redirect the content of a text fi le to a command that will use that content as its input. You won’t use this as often as redirection of the STDOUT, but it can be useful in some cases. The next exercise provides an example of how you can use it.
In Exercise 2.4, you’ll run the mail command twice. This command allows you to send email from the command line. At fi rst, you’ll use it interactively, typing a . (dot) on a line to tell mail that it has reached the end of its input. In the second example, you’ll feed the dot using input redirection.
E X E R C I S E 2 . 4
Using Redirection of STDIN
1. From a console, type mail root. This opens the command-line mail program to send a message to the user root.
2. When mail prompts for a subject, type Test message as the subject text, and press Enter.
3. The mail command displays a blank line where you can type the message body. In a real message, here is where you would type your message. In this exercise, however, you don’t need a message body, and you want to close the input immediately. To do this, type a . (dot) and press Enter. The mail message has now been sent to the user root.
4. Now you’re going to specify the subject as a command-line option using the com-mand mail -s test message 2. The mail command immediately returns a blank line, where you’ll enter a . (dot) again to tell the mail client that you’re done.
5. In the third attempt, you enter everything in one command, which is useful if you want to use commands like this in automated shell scripts. Type this command: mail -s test message 3 <. As you can see, when using redirection of the STDIN, the dot is fed to the mail command immediately, and you don’t have to do anything else to send the message.
c02.indd 52c02.indd 52 1/8/2013 10:42:23 AM1/8/2013 10:42:23 AM
Dow
nlo
ad fro
m W
ow
! eBook
<w
ww
.wow
ebook.
com
>
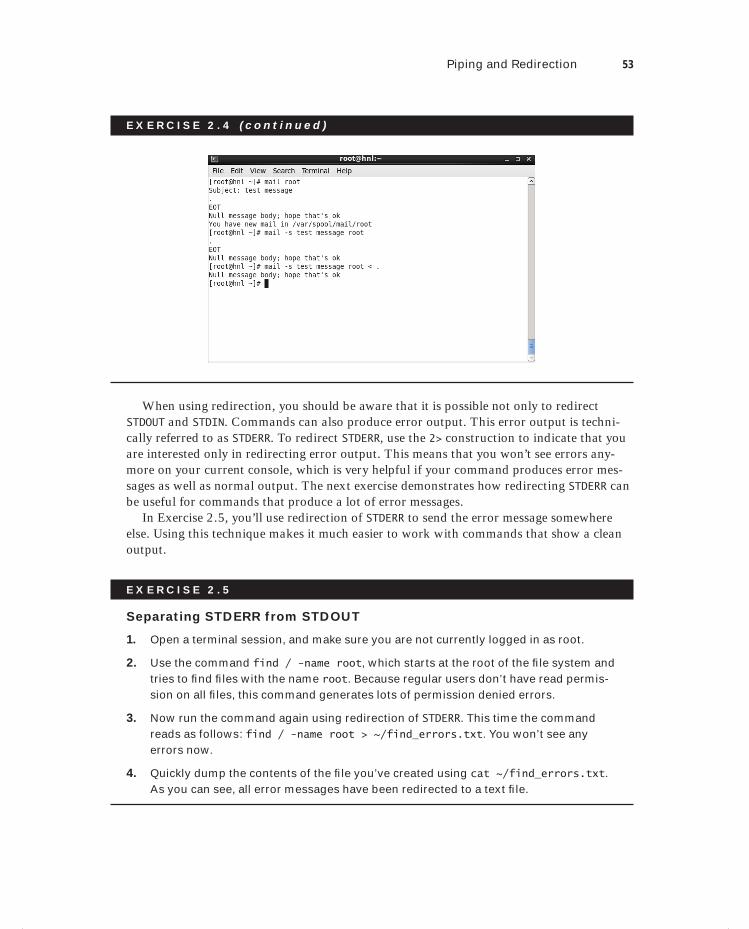
Piping and Redirection 53
E X E R C I S E 2 . 4 ( c ont inue d )
When using redirection, you should be aware that it is possible not only to redirect STDOUT and STDIN. Commands can also produce error output. This error output is techni-cally referred to as STDERR. To redirect STDERR, use the 2> construction to indicate that you are interested only in redirecting error output. This means that you won’t see errors any-more on your current console, which is very helpful if your command produces error mes-sages as well as normal output. The next exercise demonstrates how redirecting STDERR can be useful for commands that produce a lot of error messages.
In Exercise 2.5, you’ll use redirection of STDERR to send the error message somewhere else. Using this technique makes it much easier to work with commands that show a clean output.
E X E R C I S E 2 . 5
Separating STDERR from STDOUT
1. Open a terminal session, and make sure you are not currently logged in as root.
2. Use the command find / -name root, which starts at the root of the fi le system and tries to fi nd fi les with the name root. Because regular users don’t have read permis-sion on all fi les, this command generates lots of permission denied errors.
3. Now run the command again using redirection of STDERR. This time the command reads as follows: find / -name root > ~/find_errors.txt. You won’t see any errors now.
4. Quickly dump the contents of the fi le you’ve created using cat ~/find_errors.txt. As you can see, all error messages have been redirected to a text fi le.
c02.indd 53c02.indd 53 1/8/2013 10:42:23 AM1/8/2013 10:42:23 AM

54 Chapter 2 Finding Your Way on the Command Line
One of the interesting features of redirection is that, not only it is possible to redirect to regular fi les, but you can also redirect output to device fi les. In many cases, however, this works only if you’re at the root. One of the nice features of Linux is that any device con-nected to your system can be addressed by addressing a fi le. Before discussing how that works, here is a partial list of some important device fi les that can be used:
/dev/null The null device. Use this device to redirect to nothing.
/dev/zero A device that can be used to generate zeros. This can be useful when creating large empty files.
/dev/ttyS0 The first serial port.
/dev/lp0 The first legacy LPT printer port.
/dev/hda The master IDE device on IDE interface 0 (typically your hard drive).
/dev/hdb The slave IDE device on IDE interface 0 (not always in use).
/dev/hdc The master device on IDE interface 1 (typically your optical drive).
/dev/sda The first SCSI, SAS, serial ATA, or USB disk device in your computer.
/dev/sdb The second SCSI or serial ATA device in your computer.
/dev/vda The name of your hard disk if you’re working on a virtual machine in a KVM virtual environment.
/dev/sda1 The first partition on the first SCSI or serial ATA device in your computer.
/dev/tty1 The name of the first text-based console that is active on your computer. These ttys are available from tty1 up to tty12.
One way to use redirection together with a device name is by redirecting error output of a given command to the null device. To do this, you would modify the previous com-mand to grep root * 2> /dev/null. Of course, there is always the possibility that your command is not working well for a serious reason. In that case, use the command grep root * 2> /dev/tty12, for example. This will log all error output to tty12. To view the error messages later, you can use the Ctrl+F12 key sequence. (Use Ctrl+Alt+F12 if you are working in a graphical environment.)
Another cool feature you can use is redirecting the output from one device to another. To understand how this works, let’s fi rst take a look at what happens when you are using cat on a device, as in cat /dev/sda. As you can see in Figure 2.3, this displays the complete content of the sda device in the standard output, which is not very useful.
c02.indd 54c02.indd 54 1/8/2013 10:42:23 AM1/8/2013 10:42:23 AM
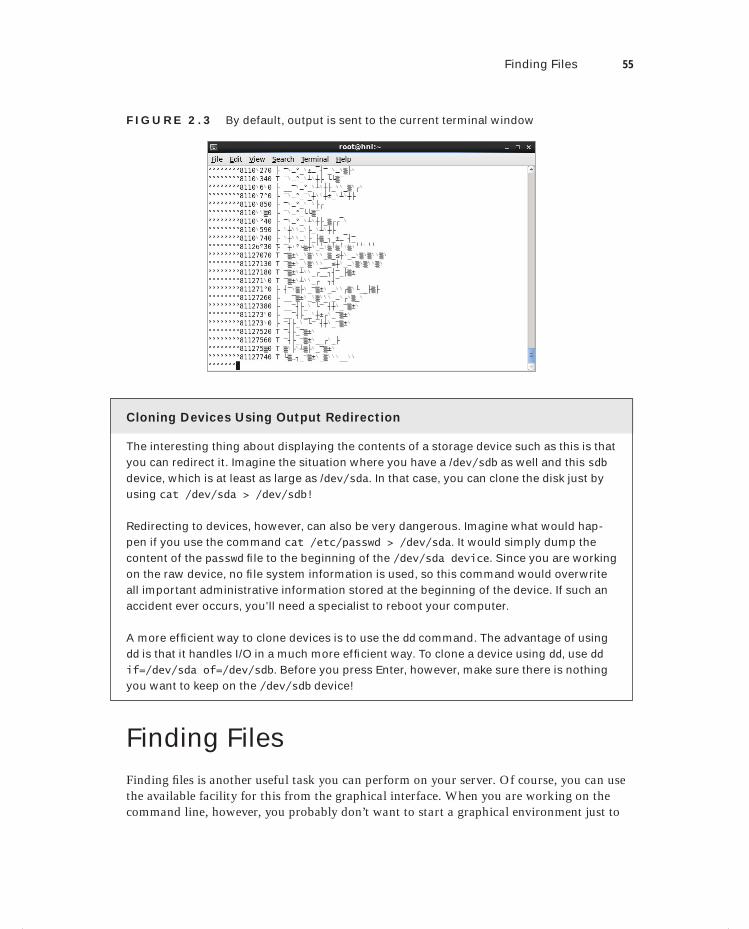
Finding Files 55
F I GU R E 2 . 3 By default, output is sent to the current terminal window
Cloning Devices Using Output Redirection
The interesting thing about displaying the contents of a storage device such as this is that you can redirect it. Imagine the situation where you have a /dev/sdb as well and this sdb device, which is at least as large as /dev/sda. In that case, you can clone the disk just by using cat /dev/sda > /dev/sdb!
Redirecting to devices, however, can also be very dangerous. Imagine what would hap-pen if you use the command cat /etc/passwd > /dev/sda. It would simply dump the content of the passwd fi le to the beginning of the /dev/sda device. Since you are working on the raw device, no fi le system information is used, so this command would overwrite all important administrative information stored at the beginning of the device. If such an accident ever occurs, you’ll need a specialist to reboot your computer.
A more effi cient way to clone devices is to use the dd command. The advantage of using dd is that it handles I/O in a much more effi cient way. To clone a device using dd, use dd if=/dev/sda of=/dev/sdb. Before you press Enter, however, make sure there is nothing you want to keep on the /dev/sdb device!
Finding FilesFinding fi les is another useful task you can perform on your server. Of course, you can use the available facility for this from the graphical interface. When you are working on the command line, however, you probably don’t want to start a graphical environment just to
c02.indd 55c02.indd 55 1/8/2013 10:42:24 AM1/8/2013 10:42:24 AM

56 Chapter 2 Finding Your Way on the Command Line
fi nd some fi les. In that case, use the find command instead. This is a very powerful com-mand that helps you fi nd fi les based on any property the fi le may have.
You can use find to search for fi les based on any fi le property, such as their names; the access, creation, or modifi cation date; the user who created them; the permissions set on the fi le; and much more. If, for example, you want to fi nd all fi les whose name begins with hosts, use find / -name "hosts*". I recommend that you always put the string of the item for which you are searching between quotes. This prevents Bash from expanding * before sending it to the find command.
Another example where find is useful is to locate fi les that belong to a specifi c user. For example, use find / -user "linda" to locate all fi les created by user linda. The fun part about find is that you can execute a command on the result of the fi nd by using the -exec option. If, for example, you want to copy all fi les of user linda to the null device (a rather senseless example, I realize, but it’s the technique that counts here), use find / -user "linda" -exec cp {} /dev/null \;.
If you’re using –exec in your find commands, you should pay special attention to two specifi c elements used in the command. First there is the {} construction, which is used to refer to the result of the previous find command. Next there is the \; element, which is used to tell find that this is the end of the part that began with -exec.
Working with an EditorFor your day-to-day management tasks from the command line, you will often need to work with an editor. Many Linux editors are available, but vi is the only one you should use. Unfortunately, using vi isn’t always easy. You may think “why bother using such a dif-fi cult editor?” The answer is simple: vi is always available no matter what Linux or UNIX system you are using. The good news is that vi is even available for Windows under the name of winvi, so there is no longer a reason to use the Notepad editor with its limited functionality. In fact, once you’ve absorbed the vi learning curve, you’ll fi nd that it is not that diffi cult. Once you’re past that, you’ll appreciate vi because it gets the job done faster than most other editors.
Another important reason why you should become familiar with vi is that some other commands are based on it. For example, to edit quota for the end users on your server, you would use edquota, which is a macro built on vi. If you want to set permissions for the sudocommand, use visudo, which, as you can guess, is also a macro built on top of vi.
It looks as though visudo is built on top of vi, and by default it is. In Linux, the $EDITOR shell variable is used to accomplish this. If you don’t like vi and want to use another editor for sudo and many other commands that by default rely on vi, you could also change the $EDITOR shell variable. To do this for your user account, create a file with the name .bashrc in your home directory and put in the line EDITOR=youreditorofchoice.
c02.indd 56c02.indd 56 1/8/2013 10:42:24 AM1/8/2013 10:42:24 AM

Working with an Editor 57
If you fi nd that vi is hard to use, there is some good news: RHEL uses a user-friendly version of vi called vim, for “vi improved.” To start vim, just use the vi command. In this section, I will provide you with the bare essentials that are needed to work with vi.
Vi Modes
One of the hardest things to get used to when working with vi is that it uses two modes.
In fact, vi uses three modes. The third mode is the ex mode. Because the ex mode can also be considered a type of command mode, I won’t distin-guish between ex mode and command mode in this book.
After starting a vi editor session, you fi rst have to enter insert mode (also referred to as input mode) before you can start entering text. Next there is the command mode, which is used to enter new commands. The nice thing about vi, however, is that it offers you a lot of choices. For example, you can choose between several methods to enter insert mode.
Use i to insert text at the current cursor position.
Use a to append text after the current position of the cursor.
Use o to open a new line under the current position of the cursor
Use O to open a new line above the current position of the cursor.
After entering insert mode, you can enter text, and vi will work just like any other edi-tor. To save your work, go back to command mode and use the appropriate commands. The magic key to go back to the command mode from insert mode is Esc.
When starting vi, always use the file you want to create or the name of an existing file you want to modify as an argument. If you don’t do that, vi will display the relevant help text screen, which you will have to exit (unless you really need help).
Saving and Quitting
After activating command mode, you use the appropriate command to save your work. The most common command is :wq!
With this command, you’ll actually do two different things. First the command begins with a : (colon). Then w saves the text you have typed thus far. If no fi lename is specifi ed after the w, the text will be saved under the same fi lename that was used when the fi le was opened. If you want to save it under a new fi lename, just enter the new name after the w command. Next the q will ensure that the editor is quit as well. Finally, the exclamation mark is used to tell vi not to issue any warnings and just do its work. Using an ! at the end
c02.indd 57c02.indd 57 1/8/2013 10:42:24 AM1/8/2013 10:42:24 AM
58 Chapter 2 Finding Your Way on the Command Line
of a command is potentially dangerous; if a previous fi le with the same name already exists, vi will overwrite it without any further warning.
As you have just learned, you can use :wq! to write and to quit vi. You can also use just parts of this command. For example, use :w if you just want to write the changes you made while working on a fi le without quitting it, or you can use :q! to quit the fi le without writing the changes. The latter is a nice panic option if you’ve done something that you absolutely don’t want to store on your system. This is useful because vi will sometimes do mysterious things to the contents of your fi le when you have hit the wrong keys by accident. There is, however, a good alternative; use the u command to undo the last changes you made to the fi le.
Cut, Copy, and Paste
You do not need a graphical interface to use the cut, copy, and paste features. To cut and copy the contents of a fi le in a simple way, you can use the v command, which enters visual mode. In visual mode, you can select a block of text using the arrow keys. After selecting the block, you can cut, copy, and paste it.
Use d to cut the selection. This will remove the selection and place it in a buffer in memory.
Use y to copy the selection to the designated area reserved for that purpose in your server’s memory.
Use p to paste the selection underneath the current line, or use P if you want to paste it above the current line. This will copy the selection you have just placed in the reserved area of your server’s memory back into your document. For this purpose, it will always use your cursor’s current position.
Deleting Text
Another action you will often do when working with vi is deleting text. There are many methods that can be used to delete text with vi. The easiest is from insert mode: just use the Delete and Backspace keys to get rid of any text you like. This works just like a word pro-cessor. Some options are available from vi command mode as well.
Use x to delete a single character. This has the same effect as using the Delete key while in insert mode.
Use dw to delete the rest of the word. That is, dw will delete anything from the current position of the cursor to the end of the word.
Use D to delete from the current cursor position up to the end of the line.
Use dd to delete a complete line.
Replacing Text
When working with ASCII text confi guration fi les, you’ll often need to replace parts of some text. Even if it’s just one character you want to change, you’ll appreciate the r
c02.indd 58c02.indd 58 1/8/2013 10:42:25 AM1/8/2013 10:42:25 AM

Working with an Editor 59
command. This allows you to change a single character from command mode without entering input mode.
A more powerful method of replacing text is by using the :%s/oldtext/newtext/g command, which replaces oldtext with newtext in the current fi le. This is very convenient if you want to change a sample confi guration fi le in which the sample server name needs to be changed to your own server name. The next exercise provides you with some practice doing this.
In Exercise 2.6, you’ll create a small sample fi le. Next you’ll learn how to change a single character and to replace multiple occurrences of a string with new text.
E X E R C I S E 2 . 6
Replacing Text with vi
1. Open a terminal, and make sure you’re in your home directory. Use the cd command without any arguments to go to your home directory.
2. Type vi example, which starts vi in a newly created fi le with the name example. Press i to open insert mode, and enter the following text:
Linda Thomsen sales San Francisco
Michelle Escalante marketing Salt Lake City
Lori Smith sales Honolulu
Zeina Klink marketing San Francisco
Anja de Vries sales Eindhoven
Susan Menyrop marketing Eindhoven
3. Press c to enter command mode, and use :w to write the document.
4. In the name Menyrop, you’ve made an error. Using the r command, it is easy to replace that one character. Without entering insert mode, put the cursor on the letter y and press r. Next type a t as a replacement for the letter y. You have just changed one single character.
5. As the Eindhoven department is closing down, all staff that works there will be relo-cated to Amsterdam. So, all occurrences of Eindhoven in the fi le need to be replaced with Amsterdam. To do this, use :%s/Eindhoven/Amsterdam/g from vi command mode.
6. Verify that all of the intended changes have been applied, and close this vi session by using :wq! from command mode.
Using sed for the Replacement of Text
In the previous procedure, you learned how to change text in vi. In some cases, you will need a more powerful tool to do this. The Streamline Editor (sed) is a perfect candidate. sed is also an extremely versatile tool, and many different kinds of operations can be
c02.indd 59c02.indd 59 1/8/2013 10:42:25 AM1/8/2013 10:42:25 AM

60 Chapter 2 Finding Your Way on the Command Line
performed with it. The number of sed operations is so large, however, that many adminis-trators don’t use sed simply because they don’t know where to begin. In this section, you’ll learn how to get started with sed.
Standard editors like vi are capable of making straightforward modifi cations to text fi les. The difference between these editors and sed is that sed is much more effi cient when handling multiple fi les simultaneously. In particular, sed’s ability to fi lter text in a pipe is not found in any other editor. sed’s default behavior is that it will walk through input fi les line by line, apply its commands to these lines, and write the result to the standard out-put. To perform these commands, sed uses regular expressions. Let’s look at some sample expressions that are applied to the example fi le users that you see in the following listing:
my-computer:~> cat users
lori:x:1006:100::/home/lori:/bin/bash
linda:x:1007:100::/home/linda:/bin/bash
lydia:x:1008:100::/home/lydia:/bin/bash
lisa:x:1009:100::/home/lisa:/bin/bash
leonora:x:1010:100:/home/leonora:/bin/bash
To begin, the following command displays the fi rst two lines from the users fi le and exits:
sed 2q users
Much more useful, however, is the following command, which prints all lines containing the text or:
sed -n /or/p users
In this example, consider -n a mandatory option, followed by the string you are look-ing for, or. The p command then gives the instruction to print the result. In this example, you’ve been searching for the literal text or. sed also works with regular expressions, the powerful search patterns that you can use in Linux and UNIX environments to make your searches more fl exible. Here are some examples in which regular expressions are used:
sed -n /^or/p users Shows all lines that don’t contain the text or
sed -n /./p users Shows all lines that contain at least one character
sed -n /\./p users Shows all lines that contain a dot
Just printing lines, however, isn’t what makes sed so powerful. You can also substitute characters using sed. The base syntax to do this is summarized in the following command where s/ is referring to the substitute command:
sed s/leo/lea/g users
This command replaces the string leo with the string lea and writes the results to the standard output. Writing it to the standard output is very secure, but it doesn’t apply a single change to the fi le itself. If you want to do that, add the -i option to the command.
sed -i s/leo/lea/g users
c02.indd 60c02.indd 60 1/8/2013 10:42:25 AM1/8/2013 10:42:25 AM

Getting Help 61
The changes are now applied immediately to the fi le, which is useful if you know exactly what you are doing. If you don’t, just have sed send the results to the standard output fi rst so that you can check it before writing it.
At this stage, you’ve seen enough to unleash the full power of sed, which reveals its full glory if combined with shell scripting. Imagine that you have four fi les named file1, file2, file3, and file4 in the current directory and you need to replace the text one in each of these fi les with the text ONE. The following small scripting line that includes sed will perform this task perfectly for you. (Much more coverage of scripting appears later in this book.)
for i in file[1-4]; do sed -i s/one/ONE/g $i; done
Imagine the power of this in a datacenter where you need to change all confi guration fi les that contain the ID of a storage device that has just been replaced, or where you want to modify a template fi le to make sure that the name of a placeholder service is replaced by the real name of the service you are now using. The possibilities of sed are unlimited, even though this section has shown you only the basics.
Getting HelpLinux offers many ways to get help. Let’s start with a short overview.
The man command offers documentation for most commands that are available on your system.
Almost all commands listen to the --help argument as well. This will display a short overview of available options that can be used with the command on which you use the --help option.
For Bash internal commands, there is the help command. This command can be used with the name of the Bash internal command about which you want to know more. For example, use help for to get more information about the Bash internal command for.
An internal command is a command that is part of the shell and does not exist as a program file on disk. To get an overview of all internal com-mands that are available, just type help on the command line.
For almost all programs that are installed on your server, extensive documentation is available in the directory /usr/share/doc.
Using man to Get Help
The most important source information available for use of Linux commands is man, which is short for the system programmer’s “manual.” Think of it as nine different books
c02.indd 61c02.indd 61 1/8/2013 10:42:26 AM1/8/2013 10:42:26 AM

62 Chapter 2 Finding Your Way on the Command Line
in which all parts of the Linux operating system are documented. That’s how the man sys-tem started in the early days of UNIX. This structure of several different books (nowadays called sections) is still present in the man command; therefore, you will fi nd a list of the available sections and the type of help you can fi nd in each section.
Looking for a quick introduction to the topics handled in any of these sections? Use man n intro. This displays the introduction page for the section you’ve selected. Table 2.1 provides an overview of the sections that are used in man.
TA B LE 2 .1 Overview of man sections
Section Type Description
0 Header files These are files that are typically in /usr/include and contain generic code that can be used by your pro-grams.
1 Executable programs or shell commands
For the end user, this is the most important section. Normally all commands that can be used by end users are documented here.
2 System calls As an administrator, you won’t use this section frequently. The system calls are functions that are provided by the kernel. This is very interesting if you are a kernel debugger or if you want to do advanced troubleshooting of your system. Normal administra-tors, however, do not need this information.
3 Library calls A library is a piece of shared code that can be used by several different programs. Typically, you don’t often need the information here to do your work as a system administrator.
4 Special files The device files in the directory /dev are documented in here. It can be useful to use this section to find out more about the workings of specific devices.
5 Configuration files Here you’ll find the proper format that you can use for most configuration files on your server. If, for example, you want to know more about the way /etc/passwd is organized, use the entry for passwd in this section by issuing the command man 5 passwd.
6 Games Historically, Linux and UNIX systems were limited in the number of games that could be installed. On a modern server, this is hardly ever the case, but man section 6 still exists as a reminder of this old habit.
c02.indd 62c02.indd 62 1/8/2013 10:42:26 AM1/8/2013 10:42:26 AM
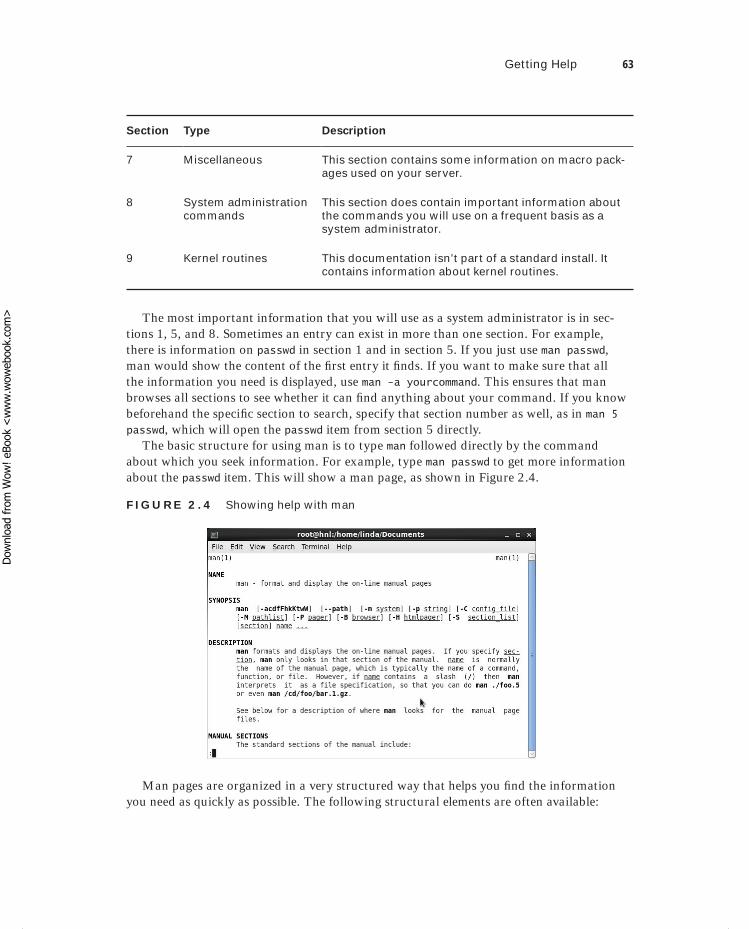
Getting Help 63
Section Type Description
7 Miscellaneous This section contains some information on macro pack-ages used on your server.
8 System administration commands
This section does contain important information about the commands you will use on a frequent basis as a system administrator.
9 Kernel routines This documentation isn’t part of a standard install. It contains information about kernel routines.
The most important information that you will use as a system administrator is in sec-tions 1, 5, and 8. Sometimes an entry can exist in more than one section. For example, there is information on passwd in section 1 and in section 5. If you just use man passwd, man would show the content of the fi rst entry it fi nds. If you want to make sure that all the information you need is displayed, use man -a yourcommand. This ensures that man browses all sections to see whether it can fi nd anything about your command. If you know beforehand the specifi c section to search, specify that section number as well, as in man 5 passwd, which will open the passwd item from section 5 directly.
The basic structure for using man is to type man followed directly by the command about which you seek information. For example, type man passwd to get more information about the passwd item. This will show a man page, as shown in Figure 2.4.
F I GU R E 2 . 4 Showing help with man
Man pages are organized in a very structured way that helps you fi nd the information you need as quickly as possible. The following structural elements are often available:
c02.indd 63c02.indd 63 1/8/2013 10:42:26 AM1/8/2013 10:42:26 AM
Dow
nlo
ad fro
m W
ow
! eBook
<w
ww
.wow
ebook.
com
>

64 Chapter 2 Finding Your Way on the Command Line
Name This is the name of the command. It describes in one or two lines what the command is used for.
Synopsis Here you can fi nd short usage information about the command. It will show all available options and indicate whether it is optional (it will be between square brackets) or mandatory (it will not be between brackets).
Description The description gives a long explanation of what the command is doing. Read it to get a clear and complete picture of the purpose of the command.
Options This is a complete list of all options that are available. It documents the use of all of them.
Files This section provides a brief list of fi les, if any, that are related to the command about which you want more information.
See Also A list of related commands.
Author The author and also the email address of the person who wrote the man page.
Man is a very useful way to get more information on how to use a given command. The problem is that it works only if you know the exact name of the command about which you want to know more. If you don’t, you can use man -k, which is also available as the alias apropos. The -k option allows you to locate the command you need by looking at keywords. This will often show a very long list of commands from all sections of the man pages. In most cases, you don’t need to see all of this information; the commands that are relevant for the system administrator are in sections 1 and 8. Occasionally, when you are looking for a confi guration fi le, section 5 should be browsed. Therefore, it is useful to pipe the output of man -k through the grep utility that can be used for fi ltering. For example, use man -k time | grep 1 to show only lines from man section 1 that have the word time in the description.
To use man, you rely on the whatis database that exists on your system. If it doesn’t, you’ll see a “nothing appropriate” message on everything you try to do—even if you’re using a command that should always give a result, such as man -k user. If you get this mes-sage, use the makewhatis command. It can take a few minutes to complete, but once it does, you have a whatis database, and man -k can be used as the invaluable tool that it is.
In Exercise 2.7, you’ll work with man -k to fi nd the information you need about a command.
E X E R C I S E 2 . 7
Working with man -k
1. Open a console, and make sure you are the root.
2. Type makewhatis to create the whatis database. If it already exists, that’s not a problem. makewhatis just creates an updated version in that case.
3. Use man -k as a password. You’ll see a long list of commands that match the keyword password in their description.
c02.indd 64c02.indd 64 1/8/2013 10:42:27 AM1/8/2013 10:42:27 AM
Getting Help 65
E X E R C I S E 2 . 7 ( c ont inue d )
4. To obtain a more useful result, make an educated guess about which section of the man pages the command you’re looking for is most likely documented in. If you’re looking for a password item, you probably are looking for the command that a user would use to change their password. So, section 1 is appropriate here.
5. Use man -k password | grep 1 to fi lter the result of your man command a bit more.
To fi nish this section about man, there are a few more things of which you should be aware.
The man command has many things in common with less. Things that work in less also often work in man. Think of searching for text using /, going to the top of a docu-ment using g, going to the end of it using G, and using q to quit man.
There is much interesting information near the end of the man page. In some of the more complicated man pages, this includes examples. There is also a section that lists related commands.
If you still can’t find out how a command works, most man pages list the email address of the person who maintains the page.
Using the --help Option
The --help option can be used with most commands. It is pretty straightforward. Most commands listen to this option, although not all commands recognize it. The nice thing, however, is that if your command doesn’t recognize the option, it will give you a short sum-mary of how to use the command when it doesn’t understand what you want it to do. You should be aware that, although the purpose of the command is to give a short overview of the way it should be used, the information is very often still too long to fi t on one screen. In that case, pipe it through less to view the information page by page. In Figure 2.5, you can see an example of the output provided by using the --help option.
Getting Information on Installed Packages
Another good option for getting help that is often overlooked is the documentation that is installed for most software packages in the /usr/share/doc directory. In this direc-tory, you will fi nd a long list of subdirectories that contain some useful information. In some cases, the information is very brief; in other cases, extensive information is avail-able. This information is often available in ASCII text format and can be viewed with less or any other utility that is capable of handling clear text. In other situations, the information is in HTML format and can be displayed properly only with a web browser. If this is the case, you don’t necessarily need to start a graphical environment to see the contents of the HTML fi le. RHEL comes with the elinks browser, which was especially developed to run from a nongraphical environment. In elinks, you can use the arrow keys to browse between hyperlinks. To quit the elinks browser, use the q command.
c02.indd 65c02.indd 65 1/8/2013 10:42:27 AM1/8/2013 10:42:27 AM
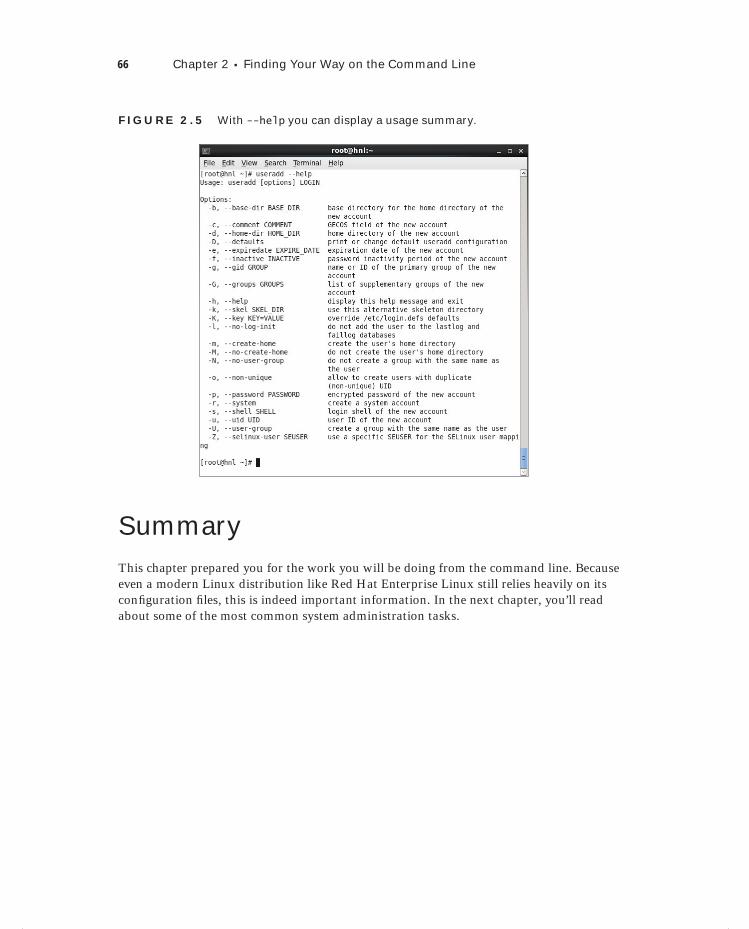
66 Chapter 2 Finding Your Way on the Command Line
F I GU R E 2 .5 With --help you can display a usage summary.
SummaryThis chapter prepared you for the work you will be doing from the command line. Because even a modern Linux distribution like Red Hat Enterprise Linux still relies heavily on its confi guration fi les, this is indeed important information. In the next chapter, you’ll read about some of the most common system administration tasks.
c02.indd 66c02.indd 66 1/8/2013 10:42:27 AM1/8/2013 10:42:27 AM
PART
IIAdministering
Red Hat Enterprise Linux
c03.indd 67c03.indd 67 1/8/2013 10:43:04 AM1/8/2013 10:43:04 AM

c03.indd 68c03.indd 68 1/8/2013 10:43:05 AM1/8/2013 10:43:05 AM

Chapter
3Performing Daily System Administration Tasks
TOPICS COVERED IN THIS CHAPTER:
Performing Job Management Tasks
Monitoring and Managing Systems and Processess
Scheduling Jobs
Mounting Devices
Working with Links
Creating Backups
Managing Printers
Setting Up System Logging
c03.indd 69c03.indd 69 1/8/2013 10:43:05 AM1/8/2013 10:43:05 AM
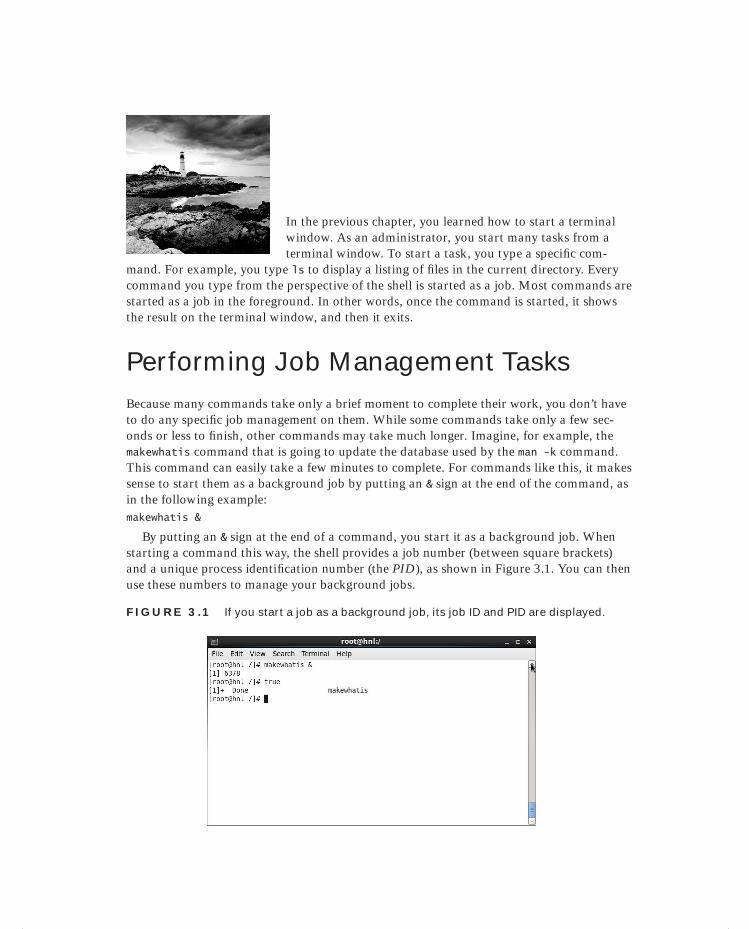
In the previous chapter, you learned how to start a terminal window. As an administrator, you start many tasks from a terminal window. To start a task, you type a specifi c com-
mand. For example, you type ls to display a listing of fi les in the current directory. Every command you type from the perspective of the shell is started as a job. Most commands are started as a job in the foreground. In other words, once the command is started, it shows the result on the terminal window, and then it exits.
Performing Job Management TasksBecause many commands take only a brief moment to complete their work, you don’t have to do any specifi c job management on them. While some commands take only a few sec-onds or less to fi nish, other commands may take much longer. Imagine, for example, the makewhatis command that is going to update the database used by the man -k command. This command can easily take a few minutes to complete. For commands like this, it makes sense to start them as a background job by putting an & sign at the end of the command, as in the following example:makewhatis &
By putting an & sign at the end of a command, you start it as a background job. When starting a command this way, the shell provides a job number (between square brackets) and a unique process identifi cation number (the PID), as shown in Figure 3.1. You can then use these numbers to manage your background jobs.
F I GU R E 3 .1 If you start a job as a background job, its job ID and PID are displayed.
c03.indd 70c03.indd 70 1/8/2013 10:43:07 AM1/8/2013 10:43:07 AM

Performing Job Management Tasks 71
The benefi t of starting a job in the background is that the terminal is still available for you to launch other commands. At the moment, the background job is fi nished; you’ll see a message that it has completed, but this message is displayed only after you’ve entered another command to start.
To manage jobs that are started in the background, there are a few commands and key sequences that you can use, as listed in Table 3.1.
TA B LE 3 .1 Managing foreground and background jobs
Command Use
Ctrl+Z Use this to pause a job. Once paused, you can put it in the fore-ground or in the background.
fg Use this to start a paused job as a foreground job.
bg Use this to start a paused job as a background job.
jobs Use this to show a list of all current jobs.
Normally, you won’t need to do too much in the way of job management, but in some cases it makes sense to move a job you’ve started into the background so that you can make the terminal available for other tasks. Exercise 3.1 shows you how to do this.
E X E R C I S E 3 .1
Managing Jobs
In this exercise, you’ll learn how to move a job that was started as a foreground job into the background. This can be especially useful for graphical programs that were started as a foreground job and that occupy your terminal until they’re fi nished.
1. From a graphical user interface, open a terminal, and from that terminal, start the system-config-users program. You will see that the terminal is now occupied by the graphical program you’ve just started and that you cannot start any other programs.
2. Click in the terminal where you started system-config-users, and use the Ctrl+Z key sequence. This temporarily stops the graphical program and returns the prompt on your terminal.
3. Use the bg command to move the job you started by entering the system-config-users command to the background. You can now continue using the graphical user interface and, at the same time, have access to the terminal where you can start other jobs by entering new commands.
c03.indd 71c03.indd 71 1/8/2013 10:43:07 AM1/8/2013 10:43:07 AM
72 Chapter 3 Performing Daily System Administration Tasks
E X E R C I S E 3 .1 ( c ont inue d )
4. From the terminal window, type the jobs command. This shows a list of all jobs that are started from this terminal. You should see just the system-config-users com-mand. Every job has a unique job number in the list displayed by the jobs command. If you have just one job, it will always be job 1.
5. To put a background job back into the foreground, use the fg command. By default, this command will put the last command you started in the background into the foreground. If you want to put another background job into the foreground, use fg followed by the job number of the job you want to manage; for instance, use fg 1.
Job numbers are specific for the shell in which you’ve started the job. This means if you have multiple terminals that are open, you can manage jobs in each of those terminals.
System and Process Monitoring and ManagementIn the preceding section, you learned how to manage jobs that you started from a shell. As mentioned, every command that you start from the shell can be managed as a job. There are, however, many more tasks that are running at any given moment on your Red Hat Enterprise Linux Server. These tasks are referred to as processes.
Every job that you start is not only a job but also a process. In addition, when your server boots, many other processes are started to provide services on your server. These are the daemons, which are processes that are always started in the background and provide services on your server. If, for instance, your server starts an Apache web server, this server is started as a daemon.
Managing processes is an important task for a system administrator. You may need to send a specifi c signal to a process that doesn’t respond properly anymore. Otherwise, on a very busy system, it is important to get an overview of the system and check exactly what it is doing. You will use a few commands to manage and monitor processes on your system, as shown in Table 3.2.
c03.indd 72c03.indd 72 1/8/2013 10:43:08 AM1/8/2013 10:43:08 AM
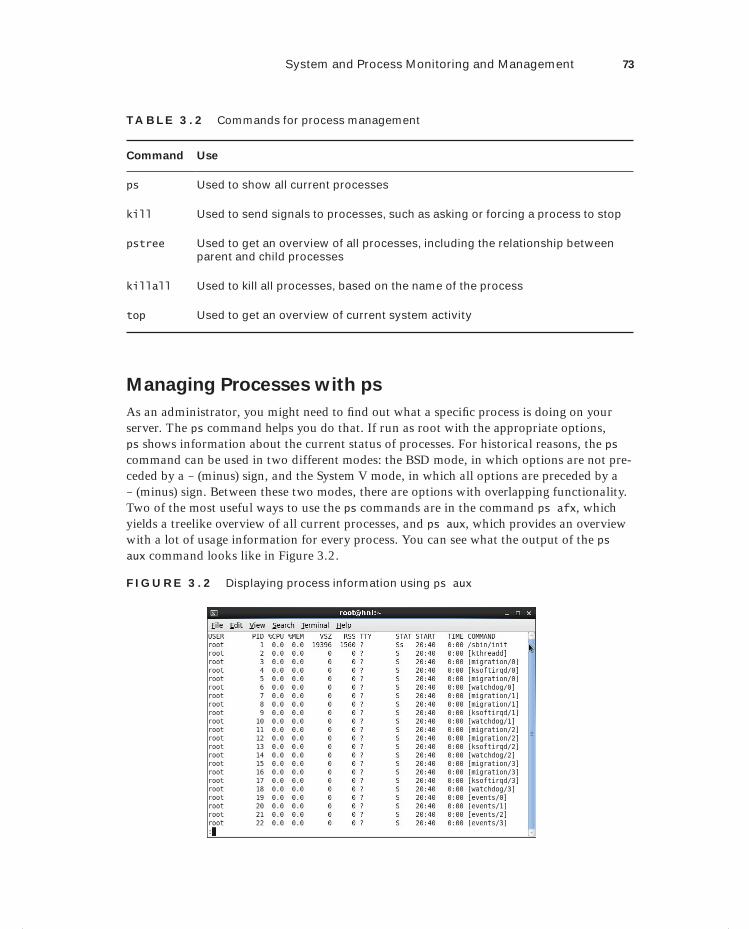
System and Process Monitoring and Management 73
TA B LE 3 . 2 Commands for process management
Command Use
ps Used to show all current processes
kill Used to send signals to processes, such as asking or forcing a process to stop
pstree Used to get an overview of all processes, including the relationship between parent and child processes
killall Used to kill all processes, based on the name of the process
top Used to get an overview of current system activity
Managing Processes with ps
As an administrator, you might need to fi nd out what a specifi c process is doing on your server. The ps command helps you do that. If run as root with the appropriate options, ps shows information about the current status of processes. For historical reasons, the ps command can be used in two different modes: the BSD mode, in which options are not pre-ceded by a – (minus) sign, and the System V mode, in which all options are preceded by a – (minus) sign. Between these two modes, there are options with overlapping functionality. Two of the most useful ways to use the ps commands are in the command ps afx, which yields a treelike overview of all current processes, and ps aux, which provides an overview with a lot of usage information for every process. You can see what the output of the ps aux command looks like in Figure 3.2.
F I GU R E 3 . 2 Displaying process information using ps aux
c03.indd 73c03.indd 73 1/8/2013 10:43:08 AM1/8/2013 10:43:08 AM

74 Chapter 3 Performing Daily System Administration Tasks
When using ps aux, process information is shown in different columns:
USER The name of the user whose identity is used to run the process.
PID The process identification number, which is a unique number that is needed to manage processes.
%CPU The percentage of CPU cycles used by a process.
%MEM The percentage of memory used by a process.
VSZ The virtual memory size. This is the total amount of memory that is claimed by a process. It is common for processes to claim much more memory than they actually need. This is referred to as memory over allocation.
RSS The resident memory size. This is the total amount of memory that a process is actually using.
TTY If the process is started from a terminal, the device name of the termi-nal is mentioned in this column.
STAT The current status of the process. The top three most common status indicators are S for sleeping, R for running, or Z for a process that has entered the zombie state.
START The time that the process started.
TIME The real time in seconds that a process has used CPU cycles since it was started.
COMMAND The name of the command file that was used to start a process. If the name of this file is between brackets, it is a kernel process.
Another common way to show process information is by using the command ps afx. The most useful addition in this command is the f option, which shows the relationship between parent and child processes. For an administrator, this relationship is important because the managing of processes occurs via the parent process. This means that in order to kill a process, you need to be able to contact the parent of that specifi c process. Also, if you kill a process that currently has active children, all of the children of the process are terminated as well. You will fi nd out how this works in Exercise 3.2.
Sending Signals to Processes with the kill Command
To manage processes as an administrator, you can send signals to the process in question. According to the POSIX standard, which defi nes how UNIX-like operating systems should
c03.indd 74c03.indd 74 1/8/2013 10:43:09 AM1/8/2013 10:43:09 AM
Dow
nlo
ad fro
m W
ow
! eBook
<w
ww
.wow
ebook.
com
>
System and Process Monitoring and Management 75
behave, different signals can be used. In practice, only a few of these signals are continuously available. It is up to the person who writes the program to determine those signals that are available and those that are not.
A well-known example of a command that offers more than the default sig-nals is the dd command. When this command is operational, you can send SIGUSR1 to the command to show details about the current progress of the dd command.
Three signals are available at all times: SIGHUP (1), SIGKILL (9), and SIGTERM (15). Each of these signals can be referred to by the name of the signal or by the number when managing processes. You can, for instance, use either kill -9 123 or kill -SIGKILL 123 to send the SIGKILL signal to the process with PID 123.
Among these signals, SIGTERM is the best way to ask a process to stop its activity. If, as an administrator, you request closure of a program using the SIGTERM signal, the pro-cess in question can still close all open fi les and stop using its resources.
A more brutal way of terminating a process is by sending it SIGKILL, which doesn’t allow the process any time at all to cease its activity; that is, the process is simply cut off, and you risk damaging open fi les.
Another way of managing a process is by using the SIGHUP signal. SIGHUP tells a pro-cess that it should reinitialize and read its confi guration fi les again.
To send signals to processes, you will use the kill command. This command typically has two arguments. The fi rst argument is the number of the signal you want to send to the process, and the second argument is the PID of the process to which you want to send a signal. For instance, the command kill -9 1234 will send the SIGKILL signal to the pro-cess with PID 1234.
When using the kill command, you can use the PIDs of multiple processes to send spe-cifi c signals to multiple processes simultaneously. Another convenient way to send a signal to multiple processes simultaneously is by using the killall command, which takes the name of a process as its argument. For example, the command killall -SIGTERM hpptd would send the SIGTERM signal to all active httpd processes. Exercise 3.2 shows you how to manage processes with ps and kill.
E X E R C I S E 3 . 2
Managing Processes with ps and kill
In this exercise, you will start a few processes to make the parent-child relationship between these processes visible. Then you will kill the parent process, and you will see that all related child processes also disappear.
1. Open a terminal window (right-click the graphical desktop, and select Open In Terminal).
c03.indd 75c03.indd 75 1/8/2013 10:43:09 AM1/8/2013 10:43:09 AM
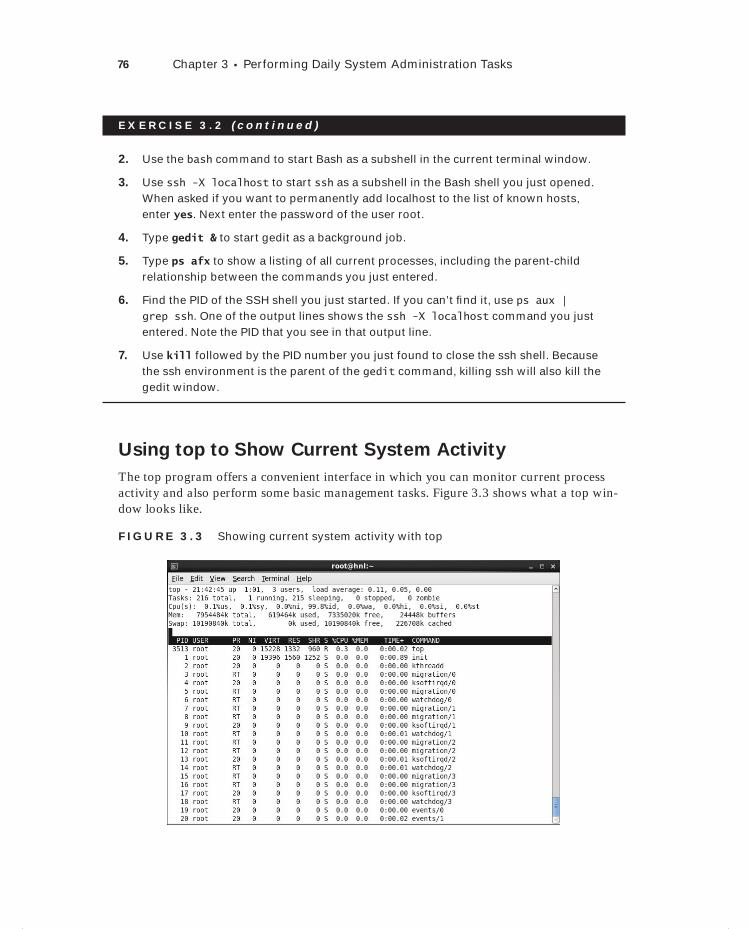
76 Chapter 3 Performing Daily System Administration Tasks
E X E R C I S E 3 . 2 ( c ont inue d )
2. Use the bash command to start Bash as a subshell in the current terminal window.
3. Use ssh -X localhost to start ssh as a subshell in the Bash shell you just opened. When asked if you want to permanently add localhost to the list of known hosts, enter yes. Next enter the password of the user root.
4. Type gedit & to start gedit as a background job.
5. Type ps afx to show a listing of all current processes, including the parent-child relationship between the commands you just entered.
6. Find the PID of the SSH shell you just started. If you can’t fi nd it, use ps aux | grep ssh. One of the output lines shows the ssh -X localhost command you just entered. Note the PID that you see in that output line.
7. Use kill followed by the PID number you just found to close the ssh shell. Because the ssh environment is the parent of the gedit command, killing ssh will also kill the gedit window.
Using top to Show Current System Activity
The top program offers a convenient interface in which you can monitor current process activity and also perform some basic management tasks. Figure 3.3 shows what a top win-dow looks like.
F I GU R E 3 . 3 Showing current system activity with top
c03.indd 76c03.indd 76 1/8/2013 10:43:09 AM1/8/2013 10:43:09 AM

System and Process Monitoring and Management 77
In the upper fi ve lines of the top interface, you can see information about the current system activity. The lower part of the top window shows a list of the most active processes at the moment. This window is refreshed every fi ve seconds. If you notice that a process is very busy, you can press the k key from within the top interface to terminate that process. The top program will fi rst ask for the PID of the process to which you want to send a signal (PID to kill). After you enter this, it will ask which signal you want to send to that PID, and then it will immediately operate on the requested PID.
In the upper fi ve lines of the top screen, you’ll fi nd a status indicator of current sys-tem performance. The most important information you’ll fi nd in the fi rst line is the load average. This gives the load average of the last minute, the last 5 minutes, and the last 15 minutes.
To understand the load average parameter, you should know that it refl ects the average number of processes in the run queue, which is the queue where processes wait before they can be handled by the scheduler. The scheduler is the kernel component that makes sure that a process is handled by any of the CPU cores in your server. One rough estimate of whether your system can handle the workload is that the number of processes waiting in the run queue should never be higher than the total number of CPU cores in your server.
A quick way to find out how many CPU cores are in your server is by press-ing the 1 key from the top interface. This will show you one line for every CPU core in your server.
In the second line of the top window, you’ll see how many tasks your server is cur-rently handling and what each of these tasks is doing. In this line, you may fi nd four status indications.
running The number of active processes in the last polling loop.
sleeping The number of processes currently loaded in memory, which haven’t issued any activity in the last polling loop.
stopped The number of processes that have been sent a stop signal but haven’t yet freed all of the resources they were using.
zombie The number of processes that are in a zombie state. This is an unmanage-able process state because the parent of the zombie process has disap-peared and the child still exists but cannot no longer be managed because the parent is needed to manage that process.
A zombie process normally is the result of bad programming. If you’re lucky, zombie processes will go away by themselves. Sometimes they don’t, and that can be an annoyance. In that case, the only way to clean up your current zombie processes is by rebooting your server.
c03.indd 77c03.indd 77 1/8/2013 10:43:10 AM1/8/2013 10:43:10 AM

78 Chapter 3 Performing Daily System Administration Tasks
In the third line of top, you get an overview of the current processor activity. If you’re experiencing a problem (which is typically expressed by a high load average), the CPU(s) line tells you exactly what the CPUs in your server are doing. This line will help you under-stand current system activity because it summarizes all the CPUs in your system. For a per-CPU overview of current activity, press the 1 key from the top interface (see Figure 3.4).
F I GU R E 3 . 4 From top, type 1 to get a CPU line for every CPU core in your server.
In the CPU(s) line, you’ll fi nd the following information about CPU states:
us The percentage of time your system is spending in user space, which is the amount of time your system is handling user-related tasks.
sy The percentage of time your system is working on kernel-related tasks in system space. On average, this should be (much) lower than the amount of time spent in user space.
ni The amount of time your system has worked on handling tasks of which the nice value has been changed (see the next section on the nice command).
id The amount of time the CPU has been idle.
wa The amount of time the CPU has been waiting for I/O requests. This is a very com-mon indicator of performance problems. If you see an elevated value here, you can make your system faster by optimizing disk performance.
hi The amount of time the CPU has been handling hardware interrupts.
c03.indd 78c03.indd 78 1/8/2013 10:43:10 AM1/8/2013 10:43:10 AM

System and Process Monitoring and Management 79
si The amount of time the CPU has been handling software interrupts.
st The amount of time that has been stolen from this CPU. You’ll see this only if your server is a virtualization hypervisor host, and this value will increase at the moment that a virtual machine running on this host requests more CPU cycles.
You’ll fi nd current information about memory usage in the last two lines of the top sta-tus. The fi rst line contains information about memory usage, and the second line has infor-mation about the usage of swap space. The formatting is not ideal, though. The last item on the second line provides information that is really about the usage of memory. The follow-ing parameters show how memory currently is used:
Mem The total amount of memory that is available to the Linux kernel.
used The total amount of memory that currently is used.
free The total amount of memory that is available for starting new processes.
buffers The amount of memory that is used for buffers. In buffers, essential system tables are stored in memory, as well as data that still has to be committed to disk.
cached The amount of memory that is currently used for cache.
The Linux kernel tries to use system memory as effi ciently as possible. To accomplish this goal, the kernel caches a lot. When a user requests a fi le from disk, it is fi rst read from disk and then copied to RAM. Fetching a fi le from disk is an extremely slow process com-pared to fetching the fi le from RAM. For that reason, once the fi le is copied in RAM, the kernel tries to keep it there as long as possible. This process is referred to as caching. From top, you can see the amount of RAM that is currently used for caching of data. You’ll notice that the longer your server is up, the more memory is allocated to cache. This is good because the alternative to using memory for caching would be to do nothing at all with it. When the kernel needs memory that currently is allocated to cache for something else, it can claim this memory back immediately.
The memory in buffers is related to cache. The kernel caches tables and indexes that it needs in order to allocate fi les and caches data that still has to be committed to disk in buffers. Like cache, buffer memory can also be claimed back immediately by the kernel when needed.
As an administrator, you can tell the kernel to free all memory in buffers and cache immediately. However, make sure that you do this on test serv-ers only because, in some cases, it may lead to a crash of the server. To free the memory in buffers and cache immediately, as root, use the com-mand echo 3 > /proc/sys/vm/drop_caches.
c03.indd 79c03.indd 79 1/8/2013 10:43:10 AM1/8/2013 10:43:10 AM

80 Chapter 3 Performing Daily System Administration Tasks
Managing Process Niceness
By default, every process is started with the same priority. On occasion, some processes may need additional time, or they can cede some of their time because the particular pro-cesses are not that important. In those cases, you can change the priority of a process by using the nice command.
In general, nice isn’t used very often because the Linux scheduler knows how to handle and prioritize jobs. But if, for example, you want to run a large batch job on a desktop computer that doesn’t need the highest prior-ity, using nice can be useful.
When using the nice command, you can adjust the process niceness from -20, which is good for the most favorable scheduling, to 19 for the least favorable scheduling. By default, all processes are started with a niceness of 0. The following sample code line shows how to start the dd command with an adjusted niceness of -10, which makes it more favorable and therefore allows it to fi nish its work faster:
nice -n -10 dd if=/dev/sda of=/dev/sdb
Aside from specifying which niceness setting to use when starting a process, you can also use the renice command to adjust the niceness of a command that has already started. By default, renice works on the PID of the process whose priority you want to adjust. Thus, you have to fi nd this PID before using renice. The ps command described earlier in this chapter is used to do this.
If, for example, you want to adjust the niceness of the find command that you just started, you would begin by using ps aux | grep find, which gives you the PID of the command. Assuming that would give you the PID 1234, you can use renice -10 1234 to adjust the niceness of the command.
Another method of adjusting process niceness is to do it from top. The convenience of using top for this purpose is that top shows only the busiest processes on your server, which are typi-cally the processes whose niceness you want to adjust anyway. After identifying the PID of the process you want to adjust, from the top interface press r. You’ll now see the PID to renicemessage on the sixth line of the top window. Now enter the PID of the process you want to adjust. The top program then prompts you with Renice PID 3284 to value. Here you enter the positive or negative nice value you want to use. Finally, press Enter to apply the niceness to the selected process. Exercise 3.3 shows how to use nice to change process priority.
E X E R C I S E 3 . 3
Using nice to Change Process Priority
In this exercise, you’ll start four dd processes, which, by default, will go on forever. You’ll see that all of them are started with the same priority and receive about the same amount of CPU time and capacity. Next you’ll adjust the niceness of two of these processes from within top, which immediately shows the effect of using nice on these commands.
c03.indd 80c03.indd 80 1/8/2013 10:43:11 AM1/8/2013 10:43:11 AM
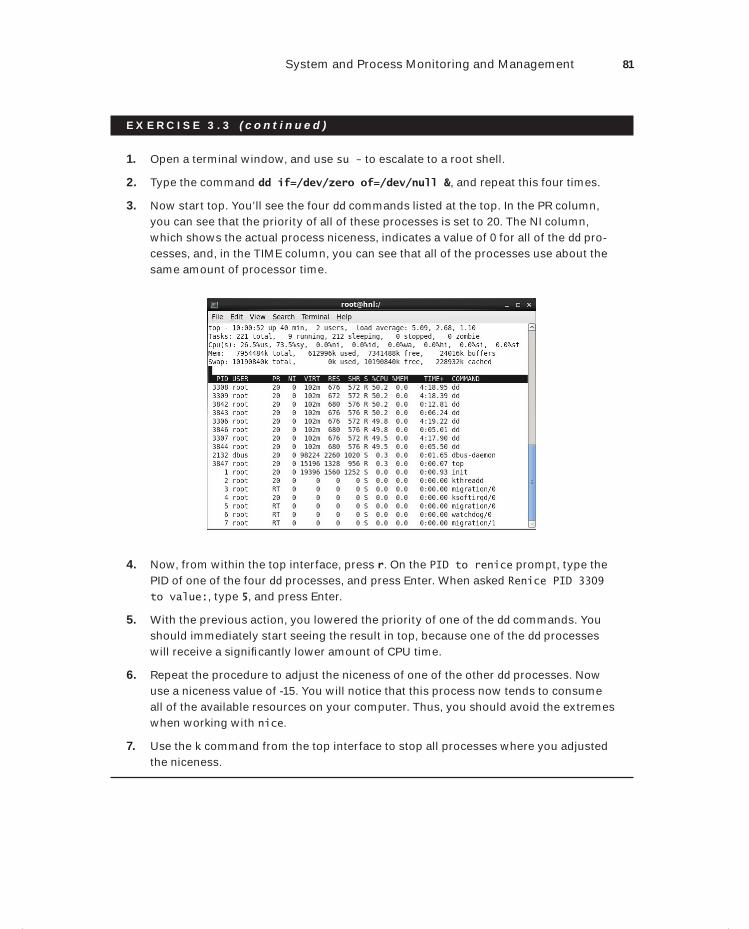
System and Process Monitoring and Management 81
E X E R C I S E 3 . 3 ( c ont inue d )
1. Open a terminal window, and use su - to escalate to a root shell.
2. Type the command dd if=/dev/zero of=/dev/null &, and repeat this four times.
3. Now start top. You’ll see the four dd commands listed at the top. In the PR column, you can see that the priority of all of these processes is set to 20. The NI column, which shows the actual process niceness, indicates a value of 0 for all of the dd pro-cesses, and, in the TIME column, you can see that all of the processes use about the same amount of processor time.
4. Now, from within the top interface, press r. On the PID to renice prompt, type the PID of one of the four dd processes, and press Enter. When asked Renice PID 3309 to value:, type 5, and press Enter.
5. With the previous action, you lowered the priority of one of the dd commands. You should immediately start seeing the result in top, because one of the dd processes will receive a signifi cantly lower amount of CPU time.
6. Repeat the procedure to adjust the niceness of one of the other dd processes. Now use a niceness value of -15. You will notice that this process now tends to consume all of the available resources on your computer. Thus, you should avoid the extremes when working with nice.
7. Use the k command from the top interface to stop all processes where you adjusted the niceness.
c03.indd 81c03.indd 81 1/8/2013 10:43:11 AM1/8/2013 10:43:11 AM
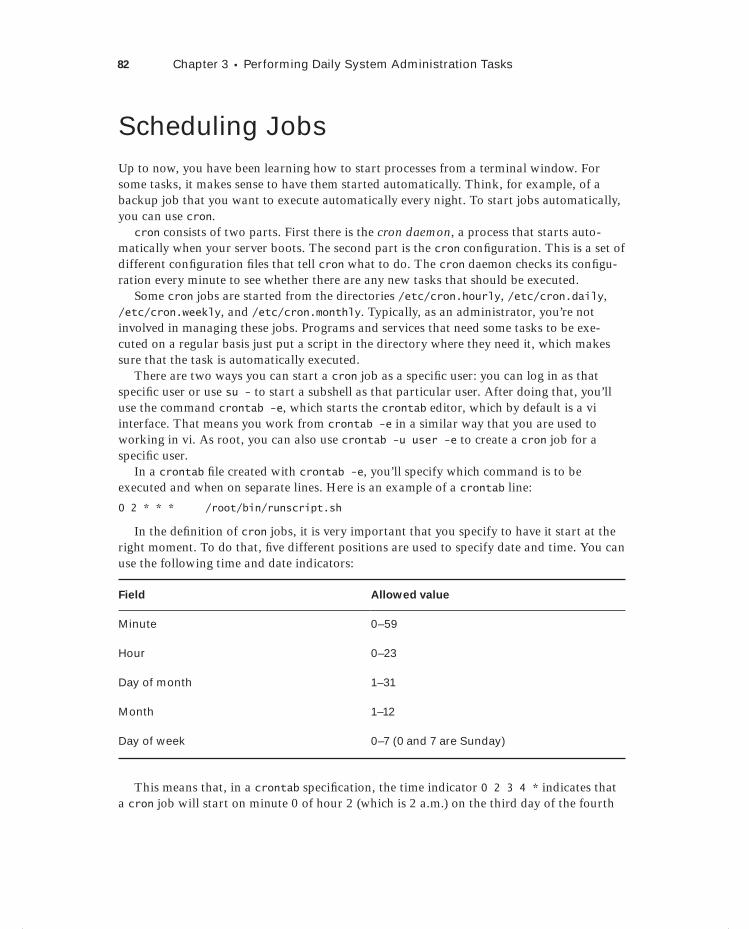
82 Chapter 3 Performing Daily System Administration Tasks
Scheduling JobsUp to now, you have been learning how to start processes from a terminal window. For some tasks, it makes sense to have them started automatically. Think, for example, of a backup job that you want to execute automatically every night. To start jobs automatically, you can use cron.
cron consists of two parts. First there is the cron daemon, a process that starts auto-matically when your server boots. The second part is the cron confi guration. This is a set of different confi guration fi les that tell cron what to do. The cron daemon checks its confi gu-ration every minute to see whether there are any new tasks that should be executed.
Some cron jobs are started from the directories /etc/cron.hourly, /etc/cron.daily, /etc/cron.weekly, and /etc/cron.monthly. Typically, as an administrator, you’re not involved in managing these jobs. Programs and services that need some tasks to be exe-cuted on a regular basis just put a script in the directory where they need it, which makes sure that the task is automatically executed.
There are two ways you can start a cron job as a specifi c user: you can log in as that specifi c user or use su - to start a subshell as that particular user. After doing that, you’ll use the command crontab -e, which starts the crontab editor, which by default is a vi interface. That means you work from crontab -e in a similar way that you are used to working in vi. As root, you can also use crontab -u user -e to create a cron job for a specifi c user.
In a crontab fi le created with crontab -e, you’ll specify which command is to be executed and when on separate lines. Here is an example of a crontab line:
0 2 * * * /root/bin/runscript.sh
In the defi nition of cron jobs, it is very important that you specify to have it start at the right moment. To do that, fi ve different positions are used to specify date and time. You can use the following time and date indicators:
Field Allowed value
Minute 0–59
Hour 0–23
Day of month 1–31
Month 1–12
Day of week 0–7 (0 and 7 are Sunday)
This means that, in a crontab specifi cation, the time indicator 0 2 3 4 * indicates that a cron job will start on minute 0 of hour 2 (which is 2 a.m.) on the third day of the fourth
c03.indd 82c03.indd 82 1/8/2013 10:43:11 AM1/8/2013 10:43:11 AM
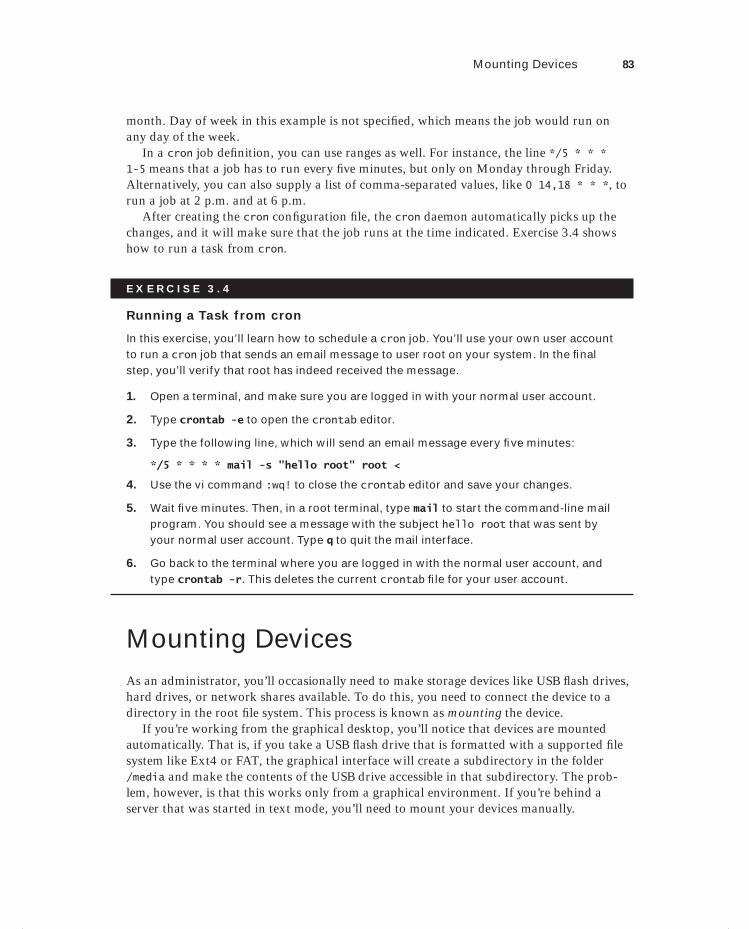
Mounting Devices 83
month. Day of week in this example is not specifi ed, which means the job would run on any day of the week.
In a cron job defi nition, you can use ranges as well. For instance, the line */5 * * * 1-5 means that a job has to run every fi ve minutes, but only on Monday through Friday. Alternatively, you can also supply a list of comma-separated values, like 0 14,18 * * *, to run a job at 2 p.m. and at 6 p.m.
After creating the cron confi guration fi le, the cron daemon automatically picks up the changes, and it will make sure that the job runs at the time indicated. Exercise 3.4 shows how to run a task from cron.
E X E R C I S E 3 . 4
Running a Task from cron
In this exercise, you’ll learn how to schedule a cron job. You’ll use your own user account to run a cron job that sends an email message to user root on your system. In the fi nal step, you’ll verify that root has indeed received the message.
1. Open a terminal, and make sure you are logged in with your normal user account.
2. Type crontab -e to open the crontab editor.
3. Type the following line, which will send an email message every fi ve minutes:
*/5 * * * * mail -s "hello root" root <
4. Use the vi command :wq! to close the crontab editor and save your changes.
5. Wait fi ve minutes. Then, in a root terminal, type mail to start the command-line mail program. You should see a message with the subject hello root that was sent by your normal user account. Type q to quit the mail interface.
6. Go back to the terminal where you are logged in with the normal user account, and type crontab -r. This deletes the current crontab fi le for your user account.
Mounting DevicesAs an administrator, you’ll occasionally need to make storage devices like USB fl ash drives, hard drives, or network shares available. To do this, you need to connect the device to a directory in the root fi le system. This process is known as mounting the device.
If you’re working from the graphical desktop, you’ll notice that devices are mounted automatically. That is, if you take a USB fl ash drive that is formatted with a supported fi le system like Ext4 or FAT, the graphical interface will create a subdirectory in the folder /media and make the contents of the USB drive accessible in that subdirectory. The prob-lem, however, is that this works only from a graphical environment. If you’re behind a server that was started in text mode, you’ll need to mount your devices manually.
c03.indd 83c03.indd 83 1/8/2013 10:43:12 AM1/8/2013 10:43:12 AM
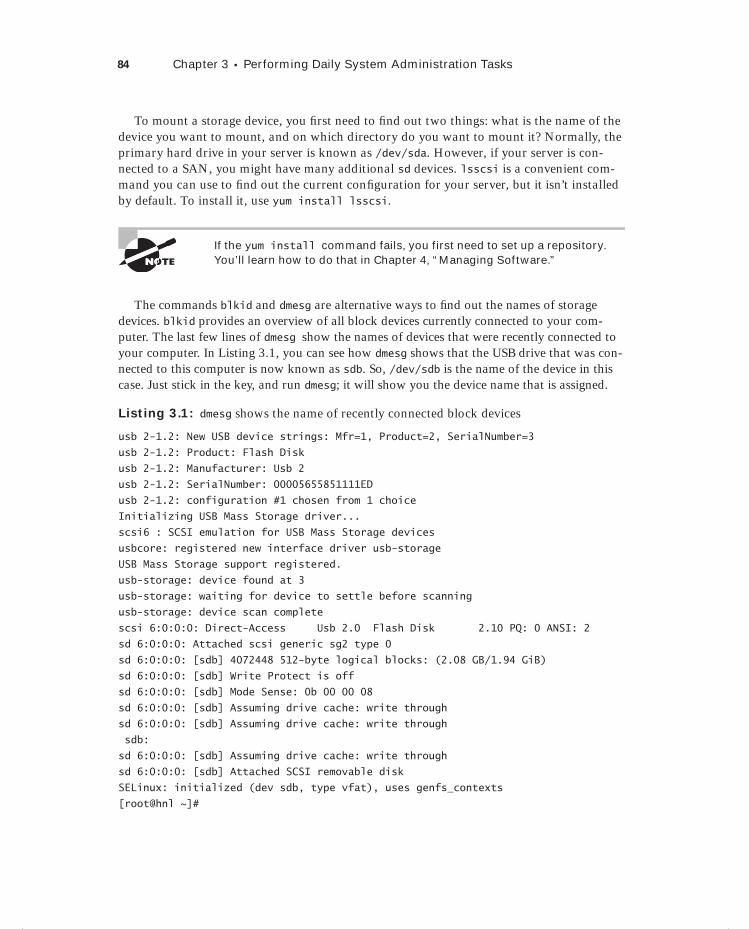
84 Chapter 3 Performing Daily System Administration Tasks
To mount a storage device, you fi rst need to fi nd out two things: what is the name of the device you want to mount, and on which directory do you want to mount it? Normally, the primary hard drive in your server is known as /dev/sda. However, if your server is con-nected to a SAN, you might have many additional sd devices. lsscsi is a convenient com-mand you can use to fi nd out the current confi guration for your server, but it isn’t installed by default. To install it, use yum install lsscsi.
If the yum install command fails, you first need to set up a repository. You’ll learn how to do that in Chapter 4, “Managing Software.”
The commands blkid and dmesg are alternative ways to fi nd out the names of storage devices. blkid provides an overview of all block devices currently connected to your com-puter. The last few lines of dmesg show the names of devices that were recently connected to your computer. In Listing 3.1, you can see how dmesg shows that the USB drive that was con-nected to this computer is now known as sdb. So, /dev/sdb is the name of the device in this case. Just stick in the key, and run dmesg; it will show you the device name that is assigned.
Listing 3.1: dmesg shows the name of recently connected block devices
usb 2-1.2: New USB device strings: Mfr=1, Product=2, SerialNumber=3
usb 2-1.2: Product: Flash Disk
usb 2-1.2: Manufacturer: Usb 2
usb 2-1.2: SerialNumber: 00005655851111ED
usb 2-1.2: configuration #1 chosen from 1 choice
Initializing USB Mass Storage driver...
scsi6 : SCSI emulation for USB Mass Storage devices
usbcore: registered new interface driver usb-storage
USB Mass Storage support registered.
usb-storage: device found at 3
usb-storage: waiting for device to settle before scanning
usb-storage: device scan complete
scsi 6:0:0:0: Direct-Access Usb 2.0 Flash Disk 2.10 PQ: 0 ANSI: 2
sd 6:0:0:0: Attached scsi generic sg2 type 0
sd 6:0:0:0: [sdb] 4072448 512-byte logical blocks: (2.08 GB/1.94 GiB)
sd 6:0:0:0: [sdb] Write Protect is off
sd 6:0:0:0: [sdb] Mode Sense: 0b 00 00 08
sd 6:0:0:0: [sdb] Assuming drive cache: write through
sd 6:0:0:0: [sdb] Assuming drive cache: write through
sdb:
sd 6:0:0:0: [sdb] Assuming drive cache: write through
sd 6:0:0:0: [sdb] Attached SCSI removable disk
SELinux: initialized (dev sdb, type vfat), uses genfs_contexts
[root@hnl ~]#
c03.indd 84c03.indd 84 1/8/2013 10:43:12 AM1/8/2013 10:43:12 AM
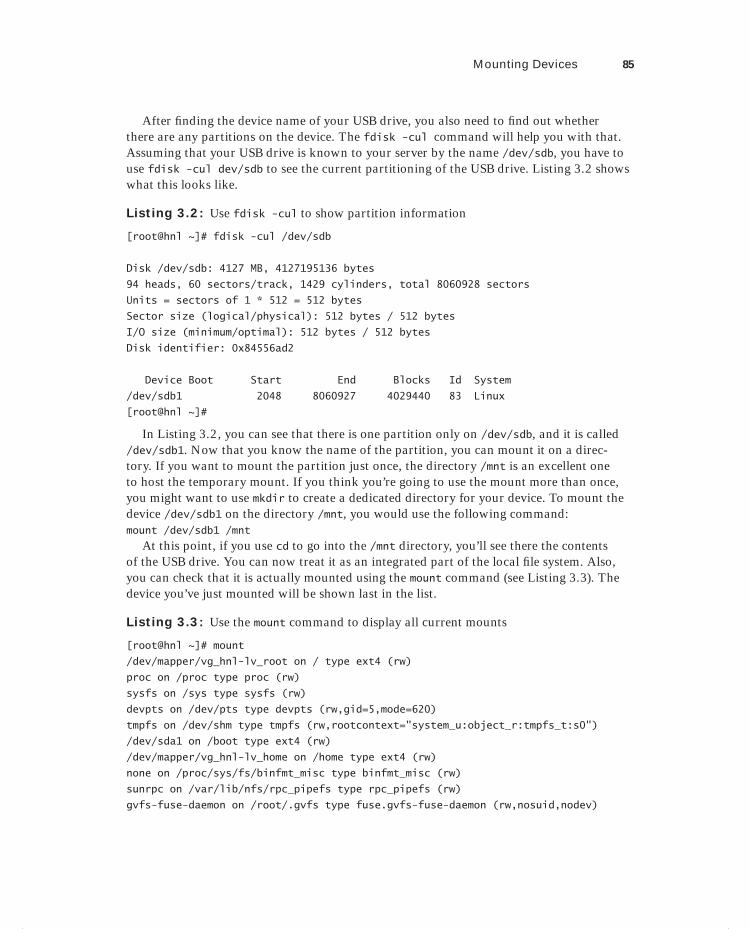
Mounting Devices 85
After fi nding the device name of your USB drive, you also need to fi nd out whether there are any partitions on the device. The fdisk -cul command will help you with that. Assuming that your USB drive is known to your server by the name /dev/sdb, you have to use fdisk -cul dev/sdb to see the current partitioning of the USB drive. Listing 3.2 shows what this looks like.
Listing 3.2: Use fdisk -cul to show partition information
[root@hnl ~]# fdisk -cul /dev/sdb
Disk /dev/sdb: 4127 MB, 4127195136 bytes
94 heads, 60 sectors/track, 1429 cylinders, total 8060928 sectors
Units = sectors of 1 * 512 = 512 bytes
Sector size (logical/physical): 512 bytes / 512 bytes
I/O size (minimum/optimal): 512 bytes / 512 bytes
Disk identifier: 0x84556ad2
Device Boot Start End Blocks Id System
/dev/sdb1 2048 8060927 4029440 83 Linux
[root@hnl ~]#
In Listing 3.2, you can see that there is one partition only on /dev/sdb, and it is called /dev/sdb1. Now that you know the name of the partition, you can mount it on a direc-tory. If you want to mount the partition just once, the directory /mnt is an excellent one to host the temporary mount. If you think you’re going to use the mount more than once, you might want to use mkdir to create a dedicated directory for your device. To mount the device /dev/sdb1 on the directory /mnt, you would use the following command:mount /dev/sdb1 /mnt
At this point, if you use cd to go into the /mnt directory, you’ll see there the contents of the USB drive. You can now treat it as an integrated part of the local fi le system. Also, you can check that it is actually mounted using the mount command (see Listing 3.3). The device you’ve just mounted will be shown last in the list.
Listing 3.3: Use the mount command to display all current mounts
[root@hnl ~]# mount
/dev/mapper/vg_hnl-lv_root on / type ext4 (rw)
proc on /proc type proc (rw)
sysfs on /sys type sysfs (rw)
devpts on /dev/pts type devpts (rw,gid=5,mode=620)
tmpfs on /dev/shm type tmpfs (rw,rootcontext="system_u:object_r:tmpfs_t:s0")
/dev/sda1 on /boot type ext4 (rw)
/dev/mapper/vg_hnl-lv_home on /home type ext4 (rw)
none on /proc/sys/fs/binfmt_misc type binfmt_misc (rw)
sunrpc on /var/lib/nfs/rpc_pipefs type rpc_pipefs (rw)
gvfs-fuse-daemon on /root/.gvfs type fuse.gvfs-fuse-daemon (rw,nosuid,nodev)
c03.indd 85c03.indd 85 1/8/2013 10:43:12 AM1/8/2013 10:43:12 AM
86 Chapter 3 Performing Daily System Administration Tasks
/dev/sdb1 on /media/EA36-30C4 type vfat (rw,nosuid,nodev,uhelper=udisks,uid=0,gid=0,shortname=mixed,dmask=0077,utf8=1,flush)
[root@hnl ~]#
Once you’ve stopped working with the device you’ve just mounted, you need to dis-mount it. To do this, use the umount command. This works only if there are no fi les on the mounted device currently in use. It also means you cannot be in the directory you used as a mount point. After verifying this, use umount followed either by the name of the device that you want to unmount or by the name of the directory you used as a mount point. For instance, to unmount a device that currently is mounted on /mnt, use umount /mnt. Exercise 3.5 shows how to mount a USB fl ash drive.
E X E R C I S E 3 . 5
Mounting a USB Flash Drive
In this exercise, you’ll learn how to mount a USB fl ash drive. After mounting it success-fully on the /mnt directory, you’ll then dismount it. You’ll also see what happens if there are fi les currently in use while dismounting the device.
1. Open a terminal, and make sure you have root privileges.
2. Insert a USB fl ash drive in the USB port of your computer.
3. Use dmesg to fi nd the device name of the USB fl ash drive. (I’ll assume it is /dev/sdb for the remainder of this exercise.)
4. Use fdisk -cul /dev/sdb to fi nd current partitions on the USB fl ash drive. I’ll assume you’ll fi nd one partition with the name of /dev/sdb1.
5. Use mount /dev/sdb1 /mnt to mount the USB fl ash drive on the /mnt directory.
6. Use cd /mnt to go into the /mnt directory.
7. Type ls to verify that you see the contents of the USB fl ash drive.
8. Now use umount /dev/sdb1 to try to dismount the USB fl ash drive. This won’t work because you still are in the /mnt directory. You’ll see the “device is busy” error mes-sage.
9. Use cd without any arguments. This takes your current shell out of the /mnt directory and back to your home directory.
10. At this point, you’ll be able to dismount the USB fl ash drive successfully using umount /dev/sdb1.
c03.indd 86c03.indd 86 1/8/2013 10:43:13 AM1/8/2013 10:43:13 AM
Working with Links 87
Understanding device naming
On a server, normally no graphical desktop is available. That means devices won’t be mounted automatically, and you need to do this by hand. If on a server many storage devices are used, which often is the case in a datacenter environment, your USB key doesn’t automatically become /dev/sdb, but it can be /dev/sdcz. (Once all the letters of the alphabet are used up to /dev/sdz, the next device created is /dev/sdaa.) To fi nd out the name of the device you’ve just attached, dmesg is very useful. In general, it reports on many hardware-related changes that have occurred on your server.
Working with LinksIn a Linux fi le system, it is very useful to be able to access a single fi le from different loca-tions. This discourages you from copying a fi le to different locations, where subsequently different versions of the fi le may come to exist. In a Linux fi le system, you can use links for this purpose. A link appears to be a regular fi le, but it’s more like a pointer that exists in one location to show you how to get to another location.
In Linux, there are two different types of links. A symbolic link is the most fl exible link type you can use. It points to any other fi le and any other directory, no matter where it is. A hard link can be used only to point to a fi le that exists on the same device.
With symbolic links, there is a difference between the original fi le and the link. If you remove the original fi le, the symbolic link won’t work anymore and thus is invalid.
A hard link is more like an additional name you’d give to a fi le. To understand hard links, you have to appreciate how Linux fi le systems work with inodes. The inode is the administration of a fi le. To get to a fi le, the fi le system reads the fi le’s inode in the fi le sys-tem metadata, and from there it learns how to access the block where the actual data of the fi le is stored. To get to the inode, the fi le system uses the fi lename that exists somewhere in a directory. A hard link is an additional fi lename that you can create anywhere in a direc-tory on the same device that gives access to the same fi le system metadata. With hard links, you only need the original fi lename to create the hard link. Once it has been created, it isn’t needed anymore, and the original fi lename can be removed. In general, you’ll use symbolic links, not hard links, because hard links have some serious limitations.
To create a link, you need the ln command. Use the option -s to create a symbolic link. Without this option, you’ll automatically create a hard link. First you’ll put the name of the original fi le directly after the ln command. Next you’ll specify the name of the link you want to create. For instance, the command ln -s /etc/passwd ~/users creates a symbolic link with the name users in your home directory. This link points to the original fi le /etc/passwd. Exercise 3.6 shows how to create links.
c03.indd 87c03.indd 87 1/8/2013 10:43:13 AM1/8/2013 10:43:13 AM
88 Chapter 3 Performing Daily System Administration Tasks
E X E R C I S E 3 . 6
Creating Links
In this exercise, you’ll learn how to create links. You’ll create a hard link as well as a sym-bolic link to the fi le /etc/hosts, and you will see how both behave differently.
1. Open a terminal, and make sure you have root permissions.
2. Use the command ln -s /etc/hosts ~/symhosts. This creates a symbolic link with the name symhosts in your home directory.
3. Use the command ln /etc/hosts ~/hardhosts. This creates a hard link with the name hardhosts in your home directory.
4. Use the command echo 10.0.0.10 dummyhost >> /etc/hosts. Verify that you can see this addition in all three fi les: /etc/hosts, ~/symhosts, and ~/hardhosts.
5. Use the command ls -il /etc/hosts ~/symhosts ~/hardhosts. The option -I shows the inode number. You can see that it is the same for /etc/hosts and ~/hard-hosts, like all other properties of the fi le.
6. Use rm /etc/hosts. Try to read the contents of ~/symhosts. What happens? Now try to access the contents of ~/hardhosts. Do you see the difference?
7. Restore the original situation by re-creating the /etc/hosts fi le. You can do that easily by making a new hard link using ln ~/hardhosts /etc/hosts.
Creating BackupsOccasionally, you might want to make a backup of important fi les on your computer. The tar command is the most common way of creating and extracting backups on Linux. The tar command has many arguments, and for someone who’s not used to them, they appear overwhelming at fi rst. If, however, you take a task-oriented approach to using tar, you’ll fi nd it much easier to use.
Three major tasks are involved in using tar: creating an archive, verifying the contents of an archive, and extracting an archive. You can write the archive to multiple destinations, but the most common procedure is to write it to a fi le. While using tar, use the f option to specify which fi le to work with.
To create an archive of all confi guration fi les in the /etc directory, for example, you would use tar cvf /tmp/etc.tar /etc. Notice that the options are not preceded by a – (minus) sign in this command (which is common behavior in tar). Also, the order of the options is specifi c. If, for instance, you used the command tar fvc /tmp/etc.tar /etc, it wouldn’t work as the f option, and its argument /tmp/etc.tar would be separated. Also,
c03.indd 88c03.indd 88 1/8/2013 10:43:13 AM1/8/2013 10:43:13 AM
Managing Printers 89
notice that you specify the location where to write the archive before specifying what to put into the archive.
Once you have created an archive fi le using the tar command, you can verify its con-tents. The only thing that changes in the command is the c (create) option. This is replaced by the t (test) option. So, tar tvf /tmp/etc.tar yields the content of the previously cre-ated archive.
Finally, the third task to accomplish with tar is the extraction of an archive. In this pro-cess, you get the fi les out of the archive and write them to the fi le system of your computer. To do this, you can use the tar xvf /tmp/etc.tar command.
When working with tar, you can also specify that the archive should be compressed or decompressed. To compress a tar archive, use either the z or j option. The z option tells tar to use the gzip compression utility, and the j option tells it to use bzip2. It doesn’t really matter which one you use because both yield comparable results. Exercise 3.7 shows how to archive and extract with tar.
E X E R C I S E 3 . 7
Archiving and Extracting with tar
In this exercise, you’ll learn how to archive the contents of the /etc directory into a tar fi le. Next you’ll check the contents of the archive, and as the last step, you’ll extract the archive into the /tmp directory.
1. Open a terminal, and use the following command to write an archive of the /etc directory to /tmp/etc.tar: tar zxvf /tmp/etc.tar /etc.
2. After a short while, you’ll have a tar archive in the /tmp directory.
3. Use the command file /tmp/etc.tar to verify that it is indeed a tar archive.
4. Now show the contents of the archive using tar tvf /tmp/etc.tar.
5. Extract the archive in the /tmp directory using tar xvf /tmp/etc.tar. Once fi n-ished, the extracted archive is created in the /tmp directory, which means you’ll fi nd the directory /tmp/etc. From there, you can copy the fi les to any location you choose.
Managing PrintersOn occasion, you’ll need to set up printers as well. The easiest way to accomplish this task is by using the graphical system-config-printer utility. This utility helps in setting up a local printer that is connected directly to your computer. It also gives you access to remote print queues.
c03.indd 89c03.indd 89 1/8/2013 10:43:14 AM1/8/2013 10:43:14 AM
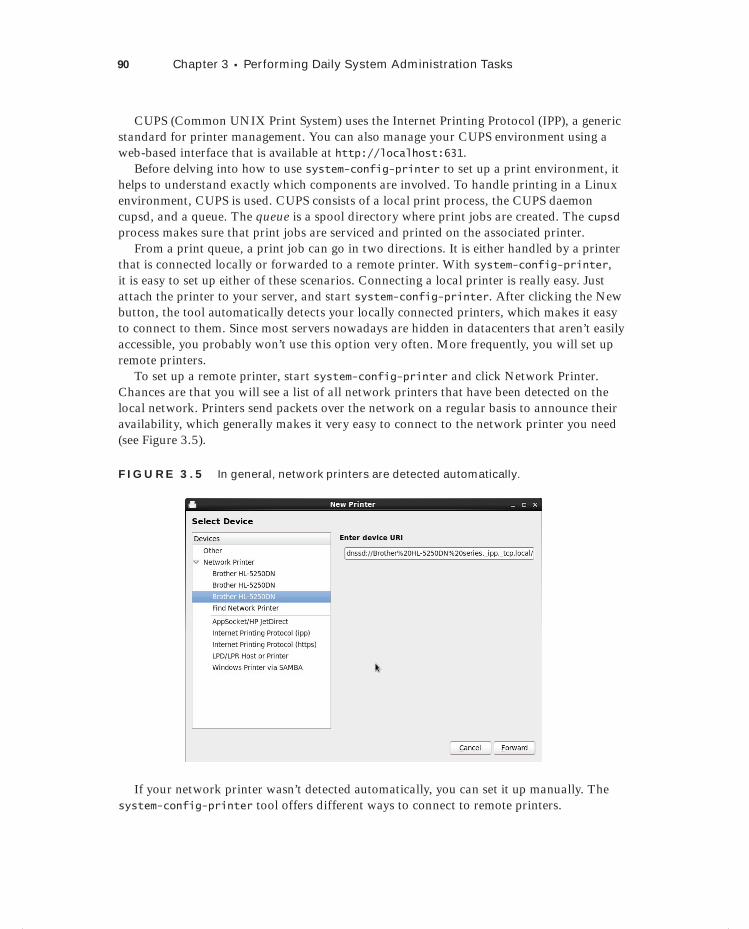
90 Chapter 3 Performing Daily System Administration Tasks
CUPS (Common UNIX Print System) uses the Internet Printing Protocol (IPP), a generic standard for printer management. You can also manage your CUPS environment using a web-based interface that is available at http://localhost:631.
Before delving into how to use system-config-printer to set up a print environment, it helps to understand exactly which components are involved. To handle printing in a Linux environment, CUPS is used. CUPS consists of a local print process, the CUPS daemon cupsd, and a queue. The queue is a spool directory where print jobs are created. The cupsd process makes sure that print jobs are serviced and printed on the associated printer.
From a print queue, a print job can go in two directions. It is either handled by a printer that is connected locally or forwarded to a remote printer. With system-config-printer, it is easy to set up either of these scenarios. Connecting a local printer is really easy. Just attach the printer to your server, and start system-config-printer. After clicking the New button, the tool automatically detects your locally connected printers, which makes it easy to connect to them. Since most servers nowadays are hidden in datacenters that aren’t easily accessible, you probably won’t use this option very often. More frequently, you will set up remote printers.
To set up a remote printer, start system-config-printer and click Network Printer. Chances are that you will see a list of all network printers that have been detected on the local network. Printers send packets over the network on a regular basis to announce their availability, which generally makes it very easy to connect to the network printer you need (see Figure 3.5).
F I GU R E 3 .5 In general, network printers are detected automatically.
If your network printer wasn’t detected automatically, you can set it up manually. The system-config-printer tool offers different ways to connect to remote printers.
c03.indd 90c03.indd 90 1/8/2013 10:43:14 AM1/8/2013 10:43:14 AM
Setting Up System Logging 91
AppSocket/HP JetDirect Use this to access printers that have an HP JetDi-rect card inserted.
Internet Printing Protocol (ipp) Use this to provide access to printers that offer access on the ipp port.
Internet Printing Protocol (http) Use this to provide access to printers that offer access on the https port.
LPD/LPR Host or Printer Use this for printers connected to a UNIX or Linux system.
Windows Printer via Samba Use this for printers that are connected to a Win-dows Server or workstation or to a Linux server offering Samba shared printers.
After setting up a print queue on your server, you can start sending print jobs to it. Normally, the CUPS process takes care of forwarding these jobs to the appropriate printer. To send a job to a printer, you can either use the Print option provided by the program you’re using or use a command to send a fi le directly to the printer. Table 3.3 provides an overview of the commands you can use to manage your printing environment.
TA B LE 3 . 3 Commands for printer management
Command Use
Lpr Used to send a file directly to a printer
Lpq Shows all jobs currently waiting to be serviced in the print queue
Lprm Used to remove print jobs from the print queue
Lpstat Gives status information about current jobs and printers
Setting Up System LoggingIf problems arise on your server, it is important for you to be able to fi nd out what hap-pened and why. To help with that, you need to set up logging on your server. On Red Hat Enterprise Linux, the Rsyslog service is used for this purpose. In this section, you’ll learn how to set up Rsyslog, you’ll become familiar with the most commonly used log fi les, and you’ll learn how to set up logrotate to make sure that your server doesn’t get fl ooded with log messages.
c03.indd 91c03.indd 91 1/8/2013 10:43:14 AM1/8/2013 10:43:14 AM
Dow
nlo
ad fro
m W
ow
! eBook
<w
ww
.wow
ebook.
com
>
92 Chapter 3 Performing Daily System Administration Tasks
Setting Up Rsyslog
Even if you don’t do anything to set it up, your server will log automatically. On every Red Hat server, the rsyslogd process is started automatically to log all important events to log fi les and other log destinations, most of which exist in the /var/log directory.
Rsyslogd uses its main confi guration fi le, /etc/rsyslog.conf, to determine what it has to do. To be able to change the default logging behavior on your server, you need to under-stand how this fi le is used. In Listing 3.4 you see part of the default rsyslog.conf fi le as it is created while installing Red Hat Enterprise Linux.
Listing 3.4: Part of rsyslog.conf
#### RULES ####
# Log all kernel messages to the console.
# Logging much else clutters up the screen.
#kern.* /dev/console
# Log anything (except mail) of level info or higher.
# Don't log private authentication messages!
*.info;mail.none;authpriv.none;cron.none /var/log/messages
# The authpriv file has restricted access.
authpriv.* /var/log/secure
authpriv.* root
# Log all the mail messages in one place.
mail.* -/var/log/maillog
# Log cron stuff
cron.* /var/log/cron
# Everybody gets emergency messages
*.emerg *
30 fewer lines
In the /etc/rsyslog.conf fi le, you’ll set up how to handle the logging of different events. To set this up properly, you need to be able to identify the different components that occur in every log. The fi rst part of the lines of code in rsyslog.conf defi ne the facil-ity. In Linux, you work with a fi xed set of predefi ned facilities, which are summarized in Table 3.4.
c03.indd 92c03.indd 92 1/8/2013 10:43:14 AM1/8/2013 10:43:14 AM
Setting Up System Logging 93
TA B LE 3 . 4 Predefined syslog facilities
Facility Description
auth and authpriv This is the facility that relates to authentication. auth has been deprecated. Use authpriv instead.
cron Logs messages related to the cron scheduler.
daemon A generic facility that can be used by different processes.
kern A facility used for kernel-related messages.
lpr Printer-related messages.
mail Everything that relates to the handling of email messages.
mark A generic facility that can be used to place markers in syslog.
news Messages that are related to the NNTP news system.
syslog Messages that are generated by Rsyslog itself.
user A generic facility that can be used to log user-related mes-sages.
uucp An old facility that is used to refer to the legacy UUCP protocol.
local0-local7 Eight different local facilities, which can be used by pro-cesses and daemons that don’t have a dedicated facility.
Most daemons and processes used on your system will be confi gured to use one of the facilities listed in Table 3.4 by default. Sometimes, the confi guration fi le of the daemon will allow you to specify which facility the daemon is going to use.
The second part of the lines of code in rsyslog.conf specifi es the priority that should be used for this facility. Priorities are used to defi ne the severity of the message. In ascending order, the following priorities can be used:
1. debug
2. info
3. notice
4. warning
5. err
c03.indd 93c03.indd 93 1/8/2013 10:43:15 AM1/8/2013 10:43:15 AM
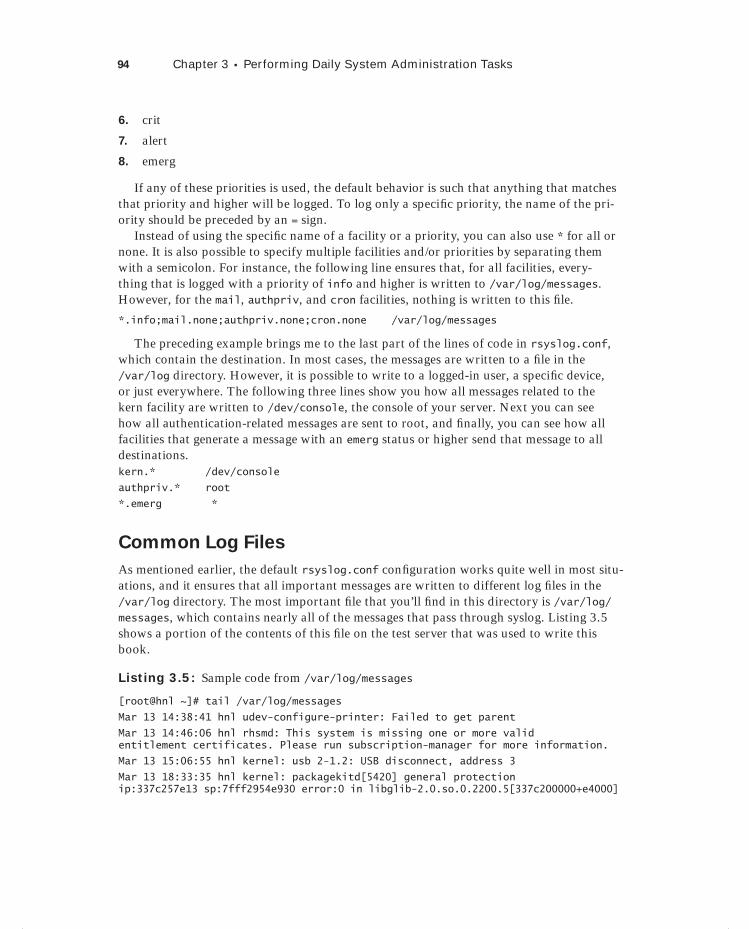
94 Chapter 3 Performing Daily System Administration Tasks
6. crit
7. alert
8. emerg
If any of these priorities is used, the default behavior is such that anything that matches that priority and higher will be logged. To log only a specifi c priority, the name of the pri-ority should be preceded by an = sign.
Instead of using the specifi c name of a facility or a priority, you can also use * for all or none. It is also possible to specify multiple facilities and/or priorities by separating them with a semicolon. For instance, the following line ensures that, for all facilities, every-thing that is logged with a priority of info and higher is written to /var/log/messages. However, for the mail, authpriv, and cron facilities, nothing is written to this fi le.
*.info;mail.none;authpriv.none;cron.none /var/log/messages
The preceding example brings me to the last part of the lines of code in rsyslog.conf, which contain the destination. In most cases, the messages are written to a fi le in the /var/log directory. However, it is possible to write to a logged-in user, a specifi c device, or just everywhere. The following three lines show you how all messages related to the kern facility are written to /dev/console, the console of your server. Next you can see how all authentication-related messages are sent to root, and fi nally, you can see how all facilities that generate a message with an emerg status or higher send that message to all destinations.kern.* /dev/console
authpriv.* root
*.emerg *
Common Log Files
As mentioned earlier, the default rsyslog.conf confi guration works quite well in most situ-ations, and it ensures that all important messages are written to different log fi les in the /var/log directory. The most important fi le that you’ll fi nd in this directory is /var/log/messages, which contains nearly all of the messages that pass through syslog. Listing 3.5 shows a portion of the contents of this fi le on the test server that was used to write this book.
Listing 3.5: Sample code from /var/log/messages
[root@hnl ~]# tail /var/log/messages
Mar 13 14:38:41 hnl udev-configure-printer: Failed to get parent
Mar 13 14:46:06 hnl rhsmd: This system is missing one or more valid entitlement certificates. Please run subscription-manager for more information.
Mar 13 15:06:55 hnl kernel: usb 2-1.2: USB disconnect, address 3
Mar 13 18:33:35 hnl kernel: packagekitd[5420] general protection ip:337c257e13 sp:7fff2954e930 error:0 in libglib-2.0.so.0.2200.5[337c200000+e4000]
c03.indd 94c03.indd 94 1/8/2013 10:43:15 AM1/8/2013 10:43:15 AM
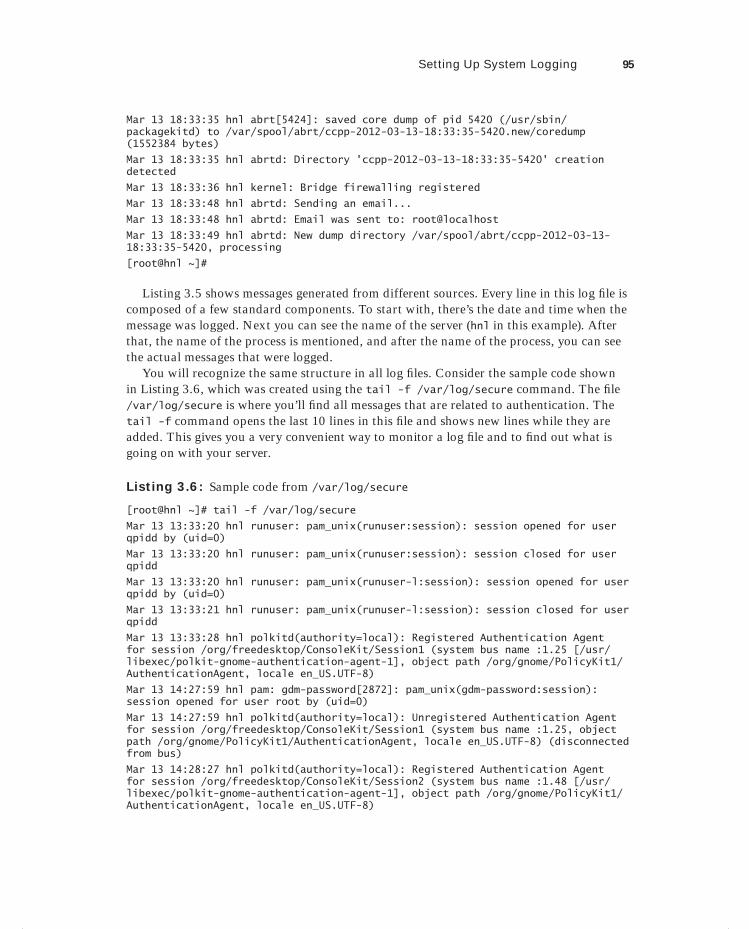
Setting Up System Logging 95
Mar 13 18:33:35 hnl abrt[5424]: saved core dump of pid 5420 (/usr/sbin/packagekitd) to /var/spool/abrt/ccpp-2012-03-13-18:33:35-5420.new/coredump (1552384 bytes)
Mar 13 18:33:35 hnl abrtd: Directory 'ccpp-2012-03-13-18:33:35-5420' creation detected
Mar 13 18:33:36 hnl kernel: Bridge firewalling registered
Mar 13 18:33:48 hnl abrtd: Sending an email...
Mar 13 18:33:48 hnl abrtd: Email was sent to: root@localhost
Mar 13 18:33:49 hnl abrtd: New dump directory /var/spool/abrt/ccpp-2012-03-13-18:33:35-5420, processing
[root@hnl ~]#
Listing 3.5 shows messages generated from different sources. Every line in this log fi le is composed of a few standard components. To start with, there’s the date and time when the message was logged. Next you can see the name of the server (hnl in this example). After that, the name of the process is mentioned, and after the name of the process, you can see the actual messages that were logged.
You will recognize the same structure in all log fi les. Consider the sample code shown in Listing 3.6, which was created using the tail -f /var/log/secure command. The fi le /var/log/secure is where you’ll fi nd all messages that are related to authentication. The tail -f command opens the last 10 lines in this fi le and shows new lines while they are added. This gives you a very convenient way to monitor a log fi le and to fi nd out what is going on with your server.
Listing 3.6: Sample code from /var/log/secure
[root@hnl ~]# tail -f /var/log/secure
Mar 13 13:33:20 hnl runuser: pam_unix(runuser:session): session opened for user qpidd by (uid=0)
Mar 13 13:33:20 hnl runuser: pam_unix(runuser:session): session closed for user qpidd
Mar 13 13:33:20 hnl runuser: pam_unix(runuser-l:session): session opened for user qpidd by (uid=0)
Mar 13 13:33:21 hnl runuser: pam_unix(runuser-l:session): session closed for user qpidd
Mar 13 13:33:28 hnl polkitd(authority=local): Registered Authentication Agent for session /org/freedesktop/ConsoleKit/Session1 (system bus name :1.25 [/usr/libexec/polkit-gnome-authentication-agent-1], object path /org/gnome/PolicyKit1/AuthenticationAgent, locale en_US.UTF-8)
Mar 13 14:27:59 hnl pam: gdm-password[2872]: pam_unix(gdm-password:session): session opened for user root by (uid=0)
Mar 13 14:27:59 hnl polkitd(authority=local): Unregistered Authentication Agent for session /org/freedesktop/ConsoleKit/Session1 (system bus name :1.25, object path /org/gnome/PolicyKit1/AuthenticationAgent, locale en_US.UTF-8) (disconnected from bus)
Mar 13 14:28:27 hnl polkitd(authority=local): Registered Authentication Agent for session /org/freedesktop/ConsoleKit/Session2 (system bus name :1.48 [/usr/libexec/polkit-gnome-authentication-agent-1], object path /org/gnome/PolicyKit1/AuthenticationAgent, locale en_US.UTF-8)
c03.indd 95c03.indd 95 1/8/2013 10:43:15 AM1/8/2013 10:43:15 AM
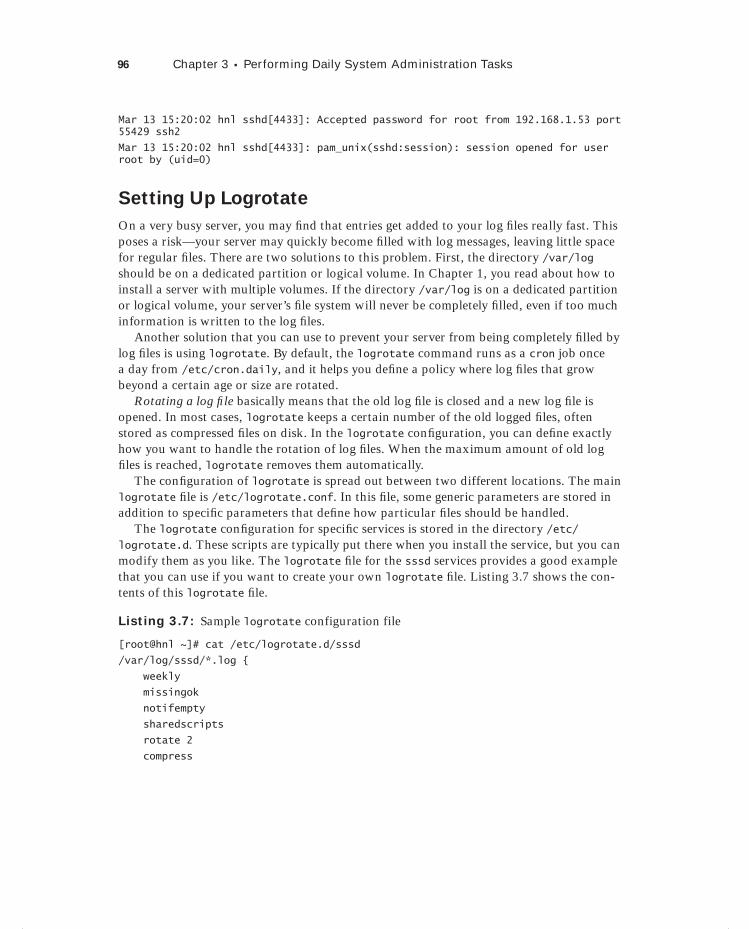
96 Chapter 3 Performing Daily System Administration Tasks
Mar 13 15:20:02 hnl sshd[4433]: Accepted password for root from 192.168.1.53 port 55429 ssh2
Mar 13 15:20:02 hnl sshd[4433]: pam_unix(sshd:session): session opened for user root by (uid=0)
Setting Up Logrotate
On a very busy server, you may fi nd that entries get added to your log fi les really fast. This poses a risk—your server may quickly become fi lled with log messages, leaving little space for regular fi les. There are two solutions to this problem. First, the directory /var/log should be on a dedicated partition or logical volume. In Chapter 1, you read about how to install a server with multiple volumes. If the directory /var/log is on a dedicated partition or logical volume, your server’s fi le system will never be completely fi lled, even if too much information is written to the log fi les.
Another solution that you can use to prevent your server from being completely fi lled by log fi les is using logrotate. By default, the logrotate command runs as a cron job once a day from /etc/cron.daily, and it helps you defi ne a policy where log fi les that grow beyond a certain age or size are rotated.
Rotating a log fi le basically means that the old log fi le is closed and a new log fi le is opened. In most cases, logrotate keeps a certain number of the old logged fi les, often stored as compressed fi les on disk. In the logrotate confi guration, you can defi ne exactly how you want to handle the rotation of log fi les. When the maximum amount of old log fi les is reached, logrotate removes them automatically.
The confi guration of logrotate is spread out between two different locations. The main logrotate fi le is /etc/logrotate.conf. In this fi le, some generic parameters are stored in addition to specifi c parameters that defi ne how particular fi les should be handled.
The logrotate confi guration for specifi c services is stored in the directory /etc/logrotate.d. These scripts are typically put there when you install the service, but you can modify them as you like. The logrotate fi le for the sssd services provides a good example that you can use if you want to create your own logrotate fi le. Listing 3.7 shows the con-tents of this logrotate fi le.
Listing 3.7: Sample logrotate configuration file
[root@hnl ~]# cat /etc/logrotate.d/sssd
/var/log/sssd/*.log {
weekly
missingok
notifempty
sharedscripts
rotate 2
compress
c03.indd 96c03.indd 96 1/8/2013 10:43:15 AM1/8/2013 10:43:15 AM
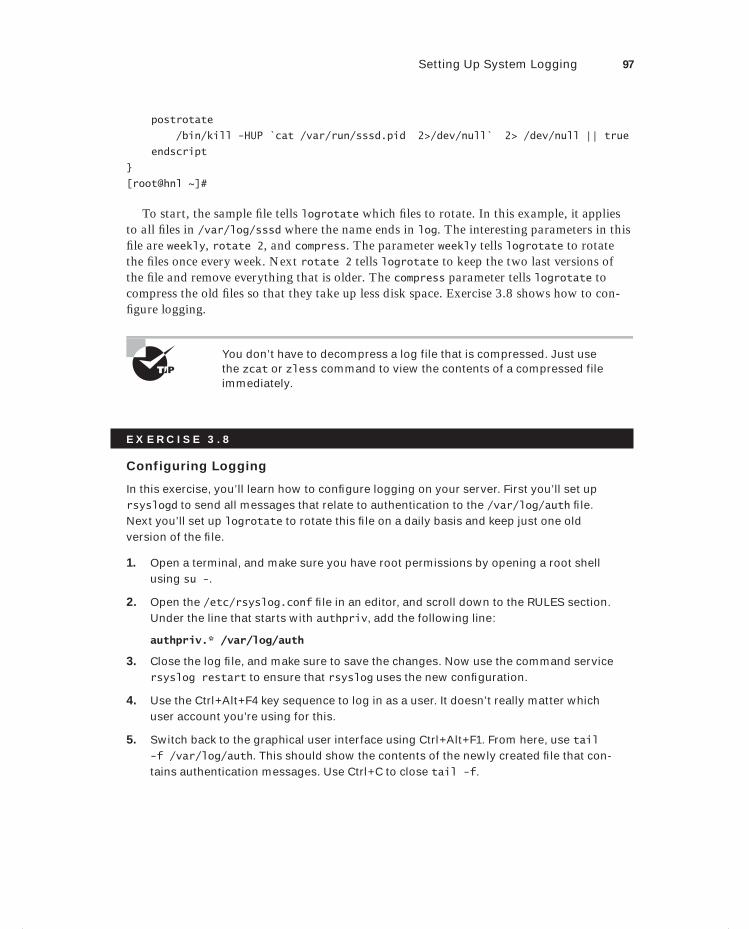
Setting Up System Logging 97
postrotate
/bin/kill -HUP `cat /var/run/sssd.pid 2>/dev/null` 2> /dev/null || true
endscript
}
[root@hnl ~]#
To start, the sample fi le tells logrotate which fi les to rotate. In this example, it applies to all fi les in /var/log/sssd where the name ends in log. The interesting parameters in this fi le are weekly, rotate 2, and compress. The parameter weekly tells logrotate to rotate the fi les once every week. Next rotate 2 tells logrotate to keep the two last versions of the fi le and remove everything that is older. The compress parameter tells logrotate to compress the old fi les so that they take up less disk space. Exercise 3.8 shows how to con-fi gure logging.
You don’t have to decompress a log file that is compressed. Just use the zcat or zless command to view the contents of a compressed file immediately.
E X E R C I S E 3 . 8
Configuring Logging
In this exercise, you’ll learn how to confi gure logging on your server. First you’ll set up rsyslogd to send all messages that relate to authentication to the /var/log/auth fi le. Next you’ll set up logrotate to rotate this fi le on a daily basis and keep just one old version of the fi le.
1. Open a terminal, and make sure you have root permissions by opening a root shell using su -.
2. Open the /etc/rsyslog.conf fi le in an editor, and scroll down to the RULES section. Under the line that starts with authpriv, add the following line:
authpriv.* /var/log/auth
3. Close the log fi le, and make sure to save the changes. Now use the command service rsyslog restart to ensure that rsyslog uses the new confi guration.
4. Use the Ctrl+Alt+F4 key sequence to log in as a user. It doesn’t really matter which user account you’re using for this.
5. Switch back to the graphical user interface using Ctrl+Alt+F1. From here, use tail -f /var/log/auth. This should show the contents of the newly created fi le that con-tains authentication messages. Use Ctrl+C to close tail -f.
c03.indd 97c03.indd 97 1/8/2013 10:43:16 AM1/8/2013 10:43:16 AM
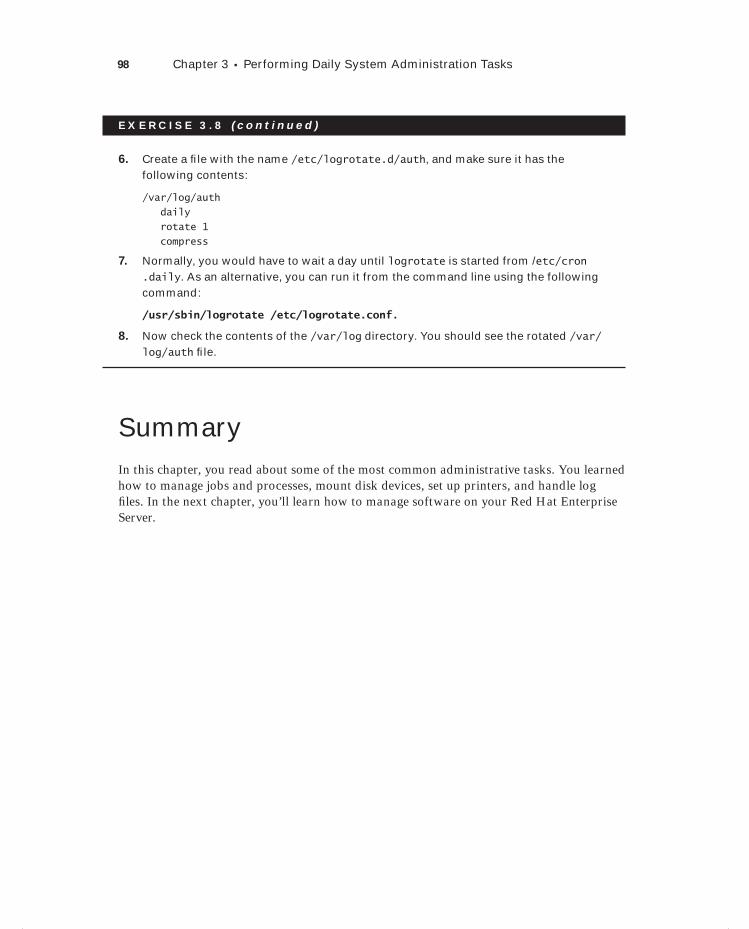
98 Chapter 3 Performing Daily System Administration Tasks
E X E R C I S E 3 . 8 ( c ont inue d )
6. Create a fi le with the name /etc/logrotate.d/auth, and make sure it has the following contents:
/var/log/auth
daily
rotate 1
compress
7. Normally, you would have to wait a day until logrotate is started from /etc/cron.daily. As an alternative, you can run it from the command line using the following command:
/usr/sbin/logrotate /etc/logrotate.conf.
8. Now check the contents of the /var/log directory. You should see the rotated /var/log/auth fi le.
SummaryIn this chapter, you read about some of the most common administrative tasks. You learned how to manage jobs and processes, mount disk devices, set up printers, and handle log fi les. In the next chapter, you’ll learn how to manage software on your Red Hat Enterprise Server.
c03.indd 98c03.indd 98 1/8/2013 10:43:16 AM1/8/2013 10:43:16 AM

Chapter
4Managing Software
TOPICS COVERED IN THIS CHAPTER:
Understanding RPM
Understanding Meta Package Handlers
Installing Software with yum
Querying Software
Extracting Files from RPM Packages
c04.indd 99c04.indd 99 1/8/2013 10:43:48 AM1/8/2013 10:43:48 AM

Managing Red Hat software is no longer the challenge it was in the past. Now everything is effi ciently organized. In this chapter, fi rst you’ll learn about RPMs, the basic package for-
mat that is used for software installation. After that, you’ll learn how software is organized in repositories and how yum is used to manage software from these repositories.
Understanding RPMIn the early days of Linux, the “tar ball” was the default method for installing software. A tar ball is an archive that contains fi les that need to be installed. Unfortunately, there were no rules for exactly what needed to be in the tar ball; neither were there any specifi ca-tions of how the software in the tar ball was to be installed.
Working with tar balls was inconvenient for several reasons.
There was no standardization.
When using tar balls, there was no way to track what was installed.
Updating and de-installing tar balls was difficult to do.
In some cases, the tar ball contained source fi les that still needed to be compiled. In other cases, the tar ball had a nice installation script. In other situations still, the tar ball would just include a bunch of fi les including a README fi le explaining what to do with the software.
The ability to trace software was needed to overcome the disadvantages of tar balls. The Red Hat Package Manager (RPM) is one of the standards designed to fulfi ll this need.
An RPM is basically an archive fi le. It is created with the cpio command. However, it’s no ordinary archive. With RPM, there is also metadata describing what is in the package and where those different fi les should be installed. Because RPM is so well organized, it is easy for an administrator to query exactly what is happening in it.
Another benefi t of using RPM is that its database is created in the /var/lib/rpm direc-tory. This database keeps track of the exact version of fi les that are installed on the com-puter. Thus, for an administrator, it is possible to query individual RPM fi les to see their contents. You can also query the database to see where a specifi c fi le comes from or what exactly is in the RPM. As you will learn later in this chapter, these query options make it really easy to fi nd the exact package or fi les you need to manage.
c04.indd 100c04.indd 100 1/8/2013 10:43:50 AM1/8/2013 10:43:50 AM
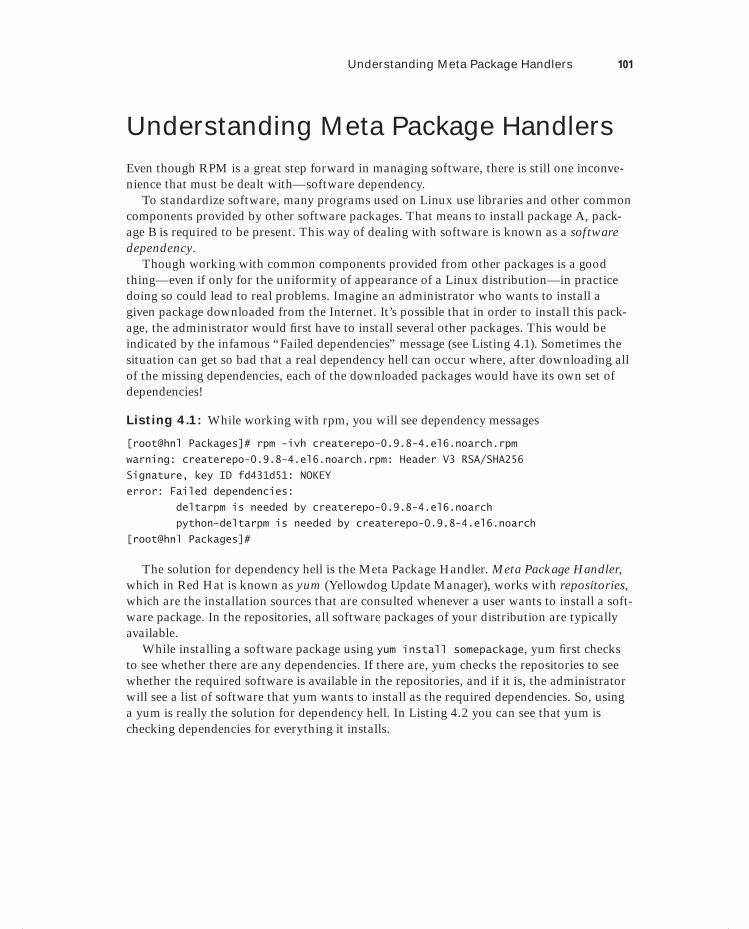
Understanding Meta Package Handlers 101
Understanding Meta Package HandlersEven though RPM is a great step forward in managing software, there is still one inconve-nience that must be dealt with—software dependency.
To standardize software, many programs used on Linux use libraries and other common components provided by other software packages. That means to install package A, pack-age B is required to be present. This way of dealing with software is known as a software dependency.
Though working with common components provided from other packages is a good thing—even if only for the uniformity of appearance of a Linux distribution—in practice doing so could lead to real problems. Imagine an administrator who wants to install a given package downloaded from the Internet. It’s possible that in order to install this pack-age, the administrator would fi rst have to install several other packages. This would be indicated by the infamous “Failed dependencies” message (see Listing 4.1). Sometimes the situation can get so bad that a real dependency hell can occur where, after downloading all of the missing dependencies, each of the downloaded packages would have its own set of dependencies!
Listing 4.1: While working with rpm, you will see dependency messages
[root@hnl Packages]# rpm -ivh createrepo-0.9.8-4.el6.noarch.rpm
warning: createrepo-0.9.8-4.el6.noarch.rpm: Header V3 RSA/SHA256
Signature, key ID fd431d51: NOKEY
error: Failed dependencies:
deltarpm is needed by createrepo-0.9.8-4.el6.noarch
python-deltarpm is needed by createrepo-0.9.8-4.el6.noarch
[root@hnl Packages]#
The solution for dependency hell is the Meta Package Handler. Meta Package Handler, which in Red Hat is known as yum (Yellowdog Update Manager), works with repositories, which are the installation sources that are consulted whenever a user wants to install a soft-ware package. In the repositories, all software packages of your distribution are typically available.
While installing a software package using yum install somepackage, yum fi rst checks to see whether there are any dependencies. If there are, yum checks the repositories to see whether the required software is available in the repositories, and if it is, the administrator will see a list of software that yum wants to install as the required dependencies. So, using a yum is really the solution for dependency hell. In Listing 4.2 you can see that yum is checking dependencies for everything it installs.
c04.indd 101c04.indd 101 1/8/2013 10:43:50 AM1/8/2013 10:43:50 AM
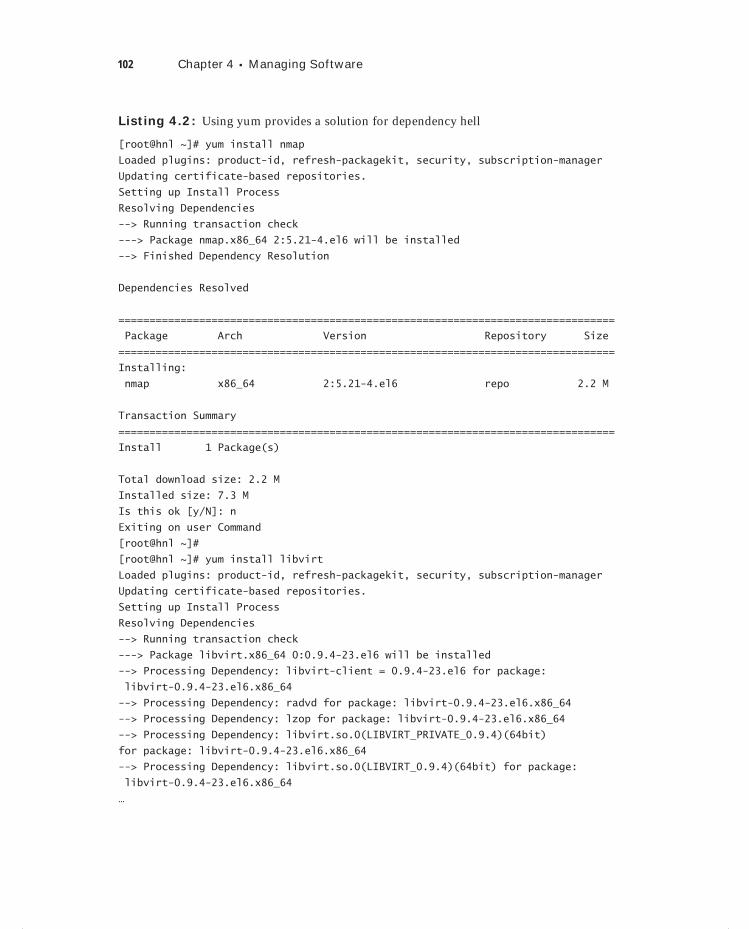
102 Chapter 4 Managing Software
Listing 4.2: Using yum provides a solution for dependency hell
[root@hnl ~]# yum install nmap
Loaded plugins: product-id, refresh-packagekit, security, subscription-manager
Updating certificate-based repositories.
Setting up Install Process
Resolving Dependencies
--> Running transaction check
---> Package nmap.x86_64 2:5.21-4.el6 will be installed
--> Finished Dependency Resolution
Dependencies Resolved
================================================================================
Package Arch Version Repository Size
================================================================================
Installing:
nmap x86_64 2:5.21-4.el6 repo 2.2 M
Transaction Summary
================================================================================
Install 1 Package(s)
Total download size: 2.2 M
Installed size: 7.3 M
Is this ok [y/N]: n
Exiting on user Command
[root@hnl ~]#
[root@hnl ~]# yum install libvirt
Loaded plugins: product-id, refresh-packagekit, security, subscription-manager
Updating certificate-based repositories.
Setting up Install Process
Resolving Dependencies
--> Running transaction check
---> Package libvirt.x86_64 0:0.9.4-23.el6 will be installed
--> Processing Dependency: libvirt-client = 0.9.4-23.el6 for package:
libvirt-0.9.4-23.el6.x86_64
--> Processing Dependency: radvd for package: libvirt-0.9.4-23.el6.x86_64
--> Processing Dependency: lzop for package: libvirt-0.9.4-23.el6.x86_64
--> Processing Dependency: libvirt.so.0(LIBVIRT_PRIVATE_0.9.4)(64bit)
for package: libvirt-0.9.4-23.el6.x86_64
--> Processing Dependency: libvirt.so.0(LIBVIRT_0.9.4)(64bit) for package:
libvirt-0.9.4-23.el6.x86_64
…
c04.indd 102c04.indd 102 1/8/2013 10:43:50 AM1/8/2013 10:43:50 AM
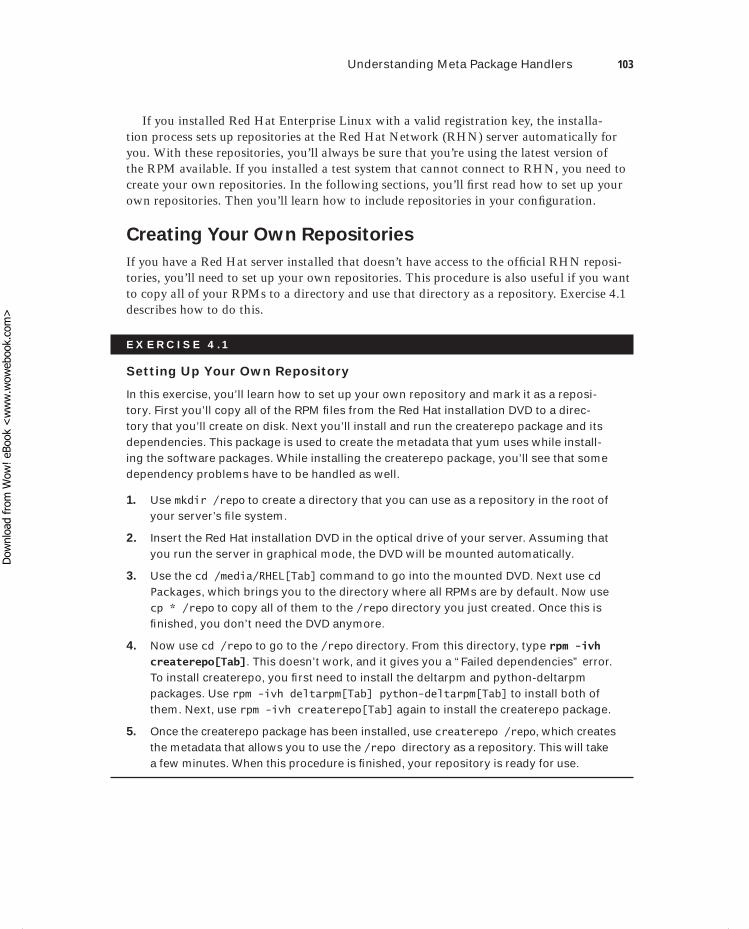
Understanding Meta Package Handlers 103
If you installed Red Hat Enterprise Linux with a valid registration key, the installa-tion process sets up repositories at the Red Hat Network (RHN) server automatically for you. With these repositories, you’ll always be sure that you’re using the latest version of the RPM available. If you installed a test system that cannot connect to RHN, you need to create your own repositories. In the following sections, you’ll fi rst read how to set up your own repositories. Then you’ll learn how to include repositories in your confi guration.
Creating Your Own Repositories
If you have a Red Hat server installed that doesn’t have access to the offi cial RHN reposi-tories, you’ll need to set up your own repositories. This procedure is also useful if you want to copy all of your RPMs to a directory and use that directory as a repository. Exercise 4.1 describes how to do this.
E X E R C I S E 4 .1
Setting Up Your Own Repository
In this exercise, you’ll learn how to set up your own repository and mark it as a reposi-tory. First you’ll copy all of the RPM fi les from the Red Hat installation DVD to a direc-tory that you’ll create on disk. Next you’ll install and run the createrepo package and its dependencies. This package is used to create the metadata that yum uses while install-ing the software packages. While installing the createrepo package, you’ll see that some dependency problems have to be handled as well.
1. Use mkdir /repo to create a directory that you can use as a repository in the root of your server’s fi le system.
2. Insert the Red Hat installation DVD in the optical drive of your server. Assuming that you run the server in graphical mode, the DVD will be mounted automatically.
3. Use the cd /media/RHEL[Tab] command to go into the mounted DVD. Next use cd Packages, which brings you to the directory where all RPMs are by default. Now use cp * /repo to copy all of them to the /repo directory you just created. Once this is fi nished, you don’t need the DVD anymore.
4. Now use cd /repo to go to the /repo directory. From this directory, type rpm -ivh createrepo[Tab]. This doesn’t work, and it gives you a “Failed dependencies” error. To install createrepo, you fi rst need to install the deltarpm and python-deltarpm packages. Use rpm -ivh deltarpm[Tab] python-deltarpm[Tab] to install both of them. Next, use rpm -ivh createrepo[Tab] again to install the createrepo package.
5. Once the createrepo package has been installed, use createrepo /repo, which creates the metadata that allows you to use the /repo directory as a repository. This will take a few minutes. When this procedure is fi nished, your repository is ready for use.
c04.indd 103c04.indd 103 1/8/2013 10:43:50 AM1/8/2013 10:43:50 AM
Dow
nlo
ad fro
m W
ow
! eBook
<w
ww
.wow
ebook.
com
>
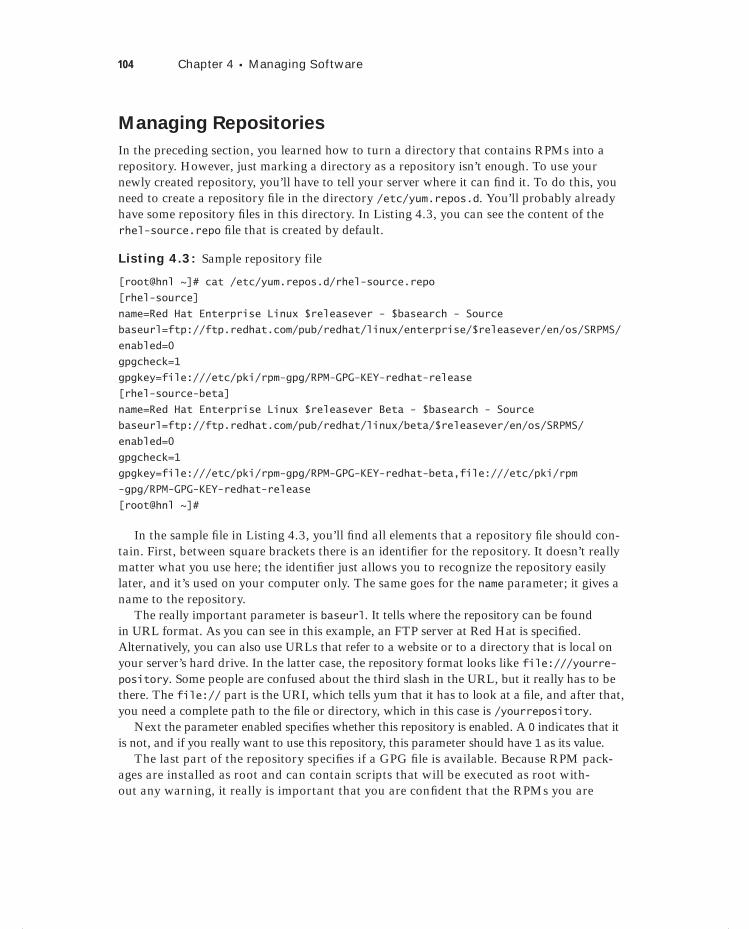
104 Chapter 4 Managing Software
Managing Repositories
In the preceding section, you learned how to turn a directory that contains RPMs into a repository. However, just marking a directory as a repository isn’t enough. To use your newly created repository, you’ll have to tell your server where it can fi nd it. To do this, you need to create a repository fi le in the directory /etc/yum.repos.d. You’ll probably already have some repository fi les in this directory. In Listing 4.3, you can see the content of the rhel-source.repo fi le that is created by default.
Listing 4.3: Sample repository file
[root@hnl ~]# cat /etc/yum.repos.d/rhel-source.repo
[rhel-source]
name=Red Hat Enterprise Linux $releasever - $basearch - Source
baseurl=ftp://ftp.redhat.com/pub/redhat/linux/enterprise/$releasever/en/os/SRPMS/
enabled=0
gpgcheck=1
gpgkey=file:///etc/pki/rpm-gpg/RPM-GPG-KEY-redhat-release
[rhel-source-beta]
name=Red Hat Enterprise Linux $releasever Beta - $basearch - Source
baseurl=ftp://ftp.redhat.com/pub/redhat/linux/beta/$releasever/en/os/SRPMS/
enabled=0
gpgcheck=1
gpgkey=file:///etc/pki/rpm-gpg/RPM-GPG-KEY-redhat-beta,file:///etc/pki/rpm
-gpg/RPM-GPG-KEY-redhat-release
[root@hnl ~]#
In the sample fi le in Listing 4.3, you’ll fi nd all elements that a repository fi le should con-tain. First, between square brackets there is an identifi er for the repository. It doesn’t really matter what you use here; the identifi er just allows you to recognize the repository easily later, and it’s used on your computer only. The same goes for the name parameter; it gives a name to the repository.
The really important parameter is baseurl. It tells where the repository can be found in URL format. As you can see in this example, an FTP server at Red Hat is specifi ed. Alternatively, you can also use URLs that refer to a website or to a directory that is local on your server’s hard drive. In the latter case, the repository format looks like file:///yourre-pository. Some people are confused about the third slash in the URL, but it really has to be there. The file:// part is the URI, which tells yum that it has to look at a fi le, and after that, you need a complete path to the fi le or directory, which in this case is /yourrepository.
Next the parameter enabled specifi es whether this repository is enabled. A 0 indicates that it is not, and if you really want to use this repository, this parameter should have 1 as its value.
The last part of the repository specifi es if a GPG fi le is available. Because RPM pack-ages are installed as root and can contain scripts that will be executed as root with-out any warning, it really is important that you are confi dent that the RPMs you are
c04.indd 104c04.indd 104 1/8/2013 10:43:51 AM1/8/2013 10:43:51 AM
Understanding Meta Package Handlers 105
installing can be trusted. GPG helps in guaranteeing the integrity of software packages you are installing.
To check whether packages have been tampered with, a GPG check is done on each package that you’ll install. To do this check, you need the GPG fi les installed locally on your computer. As you can see, some GPG fi les that are used by Red Hat are installed on your computer by default. Their location is specifi ed using the gpgkey option. Next the option gpgcheck=1 tells yum that it has to perform the GPG integrity check. If you’re hav-ing a hard time confi guring the GPG check, you can change this parameter to gpgcheck=0, which completely disables the GPG check for RPMs that are found in this repository.
In Exercise 4.2 you’ll learn how to enable the repository that you created in the preced-ing exercise by creating a repository fi le for it.
E X E R C I S E 4 . 2
Working with yum
In this exercise, you’ll start by using some yum commands, which are explained in the next section of this chapter. The purpose of using these commands is that at the start of this exercise, yum doesn’t show anything. Next you’ll enable the repository that you cre-ated in the preceding exercise, and you’ll repeat the yum commands. You will see that after enabling the repositories, the yum commands now work.
1. Use the command yum repolist. In its output (repolist: 0), the command tells you that currently no repositories are confi gured.
2. Use the command yum search nmap. The result of this command is the message No Matches found.
3. Now use vi to create a fi le with the name /etc/yum.repos.d/myrepo.repo. Note that it is important that the fi le has the extension .repo. Without it, yum will completely ignore it! The fi le should have the following contents:
[myrepo]
name=myrepo
baseurl=file:///repo
gpgcheck=0
4. Now use the commands yum repolist and yum search nmap again. Listing 4.4 shows the result of these commands.
Listing 4.4: After enabling the repository, yum commands will work
[root@hnl ~]# yum repolist
Loaded plugins: product-id, refresh-packagekit, security, subscription-manager
Updating certificate-based repositories.
repo id repo name status
myrepo myrepo 3,596
c04.indd 105c04.indd 105 1/8/2013 10:43:51 AM1/8/2013 10:43:51 AM
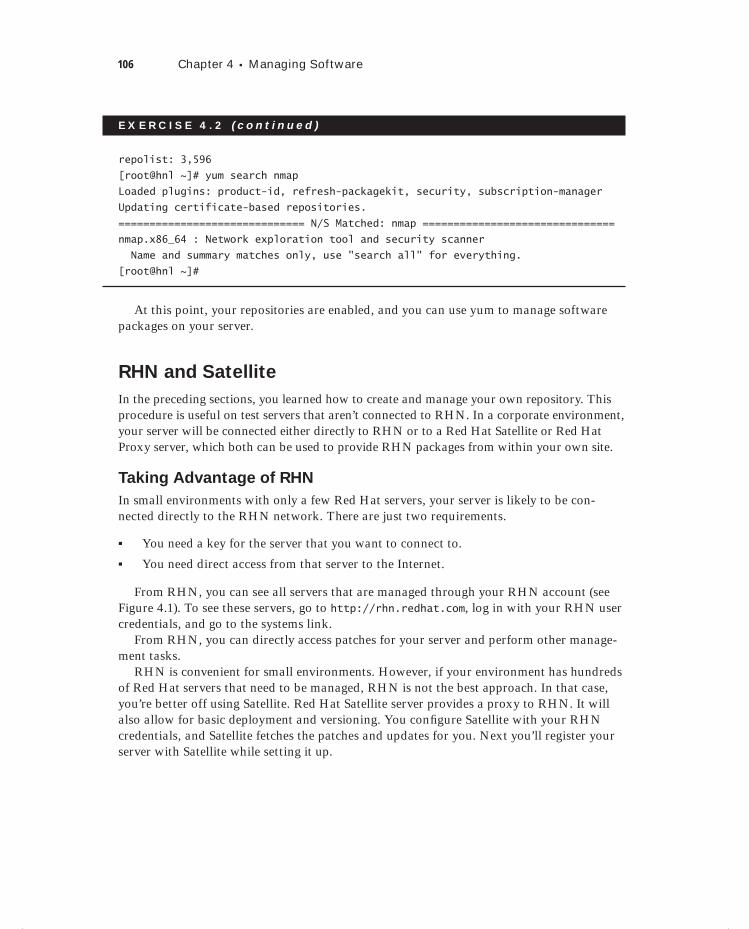
106 Chapter 4 Managing Software
E X E R C I S E 4 . 2 ( c ont inue d )
repolist: 3,596
[root@hnl ~]# yum search nmap
Loaded plugins: product-id, refresh-packagekit, security, subscription-manager
Updating certificate-based repositories.
============================== N/S Matched: nmap ===============================
nmap.x86_64 : Network exploration tool and security scanner
Name and summary matches only, use "search all" for everything.
[root@hnl ~]#
At this point, your repositories are enabled, and you can use yum to manage software packages on your server.
RHN and Satellite
In the preceding sections, you learned how to create and manage your own repository. This procedure is useful on test servers that aren’t connected to RHN. In a corporate environment, your server will be connected either directly to RHN or to a Red Hat Satellite or Red Hat Proxy server, which both can be used to provide RHN packages from within your own site.
Taking Advantage of RHN
In small environments with only a few Red Hat servers, your server is likely to be con-nected directly to the RHN network. There are just two requirements.
You need a key for the server that you want to connect to.
You need direct access from that server to the Internet.
From RHN, you can see all servers that are managed through your RHN account (see Figure 4.1). To see these servers, go to http://rhn.redhat.com, log in with your RHN user credentials, and go to the systems link.
From RHN, you can directly access patches for your server and perform other manage-ment tasks.
RHN is convenient for small environments. However, if your environment has hundreds of Red Hat servers that need to be managed, RHN is not the best approach. In that case, you’re better off using Satellite. Red Hat Satellite server provides a proxy to RHN. It will also allow for basic deployment and versioning. You confi gure Satellite with your RHN credentials, and Satellite fetches the patches and updates for you. Next you’ll register your server with Satellite while setting it up.
c04.indd 106c04.indd 106 1/8/2013 10:43:51 AM1/8/2013 10:43:51 AM
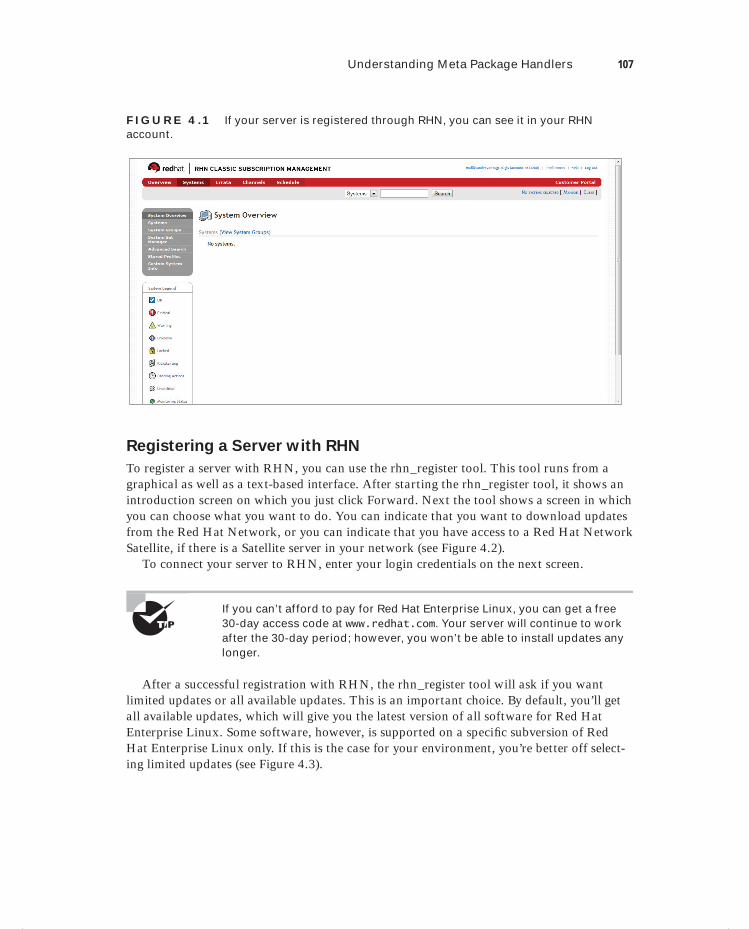
Understanding Meta Package Handlers 107
F I GU R E 4 .1 If your server is registered through RHN, you can see it in your RHN account.
Registering a Server with RHN
To register a server with RHN, you can use the rhn_register tool. This tool runs from a graphical as well as a text-based interface. After starting the rhn_register tool, it shows an introduction screen on which you just click Forward. Next the tool shows a screen in which you can choose what you want to do. You can indicate that you want to download updates from the Red Hat Network, or you can indicate that you have access to a Red Hat Network Satellite, if there is a Satellite server in your network (see Figure 4.2).
To connect your server to RHN, enter your login credentials on the next screen.
If you can’t afford to pay for Red Hat Enterprise Linux, you can get a free 30-day access code at www.redhat.com. Your server will continue to work after the 30-day period; however, you won’t be able to install updates any longer.
After a successful registration with RHN, the rhn_register tool will ask if you want limited updates or all available updates. This is an important choice. By default, you’ll get all available updates, which will give you the latest version of all software for Red Hat Enterprise Linux. Some software, however, is supported on a specifi c subversion of Red Hat Enterprise Linux only. If this is the case for your environment, you’re better off select-ing limited updates (see Figure 4.3).
c04.indd 107c04.indd 107 1/8/2013 10:43:51 AM1/8/2013 10:43:51 AM
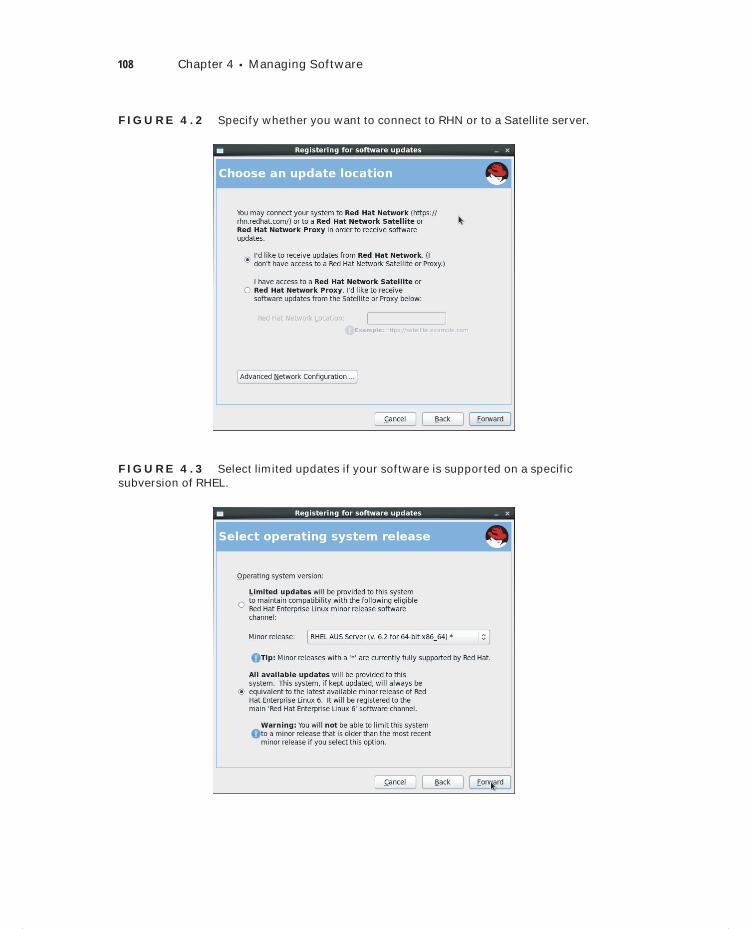
108 Chapter 4 Managing Software
F I GU R E 4 . 2 Specify whether you want to connect to RHN or to a Satellite server.
F I GU R E 4 . 3 Select limited updates if your software is supported on a specific subversion of RHEL.
c04.indd 108c04.indd 108 1/8/2013 10:43:53 AM1/8/2013 10:43:53 AM
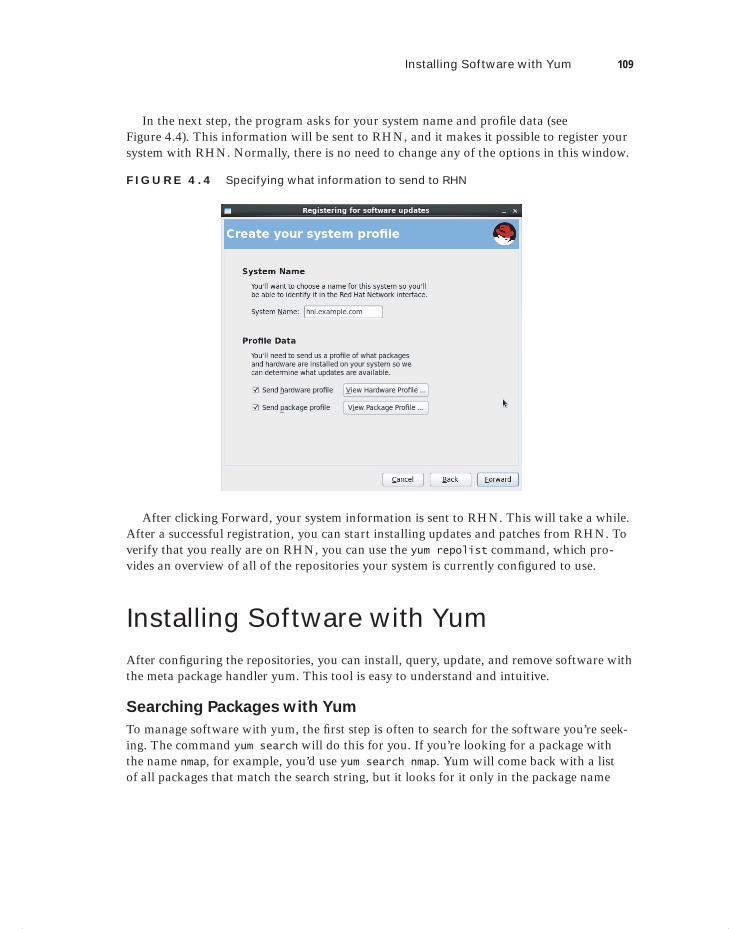
Installing Software with Yum 109
In the next step, the program asks for your system name and profi le data (see Figure 4.4). This information will be sent to RHN, and it makes it possible to register your system with RHN. Normally, there is no need to change any of the options in this window.
F I GU R E 4 . 4 Specifying what information to send to RHN
After clicking Forward, your system information is sent to RHN. This will take a while. After a successful registration, you can start installing updates and patches from RHN. To verify that you really are on RHN, you can use the yum repolist command, which pro-vides an overview of all of the repositories your system is currently confi gured to use.
Installing Software with YumAfter confi guring the repositories, you can install, query, update, and remove software with the meta package handler yum. This tool is easy to understand and intuitive.
Searching Packages with Yum
To manage software with yum, the fi rst step is often to search for the software you’re seek-ing. The command yum search will do this for you. If you’re looking for a package with the name nmap, for example, you’d use yum search nmap. Yum will come back with a list of all packages that match the search string, but it looks for it only in the package name
c04.indd 109c04.indd 109 1/8/2013 10:43:53 AM1/8/2013 10:43:53 AM
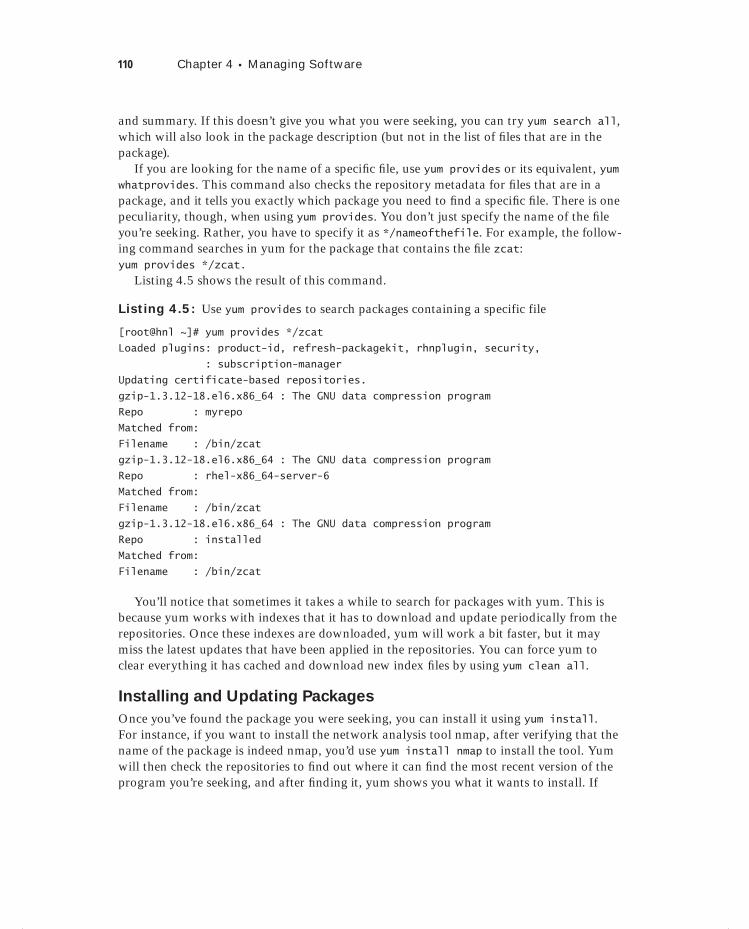
110 Chapter 4 Managing Software
and summary. If this doesn’t give you what you were seeking, you can try yum search all, which will also look in the package description (but not in the list of fi les that are in the package).
If you are looking for the name of a specifi c fi le, use yum provides or its equivalent, yum whatprovides. This command also checks the repository metadata for fi les that are in a package, and it tells you exactly which package you need to fi nd a specifi c fi le. There is one peculiarity, though, when using yum provides. You don’t just specify the name of the fi le you’re seeking. Rather, you have to specify it as */nameofthefile. For example, the follow-ing command searches in yum for the package that contains the fi le zcat:yum provides */zcat.
Listing 4.5 shows the result of this command.
Listing 4.5: Use yum provides to search packages containing a specific file
[root@hnl ~]# yum provides */zcat
Loaded plugins: product-id, refresh-packagekit, rhnplugin, security,
: subscription-manager
Updating certificate-based repositories.
gzip-1.3.12-18.el6.x86_64 : The GNU data compression program
Repo : myrepo
Matched from:
Filename : /bin/zcat
gzip-1.3.12-18.el6.x86_64 : The GNU data compression program
Repo : rhel-x86_64-server-6
Matched from:
Filename : /bin/zcat
gzip-1.3.12-18.el6.x86_64 : The GNU data compression program
Repo : installed
Matched from:
Filename : /bin/zcat
You’ll notice that sometimes it takes a while to search for packages with yum. This is because yum works with indexes that it has to download and update periodically from the repositories. Once these indexes are downloaded, yum will work a bit faster, but it may miss the latest updates that have been applied in the repositories. You can force yum to clear everything it has cached and download new index fi les by using yum clean all.
Installing and Updating Packages
Once you’ve found the package you were seeking, you can install it using yum install. For instance, if you want to install the network analysis tool nmap, after verifying that the name of the package is indeed nmap, you’d use yum install nmap to install the tool. Yum will then check the repositories to fi nd out where it can fi nd the most recent version of the program you’re seeking, and after fi nding it, yum shows you what it wants to install. If
c04.indd 110c04.indd 110 1/8/2013 10:43:53 AM1/8/2013 10:43:53 AM
Installing Software with Yum 111
there are no dependencies, it will show just one package. However, if there are dependen-cies, it displays a list of all the packages it needs to install in order to give you what you want. Next, type Y to confi rm that you really want to install what yum has proposed, and the software will be installed.
There are two useful options when working with yum install. The fi rst option, -y, can be used to automate things a bit. If you don’t use it, yum will fi rst display a summary of what it wants to install. Next it will prompt you to confi rm, after which it will start the installation. Use yum install -y to proceed immediately, without any additional prompts for confi rmation.
Another useful yum option is --nogpgcheck. If you occasionally don’t want to perform a GPG check to install a package, just add --nogpgcheck to your yum install command. For instance, use yum install -y --nogpgcheck xinetd if you want to install the xinetd pack-age without performing a GPG check and without having to confi rm the installation. See Listing 4.6 for an example of how to install a package using yum install.
Listing 4.6: Installing packages with yum install
rhel-x86_64-server-6 6989/6989
Setting up Install Process
Resolving Dependencies
--> Running transaction check
---> Package nmap.x86_64 2:5.21-4.el6 will be installed
--> Finished Dependency Resolution
Dependencies Resolved
================================================================================
Package Arch Version Repository Size
================================================================================
Installing:
nmap x86_64 2:5.21-4.el6 myrepo 2.2 M
Transaction Summary
================================================================================
Install 1 Package(s)
Total download size: 2.2 M
Installed size: 7.3 M
Is this ok [y/N]: y
Downloading Packages:
Running rpm_check_debug
Running Transaction Test
Transaction Test Succeeded
Running Transaction
Warning: RPMDB altered outside of yum.
Installing : 2:nmap-5.21-4.el6.x86_64 1/1
Installed products updated.
c04.indd 111c04.indd 111 1/8/2013 10:43:53 AM1/8/2013 10:43:53 AM
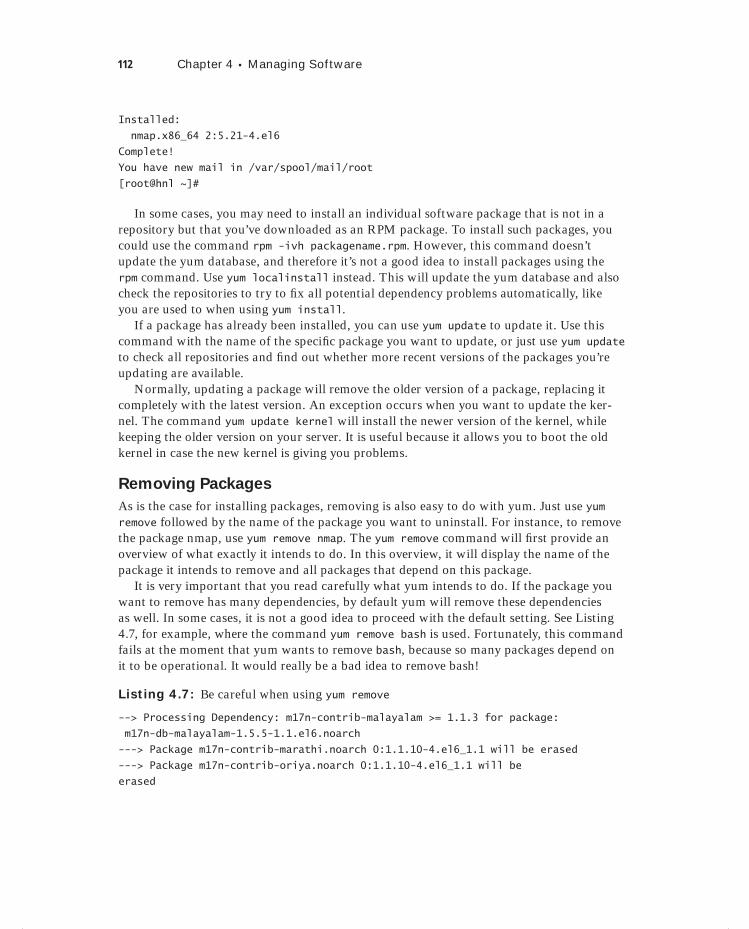
112 Chapter 4 Managing Software
Installed:
nmap.x86_64 2:5.21-4.el6
Complete!
You have new mail in /var/spool/mail/root
[root@hnl ~]#
In some cases, you may need to install an individual software package that is not in a repository but that you’ve downloaded as an RPM package. To install such packages, you could use the command rpm -ivh packagename.rpm. However, this command doesn’t update the yum database, and therefore it’s not a good idea to install packages using the rpm command. Use yum localinstall instead. This will update the yum database and also check the repositories to try to fi x all potential dependency problems automatically, like you are used to when using yum install.
If a package has already been installed, you can use yum update to update it. Use this command with the name of the specifi c package you want to update, or just use yum update to check all repositories and fi nd out whether more recent versions of the packages you’re updating are available.
Normally, updating a package will remove the older version of a package, replacing it completely with the latest version. An exception occurs when you want to update the ker-nel. The command yum update kernel will install the newer version of the kernel, while keeping the older version on your server. It is useful because it allows you to boot the old kernel in case the new kernel is giving you problems.
Removing Packages
As is the case for installing packages, removing is also easy to do with yum. Just use yum remove followed by the name of the package you want to uninstall. For instance, to remove the package nmap, use yum remove nmap. The yum remove command will fi rst provide an overview of what exactly it intends to do. In this overview, it will display the name of the package it intends to remove and all packages that depend on this package.
It is very important that you read carefully what yum intends to do. If the package you want to remove has many dependencies, by default yum will remove these dependencies as well. In some cases, it is not a good idea to proceed with the default setting. See Listing 4.7, for example, where the command yum remove bash is used. Fortunately, this command fails at the moment that yum wants to remove bash, because so many packages depend on it to be operational. It would really be a bad idea to remove bash!
Listing 4.7: Be careful when using yum remove
--> Processing Dependency: m17n-contrib-malayalam >= 1.1.3 for package:
m17n-db-malayalam-1.5.5-1.1.el6.noarch
---> Package m17n-contrib-marathi.noarch 0:1.1.10-4.el6_1.1 will be erased
---> Package m17n-contrib-oriya.noarch 0:1.1.10-4.el6_1.1 will be
erased
c04.indd 112c04.indd 112 1/8/2013 10:43:53 AM1/8/2013 10:43:53 AM
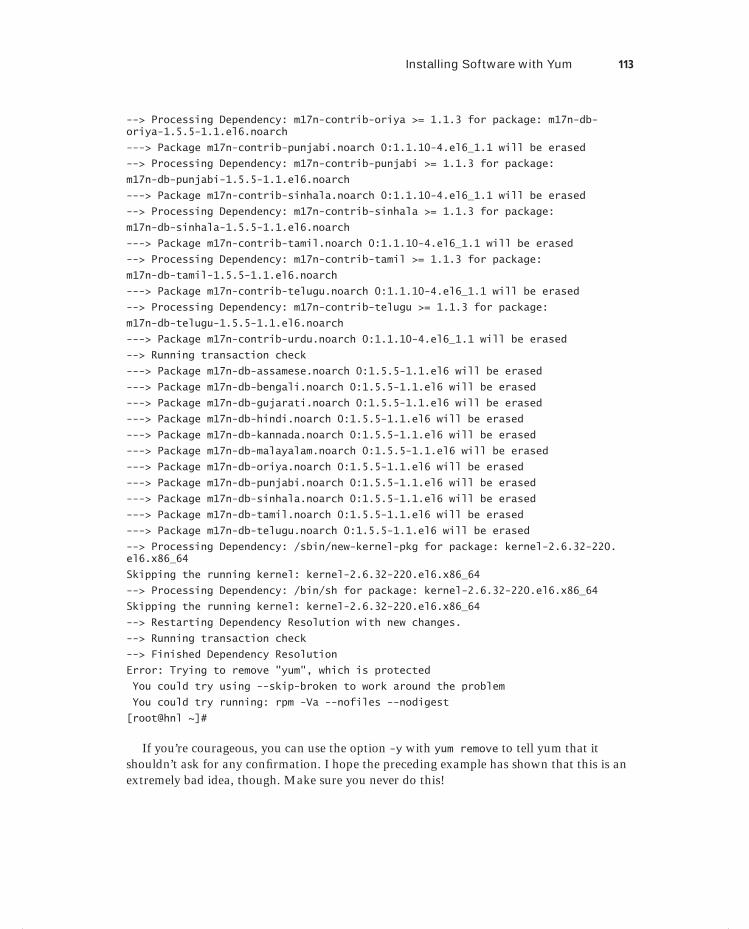
Installing Software with Yum 113
--> Processing Dependency: m17n-contrib-oriya >= 1.1.3 for package: m17n-db-oriya-1.5.5-1.1.el6.noarch
---> Package m17n-contrib-punjabi.noarch 0:1.1.10-4.el6_1.1 will be erased
--> Processing Dependency: m17n-contrib-punjabi >= 1.1.3 for package:
m17n-db-punjabi-1.5.5-1.1.el6.noarch
---> Package m17n-contrib-sinhala.noarch 0:1.1.10-4.el6_1.1 will be erased
--> Processing Dependency: m17n-contrib-sinhala >= 1.1.3 for package:
m17n-db-sinhala-1.5.5-1.1.el6.noarch
---> Package m17n-contrib-tamil.noarch 0:1.1.10-4.el6_1.1 will be erased
--> Processing Dependency: m17n-contrib-tamil >= 1.1.3 for package:
m17n-db-tamil-1.5.5-1.1.el6.noarch
---> Package m17n-contrib-telugu.noarch 0:1.1.10-4.el6_1.1 will be erased
--> Processing Dependency: m17n-contrib-telugu >= 1.1.3 for package:
m17n-db-telugu-1.5.5-1.1.el6.noarch
---> Package m17n-contrib-urdu.noarch 0:1.1.10-4.el6_1.1 will be erased
--> Running transaction check
---> Package m17n-db-assamese.noarch 0:1.5.5-1.1.el6 will be erased
---> Package m17n-db-bengali.noarch 0:1.5.5-1.1.el6 will be erased
---> Package m17n-db-gujarati.noarch 0:1.5.5-1.1.el6 will be erased
---> Package m17n-db-hindi.noarch 0:1.5.5-1.1.el6 will be erased
---> Package m17n-db-kannada.noarch 0:1.5.5-1.1.el6 will be erased
---> Package m17n-db-malayalam.noarch 0:1.5.5-1.1.el6 will be erased
---> Package m17n-db-oriya.noarch 0:1.5.5-1.1.el6 will be erased
---> Package m17n-db-punjabi.noarch 0:1.5.5-1.1.el6 will be erased
---> Package m17n-db-sinhala.noarch 0:1.5.5-1.1.el6 will be erased
---> Package m17n-db-tamil.noarch 0:1.5.5-1.1.el6 will be erased
---> Package m17n-db-telugu.noarch 0:1.5.5-1.1.el6 will be erased
--> Processing Dependency: /sbin/new-kernel-pkg for package: kernel-2.6.32-220.el6.x86_64
Skipping the running kernel: kernel-2.6.32-220.el6.x86_64
--> Processing Dependency: /bin/sh for package: kernel-2.6.32-220.el6.x86_64
Skipping the running kernel: kernel-2.6.32-220.el6.x86_64
--> Restarting Dependency Resolution with new changes.
--> Running transaction check
--> Finished Dependency Resolution
Error: Trying to remove "yum", which is protected
You could try using --skip-broken to work around the problem
You could try running: rpm -Va --nofiles --nodigest
[root@hnl ~]#
If you’re courageous, you can use the option -y with yum remove to tell yum that it shouldn’t ask for any confi rmation. I hope the preceding example has shown that this is an extremely bad idea, though. Make sure you never do this!
c04.indd 113c04.indd 113 1/8/2013 10:43:54 AM1/8/2013 10:43:54 AM
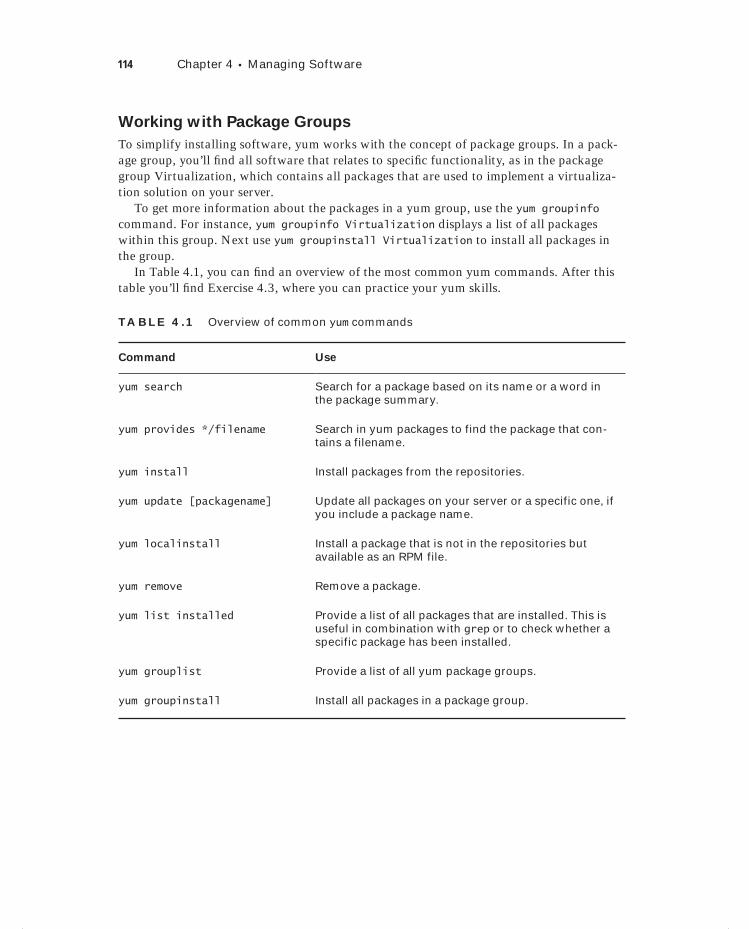
114 Chapter 4 Managing Software
Working with Package Groups
To simplify installing software, yum works with the concept of package groups. In a pack-age group, you’ll fi nd all software that relates to specifi c functionality, as in the package group Virtualization, which contains all packages that are used to implement a virtualiza-tion solution on your server.
To get more information about the packages in a yum group, use the yum groupinfo command. For instance, yum groupinfo Virtualization displays a list of all packages within this group. Next use yum groupinstall Virtualization to install all packages in the group.
In Table 4.1, you can fi nd an overview of the most common yum commands. After this table you’ll fi nd Exercise 4.3, where you can practice your yum skills.
TA B LE 4 .1 Overview of common yum commands
Command Use
yum search Search for a package based on its name or a word in the package summary.
yum provides */filename Search in yum packages to find the package that con-tains a filename.
yum install Install packages from the repositories.
yum update [packagename] Update all packages on your server or a specific one, if you include a package name.
yum localinstall Install a package that is not in the repositories but available as an RPM file.
yum remove Remove a package.
yum list installed Provide a list of all packages that are installed. This is useful in combination with grep or to check whether a specific package has been installed.
yum grouplist Provide a list of all yum package groups.
yum groupinstall Install all packages in a package group.
c04.indd 114c04.indd 114 1/8/2013 10:43:54 AM1/8/2013 10:43:54 AM
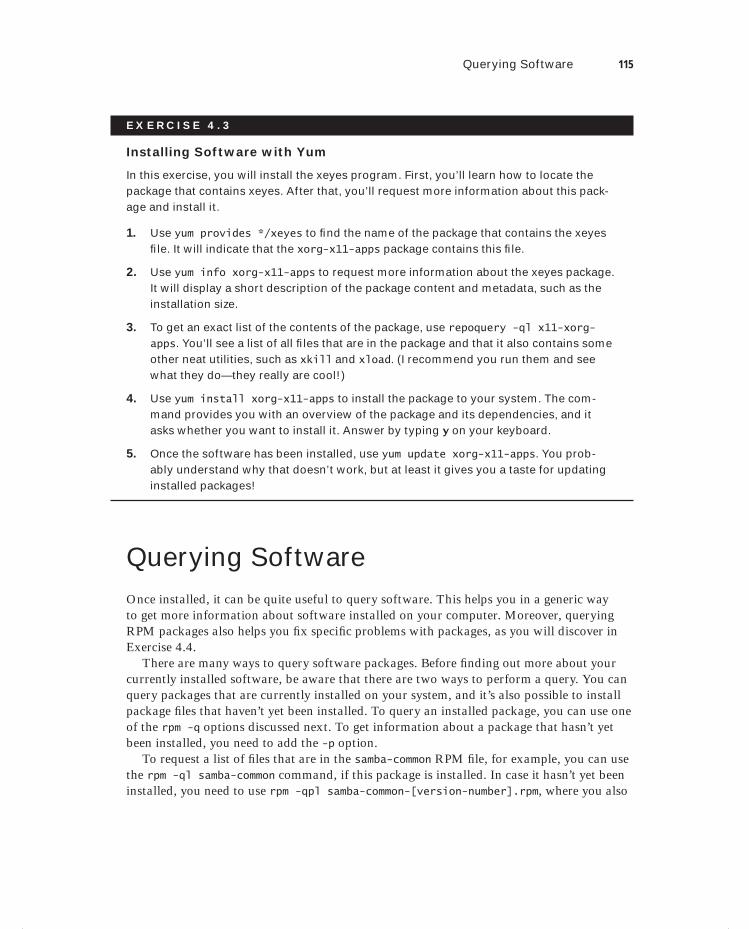
Querying Software 115
E X E R C I S E 4 . 3
Installing Software with Yum
In this exercise, you will install the xeyes program. First, you’ll learn how to locate the package that contains xeyes. After that, you’ll request more information about this pack-age and install it.
1. Use yum provides */xeyes to fi nd the name of the package that contains the xeyes fi le. It will indicate that the xorg-x11-apps package contains this fi le.
2. Use yum info xorg-x11-apps to request more information about the xeyes package. It will display a short description of the package content and metadata, such as the installation size.
3. To get an exact list of the contents of the package, use repoquery -ql x11-xorg-apps. You’ll see a list of all fi les that are in the package and that it also contains some other neat utilities, such as xkill and xload. (I recommend you run them and see what they do—they really are cool!)
4. Use yum install xorg-x11-apps to install the package to your system. The com-mand provides you with an overview of the package and its dependencies, and it asks whether you want to install it. Answer by typing y on your keyboard.
5. Once the software has been installed, use yum update xorg-x11-apps. You prob-ably understand why that doesn’t work, but at least it gives you a taste for updating installed packages!
Querying SoftwareOnce installed, it can be quite useful to query software. This helps you in a generic way to get more information about software installed on your computer. Moreover, querying RPM packages also helps you fi x specifi c problems with packages, as you will discover in Exercise 4.4.
There are many ways to query software packages. Before fi nding out more about your currently installed software, be aware that there are two ways to perform a query. You can query packages that are currently installed on your system, and it’s also possible to install package fi les that haven’t yet been installed. To query an installed package, you can use one of the rpm -q options discussed next. To get information about a package that hasn’t yet been installed, you need to add the -p option.
To request a list of fi les that are in the samba-common RPM fi le, for example, you can use the rpm -ql samba-common command, if this package is installed. In case it hasn’t yet been installed, you need to use rpm -qpl samba-common-[version-number].rpm, where you also
c04.indd 115c04.indd 115 1/8/2013 10:43:54 AM1/8/2013 10:43:54 AM
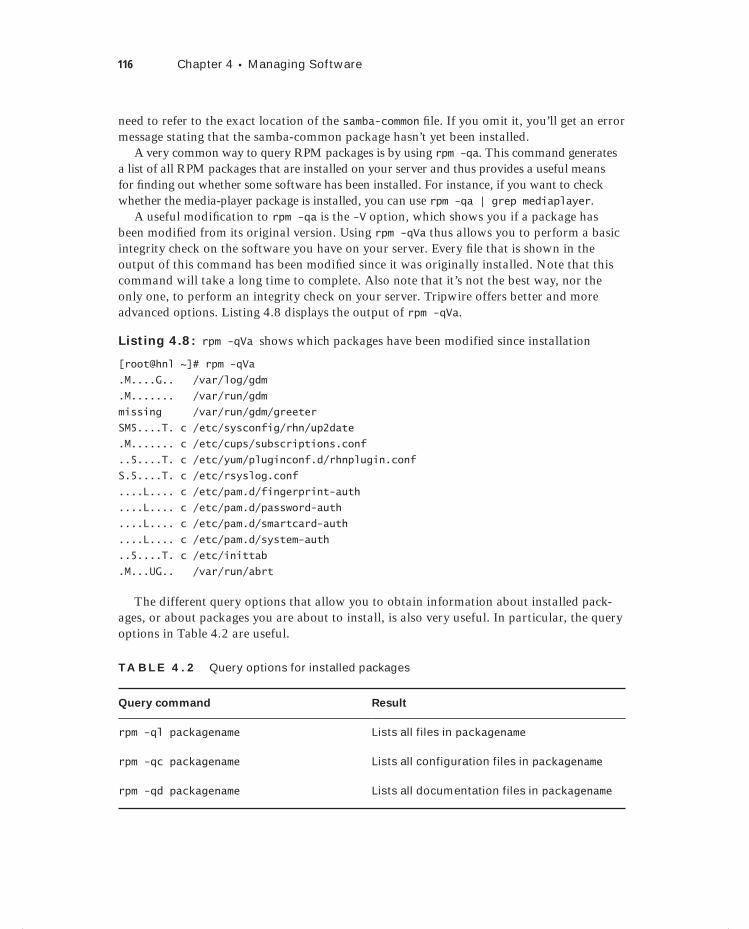
116 Chapter 4 Managing Software
need to refer to the exact location of the samba-common fi le. If you omit it, you’ll get an error message stating that the samba-common package hasn’t yet been installed.
A very common way to query RPM packages is by using rpm -qa. This command generates a list of all RPM packages that are installed on your server and thus provides a useful means for fi nding out whether some software has been installed. For instance, if you want to check whether the media-player package is installed, you can use rpm -qa | grep mediaplayer.
A useful modifi cation to rpm -qa is the -V option, which shows you if a package has been modifi ed from its original version. Using rpm -qVa thus allows you to perform a basic integrity check on the software you have on your server. Every fi le that is shown in the output of this command has been modifi ed since it was originally installed. Note that this command will take a long time to complete. Also note that it’s not the best way, nor the only one, to perform an integrity check on your server. Tripwire offers better and more advanced options. Listing 4.8 displays the output of rpm -qVa.
Listing 4.8: rpm -qVa shows which packages have been modified since installation
[root@hnl ~]# rpm -qVa
.M....G.. /var/log/gdm
.M....... /var/run/gdm
missing /var/run/gdm/greeter
SM5....T. c /etc/sysconfig/rhn/up2date
.M....... c /etc/cups/subscriptions.conf
..5....T. c /etc/yum/pluginconf.d/rhnplugin.conf
S.5....T. c /etc/rsyslog.conf
....L.... c /etc/pam.d/fingerprint-auth
....L.... c /etc/pam.d/password-auth
....L.... c /etc/pam.d/smartcard-auth
....L.... c /etc/pam.d/system-auth
..5....T. c /etc/inittab
.M...UG.. /var/run/abrt
The different query options that allow you to obtain information about installed pack-ages, or about packages you are about to install, is also very useful. In particular, the query options in Table 4.2 are useful.
TA B LE 4 . 2 Query options for installed packages
Query command Result
rpm -ql packagename Lists all files in packagename
rpm -qc packagename Lists all configuration files in packagename
rpm -qd packagename Lists all documentation files in packagename
c04.indd 116c04.indd 116 1/8/2013 10:43:54 AM1/8/2013 10:43:54 AM
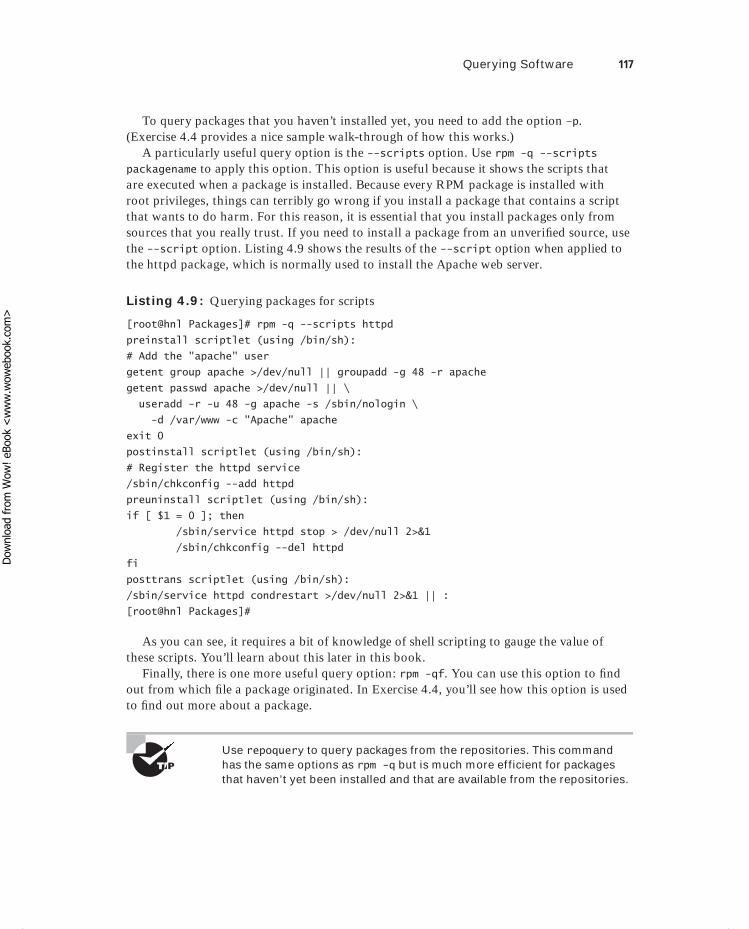
Querying Software 117
To query packages that you haven’t installed yet, you need to add the option –p. (Exercise 4.4 provides a nice sample walk-through of how this works.)
A particularly useful query option is the --scripts option. Use rpm -q --scripts packagename to apply this option. This option is useful because it shows the scripts that are executed when a package is installed. Because every RPM package is installed with root privileges, things can terribly go wrong if you install a package that contains a script that wants to do harm. For this reason, it is essential that you install packages only from sources that you really trust. If you need to install a package from an unverifi ed source, use the --script option. Listing 4.9 shows the results of the --script option when applied to the httpd package, which is normally used to install the Apache web server.
Listing 4.9: Querying packages for scripts
[root@hnl Packages]# rpm -q --scripts httpd
preinstall scriptlet (using /bin/sh):
# Add the "apache" user
getent group apache >/dev/null || groupadd -g 48 -r apache
getent passwd apache >/dev/null || \
useradd -r -u 48 -g apache -s /sbin/nologin \
-d /var/www -c "Apache" apache
exit 0
postinstall scriptlet (using /bin/sh):
# Register the httpd service
/sbin/chkconfig --add httpd
preuninstall scriptlet (using /bin/sh):
if [ $1 = 0 ]; then
/sbin/service httpd stop > /dev/null 2>&1
/sbin/chkconfig --del httpd
fi
posttrans scriptlet (using /bin/sh):
/sbin/service httpd condrestart >/dev/null 2>&1 || :
[root@hnl Packages]#
As you can see, it requires a bit of knowledge of shell scripting to gauge the value of these scripts. You’ll learn about this later in this book.
Finally, there is one more useful query option: rpm -qf. You can use this option to fi nd out from which fi le a package originated. In Exercise 4.4, you’ll see how this option is used to fi nd out more about a package.
Use repoquery to query packages from the repositories. This command has the same options as rpm -q but is much more efficient for packages that haven’t yet been installed and that are available from the repositories.
c04.indd 117c04.indd 117 1/8/2013 10:43:54 AM1/8/2013 10:43:54 AM
Dow
nlo
ad fro
m W
ow
! eBook
<w
ww
.wow
ebook.
com
>
118 Chapter 4 Managing Software
E X E R C I S E 4 . 4
Finding More Information About Installed Software
In this exercise, you’ll walk through a scenario that often occurs while working with Linux servers. You want to confi gure a service, but you don’t know where to fi nd its confi gura-tion fi les. As an example, you’ll use the /usr/sbin/wpa_supplicant program.
1. Use rpm -qf /usr/sbin/wpa_supplicant to fi nd out from what package the wpa_supplicant fi le originated. It should show you the wpa_supplicant package.
2. Use rpm -ql wpa_supplicant to show a list of all the fi les in this package. As you can see, the names of numerous fi les are displayed, and this isn’t very useful.
3. Now use rpm -qc wpa_supplicant to show just the confi guration fi les used by this package. This yields a list of three fi les only and gives you an idea of where to start confi guring the service.
Using RPM Queries to Find a Confi guration File
Imagine that you need to confi gure a new service. All you know is the name of the service and nothing else. Based on the name of the service and rpm query options, you can prob-ably fi nd everything you need to know. Let’s imagine that you know the name of the ser-vice is blah. The fi rst step would be to use find / -name blah, which gives an overview of all matching fi lenames. This would normally show a result as /usr/bin/blah. Based on that fi lename, you can now fi nd the RPM it comes from: rpm -qf /usr/bin/blah. Now that you’ve found the name of the RPM, you can query it to fi nd out which confi guration fi les it uses (rpm -qc blah) or which documentation is available (rpm -qd blah). I often use this approach when starting to work with software I’ve never used before.
Extracting Files from RPM PackagesSoftware installed on your computer may become damaged. If this happens, it’s good to know that you can extract fi les from the packages and copy them to the original location of the fi le.
Every RPM package consists of two parts: the metadata part that describes what is in the package and a cpio archive that contains the actual fi les in the package. If a fi le has been damaged, you can start with the rpm -qf query option to fi nd out from what package the fi le originated. Next use rpm2cpio | cpio -idmv to extract the fi les from the package to a temporary location. In Exercise 4.5, you’ll learn how to do this.
c04.indd 118c04.indd 118 1/8/2013 10:43:55 AM1/8/2013 10:43:55 AM
Summary 119
E X E R C I S E 4 . 5
Extracting Files from RPM Packages
In this exercise, you’ll learn how to identify from which package a fi le originated. Next you’ll extract the package to the /tmp directory, which allows you to copy the original fi le from the extracted RPM to the location where it’s supposed to exist.
1. Use rm -f /usr/sbin/modem-manager. Oops! You’ve just deleted a fi le from your system! (It normally doesn’t do any harm to delete modem-manager, because it’s hardly ever used anymore.
2. Use rpm -qf /usr/sbin/modem-manager. This command shows that the fi le comes from the ModemManager package.
3. Copy the ModemManager package fi le from the repository you created in Exercise 4.1 to the /tmp directory by using the cp /repo/ModemM[Tab] /tmp command.
4. Change the directory to the /tmp command, and use rpm2cpio |cpio -idmv to extract the package.
5. The command you used in step 4 created a few subdirectories in /tmp. Activate the directory /tmp/usr/sbin, where you can fi nd the modem-manager fi le. You can now copy it to its original location in /usr/sbin.
SummaryIn this chapter, you learned how to install, query, and manage software on your Red Hat server. You also learned how you can use the RPM tool to get extensive information about the software installed on your server. In the next chapter, you’ll learn how to manage stor-age on your server.
c04.indd 119c04.indd 119 1/8/2013 10:43:55 AM1/8/2013 10:43:55 AM

c04.indd 120c04.indd 120 1/8/2013 10:43:55 AM1/8/2013 10:43:55 AM

Chapter
5Configuring and Managing Storage
TOPICS COVERED IN THIS CHAPTER:
Understanding Partitions and Logical Volumes
Creating Partitions
Creating File Systems
Mounting File Systems Automatically through fstab
Working with Logical Volumes
Creating Swap Space
Working with Encrypted Volumes
c05.indd 121c05.indd 121 1/8/2013 10:44:18 AM1/8/2013 10:44:18 AM

In this chapter, you’ll learn how to confi gure storage on your server. In Chapter 1, you learned how to create partitions and logical volumes from the Red Hat installation program. In this
chapter, you’ll learn about the command-line tools that are available to confi gure storage on a server that already has been installed.
First you’ll read how to create partitions and logical volumes on your server, which allows you to create fi le systems on these volumes later. You’ll read about the way to con-fi gure /etc/fstab to mount these fi le systems automatically. Also, in the section about logi-cal volumes, you’ll learn how to grow and shrink logical volumes and how to work with snapshots.
At the end of this chapter, you’ll read about some advanced techniques that relate to working with storage. First, you’ll learn how to set up automount, which helps you make storage available automatically when a user needs access to storage. Finally, you’ll read how to set up encrypted volumes on your server. This helps you achieve a higher level of protec-tion to prevent unauthorized access of fi les on your server.
Understanding Partitions and Logical VolumesIn Chapter 1, “Getting Started with Red Hat Enterprise Linux,” you learned about parti-tions and logical volumes. You know that partitions offer a rather static way to confi gure storage on a server, whereas logical volumes offer a much more dynamic way to confi gure storage. However, all Red Hat servers have at least one partition that is used to boot the server, because the boot loader GRUB can’t read data from logical volumes.
If you need only basic storage features, you’ll use partitions on the storage devices. In all other cases, it is better to use logical volumes. The Logical Volume Manager (LVM) offers many benefi ts. The following are its most interesting features:
LVM makes resizing of volumes possible.
In LVM, you can work with snapshots, which are useful in making a reliable backup.
In LVM, you can easily replace failing storage devices.
As previously noted, sometimes you just need to confi gure access to storage where you know that the storage confi guration is never going to change. In that case, you can use par-titions instead of LVM. Using partitions has one major benefi t: it is much easier to create
c05.indd 122c05.indd 122 1/8/2013 10:44:20 AM1/8/2013 10:44:20 AM
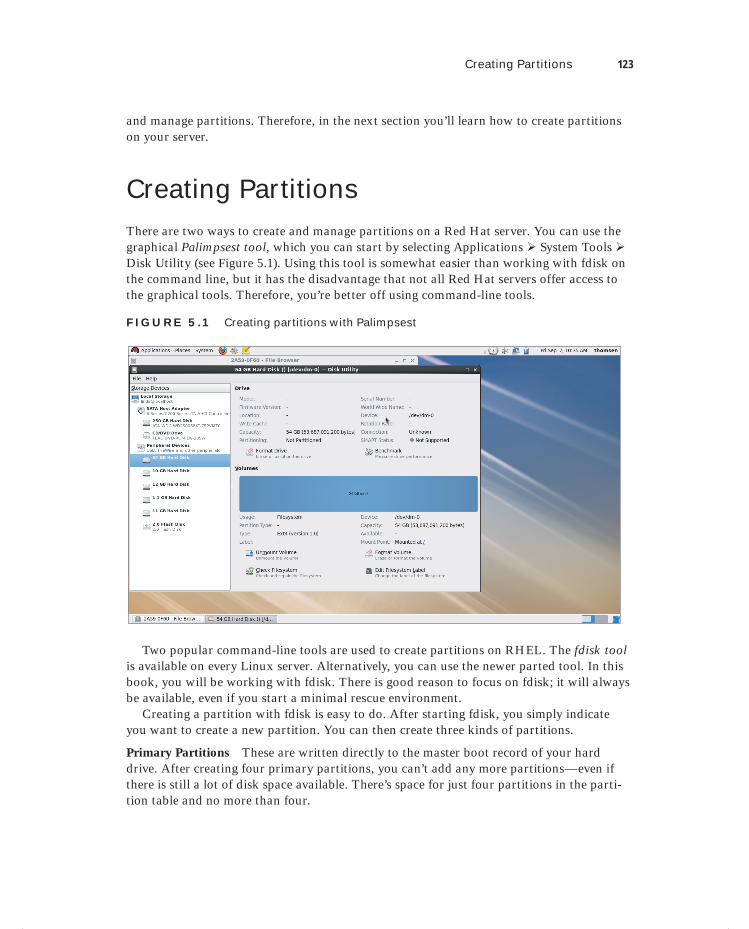
Creating Partitions 123
and manage partitions. Therefore, in the next section you’ll learn how to create partitions on your server.
Creating PartitionsThere are two ways to create and manage partitions on a Red Hat server. You can use the graphical Palimpsest tool, which you can start by selecting Applications System Tools Disk Utility (see Figure 5.1). Using this tool is somewhat easier than working with fdisk on the command line, but it has the disadvantage that not all Red Hat servers offer access to the graphical tools. Therefore, you’re better off using command-line tools.
F I GU R E 5 .1 Creating partitions with Palimpsest
Two popular command-line tools are used to create partitions on RHEL. The fdisk tool is available on every Linux server. Alternatively, you can use the newer parted tool. In this book, you will be working with fdisk. There is good reason to focus on fdisk; it will always be available, even if you start a minimal rescue environment.
Creating a partition with fdisk is easy to do. After starting fdisk, you simply indicate you want to create a new partition. You can then create three kinds of partitions.
Primary Partitions These are written directly to the master boot record of your hard drive. After creating four primary partitions, you can’t add any more partitions—even if there is still a lot of disk space available. There’s space for just four partitions in the parti-tion table and no more than four.
c05.indd 123c05.indd 123 1/8/2013 10:44:20 AM1/8/2013 10:44:20 AM
124 Chapter 5 Configuring and Managing Storage
Extended Partition Every hard drive can have one extended partition. You cannot create a fi le system in an extended partition. The only thing you can do with it is to create logical partitions. You’ll use an extended partition if you intend to use more than four partitions in total on a hard drive.
Logical Partitions A logical partition (not to be confused with a logical volume) is created inside an extended partition. You can have a maximum of 11 logical partitions per disk, and you can create fi le systems on top of logical partitions.
No matter what kind of partition you’re using, you can create a maximum of four partitions in the partition table. If you need more than four parti-tions, make sure to create one extended partition, which allows you to cre-ate 11 additional logical partitions.
After selecting between primary, extended, or logical partitions, you need to select a partition type. This is an indication to the operating system what the partition is to be used for. On RHEL servers, the following are the most common partition types:
83 This is the default partition type. It is used for any partition that is formatted with a Linux fi le system.
82 This type is used to indicate that the partition is used as swap space.
05 This partition type is used to indicate that it is an extended partition.
8e Use this partition type if you want to use the partition as an LVM physical volume.
Many additional partition types are available, but you’ll hardly ever use them.Once you’ve created the partition, you’ll write the changes to disk. Writing the new par-
tition table to disk doesn’t automatically mean your server can start using it right away. In many cases, you’ll get an error message indicating that the device on which you’ve created the partition is busy. If this happens, you’ll need to restart your server to activate the new partition. Exercise 5.1 shows how to create a partition.
E X E R C I S E 5 .1
Creating Partitions
In this exercise, you’ll create three partitions: a primary partition, an extended partition, and, within the latter, one logical partition. You can perform this exercise on the remaining free space on your hard drive. If you followed the procedures described in Chapter 1, you should have free and unallocated disk space. However, it is better to perform this proce-dure on an external storage device, such as a USB fl ash drive. Any 1GB or greater USB fl ash drive allows you to perform this procedure.
In this exercise, I’ll describe how to work with an external medium, which is known to this server as /dev/sdb. You will learn how to recognize the device so that you do not mess up your current installation of Red Hat Enterprise Linux.
c05.indd 124c05.indd 124 1/8/2013 10:44:21 AM1/8/2013 10:44:21 AM

Creating Partitions 125
E X E R C I S E 5 .1 ( c ont inue d )
1. Insert the USB fl ash drive that you want to use with your server. If a window opens showing you the contents of the USB fl ash drive, close it.
2. Open a root shell, and type the command dmesg. You should see messages indicating that a new device has been found, and you should also see the device name of the USB fl ash drive. Listing 5.1 shows what these messages look like. In this listing, you can see that the name of this device is sdb.
Listing 5.1: Verifying the device name with dmesg
VFS: busy inodes on changed media or resized disk sdb
VFS: busy inodes on changed media or resized disk sdb
usb 2-1.4: new high speed USB device using ehci_hcd and address 4
usb 2-1.4: New USB device found, idVendor=0951, idProduct=1603
usb 2-1.4: New USB device strings: Mfr=1, Product=2, SerialNumber=3
usb 2-1.4: Product: DataTraveler 2.0
usb 2-1.4: Manufacturer: Kingston
usb 2-1.4: SerialNumber: 899000000000000000000185
usb 2-1.4: configuration #1 chosen from 1 choice
scsi7 : SCSI emulation for USB Mass Storage devices
usb-storage: device found at 4
usb-storage: waiting for device to settle before scanning
usb-storage: device scan complete
scsi 7:0:0:0: Direct-Access Kingston DataTraveler 2.0 1.00 PQ: 0 ANSI: 2
sd 7:0:0:0: Attached scsi generic sg2 type 0
sd 7:0:0:0: [sdb] 2007040 512-byte logical blocks: (1.02 GB/980 MiB)
sd 7:0:0:0: [sdb] Write Protect is off
sd 7:0:0:0: [sdb] Mode Sense: 23 00 00 00
sd 7:0:0:0: [sdb] Assuming drive cache: write through
sd 7:0:0:0: [sdb] Assuming drive cache: write through
sdb: unknown partition table
sd 7:0:0:0: [sdb] Assuming drive cache: write through
sd 7:0:0:0: [sdb] Attached SCSI removable disk
[root@hnl ~]#
3. Now that you have found the name of the USB fl ash drive, use the following com-mand to wipe out its contents completely: dd if=/dev/zero of=/dev/sdb.
The dd if=/dev/zero of=/dev/sdb command assumes that the USB flash drive with which you are working has the device name /dev/sdb. Make sure you are working with the right device before executing this command! If you are not sure, do not continue; you risk wiping all data on your com-puter if it is the wrong device. There is no way to recover your data after overwriting it with dd!
c05.indd 125c05.indd 125 1/8/2013 10:44:22 AM1/8/2013 10:44:22 AM
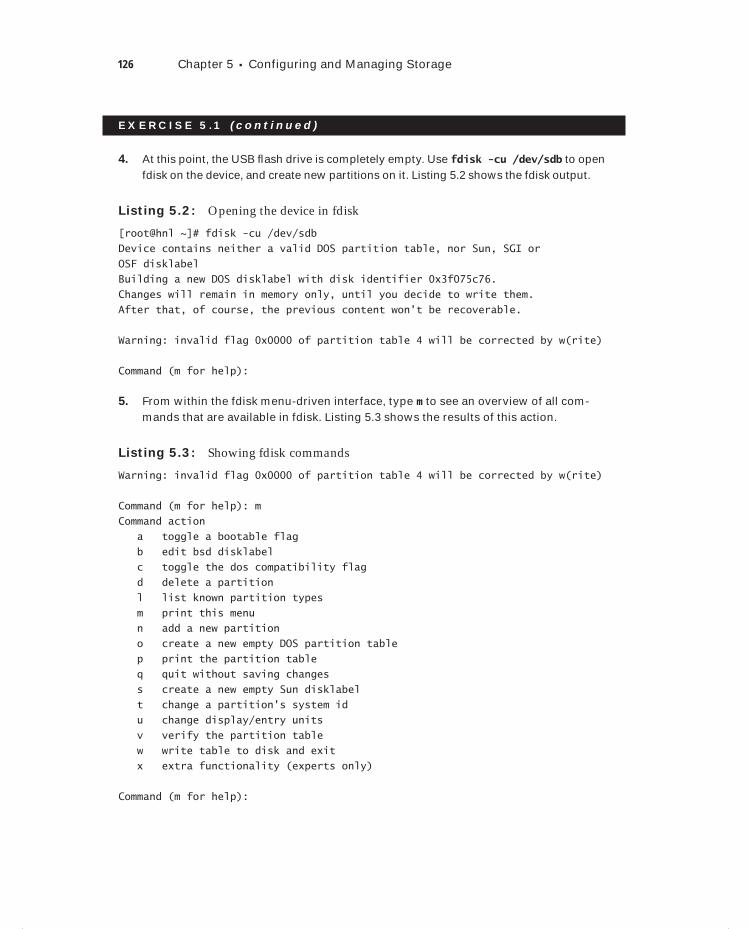
126 Chapter 5 Configuring and Managing Storage
E X E R C I S E 5 .1 ( c ont inue d )
4. At this point, the USB fl ash drive is completely empty. Use fdisk -cu /dev/sdb to open fdisk on the device, and create new partitions on it. Listing 5.2 shows the fdisk output.
Listing 5.2: Opening the device in fdisk
[root@hnl ~]# fdisk -cu /dev/sdb
Device contains neither a valid DOS partition table, nor Sun, SGI or
OSF disklabel
Building a new DOS disklabel with disk identifier 0x3f075c76.
Changes will remain in memory only, until you decide to write them.
After that, of course, the previous content won't be recoverable.
Warning: invalid flag 0x0000 of partition table 4 will be corrected by w(rite)
Command (m for help):
5. From within the fdisk menu-driven interface, type m to see an overview of all com-mands that are available in fdisk. Listing 5.3 shows the results of this action.
Listing 5.3: Showing fdisk commands
Warning: invalid flag 0x0000 of partition table 4 will be corrected by w(rite)
Command (m for help): m
Command action
a toggle a bootable flag
b edit bsd disklabel
c toggle the dos compatibility flag
d delete a partition
l list known partition types
m print this menu
n add a new partition
o create a new empty DOS partition table
p print the partition table
q quit without saving changes
s create a new empty Sun disklabel
t change a partition's system id
u change display/entry units
v verify the partition table
w write table to disk and exit
x extra functionality (experts only)
Command (m for help):
c05.indd 126c05.indd 126 1/8/2013 10:44:22 AM1/8/2013 10:44:22 AM
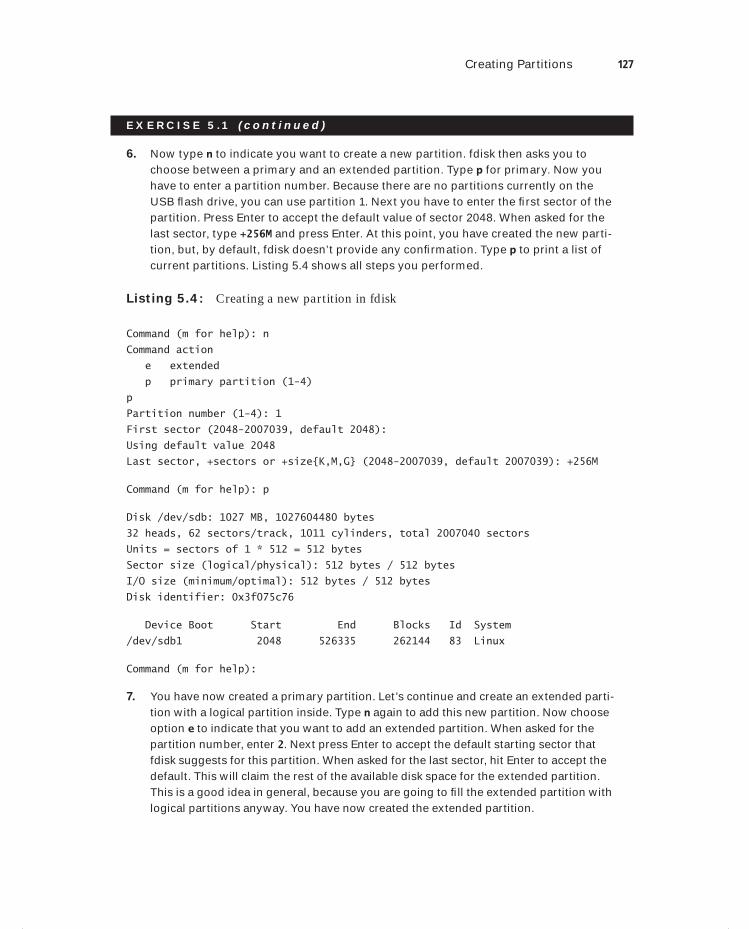
Creating Partitions 127
E X E R C I S E 5 .1 ( c ont inue d )
6. Now type n to indicate you want to create a new partition. fdisk then asks you to choose between a primary and an extended partition. Type p for primary. Now you have to enter a partition number. Because there are no partitions currently on the USB fl ash drive, you can use partition 1. Next you have to enter the fi rst sector of the partition. Press Enter to accept the default value of sector 2048. When asked for the last sector, type +256M and press Enter. At this point, you have created the new parti-tion, but, by default, fdisk doesn’t provide any confi rmation. Type p to print a list of current partitions. Listing 5.4 shows all steps you performed.
Listing 5.4: Creating a new partition in fdisk
Command (m for help): n
Command action
e extended
p primary partition (1-4)
p
Partition number (1-4): 1
First sector (2048-2007039, default 2048):
Using default value 2048
Last sector, +sectors or +size{K,M,G} (2048-2007039, default 2007039): +256M
Command (m for help): p
Disk /dev/sdb: 1027 MB, 1027604480 bytes
32 heads, 62 sectors/track, 1011 cylinders, total 2007040 sectors
Units = sectors of 1 * 512 = 512 bytes
Sector size (logical/physical): 512 bytes / 512 bytes
I/O size (minimum/optimal): 512 bytes / 512 bytes
Disk identifier: 0x3f075c76
Device Boot Start End Blocks Id System
/dev/sdb1 2048 526335 262144 83 Linux
Command (m for help):
7. You have now created a primary partition. Let’s continue and create an extended parti-tion with a logical partition inside. Type n again to add this new partition. Now choose option e to indicate that you want to add an extended partition. When asked for the partition number, enter 2. Next press Enter to accept the default starting sector that fdisk suggests for this partition. When asked for the last sector, hit Enter to accept the default. This will claim the rest of the available disk space for the extended partition. This is a good idea in general, because you are going to fi ll the extended partition with logical partitions anyway. You have now created the extended partition.
c05.indd 127c05.indd 127 1/8/2013 10:44:22 AM1/8/2013 10:44:22 AM
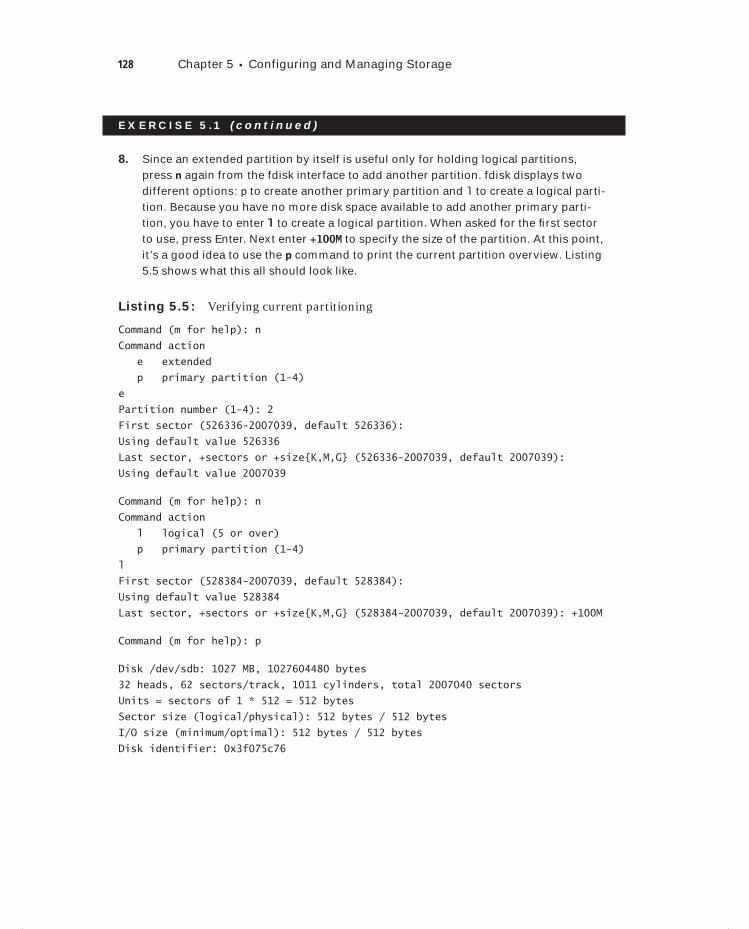
128 Chapter 5 Configuring and Managing Storage
E X E R C I S E 5 .1 ( c ont inue d )
8. Since an extended partition by itself is useful only for holding logical partitions, press n again from the fdisk interface to add another partition. fdisk displays two different options: p to create another primary partition and l to create a logical parti-tion. Because you have no more disk space available to add another primary parti-tion, you have to enter l to create a logical partition. When asked for the fi rst sector to use, press Enter. Next enter +100M to specify the size of the partition. At this point, it’s a good idea to use the p command to print the current partition overview. Listing 5.5 shows what this all should look like.
Listing 5.5: Verifying current partitioning
Command (m for help): n
Command action
e extended
p primary partition (1-4)
e
Partition number (1-4): 2
First sector (526336-2007039, default 526336):
Using default value 526336
Last sector, +sectors or +size{K,M,G} (526336-2007039, default 2007039):
Using default value 2007039
Command (m for help): n
Command action
l logical (5 or over)
p primary partition (1-4)
l
First sector (528384-2007039, default 528384):
Using default value 528384
Last sector, +sectors or +size{K,M,G} (528384-2007039, default 2007039): +100M
Command (m for help): p
Disk /dev/sdb: 1027 MB, 1027604480 bytes
32 heads, 62 sectors/track, 1011 cylinders, total 2007040 sectors
Units = sectors of 1 * 512 = 512 bytes
Sector size (logical/physical): 512 bytes / 512 bytes
I/O size (minimum/optimal): 512 bytes / 512 bytes
Disk identifier: 0x3f075c76
c05.indd 128c05.indd 128 1/8/2013 10:44:22 AM1/8/2013 10:44:22 AM
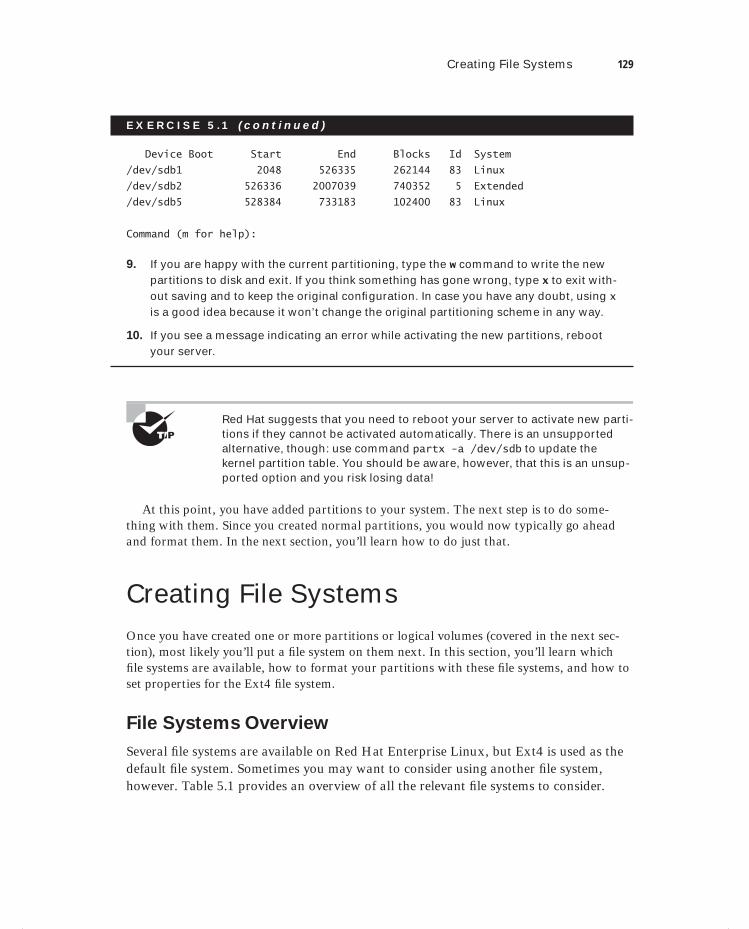
Creating File Systems 129
E X E R C I S E 5 .1 ( c ont inue d )
Device Boot Start End Blocks Id System
/dev/sdb1 2048 526335 262144 83 Linux
/dev/sdb2 526336 2007039 740352 5 Extended
/dev/sdb5 528384 733183 102400 83 Linux
Command (m for help):
9. If you are happy with the current partitioning, type the w command to write the new partitions to disk and exit. If you think something has gone wrong, type x to exit with-out saving and to keep the original confi guration. In case you have any doubt, using xis a good idea because it won’t change the original partitioning scheme in any way.
10. If you see a message indicating an error while activating the new partitions, reboot your server.
Red Hat suggests that you need to reboot your server to activate new parti-tions if they cannot be activated automatically. There is an unsupported alternative, though: use command partx -a /dev/sdb to update the kernel partition table. You should be aware, however, that this is an unsup-ported option and you risk losing data!
At this point, you have added partitions to your system. The next step is to do some-thing with them. Since you created normal partitions, you would now typically go ahead and format them. In the next section, you’ll learn how to do just that.
Creating File SystemsOnce you have created one or more partitions or logical volumes (covered in the next sec-tion), most likely you’ll put a fi le system on them next. In this section, you’ll learn which fi le systems are available, how to format your partitions with these fi le systems, and how to set properties for the Ext4 fi le system.
File Systems Overview
Several fi le systems are available on Red Hat Enterprise Linux, but Ext4 is used as the default fi le system. Sometimes you may want to consider using another fi le system, however. Table 5.1 provides an overview of all the relevant fi le systems to consider.
c05.indd 129c05.indd 129 1/8/2013 10:44:23 AM1/8/2013 10:44:23 AM

130 Chapter 5 Configuring and Managing Storage
TA B LE 5 .1 File system overview
File system Use
Ext4 The default file system on RHEL. Use it if you’re not sure which file system to use, because it’s an excellent general-purpose file system.
Ext2/3 The predecessors of the Ext4 file system. Since Ext4 is much better, there is really no good reason to use Ext2 or Ext3, with one exception: Ext2 doesn’t use a file system journal, and therefore it is a good choice for very small par-titions (less than 100MB).
XFS XFS must be purchased separately. It offers good performance for very large file systems and very large files. Ext4 has improved a lot recently, however, and therefore you should conduct proper performance tests to see whether you really need XFS.
Btrfs Btrfs is the next generation of Linux file systems. It is organized in a com-pletely different manner. An important difference is that it is based on a B-tree database, which makes the file system faster. It also has cool features like Copy on Write, which makes it very easy to revert to a previous version of a file. Apart from that, there are many more features that make Btrfs a versa-tile file system that is easy to grow and shrink. In RHEL 6.2 and newer, Btrfs is available as a tech preview version only, which means that it is not supported and not yet ready for production.
VFAT and MS-DOS
Sometimes it’s useful to put files on a USB drive to exchange them among Windows users. This is the purpose of the VFAT and MS-DOS file systems. There is no need whatsoever to format partitions on your server with one of these file systems.
GFS GFS is Red Hat’s Global File System. It is designed for use in high availability clusters where multiple nodes need to be able to write to the same file sys-tem simultaneously.
As you can see, Red Hat offers several fi le systems so that you can use the one that is most appropriate for your environment. However, Ext4 is a good choice for almost any situation. For that reason, I will cover the use and confi guration of the Ext4 fi le system exclusively in this book.
Before starting to format partitions and putting fi le systems on them, there is one fi le system feature of which you need to be aware—the fi le system journal. Modern Linux fi le systems offer journaling as a standard feature. The journal works as a transaction log in which the fi le system keeps records of fi les that are open for modifi cation at any given time. The benefi t of using a fi le system journal is that, if the server crashes, it can check to see what fi les were open at the time of the crash and immediately indicate which fi les are potentially damaged. Because using a journal helps protect your server, you would nor-mally want to use it by default. There is one drawback to using a journal, however: a fi le
c05.indd 130c05.indd 130 1/8/2013 10:44:23 AM1/8/2013 10:44:23 AM
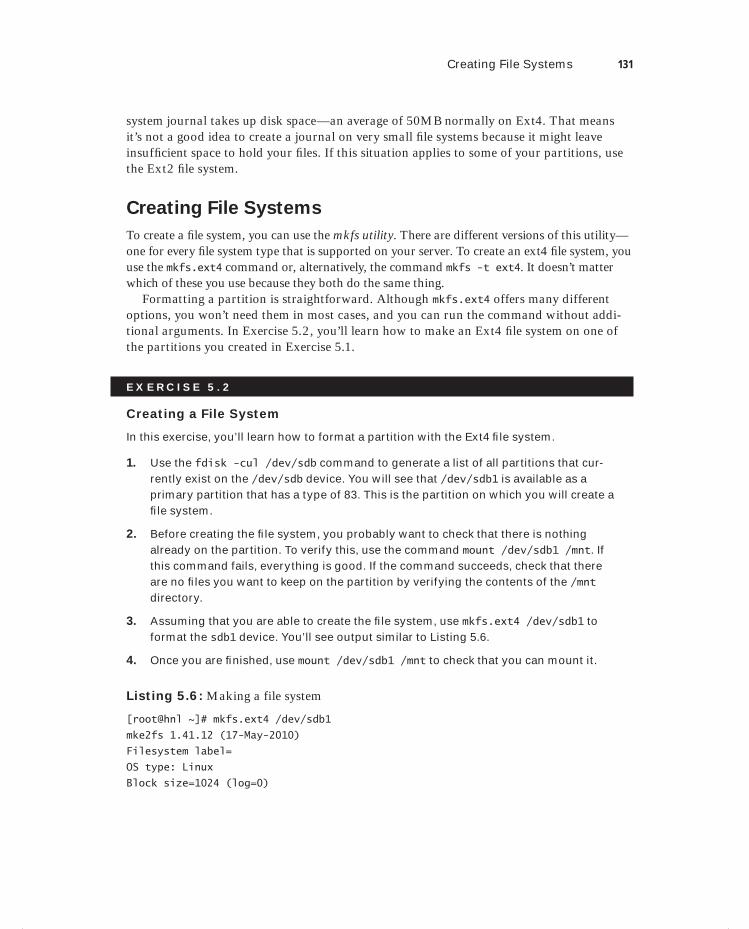
Creating File Systems 131
system journal takes up disk space—an average of 50MB normally on Ext4. That means it’s not a good idea to create a journal on very small fi le systems because it might leave insuffi cient space to hold your fi les. If this situation applies to some of your partitions, use the Ext2 fi le system.
Creating File Systems
To create a fi le system, you can use the mkfs utility. There are different versions of this utility—one for every fi le system type that is supported on your server. To create an ext4 fi le system, you use the mkfs.ext4 command or, alternatively, the command mkfs -t ext4. It doesn’t matter which of these you use because they both do the same thing.
Formatting a partition is straightforward. Although mkfs.ext4 offers many different options, you won’t need them in most cases, and you can run the command without addi-tional arguments. In Exercise 5.2, you’ll learn how to make an Ext4 fi le system on one of the partitions you created in Exercise 5.1.
E X E R C I S E 5 . 2
Creating a File System
In this exercise, you’ll learn how to format a partition with the Ext4 fi le system.
1. Use the fdisk -cul /dev/sdb command to generate a list of all partitions that cur-rently exist on the /dev/sdb device. You will see that /dev/sdb1 is available as a primary partition that has a type of 83. This is the partition on which you will create a fi le system.
2. Before creating the fi le system, you probably want to check that there is nothing already on the partition. To verify this, use the command mount /dev/sdb1 /mnt. If this command fails, everything is good. If the command succeeds, check that there are no fi les you want to keep on the partition by verifying the contents of the /mnt directory.
3. Assuming that you are able to create the fi le system, use mkfs.ext4 /dev/sdb1 to format the sdb1 device. You’ll see output similar to Listing 5.6.
4. Once you are fi nished, use mount /dev/sdb1 /mnt to check that you can mount it.
Listing 5.6: Making a file system
[root@hnl ~]# mkfs.ext4 /dev/sdb1
mke2fs 1.41.12 (17-May-2010)
Filesystem label=
OS type: Linux
Block size=1024 (log=0)
c05.indd 131c05.indd 131 1/8/2013 10:44:23 AM1/8/2013 10:44:23 AM
132 Chapter 5 Configuring and Managing Storage
E X E R C I S E 5 . 2 ( c ont inue d )
Fragment size=1024 (log=0)
Stride=0 blocks, Stripe width=0 blocks
65536 inodes, 262144 blocks
13107 blocks (5.00%) reserved for the super user
First data block=1
Maximum filesystem blocks=67371008
32 block groups
8192 blocks per group, 8192 fragments per group
2048 inodes per group
Superblock backups stored on blocks:
8193, 24577, 40961, 57345, 73729, 204801, 221185
Writing inode tables: done
Creating journal (8192 blocks): done
Writing superblocks and filesystem accounting information: done
This filesystem will be automatically checked every 27 mounts or
180 days, whichever comes first. Use tune2fs -c or -i to override.
Changing File System Properties
In most cases, you won’t need to change any of the properties of your fi le systems. In some cases, however, it can be useful to change them anyway. The tune2fs command allows you to change properties, and with dumpe2fs, you can check the properties that are currently in use. Table 5.2 lists the most useful properties. You’ll also see the tune2fs option to set the property in the list.
TA B LE 5 . 2 Ext file system properties
Property Use
-c max_mounts_count Occasionally, an Ext file system must be checked. One way to force a periodic check is by setting the maximum mount count. Don’t set it too low, because you’ll have to wait a while for the file system check to finish. On large SAN disks, it’s a good idea to disable the automated check com-pletely to prevent unexpected checks after an emergency reboot.
c05.indd 132c05.indd 132 1/8/2013 10:44:23 AM1/8/2013 10:44:23 AM
Dow
nlo
ad fro
m W
ow
! eBook
<w
ww
.wow
ebook.
com
>
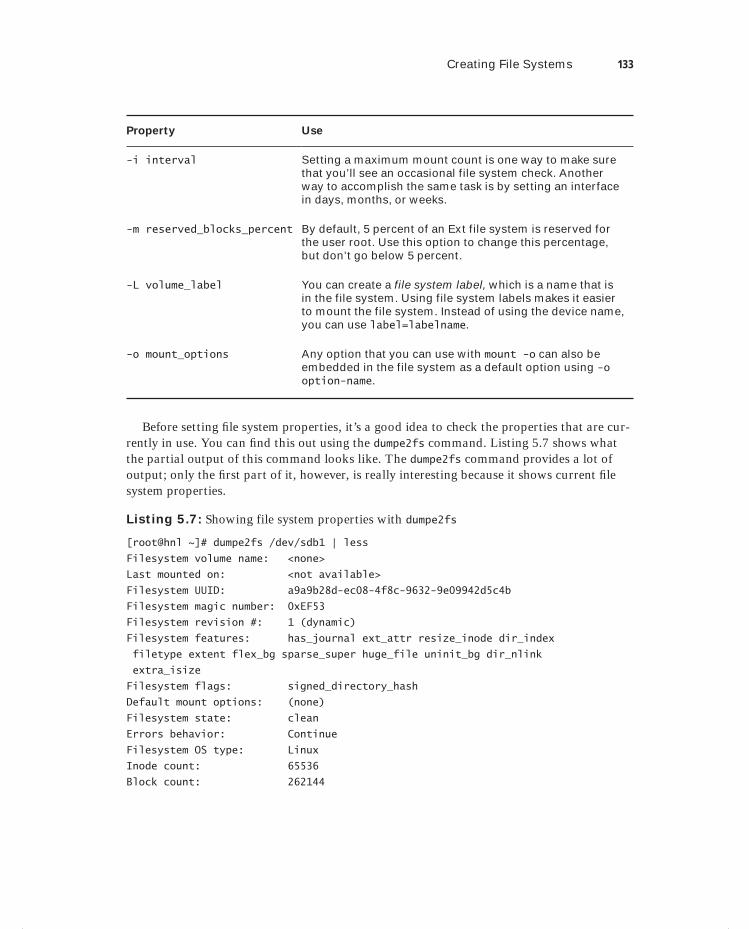
Creating File Systems 133
Property Use
-i interval Setting a maximum mount count is one way to make sure that you’ll see an occasional file system check. Another way to accomplish the same task is by setting an interface in days, months, or weeks.
-m reserved_blocks_percent By default, 5 percent of an Ext file system is reserved for the user root. Use this option to change this percentage, but don’t go below 5 percent.
-L volume_label You can create a file system label, which is a name that is in the file system. Using file system labels makes it easier to mount the file system. Instead of using the device name, you can use label=labelname.
-o mount_options Any option that you can use with mount -o can also be embedded in the file system as a default option using -o option-name.
Before setting fi le system properties, it’s a good idea to check the properties that are cur-rently in use. You can fi nd this out using the dumpe2fs command. Listing 5.7 shows what the partial output of this command looks like. The dumpe2fs command provides a lot of output; only the fi rst part of it, however, is really interesting because it shows current fi le system properties.
Listing 5.7: Showing file system properties with dumpe2fs
[root@hnl ~]# dumpe2fs /dev/sdb1 | less
Filesystem volume name: <none>
Last mounted on: <not available>
Filesystem UUID: a9a9b28d-ec08-4f8c-9632-9e09942d5c4b
Filesystem magic number: 0xEF53
Filesystem revision #: 1 (dynamic)
Filesystem features: has_journal ext_attr resize_inode dir_index
filetype extent flex_bg sparse_super huge_file uninit_bg dir_nlink
extra_isize
Filesystem flags: signed_directory_hash
Default mount options: (none)
Filesystem state: clean
Errors behavior: Continue
Filesystem OS type: Linux
Inode count: 65536
Block count: 262144
c05.indd 133c05.indd 133 1/8/2013 10:44:24 AM1/8/2013 10:44:24 AM
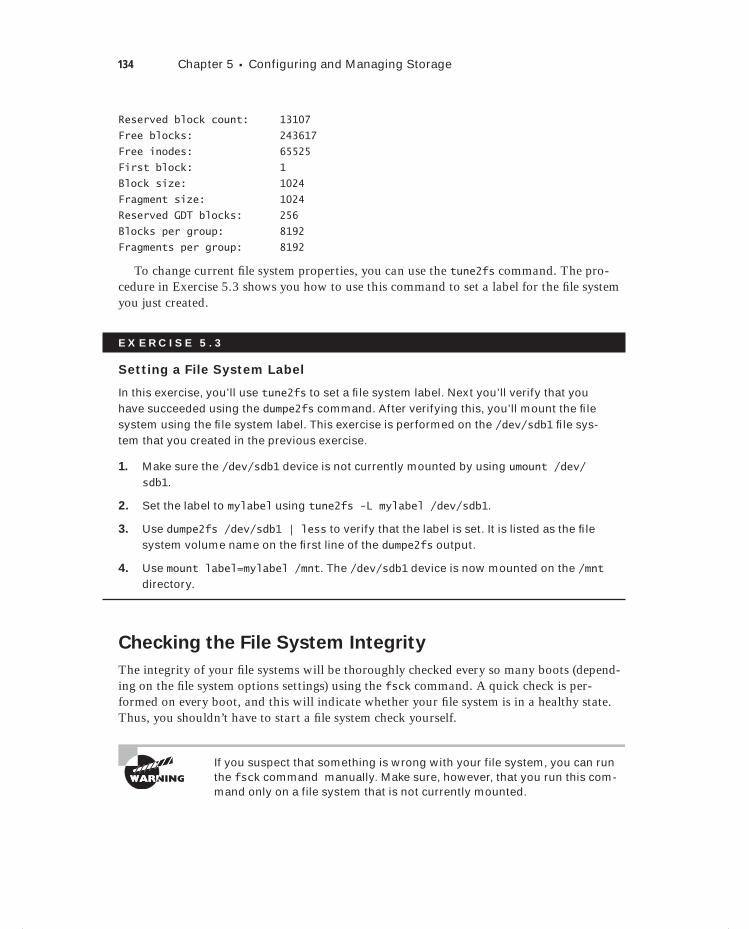
134 Chapter 5 Configuring and Managing Storage
Reserved block count: 13107
Free blocks: 243617
Free inodes: 65525
First block: 1
Block size: 1024
Fragment size: 1024
Reserved GDT blocks: 256
Blocks per group: 8192
Fragments per group: 8192
To change current fi le system properties, you can use the tune2fs command. The pro-cedure in Exercise 5.3 shows you how to use this command to set a label for the fi le system you just created.
E X E R C I S E 5 . 3
Setting a File System Label
In this exercise, you’ll use tune2fs to set a fi le system label. Next you’ll verify that you have succeeded using the dumpe2fs command. After verifying this, you’ll mount the fi le system using the fi le system label. This exercise is performed on the /dev/sdb1 fi le sys-tem that you created in the previous exercise.
1. Make sure the /dev/sdb1 device is not currently mounted by using umount /dev/sdb1.
2. Set the label to mylabel using tune2fs -L mylabel /dev/sdb1.
3. Use dumpe2fs /dev/sdb1 | less to verify that the label is set. It is listed as the fi le system volume name on the fi rst line of the dumpe2fs output.
4. Use mount label=mylabel /mnt. The /dev/sdb1 device is now mounted on the /mnt directory.
Checking the File System Integrity
The integrity of your fi le systems will be thoroughly checked every so many boots (depend-ing on the fi le system options settings) using the fsck command. A quick check is per-formed on every boot, and this will indicate whether your fi le system is in a healthy state. Thus, you shouldn’t have to start a fi le system check yourself.
If you suspect that something is wrong with your file system, you can run the fsck command manually. Make sure, however, that you run this com-mand only on a file system that is not currently mounted.
c05.indd 134c05.indd 134 1/8/2013 10:44:24 AM1/8/2013 10:44:24 AM
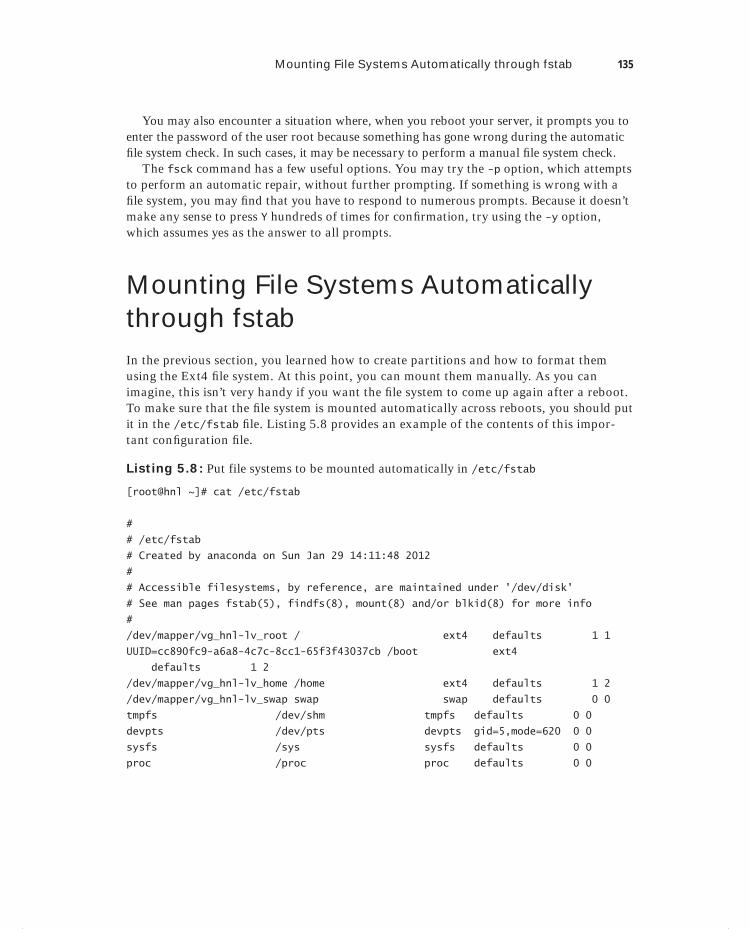
Mounting File Systems Automatically through fstab 135
You may also encounter a situation where, when you reboot your server, it prompts you to enter the password of the user root because something has gone wrong during the automatic fi le system check. In such cases, it may be necessary to perform a manual fi le system check.
The fsck command has a few useful options. You may try the -p option, which attempts to perform an automatic repair, without further prompting. If something is wrong with a fi le system, you may fi nd that you have to respond to numerous prompts. Because it doesn’t make any sense to press Y hundreds of times for confi rmation, try using the -y option, which assumes yes as the answer to all prompts.
Mounting File Systems Automatically through fstabIn the previous section, you learned how to create partitions and how to format them using the Ext4 fi le system. At this point, you can mount them manually. As you can imagine, this isn’t very handy if you want the fi le system to come up again after a reboot. To make sure that the fi le system is mounted automatically across reboots, you should put it in the /etc/fstab fi le. Listing 5.8 provides an example of the contents of this impor-tant confi guration fi le.
Listing 5.8: Put file systems to be mounted automatically in /etc/fstab
[root@hnl ~]# cat /etc/fstab
#
# /etc/fstab
# Created by anaconda on Sun Jan 29 14:11:48 2012
#
# Accessible filesystems, by reference, are maintained under '/dev/disk'
# See man pages fstab(5), findfs(8), mount(8) and/or blkid(8) for more info
#
/dev/mapper/vg_hnl-lv_root / ext4 defaults 1 1
UUID=cc890fc9-a6a8-4c7c-8cc1-65f3f43037cb /boot ext4
defaults 1 2
/dev/mapper/vg_hnl-lv_home /home ext4 defaults 1 2
/dev/mapper/vg_hnl-lv_swap swap swap defaults 0 0
tmpfs /dev/shm tmpfs defaults 0 0
devpts /dev/pts devpts gid=5,mode=620 0 0
sysfs /sys sysfs defaults 0 0
proc /proc proc defaults 0 0
c05.indd 135c05.indd 135 1/8/2013 10:44:24 AM1/8/2013 10:44:24 AM

136 Chapter 5 Configuring and Managing Storage
The /etc/fstab fi le is used to mount two different kinds of devices: you can mount fi le systems and system devices. In Listing 5.8, the fi rst four lines are used to mount fi le sys-tems, and the last four lines are used to mount specifi c system devices.
To specify how the mounts should be performed, six different columns are used:
The name of the device to be mounted.
The directory where this device should be mounted.
The file system that should be used to mount the device.
Specific mount options: use defaults if you want to perform the mount without any specific options.
Dump support: use 1 if you want the dump backup utility to be able to make a backup of this device, and use 0 if you don’t. It’s good practice to enable dump support for all real file systems.
fsck support: use 0 if you never want this file system to be checked automatically while booting. Use 1 for the root file system. This ensures that it will be checked before any-thing else takes place. Use 2 for all other file systems.
When creating the /etc/fstab fi le, you need to refer to the device you want to mount. There are several different ways of doing that. The easiest way is to use the device name, like /dev/sdb1, to indicate you want to mount the fi rst partition on the second disk. The disadvantage of this approach is that the names of these devices depend on the order in which they were detected while booting, and this order can change. Some servers detect external USB hard drives before detecting internal devices that are connected to the SCSI bus. This means you might normally address the internal hard drive as /dev/sda. However, if someone forgets to remove an external USB drive while booting, the internal drive might be known as /dev/sdb after a reboot.
To avoid issues with the device names, Red Hat Enterprise Linux partitions are normally mounted by using the UUID that is assigned to every partition. To fi nd out the UUIDs of the devices on your server, you can use the blkid command. Listing 5.9 shows the result of this command.
Listing 5.9: Finding block IDs with blkid
[root@hnl ~]# blkid
/dev/sda1: UUID="cc890fc9-a6a8-4c7c-8cc1-65f3f43037cb" TYPE="ext4"
/dev/sda2: UUID="VDaoOy-ckKR-lU6f-6t0n-qzQr-vdxJ-c5HOv1" TYPE="LVM2_member"
/dev/mapper/vg_hnl-lv_root: UUID="961998c5-4aa9-4e8a-90b5-47a982041130"
TYPE="ext4"
/dev/mapper/vg_hnl-lv_swap: UUID="5d47bfca-654e-4a59-9c4f-a5b0a8f5732d"
TYPE="swap"
c05.indd 136c05.indd 136 1/8/2013 10:44:24 AM1/8/2013 10:44:24 AM

Mounting File Systems Automatically through fstab 137
/dev/mapper/vg_hnl-lv_home: UUID="9574901d-4559-4f19-abce-b2bbe149f2a0"
TYPE="ext4"
/dev/sdb1: LABEL="mylabel" UUID="a9a9b28d-ec08-4f8c-9632-9e09942d5c4b"
TYPE="ext4"
In Listing 5.9, you can see the UUIDs of the partitions on this server as well as the LVM logical volumes, which are discussed in the next section. For mounting partitions, it is essential that you use the UUIDs, because the device names of partitions may change. For LVM logical volumes, it’s not important because the LVM names are detected automati-cally when your server boots.
Another method for addressing devices with a name that doesn’t change is to use the names in the /dev/disk directory. In this directory, you’ll fi nd four different subdirectories where the Linux kernel creates persistent names for devices. In SAN environments where iSCSI is used to connect to the SAN, the /dev/disk/by-path directory specifi cally provides useful names that make it easy to see the exact iSCSI identifi er of the device.
iSCSI is a method for connecting external partitions on a SAN to a server. This practice is very common in data center environments. You’ll learn more about this technique in Chapter 15, “Setting Up a Mail Server.”
Even though using persistent device names is useful for avoiding problems, you should eschew this method if you’re working on machines that you want to clone, such as virtual machines in a VMware ESXi environment. The disadvantage of persistent device names is that these names are bound to the specifi c hardware, which means you’ll get into trouble after restoring a cloned image to different hardware. Exercise 5.4 shows how to mount a device.
E X E R C I S E 5 . 4
Mounting Devices through /etc/fstab
In this exercise, you’ll learn how to create an entry in /etc/fstab to mount the fi le system that you created in Exercise 5.3. You will use the UUID of the device to make sure that it also works if you restart your machine using another external disk device that is con-nected to it.
1. Open a root shell, and use the blkid command to fi nd the UUID of the /dev/sdb1 device you created. If you’re in a graphical environment, copy the UUID to the clip-board.
2. Every device should be mounted on a dedicated directory. In this exercise, you’ll cre-ate a directory called/mounts/usb for this purpose. Use mkdir -p /mounts/usb to create this directory.
c05.indd 137c05.indd 137 1/8/2013 10:44:24 AM1/8/2013 10:44:24 AM
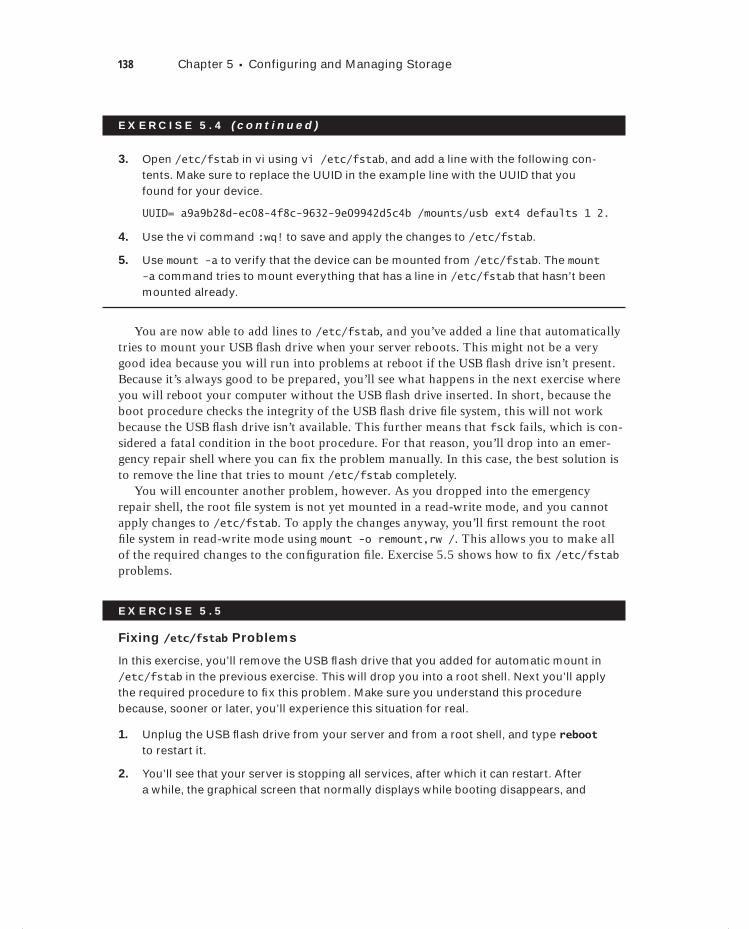
138 Chapter 5 Configuring and Managing Storage
E X E R C I S E 5 . 4 ( c ont inue d )
3. Open /etc/fstab in vi using vi /etc/fstab, and add a line with the following con-tents. Make sure to replace the UUID in the example line with the UUID that you found for your device.
UUID= a9a9b28d-ec08-4f8c-9632-9e09942d5c4b /mounts/usb ext4 defaults 1 2.
4. Use the vi command :wq! to save and apply the changes to /etc/fstab.
5. Use mount -a to verify that the device can be mounted from /etc/fstab. The mount -a command tries to mount everything that has a line in /etc/fstab that hasn’t been mounted already.
You are now able to add lines to /etc/fstab, and you’ve added a line that automatically tries to mount your USB fl ash drive when your server reboots. This might not be a very good idea because you will run into problems at reboot if the USB fl ash drive isn’t present. Because it’s always good to be prepared, you’ll see what happens in the next exercise where you will reboot your computer without the USB fl ash drive inserted. In short, because the boot procedure checks the integrity of the USB fl ash drive fi le system, this will not work because the USB fl ash drive isn’t available. This further means that fsck fails, which is con-sidered a fatal condition in the boot procedure. For that reason, you’ll drop into an emer-gency repair shell where you can fi x the problem manually. In this case, the best solution is to remove the line that tries to mount /etc/fstab completely.
You will encounter another problem, however. As you dropped into the emergency repair shell, the root fi le system is not yet mounted in a read-write mode, and you cannot apply changes to /etc/fstab. To apply the changes anyway, you’ll fi rst remount the root fi le system in read-write mode using mount -o remount,rw /. This allows you to make all of the required changes to the confi guration fi le. Exercise 5.5 shows how to fi x /etc/fstab problems.
E X E R C I S E 5 . 5
Fixing /etc/fstab Problems
In this exercise, you’ll remove the USB fl ash drive that you added for automatic mount in /etc/fstab in the previous exercise. This will drop you into a root shell. Next you’ll apply the required procedure to fi x this problem. Make sure you understand this procedure because, sooner or later, you’ll experience this situation for real.
1. Unplug the USB fl ash drive from your server and from a root shell, and type reboot to restart it.
2. You’ll see that your server is stopping all services, after which it can restart. After a while, the graphical screen that normally displays while booting disappears, and
c05.indd 138c05.indd 138 1/8/2013 10:44:25 AM1/8/2013 10:44:25 AM
Working with Logical Volumes 139
E X E R C I S E 5 . 5 ( c ont inue d )
you’ll see error messages. Read all of the messages on your computer below the line Checking filesystems. You’ll see a message that starts with fsck.ext4: Unable to resolve ‘UUID=... and ends with the text FAILED. On the last two lines, you’ll see the message Give root password for maintenance (or type Control-D to con-tinue).
3. Now enter the root password to open the Repair fi lesystem shell. Use the command touch /somefile, and you’ll see a message that the fi le cannot be touched: Read-only file system.
4. Mount the root fi le system in read-write mode using mount -o remount,rw /.
5. Use vi /etc/fstab to open the fstab fi le, and move your cursor to the line on which you try to mount the USB fi le system. Without switching to Input mode, use the vi dd command to delete this line. Once it has been deleted, use the vi :wq! command to save the modifi cations and quit vi.
6. Use the Ctrl+D key sequence to reboot your server. It should now boot without any problems.
Working with Logical VolumesIn the previous sections, you learned how to create partitions and then how to create fi le systems on them. You’ll now learn how to work with LVM logical volumes. First you’ll learn how to create them. Then you’ll read how to resize them and how to work with snap-shots. In the last subsection, you’ll learn how to remove a failing device using pvmove.
Creating Logical Volumes
To create logical volumes, you need to set up three different parts. The fi rst part is the physical volume (PV). The physical volume is the actual storage device you want to use in your LVM confi guration. This can be a LUN on the SAN, an entire disk, or a partition. If it is a partition, you’ll need to create it as one marked with the 8e partition type. After that, you can use pvcreate to create the physical volume. Using this command is easy: the only mandatory argument specifi es the name of the device you want to use, as in pvcreate /dev/sdb3.
The next step consists of setting up the volume group (VG). The volume group is the col-lection of all the storage devices you want to use in an LVM confi guration. You’ll see the total amount of storage in the volume group while you create the logical volumes in the next step. You’ll use the vgcreate command to create the volume group. For example, use vgcreate mygroup /dev/sdb3 to set up a volume group that uses /dev/sdb3 as its physical volume.
c05.indd 139c05.indd 139 1/8/2013 10:44:25 AM1/8/2013 10:44:25 AM
140 Chapter 5 Configuring and Managing Storage
The last step consists of creating the LVM volumes. To do this, you’ll need to use the lvcreate command. This command needs to know which volume group to use and what size to stipulate for the logical volume. To specify the size, you can use -L to specify the size in kilo, mega, giga, tera, exa, or petabytes. Alternatively, you can use -l to specify the size in extents. The extent is the basic building block of the LVM logical volume, and it typically has a size of 4MB. Another very handy way to specify the size of the volume is by using -l 100%FREE, which uses all available extents in the volume group. An example of the command lvcreate is lvcreate -n myvol -L 100M mygroup, which creates a 100MB volume in the group mygroup.
In Figure 5.2, you can see a schematic overview of the way LVM is organized.
F I GU R E 5 . 2 LVM schematic overview
logicalvolume
logical volume
volume group
/dev/sdb /dev/sdci ...
mkfs
pv pv pv
mkfs mkfs
logicalvolume
blockdevices
Exercise 5.6 shows how to create LVM logical volumes.
E X E R C I S E 5 . 6
Creating LVM Logical Volumes
In this exercise, you’ll learn how to create LVM logical volumes. First you’ll create a parti-tion of partition type 8e. Next you’ll use pvcreate to mark this partition as an LVM physi-cal volume. After doing that, you can use vgcreate to create the volume group. As the last step of the procedure, you’ll use lvcreate to set up the LVM logical volume. In this exercise, you’ll continue to work on the /dev/sdb device you worked with in previous exercises in this chapter.
1. From a root shell, type fdisk -cul /dev/sdb. This should show the current partitioning of /dev/sdb, as in the example shown in Listing 5.10. You should have available disk space in the extended partition that you can see because the last sector in the extended partition is far beyond the last sector of the logical partition /dev/sdb5.
c05.indd 140c05.indd 140 1/8/2013 10:44:26 AM1/8/2013 10:44:26 AM
Working with Logical Volumes 141
E X E R C I S E 5 . 6 ( c ont inue d )
Listing 5.10: Displaying current partitioning
[root@hnl ~]# fdisk -cul /dev/sdb
Disk /dev/sdb: 1027 MB, 1027604480 bytes
32 heads, 62 sectors/track, 1011 cylinders, total 2007040 sectors
Units = sectors of 1 * 512 = 512 bytes
Sector size (logical/physical): 512 bytes / 512 bytes
I/O size (minimum/optimal): 512 bytes / 512 bytes
Disk identifier: 0x3f075c76
Device Boot Start End Blocks Id System
/dev/sdb1 2048 526335 262144 83 Linux
/dev/sdb2 526336 2007039 740352 5 Extended
/dev/sdb5 528384 733183 102400 83 Linux
[root@hnl ~]#
2. Type fdisk -cu /dev/sdb to open the fdisk interface. Now type n to create a new partition, and choose l for a logical partition. Next press Enter to select the default starting sector for this partition, and then type +500M to make this a 500MB partition.
3. Before writing the changes to disk, type t to change the partition type. When asked for the partition number, enter 6. When asked for the partition type, enter 8e. Next type p to print the current partitioning. Then type w to write the changes to disk. If you get an error message, reboot your server to update the kernel with the changes. In Listing 5.11 below you can see the entire procedure of adding a logical partition with the LVM partition type.
Listing 5.11: Adding a logical partition with the LVM partition type
[root@hnl ~]# fdisk -cu /dev/sdb
Command (m for help): n
Command action
l logical (5 or over)
p primary partition (1-4)
l
First sector (735232-2007039, default 735232):
Using default value 735232
Last sector, +sectors or +size{K,M,G} (735232-2007039, default
2007039): +200M
Command (m for help): t
Partition number (1-6): 6
c05.indd 141c05.indd 141 1/8/2013 10:44:26 AM1/8/2013 10:44:26 AM

142 Chapter 5 Configuring and Managing Storage
E X E R C I S E 5 . 6 ( c ont inue d )
Hex code (type L to list codes): 8e
Changed system type of partition 6 to 8e (Linux LVM)
Command (m for help): p
Disk /dev/sdb: 1027 MB, 1027604480 bytes
32 heads, 62 sectors/track, 1011 cylinders, total 2007040 sectors
Units = sectors of 1 * 512 = 512 bytes
Sector size (logical/physical): 512 bytes / 512 bytes
I/O size (minimum/optimal): 512 bytes / 512 bytes
Disk identifier: 0x3f075c76
Device Boot Start End Blocks Id System
/dev/sdb1 2048 526335 262144 83 Linux
/dev/sdb2 526336 2007039 740352 5 Extended
/dev/sdb5 528384 733183 102400 83 Linux
/dev/sdb6 735232 1144831 204800 8e Linux LVM
Command (m for help): w
The partition table has been altered!
Calling ioctl() to re-read partition table.
Syncing disks.
3. Now that you have created a partition and marked it as partition type 8e, use pvcreate /dev/sdb to convert it into an LVM physical volume. You will now see a message that the physical volume has been created successfully.
4. To create a volume group with the name usbvg and to put the physical volume /dev/sdb6 in it, use the command vgcreate usbvg /dev/sdb6.
5. Now that you have created a volume group that contains the physical volume on /dev/sdb6, use lvcreate -n usbvol -L 100M usbvg. This creates a logical volume that uses 50 percent of available disk space in the volume group.
6. To confi rm that the logical volume has been created successfully, you can type the lvs command, which summarizes all currently existing logical volumes. Listing 5.12 shows the result of this command.
c05.indd 142c05.indd 142 1/8/2013 10:44:26 AM1/8/2013 10:44:26 AM
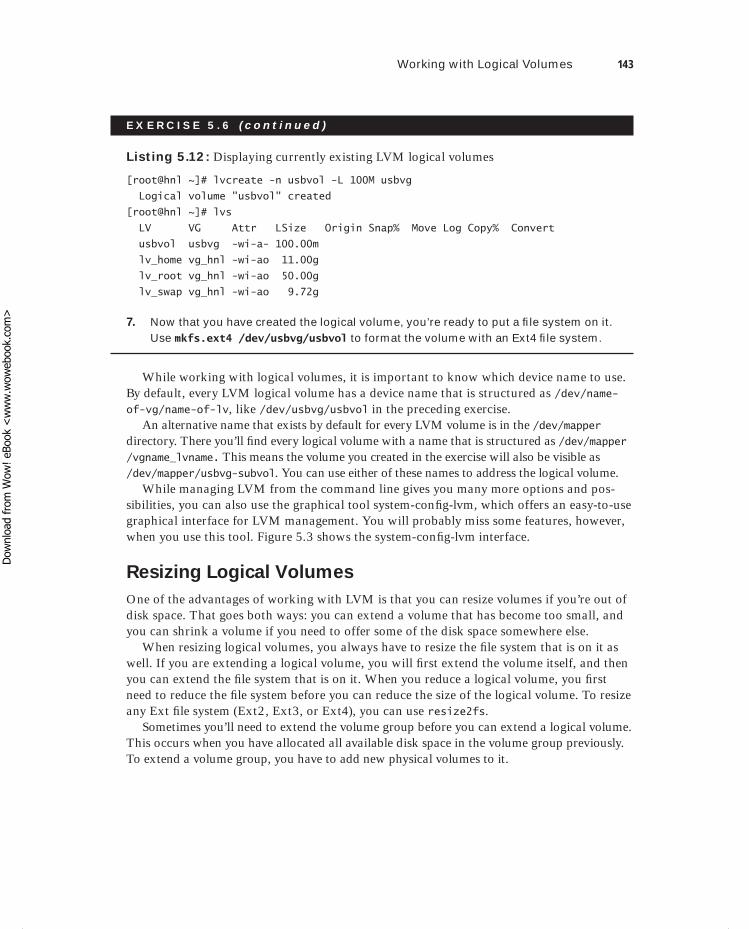
Working with Logical Volumes 143
E X E R C I S E 5 . 6 ( c ont inue d )
Listing 5.12: Displaying currently existing LVM logical volumes
[root@hnl ~]# lvcreate -n usbvol -L 100M usbvg
Logical volume "usbvol" created
[root@hnl ~]# lvs
LV VG Attr LSize Origin Snap% Move Log Copy% Convert
usbvol usbvg -wi-a- 100.00m
lv_home vg_hnl -wi-ao 11.00g
lv_root vg_hnl -wi-ao 50.00g
lv_swap vg_hnl -wi-ao 9.72g
7. Now that you have created the logical volume, you’re ready to put a fi le system on it. Use mkfs.ext4 /dev/usbvg/usbvol to format the volume with an Ext4 fi le system.
While working with logical volumes, it is important to know which device name to use. By default, every LVM logical volume has a device name that is structured as /dev/name-of-vg/name-of-lv, like /dev/usbvg/usbvol in the preceding exercise.
An alternative name that exists by default for every LVM volume is in the /dev/mapper directory. There you’ll fi nd every logical volume with a name that is structured as /dev/mapper/vgname_lvname. This means the volume you created in the exercise will also be visible as /dev/mapper/usbvg-subvol. You can use either of these names to address the logical volume.
While managing LVM from the command line gives you many more options and pos-sibilities, you can also use the graphical tool system-confi g-lvm, which offers an easy-to-use graphical interface for LVM management. You will probably miss some features, however, when you use this tool. Figure 5.3 shows the system-confi g-lvm interface.
Resizing Logical Volumes
One of the advantages of working with LVM is that you can resize volumes if you’re out of disk space. That goes both ways: you can extend a volume that has become too small, and you can shrink a volume if you need to offer some of the disk space somewhere else.
When resizing logical volumes, you always have to resize the fi le system that is on it as well. If you are extending a logical volume, you will fi rst extend the volume itself, and then you can extend the fi le system that is on it. When you reduce a logical volume, you fi rst need to reduce the fi le system before you can reduce the size of the logical volume. To resize any Ext fi le system (Ext2, Ext3, or Ext4), you can use resize2fs.
Sometimes you’ll need to extend the volume group before you can extend a logical volume. This occurs when you have allocated all available disk space in the volume group previously. To extend a volume group, you have to add new physical volumes to it.
c05.indd 143c05.indd 143 1/8/2013 10:44:27 AM1/8/2013 10:44:27 AM
Dow
nlo
ad fro
m W
ow
! eBook
<w
ww
.wow
ebook.
com
>
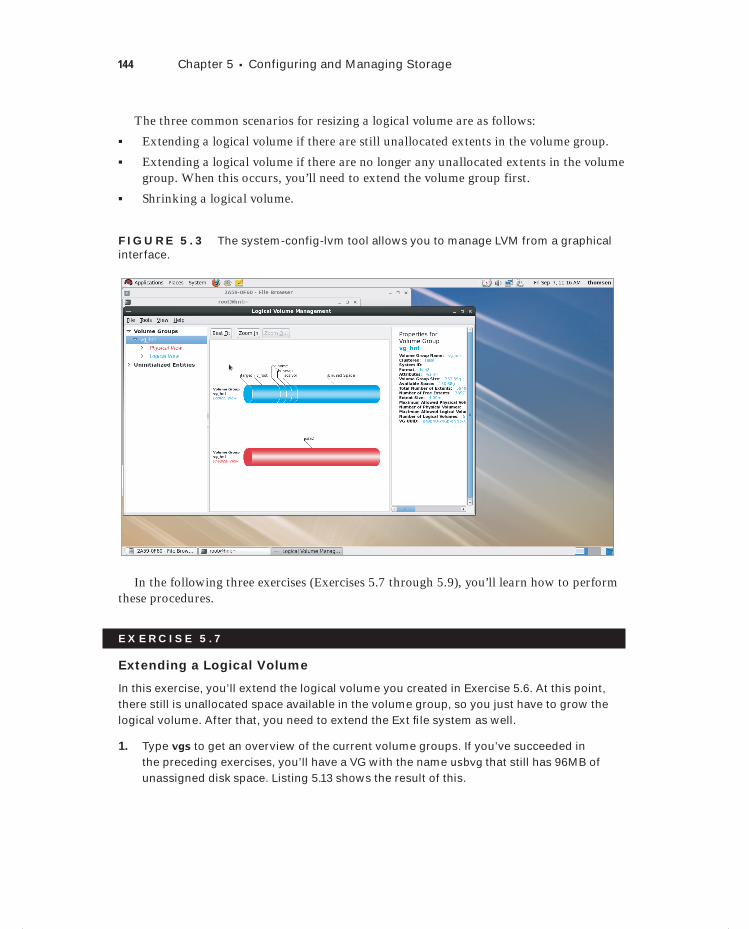
144 Chapter 5 Configuring and Managing Storage
The three common scenarios for resizing a logical volume are as follows:
Extending a logical volume if there are still unallocated extents in the volume group.
Extending a logical volume if there are no longer any unallocated extents in the volume group. When this occurs, you’ll need to extend the volume group first.
Shrinking a logical volume.
F I GU R E 5 . 3 The system-config-lvm tool allows you to manage LVM from a graphical interface.
In the following three exercises (Exercises 5.7 through 5.9), you’ll learn how to perform these procedures.
E X E R C I S E 5 . 7
Extending a Logical Volume
In this exercise, you’ll extend the logical volume you created in Exercise 5.6. At this point, there still is unallocated space available in the volume group, so you just have to grow the logical volume. After that, you need to extend the Ext fi le system as well.
1. Type vgs to get an overview of the current volume groups. If you’ve succeeded in the preceding exercises, you’ll have a VG with the name usbvg that still has 96MB of unassigned disk space. Listing 5.13 shows the result of this.
c05.indd 144c05.indd 144 1/8/2013 10:44:27 AM1/8/2013 10:44:27 AM
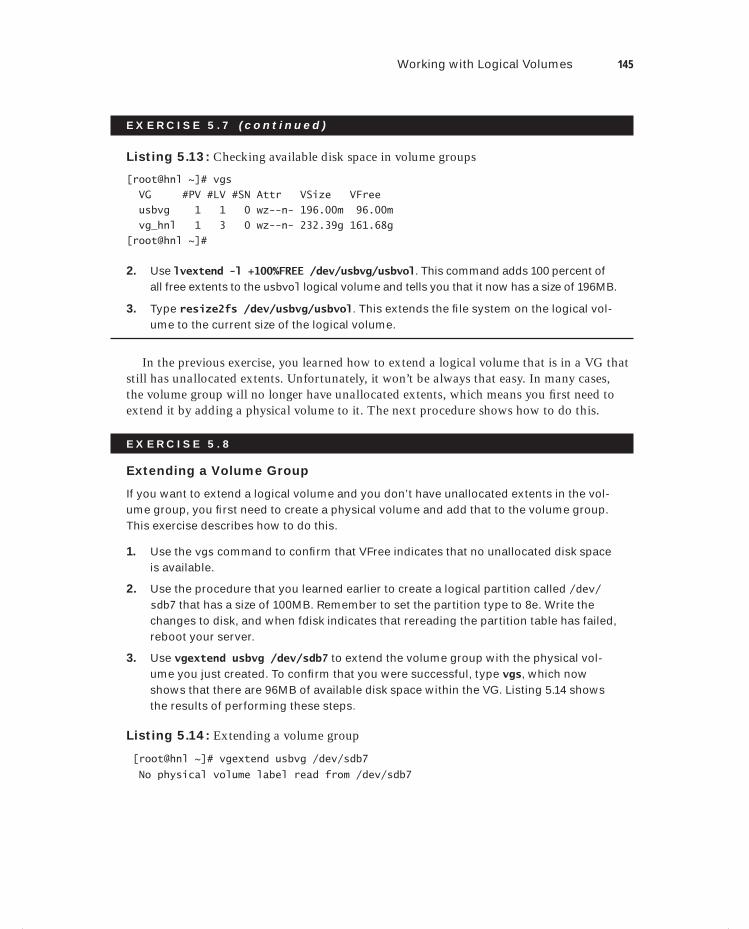
Working with Logical Volumes 145
E X E R C I S E 5 . 7 ( c ont inue d )
Listing 5.13: Checking available disk space in volume groups
[root@hnl ~]# vgs
VG #PV #LV #SN Attr VSize VFree
usbvg 1 1 0 wz--n- 196.00m 96.00m
vg_hnl 1 3 0 wz--n- 232.39g 161.68g
[root@hnl ~]#
2. Use lvextend -l +100%FREE /dev/usbvg/usbvol. This command adds 100 percent of all free extents to the usbvol logical volume and tells you that it now has a size of 196MB.
3. Type resize2fs /dev/usbvg/usbvol. This extends the fi le system on the logical vol-ume to the current size of the logical volume.
In the previous exercise, you learned how to extend a logical volume that is in a VG that still has unallocated extents. Unfortunately, it won’t be always that easy. In many cases, the volume group will no longer have unallocated extents, which means you fi rst need to extend it by adding a physical volume to it. The next procedure shows how to do this.
E X E R C I S E 5 . 8
Extending a Volume Group
If you want to extend a logical volume and you don’t have unallocated extents in the vol-ume group, you fi rst need to create a physical volume and add that to the volume group. This exercise describes how to do this.
1. Use the vgs command to confi rm that VFree indicates that no unallocated disk space is available.
2. Use the procedure that you learned earlier to create a logical partition called /dev/sdb7 that has a size of 100MB. Remember to set the partition type to 8e. Write the changes to disk, and when fdisk indicates that rereading the partition table has failed, reboot your server.
3. Use vgextend usbvg /dev/sdb7 to extend the volume group with the physical vol-ume you just created. To confi rm that you were successful, type vgs, which now shows that there are 96MB of available disk space within the VG. Listing 5.14 shows the results of performing these steps.
Listing 5.14: Extending a volume group
[root@hnl ~]# vgextend usbvg /dev/sdb7
No physical volume label read from /dev/sdb7
c05.indd 145c05.indd 145 1/8/2013 10:44:28 AM1/8/2013 10:44:28 AM
146 Chapter 5 Configuring and Managing Storage
E X E R C I S E 5 . 8 ( c ont inue d )
Writing physical volume data to disk "/dev/sdb7"
Physical volume "/dev/sdb7" successfully created
Volume group "usbvg" successfully extended
[root@hnl ~]# vgs
VG #PV #LV #SN Attr VSize VFree
usbvg 2 1 0 wz--n- 292.00m 96.00m
vg_hnl 1 3 0 wz--n- 232.39g 161.68g
In the preceding exercise, you extended a volume group. At this point, you can grow any of the logical volumes in the volume group. You learned how to do that in Exercise 5.8, and therefore that procedure won’t be repeated here.
E X E R C I S E 5 . 9
Reducing a Logical Volume
If you need to reduce a logical volume, you fi rst have to reduce the fi le system that is on it. You can do that only on an unmounted fi le system that has been checked previously. This exercise describes the procedure that you have to apply in this situation.
1. Before shrinking an LVM logical volume, you fi rst must reduce the size of the fi le sys-tem. Before reducing the size of the fi le system, you must unmount the fi le system and check its integrity. To do so, use umount /dev/usbvg/usbvol and use e2fsck -f /dev/usbvg/usbvol to check its integrity.
2. Once the check is completed, use resize2fs /dev/usbvg/usbvol 100M to shrink the fi le system on the volume to 100MB.
3. Use lvreduce -L 100M /dev/usbvg/usbvol to reduce the size of the volume to 100MB as well. Once completed, you can now safely mount the reduced volume.
Working with Snapshots
Using an LVM snapshot allows you to freeze the current state of an LVM volume. Creating a snapshot allows you to keep the current state of a volume and gives you an easy option for reverting to this state later if that becomes necessary. Snapshots are also commonly used to create backups safely. Instead of making a backup of the normal LVM volume where fi les may be opened, you can create a backup from the snapshot volume, where no fi le will be open at any time.
To appreciate what happens while creating snapshots, you need to understand that a volume consists of two essential parts: the fi le system metadata and the actual blocks
c05.indd 146c05.indd 146 1/8/2013 10:44:28 AM1/8/2013 10:44:28 AM
Working with Logical Volumes 147
containing data in a fi le. The fi le system uses the metadata pointers to fi nd the fi le’s data blocks.
When initially creating a snapshot, the fi le system metadata is copied to the newly cre-ated snapshot volume. The fi le blocks stay on the original volume, however, and as long as nothing has changed in the snapshot metadata, all pointers to the blocks on the original volume remain correct. When a fi le changes on the original volume, the original blocks are copied to the snapshot volume before the change is committed to the fi le system. This means that the longer the snapshot exists, the bigger it will become. This also means you have to estimate the number of changes that are going to take place on the original volume in order to create the right size snapshot. If only a few changes are expected for a snap-shot that you’ll use to create a backup, 5 percent of the size of the original volume may be enough. If you’re using snapshots to be able to revert to the original state before you start a large test, you will need much more than just 5 percent.
Every snapshot has a life cycle; that is, it’s not meant to exist forever. If you no longer need the snapshot, you can delete it using the lvremove command. In Exercise 5.10, you’ll learn how to create and work with a snapshot.
E X E R C I S E 5 .10
Managing Snapshots
In this exercise, you’ll start by creating a few dummy fi les on the original volume you created in earlier exercises. Then you’ll create a snapshot volume and mount it to see whether it contains the same fi les as the original volume. Next you’ll delete all fi les from the original volume to fi nd out whether they are still available on the snapshot. Then you’ll revert the snapshot to the original volume to restore the original state of this vol-ume. At the end of this exercise, you’ll delete the snapshot, a task that you always have to perform to end the snapshot life cycle.
1. Use vgs to get an overview of current use of disk space in your volume groups. This shows that usbvg has enough available disk space to create a snapshot. For this test, 50MB will be enough for the snapshot.
2. Use mount /dev/usbvg/usbvol /mnt to mount the original volume on the /mnt direc-tory. Next use cp /etc/* /mnt to copy some fi les to the original volume.
3. Use lvcreate -s -L 50M -n usbvol_snap /dev/usbvg/usbvol. You’ll see that the size is rounded up to 52MB because a basic allocation unit of 4MB is used to create logical volumes.
4. Use lvs to verify the creation of the snapshot volume. You’ll see that the snapshot volume is clearly listed as the snapshot of the original volume (see Listing 5.15).
Listing 5.15: Verifying the creation of the snapshot
[root@hnl mnt]# lvcreate -s -L 50M -n usbvol_snap /dev/usbvg/usbvol
Rounding up size to full physical extent 52.00 MiB
c05.indd 147c05.indd 147 1/8/2013 10:44:28 AM1/8/2013 10:44:28 AM

148 Chapter 5 Configuring and Managing Storage
E X E R C I S E 5 .10 ( c ont inue d )
Logical volume "usbvol_snap" created
[root@hnl mnt]# lvs
LV VG Attr LSize Origin Snap% Move Log Copy% Convert
usbvol usbvg owi-ao 100.00m
usbvol_snap usbvg swi-a- 52.00m usbvol 0.02
lv_home vg_hnl -wi-ao 11.00g
lv_root vg_hnl -wi-ao 50.00g
lv_swap vg_hnl -wi-ao 9.72g
4. Use mkdir /mnt2 to create a temporary mounting point for the snapshot, and mount it there using mount /dev/usbvg/usbvol_snap /mnt2. Switch to the /mnt2 directory to check to see that the contents are similar to the contents of the /mnt directory where the original usbvol volume is mounted.
5. Change to the /mnt directory, and use rm -f *. This removes all fi les from the /mnt directory. Change back to the /mnt2 directory to see that all fi les still exist there.
6. Use lvconvert --merge /dev/usbvg/usbvol_snap to schedule the merge of the snapshot back into the original volume at the next volume activation. You’ll see some error messages that you can safely ignore. Now unmount the snapshot using umount /mnt2.
7. Unmount the original volume using umount /mnt. Next use lvchange -a n /dev/usbvg/usbvol; lvchange -a y /dev/usbvg/usbvol. This deactivates and then acti-vates the original volume, which is a required step in merging the snapshot back into the original volume. If you see an error relating to the /var/lock directory, ignore it.
8. Use ls /mnt to show the contents of the /mnt directory, which verifi es that you suc-ceeded in performing this procedure.
9. You don’t need to remove the snapshot. By converting the snapshot back into the original volume, you’ve automatically removed the snapshot volume. In Listing 5.16 you can see what happens when merging snapshots back into the original volume.
Listing 5.16: Merging snapshots back into the original volume
[root@hnl /]# lvconvert --merge /dev/usbvg/usbvol_snap
Can't merge over open origin volume
Can't merge when snapshot is open
Merging of snapshot usbvol_snap will start next activation.
[root@hnl /]# umount /mnt2[root@hnl /]# umount /mnt
c05.indd 148c05.indd 148 1/8/2013 10:44:28 AM1/8/2013 10:44:28 AM
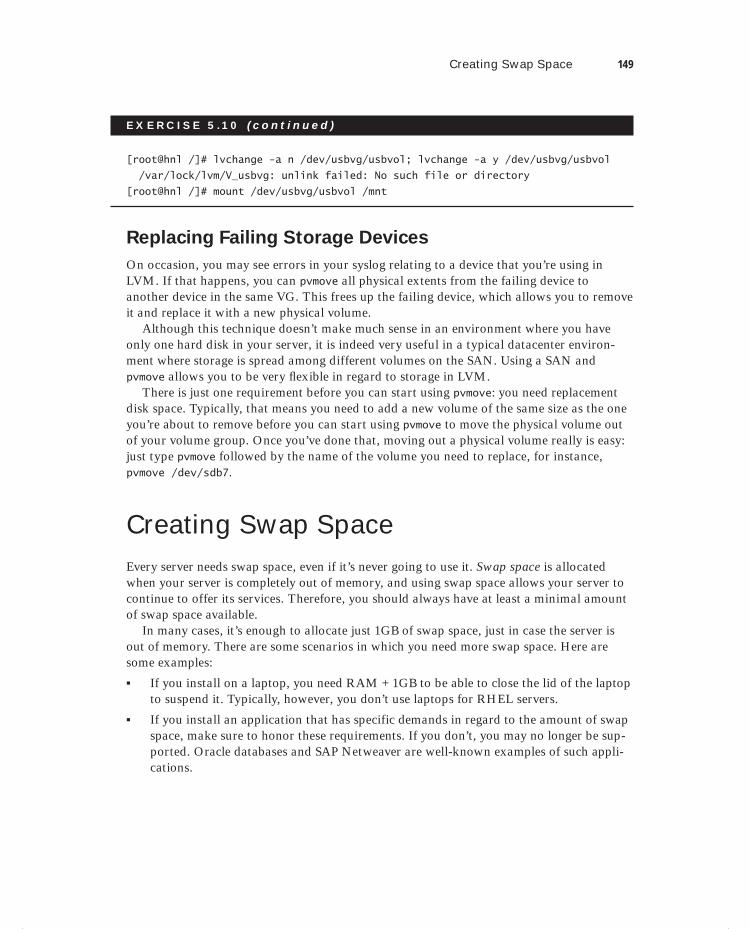
Creating Swap Space 149
E X E R C I S E 5 .10 ( c ont inue d )
[root@hnl /]# lvchange -a n /dev/usbvg/usbvol; lvchange -a y /dev/usbvg/usbvol
/var/lock/lvm/V_usbvg: unlink failed: No such file or directory
[root@hnl /]# mount /dev/usbvg/usbvol /mnt
Replacing Failing Storage Devices
On occasion, you may see errors in your syslog relating to a device that you’re using in LVM. If that happens, you can pvmove all physical extents from the failing device to another device in the same VG. This frees up the failing device, which allows you to remove it and replace it with a new physical volume.
Although this technique doesn’t make much sense in an environment where you have only one hard disk in your server, it is indeed very useful in a typical datacenter environ-ment where storage is spread among different volumes on the SAN. Using a SAN and pvmove allows you to be very fl exible in regard to storage in LVM.
There is just one requirement before you can start using pvmove: you need replacement disk space. Typically, that means you need to add a new volume of the same size as the one you’re about to remove before you can start using pvmove to move the physical volume out of your volume group. Once you’ve done that, moving out a physical volume really is easy: just type pvmove followed by the name of the volume you need to replace, for instance, pvmove /dev/sdb7.
Creating Swap SpaceEvery server needs swap space, even if it’s never going to use it. Swap space is allocated when your server is completely out of memory, and using swap space allows your server to continue to offer its services. Therefore, you should always have at least a minimal amount of swap space available.
In many cases, it’s enough to allocate just 1GB of swap space, just in case the server is out of memory. There are some scenarios in which you need more swap space. Here are some examples:
If you install on a laptop, you need RAM + 1GB to be able to close the lid of the laptop to suspend it. Typically, however, you don’t use laptops for RHEL servers.
If you install an application that has specific demands in regard to the amount of swap space, make sure to honor these requirements. If you don’t, you may no longer be sup-ported. Oracle databases and SAP Netweaver are well-known examples of such appli-cations.
c05.indd 149c05.indd 149 1/8/2013 10:44:29 AM1/8/2013 10:44:29 AM
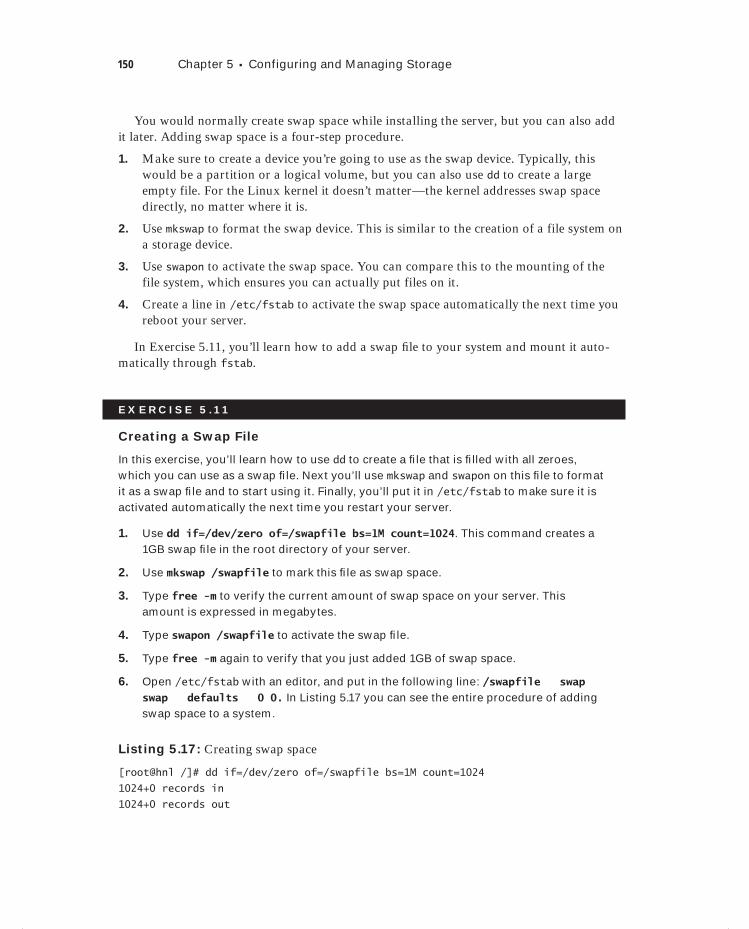
150 Chapter 5 Configuring and Managing Storage
You would normally create swap space while installing the server, but you can also add it later. Adding swap space is a four-step procedure.
1. Make sure to create a device you’re going to use as the swap device. Typically, this would be a partition or a logical volume, but you can also use dd to create a large empty file. For the Linux kernel it doesn’t matter—the kernel addresses swap space directly, no matter where it is.
2. Use mkswap to format the swap device. This is similar to the creation of a file system on a storage device.
3. Use swapon to activate the swap space. You can compare this to the mounting of the file system, which ensures you can actually put files on it.
4. Create a line in /etc/fstab to activate the swap space automatically the next time you reboot your server.
In Exercise 5.11, you’ll learn how to add a swap fi le to your system and mount it auto-matically through fstab.
E X E R C I S E 5 .11
Creating a Swap File
In this exercise, you’ll learn how to use dd to create a fi le that is fi lled with all zeroes, which you can use as a swap fi le. Next you’ll use mkswap and swapon on this fi le to format it as a swap fi le and to start using it. Finally, you’ll put it in /etc/fstab to make sure it is activated automatically the next time you restart your server.
1. Use dd if=/dev/zero of=/swapfile bs=1M count=1024. This command creates a 1GB swap fi le in the root directory of your server.
2. Use mkswap /swapfile to mark this fi le as swap space.
3. Type free -m to verify the current amount of swap space on your server. This amount is expressed in megabytes.
4. Type swapon /swapfile to activate the swap fi le.
5. Type free -m again to verify that you just added 1GB of swap space.
6. Open /etc/fstab with an editor, and put in the following line: /swapfile swap swap defaults 0 0. In Listing 5.17 you can see the entire procedure of adding swap space to a system.
Listing 5.17: Creating swap space
[root@hnl /]# dd if=/dev/zero of=/swapfile bs=1M count=1024
1024+0 records in
1024+0 records out
c05.indd 150c05.indd 150 1/8/2013 10:44:29 AM1/8/2013 10:44:29 AM
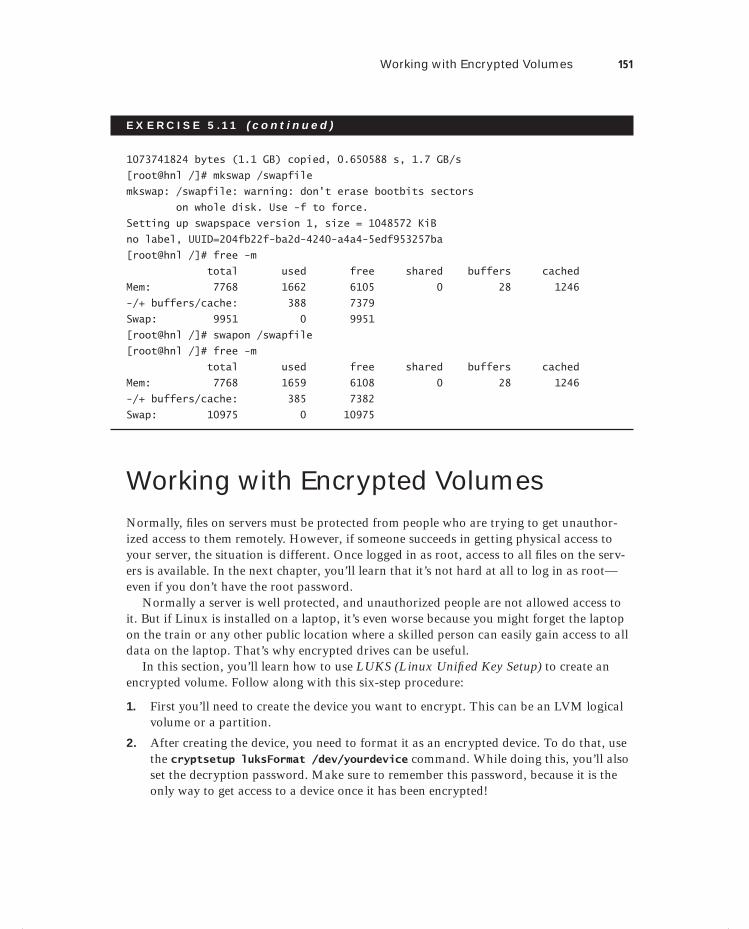
Working with Encrypted Volumes 151
E X E R C I S E 5 .11 ( c ont inue d )
1073741824 bytes (1.1 GB) copied, 0.650588 s, 1.7 GB/s
[root@hnl /]# mkswap /swapfile
mkswap: /swapfile: warning: don't erase bootbits sectors
on whole disk. Use -f to force.
Setting up swapspace version 1, size = 1048572 KiB
no label, UUID=204fb22f-ba2d-4240-a4a4-5edf953257ba
[root@hnl /]# free -m
total used free shared buffers cached
Mem: 7768 1662 6105 0 28 1246
-/+ buffers/cache: 388 7379
Swap: 9951 0 9951
[root@hnl /]# swapon /swapfile
[root@hnl /]# free -m
total used free shared buffers cached
Mem: 7768 1659 6108 0 28 1246
-/+ buffers/cache: 385 7382
Swap: 10975 0 10975
Working with Encrypted VolumesNormally, fi les on servers must be protected from people who are trying to get unauthor-ized access to them remotely. However, if someone succeeds in getting physical access to your server, the situation is different. Once logged in as root, access to all fi les on the serv-ers is available. In the next chapter, you’ll learn that it’s not hard at all to log in as root—even if you don’t have the root password.
Normally a server is well protected, and unauthorized people are not allowed access to it. But if Linux is installed on a laptop, it’s even worse because you might forget the laptop on the train or any other public location where a skilled person can easily gain access to all data on the laptop. That’s why encrypted drives can be useful.
In this section, you’ll learn how to use LUKS (Linux Unifi ed Key Setup) to create an encrypted volume. Follow along with this six-step procedure:
1. First you’ll need to create the device you want to encrypt. This can be an LVM logical volume or a partition.
2. After creating the device, you need to format it as an encrypted device. To do that, use the cryptsetup luksFormat /dev/yourdevice command. While doing this, you’ll also set the decryption password. Make sure to remember this password, because it is the only way to get access to a device once it has been encrypted!
c05.indd 151c05.indd 151 1/8/2013 10:44:29 AM1/8/2013 10:44:29 AM

152 Chapter 5 Configuring and Managing Storage
3. Once the device is formatted as an encrypted device, you need to open it before you can do anything with it. When opening it, you assign a name to the encrypted device. This name occurs in the /dev/mapper directory, because this entire procedure is man-aged by Device Mapper. Use cryptsetup luksOpen /dev/yourdevice cryptdevice-name, for example, to create the device /dev/mapper/cryptdevicename.
4. Now that you’ve opened the encrypted device and made it accessible through the /dev/mapper/cryptdevice device, you can create a file system on it. To do this, use mkfs: mkfs.ext4 /dev/mapper/cryptdevicename.
5. At this point, you can mount the encrypted device and put files on it. Use mount /dev/mapper/cryptdevicename /somewhere to mount it, and do whatever else you want to do to it.
6. After using the encrypted device, use umount to unmount. This doesn’t close the encrypted device. To close it, also (which ensures that it is accessible only after entering the password), use cryptsetup luksClose cryptdevicename.
In Exercise 5.12, you will create the encrypted device.
E X E R C I S E 5 .12
Creating an Encrypted Device
In this exercise, you’ll learn how to create an encrypted device. You’ll use the luksFormat and luksOpen commands in cryptsetup to create and open the device. Next you’ll put a fi le system on it using mkfs.ext4. After verifying that it works, you’ll unmount the fi le system and use luksClose to close the device to make sure it is closed to unauthorized access.
1. Create a new partition on the USB fl ash drive you used in earlier exercises in this chapter. Create it as a 250MB logical partition. If you’ve done all of the preceding exercises, the partition will be created as /dev/sdb8.
You know that you have to reboot to activate a new partition. There is also another way, but it is unsupported, so use it at your own risk! To update the kernel with the new partitions you just created on /dev/sdb, you can also use partx -a /dev/sdb.
2. Use cryptsetup luksFormat /dev/sdb8 to format the newly created partition as an encrypted one. When asked if you really want to do this, type YES (all in uppercase). Next, enter the password you’re going to use. Type it a second time, and wait a few seconds while the encrypted partition is formatted.
3. Now type cryptsetup luksOpen /dev/sdb8 confidential to open the encrypted volume and make it accessible as the device /dev/mapper/confidential. Use ls /dev/mapper to verify that the device has been created correctly. Listing 5.18 shows what has occurred so far.
c05.indd 152c05.indd 152 1/8/2013 10:44:29 AM1/8/2013 10:44:29 AM
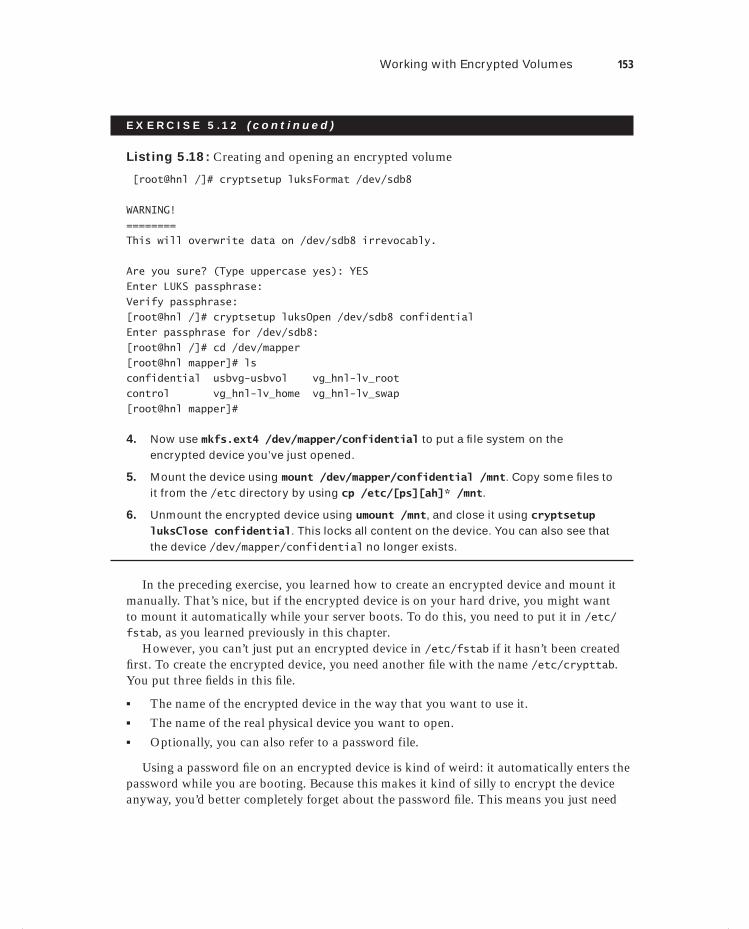
Working with Encrypted Volumes 153
E X E R C I S E 5 .12 ( c ont inue d )
Listing 5.18: Creating and opening an encrypted volume
[root@hnl /]# cryptsetup luksFormat /dev/sdb8
WARNING!
========
This will overwrite data on /dev/sdb8 irrevocably.
Are you sure? (Type uppercase yes): YES
Enter LUKS passphrase:
Verify passphrase:
[root@hnl /]# cryptsetup luksOpen /dev/sdb8 confidential
Enter passphrase for /dev/sdb8:
[root@hnl /]# cd /dev/mapper
[root@hnl mapper]# ls
confidential usbvg-usbvol vg_hnl-lv_root
control vg_hnl-lv_home vg_hnl-lv_swap
[root@hnl mapper]#
4. Now use mkfs.ext4 /dev/mapper/confidential to put a fi le system on the encrypted device you’ve just opened.
5. Mount the device using mount /dev/mapper/confidential /mnt. Copy some fi les to it from the /etc directory by using cp /etc/[ps][ah]* /mnt.
6. Unmount the encrypted device using umount /mnt, and close it using cryptsetup luksClose confidential. This locks all content on the device. You can also see that the device /dev/mapper/confidential no longer exists.
In the preceding exercise, you learned how to create an encrypted device and mount it manually. That’s nice, but if the encrypted device is on your hard drive, you might want to mount it automatically while your server boots. To do this, you need to put it in /etc/fstab, as you learned previously in this chapter.
However, you can’t just put an encrypted device in /etc/fstab if it hasn’t been created fi rst. To create the encrypted device, you need another fi le with the name /etc/crypttab. You put three fi elds in this fi le.
The name of the encrypted device in the way that you want to use it. The name of the real physical device you want to open. Optionally, you can also refer to a password file.
Using a password fi le on an encrypted device is kind of weird: it automatically enters the password while you are booting. Because this makes it kind of silly to encrypt the device anyway, you’d better completely forget about the password fi le. This means you just need
c05.indd 153c05.indd 153 1/8/2013 10:44:30 AM1/8/2013 10:44:30 AM
154 Chapter 5 Configuring and Managing Storage
two fi elds in /etc/crypttab: the name of the encrypted device once it is opened and the name of the real underlying device, as in the following example:
confidential /dev/sdb8
After making sure you’ve created the /etc/crypttab fi le, you can put a line in /etc/fstab that mounts the encrypted device as it exists after opening in the /dev/mapper direc-tory. This means you won’t mount /dev/sdb8, but you’ll mount /dev/mapper/confidential instead. The following line shows what the line in /etc/fstab should look like:
/dev/mapper/confidential /confidential ext4 defaults 1 2
In Exercise 5.13, you’ll learn how to create these two fi les.
E X E R C I S E 5 .13
Mounting an Encrypted Device Automatically
In this exercise, you’ll automatically mount the encrypted device you created in Exercise 5.12. First you’ll create /etc/crypttab, containing one line that automates the crypt-setup luksOpen command. After doing this, you can add a line to /etc/fstab to mount the encrypted device automatically. Even though you won’t be using a password fi le, you’ll be prompted while booting to enter a password.
1. Use vi /etc/crypttab to open the fi le /etc/crypttab. Put the following line in it:
confidential /dev/sdb8
2. Use mkdir /confidential to create a directory with the name /confidential.
3. Use vi /etc/fstab, and put the following line in it:
/dev/mapper/confidential /confidential ext4 defaults 1 2
4. Restart your server using the reboot command. Notice that you’ll need to enter the password while rebooting.
SummaryIn this chapter, you learned how to work with storage. You created partitions and logical volumes, and you learned how to mount them automatically using /etc/fstab. You also learned about the many possibilities that LVM logical volumes offer. Beyond that, you learned how to analyze fi le systems using fsck and set up encrypted volumes for increased protection of fi les on your server. In the next chapter, you’ll learn what happens when your Linux server boots.
c05.indd 154c05.indd 154 1/8/2013 10:44:30 AM1/8/2013 10:44:30 AM

Chapter
6Connecting to the Network
TOPICS COVERED IN THIS CHAPTER:
Understanding NetworkManager
Configuring Networking from the Command Line
Troubleshooting Networking
Setting Up IPv6
Configuring SSH
Configuring VNC Server Access
c06.indd 155c06.indd 155 1/8/2013 10:45:01 AM1/8/2013 10:45:01 AM
Dow
nlo
ad fro
m W
ow
! eBook
<w
ww
.wow
ebook.
com
>

In the previous chapter, you learned how to confi gure storage on your server. In this chapter, you’ll learn about the last essential task of Red Hat Server administration—confi guring the network.
Understanding NetworkManagerIn Red Hat Enterprise Linux 6, the NetworkManager service is used to start the network. This service is conveniently available from the graphical desktop as an icon that indicates the current status of the network.
Also, if your server doesn’t employ a graphical desktop by default, it still uses NetworkManager as a service. This service reads its confi guration fi les during start-up. In this section, you’ll learn how to confi gure the service, focusing on the confi guration fi les behind the service. Before you study NetworkManager itself, it’s a good idea to look at how Red Hat Enterprise Linux deals with services in general.
Working with Services and Runlevels
Many services are typically offered in a Red Hat Enterprise Linux environment. A service starts as your server boots. The exact services start-up process is determined by the run-level in which the server boots. The runlevel defi nes the state in which the server boots. Every runlevel is referenced by number. Common runlevels are runlevel 3 and runlevel 5. Runlevel 3 is used to start services that are needed on a server that starts without a graphical user interface, and runlevel 5 is used to defi ne a mode where the runlevel starts with a graphical interface. In each runlevel, service scripts are started. These ser-vice scripts are installed in the /etc/init.d directory and managed with the service command.
Most services provided by a Red Hat Enterprise Linux server are offered by a service script that starts when your server boots. These Bash shell scripts are written in a generic way, which allows your server to handle them all in the same manner. You can fi nd the scripts in the /etc/init.d directory.
A service script doesn’t contain any variable parameters. All variable parameters are read while the service script starts, either from its confi guration fi le in the /etc directory or from a confi guration fi le that it uses, which is stored in the /etc/sysconfig directory.
c06.indd 156c06.indd 156 1/8/2013 10:45:03 AM1/8/2013 10:45:03 AM
Understanding NetworkManager 157
Typically, the confi guration fi les in the /etc/sysconfig directory contain parameters that are required at the very fi rst stage of the service start process; the confi guration fi les in /etc are read once the server has started, and they determine exactly what the service should do.
To manage service scripts, two commands are relevant. First there is the service com-mand, which you can use to start, stop, and monitor all of the service scripts in the /etc/init.d directory. Next there is the chkconfig command, which you can use to enable the service in the runlevel. In Exercise 6.1, you’ll learn how to use both commands on the ntpd service, the process that is used for NTP time synchronization. (For more information about this, read Chapter 11, “Setting Up Cryptographic Services.”)
E X E R C I S E 6 .1
Working with Services
In this exercise, you’ll learn how to work with services. You’ll use the ntpd service as a sample service. First you’ll learn how to monitor the current state of the ser-vice and how to start it. Then, once you’ve accomplished that, you’ll learn how to enable the service so that it will automatically be started the next time you boot your server.
1. Open a root shell, and use cd to go to the directory /etc/init.d. Type ls to get a list of all service scripts currently in existence on your server.
2. Type service ntpd status. This should tell you that the ntpd service is currently stopped.
3. Type service ntpd start to start the ntpd service. You’ll see the message starting ntpd, followed by the text [ OK ] to confirm that ntpd has started successfully.
4. At this moment, you’ve started ntpd, but after a reboot it won’t be started automati-cally. Use chkconfig ntpd on to add the ntpd service to the runlevels of your server.
5. To verify that ntpd has indeed been added to your server’s runlevels, type chk-config --list (see also Listing 6.1). This command lists all services and their cur rent status. If you want, you can filter the results by adding grep ntpd to the chkconfig --list command.
Listing 6.1: Displaying current service enablement using chkconfig --list
[root@hnl ~]# chkconfig --list
NetworkManager 0:off 1:off 2:on 3:on 4:on 5:on 6:off
abrt-ccpp 0:off 1:off 2:off 3:on 4:off 5:on 6:off
abrt-oops 0:off 1:off 2:off 3:on 4:off 5:on 6:off
c06.indd 157c06.indd 157 1/8/2013 10:45:03 AM1/8/2013 10:45:03 AM
158 Chapter 6 Connecting to the Network
E X E R C I S E 6 .1 ( c ont inue d )
abrtd 0:off 1:off 2:off 3:on 4:off 5:on 6:off
acpid 0:off 1:off 2:on 3:on 4:on 5:on 6:off
atd 0:off 1:off 2:off 3:on 4:on 5:on 6:off
auditd 0:off 1:off 2:on 3:on 4:on 5:off 6:off
autofs 0:off 1:off 2:off 3:on 4:on 5:on 6:off
...
sshd 0:off 1:off 2:on 3:on 4:on 5:on 6:off
sssd 0:off 1:off 2:off 3:off 4:off 5:off 6:off
sysstat 0:off 1:on 2:on 3:on 4:on 5:on 6:off
udev-post 0:off 1:on 2:on 3:on 4:on 5:on 6:off
wdaemon 0:off 1:off 2:off 3:off 4:off 5:off 6:off
wpa_supplicant 0:off 1:off 2:off 3:off 4:off 5:off 6:off
xinetd 0:off 1:off 2:off 3:on 4:on 5:on 6:off
ypbind 0:off 1:off 2:off 3:off 4:off 5:off 6:off
xinetd based services:
chargen-dgram: off
chargen-stream: off
cvs: off
daytime-dgram: off
daytime-stream: off
discard-dgram: off
discard-stream: off
echo-dgram: off
echo-stream: off
rsync: off
tcpmux-server: off
time-dgram: off
time-stream: off
[root@hnl ~]#
Configuring the Network with NetworkManager
Now that you know how to work with services in Red Hat Enterprise Linux, it’s time to get familiar with NetworkManager. The easiest way to confi gure the network is by clicking the NetworkManager icon on the graphical desktop of your server. In this section, you’ll learn how to set network parameters using the graphical tool.
You can fi nd the NetworkManager icon in the upper-right corner of the graphical desk-top. If you click it, it provides an overview of all currently available network connections, including Wi-Fi networks to which your server is not connected. This interface is conve-nient if you’re using Linux on a laptop that roams from one Wi-Fi network to another, but it’s not as useful for servers.
If you right-click the NetworkManager icon, you can select Edit Connections to set the properties for your server’s network connections. You’ll fi nd all of the wired network
c06.indd 158c06.indd 158 1/8/2013 10:45:03 AM1/8/2013 10:45:03 AM
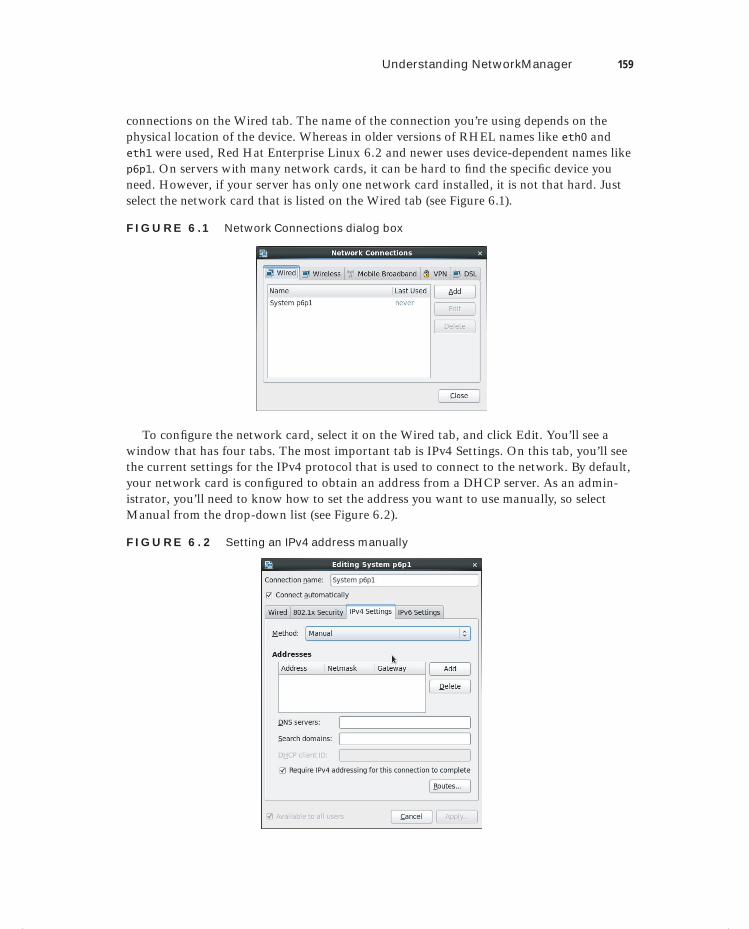
Understanding NetworkManager 159
connections on the Wired tab. The name of the connection you’re using depends on the physical location of the device. Whereas in older versions of RHEL names like eth0 and eth1 were used, Red Hat Enterprise Linux 6.2 and newer uses device-dependent names like p6p1. On servers with many network cards, it can be hard to fi nd the specifi c device you need. However, if your server has only one network card installed, it is not that hard. Just select the network card that is listed on the Wired tab (see Figure 6.1).
F I GU R E 6 .1 Network Connections dialog box
To confi gure the network card, select it on the Wired tab, and click Edit. You’ll see a window that has four tabs. The most important tab is IPv4 Settings. On this tab, you’ll see the current settings for the IPv4 protocol that is used to connect to the network. By default, your network card is confi gured to obtain an address from a DHCP server. As an admin-istrator, you’ll need to know how to set the address you want to use manually, so select Manual from the drop-down list (see Figure 6.2).
F I GU R E 6 . 2 Setting an IPv4 address manually
c06.indd 159c06.indd 159 1/8/2013 10:45:03 AM1/8/2013 10:45:03 AM
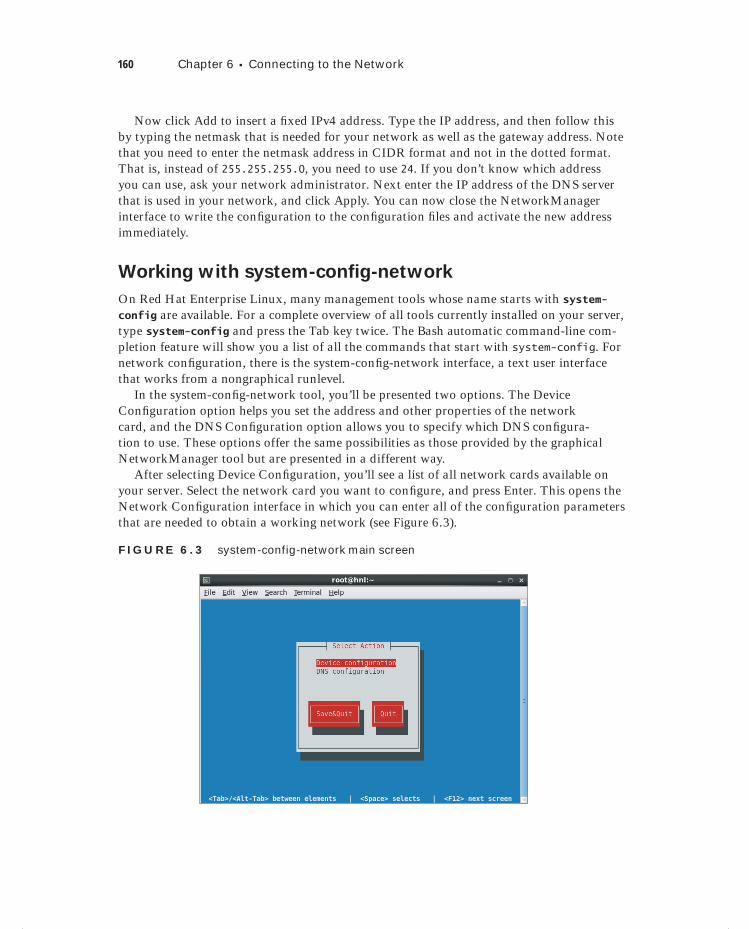
160 Chapter 6 Connecting to the Network
Now click Add to insert a fi xed IPv4 address. Type the IP address, and then follow this by typing the netmask that is needed for your network as well as the gateway address. Note that you need to enter the netmask address in CIDR format and not in the dotted format. That is, instead of 255.255.255.0, you need to use 24. If you don’t know which address you can use, ask your network administrator. Next enter the IP address of the DNS server that is used in your network, and click Apply. You can now close the NetworkManager interface to write the confi guration to the confi guration fi les and activate the new address immediately.
Working with system-config-network
On Red Hat Enterprise Linux, many management tools whose name starts with system-config are available. For a complete overview of all tools currently installed on your server, type system-config and press the Tab key twice. The Bash automatic command-line com-pletion feature will show you a list of all the commands that start with system-config. For network confi guration, there is the system-confi g-network interface, a text user interface that works from a nongraphical runlevel.
In the system-confi g-network tool, you’ll be presented two options. The Device Confi guration option helps you set the address and other properties of the network card, and the DNS Confi guration option allows you to specify which DNS confi gura-tion to use. These options offer the same possibilities as those provided by the graphical NetworkManager tool but are presented in a different way.
After selecting Device Confi guration, you’ll see a list of all network cards available on your server. Select the network card you want to confi gure, and press Enter. This opens the Network Confi guration interface in which you can enter all of the confi guration parameters that are needed to obtain a working network (see Figure 6.3).
F I GU R E 6 . 3 system-config-network main screen
c06.indd 160c06.indd 160 1/8/2013 10:45:04 AM1/8/2013 10:45:04 AM
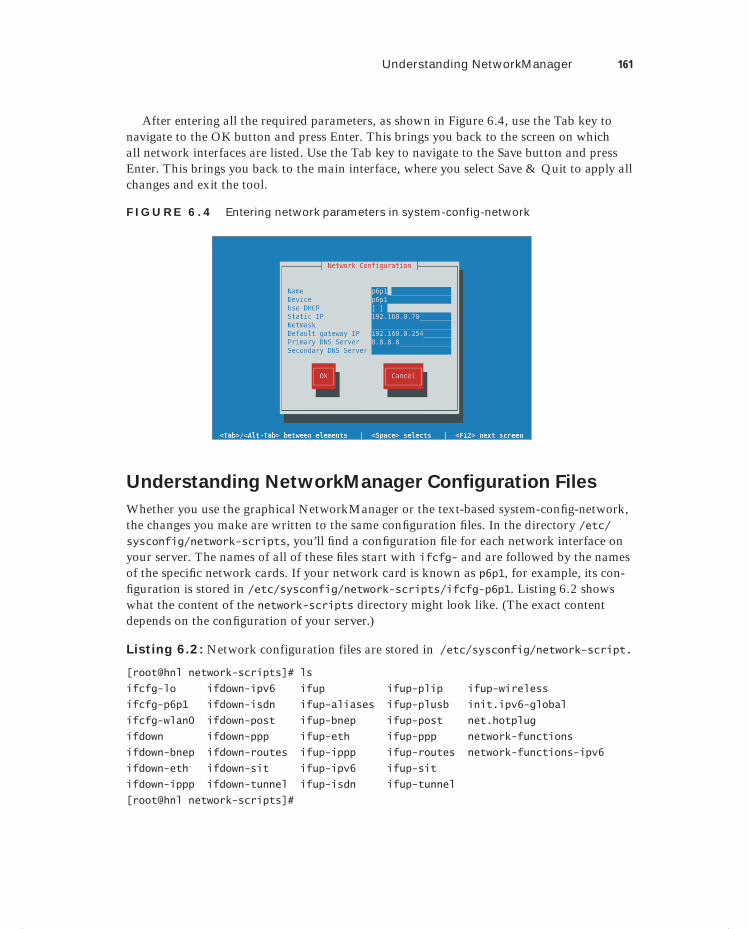
Understanding NetworkManager 161
After entering all the required parameters, as shown in Figure 6.4, use the Tab key to navigate to the OK button and press Enter. This brings you back to the screen on which all network interfaces are listed. Use the Tab key to navigate to the Save button and press Enter. This brings you back to the main interface, where you select Save & Quit to apply all changes and exit the tool.
F I GU R E 6 . 4 Entering network parameters in system-config-network
Understanding NetworkManager Configuration Files
Whether you use the graphical NetworkManager or the text-based system-confi g-network, the changes you make are written to the same confi guration fi les. In the directory /etc/sysconfig/network-scripts, you’ll fi nd a confi guration fi le for each network interface on your server. The names of all of these fi les start with ifcfg- and are followed by the names of the specifi c network cards. If your network card is known as p6p1, for example, its con-fi guration is stored in /etc/sysconfig/network-scripts/ifcfg-p6p1. Listing 6.2 shows what the content of the network-scripts directory might look like. (The exact content depends on the confi guration of your server.)
Listing 6.2: Network configuration files are stored in /etc/sysconfig/network-script.
[root@hnl network-scripts]# ls
ifcfg-lo ifdown-ipv6 ifup ifup-plip ifup-wireless
ifcfg-p6p1 ifdown-isdn ifup-aliases ifup-plusb init.ipv6-global
ifcfg-wlan0 ifdown-post ifup-bnep ifup-post net.hotplug
ifdown ifdown-ppp ifup-eth ifup-ppp network-functions
ifdown-bnep ifdown-routes ifup-ippp ifup-routes network-functions-ipv6
ifdown-eth ifdown-sit ifup-ipv6 ifup-sit
ifdown-ippp ifdown-tunnel ifup-isdn ifup-tunnel
[root@hnl network-scripts]#
c06.indd 161c06.indd 161 1/8/2013 10:45:04 AM1/8/2013 10:45:04 AM
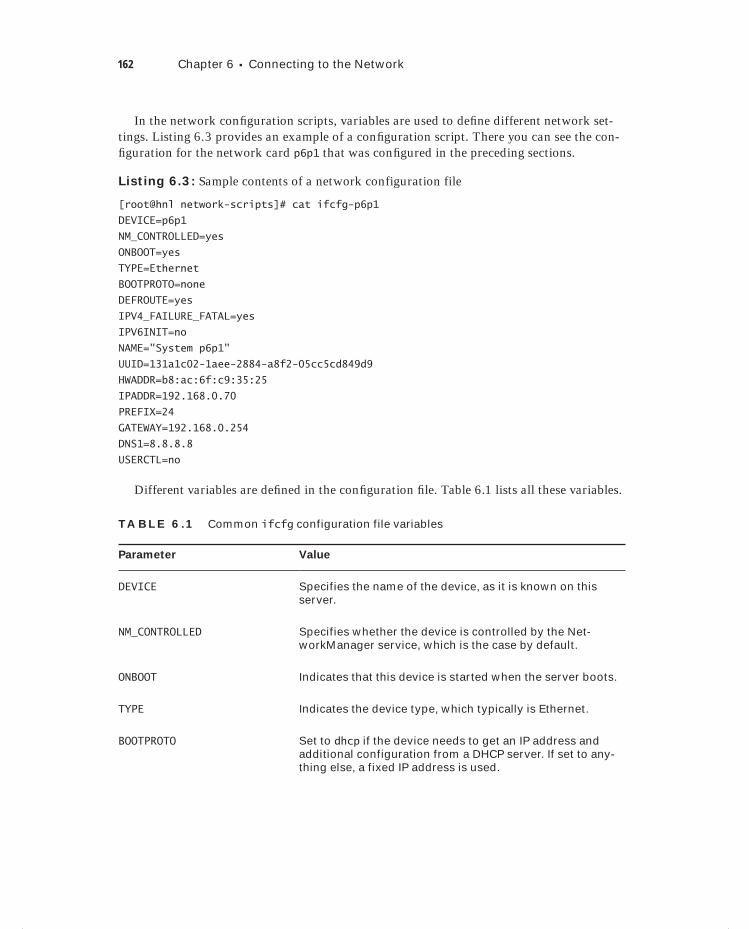
162 Chapter 6 Connecting to the Network
In the network confi guration scripts, variables are used to defi ne different network set-tings. Listing 6.3 provides an example of a confi guration script. There you can see the con-fi guration for the network card p6p1 that was confi gured in the preceding sections.
Listing 6.3: Sample contents of a network configuration file
[root@hnl network-scripts]# cat ifcfg-p6p1
DEVICE=p6p1
NM_CONTROLLED=yes
ONBOOT=yes
TYPE=Ethernet
BOOTPROTO=none
DEFROUTE=yes
IPV4_FAILURE_FATAL=yes
IPV6INIT=no
NAME="System p6p1"
UUID=131a1c02-1aee-2884-a8f2-05cc5cd849d9
HWADDR=b8:ac:6f:c9:35:25
IPADDR=192.168.0.70
PREFIX=24
GATEWAY=192.168.0.254
DNS1=8.8.8.8
USERCTL=no
Different variables are defi ned in the confi guration fi le. Table 6.1 lists all these variables.
TA B LE 6 .1 Common ifcfg configuration file variables
Parameter Value
DEVICE Specifies the name of the device, as it is known on this server.
NM_CONTROLLED Specifies whether the device is controlled by the Net-workManager service, which is the case by default.
ONBOOT Indicates that this device is started when the server boots.
TYPE Indicates the device type, which typically is Ethernet.
BOOTPROTO Set to dhcp if the device needs to get an IP address and additional configuration from a DHCP server. If set to any-thing else, a fixed IP address is used.
c06.indd 162c06.indd 162 1/8/2013 10:45:04 AM1/8/2013 10:45:04 AM
Understanding NetworkManager 163
Parameter Value
DEFROUTE If set to yes, the gateway that is set in this device is also used as the default route.
IPV4_FAILURE_FATAL Indicates whether the device should fail to come up if there is an error in the IPv4 configuration.
IPV6INIT Set to yes if you want to use IPv6.
NAME Use this to set a device name.
UUID As names of devices can change according to hardware configuration, it might make sense to set a universal unique ID (UUID). This UUID can then be used as a unique identifier for the device.
HWADDR Specifies the MAC address to be used. If you want to use a different MAC address than the one configured on your network card, this is where you should change it.
IPADDR Defines the IP address to be used on this interface.
PREFIX This variable defines the subnet mask in CIDR format. The CIDR format defines the number of bits in the sub-net mask and not the dotted decimal number, so use 24 instead of 255.255.255.0.
GATEWAY Use this to set the gateway that is used for traffic on this network card. If the variable DEFROUTER is also set to yes, the router specified here is also used as the default router.
DNS1 This parameter specifies the IP address of the first DNS server that should be used. To use additional DNS serv-ers, use the variables DNS2 and, if you like, DNS3 as well.
USERCTL Set to yes if you want end users to be able to change the network configuration. Typically, this is not a very good idea on servers.
Normally, you probably want to set the network confi guration by using tools like NetworkManager or system-config-network. However, you also can change all param-eters from the confi guration fi les. Because the NetworkManager service monitors these confi guration fi les, all changes you make in the fi les are picked up and applied immediately.
c06.indd 163c06.indd 163 1/8/2013 10:45:04 AM1/8/2013 10:45:04 AM

164 Chapter 6 Connecting to the Network
Understanding Network Service Scripts
The network confi guration on Red Hat Enterprise Linux is managed by the NetworkManager service. This service doesn’t require much management, because it is enabled by default. Also, in contrast to many other services that you might use on Linux, it picks up changes in confi guration automatically. While it is commonly necessary to restart a service after changing the confi guration, this is not the case for NetworkManager.
Apart from the NetworkManager service (/etc/init.d/NetworkManager), there’s also the network service (/etc/init.d/network). The network service is what enables all net-work cards on your server. If you stop it, all networking on your server will be ceased. The NetworkManager service is used for managing the network cards. Stopping the NetworkManager service doesn’t stop networking; it just stops the NetworkManager pro-gram, which means you need to fall back to manual management of the network interfaces on your server.
Configuring Networking from the Command LineIn all cases, your server should be confi gured to start the network interfaces automatically. In many cases, however, it’s also useful if you can manually create a confi guration for a network card. This is especially useful if you’re experiencing problems and want to test whether a given confi guration works before writing it out to a confi guration fi le.
The classic tool for manual network confi guration and monitoring is ifconfig. This command conveniently provides an overview of the current confi guration of all network cards, including some usage statistics that show how much traffi c has been handled by a network card since it was activated. Listing 6.4 shows a typical output of ifconfig.
Listing 6.4: ifconfig output
[root@hnl ~]# ifconfig
lo Link encap:Local Loopback
inet addr:127.0.0.1 Mask:255.0.0.0
inet6 addr: ::1/128 Scope:Host
UP LOOPBACK RUNNING MTU:16436 Metric:1
RX packets:212 errors:0 dropped:0 overruns:0 frame:0
TX packets:212 errors:0 dropped:0 overruns:0 carrier:0
collisions:0 txqueuelen:0
RX bytes:16246 (15.8 KiB) TX bytes:16246 (15.8 KiB)
c06.indd 164c06.indd 164 1/8/2013 10:45:04 AM1/8/2013 10:45:04 AM
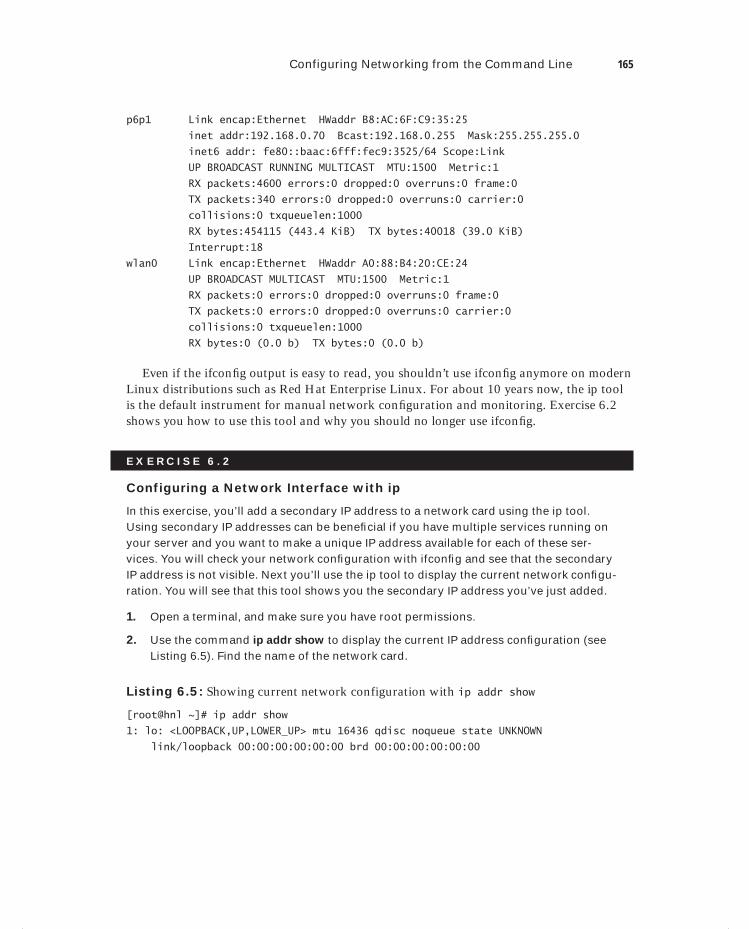
Configuring Networking from the Command Line 165
p6p1 Link encap:Ethernet HWaddr B8:AC:6F:C9:35:25
inet addr:192.168.0.70 Bcast:192.168.0.255 Mask:255.255.255.0
inet6 addr: fe80::baac:6fff:fec9:3525/64 Scope:Link
UP BROADCAST RUNNING MULTICAST MTU:1500 Metric:1
RX packets:4600 errors:0 dropped:0 overruns:0 frame:0
TX packets:340 errors:0 dropped:0 overruns:0 carrier:0
collisions:0 txqueuelen:1000
RX bytes:454115 (443.4 KiB) TX bytes:40018 (39.0 KiB)
Interrupt:18
wlan0 Link encap:Ethernet HWaddr A0:88:B4:20:CE:24
UP BROADCAST MULTICAST MTU:1500 Metric:1
RX packets:0 errors:0 dropped:0 overruns:0 frame:0
TX packets:0 errors:0 dropped:0 overruns:0 carrier:0
collisions:0 txqueuelen:1000
RX bytes:0 (0.0 b) TX bytes:0 (0.0 b)
Even if the ifconfi g output is easy to read, you shouldn’t use ifconfi g anymore on modern Linux distributions such as Red Hat Enterprise Linux. For about 10 years now, the ip tool is the default instrument for manual network confi guration and monitoring. Exercise 6.2 shows you how to use this tool and why you should no longer use ifconfi g.
E X E R C I S E 6 . 2
Configuring a Network Interface with ip
In this exercise, you’ll add a secondary IP address to a network card using the ip tool. Using secondary IP addresses can be benefi cial if you have multiple services running on your server and you want to make a unique IP address available for each of these ser-vices. You will check your network confi guration with ifconfi g and see that the secondary IP address is not visible. Next you’ll use the ip tool to display the current network confi gu-ration. You will see that this tool shows you the secondary IP address you’ve just added.
1. Open a terminal, and make sure you have root permissions.
2. Use the command ip addr show to display the current IP address confi guration (see Listing 6.5). Find the name of the network card.
Listing 6.5: Showing current network configuration with ip addr show
[root@hnl ~]# ip addr show
1: lo: <LOOPBACK,UP,LOWER_UP> mtu 16436 qdisc noqueue state UNKNOWN
link/loopback 00:00:00:00:00:00 brd 00:00:00:00:00:00
c06.indd 165c06.indd 165 1/8/2013 10:45:05 AM1/8/2013 10:45:05 AM

166 Chapter 6 Connecting to the Network
E X E R C I S E 6 . 2 ( c ont inue d )
inet 127.0.0.1/8 scope host lo
inet6 ::1/128 scope host
valid_lft forever preferred_lft forever
2: p6p1: <BROADCAST,MULTICAST,UP,LOWER_UP> mtu 1500 qdisc mq state UP qlen 1000
link/ether b8:ac:6f:c9:35:25 brd ff:ff:ff:ff:ff:ff
inet 192.168.0.70/24 brd 192.168.0.255 scope global p6p1
inet6 fe80::baac:6fff:fec9:3525/64 scope link
valid_lft forever preferred_lft forever
3: wlan0: <NO-CARRIER,BROADCAST,MULTICAST,UP> mtu 1500 qdisc mq state DOWN qlen 1000
link/ether a0:88:b4:20:ce:24 brd ff:ff:ff:ff:ff:ff
3. As shown in Listing 6.5, the network card name is p6p1. Knowing this, you can now add an IP address to this network card using the command ip addr add
dev p6p1 192.168.0.71/24. (Make sure you’re using a unique IP address!)
4. Now use the command ping 192.168.0.71 to check the availability of the IP address you’ve just added. You should see the echo reply packets coming in.
5. Use ifconfig to check the current network confi guration. You won’t see the second-ary IP address you just added.
6. Use ip addr show to display the current network confi guration. This will show you the secondary IP address.
One reason why many administrators who have been using Linux for years dislike the ip command is because it’s not very easy to use. This is because the ip command works with subcommands, known as objects in the help for the command. Using these objects makes the ip command very versatile but complex at the same time.
If you type ip help, you’ll see a help message showing all the objects that are available with the ip command (see Listing 6.6).
Listing 6.6: Use ip help to get an overview of all available objects
[root@hnl ~]# ip help
Usage: ip [ OPTIONS ] OBJECT { COMMAND | help }
ip [ -force ] -batch filename
where OBJECT := { link | addr | addrlabel | route | rule | neigh |
ntable | tunnel | maddr | mroute | monitor | xfrm }
OPTIONS := { -V[ersion] | -s[tatistics] | -d[etails] | -r[esolve] |
-f[amily] { inet | inet6 | ipx | dnet | link } |
-o[neline] | -t[imestamp] | -b[atch] [filename] |
-rc[vbuf] [size]}
c06.indd 166c06.indd 166 1/8/2013 10:45:05 AM1/8/2013 10:45:05 AM

Configuring Networking from the Command Line 167
As you can see, many objects are available, but only three are interesting:
ip link is used to show link statistics.
ip addr is used to show and manipulate the IP addresses of network interfaces.
ip route can be used to show and manage routes on your server.
Managing Device Settings
Let’s start by taking a look at ip link. With this command, you can set device properties and monitor the current state of a device. If you use the command ip link help, you’ll get a nice overview of all the available options, as you can see in Listing 6.7.
Listing 6.7: Use ip link help to show all available ip link options
[root@hnl ~]# ip link help
Usage: ip link add link DEV [ name ] NAME
[ txqueuelen PACKETS ]
[ address LLADDR ]
[ broadcast LLADDR ]
[ mtu MTU ]
type TYPE [ ARGS ]
ip link delete DEV type TYPE [ ARGS ]
ip link set DEVICE [ { up | down } ]
[ arp { on | off } ]
[ dynamic { on | off } ]
[ multicast { on | off } ]
[ allmulticast { on | off } ]
[ promisc { on | off } ]
[ trailers { on | off } ]
[ txqueuelen PACKETS ]
[ name NEWNAME ]
[ address LLADDR ]
[ broadcast LLADDR ]
[ mtu MTU ]
[ netns PID ]
[ alias NAME ]
[ vf NUM [ mac LLADDR ]
[ vlan VLANID [ qos VLAN-QOS ] ]
[ rate TXRATE ] ]
ip link show [ DEVICE ]
TYPE := { vlan | veth | vcan | dummy | ifb | macvlan | can }
c06.indd 167c06.indd 167 1/8/2013 10:45:05 AM1/8/2013 10:45:05 AM
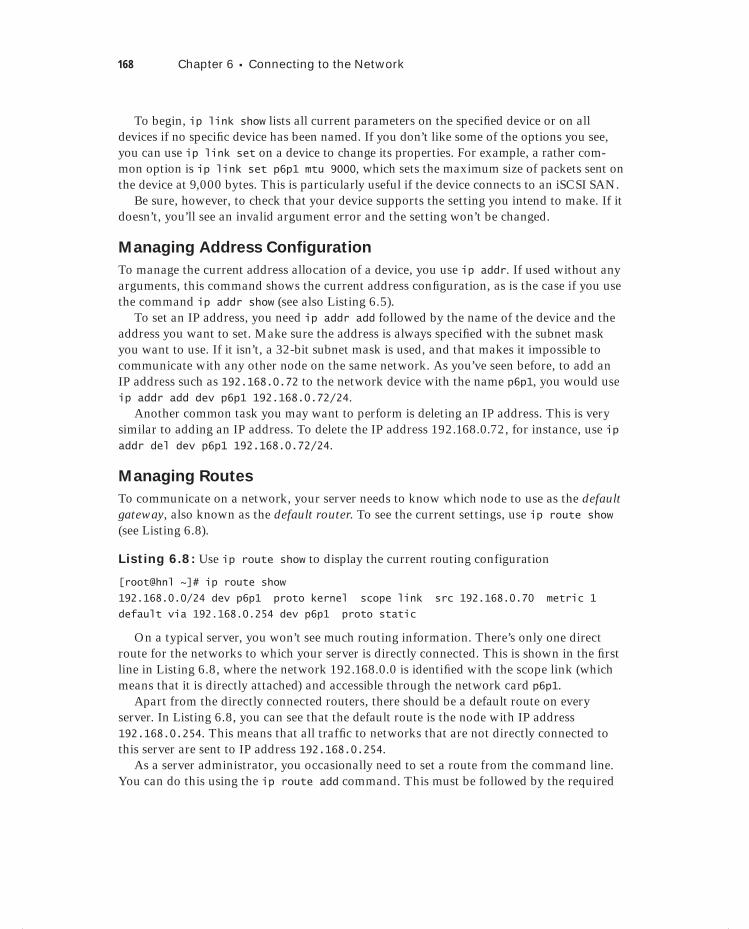
168 Chapter 6 Connecting to the Network
To begin, ip link show lists all current parameters on the specifi ed device or on all devices if no specifi c device has been named. If you don’t like some of the options you see, you can use ip link set on a device to change its properties. For example, a rather com-mon option is ip link set p6p1 mtu 9000, which sets the maximum size of packets sent on the device at 9,000 bytes. This is particularly useful if the device connects to an iSCSI SAN.
Be sure, however, to check that your device supports the setting you intend to make. If it doesn’t, you’ll see an invalid argument error and the setting won’t be changed.
Managing Address Configuration
To manage the current address allocation of a device, you use ip addr. If used without any arguments, this command shows the current address confi guration, as is the case if you use the command ip addr show (see also Listing 6.5).
To set an IP address, you need ip addr add followed by the name of the device and the address you want to set. Make sure the address is always specifi ed with the subnet mask you want to use. If it isn’t, a 32-bit subnet mask is used, and that makes it impossible to communicate with any other node on the same network. As you’ve seen before, to add an IP address such as 192.168.0.72 to the network device with the name p6p1, you would use ip addr add dev p6p1 192.168.0.72/24.
Another common task you may want to perform is deleting an IP address. This is very similar to adding an IP address. To delete the IP address 192.168.0.72, for instance, use ip addr del dev p6p1 192.168.0.72/24.
Managing Routes
To communicate on a network, your server needs to know which node to use as the default gateway, also known as the default router. To see the current settings, use ip route show (see Listing 6.8).
Listing 6.8: Use ip route show to display the current routing configuration
[root@hnl ~]# ip route show
192.168.0.0/24 dev p6p1 proto kernel scope link src 192.168.0.70 metric 1
default via 192.168.0.254 dev p6p1 proto static
On a typical server, you won’t see much routing information. There’s only one direct route for the networks to which your server is directly connected. This is shown in the fi rst line in Listing 6.8, where the network 192.168.0.0 is identifi ed with the scope link (which means that it is directly attached) and accessible through the network card p6p1.
Apart from the directly connected routers, there should be a default route on every server. In Listing 6.8, you can see that the default route is the node with IP address 192.168.0.254. This means that all traffi c to networks that are not directly connected to this server are sent to IP address 192.168.0.254.
As a server administrator, you occasionally need to set a route from the command line. You can do this using the ip route add command. This must be followed by the required
c06.indd 168c06.indd 168 1/8/2013 10:45:05 AM1/8/2013 10:45:05 AM
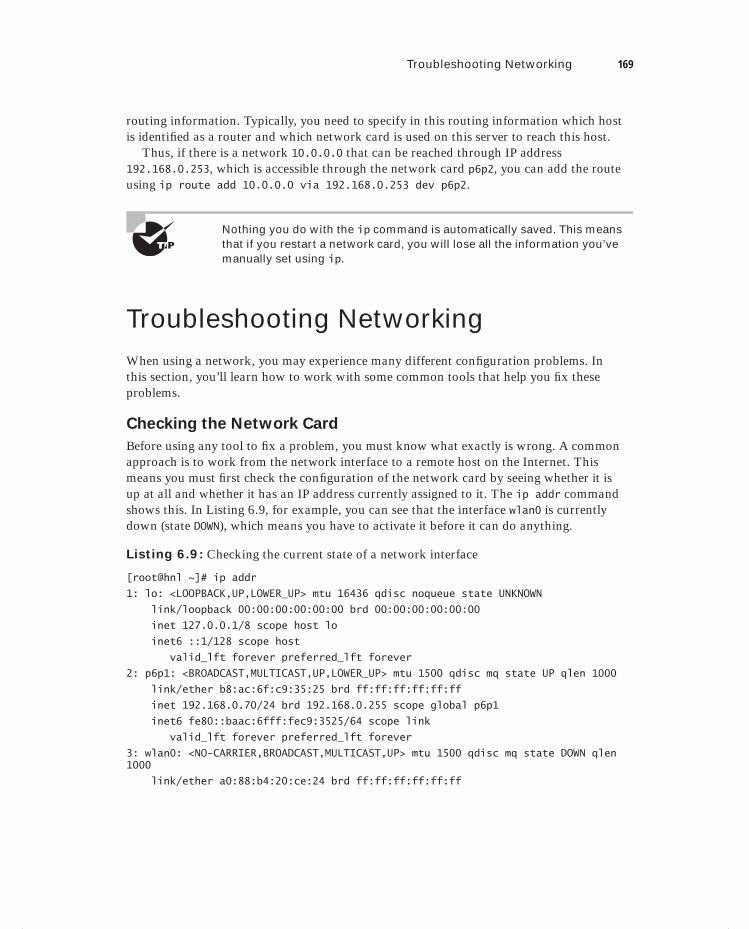
Troubleshooting Networking 169
routing information. Typically, you need to specify in this routing information which host is identifi ed as a router and which network card is used on this server to reach this host.
Thus, if there is a network 10.0.0.0 that can be reached through IP address 192.168.0.253, which is accessible through the network card p6p2, you can add the route using ip route add 10.0.0.0 via 192.168.0.253 dev p6p2.
Nothing you do with the ip command is automatically saved. This means that if you restart a network card, you will lose all the information you’ve manually set using ip.
Troubleshooting NetworkingWhen using a network, you may experience many different confi guration problems. In this section, you’ll learn how to work with some common tools that help you fi x these problems.
Checking the Network Card
Before using any tool to fi x a problem, you must know what exactly is wrong. A common approach is to work from the network interface to a remote host on the Internet. This means you must fi rst check the confi guration of the network card by seeing whether it is up at all and whether it has an IP address currently assigned to it. The ip addr command shows this. In Listing 6.9, for example, you can see that the interface wlan0 is currently down (state DOWN), which means you have to activate it before it can do anything.
Listing 6.9: Checking the current state of a network interface
[root@hnl ~]# ip addr
1: lo: <LOOPBACK,UP,LOWER_UP> mtu 16436 qdisc noqueue state UNKNOWN
link/loopback 00:00:00:00:00:00 brd 00:00:00:00:00:00
inet 127.0.0.1/8 scope host lo
inet6 ::1/128 scope host
valid_lft forever preferred_lft forever
2: p6p1: <BROADCAST,MULTICAST,UP,LOWER_UP> mtu 1500 qdisc mq state UP qlen 1000
link/ether b8:ac:6f:c9:35:25 brd ff:ff:ff:ff:ff:ff
inet 192.168.0.70/24 brd 192.168.0.255 scope global p6p1
inet6 fe80::baac:6fff:fec9:3525/64 scope link
valid_lft forever preferred_lft forever
3: wlan0: <NO-CARRIER,BROADCAST,MULTICAST,UP> mtu 1500 qdisc mq state DOWN qlen 1000
link/ether a0:88:b4:20:ce:24 brd ff:ff:ff:ff:ff:ff
c06.indd 169c06.indd 169 1/8/2013 10:45:05 AM1/8/2013 10:45:05 AM

170 Chapter 6 Connecting to the Network
If you have confi rmed that the problem is related to the local network card, it’s a good idea to see whether you can fi x it without changing the actual confi guration fi les. The fol-lowing tips will help you do that:
Use ifup on your network card to try to change its status to up. If that fails, check the physical connection; that is, is the network cable plugged in?
Use ip addr add to add an IP address manually to the network card. If this fixes the problem, you probably have a DHCP server that’s not working properly or a miscon-figuration in the network card’s configuration file.
After fi xing the problem, you should perform a simple test to see that you can truly com-municate to an outside host. To do this, pinging the default gateway is a very good idea. Just use the ping command, followed by the IP address of the node you want to ping, such as ping 192.168.0.254.
Once the network card is up again, you should check its confi guration fi les. You may have a misconfi guration in the confi guration fi le, or else the DHCP server might be down.
Checking Routing
If the local network card is not the problem, you should check external hosts. The fi rst step is to ping the default gateway. If that works, you can ping a host on the Internet, if possible, by using its IP address. My favorite ping host is 137.65.1.1, which has never failed me in my more than 20 years in IT.
In case your favorite ping host on the Internet doesn’t reply, it’s time to check routing. The following three steps generally give a result:
1. Use ip route show to display your current routing configuration. You should see a line that indicates which node is used as the default gateway. If you don’t, you should add it manually.
2. If you have a default router set, verify that there is no local firewall blocking access. To do this, use iptables -L as root. If it gives you lots of output, then you do have a firewall that’s blocking access. In that case, use service iptables stop to stop it and repeat your test. If you’re still experiencing problems, something might be wrong with your firewall configuration. If this is the case, read Chapter 10, “Securing Your Server with IPtables,” as soon as possible to make sure that the firewall is configured correctly. If possible, turn the firewall on again (after all, it does protect you!) by using service iptables start.
3. If you don’t have a firewall issue, there might be something wrong between your default gateway and the host on the Internet you’re trying to reach. Use traceroute, followed by the IP address of the target host (for example, traceroute 137.65.1.1). This command shows just how far you get and may indicate where the fault occurs. However, if the error is at your Internet provider, there’s nothing you can do.
Checking DNS
The third usual suspect in network communications errors is DNS. A useful command to check DNS confi guration is dig. Using dig, you can fi nd out whether a DNS server is capa-ble of fi nding an authoritative answer for your query about DNS hosts.
c06.indd 170c06.indd 170 1/8/2013 10:45:06 AM1/8/2013 10:45:06 AM
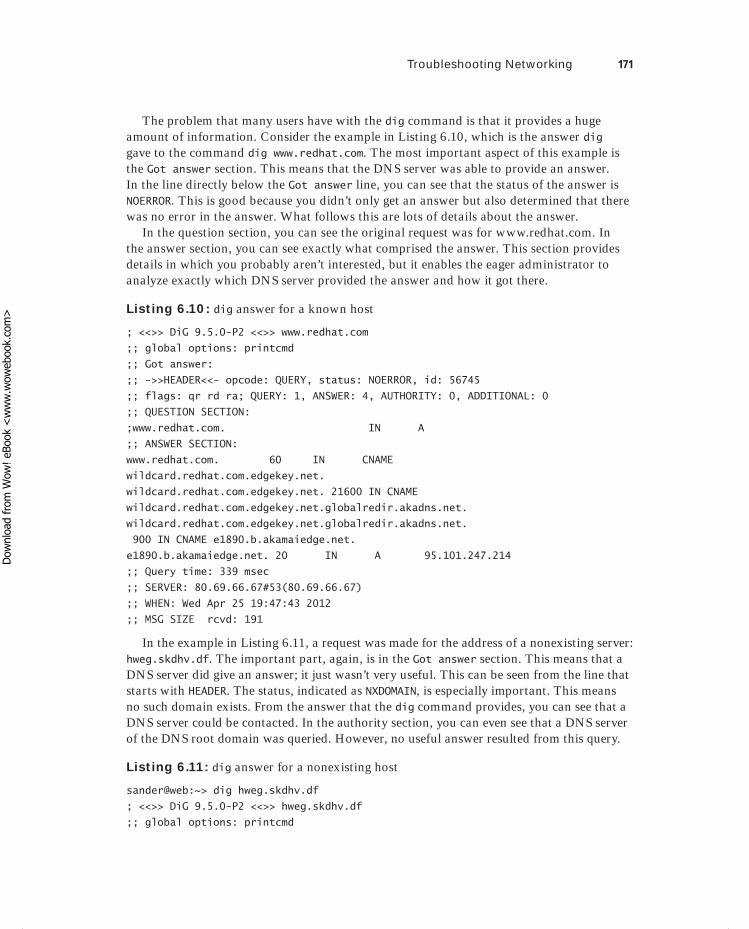
Troubleshooting Networking 171
The problem that many users have with the dig command is that it provides a huge amount of information. Consider the example in Listing 6.10, which is the answer dig gave to the command dig www.redhat.com. The most important aspect of this example is the Got answer section. This means that the DNS server was able to provide an answer. In the line directly below the Got answer line, you can see that the status of the answer is NOERROR. This is good because you didn’t only get an answer but also determined that there was no error in the answer. What follows this are lots of details about the answer.
In the question section, you can see the original request was for www.redhat.com. In the answer section, you can see exactly what comprised the answer. This section provides details in which you probably aren’t interested, but it enables the eager administrator to analyze exactly which DNS server provided the answer and how it got there.
Listing 6.10: dig answer for a known host
; <<>> DiG 9.5.0-P2 <<>> www.redhat.com
;; global options: printcmd
;; Got answer:
;; ->>HEADER<<- opcode: QUERY, status: NOERROR, id: 56745
;; flags: qr rd ra; QUERY: 1, ANSWER: 4, AUTHORITY: 0, ADDITIONAL: 0
;; QUESTION SECTION:
;www.redhat.com. IN A
;; ANSWER SECTION:
www.redhat.com. 60 IN CNAME
wildcard.redhat.com.edgekey.net.
wildcard.redhat.com.edgekey.net. 21600 IN CNAME
wildcard.redhat.com.edgekey.net.globalredir.akadns.net.
wildcard.redhat.com.edgekey.net.globalredir.akadns.net.
900 IN CNAME e1890.b.akamaiedge.net.
e1890.b.akamaiedge.net. 20 IN A 95.101.247.214
;; Query time: 339 msec
;; SERVER: 80.69.66.67#53(80.69.66.67)
;; WHEN: Wed Apr 25 19:47:43 2012
;; MSG SIZE rcvd: 191
In the example in Listing 6.11, a request was made for the address of a nonexisting server: hweg.skdhv.df. The important part, again, is in the Got answer section. This means that a DNS server did give an answer; it just wasn’t very useful. This can be seen from the line that starts with HEADER. The status, indicated as NXDOMAIN, is especially important. This means no such domain exists. From the answer that the dig command provides, you can see that a DNS server could be contacted. In the authority section, you can even see that a DNS server of the DNS root domain was queried. However, no useful answer resulted from this query.
Listing 6.11: dig answer for a nonexisting host
sander@web:~> dig hweg.skdhv.df
; <<>> DiG 9.5.0-P2 <<>> hweg.skdhv.df
;; global options: printcmd
c06.indd 171c06.indd 171 1/8/2013 10:45:06 AM1/8/2013 10:45:06 AM
Dow
nlo
ad fro
m W
ow
! eBook
<w
ww
.wow
ebook.
com
>
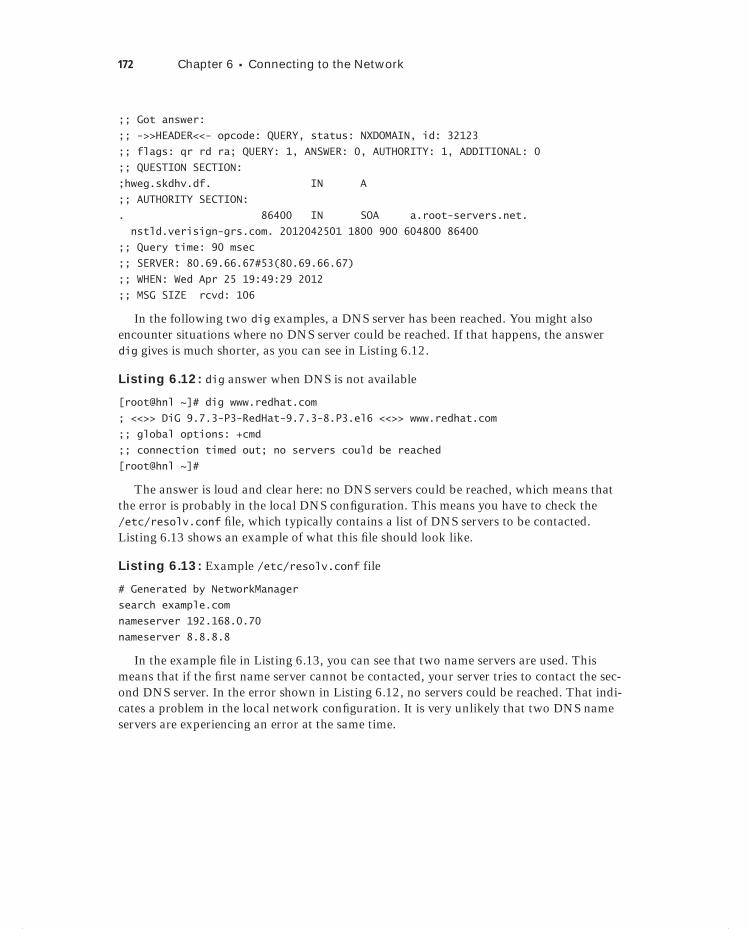
172 Chapter 6 Connecting to the Network
;; Got answer:
;; ->>HEADER<<- opcode: QUERY, status: NXDOMAIN, id: 32123
;; flags: qr rd ra; QUERY: 1, ANSWER: 0, AUTHORITY: 1, ADDITIONAL: 0
;; QUESTION SECTION:
;hweg.skdhv.df. IN A
;; AUTHORITY SECTION:
. 86400 IN SOA a.root-servers.net.
nstld.verisign-grs.com. 2012042501 1800 900 604800 86400
;; Query time: 90 msec
;; SERVER: 80.69.66.67#53(80.69.66.67)
;; WHEN: Wed Apr 25 19:49:29 2012
;; MSG SIZE rcvd: 106
In the following two dig examples, a DNS server has been reached. You might also encounter situations where no DNS server could be reached. If that happens, the answer dig gives is much shorter, as you can see in Listing 6.12.
Listing 6.12: dig answer when DNS is not available
[root@hnl ~]# dig www.redhat.com
; <<>> DiG 9.7.3-P3-RedHat-9.7.3-8.P3.el6 <<>> www.redhat.com
;; global options: +cmd
;; connection timed out; no servers could be reached
[root@hnl ~]#
The answer is loud and clear here: no DNS servers could be reached, which means that the error is probably in the local DNS confi guration. This means you have to check the /etc/resolv.conf fi le, which typically contains a list of DNS servers to be contacted. Listing 6.13 shows an example of what this fi le should look like.
Listing 6.13: Example /etc/resolv.conf file
# Generated by NetworkManager
search example.com
nameserver 192.168.0.70
nameserver 8.8.8.8
In the example fi le in Listing 6.13, you can see that two name servers are used. This means that if the fi rst name server cannot be contacted, your server tries to contact the sec-ond DNS server. In the error shown in Listing 6.12, no servers could be reached. That indi-cates a problem in the local network confi guration. It is very unlikely that two DNS name servers are experiencing an error at the same time.
c06.indd 172c06.indd 172 1/8/2013 10:45:06 AM1/8/2013 10:45:06 AM
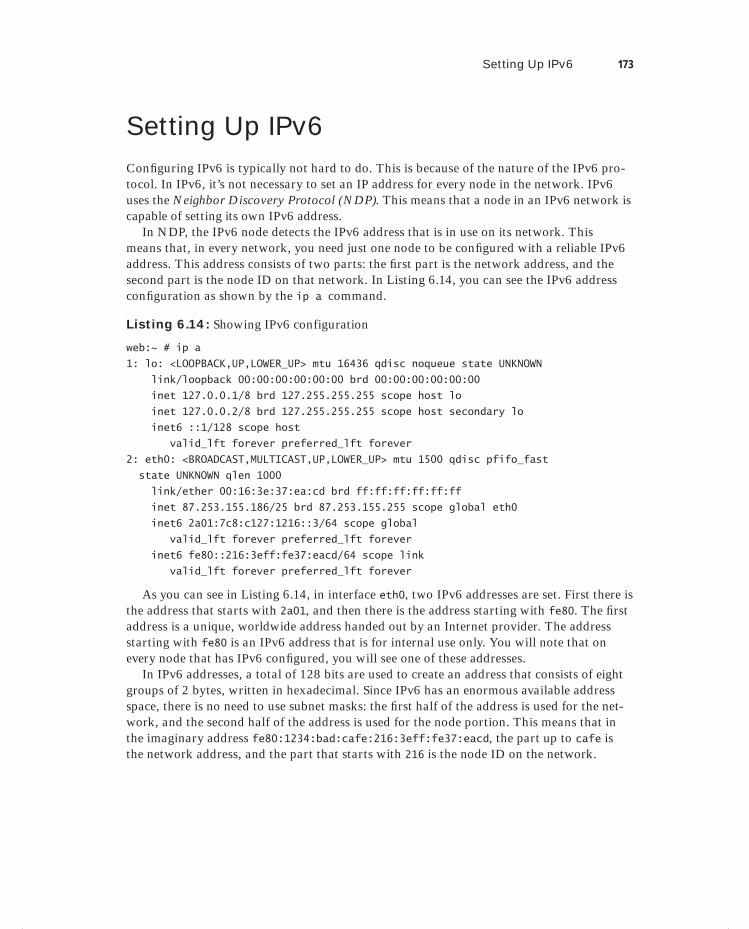
Setting Up IPv6 173
Setting Up IPv6Confi guring IPv6 is typically not hard to do. This is because of the nature of the IPv6 pro-tocol. In IPv6, it’s not necessary to set an IP address for every node in the network. IPv6 uses the Neighbor Discovery Protocol (NDP). This means that a node in an IPv6 network is capable of setting its own IPv6 address.
In NDP, the IPv6 node detects the IPv6 address that is in use on its network. This means that, in every network, you need just one node to be confi gured with a reliable IPv6 address. This address consists of two parts: the fi rst part is the network address, and the second part is the node ID on that network. In Listing 6.14, you can see the IPv6 address confi guration as shown by the ip a command.
Listing 6.14: Showing IPv6 configuration
web:~ # ip a
1: lo: <LOOPBACK,UP,LOWER_UP> mtu 16436 qdisc noqueue state UNKNOWN
link/loopback 00:00:00:00:00:00 brd 00:00:00:00:00:00
inet 127.0.0.1/8 brd 127.255.255.255 scope host lo
inet 127.0.0.2/8 brd 127.255.255.255 scope host secondary lo
inet6 ::1/128 scope host
valid_lft forever preferred_lft forever
2: eth0: <BROADCAST,MULTICAST,UP,LOWER_UP> mtu 1500 qdisc pfifo_fast
state UNKNOWN qlen 1000
link/ether 00:16:3e:37:ea:cd brd ff:ff:ff:ff:ff:ff
inet 87.253.155.186/25 brd 87.253.155.255 scope global eth0
inet6 2a01:7c8:c127:1216::3/64 scope global
valid_lft forever preferred_lft forever
inet6 fe80::216:3eff:fe37:eacd/64 scope link
valid_lft forever preferred_lft forever
As you can see in Listing 6.14, in interface eth0, two IPv6 addresses are set. First there is the address that starts with 2a01, and then there is the address starting with fe80. The fi rst address is a unique, worldwide address handed out by an Internet provider. The address starting with fe80 is an IPv6 address that is for internal use only. You will note that on every node that has IPv6 confi gured, you will see one of these addresses.
In IPv6 addresses, a total of 128 bits are used to create an address that consists of eight groups of 2 bytes, written in hexadecimal. Since IPv6 has an enormous available address space, there is no need to use subnet masks: the fi rst half of the address is used for the net-work, and the second half of the address is used for the node portion. This means that in the imaginary address fe80:1234:bad:cafe:216:3eff:fe37:eacd, the part up to cafe is the network address, and the part that starts with 216 is the node ID on the network.
c06.indd 173c06.indd 173 1/8/2013 10:45:06 AM1/8/2013 10:45:06 AM
174 Chapter 6 Connecting to the Network
If you look carefully at the node ID of the IPv6 address, you will see that it includes the MAC address of the network card on which the IPv6 address is set. You can see this in Listing 6.14, where the MAC address 00:16:3e:37:ea:cd is easily recognized in the node part of the fe80 address, which is 216:3eff:fe:37:eacd. Because the MAC address is just 6 bytes by default, the node ID is padded with the bytes ff:fe to make it an 8-byte address in the 16-byte IPv6 address.
Now that you know how IPv6 uses the MAC address in the node ID of the address, it’s easy to imagine how NDP works. NDP detects the network address in use on this network and just adds the node ID to this network.
As for servers, it might be convenient to use a node ID that is easier to recognize. You can also set it manually. Exercise 6.3 shows you how to do this.
E X E R C I S E 6 . 3
Setting a Fixed IPv6 Address
In this exercise, you will use NetworkManager to set a fi xed IPv6 address. To avoid any confl icts, you’ll use an address from the fe80 network address range. This range is reserved for use in your own LAN environment.
1. Right-click the NetworkManager icon, and select the Wired tab. From there, select your server’s network interface, and click Edit to modify its properties.
2. From the Editing System window, select the IPv6 Settings tab. From the Method drop-down list, select Manual and then click Add to open the interface that allows you to add an IPv6 address.
3. Enter the address fe80::10. The fact that you’re using :: in the address means that between the ::, the address consists of all 0s. This means that this address could also have been written as fe80:0:0:0:0:0:0:10.
4. Click Apply to save and apply the IPv6 settings to your server.
After completing the procedure in Exercise 6.3, you’ve confi gured your server as an IPv6 host. This means that using the Neighbor Discovery Protocol, it is now able to hand out IPv6 addresses to other nodes in the network that are trying to fi nd out which address to use.
To complete the IPv6 confi guration of your network, you should also confi gure the DNS server to enable address resolution for node names to IPv6 addresses and IPv6 addresses into node names.
Configuring SSHMost servers are in datacenters—hostile environments that are noisy and cold. This means that as an administrator of a Red Hat Enterprise Linux Server, you probably want to access the server from a distance. The Secure Shell (SSH) protocol is the default service to obtain remote access to a server.
c06.indd 174c06.indd 174 1/8/2013 10:45:07 AM1/8/2013 10:45:07 AM

Configuring SSH 175
To use SSH, you need an SSH server and an SSH client. SSH server is a process that runs on your server. On most Linux distributions, the name of this process is sshd. To connect to it from a client computer, you can use the ssh client utility if the client is Linux, or you can use PuTTY if you’re on a Windows client.
Enabling the SSH Server
The SSH service is installed on your Red Hat Enterprise Linux server. It isn’t enabled by default, however, so you should make sure to start it manually using the service sshd start command. After doing that, make sure that it is also started after a reboot of your server by using chkconfig sshd on. After performing these tasks, you can fi rst do a basic connection test and connect to it using the ssh command. Exercise 6.4 lets you practice these steps.
E X E R C I S E 6 . 4
Enabling and Testing the SSH Server
In this exercise, you’ll enable the SSH server and test its connectivity from your own local server.
1. From a terminal with root permissions, use the command service sshd start. In the unlikely event that this command shows an error, use yum install openssh-server to install the ssh server package.
2. Use the chkconfig sshd on command to enable the SSH service, and add it to your server’s runlevels. This ensures that the SSH server also comes up after rebooting the server.
3. Now it’s time to test the SSH server. Open a new terminal window, and use ssh root@localhost to open an SSH session where you’re logging in as root. Enter the password when prompted.
4. You’re now in an SSH session. In this example, you tested the connection from your own local machine. You can also test the connection from a remote machine. This will be discussed further in the sections that follow.
5. Type exit to close the SSH sessions.
You’ve seen that it’s not hard to enable SSH on your server. An SSH server that has been enabled with all the default settings isn’t a secure SSH server, however. To make the SSH server secure, there are at least two modifi cations you should make to the /etc/ssh/sshd_config fi le: the Port setting and the AllowRootLogin parameter.
There are two configuration files: /etc/ssh/ssh_config is the configu-ration file in which you put default settings for the ssh client utility, and you specify default settings for the Secure Shell server in /etc/ssh/sshd_config.
c06.indd 175c06.indd 175 1/8/2013 10:45:07 AM1/8/2013 10:45:07 AM

176 Chapter 6 Connecting to the Network
Make sure you consider at least the following SSH security settings:
Port By default, SSH listens on port 22. Every hacker knows this. This means that if you offer SSH services on port 22 of your server and it is connected directly to the Internet, you will see the fi rst brute-force attack, launching a dictionary attack against your server within minutes. So if you’re directly connected to the Internet, change the SSH port to something less obvious. I like putting it on port 443 (the average hacker expects HTTPS to be offered on that port and therefore will launch an HTTPS attack that will not work). The disadvantage of using port 443, however, is that you can’t use HTTPS anymore. So, use any port you like, as long as it’s not port 22.
ListenAddress By default, your SSH server offers its services on all IP addresses. In some cases, you might want to restrict this to only the IP addresses that are visible from the inter-nal network and not from the Internet. If this is the case, change 0.0.0.0 to the specifi c IP address on which your SSH server should offer its services.
PermitRootLogin By default, this parameter allows the user root to log in to your SSH server. This is not a good idea. If root is permitted to log in, the potential hacker only has to guess the root password. It’s better to switch off root login by giving this parameter the value no. This means you’ll have to connect as an ordinary user, and once connected, you’ll have to use su - to escalate your privileges to the root level.
PasswordAuthentication By default, this parameter allows users to log in using pass-words. If you have created public/private key pairs, you might consider switching off pass-word authentication completely. Be careful, though: switching off password authentication also makes it diffi cult for you to log in from an unknown machine where your private key is not available.
AllowUsers This is a very nice parameter that is not in sshd_config by default. Everyone should use it and add a list of only those users you want to allow to log in to your SSH server. This makes it really hard for hackers, because they will have to guess the name of that user before starting this evil work!
You can change the default sshd behavior using many other parameters. However, the parameters discussed are generally considered the most important parameters. In Exercise 6.5, you’ll learn how to change some of these important parameters.
E X E R C I S E 6 . 5
Securing the SSH Server
In this exercise, you’ll change some parameters that help you secure the SSH server. You’ll also create two user accounts to test the AllowUsers parameter.
c06.indd 176c06.indd 176 1/8/2013 10:45:07 AM1/8/2013 10:45:07 AM

Configuring SSH 177
E X E R C I S E 6 . 5 ( c ont inue d )
1. Open a root shell on your server, and use the commands useradd linda and useradd lisa to add two users to your server. Next set the password for these users to pass-word by using passwd linda and passwd lisa.
2. Use vi /etc/ssh/sshd_config to open the sshd confi guration fi le.
3. Change the Port parameter, and give it a value 443. Next set the PermitRootLogin parameter value to no, and add the parameter AllowUsers, giving it the value linda.
4. Close the vi editor using the :wq! command, and restart the sshd process using ser-vice sshd restart.
5. Connect as root on SSH port 443 using ssh -p 443 root@localhost. Access should be denied. Try to connect as lisa using ssh -p 443 lisa@localhost. Access should also be denied. Now try to connect as linda using ssh -p 443 linda@localhost. You should be granted access.
Using the SSH Client
An SSH client is available on every Linux computer. Using it is easy—just use the name of the server you’d like to connect to as the argument, and a connection will be established. For example, use ssh 192.168.0.1 to establish an SSH session with SSH host 192.168.0.1.
By default, SSH connects with the same user ID as the one with which you are currently logged in. You can specifi cally tell the SSH client to connect as a different user, using user-name@servername as the argument while using the SSH command. For instance, to connect as user linda to server 192.168.0.1, you can use ssh [email protected].
Using PuTTY on Windows Machines
Every Linux computer has an SSH client by default. If you’re working in a Windows envi-ronment, you can also establish SSH sessions using PuTTY. You can download a free copy of PuTTY from www.putty.org and install it on your Windows computer. After start-ing PuTTY, you’ll see the interface shown in Figure 6.5. From there, you can enter the IP address or name of the server with which you want to connect and click Open to establish the connection.
Alternatively, you can enter different properties of the SSH session you want to establish using PuTTY, including font sizes and other parameters, and you can specify a name under Saved Sessions. Next click Save to save the parameters, which creates an entry in the list of saved sessions. By using these, you can easily reestablish a session to a host that you fre-quently use.
c06.indd 177c06.indd 177 1/8/2013 10:45:07 AM1/8/2013 10:45:07 AM
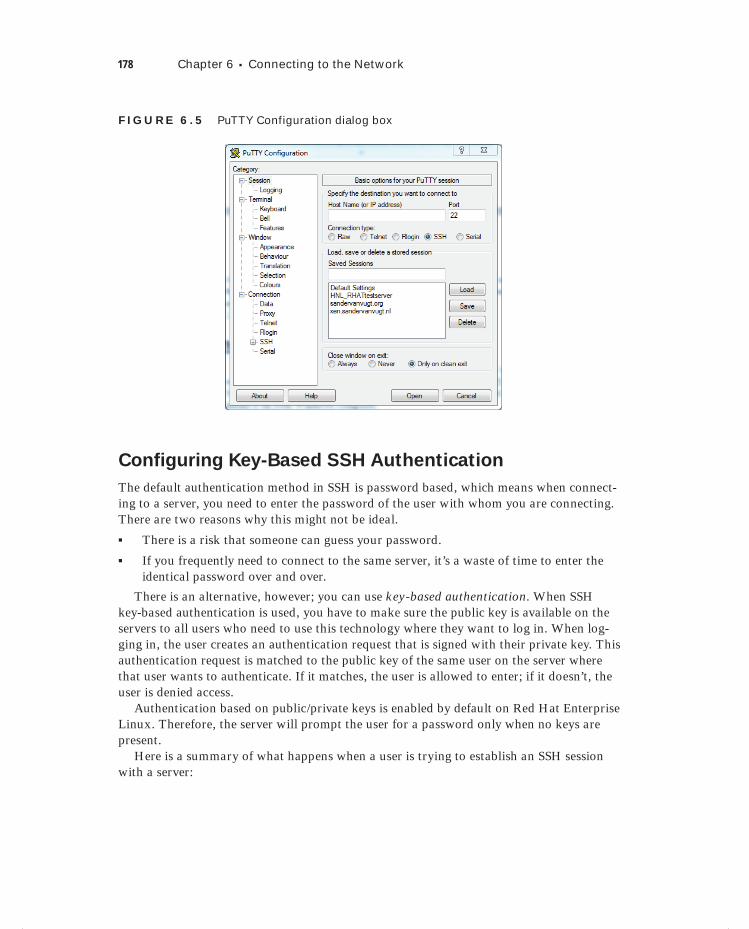
178 Chapter 6 Connecting to the Network
F I GU R E 6 .5 PuTTY Configuration dialog box
Configuring Key-Based SSH Authentication
The default authentication method in SSH is password based, which means when connect-ing to a server, you need to enter the password of the user with whom you are connecting. There are two reasons why this might not be ideal.
There is a risk that someone can guess your password.
If you frequently need to connect to the same server, it’s a waste of time to enter the identical password over and over.
There is an alternative, however; you can use key-based authentication. When SSH key-based authentication is used, you have to make sure the public key is available on the servers to all users who need to use this technology where they want to log in. When log-ging in, the user creates an authentication request that is signed with their private key. This authentication request is matched to the public key of the same user on the server where that user wants to authenticate. If it matches, the user is allowed to enter; if it doesn’t, the user is denied access.
Authentication based on public/private keys is enabled by default on Red Hat Enterprise Linux. Therefore, the server will prompt the user for a password only when no keys are present.
Here is a summary of what happens when a user is trying to establish an SSH session with a server:
c06.indd 178c06.indd 178 1/8/2013 10:45:08 AM1/8/2013 10:45:08 AM
Configuring SSH 179
1. If public key authentication is enabled (which is the default), SSH checks the .ssh directory in the user’s home directory to see whether a private key is present.
2. If a private key is found, ssh creates a packet containing some data (the salt), encrypts that packet with the private key, and sends it to the server. The public key is also sent with this packet.
3. The server then checks whether a file with the name authorized_keys exists in the home directory of the user. If it does not, the user cannot authenticate with their keys. If this file does exist and the public key is an allowed key that is also identical to the key that was previously stored on the server, the server uses this key to check the signature.
4. If the signature can be verified, the user is granted access. If it cannot, the server will prompt the user, who tries to connect for their password.
In Exercise 6.6, you’ll learn how to set up key-based authentication.
E X E R C I S E 6 . 6
Setting Up Key-Based Authentication
To use key-based authentication, you first need to create a key pair. Next you have to copy the key you want to use to the host to which you want to create a connection. You would normally do this between two hosts. This means that in order to perform this exercise, you need a second host that has Red Hat Enterprise Linux installed. In this exercise, the remote host is referred to as the server. If you don’t have a second host on which you can work, replace the host name server with localhost, and it will also work.
1. Open a root shell, and from there use ssh server. You will be prompted for a password.
2. Type exit to close the SSH session.
3. Now generate the public-private key pair using ssh-keygen. You will be prompted for the fi le in which you want to save the private key, as you can see in Listing 6.15. Press Enter to accept the default, which saves the key in /root/.ssh/id_rsa. Next press Enter twice to save the key without a passphrase. This completes the procedure and creates two fi les: id_rsa and id_rsa.pub. The private key is stored in id_rsa, and the public key is stored in id_rsa.pub.
Listing 6.15: Creating a public/private key pair
[root@hnl ~]# ssh-keygen
Generating public/private rsa key pair.
Enter file in which to save the key (/root/.ssh/id_rsa):
Enter passphrase (empty for no passphrase):
c06.indd 179c06.indd 179 1/8/2013 10:45:08 AM1/8/2013 10:45:08 AM
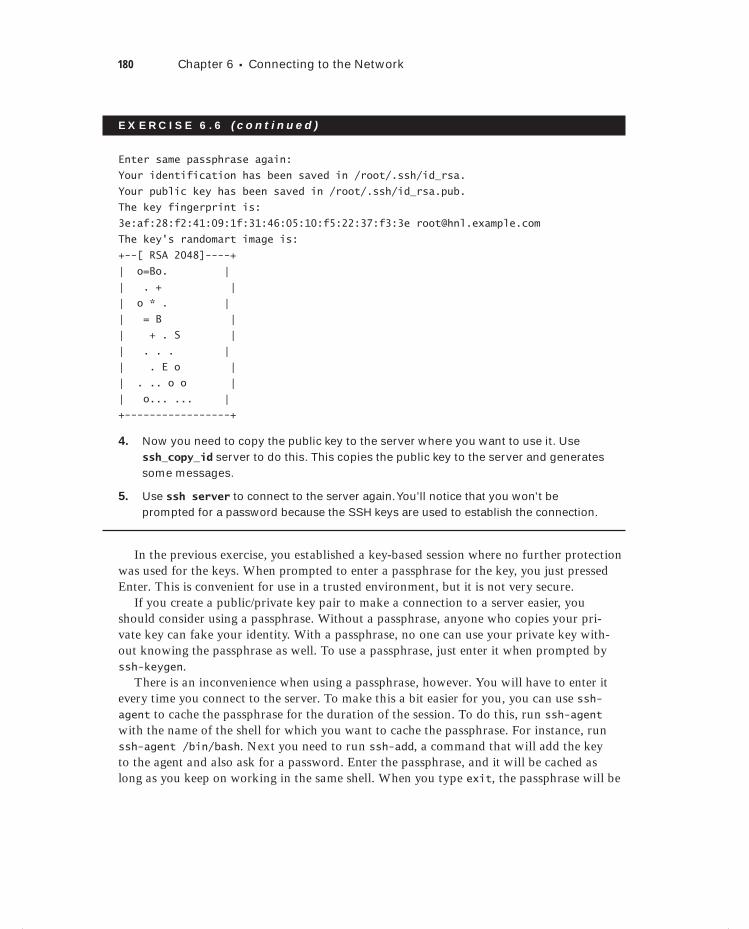
180 Chapter 6 Connecting to the Network
E X E R C I S E 6 . 6 ( c ont inue d )
Enter same passphrase again:
Your identification has been saved in /root/.ssh/id_rsa.
Your public key has been saved in /root/.ssh/id_rsa.pub.
The key fingerprint is:
3e:af:28:f2:41:09:1f:31:46:05:10:f5:22:37:f3:3e [email protected]
The key's randomart image is:
+--[ RSA 2048]----+
| o=Bo. |
| . + |
| o * . |
| = B |
| + . S |
| . . . |
| . E o |
| . .. o o |
| o... ... |
+-----------------+
4. Now you need to copy the public key to the server where you want to use it. Use ssh_copy_id server to do this. This copies the public key to the server and generates some messages.
5. Use ssh server to connect to the server again. You’ll notice that you won’t be prompted for a password because the SSH keys are used to establish the connection.
In the previous exercise, you established a key-based session where no further protection was used for the keys. When prompted to enter a passphrase for the key, you just pressed Enter. This is convenient for use in a trusted environment, but it is not very secure.
If you create a public/private key pair to make a connection to a server easier, you should consider using a passphrase. Without a passphrase, anyone who copies your pri-vate key can fake your identity. With a passphrase, no one can use your private key with-out knowing the passphrase as well. To use a passphrase, just enter it when prompted by ssh-keygen.
There is an inconvenience when using a passphrase, however. You will have to enter it every time you connect to the server. To make this a bit easier for you, you can use ssh-agent to cache the passphrase for the duration of the session. To do this, run ssh-agent with the name of the shell for which you want to cache the passphrase. For instance, run ssh-agent /bin/bash. Next you need to run ssh-add, a command that will add the key to the agent and also ask for a password. Enter the passphrase, and it will be cached as long as you keep on working in the same shell. When you type exit, the passphrase will be
c06.indd 180c06.indd 180 1/8/2013 10:45:08 AM1/8/2013 10:45:08 AM
Configuring SSH 181
forgotten, and you’ll have to repeat the same procedure if you want to start caching your passphrase again. In Exercise 6.7, you’ll create a private key that is secured with a pass-phrase, and next you will use ssh-agent to cache this passphrase.
E X E R C I S E 6 . 7
Setting Up Key-Based SSH Authentication Protected with a Passphrase
In this exercise, you’ll generate an SSH public/private key pair. You’ll protect the private key by adding a passphrase. Next you will start ssh-agent to cache the passphrase.
1. Open a root shell, and type ssh-keygen. When asked where to save the fi le, press Enter. You will be prompted that the fi le /root/.ssh/id_rsa already exists. Type Y to confi rm that you want to overwrite this fi le.
2. Now enter a passphrase, and press Enter to confi rm. Type the same passphrase again, and once more press Enter. The key will now be saved.
3. Copy the new public key to your server using ssh-copy-id server. You need to enter your password once to perform this operation.
4. Establish an SSH session to your server using ssh server. Enter the passphrase when prompted. Next type exit to close this session.
5. Type ssh-agent /bin/bash. Next type ssh-add to add your current passphrase. Enter the passphrase, and you will see a confirmation prompting Identity added.
6. Type ssh server. At this point, you’ll notice that you can enter a session without entering a passphrase.
7. Type exit to close the current ssh session.
8. Type exit to close the ssh-agent session. When you do this, the passphrase is forgotten.
9. Type ssh server to establish a new session. Notice that you are prompted to enter the passphrase again.
Using Graphical Applications with SSH
By default, you cannot use graphical programs over an SSH session. To use them in spite of this, you need to enable X-Forwarding on the SSH client. To do this, use ssh -X instead of just ssh when establishing a connection.
As an alternative, you can also set X-Forwarding to on for all users. To do this, you have to modify the /etc/ssh/ssh_config fi le. This fi le contains the parameter ForwardX11.
c06.indd 181c06.indd 181 1/8/2013 10:45:08 AM1/8/2013 10:45:08 AM
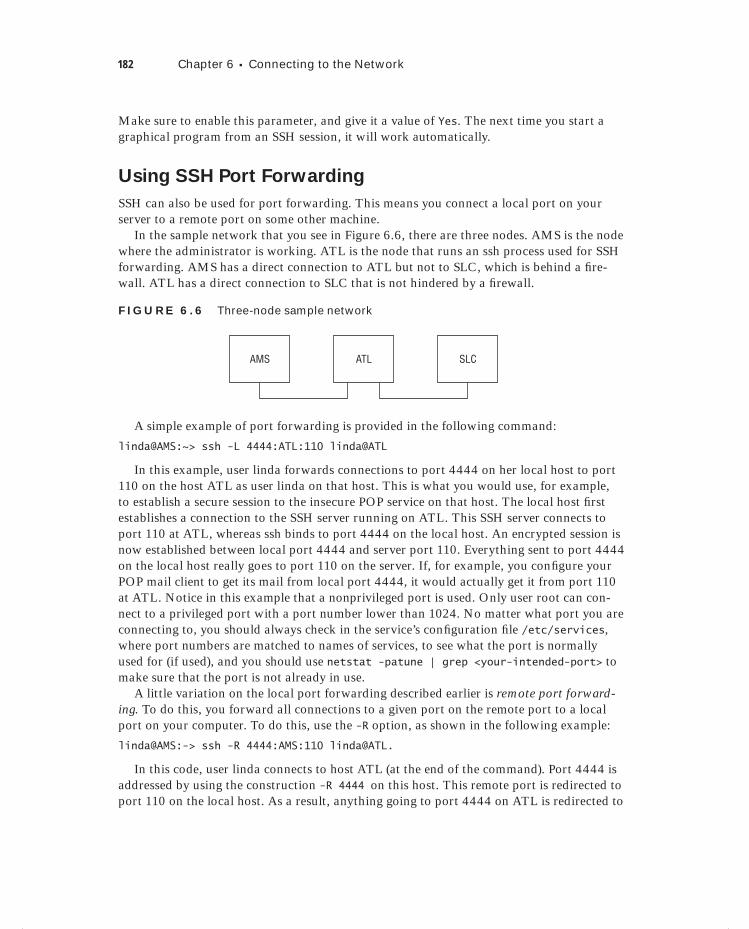
182 Chapter 6 Connecting to the Network
Make sure to enable this parameter, and give it a value of Yes. The next time you start a graphical program from an SSH session, it will work automatically.
Using SSH Port Forwarding
SSH can also be used for port forwarding. This means you connect a local port on your server to a remote port on some other machine.
In the sample network that you see in Figure 6.6, there are three nodes. AMS is the node where the administrator is working. ATL is the node that runs an ssh process used for SSH forwarding. AMS has a direct connection to ATL but not to SLC, which is behind a fi re-wall. ATL has a direct connection to SLC that is not hindered by a fi rewall.
F I GU R E 6 .6 Three-node sample network
AMS ATL SLC
A simple example of port forwarding is provided in the following command:
linda@AMS:~> ssh -L 4444:ATL:110 linda@ATL
In this example, user linda forwards connections to port 4444 on her local host to port 110 on the host ATL as user linda on that host. This is what you would use, for example, to establish a secure session to the insecure POP service on that host. The local host fi rst establishes a connection to the SSH server running on ATL. This SSH server connects to port 110 at ATL, whereas ssh binds to port 4444 on the local host. An encrypted session is now established between local port 4444 and server port 110. Everything sent to port 4444 on the local host really goes to port 110 on the server. If, for example, you confi gure your POP mail client to get its mail from local port 4444, it would actually get it from port 110 at ATL. Notice in this example that a nonprivileged port is used. Only user root can con-nect to a privileged port with a port number lower than 1024. No matter what port you are connecting to, you should always check in the service’s confi guration fi le /etc/services, where port numbers are matched to names of services, to see what the port is normally used for (if used), and you should use netstat -patune | grep <your-intended-port> to make sure that the port is not already in use.
A little variation on the local port forwarding described earlier is remote port forward-ing. To do this, you forward all connections to a given port on the remote port to a local port on your computer. To do this, use the -R option, as shown in the following example:
linda@AMS:-> ssh -R 4444:AMS:110 linda@ATL.
In this code, user linda connects to host ATL (at the end of the command). Port 4444 is addressed by using the construction -R 4444 on this host. This remote port is redirected to port 110 on the local host. As a result, anything going to port 4444 on ATL is redirected to
c06.indd 182c06.indd 182 1/8/2013 10:45:08 AM1/8/2013 10:45:08 AM
Configuring VNC Server Access 183
port 110 on AMS. This example would be useful if ATL is the client and AMS is the server running a POP mail server to which linda wants to connect.
Another common occurrence is when the host that you want to forward cannot be reached directly because it is behind a fi rewall. In this case, you can establish a tunnel to another host that is reachable with SSH. Imagine that in the example in Figure 6.5, the host SLC is running a POP mail server to which user linda wants to connect. This user would enter the following command:
linda@AMS:~> ssh -L 4444:SLC:110 linda@ATL
In this example, user linda forwards connections to port 4444 on her local host to server ATL that is running ssh. This server in turn would forward the connection to port 110 on server SLC. Note that, in this scenario, the only requirement is that ATL has the SSH service activated and no sshd is needed on SLC for this to work. Also note that there is no need for host AMS to have direct contact with SLC because this would happen from host ATL onward.
In the previous examples, you learned how to use the SSH command to do port forward-ing. The SSH command isn’t your only option for doing this, however. If a port forwarding connection needs to be established continuously, you can put it in the ssh confi guration fi le at the client computer. Put it in .ssh/config in your home directory if you want it to work for your user account only. Alternatively, you can put it in /etc/ssh/ssh_config if you want it to apply to all users on your machine. The parameter that should be used as an alternative to ssh -L 4444:ATL:110 is as follows:
LocalForward 4444 ATL:110
Configuring VNC Server AccessIn most cases, SSH gives you everything you need to establish a session to a remote server. Most administration programs are text-based. In some cases, though, you may want to establish a connection to a full graphical desktop. For such cases, VNC provides a useful solution.
To confi gure VNC on Red Hat Enterprise Linux, fi rst you install the tigervnc package. This package has a confi guration fi le in /etc/sysconfig/vncservers. You need to pre-defi ne every VNS session you want to enable for specifi c users in this confi guration fi le. The contents of the fi le may appear as follows:
VNCSERVERS="1:root"
VNCSERVERARGS[1]="-geometry 800x600 -nolisten tcp -localhost"
In the previous confi guration example, VNC session 1 is defi ned and assigned to user root on the fi rst line. The parameters for this session are defi ned after that. The session number to which the parameters apply is shown between square brackets, and following that is a list of arguments that apply to this session. The most important argument in this
c06.indd 183c06.indd 183 1/8/2013 10:45:09 AM1/8/2013 10:45:09 AM
184 Chapter 6 Connecting to the Network
list is -localhost. This specifi es that VNC clients are allowed only from localhost, which means they have to establish a secured session with the VNC server fi rst. To establish a secured session with the VNC Server, SSH tunneling is used.
Before starting the VNC server, VNC passwords must be generated for all users to whom a session is assigned. To set the password, you must log in as that user and use the command vncpasswd to set the password. Setting the password creates the fi le ~/.vnc/passwd, and if this fi le doesn’t exist, the VNC server refuses to start. Only once the pass-word has been specifi ed can the VNC server be started.
Once started, a connection to the VNC server is created using the vncviewer VNC cli-ent. For example, the command vncviewer -via root@server localhost:1 would connect to the VNC session defi ned in the example confi guration fi le shown earlier. In Exercise 6.8, you will set up a VNC server yourself.
E X E R C I S E 6 . 8
Setting Up a VNC Server
In this exercise, you will set up a VNC Server. To do this exercise, you’ll need two machines. If you don’t have two machines available, refer to Chapter 8, “Under-standing and Configuring SELinux,” about KVM virtualization before getting started. In this chapter, you will install a second Red Hat Server as a virtual machine. The two machines are referred to as client and server in this exercise.
1. Use yum install tigervnc-server to install the VNC package on the server.
2. Edit the confi guration fi le /etc/sysconfig/vncservers, and include the following two lines:
VNCSERVERS="1:linda"
VNCSERVERARGS[1]="-geometry 800x600 -nolisten tcp -localhost"
3. Use su - linda on the server to switch to the user account linda. From there, type vncpasswd to set the VNC password for this user.
4. Start the vncserver, and put it in the runlevels of your server using service vnc-server start followed by chkconfig vncserver on.
5. From the client, use vncviewer -via linda@server localhost:1. This establishes the VNC session from the client to the server.
c06.indd 184c06.indd 184 1/8/2013 10:45:09 AM1/8/2013 10:45:09 AM

Summary 185
SummaryIn this chapter, you learned how to confi gure networking on Red Hat Enterprise Linux. You read how to set up your network card with IPv4 and IPv6, and you discovered the ser-vices that are related to managing the network. You also learned how to confi gure SSH and VNC for connecting remotely to your server. In the next chapter, you’ll learn how to work with user and group accounts on your server.
c06.indd 185c06.indd 185 1/8/2013 10:45:09 AM1/8/2013 10:45:09 AM

c06.indd 186c06.indd 186 1/8/2013 10:45:09 AM1/8/2013 10:45:09 AM

PART
IIISecuring Red Hat Enterprise Linux
c07.indd 187c07.indd 187 1/8/2013 10:45:38 AM1/8/2013 10:45:38 AM

c07.indd 188c07.indd 188 1/8/2013 10:45:40 AM1/8/2013 10:45:40 AM

Working with Users, Groups, and Permissions
TOPICS COVERED IN THIS CHAPTER:
Managing Users and Groups
Using Graphical Tools for User and Group Management
Using External Authentication Sources
Understanding the Authentication Process
Understanding nsswitch
Managing Permissions
Chapter
7
c07.indd 189c07.indd 189 1/8/2013 10:45:40 AM1/8/2013 10:45:40 AM

Managing Users and GroupsTo create users from a command-line environment, you can use the useradd command. Alternatively, it is possible to add users to the relevant confi guration fi les manually. The latter may be useful in an environment where users are added from a custom-made shell script, but normally it is not recommended. The reason for this is obvious—an error in the main user confi guration fi les might cause problems for all users on your server.
In this section, you will learn how to add users from the command line using useradd, how the relevant confi guration fi les are modifi ed for these users, and how users can be added using the system-confi g-users utility.
Commands for User Management
If you want to add users from the command line, useradd is the command to use. Some other commands are available as well. Here are the most important commands for manag-ing the user environment:
useradd This command is used for adding users to the local authentication system.
usermod This command is used to modify properties for existing users.
userdel This command is used to delete users properly from a system.
Using useradd is simple. In its easiest form, it just takes the name of a user as its argu-ment, so useradd linda will create a user called linda on your server.
The useradd command has a few options. If an option is not specifi ed, useradd will read its confi guration fi le in /etc/default/useradd. In this confi guration fi le, useradd fi nds some default values (see Listing 7.1). These specify the groups the user will become a mem-ber of, where to create the user’s home directory, and more.
Listing 7.1: Setting default values in /etc/default/useradd
[root@hnl ~]# cat /etc/default/useradd
# useradd defaults file
c07.indd 190c07.indd 190 1/8/2013 10:45:40 AM1/8/2013 10:45:40 AM
Managing Users and Groups 191
GROUP=100
HOME=/home
INACTIVE=-1
EXPIRE=
SHELL=/bin/bash
SKEL=/etc/skel
CREATE_MAIL_SPOOL=yes
You can set different properties to manage users. To set up an effi cient server, it’s impor-tant to know the purpose of the settings. For every user, the group membership, UID, and shell default properties are set.
Group Membership
In any UNIX environment, a user can be a member of two different kinds of groups: the primary group and all other groups. Every user must be a member of a primary group. If one user on your system does not have a primary group setting, no one will be able to log in, so membership in a primary group is vital. On a Red Hat server, all users are by default a member of a group that has the same name as the user. This is done for security reasons to make sure that no fi les are shared with other users by accident.
Users can be members of more than just the primary group, and they will automatically have access to the rights granted to these other groups. The most important difference between a primary group and other groups is that the primary group will automatically become group owner of a new fi le that a user creates.
You now know the relation between the primary group and the other groups of which a user is a member. You will learn how to apply this knowledge in the sections covering group management later in this chapter.
UID
Another major type of information used when creating a user is the user ID (UID). For your server, this is the only way to identify a user. (Usernames are just a convenience because we, as humans, tend not to handle being identifi ed by numbers well.) In general, all users need a unique UID. Red Hat Enterprise Linux starts generating local UIDs at 500, as explained in a moment. The highest UID available by default is 60000. This is because of a restriction that is defi ned in /etc/login.defs, which can be changed if needed.
Typically, UIDs below 500 are reserved for system accounts that are needed to start ser-vices. The UID 0 is also special—the user who has it has complete administrative permis-sions to the server. UID 0 is typically reserved for the user root.
Shell
To log in to a server, every user needs a shell. The shell will enable interpretation of com-mands the user enters from their console. The default shell in Linux is /bin/bash, but several other shells are available. One of the more common alternative shells is /bin/tcsh, which has a scripting language similar to the C programming language, which makes tcsh the perfect shell for C programmers.
c07.indd 191c07.indd 191 1/8/2013 10:45:41 AM1/8/2013 10:45:41 AM

192 Chapter 7 Working with Users, Groups, and Permissions
You should, however, be aware that not all users need shells. Users with a shell are allowed to log in locally to your system and access any fi les and directories stored on that system, as far as their permissions allow such access. If you are using your system as a mail server where users only need to access their mailboxes using the POP protocol, it makes no sense to give them a login shell. Therefore, you could choose to specify an alternative com-mand to be used as the shell. For example, /sbin/nologin can be used if you don’t want to allow the user any interaction with your system locally. It may make sense to use other commands as shell. If, for example, you want the Midnight Commander to be started auto-matically when a user logs in to your system, make sure that /usr/bin/mc is specifi ed as the shell for that user.
Be sure to include the complete path to the command you want to execute as the shell environment for a user. No clue about the complete path for your favorite command? Use the command which. For example, which mc will display a line showing exactly where the program file you are seeking is located.
Managing Passwords
To access the system, a user needs a password. By default, login is denied for the users you create, and passwords are not assigned automatically. Thus, your newly created users can’t do anything on the server. To enable these users, assign passwords using the passwd command.
The passwd command is easy to use. A user can use it to change his password. If that happens, the passwd command will fi rst prompt for the old password and then for the new one. Some complexity requirements, however, have to be met. This means, in essence, that the password cannot be a word that is also in the dictionary.
The root user can change passwords as well. To set the password for a user, root can use passwd followed by the name of the user whose password needs to be changed. For exam-ple, passwd linda would change the password for user linda.
The user root can use the passwd command in three generic ways. First, you can use it for password maintenance—to change a password, for example. Second, it can also be used to set password expiry information, which dictates that a password will expire at a particu-lar date. Lastly, the passwd command can be used for account maintenance. For example, an administrator can use passwd to lock an account so that login is disabled temporarily.
Performing Account Maintenance with passwd
In an environment where many users are using the same server, it is important to perform some basic account maintenance tasks. These include locking accounts when they are unneeded for a long time, unlocking an account, and reporting the password status. An
c07.indd 192c07.indd 192 1/8/2013 10:45:41 AM1/8/2013 10:45:41 AM
Managing Users and Groups 193
administrator can also force a user to change their password on fi rst use. To perform these tasks, the passwd command has some options available.
-l Enables an administrator to lock an account. For example, passwd -l lucy will lock the account for user lucy.
-u Unlocks an account that has been locked before.
-S Reports the status of the password for a given account.
-e Forces the user to change their password on next login.
Managing Password Expiry
In a server environment, it makes sense to change passwords occasionally. The passwd com-mand has some options to manage account expiry.
-n min This rarely used option is applied to set the minimum number of days that a user must use their password. If this option is not used, a user can change their password at any time.
-x max This option is used to set the maximum number of days a user can use a password without changing it.
-c warn When a password is about to expire, you can use this option to send a warning to the user. The argument for this option specifi es the number of days before expiry of the password that the user will receive the warning.
-i inact Use this option to expire an account automatically when it hasn’t been used for a given period of time. The argument for this option is used to specify the exact duration of this period.
Apart from the passwd command, you can also use chage to manage account expiry. Consult the man page for more details on its usage.
Modifying and Deleting User Accounts
If you already know how to create a user, modifying an existing user account is no big deal. The usermod command is used for this purpose. It employs many of the same options that are used with useradd. For example, use usermod -g 101 linda to set the new primary group of user linda to a group with the unique ID 101. The usermod command has many other options. For a complete overview, consult its man page.
Another command that you will occasionally need is userdel. Use this command to delete accounts from your server. userdel is a very simple command: userdel linda deletes user linda from your system, for example. However, if used this way, userdel will leave the home directory of your user untouched. This may be necessary to ensure that your company still has access to the work of a user; however, it may be necessary to delete the user’s home directory as well. If there is no more useful data in the user home directory, it makes sense to delete it as well.
c07.indd 193c07.indd 193 1/8/2013 10:45:41 AM1/8/2013 10:45:41 AM
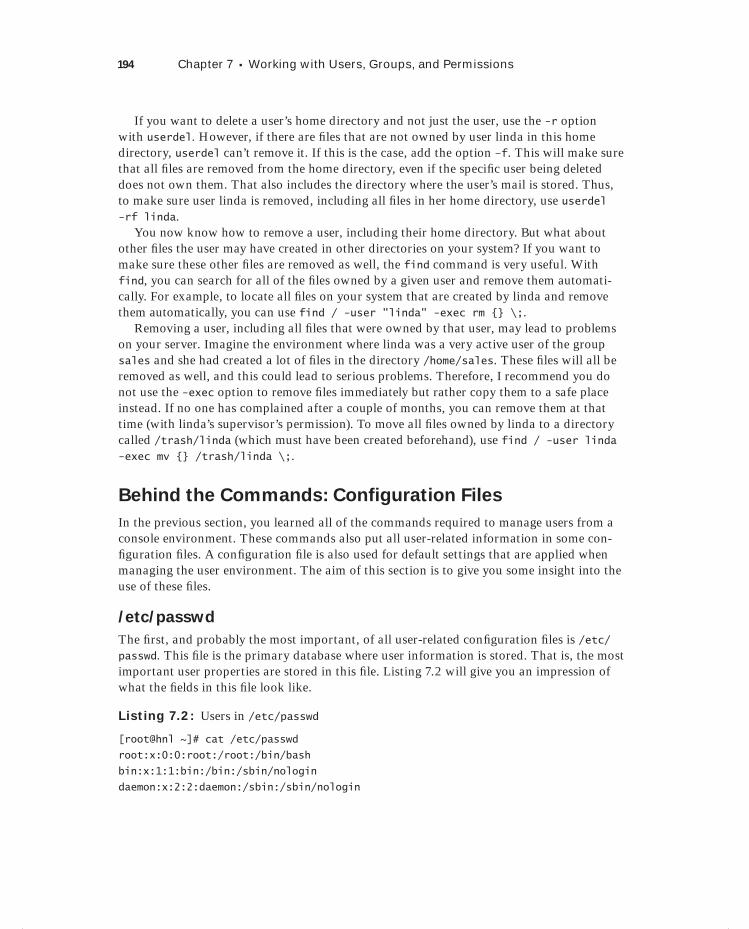
194 Chapter 7 Working with Users, Groups, and Permissions
If you want to delete a user’s home directory and not just the user, use the -r option with userdel. However, if there are fi les that are not owned by user linda in this home directory, userdel can’t remove it. If this is the case, add the option –f. This will make sure that all fi les are removed from the home directory, even if the specifi c user being deleted does not own them. That also includes the directory where the user’s mail is stored. Thus, to make sure user linda is removed, including all fi les in her home directory, use userdel -rf linda.
You now know how to remove a user, including their home directory. But what about other fi les the user may have created in other directories on your system? If you want to make sure these other fi les are removed as well, the find command is very useful. With find, you can search for all of the fi les owned by a given user and remove them automati-cally. For example, to locate all fi les on your system that are created by linda and remove them automatically, you can use find / -user "linda" -exec rm {} \;.
Removing a user, including all fi les that were owned by that user, may lead to problems on your server. Imagine the environment where linda was a very active user of the group sales and she had created a lot of fi les in the directory /home/sales. These fi les will all be removed as well, and this could lead to serious problems. Therefore, I recommend you do not use the -exec option to remove fi les immediately but rather copy them to a safe place instead. If no one has complained after a couple of months, you can remove them at that time (with linda’s supervisor’s permission). To move all fi les owned by linda to a directory called /trash/linda (which must have been created beforehand), use find / -user linda -exec mv {} /trash/linda \;.
Behind the Commands: Configuration Files
In the previous section, you learned all of the commands required to manage users from a console environment. These commands also put all user-related information in some con-fi guration fi les. A confi guration fi le is also used for default settings that are applied when managing the user environment. The aim of this section is to give you some insight into the use of these fi les.
/etc/passwd
The fi rst, and probably the most important, of all user-related confi guration fi les is /etc/passwd. This fi le is the primary database where user information is stored. That is, the most important user properties are stored in this fi le. Listing 7.2 will give you an impression of what the fi elds in this fi le look like.
Listing 7.2: Users in /etc/passwd
[root@hnl ~]# cat /etc/passwd
root:x:0:0:root:/root:/bin/bash
bin:x:1:1:bin:/bin:/sbin/nologin
daemon:x:2:2:daemon:/sbin:/sbin/nologin
c07.indd 194c07.indd 194 1/8/2013 10:45:41 AM1/8/2013 10:45:41 AM

Managing Users and Groups 195
adm:x:3:4:adm:/var/adm:/sbin/nologin
lp:x:4:7:lp:/var/spool/lpd:/sbin/nologin
sync:x:5:0:sync:/sbin:/bin/sync
shutdown:x:6:0:shutdown:/sbin:/sbin/shutdown
vcsa:x:69:69:virtual console memory owner:/dev:/sbin/nologin
rpc:x:32:32:Rpcbind Daemon:/var/cache/rpcbind:/sbin/nologin
rtkit:x:499:497:RealtimeKit:/proc:/sbin/nologin
abrt:x:173:173::/etc/abrt:/sbin/nologin
sshd:x:74:74:Privilege-separated SSH:/var/empty/sshd:/sbin/nologin
tcpdump:x:72:72::/:/sbin/nologin
linda:x:500:500:johnson:/home/linda:/bin/bash
qemu:x:107:107:qemu user:/:/sbin/nologin
Different fi elds are used in /etc/passwd. The fi elds are separated with a colon. Here is a short explanation of all the fi elds used in /etc/passwd.
Username The user’s login name is stored in the fi rst fi eld in /etc/passwd. In older UNIX versions, there was a maximum-length limitation on login names, which was eight characters. In modern Linux distributions, such as Red Hat Enterprise Linux, this limita-tion no longer exists.
Password In the old days of UNIX, encrypted passwords were stored in this fi le. There is, however, one big problem with passwords stored here—even if the password has been hashed, everyone is allowed to read /etc/passwd. Since this poses a security risk, pass-words are stored in the confi guration fi le /etc/shadow nowadays, which is discussed in the next section.
UID As you have already learned, every user has a unique user ID. Red Hat Enterprise Linux starts numbering local user IDs at 500, and typically the highest number that is used is 60000 (the highest numbers are reserved for special-purpose accounts).
GID As discussed in the previous section, every user has a primary group. The group ID of this primary group is listed there. On Red Hat Enterprise Linux, every user is also a member of a private group that has the name of the user.
GECOS The General Electric Comprehensive Operating System (GECOS) fi eld is used to include some additional information about the user. The fi eld can contain anything you like, such as the department where the user works, the user’s phone number, or any-thing else. This makes identifying a user easier for an administrator. The GECOS fi eld is optional, and often you will see that it is not used at all.
Home Directory This fi eld points to the directory of the user’s home directory.
Shell The last fi eld in /etc/passwd is used to refer to the program that is started automati-cally when a user logs in. Most often, this will be /bin/bash, but as discussed previously, every binary program can be referred to here as long as the complete path name is used.
c07.indd 195c07.indd 195 1/8/2013 10:45:41 AM1/8/2013 10:45:41 AM
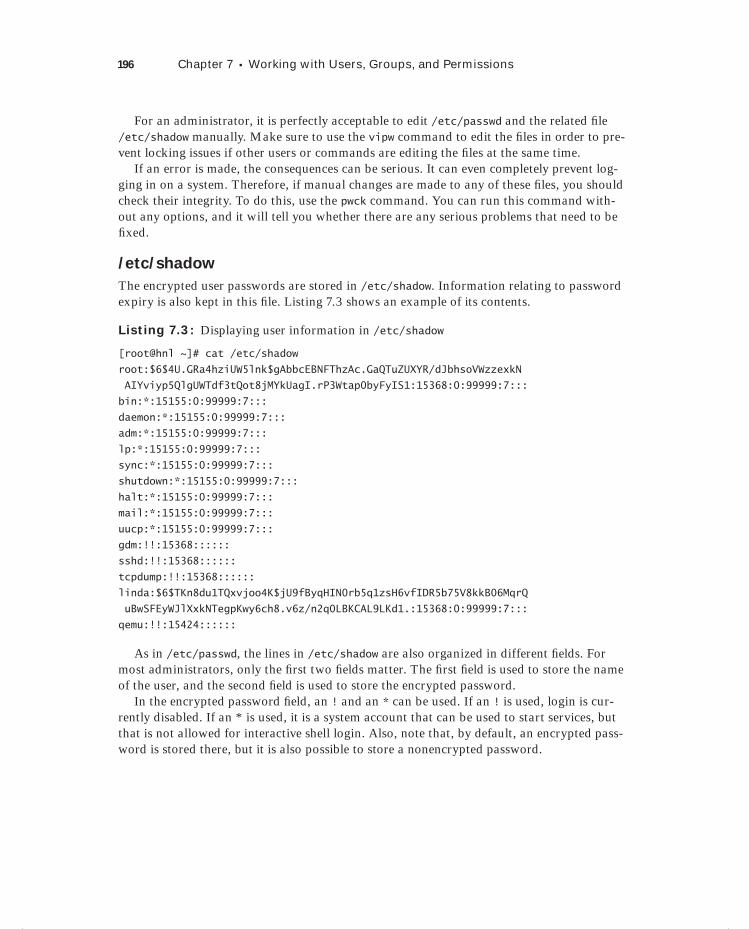
196 Chapter 7 Working with Users, Groups, and Permissions
For an administrator, it is perfectly acceptable to edit /etc/passwd and the related fi le /etc/shadow manually. Make sure to use the vipw command to edit the fi les in order to pre-vent locking issues if other users or commands are editing the fi les at the same time.
If an error is made, the consequences can be serious. It can even completely prevent log-ging in on a system. Therefore, if manual changes are made to any of these fi les, you should check their integrity. To do this, use the pwck command. You can run this command with-out any options, and it will tell you whether there are any serious problems that need to be fi xed.
/etc/shadow
The encrypted user passwords are stored in /etc/shadow. Information relating to password expiry is also kept in this fi le. Listing 7.3 shows an example of its contents.
Listing 7.3: Displaying user information in /etc/shadow
[root@hnl ~]# cat /etc/shadow
root:$6$4U.GRa4hziUW5lnk$gAbbcEBNFThzAc.GaQTuZUXYR/dJbhsoVWzzexkN
AIYviyp5QlgUWTdf3tQot8jMYkUagI.rP3Wtap0byFyIS1:15368:0:99999:7:::
bin:*:15155:0:99999:7:::
daemon:*:15155:0:99999:7:::
adm:*:15155:0:99999:7:::
lp:*:15155:0:99999:7:::
sync:*:15155:0:99999:7:::
shutdown:*:15155:0:99999:7:::
halt:*:15155:0:99999:7:::
mail:*:15155:0:99999:7:::
uucp:*:15155:0:99999:7:::
gdm:!!:15368::::::
sshd:!!:15368::::::
tcpdump:!!:15368::::::
linda:$6$TKn8du1TQxvjoo4K$jU9fByqHIN0rb5q1zsH6vfIDR5b75V8kkB06MqrQ
uBwSFEyWJlXxkNTegpKwy6ch8.v6z/n2q0LBKCAL9LKd1.:15368:0:99999:7:::
qemu:!!:15424::::::
As in /etc/passwd, the lines in /etc/shadow are also organized in different fi elds. For most administrators, only the fi rst two fi elds matter. The fi rst fi eld is used to store the name of the user, and the second fi eld is used to store the encrypted password.
In the encrypted password fi eld, an ! and an * can be used. If an ! is used, login is cur-rently disabled. If an * is used, it is a system account that can be used to start services, but that is not allowed for interactive shell login. Also, note that, by default, an encrypted pass-word is stored there, but it is also possible to store a nonencrypted password.
c07.indd 196c07.indd 196 1/8/2013 10:45:42 AM1/8/2013 10:45:42 AM
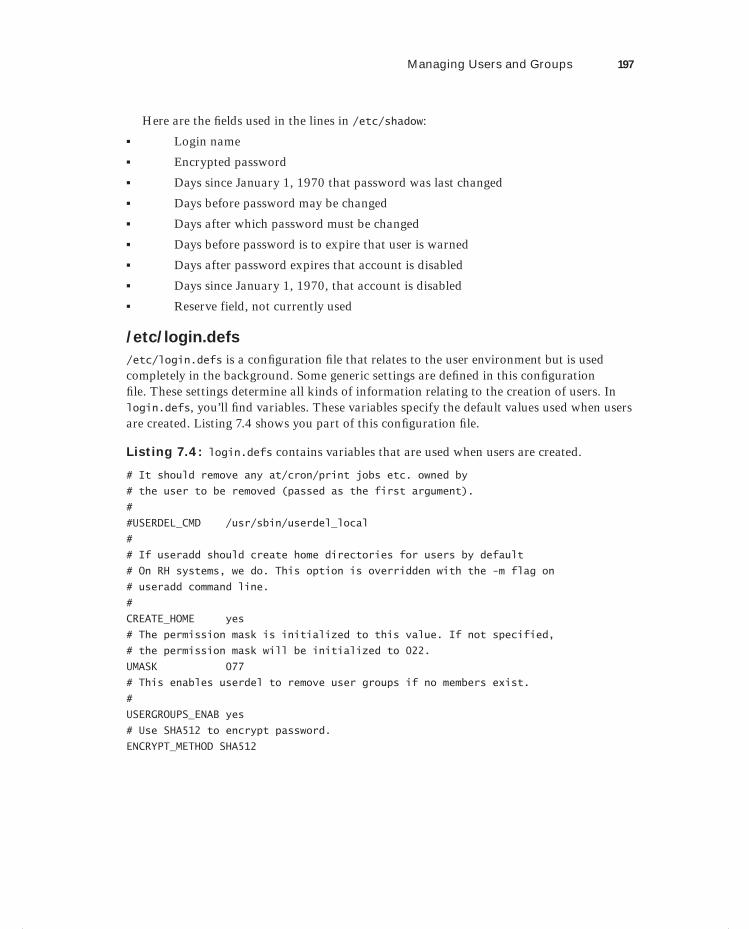
Managing Users and Groups 197
Here are the fi elds used in the lines in /etc/shadow:
Login name
Encrypted password
Days since January 1, 1970 that password was last changed
Days before password may be changed
Days after which password must be changed
Days before password is to expire that user is warned
Days after password expires that account is disabled
Days since January 1, 1970, that account is disabled
Reserve field, not currently used
/etc/login.defs
/etc/login.defs is a confi guration fi le that relates to the user environment but is used completely in the background. Some generic settings are defi ned in this confi guration fi le. These settings determine all kinds of information relating to the creation of users. In login.defs, you’ll fi nd variables. These variables specify the default values used when users are created. Listing 7.4 shows you part of this confi guration fi le.
Listing 7.4: login.defs contains variables that are used when users are created.
# It should remove any at/cron/print jobs etc. owned by
# the user to be removed (passed as the first argument).
#
#USERDEL_CMD /usr/sbin/userdel_local
#
# If useradd should create home directories for users by default
# On RH systems, we do. This option is overridden with the -m flag on
# useradd command line.
#
CREATE_HOME yes
# The permission mask is initialized to this value. If not specified,
# the permission mask will be initialized to 022.
UMASK 077
# This enables userdel to remove user groups if no members exist.
#
USERGROUPS_ENAB yes
# Use SHA512 to encrypt password.
ENCRYPT_METHOD SHA512
c07.indd 197c07.indd 197 1/8/2013 10:45:42 AM1/8/2013 10:45:42 AM

198 Chapter 7 Working with Users, Groups, and Permissions
Now that you have read about all ingredients that play a part in user management, in Exercise 7.1 you will create some user accounts.
E X E R C I S E 7.1
Creating Users
In this exercise, you’ll learn how to create user accounts. You’ll also see how these user accounts are written to the related confi guration fi les.
1. Open a root shell, and use the command useradd lisa.
2. Use the command su - lisa. This opens a shell in which you are logged in as the user lisa. The command also brings you to the home directory of this user. You can use pwd to verify this.
3. Use exit to close the shell in which you are user lisa.
4. Open the fi le /etc/login.defs with an editor. Locate the variable CREATE_HOME and change its value to no. Close the fi le and save the changes to disk.
5. Still as root, use the command useradd lori to create a user lori.
6. Use su - lori to open a subshell as the user lori. You should get an error message that lori doesn’t have a home directory.
7. Close the lori subshell, and as root, use cat /etc/passwd to see how users lisa and lori have been defi ned. As you can see, even if lori doesn’t have a home directory, there is a fi eld that refers to the location of her home directory.
8. Use userdel lori to remove lori from your system.
9. Restore the CREATE_HOME variable in /etc/login.defs to its original value.
10. Create user lori again. At this point, you should have three users: linda, lisa, and lori.
11. As root, use the passwd command to set the password for each of the three users.
Creating Groups
As you already learned, all users require a group membership. You have read about the dif-ferences between the primary group and the other groups; however, you have yet to learn how to create these groups. In this section, you’ll learn how to use the command-line tools that are available to create groups.
c07.indd 198c07.indd 198 1/8/2013 10:45:42 AM1/8/2013 10:45:42 AM
Dow
nlo
ad fro
m W
ow
! eBook
<w
ww
.wow
ebook.
com
>
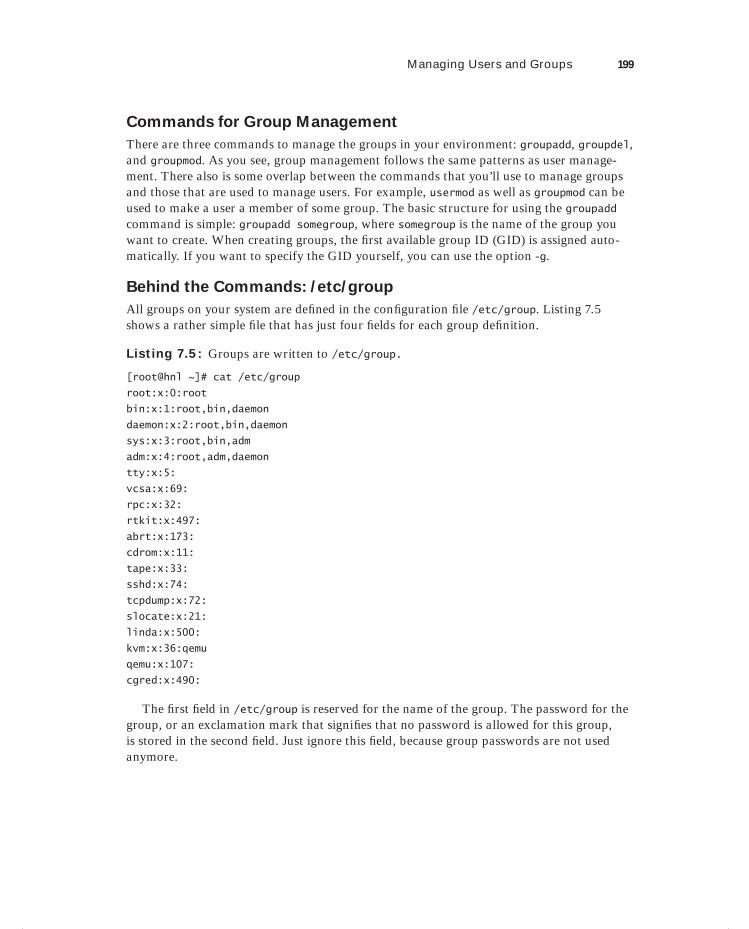
Managing Users and Groups 199
Commands for Group Management
There are three commands to manage the groups in your environment: groupadd, groupdel, and groupmod. As you see, group management follows the same patterns as user manage-ment. There also is some overlap between the commands that you’ll use to manage groups and those that are used to manage users. For example, usermod as well as groupmod can be used to make a user a member of some group. The basic structure for using the groupadd command is simple: groupadd somegroup, where somegroup is the name of the group you want to create. When creating groups, the fi rst available group ID (GID) is assigned auto-matically. If you want to specify the GID yourself, you can use the option -g.
Behind the Commands: /etc/group
All groups on your system are defi ned in the confi guration fi le /etc/group. Listing 7.5 shows a rather simple fi le that has just four fi elds for each group defi nition.
Listing 7.5: Groups are written to /etc/group.
[root@hnl ~]# cat /etc/group
root:x:0:root
bin:x:1:root,bin,daemon
daemon:x:2:root,bin,daemon
sys:x:3:root,bin,adm
adm:x:4:root,adm,daemon
tty:x:5:
vcsa:x:69:
rpc:x:32:
rtkit:x:497:
abrt:x:173:
cdrom:x:11:
tape:x:33:
sshd:x:74:
tcpdump:x:72:
slocate:x:21:
linda:x:500:
kvm:x:36:qemu
qemu:x:107:
cgred:x:490:
The fi rst fi eld in /etc/group is reserved for the name of the group. The password for the group, or an exclamation mark that signifi es that no password is allowed for this group, is stored in the second fi eld. Just ignore this fi eld, because group passwords are not used anymore.
c07.indd 199c07.indd 199 1/8/2013 10:45:42 AM1/8/2013 10:45:42 AM

200 Chapter 7 Working with Users, Groups, and Permissions
A unique group ID is provided in the third fi eld of /etc/group, and fi nally, the names of the members of the group are present in the last fi eld. These names are required only for users for whom this is not the primary group. Primary group membership itself is managed from the /etc/passwd confi guration fi le.
Managing Group Membership
To manage group membership, you can use the usermod and groupmod commands. The available usermod options provide three different choices to manipulate group membership.
-g, --gid GROUP This option is used to set the primary group for the user.
-G, --groups GROUPS Use this option to defi ne a new list of supplementary groups. Notice that this option replaces the old list of supplementary groups with the list of new supplementary groups defi ned here.
-a, --append Use this option together with -G to add new supplementary groups to the current list of supplementary groups.
Thus, if you want to add supplementary group sales to user linda, use usermod -Ga sales linda, not usermod -G sales linda. You can create and modify groups yourself in Exercise 7.2.
To verify that you’ve done your work correctly, use the id command. This command shows properties of users, including the current group assignment. Listing 7.6 shows a sample result of this command.
Listing 7.6: Use id to show user properties.
[root@hnl ~]# id linda
uid=500(linda) gid=500(linda) groups=500(linda)
E X E R C I S E 7. 2
Creating and Managing Groups
In this exercise, you’ll create two groups. Next, you’ll change the current group assignments for some of your existing users.
1. Use groupadd sales and groupadd account to create the groups sales and account.
2. Use id linda to view the current group assignment for user linda. She should be a member just of the group linda.
3. Use usermod -aG sales linda to add user linda to the group sales as a secondary group. Use id linda to confi rm that she has been added to this group.
4. Repeat this procedure to add users lori and linda to the group account as a secondary group and to add user lisa to the group sales as well.
c07.indd 200c07.indd 200 1/8/2013 10:45:42 AM1/8/2013 10:45:42 AM

Using Graphical Tools for User and Group Management 201
Using Graphical Tools for User and Group ManagementUntil now, you’ve worked with command-line tools for user and group management only. Red Hat Enterprise Linux provides the system-confi g tools that offer a graphical solution as an alternative to the command-line tools. For user and group management, the name of the tool is system-confi g-users. You can see what this tool looks like in Figure 7.1.
F I GU R E 7.1 system-config-users provides a convenient interface for user and group management.
The system-config-users tool was developed to simplify managing users and groups. To create a new user, click Add User. This opens the Add New User window in which you can specify all of the properties you want when creating a new user. It is also easy to add new groups. Just click Add Group, and you’ll see a window prompting you for all of the properties that are needed to add a new group, as shown in Figure 7.2.
c07.indd 201c07.indd 201 1/8/2013 10:45:42 AM1/8/2013 10:45:42 AM
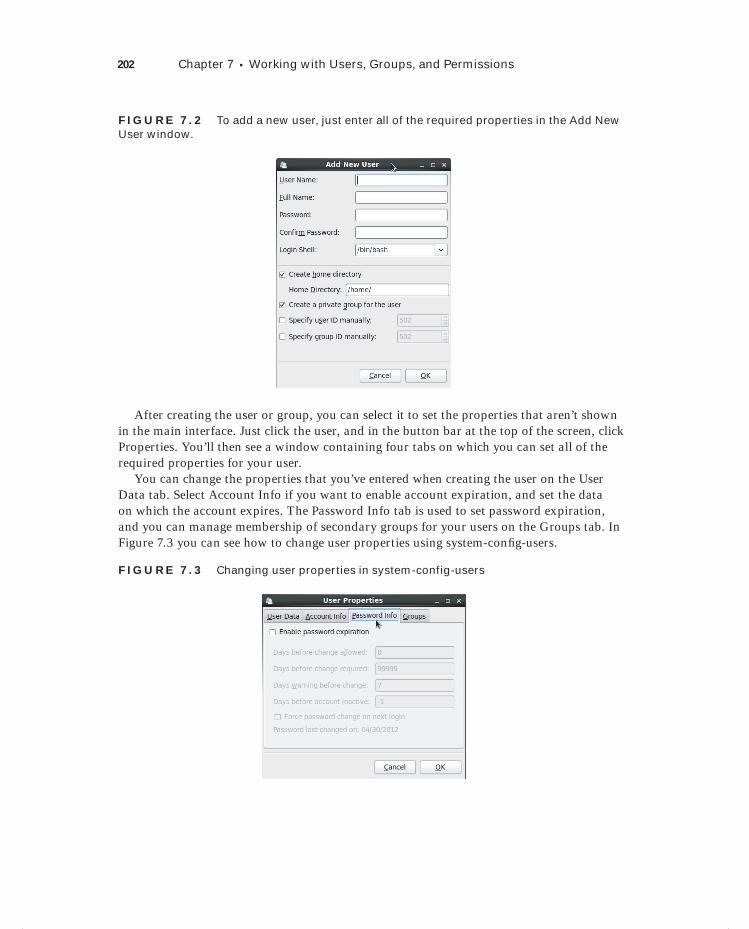
202 Chapter 7 Working with Users, Groups, and Permissions
F I GU R E 7. 2 To add a new user, just enter all of the required properties in the Add New User window.
After creating the user or group, you can select it to set the properties that aren’t shown in the main interface. Just click the user, and in the button bar at the top of the screen, click Properties. You’ll then see a window containing four tabs on which you can set all of the required properties for your user.
You can change the properties that you’ve entered when creating the user on the User Data tab. Select Account Info if you want to enable account expiration, and set the data on which the account expires. The Password Info tab is used to set password expiration, and you can manage membership of secondary groups for your users on the Groups tab. In Figure 7.3 you can see how to change user properties using system-confi g-users.
F I GU R E 7. 3 Changing user properties in system-config-users
c07.indd 202c07.indd 202 1/8/2013 10:45:42 AM1/8/2013 10:45:42 AM
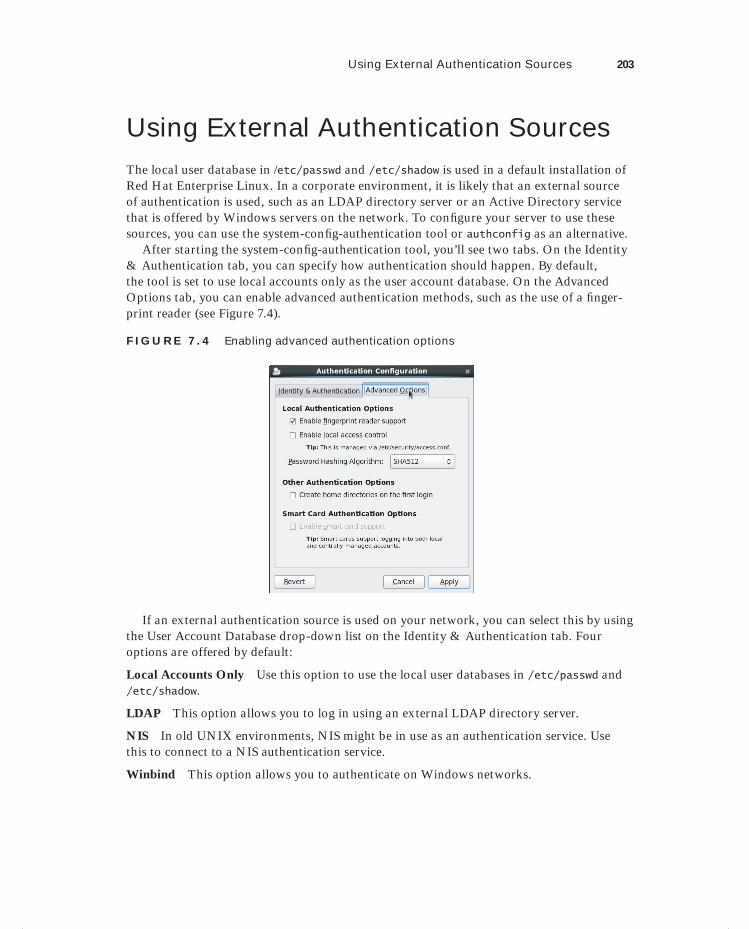
Using External Authentication Sources 203
Using External Authentication SourcesThe local user database in /etc/passwd and /etc/shadow is used in a default installation of Red Hat Enterprise Linux. In a corporate environment, it is likely that an external source of authentication is used, such as an LDAP directory server or an Active Directory service that is offered by Windows servers on the network. To confi gure your server to use these sources, you can use the system-confi g-authentication tool or authconfig as an alternative.
After starting the system-confi g-authentication tool, you’ll see two tabs. On the Identity & Authentication tab, you can specify how authentication should happen. By default, the tool is set to use local accounts only as the user account database. On the Advanced Options tab, you can enable advanced authentication methods, such as the use of a fi nger-print reader (see Figure 7.4).
F I GU R E 7. 4 Enabling advanced authentication options
If an external authentication source is used on your network, you can select this by using the User Account Database drop-down list on the Identity & Authentication tab. Four options are offered by default:
Local Accounts Only Use this option to use the local user databases in /etc/passwd and /etc/shadow.
LDAP This option allows you to log in using an external LDAP directory server.
NIS In old UNIX environments, NIS might be in use as an authentication service. Use this to connect to a NIS authentication service.
Winbind This option allows you to authenticate on Windows networks.
c07.indd 203c07.indd 203 1/8/2013 10:45:42 AM1/8/2013 10:45:42 AM
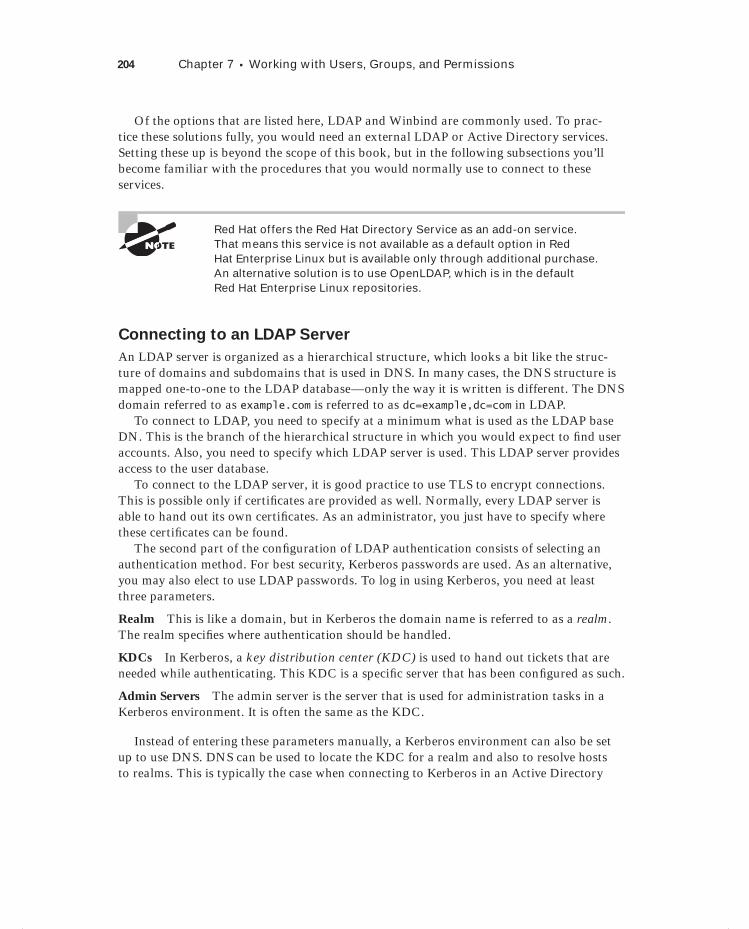
204 Chapter 7 Working with Users, Groups, and Permissions
Of the options that are listed here, LDAP and Winbind are commonly used. To prac-tice these solutions fully, you would need an external LDAP or Active Directory services. Setting these up is beyond the scope of this book, but in the following subsections you’ll become familiar with the procedures that you would normally use to connect to these services.
Red Hat offers the Red Hat Directory Service as an add-on service. That means this service is not available as a default option in Red Hat Enterprise Linux but is available only through additional purchase. An alternative solution is to use OpenLDAP, which is in the default Red Hat Enterprise Linux repositories.
Connecting to an LDAP Server
An LDAP server is organized as a hierarchical structure, which looks a bit like the struc-ture of domains and subdomains that is used in DNS. In many cases, the DNS structure is mapped one-to-one to the LDAP database—only the way it is written is different. The DNS domain referred to as example.com is referred to as dc=example,dc=com in LDAP.
To connect to LDAP, you need to specify at a minimum what is used as the LDAP base DN. This is the branch of the hierarchical structure in which you would expect to fi nd user accounts. Also, you need to specify which LDAP server is used. This LDAP server provides access to the user database.
To connect to the LDAP server, it is good practice to use TLS to encrypt connections. This is possible only if certifi cates are provided as well. Normally, every LDAP server is able to hand out its own certifi cates. As an administrator, you just have to specify where these certifi cates can be found.
The second part of the confi guration of LDAP authentication consists of selecting an authentication method. For best security, Kerberos passwords are used. As an alternative, you may also elect to use LDAP passwords. To log in using Kerberos, you need at least three parameters.
Realm This is like a domain, but in Kerberos the domain name is referred to as a realm. The realm specifi es where authentication should be handled.
KDCs In Kerberos, a key distribution center (KDC) is used to hand out tickets that are needed while authenticating. This KDC is a specifi c server that has been confi gured as such.
Admin Servers The admin server is the server that is used for administration tasks in a Kerberos environment. It is often the same as the KDC.
Instead of entering these parameters manually, a Kerberos environment can also be set up to use DNS. DNS can be used to locate the KDC for a realm and also to resolve hosts to realms. This is typically the case when connecting to Kerberos in an Active Directory
c07.indd 204c07.indd 204 1/8/2013 10:45:43 AM1/8/2013 10:45:43 AM
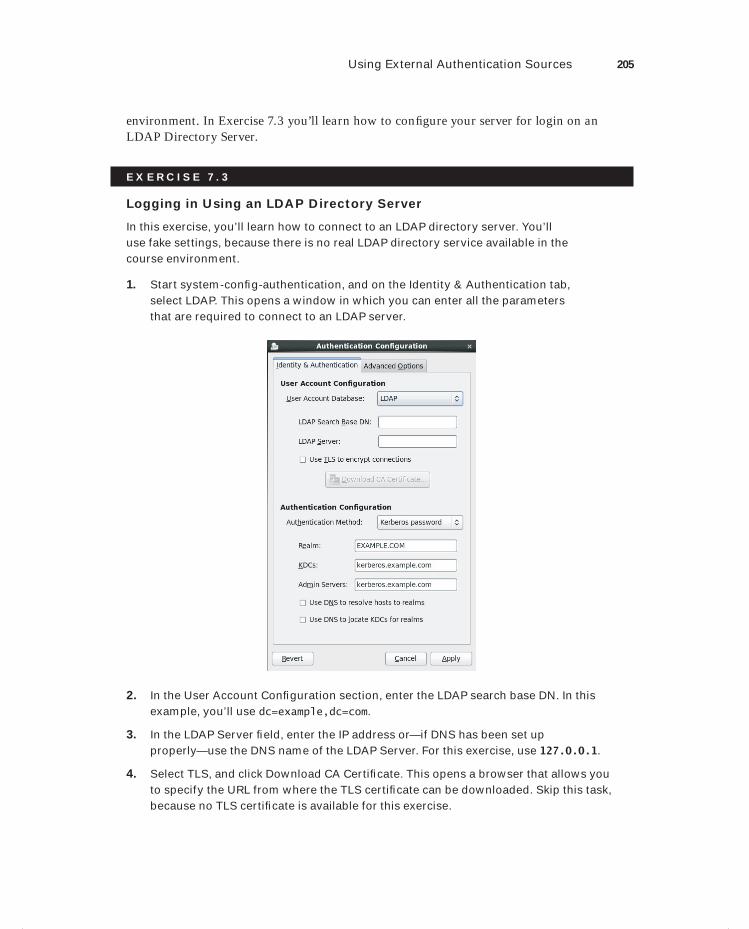
Using External Authentication Sources 205
environment. In Exercise 7.3 you’ll learn how to confi gure your server for login on an LDAP Directory Server.
E X E R C I S E 7. 3
Logging in Using an LDAP Directory Server
In this exercise, you’ll learn how to connect to an LDAP directory server. You’ll use fake settings, because there is no real LDAP directory service available in the course environment.
1. Start system-confi g-authentication, and on the Identity & Authentication tab, select LDAP. This opens a window in which you can enter all the parameters that are required to connect to an LDAP server.
2. In the User Account Confi guration section, enter the LDAP search base DN. In this example, you’ll use dc=example,dc=com.
3. In the LDAP Server fi eld, enter the IP address or—if DNS has been set up properly—use the DNS name of the LDAP Server. For this exercise, use 127.0.0.1.
4. Select TLS, and click Download CA Certifi cate. This opens a browser that allows you to specify the URL from where the TLS certifi cate can be downloaded. Skip this task, because no TLS certifi cate is available for this exercise.
c07.indd 205c07.indd 205 1/8/2013 10:45:43 AM1/8/2013 10:45:43 AM
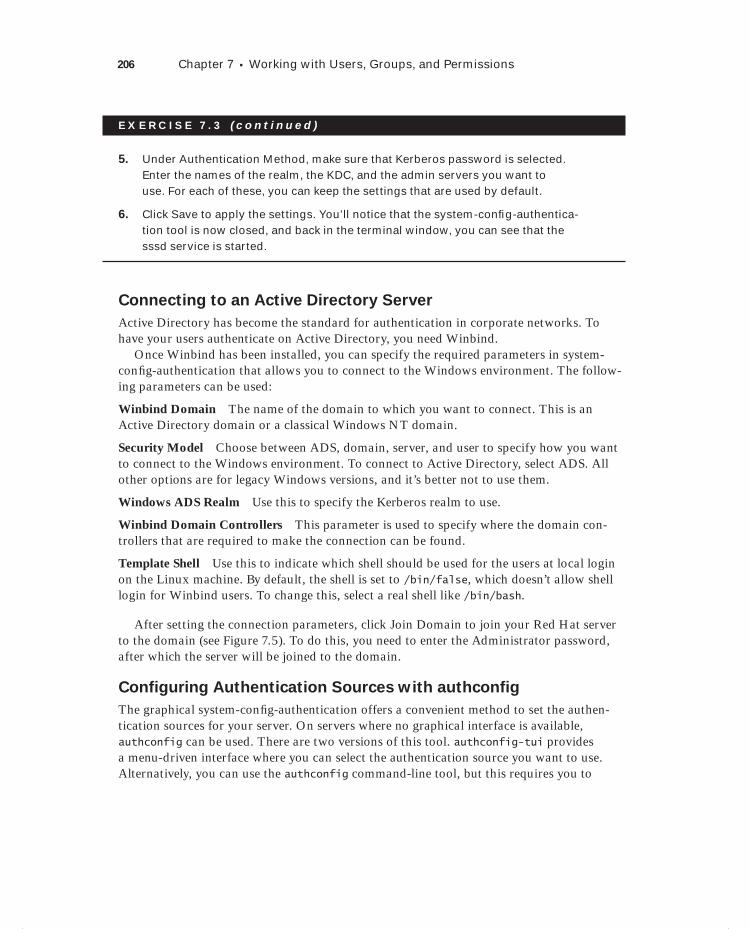
206 Chapter 7 Working with Users, Groups, and Permissions
E X E R C I S E 7. 3 ( c ont inue d )
5. Under Authentication Method, make sure that Kerberos password is selected. Enter the names of the realm, the KDC, and the admin servers you want to use. For each of these, you can keep the settings that are used by default.
6. Click Save to apply the settings. You’ll notice that the system-confi g-authentica-tion tool is now closed, and back in the terminal window, you can see that the sssd service is started.
Connecting to an Active Directory Server
Active Directory has become the standard for authentication in corporate networks. To have your users authenticate on Active Directory, you need Winbind.
Once Winbind has been installed, you can specify the required parameters in system-confi g-authentication that allows you to connect to the Windows environment. The follow-ing parameters can be used:
Winbind Domain The name of the domain to which you want to connect. This is an Active Directory domain or a classical Windows NT domain.
Security Model Choose between ADS, domain, server, and user to specify how you want to connect to the Windows environment. To connect to Active Directory, select ADS. All other options are for legacy Windows versions, and it’s better not to use them.
Windows ADS Realm Use this to specify the Kerberos realm to use.
Winbind Domain Controllers This parameter is used to specify where the domain con-trollers that are required to make the connection can be found.
Template Shell Use this to indicate which shell should be used for the users at local login on the Linux machine. By default, the shell is set to /bin/false, which doesn’t allow shell login for Winbind users. To change this, select a real shell like /bin/bash.
After setting the connection parameters, click Join Domain to join your Red Hat server to the domain (see Figure 7.5). To do this, you need to enter the Administrator password, after which the server will be joined to the domain.
Configuring Authentication Sources with authconfig
The graphical system-confi g-authentication offers a convenient method to set the authen-tication sources for your server. On servers where no graphical interface is available, authconfig can be used. There are two versions of this tool. authconfig-tui provides a menu-driven interface where you can select the authentication source you want to use. Alternatively, you can use the authconfig command-line tool, but this requires you to
c07.indd 206c07.indd 206 1/8/2013 10:45:43 AM1/8/2013 10:45:43 AM
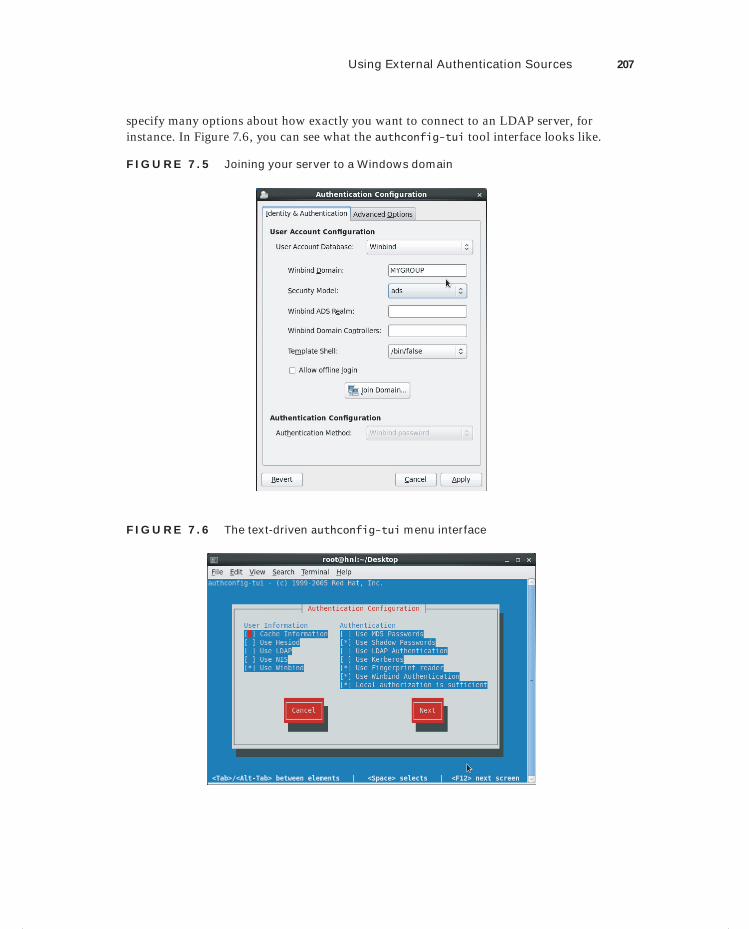
Using External Authentication Sources 207
specify many options about how exactly you want to connect to an LDAP server, for instance. In Figure 7.6, you can see what the authconfig-tui tool interface looks like.
F I GU R E 7.5 Joining your server to a Windows domain
F I GU R E 7.6 The text-driven authconfig-tui menu interface
c07.indd 207c07.indd 207 1/8/2013 10:45:43 AM1/8/2013 10:45:43 AM
208 Chapter 7 Working with Users, Groups, and Permissions
If you need a tool that can be scripted, authconfig is the solution for you. Don’t be afraid, however, of typing commands like the following, which enables secure LDAP authentication where Kerberos is used (all is one command!):
authconfig --enableldap --enableldapauth --ldapserver=ldap.example.com
--ldapbasedn=dc=example,dc=com --enabletls
--ldaploadcert=http://ldap.example.com/certificate --enablekrb5
--krb5kdc=krb.example.com --krb5realm=examplecom --update
As you can imagine, there are good reasons why some prefer using graphical or menu-driven tools like the system-confi g-authentication tool!
Understanding the Authentication ProcessWhen a user authenticates to your server, the local user database as defi ned in the fi les /etc/passwd and /etc/shadow is used on a default confi guration. If you’ve used one of the tools described in the previous section to confi gure authentication against an exter-nal authentication server, the sssd service is involved as well. Apart from sssd, PAM and /etc/nsswitch.conf also play a role. You’ll learn how these are used in the upcoming subsections.
Understanding sssd
The sssd service provides information about all available authentication sources, and it is also capable of providing offl ine authentication. This means that if you’re on a laptop that is temporarily disconnected from the network, you can still authenticate against the exter-nal authentication service using the sssd cache.
Using sssd doesn’t require much information. The confi guration parameters you’ve spec-ifi ed are written to the confi guration fi le /etc/sssd/sssd.conf. Listing 7.7 shows the part of the confi guration that was written to this fi le when LDAP authentication was enabled.
Listing 7.7: LDAP authentication parameters in /etc/sssd/sssd.conf
# ldap_user_object_class = user
# ldap_group_object_class = group
# ldap_user_home_directory = unixHomeDirectory
# ldap_user_principal = userPrincipalName
# ldap_account_expire_policy = ad
# ldap_force_upper_case_realm = true
c07.indd 208c07.indd 208 1/8/2013 10:45:45 AM1/8/2013 10:45:45 AM

Understanding nsswitch 209
#
# krb5_server = your.ad.example.com
# krb5_realm = EXAMPLE.COM
[domain/default]
ldap_id_use_start_tls = False
krb5_realm = EXAMPLE.COM
ldap_search_base = dc=example,dc=com
id_provider = ldap
auth_provider = krb5
chpass_provider = krb5
ldap_uri = ldap://127.0.0.1/
krb5_kpasswd = kerberos.example.com
krb5_kdcip = kerberos.example.com
cache_credentials = True
ldap_tls_cacertdir = /etc/openldap/cacerts
As mentioned, you won’t need to modify the sssd confi guration manually very often. However, the enumerate parameter can be rather useful. By default, if information about available users is requested with a command like getent, sssd doesn’t list LDAP users as well. This is for performance reasons. If you also want those users to be listed, add the line enumerate = True to the [domain/default] section in /etc/sssd/sssd.conf. Don’t forget to restart the sssd service after this modifi cation; otherwise, it won’t work!
Understanding nsswitchThe /etc/nsswitch fi le is used to determine where different services on a computer are looking for confi guration information. The different sources of information are specifi ed in this fi le. Listing 7.8 provides an overview of the most relevant parameters used in this fi le.
Listing 7.8: Specifying sources of information in /etc/nsswitch.conf
passwd: files sssd
shadow: files sssd
group: files sssd
bootparams: nisplus [NOTFOUND=return] files
ethers: files
netmasks: files
networks: files
protocols: files
rpc: files
services: files
c07.indd 209c07.indd 209 1/8/2013 10:45:45 AM1/8/2013 10:45:45 AM
210 Chapter 7 Working with Users, Groups, and Permissions
netgroup: files
publickey: nisplus
automount: files
aliases: files nisplus
The passwd and shadow fi les are relevant for authentication. They specify that the local fi les are always checked fi rst, prior to the authentication mechanism that is offered through sssd.
Understanding Pluggable Authentication Modules
On Linux, pluggable authentication modules (PAM) are what is used to make authentica-tion pluggable. Every modern service that needs to handle authentication passes through PAM.
There are two parts in PAM. First there are the confi guration fi les in use. Every service has its own confi guration fi le in the directory /etc/pam.d. For instance, the login service uses the confi guration fi le /etc/pam.d/login. Listing 7.9 shows the contents of this fi le.
Listing 7.9: The PAM file for login defines how to handle login.
[root@hnl ~]# cat /etc/pam.d/login
#%PAM-1.0
auth [user_unknown=ignore success=ok ignore=ignore default=bad] pam_securetty.so
auth include system-auth
account required pam_nologin.so
account include system-auth
password include system-auth
# pam_selinux.so close should be the first session rule
session required pam_selinux.so close
session required pam_loginuid.so
session optional pam_console.so
# pam_selinux.so open should only be followed by sessions to be
executed in the user context
session required pam_selinux.so open
session required pam_namespace.so
session optional pam_keyinit.so force revoke
session include system-auth
-session optional pam_ck_connector.so
In the sample PAM fi le, you can see that three columns are used to defi ne what should happen. In the fi rst column, the authentication process is split into four different phases: auth, account, password, and session. These are the stages that are typically passed through in the authentication process, but in the end, the writer of the PAM module decides which of these to implement.
c07.indd 210c07.indd 210 1/8/2013 10:45:45 AM1/8/2013 10:45:45 AM
Understanding nsswitch 211
A PAM module is called on each line in a PAM confi guration fi le. The PAM modules defi ne exactly what should happen while authenticating. If, for example, you need the authentication procedure to use an LDAP server, you can include the pam_ldap.so module that tells the service how to contact LDAP. The second column specifi es how this PAM module should be handled.
To use PAM, it is important to know which modules are available and what exactly is the purpose of each of these modules. You can fi nd out all this information in the Linux-PAM_SAG.txt fi le in the directory /usr/share/doc/pam<version>. This fi le contains an extensive description of all the default PAM modules.
As you can see, the /etc/pam.d/login fi le includes some common parameters that are found in /etc/pam.d/system-auth. This fi le contains generic parameters that should be included by other services that are related to authentication, such as the PAM fi les for su and sudo.
The general system-auth fi le is useful for services that need to be included by many programs. Imagine that you want to have your server authenticate through LDAP. Just put a line in /etc/pam.d/system-auth that calls the LDAP module, and it will be included by all login-related services, such as login, passwd, su, and many more. In Exercise 7.4, you’ll discover how to use PAM.
E X E R C I S E 7. 4
Configuring PAM
In this exercise, you’ll work with PAM and the /etc/securetty fi le. The /etc/securetty fi le defi nes the terminals on which it is secure for user root to log in. By default, this fi le is used by the PAM confi guration fi le for login and not for su. In this exercise, you’ll defi ne /dev/tty4 as an insecure tty. Next you’ll include it in the PAM fi le for su to disable root login through su on tty4 as well.
1. Open a root shell. Using vi, modify the /etc/securetty fi le in this root shell and remove the line that contains the text tty4.
2. Use the Ctrl+Alt+F4 key sequence to open the virtual console tty4. Log in as root. You’ll notice this doesn’t work. Now use the Ctrl+Alt+F3 key sequence, and check to see whether you can perform a root login on this tty. You’ll notice this works.
3. Open the /etc/pam.d/login fi le. You’ll notice that, on the fi rst line of this fi le, the pam_securetty fi le is called, which means that all authentication passes through the restrictions that are defi ned in /etc/securetty.
4. Open tty4 again, and now log in as user linda using the password password. Next, use su - to escalate to root permissions. You’ll notice that this works without any restriction.
c07.indd 211c07.indd 211 1/8/2013 10:45:45 AM1/8/2013 10:45:45 AM

212 Chapter 7 Working with Users, Groups, and Permissions
E X E R C I S E 7. 4 ( c ont inue d )
5. Open the /etc/pam.d/su fi le, and add the following on the fi rst line:
auth required pam_securetty.so
6. Save the changes, and close the fi le.
7. Type exit until you see a login prompt on tty4. Now log in as linda. This should still work. Escalate your privileges using su -. You’ll now get an access denied message, coming from the security module.
Managing PermissionsAt the beginning of this chapter, you learned how to create users and groups. In this sec-tion, you’ll learn how to apply permissions to these users and groups.
Understanding the Role of Ownership
Before I talk about permissions, you must know about the role of fi le and directory owner-ship. File and directory ownership is vital for working with permissions. First you’ll learn how you can see ownership. Next you’ll learn how to change user and group ownership for fi les and directories.
Displaying Ownership
Every fi le and every directory has an owner on Linux. To determine whether you, as a user, have permissions to a fi le or a directory, the kernel checks ownership. First it will see whether you are the user owner, which is also referred to as the user of the fi le. If you are the user, you will get the permissions that are set for the user, and the shell looks no further. If you are not the user owner, the shell will check whether you are a member of the group owner, which is also referred to as the group of the fi le. If you are a member of the group, you will get access to the fi le with the permissions of the group, and the shell looks no further. If you are neither the user owner nor the group owner, you’ll get the permissions of others.
With ls, you can display ownership for fi les in a given directory. To see current owner-ship assignments, you can use the ls -l command. This command shows the user as well as the group owner. Listing 7.10 shows the ownership settings for directories in the direc-tory /home on a system that uses the public group approach, where all users are members of the same group called users.
Listing 7.10: Displaying current file ownership
[root@hnl home]# ls -l
total 32
c07.indd 212c07.indd 212 1/8/2013 10:45:45 AM1/8/2013 10:45:45 AM

Managing Permissions 213
drwx------. 4 laura laura 4096 Apr 30 16:54 laura
drwx------. 27 linda linda 4096 Apr 28 11:07 linda
drwx------. 4 lisa lisa 4096 Apr 30 16:54 lisa
drwx------. 4 lori lori 4096 Apr 30 16:54 lori
drwx------. 2 root root 16384 Jan 29 14:10 lost+found
Occasionally, it may be useful to get a list of all fi les that have a given user or group as owner. To do this, use the find command with the argument -user. For example, the com-mand find / -user linda shows all fi les that have user linda as their owner.
You can also use find to search for fi les that have a specifi c group as their owner. For instance, the command find / -group users searches all fi les that are owned by the group users.
Changing User Ownership
When working with permissions, it is important to know how to change them. The chown command is used to do this. The syntax of this command is easy to understand, as in chown who what.
For instance, the command chown linda account would change ownership for the fi le account to user linda.
The chown command has one important option: -R. You can guess its function, because this option is available for many other commands. -R allows you to set ownership recur-sively. In other words, it allows you to set ownership of the current directory and every-thing below it. The command chown -R linda /home changes ownership for the directory /home and everything beneath it to user linda (which is typically not a very good idea because there may be fi les in there that have a different fi le ownership on purpose).
Changing Group Ownership
There are actually two ways to change group ownership. You can do it using chown, but the chgrp command does the job specifi cally. If you want to use the chown command, use a : in front of the group name. For example, the command chown :account /home/account would change the group owner of directory /home/account to the group account.
You can also use the chgrp command for the same purpose. The command chgrp account /home/account can be used to set group ownership for the directory /home/account to the group account. As is the case for chown, you can use the option -R with chgrp to change group ownership recursively.
Default Ownership
You may have noticed that when a user creates a fi le, default ownership is applied. The user who creates the fi le will automatically become user owner, and the primary group automat-ically becomes group owner. This will normally be the group that is set in the /etc/passwd fi le as the user’s primary group. If, however, the user is a member of more groups, they can change the effective primary group.
c07.indd 213c07.indd 213 1/8/2013 10:45:45 AM1/8/2013 10:45:45 AM
Dow
nlo
ad fro
m W
ow
! eBook
<w
ww
.wow
ebook.
com
>

214 Chapter 7 Working with Users, Groups, and Permissions
To show the current effective primary group, a user can use the groups command as follows:
linda@nuuk:~> groups
users dialout video
One way to change default group ownership for new fi les is to change the primary group. If the current user linda wants to change the effective primary group, she can use the newgrp command followed by the name of the group she wants to set as the new effective primary group. Listing 7.11 shows how user linda uses this command to make sales her effective primary group.
Listing 7.11: Using newgrp to change the effective primary group
linda@nuuk:~> groups
users dialout video sales
linda@nuuk:~> newgrp sales
linda@nuuk:~> groups
sales dialout video users
linda@nuuk:~>
After changing the effective primary group, all new fi les that the user creates will have this group as their group owner. To return to the original primary group setting, use exit. This will bring you back to the previous effective primary group setting.
Basic Permissions: Read, Write, and Execute
The Linux permissions system was invented in the 1970s. Since computing needs were limited in those years, the basic permission system created then was a bit limited as well. Because of backward compatibility reasons, this system is still in place today, though. This basic system consists of three permissions that can be applied to fi les and directories. In this section, you’ll learn how the system works and how to modify these permissions.
Understanding Read, Write, and Execute Permissions
The three basic permissions allow you to read, write, and execute fi les. The effect of these permissions is different if applied to fi les vs. directories. If applied to a fi le, the read permis-sion gives you the right to open the fi le for reading. That means you can read its contents, and it also means your computer can open the fi le to do something with it. A program fi le that needs access to a library, for example, requires read access to that library. From this it follows that the read permission is the most basic permission you will need to work with fi les.
c07.indd 214c07.indd 214 1/8/2013 10:45:46 AM1/8/2013 10:45:46 AM
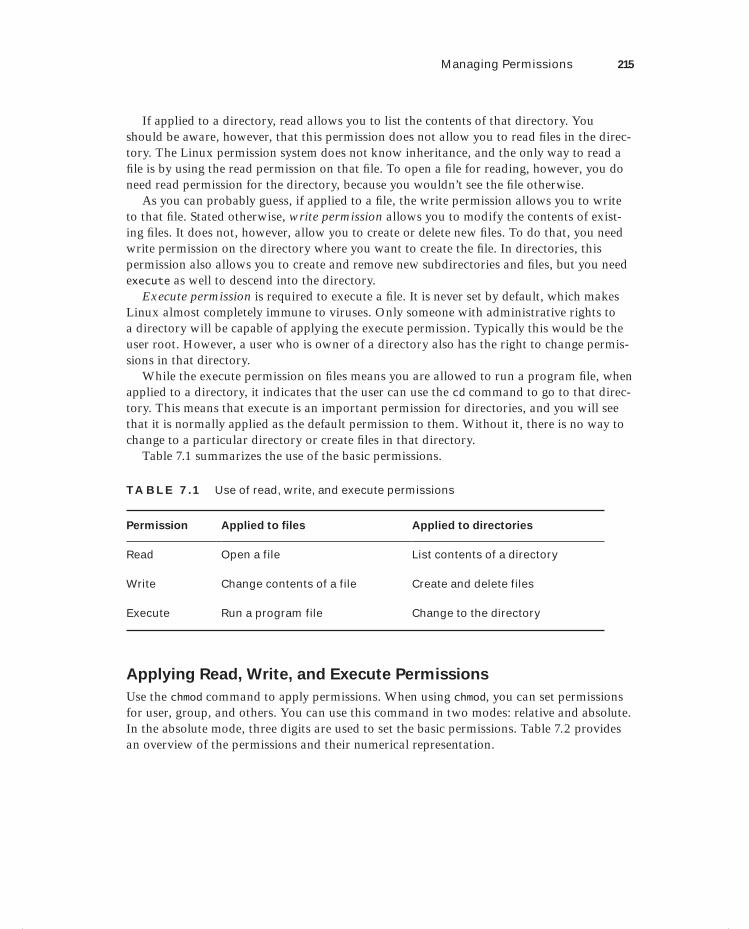
Managing Permissions 215
If applied to a directory, read allows you to list the contents of that directory. You should be aware, however, that this permission does not allow you to read fi les in the direc-tory. The Linux permission system does not know inheritance, and the only way to read a fi le is by using the read permission on that fi le. To open a fi le for reading, however, you do need read permission for the directory, because you wouldn’t see the fi le otherwise.
As you can probably guess, if applied to a fi le, the write permission allows you to write to that fi le. Stated otherwise, write permission allows you to modify the contents of exist-ing fi les. It does not, however, allow you to create or delete new fi les. To do that, you need write permission on the directory where you want to create the fi le. In directories, this permission also allows you to create and remove new subdirectories and fi les, but you need execute as well to descend into the directory.
Execute permission is required to execute a fi le. It is never set by default, which makes Linux almost completely immune to viruses. Only someone with administrative rights to a directory will be capable of applying the execute permission. Typically this would be the user root. However, a user who is owner of a directory also has the right to change permis-sions in that directory.
While the execute permission on fi les means you are allowed to run a program fi le, when applied to a directory, it indicates that the user can use the cd command to go to that direc-tory. This means that execute is an important permission for directories, and you will see that it is normally applied as the default permission to them. Without it, there is no way to change to a particular directory or create fi les in that directory.
Table 7.1 summarizes the use of the basic permissions.
TA B LE 7.1 Use of read, write, and execute permissions
Permission Applied to files Applied to directories
Read Open a file List contents of a directory
Write Change contents of a file Create and delete files
Execute Run a program file Change to the directory
Applying Read, Write, and Execute Permissions
Use the chmod command to apply permissions. When using chmod, you can set permissions for user, group, and others. You can use this command in two modes: relative and absolute. In the absolute mode, three digits are used to set the basic permissions. Table 7.2 provides an overview of the permissions and their numerical representation.
c07.indd 215c07.indd 215 1/8/2013 10:45:46 AM1/8/2013 10:45:46 AM
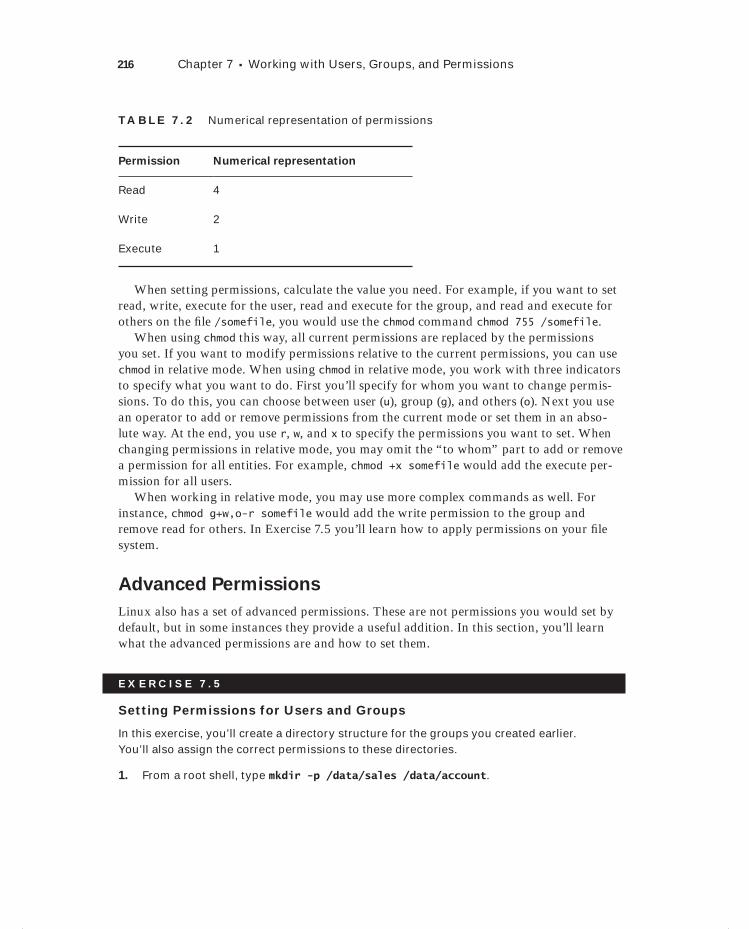
216 Chapter 7 Working with Users, Groups, and Permissions
TA B LE 7. 2 Numerical representation of permissions
Permission Numerical representation
Read 4
Write 2
Execute 1
When setting permissions, calculate the value you need. For example, if you want to set read, write, execute for the user, read and execute for the group, and read and execute for others on the fi le /somefile, you would use the chmod command chmod 755 /somefile.
When using chmod this way, all current permissions are replaced by the permissions you set. If you want to modify permissions relative to the current permissions, you can use chmod in relative mode. When using chmod in relative mode, you work with three indicators to specify what you want to do. First you’ll specify for whom you want to change permis-sions. To do this, you can choose between user (u), group (g), and others (o). Next you use an operator to add or remove permissions from the current mode or set them in an abso-lute way. At the end, you use r, w, and x to specify the permissions you want to set. When changing permissions in relative mode, you may omit the “to whom” part to add or remove a permission for all entities. For example, chmod +x somefile would add the execute per-mission for all users.
When working in relative mode, you may use more complex commands as well. For instance, chmod g+w,o-r somefile would add the write permission to the group and remove read for others. In Exercise 7.5 you’ll learn how to apply permissions on your fi le system.
Advanced Permissions
Linux also has a set of advanced permissions. These are not permissions you would set by default, but in some instances they provide a useful addition. In this section, you’ll learn what the advanced permissions are and how to set them.
E X E R C I S E 7. 5
Setting Permissions for Users and Groups
In this exercise, you’ll create a directory structure for the groups you created earlier. You’ll also assign the correct permissions to these directories.
1. From a root shell, type mkdir -p /data/sales /data/account.
c07.indd 216c07.indd 216 1/8/2013 10:45:46 AM1/8/2013 10:45:46 AM
Managing Permissions 217
E X E R C I S E 7. 5 ( c ont inue d )
2. Before setting the permissions, change the owners of these directories using chown linda.sales /data/sales and chown linda.account /data/account.
3. Set the permissions to enable the user and group owners to write fi les to these direc-tories and deny all access for all others.
chmod 770 /data/sales, and next chmod 770 /data/account
4. Use su - lisa to become user lisa, and change into the directory /data/account. Use touch emptyfile to create a fi le in this directory. Does this work?
5. Still as user lisa, use cd /data/sales and touch emptyfile to create a fi le in this directory. Does this work?
Understanding Advanced Permissions
There are three advanced permissions. The fi rst of them is the set user ID (SUID) permis-sion. On some very specifi c occasions, you may want to apply this permission to executable fi les. By default, a user who runs an executable fi le runs this fi le with their own permis-sions. For standard users, this normally means the use of the program is restricted. In some cases, however, the user needs special permissions for the execution of a certain task.
Consider the situation where a user needs to change their password. To do this, the user needs to write the new password to the /etc/shadow fi le. This fi le, however, is not writable for users who don’t have root permissions:
[root@hnl ~]# ls -l /etc/shadow
----------. 1 root root 1184 Apr 30 16:54 /etc/shadow
The SUID permission offers a solution for this problem. On the /usr/bin/passwd utility, this permission is applied by default. This means that when changing a password, the user temporarily has root permissions, which allow the user to write to the /etc/shadow fi le. You can see the SUID permission with ls -l as an s at the position where normally you would expect to see the x for the user permissions.
[root@hnl ~]# ls -l /usr/bin/passwd
-rwsr-xr-x. 1 root root 32680 Jan 28 2010 /usr/bin/passwd
The SUID permission may look useful, and it is in rare cases. At the same time, however, it is potentially dangerous. If applied incorrectly, you can give away root permissions by accident. I therefore recommend using it with the greatest care only.
The second special permission is set group ID (SGID). This permission has two effects. If applied on an executable fi le, it gives the user who executes the fi le the permissions of the
c07.indd 217c07.indd 217 1/8/2013 10:45:46 AM1/8/2013 10:45:46 AM

218 Chapter 7 Working with Users, Groups, and Permissions
group owner of that fi le. Thus, SGID can accomplish more or less the same thing that SUID does. However, SGID is hardly ever used for this purpose.
When applied to a directory, SGID may be used to set default group ownership on fi les and subdirectories created in that directory. By default, when a user creates a fi le, the user’s effective primary group is set as the group owner for that fi le. That’s not always very useful.
Imagine a situation where users linda and lori work for the accounting department and are both members of the group account. By default, these users are members of the private group of which they are the only members. Both users, however, are also members of the accounting group but as a secondary group setting.
The default situation is that when either of these users creates a fi le, the primary group becomes owner. However, if you create a shared group directory, say /groups/account, and you apply the SGID permission to that directory and set the group accounting as the group owner for that directory, all fi les created in this directory and all of its subdirectories would also have group accounting as the default group owner.
The SGID permission shows in the output of ls -l as an s at the position where you would normally fi nd the group execute permission.
[root@hnl data]# ls -ld account
drwxr-sr-x. 2 root account 4096 Apr 30 21:28 account
The third of the special permissions is called sticky bit. Sticky bit permission is used to protect fi les against accidental deletion in an environment where multiple users have write permissions in the same directory. For that reason, it is applied as a default permission to the /tmp directory, and it can be useful on shared group directories as well.
Without sticky bit, if a user can create fi les in a directory, the user can also delete fi les from that directory. In a shared group environment, this may be annoying. Imagine users linda and lori again, both of whom have write permissions to the directory /data/account and who have these permissions because of their membership of the group accounting. That means that linda is capable of deleting fi les that lori has created, and vice versa.
When applying sticky bit, a user can delete fi les only if either of the following is true:
The user is owner of the file
The user is owner of the directory where the file exists
When using ls -l, you can see sticky bit as a t at the position where you would nor-mally see the execute permission for others.
[root@hnl data]# ls -ld account/
drwxr-sr-t. 2 root account 4096 Apr 30 21:28 account/
Applying Advanced Permissions
To apply SUID, SGID, and sticky bit, you can use the chmod command. SUID has numerical value of 4, SGID has numerical value of 2, and sticky bit has numerical value of 1. If you want to apply these permissions, you need to add a four-digit argument to chmod, where the
c07.indd 218c07.indd 218 1/8/2013 10:45:47 AM1/8/2013 10:45:47 AM
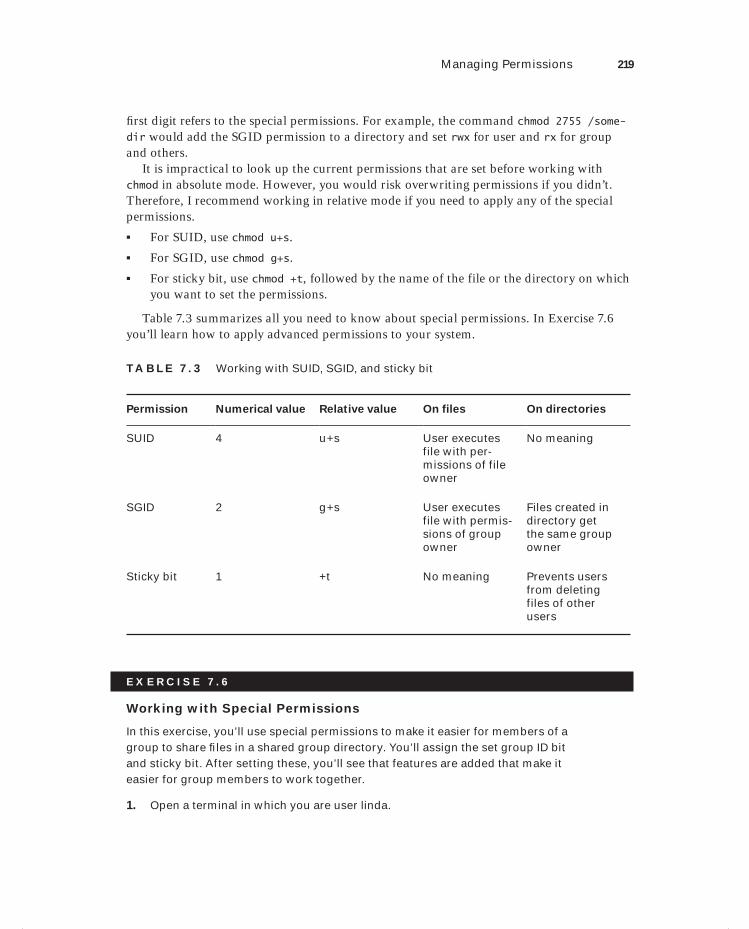
Managing Permissions 219
fi rst digit refers to the special permissions. For example, the command chmod 2755 /some-dir would add the SGID permission to a directory and set rwx for user and rx for group and others.
It is impractical to look up the current permissions that are set before working with chmod in absolute mode. However, you would risk overwriting permissions if you didn’t. Therefore, I recommend working in relative mode if you need to apply any of the special permissions.
For SUID, use chmod u+s.
For SGID, use chmod g+s.
For sticky bit, use chmod +t, followed by the name of the file or the directory on which you want to set the permissions.
Table 7.3 summarizes all you need to know about special permissions. In Exercise 7.6 you’ll learn how to apply advanced permissions to your system.
TA B LE 7. 3 Working with SUID, SGID, and sticky bit
Permission Numerical value Relative value On files On directories
SUID 4 u+s User executes file with per-missions of file owner
No meaning
SGID 2 g+s User executes file with permis-sions of group owner
Files created in directory get the same group owner
Sticky bit 1 +t No meaning Prevents users from deleting files of other users
E X E R C I S E 7. 6
Working with Special Permissions
In this exercise, you’ll use special permissions to make it easier for members of a group to share fi les in a shared group directory. You’ll assign the set group ID bit and sticky bit. After setting these, you’ll see that features are added that make it easier for group members to work together.
1. Open a terminal in which you are user linda.
c07.indd 219c07.indd 219 1/8/2013 10:45:47 AM1/8/2013 10:45:47 AM
220 Chapter 7 Working with Users, Groups, and Permissions
E X E R C I S E 7. 6 ( c ont inue d )
2. Use cd /data/sales to go to the sales directory. Use touch linda1 and touch linda2 to create two fi les of which linda is the owner.
3. Use su - lisa to switch the current user identity to user lisa, who is also a member of the sales group.
4. Use cd /data/sales and, from that directory, use ls -l. You’ll see the two fi les that were created by user linda, which are group-owned by the group linda. Use rm -f linda*. This will remove both fi les.
5. Use the command touch lisa1 and touch lisa2 to create two fi les that are owned by user lisa.
6. Use su - to escalate your current permissions to root level.
7. Use chmod g+s,o+t /data/sales to set the set group ID bit and sticky bit on the shared group directory.
8. Use su - linda. First use touch linda3 and touch linda4. You should now see that the two fi les you have created are owned by the group sales, which is group owner of the directory /data/sales.
9. Use rm -rf lisa*. Sticky bit will prevent you from removing these fi les as user linda, because you are not the owner of the fi les. Note that if user linda is directory owner of /data/sales, she can remove the fi les in question.
Working with Access Control Lists
Even if the advanced permissions that were discussed in the previous section add useful functionality to the way Linux works with permissions, it doesn’t allow you to give permis-sions to more than one user or one group on the same fi le. This feature is offered through access control lists (ACLs). Aside from that, they allow administrators to set default per-missions in a sophisticated way, where the permissions that are set can be different on dif-ferent directories.
Understanding ACLs
Although the ACL subsystem adds great functionality to your server, there is one draw-back: not all utilities support it. This means you may lose ACL settings when copying or moving fi les and also that your backup software may not be capable of backing up ACL settings.
c07.indd 220c07.indd 220 1/8/2013 10:45:47 AM1/8/2013 10:45:47 AM

Managing Permissions 221
The tar utility hasn’t supported ACLs for a long time. To make sure your ACL settings aren’t lost when you make a backup, use star instead of tar. The star utility works with the same options as tar, but it adds support for ACL settings. Alternatively, you can use the --acls option with tar.
The lack of support for permissions doesn’t have to be a problem, however. ACLs are often applied to directories as a structural measure and not on individual fi les. This means you won’t have lots of them but rather just a few applied to smart places in the fi le system. Hence, it will be relatively easy to restore the original ACLs with which you were working, even if your backup software doesn’t support them.
Preparing Your File System for ACLs
Before starting to work with ACLs, you must prepare your fi le system for ACL support. Because the fi le system metadata needs to be extended, ACLs are not always supported by default in the fi le system.
There are two ways to add fi le system support for permissions. First, if you’re using the Ext4 fi le system (which is the default fi le system on Red Hat Enterprise Linux), ACL sup-port is added to all fi le systems that were created while installing the system. You can verify this is the case by using the dumpe2fs utility on the device you want to check. For example, use dumpe2fs /dev/sda1 to check to see whether ACLs are supported on the fi le system on the device /dev/sda1 (see Listing 7.12). The Default mount options line shows the cur-rent default mount options for your fi le system. As an alternative, support for ACLs can be added as a mount option in /etc/fstab.
Listing 7.12: If your file system has default support for permissions, dumpe2fs shows it.
[root@hnl ~]# dumpe2fs /dev/sda1 | less
Filesystem volume name: <none>
Last mounted on: /boot
Filesystem UUID: cc890fc9-a6a8-4c7c-8cc1-65f3f43037cb
Filesystem magic number: 0xEF53
Filesystem revision #: 1 (dynamic)
Filesystem features: has_journal ext_attr resize_inode dir_index
filetype needs_recovery extent flex_bg sparse_super huge_file
uninit_bg dir_nlink extra_isize
Filesystem flags: signed_directory_hash
Default mount options: user_xattr acl
Filesystem state: clean
Errors behavior: Continue
Filesystem OS type: Linux
c07.indd 221c07.indd 221 1/8/2013 10:45:48 AM1/8/2013 10:45:48 AM

222 Chapter 7 Working with Users, Groups, and Permissions
Inode count: 128016
Block count: 512000
Reserved block count: 25600
Free blocks: 456166
Free inodes: 127976
First block: 1
Block size: 1024
Fragment size: 1024
Reserved GDT blocks: 256
Blocks per group: 8192
:
If your fi le system doesn’t offer support for permissions, you can use tune2fs to add sup-port to it, or you can use acl as a mount option in fstab to activate it on every mount. To add acl support by using tune2fs, use the command tune2fs -o acl,user_xattr /dev/yourdevice.
On file systems that you’ve added yourself, ACLs are not added as a default mount option. So, for every file system you’ve added where you want to be able to use ACLs, you’ll have to set them yourself.
Another option is to put the ACL option in fstab so that it is activated every time your system reboots. Just make sure that in /etc/fstab, the fourth column reads acl,user_xattr. Once your fi le system is remounted with ACL support, you can use the setfacl command to set ACLs.
In fact, file systems that have been created while installing your server have ACL support by default, so you don’t need the defaults option in /etc/fstab. File systems that have been created later don’t have this option set. In that case, you do need the acl option. Use dumpe2fs to see the prop-erties of the file system, and look for the Default mount option. If that has acl set, you don’t need to put the acl option in fstab.
Changing and Viewing ACL Settings with setfacl and getfacl
To set ACLs, you need to use the setfacl command. To see your current ACL settings, you need to use getfacl. Before setting ACLs, it’s always a good idea to show the current ACL settings using getfacl. Listing 7.13 shows the current permissions as shown with ls -l and as shown with getfacl. If you look closely, you’ll see that the information shown is exactly the same.
c07.indd 222c07.indd 222 1/8/2013 10:45:48 AM1/8/2013 10:45:48 AM
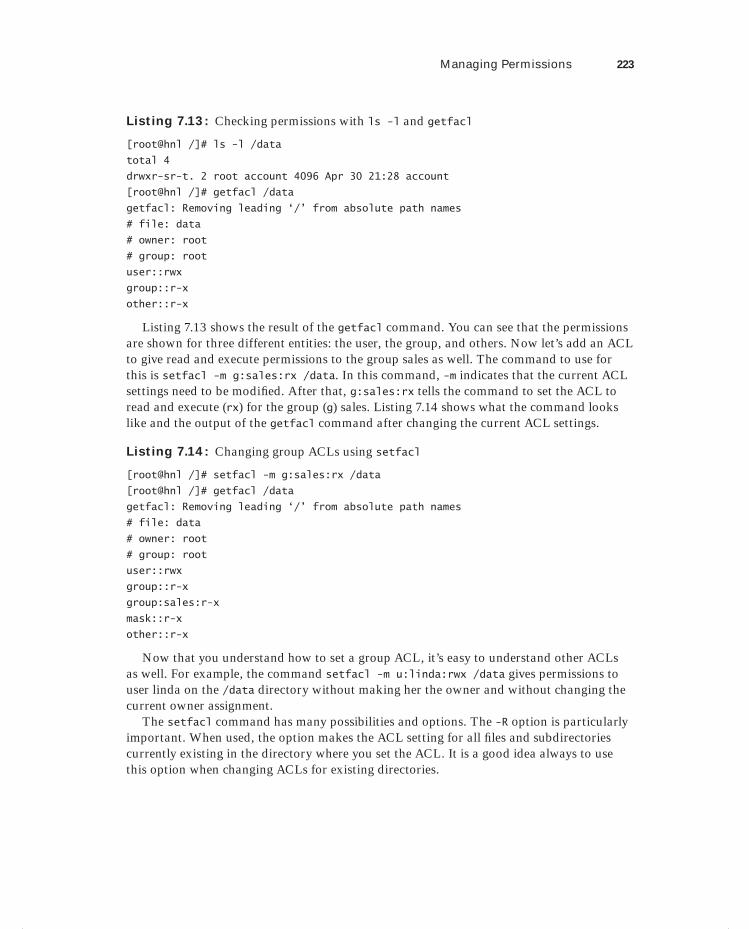
Managing Permissions 223
Listing 7.13: Checking permissions with ls -l and getfacl
[root@hnl /]# ls -l /data
total 4
drwxr-sr-t. 2 root account 4096 Apr 30 21:28 account
[root@hnl /]# getfacl /data
getfacl: Removing leading ‘/’ from absolute path names
# file: data
# owner: root
# group: root
user::rwx
group::r-x
other::r-x
Listing 7.13 shows the result of the getfacl command. You can see that the permissions are shown for three different entities: the user, the group, and others. Now let’s add an ACL to give read and execute permissions to the group sales as well. The command to use for this is setfacl -m g:sales:rx /data. In this command, -m indicates that the current ACL settings need to be modifi ed. After that, g:sales:rx tells the command to set the ACL to read and execute (rx) for the group (g) sales. Listing 7.14 shows what the command looks like and the output of the getfacl command after changing the current ACL settings.
Listing 7.14: Changing group ACLs using setfacl
[root@hnl /]# setfacl -m g:sales:rx /data
[root@hnl /]# getfacl /data
getfacl: Removing leading ‘/’ from absolute path names
# file: data
# owner: root
# group: root
user::rwx
group::r-x
group:sales:r-x
mask::r-x
other::r-x
Now that you understand how to set a group ACL, it’s easy to understand other ACLs as well. For example, the command setfacl -m u:linda:rwx /data gives permissions to user linda on the /data directory without making her the owner and without changing the current owner assignment.
The setfacl command has many possibilities and options. The -R option is particularly important. When used, the option makes the ACL setting for all fi les and subdirectories currently existing in the directory where you set the ACL. It is a good idea always to use this option when changing ACLs for existing directories.
c07.indd 223c07.indd 223 1/8/2013 10:45:48 AM1/8/2013 10:45:48 AM
224 Chapter 7 Working with Users, Groups, and Permissions
Working with Default ACLs
One benefi t of using ACLs is that you can give permissions to more than one user or group at a directory. Another benefi t is that you can enable inheritance by working with default ACLs. By setting a default ACL, you’ll determine the permissions that will be set for all new items that are created in the directory. Be aware, however, that a default ACL does not change the permissions for existing fi les and subdirectories. To change those as well, you’ll need to add a standard ACL.
To set a default ACL, you have to add the option d after the option –m. (The order does matter.) Use setfacl -m d:g:sales:rx /data if you want group sales to have read and execute permissions on everything that will ever be created in the /data directory.
When using default ACLs, it can also be useful to set an ACL for others. Normally this doesn’t make much sense, because you can change the permissions for others by using chmod. What you can’t do with chmod, however, is to specify the permissions that should be given to others on every new fi le that will ever be created. For example, if you want others not to get any permissions on anything that is created in /data, use setfacl -m d:o::- /data. In Exercise 7.7 you’ll learn how to apply ACLs to your fi le system.
E X E R C I S E 7. 7
Refining Permissions Using ACLs
In this exercise, you’ll continue to work on the /data/account and /data/sales direc-tories that you created earlier. In previous exercises, you ensured that the group sales has permissions on /data/sales and that the group account has permissions on /data/account. Up to now, you haven’t been able to refi ne the design, which you will do in this exercise. First you’ll make sure that the group account gets read permissions on the /data/sales directory and that group sales gets read permissions on the /data/account directory. Next you’ll set default ACLs to make sure that the permissions are properly set for all new items on all new fi les.
1. Open a root terminal.
2. Use setfacl -m g:account:rx /data/sales and setfacl -m g:sales:rx /data/account.
3. Use getfacl to verify that the permissions have been set the way you intend.
4. Use setfacl -m d:g:account:rwx,g:sales:rx /data/sales to set the default ACL for the directory sales.
5. Add the default ACL for the directory /data/account by using setfacl -m d:g:sales:rwx,g:account:rx /data/account.
6. Verify that the ACL settings are effective by adding a new fi le in /data/sales; use touch /data/sales/newfile and use getfacl /data/sales/newfile to check the current permission assignments.
c07.indd 224c07.indd 224 1/8/2013 10:45:48 AM1/8/2013 10:45:48 AM
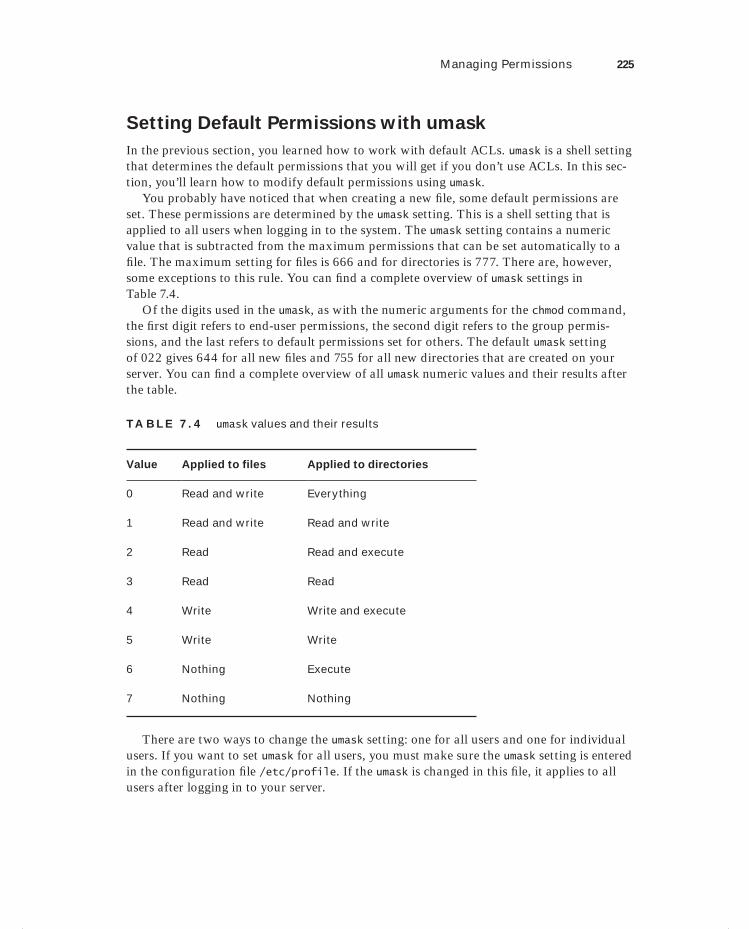
Managing Permissions 225
Setting Default Permissions with umask
In the previous section, you learned how to work with default ACLs. umask is a shell setting that determines the default permissions that you will get if you don’t use ACLs. In this sec-tion, you’ll learn how to modify default permissions using umask.
You probably have noticed that when creating a new fi le, some default permissions are set. These permissions are determined by the umask setting. This is a shell setting that is applied to all users when logging in to the system. The umask setting contains a numeric value that is subtracted from the maximum permissions that can be set automatically to a fi le. The maximum setting for fi les is 666 and for directories is 777. There are, however, some exceptions to this rule. You can fi nd a complete overview of umask settings in Table 7.4.
Of the digits used in the umask, as with the numeric arguments for the chmod command, the fi rst digit refers to end-user permissions, the second digit refers to the group permis-sions, and the last refers to default permissions set for others. The default umask setting of 022 gives 644 for all new fi les and 755 for all new directories that are created on your server. You can fi nd a complete overview of all umask numeric values and their results after the table.
TA B LE 7. 4 umask values and their results
Value Applied to files Applied to directories
0 Read and write Everything
1 Read and write Read and write
2 Read Read and execute
3 Read Read
4 Write Write and execute
5 Write Write
6 Nothing Execute
7 Nothing Nothing
There are two ways to change the umask setting: one for all users and one for individual users. If you want to set umask for all users, you must make sure the umask setting is entered in the confi guration fi le /etc/profile. If the umask is changed in this fi le, it applies to all users after logging in to your server.
c07.indd 225c07.indd 225 1/8/2013 10:45:48 AM1/8/2013 10:45:48 AM

226 Chapter 7 Working with Users, Groups, and Permissions
An alternative to setting the umask setting in /etc/profile, where it is applied to all users logging in to the system, is to change the umask settings in a fi le with the name .profile, which is created in the home directory of an individual user. Settings applied in this fi le are for the individual user only. Therefore, this is a good method if you need more granularity.
Working with Attributes
When working with permissions, there is always a relationship between a user or group object and the permissions these user or group objects have on a fi le or directory. An alter-native method of securing fi les on a Linux server is by working with attributes. Attributes do their work, regardless of the user who accesses the fi le.
As is the case for ACLs, a mount option must also be enabled for fi le attributes. This is the user_xattr option. Some attributes are available but not yet implemented. Don’t use them because they bring you nothing. Here is a list of the most useful attributes that can be applied:
A This attribute ensures that the fi le access time of the fi le is not modifi ed. Normally, every time a fi le is opened, the fi le access time is written to the fi le’s metadata. This affects performance in a negative way. Therefore, on fi les that are accessed on a regular basis, the A attribute is used to disable this feature.
a This attribute allows a fi le to be added to but not to be removed.
c If you are using a fi le system where volume-level compression is supported, this fi le attribute makes sure that the fi le is compressed the fi rst time that the compression engine becomes active.
D This attribute makes sure that changes to fi les are written to disk immediately and not to cache fi rst. This is a useful attribute on important database fi les to make sure they don’t get lost between fi le cache and hard disk.
d This attribute makes sure the fi le is not backed up in backups where the dump utility is used.
I This attribute enables indexing for the directory where it is enabled. It allows faster fi le access for primitive fi le systems like ext3 that don’t use a B-tree database for fast access to fi les.
i This attribute makes the fi le immutable. This means that no changes can be made to the fi le, which is useful for fi les that need a bit of extra protection.
j This attribute ensures that, on an ext3 fi le system, the fi le is fi rst written to the journal and only after that to the data blocks on the hard drive.
s This attribute overwrites the blocks where the fi le was stored with zeros after the fi le has been deleted. It makes sure that recovery of the fi le is not possible after it has been deleted.
u This attribute saves undelete information. This allows a utility to salvage deleted fi les.
c07.indd 226c07.indd 226 1/8/2013 10:45:49 AM1/8/2013 10:45:49 AM

Summary 227
Although there are quite a few attributes that can be used, be aware that most attributes are rather experimental and are useful only if an applica-tion is used that works with the given attribute. For example, it doesn’t make sense to apply the u attribute if no utility has been developed to use this attribute to recover deleted files.
If you want to apply attributes, you can use the chattr command. For example, use chattr +s somefile to apply the attribute s to somefile. What if you need to remove the attribute again? Then use chattr -s somefile, and it will be removed. To get an overview of all attributes that are currently applied, use the lsattr command.
SummaryIn this chapter, you learned how to set up your server with users and groups. You also learned how to use permissions and attributes to make sure these users and groups can do what they need to do. In the next chapter, you’ll learn how to use SELinux to add an extra layer of protection to your server.
c07.indd 227c07.indd 227 1/8/2013 10:45:49 AM1/8/2013 10:45:49 AM

c07.indd 228c07.indd 228 1/8/2013 10:45:49 AM1/8/2013 10:45:49 AM

Chapter
8Understanding and Configuring SELinux
TOPICS COVERED IN THIS CHAPTER:
Understanding SELinux
Selecting the SELinux Mode
Working with SELinux Context Types
Configuring SELinux Policies
Working with SELinux Modules
Setting up SELinux with system-config-selinux
Troubleshooting SELinux
c08.indd 229c08.indd 229 1/8/2013 10:46:20 AM1/8/2013 10:46:20 AM

To keep a server really secure, you’ll need to make sure that services are monitored and limited in what they can do. That is what SELinux is used for. In this chapter you’ll read how to
manage SELinux to add more security to your server and limit the chances of security inci-dents happening.
Understanding SELinuxPermissions are the foundation of all security on your Red Hat Enterprise Linux server. Just using permissions, however, isn’t suffi cient if you really want to protect your server. Let’s start with a real-life example that happened to me in 2011.
SELinux in Real Life
In 2011, I was running a server that was hosting the Apache web server. The server had been operational since late 2004, and since it worked well and nothing bad had ever happened to it, I had basically left it to its own devices, so to speak. Then one morning I discovered several email messages coming from the hosting provider. The last of them stated that I was at 250 percent of my monthly bandwidth!
So, what happened? On this server, the Apache web server was running with the per-missions of a dedicated user account. This user account had some permissions in the Apache-related directories, but as is the case for all users, read, write, and execute was in the /tmp directory. So, a hacker had used a fl aw in the Apache process to enter my server and place some Python scripts in the /tmp directory that were sending lots of data to vic-tims all over the world.
Now, the interesting thing is how to resolve such a problem. My fi rst approach was rather naïve: I created a fi rewall rule that blocked all traffi c on this server that wasn’t an answer to an incoming connection request. That worked for about a week, until the hacker came back and applied a much more sophisticated hack where a client and server part of his script worked together so that my fi rewall considered it normal and allowed network traf-fi c. After that, I reached 350 percent of my monthly bandwidth.
c08.indd 230c08.indd 230 1/8/2013 10:46:21 AM1/8/2013 10:46:21 AM
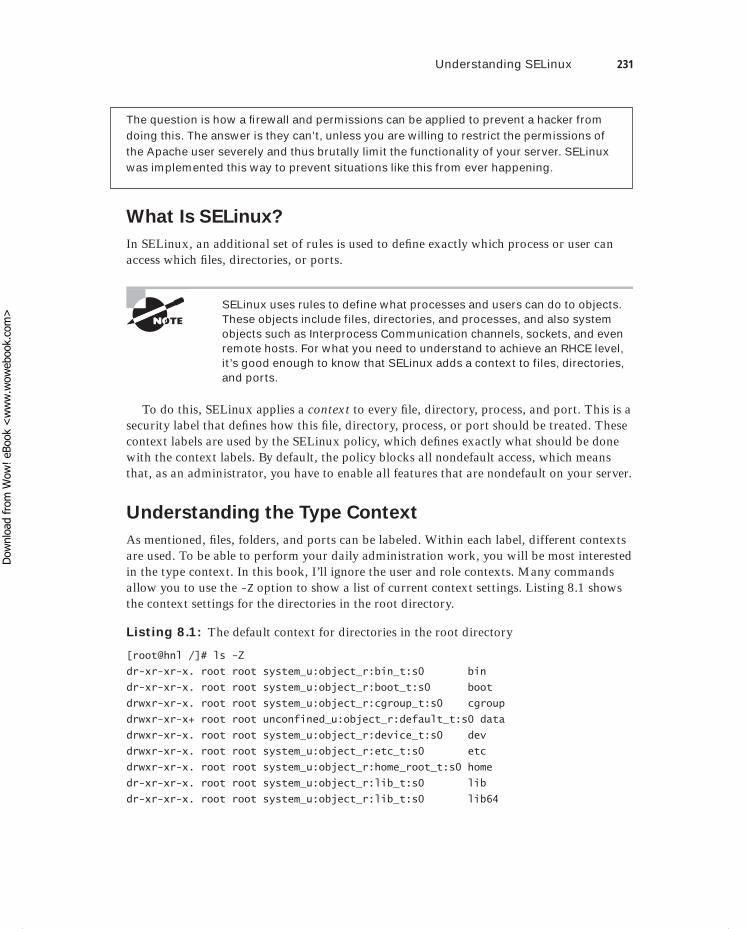
Understanding SELinux 231
The question is how a fi rewall and permissions can be applied to prevent a hacker from doing this. The answer is they can’t, unless you are willing to restrict the permissions of the Apache user severely and thus brutally limit the functionality of your server. SELinux was implemented this way to prevent situations like this from ever happening.
What Is SELinux?
In SELinux, an additional set of rules is used to defi ne exactly which process or user can access which fi les, directories, or ports.
SELinux uses rules to define what processes and users can do to objects. These objects include files, directories, and processes, and also system objects such as Interprocess Communication channels, sockets, and even remote hosts. For what you need to understand to achieve an RHCE level, it’s good enough to know that SELinux adds a context to files, directories, and ports.
To do this, SELinux applies a context to every fi le, directory, process, and port. This is a security label that defi nes how this fi le, directory, process, or port should be treated. These context labels are used by the SELinux policy, which defi nes exactly what should be done with the context labels. By default, the policy blocks all nondefault access, which means that, as an administrator, you have to enable all features that are nondefault on your server.
Understanding the Type Context
As mentioned, fi les, folders, and ports can be labeled. Within each label, different contexts are used. To be able to perform your daily administration work, you will be most interested in the type context. In this book, I’ll ignore the user and role contexts. Many commands allow you to use the -Z option to show a list of current context settings. Listing 8.1 shows the context settings for the directories in the root directory.
Listing 8.1: The default context for directories in the root directory
[root@hnl /]# ls -Z
dr-xr-xr-x. root root system_u:object_r:bin_t:s0 bin
dr-xr-xr-x. root root system_u:object_r:boot_t:s0 boot
drwxr-xr-x. root root system_u:object_r:cgroup_t:s0 cgroup
drwxr-xr-x+ root root unconfined_u:object_r:default_t:s0 data
drwxr-xr-x. root root system_u:object_r:device_t:s0 dev
drwxr-xr-x. root root system_u:object_r:etc_t:s0 etc
drwxr-xr-x. root root system_u:object_r:home_root_t:s0 home
dr-xr-xr-x. root root system_u:object_r:lib_t:s0 lib
dr-xr-xr-x. root root system_u:object_r:lib_t:s0 lib64
c08.indd 231c08.indd 231 1/8/2013 10:46:22 AM1/8/2013 10:46:22 AM
Dow
nlo
ad fro
m W
ow
! eBook
<w
ww
.wow
ebook.
com
>
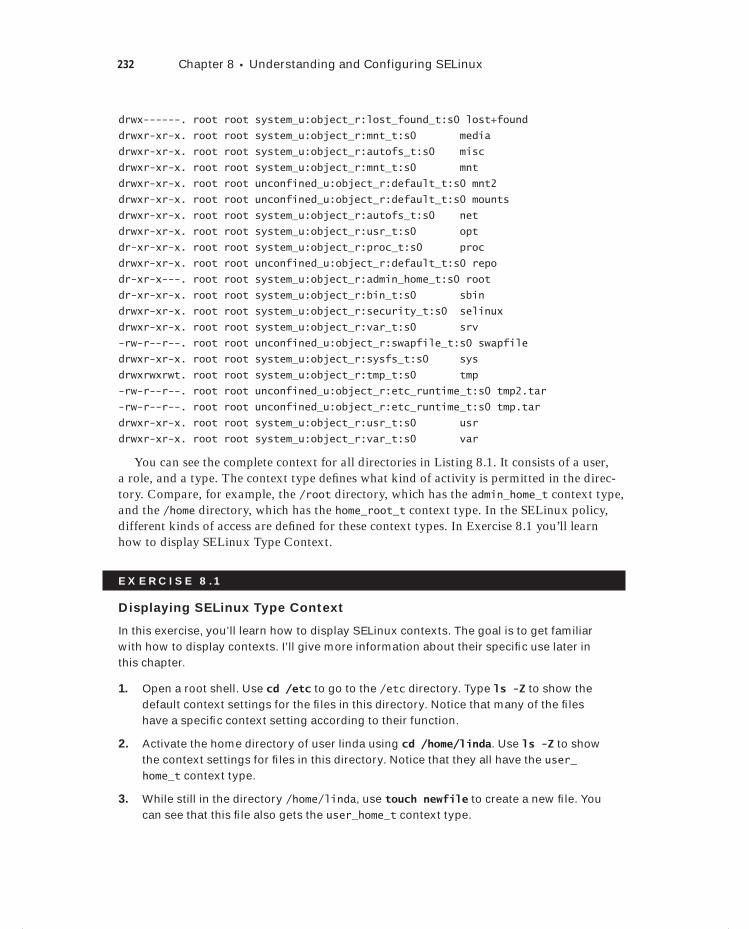
232 Chapter 8 Understanding and Configuring SELinux
drwx------. root root system_u:object_r:lost_found_t:s0 lost+found
drwxr-xr-x. root root system_u:object_r:mnt_t:s0 media
drwxr-xr-x. root root system_u:object_r:autofs_t:s0 misc
drwxr-xr-x. root root system_u:object_r:mnt_t:s0 mnt
drwxr-xr-x. root root unconfined_u:object_r:default_t:s0 mnt2
drwxr-xr-x. root root unconfined_u:object_r:default_t:s0 mounts
drwxr-xr-x. root root system_u:object_r:autofs_t:s0 net
drwxr-xr-x. root root system_u:object_r:usr_t:s0 opt
dr-xr-xr-x. root root system_u:object_r:proc_t:s0 proc
drwxr-xr-x. root root unconfined_u:object_r:default_t:s0 repo
dr-xr-x---. root root system_u:object_r:admin_home_t:s0 root
dr-xr-xr-x. root root system_u:object_r:bin_t:s0 sbin
drwxr-xr-x. root root system_u:object_r:security_t:s0 selinux
drwxr-xr-x. root root system_u:object_r:var_t:s0 srv
-rw-r--r--. root root unconfined_u:object_r:swapfile_t:s0 swapfile
drwxr-xr-x. root root system_u:object_r:sysfs_t:s0 sys
drwxrwxrwt. root root system_u:object_r:tmp_t:s0 tmp
-rw-r--r--. root root unconfined_u:object_r:etc_runtime_t:s0 tmp2.tar
-rw-r--r--. root root unconfined_u:object_r:etc_runtime_t:s0 tmp.tar
drwxr-xr-x. root root system_u:object_r:usr_t:s0 usr
drwxr-xr-x. root root system_u:object_r:var_t:s0 var
You can see the complete context for all directories in Listing 8.1. It consists of a user, a role, and a type. The context type defi nes what kind of activity is permitted in the direc-tory. Compare, for example, the /root directory, which has the admin_home_t context type, and the /home directory, which has the home_root_t context type. In the SELinux policy, different kinds of access are defi ned for these context types. In Exercise 8.1 you’ll learn how to display SELinux Type Context.
E X E R C I S E 8 .1
Displaying SELinux Type Context
In this exercise, you’ll learn how to display SELinux contexts. The goal is to get familiar with how to display contexts. I’ll give more information about their specifi c use later in this chapter.
1. Open a root shell. Use cd /etc to go to the /etc directory. Type ls -Z to show the default context settings for the fi les in this directory. Notice that many of the fi les have a specifi c context setting according to their function.
2. Activate the home directory of user linda using cd /home/linda. Use ls -Z to show the context settings for fi les in this directory. Notice that they all have the user_home_t context type.
3. While still in the directory /home/linda, use touch newfile to create a new fi le. You can see that this fi le also gets the user_home_t context type.
c08.indd 232c08.indd 232 1/8/2013 10:46:22 AM1/8/2013 10:46:22 AM
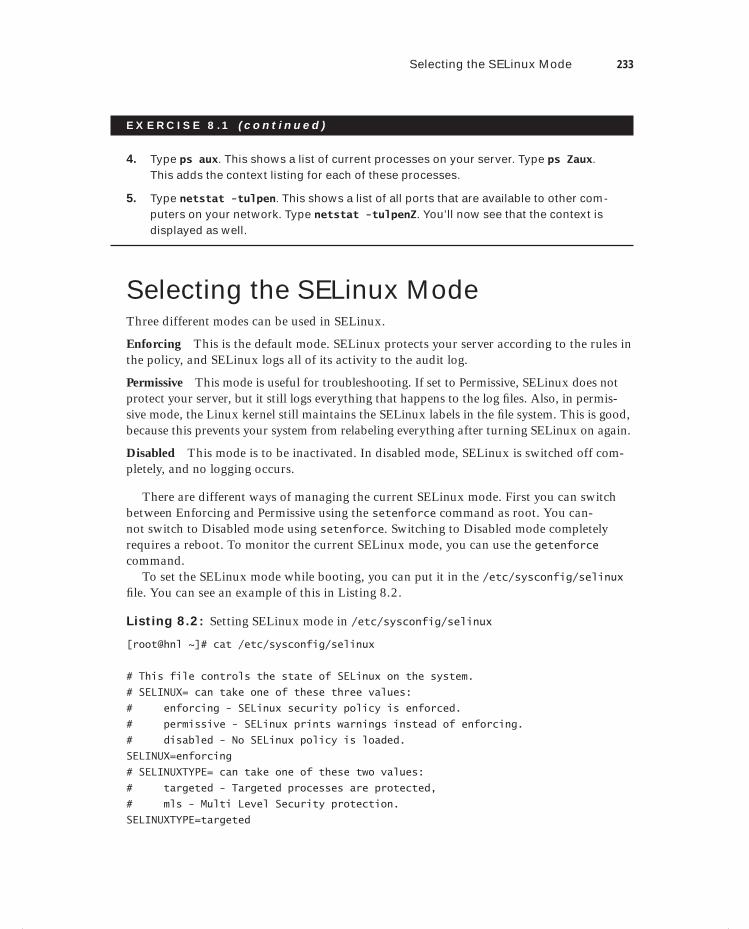
Selecting the SELinux Mode 233
E X E R C I S E 8 .1 ( c ont inue d )
4. Type ps aux. This shows a list of current processes on your server. Type ps Zaux. This adds the context listing for each of these processes.
5. Type netstat -tulpen. This shows a list of all ports that are available to other com-puters on your network. Type netstat -tulpenZ. You’ll now see that the context is displayed as well.
Selecting the SELinux ModeThree different modes can be used in SELinux.
Enforcing This is the default mode. SELinux protects your server according to the rules in the policy, and SELinux logs all of its activity to the audit log.
Permissive This mode is useful for troubleshooting. If set to Permissive, SELinux does not protect your server, but it still logs everything that happens to the log fi les. Also, in permis-sive mode, the Linux kernel still maintains the SELinux labels in the fi le system. This is good, because this prevents your system from relabeling everything after turning SELinux on again.
Disabled This mode is to be inactivated. In disabled mode, SELinux is switched off com-pletely, and no logging occurs.
There are different ways of managing the current SELinux mode. First you can switch between Enforcing and Permissive using the setenforce command as root. You can-not switch to Disabled mode using setenforce. Switching to Disabled mode completely requires a reboot. To monitor the current SELinux mode, you can use the getenforce command.
To set the SELinux mode while booting, you can put it in the /etc/sysconfig/selinux fi le. You can see an example of this in Listing 8.2.
Listing 8.2: Setting SELinux mode in /etc/sysconfig/selinux
[root@hnl ~]# cat /etc/sysconfig/selinux
# This file controls the state of SELinux on the system.
# SELINUX= can take one of these three values:
# enforcing - SELinux security policy is enforced.
# permissive - SELinux prints warnings instead of enforcing.
# disabled - No SELinux policy is loaded.
SELINUX=enforcing
# SELINUXTYPE= can take one of these two values:
# targeted - Targeted processes are protected,
# mls - Multi Level Security protection.
SELINUXTYPE=targeted
c08.indd 233c08.indd 233 1/8/2013 10:46:22 AM1/8/2013 10:46:22 AM
234 Chapter 8 Understanding and Configuring SELinux
You can also set the current SELinux mode on the GRUB prompt while booting. See Chapter 19, “Understanding and Troubleshooting the Boot Procedure,” for more details about the boot procedure.) On the GRUB prompt, use selinux=0 to disable SELinux while booting, and use selinux=1 if you want it to be enabled.
In general, you want SELinux to be enabled at all times. There are some products, how-ever, that specifi cally mention they cannot work with SELinux. If you have software that specifi cally mentions an incompatibility with SELinux, you have to turn off SELinux. If you suspect that SELinux is preventing your service from functioning the way it should, don’t just turn it off. Instead, analyze the log fi les as described in the “Troubleshooting SELinux” section in this chapter. It can be useful, however, to test whether your server works if SELinux is switched off. To perform this temporary test, use setenforce Permissive. Exercise 8.2 provides an example of why this might be useful.
E X E R C I S E 8 . 2
Switching between SELinux Modes
In this exercise, you’ll install an Apache web server and confi gure it for nondefault behav-ior, which will be denied by SELinux. Next you’ll set SELinux to Permissive mode, which shows that the nondefault behavior is then accepted. Then you’ll change the /etc/sysconfig/selinux fi le to set SELinux to disabled. Following that, you’ll create an empty fi le, set SELinux to Enforcing again, and reboot your server. You’ll notice that, after the reboot, a relabeling procedure is started, which takes a lot of time to complete.
1. Use yum install httpd to install the Apache web server. If yum says that it’s already installed, that’s OK; just continue with the exercise.
2. Once installed, use service httpd start to verify that your Apache server does indeed start. Once verifi ed, use service httpd stop to stop it again.
3. With your editor, open the /etc/httpd/conf/httpd.conf fi le and fi nd the line that reads Listen 80. Change this to Listen 81. This tries to start the Apache web server on port 81. Now use service httpd start to start the Apache web server again. You will get a Permission denied message.
4. Type setenforce Permissive, and try to start the Apache server again. You’ll see that it now works. Open the httpd.conf fi le, and change the default listen port back to 80.
5. Open the fi le /etc/sysconfig/selinux in your editor, and change the SELINUX parameter to disabled. Reboot your server.
6. After the reboot, log in as root and use touch disabledfile to create a new fi le in your home directory.
7. Use ls -Z to check the context that was set for this fi le. You will see that no context is set for this fi le.
c08.indd 234c08.indd 234 1/8/2013 10:46:22 AM1/8/2013 10:46:22 AM
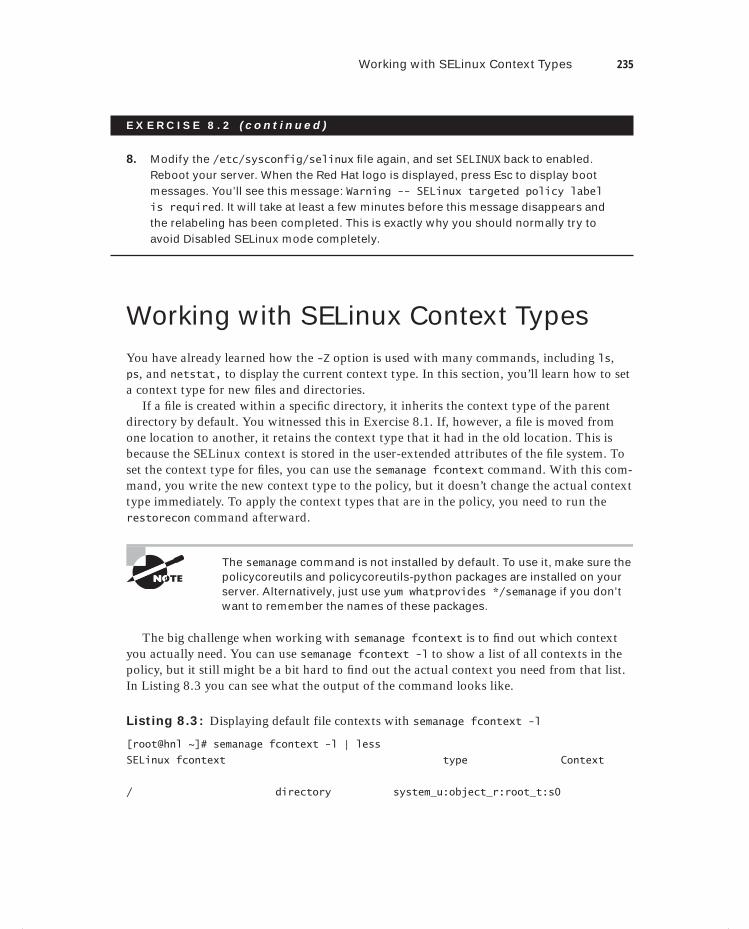
Working with SELinux Context Types 235
E X E R C I S E 8 . 2 ( c ont inue d )
8. Modify the /etc/sysconfig/selinux fi le again, and set SELINUX back to enabled. Reboot your server. When the Red Hat logo is displayed, press Esc to display boot messages. You’ll see this message: Warning -- SELinux targeted policy label is required. It will take at least a few minutes before this message disappears and the relabeling has been completed. This is exactly why you should normally try to avoid Disabled SELinux mode completely.
Working with SELinux Context TypesYou have already learned how the -Z option is used with many commands, including ls, ps, and netstat, to display the current context type. In this section, you’ll learn how to set a context type for new fi les and directories.
If a fi le is created within a specifi c directory, it inherits the context type of the parent directory by default. You witnessed this in Exercise 8.1. If, however, a fi le is moved from one location to another, it retains the context type that it had in the old location. This is because the SELinux context is stored in the user-extended attributes of the fi le system. To set the context type for fi les, you can use the semanage fcontext command. With this com-mand, you write the new context type to the policy, but it doesn’t change the actual context type immediately. To apply the context types that are in the policy, you need to run the restorecon command afterward.
The semanage command is not installed by default. To use it, make sure the policycoreutils and policycoreutils-python packages are installed on your server. Alternatively, just use yum whatprovides */semanage if you don’t want to remember the names of these packages.
The big challenge when working with semanage fcontext is to fi nd out which context you actually need. You can use semanage fcontext -l to show a list of all contexts in the policy, but it still might be a bit hard to fi nd out the actual context you need from that list. In Listing 8.3 you can see what the output of the command looks like.
Listing 8.3: Displaying default file contexts with semanage fcontext -l
[root@hnl ~]# semanage fcontext -l | less
SELinux fcontext type Context
/ directory system_u:object_r:root_t:s0
c08.indd 235c08.indd 235 1/8/2013 10:46:22 AM1/8/2013 10:46:22 AM
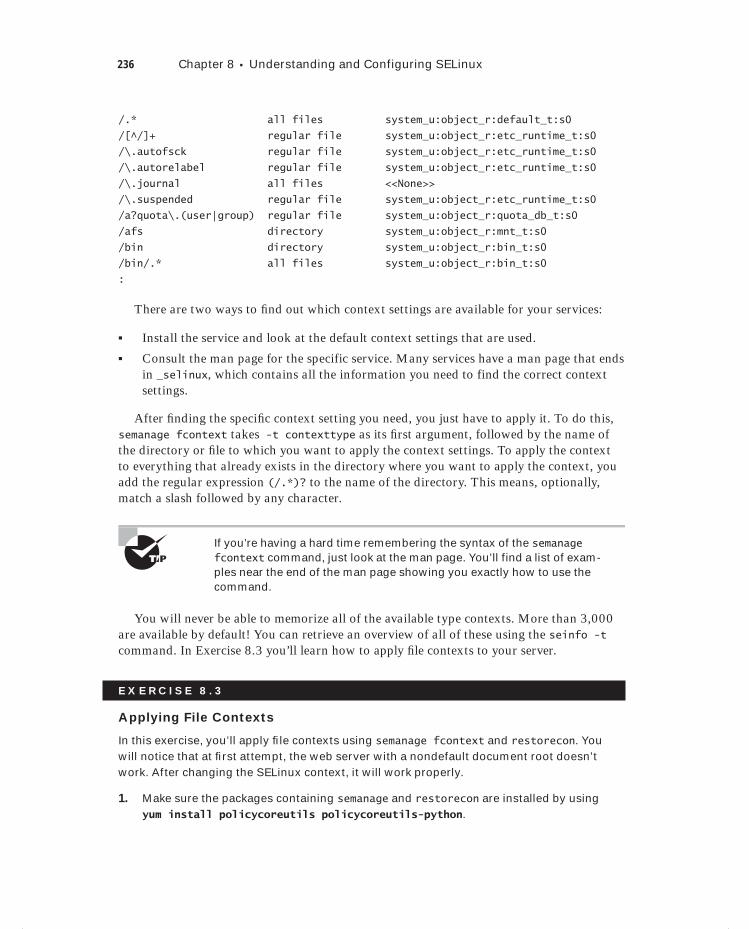
236 Chapter 8 Understanding and Configuring SELinux
/.* all files system_u:object_r:default_t:s0
/[^/]+ regular file system_u:object_r:etc_runtime_t:s0
/\.autofsck regular file system_u:object_r:etc_runtime_t:s0
/\.autorelabel regular file system_u:object_r:etc_runtime_t:s0
/\.journal all files <<None>>
/\.suspended regular file system_u:object_r:etc_runtime_t:s0
/a?quota\.(user|group) regular file system_u:object_r:quota_db_t:s0
/afs directory system_u:object_r:mnt_t:s0
/bin directory system_u:object_r:bin_t:s0
/bin/.* all files system_u:object_r:bin_t:s0
:
There are two ways to fi nd out which context settings are available for your services:
Install the service and look at the default context settings that are used.
Consult the man page for the specific service. Many services have a man page that ends in _selinux, which contains all the information you need to find the correct context settings.
After fi nding the specifi c context setting you need, you just have to apply it. To do this, semanage fcontext takes -t contexttype as its fi rst argument, followed by the name of the directory or fi le to which you want to apply the context settings. To apply the context to everything that already exists in the directory where you want to apply the context, you add the regular expression (/.*)? to the name of the directory. This means, optionally, match a slash followed by any character.
If you’re having a hard time remembering the syntax of the semanage fcontext command, just look at the man page. You’ll find a list of exam-ples near the end of the man page showing you exactly how to use the command.
You will never be able to memorize all of the available type contexts. More than 3,000 are available by default! You can retrieve an overview of all of these using the seinfo -t command. In Exercise 8.3 you’ll learn how to apply fi le contexts to your server.
E X E R C I S E 8 . 3
Applying File Contexts
In this exercise, you’ll apply fi le contexts using semanage fcontext and restorecon. You will notice that at fi rst attempt, the web server with a nondefault document root doesn’t work. After changing the SELinux context, it will work properly.
1. Make sure the packages containing semanage and restorecon are installed by using yum install policycoreutils policycoreutils-python.
c08.indd 236c08.indd 236 1/8/2013 10:46:23 AM1/8/2013 10:46:23 AM
Configuring SELinux Policies 237
E X E R C I S E 8 . 3 ( c ont inue d )
2. Use mkdir /web, and then activate that directory using cd /web.
3. Use your editor to create the fi le /web/index.html that contains the text welcome to my website.
4. Open the fi le /etc/httpd/conf/httpd.conf with an editor, and change the Docu-mentRoot line to DocumentRoot "/web".
5. Start the Apache web server using service httpd start.
6. Use elinks localhost to open a session to your local web server. You will receive a Connection refused message. Press Enter and then q to quit elinks.
7. Use ls -Z /var/www to fi nd the current type context for the default Apache Documen-tRoot, which is /var/www/html. It should be set to httpd_sys_content_t.
8. Use semanage fcontext -a -f ""-t httpd_sys_content_t '/web(/.*) ?' and press Enter.
9. Now use restorecon /web to apply the new type context.
10. Use ls -Z /web to show the context of the fi les in the directory /web. Can you see what has gone wrong?
11. Use restorecon -R /web to apply the new context recursively to the /web directory. The type context has now been set correctly.
12. Restart the web server using service httpd restart. You should now be able to access the content of the /web directory.
13. Open the /etc/httpd/conf/httpd.conf fi le with an editor, and make sure the Docu-mentRoot parameter is set to /var/www/html.
Configuring SELinux PoliciesWriting a policy is the work of a specialist, and it would merit a book in itself. An easy way to change the behavior of the policy is by working with Booleans. Booleans are switches that you can use to change the settings in the policy.
To fi nd out what Booleans can do for you, here are three options:
Use the man page for the service you want to configure to find out about Booleans that are specific to that service. Many services have a man page that ends in _selinux and contain exactly the information you need.
Use getsebool -a to show a list of all Booleans that are currently available. Use grep to filter the list for Booleans that are specific to the service you want to configure. The name of the Boolean often provides a good indication of its purpose.
Use semanage Boolean -l to show a list of all Booleans. The output of this command is similar to the output of getsebool -a, with the difference being that the description is usually a bit longer.
c08.indd 237c08.indd 237 1/8/2013 10:46:23 AM1/8/2013 10:46:23 AM
238 Chapter 8 Understanding and Configuring SELinux
Once you have found the Boolean you want to set, you can use setsebool -P. It is impor-tant to use the -P option at all times when using setsebool. This option writes the setting to the policy fi le on disk, and this is the only way to make sure that the Boolean is applied auto-matically after a reboot. In Exercise 8.4, you will learn how to work with SELinux Booleans.
E X E R C I S E 8 . 4
Working with SELinux Booleans
In this exercise, you’ll learn how to work with Booleans. You will explore Booleans that are available for the vsftpd FTP server, and you will enable the FTP server for anonymous writes.
1. From a root shell, type getsebool -a | grep ftp. This displays a list of Booleans that are related to FTP servers.
2. Use the command semanage boolean -l | grep ftp. Compare the result to that of the getsebool command you used in the fi rst step of this exercise.
3. Use man -k _selinux. This shows a short list of services that have their own man pages that relate to SELinux. As you can see, there is a man page for ftpd_selinux as well.
4. Use setsebool allow_ftpd_anon_write on to switch on this Boolean. Notice that it doesn’t take much time to write the change. Use getsebool -a |grep ftpd_anon to verify that the Boolean is indeed turned on.
5. Reboot your server.
6. Check again to see whether the allow_ftpd_anon_write Boolean is still turned on. Because it hasn’t yet been written to the policy, you’ll see that it is off right now.
7. Use setsebool -P allow_ftpd_anon_write on to switch the Boolean on and write the setting to the policy.
Working with SELinux ModulesThe current implementation of SELinux on Red Hat Enterprise Linux is modular. This means that the policy that implements SELinux features is not a single large policy but one that consists of many smaller modules. Each module covers a specifi c part of the SELinux confi guration.
The concept of SELinux module was introduced to make it easy for third-party vendors to make their services compatible with SELinux. To get an overview of SELinux modules, you can use the semodule -l command.
It is also possible for an administrator to switch modules on or off. This can be useful if you want to disable a single part of SELinux to run a specifi c service without SELinux
c08.indd 238c08.indd 238 1/8/2013 10:46:23 AM1/8/2013 10:46:23 AM
Troubleshooting SELinux 239
protection. To switch off a SELinux module, use selinux -d modulename. If you want to switch it on again, use selinux -e modulename.
Setting Up SELinux with system-config-selinuxYou’ve read about some of the most useful command-line tools. In case you don’t like working with the command-line interface, there is a graphical tool as well, known as system-confi g-selinux. This tool is in the package policycoreutils-gui, so make sure it is installed before you try to launch it.
The system-confi g-selinux tool conveniently offers most of the options you learned how to use from the command line. There is one important drawback to using it, though; everything you want to write to the policy from system-confi g-selinux is written to the policy immediately after selecting it. This means you can’t click dozens of options one after another because, after selecting an option, the policy is immediately updated and you have to wait a minute for that. So, my advice on this is simple: don’t use it!
Troubleshooting SELinuxAs you read earlier in this chapter, many administrators turn off SELinux because it pre-vents them from doing what they want to do. By turning off SELinux, you take a huge risk, however. It is much better to keep it on and then to analyze what needs to be done if it is preventing you from performing a specifi c task. The setroubleshoot-server package makes it a lot easier to analyze what has gone wrong by providing a set of tools that spell out what you need to do to make it work. Use yum install -y setroubleshoot to install the server and all of the utilities you need.
By default, if SELinux is the reason why something isn’t working, a log message to this effect is sent to the /var/log/audit/audit.log fi le (that is, if the auditd service is running). If you see an empty /var/log/audit, check that the auditd service is running (service auditd status) and enabled (chkconfig --list | grep auditd). Also, you need the package setroubleshoot-server to be installed before anything appears in the audit.log fi le. The messages in the audit.log fi le, unfortunately, are hard to read. Listing 8.4 shows an example of this.
Listing 8.4: Example lines from /etc/audit/audit.log
type=USER_START msg=audit(1336057801.202:14): user pid=2943 uid=0
auid=500 ses=4 subj=system_u:system_r:crond_t:s0-s0:c0.c1023 msg='op=PAM:session_open acct="linda" exe="/usr/sbin/crond" hostname=?
addr=? terminal=cron res=success'
type=CRED_DISP msg=audit(1336057801.325:15): user pid=2942 uid=0 auid=0
c08.indd 239c08.indd 239 1/8/2013 10:46:23 AM1/8/2013 10:46:23 AM
240 Chapter 8 Understanding and Configuring SELinux
ses=3 subj=system_u:system_r:crond_t:s0-s0:c0.c1023 msg='op=PAM:setcred acct="root" exe="/usr/sbin/crond" hostname=? addr=? terminal=cron
res=success'
type=USER_END msg=audit(1336057801.326:16): user pid=2942 uid=0 auid=0
ses=3 subj=system_u:system_r:crond_t:s0-s0:c0.c1023 msg='op=PAM:session_close acct="root" exe="/usr/sbin/crond" hostname=?
addr=? terminal=cron res=success'
type=CRED_DISP msg=audit(1336057801.390:17): user pid=2943 uid=500 auid=500
ses=4 subj=system_u:system_r:crond_t:s0-s0:c0.c1023 msg='op=PAM:setcred
acct="linda" exe="/usr/sbin/crond" hostname=? addr=? terminal=cron
res=success'
type=USER_END msg=audit(1336057801.390:18): user pid=2943 uid=500 auid=500
ses=4 subj=system_u:system_r:crond_t:s0-s0:c0.c1023
msg='op=PAM:session_close acct="linda" exe="/usr/sbin/crond"
hostname=? addr=? terminal=cron res=success'
type=AVC msg=audit(1336057812.508:19): avc: denied { getattr } for
pid=2823 comm="httpd" path="/webb/index.html" dev=dm-0 ino=2228227 scontext=unconfined_u:system_r:httpd_t:s0
tcontext=unconfined_u:object_r:default_t:s0 tclass=file
type=AVC msg=audit(1336057812.508:20): avc: denied { getattr } for
pid=2823 comm="httpd" path="/webb/index.html" dev=dm-0 ino=2228227
scontext=unconfined_u:system_r:httpd_t:s0
tcontext=unconfined_u:object_r:default_t:s0 tclass=file
If you’re really motivated, you’ll get the information you need out of the audit.log fi le. Take, for example, the last line that starts with type=AVC. It is followed by an ID that is used by auditd, after which you can see that the httpd process with PID 2823 is denied access to the fi le /webb/index.html. There is another way of understanding what’s hap-pening, though. Look at the last lines of /var/log/messages in Listing 8.5. After installing setroubleshoot-server, it logs the same event.
Listing 8.5: The same message as seen in /var/log/messages
[root@hnl audit]# tail /var/log/messages
May 3 17:01:59 hnl kernel: hda-intel: Invalid position buffer, using LPIB read method instead.
May 3 17:02:00 hnl kernel: hda-intel: IRQ timing workaround is activated
for card #0. Suggest a bigger bdl_pos_adj.
May 3 17:02:07 hnl avahi-daemon[2121]: Invalid query packet.
May 3 17:02:34 hnl avahi-daemon[2121]: Invalid query packet.
May 3 17:04:43 hnl kernel: type=1400 audit(1336057483.276:4): avc: denied
{ getattr } for pid=2822 comm="httpd" path="/webb/index.html" dev=dm-0
ino=2228227 scontext=unconfined_u:system_r:httpd_t:s0
c08.indd 240c08.indd 240 1/8/2013 10:46:23 AM1/8/2013 10:46:23 AM
Troubleshooting SELinux 241
tcontext=unconfined_u:object_r:default_t:s0 tclass=file
May 3 17:04:43 hnl kernel: type=1400 audit(1336057483.276:5): avc: denied
{ getattr } for pid=2822 comm="httpd" path="/webb/index.html" dev=dm-0
ino=2228227 scontext=unconfined_u:system_r:httpd_t:s0
tcontext=unconfined_u:object_r:default_t:s0 tclass=file
May 3 17:10:00 hnl auditd[2929]: Started dispatcher: /sbin/audispd pid:
2931
May 3 17:10:00 hnl audispd: audispd initialized with q_depth=120 and 1
active plugins
May 3 17:10:00 hnl auditd[2929]: Init complete, auditd 2.1.3 listening for
events (startup state enable)
May 3 17:10:15 hnl setroubleshoot: SELinux is preventing httpd from
getattr access on the file /webb/index.html. For complete SELinux messages. run sealert -l bedbcf59-9bc0-4425-b4fd-e45b8f4e3369
As you can see from /var/log/messages, it is loud and clear what is happening. Even better, you can run the sealert command followed by a specifi c ID to fi nd an even more detailed explanation of what’s going on. You can see the complete explanation for this event in Listing 8.6.
Listing 8.6: The sealert command tells you what to do
[root@hnl ~]# sealert -l bedbcf59-9bc0-4425-b4fd-e45b8f4e3369
SELinux is preventing httpd from getattr access on the file /webb/index.html.
***** Plugin catchall_labels (83.8 confidence) suggests ********************
If you want to allow httpd to have getattr access on the index.html file
Then you need to change the label on /webb/index.html
Do
# semanage fcontext -a -t FILE_TYPE '/webb/index.html'
where FILE_TYPE is one of the following: net_conf_t, textrel_shlib_t,
public_content_t, cert_type, etc_runtime_t, anon_inodefs_t,
dirsrv_var_run_t, sysctl_kernel_t, httpd_modules_t, fail2ban_var_lib_t,
puppet_var_lib_t, httpd_var_lib_t, httpd_var_run_t, rpm_script_tmp_t,
httpd_awstats_htaccess_t, httpd_dirsrvadmin_htaccess_t,
httpd_suexec_exec_t, httpd_user_htaccess_t, application_exec_type, chroot_exec_t, httpd_nutups_cgi_htaccess_t, mailman_cgi_exec_t,
gitosis_var_lib_t, httpd_sys_content_t, public_content_rw_t, dirsrvadmin_config_t, user_cron_spool_t, httpd_squid_htaccess_t,
c08.indd 241c08.indd 241 1/8/2013 10:46:23 AM1/8/2013 10:46:23 AM

242 Chapter 8 Understanding and Configuring SELinux
httpd_bugzilla_htaccess_t, httpd_cobbler_htaccess_t, httpd_munin_htaccess_t, rpm_tmp_t, mailman_data_t,
dirsrvadmin_unconfined_script_exec_t, httpd_apcupsd_cgi_htaccess_t, mailman_archive_t, system_dbusd_var_lib_t, httpd_cvs_htaccess_t,
httpd_git_htaccess_t, httpd_sys_htaccess_t, squirrelmail_spool_t, ld_so_cache_t, bin_t, httpd_prewikka_htaccess_t, httpd_t, lib_t,
abrt_var_cache_t, passenger_var_lib_t, passenger_var_run_t, cobbler_var_lib_t, usr_t, httpd_rotatelogs_exec_t,
httpd_smokeping_cgi_htaccess_t, nagios_etc_t, nagios_log_t, sssd_public_t, httpd_keytab_t, locale_t, httpd_unconfined_script_exec_t, etc_t, fonts_t,
logfile, cluster_conf_t, proc_t, sysfs_t, krb5_keytab_t, fonts_cache_t, httpd_exec_t, httpd_lock_t, passenger_exec_t, httpd_log_t, dirsrv_config_t,
httpd_config_t, krb5_conf_t, user_tmp_t, abrt_var_run_t, httpd_mediawiki_htaccess_t, udev_tbl_t, httpd_tmp_t, calamaris_www_t,
smokeping_var_lib_t, shell_exec_t, httpd_w3c_validator_htaccess_t, httpd_cache_t, httpd_tmpfs_t, mysqld_etc_t, sysctl_crypto_t, cvs_data_t,
iso9660_t, dirsrvadmin_tmp_t, cobbler_etc_t, puppet_tmp_t, var_lib_t, httpd_helper_exec_t, dbusd_etc_t, user_home_t, dirsrv_share_t, configfile,
abrt_t, lib_t, httpd_squirrelmail_t, httpd_php_exec_t, httpd_nagios_htaccess_t, abrt_helper_exec_t, httpd_mediawiki_tmp_t,
samba_var_t, dirsrv_var_log_t, ld_so_t, zarafa_var_lib_t, httpd_cvs_ra_content_t, httpd_cvs_rw_content_t, httpd_git_ra_content_t,
httpd_git_rw_content_t, httpd_nagios_content_t, httpd_sys_ra_content_t, httpd_sys_rw_content_t, httpd_sys_rw_content_t,
httpd_w3c_validator_content_t, httpd_nagios_ra_content_t, httpd_nagios_rw_content_t, httpd_nutups_cgi_ra_content_t,
httpd_nutups_cgi_rw_content_t, httpd_cobbler_script_exec_t, httpd_mediawiki_script_exec_t, httpd_smokeping_cgi_script_exec_t,
httpd_git_content_t, httpd_user_content_t, httpd_apcupsd_cgi_content_t, httpd_mediawiki_ra_content_t, httpd_mediawiki_rw_content_t,
httpd_apcupsd_cgi_ra_content_t, httpd_apcupsd_cgi_rw_content_t, httpd_squid_ra_content_t, httpd_squid_rw_content_t,
httpd_prewikka_content_t, httpd_smokeping_cgi_content_t, httpd_smokeping_cgi_ra_content_t, httpd_smokeping_cgi_rw_content_t,
httpd_cvs_content_t, httpd_sys_content_t, httpd_munin_content_t, httpd_squid_content_t, httpd_awstats_script_exec_t,
httpd_munin_script_exec_t, httpd_dirsrvadmin_ra_content_t, httpd_dirsrvadmin_rw_content_t, httpd_w3c_validator_script_exec_t,
httpd_prewikka_ra_content_t, httpd_prewikka_rw_content_t, httpd_user_script_exec_t, httpd_bugzilla_content_t,
httpd_mediawiki_content_t, krb5_host_rcache_t, httpd_cobbler_content_t, httpd_apcupsd_cgi_script_exec_t, root_t, httpd_dirsrvadmin_content_t,
httpd_squid_script_exec_t, httpd_nagios_script_exec_t, httpd_w3c_validator_ra_content_t, httpd_w3c_validator_rw_content_t,
httpd_awstats_ra_content_t, httpd_awstats_rw_content_t, httpd_awstats_content_t, httpd_bugzilla_script_exec_t,
httpd_user_ra_content_t, httpd_user_rw_content_t, httpdcontent, httpd_cobbler_ra_content_t, httpd_cobbler_rw_content_t,
c08.indd 242c08.indd 242 1/8/2013 10:46:23 AM1/8/2013 10:46:23 AM
Dow
nlo
ad fro
m W
ow
! eBook
<w
ww
.wow
ebook.
com
>
Troubleshooting SELinux 243
httpd_prewikka_script_exec_t, httpd_nutups_cgi_content_t, httpd_munin_ra_content_t, httpd_munin_rw_content_t,
httpd_sys_script_exec_t, httpd_git_script_exec_t, httpd_cvs_script_exec_t, httpd_dirsrvadmin_script_exec_t, httpd_bugzilla_ra_content_t,
httpd_bugzilla_rw_content_t, httpd_nutups_cgi_script_exec_t.
Then execute:
restorecon -v '/webb/index.html'
***** Plugin catchall (17.1 confidence) suggests ***************************
If you believe that httpd should be allowed getattr access on the
index.html file by default.
Then you should report this as a bug.
You can generate a local policy module to allow this access.
Do
allow this access for now by executing:
# grep httpd /var/log/audit/audit.log | audit2allow -M mypol
# semodule -i mypol.pp
The amount of information that is shown by sealert may strike you as being over-whelming, but if you know where to look, it’s not that bad. As you can see right at the beginning, it tells you to run the semanage fcontext command, followed by a type context. It is not exactly sure which one to use, so for your convenience, it shows just those type contexts that are relevant to this scenario instead of the more than 3,000 type contexts that exist. After the list of all relevant type contexts, it tells you to run restorecon to apply the fi nal fi x. Just follow the procedure that is indicated here, and you’ll fi x the issue right away. In Exercise 8.5 you’ll learn how to enable sealert messages.
E X E R C I S E 8 . 5
Enabling sealert Message Analysis
In this exercise, once again you’ll modify the Apache web server to force it to do some-thing that SELinux doesn’t like. To analyze what is happening, you’ll use the tools that are available from the setroubleshoot-server package.
1. Use yum -y install setroubleshoot-server to install the setroubleshoot-server package.
2. Create a directory with the name /web2, put an index.html fi le in the directory that contains some text, and change the httpd DocumentRoot setting in /etc/httpd/conf/httpd.conf to refer to /web2 as the default DocumentRoot. After making those changes, restart Apache using service httpd restart.
c08.indd 243c08.indd 243 1/8/2013 10:46:23 AM1/8/2013 10:46:23 AM
244 Chapter 8 Understanding and Configuring SELinux
E X E R C I S E 8 . 5 ( c ont inue d )
3. Make sure that auditd is started; if it’s not, use service auditd start and chkcon-fig auditd on to start auditd and put it in your server’s runlevels.
4. Use elinks to try to get to the new DocumentRoot, which obviously will be forbidden. (Use elinks http://localhost.)
5. Use tail /var/log/audit/audit.log to read the messages that were written by SELinux to the audit.log. You’ll notice they are a bit hard to read.
6. Use tail /var/log/messages to read about the same event. You’ll see that it’s much easier to do from this fi le.
7. Copy the sealert -l command from /var/log/messages, including the full ID after the -l option, and run the command from the command line.
8. Follow the directions given by sealert -l to fi x the issue.
SummaryIn this chapter, you learned how to work with SELinux. You learned only the basics—the real work begins when you start installing and confi guring services that need SELinux to allow them to do what you need them to do. Therefore, in many of the chapters that follow, you’ll encounter SELinux again and explore some practical cases where you really need to confi gure SELinux before you can start a service.
c08.indd 244c08.indd 244 1/8/2013 10:46:23 AM1/8/2013 10:46:23 AM

Chapter
9Working with KVM Virtualization
TOPICS COVERED IN THIS CHAPTER:
Understanding the KVM Virtualization Architecture
Preparing Your Host for KVM Virtualization
Installing a KVM Virtual Machine
Managing KVM Virtual Machines
Understanding KVM Networking
c09.indd 245c09.indd 245 1/8/2013 10:46:55 AM1/8/2013 10:46:55 AM
Virtualization is a popular solution to use system resources in a more effi cient way. In Red Hat Enterprise Linux, KVM is available to offer datacenter-ready virtualization. In this chap-
ter, you’ll learn everything you need to know about KVM to build a versatile virtualized environment on top of it.
Understanding the KVM Virtualization ArchitectureIn many datacenters today, virtualization techniques are employed to use hardware more effi ciently. Virtualization allows you to run several virtual machines on one physical server and thus makes each server more cost-effective to run.
Red Hat KVM Virtualization
In its 64-bit version, Red Hat Enterprise Linux Server includes KVM virtualization by default. KVM stands for Kernel Virtual Machine. This is hypervisor type 1 virtualization; a hypervi-sor offers the most effi cient way to install virtualized operating systems. In this section, you’ll learn how to set up a KVM virtual machine and perform basic management tasks on it.
To run KVM on your server, there are just two requirements:
The server must be running a 64-bit version of Red Hat Enterprise Linux.
The CPU must offer virtualization support.
In Exercise 9.1, you’ll learn how to determine whether your server meets these conditions.
E X E R C I S E 9 .1
Determining Whether Your Server Meets KVM Virtualization Requirements
In this exercise, you’ll use two commands to determine whether your server meets KVM virtualization requirements.
1. Log in to your server using the username root and the password password.
2. Right-click the graphical desktop, and select the option Open In Terminal.
c09.indd 246c09.indd 246 1/8/2013 10:46:56 AM1/8/2013 10:46:56 AM

Understanding the KVM Virtualization Architecture 247
E X E R C I S E 9 .1 ( c ont inue d )
3. Type the command arch. If it answers x86_64, you’re using a 64-bit architecture.
4. Type cat /proc/cpuinfo, and locate the flags section of the output. With Intel microprocessors, you will see vmx, and on AMD microprocessors, you will see svm to indicate that virtualization is supported on your CPU. If you also see the lm fl ag on your CPU, this indicates you have a 64-bit processor.
5. Reboot your server, and enter the BIOS settings. The exact procedure to do this is different on different server models. Check the CPU features to ensure that virtualiza-tion is enabled.
To use your server as a KVM virtualization host, you’ll also need to install the required software. The easiest way to do this is by selecting the Virtualization host package while installing the server. Alternatively, you can add the required packages once the installation is completed. In Exercise 9.2 later in the chapter, you’ll learn how to do this.
An essential part of the KVM confi guration on your server is libvirt. Libvirt is a generic interface that communicates to the KVM hypervisor and makes it possible to manage KVM and other virtualization solutions that may run on Linux. The advantage of using libvirt is that it provides a library against which different management programs can be used. On Red Hat Enterprise Linux, the Virtual Machine Manager graphical tool and the virsh command provide the main management interfaces that use libvirt. In Figure 9.1 you see an overview of how libvirt integrates in virtualization on Red Hat Enterprise Linux.
F I GU R E 9 .1 Libvirt overview
1.6 VIRT
KVM XEN
VIRSHVIRTUAL MACHINE
MANAGER
OTHERLINUX
VIRTUALIZATION
Red Hat Enterprise Virtualization
The default KVM virtualization in Red Hat Enterprise Linux works fi ne as far as it goes, but it’s not a solution that would allow administrators to virtualize a large datacenter and manage many virtual machines from a central location. To provide such a solution, Red Hat created Red Hat Enterprise Virtualization (RHEV).
c09.indd 247c09.indd 247 1/8/2013 10:46:57 AM1/8/2013 10:46:57 AM
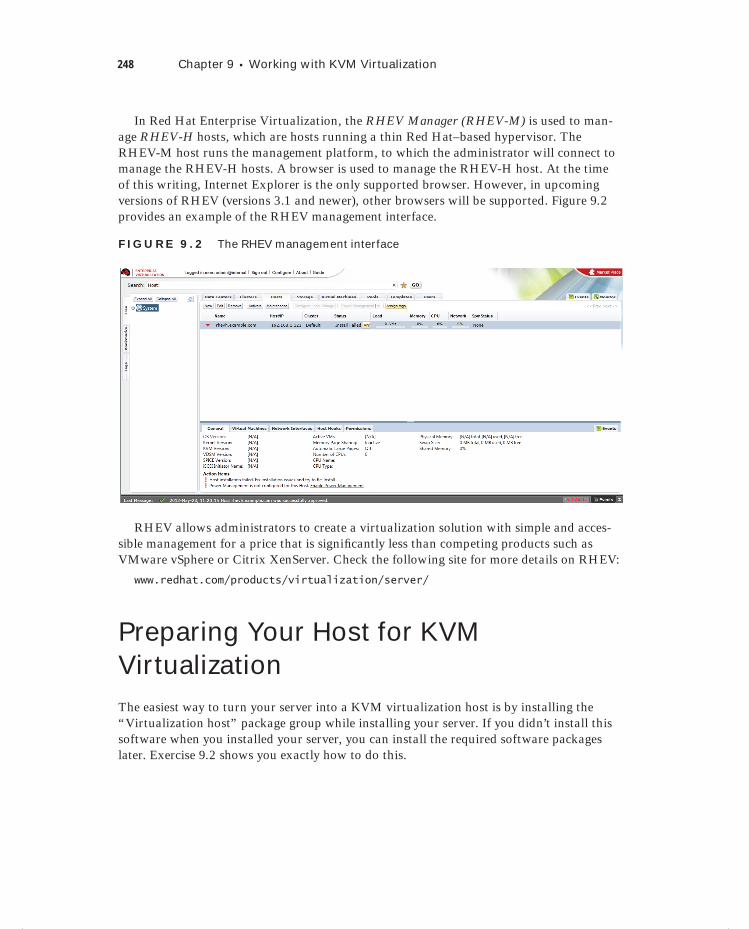
248 Chapter 9 Working with KVM Virtualization
In Red Hat Enterprise Virtualization, the RHEV Manager (RHEV-M) is used to man-age RHEV-H hosts, which are hosts running a thin Red Hat–based hypervisor. The RHEV-M host runs the management platform, to which the administrator will connect to manage the RHEV-H hosts. A browser is used to manage the RHEV-H host. At the time of this writing, Internet Explorer is the only supported browser. However, in upcoming versions of RHEV (versions 3.1 and newer), other browsers will be supported. Figure 9.2 provides an example of the RHEV management interface.
F I GU R E 9 . 2 The RHEV management interface
RHEV allows administrators to create a virtualization solution with simple and acces-sible management for a price that is signifi cantly less than competing products such as VMware vSphere or Citrix XenServer. Check the following site for more details on RHEV:
www.redhat.com/products/virtualization/server/
Preparing Your Host for KVM VirtualizationThe easiest way to turn your server into a KVM virtualization host is by installing the “Virtualization host” package group while installing your server. If you didn’t install this software when you installed your server, you can install the required software packages later. Exercise 9.2 shows you exactly how to do this.
c09.indd 248c09.indd 248 1/8/2013 10:46:57 AM1/8/2013 10:46:57 AM

Installing a KVM Virtual Machine 249
E X E R C I S E 9 . 2
Preparing Your Server to Function as a KVM Hypervisor
In this exercise, you’ll install all of the software that is needed to turn your server into a KVM virtualization host. You’ll also start the required services and kernel modules and do a test run to verify that KVM support is indeed enabled.
1. Open a root shell on your server, and type yum -y groupinstall virtualization. This installs all of the packages that are required for KVM virtualization and its management.
2. To use libvirt, you need libvirtd. Use service libvirtd start and chkconfig libvirtd on to start and enable this service.
3. Load the KVM kernel module using modprobe kvm. Next, use lsmod | grep kvm to verify that the kvm kernel module and the platform-specifi c support modules are loaded. Your server is now ready to start installing KVM virtual machines (see Listing 9.1).
Listing 9.1: Verifying that the KVM kernel module is loaded
[root@hnl ~]# lsmod | grep kvm
kvm_intel 50380 0
kvm 305113 1 kvm_intel
Installing a KVM Virtual MachineAfter ensuring you’ve met all of the requirements to install virtual machines, you can use the Virtual Machine Manager to start the installation. In Exercise 9.3, you’ll use the Virtual Machine Manager utility to install a virtual machine, and you’ll become familiar with some of the most important features of Virtual Machine Manager.
Before starting the installation of a virtual machine, consider how you will handle storage. KVM offers two options:
Create a disk image file as the backend for the virtual hard drive.
Use an LVM logical volume.
There is a major benefi t to using LVM logical volumes. Doing so allows you to create a snapshot of the current state of the virtual machine.
c09.indd 249c09.indd 249 1/8/2013 10:46:57 AM1/8/2013 10:46:57 AM
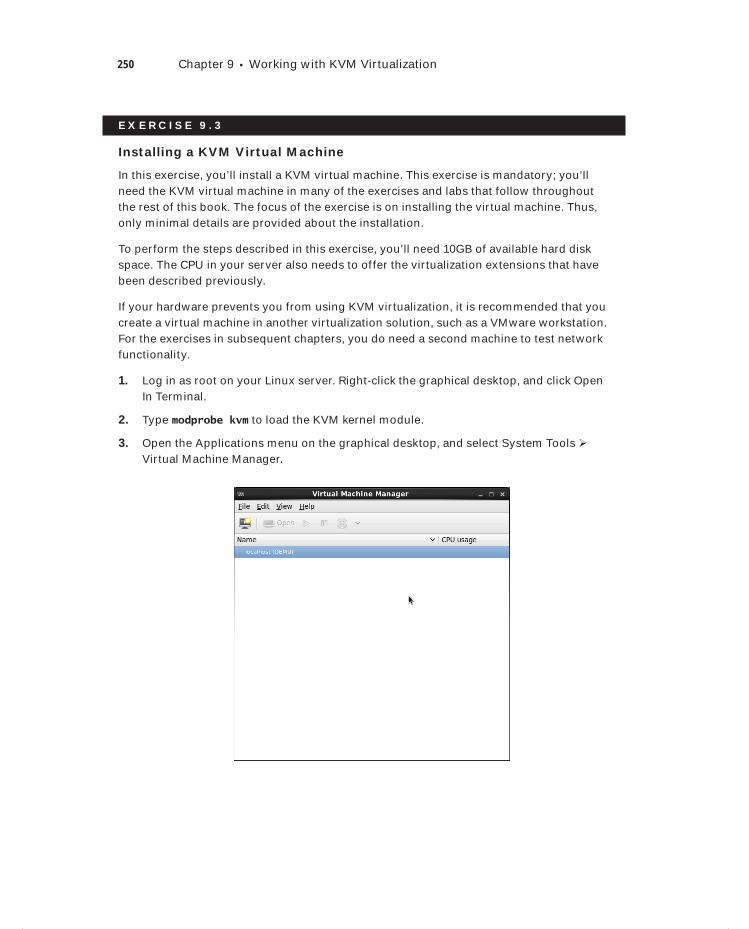
250 Chapter 9 Working with KVM Virtualization
E X E R C I S E 9 . 3
Installing a KVM Virtual Machine
In this exercise, you’ll install a KVM virtual machine. This exercise is mandatory; you’ll need the KVM virtual machine in many of the exercises and labs that follow throughout the rest of this book. The focus of the exercise is on installing the virtual machine. Thus, only minimal details are provided about the installation.
To perform the steps described in this exercise, you’ll need 10GB of available hard disk space. The CPU in your server also needs to offer the virtualization extensions that have been described previously.
If your hardware prevents you from using KVM virtualization, it is recommended that you create a virtual machine in another virtualization solution, such as a VMware workstation. For the exercises in subsequent chapters, you do need a second machine to test network functionality.
1. Log in as root on your Linux server. Right-click the graphical desktop, and click Open In Terminal.
2. Type modprobe kvm to load the KVM kernel module.
3. Open the Applications menu on the graphical desktop, and select System Tools Virtual Machine Manager.
c09.indd 250c09.indd 250 1/8/2013 10:46:57 AM1/8/2013 10:46:57 AM
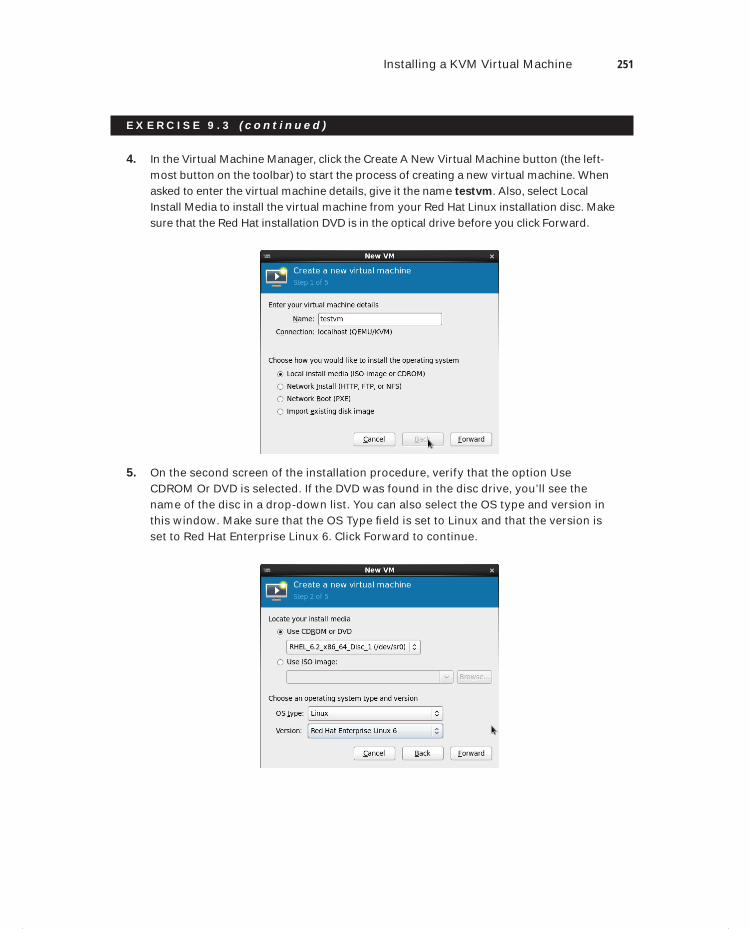
Installing a KVM Virtual Machine 251
E X E R C I S E 9 . 3 ( c ont inue d )
4. In the Virtual Machine Manager, click the Create A New Virtual Machine button (the left-most button on the toolbar) to start the process of creating a new virtual machine. When asked to enter the virtual machine details, give it the name testvm. Also, select Local Install Media to install the virtual machine from your Red Hat Linux installation disc. Make sure that the Red Hat installation DVD is in the optical drive before you click Forward.
5. On the second screen of the installation procedure, verify that the option Use CDROM Or DVD is selected. If the DVD was found in the disc drive, you’ll see the name of the disc in a drop-down list. You can also select the OS type and version in this window. Make sure that the OS Type fi eld is set to Linux and that the version is set to Red Hat Enterprise Linux 6. Click Forward to continue.
c09.indd 251c09.indd 251 1/8/2013 10:46:57 AM1/8/2013 10:46:57 AM
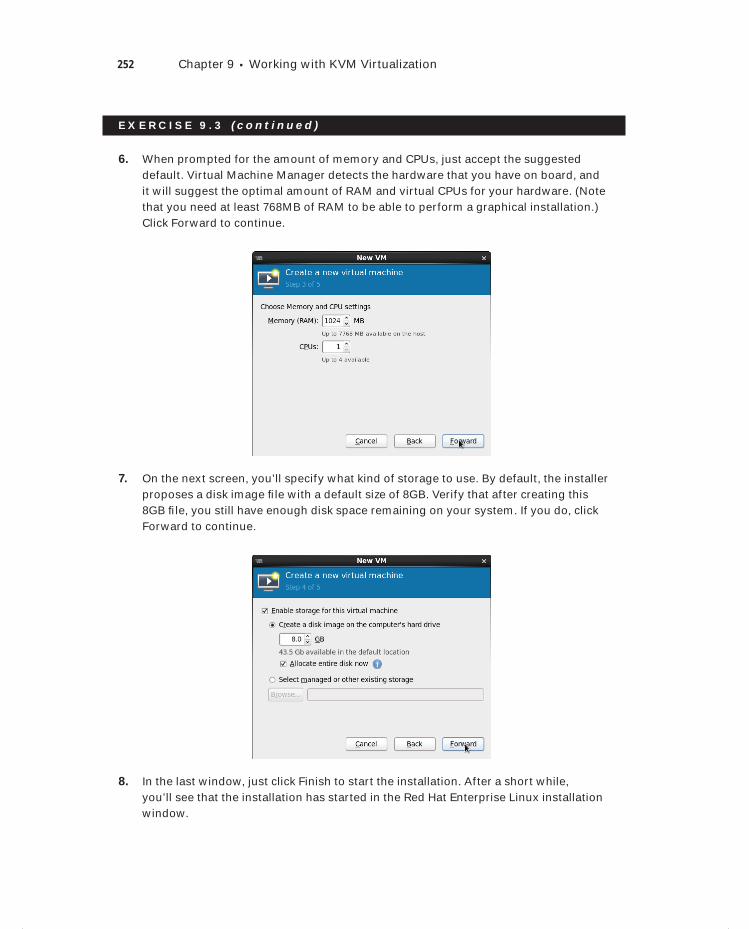
252 Chapter 9 Working with KVM Virtualization
E X E R C I S E 9 . 3 ( c ont inue d )
6. When prompted for the amount of memory and CPUs, just accept the suggested default. Virtual Machine Manager detects the hardware that you have on board, and it will suggest the optimal amount of RAM and virtual CPUs for your hardware. (Note that you need at least 768MB of RAM to be able to perform a graphical installation.) Click Forward to continue.
7. On the next screen, you’ll specify what kind of storage to use. By default, the installer proposes a disk image fi le with a default size of 8GB. Verify that after creating this 8GB fi le, you still have enough disk space remaining on your system. If you do, click Forward to continue.
8. In the last window, just click Finish to start the installation. After a short while, you’ll see that the installation has started in the Red Hat Enterprise Linux installation window.
c09.indd 252c09.indd 252 1/8/2013 10:46:58 AM1/8/2013 10:46:58 AM
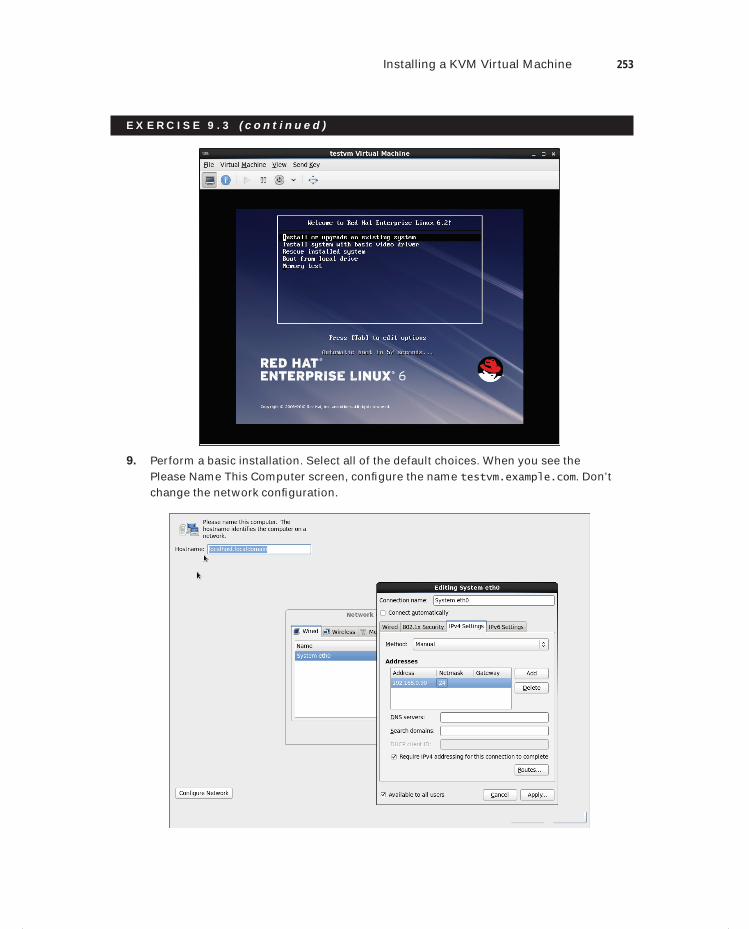
Installing a KVM Virtual Machine 253
E X E R C I S E 9 . 3 ( c ont inue d )
9. Perform a basic installation. Select all of the default choices. When you see the Please Name This Computer screen, confi gure the name testvm.example.com. Don’t change the network confi guration.
c09.indd 253c09.indd 253 1/8/2013 10:46:58 AM1/8/2013 10:46:58 AM
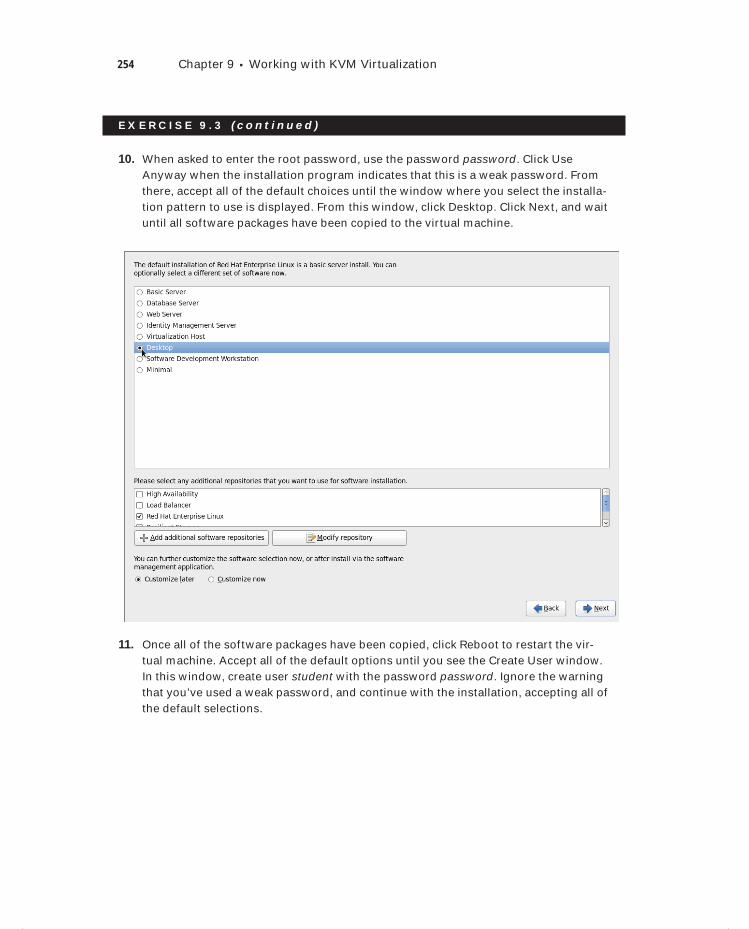
254 Chapter 9 Working with KVM Virtualization
E X E R C I S E 9 . 3 ( c ont inue d )
10. When asked to enter the root password, use the password password. Click Use Anyway when the installation program indicates that this is a weak password. From there, accept all of the default choices until the window where you select the installa-tion pattern to use is displayed. From this window, click Desktop. Click Next, and wait until all software packages have been copied to the virtual machine.
11. Once all of the software packages have been copied, click Reboot to restart the vir-tual machine. Accept all of the default options until you see the Create User window. In this window, create user student with the password password. Ignore the warning that you’ve used a weak password, and continue with the installation, accepting all of the default selections.
c09.indd 254c09.indd 254 1/8/2013 10:46:59 AM1/8/2013 10:46:59 AM
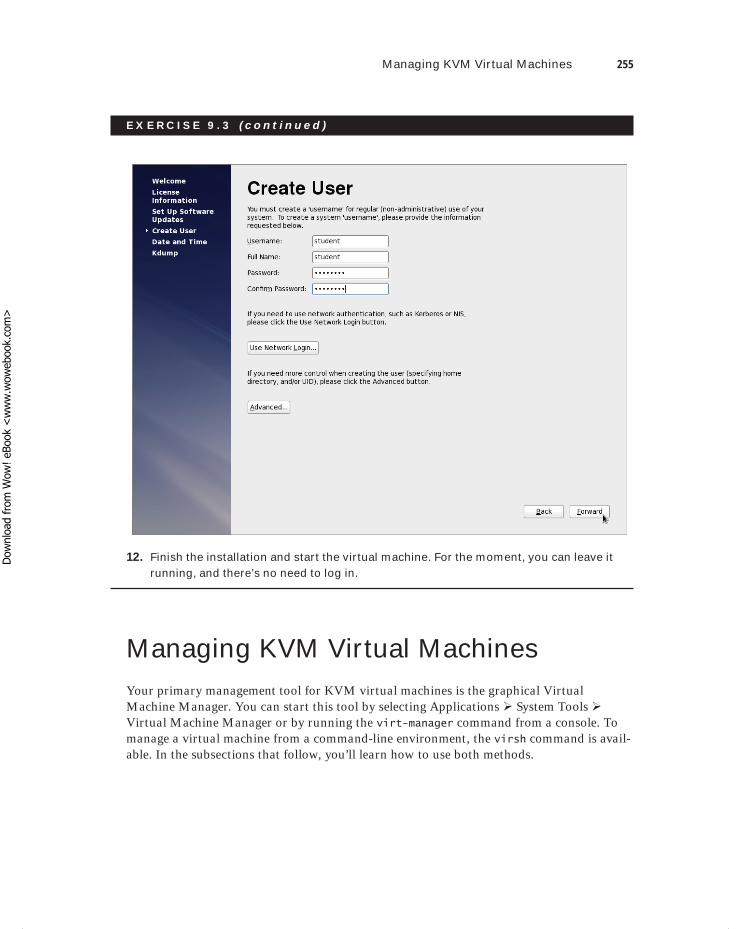
Managing KVM Virtual Machines 255
E X E R C I S E 9 . 3 ( c ont inue d )
12. Finish the installation and start the virtual machine. For the moment, you can leave it running, and there’s no need to log in.
Managing KVM Virtual MachinesYour primary management tool for KVM virtual machines is the graphical Virtual Machine Manager. You can start this tool by selecting Applications System Tools Virtual Machine Manager or by running the virt-manager command from a console. To manage a virtual machine from a command-line environment, the virsh command is avail-able. In the subsections that follow, you’ll learn how to use both methods.
c09.indd 255c09.indd 255 1/8/2013 10:46:59 AM1/8/2013 10:46:59 AM
Dow
nlo
ad fro
m W
ow
! eBook
<w
ww
.wow
ebook.
com
>
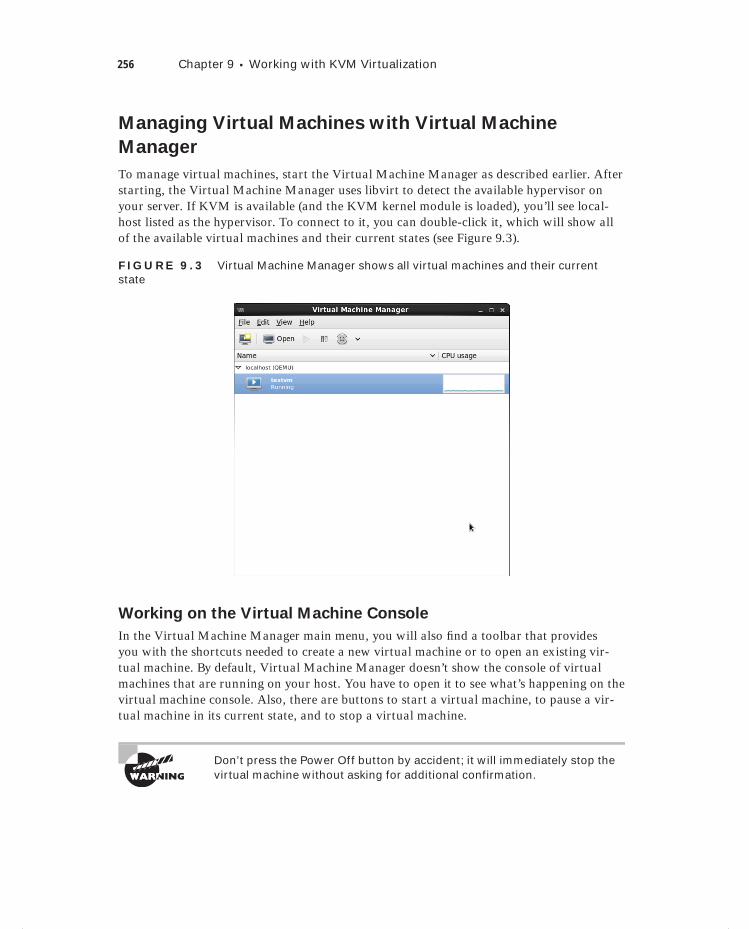
256 Chapter 9 Working with KVM Virtualization
Managing Virtual Machines with Virtual Machine
Manager
To manage virtual machines, start the Virtual Machine Manager as described earlier. After starting, the Virtual Machine Manager uses libvirt to detect the available hypervisor on your server. If KVM is available (and the KVM kernel module is loaded), you’ll see local-host listed as the hypervisor. To connect to it, you can double-click it, which will show all of the available virtual machines and their current states (see Figure 9.3).
F I GU R E 9 . 3 Virtual Machine Manager shows all virtual machines and their current state
Working on the Virtual Machine Console
In the Virtual Machine Manager main menu, you will also fi nd a toolbar that provides you with the shortcuts needed to create a new virtual machine or to open an existing vir-tual machine. By default, Virtual Machine Manager doesn’t show the console of virtual machines that are running on your host. You have to open it to see what’s happening on the virtual machine console. Also, there are buttons to start a virtual machine, to pause a vir-tual machine in its current state, and to stop a virtual machine.
Don’t press the Power Off button by accident; it will immediately stop the virtual machine without asking for additional confirmation.
c09.indd 256c09.indd 256 1/8/2013 10:46:59 AM1/8/2013 10:46:59 AM
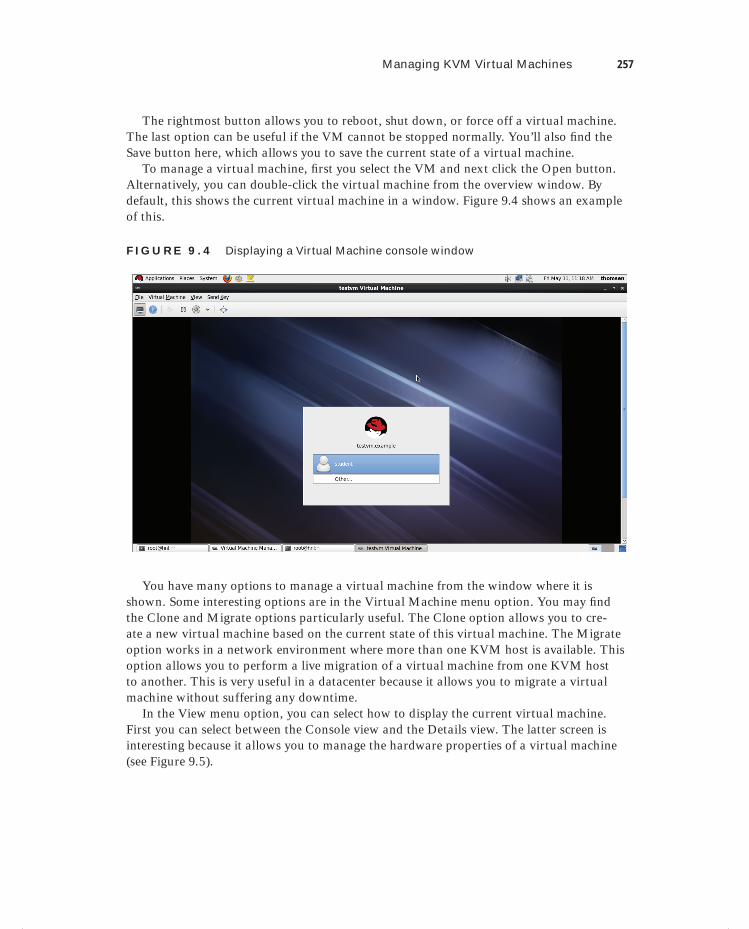
Managing KVM Virtual Machines 257
The rightmost button allows you to reboot, shut down, or force off a virtual machine. The last option can be useful if the VM cannot be stopped normally. You’ll also fi nd the Save button here, which allows you to save the current state of a virtual machine.
To manage a virtual machine, fi rst you select the VM and next click the Open button. Alternatively, you can double-click the virtual machine from the overview window. By default, this shows the current virtual machine in a window. Figure 9.4 shows an example of this.
F I GU R E 9 . 4 Displaying a Virtual Machine console window
You have many options to manage a virtual machine from the window where it is shown. Some interesting options are in the Virtual Machine menu option. You may fi nd the Clone and Migrate options particularly useful. The Clone option allows you to cre-ate a new virtual machine based on the current state of this virtual machine. The Migrate option works in a network environment where more than one KVM host is available. This option allows you to perform a live migration of a virtual machine from one KVM host to another. This is very useful in a datacenter because it allows you to migrate a virtual machine without suffering any downtime.
In the View menu option, you can select how to display the current virtual machine. First you can select between the Console view and the Details view. The latter screen is interesting because it allows you to manage the hardware properties of a virtual machine (see Figure 9.5).
c09.indd 257c09.indd 257 1/8/2013 10:47:00 AM1/8/2013 10:47:00 AM
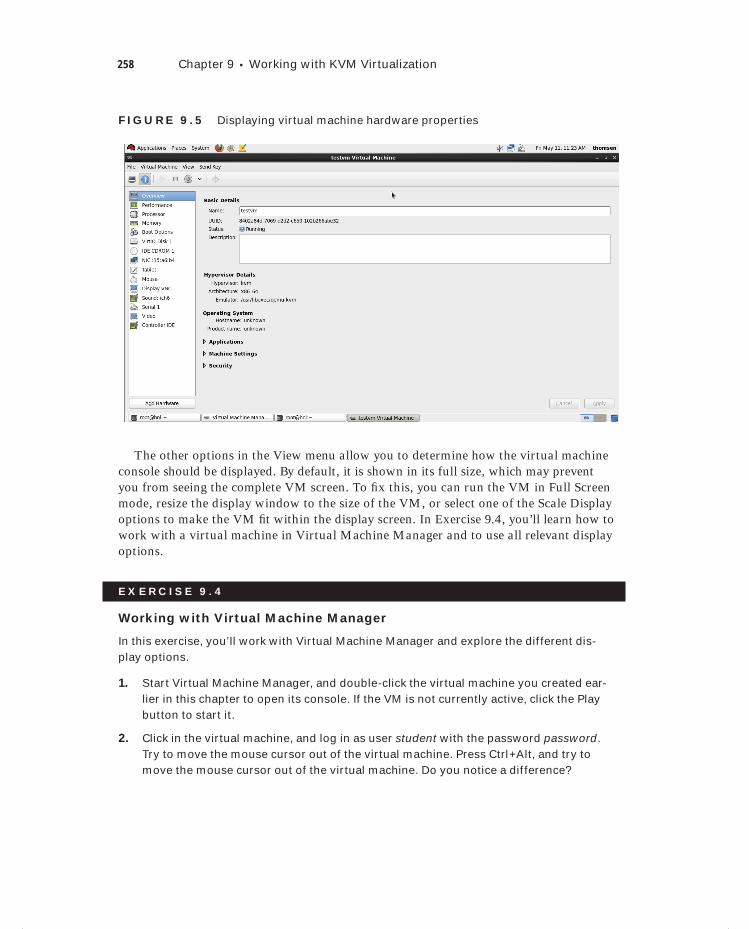
258 Chapter 9 Working with KVM Virtualization
F I GU R E 9 .5 Displaying virtual machine hardware properties
The other options in the View menu allow you to determine how the virtual machine console should be displayed. By default, it is shown in its full size, which may prevent you from seeing the complete VM screen. To fi x this, you can run the VM in Full Screen mode, resize the display window to the size of the VM, or select one of the Scale Display options to make the VM fi t within the display screen. In Exercise 9.4, you’ll learn how to work with a virtual machine in Virtual Machine Manager and to use all relevant display options.
E X E R C I S E 9 . 4
Working with Virtual Machine Manager
In this exercise, you’ll work with Virtual Machine Manager and explore the different dis-play options.
1. Start Virtual Machine Manager, and double-click the virtual machine you created ear-lier in this chapter to open its console. If the VM is not currently active, click the Play button to start it.
2. Click in the virtual machine, and log in as user student with the password password. Try to move the mouse cursor out of the virtual machine. Press Ctrl+Alt, and try to move the mouse cursor out of the virtual machine. Do you notice a difference?
c09.indd 258c09.indd 258 1/8/2013 10:47:01 AM1/8/2013 10:47:01 AM
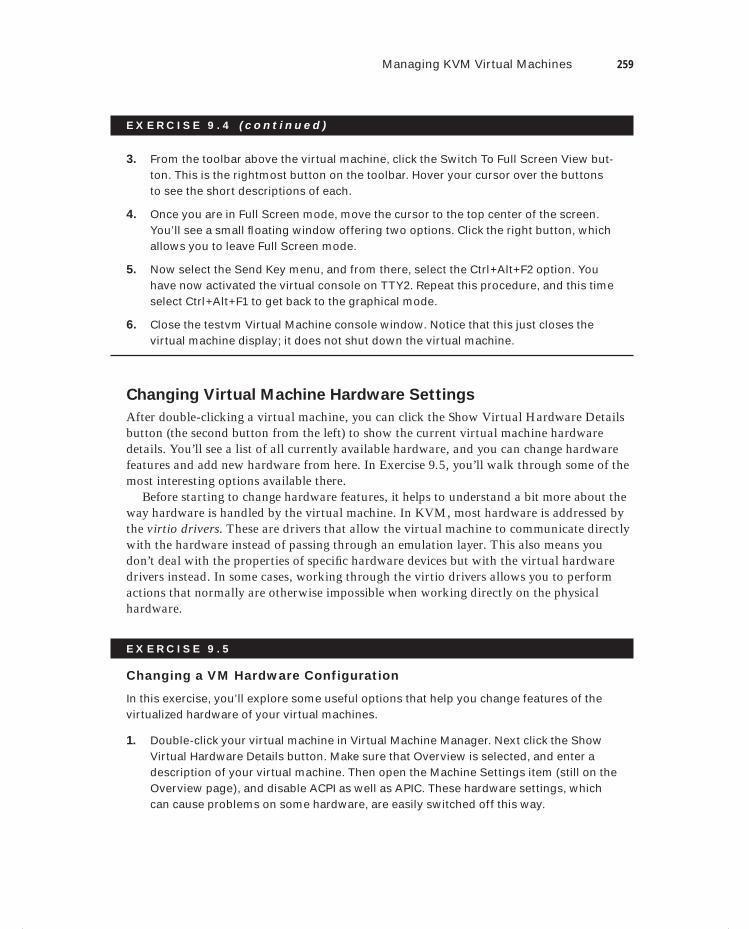
Managing KVM Virtual Machines 259
E X E R C I S E 9 . 4 ( c ont inue d )
3. From the toolbar above the virtual machine, click the Switch To Full Screen View but-ton. This is the rightmost button on the toolbar. Hover your cursor over the buttons to see the short descriptions of each.
4. Once you are in Full Screen mode, move the cursor to the top center of the screen. You’ll see a small fl oating window offering two options. Click the right button, which allows you to leave Full Screen mode.
5. Now select the Send Key menu, and from there, select the Ctrl+Alt+F2 option. You have now activated the virtual console on TTY2. Repeat this procedure, and this time select Ctrl+Alt+F1 to get back to the graphical mode.
6. Close the testvm Virtual Machine console window. Notice that this just closes the virtual machine display; it does not shut down the virtual machine.
Changing Virtual Machine Hardware Settings
After double-clicking a virtual machine, you can click the Show Virtual Hardware Details button (the second button from the left) to show the current virtual machine hardware details. You’ll see a list of all currently available hardware, and you can change hardware features and add new hardware from here. In Exercise 9.5, you’ll walk through some of the most interesting options available there.
Before starting to change hardware features, it helps to understand a bit more about the way hardware is handled by the virtual machine. In KVM, most hardware is addressed by the virtio drivers. These are drivers that allow the virtual machine to communicate directly with the hardware instead of passing through an emulation layer. This also means you don’t deal with the properties of specifi c hardware devices but with the virtual hardware drivers instead. In some cases, working through the virtio drivers allows you to perform actions that normally are otherwise impossible when working directly on the physical hardware.
E X E R C I S E 9 . 5
Changing a VM Hardware Configuration
In this exercise, you’ll explore some useful options that help you change features of the virtualized hardware of your virtual machines.
1. Double-click your virtual machine in Virtual Machine Manager. Next click the Show Virtual Hardware Details button. Make sure that Overview is selected, and enter a description of your virtual machine. Then open the Machine Settings item (still on the Overview page), and disable ACPI as well as APIC. These hardware settings, which can cause problems on some hardware, are easily switched off this way.
c09.indd 259c09.indd 259 1/8/2013 10:47:01 AM1/8/2013 10:47:01 AM
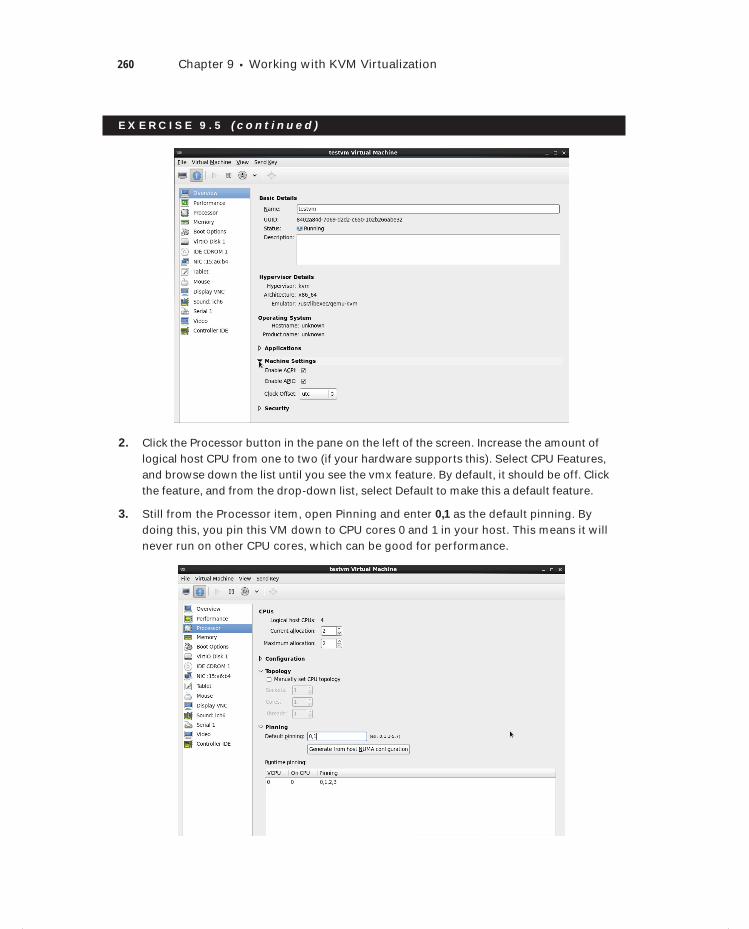
260 Chapter 9 Working with KVM Virtualization
E X E R C I S E 9 . 5 ( c ont inue d )
2. Click the Processor button in the pane on the left of the screen. Increase the amount of logical host CPU from one to two (if your hardware supports this). Select CPU Features, and browse down the list until you see the vmx feature. By default, it should be off. Click the feature, and from the drop-down list, select Default to make this a default feature.
3. Still from the Processor item, open Pinning and enter 0,1 as the default pinning. By doing this, you pin this VM down to CPU cores 0 and 1 in your host. This means it will never run on other CPU cores, which can be good for performance.
c09.indd 260c09.indd 260 1/8/2013 10:47:01 AM1/8/2013 10:47:01 AM
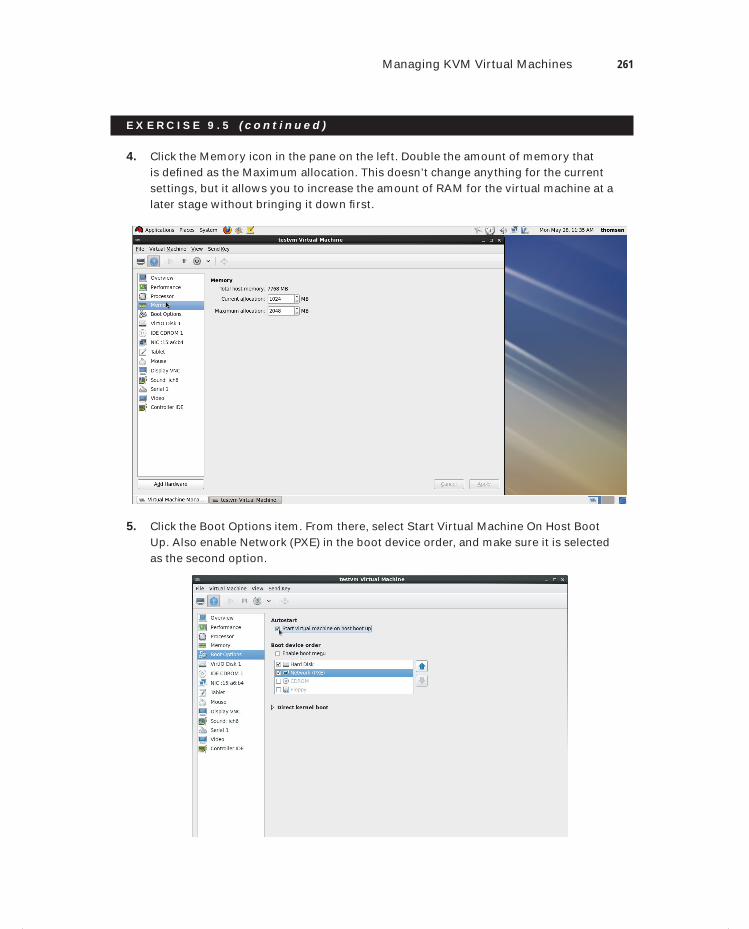
Managing KVM Virtual Machines 261
E X E R C I S E 9 . 5 ( c ont inue d )
4. Click the Memory icon in the pane on the left. Double the amount of memory that is defi ned as the Maximum allocation. This doesn’t change anything for the current settings, but it allows you to increase the amount of RAM for the virtual machine at a later stage without bringing it down fi rst.
5. Click the Boot Options item. From there, select Start Virtual Machine On Host Boot Up. Also enable Network (PXE) in the boot device order, and make sure it is selected as the second option.
c09.indd 261c09.indd 261 1/8/2013 10:47:01 AM1/8/2013 10:47:01 AM
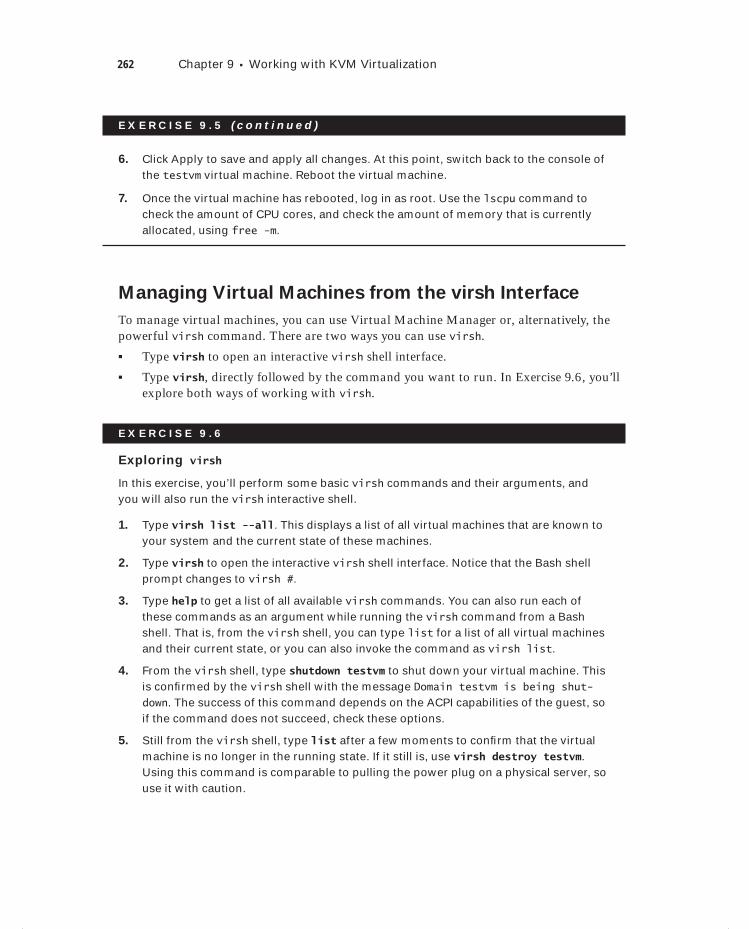
262 Chapter 9 Working with KVM Virtualization
E X E R C I S E 9 . 5 ( c ont inue d )
6. Click Apply to save and apply all changes. At this point, switch back to the console of the testvm virtual machine. Reboot the virtual machine.
7. Once the virtual machine has rebooted, log in as root. Use the lscpu command to check the amount of CPU cores, and check the amount of memory that is currently allocated, using free -m.
Managing Virtual Machines from the virsh Interface
To manage virtual machines, you can use Virtual Machine Manager or, alternatively, the powerful virsh command. There are two ways you can use virsh.
Type virsh to open an interactive virsh shell interface.
Type virsh, directly followed by the command you want to run. In Exercise 9.6, you’ll explore both ways of working with virsh.
E X E R C I S E 9 . 6
Exploring virsh
In this exercise, you’ll perform some basic virsh commands and their arguments, and you will also run the virsh interactive shell.
1. Type virsh list --all. This displays a list of all virtual machines that are known to your system and the current state of these machines.
2. Type virsh to open the interactive virsh shell interface. Notice that the Bash shell prompt changes to virsh #.
3. Type help to get a list of all available virsh commands. You can also run each of these commands as an argument while running the virsh command from a Bash shell. That is, from the virsh shell, you can type list for a list of all virtual machines and their current state, or you can also invoke the command as virsh list.
4. From the virsh shell, type shutdown testvm to shut down your virtual machine. This is confi rmed by the virsh shell with the message Domain testvm is being shut-down. The success of this command depends on the ACPI capabilities of the guest, so if the command does not succeed, check these options.
5. Still from the virsh shell, type list after a few moments to confi rm that the virtual machine is no longer in the running state. If it still is, use virsh destroy testvm. Using this command is comparable to pulling the power plug on a physical server, so use it with caution.
c09.indd 262c09.indd 262 1/8/2013 10:47:02 AM1/8/2013 10:47:02 AM

Understanding KVM Networking 263
E X E R C I S E 9 . 6 ( c ont inue d )
6. Still from the virsh shell, type start testvm to start your virtual machine again.
7. Confi rm that the virtual machine is now in the running state. Notice that the ID of the virtual machine has been increased by one. Type exit to close the virsh shell.
Understanding KVM NetworkingWhen you create a virtual machine in KVM, this virtual machine probably needs to con-nect to an external network. To accomplish this, NAT is used by default. Using NAT means that the virtual machine can connect to any host on external networks but that the virtual machine cannot be reached from external networks. If your virtual machine needs to be reached by external computers, you need to change the way networking is handled. The fol-lowing networking modes are available:
Isolated Virtual Network Use this if you need virtual machines to be able to com-municate among each other or with the KVM host when you don’t need any external communication.
NAT Use this if you want to enable your virtual machines to initiate outside traffi c but want to protect them from computers on other networks. In this mode, the virtual machines cannot be reached directly by other computers.
Routed Use this if you want virtual machines to be fully reachable by computers on exter-nal networks. If you need this mode, the virtual machine needs to be on its own network and the KVM host is working as a router to route traffi c.
To use your virtual machine as a test machine in your network, you need to set it up with an isolated virtual network. This is something you can accomplish while install-ing the virtual machines by selecting the Advanced confi guration mode on the network card. Alternatively, you can reconfi gure networking later. The latter is a more compli-cated method, but it works just as well. In Exercise 9.4, you’ll walk through the procedure required to change NAT networking on testvm to isolated networking.
When setting up networking, you always have to be aware of the two parts involved. First there is the host portion, which is the part of the confi guration that you’ll set up on the KVM host and that puts your network in a specifi c mode. Next, after setting up a spe-cifi c kind of network on the KVM host, you need to connect the network card in the vir-tual machine to this network. In Exercise 9.7, you’ll set up the network adapter in the KVM host environment.
c09.indd 263c09.indd 263 1/8/2013 10:47:02 AM1/8/2013 10:47:02 AM
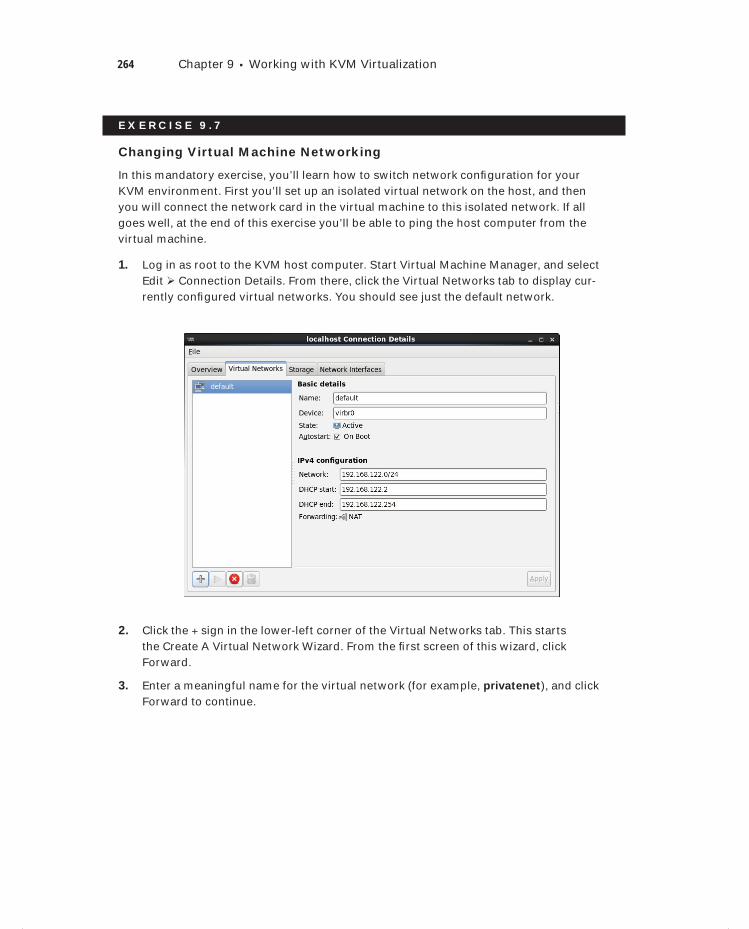
264 Chapter 9 Working with KVM Virtualization
E X E R C I S E 9 . 7
Changing Virtual Machine Networking
In this mandatory exercise, you’ll learn how to switch network confi guration for your KVM environment. First you’ll set up an isolated virtual network on the host, and then you will connect the network card in the virtual machine to this isolated network. If all goes well, at the end of this exercise you’ll be able to ping the host computer from the virtual machine.
1. Log in as root to the KVM host computer. Start Virtual Machine Manager, and select Edit Connection Details. From there, click the Virtual Networks tab to display cur-rently confi gured virtual networks. You should see just the default network.
2. Click the + sign in the lower-left corner of the Virtual Networks tab. This starts the Create A Virtual Network Wizard. From the fi rst screen of this wizard, click Forward.
3. Enter a meaningful name for the virtual network (for example, privatenet), and click Forward to continue.
c09.indd 264c09.indd 264 1/8/2013 10:47:02 AM1/8/2013 10:47:02 AM
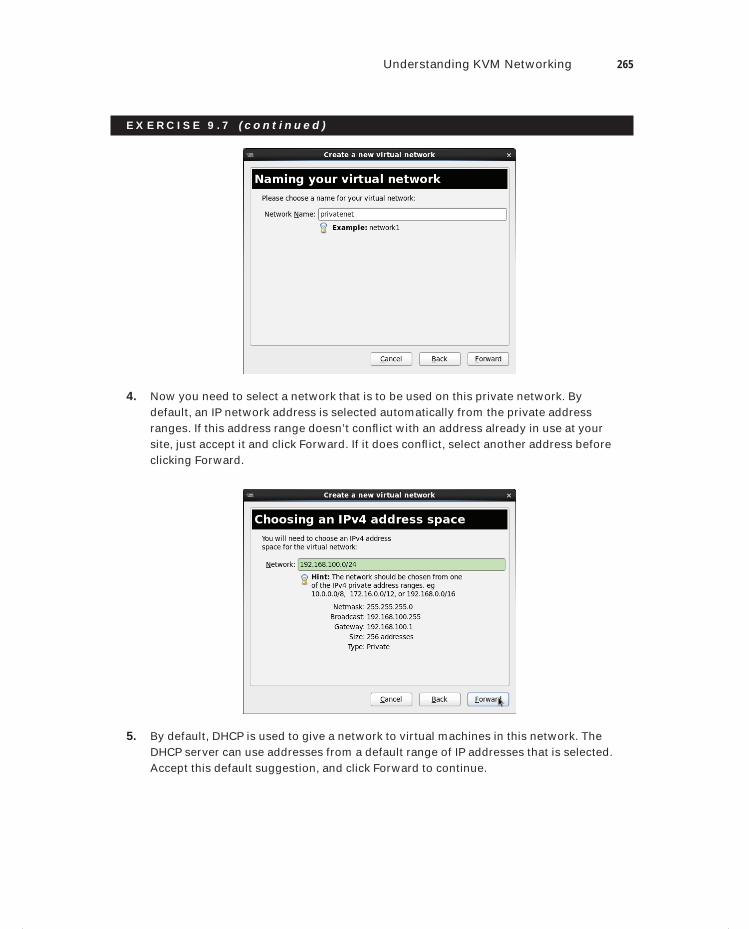
Understanding KVM Networking 265
E X E R C I S E 9 . 7 ( c ont inue d )
4. Now you need to select a network that is to be used on this private network. By default, an IP network address is selected automatically from the private address ranges. If this address range doesn’t confl ict with an address already in use at your site, just accept it and click Forward. If it does confl ict, select another address before clicking Forward.
5. By default, DHCP is used to give a network to virtual machines in this network. The DHCP server can use addresses from a default range of IP addresses that is selected. Accept this default suggestion, and click Forward to continue.
c09.indd 265c09.indd 265 1/8/2013 10:47:03 AM1/8/2013 10:47:03 AM
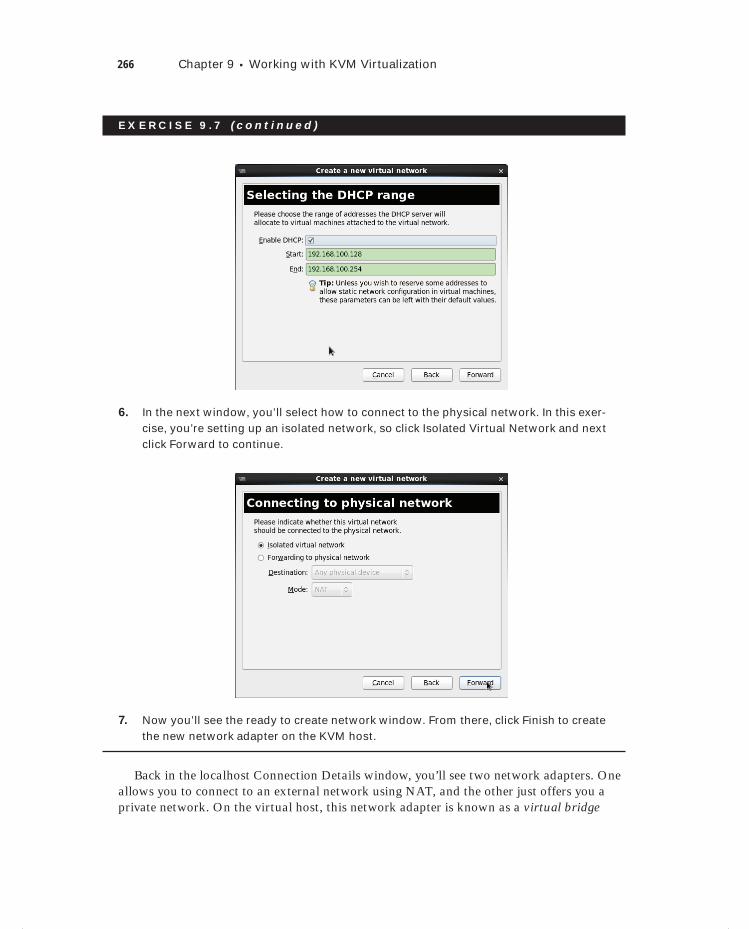
266 Chapter 9 Working with KVM Virtualization
E X E R C I S E 9 . 7 ( c ont inue d )
6. In the next window, you’ll select how to connect to the physical network. In this exer-cise, you’re setting up an isolated network, so click Isolated Virtual Network and next click Forward to continue.
7. Now you’ll see the ready to create network window. From there, click Finish to create the new network adapter on the KVM host.
Back in the localhost Connection Details window, you’ll see two network adapters. One allows you to connect to an external network using NAT, and the other just offers you a private network. On the virtual host, this network adapter is known as a virtual bridge
c09.indd 266c09.indd 266 1/8/2013 10:47:03 AM1/8/2013 10:47:03 AM
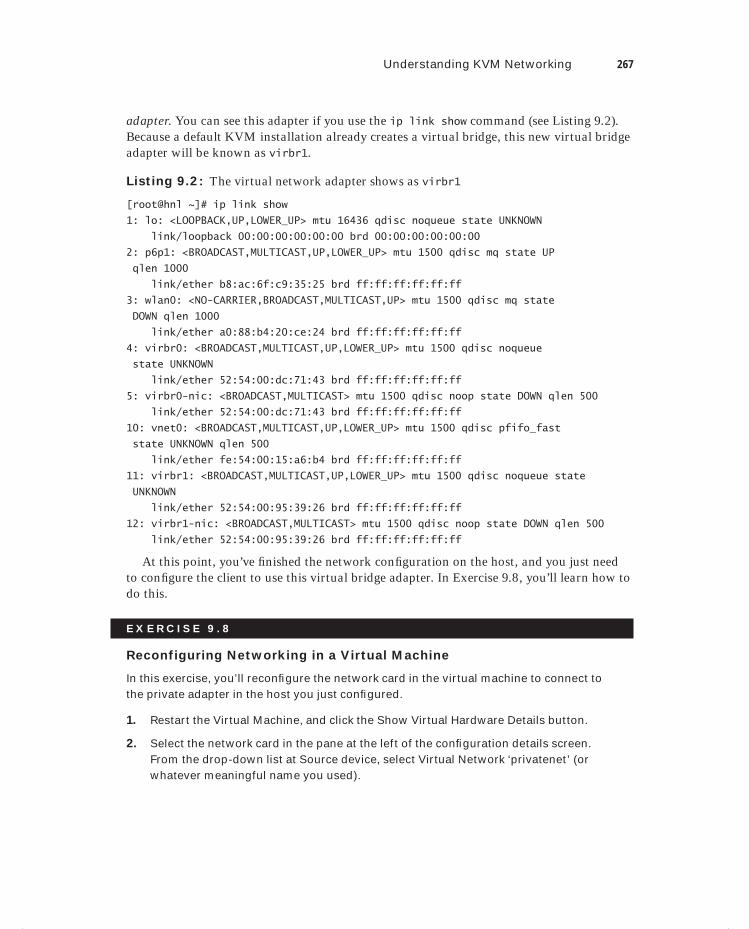
Understanding KVM Networking 267
adapter. You can see this adapter if you use the ip link show command (see Listing 9.2). Because a default KVM installation already creates a virtual bridge, this new virtual bridge adapter will be known as virbr1.
Listing 9.2: The virtual network adapter shows as virbr1
[root@hnl ~]# ip link show
1: lo: <LOOPBACK,UP,LOWER_UP> mtu 16436 qdisc noqueue state UNKNOWN
link/loopback 00:00:00:00:00:00 brd 00:00:00:00:00:00
2: p6p1: <BROADCAST,MULTICAST,UP,LOWER_UP> mtu 1500 qdisc mq state UP
qlen 1000
link/ether b8:ac:6f:c9:35:25 brd ff:ff:ff:ff:ff:ff
3: wlan0: <NO-CARRIER,BROADCAST,MULTICAST,UP> mtu 1500 qdisc mq state
DOWN qlen 1000
link/ether a0:88:b4:20:ce:24 brd ff:ff:ff:ff:ff:ff
4: virbr0: <BROADCAST,MULTICAST,UP,LOWER_UP> mtu 1500 qdisc noqueue
state UNKNOWN
link/ether 52:54:00:dc:71:43 brd ff:ff:ff:ff:ff:ff
5: virbr0-nic: <BROADCAST,MULTICAST> mtu 1500 qdisc noop state DOWN qlen 500
link/ether 52:54:00:dc:71:43 brd ff:ff:ff:ff:ff:ff
10: vnet0: <BROADCAST,MULTICAST,UP,LOWER_UP> mtu 1500 qdisc pfifo_fast
state UNKNOWN qlen 500
link/ether fe:54:00:15:a6:b4 brd ff:ff:ff:ff:ff:ff
11: virbr1: <BROADCAST,MULTICAST,UP,LOWER_UP> mtu 1500 qdisc noqueue state
UNKNOWN
link/ether 52:54:00:95:39:26 brd ff:ff:ff:ff:ff:ff
12: virbr1-nic: <BROADCAST,MULTICAST> mtu 1500 qdisc noop state DOWN qlen 500
link/ether 52:54:00:95:39:26 brd ff:ff:ff:ff:ff:ff
At this point, you’ve fi nished the network confi guration on the host, and you just need to confi gure the client to use this virtual bridge adapter. In Exercise 9.8, you’ll learn how to do this.
E X E R C I S E 9 . 8
Reconfiguring Networking in a Virtual Machine
In this exercise, you’ll reconfi gure the network card in the virtual machine to connect to the private adapter in the host you just confi gured.
1. Restart the Virtual Machine, and click the Show Virtual Hardware Details button.
2. Select the network card in the pane at the left of the confi guration details screen. From the drop-down list at Source device, select Virtual Network ‘privatenet’ (or whatever meaningful name you used).
c09.indd 267c09.indd 267 1/8/2013 10:47:03 AM1/8/2013 10:47:03 AM
268 Chapter 9 Working with KVM Virtualization
E X E R C I S E 9 . 8 ( c ont inue d )
3. In the drop-down list at Device Model, the virtio driver is selected by default. This is a good choice because the virtio driver offers a performance that is much better than that of the emulated drivers for other types of network card.
4. Click Apply to save the settings. Click OK when a message appears indicating that you need to restart the virtual machine.
5. Reboot your virtual machine. While it is rebooting, use ip address show on the KVM host to fi nd the IP address that is used on the virbr1 adapter that you created in the previous exercise. If you’ve used all the suggested values in this exercise, it should have the IP address 192.168.100.1.
6. Log in to the virtual machine, and open a root shell. From this shell, type ping 192.168.100.1 to verify that you have successfully completed this exercise.
If you don’t succeed in changing the network configuration as described in Exercise 9.8, try to apply this procedure while the virtual machine is down.
SummaryIn this chapter, you learned how to work with virtual machines in a KVM environment. You learned how to install a virtual machine in KVM and how to manage the virtual machine using Virtual Machine Manager once it was installed. You also learned how to confi gure nondefault networking in a KVM environmen t.
c09.indd 268c09.indd 268 1/8/2013 10:47:03 AM1/8/2013 10:47:03 AM

Chapter
10Securing Your Server with iptables
TOPICS COVERED IN THIS CHAPTER:
Understanding Firewalls
Setting Up a Firewall with system-config-firewall
Setting Up a Firewall with iptables
Advanced iptables Configuration
Configuring NAT
c10.indd 269c10.indd 269 1/8/2013 10:41:34 AM1/8/2013 10:41:34 AM
Red Hat Enterprise Linux is often used to offer services on the Internet. That means that unauthorized users will try to attack your server and get access to parts of the server that you don’t
want to be available to unauthorized users. To prevent this, you need to install a fi rewall. In this chapter you’ll learn how to install a fi rewall on Red Hat Enterprise Linux, and thus protect valuable assets on your server.
Understanding FirewallsSome administrators believe that if they offer only the services that are supposed to be on a server and nothing else, the server is thus secure and no additional security measures are required. They are wrong!
Too often, when a hacker breaks through the security wall of a server, it is done by using ports that are actually allowed on the server. For instance, the hacker can abuse an Apache web server and have it launch a script that opens connections to external machines. In Chapter 8, you learned how SELinux can be used to avoid this scenario. In this chapter, you’ll learn how a fi rewall can be used to make sure that no connections are initiated to nodes that haven’t specifi cally been allowed beforehand.
A fi rewall works through packet inspection. This means that the fi rewall screens incom-ing and outgoing packets to check whether the address, protocol, and port of the packet is either allowed or denied. From the perspective of the OSI model, a fi rewall works on lay-ers 3, 4, and 5. What a fi rewall typically cannot do is a check on the user that has sent the packet. Also, fi rewalls normally have a hard time checking the actual data portion of the packet. You’ll need a proxy to do that.
Even though a fi rewall is important, not every server is using one. By default, Red Hat switches it on, but in some cases it doesn’t make much sense, and the administrator dis-ables it. Typically, this depends on the confi guration of the network in which the server is installed. In large company networks, fi rewalls are often handled by the router that con-nects the network to the Internet. Everything behind the router is considered to be secure and doesn’t need a fi rewall of its own. However, if a server is directly connected to the Internet, the server does require a fi rewall. Also, if a server has a specifi c role in a company network and you want to confi gure it for additional security, it’s a good idea to confi gure it with a fi rewall.
Netfi lter is the default fi rewall offered through the Linux kernel. To confi gure Netfi lter on Red Hat Enterprise Linux, you can use the system-confi g-fi rewall tool if you prefer to
c10.indd 270c10.indd 270 1/8/2013 10:41:35 AM1/8/2013 10:41:35 AM

Setting Up a Firewall with system-config-firewall 271
use a graphical interface or the iptables command if you want to work from the command line. In this chapter, you’ll learn how to do both.
Setting Up a Firewall with system-config-firewallIf you just need basic fi rewall services and have a graphical desktop available, system-confi g-fi rewall is the simplest way to get started. Using the graphical interface, you can eas-ily select the services you trust on the interfaces you trust. It also allows you to set up some of the more advanced confi gurations, including IP masquerading and port forwarding (see Figure 10.1). In a text-only mode, you can use the system-config-firewall-tui command if you want a menu-driven interface to confi gure the fi rewall.
F I GU R E 10 .1 system-config-firewall offers a graphical interface to configure the firewall.
Before starting to configure a firewall with system-config-firewall, one important thing to realize is that it wipes clean all configurations you cre-ated manually. It warns you about this when you start the utility, but it is better to say it twice because it is frustrating to see the fruits of your hard labor erased with one simple mouse click. Thus, if you plan to set up a sophisticated firewall, it’s OK to start with system-config-firewall, but once you’ve modified it manually, you should never use system-config-firewall again.
c10.indd 271c10.indd 271 1/8/2013 10:41:36 AM1/8/2013 10:41:36 AM
Dow
nlo
ad fro
m W
ow
! eBook
<w
ww
.wow
ebook.
com
>
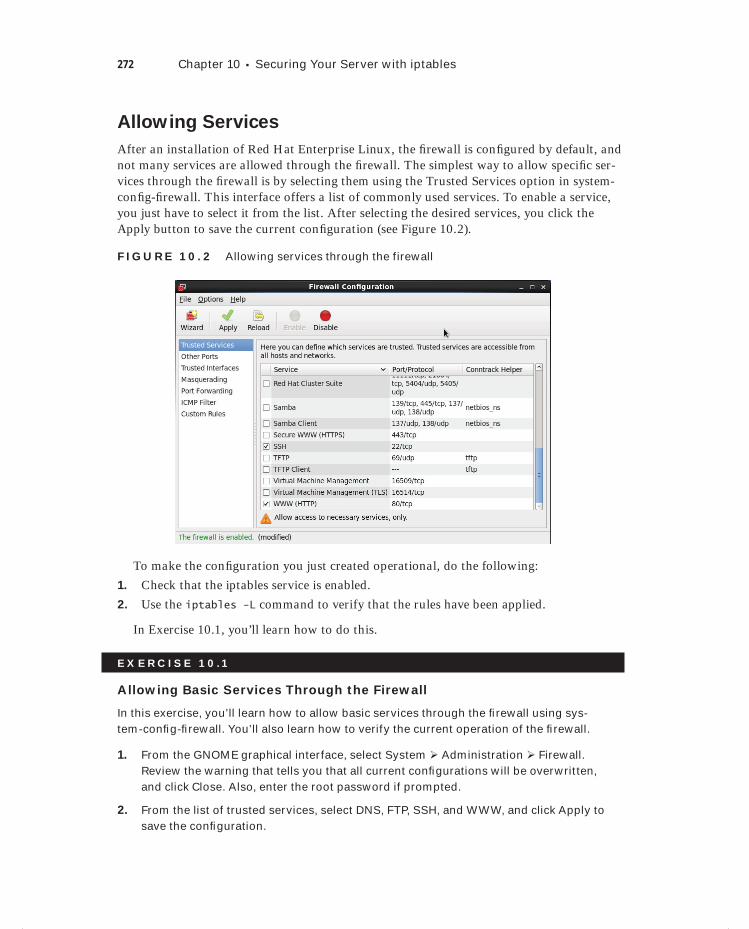
272 Chapter 10 Securing Your Server with iptables
Allowing Services
After an installation of Red Hat Enterprise Linux, the fi rewall is confi gured by default, and not many services are allowed through the fi rewall. The simplest way to allow specifi c ser-vices through the fi rewall is by selecting them using the Trusted Services option in system-confi g-fi rewall. This interface offers a list of commonly used services. To enable a service, you just have to select it from the list. After selecting the desired services, you click the Apply button to save the current confi guration (see Figure 10.2).
F I GU R E 10 . 2 Allowing services through the firewall
To make the confi guration you just created operational, do the following:
1. Check that the iptables service is enabled.
2. Use the iptables -L command to verify that the rules have been applied.
In Exercise 10.1, you’ll learn how to do this.
E X E R C I S E 10 .1
Allowing Basic Services Through the Firewall
In this exercise, you’ll learn how to allow basic services through the fi rewall using sys-tem-confi g-fi rewall. You’ll also learn how to verify the current operation of the fi rewall.
1. From the GNOME graphical interface, select System Administration Firewall. Review the warning that tells you that all current confi gurations will be overwritten, and click Close. Also, enter the root password if prompted.
2. From the list of trusted services, select DNS, FTP, SSH, and WWW, and click Apply to save the confi guration.
c10.indd 272c10.indd 272 1/8/2013 10:41:36 AM1/8/2013 10:41:36 AM
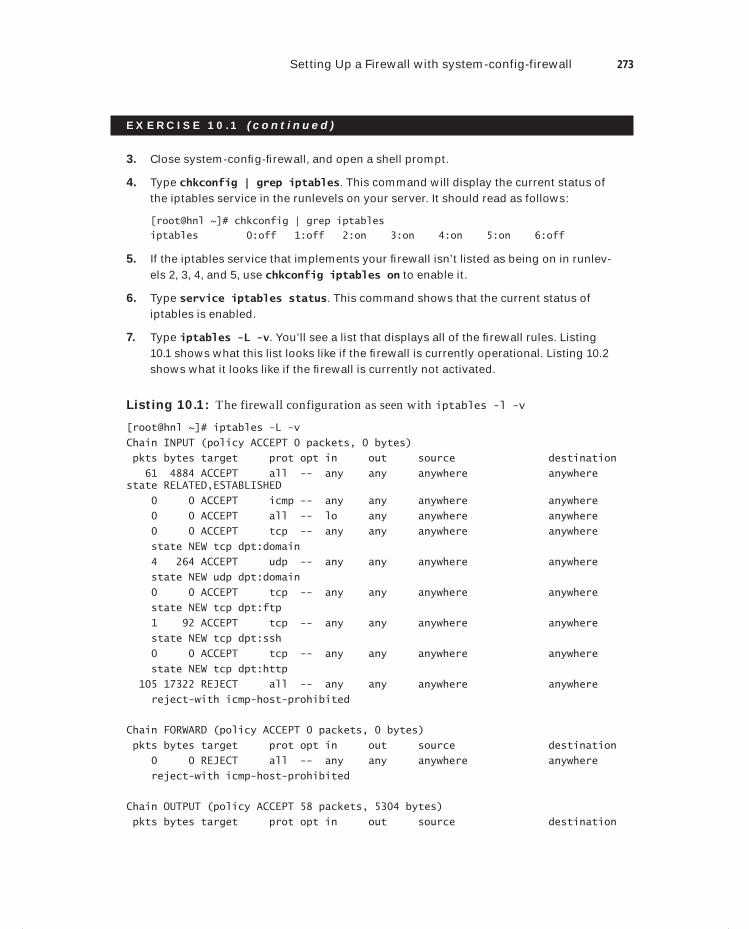
Setting Up a Firewall with system-config-firewall 273
E X E R C I S E 10 .1 ( c ont inue d )
3. Close system-confi g-fi rewall, and open a shell prompt.
4. Type chkconfig | grep iptables. This command will display the current status of the iptables service in the runlevels on your server. It should read as follows:
[root@hnl ~]# chkconfig | grep iptables
iptables 0:off 1:off 2:on 3:on 4:on 5:on 6:off
5. If the iptables service that implements your fi rewall isn’t listed as being on in runlev-els 2, 3, 4, and 5, use chkconfig iptables on to enable it.
6. Type service iptables status. This command shows that the current status of iptables is enabled.
7. Type iptables -L -v. You’ll see a list that displays all of the fi rewall rules. Listing 10.1 shows what this list looks like if the fi rewall is currently operational. Listing 10.2 shows what it looks like if the fi rewall is currently not activated.
Listing 10.1: The firewall configuration as seen with iptables -l -v
[root@hnl ~]# iptables -L -v
Chain INPUT (policy ACCEPT 0 packets, 0 bytes)
pkts bytes target prot opt in out source destination
61 4884 ACCEPT all -- any any anywhere anywhere state RELATED,ESTABLISHED
0 0 ACCEPT icmp -- any any anywhere anywhere
0 0 ACCEPT all -- lo any anywhere anywhere
0 0 ACCEPT tcp -- any any anywhere anywhere
state NEW tcp dpt:domain
4 264 ACCEPT udp -- any any anywhere anywhere
state NEW udp dpt:domain
0 0 ACCEPT tcp -- any any anywhere anywhere
state NEW tcp dpt:ftp
1 92 ACCEPT tcp -- any any anywhere anywhere
state NEW tcp dpt:ssh
0 0 ACCEPT tcp -- any any anywhere anywhere
state NEW tcp dpt:http
105 17322 REJECT all -- any any anywhere anywhere
reject-with icmp-host-prohibited
Chain FORWARD (policy ACCEPT 0 packets, 0 bytes)
pkts bytes target prot opt in out source destination
0 0 REJECT all -- any any anywhere anywhere
reject-with icmp-host-prohibited
Chain OUTPUT (policy ACCEPT 58 packets, 5304 bytes)
pkts bytes target prot opt in out source destination
c10.indd 273c10.indd 273 1/8/2013 10:41:36 AM1/8/2013 10:41:36 AM
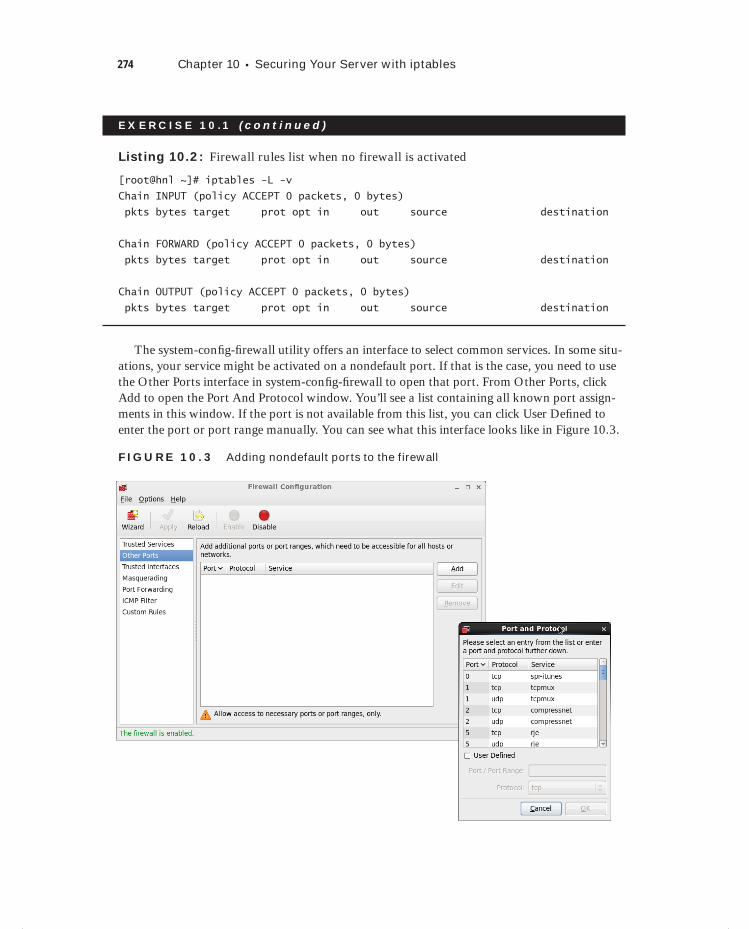
274 Chapter 10 Securing Your Server with iptables
E X E R C I S E 10 .1 ( c ont inue d )
Listing 10.2: Firewall rules list when no firewall is activated
[root@hnl ~]# iptables -L -v
Chain INPUT (policy ACCEPT 0 packets, 0 bytes)
pkts bytes target prot opt in out source destination
Chain FORWARD (policy ACCEPT 0 packets, 0 bytes)
pkts bytes target prot opt in out source destination
Chain OUTPUT (policy ACCEPT 0 packets, 0 bytes)
pkts bytes target prot opt in out source destination
The system-confi g-fi rewall utility offers an interface to select common services. In some situ-ations, your service might be activated on a nondefault port. If that is the case, you need to use the Other Ports interface in system-confi g-fi rewall to open that port. From Other Ports, click Add to open the Port And Protocol window. You’ll see a list containing all known port assign-ments in this window. If the port is not available from this list, you can click User Defi ned to enter the port or port range manually. You can see what this interface looks like in Figure 10.3.
F I GU R E 10 . 3 Adding nondefault ports to the firewall
c10.indd 274c10.indd 274 1/8/2013 10:41:37 AM1/8/2013 10:41:37 AM
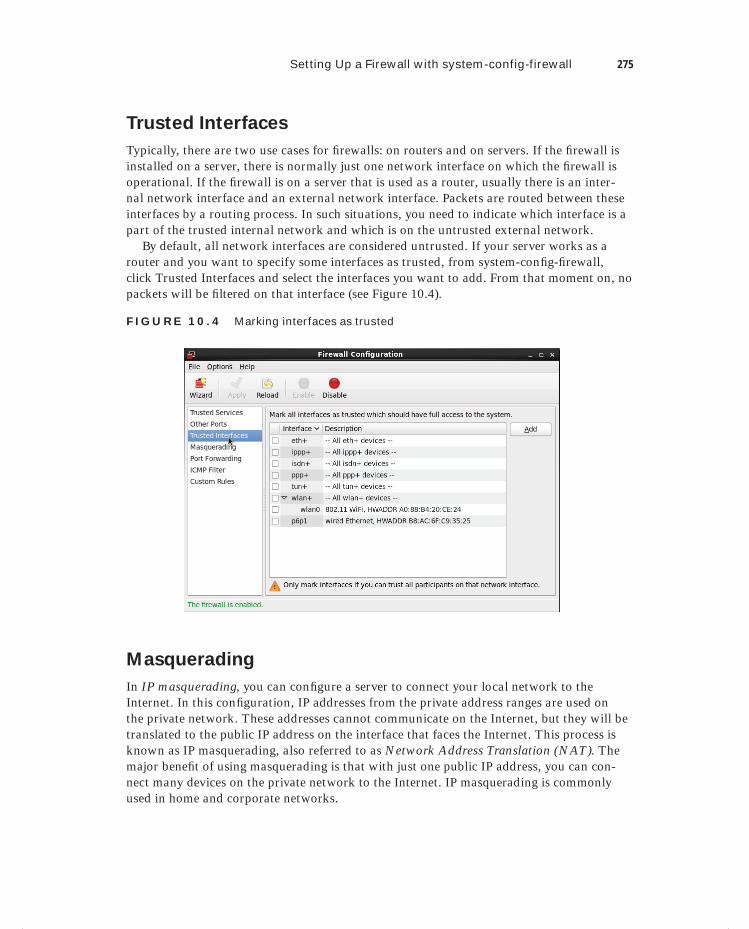
Setting Up a Firewall with system-config-firewall 275
Trusted Interfaces
Typically, there are two use cases for fi rewalls: on routers and on servers. If the fi rewall is installed on a server, there is normally just one network interface on which the fi rewall is operational. If the fi rewall is on a server that is used as a router, usually there is an inter-nal network interface and an external network interface. Packets are routed between these interfaces by a routing process. In such situations, you need to indicate which interface is a part of the trusted internal network and which is on the untrusted external network.
By default, all network interfaces are considered untrusted. If your server works as a router and you want to specify some interfaces as trusted, from system-confi g-fi rewall, click Trusted Interfaces and select the interfaces you want to add. From that moment on, no packets will be fi ltered on that interface (see Figure 10.4).
F I GU R E 10 . 4 Marking interfaces as trusted
Masquerading
In IP masquerading, you can confi gure a server to connect your local network to the Internet. In this confi guration, IP addresses from the private address ranges are used on the private network. These addresses cannot communicate on the Internet, but they will be translated to the public IP address on the interface that faces the Internet. This process is known as IP masquerading, also referred to as Network Address Translation (NAT). The major benefi t of using masquerading is that with just one public IP address, you can con-nect many devices on the private network to the Internet. IP masquerading is commonly used in home and corporate networks.
c10.indd 275c10.indd 275 1/8/2013 10:41:37 AM1/8/2013 10:41:37 AM
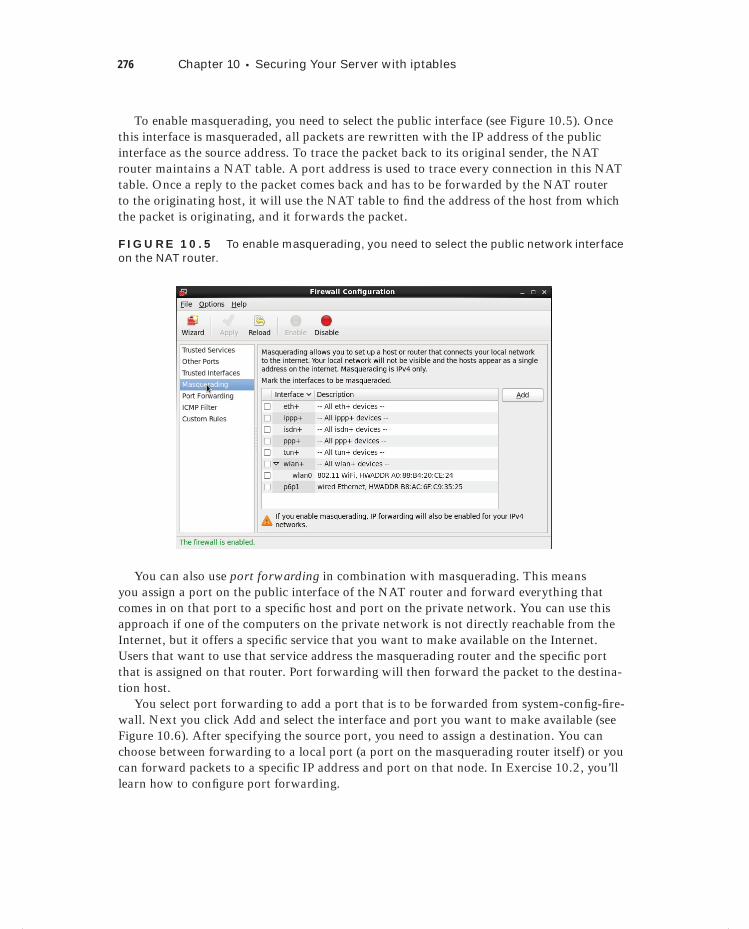
276 Chapter 10 Securing Your Server with iptables
To enable masquerading, you need to select the public interface (see Figure 10.5). Once this interface is masqueraded, all packets are rewritten with the IP address of the public interface as the source address. To trace the packet back to its original sender, the NAT router maintains a NAT table. A port address is used to trace every connection in this NAT table. Once a reply to the packet comes back and has to be forwarded by the NAT router to the originating host, it will use the NAT table to fi nd the address of the host from which the packet is originating, and it forwards the packet.
F I GU R E 10 .5 To enable masquerading, you need to select the public network interface on the NAT router.
You can also use port forwarding in combination with masquerading. This means you assign a port on the public interface of the NAT router and forward everything that comes in on that port to a specifi c host and port on the private network. You can use this approach if one of the computers on the private network is not directly reachable from the Internet, but it offers a specifi c service that you want to make available on the Internet. Users that want to use that service address the masquerading router and the specifi c port that is assigned on that router. Port forwarding will then forward the packet to the destina-tion host.
You select port forwarding to add a port that is to be forwarded from system-confi g-fi re-wall. Next you click Add and select the interface and port you want to make available (see Figure 10.6). After specifying the source port, you need to assign a destination. You can choose between forwarding to a local port (a port on the masquerading router itself) or you can forward packets to a specifi c IP address and port on that node. In Exercise 10.2, you’ll learn how to confi gure port forwarding.
c10.indd 276c10.indd 276 1/8/2013 10:41:37 AM1/8/2013 10:41:37 AM
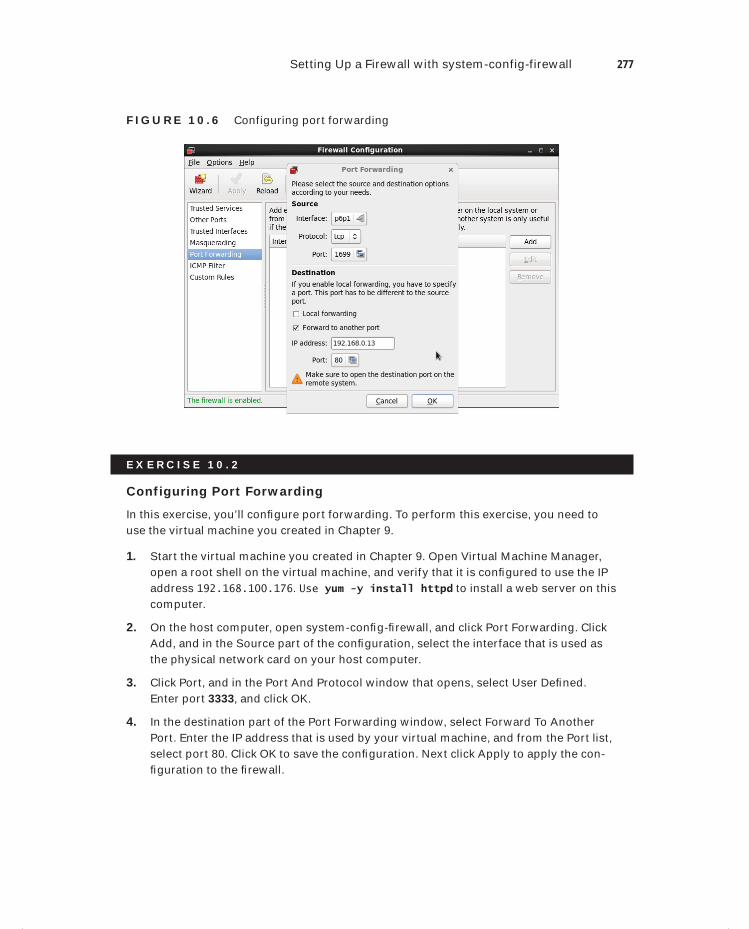
Setting Up a Firewall with system-config-firewall 277
F I GU R E 10 .6 Configuring port forwarding
E X E R C I S E 10 . 2
Configuring Port Forwarding
In this exercise, you’ll confi gure port forwarding. To perform this exercise, you need to use the virtual machine you created in Chapter 9.
1. Start the virtual machine you created in Chapter 9. Open Virtual Machine Manager, open a root shell on the virtual machine, and verify that it is confi gured to use the IP address 192.168.100.176. Use yum -y install httpd to install a web server on this computer.
2. On the host computer, open system-confi g-fi rewall, and click Port Forwarding. Click Add, and in the Source part of the confi guration, select the interface that is used as the physical network card on your host computer.
3. Click Port, and in the Port And Protocol window that opens, select User Defi ned. Enter port 3333, and click OK.
4. In the destination part of the Port Forwarding window, select Forward To Another Port. Enter the IP address that is used by your virtual machine, and from the Port list, select port 80. Click OK to save the confi guration. Next click Apply to apply the con-fi guration to the fi rewall.
c10.indd 277c10.indd 277 1/8/2013 10:41:37 AM1/8/2013 10:41:37 AM
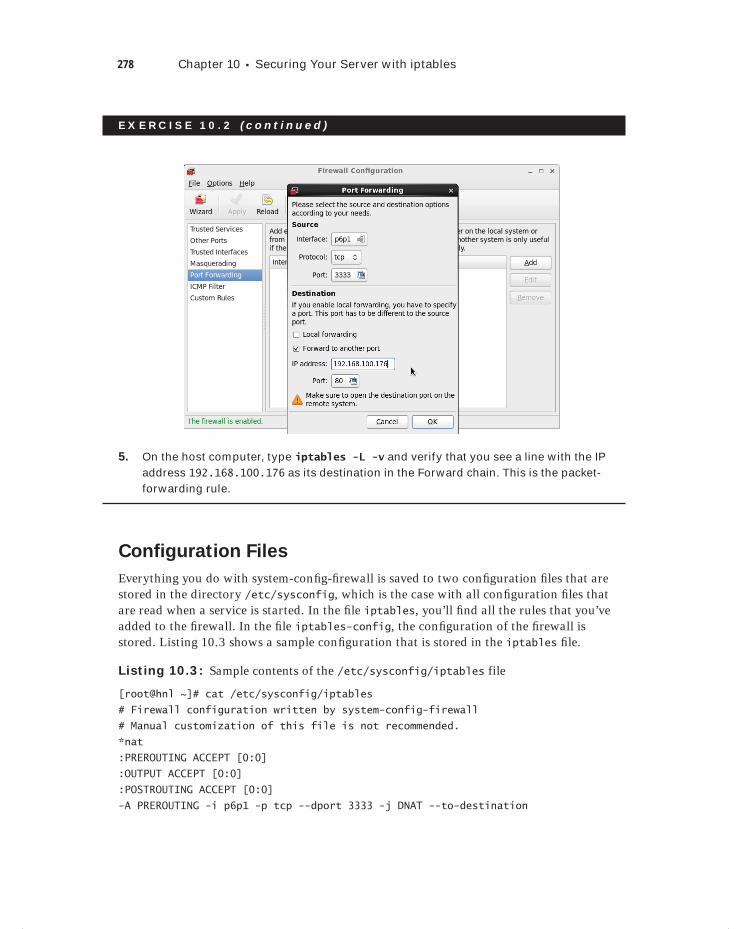
278 Chapter 10 Securing Your Server with iptables
E X E R C I S E 10 . 2 ( c ont inue d )
5. On the host computer, type iptables -L -v and verify that you see a line with the IP address 192.168.100.176 as its destination in the Forward chain. This is the packet-forwarding rule.
Configuration Files
Everything you do with system-confi g-fi rewall is saved to two confi guration fi les that are stored in the directory /etc/sysconfig, which is the case with all confi guration fi les that are read when a service is started. In the fi le iptables, you’ll fi nd all the rules that you’ve added to the fi rewall. In the fi le iptables-config, the confi guration of the fi rewall is stored. Listing 10.3 shows a sample confi guration that is stored in the iptables fi le.
Listing 10.3: Sample contents of the /etc/sysconfig/iptables file
[root@hnl ~]# cat /etc/sysconfig/iptables
# Firewall configuration written by system-config-firewall
# Manual customization of this file is not recommended.
*nat
:PREROUTING ACCEPT [0:0]
:OUTPUT ACCEPT [0:0]
:POSTROUTING ACCEPT [0:0]
-A PREROUTING -i p6p1 -p tcp --dport 3333 -j DNAT --to-destination
c10.indd 278c10.indd 278 1/8/2013 10:41:38 AM1/8/2013 10:41:38 AM
Setting Up a Firewall with iptables 279
192.168.100.176:80
COMMIT
*filter
:INPUT ACCEPT [0:0]
:FORWARD ACCEPT [0:0]
:OUTPUT ACCEPT [0:0]
-A INPUT -m state --state ESTABLISHED,RELATED -j ACCEPT
-A INPUT -p icmp -j ACCEPT
-A INPUT -i lo -j ACCEPT
-A INPUT -m state --state NEW -m tcp -p tcp --dport 53 -j ACCEPT
-A INPUT -m state --state NEW -m udp -p udp --dport 53 -j ACCEPT
-A INPUT -m state --state NEW -m tcp -p tcp --dport 21 -j ACCEPT
-A INPUT -m state --state NEW -m tcp -p tcp --dport 22 -j ACCEPT
-A INPUT -m state --state NEW -m tcp -p tcp --dport 80 -j ACCEPT
-A FORWARD -m state --state ESTABLISHED,RELATED -j ACCEPT
-A FORWARD -p icmp -j ACCEPT
-A FORWARD -i lo -j ACCEPT
-A FORWARD -i p6p1 -m state --state NEW -m tcp -p tcp -d 192.168.100.176
--dport 80 -j ACCEPT
-A INPUT -j REJECT --reject-with icmp-host-prohibited
-A FORWARD -j REJECT --reject-with icmp-host-prohibited
COMMIT
system-config-iptables stores the old configuration before it starts, which is very useful. You can find this old configuration in the files /etc/sys-config/iptables.old and /etc/sysconfig/iptables-config.old. This is good to know if you make a mistake and want to revert to the previous configuration.
If you’ve also confi gured fi rewall rules for IPv6, these have their own confi guration fi les: /etc/sysconfig/ip6tables and /etc/sysconfig/ip6tables-config.
Setting Up a Firewall with iptablesThe system-confi g-fi rewall tool includes a good utility to set up a basic fi rewall. However, if you need to confi gure a fi rewall that offers advanced features, it’s really not good enough. In that case, you’re better off using the iptables command. iptables tends to generate rather long commands. However, once you understand what you’re doing, it’s not very dif-fi cult. This section is designed to help you understand how to use the iptables command so that you can create fi rewall rules yourself whenever necessary.
c10.indd 279c10.indd 279 1/8/2013 10:41:38 AM1/8/2013 10:41:38 AM
280 Chapter 10 Securing Your Server with iptables
Understanding Tables, Chains, and Rules
Tables are the basic building blocks of a Netfi lter fi rewall. Specifi c tables can be created to stipulate the specifi c functionality of the fi rewall. By default, the fi lter table is used. The NAT table is also frequently used.
A table contains chains. A chain consists of a set of rules that is sequentially processed for each packet that enters the fi rewall until it fi nds a match. The default strategy is “exit on match,” which means that the fi rewall looks no further once the fi rst rule that matches for a specifi c packet is found. The following chains are used in the fi lter table:
INPUT Incoming packets are processed in this chain.
OUTPUT This chain is used for outgoing packets.
FORWARD This chain is used on routers, and packets that don’t have a process on the fi rewall as their destination use it.
Of these chains, a server administrator must understand how to use INPUT and OUTPUT. Confi guring the FORWARD chain is not as important as it is for routers only. In modern network environments, hardware routers are used more and more frequently, which means that the role of Linux servers as a fi rewall becomes less important.
Understanding How a Rule Is Composed
Different elements can be used to specify properties of a packet in each rule. You don’t have to specify each of these elements, but you are free to use them and make the rule more specifi c. Some elements are mandatory, though. Here is a list of some of the most common elements you’ll fi nd in rules:
Modules A module is an optional element that you can use in a rule. Modules offer enhancements to the Netfi lter fi rewall. They do that by loading a specifi c kernel module that adds functionality. A very common module in iptables rules is the state module, which looks at the state of a packet.
Interface On a server with multiple network cards, it makes sense to apply rules to spe-cifi c interfaces only. However, if you’re confi guring your fi rewall on a typical server with one network card only, you can safely omit the interface specifi cation.
IP Addresses In a rule, you can allow or deny access to specifi c IP addresses or IP network addresses. For example, if you’re in a school, you might want to differentiate between a safe internal network, which contains users who typically can be trusted, such as internal staff, and an unsafe internal network that is used by the students. IP addresses are also used in rules that confi gure port forwarding.
Protocol Most rules allow or deny access to specifi c ports. These ports are always con-nected to the UDP or TCP protocol. Therefore, if you want to state a specifi c port, you also need to indicate the protocol that is to be used. You can also include ICMP as the protocol to be used.
c10.indd 280c10.indd 280 1/8/2013 10:41:38 AM1/8/2013 10:41:38 AM
Setting Up a Firewall with iptables 281
Target The target is also a mandatory component in a rule. A target specifi es what needs to be done with a matching packet. Different targets can be used, of which ACCEPT, DROP, REJECT, and LOG are the most important.
Apart from these common elements found in rules, you need to specify the purpose of the rule. If viewed generically, there are two options: either you can set a policy or you can add a rule to a chain.
A policy defi nes the default behavior. If no specifi c rule is found in the chain that matches an incoming packet, the policy is applied. It is always good practice to defi ne a policy that denies all access.
After defi ning a policy, you can start working on the chains. This typically means you’ll append or insert rules in the chain. It is very important to be aware that order does mat-ter. That is, if you use -A to append a rule, it is entered at the last position in the chain. However, if you use -I to insert a rule, you can specify where exactly in the chain you want to insert it.
Configuration Example
That’s enough talk about how rules and chains are used. Now let’s work on an example. In this example, you’ll confi gure a basic fi rewall. The purpose of this fi rewall is that FTP, SSH, HTTP, and HTTPS traffi c needs to be allowed. Everything else has to be specifi cally denied.
The previous scenario sketches a typical customer request that a consultant might receive. Before starting to work on the request, it is important to think it through thor-oughly because critical information is often lacking. The previous request, for example, is missing some basic elements.
If all traffic is denied, traffic on the loopback interface is also denied. You’ll need to allow everything that’s happening on the loopback interface, however, to ensure that internal IP traffic can be handled correctly.
The customer wants for four specific services. Do these services need to be available on this server for external users only, or is internal access also required?
The DNS protocol is needed in nearly all situations. Typically, this is not something a customer asks for specifically.
Apart from allowing incoming packets to the HTTP server, the firewall also needs to be configured to allow replies to be returned to the originator of the request.
Different styles can be used to confi gure a fi rewall. If you use system-confi g-fi rewall, for example, you’ll notice that all outgoing traffi c is allowed. This is not always wise because it would allow a hacker to install a malicious script confi gured to access a common port on your server that opens connections to external machines at will. Therefore, it is a good idea to think about the OUTPUT chain as well as the INPUT chain.
In Exercise 10.3, you’ll learn how to build a Netfi lter fi rewall.
c10.indd 281c10.indd 281 1/8/2013 10:41:39 AM1/8/2013 10:41:39 AM
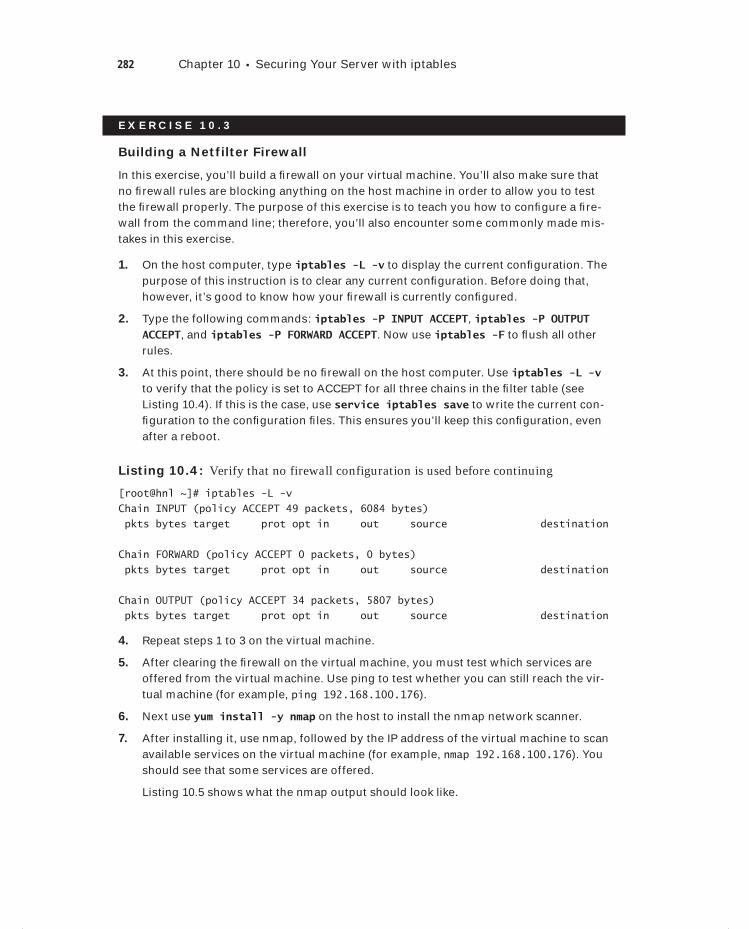
282 Chapter 10 Securing Your Server with iptables
E X E R C I S E 10 . 3
Building a Netfilter Firewall
In this exercise, you’ll build a fi rewall on your virtual machine. You’ll also make sure that no fi rewall rules are blocking anything on the host machine in order to allow you to test the fi rewall properly. The purpose of this exercise is to teach you how to confi gure a fi re-wall from the command line; therefore, you’ll also encounter some commonly made mis-takes in this exercise.
1. On the host computer, type iptables -L -v to display the current confi guration. The purpose of this instruction is to clear any current confi guration. Before doing that, however, it’s good to know how your fi rewall is currently confi gured.
2. Type the following commands: iptables -P INPUT ACCEPT, iptables -P OUTPUT ACCEPT, and iptables -P FORWARD ACCEPT. Now use iptables -F to fl ush all other rules.
3. At this point, there should be no fi rewall on the host computer. Use iptables -L -v to verify that the policy is set to ACCEPT for all three chains in the fi lter table (see Listing 10.4). If this is the case, use service iptables save to write the current con-fi guration to the confi guration fi les. This ensures you’ll keep this confi guration, even after a reboot.
Listing 10.4: Verify that no firewall configuration is used before continuing
[root@hnl ~]# iptables -L -v
Chain INPUT (policy ACCEPT 49 packets, 6084 bytes)
pkts bytes target prot opt in out source destination
Chain FORWARD (policy ACCEPT 0 packets, 0 bytes)
pkts bytes target prot opt in out source destination
Chain OUTPUT (policy ACCEPT 34 packets, 5807 bytes)
pkts bytes target prot opt in out source destination
4. Repeat steps 1 to 3 on the virtual machine.
5. After clearing the fi rewall on the virtual machine, you must test which services are offered from the virtual machine. Use ping to test whether you can still reach the vir-tual machine (for example, ping 192.168.100.176).
6. Next use yum install -y nmap on the host to install the nmap network scanner.
7. After installing it, use nmap, followed by the IP address of the virtual machine to scan available services on the virtual machine (for example, nmap 192.168.100.176). You should see that some services are offered.
Listing 10.5 shows what the nmap output should look like.
c10.indd 282c10.indd 282 1/8/2013 10:41:39 AM1/8/2013 10:41:39 AM
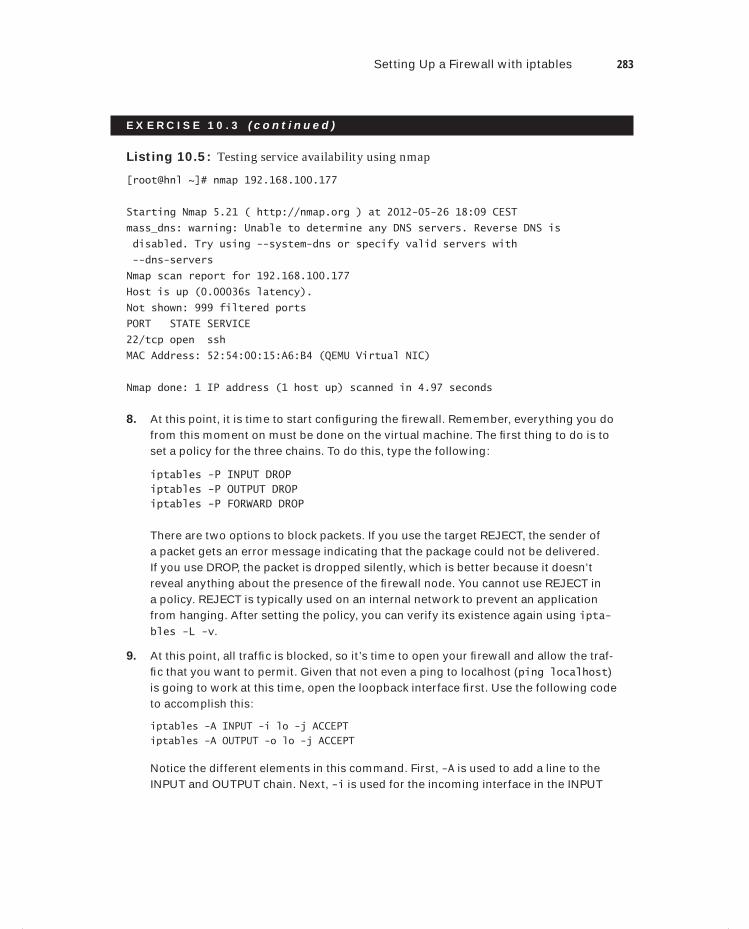
Setting Up a Firewall with iptables 283
E X E R C I S E 10 . 3 ( c ont inue d )
Listing 10.5: Testing service availability using nmap
[root@hnl ~]# nmap 192.168.100.177
Starting Nmap 5.21 ( http://nmap.org ) at 2012-05-26 18:09 CEST
mass_dns: warning: Unable to determine any DNS servers. Reverse DNS is
disabled. Try using --system-dns or specify valid servers with
--dns-servers
Nmap scan report for 192.168.100.177
Host is up (0.00036s latency).
Not shown: 999 filtered ports
PORT STATE SERVICE
22/tcp open ssh
MAC Address: 52:54:00:15:A6:B4 (QEMU Virtual NIC)
Nmap done: 1 IP address (1 host up) scanned in 4.97 seconds
8. At this point, it is time to start confi guring the fi rewall. Remember, everything you do from this moment on must be done on the virtual machine. The fi rst thing to do is to set a policy for the three chains. To do this, type the following:
iptables -P INPUT DROP
iptables -P OUTPUT DROP
iptables -P FORWARD DROP
There are two options to block packets. If you use the target REJECT, the sender of a packet gets an error message indicating that the package could not be delivered. If you use DROP, the packet is dropped silently, which is better because it doesn’t reveal anything about the presence of the fi rewall node. You cannot use REJECT in a policy. REJECT is typically used on an internal network to prevent an application from hanging. After setting the policy, you can verify its existence again using ipta-bles -L -v.
9. At this point, all traffi c is blocked, so it’s time to open your fi rewall and allow the traf-fi c that you want to permit. Given that not even a ping to localhost (ping localhost) is going to work at this time, open the loopback interface fi rst. Use the following code to accomplish this:
iptables -A INPUT -i lo -j ACCEPT
iptables -A OUTPUT -o lo -j ACCEPT
Notice the different elements in this command. First, -A is used to add a line to the INPUT and OUTPUT chain. Next, -i is used for the incoming interface in the INPUT
c10.indd 283c10.indd 283 1/8/2013 10:41:39 AM1/8/2013 10:41:39 AM
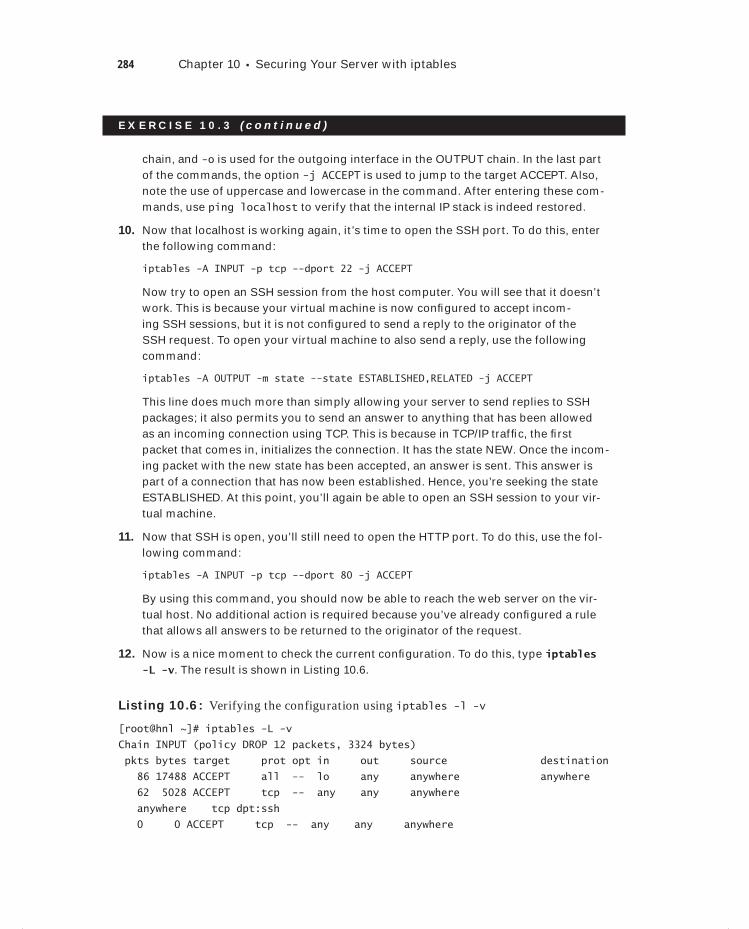
284 Chapter 10 Securing Your Server with iptables
E X E R C I S E 10 . 3 ( c ont inue d )
chain, and -o is used for the outgoing interface in the OUTPUT chain. In the last part of the commands, the option -j ACCEPT is used to jump to the target ACCEPT. Also, note the use of uppercase and lowercase in the command. After entering these com-mands, use ping localhost to verify that the internal IP stack is indeed restored.
10. Now that localhost is working again, it’s time to open the SSH port. To do this, enter the following command:
iptables -A INPUT -p tcp --dport 22 -j ACCEPT
Now try to open an SSH session from the host computer. You will see that it doesn’t work. This is because your virtual machine is now confi gured to accept incom-ing SSH sessions, but it is not confi gured to send a reply to the originator of the SSH request. To open your virtual machine to also send a reply, use the following command:
iptables -A OUTPUT -m state --state ESTABLISHED,RELATED -j ACCEPT
This line does much more than simply allowing your server to send replies to SSH packages; it also permits you to send an answer to anything that has been allowed as an incoming connection using TCP. This is because in TCP/IP traffi c, the fi rst packet that comes in, initializes the connection. It has the state NEW. Once the incom-ing packet with the new state has been accepted, an answer is sent. This answer is part of a connection that has now been established. Hence, you’re seeking the state ESTABLISHED. At this point, you’ll again be able to open an SSH session to your vir-tual machine.
11. Now that SSH is open, you’ll still need to open the HTTP port. To do this, use the fol-lowing command:
iptables -A INPUT -p tcp --dport 80 -j ACCEPT
By using this command, you should now be able to reach the web server on the vir-tual host. No additional action is required because you’ve already confi gured a rule that allows all answers to be returned to the originator of the request.
12. Now is a nice moment to check the current confi guration. To do this, type iptables -L -v. The result is shown in Listing 10.6.
Listing 10.6: Verifying the configuration using iptables -l -v
[root@hnl ~]# iptables -L -v
Chain INPUT (policy DROP 12 packets, 3324 bytes)
pkts bytes target prot opt in out source destination
86 17488 ACCEPT all -- lo any anywhere anywhere
62 5028 ACCEPT tcp -- any any anywhere
anywhere tcp dpt:ssh
0 0 ACCEPT tcp -- any any anywhere
c10.indd 284c10.indd 284 1/8/2013 10:41:39 AM1/8/2013 10:41:39 AM
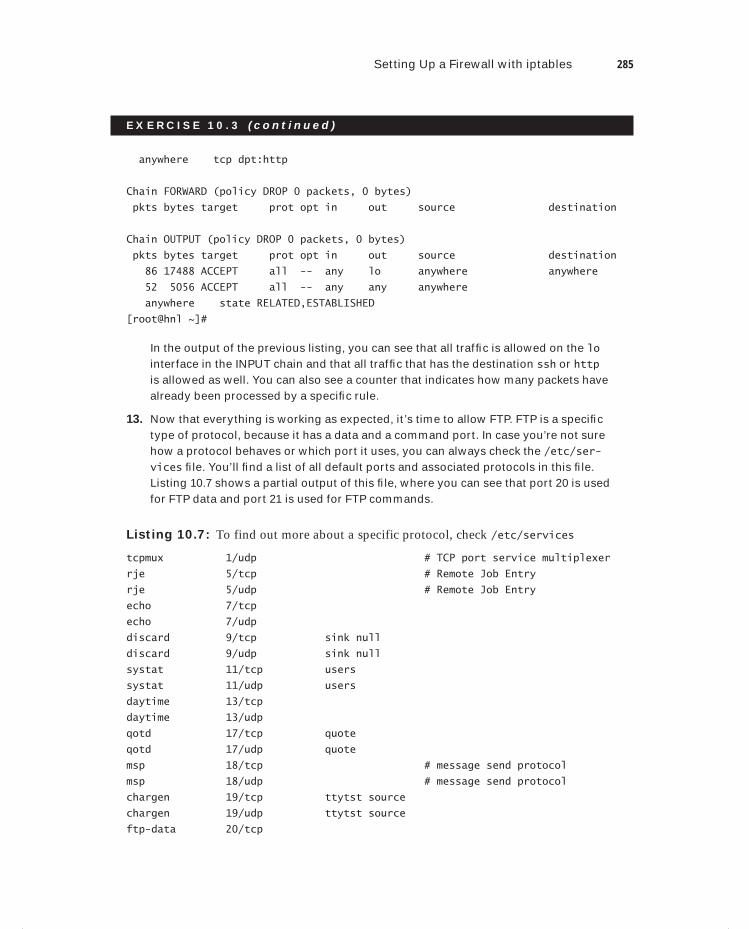
Setting Up a Firewall with iptables 285
E X E R C I S E 10 . 3 ( c ont inue d )
anywhere tcp dpt:http
Chain FORWARD (policy DROP 0 packets, 0 bytes)
pkts bytes target prot opt in out source destination
Chain OUTPUT (policy DROP 0 packets, 0 bytes)
pkts bytes target prot opt in out source destination
86 17488 ACCEPT all -- any lo anywhere anywhere
52 5056 ACCEPT all -- any any anywhere
anywhere state RELATED,ESTABLISHED
[root@hnl ~]#
In the output of the previous listing, you can see that all traffi c is allowed on the lo interface in the INPUT chain and that all traffi c that has the destination ssh or http is allowed as well. You can also see a counter that indicates how many packets have already been processed by a specifi c rule.
13. Now that everything is working as expected, it’s time to allow FTP. FTP is a specifi c type of protocol, because it has a data and a command port. In case you’re not sure how a protocol behaves or which port it uses, you can always check the /etc/ser-vices fi le. You’ll fi nd a list of all default ports and associated protocols in this fi le. Listing 10.7 shows a partial output of this fi le, where you can see that port 20 is used for FTP data and port 21 is used for FTP commands.
Listing 10.7: To find out more about a specific protocol, check /etc/services
tcpmux 1/udp # TCP port service multiplexer
rje 5/tcp # Remote Job Entry
rje 5/udp # Remote Job Entry
echo 7/tcp
echo 7/udp
discard 9/tcp sink null
discard 9/udp sink null
systat 11/tcp users
systat 11/udp users
daytime 13/tcp
daytime 13/udp
qotd 17/tcp quote
qotd 17/udp quote
msp 18/tcp # message send protocol
msp 18/udp # message send protocol
chargen 19/tcp ttytst source
chargen 19/udp ttytst source
ftp-data 20/tcp
c10.indd 285c10.indd 285 1/8/2013 10:41:39 AM1/8/2013 10:41:39 AM
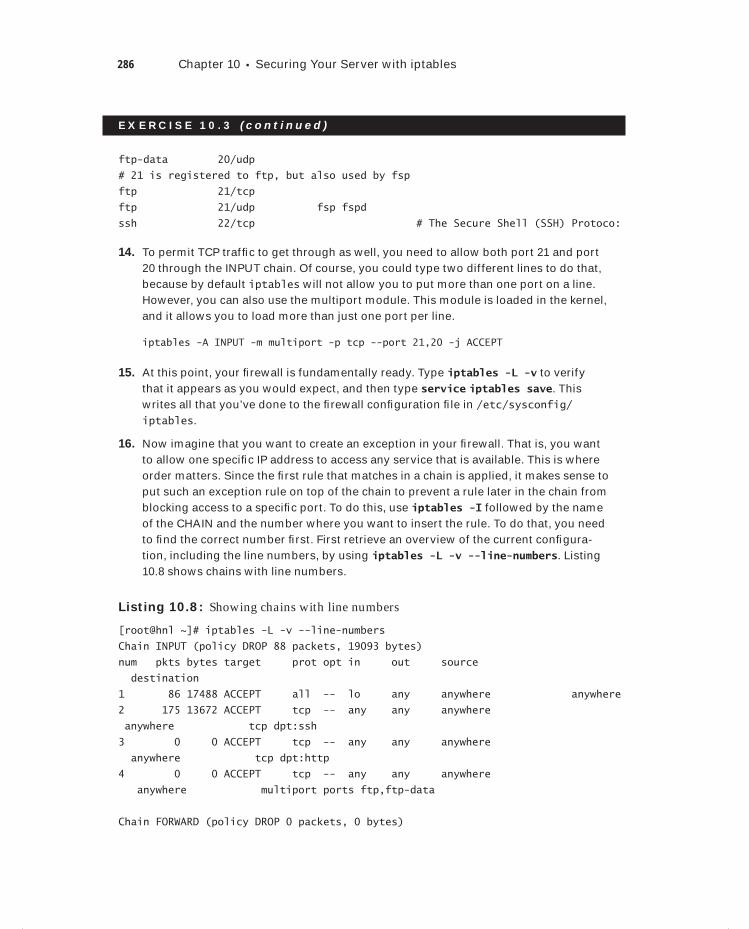
286 Chapter 10 Securing Your Server with iptables
E X E R C I S E 10 . 3 ( c ont inue d )
ftp-data 20/udp
# 21 is registered to ftp, but also used by fsp
ftp 21/tcp
ftp 21/udp fsp fspd
ssh 22/tcp # The Secure Shell (SSH) Protoco:
14. To permit TCP traffi c to get through as well, you need to allow both port 21 and port 20 through the INPUT chain. Of course, you could type two different lines to do that, because by default iptables will not allow you to put more than one port on a line. However, you can also use the multiport module. This module is loaded in the kernel, and it allows you to load more than just one port per line.
iptables -A INPUT -m multiport -p tcp --port 21,20 -j ACCEPT
15. At this point, your fi rewall is fundamentally ready. Type iptables -L -v to verify that it appears as you would expect, and then type service iptables save. This writes all that you’ve done to the fi rewall confi guration fi le in /etc/sysconfig/iptables.
16. Now imagine that you want to create an exception in your fi rewall. That is, you want to allow one specifi c IP address to access any service that is available. This is where order matters. Since the fi rst rule that matches in a chain is applied, it makes sense to put such an exception rule on top of the chain to prevent a rule later in the chain from blocking access to a specifi c port. To do this, use iptables -I followed by the name of the CHAIN and the number where you want to insert the rule. To do that, you need to fi nd the correct number fi rst. First retrieve an overview of the current confi gura-tion, including the line numbers, by using iptables -L -v --line-numbers. Listing 10.8 shows chains with line numbers.
Listing 10.8: Showing chains with line numbers
[root@hnl ~]# iptables -L -v --line-numbers
Chain INPUT (policy DROP 88 packets, 19093 bytes)
num pkts bytes target prot opt in out source
destination
1 86 17488 ACCEPT all -- lo any anywhere anywhere
2 175 13672 ACCEPT tcp -- any any anywhere
anywhere tcp dpt:ssh
3 0 0 ACCEPT tcp -- any any anywhere
anywhere tcp dpt:http
4 0 0 ACCEPT tcp -- any any anywhere
anywhere multiport ports ftp,ftp-data
Chain FORWARD (policy DROP 0 packets, 0 bytes)
c10.indd 286c10.indd 286 1/8/2013 10:41:40 AM1/8/2013 10:41:40 AM
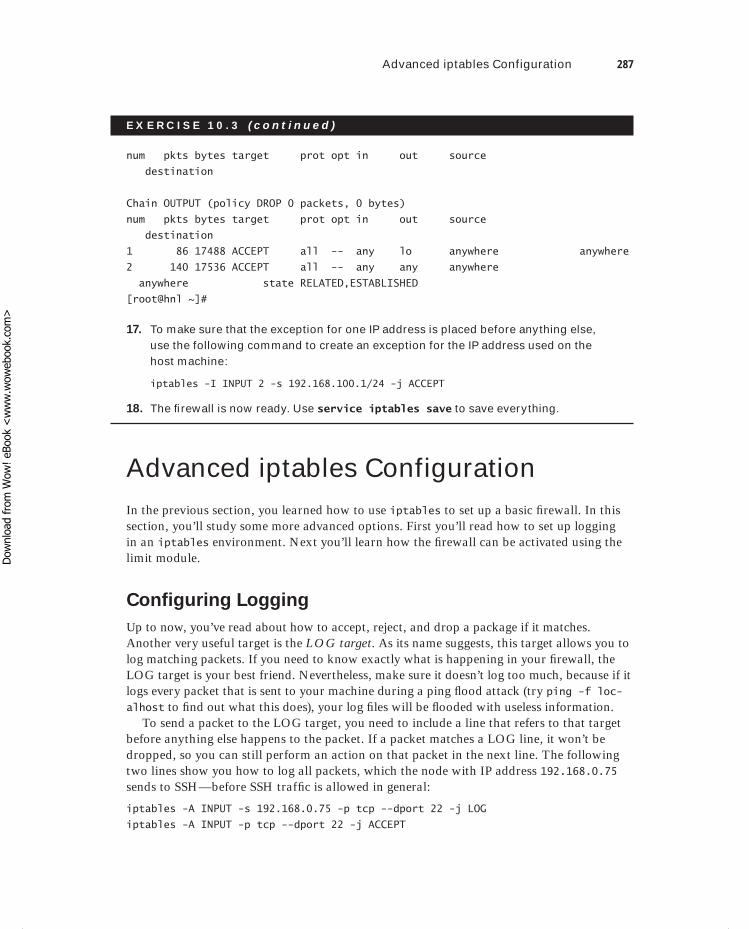
Advanced iptables Configuration 287
E X E R C I S E 10 . 3 ( c ont inue d )
num pkts bytes target prot opt in out source
destination
Chain OUTPUT (policy DROP 0 packets, 0 bytes)
num pkts bytes target prot opt in out source
destination
1 86 17488 ACCEPT all -- any lo anywhere anywhere
2 140 17536 ACCEPT all -- any any anywhere
anywhere state RELATED,ESTABLISHED
[root@hnl ~]#
17. To make sure that the exception for one IP address is placed before anything else, use the following command to create an exception for the IP address used on the host machine:
iptables -I INPUT 2 -s 192.168.100.1/24 -j ACCEPT
18. The fi rewall is now ready. Use service iptables save to save everything.
Advanced iptables ConfigurationIn the previous section, you learned how to use iptables to set up a basic fi rewall. In this section, you’ll study some more advanced options. First you’ll read how to set up logging in an iptables environment. Next you’ll learn how the fi rewall can be activated using the limit module.
Configuring Logging
Up to now, you’ve read about how to accept, reject, and drop a package if it matches. Another very useful target is the LOG target. As its name suggests, this target allows you to log matching packets. If you need to know exactly what is happening in your fi rewall, the LOG target is your best friend. Nevertheless, make sure it doesn’t log too much, because if it logs every packet that is sent to your machine during a ping fl ood attack (try ping -f loc-alhost to fi nd out what this does), your log fi les will be fl ooded with useless information.
To send a packet to the LOG target, you need to include a line that refers to that target before anything else happens to the packet. If a packet matches a LOG line, it won’t be dropped, so you can still perform an action on that packet in the next line. The following two lines show you how to log all packets, which the node with IP address 192.168.0.75 sends to SSH—before SSH traffi c is allowed in general:
iptables -A INPUT -s 192.168.0.75 -p tcp --dport 22 -j LOG
iptables -A INPUT -p tcp --dport 22 -j ACCEPT
c10.indd 287c10.indd 287 1/8/2013 10:41:40 AM1/8/2013 10:41:40 AM
Dow
nlo
ad fro
m W
ow
! eBook
<w
ww
.wow
ebook.
com
>
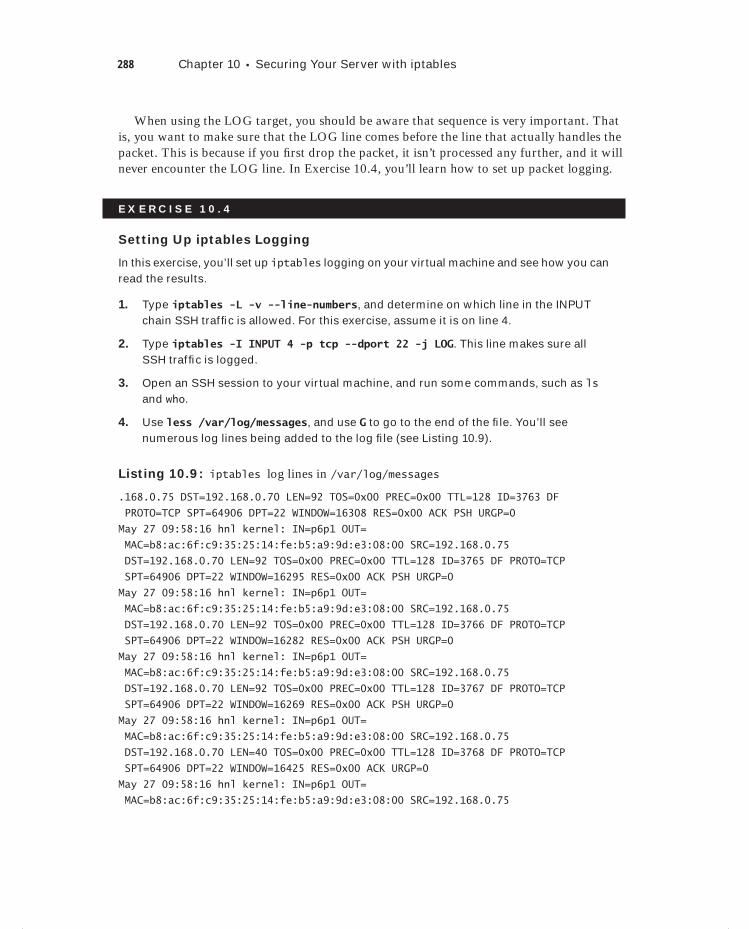
288 Chapter 10 Securing Your Server with iptables
When using the LOG target, you should be aware that sequence is very important. That is, you want to make sure that the LOG line comes before the line that actually handles the packet. This is because if you fi rst drop the packet, it isn’t processed any further, and it will never encounter the LOG line. In Exercise 10.4, you’ll learn how to set up packet logging.
E X E R C I S E 10 . 4
Setting Up iptables Logging
In this exercise, you’ll set up iptables logging on your virtual machine and see how you can read the results.
1. Type iptables -L -v --line-numbers, and determine on which line in the INPUT chain SSH traffi c is allowed. For this exercise, assume it is on line 4.
2. Type iptables -I INPUT 4 -p tcp --dport 22 -j LOG. This line makes sure all SSH traffi c is logged.
3. Open an SSH session to your virtual machine, and run some commands, such as ls and who.
4. Use less /var/log/messages, and use G to go to the end of the fi le. You’ll see numerous log lines being added to the log fi le (see Listing 10.9).
Listing 10.9: iptables log lines in /var/log/messages
.168.0.75 DST=192.168.0.70 LEN=92 TOS=0x00 PREC=0x00 TTL=128 ID=3763 DF
PROTO=TCP SPT=64906 DPT=22 WINDOW=16308 RES=0x00 ACK PSH URGP=0
May 27 09:58:16 hnl kernel: IN=p6p1 OUT=
MAC=b8:ac:6f:c9:35:25:14:fe:b5:a9:9d:e3:08:00 SRC=192.168.0.75
DST=192.168.0.70 LEN=92 TOS=0x00 PREC=0x00 TTL=128 ID=3765 DF PROTO=TCP
SPT=64906 DPT=22 WINDOW=16295 RES=0x00 ACK PSH URGP=0
May 27 09:58:16 hnl kernel: IN=p6p1 OUT=
MAC=b8:ac:6f:c9:35:25:14:fe:b5:a9:9d:e3:08:00 SRC=192.168.0.75
DST=192.168.0.70 LEN=92 TOS=0x00 PREC=0x00 TTL=128 ID=3766 DF PROTO=TCP
SPT=64906 DPT=22 WINDOW=16282 RES=0x00 ACK PSH URGP=0
May 27 09:58:16 hnl kernel: IN=p6p1 OUT=
MAC=b8:ac:6f:c9:35:25:14:fe:b5:a9:9d:e3:08:00 SRC=192.168.0.75
DST=192.168.0.70 LEN=92 TOS=0x00 PREC=0x00 TTL=128 ID=3767 DF PROTO=TCP
SPT=64906 DPT=22 WINDOW=16269 RES=0x00 ACK PSH URGP=0
May 27 09:58:16 hnl kernel: IN=p6p1 OUT=
MAC=b8:ac:6f:c9:35:25:14:fe:b5:a9:9d:e3:08:00 SRC=192.168.0.75
DST=192.168.0.70 LEN=40 TOS=0x00 PREC=0x00 TTL=128 ID=3768 DF PROTO=TCP
SPT=64906 DPT=22 WINDOW=16425 RES=0x00 ACK URGP=0
May 27 09:58:16 hnl kernel: IN=p6p1 OUT=
MAC=b8:ac:6f:c9:35:25:14:fe:b5:a9:9d:e3:08:00 SRC=192.168.0.75
c10.indd 288c10.indd 288 1/8/2013 10:41:40 AM1/8/2013 10:41:40 AM
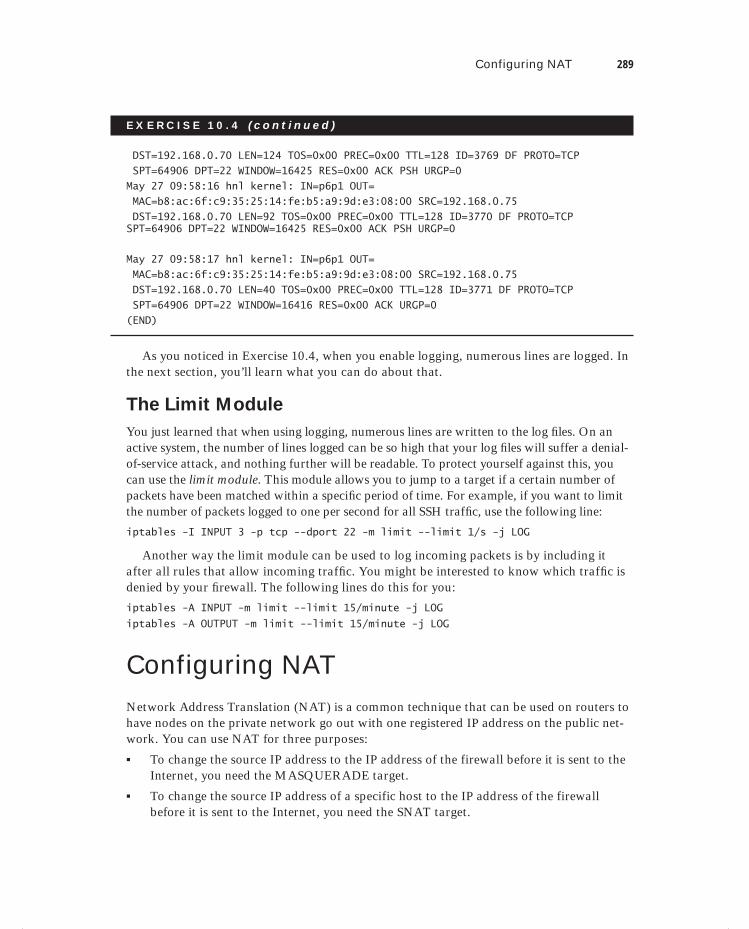
Configuring NAT 289
E X E R C I S E 10 . 4 ( c ont inue d )
DST=192.168.0.70 LEN=124 TOS=0x00 PREC=0x00 TTL=128 ID=3769 DF PROTO=TCP
SPT=64906 DPT=22 WINDOW=16425 RES=0x00 ACK PSH URGP=0
May 27 09:58:16 hnl kernel: IN=p6p1 OUT=
MAC=b8:ac:6f:c9:35:25:14:fe:b5:a9:9d:e3:08:00 SRC=192.168.0.75
DST=192.168.0.70 LEN=92 TOS=0x00 PREC=0x00 TTL=128 ID=3770 DF PROTO=TCP SPT=64906 DPT=22 WINDOW=16425 RES=0x00 ACK PSH URGP=0
May 27 09:58:17 hnl kernel: IN=p6p1 OUT=
MAC=b8:ac:6f:c9:35:25:14:fe:b5:a9:9d:e3:08:00 SRC=192.168.0.75
DST=192.168.0.70 LEN=40 TOS=0x00 PREC=0x00 TTL=128 ID=3771 DF PROTO=TCP
SPT=64906 DPT=22 WINDOW=16416 RES=0x00 ACK URGP=0
(END)
As you noticed in Exercise 10.4, when you enable logging, numerous lines are logged. In the next section, you’ll learn what you can do about that.
The Limit Module
You just learned that when using logging, numerous lines are written to the log fi les. On an active system, the number of lines logged can be so high that your log fi les will suffer a denial-of-service attack, and nothing further will be readable. To protect yourself against this, you can use the limit module. This module allows you to jump to a target if a certain number of packets have been matched within a specifi c period of time. For example, if you want to limit the number of packets logged to one per second for all SSH traffi c, use the following line:
iptables -I INPUT 3 -p tcp --dport 22 -m limit --limit 1/s -j LOG
Another way the limit module can be used to log incoming packets is by including it after all rules that allow incoming traffi c. You might be interested to know which traffi c is denied by your fi rewall. The following lines do this for you:
iptables -A INPUT -m limit --limit 15/minute -j LOG
iptables -A OUTPUT -m limit --limit 15/minute -j LOG
Configuring NATNetwork Address Translation (NAT) is a common technique that can be used on routers to have nodes on the private network go out with one registered IP address on the public net-work. You can use NAT for three purposes:
To change the source IP address to the IP address of the firewall before it is sent to the Internet, you need the MASQUERADE target.
To change the source IP address of a specific host to the IP address of the firewall before it is sent to the Internet, you need the SNAT target.
c10.indd 289c10.indd 289 1/8/2013 10:41:40 AM1/8/2013 10:41:40 AM
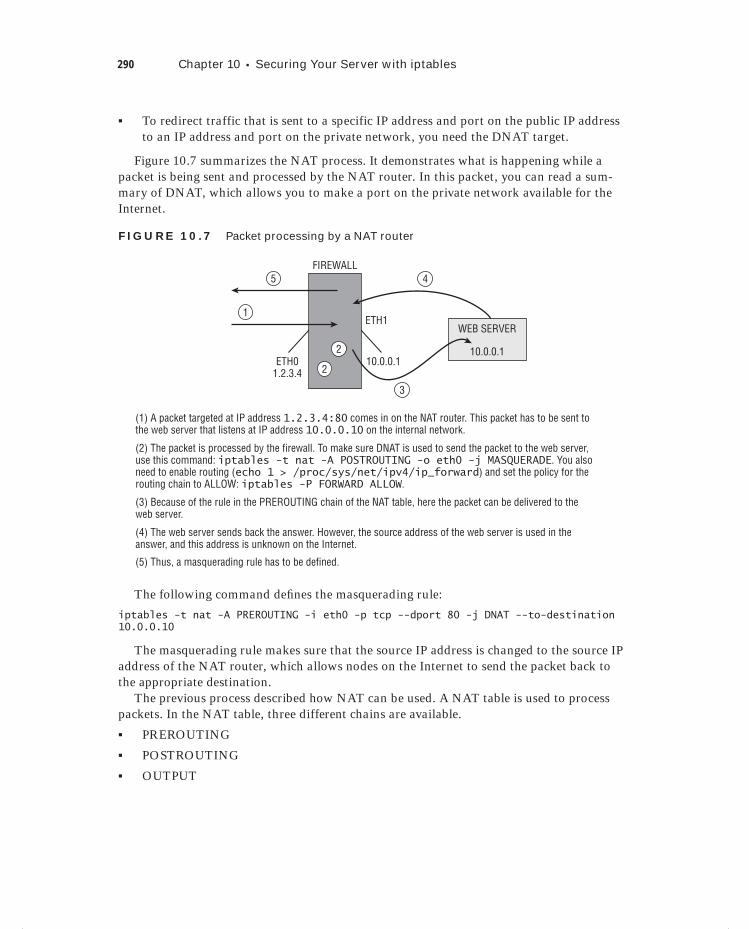
290 Chapter 10 Securing Your Server with iptables
To redirect traffic that is sent to a specific IP address and port on the public IP address to an IP address and port on the private network, you need the DNAT target.
Figure 10.7 summarizes the NAT process. It demonstrates what is happening while a packet is being sent and processed by the NAT router. In this packet, you can read a sum-mary of DNAT, which allows you to make a port on the private network available for the Internet.
F I GU R E 10 .7 Packet processing by a NAT router
WEB SERVER
ETH01.2.3.4
FIREWALL
10.0.0.1
(1) A packet targeted at IP address 1.2.3.4:80 comes in on the NAT router. This packet has to be sent tothe web server that listens at IP address 10.0.0.10 on the internal network.
(3) Because of the rule in the PREROUTING chain of the NAT table, here the packet can be delivered to theweb server.
(4) The web server sends back the answer. However, the source address of the web server is used in theanswer, and this address is unknown on the Internet.
(5) Thus, a masquerading rule has to be defined.
(2) The packet is processed by the firewall. To make sure DNAT is used to send the packet to the web server,use this command: iptables -t nat -A POSTROUTING -o eth0 -j MASQUERADE. You alsoneed to enable routing (echo 1 > /proc/sys/net/ipv4/ip_forward) and set the policy for therouting chain to ALLOW: iptables -P FORWARD ALLOW.
ETH1
10.0.0.1
2
5 4
3
1
2
The following command defi nes the masquerading rule:
iptables -t nat -A PREROUTING -i eth0 -p tcp --dport 80 -j DNAT --to-destination 10.0.0.10
The masquerading rule makes sure that the source IP address is changed to the source IP address of the NAT router, which allows nodes on the Internet to send the packet back to the appropriate destination.
The previous process described how NAT can be used. A NAT table is used to process packets. In the NAT table, three different chains are available.
PREROUTING
POSTROUTING
OUTPUT
c10.indd 290c10.indd 290 1/8/2013 10:41:40 AM1/8/2013 10:41:40 AM
Configuring NAT 291
Of these chains, PREROUTING and POSTROUTING are most important. In PREROUTING, packets are processed before the routing decision is made. This chain is typically used for incoming packets where the destination address has to be rewritten, which happens in DNAT. In SNAT and MASQUERADE, the source IP address must be rewritten, and that needs to be done after the routing process has been applied. Therefore, the SNAT and MASQUERADE rules are added to the POSTROUTING chain.
To enable any kind of Network Address Translation, there remains one important thing to address: your host must be confi gured for packet forwarding. By default, the Linux ker-nel doesn’t allow packet forwarding. To make sure that your computer can do packet for-warding, check that the /etc/sysctl.conf fi le contains the following line:
net.ipv4.ip_forward = 1
After changing this line, use sysctl -p to read the changed settings. Now your host can be used for NAT. In Exercise 10.5, you’ll learn how to confi gure NAT.
E X E R C I S E 10 . 5
Configuring NAT
In this exercise, you’ll learn how to set up NAT. You’ll use the host computer as the NAT router and the virtual machine as the web server on the private network. All confi guration is done on the host computer, but you must make sure that all iptables confi guration is erased. (You’ll take care of this during the fi rst steps of this exercise.) To test the confi gu-ration, you’ll need a third machine that is connected to the same network as the RHEL server that you are using as host. If you don’t have a third machine available, that’s fi ne; you just can’t test the confi guration.
1. On the virtual machine, use iptables -F, iptables -P INPUT ALLOW, iptables -P OUTPUT ALLOW, and iptables -P FORWARD ALLOW. Next use service iptables save to save this confi guration.
2. Repeat step 1 on the host computer, and use service httpd stop followed by chk-config httpd off to make sure the web server is stopped on the host computer.
3. On the host computer, enable routing by opening /etc/sysctl.conf with an editor. Make sure it includes the line net.ipv.ip_forward = 1, and use sysctl -p to the sysctl service to make the change effective.
4. On the host, use iptables -t nat -A PREROUTING -i eth0 -p tcp --dport 80 -j DNAT --to-destination 192.168.100.76. Make sure that you use the actual name of your network card on the host machine and that the --to-destination option uses the IP address of the virtual machine.
5. Also on the host, use iptables -t nat -A POSTROUTING -o eth0 -j MASQUERADE to enable IP masquerading.
c10.indd 291c10.indd 291 1/8/2013 10:41:41 AM1/8/2013 10:41:41 AM
292 Chapter 10 Securing Your Server with iptables
E X E R C I S E 10 . 5 ( c ont inue d )
6. On another computer connected to the same network as your RHEL host, test that you can reach the HTTP port on the host.
7. After verifying that this works, restart both the host computer and the virtual machine to clear the NAT confi guration. Note : Don’t forget this step, or you will experience problems completing the exercises in upcoming chapters successfully.
SummaryIn this chapter, you learned how to confi gure a fi rewall on your Red Hat server. You worked with the system-confi g-fi rewall tool and the iptables command to confi gure a basic fi rewall. You also learned how to extend the functionality of the fi rewall by using modules. You studied how to confi gure logging, which lets you analyze when something is not working as expected in the fi rewall. Finally, you learned how to set up the three differ-ent kinds of NAT to make computers on the private network available to the outside world .
c10.indd 292c10.indd 292 1/8/2013 10:41:41 AM1/8/2013 10:41:41 AM

Chapter
11Setting Up Cryptographic Services
TOPICS COVERED IN THIS CHAPTER:
Introducing SSL
Managing Certificates with openssl
Working with GNU Privacy Guard
c11.indd 293c11.indd 293 1/8/2013 10:49:08 AM1/8/2013 10:49:08 AM

On a typical Red Hat Enterprise Linux system, there are many services that need to be secured while transmitting packets over the network. SSL is the common solution that is shared
between many services, such as LDAP, http, and many more. Before starting to work with these services in subsequent chapters, you’ll learn in this chapter how to use SSL. Also, you’ll learn how to use GPG as a security solution.
Introducing SSLFor many of the services that are offered on a current-day server, additional security is a requirement. By applying this security, you can make sure that traffi c to the server is encrypted and that the identity of the server is guaranteed. To achieve this level of security, you can use SSL. Before learning about SSL, however, you’ll learn about how public/private keys are used in cryptography.
When thinking about SSL, many people consider web servers only. Other types of servers also use SSL certificates. Without SSL, anyone can cap-ture passwords that are sent between a POP or IMAP mail client and the mail server. Furthermore, LDAP is commonly protected with SSL to make sure that the passwords sent when authenticating against an LDAP server cannot be captured.
If a user wants to establish a connection to a website, this connection needs to be pro-tected. To ensure a protected connection, public and private keys are used. These keys can be used for three reasons:
To encrypt traffic to and from a server
To prove the identity of another party
To verify that a message has not been tampered with
Let’s take an example where public/private keys are used to encrypt traffi c that is sent to a server, which is common on the Internet.
c11.indd 294c11.indd 294 1/8/2013 10:49:09 AM1/8/2013 10:49:09 AM

Introducing SSL 295
1. When the connection to the server is first initialized, the server sends its public key (PKI) certificate. This contains the public key of the server, and it is signed with the private key of the certificate authority (CA) used by the owner of the server.
2. To verify that the PKI certificate can be trusted, the signature of the CA in the cer-tificate is checked. If the signature can be traced back to a public key that already is known to the client, the connection is considered to be trusted.
3. Now that the connection is trusted, a symmetric session key generated by the client is sent. The data traffic is encrypted with this session key for performance reasons.
4. Because public/private key encryption is one-way encryption, only the server is capable of decrypting the traffic by using its private key.
As you’ve seen in this example, to work with SSL, you need a public key certifi cate. The certifi cate is required to guarantee the identity of the server that uses it. It contains the public key of the server that users are going to use to establish a secured connection, and it contains a “proof of identity,” which is normally provided by a CA. As an alternative, you can work with self-signed certifi cates. In this chapter, you’ll learn how to set up both.
Proof of Authenticity: the Certificate Authority
The use of public/private keys is a great improvement in Internet security. There is a chal-lenge, however: how can the receiver be sure that the public key that it receives actually comes from a trusted server and not from a hacker who has hijacked the connection? This is where the CA comes in.
A CA is used to guarantee the authenticity of a public key. The role of the CA is to sign PKI certifi cates. Any server can generate a PKI certifi cate, and it is the role of the CA to sign these PKI certifi cates with its private key. However, this is useful only if the client that receives the certifi cate knows the public key of the CA. If this is not the case, users will see a message indicating they are using an untrusted connection, and the client application will probably close the connection. Thus, for common use on the Internet, make sure that the CA is known to everyone. For private internal use, an in-house CA can also be used.
The Trusted Root
If you want to create your own CA, make sure the users who use it can trust it. You can accomplish this by having its certifi cates signed by a commonly known CA. Because the public keys of these commonly known CAs are available in most client applications, the CA that uses it will be transparently accepted. The only drawback is that, in general, you need to pay money to the CA that is going to sign your certifi cates. If you don’t want or don’t need to do that, you can use a self-signed certifi cate.
If you are creating a certifi cate that is to be trusted, you need to have it signed. To do this, you’ll send a certifi cate signing request. You’ll learn how to do this later in this chapter.
c11.indd 295c11.indd 295 1/8/2013 10:49:10 AM1/8/2013 10:49:10 AM
296 Chapter 11 Setting Up Cryptographic Services
Running Your Own CA
In this chapter, you will learn how to run your own CA. If you do that, you can have its certifi cates signed by a trusted root. Alternatively, you can use self-signed certifi cates. This is the “you can trust me because I say so” type of certifi cate. It’s not the kind of security you want to show your customers on the Internet, but it works well for internal use.
If you’re using a self-signed certifi cate anywhere in the chain, the fi rst time it is used, the user will get a message indicating there is a problem with the trustworthiness of the certifi -cate. If your users are mainly internal, you can deal with that by importing the certifi cates on the users’ workstations. If they are external users, you need to convince them that the certifi cate is to be trusted. If you’re offering an SSL-protected web server for your local hockey club, for example, that’s not too hard to do, but you don’t try want to do this with your e-commerce customers.
Managing Certificates with opensslTo create and manage certifi cates, you can use the openssl command-line utility. This is a very versatile command that offers many options but is sometimes diffi cult to use. To begin, you’ll learn how to create a self-signed certifi cate.
Creating a Self-Signed Certificate
In the following procedure, you can read how to create a self-signed certifi cate.To begin, you need to store the certifi cates that you are going to create. You can do
this in the home directory of user root if you want them to be well protected, or else you can put the certifi cates in the directory /etc/pki/tls, which exists for this purpose by default. Within this directory, you need four subdirectories to store the certifi cates: certs, newcerts, private, and crl. These subdirectories have already been created on Red Hat Enterprise Linux.
Here is an overview of how each of these directories is used:
certs This is the location used to store all signed PKI certifi cates. The directory can be open for public access because it contains only public keys and no private ones.
newcerts This is where you temporarily store all new certifi cates until they have been signed. After you’ve signed them, you can remove them from this location.
private This directory is used to store private keys. You must make sure that this direc-tory is well protected because the private keys that are stored here are the proof of identity for your server. If the private keys are compromised, anyone can pretend to be your server. To protect the private keys, make sure that the private directory has permission mode 700 and that user root is owner of this directory.
crl A certifi cate revocation list (CRL) is a list of certifi cates that are invalid. If ever you need to revoke certifi cates, copy them to this directory.
c11.indd 296c11.indd 296 1/8/2013 10:49:10 AM1/8/2013 10:49:10 AM
Managing Certificates with openssl 297
In the procedure below, you’ll learn how to create your own Certifi cate Authority.
1. To create a certificate for your CA server, you can use the configuration file that you’ll find in /etc/pki/openssl.cnf. This file contains default settings that are used to facili-tate the creation of new certificates. Using this file makes creating certificates easier; all default values that are specified here don’t have to be used on the command line. It’s a good idea to read through this file so that you know which kinds of settings are avail-able. Take special notice of the directory paths where you can find a reference to all the directories that are used while using the openssl command. If you’re planning to put the certificates somewhere else on your server, you can change the HOME and dir vari-ables from this file to reflect the directories you will be using (see Listing 11.1).
Listing 11.1: Partial contents of the /etc/pki/openssl.cnf file
HOME = /root/rootCA
dir = /root/root-CA
...
certificate = $dir/root-CAcert.pem
...
private-key = $dir/root-CAkey.pem
2. After checking the default values you want to use in openssl.cnf, you can start creat-ing your own self-signed certificate. The following command allows you to create a certificate that uses a 1024-bit RSA key with a validity of 10 years:
openssl req -newkey rsa:1024 -x509 -days 3650
In the previous code snippet, you can see that openssl is used as the master command. It is used with the req command. The openssl command uses subcommands. req is the com-mand that is used to generate a certifi cate-signing request. With that request, a new key is created with an RSA length of 1024 bits in which x509 and a validity of 10 years is used.
When creating a certifi cate that is to be used for a CA, it’s a good idea to choose a long validity period. It should at least be longer than the period a normal certifi cate is typically valid, because when the CA certifi cate expires, all certifi cates that are signed by it will expire too.
In this command, only a minimal number of parameters are used. The command could have been much longer, but that wasn’t necessary, because the default options from openssl.cnf have been used. A more complex example follows, where a specifi c mention is made of where the private key and certifi cate must be written.
openssl req -newkey rsa:2048 -x509 -days 3650 -keyout private/my-CAkey.pem -out my-CAcert.pem
When you are creating a key, the openssl command prompts for a passphrase. This will always occur, because a passphrase cannot be read from a confi guration fi le. It is very important to select a secure passphrase. If the private key gets stolen, the passphrase is your last protection it has against being abused. If you don’t want to be forced to enter a
c11.indd 297c11.indd 297 1/8/2013 10:49:10 AM1/8/2013 10:49:10 AM
298 Chapter 11 Setting Up Cryptographic Services
passphrase every time the service is restarted, you can just press Enter when prompted for the passphrase. This will set an empty passphrase, so the user won’t be prompted.
Self-Signed Certificates and Security
Creating a self-signed certifi cate doesn’t necessarily guarantee security. In fact, self-signed certifi cates are not about security—they are about trustworthiness. A self-signed certifi cate is as secure as a certifi cate that has been signed by a commercial certifi cate authority. The only difference is that users risk getting a message when they are setting up a connection with this type of certifi cate because it is signed by an unknown CA.
In many corporate environments, it makes sense to work with self-signed certifi cates. For instance, think of an intranet site, where https is a requirement and the data has to be protected when sent to users. Because the users of such a website all can typically be managed by corporate IT, it makes sense to save a lot of money by using self-signed cer-tifi cates instead of an expensive commercial certifi cate.
Another way of creating a self-signed certifi cate is by using the genkey command. This command provides a text user interface that guides the user through the process of creating a certifi cate. In Exercise 11.1, you’ll learn how to use genkey to create such a certifi cate.
E X E R C I S E 11 .1
Creating a Self-Signed Certificate
In this exercise, you will create a self-signed certifi cate using the genkey command.
1. Use yum install -y crypto-utils mod_ssl to install the RPM package that con-tains the genkey command.
2. Use the genkey command followed by a unique name that is going to be used for the resulting fi les. It is good to the name of your server as the fi lename. You must also specify how long you want the key to be valid by using --days followed by a number of days. If you omit this option, the key will be valid for one month only. The com-plete command looks like genkey --days 365 yourserver.example.com. Notice that the genkey command automatically places the resulting PKI certifi cate and pri-vate key in the correct directories, which are /etc/pki/tls/private and /etc/pki/tls/certs.
c11.indd 298c11.indd 298 1/8/2013 10:49:11 AM1/8/2013 10:49:11 AM
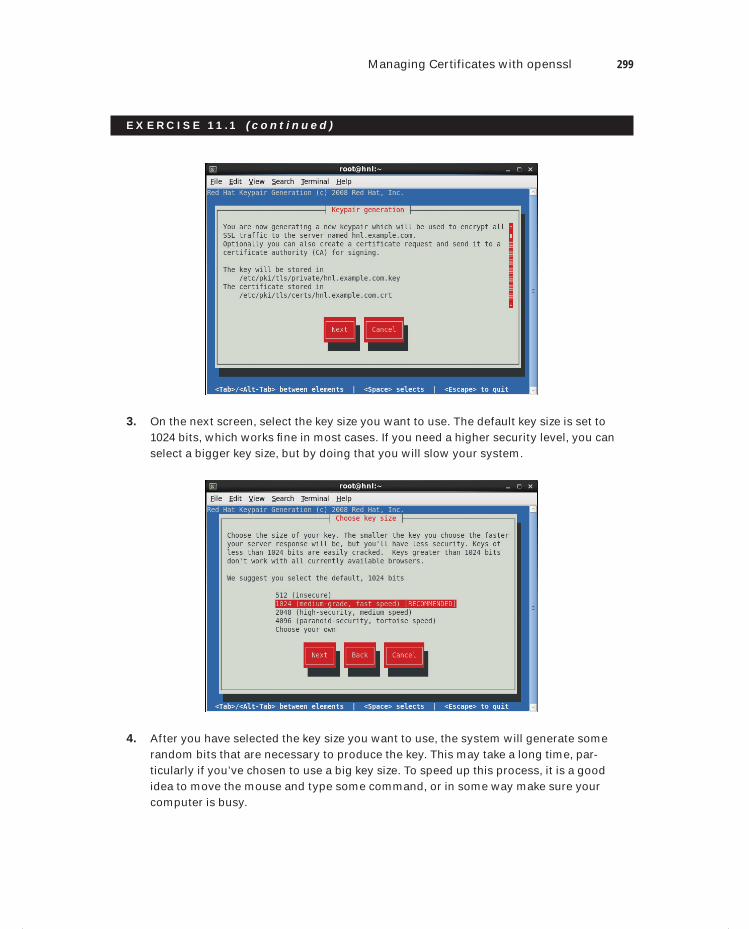
Managing Certificates with openssl 299
E X E R C I S E 11 .1 ( c ont inue d )
3. On the next screen, select the key size you want to use. The default key size is set to 1024 bits, which works fi ne in most cases. If you need a higher security level, you can select a bigger key size, but by doing that you will slow your system.
4. After you have selected the key size you want to use, the system will generate some random bits that are necessary to produce the key. This may take a long time, par-ticularly if you’ve chosen to use a big key size. To speed up this process, it is a good idea to move the mouse and type some command, or in some way make sure your computer is busy.
c11.indd 299c11.indd 299 1/8/2013 10:49:11 AM1/8/2013 10:49:11 AM
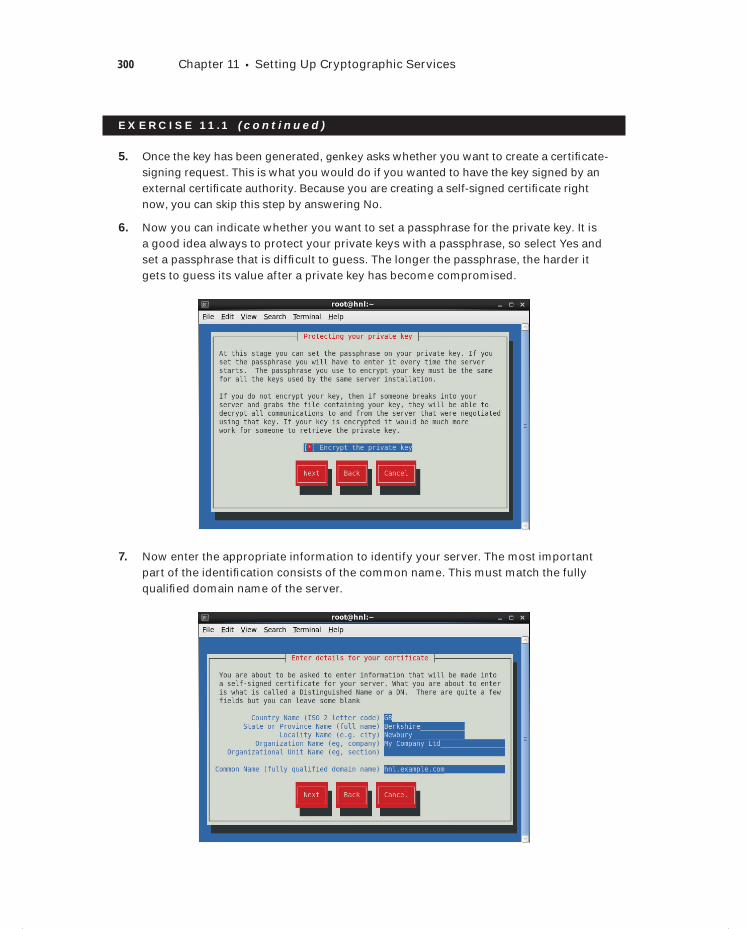
300 Chapter 11 Setting Up Cryptographic Services
E X E R C I S E 11 .1 ( c ont inue d )
5. Once the key has been generated, genkey asks whether you want to create a certifi cate-signing request. This is what you would do if you wanted to have the key signed by an external certifi cate authority. Because you are creating a self-signed certifi cate right now, you can skip this step by answering No.
6. Now you can indicate whether you want to set a passphrase for the private key. It is a good idea always to protect your private keys with a passphrase, so select Yes and set a passphrase that is diffi cult to guess. The longer the passphrase, the harder it gets to guess its value after a private key has become compromised.
7. Now enter the appropriate information to identify your server. The most important part of the identifi cation consists of the common name. This must match the fully qualifi ed domain name of the server.
c11.indd 300c11.indd 300 1/8/2013 10:49:11 AM1/8/2013 10:49:11 AM
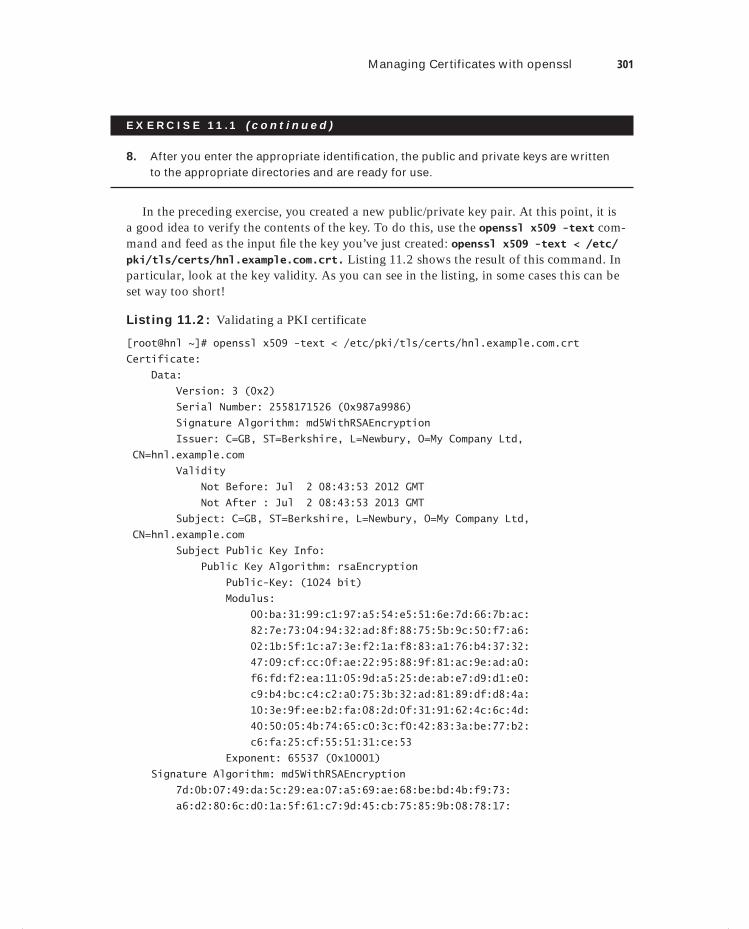
Managing Certificates with openssl 301
E X E R C I S E 11 .1 ( c ont inue d )
8. After you enter the appropriate identifi cation, the public and private keys are written to the appropriate directories and are ready for use.
In the preceding exercise, you created a new public/private key pair. At this point, it is a good idea to verify the contents of the key. To do this, use the openssl x509 -text com-mand and feed as the input fi le the key you’ve just created: openssl x509 -text < /etc/pki/tls/certs/hnl.example.com.crt. Listing 11.2 shows the result of this command. In particular, look at the key validity. As you can see in the listing, in some cases this can be set way too short!
Listing 11.2: Validating a PKI certificate
[root@hnl ~]# openssl x509 -text < /etc/pki/tls/certs/hnl.example.com.crt
Certificate:
Data:
Version: 3 (0x2)
Serial Number: 2558171526 (0x987a9986)
Signature Algorithm: md5WithRSAEncryption
Issuer: C=GB, ST=Berkshire, L=Newbury, O=My Company Ltd,
CN=hnl.example.com
Validity
Not Before: Jul 2 08:43:53 2012 GMT
Not After : Jul 2 08:43:53 2013 GMT
Subject: C=GB, ST=Berkshire, L=Newbury, O=My Company Ltd,
CN=hnl.example.com
Subject Public Key Info:
Public Key Algorithm: rsaEncryption
Public-Key: (1024 bit)
Modulus:
00:ba:31:99:c1:97:a5:54:e5:51:6e:7d:66:7b:ac:
82:7e:73:04:94:32:ad:8f:88:75:5b:9c:50:f7:a6:
02:1b:5f:1c:a7:3e:f2:1a:f8:83:a1:76:b4:37:32:
47:09:cf:cc:0f:ae:22:95:88:9f:81:ac:9e:ad:a0:
f6:fd:f2:ea:11:05:9d:a5:25:de:ab:e7:d9:d1:e0:
c9:b4:bc:c4:c2:a0:75:3b:32:ad:81:89:df:d8:4a:
10:3e:9f:ee:b2:fa:08:2d:0f:31:91:62:4c:6c:4d:
40:50:05:4b:74:65:c0:3c:f0:42:83:3a:be:77:b2:
c6:fa:25:cf:55:51:31:ce:53
Exponent: 65537 (0x10001)
Signature Algorithm: md5WithRSAEncryption
7d:0b:07:49:da:5c:29:ea:07:a5:69:ae:68:be:bd:4b:f9:73:
a6:d2:80:6c:d0:1a:5f:61:c7:9d:45:cb:75:85:9b:08:78:17:
c11.indd 301c11.indd 301 1/8/2013 10:49:12 AM1/8/2013 10:49:12 AM
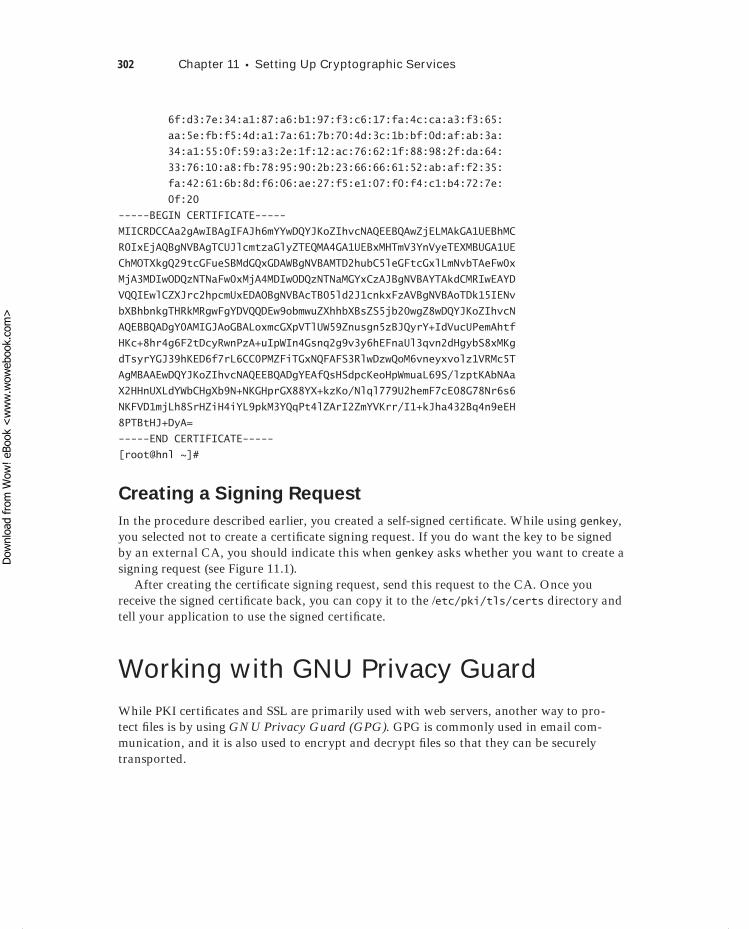
302 Chapter 11 Setting Up Cryptographic Services
6f:d3:7e:34:a1:87:a6:b1:97:f3:c6:17:fa:4c:ca:a3:f3:65:
aa:5e:fb:f5:4d:a1:7a:61:7b:70:4d:3c:1b:bf:0d:af:ab:3a:
34:a1:55:0f:59:a3:2e:1f:12:ac:76:62:1f:88:98:2f:da:64:
33:76:10:a8:fb:78:95:90:2b:23:66:66:61:52:ab:af:f2:35:
fa:42:61:6b:8d:f6:06:ae:27:f5:e1:07:f0:f4:c1:b4:72:7e:
0f:20
-----BEGIN CERTIFICATE-----
MIICRDCCAa2gAwIBAgIFAJh6mYYwDQYJKoZIhvcNAQEEBQAwZjELMAkGA1UEBhMC
R0IxEjAQBgNVBAgTCUJlcmtzaGlyZTEQMA4GA1UEBxMHTmV3YnVyeTEXMBUGA1UE
ChMOTXkgQ29tcGFueSBMdGQxGDAWBgNVBAMTD2hubC5leGFtcGxlLmNvbTAeFw0x
MjA3MDIwODQzNTNaFw0xMjA4MDIwODQzNTNaMGYxCzAJBgNVBAYTAkdCMRIwEAYD
VQQIEwlCZXJrc2hpcmUxEDAOBgNVBAcTB05ld2J1cnkxFzAVBgNVBAoTDk15IENv
bXBhbnkgTHRkMRgwFgYDVQQDEw9obmwuZXhhbXBsZS5jb20wgZ8wDQYJKoZIhvcN
AQEBBQADgY0AMIGJAoGBALoxmcGXpVTlUW59Znusgn5zBJQyrY+IdVucUPemAhtf
HKc+8hr4g6F2tDcyRwnPzA+uIpWIn4Gsnq2g9v3y6hEFnaUl3qvn2dHgybS8xMKg
dTsyrYGJ39hKED6f7rL6CC0PMZFiTGxNQFAFS3RlwDzwQoM6vneyxvolz1VRMc5T
AgMBAAEwDQYJKoZIhvcNAQEEBQADgYEAfQsHSdpcKeoHpWmuaL69S/lzptKAbNAa
X2HHnUXLdYWbCHgXb9N+NKGHprGX88YX+kzKo/Nlql779U2hemF7cE08G78Nr6s6
NKFVD1mjLh8SrHZiH4iYL9pkM3YQqPt4lZArI2ZmYVKrr/I1+kJha432Bq4n9eEH
8PTBtHJ+DyA=
-----END CERTIFICATE-----
[root@hnl ~]#
Creating a Signing Request
In the procedure described earlier, you created a self-signed certifi cate. While using genkey, you selected not to create a certifi cate signing request. If you do want the key to be signed by an external CA, you should indicate this when genkey asks whether you want to create a signing request (see Figure 11.1).
After creating the certifi cate signing request, send this request to the CA. Once you receive the signed certifi cate back, you can copy it to the /etc/pki/tls/certs directory and tell your application to use the signed certifi cate.
Working with GNU Privacy GuardWhile PKI certifi cates and SSL are primarily used with web servers, another way to pro-tect fi les is by using GNU Privacy Guard (GPG). GPG is commonly used in email com-munication, and it is also used to encrypt and decrypt fi les so that they can be securely transported.
c11.indd 302c11.indd 302 1/8/2013 10:49:12 AM1/8/2013 10:49:12 AM
Dow
nlo
ad fro
m W
ow
! eBook
<w
ww
.wow
ebook.
com
>

Working with GNU Privacy Guard 303
F I GU R E 11.1 After creating the public/private key pair, genkey asks whether you also want to create a signing request.
Creating GPG Keys
To create a key pair, you have to use gpg --gen-key. This command starts an interactive interface where questions are posed about the identity of the user who is going to use the key. Next you’ll need to enter a passphrase to protect the key. Once that has been done, the process that generates the key needs entropy. This is random data that you have to generate while the key pair is being created. Note that for longer keys, it will take more time to gen-erate the key, and a lot of disk activity may be required to create it successfully (see Listing 11.3).
Listing 11.3: Generating a GPG key pair
[linda@hnl ~]$ gpg --gen-key.gpg (GnuPG) 2.0.14; Copyright (C) 2009 Free
Software Foundation, Inc.
This is free software: you are free to change and redistribute it.
There is NO WARRANTY, to the extent permitted by law.
Please select what kind of key you want:
(1) RSA and RSA (default)
(2) DSA and Elgamal
(3) DSA (sign only)
(4) RSA (sign only)
c11.indd 303c11.indd 303 1/8/2013 10:49:12 AM1/8/2013 10:49:12 AM

304 Chapter 11 Setting Up Cryptographic Services
Your selection? 1
RSA keys may be between 1024 and 4096 bits long.
What keysize do you want? (2048) 2048
Requested keysize is 2048 bits
Please specify how long the key should be valid.
0 = key does not expire
<n> = key expires in n days
<n>w = key expires in n weeks
<n>m = key expires in n months
<n>y = key expires in n years
Key is valid for? (0) 0
Key does not expire at all
Is this correct? (y/N) y
GnuPG needs to construct a user ID to identify your key.
Real name: Linda Thomsen
Email address: [email protected]
Comment: non
You selected this USER-ID:
"Linda Thomsen (non) <[email protected]>"
Change (N)ame, (C)omment, (E)mail or (O)kay/(Q)uit? o
You need a Passphrase to protect your secret key.
can’t connect to `/root/.gnupg/S.gpg-agent’: No such file or directory
gpg-agent[3118]: directory `/root/.gnupg/private-keys-v1.d’ created
We need to generate a lot of random bytes. It is a good idea to perform
some other action (type on the keyboard, move the mouse, utilize the
disks) during the prime generation; this gives the random number
generator a better chance to gain enough entropy.
gpg: key 3CBABF7E marked as ultimately trusted
public and secret key created and signed.
gpg: checking the trustdb
gpg: 3 marginal(s) needed, 1 complete(s) needed, PGP trust model
gpg: depth: 0 valid: 1 signed: 0 trust: 0-, 0q, 0n, 0m, 0f, 1u
pub 2048R/3CBABF7E 2012-06-29
Key fingerprint = A733 F93E A224 EFEE AB3D 9850 7A07 A037 3CBA BF7E
c11.indd 304c11.indd 304 1/8/2013 10:49:12 AM1/8/2013 10:49:12 AM
Working with GNU Privacy Guard 305
uid Linda Thomsen (non) <[email protected]>
sub 2048R/B398384F 2012-06-29
When you start to create a passphrase, a graphical window opens. If for some reason you get an error while assigning the passphrase, this graphi-cal window will likely not open. In this case, restart the command from a graphical environment. In addition, don’t use it from an su – environment, because this is a common cause of errors when creating GPG keys.
While creating the key pair, a keyring is created. This keyring consists of two fi les that are written to the .gnupg directory in the home directory of the user. The public key is written to ~/.gnupg/pubring.gpg, and the private key is written to ~/.gnupg/secring.gpg. Make sure that the private key fi le is well secured because it contains your identity. Thus, if anyone steals this fi le, they can pretend to be you. So, always make sure the private key is protected with a passphrase and that unauthorized use is not possible.
Key Transfer
Having a GPG public/private key pair is good, but it is useful only if you can share the key with others. If others are using your public key to send encrypted messages by email or to encrypt fi les they want to send to you, you can ensure communications in a secure way. To accomplish this, you need to initialize the key transfer.
Initializing a key transfer means you have to export the key. To do this, you can use the gpg --export command. For example, use gpg --export -a to dump the public key to the STDOUT. You can see the result of this command in Listing 11.4.
Listing 11.4: Exporting your public key
sander@SYD:~> gpg --export -a
-----BEGIN PGP PUBLIC KEY BLOCK-----
Version: GnuPG v2.0.9 (GNU/Linux)
mQGiBEmvh28RBADqKXLjFBih2T+Vpq9dARMl6gvxShcHPet4tZ/Pyr/h/NNwiqwP
ZP/K69ki2qCMLLJ8o3S+KlQqXXedkKHbI6lA1G3RSnPZIrEoRTMQBjUn3WkTgRU3
W3FXb3YdLezjT+tYGGosaglIkToWr8vDNXbcerOCWYOM5l3jeABWdZzWFwCgppZ3
hpPCyJ8YIbsLMgAKOxdSg20EANZelbPncoPUc0p9INRLIW+Xt1sMbPDtZj1bIqxx
vWTowpMdJMKSekihXAb3sqKMx5LEJGtaOY6qjD3aygt4GzLcedzVmdZAdNUiFS89
xrphg/wejhvZVrGFuofpN9r6jziQ4yyFeuX77rb0aHj2Zj2aWL4nnO9h5KMHaUx7
8ZsrA/0XUwcOL4AT6Z3MdPc5LHxMRSgJqiidh3DJhi6UxN9vCwtksDvMptDu0b/Y
c11.indd 305c11.indd 305 1/8/2013 10:49:13 AM1/8/2013 10:49:13 AM
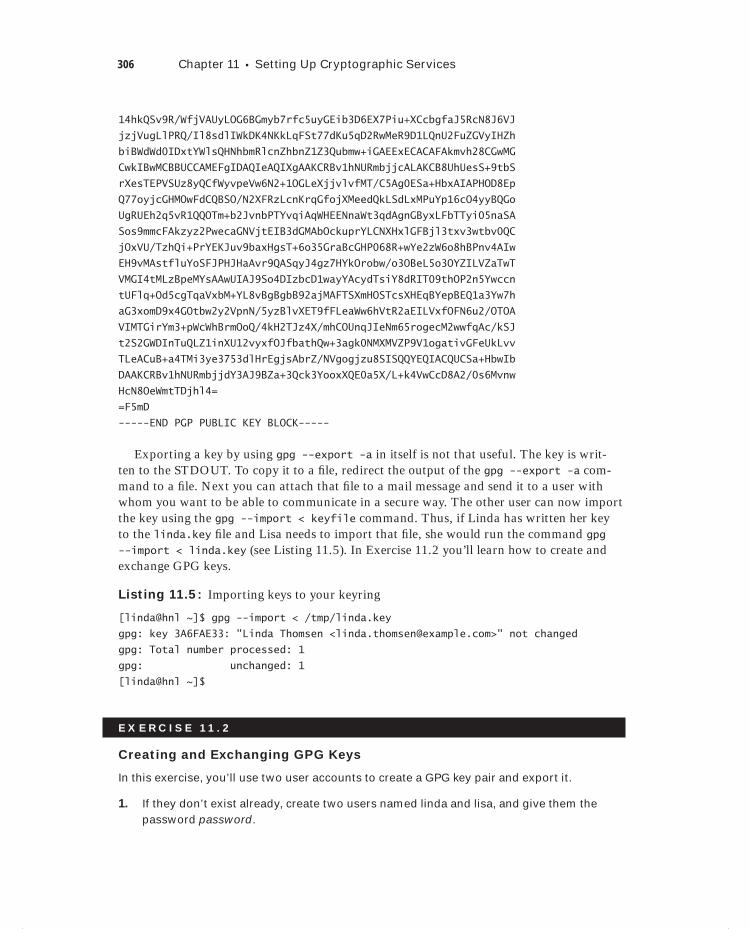
306 Chapter 11 Setting Up Cryptographic Services
14hkQSv9R/WfjVAUyLOG6BGmyb7rfc5uyGEib3D6EX7Piu+XCcbgfaJ5RcN8J6VJ
jzjVugLlPRQ/Il8sdlIWkDK4NKkLqFSt77dKu5qD2RwMeR9D1LQnU2FuZGVyIHZh
biBWdWd0IDxtYWlsQHNhbmRlcnZhbnZ1Z3Qubmw+iGAEExECACAFAkmvh28CGwMG
CwkIBwMCBBUCCAMEFgIDAQIeAQIXgAAKCRBv1hNURmbjjcALAKCB8UhUesS+9tbS
rXesTEPVSUz8yQCfWyvpeVw6N2+1OGLeXjjvlvfMT/C5Ag0ESa+HbxAIAPHOD8Ep
Q77oyjcGHMOwFdCQBSO/N2XFRzLcnKrqGfojXMeedQkLSdLxMPuYp16cO4yyBQGo
UgRUEh2q5vR1QQOTm+b2JvnbPTYvqiAqWHEENnaWt3qdAgnGByxLFbTTyi05naSA
Sos9mmcFAkzyz2PwecaGNVjtEIB3dGMAbOckuprYLCNXHxlGFBjl3txv3wtbv0QC
jOxVU/TzhQi+PrYEKJuv9baxHgsT+6o35GraBcGHP068R+wYe2zW6o8hBPnv4AIw
EH9vMAstfluYoSFJPHJHaAvr9QASqyJ4gz7HYkOrobw/o3OBeL5o3OYZILVZaTwT
VMGI4tMLzBpeMYsAAwUIAJ9So4DIzbcD1wayYAcydTsiY8dRIT09thOP2n5Ywccn
tUFlq+Od5cgTqaVxbM+YL8vBgBgbB92ajMAFTSXmHOSTcsXHEqBYepBEQ1a3Yw7h
aG3xomD9x4GOtbw2y2VpnN/5yzBlvXET9fFLeaWw6hVtR2aEILVxfOFN6u2/OTOA
VIMTGirYm3+pWcWhBrmOoQ/4kH2TJz4X/mhCOUnqJIeNm65rogecM2wwfqAc/kSJ
t2S2GWDInTuQLZ1inXU12vyxfOJfbathQw+3agk0NMXMVZP9V1ogativGFeUkLvv
TLeACuB+a4TMi3ye3753dlHrEgjsAbrZ/NVgogjzu8SISQQYEQIACQUCSa+HbwIb
DAAKCRBv1hNURmbjjdY3AJ9BZa+3Qck3YooxXQE0a5X/L+k4VwCcD8A2/0s6Mvnw
HcN8OeWmtTDjhl4=
=F5mD
-----END PGP PUBLIC KEY BLOCK-----
Exporting a key by using gpg --export -a in itself is not that useful. The key is writ-ten to the STDOUT. To copy it to a fi le, redirect the output of the gpg --export -a com-mand to a fi le. Next you can attach that fi le to a mail message and send it to a user with whom you want to be able to communicate in a secure way. The other user can now import the key using the gpg --import < keyfile command. Thus, if Linda has written her key to the linda.key fi le and Lisa needs to import that fi le, she would run the command gpg --import < linda.key (see Listing 11.5). In Exercise 11.2 you’ll learn how to create and exchange GPG keys.
Listing 11.5: Importing keys to your keyring
[linda@hnl ~]$ gpg --import < /tmp/linda.key
gpg: key 3A6FAE33: "Linda Thomsen <[email protected]>" not changed
gpg: Total number processed: 1
gpg: unchanged: 1
[linda@hnl ~]$
E X E R C I S E 11 . 2
Creating and Exchanging GPG Keys
In this exercise, you’ll use two user accounts to create a GPG key pair and export it.
1. If they don’t exist already, create two users named linda and lisa, and give them the password password.
c11.indd 306c11.indd 306 1/8/2013 10:49:13 AM1/8/2013 10:49:13 AM
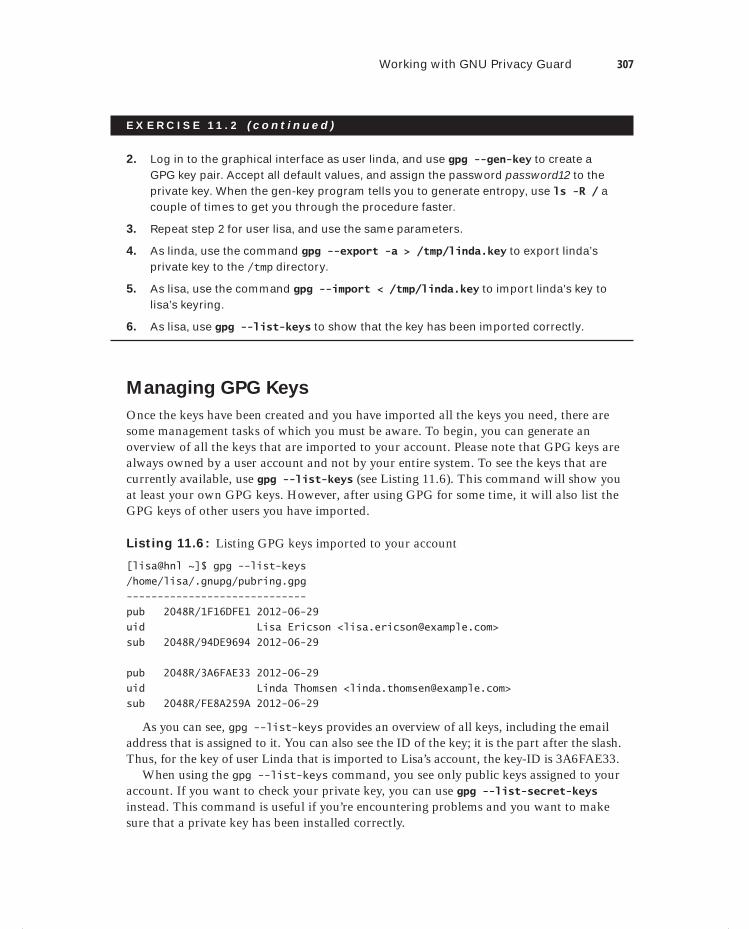
Working with GNU Privacy Guard 307
E X E R C I S E 11 . 2 ( c ont inue d )
2. Log in to the graphical interface as user linda, and use gpg --gen-key to create a GPG key pair. Accept all default values, and assign the password password12 to the private key. When the gen-key program tells you to generate entropy, use ls -R / a couple of times to get you through the procedure faster.
3. Repeat step 2 for user lisa, and use the same parameters.
4. As linda, use the command gpg --export -a > /tmp/linda.key to export linda’s private key to the /tmp directory.
5. As lisa, use the command gpg --import < /tmp/linda.key to import linda’s key to lisa’s keyring.
6. As lisa, use gpg --list-keys to show that the key has been imported correctly.
Managing GPG Keys
Once the keys have been created and you have imported all the keys you need, there are some management tasks of which you must be aware. To begin, you can generate an overview of all the keys that are imported to your account. Please note that GPG keys are always owned by a user account and not by your entire system. To see the keys that are currently available, use gpg --list-keys (see Listing 11.6). This command will show you at least your own GPG keys. However, after using GPG for some time, it will also list the GPG keys of other users you have imported.
Listing 11.6: Listing GPG keys imported to your account
[lisa@hnl ~]$ gpg --list-keys
/home/lisa/.gnupg/pubring.gpg
-----------------------------
pub 2048R/1F16DFE1 2012-06-29
uid Lisa Ericson <[email protected]>
sub 2048R/94DE9694 2012-06-29
pub 2048R/3A6FAE33 2012-06-29
uid Linda Thomsen <[email protected]>
sub 2048R/FE8A259A 2012-06-29
As you can see, gpg --list-keys provides an overview of all keys, including the email address that is assigned to it. You can also see the ID of the key; it is the part after the slash. Thus, for the key of user Linda that is imported to Lisa’s account, the key-ID is 3A6FAE33.
When using the gpg --list-keys command, you see only public keys assigned to your account. If you want to check your private key, you can use gpg --list-secret-keys instead. This command is useful if you’re encountering problems and you want to make sure that a private key has been installed correctly.
c11.indd 307c11.indd 307 1/8/2013 10:49:13 AM1/8/2013 10:49:13 AM
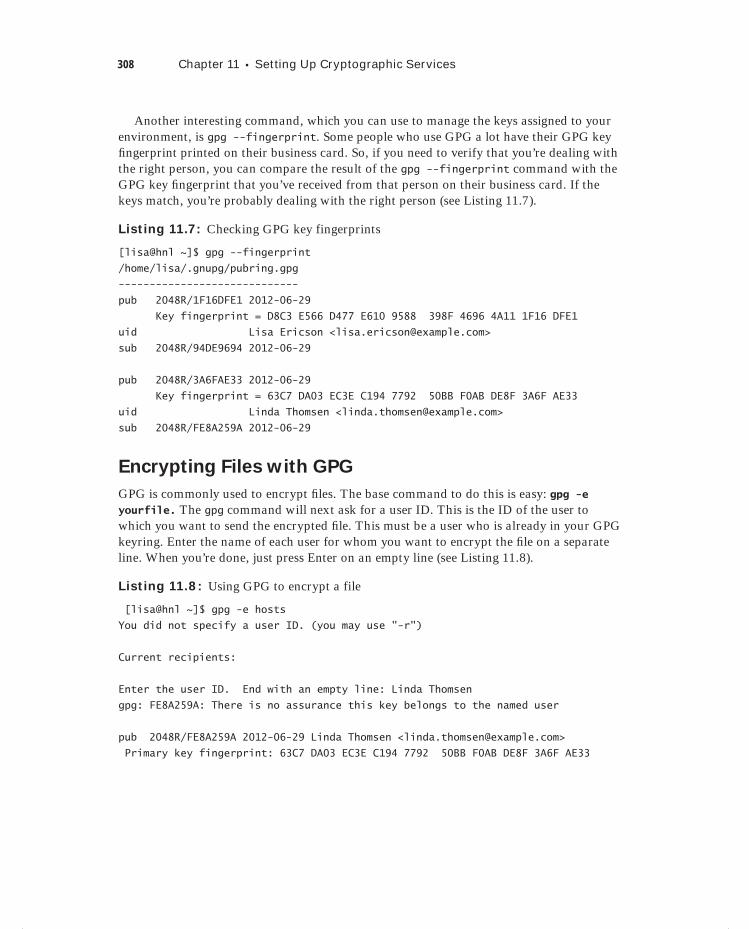
308 Chapter 11 Setting Up Cryptographic Services
Another interesting command, which you can use to manage the keys assigned to your environment, is gpg --fingerprint. Some people who use GPG a lot have their GPG key fi ngerprint printed on their business card. So, if you need to verify that you’re dealing with the right person, you can compare the result of the gpg --fingerprint command with the GPG key fi ngerprint that you’ve received from that person on their business card. If the keys match, you’re probably dealing with the right person (see Listing 11.7).
Listing 11.7: Checking GPG key fingerprints
[lisa@hnl ~]$ gpg --fingerprint
/home/lisa/.gnupg/pubring.gpg
-----------------------------
pub 2048R/1F16DFE1 2012-06-29
Key fingerprint = D8C3 E566 D477 E610 9588 398F 4696 4A11 1F16 DFE1
uid Lisa Ericson <[email protected]>
sub 2048R/94DE9694 2012-06-29
pub 2048R/3A6FAE33 2012-06-29
Key fingerprint = 63C7 DA03 EC3E C194 7792 50BB F0AB DE8F 3A6F AE33
uid Linda Thomsen <[email protected]>
sub 2048R/FE8A259A 2012-06-29
Encrypting Files with GPG
GPG is commonly used to encrypt fi les. The base command to do this is easy: gpg -e yourfile. The gpg command will next ask for a user ID. This is the ID of the user to which you want to send the encrypted fi le. This must be a user who is already in your GPG keyring. Enter the name of each user for whom you want to encrypt the fi le on a separate line. When you’re done, just press Enter on an empty line (see Listing 11.8).
Listing 11.8: Using GPG to encrypt a file
[lisa@hnl ~]$ gpg -e hosts
You did not specify a user ID. (you may use "-r")
Current recipients:
Enter the user ID. End with an empty line: Linda Thomsen
gpg: FE8A259A: There is no assurance this key belongs to the named user
pub 2048R/FE8A259A 2012-06-29 Linda Thomsen <[email protected]>
Primary key fingerprint: 63C7 DA03 EC3E C194 7792 50BB F0AB DE8F 3A6F AE33
c11.indd 308c11.indd 308 1/8/2013 10:49:14 AM1/8/2013 10:49:14 AM
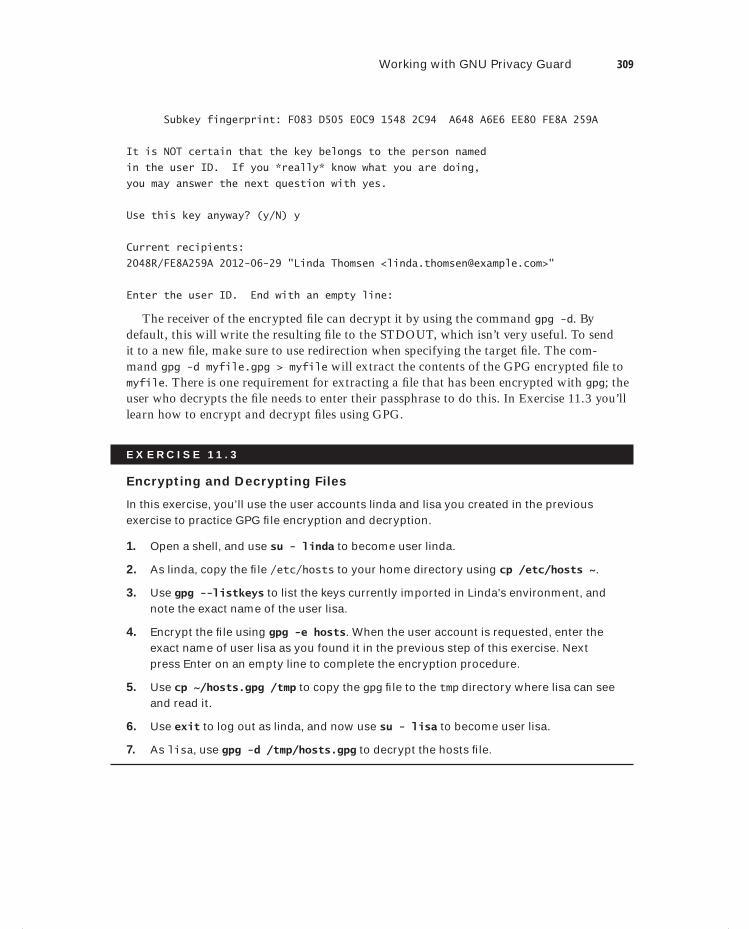
Working with GNU Privacy Guard 309
Subkey fingerprint: F083 D505 E0C9 1548 2C94 A648 A6E6 EE80 FE8A 259A
It is NOT certain that the key belongs to the person named
in the user ID. If you *really* know what you are doing,
you may answer the next question with yes.
Use this key anyway? (y/N) y
Current recipients:
2048R/FE8A259A 2012-06-29 "Linda Thomsen <[email protected]>"
Enter the user ID. End with an empty line:
The receiver of the encrypted fi le can decrypt it by using the command gpg -d. By default, this will write the resulting fi le to the STDOUT, which isn’t very useful. To send it to a new fi le, make sure to use redirection when specifying the target fi le. The com-mand gpg -d myfile.gpg > myfile will extract the contents of the GPG encrypted fi le to myfile. There is one requirement for extracting a fi le that has been encrypted with gpg; the user who decrypts the fi le needs to enter their passphrase to do this. In Exercise 11.3 you’ll learn how to encrypt and decrypt fi les using GPG.
E X E R C I S E 11 . 3
Encrypting and Decrypting Files
In this exercise, you’ll use the user accounts linda and lisa you created in the previous exercise to practice GPG fi le encryption and decryption.
1. Open a shell, and use su - linda to become user linda.
2. As linda, copy the fi le /etc/hosts to your home directory using cp /etc/hosts ~.
3. Use gpg --listkeys to list the keys currently imported in Linda’s environment, and note the exact name of the user lisa.
4. Encrypt the fi le using gpg -e hosts. When the user account is requested, enter the exact name of user lisa as you found it in the previous step of this exercise. Next press Enter on an empty line to complete the encryption procedure.
5. Use cp ~/hosts.gpg /tmp to copy the gpg fi le to the tmp directory where lisa can see and read it.
6. Use exit to log out as linda, and now use su - lisa to become user lisa.
7. As lisa, use gpg -d /tmp/hosts.gpg to decrypt the hosts fi le.
c11.indd 309c11.indd 309 1/8/2013 10:49:14 AM1/8/2013 10:49:14 AM

310 Chapter 11 Setting Up Cryptographic Services
GPG File Encryption
On occasion, I need to send network security designs to one of my customers. This cus-tomer runs a sensitive business, so they want to make sure that nothing can go wrong with it and that the document cannot be intercepted. For that reason, I proposed to my customer to use GPG fi le encryption. After showing them how easy it is to use, they quickly agreed.
GPG Signing
The purpose of signing is to provide proof that something has actually been transmitted to the intended sender. To sign data, the user’s private key is used. The signing process adds a digital signature to a message or fi le. If the receiver of the message has the public key of the sender in their GPG ring, this can automatically prove that the message actually comes from the intended sender. The procedure of signing is frequently used in email communica-tions, but it can also be used to sign RPM fi les. You will learn how to do this in Exercise 11.4.
To sign a fi le, the basic command is gpg -s file. This command can also be combined with -e to encrypt the fi le. Use gpg -e -s file if you want to encrypt and sign a fi le at the same time. Notice that in order to sign a fi le, you don’t need to have the GPG key of the recipient on your system; a signed fi le can be for anyone, and the verifi cation of the signed fi le happens with the public key of the person who signed it. If you want to sign and encrypt the same fi le, you do need the public key of the recipient in your GPG ring of trust for the encryption part of the command.
If you’ve received a fi le that is signed with GPG, you can use gpg -d to open it. If you have the public key of the sender on your system, it will automatically be opened. If you don’t have the public key, that means you cannot verify the signature of the fi le, but you still are able to open it.
Signing RPM Files
GPG is commonly used when working with RPM fi les. When installing an RPM fi le, this is done with root permissions, and since an RPM fi le may also contain scripts that are exe-cuted with root permissions, you must be sure that you can trust it. To ensure that you can trust the RPM fi les you’re installing, many RPMs are signed with a GPG key. By default, yum will always do a GPG check, and if it fails, you cannot install the RPM.
When signing RPM packages, the creator of the RPM package needs to go through a signing procedure. The result is a signature that you can offer together with the RPM
c11.indd 310c11.indd 310 1/8/2013 10:49:14 AM1/8/2013 10:49:14 AM
Working with GNU Privacy Guard 311
package. This signature can then be checked against the GPG key, which should be publicly available and imported by the person who wants to install the package. If the signature matches this publicly available GPG key, the person who downloads the package indeed is guaranteed that the package is signed by the GPG key, which is joined with the package. This procedure is convenient, but it doesn’t offer a 100 percent guarantee. If the source offering the package gets compromised, a situation may arise where both the RPM package and the key are falsifi ed. Signing packages, however, does increase confi dentiality, because the hacker needs to perform two hacks instead of one before the forged package can be offered. Therefore, if you ever want to publish your own RPM packages, it’s a good idea to offer a GPG signature as well. In Exercise 11.4, you’ll learn how to use GPG signing on RPM packages.
E X E R C I S E 11 . 4
Signing RPM Packages with GPG Keys
In this exercise, you’ll learn how to sign an RPM package with a GPG key. There is no need for a specifi c RPM package to perform this procedure; any RPM that you’ve copied from one of the default Red Hat repositories will do. All of the steps described in this pro-cedure have to be executed as root.
1. To begin, you need a GPG key pair. To create it, use the gpg --gen-key command and specify the properties of the key. Before the key can be created, you need to gen-erate some random data, so make sure to cause some disk activity to speed up the process of key generation.
2. After generating the GPG key pair, you need the key ID, and based on that, you need to create a key fi le. The key ID is what you see in the output of the gpg command in the pub line. You can also use gpg --list-keys to fi nd the key ID for the key you’ve just created. The following command will create a fi le in the home directory of the current user, which you can use to sign the key. (Make sure to replace the key ID with the key ID of your GPG key.)
gpg -a -o ~/RPM-GPG-KEY-test --export 455F7CBF
3. Next, in the home directory of that same user, you have to create an .rpmmacros fi le that has (at least) the following content. Notice that the GPG key ID is also used in this command:
%_gpg_name 455F7CBF
4. At this point, you can (re)sign the package. The following command is used to sign an RPM package that has just been created and is available in the RPM build direc-tory:
rpm --resign ~/rpmbuild/RPMS/x86_64/test-1.0-1.fc14.x86_64.rpm
c11.indd 311c11.indd 311 1/8/2013 10:49:15 AM1/8/2013 10:49:15 AM
312 Chapter 11 Setting Up Cryptographic Services
E X E R C I S E 11 . 4 ( c ont inue d )
5. At this point, you have a signed package as well as a key, which the user who wants to verify the package integrity can use. To use it, you should publish the key together with the signed package and put it on a web server, for example. Before you do that, however, it is a good idea to test it to see whether it works. The following two com-mands perform a local test; the fi rst command imports the GPG package, and in the next command, you use yum localinstall to install the package with the Yum pack-age manager but without the need to set up a repository fi rst:
rpm --import ~/RPM-GPG-KEY-test
yum localinstall ~/rpmbuild/RPMS/x86_64/test-1.0-1.fc14.x86_64.rpm
SummaryIn this chapter, you learned about two different encryption-related commands. First you used the openssl command to create a self-signed SSL certifi cate. You also read when it is useful to do it this way and in which cases you’re better off using a certifi cate that is signed by an offi cial and widely recognized certifi cate authority (CA).
In the second part of this chapter, you read how to use GPG to add security to your server. Using GPG helps you sign fi les and messages so that the receiving party knows that they can be trusted. It also allows you to encrypt fi les and messages so that they cannot be read by unauthorized people.
c11.indd 312c11.indd 312 1/8/2013 10:49:15 AM1/8/2013 10:49:15 AM
Networking Red Hat Enterprise
Linux
PART
IV
c12.indd 313c12.indd 313 1/8/2013 12:09:19 PM1/8/2013 12:09:19 PM

c12.indd 314c12.indd 314 1/8/2013 12:09:20 PM1/8/2013 12:09:20 PM

Configuring OpenLDAP
TOPICS COVERED IN THIS CHAPTER:
Understanding OpenLDAP
Configuring a Base OpenLDAP Server
Populating the OpenLDAP Database
Using OpenLDAP for Authentication
Chapter
12
c12.indd 315c12.indd 315 1/8/2013 12:09:20 PM1/8/2013 12:09:20 PM

If you’re running a single Red Hat Enterprise Linux Server or even just a few servers, there is no problem in managing con-fi guration fi les on each individual server. However, if you’re
responsible for operating dozens of servers, you’ll need a solution that helps you maintain essential system information from a single location in your network. An LDAP server is such a solution, and in this chapter you’ll learn how to set up OpenLDAP for authenticat-ing users on the network.
Understanding OpenLDAPThe Lightweight Directory Access Protocol (LDAP) is a solution to access centrally stored information over a network. This centrally stored information is organized in a directory that follows the X.500 standard.
Apart from being a protocol to access information in a directory, LDAP has developed into a specifi cation to create such a Directory by itself. Because it is an open source solu-tion, in Linux environments, OpenLDAP is one of the most commonly used LDAP direc-tory services.
Apart from OpenLDAP, some proprietary directory services exist as well. One of these is the Fedora directory, which was introduced in 2005 and has been used in previous ver-sions of Red Hat. Development of this directory service has been discontinued in favor of OpenLDAP.
Types of Information in OpenLDAP
An LDAP server like OpenLDAP is typically used to disclose information that is important for many servers and clients in a network. This normally includes users and groups, and it might encompass information about systems in the network as well. However, the scope of OpenLDAP isn’t restricted to this type of information. Originally, the X.500 standard was developed as a phone Directory, and some telecom providers still use an online Directory of all their customers that runs on OpenLDAP.
The LDAP Name Scheme
One of the typical properties in OpenLDAP is that it is organized in a hierarchical man-ner. This hierarchical setup is organized more or less like a DNS hierarchy is organized.
c12.indd 316c12.indd 316 1/8/2013 12:09:20 PM1/8/2013 12:09:20 PM
Dow
nlo
ad fro
m W
ow
! eBook
<w
ww
.wow
ebook.
com
>

Understanding OpenLDAP 317
The advantage of this approach is that information can be grouped into containers where it is really needed, and clients can refer to the actual location where this information is stored.
The OpenLDAP hierarchy often follows the way a DNS hierarchy is set up. However, while specifying where a certain item exists in the hierarchy, it is common to refer to the specifi c type of item in that hierarchy. If, for instance, there is a user linda in the hierarchy Colorado.example.com, the fully distinguished name of this user is referred to as cn=linda,dc=Colorado,dc=example,dc=com.
Notice that in the fully distinguished names of objects in the LDAP hierarchy, a comma is used as a separator and not a dot, which is common in DNS. Also, notice the way you refer to the type of object. In the example of cn=linda,dc=Colorado,dc=example,dc=com, two object types are used.
cn This is short for common name. It is a generic way to refer to leaf entries, which are the end objects, such as users and groups, that by themselves cannot contain anything else.
dc This is short for domain component. It is used to refer to one of the container entries in the LDAP hierarchy. If in a setup the LDAP hierarchy is mapped to a DNS hierarchy, typi-cally all the DNS domains are referred to as dc objects.
In this chapter, I’ll use the cn and dc entry types only. However, these are not the only entry types that can be used in OpenLDAP; many others are commonly used as well. Although they’re interesting, using these other entry types is not a requirement to set up a working OpenLDAP directory server, which can be used for network authentication.
When learning about OpenLDAP, you’ll often hear the word entry, which in OpenLDAP is anything that can be used in the LDAP data-base. In the context of this chapter, where the purpose is to set up an OpenLDAP directory server to be used for authentication, entries are often users and groups. The information that is directly associated with an entry is stored in its attributes. The LDAP schema defines which types of entries use which attributes.
As you’ve seen, by using the different LDAP entry types, you can set up a hierarchical Directory structure. This is the reason why OpenLDAP is so widely used. You can easily build an OpenLDAP hierarchy where objects in other locations are easily referred to with-out storing them on local servers. This makes OpenLDAP a lightweight Directory, espe-cially if compared to other directory servers, such as Microsoft’s Active Directory.
Replication and Referrals
Among the most important reasons why LDAP has replaced Network Information System (NIS), commonly used on older UNIX and Linux versions, is that it is possible to set up a solution that consists of multiple servers all over the world. This is accomplished by set-ting up OpenLDAP Directories in a hierarchical way and telling servers that contain a
c12.indd 317c12.indd 317 1/8/2013 12:09:21 PM1/8/2013 12:09:21 PM
318 Chapter 12 Configuring OpenLDAP
copy of the database for a specifi c domain how they can contact servers, which contain the information used elsewhere in the hierarchy. To do this, LDAP uses referrals. A referral is a specifi cation in the confi guration fi le of an LDAP server that specifi es where it can fi nd other LDAP servers that it needs for specifi c information.
Another very useful feature of OpenLDAP is that it can use replication. This means you can set up an OpenLDAP Directory in a way in which there is no single point of failure, because the information is available on multiple servers in the hierarchy. To accomplish this goal, OpenLDAP uses slurpd, a daemon that runs on your Linux server to make sure that all the information that is added to a local copy of the database is also replicated to all remote copies of the database.
Configuring a Base OpenLDAP ServerAfter learning something about LDAP base terminology, you’ll now discover how to set up a base OpenLDAP server. The goal is not to do anything very complicated; you’ll just learn how to set up a single instance of an LDAP server that can be used by multiple clients in your network for authentication. To confi gure a base OpenLDAP server, you need to follow these steps:
1. Install the OpenLDAP software.
2. Configure the LDAP process to service your needs.
3. Run the OpenLDAP server.
Once you’ve completed these steps, you can continue and add information to the LDAP database.
Installing and Configuring OpenLDAP
Installing OpenLDAP is not hard. Just run the following command to install everything you need on your server:
yum install -y openldap openldap-clients openldap-servers
This will copy about 5MB of fi les to your server, after which you can start OpenLDAP’s confi guration. In contrast to the confi guration of other services, OpenLDAP doesn’t con-tain a single confi guration fi le. Instead, it uses a confi guration directory, which by itself is organized in a way that is typical for LDAP. This means you’ll have to run some specifi c utilities against this directory to confi gure it in the appropriate manner. In most cases, how-ever, you don’t need to make any changes to the default confi guration that is specifi ed in /etc/openldap/slapd.d/cn=config.ldif.
The confi guration for the LDAP process is stored in a fi le that is created in the LDIF format. This is the LDAP Input Format (LDIF), a specifi c format that allows you to enter
c12.indd 318c12.indd 318 1/8/2013 12:09:21 PM1/8/2013 12:09:21 PM
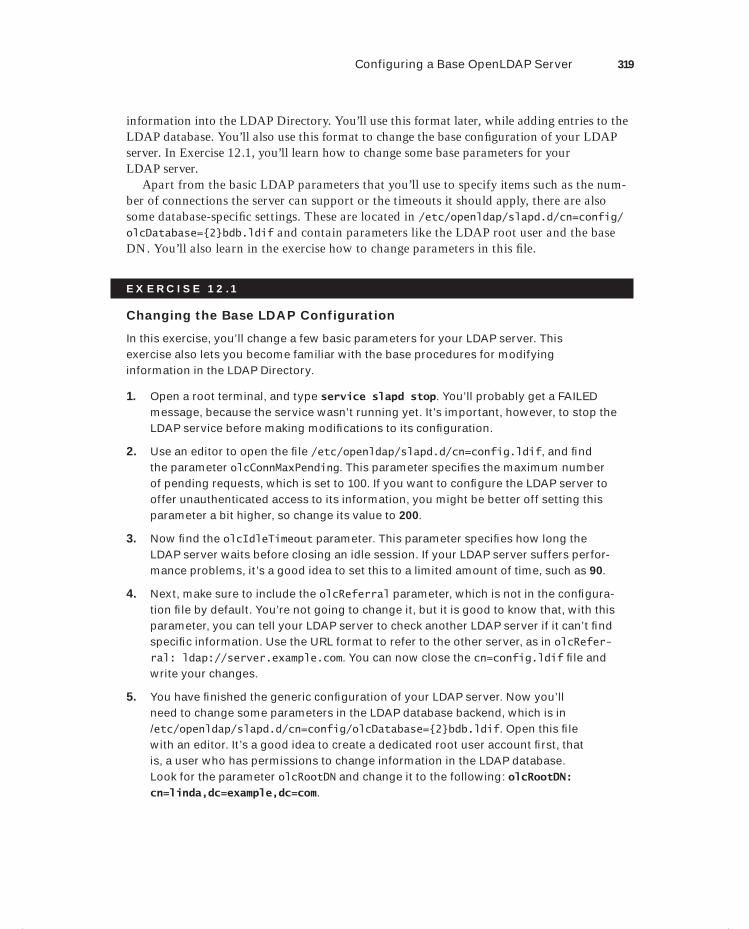
Configuring a Base OpenLDAP Server 319
information into the LDAP Directory. You’ll use this format later, while adding entries to the LDAP database. You’ll also use this format to change the base confi guration of your LDAP server. In Exercise 12.1, you’ll learn how to change some base parameters for your LDAP server.
Apart from the basic LDAP parameters that you’ll use to specify items such as the num-ber of connections the server can support or the timeouts it should apply, there are also some database-specifi c settings. These are located in /etc/openldap/slapd.d/cn=config/olcDatabase={2}bdb.ldif and contain parameters like the LDAP root user and the base DN. You’ll also learn in the exercise how to change parameters in this fi le.
E X E R C I S E 12 .1
Changing the Base LDAP Configuration
In this exercise, you’ll change a few basic parameters for your LDAP server. This exercise also lets you become familiar with the base procedures for modifying information in the LDAP Directory.
1. Open a root terminal, and type service slapd stop. You’ll probably get a FAILED message, because the service wasn’t running yet. It’s important, however, to stop the LDAP service before making modifi cations to its confi guration.
2. Use an editor to open the fi le /etc/openldap/slapd.d/cn=config.ldif, and fi nd the parameter olcConnMaxPending. This parameter specifi es the maximum number of pending requests, which is set to 100. If you want to confi gure the LDAP server to offer unauthenticated access to its information, you might be better off setting this parameter a bit higher, so change its value to 200.
3. Now fi nd the olcIdleTimeout parameter. This parameter specifi es how long the LDAP server waits before closing an idle session. If your LDAP server suffers perfor-mance problems, it’s a good idea to set this to a limited amount of time, such as 90.
4. Next, make sure to include the olcReferral parameter, which is not in the confi gura-tion fi le by default. You’re not going to change it, but it is good to know that, with this parameter, you can tell your LDAP server to check another LDAP server if it can’t fi nd specifi c information. Use the URL format to refer to the other server, as in olcRefer-ral: ldap://server.example.com. You can now close the cn=config.ldif fi le and write your changes.
5. You have fi nished the generic confi guration of your LDAP server. Now you’ll need to change some parameters in the LDAP database backend, which is in /etc/openldap/slapd.d/cn=config/olcDatabase={2}bdb.ldif. Open this fi le with an editor. It’s a good idea to create a dedicated root user account fi rst, that is, a user who has permissions to change information in the LDAP database. Look for the parameter olcRootDN and change it to the following: olcRootDN: cn=linda,dc=example,dc=com.
c12.indd 319c12.indd 319 1/8/2013 12:09:21 PM1/8/2013 12:09:21 PM
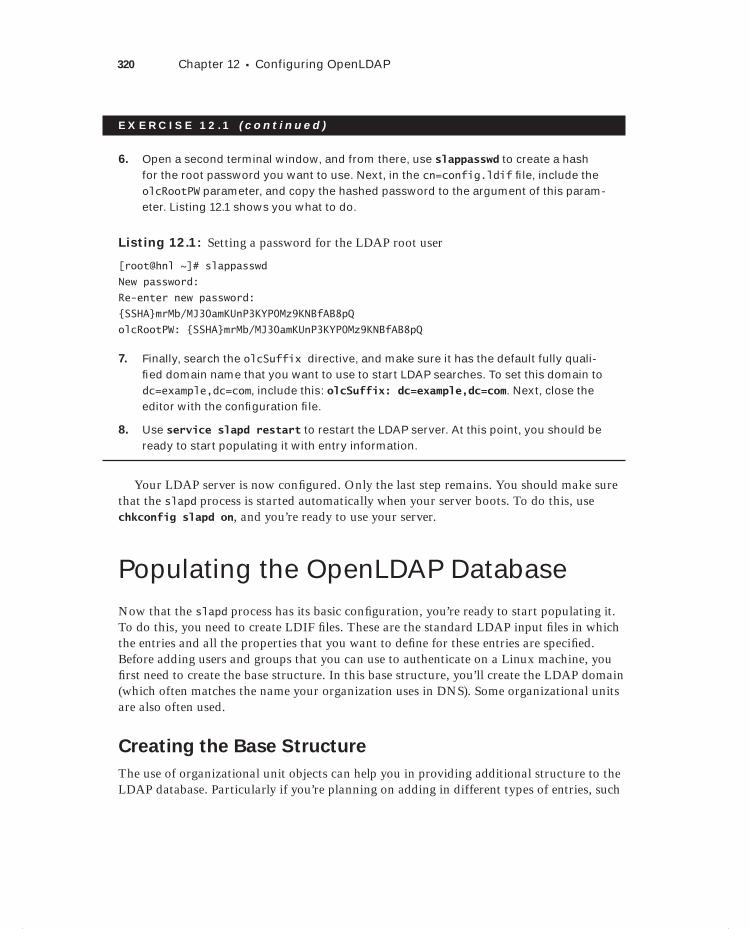
320 Chapter 12 Configuring OpenLDAP
E X E R C I S E 12 .1 ( c ont inue d )
6. Open a second terminal window, and from there, use slappasswd to create a hash for the root password you want to use. Next, in the cn=config.ldif fi le, include the olcRootPW parameter, and copy the hashed password to the argument of this param-eter. Listing 12.1 shows you what to do.
Listing 12.1: Setting a password for the LDAP root user
[root@hnl ~]# slappasswd
New password:
Re-enter new password:
{SSHA}mrMb/MJ30amKUnP3KYP0Mz9KNBfAB8pQ
olcRootPW: {SSHA}mrMb/MJ30amKUnP3KYP0Mz9KNBfAB8pQ
7. Finally, search the olcSuffix directive, and make sure it has the default fully quali-fi ed domain name that you want to use to start LDAP searches. To set this domain to dc=example,dc=com, include this: olcSuffix: dc=example,dc=com. Next, close the editor with the confi guration fi le.
8. Use service slapd restart to restart the LDAP server. At this point, you should be ready to start populating it with entry information.
Your LDAP server is now confi gured. Only the last step remains. You should make sure that the slapd process is started automatically when your server boots. To do this, use chkconfig slapd on, and you’re ready to use your server.
Populating the OpenLDAP DatabaseNow that the slapd process has its basic confi guration, you’re ready to start populating it. To do this, you need to create LDIF fi les. These are the standard LDAP input fi les in which the entries and all the properties that you want to defi ne for these entries are specifi ed. Before adding users and groups that you can use to authenticate on a Linux machine, you fi rst need to create the base structure. In this base structure, you’ll create the LDAP domain (which often matches the name your organization uses in DNS). Some organizational units are also often used.
Creating the Base Structure
The use of organizational unit objects can help you in providing additional structure to the LDAP database. Particularly if you’re planning on adding in different types of entries, such
c12.indd 320c12.indd 320 1/8/2013 12:09:21 PM1/8/2013 12:09:21 PM
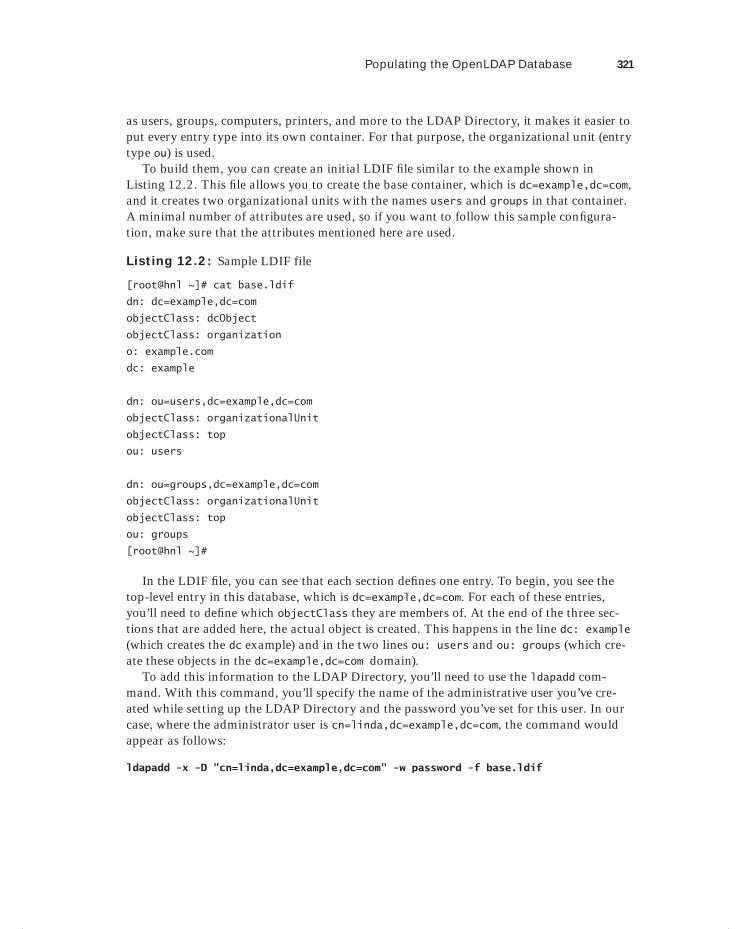
Populating the OpenLDAP Database 321
as users, groups, computers, printers, and more to the LDAP Directory, it makes it easier to put every entry type into its own container. For that purpose, the organizational unit (entry type ou) is used.
To build them, you can create an initial LDIF fi le similar to the example shown in Listing 12.2. This fi le allows you to create the base container, which is dc=example,dc=com, and it creates two organizational units with the names users and groups in that container. A minimal number of attributes are used, so if you want to follow this sample confi gura-tion, make sure that the attributes mentioned here are used.
Listing 12.2: Sample LDIF file
[root@hnl ~]# cat base.ldif
dn: dc=example,dc=com
objectClass: dcObject
objectClass: organization
o: example.com
dc: example
dn: ou=users,dc=example,dc=com
objectClass: organizationalUnit
objectClass: top
ou: users
dn: ou=groups,dc=example,dc=com
objectClass: organizationalUnit
objectClass: top
ou: groups
[root@hnl ~]#
In the LDIF fi le, you can see that each section defi nes one entry. To begin, you see the top-level entry in this database, which is dc=example,dc=com. For each of these entries, you’ll need to defi ne which objectClass they are members of. At the end of the three sec-tions that are added here, the actual object is created. This happens in the line dc: example (which creates the dc example) and in the two lines ou: users and ou: groups (which cre-ate these objects in the dc=example,dc=com domain).
To add this information to the LDAP Directory, you’ll need to use the ldapadd com-mand. With this command, you’ll specify the name of the administrative user you’ve cre-ated while setting up the LDAP Directory and the password you’ve set for this user. In our case, where the administrator user is cn=linda,dc=example,dc=com, the command would appear as follows:
ldapadd -x -D "cn=linda,dc=example,dc=com" -w password -f base.ldif
c12.indd 321c12.indd 321 1/8/2013 12:09:21 PM1/8/2013 12:09:21 PM

322 Chapter 12 Configuring OpenLDAP
When adding information to an LDAP database, it’s also useful if you can verify that the information has been added correctly. The tool to use for this purpose is ldapsearch. This tool requires a number of parameters. You’ll need to use the following options at least:
-x Indicates that simple authentication should be used.
-D Specifi es the account you want to use to get the requested information from the LDAP Directory.
-w Specifi es the password to use. Notice that the password is entered as clear text on the command line.
-b Specifi es the base context to use.
When using ldapsearch, you’ll also need to specify exactly what it is you are seeking. To see all the information, you can add "(objectclass=*)" to the command. This means that to get the information from the LDAP Directory you’ve just entered, you can now use the following command:
ldapsearch -x -D "cn=linda,dc=example,dc=com" -w password -b "dc=example,dc=com” "(objectclass=*)"
Listing 12.3 shows you what this command and its output should look like.
Listing 12.3: Displaying information from the LDAP Directory
[root@hnl ~]# ldapsearch -x -D "cn=linda,dc=example,dc=com" -w password
-b "dc=example,dc=com" "(objectclass=*)"
# extended LDIF
#
# LDAPv3
# base <dc=example,dc=com> with scope subtree
# filter: (objectclass=*)
# requesting: ALL
#
# example.com
dn: dc=example,dc=com
objectClass: dcObject
objectClass: organization
o: example.com
dc: example
# users, example.com
dn: ou=users,dc=example,dc=com
objectClass: organizationalUnit
objectClass: top
c12.indd 322c12.indd 322 1/8/2013 12:09:21 PM1/8/2013 12:09:21 PM
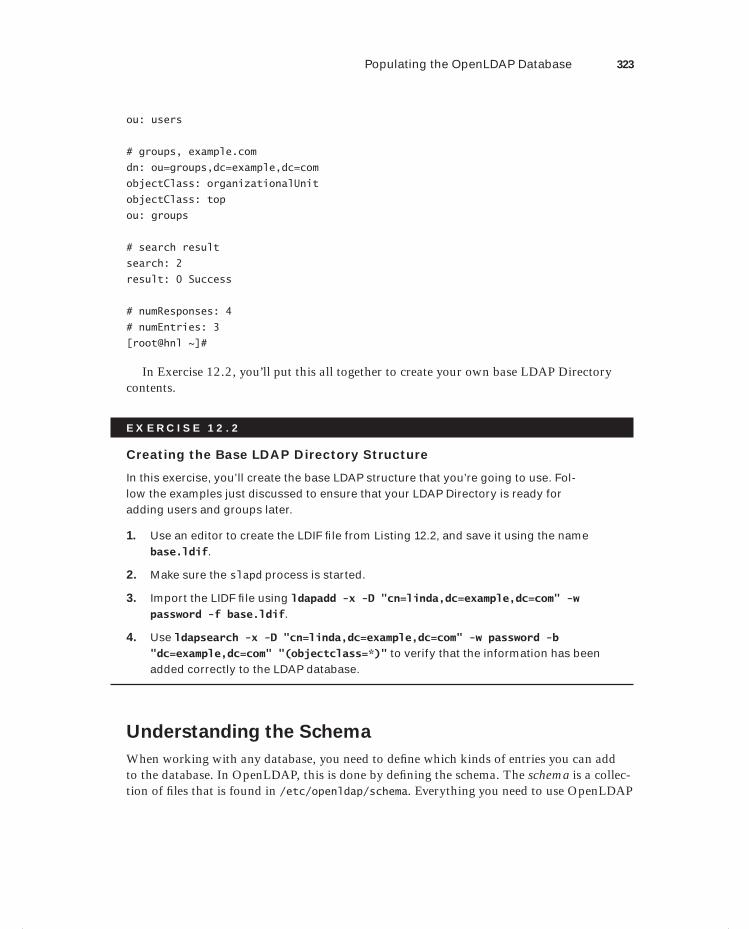
Populating the OpenLDAP Database 323
ou: users
# groups, example.com
dn: ou=groups,dc=example,dc=com
objectClass: organizationalUnit
objectClass: top
ou: groups
# search result
search: 2
result: 0 Success
# numResponses: 4
# numEntries: 3
[root@hnl ~]#
In Exercise 12.2, you’ll put this all together to create your own base LDAP Directory contents.
E X E R C I S E 12 . 2
Creating the Base LDAP Directory Structure
In this exercise, you’ll create the base LDAP structure that you’re going to use. Fol-low the examples just discussed to ensure that your LDAP Directory is ready for adding users and groups later.
1. Use an editor to create the LDIF fi le from Listing 12.2, and save it using the name base.ldif.
2. Make sure the slapd process is started.
3. Import the LIDF fi le using ldapadd -x -D "cn=linda,dc=example,dc=com" -w password -f base.ldif.
4. Use ldapsearch -x -D "cn=linda,dc=example,dc=com" -w password -b "dc=example,dc=com" "(objectclass=*)" to verify that the information has been added correctly to the LDAP database.
Understanding the Schema
When working with any database, you need to defi ne which kinds of entries you can add to the database. In OpenLDAP, this is done by defi ning the schema. The schema is a collec-tion of fi les that is found in /etc/openldap/schema. Everything you need to use OpenLDAP
c12.indd 323c12.indd 323 1/8/2013 12:09:21 PM1/8/2013 12:09:21 PM
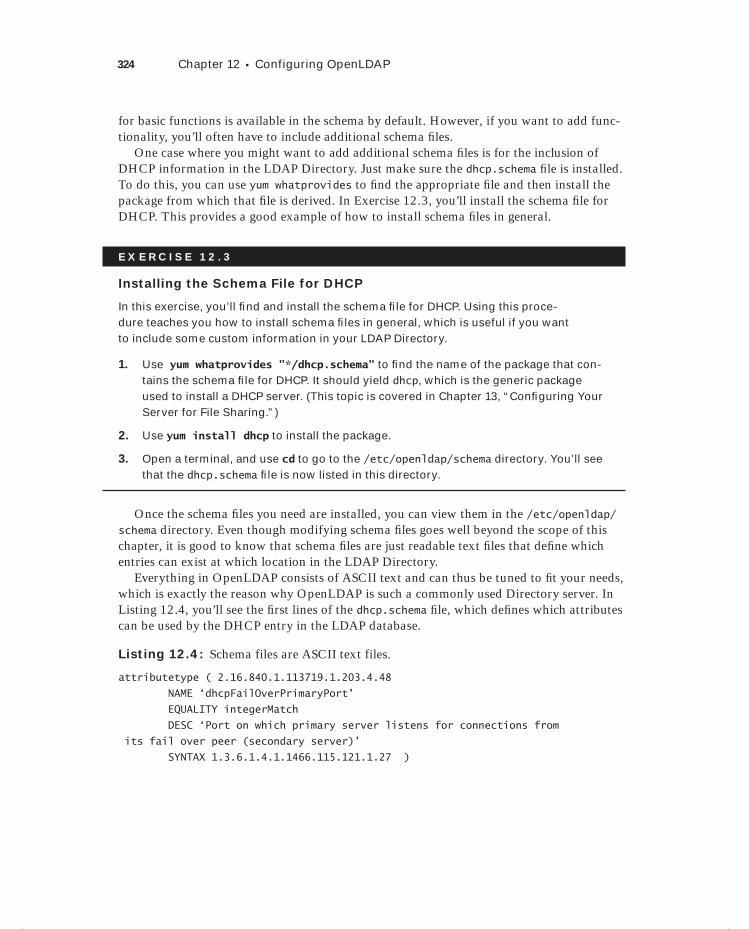
324 Chapter 12 Configuring OpenLDAP
for basic functions is available in the schema by default. However, if you want to add func-tionality, you’ll often have to include additional schema fi les.
One case where you might want to add additional schema fi les is for the inclusion of DHCP information in the LDAP Directory. Just make sure the dhcp.schema fi le is installed. To do this, you can use yum whatprovides to fi nd the appropriate fi le and then install the package from which that fi le is derived. In Exercise 12.3, you’ll install the schema fi le for DHCP. This provides a good example of how to install schema fi les in general.
E X E R C I S E 12 . 3
Installing the Schema File for DHCP
In this exercise, you’ll fi nd and install the schema fi le for DHCP. Using this proce-dure teaches you how to install schema fi les in general, which is useful if you want to include some custom information in your LDAP Directory.
1. Use yum whatprovides "*/dhcp.schema" to fi nd the name of the package that con-tains the schema fi le for DHCP. It should yield dhcp, which is the generic package used to install a DHCP server. (This topic is covered in Chapter 13, “Confi guring Your Server for File Sharing.”)
2. Use yum install dhcp to install the package.
3. Open a terminal, and use cd to go to the /etc/openldap/schema directory. You’ll see that the dhcp.schema fi le is now listed in this directory.
Once the schema fi les you need are installed, you can view them in the /etc/openldap/schema directory. Even though modifying schema fi les goes well beyond the scope of this chapter, it is good to know that schema fi les are just readable text fi les that defi ne which entries can exist at which location in the LDAP Directory.
Everything in OpenLDAP consists of ASCII text and can thus be tuned to fi t your needs, which is exactly the reason why OpenLDAP is such a commonly used Directory server. In Listing 12.4, you’ll see the fi rst lines of the dhcp.schema fi le, which defi nes which attributes can be used by the DHCP entry in the LDAP database.
Listing 12.4: Schema files are ASCII text files.
attributetype ( 2.16.840.1.113719.1.203.4.48
NAME ‘dhcpFailOverPrimaryPort’
EQUALITY integerMatch
DESC ‘Port on which primary server listens for connections from
its fail over peer (secondary server)’
SYNTAX 1.3.6.1.4.1.1466.115.121.1.27 )
c12.indd 324c12.indd 324 1/8/2013 12:09:21 PM1/8/2013 12:09:21 PM
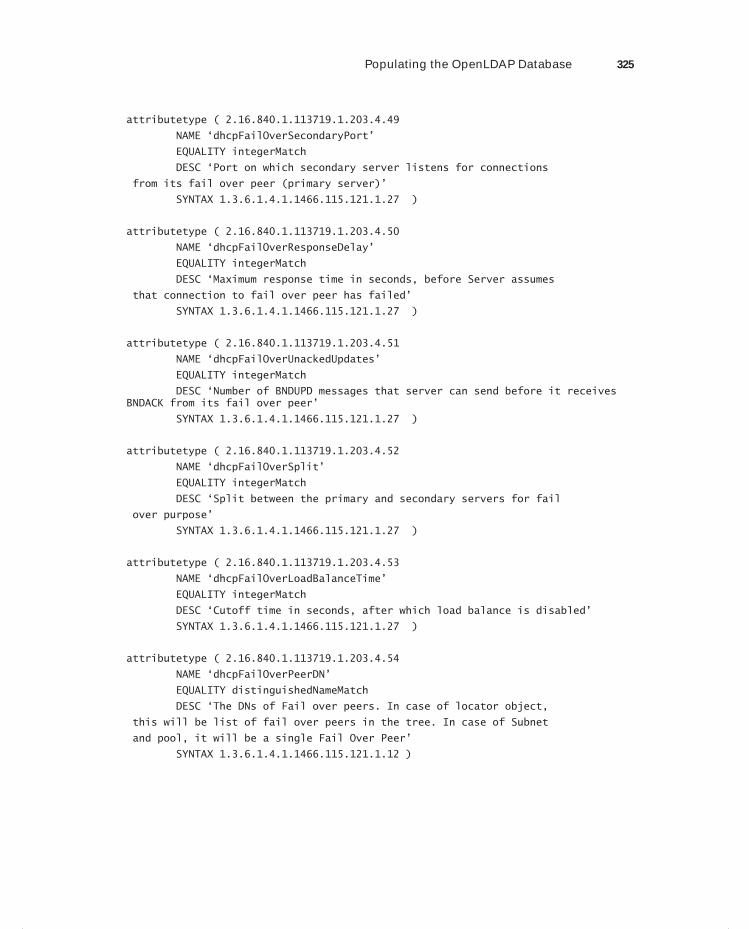
Populating the OpenLDAP Database 325
attributetype ( 2.16.840.1.113719.1.203.4.49
NAME ‘dhcpFailOverSecondaryPort’
EQUALITY integerMatch
DESC ‘Port on which secondary server listens for connections
from its fail over peer (primary server)’
SYNTAX 1.3.6.1.4.1.1466.115.121.1.27 )
attributetype ( 2.16.840.1.113719.1.203.4.50
NAME ‘dhcpFailOverResponseDelay’
EQUALITY integerMatch
DESC ‘Maximum response time in seconds, before Server assumes
that connection to fail over peer has failed’
SYNTAX 1.3.6.1.4.1.1466.115.121.1.27 )
attributetype ( 2.16.840.1.113719.1.203.4.51
NAME ‘dhcpFailOverUnackedUpdates’
EQUALITY integerMatch
DESC ‘Number of BNDUPD messages that server can send before it receives BNDACK from its fail over peer’
SYNTAX 1.3.6.1.4.1.1466.115.121.1.27 )
attributetype ( 2.16.840.1.113719.1.203.4.52
NAME ‘dhcpFailOverSplit’
EQUALITY integerMatch
DESC ‘Split between the primary and secondary servers for fail
over purpose’
SYNTAX 1.3.6.1.4.1.1466.115.121.1.27 )
attributetype ( 2.16.840.1.113719.1.203.4.53
NAME ‘dhcpFailOverLoadBalanceTime’
EQUALITY integerMatch
DESC ‘Cutoff time in seconds, after which load balance is disabled’
SYNTAX 1.3.6.1.4.1.1466.115.121.1.27 )
attributetype ( 2.16.840.1.113719.1.203.4.54
NAME ‘dhcpFailOverPeerDN’
EQUALITY distinguishedNameMatch
DESC ‘The DNs of Fail over peers. In case of locator object,
this will be list of fail over peers in the tree. In case of Subnet
and pool, it will be a single Fail Over Peer’
SYNTAX 1.3.6.1.4.1.1466.115.121.1.12 )
c12.indd 325c12.indd 325 1/8/2013 12:09:21 PM1/8/2013 12:09:21 PM
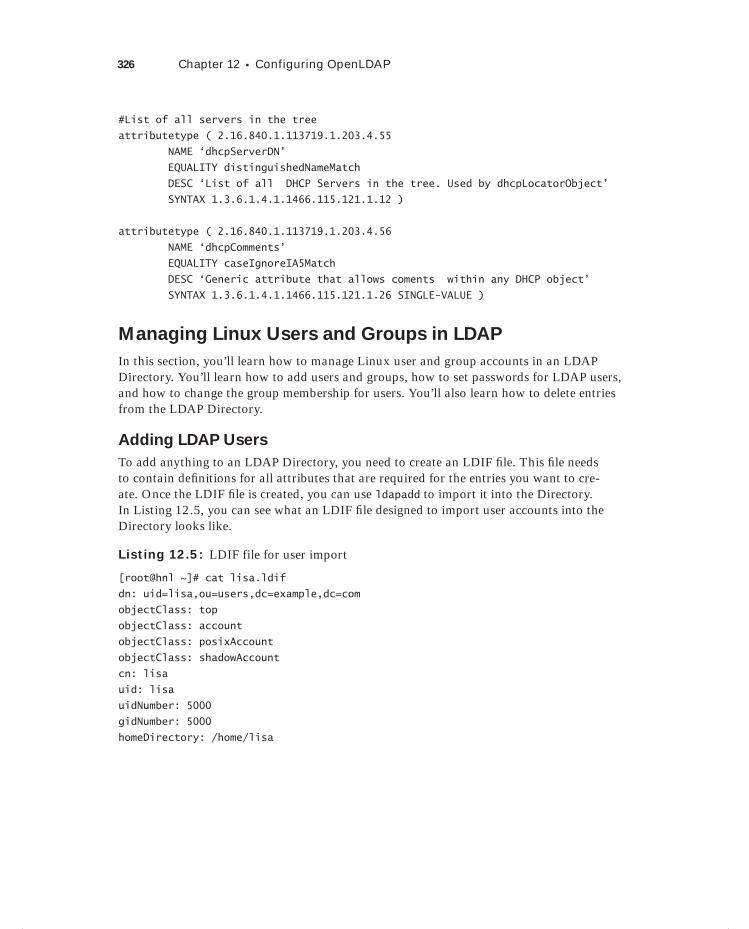
326 Chapter 12 Configuring OpenLDAP
#List of all servers in the tree
attributetype ( 2.16.840.1.113719.1.203.4.55
NAME ‘dhcpServerDN’
EQUALITY distinguishedNameMatch
DESC ‘List of all DHCP Servers in the tree. Used by dhcpLocatorObject’
SYNTAX 1.3.6.1.4.1.1466.115.121.1.12 )
attributetype ( 2.16.840.1.113719.1.203.4.56
NAME ‘dhcpComments’
EQUALITY caseIgnoreIA5Match
DESC ‘Generic attribute that allows coments within any DHCP object’
SYNTAX 1.3.6.1.4.1.1466.115.121.1.26 SINGLE-VALUE )
Managing Linux Users and Groups in LDAP
In this section, you’ll learn how to manage Linux user and group accounts in an LDAP Directory. You’ll learn how to add users and groups, how to set passwords for LDAP users, and how to change the group membership for users. You’ll also learn how to delete entries from the LDAP Directory.
Adding LDAP Users
To add anything to an LDAP Directory, you need to create an LDIF fi le. This fi le needs to contain defi nitions for all attributes that are required for the entries you want to cre-ate. Once the LDIF fi le is created, you can use ldapadd to import it into the Directory. In Listing 12.5, you can see what an LDIF fi le designed to import user accounts into the Directory looks like.
Listing 12.5: LDIF file for user import
[root@hnl ~]# cat lisa.ldif
dn: uid=lisa,ou=users,dc=example,dc=com
objectClass: top
objectClass: account
objectClass: posixAccount
objectClass: shadowAccount
cn: lisa
uid: lisa
uidNumber: 5000
gidNumber: 5000
homeDirectory: /home/lisa
c12.indd 326c12.indd 326 1/8/2013 12:09:21 PM1/8/2013 12:09:21 PM
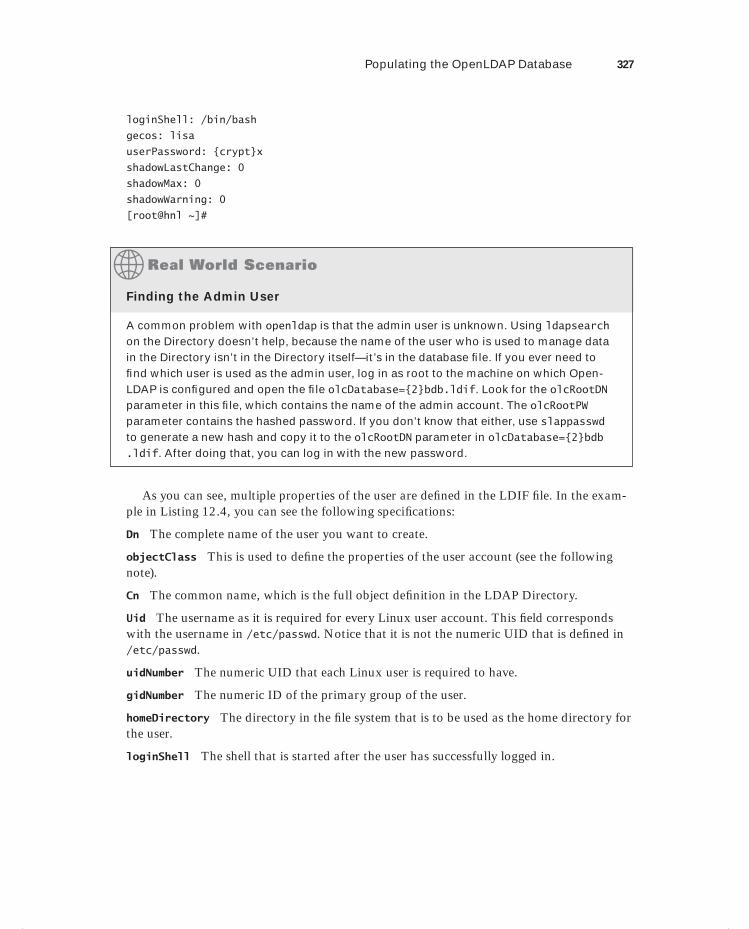
Populating the OpenLDAP Database 327
loginShell: /bin/bash
gecos: lisa
userPassword: {crypt}x
shadowLastChange: 0
shadowMax: 0
shadowWarning: 0
[root@hnl ~]#
Finding the Admin User
A common problem with openldap is that the admin user is unknown. Using ldapsearch on the Directory doesn’t help, because the name of the user who is used to manage data in the Directory isn’t in the Directory itself—it’s in the database fi le. If you ever need to fi nd which user is used as the admin user, log in as root to the machine on which Open-LDAP is confi gured and open the fi le olcDatabase={2}bdb.ldif. Look for the olcRootDN parameter in this fi le, which contains the name of the admin account. The olcRootPW parameter contains the hashed password. If you don’t know that either, use slappasswd to generate a new hash and copy it to the olcRootDN parameter in olcDatabase={2}bdb.ldif. After doing that, you can log in with the new password.
As you can see, multiple properties of the user are defi ned in the LDIF fi le. In the exam-ple in Listing 12.4, you can see the following specifi cations:
Dn The complete name of the user you want to create.
objectClass This is used to defi ne the properties of the user account (see the following note).
Cn The common name, which is the full object defi nition in the LDAP Directory.
Uid The username as it is required for every Linux user account. This fi eld corresponds with the username in /etc/passwd. Notice that it is not the numeric UID that is defi ned in /etc/passwd.
uidNumber The numeric UID that each Linux user is required to have.
gidNumber The numeric ID of the primary group of the user.
homeDirectory The directory in the fi le system that is to be used as the home directory for the user.
loginShell The shell that is started after the user has successfully logged in.
c12.indd 327c12.indd 327 1/8/2013 12:09:22 PM1/8/2013 12:09:22 PM

328 Chapter 12 Configuring OpenLDAP
gecos The information fi eld that is used to specify additional information for the user.
userPassword The user password. You don’t set the real password here. However, for every user you use the text {crypt}x, which indicates that the user is using an encrypted password. To actually set the password, use ldappasswd as discussed in the next section.
shadowLastChange The value that is normally in /etc/shadow that indicates when the password was changed the last time.
shadowMax The value that normally is used in /etc/shadow to specify the maximum num-ber of days the password can be used.
shadowWarning The value that normally is used in /etc/shadow to specify when users should get a warning that they should change their passwords.
To define the attributes of entries in an LDAP Directory, the entries inherit these from superclasses. A superclass is an entry that contains a set of specific attributes that are used by many other entries. Instead of specifying each of these attributes for every individual entry that is added, you’ll need to refer only to the superclass that is to be used. In an LDIF file, this is done by including the objectClass lines. In the sample LDIF file in Listing 12.5, for example, you can see that the entries of a user account come from four different superclasses in the schema. This is not something you typically need to change, but it’s good to know how it works anyway.
Once you have generated an LDIF for the user accounts you want to create, you can use ldapadd to import it. Assuming the name of the LDIF fi le is lisa.ldif, the administrator user account cn=linda,dc=example,dc=com would use the following command to complete the import:
ldapadd -x -D "cn=linda,dc=example,dc=com" -w password -f lisa.ldif
Setting the Password for LDAP Users
Now that you have imported a user account in the LDAP Directory, you still need to set its password. To do this, as the LDAP administrator, you can use the ldappasswd command. The following example shows you how the LDAP administrator linda uses ldappasswd to set the password for user lisa to mypassword:
ldappasswd -s mypassword -D "cn=linda,dc=example,dc=com" -w password -x "uid=lisa,ou=users,dc=example,dc=com"
In Exercise 12.4, you’ll create a user in the LDAP Directory.
c12.indd 328c12.indd 328 1/8/2013 12:09:22 PM1/8/2013 12:09:22 PM
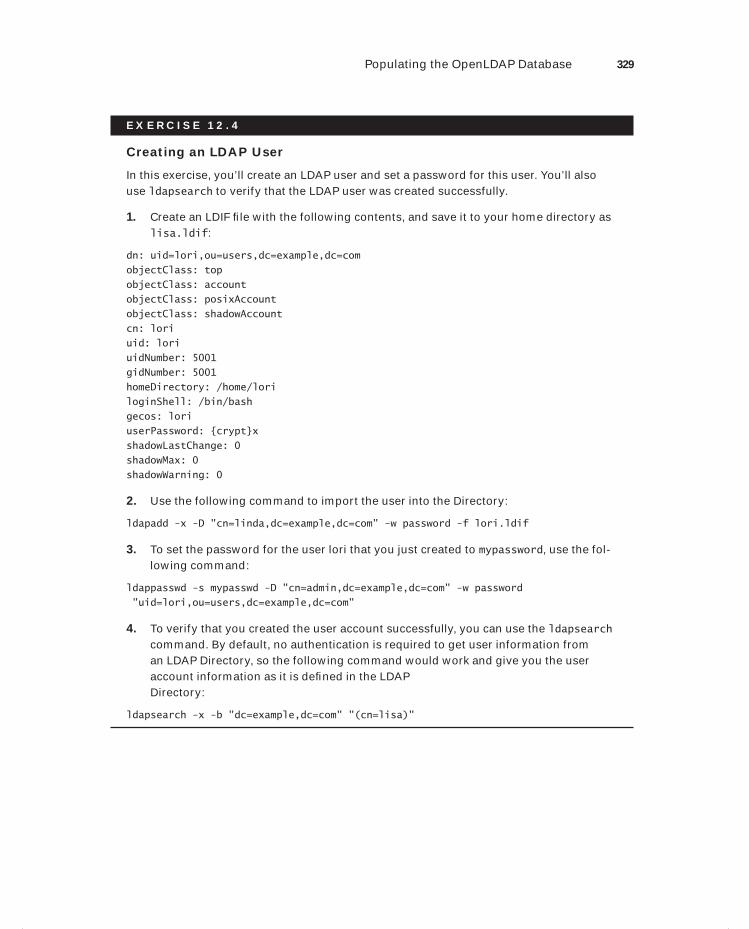
Populating the OpenLDAP Database 329
E X E R C I S E 12 . 4
Creating an LDAP User
In this exercise, you’ll create an LDAP user and set a password for this user. You’ll also use ldapsearch to verify that the LDAP user was created successfully.
1. Create an LDIF fi le with the following contents, and save it to your home directory as lisa.ldif:
dn: uid=lori,ou=users,dc=example,dc=com
objectClass: top
objectClass: account
objectClass: posixAccount
objectClass: shadowAccount
cn: lori
uid: lori
uidNumber: 5001
gidNumber: 5001
homeDirectory: /home/lori
loginShell: /bin/bash
gecos: lori
userPassword: {crypt}x
shadowLastChange: 0
shadowMax: 0
shadowWarning: 0
2. Use the following command to import the user into the Directory:
ldapadd -x -D "cn=linda,dc=example,dc=com" -w password -f lori.ldif
3. To set the password for the user lori that you just created to mypassword, use the fol-lowing command:
ldappasswd -s mypasswd -D "cn=admin,dc=example,dc=com" -w password
"uid=lori,ou=users,dc=example,dc=com"
4. To verify that you created the user account successfully, you can use the ldapsearch command. By default, no authentication is required to get user information from an LDAP Directory, so the following command would work and give you the user account information as it is defi ned in the LDAP Directory:
ldapsearch -x -b "dc=example,dc=com" "(cn=lisa)"
c12.indd 329c12.indd 329 1/8/2013 12:09:22 PM1/8/2013 12:09:22 PM
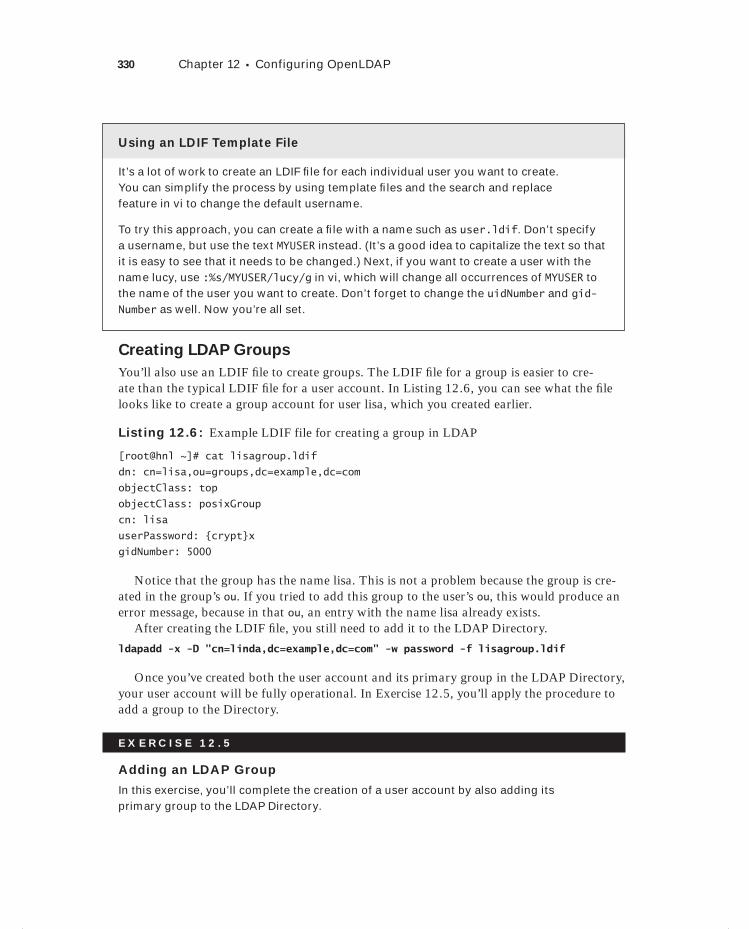
330 Chapter 12 Configuring OpenLDAP
Using an LDIF Template File
It’s a lot of work to create an LDIF fi le for each individual user you want to create. You can simplify the process by using template fi les and the search and replace feature in vi to change the default username.
To try this approach, you can create a fi le with a name such as user.ldif. Don’t specify a username, but use the text MYUSER instead. (It’s a good idea to capitalize the text so that it is easy to see that it needs to be changed.) Next, if you want to create a user with the name lucy, use :%s/MYUSER/lucy/g in vi, which will change all occurrences of MYUSER to the name of the user you want to create. Don’t forget to change the uidNumber and gid-Number as well. Now you’re all set.
Creating LDAP Groups
You’ll also use an LDIF fi le to create groups. The LDIF fi le for a group is easier to cre-ate than the typical LDIF fi le for a user account. In Listing 12.6, you can see what the fi le looks like to create a group account for user lisa, which you created earlier.
Listing 12.6: Example LDIF file for creating a group in LDAP
[root@hnl ~]# cat lisagroup.ldif
dn: cn=lisa,ou=groups,dc=example,dc=com
objectClass: top
objectClass: posixGroup
cn: lisa
userPassword: {crypt}x
gidNumber: 5000
Notice that the group has the name lisa. This is not a problem because the group is cre-ated in the group’s ou. If you tried to add this group to the user’s ou, this would produce an error message, because in that ou, an entry with the name lisa already exists.
After creating the LDIF fi le, you still need to add it to the LDAP Directory.
ldapadd -x -D "cn=linda,dc=example,dc=com" -w password -f lisagroup.ldif
Once you’ve created both the user account and its primary group in the LDAP Directory, your user account will be fully operational. In Exercise 12.5, you’ll apply the procedure to add a group to the Directory.
E X E R C I S E 12 . 5
Adding an LDAP Group
In this exercise, you’ll complete the creation of a user account by also adding its primary group to the LDAP Directory.
c12.indd 330c12.indd 330 1/8/2013 12:09:22 PM1/8/2013 12:09:22 PM
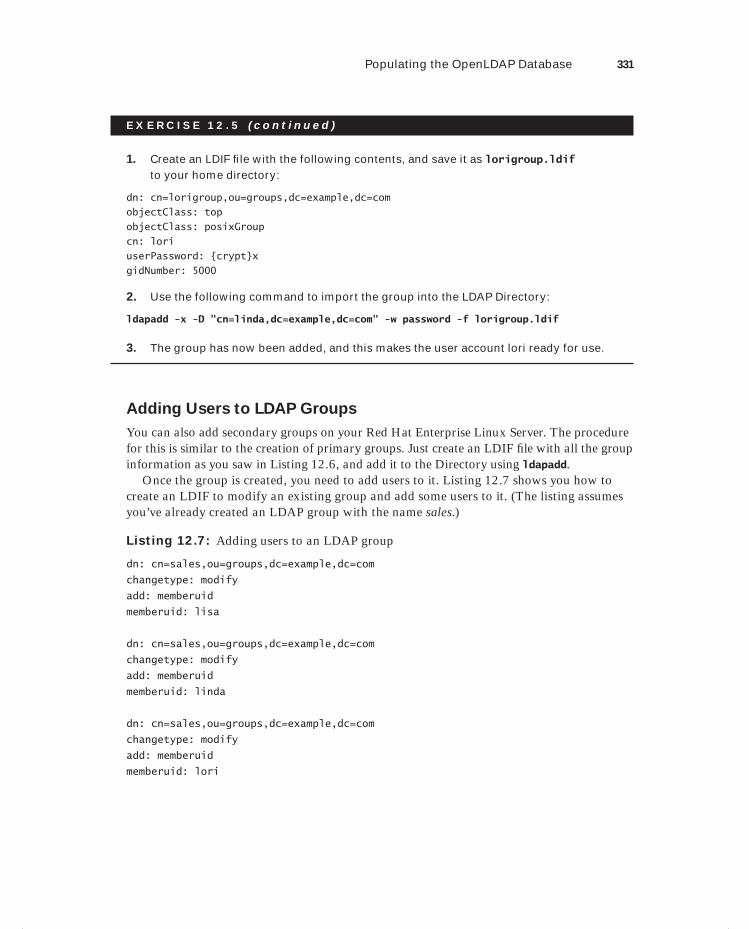
Populating the OpenLDAP Database 331
E X E R C I S E 12 . 5 ( c ont inue d )
1. Create an LDIF fi le with the following contents, and save it as lorigroup.ldif to your home directory:
dn: cn=lorigroup,ou=groups,dc=example,dc=com
objectClass: top
objectClass: posixGroup
cn: lori
userPassword: {crypt}x
gidNumber: 5000
2. Use the following command to import the group into the LDAP Directory:
ldapadd -x -D "cn=linda,dc=example,dc=com" -w password -f lorigroup.ldif
3. The group has now been added, and this makes the user account lori ready for use.
Adding Users to LDAP Groups
You can also add secondary groups on your Red Hat Enterprise Linux Server. The procedure for this is similar to the creation of primary groups. Just create an LDIF fi le with all the group information as you saw in Listing 12.6, and add it to the Directory using ldapadd.
Once the group is created, you need to add users to it. Listing 12.7 shows you how to create an LDIF to modify an existing group and add some users to it. (The listing assumes you’ve already created an LDAP group with the name sales.)
Listing 12.7: Adding users to an LDAP group
dn: cn=sales,ou=groups,dc=example,dc=com
changetype: modify
add: memberuid
memberuid: lisa
dn: cn=sales,ou=groups,dc=example,dc=com
changetype: modify
add: memberuid
memberuid: linda
dn: cn=sales,ou=groups,dc=example,dc=com
changetype: modify
add: memberuid
memberuid: lori
c12.indd 331c12.indd 331 1/8/2013 12:09:22 PM1/8/2013 12:09:22 PM
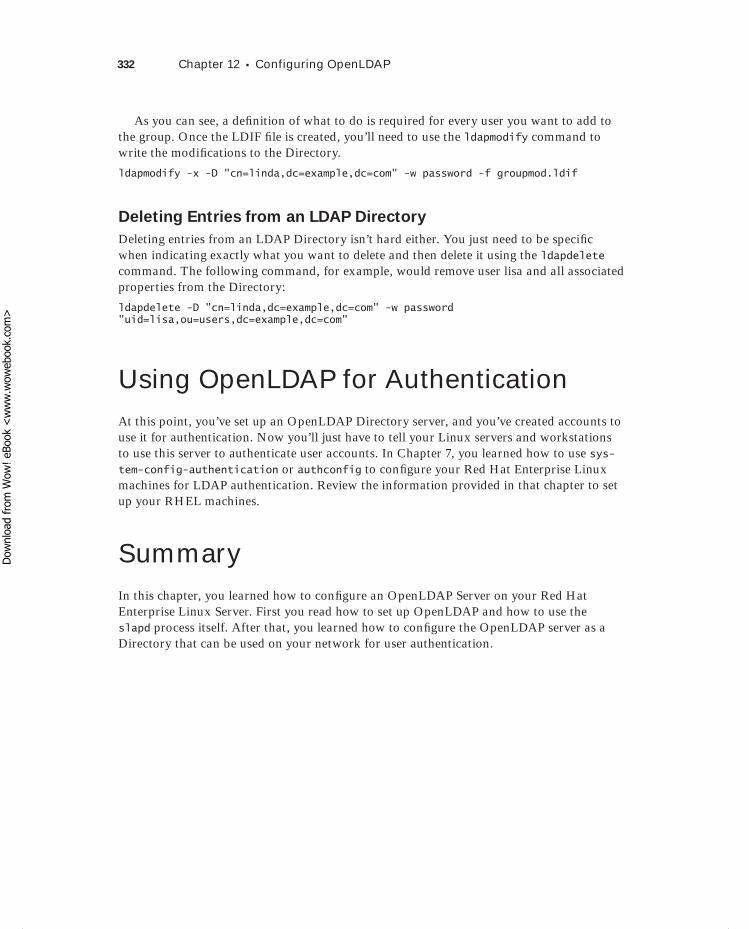
332 Chapter 12 Configuring OpenLDAP
As you can see, a defi nition of what to do is required for every user you want to add to the group. Once the LDIF fi le is created, you’ll need to use the ldapmodify command to write the modifi cations to the Directory.
ldapmodify -x -D "cn=linda,dc=example,dc=com" -w password -f groupmod.ldif
Deleting Entries from an LDAP Directory
Deleting entries from an LDAP Directory isn’t hard either. You just need to be specifi c when indicating exactly what you want to delete and then delete it using the ldapdelete command. The following command, for example, would remove user lisa and all associated properties from the Directory:
ldapdelete -D "cn=linda,dc=example,dc=com" -w password "uid=lisa,ou=users,dc=example,dc=com"
Using OpenLDAP for AuthenticationAt this point, you’ve set up an OpenLDAP Directory server, and you’ve created accounts to use it for authentication. Now you’ll just have to tell your Linux servers and workstations to use this server to authenticate user accounts. In Chapter 7, you learned how to use sys-tem-config-authentication or authconfig to confi gure your Red Hat Enterprise Linux machines for LDAP authentication. Review the information provided in that chapter to set up your RHEL machines.
SummaryIn this chapter, you learned how to confi gure an OpenLDAP Server on your Red Hat Enterprise Linux Server. First you read how to set up OpenLDAP and how to use the slapd process itself. After that, you learned how to confi gure the OpenLDAP server as a Directory that can be used on your network for user authentication.
c12.indd 332c12.indd 332 1/8/2013 12:09:22 PM1/8/2013 12:09:22 PM
Dow
nlo
ad fro
m W
ow
! eBook
<w
ww
.wow
ebook.
com
>
Chapter
13Configuring Your Server for File Sharing
TOPICS COVERED IN THIS CHAPTER:
Configuring NFS4
Configuring Automount
Configuring Samba
Offering FTP Services
File Sharing and SELinux
c13.indd 333c13.indd 333 1/8/2013 12:10:06 PM1/8/2013 12:10:06 PM
Linux can do great work as a fi le server. In this chapter, you’ll learn about the options for doing so. First you’ll read how to confi gure NFS4, a confi guration solution that is often used
when fi les need to be shared between different Linux computers. After learning how to use NFS4, you’ll read how to make mounting NFS shares easy by confi guring Automount.Next, you’ll read how to offer fi le sharing in a way that is compatible with Windows by set-ting up a Samba server that offers shared fi les and printers to CIFS clients. FTP is a good solution for offering fi le access over the Internet when Samba and NFS are used in local network environments. Therefore, you’ll learn how to set up FTP in this chapter. In the last part of this chapter, you’ll read how SELinux can make offering fi le sharing ser-vices diffi cult and what you can do to open it for fi le sharing.
Configuring NFS4NFS is the old solution for offering fi le-sharing services on UNIX platforms. Every brand of UNIX and Linux supports the NFS fi le system natively, and NFS functionality is offered through the kernel. This makes it a very fast solution. To use NFS, you need to install the NFS server package.
Because it is old, NFS security is not as developed as those in other fi le-sharing solutions, such as Samba. By default, the security is host-based. This means an administrator will allow or deny access to hosts, not to individual users. Once a host has established a connec-tion, there isn’t much to do to confi gure access for individual users. By default, a user on an NFS client will access fi les with the same user ID on the NFS server. This means that if on her client machine, user linda uses UID 502, she will access fi les on the NFS server with that same UID, even if it belongs to a completely different user. As you can imagine, this can be very confusing! Therefore, NFS works best in environments where user identities are shared over the network by using a solution such as LDAP, which you read about in Chapter 12.
NFSv4 is offered on Red Hat Enterprise Linux 6 and newer. This version provides some signifi cant improvements over previous versions, such as the following:
Filtering NFSv4 in a firewall is much easier than in the past.
NFSv4 has better security options, including the option to use Kerberos.
NFSv4 offers the option to make a pseudo-root mount, which allows users to mount everything to which they have access by issuing one mount only.
c13.indd 334c13.indd 334 1/8/2013 12:10:07 PM1/8/2013 12:10:07 PM
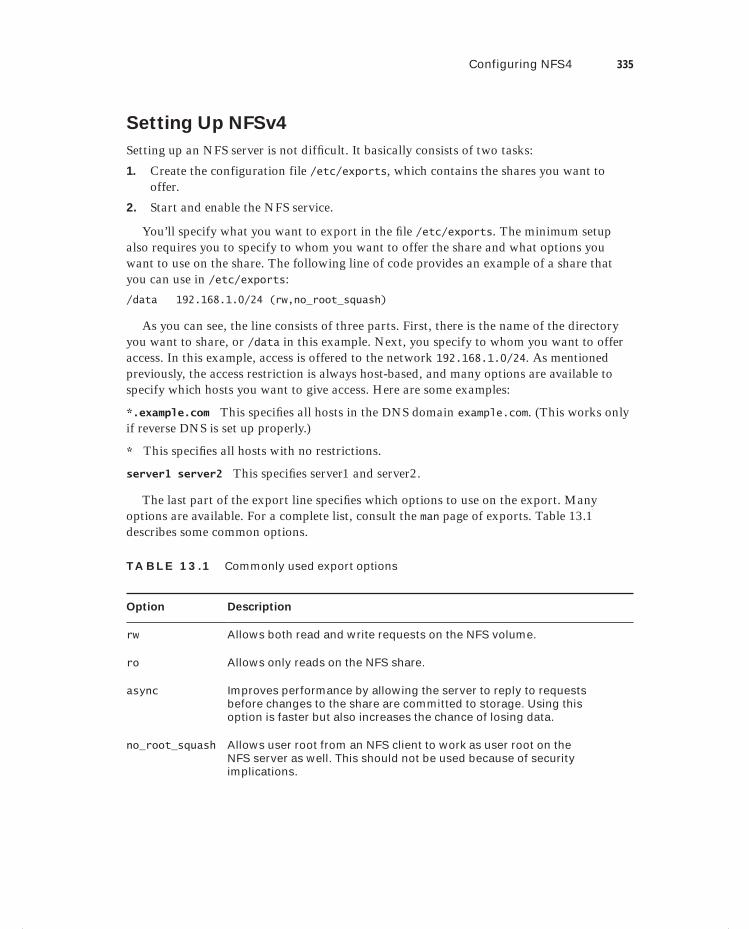
Configuring NFS4 335
Setting Up NFSv4
Setting up an NFS server is not diffi cult. It basically consists of two tasks:
1. Create the configuration file /etc/exports, which contains the shares you want to offer.
2. Start and enable the NFS service.
You’ll specify what you want to export in the fi le /etc/exports. The minimum setup also requires you to specify to whom you want to offer the share and what options you want to use on the share. The following line of code provides an example of a share that you can use in /etc/exports:
/data 192.168.1.0/24 (rw,no_root_squash)
As you can see, the line consists of three parts. First, there is the name of the directory you want to share, or /data in this example. Next, you specify to whom you want to offer access. In this example, access is offered to the network 192.168.1.0/24. As mentioned previously, the access restriction is always host-based, and many options are available to specify which hosts you want to give access. Here are some examples:
*.example.com This specifi es all hosts in the DNS domain example.com. (This works only if reverse DNS is set up properly.)
* This specifi es all hosts with no restrictions.
server1 server2 This specifi es server1 and server2.
The last part of the export line specifi es which options to use on the export. Many options are available. For a complete list, consult the man page of exports. Table 13.1 describes some common options.
TA B LE 13 .1 Commonly used export options
Option Description
rw Allows both read and write requests on the NFS volume.
ro Allows only reads on the NFS share.
async Improves performance by allowing the server to reply to requests before changes to the share are committed to storage. Using this option is faster but also increases the chance of losing data.
no_root_squash Allows user root from an NFS client to work as user root on the NFS server as well. This should not be used because of security implications.
c13.indd 335c13.indd 335 1/8/2013 12:10:07 PM1/8/2013 12:10:07 PM
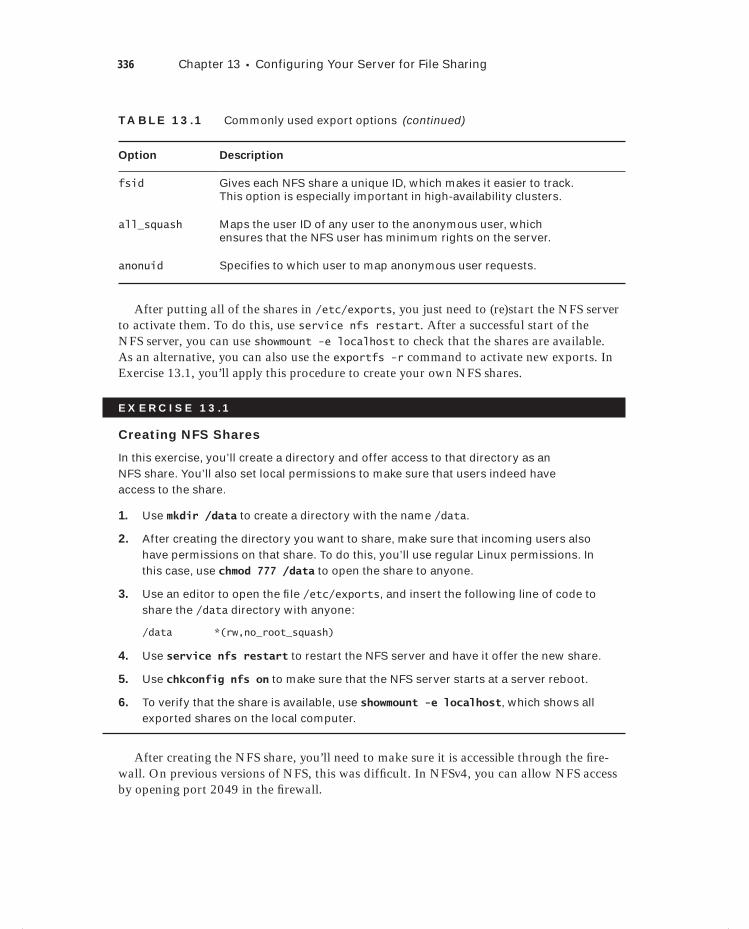
336 Chapter 13 Configuring Your Server for File Sharing
Option Description
fsid Gives each NFS share a unique ID, which makes it easier to track. This option is especially important in high-availability clusters.
all_squash Maps the user ID of any user to the anonymous user, which ensures that the NFS user has minimum rights on the server.
anonuid Specifies to which user to map anonymous user requests.
After putting all of the shares in /etc/exports, you just need to (re)start the NFS server to activate them. To do this, use service nfs restart. After a successful start of the NFS server, you can use showmount -e localhost to check that the shares are available. As an alternative, you can also use the exportfs -r command to activate new exports. In Exercise 13.1, you’ll apply this procedure to create your own NFS shares.
E X E R C I S E 13 .1
Creating NFS Shares
In this exercise, you’ll create a directory and offer access to that directory as an NFS share. You’ll also set local permissions to make sure that users indeed have access to the share.
1. Use mkdir /data to create a directory with the name /data.
2. After creating the directory you want to share, make sure that incoming users also have permissions on that share. To do this, you’ll use regular Linux permissions. In this case, use chmod 777 /data to open the share to anyone.
3. Use an editor to open the fi le /etc/exports, and insert the following line of code to share the /data directory with anyone:
/data *(rw,no_root_squash)
4. Use service nfs restart to restart the NFS server and have it offer the new share.
5. Use chkconfig nfs on to make sure that the NFS server starts at a server reboot.
6. To verify that the share is available, use showmount -e localhost, which shows all exported shares on the local computer.
After creating the NFS share, you’ll need to make sure it is accessible through the fi re-wall. On previous versions of NFS, this was diffi cult. In NFSv4, you can allow NFS access by opening port 2049 in the fi rewall.
TA B LE 13 .1 Commonly used export options (continued)
c13.indd 336c13.indd 336 1/8/2013 12:10:07 PM1/8/2013 12:10:07 PM
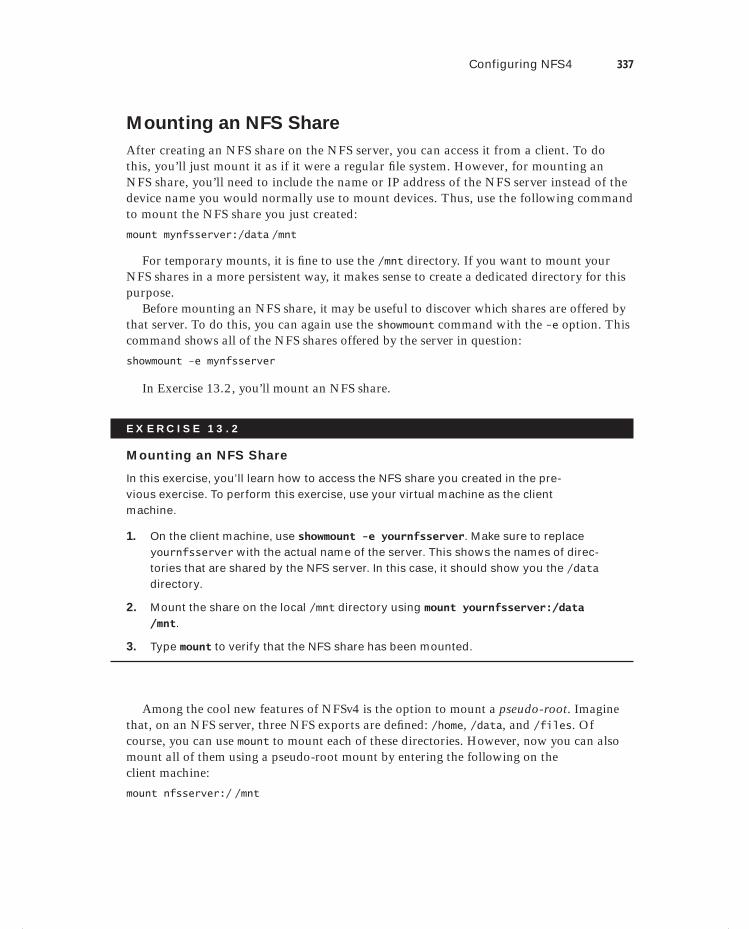
Configuring NFS4 337
Mounting an NFS Share
After creating an NFS share on the NFS server, you can access it from a client. To do this, you’ll just mount it as if it were a regular fi le system. However, for mounting an NFS share, you’ll need to include the name or IP address of the NFS server instead of the device name you would normally use to mount devices. Thus, use the following command to mount the NFS share you just created:
mount mynfsserver:/data /mnt
For temporary mounts, it is fi ne to use the /mnt directory. If you want to mount your NFS shares in a more persistent way, it makes sense to create a dedicated directory for this purpose.
Before mounting an NFS share, it may be useful to discover which shares are offered by that server. To do this, you can again use the showmount command with the -e option. This command shows all of the NFS shares offered by the server in question:
showmount -e mynfsserver
In Exercise 13.2, you’ll mount an NFS share.
E X E R C I S E 13 . 2
Mounting an NFS Share
In this exercise, you’ll learn how to access the NFS share you created in the pre-vious exercise. To perform this exercise, use your virtual machine as the client machine.
1. On the client machine, use showmount -e yournfsserver. Make sure to replace yournfsserver with the actual name of the server. This shows the names of direc-tories that are shared by the NFS server. In this case, it should show you the /data directory.
2. Mount the share on the local /mnt directory using mount yournfsserver:/data /mnt.
3. Type mount to verify that the NFS share has been mounted.
Among the cool new features of NFSv4 is the option to mount a pseudo-root. Imagine that, on an NFS server, three NFS exports are defi ned: /home, /data, and /files. Of course, you can use mount to mount each of these directories. However, now you can also mount all of them using a pseudo-root mount by entering the following on the client machine:
mount nfsserver:/ /mnt
c13.indd 337c13.indd 337 1/8/2013 12:10:07 PM1/8/2013 12:10:07 PM
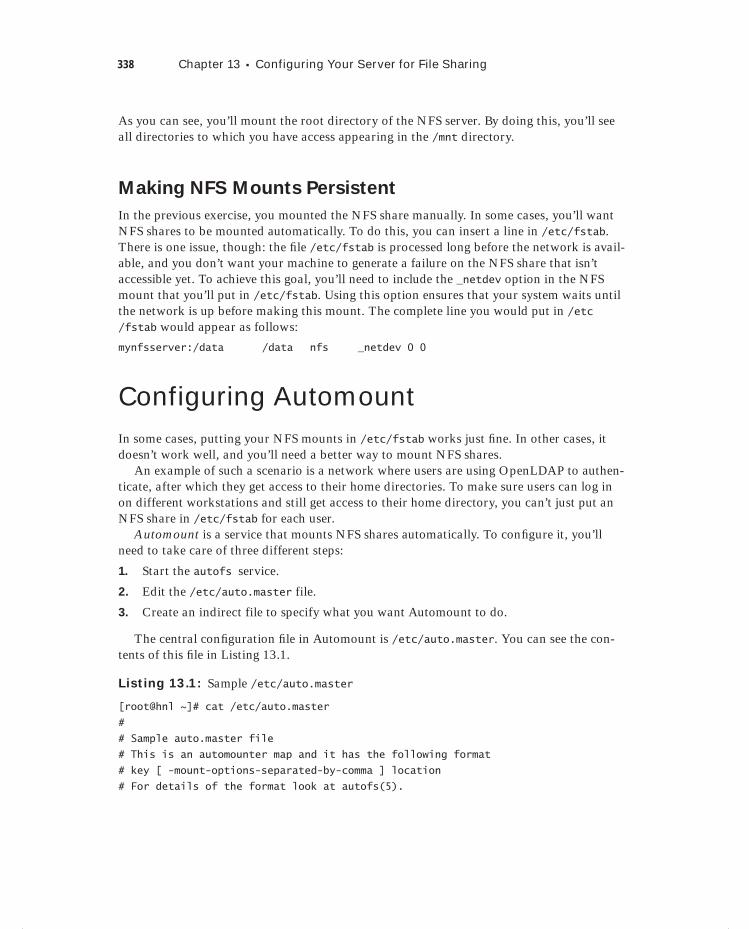
338 Chapter 13 Configuring Your Server for File Sharing
As you can see, you’ll mount the root directory of the NFS server. By doing this, you’ll see all directories to which you have access appearing in the /mnt directory.
Making NFS Mounts Persistent
In the previous exercise, you mounted the NFS share manually. In some cases, you’ll want NFS shares to be mounted automatically. To do this, you can insert a line in /etc/fstab. There is one issue, though: the fi le /etc/fstab is processed long before the network is avail-able, and you don’t want your machine to generate a failure on the NFS share that isn’t accessible yet. To achieve this goal, you’ll need to include the _netdev option in the NFS mount that you’ll put in /etc/fstab. Using this option ensures that your system waits until the network is up before making this mount. The complete line you would put in /etc/fstab would appear as follows:
mynfsserver:/data /data nfs _netdev 0 0
Configuring AutomountIn some cases, putting your NFS mounts in /etc/fstab works just fi ne. In other cases, it doesn’t work well, and you’ll need a better way to mount NFS shares.
An example of such a scenario is a network where users are using OpenLDAP to authen-ticate, after which they get access to their home directories. To make sure users can log in on different workstations and still get access to their home directory, you can’t just put an NFS share in /etc/fstab for each user.
Automount is a service that mounts NFS shares automatically. To confi gure it, you’ll need to take care of three different steps:
1. Start the autofs service.
2. Edit the /etc/auto.master file.
3. Create an indirect file to specify what you want Automount to do.
The central confi guration fi le in Automount is /etc/auto.master. You can see the con-tents of this fi le in Listing 13.1.
Listing 13.1: Sample /etc/auto.master
[root@hnl ~]# cat /etc/auto.master
#
# Sample auto.master file
# This is an automounter map and it has the following format
# key [ -mount-options-separated-by-comma ] location
# For details of the format look at autofs(5).
c13.indd 338c13.indd 338 1/8/2013 12:10:07 PM1/8/2013 12:10:07 PM
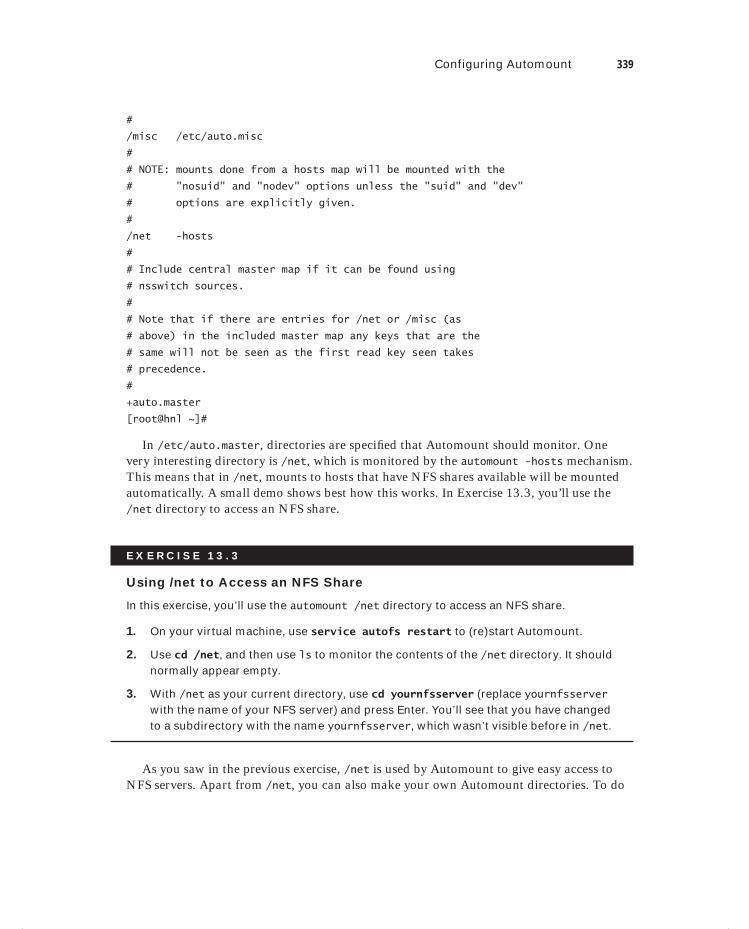
Configuring Automount 339
#
/misc /etc/auto.misc
#
# NOTE: mounts done from a hosts map will be mounted with the
# "nosuid" and "nodev" options unless the "suid" and "dev"
# options are explicitly given.
#
/net -hosts
#
# Include central master map if it can be found using
# nsswitch sources.
#
# Note that if there are entries for /net or /misc (as
# above) in the included master map any keys that are the
# same will not be seen as the first read key seen takes
# precedence.
#
+auto.master
[root@hnl ~]#
In /etc/auto.master, directories are specifi ed that Automount should monitor. One very interesting directory is /net, which is monitored by the automount -hosts mechanism. This means that in /net, mounts to hosts that have NFS shares available will be mounted automatically. A small demo shows best how this works. In Exercise 13.3, you’ll use the /net directory to access an NFS share.
E X E R C I S E 13 . 3
Using /net to Access an NFS Share
In this exercise, you’ll use the automount /net directory to access an NFS share.
1. On your virtual machine, use service autofs restart to (re)start Automount.
2. Use cd /net, and then use ls to monitor the contents of the /net directory. It should normally appear empty.
3. With /net as your current directory, use cd yournfsserver (replace yournfsserver with the name of your NFS server) and press Enter. You’ll see that you have changed to a subdirectory with the name yournfsserver, which wasn’t visible before in /net.
As you saw in the previous exercise, /net is used by Automount to give easy access to NFS servers. Apart from /net, you can also make your own Automount directories. To do
c13.indd 339c13.indd 339 1/8/2013 12:10:08 PM1/8/2013 12:10:08 PM
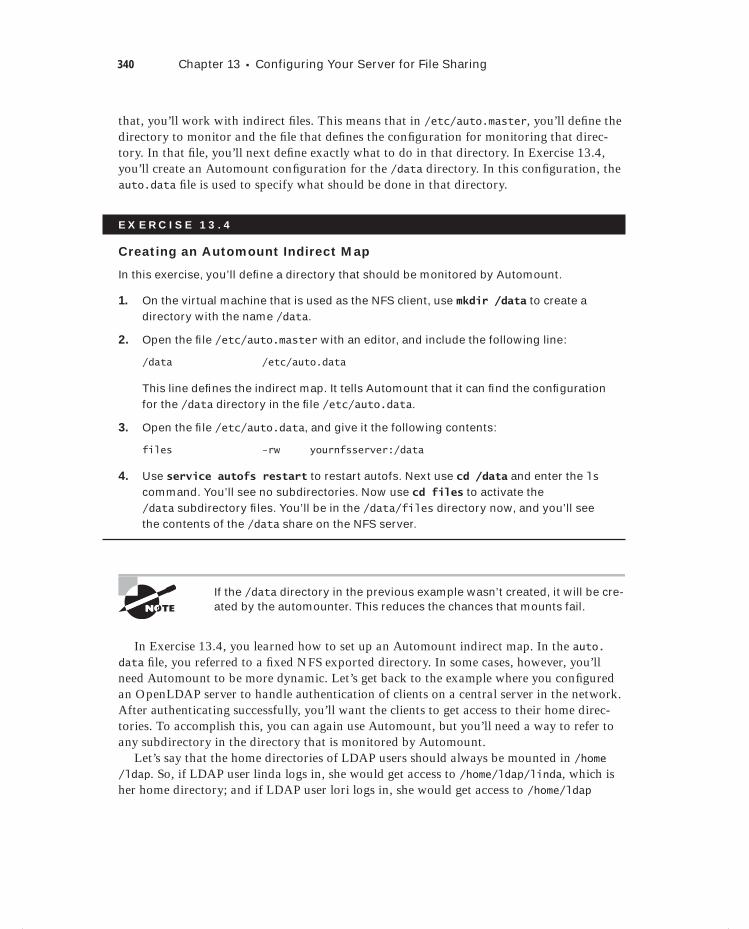
340 Chapter 13 Configuring Your Server for File Sharing
that, you’ll work with indirect fi les. This means that in /etc/auto.master, you’ll defi ne the directory to monitor and the fi le that defi nes the confi guration for monitoring that direc-tory. In that fi le, you’ll next defi ne exactly what to do in that directory. In Exercise 13.4, you’ll create an Automount confi guration for the /data directory. In this confi guration, the auto.data fi le is used to specify what should be done in that directory.
E X E R C I S E 13 . 4
Creating an Automount Indirect Map
In this exercise, you’ll defi ne a directory that should be monitored by Automount.
1. On the virtual machine that is used as the NFS client, use mkdir /data to create a directory with the name /data.
2. Open the fi le /etc/auto.master with an editor, and include the following line:
/data /etc/auto.data
This line defi nes the indirect map. It tells Automount that it can fi nd the confi guration for the /data directory in the fi le /etc/auto.data.
3. Open the fi le /etc/auto.data, and give it the following contents:
files -rw yournfsserver:/data
4. Use service autofs restart to restart autofs. Next use cd /data and enter the ls command. You’ll see no subdirectories. Now use cd files to activate the /data subdirectory fi les. You’ll be in the /data/files directory now, and you’ll see the contents of the /data share on the NFS server.
If the /data directory in the previous example wasn’t created, it will be cre-ated by the automounter. This reduces the chances that mounts fail.
In Exercise 13.4, you learned how to set up an Automount indirect map. In the auto.data fi le, you referred to a fi xed NFS exported directory. In some cases, however, you’ll need Automount to be more dynamic. Let’s get back to the example where you confi gured an OpenLDAP server to handle authentication of clients on a central server in the network. After authenticating successfully, you’ll want the clients to get access to their home direc-tories. To accomplish this, you can again use Automount, but you’ll need a way to refer to any subdirectory in the directory that is monitored by Automount.
Let’s say that the home directories of LDAP users should always be mounted in /home/ldap. So, if LDAP user linda logs in, she would get access to /home/ldap/linda, which is her home directory; and if LDAP user lori logs in, she would get access to /home/ldap
c13.indd 340c13.indd 340 1/8/2013 12:10:08 PM1/8/2013 12:10:08 PM
Configuring Automount 341
/lori, which is also an NFS mount to her home directory. Assuming the home directories are available through an NFS export on the server with the name nfsserver, you could make the following Automount confi guration.
First, in /etc/auto.master, include the following line to monitor the content of /home/ldap:/home/ldap /etc/auto.ldap
This line tells Automount that the additional confi guration for /home/ldap is in the fi le /etc/auto.ldap. In that fi le, you would need to add the following:
* -rw nfsserver:/home/ldap/&
You can read this line as follows: for * (which is every subdirectory you can imagine) in the directory /home/ldap, a read-writable mount should be made to the & (which is the directory that uses the same name) on nfsserver:/home/ldap. In Exercise 13.5, you’ll learn how to bring all of this together.
E X E R C I S E 13 . 5
Creating an Automount Configuration for Home Directories
In this exercise, you’ll create an NFS share on your host computer, which gives access to user home directories. Next you’ll set up Automount on the virtual machine to make mounting these home directories transparent.
1. On the host computer, open /etc/exports, and add the following line:
/home *(rw)
2. On the host computer, use service nfs restart to (re)start the NFS service.
3. On the host computer, use useradd lucy to create a user lucy and a directory /home/lucy.
3. On the virtual machine, use showmount -e yournfsserver to verify that the NFS server offers the share.
4. On the virtual machine, open /etc/auto.master, and insert the following line:
/home /etc/auto.home
5. On the virtual machine, create the fi le /etc/auto.home, and give it the following con-tents:
* -rw yournfsserver:/home/&
6. Restart Automount on the virtual machine using service autofs restart, and use cd /home/lucy to access the contents of /home/lucy. You’ll now have access to /home/lucy on the NFS server.
c13.indd 341c13.indd 341 1/8/2013 12:10:08 PM1/8/2013 12:10:08 PM
342 Chapter 13 Configuring Your Server for File Sharing
Configuring SambaYou just learned how to use NFS for accessing fi le systems on remote computers. NFS is fast and convenient, but it also has an major disadvantage: it works only between Linux and UNIX machines. To offer access to other types of clients, you’ll need to use a fi le-sharing protocol that is available on those clients as well. The Common Internet File System (CIFS) is such a protocol, and it is offered by the Linux Samba server. In this chapter, you’ll learn how to set up a Samba server to offer fi le shares.
Samba is a very versatile service that you can use for different purposes on your network. Apart from sharing fi les, it can share printers and also offer Windows domain services such as directory services. You can even integrate Samba into an Active Directory domain and make it a member server of Active Directory. This means that all users in Active Directory get easy access to the resources you offer on the Samba server. The most popular use of Samba, however, is as a fi le server.
Setting Up a Samba File Server
Setting up a Samba fi le server is fairly straightforward. To set one up, you need to do the following:
1. Create a directory on the Linux file system on the Samba server.
2. If needed, create Linux users and give the appropriate permissions to the directory you just created.
3. Install the Samba server.
4. Define the share in /etc/samba/smb.conf.
5. Create a Samba user account that has access to the share.
6. (Re)start the Samba service.
7. Tell SELinux to give access to the Samba share.
A few of the previous steps require further explanation. Let’s start with the user account. There are different ways to offer user access on Samba, which is also further explained in the next section in this chapter. To set up a basic Samba server, as you’ll do in the following exercise, you’ll need both a Linux user and a Samba user. The Linux user is used for Linux permissions on the local Linux fi le system. A Windows user cannot authen-ticate with the credentials of a Linux user, however. This is why you’ll also need a Samba user with the same name as the Linux user. Typically, the Windows user needs to work only with the Samba user, which also means that only the password of the Samba user is rel-evant. The Linux user is for local Linux access only. As an administrator, you only need to make sure that it has the appropriate rights.
To defi ne the Samba share, you’ll put it in Samba’s main confi guration fi le, which is /etc/samba/smb.conf. The basic share defi nition is very simple: it gives a name to the share, and it tells Samba what to share. A minimum share defi nition might appear as follows:
[myshare]
c13.indd 342c13.indd 342 1/8/2013 12:10:08 PM1/8/2013 12:10:08 PM
Configuring Samba 343
path=/mysharedfolder
When defi ning a share, you can also use many options to defi ne to whom and with which access permissions the share should be available. It could, for example, appear as follows:
[myshare]
path = /mydatafiles
comment = some shared files
allow hosts = 192.168.1.
writable = yes
public = yes
write list = +mygroup
In this example share, some options are added. First a comment is specifi ed, which makes it easier for clients to identify the share when they are browsing the network for available services. Next the allow hosts parameter restricts access to hosts that have an IP address starting with 192.168.1 only. The option public = yes makes it a public share that is accessible by anyone who has a Samba account to authenticate to this server. It is also writable, which is indicated by the option writable = yes. To write to the share, though, a user must be a member of the local Linux group mygroup.
Apart from the defi nition of many shares, you’ll also fi nd a [global] section in the beginning of each /etc/samba/smb.conf confi guration fi le. In this section, you’ll fi nd the generic parameters that your Samba server is using, such as its workgroup name, the network interfaces on which it is listening, and the locations to which it writes its log fi les. You normally don’t have to change anything here to set up a basic Samba server. In Listing 13.2, you can see an example of some of the parameters that are defi ned in the [global] section. For more details, read man (5) smb.conf.
Listing 13.2: The Samba [global] section defines generic Samba parameters
[root@hnl samba]# less smb.conf
[global]
# ----------------------- Network Related Options -------------------------
#
# workgroup = NT-Domain-Name or Workgroup-Name, eg: MIDEARTH
#
# server string is the equivalent of the NT Description field
#
# netbios name can be used to specify a server name not tied to the hostname
#
# Interfaces lets you configure Samba to use multiple interfaces
# If you have multiple network interfaces then you can list the ones
# you want to listen on (never omit localhost)
#
c13.indd 343c13.indd 343 1/8/2013 12:10:08 PM1/8/2013 12:10:08 PM
344 Chapter 13 Configuring Your Server for File Sharing
# Hosts Allow/Hosts Deny lets you restrict who can connect, and you can
# specifiy it as a per share option as well
#
workgroup = MYGROUP
server string = Samba Server Version %v
; netbios name = MYSERVER
; interfaces = lo eth0 192.168.12.2/24 192.168.13.2/24
; hosts allow = 127. 192.168.12. 192.168.13.
# --------------------------- Logging Options -----------------------------
#
After specifying the directory you want to share and setting Linux permissions to it, you’ll also need to create Samba user accounts. Before doing that, however, you need to make sure you have Linux user accounts with the corresponding names. Therefore, if you need a Samba account for Windows user lucy, you’ll have to create Linux for user lucy fi rst. To create a Samba user account, you’ll use smbpasswd -a. For example, smbpasswd -a lucy would create Samba user named lucy on your system. In Exercise 13.6, you’ll set up a Samba server on your host computer.
E X E R C I S E 13 . 6
Setting Up a Samba Server
In this exercise, you’ll walk through all the steps necessary to set up a Samba server. You’ll start by creating a directory on the Linux fi le system and grant the appropriate per-missions to this directory. Next, you’ll install the Samba packages and create the share in Samba. After completing that, you’ll create a Samba account, which makes the Samba server accessible for the designated Samba users.
1. Use mkdir /sambafiles to create a directory on the Linux fi le system.
2. Use chmod 777 /sambafiles to grant the appropriate permissions to the /sam-bafiles share. It’s not the most elegant way to set security, but it’s not local Linux security that matters here.
3. As root, use yum -y install samba samba-common samba-client to install all the required Samba server packages.
4. Open the fi le /etc/samba/smb.conf with an editor. Locate the workgroup parameter, and change it to workgroup = MYSAMBA.
5. Go to the bottom of the confi guration fi le, and add the following share confi guration:
[sambafiles]
c13.indd 344c13.indd 344 1/8/2013 12:10:08 PM1/8/2013 12:10:08 PM

Configuring Samba 345
E X E R C I S E 13 . 6 ( c ont inue d )
comment = samba files
path = /sambafiles
writable = yes
valid user = lucy, linda, lori
6. Use useradd lucy to create a user account for user lucy. Don’t set the password, because Samba users don’t need a password on the Linux system.
7. Use smbpasswd -a lucy to create Samba user lucy.
8. Use service smb restart to (re)start the Samba service and chkconfig smb on to make sure that it starts when the server boots.
9. Use smbclient -L //localhost. This will show you the current Samba server parameters, and you’ll see that the share you just created is listed. The smbclient -L command will show a login prompt that you can ignore. Do this by pressing Enter twice.
Samba and SELinux
You’ve just created a Samba share, but for now it won’t work. This is because you must apply some SELinux settings before being able to use Samba on Red Hat. Apart from some Booleans, which you can use, the most important change required is that you set the direc-tories that you want to share with Samba to the samba_share_t context type. If you want to grant access to a Samba shared directory to other fi le-sharing services, you can also set the context type to public_content_t.
To set the appropriate Samba context type, use the following two commands:
semanage fcontext -a -t samba_share_t "/sambashare(/.*)?"
restorecon -R -v /sambashare
After making these changes, the Samba share should now be accessible. In Exercise 13.7, you can practice applying SELinux labels for Samba.
E X E R C I S E 13 . 7
Setting SELinux Labels for Samba
In this exercise, you’ll set the SELinux labels that are required for directories shared with Samba.
1. As root, use semanage fcontext -a -t samba_share_t "/sambashare(/.*)?".
2. Use restorecon -R -v /sambashare to make the new label effective.
c13.indd 345c13.indd 345 1/8/2013 12:10:08 PM1/8/2013 12:10:08 PM
346 Chapter 13 Configuring Your Server for File Sharing
Samba Advanced Authentication Options
When working with Samba, you can use different security options. This option is set in the [global] section of the /etc/samba/smb.conf fi le, and it determines where Samba looks for user authentication information. The default setting is security = user, which means that Samba needs a local Samba user account that is stored in a smbpasswd fi le.
The following authentication options are available:
security = share When using this option, a user does not need to send a username and password to a share before connecting to it. You can set it up so that a user has to enter a password before connecting. However, this would be a share-level password that is used by every user connecting to the share. Using it can be benefi cial on an anonymous share, to where you want users to connect with limited permissions. When using this option, use the guest only parameter in the share. Never use it for shares that contain valuable data.
security = user This is the default security option, where a user must log in to the share before getting access.
security = domain This option works if your Samba server has been added to a Windows domain. (You can use the net utility on Linux to do that.) If used, Samba user account information is obtained from the Windows domain. You still need a local Linux account to handle permissions, though.
security = server This option uses an external server (such as another Samba server) to handle Samba authentication requests. It is best to avoid using this, because it isn’t very secure.
security = ads This option makes Samba a member in a Windows Active Directory domain. It does not make it a domain controller but integrates Samba in the AD domain, which makes it easier to access resources in the AD domain or to set up access for AD users to resources in Samba.
Accessing Samba Shares
After setting up the Samba server, you’ll need to access it. From Windows, you can set up a network share and point to the Samba server. There’s no real difference in accessing a Samba share from Windows than from accessing a Windows share from Windows.
There are also some tools that you can use to access Samba shares on Linux. First you can use graphical tools, such as Nautilus, to connect to a Samba share. To list the Samba shares that are offered by a specifi c server, you can use smbclient -L (see Listing 13.3). This shows the names of all shares that are offered, and it also provides an option to log in to the Samba server. The smbclient interface is not very easy to use, however. When using smbclient -L to list shares, just press Enter when asked for a password. Entering a pass-word is not required to list available shares.
c13.indd 346c13.indd 346 1/8/2013 12:10:08 PM1/8/2013 12:10:08 PM
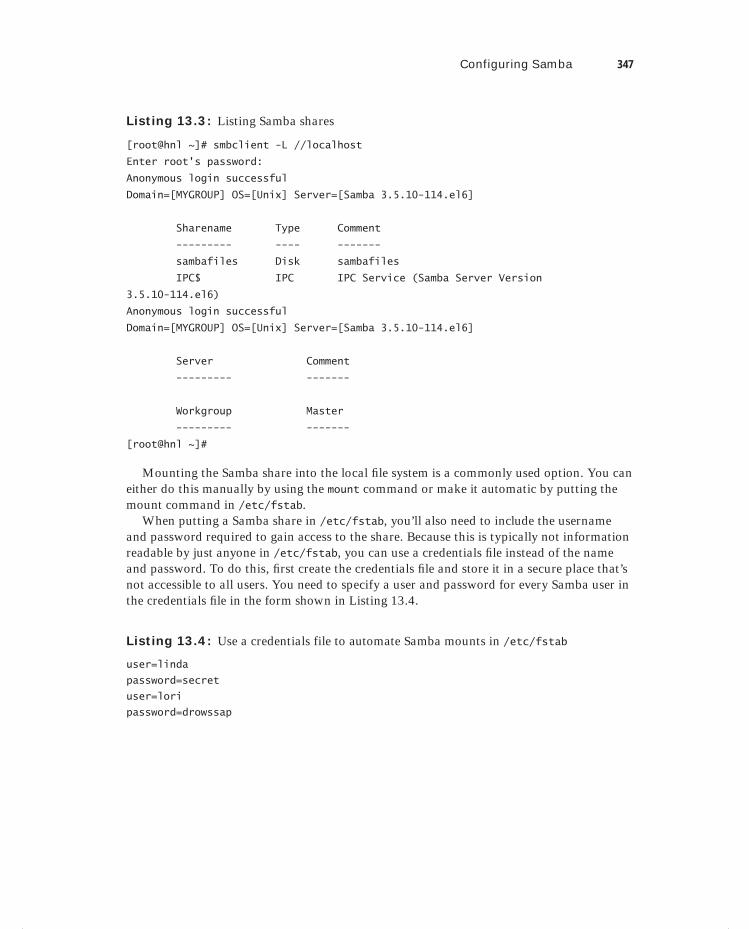
Configuring Samba 347
Listing 13.3: Listing Samba shares
[root@hnl ~]# smbclient -L //localhost
Enter root's password:
Anonymous login successful
Domain=[MYGROUP] OS=[Unix] Server=[Samba 3.5.10-114.el6]
Sharename Type Comment
--------- ---- -------
sambafiles Disk sambafiles
IPC$ IPC IPC Service (Samba Server Version
3.5.10-114.el6)
Anonymous login successful
Domain=[MYGROUP] OS=[Unix] Server=[Samba 3.5.10-114.el6]
Server Comment
--------- -------
Workgroup Master
--------- -------
[root@hnl ~]#
Mounting the Samba share into the local fi le system is a commonly used option. You can either do this manually by using the mount command or make it automatic by putting the mount command in /etc/fstab.
When putting a Samba share in /etc/fstab, you’ll also need to include the username and password required to gain access to the share. Because this is typically not information readable by just anyone in /etc/fstab, you can use a credentials fi le instead of the name and password. To do this, fi rst create the credentials fi le and store it in a secure place that’s not accessible to all users. You need to specify a user and password for every Samba user in the credentials fi le in the form shown in Listing 13.4.
Listing 13.4: Use a credentials file to automate Samba mounts in /etc/fstab
user=linda
password=secret
user=lori
password=drowssap
c13.indd 347c13.indd 347 1/8/2013 12:10:08 PM1/8/2013 12:10:08 PM
348 Chapter 13 Configuring Your Server for File Sharing
After creating a credentials fi le, you can enter a line in /etc/fstab to mount the Samba share. To refer to the share, you’ll need to use the //server/share format. The following sample code snippet shows how you can mount Samba shares from /etc/fstab://mysambaserver/share /data/samba cifs credentials=/root/credentials 0 0
In Exercise 13.8, you will practice mounting Samba shares from /etc/fstab.
E X E R C I S E 13 . 8
Mounting a Samba Share Using /etc/fstab
In this exercise, you’ll set up your client computer to connect to the Samba share you just created. Perform all steps on the virtual machine that you’re using as a client computer.
1. On the client computer, use smbclient -L //yoursambaserver to list the Samba shares on your Samba server. You’ll see the share you created in Exercise 13.6.
2. Open /etc/fstab with an editor, and add the following line:
//sambaserver/sambafiles /mnt/samba cifs credentials=/root/credentials 0 0
3. Use an editor to create the fi le /root/credentials with the following content:
user=lucy
password=password
4. Use mount -a to mount the newly created share from /etc/fstab. Type mount, and you’ll see that the Samba share is mounted on your computer.
Offering FTP ServicesSamba and NFS are commonly used services designed to offer access to shared fi les within the same network. If you also want to share fi les with external users, FTP is a more suitable option. On Red Hat Enterprise Linux, vsftpd is the preferred FTP server.
Deploying vsftpd to offer access to shared fi les is easy to do. After installing the vsftpd package, it uses its default home directory, /var/ftp. If you create a /pub subdirectory within that directory, you can start putting fi les in it that will be accessible for anonymous FTP users. Remember that FTP is clear text, so extra security precautions should be taken.
To open vsftpd for authenticated users, you can change the settings in the confi guration fi le /etc/vsftpd.conf. This is a very readable confi guration fi le, which contains many set-tings examples and good documentation on how to use these settings. Listing 13.5 shows part of its contents.
c13.indd 348c13.indd 348 1/8/2013 12:10:08 PM1/8/2013 12:10:08 PM
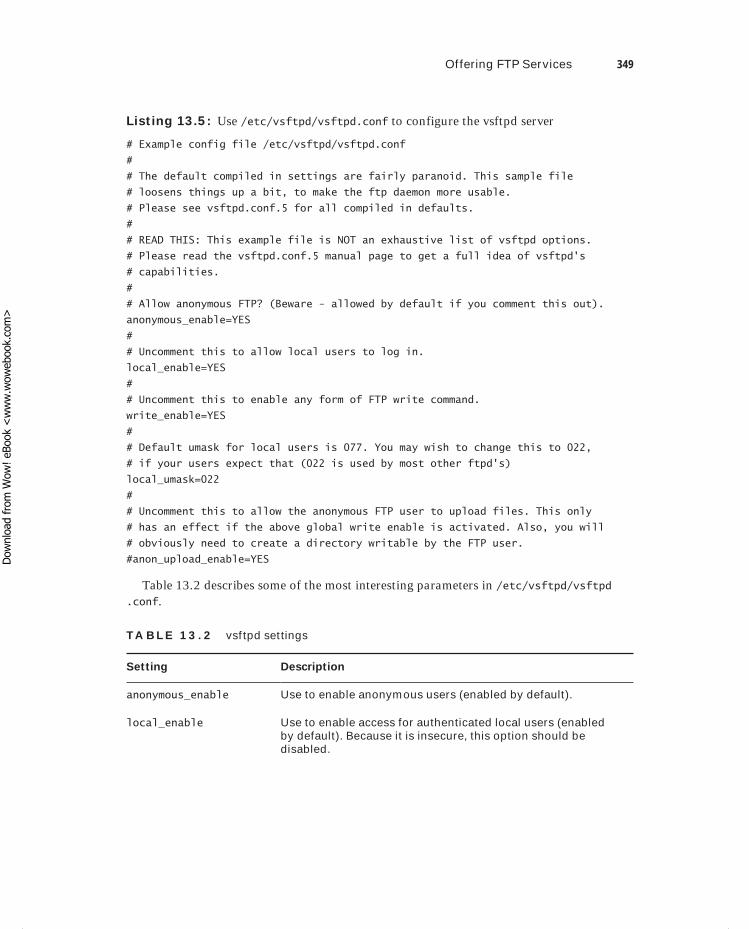
Offering FTP Services 349
Listing 13.5: Use /etc/vsftpd/vsftpd.conf to configure the vsftpd server
# Example config file /etc/vsftpd/vsftpd.conf
#
# The default compiled in settings are fairly paranoid. This sample file
# loosens things up a bit, to make the ftp daemon more usable.
# Please see vsftpd.conf.5 for all compiled in defaults.
#
# READ THIS: This example file is NOT an exhaustive list of vsftpd options.
# Please read the vsftpd.conf.5 manual page to get a full idea of vsftpd's
# capabilities.
#
# Allow anonymous FTP? (Beware - allowed by default if you comment this out).
anonymous_enable=YES
#
# Uncomment this to allow local users to log in.
local_enable=YES
#
# Uncomment this to enable any form of FTP write command.
write_enable=YES
#
# Default umask for local users is 077. You may wish to change this to 022,
# if your users expect that (022 is used by most other ftpd's)
local_umask=022
#
# Uncomment this to allow the anonymous FTP user to upload files. This only
# has an effect if the above global write enable is activated. Also, you will
# obviously need to create a directory writable by the FTP user.
#anon_upload_enable=YES
Table 13.2 describes some of the most interesting parameters in /etc/vsftpd/vsftpd.conf.
TA B LE 13 . 2 vsftpd settings
Setting Description
anonymous_enable Use to enable anonymous users (enabled by default).
local_enable Use to enable access for authenticated local users (enabled by default). Because it is insecure, this option should be disabled.
c13.indd 349c13.indd 349 1/8/2013 12:10:08 PM1/8/2013 12:10:08 PM
Dow
nlo
ad fro
m W
ow
! eBook
<w
ww
.wow
ebook.
com
>
350 Chapter 13 Configuring Your Server for File Sharing
Setting Description
write_enable Allows write access (by default only for authenticated users).
anon_upload_enable Use this if you want to allow anonymous users to upload files. (Be sure you know what you’re doing if you’re plan-ning to enable this option because using it has some secu-rity risks!)
xferlog_enable Logs all FTP transfers.
chown_uploads Change the owner of uploaded files. (This parameter can be useful if you want to allow anonymous users to upload files.)
After applying the required settings to your FTP server, you’ll also need to make sure it is accessible. This requires setting the appropriate firewall rules and the SELinux settings as well. The next section in this chapter further explains SELinux and FTP. Before that, however, read what to do on the firewall.
First you’ll need to open the fi rewall. Remember that if you’ve made custom modifi ca-tions to your fi rewall confi guration, you shouldn’t use system-config-firewall anymore, so make sure to apply the proposed changes manually.
You’ll need to load two fi rewall modules for FTP: nf_conntrack_ftp and nf_nat_ftp. The fi rst allows FTP to track connections, which is an absolute requirement for opening both ports 20 and 21 on the fi rewall and the higher ports that are needed for active/passive connection. The second module, nf_nat_ftp, is required only if you want to offer FTP ser-vices through a NAT. To load these modules at all times when the fi rewall is initialized, put the following line of code in /etc/sysconfig/iptables_config:
IPTABLES_MODULES="nf_conntrack_ftp nf_nat_ftp"
After adding these two modules, you’ll need to restart the fi rewall service, so use service iptables restart before continuing. Next you can open the FTP ports in the fi rewall. The following two commands allow you to do just that:iptables -A INPUT -p tcp --dport 21 -j ALLOW
iptables -A INPUT -m state --state ESTABLISHED,RELATED -j ALLOW
If possible, try to determine which services you need to be accessible through the firewall before starting to configure anything. It’s much easier to use system-config-firewall just once to open everything you need and then never touch the firewall configuration again.
TA B LE 13 . 2 vsftpd settings (continued)
c13.indd 350c13.indd 350 1/8/2013 12:10:08 PM1/8/2013 12:10:08 PM

File Sharing and SELinux 351
In Exercise 13.9 you’ll learn how to set up an Anonymous FTP Server.
E X E R C I S E 13 . 9
Enabling an Anonymous FTP Server
In this exercise, you’ll learn how easy it is to set up your server for anonymous FTP access.
1. Use yum -y install vsftpd.
2. Use service vsftpd start to start the FTP server, and use chkconfig vsftpd on to make sure it starts when you reboot your server.
3. Use yum -y install lftp to install the lftp FTP client to your computer.
4. From a console, type lftp localhost. This opens an anonymous FTP client inter-face. From this interface, use ls to see the contents of the current directory, use cd to change directories, and use the get and put commands to download and upload fi les.
File Sharing and SELinuxWhen confi guring fi le-sharing services, you’ll also have to deal with SELinux. SELinux normally works with known services and gives them access to their default directories. File-sharing services typically give access to fi les no matter where they are stored, but you will need to make sure they can in this case.
The fi rst step in confi guring access for fi le-sharing services is to set the appropriate context type on directories. In the section on Samba, you read that public_content_t is a good option for opening a directory for different fi le-sharing services. Use semanage to set the context type, and use restorecon to apply it before starting to use any of the services discussed in this chapter.
A second step in the confi guration process consists of setting the appropriate Booleans. It may not always be clear which Booleans are available for the services you’re trying to confi gure, but there are some easy ways to fi nd out. First you can use getsebool -a to dis-play a list of all Booleans and use grep to fi lter out the appropriate Booleans. Use semanage boolean -l for more details on what the Booleans are doing. Listing 13.6 shows you how this works for FTP.
Listing 13.6: Finding the appropriate Booleans for your service
[root@hnl ~]# getsebool -a | grep ftp
allow_ftpd_anon_write --> off
c13.indd 351c13.indd 351 1/8/2013 12:10:09 PM1/8/2013 12:10:09 PM
352 Chapter 13 Configuring Your Server for File Sharing
allow_ftpd_full_access --> off
allow_ftpd_use_cifs --> off
allow_ftpd_use_nfs --> off
ftp_home_dir --> off
ftpd_connect_db --> off
httpd_enable_ftp_server --> off
tftp_anon_write --> off
[root@hnl ~]#
After fi nding the Boolean you want to set, use setsebool -P to set it. Don’t forget the -P option, which makes the Boolean persistent.
If these generic approaches don’t help you gain access to your service, you can also con-sult the appropriate man pages. If you use the command man -k _selinux, you’ll see a list of man pages for all service-specifi c SELinux man pages that are available on your server (see Listing 13.7).
Listing 13.7: Use man -k _selinux to get a list of all service-specific SELinux man pages
[root@hnl ~]# man -k _selinux
abrt_selinux (8) - Security-Enhanced Linux Policy for the ABRT daemon
ftpd_selinux (8) - Security-Enhanced Linux policy for ftp daemons
git_selinux (8) - Security Enhanced Linux Policy for the Git daemon
httpd_selinux (8) - Security Enhanced Linux Policy for the httpd daemon
kerberos_selinux (8) - Security Enhanced Linux Policy for Kerberos
mysql_selinux (8) - Security-Enhanced Linux Policy for the MySQL daemon
named_selinux (8) - Security Enhanced Linux Policy for the
Internet Name server (named) daemon
nfs_selinux (8) - Security Enhanced Linux Policy for NFS
pam_selinux (8) - PAM module to set the default security context
rsync_selinux (8) - Security Enhanced Linux Policy for the rsync daemon
samba_selinux (8) - Security Enhanced Linux Policy for Samba
squid_selinux (8) - Security-Enhanced Linux Policy for the squid daemon
ypbind_selinux (8) - Security Enhanced Linux Policy for NIS
SummaryIn this chapter, you learned how to set up fi le-sharing services on your server. You learned how to work with NFSv4 to make convenient and fast fi le shares between Linux and UNIX computers. You also learned how to confi gure autofs to make it easy to access fi les that are offered by an NFS server.
You also read about Samba, which has become the de facto standard for sharing fi les between any client. All modern operating systems have a CIFS stack, which can communi-cate with a Samba service.
c13.indd 352c13.indd 352 1/8/2013 12:10:09 PM1/8/2013 12:10:09 PM

Summary 353
You also learned about setting up an FTP server in this chapter, which is a convenient way to share fi les on the Internet. Since when setting up fi le-sharing services you also need to take care of SELinux, this chapter concluded with a section on SELinux and fi le-sharing services.
c13.indd 353c13.indd 353 1/8/2013 12:10:09 PM1/8/2013 12:10:09 PM

c13.indd 354c13.indd 354 1/8/2013 12:10:09 PM1/8/2013 12:10:09 PM

Chapter
14Configuring DNS and DHCP
TOPICS COVERED IN THIS CHAPTER:
Understanding DNS
Setting Up a DNS Server
Understanding DHCP
Setting Up a DHCP Server
c14.indd 355c14.indd 355 1/8/2013 12:10:21 PM1/8/2013 12:10:21 PM
In each network, some common services are used. Amongst the most common of these services are DNS and DHCP. DNS is the system that helps clients resolve an IP address in a name
and vice versa. DHCP is the service that allows clients to obtain IP related confi guration automatically. In this chapter, you’ll learn how to set up these services.
Understanding DNSDomain Name System (DNS) is the system that associates hostnames with IP addresses. Thanks to DNS, users and administrators don’t have to remember the IP addresses of com-puters to which they want to connect but can do so just by entering a name, such as www.example.com. In this section, you’ll learn how DNS is organized.
The DNS Hierarchy
DNS is a worldwide hierarchical system. In each DNS name, you can see the place of a server in the hierarchy. In a name like www.example.com, three parts are involved. First, there is the top-level domain (TLD) .com. This is one of the top-level domains that have been established by the Internet Assigned Numbers Authority (IANA), the organiza-tion that is the ultimate authority responsible for DNS naming. Other common top-level domains are .org, .gov, .edu, .mil, and the many top-level domains that exist for coun-tries, such as .uk, .ca, .in, .cn, and .nl. Currently, the top-level domain system is chang-ing, and a proposal has been released to make many more top domains available.
Each of the top-level domains has a number of name servers. These are the servers that have information on the hosts within the domain. The most important piece of information that the name servers of the top-level domain have is that relating to the domains that exist within that domain (the subdomain), such as redhat.com, example.com, and so forth. The name servers of the top-level domains need to know how to fi nd the name servers of these second-tier domains.
Within the second-tier domains, subdomains can also exist, but often this is the level where individual hosts exist. Think of hostnames like www.example.com, ftp.redhat.com, and so on. To fi nd these hosts, the second-tier domains normally have a name server that contains resource records for hosts within the domain, which are consulted to fi nd the spe-cifi c IP address of a host.
The root domain is at the top of the DNS hierarchy. This is the domain that is not directly visible in DNS names but is used to connect all of the top-level domains together.
c14.indd 356c14.indd 356 1/8/2013 12:10:22 PM1/8/2013 12:10:22 PM
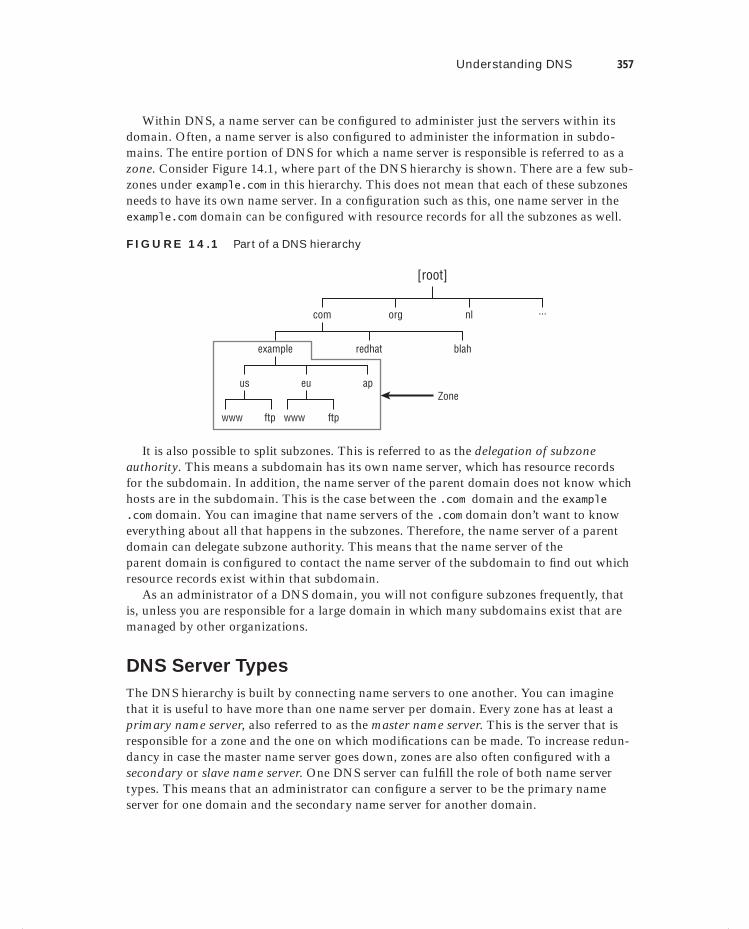
Understanding DNS 357
Within DNS, a name server can be confi gured to administer just the servers within its domain. Often, a name server is also confi gured to administer the information in subdo-mains. The entire portion of DNS for which a name server is responsible is referred to as a zone. Consider Figure 14.1, where part of the DNS hierarchy is shown. There are a few sub-zones under example.com in this hierarchy. This does not mean that each of these subzones needs to have its own name server. In a confi guration such as this, one name server in the example.com domain can be confi gured with resource records for all the subzones as well.
F I GU R E 14 .1 Part of a DNS hierarchy
[root]
com
example
us
www www ftpftp
eu ap
redhat blah
Zone
org nl ...
It is also possible to split subzones. This is referred to as the delegation of subzone authority. This means a subdomain has its own name server, which has resource records for the subdomain. In addition, the name server of the parent domain does not know which hosts are in the subdomain. This is the case between the .com domain and the example.com domain. You can imagine that name servers of the .com domain don’t want to know everything about all that happens in the subzones. Therefore, the name server of a parent domain can delegate subzone authority. This means that the name server of the parent domain is confi gured to contact the name server of the subdomain to fi nd out which resource records exist within that subdomain.
As an administrator of a DNS domain, you will not confi gure subzones frequently, that is, unless you are responsible for a large domain in which many subdomains exist that are managed by other organizations.
DNS Server Types
The DNS hierarchy is built by connecting name servers to one another. You can imagine that it is useful to have more than one name server per domain. Every zone has at least a primary name server, also referred to as the master name server. This is the server that is responsible for a zone and the one on which modifi cations can be made. To increase redun-dancy in case the master name server goes down, zones are also often confi gured with a secondary or slave name server. One DNS server can fulfi ll the role of both name server types. This means that an administrator can confi gure a server to be the primary name server for one domain and the secondary name server for another domain.
c14.indd 357c14.indd 357 1/8/2013 12:10:23 PM1/8/2013 12:10:23 PM
358 Chapter 14 Configuring DNS and DHCP
To keep the primary and secondary name servers synchronized, a process known as zone transfer is used. In a zone transfer, a primary server can push its database to the secondary name server, or the secondary name server can request updates from the primary name server. How this occurs depends on the way that the administrator of the name server confi gures it.
In DNS traffi c, both primary and secondary name servers are considered to be authoritative name servers. This means that if a client gets an answer from the secondary name server about a resource record within the zone of that name server, it is considered to be an authoritative reply. This is because the answer comes from a name server that has direct knowledge of the resource records in that zone.
Apart from authoritative name servers, there are also recursive name servers. These are name servers that are capable of giving an answer, but they don’t get the answer from their own database. This is possible because, by default, every DNS name server caches its most recent request. How this works is explained in the following section.
The DNS Lookup Process
To get information from a DNS server, a client computer is confi gured with a DNS resolver. This is the confi guration that tells the client which DNS server to use. If the client computer is a Linux machine, the DNS resolver is in the confi guration fi le /etc/resolv.conf.
When a client needs to get information from DNS, it will always contact the name server that is confi gured in the DNS resolver to request that information. Because each DNS server is part of the worldwide DNS hierarchy, each DNS server should be able to handle client requests. In the DNS resolver, more than one name server is often confi gured to han-dle cases where the fi rst DNS server in the list is not available.
Let’s assume that a client is in the example.com domain and wants to get the resource record for www.sander.fr. The following will occur:
1. When the request arrives at the name server of example.com, this name server will check its cache. If it has recently found the requested resource record, the name server will issue a recursive answer from cache, and nothing else needs to be done.
2. If the name server cannot answer the request from cache, it will first check whether a forwarder has been configured. A forwarder is a DNS name server to which requests are forwarded that cannot be answered by the local DNS server. For example, this can be the name server of a provider that serves many zones and that has a large DNS cache.
3. If no forwarder has been configured, the DNS server will resolve the name step-by-step. In the first step, it will contact the name servers of the DNS root domain to find out how to reach the name servers of the .fr domain.
4. After finding out which name servers are responsible for the .fr domain, the local DNS server, which still acts on behalf of the client that issued the original request, contacts a name server of the .fr domain to find out which name server to contact to obtain information about the sander domain.
5. After finding the name server that is authoritative for the sander.fr domain, the name server can then request the resource record it needs. It will cache this resource record and send the answer back to the client.
c14.indd 358c14.indd 358 1/8/2013 12:10:23 PM1/8/2013 12:10:23 PM
Setting Up a DNS Server 359
DNS Zone Types
Most DNS servers are confi gured to service at least two zone types. First there is the regu-lar zone type that is used to fi nd an IP address for a hostname. This is the most common use of DNS. In some cases, however, it is needed to fi nd the name for a specifi c IP address. This type of request is handled by the in-addr.arpa zones.
In in-addr.arpa zones, PTR resource records are confi gured. The name of the in-addr.arpa zone is the reversed network part of the IP address followed by in-addr.arpa. For example, if the IP address is 193.173.10.87, the in-addr.arpa zone would be 87.10.173.in-addr.arpa. The name server for this zone would be confi gured to know the names of all IP addresses within that zone.
Although in-addr.arpa zones are useful, they are not always confi gured. The main reason is that DNS name resolving also works without in-addr.arpa zones; reverse name resolution is required in specifi c cases only.
Setting Up a DNS ServerThe Berkeley Internet Name Domain (BIND) service is used to offer DNS services on Red Hat Enterprise Linux. In this section, you’ll learn how to set it up. First you’ll read how to set up a cache-only name server. Next you’ll learn how to set up a primary name server for your own zone. Then you’ll learn how to set up a secondary name server and have it syn-chronize with the primary name server.
If you want to set up DNS in your own environment for testing purposes, use the example.com domain. This domain is reserved as a private DNS domain on the Internet. Thus, you can be assured that nothing related to example.com will ever go out on the Internet so that it doesn’t give you any conflicts with other domains. As you have already noticed, nearly every example in this book is based on the example.com domain.
Setting Up a Cache-Only Name Server
Running a cache-only name server can be useful when optimizing DNS requests in your network. If you run a BIND service on your server, it will do the recursion on behalf of all clients. Once the resource record is found, it is stored in cache on the cache-only name server. This means that the next time a client needs the same information, it can be pro-vided much faster.
Confi guring a cache-only name server isn’t diffi cult. You just need to install the BIND service and make sure that it allows incoming traffi c. For cache-only name servers, it also makes sense to confi gure a forwarder. In Exercise 14.1, you’ll learn how to do this.
c14.indd 359c14.indd 359 1/8/2013 12:10:23 PM1/8/2013 12:10:23 PM
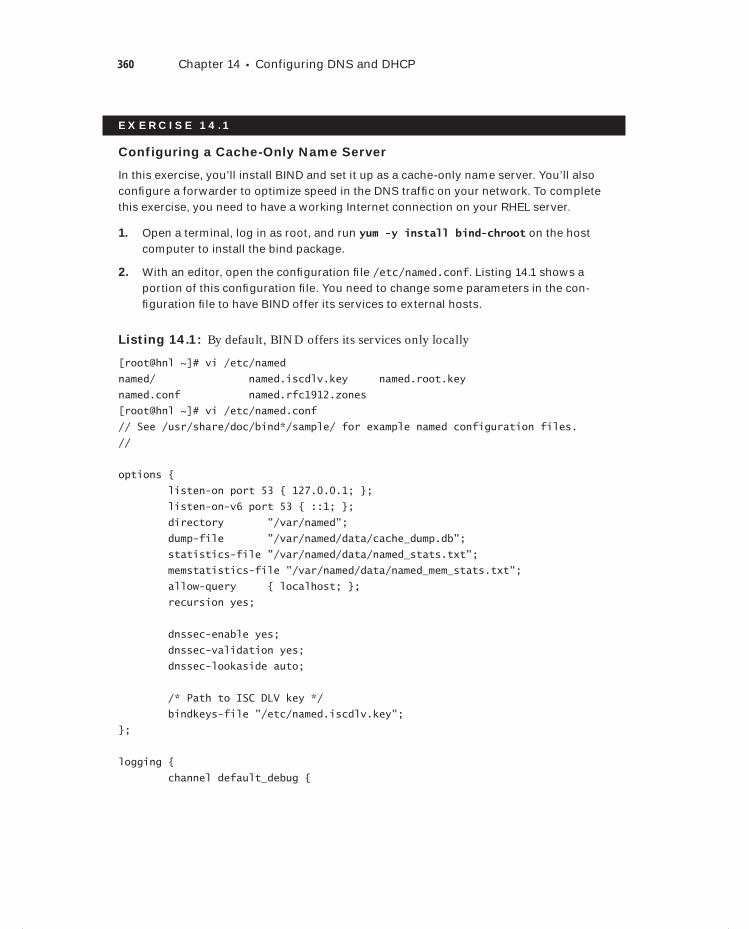
360 Chapter 14 Configuring DNS and DHCP
E X E R C I S E 14 .1
Configuring a Cache-Only Name Server
In this exercise, you’ll install BIND and set it up as a cache-only name server. You’ll also confi gure a forwarder to optimize speed in the DNS traffi c on your network. To complete this exercise, you need to have a working Internet connection on your RHEL server.
1. Open a terminal, log in as root, and run yum -y install bind-chroot on the host computer to install the bind package.
2. With an editor, open the confi guration fi le /etc/named.conf. Listing 14.1 shows a portion of this confi guration fi le. You need to change some parameters in the con-fi guration fi le to have BIND offer its services to external hosts.
Listing 14.1: By default, BIND offers its services only locally
[root@hnl ~]# vi /etc/named
named/ named.iscdlv.key named.root.key
named.conf named.rfc1912.zones
[root@hnl ~]# vi /etc/named.conf
// See /usr/share/doc/bind*/sample/ for example named configuration files.
//
options {
listen-on port 53 { 127.0.0.1; };
listen-on-v6 port 53 { ::1; };
directory "/var/named";
dump-file "/var/named/data/cache_dump.db";
statistics-file "/var/named/data/named_stats.txt";
memstatistics-file "/var/named/data/named_mem_stats.txt";
allow-query { localhost; };
recursion yes;
dnssec-enable yes;
dnssec-validation yes;
dnssec-lookaside auto;
/* Path to ISC DLV key */
bindkeys-file "/etc/named.iscdlv.key";
};
logging {
channel default_debug {
c14.indd 360c14.indd 360 1/8/2013 12:10:23 PM1/8/2013 12:10:23 PM
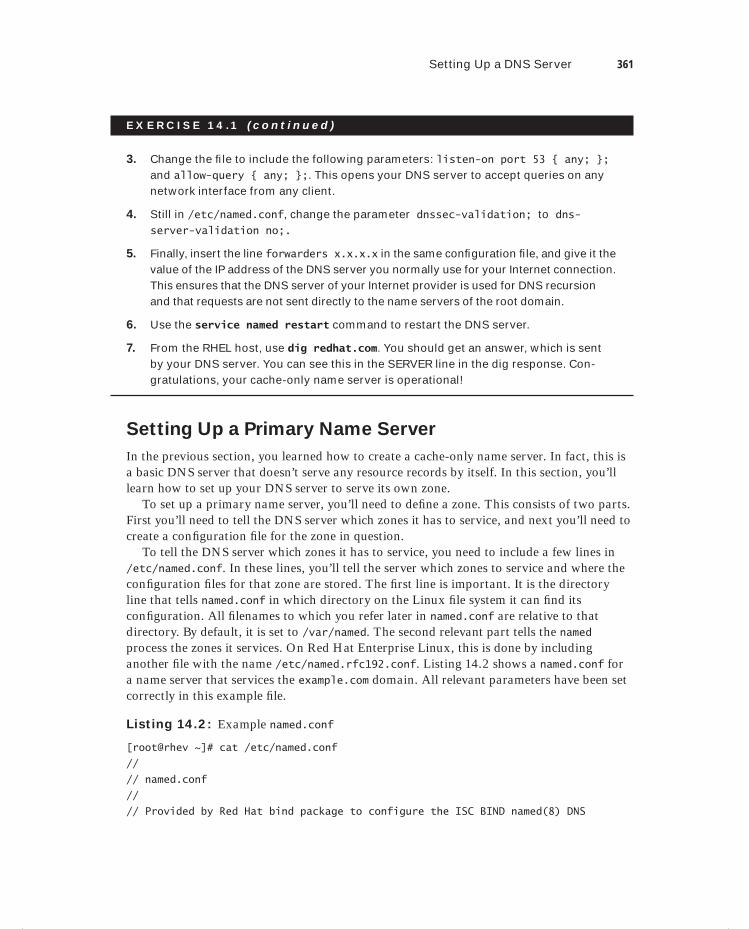
Setting Up a DNS Server 361
E X E R C I S E 14 .1 ( c ont inue d )
3. Change the fi le to include the following parameters: listen-on port 53 { any; }; and allow-query { any; };. This opens your DNS server to accept queries on any network interface from any client.
4. Still in /etc/named.conf, change the parameter dnssec-validation; to dns-server-validation no;.
5. Finally, insert the line forwarders x.x.x.x in the same confi guration fi le, and give it the value of the IP address of the DNS server you normally use for your Internet connection. This ensures that the DNS server of your Internet provider is used for DNS recursion and that requests are not sent directly to the name servers of the root domain.
6. Use the service named restart command to restart the DNS server.
7. From the RHEL host, use dig redhat.com. You should get an answer, which is sent by your DNS server. You can see this in the SERVER line in the dig response. Con-gratulations, your cache-only name server is operational!
Setting Up a Primary Name Server
In the previous section, you learned how to create a cache-only name server. In fact, this is a basic DNS server that doesn’t serve any resource records by itself. In this section, you’ll learn how to set up your DNS server to serve its own zone.
To set up a primary name server, you’ll need to defi ne a zone. This consists of two parts. First you’ll need to tell the DNS server which zones it has to service, and next you’ll need to create a confi guration fi le for the zone in question.
To tell the DNS server which zones it has to service, you need to include a few lines in /etc/named.conf. In these lines, you’ll tell the server which zones to service and where the confi guration fi les for that zone are stored. The fi rst line is important. It is the directory line that tells named.conf in which directory on the Linux fi le system it can fi nd its confi guration. All fi lenames to which you refer later in named.conf are relative to that directory. By default, it is set to /var/named. The second relevant part tells the named process the zones it services. On Red Hat Enterprise Linux, this is done by including another fi le with the name /etc/named.rfc192.conf. Listing 14.2 shows a named.conf for a name server that services the example.com domain. All relevant parameters have been set correctly in this example fi le.
Listing 14.2: Example named.conf
[root@rhev ~]# cat /etc/named.conf
//
// named.conf
//
// Provided by Red Hat bind package to configure the ISC BIND named(8) DNS
c14.indd 361c14.indd 361 1/8/2013 12:10:23 PM1/8/2013 12:10:23 PM
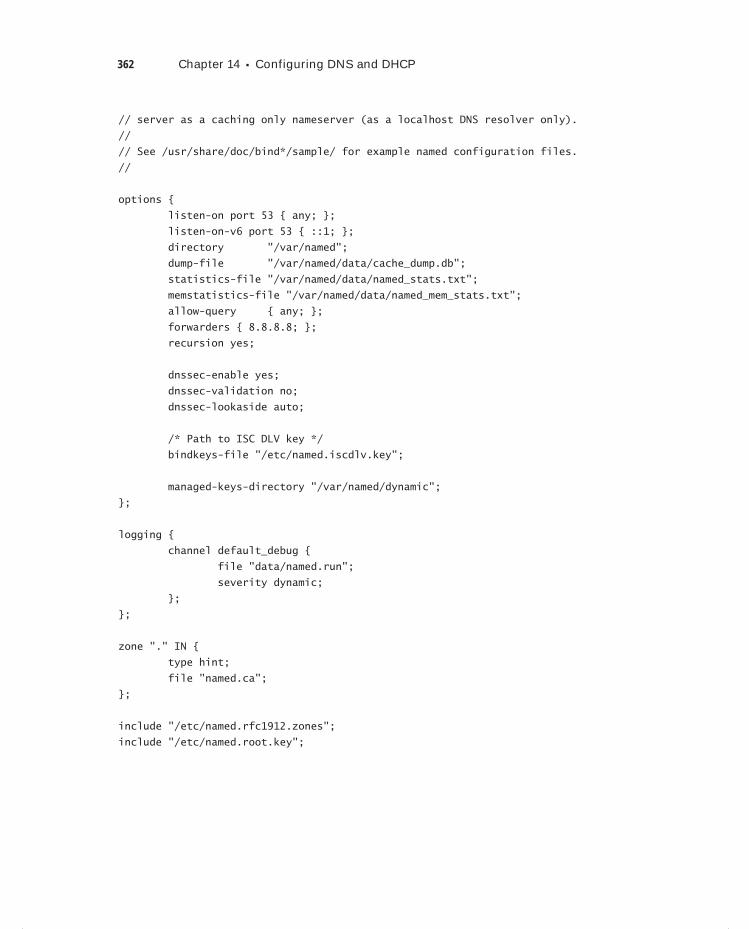
362 Chapter 14 Configuring DNS and DHCP
// server as a caching only nameserver (as a localhost DNS resolver only).
//
// See /usr/share/doc/bind*/sample/ for example named configuration files.
//
options {
listen-on port 53 { any; };
listen-on-v6 port 53 { ::1; };
directory "/var/named";
dump-file "/var/named/data/cache_dump.db";
statistics-file "/var/named/data/named_stats.txt";
memstatistics-file "/var/named/data/named_mem_stats.txt";
allow-query { any; };
forwarders { 8.8.8.8; };
recursion yes;
dnssec-enable yes;
dnssec-validation no;
dnssec-lookaside auto;
/* Path to ISC DLV key */
bindkeys-file "/etc/named.iscdlv.key";
managed-keys-directory "/var/named/dynamic";
};
logging {
channel default_debug {
file "data/named.run";
severity dynamic;
};
};
zone "." IN {
type hint;
file "named.ca";
};
include "/etc/named.rfc1912.zones";
include "/etc/named.root.key";
c14.indd 362c14.indd 362 1/8/2013 12:10:23 PM1/8/2013 12:10:23 PM
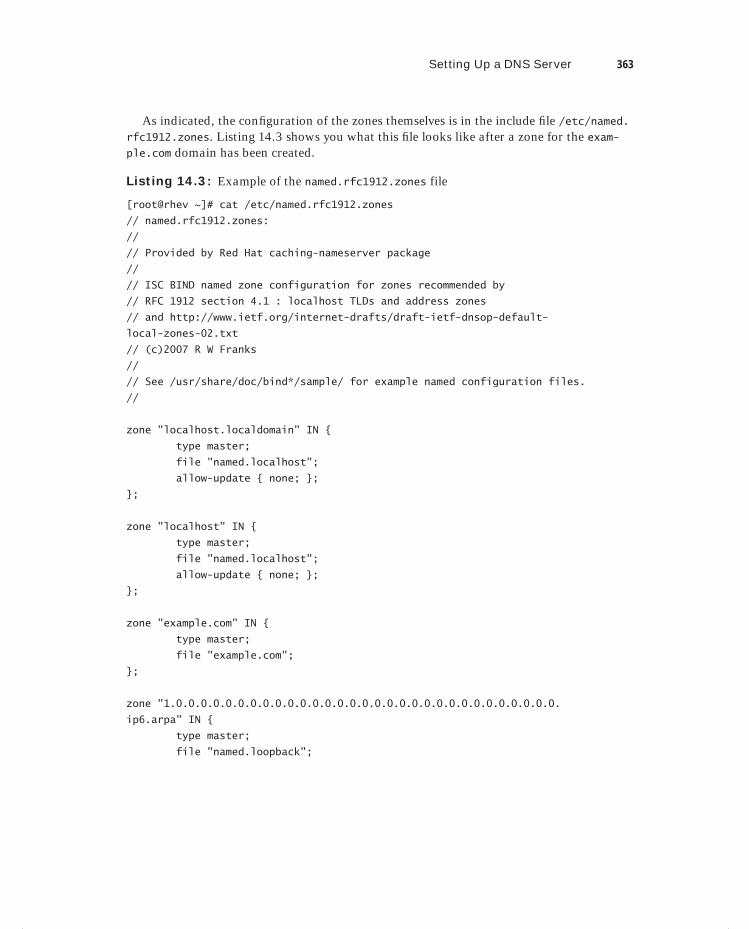
Setting Up a DNS Server 363
As indicated, the confi guration of the zones themselves is in the include fi le /etc/named.rfc1912.zones. Listing 14.3 shows you what this fi le looks like after a zone for the exam-ple.com domain has been created.
Listing 14.3: Example of the named.rfc1912.zones file
[root@rhev ~]# cat /etc/named.rfc1912.zones
// named.rfc1912.zones:
//
// Provided by Red Hat caching-nameserver package
//
// ISC BIND named zone configuration for zones recommended by
// RFC 1912 section 4.1 : localhost TLDs and address zones
// and http://www.ietf.org/internet-drafts/draft-ietf-dnsop-default-
local-zones-02.txt
// (c)2007 R W Franks
//
// See /usr/share/doc/bind*/sample/ for example named configuration files.
//
zone "localhost.localdomain" IN {
type master;
file "named.localhost";
allow-update { none; };
};
zone "localhost" IN {
type master;
file "named.localhost";
allow-update { none; };
};
zone "example.com" IN {
type master;
file "example.com";
};
zone "1.0.0.0.0.0.0.0.0.0.0.0.0.0.0.0.0.0.0.0.0.0.0.0.0.0.0.0.0.0.0.0.
ip6.arpa" IN {
type master;
file "named.loopback";
c14.indd 363c14.indd 363 1/8/2013 12:10:24 PM1/8/2013 12:10:24 PM
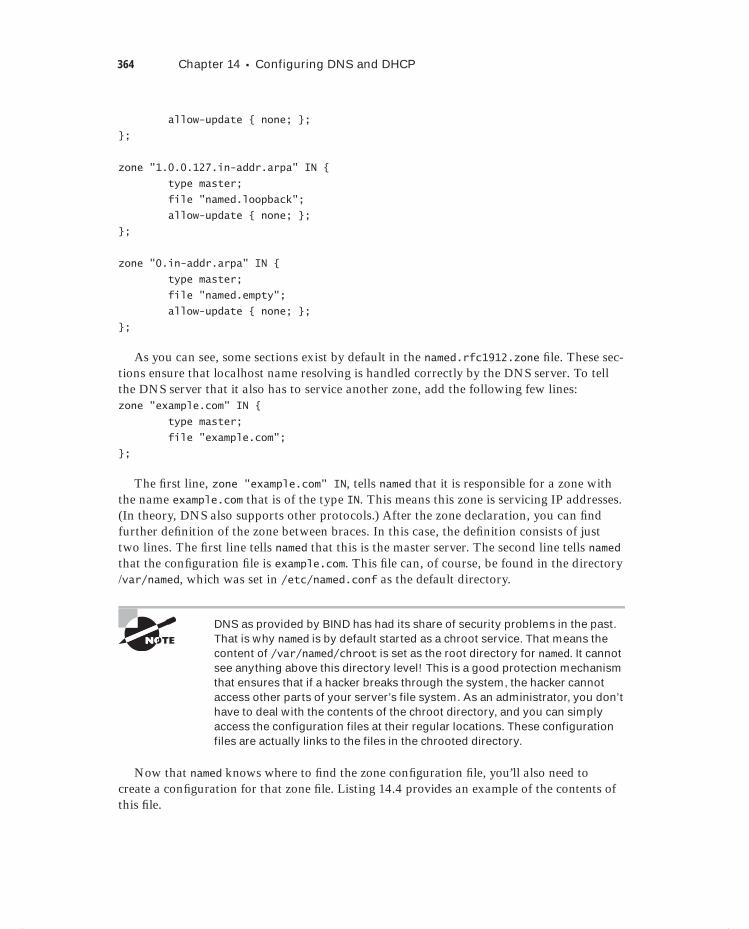
364 Chapter 14 Configuring DNS and DHCP
allow-update { none; };
};
zone "1.0.0.127.in-addr.arpa" IN {
type master;
file "named.loopback";
allow-update { none; };
};
zone "0.in-addr.arpa" IN {
type master;
file "named.empty";
allow-update { none; };
};
As you can see, some sections exist by default in the named.rfc1912.zone fi le. These sec-tions ensure that localhost name resolving is handled correctly by the DNS server. To tell the DNS server that it also has to service another zone, add the following few lines:zone "example.com" IN {
type master;
file "example.com";
};
The fi rst line, zone "example.com" IN, tells named that it is responsible for a zone with the name example.com that is of the type IN. This means this zone is servicing IP addresses. (In theory, DNS also supports other protocols.) After the zone declaration, you can fi nd further defi nition of the zone between braces. In this case, the defi nition consists of just two lines. The fi rst line tells named that this is the master server. The second line tells named that the confi guration fi le is example.com. This fi le can, of course, be found in the directory /var/named, which was set in /etc/named.conf as the default directory.
DNS as provided by BIND has had its share of security problems in the past. That is why named is by default started as a chroot service. That means the content of /var/named/chroot is set as the root directory for named. It cannot see anything above this directory level! This is a good protection mechanism that ensures that if a hacker breaks through the system, the hacker cannot access other parts of your server’s file system. As an administrator, you don’t have to deal with the contents of the chroot directory, and you can simply access the configuration files at their regular locations. These configuration files are actually links to the files in the chrooted directory.
Now that named knows where to fi nd the zone confi guration fi le, you’ll also need to create a confi guration for that zone fi le. Listing 14.4 provides an example of the contents of this fi le.
c14.indd 364c14.indd 364 1/8/2013 12:10:24 PM1/8/2013 12:10:24 PM
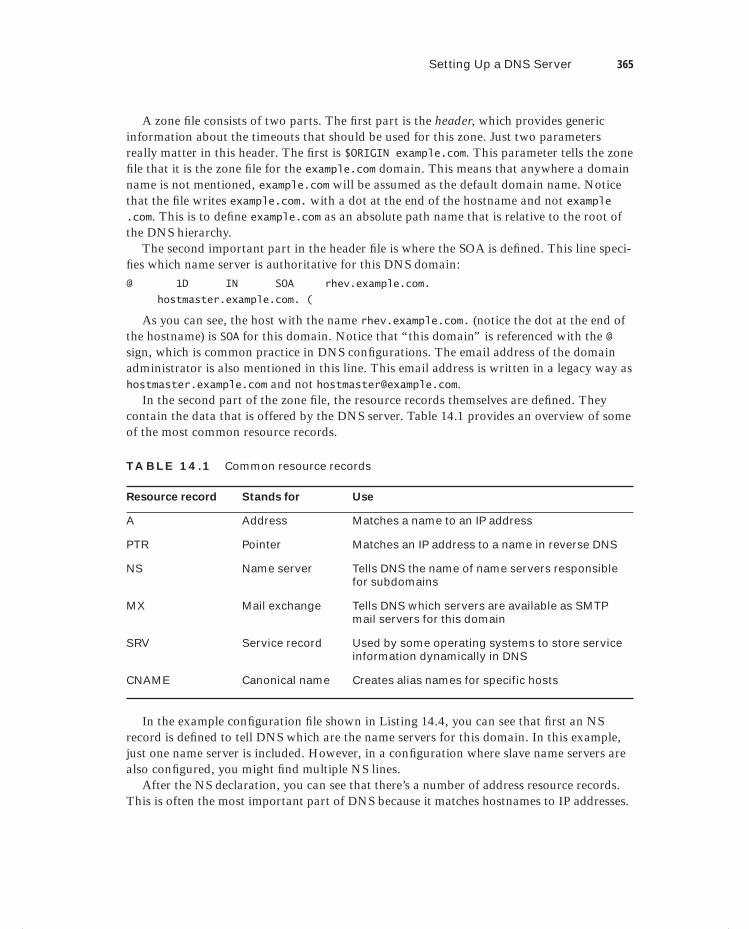
Setting Up a DNS Server 365
A zone fi le consists of two parts. The fi rst part is the header, which provides generic information about the timeouts that should be used for this zone. Just two parameters really matter in this header. The fi rst is $ORIGIN example.com. This parameter tells the zone fi le that it is the zone fi le for the example.com domain. This means that anywhere a domain name is not mentioned, example.com will be assumed as the default domain name. Notice that the fi le writes example.com. with a dot at the end of the hostname and not example.com. This is to defi ne example.com as an absolute path name that is relative to the root of the DNS hierarchy.
The second important part in the header fi le is where the SOA is defi ned. This line speci-fi es which name server is authoritative for this DNS domain:
@ 1D IN SOA rhev.example.com.
hostmaster.example.com. (
As you can see, the host with the name rhev.example.com. (notice the dot at the end of the hostname) is SOA for this domain. Notice that “this domain” is referenced with the @ sign, which is common practice in DNS confi gurations. The email address of the domain administrator is also mentioned in this line. This email address is written in a legacy way as hostmaster.example.com and not [email protected].
In the second part of the zone fi le, the resource records themselves are defi ned. They contain the data that is offered by the DNS server. Table 14.1 provides an overview of some of the most common resource records.
TA B LE 14 .1 Common resource records
Resource record Stands for Use
A Address Matches a name to an IP address
PTR Pointer Matches an IP address to a name in reverse DNS
NS Name server Tells DNS the name of name servers responsible for subdomains
MX Mail exchange Tells DNS which servers are available as SMTP mail servers for this domain
SRV Service record Used by some operating systems to store service information dynamically in DNS
CNAME Canonical name Creates alias names for specific hosts
In the example confi guration fi le shown in Listing 14.4, you can see that fi rst an NS record is defi ned to tell DNS which are the name servers for this domain. In this example, just one name server is included. However, in a confi guration where slave name servers are also confi gured, you might fi nd multiple NS lines.
After the NS declaration, you can see that there’s a number of address resource records. This is often the most important part of DNS because it matches hostnames to IP addresses.
c14.indd 365c14.indd 365 1/8/2013 12:10:24 PM1/8/2013 12:10:24 PM

366 Chapter 14 Configuring DNS and DHCP
The last part of the confi guration tells DNS the mail exchanges for this domain. As you can see, one is an internal server that is within the same DNS domain, and the other is a server that is hosted by some provider in an external domain. In Exercise 14.2, you’ll prac-tice setting up your own DNS Server.
Listing 14.4: Example zone file
[root@rhev named]# cat example.com
$TTL 86400
$ORIGIN example.com.
@ 1D IN SOA rhev.example.com.
hostmaster.example.com. (
20120822
3H ; refresh
15 ; retry
1W ; expire
3h ; minimum
)
IN NS rhev.example.com.
rhev IN A 192.168.1.220
rhevh IN A 192.168.1.151
rhevh1 IN A 192.168.1.221
blah IN A 192.168.1.1
router IN CNAME blah
IN MX 10 blah.example.com.
IN MX 20 blah.provider.com.
Why Bother Creating Your Own DNS?
If you have servers hosted with your provider, the easiest way of setting up a DNS con-fi guration is likely by using the provider interface and host of the DNS database of your provider. This is excellent when you want to make sure your DNS records are accessible for external users. In some cases, however, you will not want to do that, and you’ll need only the DNS records in your internal network. In such cases, you can use what you’ve learned in this book to create your own DNS server.
One reason I’ve come across for setting up my own DNS occurred while I was setting up a Red Hat Enterprise Virtualization (RHEV) environment. In RHEV, DNS is essential because all the nodes communicate by names only, and there is no way to access a shell on an RHEV hypervisor node, which is a minimal operating system with no option to log in as root. On my fi rst attempt to set up the environment without DNS, it failed completely. On the second attempt, with a correctly confi gured and operational DNS, RHEV worked smoothly.
c14.indd 366c14.indd 366 1/8/2013 12:10:24 PM1/8/2013 12:10:24 PM
Dow
nlo
ad fro
m W
ow
! eBook
<w
ww
.wow
ebook.
com
>

Setting Up a DNS Server 367
E X E R C I S E 14 . 2
Setting Up a Primary DNS Server
In this exercise, you’ll learn how to set up a primary DNS server. You’ll confi gure the name server for the example.com domain and then put in some resource records. At the end of the exercise, you’ll check that it’s all working as expected.
1. Make sure that the bind package is installed on your host computer.
2. Open the /etc/named.conf fi le, and make sure the following parameters are included:
directory is set to /var/named
listen-on port 53 is set to any
allow-query is set to any
forwarders contains the IP address of your Internet provider’s DNS name server
dns-sec validation is set to no
3. Open the /etc/named.rfc1912.zones fi le, and create a defi nition for the example.com domain. You can use the same confi guration shown in Listing 14.3.
4. Create a fi le /var/named/example.com, and give it contents similar to those in Listing 14.4. Change it to match the hostnames in your environment.
5. Make sure that the DNS resolver in /etc/resolv.conf is set to your own DNS server.
6. Use dig yourhost.example.com, and verify that your DNS server gives the correct information from your DNS database.
Configuring an in-addr.arpa Zone
In the previous section, you learned how to set up a normal zone, which is used to resolve a name to its IP address. It is often a good idea also to set up an in-addr.arpa zone. This allows external DNS servers to fi nd the name that belongs to an incoming IP address. Setting up an in-addr.arpa zone is not a strict requirement, however, and your DNS server will work fi ne without an in-addr.arpa zone.
Creating an in-addr.arpa zone works similarly to the creation of a regular zone in DNS. You’ll need to modify the /etc/named.rfc1912.zones fi le to defi ne the in-addr.arpa zone. This defi nition might appear as follows:
zone "100.173.193.in-addr.arpa" {
type master;
file "193.173.100.zone";
};
Notice that in in-addr.arpa, you’ll always use the reverse network part of the IP address. In this case, the network is 193.173.100.0/24, so the reverse network part is
c14.indd 367c14.indd 367 1/8/2013 12:10:24 PM1/8/2013 12:10:24 PM
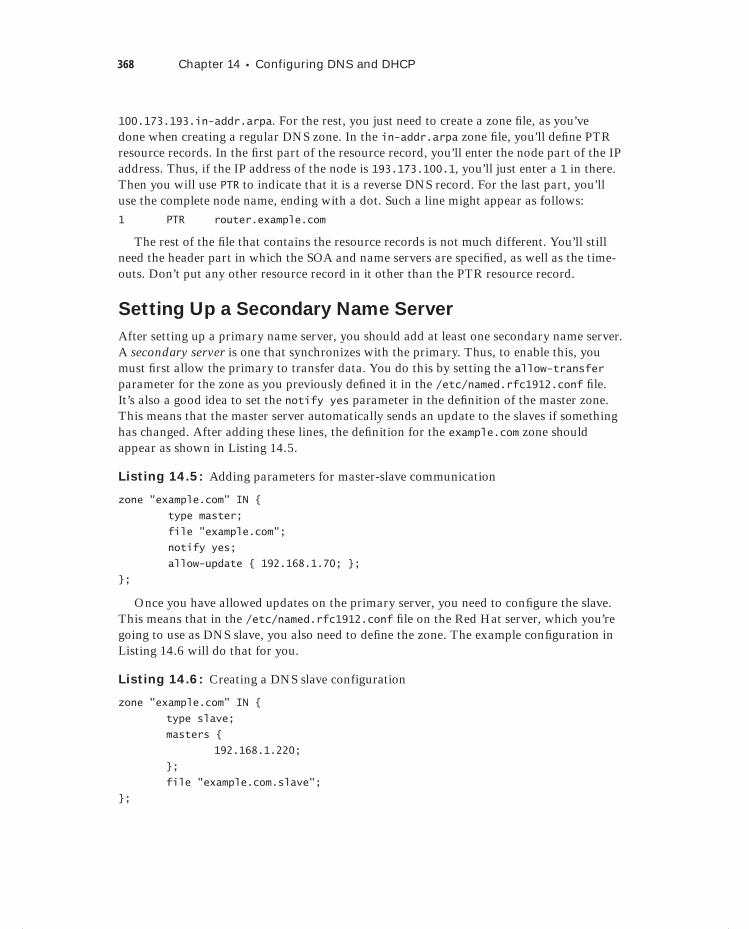
368 Chapter 14 Configuring DNS and DHCP
100.173.193.in-addr.arpa. For the rest, you just need to create a zone fi le, as you’ve done when creating a regular DNS zone. In the in-addr.arpa zone fi le, you’ll defi ne PTR resource records. In the fi rst part of the resource record, you’ll enter the node part of the IP address. Thus, if the IP address of the node is 193.173.100.1, you’ll just enter a 1 in there. Then you will use PTR to indicate that it is a reverse DNS record. For the last part, you’ll use the complete node name, ending with a dot. Such a line might appear as follows:
1 PTR router.example.com
The rest of the fi le that contains the resource records is not much different. You’ll still need the header part in which the SOA and name servers are specifi ed, as well as the time-outs. Don’t put any other resource record in it other than the PTR resource record.
Setting Up a Secondary Name Server
After setting up a primary name server, you should add at least one secondary name server. A secondary server is one that synchronizes with the primary. Thus, to enable this, you must fi rst allow the primary to transfer data. You do this by setting the allow-transfer parameter for the zone as you previously defi ned it in the /etc/named.rfc1912.conf fi le. It’s also a good idea to set the notify yes parameter in the defi nition of the master zone. This means that the master server automatically sends an update to the slaves if something has changed. After adding these lines, the defi nition for the example.com zone should appear as shown in Listing 14.5.
Listing 14.5: Adding parameters for master-slave communication
zone "example.com" IN {
type master;
file "example.com";
notify yes;
allow-update { 192.168.1.70; };
};
Once you have allowed updates on the primary server, you need to confi gure the slave. This means that in the /etc/named.rfc1912.conf fi le on the Red Hat server, which you’re going to use as DNS slave, you also need to defi ne the zone. The example confi guration in Listing 14.6 will do that for you.
Listing 14.6: Creating a DNS slave configuration
zone "example.com" IN {
type slave;
masters {
192.168.1.220;
};
file "example.com.slave";
};
c14.indd 368c14.indd 368 1/8/2013 12:10:24 PM1/8/2013 12:10:24 PM

Understanding DHCP 369
After creating the slave confi guration, make sure to restart the named service to get it working.
This chapter hasn’t presented any information about key-based DNS com-munication. If you truly need security in a DNS environment, it is important to secure the communication between the master and slave servers by using keys. Working with DNS keys is complicated, and you don’t need it for internal use. If you want to know more about key-based DNS communi-cation, look for information about TSIG keys, which is what you need to set up DNS in a highly secured environment.
Understanding DHCPThe Dynamic Host Confi guration Protocol (DHCP) is used to assign IP-related confi gu-ration to hosts in your network. Using a DHCP server makes managing a network a lot easier, because it gives the administrator the option to manage IP-related confi guration on a single, central location on the network, instead of on multiple different hosts.
Counter to common belief, DHCP offers much more than just the IP address to hosts that request its information. A DHCP server can be confi gured to assign more than 80 dif-ferent parameters to its clients, of which the most commonly used are IP addresses, default gateways, and the IP address of the DNS name servers.
When a client comes up, it will send a DHCP request on the network. This DHCP request is sent as a broadcast, and the DHCP server that receives the DHCP request will answer and assign an available IP address. Because the DHCP request is sent as a broadcast, you can have just one DHCP server per subnet. If multiple DHCP servers are available, there is no way to determine which DHCP server assigns the IP addresses. In such cases, it is common to set up failover DHCP, which means that two DHCP services together are servicing the same subnet, and one DHCP server completely takes over if something goes wrong.
It is also good to know that each client, no matter which operating system is used on the client, remembers by default the last IP address it has used. When sending out a DHCP request, it will always request to use the last IP address again. If that IP address is no lon-ger available, the DHCP server will give another IP address from the pool of available IP addresses.
When confi guring a DHCP server, it is a good idea to think about the default lease time. This is the amount of time that the client can use an IP address it has received without con-tacting the DHCP server again. In most cases, it’s a good idea to set the default lease time to a rather short amount of time, which means it doesn’t take too long for an IP address to be given back to the DHCP server. This makes sense especially in an environment where users connect for a short period of time, because within the max-lease-time (two hours by default), the IP address is claimed and cannot be used by another client. In many cases, it makes sense to set the max-lease-time to a period much shorter than 7,200 seconds.
c14.indd 369c14.indd 369 1/8/2013 12:10:24 PM1/8/2013 12:10:24 PM
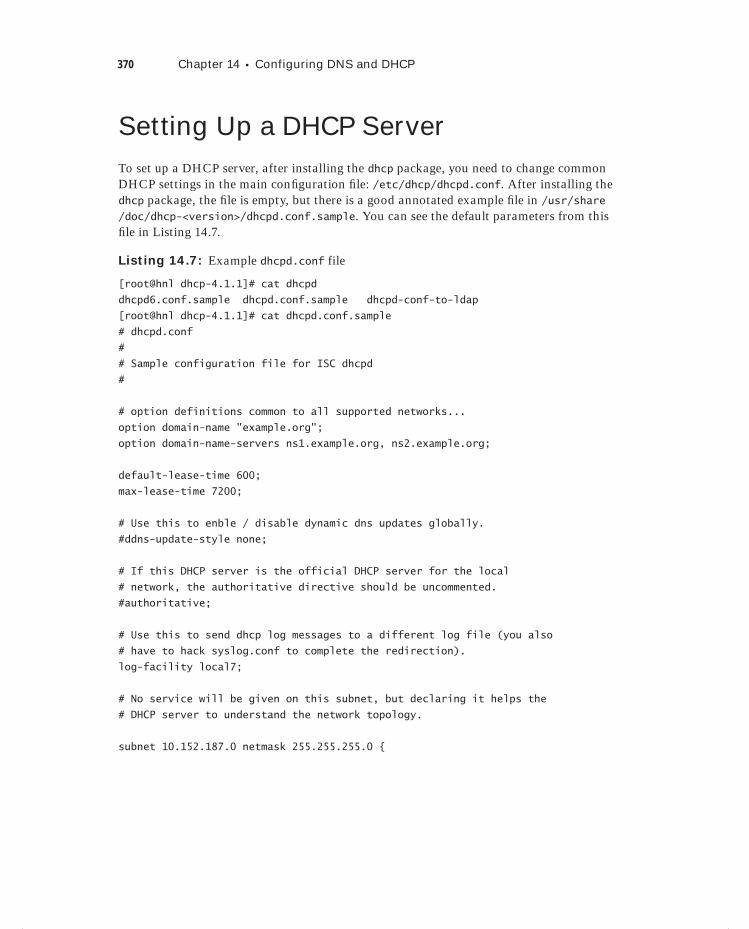
370 Chapter 14 Configuring DNS and DHCP
Setting Up a DHCP ServerTo set up a DHCP server, after installing the dhcp package, you need to change common DHCP settings in the main confi guration fi le: /etc/dhcp/dhcpd.conf. After installing the dhcp package, the fi le is empty, but there is a good annotated example fi le in /usr/share/doc/dhcp-<version>/dhcpd.conf.sample. You can see the default parameters from this fi le in Listing 14.7.
Listing 14.7: Example dhcpd.conf file
[root@hnl dhcp-4.1.1]# cat dhcpd
dhcpd6.conf.sample dhcpd.conf.sample dhcpd-conf-to-ldap
[root@hnl dhcp-4.1.1]# cat dhcpd.conf.sample
# dhcpd.conf
#
# Sample configuration file for ISC dhcpd
#
# option definitions common to all supported networks...
option domain-name "example.org";
option domain-name-servers ns1.example.org, ns2.example.org;
default-lease-time 600;
max-lease-time 7200;
# Use this to enble / disable dynamic dns updates globally.
#ddns-update-style none;
# If this DHCP server is the official DHCP server for the local
# network, the authoritative directive should be uncommented.
#authoritative;
# Use this to send dhcp log messages to a different log file (you also
# have to hack syslog.conf to complete the redirection).
log-facility local7;
# No service will be given on this subnet, but declaring it helps the
# DHCP server to understand the network topology.
subnet 10.152.187.0 netmask 255.255.255.0 {
c14.indd 370c14.indd 370 1/8/2013 12:10:24 PM1/8/2013 12:10:24 PM
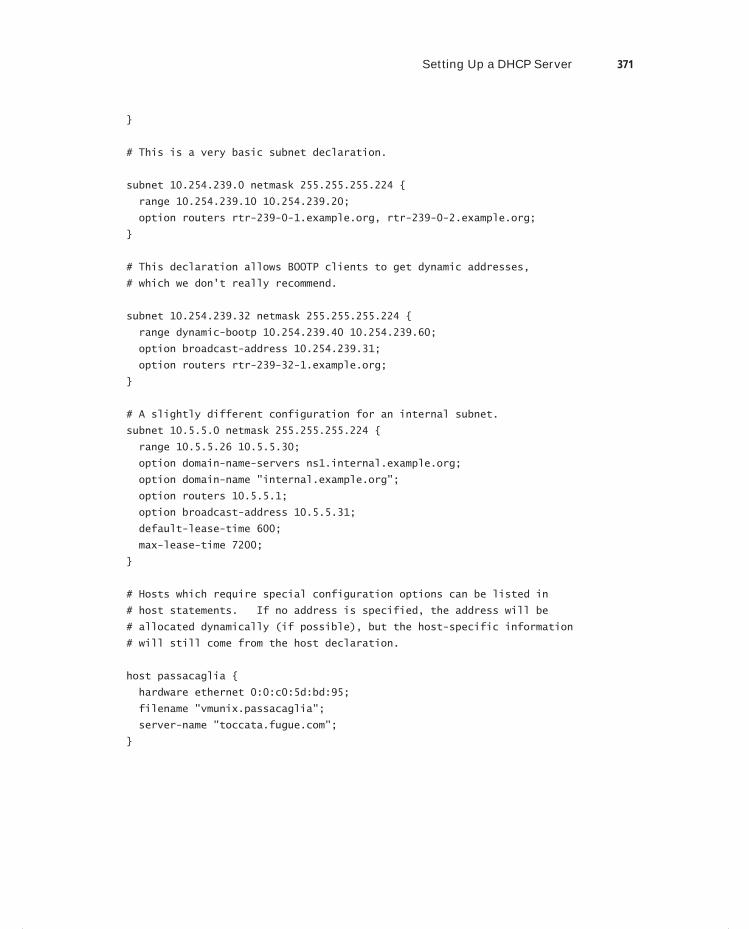
Setting Up a DHCP Server 371
}
# This is a very basic subnet declaration.
subnet 10.254.239.0 netmask 255.255.255.224 {
range 10.254.239.10 10.254.239.20;
option routers rtr-239-0-1.example.org, rtr-239-0-2.example.org;
}
# This declaration allows BOOTP clients to get dynamic addresses,
# which we don't really recommend.
subnet 10.254.239.32 netmask 255.255.255.224 {
range dynamic-bootp 10.254.239.40 10.254.239.60;
option broadcast-address 10.254.239.31;
option routers rtr-239-32-1.example.org;
}
# A slightly different configuration for an internal subnet.
subnet 10.5.5.0 netmask 255.255.255.224 {
range 10.5.5.26 10.5.5.30;
option domain-name-servers ns1.internal.example.org;
option domain-name "internal.example.org";
option routers 10.5.5.1;
option broadcast-address 10.5.5.31;
default-lease-time 600;
max-lease-time 7200;
}
# Hosts which require special configuration options can be listed in
# host statements. If no address is specified, the address will be
# allocated dynamically (if possible), but the host-specific information
# will still come from the host declaration.
host passacaglia {
hardware ethernet 0:0:c0:5d:bd:95;
filename "vmunix.passacaglia";
server-name "toccata.fugue.com";
}
c14.indd 371c14.indd 371 1/8/2013 12:10:24 PM1/8/2013 12:10:24 PM
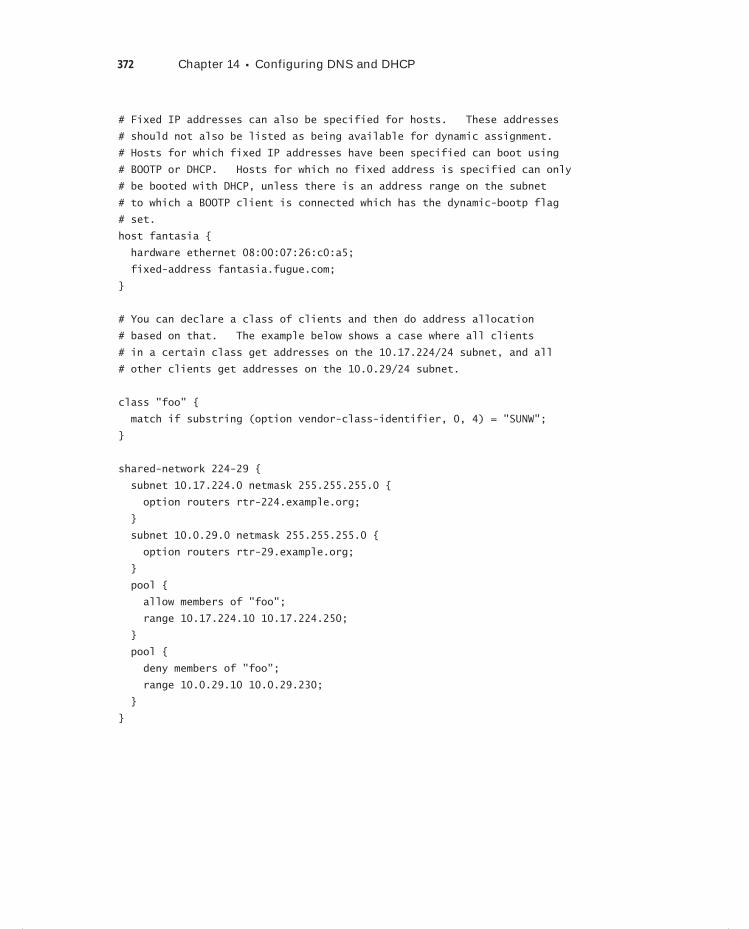
372 Chapter 14 Configuring DNS and DHCP
# Fixed IP addresses can also be specified for hosts. These addresses
# should not also be listed as being available for dynamic assignment.
# Hosts for which fixed IP addresses have been specified can boot using
# BOOTP or DHCP. Hosts for which no fixed address is specified can only
# be booted with DHCP, unless there is an address range on the subnet
# to which a BOOTP client is connected which has the dynamic-bootp flag
# set.
host fantasia {
hardware ethernet 08:00:07:26:c0:a5;
fixed-address fantasia.fugue.com;
}
# You can declare a class of clients and then do address allocation
# based on that. The example below shows a case where all clients
# in a certain class get addresses on the 10.17.224/24 subnet, and all
# other clients get addresses on the 10.0.29/24 subnet.
class "foo" {
match if substring (option vendor-class-identifier, 0, 4) = "SUNW";
}
shared-network 224-29 {
subnet 10.17.224.0 netmask 255.255.255.0 {
option routers rtr-224.example.org;
}
subnet 10.0.29.0 netmask 255.255.255.0 {
option routers rtr-29.example.org;
}
pool {
allow members of "foo";
range 10.17.224.10 10.17.224.250;
}
pool {
deny members of "foo";
range 10.0.29.10 10.0.29.230;
}
}
c14.indd 372c14.indd 372 1/8/2013 12:10:24 PM1/8/2013 12:10:24 PM

Setting Up a DHCP Server 373
Here are the most relevant parameters from the dhcpd.conf fi le and a short explanation of each:
option domain-name Use this to set the DNS domain name for the DHCP clients.
option domain-name-servers This specifi es the DNS name servers that should be used.
default-lease-time This is the default time in seconds that a client can use the IP address that it has received from the DHCP server.
max-lease-time This is the maximum time that a client can keep on using its assigned IP address. If within the max-lease-time timeout it hasn’t been able to contact the DHCP server for renewal, the IP address will expire, and the client can’t use it anymore.
log-facility This specifi es which syslog facility the DHCP server uses.
subnet This is the essence of the work of a DHCP server. The subnet defi nition specifi es the network on which the DHCP server should assign IP addresses. A DHCP server can serve multiple subnets, but it is common for the DHCP server to be directly connected to the subnet it serves.
range This is the range of IP addresses within the subnet that the DHCP server can assign to clients.
option routers This is the router that should be set as the default gateway.
As you see from the sample DHCP confi guration fi le, there are many options that an administrator can use to specify different kinds of information that should be handed out. Some options can be set globally and also in the subnet, while other options are set in spe-cifi c subnets. As an administrator, you need to determine where you want to set specifi c options.
Apart from the subnet declarations that you make on the DHCP server, you can also defi ne the confi guration for specifi c hosts. In the example fi le in Listing 14.7, you can see this in the host declarations for host passacaglia and host fantasia. Host declarations will work based on the specifi cation of the hardware Ethernet address of the host; this is the MAC address of the network card where the DHCP request comes in.
At the end of the example confi guration fi le, you can also see that a class is defi ned, as well as a shared network in which different subnets and pools are used. The idea is that you can use the class to identify a specifi c host. This works on the basis of the vendor class identifi er, which is capable of identifying the type of host that sends a DHCP request. Once a specifi c kind of host is identifi ed, you can match it to a class and, based on class member-ship, assign specifi c confi guration that makes sense for that class type only.
At the end of the example dhcpd.conf confi guration fi le, you can see that, on a shared network, two different subnets are declared where all members of the class foo are assigned to one of the subnets and all others are assigned to the other class. In Exercise 14.3, you’ll learn how to set up your own DHCP Server.
c14.indd 373c14.indd 373 1/8/2013 12:10:24 PM1/8/2013 12:10:24 PM
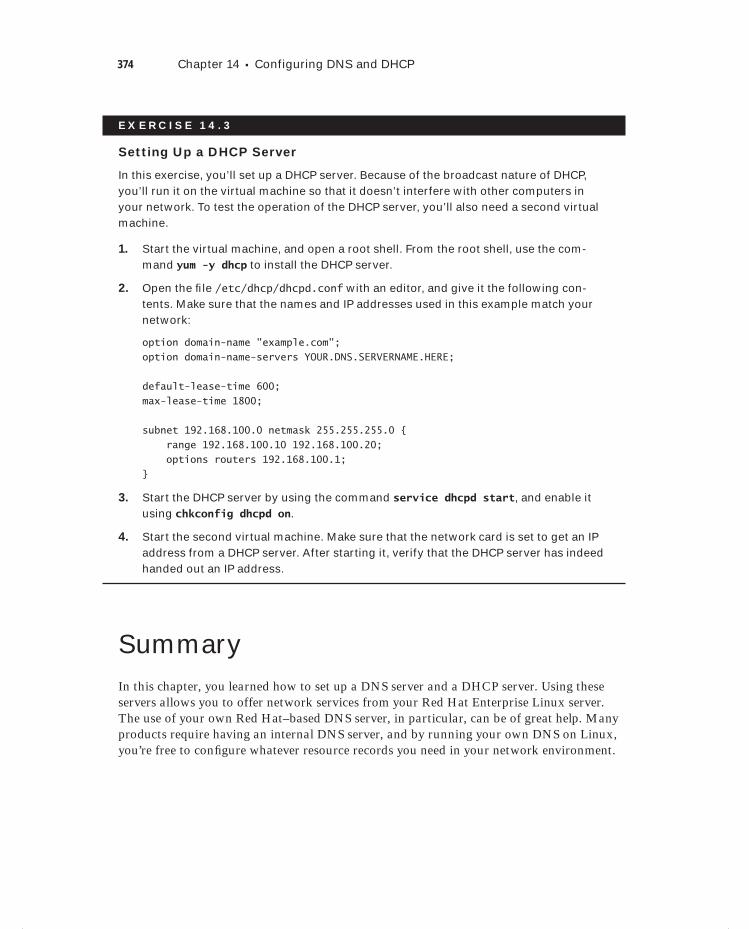
374 Chapter 14 Configuring DNS and DHCP
E X E R C I S E 14 . 3
Setting Up a DHCP Server
In this exercise, you’ll set up a DHCP server. Because of the broadcast nature of DHCP, you’ll run it on the virtual machine so that it doesn’t interfere with other computers in your network. To test the operation of the DHCP server, you’ll also need a second virtual machine.
1. Start the virtual machine, and open a root shell. From the root shell, use the com-mand yum -y dhcp to install the DHCP server.
2. Open the fi le /etc/dhcp/dhcpd.conf with an editor, and give it the following con-tents. Make sure that the names and IP addresses used in this example match your network:
option domain-name "example.com";
option domain-name-servers YOUR.DNS.SERVERNAME.HERE;
default-lease-time 600;
max-lease-time 1800;
subnet 192.168.100.0 netmask 255.255.255.0 {
range 192.168.100.10 192.168.100.20;
options routers 192.168.100.1;
}
3. Start the DHCP server by using the command service dhcpd start, and enable it using chkconfig dhcpd on.
4. Start the second virtual machine. Make sure that the network card is set to get an IP address from a DHCP server. After starting it, verify that the DHCP server has indeed handed out an IP address.
SummaryIn this chapter, you learned how to set up a DNS server and a DHCP server. Using these servers allows you to offer network services from your Red Hat Enterprise Linux server. The use of your own Red Hat–based DNS server, in particular, can be of great help. Many products require having an internal DNS server, and by running your own DNS on Linux, you’re free to confi gure whatever resource records you need in your network environment.
c14.indd 374c14.indd 374 1/8/2013 12:10:25 PM1/8/2013 12:10:25 PM

Chapter
15Setting Up a Mail Server
TOPICS COVERED IN THIS CHAPTER:
Using the Message Transfer Agent
Setting Up Postfix as an SMTP Server
Configuring Dovecot for POP and IMAP
Further Steps
c15.indd 375c15.indd 375 1/8/2013 12:06:33 PM1/8/2013 12:06:33 PM

It’s hard to imagine the Internet without email. Even if new techniques to communicate, such as instant messaging, tweet-ing, and texting, have established themselves, email is still an
important means of communicating on the Internet. To confi gure an Internet mail solu-tion, Red Hat offers Postfi x as the default mail server. Before learning how this mail server works, this chapter is a short introduction into the domain of Internet mail.
Using the Message Transfer AgentThree components play a role in the process of Internet mail. First there is the message transfer agent (MTA). The MTA uses the Simple Mail Transfer Protocol (SMTP) to exchange mail messages with other MTAs on the Internet. If a user sends a mail message to a user on another domain on the Internet, it’s the responsibility of the MTA to contact the MTA of the other domain and deliver the message there. To fi nd out which MTA serves the other domain, the DNS MX record is used.
Upon receiving a message, the MTA checks whether it is the fi nal destination. If it is, it will deliver the message to the local message delivery agent (MDA), which takes care of delivering the message to the mailbox of the user. If the MTA itself is not the fi nal destina-tion, the MTA relays the message to the MTA of the fi nal destination.
Relaying is a hot item in email delivery. Normally, an MTA doesn’t relay messages for just anyone, but only for authenticated users or users who are known in some other way. If messages were relayed for everyone, this would likely mean that the MTA was being abused by spammers on the Internet.
If, for some reason, the MTA cannot deliver the message to the other MTA, it will queue it. Queuing means that the MTA stores the message in a local directory and will try to deliver it again later. As an administrator, you can fl ush the queues, which means that you can tell the MTA to send all queued messages now.
Upon delivery, it sometimes happens that the MTA, which contacted an exterior MTA and delivered the message there, receives it back. This process is referred to as bouncing. In general, a message is bounced if it doesn’t comply with the rules of the receiving MTA, but it can also be bounced if the destination user simply doesn’t exist. Alternatively, it’s nicer if an MTA is confi gured simply to generate an error if the message couldn’t be delivered.
c15.indd 376c15.indd 376 1/8/2013 12:06:35 PM1/8/2013 12:06:35 PM

Setting Up Postfix as an SMTP Server 377
Understanding the Mail Delivery Agent
Upon receiving a message, the MTA typically delivers it at the mail delivery agent. This is the software component that takes care of delivering the mail message to the destina-tion user. Typically, the MDA delivers mail to the recipient’s local message store, which by default on Red Hat Enterprise Linux is the directory /var/spool/mail/$USER. In the Postfi x mail server, an MDA is included in the form of the local program.
You should be aware that the MDA is only the software part that drops the message somewhere the recipient can fi nd it. It is not the POP or IMAP server, which is an addition to a mail solution that makes it easier for users to get their messages (if they’re not on the same machine where the MDA is running). In the early days of the Internet, message recipi-ents typically logged in to the machine where the MDA functioned; nowadays, it is common for users to get their messages from a remote desktop on which they are working. To facili-tate this, you need a POP server that allows users to download messages or an IMAP server that allows users to connect to the mail server and read the messages while they’re online.
Understanding the Mail User Agent
Finally, the mail message arrives in the mail user agent (MUA). This is the mail client that end users use to read their messages or to compose new messages. As a mail server admin-istrator, you typically don’t care much about the MUA. It is the responsibility of users to install an MUA, which allows them to work with email on their computer, tablet, or smart-phone. Popular MUAa are Outlook, Evolution, and the Linux command-line Mutt tool, which you’ll work with in this chapter.
Setting Up Postfix as an SMTP ServerSetting up a Postfi x mail server can be easy, depending on exactly what you want to do with it. If you only want to enable Postfi x for local email delivery, you just have to set a few security parameters and be aware of a minimal number of administration commands. If you want to set up Postfi x for mail delivery to other domains on the Internet, that is a bit more involved.
In both cases, you will do most of the work in the /etc/postfix/main.cf fi le. This is the Postfi x confi guration fi le in which you’ll tune some of the many parameters that are available in this fi le.
For troubleshooting the message delivery process, the /var/log/maillog fi le is an impor-tant source of information. In this fi le, you’ll fi nd status information about the message delivery process, and just by reading it, you will often fi nd out why you are experi-encing problems.
c15.indd 377c15.indd 377 1/8/2013 12:06:35 PM1/8/2013 12:06:35 PM
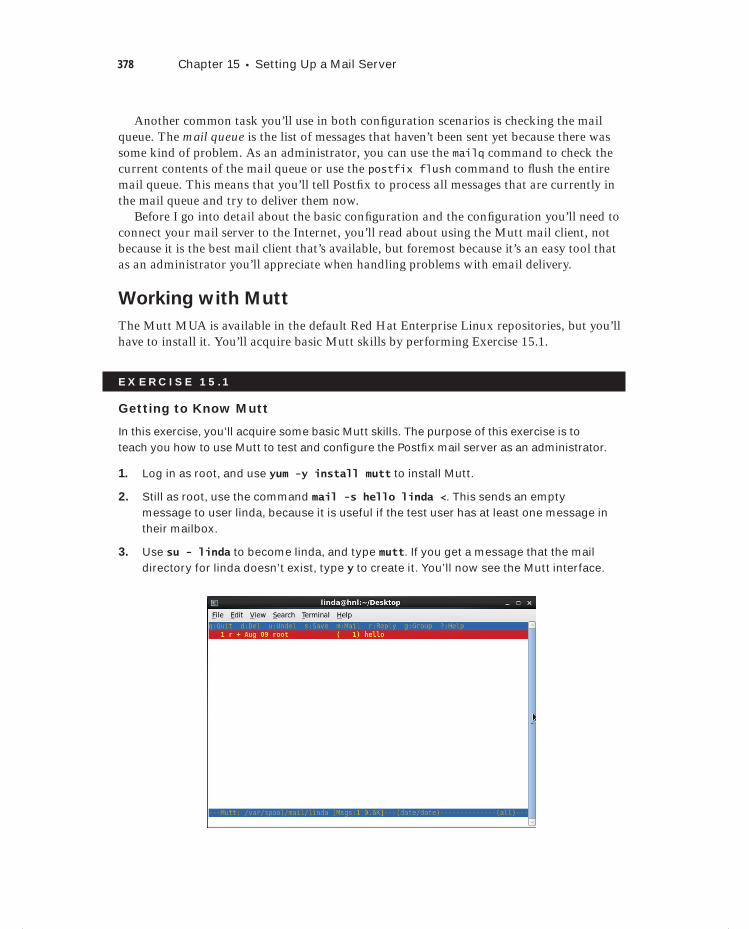
378 Chapter 15 Setting Up a Mail Server
Another common task you’ll use in both confi guration scenarios is checking the mail queue. The mail queue is the list of messages that haven’t been sent yet because there was some kind of problem. As an administrator, you can use the mailq command to check the current contents of the mail queue or use the postfix flush command to fl ush the entire mail queue. This means that you’ll tell Postfi x to process all messages that are currently in the mail queue and try to deliver them now.
Before I go into detail about the basic confi guration and the confi guration you’ll need to connect your mail server to the Internet, you’ll read about using the Mutt mail client, not because it is the best mail client that’s available, but foremost because it’s an easy tool that as an administrator you’ll appreciate when handling problems with email delivery.
Working with Mutt
The Mutt MUA is available in the default Red Hat Enterprise Linux repositories, but you’ll have to install it. You’ll acquire basic Mutt skills by performing Exercise 15.1.
E X E R C I S E 15 .1
Getting to Know Mutt
In this exercise, you’ll acquire some basic Mutt skills. The purpose of this exercise is to teach you how to use Mutt to test and confi gure the Postfi x mail server as an administrator.
1. Log in as root, and use yum -y install mutt to install Mutt.
2. Still as root, use the command mail -s hello linda <. This sends an empty message to user linda, because it is useful if the test user has at least one message in their mailbox.
3. Use su - linda to become linda, and type mutt. If you get a message that the mail directory for linda doesn’t exist, type y to create it. You’ll now see the Mutt interface.
c15.indd 378c15.indd 378 1/8/2013 12:06:36 PM1/8/2013 12:06:36 PM
Setting Up Postfix as an SMTP Server 379
E X E R C I S E 15 .1 ( c ont inue d )
4. Press Enter to open the mail message. Because it doesn’t contain any content, you’ll just see the message header.
5. Type q once you’ve fi nished reading the message.
6. To reply to the message, type r. Mutt will prompt you to choose which user you want to send the message and which subject line you want to use. Press Enter twice to accept the default suggestions.
7. The message composition window opens next. This is a vi window, so use o to open a new line and start writing the message. Once you are fi nished writing, use the vi command :wq! to close the message-editing interface.
8. Now you’ll see the message summary. From there, type y to send it to root. Next type q to quit Mutt.
9. Exit linda’s su shell, and as root type mutt. You’ll see that linda’s message has been delivered to her inbox.
At this point, you know everything about Mutt that you need to know as a mail server administrator. You’ve seen that it’s not diffi cult to send mail messages with Mutt, and because the recipient is on the local machine, it works perfectly.
In Exercise 15.2, you’re going to try to send an email message to a user on the virtual machine testvm.
E X E R C I S E 15 . 2
Sending a Message to an External User
In this exercise, you’re going to send an email message to a user on another computer. This means that two instances of Postfi x will need to communicate with one another. Make sure to follow all of the instructions so that all prerequisites have been set properly.
1. On the host computer, use virsh list. If you performed all previous exercises, you’ll see a virtual machine with the name testvm. Use virsh start testvm to start this virtual machine.
2. On the host computer, start the Virtual Machine Manager using the virt-manager command. Open a console on the virtual machine, and note its IP address.
3. On both the host and the virtual machine, edit the /etc/hosts fi le and include a line for the host computer and the virtual machine. The purpose for doing this is that these two computers can then resolve one another.
4. On the virtual machine, use useradd lisa to create a user with the name lisa.
5. On the host computer, use su - linda to become linda and start Mutt. From the Mutt interface, type m to start composing a new mail message. Enter [email protected] in the to fi eld. In the Subject fi eld, enter test message 1. Enter some text in the mail message, and press y to send it.
c15.indd 379c15.indd 379 1/8/2013 12:06:36 PM1/8/2013 12:06:36 PM
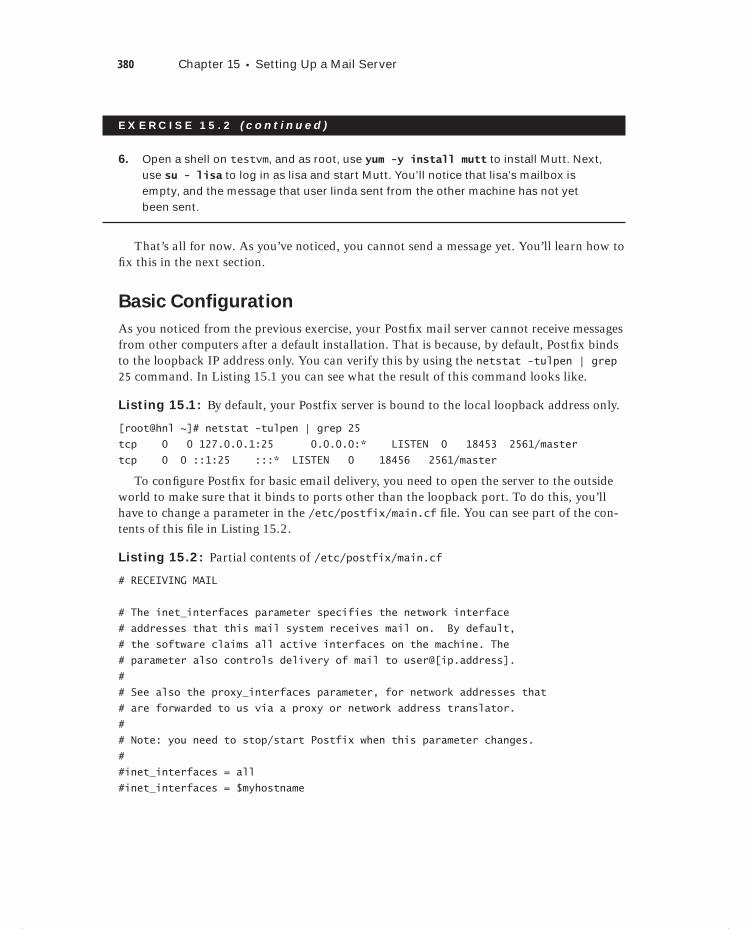
380 Chapter 15 Setting Up a Mail Server
E X E R C I S E 15 . 2 ( c ont inue d )
6. Open a shell on testvm, and as root, use yum -y install mutt to install Mutt. Next, use su - lisa to log in as lisa and start Mutt. You’ll notice that lisa’s mailbox is empty, and the message that user linda sent from the other machine has not yet been sent.
That’s all for now. As you’ve noticed, you cannot send a message yet. You’ll learn how to fi x this in the next section.
Basic Configuration
As you noticed from the previous exercise, your Postfi x mail server cannot receive messages from other computers after a default installation. That is because, by default, Postfi x binds to the loopback IP address only. You can verify this by using the netstat -tulpen | grep 25 command. In Listing 15.1 you can see what the result of this command looks like.
Listing 15.1: By default, your Postfix server is bound to the local loopback address only.
[root@hnl ~]# netstat -tulpen | grep 25
tcp 0 0 127.0.0.1:25 0.0.0.0:* LISTEN 0 18453 2561/master
tcp 0 0 ::1:25 :::* LISTEN 0 18456 2561/master
To confi gure Postfi x for basic email delivery, you need to open the server to the outside world to make sure that it binds to ports other than the loopback port. To do this, you’ll have to change a parameter in the /etc/postfix/main.cf fi le. You can see part of the con-tents of this fi le in Listing 15.2.
Listing 15.2: Partial contents of /etc/postfix/main.cf
# RECEIVING MAIL
# The inet_interfaces parameter specifies the network interface
# addresses that this mail system receives mail on. By default,
# the software claims all active interfaces on the machine. The
# parameter also controls delivery of mail to user@[ip.address].
#
# See also the proxy_interfaces parameter, for network addresses that
# are forwarded to us via a proxy or network address translator.
#
# Note: you need to stop/start Postfix when this parameter changes.
#
#inet_interfaces = all
#inet_interfaces = $myhostname
c15.indd 380c15.indd 380 1/8/2013 12:06:36 PM1/8/2013 12:06:36 PM
Setting Up Postfix as an SMTP Server 381
#inet_interfaces = $myhostname, localhost
inet_interfaces = localhost
# Enable IPv4, and IPv6 if supported
inet_protocols = all
# The proxy_interfaces parameter specifies the network interface
# addresses that this mail system receives mail on by way of a
:
In the receiving mail section of the main.cf fi le, you’ll notice that by default the inet_interfaces parameter is set to localhost. This is very secure, and it’s also the reason why lisa never received her email message on testvm in the previous exercise. In Exercise 15.3, you’ll learn how to change this and also enable the mail server on testvm to receive email messages from external sources.
E X E R C I S E 15 . 3
Opening Your Mail Server for External Mail
In this exercise, you’ll learn how to open your mail server to receive mail messages from external sources. It doesn’t really make it an Internet mail server just yet, but at least you’ll be able to receive messages from others.
1. On the testvm virtual machine, open the /etc/postfix/main.cf fi le with an editor.
2. Find the parameter inet_interfaces = localhost, and put a hash sign in front of it.
3. Enable the parameter inet_interfaces = all by removing the pound sign in front of the line.
4. Still on testvm, use service postfix restart to restart the Postfi x process. If a fi re-wall is active, make sure that port 25 is open on it.
5. On testvm, use su - lisa to become user lisa and start Mutt. You’ll notice that lisa still hasn’t received her message yet.
6. As root on the host computer, type mailq to type the current content of the mail queue. As with the fi rst attempt, the message couldn’t be sent; the message that linda tried to send to lisa is stuck in the queue.
7. Type postfix flush to fl ush the mail queue. Postfi x will now try to send the mes-sage again.
In the previous exercise, you enabled your mail server to receive messages from other servers. It still doesn’t work, however, and that is because of DNS. Typically, in a DNS domain, only one or a few servers are solely responsible for mail message handling. The clients in the domain are set up to fetch their messages from this mail exchange (MX) host.
c15.indd 381c15.indd 381 1/8/2013 12:06:36 PM1/8/2013 12:06:36 PM
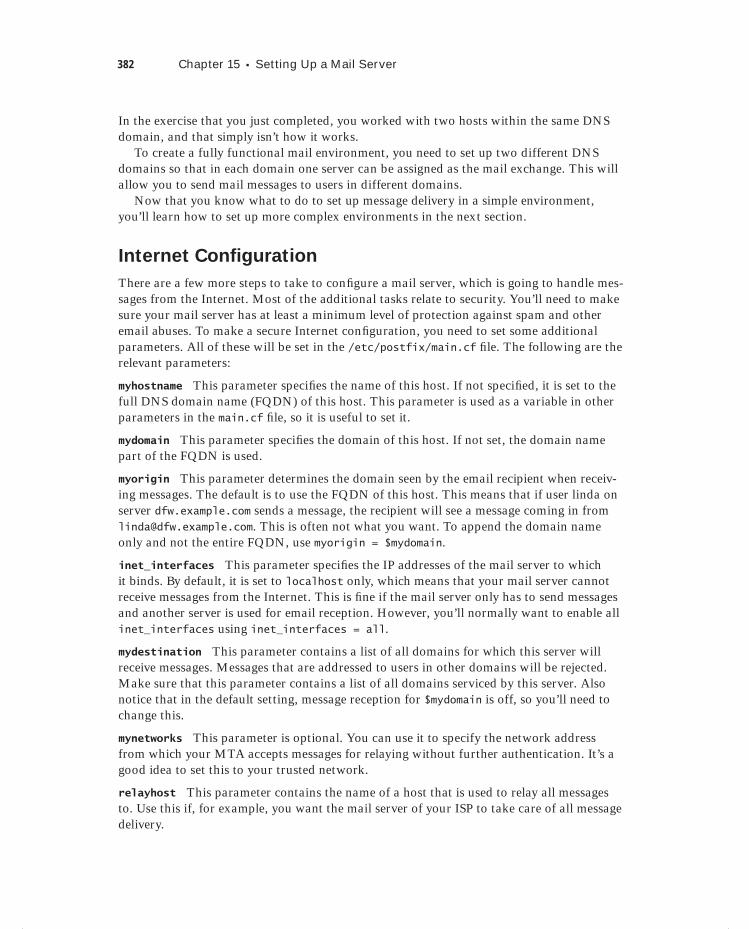
382 Chapter 15 Setting Up a Mail Server
In the exercise that you just completed, you worked with two hosts within the same DNS domain, and that simply isn’t how it works.
To create a fully functional mail environment, you need to set up two different DNS domains so that in each domain one server can be assigned as the mail exchange. This will allow you to send mail messages to users in different domains.
Now that you know what to do to set up message delivery in a simple environment, you’ll learn how to set up more complex environments in the next section.
Internet Configuration
There are a few more steps to take to confi gure a mail server, which is going to handle mes-sages from the Internet. Most of the additional tasks relate to security. You’ll need to make sure your mail server has at least a minimum level of protection against spam and other email abuses. To make a secure Internet confi guration, you need to set some additional parameters. All of these will be set in the /etc/postfix/main.cf fi le. The following are the relevant parameters:
myhostname This parameter specifi es the name of this host. If not specifi ed, it is set to the full DNS domain name (FQDN) of this host. This parameter is used as a variable in other parameters in the main.cf fi le, so it is useful to set it.
mydomain This parameter specifi es the domain of this host. If not set, the domain name part of the FQDN is used.
myorigin This parameter determines the domain seen by the email recipient when receiv-ing messages. The default is to use the FQDN of this host. This means that if user linda on server dfw.example.com sends a message, the recipient will see a message coming in from [email protected]. This is often not what you want. To append the domain name only and not the entire FQDN, use myorigin = $mydomain.
inet_interfaces This parameter specifi es the IP addresses of the mail server to which it binds. By default, it is set to localhost only, which means that your mail server cannot receive messages from the Internet. This is fi ne if the mail server only has to send messages and another server is used for email reception. However, you’ll normally want to enable all inet_interfaces using inet_interfaces = all.
mydestination This parameter contains a list of all domains for which this server will receive messages. Messages that are addressed to users in other domains will be rejected. Make sure that this parameter contains a list of all domains serviced by this server. Also notice that in the default setting, message reception for $mydomain is off, so you’ll need to change this.
mynetworks This parameter is optional. You can use it to specify the network address from which your MTA accepts messages for relaying without further authentication. It’s a good idea to set this to your trusted network.
relayhost This parameter contains the name of a host that is used to relay all messages to. Use this if, for example, you want the mail server of your ISP to take care of all message delivery.
c15.indd 382c15.indd 382 1/8/2013 12:06:37 PM1/8/2013 12:06:37 PM

Configuring Dovecot for POP and IMAP 383
To change any of these parameters (or one of the many other parameters that you’ll fi nd in /etc/postfix/main.cf), you can change the confi guration fi le by hand and restart Postfi x after doing so. Alternatively, you can use the postconf command to monitor and set parameters. Use postconf mydestination to see the current setting of the postconf param-eter, and use postconf -e "mydestination = $mydomain" to change its current value.
Configuring Dovecot for POP and IMAPAfter installing and confi guring the Postfi x MTA, users can connect to your server and read mail messages using an MUA such as Mutt. To allow users to handle mail on their own computers, you need a service that offers POP or IMAP mail access. Dovecot is the default service to do that on Red Hat Enterprise Linux.
When using POP, users can connect to the mail server and download messages to their own computers. When using IMAP, users connect to the mail server and edit their mes-sages on that mail server. POP works fi ne for users who have one device to handle mail. IMAP works better for users who have multiple devices to handle their mail.
After a default installation of Dovecot, it will offer POP and IMAP. To confi gure POP, you’ll tune the /etc/dovecot/dovecot.conf fi le. There aren’t many changes that need to be done in this fi le. By default, Dovecot offers POP and IMAP over both a secure and an unse-cure port. All you need to do after installing Dovecot is to make sure it is started by using service dovecot start and chkconfig dovecot on.
By default messages are sent unencrypted in Dovecot. This means that passwords and other sensitive information can be captured while in transit. For that reason, you should also always offer POP3S and IMAPS. Offering these services is not hard; you just need to create and sign an SSL certifi cate as discussed in Chapter 12 and copy it to the right locations.
The default Dovecot certifi cate and private key are in the fi les /etc/pki/dovecot/certs/dovecot.pem and /etc/pki/dovecot/private/dovecot.pem. If you ever create your own certifi cates and have them signed, make sure to copy the new .pem fi les to these locations. After putting the certifi cates there, you should restart Dovecot. You can also use the /usr/libexec/dovecot/mkcert.sh script to generate some self-signed certifi cates for Dovecot and put them in the right locations. In Exercise 15.4, you’ll create your own base Dovecot confi guration.
E X E R C I S E 15 . 4
Creating a Base Dovecot Configuration
In this exercise, you’ll install Dovecot and create a base confi guration that can be used by users to connect and get their email.
1. As root on the host computer, use yum -y install dovecot to install the Dovecot service.
c15.indd 383c15.indd 383 1/8/2013 12:06:37 PM1/8/2013 12:06:37 PM
384 Chapter 15 Setting Up a Mail Server
E X E R C I S E 15 . 4 ( c ont inue d )
2. Run /usr/libexec/dovecot/mkcert.sh to create some self-signed certifi cates for Dovecot, and install them in the right locations.
3. Use service dovecot start to start Dovecot.
4. As root, make sure that user linda has a message in her mailbox by entering the fol-lowing command: mail -s hello linda <. This sends an empty message to user linda that has only a subject line.
5. Use su - to become linda, and as linda, start Mutt.
6. From Mutt, hit c to change the mailbox you’re accessing, and enter the URL pop://linda@localhost. This should give you access to your mailbox on the local com-puter.
7. Use c once more, and enter the URL pop3://linda@localhost. You’ll now have access to the mailbox using the TLS version of POP3.
In the previous exercise, you learned that it really is very easy to set up a basic mail server for internal users. You now have Dovecot running and offering POP and IMAP mail, including the TLS-secured versions of these mail protocols.
Further StepsThe purpose of this chapter was to teach you how to set up a simple mail environment that is good for internal use. The steps discussed here aren’t good enough to set up a reliable and secure email infrastructure for external use, however. One important aspect that hasn’t been covered is spam/antivirus security. To accomplish this, you’ll need additional solutions that require different licenses, such as Spam Assassin. Confi guring these programs, how-ever, is beyond the scope of this book. Nevertheless, don’t forget to address these issues if you want to set up a reliable infrastructure for email handling.
SummaryIn this chapter, you learned how to set up a basic environment for handling email. You confi gured Postfi x for email handling and Dovecot to offer POP3 and IMAP access to user mailboxes. Your server is now ready to start servicing mail messages.
c15.indd 384c15.indd 384 1/8/2013 12:06:37 PM1/8/2013 12:06:37 PM
Dow
nlo
ad fro
m W
ow
! eBook
<w
ww
.wow
ebook.
com
>

Chapter
16Configuring Apache on Red Hat Enterprise Linux
TOPICS COVERED IN THIS CHAPTER:
Configuring the Apache Web Server
Working with Virtual Hosts
Securing the Web Server with TLS Certificates
Configuring Authentication
Setting Up MySQL
c16.indd 385c16.indd 385 1/8/2013 10:54:42 AM1/8/2013 10:54:42 AM

LAMP is amongst the most common uses of Linux. LAMP stands for Linux, Apache, MySQL, and PHP. In this chapter, you’ll learn how to set up a LAMP server. Well, a LAM server
actually, because PHP is too big a subject to summarize in this chapter. You’ll fi rst learn how to set up an Apache web server, including information about setting up virtual hosts, using TLS Certifi cates, and the confi guration of authentication. At the end of the chapter, you’ll also learn how to set up a basic MySQL server.
Configuring the Apache Web ServerApache is one of the most used services on Red Hat Enterprise Linux. A basic installation of an Apache website is easy to perform, but by using modules you can make Apache as sophisticated as you need. In this section, you’ll learn how to set up a basic Apache web server, which offers access to a simple website. Later sections teach you how to work with more advanced options, such as virtual hosts, security, and TLS certifi cates.
Creating a Basic Website
Confi guring an Apache server that services just one website is not hard to do—you just have to install the Apache software and create some content in the Apache document root. The default document root is set to /var/www/html on a Red Hat Enterprise Linux server. Just put a fi le in this directory with the name index.html, and it will be served by your Apache server. In Exercise 16.1, you’ll learn how to install a basic Apache web server and have it serve a basic website.
E X E R C I S E 16 .1
Creating a Basic Website
In this exercise, you’ll learn how to confi gure Apache to serve a basic website.
1. Use yum -y install httpd to install the Apache web server.
2. Use chkconfig httpd on to put the Apache web server in your server’s runlevels, and have it start at boot in your runlevels.
c16.indd 386c16.indd 386 1/8/2013 10:54:44 AM1/8/2013 10:54:44 AM

Configuring the Apache Web Server 387
E X E R C I S E 16 .1 ( c ont inue d )
3. Open a root shell, and go to the directory /var/www/html. In this directory, create a fi le with the name index.html. In this fi le, put the content “welcome to my website” and then use service httpd start to start the Apache web server.
4. Still from the root shell, use elinks http://localhost to access the website you just created. You’ll notice that your web server is up and running!
Understanding the Apache Configuration Files
As you’ve seen, it’s easy to set up a basic Apache web server, as long as you can retain all of the default settings. Later in this chapter, you’ll see that it’s not so easy once you go beyond the default settings. To be able to confi gure the web server in more complex sce-narios, you’ll need to understand how the Apache confi guration fi les are organized.
Everything related to the confi guration of your Apache server is in the /etc/httpd direc-tory. In this directory, you’ll fi nd two subdirectories: conf and conf.d. In /etc/httpd/confd, you’ll fi nd the main Apache confi guration fi le httpd.conf. From the httpd.conf fi le, many confi guration fi les are included, and by default, they are in /etc/httpd/conf.d. This httpd.conf fi le is designed to contain the entire Apache confi guration. However, because Apache can take advantage of many additional features, parts of the confi guration are stored in additional confi guration fi les in Red Hat Enterprise Linux.
To understand how these additional confi guration fi les are organized, you need to appre-ciate that Apache is modular. Installing additional modules can extend the functionality of the httpd process. An example of this is the mod_ssl module that you’ll use later in this chapter to make the Apache server work with TLS encryption.
Many modules are available for Apache to provide different kinds of functionality. Each module normally has its own confi guration fi le, which is stored in the /etc/httpd/conf.d directory. The names of these modules have to end with .conf to ensure they are included by your web server.
Creating configuration files where the name does not end in .conf is a common error made by some administrators. Make sure that the names of configuration files always end in .conf. Otherwise, they won’t be included by your Apache server.
As mentioned earlier, the main confi guration fi le of Apache is /etc/httpd/conf/httpd.conf. Listing 16.1 shows part of its confi guration. The original httpd.conf fi le is more than 1,000 lines long. Listing 16.1 shows some of its more relevant parts.
Listing 16.1: Example httpd.conf file
[root@hnl conf]# cat httpd.conf.svv
ServerTokens OS
c16.indd 387c16.indd 387 1/8/2013 10:54:44 AM1/8/2013 10:54:44 AM

388 Chapter 16 Configuring Apache on Red Hat Enterprise Linux
ServerRoot "/etc/httpd"
PidFile run/httpd.pid
Timeout 60
KeepAlive Off
MaxKeepAliveRequests 100
KeepAliveTimeout 15
<IfModule prefork.c>
StartServers 8
MinSpareServers 5
MaxSpareServers 20
ServerLimit 256
MaxClients 256
MaxRequestsPerChild 4000
</IfModule>
<IfModule worker.c>
StartServers 4
MaxClients 300
MinSpareThreads 25
MaxSpareThreads 75
ThreadsPerChild 25
MaxRequestsPerChild 0
</IfModule>
#Listen 12.34.56.78:80
Listen 80
LoadModule auth_basic_module modules/mod_auth_basic.so
LoadModule auth_digest_module modules/mod_auth_digest.so
LoadModule authn_file_module modules/mod_authn_file.so
LoadModule authn_alias_module modules/mod_authn_alias.so
LoadModule authn_anon_module modules/mod_authn_anon.so
LoadModule authn_dbm_module modules/mod_authn_dbm.so
LoadModule authn_default_module modules/mod_authn_default.so
LoadModule authz_host_module modules/mod_authz_host.so
LoadModule authz_user_module modules/mod_authz_user.so
LoadModule authz_owner_module modules/mod_authz_owner.so
...
Include conf.d/*.conf
c16.indd 388c16.indd 388 1/8/2013 10:54:45 AM1/8/2013 10:54:45 AM

Configuring the Apache Web Server 389
User apache
Group apache
ServerAdmin root@localhost
UseCanonicalName Off
DocumentRoot "/var/www/html"
<Directory />
Options FollowSymLinks
AllowOverride None
</Directory>
<Directory "/var/www/html">
Options Indexes FollowSymLinks
AllowOverride None
Order allow,deny
Allow from all
</Directory>
<IfModule mod_userdir.c>
UserDir disabled
</IfModule>
DirectoryIndex index.html index.html.var
AccessFileName .htaccess
<IfModule mod_mime_magic.c>
# MIMEMagicFile /usr/share/magic.mime
MIMEMagicFile conf/magic
</IfModule>
HostnameLookups Off
ErrorLog logs/error_log
LogLevel warn
CustomLog logs/access_log combined
ServerSignature On
Alias /icons/ "/var/www/icons/"
<Directory "/var/www/icons">
c16.indd 389c16.indd 389 1/8/2013 10:54:45 AM1/8/2013 10:54:45 AM
390 Chapter 16 Configuring Apache on Red Hat Enterprise Linux
Options Indexes MultiViews FollowSymLinks
AllowOverride None
Order allow,deny
Allow from all
</Directory>
ScriptAlias /cgi-bin/ "/var/www/cgi-bin/"
<Directory "/var/www/cgi-bin">
AllowOverride None
Options None
Order allow,deny
Allow from all
</Directory>
Generic Parameters
The example confi guration fi le from Listing 16.1 starts with some generic confi guration settings. An important directive is ServerRoot. This defi nes the root of the confi guration directory. On Red Hat Enterprise Linux, by default the server root is set to /etc/httpd. It is important to be aware of this because other fi lenames that are referenced later in the confi g-uration fi le are all relative to the server root directory. An example is the PidFile (a fi le that contains the PID of the httpd process), which is set to run/httpd.pid. This fi lename must be related to the server root directory; hence, the full name is /etc/httpd/run/httpd.pid.
Another important parameter in the beginning of the confi guration fi le is the Listen parameter. In this example, it directs httpd to listen at port 80. Because no specifi c IP addresses are mentioned, it will bind to port 80 on all IP addresses that are available. You can include a specifi c IP address if you want httpd to bind to just that one and to no other IP addresses.
The next list of generic parameters is a bit lower in the httpd.conf fi le. These are the parameters User and Group, which specify the user and group that should be used to run the Apache server. Apache is normally started as root and, once started, will run as this user and group with fewer privileges. By default, both are set to apache. The most impor-tant thing to remember here is that Apache should never offer its services as root!
Another important directive is the DocumentRoot. This specifi es where Apache should look for its content. Documents that are stored in the DocumentRoot are served by default. The standard behavior on Red Hat Enterprise Linux is to show the contents of the index.html fi le that is created in the DocumentRoot. However, there are some parameters behind that behavior, which are explained later in this chapter.
Apache Mode
Apache can be started in two different modes: the prefork mode and the worker mode. The prefork mode is the default mode. In this mode, a master httpd process is started,
c16.indd 390c16.indd 390 1/8/2013 10:54:45 AM1/8/2013 10:54:45 AM
Configuring the Apache Web Server 391
and this master process will start different httpd servers. As an alternative, the worker mode can be used. In this mode, one httpd process is active, and it uses different threads to serve client requests. Even if the worker mode is a bit more effi cient with regard to resource usage, some modules cannot handle it, and therefore the prefork mode is used as default.
However, if you need the best performance that httpd can offer and you don’t use mod-ules that are incompatible with worker mode, it’s a good idea to use worker mode instead. Worker mode can be confi gured to serve more simultaneous processes.
To change the default mode that Apache uses, you can modify the HTTPD parameter in /etc/sysconfig/httpd. To use the worker mode, you have to start the /usr/sbin/httpd.worker binary instead of /usr/sbin/httpd. To accomplish this, just remove the pound sign in front of the example line in /etc/sysconfig/httpd and restart the httpd process using service httpd restart.
For both modes, you can set some performance parameters:
StartServers This is the number of server processes httpd should always start.
MinSpareServers This is the minimum amount of spare server processes that are kept. It is good to have a certain minimum because it allows httpd to serve client requests really fast. However, the minimum shouldn’t be too high because each server uses system resources.
MinSpareThreads In worker mode, this is the minimum amount of spare threads that httpd should keep. You can see that it is set considerably higher than the MinSpareServers parameter in prefork mode.
MaxSpareServers and MaxSpareThreads This is the maximum amount of spare servers or threads that httpd should keep.
ServerLimit This is the total amount of server processes that can be started as a maxi-mum. Note that the value of 256 is pretty high, and it should be suffi cient for most servers.
MaxClients This is the maximum number of clients that can be connected. Note that in worker mode, one client can have several concurrent requests, which are opened simultaneously.
MaxRequestPerChild This is the number of requests that can be opened by a server pro-cess. In prefork mode, the maximum is capped at 4,000; in worker mode, there is no maxi-mum setting.
Modules
Among the features that make the Apache web server attractive is the fact that it is modu-lar. By including modules, functionality can be added to Apache. To include Apache mod-ules, they fi rst need to be installed. By default, some of the most common modules are installed to the /etc/httpd/modules directory. To tell Apache that it should load a specifi c module, you need to use the LoadModule directive. By default, this directive is used to include many modules.
c16.indd 391c16.indd 391 1/8/2013 10:54:45 AM1/8/2013 10:54:45 AM
392 Chapter 16 Configuring Apache on Red Hat Enterprise Linux
If a module is loaded, it can also have a specifi c confi guration. There are three ways to load additional confi gurations for modules:
Use the IfModule directive in httpd.conf.
Put it in an include file.
If a module is common, its parameters can be entered in httpd.conf without further specification.
By default, some modules put their confi guration in a separate confi guration fi le and store that fi le in the directory /etc/httpd/conf.d. The directive include conf.d/*.conf ensures that all confi guration fi les where the name ends in .conf are included by default when Apache starts. Later in this chapter, you’ll read about the mod_ssl module, which cre-ates its own confi guration fi le in /etc/httpd/conf.d.
Another approach to include parameters that are relevant for specifi c modules is by using the IfModule parameter in the httpd.conf fi le. This approach is more practical for modules that have a limited number of specifi c directives.
If a module is very common and almost always used, its parameters can simply be entered in the httpd.conf fi le. An example of this is the DirectoryIndex option discussed next. This option is provided by the mod_dir module, which is included in nearly all Apache confi gurations and therefore requires no further specifi cation.
Setting Directory Options
The administrator can also set different directory options on an Apache web server. These options are used to defi ne how the contents of a directory on the httpd server should be presented to users who access that directory. The default behavior is that the httpd pro-cesses look in the document root to see whether there is a fi le whose name starts with index. The DirectoryIndex directive can be used to specify that other fi les should also be considered. If this is the case, it will show the contents of this fi le, and if not, a list of fi les in the directory is shown.
To modify this behavior, the DirectoryIndex and Options directives can be used. By default, the DirectoryIndex directive specifi es that Apache should look for a fi le with the name index.html or index.html.var. The Options directive within a directory defi ni-tion (as you can see in the /var/www/icons directory statement) can further fi ne-tune the options that are used to display the contents of a directory. You can also use Options to determine which server features are available in a particular directory.
A useful argument for the Options directive is Indexes. If you use this option, you will see a list of fi les in the directory if no index.html is available. Related to this option is FollowSymLinks. This option will ensure that symbolic links are followed if they exist in the document directory. Don’t use this because it is considered a security threat.
Handling Basic Directory Restrictions
In a directory served by Apache, some basic restrictions can be used. First, there is the AllowOverride directive. This directive is related to the .htaccess fi le that an administrator can use to restrict access to a given directory. If AllowOverride is set to none, the contents of any .htaccess fi le that is found anywhere in a subdirectory of the current directory will be
c16.indd 392c16.indd 392 1/8/2013 10:54:45 AM1/8/2013 10:54:45 AM
Configuring the Apache Web Server 393
ignored. If you don’t want the owners of subdirectories to restrict access to their directories, you should set AllowOverride to none. If you want to allow users to restrict access to subdi-rectories, set it to All. In high-performance environments, don’t use it at all because this will force Apache to recurse through the entire directory tree on every request.
Another basic way to handle access restrictions is by using the Order directive. With this directive, you’ll specify the order in which allow and deny commands are used. The order is not defi ned by how the rules appear in your confi guration fi le but by how you’ve used the Order directive. The default order is deny and then allow. This means that if a client is excluded by deny, it will be excluded unless it matches allow. If neither is matched, the client gets access. As you see, this is a rather open approach that doesn’t put many restrictions on a directory.
Look at this example:
order allow, deny
allow from 10.100
deny from all
In this line, the allow rules are read fi rst and give access to any host that has an IP address starting with 10.100. However, after reading the deny line that denies access to all, the site would be closed, even for devices that have an IP address starting with 10.100. If you want to make sure that everyone is denied with the exception of devices that have an IP address starting with 10.100, you should rewrite the statement as follows:
order deny, allow
allow from 10.100
deny from all
Put this way, the httpd process fi rst reads the deny line, which denies access to all, and then handles all exceptions as stated on the allow lines.
Apache Log Files
To help you troubleshoot Apache issues, two log fi les are used by default. You can fi nd these fi les in the /var/log/httpd directory. The access_log fi le contains information about users who have accessed your server. Note that it can grow very fast on busy web servers! The error_log fi le has error messages that can be useful in troubleshooting your Apache web server.
Apache and SELinux
As an administrator, SELinux can often be an annoyance. This is because it defi nes in a very strict way what is allowed and what isn’t allowed. Moreover, if anything happens that isn’t allowed specifi cally in the policy, SELinux will deny it. You already learned this while working on Exercise 8.6.
To make sure that Apache runs smoothly with SELinux, there are a few things that need to be addressed. First you’ll need to make sure that the appropriate context types have been applied. Typically, these are httpd_sys_content_t on directories where Apache can access documents, and httpd_sys_script_exec_t on directories from where Apache needs to run
c16.indd 393c16.indd 393 1/8/2013 10:54:46 AM1/8/2013 10:54:46 AM
394 Chapter 16 Configuring Apache on Red Hat Enterprise Linux
scripts. But some other context types are also available. Here are the context types that are defi ned for httpd:
httpd_sys_content_t Set this on directories that should be accessible by the httpd process.
httpd_sys_script_exec_t Set this on directories that contain scripts that are allowed to run from the httpd process.
httpd_sys_rw_content_t This context type is useful if you want to run scripts from the httpd process and allow the httpd process to write the resulting data to a directory.
httpd_sys_ra_content_t Use this if you want to allow scripts to append to existing fi les.
httpd_unconfined_script_exec_t Use this to allow a script to run without any SELinux protection. Use this only as a last resort if nothing else works!
public_content_t Use this to allow access to a directory from the httpd process but also by other services like Samba and NFS.
public_content_rw_t Use this to allow shared read-write access to a directory.
To change the context type in the policy, you can use the semanage fcontext command. For example, use semanage fcontext -a -t httpd_sys_content_t "/www(/.*)" to label the /www directory for the specifi ed context type. Next use restorecon -r /www to apply the new context to the fi le system.
Apart from the context types that can be used for Apache, there are numerous Booleans as well. These behave as on/off switches for specifi c features. To get a list of all available Booleans for httpd, use getsebool -a | grep httpd. Alternatively, you can read the man page httpd_selinux for Apache SELinux-specifi c information. The command semanage Boolean -l will also yield a nice, short description of all Booleans. In Exercise 16.2, you will confi gure SELinux for Apache.
E X E R C I S E 16 . 2
Configuring SELinux for Apache
In this exercise, you’ll run Apache on a different port. SELinux will deny this, but you’ll apply the appropriate fi x to ensure that Apache is allowed to listen on this port.
1. Open a root shell. Copy the fi le /etc/httpd/conf/httpd.conf to httpd.conf.bak, which allows you easily to revert to the original situation later.
2. Open the /etc/httpd/conf/httpd.conf fi le in an editor.
3. Look up the parameter Listen 80, and change it to Listen 888. Save the changes, and use service httpd restart to restart the httpd process. It will give you an error message.
4. Use tail -f /var/log/messages to read the log message that was written when Apache tried to start on port 888. If you don’t see a line that instructs you to use the sealert command, use yum -y install setroubleshoot-server. Also make sure that the auditd process is running, and restart Apache.
c16.indd 394c16.indd 394 1/8/2013 10:54:46 AM1/8/2013 10:54:46 AM
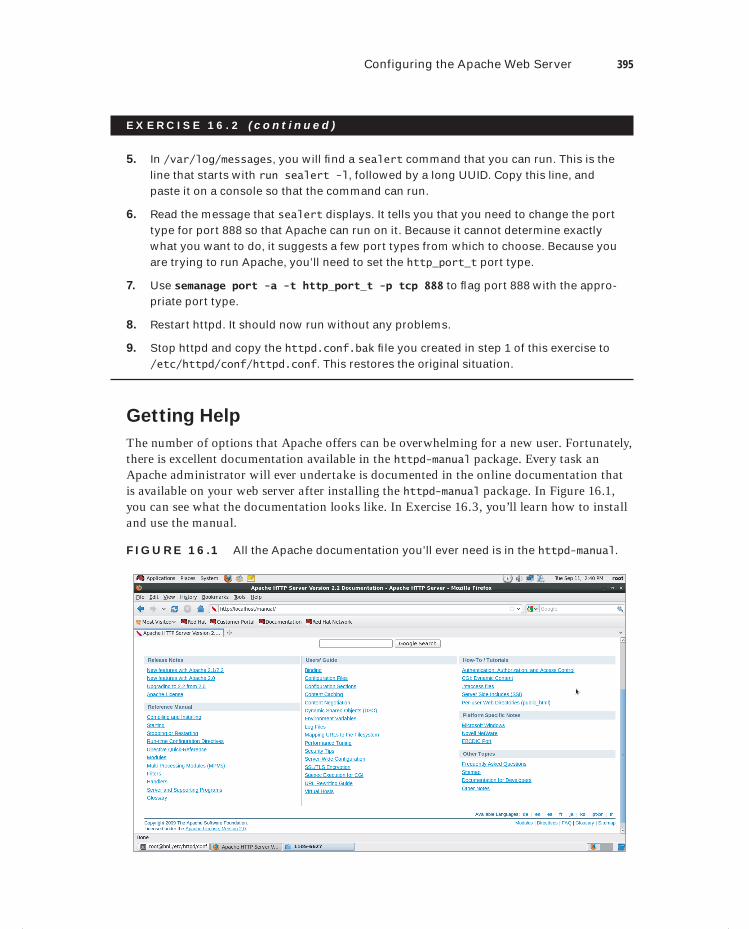
Configuring the Apache Web Server 395
E X E R C I S E 16 . 2 ( c ont inue d )
5. In /var/log/messages, you will fi nd a sealert command that you can run. This is the line that starts with run sealert -l, followed by a long UUID. Copy this line, and paste it on a console so that the command can run.
6. Read the message that sealert displays. It tells you that you need to change the port type for port 888 so that Apache can run on it. Because it cannot determine exactly what you want to do, it suggests a few port types from which to choose. Because you are trying to run Apache, you’ll need to set the http_port_t port type.
7. Use semanage port -a -t http_port_t -p tcp 888 to fl ag port 888 with the appro-priate port type.
8. Restart httpd. It should now run without any problems.
9. Stop httpd and copy the httpd.conf.bak fi le you created in step 1 of this exercise to /etc/httpd/conf/httpd.conf. This restores the original situation.
Getting Help
The number of options that Apache offers can be overwhelming for a new user. Fortunately, there is excellent documentation available in the httpd-manual package. Every task an Apache administrator will ever undertake is documented in the online documentation that is available on your web server after installing the httpd-manual package. In Figure 16.1, you can see what the documentation looks like. In Exercise 16.3, you’ll learn how to install and use the manual.
F I GU R E 16 .1 All the Apache documentation you’ll ever need is in the httpd-manual.
c16.indd 395c16.indd 395 1/8/2013 10:54:46 AM1/8/2013 10:54:46 AM
396 Chapter 16 Configuring Apache on Red Hat Enterprise Linux
E X E R C I S E 16 . 3
Installing and Using the Apache Documentation
There is no need to try to remember all of the options Apache has to offer—just install the manual. In this exercise, you’ll learn how to install and use the Apache documentation.
1. Open a root shell, and use yum -y install httpd-manual to install the Apache doc-umentation.
2. Use service httpd restart to restart the httpd process.
3. Open a browser, and enter the URL http://localhost/manual. This will show the Apache documentation containing all of the information you’ll ever need about Apache.
Working with Virtual HostsOne Apache installation can handle more than one Apache website. To handle more than one site from an Apache server, you can create virtual hosts. A virtual host is a defi nition of different websites to be served by the Apache web server. You can include this defi nition in the main Apache confi guration fi le /etc/httpd/conf/httpd.conf or in separate fi les that you’ll create in the /etc/httpd/conf.d/ directory. If you chose the latter solution, make sure the name of each of these fi les ends in .conf.
Before you can start working with virtual hosts, you’ll need to make sure that hostname resolving works. That means you’ll need to make sure the virtual host can be reached by its name. This means you’ll either have to create A records or CNAME records in DNS or have to create an entry in the /etc/hosts fi le that tells the client computer which IP address to connect to in order to reach the virtual host. In a test environment like the one you’re using in this book, it is a very common error to forget to set up name resolving.
When setting up virtual hosts, you’ll have to choose which type to use. You can confi g-ure either a name-based virtual host, an IP-based virtual host, or both. Name-based virtual hosts are the default, and they are easier to set up because you can run multiple Apache sites on one IP address. IP-virtual hosts are often used if SSL is needed on a website, because in SSL it is benefi cial if a connection can be traced back to its original unique IP address. So, you must set up IP-based virtual hosting to get SSL working.
When setting up a virtual host, you can use almost any Apache directive. In Listing 16.2, you can see an example of some of the most common directives that are used while setting up virtual hosts.
Listing 16.2: Example virtual host configuration
<VirtualHost *:80>
ServerAdmin [email protected]
c16.indd 396c16.indd 396 1/8/2013 10:54:46 AM1/8/2013 10:54:46 AM
Working with Virtual Hosts 397
DocumentRoot /www/docs/dummy-host.example.com
ServerName dummy-host.example.com
ErrorLog logs/dummy-host.example.com-error_log
CustomLog logs/dummy-host.example.com-access_log common
</VirtualHost>
The example in Listing 16.2 starts by defi ning the port on which the virtual host should listen. This is set to *:80, which means that it is available on any IP address on this machine on port 80. Next, the ServerAdmin directive is used to tell users whom to contact if they need to get in touch with the administrator of this web server.
The most important parameter that you’ll use when defi ning a virtual host is a DocumentRoot that is specifi c for that virtual host. In this example, a DocumentRoot in /www is used, which means you’ll also need to set the appropriate SELinux context type. Next the ServerName is specifi ed, and as the last bit of the confi guration, some dedicated log fi les for this virtual host are defi ned.
When setting up virtual hosts, you should be aware of one thing. Either you configure all hosts as virtual hosts or you don’t. This means that if you set up some virtual hosts on an Apache server that also already has a nor-mal host definition, the normal host definition will fail after installing the virtual hosts.
When confi guring virtual hosts, you should consider creating separate .conf fi les for the virtual hosts in /etc/httpd/conf.d. Working with separate .conf fi les makes managing virtual hosts easier, especially if you’re planning on creating many of them. In Exercise 16.4, you’ll learn how to set up two virtual hosts.
E X E R C I S E 16 . 4
Configuring Virtual Hosts
In this exercise, you’ll create two virtual hosts. Before setting up virtual hosts, you’ll fi rst set up name resolving. After that, you’ll create the virtual hosts confi guration. You’ll also need to change the SELinux confi guration to make this work. You will use both the host computer and the virtual machine for this exercise.
1. On your host computer, open the fi le /etc/hosts with an editor and add two lines that make it possible to resolve the names of the virtual host you are going to create to the IP address of the virtual machine.
2. On the virtual machine, open a root shell and create a confi guration fi le with the name server1.example.com.conf in the directory /etc/httpd/conf.d. Give this fi le the following content:
<VirtualHost *:80>
ServerAdmin [email protected]
c16.indd 397c16.indd 397 1/8/2013 10:54:47 AM1/8/2013 10:54:47 AM

398 Chapter 16 Configuring Apache on Red Hat Enterprise Linux
E X E R C I S E 16 . 4 ( c ont inue d )
DocumentRoot /www/docs/server1.example.com
ServerName server1.example.com
ErrorLog logs/server1/example.com-error_log
CustomLog logs/server1.example.com-access_log common
</VirtualHost>
3. Close the confi guration fi le, and from the root shell, use mkdir -p /www/docs/server1.example.com.
4. Create a fi le with the name index.html in the server1 document root, and make sure its contents read “Welcome to server1.”
5. Use semanage fcontext -a -t httpd_sys_content_t "/www(/.*)", followed by restorecon -r /www.
6. Open the /etc/httpd/conf/httpd.conf fi le with your editor, and take out the # sign at the front of the line NameVirtualHost *:80.
7. Use service httpd restart to restart the Apache web server.
8. Use elinks http://server1.example.com. You should now see the server1 wel-come page.
9. Back on the root shell, copy the /etc/httpd/conf.d/server1.example.com.conf fi le to a fi le with the name /etc/httpd/conf.d/server2.example.com.conf.
10. Open the server2.example.com.conf fi le in vi, and use the vi command :%s/server1/server2/g. This should replace all instances of server1 with the text server2.
11. Create the /www/docs/server2.example.com document root, set the SELinux labels, and create a fi le index.html in it containing the text “Welcome to server2.”
12. Restart httpd, and verify that both server1 and server2 are accessible.
In the previous exercise, you created two virtual hosts and verifi ed that both are work-ing as expected. With the creation of the virtual hosts, the web server you’ve confi gured in Exercise 16.1 is no longer working. If you try to access this web server by using the com-mand elinks http://localhost, for example, you’ll get access to the fi rst virtual web server that Apache fi nds. This process goes in alphabetical order, and because httpd fi nds the server1 confi guration fi le fi rst, it will show you the server1 confi guration by default.
When configuring a server with multiple web servers, make sure your most important website comes first. That is, make sure that httpd loads the configuration of the most important website if it can’t find the site the user is trying to access. You can do this by having the name of the configuration file come first alphabetically; this website will be used as the default one.
c16.indd 398c16.indd 398 1/8/2013 10:54:47 AM1/8/2013 10:54:47 AM

Securing the Web Server with TLS Certificates 399
Securing the Web Server with TLS CertificatesFor some web servers, protection isn’t an issue; for others, it is a major issue. For example, if you’re running an ecommerce site, a website where users need to be sure they are con-nected to the correct site or a website where traffi c simply must be protected, you’ll need to use encryption. TLS security guarantees that sensitive data can be encrypted while in tran-sit. At the same time, it can be used to prove the identity of servers on the Internet.
To use TLS in an Apache environment, you need mod_ssl. This Apache module is not installed by default, so you’ll need to do the installation yourself. After installing mod_ssl, you’ll fi nd its confi guration fi le ssl.conf in the /etc/httpd/conf.d directory. Listing 16.3 shows the directives that are used in this confi guration fi le.
Listing 16.3: The ssl.conf configuration file
[root@hnl conf.d]# cat ssl.conf
LoadModule ssl_module modules/mod_ssl.so
Listen 443
## SSL Global Context
SSLPassPhraseDialog builtin
SSLSessionCache shmcb:/var/cache/mod_ssl/scache(512000)
SSLSessionCacheTimeout 300
SSLMutex default
SSLRandomSeed startup file:/dev/urandom 256
SSLRandomSeed connect builtin
#SSLRandomSeed startup file:/dev/random 512
#SSLRandomSeed connect file:/dev/random 512
#SSLRandomSeed connect file:/dev/urandom 512
SSLCryptoDevice builtin
#SSLCryptoDevice ubsec
## SSL Virtual Host Context
<VirtualHost _default_:443>
#DocumentRoot "/var/www/html"
#ServerName www.example.com:443
ErrorLog logs/ssl_error_log
TransferLog logs/ssl_access_log
LogLevel warn
c16.indd 399c16.indd 399 1/8/2013 10:54:48 AM1/8/2013 10:54:48 AM
400 Chapter 16 Configuring Apache on Red Hat Enterprise Linux
SLEngine on
SSLProtocol all -SSLv2
SSLCipherSuite ALL:!ADH:!EXPORT:!SSLv2:RC4+RSA:+HIGH:+MEDIUM:+LOW
SSLCertificateFile /etc/pki/tls/certs/localhost.crt
SSLCertificateKeyFile /etc/pki/tls/private/localhost.key
#SSLCertificateChainFile /etc/pki/tls/certs/server-chain.crt
#SSLCACertificateFile /etc/pki/tls/certs/ca-bundle.crt
#SSLVerifyClient require
#SSLVerifyDepth 10
<Files ~ "\.(cgi|shtml|phtml|php3?)$">
SSLOptions +StdEnvVars
</Files>
<Directory "/var/www/cgi-bin">
SSLOptions +StdEnvVars
</Directory>
SetEnvIf User-Agent ".*MSIE.*" \
nokeepalive ssl-unclean-shutdown \
downgrade-1.0 force-response-1.0
CustomLog logs/ssl_request_log \
"%t %h %{SSL_PROTOCOL}x %{SSL_CIPHER}x \"%r\" %b"
</VirtualHost>
In the ssl.conf fi le, many directives are used to specify how the SSL protocol should be confi gured. In most cases, you are just fi ne using the default values. The important values for confi guring a site with SSL are as follows:
LoadModule ssl_module modules/mod_ssl.so
This line makes sure that the SSL module is loaded. Note the path that is used. It is relative to the ServerRoot directive that defines the path in httpd.conf to /etc/httpd.
Listen 443 This line tells mod_ssl to offer TLS services on port 443.
SSLCertificateFile This line refers to the fi le that is used for the server certifi cate. By default, the localhost.crt fi le is used. This is the default confi guration fi le that is created while installing Red Hat Enterprise Linux.
SSLCertificateKeyFile This line tells mod_ssl where it can fi nd the private key for the server. By default, the localhost.key fi le is used, which is generated during the installation of Red Hat Enterprise Linux.
c16.indd 400c16.indd 400 1/8/2013 10:54:48 AM1/8/2013 10:54:48 AM
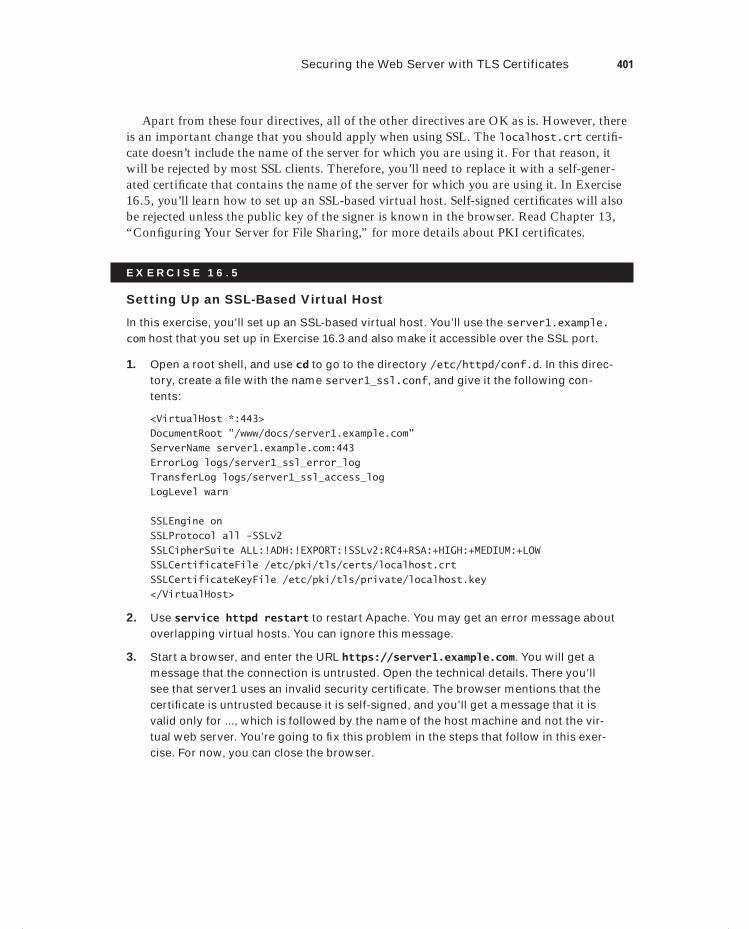
Securing the Web Server with TLS Certificates 401
Apart from these four directives, all of the other directives are OK as is. However, there is an important change that you should apply when using SSL. The localhost.crt certifi -cate doesn’t include the name of the server for which you are using it. For that reason, it will be rejected by most SSL clients. Therefore, you’ll need to replace it with a self-gener-ated certifi cate that contains the name of the server for which you are using it. In Exercise 16.5, you’ll learn how to set up an SSL-based virtual host. Self-signed certifi cates will also be rejected unless the public key of the signer is known in the browser. Read Chapter 13, “Confi guring Your Server for File Sharing,” for more details about PKI certifi cates.
E X E R C I S E 16 . 5
Setting Up an SSL-Based Virtual Host
In this exercise, you’ll set up an SSL-based virtual host. You’ll use the server1.example.com host that you set up in Exercise 16.3 and also make it accessible over the SSL port.
1. Open a root shell, and use cd to go to the directory /etc/httpd/conf.d. In this direc-tory, create a fi le with the name server1_ssl.conf, and give it the following con-tents:
<VirtualHost *:443>
DocumentRoot "/www/docs/server1.example.com"
ServerName server1.example.com:443
ErrorLog logs/server1_ssl_error_log
TransferLog logs/server1_ssl_access_log
LogLevel warn
SSLEngine on
SSLProtocol all -SSLv2
SSLCipherSuite ALL:!ADH:!EXPORT:!SSLv2:RC4+RSA:+HIGH:+MEDIUM:+LOW
SSLCertificateFile /etc/pki/tls/certs/localhost.crt
SSLCertificateKeyFile /etc/pki/tls/private/localhost.key
</VirtualHost>
2. Use service httpd restart to restart Apache. You may get an error message about overlapping virtual hosts. You can ignore this message.
3. Start a browser, and enter the URL https://server1.example.com. You will get a message that the connection is untrusted. Open the technical details. There you’ll see that server1 uses an invalid security certifi cate. The browser mentions that the certifi cate is untrusted because it is self-signed, and you’ll get a message that it is valid only for ..., which is followed by the name of the host machine and not the vir-tual web server. You’re going to fi x this problem in the steps that follow in this exer-cise. For now, you can close the browser.
c16.indd 401c16.indd 401 1/8/2013 10:54:48 AM1/8/2013 10:54:48 AM
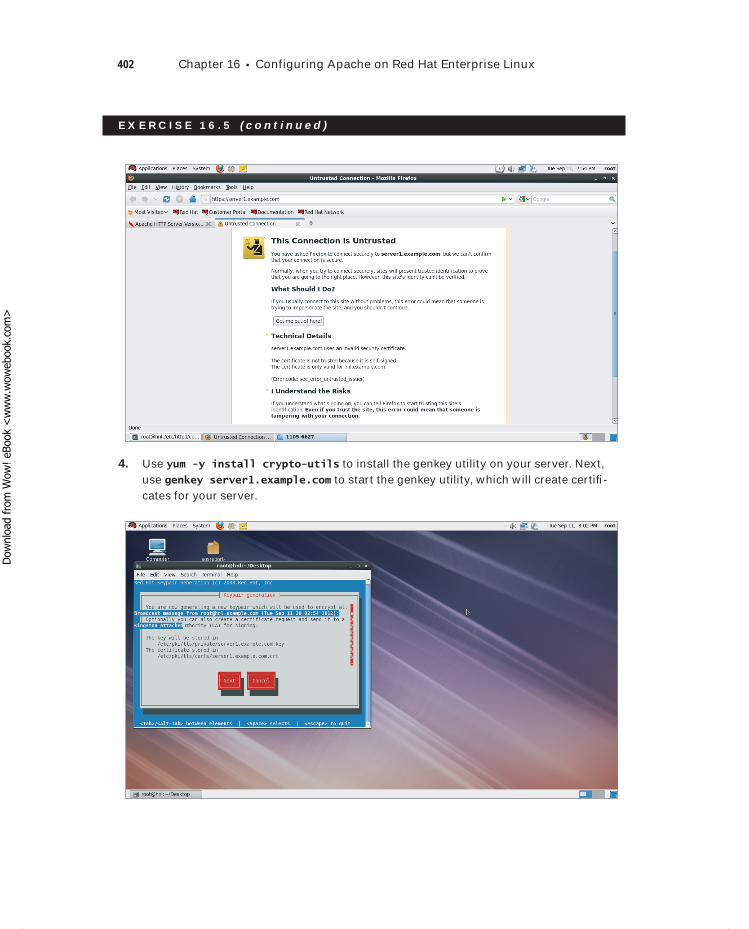
402 Chapter 16 Configuring Apache on Red Hat Enterprise Linux
E X E R C I S E 16 . 5 ( c ont inue d )
4. Use yum -y install crypto-utils to install the genkey utility on your server. Next, use genkey server1.example.com to start the genkey utility, which will create certifi -cates for your server.
c16.indd 402c16.indd 402 1/8/2013 10:54:48 AM1/8/2013 10:54:48 AM
Dow
nlo
ad fro
m W
ow
! eBook
<w
ww
.wow
ebook.
com
>
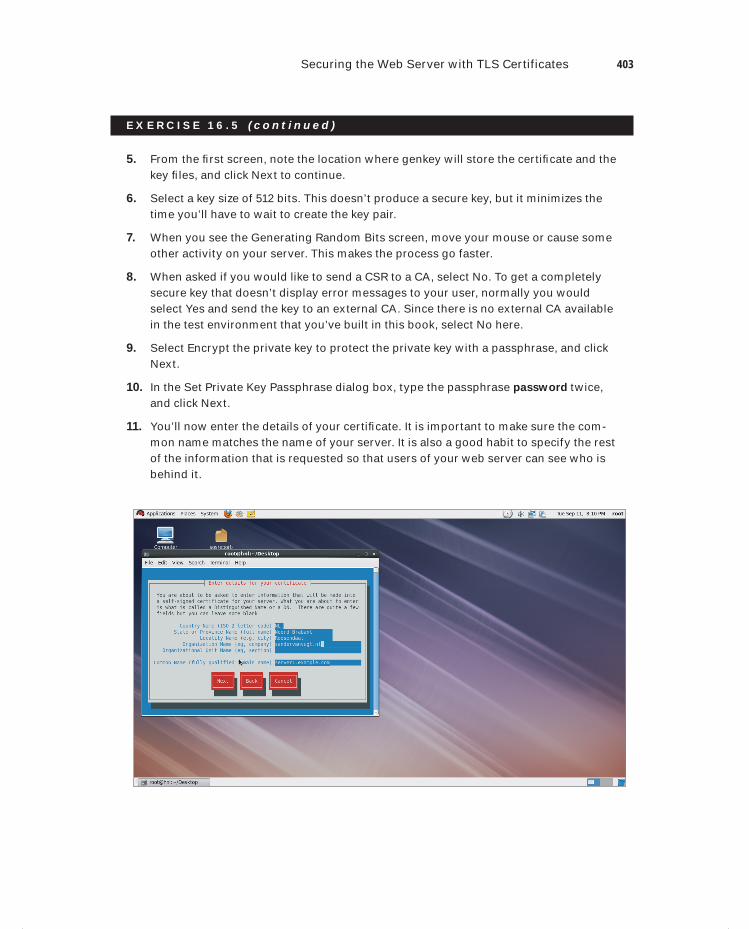
Securing the Web Server with TLS Certificates 403
E X E R C I S E 16 . 5 ( c ont inue d )
5. From the fi rst screen, note the location where genkey will store the certifi cate and the key fi les, and click Next to continue.
6. Select a key size of 512 bits. This doesn’t produce a secure key, but it minimizes the time you’ll have to wait to create the key pair.
7. When you see the Generating Random Bits screen, move your mouse or cause some other activity on your server. This makes the process go faster.
8. When asked if you would like to send a CSR to a CA, select No. To get a completely secure key that doesn’t display error messages to your user, normally you would select Yes and send the key to an external CA. Since there is no external CA available in the test environment that you’ve built in this book, select No here.
9. Select Encrypt the private key to protect the private key with a passphrase, and click Next.
10. In the Set Private Key Passphrase dialog box, type the passphrase password twice, and click Next.
11. You’ll now enter the details of your certifi cate. It is important to make sure the com-mon name matches the name of your server. It is also a good habit to specify the rest of the information that is requested so that users of your web server can see who is behind it.
c16.indd 403c16.indd 403 1/8/2013 10:54:50 AM1/8/2013 10:54:50 AM
404 Chapter 16 Configuring Apache on Red Hat Enterprise Linux
E X E R C I S E 16 . 5 ( c ont inue d )
12. At this point you’ve generated a key pair that at least matches the name of your server. Open the /etc/httpd/conf.d/server1_ssl.conf fi le again with an editor. Look up the directives SSLCertifi cateFile and SSLCertifi cateKeyFile, and make sure the key you’ve just generated is referenced as shown in the following two example lines:
SSLCertificateFile /etc/pki/tls/certs/server1.example.com.crt
SSLCertificateKeyFile /etc/pki/tls/private/server1.example.com.key
13. Use the command service httpd restart. When starting, httpd will prompt you for a password. Enter the passphrase to fi nish starting your web server.
14. Use your browser to connect to https://server1.example.com again. You’ll still get a certifi cate error message because you’re using a self-signed certifi cate, but you will no longer see the error about the name used in the certifi cate.
In Exercise 16.5, you confi gured your server to use a certifi cate. You also entered a pass-phrase to protect the private key. This is normally recommended because without a passphrase on the private key, an intruder would only have to steal the private key to be able to forge your entire website. Therefore, in production environments, TLS-protected websites should always have a passphrase on the private key. The drawback, however, is that it has to be reentered on every restart, and for that reason it is also often omitted.
You also witnessed a signifi cant disadvantage of using a private key; that is, you’ll need to enter a passphrase when the httpd process is started. This makes it very hard to start the web server automatically from the runlevels while booting your server. Therefore, if you want to shield your web server with a private key that is protected with a passphrase, you have to remove it from the runlevels.
Configuring AuthenticationYou already learned how to protect your Apache server from access by unauthorized devices. You can also confi gure Apache to allow access only to specifi c users. To do this, you can confi gure your server to use authentication. In this section, you’ll learn how to confi gure authentication based on a fl at fi le that contains usernames and hashed passwords and how to confi gure authentication for user accounts that are stored in an LDAP directory server.
In both cases, you need to be aware that authentication settings are related to a direc-tory or web context that you want to protect. This means that the settings discussed in this chapter are always placed in a block that opens with <Directory> and ends with
c16.indd 404c16.indd 404 1/8/2013 10:54:51 AM1/8/2013 10:54:51 AM
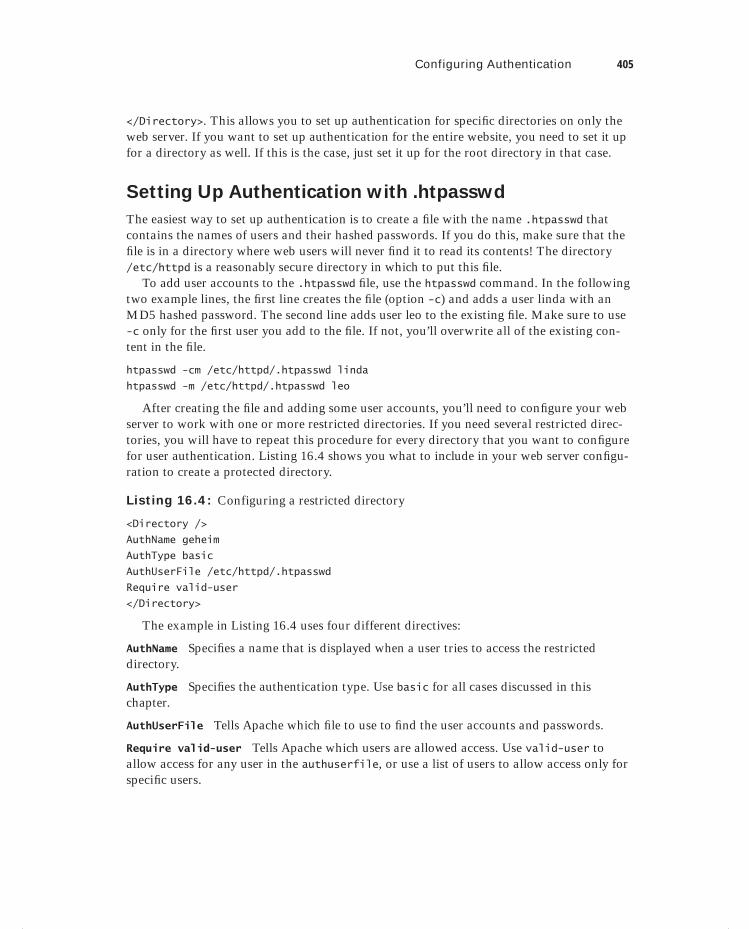
Configuring Authentication 405
</Directory>. This allows you to set up authentication for specifi c directories on only the web server. If you want to set up authentication for the entire website, you need to set it up for a directory as well. If this is the case, just set it up for the root directory in that case.
Setting Up Authentication with .htpasswd
The easiest way to set up authentication is to create a fi le with the name .htpasswd that contains the names of users and their hashed passwords. If you do this, make sure that the fi le is in a directory where web users will never fi nd it to read its contents! The directory /etc/httpd is a reasonably secure directory in which to put this fi le.
To add user accounts to the .htpasswd fi le, use the htpasswd command. In the following two example lines, the fi rst line creates the fi le (option -c) and adds a user linda with an MD5 hashed password. The second line adds user leo to the existing fi le. Make sure to use -c only for the fi rst user you add to the fi le. If not, you’ll overwrite all of the existing con-tent in the fi le.
htpasswd -cm /etc/httpd/.htpasswd linda
htpasswd -m /etc/httpd/.htpasswd leo
After creating the fi le and adding some user accounts, you’ll need to confi gure your web server to work with one or more restricted directories. If you need several restricted direc-tories, you will have to repeat this procedure for every directory that you want to confi gure for user authentication. Listing 16.4 shows you what to include in your web server confi gu-ration to create a protected directory.
Listing 16.4: Configuring a restricted directory
<Directory />
AuthName geheim
AuthType basic
AuthUserFile /etc/httpd/.htpasswd
Require valid-user
</Directory>
The example in Listing 16.4 uses four different directives:
AuthName Specifi es a name that is displayed when a user tries to access the restricted directory.
AuthType Specifi es the authentication type. Use basic for all cases discussed in this chapter.
AuthUserFile Tells Apache which fi le to use to fi nd the user accounts and passwords.
Require valid-user Tells Apache which users are allowed access. Use valid-user to allow access for any user in the authuserfile, or use a list of users to allow access only for specifi c users.
c16.indd 405c16.indd 405 1/8/2013 10:54:52 AM1/8/2013 10:54:52 AM
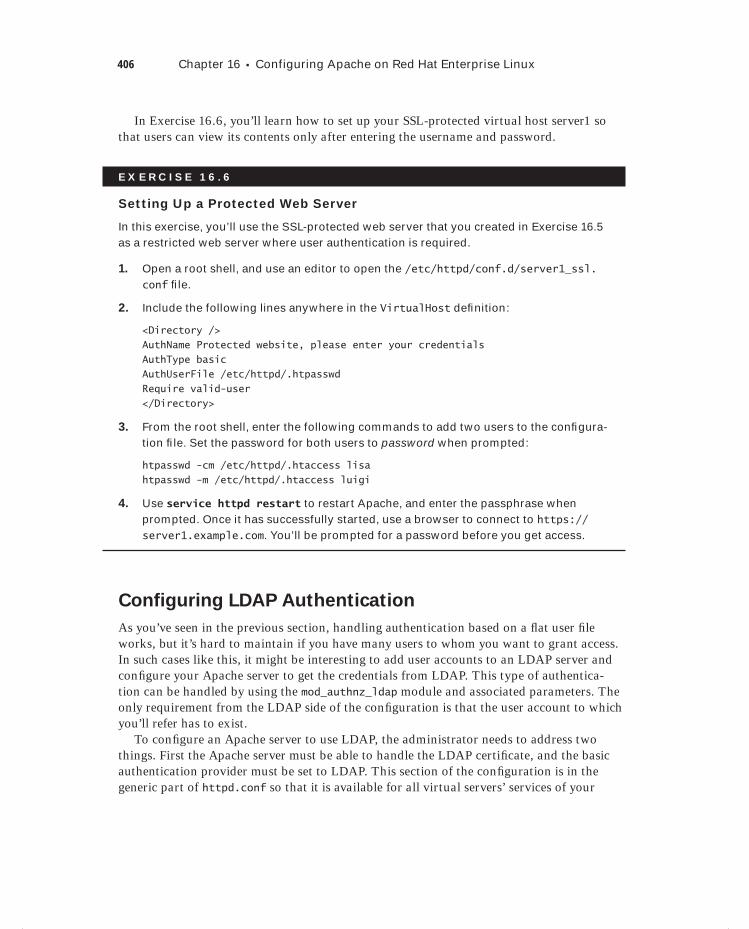
406 Chapter 16 Configuring Apache on Red Hat Enterprise Linux
In Exercise 16.6, you’ll learn how to set up your SSL-protected virtual host server1 so that users can view its contents only after entering the username and password.
E X E R C I S E 16 . 6
Setting Up a Protected Web Server
In this exercise, you’ll use the SSL-protected web server that you created in Exercise 16.5 as a restricted web server where user authentication is required.
1. Open a root shell, and use an editor to open the /etc/httpd/conf.d/server1_ssl.conf fi le.
2. Include the following lines anywhere in the VirtualHost defi nition:
<Directory />
AuthName Protected website, please enter your credentials
AuthType basic
AuthUserFile /etc/httpd/.htpasswd
Require valid-user
</Directory>
3. From the root shell, enter the following commands to add two users to the confi gura-tion fi le. Set the password for both users to password when prompted:
htpasswd -cm /etc/httpd/.htaccess lisa
htpasswd -m /etc/httpd/.htaccess luigi
4. Use service httpd restart to restart Apache, and enter the passphrase when prompted. Once it has successfully started, use a browser to connect to https://server1.example.com. You’ll be prompted for a password before you get access.
Configuring LDAP Authentication
As you’ve seen in the previous section, handling authentication based on a fl at user fi le works, but it’s hard to maintain if you have many users to whom you want to grant access. In such cases like this, it might be interesting to add user accounts to an LDAP server and confi gure your Apache server to get the credentials from LDAP. This type of authentica-tion can be handled by using the mod_authnz_ldap module and associated parameters. The only requirement from the LDAP side of the confi guration is that the user account to which you’ll refer has to exist.
To confi gure an Apache server to use LDAP, the administrator needs to address two things. First the Apache server must be able to handle the LDAP certifi cate, and the basic authentication provider must be set to LDAP. This section of the confi guration is in the generic part of httpd.conf so that it is available for all virtual servers’ services of your
c16.indd 406c16.indd 406 1/8/2013 10:54:52 AM1/8/2013 10:54:52 AM
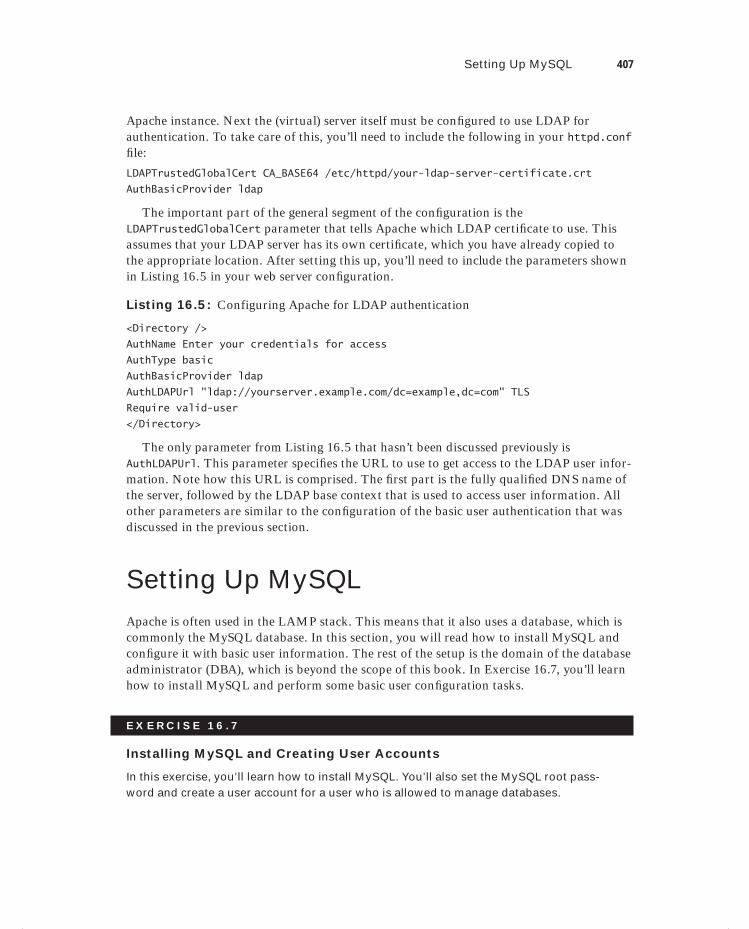
Setting Up MySQL 407
Apache instance. Next the (virtual) server itself must be confi gured to use LDAP for authentication. To take care of this, you’ll need to include the following in your httpd.conf fi le:
LDAPTrustedGlobalCert CA_BASE64 /etc/httpd/your-ldap-server-certificate.crt
AuthBasicProvider ldap
The important part of the general segment of the confi guration is the LDAPTrustedGlobalCert parameter that tells Apache which LDAP certifi cate to use. This assumes that your LDAP server has its own certifi cate, which you have already copied to the appropriate location. After setting this up, you’ll need to include the parameters shown in Listing 16.5 in your web server confi guration.
Listing 16.5: Configuring Apache for LDAP authentication
<Directory />
AuthName Enter your credentials for access
AuthType basic
AuthBasicProvider ldap
AuthLDAPUrl "ldap://yourserver.example.com/dc=example,dc=com" TLS
Require valid-user
</Directory>
The only parameter from Listing 16.5 that hasn’t been discussed previously is AuthLDAPUrl. This parameter specifi es the URL to use to get access to the LDAP user infor-mation. Note how this URL is comprised. The fi rst part is the fully qualifi ed DNS name of the server, followed by the LDAP base context that is used to access user information. All other parameters are similar to the confi guration of the basic user authentication that was discussed in the previous section.
Setting Up MySQLApache is often used in the LAMP stack. This means that it also uses a database, which is commonly the MySQL database. In this section, you will read how to install MySQL and confi gure it with basic user information. The rest of the setup is the domain of the database administrator (DBA), which is beyond the scope of this book. In Exercise 16.7, you’ll learn how to install MySQL and perform some basic user confi guration tasks.
E X E R C I S E 16 . 7
Installing MySQL and Creating User Accounts
In this exercise, you’ll learn how to install MySQL. You’ll also set the MySQL root pass-word and create a user account for a user who is allowed to manage databases.
c16.indd 407c16.indd 407 1/8/2013 10:54:52 AM1/8/2013 10:54:52 AM
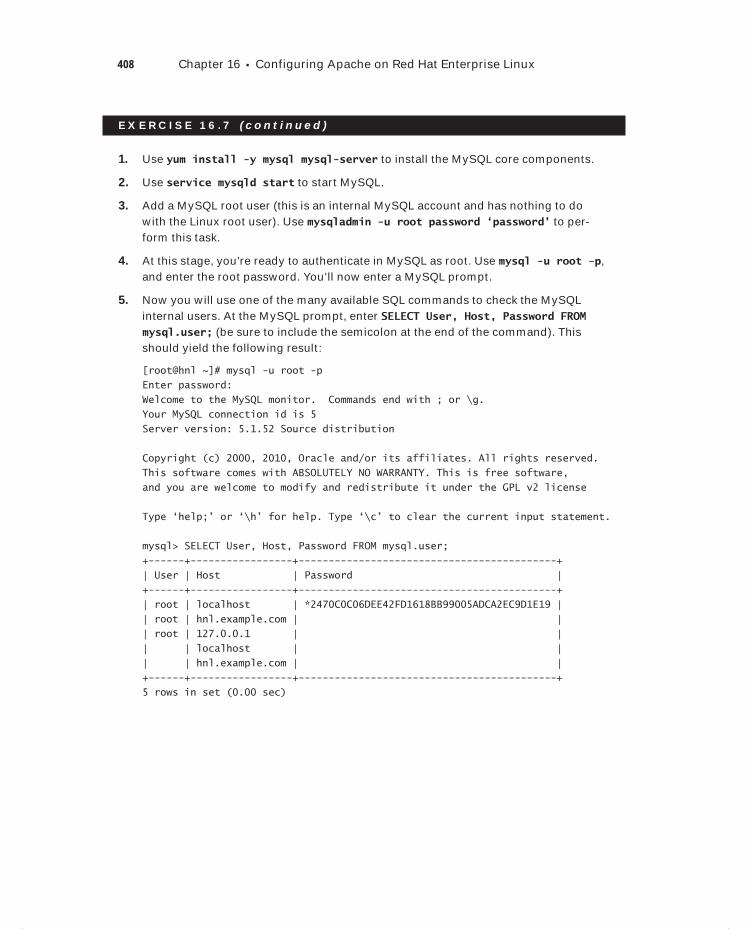
408 Chapter 16 Configuring Apache on Red Hat Enterprise Linux
E X E R C I S E 16 . 7 ( c ont inue d )
1. Use yum install -y mysql mysql-server to install the MySQL core components.
2. Use service mysqld start to start MySQL.
3. Add a MySQL root user (this is an internal MySQL account and has nothing to do with the Linux root user). Use mysqladmin -u root password ‘password’ to per-form this task.
4. At this stage, you’re ready to authenticate in MySQL as root. Use mysql -u root –p, and enter the root password. You’ll now enter a MySQL prompt.
5. Now you will use one of the many available SQL commands to check the MySQL internal users. At the MySQL prompt, enter SELECT User, Host, Password FROM mysql.user; (be sure to include the semicolon at the end of the command). This should yield the following result:
[root@hnl ~]# mysql -u root -p
Enter password:
Welcome to the MySQL monitor. Commands end with ; or \g.
Your MySQL connection id is 5
Server version: 5.1.52 Source distribution
Copyright (c) 2000, 2010, Oracle and/or its affiliates. All rights reserved.
This software comes with ABSOLUTELY NO WARRANTY. This is free software,
and you are welcome to modify and redistribute it under the GPL v2 license
Type ‘help;’ or ‘\h’ for help. Type ‘\c’ to clear the current input statement.
mysql> SELECT User, Host, Password FROM mysql.user;
+------+-----------------+-------------------------------------------+
| User | Host | Password |
+------+-----------------+-------------------------------------------+
| root | localhost | *2470C0C06DEE42FD1618BB99005ADCA2EC9D1E19 |
| root | hnl.example.com | |
| root | 127.0.0.1 | |
| | localhost | |
| | hnl.example.com | |
+------+-----------------+-------------------------------------------+
5 rows in set (0.00 sec)
c16.indd 408c16.indd 408 1/8/2013 10:54:52 AM1/8/2013 10:54:52 AM
Summary 409
E X E R C I S E 16 . 7 ( c ont inue d )
6. Now create a MySQL User with the following command (still from the MySQL prompt): CREATE USER ‘mysqlUser’@’localhost’ IDENTIFIED BY ‘mysqlpassword’;.
7. Now that mysqlUser is created, you’ll need to give this user some management per-missions. The following command gives this user all of the permissions that a DBA typically wants to have to create databases: GRANT ALL PRIVILEGES ON *.* TO ‘mysqlUser’@’localhost’ WITH GRANT OPTION;.
8. At this point, you’re done and ready to leave the MySQL management interface. Type exit.
9. Now test that you can log into MySQL using the user account you just created. From the bash shell prompt, use mysql -u mysqlUser -p to log in, and use exit to log out again.
SummaryIn this chapter, you learned how to confi gure Apache on your server. You read how to per-form most of the common confi guration tasks, including virtual web servers, SSL protec-tion, and authentication using user accounts. You also learned how to fi x SELinux issues that might occur when managing Apache and how the Apache confi guration fi les are han-dled on Red Hat Enterprise Linux. At the end of the chapter, you had a short introduction to MySQL management in an Apache environment.
c16.indd 409c16.indd 409 1/8/2013 10:54:52 AM1/8/2013 10:54:52 AM

c16.indd 410c16.indd 410 1/8/2013 10:54:52 AM1/8/2013 10:54:52 AM
PART
VAdvanced
Red Hat Enterprise Linux
Configuration
c17.indd 411c17.indd 411 1/8/2013 10:55:16 AM1/8/2013 10:55:16 AM

c17.indd 412c17.indd 412 1/8/2013 10:55:17 AM1/8/2013 10:55:17 AM

Chapter
17Monitoring and Optimizing Performance
TOPICS COVERED IN THIS CHAPTER:
Interpreting What’s Going On: The top Utility
Analyzing CPU Performance
Analyzing Memory Usage
Monitoring Storage Performance
Understanding Network Performance
Optimizing Performance
c17.indd 413c17.indd 413 1/8/2013 10:55:17 AM1/8/2013 10:55:17 AM

Running a server is one thing; running a server that works well is something else. On a server installed with the default settings, performance may not be up to where you need it to
be. Finding a performance problem on a Linux server is not that easy. You need to know exactly what is going on, and you also need to know how to interpret performance-mon-itoring data. In this chapter, you will fi rst learn how to monitor performance. After that, you’ll learn how to optimize your server.
Interpreting What’s Going On: The top UtilityBefore examining details, you need a general overview of the current state of your server. The top utility is an excellent tool to help you get this information.
Let’s start by looking at a server that is restoring a workstation from an image fi le using the Clonezilla imaging solution. (This is merely a random example of a tool that produces some workload on the machine.) The top window in Listing 17.1 shows how busy the server is doing this task.
Listing 17.1: Analyzing top on a somewhat busy server
top - 09:19:12 up 21 min, 3 users, load average: 0.55, 0.21, 0.13
Tasks: 140 total, 1 running, 139 sleeping, 0 stopped, 0 zombie
Cpu(s): 0.0%us, 1.0%sy, 0.0%ni, 90.1%id, 3.9%wa, 0.0%hi, 5.0%si, 0.0%st
Mem: 4083276k total, 989152k used, 3094124k free, 15712k buffers
Swap: 2097144k total, 0k used, 2097144k free, 862884k cached
PID USER PR NI VIRT RES SHR S %CPU %MEM TIME+ COMMAND
5350 root 20 0 0 0 0 S 0 0.0 0:00.05 nfsd
5356 root 20 0 0 0 0 S 0 0.0 0:00.07 nfsd
5359 root 20 0 0 0 0 S 0 0.0 0:00.08 nfsd
1 root 20 0 1804 760 548 S 0 0.0 0:01.19 init
2 root 15 -5 0 0 0 S 0 0.0 0:00.00 kthreadd
3 root RT -5 0 0 0 S 0 0.0 0:00.00 migration/0
4 root 15 -5 0 0 0 S 0 0.0 0:00.00 ksoftirqd/0
5 root RT -5 0 0 0 S 0 0.0 0:00.00 watchdog/0
c17.indd 414c17.indd 414 1/8/2013 10:55:18 AM1/8/2013 10:55:18 AM

Interpreting What’s Going On: The top Utility 415
6 root RT -5 0 0 0 S 0 0.0 0:00.00 migration/1
7 root 15 -5 0 0 0 S 0 0.0 0:00.00 ksoftirqd/1
8 root RT -5 0 0 0 S 0 0.0 0:00.00 watchdog/1
9 root 15 -5 0 0 0 S 0 0.0 0:00.00 events/0
10 root 15 -5 0 0 0 S 0 0.0 0:00.00 events/1
11 root 15 -5 0 0 0 S 0 0.0 0:00.00 khelper
46 root 15 -5 0 0 0 S 0 0.0 0:00.00 kblockd/0
47 root 15 -5 0 0 0 S 0 0.0 0:00.00 kblockd/1
50 root 15 -5 0 0 0 S 0 0.0 0:00.00 kacpid
CPU Monitoring with top
When analyzing performance, you start with the fi rst line of the top output. The load aver-age parameters are of special interest. There are three of them, indicating the load average for the last minute, last fi ve minutes, and the last fi fteen minutes. The anchor value is 1.00. You will see 1.00 on a single CPU system where the system is completely busy but all is running smoothly and there is no queuing; 1.00 is the anchor value for each CPU core in your system. Thus, on a dual quad-core processor system, the anchor value would be 8.00.
The load average is for your system, not for your CPU. It is definitively pos-sible to have a load average far above 1.00 while your CPU is doing next to nothing. For example, the system can be busy waiting for I/O.
Having a system that works exactly at the anchor value may be good but not necessar-ily. You need to understand more about typical workloads before being able to determine whether a workload of 1.00 is good.
For example, think about a task that is running completely on the CPU. You can force such a task by entering the following code line:
while true; do true; done
This task will completely claim one CPU core, thus causing a workload of 1.00. However, since this is a task that doesn’t do any I/O, it does not have waiting times. Therefore, for a task such as this, 1.00 is considered a heavy workload because if another task is started, processes will have to be queued because of a lack of available resources.
Now let’s consider a task that is I/O intensive, such as one in which your hard drive is completely copied to the null device (dd if=/dev/sda of=/dev/null). This task also easily results in a workload that is 1.00 or greater, but since it involves a lot of waiting time for I/O, it’s not as bad as the while true task. This is because while waiting for I/O, the CPU can do something else. Thus, don’t draw conclusions too quickly from the load line.
When you see that your servers’ CPUs are quite busy, you should pursue further analy-sis. First you should relate the load average to the number of CPUs in your server. By default, top gives a summary for all of the CPUs in your server. Press the 1 on the keyboard to show a line for each CPU core in your server. Since all modern servers are multicore, you
c17.indd 415c17.indd 415 1/8/2013 10:55:18 AM1/8/2013 10:55:18 AM

416 Chapter 17 Monitoring and Optimizing Performance
should apply this option because it also provides information about the multiprocessing environment. Listing 17.2 shows usage statistics on a quad-core server.
Listing 17.2: Monitoring performance on a quad-core server
[root@hnl ~]# top
top - 18:38:28 up 17 min, 3 users, load average: 0.22, 0.32, 0.18
Tasks: 205 total, 1 running, 204 sleeping, 0 stopped, 0 zombie
Cpu0 : 1.1%us, 2.0%sy, 0.0%ni, 94.2%id, 2.5%wa, 0.0%hi, 0.1%si, 0.0%st
Cpu1 : 0.6%us, 1.1%sy, 0.0%ni, 97.5%id, 0.7%wa, 0.0%hi, 0.1%si, 0.0%st
Cpu2 : 0.7%us, 1.4%sy, 0.0%ni, 95.8%id, 2.0%wa, 0.0%hi, 0.0%si, 0.0%st
Cpu3 : 0.6%us, 1.1%sy, 0.0%ni, 97.6%id, 0.6%wa, 0.0%hi, 0.0%si, 0.0%st
Mem: 1016928k total, 560572k used, 456356k free, 60092k buffers
Swap: 2064376k total, 0k used, 2064376k free, 198728k cached
PID USER PR NI VIRT RES SHR S %CPU %MEM TIME+ COMMAND
3255 root 20 0 15088 1320 960 R 1.4 0.1 0:00.27 top
42 root 20 0 0 0 0 S 0.7 0.0 0:00.12 ata/1
1 root 20 0 19404 1568 1252 S 0.0 0.2 0:04.31 init
2 root 20 0 0 0 0 S 0.0 0.0 0:00.03 kthreadd
3 root RT 0 0 0 0 S 0.0 0.0 0:00.04 migration/0
4 root 20 0 0 0 0 S 0.0 0.0 0:00.00 ksoftirqd/0
5 root RT 0 0 0 0 S 0.0 0.0 0:00.00 migration/0
6 root RT 0 0 0 0 S 0.0 0.0 0:00.00 watchdog/0
7 root RT 0 0 0 0 S 0.0 0.0 0:00.15 migration/1
8 root RT 0 0 0 0 S 0.0 0.0 0:00.00 migration/1
9 root 20 0 0 0 0 S 0.0 0.0 0:00.00 ksoftirqd/1
10 root RT 0 0 0 0 S 0.0 0.0 0:00.00 watchdog/1
11 root RT 0 0 0 0 S 0.0 0.0 0:00.05 migration/2
12 root RT 0 0 0 0 S 0.0 0.0 0:00.00 migration/2
When thinking about exactly what your server is doing, the CPU lines are an important indicator. There you can monitor CPU performance, divided into different performance categories. The following list summarizes these options:
us This refers to a workload in user space. Typically, this relates to processes that are started by end users and don’t run with root priorities. If you see a high load here, this means your server is heavily used by applications.
sy This refers to the work that is done in system space. These are important tasks in which the kernel of your operating system is also involved. In general, load average here should not be too high. You can see that it is elevated when particular jobs are executed, such as for the creation of a 4096 private key in which a large amount of random data is read.
c17.indd 416c17.indd 416 1/8/2013 10:55:19 AM1/8/2013 10:55:19 AM

Interpreting What’s Going On: The top Utility 417
ni This indicator relates to the number of jobs that have been started with an adjusted nice command value.
id Here you can see how busy the idle loop is. This special loop indicates the amount of time your CPU is doing nothing. Thus, a high percentage in the idle loop time means a CPU that is not too busy.
wa This is an important indicator. The wa parameter refers to the amount of time that your CPU is waiting for I/O. If the value you observe is frequently greater than 30 percent, this could indicate a problem on the I/O channel that involves storage and network. See the sec-tions on storage and network performance monitoring later in this chapter to fi nd out what may be causing this.
hi The hi parameter relates to the time the CPU spends handling hardware interrupts. You will see some utilization here when a device is particularly busy (optical drives, for instance, stress this parameter from time to time), but normally you won’t ever see it above a few percentage points.
si This parameter relates to software interrupts. Typically, these are lower-priority inter-rupts that are created by the kernel. You will likely never see a high utilization in this fi eld.
st The st parameter relates to an environment where virtualization is used. In some vir-tual environments, a virtual machine can take, or “steal” (hence st), CPU time from the host operating system. If this happens, you will see some utilization in the st fi eld. If the utilization becomes very high, consider offl oading virtual machines from your server.
Memory Monitoring with top
The second piece of information you get from top are the lines relating to memory and swap usage. The memory lines contain fi ve parameters. The last parameter is in the swap line. The fi ve parameters are as follows:
total The total amount of physical memory installed in your server.
used The amount of memory that is currently in use by something. This includes memory in buffers and cache.
free The amount of memory that is currently not in use. On a typical server, which is operational for more than a couple of hours, you will always see that this value is rather low.
buffers This parameter relates to the write cache that your server uses. It also contains fi le system tables and other structures that the server needs to have in memory. All data that a server must write to disk is written to the write cache fi rst. From there, the disk controller takes care of this data when it has the time to write it. The advantage of using write cache is that, from the perspective of the end user, the data is written so that the application the user is using does not need to wait for it to be available. However, this buffer cache is memory used for nonessential purposes, and when an application needs more memory and can’t allocate it from the pool of free memory, the write cache can be
c17.indd 417c17.indd 417 1/8/2013 10:55:19 AM1/8/2013 10:55:19 AM
418 Chapter 17 Monitoring and Optimizing Performance
written to disk (fl ushed) so that memory that had been used by the write cache is then available for other purposes. Essentially, write cache is a good thing that makes your server perform faster.
cached When a user requests a fi le from the server, the fi le normally has to be read from the hard disk. Since a hard disk is typically about 1,000 times slower than RAM, this pro-cess causes major delays. For this reason, the fi le is stored in cache every time after fetching a fi le from the server hard drive. This is a read cache and has only one purpose: to speed up reads. When memory that is currently allocated to the read cache is needed for other pur-poses, the read cache can be freed instantly so that more memory can be added to the pool of available (“free”) memory.
Your server will typically see a high amount of cached memory, especially if it is used mostly for reads. This is considered good because it will speed up your server. In case your server is used mostly for reads and this parameter falls below 40 percent of total available memory, you will most likely slow down performance. Add more RAM if this happens. Be aware, however, that there are exceptions. Servers running large databases typically don’t have a very high read cache, because the data is stored in memory, which is claimed by the database. It is not managed by the Linux kernel.
Apart from the Mem: line, which gives information about memory usage, there is the Swap: line. This relates to the usage of swap space. Swap space is emulated RAM on a hard disk, typically on a swap partition that you create when installing your server. If your server starts using swap, this can be bad because it is about 1,000 times slower than RAM. Swap isn’t always that bad, however, because the kernel can use it to move data to swap that it doesn’t really need at the moment, and this action frees memory for data that is needed more often. Also, there are some applications, such as Oracle databases or SAP applications, that use swap in a clever way. So, swap isn’t always a bad thing. In Exercise 17.1, you’ll learn how to monitor buffer and cache memory.
E X E R C I S E 17.1
Monitoring Buffer and Cache Memory
In this exercise, you’ll monitor how buffer and cache memory is used. To start with a clean image, fi rst you’ll restart your server so that no old data is in buffers or cache. Next, you’ll run some commands that will fi ll the buffer and cache memory. Finally, you’ll clear the total amount of buffer and cache memory by using /proc/sys/vm/drop_caches.
1. Reboot your server.
2. After rebooting, open two root console windows. In one window, start top so that you’ll have a real-time overview of what’s happening. Note the current memory allo-cation. Buffers and cache should be low, and your server should have a relatively large amount of free memory available.
3. Run the following script to read data, which will fi ll your server cache:
cd /etc
for I in *
c17.indd 418c17.indd 418 1/8/2013 10:55:19 AM1/8/2013 10:55:19 AM
Interpreting What’s Going On: The top Utility 419
E X E R C I S E 17.1 ( c ont inue d )
do
cat $I
done
4. You should see an increase in cache (probably not much, because the contents of the /etc directory typically aren’t that high).
5. Run the following command to fi ll the buffer cache: ls -Rl / > /dev/null &.
6. Notice that the buffer cache has also fi lled somewhat.
7. Optionally, you can run some additional commands that will fi ll buffers as well as cache, such as dd if=/dev/sda of=/dev/null &.
8. Once fi nished, type free -m to observe the current usage of buffers and cache.
9. Tell the kernel to drop all buffers and cache that it doesn’t need at this time by using echo 2 > /proc/sys/vm/drop_caches.
Process Monitoring with top
The last part of top is reserved for information about the most active processes. In this sec-tion, you’ll see a few parameters that are related to these processes.
PID The process ID of the process.
USER The user who started the process.
PR The priority of the process. The priority of any process is determined automatically, and the process with the highest priority is eligible to be serviced fi rst from the queue of runnable processes. Some processes run with a real-time priority, which is indicated as RT. Processes with this priority can claim CPU cycles in real time, which means they will always have the highest priority.
NI The nice value with which the process was started. This refers to an adjusted priority that has been set using the nice command.
VIRT The amount of memory that was claimed by the process when it fi rst started.
RES This stands for resident memory. It relates to the amount of memory that a process is actually using. You will see that, in some cases, this is considerably lower than the param-eter mentioned in the virt column. This is because many process like to over-allocate memory, which means that they claim more memory than they really need.
SHR The amount of memory this process uses that is shared with another process.
S The status of a process.
c17.indd 419c17.indd 419 1/8/2013 10:55:19 AM1/8/2013 10:55:19 AM

420 Chapter 17 Monitoring and Optimizing Performance
%CPU Relates to the percentage of CPU time that this process is using. You will normally see the process with the highest CPU utilization mentioned on top of this list.
%MEM The percentage of memory that this process has claimed.
TIME+ The total amount of time that this process has been using CPU cycles.
COMMAND The name of the command that relates to this process.
Analyzing CPU PerformanceThe top utility offers a good starting point for performance tuning. However, if you need to dig more deeply into a performance problem, top does not offer adequate information, and more advanced tools are required. In this section, you’ll learn what you can do to fi nd out more about CPU performance-related problems.
Most people tend to start analyzing a performance problem at the CPU, since they think CPU performance is the most important factor in server performance. In most situ-ations, this is not true. Assuming that you have an up-to-date CPU, you will rarely see a performance problem related to the CPU. In most cases, a problem that appears to be CPU-related is caused by something else. For instance, your CPU may be waiting for data to be written to disk. In Exercise 17.2, you’ll learn how to analyze CPU performance.
E X E R C I S E 17. 2
Analyzing CPU Performance
In this exercise, you’ll run two different commands that both affect CPU performance. You’ll notice a difference in behavior between both commands.
1. Log in as root, and open two terminal windows. In one of the windows, start top.
2. In the second window, run the command dd if=/dev/urandom of=/dev/null. You will see the usage percentage increasing in the us column. Press 1 if you have a mul-ticore system. You’ll notice that one CPU core is completely occupied by this task.
3. Stop the dd job, and write a small script in the home directory of user root with the following content:
[root@hnl ~]# cat wait
#!/bin/bash
COUNTER=0
while true
do
dd if=/dev/urandom of=/root/file.$COUNTER bs=1M count=1
c17.indd 420c17.indd 420 1/8/2013 10:55:20 AM1/8/2013 10:55:20 AM
Dow
nlo
ad fro
m W
ow
! eBook
<w
ww
.wow
ebook.
com
>

Analyzing CPU Performance 421
E X E R C I S E 17. 2 ( c ont inue d )
COUNTER=$(( COUNTER + 1 ))
[ COUNTER = 1000 ] && exit
done
4. Run the script. You’ll notice that fi rst the sy parameter in top goes up, and the wa parameter also goes up after a while. This is because the I/O channel gets too busy, and the CPU has to wait for data to be committed to I/O.
5. Make sure that both the script and the dd command have stopped, and close the root shells.
Understanding CPU Performance
To monitor what is happening on your CPU, you should know how the Linux kernel works with it. A key component is the run queue. Before being served by the CPU, every process enters the run queue. There’s a run queue for every CPU core in the system. Once a process is in the run queue, it can be runnable or blocked. A runnable process is one that is com-peting for CPU time.
The Linux scheduler decides which runnable process to run next based on the current priority of the process. A blocked process doesn’t compete for CPU time. The load average line in top summarizes the workload that is caused by all runnable and blocked processes combined. If you want to know how many of the processes are currently in either a run-nable or blocked state, use the vmstat utility. The columns r and b show the number of runnable and blocked processes. Listing 17.3 shows what this looks like on a system where vmstat has polled the system fi ve times with a two-second interval.
Listing 17.3: Use vmstat to see how many processes are in runnable or blocked state
[root@hnl ~]# vmstat 2 5
procs -----------memory---------- ---swap-- -----io---- --system-- -----cpu-----
r b swpd free buff cache si so bi bo in cs us sy id wa st
2 0 0 82996 372236 251688 0 0 61 3 36 29 1 1 98 1 0
2 0 0 66376 493776 143932 0 0 76736 0 3065 1343 25 27 45 3 0
2 0 0 71408 491088 142924 0 0 51840 0 2191 850 29 15 54 2 0
2 0 0 69552 495568 141128 0 0 33536 0 1914 372 31 13 56 0 0
2 0 0 69676 498000 138900 0 0 34816 16 1894 507 31 12 57 0 0
Context Switches and Interrupts
A modern Linux system is a multitasking system. This is true for every processor architec-ture because the Linux kernel constantly switches between different processes. To perform this switch, the CPU needs to save all the context information for the old process and
c17.indd 421c17.indd 421 1/8/2013 10:55:20 AM1/8/2013 10:55:20 AM
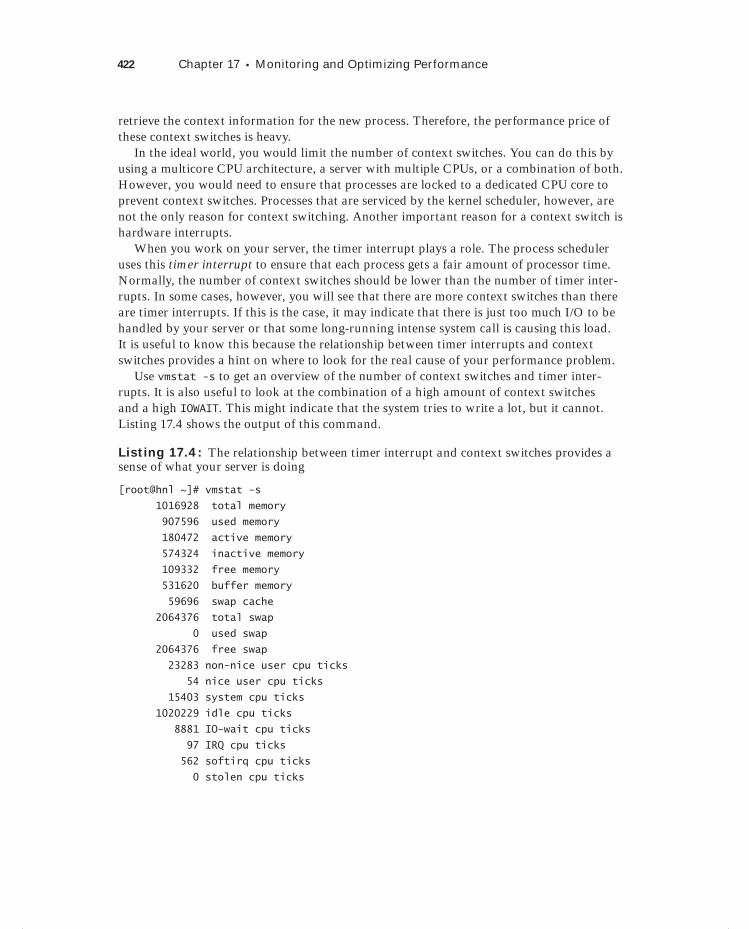
422 Chapter 17 Monitoring and Optimizing Performance
retrieve the context information for the new process. Therefore, the performance price of these context switches is heavy.
In the ideal world, you would limit the number of context switches. You can do this by using a multicore CPU architecture, a server with multiple CPUs, or a combination of both. However, you would need to ensure that processes are locked to a dedicated CPU core to prevent context switches. Processes that are serviced by the kernel scheduler, however, are not the only reason for context switching. Another important reason for a context switch is hardware interrupts.
When you work on your server, the timer interrupt plays a role. The process scheduler uses this timer interrupt to ensure that each process gets a fair amount of processor time. Normally, the number of context switches should be lower than the number of timer inter-rupts. In some cases, however, you will see that there are more context switches than there are timer interrupts. If this is the case, it may indicate that there is just too much I/O to be handled by your server or that some long-running intense system call is causing this load. It is useful to know this because the relationship between timer interrupts and context switches provides a hint on where to look for the real cause of your performance problem.
Use vmstat -s to get an overview of the number of context switches and timer inter-rupts. It is also useful to look at the combination of a high amount of context switches and a high IOWAIT. This might indicate that the system tries to write a lot, but it cannot. Listing 17.4 shows the output of this command.
Listing 17.4: The relationship between timer interrupt and context switches provides a sense of what your server is doing
[root@hnl ~]# vmstat -s
1016928 total memory
907596 used memory
180472 active memory
574324 inactive memory
109332 free memory
531620 buffer memory
59696 swap cache
2064376 total swap
0 used swap
2064376 free swap
23283 non-nice user cpu ticks
54 nice user cpu ticks
15403 system cpu ticks
1020229 idle cpu ticks
8881 IO-wait cpu ticks
97 IRQ cpu ticks
562 softirq cpu ticks
0 stolen cpu ticks
c17.indd 422c17.indd 422 1/8/2013 10:55:20 AM1/8/2013 10:55:20 AM
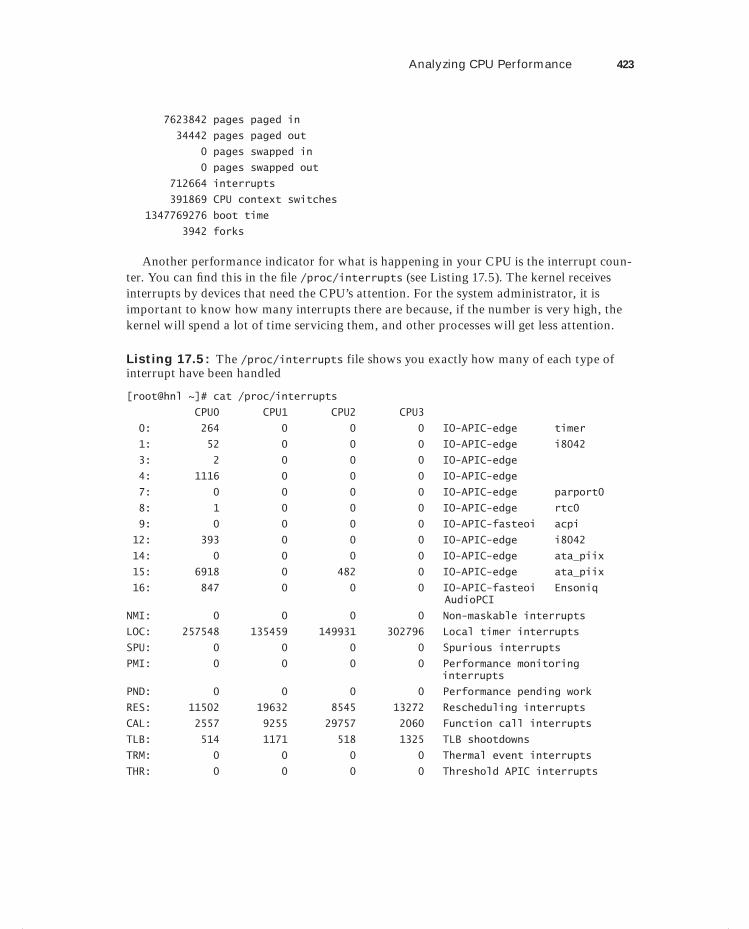
Analyzing CPU Performance 423
7623842 pages paged in
34442 pages paged out
0 pages swapped in
0 pages swapped out
712664 interrupts
391869 CPU context switches
1347769276 boot time
3942 forks
Another performance indicator for what is happening in your CPU is the interrupt coun-ter. You can fi nd this in the fi le /proc/interrupts (see Listing 17.5). The kernel receives interrupts by devices that need the CPU’s attention. For the system administrator, it is important to know how many interrupts there are because, if the number is very high, the kernel will spend a lot of time servicing them, and other processes will get less attention.
Listing 17.5: The /proc/interrupts file shows you exactly how many of each type of interrupt have been handled
[root@hnl ~]# cat /proc/interrupts
CPU0 CPU1 CPU2 CPU3
0: 264 0 0 0 IO-APIC-edge timer
1: 52 0 0 0 IO-APIC-edge i8042
3: 2 0 0 0 IO-APIC-edge
4: 1116 0 0 0 IO-APIC-edge
7: 0 0 0 0 IO-APIC-edge parport0
8: 1 0 0 0 IO-APIC-edge rtc0
9: 0 0 0 0 IO-APIC-fasteoi acpi
12: 393 0 0 0 IO-APIC-edge i8042
14: 0 0 0 0 IO-APIC-edge ata_piix
15: 6918 0 482 0 IO-APIC-edge ata_piix
16: 847 0 0 0 IO-APIC-fasteoi Ensoniq AudioPCI
NMI: 0 0 0 0 Non-maskable interrupts
LOC: 257548 135459 149931 302796 Local timer interrupts
SPU: 0 0 0 0 Spurious interrupts
PMI: 0 0 0 0 Performance monitoring interrupts
PND: 0 0 0 0 Performance pending work
RES: 11502 19632 8545 13272 Rescheduling interrupts
CAL: 2557 9255 29757 2060 Function call interrupts
TLB: 514 1171 518 1325 TLB shootdowns
TRM: 0 0 0 0 Thermal event interrupts
THR: 0 0 0 0 Threshold APIC interrupts
c17.indd 423c17.indd 423 1/8/2013 10:55:20 AM1/8/2013 10:55:20 AM

424 Chapter 17 Monitoring and Optimizing Performance
MCE: 0 0 0 0 Machine check exceptions
MCP: 10 10 10 10 Machine check polls
ERR: 0
MIS: 0
[root@hnl ~]#
As mentioned previously, in a multicore environment, context switches can result in per-formance overhead. You can see how often these occur by using the top utility. It can pro-vide information about the CPU that was last used by any process, but you need to switch this on. To do that, from the top utility, fi rst press the f command and type j. This will switch the option Last Used CPU (SMP) on for an SMP environment. Listing 17.6 shows the interface that allows you to do this.
Listing 17.6: After pressing the f key, you can switch different options on or off in top
Current Fields: AEHIOQTWKNMbcdfgjplrsuvyzX for window 1:Def
Toggle fields via field letter, type any other key to return
* A: PID = Process Id u: nFLT = Page Fault count
* E: USER = User Name v: nDRT = Dirty Pages count
* H: PR = Priority y: WCHAN = Sleeping in Function
* I: NI = Nice value z: Flags = Task Flags <sched.h>
* O: VIRT = Virtual Image (kb) * X: COMMAND = Command name/line
* Q: RES = Resident size (kb)
* T: SHR = Shared Mem size (kb) Flags field:
* W: S = Process Status 0x00000001 PF_ALIGNWARN
* K: %CPU = CPU usage 0x00000002 PF_STARTING
* N: %MEM = Memory usage (RES) 0x00000004 PF_EXITING
* M: TIME+ = CPU Time, hundredths 0x00000040 PF_FORKNOEXEC
b: PPID = Parent Process Pid 0x00000100 PF_SUPERPRIV
c: RUSER = Real user name 0x00000200 PF_DUMPCORE
d: UID = User Id 0x00000400 PF_SIGNALED
f: GROUP = Group Name 0x00000800 PF_MEMALLOC
g: TTY = Controlling Tty 0x00002000 PF_FREE_PAGES (2.5)
j: P = Last used cpu (SMP) 0x00008000 debug flag (2.5)
p: SWAP = Swapped size (kb) 0x00024000 special threads (2.5)
l: TIME = CPU Time 0x001D0000 special states (2.5)
r: CODE = Code size (kb) 0x00100000 PF_USEDFPU (thru 2.4)
s: DATA = Data+Stack size (kb)
After switching the last used CPU option on, you will see the column P in top that dis-plays the number of the CPU that was last used by a process.
c17.indd 424c17.indd 424 1/8/2013 10:55:21 AM1/8/2013 10:55:21 AM

Analyzing Memory Usage 425
Using vmstat
top offers a very good starting point for monitoring CPU utilization. If it doesn’t provide you with all the information that you need, you may want to try the vmstat utility. First you may need to install this package using yum -y install sysstat. With vmstat, you get a nice, detailed view on what is happening on your server. The CPU section is of special interest because it contains the fi ve most important parameters of CPU usage.
cs The number of context switches
us The percentage of time the CPU has spent in user space
sy The percentage of time the CPU has spent in system space
id The percentage of CPU utilization in the idle loop
wa The percentage of utilization where the CPU was waiting for I/O
There are two ways to use vmstat. Probably the most useful way to run it is in the so-called sample mode. In this mode, a sample is taken every n seconds. You must specify the number of seconds for the sample as an option when starting vmstat. Running performance-monitoring utilities in this way is always benefi cial, since it will show you progress over a given amount of time. You also may fi nd it useful to run vmstat for a certain number of times only.
Another useful way to run vmstat is with the -s option. In this mode, vmstat shows you the statistics since the system was booted. Apart from the CPU-related options, vmstat also shows information about processors, memory, swap, i/o, and system. These options are covered later in this chapter.
Analyzing Memory UsageMemory is also an essential component of your server. The CPU can work smoothly only if processes are ready in memory and can be offered from there. If this is not the case, the server has to get its data from the I/O channel, which is about 1,000 times slower to access than memory. From the processor’s point of view, even system RAM is relatively slow. Therefore, modern server processors contain large amounts of cache, which are even faster than memory.
You learned how to interpret basic memory statistics provided by top earlier in this chapter. In this section, you will learn about some more advanced memory-related information.
Page Size
A basic concept in memory handling is the memory page size. On an i386 system, 4KB pages are typically used. This means that everything that happens does so in 4KB chunks.
c17.indd 425c17.indd 425 1/8/2013 10:55:21 AM1/8/2013 10:55:21 AM
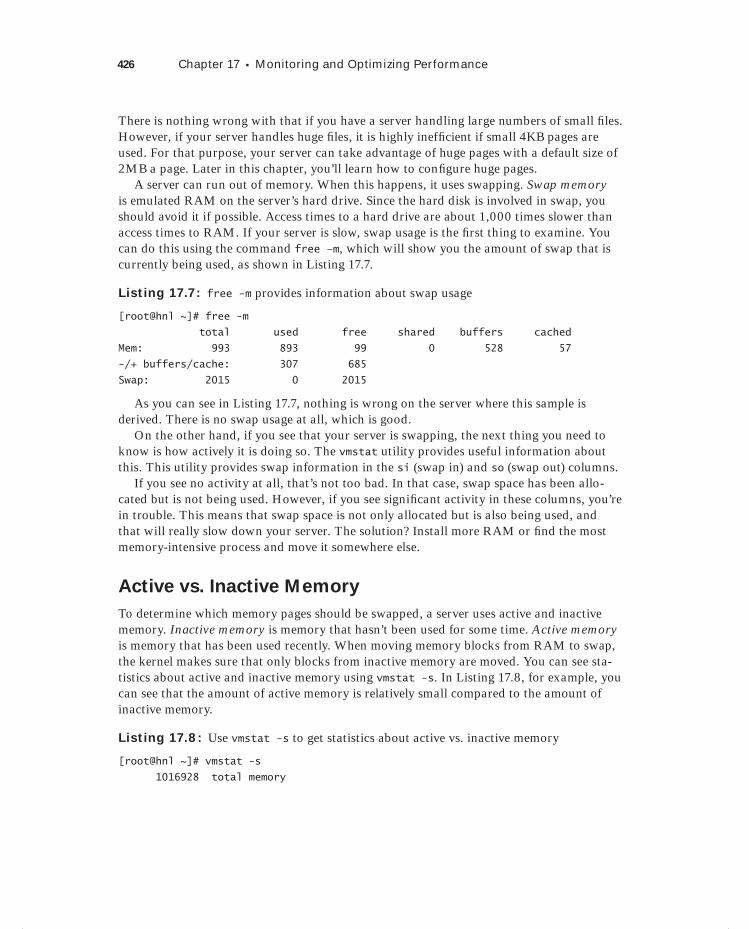
426 Chapter 17 Monitoring and Optimizing Performance
There is nothing wrong with that if you have a server handling large numbers of small fi les. However, if your server handles huge fi les, it is highly ineffi cient if small 4KB pages are used. For that purpose, your server can take advantage of huge pages with a default size of 2MB a page. Later in this chapter, you’ll learn how to confi gure huge pages.
A server can run out of memory. When this happens, it uses swapping. Swap memory is emulated RAM on the server’s hard drive. Since the hard disk is involved in swap, you should avoid it if possible. Access times to a hard drive are about 1,000 times slower than access times to RAM. If your server is slow, swap usage is the fi rst thing to examine. You can do this using the command free –m, which will show you the amount of swap that is currently being used, as shown in Listing 17.7.
Listing 17.7: free -m provides information about swap usage
[root@hnl ~]# free -m
total used free shared buffers cached
Mem: 993 893 99 0 528 57
-/+ buffers/cache: 307 685
Swap: 2015 0 2015
As you can see in Listing 17.7, nothing is wrong on the server where this sample is derived. There is no swap usage at all, which is good.
On the other hand, if you see that your server is swapping, the next thing you need to know is how actively it is doing so. The vmstat utility provides useful information about this. This utility provides swap information in the si (swap in) and so (swap out) columns.
If you see no activity at all, that’s not too bad. In that case, swap space has been allo-cated but is not being used. However, if you see signifi cant activity in these columns, you’re in trouble. This means that swap space is not only allocated but is also being used, and that will really slow down your server. The solution? Install more RAM or fi nd the most memory-intensive process and move it somewhere else.
Active vs. Inactive Memory
To determine which memory pages should be swapped, a server uses active and inactive memory. Inactive memory is memory that hasn’t been used for some time. Active memory is memory that has been used recently. When moving memory blocks from RAM to swap, the kernel makes sure that only blocks from inactive memory are moved. You can see sta-tistics about active and inactive memory using vmstat -s. In Listing 17.8, for example, you can see that the amount of active memory is relatively small compared to the amount of inactive memory.
Listing 17.8: Use vmstat -s to get statistics about active vs. inactive memory
[root@hnl ~]# vmstat -s
1016928 total memory
c17.indd 426c17.indd 426 1/8/2013 10:55:21 AM1/8/2013 10:55:21 AM

Analyzing Memory Usage 427
915056 used memory
168988 active memory
598880 inactive memory
101872 free memory
541564 buffer memory
59084 swap cache
2064376 total swap
0 used swap
2064376 free swap
142311 non-nice user cpu ticks
251 nice user cpu ticks
30673 system cpu ticks
1332644 idle cpu ticks
24256 IO-wait cpu ticks
371 IRQ cpu ticks
1175 softirq cpu ticks
0 stolen cpu ticks
21556610 pages paged in
56830 pages paged out
0 pages swapped in
0 pages swapped out
2390762 interrupts
695020 CPU context switches
1347791046 boot time
6233 forks
Kernel Memory
When analyzing memory usage, you should also take into account the memory that is used by the kernel itself. This is called slab memory. You can see the amount of slab currently in use in the /proc/meminfo fi le. Listing 17.9 provides an example of the contents of this fi le that gives you detailed information about memory usage.
Listing 17.9: The /proc/meminfo file provides detailed information about memory usage
[root@hnl ~]# cat /proc/meminfo
MemTotal: 1016928 kB
MemFree: 99568 kB
Buffers: 541568 kB
Cached: 59092 kB
SwapCached: 0 kB
c17.indd 427c17.indd 427 1/8/2013 10:55:21 AM1/8/2013 10:55:21 AM

428 Chapter 17 Monitoring and Optimizing Performance
Active: 171172 kB
Inactive: 598808 kB
Active(anon): 69128 kB
Inactive(anon): 103728 kB
Active(file): 102044 kB
Inactive(file): 495080 kB
Unevictable: 0 kB
Mlocked: 0 kB
SwapTotal: 2064376 kB
SwapFree: 2064376 kB
Dirty: 36 kB
Writeback: 0 kB
AnonPages: 169292 kB
Mapped: 37268 kB
Shmem: 3492 kB
Slab: 90420 kB
SReclaimable: 32420 kB
SUnreclaim: 58000 kB
KernelStack: 2440 kB
PageTables: 27636 kB
NFS_Unstable: 0 kB
Bounce: 0 kB
WritebackTmp: 0 kB
CommitLimit: 2572840 kB
Committed_AS: 668328 kB
VmallocTotal: 34359738367 kB
VmallocUsed: 272352 kB
VmallocChunk: 34359448140 kB
HardwareCorrupted: 0 kB
AnonHugePages: 38912 kB
HugePages_Total: 0
HugePages_Free: 0
HugePages_Rsvd: 0
HugePages_Surp: 0
Hugepagesize: 2048 kB
DirectMap4k: 8192 kB
DirectMap2M: 1040384 kB
In Listing 17.9, you can see that the amount of memory that is used by the Linux ker-nel is relatively small. If you need more details about what the kernel is doing with that
c17.indd 428c17.indd 428 1/8/2013 10:55:21 AM1/8/2013 10:55:21 AM

Analyzing Memory Usage 429
memory, you may want to use the slabtop utility. This utility provides information about the different parts (referred to as objects) of the kernel and what exactly they are doing. For normal performance-analysis purposes, the SIZE and NAME columns are the most interesting ones. The other columns are of interest mainly for programmers and kernel developers, and thus they are not discussed in this chapter. Listing 17.10 shows an example of the type of information provided by slabtop.
Listing 17.10: The slabtop utility provides information about kernel memory usage
[root@hnl ~]# slabtop
Active / Total Objects (% used) : 1069357 / 1105539 (96.7%)
Active / Total Slabs (% used) : 19402 / 19408 (100.0%)
Active / Total Caches (% used) : 110 / 190 (57.9%)
Active / Total Size (% used) : 71203.09K / 77888.23K (91.4%)
Minimum / Average / Maximum Object : 0.02K / 0.07K / 4096.00K
OBJS ACTIVE USE OBJ SIZE SLABS OBJ/SLAB CACHE SIZE NAME
480672 480480 99% 0.02K 3338 144 13352K avtab_node
334096 333912 99% 0.03K 2983 112 11932K size-32
147075 134677 91% 0.10K 3975 37 15900K buffer_head
17914 10957 61% 0.07K 338 53 1352K selinux_inode_security
15880 10140 63% 0.19K 794 20 3176K dentry
15694 13577 86% 0.06K 266 59 1064K size-64
14630 14418 98% 0.20K 770 19 3080K vm_area_struct
11151 11127 99% 0.14K 413 27 1652K sysfs_dir_cache
8239 7978 96% 0.05K 107 77 428K anon_vma_chain
6440 6276 97% 0.04K 70 92 280K anon_vma
6356 4632 72% 0.55K 908 7 3632K radix_tree_node
6138 6138 100% 0.58K 1023 6 4092K inode_cache
5560 5486 98% 0.19K 278 20 1112K filp
4505 4399 97% 0.07K 85 53 340K Acpi-Operand
4444 2537 57% 1.00K 1111 4 4444K ext4_inode_cache
4110 3596 87% 0.12K 137 30 548K size-128
The most interesting information a system administrator gets from slabtop is the amount of memory that a particular slab is using. If this amount seems too high, there may be something wrong with this module, and you might need to update your kernel. The slab-top utility can also be used to determine the number of resources a certain kernel module is using. For instance, you’ll fi nd information about the caches your fi le system driver is using, and if these appear too high, it can indicate you might have to tune some fi le system param-eters. In Exercise 17.3, you’ll learn how to analyze kernel memory.
c17.indd 429c17.indd 429 1/8/2013 10:55:21 AM1/8/2013 10:55:21 AM

430 Chapter 17 Monitoring and Optimizing Performance
E X E R C I S E 17. 3
Analyzing Kernel Memory
In this exercise, you’ll induce a little bit of stress on your server, and you’ll use slabtop to fi nd out which parts of the kernel are getting busy. Because the Linux kernel is sophisti-cated and uses its resources as effi ciently as possible, you won’t see huge changes, but you will be able to observe some subtle changes.
1. Open two terminal windows in which you are root.
2. In one terminal window, type slabtop, and look at what the different slabs are cur-rently doing.
3. In the other terminal window, use ls -lR /. You should see the dentry cache increas-ing, which refers to the part of memory where the kernel caches directory entries.
4. Once the ls -R command has fi nished, type dd if=/dev/sda of=/dev/null to cre-ate some read activity. You’ll see the buffer_head parameter increasing. These are the fi le system buffers that are used to cache the information the dd command uses.
Using ps for Analyzing Memory
When tuning memory utilization, the ps utility is one you should never forget. The advan-tage of ps is that it provides memory usage information for all processes on your server, and it is easy to grep on its results to locate information about particular processes.
To monitor memory usage, the ps aux command is very useful. It displays memory information in the VSZ and the RSS columns. The VSZ (Virtual Size) parameter provides information about the virtual memory that is used. This relates to the total amount of memory that is claimed by a process. The RSS (Resident Size) parameter refers to the amount of memory that is actually in use. Listing 17.11 provides an example of some lines of ps aux output.
Listing 17.11: ps aux displays memory usage information for particular processes
[root@hnl ~]# ps aux | less
USER PID %CPU %MEM VSZ RSS TTY STAT START TIME COMMAND
root 1 0.0 0.1 19404 1440 ? Ss 00:27 0:04 /sbin/init
root 2 0.0 0.0 0 0 ? S 00:27 0:00 [kthreadd]
root 3 0.0 0.0 0 0 ? S 00:27 0:00 [migration/0]
root 4 0.0 0.0 0 0 ? S 00:27 0:00 [ksoftirqd/0]
root 5 0.0 0.0 0 0 ? S 00:27 0:00 [migration/0]
root 6 0.0 0.0 0 0 ? S 00:27 0:00 [watchdog/0]
root 7 0.0 0.0 0 0 ? S 00:27 0:00 [migration/1]
c17.indd 430c17.indd 430 1/8/2013 10:55:22 AM1/8/2013 10:55:22 AM

Analyzing Memory Usage 431
root 8 0.0 0.0 0 0 ? S 00:27 0:00 [migration/1]
root 9 0.0 0.0 0 0 ? S 00:27 0:00 [ksoftirqd/1]
root 10 0.0 0.0 0 0 ? S 00:27 0:00 [watchdog/1]
root 11 0.0 0.0 0 0 ? S 00:27 0:00 [migration/2]
root 12 0.0 0.0 0 0 ? S 00:27 0:00 [migration/2]
root 13 0.0 0.0 0 0 ? S 00:27 0:00 [ksoftirqd/2]
root 14 0.0 0.0 0 0 ? S 00:27 0:00 [watchdog/2]
root 15 0.0 0.0 0 0 ? S 00:27 0:00 [migration/3]
root 16 0.0 0.0 0 0 ? S 00:27 0:00 [migration/3]
root 17 0.0 0.0 0 0 ? S 00:27 0:00 [ksoftirqd/3]
root 18 0.0 0.0 0 0 ? S 00:27 0:00 [watchdog/3]
root 19 0.0 0.0 0 0 ? S 00:27 0:00 [events/0]
root 20 0.0 0.0 0 0 ? S 00:27 0:00 [events/1]
root 21 0.0 0.0 0 0 ? S 00:27 0:00 [events/2]
root 22 0.0 0.0 0 0 ? S 00:27 0:00 [events/3]
:
When reviewing the output of ps aux, you may notice that there are two different kinds of processes. The names of some are between square brackets, while the names of others are not. If the name of a process is between square brackets, the process is part of the ker-nel. All other processes are “normal.”
If you need to know more about a process and what exactly it is doing, there are two ways to get that information. First you can check the /proc directory for the particular process. For example, /proc/5658 yields information for the process with PID 5658. In this directory, you’ll fi nd the maps fi le that gives you some more insight on how memory is mapped for this process. As you can see in Listing 17.12, this information is rather detailed. It includes the exact memory addresses that this process is using, and it even tells you about subroutines and libraries that are related to this process.
Listing 17.12: The /proc/PID/maps file provides detailed information on memory utilization of particular processes
root@hnl:~# cat /proc/5658/maps
b7781000-b78c1000 rw-s 00000000 00:09 14414 /dev/zero (deleted)
b78c1000-b78c4000 r-xp 00000000 fe:00 5808329 /lib/security/pam_limits.so
b78c4000-b78c5000 rw-p 00002000 fe:00 5808329 /lib/security/pam_limits.so
b78c5000-b78c7000 r-xp 00000000 fe:00 5808334 /lib/security/pam_mail.so
b78c7000-b78c8000 rw-p 00001000 fe:00 5808334 /lib/security/pam_mail.so
b78c8000-b78d3000 r-xp 00000000 fe:00 5808351 /lib/security/pam_unix.so
b78d3000-b78d4000 rw-p 0000b000 fe:00 5808351 /lib/security/pam_unix.so
b78d4000-b78e0000 rw-p b78d4000 00:00 0
...
c17.indd 431c17.indd 431 1/8/2013 10:55:22 AM1/8/2013 10:55:22 AM

432 Chapter 17 Monitoring and Optimizing Performance
b7eb7000-b7eb8000 r-xp 00000000 fe:00 5808338 /lib/security/pam_nologin.so
b7eb8000-b7eb9000 rw-p 00000000 fe:00 5808338 /lib/security/pam_nologin.so
b7eb9000-b7ebb000 rw-p b7eb9000 00:00 0
b7ebb000-b7ebc000 r-xp b7ebb000 00:00 0 [vdso]
b7ebc000-b7ed6000 r-xp 00000000 fe:00 5808145 /lib/ld-2.7.so
b7ed6000-b7ed8000 rw-p 00019000 fe:00 5808145 /lib/ld-2.7.so
b7ed8000-b7f31000 r-xp 00000000 fe:00 1077630 /usr/sbin/sshd
b7f31000-b7f33000 rw-p 00059000 fe:00 1077630 /usr/sbin/sshd
b7f33000-b7f5b000 rw-p b7f33000 00:00 0 [heap]
bff9a000-bffaf000 rw-p bffeb000 00:00 0 [stack]
Another way of fi nding out what particular processes are doing is by using the pmap command. This command mines the /proc/PID/maps fi le for information and also addresses some other information, such as the summary of memory usage displayed by ps aux. pmap also lets you see which amounts of memory are used by the libraries involved in this process. Listing 17.13 provides an example of the output of this utility.
Listing 17.13: The pmap command mines /proc/PID/maps to provide its information
[root@hnl 2996]# pmap -d 2996
2996: /usr/libexec/pulse/gconf-helper
Address Kbytes Mode Offset Device Mapping
0000000000400000 8 r-x-- 0000000000000000 0fd:00000 gconf-helper
0000000000601000 16 rw--- 0000000000001000 0fd:00000 gconf-helper
0000000001bc6000 136 rw--- 0000000000000000 000:00000 [ anon ]
00000037de400000 128 r-x-- 0000000000000000 0fd:00000 ld-2.12.so
00000037de61f000 4 r---- 000000000001f000 0fd:00000 ld-2.12.so
00000037de620000 4 rw--- 0000000000020000 0fd:00000 ld-2.12.so
00000037de621000 4 rw--- 0000000000000000 000:00000 [ anon ]
00000037de800000 8 r-x-- 0000000000000000 0fd:00000 libdl-2.12.so
00000037de802000 2048 ----- 0000000000002000 0fd:00000 libdl-2.12.so
00000037dea02000 4 r---- 0000000000002000 0fd:00000 libdl-2.12.so
00000037dea03000 4 rw--- 0000000000003000 0fd:00000 libdl-2.12.so
00000037dec00000 1628 r-x-- 0000000000000000 0fd:00000 libc-2.12.so
00000037ded97000 2048 ----- 0000000000197000 0fd:00000 libc-2.12.so
00000037def97000 16 r---- 0000000000197000 0fd:00000 libc-2.12.so
00000037def9b000 4 rw--- 000000000019b000 0fd:00000 libc-2.12.so
00000037def9c000 20 rw--- 0000000000000000 000:00000 [ anon ]
00000037df000000 92 r-x-- 0000000000000000 0fd:00000 libpthread-2.12.so
...
00007f9a30bf4000 4 r---- 000000000000c000 0fd:00000 libnss_files-2.12.so
c17.indd 432c17.indd 432 1/8/2013 10:55:22 AM1/8/2013 10:55:22 AM

Monitoring Storage Performance 433
00007f9a30bf5000 4 rw--- 000000000000d000 0fd:00000 libnss_files-2.12.so
00007f9a30bf6000 68 rw--- 0000000000000000 000:00000 [ anon ]
00007f9a30c14000 8 rw--- 0000000000000000 000:00000 [ anon ]
00007fffb5628000 84 rw--- 0000000000000000 000:00000 [ stack ]
00007fffb57b9000 4 r-x-- 0000000000000000 000:00000 [ anon ]
ffffffffff600000 4 r-x-- 0000000000000000 000:00000 [ anon ]
mapped: 90316K writeable/private: 792K shared: 0K
One of the advantages of the pmap command is that it presents detailed information about the order in which a process does its work. You can see calls to external libraries and additional memory allocation (malloc) requests that the program is doing, as shown in the lines that have [anon] at the end.
Monitoring Storage PerformanceOne of the hardest things to do properly is to monitor storage utilization. The reason is that the storage channel is typically at the end of the chain. Other elements in your server can have either a positive or a negative infl uence on storage performance. For example, if your server is low on memory, this will be refl ected in storage performance because if you don’t have enough memory, there can’t be a lot of cache and buffers, and thus your server has more work to do on the storage channel.
Likewise, a slow CPU can have a negative impact on storage performance because the queue of runnable processes can’t be cleared fast enough. Therefore, before jumping to the conclusion that you have bad performance on the storage channel, you should also try to consider other factors.
It is generally hard to optimize storage performance on a server. The best behavior gen-erally depends on your server’s typical workload. For example, a server that does a lot of reads has other needs than a server that mainly handles writes. A server that is doing writes most of the time can benefi t from a storage channel with many disks because more control-lers can work on clearing the write buffer cache from memory. However, if your server is mainly reading data, the effect of having many disks is just the opposite. Because of the large number of disks, seek times will increase, and performance will thus be negatively impacted.
Here are some indicators for storage performance problems. Is one of these the cause of problems on your server? If it is, analyze what is happening:
Memory buffers and cache are heavily used, while CPU utilization is low.
The disk or controller utilization is high.
The network response times are long while network utilization is low.
The wa parameter in top is very high.
c17.indd 433c17.indd 433 1/8/2013 10:55:22 AM1/8/2013 10:55:22 AM

434 Chapter 17 Monitoring and Optimizing Performance
Understanding Disk Activity
Before trying to understand storage performance, you should consider another factor, and that is the way that disk activity typically takes place. First, a storage device in general handles large sequential transfers better than small random transfers. This is because, in memory, you can confi gure read-ahead and write-ahead, which means that the storage controller already moves to the next block where it likely has to go. If your server handles mostly small fi les, read-ahead buffers will have no effect at all. On the contrary, they will only slow it down.
From the tools perspective, three tools really count when doing disk performance analy-sis. The fi rst tool to start your disk performance analysis is vmstat. This tool has a couple of options that help you see what is happening on a particular disk device, such as –d, which gives you statistics for individual disks, or –p, which gives partition performance statistics. As you have seen, you can use vmstat with an interval parameter and also a count parameter. In Listing 17.14, you can see the result of the command vmstat -d, which gives detailed information on storage utilization for all disk devices on your server.
Listing 17.14: To understand storage usage, start with vmstat
[root@hnl ~]# vmstat -d
disk- ------------reads------------ ------------writes----------- -----IO------
total merged sectors ms total merged sectors ms cur sec
ram0 0 0 0 0 0 0 0 0 0 0
ram1 0 0 0 0 0 0 0 0 0 0
ram2 0 0 0 0 0 0 0 0 0 0
ram3 0 0 0 0 0 0 0 0 0 0
ram4 0 0 0 0 0 0 0 0 0 0
ram5 0 0 0 0 0 0 0 0 0 0
ram6 0 0 0 0 0 0 0 0 0 0
ram7 0 0 0 0 0 0 0 0 0 0
ram8 0 0 0 0 0 0 0 0 0 0
ram9 0 0 0 0 0 0 0 0 0 0
ram10 0 0 0 0 0 0 0 0 0 0
ram11 0 0 0 0 0 0 0 0 0 0
ram12 0 0 0 0 0 0 0 0 0 0
ram13 0 0 0 0 0 0 0 0 0 0
ram14 0 0 0 0 0 0 0 0 0 0
ram15 0 0 0 0 0 0 0 0 0 0
loop0 0 0 0 0 0 0 0 0 0 0
loop1 0 0 0 0 0 0 0 0 0 0
loop2 0 0 0 0 0 0 0 0 0 0
loop3 0 0 0 0 0 0 0 0 0 0
c17.indd 434c17.indd 434 1/8/2013 10:55:22 AM1/8/2013 10:55:22 AM

Monitoring Storage Performance 435
disk- ------------reads------------ ------------writes----------- -----IO------
total merged sectors ms total merged sectors ms cur sec
loop4 0 0 0 0 0 0 0 0 0 0
loop5 0 0 0 0 0 0 0 0 0 0
loop6 0 0 0 0 0 0 0 0 0 0
loop7 0 0 0 0 0 0 0 0 0 0
sr0 0 0 0 0 0 0 0 0 0 0
sda 543960 15236483 127083246 1501450 8431 308221 2533136 4654498 0 817
dm-0 54963 0 1280866 670472 316633 0 2533064 396941052 0 320
dm-1 322 0 2576 1246 0 0 0 0 0 0
You can see detailed statistics about the reads and writes that have occurred on a disk in the output of this command. The following parameters are displayed when using vmstat -d.
Reads
total The total number of reads requested.
merged The total amount of adjacent locations that have been merged to improve per-formance. This is the result of the read-ahead parameter. High numbers are good. A high number here means that within the same read request, a couple of adjacent blocks have also been read.
sectors The total amount of disk sectors that have been read.
ms Total time spent reading from disk.
Writes
total The total amount of writes
merged The total amount of writes to adjacent sectors
sectors The total amount of sectors that have been written
ms The total time in milliseconds that your system has spent writing data
I/O
cur The total number of I/O requests currently in process
sec The total amount of time spent waiting for I/O to complete
Another way to monitor disk performance with vmstat is by running it in sample mode. For example, vmstat 2 15 will run 15 samples with a 2-second interval. Listing 17.15 shows the result of this command.
c17.indd 435c17.indd 435 1/8/2013 10:55:23 AM1/8/2013 10:55:23 AM

436 Chapter 17 Monitoring and Optimizing Performance
Listing 17.15: In sample mode, you can get a real-time impression of disk utilization
root@hnl:~# vmstat 2 15
procs -----------memory---------- ---swap-- -----io---- -system-- ----cpu----
r b swpd free buff cache si so bi bo in cs us sy id wa
0 0 0 3666400 14344 292496 0 0 56 4 579 70 0 0 99 0
0 0 0 3645452 14344 313680 0 0 10560 0 12046 2189 0 4 94 2
0 13 0 3623364 14344 335772 0 0 11040 0 12127 2221 0 6 92 2
0 0 0 3602032 14380 356880 0 0 10560 18 12255 2323 0 7 90 3
0 0 0 3582048 14380 377124 0 0 10080 0 11525 2089 0 4 93 3
0 0 0 3561076 14380 398160 0 0 10560 24 12069 2141 0 5 91 4
0 0 0 3539652 14380 419280 0 0 10560 0 11913 2209 0 4 92 4
0 0 0 3518016 14380 440336 0 0 10560 0 11632 2226 0 7 90 3
0 0 0 3498756 14380 459600 0 0 9600 0 10822 2455 0 4 92 3
0 0 0 3477832 14380 480800 0 0 10560 0 12011 2279 0 3 94 2
0 0 0 3456600 14380 501840 0 0 10560 0 12078 2670 0 3 94 3
0 0 0 3435636 14380 523044 0 0 10560 0 12106 1850 0 3 93 4
0 0 0 3414824 14380 544016 0 0 10560 0 11989 1731 0 3 92 4
0 0 0 3393516 14380 565136 0 0 10560 0 11919 1965 0 6 92 2
0 0 0 3370920 14380 587216 0 0 11040 0 12378 2020 0 5 90 4
The columns that count in Listing 17.15 are io: bi and io: bo because they show the number of blocks that came in from the storage channel (bi) and the number of blocks that were written to the storage channel (bo). It is clear in Listing 17.15 that the server is busy servicing some heavy read requests and works on nearly no writes at all. It is not always this easy, however. In certain situations, you will fi nd that some clients are performing heavy read requests while your server shows nearly no activity in the io: bi column. If this happens, it is probably because the data that was read is still in cache.
Another tool for monitoring performance on the storage channel is iostat. It provides an overview for each device of the number of reads and writes. In Listing 17.16, you can see the following device parameters displayed:
tps The number of transactions (read plus writes) handled per second
Blk_read/s The number of blocks read per second
Blk_wrtn/s The rate of disk blocks written per second
Blk_read The total number of blocks read since start-up
Blk_wrtn The total number of blocks that were written since start-up
Listing 17.16: The iostat utility provides information about the number of blocks that were read and written per second
[root@hnl ~]# iostat
Linux 2.6.32-220.el6.x86_64 (hnl.example.com) 09/16/2012 _x86_64_ (4 CPU)
avg-cpu: %user %nice %system %iowait %steal %idle
13.49 0.01 2.64 1.52 0.00 82.35
c17.indd 436c17.indd 436 1/8/2013 10:55:23 AM1/8/2013 10:55:23 AM

Monitoring Storage Performance 437
Device: tps Blk_read/s Blk_wrtn/s Blk_read Blk_wrtn
sda 77.16 17745.53 366.29 127083390 2623136
dm-0 53.46 178.88 366.28 1281026 2623064
dm-1 0.04 0.36 0.00 2576 0
If used in this way, iostat doesn’t provide you with enough detail. Therefore, you can also use the -x option. This option provides much more information, so it doesn’t fi t on the screen as nicely as iostat alone in most cases. In Listing 17.17, you can see an example iostat used with the –x option.
Listing 17.17: iostat -x provides a lot of information about what is happening on the storage channel
[root@hnl ~]# iostat -x
Linux 2.6.32-220.el6.x86_64 (hnl.example.com) 09/16/2012 _x86_64_ (4 CPU)
avg-cpu: %user %nice %system %iowait %steal %idle
13.35 0.01 2.88 1.51 0.00 82.26
Device: rrqm/s wrqm/s r/s w/s rsec/s wsec/s avgrq-sz
avgqu-sz await svctm %util
sda 2104.75 61.00 75.14 1.33 17555.25 498.66 236.07
0.86 11.19 1.51 11.56
dm-0 0.00 0.00 7.60 62.33 177.05 498.65 9.66
55.55 794.39 0.67 4.69
dm-1 0.00 0.00 0.04 0.00 0.36 0.00 8.00
0.00 3.87 2.04 0.01
When using the -x option, iostat provides the following information:
rrqm/s Reads per second merged before being issued to disk. Compare this to the information in the r/s column to fi nd out how much of a gain in effi ciency results because of read-ahead.
wrqm/s Writes per second merged before being issued to disk. Compare this to the w/s parameter to see how much of a performance gain results because of write-ahead.
r/s The number of real reads per second.
w/s The number of real writes per second.
rsec/s The number of 512-byte sectors read per second.
wsec The number of 512-byte sectors written per second.
avgrq-sz The average size of disk requests in sectors. This parameter provides important information because it shows the average size of the fi les that were requested from disk. Based on the information that you get from this parameter, you can optimize your fi le system.
avgqu-sz The average size of the disk request queue. This should be low at all times because it gives the number of pending disk requests. If it yields a high number, this
c17.indd 437c17.indd 437 1/8/2013 10:55:23 AM1/8/2013 10:55:23 AM

438 Chapter 17 Monitoring and Optimizing Performance
means the performance of your storage channel cannot cope with the performance of your network.
await The average waiting time in milliseconds. This is the time the request has been waiting in the I/O queue, plus the time it actually took to service this request. This param-eter should also be low in all cases.
svctm The average service time in milliseconds. This is the time it took before a request could be submitted to disk. If this parameter is less than a couple of milliseconds (never more than 10), nothing is wrong with your server. However, if this parameter is greater than 10 millisec-onds, something is wrong, and you should consider performing some storage optimization.
%util The percentage of CPU utilization related to I/O.
Finding Most Busy Processes with iotop
The most useful tool for analyzing performance on a server is iotop. This tool hasn’t been around for a long time, because it requires relatively new functionality in the kernel, which allows administrators to fi nd out which processes are causing the heaviest weight on I/O performance.
Running iotop is as easy as running top. Just start the utility, and you will see which process is causing you an I/O headache. The busiest process is listed at the top, and you can also see details about the reads and writes that this process performs.
Within iotop, you’ll see two different kinds of processes, as shown in Listing 17.18. There are processes where the name is written between square brackets. These are kernel processes that aren’t loaded as a separate binary but are part of the kernel itself. All other processes listed are normal binaries.
Listing 17.18: Analyzing I/O performance with iotop
[root@hnl ~]# iotop
Total DISK READ: 0.00 B/s | Total DISK WRITE: 0.00 B/s
TID PRIO USER DISK READ DISK WRITE SWAPIN IO> COMMAND
2560 be/4 root 0.00 B/s 0.00 B/s 0.00 % 0.00 % console-k~-no-daemon
1 be/4 root 0.00 B/s 0.00 B/s 0.00 % 0.00 % init
2 be/4 root 0.00 B/s 0.00 B/s 0.00 % 0.00 % [kthreadd]
3 rt/4 root 0.00 B/s 0.00 B/s 0.00 % 0.00 % [migration/0]
4 be/4 root 0.00 B/s 0.00 B/s 0.00 % 0.00 % [ksoftirqd/0]
5 rt/4 root 0.00 B/s 0.00 B/s 0.00 % 0.00 % [migration/0]
6 rt/4 root 0.00 B/s 0.00 B/s 0.00 % 0.00 % [watchdog/0]
7 rt/4 root 0.00 B/s 0.00 B/s 0.00 % 0.00 % [migration/1]
8 rt/4 root 0.00 B/s 0.00 B/s 0.00 % 0.00 % [migration/1]
9 be/4 root 0.00 B/s 0.00 B/s 0.00 % 0.00 % [ksoftirqd/1]
10 rt/4 root 0.00 B/s 0.00 B/s 0.00 % 0.00 % [watchdog/1]
11 rt/4 root 0.00 B/s 0.00 B/s 0.00 % 0.00 % [migration/2]
12 rt/4 root 0.00 B/s 0.00 B/s 0.00 % 0.00 % [migration/2]
c17.indd 438c17.indd 438 1/8/2013 10:55:23 AM1/8/2013 10:55:23 AM

Monitoring Storage Performance 439
13 be/4 root 0.00 B/s 0.00 B/s 0.00 % 0.00 % [ksoftirqd/2]
14 rt/4 root 0.00 B/s 0.00 B/s 0.00 % 0.00 % [watchdog/2]
15 rt/4 root 0.00 B/s 0.00 B/s 0.00 % 0.00 % [migration/3]
16 rt/4 root 0.00 B/s 0.00 B/s 0.00 % 0.00 % [migration/3]
17 be/4 root 0.00 B/s 0.00 B/s 0.00 % 0.00 % [ksoftirqd/3]
18 rt/4 root 0.00 B/s 0.00 B/s 0.00 % 0.00 % [watchdog/3]
19 be/4 root 0.00 B/s 0.00 B/s 0.00 % 0.00 % [events/0]
20 be/4 root 0.00 B/s 0.00 B/s 0.00 % 0.00 % [events/1]
21 be/4 root 0.00 B/s 0.00 B/s 0.00 % 0.00 % [events/2]
Normally, you would start to analyze I/O performance because of an abnormality in the regular I/O load. For example, you may fi nd a high wa indicator in top. In Exercise 17.4, you’ll explore an I/O problem using this approach.
E X E R C I S E 17. 4
Exploring I/O Performance
In this exercise, you’ll start a couple of I/O-intensive tasks. First you’ll see abnormal behavior occurring in top, after which you’ll use iotop to explore what is going on.
1. Open two root shells. In one shell, run top. In the second shell, start the command dd if=/dev/sda of=/dev/null. Run this command four times.
2. Observe what happens in top. You will notice that the wa parameter increases. Press 1. If you’re using a multicore system, you should also see that the workload is evenly load-balanced between the cores.
3. Start iotop. You will see that the four dd processes are listed at the top, and you’ll also notice that no other kernel processes are signifi cantly high in the list.
4. Use find / -exec xxd {} \; to create some read activity. In iotop, you should see the process itself listed earlier but no further signifi cant workload.
5. Create a script with the following content:
#!/bin/bash
while true
do
cp -R / blah.tmp
rm -f /blah.tmp
sync
done
6. Run the script, and observe the list of processes in iotop. Occasionally, you should see the fl ush process doing a lot of work. This is to synchronize the newly written fi les back from the buffer cache to disk.
c17.indd 439c17.indd 439 1/8/2013 10:55:23 AM1/8/2013 10:55:23 AM
Dow
nlo
ad fro
m W
ow
! eBook
<w
ww
.wow
ebook.
com
>
440 Chapter 17 Monitoring and Optimizing Performance
Setting and Monitoring Drive Activity with hdparm
The hdparm utility can be used to set drive parameters or display parameters that are currently set for the drive. It has lots of options that you can use to set many features, not all of which are useful in every case. To see the default settings for your disk, use hdparm /dev/sda. This yields the result shown in Listing 17.19.
Listing 17.19: Use hdparm to see disk parameters
[root@hnl ~]# hdparm /dev/sda
/dev/sda:
multcount = 16 (on)
IO_support = 1 (32-bit)
readonly = 0 (off)
readahead = 256 (on)
geometry = 30401/255/63, sectors = 488397168, start = 0
The hdparm utility has some optimization options. For example, the -a option can be used to set the default drive read-ahead in sectors. Use hdparm -a 64, for example, if you want the disk to read ahead a total of 64 sectors. Some other management options are also useful, such as -f and -F, which allow you to fl ush the buffer cache and the write cache for the disk. This ensures that all data on the disk has been written to disk.
Understanding Network PerformanceOn a typical server, network performance is as important as disk, memory, and CPU perfor-mance. After all, the data has to be delivered over the network to the end user. The problem is, however, that things aren’t always as they seem. In some cases, a network problem can be caused by misconfi guration in server RAM. For example, if packets get dropped on the net-work, the reason may very well be that your server just doesn’t have an adequate number of buffers reserved for receiving packets, which may be because your server is low on memory. Again, everything is related, and it’s your job to fi nd the real cause of the troubles.
When considering network performance, you should always ask yourself what exactly you want to know. As you know, several layers of communication are used on a network. If you want to analyze a problem with your Samba server, this requires a completely different approach from analyzing a problem with dropped packets. A good network performance analysis always goes from bottom up. This means that you fi rst need to check what is hap-pening at the physical layer of the OSI model and then go up through the Ethernet, IP, TCP/UDP, and protocol layers.
When analyzing network performance, you should always start by checking the network interface itself. Good old ifconfi g offers excellent statistics to do just that. For example, consider Listing 17.20, which shows the result of ifconfi g on the eth0 network interface.
c17.indd 440c17.indd 440 1/8/2013 10:55:24 AM1/8/2013 10:55:24 AM
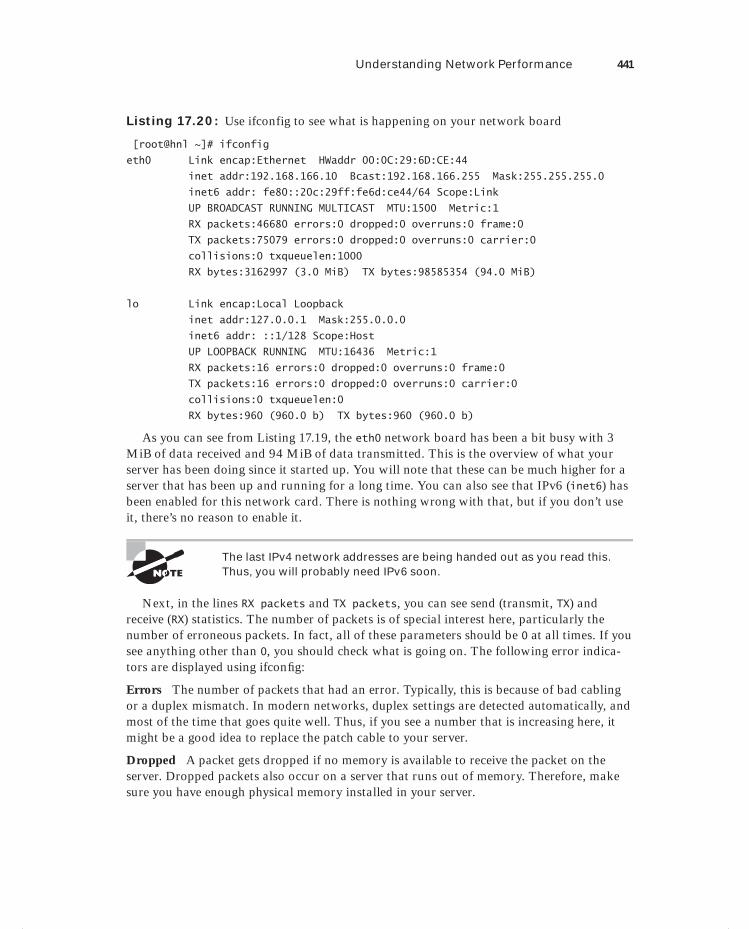
Understanding Network Performance 441
Listing 17.20: Use ifconfig to see what is happening on your network board
[root@hnl ~]# ifconfig
eth0 Link encap:Ethernet HWaddr 00:0C:29:6D:CE:44
inet addr:192.168.166.10 Bcast:192.168.166.255 Mask:255.255.255.0
inet6 addr: fe80::20c:29ff:fe6d:ce44/64 Scope:Link
UP BROADCAST RUNNING MULTICAST MTU:1500 Metric:1
RX packets:46680 errors:0 dropped:0 overruns:0 frame:0
TX packets:75079 errors:0 dropped:0 overruns:0 carrier:0
collisions:0 txqueuelen:1000
RX bytes:3162997 (3.0 MiB) TX bytes:98585354 (94.0 MiB)
lo Link encap:Local Loopback
inet addr:127.0.0.1 Mask:255.0.0.0
inet6 addr: ::1/128 Scope:Host
UP LOOPBACK RUNNING MTU:16436 Metric:1
RX packets:16 errors:0 dropped:0 overruns:0 frame:0
TX packets:16 errors:0 dropped:0 overruns:0 carrier:0
collisions:0 txqueuelen:0
RX bytes:960 (960.0 b) TX bytes:960 (960.0 b)
As you can see from Listing 17.19, the eth0 network board has been a bit busy with 3 MiB of data received and 94 MiB of data transmitted. This is the overview of what your server has been doing since it started up. You will note that these can be much higher for a server that has been up and running for a long time. You can also see that IPv6 (inet6) has been enabled for this network card. There is nothing wrong with that, but if you don’t use it, there’s no reason to enable it.
The last IPv4 network addresses are being handed out as you read this. Thus, you will probably need IPv6 soon.
Next, in the lines RX packets and TX packets, you can see send (transmit, TX) and receive (RX) statistics. The number of packets is of special interest here, particularly the number of erroneous packets. In fact, all of these parameters should be 0 at all times. If you see anything other than 0, you should check what is going on. The following error indica-tors are displayed using ifconfi g:
Errors The number of packets that had an error. Typically, this is because of bad cabling or a duplex mismatch. In modern networks, duplex settings are detected automatically, and most of the time that goes quite well. Thus, if you see a number that is increasing here, it might be a good idea to replace the patch cable to your server.
Dropped A packet gets dropped if no memory is available to receive the packet on the server. Dropped packets also occur on a server that runs out of memory. Therefore, make sure you have enough physical memory installed in your server.
c17.indd 441c17.indd 441 1/8/2013 10:55:24 AM1/8/2013 10:55:24 AM
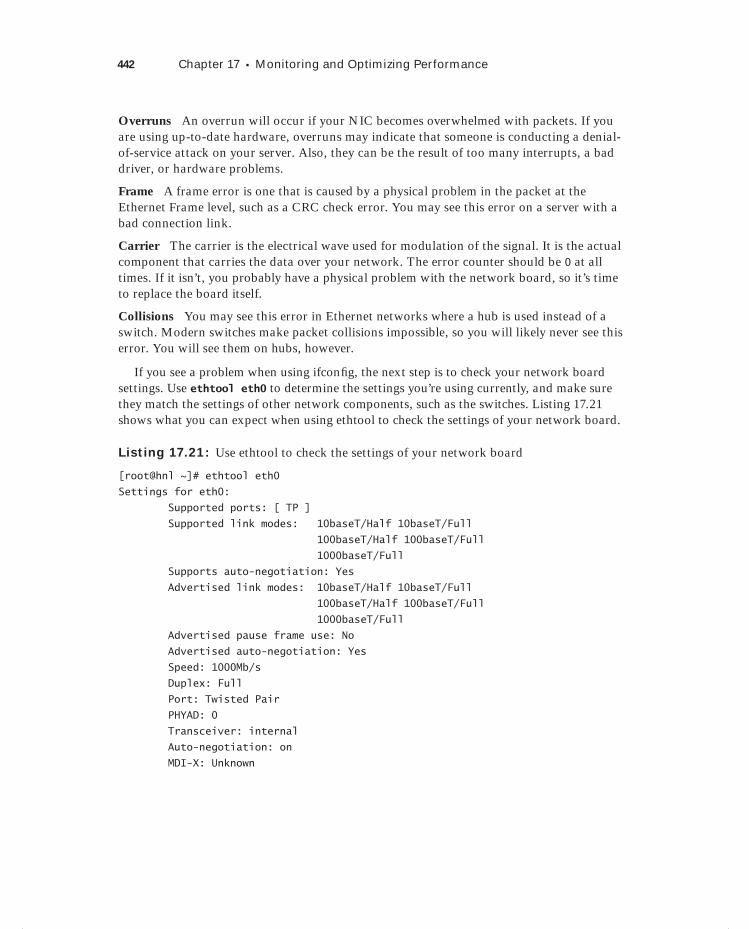
442 Chapter 17 Monitoring and Optimizing Performance
Overruns An overrun will occur if your NIC becomes overwhelmed with packets. If you are using up-to-date hardware, overruns may indicate that someone is conducting a denial-of-service attack on your server. Also, they can be the result of too many interrupts, a bad driver, or hardware problems.
Frame A frame error is one that is caused by a physical problem in the packet at the Ethernet Frame level, such as a CRC check error. You may see this error on a server with a bad connection link.
Carrier The carrier is the electrical wave used for modulation of the signal. It is the actual component that carries the data over your network. The error counter should be 0 at all times. If it isn’t, you probably have a physical problem with the network board, so it’s time to replace the board itself.
Collisions You may see this error in Ethernet networks where a hub is used instead of a switch. Modern switches make packet collisions impossible, so you will likely never see this error. You will see them on hubs, however.
If you see a problem when using ifconfi g, the next step is to check your network board settings. Use ethtool eth0 to determine the settings you’re using currently, and make sure they match the settings of other network components, such as the switches. Listing 17.21 shows what you can expect when using ethtool to check the settings of your network board.
Listing 17.21: Use ethtool to check the settings of your network board
[root@hnl ~]# ethtool eth0
Settings for eth0:
Supported ports: [ TP ]
Supported link modes: 10baseT/Half 10baseT/Full
100baseT/Half 100baseT/Full
1000baseT/Full
Supports auto-negotiation: Yes
Advertised link modes: 10baseT/Half 10baseT/Full
100baseT/Half 100baseT/Full
1000baseT/Full
Advertised pause frame use: No
Advertised auto-negotiation: Yes
Speed: 1000Mb/s
Duplex: Full
Port: Twisted Pair
PHYAD: 0
Transceiver: internal
Auto-negotiation: on
MDI-X: Unknown
c17.indd 442c17.indd 442 1/8/2013 10:55:24 AM1/8/2013 10:55:24 AM
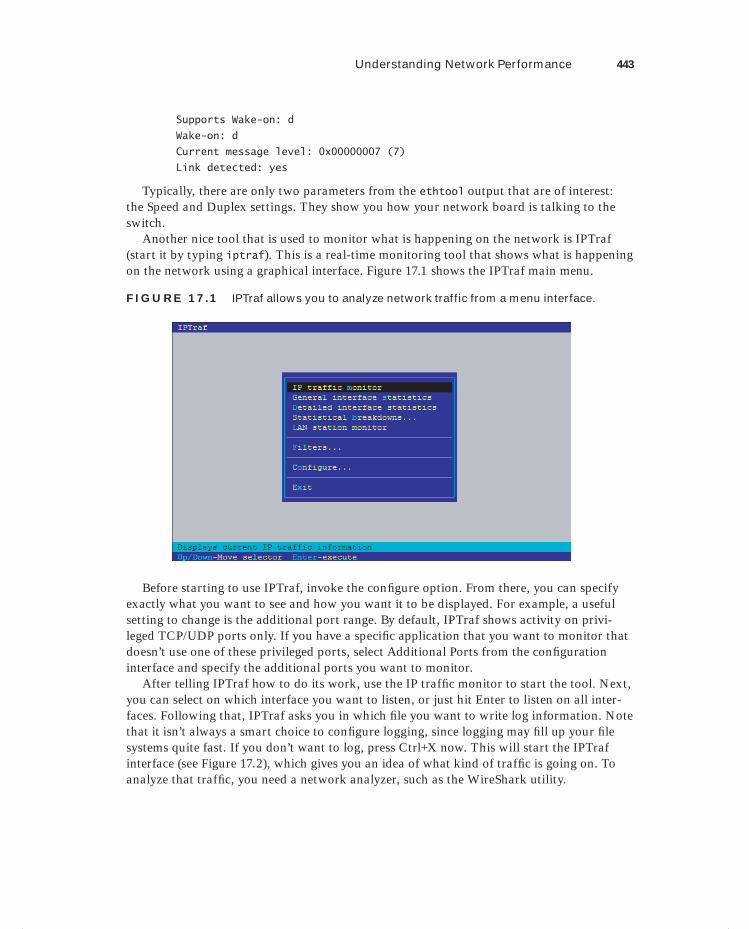
Understanding Network Performance 443
Supports Wake-on: d
Wake-on: d
Current message level: 0x00000007 (7)
Link detected: yes
Typically, there are only two parameters from the ethtool output that are of interest: the Speed and Duplex settings. They show you how your network board is talking to the switch.
Another nice tool that is used to monitor what is happening on the network is IPTraf (start it by typing iptraf). This is a real-time monitoring tool that shows what is happening on the network using a graphical interface. Figure 17.1 shows the IPTraf main menu.
F I GU R E 17.1 IPTraf allows you to analyze network traffic from a menu interface.
Before starting to use IPTraf, invoke the confi gure option. From there, you can specify exactly what you want to see and how you want it to be displayed. For example, a useful setting to change is the additional port range. By default, IPTraf shows activity on privi-leged TCP/UDP ports only. If you have a specifi c application that you want to monitor that doesn’t use one of these privileged ports, select Additional Ports from the confi guration interface and specify the additional ports you want to monitor.
After telling IPTraf how to do its work, use the IP traffi c monitor to start the tool. Next, you can select on which interface you want to listen, or just hit Enter to listen on all inter-faces. Following that, IPTraf asks you in which fi le you want to write log information. Note that it isn’t always a smart choice to confi gure logging, since logging may fi ll up your fi le systems quite fast. If you don’t want to log, press Ctrl+X now. This will start the IPTraf interface (see Figure 17.2), which gives you an idea of what kind of traffi c is going on. To analyze that traffi c, you need a network analyzer, such as the WireShark utility.
c17.indd 443c17.indd 443 1/8/2013 10:55:24 AM1/8/2013 10:55:24 AM
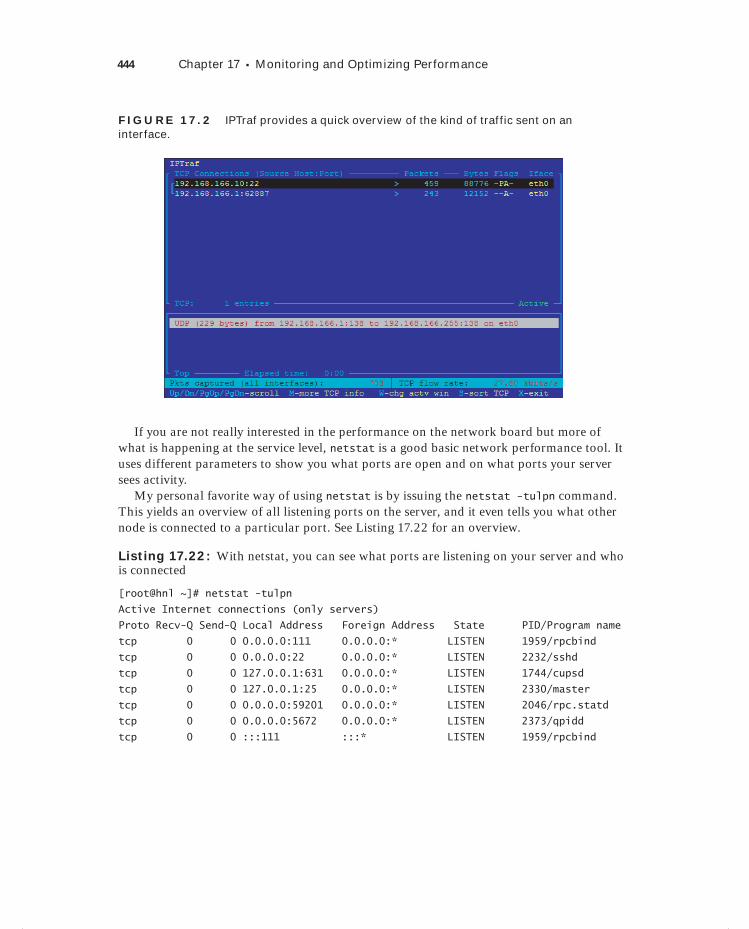
444 Chapter 17 Monitoring and Optimizing Performance
F I GU R E 17. 2 IPTraf provides a quick overview of the kind of traffic sent on an interface.
If you are not really interested in the performance on the network board but more of what is happening at the service level, netstat is a good basic network performance tool. It uses different parameters to show you what ports are open and on what ports your server sees activity.
My personal favorite way of using netstat is by issuing the netstat -tulpn command. This yields an overview of all listening ports on the server, and it even tells you what other node is connected to a particular port. See Listing 17.22 for an overview.
Listing 17.22: With netstat, you can see what ports are listening on your server and who is connected
[root@hnl ~]# netstat -tulpn
Active Internet connections (only servers)
Proto Recv-Q Send-Q Local Address Foreign Address State PID/Program name
tcp 0 0 0.0.0.0:111 0.0.0.0:* LISTEN 1959/rpcbind
tcp 0 0 0.0.0.0:22 0.0.0.0:* LISTEN 2232/sshd
tcp 0 0 127.0.0.1:631 0.0.0.0:* LISTEN 1744/cupsd
tcp 0 0 127.0.0.1:25 0.0.0.0:* LISTEN 2330/master
tcp 0 0 0.0.0.0:59201 0.0.0.0:* LISTEN 2046/rpc.statd
tcp 0 0 0.0.0.0:5672 0.0.0.0:* LISTEN 2373/qpidd
tcp 0 0 :::111 :::* LISTEN 1959/rpcbind
c17.indd 444c17.indd 444 1/8/2013 10:55:24 AM1/8/2013 10:55:24 AM

Understanding Network Performance 445
tcp 0 0 :::22 :::* LISTEN 2232/sshd
tcp 0 0 :::42998 :::* LISTEN 2046/rpc.statd
tcp 0 0 ::1:631 :::* LISTEN 1744/cupsd
tcp 0 0 ::1:25 :::* LISTEN 2330/master
udp 0 0 0.0.0.0:950 0.0.0.0:* 2046/rpc.statd
udp 0 0 0.0.0.0:39373 0.0.0.0:* 2046/rpc.statd
udp 0 0 0.0.0.0:862 0.0.0.0:* 1959/rpcbind
udp 0 0 0.0.0.0:42464 0.0.0.0:* 2016/avahi-daemon
udp 0 0 0.0.0.0:5353 0.0.0.0:* 2016/avahi-daemon
udp 0 0 0.0.0.0:111 0.0.0.0:* 1959/rpcbind
udp 0 0 0.0.0.0:631 0.0.0.0:* 1744/cupsd
udp 0 0 :::47801 :::* 2046/rpc.statd
udp 0 0 :::862 :::* 1959/rpcbind
udp 0 0 :::111 :::* 1959/rpcbind
When using netstat, many options are available. Here is an overview of the most interesting ones:
-p Shows the PID of the program that has opened a port
-c Updates the display every second
-s Shows statistics for IP, UDP, TCP, and ICMP
-t Shows TCP sockets
-u Shows UDP sockets
-w Shows RAW sockets
-l Shows listening ports
-n Resolves addresses to names
Many other tools are available to monitor the network. Most of them fall beyond the scope of this chapter because they are rather protocol- or service-specifi c, and they will not be very helpful in determining performance problems on the network.
There is one very simple performance testing method that I use at all times when analyz-ing a performance problem. All that really counts when analyzing network performance is how fast your network can copy data to and from your server. To measure this, I like to create a big fi le (1GB, for example) and copy it over the network. To measure the time expended, I use the time command, which gives a clear impression of how long it actually took to copy the fi le. For example, time scp server:/bigfile /localdir will yield a sum-mary of the total time it took to copy the fi le over the network. This is an excellent test, especially when you start optimizing performance, because it will immediately show you whether you have achieved your goals.
c17.indd 445c17.indd 445 1/8/2013 10:55:25 AM1/8/2013 10:55:25 AM

446 Chapter 17 Monitoring and Optimizing Performance
Optimizing PerformanceNow that you know what to look for in your server’s performance, it’s time to start opti-mizing. Optimizing performance is a complicated job. While the tips provided in this chap-ter cannot possibly cover everything about server performance optimization, it’s good to know at least some of the basic approaches you can use to make your server perform better.
You can look at performance optimization in two different ways. For some people, it is simply a matter of changing some parameters and seeing what happens. This is not the best approach. A much better approach to performance optimization occurs when you fi rst start performance monitoring. This gives you some crystal-clear ideas on what exactly is hap-pening with performance on your server.
Before optimizing anything, you should know exactly what to optimize. For example, if the network performs badly, you should know whether it is because of problems on the network itself or simply because you don’t have enough memory allocated for the network. Therefore, make sure you know exactly what to optimize, using the methods you’ve read about in the previous sections.
Once you know what to optimize, it comes down to doing it. In many situations, opti-mizing performance means writing a parameter to the /proc fi le system. This fi le system is created by the kernel when your server comes up, and it normally contains the settings your kernel is using.
Under /proc/sys, you’ll fi nd many system parameters that can be changed. The easy way to do this is by echoing the new value to the confi guration fi le. For example, the /proc/sys/vm/swappiness fi le contains a value that indicates how willing your server is to swap. The range of this value is between 0 and 100. A low value means that your server will avoid swapping as long as possible, while a high value means that your server is more willing to swap. The default value in this fi le is 60. If you think your server is too eager to swap, you can change it as follows:
echo "30" > /proc/sys/vm/swappiness
This method works well, but there is a problem. As soon as the server restarts, you will lose this value. Thus, the better solution is to store it in a confi guration fi le and make sure that confi guration fi le is read when your server restarts. A confi guration fi le exists for this purpose, and the name of the fi le is /etc/sysctl.conf. When booting, your server starts the sysctl service, which reads this confi guration fi le and applies all of the settings in it.
In /etc/sysctl.conf, you refer to fi les that exist in the /proc/sys hierarchy. Thus, the name of the fi le to which you are referring is relative to this directory. Also, instead of using a slash as the separator between directories, subdirectories, and fi les, it is common to use a dot (even if the slash is also accepted). This means that to apply the change to the swappiness parameter as explained earlier, you should include the following line in /etc/sysctl.conf:
vm.swappiness=30
This setting is applied the next time your server reboots only. Instead of just writing it to the confi guration fi le, you can apply it to the current sysctl settings as well. To do that, the following command can be used to apply this setting immediately:sysctl -w vm.swappiness=30
c17.indd 446c17.indd 446 1/8/2013 10:55:25 AM1/8/2013 10:55:25 AM
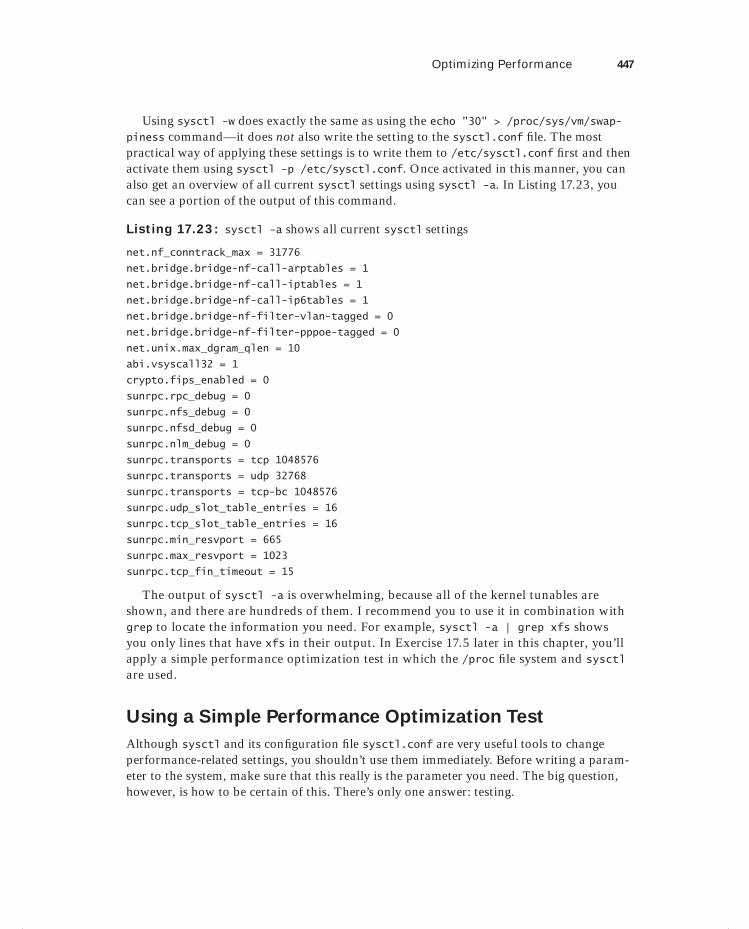
Optimizing Performance 447
Using sysctl -w does exactly the same as using the echo "30" > /proc/sys/vm/swap-piness command—it does not also write the setting to the sysctl.conf fi le. The most practical way of applying these settings is to write them to /etc/sysctl.conf fi rst and then activate them using sysctl -p /etc/sysctl.conf. Once activated in this manner, you can also get an overview of all current sysctl settings using sysctl -a. In Listing 17.23, you can see a portion of the output of this command.
Listing 17.23: sysctl -a shows all current sysctl settings
net.nf_conntrack_max = 31776
net.bridge.bridge-nf-call-arptables = 1
net.bridge.bridge-nf-call-iptables = 1
net.bridge.bridge-nf-call-ip6tables = 1
net.bridge.bridge-nf-filter-vlan-tagged = 0
net.bridge.bridge-nf-filter-pppoe-tagged = 0
net.unix.max_dgram_qlen = 10
abi.vsyscall32 = 1
crypto.fips_enabled = 0
sunrpc.rpc_debug = 0
sunrpc.nfs_debug = 0
sunrpc.nfsd_debug = 0
sunrpc.nlm_debug = 0
sunrpc.transports = tcp 1048576
sunrpc.transports = udp 32768
sunrpc.transports = tcp-bc 1048576
sunrpc.udp_slot_table_entries = 16
sunrpc.tcp_slot_table_entries = 16
sunrpc.min_resvport = 665
sunrpc.max_resvport = 1023
sunrpc.tcp_fin_timeout = 15
The output of sysctl -a is overwhelming, because all of the kernel tunables are shown, and there are hundreds of them. I recommend you to use it in combination with grep to locate the information you need. For example, sysctl -a | grep xfs shows you only lines that have xfs in their output. In Exercise 17.5 later in this chapter, you’ll apply a simple performance optimization test in which the /proc fi le system and sysctl are used.
Using a Simple Performance Optimization Test
Although sysctl and its confi guration fi le sysctl.conf are very useful tools to change performance-related settings, you shouldn’t use them immediately. Before writing a param-eter to the system, make sure that this really is the parameter you need. The big question, however, is how to be certain of this. There’s only one answer: testing.
c17.indd 447c17.indd 447 1/8/2013 10:55:25 AM1/8/2013 10:55:25 AM
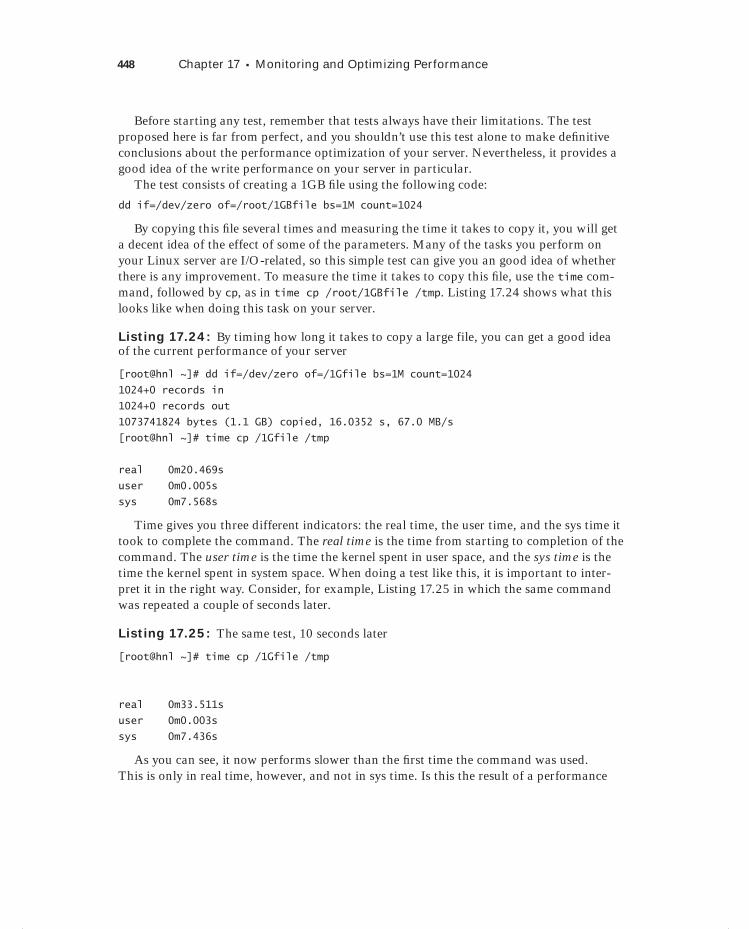
448 Chapter 17 Monitoring and Optimizing Performance
Before starting any test, remember that tests always have their limitations. The test proposed here is far from perfect, and you shouldn’t use this test alone to make defi nitive conclusions about the performance optimization of your server. Nevertheless, it provides a good idea of the write performance on your server in particular.
The test consists of creating a 1GB fi le using the following code:
dd if=/dev/zero of=/root/1GBfile bs=1M count=1024
By copying this fi le several times and measuring the time it takes to copy it, you will get a decent idea of the effect of some of the parameters. Many of the tasks you perform on your Linux server are I/O-related, so this simple test can give you an good idea of whether there is any improvement. To measure the time it takes to copy this fi le, use the time com-mand, followed by cp, as in time cp /root/1GBfile /tmp. Listing 17.24 shows what this looks like when doing this task on your server.
Listing 17.24: By timing how long it takes to copy a large file, you can get a good idea of the current performance of your server
[root@hnl ~]# dd if=/dev/zero of=/1Gfile bs=1M count=1024
1024+0 records in
1024+0 records out
1073741824 bytes (1.1 GB) copied, 16.0352 s, 67.0 MB/s
[root@hnl ~]# time cp /1Gfile /tmp
real 0m20.469s
user 0m0.005s
sys 0m7.568s
Time gives you three different indicators: the real time, the user time, and the sys time it took to complete the command. The real time is the time from starting to completion of the command. The user time is the time the kernel spent in user space, and the sys time is the time the kernel spent in system space. When doing a test like this, it is important to inter-pret it in the right way. Consider, for example, Listing 17.25 in which the same command was repeated a couple of seconds later.
Listing 17.25: The same test, 10 seconds later
[root@hnl ~]# time cp /1Gfile /tmp
real 0m33.511s
user 0m0.003s
sys 0m7.436s
As you can see, it now performs slower than the fi rst time the command was used. This is only in real time, however, and not in sys time. Is this the result of a performance
c17.indd 448c17.indd 448 1/8/2013 10:55:25 AM1/8/2013 10:55:25 AM

Optimizing Performance 449
parameter that I’ve changed in between tests? No, but look at the result of free -m as shown in Listing 17.26.
Listing 17.26: free -m might indicate why the second test went faster
root@hnl:~# free -m
total used free shared buffers cached
Mem: 3987 2246 1741 0 17 2108
-/+ buffers/cache: 119 3867
Swap: 2047 0 2047
Do you have any idea what has happened here? The entire 1GB fi le was put into cache. As you can see, free -m shows almost 2GB of data in cache that wasn’t there beforehand, and this infl uences the time it takes to copy a large fi le.
So, what lesson can you learn from these examples? Performance optimization is com-plex. You have to take into account many factors that infl uence the performance of your server. Only when this is done the right way will you truly see how your server performs currently and whether you have succeeded in improving its performance. If you fail to examine the data carefully, you may miss things and think you have improved performance while in actuality worsening it.
CPU Tuning
In this section, you’ll learn what you can do to optimize the performance of your server’s CPU. First you’ll learn about some aspects of the workings of the CPU that are important when trying to optimize its performance parameters. Then you’ll read about some common techniques that are employed to optimize CPU utilization.
Understanding CPU Performance
To be able to tune the CPU, you must know what is important about this part of your sys-tem. To understand the CPU, you should know about the thread scheduler. This part of the kernel makes sure that all process threads get an equal amount of CPU cycles. Since most processes will also do some I/O, it’s not really a problem that the scheduler puts process threads on hold at a given moment. While not being served by the CPU, the process thread can handle its I/O. The scheduler operates by using fairness, meaning that all threads are moving forward in an even manner. By using fairness, the scheduler makes sure there is not too much latency.
The scheduling process is pretty simple in a single–CPU core environment. However, if multiple cores are used, it is more complicated. To work in a multi-CPU or multicore environment, your server will use a specialized Symmetric Multiprocessing (SMP) kernel. If needed, this kernel is installed automatically. In an SMP environment, the scheduler makes sure that some kind of load balancing is used. This means that process threads are spread over the available CPU cores. Some programs are written to be used in an SMP
c17.indd 449c17.indd 449 1/8/2013 10:55:25 AM1/8/2013 10:55:25 AM

450 Chapter 17 Monitoring and Optimizing Performance
environment and are able to use multiple CPUs by themselves. Most programs can’t do this, however, and depend on the capabilities of the kernel to do it.
One specifi c concern in a multi-CPU environment is that the scheduler should prevent processes and threads from being moved to other CPU cores. Moving a process means that the information the process has written in the CPU cache needs to be moved as well, and that is a relatively expensive process.
You may think that a server will always benefi t from installing multiple CPU cores, but this is not true. When working on multiple cores, chances increase that processes are swapped among cores, taking their cached information with them, and that slows down performance in a multiprocessing environment. When using multicore systems, you should always optimize your system for such a confi guration.
Optimizing CPU Performance
CPU performance optimization is about two things: priority and optimization of the SMP environment. Every process gets a static priority from the scheduler. The scheduler can dif-ferentiate between real-time (RT) processes and normal processes. However, if a process falls into one of these categories, it will be equal to all other processes in the same category. Note that some real-time processes (most of them are part of the Linux kernel) will run at highest priority, while the rest of available CPU cycles must be divided among the other processes. In this procedure, it’s all about fairness: the longer a process is waiting, the higher its priority. You have already learned how to use the nice command to tune process priority.
If you are working in an SMP environment, one important utility used to improve per-formance is the taskset command. You can use taskset to set CPU affi nity for a process to one or more CPUs. The result is that your process is less likely to be moved to another CPU. The taskset command uses a hexadecimal bitmask to specify which CPU to use. In this bitmap, the value 0x1 refers to CPU0, 0x2 refers to CPU1, 0x4 to CPU2, 0x8 to CPU3, and so on. Notice that these numbers combine, so use 0x3 to refer to CPUs 0 and 1.
Therefore, if you have a command that you would like to bind to CPU 2 and CPU 3, you would use the command taskset 0x12 somecommand.
You can also use taskset on running processes by using the -p option. With this option, you can refer to the PID of a process; for instance, taskset -p 0x3 7034 would set the affi nity of the process using PID 7034 to CPU 0 and CPU 1.
You can specify CPU affi nity for IRQs as well. To do this, you can use the same bit-mask that you used with taskset. Every interrupt has subdirectory in /proc/irq/, and in that subdirectory there is a fi le called smp_affinity. Thus, if your IRQ 5 is producing a very high workload (check /proc/interrupts to see whether this is the case) and there-fore you want that IRQ to work on CPU 1, use the command echo 0x2 > /proc/irq/3/smp_affinity.
Another approach to optimizing CPU performance is by using cgroups. cgroups provide a new way to optimize all aspects of performance, including CPU, memory, I/O, and more. Later in this chapter, you’ll learn how to use cgroups.
c17.indd 450c17.indd 450 1/8/2013 10:55:26 AM1/8/2013 10:55:26 AM

Optimizing Performance 451
Tuning Memory
System memory is a very important part of a computer. It functions as a buffer between CPU and I/O, and by tuning memory you can really get the best out of it. Linux works with the concept of virtual memory, which is the total of all memory available on a server. You can tune virtual memory by writing to the /proc/sys/vm directory. This directory contains lots of parameters that help you tune the way your server’s memory is used.
As always, when tuning the performance of a server, there are no solutions that work in all cases. Use the parameters in /proc/sys/vm with caution, and use them one by one. Only by tuning each parameter individually will you be able to determine whether it achieved the desired result.
Understanding Memory Performance
In a Linux system, virtual memory is used for many purposes. First, there are processes that claim their amount of memory. When tuning for processes, it helps to know how these processes allocate memory. For example, a database server that allocates large amounts of system memory when starting up has different needs than a mail server that works with small fi les only. Also, each process has its own memory space that may not be addressed by other processes. The kernel ensures that this never happens.
When a process is created using the fork() system call, which basically creates a child process from the parent, the kernel creates a virtual address space for the process. The part of the kernel that handles this is known as the dynamic linker. The virtual address space that is used by a process consists of pages. On a 64-bit server, the default page size is 4KB. For applications that need lots of memory, you can optimize memory by confi guring huge pages. It needs to be supported by the application, however. Think of large databases, for example. Also note that memory, which has been allocated for huge pages, cannot be used for any other purpose.
Another important aspect of memory usage is caching. In your system, there is a read cache and a write cache. It may not surprise you that a server that handles read requests most of the time is tuned in a different way than a server that primarily handles write requests.
Configuring Huge Pages
If your server is heavily used for one application, it may benefi t from using large pages (also referred to as huge pages). A huge page by default is 2MB in size, and it may be useful in improving performance in high-performance computing environments and with memory-intensive applications. By default, no huge pages are allocated, because they would be wasteful for a server that doesn’t need them. Typically, you set huge pages from the Grub boot loader when starting your server. Later, you can check the amount of huge pages in
c17.indd 451c17.indd 451 1/8/2013 10:55:26 AM1/8/2013 10:55:26 AM
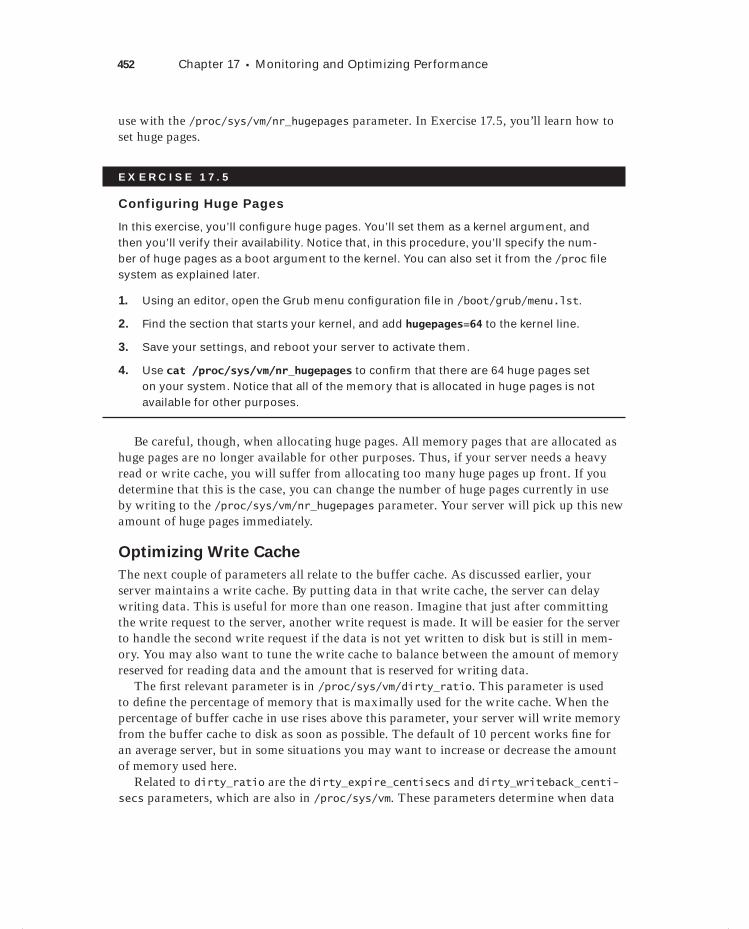
452 Chapter 17 Monitoring and Optimizing Performance
use with the /proc/sys/vm/nr_hugepages parameter. In Exercise 17.5, you’ll learn how to set huge pages.
E X E R C I S E 17. 5
Configuring Huge Pages
In this exercise, you’ll confi gure huge pages. You’ll set them as a kernel argument, and then you’ll verify their availability. Notice that, in this procedure, you’ll specify the num-ber of huge pages as a boot argument to the kernel. You can also set it from the /proc fi le system as explained later.
1. Using an editor, open the Grub menu confi guration fi le in /boot/grub/menu.lst.
2. Find the section that starts your kernel, and add hugepages=64 to the kernel line.
3. Save your settings, and reboot your server to activate them.
4. Use cat /proc/sys/vm/nr_hugepages to confi rm that there are 64 huge pages set on your system. Notice that all of the memory that is allocated in huge pages is not available for other purposes.
Be careful, though, when allocating huge pages. All memory pages that are allocated as huge pages are no longer available for other purposes. Thus, if your server needs a heavy read or write cache, you will suffer from allocating too many huge pages up front. If you determine that this is the case, you can change the number of huge pages currently in use by writing to the /proc/sys/vm/nr_hugepages parameter. Your server will pick up this new amount of huge pages immediately.
Optimizing Write Cache
The next couple of parameters all relate to the buffer cache. As discussed earlier, your server maintains a write cache. By putting data in that write cache, the server can delay writing data. This is useful for more than one reason. Imagine that just after committing the write request to the server, another write request is made. It will be easier for the server to handle the second write request if the data is not yet written to disk but is still in mem-ory. You may also want to tune the write cache to balance between the amount of memory reserved for reading data and the amount that is reserved for writing data.
The fi rst relevant parameter is in /proc/sys/vm/dirty_ratio. This parameter is used to defi ne the percentage of memory that is maximally used for the write cache. When the percentage of buffer cache in use rises above this parameter, your server will write memory from the buffer cache to disk as soon as possible. The default of 10 percent works fi ne for an average server, but in some situations you may want to increase or decrease the amount of memory used here.
Related to dirty_ratio are the dirty_expire_centisecs and dirty_writeback_centi-secs parameters, which are also in /proc/sys/vm. These parameters determine when data
c17.indd 452c17.indd 452 1/8/2013 10:55:26 AM1/8/2013 10:55:26 AM
Optimizing Performance 453
in the write cache expires and has to be written to disk, even if the write cache hasn’t yet reached the threshold defi ned in dirty_ratio. By using these parameters, you reduce the chances of losing data when a power outage occurs on your server. Furthermore, if you want to use power more effi ciently, it is useful to give both of these parameters a 0 value, which actually disables them and keeps data as long as possible in the write cache. This is useful for laptop computers because the hard disk needs to spin up in order to write these data, and that uses a lot of power.
The last parameter that is related to writing data is nr_pdflush_threads. This param-eter helps determine the amount of threads the kernel launches for writing data from the buffer cache. This is fairly simple in concept: more of these means faster write back. Thus, if you think that buffer cache on your server is not cleared fast enough, increase the amount of pdflush_threads using the command sysctl -w vm.nr_pdflush_threads=4.
When using this option, respect the limitations. By default, the minimum amount of pdflush_threads is set to 0, and there is a maximum of 8 so that the kernel still has a dynamic range to determine what exactly it has to do.
Next, there is the issue of overcommitting memory. By default, every process tends to claim more memory than it really needs. This is good because it makes the process faster if some spare memory is available. It can then access it much faster when it needs it because it doesn’t have to ask the kernel if it has some more memory to give.
To tune the behavior of overcommitting memory, you can write to the /proc/sys/vm/overcommit_memory parameter. You can set this parameter’s values. The default value is 0, which means that the kernel checks to see whether it still has memory available before granting it. If this doesn’t give you the performance you need, you can consider changing it to 1, which means that the system thinks there is enough memory in all cases. This is good for the performance of memory-intensive tasks but may result in processes getting killed automatically. You can also use the value of 2, which means that the kernel fails the mem-ory request if there is not enough memory available.
This minimum amount of memory that is available is specifi ed in the /proc/sys/vm/overcommit_ratio parameter, which by default is set to 50 percent of available RAM. Using the value of 2 ensures that your server will never run out of available memory by granting memory demanded by a process that needs huge amounts of memory. (On a server with 16GB of RAM, the memory allocation request would be denied only if more than 8GB is requested by one single process!)
Another nice parameter is /proc/sys/vm/swappiness. This indicates how eager the pro-cess is to start swapping out memory pages. A high value means that your server will swap very quickly, and a low value means that the server will wait some more before starting to swap. The default value of 60 works well in most situations. If you still think that your server starts swapping too quickly, set it to a somewhat lower value, like 40.
Optimizing Interprocess Communication
The last relevant parameters are those that relate to shared memory. Shared memory is a method that the Linux kernel or Linux applications can use to make communication
c17.indd 453c17.indd 453 1/8/2013 10:55:27 AM1/8/2013 10:55:27 AM
454 Chapter 17 Monitoring and Optimizing Performance
between processes (also known as Interprocess Communication, or IPC) as fast as pos-sible. In database environments, it often makes sense to optimize shared memory. The cool thing about shared memory is that the kernel is not involved in the communication among the processes using it, because data doesn’t even have to be copied since the memory areas can be addressed directly. To get an idea of shared memory-related settings that your server is currently using, use the ipcs -lm command, as shown in Listing 17.27.
Listing 17.27: Use the ipcs -lm command to get an idea of shared memory settings
root@hnl ~]# ipcs -lm
------ Shared Memory Limits --------
max number of segments = 4096
max seg size (kbytes) = 67108864
max total shared memory (kbytes) = 17179869184
min seg size (bytes) = 1
When your applications are written to use shared memory, you can benefi t from tuning some of its parameters. If on the other hand your applications don’t know how to handle it, it doesn’t make a difference if you change the shared memory-related parameters. To fi nd out whether on your server shared memory is used and, if so, in what amount it is used, use the ipcs -m command. Listing 17.28 provides an example of this command’s output on a server where just one shared memory segment is used.
Listing 17.28: Use ipcs -m to find out if your server is using shared memory segments
[root@hnl ~]# ipcs -m
------ Shared Memory Segments --------
key shmid owner perms bytes nattch status
0x00000000 0 gdm 600 393216 2 dest
0x00000000 32769 gdm 600 393216 2 dest
0x00000000 65538 gdm 600 393216 2 dest
The fi rst /proc parameter that is related to shared memory is shmmax. This defi nes the maximum size in bytes of a single shared memory segment that a Linux process can allo-cate. You can see the current setting in the confi guration fi le /proc/sys/kernel/shmmax.
root@hnl:~# cat /proc/sys/kernel/shmmax
33554432
This sample was taken from a system that has 4GB of RAM. The shmmax setting was automatically created to allow processes to allocate up to about 3.3GB of RAM. It doesn’t
c17.indd 454c17.indd 454 1/8/2013 10:55:27 AM1/8/2013 10:55:27 AM

Optimizing Performance 455
make sense to tune the parameter to use all available RAM, since the RAM also has to be used for other purposes.
The second parameter that is related to shared memory is shmmni, which is not the mini-mal size of shared memory segments as you might think but rather the maximum number of the shared memory segments that your kernel can allocate. You can get the default value from /proc/sys/kernel/shmmni. It should be set to 4096. If you have an application that relies heavily on the use of shared memory, you may benefi t from increasing this parameter, as follows:
sysctl -w kernel.shmmni=8192
The last parameter related to shared memory is shmall. It is set in /proc/sys/kernel/shmall, and it defi nes the total amount of shared memory pages that can be used system-wide. Normally, the value should be set to the value of shmmax, divided by the current page size your server is using. On a 32-bit processor, fi nding the page size is easy; it is always set to 4096. On a 64-bit computer, you can use the getconf command to determine the current page size.
[root@hnl ~]# getconf PAGE_SIZE
4096
If the shmall parameter doesn’t contain a value that is big enough for your application, change it as needed. For example, use the following command:
sysctl -w kernel.shmall=2097152
Tuning Storage Performance
The third element in the chain of Linux performance is the storage channel. Performance optimization on this channel can be divided in two parts: journal optimization and I/O buffer performance. Apart from that, there are also some fi le system parameters that can be tuned to optimize performance. You already read how to do this using the tune2fs command.
Understanding Storage Performance
To determine what happens with I/O on your server, Linux uses the I/O scheduler. This kernel component sits between the block layer that communicates directly with the fi le sys-tems and the device drivers. The block layer generates I/O requests for the fi le systems and passes those requests to the I/O scheduler. This scheduler in turn transforms the request and passes it on to the low-level drivers. The drivers then forward the request to the actual storage devices. Optimizing storage performance starts with optimizing the I/O scheduler. Figure 17.3 gives an overview of everything involved in analyzing I/O performance.
c17.indd 455c17.indd 455 1/8/2013 10:55:27 AM1/8/2013 10:55:27 AM
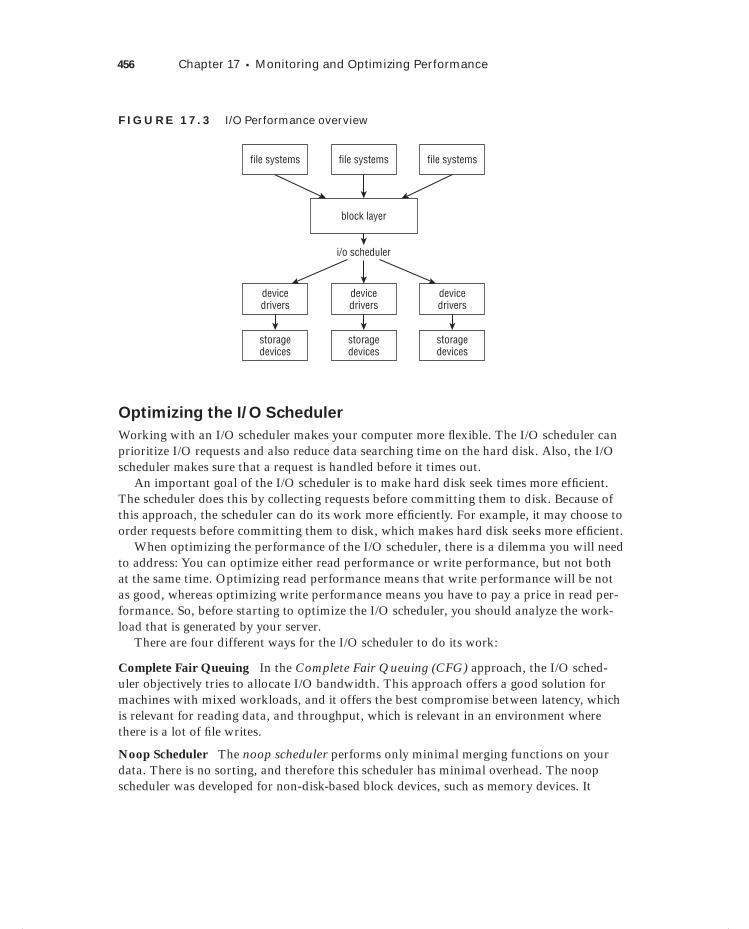
456 Chapter 17 Monitoring and Optimizing Performance
F I GU R E 17. 3 I/O Performance overview
block layer
i/o scheduler
devicedrivers
devicedrivers
devicedrivers
storagedevices
storagedevices
storagedevices
file systems file systems file systems
Optimizing the I/O Scheduler
Working with an I/O scheduler makes your computer more fl exible. The I/O scheduler can prioritize I/O requests and also reduce data searching time on the hard disk. Also, the I/O scheduler makes sure that a request is handled before it times out.
An important goal of the I/O scheduler is to make hard disk seek times more effi cient. The scheduler does this by collecting requests before committing them to disk. Because of this approach, the scheduler can do its work more effi ciently. For example, it may choose to order requests before committing them to disk, which makes hard disk seeks more effi cient.
When optimizing the performance of the I/O scheduler, there is a dilemma you will need to address: You can optimize either read performance or write performance, but not both at the same time. Optimizing read performance means that write performance will be not as good, whereas optimizing write performance means you have to pay a price in read per-formance. So, before starting to optimize the I/O scheduler, you should analyze the work-load that is generated by your server.
There are four different ways for the I/O scheduler to do its work:
Complete Fair Queuing In the Complete Fair Queuing (CFG) approach, the I/O sched-uler objectively tries to allocate I/O bandwidth. This approach offers a good solution for machines with mixed workloads, and it offers the best compromise between latency, which is relevant for reading data, and throughput, which is relevant in an environment where there is a lot of fi le writes.
Noop Scheduler The noop scheduler performs only minimal merging functions on your data. There is no sorting, and therefore this scheduler has minimal overhead. The noop scheduler was developed for non-disk-based block devices, such as memory devices. It
c17.indd 456c17.indd 456 1/8/2013 10:55:27 AM1/8/2013 10:55:27 AM
Optimizing Performance 457
also works well with storage media that have extensive caching, virtual machines (in some cases), and intelligent SAN devices.
Deadline Scheduler The deadline scheduler works with fi ve different I/O queues and thus is very capable of making a difference between read requests and write requests. When using this scheduler, read requests get a higher priority. Write requests do not have a dead-line, and therefore data to be written can remain in cache for a longer period. This sched-uler works well in environments where both good read and good write performance are required but where they have a higher priority for reads. This scheduler does particularly well in database environments.
Anticipatory Scheduler The anticipatory scheduler tries to reduce read response times. It does so by introducing a controlled delay in all read requests. This increases the possibility that another read request can be handled in the same I/O request, and therefore it makes reads more effi cient.
The results of switching among I/O schedulers heavily depends on the nature of the workload of the specific server. The previous summary is merely a guideline, and before changing the I/O scheduler, you should test intensively to find out whether it really leads to the desired results.
There are two ways to change the current I/O scheduler. You can echo a new value to the /sys/block/<YOURDEVICE>/queue/scheduler fi le. Alternatively, you can set it as a boot parameter using elevator=yourscheduler on the GRUB prompt or in the GRUB menu. The choices are noop, anticipatory, deadline, and CFQ.
Optimizing Reads
Another way to optimize the way your server works is by tuning read requests. This is something you can do on a per-disk basis. First there is read_ahead, which can be tuned in /sys/block/<YOURDEVICE>/queue/read_ahead_kb. On a default Red Hat Enterprise Linux installation, this parameter is set to 128 KB. If you have fast disks, you can opti-mize your read performance by using a higher value; 512 KB is a starting point, but make sure always to test before making a new setting fi nal. Also, you can tune the number of outstanding read requests by using /sys/block/<YOURDEVICE>/queue/nr_requests. The default value for this parameter also is set to 128 KB, but a higher value may optimize your server signifi cantly. Try 512 KB, or even 1024 KB, to get the best read performance. Always observe, however, that it doesn’t introduce too much latency while writing fi les. In Exercise 17.6 you’ll learn how to change scheduler parameters.
Optimizing read performance works well, but remember that while improv-ing read performance, you also introduce latency on writes. In general, there is nothing wrong with that, but if your server loses power, all data that is still in the memory buffers and yet hasn’t been written will be lost.
c17.indd 457c17.indd 457 1/8/2013 10:55:28 AM1/8/2013 10:55:28 AM
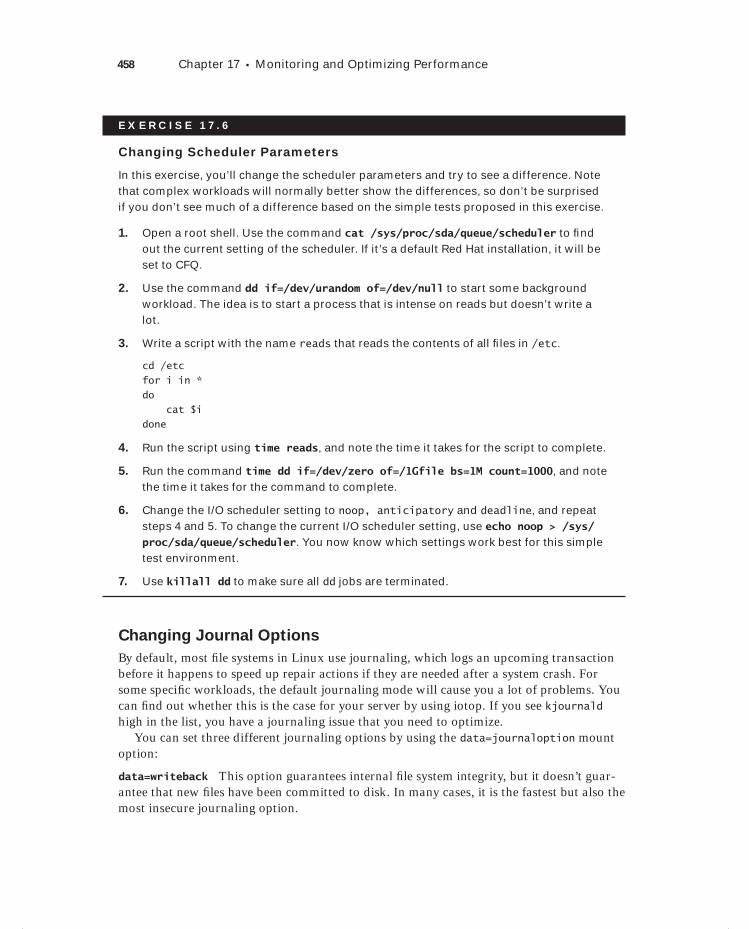
458 Chapter 17 Monitoring and Optimizing Performance
E X E R C I S E 17. 6
Changing Scheduler Parameters
In this exercise, you’ll change the scheduler parameters and try to see a difference. Note that complex workloads will normally better show the differences, so don’t be surprised if you don’t see much of a difference based on the simple tests proposed in this exercise.
1. Open a root shell. Use the command cat /sys/proc/sda/queue/scheduler to fi nd out the current setting of the scheduler. If it’s a default Red Hat installation, it will be set to CFQ.
2. Use the command dd if=/dev/urandom of=/dev/null to start some background workload. The idea is to start a process that is intense on reads but doesn’t write a lot.
3. Write a script with the name reads that reads the contents of all fi les in /etc.
cd /etc
for i in *
do
cat $i
done
4. Run the script using time reads, and note the time it takes for the script to complete.
5. Run the command time dd if=/dev/zero of=/1Gfile bs=1M count=1000, and note the time it takes for the command to complete.
6. Change the I/O scheduler setting to noop, anticipatory and deadline, and repeat steps 4 and 5. To change the current I/O scheduler setting, use echo noop > /sys/proc/sda/queue/scheduler. You now know which settings work best for this simple test environment.
7. Use killall dd to make sure all dd jobs are terminated.
Changing Journal Options
By default, most fi le systems in Linux use journaling, which logs an upcoming transaction before it happens to speed up repair actions if they are needed after a system crash. For some specifi c workloads, the default journaling mode will cause you a lot of problems. You can fi nd out whether this is the case for your server by using iotop. If you see kjournald high in the list, you have a journaling issue that you need to optimize.
You can set three different journaling options by using the data=journaloption mount option:
data=writeback This option guarantees internal fi le system integrity, but it doesn’t guar-antee that new fi les have been committed to disk. In many cases, it is the fastest but also the most insecure journaling option.
c17.indd 458c17.indd 458 1/8/2013 10:55:28 AM1/8/2013 10:55:28 AM

Optimizing Performance 459
data=ordered This is the default mode. It forces all data to be written to the fi le system before the metadata is written to the journal.
data=journaled This is the most secure journaling option, where all data blocks are jour-naled as well. The performance price for using this option is high, but it does offer the best security for your fi les.
Saving Lots of Money Through Performance Optimization
A customer once contacted me about a serious issue on one of their servers. At the end of the day, the server received about 50GB of database data, and then it completely stalled because it was working so hard on these database fi les. This took about half an hour, and then the server started reacting again. At the moment the customer contacted me, they were about to replace the entire 8TB of storage in their server with SSD disks at an estimated cost of about $50,000. Before spending that much money on a solution they weren’t certain would fi x the problem, they called me and asked to analyze the server.
At the moment the problem normally occurred, I logged in to the server, and on the fi rst attempt, I noticed that it became completely unresponsive. Even a command like ls took more than fi ve minutes to produce a result in a directory with only a small number of fi les. top showed that the server was very busy with I/O, however. The second day I pre-pared iotop to see which process was responsible for the high I/O load, and kjournald, the kernel process responsible for journaling, showed up very high in the list. I changed the journal setting from data=ordered to data-writeback, and the next day the server was perfectly capable of handling the 50GB of data it received at the end of the day. My actions thus saved the customer about $50,000 for the purchase of new hardware.
Network Tuning
Among the most diffi cult items to tune is network performance. This is because, in networking, multiple layers of communication are involved, and each is handled separately on Linux. First there are buffers on the network card itself that deal with physical frames. Next, there is the TCP/IP protocol stack, and then there is also the application stack. All work together, and tuning one has consequences on the other layer. While tuning the network, always work upward in the protocol stack. That is, start by tuning the packets themselves, then tune the TCP/IP stack, and after that, examine the service stacks that are in use on your server.
Tuning Kernel Parameters
While it initializes, the kernel sets some parameters automatically based on the amount of memory that is available on your server. So, the good news is that, in many situations, there
c17.indd 459c17.indd 459 1/8/2013 10:55:28 AM1/8/2013 10:55:28 AM
Dow
nlo
ad fro
m W
ow
! eBook
<w
ww
.wow
ebook.
com
>

460 Chapter 17 Monitoring and Optimizing Performance
is no work to be done. By default, some parameters are not set in the most optimal way, so in those cases there is some performance to be gained.
For every network connection, the kernel allocates a socket. The socket is the end-to-end line of communication. Each socket has a receive buffer and a send buffer, also known as the read (receive) and write (send) buffers. These buffers are very important. If they are full, no more data can be processed, so the data will be dropped. This will have important consequences for the performance of your server, because if data is dropped, it needs to be sent and processed again.
The basis of all reserved sockets on the network comes from two /proc tunables.
/proc/sys/net/core/wmem_default
/proc/sys/net/core/rmem_default
All kernel-based sockets are reserved from these sockets. However, if a socket is TCP based, the settings in here are overwritten by TCP-specifi c parameters, in particular the tcp_rmem and tcp_wmem parameters. In the next section, you will read about how to opti-mize them.
The values of the wmem_default and rmem_default are set automatically when your server boots. If you have dropped packets on the network interface, you may benefi t by increasing them. For some workloads, the values that are used by default are rather low. To set them, tune the following parameters in /etc/sysctl.conf:
net.core.wmem_default
net.core.rmem_default
Particularly if you have dropped packets, try doubling them to fi nd out whether the dropped packets go away by doing so.
Related to the default read and write buffer size is the maximum read and write buffer size, rmem_max and wmem_max. These are also calculated automatically when your server comes up. For many situations, however, they are far too low. For example, on a server that has 4GB of RAM, the sizes of these are set to 128KB only! You may benefi t from changing their values to something that is much larger, such as 8MB instead.
sysctl -w net.core.rmem_max=8388608
sysctl -w net.core.wmem_max=8388608
When increasing the read and write buffer size, you also have to increase the maximum amount of incoming packets that can be queued. This is set in netdev_max_backlog. The default value is set to 1000, which is insuffi cient for very busy servers. Try increasing it to a much higher value, such as 8000, especially if you have lots of connections coming in or if there are lots of dropped packets.
sysctl -w net.core.netdev_max_backlog=8000
Apart from the maximum number of incoming packets that your server can queue, there also is a maximum amount of incoming connections that can be accepted. You can set them from the somaxconn fi le in /proc.
sysctl -w net.core.somaxconn=512
c17.indd 460c17.indd 460 1/8/2013 10:55:29 AM1/8/2013 10:55:29 AM

Optimizing Performance 461
By tuning this parameter, you will limit the amount of new connections that are dropped.
Optimizing TCP/IP
Up until now, you have tuned kernel buffers for network sockets only. These are generic parameters. If you are working with TCP, some specifi c tunables are also available. By default, some TCP tunables have a value that is too low. Many are self-tunable and adjust their values automatically, if needed. Chances are that you can gain a lot by increasing them. All relevant options are in proc/sys/net/ipv4.
To begin, there is a read buffer size and a write buffer size that you can set for TCP. They are written to tcp_rmem and tcp_wmem. Here again the kernel tries to allocate the best possible values when it boots. In some cases, however, it doesn’t work out very well. If this happens, you can change the minimum size, the default size, and the maximum size of these buffers. Notice that each of these two parameters contains three values at the same time, for minimum, default, and maximum size. In general, there is no need to tune the minimum size. It can be interesting, though, to tune the default size. This is the buffer size that will be available when your server boots. Tuning the maximum size is also important, because it defi nes the upper threshold above which packets will get dropped. Listing 17.29 shows the default settings for these parameters on my server with 4GB of RAM.
Listing 17.29: Default settings for TCP read and write buffers
[root@hnl ~]# cat /proc/sys/net/ipv4/tcp_rmem
4096 87380 3985408
[root@hnl ~]# cat /proc/sys/net/ipv4/tcp_wmem
4096 16384 3985408
In this example, the maximum size is quite good. Almost 4MB is available as the maxi-mum size for read and write buffers. The default write buffer size is limited. Imagine that you want to tune these parameters in a way that the default write buffer size is as big as the default read buffer size, and the maximum for both parameters is set to 8MB. You can do that with the next two commands:
sysctl -w net.ipv4.tcp_rmem="4096 87380 8388608"
sysctl -w net.ipv4.tcp_wmem="4096 87380 8388608"
Before tuning options such as these, you should always check the availability of memory on your server. All memory that is allocated for TCP read and write buffers can no longer be used for other purposes, so you may cause problems in other areas while tuning these. It’s an important rule in tuning that you should always make sure that the parameters are well balanced.
Another useful set of parameters is related to the acknowledged nature of TCP. Let’s look at an example to understand how this works. Imagine that the sender in a TCP con-nection sends a series of packets numbered 1, 2, 3, 4, 5, 6, 7, 8, 9, and 10. Now imagine that the receiver receives all of them, with the exception of packet 5. In the default setting,
c17.indd 461c17.indd 461 1/8/2013 10:55:29 AM1/8/2013 10:55:29 AM
462 Chapter 17 Monitoring and Optimizing Performance
the receiver would acknowledge receiving up to packet 4, in which case the sender would send packets 5, 6, 7, 8, 9, and 10 again. This is a waste of bandwidth since packets 6, 7, 8, 9, and 10 have already been received correctly.
To handle this acknowledgment traffi c in a more effi cient way, the setting /proc/sys/net/ipv4/tcp_sack is enabled (that is, it has the value of 1). This means that in cases such as the previous one, only missing packets have to be sent again and not the complete packet stream. For your network bandwidth, this is good because only those packets that actu-ally need to be retransmitted are retransmitted. Thus, if your bandwidth is low, you should always leave it on. However, if you are on a fast network, there is a downside. When using this parameter, packets may come in out of order. This means you need larger TCP receive buffers to keep all of the packets until they can be defragmented and put in the right order. This means that using this parameter requires more memory to be reserved, and from that perspective, on fast network connections you had better switch it off. To accomplish that, use the following code:
sysctl -w net.ipv4.tcp_sack=0
When disabling TCP selective acknowledgments as described earlier, you should also disable two related parameters: tcp_dsack and tcp_fack. These parameters enable selec-tive acknowledgments for specifi c packet types. To enable them, use the following two commands:
sysctl -w net.ipv4.tcp_dsack=0
sysctl -w net.ipv4.tcp_fack=0
In case you prefer to work with selective acknowledgments, you can also tune the amount of memory that is reserved to buffer incoming packets that have to be put in the right order. Two parameters are relevant to accomplish this: ipfrag_low_tresh and ipfrag_high_tresh. When the amount specifi ed in ipfrag_high_tresh is reached, new packets to be defragmented are dropped until the server reaches ipfrag_low_tresh. Make sure that the value of both of these parameters is set high enough at all times if your server uses selective acknowledgments. The following values are reasonable for most servers:
sysctl -w net.ipv4.ipfrag_low_tresh=393216
sysctl -w net.ipv4.ipfrag_high_tresh=524288
Next, there is the length of the TCP Syn queue that is created for each port. The idea is that all incoming connections are queued until they can be serviced. As you can probably guess, when the queue is full, connections get dropped. The situation is that the tcp_max_syn_backlog that manages these per port queues has a default value that is too low, because only 1024 bytes are reserved for each port. For good performance, you should allocate 8192 bytes per port using the following:
sysctl -w net.ipv4.tcp_max_syn_backlog=8192
There are also some options that relate to the time an established connection is main-tained. The idea is that every connection that your server has to keep alive uses resources. If your server is very busy at a given moment, it will run out of resources and tell new
c17.indd 462c17.indd 462 1/8/2013 10:55:29 AM1/8/2013 10:55:29 AM

Optimizing Performance 463
incoming clients that no resources are available. Since it is easy enough for a client to rees-tablish a connection in most cases, you probably want to tune your server in a way that it detects failing connections as soon as possible.
The fi rst parameter that relates to maintaining connections is tcp_synack_retries. This parameter defi nes the number of times the kernel will send a response to an incoming new connection request. The default value is 5. Given the current quality of network connec-tions, three is probably enough, and it is better for busy servers because it makes a connec-tion available sooner. Use the following to change it:
sysctl -w net.ipv4.tcp_synack_retries=3
Next, there is the tcp_retries2 option. This relates to the number of times the server tries to resend data to a remote host, which has an established session. Since it is incon-venient for a client computer if a connection is dropped, the default value of 15 is a lot higher than the default value for tcp_synack_retries. However, retrying it 15 times means while your server is retrying to send the data, it can’t use its resources for something else. Therefore, it is best to decrease this parameter to a more reasonable value of 5.
sysctl -w net.ipv4.tcp_retries2=5
The parameters just discussed relate to sessions that appear to be gone. Another area where you can do some optimization is in maintaining inactive sessions. By default, a TCP session can remain idle forever. You probably don’t want that, so use the tcp_keepal-ive_time option to determine how long an established inactive session will be maintained. By default, this will be 7,200 seconds, or two hours. If your server tends to run out of resources because too many requests are coming in, limit it to a considerably shorter period of time, as shown here:
sysctl -w net.ipv4.tcp_keepalive_time=900
Related to the keepalive_time is the number of packets that your server will send before deciding that a connection is dead. You can manage this by using the tcp_keepal-ive_probes parameter. By default, nine packets are sent before a server is considered dead. Change it to 3 if you want to terminate dead connections faster, as shown here:
sysctl -w net.ipv4.tcp_keepalive_probes=3
Related to the amount of tcp_keepalive_probes is the interval you use to send these probes. By default, this happens every 75 seconds. So, even with three probes, it still takes more than three minutes before your server sees that a connection has failed. To reduce this period, give the tcp_keepalive_intvl parameter the value of 15, as follows:
sysctl -w net.ipv4.tcp_keepalive_intvl=15
To complete the story of maintaining connections, you need two more parameters. By default, the kernel waits a bit before reusing a socket. If you run a busy server, performance will benefi t from switching this off. To do this, use the following two commands:
sysctl -w net.ipv4.tcp_tw_reuse=1
sysctl -w net.ipv4.tcp_tw_recycle=1
c17.indd 463c17.indd 463 1/8/2013 10:55:29 AM1/8/2013 10:55:29 AM
464 Chapter 17 Monitoring and Optimizing Performance
Generic Network Performance Optimization Tips
Up to this point, I have only discussed kernel parameters. There are also some more generic hints to follow when optimizing performance on the network. You probably have applied all of them already, but just to be sure, let’s repeat some of the most important tips:
Make sure you have the latest network driver modules.
Use network card teaming to make a bond interface in which two physical network cards are used to increase the performance of the network card in your server.
Check the Ethernet configuration settings, such as the frame size, MTU, speed, and duplex mode, on your network. Make sure that all devices involved in network com-munications use the same settings.
Optimizing Linux Performance Using cgroups
Among the latest features for performance optimization that Linux offers is cgroups (short for control groups). Using cgroups is a technique that allows you to create groups of resources and allocate them to specifi c services. With this solution, you can make sure that a fi xed percentage of resources on your server are always available for those services that need it.
To start using cgroups, fi rst make sure the libcgroup RPM package is installed. Once you have confi rmed its installation, you need to start the cgconfig and cgred services. Make sure to put these in the runlevels of your server, using chkconfig cgconfig on and chkconfig cgred on. Next make sure to start these services. This will create a directory /cgroup with a couple of subdirectories in it. These subdirectories are referred to as controllers. The controllers refer to the system resources that you can limit using cgroups. Some of the most interesting controllers include the following:
blkio Use this to limit the amount of I/O that can be handled.
cpu This is used to limit CPU cycles.
memory Use this to limit the amount of memory that you can grant to processes.
There are additional controllers, but they are not as useful as those described.Now let’s assume you’re running an Oracle database on your server, and you want to
make sure that it runs in a cgroup where it has access to at least 75 percent of available memory and CPU cycles. The fi rst step would be to create a cgroup that defi nes access to CPU and memory resources. The following command would create this cgroup with the name oracle: cgcreate -g cpu,memory oracle. After defi ning the cgroups this way, you’ll see that in the /cgroups/cpu and /cgroups/memory directories, a subdirectory with the name oracle is created. In this subdirectory, different parameters are available to specify the resources you want to make available to the cgroup (see Listing 17.30).
c17.indd 464c17.indd 464 1/8/2013 10:55:29 AM1/8/2013 10:55:29 AM
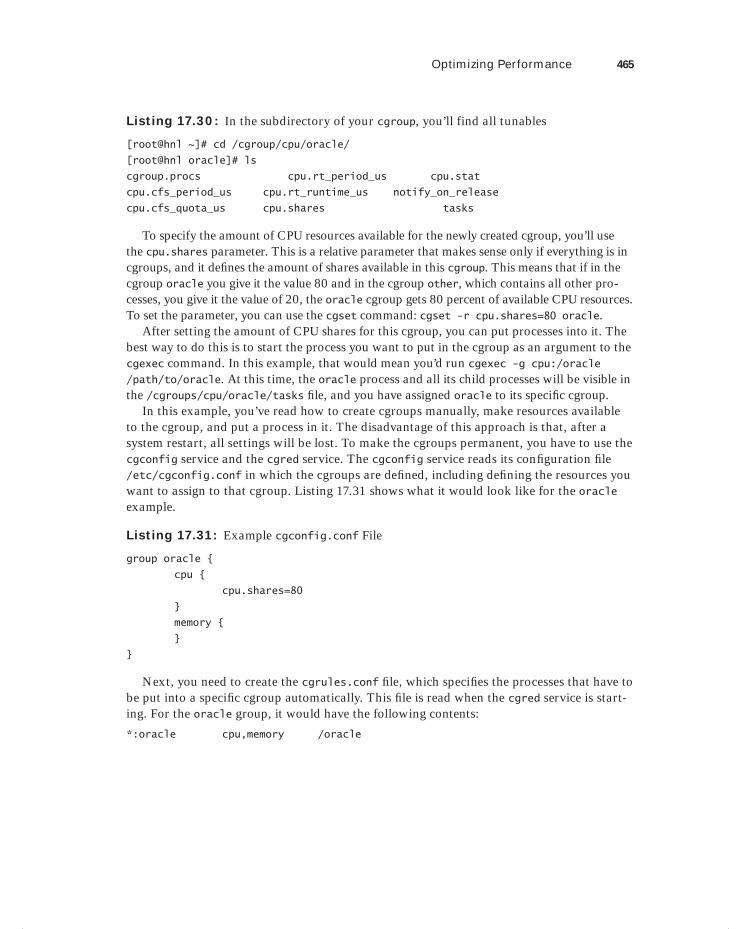
Optimizing Performance 465
Listing 17.30: In the subdirectory of your cgroup, you’ll find all tunables
[root@hnl ~]# cd /cgroup/cpu/oracle/
[root@hnl oracle]# ls
cgroup.procs cpu.rt_period_us cpu.stat
cpu.cfs_period_us cpu.rt_runtime_us notify_on_release
cpu.cfs_quota_us cpu.shares tasks
To specify the amount of CPU resources available for the newly created cgroup, you’ll use the cpu.shares parameter. This is a relative parameter that makes sense only if everything is in cgroups, and it defi nes the amount of shares available in this cgroup. This means that if in the cgroup oracle you give it the value 80 and in the cgroup other, which contains all other pro-cesses, you give it the value of 20, the oracle cgroup gets 80 percent of available CPU resources. To set the parameter, you can use the cgset command: cgset -r cpu.shares=80 oracle.
After setting the amount of CPU shares for this cgroup, you can put processes into it. The best way to do this is to start the process you want to put in the cgroup as an argument to the cgexec command. In this example, that would mean you’d run cgexec -g cpu:/oracle /path/to/oracle. At this time, the oracle process and all its child processes will be visible in the /cgroups/cpu/oracle/tasks fi le, and you have assigned oracle to its specifi c cgroup.
In this example, you’ve read how to create cgroups manually, make resources available to the cgroup, and put a process in it. The disadvantage of this approach is that, after a system restart, all settings will be lost. To make the cgroups permanent, you have to use the cgconfig service and the cgred service. The cgconfig service reads its confi guration fi le /etc/cgconfig.conf in which the cgroups are defi ned, including defi ning the resources you want to assign to that cgroup. Listing 17.31 shows what it would look like for the oracle example.
Listing 17.31: Example cgconfig.conf File
group oracle {
cpu {
cpu.shares=80
}
memory {
}
}
Next, you need to create the cgrules.conf fi le, which specifi es the processes that have to be put into a specifi c cgroup automatically. This fi le is read when the cgred service is start-ing. For the oracle group, it would have the following contents:
*:oracle cpu,memory /oracle
c17.indd 465c17.indd 465 1/8/2013 10:55:30 AM1/8/2013 10:55:30 AM
466 Chapter 17 Monitoring and Optimizing Performance
If you have made sure that both the cgconfig service and the cgred service are starting from the runlevels, your services will automatically be started in the appropriate cgroup.
SummaryIn this chapter, you learned how to tune and optimize performance on your server. You read that for both the tuning and the optimization parts, you’ll always look at four differ-ent categories: CPU, memory, I/O, and network. For each of these, several tools are avail-able to optimize performance.
Performance optimization is often done by tuning parameters in the /proc fi le system. Apart from that, there are also different options that can be very diverse, depending on the optimization you’re trying to achieve. cgroups is an important new instrument designed to optimize performance. It allows you to limit resources for services on your server in a very specifi c way.
c17.indd 466c17.indd 466 1/8/2013 10:55:30 AM1/8/2013 10:55:30 AM

Chapter
18Introducing Bash Shell Scripting
TOPICS COVERED IN THIS CHAPTER:
Getting Started
Working with Variables and Input
Performing Calculations
Using Control Structures
c18.indd 467c18.indd 467 1/8/2013 10:56:00 AM1/8/2013 10:56:00 AM

Once you are at ease working with the command line, you’ll want more. You already learned how to combine commands using piping, but if you really want to get the best from your
commands, there is much more you can do. In this chapter, you’ll be introduced to the pos-sibilities of Bash shell scripting, which helps you accomplish diffi cult tasks easily. Once you have a fi rm grasp of shell scripting, you’ll be able to automate many tasks and thus be able to complete your work more than twice as fast as you could before.
Getting StartedA shell script is a text fi le that contains a sequence of commands. Basically, anything that can run a bunch of commands is considered a shell script. Nevertheless, there are some rules to ensure that you create quality shell scripts—scripts that not only work well for the task for which they are written but that also will be readable by others. At some point, you’ll be happy to write readable shell scripts. Especially as your scripts get longer, you’ll agree that if a script does not meet the basic requirements of readability, even you won’t be able to understand what it is doing.
Elements of a Good Shell Script
When writing a script, make sure it meets the following recommendations:
Has a unique name
Includes the shebang (#!) to tell the shell which subshell should execute the script
Includes comments—lots of comments
Uses the exit command to tell the shell executing the script that it has executed successfully
Is executable
Let’s talk about the name of the script fi rst. You’ll be amazed how many commands exist on your computer. Thus, you have to be sure that the name of your script is unique. For example, many people like to name their fi rst script test. Unfortunately, there’s already a command with the name test, which will be discussed later in this chapter. If your script has the same name as an existing command, the existing command will be executed and not your script, unless you prefi x the name of the script with a backslash (/) character. So,
c18.indd 468c18.indd 468 1/8/2013 10:56:01 AM1/8/2013 10:56:01 AM
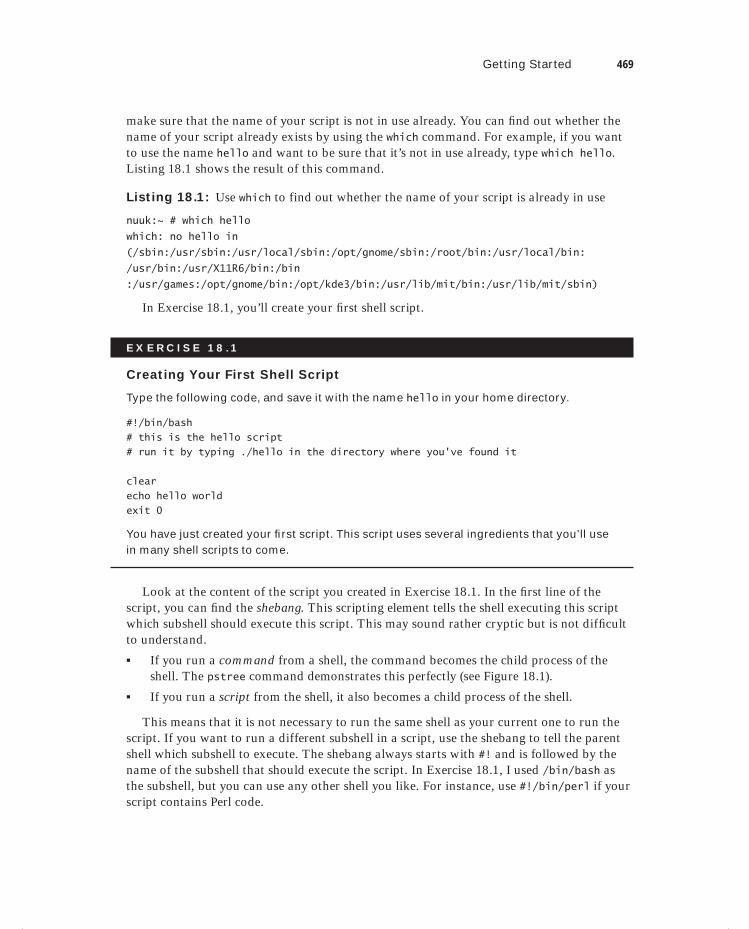
Getting Started 469
make sure that the name of your script is not in use already. You can fi nd out whether the name of your script already exists by using the which command. For example, if you want to use the name hello and want to be sure that it’s not in use already, type which hello. Listing 18.1 shows the result of this command.
Listing 18.1: Use which to find out whether the name of your script is already in use
nuuk:~ # which hello
which: no hello in
(/sbin:/usr/sbin:/usr/local/sbin:/opt/gnome/sbin:/root/bin:/usr/local/bin:
/usr/bin:/usr/X11R6/bin:/bin
:/usr/games:/opt/gnome/bin:/opt/kde3/bin:/usr/lib/mit/bin:/usr/lib/mit/sbin)
In Exercise 18.1, you’ll create your fi rst shell script.
E X E R C I S E 18 .1
Creating Your First Shell Script
Type the following code, and save it with the name hello in your home directory.
#!/bin/bash
# this is the hello script
# run it by typing ./hello in the directory where you've found it
clear
echo hello world
exit 0
You have just created your fi rst script. This script uses several ingredients that you’ll use in many shell scripts to come.
Look at the content of the script you created in Exercise 18.1. In the fi rst line of the script, you can fi nd the shebang. This scripting element tells the shell executing this script which subshell should execute this script. This may sound rather cryptic but is not diffi cult to understand.
If you run a command from a shell, the command becomes the child process of the shell. The pstree command demonstrates this perfectly (see Figure 18.1).
If you run a script from the shell, it also becomes a child process of the shell.
This means that it is not necessary to run the same shell as your current one to run the script. If you want to run a different subshell in a script, use the shebang to tell the parent shell which subshell to execute. The shebang always starts with #! and is followed by the name of the subshell that should execute the script. In Exercise 18.1, I used /bin/bash as the subshell, but you can use any other shell you like. For instance, use #!/bin/perl if your script contains Perl code.
c18.indd 469c18.indd 469 1/8/2013 10:56:02 AM1/8/2013 10:56:02 AM

470 Chapter 18 Introducing Bash Shell Scripting
F I GU R E 18 .1 Use pstree to show that commands are run as a subshell.
You will notice that not all scripts include a shebang. Without a shebang, the shell just executes the script using the same shell for the subshell process. This makes the script less portable; however, if you try to run it from a different parent shell than the shell for which the script was written, you’ll risk that the script will fail.
The second part in the script in Exercise 18.1 consists of two lines of comments. As you can see, these comment lines explain to the user the purpose of the script and how to use it.
Comment lines should be clear and explain what’s happening. A comment line always starts with a #.
You may ask why the shebang, which also starts with a #, is not interpreted as a comment. This is because of its position and the fact that it is immedi-ately followed by an exclamation mark. This combination at the very start of a script tells the shell that it’s not a comment but rather a shebang.
Back to the script that you created in Exercise 18.1. The body of the script follows the comment lines, and it contains the code that the script should execute. In the example, the code consists of two simple commands: fi rst the screen is cleared, and next the text hello world is echoed on the screen.
c18.indd 470c18.indd 470 1/8/2013 10:56:02 AM1/8/2013 10:56:02 AM
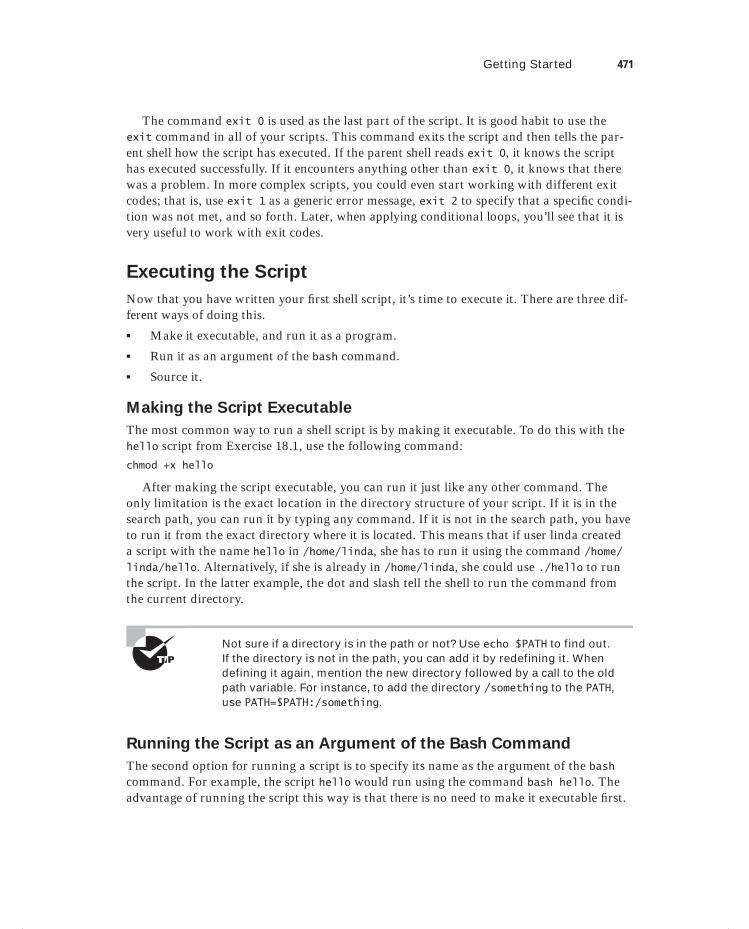
Getting Started 471
The command exit 0 is used as the last part of the script. It is good habit to use the exit command in all of your scripts. This command exits the script and then tells the par-ent shell how the script has executed. If the parent shell reads exit 0, it knows the script has executed successfully. If it encounters anything other than exit 0, it knows that there was a problem. In more complex scripts, you could even start working with different exit codes; that is, use exit 1 as a generic error message, exit 2 to specify that a specifi c condi-tion was not met, and so forth. Later, when applying conditional loops, you’ll see that it is very useful to work with exit codes.
Executing the Script
Now that you have written your fi rst shell script, it’s time to execute it. There are three dif-ferent ways of doing this.
Make it executable, and run it as a program.
Run it as an argument of the bash command.
Source it.
Making the Script Executable
The most common way to run a shell script is by making it executable. To do this with the hello script from Exercise 18.1, use the following command:
chmod +x hello
After making the script executable, you can run it just like any other command. The only limitation is the exact location in the directory structure of your script. If it is in the search path, you can run it by typing any command. If it is not in the search path, you have to run it from the exact directory where it is located. This means that if user linda created a script with the name hello in /home/linda, she has to run it using the command /home/linda/hello. Alternatively, if she is already in /home/linda, she could use ./hello to run the script. In the latter example, the dot and slash tell the shell to run the command from the current directory.
Not sure if a directory is in the path or not? Use echo $PATH to find out. If the directory is not in the path, you can add it by redefining it. When defining it again, mention the new directory followed by a call to the old path variable. For instance, to add the directory /something to the PATH, use PATH=$PATH:/something.
Running the Script as an Argument of the Bash Command
The second option for running a script is to specify its name as the argument of the bash command. For example, the script hello would run using the command bash hello. The advantage of running the script this way is that there is no need to make it executable fi rst.
c18.indd 471c18.indd 471 1/8/2013 10:56:03 AM1/8/2013 10:56:03 AM

472 Chapter 18 Introducing Bash Shell Scripting
There’s one additional benefi t too: if you run it this way, you can specify an argument to the bash command while running it.
Make sure you are using a complete path to the location of the script when running it this way. It has to be in the current directory, or you would have to use a complete reference to the directory where it is located. This means that if the script is /home/linda/hello and your current directory is /tmp, you should run it using bash /home/linda/hello.
Sourcing the Script
The third way of running a script is completely different. You can source the script. By sourcing a script, you don’t run it as a subshell. Rather, you include it in the current shell. This can be useful if the script contains variables that you want to be active in the current shell. (This often happens in the scripts that are executed when you boot your computer.)
If you source a script, you need to know what you’re doing, or you may encounter unex-pected problems. For example, if you use the exit command in a script that is sourced, it closes the current shell. Remember, the exit command exits the current script. To be more specifi c, it doesn’t exit the script itself, but rather it tells the executing shell that the script is over and it has to return to its parent shell. Therefore, don’t source scripts that contain the exit command.
There are two ways to source a script. These two lines show you how to source a script that has the name settings:. settings
source settings
It doesn’t really matter which one you use because both are completely equivalent. When discussing variables in the next section, I’ll provide more examples of why sourcing is a very useful technique.
Working with Variables and InputWhat makes a script so fl exible is the use of variables. A variable is a value you get from somewhere that will be dynamic. The value of a variable normally depends on the circum-stances. For example, you can have your script get the variable itself by executing a com-mand, making a calculation, specifying it as a command-line argument for the script, or modifying a text string. In this section, you’ll learn about the basic variables.
Understanding Variables
You can defi ne a variable somewhere in a script and use it in a fl exible way later. Though you can do this in a script, you don’t absolutely have to. You can also defi ne a variable in a shell. To defi ne a variable, use varname=value to get the value of a variable. Later, you can call its value using the echo command. Listing 18.2 provides an example of how a variable is set on the command line and how its value is used in the next command.
c18.indd 472c18.indd 472 1/8/2013 10:56:03 AM1/8/2013 10:56:03 AM
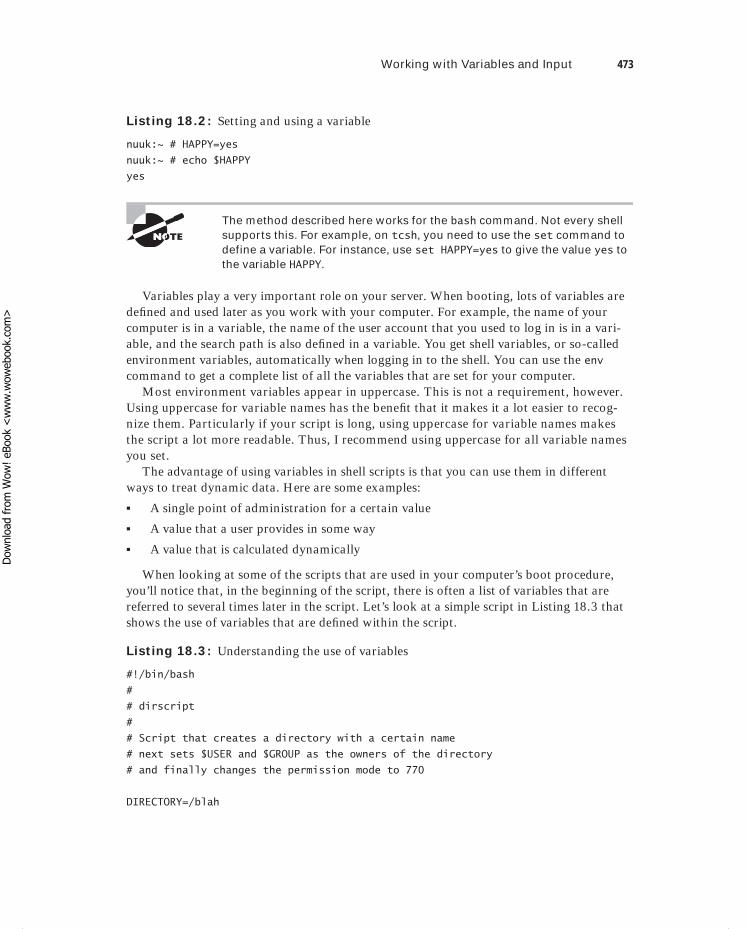
Working with Variables and Input 473
Listing 18.2: Setting and using a variable
nuuk:~ # HAPPY=yes
nuuk:~ # echo $HAPPY
yes
The method described here works for the bash command. Not every shell supports this. For example, on tcsh, you need to use the set command to define a variable. For instance, use set HAPPY=yes to give the value yes to the variable HAPPY.
Variables play a very important role on your server. When booting, lots of variables are defi ned and used later as you work with your computer. For example, the name of your computer is in a variable, the name of the user account that you used to log in is in a vari-able, and the search path is also defi ned in a variable. You get shell variables, or so-called environment variables, automatically when logging in to the shell. You can use the env command to get a complete list of all the variables that are set for your computer.
Most environment variables appear in uppercase. This is not a requirement, however. Using uppercase for variable names has the benefi t that it makes it a lot easier to recog-nize them. Particularly if your script is long, using uppercase for variable names makes the script a lot more readable. Thus, I recommend using uppercase for all variable names you set.
The advantage of using variables in shell scripts is that you can use them in different ways to treat dynamic data. Here are some examples:
A single point of administration for a certain value
A value that a user provides in some way
A value that is calculated dynamically
When looking at some of the scripts that are used in your computer’s boot procedure, you’ll notice that, in the beginning of the script, there is often a list of variables that are referred to several times later in the script. Let’s look at a simple script in Listing 18.3 that shows the use of variables that are defi ned within the script.
Listing 18.3: Understanding the use of variables
#!/bin/bash
#
# dirscript
#
# Script that creates a directory with a certain name
# next sets $USER and $GROUP as the owners of the directory
# and finally changes the permission mode to 770
DIRECTORY=/blah
c18.indd 473c18.indd 473 1/8/2013 10:56:03 AM1/8/2013 10:56:03 AM
Dow
nlo
ad fro
m W
ow
! eBook
<w
ww
.wow
ebook.
com
>
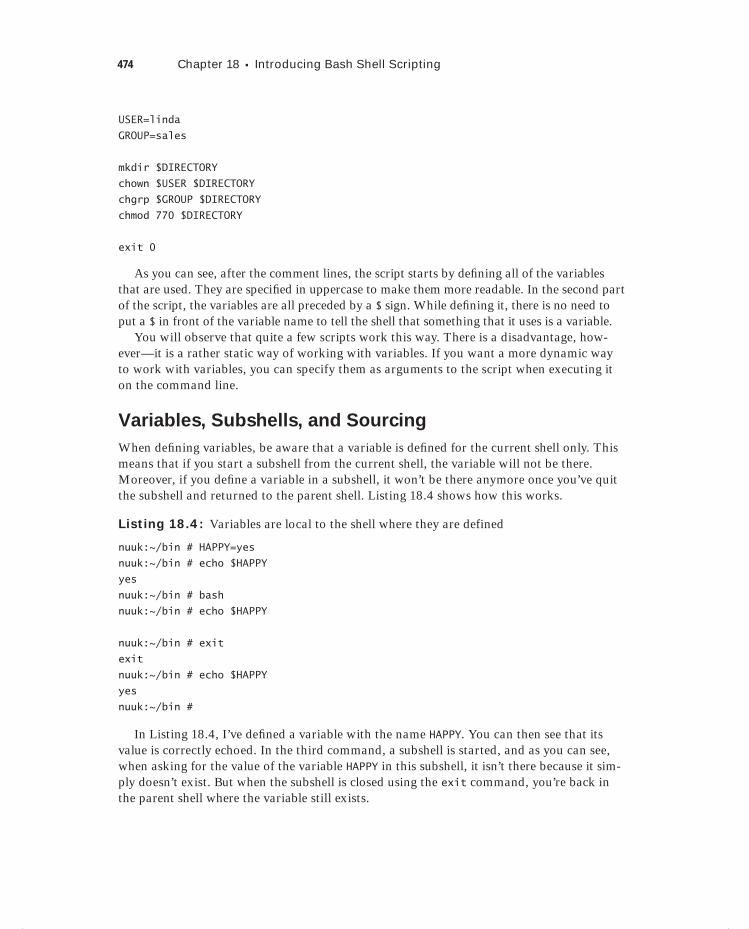
474 Chapter 18 Introducing Bash Shell Scripting
USER=linda
GROUP=sales
mkdir $DIRECTORY
chown $USER $DIRECTORY
chgrp $GROUP $DIRECTORY
chmod 770 $DIRECTORY
exit 0
As you can see, after the comment lines, the script starts by defi ning all of the variables that are used. They are specifi ed in uppercase to make them more readable. In the second part of the script, the variables are all preceded by a $ sign. While defi ning it, there is no need to put a $ in front of the variable name to tell the shell that something that it uses is a variable.
You will observe that quite a few scripts work this way. There is a disadvantage, how-ever—it is a rather static way of working with variables. If you want a more dynamic way to work with variables, you can specify them as arguments to the script when executing it on the command line.
Variables, Subshells, and Sourcing
When defi ning variables, be aware that a variable is defi ned for the current shell only. This means that if you start a subshell from the current shell, the variable will not be there. Moreover, if you defi ne a variable in a subshell, it won’t be there anymore once you’ve quit the subshell and returned to the parent shell. Listing 18.4 shows how this works.
Listing 18.4: Variables are local to the shell where they are defined
nuuk:~/bin # HAPPY=yes
nuuk:~/bin # echo $HAPPY
yes
nuuk:~/bin # bash
nuuk:~/bin # echo $HAPPY
nuuk:~/bin # exit
exit
nuuk:~/bin # echo $HAPPY
yes
nuuk:~/bin #
In Listing 18.4, I’ve defi ned a variable with the name HAPPY. You can then see that its value is correctly echoed. In the third command, a subshell is started, and as you can see, when asking for the value of the variable HAPPY in this subshell, it isn’t there because it sim-ply doesn’t exist. But when the subshell is closed using the exit command, you’re back in the parent shell where the variable still exists.
c18.indd 474c18.indd 474 1/8/2013 10:56:03 AM1/8/2013 10:56:03 AM
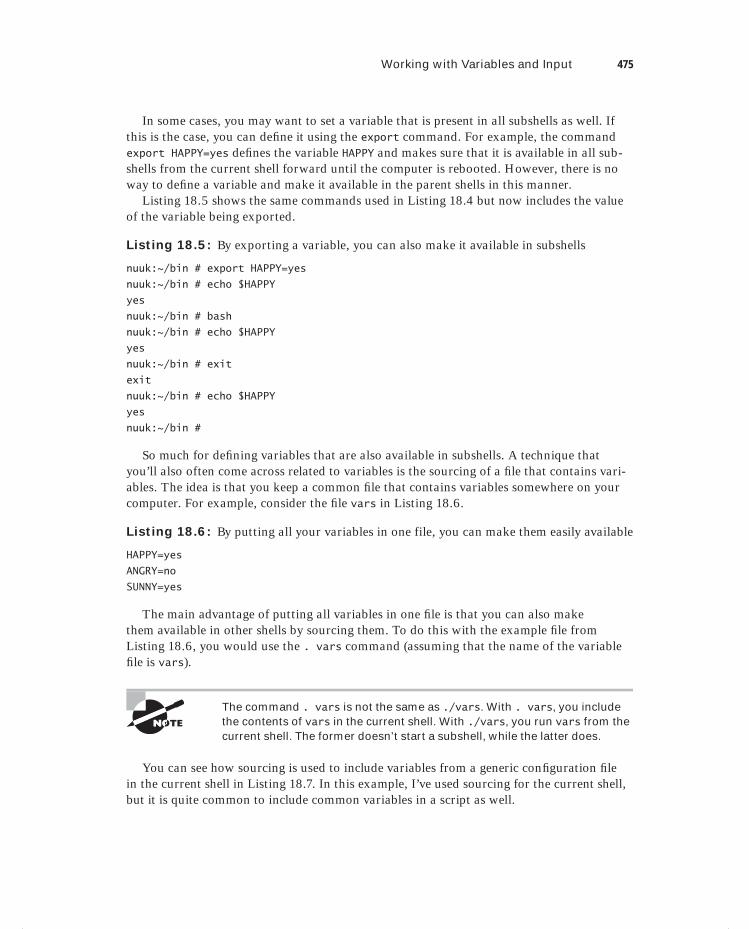
Working with Variables and Input 475
In some cases, you may want to set a variable that is present in all subshells as well. If this is the case, you can defi ne it using the export command. For example, the command export HAPPY=yes defi nes the variable HAPPY and makes sure that it is available in all sub-shells from the current shell forward until the computer is rebooted. However, there is no way to defi ne a variable and make it available in the parent shells in this manner.
Listing 18.5 shows the same commands used in Listing 18.4 but now includes the value of the variable being exported.
Listing 18.5: By exporting a variable, you can also make it available in subshells
nuuk:~/bin # export HAPPY=yes
nuuk:~/bin # echo $HAPPY
yes
nuuk:~/bin # bash
nuuk:~/bin # echo $HAPPY
yes
nuuk:~/bin # exit
exit
nuuk:~/bin # echo $HAPPY
yes
nuuk:~/bin #
So much for defi ning variables that are also available in subshells. A technique that you’ll also often come across related to variables is the sourcing of a fi le that contains vari-ables. The idea is that you keep a common fi le that contains variables somewhere on your computer. For example, consider the fi le vars in Listing 18.6.
Listing 18.6: By putting all your variables in one file, you can make them easily available
HAPPY=yes
ANGRY=no
SUNNY=yes
The main advantage of putting all variables in one fi le is that you can also make them available in other shells by sourcing them. To do this with the example fi le from Listing 18.6, you would use the . vars command (assuming that the name of the variable fi le is vars).
The command . vars is not the same as ./vars. With . vars, you include the contents of vars in the current shell. With ./vars, you run vars from the current shell. The former doesn’t start a subshell, while the latter does.
You can see how sourcing is used to include variables from a generic confi guration fi le in the current shell in Listing 18.7. In this example, I’ve used sourcing for the current shell, but it is quite common to include common variables in a script as well.
c18.indd 475c18.indd 475 1/8/2013 10:56:03 AM1/8/2013 10:56:03 AM
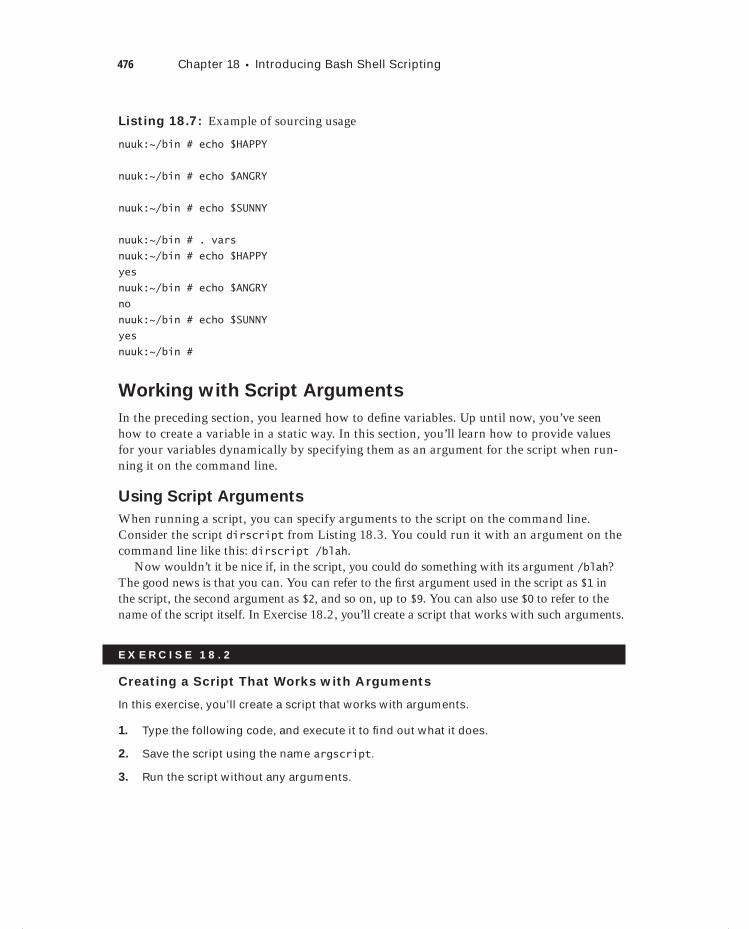
476 Chapter 18 Introducing Bash Shell Scripting
Listing 18.7: Example of sourcing usage
nuuk:~/bin # echo $HAPPY
nuuk:~/bin # echo $ANGRY
nuuk:~/bin # echo $SUNNY
nuuk:~/bin # . vars
nuuk:~/bin # echo $HAPPY
yes
nuuk:~/bin # echo $ANGRY
no
nuuk:~/bin # echo $SUNNY
yes
nuuk:~/bin #
Working with Script Arguments
In the preceding section, you learned how to defi ne variables. Up until now, you’ve seen how to create a variable in a static way. In this section, you’ll learn how to provide values for your variables dynamically by specifying them as an argument for the script when run-ning it on the command line.
Using Script Arguments
When running a script, you can specify arguments to the script on the command line. Consider the script dirscript from Listing 18.3. You could run it with an argument on the command line like this: dirscript /blah.
Now wouldn’t it be nice if, in the script, you could do something with its argument /blah? The good news is that you can. You can refer to the fi rst argument used in the script as $1 in the script, the second argument as $2, and so on, up to $9. You can also use $0 to refer to the name of the script itself. In Exercise 18.2, you’ll create a script that works with such arguments.
E X E R C I S E 18 . 2
Creating a Script That Works with Arguments
In this exercise, you’ll create a script that works with arguments.
1. Type the following code, and execute it to fi nd out what it does.
2. Save the script using the name argscript.
3. Run the script without any arguments.
c18.indd 476c18.indd 476 1/8/2013 10:56:03 AM1/8/2013 10:56:03 AM

Working with Variables and Input 477
E X E R C I S E 18 . 2 ( c ont inue d )
4. Observe what happens if you put one or more arguments after the name of the script.
#!/bin/bash
#
# argscript
#
# Silly script that shows how arguments are used
ARG1=$1
ARG2=$2
ARG3=$3
SCRIPTNAME=$0
echo The name of this script is $SCRIPTNAME
echo The first argument used is $ARG1
echo The second argument used is $ARG2
echo The third argument used is $ARG3
exit 0
In Exercise 18.3, you’ll rewrite the script dirscript to use arguments. This changes dirscript from a rather static script that can create only one directory to a very dynamic one that can create any directory and assign any user and any group as the owner of that directory.
E X E R C I S E 18 . 3
Referring to Command-Line Arguments in a Script
The following script is a rewrite of dirscript. In this new version, the script works with arguments instead of fi xed variables, which makes it a lot more fl exible.
1. Type the code from the following example script.
2. Save the code to a fi le with the name dirscript2.
3. Run the script with three different arguments. Also try running it with more argu-ments.
4. Observe what happens.
#!/bin/bash
#
# dirscript
c18.indd 477c18.indd 477 1/8/2013 10:56:03 AM1/8/2013 10:56:03 AM
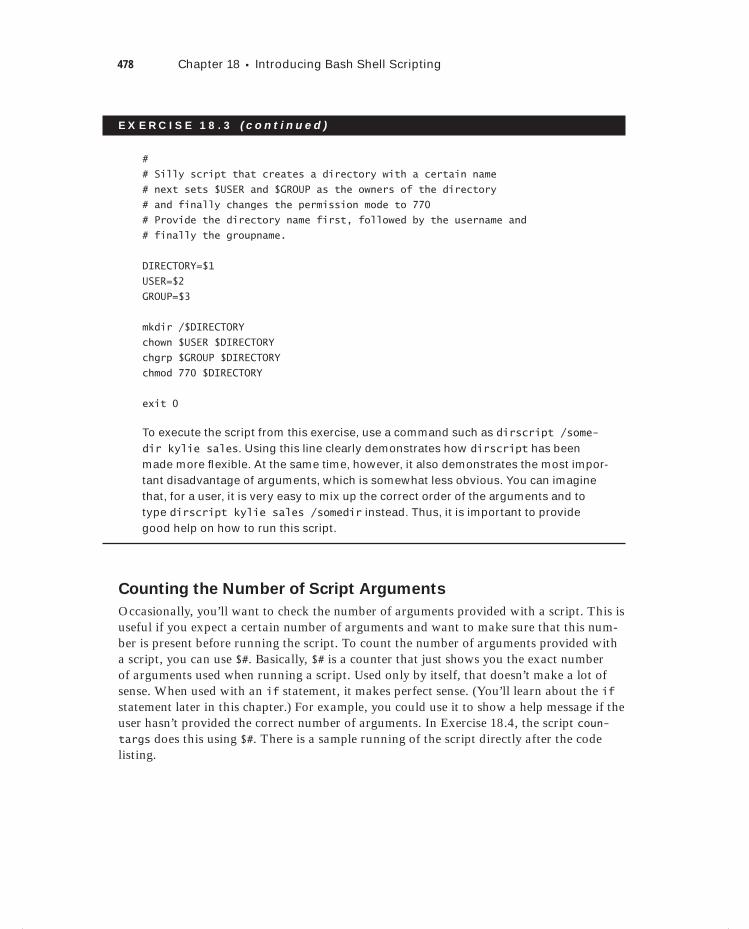
478 Chapter 18 Introducing Bash Shell Scripting
E X E R C I S E 18 . 3 ( c ont inue d )
#
# Silly script that creates a directory with a certain name
# next sets $USER and $GROUP as the owners of the directory
# and finally changes the permission mode to 770
# Provide the directory name first, followed by the username and
# finally the groupname.
DIRECTORY=$1
USER=$2
GROUP=$3
mkdir /$DIRECTORY
chown $USER $DIRECTORY
chgrp $GROUP $DIRECTORY
chmod 770 $DIRECTORY
exit 0
To execute the script from this exercise, use a command such as dirscript /some-dir kylie sales. Using this line clearly demonstrates how dirscript has been made more fl exible. At the same time, however, it also demonstrates the most impor-tant disadvantage of arguments, which is somewhat less obvious. You can imagine that, for a user, it is very easy to mix up the correct order of the arguments and to type dirscript kylie sales /somedir instead. Thus, it is important to provide good help on how to run this script.
Counting the Number of Script Arguments
Occasionally, you’ll want to check the number of arguments provided with a script. This is useful if you expect a certain number of arguments and want to make sure that this num-ber is present before running the script. To count the number of arguments provided with a script, you can use $#. Basically, $# is a counter that just shows you the exact number of arguments used when running a script. Used only by itself, that doesn’t make a lot of sense. When used with an if statement, it makes perfect sense. (You’ll learn about the if statement later in this chapter.) For example, you could use it to show a help message if the user hasn’t provided the correct number of arguments. In Exercise 18.4, the script coun-targs does this using $#. There is a sample running of the script directly after the code listing.
c18.indd 478c18.indd 478 1/8/2013 10:56:04 AM1/8/2013 10:56:04 AM
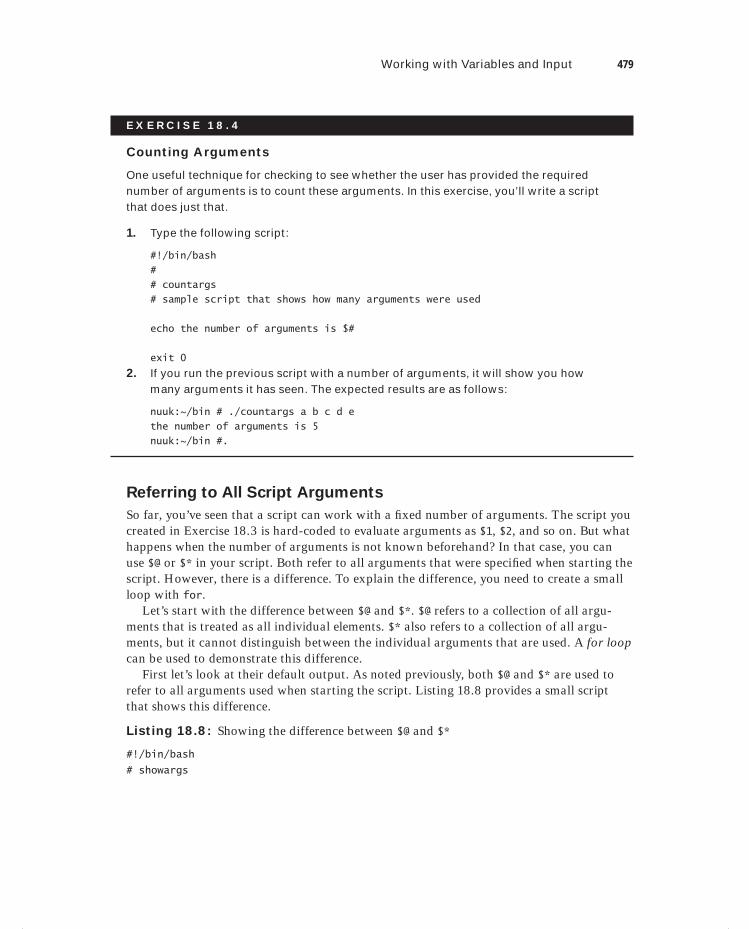
Working with Variables and Input 479
E X E R C I S E 18 . 4
Counting Arguments
One useful technique for checking to see whether the user has provided the required number of arguments is to count these arguments. In this exercise, you’ll write a script that does just that.
1. Type the following script:
#!/bin/bash
#
# countargs
# sample script that shows how many arguments were used
echo the number of arguments is $#
exit 0
2. If you run the previous script with a number of arguments, it will show you how many arguments it has seen. The expected results are as follows:
nuuk:~/bin # ./countargs a b c d e
the number of arguments is 5
nuuk:~/bin #.
Referring to All Script Arguments
So far, you’ve seen that a script can work with a fi xed number of arguments. The script you created in Exercise 18.3 is hard-coded to evaluate arguments as $1, $2, and so on. But what happens when the number of arguments is not known beforehand? In that case, you can use $@ or $* in your script. Both refer to all arguments that were specifi ed when starting the script. However, there is a difference. To explain the difference, you need to create a small loop with for.
Let’s start with the difference between $@ and $*. $@ refers to a collection of all argu-ments that is treated as all individual elements. $* also refers to a collection of all argu-ments, but it cannot distinguish between the individual arguments that are used. A for loop can be used to demonstrate this difference.
First let’s look at their default output. As noted previously, both $@ and $* are used to refer to all arguments used when starting the script. Listing 18.8 provides a small script that shows this difference.
Listing 18.8: Showing the difference between $@ and $*
#!/bin/bash
# showargs
c18.indd 479c18.indd 479 1/8/2013 10:56:04 AM1/8/2013 10:56:04 AM
480 Chapter 18 Introducing Bash Shell Scripting
# this script shows all arguments used when starting the script
echo the arguments are $@
echo the arguments are $*
exit 0
Let’s look at what happens when you launch this script with the arguments a b c d. The result appears in Listing 18.9.
Listing 18.9: Running showargs with different arguments
nuuk:~/bin # ./showargs a b c d
the arguments are a b c d
the arguments are a b c d
So far, there seems to be no difference between $@ and $*. However, there is an important difference: the collection of arguments in $* is seen as one text string, and the collection of arguments in $@ is seen as separate strings. In the section that explains for loops, you will see proof of that.
At this point, you’ve learned how to handle a script that has an infi nite number of arguments. You just tell the script that it should interpret each argument one by one. The next section shows you how to count the number of arguments.
Asking for Input
Another way to get input is simply to ask for it. To do this, you can use read in the script. When using read, the script waits for user input and puts that into a variable. In Exercise 18.5, you will create a simple script that fi rst asks for input and then refl ects the input provided by echoing the value of the variable. You can see what happens when you run the script directly after the sample code.
E X E R C I S E 18 . 5
Asking for Input with read
In this exercise, you’ll write a script that handles user input. You’ll use read to do this.
1. Type the following code, and save it to a fi le with the name askinput.
#!/bin/bash
#
# askinput
# ask user to enter some text and then display it
echo Enter some text
read SOMETEXT
c18.indd 480c18.indd 480 1/8/2013 10:56:04 AM1/8/2013 10:56:04 AM
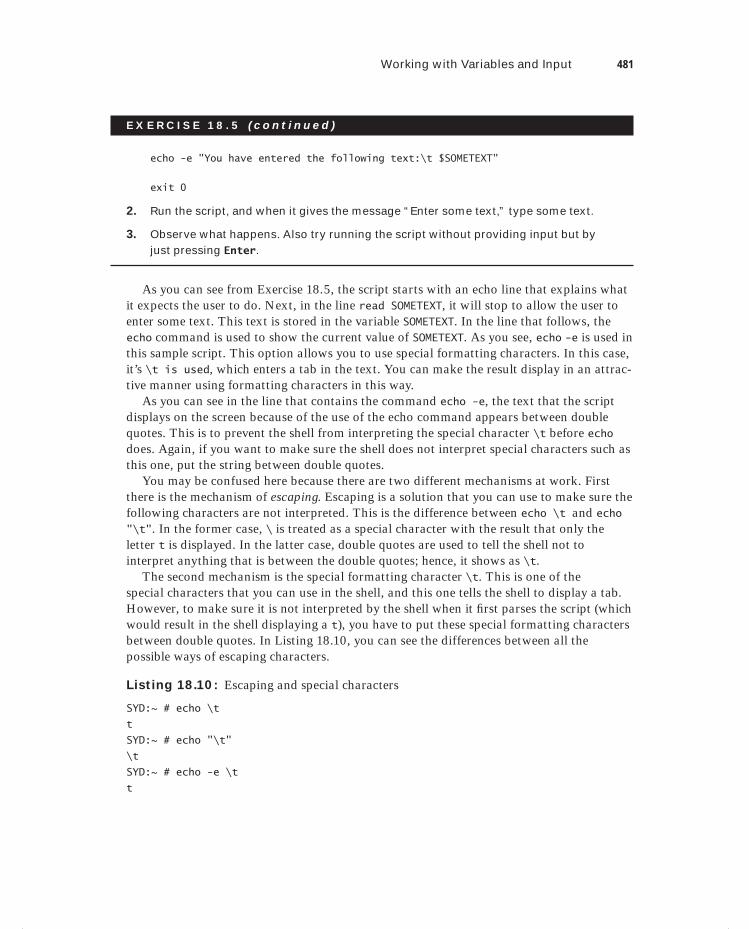
Working with Variables and Input 481
E X E R C I S E 18 . 5 ( c ont inue d )
echo -e "You have entered the following text:\t $SOMETEXT"
exit 0
2. Run the script, and when it gives the message “Enter some text,” type some text.
3. Observe what happens. Also try running the script without providing input but by just pressing Enter.
As you can see from Exercise 18.5, the script starts with an echo line that explains what it expects the user to do. Next, in the line read SOMETEXT, it will stop to allow the user to enter some text. This text is stored in the variable SOMETEXT. In the line that follows, the echo command is used to show the current value of SOMETEXT. As you see, echo -e is used in this sample script. This option allows you to use special formatting characters. In this case, it’s \t is used, which enters a tab in the text. You can make the result display in an attrac-tive manner using formatting characters in this way.
As you can see in the line that contains the command echo -e, the text that the script displays on the screen because of the use of the echo command appears between double quotes. This is to prevent the shell from interpreting the special character \t before echo does. Again, if you want to make sure the shell does not interpret special characters such as this one, put the string between double quotes.
You may be confused here because there are two different mechanisms at work. First there is the mechanism of escaping. Escaping is a solution that you can use to make sure the following characters are not interpreted. This is the difference between echo \t and echo "\t". In the former case, \ is treated as a special character with the result that only the letter t is displayed. In the latter case, double quotes are used to tell the shell not to interpret anything that is between the double quotes; hence, it shows as \t.
The second mechanism is the special formatting character \t. This is one of the special characters that you can use in the shell, and this one tells the shell to display a tab. However, to make sure it is not interpreted by the shell when it fi rst parses the script (which would result in the shell displaying a t), you have to put these special formatting characters between double quotes. In Listing 18.10, you can see the differences between all the possible ways of escaping characters.
Listing 18.10: Escaping and special characters
SYD:~ # echo \t
t
SYD:~ # echo "\t"
\t
SYD:~ # echo -e \t
t
c18.indd 481c18.indd 481 1/8/2013 10:56:04 AM1/8/2013 10:56:04 AM
482 Chapter 18 Introducing Bash Shell Scripting
SYD:~ # echo -e "\t"
SYD:~ #
When using echo -e, use the following special characters:
\0NNN This is the character whose ASCII code is NNN (octal).
\\ Use this if you want to show just a backslash.
\a If supported by your system, this will let you hear a beep.
\b This is a backspace.
\c This suppresses a trailing newline.
\f This is a form feed.
\n This is a new line.
\ This is a carriage return.
\t This is a horizontal tab.
\v This is a vertical tab.
Using Command Substitution
Another way of putting a variable text in a script is by using command substitution. In command substitution, you use the result of a command in the script. This is useful if the script has something to do with the result of a command. For example, you can use this technique to tell a script that it should execute only if a certain condition is met (using a conditional loop with if to accomplish this). To use command substitution, put the com-mand that you want to use between backquotes (also known as backticks). As an alterna-tive, you can put the command substitution between braces with a $ sign in front of the (. The following sample code shows how this works:
nuuk:~/bin # echo "today is $(date +%d-%m-%y)"
today is 04-06-12
In this example, the date command is used with some of its special formatting charac-ters. The command date +%d-%m-%y tells date to present its result in the day-month-year format. In this example, the command is just executed. However, you can also put the result of the command substitution in a variable, which makes it easier to perform a calcu-lation on the result later in the script. The following sample code shows how to do that:
nuuk:~/bin # TODAY=$(date +%d-%m-%y)
nuuk:~/bin # echo today=$TODAY
today is 27-01-09
There is also an alternative method to using command substitution. In the previous examples, the command was put between $( and ). Instead, you can also place the com-mand between backticks. This means that $(date) and `date will have the same result.
c18.indd 482c18.indd 482 1/8/2013 10:56:04 AM1/8/2013 10:56:04 AM

Working with Variables and Input 483
Substitution Operators
It may be important to verify that a variable indeed has a value assigned to it within a script before the script continues. To do this, bash offers substitution operators. Substitution operators let you assign a default value if a variable doesn’t have a currently assigned value and much more. Table 18.1 describes substitution operators and their use.
TA B LE 18 .1 Substitution operators
Operator Use
${parameter:-value} This shows a value if a parameter is not defined.
${parameter=value} This assigns a value to a parameter if a parameter does not exist. This operator does nothing if a parameter exists but doesn’t have a value.
${parameter:=value} This assigns value if a parameter currently has no value or if a parameter doesn’t exist.
${parameter:?value} This shows a message that is defined as the value if a parameter doesn’t exist or is empty. Using this construction will force the shell script to be aborted immediately.
${parameter:+value} If a parameter has a value, the value is displayed. If it doesn’t have a value, nothing happens.
Substitution operators can be diffi cult to understand. To make it easier to see just how they work, Listing 18.11 provides some examples. Something happens to the $BLAH variable in all of these examples. Notice that the result of the given command is different depending on the substitution operator that is used. To make it easier to understand what happens, I’ve added line numbers to the listing. (Omit the line numbers when trying this yourself.)
Listing 18.11: Using substitution operators
1. sander@linux %> echo $BLAH
2.
3. sander@linux %> echo ${BLAH:-variable is empty}
4 variable is empty
5. sander@linux %> echo $BLAH
6.
7. sander@linux %> echo ${BLAH=value}
8. value
9. sander@linux %> echo $BLAH
10. value
11. sander@linux %> BLAH=
c18.indd 483c18.indd 483 1/8/2013 10:56:04 AM1/8/2013 10:56:04 AM
Dow
nlo
ad fro
m W
ow
! eBook
<w
ww
.wow
ebook.
com
>

484 Chapter 18 Introducing Bash Shell Scripting
12. sander@linux %> echo ${BLAH=value}
13.
14. sander@linux %> echo ${BLAH:=value}
15. value
16. sander@linux %> echo $BLAH
17. value
18. sander@linux %> echo ${BLAH:+sometext}
19. sometext
Listing 18.11 starts with the command echo $BLAH.This command reads the variable BLAH and shows its current value. Because BLAH doesn’t
yet have a value, nothing is shown in line 2. Next a message is defi ned in line 3 that should be displayed if BLAH is empty. This occurs with the following command:
sander@linux %> echo ${BLAH:-variable is empty}
As you can see, the message is displayed in line 4. However, this doesn’t assign a value to BLAH, which you see in line 5 and line 6 where the current value of BLAH is again requested:3. sander@linux %> echo ${BLAH:-variable is empty}
4 variable is empty
5. sander@linux %> echo $BLAH
6.
BLAH fi nally gets a value in line 7, which is displayed in line 8 as follows:7. sander@linux %> echo ${BLAH=value}
8. value
The shell remembers the new value of BLAH, which you can see in line 9 and line 10 where the value of BLAH is referred to and displayed as follows:9. sander@linux %> echo $BLAH
10. value
BLAH is redefi ned in line 11, but it gets a null value.11. sander@linux %> BLAH=
The variable still exists; it just has no value here. This is demonstrated when echo ${BLAH=value} is used in line 12. Because BLAH has a null value at that moment, no new value is assigned.12. sander@linux %> echo ${BLAH=value}
13.
Next, the construction echo ${BLAH:=value} is used to assign a new value to BLAH. The fact that BLAH actually gets a value from this is shown in line 16 and line 17:14. sander@linux %> echo ${BLAH:=value}
15. value
16. sander@linux %> echo $BLAH
17. value
c18.indd 484c18.indd 484 1/8/2013 10:56:04 AM1/8/2013 10:56:04 AM
Working with Variables and Input 485
Finally, the construction in line 18 is used to display sometext if BLAH currently has a value.
18. sander@linux %> echo ${BLAH:+sometext}
19. sometext
Note that this doesn’t change the value that is assigned to BLAH at that moment; som-etext just indicates that it indeed has a value.
Changing Variable Content with Pattern Matching
You’ve just seen how substitution operators can be used to supply a value to a variable that does not have one. You can view them as a rather primitive way of handling errors in your script. A pattern-matching operator can be used to search for a pattern in a variable and, if that pattern is found, modify the variable. This is very useful because it allows you to defi ne a variable in exactly the way you want. For example, think of the situation in which a user enters a complete path name of a fi le but only the name of the fi le (without the path) is needed in your script.
You can use the pattern-matching operator to change this. Pattern-matching operators allow you to remove part of a variable automatically. In Exercise 18.6, you’ll write a small script that uses pattern matching.
E X E R C I S E 18 . 6
Working with Pattern-Matching Operators
In this exercise, you’ll write a script that uses pattern matching.
1. Write a script that contains the following code, and save it with the name stripit.
#!/bin/bash
# stripit
# script that extracts the file name from a filename that includes the path
# usage: stripit <complete file name>
filename=${1##*/}
echo "The name of the file is $filename"
exit 0
2. Run the script with the argument /bin/bash.
3. Observe the result. You will notice that, when executed, the code you’ve just written will show the following result:
sander@linux %> ./stripit /bin/bash
the name of the file is bash
c18.indd 485c18.indd 485 1/8/2013 10:56:04 AM1/8/2013 10:56:04 AM
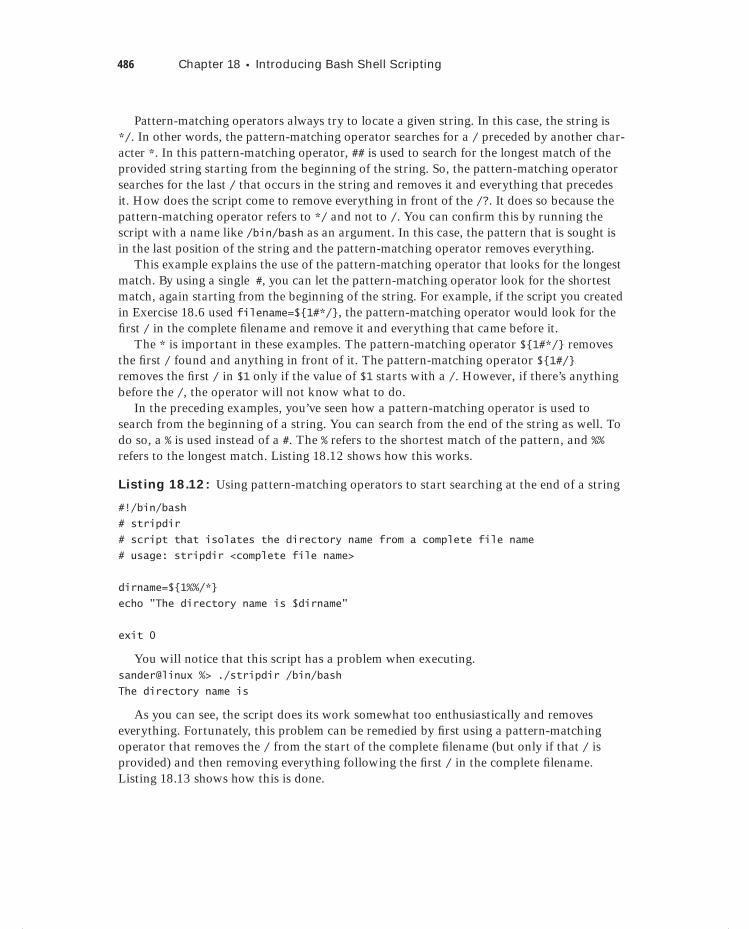
486 Chapter 18 Introducing Bash Shell Scripting
Pattern-matching operators always try to locate a given string. In this case, the string is */. In other words, the pattern-matching operator searches for a / preceded by another char-acter *. In this pattern-matching operator, ## is used to search for the longest match of the provided string starting from the beginning of the string. So, the pattern-matching operator searches for the last / that occurs in the string and removes it and everything that precedes it. How does the script come to remove everything in front of the /?. It does so because the pattern-matching operator refers to */ and not to /. You can confi rm this by running the script with a name like /bin/bash as an argument. In this case, the pattern that is sought is in the last position of the string and the pattern-matching operator removes everything.
This example explains the use of the pattern-matching operator that looks for the longest match. By using a single #, you can let the pattern-matching operator look for the shortest match, again starting from the beginning of the string. For example, if the script you created in Exercise 18.6 used filename=${1#*/}, the pattern-matching operator would look for the fi rst / in the complete fi lename and remove it and everything that came before it.
The * is important in these examples. The pattern-matching operator ${1#*/} removes the fi rst / found and anything in front of it. The pattern-matching operator ${1#/} removes the fi rst / in $1 only if the value of $1 starts with a /. However, if there’s anything before the /, the operator will not know what to do.
In the preceding examples, you’ve seen how a pattern-matching operator is used to search from the beginning of a string. You can search from the end of the string as well. To do so, a % is used instead of a #. The % refers to the shortest match of the pattern, and %% refers to the longest match. Listing 18.12 shows how this works.
Listing 18.12: Using pattern-matching operators to start searching at the end of a string
#!/bin/bash
# stripdir
# script that isolates the directory name from a complete file name
# usage: stripdir <complete file name>
dirname=${1%%/*}
echo "The directory name is $dirname"
exit 0
You will notice that this script has a problem when executing.sander@linux %> ./stripdir /bin/bash
The directory name is
As you can see, the script does its work somewhat too enthusiastically and removes everything. Fortunately, this problem can be remedied by fi rst using a pattern-matching operator that removes the / from the start of the complete fi lename (but only if that / is provided) and then removing everything following the fi rst / in the complete fi lename. Listing 18.13 shows how this is done.
c18.indd 486c18.indd 486 1/8/2013 10:56:04 AM1/8/2013 10:56:04 AM
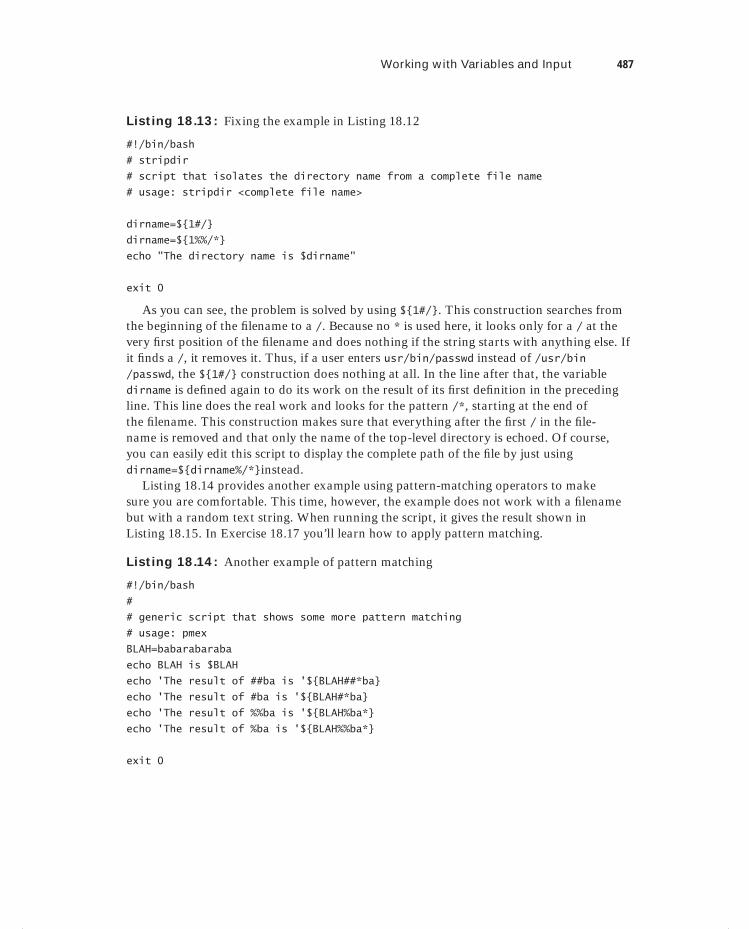
Working with Variables and Input 487
Listing 18.13: Fixing the example in Listing 18.12
#!/bin/bash
# stripdir
# script that isolates the directory name from a complete file name
# usage: stripdir <complete file name>
dirname=${1#/}
dirname=${1%%/*}
echo "The directory name is $dirname"
exit 0
As you can see, the problem is solved by using ${1#/}. This construction searches from the beginning of the fi lename to a /. Because no * is used here, it looks only for a / at the very fi rst position of the fi lename and does nothing if the string starts with anything else. If it fi nds a /, it removes it. Thus, if a user enters usr/bin/passwd instead of /usr/bin/passwd, the ${1#/} construction does nothing at all. In the line after that, the variable dirname is defi ned again to do its work on the result of its fi rst defi nition in the preceding line. This line does the real work and looks for the pattern /*, starting at the end of the fi lename. This construction makes sure that everything after the fi rst / in the fi le-name is removed and that only the name of the top-level directory is echoed. Of course, you can easily edit this script to display the complete path of the fi le by just using dirname=${dirname%/*}instead.
Listing 18.14 provides another example using pattern-matching operators to make sure you are comfortable. This time, however, the example does not work with a fi lename but with a random text string. When running the script, it gives the result shown in Listing 18.15. In Exercise 18.17 you’ll learn how to apply pattern matching.
Listing 18.14: Another example of pattern matching
#!/bin/bash
#
# generic script that shows some more pattern matching
# usage: pmex
BLAH=babarabaraba
echo BLAH is $BLAH
echo 'The result of ##ba is '${BLAH##*ba}
echo 'The result of #ba is '${BLAH#*ba}
echo 'The result of %%ba is '${BLAH%ba*}
echo 'The result of %ba is '${BLAH%%ba*}
exit 0
c18.indd 487c18.indd 487 1/8/2013 10:56:04 AM1/8/2013 10:56:04 AM

488 Chapter 18 Introducing Bash Shell Scripting
Listing 18.15: The result of the script in Listing 18.14
root@RNA:~/scripts# ./pmex
BLAH is babarabaraba
The result of ##ba is
The result of #ba is barabaraba
The result of %%ba is babarabara
The result of %ba is
root@RNA:~/scripts#
E X E R C I S E 18 . 7
Applying Pattern Matching on a Date String
In this exercise, you’ll apply pattern matching on a date string. You’ll see how to use pat-tern matching to fi lter out text in the middle of a string. The goal is to write a script that works on the result of the command date +%d-%m-%y. Next, it should show three separate lines, echoing today’s day is ..., the month is ..., and the year is ....
1. Write a script that uses command substitution on the command date +%d-%m-%y and saves the result in a variable with the name DATE. Save the script using the name today.
2. Modify the script so that it uses pattern matching on the $DATE variable to show three different lines.
today is 22
this month is september
this year is 2012
3. Verify that the script you’ve written looks more or less like the following example script:
#!/bin/bash
#
DATE=$(date +%d-%m-%y)
TODAY=${DATE%%-*}
THISMONTH=${DATE%-*}
THISMONTH=${THISMONTH#*-}
THISYEAR=${DATE##*-}
echo today is $TODAY
echo this month is $THISMONTH
echo this year is $THISYEAR
c18.indd 488c18.indd 488 1/8/2013 10:56:04 AM1/8/2013 10:56:04 AM
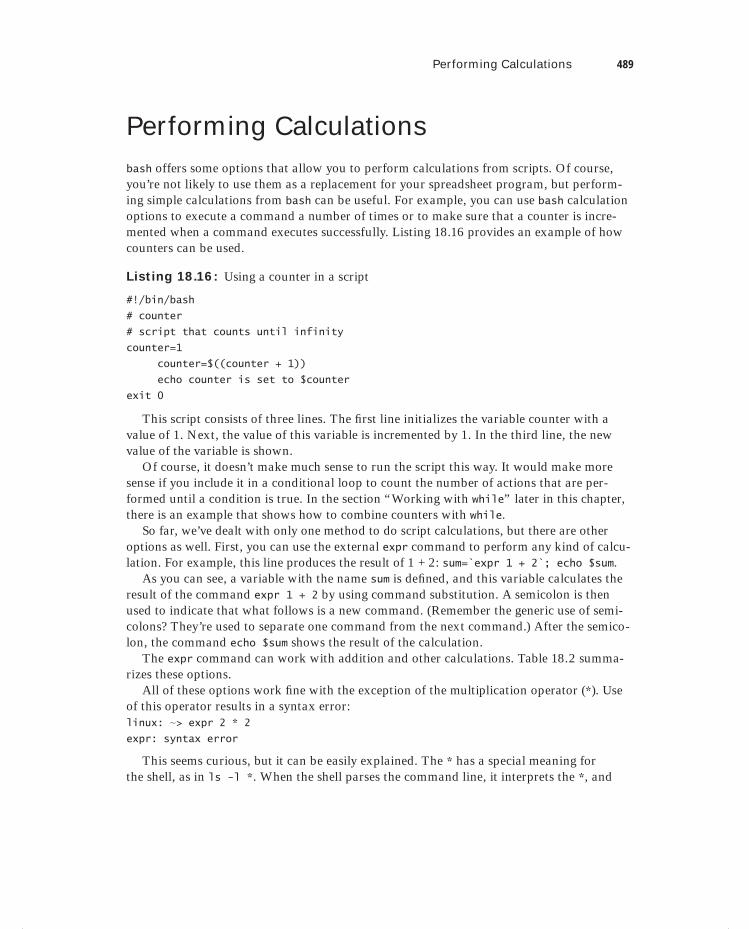
Performing Calculations 489
Performing Calculationsbash offers some options that allow you to perform calculations from scripts. Of course, you’re not likely to use them as a replacement for your spreadsheet program, but perform-ing simple calculations from bash can be useful. For example, you can use bash calculation options to execute a command a number of times or to make sure that a counter is incre-mented when a command executes successfully. Listing 18.16 provides an example of how counters can be used.
Listing 18.16: Using a counter in a script
#!/bin/bash
# counter
# script that counts until infinity
counter=1
counter=$((counter + 1))
echo counter is set to $counter
exit 0
This script consists of three lines. The fi rst line initializes the variable counter with a value of 1. Next, the value of this variable is incremented by 1. In the third line, the new value of the variable is shown.
Of course, it doesn’t make much sense to run the script this way. It would make more sense if you include it in a conditional loop to count the number of actions that are per-formed until a condition is true. In the section “Working with while” later in this chapter, there is an example that shows how to combine counters with while.
So far, we’ve dealt with only one method to do script calculations, but there are other options as well. First, you can use the external expr command to perform any kind of calcu-lation. For example, this line produces the result of 1 + 2: sum=`expr 1 + 2`; echo $sum.
As you can see, a variable with the name sum is defi ned, and this variable calculates the result of the command expr 1 + 2 by using command substitution. A semicolon is then used to indicate that what follows is a new command. (Remember the generic use of semi-colons? They’re used to separate one command from the next command.) After the semico-lon, the command echo $sum shows the result of the calculation.
The expr command can work with addition and other calculations. Table 18.2 summa-rizes these options.
All of these options work fi ne with the exception of the multiplication operator (*). Use of this operator results in a syntax error:linux: ∼> expr 2 * 2expr: syntax error
This seems curious, but it can be easily explained. The * has a special meaning for the shell, as in ls -l *. When the shell parses the command line, it interprets the *, and
c18.indd 489c18.indd 489 1/8/2013 10:56:04 AM1/8/2013 10:56:04 AM
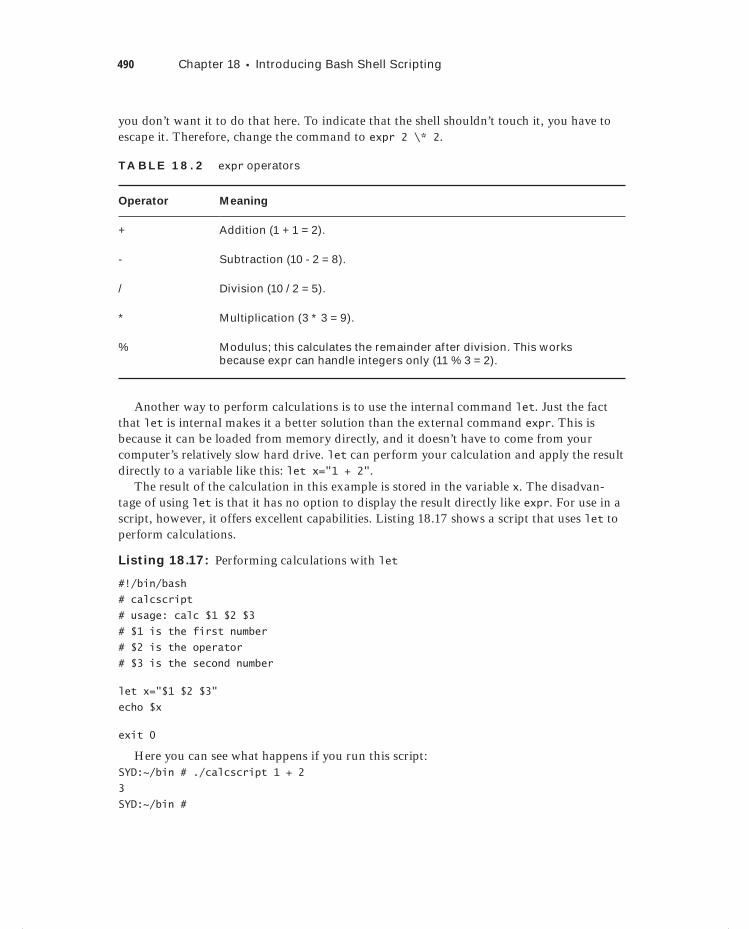
490 Chapter 18 Introducing Bash Shell Scripting
you don’t want it to do that here. To indicate that the shell shouldn’t touch it, you have to escape it. Therefore, change the command to expr 2 \* 2.
TA B LE 18 . 2 expr operators
Operator Meaning
+ Addition (1 + 1 = 2).
- Subtraction (10 - 2 = 8).
/ Division (10 / 2 = 5).
* Multiplication (3 * 3 = 9).
% Modulus; this calculates the remainder after division. This works because expr can handle integers only (11 % 3 = 2).
Another way to perform calculations is to use the internal command let. Just the fact that let is internal makes it a better solution than the external command expr. This is because it can be loaded from memory directly, and it doesn’t have to come from your computer’s relatively slow hard drive. let can perform your calculation and apply the result directly to a variable like this: let x="1 + 2".
The result of the calculation in this example is stored in the variable x. The disadvan-tage of using let is that it has no option to display the result directly like expr. For use in a script, however, it offers excellent capabilities. Listing 18.17 shows a script that uses let to perform calculations.
Listing 18.17: Performing calculations with let
#!/bin/bash
# calcscript
# usage: calc $1 $2 $3
# $1 is the first number
# $2 is the operator
# $3 is the second number
let x="$1 $2 $3"
echo $x
exit 0
Here you can see what happens if you run this script:SYD:~/bin # ./calcscript 1 + 2
3
SYD:~/bin #
c18.indd 490c18.indd 490 1/8/2013 10:56:04 AM1/8/2013 10:56:04 AM
Using Control Structures 491
If you think that I’ve already covered all the methods used to perform calculations in a shell script, then you’re wrong. Listing 18.18 shows another method that you can use to perform calculations.
Listing 18.18: Another way to calculate in a bash shell script
#!/bin/bash
# calcscript
# usage: calc $1 $2 $3
# $1 is the first number
# $2 is the operator
# $3 is the second number
x=$(($1 $2 $3))
echo $x
exit 0
If you run the above script, the result is as follows:
SYD:~/bin # ./calcscript
1 + 2
3
SYD:~/bin #
You saw this construction previously when you read about the script that increases the value of the variable counter. Note that the double pair of parentheses can be replaced with one pair of square brackets instead, assuming the preceding $ is present.
Using Control StructuresUp until now, I haven’t discussed the way in which the execution of commands can be made conditional. The technique for enabling this in shell scripts is known as fl ow control. bash offers many options to use fl ow control in scripts.
if Use if to execute commands only if certain conditions are met. To customize the working of if further, you can use else to indicate what should happen if the condition isn’t met.
case Use case to handle options. This allows the user to specify further the working of the command as it is run.
for This construction is used to run a command for a given number of items. For exam-ple, you can use for to do something for every fi le in a specifi ed directory.
while Use while as long as the specifi ed condition is met. For example, this construction can be very useful to check whether a certain host is reachable or to monitor the activity of a process.
until This is the opposite of while. Use until to run a command until a certain condition is met.
c18.indd 491c18.indd 491 1/8/2013 10:56:05 AM1/8/2013 10:56:05 AM
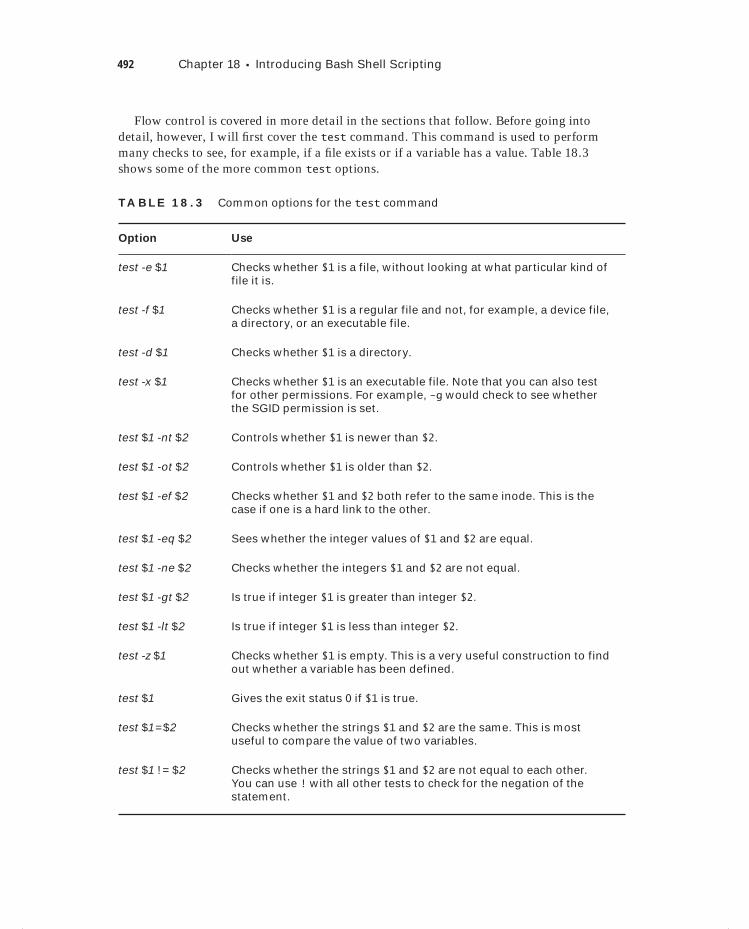
492 Chapter 18 Introducing Bash Shell Scripting
Flow control is covered in more detail in the sections that follow. Before going into detail, however, I will fi rst cover the test command. This command is used to perform many checks to see, for example, if a fi le exists or if a variable has a value. Table 18.3 shows some of the more common test options.
TA B LE 18 . 3 Common options for the test command
Option Use
test -e $1 Checks whether $1 is a file, without looking at what particular kind of file it is.
test -f $1 Checks whether $1 is a regular file and not, for example, a device file, a directory, or an executable file.
test -d $1 Checks whether $1 is a directory.
test -x $1 Checks whether $1 is an executable file. Note that you can also test for other permissions. For example, -g would check to see whether the SGID permission is set.
test $1 -nt $2 Controls whether $1 is newer than $2.
test $1 -ot $2 Controls whether $1 is older than $2.
test $1 -ef $2 Checks whether $1 and $2 both refer to the same inode. This is the case if one is a hard link to the other.
test $1 -eq $2 Sees whether the integer values of $1 and $2 are equal.
test $1 -ne $2 Checks whether the integers $1 and $2 are not equal.
test $1 -gt $2 Is true if integer $1 is greater than integer $2.
test $1 -lt $2 Is true if integer $1 is less than integer $2.
test -z $1 Checks whether $1 is empty. This is a very useful construction to find out whether a variable has been defined.
test $1 Gives the exit status 0 if $1 is true.
test $1=$2 Checks whether the strings $1 and $2 are the same. This is most useful to compare the value of two variables.
test $1 != $2 Checks whether the strings $1 and $2 are not equal to each other. You can use ! with all other tests to check for the negation of the statement.
c18.indd 492c18.indd 492 1/8/2013 10:56:05 AM1/8/2013 10:56:05 AM
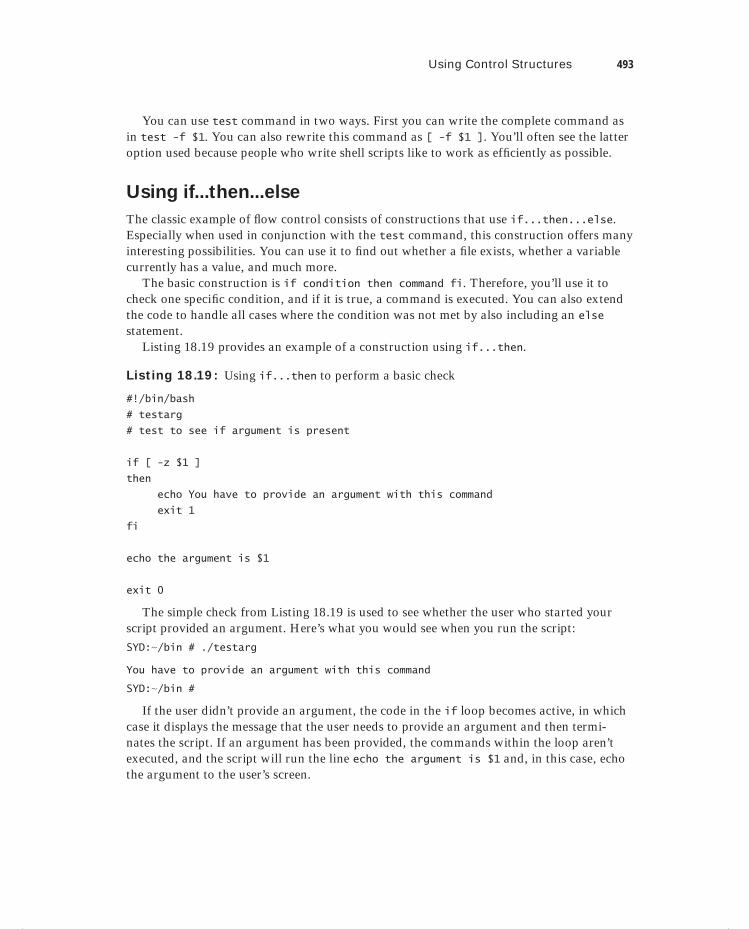
Using Control Structures 493
You can use test command in two ways. First you can write the complete command as in test -f $1. You can also rewrite this command as [ -f $1 ]. You’ll often see the latter option used because people who write shell scripts like to work as effi ciently as possible.
Using if...then...else
The classic example of fl ow control consists of constructions that use if...then...else. Especially when used in conjunction with the test command, this construction offers many interesting possibilities. You can use it to fi nd out whether a fi le exists, whether a variable currently has a value, and much more.
The basic construction is if condition then command fi. Therefore, you’ll use it to check one specifi c condition, and if it is true, a command is executed. You can also extend the code to handle all cases where the condition was not met by also including an else statement.
Listing 18.19 provides an example of a construction using if...then.
Listing 18.19: Using if...then to perform a basic check
#!/bin/bash
# testarg
# test to see if argument is present
if [ -z $1 ]
then
echo You have to provide an argument with this command
exit 1
fi
echo the argument is $1
exit 0
The simple check from Listing 18.19 is used to see whether the user who started your script provided an argument. Here’s what you would see when you run the script:
SYD:∼/bin # ./testarg
You have to provide an argument with this command
SYD:∼/bin #
If the user didn’t provide an argument, the code in the if loop becomes active, in which case it displays the message that the user needs to provide an argument and then termi-nates the script. If an argument has been provided, the commands within the loop aren’t executed, and the script will run the line echo the argument is $1 and, in this case, echo the argument to the user’s screen.
c18.indd 493c18.indd 493 1/8/2013 10:56:05 AM1/8/2013 10:56:05 AM

494 Chapter 18 Introducing Bash Shell Scripting
Also notice how the syntax of the if construction is organized. First you open it with if. Next, then is used, separated on a new line (or with a semicolon). Finally, the if loop is closed with a fi statement. Make sure that all these ingredients are used all the time or your loop won’t work.
The example in Listing 18.19 is a rather simple one. It’s also possible to make more complex if loops and have them test for more than one condition. To do this, use else or elif. By using else within the control structure, you can make sure that some action occurs if the condition is met. However, it allows you to check another condition if the condition is not met. You can even use else in conjunction with if (elif) to open a new control structure if the fi rst condition isn’t met. If you do that, you have to use then after elif. Listing 18.20 is an example of the latter construction.
Listing 18.20: Nesting if control structures
#!/bin/bash
# testfile
if [ -f $1 ]
then
echo "$1 is a file"
elif [ -d $1 ]
then
echo "$1 is a directory"
else
echo "I don't know what \$1 is"
fi
exit 0
Here is what happens when you run this script:SYD:∼/bin # ./testfile /bin/blahI don't know what $1 is
SYD:∼/bin #
In this example, the argument that was entered when running the script is checked. If it is a fi le (if [ -f $1 ]), the script informs the user. If it isn’t a fi le, the part beneath elif is executed, which opens a second control structure. In this second control structure, the fi rst test performed is to see whether $1 is a directory. Note that this second part of the control structure becomes active only if $1 is not a fi le. If $1 isn’t a directory, the part following else is executed, and the script reports that it has no idea about what the function of $1 is. Notice that, for this entire construction, only one fi is needed to close the control struc-ture, but after every if or elif statement, you need to use then.
if...then...else constructions are used in two different ways. You can write out the com-plete construction as shown in the previous examples, or you can use constructions that use && and ||. These logical operators are used to separate two commands and establish a
c18.indd 494c18.indd 494 1/8/2013 10:56:05 AM1/8/2013 10:56:05 AM

Using Control Structures 495
conditional relationship between them. If && is used, the second command is executed only if the fi rst command is executed successfully; in other words, if the fi rst command is true. If || is used, the second command is executed only if the fi rst command isn’t true. Thus, with one line of code you can fi nd out whether $1 is a fi le and echo a message if it is, as follows:
[ -f $1 ] && echo $1 is a file
This can also be rewritten differently, as follows:[ ! -f $1 ] || echo $1 is a file
The previous example works only as part of a complete shell script. Listing 18.21 shows how the example from Listing 18.20 is rewritten to use this syntax.
The code in the second example (where || is used) performs a test to see whether $1 is not a fi le. (The ! is used to test whether something is not the case.) Only if the test fails (which is the case if $1 is a fi le), it executes the part after the || and echoes that $1 is a fi le.
Listing 18.21: The example from Listing 18.20 rewritten with && and ||
([ -z $1 ] && echo please provide an argument; exit 1) || (([ -f $1 ]
&& echo $1 is a file) || ([ -d $1 ] && echo $1 is a directory || echo
I have no idea what $1 is))
Basically, the script in Listing 18.21 does the same thing as the script in Listing 18.20. However, there a few differences. First, I’ve added a [ -z $1 ] test to give an error if $1 is not defi ned. Next, the example in Listing 18.21 is all on one line. This makes the script more compact, but it also makes it a little harder to see what is going on. I’ve used paren-theses to increase the readability a little bit and also to keep the different parts of the script together. The parts between parentheses are the main tests, and those within the main tests are some smaller ones.
Let’s have a look at some other examples with if...then...else. Consider the following line:rsync -vaze ssh --delete /var/ftp 10.0.0.20:/var/ftp || echo "rsync failed" | mail [email protected]
In this single script line, the rsync command tries to synchronize the content of the directory /var/ftp with the content of the same directory on some other machine. If this succeeds, no further evaluation of this line is attempted. If it does not, however, the part after the || becomes active, and it makes sure that user [email protected] gets a message.
The following script presents another, more complex example, which checks whether available disk space has dropped below a certain threshold. The complex part lies in the sequence of pipes used in the command substitution.if [ `df -m /var | tail -n1 | awk '{print $4} '` -lt 120 ]
then
logger running out of disk space
fi
c18.indd 495c18.indd 495 1/8/2013 10:56:05 AM1/8/2013 10:56:05 AM
Dow
nlo
ad fro
m W
ow
! eBook
<w
ww
.wow
ebook.
com
>
496 Chapter 18 Introducing Bash Shell Scripting
The important part of this piece of code is in the fi rst line where the result of a com-mand is used in the if loop by using backquoting. That result is compared with the value 120. If the result is less than 120, the section that follows becomes active. If the result is greater than 120, nothing happens. As for the command itself, it uses the df command to check available disk space on the volume where /var is mounted, fi lters out the last line of that result, and, from that last line, fi lters out the fourth column only, which in turn is compared to the value 120. If the condition is true, the logger command writes a message to the system log fi le. The example isn’t very well organized. The following rewrite does the same things but uses a different syntax:
[ `df -m /var | tail -n1 | awk '{print $4}'` -lt $1 ] && logger running out of
disk space
This rewrite demonstrates the challenge in writing shell scripts: you can almost always make them better.
Using case
Let’s start with an example this time. In Exercise 18.8, you’ll create the script, run it, and then try to explain what it has done.
E X E R C I S E 18 . 8
Example Script Using case
In this exercise, you’ll create a “soccer expert” script. The script will use case to advise the user about the capabilities of their preferred soccer teams.
1. Write a script that advises the user about the capabilities of their favorite soccer team. The script should contain the following components:
It should ask the user to enter the name of a country.
It should use case to test against different country names.
It should translate all input to uppercase to make evaluation of the user input easier.
It should tell the user what kind of input is expected.
2. Run your script until you’re happy with it, and apply fi xes where needed.
3. Compare your solution to the following one suggested, which is only an example of how to approach this task:
#!/bin/bash
# soccer
# Your personal soccer expert
# predicts world championship football
cat << EOF
c18.indd 496c18.indd 496 1/8/2013 10:56:06 AM1/8/2013 10:56:06 AM

Using Control Structures 497
E X E R C I S E 18 . 8 ( c ont inue d )
Enter the name of the country you think will be world soccer champion in 2010.
EOF
read COUNTRY
# translate $COUNTRY into all uppercase
COUNTRY=`echo $COUNTRY | tr a-z A-Z`
# perform the test
case $COUNTRY in
NEDERLAND | HOLLAND | NETHERLANDS)
echo "Yes, you are a soccer expert "
;;
DEUTSCHLAND | GERMANY | MANNSCHAFT)
echo "No, they are the worst team on earth"
;;
ENGLAND | AUSTRALIA | FRANCE | BRAZIL)
echo "hahahahahahaha, you must be joking"
;;
*)
echo "Huh? Do they play soccer?"
;;
esac
exit 0
As you can see in the example script from Exercise 18.8, this script is used to predict the results of the next World Cup championship. (Of course, you can modify it for any sports event that you like.) First, it asks the person who runs the script to enter the name of the country that they think will be the next World Cup champion. This country is put into the $COUNTRY variable. Notice the use of uppercase for this variable; it’s a good way to identify variables easily as your script grows.
Because the case statement that is used in this script is case-sensitive, the user input in the fi rst part is translated into all uppercase using the tr command. Then, using command substitution, the current value of $COUNTRY is read, translated to all uppercase, and assigned again to the $COUNTRY variable. Also note that I’ve made it easier to distinguish the different parts of this script by adding some extra comments.
The body of this script consists of the case command, which is used to evaluate the input the user has entered. The generic construction used to evaluate the input is as follows:
alternative1 | alternative2)
command
;;
c18.indd 497c18.indd 497 1/8/2013 10:56:06 AM1/8/2013 10:56:06 AM
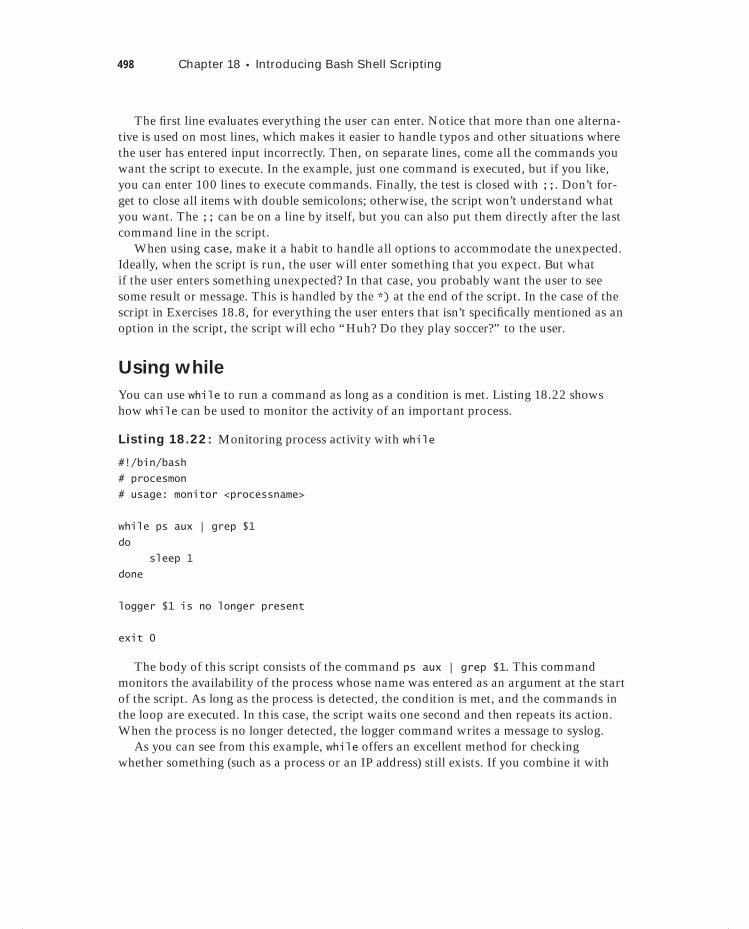
498 Chapter 18 Introducing Bash Shell Scripting
The fi rst line evaluates everything the user can enter. Notice that more than one alterna-tive is used on most lines, which makes it easier to handle typos and other situations where the user has entered input incorrectly. Then, on separate lines, come all the commands you want the script to execute. In the example, just one command is executed, but if you like, you can enter 100 lines to execute commands. Finally, the test is closed with ;;. Don’t for-get to close all items with double semicolons; otherwise, the script won’t understand what you want. The ;; can be on a line by itself, but you can also put them directly after the last command line in the script.
When using case, make it a habit to handle all options to accommodate the unexpected. Ideally, when the script is run, the user will enter something that you expect. But what if the user enters something unexpected? In that case, you probably want the user to see some result or message. This is handled by the *) at the end of the script. In the case of the script in Exercises 18.8, for everything the user enters that isn’t specifi cally mentioned as an option in the script, the script will echo “Huh? Do they play soccer?” to the user.
Using while
You can use while to run a command as long as a condition is met. Listing 18.22 shows how while can be used to monitor the activity of an important process.
Listing 18.22: Monitoring process activity with while
#!/bin/bash
# procesmon
# usage: monitor <processname>
while ps aux | grep $1
do
sleep 1
done
logger $1 is no longer present
exit 0
The body of this script consists of the command ps aux | grep $1. This command monitors the availability of the process whose name was entered as an argument at the start of the script. As long as the process is detected, the condition is met, and the commands in the loop are executed. In this case, the script waits one second and then repeats its action. When the process is no longer detected, the logger command writes a message to syslog.
As you can see from this example, while offers an excellent method for checking whether something (such as a process or an IP address) still exists. If you combine it with
c18.indd 498c18.indd 498 1/8/2013 10:56:06 AM1/8/2013 10:56:06 AM
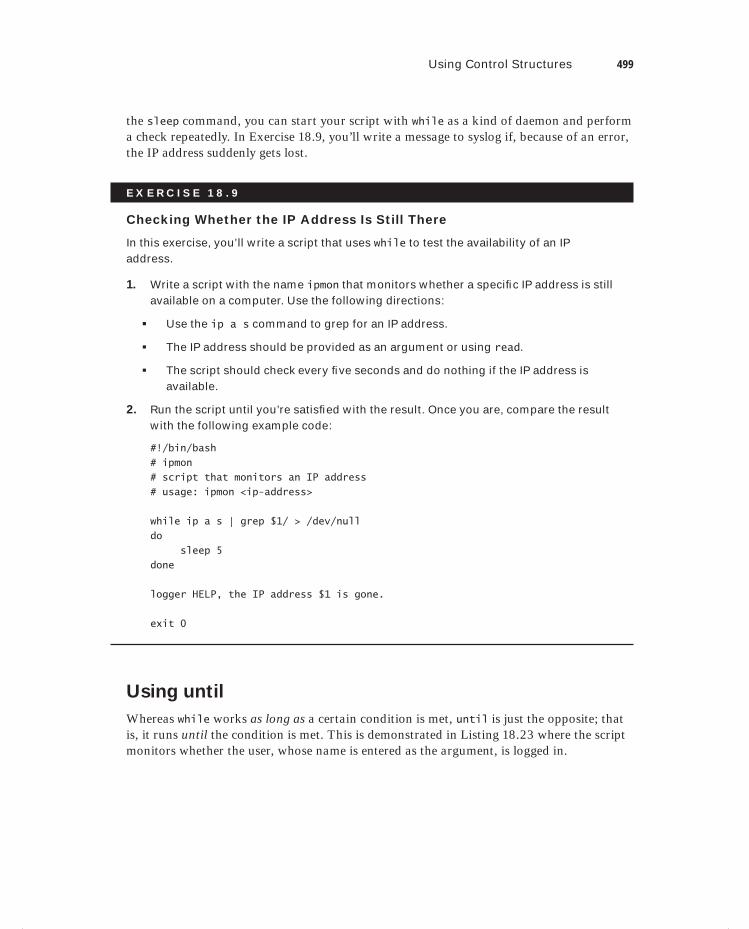
Using Control Structures 499
the sleep command, you can start your script with while as a kind of daemon and perform a check repeatedly. In Exercise 18.9, you’ll write a message to syslog if, because of an error, the IP address suddenly gets lost.
E X E R C I S E 18 . 9
Checking Whether the IP Address Is Still There
In this exercise, you’ll write a script that uses while to test the availability of an IP address.
1. Write a script with the name ipmon that monitors whether a specifi c IP address is still available on a computer. Use the following directions:
Use the ip a s command to grep for an IP address.
The IP address should be provided as an argument or using read.
The script should check every fi ve seconds and do nothing if the IP address is available.
2. Run the script until you’re satisfi ed with the result. Once you are, compare the result with the following example code:
#!/bin/bash
# ipmon
# script that monitors an IP address
# usage: ipmon <ip-address>
while ip a s | grep $1/ > /dev/null
do
sleep 5
done
logger HELP, the IP address $1 is gone.
exit 0
Using until
Whereas while works as long as a certain condition is met, until is just the opposite; that is, it runs until the condition is met. This is demonstrated in Listing 18.23 where the script monitors whether the user, whose name is entered as the argument, is logged in.
c18.indd 499c18.indd 499 1/8/2013 10:56:06 AM1/8/2013 10:56:06 AM
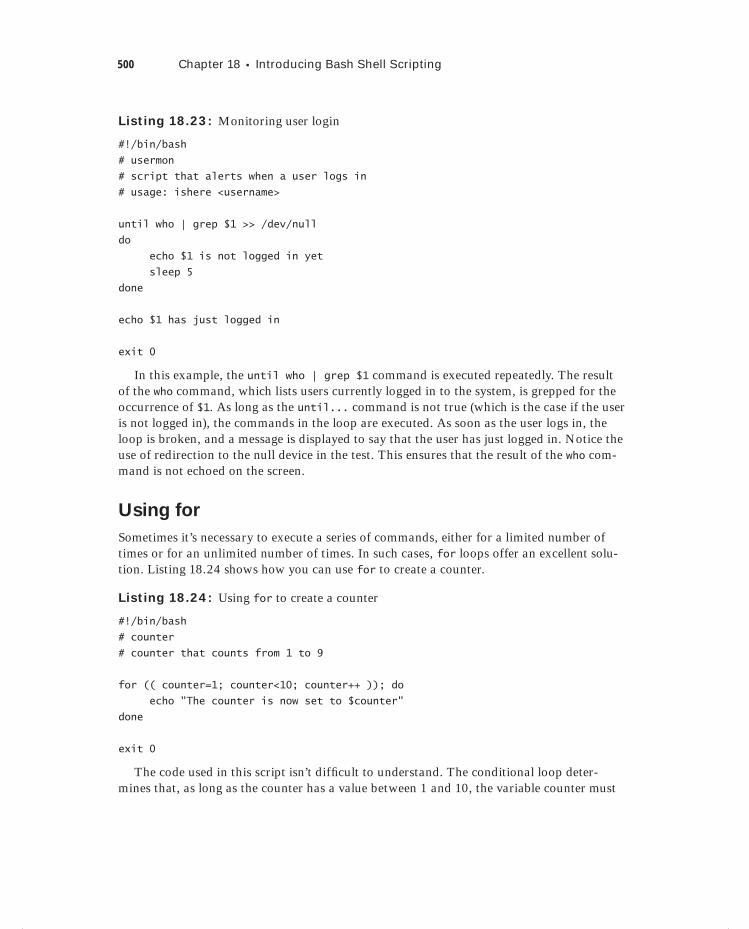
500 Chapter 18 Introducing Bash Shell Scripting
Listing 18.23: Monitoring user login
#!/bin/bash
# usermon
# script that alerts when a user logs in
# usage: ishere <username>
until who | grep $1 >> /dev/null
do
echo $1 is not logged in yet
sleep 5
done
echo $1 has just logged in
exit 0
In this example, the until who | grep $1 command is executed repeatedly. The result of the who command, which lists users currently logged in to the system, is grepped for the occurrence of $1. As long as the until... command is not true (which is the case if the user is not logged in), the commands in the loop are executed. As soon as the user logs in, the loop is broken, and a message is displayed to say that the user has just logged in. Notice the use of redirection to the null device in the test. This ensures that the result of the who com-mand is not echoed on the screen.
Using for
Sometimes it’s necessary to execute a series of commands, either for a limited number of times or for an unlimited number of times. In such cases, for loops offer an excellent solu-tion. Listing 18.24 shows how you can use for to create a counter.
Listing 18.24: Using for to create a counter
#!/bin/bash
# counter
# counter that counts from 1 to 9
for (( counter=1; counter<10; counter++ )); do
echo "The counter is now set to $counter"
done
exit 0
The code used in this script isn’t diffi cult to understand. The conditional loop deter-mines that, as long as the counter has a value between 1 and 10, the variable counter must
c18.indd 500c18.indd 500 1/8/2013 10:56:06 AM1/8/2013 10:56:06 AM

Using Control Structures 501
be automatically incremented by 1. To do this, the construction counter++ is used. As long as the incrementing of the variable counter continues, the commands between do and done are executed. When the specifi ed number is reached, the loop is exited, the script termi-nates, and it indicates to the system with exit 0 that it has completed its work successfully.
Loops with for can be pretty versatile. For example, you can use it to do something on every line in a text fi le. The example in Listing 18.25 illustrates how this works. (As you will see, it has some problems, however.)
Listing 18.25: Displaying lines from a text file
#!/bin/bash
# listusers
# faulty script that tries to show all users in /etc/passwd
for i in `cat /etc/passwd`
do
echo $i
done
exit 0
In this example, for is used to display all lines in /etc/passwd one by one. Of course, just echoing the lines is a rather trivial example, but it’s enough to show you how a for statement works. If you’re using for in this manner, notice that it cannot handle spaces in the lines. A space is interpreted as a fi eld separator, so a new fi eld would begin after the space.
Finding All Available IP Addresses
In this example, for is used to ping a range of IP addresses. This is a script that one of my customers likes to run to see whether a range of machines is up and running. Because the IP addresses are always in the same range, starting with 192.168.1, there’s no harm in including these fi rst three bits in the IP address itself.
#!/bin/bash
for i in $@
do
ping -c 1 192.168.1.$i
done
Notice the use of $@ in this script. This operator allows you to refer to all arguments speci-fi ed when the script was started, no matter how many arguments there are.
c18.indd 501c18.indd 501 1/8/2013 10:56:07 AM1/8/2013 10:56:07 AM
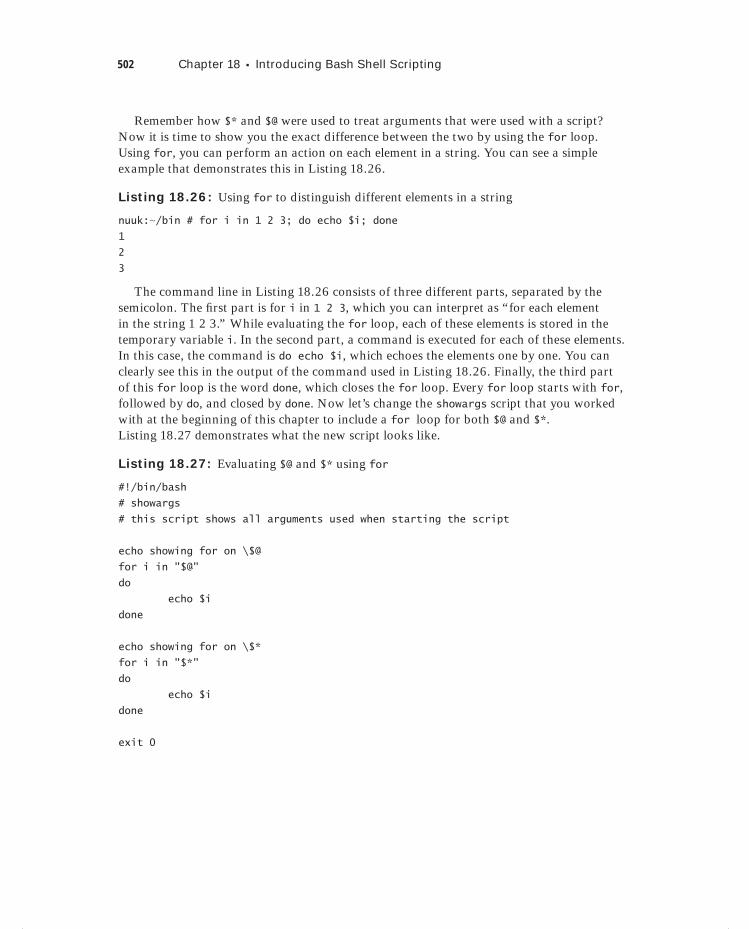
502 Chapter 18 Introducing Bash Shell Scripting
Remember how $* and $@ were used to treat arguments that were used with a script? Now it is time to show you the exact difference between the two by using the for loop. Using for, you can perform an action on each element in a string. You can see a simple example that demonstrates this in Listing 18.26.
Listing 18.26: Using for to distinguish different elements in a string
nuuk:∼/bin # for i in 1 2 3; do echo $i; done1
2
3
The command line in Listing 18.26 consists of three different parts, separated by the semicolon. The fi rst part is for i in 1 2 3, which you can interpret as “for each element in the string 1 2 3.” While evaluating the for loop, each of these elements is stored in the temporary variable i. In the second part, a command is executed for each of these elements. In this case, the command is do echo $i, which echoes the elements one by one. You can clearly see this in the output of the command used in Listing 18.26. Finally, the third part of this for loop is the word done, which closes the for loop. Every for loop starts with for, followed by do, and closed by done. Now let’s change the showargs script that you worked with at the beginning of this chapter to include a for loop for both $@ and $*. Listing 18.27 demonstrates what the new script looks like.
Listing 18.27: Evaluating $@ and $* using for
#!/bin/bash
# showargs
# this script shows all arguments used when starting the script
echo showing for on \$@
for i in "$@"
do
echo $i
done
echo showing for on \$*
for i in "$*"
do
echo $i
done
exit 0
c18.indd 502c18.indd 502 1/8/2013 10:56:07 AM1/8/2013 10:56:07 AM
Summary 503
Let’s consider a few comments before running this script. In this script, a technique called escaping is used. The purpose of escaping is to make sure that the shell doesn’t inter-pret certain elements. Consider for instance the line echo showing for on $@. If you run it this way, the shell interprets $@ and shows you its current value. In this case, since you don’t want that, the shell just displays the characters $@. To do that, the shell does not interpret the $ sign, which you enforce by adding a slash in front of it. By using a slash, you tell the shell not to interpret the next character.
A few lines of code later, there are the lines for i in "$@" and for i in "$*". Here I’ve used double quotes to prevent the shell from interpreting $@ and $* before executing the code lines in the script. You want the shell to interpret these the moment it runs the script, and therefore I put both in double quotes. I recommend at this point that you to try the difference yourself. Run the script once without the double quotes and once with them.
When running the script without the double quotes, you start the script with a command like ./showargs a b c d. The shell already interprets $* before it comes at the line for i in $*. Thus, it would execute for i in a b c d and next show four different lines contain-ing a, b, c, and d. However, that’s not what you want: you want the shell to show the result of for i in $*. To make sure that this happens, put $* in double quotes. Listing 18.28 shows the result of running the example script from Listing 18.26.
Listing 18.28: Result of running the example script from Listing 18.26
nuuk:∼/bin # ./showargs a b c dshowing for on $@
a
b
c
d
showing for on $*
a b c d
nuuk:∼/bin #
SummaryIn this chapter, you learned how to write shell scripts. You worked with some of the basic shell scripting technologies, which will allow you to use shell scripting and to start experi-menting with this technique and creating your own, more advanced scripts. Also, based on the information provided in this chapter, you should now be able to understand most of the start-up scripts t hat are on your server.
c18.indd 503c18.indd 503 1/8/2013 10:56:07 AM1/8/2013 10:56:07 AM

c18.indd 504c18.indd 504 1/8/2013 10:56:07 AM1/8/2013 10:56:07 AM

Chapter
19Understanding and Troubleshooting the Boot Procedure
TOPICS COVERED IN THIS CHAPTER:
Introduction to Troubleshooting the Boot Procedure
Configuring Booting with GRUB
Common Kernel Management Tasks
Configuring Service Startup with Upstart
Basic Red Hat Enterprise Linux Troubleshooting
c19.indd 505c19.indd 505 1/8/2013 10:56:37 AM1/8/2013 10:56:37 AM
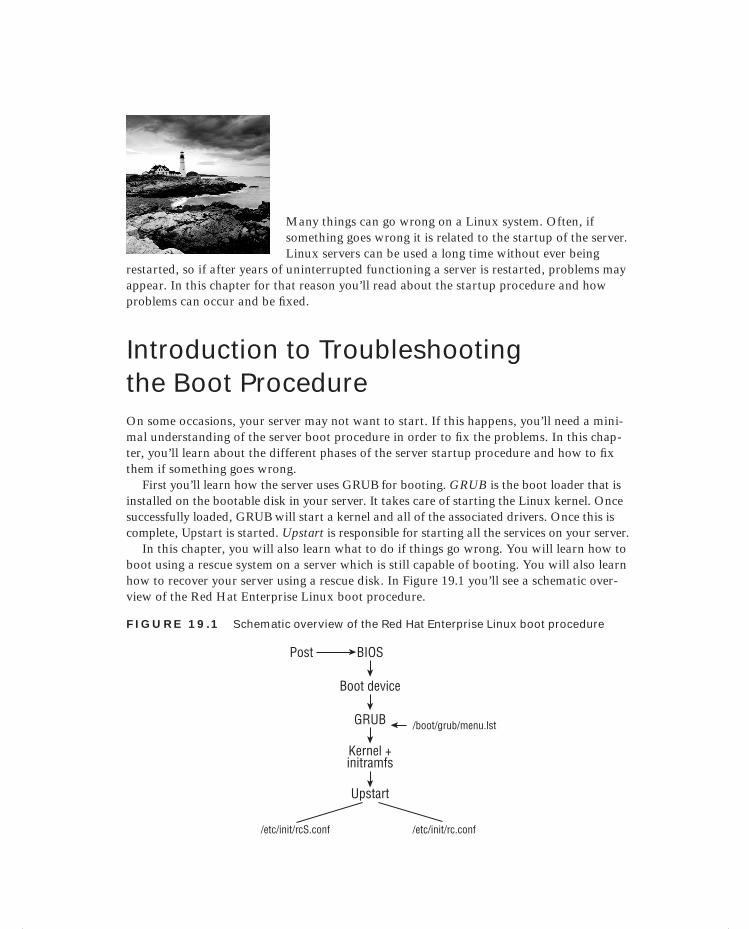
Many things can go wrong on a Linux system. Often, if something goes wrong it is related to the startup of the server. Linux servers can be used a long time without ever being
restarted, so if after years of uninterrupted functioning a server is restarted, problems may appear. In this chapter for that reason you’ll read about the startup procedure and how problems can occur and be fi xed.
Introduction to Troubleshooting the Boot ProcedureOn some occasions, your server may not want to start. If this happens, you’ll need a mini-mal understanding of the server boot procedure in order to fi x the problems. In this chap-ter, you’ll learn about the different phases of the server startup procedure and how to fi x them if something goes wrong.
First you’ll learn how the server uses GRUB for booting. GRUB is the boot loader that is installed on the bootable disk in your server. It takes care of starting the Linux kernel. Once successfully loaded, GRUB will start a kernel and all of the associated drivers. Once this is complete, Upstart is started. Upstart is responsible for starting all the services on your server.
In this chapter, you will also learn what to do if things go wrong. You will learn how to boot using a rescue system on a server which is still capable of booting. You will also learn how to recover your server using a rescue disk. In Figure 19.1 you’ll see a schematic over-view of the Red Hat Enterprise Linux boot procedure.
F I GU R E 19 .1 Schematic overview of the Red Hat Enterprise Linux boot procedure
BIOSPost
Boot device
GRUB
Kernel +initramfs
Upstart
/etc/init/rcS.conf /etc/init/rc.conf
/boot/grub/menu.lst
c19.indd 506c19.indd 506 1/8/2013 10:56:38 AM1/8/2013 10:56:38 AM
Configuring Booting with GRUB 507
Configuring Booting with GRUBWhen your server starts, it needs to know which operating system to start. A boot loader is loaded for this purpose. On Red Hat Enterprise Linux, the GRUB boot loader is used. On a standard installation, the fi rst part of the boot loader program is installed in the master boot record, and from there the rest of the boot procedure is executed.
Understanding the grub.conf Configuration File
An important part of GRUB is the confi guration fi le /boot/grub/grub.conf. Listing 19.1 shows you what this fi le looks like.
Listing 19.1: Sample /boot/grub/grub.conf file
[root@hnl ~]# cat /boot/grub/grub.conf
# grub.conf generated by anaconda
#
# Note that you do not have to rerun grub after making changes to this file
# NOTICE: You have a /boot partition. This means that
# all kernel and initrd paths are relative to /boot/, eg.
# root (hd0,0)
# kernel /vmlinuz-version ro root=/dev/mapper/vg_hnl-lv_root
# initrd /initrd-[generic-]version.img
#boot=/dev/sda
default=0
timeout=5
splashimage=(hd0,0)/grub/splash.xpm.gz
hiddenmenu
title Red Hat Enterprise Linux (2.6.32-220.el6.x86_64)
root (hd0,0)
kernel /vmlinuz-2.6.32-220.el6.x86_64 ro root=/dev/mapper/vg_hnl-
lv_root rd_NO_LUKS LANG=en_US.UTF-8 KEYBOARDTYPE=pc KEYTABLE=us-acentos
rd_NO_MD quiet SYSFONT=latarcyrheb-sun16 rhgb crashkernel=128M
rd_LVM_LV=vg_hnl/lv_swap rd_LVM_LV=vg_hnl/lv_root rd_NO_DM
initrd /initramfs-2.6.32-220.el6.x86_64.img
The purpose of GRUB is to load the kernel and the initial RAM fi le system. The kernel is the heart of the operating system, which ensures that the hardware in the computer can be used. The initial RAM fi le system contains modules that are needed by the kernel to access the fi le system and load other modules.
To load the kernel and initial RAM fi le system, different sections can be included in grub.conf. Only one section is used in the sample fi le in Listing 19.1. It is defi ned in the line that starts with title Red Hat Enterprise Linux and the three lines beneath that one.
c19.indd 507c19.indd 507 1/8/2013 10:56:39 AM1/8/2013 10:56:39 AM
508 Chapter 19 Understanding and Troubleshooting the Boot Procedure
The fi rst thing that happens in each section is that the root device is referenced. This is not the device that contains the root fi le system; it is the device that GRUB will use to fi nd all the fi les that are referenced in the grub.conf confi guration fi le. The root device is referred to by its BIOS name, which in this case is hd0,0. This refers to the fi rst partition on the fi rst hard disk, which from the perspective of the kernel is known as /dev/sda1. GRUB has to use the BIOS name of the device because, at the initial boot stage when this fi le is read, the kernel name /dev/sda1 is unknown yet.
Next the kernel is loaded on the line that starts with kernel /vmlinuz..., and it is fol-lowed by a number of options that specify exactly how the kernel should be loaded. The name of the referenced fi le (/vmlinuz) is relative to the root that is defi ned in the fi rst line. This means it is obtained from the partition root of the device /dev/sda1.
After specifying the name of the kernel, some kernel load options are specifi ed. All options that appear in uppercase are variables that are passed to the init. If you’re start-ing your server in troubleshooting mode, you can safely omit all of these parameters. The important boot parameters are listed next.
There are many boot parameters you can use. For a complete overview, read the man page bootparam(7).
ro This parameter indicates that the root fi le system should be mounted as read-only.
root= This parameter specifi es the name of the device that contains the root fi le system. On Red Hat Enterprise Linux, this is typically an LVM device.
quiet This parameter hides the messages that are generated while booting. For better insight into what your server is doing when it boots, consider removing it.
rhgb This parameter loads the Red Hat Graphical Boot, which displays a logo graphic when booting. Because this hides the messages that are generated while your server is boot-ing, consider removing it.
The last parameter in the section that specifi es what should be loaded indicates the name of the initial RAM fi le system. The parameter name is initrd, and the name of the fi le is initramfs. This line ensures that an automatically generated fi le is loaded, which contains all of the required hardware drivers to boot your server and also some important other drivers, such as the Ext4 fi le system driver.
Apart from the specifi c sections that specify which kernel to load, in grub.conf you’ll also fi nd a generic section that specifi es how to load it. You will fi nd the following param-eters in the example fi le in Listing 19.1:
default This specifi es which of the proposed operating systems to load, and it refers to the sections that are defi ned below the generic section in grub.conf. In Listing 19.1, section 0 is referenced. This refers to the fi rst (and only) section in the example listing.
timeout During boot, the user can press Tab to open the GRUB menu and add or change kernel parameters. The timeout boot option is used to specify how much time a user has to get into the GRUB menu.
c19.indd 508c19.indd 508 1/8/2013 10:56:39 AM1/8/2013 10:56:39 AM
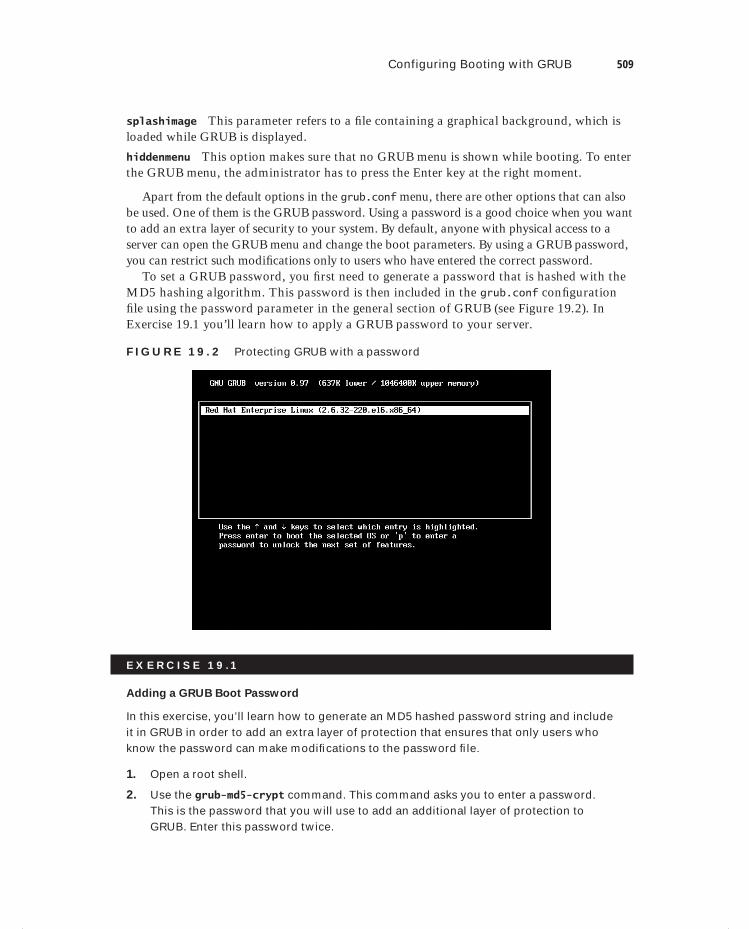
Configuring Booting with GRUB 509
splashimage This parameter refers to a fi le containing a graphical background, which is loaded while GRUB is displayed.
hiddenmenu This option makes sure that no GRUB menu is shown while booting. To enter the GRUB menu, the administrator has to press the Enter key at the right moment.
Apart from the default options in the grub.conf menu, there are other options that can also be used. One of them is the GRUB password. Using a password is a good choice when you want to add an extra layer of security to your system. By default, anyone with physical access to a server can open the GRUB menu and change the boot parameters. By using a GRUB password, you can restrict such modifi cations only to users who have entered the correct password.
To set a GRUB password, you fi rst need to generate a password that is hashed with the MD5 hashing algorithm. This password is then included in the grub.conf confi guration fi le using the password parameter in the general section of GRUB (see Figure 19.2). In Exercise 19.1 you’ll learn how to apply a GRUB password to your server.
F I GU R E 19 . 2 Protecting GRUB with a password
E X E R C I S E 19 .1
Adding a GRUB Boot Password
In this exercise, you’ll learn how to generate an MD5 hashed password string and include it in GRUB in order to add an extra layer of protection that ensures that only users who know the password can make modifi cations to the password fi le.
1. Open a root shell.
2. Use the grub-md5-crypt command. This command asks you to enter a password. This is the password that you will use to add an additional layer of protection to GRUB. Enter this password twice.
c19.indd 509c19.indd 509 1/8/2013 10:56:39 AM1/8/2013 10:56:39 AM

510 Chapter 19 Understanding and Troubleshooting the Boot Procedure
E X E R C I S E 19 .1 ( c ont inue d )
3. Copy the password hash that is shown on the screen of your computer using your mouse (you need to be able to paste it in the next step).
4. Open /boot/grub/grub.conf with an editor, and in the general section of the fi le, add the line password=. Paste the password hash after the = sign so that the complete line appears as follows:
password --md5 $1$6XWao0$98FkjAkEJWBB/
5. Remove the line that contains the hiddenmenu parameter. Then save the changes to the grub.conf fi le, and close your editor.
6. Reboot your computer.
7. When the GRUB menu shows, press p. You’ll then be prompted for the password that you used to protect GRUB. Enter the password to unlock the mode where you can change GRUB parameters.
8. You’ll now see that the GRUB menu asks you to press a, c, or e to apply changes to the boot procedure. In the next section, you’ll learn more about useful boot options you can use. For now, press Enter to continue the normal boot procedure.
Changing Boot Options
In the previous section, you learned how to change the GRUB confi guration fi le from a run-ning system. Occasionally, your server may have a problem booting normally, and you’ll need to enter the GRUB prompt to change the GRUB parameters from there. Here are some common reasons:
You’ve made an error in the grub.conf file, which prevents your server from booting.
There is a problem while booting your server, and you need to boot it in maintenance mode.
If you are having trouble booting your server, there are several options you can use to change the way GRUB is loading. To use these options, you need to enter the GRUB menu while booting (see Figure 19.3).
The exact procedure to enter the GRUB boot menu while booting depends on the GRUB confi guration.
If the hiddenmenu option is used, press the Escape key after the computer’s power-on self-test (POST) and before the operating system starts loading.
If the GRUB menu is password-protected, press p and enter the GRUB password to unlock the editing features.
From the GRUB menu, press a if you want to change only the boot parameters for the kernel. This can be useful if, for instance, instead of booting into the default runlevel 5, you want to boot into another runlevel, such as runlevel 3.
c19.indd 510c19.indd 510 1/8/2013 10:56:39 AM1/8/2013 10:56:39 AM
Dow
nlo
ad fro
m W
ow
! eBook
<w
ww
.wow
ebook.
com
>
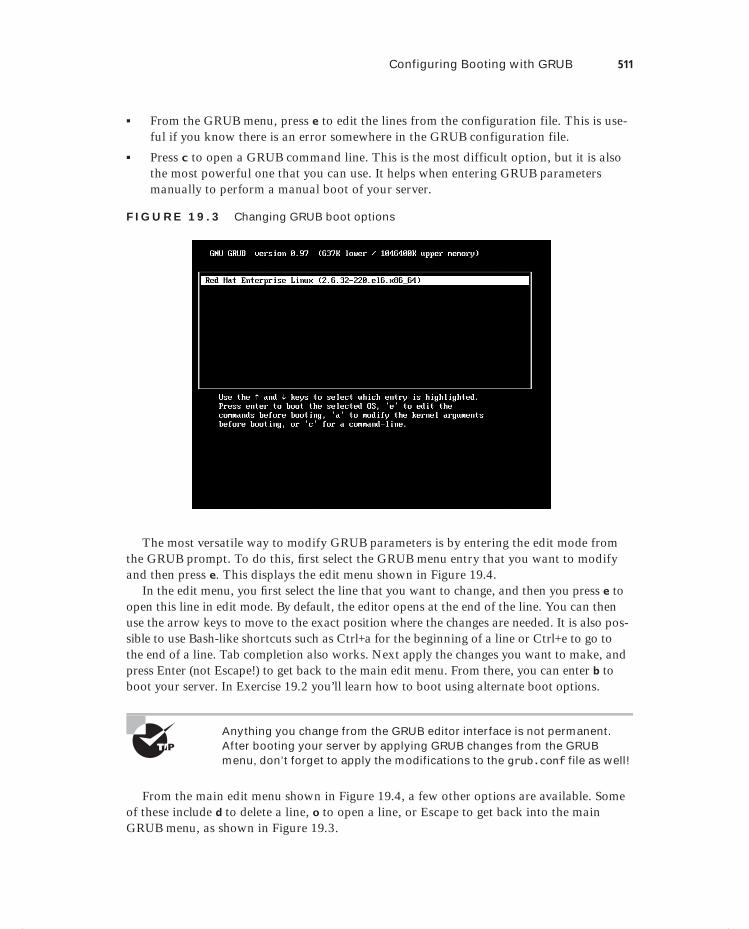
Configuring Booting with GRUB 511
From the GRUB menu, press e to edit the lines from the configuration file. This is use-ful if you know there is an error somewhere in the GRUB configuration file.
Press c to open a GRUB command line. This is the most difficult option, but it is also the most powerful one that you can use. It helps when entering GRUB parameters manually to perform a manual boot of your server.
F I GU R E 19 . 3 Changing GRUB boot options
The most versatile way to modify GRUB parameters is by entering the edit mode from the GRUB prompt. To do this, fi rst select the GRUB menu entry that you want to modify and then press e. This displays the edit menu shown in Figure 19.4.
In the edit menu, you fi rst select the line that you want to change, and then you press e to open this line in edit mode. By default, the editor opens at the end of the line. You can then use the arrow keys to move to the exact position where the changes are needed. It is also pos-sible to use Bash-like shortcuts such as Ctrl+a for the beginning of a line or Ctrl+e to go to the end of a line. Tab completion also works. Next apply the changes you want to make, and press Enter (not Escape!) to get back to the main edit menu. From there, you can enter b to boot your server. In Exercise 19.2 you’ll learn how to boot using alternate boot options.
Anything you change from the GRUB editor interface is not permanent. After booting your server by applying GRUB changes from the GRUB menu, don’t forget to apply the modifications to the grub.conf file as well!
From the main edit menu shown in Figure 19.4, a few other options are available. Some of these include d to delete a line, o to open a line, or Escape to get back into the main GRUB menu, as shown in Figure 19.3.
c19.indd 511c19.indd 511 1/8/2013 10:56:39 AM1/8/2013 10:56:39 AM
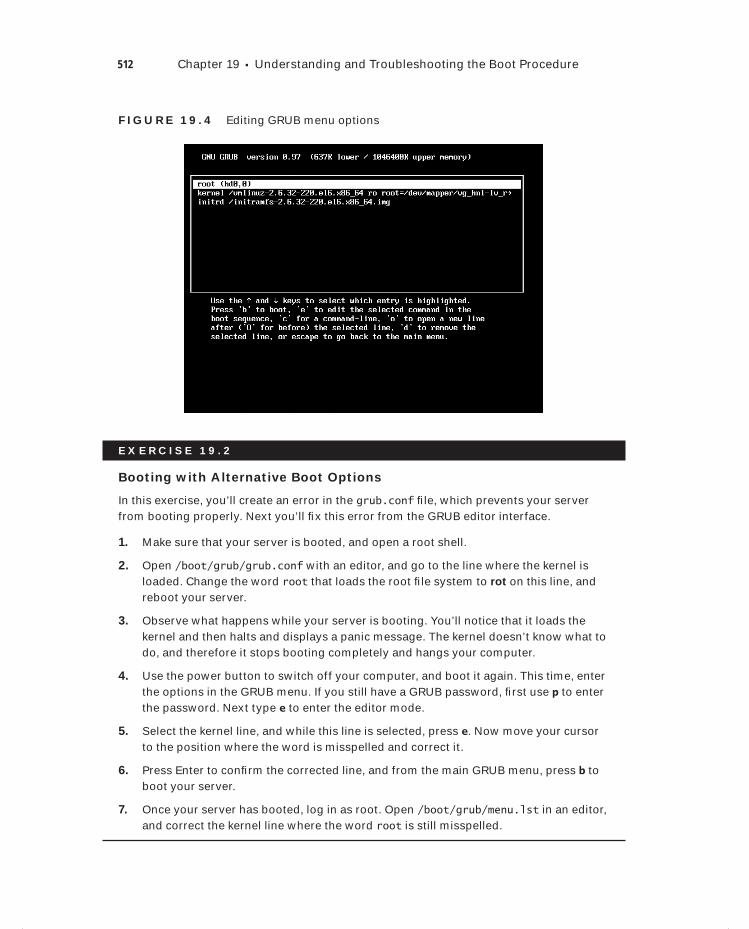
512 Chapter 19 Understanding and Troubleshooting the Boot Procedure
F I GU R E 19 . 4 Editing GRUB menu options
E X E R C I S E 19 . 2
Booting with Alternative Boot Options
In this exercise, you’ll create an error in the grub.conf fi le, which prevents your server from booting properly. Next you’ll fi x this error from the GRUB editor interface.
1. Make sure that your server is booted, and open a root shell.
2. Open /boot/grub/grub.conf with an editor, and go to the line where the kernel is loaded. Change the word root that loads the root fi le system to rot on this line, and reboot your server.
3. Observe what happens while your server is booting. You’ll notice that it loads the kernel and then halts and displays a panic message. The kernel doesn’t know what to do, and therefore it stops booting completely and hangs your computer.
4. Use the power button to switch off your computer, and boot it again. This time, enter the options in the GRUB menu. If you still have a GRUB password, fi rst use p to enter the password. Next type e to enter the editor mode.
5. Select the kernel line, and while this line is selected, press e. Now move your cursor to the position where the word is misspelled and correct it.
6. Press Enter to confi rm the corrected line, and from the main GRUB menu, press b to boot your server.
7. Once your server has booted, log in as root. Open /boot/grub/menu.lst in an editor, and correct the kernel line where the word root is still misspelled.
c19.indd 512c19.indd 512 1/8/2013 10:56:40 AM1/8/2013 10:56:40 AM
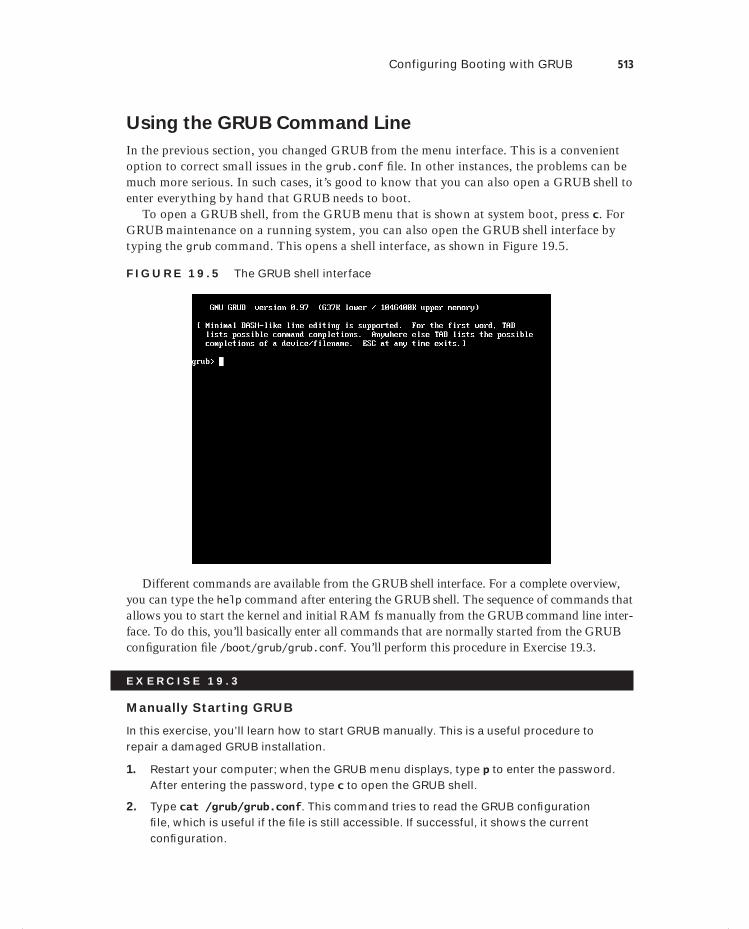
Configuring Booting with GRUB 513
Using the GRUB Command Line
In the previous section, you changed GRUB from the menu interface. This is a convenient option to correct small issues in the grub.conf fi le. In other instances, the problems can be much more serious. In such cases, it’s good to know that you can also open a GRUB shell to enter everything by hand that GRUB needs to boot.
To open a GRUB shell, from the GRUB menu that is shown at system boot, press c. For GRUB maintenance on a running system, you can also open the GRUB shell interface by typing the grub command. This opens a shell interface, as shown in Figure 19.5.
F I GU R E 19 .5 The GRUB shell interface
Different commands are available from the GRUB shell interface. For a complete overview, you can type the help command after entering the GRUB shell. The sequence of commands that allows you to start the kernel and initial RAM fs manually from the GRUB command line inter-face. To do this, you’ll basically enter all commands that are normally started from the GRUB confi guration fi le /boot/grub/grub.conf. You’ll perform this procedure in Exercise 19.3.
E X E R C I S E 19 . 3
Manually Starting GRUB
In this exercise, you’ll learn how to start GRUB manually. This is a useful procedure to repair a damaged GRUB installation.
1. Restart your computer; when the GRUB menu displays, type p to enter the password. After entering the password, type c to open the GRUB shell.
2. Type cat /grub/grub.conf. This command tries to read the GRUB confi guration fi le, which is useful if the fi le is still accessible. If successful, it shows the current confi guration.
c19.indd 513c19.indd 513 1/8/2013 10:56:40 AM1/8/2013 10:56:40 AM
514 Chapter 19 Understanding and Troubleshooting the Boot Procedure
E X E R C I S E 19 . 3 ( c ont inue d )
3. Now enter all of the boot parameters by hand. The commands listed here might need to be adjusted to suit your environment. First type root (hd0,0).
4. Now type kernel vmlinuz-[tab] ro root=/your/root/filesystem. Notice the use of the Tab key in the command. Command completion works from the GRUB prompt, and in this case, it will show you the available kernel versions and make it easier to start the kernel version you need.
5. Type initrd /initramfs-[tab].
6. Type boot, and press Enter. Your computer will now start.
Reinstalling GRUB
In some situations your GRUB confi guration might be so badly damaged that you need to reinstall it. There are two ways of doing this: from the GRUB shell or from a Bash shell environment on a rescue system. The easiest way to reinstall GRUB is from the GRUB shell. All you need to do is to run the command setup followed by the BIOS name of the device where you want to install the GRUB boot loader. For example, setup (hd0) installs GRUB in the master boot record of your computer.
An alternative is to use the grub-install command from a Bash shell. You can do this on a running system (but why would you want to reinstall GRUB if you are able to boot it into a running system?). Alternatively, you can also use this approach from a rescue disk. In a later section, you will learn how to boot a rescue system.
GRUB behind the Scenes
It helps to understand how GRUB works in order to manage it. GRUB consists of different parts. The fi rst part is installed in the master boot record (MBR) of your hard disk or in the boot sector of the active partition. By default, Red Hat Enterprise Linux installs it in the MBR. This part is very small, just 446 bytes, and it is called the GRUB stage 1 boot loader.
The 446 bytes in the MBR are not enough to start an entire operating system, however, and that is the reason behind the stage 2 part of GRUB. This part is in the fi rst megabyte of your hard disk—an area used to store metadata needed to start the computer. With the use of the stage 2, GRUB is capable of reading fi les directly from the fi le system, as long as the fi le system is supported. You can fi nd a list of supported fi le systems in the /boot/grub directory. The minimal fi le system drivers in this directory all have a name that ends with stage1_5.
An important fi le also used by GRUB is /boot/grub/device.map. This fi le contains the mapping between kernel device names and BIOS device names. If you’re ever having a prob-lem recognizing the boot disk correctly, the reason might be a misconfi guration of this fi le.
c19.indd 514c19.indd 514 1/8/2013 10:56:40 AM1/8/2013 10:56:40 AM

Configuring Booting with GRUB 515
On a server that experiences severe problems with GRUB, it can be useful to check whether GRUB is still present in the MBR. To do this, the tool xxd can be useful. xxd is a hexadecimal viewer, and if you use xxd -l 512 /dev/sda on your computer, it will show you the contents of the MBR. Even if the contents are completely hexadecimal, you’ll eas-ily recognize the GRUB error message, which indicates that a GRUB boot loader has been installed. Listing 19.2 shows a typical MBR that contains GRUB.
Listing 19.2: Showing the contents of an MBR with xxd
[root@hnl ~]# xxd -l 512 /dev/sda
0000000: eb48 9010 8ed0 bc00 b0b8 0000 8ed8 8ec0 .H..............
0000010: fbbe 007c bf00 06b9 0002 f3a4 ea21 0600 ...|.........!..
0000020: 00be be07 3804 750b 83c6 1081 fefe 0775 ....8.u........u
0000030: f3eb 16b4 02b0 01bb 007c b280 8a74 0302 .........|...t..
0000040: ff00 0020 0100 0000 0002 fa90 90f6 c280 ... ............
0000050: 7502 b280 ea59 7c00 0031 c08e d88e d0bc u....Y|..1......
0000060: 0020 fba0 407c 3cff 7402 88c2 52f6 c280 . ..@|<.t...R...
0000070: 7454 b441 bbaa 55cd 135a 5272 4981 fb55 tT.A..U..ZRrI..U
0000080: aa75 43a0 417c 84c0 7505 83e1 0174 3766 .uC.A|..u....t7f
0000090: 8b4c 10be 057c c644 ff01 668b 1e44 7cc7 .L...|.D..f..D|.
00000a0: 0410 00c7 4402 0100 6689 5c08 c744 0600 ....D...f.\..D..
00000b0: 7066 31c0 8944 0466 8944 0cb4 42cd 1372 pf1..D.f.D..B..r
00000c0: 05bb 0070 eb7d b408 cd13 730a f6c2 800f ...p.}....s.....
00000d0: 84f0 00e9 8d00 be05 7cc6 44ff 0066 31c0 ........|.D..f1.
00000e0: 88f0 4066 8944 0431 d288 cac1 e202 88e8 [email protected]........
00000f0: 88f4 4089 4408 31c0 88d0 c0e8 0266 8904 [email protected]..
0000100: 66a1 447c 6631 d266 f734 8854 0a66 31d2 f.D|f1.f.4.T.f1.
0000110: 66f7 7404 8854 0b89 440c 3b44 087d 3c8a f.t..T..D.;D.}<.
0000120: 540d c0e2 068a 4c0a fec1 08d1 8a6c 0c5a T.....L......l.Z
0000130: 8a74 0bbb 0070 8ec3 31db b801 02cd 1372 .t...p..1......r
0000140: 2a8c c38e 0648 7c60 1eb9 0001 8edb 31f6 *....H|`......1.
0000150: 31ff fcf3 a51f 61ff 2642 7cbe 7f7d e840 1.....a.&B|..}.@
0000160: 00eb 0ebe 847d e838 00eb 06be 8e7d e830 .....}.8.....}.0
0000170: 00be 937d e82a 00eb fe47 5255 4220 0047 ...}.*...GRUB .G
0000180: 656f 6d00 4861 7264 2044 6973 6b00 5265 eom.Hard Disk.Re
0000190: 6164 0020 4572 726f 7200 bb01 00b4 0ecd ad. Error.......
00001a0: 10ac 3c00 75f4 c300 0000 0000 0000 0000 ..<.u...........
00001b0: 0000 0000 0000 0000 6123 0500 0000 8020 ........a#.....
00001c0: 2100 83dd 1e3f 0008 0000 00a0 0f00 00dd !....?..........
00001d0: 1f3f 8efe ffff 00a8 0f00 00b0 0c1d 0000 .?..............
00001e0: 0000 0000 0000 0000 0000 0000 0000 0000 ................
00001f0: 0000 0000 0000 0000 0000 0000 0000 55aa ..............U.
[root@hnl ~]#
c19.indd 515c19.indd 515 1/8/2013 10:56:40 AM1/8/2013 10:56:40 AM
516 Chapter 19 Understanding and Troubleshooting the Boot Procedure
Apart from the GRUB error message that is shown in Listing 19.2, in the lines that start with 1c0 and 1d0, you can also recognize the partition table. The second columns of these lines clearly mark the existence of a partition of type 83 and 8e.
GRUB 2
The GRUB boot loader is used on Red Hat Enterprise Linux 6. In recent versions of Fedora, GRUB has been replaced with GRUB 2, which is organized in a completely differ-ent way. GRUB 2 is going to be introduced in Red Hat Enterprise Linux 7.
Common Kernel Management TasksThe main task of GRUB is to load the kernel. The kernel is the heart of the operating sys-tem, and it is the layer that addresses the hardware directly. To access different hardware components, the kernel uses initrd, which contains everything needed to access the fi le system from which the other modules can be loaded. As an administrator, you will occa-sionally have to manage these kernel drivers.
The Linux kernel that is used in Red Hat Enterprise Linux 6 is feature rich, and it offers support for the most common server hardware. This support is added by using open source drivers, which are included with the kernel itself. In some cases, as an administrator you’ll have to give the kernel a little help to get the appropriate driver loaded. If you’ve purchased server hardware that is certifi ed for Red Hat Enterprise Linux, this will rarely be the case. If you’re installing Red Hat on noncertifi ed hardware, you may end up with unsupported hardware components.
As an administrator, there are a few tasks that you’ll need to be able to perform with regard to hardware management.
Analyze your server to find out whether a specific module is loaded.
Load and unload kernel modules.
Load kernel modules with specific options.
In the early days of Linux, kernels occasionally needed to be recompiled to include specific functions. In a modern, supported Linux server operating system like Red Hat Enterprise Linux, you should never have to do that. You may even lose support if you recompile your kernel! To include func-tionality in the kernel, you’ll typically make sure that the correct supporting modules are loaded.
c19.indd 516c19.indd 516 1/8/2013 10:56:40 AM1/8/2013 10:56:40 AM
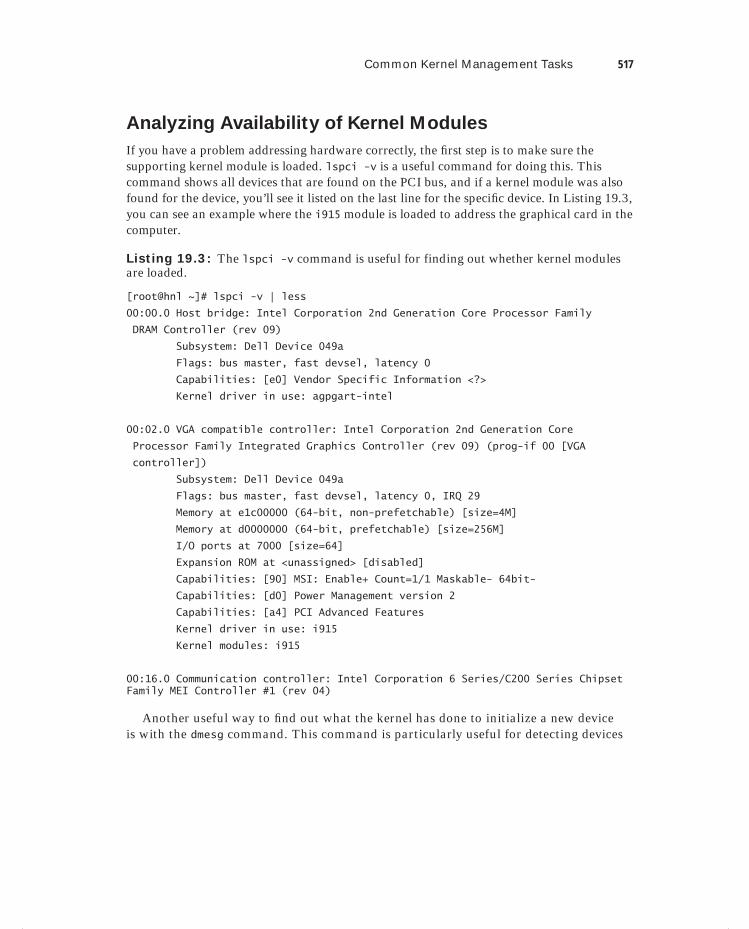
Common Kernel Management Tasks 517
Analyzing Availability of Kernel Modules
If you have a problem addressing hardware correctly, the fi rst step is to make sure the supporting kernel module is loaded. lspci -v is a useful command for doing this. This command shows all devices that are found on the PCI bus, and if a kernel module was also found for the device, you’ll see it listed on the last line for the specifi c device. In Listing 19.3, you can see an example where the i915 module is loaded to address the graphical card in the computer.
Listing 19.3: The lspci -v command is useful for finding out whether kernel modules are loaded.
[root@hnl ~]# lspci -v | less
00:00.0 Host bridge: Intel Corporation 2nd Generation Core Processor Family
DRAM Controller (rev 09)
Subsystem: Dell Device 049a
Flags: bus master, fast devsel, latency 0
Capabilities: [e0] Vendor Specific Information <?>
Kernel driver in use: agpgart-intel
00:02.0 VGA compatible controller: Intel Corporation 2nd Generation Core
Processor Family Integrated Graphics Controller (rev 09) (prog-if 00 [VGA
controller])
Subsystem: Dell Device 049a
Flags: bus master, fast devsel, latency 0, IRQ 29
Memory at e1c00000 (64-bit, non-prefetchable) [size=4M]
Memory at d0000000 (64-bit, prefetchable) [size=256M]
I/O ports at 7000 [size=64]
Expansion ROM at <unassigned> [disabled]
Capabilities: [90] MSI: Enable+ Count=1/1 Maskable- 64bit-
Capabilities: [d0] Power Management version 2
Capabilities: [a4] PCI Advanced Features
Kernel driver in use: i915
Kernel modules: i915
00:16.0 Communication controller: Intel Corporation 6 Series/C200 Series Chipset Family MEI Controller #1 (rev 04)
Another useful way to fi nd out what the kernel has done to initialize a new device is with the dmesg command. This command is particularly useful for detecting devices
c19.indd 517c19.indd 517 1/8/2013 10:56:40 AM1/8/2013 10:56:40 AM

518 Chapter 19 Understanding and Troubleshooting the Boot Procedure
that were newly attached to the system. With dmesg, you’ll read the kernel ring buffer, a specifi c area in memory that contains just kernel messages. Listing 19.4 shows the results of the dmesg command after connecting a USB disc to the system (see Listing 19.4). Some kernel module names can be recognized as the part of the dmesg lines before the colon.
Listing 19.4: Using dmesg to show recent kernel messages
usb 2-1.4: New USB device strings: Mfr=1, Product=2, SerialNumber=3
usb 2-1.4: Product: DataTraveler 2.0
usb 2-1.4: Manufacturer: Kingston
usb 2-1.4: SerialNumber: 5B711B8EA1FB
usb 2-1.4: configuration #1 chosen from 1 choice
Initializing USB Mass Storage driver...
scsi6 : SCSI emulation for USB Mass Storage devices
usbcore: registered new interface driver usb-storage
USB Mass Storage support registered.
usb-storage: device found at 3
usb-storage: waiting for device to settle before scanning
usb-storage: device scan complete
scsi 6:0:0:0: Direct-Access Kingston DataTraveler 2.0 PMAP PQ: 0 ANSI: 0 CCS
sd 6:0:0:0: Attached scsi generic sg2 type 0
sd 6:0:0:0: [sdb] 4030464 512-byte logical blocks: (2.06 GB/1.92 GiB)
sd 6:0:0:0: [sdb] Write Protect is off
sd 6:0:0:0: [sdb] Mode Sense: 23 00 00 00
sd 6:0:0:0: [sdb] Assuming drive cache: write through
sd 6:0:0:0: [sdb] Assuming drive cache: write through
sdb: sdb1
sd 6:0:0:0: [sdb] Assuming drive cache: write through
sd 6:0:0:0: [sdb] Attached SCSI removable disk
SELinux: initialized (dev sdb1, type vfat), uses genfs_contexts
Loading and Unloading Kernel Modules
As an administrator, you rarely have to load kernel modules manually. This is because the Linux kernel by itself detects which hardware is available, and it will normally automati-cally load the modules. Nevertheless, sometimes you will indeed have to load kernel mod-ules manually.
To load a kernel module, use the modprobe command followed by the name of the spe-cifi c kernel module. For example, use modprobe cdrom to load the kernel module that is used to access the optical drive in your computer. To unload the same kernel module manu-ally, you would use modprobe -r cdrom.
c19.indd 518c19.indd 518 1/8/2013 10:56:40 AM1/8/2013 10:56:40 AM

Common Kernel Management Tasks 519
To see which kernel modules have been loaded, you can use the lsmod command. This produces a list of all modules that are currently loaded, and it will also show you if other kernel modules are dependent on it.
Listing 19.5 shows what the output of the lsmod command looks like.
Listing 19.5: Listing kernel modules with lsmod
sr_mod 16228 1
cdrom 39771 1 sr_mod
sd_mod 39488 6
crc_t10dif 1541 1 sd_mod
sdhci_pci 8191 0
sdhci 20595 1 sdhci_pci
mmc_core 72991 1 sdhci
firewire_ohci 24901 0
firewire_core 51229 1 firewire_ohci
crc_itu_t 1717 1 firewire_core
ahci 40455 3
wmi 6287 0
i915 545923 2
drm_kms_helper 33236 1 i915
drm 230675 3 i915,drm_kms_helper
i2c_algo_bit 5762 1 i915
i2c_core 31276 5 i2c_i801,i915,drm_kms_helper,drm,i2c_algo_bit
video 21032 1 i915
output 2505 1 video
dm_mirror 14101 0
dm_region_hash 12170 1 dm_mirror
dm_log 10122 2 dm_mirror,dm_region_hash
dm_mod 81500 16 dm_mirror,dm_log
You may have heard of the insmod and rmmod commands. These are older commands and should no longer be used. The modprobe command ana-lyzes the dependencies of a kernel module, and it will also load all module dependencies. This is not the case for insmod and rmmod.
Loading Kernel Modules with Specific Options
As is the case for drivers in other operating systems, kernel modules can also be loaded with specifi c driver options. This is useful if you need to enable specifi c options for the module in question. To fi nd out which options are available for a specifi c module, use the
c19.indd 519c19.indd 519 1/8/2013 10:56:40 AM1/8/2013 10:56:40 AM
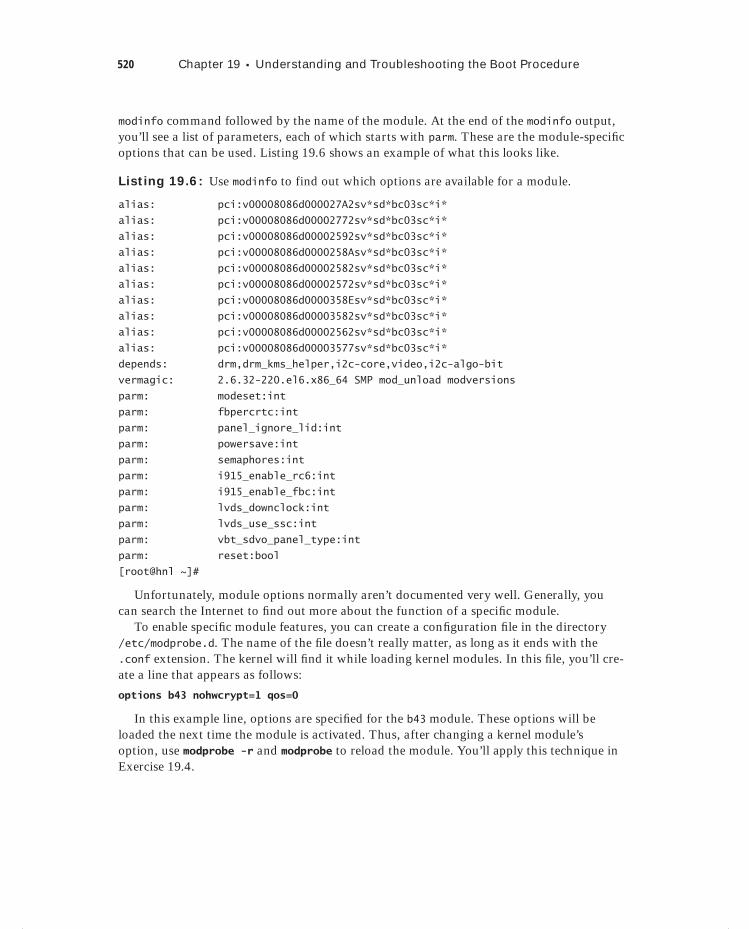
520 Chapter 19 Understanding and Troubleshooting the Boot Procedure
modinfo command followed by the name of the module. At the end of the modinfo output, you’ll see a list of parameters, each of which starts with parm. These are the module-specifi c options that can be used. Listing 19.6 shows an example of what this looks like.
Listing 19.6: Use modinfo to find out which options are available for a module.
alias: pci:v00008086d000027A2sv*sd*bc03sc*i*
alias: pci:v00008086d00002772sv*sd*bc03sc*i*
alias: pci:v00008086d00002592sv*sd*bc03sc*i*
alias: pci:v00008086d0000258Asv*sd*bc03sc*i*
alias: pci:v00008086d00002582sv*sd*bc03sc*i*
alias: pci:v00008086d00002572sv*sd*bc03sc*i*
alias: pci:v00008086d0000358Esv*sd*bc03sc*i*
alias: pci:v00008086d00003582sv*sd*bc03sc*i*
alias: pci:v00008086d00002562sv*sd*bc03sc*i*
alias: pci:v00008086d00003577sv*sd*bc03sc*i*
depends: drm,drm_kms_helper,i2c-core,video,i2c-algo-bit
vermagic: 2.6.32-220.el6.x86_64 SMP mod_unload modversions
parm: modeset:int
parm: fbpercrtc:int
parm: panel_ignore_lid:int
parm: powersave:int
parm: semaphores:int
parm: i915_enable_rc6:int
parm: i915_enable_fbc:int
parm: lvds_downclock:int
parm: lvds_use_ssc:int
parm: vbt_sdvo_panel_type:int
parm: reset:bool
[root@hnl ~]#
Unfortunately, module options normally aren’t documented very well. Generally, you can search the Internet to fi nd out more about the function of a specifi c module.
To enable specifi c module features, you can create a confi guration fi le in the directory /etc/modprobe.d. The name of the fi le doesn’t really matter, as long as it ends with the .conf extension. The kernel will fi nd it while loading kernel modules. In this fi le, you’ll cre-ate a line that appears as follows:
options b43 nohwcrypt=1 qos=0
In this example line, options are specifi ed for the b43 module. These options will be loaded the next time the module is activated. Thus, after changing a kernel module’s option, use modprobe -r and modprobe to reload the module. You’ll apply this technique in Exercise 19.4.
c19.indd 520c19.indd 520 1/8/2013 10:56:40 AM1/8/2013 10:56:40 AM
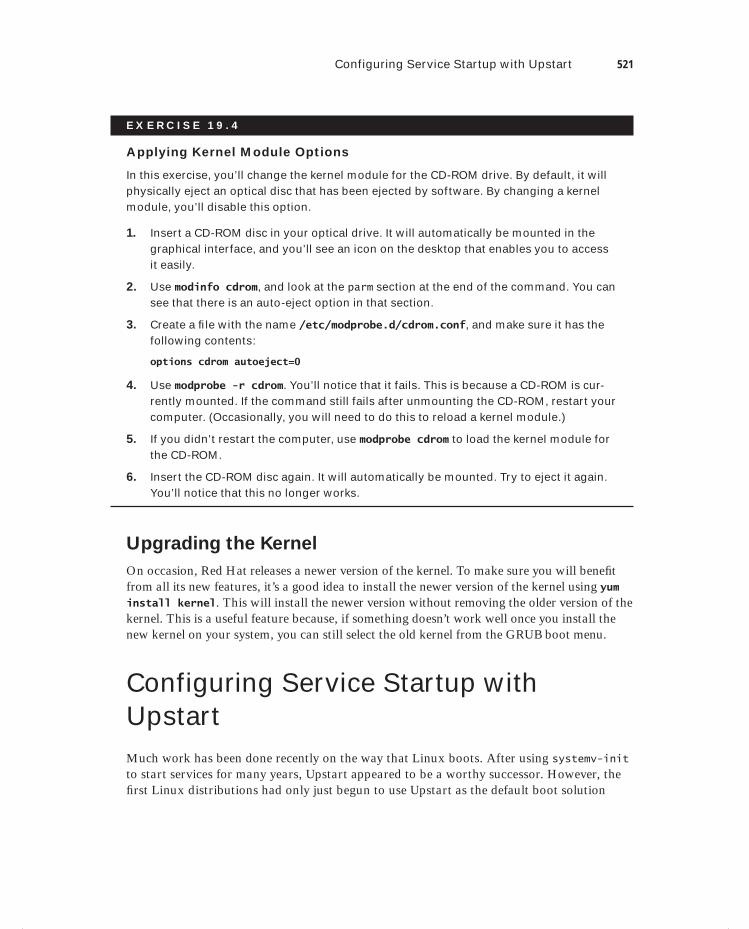
Configuring Service Startup with Upstart 521
E X E R C I S E 19 . 4
Applying Kernel Module Options
In this exercise, you’ll change the kernel module for the CD-ROM drive. By default, it will physically eject an optical disc that has been ejected by software. By changing a kernel module, you’ll disable this option.
1. Insert a CD-ROM disc in your optical drive. It will automatically be mounted in the graphical interface, and you’ll see an icon on the desktop that enables you to access it easily.
2. Use modinfo cdrom, and look at the parm section at the end of the command. You can see that there is an auto-eject option in that section.
3. Create a fi le with the name /etc/modprobe.d/cdrom.conf, and make sure it has the following contents:
options cdrom autoeject=0
4. Use modprobe -r cdrom. You’ll notice that it fails. This is because a CD-ROM is cur-rently mounted. If the command still fails after unmounting the CD-ROM, restart your computer. (Occasionally, you will need to do this to reload a kernel module.)
5. If you didn’t restart the computer, use modprobe cdrom to load the kernel module for the CD-ROM.
6. Insert the CD-ROM disc again. It will automatically be mounted. Try to eject it again. You’ll notice that this no longer works.
Upgrading the Kernel
On occasion, Red Hat releases a newer version of the kernel. To make sure you will benefi t from all its new features, it’s a good idea to install the newer version of the kernel using yum install kernel. This will install the newer version without removing the older version of the kernel. This is a useful feature because, if something doesn’t work well once you install the new kernel on your system, you can still select the old kernel from the GRUB boot menu.
Configuring Service Startup with UpstartMuch work has been done recently on the way that Linux boots. After using systemv-init to start services for many years, Upstart appeared to be a worthy successor. However, the fi rst Linux distributions had only just begun to use Upstart as the default boot solution
c19.indd 521c19.indd 521 1/8/2013 10:56:40 AM1/8/2013 10:56:40 AM
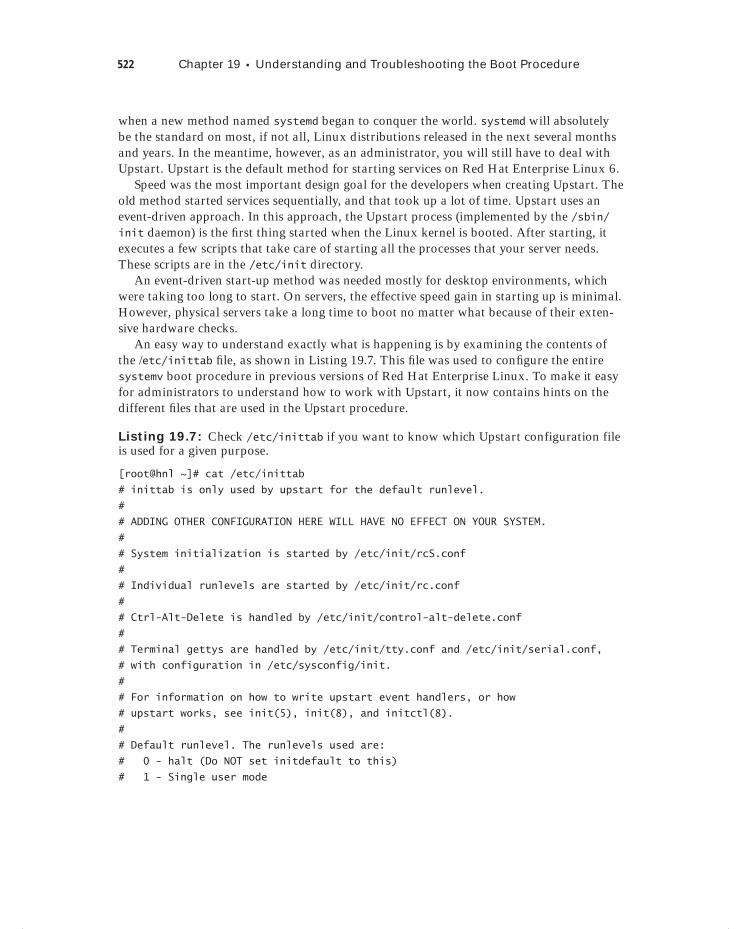
522 Chapter 19 Understanding and Troubleshooting the Boot Procedure
when a new method named systemd began to conquer the world. systemd will absolutely be the standard on most, if not all, Linux distributions released in the next several months and years. In the meantime, however, as an administrator, you will still have to deal with Upstart. Upstart is the default method for starting services on Red Hat Enterprise Linux 6.
Speed was the most important design goal for the developers when creating Upstart. The old method started services sequentially, and that took up a lot of time. Upstart uses an event-driven approach. In this approach, the Upstart process (implemented by the /sbin/init daemon) is the fi rst thing started when the Linux kernel is booted. After starting, it executes a few scripts that take care of starting all the processes that your server needs. These scripts are in the /etc/init directory.
An event-driven start-up method was needed mostly for desktop environments, which were taking too long to start. On servers, the effective speed gain in starting up is minimal. However, physical servers take a long time to boot no matter what because of their exten-sive hardware checks.
An easy way to understand exactly what is happening is by examining the contents of the /etc/inittab fi le, as shown in Listing 19.7. This fi le was used to confi gure the entire systemv boot procedure in previous versions of Red Hat Enterprise Linux. To make it easy for administrators to understand how to work with Upstart, it now contains hints on the different fi les that are used in the Upstart procedure.
Listing 19.7: Check /etc/inittab if you want to know which Upstart configuration file is used for a given purpose.
[root@hnl ~]# cat /etc/inittab
# inittab is only used by upstart for the default runlevel.
#
# ADDING OTHER CONFIGURATION HERE WILL HAVE NO EFFECT ON YOUR SYSTEM.
#
# System initialization is started by /etc/init/rcS.conf
#
# Individual runlevels are started by /etc/init/rc.conf
#
# Ctrl-Alt-Delete is handled by /etc/init/control-alt-delete.conf
#
# Terminal gettys are handled by /etc/init/tty.conf and /etc/init/serial.conf,
# with configuration in /etc/sysconfig/init.
#
# For information on how to write upstart event handlers, or how
# upstart works, see init(5), init(8), and initctl(8).
#
# Default runlevel. The runlevels used are:
# 0 - halt (Do NOT set initdefault to this)
# 1 - Single user mode
c19.indd 522c19.indd 522 1/8/2013 10:56:41 AM1/8/2013 10:56:41 AM

Configuring Service Startup with Upstart 523
# 2 - Multiuser, without NFS (The same as 3, if you do not have networking)
# 3 - Full multiuser mode
# 4 - unused
# 5 - X11
# 6 - reboot (Do NOT set initdefault to this)
#
id:5:initdefault:
The only thing still relevant in /etc/inittab is that it defi nes the default runlevel. This happens on the last line. In Listing 19.3, you can see that id:5:initdefault: is used to set runlevel 5 as the default. If ever you want your server to start in a different runlevel, like the nongraphical runlevel 3, you can change it here. (You can also add it for one-time use as a kernel argument from the GRUB prompt.)
The main part of the Upstart confi guration is handled by different scripts in the /etc/init directory. Of these, two are particularly important in the boot procedure. The /etc/init/rcS.conf fi le is used for system initialization, and the /etc/init/rc.conf fi le is used to start the runlevel services. Examining these scripts reveals that Red Hat hasn’t changed that much since it used systemv in the old days. The most important line in /etc/init/rcS.conf is the one that starts rc.sysinit, a script that takes care of starting everything your server needs to do its job, such as mounting fi le systems and initializing proc and swap.
The other script is /etc/init/rc.conf, which takes care of starting services in the run-levels. Upstart on RHEL 6 is still fully compliant with runlevels as they were used in sys-tem-init. The scripts that start the services themselves are in the directory /etc/init.d. These are the scripts that you can start with a command like service nameofthescript start.
To automate the start of these scripts during the boot procedure, Upstart executes sym-bolic links that start with S in the directory /etc/rcX.d, where X is the current runlevel to be started. Thus, if your server is confi gured to start runlevel 3 from the /etc/init/rc.conf fi le, the rc script is started, and it executes all symbolic links in order. On my sys-tem, this means that /etc/rc3.d/S01sysstat is the fi rst thing that is executed, and /etc/rc3.d/S99local is the last script that is executed. At the end of the procedure, all services that are confi gured to be started are started using this approach. As an administrator, you can use the chkconfig command to put the services in the runlevels where they are typi-cally needed. While switching runlevels, all symbolic links that have a name that starts with K are also executed—called kill scripts. This is because you could be switching to another runlevel where services that were needed previously are no longer needed.
After processing the runlevels, a few minor scripts are executed. These are, for exam-ple, the /etc/init/start-ttys.conf script, which prepares all TTYs on your server, or prefdm.conf, which runs the graphical interface in case you use it. As an administrator, it is interesting to know these scripts exist, but you’ll never really change anything in them.
For your daily work as an administrator of a Red Hat Enterprise Linux server, you don’t need to go into the Upstart scripts very often. If after installing a service your
c19.indd 523c19.indd 523 1/8/2013 10:56:41 AM1/8/2013 10:56:41 AM
524 Chapter 19 Understanding and Troubleshooting the Boot Procedure
server refuses to boot, it can be useful, though, to know how Upstart works. Having knowledge of its workings allows you to correct errors that are related to misconfi guring the Upstart scripts.
Basic Red Hat Enterprise Linux TroubleshootingThings don’t go wrong too often on your Red Hat Enterprise Linux server. If things do go wrong, it is frequently related to the boot procedure. You have already learned how to enter the GRUB shell to perform some basic troubleshooting tasks from there, such as manually loading the kernel and initial RAM fi le system fi les. In this section, you’ll learn about some other techniques that can be useful in fi xing boot-related problems on your server.
Booting in Minimal Mode
If your server refuses to boot properly, it may very well be because a service has been installed that cannot start. To fi x such problems, it is helpful to start your server in a mini-mal mode. There are two minimal modes that you can use under specifi c circumstances.
Runlevel 1 is the mode entered for troubleshooting problems when you’re sure they are located in the runlevels and not in the initial phase of the boot procedure. In runlevel 1, all of the essential services are started, and only a minimal number of services are started in the runlevels. You can see which services these are by examining all symbolic links that start with S in the /etc/rc1.d directory.
If your server still doesn’t boot after entering runlevel 1, the problem might be in the initial boot phase. If this is the case, you can skip the entire Upstart-related part of the boot procedure by using the init=/bin/bash command as a kernel argument on the GRUB prompt. This brings you into a minimal mode where only the root file system is mounted and not much else has been started. From this mode, you can start all of the essential services yourself, which allows you to analyze where things go wrong and to fix them.
Another useful troubleshooting mode is the interactive mode, which you can activate by pressing I once the services start loading. In interactive mode you can start every script one by one so that you can see exactly where it goes wrong if problems do occur. To use inter-active mode, your system needs to have loaded the init process successfully.
In general, it’s a good idea to use runlevel 1 before trying to fi x your problems from an init=/bin/bash shell. The reason is simple: many parts of your system have been started in runlevel 1, whereas not very much is started when you use init=/bin/bash. This makes troubleshooting from runlevel 1 a lot easier. In Exercise 19.5 you’ll practice how to do this.
c19.indd 524c19.indd 524 1/8/2013 10:56:41 AM1/8/2013 10:56:41 AM
Dow
nlo
ad fro
m W
ow
! eBook
<w
ww
.wow
ebook.
com
>
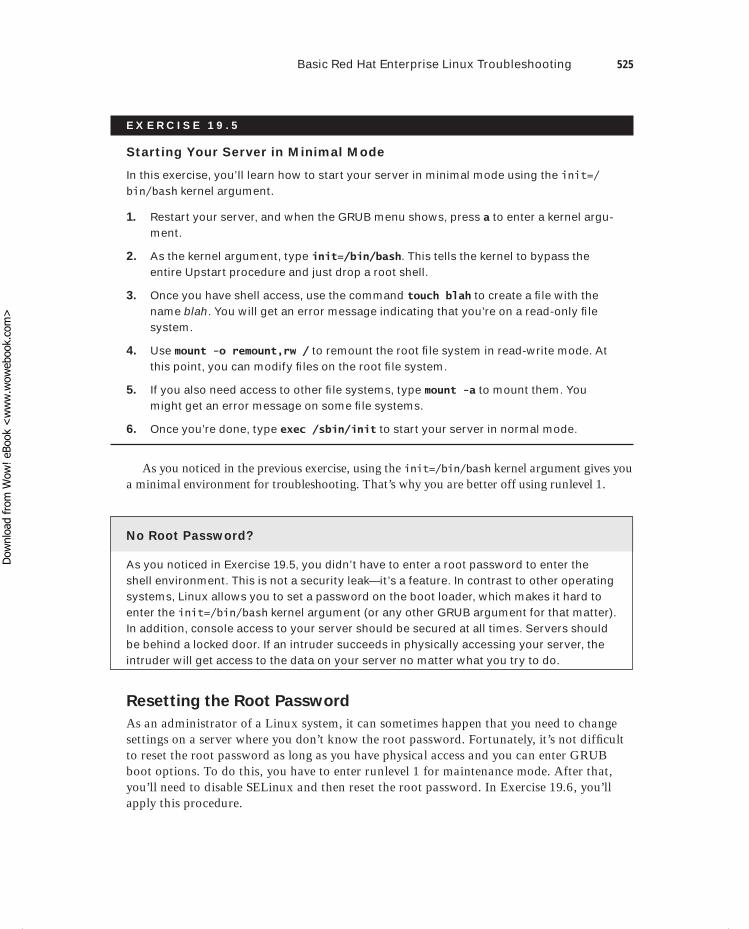
Basic Red Hat Enterprise Linux Troubleshooting 525
E X E R C I S E 19 . 5
Starting Your Server in Minimal Mode
In this exercise, you’ll learn how to start your server in minimal mode using the init=/bin/bash kernel argument.
1. Restart your server, and when the GRUB menu shows, press a to enter a kernel argu-ment.
2. As the kernel argument, type init=/bin/bash. This tells the kernel to bypass the entire Upstart procedure and just drop a root shell.
3. Once you have shell access, use the command touch blah to create a fi le with the name blah. You will get an error message indicating that you’re on a read-only fi le system.
4. Use mount -o remount,rw / to remount the root fi le system in read-write mode. At this point, you can modify fi les on the root fi le system.
5. If you also need access to other fi le systems, type mount -a to mount them. You might get an error message on some fi le systems.
6. Once you’re done, type exec /sbin/init to start your server in normal mode.
As you noticed in the previous exercise, using the init=/bin/bash kernel argument gives you a minimal environment for troubleshooting. That’s why you are better off using runlevel 1.
No Root Password?
As you noticed in Exercise 19.5, you didn’t have to enter a root password to enter the shell environment. This is not a security leak—it’s a feature. In contrast to other operating systems, Linux allows you to set a password on the boot loader, which makes it hard to enter the init=/bin/bash kernel argument (or any other GRUB argument for that matter). In addition, console access to your server should be secured at all times. Servers should be behind a locked door. If an intruder succeeds in physically accessing your server, the intruder will get access to the data on your server no matter what you try to do.
Resetting the Root Password
As an administrator of a Linux system, it can sometimes happen that you need to change settings on a server where you don’t know the root password. Fortunately, it’s not diffi cult to reset the root password as long as you have physical access and you can enter GRUB boot options. To do this, you have to enter runlevel 1 for maintenance mode. After that, you’ll need to disable SELinux and then reset the root password. In Exercise 19.6, you’ll apply this procedure.
c19.indd 525c19.indd 525 1/8/2013 10:56:41 AM1/8/2013 10:56:41 AM
Dow
nlo
ad fro
m W
ow
! eBook
<w
ww
.wow
ebook.
com
>
526 Chapter 19 Understanding and Troubleshooting the Boot Procedure
E X E R C I S E 19 . 6
Resetting the Root Password
In this exercise, you’ll learn how to reset the password for the root user.
1. Reboot your server. When GRUB shows, press a to open the interface where you can enter kernel parameters, and type 1 at the end of the line.
2. Your server now starts in runlevel 1 and drops you into a root shell without the need to enter a password.
3. Enter the command setenforce 0 to set SELinux to permissive mode.
4. Type passwd, and enter the new password you want to use for the root user.
How Real Is All This?
Normally, you shouldn’t experience too many problems with your Linux server. This is especially true because many Linux servers keep running for years without ever restarting. If after years a server is shut down, for instance, because it has to be moved to another location and it is started again at its new location, problems can manifest themselves because of mechanical problems with the hard disk. Most of these problems happen during the boot procedure. In my practice as a consultant, I have seen many occasions where boot problems have occurred, or even entire GRUB confi gurations have disappeared. The knowledge that you’ve acquired in this chapter will help you if this ever happens on one of your servers.
Using a Rescue Environment to Recover System Access
If you can still start GRUB, the kernel, and an initial RAM fi le system, you can enter a ker-nel option to start an environment where you can troubleshoot your server. In some cases, you can’t do this because something is wrong with one of these three items. If that happens, it’s good to know how you can start a rescue system.
A Linux installation that allows you to start from external media can be used as a rescue system. For example, if you have a Knoppix DVD, you can use it to repair your Red Hat Enterprise Linux server. Just start from the Knoppix DVD, mount the Red Hat fi le systems from your server’s hard disk, and start troubleshooting.
You can also use the Rescue System option that is on the Red Hat Enterprise Linux instal-lation disc. There is a major benefi t to using this option: it uses the same software that you have installed on your server’s hard disk, and therefore you’re less likely to encounter prob-lems because of different kernel versions or other parts of the system that are not the same.
c19.indd 526c19.indd 526 1/8/2013 10:56:41 AM1/8/2013 10:56:41 AM

Summary 527
In Exercise 19.7, you’ll learn how to start a rescue system and mount it in a way that you can repair anything on your Red Hat Enterprise Linux server.
E X E R C I S E 19 . 7
Starting a Rescue System
In this exercise, you’ll start a rescue system that allows you to repair anything on your server’s hard disk if it fails to boot normally. You’ll need the installation DVD of your Red Hat server to perform this procedure.
1. Insert the installation disc in the optical drive of your server, and reboot the server.
2. Make sure the server boots from the DVD; from the DVD menu, select the Rescue Installed System option. It will take a while before the initial rescue image is loaded from the appropriate initrd image fi le on the installation disc.
3. In the Choose A Language menu, select English. Next select the keyboard type you’re using.
4. When asked what type of media contains the rescue image, select Local CD/DVD.
5. In the Setup Networking screen, select No. You normally don’t need networking to repair issues that prevent your server from booting properly.
6. On the next screen, press Enter to select the Continue option. This option tries to fi nd a Red Hat Enterprise Linux installation on the disks of your current machine, and mount this on the directory /mnt/sysimage.
7. Once the rescue system has successfully discovered your current installation, it will tell you so on a screen that states that your system has been mounted. Click OK to acknowledge this, and on the screen that follows, click OK again.
8. Now select the shell option to start a shell and click OK. This drops you into a Bash shell environment.
9. Use chroot /mnt/sysimage to make the root of your installation on disk your current root directory. This ensures that all path references are right, and you can perform any repair action you like.
SummaryIn this chapter, you learned about the parts of your computer that are involved in the boot procedure. You learned how GRUB is confi gured and what you can do to specify specifi c boot options. You also learned how Upstart is used to start essential services on your com-puter. At the end of this chapter, you read about some common scenarios that can help you troubleshoot your server if it fails to start normally.
c19.indd 527c19.indd 527 1/8/2013 10:56:41 AM1/8/2013 10:56:41 AM

c19.indd 528c19.indd 528 1/8/2013 10:56:41 AM1/8/2013 10:56:41 AM

Chapter
20Introducing High-Availability Clustering
TOPICS COVERED IN THIS CHAPTER:
Understanding High-Availability Clustering
Configuring Cluster-Based Services
Installing the Red Hat High Availability Add-on
Creating Resources and Services
Configuring GFS2 File Systems
c20.indd 529c20.indd 529 1/8/2013 10:54:00 AM1/8/2013 10:54:00 AM

High-availability clustering is often used in conjunction with Red Hat Enterprise Linux. In this chapter, you’ll learn how to set up a high-availability cluster using the Red Hat High
Availability add-on. Using such a cluster lets you guarantee that vital services are available at all times and, if something bad happens to your servers, that the services monitored by high availability are restarted on another node as soon as possible.
Understanding High-Availability ClusteringThe purpose of a server is to offer services to users. In some cases, it doesn’t matter if the services are briefl y unavailable. In other cases, it will cost a lot of money if a service can-not be reached temporarily. For example, think of a highly popular ecommerce site; if it is down, the customer will shop somewhere else. For those important services, high availabil-ity is a requirement.
Lab Hardware Requirements
The labs described in this chapter require the use of three different machines. The easi-est way to prepare for the labs is by creating a second virtual machine on your KVM host. The KVM host itself can then be used as the iSCSI SAN, as described in Exercise 20.1, whereas the virtual machines can be used as nodes in the HA cluster. You may also run the labs on three different virtual machines. In this chapter, the SAN node will be referred to as san, and the nodes in the cluster are referred to as node1 and node2.
The Workings of High Availability
In a high-availability (HA) cluster, at least two servers are involved when offering high availability of vital services. A typical HA cluster is dedicated to just that service. This means that other services, which are not involved in the HA setup, are not offered by that cluster.
The service in an HA setup is a group of resources. Be sure that you’re thinking about this correctly: what on a stand-alone server is typically referred to as a service (think of
c20.indd 530c20.indd 530 1/8/2013 10:54:02 AM1/8/2013 10:54:02 AM
Understanding High-Availability Clustering 531
those that are started from the runlevels) is referred to as a resource in an HA environment. A service in an HA environment consists of different resources that are treated as one by the cluster.
To make sure that the service is available, the HA cluster continuously monitors the servers that are involved in the cluster (the nodes). If a node goes down, the cluster makes sure the service is started as soon as possible on another node. This means in any HA clus-ter, there will always be a small amount of time that the service is not available after a fail-ure. The goal is to make sure that this amount of time is as small as possible.
Apart from node monitoring, the service itself can also be monitored. This often hap-pens by default. In some cases, you’ll need to set up service monitoring manually. This is because the cluster software doesn’t always know how to monitor the availability of specifi c services, especially if custom software is involved.
High-Availability Requirements
Several components are involved in setting up an HA cluster. In its simplest form, two servers are connected to each other by a network cable. But a cluster that is confi gured in a simple, nonredundant way like this can create some unpleasant surprises. Imagine, for instance, that the network cable breaks. In that case, both nodes in the cluster would no longer see each other, and there would be no way for one node to fi nd out what the other node is doing. This also means that, in such a scenario, there would be no way to make sure that the cluster service is started on the right machine and that its services would continue to be offered. That is why a typical Red Hat cluster involves more than just two nodes.
The following items are typically used in HA clusters:
Multiple nodes
Fence devices
Ethernet bonding
Shared storage
Let’s take a closer look at each of these standard components.
Multiple Nodes
Obviously, it doesn’t make much sense to create a cluster that consists of one node only.
You can actually create a one-node cluster. In a test environment, a one-node cluster allows you to become familiar with the software, and if the monitored resource becomes unavailable, the one-node cluster will make sure that it is restarted on the same node.
A typical cluster uses at least two nodes, with a maximum number of 16 nodes. Sixteen-node clusters are not very common, but they can be deployed to ensure the high availability of a large number of services.
c20.indd 531c20.indd 531 1/8/2013 10:54:02 AM1/8/2013 10:54:02 AM
532 Chapter 20 Introducing High-Availability Clustering
In this chapter, I’ll use the two-node cluster as an example because it is typically enough to ensure that one service can be offered at high availability. Some administrators like to work with three nodes as the minimum. This is to ensure that quorum can be maintained at all times.
Quorum is also an important element in an HA cluster. It is the minimum number of nodes that must be available to continue offering services. Typically, the quorum consists of half-plus-one nodes. That is, a node needs majority in the cluster to be able to continue offering services. Later you’ll learn that, instead of using a third node, you can also confi g-ure a quorum device to get quorum in the cluster.
Fence Devices
To maintain the integrity of the cluster, a failing node must be stopped at all times. The “Using Fencing to Prevent Disaster” example explains why.
Using Fencing to Prevent Disaster
Imagine a service that consists of an IMAP mail server process and a fi le system that is offered by one of the nodes in the cluster. Picture that it currently is running on node1, but at a given moment, communication in the cluster fails and node1 no longer can see node2. From the perspective of node1, nothing would happen because it is already ser-vicing the mail server. From the perspective of node2, however, node1 is considered to be down, so it would also start the mail server service. The result would be that the mail server process is running on two different nodes in the cluster, and it is writing to the same fi le system at the same time from these two different nodes. In the case of a normal fi le system, like Ext4 or XFS, this would defi nitely cause fi le system corruption. That is why you need a solution to shut down a failed node before taking over its resources. To accomplish this goal, you’ll need a fencing device.
A fencing device is typically a hardware device, which is available to shut down another node, even if the node itself has failed. Common solutions include power switches or inte-grated management cards, such as HP ILO or Dell DRAC. Before taking over a resource, the cluster can instruct the fencing device to make sure the failing node is actually shut down. A power switch can do that by shutting down the physical port(s) to which the node is connected, and a management board can do that by halting the failing node.
If you’re using an integrated management card for fencing, you’ll need to make sure that ACPI is disabled on the hosts that you want to fence. If enabled, ACPI can cause the fencing process to fail.
The problem with fencing is that you’ll need specifi c hardware to shut down a failing node, and that hardware isn’t always available. The good news is that you can create a clus-ter without fencing or have a cluster that uses a dummy fence device, such as fence_manual.
c20.indd 532c20.indd 532 1/8/2013 10:54:02 AM1/8/2013 10:54:02 AM

Understanding High-Availability Clustering 533
The bad news is that by doing so, you will risk that services in the cluster will be corrupted. Thus, when planning the purchase of cluster hardware, make sure to include fencing hard-ware as well!
Fencing is also referred to as STONITH, which stands for Shoot The Other Node In The Head. This is exactly what STONITH will do if a node needs to be shut down to prevent corruption from occurring on your cluster.
A Dedicated Cluster Interface
To make sure that cluster traffi c is not interrupted by anything—for example, a spike in the number of packets sent on the user network—a dedicated cluster network is often created. This ensures that cluster packets will always get through no matter what happens on the user network. To increase fault tolerance, the user network can serve as a backup for the cluster traffi c, which is used in case something physically goes wrong on the cluster net-work interface.
In the lab setup described in this chapter, you will not use a dedicated cluster interface and send packets over the user network.
Ethernet Bonding
A network card can always fail. To minimize the impact of this and to get more bandwidth, Ethernet bonding is often used in HA cluster environments. An Ethernet bond is a logical device that groups at least two network cards. When confi guring this, you choose a proto-col that specifi es how the bond should work. A round-robin algorithm is often used, which means that, under normal operation, frames are distributed across all network interfaces involved in the bond. However, if one of the interfaces goes down, the other interface is capable of handling all the traffi c. Other algorithms are also available, such as active/pas-sive or LACP, but these often depend on the features that are offered by the switch.
Setting up bonding is rather essential because without a bond, if one interface in the cluster goes down, the service that the cluster is hosting may become unavailable.
Shared Storage
Most services that run in your cluster will need access to fi les. When the service fails over, these fi les will also need to be available on the target server. Of course, you can use rsync or another synchronization tool to synchronize these fi les, but it’s much more convenient to use shared storage to accomplish this goal.
Many companies have a proprietary Fibre Channel or iSCSI SAN that is used as shared storage. However, you don’t have to make the large investment required for a shared SAN. Software-based shared storage options are also available, including iSCSI and NFS. Even though both are capable of providing access to the same fi les from different machines, a shared storage solution that offers block instead of fi le access is generally considered better, more resilient, and faster. Thus, you will learn how to confi gure an iSCSI target as a shared storage device in this chapter.
Typically with shared storage, you’ll also want to use a storage network. This is to make sure the packets that are sent over the storage network cannot interfere with the packets on
c20.indd 533c20.indd 533 1/8/2013 10:54:03 AM1/8/2013 10:54:03 AM

534 Chapter 20 Introducing High-Availability Clustering
the user network, which normally is the network on which cluster traffi c is sent. If packets did interfere, it could lead to cluster traffi c no longer coming through, and this can cause failures on the cluster.
If you’re using a proprietary iSCSI or Fibre Channel SAN, you probably already have a storage network that was installed with the SAN. If you’re fi rst setting up an iSCSI SAN as described later in this chapter, you’ll need to set up this shared storage network yourself. Figure 20.1 gives an overview of a typical cluster confi guration.
F I GU R E 20 .1 Typical cluster configuration overview
sharedstorage
fencing
switch
node 1 node 2
storagenetwork
bondednetworkdevices
Red Hat High-Availability Add-on Software Components
When working with Red Hat high-availability add-ons, you’ll use several different software components. The following sections introduce these components in order to prepare you to build the cluster.
Corosync
Corosync takes care of the lower layers of the cluster. It uses the Totem protocol to ensure that all nodes in the cluster are still available. If something goes wrong on the Corosync layer, it will notify the upper layers of the cluster, where the placement of services and resources is addressed. You’ll also encounter the name OpenAIS, which is what was used before Corosync was adopted. The OpenAIS developers halted their work and joined forces with the Corosync developers.
Rgmanager
Rgmanager refers to the upper layers of the cluster. It consists of different processes, which ensure that services are running where they should be. If Corosync detects a failure on the cluster, the Rgmanager layer will move the services to a node where they can continue to do their work.
c20.indd 534c20.indd 534 1/8/2013 10:54:03 AM1/8/2013 10:54:03 AM
Configuring Cluster-Based Services 535
Pacemaker
Rgmanager is the traditional Red Hat HA cluster stack. There is another Linux-based HA solution, however, which is known as Pacemaker. It is a broadly adopted HA project, and Red Hat has also contributed to it. In RHEL 6, it is available as an unsupported technology preview solution. If testing goes well, it is likely that Pacemaker will be the default solution for the upper layers in the cluster in Red Hat Enterprise Linux 7. Because Rgmanager is still the standard in RHEL 6, Pacemaker is not discussed in this chapter.
Conga
Conga is the management interface that is used to create and manage clusters. It consists of two parts: ricci and luci. Ricci is the agent that should be installed on all nodes in the clus-ter, and luci is the management application that talks to ricci. As an administrator, you’ll log in to the luci web interface to create and manage your cluster.
The names come from the 1950s comedy “I Love Lucy,” starring Lucille (Lucy) Ball and Desi (Ricky) Arnez, where Ricky played the conga drums in a nightclub.
Apart from Conga, you can also manage your cluster from the command line. In RHEL 6 the cssadmin tool is used extensively as a command-line interface and allows you to manage all aspects of the cluster.
Configuring Cluster-Based ServicesAs you’ve read in the previous sections, a typical cluster includes shared storage as well as network bonding. Before starting the confi guration of the cluster, you’ll learn how to set up these components in order to ensure that the cluster you are building is a redundant and resilient cluster.
Setting Up Bonding
To set up a bonded network interface, you’ll have to accomplish these steps:
1. Identify the physical network cards that you want to configure in the bonding interface.
2. Change the configuration for the physical network cards to make them slaves for the bonding interface.
3. Create a configuration file for the bonding interface.
4. Make sure the bonding kernel module is loaded.
In Exercise 20.1, you will learn how to create a bond device.
c20.indd 535c20.indd 535 1/8/2013 10:54:03 AM1/8/2013 10:54:03 AM
536 Chapter 20 Introducing High-Availability Clustering
E X E R C I S E 2 0 .1
Creating a Bond Device
In this exercise, you’ll set up a bond device. You’ll do this on one network interface only, which doesn’t really matter for the procedure, because it still stays the same.
1. Nowadays, a typical server is confi gured with several physical network cards. If there are only two cards that you want to put in the bonding device, it’s easy to use them, and there is no particular need to determine which is which. If you have several network cards, it can be hard to fi nd out which physical card corresponds to which logical device. There are a few tricks that can help, however. First, if you plug or unplug a network cable, you’ll see a message in /var/log/messages indicating that a cable has been (un)plugged for that specifi c device. You can also use the command ethtool -p em1 30. This will blink the LEDs on the specifi c network card (em1, in this example) for 30 seconds, which also makes it easy to identify the appropriate network card.
2. After fi nding out which network card you want to use, you need to put it in slave mode. You’ll also need to remove all confi gurations on the network card, because they will be set on the bonding device instead. Thus, if the network card em1 is going to be used in a bonded confi guration, make sure that its confi guration fi le follows the example shown here:
DEVICE=em1
BOOTPROTO=none
ONBOOT=yes
MASTER=bond0
SLAVE=yes
USERCTL=no
3. After creating the appropriate confi guration for the devices you want to put in slave mode, you’ll need to create a confi guration for the bond device itself. Typically, these devices will use names bond0, bond1, and so on, and the confi guration fi le (which would be /etc/sysconfig/network-scripts/ifcfg-bond0 for bond device bond0) would appear as follows:
DEVICE=bond0
IPADDR=192.168.1.100
PREFIX=24
ONBOOT=yes
BOOTPROTO=none
USERCTL=no
BONDING_OPTS="mode=1 miimon=100"
c20.indd 536c20.indd 536 1/8/2013 10:54:04 AM1/8/2013 10:54:04 AM
Configuring Cluster-Based Services 537
E X E R C I S E 2 0 .1 ( c ont inue d )
While most of the parameters in the ifcfg-bond0 fi le should be clear, you can see that there are also a few bonding options included. First there is the bonding mode, which is set to mode 1 in this example. mode 1 is the active-backup confi guration in which only one interface is active at a time, and the other interface takes over in case it fails. Other popular modes include mode 0 (balance-rr) where frames are transmit-ted in round-robin fashion across interfaces, and mode 3, where packets are broad-cast to all interfaces at all times. Another bonding option is miimon, the monitoring interval that is specifi ed in milliseconds. In this example, the interface is monitored every 100 milliseconds. If that causes problems on your network, you might consider setting it lower; for example, to 50 milliseconds to make sure that the bond device reacts faster if a physical connection drops.
4. After creating the confi guration for the bond device, you’ll need to make sure that the bonding kernel module is loaded. To do this, create a fi le with the name /etc/modprobe.d/bonding.conf, and put in the line alias bond0 bonding.
After performing all of these steps, your bond device is ready for use. Restart the network, and use the ip a command to verify that it is indeed available.
Setting Up Shared Storage
Now that you’ve set up bonding, you’re ready to take the next step, which is to set up the shared storage. In this section, you’ll learn how to set up a software-based iSCSI SAN. You will set up a central SAN machine that is confi gured to offer shared storage to the other nodes. This machine is referred to as the iSCSI target.
Next you’ll connect the two other nodes in your lab to communicate with the iSCSI tar-get. To accomplish this, you’ll need to set them up as the iSCSI initiator. After successfully connecting the iSCSI initiator to the iSCSI target, you will see additional disk devices on the cluster nodes. These disk devices exist on the iSCSI target and not on the iSCSI initiators. For that reason, everything you write to these disk devices is also accessible by the other node.
When creating services later in this chapter, you will set up a fi le system resource that is man-aged by the cluster. This fi le system resource will be running on one of the nodes, and if that node experiences a problem, it will fail over to the other node to ensure that, even after a fail-ure, the fi le system is still accessible. Figure 20.2 gives an overview of an iSCSI confi guration.
Setting Up the iSCSI Target
To set up an iSCSI target, you’ll need a few things. First you’ll need something to share. This can be any storage device, such as a complete disk, an LVM logical volume, a parti-tion, or a sparse fi le. In Exercise 20.2, fi rst you will create an LVM volume to use as a shared storage device.
c20.indd 537c20.indd 537 1/8/2013 10:54:04 AM1/8/2013 10:54:04 AM
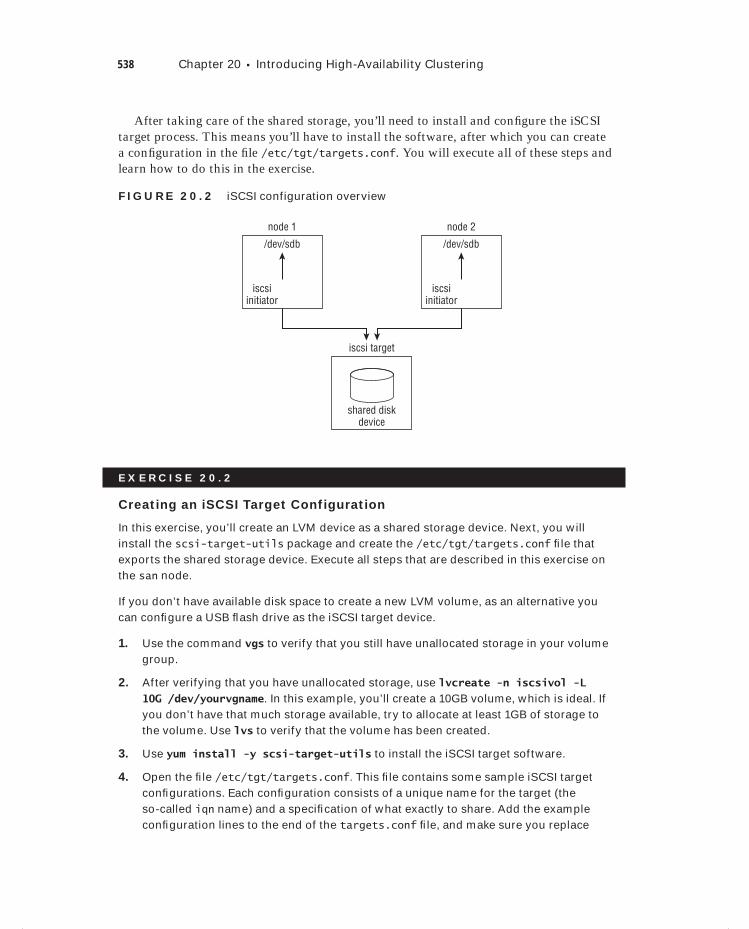
538 Chapter 20 Introducing High-Availability Clustering
After taking care of the shared storage, you’ll need to install and confi gure the iSCSI target process. This means you’ll have to install the software, after which you can create a confi guration in the fi le /etc/tgt/targets.conf. You will execute all of these steps and learn how to do this in the exercise.
F I GU R E 20 . 2 iSCSI configuration overview
shared diskdevice
/dev/sdb /dev/sdb
iscsiinitiator
node 1 node 2
iscsiinitiator
iscsi target
E X E R C I S E 2 0 . 2
Creating an iSCSI Target Configuration
In this exercise, you’ll create an LVM device as a shared storage device. Next, you will install the scsi-target-utils package and create the /etc/tgt/targets.conf fi le that exports the shared storage device. Execute all steps that are described in this exercise on the san node.
If you don’t have available disk space to create a new LVM volume, as an alternative you can confi gure a USB fl ash drive as the iSCSI target device.
1. Use the command vgs to verify that you still have unallocated storage in your volume group.
2. After verifying that you have unallocated storage, use lvcreate -n iscsivol -L 10G /dev/yourvgname. In this example, you’ll create a 10GB volume, which is ideal. If you don’t have that much storage available, try to allocate at least 1GB of storage to the volume. Use lvs to verify that the volume has been created.
3. Use yum install -y scsi-target-utils to install the iSCSI target software.
4. Open the fi le /etc/tgt/targets.conf. This fi le contains some sample iSCSI target confi gurations. Each confi guration consists of a unique name for the target (the so-called iqn name) and a specifi cation of what exactly to share. Add the example confi guration lines to the end of the targets.conf fi le, and make sure you replace
c20.indd 538c20.indd 538 1/8/2013 10:54:04 AM1/8/2013 10:54:04 AM
Configuring Cluster-Based Services 539
E X E R C I S E 2 0 . 2 ( c ont inue d )
the name of the volume group and logical volume to match the names of the vol-ume group and logical volume you are using:
<target iqn.2012-12.com.example.san:mytarget>
backing-store /dev/myvolumegroup/iscsivol
</target>
5. Use service tgtd start to start the iSCSI target software. Once you’ve done that, run chkconfig tgtd on to enable the iSCSI target.
Setting Up the iSCSI Initiator
At this point, your iSCSI target is ready for use. Now it’s time to create the iSCSI initiator confi guration. You can think of the iSCSI initiator as an SCSI controller. The only differ-ence between an iSCSI SCSI controller and a regular SCSI controller is that in an iSCSI controller, you’re using a network cable instead of a SCSI fl at cable. In an iSCSI controller, IP packets are used to send the SCSI commands to the iSCSI target.
Before establishing a connection with the iSCSI initiator, your nodes will show local disk devices only. Once the iSCSI connection has been established, you’ll also see the iSCSI disk devices. In Exercise 20.3, you will use the lsscsi command to see this.
To create the iSCSI connections, you’ll use the iscsiadm command. This command stores its confi guration in a database, not in a text fi le. For that reason, you need to use the iscsiadm command for everything you want to do with your iSCSI connections. First, you’ll have to discover the LUNs that are offered by a specifi c target. Next, you’ll need to log in to the target and, in case you don’t need the iSCSI connection anymore, you’ll need to log out. If you don’t log out from an iSCSI connection, it will be reestablished every time the iSCSI initiator process is started.
To manage connections to an iSCSI SAN, you’ll need four different iSCSI commands.
iscsiadm --mode discoverydb --type sendtargets --portal 192.168.1.70
--discover This command connects to the IP address that is specifi ed with the --portal option and discovers all iSCSI targets and LUNS offered by the targets that are available. See Listing 20.1 for an example of its output.
Listing 20.1: Discovering iSCSI targets
[root@node2 ∼]# iscsiadm --mode discoverydb --type sendtargets --portal 192.168.1.70 --discover
Starting iscsid: [ OK ]
192.168.1.70:3260,1 iqn.2012-8.com.example.san:mytarget
[root@node2 ∼]#
iscsiadm --mode node --targetname iqn.2012-8.com.example.san:mytarget --portal
192.168.1.70 --login This command uses the target name that was discovered with the previous command to make a connection to the iSCSI target. In Listing 20.2, you can see the results of this command.
c20.indd 539c20.indd 539 1/8/2013 10:54:04 AM1/8/2013 10:54:04 AM

540 Chapter 20 Introducing High-Availability Clustering
Listing 20.2: Connecting to an iSCSI target
[root@node2 ∼]# iscsiadm --mode node --targetname iqn.2012-8.com.example.san:mytarget --portal 192.168.1.70 --login
Logging in to [iface: default, target: iqn.2012-8.com.example.san:mytarget, portal: 192.168.1.70,3260] (multiple)
Login to [iface: default, target: iqn.2012-8.com.example.san:mytarget, portal: 192.168.1.70,3260] successful.
[root@node2 ∼]#
iscsiadm --mode node --targetname iqn.2012-8.com.example.san:mytarget --portal
192.168.1.70 –logout This command logs you out from a currently connected target. After restarting the iSCSI initiator software, the connection will be restored because it is still in the database.
iscsiadm --mode node --targetname iqn.2012-8.com.example.san:mytarget --portal
192.168.1.70 --delete Use this command to delete a current connection. After restart-ing the iSCSI initiator, the connection won’t be reestablished because the confi guration that was created before is now deleted from the server.
After connecting to an iSCSI target, you can request current status parameters about the connection. To do this, use one of the following commands:
iscsiadm --mode discoverydb Shows information about the targets that have been discovered
iscsiadm --mode node Shows which targets this node is confi gured to connect to
iscsiadm --mode session Shows all sessions that are currently existing
In Exercise 20.3, you will connect the servers that you want to use as nodes in the clus-ter to the iSCSI target you created in Exercise 20.2.
E X E R C I S E 2 0 . 3
Connecting to an iSCSI Target
In this exercise, you’ll connect all cluster nodes to the storage using the iscsiadm com-mands you just learned. Make sure to execute the following steps on all computers that will be connected to the cluster.
1. Use yum install iscsi-initiator-utils to install the iSCSI initiator on all nodes.
2. Use iscsiadm --mode discoverydb --type sendtargets --portal 192.168.1.70 to get a list of targets that are available on that IP address. Notice the exact name of the target, because you’ll need it for the next step. Also make sure to replace the IP address used in the example by the IP address that your iSCSI target is actually using.
3. Using the name of the target that you just discovered, log in to it using the following command: iscsiadm --mode node --targetname iqn.2012-8.com.example.san:mytarget --portal 192.168.1.70 --login.
c20.indd 540c20.indd 540 1/8/2013 10:54:05 AM1/8/2013 10:54:05 AM

Installing the Red Hat High Availability Add-on 541
E X E R C I S E 2 0 . 3 ( c ont inue d )
4. Use yum -y install lsscsi to install the lsscsi package, and enter lsscsi to verify that you are connected to the target. You should see the iSCSI disk listed as disk type VIRTUAL-DISK.
[root@node2 ∼]# lsscsi[0:0:0:0] disk ATA WDC WD2500BEKT-7 01.0 /dev/sda
[1:0:0:0] cd/dvd TEAC DVD-ROM DV-28SW 3.2C /dev/sr0
[6:0:0:0] storage IET Controller 0001 -
[6:0:0:1] disk IET VIRTUAL-DISK 0001 /dev/sdb
5. Reboot the nodes, and ensure that the iSCSI target connection comes up after the reboot.
If all goes well, you’ll have two working iSCSI target connections at this point. In some cases, it may refuse to come up after a restart. If that happens, use the following checklist for troubleshooting:
Is the tgtd process in the runlevels on the iSCSI target?
Is port 3260 open in the firewall?
Is the iSCSI initiator process started automatically on the nodes?
Now that you’ve set up the iSCSI confi guration and you know how to set up bonding, it’s time to move ahead and start the installation of the cluster itself.
Installing the Red Hat High Availability Add-onOnce you’ve set up all of the base requirements, you’re just about ready to start the instal-lation of the Red Hat High Availability add-on on the two nodes. Before you start doing that, however, there’s one more thing you need to address: all nodes should be able to reach each other by name. This means you have to create entries in DNS or create an /etc/hosts fi le and distribute it among the nodes. Follow the steps in Exercise 20.4 to make sure that all the hosts recognize each other.
E X E R C I S E 2 0 . 4
Creating an /etc/hosts File
Creating an /etc/hosts fi le so that all hosts in the cluster are capable of resolving each other by name is an essential part of the cluster setup. Without proper name resolution, your cluster setup will assuredly fail.
c20.indd 541c20.indd 541 1/8/2013 10:54:05 AM1/8/2013 10:54:05 AM
Dow
nlo
ad fro
m W
ow
! eBook
<w
ww
.wow
ebook.
com
>
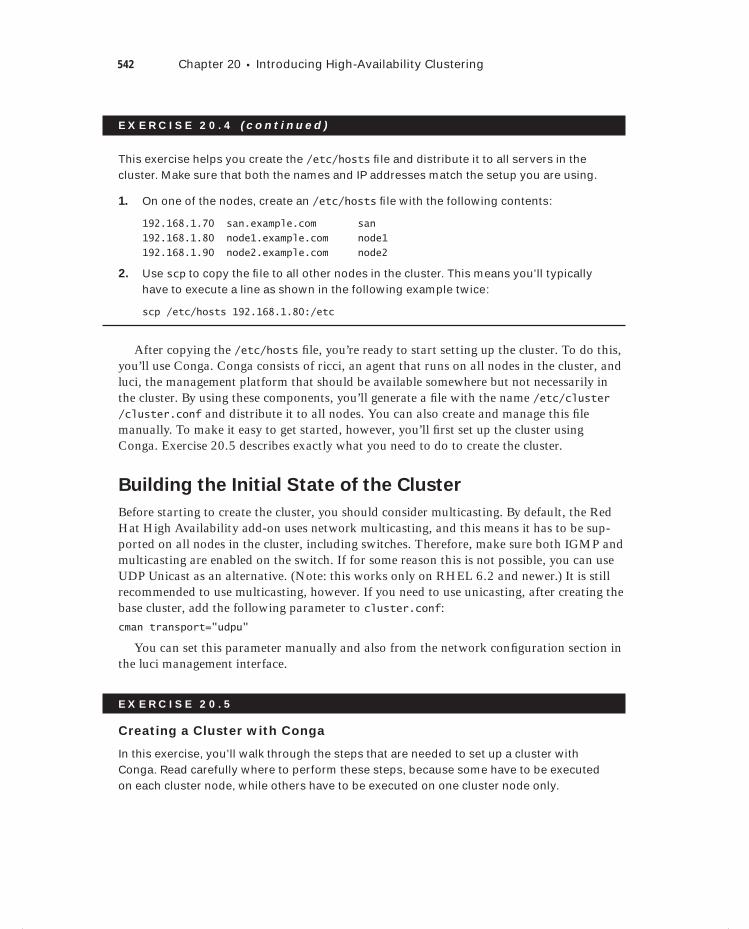
542 Chapter 20 Introducing High-Availability Clustering
E X E R C I S E 2 0 . 4 ( c ont inue d )
This exercise helps you create the /etc/hosts fi le and distribute it to all servers in the cluster. Make sure that both the names and IP addresses match the setup you are using.
1. On one of the nodes, create an /etc/hosts fi le with the following contents:
192.168.1.70 san.example.com san
192.168.1.80 node1.example.com node1
192.168.1.90 node2.example.com node2
2. Use scp to copy the fi le to all other nodes in the cluster. This means you’ll typically have to execute a line as shown in the following example twice:
scp /etc/hosts 192.168.1.80:/etc
After copying the /etc/hosts fi le, you’re ready to start setting up the cluster. To do this, you’ll use Conga. Conga consists of ricci, an agent that runs on all nodes in the cluster, and luci, the management platform that should be available somewhere but not necessarily in the cluster. By using these components, you’ll generate a fi le with the name /etc/cluster/cluster.conf and distribute it to all nodes. You can also create and manage this fi le manually. To make it easy to get started, however, you’ll fi rst set up the cluster using Conga. Exercise 20.5 describes exactly what you need to do to create the cluster.
Building the Initial State of the Cluster
Before starting to create the cluster, you should consider multicasting. By default, the Red Hat High Availability add-on uses network multicasting, and this means it has to be sup-ported on all nodes in the cluster, including switches. Therefore, make sure both IGMP and multicasting are enabled on the switch. If for some reason this is not possible, you can use UDP Unicast as an alternative. (Note: this works only on RHEL 6.2 and newer.) It is still recommended to use multicasting, however. If you need to use unicasting, after creating the base cluster, add the following parameter to cluster.conf:
cman transport="udpu"
You can set this parameter manually and also from the network confi guration section in the luci management interface.
E X E R C I S E 2 0 . 5
Creating a Cluster with Conga
In this exercise, you’ll walk through the steps that are needed to set up a cluster with Conga. Read carefully where to perform these steps, because some have to be executed on each cluster node, while others have to be executed on one cluster node only.
c20.indd 542c20.indd 542 1/8/2013 10:54:05 AM1/8/2013 10:54:05 AM
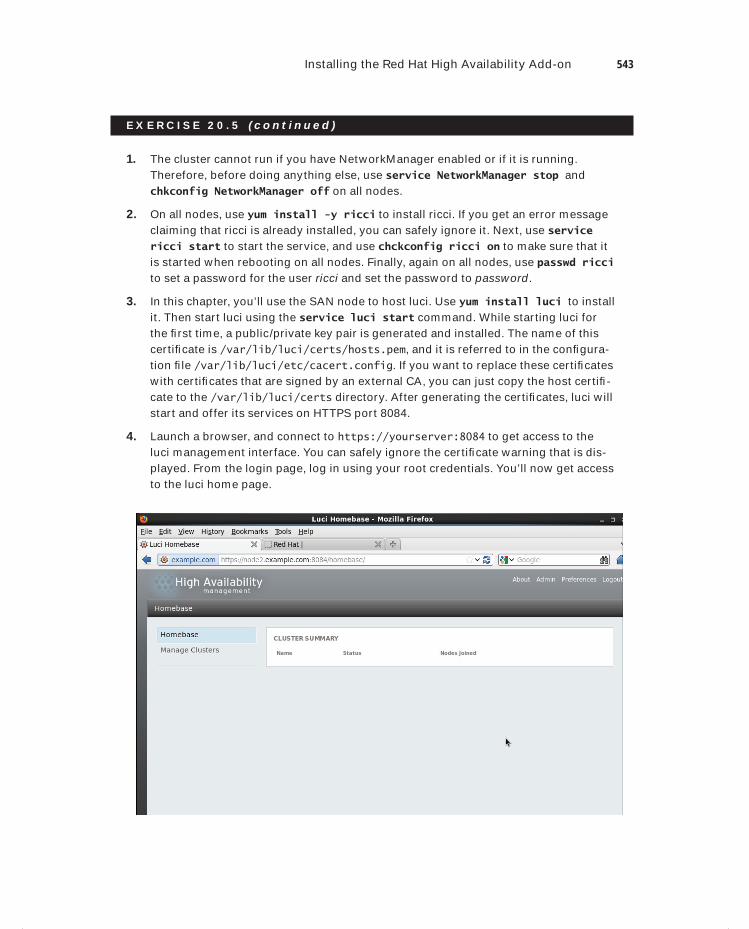
Installing the Red Hat High Availability Add-on 543
E X E R C I S E 2 0 . 5 ( c ont inue d )
1. The cluster cannot run if you have NetworkManager enabled or if it is running. Therefore, before doing anything else, use service NetworkManager stop and chkconfig NetworkManager off on all nodes.
2. On all nodes, use yum install -y ricci to install ricci. If you get an error message claiming that ricci is already installed, you can safely ignore it. Next, use service ricci start to start the service, and use chckconfig ricci on to make sure that it is started when rebooting on all nodes. Finally, again on all nodes, use passwd ricci to set a password for the user ricci and set the password to password.
3. In this chapter, you’ll use the SAN node to host luci. Use yum install luci to install it. Then start luci using the service luci start command. While starting luci for the fi rst time, a public/private key pair is generated and installed. The name of this certifi cate is /var/lib/luci/certs/hosts.pem, and it is referred to in the confi gura-tion fi le /var/lib/luci/etc/cacert.config. If you want to replace these certifi cates with certifi cates that are signed by an external CA, you can just copy the host certifi -cate to the /var/lib/luci/certs directory. After generating the certifi cates, luci will start and offer its services on HTTPS port 8084.
4. Launch a browser, and connect to https://yourserver:8084 to get access to the luci management interface. You can safely ignore the certifi cate warning that is dis-played. From the login page, log in using your root credentials. You’ll now get access to the luci home page.
c20.indd 543c20.indd 543 1/8/2013 10:54:05 AM1/8/2013 10:54:05 AM
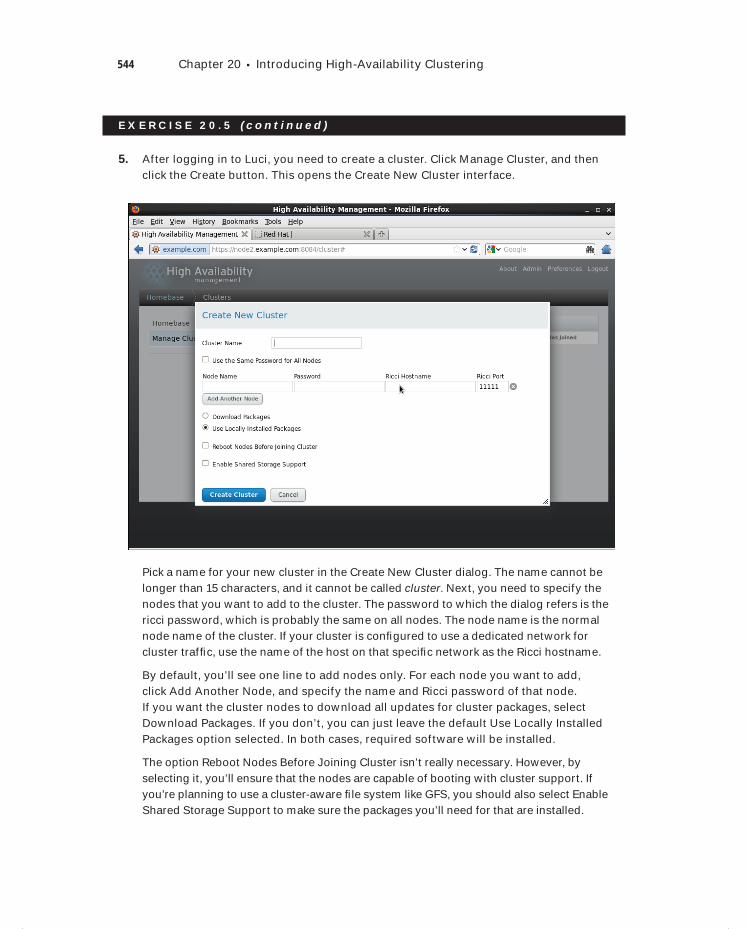
544 Chapter 20 Introducing High-Availability Clustering
E X E R C I S E 2 0 . 5 ( c ont inue d )
5. After logging in to Luci, you need to create a cluster. Click Manage Cluster, and then click the Create button. This opens the Create New Cluster interface.
Pick a name for your new cluster in the Create New Cluster dialog. The name cannot be longer than 15 characters, and it cannot be called cluster. Next, you need to specify the nodes that you want to add to the cluster. The password to which the dialog refers is the ricci password, which is probably the same on all nodes. The node name is the normal node name of the cluster. If your cluster is confi gured to use a dedicated network for cluster traffi c, use the name of the host on that specifi c network as the Ricci hostname.
By default, you’ll see one line to add nodes only. For each node you want to add, click Add Another Node, and specify the name and Ricci password of that node. If you want the cluster nodes to download all updates for cluster packages, select Download Packages. If you don’t, you can just leave the default Use Locally Installed Packages option selected. In both cases, required software will be installed.
The option Reboot Nodes Before Joining Cluster isn’t really necessary. However, by selecting it, you’ll ensure that the nodes are capable of booting with cluster support. If you’re planning to use a cluster-aware fi le system like GFS, you should also select Enable Shared Storage Support to make sure the packages you’ll need for that are installed.
c20.indd 544c20.indd 544 1/8/2013 10:54:05 AM1/8/2013 10:54:05 AM
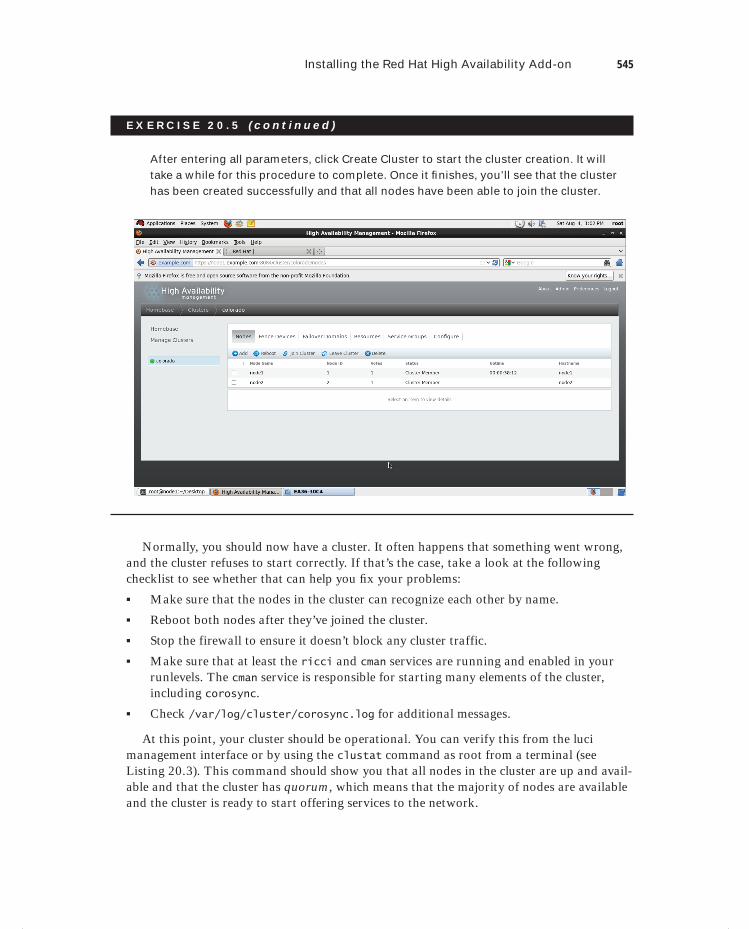
Installing the Red Hat High Availability Add-on 545
E X E R C I S E 2 0 . 5 ( c ont inue d )
After entering all parameters, click Create Cluster to start the cluster creation. It will take a while for this procedure to complete. Once it fi nishes, you’ll see that the cluster has been created successfully and that all nodes have been able to join the cluster.
Normally, you should now have a cluster. It often happens that something went wrong, and the cluster refuses to start correctly. If that’s the case, take a look at the following checklist to see whether that can help you fi x your problems:
Make sure that the nodes in the cluster can recognize each other by name.
Reboot both nodes after they’ve joined the cluster.
Stop the firewall to ensure it doesn’t block any cluster traffic.
Make sure that at least the ricci and cman services are running and enabled in your runlevels. The cman service is responsible for starting many elements of the cluster, including corosync.
Check /var/log/cluster/corosync.log for additional messages.
At this point, your cluster should be operational. You can verify this from the luci management interface or by using the clustat command as root from a terminal (see Listing 20.3). This command should show you that all nodes in the cluster are up and avail-able and that the cluster has quorum, which means that the majority of nodes are available and the cluster is ready to start offering services to the network.
c20.indd 545c20.indd 545 1/8/2013 10:54:06 AM1/8/2013 10:54:06 AM
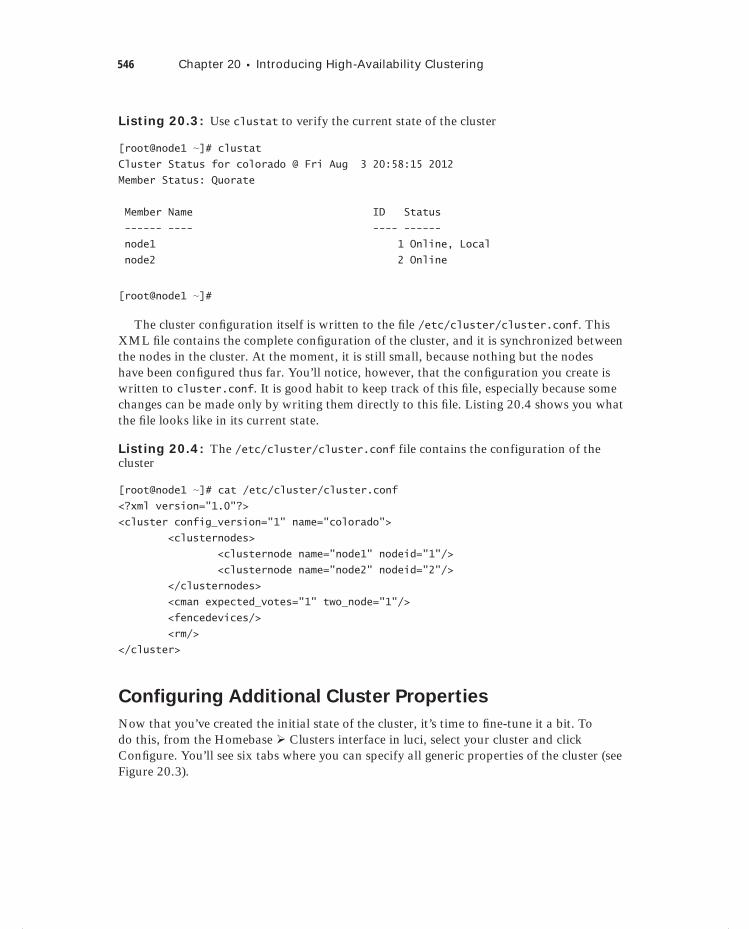
546 Chapter 20 Introducing High-Availability Clustering
Listing 20.3: Use clustat to verify the current state of the cluster
[root@node1 ∼]# clustatCluster Status for colorado @ Fri Aug 3 20:58:15 2012
Member Status: Quorate
Member Name ID Status
------ ---- ---- ------
node1 1 Online, Local
node2 2 Online
[root@node1 ∼]#
The cluster confi guration itself is written to the fi le /etc/cluster/cluster.conf. This XML fi le contains the complete confi guration of the cluster, and it is synchronized between the nodes in the cluster. At the moment, it is still small, because nothing but the nodes have been confi gured thus far. You’ll notice, however, that the confi guration you create is written to cluster.conf. It is good habit to keep track of this fi le, especially because some changes can be made only by writing them directly to this fi le. Listing 20.4 shows you what the fi le looks like in its current state.
Listing 20.4: The /etc/cluster/cluster.conf file contains the configuration of the cluster
[root@node1 ∼]# cat /etc/cluster/cluster.conf<?xml version="1.0"?>
<cluster config_version="1" name="colorado">
<clusternodes>
<clusternode name="node1" nodeid="1"/>
<clusternode name="node2" nodeid="2"/>
</clusternodes>
<cman expected_votes="1" two_node="1"/>
<fencedevices/>
<rm/>
</cluster>
Configuring Additional Cluster Properties
Now that you’ve created the initial state of the cluster, it’s time to fi ne-tune it a bit. To do this, from the Homebase Clusters interface in luci, select your cluster and click Confi gure. You’ll see six tabs where you can specify all generic properties of the cluster (see Figure 20.3).
c20.indd 546c20.indd 546 1/8/2013 10:54:06 AM1/8/2013 10:54:06 AM
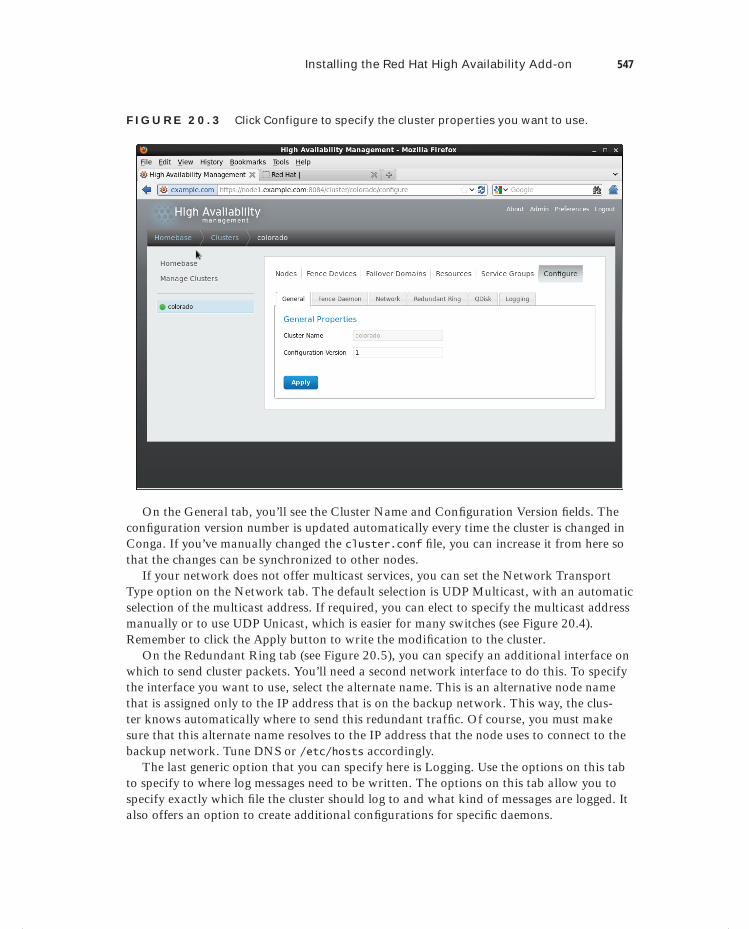
Installing the Red Hat High Availability Add-on 547
F I GU R E 20 . 3 Click Configure to specify the cluster properties you want to use.
On the General tab, you’ll see the Cluster Name and Confi guration Version fi elds. The confi guration version number is updated automatically every time the cluster is changed in Conga. If you’ve manually changed the cluster.conf fi le, you can increase it from here so that the changes can be synchronized to other nodes.
If your network does not offer multicast services, you can set the Network Transport Type option on the Network tab. The default selection is UDP Multicast, with an automatic selection of the multicast address. If required, you can elect to specify the multicast address manually or to use UDP Unicast, which is easier for many switches (see Figure 20.4). Remember to click the Apply button to write the modifi cation to the cluster.
On the Redundant Ring tab (see Figure 20.5), you can specify an additional interface on which to send cluster packets. You’ll need a second network interface to do this. To specify the interface you want to use, select the alternate name. This is an alternative node name that is assigned only to the IP address that is on the backup network. This way, the clus-ter knows automatically where to send this redundant traffi c. Of course, you must make sure that this alternate name resolves to the IP address that the node uses to connect to the backup network. Tune DNS or /etc/hosts accordingly.
The last generic option that you can specify here is Logging. Use the options on this tab to specify to where log messages need to be written. The options on this tab allow you to specify exactly which fi le the cluster should log to and what kind of messages are logged. It also offers an option to create additional confi gurations for specifi c daemons.
c20.indd 547c20.indd 547 1/8/2013 10:54:06 AM1/8/2013 10:54:06 AM
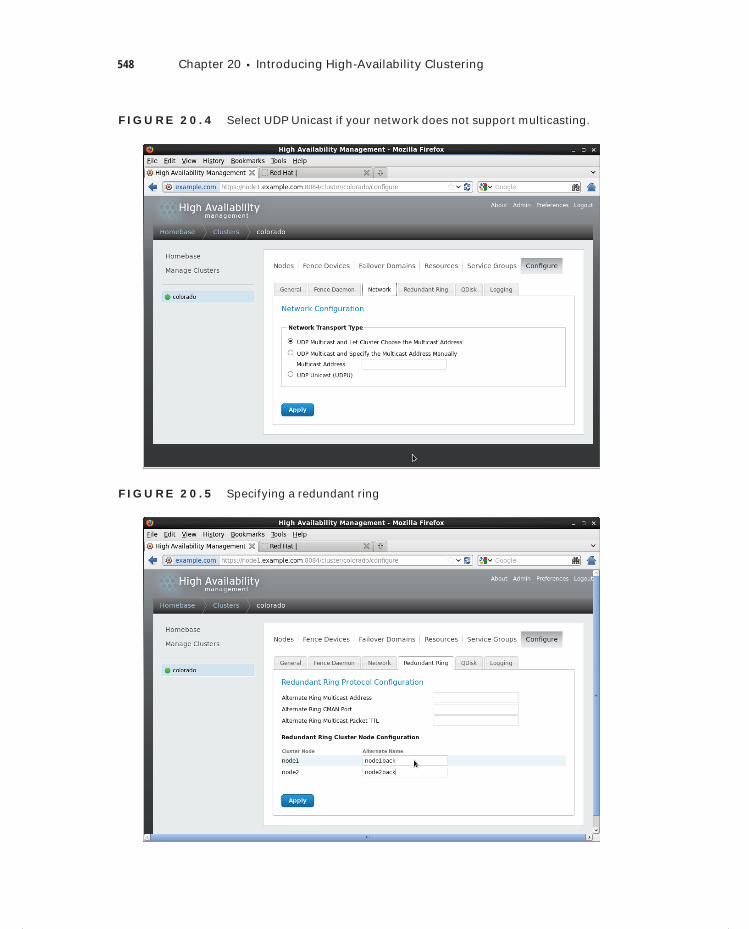
548 Chapter 20 Introducing High-Availability Clustering
F I GU R E 20 . 4 Select UDP Unicast if your network does not support multicasting.
F I GU R E 20 .5 Specifying a redundant ring
c20.indd 548c20.indd 548 1/8/2013 10:54:06 AM1/8/2013 10:54:06 AM
Installing the Red Hat High Availability Add-on 549
Configuring a Quorum Disk
As you have learned, quorum is an important mechanism in the cluster that helps nodes deter-mine whether they are part of the majority of the cluster. By default, every node has one vote, and if a node sees at least half of the nodes plus one, then there is quorum. An exception exists for two-node clusters, where the <cman two_node="1"> parameter is set in /etc/cluster/cluster.conf to indicate that it is a two-node cluster in which the quorum rules are different because otherwise the cluster could never have quorum if one of the nodes is down.
Particularly in a two-node cluster but also in other clusters that have an even number of nodes, a situation of a split brain can arise. That is a condition where two parts of the cluster, which have an equal amount of cluster votes, can no longer reach one another. This would mean that the services could not run anywhere. To prevent situations such as this, using a quorum disk can be useful.
A quorum disk involves two parts. First you’ll need a shared storage device that can be accessed by all nodes in the cluster. Then you’ll need heuristics testing. Heuristics testing consists of at least one test that a node has to perform successfully before it can connect to the quorum disk.
If a situation of split brain arises, the nodes will all poll the quorum disk. If they’re capable of performing the heuristics test, the node can count an extra vote toward its quorum. If the heuristics test cannot be executed successfully, the node will not have access to the vote offered by the quorum disk, and it will therefore lose quorum and know that it has to be terminated.
To set up a quorum disk, you have to perform these steps:
1. Create a partition on the shared disk device.
2. Use mkqdisk to mark this partition as a quorum disk.
3. Specify the heuristics to use in the Conga management interface.
In Exercise 20.6, you’ll perform these steps.
E X E R C I S E 2 0 . 6
Creating a Quorum Disk
In this exercise, you’ll set up your cluster to use a quorum disk. Access to the shared iSCSI device is needed in order to perform this exercise.
1. On one cluster node, use fdisk to create a partition on the iSCSI device. It doesn’t need to be big—100MB is suffi cient.
2. On the other cluster node, use the partx -a command to update the partition table. Now check /proc/partitions on both nodes to verify that the partition on the iSCSI disk has been created.
3. On one of the nodes, use the following command to create the quorum disk: mkqdisk -c /dev/sdb1 -l quorumdisk. Before typing this command, make sure to double-check the name of the device you are using.
4. On the other node, use mkqdisk -L to show all quorum disks. You should see the quorum disk with the label quorumdisk that you just created.
c20.indd 549c20.indd 549 1/8/2013 10:54:07 AM1/8/2013 10:54:07 AM
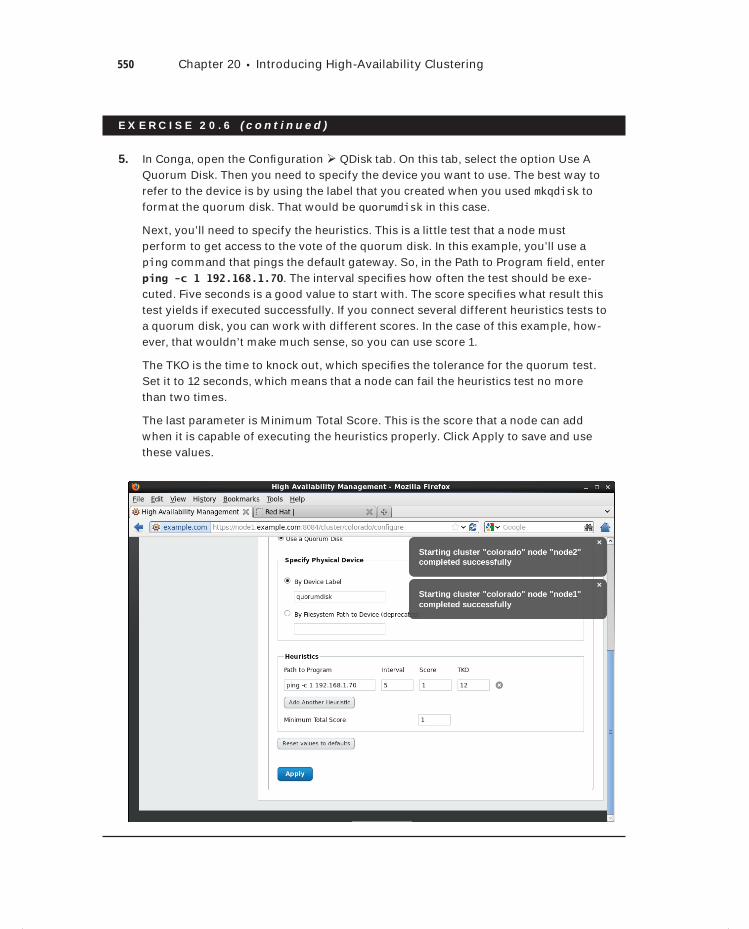
550 Chapter 20 Introducing High-Availability Clustering
E X E R C I S E 2 0 . 6 ( c ont inue d )
5. In Conga, open the Confi guration QDisk tab. On this tab, select the option Use A Quorum Disk. Then you need to specify the device you want to use. The best way to refer to the device is by using the label that you created when you used mkqdisk to format the quorum disk. That would be quorumdisk in this case.
Next, you’ll need to specify the heuristics. This is a little test that a node must perform to get access to the vote of the quorum disk. In this example, you’ll use a ping command that pings the default gateway. So, in the Path to Program fi eld, enter ping -c 1 192.168.1.70. The interval specifi es how often the test should be exe-cuted. Five seconds is a good value to start with. The score specifi es what result this test yields if executed successfully. If you connect several different heuristics tests to a quorum disk, you can work with different scores. In the case of this example, how-ever, that wouldn’t make much sense, so you can use score 1.
The TKO is the time to knock out, which specifi es the tolerance for the quorum test. Set it to 12 seconds, which means that a node can fail the heuristics test no more than two times.
The last parameter is Minimum Total Score. This is the score that a node can add when it is capable of executing the heuristics properly. Click Apply to save and use these values.
c20.indd 550c20.indd 550 1/8/2013 10:54:07 AM1/8/2013 10:54:07 AM
Installing the Red Hat High Availability Add-on 551
After creating the quorum device, you can use the cman_tool status command to verify that it works as expected (see Listing 20.5). Look at the number of nodes (which is set to 2) and the number of expected nodes (which is set to 3). The reason for this can be found in the quorum device votes, which as you can see is set to 1. This means that the quorum device is working, and you’re ready to move on to the next step.
Listing 20.5: Use cman_tool status to verify the working of the quorum device
[root@node1 ∼]# cman_tool statusVersion: 6.2.0
Config Version: 2
Cluster Name: colorado
Cluster Id: 17154
Cluster Member: Yes
Cluster Generation: 320
Membership state: Cluster-Member
Nodes: 2
Expected votes: 3
Quorum device votes: 1
Total votes: 3
Node votes: 1
Quorum: 2
Active subsystems: 11
Flags:
Ports Bound: 0 11 177 178
Node name: node1
Node ID: 1
Multicast addresses: 239.192.67.69
Node addresses: 192.168.1.80
Setting Up Fencing
After setting up a quorum disk, you’ll need to address fencing. Fencing is what you need to maintain the integrity of the cluster. If the Totem protocol packets sent out by Corosync can no longer reach another node, before taking over its services, you must make sure that the other node is really down. The best way to achieve this is by using hardware fencing.
Hardware fencing means that a hardware device is used to terminate a failing node. Typically, a power switch or integrated management card, such as HP ILO or Dell Drac, is used for this purpose.
To set up fencing, you need to perform two different steps. First you need to confi gure the fence devices, and then you associate the fence devices to the nodes in the network. To
c20.indd 551c20.indd 551 1/8/2013 10:54:07 AM1/8/2013 10:54:07 AM
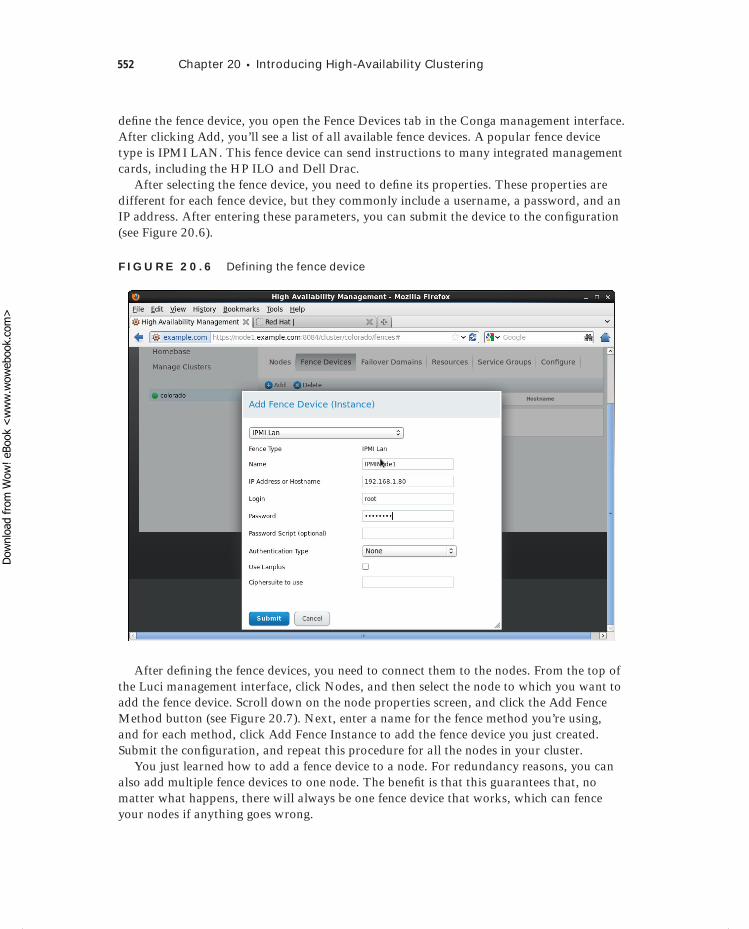
552 Chapter 20 Introducing High-Availability Clustering
defi ne the fence device, you open the Fence Devices tab in the Conga management interface. After clicking Add, you’ll see a list of all available fence devices. A popular fence device type is IPMI LAN. This fence device can send instructions to many integrated management cards, including the HP ILO and Dell Drac.
After selecting the fence device, you need to defi ne its properties. These properties are different for each fence device, but they commonly include a username, a password, and an IP address. After entering these parameters, you can submit the device to the confi guration (see Figure 20.6).
F I GU R E 20 .6 Defining the fence device
After defi ning the fence devices, you need to connect them to the nodes. From the top of the Luci management interface, click Nodes, and then select the node to which you want to add the fence device. Scroll down on the node properties screen, and click the Add Fence Method button (see Figure 20.7). Next, enter a name for the fence method you’re using, and for each method, click Add Fence Instance to add the fence device you just created. Submit the confi guration, and repeat this procedure for all the nodes in your cluster.
You just learned how to add a fence device to a node. For redundancy reasons, you can also add multiple fence devices to one node. The benefi t is that this guarantees that, no matter what happens, there will always be one fence device that works, which can fence your nodes if anything goes wrong.
c20.indd 552c20.indd 552 1/8/2013 10:54:07 AM1/8/2013 10:54:07 AM
Dow
nlo
ad fro
m W
ow
! eBook
<w
ww
.wow
ebook.
com
>
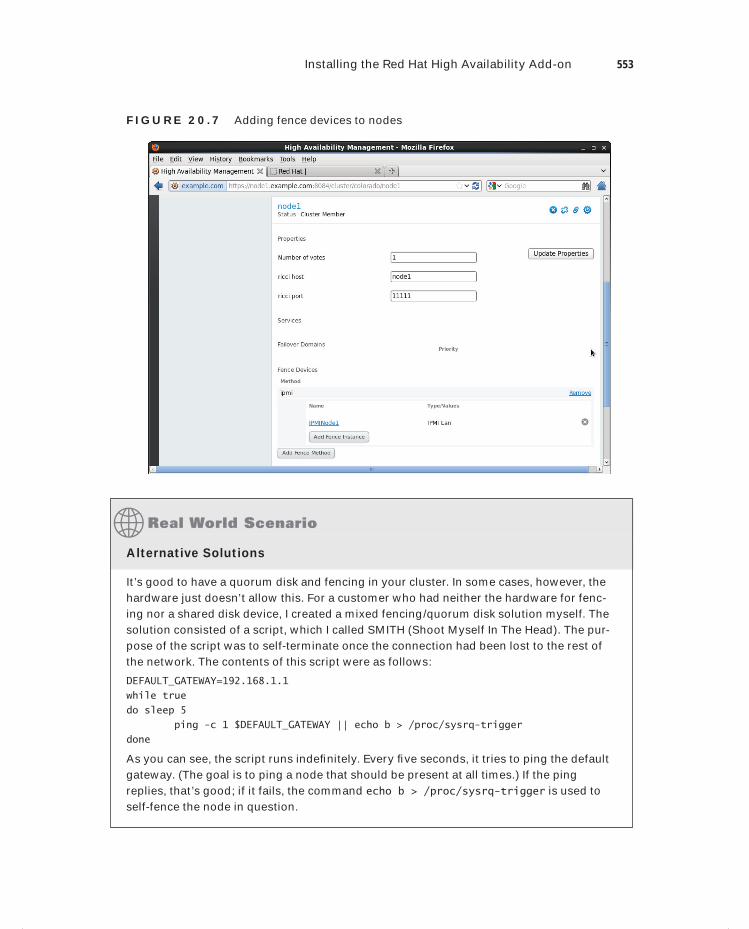
Installing the Red Hat High Availability Add-on 553
F I GU R E 20 .7 Adding fence devices to nodes
Alternative Solutions
It’s good to have a quorum disk and fencing in your cluster. In some cases, however, the hardware just doesn’t allow this. For a customer who had neither the hardware for fenc-ing nor a shared disk device, I created a mixed fencing/quorum disk solution myself. The solution consisted of a script, which I called SMITH (Shoot Myself In The Head). The pur-pose of the script was to self-terminate once the connection had been lost to the rest of the network. The contents of this script were as follows:
DEFAULT_GATEWAY=192.168.1.1
while true
do sleep 5
ping -c 1 $DEFAULT_GATEWAY || echo b > /proc/sysrq-trigger
done
As you can see, the script runs indefi nitely. Every fi ve seconds, it tries to ping the default gateway. (The goal is to ping a node that should be present at all times.) If the ping replies, that’s good; if it fails, the command echo b > /proc/sysrq-trigger is used to self-fence the node in question.
c20.indd 553c20.indd 553 1/8/2013 10:54:07 AM1/8/2013 10:54:07 AM
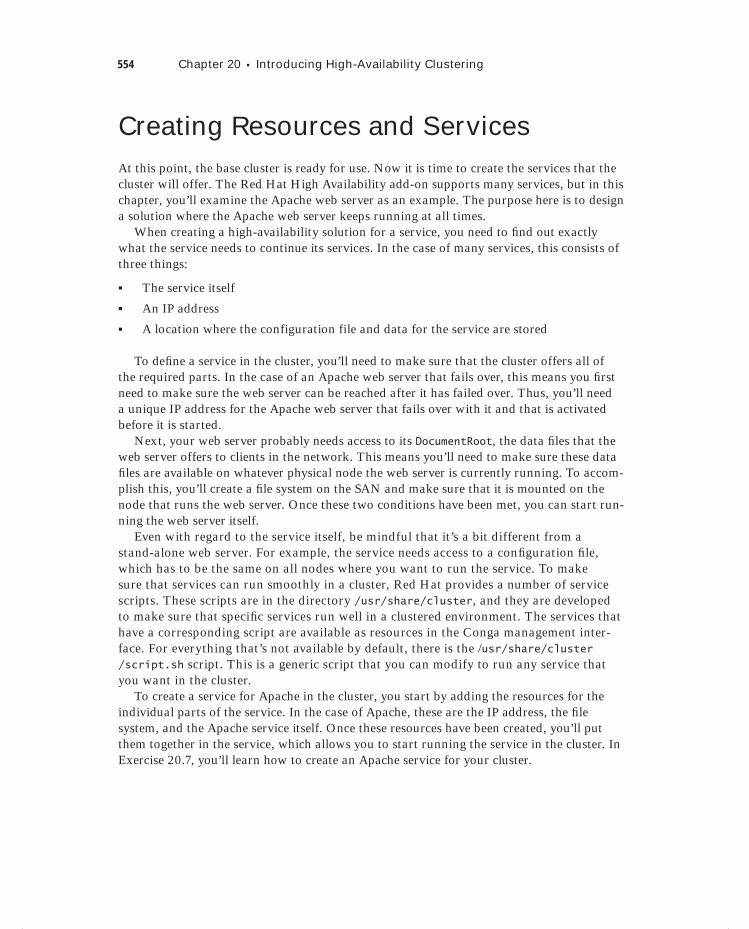
554 Chapter 20 Introducing High-Availability Clustering
Creating Resources and ServicesAt this point, the base cluster is ready for use. Now it is time to create the services that the cluster will offer. The Red Hat High Availability add-on supports many services, but in this chapter, you’ll examine the Apache web server as an example. The purpose here is to design a solution where the Apache web server keeps running at all times.
When creating a high-availability solution for a service, you need to fi nd out exactly what the service needs to continue its services. In the case of many services, this consists of three things:
The service itself
An IP address
A location where the configuration file and data for the service are stored
To defi ne a service in the cluster, you’ll need to make sure that the cluster offers all of the required parts. In the case of an Apache web server that fails over, this means you fi rst need to make sure the web server can be reached after it has failed over. Thus, you’ll need a unique IP address for the Apache web server that fails over with it and that is activated before it is started.
Next, your web server probably needs access to its DocumentRoot, the data fi les that the web server offers to clients in the network. This means you’ll need to make sure these data fi les are available on whatever physical node the web server is currently running. To accom-plish this, you’ll create a fi le system on the SAN and make sure that it is mounted on the node that runs the web server. Once these two conditions have been met, you can start run-ning the web server itself.
Even with regard to the service itself, be mindful that it’s a bit different from a stand-alone web server. For example, the service needs access to a confi guration fi le, which has to be the same on all nodes where you want to run the service. To make sure that services can run smoothly in a cluster, Red Hat provides a number of service scripts. These scripts are in the directory /usr/share/cluster, and they are developed to make sure that specifi c services run well in a clustered environment. The services that have a corresponding script are available as resources in the Conga management inter-face. For everything that’s not available by default, there is the /usr/share/cluster/script.sh script. This is a generic script that you can modify to run any service that you want in the cluster.
To create a service for Apache in the cluster, you start by adding the resources for the individual parts of the service. In the case of Apache, these are the IP address, the fi le system, and the Apache service itself. Once these resources have been created, you’ll put them together in the service, which allows you to start running the service in the cluster. In Exercise 20.7, you’ll learn how to create an Apache service for your cluster.
c20.indd 554c20.indd 554 1/8/2013 10:54:08 AM1/8/2013 10:54:08 AM
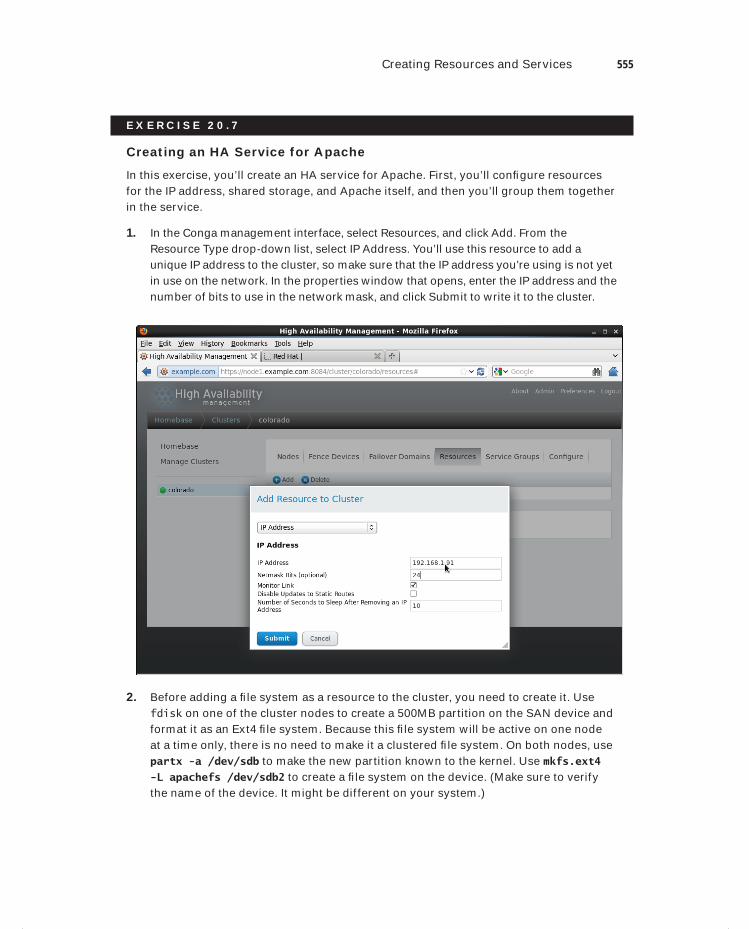
Creating Resources and Services 555
E X E R C I S E 2 0 . 7
Creating an HA Service for Apache
In this exercise, you’ll create an HA service for Apache. First, you’ll confi gure resources for the IP address, shared storage, and Apache itself, and then you’ll group them together in the service.
1. In the Conga management interface, select Resources, and click Add. From the Resource Type drop-down list, select IP Address. You’ll use this resource to add a unique IP address to the cluster, so make sure that the IP address you’re using is not yet in use on the network. In the properties window that opens, enter the IP address and the number of bits to use in the network mask, and click Submit to write it to the cluster.
2. Before adding a fi le system as a resource to the cluster, you need to create it. Use fdisk on one of the cluster nodes to create a 500MB partition on the SAN device and format it as an Ext4 fi le system. Because this fi le system will be active on one node at a time only, there is no need to make it a clustered fi le system. On both nodes, use partx -a /dev/sdb to make the new partition known to the kernel. Use mkfs.ext4 -L apachefs /dev/sdb2 to create a fi le system on the device. (Make sure to verify the name of the device. It might be different on your system.)
c20.indd 555c20.indd 555 1/8/2013 10:54:08 AM1/8/2013 10:54:08 AM
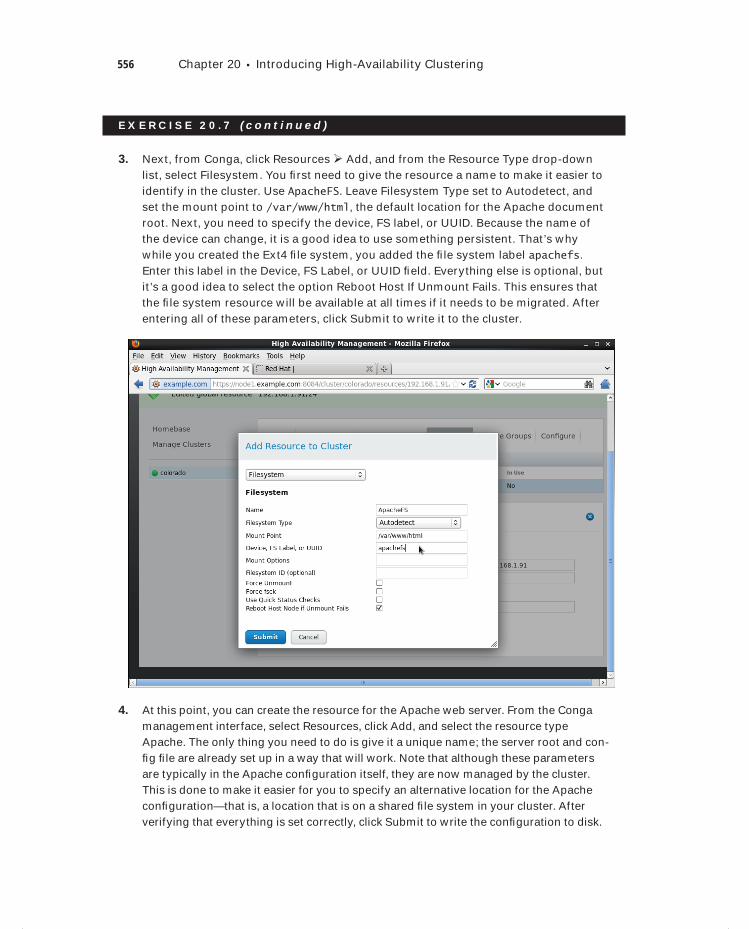
556 Chapter 20 Introducing High-Availability Clustering
E X E R C I S E 2 0 . 7 ( c ont inue d )
3. Next, from Conga, click Resources Add, and from the Resource Type drop-down list, select Filesystem. You fi rst need to give the resource a name to make it easier to identify in the cluster. Use ApacheFS. Leave Filesystem Type set to Autodetect, and set the mount point to /var/www/html, the default location for the Apache document root. Next, you need to specify the device, FS label, or UUID. Because the name of the device can change, it is a good idea to use something persistent. That’s why while you created the Ext4 fi le system, you added the fi le system label apachefs. Enter this label in the Device, FS Label, or UUID fi eld. Everything else is optional, but it’s a good idea to select the option Reboot Host If Unmount Fails. This ensures that the fi le system resource will be available at all times if it needs to be migrated. After entering all of these parameters, click Submit to write it to the cluster.
4. At this point, you can create the resource for the Apache web server. From the Conga management interface, select Resources, click Add, and select the resource type Apache. The only thing you need to do is give it a unique name; the server root and con-fi g fi le are already set up in a way that will work. Note that although these parameters are typically in the Apache confi guration itself, they are now managed by the cluster. This is done to make it easier for you to specify an alternative location for the Apache confi guration—that is, a location that is on a shared fi le system in your cluster. After verifying that everything is set correctly, click Submit to write the confi guration to disk.
c20.indd 556c20.indd 556 1/8/2013 10:54:08 AM1/8/2013 10:54:08 AM
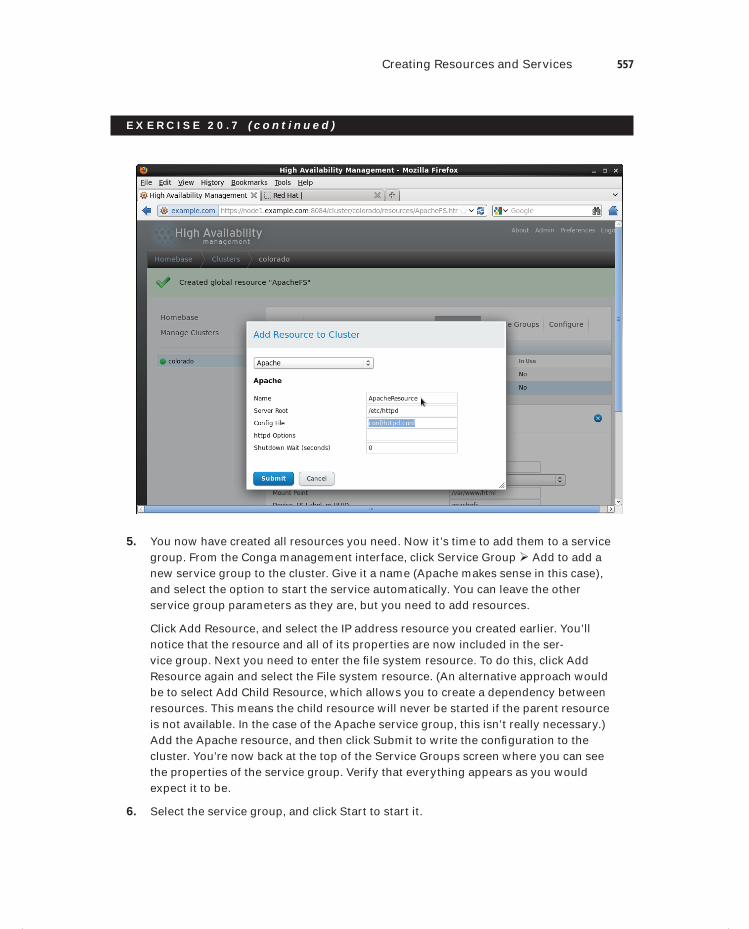
Creating Resources and Services 557
E X E R C I S E 2 0 . 7 ( c ont inue d )
5. You now have created all resources you need. Now it’s time to add them to a service group. From the Conga management interface, click Service Group Add to add a new service group to the cluster. Give it a name (Apache makes sense in this case), and select the option to start the service automatically. You can leave the other service group parameters as they are, but you need to add resources.
Click Add Resource, and select the IP address resource you created earlier. You’ll notice that the resource and all of its properties are now included in the ser-vice group. Next you need to enter the fi le system resource. To do this, click Add Resource again and select the File system resource. (An alternative approach would be to select Add Child Resource, which allows you to create a dependency between resources. This means the child resource will never be started if the parent resource is not available. In the case of the Apache service group, this isn’t really necessary.) Add the Apache resource, and then click Submit to write the confi guration to the cluster. You’re now back at the top of the Service Groups screen where you can see the properties of the service group. Verify that everything appears as you would expect it to be.
6. Select the service group, and click Start to start it.
c20.indd 557c20.indd 557 1/8/2013 10:54:08 AM1/8/2013 10:54:08 AM
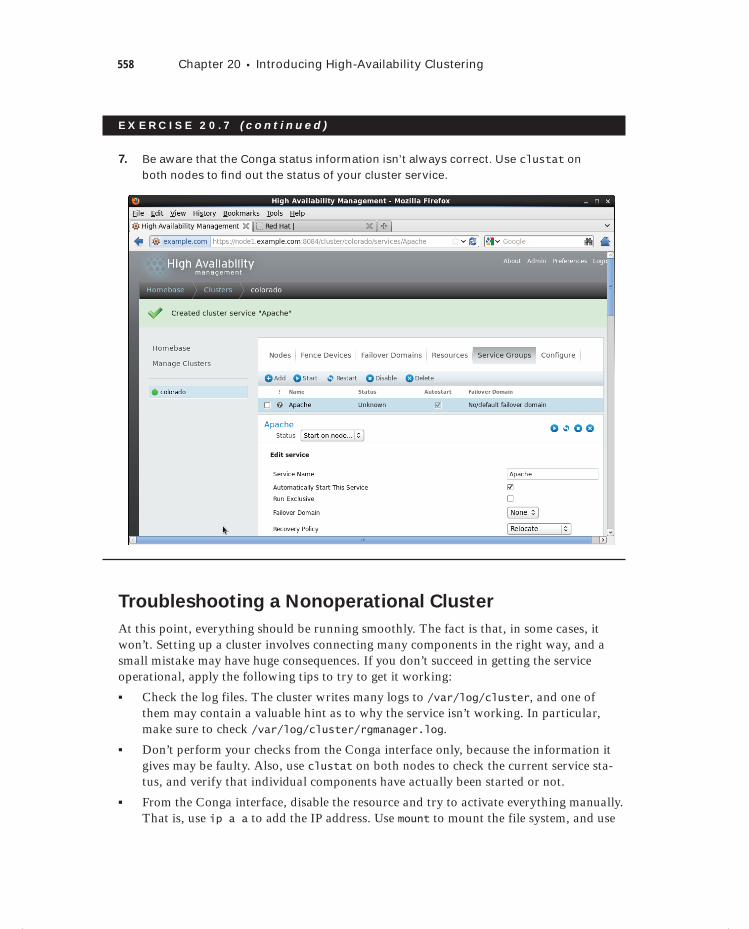
558 Chapter 20 Introducing High-Availability Clustering
E X E R C I S E 2 0 . 7 ( c ont inue d )
7. Be aware that the Conga status information isn’t always correct. Use clustat on both nodes to fi nd out the status of your cluster service.
Troubleshooting a Nonoperational Cluster
At this point, everything should be running smoothly. The fact is that, in some cases, it won’t. Setting up a cluster involves connecting many components in the right way, and a small mistake may have huge consequences. If you don’t succeed in getting the service operational, apply the following tips to try to get it working:
Check the log files. The cluster writes many logs to /var/log/cluster, and one of them may contain a valuable hint as to why the service isn’t working. In particular, make sure to check /var/log/cluster/rgmanager.log.
Don’t perform your checks from the Conga interface only, because the information it gives may be faulty. Also, use clustat on both nodes to check the current service sta-tus, and verify that individual components have actually been started or not.
From the Conga interface, disable the resource and try to activate everything manually. That is, use ip a a to add the IP address. Use mount to mount the file system, and use
c20.indd 558c20.indd 558 1/8/2013 10:54:09 AM1/8/2013 10:54:09 AM
Configuring GFS2 File Systems 559
service httpd start to start the Apache service. This will probably allow you to narrow down the scope of the problem to one particular resource.
If you have a problem with the file system resource, make sure to use /dev/disk naming, instead of device names like /dev/sdb2, which can change if something changes to the storage topology.
If a service appears as disabled in both Conga and in clustat, use clusvcadm -e servicename to enable it. It may also help to relocate the service to another node. Use clusvcadm -r servicename -m nodename to relocate a service.
Don’t use the service command on local nodes to verify whether services are running. (You haven’t started them from the runlevels, so the service command won’t work.) Use ps aux and grep for the process you are seeking.
Configuring GFS2 File SystemsYou now have a working cluster and a service running within it. You used an Ext4 fi le sys-tem in this service. Ext4 is fi ne for services that fail over between nodes. If multiple nodes in the cluster need access to the same fi le system at the same time, you’ll need a cluster fi le system. Red Hat offers the Global File System 2 (GFS2) as the default cluster fi le system. Using GFS2 lets you to write to the same fi le system from multiple nodes at the same time.
To use GFS2, you need to have a running cluster. Once you have that, you’ll need to install the cluster version of LVM2 and make sure that the accompanying service is started on all nodes that are going to run the GFS2 fi le system. Next, you will make a cluster-aware LVM2 volume and create the GFS2 fi le system on it. Once created, you can mount the GFS fi le system from /etc/fstab on the affected nodes or create a cluster resource that mounts it automatically for you. In Exercise 20.8, you’ll learn how to set up the GFS fi le system in your cluster.
E X E R C I S E 2 0 . 8
Creating a GFS File System
In this exercise, you’ll create a GFS fi le system. To do this, you’ll enable cluster LVM, create the fi le system, and, on top of that, create the GFS fi le system that will be mounted from fstab.
1. On one of the nodes, use fdisk to create a partition on the SAN device, and make sure to mark it as partition type 0x8e. Reboot both nodes to make sure the partitions are visible on both nodes, and verify this is the case before continuing.
2. On both nodes, use yum install -y lvm2-cluster gfs2-utils to install cLVM and the GFS software.
3. On both nodes, use service clvmd start to start the cLVM service and chkconfig clvmd on to enable it.
c20.indd 559c20.indd 559 1/8/2013 10:54:09 AM1/8/2013 10:54:09 AM
560 Chapter 20 Introducing High-Availability Clustering
E X E R C I S E 2 0 . 8 ( c ont inue d )
4. On one node, use pvcreate /dev/sdb3 to mark the LVM partition on the SAN device as a physical volume. Before doing this, however, verify that the name of the partition is correct.
5. Use vgcreate -c y clusgroup /dev/sdb3 to create a cluster-enabled volume group.
6. Use lvcreate -l 100%FREE -n clusvol clusgroup to create a cluster-enabled volume with the name clusvol.
7. On both nodes, use lvs to verify that the cluster-enabled LVM volume has been created.
8. Use mkfs.gfs2 -p lock_dlm -t name_of_your_cluster:gfs -j 2 /dev/clusgroup/clusvol. This will format the clustered LVM volume as a GFS2 fi le system. The -p option tells mkfs to use the lock_dlm lock table. This instructs the fi le system to use a distributed lock manager so that fi le locks are synchronized to all nodes in the cluster. The option -t is equally important, because it specifi es the name of your cluster, followed by the name of the GFS resource you want to create in the cluster. The option -j 2 tells mkfs to create two GFS journals; you’ll need one for each node that accesses the GFS volume.
9. On both nodes, mount the GFS2 fi le system temporarily on /mnt, using mount /dev/clusgroup/clusvol /mnt. On both nodes, create some fi les on the fi le system. You’ll notice that the fi les also appear immediately on the other nodes.
10. Use mkdir /gfsvol to create a directory on which you can mount the GFS volume.
11. Make the mount persistent by adding the following line to /etc/fstab:
/dev/clusgroup/clusvol /gfsvol gfs2 _netdev 0 0
12. Use chkconfig gfs2 on to enable the GFS2 service, which is needed to mount GFS2 volumes from /etc/fstab.
13. Reboot both nodes to verify that the GFS fi le system is mounted automatically.
SummaryIn this chapter, you learned how to create a high-availability cluster using the Red Hat High Availability add-on. After reading about the base requirements to set up a cluster, you created a two-node cluster that uses iSCSI as a shared disk device. You learned how to set up cluster essentials, such as a quorum disk and fencing, and you created a service for Apache, which ensures that the cluster ensures that your Apache process will always be running. Finally, you learned how to set up cLVM and GFS2 to use the GFS2 cluster-aware fi le system in your cluste r.
c20.indd 560c20.indd 560 1/8/2013 10:54:09 AM1/8/2013 10:54:09 AM

Chapter
21Setting Up an Installation Server
TOPICS COVERED IN THIS CHAPTER:
Configuring a Network Server As an Installation Server
Setting Up a TFTP and DHCP Server for PXE Boot
Creating a Kickstart File
c21.indd 561c21.indd 561 1/8/2013 10:48:39 AM1/8/2013 10:48:39 AM
In this chapter, you’ll learn how to set up an installation server. This is useful if you need to install several instances of Red Hat Enterprise Linux. By using an installation server, you
can avoid installing every physical server individually from the installation DVD. Also, it allows you to install servers that don’t have optical drives, such as blade servers.
Setting up an installation server involves several steps. To begin, you need to make the installation fi les available. To do this, you’ll confi gure a network server. This can be an NFS, FTP, or HTTP server. Next, you’ll need to set up PXE boot, which provides a boot image to your client by working together with the DHCP server.
The last step in setting up a completely automated installation is to create a kickstart fi le. This is an answer fi le that contains all the settings that are needed to install your server.
Configuring a Network Server As an Installation ServerThe fi rst step in setting up an installation server is to confi gure a network server as an installa-tion server. This involves copying the entire installation DVD to a share on a network server. After doing this, you can use a client computer to access the installation fi les. In Exercise 21.1, you’ll set up a network installation server. After setting it up, you’ll test it. For now, the test is quite simple: you’ll boot the server from the installation DVD and refer to the network path for installation. Once the entire installation server has been completely set up, the procedure will become much more sophisticated, because the TFTP server will provide a boot image. Because there is no TFTP server yet, you’ll have to use the installation DVD instead.
E X E R C I S E 2 1 .1
Setting Up the Network Installation Server
In this exercise, you’ll set up the network installation server by copying over all the fi les required for installation to a directory that is offered by an HTTP server. After doing this, you’ll test the installation from a virtual machine. To perform this exercise, you need the server1.example.com virtual Apache web server you created in Exercise 16.3 of this book.
1. Insert the Red Hat Enterprise Linux installation DVD in the optical drive of your server.
2. Use mkdir /www/docs/server1.example.com/install to create a subdirectory in the Apache document root for server1.example.com.
c21.indd 562c21.indd 562 1/8/2013 10:48:41 AM1/8/2013 10:48:41 AM
Dow
nlo
ad fro
m W
ow
! eBook
<w
ww
.wow
ebook.
com
>Dow
nlo
ad fro
m W
ow
! eBook
<w
ww
.wow
ebook.
com
>
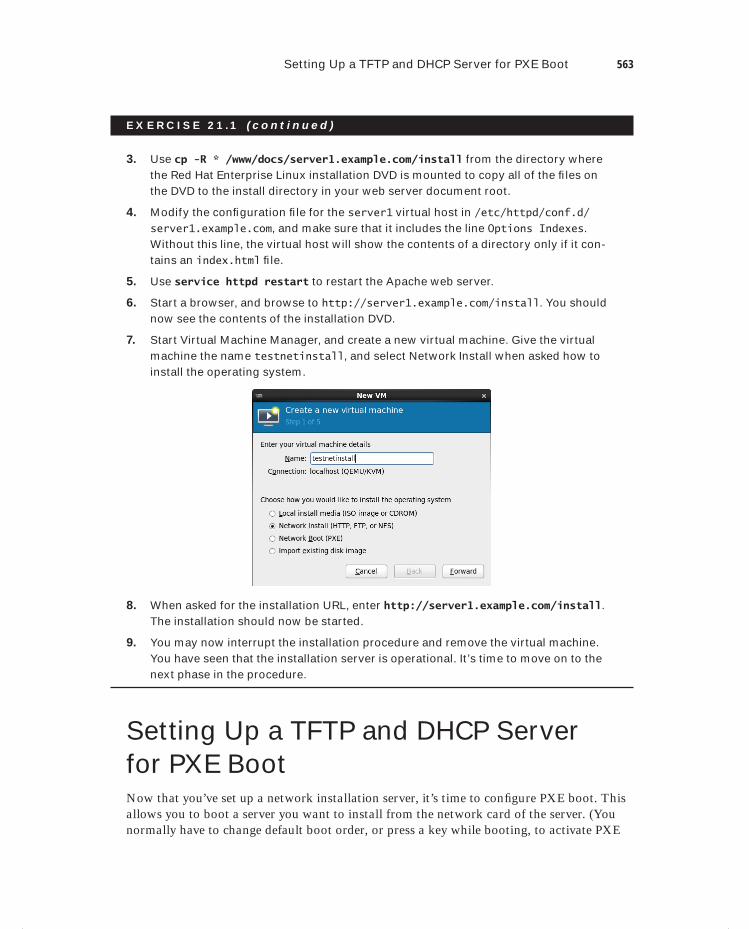
Setting Up a TFTP and DHCP Server for PXE Boot 563
E X E R C I S E 2 1 .1 ( c ont inue d )
3. Use cp -R * /www/docs/server1.example.com/install from the directory where the Red Hat Enterprise Linux installation DVD is mounted to copy all of the fi les on the DVD to the install directory in your web server document root.
4. Modify the confi guration fi le for the server1 virtual host in /etc/httpd/conf.d/server1.example.com, and make sure that it includes the line Options Indexes. Without this line, the virtual host will show the contents of a directory only if it con-tains an index.html fi le.
5. Use service httpd restart to restart the Apache web server.
6. Start a browser, and browse to http://server1.example.com/install. You should now see the contents of the installation DVD.
7. Start Virtual Machine Manager, and create a new virtual machine. Give the virtual machine the name testnetinstall, and select Network Install when asked how to install the operating system.
8. When asked for the installation URL, enter http://server1.example.com/install. The installation should now be started.
9. You may now interrupt the installation procedure and remove the virtual machine. You have seen that the installation server is operational. It’s time to move on to the next phase in the procedure.
Setting Up a TFTP and DHCP Server for PXE BootNow that you’ve set up a network installation server, it’s time to confi gure PXE boot. This allows you to boot a server you want to install from the network card of the server. (You normally have to change default boot order, or press a key while booting, to activate PXE
c21.indd 563c21.indd 563 1/8/2013 10:48:41 AM1/8/2013 10:48:41 AM
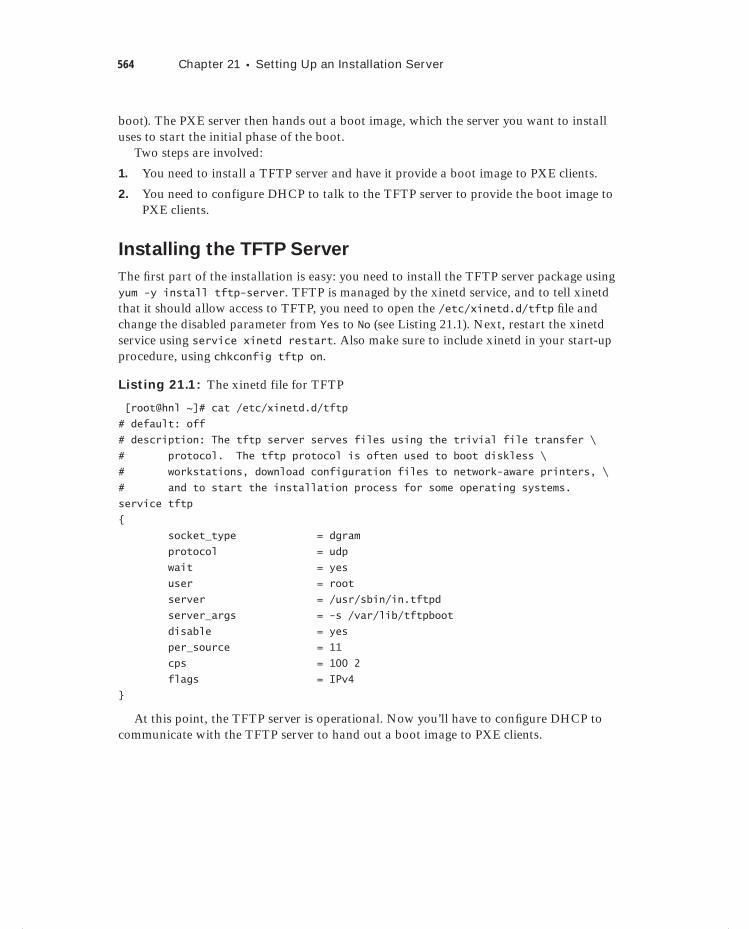
564 Chapter 21 Setting Up an Installation Server
boot). The PXE server then hands out a boot image, which the server you want to install uses to start the initial phase of the boot.
Two steps are involved:
1. You need to install a TFTP server and have it provide a boot image to PXE clients.
2. You need to configure DHCP to talk to the TFTP server to provide the boot image to PXE clients.
Installing the TFTP Server
The fi rst part of the installation is easy: you need to install the TFTP server package using yum -y install tftp-server. TFTP is managed by the xinetd service, and to tell xinetd that it should allow access to TFTP, you need to open the /etc/xinetd.d/tftp fi le and change the disabled parameter from Yes to No (see Listing 21.1). Next, restart the xinetd service using service xinetd restart. Also make sure to include xinetd in your start-up procedure, using chkconfig tftp on.
Listing 21.1: The xinetd file for TFTP
[root@hnl ~]# cat /etc/xinetd.d/tftp
# default: off
# description: The tftp server serves files using the trivial file transfer \
# protocol. The tftp protocol is often used to boot diskless \
# workstations, download configuration files to network-aware printers, \
# and to start the installation process for some operating systems.
service tftp
{
socket_type = dgram
protocol = udp
wait = yes
user = root
server = /usr/sbin/in.tftpd
server_args = -s /var/lib/tftpboot
disable = yes
per_source = 11
cps = 100 2
flags = IPv4
}
At this point, the TFTP server is operational. Now you’ll have to confi gure DHCP to communicate with the TFTP server to hand out a boot image to PXE clients.
c21.indd 564c21.indd 564 1/8/2013 10:48:41 AM1/8/2013 10:48:41 AM
Setting Up a TFTP and DHCP Server for PXE Boot 565
Configuring DHCP for PXE Boot
Now you’ll have to modify the DHCP server confi guration so that it can hand out a boot image to PXE clients. To do this, make sure to include the boot lines in Listing 21.2 in your dhcpd.conf fi le, and restart the DHCP server.
Listing 21.2: Adding PXE boot lines to the dhcpd.conf file
option space pxelinux;
option pxelinux.magic code 208 = string;
option pxelinux.configfile code 209 = text;
option pxelinux.pathprefix code 210 = text;
option pxelinux.reboottime code 211 = unsigned integer 32 ;
subnet 192.168.1.0 netmask 255.255.255.0 {
option routers 192.168.1.1 ;
range 192.168.1.200 192.168.1.250 ;
class "pxeclients" {
match if substring (option vendor-class-identifier, 0, 9) = "PXEClient";
next-server 192.168.1.70;
filename "pxelinux/pxelinux.0";
}
}
The most important part of the example confi guration in Listing 21.2 is where the class pxeclients is defi ned. The match line ensures that all servers that are performing a PXE boot are recognized automatically. This is done to avoid problems and to have DHCP hand out the PXE boot image only to servers that truly want to do a PXE boot. Next, the next-server statement refers to the IP address of the server that hands out the boot image. This is the server that runs the TFTP server. Finally, a fi le is handed out. In the next section, you’ll learn how to provide the right fi le in the right location.
Creating the TFTP PXE Server Content
The role of the PXE server is to deliver an image to the client that performs a PXE boot. In fact, it replaces the task that is normally performed by GRUB and the contents of the boot directory. This means that to confi gure a PXE server, you’ll need to copy everything needed to boot your server to the /var/lib/tftpboot/pxelinux directory. You’ll also need to create a PXE boot fi le that will perform the task that is normally handled by the
c21.indd 565c21.indd 565 1/8/2013 10:48:42 AM1/8/2013 10:48:42 AM
566 Chapter 21 Setting Up an Installation Server
grub.conf fi le. In Exercise 21.2, you’ll copy all of the required contents to the TFTP server root directory.
The fi le default plays a special role in the PXE boot confi guration. This fi le contains the boot information for all PXE clients. If you create a fi le with the name default, all clients that are allowed to PXE boot will use it. You can also create a confi guration fi le for a spe-cifi c host by using the IP address in the name of the fi le. There is one restriction, however; it has to be the IP address in a hexadecimal notation. To help you with this, a host that is performing a PXE boot will always show its hexadecimal IP address on the console while booting.
Alternatively, you can calculate the hexadecimal IP address yourself. If you do so, make sure to calculate the hexadecimal value for the four parts of the IP address of the tar-get host. The calculator on your computer can help you with this. For example, if the IP address is 192.168.0.200, the hexadecimal value is C0.A8.0.C8. Thus, if you create a fi le with the name C0A80C8, this fi le will be read only by that specifi c host. If you want to use this solution, it also makes sense to create host-specifi c entries in the dhcpd.conf fi le. You learned how to do this in Chapter 14, “Confi guring DNS and DCHP.”
E X E R C I S E 2 1 . 2
Configuring the TFTP Server for PXE Boot
To set up a TFTP server, you’ll confi gure a DHCP server and the TFTP server. Be aware that the confi guration of a DHCP server on your network can cause problems. An addi-tional complicating factor is that the KVM virtual network environment probably already runs a DHCP server. This means you cannot use the DHCP server, which you’ll confi gure to serve virtual machines. To succeed with this exercise, make sure your Red Hat Enter-prise Linux Server is disconnected from the network and connect it to only one PC, which is capable of performing a PXE boot.
1. Use yum install -y tftpserver to install the TFTP server. Because TFTP is man-aged by xinetd, use chkconfig xinetd on to add xinetd to your runlevels.
2. Open the confi guration fi le /etc/xinetd.d/tftp with an editor, and change the line disabled = yes to disabled = no.
3. If not yet installed, install a DHCP server. Open the confi guration fi le /etc/dhcp/dhcpd.conf, and give it the exact contents of the example shown in Listing 21.2.
4. Copy syslinux<version>.rpm from the Packages directory on the RHEL installation disc to /tmp. You’ll need to extract the fi le pxelinux.0 from it. This is an essential fi le for setting up the PXE boot environment. To extract the RPM fi le, use cd /tmp to go to the /tmp directory, and from there, use rpm2cpio syslinux<version>.rpm | cpio -idmv to extract the fi le.
5. Copy the /usr/share/syslinx/pxelinux.0 fi le to /var/lib/tftpboot/pxelinux.
c21.indd 566c21.indd 566 1/8/2013 10:48:42 AM1/8/2013 10:48:42 AM
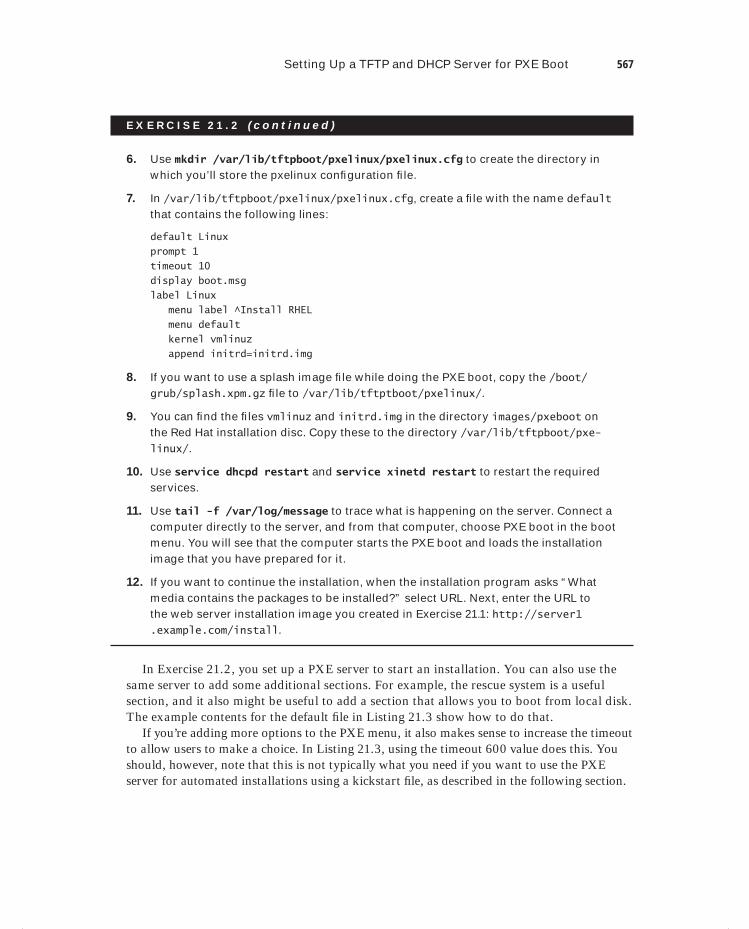
Setting Up a TFTP and DHCP Server for PXE Boot 567
E X E R C I S E 2 1 . 2 ( c ont inue d )
6. Use mkdir /var/lib/tftpboot/pxelinux/pxelinux.cfg to create the directory in which you’ll store the pxelinux confi guration fi le.
7. In /var/lib/tftpboot/pxelinux/pxelinux.cfg, create a fi le with the name default that contains the following lines:
default Linux
prompt 1
timeout 10
display boot.msg
label Linux
menu label ^Install RHEL
menu default
kernel vmlinuz
append initrd=initrd.img
8. If you want to use a splash image fi le while doing the PXE boot, copy the /boot/grub/splash.xpm.gz fi le to /var/lib/tftptboot/pxelinux/.
9. You can fi nd the fi les vmlinuz and initrd.img in the directory images/pxeboot on the Red Hat installation disc. Copy these to the directory /var/lib/tftpboot/pxe-linux/.
10. Use service dhcpd restart and service xinetd restart to restart the required services.
11. Use tail -f /var/log/message to trace what is happening on the server. Connect a computer directly to the server, and from that computer, choose PXE boot in the boot menu. You will see that the computer starts the PXE boot and loads the installation image that you have prepared for it.
12. If you want to continue the installation, when the installation program asks “What media contains the packages to be installed?” select URL. Next, enter the URL to the web server installation image you created in Exercise 21.1: http://server1.example.com/install.
In Exercise 21.2, you set up a PXE server to start an installation. You can also use the same server to add some additional sections. For example, the rescue system is a useful section, and it also might be useful to add a section that allows you to boot from local disk. The example contents for the default fi le in Listing 21.3 show how to do that.
If you’re adding more options to the PXE menu, it also makes sense to increase the timeout to allow users to make a choice. In Listing 21.3, using the timeout 600 value does this. You should, however, note that this is not typically what you need if you want to use the PXE server for automated installations using a kickstart fi le, as described in the following section.
c21.indd 567c21.indd 567 1/8/2013 10:48:42 AM1/8/2013 10:48:42 AM
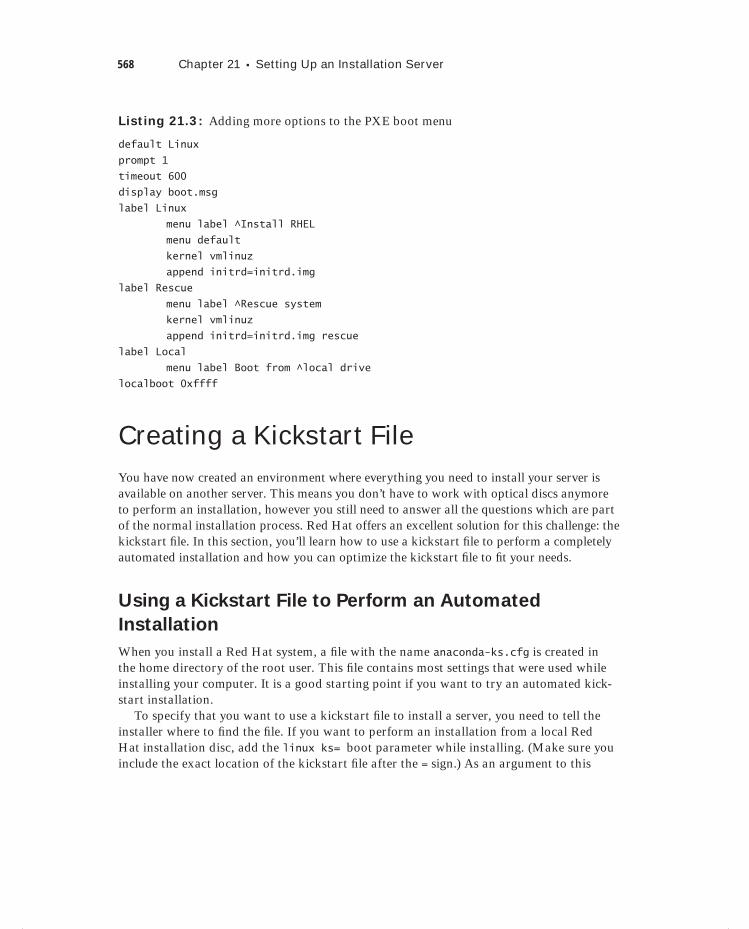
568 Chapter 21 Setting Up an Installation Server
Listing 21.3: Adding more options to the PXE boot menu
default Linux
prompt 1
timeout 600
display boot.msg
label Linux
menu label ^Install RHEL
menu default
kernel vmlinuz
append initrd=initrd.img
label Rescue
menu label ^Rescue system
kernel vmlinuz
append initrd=initrd.img rescue
label Local
menu label Boot from ^local drive
localboot 0xffff
Creating a Kickstart FileYou have now created an environment where everything you need to install your server is available on another server. This means you don’t have to work with optical discs anymore to perform an installation, however you still need to answer all the questions which are part of the normal installation process. Red Hat offers an excellent solution for this challenge: the kickstart fi le. In this section, you’ll learn how to use a kickstart fi le to perform a completely automated installation and how you can optimize the kickstart fi le to fi t your needs.
Using a Kickstart File to Perform an Automated
Installation
When you install a Red Hat system, a fi le with the name anaconda-ks.cfg is created in the home directory of the root user. This fi le contains most settings that were used while installing your computer. It is a good starting point if you want to try an automated kick-start installation.
To specify that you want to use a kickstart fi le to install a server, you need to tell the installer where to fi nd the fi le. If you want to perform an installation from a local Red Hat installation disc, add the linux ks= boot parameter while installing. (Make sure you include the exact location of the kickstart fi le after the = sign.) As an argument to this
c21.indd 568c21.indd 568 1/8/2013 10:48:42 AM1/8/2013 10:48:42 AM
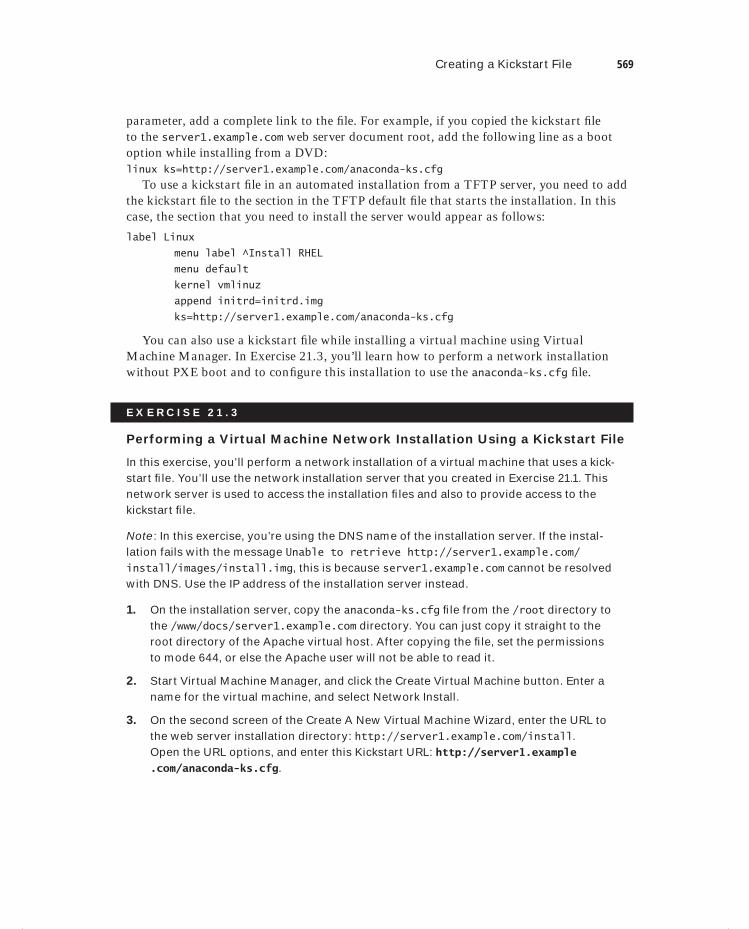
Creating a Kickstart File 569
parameter, add a complete link to the fi le. For example, if you copied the kickstart fi le to the server1.example.com web server document root, add the following line as a boot option while installing from a DVD:linux ks=http://server1.example.com/anaconda-ks.cfg
To use a kickstart fi le in an automated installation from a TFTP server, you need to add the kickstart fi le to the section in the TFTP default fi le that starts the installation. In this case, the section that you need to install the server would appear as follows:
label Linux
menu label ^Install RHEL
menu default
kernel vmlinuz
append initrd=initrd.img
ks=http://server1.example.com/anaconda-ks.cfg
You can also use a kickstart fi le while installing a virtual machine using Virtual Machine Manager. In Exercise 21.3, you’ll learn how to perform a network installation without PXE boot and to confi gure this installation to use the anaconda-ks.cfg fi le.
E X E R C I S E 2 1 . 3
Performing a Virtual Machine Network Installation Using a Kickstart File
In this exercise, you’ll perform a network installation of a virtual machine that uses a kick-start fi le. You’ll use the network installation server that you created in Exercise 21.1. This network server is used to access the installation fi les and also to provide access to the kickstart fi le.
Note : In this exercise, you’re using the DNS name of the installation server. If the instal-lation fails with the message Unable to retrieve http://server1.example.com/install/images/install.img, this is because server1.example.com cannot be resolved with DNS. Use the IP address of the installation server instead.
1. On the installation server, copy the anaconda-ks.cfg fi le from the /root directory to the /www/docs/server1.example.com directory. You can just copy it straight to the root directory of the Apache virtual host. After copying the fi le, set the permissions to mode 644, or else the Apache user will not be able to read it.
2. Start Virtual Machine Manager, and click the Create Virtual Machine button. Enter a name for the virtual machine, and select Network Install.
3. On the second screen of the Create A New Virtual Machine Wizard, enter the URL to the web server installation directory: http://server1.example.com/install. Open the URL options, and enter this Kickstart URL: http://server1.example.com/anaconda-ks.cfg.
c21.indd 569c21.indd 569 1/8/2013 10:48:42 AM1/8/2013 10:48:42 AM
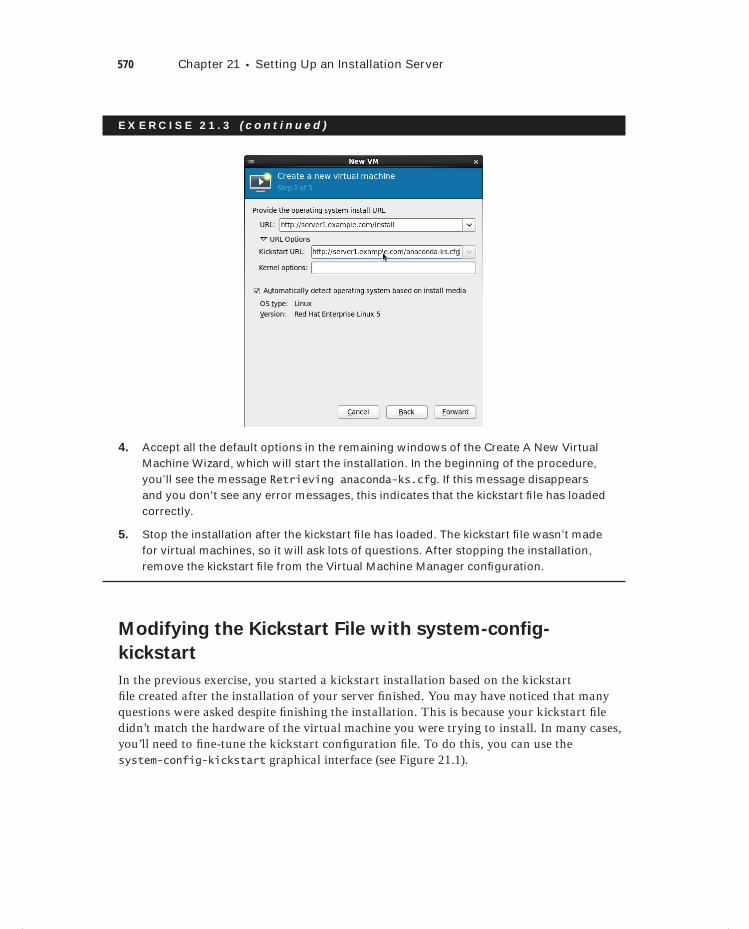
570 Chapter 21 Setting Up an Installation Server
E X E R C I S E 2 1 . 3 ( c ont inue d )
4. Accept all the default options in the remaining windows of the Create A New Virtual Machine Wizard, which will start the installation. In the beginning of the procedure, you’ll see the message Retrieving anaconda-ks.cfg. If this message disappears and you don’t see any error messages, this indicates that the kickstart fi le has loaded correctly.
5. Stop the installation after the kickstart fi le has loaded. The kickstart fi le wasn’t made for virtual machines, so it will ask lots of questions. After stopping the installation, remove the kickstart fi le from the Virtual Machine Manager confi guration.
Modifying the Kickstart File with system-config-
kickstart
In the previous exercise, you started a kickstart installation based on the kickstart fi le created after the installation of your server fi nished. You may have noticed that many questions were asked despite fi nishing the installation. This is because your kickstart fi le didn’t match the hardware of the virtual machine you were trying to install. In many cases, you’ll need to fi ne-tune the kickstart confi guration fi le. To do this, you can use the system-config-kickstart graphical interface (see Figure 21.1).
c21.indd 570c21.indd 570 1/8/2013 10:48:43 AM1/8/2013 10:48:43 AM
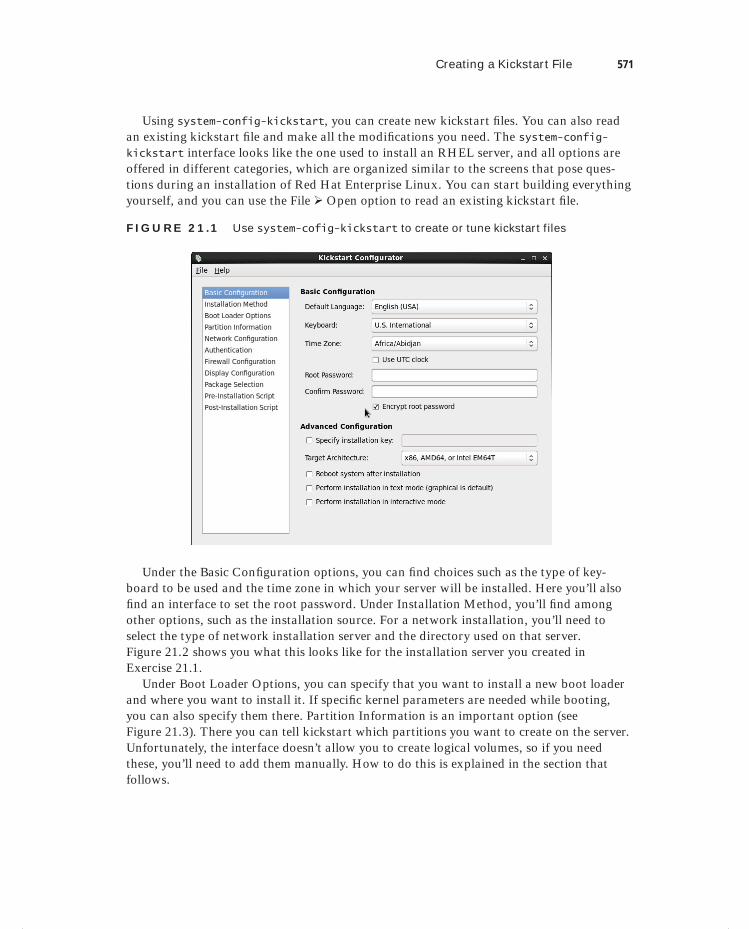
Creating a Kickstart File 571
Using system-config-kickstart, you can create new kickstart fi les. You can also read an existing kickstart fi le and make all the modifi cations you need. The system-config-kickstart interface looks like the one used to install an RHEL server, and all options are offered in different categories, which are organized similar to the screens that pose ques-tions during an installation of Red Hat Enterprise Linux. You can start building everything yourself, and you can use the File Open option to read an existing kickstart fi le.
F I GU R E 21.1 Use system-cofig-kickstart to create or tune kickstart files
Under the Basic Confi guration options, you can fi nd choices such as the type of key-board to be used and the time zone in which your server will be installed. Here you’ll also fi nd an interface to set the root password. Under Installation Method, you’ll fi nd among other options, such as the installation source. For a network installation, you’ll need to select the type of network installation server and the directory used on that server. Figure 21.2 shows you what this looks like for the installation server you created in Exercise 21.1.
Under Boot Loader Options, you can specify that you want to install a new boot loader and where you want to install it. If specifi c kernel parameters are needed while booting, you can also specify them there. Partition Information is an important option (see Figure 21.3). There you can tell kickstart which partitions you want to create on the server. Unfortunately, the interface doesn’t allow you to create logical volumes, so if you need these, you’ll need to add them manually. How to do this is explained in the section that follows.
c21.indd 571c21.indd 571 1/8/2013 10:48:43 AM1/8/2013 10:48:43 AM
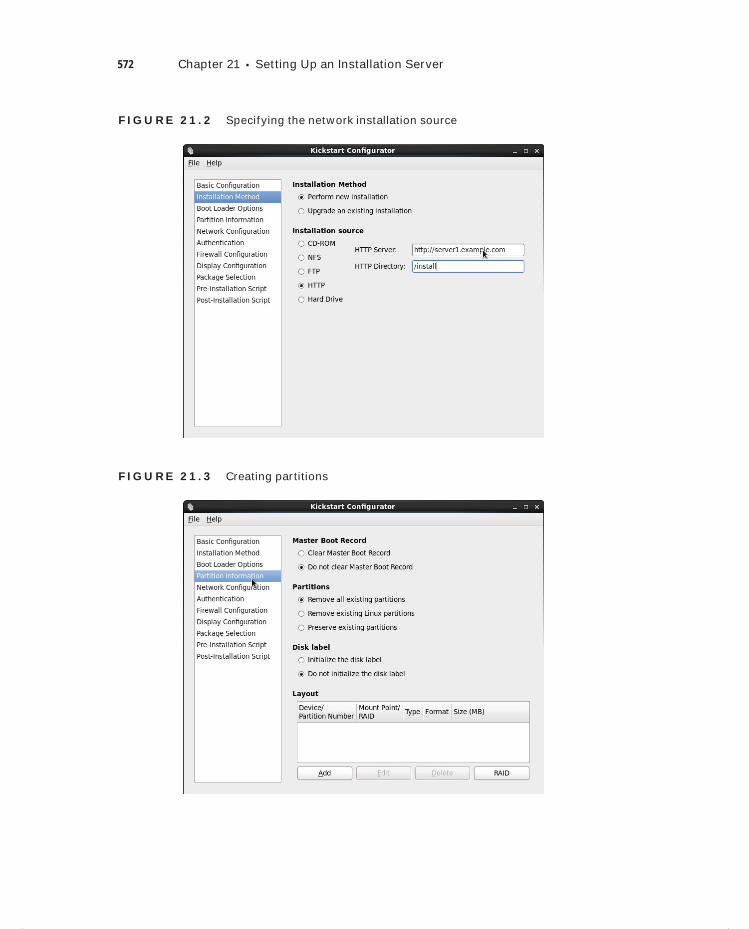
572 Chapter 21 Setting Up an Installation Server
F I GU R E 21. 2 Specifying the network installation source
F I GU R E 21. 3 Creating partitions
c21.indd 572c21.indd 572 1/8/2013 10:48:43 AM1/8/2013 10:48:43 AM

Creating a Kickstart File 573
By default, the Network Confi guration option is empty. If you want networking on your server, you’ll need to use the Add Network Device option to indicate the name of the device and how you want it to obtain its network confi guration. The Authentication option offers tabs to specify external authentication services such as NIS, LDAP, Kerberos, and some others. If you don’t specify any of these, you’ll default to the local authentication mecha-nism that goes through /etc/passwd, which is fi ne for many servers.
If you don’t like SELinux and fi rewalls, activate the Firewall Confi guration option. SELinux is on by default, which is good in most cases, and the fi rewall is switched off by default. If your server is connected directly to the Internet, turn it on and select all of the trusted services that you want to allow. For the Display Confi guration option, you can tell the installer whether your server should install a graphical environment.
An interesting option is Package Selection. This option allows you to select package cat-egories, however it does not allow you to select individual packages. If you need to select individual packages, you’ll have to create a manual confi guration. Finally, there are the Pre-Installation Script and Post-Installation Script options that allow you to add scripts to the installation procedure to execute specifi c tasks while installing the server.
Making Manual Modifications to the Kickstart File
There are some modifi cations that you cannot make to a kickstart fi le using the graphical interface. Fortunately, kickstart is an ASCII text fi le that can be edited manually. You can make manual modifi cations to confi gure features, including LVM logical volumes or indi-vidual packages, which are tasks that cannot be accomplished from the system-config-kickstart interface. Listing 21.4 shows the contents of the anaconda-ks.cfg fi le that is generated upon installation of a server. This fi le is interesting because it shows examples of everything that cannot be done from the graphical interface.
Listing 21.4: Contents of the anaconda-ks.cfg file
[root@hnl ~]# cat anaconda-ks.cfg
# Kickstart file automatically generated by anaconda.
#version=DEVEL
install
cdrom
lang en_US.UTF-8
keyboard us-acentos
network --onboot no --device p6p1 --bootproto static --ip 192.168.0.70 --netmask
255.255.255.0 --noipv6 --hostname hnl.example.com
network --onboot no --device wlan0 --noipv4 --noipv6
rootpw --iscrypted
$6$tvvRd3Vd2ZBQ26yi$TdQs4ndaKXny0CkvtmENBeFkCs2eRnhzeobyGR50BEN02OdKCmr.x0yAkY9nhk.
c21.indd 573c21.indd 573 1/8/2013 10:48:43 AM1/8/2013 10:48:43 AM
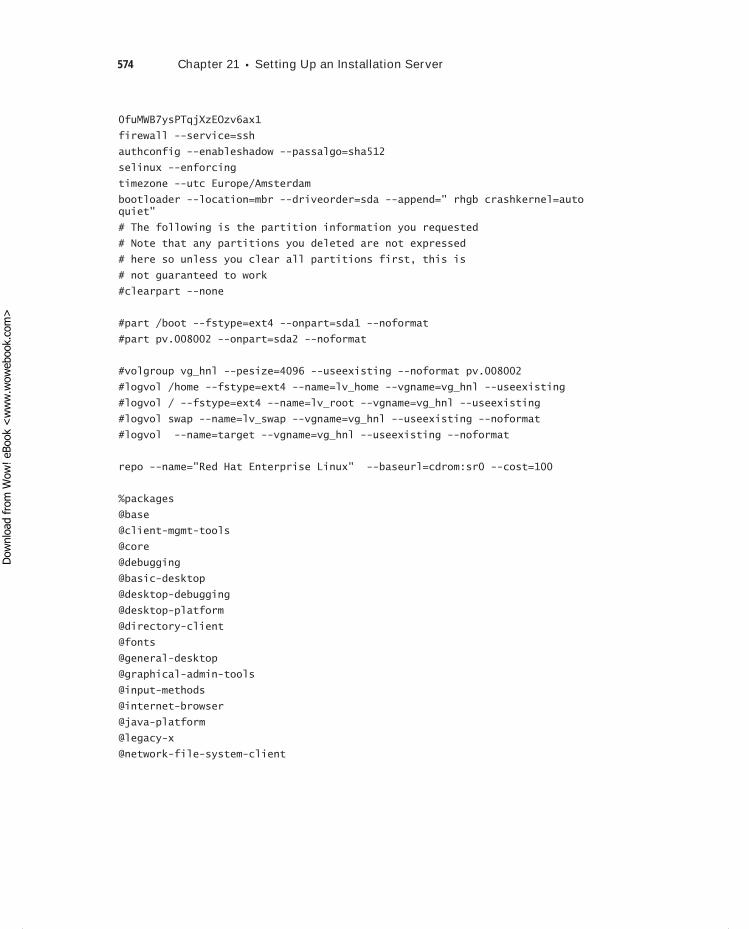
574 Chapter 21 Setting Up an Installation Server
0fuMWB7ysPTqjXzEOzv6ax1
firewall --service=ssh
authconfig --enableshadow --passalgo=sha512
selinux --enforcing
timezone --utc Europe/Amsterdam
bootloader --location=mbr --driveorder=sda --append=" rhgb crashkernel=auto quiet"
# The following is the partition information you requested
# Note that any partitions you deleted are not expressed
# here so unless you clear all partitions first, this is
# not guaranteed to work
#clearpart --none
#part /boot --fstype=ext4 --onpart=sda1 --noformat
#part pv.008002 --onpart=sda2 --noformat
#volgroup vg_hnl --pesize=4096 --useexisting --noformat pv.008002
#logvol /home --fstype=ext4 --name=lv_home --vgname=vg_hnl --useexisting
#logvol / --fstype=ext4 --name=lv_root --vgname=vg_hnl --useexisting
#logvol swap --name=lv_swap --vgname=vg_hnl --useexisting --noformat
#logvol --name=target --vgname=vg_hnl --useexisting --noformat
repo --name="Red Hat Enterprise Linux" --baseurl=cdrom:sr0 --cost=100
%packages
@base
@client-mgmt-tools
@core
@debugging
@basic-desktop
@desktop-debugging
@desktop-platform
@directory-client
@fonts
@general-desktop
@graphical-admin-tools
@input-methods
@internet-browser
@java-platform
@legacy-x
@network-file-system-client
c21.indd 574c21.indd 574 1/8/2013 10:48:44 AM1/8/2013 10:48:44 AM
Dow
nlo
ad fro
m W
ow
! eBook
<w
ww
.wow
ebook.
com
>
Creating a Kickstart File 575
@perl-runtime
@print-client
@remote-desktop-clients
@server-platform
@server-policy
@x11
mtools
pax
python-dmidecode
oddjob
sgpio
genisoimage
wodim
abrt-gui
certmonger
pam_krb5
krb5-workstation
libXmu
perl-DBD-SQLite
%end
The anaconda-ks.cfg fi le starts with some generic settings. The fi rst line that needs your attention is the network line. As you can see, it contains the device name --device p6p1. This device name is related to the specifi c hardware confi guration of the server on which the fi le was created, and it will probably not work on many other hardware platforms. So, it is better replace this with --device eth0. Also, it is not a very good idea to leave a fi xed IP address in the confi guration fi le. So, you should replace --bootproto static --ip 192.168.0.70 --netmask 255.255.255.0 with --bootproto dhcp.
The next interesting parameter is the line that contains the root password. As you can see, it contains the encrypted root password that was used while installing this server. If you want the installation process to prompt for a root password, you can remove this line completely.
An important part of this listing is where partitions and logical volumes are created. You can see the syntax that is used to accomplish these tasks, and you can also see that no sizes are specifi ed. If you want to specify the size that is to be used for the partitions, add the --size option to each line where a partition or a logical volume is created. Also, consider the syntax that is used to create the LVM environment, because this cannot be done from the graphical interface.
After the defi nition of partitions and logical volumes, the repository to be used is speci-fi ed. This is also a parameter that also generally needs to be changed. The --baseurl parameter contains a URL that refers to the installation URL that you want to use. For
c21.indd 575c21.indd 575 1/8/2013 10:48:44 AM1/8/2013 10:48:44 AM
576 Chapter 21 Setting Up an Installation Server
example, it can read --baseurl=http://server1.example.com/install to refer to an HTTP installation server.
In the next section, the packages that are to be installed are specifi ed. Everything that starts with an @ (like @base) refers to an RPM package group. At the bottom of the list, individual packages are added simply by mentioning the name of the packages.
SummaryIn this chapter, you learned how to confi gure an installation server. First, you learned how to confi gure a web server as an installation server by copying all packages to this server. Based on this, you were able to start an installation from a standard installation disk and then refer to the installation server to continue the installation process.
The next step involved confi guring a DHCP/TFTP server to deliver a boot image to clients that boot from their network card. On the DHCP server, you created a section that tells the server where it could fi nd the TFTP server, and in the TFTP document root, you copied all fi les that were needed to start the installation process, including the important fi le default, which contains the default settings for all PXE clients.
In the last part of this chapter, you learned how to create a kickstart fi le to automate the installation of your new server. You worked with the system-config-kickstart graphical utility and the options that can be added by modifying a kickstart confi guration fi le manu-ally. Putting all of this together, you can now set up your own installation server .
c21.indd 576c21.indd 576 1/8/2013 10:48:44 AM1/8/2013 10:48:44 AM

Appendix
AHands-On Labs
bapp01.indd 577bapp01.indd 577 1/8/2013 10:38:59 AM1/8/2013 10:38:59 AM

578 Appendix A Hands-On Labs
Chapter 1: Getting Started with Red Hat Enterprise Linux
Exploring the Graphical Desktop
In this lab, you’ll explore the GNOME graphical desktop interface. This lab helps you fi nd where the essential elements of the GNOME desktop are located.
1. Log in to the graphical desktop as user “student.”
2. Change the password of user student to “password,” using the tools available in the graphical desktop.
3. Open a terminal window, and type ls to display files in the current directory.
4. Use Nautilus to browse to the contents of the /etc directory. Can you open the files in this directory? Can you create new files in this directory?
5. Configure your graphical desktop to have four available workspaces.
6. Open the NetworkManager application, and find out the current IP address configura-tion in use on your computer.
7. Use the graphical help system, and see what information you can find about changing a user’s password.
Chapter 2: Finding Your Way on the Command Line
1. Use man and man -k to find out how to change the current date on your computer. Set the date to yesterday (and don’t forget to set it back when you’re done with the exercise).
2. Create a directory with the name /tempdir. Copy all files from the /etc directory that start with an a, b, or c to this directory.
3. Find out which command and which specific options you will need to show a time-sorted list of the contents of the directory /etc.
4. Create a file in your home directory, and fill it all with errors that are generated if you try to run the command grep -R root * from the /proc directory as an ordinary user. If necessary, refer to the man page of grep to find out how to use the command.
5. Find all files on your server that have a size greater than 100 MB.
6. Log in as root, and open two console windows in the graphical environment. From console window 1, run the following commands: cpuinfo, cat /etc/hosts,
bapp01.indd 578bapp01.indd 578 1/8/2013 10:39:00 AM1/8/2013 10:39:00 AM
Chapter 3: Performing Daily System Administration Tasks 579
and w. From console window 2, use the following commands: ps aux, tail -n 10 /etc/passwd, and mail -s hello root < . Can you run the commands that you’ve entered in console window 1 from the history in console window 2? What do you need to do to update the history with the commands that you’ve used from both environments?
7. Make a copy of the file /etc/passwd to your home directory. After copying it, rename the file ∼/passwd to ∼/users. Use the most efficient method to delete all lines in this file in which the third column has a number less than 500. Next, replace the text /bin/bash all throughout the file with the text /bin/false.
Chapter 3: Performing Daily System Administration Tasks
Managing Processes
In this lab, you’ll explore process management options.
1. Start the command dd if=/dev/sda of=/dev/zero three times as a background job.
2. Find the PID of the three dd processes you just started, and change the nice value of one of the processes to -5.
3. Start the command dd if=/dev/zero of=/dev/sda as a foreground job. Next, use the appropriate procedure to put it in the background. Then verify that it indeed runs as a background job.
4. Use the most efficient procedure to terminate all of the dd commands.
Working with Storage Devices and Links
In this lab, you’ll mount a USB key and create symbolic links.
1. Find a USB flash drive, and manually mount it on the /mnt directory.
2. Create a symbolic link to the /etc directory in the /tmp directory.
Making a Backup
In this lab, you’ll use tar to make a backup of some fi les.
1. Create a backup of the /tmp directory in an archive with the name /tmp.tar. Check if it contains the symbolic link you just created.
2. Use the tar man page to find the tar option that allows you to archive symbolic links.
bapp01.indd 579bapp01.indd 579 1/8/2013 10:39:00 AM1/8/2013 10:39:00 AM
580 Appendix A Hands-On Labs
3. Create an rsyslog line that writes a message to user root every time that a user logs in. This line shouldn’t replace the current configuration for the given facility; it should just add another option.
4. Use the man page of logrotate to find out how to rotate the /var/log/messages file every week, but only if it has a size of at least 1MB.
Chapter 4: Managing Software
Creating a Repository
1. Copy all package files on your installation disc to a directory with the name /pack-ages, and mark this directory as a repository.
2. Configure your server to use the /packages repository.
Using Query Options
1. Search and install the package that contains the winbind file.
2. Locate the configuration file from the winbind package, and then delete it.
Extracting Files From RPMs
1. Extract the package that contains the winbind file so that you can copy the original configuration file out of the package to its target destination.
Chapter 5: Configuring and Managing StorageIn this lab, you will apply all the skills you have learned in this chapter. You will create two partitions on the /dev/sdb device that you worked with in previous exercises. Also, make sure that all currently existing partitions and volumes are wiped before you begin.
Both partitions have to be 500MB in size and created as primary partitions. Use the fi rst partition to create an encrypted volume with the name cryptvol. Format this volume with the Ext4 fi le system, and make sure it mounts automatically when your server reboots.
bapp01.indd 580bapp01.indd 580 1/8/2013 10:39:00 AM1/8/2013 10:39:00 AM

Chapter 7: Working with Users, Groups, and Permissions 581
Use the second partition in an LVM setup. Create a logical volume with the name logvol, in the VG vgroup. Mount this as an Ext4 fi le system on the /logvol directory. Make sure that this fi le system also mounts automatically when you reboot your server.
Chapter 6: Connecting to the Network
1. Using the command line, display the current network configuration on your server. Make sure to document the IP address, default gateway, and DNS server settings.
2. Manually add the secondary IP address 10.0.0.111 to the Ethernet network card on your server. Do this in a nonpersistent way.
3. Change the IP address your server uses by manipulating the appropriate configuration file. Do you also need to restart any service?
4. Query DNS to find out which DNS server is authoritative for www.sandervanvugt.com. (This works only if you can connect to the Internet from your server.)
5. Change the name of your server to myserver. Make sure that the name still exists after a reboot of your server.
6. Set up SSH in such a way that the user root cannot log in directly to it and so that user linda is the only allowed user.
7. Set up key-based authentication to your server. Use keys that are not protected with a passphrase.
8. Configure your client so that X-Forwarding over SSH is enabled by default.
9. Set up a VNC Server for user linda on session 1.
10. From the client computer, establish a VNC session to your server.
Chapter 7: Working with Users, Groups, and PermissionsThis lab is scenario-based. That is, imagine you’re a consultant and have to create a solu-tion for the customer request that follows.
Create a solution for a small environment where shared groups are used. The environ-ment needs four users: Bob, Bill, Susan, and Caroline. The users work in two small depart-ments: support and sales. Bob and Bill are in the group support, and Susan and Caroline are in the group sales.
bapp01.indd 581bapp01.indd 581 1/8/2013 10:39:00 AM1/8/2013 10:39:00 AM

582 Appendix A Hands-On Labs
The users will store fi les in the directories /data/support and /data/sales. Each of these groups needs full access to its directory; the other group needs read access only. Make sure that group ownership is inherited automatically and that users can only delete fi les that they have created themselves.
Caroline is the leader of the sales team and needs permissions to manage fi les in the sales directory. Bill is the leader of the support team and needs permissions to manage fi les in the support directory. Apart from the members of these two groups, all others need to be excluded from accessing these directories.
Set default permissions on all new fi les that allow the users specifi ed to do their work.
Chapter 8: Understanding and Configuring SELinux Install an Apache web server that uses the directory /srv/web as the document root. Confi gure it so that it can also serve up documents from user home directories. Also, make sure you can use the sealert command in case anything goes wrong.
Chapter 9: Working with KVM VirtualizationFirst make sure you have completed at least Exercises 9.1, 9.2, 9.6, and 9.7. You need the confi guration that is created in these labs to complete labs that will come later in this book successfully.
This additional end-of-chapter lab requires you to confi gure a Yum repository. The repository is to be confi gured on the host computer, and the virtual machine should have access to this repository. You need to complete this task in order to be able to install soft-ware on the virtual machine in the next chapter.
To complete this lab, do the following:
1. Install an FTP server on the host computer. Then create a share that makes the /repo directory accessible over the network.
2. Configure the virtual machine so that it can reach the host computer based on its name.
3. Create a repository file on the virtual machine that allows access to the NFS shared repository on the host computer.
bapp01.indd 582bapp01.indd 582 1/8/2013 10:39:01 AM1/8/2013 10:39:01 AM
Chapter 12: Configuring Open LDAP 583
Chapter 10: Securing Your Server with iptablesIn Exercise 10.3, you opened the fi rewall on the virtual machine to accept incoming DNS, SSH, HTTP, and FTP traffi c. It’s impossible, however, to initiate this traffi c from the fi re-wall. This lab has you open the fi rewall on the virtual machine for outgoing DNS, SSH, and HTTP traffi c.
Chapter 11: Setting Up Cryptographic Services
1. Create a self-signed certificate, and copy it to the directory /etc/pki. Make sure that the certificate is accessible to the services that need access to it, while the private key is in a well-secured directory where it isn’t accessible to other users.
2. Create two user accounts: ronald and marsha. Create a GPG key pair for each. As Marsha, create a file with the name secret.txt. Make sure to store it in Marsha’s home directory. Encrypt this file, and send it to Ronald. As Ronald, decrypt it and verify that you can read the contents of the file.
Chapter 12: Configuring Open LDAPIn this chapter, you read how to set up an OpenLDAP server for authentication. This lab exercise provides an opportunity to repeat all of the previous steps and to set up a domain in your slapd process. Make sure to complete the following tasks:
1. Create all that is needed to use a base context example.local in LDAP. Create an administrative user account with the name admin.example.local, and give this user the password password.
2. Set up two organizational units with the names users and groups.
3. In ou=users, create three users: louise, lucy, and leo. The users should have a group with their own name as the primary group.
4. In ou=groups, create a group called sales and make sure louise, lucy, and leo are all members of this group.
bapp01.indd 583bapp01.indd 583 1/8/2013 10:39:01 AM1/8/2013 10:39:01 AM
584 Appendix A Hands-On Labs
5. Use ldapsearch to verify that all is configured correctly.
6. Start your virtual machine, and configure it to authenticate on the LDAP server. You should be able to log in from the virtual machine using any of the three user accounts you created in step 3.
Chapter 13: Configuring Your Server for File Sharing
1. Set up an NFS server on your virtual machine. Make sure it exports a directory /nfsfiles and that this directory is accessible only for your host computer.
2. Set up autofs on your host. It should make sure that when the directory /mnt/nfs is used, the NFS share on the other machine is accessed automatically.
3. Set up a Samba server that offers access to the /data directory on your virtual machine. It should be accessible only by users linda and lisa.
4. Set up an FTP server in such a way that anonymous users can upload files to the server. However, after uploading, the files should immediately become invisible to the users.
Chapter 14: Configuring DNS and DHCPThis lab exercise consists of two tasks:
1. Configure a DNS zone for example.net. You can add this zone as an extra one to the DNS server you configured earlier while working through the exercises in this chapter. Config-ure your DNS as master server, and also set up a slave server in the virtual machine. Add a few resource records, including an address record for blah.example.org. You can test the configuration by using dig. It should give you the resource record for blah.org, even if the host does not exist.
2. Use ifconfig to find out the MAC address in use on your second virtual machine. Configure a DHCP server that assigns the IP address 192.168.100.2 to this second vir-tual machine. Run this DHCP server on the first virtual machine. You can modify the configuration of your current DHCP server to accomplish this task.
bapp01.indd 584bapp01.indd 584 1/8/2013 10:39:01 AM1/8/2013 10:39:01 AM
Chapter 16: Configuring Apache on Red Hat Enterprise Linux 585
Chapter 15: Setting Up a Mail ServerIn Exercise 15.3, you saw how email delivery failed because DNS wasn’t set up properly. In this lab, you’ll set up a mail environment between two DNS domains. For the DNS portion of the confi guration requirements, please consult the relevant information in Chapter 14.
1. Configure your virtual machine to be in the DNS domain example.local. It should use the host server as the DNS server.
2. Set up your host computer to be the DNS server that serves both example.local and example.com, and make sure you have resource records for at least the mail servers.
3. On both servers, configure Postfix to allow the receipt of mail messages from other hosts. Also make sure that in messages, which originate from these services, just the DNS domain name is shown and not the FQDN of the originating host.
4. On both servers, make sure that Dovecot is started, and users can use only POP3 and POP3S to access their mail messages.
5. On the host, use Mutt to send a message to user lisa on the testvm computer. As lisa on the testvm computer, start Mutt and verify that the message has arrived.
Chapter 16: Configuring Apache on Red Hat Enterprise LinuxIn this lab, you’ll confi gure an Apache web server that has three virtual hosts. To do this lab, you’ll also need to enter records in DNS, because the client must always be able to resolve the name to the correct IP address in virtual host confi gurations. The names of the virtual hosts are public.example.com, sales.example.com, and accounting.example.com. Use your virtual machine to confi gure the httpd server, and use the host computer to test all access. Make sure to implement the following functions:
1. The servers must have a document root in /web, followed by the name of the specific server (that is, /web/public, /web/sales, and /web/accounting).
2. Make sure the document roots of the servers have some content to serve. It will work best to create an index.html file for each server showing the text welcome to <servername>. This helps you identify the server easily when connecting to it at a later stage.
bapp01.indd 585bapp01.indd 585 1/8/2013 10:39:01 AM1/8/2013 10:39:01 AM
586 Appendix A Hands-On Labs
3. For each server, create a virtual server configuration that redirects clients to the appro-priate server.
4. Ensure that only hosts from the local network can access the accounting website and that access is denied to all other hosts.
5. Configure user authentication for the sales server. Only users leo and lisa should get access, and all others should be denied access.
Chapter 17: Monitoring and Optimizing Performance In this lab, you’ll work on a performance-related case. You can perform the steps of this lab on your virtual computer to make sure that the host computer will keep running properly.
A customer has problems with the performance of her server. While analyzing the server, you see that no swap is used. You also notice that the server is short on memory, with just about 10 percent of total memory used by cache and buffers, while there are no specifi c applications that require a large memory allocation. You also notice that disk I/O is slow.
Which steps are you going to take to optimize these problems? Use a simple test proce-dure, and try all of the settings that you want to apply.
Chapter 18: Introducing Bash Shell Scripting
Writing a Script to Monitor Activity on the Apache Web
Server
1. Write a script that monitors the availability of the Apache web server. The script should check every second to see whether Apache is still running. If it is no longer running, it should restart Apache and write a message that it has done so to syslog.
Using the select Command
2. As a Red Hat Certified professional, you are expected to be creative with Linux and apply solutions that are based on things that you have not worked with previously. In this exercise, you are going to work with the bash shell statement select, which allows you to present a menu to the user. Use the available help to complete this exercise.
bapp01.indd 586bapp01.indd 586 1/8/2013 10:39:01 AM1/8/2013 10:39:01 AM
Dow
nlo
ad fro
m W
ow
! eBook
<w
ww
.wow
ebook.
com
>
Chapter 20: Introducing High-Availability Clustering 587
Write a simple script that asks the user to enter the name of an RPM or fi le that the user wants to query. Write the script to present a menu that provides different options that allow the user to do queries on the RPM database. The script should offer some options, and it should run the task that the user has selected.
The following options must be presented:
a. Find the RPM from which this file originates.
b. Check that the RPM where the user has provided the name is installed.
c. Install this RPM.
d. Remove this RPM.
Chapter 19: Understanding and Troubleshooting the Boot ProcedureIn this lab, you’ll break and (ideally) fi x your server. You must perform this lab on your virtual machine, because it is easier to reinstall if things go wrong. The lab is at your own risk, things might seriously go wrong, and you might not be able to fi x it.
1. Open the /etc/fstab file with an editor, and locate the line where your home direc-tory is mounted. In the home directory device name, remove one letter and reboot your server. Fix the problems you encounter.
2. Open the /etc/inittab file, and set the default runlevel to 6. Reboot your server, and fix the problem.
3. Use the command dd if=/dev/zero of=/dev/sda bs=446 count=1. (Change /dev/sda to /dev/vda if you’re on your virtual machine.) Reboot your server, and fix the problem.
Chapter 20: Introducing High-Availability ClusteringBefore starting this lab, you need to do some cleanup on the existing cluster. To do so, per-form the following tasks:
1. Use the iscsiadm logout function on the cluster nodes to log out from the iSCSI target device.
2. Use Conga to delete the current cluster.
3. Make sure that the following services are no longer in your runlevels: cman, rgmanager, ricci, clvmd, and gfs2.
bapp01.indd 587bapp01.indd 587 1/8/2013 10:39:01 AM1/8/2013 10:39:01 AM
588 Appendix A Hands-On Labs
After cleaning everything up, create a cluster that meets the following requirements:
1. Use iSCSI as shared storage. You can use the iSCSI target you created in an earlier exercise.
2. Use Conga to set up a base cluster with the name Wyoming.
3. Create a quorum disk that pings the default gateway every 10 seconds. (Don’t config-ure fencing.)
4. Create a service for FTP.
Chapter 21: Setting Up an Installation ServerCreate an installation server. Make sure that this server installs from a dedicated virtual web server, which you will need to create for this purpose. Also, confi gure DHCP and TFTP to hand out an installation image to clients. Create a simple kickstart installation fi le that uses a 500MB /boot partition and that adds the rest of the available disk space to a partition that is going to be used to create some LVM logical volumes. Also, make sure that the nmap package is installed and that the network card is confi gured to use DHCP on eth0.
If you want to test the configuration, you’ll need to use an external system and connect it to the installation server. Be warned that everything that is installed on this test system will be wiped out and replaced with a Red Hat Enterprise Linux installation!
bapp01.indd 588bapp01.indd 588 1/8/2013 10:39:01 AM1/8/2013 10:39:01 AM

Appendix
BAnswers to Hands-On Labs
bapp02.indd 589bapp02.indd 589 1/8/2013 10:39:16 AM1/8/2013 10:39:16 AM

590 Appendix B Answers to Hands-On Labs
Chapter 1: Getting Started with Red Hat Enterprise Linux
Exploring the Graphical Desktop
1. In the login screen, click the login name “student” and type the password.
2. In the upper-right corner you can see the name of the user who is currently logged in. Click this username to get access to different tools, such as the tool that allows you to change the password.
3. Right-click the graphical desktop, and select Open in terminal. Next, type ls.
4. On the graphical desktop, you’ll find an icon representing your home folder. Click it and navigate to the /etc folder. You’ll notice that as a normal user, you have limited access to this folder.
5. Right-click a workspace icon, and select the number of workspaces you want to be dis-played.
6. Right-click the NetworkManager icon in the upper-right corner of the desktop. Next, click Connection Information to display information about the current connection.
7. Press F1 to show the help system. Type the keyword you want to search for and browse the results.
Chapter 2: Finding Your Way on the Command Line
1. For instance, use man -k time | grep 8. You’ll find the date command. Use date mmddhhmm to set the date.
2. mkdir /tempdir, cp /etc/[abc]* /tempdir
3. Use man ls. You’ll find the -t option, which allows you to sort ls output on time.
4. cd /proc; grep -R root * 2> ~/procerrors.txt
5. find / -size +100M
6. This doesn’t work because the history file gets updated only when the shell is closed.
7. cp /etc/passwd ∼. mv ∼/passwd ∼/users
bapp02.indd 590bapp02.indd 590 1/8/2013 10:39:17 AM1/8/2013 10:39:17 AM

Chapter 3: Performing Daily System Administration Tasks 591
Chapter 3: Performing Daily System Administration Tasks
Managing Processes
1. Run dd if=/dev/sda of=/dev/zero three times.
2. Use ps aux | grep dd, and write down the PIDs. A useful addition to show just the PIDs and nothing else is found by piping the results of this command through awk ‘{ print $2 }’. Next, use nice -5 $PID (where $PID is replaced by the PIDs you just found).
3. To put a foreground job in the background, use the Ctrl+Z key sequence to pause the job. Next, use the bg command, which restarts the job in the background. Then use jobs to show a list of current jobs, including the one you just started.
4. Use killall dd.
Working with Storage Devices and Linkx
1. First use dmesg to find out the device name of the USB flash drive. Next, assuming that the name of the USB drive is /dev/sdb, use fdisk -cul to show the partitions on this device. It will probably show just one partition with the name /dev/sdb1. Mount it using mount /dev/sdb1 /mnt.
2. The link is ln -s /etc /tmp.
Making a Backup
1. Use tar czvf /tmp.tar /tmp. To verify the archive, use tar tvf /tmp.tar. You’ll see that the archive doesn’t contain the symbolic link.
2. This is the h option. Use tar czhvf /tmp.tar /tmp to create the archive.
3. Add the following to /etc/rsyslog.conf:authpriv.info root.
Next, use service restart rsyslog to restart the syslog service.
4. Remove the /var/log/messages line from the /etc/logrotate.d/syslog file. Next, cre-ate a file with the name /etc/logrotate.d/messages, containing the following contents:
/var/log/messages
{
weekly
rotate 2
minsize 1M
}
bapp02.indd 591bapp02.indd 591 1/8/2013 10:39:17 AM1/8/2013 10:39:17 AM
592 Appendix B Answers to Hands-On Labs
Chapter 4: Managing Software
Creating Repositories
1. Use mkdir /packages. Next, copy all RPMs from the installation DVD to this direc-tory. Then install createrepo, using rpm -ivh createrepo[Tab] from the directory that contains the packages (assuming that createrepo hasn’t yet been installed). If you get messages about dependencies, install them as well. Use createrepo /packages to mark the /packages directory as a repository.
2. Create a file with the name /etc/yum.repos.d/packages.repo, and make sure it has the following contents:[packages]
name=packages
baseurl=file:///packages
gpgcheck=0
Using Query Options
1. Use yum provides */winbind. This shows that winbind is in the samba-winbind pack-age. Use yum install samba-winbind to install the package.
2. rpm -qc samba-winbind reveals after installation that the only configuration file is /etc/security/pam_winbind.conf.
Extracting Files from RPMs
1. Copy the samba-winbind-[version].rpm file to /tmp. From there, use rpm2cpio samba-winbind[tab] | cpio -idmc to extract it. You can now copy it to its target destination.
Chapter 5: Configuring and Managing Storage
1. Use dd if=/dev/zero of=/dev/sdb bs=1M count=10.
2. Use fdisk -cu /dev/sdb to create two partitions. The first needs to be of type 83, and the second needs to be type 8e. Use +500M twice when asked for the last cylinder you want to use.
3. Use pvcreate /dev/sdb2.
4. Use vgcreate vgroup /dev/sdb2.
5. Use lvcreate -n logvol1 -L 500M /dev/vgroup.
bapp02.indd 592bapp02.indd 592 1/8/2013 10:39:18 AM1/8/2013 10:39:18 AM
Chapter 7: Working with Users, Groups, and Permissions 593
6. Use mkfs.ext4 /dev/vgroup/logvol1.
7. Use cryptsetup luksFormat /dev/sdb1.
8. Use cryptsetup luksOpen /dev/sdb1 cryptvol.
9. Use mkfs.ext4 /dev/mapper/cryptvol.
10. Add the following line to /etc/crypttab: cryptvol /dev/sdb1.
11. Add the following lines to /etc/fstab: /dev/mapper/cryptvol /cryptvol ext4 defaults 1 2 and /dev/vgroup.logvol1 /logvol ext4 defaults 1 2.
Chapter 6: Connecting to the Network
1. Use ip addr show, ip route show, and cat /etc/resolv.conf.
2. Use ip addr add dev <yourdevicehere> 10.0.0.111/24.
3. Change the IPADDR line in /etc/sysconfig/network-scripts/yourinterface. The NetworkManager service picks up the changes automatically.
4. dig www.sandervanvugt.com will give you the answer.
5. Change the HOSTNAME parameter in /etc/sysconfig/network.
6. Modify the contents of /etc/ssh/sshd_config. Make sure these two lines are acti-vated: PermitRootLogin no and AllowUsers linda.
7. Use ssh-keygen to generate the public/private key pair. Next, copy the public key to the server from the client using ssh-copy-id server.
8. Modify the /etc/sysconfig/ssh_config file to include the line ForwardX11 yes.
9. Install tigervnc-server, and modify the /etc/sysconfig/vncservers file to include the lines VNCSERVERS=”1:linda” and VNCSERVERARGS[1]=”-geometry 800x600 -nolisten tcp -localhost”. Next, use su - linda to become user linda, and as linda use vncpasswd to set the VNC password and start the vncserver using service vncserver start.
10. Use vncviewer -via linda@server localhost:1. Make sure that an entry that defines the IP address for the server is included in /etc/hosts on the client.
Chapter 7: Working with Users, Groups, and Permissions
1. Use useradd BobBillSusanCaroline to create the users. Don’t forget to set the pass-word for each of these users using the passwd command.
2. Use groupadd {support,sales} to create the groups.
bapp02.indd 593bapp02.indd 593 1/8/2013 10:39:18 AM1/8/2013 10:39:18 AM
594 Appendix B Answers to Hands-On Labs
3. Use mkdir -p /data/sales /data/support to create the directories.
4. Use chgrp sales /data/sales and chgrp support /data/support to set group own-ership.
5. Use chown Caroline /data/sales and chown Isabelle /data/account to change user ownership.
6. Use chmod 3770 /data/* to set the appropriate permissions.
Chapter 8: Understanding and Configuring SELinux
1. Use yum -y install httpd (if it hasn’t been installed yet), and change the Document-Root setting in /etc/httpd/conf/httpd.conf to /srv/www.
2. Use ls -Zd /var/www/htdocs to find the default type context that Apache needs for the document root.
3. Use semanage -f -a "" -t http_sys_content_t /srv/www(/.*)? to set the new type context.
4. Use restorecon -R /srv to apply the new type context.
5. Use setsebool -P httpd_enable_homedirs on to allow httpd to access web pages in user home directories.
6. Install the setroubleshoot-server package using yum -y install setroubleshoot-server.
Chapter 9: Working with KVM Virtualization
1. On the host, run yum install -y vsftpd.
2. On the host, create a bind mount in /var/ftp/pub/repo to /repo.
a. To perform this mount manually, use mount -o bind /repo /var/ftp/pub/repo.
b. To have this mount activated automatically on reboot, put the following line in /etc/fstab:
/repo /var/ftp/pub/repo none bind 0 0
3. On the host, run service vsftpd start.
4. On the host, run chkconfig vsftpd on.
bapp02.indd 594bapp02.indd 594 1/8/2013 10:39:18 AM1/8/2013 10:39:18 AM
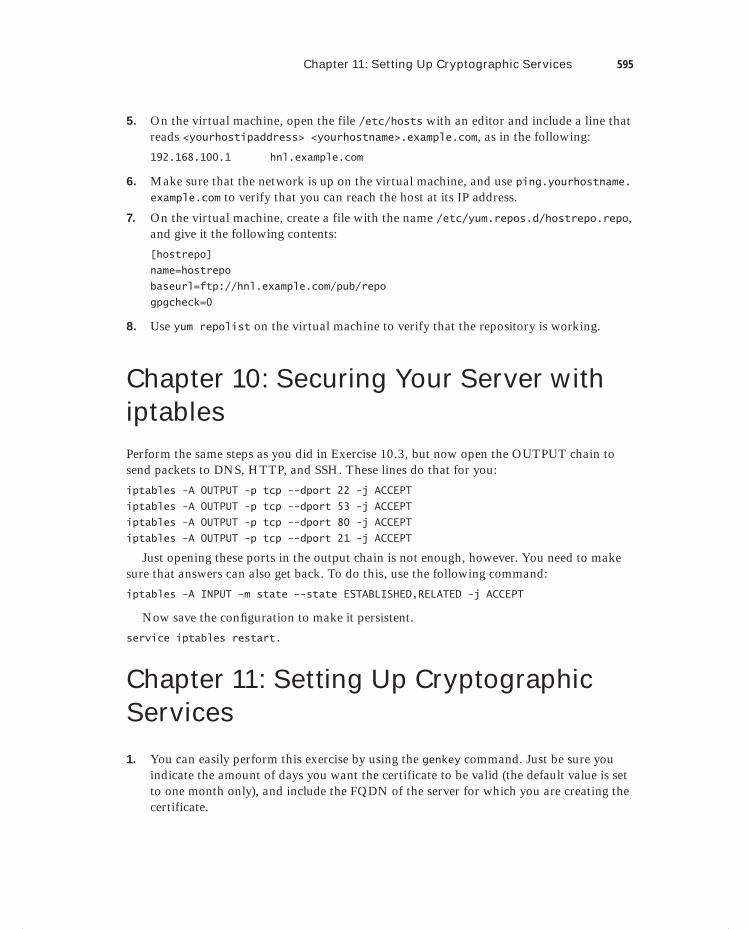
Chapter 11: Setting Up Cryptographic Services 595
5. On the virtual machine, open the file /etc/hosts with an editor and include a line that reads <yourhostipaddress> <yourhostname>.example.com, as in the following:
192.168.100.1 hnl.example.com
6. Make sure that the network is up on the virtual machine, and use ping.yourhostname.example.com to verify that you can reach the host at its IP address.
7. On the virtual machine, create a file with the name /etc/yum.repos.d/hostrepo.repo, and give it the following contents:
[hostrepo]
name=hostrepo
baseurl=ftp://hnl.example.com/pub/repo
gpgcheck=0
8. Use yum repolist on the virtual machine to verify that the repository is working.
Chapter 10: Securing Your Server with iptablesPerform the same steps as you did in Exercise 10.3, but now open the OUTPUT chain to send packets to DNS, HTTP, and SSH. These lines do that for you:
iptables -A OUTPUT -p tcp --dport 22 -j ACCEPT
iptables -A OUTPUT -p tcp --dport 53 -j ACCEPT
iptables -A OUTPUT -p tcp --dport 80 -j ACCEPT
iptables -A OUTPUT -p tcp --dport 21 -j ACCEPT
Just opening these ports in the output chain is not enough, however. You need to make sure that answers can also get back. To do this, use the following command:
iptables -A INPUT -m state --state ESTABLISHED,RELATED -j ACCEPT
Now save the confi guration to make it persistent.
service iptables restart.
Chapter 11: Setting Up Cryptographic Services
1. You can easily perform this exercise by using the genkey command. Just be sure you indicate the amount of days you want the certificate to be valid (the default value is set to one month only), and include the FQDN of the server for which you are creating the certificate.
bapp02.indd 595bapp02.indd 595 1/8/2013 10:39:18 AM1/8/2013 10:39:18 AM
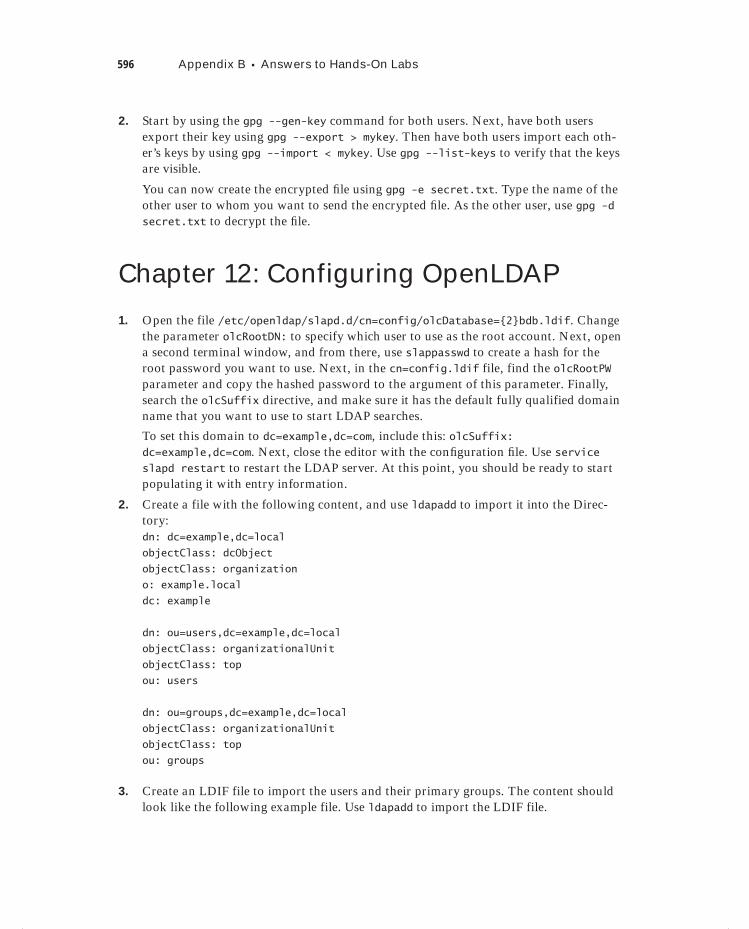
596 Appendix B Answers to Hands-On Labs
2. Start by using the gpg --gen-key command for both users. Next, have both users export their key using gpg --export > mykey. Then have both users import each oth-er’s keys by using gpg --import < mykey. Use gpg --list-keys to verify that the keys are visible.
You can now create the encrypted fi le using gpg -e secret.txt. Type the name of the other user to whom you want to send the encrypted fi le. As the other user, use gpg -d secret.txt to decrypt the fi le.
Chapter 12: Configuring OpenLDAP
1. Open the file /etc/openldap/slapd.d/cn=config/olcDatabase={2}bdb.ldif. Change the parameter olcRootDN: to specify which user to use as the root account. Next, open a second terminal window, and from there, use slappasswd to create a hash for the root password you want to use. Next, in the cn=config.ldif file, find the olcRootPW parameter and copy the hashed password to the argument of this parameter. Finally, search the olcSuffix directive, and make sure it has the default fully qualified domain name that you want to use to start LDAP searches.
To set this domain to dc=example,dc=com, include this: olcSuffix: dc=example,dc=com. Next, close the editor with the confi guration fi le. Use service slapd restart to restart the LDAP server. At this point, you should be ready to start populating it with entry information.
2. Create a file with the following content, and use ldapadd to import it into the Direc-tory:dn: dc=example,dc=local
objectClass: dcObject
objectClass: organization
o: example.local
dc: example
dn: ou=users,dc=example,dc=local
objectClass: organizationalUnit
objectClass: top
ou: users
dn: ou=groups,dc=example,dc=local
objectClass: organizationalUnit
objectClass: top
ou: groups
3. Create an LDIF file to import the users and their primary groups. The content should look like the following example file. Use ldapadd to import the LDIF file.
bapp02.indd 596bapp02.indd 596 1/8/2013 10:39:18 AM1/8/2013 10:39:18 AM
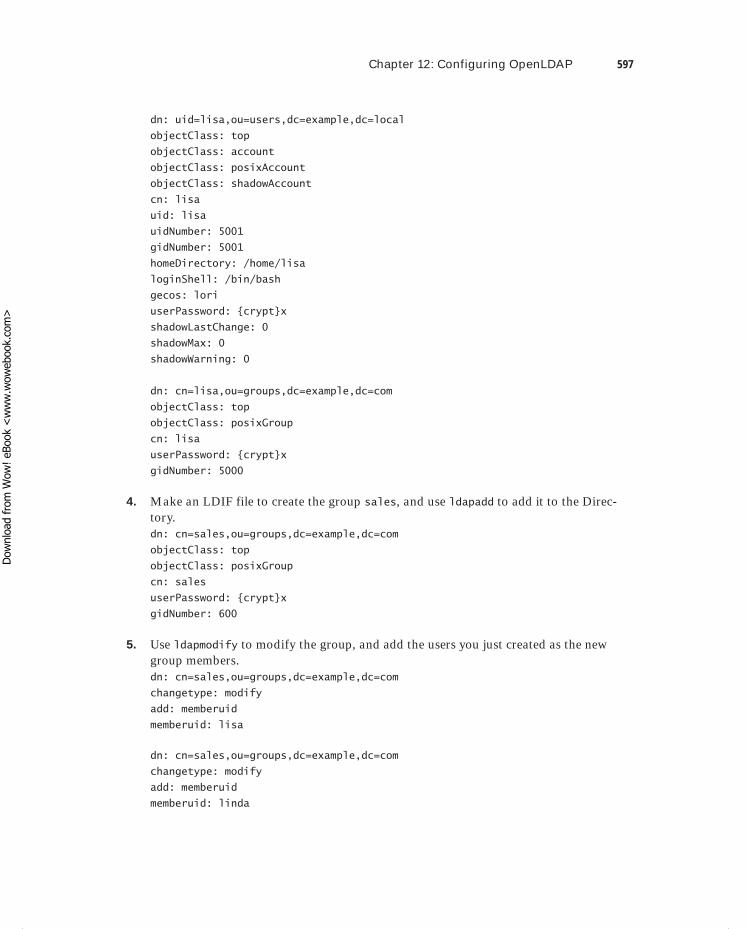
Chapter 12: Configuring OpenLDAP 597
dn: uid=lisa,ou=users,dc=example,dc=local
objectClass: top
objectClass: account
objectClass: posixAccount
objectClass: shadowAccount
cn: lisa
uid: lisa
uidNumber: 5001
gidNumber: 5001
homeDirectory: /home/lisa
loginShell: /bin/bash
gecos: lori
userPassword: {crypt}x
shadowLastChange: 0
shadowMax: 0
shadowWarning: 0
dn: cn=lisa,ou=groups,dc=example,dc=com
objectClass: top
objectClass: posixGroup
cn: lisa
userPassword: {crypt}x
gidNumber: 5000
4. Make an LDIF file to create the group sales, and use ldapadd to add it to the Direc-tory.dn: cn=sales,ou=groups,dc=example,dc=com
objectClass: top
objectClass: posixGroup
cn: sales
userPassword: {crypt}x
gidNumber: 600
5. Use ldapmodify to modify the group, and add the users you just created as the new group members.dn: cn=sales,ou=groups,dc=example,dc=com
changetype: modify
add: memberuid
memberuid: lisa
dn: cn=sales,ou=groups,dc=example,dc=com
changetype: modify
add: memberuid
memberuid: linda
bapp02.indd 597bapp02.indd 597 1/8/2013 10:39:18 AM1/8/2013 10:39:18 AM
Dow
nlo
ad fro
m W
ow
! eBook
<w
ww
.wow
ebook.
com
>
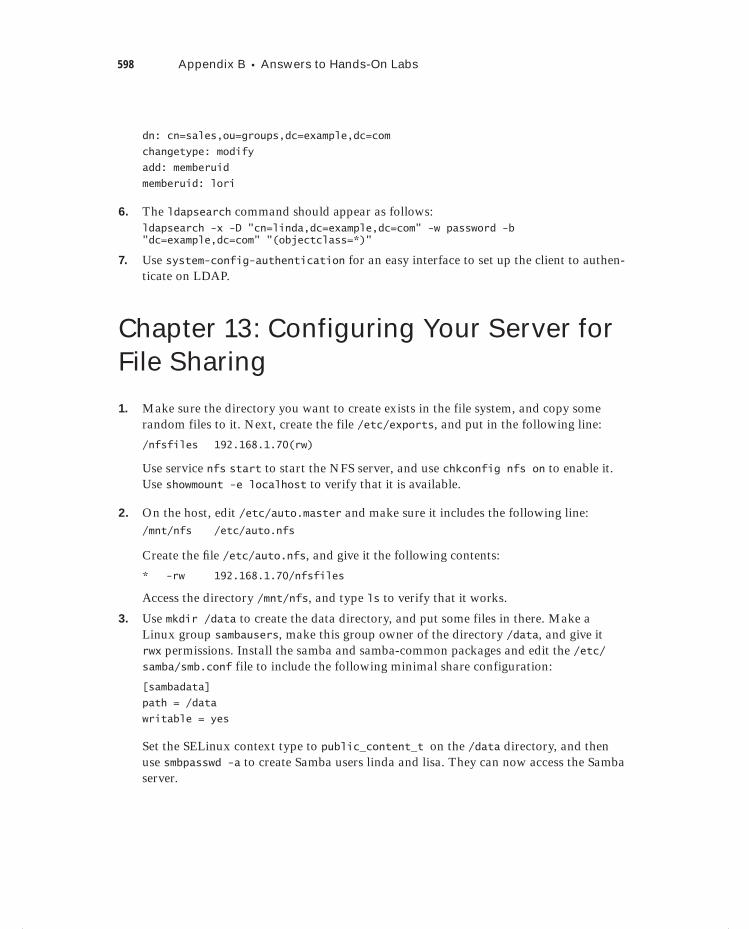
598 Appendix B Answers to Hands-On Labs
dn: cn=sales,ou=groups,dc=example,dc=com
changetype: modify
add: memberuid
memberuid: lori
6. The ldapsearch command should appear as follows:ldapsearch -x -D "cn=linda,dc=example,dc=com" -w password -b "dc=example,dc=com" "(objectclass=*)"
7. Use system-config-authentication for an easy interface to set up the client to authen-ticate on LDAP.
Chapter 13: Configuring Your Server for File Sharing
1. Make sure the directory you want to create exists in the file system, and copy some random files to it. Next, create the file /etc/exports, and put in the following line:
/nfsfiles 192.168.1.70(rw)
Use service nfs start to start the NFS server, and use chkconfig nfs on to enable it. Use showmount -e localhost to verify that it is available.
2. On the host, edit /etc/auto.master and make sure it includes the following line:/mnt/nfs /etc/auto.nfs
Create the fi le /etc/auto.nfs, and give it the following contents:
* -rw 192.168.1.70/nfsfiles
Access the directory /mnt/nfs, and type ls to verify that it works.
3. Use mkdir /data to create the data directory, and put some files in there. Make a Linux group sambausers, make this group owner of the directory /data, and give it rwx permissions. Install the samba and samba-common packages and edit the /etc/samba/smb.conf file to include the following minimal share configuration:
[sambadata]
path = /data
writable = yes
Set the SELinux context type to public_content_t on the /data directory, and then use smbpasswd -a to create Samba users linda and lisa. They can now access the Samba server.
bapp02.indd 598bapp02.indd 598 1/8/2013 10:39:18 AM1/8/2013 10:39:18 AM

Chapter 14: Configuring DNS and DCHP 599
4. Install vsftpd. Create a directory /var/ftp/upload, and make sure the user and group owners are set to ftp.ftp. Set the permission mode on this directory to 730. Use semanage to label this directory with public_content_rw_t, and use setsebool -P allow_ftpd_anon_write on. Next, include the following parameters in /etc/vsftpd/vsftpd.conf:
anon_upload_enable = YES
chown_uploads = YES
chown_username = daemon
To get your traffi c through the fi rewall, edit the /etc/sysconfig/iptables_config fi le to include the following line:
IPTABLES_MODULES=”nf_conntrack_ftp nf_nat_ftp”
Add the following lines to the fi rewall confi guration, and after adding these lines, use service iptables save to make the new rules persistent:
iptables -A INPUT -p tcp --dport 21 -j ALLOW
iptables -A INPUT -m state --state ESTABLISHED,RELATED -j ALLOW
Chapter 14: Configuring DNS and DCHP
1. In /etc/named.rfc1912.zones, create a zone declaration. It should appear as follows on the master server:zone "example.com" IN {
type master;
file "example.com";
notify yes;
allow-update { IP-OF-YOUR-SLAVE };
};
On the slave server, also create a zone declaration in /etc/named.rfc19212.zones that looks like the following:zone "example.com" IN {
type slave;
masters {
192.168.1.220;
};
file "example.com.slave";
};
On the master, create the example.com fi le in /var/named following the example in Listing 14.4. Make sure to add the DNS server to your runlevels using chkconfig
bapp02.indd 599bapp02.indd 599 1/8/2013 10:39:18 AM1/8/2013 10:39:18 AM
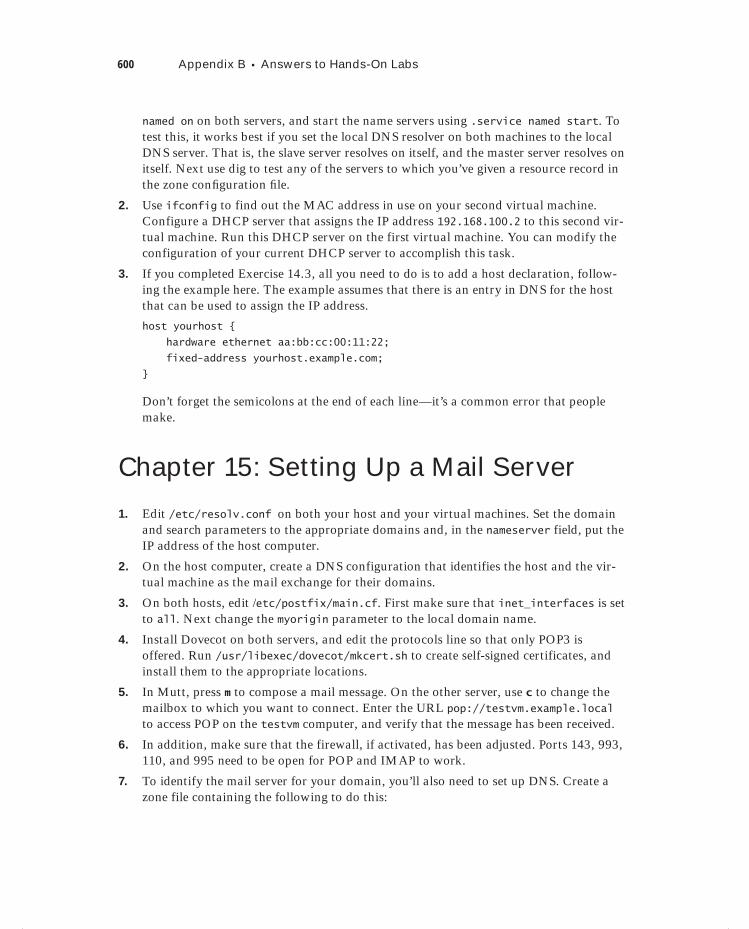
600 Appendix B Answers to Hands-On Labs
named on on both servers, and start the name servers using .service named start. To test this, it works best if you set the local DNS resolver on both machines to the local DNS server. That is, the slave server resolves on itself, and the master server resolves on itself. Next use dig to test any of the servers to which you’ve given a resource record in the zone confi guration fi le.
2. Use ifconfig to find out the MAC address in use on your second virtual machine. Configure a DHCP server that assigns the IP address 192.168.100.2 to this second vir-tual machine. Run this DHCP server on the first virtual machine. You can modify the configuration of your current DHCP server to accomplish this task.
3. If you completed Exercise 14.3, all you need to do is to add a host declaration, follow-ing the example here. The example assumes that there is an entry in DNS for the host that can be used to assign the IP address.
host yourhost {
hardware ethernet aa:bb:cc:00:11:22;
fixed-address yourhost.example.com;
}
Don’t forget the semicolons at the end of each line—it’s a common error that people make.
Chapter 15: Setting Up a Mail Server
1. Edit /etc/resolv.conf on both your host and your virtual machines. Set the domain and search parameters to the appropriate domains and, in the nameserver field, put the IP address of the host computer.
2. On the host computer, create a DNS configuration that identifies the host and the vir-tual machine as the mail exchange for their domains.
3. On both hosts, edit /etc/postfix/main.cf. First make sure that inet_interfaces is set to all. Next change the myorigin parameter to the local domain name.
4. Install Dovecot on both servers, and edit the protocols line so that only POP3 is offered. Run /usr/libexec/dovecot/mkcert.sh to create self-signed certificates, and install them to the appropriate locations.
5. In Mutt, press m to compose a mail message. On the other server, use c to change the mailbox to which you want to connect. Enter the URL pop://testvm.example.local to access POP on the testvm computer, and verify that the message has been received.
6. In addition, make sure that the firewall, if activated, has been adjusted. Ports 143, 993, 110, and 995 need to be open for POP and IMAP to work.
7. To identify the mail server for your domain, you’ll also need to set up DNS. Create a zone file containing the following to do this:
bapp02.indd 600bapp02.indd 600 1/8/2013 10:39:18 AM1/8/2013 10:39:18 AM
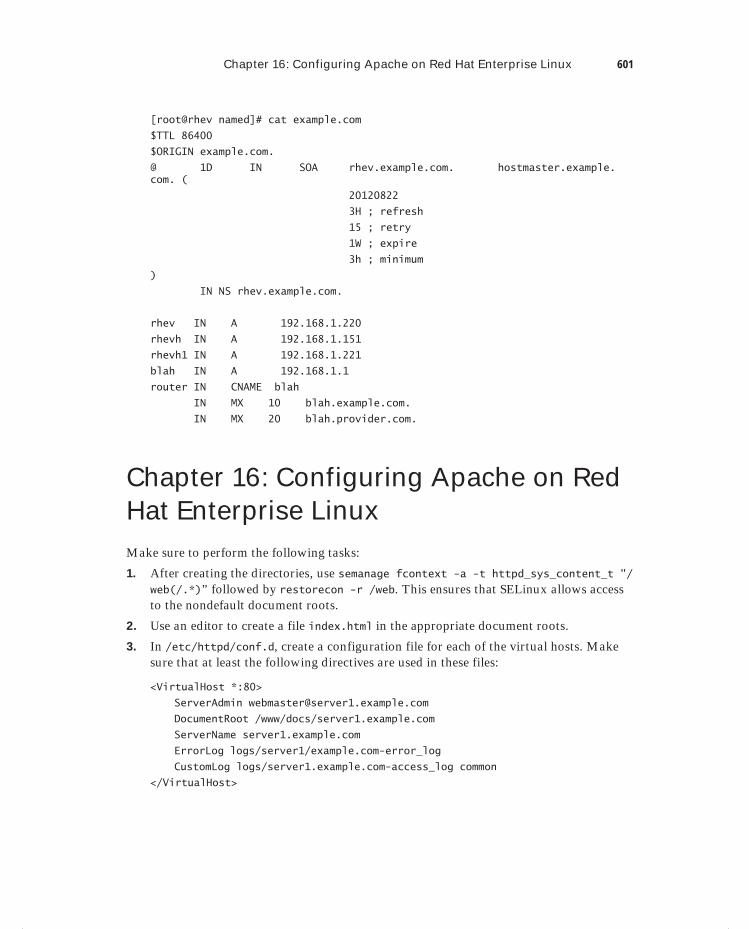
Chapter 16: Configuring Apache on Red Hat Enterprise Linux 601
[root@rhev named]# cat example.com
$TTL 86400
$ORIGIN example.com.
@ 1D IN SOA rhev.example.com. hostmaster.example.com. (
20120822
3H ; refresh
15 ; retry
1W ; expire
3h ; minimum
)
IN NS rhev.example.com.
rhev IN A 192.168.1.220
rhevh IN A 192.168.1.151
rhevh1 IN A 192.168.1.221
blah IN A 192.168.1.1
router IN CNAME blah
IN MX 10 blah.example.com.
IN MX 20 blah.provider.com.
Chapter 16: Configuring Apache on Red Hat Enterprise LinuxMake sure to perform the following tasks:
1. After creating the directories, use semanage fcontext -a -t httpd_sys_content_t "/web(/.*)” followed by restorecon -r /web. This ensures that SELinux allows access to the nondefault document roots.
2. Use an editor to create a file index.html in the appropriate document roots.
3. In /etc/httpd/conf.d, create a configuration file for each of the virtual hosts. Make sure that at least the following directives are used in these files:
<VirtualHost *:80>
ServerAdmin [email protected]
DocumentRoot /www/docs/server1.example.com
ServerName server1.example.com
ErrorLog logs/server1/example.com-error_log
CustomLog logs/server1.example.com-access_log common
</VirtualHost>
bapp02.indd 601bapp02.indd 601 1/8/2013 10:39:18 AM1/8/2013 10:39:18 AM
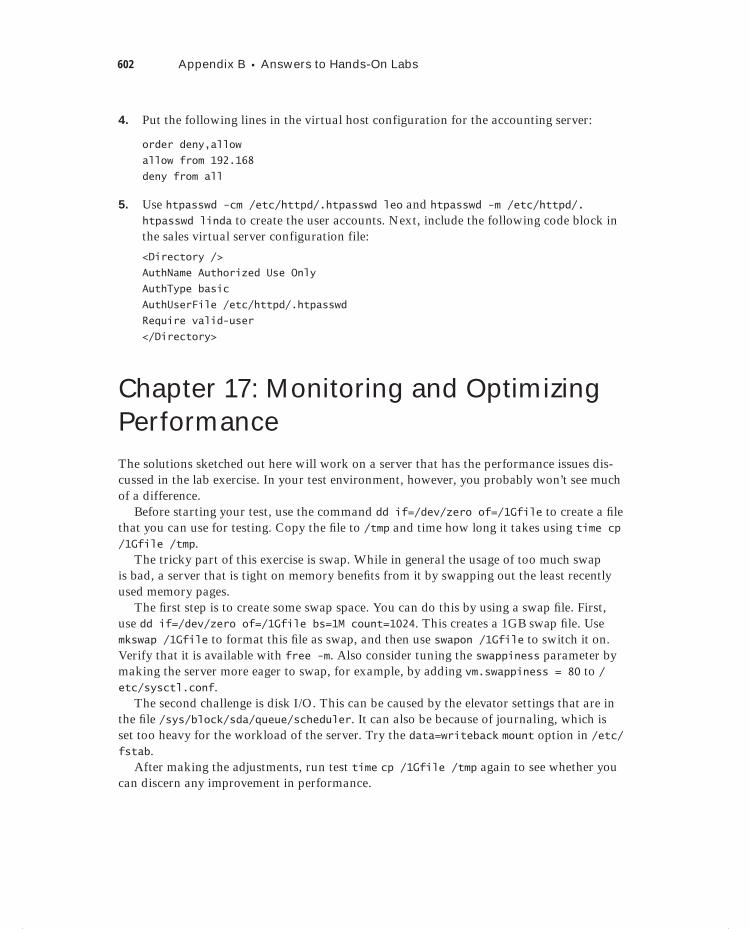
602 Appendix B Answers to Hands-On Labs
4. Put the following lines in the virtual host configuration for the accounting server:
order deny,allow
allow from 192.168
deny from all
5. Use htpasswd -cm /etc/httpd/.htpasswd leo and htpasswd -m /etc/httpd/.htpasswd linda to create the user accounts. Next, include the following code block in the sales virtual server configuration file:
<Directory />
AuthName Authorized Use Only
AuthType basic
AuthUserFile /etc/httpd/.htpasswd
Require valid-user
</Directory>
Chapter 17: Monitoring and Optimizing PerformanceThe solutions sketched out here will work on a server that has the performance issues dis-cussed in the lab exercise. In your test environment, however, you probably won’t see much of a difference.
Before starting your test, use the command dd if=/dev/zero of=/1Gfile to create a fi le that you can use for testing. Copy the fi le to /tmp and time how long it takes using time cp /1Gfile /tmp.
The tricky part of this exercise is swap. While in general the usage of too much swap is bad, a server that is tight on memory benefi ts from it by swapping out the least recently used memory pages.
The fi rst step is to create some swap space. You can do this by using a swap fi le. First, use dd if=/dev/zero of=/1Gfile bs=1M count=1024. This creates a 1GB swap fi le. Use mkswap /1Gfile to format this fi le as swap, and then use swapon /1Gfile to switch it on. Verify that it is available with free -m. Also consider tuning the swappiness parameter by making the server more eager to swap, for example, by adding vm.swappiness = 80 to /etc/sysctl.conf.
The second challenge is disk I/O. This can be caused by the elevator settings that are in the fi le /sys/block/sda/queue/scheduler. It can also be because of journaling, which is set too heavy for the workload of the server. Try the data=writeback mount option in /etc/fstab.
After making the adjustments, run test time cp /1Gfile /tmp again to see whether you can discern any improvement in performance.
bapp02.indd 602bapp02.indd 602 1/8/2013 10:39:18 AM1/8/2013 10:39:18 AM
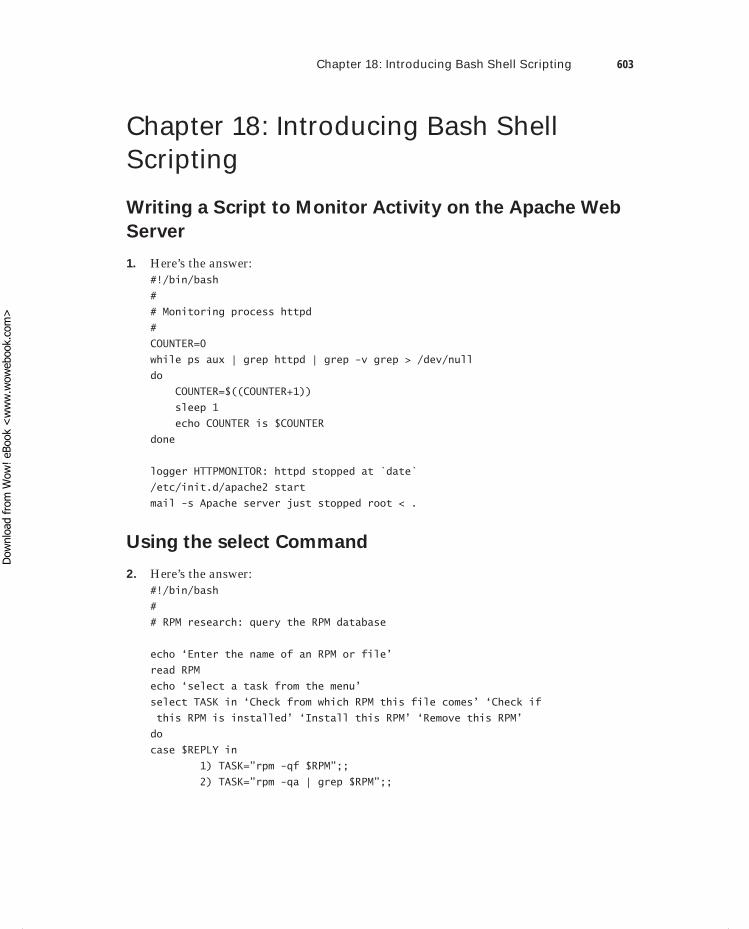
Chapter 18: Introducing Bash Shell Scripting 603
Chapter 18: Introducing Bash Shell Scripting
Writing a Script to Monitor Activity on the Apache Web
Server
1. Here’s the answer:#!/bin/bash
#
# Monitoring process httpd
#
COUNTER=0
while ps aux | grep httpd | grep -v grep > /dev/null
do
COUNTER=$((COUNTER+1))
sleep 1
echo COUNTER is $COUNTER
done
logger HTTPMONITOR: httpd stopped at `date`
/etc/init.d/apache2 start
mail -s Apache server just stopped root < .
Using the select Command
2. Here’s the answer:#!/bin/bash
#
# RPM research: query the RPM database
echo ‘Enter the name of an RPM or file’
read RPM
echo ‘select a task from the menu’
select TASK in ‘Check from which RPM this file comes’ ‘Check if
this RPM is installed’ ‘Install this RPM’ ‘Remove this RPM’
do
case $REPLY in
1) TASK=”rpm -qf $RPM”;;
2) TASK=”rpm -qa | grep $RPM”;;
bapp02.indd 603bapp02.indd 603 1/8/2013 10:39:18 AM1/8/2013 10:39:18 AM
Dow
nlo
ad fro
m W
ow
! eBook
<w
ww
.wow
ebook.
com
>
604 Appendix B Answers to Hands-On Labs
3) TASK=”rpm -ivh $RPM”;;
4) TASK=”rpm -e $RPM;;
*) echo error && exit 1;;
esac
if [ -n "TASK" ]
then
clear
echo you have selected TASK
$TASK
break
else
echo invalid choice
fi
done
Chapter 19: Understanding and Troubleshooting the Boot Procedure
1. Your server will issue an error while booting, and it will tell you to “Enter root pass-word for maintenance mode.” Enter the root password to get access to a shell environ-ment. The file system is mounted as read-only at this point. Use mount -o remount,rw / to mount the root file system in read-write mode, and fix your /etc/fstab.
2. Your server will keep on rebooting. To fix this, you first need to enter the GRUB prompt when the server reboots. From there, enter 3 or 5 to enter a normal runlevel. Don’t forget to fix the /etc/inittab file as well.
3. You have wiped your GRUB configuration. This is an issue you can repair only from the rescue disk. Boot the rescue disc, and make sure to mount your Linux installation on /mnt/sysimage. Next, use chroot /mnt/sysimage to change the current root direc-tory. Also verify that your /boot directory has been mounted correctly. If it has, use grub-install /dev/sda to reinstall GRUB.
Chapter 20: Introducing High-Availability Clustering
1. Use iscsiadm to discover the iSCSI target, and log in to it.
2. Make sure to run ricci on all nodes, and set a password for the ricci user. Then start luci on one node, and create the cluster.
bapp02.indd 604bapp02.indd 604 1/8/2013 10:39:18 AM1/8/2013 10:39:18 AM
Chapter 21: Setting Up an Installation Server 605
3. Make sure you have a partition on the SAN that you can use for the quorum disk. Use mkqdisk to format the quorum disk, and then switch it on from Conga. Also in Conga, define the heuristics test, which consists of the ping -c 1 yourgateway command.
4. Create the service group for FTP, and assign at minimum the resources for a unique IP address, a file system, and the FTP service. Make sure to mount the file system on /var/ftp/pub.
Chapter 21: Setting Up an Installation ServerComplete the following tasks:
1. Create a virtual web server, and add the name of this web server to DNS if you want to be able to use URLs to perform the installation.
2. Copy all files from the installation DVD to the document root of that web server.
3. Set up DHCP and TFTP. You can use the examples taken from the code listings in this chapter.
4. Use the anaconda-ks.cfg file that was created while installing your host machine, and change it to match the requirements detailed previously.
bapp02.indd 605bapp02.indd 605 1/8/2013 10:39:18 AM1/8/2013 10:39:18 AM

bapp02.indd 606bapp02.indd 606 1/8/2013 10:39:19 AM1/8/2013 10:39:19 AM

Glossary
bgloss.indd 607bgloss.indd 607 1/8/2013 10:39:31 AM1/8/2013 10:39:31 AM
608 Glossary
Aactive memory This is memory that has recently been used by the kernel and that can be accessed relatively fast.
anchor value This is a value used in performance optimization that can be used as the default value to which the results of performance tests can be compared.
anticipatory scheduler This is the I/O scheduler that tries to predict the next read opera-tion. In particular, this scheduler is useful in optimizing read requests.
authoritative name servers In DNS, this is a name server that has the authority to give information about resource records that are in the DNS database.
automount This is a system implemented using the autofs daemon and that allows file systems to be mounted automatically when they are needed.
BBash This is the default shell environment that is used in Linux. The Bash shell takes care of interpreting the commands that users will run. Bash also has an extensive scripting language that is used to write shell scripts to automate frequent administrator tasks.
Booleans These are on/off switches that can be used in SELinux. Using Booleans makes modifying settings in the SELinux policy easy, which would be extremely complex without the use of Booleans.
boot loader This is a small program of which the first part is installed in the master boot record of a computer, which takes care of loading an operating system kernel. On Red Hat Enterprise Linux, GRUB is used as the default boot loader. Others are also available but rarely used.
bouncing In email, this is a solution that returns an error message to another MTA after having received a message for a user who doesn’t exist in this domain.
Ccaching Caching is employed to keep frequently used data in a faster memory area. Cach-ing occurs on multiple levels. On the CPU, there is a fast but expensive cache that keeps the most frequently used code close to the CPU. In memory, there is a cache that keeps the most frequently used files from hard disk in memory.
certificate revocation list (CRL) In TLS certificates, a CRL can be used to keep a list of cer-tificates that are no longer valid. This allows clients to verify the validity of TLS certificates.
bgloss.indd 608bgloss.indd 608 1/8/2013 10:39:33 AM1/8/2013 10:39:33 AM

Glossary 609
cgroups In performance optimization, a cgroup is a predefined group of resources. By using cgroups, system resources can be grouped and reserved for specific processes only. It is possible to configure cgroups in such a way in which only allowed processes can access its resources.
chain In a Netfilter firewall, a chain is a list of filtering rules. The rules in a chain are always sequentially processed until a match is found.
Common Internet File System (CIFS) The Common Internet File System is a file-sharing solution that is based on the Server Message Block (SMB) protocol specification, which was developed by IBM for its OS/2 operating system and adapted by Microsoft, which published the specifications in 1995. On Linux, CIFS is implemented in the Samba server, which is commonly used to share files in corporate environments. CIFS is also a common solution on NAS appliances.
command substitution This is a technique in shell scripting that uses the result of a com-mand in the script. By using command substitution, a flexible shell script can be created to execute on the results of a specific command that may be different given the conditions under which it is executed.
complete fair queuing (CFQ) In kernel scheduler optimization, CFQ is an approach where read requests have the same priority as write requests. CFQ is the default scheduler setting that treats read and write requests with equal priority. Because of the equal treat-ment between these requests, it may not be the best approach for optimal performance on a server, which is focused either on read requests or on write requests.
Conga In the Red Hat High Availability add-on, Conga is the name for the web-based management platform, which consists of the ricci agents and luci management interface.
context In LDAP, a context is a location in the LDAP directory. An LDAP client is typically configured with a default context, which is the default location in LDAP where the client has to look for objects in the directory.
controllers In cgroups, different kinds of system resources can be controlled. cgroups use controllers to define to which type of system resource access is provided. Different control-lers are available for memory, CPU cycles, or I/O, for example.
copyleft license A copyleft license is the open source alternative to a copyright license. In a copyright license, the rights are claimed by an organization. In a copyleft license, the license rights are not claimed but are left for the general public.
Corosync This is the part of the Red Hat High Availability add-on that takes care of the lower layers of the cluster. Corosync uses the Totem protocol to verify whether other nodes in the cluster are still available.
cron daemon Cron is a daemon (process) that is used to schedule tasks. The cron daemon does this based on the settings that are defined in the /etc/crontab file.
bgloss.indd 609bgloss.indd 609 1/8/2013 10:39:33 AM1/8/2013 10:39:33 AM
610 Glossary
Ddaemons Daemons are service processes on Linux. To launch them, you’ll typically use the service command.
deadline scheduler This is a scheduler setting that waits as long as possible before it writes data to disk. By doing this, it ensures that writes are performed as efficiently as possible. Using the deadline scheduler is recommended for optimizing servers that do more writing than reading.
default gateway On IP networks, a default gateway is the router that connects this net-work to the outside world. Every computer needs to be configured with a default gateway; otherwise, no packets can be sent to exterior networks.
dentry cache This is an area in kernel memory that is used to cache directory entries. These are needed to find files and directories on disk. On systems that read a lot, the dentry cache will be relatively high.
dig Dig is a utility that can be used to query DNS name servers.
Domain Name System (DNS) DNS allows users of networks to use easy-to-remember names instead of hard-to-remember IP addresses. Every computer needs to be configured with at least one DNS server.
Dynamic Host Configuration Protocol (DHCP) DHCP is a protocol that is used to provide computers on the network with IP addresses and other IP-related information automatically. Using this as an alternative to the tedious manual assignment of IP addresses makes managing network-related configuration on hosts in an IP network relatively easy.
dynamic linker Library files need to be connected to the program files that use them. This can be done statically or dynamically. In the latter case, the dynamic linker is used to do this. It is a software component that tracks needed libraries, and if a function call is made to the library, it will be loaded.
Eentropy Entropy is random data. When generating encryption keys, you’ll need lots of random data, particularly if you’re using large encryption keys (such as 4096-bit keys). Entropy is typically created by causing random action on your computer, such as moving the mouse or displaying large directory listings.
entry In LDAP, an entry is an object in the LDAP database. The LDAP schema defines the different entries that can be used. Typical entries are users and groups that are created in LDAP to handle authentication.
environment variables An environment variable is one that is in a shell environment. Shells like Bash use local variables, which are available in the current shell only, and
bgloss.indd 610bgloss.indd 610 1/8/2013 10:39:33 AM1/8/2013 10:39:33 AM
Dow
nlo
ad fro
m W
ow
! eBook
<w
ww
.wow
ebook.
com
>
Glossary 611
environment variables, which are available in this shell and also in all of its subshells. Many environment variables are automatically set when your server starts.
escaping In a shell environment, escaping is the technique that makes sure that the next character or set of characters is not interpreted. This is needed to ensure that the shell takes the next character solely as a character and that it does not inter-pret its function in the shell. Typical characters that are often escaped are the asterisk (*) and dollar ($) sign.
Ethernet bond An Ethernet bond is a set of network cards that are bundled together. Ethernet bonding is common on servers, and it is used to increase the available bandwidth or add redundancy to a network connection.
execute permission The execute permission is used on program files in Linux. Without execute permission, it is not possible to run the program file or enter a directory.
extent Traditionally, file systems used blocks of 4KB as the minimum unit for allocating files. This took up many blocks for large files, which increased the overhead for these types of files. To make large file systems more efficient, modern file systems like ext4 use extents. An extent often has a default size of 2MB.
Ffairness This is the principle that ensures that all process types are treated by the kernel scheduler with equal priority.
fdisk tool This tool is used to create partitions.
Fedora This is an open source Linux distribution that is used as a development platform for Red Hat Enterprise Linux. Before new software solutions are offered in Red Hat Enter-prise Linux, they are already thoroughly tested in Fedora.
fencing This is a solution in a high-availability cluster that is used to make sure that erro-neous nodes are stopped.
fencing device This hardware device used to fence erroneous nodes in a high-availability cluster. Fencing devices can be internal, such as integrated management boards, or external to the server, which is the case for power switches.
file system label File system labels can be used as an easy method for identifying a file system. Instead of using the device name, which can change depending on the order in which the kernel detects the device, the file system label can be used to mount the devices.
for loop This is a conditional statement that can be used in shell scripts. A for loop is per-formed as long as a certain condition is met. It is an excellent structure to process a range of items.
bgloss.indd 611bgloss.indd 611 1/8/2013 10:39:33 AM1/8/2013 10:39:33 AM
612 Glossary
GGlobal File System 2 (GFS2) GFS2 is the Red Hat Cluster File System. The nice thing about GFS2 is that multiple nodes can write it to simultaneously. On a noncluster file sys-tem, such as ext4, if multiple nodes try to write to the same file system simultaneously, this leads to file system corruption.
Gnu Privacy Guard (GPG) GPG is a public/private key-based encryption solution. It can be used for multiple purposes. Some common examples include the encryption of files or RPM checksums. By creating a checksum on the RPM package, the user who downloads a package can verify that the package has not been tampered with.
group owner Every file and every directory on Linux has a group owner to which permis-sions are assigned. All users who are members of the group can access the file or directory using the permissions of the group.
Hhard link A hard link is a way to refer to a file. Basically, it is a second name that is cre-ated for a file. Hard links make it easy to refer to multiple files in a flexible way.
hardware fencing In high-availability clustering, hardware fencing is a method used for stopping failing nodes in the cluster to maintain the integrity of the resources, which are serviced by the cluster node in question. To implement this method, specific hardware is used, such as a management board or manageable power switch.
heuristics In high-availability clusters, a quorum disk can be used to verify that a node still has quorum. This means that it still is part of the majority of the cluster, and therefore it can serve cluster resources. To define the quorum disk, certain tests are assigned to it, and these are defined in the quorum disk heuristics.
hidden file A hidden file is a file that cannot be seen in a normal directory listing. To create a hidden file, the user should create a file in which the filename starts with a dot.
huge page By default, memory is allocated in 4KB pages. For applications such as data-bases that need to allocate huge amounts of memory, this is very inefficient. Therefore, the operating system can be configured with huge pages, which by default are 2MB in size. Using huge pages in some cases makes the operating system much more efficient.
Iinactive memory Inactive memory is memory that hasn’t been used recently. Pages that are in inactive memory are moved to swap before the actively used pages in active memory.
bgloss.indd 612bgloss.indd 612 1/8/2013 10:39:33 AM1/8/2013 10:39:33 AM

Glossary 613
inode An inode contains the complete administration of a file. In fact, a file is the inode. In actuality, names are assigned to files only for our convenience. The kernel itself works with inode numbers. Use ls -i to find the inode number of a particular file.
insert mode In the editor vi, the insert mode is the one in which text can be entered. This is in contrast to the command mode, which is the one in which commands can be entered, such as the command needed to save a document.
Inter-Process Communication (IPC) Inter-Process Communication is that communica-tion that occurs directly between processes. The kernel allocates sockets and named pipes to have IPCs transpire.
internal command An internal command is one that is part of the Bash shell binary. It cannot be found on disk, but it is loaded when the Bash shell is loaded.
IP masquerading IP masquerading is the technique where on the public side of the network, a registered IP address is used, and on the private side of the network, non-Inter-net-routable private IP addresses are used. IP masquerading is used to translate these private IP addresses to the public IP address, which nevertheless allows all private addresses to con-nect to the Internet.
iSCSI iSCSI is the protocol that is used to send SCSI commands over IP. It is a common SAN solution that implements shared storage, which is often required in high-availability clusters.
KKdump Kdump is a special version of the kernel that is loaded if a core dump occurs. This situation is rare in Linux, and it happens when the kernel crashes and dumps a memory core. The Kdump kernel takes the memory core dump, and it makes sure that it is written to disk.
key distribution center (KDC) A KDC is used in Kerberos to hand out tickets. After successful authentication, a KDC ticket allows a client to connect to one of the services that is made available by Kerberos.
key transfer Key transfer is the process where a shared security key has to be transferred to the communication partner. This is often done by using public/private key encryption.
key-based authentication Key-based authentication is an authentication solution where no passwords are exchanged. However, the authentication takes place by users who prove their identity by signing a special packet with their private key. Based on the public key, which also is publicly available to the authentication partner, a user can be authenticated. Key-based authentication is frequently used in SSH environments.
bgloss.indd 613bgloss.indd 613 1/8/2013 10:39:33 AM1/8/2013 10:39:33 AM

614 Glossary
keyring In GPG encryption, the key ring is the collection of all the keys that a user has collected. This includes keys from other users, as well as the key that belongs to the particu-lar user.
kickstart file A kickstart file is one that contains all of the answers needed to install the server automatically.
LLDAP Input Format (LDIF) LDIF is the default format used to enter information in an LDAP directory.
leaf-entries In LDAP, a leaf entry is one that cannot contain any entries by itself. This is in contrast to a container entry, which is used to create structure in the LDAP database.
library A library is a file that contains shared code. Libraries are used to make program-ming more efficient. Common code is included in the library, and the program files that use these libraries need to be linked to the library.
Libvirt Libvirt is a generic interface that is used for managing virtual environments. Common utilities like virsh and Virtual Machine Manager use it to manage virtualization environments like KVM, the default virtualization solution in Red Hat Enterprise Linux.
Lightweight Directory Access Protocol (LDAP) LDAP is a directory service. This is a service that is used to store items, which are needed in corporate IT environments. It is frequently used to create user accounts in large environments because LDAP is much more flexible than flat authentication databases.
link See hard link and soft link.
load average Load average is the average workload on a server. For performance optimi-zation, it is important to know the load average that is common for a server.
load balancing Load balancing is a technique that is used to distribute a workload between different physical servers. This technique is often used in combination with high-availability clustering to ensure that high workloads are handled efficiently.
log target In rsyslog, a log target defines where log messages should be sent. This can be multiple destinations, such as a file, console, user, or central log server.
logical operators Logical operators are used in Bash scripts to execute commands depending on the result of previously executed commands. There are two such logical oper-ators: a || b executes b only if a didn’t complete successfully, and a && b executes b only if a was executed successfully.
bgloss.indd 614bgloss.indd 614 1/8/2013 10:39:33 AM1/8/2013 10:39:33 AM

Glossary 615
Logical Volume Manager (LVM) Logical volumes are a flexible method for organizing disk storage. They provide benefits over the use of partitions, for example, in that it is much easier to increase or decrease a logical volume in size than a partition.
Linux Unified Key Setup (LUKS) LUKS is a method used to create encrypted disks and volumes. LUKS adds a level of security, and it ensures that data on the device cannot be accessed without entering the correct passphrase if the device is connected to another machine.
luci Management interface for high-availability clusters. As a part of the Conga solution, it probes the ricci agents that are used on cluster nodes to exchange information with them.
Mmail exchange (MX) A mail exchange is a mail server, which is responsible for handling email for a specific DNS domain.
mail queue Email that is sent is first placed in the mail queue. From there, it will be picked up by a mail process, which sends it to its destination. Sometimes messages keep “hanging” in the queue. If this happens, it helps to flush the queue or wait for the mail server process to try again to send the message.
mail user agent (MUA) The MUA is the user program used to send and read email messages.
master name server A master DNS name server, also referred to as a primary name server, is the server responsible for the resource records in a DNS domain. It communicates with slave or secondary DNS name servers to synchronize data for redundancy purposes.
memory over-allocation Memory over-allocation is the situation where a process claims more memory than that which is actually needed, just in case it might require it later. The total amount of claimed but not necessarily used memory is referred to as virtual memory.
message delivery agent (MDA) The MDA is the part of a mail server, which ensures that messages are delivered to the mailbox of the end user after it has been received by the mes-sage transfer agent.
message transfer agent (MTA) The MTA is the part of the mail server, which sends out a message to the mail server of the recipient. To find that mail server, it uses the MX record in DNS.
meta package handler A meta package handler is a solution that uses repositories to resolve dependency problems while installing RPM software packages. On Red Hat Enterprise Linux, the yum utility is used as the meta package handler.
bgloss.indd 615bgloss.indd 615 1/8/2013 10:39:33 AM1/8/2013 10:39:33 AM
616 Glossary
mkfs utility The mkfs utility is used to create a file system on a storage device, which can be a partition or an LVM logical volume. This process is referred to as formatting on other operating systems.
module Modules are pieces of software that can easily be included in a bigger software framework. Modules are used by different software solutions. The Linux kernel and the Apache web server are probably the best-known module solutions.
mounting Mounting is the process of connecting a storage device to a directory. Once it has been mounted, users can access the storage device to work with the data on that device.
Nname servers A (DNS) name server is a server that is contacted to translate DNS names like www.example.com, which are easy to use, to IP addresses, which are required to commu-nicate over an IP network. Every client computer needs to be configured with the IP address of at least one DNS name server.
ncurses ncurses is the generic way to refer to a menu-driven interface. On Red Hat Enter-prise Linux, there are some menu-driven interfaces that are useful for configuring a server, which doesn’t run a graphical user interface.
Neighbor Discovery Protocol (NDP) NDP is a protocol used in IPv6 to discover other nodes that are using IPv6. Based on this information, a node can find out in which IPv6 network it is used and, subsequently, add its own MAC address to configure the IPv6 address that it should use automatically.
Netfilter Netfilter is the name of the kernel-level firewall that is used in Linux. To configure the Netfilter firewall, the administrator uses the iptables command or the system-config-firewall menu-driven interface.
Network Address Translation (NAT) NAT is a solution used to hide internal nodes on the private network from the outside world. The nodes use the public IP address of the NAT router or firewall to gain access to external servers. Accordingly, only external servers can send answers to these internal hosts without accessing them directly.
Network Manager Service The Network Manager Service is one that simplifies manag-ing IP addresses. It monitors the IP configuration files and applies changes to these files immediately. It also uses a graphical user interface to make the management of IP addresses and related information easier for the administrator.
network service The network service is used to manage network interfaces.
noop scheduler The noop scheduler is an I/O scheduler that performs no operations on I/O transactions. Use this scheduler on advanced hardware, which optimizes I/O requests in a good enough way so that no further Linux OS-level optimization is required.
bgloss.indd 616bgloss.indd 616 1/8/2013 10:39:33 AM1/8/2013 10:39:33 AM
Glossary 617
Oobjects An object is a generic name in IT for an independent entity. Objects occur every-where, such as in programming, but they also exist in LDAP where the entries in an LDAP directory are also referred to as objects.
Ppacemaker Pacemaker is used in high-availability clusters to manage resources. Pace-maker is the name for the suite of daemons and utilities that help you run cluster resources where they need to be running.
packet inspection Packet inspection is a technique that is used, among others, by fire-walls for looking at the content of a packet. In general, packet inspection refers to an approach that goes beyond solely looking at the header of a packet but also looks into its data.
page size Memory is allocated in blocks. These blocks are referred to as pages, and they have a default size of 4KB. For applications that need large amounts of memory, it makes sense to use huge pages, which have a default size of 2MB.
Palimpsest tool Palimpsest is the utility used to manage partitions and file systems on a hard disk.
partition A partition is the base allocation unit that is needed to create file systems with the mkfs utility.
pattern-matching operator In shell scripting, a pattern-matching operator is one that analyzes patterns and, if required, modifies patterns in strings that are evaluated by the script.
physical volume In LVM, a physical volume is the physical device that is added to the LVM volume group. Typically, physical volumes are disks and partitions.
piping Piping is the solution where the output of one command is sent to another com-mand for further processing. It is often used for filtering, as in ps aux | grep http.
Pluggable Authentication Modules (PAM) Authentication on Linux is modular, and the system used to manage these modules is called Pluggable Authentication Modules (PAM). The benefit of using PAM is that it is easy to insert a module in it, which enables a new way of authenticating without the need to rewrite the complete program.
policy In a Netfilter firewall, the policy defines the default behavior. If no specific rule matches a packet, which is processed in any of the chains, the policy is applied. In SELinux, the policy is the total collection of SELinux rules that are applied.
bgloss.indd 617bgloss.indd 617 1/8/2013 10:39:34 AM1/8/2013 10:39:34 AM
618 Glossary
port forwarding On a firewall, port forwarding is used to send all packets, which are received on a public port, on a router to a specific host and port on the internal network.
POSIX standard POSIX is an old standard from the UNIX world, which was designed to reach a higher level of uniformity between UNIX operating systems. This standard is very comprehensive, including defining the behavior of specific commands. Many Linux com-mands also comply with the POSIX standard.
pre-routing In a Netfilter firewall, the pre-routing chain applies to all outgoing packets, and it is applied before the routing process determines how to send them forward.
primary name server See master name server.
priorities In performance optimization, the priority determines when a specific request is handled. The lower the priority; the sooner the request is handled. Requests that need immediate attention will get real-time priority.
process ID (PID) Every process has a unique identifier, which is referred to as the process ID (PID). PIDs are used to manage specific processes.
processes A process is a task that runs on a Linux server. Every process can be managed by its specific PID, and it allocates its own runtime environment, which includes the total amount of memory that is reserved by the process. Within a process, multiple subtasks can be executed. These are referred to as threads. Some services, like httpd, can be configured to start multiple processes or just one process that starts multiple tasks.
pseudo-root In the NFS file-sharing protocol, a pseudo-root is a common directory that contains multiple exported directories. The NFS client can mount the pseudo-root to gain access to all of these directories instead of mounting the individual directories one by one.
Public Key Certificate (PKC) In TLS secure communications, a public key certificate is used to hand out the public key of nodes to other machines. The public key certificate con-tains a signature that is created by a certificate authority, which guarantees the authenticity of the public key that is in the certificate.
Qqueue A queue is a line in which items are placed before they are served. Queues are used in email, and they are also by the kernel in handling processes.
queuing This is the process of placing items in a queue.
quorum In high-availability clustering, the quorum refers to the majority of the cluster. Typ-ically, nodes cannot run services if the node is not part of a cluster that has a quorum. This approach is used to guarantee the integrity of services that are running in the cluster.
bgloss.indd 618bgloss.indd 618 1/8/2013 10:39:34 AM1/8/2013 10:39:34 AM
Glossary 619
quorum disk A quorum disk is a solution that a cluster can use to get quorum. Quorum disks are particularly useful in a two-node cluster, where normally one node cannot have quorum if the other node goes down. To fix this problem, the quorum disk adds another quo-rum vote to the cluster.
Rread permission This is the permission given to read a file. If applied to a directory, the read permission allows the listing of items in the directory.
real time A real-time process is one that is serviced at the highest-level priority. This means that it will go through before any other processes that are currently in the process queue, and it has to wait only for other real-time processes to occur.
realm A realm is a domain in the Kerberos authentication protocol. The realm is a collec-tion of services that share the same Kerberos configuration.
Red Hat Enterprise Virtualization (RHEV) RHEV is a KVM-based virtualization solu-tion. It is a separate product that distinguishes itself by offering an easy-to-use management interface, with added features such as high availability, which are not available in default KVM.
Red Hat Package Manager (RPM) RPM is a standard used to bundle software pack-ages in RPM files. An RPM file contains an archive of packages, as well as metadata that describes what is in the RPM package.
referral In LDAP, a referral is a pointer to another LDAP server. Referrals are used to find information that isn’t managed by this LDAP server.
relaying In email, relaying is a solution where email is forwarded to another message transfer agent that ensures that it reaches its destination.
replication In LDAP, replication is creating multiple copies of the same database. In repli-cation, there is a process that ensures that modifications applied to one of the databases are also synchronized to all copies of that database.
repositories In RPM package management, a repository is an installation source. It can be a local directory or offered by a remote server, and it contains a collection of RPMs and metadata that describes exactly what is in the repository.
resource records In DNS, resource records are those that are in the DNS database. There are multiple types of resource records, like A, which resolves a name in an IP address, or PTR, which resolves an IP address into a name.
RGManager In high-availability clustering, RGManager is the resource group manager. It determines where in the cluster certain resources will be running.
bgloss.indd 619bgloss.indd 619 1/8/2013 10:39:34 AM1/8/2013 10:39:34 AM

620 Glossary
RHEV Manager (RHEV-M) In Red Hat Enterprise Virtualization, the RHEV-M host offers the management platform that is used to manage virtual machines.
RHEV-H In Red Hat Enterprise Virtualization, RHEV-H is the hypervisor host. It is the host that runs the actual KVM virtual machines.
ricci In high-availability clustering, Conga is the platform that provides a web-based man-agement interface. Ricci is the agent that runs on all cluster nodes, and it is managed by the luci management platform. The administrator logs in to the luci management interface to perform management tasks.
root domain In DNS, the root domain is the starting point of all name resolution. It is at the top of the hierarchy that contains the top-level domains, such as .com, .org, and many more.
rotating a log file Rotating a log file is the process where an old log file is closed and a new log file is opened, based on criteria such as the age or size of the old log file. Log rota-tion is used to ensure that a disk is not completely filled up by log files, which grow too big.
rsyslogd process The rsyslogd process takes care of logging system messages. To specify what it should log, it uses a configuration file where facilities and priorities are used to define exactly where the messages are logged.
run queue See queue.
runlevel A runlevel is the status in which a server is started. It determines the amount of services that should be loaded on the server.
SSamba Samba is the open source file server that implements the Common Internet File System (CIFS) protocol to share files. It is a popular solution because all Windows clients use CIFS as their native protocol.
Satellite Red Hat Satellite is an installation proxy. It can be used on large networks, and it is located between the RHN installation repositories and local servers. The Satellite server updates from RHN, and the local servers will install updates from Red Hat Satellite.
scheduler The scheduler is the part of the kernel that divides CPU cycles between pro-cesses. The scheduler takes into consideration the priority of the processes, and it will make sure that the process with the lowest priority number is serviced first. Between processes with equal priority, CPU time will be evenly divided.
schema In LDAP, the schema defines the objects that can exist in the database. In some cases, when new solutions are implemented, a schema extension is necessary.
secondary server In DNS, a secondary server is one that receives updates from a primary server. Clients can use a secondary server for name resolving.
bgloss.indd 620bgloss.indd 620 1/8/2013 10:39:34 AM1/8/2013 10:39:34 AM
Dow
nlo
ad fro
m W
ow
! eBook
<w
ww
.wow
ebook.
com
>

Glossary 621
Set group ID (SGID) SGID is a permission, which makes sure that the person who executes a file executes it with the permissions of the group that is owner of the file. Also, when applied to a directory, SGID sets the inheritance of group ownership on that directory forward. This means that all items that are created in that directory and its subdirectories will get the same group owner.
Set user ID (SUID) permission SUID permission makes sure that a user who executes a file will execute it with the permissions of the owner of the file. This is a potentially danger-ous permission, and for that reason, it normally isn’t used by system administrators.
shared memory Shared memory is memory that is shared between processes. Using shared memory is useful if, for example, multiple processes need access to the same library. Instead of loading the library multiple times, it can be shared between the processes.
shebang The shebang (#!/bin/bash) is used on the first line of a shell script. It indicates the shell that should be used to interpret the commands in the shell script.
shell The shell is the user interface that interprets user commands and interfaces to the hardware in the computer.
shell script A shell script is a file that contains a series of commands in which conditional statements can be used in order that certain commands are executed only in specific cases.
shell variable A shell variable is a name that points to an area in memory that contains a dynamic value. Because shell variables are dynamic, they are often used in shell scripts, because they make the shell script flexible.
Simple Mail Transfer Protocol (SMTP) SMTP is the default protocol that is used by MTAs to make sure that mail is forwarded to the mail exchange, which is responsible for a specific DNS domain.
slab memory Slab memory is memory that is used by the kernel.
slave name server See secondary name server.
snapshot In LVM, a snapshot is a “photo” of the state of a logical volume at a specific point in time. Using snapshots makes it much easier to create backups, because there will be never open files in a snapshot.
software dependency Programmers often use libraries or other components that are necessary for the program to function but are external to the program itself. When install-ing the program, these components also need to be installed. The installation program will therefore look for these software dependencies.
STDERR STDERR is standard error, or the default location to which a process will send error messages.
sticky bit permission The sticky bit permission can be used on directories. It has no func-tion on files. If applied, it makes sure that only the user of a file, or the user of the parent directory, can delete files.
bgloss.indd 621bgloss.indd 621 1/8/2013 10:39:34 AM1/8/2013 10:39:34 AM

622 Glossary
Streamline Editor (SED) SED is a powerful command-line utility that can be used for text file processing.
substitution operators Substitution operators are those that change an item in a script dynamically, depending on factors that are external to that script.
superclass In LDAP, a superclass is used to define entries in the LDAP schema. The super-class contains attributes that are needed by multiple entries. Instead of defining these for every entry that needs them, the attributes are defined on the superclass, and the specific entry in the schema is connected to the superclass so that it inherits all of these attributes.
swap memory Swap memory is simulated RAM memory on disk. The Linux kernel can use swap memory if it is short on physical RAM.
swap space See swap memory.
symbolic link A symbolic link is used to point to a file that is somewhere else. Symbolic links are used to make it easier to use remote files.
symmetric multiprocessing (SMP) SMP is what the kernel uses to divide tasks between multiple processors.
sys time When the time utility is used to measure the time it takes to execute a command, it will distinguish between real time and sys time. Real time is the time that has passed between the start and the completion of the command. This also includes the time that the processor has been busy servicing other tasks. Sys time, also referred to as system time, is the time that the process actually has been using the CPU.
system-config To make configuring a system easy, Red Hat includes many utilities where the name starts with system-config. To find them, type system-config and, before press-ing Enter, press the Tab key twice.
Ttar ball A tar ball is an archive file that has been created using the tar utility.
top-level domain (TLD) A TLD is one of the domains in DNS that exists on the upper level. These are commonly known domains, such as .com, .org, and .mil.
UUpstart Upstart is the Linux system used for starting services.
user owner To calculate file system permissions, the user owner is the first entity that is considered. Every file has a user owner, and if the user who is the owner accesses that file, the permissions of that user are applied.
bgloss.indd 622bgloss.indd 622 1/8/2013 10:39:34 AM1/8/2013 10:39:34 AM

Glossary 623
user space When a program is executed, it can run in user space and in kernel space. In user space, it has limited permissions. In kernel space (also referred to as system space), it has unrestricted permissions.
Vvariable A variable is a name that is connected to a specific area in memory where a changeable value is stored. Variables are frequently used in shell scripts, and they are defined when calling the script, or from within the script, by using statements such as the read statement.
virtio drivers Virtio drivers are those that are used in KVM virtual machines. A virtio driver allows the virtual machine to communicate directly with the hardware. These drivers are used most frequently for network cards and disks.
virtual bridge adapter To connect virtual machines to the network, a virtual bridge is used. The virtual bridge at one end is connected to the physical Ethernet card. At the other end, it is connected to the virtual network cards within the virtual machines, and it allows all of these network cards to access the same physical network connection.
virtual host A virtual host is a computer that is installed as a virtual machine in a KVM environment. This is also referred to as a virtual guest. Another context where virtual hosts are used is the Apache web server where one Apache service can serve multiple web services, referred to as virtual hosts.
virtual memory Virtual memory is the total amount of memory that is available to a pro-cess. It is not the same as all memory that is in use; rather, it’s just the memory that could be used by the process.
volume group In LVM, the volume group is used as the abstraction of all available stor-age. It provides the storage needed to create logical volumes, and it gets this storage from the underlying physical volumes.
Wwrite permission The write permission is the one that allows users to change the content of existing files. If applied to a directory, it allows the user who has write permissions to create or delete files and subdirectories in that directory.
Yyum See meta package handler.
bgloss.indd 623bgloss.indd 623 1/8/2013 10:39:34 AM1/8/2013 10:39:34 AM

624 Glossary
Zzone This is the connected domains and subdomains for which a DNS server is responsible.
zone transfer This is the update of changes in DNS zones between master and slave DNS servers.
bgloss.indd 624bgloss.indd 624 1/8/2013 10:39:34 AM1/8/2013 10:39:34 AM

Symbols! command, 44#! (shebang), 468–470% parameters, 420> (single redirector sign), 52>> (double redirector sign), 52
Numbers64-bit versions. see installation of RHEL Server
A-a, --append, 200absolute mode, 215–216access control lists (ACLs)
default, 224getfacl for, 222–223introduction to, 220–221preparing file systems for, 221–222settings for, 222–223
Account Information, 37accounts of users. see usersACLs (access control lists). see access control lists
(ACLs)Active Directory, 206active vs. inactive memory, 427–430add-ons
for high-availability clustering, 534–535, 541–553introduction to, 8
addresses, IP. see IP addressesaddresses, NAT for. see NAT (Network Address
Translation)admin servers, 204–206admin users, 327administration tasks. see system administrationadvanced permissions, 216–220AllowOverride, 392–393AllowUsers settings, 176–177
AMS nodes, 182–183anaconda-ks.cfg files, 573–575analyzing performance. see performanceanchor values, 415anonymous FTP servers, 351anticipatory schedulers, 457Apache
authentication in, 404–407configuration files in, 387–390context types in, 393–394directories in, 392–393documentation in, 396generic parameters in, 390hands-on labs on, 603–604, 619–621help in, 395–396high-availability clustering for, 555–558.htpasswd in, 405–406introduction to, 385–386LDAP authentication in, 406–407log files in, 393modes in, 390–391modules in, 391–392MySQL in, 407–409restricted directories in, 405security in, 399–404SELinux and, 230–231, 234–235, 393–395SSL-based virtual hosts in, 401–404summary of, 409TLS certificates in, 399–404virtual hosts in, 396–398, 401–404Web servers in, 386–395, 562–563website creation in, 386–387
Applications menu, 34–35architecture, 246–248archive files, 88–89, 100arguments
in Bash commands, 471–472in Bash shell scripts, 476–480in command-line, 477–478counting, 478–479referring to all, 479–480
ASCII filesintroduction to, 45replacing text in, 58–59schemas in, 324
Index
bindex.indd 625bindex.indd 625 1/8/2013 10:39:47 AM1/8/2013 10:39:47 AM

626 ATL nodes – cached parameter
ATL nodes, 182–183attributes, 226–227auditing logs, 239–240authentication
Active Directory in, 206in Apache, 404–407authconfig for, 206–208external sources of, 203–208LDAP server in, 204–206OpenLDAP in, 332overview of, 208–209PAM in, 210–212in Samba, 346sssd in, 208–209of users, 208–209
authoritative name servers, 358authority, defined, 357automated installations, 568–569Automount
configuration of, generally, 338–339home directories in, 341indirect maps in, 340–341/net directory in, 339–340NFS shares in, 339–340
Bbackground jobs, 70–71backquotes, 482backticks, 482backups
hands-on labs on, 597–598, 609in system administration, 88–89
base directory structure, 320–323base server configuration, 318–320Bash shell scripts
for in, 500–503arguments in, 471–472, 476–480asking for input in, 480–482best practices for, 42–43calculations in, 489–491case in, 496–498command substitution in, 482command-line arguments in, 477–478comments in, 470content changes in, 485–488control structures in, generally, 491–493counting arguments in, 478–479creation of, 469–471elements of, 468–469executable, 471execution of, 471
hands-on labs on, 604–605, 621help in, 61history feature in, 44–45if.then.else in, 493–496introduction to, 42, 467–468IP address checks in, 499, 501key sequences in, 43–44pattern matching in, 485–488read for, 480–482referring to all arguments in, 479–480sourcing, 472, 474–476subshells in, 470, 472–475substitution operators in, 483–485summary of, 503until in, 499–500variables in, generally, 472–475while in, 498–499
BIND (Berkeley Internet Name Domain), 359–361, 364
Blk_ parameters, 436blkid command, 84–86blocked processes, 421bonding, 535–537Booleans, 237–238, 351–352boot procedures
/boot/grub/grub.conf for, 507–512from DVDs, 11GRUB configuring, 506–516hands-on labs on, 605, 622interactive mode in, 524introduction to, 505–506kernel management in, 516–521in minimal mode, 524–525rescue environments for, 526–527root passwords in, 525–526service startup configuration in, 521–524summary of, 527system access recovery and, 526–527troubleshooting, 506, 524–527Upstart for, 506, 521
bouncing messages, 376Bourne Again Shell (Bash) shell. see Bash shell
scriptsBSD mode, 73buffers parameter, 417–418busy processes, 438–439
C-c warn, 193cached parameter, 418
bindex.indd 626bindex.indd 626 1/8/2013 10:39:47 AM1/8/2013 10:39:47 AM

caches – control structures 627
cachesintroduction to, 79name servers and, 359–361parameters for, 418write for, 452–453
calculations, 489–491carrier problems, 442CAs (certificate authorities), 295–296case command, 496–498cat command, 43, 48, 54–55cd (change current working directory) command,
45CentOS (Community Enterprise Operating
System), 8certificate authorities (CAs), 295–296certificate revocation lists (CRLs), 296CFG (Complete Fair Queueing), 456cgroups (control groups), 450, 464–466chains, 280–287change current working directory (cd) command,
45chgrp command, 213child processes, 469chmod command, 215–216, 218–219chown command, 213CIFS (Common Internet File System), 342clients in SSH, 177cloning, 55, 257Cloud, 9Cluster Services, 8. see also high-availability (HA)
clusteringcman_tool status command, 551cn (common name) commands, 317–321collisions, 442COMMAND parameter, 420command substitution, 482command-line arguments, 477–478command-line commands. see also specific
commandsaddress configuration with, 168Bash shell in, 42–45copying with, 47–48, 58cutting with, 58deleting text with, 58for directories, 45–46editors and, 56–57empty file creation with, 49file management with, 45–49group management with, 199–200in GRUB, 513–514
hands-on labs on, 596–597, 608help with, 61–65ifconfig, 164–165installed packages information with, 65–66introduction to, 42IP address management with, 165–169ip route, 168–169ip tool, generally, 165–166listing files with, 46moving files with, 48network connections with, 164–169pasting with, 58piping, 50–51quitting work with, 57–58redirection of, 50–56removing files with, 46–47replacing text with, 58–61route management with, 168–169saving work with, 57–58summary of, 66for user management, 190–191vi modes and, 57viewing text file contents with, 48–49
comments, 470Common Internet File System (CIFS), 342common name (cn) commands, 317–320Common UNIX Print System (CUPS), 90–91Community Enterprise Operating System
(CentOS), 8Complete Fair Queueing (CFG), 456compressed files, 97computer requirements, 11configuration files
in Apache, 387–390.conf file extension for, 387in NetworkManager, 158–160, 161–163RPM queries finding, 118in system-config-firewall, 278–279for users, 194–198
CongaHA services for Apache in, 555–558introduction to, 535overview of, 542–546troubleshooting, 558–559
context switch (cs) parameter, 425context switches, 421–425context types
in Apache, 393–394defined, 231in SELinux, 231–233, 235–237
control groups (cgroups), 450, 464–466control structures, 491–493
bindex.indd 627bindex.indd 627 1/8/2013 10:39:47 AM1/8/2013 10:39:47 AM

628 controllers – DNS (Domain Name System)
controllers, 464copy commands, 47–48, 58copyleft licenses, 5Corosync, 534counters, 489, 500–501cp (copy files) command, 47–48cpio archives, 118–119CPUs
context switches in, 421–424core of, 77–78interrupts in, 421–424monitoring, 415–417performance of, 420–425, 449–450top utility for, 415–417vmstat utility for, 425
CRLs (certificate revocation lists), 296cron command, 82–83cryptographic services
GNU Privacy Guard, 302–312hands-on labs on, 601, 613–614introduction to, 293–294openssl, 296–302SSL. see SSL (Secure Sockets Layer)summary of, 312
cs (context switch) parameter, 425cssadmin tool, 535Ctrl+A, 44Ctrl+B, 44Ctrl+C, 43Ctrl+D, 43Ctrl+F12, 54Ctrl+R, 43Ctrl+Z, 44, 73CUPS (Common UNIX Print System), 90–91cur parameter, 435current system activity, 76–79Custom Layout, 20cut commands, 58
Ddaemons
cron, 82CUPS, 90–91defined, 72Rsyslog, 92–94
Date and Time settings, 30–31date strings, 488dc (domain component) commands, 317–321
dd command, 55, 58, 75deadline schedulers, 457decryption of files, 309dedicated cluster interfaces, 533defaults
for ACLs, 224for gateways, 168, 213–214for Netfilter firewalls, 270–271for ownership, 213–214for permissions, 221–222, 225–226for routers, 168
delegation of subzone authority, 357delete commands, 58Dell Drac, 552dependencies, 101–103Desktop option, 27dev (device files), 54–55DHCP (Dynamic Host Configuration Protocol)
dhcpd.conf file in, 565hands-on labs on, 602, 617–618introduction to, 369in OpenLDAP, 324servers in, 370–374, 563–568summary of, 374
dig command, 170–172directories
access in. see LDAP (Lightweight Directory Access Protocol)
Active Directory, 206in Apache, 392–393in Automount, 339–341command-line commands for, 45–46context settings for, 231–232
Directory Server, 9dirty_ratio, 452–453disabled mode, 233–235disk activity, 434–436disk parameters, 440Display Preferences, 36distributions of Linux, 5–6dmesg command, 84–86, 125, 517–518DNS (Domain Name System)
cache-only name servers in, 359–361creating, 366hands-on labs on, 602, 617–618hierarchy in, 316–317, 356–357in-addr.arpa zones in, 359, 367–368introduction to, 355–356lookup process in, 358master-slave communications in, 368–369in network connections, 170–172
bindex.indd 628bindex.indd 628 1/8/2013 10:39:47 AM1/8/2013 10:39:47 AM

documentation – file system management 629
primary name servers in, 357, 361–367secondary name servers in, 357, 368–369server setup in, 359–369server types in, 357–358summary of, 374zone types in, 359
documentation, 396DocumentRoot, 390, 397domain component (dc) commands, 317–320Domain Name System (DNS). see DNS (Domain
Name System)double redirector sign (>>), 52Dovecot, 383–384drive activity, 440dropped packets, 441dumpe2fs command, 132–133DVDs, 562–563, 568–569Dynamic Host Configuration Protocol (DHCP).
see DHCP (Dynamic Host Configuration Protocol)
dynamic linkers, 451
Eecho $PATH, 471editors, 56–57email. see mail serversempty files, 49encryption, 151–154, 308–310end-of-file (EOF) signals, 43enforcing mode, 233–235Enterprise File System (XFS), 8EOF (end-of-file) signals, 43error messages, 441–442escaping, 481–482, 503/etc/ commands
auto.master, 338–341fstab, 137–139, 338, 347group, 199–200hosts, 541–542httpd, 387, 392inittab, 522–523logins.defs, 197–198nsswitch, 209–210pam.d, 210–211passwd, 194samba/smb.conf, 342–343securetty, 211–212shadow, 196–197
sysconfig, 156–162, 278–279sysctl.conf, 446
Ethernet bonding, 533ethtool eth0, 442–443Ewing, Marc, 5ex mode, 57executable Bash shell scripts, 471execute permissions, 214–216exit command, 471expiration of passwords, 193export options, 335–336expr operators, 489–490Ext4 file system. see file system managementextended partitions, 124, 128extents, 140extracting archives, 88–89extracting files, 118–119
Ffairness, 449fdisk -cul command, 85–86fdisk tool, 123, 126Fedora, 6, 316fencing, 551–553Fibre Channel, 533–534file sharing
Automount for, 338–341FTP for, 348–351hands-on labs on, 602, 616–617introduction to, 333–334NFS4 for, 334–338Samba for, 342–348SELinux and, 351–352summary of, 352–353
file system managementaccess control lists in, 221–222command-line commands for, 45–49copying files in, 47–48creating empty files in, 49creation of, 131–132directories in, 45–46files in. see filesintegrity of, 134–135journaling in, 130–131labels in, 134listing files in, 46moving files in, 48permissions in, 221–222properties of, 132–134
bindex.indd 629bindex.indd 629 1/8/2013 10:39:48 AM1/8/2013 10:39:48 AM
Dow
nlo
ad fro
m W
ow
! eBook
<w
ww
.wow
ebook.
com
>

630 File Transfer Protocol (FTP) – GRUB
removing files in, 46–47sharing. see file sharingstorage in, 129–131, 135–139types of, 130viewing text file contents in, 48–49
File Transfer Protocol (FTP), 348–351files
command-line commands for, 46–49encryption of, 308–310extensions for, 387log, 94–96management of. see file system managementservers for, 341–345sharing. see file sharing
fingerprints, 308firewalls
allowing services through, 272–274introduction to, 270–271IP masquerading in, 275–278iptables for advanced configuration of,
287–289iptables for, generally, 279–287in kickstart files, 573port forwarding in, 276–278ports in, adding, 274trusted interfaces in, 275
fixed IPv6 addresses, 174flow control, 490–496for commands, 500–503for loop command, 479foreground jobs, 71fork() system calls, 451FORWARD chain, 280frame errors, 442free commands, 52, 417free versions of RHEL, 7–8fsck command, 134–135fstab command, 135–139FTP (File Transfer Protocol), 348–351
Ggateways, 168generic parameters, 390genkey command
in GPG, 303–304, 307, 311in openssl, 298–302
getfacl command, 222–223getsebool command, 237–238GFS2 (Global File System 2), 559–560
GNOME user interfaceApplications menu in, 34–35introduction to, 33–34Places menu in, 35–36Red Hat Enterprise Linux and, 33–38System menu in, 36–38
GNU General Public License (GPL), 5GNU Privacy Guard (GPG)
decryption of files with, 309file encryption with, 308–310files in, generally, 104–105introduction to, 302–303keys, creating, 303–307keys, managing, 307–308keys, signing RPM packages with, 311–312keys, transferring, 305–307RPM file signing in, 310–312signing in, 310–312
GPL (GNU General Public License), 5graphical tools
for groups, 201–202hands-on labs on, 596, 608SSH, 181–182for users, 201–202
grep command, 50–51, 54groups
authentication of, external sources for, 203–208authentication of, generally, 208–209authentication of, PAM for, 210–212creating, 198/etc/group, 199–200graphical tools for, 201–202hands-on labs on, 599–600, 611–612introduction to, 189–190management of, 199–200membership in, 191, 200nsswitch for, 209–210in OpenLDAP, 326–332ownership by, 212–214permissions for. see permissionssummary of, 227
GRUBfor boot procedure, generally, 506–507changing boot options in, 510–512command-line commands in, 513–514grub.conf configuration file in, 507–510kernel loading in, 516manually starting, 513–514passwords for, 509–510performance and, 451–452, 457prompt for, 234reinstalling, 514workings of, 514–516
bindex.indd 630bindex.indd 630 1/8/2013 10:39:48 AM1/8/2013 10:39:48 AM

HA (high-availability) clustering. – “I Love Lucy 631
HHA (high-availability) clustering. see high-
availability (HA) clusteringhands-on labs
on Apache, 603–604, 619–621on backups, 597–598, 609on Bash shell scripting, 604–605, 621on boot procedure, 605, 622on command line, 596–597, 608on cryptography, 601, 613–614on DHCP, 602, 617–618on DNS, 602, 617–618on file sharing, 602, 616–617on graphical desktop, 596, 608on groups, 599–600, 611–612on high-availability clustering, 605, 622–623on installation servers, 606, 623on iptables, 601, 613on KVM virtualization, 600, 612–613on mail servers, 603, 618–619on network connections, 599, 611on OpenLDAP, 601–602, 614–616on performance, 604, 620on permissions, 599–600, 611–612on process management, 597–598, 609on query options, 598, 610on repositories, 598, 610on RPMs, 598, 610on select commands, 604–605, 621–622on SELinux, 600, 612on server security, 601, 613on software management, 598, 610on storage, 597–599, 609–611on system administration, 597–598, 609on users, 599–600, 611–612
hands-on support, 6hard links, 87hardware fencing, 551hardware support, 6hdparm utility, 440head command, 48headers, 365--help, 65help, 61–65, 395–396heuristics testing, 549hi parameter, 417hidden files, 46hiddenmenu, 509High Availability add-ons. see Red Hat High
Availability add-onshigh-availability (HA) clustering
add-ons for, generally, 534–535add-ons for, installing, 541–553for Apache, 555–558bonding in, 535–537cluster properties configuration in, 546–548cluster-based services in, 535–541Conga in, 535, 542–546Corosync in, 534dedicated cluster interfaces in, 533Ethernet bonding in, 533fencing in, 551–553Global File System 2 in, 559–560hands-on labs on, 605, 622–623initial state of clusters in, 542–546introduction to, 529–530iSCSI initiators in, 539–541iSCSI targets in, 537–541lab hardware requirements for, 530multiple nodes in, 531–532Pacemaker in, 535quorum disks in, 532, 549–551requirements for, 531–534resources for, 554–558Rgmanager in, 534services for, 554–558shared storage in, 533–534, 537summary of, 560troubleshooting, 558–559workings of, 530–531
home directories, 341hosts
in Apache, 396–398, 401–404in DHCP. see DHCP (Dynamic Host Configuration
Protocol)in DNS. see DNS (Domain Name System)in High Availability add-ons, 541–542in KVM virtualization, 248–249names of, 15SSL-based, 401–404
HP ILO, 552.htpasswd, 405–406HTTPD parameters, 391httpd_sys_ commands, 393–394httpd.conf files, 386–392httpd-manual, 395hypervisor type 1 virtualization, 246
I-i inact, 193“I Love Lucy,” 535
bindex.indd 631bindex.indd 631 1/8/2013 10:39:48 AM1/8/2013 10:39:48 AM

632 IANA (Internet Assigned Numbers Authority) – IP addresses
IANA (Internet Assigned Numbers Authority), 356
id (idle loop) parameter, 417, 425Identity & Authentication tab, 203–205idle loop (id) parameter, 425IDs of jobs, 70ifconfig
commands in, 164–165network performance in, 440–441variables in, 162–163
if.then.else, 493–496IMAP mail access, 383–384inactive memory, 426–430in-addr.arpa zones, 359Indexes, 392indirect maps, 340–341information types, 316init=/bin/bash, 524–525initial state of clusters, 542–546initiators in iSCSI, 537–541inode, 87input, in Bash shell scripts, 480–482INPUT chain, 280input/output (I/O) requests. see I/O (input/output)
requestsinsert mode, 57installation of OpenLDAP, 318–320installation of RHEL Server
booting from DVD for, 11completion of, 32computer requirements for, 11Custom Layout option in, 20Date and Time settings in, 30–31Desktop option for, 27formatting in, 27hostnames in, 15integrity checks in, 12introduction to, 9–10IP addresses in, 15–17Kdump settings in, 31–32keyboard layouts in, 14language options in, 13license agreements for, 28loading Linux kernel in, 12login window and, 32LVM Physical Volume in, 22–26network settings in, 15–17partition creation in, 21–26Red Hat Network in, 28–29root passwords in, 18–19Software Updates in, 28–29
storage devices in, 14–15, 19–26time settings in, 17–18, 30–31user accounts in, 29–30
installation of software, 115installation servers
automated installations in, 568–569DHCP servers in, 563–568introduction to, 561–562kickstart files in, 568–576network servers as, 562–563PXE boot configuration in, 563–568summary of, 576system-config-kickstart in, 570–573TFTP servers in, 563–568virtual machine network installations in, 569–570
installed packages information, 65–66integrated management cards, 532integrity checks, 12interactive mode, 524interfaces
in clusters, 533command-line commands for, 165GNOME user. see GNOME user interfacein GRUB, 513ncurses, 12in rules, 280trusted, 275virsh, 247
internal commands, 61Internet Assigned Numbers Authority (IANA),
356interprocess communication, 453–455Interprocess Communication (IPC), 454interrupts, 421–424I/O (input/output) requests
iotop utility for, 438–439performance of, generally, 456scheduler for, 456–457in storage performance, 435–438waiting for, 425
iostat utility, 436–438iotop utility, 438–439IP addresses
in Apache, 396in Bash shell scripts, 499, 501in DHCP. see DHCP (Dynamic Host Configuration
Protocol)in DNS. see DNS (Domain Name System)in installation of RHEL Server, 15–17ip tool for. see ip toolIPTraf tool and, 443–444for network connections, 165–170
bindex.indd 632bindex.indd 632 1/8/2013 10:39:48 AM1/8/2013 10:39:48 AM

IP masquerading – LDAP (Lightweight Directory Access Protocol) 633
v4, 159–160v6, 173–174
IP masquerading, 275–278ip tool
introduction to, 165–166ip addr, 168ip help, 166–167ip route, 168–169
IPC (Interprocess Communication), 454IPMI LAN, 552iptables
advanced configuration with, 287–289chains in, 280–287firewalls and, 270–271, 279–287introduction to, 269–270limit modules in, 289logging configuration in, 287–288NAT configuration with, 289–292Netfilter firewalls with, 282–287rules in, 280–287summary of, 292system-config-firewall and, 271–279tables in, 280–287
IPTraf tool, 443–444IPv4 addresses, 159–160IPv6 addresses, 173–174iSCSI, 137, 537–541Isolated Virtual Network, 263
JJBoss Enterprise Middleware, 9job management, 70–72jobs command, 71journaling, 458–459
KKDCs (key distribution centers), 204–206Kdump settings, 31–32Kerberos, 204–206kernel management
availability of modules in, 517–518for boot procedure, generally, 516loading/unloading modules in, 518–521memory usage in, 427modules with specific options in, 519–521performance in, 459–461ring buffers in, 518upgrades in, 521
Kernel Virtual Machine (KVM). see KVM (Kernel Virtual Machine)
key distribution centers (KDCs), 204–206key transfers, 305–307key-based authentication, 178–181keyboard layouts, 14keyrings, 305–306keys in GPG. see GNU Privacy Guard (GPG)keys in RPM packages, 311–312kickstart files
automated installations in, 568–569in installation servers, 568–576introduction to, 568–576manually modifying kickstart files in, 573–576system-config-kickstart in, 570–573virtual machine network installations in, 569–570
kill command, 74–76kill scripts, 523Knoppix DVDs, 526KVM (Kernel Virtual Machine)
architecture of, 246–248hands-on labs on, 600, 612–613hypervisors in, 249installation of, 248–255introduction to, 245–246management of, 255–263networking in, 263–268preparing hosts for, 248–249Red Hat, 246requirements for, 246–247RHEV and, 247–248summary of, 268virsh interface for, 262–263Virtual Machine Manager for, 249
Llab hardware requirements, 530labels, 345labs. see hands-on labsLAMP (Linux, Apache, MySQL, and PHP), 386,
407language options, 13LDAP (Lightweight Directory Access Protocol)
in Apache, 406–407authentication in, 206–209, 406–407defined, 316Directory in. see LDAP DirectoryInput Format in. see LDAP Input Format (LDIF)Open. see OpenLDAPserver in, 204–206
bindex.indd 633bindex.indd 633 1/8/2013 10:39:48 AM1/8/2013 10:39:48 AM

634 LDAP Directory – mail servers
sssd in, 208–209
LDAP Directoryadding information to, 321–322adding users to groups in, 331–332configuration of, 319–320creating base structure of, 323creating groups in, 330–331creating users in, 328–330deleting entries in, 332DHCP information in, 324–326displaying information from, 322–323
LDAP Input Format (LDIF)adding users to groups with, 331–332adding/displaying information in, 321–323creating groups with, 330–331introduction to, 318–319templates in, 330for user import, 326–328
leaf entries, 317less command, 48let command, 490libvirt, 247, 249, 256license agreements, 28Lightweight Directory Access Protocol (LDAP).
see LDAP (Lightweight Directory Access Protocol)
limit modules, 289links, 87–88Linux
command line in, 49distributions of, 5–6in LAMP, 407loading, 12LUKS in, 151in OpenLDAP, 326–332origins of, 4–5performance of, 464–466in RHEL. see Red Hat Enterprise Linux (RHEL)Scientific, 8SELinux. see SELinux
Linux Unified Key Setup (LUKS), 151list files (ls) command, 46Listen commands, 390, 400ListenAddress settings, 176ln command, 87–88load averages, 77, 415load balancing, 449LoadModule, 391Lock Screen, 38log messages, 547logical operators, 494–495logical partitions, 124, 128
logical volumescreating, 139–143in kickstart files, 575Manager for. see LVM (Logical Volume Manager)resizing, 143–146snapshots of, 146–149for storage, generally, 122
login windows, 32logs
in Apache, 393common, 94–96configuration of, 97–98, 287–288rotating, 96–98Rsyslog, 92–94in SELinux, 239–240system, 91–98
ls (list files) command, 46lsmod command, 519lspci -v command, 517luci, 535LUKS (Linux Unified Key Setup), 151LVM (Logical Volume Manager)
displaying existing volumes in, 143introduction to, 122KVM virtual machines and, 249Physical Volume in, 22–26reducing volumes in, 146storage and, 149
Mmachines for virtualization. see KVM (Kernel
Virtual Machine)mail command, 52mail delivery agent (MDA), 376–377mail queues, 376, 378mail servers
Dovecot, 383–384hands-on labs on, 603, 618–619IMAP mail access in, 383–384Internet configuration in, 382–383introduction to, 375–376mail delivery agents in, 376–377mail user agents ub, 376–379message transfer agents in, 376–377Mutt MUA, 378–379opening for external mail, 381POP mail access in, 383–384Postfix, 377–383security of, 384sending messages to external servers in, 379–380
bindex.indd 634bindex.indd 634 1/8/2013 10:39:48 AM1/8/2013 10:39:48 AM

mail user agent (MUA) – NAT (Network Address Translation) 635
SMTP, 377–383summary of, 384
mail user agent (MUA), 377–379man (help manual) command, 61–65, 352masquerading, 289–291Massachusetts Institute of Technology (MIT), 5master boot records (MBRs), 514–515master name servers, 357, 368Max commands, 391MBRs (master boot records), 514–515MCC Interim Linux, 5MDA (mail delivery agent), 377membership in groups, 191, 200memory usage
active vs. inactive, 427–430introduction to, 3–6, 79, 451of kernels, 427page size in, 425–426in performance, 425–433ps utility for, 430–433slab memory in, 427–430top utility and, 417–419
merged parameter, 435message analysis, 243–244message transfer agent (MTA), 376–377Meta Package Handler. see also yum (Yellowdog
Update Manager)introduction to, 101–103repository creation in, 103repository management in, 104–106RHN and, 106–109Satellite and, 106–108server registration in, 107–109
Migrate options, 257minimal mode, 524–525MinSpare commands, 391MIT (Massachusetts Institute of Technology), 5mkdir (make new directory) command, 46mkfs utility, 131modes
absolute, 215–216in Apache, 390–391BSD, 73disabled, 233–235enforcing, 233–235ex, 57insert, 57interactive, 524permissive, 233–235prefork, 390–391relative, 215–216routed, 263
sample, 425in SELinux, 233–235System V, 73in vi, 57worker, 390–391
modinfo command, 520modprobe commands, 518–521modules
in Apache, 391–392, 399–401in kernels, 517–521limit, 289load, 391PAM, 210–212in rules, 280in SELinux, 238–239SSL, 399–401state, 280
monitoring performance. see performancemore command, 48mount command, 85–86mounting devices
automatically, 154/etc/fstab for, 137–139in system administration, 83–87
mounting shares, 337–338, 348move files (mv) command, 48ms parameter, 435MTA (message transfer agent), 376–377MUA (mail user agent), 377–379multiple nodes, 531–532Mutt MUA, 378–379mv (move files) command, 48MySQL, 407–409
N-n min, 193name schemes, 316–317name servers
cache-only, 359–361defined, 356in-addr.arpa zones in, 359, 367–368primary, 361–367secondary, 368–369
named.conf, 361–362naming devices, 87NAT (Network Address Translation)
configuration of, 289–292IP masquerading and, 275–278iptables for, 289–292KVM virtual machines and, 263
bindex.indd 635bindex.indd 635 1/8/2013 10:39:48 AM1/8/2013 10:39:48 AM

636 Nautilus – OpenLDAP
Nautilus, 35ncurses interfaces, 12NDP (Neighbor Discovery Protocol), 173nesting, 494/net directory, 339–340Netfilter firewalls
as default, 270–271with iptables, 282–287port forwarding in, 276–278ports in, adding, 274system-config-firewall for, 271–279
netstat, 444–445Network Address Translation (NAT). see NAT
(Network Address Translation)network connections. see also networks
address configuration for, 168command-line commands for, 164–169configuration files in, 161–163configuring networks with, 158–160DNS in, 170–172hands-on labs on, 599, 611ifconfig for, 164–165interfaces in for, 165introduction to, 155–156ip addr for, 168ip help for, 166–167ip link for, 167–168ip route for, 168–169ip tool for, generally, 165–166IPv6 in, 173–174network cards in, 169–170network service scripts in, 164NetworkManager for, 156–164route management for, 168–170runlevels in, 156–158services in, 156–158SSH in. see SSH (Secure Shell)summary of, 185system-config-network and, 160–161troubleshooting, 169–172VNC server access in, 183–184
Network Information System (NIS), 317Network Printer, 90–91NetworkManager
configuring networks with, 158–163introduction to, 37, 156network service scripts in, 164runlevels in, 156–158services in, 156–158system-config-network and, 160–161
networksconnections in. see network connectionsin KVM virtualization, 263–268
performance of, 440–445servers for, 562–563settings for, 15–17tuning, 459–464
NFS4in Automount, 339–341configuration of, generally, 334mounting shares in, 337–338persistent mounts in, 338setup of, 335–336shares in, 336–338
nicenessperformance and, 417, 419in process management, 80–81
NIS (Network Information System), 317nodes
AMS, 182–183ATL, 182–183in high-availability clustering, 531–533inode, 87SLC, 182–183
--nogpgcheck, 111noop schedulers, 456–457nr_pdflush_threads parameter, 453nsswitch, 209–210ntpd service, 157–158
Oobjects
definition of, 166of kernels, 429SELinux and, 231
OpenAIS, 534OpenLDAP
admin users in, 327authentication with, 332base directory structure in, 320–323base server configuration in, 318–320deleting entries in, 332groups in, adding users to, 331groups in, creating, 330–331groups in, generally, 326hands-on labs on, 601–602, 614–616information types in, 316installation of, 318–320introduction to, 315–316LDAP Directory in, 326–332Linux in, 326–332name scheme in, 316–317populating databases in, 320referrals in, 317–318
bindex.indd 636bindex.indd 636 1/8/2013 10:39:48 AM1/8/2013 10:39:48 AM

openssl – permissions. 637
replication in, 317–318schemas in, 323–326summary of, 332users in, adding to groups, 331–332users in, generally, 326–328users in, passwords for, 328–330
opensslintroduction to, 296self-signed certificates in, 296–302signing requests in, 302
optimizing performance. see performanceOrder, 393OUTPUT chain, 280overruns, 442ownership
changing, 213displaying, 212–213introduction to, 212
PPaaS (Platform as a Service), 9Pacemaker, 535packages
groups of, 114installation of, 110–112in kickstart files, 573removal of, 112–113searching, 109–110updating, 110–112
packets. see also firewallsinspection of, 270in NAT, 289–291RX (receive), 441TX (transmit), 441
page size, 425–426, 451–452Palimpsest tool, 123PAM (pluggable authentication modules), 210–
212partitions
creating, 21–26, 123–129extended, 124, 128in kickstart files, 572, 575logical, 124, 128primary, 123, 126–127for storage, generally, 122types of, 123–124
passphrases, 180–181passwd command, 192–193PasswordAuthentication settings, 176
passwordsin Apache, 405on boot loaders, 525for GRUB, 509–510for OpenLDAP users, 328–330for users, generally, 192–193
paste commands, 58pattern matching, 485–488performance
cgroups for, 450, 464–466of CPUs, 420–425, 449–450hands-on labs on, 604, 620interprocess communication in, 453–455introduction to, 413–414I/O scheduler in, 456–457journaling in, 458–459kernel parameters in, 459–461of Linux, 464–466memory usage in, 425–433, 451–455of networks, 440–445, 459–464optimization of, 446–449page size in, 451–452read requests in, 457–458shared memory in, 453–455of storage, 433–440, 455–456summary of, 466sysctl settings in, 446TCP/IP in, 461–463testing, 447–449top utility for, 414–420tuning CPUs for, 449–450tuning memory for, 451–455tuning networks in, 459–464tuning storage performance in, 455–456write cache in, 452–453
permissions. see also authenticationaccess control lists in, 220–224advanced, 216–220attributes for, 226–227basic, 214–216changing ownership in, 213default, 225–226displaying ownership in, 212–213execute, 214–216group ID in, 217–219hands-on labs on, 599–600, 611–612introduction to, 189–190, 212ownership in, 212–214read, 214–216set user/group ID in, 217–219special, 219–220sticky bit, 218–219summary of, 227
bindex.indd 637bindex.indd 637 1/8/2013 10:39:48 AM1/8/2013 10:39:48 AM

638 permissive mode – queues
umask for, 225–226user ID in, 217–219write, 214–216
permissive mode, 233–235PermitRootLogin settings, 176persistent mounts, 338physical volumes (PVs), 139PIDs (process identification numbers)
introduction to, 70parameters for, 419PidFile for, 390
pings, 170piping commands, 50–51Places menu, 35–36Platform as a Service (PaaS), 9pluggable authentication modules (PAM), 210–
212policies, 237–238, 281POP mail access, 383–384populating databases, 320port forwarding, 182–183, 276–278port settings, 176POSIX standard, 74–75Postfix
basic configuration of, 380–381Internet configuration in, 382–383introduction to, 377–378Mutt and, 378–379opening for external mail, 381sending messages to external servers in, 379–380
power switches, 532PR parameter, 419prefork mode, 390–391primary name servers, 357primary partitions, 123, 126–127Print Working Directory (pwd) command, 45printers
CUPS for, 90–91management of, 89–91Network Printer for, 90–91Print Working Directory for, 45system-config-printer for, 89–90
priorities of processes, 80–81, 93–94private keys
in GPG. see GNU Privacy Guard (GPG)in openssl, 296–302in SSL, 294–295
/proc/ commandsmeminfo, 427–428PID/maps, 431–432sys, 446, 451
process identification numbers (PIDs). see PIDs (process identification numbers)
process managementcurrent system activity in, 76–79hands-on labs on, 597–598, 609introduction to, 72–73kill command in, 74–76monitoring processes in, 419–420niceness in, 80–81ps command in, 73–74sending signals to processes in, 74–76top program in, 76–79, 419–420
protocolsDHCP. see DHCP (Dynamic Host Configuration
Protocol)File Transfer, 348–351LDAP. see LDAP (Lightweight Directory Access
Protocol)Neighbor Discovery, 173in rules, 280Simple Mail Transfer, 376
ps utilitymemory usage and, 430–433for piping, 50–51in process management, 73–76
pseudo-roots, 337pstree, 470public key (PKI) certificates, 295, 301–302public keys
in GPG. see GNU Privacy Guard (GPG)in openssl, 296–302in SSL, 294
PuTTY, 177–178pvmove, 149PVs (physical volumes), 139pwd (Print Working Directory) command, 45PXE boot configuration, 563–568
Q:q! (quit), 58quad-core servers, 416queries
options for, 598, 610RPM, 118in software management, 115–118
queuesin CFG, 456of email, 376, 378introduction to, 90run, 421
bindex.indd 638bindex.indd 638 1/8/2013 10:39:48 AM1/8/2013 10:39:48 AM

quit work commands – Richie, Dennis 639
quit work commands, 57–58quorum
definition of, 545disks, 532, 549–551
Rr command, 59RAM, 79read (receive) buffers, 460–461read command, 480–482read permissions, 214–216read requests, 435, 457–458realms, 204real-time (RT) processes, 448, 450receive (RX) packets, 441recursive name servers, 358recursive ownership settings, 213Red Hat Cloud, 9Red Hat Cluster Services (RHCS), 8Red Hat Enterprise Linux (RHEL)
add-ons to, 8Directory Server and, 9distributions of Linux in, 5–6Enterprise File System and, 8Fedora, 6free version of, 7–8GNOME user interface and, 33–38introduction to, 3–4JBoss Enterprise Middleware and, 9as open source software, 3–6origins of Linux and, 4–5Red Hat Cloud and, 9Red Hat Cluster Services and, 8Red Hat Enterprise Virtualization and. see Red Hat
Enterprise Virtualization (RHEV)related products and, 7–9Server edition of, generally, 7–8Server edition of, installing. see installation of RHEL
Serversummary of, 39Workstation edition of, 8
Red Hat Enterprise Virtualization (RHEV)DNS and, 366introduction to, 9Manager in, 248overview of, 247–248
Red Hat High Availability add-ons. see also high-availability (HA) clustering
/etc/hosts files in, 541–542
installation of, generally, 541installing, additional cluster properties in, 546–548installing, fencing in, 551–553installing, initial state of clusters in, 542–546installing, quorum disks in, 549–551overview of, 534–535
Red Hat Network (RHN), 28–29, 103–109Red Hat Package Manager (RPM)
GNU Privacy Guard and, 310–312hands-on labs on, 598, 610introduction to, 100keys in RPM, 311–312Meta Package Handler and. see Meta Package
Handlerquerying packages in, 115–119repositories and, 103–105
redirection, 50–56Redundant Ring tab, 547–548referrals, 317–318related products, 7–9relative mode, 215–216relaying mail, 376remote port forwarding, 182–183remove files commands, 46–47renice command, 80replacing failing devices, 149replacing text, 58–61replication, 317–318repoquery, 117repositories
creating, 103defined, 102hands-on labs on, 598, 610managing, 104–106
RES parameter, 419Rescue System, 526–527resolvers, 358resources
in high-availability clustering, 531, 554–558records of, 356, 365
restricted directories, 405Rgmanager, 534RHCS (Red Hat Cluster Services), 8RHEL (Red Hat Enterprise Linux). see Red Hat
Enterprise Linux (RHEL)RHEV (Red Hat Enterprise Virtualization). see
Red Hat Enterprise Virtualization (RHEV)RHEV Manager (RHEV-M), 248RHN (Red Hat Network), 28–29, 103–109ricci, 535Richie, Dennis, 4
bindex.indd 639bindex.indd 639 1/8/2013 10:39:48 AM1/8/2013 10:39:48 AM

640 rm (remove files) command – servers
rm (remove files) command, 46–47rmdir (remove directory) command, 46root domains, 356root passwords, 18–19, 525–526rotating log files, 96–97route management, 168–169, 170Routed mode, 263RPM (Red Hat Package Manager). see Red Hat
Package Manager (RPM)rpm -qa, 116RSS (Resident Size) parameter, 430Rsyslog, 92–94RT (real-time) processes, 448, 450rules, 280–287run queues, 421runlevels, 156–158, 524runnable processes, 421RX (receive) packets, 441
SS parameter, 419Samba
accessing shares in, 346–348advanced authentication in, 346configuration of, generally, 342file server setup in, 341–345mounting shares in, 348samba-common RPM files in, 115SELinux and, 345
sample mode, 425sash shell, 42Satellite, 7, 106–108save work commands, 57–58scheduling jobs, 77, 82–83schemas, 323–326Scientific Linux, 8Screensaver tool, 36–37--scripts, 117scripts
Bash shell. see Bash shell scriptskill, 523network service, 164querying packages for, 117
sealert command, 241–244sec parameter, 435secondary name servers, 357sections, 62–63sectors parameter, 435
Secure Shell (SSH). see SSH (Secure Shell)Secure Sockets Layer (SSL). see SSL (Secure
Sockets Layer)security
in Apache, 399–404authentication in. see authenticationcryptography for. see cryptographic servicesiptables for. see iptablesof mail servers, 384options for, 346permissions in. see permissionsSSH and. see SSH (Secure Shell)SSL and. see SSL (Secure Sockets Layer)
sed (Streamline Editor), 59–61select commands, 604–605, 621–622self-signed certificates, 296–302SELinux
Apache and, 393–395Booleans in, 237–238context types in, 231–233, 235–237definition of, 231disabled mode in, 233–235enforcing mode in, 233–235file sharing and, 351–352hands-on labs on, 600, 612introduction to, 229–231modes in, 233–235modules in, 238–239permissive mode in, 233–235policies in, 237–238Samba and, 345summary of, 244system-config-selinux in, 233, 239troubleshooting, 239–244type context in, 231–233
semanage Boolean -l command, 237–238semanage fcontext command, 235–237, 243,
394Server edition of RHEL, 7–8. see also installation
of RHEL Serverservers
in DNS. see DNS (Domain Name System)for email. see mail serversfile sharing and. see file sharingfirewalls for. see iptablesinstallation. see installation serversmeta package handlers and, 107–109name. see name serversregistration of, 107–109security of, 601, 613ServerAdmin for, 397ServerLimit for, 391
bindex.indd 640bindex.indd 640 1/8/2013 10:39:48 AM1/8/2013 10:39:48 AM

service-oriented architecture (SOA) – state modules 641
ServerRoot for, 390slave name, 368–369SSH, 175–177TFTP, 563–568
service-oriented architecture (SOA), 365services
Cluster, 8cryptographic. see cryptographic servicesfirewalls allowing, 272–274high-availability clustering, 530–531, 554–558in NetworkManager, 156–158platforms as, 9startup configuration for, 521–524
set group ID (SGID) permissions, 217–219set user ID (SUID) permissions, 217–219setfacl command, 222–223setsebool command, 237–238SGID (set group ID) permissions, 217–219shared memory, 453–455shared storage, 533–534, 537shares, in NFS4, 336–338shares, in Samba, 346–348sharing files. see file sharingshebang (#!), 468–470shell interfaces, 513shell scripts, defined, 468. see also Bash shell
scriptsshells
in Bash. see Bash shell scriptsdefinition of, 42, 191–192in SSH. see SSH (Secure Shell)
Shoot Myself In The Head (SMITH), 553Shoot The Other Node In The Head (STONITH),
533SHR parameter, 419si parameter, 417SIGHUP, 75SIGKILL, 75signals to processes, 74–76signed certificates, 296–302signing requests, 302signing RPM files, 310–312SIGTERM, 75Simple Mail Transfer Protocol (SMTP), 376–383single redirector sign (>), 52slab memory, 427–430slabtop utility, 429–430slappasswd, 320slave name servers, 357, 368–369SLC nodes, 182–183
SMITH (Shoot Myself In The Head), 553SMP (Symmetric Multiprocessing) kernels, 449SMTP (Simple Mail Transfer Protocol), 376–383snapshots, 146–149SOA (service-oriented architecture), 365software dependencies, 101–103software management
extracting files in, 118–119groups of packages in, 114hands-on labs on, 598, 610installing packages in, 110–112installing software in, 115introduction to, 99–100meta package handlers in, 101–109querying software in, 115–118Red Hat Package Manager for, 100, 118–119removing packages in, 112–113searching packages in, 109–110summary of, 119support in, 6updating packages in, 110–112yum for, 109–115
Software Updates, 28–29:%s/oldtext/newtext/g, 59sourcing, 472, 474–476Spam Assassin, 384special formatting characters, 481–482special permissions, 219–220splashimage, 509split brain situations, 549SSH (Secure Shell)
clients in, 177configuring, generally, 174–175enabling servers in, 175–176graphical applications with, 181–182key-based authentication in, 178–181port forwarding in, 182–183PuTTY and, 177–178securing servers in, 176–177
SSL (Secure Sockets Layer)Apache and, 399–404certificate authorities in, 295–296introduction to, 294–295ssl.conf configuration file in, 399–400trusted roots in, 295virtual hosts based in, 406web servers protected by, 406
st parameter, 417Stallman, Richard, 5StartServers, 391state modules, 280
bindex.indd 641bindex.indd 641 1/8/2013 10:39:49 AM1/8/2013 10:39:49 AM
Dow
nlo
ad fro
m W
ow
! eBook
<w
ww
.wow
ebook.
com
>

642 STDERR – targets
STDERR, 53STDIN, 52–53STDOUT, 51–53sticky bit permissions, 218–219STONITH (Shoot The Other Node In The Head),
533storage
busy processes in, 438–439disk activity and, 434–436drive activity in, 440encrypted volumes in, 151–154file system integrity and, 134–135file system properties and, 132–134file systems for, creating, 131–132file systems for, generally, 129–131file systems for, mounting automatically, 135–139fstab for, 135–139hands-on labs on, 597–599, 609–611hdparm utility for, 440in installation of RHEL Server, 14–15, 19–26introduction to, 121–122I/O requests and, 435–438iotop utility for, 438–439logical volumes for, creating, 139–143logical volumes for, generally, 122logical volumes for, resizing, 143–146logical volumes for, snapshots of, 146–149partitions in, creating, 123–129partitions in, generally, 122performance of, 433–440, 455–456read requests and, 435replacing failing devices for, 149snapshots for, 146–149summary of, 154swap space in, 149–151tuning performance of, 455–456writes and, 435
Streamline Editor (sed), 59–61subshells, 470, 472–475substitution operators, 483–485subzone authority, 357SUID (set user ID) permissions, 217–219superclasses, 328swap memory, 426, 453swap space, 149–151, 418Switch User, 38sy (system space), 416, 425symbolic links, 87Symmetric Multiprocessing (SMP) kernels, 449sysctl settings, 446system administration
access recovery in, 526–527
backups in, 88–89common log files in, 94–96hands-on labs on, 597–598, 609introduction to, 69–70job management tasks in, 70–72links for, 87–88logging in. see system loggingmounting devices in, 83–87printer management in, 89–91process management in. see process managementRsyslog in, 92–94scheduling jobs in, 82–83summary of, 98system logging in. see system logging
system loggingcommon log files in, 94–96introduction to, 91logrotate in, 96–98Rsyslog in, 92–94
System menu, 36–38system space (sy) parameter, 425System Tools, 34–35System V mode, 73system-config commands
-firewall. see system-config-firewall-kickstart, 570–573-lvm, 144-network, 160–161-printer, 89–90-selinux, 233, 239-users, 201–202
system-config-firewallallowing services in, 272–274configuration files in, 278–279introduction to, 271IP masquerading in, 275–278port forwarding in, 276–278trusted interfaces in, 275
systemd, 522
TTab key, 43tables, 280–287. see also iptablestac command, 48tail command, 48–49tar archives, 88–89tar balls, 100tar utility, 221targets
in iSCSI, 537–541
bindex.indd 642bindex.indd 642 1/8/2013 10:39:49 AM1/8/2013 10:39:49 AM

taskset command – /var/log/messages 643
LOG, 287–288in rules, 281
taskset command, 450TCP read and write buffers, 461TCP/IP, 461–463tcsh shell, 42Terminal, 34, 42test command, 492–493TFTP servers, 563–568thread schedulers, 449time settings, 17–18, 30–31TIME+ parameter, 420timer interrupts, 422–423TLDs (top-level domains), 356TLS certificates, 399–404top utility
context switches in, 424CPU monitoring with, 415–417introduction to, 73, 414–415memory monitoring with, 417–419process management with, 76–79, 419–420
top-level domains (TLDs), 356Torvalds, Linus, 5total parameter, 417, 435touch command, 49tps parameter, 436transmit (TX) packets, 441troubleshooting
boot procedure, 506, 524–527DNS, 170–172high-availability clustering, 558–559network cards, 169–170network connections, 169–172routing, 170SELinux, 239–244
trusted interfaces, 275trusted roots, 295tune2fs command, 132, 134tuning. see also performance
CPUs, 449–450memory usage, 451–455networks, 459–464
TX (transmit) packets, 441
UUDP Multicast/Unicast, 547–548UIDs (user IDs), 191umask, 225–226University of Helsinki, 5
UNIX operating system, 4–5until, 499–500Upstart, 506, 521us (user space), 416, 425usage summaries, 66USB flash drives, 83used parameter, 417Usenet, 5USER parameter, 419user space (us), 78, 425users
accounts of, 29–30, 192–194admin, 327authentication of, external sources for, 203–208authentication of, generally, 208–209authentication of, PAM for, 210–212configuration files for, 194–198deleting, 193–194/etc/logins.defs for, 197–198/etc/passwd for, 194–196/etc/shadow for, 196–197graphical tools for, 201–202groups of. see groupshands-on labs on, 599–600, 611–612IDs of, 191introduction to, 189–190logins for, 500management of, 190–191modifying accounts of, 193–194in MySQL, 407–409nsswitch for, 209–210in OpenLDAP, 326–332ownership by, 212–214passwords for, 192–193permissions for. see permissionsshells for, 191–192summary of, 227time of, 448
UUIDs, 136–137
Vvariables
arguments and, 476–480in Bash shell scripts, generally, 472–475command substitution for, 482pattern matching for, 485–488in shells, 43sourcing, 474–476subshells and, 472–475substitution operators for, 483–485
/var/log/messages, 94–96, 240–241
bindex.indd 643bindex.indd 643 1/8/2013 10:39:49 AM1/8/2013 10:39:49 AM

644 VGs (volume groups) – zsh shell
VGs (volume groups), 139–146vi
introduction to, 56–57modes in, 57quitting, 57–58replacing text with, 59saving work in, 57–58
view file contents commands, 48–49virsh interface, 247, 262–263VIRT parameter, 419virtio drivers, 259, 268virtual bridge adapters, 266–267virtual hosts, 396–398, 401–404Virtual Machine Manager
consoles of virtual machines in, 256–258display options in, 258–259hardware settings in, 259–262installing KVM virtual machines with, 249–255for KVM virtualization, 249managing KVM virtual machines with, 255–262network configuration in, 264–267port forwarding in, 276–278
virtual machine networks, 569–570virtual memory, 451Virtual Size (VSZ) parameter, 430virtualization in KVM. see KVM (Kernel Virtual
Machine)virtualization in Red Hat Enterprise. see Red Hat
Enterprise Virtualization (RHEV)vmstat utility
active vs. inactive memory in, 426–427for CPUs, 425disk utilization in, 436storage usage analysis in, 434–435
VNC server access, 183–184volume groups (VGs), 139–146vsftpd, 348–350VSZ (Virtual Size) parameter, 430
Wwa (waiting for I/O) parameter, 417, 425Web server configuration. see Apachewebsite creation, 386–387which, 469while, 498–499Winbind, 206Windows, 177–178
Wired tab, 159WireShark, 443worker mode, 390–391Workspace Switcher, 38Workstation edition of RHEL, 8:wq! (save work), 57write (send) buffers, 460–461write cache, 452–453write permissions, 214–216writes, 435
X-x max, 193X.500 standard, 316xeyes program, 115X-Forwarding, 181XFS (Enterprise File System), 8xinetd files, 563xxd tool, 515–516
YYellowdog Update Manager (yum). see yum
(Yellowdog Update Manager)Young, Bob, 5yum (Yellowdog Update Manager)
groups of packages with, 114install command in, 84installing packages with, 110–112installing software with, 115introduction to, 101, 109kernel upgrades in, 521removing packages with, 112–113searching packages with, 109–110software dependencies and, 102–103software management with, 109–115updating packages with, 110–112
Zzombie processes, 77zones, 356–358zsh shell, 42
bindex.indd 644bindex.indd 644 1/8/2013 10:39:49 AM1/8/2013 10:39:49 AM
Dow
nlo
ad fro
m W
ow
! eBook
<w
ww
.wow
ebook.
com
>Dow
nlo
ad fro
m W
ow
! eBook
<w
ww
.wow
ebook.
com
>
Related Documents