Red Hat Directory Server 10 Administration Guide Updated for Directory Server 10.6 Last Updated: 2021-10-25

Welcome message from author
This document is posted to help you gain knowledge. Please leave a comment to let me know what you think about it! Share it to your friends and learn new things together.
Transcript

Red Hat Directory Server 10
Administration Guide
Updated for Directory Server 10.6
Last Updated: 2021-10-25

Red Hat Directory Server 10 Administration Guide
Updated for Directory Server 10.6
Marc MuehlfeldRed Hat Customer Content [email protected]
Petr BokočRed Hat Customer Content Services
Tomáš ČapekRed Hat Customer Content Services
Petr KovářRed Hat Customer Content Services
Ella Deon BallardRed Hat Customer Content Services

Legal Notice
Copyright © 2020 Red Hat, Inc.
This document is licensed by Red Hat under the Creative Commons Attribution-ShareAlike 3.0Unported License. If you distribute this document, or a modified version of it, you must provideattribution to Red Hat, Inc. and provide a link to the original. If the document is modified, all Red Hattrademarks must be removed.
Red Hat, as the licensor of this document, waives the right to enforce, and agrees not to assert,Section 4d of CC-BY-SA to the fullest extent permitted by applicable law.
Red Hat, Red Hat Enterprise Linux, the Shadowman logo, the Red Hat logo, JBoss, OpenShift,Fedora, the Infinity logo, and RHCE are trademarks of Red Hat, Inc., registered in the United Statesand other countries.
Linux ® is the registered trademark of Linus Torvalds in the United States and other countries.
Java ® is a registered trademark of Oracle and/or its affiliates.
XFS ® is a trademark of Silicon Graphics International Corp. or its subsidiaries in the United Statesand/or other countries.
MySQL ® is a registered trademark of MySQL AB in the United States, the European Union andother countries.
Node.js ® is an official trademark of Joyent. Red Hat is not formally related to or endorsed by theofficial Joyent Node.js open source or commercial project.
The OpenStack ® Word Mark and OpenStack logo are either registered trademarks/service marksor trademarks/service marks of the OpenStack Foundation, in the United States and othercountries and are used with the OpenStack Foundation's permission. We are not affiliated with,endorsed or sponsored by the OpenStack Foundation, or the OpenStack community.
All other trademarks are the property of their respective owners.
Abstract
This guide covers both GUI and command-line procedures for managing Directory Server instancesand databases. This documentation is no longer maintained. For details, see .
. . . . . . . . . . . . . . . . . . . . . . . . . . . . . . . . . . . . . . . . . . . . . . . . . . . . . . . . . . . . . . . . . . . . . . . . . . . . . . . . . . . . . . . . . . . . . . . . . . . . . . . . . . . . . . . . . . . . . . . . . . . . . . . . . . . . . . . . . . . . . . . . . . . . . . . . . . . . . . . . . . . . . . . . . . . . . . . . . . . . . . . . . . . . . . . . . . . . . . . . . . . . . . . . . . . . . . . . . . . . . . . . . . . . . . . . . . . . . . . . . . . . . . . . . . . . . . . . . . . . . . . . . . . . . . . . . . . . . . . .
. . . . . . . . . . . . . . . . . . . . . . . . . . . . . . . . . . . . . . . . . . . . . . . . . . . . . . . . . . . . . . . . . . . . . . . . . . . . . . . . . . . . . . . . . . . . . . . . . . . . . . . . . . . . . . . . . . . . . . . . . . . . . . . . . . . . . . . . . . . . . . . . . . . . . . . . . . . . . . . . . . . . . . . . . . . . . . . . . . . . . . . . . . . . . . . . . . . . . . . . . . . . . . . . . . . . . . . . . . . . . . . . . . . . . . . . . . . . . . . . . . . . . . . . . . . . . . . . . . . . . . . . . . . . . . . . . . . . . . . .
. . . . . . . . . . . . . . . . . . . . . . . . . . . . . . . . . . . . . . . . . . . . . . . . . . . . . . . . . . . . . . . . . . . . . . . . . . . . . . . . . . . . . . . . . . . . . . . . . . . . . . . . . . . . . . . . . . . . . . . . . . . . . . . . . . . . . . . . . . . . . . . . . . . . . . . . . . . . . . . . . . . . . . . . . . . . . . . . . . . . . . . . . . . . . . . . . . . . . . . . . . . . . . . . . . . . . . . . . . . . . . . . . . . . . . . . . . . . . . . . . . . . . . . . . . . . . . . . . . . . . . . . . . . . . . . . . . . . . . . .
. . . . . . . . . . . . . . . . . . . . . . . . . . . . . . . . . . . . . . . . . . . . . . . . . . . . . . . . . . . . . . . . . . . . . . . . . . . . . . . . . . . . . . . . . . . . . . . . . . . . . . . . . . . . . . . . . . . . . . . . . . . . . . . . . . . . . . . . . . . . . . . . . . . . . . . . . . . . . . . . . . . . . . . . . . . . . . . . . . . . . . . . . . . . . . . . . . . . . . . . . . . . . . . . . . . . . . . . . . . . . . . . . . . . . . . . . . . . . . . . . . . . . . . . . . . . . . . . . . . . . . . . . . . . . . . . . . . . . . . .
. . . . . . . . . . . . . . . . . . . . . . . . . . . . . . . . . . . . . . . . . . . . . . . . . . . . . . . . . . . . . . . . . . . . . . . . . . . . . . . . . . . . . . . . . . . . . . . . . . . . . . . . . . . . . . . . . . . . . . . . . . . . . . . . . . . . . . . . . . . . . . . . . . . . . . . . . . . . . . . . . . . . . . . . . . . . . . . . . . . . . . . . . . . . . . . . . . . . . . . . . . . . . . . . . . . . . . . . . . . . . . . . . . . . . . . . . . . . . . . . . . . . . . . . . . . . . . . . . . . . . . . . . . . . . . . . . . . . . . . .
. . . . . . . . . . . . . . . . . . . . . . . . . . . . . . . . . . . . . . . . . . . . . . . . . . . . . . . . . . . . . . . . . . . . . . . . . . . . . . . . . . . . . . . . . . . . . . . . . . . . . . . . . . . . . . . . . . . . . . . . . . . . . . . . . . . . . . . . . . . . . . . . . . . . . . . . . . . . . . . . . . . . . . . . . . . . . . . . . . . . . . . . . . . . . . . . . . . . . . . . . . . . . . . . . . . . . . . . . . . . . . . . . . . . . . . . . . . . . . . . . . . . . . . . . . . . . . . . . . . . . . . . . . . . . . . . . . . . . . . .
. . . . . . . . . . . . . . . . . . . . . . . . . . . . . . . . . . . . . . . . . . . . . . . . . . . . . . . . . . . . . . . . . . . . . . . . . . . . . . . . . . . . . . . . . . . . . . . . . . . . . . . . . . . . . . . . . . . . . . . . . . . . . . . . . . . . . . . . . . . . . . . . . . . . . . . . . . . . . . . . . . . . . . . . . . . . . . . . . . . . . . . . . . . . . . . . . . . . . . . . . . . . . . . . . . . . . . . . . . . . . . . . . . . . . . . . . . . . . . . . . . . . . . . . . . . . . . . . . . . . . . . . . . . . . . . . . . . . . . . .
. . . . . . . . . . . . . . . . . . . . . . . . . . . . . . . . . . . . . . . . . . . . . . . . . . . . . . . . . . . . . . . . . . . . . . . . . . . . . . . . . . . . . . . . . . . . . . . . . . . . . . . . . . . . . . . . . . . . . . . . . . . . . . . . . . . . . . . . . . . . . . . . . . . . . . . . . . . . . . . . . . . . . . . . . . . . . . . . . . . . . . . . . . . . . . . . . . . . . . . . . . . . . . . . . . . . . . . . . . . . . . . . . . . . . . . . . . . . . . . . . . . . . . . . . . . . . . . . . . . . . . . . . . . . . . . . . . . . . . . .
. . . . . . . . . . . . . . . . . . . . . . . . . . . . . . . . . . . . . . . . . . . . . . . . . . . . . . . . . . . . . . . . . . . . . . . . . . . . . . . . . . . . . . . . . . . . . . . . . . . . . . . . . . . . . . . . . . . . . . . . . . . . . . . . . . . . . . . . . . . . . . . . . . . . . . . . . . . . . . . . . . . . . . . . . . . . . . . . . . . . . . . . . . . . . . . . . . . . . . . . . . . . . . . . . . . . . . . . . . . . . . . . . . . . . . . . . . . . . . . . . . . . . . . . . . . . . . . . . . . . . . . . . . . . . . . . . . . . . . . .
Table of Contents
DEPRECATED DOCUMENTATION
CHAPTER 1. BASIC RED HAT DIRECTORY SERVER SETTINGS
1.1. SYSTEM REQUIREMENTS
1.2. FILE LOCATIONS
1.3. STARTING THE DIRECTORY SERVER MANAGEMENT CONSOLE
1.4. STARTING AND STOPPING A DIRECTORY SERVER INSTANCE
1.5. STARTING AND STOPPING THE DIRECTORY SERVER ADMINISTRATION SERVER SERVICE
1.6. ENABLING LDAPI
1.7. CHANGING DIRECTORY SERVER PORT NUMBERS
1.8. MANAGING DIRECTORY SERVER INSTANCES
1.9. USING DIRECTORY SERVER PLUG-INS
1.10. SERVER CONFIGURATION ATTRIBUTES
CHAPTER 2. CONFIGURING DIRECTORY DATABASES
2.1. CREATING AND MAINTAINING SUFFIXES
2.2. CREATING AND MAINTAINING DATABASES
2.3. CREATING AND MAINTAINING DATABASE LINKS
2.4. CONFIGURING CASCADING CHAINING
2.5. USING REFERRALS
CHAPTER 3. MANAGING DIRECTORY ENTRIES
3.1. MANAGING ENTRIES USING THE COMMAND LINE
3.2. MANAGING ENTRIES USING THE DIRECTORY CONSOLE
CHAPTER 4. TRACKING MODIFICATIONS TO DIRECTORY ENTRIES
4.1. TRACKING MODIFICATIONS TO THE DATABASE THROUGH UPDATE SEQUENCE NUMBERS
4.2. TRACKING ENTRY MODIFICATIONS THROUGH OPERATIONAL ATTRIBUTES
4.3. TRACKING THE BIND DN FOR PLUG-IN INITIATED UPDATES
4.4. TRACKING PASSWORD CHANGE TIMES
CHAPTER 5. MAINTAINING REFERENTIAL INTEGRITY
5.1. HOW REFERENTIAL INTEGRITY WORKS
5.2. USING REFERENTIAL INTEGRITY WITH REPLICATION
5.3. ENABLING AND DISABLING REFERENTIAL INTEGRITY
5.4. MODIFYING THE UPDATE INTERVAL
5.5. MODIFYING THE ATTRIBUTE LIST
5.6. CONFIGURING SCOPE FOR THE REFERENTIAL INTEGRITY
CHAPTER 6. POPULATING DIRECTORY DATABASES
6.1. IMPORTING DATA
6.2. EXPORTING DATA
6.3. BACKING UP AND RESTORING DATA
CHAPTER 7. MANAGING ATTRIBUTES AND VALUES
7.1. ENFORCING ATTRIBUTE UNIQUENESS
7.2. ASSIGNING CLASS OF SERVICE
7.3. LINKING ATTRIBUTES TO MANAGE ATTRIBUTE VALUES
7.4. ASSIGNING AND MANAGING UNIQUE NUMERIC ATTRIBUTE VALUES
CHAPTER 8. ORGANIZING AND GROUPING ENTRIES
8.1. USING GROUPS
8.2. USING ROLES
6
7
7
7
7
9
11
12
13
16
17
22
24
24
33
43
66
77
86
86
96
112
112
115
116
117
119
119
120
120
121
122
123
124
124
132
136
146
146
151
174
178
188
188
210
Table of Contents
1

. . . . . . . . . . . . . . . . . . . . . . . . . . . . . . . . . . . . . . . . . . . . . . . . . . . . . . . . . . . . . . . . . . . . . . . . . . . . . . . . . . . . . . . . . . . . . . . . . . . . . . . . . . . . . . . . . . . . . . . . . . . . . . . . . . . . . . . . . . . . . . . . . . . . . . . . . . . . . . . . . . . . . . . . . . . . . . . . . . . . . . . . . . . . . . . . . . . . . . . . . . . . . . . . . . . . . . . . . . . . . . . . . . . . . . . . . . . . . . . . . . . . . . . . . . . . . . . . . . . . . . . . . . . . . . . . . . . . . . . .
. . . . . . . . . . . . . . . . . . . . . . . . . . . . . . . . . . . . . . . . . . . . . . . . . . . . . . . . . . . . . . . . . . . . . . . . . . . . . . . . . . . . . . . . . . . . . . . . . . . . . . . . . . . . . . . . . . . . . . . . . . . . . . . . . . . . . . . . . . . . . . . . . . . . . . . . . . . . . . . . . . . . . . . . . . . . . . . . . . . . . . . . . . . . . . . . . . . . . . . . . . . . . . . . . . . . . . . . . . . . . . . . . . . . . . . . . . . . . . . . . . . . . . . . . . . . . . . . . . . . . . . . . . . . . . . . . . . . . . . .
. . . . . . . . . . . . . . . . . . . . . . . . . . . . . . . . . . . . . . . . . . . . . . . . . . . . . . . . . . . . . . . . . . . . . . . . . . . . . . . . . . . . . . . . . . . . . . . . . . . . . . . . . . . . . . . . . . . . . . . . . . . . . . . . . . . . . . . . . . . . . . . . . . . . . . . . . . . . . . . . . . . . . . . . . . . . . . . . . . . . . . . . . . . . . . . . . . . . . . . . . . . . . . . . . . . . . . . . . . . . . . . . . . . . . . . . . . . . . . . . . . . . . . . . . . . . . . . . . . . . . . . . . . . . . . . . . . . . . . . .
. . . . . . . . . . . . . . . . . . . . . . . . . . . . . . . . . . . . . . . . . . . . . . . . . . . . . . . . . . . . . . . . . . . . . . . . . . . . . . . . . . . . . . . . . . . . . . . . . . . . . . . . . . . . . . . . . . . . . . . . . . . . . . . . . . . . . . . . . . . . . . . . . . . . . . . . . . . . . . . . . . . . . . . . . . . . . . . . . . . . . . . . . . . . . . . . . . . . . . . . . . . . . . . . . . . . . . . . . . . . . . . . . . . . . . . . . . . . . . . . . . . . . . . . . . . . . . . . . . . . . . . . . . . . . . . . . . . . . . . .
. . . . . . . . . . . . . . . . . . . . . . . . . . . . . . . . . . . . . . . . . . . . . . . . . . . . . . . . . . . . . . . . . . . . . . . . . . . . . . . . . . . . . . . . . . . . . . . . . . . . . . . . . . . . . . . . . . . . . . . . . . . . . . . . . . . . . . . . . . . . . . . . . . . . . . . . . . . . . . . . . . . . . . . . . . . . . . . . . . . . . . . . . . . . . . . . . . . . . . . . . . . . . . . . . . . . . . . . . . . . . . . . . . . . . . . . . . . . . . . . . . . . . . . . . . . . . . . . . . . . . . . . . . . . . . . . . . . . . . . .
. . . . . . . . . . . . . . . . . . . . . . . . . . . . . . . . . . . . . . . . . . . . . . . . . . . . . . . . . . . . . . . . . . . . . . . . . . . . . . . . . . . . . . . . . . . . . . . . . . . . . . . . . . . . . . . . . . . . . . . . . . . . . . . . . . . . . . . . . . . . . . . . . . . . . . . . . . . . . . . . . . . . . . . . . . . . . . . . . . . . . . . . . . . . . . . . . . . . . . . . . . . . . . . . . . . . . . . . . . . . . . . . . . . . . . . . . . . . . . . . . . . . . . . . . . . . . . . . . . . . . . . . . . . . . . . . . . . . . . . .
8.3. AUTOMATICALLY CREATING DUAL ENTRIES
8.4. USING VIEWS
CHAPTER 9. CONFIGURING SECURE CONNECTIONS
9.1. REQUIRING SECURE CONNECTIONS
9.2. SETTING A MINIMUM STRENGTH FACTOR
9.3. MANAGING THE NSS DATABASE USED BY DIRECTORY SERVER
9.4. ENABLING TLS
9.5. DISPLAYING THE ENCRYPTION PROTOCOLS ENABLED IN DIRECTORY SERVER
9.6. SETTING THE ENCRYPTION PROTOCOL VERSIONS
9.7. USING HARDWARE SECURITY MODULES
9.8. USING CERTIFICATE-BASED CLIENT AUTHENTICATION
9.9. SETTING UP SASL IDENTITY MAPPING
9.10. USING KERBEROS GSS-API WITH SASL
9.11. SETTING SASL MECHANISMS
9.12. USING SASL WITH LDAP CLIENTS
CHAPTER 10. CONFIGURING ATTRIBUTE ENCRYPTION
10.1. ENCRYPTION KEYS
10.2. ENCRYPTION CIPHERS
10.3. CONFIGURING ATTRIBUTE ENCRYPTION FROM THE CONSOLE
10.4. CONFIGURING ATTRIBUTE ENCRYPTION USING THE COMMAND LINE
10.5. ENABLING ATTRIBUTE ENCRYPTION FOR EXISTING ATTRIBUTE VALUES
10.6. GENERAL CONSIDERATIONS AFTER ENABLING ATTRIBUTE ENCRYPTION
10.7. EXPORTING AND IMPORTING AN ENCRYPTED DATABASE
10.8. UPDATING THE TLS CERTIFICATES USED FOR ATTRIBUTE ENCRYPTION
CHAPTER 11. MANAGING FIPS MODE SUPPORT
Enabling FIPS Mode Support
Disabling FIPS Mode Support
CHAPTER 12. MANAGING THE DIRECTORY SCHEMA
12.1. OVERVIEW OF SCHEMA
12.2. MANAGING OBJECT IDENTIFIERS
12.3. DIRECTORY SERVER ATTRIBUTE SYNTAXES
12.4. MANAGING CUSTOM SCHEMA IN THE CONSOLE
12.5. MANAGING SCHEMA USING LDAPMODIFY
12.6. CREATING CUSTOM SCHEMA FILES
12.7. DYNAMICALLY RELOADING SCHEMA
12.8. TURNING SCHEMA CHECKING ON AND OFF
12.9. USING SYNTAX VALIDATION
CHAPTER 13. MANAGING INDEXES
13.1. ABOUT INDEXES
13.2. CREATING STANDARD INDEXES
13.3. GENERATING NEW INDEXES TO EXISTING DATABASES
13.4. CREATING BROWSING (VLV) INDEXES
13.5. CHANGING THE INDEX SORT ORDER
13.6. CHANGING THE WIDTH FOR INDEXED SUBSTRING SEARCHES
13.7. DELETING INDEXES
CHAPTER 14. FINDING DIRECTORY ENTRIES
14.1. IMPROVING SEARCH PERFORMANCE THROUGH RESOURCE LIMITS
14.2. FINDING ENTRIES USING THE DIRECTORY SERVER CONSOLE
14.3. USING LDAPSEARCH
226
234
242
242
242
243
256
270
271
272
272
275
282
284
285
286
287
287
288
289
290
290
290
292
293
293
293
294
294
298
299
299
306
308
310
312
314
318
318
322
326
327
332
333
334
341
341
346
348
Administration Guide
2
. . . . . . . . . . . . . . . . . . . . . . . . . . . . . . . . . . . . . . . . . . . . . . . . . . . . . . . . . . . . . . . . . . . . . . . . . . . . . . . . . . . . . . . . . . . . . . . . . . . . . . . . . . . . . . . . . . . . . . . . . . . . . . . . . . . . . . . . . . . . . . . . . . . . . . . . . . . . . . . . . . . . . . . . . . . . . . . . . . . . . . . . . . . . . . . . . . . . . . . . . . . . . . . . . . . . . . . . . . . . . . . . . . . . . . . . . . . . . . . . . . . . . . . . . . . . . . . . . . . . . . . . . . . . . . . . . . . . . . . .
. . . . . . . . . . . . . . . . . . . . . . . . . . . . . . . . . . . . . . . . . . . . . . . . . . . . . . . . . . . . . . . . . . . . . . . . . . . . . . . . . . . . . . . . . . . . . . . . . . . . . . . . . . . . . . . . . . . . . . . . . . . . . . . . . . . . . . . . . . . . . . . . . . . . . . . . . . . . . . . . . . . . . . . . . . . . . . . . . . . . . . . . . . . . . . . . . . . . . . . . . . . . . . . . . . . . . . . . . . . . . . . . . . . . . . . . . . . . . . . . . . . . . . . . . . . . . . . . . . . . . . . . . . . . . . . . . . . . . . . .
. . . . . . . . . . . . . . . . . . . . . . . . . . . . . . . . . . . . . . . . . . . . . . . . . . . . . . . . . . . . . . . . . . . . . . . . . . . . . . . . . . . . . . . . . . . . . . . . . . . . . . . . . . . . . . . . . . . . . . . . . . . . . . . . . . . . . . . . . . . . . . . . . . . . . . . . . . . . . . . . . . . . . . . . . . . . . . . . . . . . . . . . . . . . . . . . . . . . . . . . . . . . . . . . . . . . . . . . . . . . . . . . . . . . . . . . . . . . . . . . . . . . . . . . . . . . . . . . . . . . . . . . . . . . . . . . . . . . . . . .
. . . . . . . . . . . . . . . . . . . . . . . . . . . . . . . . . . . . . . . . . . . . . . . . . . . . . . . . . . . . . . . . . . . . . . . . . . . . . . . . . . . . . . . . . . . . . . . . . . . . . . . . . . . . . . . . . . . . . . . . . . . . . . . . . . . . . . . . . . . . . . . . . . . . . . . . . . . . . . . . . . . . . . . . . . . . . . . . . . . . . . . . . . . . . . . . . . . . . . . . . . . . . . . . . . . . . . . . . . . . . . . . . . . . . . . . . . . . . . . . . . . . . . . . . . . . . . . . . . . . . . . . . . . . . . . . . . . . . . . .
14.4. LDAP SEARCH FILTERS
14.5. EXAMPLES OF COMMON LDAPSEARCHES
14.6. USING PERSISTENT SEARCH
14.7. SEARCHING WITH SPECIFIED CONTROLS
CHAPTER 15. MANAGING REPLICATION
15.1. REPLICATION OVERVIEW
15.2. CONFIGURING REPLICATION FROM THE COMMAND LINE
15.3. REPLICATION SCENARIOS
15.4. CREATING THE SUPPLIER BIND DN ENTRY
15.5. CONFIGURING SINGLE-MASTER REPLICATION
15.6. CONFIGURING MULTI-MASTER REPLICATION
15.7. CONFIGURING CASCADING REPLICATION
15.8. TEMPORARILY SUSPENDING REPLICATION
15.9. DISABLING AND RE-ENABLING A REPLICATION AGREEMENT
15.10. MANAGING ATTRIBUTES WITHIN FRACTIONAL REPLICATION
15.11. MAKING A READ-ONLY REPLICA UPDATABLE
15.12. REMOVING A SUPPLIER FROM THE REPLICATION TOPOLOGY
15.13. MANAGING DELETED ENTRIES WITH REPLICATION
15.14. CONFIGURING CHANGELOG ENCRYPTION
15.15. REMOVING THE CHANGELOG
15.16. MOVING THE REPLICATION CHANGELOG DIRECTORY
15.17. TRIMMING THE REPLICATION CHANGELOG
15.18. INITIALIZING CONSUMERS
15.19. FORCING REPLICATION UPDATES
15.20. REPLICATION OVER TLS
15.21. SETTING REPLICATION TIMEOUT PERIODS
15.22. REPLICATING O=NETSCAPEROOT FOR ADMINISTRATION SERVER FAILOVER
15.23. USING THE RETRO CHANGELOG PLUG-IN
15.24. MONITORING REPLICATION STATUS
15.25. COMPARING TWO DIRECTORY SERVER INSTANCES
15.26. SOLVING COMMON REPLICATION CONFLICTS
15.27. TROUBLESHOOTING REPLICATION-RELATED PROBLEMS
CHAPTER 16. SYNCHRONIZING RED HAT DIRECTORY SERVER WITH MICROSOFT ACTIVE DIRECTORY
16.1. ABOUT WINDOWS SYNCHRONIZATION
16.2. SUPPORTED ACTIVE DIRECTORY VERSIONS
16.3. SYNCHRONIZING PASSWORDS
16.4. STEPS FOR CONFIGURING WINDOWS SYNCHRONIZATION
16.5. SYNCHRONIZING USERS
16.6. SYNCHRONIZING GROUPS
16.7. CONFIGURING UNI-DIRECTIONAL SYNCHRONIZATION
16.8. CONFIGURING MULTIPLE SUBTREES AND FILTERS IN WINDOWS SYNCHRONIZATION
16.9. SYNCHRONIZING POSIX ATTRIBUTES FOR USERS AND GROUPS
16.10. DELETING AND RESURRECTING ENTRIES
16.11. SENDING SYNCHRONIZATION UPDATES
16.12. MODIFYING THE SYNCHRONIZATION AGREEMENT
16.13. MANAGING THE PASSWORD SYNC SERVICE
16.14. TROUBLESHOOTING
CHAPTER 17. SETTING UP CONTENT SYNCHRONIZATION
CHAPTER 18. MANAGING ACCESS CONTROL
351
365
370
370
377
377
380
389
393
395
404
416
428
428
429
431
432
434
435
436
437
438
440
444
445
447
447
449
451
455
457
463
467
467
470
470
471
486
493
500
501
502
503
504
507
513
515
517
519
Table of Contents
3

. . . . . . . . . . . . . . . . . . . . . . . . . . . . . . . . . . . . . . . . . . . . . . . . . . . . . . . . . . . . . . . . . . . . . . . . . . . . . . . . . . . . . . . . . . . . . . . . . . . . . . . . . . . . . . . . . . . . . . . . . . . . . . . . . . . . . . . . . . . . . . . . . . . . . . . . . . . . . . . . . . . . . . . . . . . . . . . . . . . . . . . . . . . . . . . . . . . . . . . . . . . . . . . . . . . . . . . . . . . . . . . . . . . . . . . . . . . . . . . . . . . . . . . . . . . . . . . . . . . . . . . . . . . . . . . . . . . . . . . .
. . . . . . . . . . . . . . . . . . . . . . . . . . . . . . . . . . . . . . . . . . . . . . . . . . . . . . . . . . . . . . . . . . . . . . . . . . . . . . . . . . . . . . . . . . . . . . . . . . . . . . . . . . . . . . . . . . . . . . . . . . . . . . . . . . . . . . . . . . . . . . . . . . . . . . . . . . . . . . . . . . . . . . . . . . . . . . . . . . . . . . . . . . . . . . . . . . . . . . . . . . . . . . . . . . . . . . . . . . . . . . . . . . . . . . . . . . . . . . . . . . . . . . . . . . . . . . . . . . . . . . . . . . . . . . . . . . . . . . . .
. . . . . . . . . . . . . . . . . . . . . . . . . . . . . . . . . . . . . . . . . . . . . . . . . . . . . . . . . . . . . . . . . . . . . . . . . . . . . . . . . . . . . . . . . . . . . . . . . . . . . . . . . . . . . . . . . . . . . . . . . . . . . . . . . . . . . . . . . . . . . . . . . . . . . . . . . . . . . . . . . . . . . . . . . . . . . . . . . . . . . . . . . . . . . . . . . . . . . . . . . . . . . . . . . . . . . . . . . . . . . . . . . . . . . . . . . . . . . . . . . . . . . . . . . . . . . . . . . . . . . . . . . . . . . . . . . . . . . . . .
18.1. ACCESS CONTROL PRINCIPLES
18.2. ACI PLACEMENT
18.3. ACI STRUCTURE
18.4. ACI EVALUATION
18.5. LIMITATIONS OF ACIS
18.6. HOW DIRECTORY SERVER HANDLES ACIS IN A REPLICATION TOPOLOGY
18.7. DISPLAYING ACIS
18.8. ADDING AN ACI
18.9. DELETING AN ACI
18.10. UPDATING AN ACI
18.11. DEFINING TARGETS
18.12. DEFINING PERMISSIONS
18.13. DEFINING BIND RULES
18.14. CHECKING ACCESS RIGHTS ON ENTRIES (GET EFFECTIVE RIGHTS)
18.15. LOGGING ACCESS CONTROL INFORMATION
18.16. ADVANCED ACCESS CONTROL: USING MACRO ACIS
18.17. SETTING ACCESS CONTROLS ON DIRECTORY MANAGER
18.18. COMPATIBILITY WITH PREVIOUS RELEASES
CHAPTER 19. MANAGING USER AUTHENTICATION
19.1. SETTING USER PASSWORDS
19.2. SETTING PASSWORD ADMINISTRATORS
19.3. CHANGING PASSWORDS STORED EXTERNALLY
19.4. MANAGING THE PASSWORD POLICY
19.5. UNDERSTANDING PASSWORD EXPIRATION CONTROLS
19.6. MANAGING THE DIRECTORY MANAGER PASSWORD
19.7. CHECKING ACCOUNT AVAILABILITY FOR PASSWORDLESS ACCESS
19.8. CONFIGURING A PASSWORD-BASED ACCOUNT LOCKOUT POLICY
19.9. CONFIGURING TIME-BASED ACCOUNT LOCKOUT POLICIES
19.10. REPLICATING ACCOUNT LOCKOUT ATTRIBUTES
19.11. ENABLING DIFFERENT TYPES OF BINDS
19.12. USING PASS-THROUGH AUTHENTICATION
19.13. USING ACTIVE DIRECTORY-FORMATTED USER NAMES FOR AUTHENTICATION
19.14. USING PAM FOR PASS-THROUGH AUTHENTICATION
19.15. MANUALLY INACTIVATING USERS AND ROLES
CHAPTER 20. MONITORING SERVER AND DATABASE ACTIVITY
20.1. TYPES OF DIRECTORY SERVER LOG FILES
20.2. DISPLAYING LOG FILES
20.3. CONFIGURING LOG FILES
20.4. GETTING ACCESS LOG STATISTICS
20.5. MONITORING THE LOCAL DISK FOR GRACEFUL SHUTDOWN
20.6. MONITORING SERVER ACTIVITY
20.7. MONITORING DATABASE ACTIVITY
20.8. MONITORING DATABASE LINK ACTIVITY
20.9. ENABLING AND DISABLING COUNTERS
CHAPTER 21. MONITORING DIRECTORY SERVER USING SNMP
21.1. ABOUT SNMP
21.2. CONFIGURING THE DIRECTORY SERVER FOR SNMP
21.3. SETTING UP AN SNMP AGENT FOR DIRECTORY SERVER
21.4. CONFIGURING SNMP TRAPS
21.5. USING THE MANAGEMENT INFORMATION BASE
519
519
520
520
521
521
522
522
526
527
528
536
539
555
566
567
572
574
575
575
575
576
577
587
588
592
594
596
603
605
611
619
620
626
630
630
630
631
639
642
644
651
657
658
659
659
659
660
661
662
Administration Guide
4
. . . . . . . . . . . . . . . . . . . . . . . . . . . . . . . . . . . . . . . . . . . . . . . . . . . . . . . . . . . . . . . . . . . . . . . . . . . . . . . . . . . . . . . . . . . . . . . . . . . . . . . . . . . . . . . . . . . . . . . . . . . . . . . . . . . . . . . . . . . . . . . . . . . . . . . . . . . . . . . . . . . . . . . . . . . . . . . . . . . . . . . . . . . . . . . . . . . . . . . . . . . . . . . . . . . . . . . . . . . . . . . . . . . . . . . . . . . . . . . . . . . . . . . . . . . . . . . . . . . . . . . . . . . . . . . . . . . . . . . .
. . . . . . . . . . . . . . . . . . . . . . . . . . . . . . . . . . . . . . . . . . . . . . . . . . . . . . . . . . . . . . . . . . . . . . . . . . . . . . . . . . . . . . . . . . . . . . . . . . . . . . . . . . . . . . . . . . . . . . . . . . . . . . . . . . . . . . . . . . . . . . . . . . . . . . . . . . . . . . . . . . . . . . . . . . . . . . . . . . . . . . . . . . . . . . . . . . . . . . . . . . . . . . . . . . . . . . . . . . . . . . . . . . . . . . . . . . . . . . . . . . . . . . . . . . . . . . . . . . . . . . . . . . . . . . . . . . . . . . . .
. . . . . . . . . . . . . . . . . . . . . . . . . . . . . . . . . . . . . . . . . . . . . . . . . . . . . . . . . . . . . . . . . . . . . . . . . . . . . . . . . . . . . . . . . . . . . . . . . . . . . . . . . . . . . . . . . . . . . . . . . . . . . . . . . . . . . . . . . . . . . . . . . . . . . . . . . . . . . . . . . . . . . . . . . . . . . . . . . . . . . . . . . . . . . . . . . . . . . . . . . . . . . . . . . . . . . . . . . . . . . . . . . . . . . . . . . . . . . . . . . . . . . . . . . . . . . . . . . . . . . . . . . . . . . . . . . . . . . . . .
. . . . . . . . . . . . . . . . . . . . . . . . . . . . . . . . . . . . . . . . . . . . . . . . . . . . . . . . . . . . . . . . . . . . . . . . . . . . . . . . . . . . . . . . . . . . . . . . . . . . . . . . . . . . . . . . . . . . . . . . . . . . . . . . . . . . . . . . . . . . . . . . . . . . . . . . . . . . . . . . . . . . . . . . . . . . . . . . . . . . . . . . . . . . . . . . . . . . . . . . . . . . . . . . . . . . . . . . . . . . . . . . . . . . . . . . . . . . . . . . . . . . . . . . . . . . . . . . . . . . . . . . . . . . . . . . . . . . . . . .
. . . . . . . . . . . . . . . . . . . . . . . . . . . . . . . . . . . . . . . . . . . . . . . . . . . . . . . . . . . . . . . . . . . . . . . . . . . . . . . . . . . . . . . . . . . . . . . . . . . . . . . . . . . . . . . . . . . . . . . . . . . . . . . . . . . . . . . . . . . . . . . . . . . . . . . . . . . . . . . . . . . . . . . . . . . . . . . . . . . . . . . . . . . . . . . . . . . . . . . . . . . . . . . . . . . . . . . . . . . . . . . . . . . . . . . . . . . . . . . . . . . . . . . . . . . . . . . . . . . . . . . . . . . . . . . . . . . . . . . .
. . . . . . . . . . . . . . . . . . . . . . . . . . . . . . . . . . . . . . . . . . . . . . . . . . . . . . . . . . . . . . . . . . . . . . . . . . . . . . . . . . . . . . . . . . . . . . . . . . . . . . . . . . . . . . . . . . . . . . . . . . . . . . . . . . . . . . . . . . . . . . . . . . . . . . . . . . . . . . . . . . . . . . . . . . . . . . . . . . . . . . . . . . . . . . . . . . . . . . . . . . . . . . . . . . . . . . . . . . . . . . . . . . . . . . . . . . . . . . . . . . . . . . . . . . . . . . . . . . . . . . . . . . . . . . . . . . . . . . . .
. . . . . . . . . . . . . . . . . . . . . . . . . . . . . . . . . . . . . . . . . . . . . . . . . . . . . . . . . . . . . . . . . . . . . . . . . . . . . . . . . . . . . . . . . . . . . . . . . . . . . . . . . . . . . . . . . . . . . . . . . . . . . . . . . . . . . . . . . . . . . . . . . . . . . . . . . . . . . . . . . . . . . . . . . . . . . . . . . . . . . . . . . . . . . . . . . . . . . . . . . . . . . . . . . . . . . . . . . . . . . . . . . . . . . . . . . . . . . . . . . . . . . . . . . . . . . . . . . . . . . . . . . . . . . . . . . . . . . . . .
. . . . . . . . . . . . . . . . . . . . . . . . . . . . . . . . . . . . . . . . . . . . . . . . . . . . . . . . . . . . . . . . . . . . . . . . . . . . . . . . . . . . . . . . . . . . . . . . . . . . . . . . . . . . . . . . . . . . . . . . . . . . . . . . . . . . . . . . . . . . . . . . . . . . . . . . . . . . . . . . . . . . . . . . . . . . . . . . . . . . . . . . . . . . . . . . . . . . . . . . . . . . . . . . . . . . . . . . . . . . . . . . . . . . . . . . . . . . . . . . . . . . . . . . . . . . . . . . . . . . . . . . . . . . . . . . . . . . . . . .
. . . . . . . . . . . . . . . . . . . . . . . . . . . . . . . . . . . . . . . . . . . . . . . . . . . . . . . . . . . . . . . . . . . . . . . . . . . . . . . . . . . . . . . . . . . . . . . . . . . . . . . . . . . . . . . . . . . . . . . . . . . . . . . . . . . . . . . . . . . . . . . . . . . . . . . . . . . . . . . . . . . . . . . . . . . . . . . . . . . . . . . . . . . . . . . . . . . . . . . . . . . . . . . . . . . . . . . . . . . . . . . . . . . . . . . . . . . . . . . . . . . . . . . . . . . . . . . . . . . . . . . . . . . . . . . . . . . . . . . .
. . . . . . . . . . . . . . . . . . . . . . . . . . . . . . . . . . . . . . . . . . . . . . . . . . . . . . . . . . . . . . . . . . . . . . . . . . . . . . . . . . . . . . . . . . . . . . . . . . . . . . . . . . . . . . . . . . . . . . . . . . . . . . . . . . . . . . . . . . . . . . . . . . . . . . . . . . . . . . . . . . . . . . . . . . . . . . . . . . . . . . . . . . . . . . . . . . . . . . . . . . . . . . . . . . . . . . . . . . . . . . . . . . . . . . . . . . . . . . . . . . . . . . . . . . . . . . . . . . . . . . . . . . . . . . . . . . . . . . . .
CHAPTER 22. MAKING A HIGH-AVAILABILITY AND DISASTER RECOVERY PLAN
22.1. IDENTIFYING POTENTIAL SCENARIOS
22.2. DEFINING THE TYPE OF ROLLOVER
22.3. IDENTIFYING USEFUL DIRECTORY SERVER FEATURES FOR DISASTER RECOVERY
22.4. DEFINING THE RECOVERY PROCESS
22.5. BASIC EXAMPLE: PERFORMING A RECOVERY
APPENDIX A. USING LDAP CLIENT TOOLS
A.1. RUNNING EXTENDED OPERATIONS
A.2. COMPARING ENTRIES
A.3. CHANGING PASSWORDS
A.4. GENERATING LDAP URLS
APPENDIX B. LDAP DATA INTERCHANGE FORMAT
B.1. ABOUT THE LDIF FILE FORMAT
B.2. CONTINUING LINES IN LDIF
B.3. REPRESENTING BINARY DATA
B.4. SPECIFYING DIRECTORY ENTRIES USING LDIF
B.5. DEFINING DIRECTORIES USING LDIF
B.6. STORING INFORMATION IN MULTIPLE LANGUAGES
APPENDIX C. LDAP URLS
C.1. COMPONENTS OF AN LDAP URL
C.2. ESCAPING UNSAFE CHARACTERS
C.3. EXAMPLES OF LDAP URLS
APPENDIX D. INTERNATIONALIZATION
D.1. ABOUT LOCALES
D.2. SUPPORTED LOCALES
D.3. SUPPORTED LANGUAGE SUBTYPES
D.4. SEARCHING AN INTERNATIONALIZED DIRECTORY
D.5. TROUBLESHOOTING MATCHING RULES
APPENDIX E. MANAGING THE ADMINISTRATION SERVER
E.1. INTRODUCTION TO RED HAT ADMINISTRATION SERVER
E.2. ADMINISTRATION SERVER CONFIGURATION
APPENDIX F. USING ADMIN EXPRESS
F.1. MANAGING SERVERS IN ADMIN EXPRESS
F.2. CONFIGURING ADMIN EXPRESS
APPENDIX G. USING THE CONSOLE
G.1. OVERVIEW OF THE DIRECTORY SERVER CONSOLE
G.2. CHANGING THE CONSOLE APPEARANCE
G.3. MANAGING SERVER INSTANCES
G.4. MANAGING DIRECTORY SERVER USERS AND GROUPS
G.5. SETTING ACCESS CONTROLS
INDEX
APPENDIX H. REVISION HISTORY
667
667
668
668
670
670
672
672
673
674
675
678
678
679
680
681
685
687
689
689
690
691
693
693
693
694
696
701
702
702
703
722
722
724
732
732
740
750
753
768
775
817
Table of Contents
5

DEPRECATED DOCUMENTATION
IMPORTANT
Note that as of November 30, 2020, the support for Red Hat Directory Server 10 hasended. For details, see “Red Hat Directory Server Life Cycle policy”. Red Hatrecommends users of Directory Server 10 to update to the latest version.
Due to the end of the maintenance phase of this product, this documentation is nolonger updated. Use it only as a reference!
Administration Guide
6

CHAPTER 1. BASIC RED HAT DIRECTORY SERVER SETTINGS
The Red Hat Directory Server includes a directory service, an administration server to manage multipleserver instances, and a Java-based console to manage server instances through a graphical interface.This chapter provides an overview of the basic tasks for administering a directory service.
The Directory Server is a robust, scalable server designed to manage an enterprise-wide directory ofusers and resources. It is based on an open-systems server protocol called the Lightweight DirectoryAccess Protocol (LDAP). The server manages the directory databases and responds to client requests.
Directory Server is comprised of several components, which work in tandem:
The Directory Server is the core LDAP server daemon. It is compliant with LDAP v3 standards.This component includes command-line server management and administration programs andscripts for common operations like export and backing up databases.
The Directory Server Console is the user interface that simplifies management of users, groups,and other LDAP data. The Console is used for all aspects of the server management, includingbackups; security, replication, or databases configuration; server monitoring; and viewingstatistics.
The Administration Server is the management agent which administers Directory Serverinstances. It communicates with the Directory Server Console and performs operations on theDirectory Server instances. It also provides a simple HTML interface and online help pages.
You can administer Directory Server by using command-line utilities, but it is also possible to use theDirectory Server Console.
1.1. SYSTEM REQUIREMENTS
See the corresponding section in the Red Hat Directory Server 10 Release Notes.
1.2. FILE LOCATIONS
See the corresponding section in the Red Hat Directory Server Configuration, Command, and File
Reference.
1.3. STARTING THE DIRECTORY SERVER MANAGEMENT CONSOLE
The Management Console provides a graphical user interface that enables you to performadministrative tasks, such as:
Managing Directory Server instances
Managing the Administration Server
Managing users and groups
NOTE
The Management Console uses Java. For details about the supported Java runtimeenvironments and versions, see the Red Hat Directory Server Release Notes.
To open the Management Console, enter:
CHAPTER 1. BASIC RED HAT DIRECTORY SERVER SETTINGS
7
# redhat-idm-console
For supported command-line options, see the corresponding section in the Red Hat Directory Server
Configuration, Command, and File Reference.
1.3.1. Opening the Directory Server Console
1. Start the Directory Server Management Console:
# redhat-idm-console
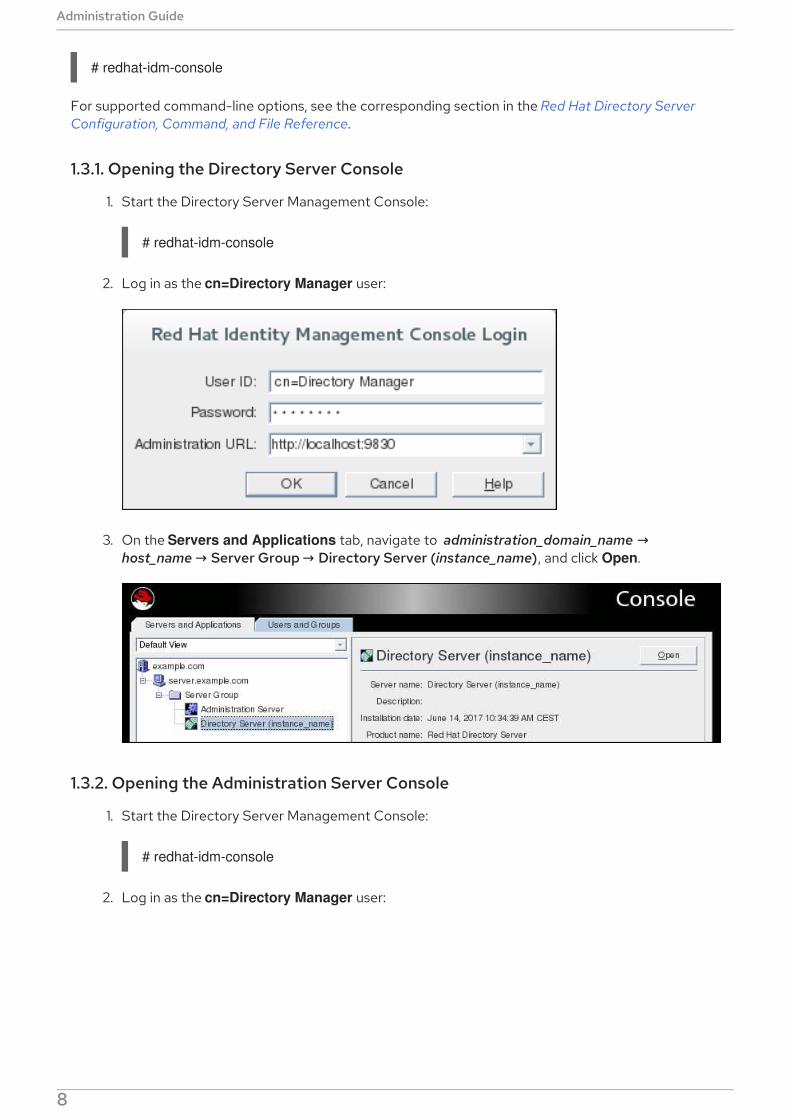
2. Log in as the cn=Directory Manager user:
3. On the Servers and Applications tab, navigate to administration_domain_name →host_name → Server Group → Directory Server (instance_name), and click Open.
1.3.2. Opening the Administration Server Console
1. Start the Directory Server Management Console:
# redhat-idm-console
2. Log in as the cn=Directory Manager user:
Administration Guide
8

3. On the Servers and Applications tab, navigate to administration_domain_name →host_name → Server Group → Administration Server, and click Open.
1.4. STARTING AND STOPPING A DIRECTORY SERVER INSTANCE
1.4.1. Starting and Stopping a Directory Server Instance Using the Command Line
Use the systemctl utility to start, stop, or restart an instance:
To start an instance:
# systemctl start dirsrv@instance_name
To stop an instance:
# systemctl stop dirsrv@instance_name
To restart an instance:
# systemctl restart dirsrv@instance_name
Optionally, you can enable Directory Server instances to automatically start when the system boots:
for a single instance:
# systemctl enable dirsrv@instance_name
for all instances on a server:
# systemctl enable dirsrv.target
For further details, see the Managing System Services section in the Red Hat System Administrator's
CHAPTER 1. BASIC RED HAT DIRECTORY SERVER SETTINGS
9

For further details, see the Managing System Services section in the Red Hat System Administrator's
Guide.
1.4.2. Starting and Stopping a Directory Server Instance Using the Console
Besides the command line, you can use the Directory Server Console to start, stop, or restart instances.
IMPORTANT
If you run SELinux in enforcing mode, you cannot use the Console to start or stop aninstance. To work around the problem, use the command line to manage the services.See Section 1.4, “Starting and Stopping a Directory Server Instance” .
IMPORTANT
If you enabled TLS encryption for an instance, Directory Server prompts for the TLScertificate password when the instance starts. The Directory Server Console does notsupport displaying this password prompt in the GUI. To work around the problem:
use the command line to manage the service. See Section 1.4.1, “Starting andStopping a Directory Server Instance Using the Command Line”.
create a password file. See Section 9.4.1.5, “Creating a Password File forDirectory Server”.
To start, stop, or restart a Directory Server instance:
1. Start the Directory Server Console and log in using the cn=Directory Manager user name.
For details, see Section E.2.2, “Opening the Administration Server Console” .
2. On the Servers and Applications tab, navigate to administration_domain_name →host_name → Server Group → Directory Server (instance_name), and click Open.
3. On the Tasks tab, click the task you want to execute:
Administration Guide
10

4. Click Yes to confirm.
After the task finished, the console displays a message if the operation was successful or failed.
1.5. STARTING AND STOPPING THE DIRECTORY SERVERADMINISTRATION SERVER SERVICE
The Administration Server provides the Directory Server Console — a GUI to manage Directory Server.
1.5.1. Starting and Stopping the Administration Server Service Using the CommandLine
Use the systemctl utility to start, stop, or restart the Administration Server service:
To start the service:
# systemctl start dirsrv-admin
To stop the service:
# systemctl stop dirsrv-admin
To restart the service:
# systemctl restart dirsrv-admin
Optionally, enable the Administration Server to automatically start when the system boots:
# systemctl enable dirsrv-admin
For further details, see the Managing System Services section in the Red Hat System Administrator's
Guide.
1.5.2. Restarting and Stopping the Administration Server Service Using the Console
To restart or stop the Administration Server service:
1. Start the Directory Server Console and log in using the cn=Directory Manager user name.
For details, see Section E.2.2, “Opening the Administration Server Console” .
2. On the Servers and Applications tab, navigate to administration_domain_name →
CHAPTER 1. BASIC RED HAT DIRECTORY SERVER SETTINGS
11

2. On the Servers and Applications tab, navigate to administration_domain_name →host_name → Server Group → Administration Server, and click Open.
3. On the Tasks tab, click the task you want to execute:
4. Click Yes to confirm.
After the task finished, the console displays a message if the operation was successful or failed.
1.6. ENABLING LDAPI
Inter-process communication (IPC) is a way for separate processes on a Unix machine or a network tocommunicate directly with each other. LDAPI allows LDAP connections to run over IPC connections,meaning that LDAP operations can run over Unix sockets. These connections are much faster and moresecure than regular LDAP connections.
LDAPI is enabled through two configuration attributes:
nsslapd-ldapilisten to enable LDAPI for Directory Server
nsslapd-ldapifilepath to point to the Unix socket file
To enable LDAPI:
1. Modify the nsslapd-ldapilisten to turn LDAPI on and add the socket file attribute.
# ldapmodify -D "cn=Directory Manager" -W -p 389 -h server.example.com -x
dn: cn=config
changetype: modify
replace: nsslapd-ldapilisten
nsslapd-ldapilisten: on
-
add: nsslapd-ldapifilepath
nsslapd-ldapifilepath: /var/run/slapd-example.socket
2. Restart the server to apply the new configuration.
Administration Guide
12
# systemctl restart dirsrv@instance
1.7. CHANGING DIRECTORY SERVER PORT NUMBERS
The standard and secure LDAP port numbers used by Directory Server can be changed through theDirectory Server Console or by changing the value of the nsslapd-port or nsslapd-secureport
attribute under the cn=config entry in the dse.ldif.
NOTE
Modifying the standard or secure port numbers for a Configuration Directory Server,which maintains the o=NetscapeRoot subtree, should be done through theDirectory Server Console.
1.7.1. Changing Standard Port Numbers
1. In the Directory Server Console, select the Configuration tab, and then select the top entry inthe navigation tree in the left pane.
2. Select the Settings tab in the right pane.
3. Change the port numbers. The port number for the server to use for non-TLS communicationsin the Port field, with a default value of 389.
4. Click Save.
5. The Console returns a warning, You are about to change the port number for the Configuration
Directory. This will affect all Administration Servers that use this directory and you'll need to
update them with the new port number. Are you sure you want to change the port number? Click Yes.
6. Then a dialog appears, reading that the changes will not take effect until the server is restarted.Click OK.
NOTE
Do not restart the Directory Server at this point. If you do, you will not be able tomake the necessary changes to the Administration Server through the Console.
7. Open the Administration Server Console.
8. In the Configuration tab, select the Configuration DS tab.
CHAPTER 1. BASIC RED HAT DIRECTORY SERVER SETTINGS
13

9. In the LDAP Port field, type in the new LDAP port number for your Directory Server instance.
10. Change the SELinux labels for the Directory Server ports so that the new port number is used inthe Directory Server policies. For example:
# semanage port -a -t ldap_port_t -p tcp 1389
WARNING
If the SELinux label is not reset, then the Directory Server will not be able tobe restarted.
11. In the Tasks tab of the Directory Server Console, click Restart Directory Server. A dialog toconfirm that you want to restart the server. Click Yes.
12. Open the Configuration DS tab of the Administration Server Console and select Save.
A dialog will appear, reading The Directory Server setting has been modified. You must shutdown
and restart your Administration Server and all the servers in the Server Group for the changes to
take effect. Click OK.
13. In the Tasks tab of the Administration Server Console, click Restart Admin Server. A dialogopens reading that the Administration Server has been successfully restarted. Click Close.
NOTE
You must close and reopen the Console before you can do anything else in theConsole. Refresh may not update the Console, and, if you try to do anything, youwill get a warning that reads Unable to contact LDAP server.
1.7.2. Changing the LDAPS Port Numbers
Changing the configuration directory or user directory port or secure port numbers has the followingrepercussions:
The Directory Server port number must also be updated in the Administration Server
Administration Guide
14
The Directory Server port number must also be updated in the Administration Serverconfiguration.
If there are other Directory Server instances that point to the configuration or user directory,update those servers to point to the new port number.
To modify the LDAPS port:
1. Make sure that the CA certificate used to issue the Directory Server instance's certificate is inthe Administration Server certificate database. Importing CA certificates for theAdministration Server is the same as the Directory Server process described in Section 9.3.3,“Installing a CA Certificate”.
2. The secure port can be configured using the Directory Server Console, much like the process inSection 1.7.1, “Changing Standard Port Numbers” (only setting the value in the Encrypted Port
field). However, in some circumstances, such as if there are multiple Directory Server instanceson the same machine, where changing port numbers may not be possible through theDirectory Server Console. It may be be better to use ldapmodify to change the port number.
For example:
# ldapmodify -x -h server.example.com -p 1389 -D "cn=Directory Manager" -W
dn: cn=config
replace: nsslapd-securePort
nsslapd-securePort: 1636
3. Edit the corresponding port configuration for the Directory Server instance in thAdministration Server configuration (o=netscaperoot).
First, search for the current configuration:
# ldapsearch -x -h config-ds.example.com -p 389 -D "cn=Directory Manager" -W -b
"cn=slapd-ID,cn=389 Directory Server,cn=Server
Group,cn=server.example.com,ou=example.com,o=NetscapeRoot" -s base "(objectclass=*)"
nsSecureServerPort
dn: cn=slapd-ID,cn=389 Directory Server,cn=Server
Group,cn=server.example.com,ou=example.com,o=NetscapeRoot
nsSecureServerPort: 636
Then, edit the configuration:
# ldapmodify -x -h config-ds.example.com -p 389 -D "cn=Directory Manager" -W
dn: cn=slapd-ID,cn=389 Directory Server,cn=Server
Group,cn=server.example.com,ou=example.com,o=NetscapeRoot
replace: nsSecureServerPort
nsSecureServerPort: 1636
4. Start the Directory Server Console for the instance and confirm that the new LDAPS portnumber is listed in the Configuration tab.
5. Optionally, select the Use SSL in Console check box.
6. Change the SELinux labels for the Directory Server ports so that the new port number is used in
CHAPTER 1. BASIC RED HAT DIRECTORY SERVER SETTINGS
15
6. Change the SELinux labels for the Directory Server ports so that the new port number is used inthe Directory Server policies. For example:
# semanage port -a -t ldap_port_t -p tcp 1636
WARNING
If the SELinux label is not reset, then the Directory Server will not be able tobe restarted.
7. Restart the Directory Server instance.
1.8. MANAGING DIRECTORY SERVER INSTANCES
1.8.1. Creating a New Directory Server Instance
For details, see the corresponding sections in the Red Hat Directory Server Installation Guide:
Creating a new instance using the command line
Creating a new instance using the Console
1.8.2. Removing a Directory Server Instance
1.8.2.1. Removing a Directory Server Instance Using the Command Line
It is possible to remove a single instance of Directory Server without uninstalling all other instances,removing an Administration Server instance, or removing the packages.
# remove-ds.pl -i slapd-instance_name -a
The remove-ds.pl script removes any related files and directories if the -a (all) option is specified. Butthe Directory Server instance is not unregistered from the Configuration Directory Server.
By default, the key and cert files are left in the instance configuration directory, and the configurationdirectory is renamed slapd-instance-name.removed. Using the -a option (as shown) removes thesecurity databases, as well.
NOTE
If there is a problem with the Directory Server, like the installation failed or the servercannot be restarted, then running remove-ds.pl script fails. In this case, try the -f optionto force the removal process.
1.8.2.1.1. Removing a Directory Server Instance and Administration Server
It is possible to remove both the Directory Server and the Administration Server (if configured on the
Administration Guide
16
It is possible to remove both the Directory Server and the Administration Server (if configured on thesame system).
The -y option is required for the script to perform the removal operation. Otherwise, the remove-ds-
admin.pl script performs a dry-run but does not remove any servers.
The -a option is not required, but it is recommended if a Directory Server or Administration Serverinstance may be re-configured on the system later. By default, all of the security databases arepreserved by the removal script. The -a option removes the security databases, as well.
NOTE
The Directory Server instance must be running for the script to bind to the server.
NOTE
If there is a problem with the Directory Server, like the installation failed or the servercannot be restarted, then running remove-ds-admin.pl script fails. In this case, try the -f
option to force the removal process.
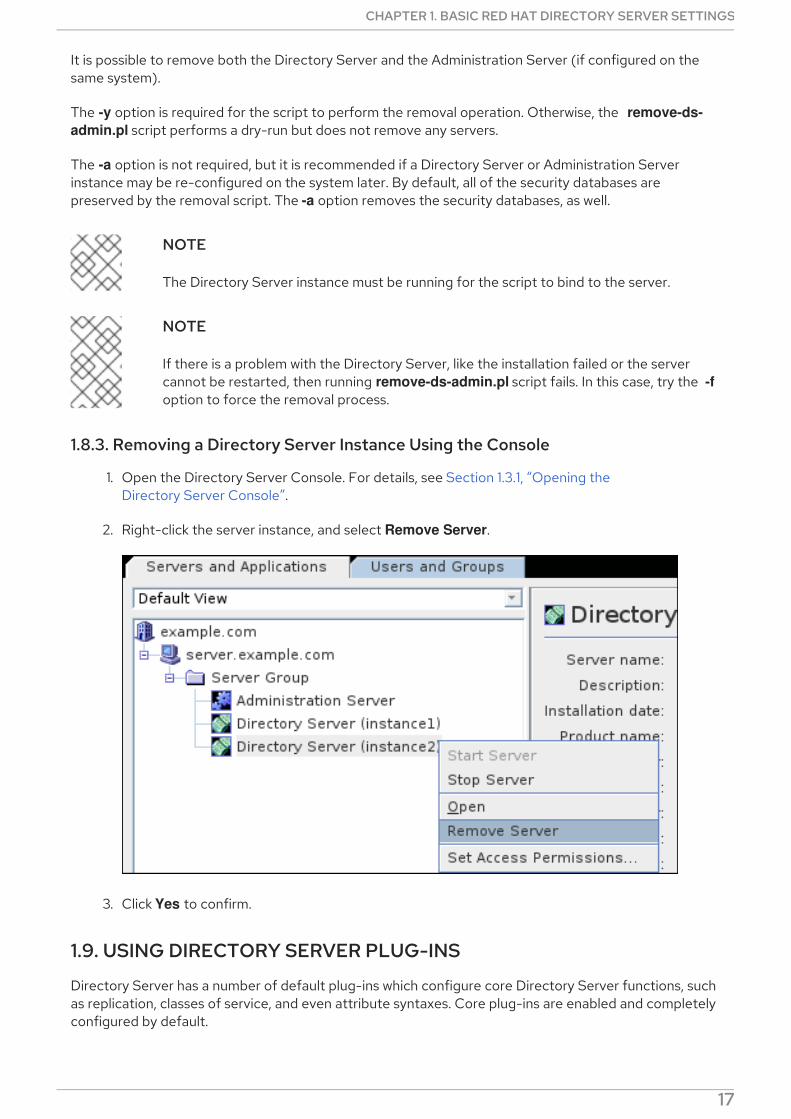
1.8.3. Removing a Directory Server Instance Using the Console
1. Open the Directory Server Console. For details, see Section 1.3.1, “Opening theDirectory Server Console”.
2. Right-click the server instance, and select Remove Server.
3. Click Yes to confirm.
1.9. USING DIRECTORY SERVER PLUG-INS
Directory Server has a number of default plug-ins which configure core Directory Server functions, suchas replication, classes of service, and even attribute syntaxes. Core plug-ins are enabled and completelyconfigured by default.
Other default plug-ins extend the functionality of the Directory Server by providing consistent, but
CHAPTER 1. BASIC RED HAT DIRECTORY SERVER SETTINGS
17
Other default plug-ins extend the functionality of the Directory Server by providing consistent, butuser-defined, behaviors, as with DNA, attribute uniqueness, and attribute linking. These plug-ins areavailable, but not all are enabled or configured by default.
Using plug-ins also allows the Directory Server to be easily extended, so customers can write and deploytheir own server plug-ins to perform whatever directory operations they need for their specificdeployment.
For further details, see:
Section 1.9, “Using Directory Server Plug-ins”
The Plug-in Implemented Server Functionality Reference section in the Red Hat Directory Server
Configuration, Command, and File Reference
Red Hat Directory Server Plug-in Guide
1.9.1. Enabling Plug-ins Dynamically
Directory Server supports dynamic plug-ins that can be enabled without restarting the Directory Server.Allowing for dynamically enabled plug-ins makes server administration significantly easier. By usingdynamic plug-ins, you can avoid restarting the server multiple times to install and configure the plug-ins.This makes deploying software applications for the Directory Server much faster.
Each plug-in can be enabled or disabled by switching the value of the nsslapd-pluginEnabled attribute.For example:
# ldapmodify -x -D 'cn=Directory Manager' -W
dn: cn=Plug-in_name,cn=plugins,cn=config
changetype: modify
replace: nsslapd-pluginEnabled
nsslapd-pluginEnabled: on
Restarting the Directory Server when plug-ins are reconfigured is not required if you specify the nsslapd-dynamic-plugins switch under the cn=config entry. To enable the dynamic plug-in feature,set the nsslapd-dynamic-plugins attribute to on:
dn: cn=config
nsslapd-dynamic-plugins: on
To disable the dynamic plug-in feature, set the nsslapd-dynamic-plugins attribute to off:
dn: cn=config
nsslapd-dynamic-plugins: off
By default, nsslapd-dynamic-plugins is set to off.
1.9.2. Enabling Plug-ins
1.9.2.1. Enabling Plug-ins in the Command Line
To disable or enable a plug-in through the command line, use the ldapmodify utility to edit the value ofthe nsslapd-pluginEnabled attribute. For example:
Administration Guide
18
# ldapmodify -D "cn=Directory Manager" -W -p 389 -h server.example.com -x
dn: cn=ACL Plugin,cn=plugins,cn=config
changetype: modify
replace: nsslapd-pluginEnabled
nsslapd-pluginEnabled: on
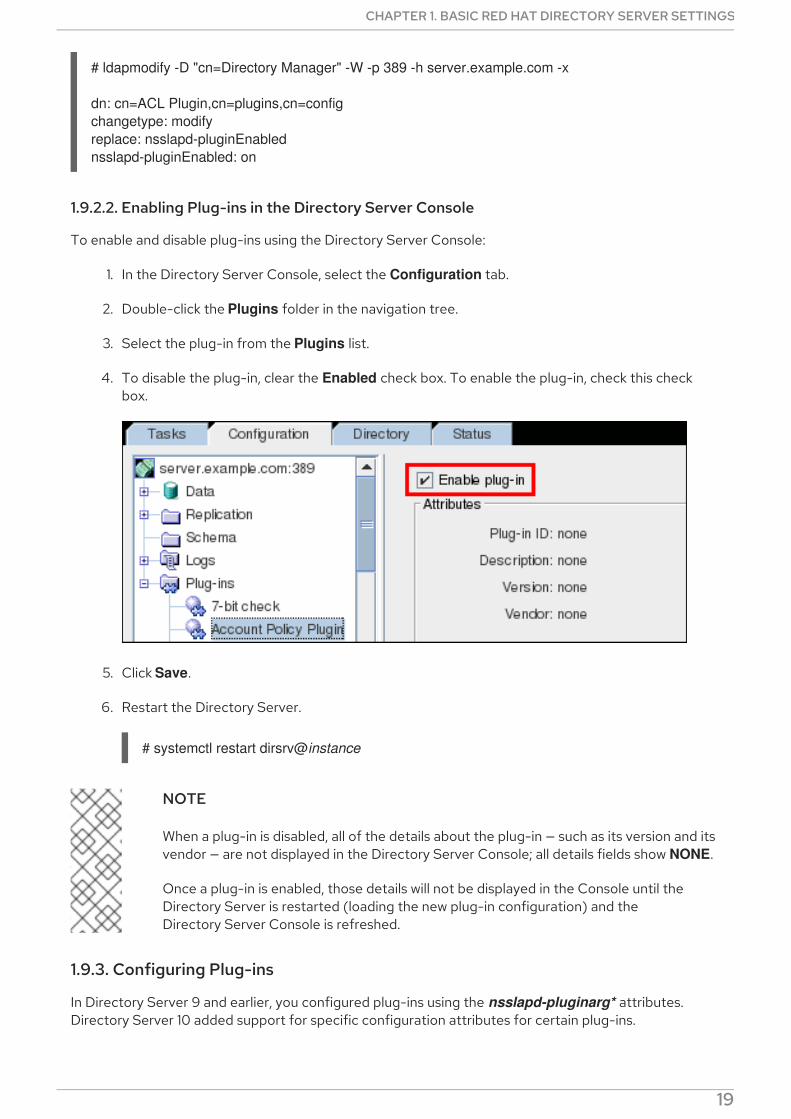
1.9.2.2. Enabling Plug-ins in the Directory Server Console
To enable and disable plug-ins using the Directory Server Console:
1. In the Directory Server Console, select the Configuration tab.
2. Double-click the Plugins folder in the navigation tree.
3. Select the plug-in from the Plugins list.
4. To disable the plug-in, clear the Enabled check box. To enable the plug-in, check this checkbox.
5. Click Save.
6. Restart the Directory Server.
# systemctl restart dirsrv@instance
NOTE
When a plug-in is disabled, all of the details about the plug-in — such as its version and itsvendor — are not displayed in the Directory Server Console; all details fields show NONE.
Once a plug-in is enabled, those details will not be displayed in the Console until theDirectory Server is restarted (loading the new plug-in configuration) and theDirectory Server Console is refreshed.
1.9.3. Configuring Plug-ins
In Directory Server 9 and earlier, you configured plug-ins using the nsslapd-pluginarg* attributes.Directory Server 10 added support for specific configuration attributes for certain plug-ins.
IMPORTANT
CHAPTER 1. BASIC RED HAT DIRECTORY SERVER SETTINGS
19

IMPORTANT
If both the plug-in-specific configuration attributes and the deprecated nsslapd-
pluginarg* attributes are set in a plug-in's configuration, Directory Server only usessettings in plug-in-specific attributes.
The following two examples use the same settings for the Referential Integrity plug-in but using thedifferent configuration options:
Example 1.1. Plug-in Configuration using Configuration Attributes
referint-update-delay: 0
referint-logfile: /var/log/dirsrv/slapd-localhost/referint
referint-logchanges: 0
referint-membership-attr: member
referint-membership-attr: uniquemember
referint-membership-attr: owner
referint-membership-attr: seeAlso
NOTE
Red Hat recommends using only the configuration plug-in-specific attributes. For plug-in-specific attributes, see the corresponding section in the Red Hat Directory Server
Configuration, Command, and File Reference.
Example 1.2. Plug-in Configuration using Plug-in Argument Attributes (Deprecated)
nsslapd-pluginarg0: 0
nsslapd-pluginarg1: /var/log/dirsrv/slapd-localhost/referint
nsslapd-pluginarg2: 0
nsslapd-pluginarg3: member
nsslapd-pluginarg4: uniquemember
nsslapd-pluginarg5: owner
nsslapd-pluginarg6: seeAlso
1.9.3.1. Configuring Plug-ins using the Command Line
To use the ldapmodify utility to configure settings of a plug-in:
1. Identify the distinguished name (DN) of the plug-in's configuration. For details, see thecorresponding section in the Red Hat Directory Server Configuration, Command, and File
Reference.
2. Set the new value. For example, to set the update delay of the Referential Integrity plug-in to 0:
# ldapmodify -D "cn=Directory Manager" -W -p 389 -h server.example.com -x
dn: cn=referential integrity postoperation,cn=plugins,cn=config
Administration Guide
20

changetype: modify
replace: referint-update-delay
referint-update-delay: 0
3. Restart the Directory Server instance:
# systemctl restart dirsrv@instance_name
1.9.3.2. Configuring Plug-ins using the Console
To use the Directory Server Console to configure settings of a plug-in:
1. Start the Directory Server Console and log in using the cn=Directory Manager user name.
For details, see Section E.2.2, “Opening the Administration Server Console” .
2. On the Servers and Applications tab, navigate to administration_domain_name →host_name → Server Group → Directory Server (instance_name), and click Open.
3. Navigate to Plug-ins and select the plug-in to configure.
4. Click the Advanced button in the right panel.
NOTE
Red Hat recommends to configure the plug-in using the Property Editor, whichuses the plug-in-specific attributes.
5. Set the plug-in-specific attributes.
6. Click OK to close the Property Editor.
7. Restart Directory Server. For details, see Section 1.5.2, “Restarting and Stopping theAdministration Server Service Using the Console”.
1.9.4. Setting the Plug-in Precedence
The plug-in precedence is the priority it has in the execution order of plug-ins. For pre- and post-operation plug-ins, this allows one plug-in to be executed and complete before the next plug-in isinitiated, which lets the second plug-in take advantage of the first plug-in's results.
Plug-in precedence is configured in the nsslapd-pluginPrecedence attribute on the plug-in'sconfiguration entry. This attribute has a value of 1 (highest priority) to 99 (lowest priority). If theattribute is not set, it has a default value of 50.
CHAPTER 1. BASIC RED HAT DIRECTORY SERVER SETTINGS
21
IMPORTANT
Do not set the plug-in precedence for the default Directory Server plug-ins unless told todo so by Red Hat support. The plug-in precedence attribute is primarily to govern thebehavior of custom plug-ins, not to change the behavior of the core Directory Serverplug-ins.
The nsslapd-pluginPrecedence attribute is set using the ldapmodify command. For example:
# ldapmodify -D "cn=Directory Manager" -W -p 389 -h server.example.com -x
dn: cn=My Example Plugin,cn=plugins,cn=config
changetype: modify
replace: nsslapd-pluginPrecedence
nsslapd-pluginPrecedence: 1
1.10. SERVER CONFIGURATION ATTRIBUTES
Directory Server stores the configuration maintained in the cn=config entry in the /etc/dirsrv/slapd-instance_name/dse.ldif file. If you set up a new instance, Directory Server only storesconfiguration attributes that have been modified in this file. Attributes that are not listed, use theirdefault value.
This enables you to:
Identify all configuration parameters set in this instance by displaying the /etc/dirsrv/slapd-instance_name/dse.ldif file.
Restore a default value by deleting the parameter.
If you delete a configuration parameter, the parameter is no longer listed in the /etc/dirsrv/slapd-instance_name/dse.ldif file. However, the parameter and its default value isdisplayed when you search the parameter in the cn=config entry using the LDAP protocol.
Note that you cannot delete the parameters listed in Table 1.1, “Configuration Attributes ThatCannot Be Deleted” to reset them to their default. If you try to delete them, the server will rejectthe request with a Server is unwilling to perform (53) error.
Use the latest default values provided by a new Directory Server version.
New versions often provide optimized settings and increased security. For example, if you donot set the passwordStorageScheme attribute, Directory Server automatically uses thestrongest supported password storage scheme available. If a future update changes the defaultvalue to increase security, passwords will be automatically encrypted using the new storagescheme when a user set a passwords.
NOTE
If you manually set a parameter to the same value as its default, the value is notupdated. This happens, when a newer version uses a different default value.
Table 1.1. Configuration Attributes That Cannot Be Deleted
Administration Guide
22
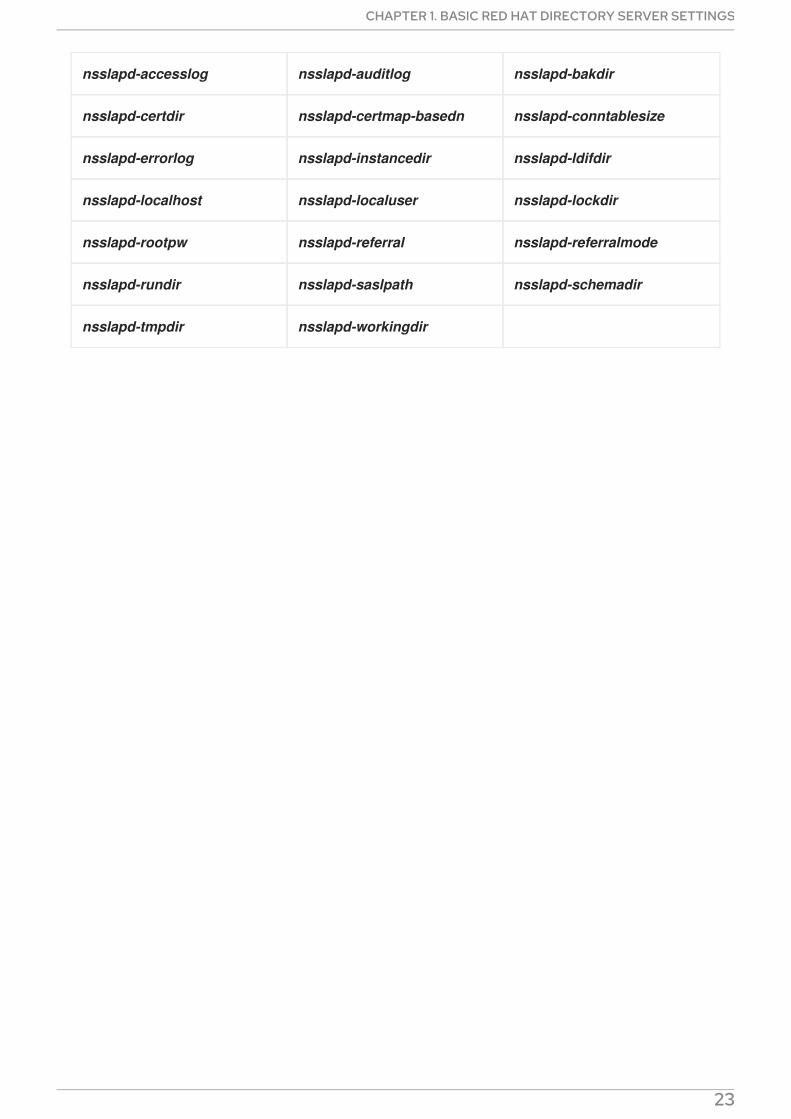
nsslapd-accesslog nsslapd-auditlog nsslapd-bakdir
nsslapd-certdir nsslapd-certmap-basedn nsslapd-conntablesize
nsslapd-errorlog nsslapd-instancedir nsslapd-ldifdir
nsslapd-localhost nsslapd-localuser nsslapd-lockdir
nsslapd-rootpw nsslapd-referral nsslapd-referralmode
nsslapd-rundir nsslapd-saslpath nsslapd-schemadir
nsslapd-tmpdir nsslapd-workingdir
CHAPTER 1. BASIC RED HAT DIRECTORY SERVER SETTINGS
23
CHAPTER 2. CONFIGURING DIRECTORY DATABASES
The directory is made up of databases, and the directory tree is distributed across the databases. Thischapter describes how to create suffixes, the branch points for the directory tree, and how to create thedatabases associated with each suffix. This chapter also describes how to create database links toreference databases on remote servers and how to use referrals to point clients to external sources ofdirectory data.
2.1. CREATING AND MAINTAINING SUFFIXES
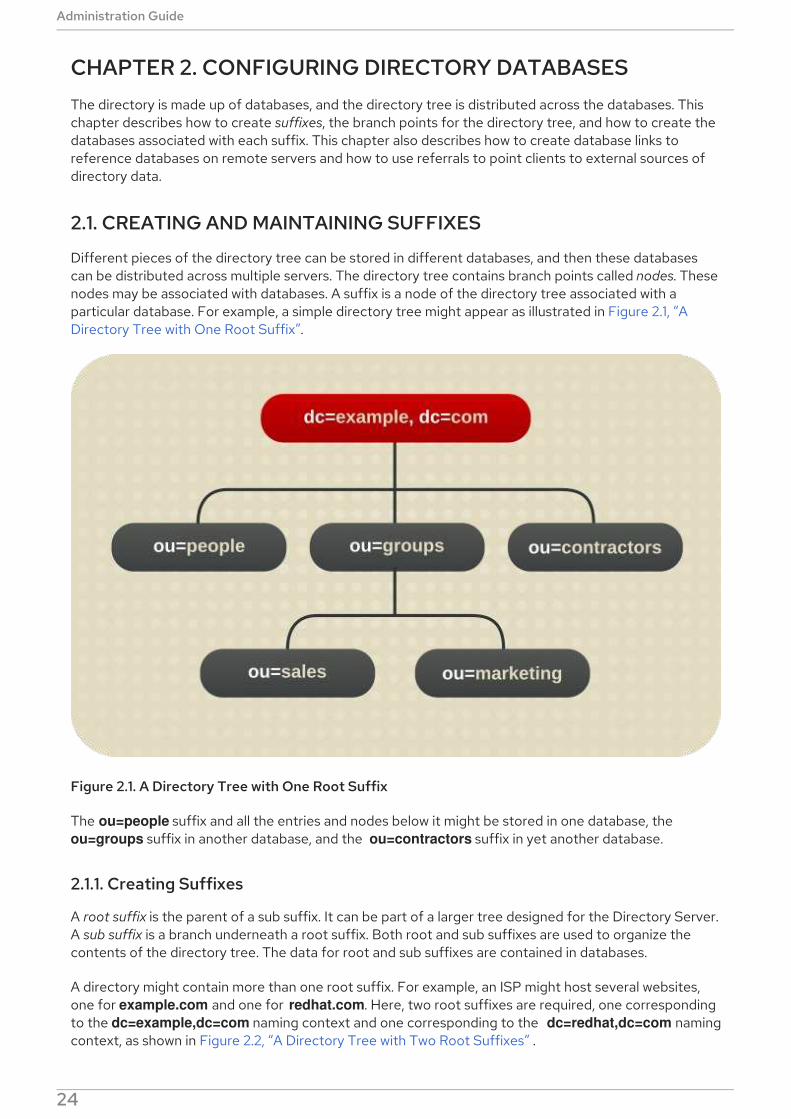
Different pieces of the directory tree can be stored in different databases, and then these databasescan be distributed across multiple servers. The directory tree contains branch points called nodes. Thesenodes may be associated with databases. A suffix is a node of the directory tree associated with aparticular database. For example, a simple directory tree might appear as illustrated in Figure 2.1, “ADirectory Tree with One Root Suffix”.
Figure 2.1. A Directory Tree with One Root Suffix
The ou=people suffix and all the entries and nodes below it might be stored in one database, the ou=groups suffix in another database, and the ou=contractors suffix in yet another database.
2.1.1. Creating Suffixes
A root suffix is the parent of a sub suffix. It can be part of a larger tree designed for the Directory Server.A sub suffix is a branch underneath a root suffix. Both root and sub suffixes are used to organize thecontents of the directory tree. The data for root and sub suffixes are contained in databases.
A directory might contain more than one root suffix. For example, an ISP might host several websites,one for example.com and one for redhat.com. Here, two root suffixes are required, one correspondingto the dc=example,dc=com naming context and one corresponding to the dc=redhat,dc=com namingcontext, as shown in Figure 2.2, “A Directory Tree with Two Root Suffixes” .
Administration Guide
24

Figure 2.2. A Directory Tree with Two Root Suffixes
It is also possible to create root suffixes to exclude portions of the directory tree from searchoperations. For example, Example Corporation wants to exclude their European office from a search onthe general Example Corporation directory. To do this, they create two root suffixes. One root suffixcorresponds to the general Example Corporation directory tree, dc=example,dc=com, and one rootsuffix corresponds to the European branch of their directory tree, l=europe,dc=example,dc=com.From a client application's perspective, the directory tree looks as illustrated in Figure 2.3, “A DirectoryTree with a Root Suffix Off Limits to Search Operations”.
Figure 2.3. A Directory Tree with a Root Suffix Off Limits to Search Operations
Searches performed by client applications on the dc=example,dc=com branch of the directory will notreturn entries from the l=europe,dc=example,dc=com branch of the directory, as it is a separate rootsuffix.
If you wanted to include entries in the European branch of the directory tree in general searches, youcould make the European branch a sub suffix of the general branch. To do this, create a root suffix forExample Corporation, dc=example,dc=com, and then create a sub suffix beneath it for the Europeandirectory entries, l=europe,dc=example,dc=com. From a client application's perspective, the directorytree would appear as illustrated in Figure 2.4, “A Directory Tree with a Sub Suffix” .
CHAPTER 2. CONFIGURING DIRECTORY DATABASES
25

Figure 2.4. A Directory Tree with a Sub Suffix
This section describes creating root and sub suffixes for the directory using either theDirectory Server Console or the command line.
2.1.1.1. Creating a New Root Suffix Using the Console
1. In the Directory Server Console, select the Configuration tab.
2. Right-click Data in the left navigation pane, and select New Root Suffix from the pop-up menu.
3. Enter a unique suffix in the New suffix field.
The suffix must be named in line with dc naming conventions, such as dc=example,dc=com.
Administration Guide
26
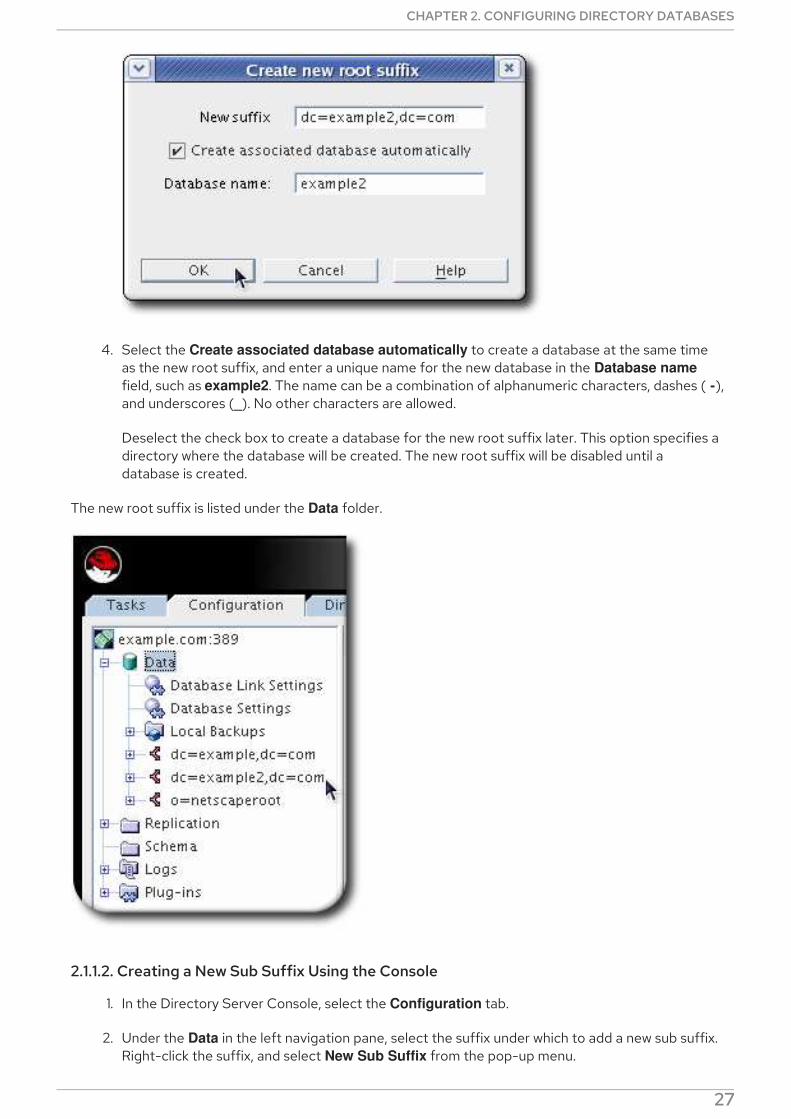
4. Select the Create associated database automatically to create a database at the same timeas the new root suffix, and enter a unique name for the new database in the Database name
field, such as example2. The name can be a combination of alphanumeric characters, dashes ( -),and underscores (_). No other characters are allowed.
Deselect the check box to create a database for the new root suffix later. This option specifies adirectory where the database will be created. The new root suffix will be disabled until adatabase is created.
The new root suffix is listed under the Data folder.
2.1.1.2. Creating a New Sub Suffix Using the Console
1. In the Directory Server Console, select the Configuration tab.
2. Under the Data in the left navigation pane, select the suffix under which to add a new sub suffix.Right-click the suffix, and select New Sub Suffix from the pop-up menu.
CHAPTER 2. CONFIGURING DIRECTORY DATABASES
27

The Create new sub suffix dialog box is displayed.
3. Enter a unique suffix name in the New suffix field. The suffix must be named in line with dc
naming conventions, for example ou=groups.
The root suffix is automatically added to the name. For example, if the sub suffix ou=groups iscreated under the dc=example,dc=com suffix, the Console automatically names it ou=groups,dc=example,dc=com.
4. Select the Create associated database automatically check box to create a database at thesame time as the new sub suffix, and enter a unique name for the new database in the Database
name field, such as example2. The name can be a combination of alphanumeric characters,dashes (-), and underscores (_). No other characters are allowed.
If the check box is not selected, than the database for the new sub suffix must be created later.The new sub suffix is disabled until a database is created.
Administration Guide
28

The suffix appears automatically under its root suffix in the Data tree in the left navigation pane.
2.1.1.3. Creating Root and Sub Suffixes using the Command Line
The suffix configuration information is stored in the cn=mapping tree,cn=config entry. Use the ldapmodify utility to add new suffixes to the directory.
For a list of all parameters you can set when creating a suffix, see the corresponding section in theRed Hat Directory Server Configuration, Command, and File Reference .
Creating a Root SuffixFor example, to add the dc=example,dc=com root suffix:
# ldapmodify -D "cn=Directory Manager" -W -p 389 -h server.example.com -x
dn: cn="dc=example,dc=com",cn=mapping tree,cn=config
changetype: add
cn: dc=example,dc=com
objectclass: top
objectclass: extensibleObject
objectclass: nsMappingTree
nsslapd-state: backend
nsslapd-backend: UserData
Creating a Sub SuffixCreating a sub suffix is similar to creating a root suffix. The difference is that you additionally set theparent suffix in the nsslapd-parent-suffix.
For example, to create the ou=groups sub suffix under the dc=example,dc=com root suffix:
# ldapmodify -D "cn=Directory Manager" -W -p 389 -h server.example.com -x
CHAPTER 2. CONFIGURING DIRECTORY DATABASES
29
dn: cn="ou=groups,dc=example,dc=com",cn=mapping tree,cn=config
changetype: add
cn: ou=groups,dc=example,dc=com
objectclass: top
objectclass: extensibleObject
objectclass: nsMappingTree
nsslapd-state: backend
nsslapd-backend: GroupData
nsslapd-parent-suffix: dc=example,dc=com
2.1.2. Maintaining Suffixes
2.1.2.1. Viewing the Default Naming Context
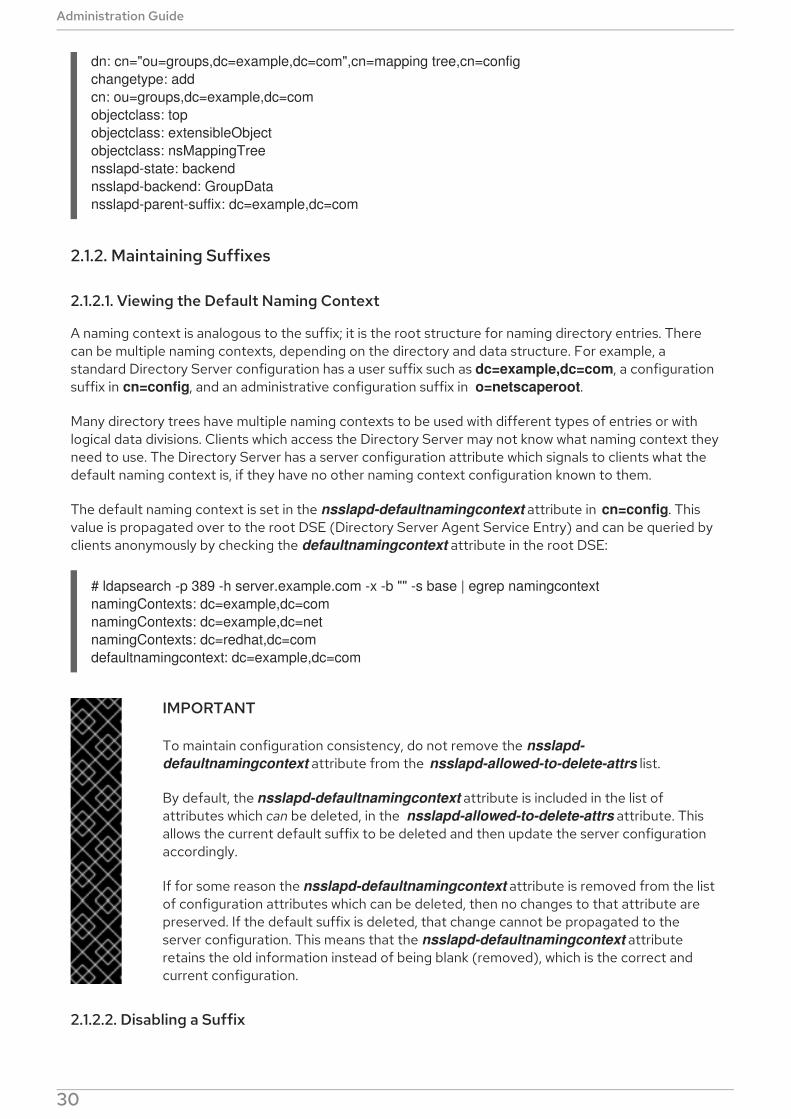
A naming context is analogous to the suffix; it is the root structure for naming directory entries. Therecan be multiple naming contexts, depending on the directory and data structure. For example, astandard Directory Server configuration has a user suffix such as dc=example,dc=com, a configurationsuffix in cn=config, and an administrative configuration suffix in o=netscaperoot.
Many directory trees have multiple naming contexts to be used with different types of entries or withlogical data divisions. Clients which access the Directory Server may not know what naming context theyneed to use. The Directory Server has a server configuration attribute which signals to clients what thedefault naming context is, if they have no other naming context configuration known to them.
The default naming context is set in the nsslapd-defaultnamingcontext attribute in cn=config. Thisvalue is propagated over to the root DSE (Directory Server Agent Service Entry) and can be queried byclients anonymously by checking the defaultnamingcontext attribute in the root DSE:
# ldapsearch -p 389 -h server.example.com -x -b "" -s base | egrep namingcontext
namingContexts: dc=example,dc=com
namingContexts: dc=example,dc=net
namingContexts: dc=redhat,dc=com
defaultnamingcontext: dc=example,dc=com
IMPORTANT
To maintain configuration consistency, do not remove the nsslapd-
defaultnamingcontext attribute from the nsslapd-allowed-to-delete-attrs list.
By default, the nsslapd-defaultnamingcontext attribute is included in the list ofattributes which can be deleted, in the nsslapd-allowed-to-delete-attrs attribute. Thisallows the current default suffix to be deleted and then update the server configurationaccordingly.
If for some reason the nsslapd-defaultnamingcontext attribute is removed from the listof configuration attributes which can be deleted, then no changes to that attribute arepreserved. If the default suffix is deleted, that change cannot be propagated to theserver configuration. This means that the nsslapd-defaultnamingcontext attributeretains the old information instead of being blank (removed), which is the correct andcurrent configuration.
2.1.2.2. Disabling a Suffix
In certain situations, a suffix in the directory needs to be disabled. If a suffix is disabled, the content of
Administration Guide
30
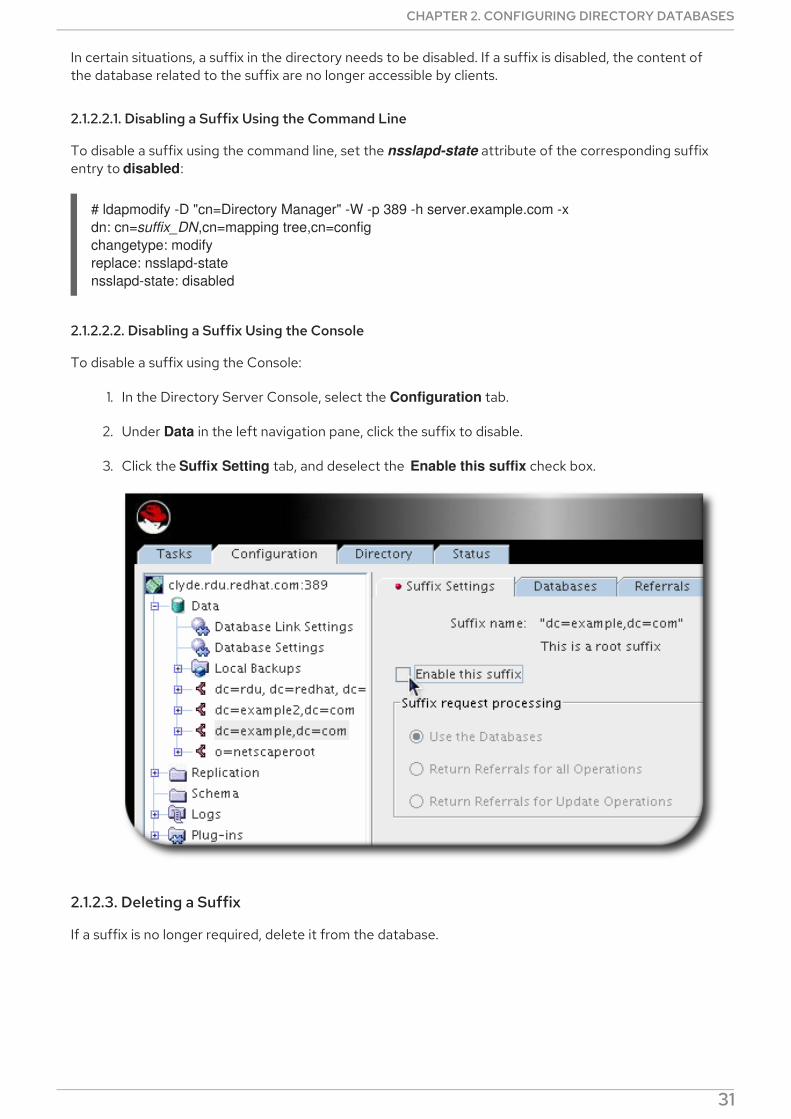
In certain situations, a suffix in the directory needs to be disabled. If a suffix is disabled, the content ofthe database related to the suffix are no longer accessible by clients.
2.1.2.2.1. Disabling a Suffix Using the Command Line
To disable a suffix using the command line, set the nsslapd-state attribute of the corresponding suffixentry to disabled:
# ldapmodify -D "cn=Directory Manager" -W -p 389 -h server.example.com -x
dn: cn=suffix_DN,cn=mapping tree,cn=config
changetype: modify
replace: nsslapd-state
nsslapd-state: disabled
2.1.2.2.2. Disabling a Suffix Using the Console
To disable a suffix using the Console:
1. In the Directory Server Console, select the Configuration tab.
2. Under Data in the left navigation pane, click the suffix to disable.
3. Click the Suffix Setting tab, and deselect the Enable this suffix check box.
2.1.2.3. Deleting a Suffix
If a suffix is no longer required, delete it from the database.
CHAPTER 2. CONFIGURING DIRECTORY DATABASES
31

WARNING
Deleting a suffix also deletes all database entries and replication informationassociated with that suffix.
2.1.2.3.1. Deleting a Suffix Using the Command Line
To delete a suffix using the command line:
1. Delete the suffix from the mapping tree:
# ldapdelete -D "cn=Directory Manager" -W -p 389 -h server.example.com -x
"cn="suffix_DN",cn=mapping tree,cn=config"
2. If the suffix uses a separate database, delete the database:
# ldapdelete -D "cn=Directory Manager" -W -p 389 -h server.example.com -x
"cn=database_name,cn=ldbm database,cn=plugins,cn=config"
2.1.2.3.2. Deleting a Suffix Using the Console
To delete a suffix using the Console:
1. In the Directory Server Console, select the Configuration tab.
2. Under Data in the left navigation pane, select the suffix to delete.
3. Right-click the suffix, and select Delete from the menu.
4. Select either Delete this suffix and all of its sub suffixes or Delete this suffix only.
Administration Guide
32

2.2. CREATING AND MAINTAINING DATABASES
After creating suffixes to organizing the directory data, create databases to contain data of thatdirectory.
2.2.1. Creating Databases
The directory tree can be distributed over multiple Directory Server databases. There are two ways todistribute data across multiple databases:
One database per suffix. The data for each suffix is contained in a separate database.
Three databases are added to store the data contained in separate suffixes:
This division of the tree units corresponds to three databases, for example:
CHAPTER 2. CONFIGURING DIRECTORY DATABASES
33
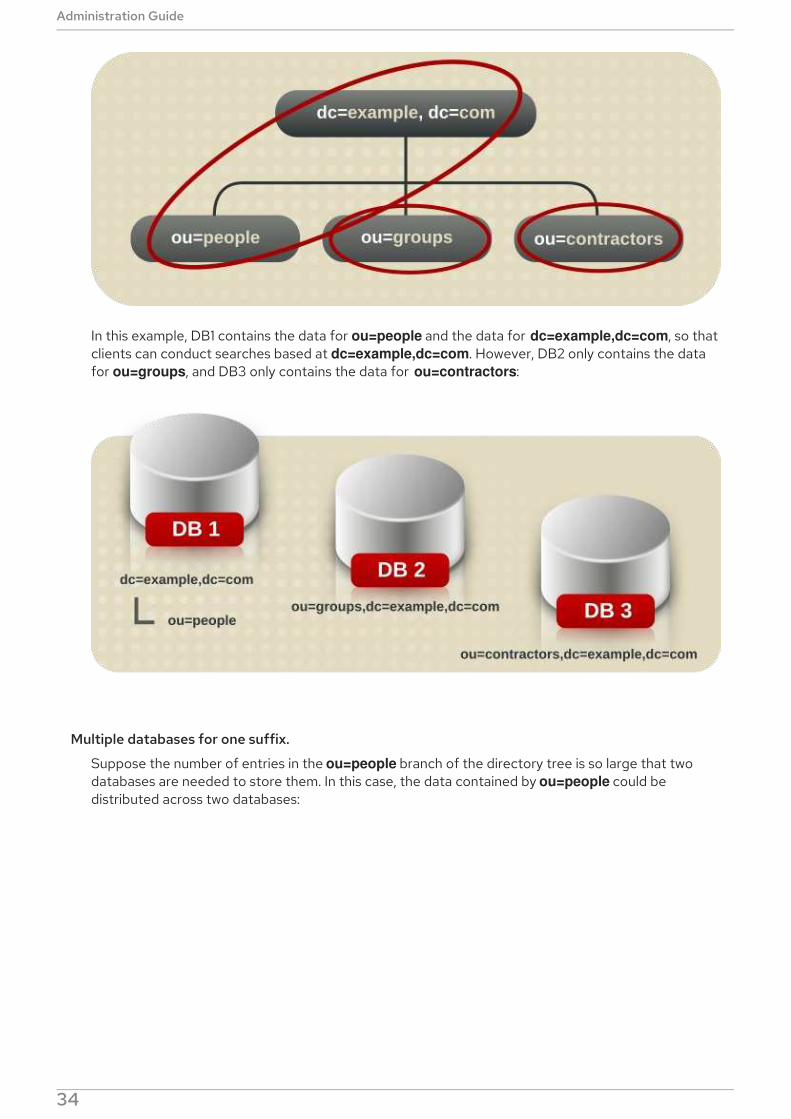
In this example, DB1 contains the data for ou=people and the data for dc=example,dc=com, so thatclients can conduct searches based at dc=example,dc=com. However, DB2 only contains the datafor ou=groups, and DB3 only contains the data for ou=contractors:
Multiple databases for one suffix.
Suppose the number of entries in the ou=people branch of the directory tree is so large that twodatabases are needed to store them. In this case, the data contained by ou=people could bedistributed across two databases:
Administration Guide
34
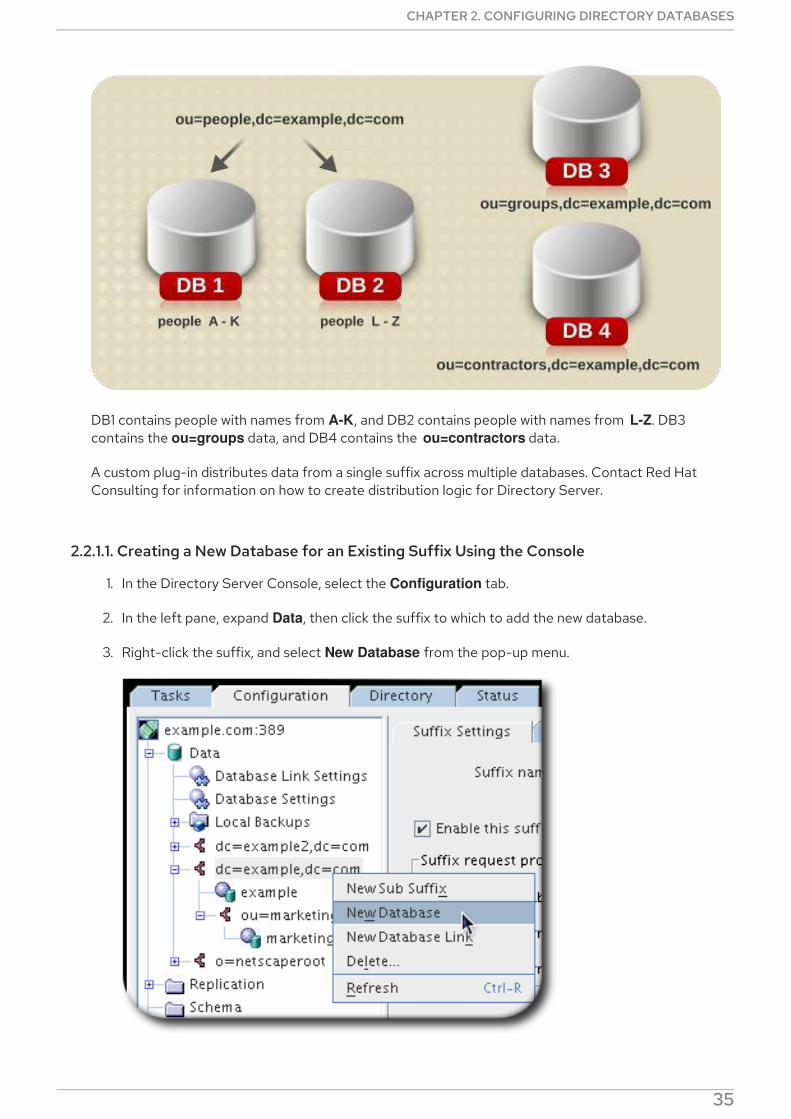
DB1 contains people with names from A-K, and DB2 contains people with names from L-Z. DB3contains the ou=groups data, and DB4 contains the ou=contractors data.
A custom plug-in distributes data from a single suffix across multiple databases. Contact Red HatConsulting for information on how to create distribution logic for Directory Server.
2.2.1.1. Creating a New Database for an Existing Suffix Using the Console
1. In the Directory Server Console, select the Configuration tab.
2. In the left pane, expand Data, then click the suffix to which to add the new database.
3. Right-click the suffix, and select New Database from the pop-up menu.
CHAPTER 2. CONFIGURING DIRECTORY DATABASES
35

4. Enter a unique name for the database, such as example2. The database name can be acombination of alphanumeric characters, dashes (-), and underscores (_).
The Create database in field is automatically filled with the default database directory(/var/lib/dirsrv/slapd-instance/db) and the name of the new database. It is also possible toenter or browse for a different directory location.
2.2.1.2. Creating a New Database for a Single Suffix from the Command Line
Use the ldapmodify command-line utility to add a new database to the directory configuration file. Thedatabase configuration information is stored in the cn=ldbm database,cn=plugins,cn=config entry.For example, add a new database to the server example1:
1. Run ldapmodify and create the entry for the new database.
# ldapmodify -a -D "cn=Directory Manager" -W -p 389 -h server.example.com -x
dn: cn=UserData,cn=ldbm database,cn=plugins,cn=config
changetype: add
objectclass: extensibleObject
objectclass: nsBackendInstance
nsslapd-suffix: ou=people,dc=example,dc=com
The added entry corresponds to a database named UserData that contains the data for theroot or sub suffix ou=people,dc=example,dc=com.
2. Create a root or a sub-suffix, as described in Section 2.1.1.3, “Creating Root and Sub Suffixesusing the Command Line”. The database name, given in the DN attribute, must correspond withthe value in the nsslapd-backend attribute of the suffix entry.
2.2.1.3. Adding Multiple Databases for a Single Suffix
A single suffix can be distributed across multiple databases. However, to distribute the suffix, a customdistribution function has to be created to extend the directory. For more information on creating acustom distribution function, contact Red Hat Consulting.
NOTE
Administration Guide
36
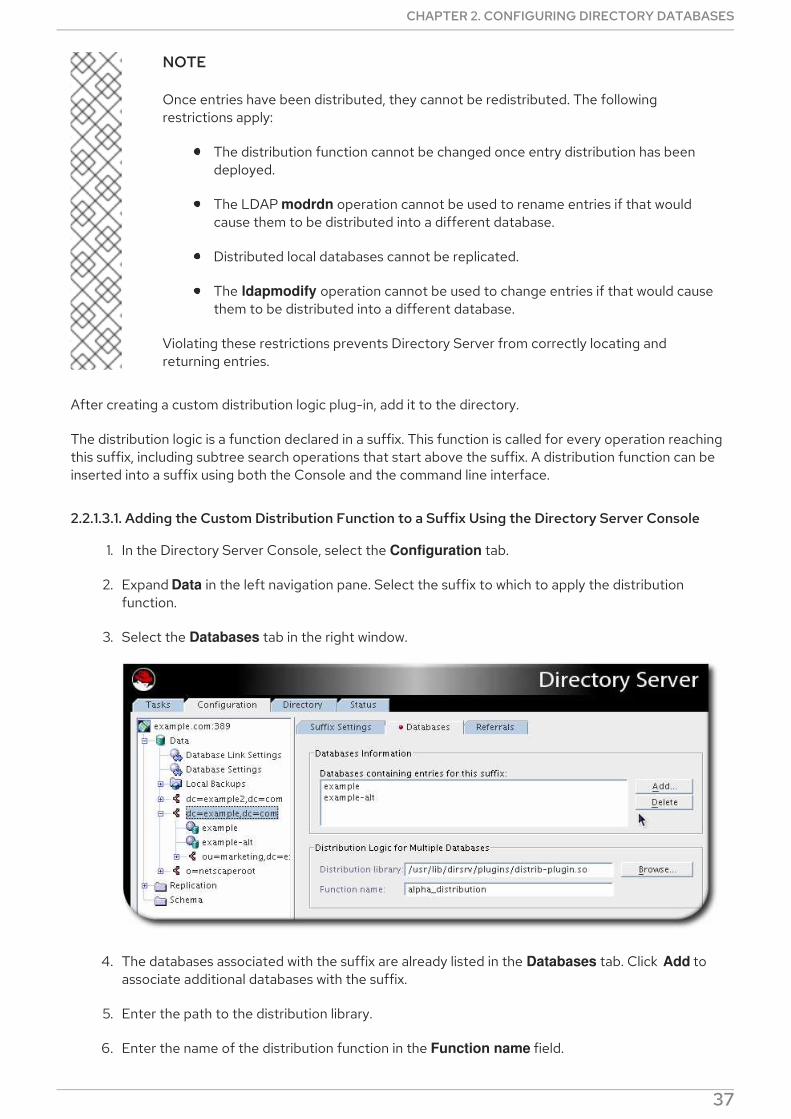
NOTE
Once entries have been distributed, they cannot be redistributed. The followingrestrictions apply:
The distribution function cannot be changed once entry distribution has beendeployed.
The LDAP modrdn operation cannot be used to rename entries if that wouldcause them to be distributed into a different database.
Distributed local databases cannot be replicated.
The ldapmodify operation cannot be used to change entries if that would causethem to be distributed into a different database.
Violating these restrictions prevents Directory Server from correctly locating andreturning entries.
After creating a custom distribution logic plug-in, add it to the directory.
The distribution logic is a function declared in a suffix. This function is called for every operation reachingthis suffix, including subtree search operations that start above the suffix. A distribution function can beinserted into a suffix using both the Console and the command line interface.
2.2.1.3.1. Adding the Custom Distribution Function to a Suffix Using the Directory Server Console
1. In the Directory Server Console, select the Configuration tab.
2. Expand Data in the left navigation pane. Select the suffix to which to apply the distributionfunction.
3. Select the Databases tab in the right window.
4. The databases associated with the suffix are already listed in the Databases tab. Click Add toassociate additional databases with the suffix.
5. Enter the path to the distribution library.
6. Enter the name of the distribution function in the Function name field.
CHAPTER 2. CONFIGURING DIRECTORY DATABASES
37

2.2.1.3.2. Adding the Custom Distribution Function to a Suffix Using the Command Line
1. Run ldapmodify.
# ldapmodify -D "cn=Directory Manager" -W -p 389 -h server.example.com -x
2. Add the following attributes to the suffix entry itself, supplying the information about thecustom distribution logic:
dn: suffix
changetype: modify
add: nsslapd-backend
nsslapd-backend: Database1
-
add: nsslapd-backend
nsslapd-backend: Database2
-
add: nsslapd-backend
nsslapd-backend: Database3
-
add: nsslapd-distribution-plugin
nsslapd-distribution-plugin: /full/name/of/a/shared/library
-
add: nsslapd-distribution-funct
nsslapd-distribution-funct: distribution-function-name
The nsslapd-backend attribute specifies all databases associated with this suffix. The nsslapd-distribution-plugin attribute specifies the name of the library that the plug-in uses.The nsslapd-distribution-funct attribute provides the name of the distribution function itself.
For more information about using the ldapmodify command-line utility, see Section 3.1, “ManagingEntries Using the Command Line”.
2.2.2. Maintaining Directory Databases
Section 2.2.2.1, “Placing a Database in Read-Only Mode”
Section 2.2.2.2, “Deleting a Database”
Section 2.2.2.3, “Changing the Transaction Log Directory”
2.2.2.1. Placing a Database in Read-Only Mode
When a database is in read-only mode, you cannot create, modify, or delete any entries. One of thesituations when read-only mode is useful is for manually initializing a consumer or before backing up orexporting data from the Directory Server. Read-only mode ensures a faithful image of the state ofthese databases at a given time.
The Directory Server Console and the command-line utilities do not automatically put the directory inread-only mode before export or backup operations because this would make your directory unavailablefor updates. However, with multi-master replication, this might not be a problem.
Section 2.2.2.1.1, “Making a Database Read-Only Using the Console”
Section 2.2.2.1.2, “Making a Database Read-Only from the Command Line”
Administration Guide
38

Section 2.2.2.1.3, “Placing the Entire Directory Server in Read-Only Mode”
2.2.2.1.1. Making a Database Read-Only Using the Console
1. In the Directory Server Console, select the Configuration tab.
2. Expand Data in the left pane. Expand the suffix containing the database to put in read-onlymode.
3. Select the database to put into read-only mode.
4. Select the Database Settings tab in the right pane.
5. Select the database is read-only check box.
The change takes effect immediately.
Before importing or restoring the database, ensure that the databases affected by the operation are not
in read-only mode.
To disable read-only mode, open the database up in the Directory Server Console again and uncheckthe database is read-only check box.
2.2.2.1.2. Making a Database Read-Only from the Command Line
To manually place a database into read-only mode:
1. Run ldapmodify.
# ldapmodify -D "cn=Directory Manager" -W -p 389 -h server.example.com -x
2. Change the read-only attribute to on
dn: cn=database_name,cn=ldbm database,cn=plugins,cn=config
changetype: modify
replace: nsslapd-readonly
nsslapd-readonly: on
NOTE
CHAPTER 2. CONFIGURING DIRECTORY DATABASES
39
NOTE
By default, the name of the database created at installation time is userRoot.
2.2.2.1.3. Placing the Entire Directory Server in Read-Only Mode
If the Directory Server maintains more than one database and all databases need to be placed in read-only mode, this can be done in a single operation.
WARNING
This operation also makes the Directory Server configuration read-only; therefore,you cannot update the server configuration, enable or disable plug-ins, or evenrestart the Directory Server while it is in read-only mode. Once read-only mode isenabled, it cannot cannot be undone from the Console; you must modify theconfiguration files.
NOTE
If Directory Server contains replicas, do not use read-only mode because it will disablereplication.
To put the Directory Server in read-only mode:
1. In the Directory Server Console, select the Configuration tab, and then select the top entry inthe navigation tree in the left pane.
2. Select the Settings tab in the right pane.
Administration Guide
40
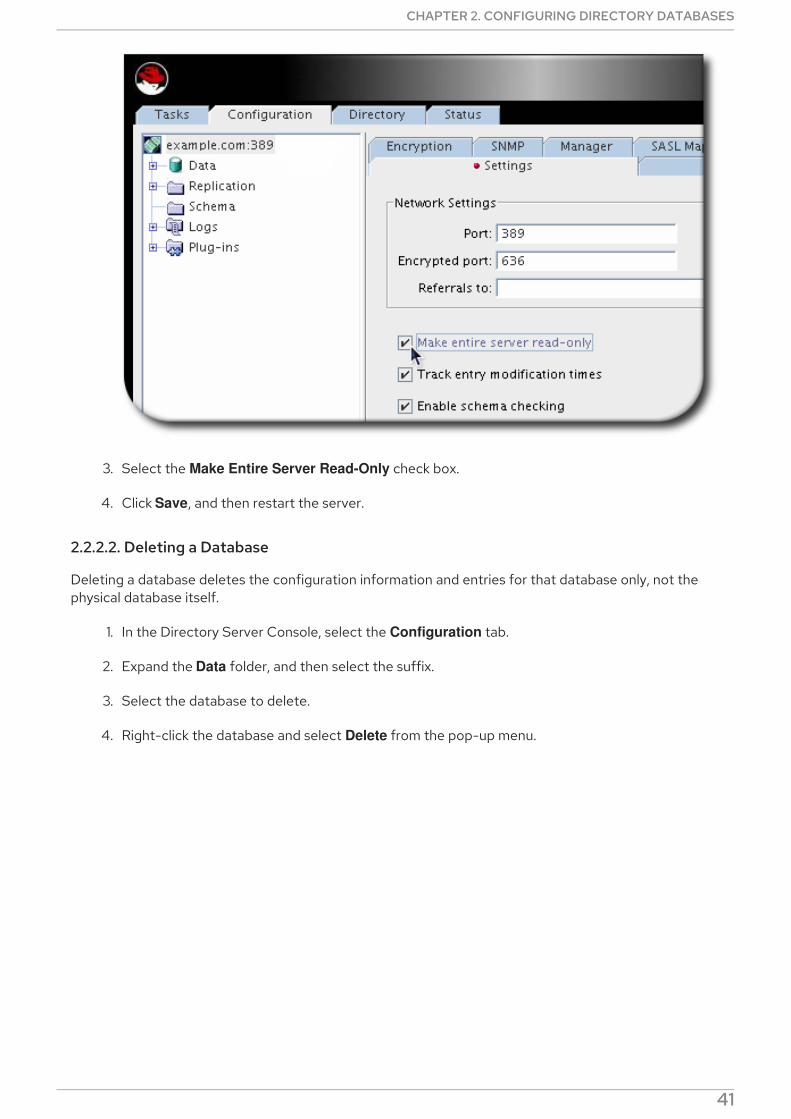
3. Select the Make Entire Server Read-Only check box.
4. Click Save, and then restart the server.
2.2.2.2. Deleting a Database
Deleting a database deletes the configuration information and entries for that database only, not thephysical database itself.
1. In the Directory Server Console, select the Configuration tab.
2. Expand the Data folder, and then select the suffix.
3. Select the database to delete.
4. Right-click the database and select Delete from the pop-up menu.
CHAPTER 2. CONFIGURING DIRECTORY DATABASES
41
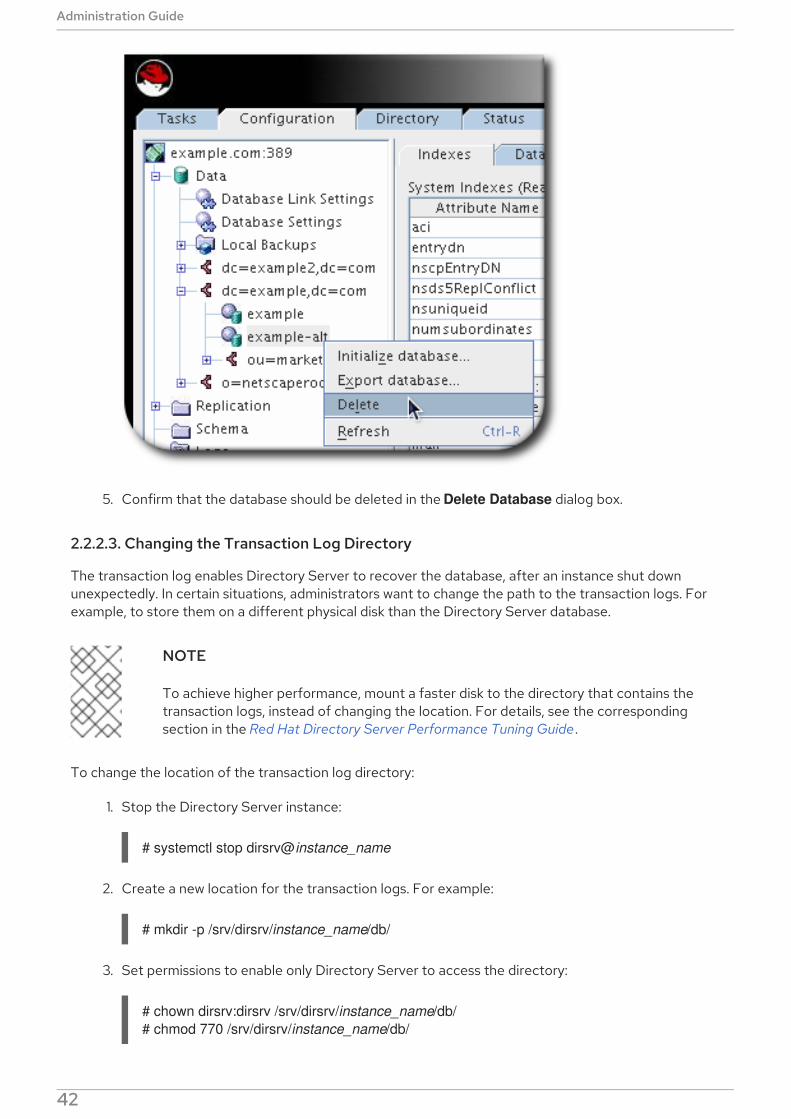
5. Confirm that the database should be deleted in the Delete Database dialog box.
2.2.2.3. Changing the Transaction Log Directory
The transaction log enables Directory Server to recover the database, after an instance shut downunexpectedly. In certain situations, administrators want to change the path to the transaction logs. Forexample, to store them on a different physical disk than the Directory Server database.
NOTE
To achieve higher performance, mount a faster disk to the directory that contains thetransaction logs, instead of changing the location. For details, see the correspondingsection in the Red Hat Directory Server Performance Tuning Guide .
To change the location of the transaction log directory:
1. Stop the Directory Server instance:
# systemctl stop dirsrv@instance_name
2. Create a new location for the transaction logs. For example:
# mkdir -p /srv/dirsrv/instance_name/db/
3. Set permissions to enable only Directory Server to access the directory:
# chown dirsrv:dirsrv /srv/dirsrv/instance_name/db/
# chmod 770 /srv/dirsrv/instance_name/db/
Administration Guide
42
4. Remove all __db.* files from the previous transaction log directory. For example:
# rm /var/lib/dirsrv/slapd-instance_name/db/__db.*
5. Move all log.* files from the previous to the new transaction log directory. For example:
# mv /var/lib/dirsrv/slapd-instance_name/db/log.* \
/srv/dirsrv/instance_name/db/
6. If SELinux is running in enforcing mode, set the dirsrv_var_lib_t context on the directory:
# semanage fcontext -a -t dirsrv_var_lib_t /srv/dirsrv/instance_name/db/
# restorecon -Rv /srv/dirsrv/instance_name/db/
7. Edit the /etc/dirsrv/slapd-instance_name/dse.ldif file, and update the nsslapd-db-
logdirectory parameter under the cn=config,cn=ldbm database,cn=plugins,cn=config entry.For example:
dn: cn=config,cn=ldbm database,cn=plugins,cn=config
...
nsslapd-db-logdirectory: /srv/dirsrv/instance_name/db/
8. Start the instance:
# systemctl start dirsrv@instance_name
2.3. CREATING AND MAINTAINING DATABASE LINKS
Chaining means that a server contacts other servers on behalf of a client application and then returnsthe combined results. Chaining is implemented through a database link, which points to data storedremotely. When a client application requests data from a database link, the database link retrieves thedata from the remote database and returns it to the client.
Section 2.3.1, “Creating a New Database Link”
Section 2.3.2, “Configuring the Chaining Policy”
Section 2.3.3, “Maintaining Database Links”
Section 2.3.4, “Configuring Database Link Defaults”
Section 2.3.5, “Deleting Database Links”
Section 2.3.6, “Database Links and Access Control Evaluation”
For more general information about chaining, see the chapter "Designing the Directory Topology," in theRed Hat Directory Server Deployment Guide. Section 20.8, “Monitoring Database Link Activity” covershow to monitor database link activity.
2.3.1. Creating a New Database Link
The basic database link configuration requires four piece of information:
Suffix information. A suffix is created in the directory tree that is managed by the database link,
CHAPTER 2. CONFIGURING DIRECTORY DATABASES
43
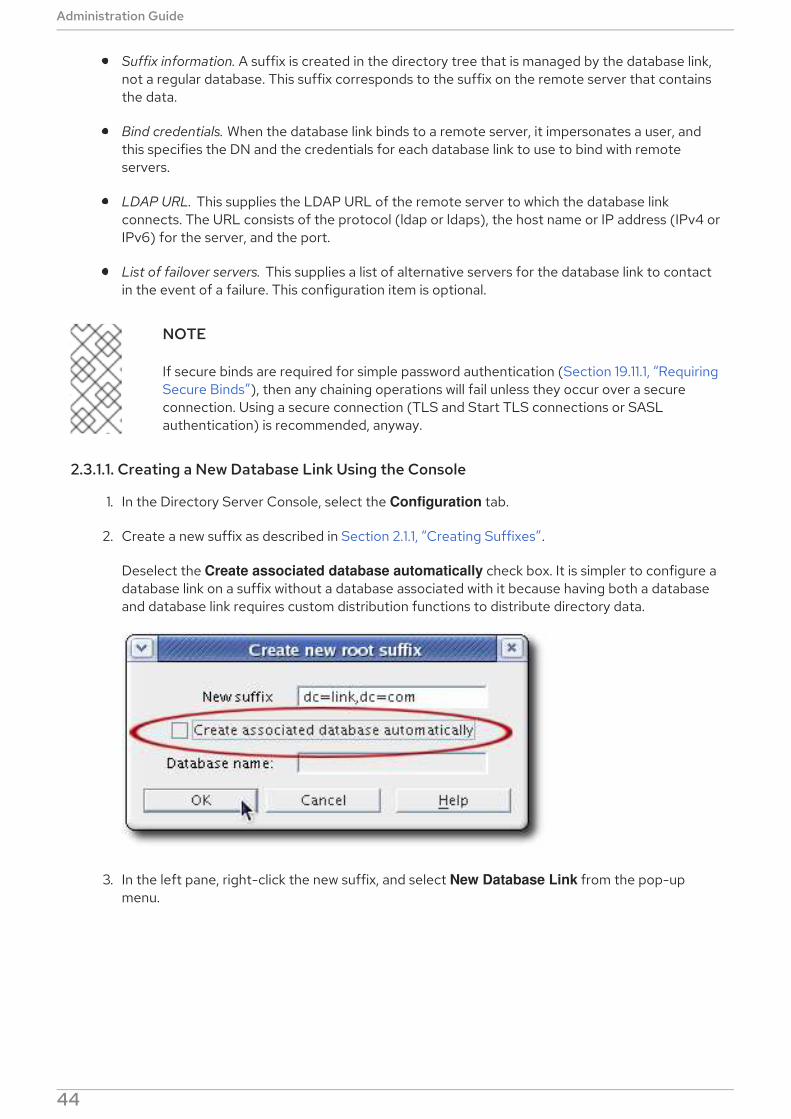
Suffix information. A suffix is created in the directory tree that is managed by the database link,not a regular database. This suffix corresponds to the suffix on the remote server that containsthe data.
Bind credentials. When the database link binds to a remote server, it impersonates a user, andthis specifies the DN and the credentials for each database link to use to bind with remoteservers.
LDAP URL. This supplies the LDAP URL of the remote server to which the database linkconnects. The URL consists of the protocol (ldap or ldaps), the host name or IP address (IPv4 orIPv6) for the server, and the port.
List of failover servers. This supplies a list of alternative servers for the database link to contactin the event of a failure. This configuration item is optional.
NOTE
If secure binds are required for simple password authentication (Section 19.11.1, “RequiringSecure Binds”), then any chaining operations will fail unless they occur over a secureconnection. Using a secure connection (TLS and Start TLS connections or SASLauthentication) is recommended, anyway.
2.3.1.1. Creating a New Database Link Using the Console
1. In the Directory Server Console, select the Configuration tab.
2. Create a new suffix as described in Section 2.1.1, “Creating Suffixes”.
Deselect the Create associated database automatically check box. It is simpler to configure adatabase link on a suffix without a database associated with it because having both a databaseand database link requires custom distribution functions to distribute directory data.
3. In the left pane, right-click the new suffix, and select New Database Link from the pop-upmenu.
Administration Guide
44

4. Fill in the database link name. The name can be a combination of alphanumeric characters,dashes (-), and underscores (_). No other characters, like spaces, are allowed.
5. Set the radio button for the appropriate method for authentication.
CHAPTER 2. CONFIGURING DIRECTORY DATABASES
45
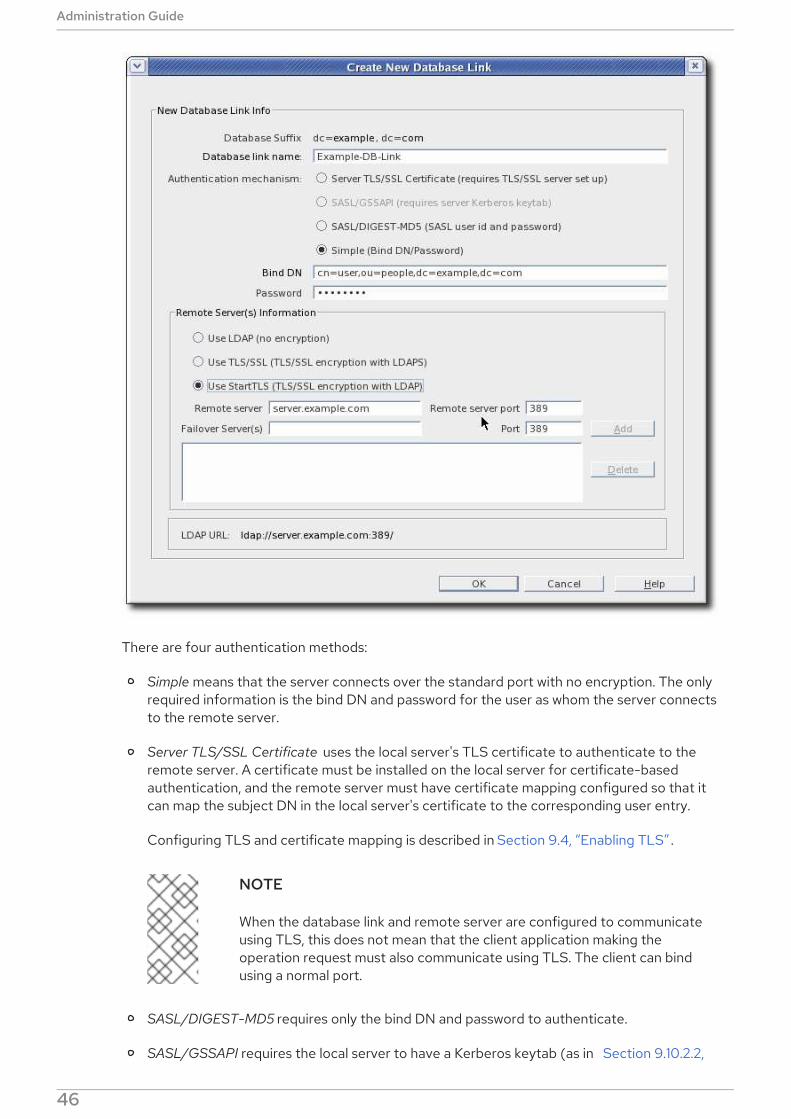
There are four authentication methods:
Simple means that the server connects over the standard port with no encryption. The onlyrequired information is the bind DN and password for the user as whom the server connectsto the remote server.
Server TLS/SSL Certificate uses the local server's TLS certificate to authenticate to theremote server. A certificate must be installed on the local server for certificate-basedauthentication, and the remote server must have certificate mapping configured so that itcan map the subject DN in the local server's certificate to the corresponding user entry.
Configuring TLS and certificate mapping is described in Section 9.4, “Enabling TLS” .
NOTE
When the database link and remote server are configured to communicateusing TLS, this does not mean that the client application making theoperation request must also communicate using TLS. The client can bindusing a normal port.
SASL/DIGEST-MD5 requires only the bind DN and password to authenticate.
SASL/GSSAPI requires the local server to have a Kerberos keytab (as in Section 9.10.2.2,
Administration Guide
46

“About the KDC Server and Keytabs”), and the remote server to have a SASL mapping tomap the local server's principal to the real user entry (as in Section 9.9.3.1, “ConfiguringSASL Identity Mapping from the Console”).
6. In the Remote Server Information section, select the connection type for the local server touse to connect to the remote server. There are three options:
Use LDAP . This sets a standard, unencrypted connection.
Use TLS/SSL . This uses a secure connection over the server's secure LDAPS port, such as 636. This setting is required to use TLS/TLS.
When using TLS, make sure that the remote server's port number is set to its secure port.
Use Start TLS . This uses Start TLS to establish a secure connection over the server'sstandard port.
NOTE
If secure binds are required for simple password authentication (Section 19.11.1,“Requiring Secure Binds”), then any chaining operations will fail unless they occurover a secure connection. Using a secure connection (TLS and Start TLSconnections or SASL authentication) is recommended, anyway.
7. In the Remote Server Information section, fill in the name (host name, IPv4 address, or IPv6address) and port number for the remote server.
For any failover servers, fill in the host name and port number, and click the Add button. Afailover server is a backup server, so that if the primary remote server fails, the database linkcontacts the first server in the failover servers list and cycles through the list until a server isaccessed.
The new database link is listed under the suffix, in place of the database.
NOTE
The Console provides a checklist of information that needs to be present on the remote
server for the database link to bind successfully. To view this checklist, click the newdatabase link, and click the Authentication tab. The checklist is in the Remote server
checklist box.
2.3.1.2. Creating a Database Link from the Command Line
1. Use the ldapmodify command-line utility to create a new database link. The new instance mustbe located in the cn=chaining database,cn=plugins,cn=config entry.
# ldapmodify -a -D "cn=Directory Manager" -W -p 389 -h server.example.com -x
CHAPTER 2. CONFIGURING DIRECTORY DATABASES
47
2. Specify the configuration information for the database link:
dn: cn=examplelink,cn=chaining database,cn=plugins,cn=config
changetype: add
objectclass: top
objectclass: extensibleObject
objectclass: nsBackendInstance
nsslapd-suffix: ou=people,dc=example,dc=com suffix being chained
nsfarmserverurl: ldap://people.example.com:389/ LDAP URL to remote server
nsMultiplexorBindDN: cn=proxy admin,cn=config bind DN
nsMultiplexorCredentials: secret bind password
cn: examplelink
NOTE
If secure binds are required for simple password authentication (Section 19.11.1, “RequiringSecure Binds”), then any chaining operations will fail unless they occur over a secureconnection. Using a secure connection (TLS and Start TLS connections or SASLauthentication) is recommended, anyway.
Default configuration attributes are contained in the cn=default instance config,cn=chaining
database,cn=plugins,cn=config entry. These configuration attributes apply to all database links atcreation time. Changes to the default configuration only affect new database links. The defaultconfiguration attributes on existing database links cannot be changed.
Each database link contains its own specific configuration information, which is stored with the databaselink entry itself, cn=database_link, cn=chaining database,cn=plugins,cn=config. For more informationabout configuration attributes, see the Red Hat Directory Server
Configuration, Command, and File Reference.
Section 2.3.1.2.1, “Providing Suffix Information”
Section 2.3.1.2.2, “Providing Bind Credentials”
Section 2.3.1.2.3, “Providing an LDAP URL”
Section 2.3.1.2.4, “Providing a List of Failover Servers”
Section 2.3.1.2.5, “Using Different Bind Mechanisms”
Section 2.3.1.2.6, “Summary of Database Link Configuration Attributes”
Section 2.3.1.2.7, “Database Link Configuration Example”
2.3.1.2.1. Providing Suffix Information
Use the nsslapd-suffix attribute to define the suffix managed by the database link. For example, for thedatabase link to point to the people information for a remote site of the company, enter the followingsuffix information:
nsslapd-suffix: l=Zanzibar,ou=people,dc=example,dc=com
The suffix information is stored in the cn=database_link, cn=chaining database,cn=plugins,cn=config
entry.
Administration Guide
48
NOTE
After creating the database link, any alterations to the nsslapd-nsslapd-suffix attributeare applied only after the server containing the database link is restarted.
2.3.1.2.2. Providing Bind Credentials
For a request from a client application to be chained to a remote server, special bind credentials can besupplied for the client application. This gives the remote server the proxied authorization rights neededto chain operations. Without bind credentials, the database link binds to the remote server as anonymous.
Providing bind credentials involves the following steps:
1. On the remote server:
Create an administrative user for the database link.
For information on adding entries, see Chapter 3, Managing Directory Entries .
Provide proxy access rights for the administrative user created in step 1 on the subtreechained to by the database link.
For more information on configuring ACIs, see Chapter 18, Managing Access Control
2. On the server containing the database link, use ldapmodify to provide a user DN for thedatabase link in the nsMultiplexorBindDN attribute of the cn=database_link,cn=chaining
database,cn=plugins,cn=config entry.
WARNING
The nsMultiplexorBindDN cannot be that of the Directory Manager.
Use ldapmodify to provide a user password for the database link in the nsMultiplexorCredentials attribute of the cn=database_link,cn=chaining
database,cn=plugins,cn=config entry.
For example, a client application sends a request to Server A. Server A contains a database link thatchains the request to a database on Server B.
CHAPTER 2. CONFIGURING DIRECTORY DATABASES
49
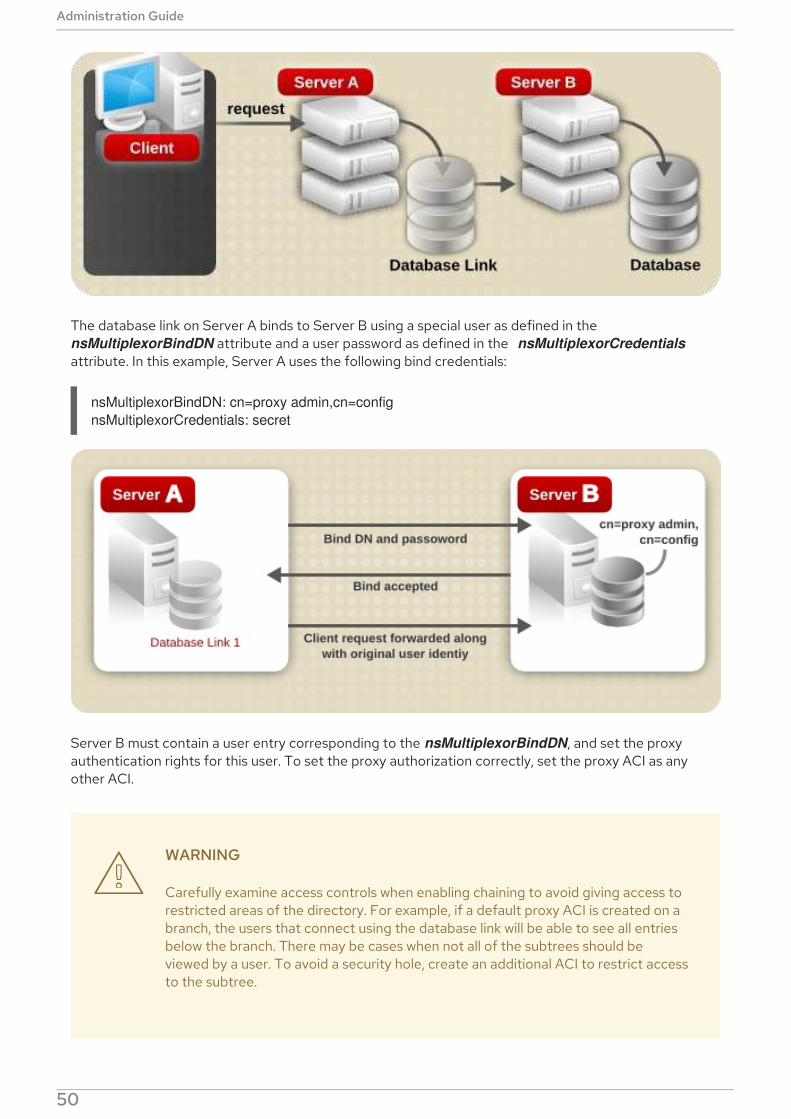
The database link on Server A binds to Server B using a special user as defined in the nsMultiplexorBindDN attribute and a user password as defined in the nsMultiplexorCredentials
attribute. In this example, Server A uses the following bind credentials:
nsMultiplexorBindDN: cn=proxy admin,cn=config
nsMultiplexorCredentials: secret
Server B must contain a user entry corresponding to the nsMultiplexorBindDN, and set the proxyauthentication rights for this user. To set the proxy authorization correctly, set the proxy ACI as anyother ACI.
WARNING
Carefully examine access controls when enabling chaining to avoid giving access torestricted areas of the directory. For example, if a default proxy ACI is created on abranch, the users that connect using the database link will be able to see all entriesbelow the branch. There may be cases when not all of the subtrees should beviewed by a user. To avoid a security hole, create an additional ACI to restrict accessto the subtree.
Administration Guide
50
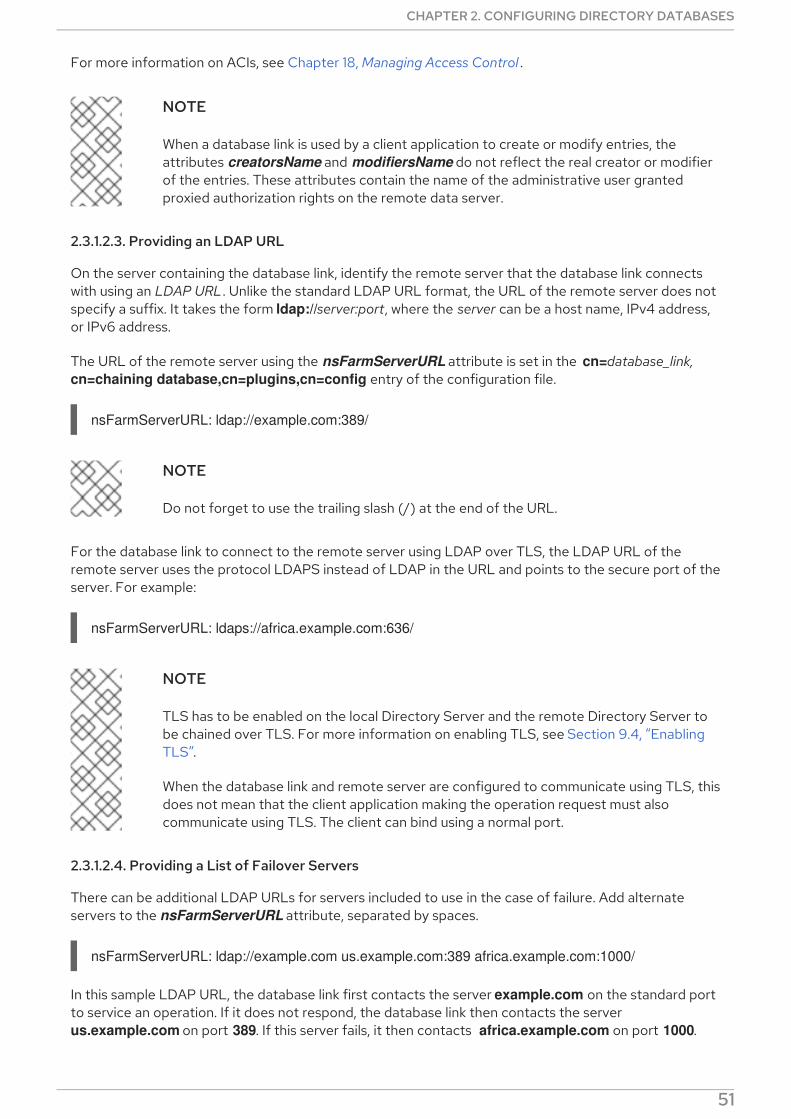
For more information on ACIs, see Chapter 18, Managing Access Control .
NOTE
When a database link is used by a client application to create or modify entries, theattributes creatorsName and modifiersName do not reflect the real creator or modifierof the entries. These attributes contain the name of the administrative user grantedproxied authorization rights on the remote data server.
2.3.1.2.3. Providing an LDAP URL
On the server containing the database link, identify the remote server that the database link connectswith using an LDAP URL. Unlike the standard LDAP URL format, the URL of the remote server does notspecify a suffix. It takes the form ldap://server:port, where the server can be a host name, IPv4 address,or IPv6 address.
The URL of the remote server using the nsFarmServerURL attribute is set in the cn=database_link,
cn=chaining database,cn=plugins,cn=config entry of the configuration file.
nsFarmServerURL: ldap://example.com:389/
NOTE
Do not forget to use the trailing slash (/) at the end of the URL.
For the database link to connect to the remote server using LDAP over TLS, the LDAP URL of theremote server uses the protocol LDAPS instead of LDAP in the URL and points to the secure port of theserver. For example:
nsFarmServerURL: ldaps://africa.example.com:636/
NOTE
TLS has to be enabled on the local Directory Server and the remote Directory Server tobe chained over TLS. For more information on enabling TLS, see Section 9.4, “EnablingTLS”.
When the database link and remote server are configured to communicate using TLS, thisdoes not mean that the client application making the operation request must alsocommunicate using TLS. The client can bind using a normal port.
2.3.1.2.4. Providing a List of Failover Servers
There can be additional LDAP URLs for servers included to use in the case of failure. Add alternateservers to the nsFarmServerURL attribute, separated by spaces.
nsFarmServerURL: ldap://example.com us.example.com:389 africa.example.com:1000/
In this sample LDAP URL, the database link first contacts the server example.com on the standard portto service an operation. If it does not respond, the database link then contacts the server us.example.com on port 389. If this server fails, it then contacts africa.example.com on port 1000.
CHAPTER 2. CONFIGURING DIRECTORY DATABASES
51
2.3.1.2.5. Using Different Bind Mechanisms
The local server can connect to the remote server using several different connection types andauthentication mechanisms.
There are three ways that the local server can connect to the remote server:
Over the standard LDAP port
Over a dedicated LDAPS port
Using Start TLS, which is a secure connection over a standard port
NOTE
If secure binds are required for simple password authentication (Section 19.11.1, “RequiringSecure Binds”), then any chaining operations will fail unless they occur over a secureconnection. Using a secure connection (TLS and Start TLS connections or SASLauthentication) is recommended, anyway.
Ultimately, there are two connection settings. The TLS option signifies that both of the servers areconfigured to run and accept connections over TLS, but there is no separate configuration attribute forenforcing TLS.
The connection type is identified in the nsUseStartTLS attribute. When this is on, then the serverinitiates a Start TLS connect over the standard port. If this is off, then the server either uses the LDAPport or the LDAPS port, depending on what is configured for the remote server in the nsFarmServerURL attribute.
For example, to use Start TLS:
nsUseStartTLS: on
For example, to use a standard connection or TLS connection:
nsUseStartTLS: off
There are four different methods which the local server can use to authenticate to the farm server.
empty. If there is no bind mechanism set, then the server performs simple authentication andrequires the nsMultiplexorBindDN and nsMultiplexorCredentials attributes to give the bindinformation.
EXTERNAL. This uses an TLS certificate to authenticate the farm server to the remote server.Either the farm server URL must be set to the secure URL (ldaps) or the nsUseStartTLS
attribute must be set to on.
Additionally, the remote server must be configured to map the farm server's certificate to itsbind identity, as described in the certmap.conf section in the Red Hat Directory Server
Configuration, Command, and File Reference.
DIGEST-MD5. This uses SASL authentication with DIGEST-MD5 encryption. As with simpleauthentication, this requires the nsMultiplexorBindDN and nsMultiplexorCredentials
attributes to give the bind information.
Administration Guide
52

GSSAPI. This uses Kerberos-based authentication over SASL.
The farm server must be configured with a Kerberos keytab, and the remote server must have adefined SASL mapping for the farm server's bind identity. Setting up Kerberos keytabs andSASL mappings is described in Section 9.9, “Setting up SASL Identity Mapping” .
NOTE
SASL connections can be established over standard connections or TLS connections.
For example:
nsBindMechanism: EXTERNAL
NOTE
If SASL is used, then the local server must also be configured to chain the SASL andpassword policy components. Add the components for the database link configuration, asdescribed in Section 2.3.2, “Configuring the Chaining Policy” . For example:
ldapmodify -D "cn=Directory Manager" -W -p 389 -h server.example.com -x
dn: cn=config,cn=chaining database,cn=plugins,cn=config
changetype: modify
add: nsActiveChainingComponents
nsActiveChainingComponents: cn=password policy,cn=components,cn=config
-
add: nsActiveChainingComponents
nsActiveChainingComponents: cn=sasl,cn=components,cn=config
^D
2.3.1.2.6. Summary of Database Link Configuration Attributes
The following table lists the attributes available for configuring a database link. Some of these attributeswere discussed in the earlier sections. All instance attributes are defined in the cn=database_link, cn=chaining database,cn=plugins,cn=config entry.
Values defined for a specific database link take precedence over the global attribute value.
Table 2.1. Database Link Configuration Attributes
Attributes Value
nsTransmittedControls [†] Gives the OID of LDAP controls forwarded by the database link to theremote data server.
nsslapd-suffix The suffix managed by the database link. Any changes to this attribute afterthe entry has been created take effect only after the server containing thedatabase link is restarted.
CHAPTER 2. CONFIGURING DIRECTORY DATABASES
53
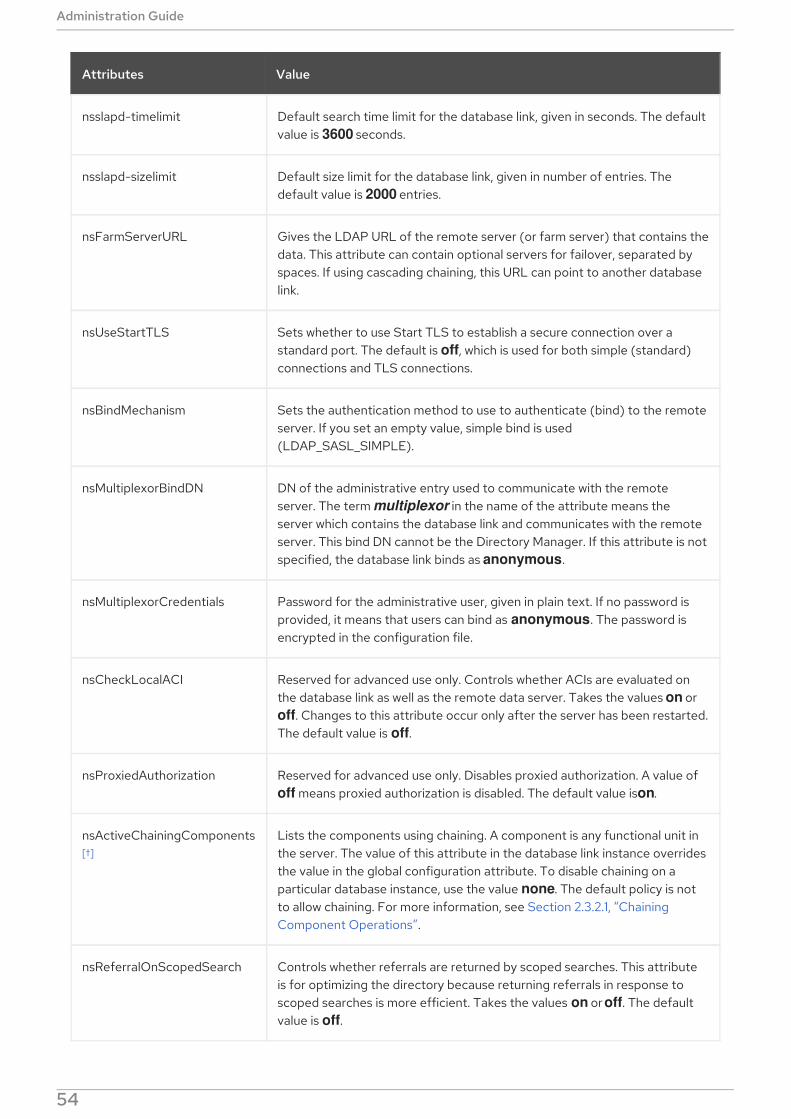
nsslapd-timelimit Default search time limit for the database link, given in seconds. The defaultvalue is 3600 seconds.
nsslapd-sizelimit Default size limit for the database link, given in number of entries. Thedefault value is 2000 entries.
nsFarmServerURL Gives the LDAP URL of the remote server (or farm server) that contains thedata. This attribute can contain optional servers for failover, separated byspaces. If using cascading chaining, this URL can point to another databaselink.
nsUseStartTLS Sets whether to use Start TLS to establish a secure connection over astandard port. The default is off, which is used for both simple (standard)connections and TLS connections.
nsBindMechanism Sets the authentication method to use to authenticate (bind) to the remoteserver. If you set an empty value, simple bind is used(LDAP_SASL_SIMPLE).
nsMultiplexorBindDN DN of the administrative entry used to communicate with the remoteserver. The term multiplexor in the name of the attribute means theserver which contains the database link and communicates with the remoteserver. This bind DN cannot be the Directory Manager. If this attribute is notspecified, the database link binds as anonymous.
nsMultiplexorCredentials Password for the administrative user, given in plain text. If no password isprovided, it means that users can bind as anonymous. The password isencrypted in the configuration file.
nsCheckLocalACI Reserved for advanced use only. Controls whether ACIs are evaluated onthe database link as well as the remote data server. Takes the values on or off. Changes to this attribute occur only after the server has been restarted.The default value is off.
nsProxiedAuthorization Reserved for advanced use only. Disables proxied authorization. A value of off means proxied authorization is disabled. The default value is on.
nsActiveChainingComponents[†]
Lists the components using chaining. A component is any functional unit inthe server. The value of this attribute in the database link instance overridesthe value in the global configuration attribute. To disable chaining on aparticular database instance, use the value none. The default policy is notto allow chaining. For more information, see Section 2.3.2.1, “ChainingComponent Operations”.
nsReferralOnScopedSearch Controls whether referrals are returned by scoped searches. This attributeis for optimizing the directory because returning referrals in response toscoped searches is more efficient. Takes the values on or off. The defaultvalue is off.
Attributes Value
Administration Guide
54
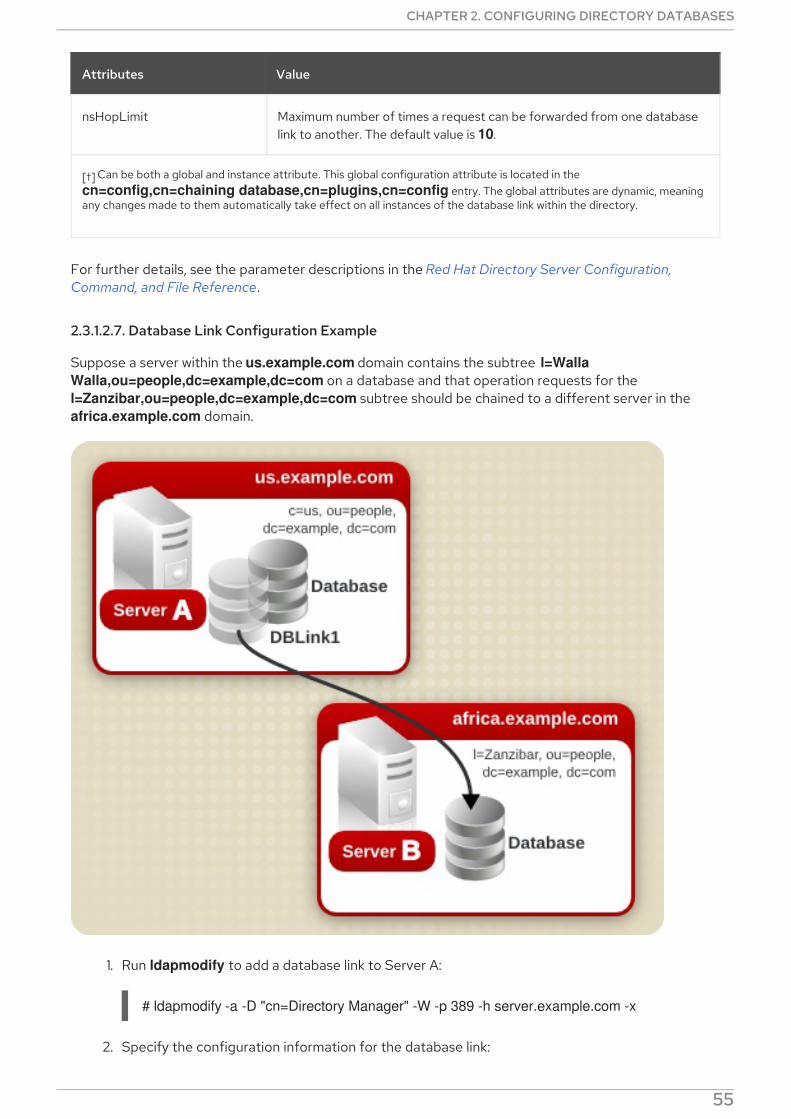
nsHopLimit Maximum number of times a request can be forwarded from one databaselink to another. The default value is 10.
[†] Can be both a global and instance attribute. This global configuration attribute is located in the
cn=config,cn=chaining database,cn=plugins,cn=config entry. The global attributes are dynamic, meaningany changes made to them automatically take effect on all instances of the database link within the directory.
Attributes Value
For further details, see the parameter descriptions in the Red Hat Directory Server Configuration,
Command, and File Reference.
2.3.1.2.7. Database Link Configuration Example
Suppose a server within the us.example.com domain contains the subtree l=Walla
Walla,ou=people,dc=example,dc=com on a database and that operation requests for the l=Zanzibar,ou=people,dc=example,dc=com subtree should be chained to a different server in the africa.example.com domain.
1. Run ldapmodify to add a database link to Server A:
# ldapmodify -a -D "cn=Directory Manager" -W -p 389 -h server.example.com -x
2. Specify the configuration information for the database link:
CHAPTER 2. CONFIGURING DIRECTORY DATABASES
55
dn: cn=DBLink1,cn=chaining database,cn=plugins,cn=config
changetype: add
objectclass: top
objectclass: extensibleObject
objectclass: nsBackendInstance
nsslapd-suffix: c=africa,ou=people,dc=example,dc=com
nsfarmserverurl: ldap://africa.example.com:389/
nsMultiplexorBindDN: cn=proxy admin,cn=config
nsMultiplexorCredentials: secret
cn: DBLink1
dn: cn="c=africa,ou=people,dc=example,dc=com",cn=mapping tree,cn=config
objectclass: top
objectclass: extensibleObject
objectclass: nsMappingTree
nsslapd-state: backend
nsslapd-backend: DBLink1
nsslapd-parent-suffix: ou=people,dc=example,dc=com
cn: c=africa,ou=people,dc=example,dc=com
In the first entry, the nsslapd-suffix attribute contains the suffix on Server B to which to chainfrom Server A. The nsFarmServerURL attribute contains the LDAP URL of Server B.
The second entry creates a new suffix, allowing the server to route requests made to the newdatabase link. The cn attribute contains the same suffix specified in the nsslapd-suffix
attribute of the database link. The nsslapd-backend attribute contains the name of thedatabase link. The nsslapd-parent-suffix attribute specifies the parent of this new suffix, ou=people,dc=example,dc=com.
3. Create an administrative user on Server B, as follows:
dn: cn=proxy admin,cn=config
objectclass: person
objectclass: organizationalPerson
objectclass: inetOrgPerson
cn: proxy admin
sn: proxy admin
userPassword: secret
description: Entry for use by database links
WARNING
Do not use the Directory Manager user as the proxy administrative user onthe remote server. This creates a security hole.
4. Add the following proxy authorization ACI to the l=Zanzibar,ou=people,dc=example,dc=com
entry on Server B:
Administration Guide
56
aci: (targetattr = "*")(version 3.0; acl "Proxied authorization
for database links"; allow (proxy) userdn = "ldap:///cn=proxy
admin,cn=config";)
This ACI gives the proxy admin user read-only access to the data contained on the remoteserver within the l=Zanzibar,ou=people,dc=example,dc=com subtree only.
NOTE
When a user binds to a database link, the user's identity is sent to the remoteserver. Access controls are always evaluated on the remote server. For the userto modify or write data successfully to the remote server, set up the correctaccess controls on the remote server. For more information about how accesscontrols are evaluated in the context of chained operations, see Section 2.3.6,“Database Links and Access Control Evaluation”.
2.3.2. Configuring the Chaining Policy
These procedures describe configuring how Directory Server chains requests made by client applicationsto Directory Servers that contain database links. This chaining policy applies to all database links createdon Directory Server.
2.3.2.1. Chaining Component Operations
A component is any functional unit in the server that uses internal operations. For example, plug-ins areconsidered to be components, as are functions in the front-end. However, a plug-in may actually becomprised of multiple components (for example, the ACI plug-in).
Some components send internal LDAP requests to the server, expecting to access local data only. Forsuch components, control the chaining policy so that the components can complete their operationssuccessfully. One example is the certificate verification function. Chaining the LDAP request made bythe function to check certificates implies that the remote server is trusted. If the remote server is nottrusted, then there is a security problem.
By default, all internal operations are not chained and no components are allowed to chain, although thiscan be overridden.
Additionally, an ACI must be created on the remote server to allow the specified plug-in to perform itsoperations on the remote server. The ACI must exist in the suffix assigned to the database link.
The following lists the component names, the potential side-effects of allowing them to chain internaloperations, and the permissions they need in the ACI on the remote server:
ACI plug-in
This plug-in implements access control. Operations used to retrieve and update ACI attributes arenot chained because it is not safe to mix local and remote ACI attributes. However, requests used toretrieve user entries may be chained by setting the chaining components attribute:
nsActiveChainingComponents: cn=ACI Plugin,cn=plugins,cn=config
Permissions: Read, search, and compare
Resource limit component
This component sets server limits depending on the user bind DN. Resource limits can be applied on
CHAPTER 2. CONFIGURING DIRECTORY DATABASES
57
This component sets server limits depending on the user bind DN. Resource limits can be applied onremote users if the resource limitation component is allowed to chain. To chain resource limitcomponent operations, add the chaining component attribute:
nsActiveChainingComponents: cn=resource limits,cn=components,cn=config
Permissions: Read, search, and compare
Certificate-based authentication checking component
This component is used when the external bind method is used. It retrieves the user certificate fromthe database on the remote server. Allowing this component to chain means certificate-basedauthentication can work with a database link. To chain this component's operations, add the chainingcomponent attribute:
nsActiveChainingComponents: cn=certificate-based authentication,cn=components,cn=config
Permissions: Read, search, and compare
Password policy component
This component is used to allow SASL binds to the remote server. Some forms of SASLauthentication require authenticating with a user name and password. Enabling the password policyallows the server to verify and implement the specific authentication method requested and to applythe appropriate password policies. To chain this component's operations, add the chainingcomponent attribute:
nsActiveChainingComponents: cn=password policy,cn=components,cn=config
Permissions: Read, search, and compare
SASL component
This component is used to allow SASL binds to the remote server. To chain this component'soperations, add the chaining component attribute:
nsActiveChainingComponents: cn=password policy,cn=components,cn=config
Permissions: Read, search, and compare
Referential Integrity plug-in
This plug-in ensures that updates made to attributes containing DNs are propagated to all entriesthat contain pointers to the attribute. For example, when an entry that is a member of a group isdeleted, the entry is automatically removed from the group. Using this plug-in with chaining helpssimplify the management of static groups when the group members are remote to the static groupdefinition. To chain this component's operations, add the chaining component attribute:
nsActiveChainingComponents: cn=referential integrity postoperation,cn=plugins,cn=config
Permissions: Read, search, and compare
Attribute Uniqueness plug-in
This plug-in checks that all the values for a specified attribute are unique (no duplicates). If this plug-
Administration Guide
58
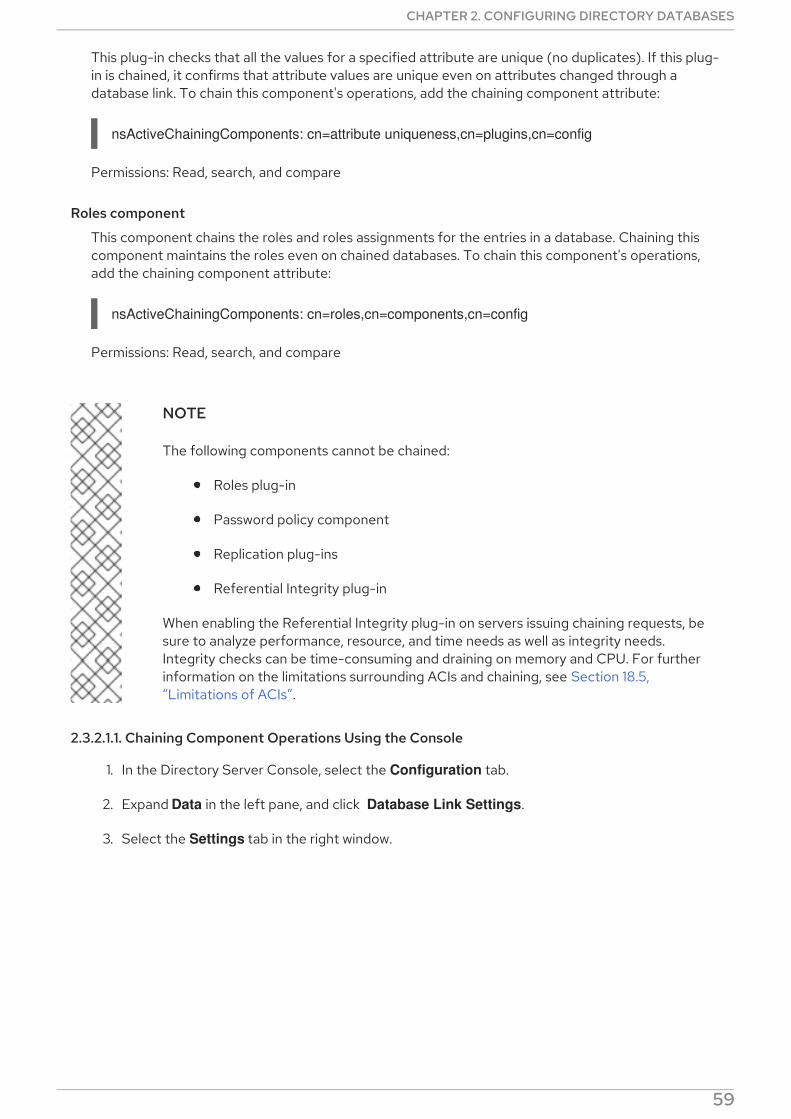
This plug-in checks that all the values for a specified attribute are unique (no duplicates). If this plug-in is chained, it confirms that attribute values are unique even on attributes changed through adatabase link. To chain this component's operations, add the chaining component attribute:
nsActiveChainingComponents: cn=attribute uniqueness,cn=plugins,cn=config
Permissions: Read, search, and compare
Roles component
This component chains the roles and roles assignments for the entries in a database. Chaining thiscomponent maintains the roles even on chained databases. To chain this component's operations,add the chaining component attribute:
nsActiveChainingComponents: cn=roles,cn=components,cn=config
Permissions: Read, search, and compare
NOTE
The following components cannot be chained:
Roles plug-in
Password policy component
Replication plug-ins
Referential Integrity plug-in
When enabling the Referential Integrity plug-in on servers issuing chaining requests, besure to analyze performance, resource, and time needs as well as integrity needs.Integrity checks can be time-consuming and draining on memory and CPU. For furtherinformation on the limitations surrounding ACIs and chaining, see Section 18.5,“Limitations of ACIs”.
2.3.2.1.1. Chaining Component Operations Using the Console
1. In the Directory Server Console, select the Configuration tab.
2. Expand Data in the left pane, and click Database Link Settings.
3. Select the Settings tab in the right window.
CHAPTER 2. CONFIGURING DIRECTORY DATABASES
59
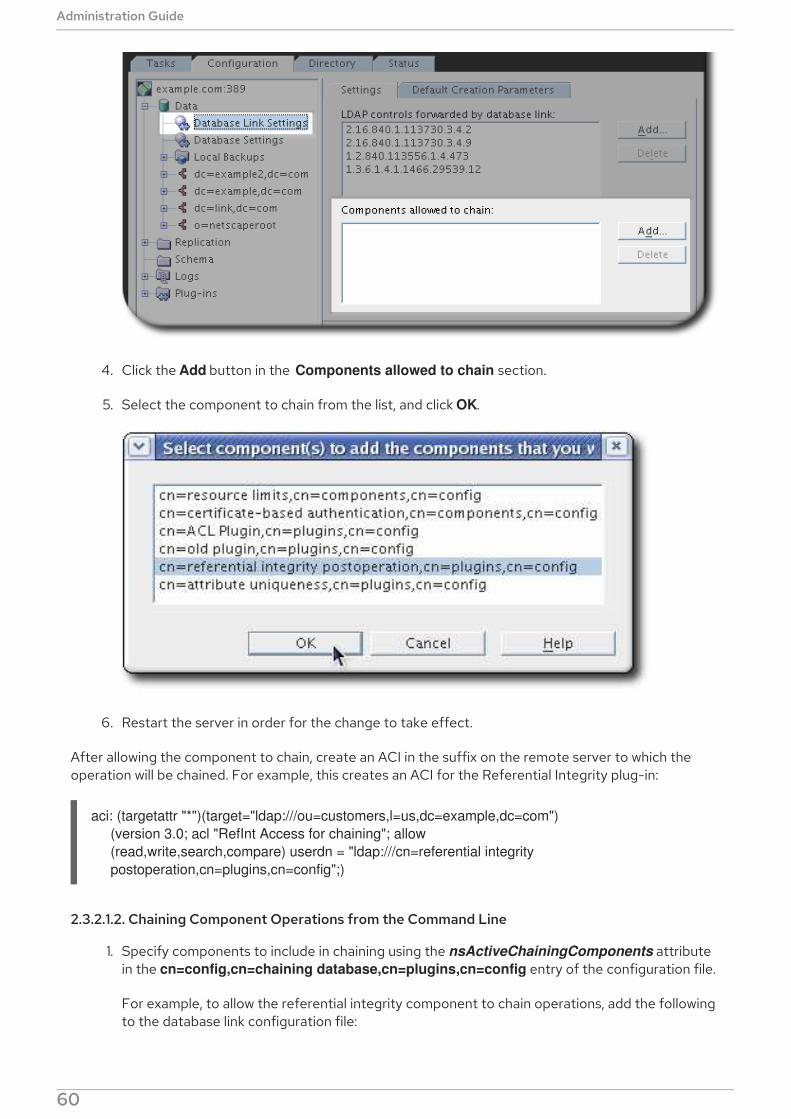
4. Click the Add button in the Components allowed to chain section.
5. Select the component to chain from the list, and click OK.
6. Restart the server in order for the change to take effect.
After allowing the component to chain, create an ACI in the suffix on the remote server to which theoperation will be chained. For example, this creates an ACI for the Referential Integrity plug-in:
aci: (targetattr "*")(target="ldap:///ou=customers,l=us,dc=example,dc=com")
(version 3.0; acl "RefInt Access for chaining"; allow
(read,write,search,compare) userdn = "ldap:///cn=referential integrity
postoperation,cn=plugins,cn=config";)
2.3.2.1.2. Chaining Component Operations from the Command Line
1. Specify components to include in chaining using the nsActiveChainingComponents attributein the cn=config,cn=chaining database,cn=plugins,cn=config entry of the configuration file.
For example, to allow the referential integrity component to chain operations, add the followingto the database link configuration file:
Administration Guide
60

nsActiveChainingComponents: cn=referential integrity
postoperation,cn=components,cn=config
See Section 2.3.2.1, “Chaining Component Operations” for a list of the components which canbe chained.
2. Restart the server for the change to take effect.
# systemctl restart dirsrv@instance_name
3. Create an ACI in the suffix on the remote server to which the operation will be chained. Forexample, this creates an ACI for the Referential Integrity plug-in:
aci: (targetattr "*")(target="ldap:///ou=customers,l=us,dc=example,dc=com")
(version 3.0; acl "RefInt Access for chaining"; allow
(read,write,search,compare) userdn = "ldap:///cn=referential
integrity postoperation,cn=plugins,cn=config";)
2.3.2.2. Chaining LDAP Controls
It is possible to not chain operation requests made by LDAP controls. By default, requests made by thefollowing controls are forwarded to the remote server by the database link:
Virtual List View (VLV). This control provides lists of parts of entries rather than returning allentry information.
Server-side sorting. This control sorts entries according to their attribute values, usually using aspecific matching rule.
Dereferencing. This control tracks back over references in entry attributes in a search and pullsspecified attribute information from the referenced entry and returns it with the rest of thesearch results.
Managed DSA. This controls returns smart referrals as entries, rather than following the referral,so the smart referral itself can be changed or deleted.
Loop detection. This control keeps track of the number of times the server chains with anotherserver. When the count reaches the configured number, a loop is detected, and the clientapplication is notified. For more information about using this control, see Section 2.4.4,“Detecting Loops”.
NOTE
Server-side sorting and VLV controls are supported only when a client application requestis made to a single database. Database links cannot support these controls when a clientapplication makes a request to multiple databases.
2.3.2.2.1. Chaining LDAP Controls Using the Console
1. In the Directory Server Console, select the Configuration tab.
2. Expand the Data folder in the left pane, and click Database Link Settings.
3. Select the Settings tab in the right window.
CHAPTER 2. CONFIGURING DIRECTORY DATABASES
61
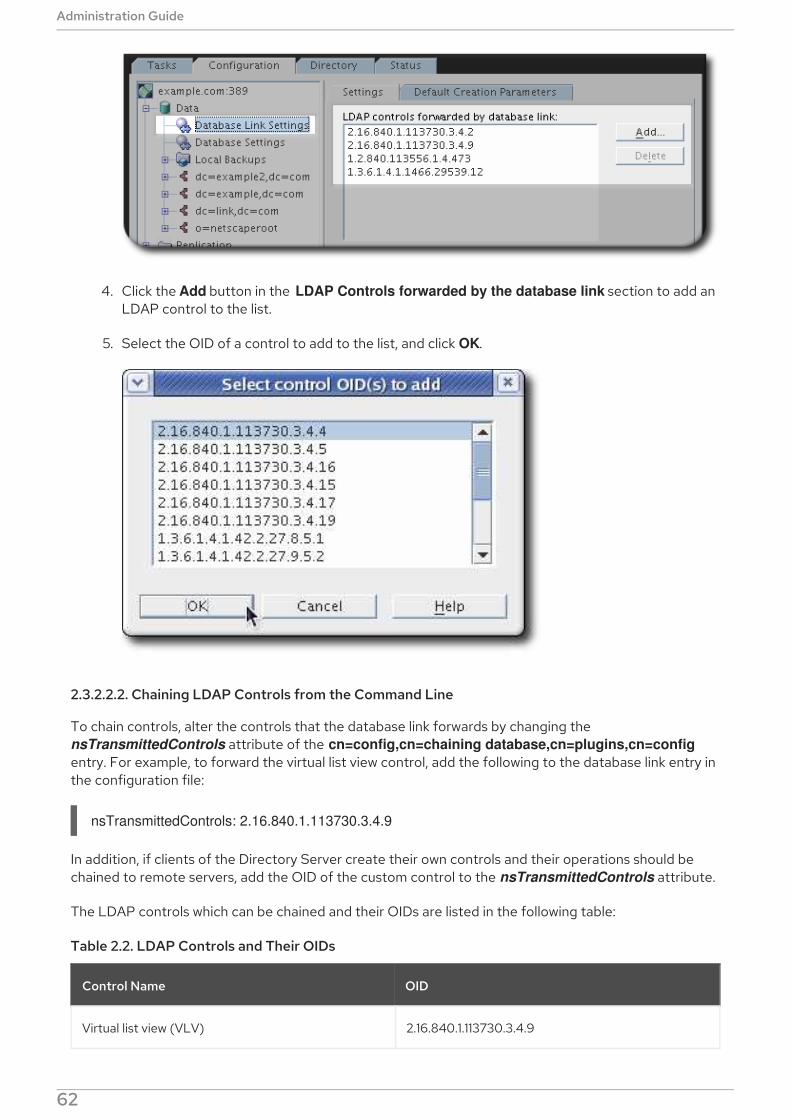
4. Click the Add button in the LDAP Controls forwarded by the database link section to add anLDAP control to the list.
5. Select the OID of a control to add to the list, and click OK.
2.3.2.2.2. Chaining LDAP Controls from the Command Line
To chain controls, alter the controls that the database link forwards by changing the nsTransmittedControls attribute of the cn=config,cn=chaining database,cn=plugins,cn=config
entry. For example, to forward the virtual list view control, add the following to the database link entry inthe configuration file:
nsTransmittedControls: 2.16.840.1.113730.3.4.9
In addition, if clients of the Directory Server create their own controls and their operations should bechained to remote servers, add the OID of the custom control to the nsTransmittedControls attribute.
The LDAP controls which can be chained and their OIDs are listed in the following table:
Table 2.2. LDAP Controls and Their OIDs
Control Name OID
Virtual list view (VLV) 2.16.840.1.113730.3.4.9
Administration Guide
62
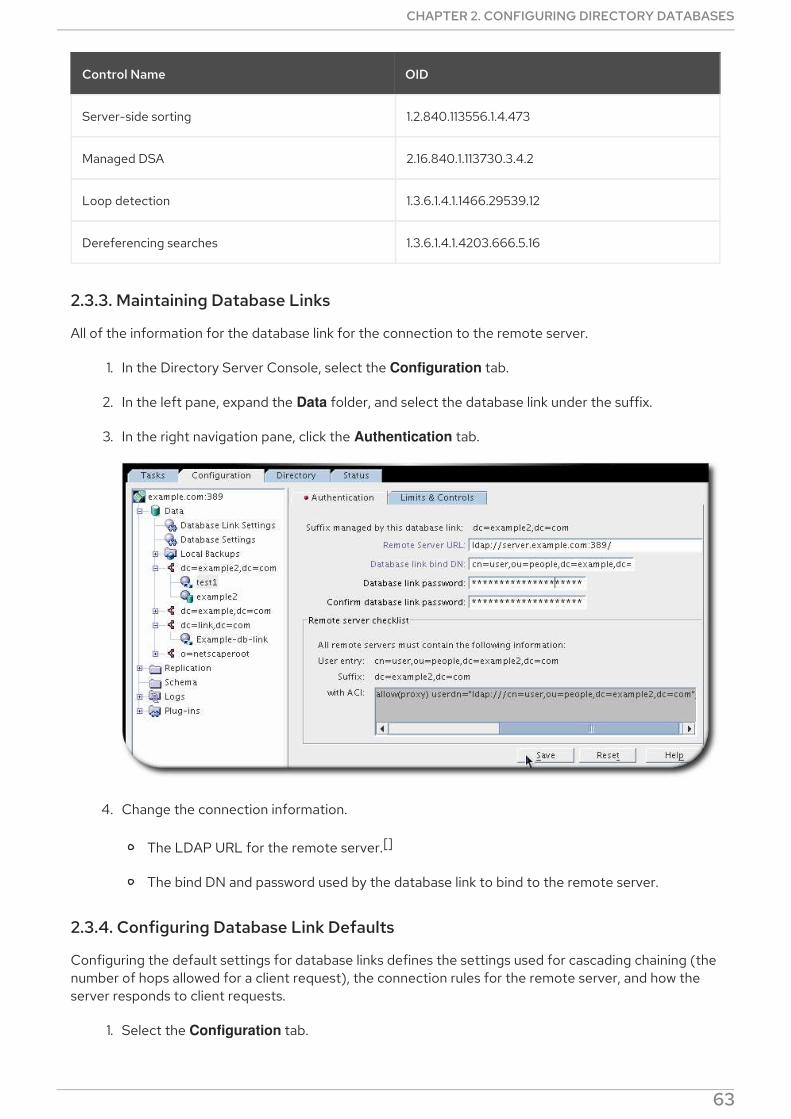
Server-side sorting 1.2.840.113556.1.4.473
Managed DSA 2.16.840.1.113730.3.4.2
Loop detection 1.3.6.1.4.1.1466.29539.12
Dereferencing searches 1.3.6.1.4.1.4203.666.5.16
Control Name OID
2.3.3. Maintaining Database Links
All of the information for the database link for the connection to the remote server.
1. In the Directory Server Console, select the Configuration tab.
2. In the left pane, expand the Data folder, and select the database link under the suffix.
3. In the right navigation pane, click the Authentication tab.
4. Change the connection information.
The LDAP URL for the remote server.[]
The bind DN and password used by the database link to bind to the remote server.
2.3.4. Configuring Database Link Defaults
Configuring the default settings for database links defines the settings used for cascading chaining (thenumber of hops allowed for a client request), the connection rules for the remote server, and how theserver responds to client requests.
1. Select the Configuration tab.
2. Expand the Data folder in the left pane, and click Database Link Settings. Open the Default
CHAPTER 2. CONFIGURING DIRECTORY DATABASES
63

2. Expand the Data folder in the left pane, and click Database Link Settings. Open the Default
Creation Parameters tab.
3. Fill in the new configuration parameters.
NOTE
Changes made to the default settings of a database link are not applied retroactively.Only the database links created after changes are made to the default settings willreflect the changes.
2.3.5. Deleting Database Links
To delete a database link, right-click the database link, and select Delete from the pop-up menu.Confirm the delete when prompted.
1. In the Directory Server Console, select the Configuration tab.
2. Under Data in the left navigation pane, open the suffix and select the database link to delete.
3. Right-click the database link, and select Delete from the menu.
Administration Guide
64

2.3.6. Database Links and Access Control Evaluation
When a user binds to a server containing a database link, the database link sends the user's identity tothe remote server. Access controls are always evaluated on the remote server. Every LDAP operationevaluated on the remote server uses the original identity of the client application passed using theproxied authorization control. Operations succeed on the remote server only if the user has the correctaccess controls on the subtree contained on the remote server. This requires adding the usual accesscontrols to the remote server with a few restrictions:
Not all types of access control can be used.
For example, role-based or filter-based ACIs need access to the user entry. Because the dataare accessed through database links, only the data in the proxy control can be verified. Considerdesigning the directory in a way that ensures the user entry is located in the same database asthe user's data.
All access controls based on the IP address or DNS domain of the client may not work since theoriginal domain of the client is lost during chaining. The remote server views the clientapplication as being at the same IP address and in the same DNS domain as the database link.
NOTE
Directory Server supports both IPv4 and IPv6 IP addresses.
The following restrictions apply to the ACIs used with database links:
ACIs must be located with any groups they use. If the groups are dynamic, all users in the groupmust be located with the ACI and the group. If the group is static, it links to remote users.
ACIs must be located with any role definitions they use and with any users intended to havethose roles.
ACIs that link to values of a user's entry (for example, userattr subject rules) will work if the useris remote.
Though access controls are always evaluated on the remote server, they can also be evaluated on both
CHAPTER 2. CONFIGURING DIRECTORY DATABASES
65
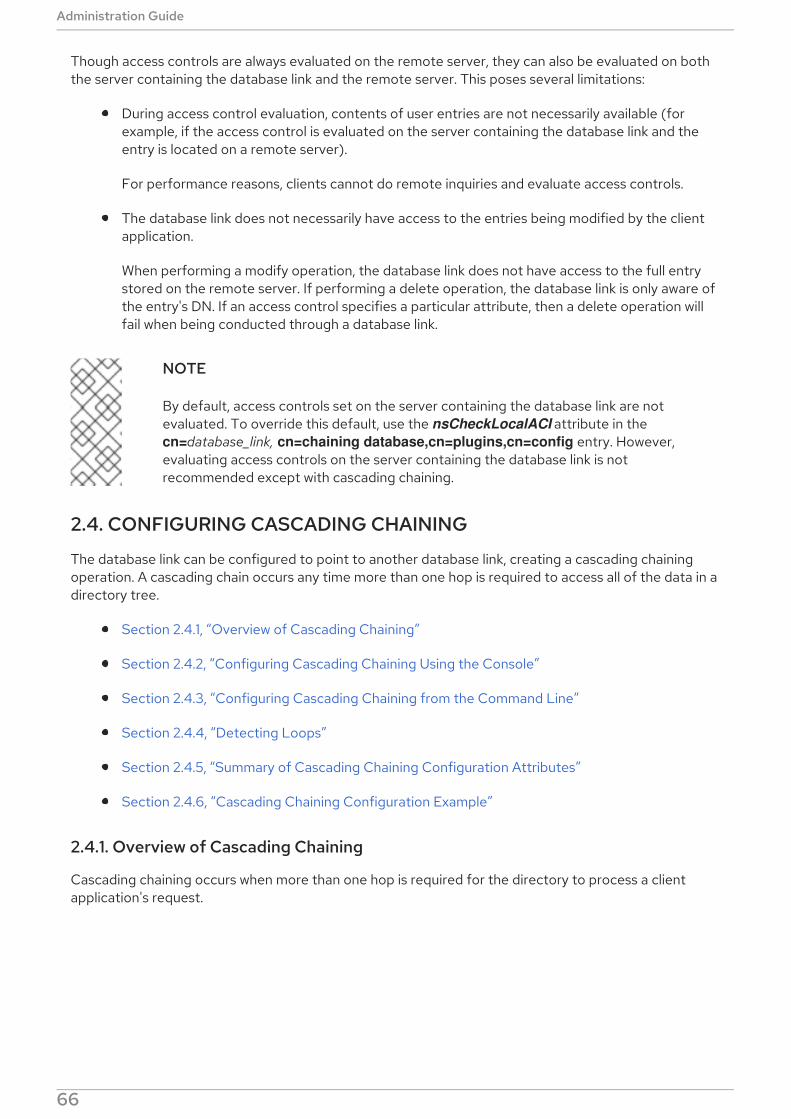
Though access controls are always evaluated on the remote server, they can also be evaluated on boththe server containing the database link and the remote server. This poses several limitations:
During access control evaluation, contents of user entries are not necessarily available (forexample, if the access control is evaluated on the server containing the database link and theentry is located on a remote server).
For performance reasons, clients cannot do remote inquiries and evaluate access controls.
The database link does not necessarily have access to the entries being modified by the clientapplication.
When performing a modify operation, the database link does not have access to the full entrystored on the remote server. If performing a delete operation, the database link is only aware ofthe entry's DN. If an access control specifies a particular attribute, then a delete operation willfail when being conducted through a database link.
NOTE
By default, access controls set on the server containing the database link are notevaluated. To override this default, use the nsCheckLocalACI attribute in the cn=database_link, cn=chaining database,cn=plugins,cn=config entry. However,evaluating access controls on the server containing the database link is notrecommended except with cascading chaining.
2.4. CONFIGURING CASCADING CHAINING
The database link can be configured to point to another database link, creating a cascading chainingoperation. A cascading chain occurs any time more than one hop is required to access all of the data in adirectory tree.
Section 2.4.1, “Overview of Cascading Chaining”
Section 2.4.2, “Configuring Cascading Chaining Using the Console”
Section 2.4.3, “Configuring Cascading Chaining from the Command Line”
Section 2.4.4, “Detecting Loops”
Section 2.4.5, “Summary of Cascading Chaining Configuration Attributes”
Section 2.4.6, “Cascading Chaining Configuration Example”
2.4.1. Overview of Cascading Chaining
Cascading chaining occurs when more than one hop is required for the directory to process a clientapplication's request.
Administration Guide
66
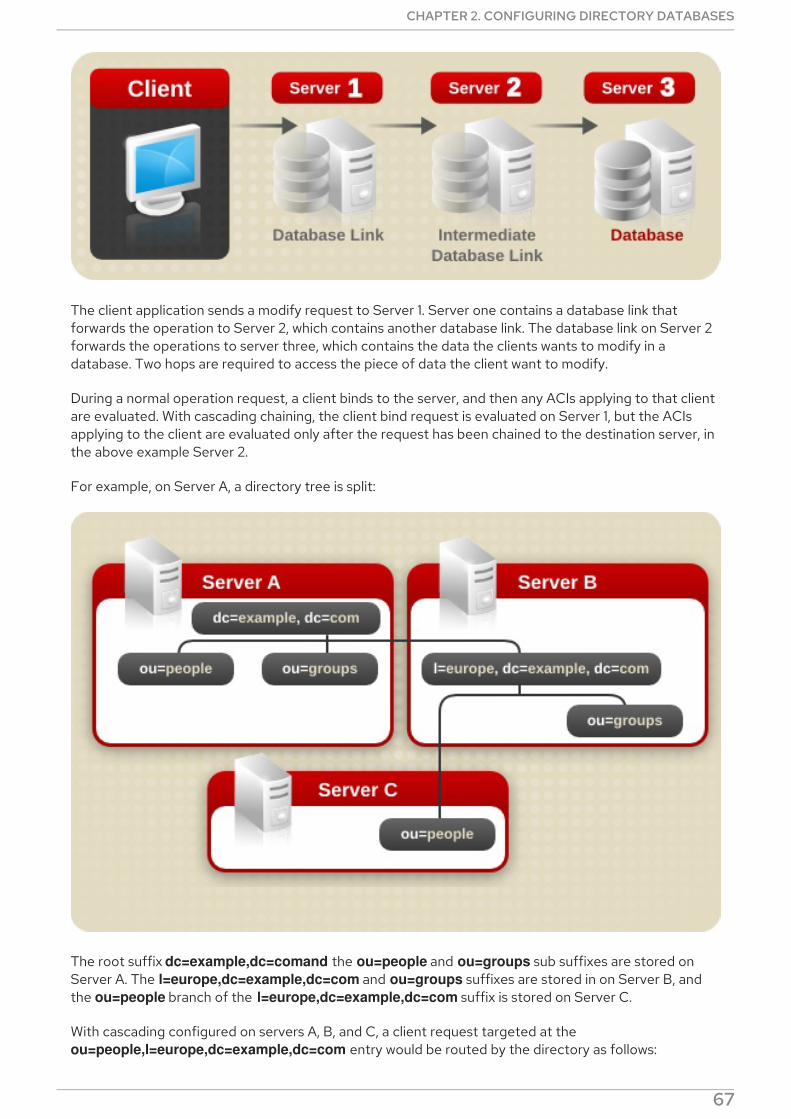
The client application sends a modify request to Server 1. Server one contains a database link thatforwards the operation to Server 2, which contains another database link. The database link on Server 2forwards the operations to server three, which contains the data the clients wants to modify in adatabase. Two hops are required to access the piece of data the client want to modify.
During a normal operation request, a client binds to the server, and then any ACIs applying to that clientare evaluated. With cascading chaining, the client bind request is evaluated on Server 1, but the ACIsapplying to the client are evaluated only after the request has been chained to the destination server, inthe above example Server 2.
For example, on Server A, a directory tree is split:
The root suffix dc=example,dc=comand the ou=people and ou=groups sub suffixes are stored onServer A. The l=europe,dc=example,dc=com and ou=groups suffixes are stored in on Server B, andthe ou=people branch of the l=europe,dc=example,dc=com suffix is stored on Server C.
With cascading configured on servers A, B, and C, a client request targeted at the ou=people,l=europe,dc=example,dc=com entry would be routed by the directory as follows:
CHAPTER 2. CONFIGURING DIRECTORY DATABASES
67
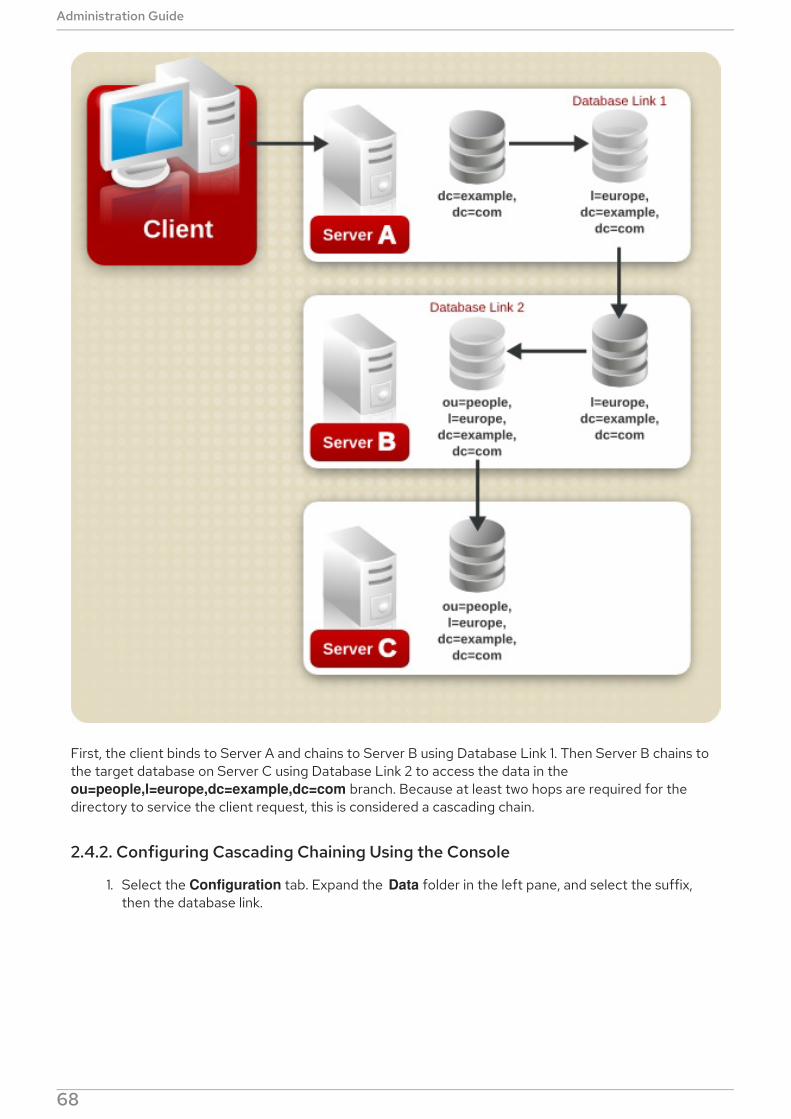
First, the client binds to Server A and chains to Server B using Database Link 1. Then Server B chains tothe target database on Server C using Database Link 2 to access the data in the ou=people,l=europe,dc=example,dc=com branch. Because at least two hops are required for thedirectory to service the client request, this is considered a cascading chain.
2.4.2. Configuring Cascading Chaining Using the Console
1. Select the Configuration tab. Expand the Data folder in the left pane, and select the suffix,then the database link.
Administration Guide
68
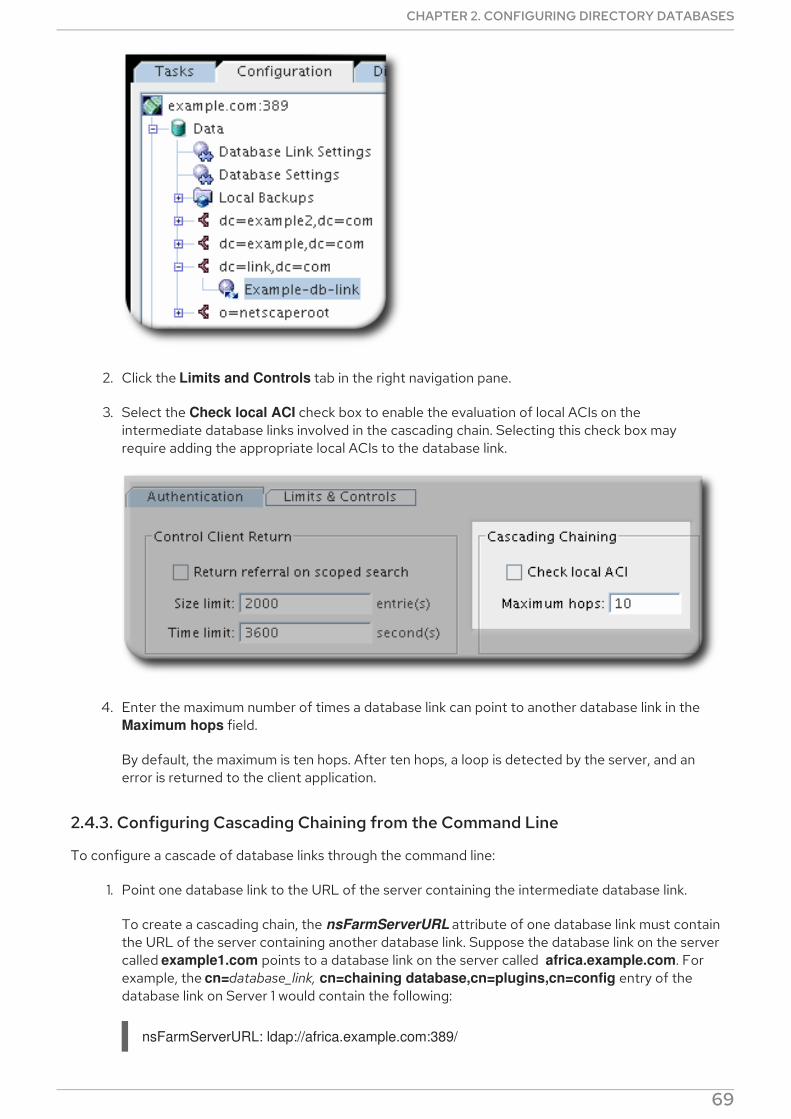
2. Click the Limits and Controls tab in the right navigation pane.
3. Select the Check local ACI check box to enable the evaluation of local ACIs on theintermediate database links involved in the cascading chain. Selecting this check box mayrequire adding the appropriate local ACIs to the database link.
4. Enter the maximum number of times a database link can point to another database link in the Maximum hops field.
By default, the maximum is ten hops. After ten hops, a loop is detected by the server, and anerror is returned to the client application.
2.4.3. Configuring Cascading Chaining from the Command Line
To configure a cascade of database links through the command line:
1. Point one database link to the URL of the server containing the intermediate database link.
To create a cascading chain, the nsFarmServerURL attribute of one database link must containthe URL of the server containing another database link. Suppose the database link on the servercalled example1.com points to a database link on the server called africa.example.com. Forexample, the cn=database_link, cn=chaining database,cn=plugins,cn=config entry of thedatabase link on Server 1 would contain the following:
nsFarmServerURL: ldap://africa.example.com:389/
CHAPTER 2. CONFIGURING DIRECTORY DATABASES
69
2. Configure the intermediate database link or links (in the example, Server 2) to transmit theProxy Authorization Control.
By default, a database link does not transmit the Proxy Authorization Control. However, whenone database link contacts another, this control is used to transmit information needed by thefinal destination server. The intermediate database link needs to transmit this control. Toconfigure the database link to transmit the proxy authorization control, add the following to the cn=config,cn=chaining database,cn=plugins,cn=config entry of the intermediate databaselink:
nsTransmittedControls: 2.16.840.1.113730.3.4.12
The OID value represents the Proxy Authorization Control. For more information about chainingLDAP controls, see Section 2.3.2.2, “Chaining LDAP Controls”.
3. Create a proxy administrative user ACI on all intermediate database links.
The ACI must exist on the server that contains the intermediate database link that checks therights of the first database link before translating the request to another server. For example, ifServer 2 does not check the credentials of Server 1, then anyone could bind as anonymous andpass a proxy authorization control allowing them more administrative privileges thanappropriate. The proxy ACI prevents this security breach.
1. Create a database, if one does not already exist, on the server containing the intermediatedatabase link. This database will contain the admin user entry and the ACI. For informationabout creating a database, see Section 2.2.1, “Creating Databases”.
2. Create an entry that corresponds to the administrative user in the database.
3. Create an ACI for the administrative user that targets the appropriate suffix. This ensuresthe administrator has access only to the suffix of the database link. For example:
aci: (targetattr = "*")(version 3.0; acl "Proxied authorization for database links";
allow (proxy) userdn = "ldap:///cn=proxy admin,cn=config";)
This ACI is like the ACI created on the remote server when configuring simple chaining.
WARNING
Carefully examine access controls when enabling chaining to avoid givingaccess to restricted areas of the directory. For example, if a default proxyACI is created on a branch, the users that connect through the databaselink will be able to see all entries below the branch. There may be caseswhen not all of the subtrees should be viewed by a user. To avoid a securityhole, create an additional ACI to restrict access to the subtree.
4. Enable local ACI evaluation on all intermediate database links.
To confirm that the proxy administrative ACI is used, enable evaluation of local ACIs on allintermediate database links involved in chaining. Add the following attribute to the
Administration Guide
70
cn=database_link, cn=chaining database,cn=plugins,cn=config entry of each intermediatedatabase link:
nsCheckLocalACI: on
Setting this attribute to on in the cn=default instance config,cn=chaining
database,cn=plugins,cn=config entry means that all new database link instances will have the nsCheckLocalACI attribute set to on in their cn=database_link, cn=chaining
database,cn=plugins,cn=config entry.
5. Create client ACIs on all intermediate database links and the final destination database.
Because local ACI evaluation is enabled, the appropriate client application ACIs must be createdon all intermediate database links, as well as the final destination database. To do this on theintermediate database links, first create a database that contains a suffix that represents a rootsuffix of the final destination suffix.
For example, if a client request made to the c=africa,ou=people,dc=example,dc=com suffix ischained to a remote server, all intermediate database links need to contain a databaseassociated with the dc=example,dc=com suffix.
Add any client ACIs to this superior suffix entry. For example:
aci: (targetattr = "*")(version 3.0; acl "Client authentication for database link users";
allow (all) userdn = "ldap:///uid=* ,cn=config";)
This ACI allows client applications that have a uid in the cn=config entry of Server 1 to performany type of operation on the data below the ou=people,dc=example,dc=com suffix on serverthree.
2.4.4. Detecting Loops
An LDAP control included with Directory Server prevents loops. When first attempting to chain, theserver sets this control to be the maximum number of hops, or chaining connections, allowed. Eachsubsequent server decrements the count. If a server receives a count of 0, it determines that a loop hasbeen detected and notifies the client application.
The number of hops allowed is defined using the nsHopLimit attribute. If not specified, the default valueis 10.
To use the control, add the following OID to the nsTransmittedControl attribute in the cn=config,cn=chaining database,cn=plugins,cn=config entry:
nsTransmittedControl: 1.3.6.1.4.1.1466.29539.12
If the control is not present in the configuration file of each database link, loop detection will not beimplemented.
2.4.5. Summary of Cascading Chaining Configuration Attributes
The following describes the attributes used to configure intermediate database links in a cascadingchain:
nsFarmServerURL
CHAPTER 2. CONFIGURING DIRECTORY DATABASES
71
URL of the server containing the next database link in the cascading chain.
nsTransmittedControls
Enter the following OIDs to the database links involved in the cascading chain:
nsTransmittedControls: 2.16.840.1.113730.3.4.12
nsTransmittedControls: 1.3.6.1.4.1.1466.29539.12
aci
This attribute must contain the following ACI:
aci: (targetattr = "*")(version 3.0; acl "Proxied
authorization for database links";
allow (proxy) userdn = "ldap:///cn=proxy admin,cn=config";)
nsCheckLocalACI
To enable evaluation of local ACIs on all database links involved in chaining, turn local ACI evaluationon, as follows:
nsCheckLocalACI: on
2.4.6. Cascading Chaining Configuration Example
To create a cascading chain involving three servers as in the diagram below, the chaining componentsmust be configured on all three servers.
Administration Guide
72
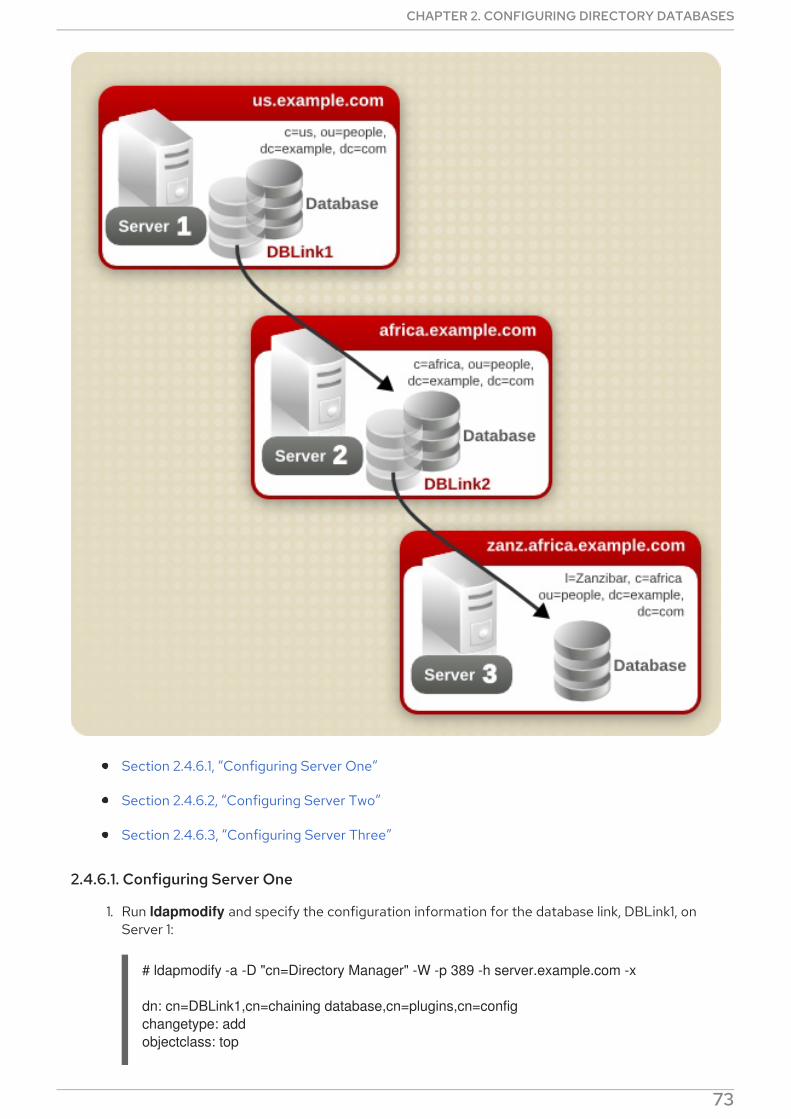
Section 2.4.6.1, “Configuring Server One”
Section 2.4.6.2, “Configuring Server Two”
Section 2.4.6.3, “Configuring Server Three”
2.4.6.1. Configuring Server One
1. Run ldapmodify and specify the configuration information for the database link, DBLink1, onServer 1:
# ldapmodify -a -D "cn=Directory Manager" -W -p 389 -h server.example.com -x
dn: cn=DBLink1,cn=chaining database,cn=plugins,cn=config
changetype: add
objectclass: top
CHAPTER 2. CONFIGURING DIRECTORY DATABASES
73

objectclass: extensibleObject
objectclass: nsBackendInstance
nsslapd-suffix: c=africa,ou=people,dc=example,dc=com
nsfarmserverurl: ldap://africa.example.com:389/
nsMultiplexorBindDN: cn=server1 proxy admin,cn=config
nsMultiplexorCredentials: secret
cn: DBLink1
nsCheckLocalACI:off
dn: cn="c=africa,ou=people,dc=example,dc=com",cn=mapping tree,cn=config
changetype: add
objectclass: nsMappingTree
nsslapd-state: backend
nsslapd-backend: DBLink1
nsslapd-parent-suffix: ou=people,dc=example,dc=com
cn: c=africa,ou=people,dc=example,dc=com
The first section creates the entry associated with DBLink1. The second section creates a newsuffix, allowing the server to direct requests made to the database link to the correct server. ThensCheckLocalACI attribute does not need to be configured to check local ACIs, as this is onlyrequired on the database link, DBLink2, on Server 2.
2. To implement loop detection, to specify the OID of the loop detection control in the nsTransmittedControl attribute stored in cn=config,cn=chaining
database,cn=plugins,cn=config entry on Server 1.
dn: cn=config,cn=chaining database,cn=plugins,cn=config
changetype: modify
add: nsTransmittedControl
nsTransmittedControl: 1.3.6.1.4.1.1466.29539.12
As the nsTransmittedControl attribute is usually configured by default with the loop detectioncontrol OID 1.3.6.1.4.1.1466.29539.12 value, it is wise to check beforehand whether it alreadyexists. If it does exist, this step is not necessary.
2.4.6.2. Configuring Server Two
1. Create a proxy administrative user on Server 2. This administrative user will be used to allowServer 1 to bind and authenticate to Server 2. It is useful to choose a proxy administrative username which is specific to Server 1, as it is the proxy administrative user which will allow server one
to bind to Server 2. Create the proxy administrative user, as follows:
dn: cn=server1 proxy admin,cn=config
objectclass: person
objectclass: organizationalPerson
objectclass: inetOrgPerson
cn: server1 proxy admin
sn: server1 proxy admin
userPassword: secret
description: Entry for use by database links
Administration Guide
74

WARNING
Do not use the Directory Manager or Administrator ID user as the proxyadministrative user on the remote server. This creates a security hole.
2. Configure the database link, DBLink2, on Server 2:
dn: cn=DBLink2,cn=chaining database,cn=plugins,cn=config
objectclass: top
objectclass: extensibleObject
objectclass: nsBackendInstance
nsslapd-suffix: l=Zanzibar,c=africa,ou=people,dc=example,dc=com
nsfarmserverurl: ldap://zanz.africa.example.com:389/
nsMultiplexorBindDN: cn=server2 proxy admin,cn=config
nsMultiplexorCredentials: secret
cn: DBLink2
nsCheckLocalACI:on
dn: cn="l=Zanzibar,c=africa,ou=people,dc=example,dc=com",cn=mapping tree,cn=config
objectclass: top
objectclass: extensibleObject
objectclass: nsMappingTree
nsslapd-state: backend
nsslapd-backend: DBLink2
nsslapd-parent-suffix: c=africa,ou=people,dc=example,dc=com
cn: l=Zanzibar,c=africa,ou=people,dc=example,dc=com
Since database link DBLink2 is the intermediate database link in the cascading chainingconfiguration, set the nsCheckLocalACI attribute to on to allow the server to check whether itshould allow the client and proxy administrative user access to the database link.
3. The database link on Server 2 must be configured to transmit the proxy authorization controland the loop detection control. To implement the proxy authorization control and the loopdetection control, specify both corresponding OIDs. Add the following information to the cn=config,cn=chaining database,cn=plugins,cn=config entry on Server 2:
dn: cn=config,cn=chaining database,cn=plugins,cn=config
changetype: modify
add: nsTransmittedControl
nsTransmittedControl: 2.16.840.1.113730.3.4.12
nsTransmittedControl: 1.3.6.1.4.1.1466.29539.12
nsTransmittedControl: 2.16.840.1.113730.3.4.12 is the OID for the proxy authorizationcontrol. nsTransmittedControl: 1.3.6.1.4.1.1466.29539.12 is the or the loop detection control.
Check beforehand whether the loop detection control is already configured, and adapt theabove command accordingly.
4. Configure the ACIs. On Server 2, ensure that a suffix exists above the
CHAPTER 2. CONFIGURING DIRECTORY DATABASES
75
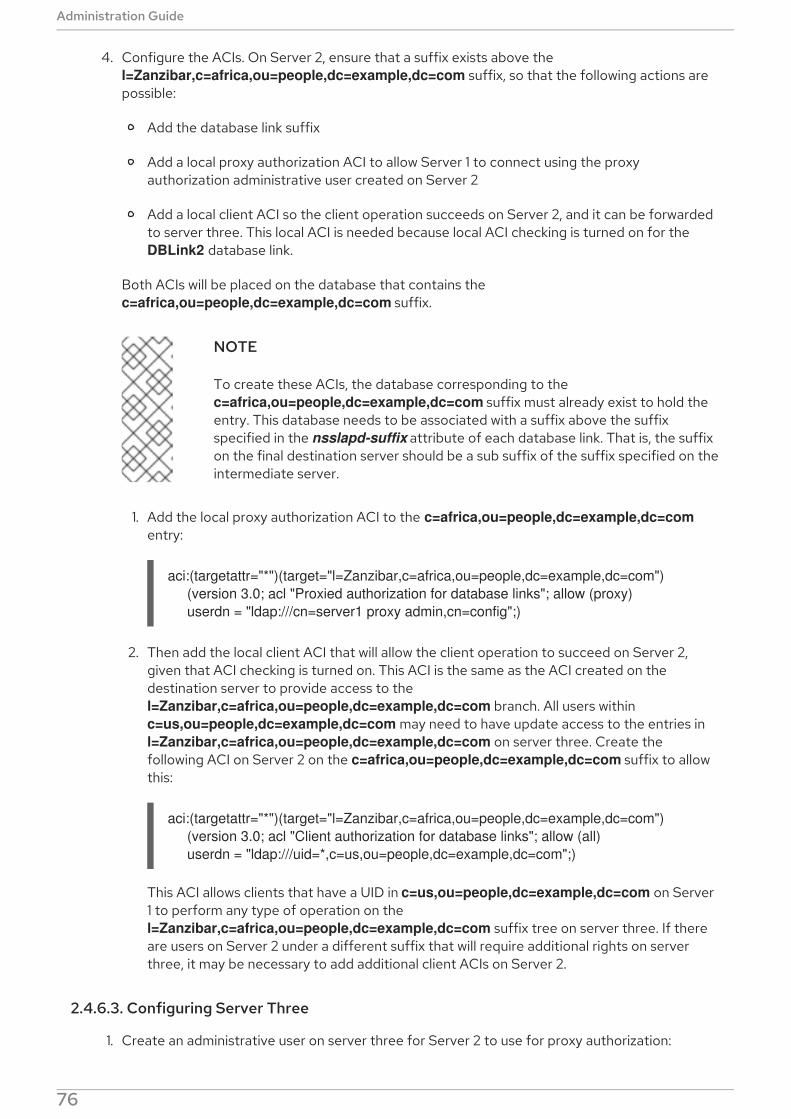
4. Configure the ACIs. On Server 2, ensure that a suffix exists above the l=Zanzibar,c=africa,ou=people,dc=example,dc=com suffix, so that the following actions arepossible:
Add the database link suffix
Add a local proxy authorization ACI to allow Server 1 to connect using the proxyauthorization administrative user created on Server 2
Add a local client ACI so the client operation succeeds on Server 2, and it can be forwardedto server three. This local ACI is needed because local ACI checking is turned on for the DBLink2 database link.
Both ACIs will be placed on the database that contains the c=africa,ou=people,dc=example,dc=com suffix.
NOTE
To create these ACIs, the database corresponding to the c=africa,ou=people,dc=example,dc=com suffix must already exist to hold theentry. This database needs to be associated with a suffix above the suffixspecified in the nsslapd-suffix attribute of each database link. That is, the suffixon the final destination server should be a sub suffix of the suffix specified on theintermediate server.
1. Add the local proxy authorization ACI to the c=africa,ou=people,dc=example,dc=com
entry:
aci:(targetattr="*")(target="l=Zanzibar,c=africa,ou=people,dc=example,dc=com")
(version 3.0; acl "Proxied authorization for database links"; allow (proxy)
userdn = "ldap:///cn=server1 proxy admin,cn=config";)
2. Then add the local client ACI that will allow the client operation to succeed on Server 2,given that ACI checking is turned on. This ACI is the same as the ACI created on thedestination server to provide access to the l=Zanzibar,c=africa,ou=people,dc=example,dc=com branch. All users within c=us,ou=people,dc=example,dc=com may need to have update access to the entries in l=Zanzibar,c=africa,ou=people,dc=example,dc=com on server three. Create thefollowing ACI on Server 2 on the c=africa,ou=people,dc=example,dc=com suffix to allowthis:
aci:(targetattr="*")(target="l=Zanzibar,c=africa,ou=people,dc=example,dc=com")
(version 3.0; acl "Client authorization for database links"; allow (all)
userdn = "ldap:///uid=*,c=us,ou=people,dc=example,dc=com";)
This ACI allows clients that have a UID in c=us,ou=people,dc=example,dc=com on Server1 to perform any type of operation on the l=Zanzibar,c=africa,ou=people,dc=example,dc=com suffix tree on server three. If thereare users on Server 2 under a different suffix that will require additional rights on serverthree, it may be necessary to add additional client ACIs on Server 2.
2.4.6.3. Configuring Server Three
1. Create an administrative user on server three for Server 2 to use for proxy authorization:
Administration Guide
76
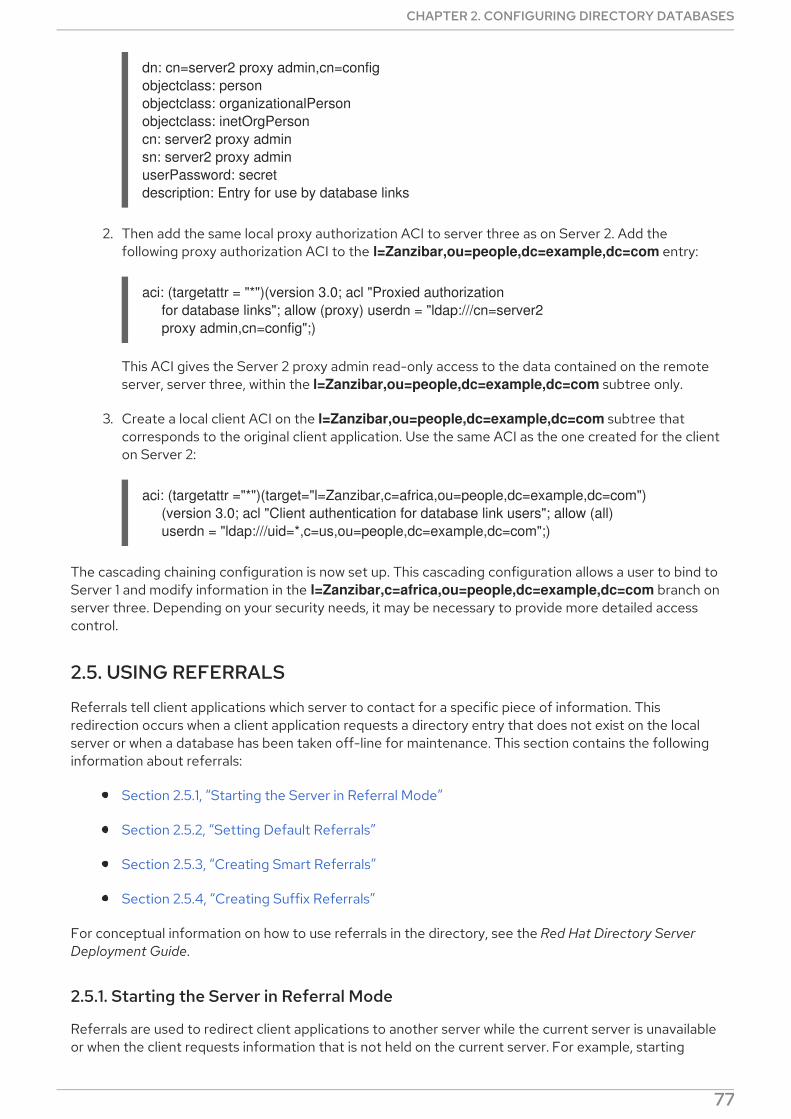
dn: cn=server2 proxy admin,cn=config
objectclass: person
objectclass: organizationalPerson
objectclass: inetOrgPerson
cn: server2 proxy admin
sn: server2 proxy admin
userPassword: secret
description: Entry for use by database links
2. Then add the same local proxy authorization ACI to server three as on Server 2. Add thefollowing proxy authorization ACI to the l=Zanzibar,ou=people,dc=example,dc=com entry:
aci: (targetattr = "*")(version 3.0; acl "Proxied authorization
for database links"; allow (proxy) userdn = "ldap:///cn=server2
proxy admin,cn=config";)
This ACI gives the Server 2 proxy admin read-only access to the data contained on the remoteserver, server three, within the l=Zanzibar,ou=people,dc=example,dc=com subtree only.
3. Create a local client ACI on the l=Zanzibar,ou=people,dc=example,dc=com subtree thatcorresponds to the original client application. Use the same ACI as the one created for the clienton Server 2:
aci: (targetattr ="*")(target="l=Zanzibar,c=africa,ou=people,dc=example,dc=com")
(version 3.0; acl "Client authentication for database link users"; allow (all)
userdn = "ldap:///uid=*,c=us,ou=people,dc=example,dc=com";)
The cascading chaining configuration is now set up. This cascading configuration allows a user to bind toServer 1 and modify information in the l=Zanzibar,c=africa,ou=people,dc=example,dc=com branch onserver three. Depending on your security needs, it may be necessary to provide more detailed accesscontrol.
2.5. USING REFERRALS
Referrals tell client applications which server to contact for a specific piece of information. Thisredirection occurs when a client application requests a directory entry that does not exist on the localserver or when a database has been taken off-line for maintenance. This section contains the followinginformation about referrals:
Section 2.5.1, “Starting the Server in Referral Mode”
Section 2.5.2, “Setting Default Referrals”
Section 2.5.3, “Creating Smart Referrals”
Section 2.5.4, “Creating Suffix Referrals”
For conceptual information on how to use referrals in the directory, see the Red Hat Directory Server
Deployment Guide.
2.5.1. Starting the Server in Referral Mode
Referrals are used to redirect client applications to another server while the current server is unavailableor when the client requests information that is not held on the current server. For example, starting
CHAPTER 2. CONFIGURING DIRECTORY DATABASES
77

Directory Server in referral mode while there are configuration changes being made to theDirectory Server will refer all clients to another supplier while that server is unavailable. Starting theDirectory Server in referral mode is done with the refer command.
Run nsslapd with the refer option.
# ns-slapd refer -D /etc/dirsrv/slapd-instance_name [-p port] -r referral_url
/etc/dirsrv/slapd-instance_name/ is the directory where the Directory Server configurationfiles are. This is the default location on Red Hat Enterprise Linux 7.
port is the optional port number of the Directory Server to start in referral mode.
referral_url is the referral returned to clients. The format of an LDAP URL is covered inAppendix C, LDAP URLs .
2.5.2. Setting Default Referrals
Default referrals are returned to client applications that submit operations on a DN not contained withinany of the suffixes maintained by the directory. The following procedures describes setting a defaultreferral for the directory using the console and the command-line utilities.
2.5.2.1. Setting a Default Referral Using the Console
1. In the Directory Server Console, select the Configuration tab.
2. Select the top entry in the navigation tree in the left pane.
3. Select the Settings tab in the right pane.
4. Enter an LDAP URL for the referral.
Enter multiple referral URLs separated by spaces and in quotes:
"ldap://dir1.example.com:389/dc=example,dc=com" "ldap://dir2.example.com/"
Administration Guide
78
For more information about LDAP URLs, see Appendix C, LDAP URLs .
2.5.2.2. Setting a Default Referral from the Command Line
ldapmodify can add a default referral to the cn=config entry in the directory's configuration file. Forexample, to add a new default referral from one Directory Server, dir1.example.com, to a server named dir2.example.com, add a new line to the cn=config entry.
1. Run the ldapmodify utility and add the default referral to the dir2.example.com server:
# ldapmodify -D "cn=Directory Manager" -W -p 389 -h server.example.com -x
dn: cn=config
changetype: modify
replace: nsslapd-referral
nsslapd-referral: ldap://dir2.example.com/
After adding the default referral to the cn=config entry of the directory, the directory will return thedefault referral in response to requests made by client applications. The Directory Server does not needto be restarted.
2.5.3. Creating Smart Referrals
Smart referrals map a directory entry or directory tree to a specific LDAP URL. Using smart referrals,client applications can be referred to a specific server or a specific entry on a specific server.
For example, a client application requests the directory entry uid=jdoe,ou=people,dc=example,dc=com. A smart referral is returned to the client that points to theentry cn=john doe,o=people,l=europe,dc=example,dc=com on the server directory.europe.example.com.
The way the directory uses smart referrals conforms to the standard specified in RFC 2251 section 4.1.11.The RFC can be downloaded at http://www.ietf.org/rfc/rfc2251.txt.
2.5.3.1. Creating Smart Referrals Using the Directory Server Console
1. In the Directory Server Console, select the Directory tab.
2. Browse through the tree in the left navigation pane, and select the entry for which to add thereferral.
3. Right-click the entry, and select Set Smart Referrals.
CHAPTER 2. CONFIGURING DIRECTORY DATABASES
79
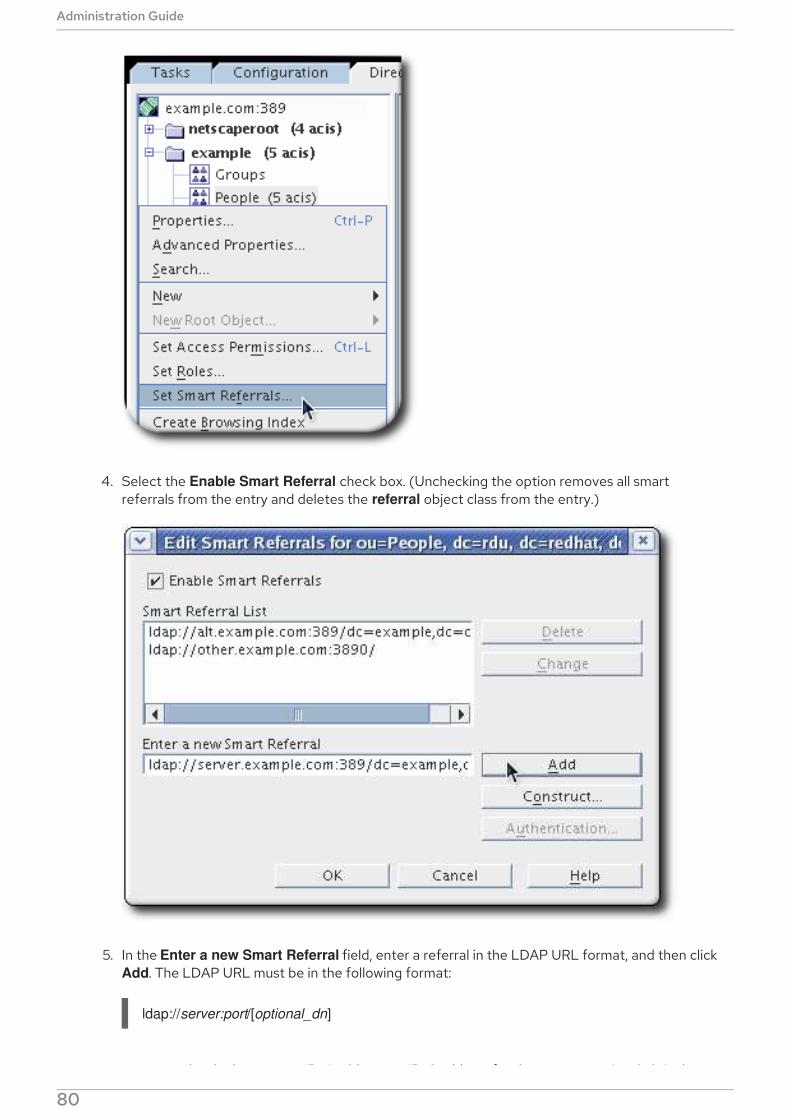
4. Select the Enable Smart Referral check box. (Unchecking the option removes all smartreferrals from the entry and deletes the referral object class from the entry.)
5. In the Enter a new Smart Referral field, enter a referral in the LDAP URL format, and then clickAdd. The LDAP URL must be in the following format:
ldap://server:port/[optional_dn]
server can be the host name, IPv4 address, or IPv6 address for the server. optional_dn is the
Administration Guide
80
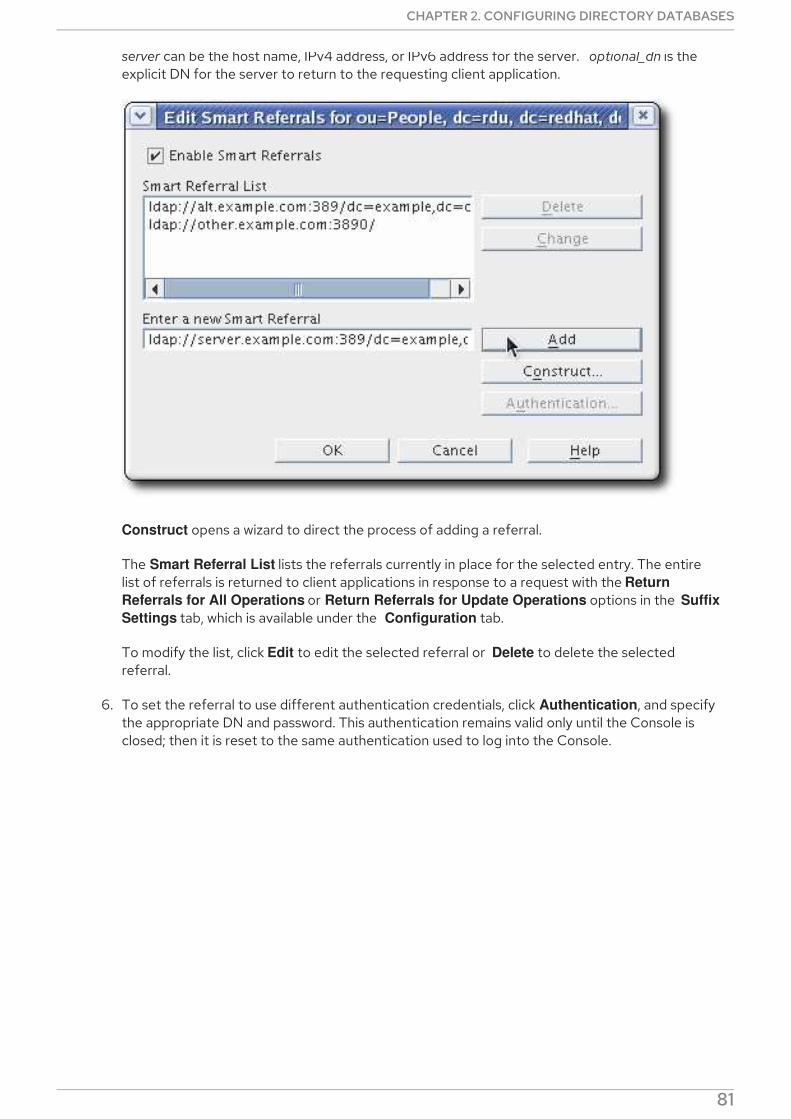
server can be the host name, IPv4 address, or IPv6 address for the server. optional_dn is theexplicit DN for the server to return to the requesting client application.
Construct opens a wizard to direct the process of adding a referral.
The Smart Referral List lists the referrals currently in place for the selected entry. The entirelist of referrals is returned to client applications in response to a request with the Return
Referrals for All Operations or Return Referrals for Update Operations options in the Suffix
Settings tab, which is available under the Configuration tab.
To modify the list, click Edit to edit the selected referral or Delete to delete the selectedreferral.
6. To set the referral to use different authentication credentials, click Authentication, and specifythe appropriate DN and password. This authentication remains valid only until the Console isclosed; then it is reset to the same authentication used to log into the Console.
CHAPTER 2. CONFIGURING DIRECTORY DATABASES
81
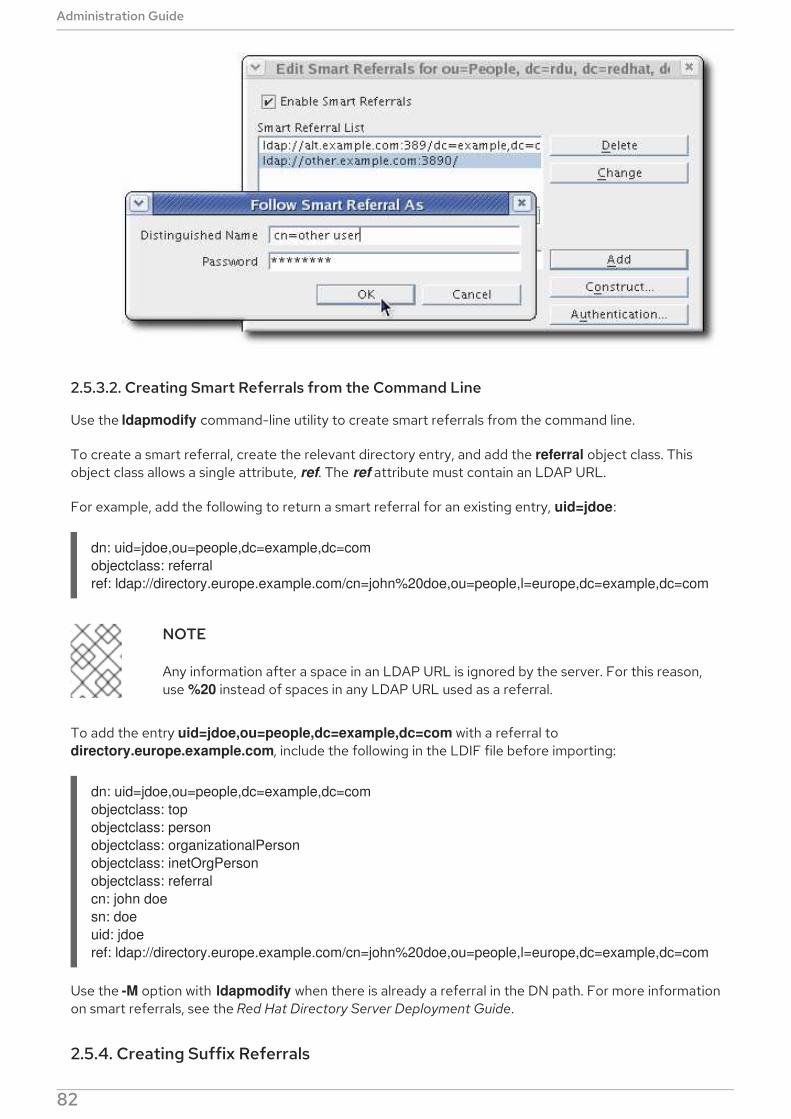
2.5.3.2. Creating Smart Referrals from the Command Line
Use the ldapmodify command-line utility to create smart referrals from the command line.
To create a smart referral, create the relevant directory entry, and add the referral object class. Thisobject class allows a single attribute, ref. The ref attribute must contain an LDAP URL.
For example, add the following to return a smart referral for an existing entry, uid=jdoe:
dn: uid=jdoe,ou=people,dc=example,dc=com
objectclass: referral
ref: ldap://directory.europe.example.com/cn=john%20doe,ou=people,l=europe,dc=example,dc=com
NOTE
Any information after a space in an LDAP URL is ignored by the server. For this reason,use %20 instead of spaces in any LDAP URL used as a referral.
To add the entry uid=jdoe,ou=people,dc=example,dc=com with a referral to directory.europe.example.com, include the following in the LDIF file before importing:
dn: uid=jdoe,ou=people,dc=example,dc=com
objectclass: top
objectclass: person
objectclass: organizationalPerson
objectclass: inetOrgPerson
objectclass: referral
cn: john doe
sn: doe
uid: jdoe
ref: ldap://directory.europe.example.com/cn=john%20doe,ou=people,l=europe,dc=example,dc=com
Use the -M option with ldapmodify when there is already a referral in the DN path. For more informationon smart referrals, see the Red Hat Directory Server Deployment Guide.
2.5.4. Creating Suffix Referrals
Administration Guide
82
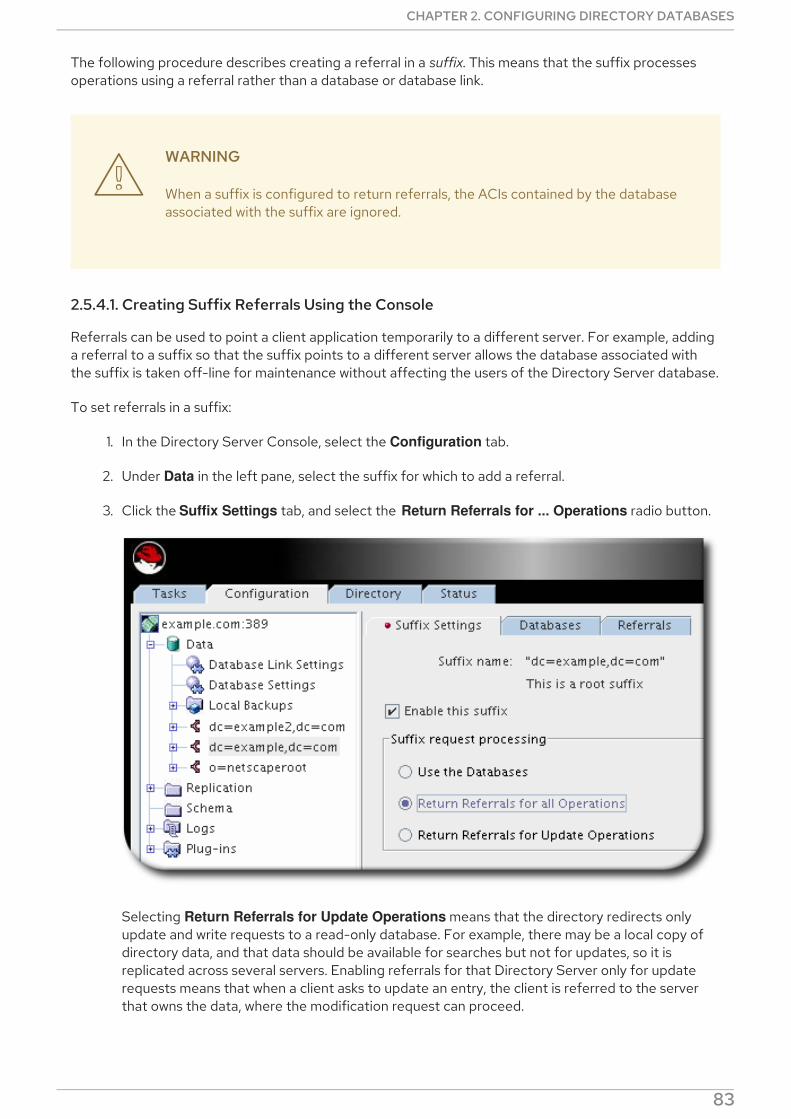
The following procedure describes creating a referral in a suffix. This means that the suffix processesoperations using a referral rather than a database or database link.
WARNING
When a suffix is configured to return referrals, the ACIs contained by the databaseassociated with the suffix are ignored.
2.5.4.1. Creating Suffix Referrals Using the Console
Referrals can be used to point a client application temporarily to a different server. For example, addinga referral to a suffix so that the suffix points to a different server allows the database associated withthe suffix is taken off-line for maintenance without affecting the users of the Directory Server database.
To set referrals in a suffix:
1. In the Directory Server Console, select the Configuration tab.
2. Under Data in the left pane, select the suffix for which to add a referral.
3. Click the Suffix Settings tab, and select the Return Referrals for ... Operations radio button.
Selecting Return Referrals for Update Operations means that the directory redirects onlyupdate and write requests to a read-only database. For example, there may be a local copy ofdirectory data, and that data should be available for searches but not for updates, so it isreplicated across several servers. Enabling referrals for that Directory Server only for updaterequests means that when a client asks to update an entry, the client is referred to the serverthat owns the data, where the modification request can proceed.
4. Click the Referrals tab. Enter an LDAP URL in the [1] in the Enter a new referral field, or click
CHAPTER 2. CONFIGURING DIRECTORY DATABASES
83

4. Click the Referrals tab. Enter an LDAP URL in the [1] in the Enter a new referral field, or click Construct to create an LDAP URL.
5. Click Add to add the referral to the list.
You can enter multiple referrals. The directory returns the entire list of referrals in response torequests from client applications.
2.5.4.2. Creating Suffix Referrals from the Command Line
Add a suffix referral to the root or sub suffix entry in the directory configuration file under the cn=mapping tree,cn=config branch.
Run ldapmodify and add a suffix referral to the ou=people,dc=example,dc=com root suffix:
# ldapmodify -a -D "cn=Directory Manager" -W -p 389 -h server.example.com -x
dn: cn=ou=people,dc=example,dc=com,cn=mapping tree,cn=config
changetype: add
objectclass: extensibleObject
objectclass: nsMappingTree
nsslapd-state: referral
nsslapd-referral: ldap://zanzibar.com/
The nsslapd-state attribute is set to referral, meaning that a referral is returned for requests made tothis suffix. The nsslapd-referral attribute contains the LDAP URL of the referral returned by the suffix,in this case a referral to the zanzibar.com server.
The nsslapd-state attribute can also be set to referral on update. This means that the database is used
Administration Guide
84
The nsslapd-state attribute can also be set to referral on update. This means that the database is usedfor all operations except update requests. When a client application makes an update request to a suffixset to referral on update, the client receives a referral.
For more information about the suffix configuration attributes, see Section 2.1.1.3, “Creating Root andSub Suffixes using the Command Line”.
[] Unlike the standard LDAP URL format, the URL of the remote server does not specify a suffix. It has the form ldap://server:port/, where server can be the host name, IPv4 address, or IPv6 address.
[1] Appendix C, LDAP URLs has more information about the structure of LDAP URLs.
CHAPTER 2. CONFIGURING DIRECTORY DATABASES
85
CHAPTER 3. MANAGING DIRECTORY ENTRIES
This chapter discusses how to use the Directory Server Console and the ldapmodify and ldapdelete
command-line utilities to modify the contents of your directory.
Entries stored in Active Directory can be added to the Directory Server through Windows Sync; seeChapter 16, Synchronizing Red Hat Directory Server with Microsoft Active Directory for more informationon adding or modifying synchronized entries through Windows User Sync.
3.1. MANAGING ENTRIES USING THE COMMAND LINE
To perform LDAP operations using the command line, install the openldap-clients package. The utilitiesinstalled by this package enable you to:
Add new entries
Add new attributes to existing entries
Update existing entries and attributes
Delete entries and attributes from entries
Perform bulk operations
To install the openldap-clients package:
# yum install openldap-clients
NOTE
To perform LDAP operations, you need the appropriate permissions. For details aboutaccess control, see Chapter 18, Managing Access Control .
3.1.1. Providing Input to the ldapadd, ldapmodify, and ldapdelete Utilities
When you add, update, or delete entries or attributes in your directory, you can either use the interactivemode of the utilities to enter LDAP Data Interchange Format (LDIF) statements or pass an LDIF file tothem.
For further details about LDIF, see Section B.1, “About the LDIF File Format” .
3.1.1.1. Providing Input Using the Interactive Mode
In the interactive mode, the ldapadd, ldapmodify, and ldapdelete utilities read the input from thecommand line. To exit the interactive mode, press the Ctrl+D (^D) key combination to send the End OfFile (EOF) escape sequence.
In interactive mode, the utility sends the statements to the LDAP server when you press Enter twice orwhen you send the EOF sequence.
Use the interactive mode:
To enter LDIF statements without creating a file:
Administration Guide
86
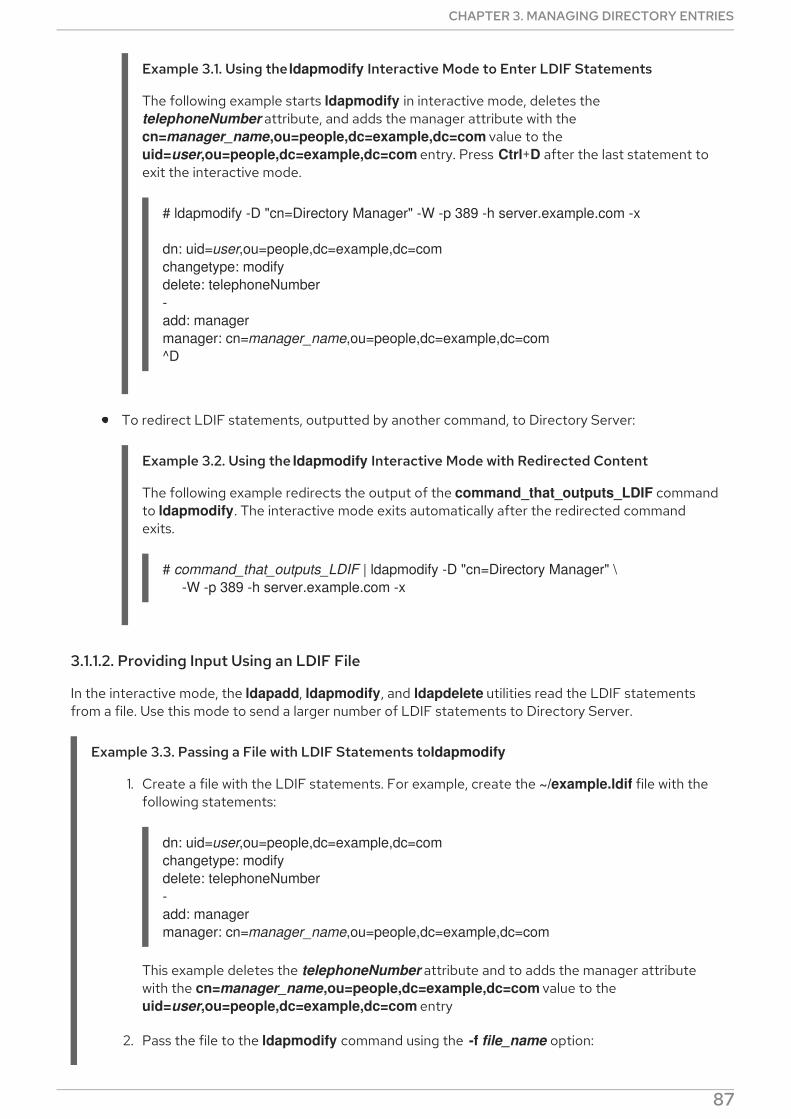
Example 3.1. Using the ldapmodify Interactive Mode to Enter LDIF Statements
The following example starts ldapmodify in interactive mode, deletes the telephoneNumber attribute, and adds the manager attribute with the cn=manager_name,ou=people,dc=example,dc=com value to the uid=user,ou=people,dc=example,dc=com entry. Press Ctrl+D after the last statement toexit the interactive mode.
# ldapmodify -D "cn=Directory Manager" -W -p 389 -h server.example.com -x
dn: uid=user,ou=people,dc=example,dc=com
changetype: modify
delete: telephoneNumber
-
add: manager
manager: cn=manager_name,ou=people,dc=example,dc=com
^D
To redirect LDIF statements, outputted by another command, to Directory Server:
Example 3.2. Using the ldapmodify Interactive Mode with Redirected Content
The following example redirects the output of the command_that_outputs_LDIF commandto ldapmodify. The interactive mode exits automatically after the redirected commandexits.
# command_that_outputs_LDIF | ldapmodify -D "cn=Directory Manager" \
-W -p 389 -h server.example.com -x
3.1.1.2. Providing Input Using an LDIF File
In the interactive mode, the ldapadd, ldapmodify, and ldapdelete utilities read the LDIF statementsfrom a file. Use this mode to send a larger number of LDIF statements to Directory Server.
Example 3.3. Passing a File with LDIF Statements to ldapmodify
1. Create a file with the LDIF statements. For example, create the ~/example.ldif file with thefollowing statements:
dn: uid=user,ou=people,dc=example,dc=com
changetype: modify
delete: telephoneNumber
-
add: manager
manager: cn=manager_name,ou=people,dc=example,dc=com
This example deletes the telephoneNumber attribute and to adds the manager attributewith the cn=manager_name,ou=people,dc=example,dc=com value to the uid=user,ou=people,dc=example,dc=com entry
2. Pass the file to the ldapmodify command using the -f file_name option:
CHAPTER 3. MANAGING DIRECTORY ENTRIES
87

# ldapmodify -D "cn=Directory Manager" -W -p 389 -h server.example.com -x \
-f ~/example.ldif
3.1.2. The Continuous Operation Mode
If you send multiple LDIF statements to Directory Server and one operation fails, the process stops.However, entries processed before the error occurred were successfully added, modified, or deleted.
To ignore errors and continue processing further LDIF statements in a batch, pass the -c option to ldapadd and ldapmodify. For example:
# ldpamodify -c -D "cn=Directory Manager" -W -p 389 -h server.example.com -x
3.1.3. Adding an Entry
To add a new entry to the directory, use the ldapadd or ldapmodify utility. Note that ldapadd is asymbolic link to /bin/ldapmodify. Therefore, ldapadd performs the same operation as ldapmodify -a.
NOTE
You can only add a new directory entry, if the parent entry already exists. For example,you cannot add the cn=user,ou=people,dc=example,dc=com entry, if the ou=people,dc=example,dc=com parent entry does not exist.
3.1.3.1. Adding an Entry Using ldapadd
To use the ldapadd utility to add, for example, the cn=user,ou=people,dc=example,dc=com userentry:
# ldapadd -D "cn=Directory Manager" -W -p 389 -h server.example.com -x
dn: uid=user,ou=People,dc=example,dc=com
uid: user
givenName: given_name
objectClass: top
objectClass: person
objectClass: organizationalPerson
objectClass: inetorgperson
sn: surname
cn: user
NOTE
Running ldapadd automatically performs a changetype: add operation. Therefore, youdo not need to specify changetype: add in the LDIF statement.
For further details on the parameters used in the command, see the ldapadd(1) man page.
3.1.3.2. Adding an Entry Using ldapmodify
To use the ldapmodify utility to add, for example, the cn=user,ou=people,dc=example,dc=com user
Administration Guide
88
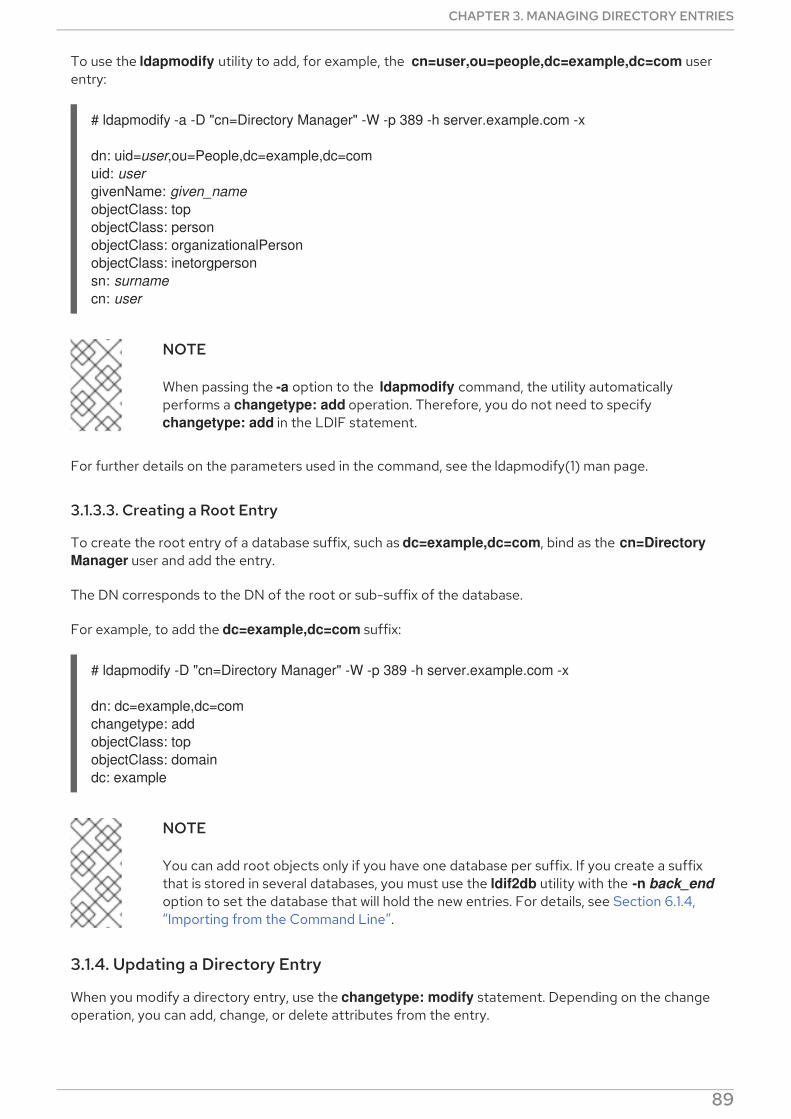
To use the ldapmodify utility to add, for example, the cn=user,ou=people,dc=example,dc=com userentry:
# ldapmodify -a -D "cn=Directory Manager" -W -p 389 -h server.example.com -x
dn: uid=user,ou=People,dc=example,dc=com
uid: user
givenName: given_name
objectClass: top
objectClass: person
objectClass: organizationalPerson
objectClass: inetorgperson
sn: surname
cn: user
NOTE
When passing the -a option to the ldapmodify command, the utility automaticallyperforms a changetype: add operation. Therefore, you do not need to specify changetype: add in the LDIF statement.
For further details on the parameters used in the command, see the ldapmodify(1) man page.
3.1.3.3. Creating a Root Entry
To create the root entry of a database suffix, such as dc=example,dc=com, bind as the cn=Directory
Manager user and add the entry.
The DN corresponds to the DN of the root or sub-suffix of the database.
For example, to add the dc=example,dc=com suffix:
# ldapmodify -D "cn=Directory Manager" -W -p 389 -h server.example.com -x
dn: dc=example,dc=com
changetype: add
objectClass: top
objectClass: domain
dc: example
NOTE
You can add root objects only if you have one database per suffix. If you create a suffixthat is stored in several databases, you must use the ldif2db utility with the -n back_end
option to set the database that will hold the new entries. For details, see Section 6.1.4,“Importing from the Command Line”.
3.1.4. Updating a Directory Entry
When you modify a directory entry, use the changetype: modify statement. Depending on the changeoperation, you can add, change, or delete attributes from the entry.
Use the ldapmodify utility to send the LDIF statements to Directory Server. For example, in interactive
CHAPTER 3. MANAGING DIRECTORY ENTRIES
89
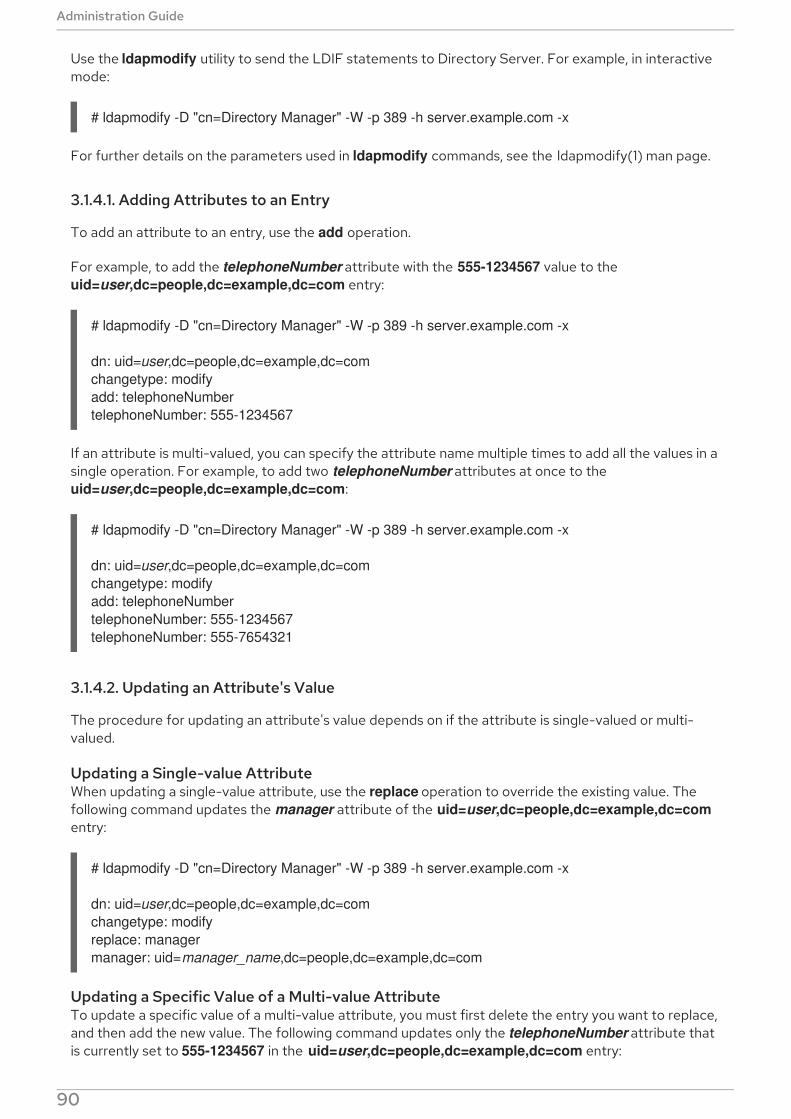
Use the ldapmodify utility to send the LDIF statements to Directory Server. For example, in interactivemode:
# ldapmodify -D "cn=Directory Manager" -W -p 389 -h server.example.com -x
For further details on the parameters used in ldapmodify commands, see the ldapmodify(1) man page.
3.1.4.1. Adding Attributes to an Entry
To add an attribute to an entry, use the add operation.
For example, to add the telephoneNumber attribute with the 555-1234567 value to the uid=user,dc=people,dc=example,dc=com entry:
# ldapmodify -D "cn=Directory Manager" -W -p 389 -h server.example.com -x
dn: uid=user,dc=people,dc=example,dc=com
changetype: modify
add: telephoneNumber
telephoneNumber: 555-1234567
If an attribute is multi-valued, you can specify the attribute name multiple times to add all the values in asingle operation. For example, to add two telephoneNumber attributes at once to the uid=user,dc=people,dc=example,dc=com:
# ldapmodify -D "cn=Directory Manager" -W -p 389 -h server.example.com -x
dn: uid=user,dc=people,dc=example,dc=com
changetype: modify
add: telephoneNumber
telephoneNumber: 555-1234567
telephoneNumber: 555-7654321
3.1.4.2. Updating an Attribute's Value
The procedure for updating an attribute's value depends on if the attribute is single-valued or multi-valued.
Updating a Single-value AttributeWhen updating a single-value attribute, use the replace operation to override the existing value. Thefollowing command updates the manager attribute of the uid=user,dc=people,dc=example,dc=com
entry:
# ldapmodify -D "cn=Directory Manager" -W -p 389 -h server.example.com -x
dn: uid=user,dc=people,dc=example,dc=com
changetype: modify
replace: manager
manager: uid=manager_name,dc=people,dc=example,dc=com
Updating a Specific Value of a Multi-value AttributeTo update a specific value of a multi-value attribute, you must first delete the entry you want to replace,and then add the new value. The following command updates only the telephoneNumber attribute thatis currently set to 555-1234567 in the uid=user,dc=people,dc=example,dc=com entry:
Administration Guide
90
# ldapmodify -D "cn=Directory Manager" -W -p 389 -h server.example.com -x
dn: uid=user,dc=people,dc=example,dc=com
changetype: modify
delete: telephoneNumber
telephoneNumber: 555-1234567
-
add: telephoneNumber
telephoneNumber: 555-9876543
3.1.4.3. Deleting Attributes from an Entry
To delete an attribute from an entry, use the delete operation.
Deleting an AttributeFor example, to delete the manager attribute from the uid=user,dc=people,dc=example,dc=com
entry:
# ldapmodify -D "cn=Directory Manager" -W -p 389 -h server.example.com -x
dn: uid=user,dc=people,dc=example,dc=com
changetype: modify
delete: manager
NOTE
If the attribute contains multiple values, this operation deletes all of them.
Deleting a Specific Value of a Multi-value AttributeIf you want to delete a specific value from a multi-value attribute, list the attribute and its value in theLDIF statement. For example, to delete only the telephoneNumber attribute that is set to 555-1234567
from the uid=user,dc=people,dc=example,dc=com entry:
# ldapmodify -D "cn=Directory Manager" -W -p 389 -h server.example.com -x
dn: uid=user,dc=people,dc=example,dc=com
changetype: modify
delete: telephoneNumber
telephoneNumber: 555-1234567
3.1.5. Deleting an Entry
Deleting an entry removes the entry from the directory.
NOTE
You can only delete entries that have no child entries. For example, you cannot delete theou=People,dc=example,dc=com entry, if the uid=user,ou=People,dc=example,dc=com entry still exists.
3.1.5.1. Deleting an Entry Using ldapdelete
CHAPTER 3. MANAGING DIRECTORY ENTRIES
91
The ldapdelete utility enables you to delete one or multiple entries. For example, to delete the uid=user,ou=People,dc=example,dc=com entry:
# ldapdelete -D "cn=Directory Manager" -W -p 389 -h server.example.com -x
"uid=user,ou=People,dc=example,dc=com"
To delete multiple entries in one operation, append them to the command. For example:
# ldapdelete -D "cn=Directory Manager" -W -p 389 -h server.example.com -x \
"uid=user1,ou=People,dc=example,dc=com" \
"uid=user2,ou=People,dc=example,dc=com"
For further details on the parameters used, see the ldapdelete(1) man page.
3.1.5.2. Deleting an Entry Using ldapmodify
To delete an entry using the ldapmodify utility, use the changetype: delete operation. For example, todelete the uid=user,ou=People,dc=example,dc=com entry:
# ldapmodify -D "cn=Directory Manager" -W -p 389 -h server.example.com -x
dn: uid=user,dc=people,dc=example,dc=com
changetype: delete
3.1.6. Renaming and Moving an Entry
Use the ldapmodify utility to send the LDIF statements to Directory Server when you rename an entry.For example, in interactive mode:
# ldapmodify -D "cn=Directory Manager" -W -p 389 -h server.example.com -x
For further details on the parameters used in ldapmodify commands, see the ldapmodify(1) man page.
NOTE
Use the moddn Access Control List (ACL) to grant permissions to move entries. Fordetails, see Section 18.11.2.1, “Targeting Source and Destination DNs” .
3.1.6.1. Types of Rename Operations
The following rename operations exist:
Renaming an Entry
If you rename a entry, the modrdn operation changes the Relative Distinguished Name (RDN) of theentry:
Administration Guide
92

Renaming a Subentry
For subtree entries, the modrdn operation renames the subtree and also the DN components ofchild entries:
Note that for large subtrees, this process can take a lot of time and resources.
Moving an Entry to a New Parent
A similar action to renaming a subtree is moving an entry from one subtree to another. This is anexpanded type of the modrdn operation, which simultaneously renames the entry and sets a newSuperior attribute which moves the entry from one parent to another:
3.1.6.2. Considerations for Renaming Entries
Keep the following in mind when performing rename operations:
You cannot rename the root suffix.
Subtree rename operations have minimal effect on replication. Replication agreements are
CHAPTER 3. MANAGING DIRECTORY ENTRIES
93

applied to an entire database, not a subtree within the database. Therefore, a subtree renameoperation does not require reconfiguring a replication agreement. All name changes after asubtree rename operation are replicated as normal.
Renaming a subtree might require any synchronization agreements to be reconfigured.Synchronization agreements are set at the suffix or subtree level. Therefore, renaming asubtree might break synchronization.
Renaming a subtree requires that any subtree-level Access Control Instructions (ACI) set forthe subtree be reconfigured manually, as well as any entry-level ACIs set for child entries of thesubtree.
Trying to change the component of a subtree, such as moving from ou to dc, might fail with aschema violation. For example, the organizationalUnit object class requires the ou attribute. Ifthat attribute is removed as part of renaming the subtree, the operation fails.
If you move a group, the MemberOf plug-in automatically updates the memberOf attributes.However, if you move a subtree that contain groups, you must manually create a task in the cn=memberof task entry or use the fixup-memberof.pl to update the related memberOf
attributes.
For details about cleaning up memberOf attribute references, see Section 8.1.4.7,“Synchronizing memberOf Values”.
3.1.6.3. The deleteOldRDN Parameter
When you rename an entry, the deleteOldRDN parameter controls whether the old RDN will be deletedor retained.
deleteOldRDN: 0
The existing RDN is retained as a value in the new entry. The resulting entry contains two cn
attributes: one with the old and one with the new common name (CN).
For example, the following attributes belong to a group that was renamed from cn=old_group,dc=example,dc=com to cn=new_group,dc=example,dc=com with the deleteOldRDN: 0 parameter set.
dn: cn=new_group,ou=Groups,dc=example,dc=com
objectClass: top
objectClass: groupOfUniqueNames
cn: old_group
cn: new_group
deleteOldRDN: 1
Directory Server deletes the old entry and creates a new entry using the new RDN. The new entryonly contains the cn attribute of the new entry.
For example, the following group was renamed to cn=new_group,dc=example,dc=com with the deleteOldRDN: 1 parameter set:
dn: cn=new_group,ou=Groups,dc=example,dc=com
objectClass: top
objectClass: groupofuniquenames
cn: new_group
Administration Guide
94
3.1.6.4. Renaming an Entry or Subtree
To rename an entry or subtree, use the changetype: modrdn operation and set the new RDN in the newrdn attribute.
For example, to rename the cn=old_group,ou=Groups,dc=example,dc=com entry to cn=new_group,ou=Groups,dc=example,dc=com:
# ldapmodify -D "cn=Directory Manager" -W -p 389 -h server.example.com -x
dn: cn=old_group,ou=Groups,dc=example,dc=com
changetype: modrdn
newrdn: cn=new_group
deleteOldRDN: 1
For details about the deleteOldRDN, see Section 3.1.6.3, “The deleteOldRDN Parameter”.
3.1.6.5. Moving an Entry to a New Parent
To move an entry to a new parent, use the changetype: modrdn operation and set the following toattributes:
newrdn
Sets the RDN of the moved entry. You must set this entry, even if the RDN remains the same.
newSuperior
Sets the DN of the new parent entry.
For example, to move the uid=user entry from ou=Engineering,ou=People,dc=example,dc=com to ou=Marketing,ou=People,dc=example,dc=com:
# ldapmodify -D "cn=Directory Manager" -W -p 389 -h server.example.com -x
dn: uid=user,ou=Engineering,ou=People,dc=example,dc=com
changetype: modrdn
newrdn: uid=user
newSuperior= ou=Marketing,ou=People,dc=example,dc=com
deleteOldRDN: 1
For details about the deleteOldRDN, see Section 3.1.6.3, “The deleteOldRDN Parameter”.
3.1.7. Using Special Characters
When using the command line, enclose characters that have a special meaning to the command-lineinterpreter, such as space ( ), asterisk (*), or backslash (\), with quotation marks. Depending on thecommand-line interpreter, use single or double quotation marks.
For example, to authenticate as the cn=Directory Manager user, enclose the user's DN in quotationmarks:
# ldapmodify -a -D "cn=Directory Manager" -W -p 389 -h server.example.com -x
Additionally, if a DN contains a comma in a component, escape it using a backslash. For example, to
CHAPTER 3. MANAGING DIRECTORY ENTRIES
95
Additionally, if a DN contains a comma in a component, escape it using a backslash. For example, toauthenticate as the uid=user,ou=People,dc=example.com Chicago, IL user:
# ldapmodify -a -D "cn=uid=user,ou=People,dc=example.com Chicago\, IL" \
-W -p 389 -h server.example.com -x
3.1.8. Using Binary Attributes
Certain attributes support binary values, such as the jpegPhoto attribute. When you add or update suchan attribute, the utility reads the value for the attribute from a file. To add or update such an attribute,you can use the ldapmodify utility.
For example, to add the jpegPhoto attribute to the uid=user,ou=People,dc=example,dc=com entry,and read the value for the attribute from the /home/user_name/photo.jpg file, enter:
# ldapmodify -D "cn=Directory Manager" -W -p 389 -h server.example.com -x
dn: uid=user,ou=People,dc=example,dc=com
changetype: modify
add: jpegPhoto
jpegPhoto:< file:///home/user_name/photo.jpg
IMPORTANT
Note that there is no space between : and <.
3.1.9. Updating an Entry in an Internationalized Directory
To use attribute values with languages other than English, associate the attribute's value with alanguage tag.
When using ldapmodify to update an attribute that has a language tag set, you must match the valueand language tag exactly or the operation will fail.
For example, to modify an attribute value that has the lang-fr language tag set, include the tag in the modify operation:
# ldapmodify -D "cn=Directory Manager" -W -p 389 -h server.example.com -x
dn: uid=user,ou=People,dc=example,dc=com
changetype: modify
replace: homePostalAddress;lang-fr
homePostalAddress;lang-fr: 34 rue de Seine
3.2. MANAGING ENTRIES USING THE DIRECTORY CONSOLE
You can use the Directory tab and the Property Editor on the Directory Server Console to add, modify,or delete entries individually.
To add several entries simultaneously, use the command-line utilities described in Section 3.1,“Managing Entries Using the Command Line”.
Section 3.2.1, “Creating a Root Entry”
Administration Guide
96
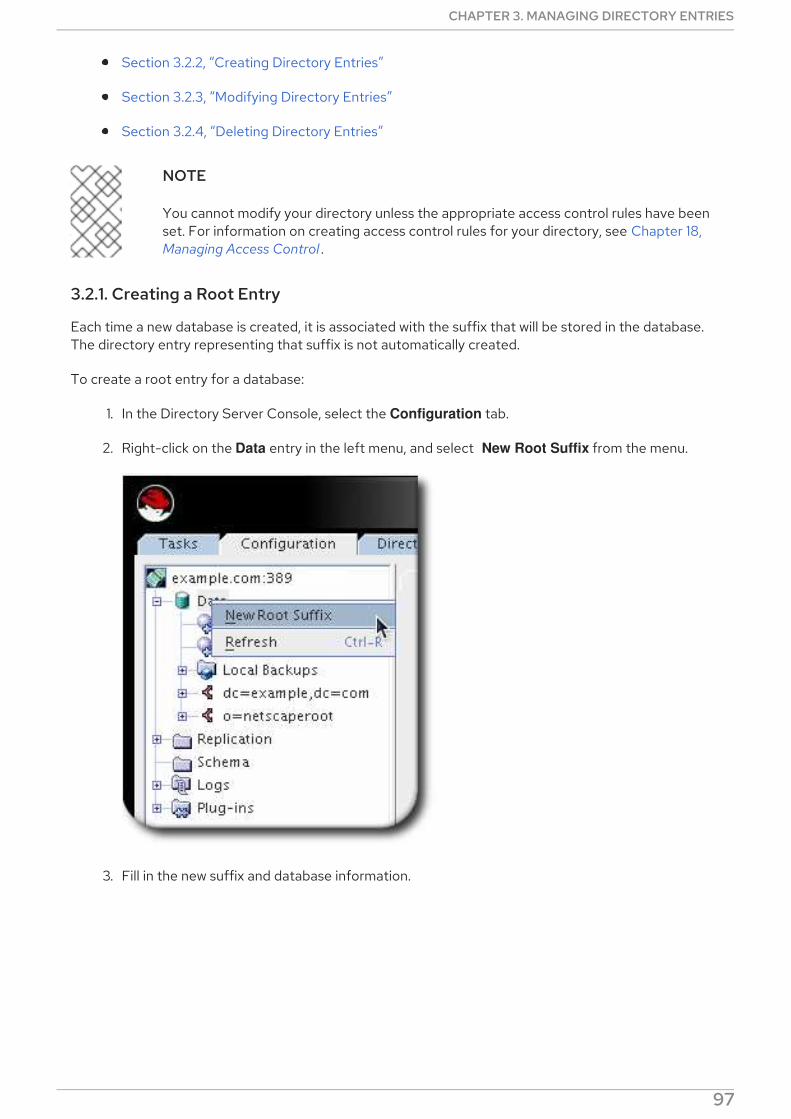
Section 3.2.2, “Creating Directory Entries”
Section 3.2.3, “Modifying Directory Entries”
Section 3.2.4, “Deleting Directory Entries”
NOTE
You cannot modify your directory unless the appropriate access control rules have beenset. For information on creating access control rules for your directory, see Chapter 18,Managing Access Control .
3.2.1. Creating a Root Entry
Each time a new database is created, it is associated with the suffix that will be stored in the database.The directory entry representing that suffix is not automatically created.
To create a root entry for a database:
1. In the Directory Server Console, select the Configuration tab.
2. Right-click on the Data entry in the left menu, and select New Root Suffix from the menu.
3. Fill in the new suffix and database information.
CHAPTER 3. MANAGING DIRECTORY ENTRIES
97
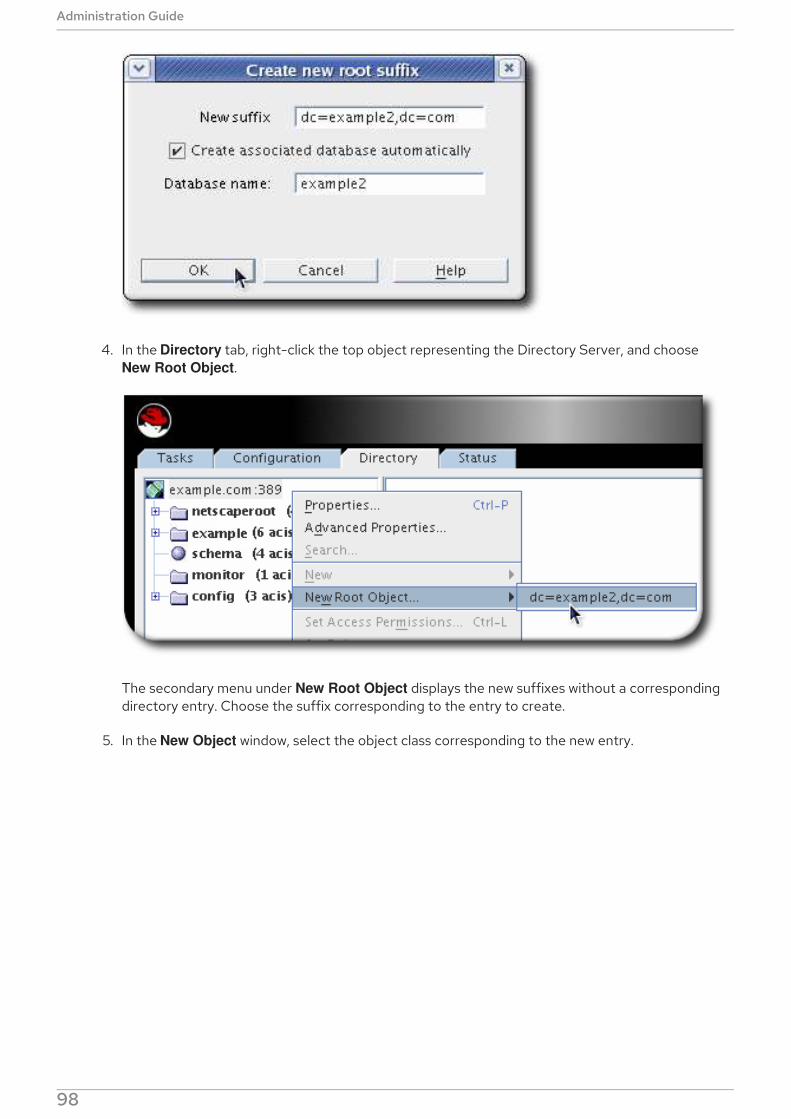
4. In the Directory tab, right-click the top object representing the Directory Server, and choose New Root Object.
The secondary menu under New Root Object displays the new suffixes without a correspondingdirectory entry. Choose the suffix corresponding to the entry to create.
5. In the New Object window, select the object class corresponding to the new entry.
Administration Guide
98
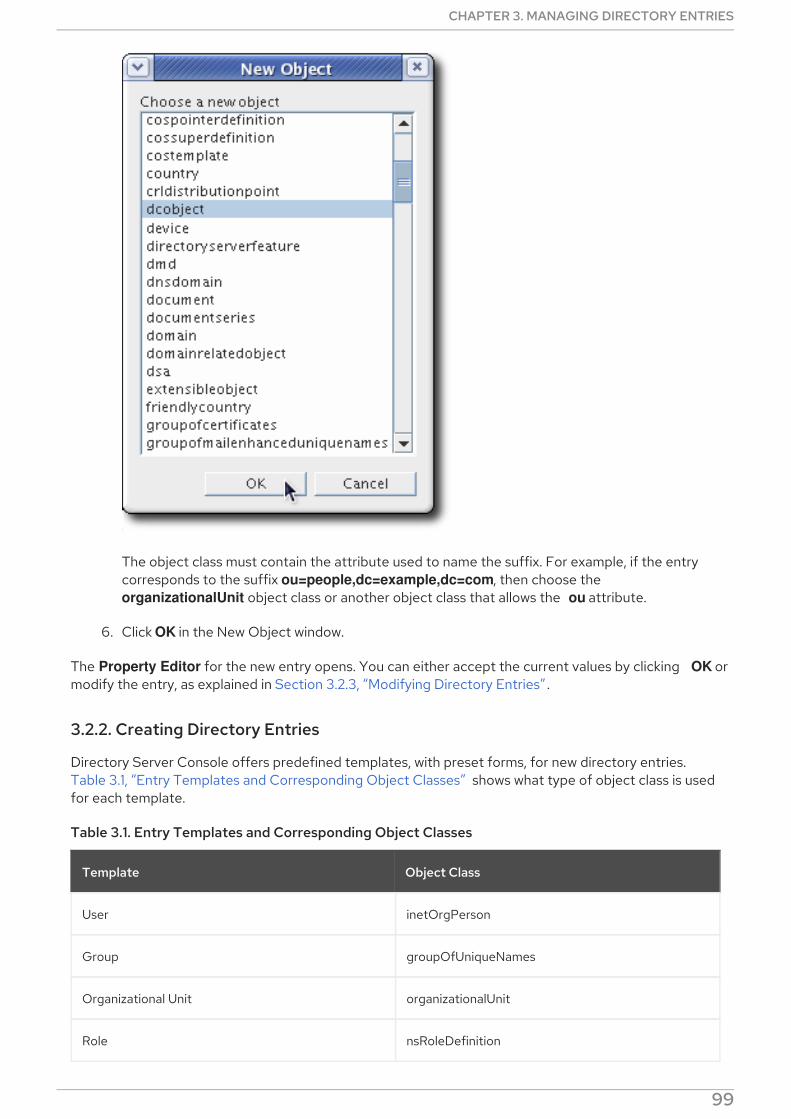
The object class must contain the attribute used to name the suffix. For example, if the entrycorresponds to the suffix ou=people,dc=example,dc=com, then choose the organizationalUnit object class or another object class that allows the ou attribute.
6. Click OK in the New Object window.
The Property Editor for the new entry opens. You can either accept the current values by clicking OK ormodify the entry, as explained in Section 3.2.3, “Modifying Directory Entries” .
3.2.2. Creating Directory Entries
Directory Server Console offers predefined templates, with preset forms, for new directory entries.Table 3.1, “Entry Templates and Corresponding Object Classes” shows what type of object class is usedfor each template.
Table 3.1. Entry Templates and Corresponding Object Classes
Template Object Class
User inetOrgPerson
Group groupOfUniqueNames
Organizational Unit organizationalUnit
Role nsRoleDefinition
CHAPTER 3. MANAGING DIRECTORY ENTRIES
99

Class of Service cosSuperDefinition
Template Object Class
Another type, Other allows any kind of entry to be created by allowing users to select the specific objectclasses and attributes to apply.
1. In the Directory Server Console, select the Directory tab.
2. In the left pane, right-click the main entry to add the new entry, and select the type of entry: User, Group, Organizational Unit, Role, Class of Service, or Other.
3. If the new entry type was Other, then a list of object classes opens. Select an object class fromthe list to define the new entry.
4. Supply a value for all the listed attributes. Required attributes are marked with an asterisk (*).
Administration Guide
100
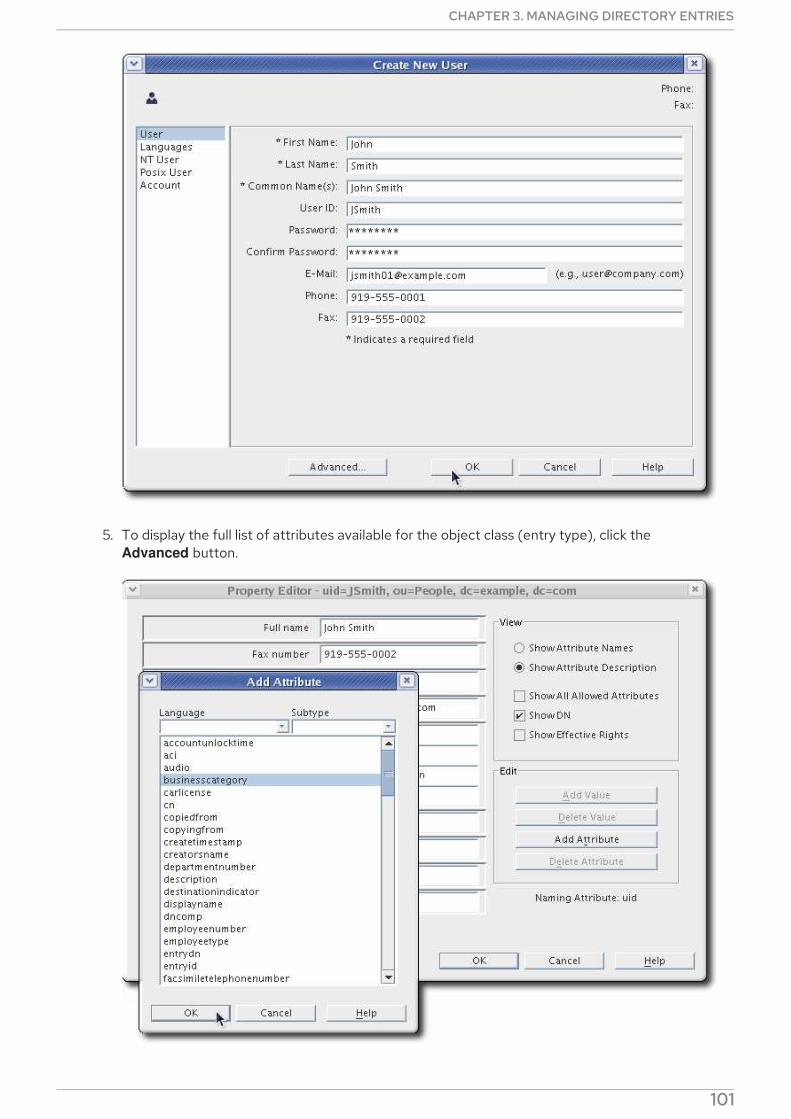
5. To display the full list of attributes available for the object class (entry type), click the Advanced button.
CHAPTER 3. MANAGING DIRECTORY ENTRIES
101

In the Property Editor, select any additional attributes, and fill in the attribute values.
6. Click OK to save the entry. The new entry is listed in the right pane.
3.2.3. Modifying Directory Entries
Modifying directory entries in Directory Server Console uses a dialog window called the Property Editor.The Property Editor contains the list of object classes and attributes belonging to an entry and can beused to edit the object classes and attributes belonging to that entry by adding and removing objectclasses, attributes and attribute values, and attribute subtypes.
Administration Guide
102
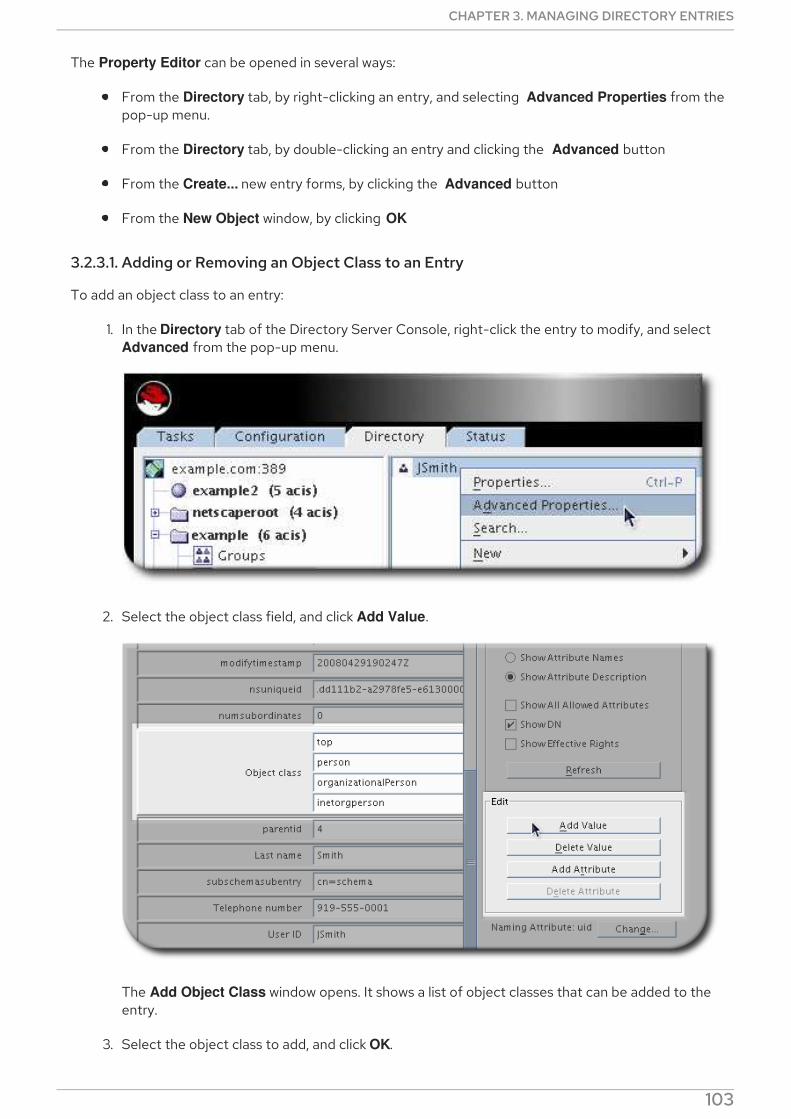
The Property Editor can be opened in several ways:
From the Directory tab, by right-clicking an entry, and selecting Advanced Properties from thepop-up menu.
From the Directory tab, by double-clicking an entry and clicking the Advanced button
From the Create... new entry forms, by clicking the Advanced button
From the New Object window, by clicking OK
3.2.3.1. Adding or Removing an Object Class to an Entry
To add an object class to an entry:
1. In the Directory tab of the Directory Server Console, right-click the entry to modify, and select Advanced from the pop-up menu.
2. Select the object class field, and click Add Value.
The Add Object Class window opens. It shows a list of object classes that can be added to theentry.
3. Select the object class to add, and click OK.
CHAPTER 3. MANAGING DIRECTORY ENTRIES
103
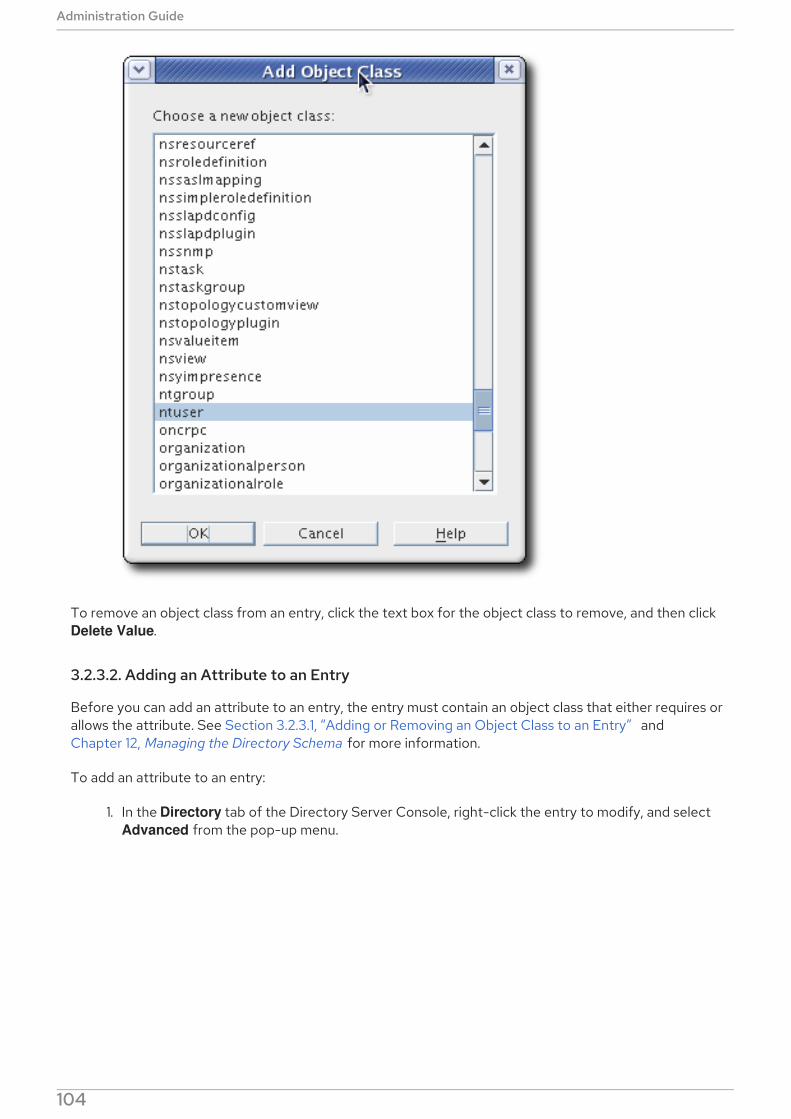
To remove an object class from an entry, click the text box for the object class to remove, and then click Delete Value.
3.2.3.2. Adding an Attribute to an Entry
Before you can add an attribute to an entry, the entry must contain an object class that either requires orallows the attribute. See Section 3.2.3.1, “Adding or Removing an Object Class to an Entry” andChapter 12, Managing the Directory Schema for more information.
To add an attribute to an entry:
1. In the Directory tab of the Directory Server Console, right-click the entry to modify, and select Advanced from the pop-up menu.
Administration Guide
104
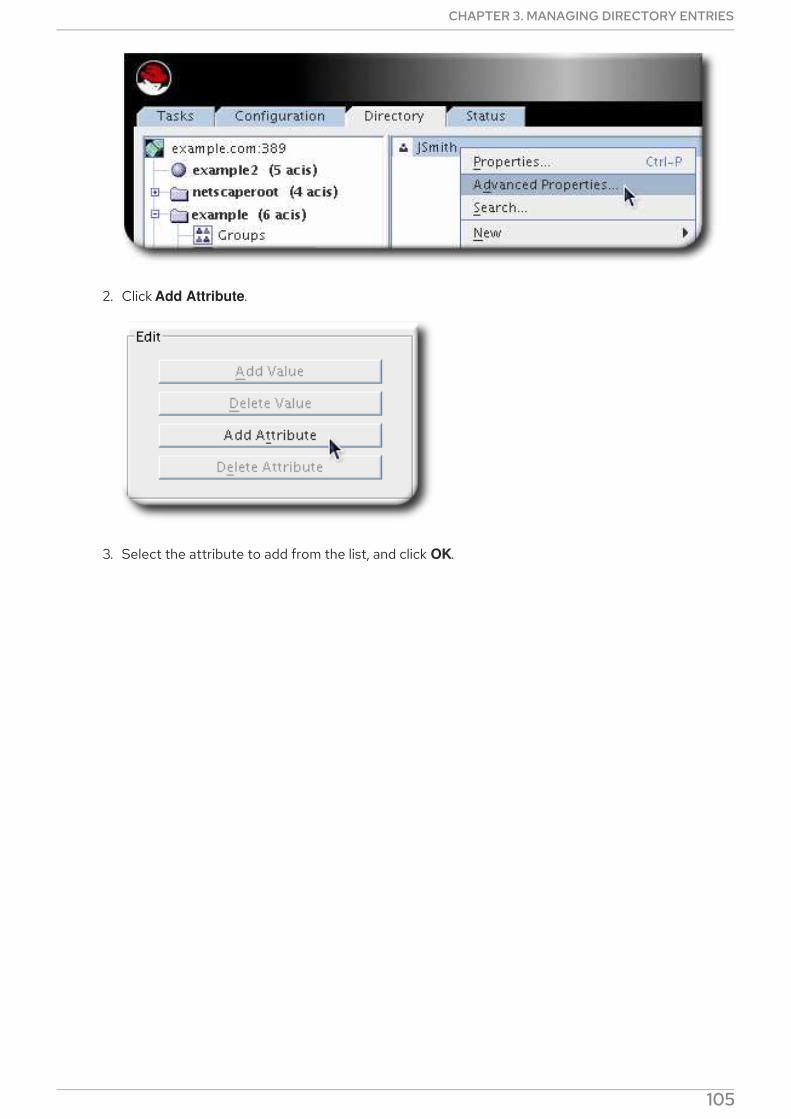
2. Click Add Attribute.
3. Select the attribute to add from the list, and click OK.
CHAPTER 3. MANAGING DIRECTORY ENTRIES
105

NOTE
If the attribute you want to add is not listed, add the object class containing theattribute first, then add the attribute. See Section 3.2.3.1, “Adding or Removingan Object Class to an Entry” for instructions on adding an object class. If you donot know which object class contains the attribute you need, look up the attributein the Red Hat Directory Server 10 Configuration, Command, and File Reference .,which lists the object classes which use that attribute.
4. Type in the value for the new attribute in the field to the right of the attribute name.
To remove the attribute and all its values from the entry, select Delete Attribute from the Edit menu.
3.2.3.3. Adding Very Large Attributes
The configuration attribute nsslapd-maxbersize sets the maximum size limit for LDAP requests. The
Administration Guide
106

The configuration attribute nsslapd-maxbersize sets the maximum size limit for LDAP requests. Thedefault configuration of Directory Server sets this attribute at 2 megabytes. LDAP add or modifyoperations will fail when attempting to add very large attributes that result in a request that is largerthan 2 megabytes. However, the limit is not applied to replication processes.
To add very large attributes, first change the setting for the nsslapd-maxbersize configurationattribute to a value larger than the largest LDAP request you will make.
When determining the value to set, consider all elements of the LDAP add and modify operations usedto add the attributes, not just the single attribute. There are a number of different factors to consider,including the following:
The size of each attribute name in the request
The size of the values of each of the attributes in the request
The size of the DN in the request
Some overhead, usually 10 kilobytes
One common issue that requires increasing the nsslapd-maxbersize setting is using attributes whichhold CRL values, such as certificateRevocationList, authorityRevocationList, and deltaRevocationList.
For further information about the nsslapd-maxbersize attribute, see the corresponding section in theRed Hat Directory Server Configuration, Command, and File Reference .
3.2.3.4. Adding Attribute Values
Multi-valued attributes allow multiple value for one attribute to be added to an entry.
1. In the Directory tab of the Directory Server Console, right-click the entry to modify, and select Advanced from the pop-up menu.
2. Select the attribute to which to add a value, and then click Add Value.
CHAPTER 3. MANAGING DIRECTORY ENTRIES
107
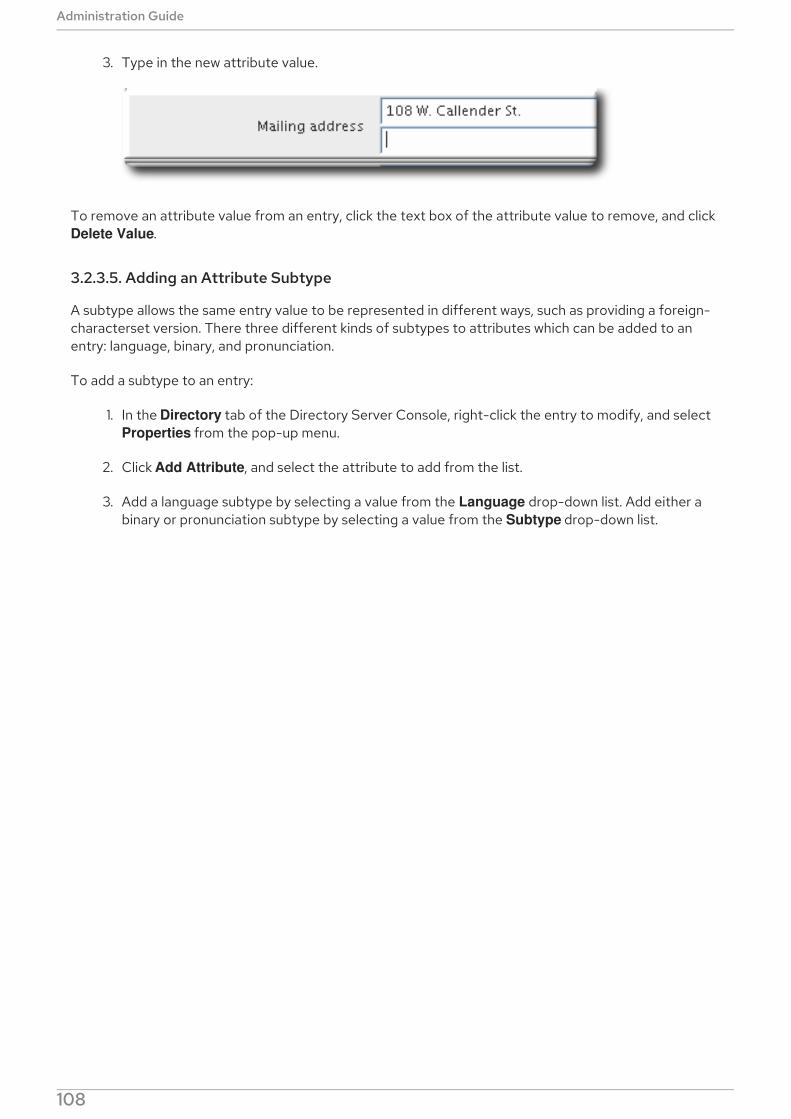
3. Type in the new attribute value.
To remove an attribute value from an entry, click the text box of the attribute value to remove, and click Delete Value.
3.2.3.5. Adding an Attribute Subtype
A subtype allows the same entry value to be represented in different ways, such as providing a foreign-characterset version. There three different kinds of subtypes to attributes which can be added to anentry: language, binary, and pronunciation.
To add a subtype to an entry:
1. In the Directory tab of the Directory Server Console, right-click the entry to modify, and select Properties from the pop-up menu.
2. Click Add Attribute, and select the attribute to add from the list.
3. Add a language subtype by selecting a value from the Language drop-down list. Add either abinary or pronunciation subtype by selecting a value from the Subtype drop-down list.
Administration Guide
108

Language Subtype
Sometimes a user's name can be more accurately represented in characters of a language other thanthe default language. For example, a user, Noriko, has a name in Japanese and prefers that her name berepresented by Japanese characters when possible. You can select Japanese as a language subtype forthe givenname attribute so that other users can search for her name in Japanese as well as English. Forexample:
givenname;lang-ja
To specify a language subtype for an attribute, add the subtype to the attribute name as follows:
attribute;lang-subtype:attribute value
attribute is the attribute being added to the entry and subtype is the two character abbreviation for thelanguage. The supported language subtypes are listed in Table D.1, “Supported Language Subtypes” .
Only one language subtype can be added per attribute instance in an entry. To assign multiple languagesubtypes, add another attribute instance to the entry, and then assign the new language subtype. Forexample, the following is illegal:
cn;lang-ja;lang-en-GB:value
Instead, use:
CHAPTER 3. MANAGING DIRECTORY ENTRIES
109

cn;lang-ja:ja-value
cn;lang-en-GB:value
Binary Subtype
Assigning the binary subtype to an attribute indicates that the attribute value is binary, such as usercertificates (usercertificate;binary).
Although you can store binary data within an attribute that does not contain the binary subtype (forexample, jpegphoto), the binary subtype indicates to clients that multiple variants of the attribute typemay exist.
Pronunciation Subtype
Assigning the pronunciation subtype to an attribute indicates that the attribute value is a phoneticrepresentation. The subtype is added to the attribute name as attribute;phonetic. This subtype iscommonly used in combination with a language subtype for languages that have more than onealphabet, where one is a phonetic representation.
This subtype is useful with attributes that are expected to contain user names, such as cn or givenname. For example, givenname;lang-ja;phonetic indicates that the attribute value is thephonetic version of the user's Japanese name.
3.2.4. Deleting Directory Entries
1. In the Directory Server Console, select the Directory tab.
2. Right-click the entry to delete, and select Delete from the right-click menu.
Administration Guide
110

WARNING
The server deletes the entry or entries immediately. There is no way to undo thedelete operation.
CHAPTER 3. MANAGING DIRECTORY ENTRIES
111

CHAPTER 4. TRACKING MODIFICATIONS TO DIRECTORYENTRIES
It can be useful to track when changes are made to entries. There are two aspects of entry modificationsthat the Directory Server tracks:
Using change sequence numbers to track changes to the database. This is similar to changesequence numbers used in replication and synchronization. Every normal directory operationtriggers a sequence number.
Assigning creation and modification information. These attributes record the names of the userwho created and most recently modified an entry, as well as the timestamps of when it wascreated and modified.
NOTE
The entry USN, modify time and name, and create time and name are all operationalattributes and are not returned in a regular ldapsearch. For details on running a searchfor operational attributes, see Section 14.5.7, “Searching for Operational Attributes” .
4.1. TRACKING MODIFICATIONS TO THE DATABASE THROUGHUPDATE SEQUENCE NUMBERS
The USN Plug-in provides a way for LDAP clients to know that something — anything — in the databasehas changed.
4.1.1. An Overview of the Entry Sequence Numbers
When the USN Plug-in is enabled, update sequence numbers (USNs) are sequential numbers that areassigned to an entry whenever a write operation is performed against the entry. (Write operationsinclude add, modify, modrdn, and delete operations. Internal database operations, like exportoperations, are not counted in the update sequence.) A USN counter keeps track of the most recentlyassigned USN.
4.1.1.1. Local and Global USNs
The USN is evaluated globally, for the entire database, not for the single entry. The USN is similar to thechange sequence number for replication and synchronization, in that it simply ticks upward to track anychanges in the database or directory. However, the entry USN is maintained separately from the CSNs,and USNs are not replicated.
The entry shows the change number for the last modification to that entry in the entryUSN operationalattribute. (For details on running a search for operational attributes, see Section 14.5.7, “Searching forOperational Attributes”.)
Example 4.1. Example Entry USN
dn: uid=jsmith,ou=People,dc=example,dc=com
mail: [email protected]
uid: jsmith
givenName: John
objectClass: top
objectClass: person
Administration Guide
112
objectClass: organizationalPerson
objectClass: inetorgperson
sn: Smith
cn: John Smith
userPassword: {SSHA}EfhKCI4iKl/ipZMsWlITQatz7v2lUnptxwZ/pw==
entryusn: 1122
The USN Plug-in has two modes, local mode and global mode:
In local mode, each back end database has an instance of the USN Plug-in with a USN counterspecific to that back end database. This is the default setting.
In global mode, there is a global instance of the USN Plug-in with a global USN counter thatapplies to changes made to the entire directory.
When the USN Plug-in is set to local mode, results are limited to the local back end database. When theUSN Plug-in is set to global mode, the returned results are for the entire directory.
The root DSE shows the most recent USN assigned to any entry in the database in the lastusn attribute.When the USN Plug-in is set to local mode, so each database has its own local USN counter, the lastUSN shows both the database which assigned the USN and the USN:
lastusn;database_name:USN
For example:
lastusn;example1: 2130
lastusn;example2: 2070
In global mode, when the database uses a shared USN counter, the lastUSN attribute shows the latestUSN only:
lastusn: 4200
4.1.1.2. Importing USN Entries
When entries are imported, the USN Plug-in uses the nsslapd-entryusn-import-initval attribute tocheck if the entry has an assigned USN. If the value of nsslapd-entryusn-import-initval is numerical,the imported entry will use this numerical value as the entry's USN. If the value of nsslapd-entryusn-
import-initval is not numerical, the USN Plug-in will use the value of the lastUSN attribute andincrement it by one as the USN for the imported entry.
4.1.2. Configuring the USN Plug-in
The USN Plug-in must be enabled for USNs to be recorded on entries, as described in Section 1.9.2.2,“Enabling Plug-ins in the Directory Server Console”. The plug-in can be enabled through theDirectory Server Console or through the command line. For example:
# ldapmodify -D "cn=Directory Manager" -W -x
dn: cn=USN,cn=plugins,cn=config
changetype: modify
CHAPTER 4. TRACKING MODIFICATIONS TO DIRECTORY ENTRIES
113
replace: nsslapd-pluginEnabled
nsslapd-pluginEnabled: on
Then restart the server to apply the changes.
4.1.3. Enabling Global USN
With the default settings, Directory Server uses unique update sequence numbers (USN) for each backend database. To enable unique USNs across all back end databases:
1. Enable the USN plug-in. See Section 4.1.2, “Configuring the USN Plug-in” .
2. Set the nsslapd-entryusn-global parameter to on:
# ldapmodify -D "cn=Directory Manager" -W -x
dn: cn=config
changetype: modify
replace: nsslapd-entryusn-global
nsslapd-entryusn-global: on
4.1.4. Cleaning up USN Tombstone Entries
The USN Plug-in moves entries to tombstone entries when the entry is deleted. If replication is enabled,then separate tombstone entries are kept by both the USN and Replication Plug-ins. Both tombstoneentries are deleted by the replication process, but for server performance, it can be beneficial to deletethe USN tombstones before converting a server to a replica or to free memory for the server.
The usn-tombstone-cleanup.pl command deletes USN tombstone entries for a specific database backend or specific suffix. Optionally, it can delete all of tombstone entries up to a certain USN. For example:
# /usr/lib64/dirsrv/instance/usn-tombstone-cleanup.pl -D "cn=Directory Manager" -w secret -s
"ou=people,dc=example,dc=com" -m 1100
Either the back end must be specified using the -n option or the suffix, using the -s option. If both aregiven, then the suffix in the -s option is used.
The options for usn-tombstone-cleanup.pl command are listed in Table 4.1, “usn-tombstone-cleanup.pl Options”. More details for this tool are in the Configuration, Command, and File Reference.
Table 4.1. usn-tombstone-cleanup.pl Options
Option Description
-D rootdn Gives the user DN with root permissions, such as Directory Manager. Thedefault is the DN of the Directory Manager, which is read from the nsslapd-root attribute under cn=config.
-m maximum_USN Sets the upper bound for entries to delete. All tombstone entries with an entryUSN value up to the specified maximum (inclusive) are deleted, butnot past that USN value. If no maximum USN value is set, then all back endtombstone entries are deleted.
-n backendInstance Gives the name of the database containing the entries to clean (delete).
Administration Guide
114

-s suffix Gives the name of the suffix containing the entries to clean (delete).
-w password The password associated with the user DN.
Option Description
4.2. TRACKING ENTRY MODIFICATIONS THROUGH OPERATIONALATTRIBUTES
Using the default settings, Directory Server tracks the following operational attributes for every entry:
creatorsName: The distinguished name (DN) of the user who initially created the entry.
createTimestamp: The times stamp in Greenwich Mean Time (GMT) format when the entry wascreated.
modifiersName: The distinguished name of the user who last modified the entry.
modifyTimestamp: The time stamp in the GMT format for when the entry was last modified.
Note that operational attributes are not returned in default searches. You must explicitly request theseattributes in queries. For details, see Section 14.5.7, “Searching for Operational Attributes” .
IMPORTANT
Red Hat recommends not disabling tracking these operational attributes. If disabled,entries do not get a unique ID assigned in the nsUniqueID attribute and replication doesnot work.
4.2.1. Entries Modified or Created by a Database Link
When an entry is created or modified over a database link, the creatorsName and modifiersName
attributes contain the name of the user who is granted proxy authorization rights on the remote server.In this case, the attributes do not display the original creator or latest modifier of the entry. However, theaccess logs show both the proxy user (dn) and the original user (authzid). For example:
[23/May/2011:18:13:56.145747965 +051800] conn=1175 op=0 BIND dn="cn=proxy
admin,ou=People,dc=example,dc=com" method=128 version=3
[23/May/2011:18:13:56.575439751 +051800] conn=1175 op=0 RESULT err=0 tag=97 nentries=0
etime=0 dn="cn=proxy admin,ou=people,dc=example,dc=com"
[23/May/2011:18:13:56.744359706 +051800] conn=1175 op=1 SRCH base="dc=example,dc=com"
scope=2 filter="(objectClass=*)" attrs=ALL
authzid="uid=user_name,ou=People,dc=example,dc=com"
For further details about proxy authorization, see Section 2.3.1.2.2, “Providing Bind Credentials” .
4.2.2. How to Enable Tracking Of Modifications Using the Command Line
Modification tracking is enabled by default, and Red Hat recommends not disabling this feature. To re-enable tracking of entry modifications using the command line:
1. Set the nsslapd-lastmod to on:
CHAPTER 4. TRACKING MODIFICATIONS TO DIRECTORY ENTRIES
115
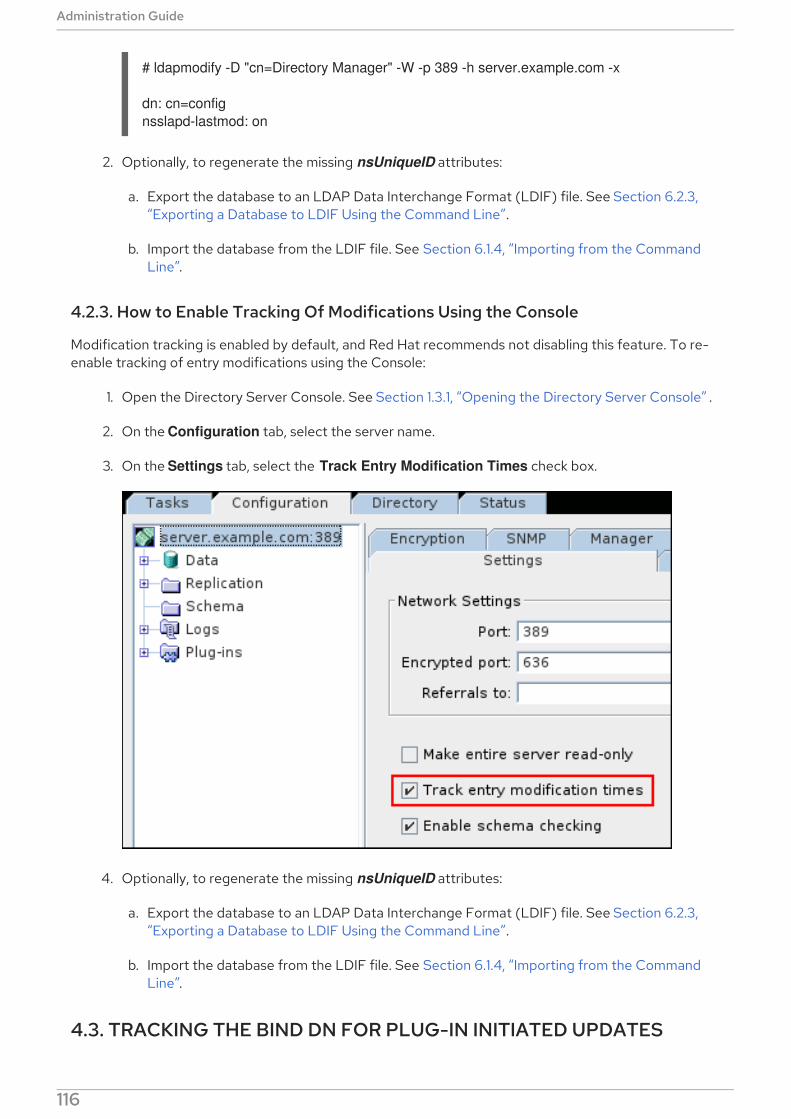
# ldapmodify -D "cn=Directory Manager" -W -p 389 -h server.example.com -x
dn: cn=config
nsslapd-lastmod: on
2. Optionally, to regenerate the missing nsUniqueID attributes:
a. Export the database to an LDAP Data Interchange Format (LDIF) file. See Section 6.2.3,“Exporting a Database to LDIF Using the Command Line”.
b. Import the database from the LDIF file. See Section 6.1.4, “Importing from the CommandLine”.
4.2.3. How to Enable Tracking Of Modifications Using the Console
Modification tracking is enabled by default, and Red Hat recommends not disabling this feature. To re-enable tracking of entry modifications using the Console:
1. Open the Directory Server Console. See Section 1.3.1, “Opening the Directory Server Console” .
2. On the Configuration tab, select the server name.
3. On the Settings tab, select the Track Entry Modification Times check box.
4. Optionally, to regenerate the missing nsUniqueID attributes:
a. Export the database to an LDAP Data Interchange Format (LDIF) file. See Section 6.2.3,“Exporting a Database to LDIF Using the Command Line”.
b. Import the database from the LDIF file. See Section 6.1.4, “Importing from the CommandLine”.
4.3. TRACKING THE BIND DN FOR PLUG-IN INITIATED UPDATES
One change to an entry can trigger other, automatic changes across the directory tree. When a user is
Administration Guide
116

One change to an entry can trigger other, automatic changes across the directory tree. When a user isdeleted, for example, that user is automatically removed from any groups it belonged to by theReferential Integrity Postoperation plug-in.
The initial action is shown in the entry as being performed by whatever user account is bound to theserver, but all related updates (by default) are shown as being performed by the plug-in, with noinformation about which user initiated that update. For example, using the MemberOf Plug-in to updateuser entries with group membership, the update to the group account is shown as being performed bythe bound user, while the edit to the user entry is shown as being performed by the MemberOf Plug-in:
dn: cn=my_group,ou=groups,dc=example,dc=com
modifiersname: uid=jsmith,ou=people,dc=example,dc=com
dn: uid=bjensen,ou=people,dc=example,dc=com
modifiersname: cn=memberOf plugin,cn=plugins,cn=config
The nsslapd-plugin-binddn-tracking attribute allows the server to track which user originated anupdate operation, as well as the internal plug-in which actually performed it. The bound user is shown inthe modifiersname and creatorsname operational attributes, while the plug-in which performed it isshown in the internalModifiersname and internalCreatorsname operational attributes. For example:
dn: uid=bjensen,ou=people,dc=example,dc=com
modifiersname: uid=jsmith,ou=people,dc=example,dc=com
internalModifiersname: cn=memberOf plugin,cn=plugins,cn=config
The nsslapd-plugin-binddn-tracking attribute tracks and maintains the relationship between thebound user and any updates performed for that connection.
NOTE
The internalModifiersname and internalCreatorsname attributes always show a plug-inas the identity. This plug-in could be an additional plug-in, such as the MemberOf Plug-in.If the change is made by the core Directory Server, then the plug-in is the database plug-in, cn=ldbm database,cn=plugins,cn=config.
The nsslapd-plugin-binddn-tracking attribute is disabled by default. To allow the server to trackoperations based on bind DN, enable that attribute using ldapmodify:
# ldapmodify -D "cn=Directory Manager" -W -p 389 -h server.example.com -x
dn: cn=config
changetype: modify
replace: nsslapd-plugin-binddn-tracking
nsslapd-plugin-binddn-tracking: on
4.4. TRACKING PASSWORD CHANGE TIMES
Password change operations are normally treated as any other modification to an entry, so the updatetime is recorded in the lastModified operational attribute. However, there can be times when the timeof the last password change needs to be recorded separately, to make it easier to update passwords inActive Directory synchronization or to connect with other LDAP clients.
The passwordTrackUpdateTime attribute within the password policy tells the server to record a
CHAPTER 4. TRACKING MODIFICATIONS TO DIRECTORY ENTRIES
117
timestamp for the last time that the password was updated for an entry. The password change timeitself is stored as an operational attribute on the user entry, pwdUpdateTime (which is separate fromthe modifyTimestamp or lastModified operational attributes).
The passwordTrackUpdateTime attribute can be set as part of the global password policy or on asubtree or user-level policy, depending on what clients need to access the password change time.Setting password policies is described in Section 19.4, “Managing the Password Policy” .
Administration Guide
118
CHAPTER 5. MAINTAINING REFERENTIAL INTEGRITY
Referential Integrity is a database mechanism that ensures relationships between related entries aremaintained. In the Directory Server, the Referential Integrity can be used to ensure that an update toone entry in the directory is correctly reflected in any other entries that reference to the updated entry.
For example, if a user's entry is removed from the directory and Referential Integrity is enabled, theserver also removes the user from any groups of which the user is a member. If Referential Integrity isnot enabled, the user remains a member of the group until manually removed by the administrator. Thisis an important feature if you are integrating the Directory Server with other products that rely on thedirectory for user and group management.
5.1. HOW REFERENTIAL INTEGRITY WORKS
When the Referential Integrity Postoperation plug-in is enabled, it performs integrity updates onspecified attributes immediately after a delete or rename operation. By default, the ReferentialIntegrity Postoperation plug-in is disabled.
NOTE
Enable the Referential Integrity Postoperation plug-in only on one supplier replica in amulti-master replication environment, because the operations generated by the plug-inwill be replicated. If you enable the plug-in on multiple masters, the servers have tomanage and reapply already performed operations.
When a user or group entry is deleted, updated, renamed, or moved within the directory, the operation islogged to the Referential Integrity log file. For the distinguished names (DN) in the log file,Directory Server searches and updates in intervals the attributes set in the plug-in configuration:
For entries, marked in the log file as deleted, the corresponding attribute in the directory isdeleted.
For entries, marked in the log file as updated, the corresponding attribute in the directory isupdated.
For entries, marked in the log file as renamed or moved, the value of the correspondingattribute in the directory is renamed.
By default, when the Referential Integrity Postoperationplug-in is enabled, it performs integrityupdates on the member, uniquemember, owner, and seeAlso attributes immediately after a delete orrename operation. However, the behavior of the Referential Integrity Postoperation plug-in can beconfigured to suit the needs of the directory in several different ways:
Record Referential Integrity updates in the replication change log.
Modify the update interval.
Select the attributes to which to apply Referential Integrity.
Disable Referential Integrity.
All attributes used in referential integrity must be indexed for presence and equality; not indexing thoseattributes results poor server performance for modify and delete operations.
CHAPTER 5. MAINTAINING REFERENTIAL INTEGRITY
119
nsIndexType: pres
nsIndexType: eq
nsIndexType: sub
See Section 13.2, “Creating Standard Indexes” for more information about checking and creatingindexes.
5.2. USING REFERENTIAL INTEGRITY WITH REPLICATION
There are certain limitations when using the Referential Integrity Postoperation plug-in in a replicationenvironment:
Never enable it on a dedicated consumer server (a server that contains only read-only replicas).
Never enable it on a server that contains a combination of read-write and read-only replicas.
It is possible to enable it on a supplier server that contains only read-write replicas.
With multi-master replication, enable the plug-in on just one supplier.
If the replication environment satisfies the all of those condition, you can enable the ReferentialIntegrity Postoperation plug-in.
1. Enable the Referential Integrity Postoperation plug-in as described in Section 5.3, “Enablingand Disabling Referential Integrity”.
2. Configure the plug-in to record any integrity updates in the changelog.
3. Ensure that the Referential Integrity Postoperation plug-in is disabled on all consumerservers.
NOTE
Because the supplier server sends any changes made by the ReferentialIntegrity Postoperation Integrity plug-in to consumer servers, it is unnecessaryto run the Referential Integrity Postoperation plug-in on consumer servers.
5.3. ENABLING AND DISABLING REFERENTIAL INTEGRITY
5.3.1. Enabling and Disabling Referential Integrity from the Command Line
To enable or disable the Referential Integrity Postoperation plug-in, set the nsslapd-pluginEnabled
parameter in the plug-in's configuration entry:
For example, to enable the plug-in:
1. Set the nsslapd-pluginEnabled parameter to on:
# ldapmodify -D "cn=Directory Manager" -W -p 389 -h server.example.com -x
dn: cn=,cn=plugins,cn=config
changetype: modify
replace: nsslapd-pluginEnabled
nsslapd-pluginEnabled: on
Administration Guide
120
2. Restart the instance:
# systemctl restart dirsrv@instance_name
5.3.2. Enabling and Disabling Referential Integrity in the Console
To enable the Referential Integrity Postoperation plug-in, follow the procedure in Section 1.9.2.2,“Enabling Plug-ins in the Directory Server Console”.
5.4. MODIFYING THE UPDATE INTERVAL
By default, the server performs Referential Integrity updates immediately after a delete or a modrdn
operation. Depending on the amount of operations, this can cause a performance impact. To reduce theperformance impact, you can increase the amount of time between updates.
Set the interval in seconds. Alternatively, you can set the following values:
0: The check for referential integrity is performed immediately.
-1: No check for referential integrity is performed.
IMPORTANT
If you set the update interval to 0, you can only enable the plug-in on all masters in amulti-master replication environment if you also set their Referential IntegrityPostoperation plug-in's update interval to 0. However, if you configure a positive valueon one master, you must not enable the plug-in on any other master to preventreplication loops and directory inconsistencies.
If you want to enable the plug-in in a multi-master replication environment, Red Hatrecommends setting the update interval to 0 and to enable the plug-in on all masters.
5.4.1. Modifying the Update Interval Using the Command Line
To set the update interval using the command line to, for example, to update immediately:
1. Set the interval in seconds in the referint-update-delay parameter:
# ldapmodify -D "cn=Directory Manager" -W -x
dn: cn=referential integrity postoperation,cn=plugins,cn=config
changetype: modify
replace: referint-update-delay
referint-update-delay: 0
2. Restart the Directory Server instance:
# systemctl restart dirsrv@instance_name
Referential Integrity can only be enabled on one master. If you set the interval to 0, Directory Servercleans up references replicates these changes to all consumers immediately. If you set the interval to avalue greater than 0, and the master who has Referential Integrity enabled is offline, the references arenot cleaned up before this master is up again.
CHAPTER 5. MAINTAINING REFERENTIAL INTEGRITY
121
5.4.2. Modifying the Update Interval using the Console
To set the update interval using the Console:
1. Open the Property Editor in the Referential Integrity Postoperation plug-in's configuration.For details, see Section 1.9.3.2, “Configuring Plug-ins using the Console” .
2. Set the interval in seconds in the referint-update-delay parameter.
3. Restart the Directory Server instance. See Section 1.4.2, “Starting and Stopping aDirectory Server Instance Using the Console”.
5.5. MODIFYING THE ATTRIBUTE LIST
By default, the Referential Integrity plug-in is set up to check for and update the member, uniquemember, owner, and seeAlso attributes. You can add or delete attributes to be updated usingthe command line or the Console.
NOTE
Attributes set in the Referential Integrity plug-in's parameter list, must have equalityindexing on all databases. Otherwise, the plug-in scans every entry of the database formatching the deleted or modified DN. This can have a significant performance impact.For details about checking and creating indexes, see Section 13.2, “Creating StandardIndexes”.
5.5.1. Modifying the Attribute List Using the Console
1. Open the Property Editor in the Referential Integrity Postoperation plug-in's configuration.For details, see Section 1.9.3.2, “Configuring Plug-ins using the Console” .
2. Update the attributes in the referint-membership-attr attribute.
You can add additional values or delete existing ones using the Add Value and Delete Value
buttons.
3. Restart the Directory Server instance. See Section 1.4.2, “Starting and Stopping aDirectory Server Instance Using the Console”.
5.5.2. Configuring the Attribute List from the Command Line
1. Update the attribute list:
To add an additional attribute that should be checked and updated by the plug-in:
# ldapmodify -D "cn=Directory Manager" -W -x
dn: cn=referential integrity postoperation,cn=plugins,cn=config
add: referint-membership-attr
referint-membership-attr: attribute_name
To delete an attribute that should no longer be checked and updated by the plug-in:
# ldapmodify -D "cn=Directory Manager" -W -x
Administration Guide
122

dn: cn=referential integrity postoperation,cn=plugins,cn=config
delete: referint-membership-attr
referint-membership-attr: attribute_name
2. Restart the Directory Server instance:
# systemctl restart dirsrv@instance_name
5.6. CONFIGURING SCOPE FOR THE REFERENTIAL INTEGRITY
If an entry is deleted, the references to it are deleted or modified to reflect the change. When thisupdate is applied to all entries and all groups, it can impact performance and prevents flexibility ofrestricting the referential integrity to selected subtrees. Defining a scope addresses this problem.
For example, there may be one suffix, dc=example,dc=com, containing two subtrees: ou=active
users,dc=example,dc=com and ou=deleted users,dc=example,dc=com. Entries in deleted users
should not be handled for purposes of referential integrity.
The following three attributes can be used to define the scope in the Referential IntegrityPostoperation plug-in configuration.
The nsslapd-pluginEntryScope attribute
This multi-value attribute controls the scope of the entry that is deleted or renamed. It defines thesubtree in which the Referential Integrity Postoperation plug-in looks for the delete or renameoperations of a user entry. If a user is deleted or renamed that does not exist under the definedsubtree, the plug-in ignores the operation. The attribute allows you to specify to which branches ofthe database the plug-in should apply the operation.
nsslapd-pluginEntryScope: dn
The nsslapd-pluginExcludeEntryScope attribute
This attribute also controls the scope of the entry that is deleted or renamed. It defines the subtreein which the Referential Integrity Postoperation plug-in ignores any operations for deleting orrenaming a user.
nsslapd-pluginExcludeEntryScope: dn
The nsslapd-pluginContainerScope attribute
This attribute controls the scope of groups in which references are updated. After a user is deleted,the Referential Integrity Postoperation plug-in looks for the groups to which the user belongs andupdates them accordingly. This attribute specifies which branch the plug-in searches for the groupsto which the user belongs. The Referential Integrity Postoperation plug-in only updates groupsthat are under the specified container branch, and leaves all other groups not updated.
nsslapd-pluginContainerScope: dn
CHAPTER 5. MAINTAINING REFERENTIAL INTEGRITY
123
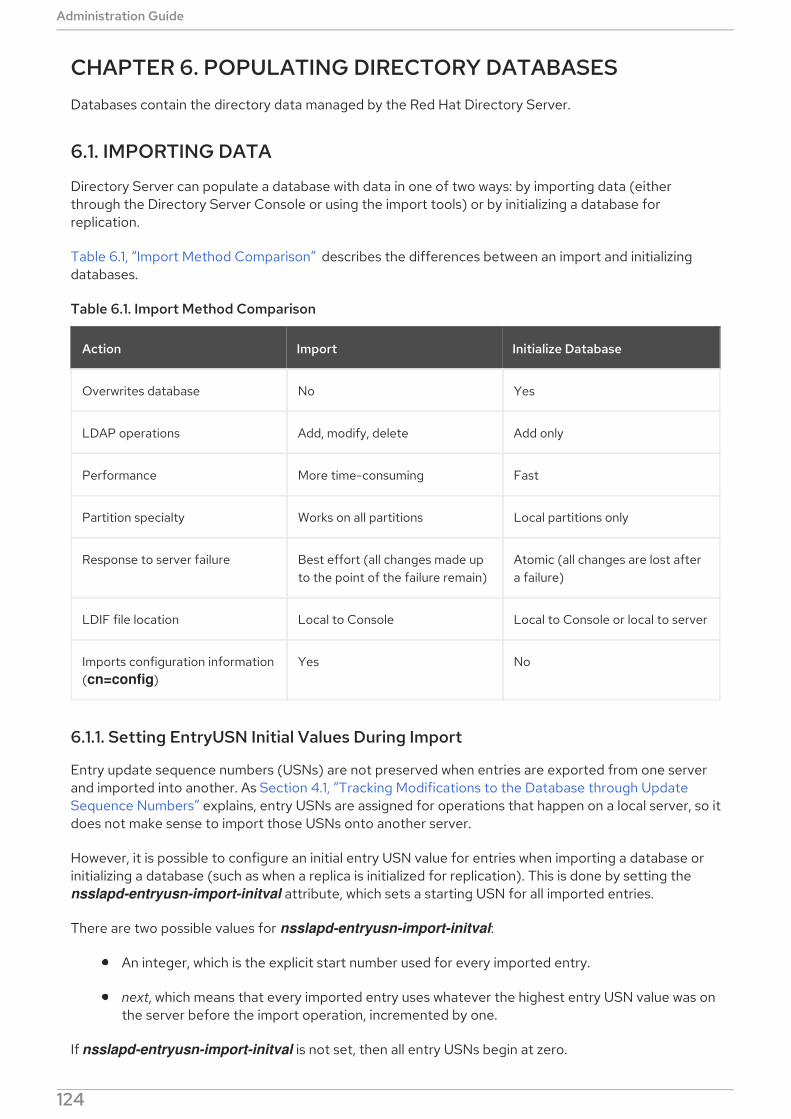
CHAPTER 6. POPULATING DIRECTORY DATABASES
Databases contain the directory data managed by the Red Hat Directory Server.
6.1. IMPORTING DATA
Directory Server can populate a database with data in one of two ways: by importing data (eitherthrough the Directory Server Console or using the import tools) or by initializing a database forreplication.
Table 6.1, “Import Method Comparison” describes the differences between an import and initializingdatabases.
Table 6.1. Import Method Comparison
Action Import Initialize Database
Overwrites database No Yes
LDAP operations Add, modify, delete Add only
Performance More time-consuming Fast
Partition specialty Works on all partitions Local partitions only
Response to server failure Best effort (all changes made upto the point of the failure remain)
Atomic (all changes are lost aftera failure)
LDIF file location Local to Console Local to Console or local to server
Imports configuration information(cn=config)
Yes No
6.1.1. Setting EntryUSN Initial Values During Import
Entry update sequence numbers (USNs) are not preserved when entries are exported from one serverand imported into another. As Section 4.1, “Tracking Modifications to the Database through UpdateSequence Numbers” explains, entry USNs are assigned for operations that happen on a local server, so itdoes not make sense to import those USNs onto another server.
However, it is possible to configure an initial entry USN value for entries when importing a database orinitializing a database (such as when a replica is initialized for replication). This is done by setting the nsslapd-entryusn-import-initval attribute, which sets a starting USN for all imported entries.
There are two possible values for nsslapd-entryusn-import-initval:
An integer, which is the explicit start number used for every imported entry.
next, which means that every imported entry uses whatever the highest entry USN value was onthe server before the import operation, incremented by one.
If nsslapd-entryusn-import-initval is not set, then all entry USNs begin at zero.
Administration Guide
124

For example, if the highest value on the server is 1000 before the import or initialization operation, andthe nsslapd-entryusn-import-initval value is next, then every imported entry is assigned a USN of 1001:
# ldapsearch -D "cn=Directory Manager" -W -p 389 -h server.example.com -x "(cn=*)" entryusn
dn: dc=example,dc=com
entryusn: 1001
dn: ou=Accounting,dc=example,dc=com
entryusn: 1001
dn: ou=Product Development,dc=example,dc=com
entryusn: 1001
...
dn: uid=jsmith,ou=people,dc=example,dc=com
entryusn: 1001
...
To set an initial value for entry USNs, simply add the nsslapd-entryusn-import-initval attribute to theserver into which data are being imported or to the master server which will perform the initialization.
# ldapmodify -D "cn=Directory Manager" -W -x -D "cn=directory manager" -W -p 389 -h
server.example.com -x
dn: cn=config
changetype: modify
add: nsslapd-entryusn-import-initval
nsslapd-entryusn-import-initval: next
NOTE
In multi-master replication, the nsslapd-entryusn-import-initval attribute is not
replicated between servers. This means that the value must be set specifically onwhichever supplier server is being used to initialize a replica.
For example, if Supplier1 has nsslapd-entryusn-import-initval set to next and is used toinitialize a replica, then the entry USNs for imported entries have the highest value plusone. If Supplier2 does not have nsslapd-entryusn-import-initval set and is used toinitialize a replica, then all entry USNs for imported entries begin at zero — even ifSupplier1 and Supplier 2 have a multi-master replication agreement between them.
6.1.2. Importing a Database from the Console
When performing an import operation from the Directory Server Console, an ldapmodify operation isexecuted to append data, as well as to modify and delete entries. The operation is performed on all ofthe databases managed by the Directory Server and on remote databases to which the Directory Serverhas a configured database link.
Import operations can be run on a server instance that is local to the Directory Server Console or on adifferent host machine (a remote import operation).
You must be logged in as the Directory Manager in order to perform an import.
NOTE
CHAPTER 6. POPULATING DIRECTORY DATABASES
125
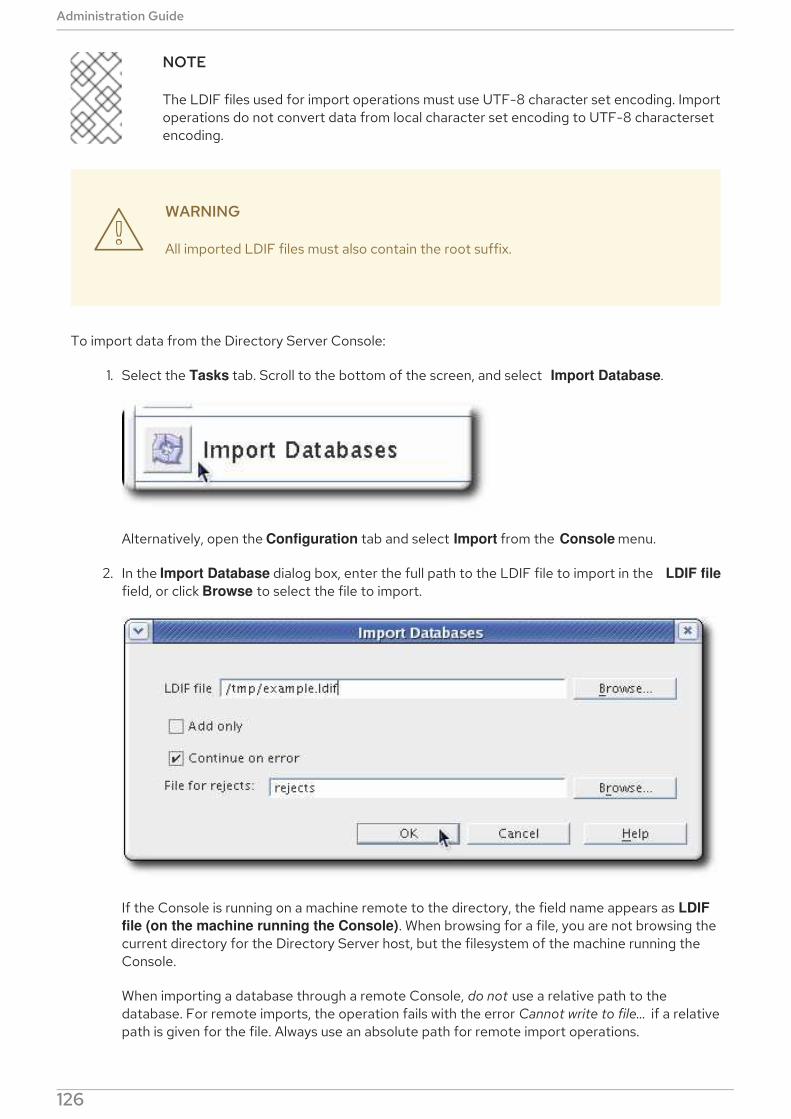
NOTE
The LDIF files used for import operations must use UTF-8 character set encoding. Importoperations do not convert data from local character set encoding to UTF-8 charactersetencoding.
WARNING
All imported LDIF files must also contain the root suffix.
To import data from the Directory Server Console:
1. Select the Tasks tab. Scroll to the bottom of the screen, and select Import Database.
Alternatively, open the Configuration tab and select Import from the Console menu.
2. In the Import Database dialog box, enter the full path to the LDIF file to import in the LDIF file
field, or click Browse to select the file to import.
If the Console is running on a machine remote to the directory, the field name appears as LDIF
file (on the machine running the Console). When browsing for a file, you are not browsing thecurrent directory for the Directory Server host, but the filesystem of the machine running theConsole.
When importing a database through a remote Console, do not use a relative path to thedatabase. For remote imports, the operation fails with the error Cannot write to file... if a relativepath is given for the file. Always use an absolute path for remote import operations.
Administration Guide
126

3. In the Options box, select one or both of the following options:
Add Only. The LDIF file may contain modify and delete instructions in addition to thedefault add instructions. For the server to ignore operations other than add, select the Add
only check box.
Continue on Error. Select the Continue on error check box for the server to continue withthe import even if errors occur. For example, use this option to import an LDIF file thatcontains some entries that already exist in the database in addition to new ones. The servernotes existing entries in the rejects file while adding all new entries.
4. In the File for Rejects field, enter the full path to the file in which the server is to record allentries it cannot import, or click Browse to select the file which will contain the rejects.
A reject is an entry which cannot be imported into the database; for example, the server cannotimport an entry that already exists in the database or an entry that has no parent object. TheConsole will write the error message sent by the server to the rejects file.
Leaving this field blank means the server will not record rejected entries.
The server performs the import and also creates indexes.
NOTE
Trailing spaces are dropped during a remote Console import but are preserved duringboth local Console or ldif2db import operations.
6.1.3. Initializing a Database from the Console
The existing data in a database can be overwritten by initializing databases.
You must be logged in as the Directory Manager in order to initialize a database because an LDIF filethat contains a root entry cannot be imported into a database except as the Directory Manager (rootDN). Only the Directory Manager has access to the root entry, such as dc=example,dc=com.
WARNING
When initializing databases from an LDIF file, be careful not to overwrite the o=NetscapeRoot suffix unless you are restoring data. Otherwise, initializing thedatabase deletes information and may require re-installing the Directory Server.
To initialize a database using the Directory Server Console:
1. Select the Configuration tab.
2. Expand the Data tree in the left navigation pane. Expand the suffix of the database to initialize,then click the database itself.
3. Right-click the database, and select Initialize Database.
CHAPTER 6. POPULATING DIRECTORY DATABASES
127

Alternatively, select Initialize Database from the Object menu.
4. In the LDIF file field, enter the full path to the LDIF file to import, or click Browse.
5. If the Console is running from a machine local to the file being imported, click OK and proceedwith the import immediately. If the Console is running from a machine remote to the servercontaining the LDIF file, select one of the following options, then click OK:
From local machine. Indicates that the LDIF file is located on the local machine.
From server machine. Indicates that the LDIF file is located on a remote server.
The default LDIF directory is /var/lib/dirsrv/slapd-instance/ldif.
6.1.4. Importing from the Command Line
There are four methods for importing data through the command line:
Using ldif2db. This import method overwrites the contents of the database and requires theserver to be stopped; see Section 6.1.4.1, “Importing Using the ldif2db Command-Line Script” .
Using ldif2db.pl. This import method overwrites the contents of the database while the server isstill running; see Section 6.1.4.2, “Importing Using the ldif2db.pl Perl Script” .
Administration Guide
128
Using ldif2ldap. This method appends the LDIF file through LDAP. This method is useful toappend data to all of the databases; see Section 6.1.4.3, “Importing Using the ldif2ldapCommand-Line Script”.
Creating a cn=tasks entry. This method creates a temporary task entry which automaticallylaunches an import operation. This is functionally like running ldif2db. See Section 6.1.4.4,“Importing through the cn=tasks Entry”.
NOTE
The LDIF files used for import operations must use UTF-8 character set encoding. Importoperations do not convert data from local character set encoding to UTF-8 charactersetencoding.
WARNING
All imported LDIF files must also contain the root suffix.
NOTE
To import a database that has been encrypted, use the -E option with the script. SeeSection 10.7, “Exporting and Importing an Encrypted Database” for more information.
6.1.4.1. Importing Using the ldif2db Command-Line Script
The ldif2db script overwrites the data in the specified database. Also, the script requires that theDirectory Server be stopped when the import begins.
By default, the script first saves and then merges any existing o=NetscapeRoot configurationinformation with the o=NetscapeRoot configuration information in the files being imported.
WARNING
This script overwrites the data in the database.
To import an LDIF:
1. Stop the server:
# systemctl stop dirsrv@instance
2. Run the ldif2db command-line script:
CHAPTER 6. POPULATING DIRECTORY DATABASES
129

# ldif2db -Z instance_name -n Database1 -i /var/lib/dirsrv/slapd-instance/ldif/demo.ldif -i
/var/lib/dirsrv/slapd-instance/ldif/demo2.ldif
For information about the parameters used in the example, see the description of the ldif2db
script in the Red Hat Directory Server Configuration, Command, and File Reference .
WARNING
If the database specified in the -n option does not correspond with thesuffix contained by the LDIF file, all of the data contained by the databaseis deleted, and the import fails. Make sure that the database name is notmisspelled.
3. Start the server:
# systemctl start dirsrv@instance
6.1.4.2. Importing Using the ldif2db.pl Perl Script
As with the ldif2db script, the ldif2db.pl script overwrites the data in the specified database. This scriptrequires the server to be running in order to perform the import.
WARNING
This script overwrites the data in the database.
Run the ldif2db.pl script:
# ldif2db.pl -Z instance_name -D "cn=Directory Manager" -w secret -i
/var/lib/dirsrv/slapd-instance/ldif/demo.ldif -n Database1
For information about the parameters used in the example, see the description of the ldif2db.pl script inthe Red Hat Directory Server Configuration, Command, and File Reference .
NOTE
You do not need root privileges to run the script, but you must authenticate as theDirectory Manager.
6.1.4.3. Importing Using the ldif2ldap Command-Line Script
The ldif2ldap script appends the LDIF file through LDAP. Using this script, data are imported to all
Administration Guide
130

The ldif2ldap script appends the LDIF file through LDAP. Using this script, data are imported to alldirectory databases at the same time. The server must be running in order to import using ldif2ldap.
To import LDIF using ldif2ldap:
[root@server ~]# ldif2ldap -Z instance_name -D "cn=Directory Manager" -w secretpwd
/var/lib/dirsrv/slapd-instance/ldif/demo.ldif
The ldif2ldap script requires the DN of the administrative user, the password of the administrative user,and the absolute path and filename of the LDIF files to be imported.
For information about the parameters used in the example, see the description of the ldif2ldap script inthe Red Hat Directory Server Configuration, Command, and File Reference .
6.1.4.4. Importing through the cn=tasks Entry
The cn=tasks,cn=config entry in the Directory Server configuration is a container entry for temporaryentries that the server uses to manage tasks. Several common directory tasks have container entriesunder cn=tasks,cn=config. Temporary task entries can be created under cn=import,cn=tasks,cn=config to initiate an import operation.
As with the ldif2db and ldif2db.pl scripts, an import operation in cn=tasks overwrites all of theinformation in the database.
This task entry requires three attributes:
A unique name (cn)
The filename of the LDIF file to import (nsFilename)
The name of the database into which to import the file (nsInstance)
It is also possible to supply the DNs of suffixes to include or exclude from the import, analogous to the -s and -x options, respectively, for the ldif2db and ldif2db.pl scripts.
The entry is simply added using ldapmodify, as described in Section 3.1.3.2, “Adding an Entry Using ldapmodify”. For example:
# ldapmodify -a -D "cn=Directory Manager" -W -p 389 -h server.example.com -x
dn: cn=example import,cn=import,cn=tasks,cn=config
changetype: add
objectclass: extensibleObject
cn: example import
nsFilename: /home/files/example.ldif
nsInstance: userRoot
nsIncludeSuffix: ou=People,dc=example,dc=com
nsExcludeSuffix: ou=Groups,dc=example,dc=com
As soon as the task is completed, the entry is removed from the directory configuration.
For details about the attributes used in the example and other attributes you can set in this entry, seethe cn=import,cn=tasks,cn=config entry description in the Red Hat Directory Server Configuration,
Command, and File Reference
CHAPTER 6. POPULATING DIRECTORY DATABASES
131
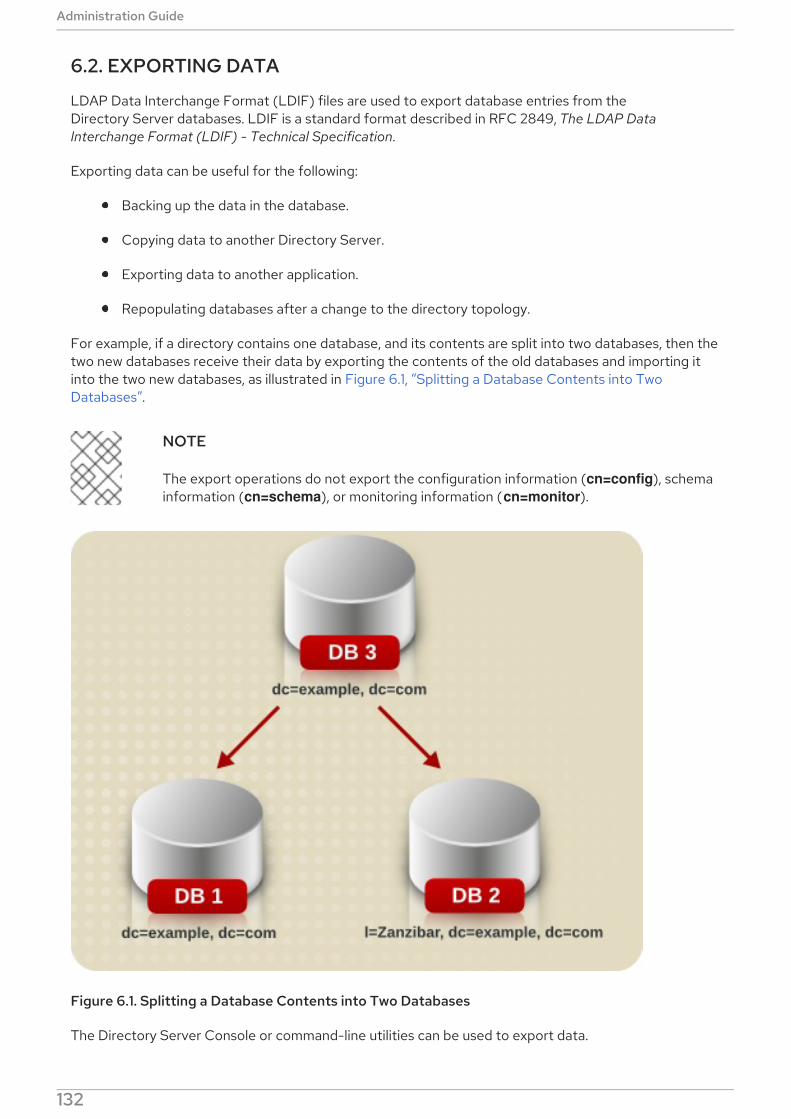
6.2. EXPORTING DATA
LDAP Data Interchange Format (LDIF) files are used to export database entries from theDirectory Server databases. LDIF is a standard format described in RFC 2849, The LDAP Data
Interchange Format (LDIF) - Technical Specification.
Exporting data can be useful for the following:
Backing up the data in the database.
Copying data to another Directory Server.
Exporting data to another application.
Repopulating databases after a change to the directory topology.
For example, if a directory contains one database, and its contents are split into two databases, then thetwo new databases receive their data by exporting the contents of the old databases and importing itinto the two new databases, as illustrated in Figure 6.1, “Splitting a Database Contents into TwoDatabases”.
NOTE
The export operations do not export the configuration information (cn=config), schemainformation (cn=schema), or monitoring information (cn=monitor).
Figure 6.1. Splitting a Database Contents into Two Databases
The Directory Server Console or command-line utilities can be used to export data.
Administration Guide
132
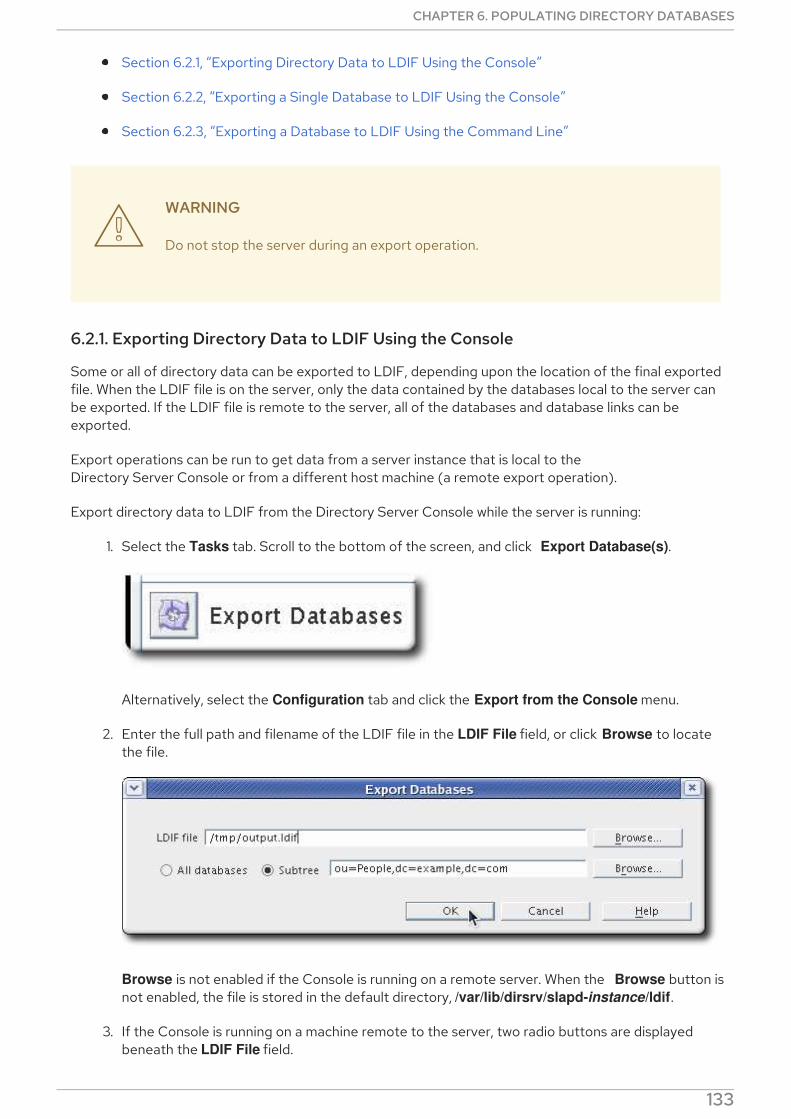
Section 6.2.1, “Exporting Directory Data to LDIF Using the Console”
Section 6.2.2, “Exporting a Single Database to LDIF Using the Console”
Section 6.2.3, “Exporting a Database to LDIF Using the Command Line”
WARNING
Do not stop the server during an export operation.
6.2.1. Exporting Directory Data to LDIF Using the Console
Some or all of directory data can be exported to LDIF, depending upon the location of the final exportedfile. When the LDIF file is on the server, only the data contained by the databases local to the server canbe exported. If the LDIF file is remote to the server, all of the databases and database links can beexported.
Export operations can be run to get data from a server instance that is local to theDirectory Server Console or from a different host machine (a remote export operation).
Export directory data to LDIF from the Directory Server Console while the server is running:
1. Select the Tasks tab. Scroll to the bottom of the screen, and click Export Database(s).
Alternatively, select the Configuration tab and click the Export from the Console menu.
2. Enter the full path and filename of the LDIF file in the LDIF File field, or click Browse to locatethe file.
Browse is not enabled if the Console is running on a remote server. When the Browse button isnot enabled, the file is stored in the default directory, /var/lib/dirsrv/slapd-instance/ldif.
3. If the Console is running on a machine remote to the server, two radio buttons are displayedbeneath the LDIF File field.
Select To local machine to export the data to an LDIF file on the machine from which the
CHAPTER 6. POPULATING DIRECTORY DATABASES
133

Select To local machine to export the data to an LDIF file on the machine from which theConsole is running.
Select To server machine to export to an LDIF file located on the server's machine.
4. To export the whole directory, select the Entire database radio button.
To export only a single subtree of the suffix contained by the database, select the Subtree radiobutton, and then enter the name of the suffix in the Subtree text box. This option exports asubtree that is contained by more than one database.
Alternatively, click Browse to select a suffix or subtree.
6.2.2. Exporting a Single Database to LDIF Using the Console
It is also possible to export a single database to LDIF. Do the following while the server is running:
1. Select the Configuration tab.
2. Expand the Data tree in the left navigation pane. Expand the suffix, and select the databaseunder the suffix.
3. Right-click the database, and select Export Database.
Alternatively, select Export Database from the Object menu.
4. In the LDIF file field, enter the full path to the LDIF file, or click Browse.
Administration Guide
134

When the Browse button is not enabled, the file is stored in the default directory, /var/lib/dirsrv/slapd-instance/ldif.
6.2.3. Exporting a Database to LDIF Using the Command Line
Directory Server supports the following ways to export data into LDIF files:
6.2.3.1. Exporting a Database While Directory Server is Running
To export a database while Directory Server is running, create an export task. You can either use the db2ldif.pl script to create it or create the task manually. After the task is completed, Directory Serverautomatically removes the task entry from the cn=export,cn=tasks,cn=config entry.
For a comparison of which db2ldif.pl command-line option sets which attribute in the task entry, see theRed Hat Directory Server Configuration, Command, and File Reference .
6.2.3.1.1. Exporting a Database Using the db2ldif.pl Script
The db2ldif.pl script creates a task to export a database while Directory Server is running. For example,to export the userRoot database:
# db2ldif.pl -Z instance_name -D "cn=Directory Manager" -w - -n userRoot
By default, the script stores the exported data in the /var/lib/dirsrv/slapd-instance_name/ldif/
directory. The created file is named instance_name-database_or_suffix_name-time_stamp.ldif.Alternatively, you can pass the -a file_name option to the script to set a different location. Note that theDirectory Server user requires write permissions in the destination directory.
For details about the available command-line options, see the description of the script in theRed Hat Directory Server Configuration, Command, and File Reference .
To export an encrypted database, see Section 10.7, “Exporting and Importing an Encrypted Database” .
6.2.3.1.2. Manually Creating an Export Task
Instead of using the db2ldif.pl script to create an export task, you can create the task entry manually.For example, to create a task that exports the userRoot database to the /tmp/export.ldif file:
# ldapmodify -D "cn=Directory Manager" -W -p 389 -h server.example.com -x
dn: cn=task_name,cn=export,cn=tasks,cn=config
objectclass: extensibleObject
CHAPTER 6. POPULATING DIRECTORY DATABASES
135

cn: task_name
nsInstance: userRoot
nsFilename: /tmp/export.ldif
For a list of settings which you can use in export task entries, see the Red Hat Directory Server
Configuration, Command, and File Reference.
6.2.3.2. Exporting a Database While Directory Server is Stopped
To export a database while the Directory Server instance is stopped, use the db2ldif script. The scripttakes the same options as the db2ldif.pl script, which can export data while the instance is running.
For example, to export the userRoot database while the instance is stopped:
# db2ldif -Z instance_name -n userRoot
By default, the script stores the exported data in the /var/lib/dirsrv/slapd-instance_name/ldif/
directory. The created file is named instance_name-database_or_suffix_name-time_stamp.ldif.Alternatively, you can pass the -a file_name option to the script to set a different location. Note that theDirectory Server user requires write permissions in the destination directory.
For details about the available command-line options, see the description of the script in theRed Hat Directory Server Configuration, Command, and File Reference .
6.3. BACKING UP AND RESTORING DATA
Databases can be backed up and restored using the Directory Server Console or a command-line script.A backup contains, for example:
All database files, such as for userRoot and NetscapeRoot, including the data stored withinthese databases
The transaction logs
The Indices
In contrast to a backup, you can export data as described in Section 6.2, “Exporting Data” . Use theexport feature to export specific data, such as a subtree, from a server in the LDAP Data InterchangeFormat (LDIF) format.
This section describes the following procedures:
Section 6.3.1, “Backing up All Databases”
Section 6.3.2, “Backing up the dse.ldif Configuration File”
Section 6.3.3, “Restoring All Databases”
Section 6.3.4, “Restoring a Single Database”
Section 6.3.5, “Restoring Databases That Include Replicated Entries”
Section 6.3.6, “Restoring the dse.ldif Configuration File”
Administration Guide
136
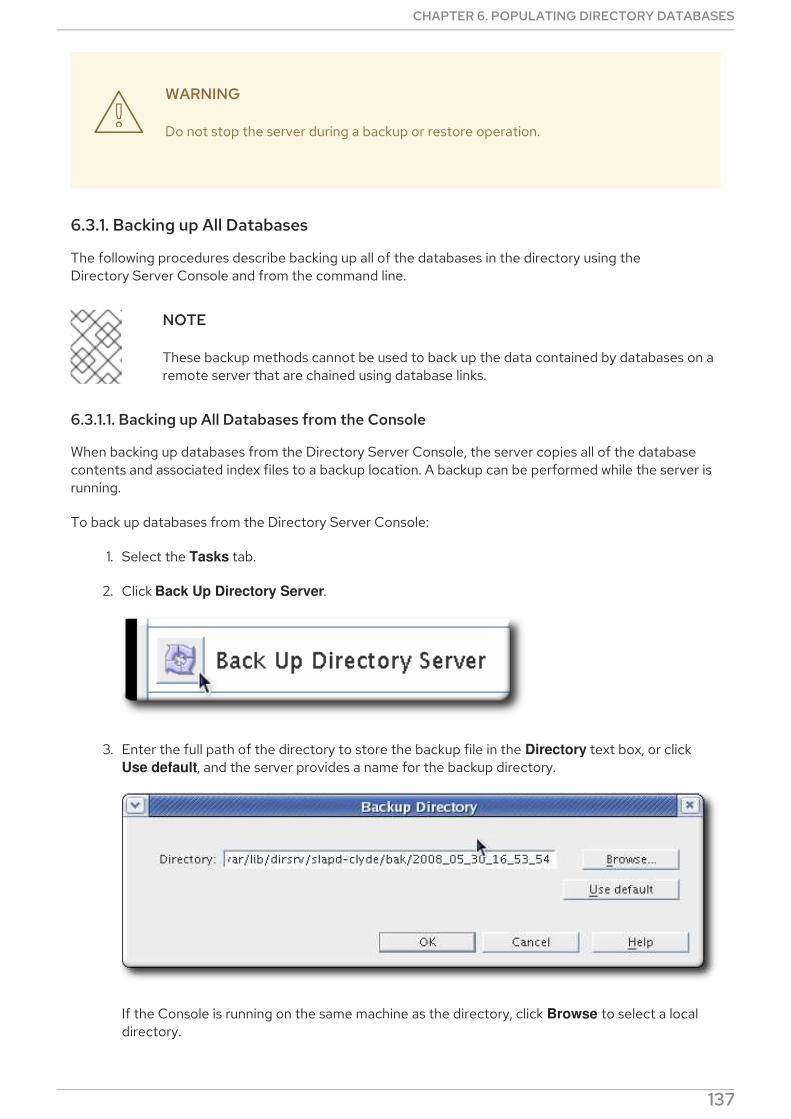
WARNING
Do not stop the server during a backup or restore operation.
6.3.1. Backing up All Databases
The following procedures describe backing up all of the databases in the directory using theDirectory Server Console and from the command line.
NOTE
These backup methods cannot be used to back up the data contained by databases on aremote server that are chained using database links.
6.3.1.1. Backing up All Databases from the Console
When backing up databases from the Directory Server Console, the server copies all of the databasecontents and associated index files to a backup location. A backup can be performed while the server isrunning.
To back up databases from the Directory Server Console:
1. Select the Tasks tab.
2. Click Back Up Directory Server.
3. Enter the full path of the directory to store the backup file in the Directory text box, or click Use default, and the server provides a name for the backup directory.
If the Console is running on the same machine as the directory, click Browse to select a localdirectory.
CHAPTER 6. POPULATING DIRECTORY DATABASES
137
With the default location, the backup files are placed in /var/lib/dirsrv/slapd-instance/bak. Bydefault, the backup directory name contains the name of the server instance and the time anddate the backup was created (instance-YYYY_MM_DD_hhmmss).
6.3.1.2. Backing up All Databases from the Command Line
Databases can be backed up from the command line using either the db2bak command-line script orthe db2bak.pl Perl script. The command-line script works when the server is running or when the serveris stopped; the Perl script can only be used when the server is running.
IMPORTANT
If the database being backed up is a master database, meaning it keeps a changelog, thenit must be backed up using the db2bak.pl Perl script or using theDirectory Server Console if the server is kept running. The changelog only writes its RUVentries to the database when the server is shut down; while the server is running, thechangelog keeps its changes in memory. For the Perl script and the Console, thesechangelog RUVs are written to the database before the backup process runs. However,that step is not performed by the command-line script.
The db2bak should not be run on a running master server. Either use the Perl script orstop the server before performing the backup.
Configuration information cannot be backed up using this backup method. For information on backingup the configuration information, see Section 6.3.2, “Backing up the dse.ldif Configuration File” .
To back up the directory from the command line using the db2bak.pl script, run the db2bak.pl Perlscript, specifying the backup filename and directory.
# db2bak.pl -Z instance_name -D "cn=Directory Manager" -w password -a /var/lib/dirsrv/slapd-
example/bak/instance-2020_04_30_16_27_5-custom-name
NOTE
Do not use a trailing slash character ("/") when using the -a option to specify the defaultbackup directory that is configured using the nsslapd-bakdir directive. For example:
# db2bak.pl -Z instance_name -D "cn=Directory Manager" -w password -a
/var/lib/dirsrv/slapd-example/bak
Note the lack of slash after slapd-example/bak.
This limitation only applies when specifying exactly the same directory which is configuredin nsslapd-bakdir. Any other directory, even inside the default backup directory (forexample, bak/custom-name/) can be specified with or without a trailing slash.
The backup directory where the server saves the backed up databases can be specified with the script. Ifa directory is not specified, the backup file is stored in /var/lib/dirsrv/slapd-instance/bak. By default,the backup directory is named with the Directory Server instance name and the date of the backup(serverID-YYYY_MM_DD_hhmmss).
For information about ldif2db, see the script's description in the Red Hat Directory Server Configuration,
Command, and File Reference.
Administration Guide
138
6.3.1.3. Backing up the Database through the cn=tasks Entry
The cn=tasks,cn=config entry in the Directory Server configuration is a container entry for temporaryentries that the server uses to manage tasks. Several common directory tasks have container entriesunder cn=tasks,cn=config. Temporary task entries can be created under cn=backup,cn=tasks,cn=config to initiate a backup operation.
The backup task entry requires three attributes:
A unique name (cn).
The directory to write the backup file to (nsArchiveDir). The backup file is named with theDirectory Server instance name and the date of the backup (serverID-YYYY_MM_DD_hhmmss).
The type of database (nsDatabaseType); the only option is ldbm database.
The entry is simply added using ldapmodify, as described in Section 3.1.3.2, “Adding an Entry Using ldapmodify”. For example:
# ldapmodify -a -D "cn=Directory Manager" -W -p 389 -h server.example.com -x
dn: cn=example backup,cn=backup,cn=tasks,cn=config
changetype: add
objectclass: extensibleObject
cn: example backup
nsArchiveDir: /export/backups/
nsDatabaseType: ldbm database
As soon as the task is completed, the entry is removed from the directory configuration.
For details about the attributes used in the example and other attributes you can set in this entry, seethe cn=backup,cn=tasks,cn=config entry description in the Red Hat Directory Server Configuration,
Command, and File Reference
6.3.2. Backing up the dse.ldif Configuration File
Directory Server automatically backs up the dse.ldif configuration file. When the Directory Server isstarted, the directory creates a backup of the dse.ldif file automatically in a file named dse.ldif.startOK
in the /etc/dirsrv/slapd-instance directory.
When the dse.ldif file is modified, the file is first backed up to a file called dse.ldif.bak in the /etc/dirsrv/slapd-instance directory before the directory writes the modifications to the dse.ldif file.
6.3.3. Restoring All Databases
The following procedures describe restoring all of the databases in the directory using theDirectory Server Console and from the command line.
NOTE
Restoring a database from backup also restores the changelog.
IMPORTANT
CHAPTER 6. POPULATING DIRECTORY DATABASES
139

IMPORTANT
While restoring databases, the server must be running. However, the databases will beunavailable for processing operations during the restore.
Therefore, stop all replication processes before restoring a database. For details, seeSection 15.9, “Disabling and Re-enabling a Replication Agreement” .
6.3.3.1. Restoring All Databases from the Console
If the databases become corrupted, restore data from a previously generated backup using theDirectory Server Console. This process consists of stopping the server and then copying the databasesand associated index files from the backup location to the database directory.
WARNING
Restoring databases overwrites any existing database files.
IMPORTANT
While restoring databases, the server must be running. However, the databases will beunavailable for processing operations during the restore.
Therefore, stop all replication processes before restoring a database. For details, seeSection 15.9, “Disabling and Re-enabling a Replication Agreement” .
To restore databases from a previously created backup:
1. In the Directory Server Console, select the Tasks tab.
2. Click Restore Directory Server.
3. Select the backup from the Available Backups list, or enter the full path to a valid backup in
Administration Guide
140
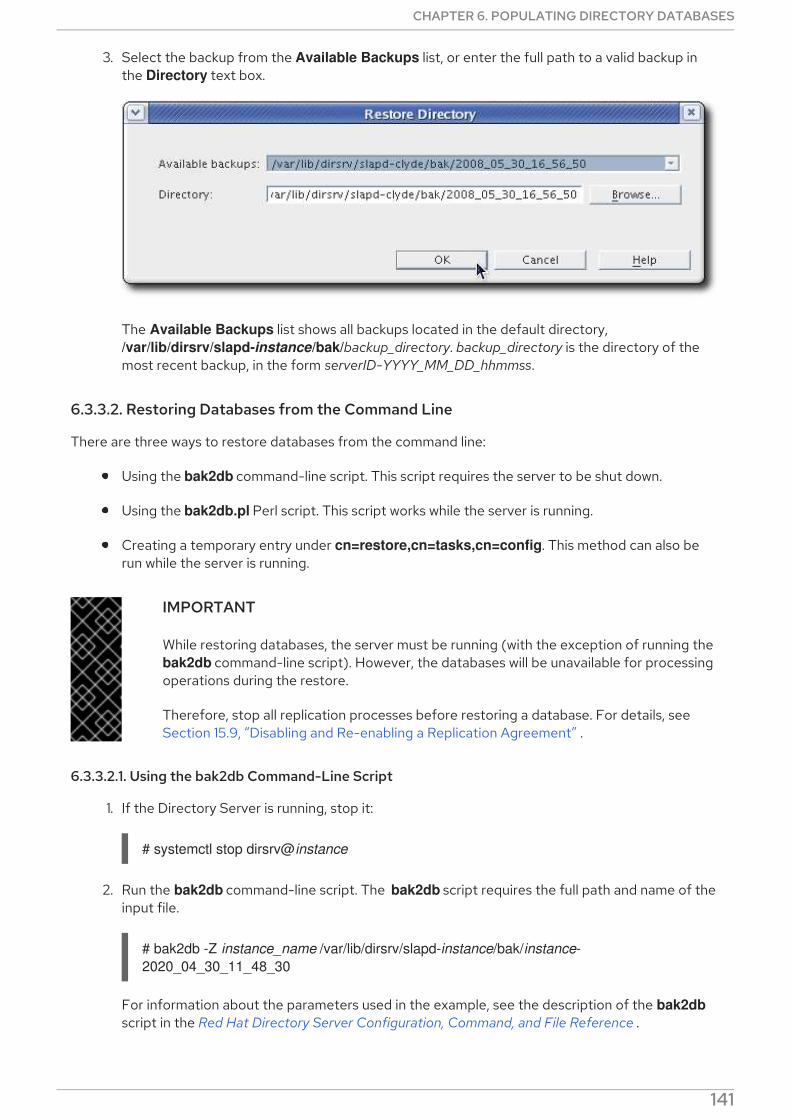
3. Select the backup from the Available Backups list, or enter the full path to a valid backup inthe Directory text box.
The Available Backups list shows all backups located in the default directory, /var/lib/dirsrv/slapd-instance/bak/backup_directory. backup_directory is the directory of themost recent backup, in the form serverID-YYYY_MM_DD_hhmmss.
6.3.3.2. Restoring Databases from the Command Line
There are three ways to restore databases from the command line:
Using the bak2db command-line script. This script requires the server to be shut down.
Using the bak2db.pl Perl script. This script works while the server is running.
Creating a temporary entry under cn=restore,cn=tasks,cn=config. This method can also berun while the server is running.
IMPORTANT
While restoring databases, the server must be running (with the exception of running the bak2db command-line script). However, the databases will be unavailable for processingoperations during the restore.
Therefore, stop all replication processes before restoring a database. For details, seeSection 15.9, “Disabling and Re-enabling a Replication Agreement” .
6.3.3.2.1. Using the bak2db Command-Line Script
1. If the Directory Server is running, stop it:
# systemctl stop dirsrv@instance
2. Run the bak2db command-line script. The bak2db script requires the full path and name of theinput file.
# bak2db -Z instance_name /var/lib/dirsrv/slapd-instance/bak/instance-
2020_04_30_11_48_30
For information about the parameters used in the example, see the description of the bak2db
script in the Red Hat Directory Server Configuration, Command, and File Reference .
CHAPTER 6. POPULATING DIRECTORY DATABASES
141

6.3.3.2.2. Using bak2db.pl Perl Script
Run the bak2db.pl Perl script.
# bak2db.pl -Z instance_name -D "cn=Directory Manager" -w secret -a
/var/lib/dirsrv/slapd-instance/bak/instance-2020_04_30_11_48_30
For information about the parameters used in the example, see the description of the bak2db.pl scriptin the Red Hat Directory Server Configuration, Command, and File Reference .
IMPORTANT
While restoring databases, the server must be running. However, the databases will beunavailable for processing operations during the restore.
Therefore, stop all replication processes before restoring a database. For details, seeSection 15.9, “Disabling and Re-enabling a Replication Agreement” .
6.3.3.2.3. Restoring the Database through the cn=tasks Entry
The cn=tasks,cn=config entry in the Directory Server configuration is a container entry for temporaryentries that the server uses to manage tasks. Several common directory tasks have container entriesunder cn=tasks,cn=config. Temporary task entries can be created under cn=restore,cn=tasks,cn=config to initiate a restore operation.
IMPORTANT
While restoring databases, the server must be running. However, the databases will beunavailable for processing operations during the restore.
Therefore, stop all replication processes before restoring a database. For details, seeSection 15.9, “Disabling and Re-enabling a Replication Agreement” .
The restore task entry requires three attributes, the same as the backup task:
A unique name (cn).
The directory from which to retrieve the backup file (nsArchiveDir).
The type of database (nsDatabaseType); the only option is ldbm database.
The entry is simply added using ldapmodify, as described in Section 3.1.3.2, “Adding an Entry Using ldapmodify”. For example:
# ldapmodify -a -D "cn=Directory Manager" -W -p 389 -h server.example.com -x
dn: cn=example restore,cn=restore,cn=tasks,cn=config
changetype: add
objectclass: extensibleObject
cn: example restore
nsArchiveDir: /export/backups/
nsDatabaseType: ldbm database
As soon as the task is completed, the entry is removed from the directory configuration.
Administration Guide
142
For details about the attributes used in the example and other attributes you can set in this entry, seethe cn=restore,cn=tasks,cn=config entry description in the Red Hat Directory Server Configuration,
Command, and File Reference
6.3.4. Restoring a Single Database
It is possible to restore a single database through the command line, but not in theDirectory Server Console. To restore a single database:
1. Stop the Directory Server if it is running.
# systemctl stop dirsrv@instance
2. Restore the back end from the /var/lib/dirsrv/slapd-instance/bak archives with the bak2db
script, using the -n parameter to specify the database name. For example:
# bak2db -Z instance_name /var/lib/dirsrv/slapd-instance/bak/backup_file -n userRoot
3. Restart the Directory Server.
# systemctl start dirsrv@instance
NOTE
If the Directory Server fails to start, remove the database transaction log files in /var/lib/dirsrv/slapd-instance/db/log.###, then retry starting the server.
6.3.5. Restoring Databases That Include Replicated Entries
Several situations can occur when a supplier server is restored:
The consumer servers are also restored.
For the very unlikely situation, that all databases are restored from backups taken at exactly thesame time (so that the data are in sync), the consumers remain synchronized with the supplier,and it is not necessary to do anything else. Replication resumes without interruption.
Only the supplier is restored.
If only the supplier is restored or if the consumers are restored from backups taken at a differenttimes, reinitialize the consumers for the supplier to update the data in the database. If only thesupplier is restored or if the consumers are restored from backups taken at a different times,reinitialize the consumers for the supplier to update the data in the database.
Changelog entries have not yet expired on the supplier server.
If the supplier's changelog has not expired since the database backup was taken, then restorethe local consumer and continue with normal operations. This situation occurs only if the backupwas taken within a period of time that is shorter than the value set for the maximum changelogage attribute, nsslapd-changelogmaxage, in the cn=changelog5,cn=config entry. For moreinformation about this option, see the Red Hat Directory Server
Configuration, Command, and File Reference.
Directory Server automatically detects the compatibility between the replica and its changelog.
CHAPTER 6. POPULATING DIRECTORY DATABASES
143
Directory Server automatically detects the compatibility between the replica and its changelog.If a mismatch is detected, the server removes the old changelog file and creates a new, emptyone.
Changelog entries have expired on the supplier server since the time of the local backup.
If changelog entries have expired, reinitialize the consumer. For more information onreinitializing consumers, see Section 15.18, “Initializing Consumers” .
Example 6.1. Restoring a Directory Server Replication Topology
For example, to restore all servers in a replication environment, consisting of two masters and twoconsumer server:
1. Restore the first master. Use the ldif2db utility without the -r option to import the data. SeeSection 6.1.4, “Importing from the Command Line” .
2. Online-initialize the remaining servers by using replication:
a. Initialize the second master from the first one.
b. Initialize the consumers from the master.
For details, see Section 15.18, “Initializing Consumers” .
3. On each server, display the nsds5replicaLastUpdateStatus attribute to verify thatreplication works correctly:
# ldapsearch -D "cn=Directory Manager" -W -p 389 -h server.example.com -b
"cn=example_agreement,cn=replica,cn=dc\=example\,dc\=com,cn=mapping
tree,cn=config" nsds5replicaLastUpdateStatus
For details about possible statuses, see the Replication Agreement Status appendix in theRed Hat Directory Server Configuration, Command, and File Reference .
The changelog associated with the restored database will be erased during the restore operation. Amessage will be logged to the supplier servers' log files indicating that reinitialization is required.
For information on managing replication, see Chapter 15, Managing Replication.
6.3.6. Restoring the dse.ldif Configuration File
The directory creates two backup copies of the dse.ldif file in the /etc/dirsrv/slapd-instance directory.The dse.ldif.startOK file records a copy of the dse.ldif file at server start up. The dse.ldif.bak filecontains a backup of the most recent changes to the dse.ldif file. Use the version with the most recentchanges to restore the directory.
To restore the dse.ldif configuration file:
1. Stop the server.
# systemctl stop dirsrv@instance
2. Restore the database as outlined in Section 6.3.4, “Restoring a Single Database” to copy the
Administration Guide
144

2. Restore the database as outlined in Section 6.3.4, “Restoring a Single Database” to copy thebackup copy of the dse.ldif file into the directory.
3. Restart the server.
# systemctl restart dirsrv@instance
CHAPTER 6. POPULATING DIRECTORY DATABASES
145
CHAPTER 7. MANAGING ATTRIBUTES AND VALUES
Red Hat Directory Server provides several different mechanisms for dynamically and automaticallymaintaining some types of attributes on directory entries. These plug-ins and configuration optionssimplify managing directory data and expressing relationships between entries.
Part of the characteristic of entries are their relationships to each other. Obviously, a manager has anemployee, so those two entries are related. Groups are associated with their members. There are lessapparent relationships, too, like between entries which share a common physical location.
Red Hat Directory Server provides several different ways that these relationships between entries canbe maintained smoothly and consistently. There are several plug-ins can apply or generate attributesautomatically as part of the data within the directory, including classes of service, linking attributes, andgenerating unique numeric attribute values.
7.1. ENFORCING ATTRIBUTE UNIQUENESS
To ensure that the value of an attribute is unique across the directory or subtree, use the AttributeUniqueness plug-in.
If you want multiple attributes to be unique or if you want to use different conditions, create multipleconfiguration records of the plug-in.
7.1.1. Creating a New Configuration Record of the Attribute Uniqueness Plug-in
For each attribute whose values must be unique, create a new configuration record of the AttributeUniqueness plug-in.
NOTE
You can only create a new configuration record of the plug-in from the command line.
To create a new unconfigured and disabled configuration record of the plug-in named Example
Attribute Uniqueness:
# ldapadd -D "cn=Directory Manager" -W -p 389 -h server.example.com -x
dn: cn=Example Attribute Uniqueness,cn=plugins,cn=config
objectClass: top
objectClass: nsSlapdPlugin
objectClass: extensibleObject
cn: Example Attribute Uniqueness
nsslapd-pluginPath: libattr-unique-plugin
nsslapd-pluginInitfunc: NSUniqueAttr_Init
nsslapd-pluginType: betxnpreoperation
nsslapd-pluginEnabled: off
nsslapd-plugin-depends-on-type: database
nsslapd-pluginId: NSUniqueAttr
nsslapd-pluginVersion: none
nsslapd-pluginVendor: 389 Project
nsslapd-pluginDescription: Enforce unique attribute values
uniqueness-attribute-name: uid
7.1.2. Configuring Attribute Uniqueness over Suffixes or Subtrees
Administration Guide
146
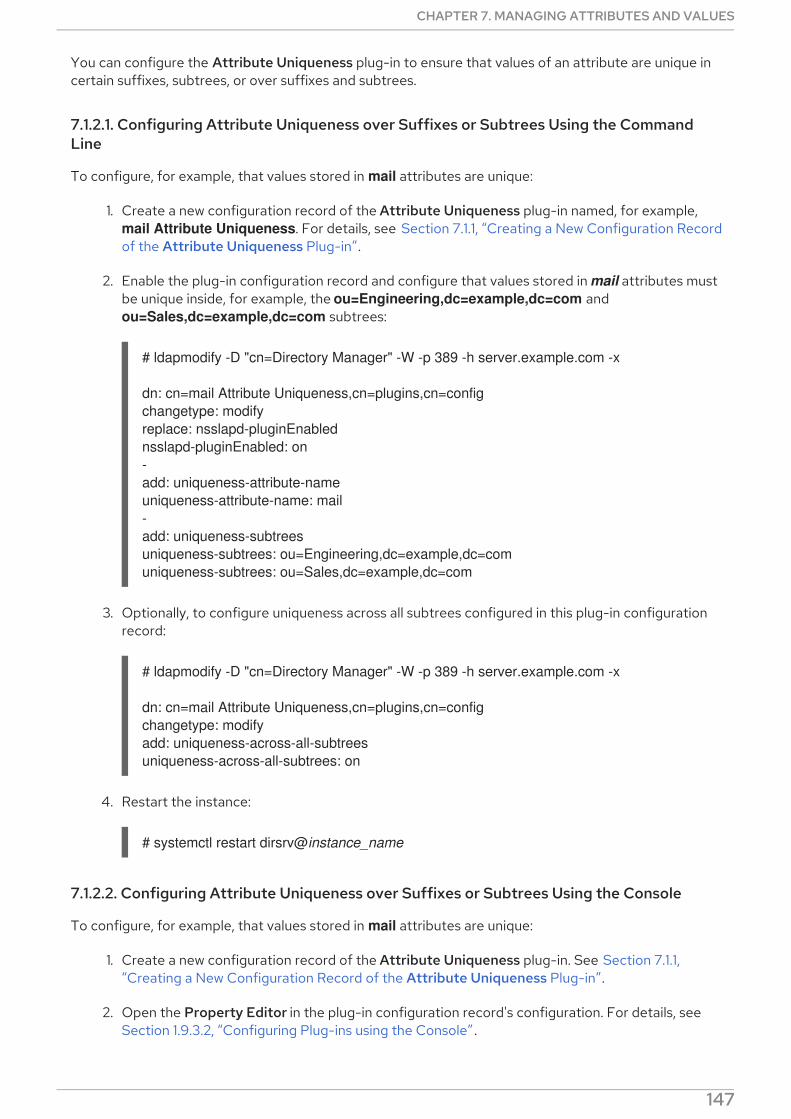
You can configure the Attribute Uniqueness plug-in to ensure that values of an attribute are unique incertain suffixes, subtrees, or over suffixes and subtrees.
7.1.2.1. Configuring Attribute Uniqueness over Suffixes or Subtrees Using the CommandLine
To configure, for example, that values stored in mail attributes are unique:
1. Create a new configuration record of the Attribute Uniqueness plug-in named, for example, mail Attribute Uniqueness. For details, see Section 7.1.1, “Creating a New Configuration Recordof the Attribute Uniqueness Plug-in”.
2. Enable the plug-in configuration record and configure that values stored in mail attributes mustbe unique inside, for example, the ou=Engineering,dc=example,dc=com and ou=Sales,dc=example,dc=com subtrees:
# ldapmodify -D "cn=Directory Manager" -W -p 389 -h server.example.com -x
dn: cn=mail Attribute Uniqueness,cn=plugins,cn=config
changetype: modify
replace: nsslapd-pluginEnabled
nsslapd-pluginEnabled: on
-
add: uniqueness-attribute-name
uniqueness-attribute-name: mail
-
add: uniqueness-subtrees
uniqueness-subtrees: ou=Engineering,dc=example,dc=com
uniqueness-subtrees: ou=Sales,dc=example,dc=com
3. Optionally, to configure uniqueness across all subtrees configured in this plug-in configurationrecord:
# ldapmodify -D "cn=Directory Manager" -W -p 389 -h server.example.com -x
dn: cn=mail Attribute Uniqueness,cn=plugins,cn=config
changetype: modify
add: uniqueness-across-all-subtrees
uniqueness-across-all-subtrees: on
4. Restart the instance:
# systemctl restart dirsrv@instance_name
7.1.2.2. Configuring Attribute Uniqueness over Suffixes or Subtrees Using the Console
To configure, for example, that values stored in mail attributes are unique:
1. Create a new configuration record of the Attribute Uniqueness plug-in. See Section 7.1.1,“Creating a New Configuration Record of the Attribute Uniqueness Plug-in”.
2. Open the Property Editor in the plug-in configuration record's configuration. For details, seeSection 1.9.3.2, “Configuring Plug-ins using the Console” .
CHAPTER 7. MANAGING ATTRIBUTES AND VALUES
147
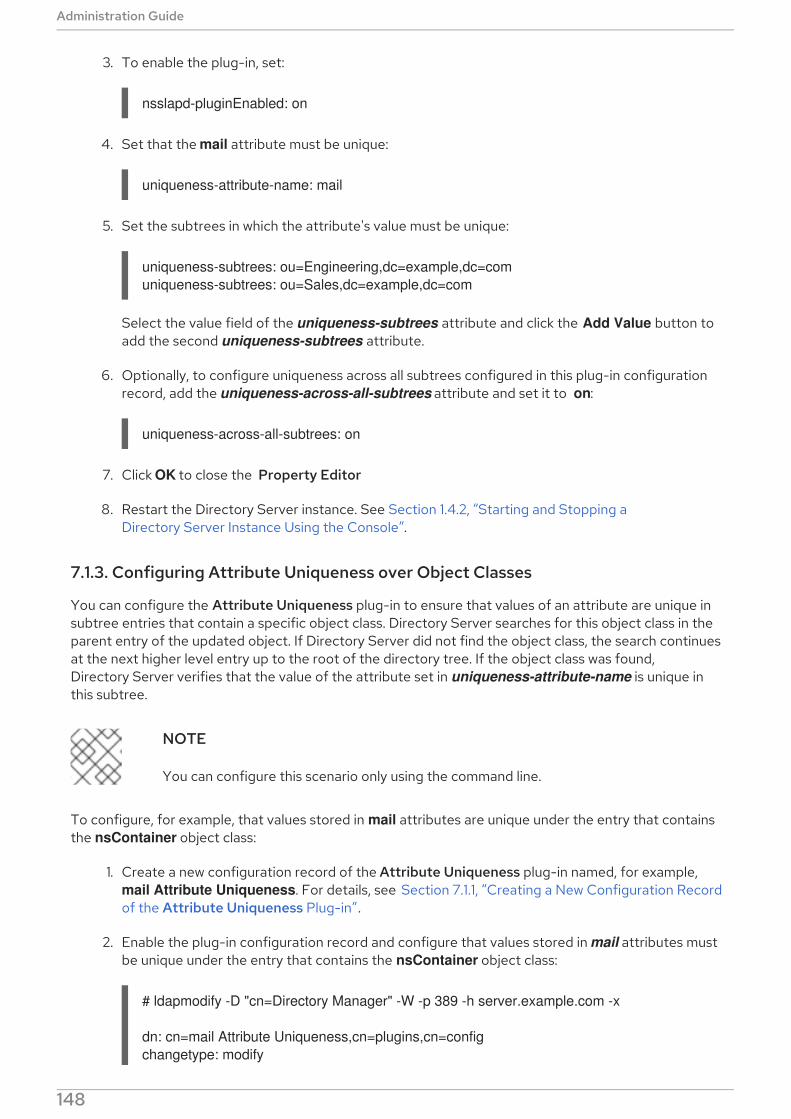
3. To enable the plug-in, set:
nsslapd-pluginEnabled: on
4. Set that the mail attribute must be unique:
uniqueness-attribute-name: mail
5. Set the subtrees in which the attribute's value must be unique:
uniqueness-subtrees: ou=Engineering,dc=example,dc=com
uniqueness-subtrees: ou=Sales,dc=example,dc=com
Select the value field of the uniqueness-subtrees attribute and click the Add Value button toadd the second uniqueness-subtrees attribute.
6. Optionally, to configure uniqueness across all subtrees configured in this plug-in configurationrecord, add the uniqueness-across-all-subtrees attribute and set it to on:
uniqueness-across-all-subtrees: on
7. Click OK to close the Property Editor
8. Restart the Directory Server instance. See Section 1.4.2, “Starting and Stopping aDirectory Server Instance Using the Console”.
7.1.3. Configuring Attribute Uniqueness over Object Classes
You can configure the Attribute Uniqueness plug-in to ensure that values of an attribute are unique insubtree entries that contain a specific object class. Directory Server searches for this object class in theparent entry of the updated object. If Directory Server did not find the object class, the search continuesat the next higher level entry up to the root of the directory tree. If the object class was found,Directory Server verifies that the value of the attribute set in uniqueness-attribute-name is unique inthis subtree.
NOTE
You can configure this scenario only using the command line.
To configure, for example, that values stored in mail attributes are unique under the entry that containsthe nsContainer object class:
1. Create a new configuration record of the Attribute Uniqueness plug-in named, for example, mail Attribute Uniqueness. For details, see Section 7.1.1, “Creating a New Configuration Recordof the Attribute Uniqueness Plug-in”.
2. Enable the plug-in configuration record and configure that values stored in mail attributes mustbe unique under the entry that contains the nsContainer object class:
# ldapmodify -D "cn=Directory Manager" -W -p 389 -h server.example.com -x
dn: cn=mail Attribute Uniqueness,cn=plugins,cn=config
changetype: modify
Administration Guide
148
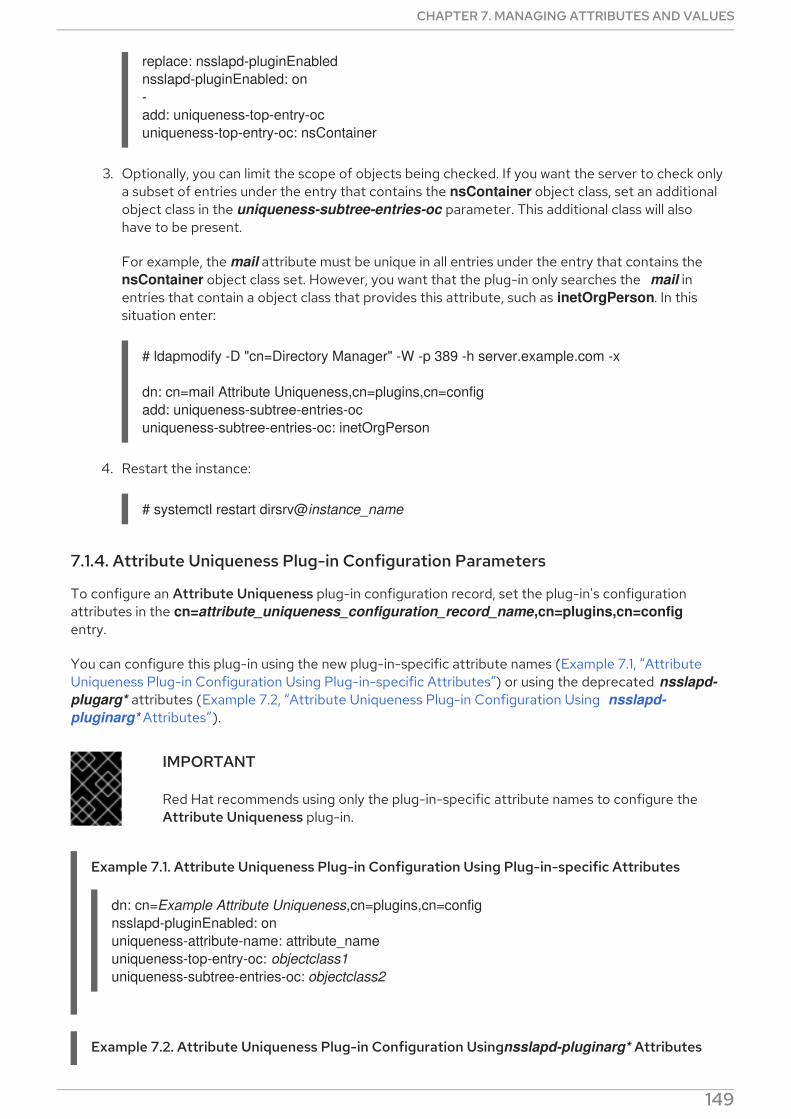
replace: nsslapd-pluginEnabled
nsslapd-pluginEnabled: on
-
add: uniqueness-top-entry-oc
uniqueness-top-entry-oc: nsContainer
3. Optionally, you can limit the scope of objects being checked. If you want the server to check onlya subset of entries under the entry that contains the nsContainer object class, set an additionalobject class in the uniqueness-subtree-entries-oc parameter. This additional class will alsohave to be present.
For example, the mail attribute must be unique in all entries under the entry that contains the nsContainer object class set. However, you want that the plug-in only searches the mail inentries that contain a object class that provides this attribute, such as inetOrgPerson. In thissituation enter:
# ldapmodify -D "cn=Directory Manager" -W -p 389 -h server.example.com -x
dn: cn=mail Attribute Uniqueness,cn=plugins,cn=config
add: uniqueness-subtree-entries-oc
uniqueness-subtree-entries-oc: inetOrgPerson
4. Restart the instance:
# systemctl restart dirsrv@instance_name
7.1.4. Attribute Uniqueness Plug-in Configuration Parameters
To configure an Attribute Uniqueness plug-in configuration record, set the plug-in's configurationattributes in the cn=attribute_uniqueness_configuration_record_name,cn=plugins,cn=config
entry.
You can configure this plug-in using the new plug-in-specific attribute names (Example 7.1, “AttributeUniqueness Plug-in Configuration Using Plug-in-specific Attributes”) or using the deprecated nsslapd-
plugarg* attributes (Example 7.2, “Attribute Uniqueness Plug-in Configuration Using nsslapd-
pluginarg* Attributes”).
IMPORTANT
Red Hat recommends using only the plug-in-specific attribute names to configure theAttribute Uniqueness plug-in.
Example 7.1. Attribute Uniqueness Plug-in Configuration Using Plug-in-specific Attributes
dn: cn=Example Attribute Uniqueness,cn=plugins,cn=config
nsslapd-pluginEnabled: on
uniqueness-attribute-name: attribute_name
uniqueness-top-entry-oc: objectclass1
uniqueness-subtree-entries-oc: objectclass2
Example 7.2. Attribute Uniqueness Plug-in Configuration Using nsslapd-pluginarg* Attributes
CHAPTER 7. MANAGING ATTRIBUTES AND VALUES
149
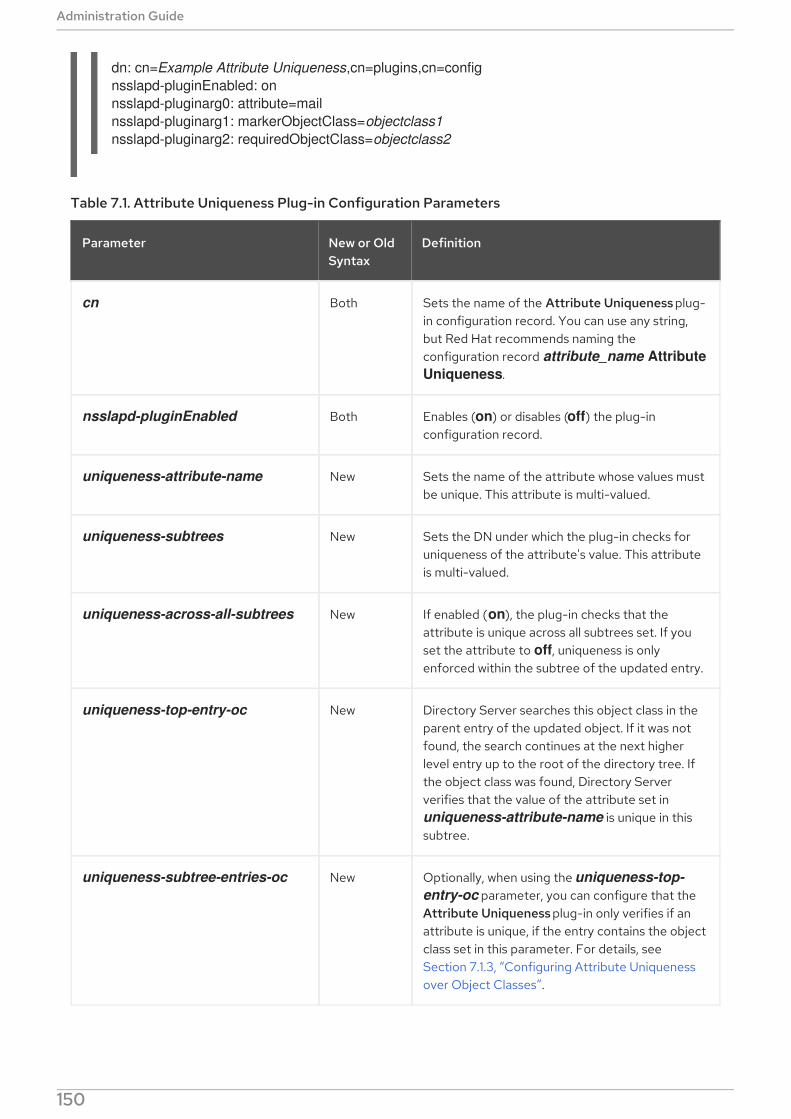
dn: cn=Example Attribute Uniqueness,cn=plugins,cn=config
nsslapd-pluginEnabled: on
nsslapd-pluginarg0: attribute=mail
nsslapd-pluginarg1: markerObjectClass=objectclass1
nsslapd-pluginarg2: requiredObjectClass=objectclass2
Table 7.1. Attribute Uniqueness Plug-in Configuration Parameters
Parameter New or OldSyntax
Definition
cn Both Sets the name of the Attribute Uniqueness plug-in configuration record. You can use any string,but Red Hat recommends naming theconfiguration record attribute_name Attribute
Uniqueness.
nsslapd-pluginEnabled Both Enables (on) or disables (off) the plug-inconfiguration record.
uniqueness-attribute-name New Sets the name of the attribute whose values mustbe unique. This attribute is multi-valued.
uniqueness-subtrees New Sets the DN under which the plug-in checks foruniqueness of the attribute's value. This attributeis multi-valued.
uniqueness-across-all-subtrees New If enabled (on), the plug-in checks that theattribute is unique across all subtrees set. If youset the attribute to off, uniqueness is onlyenforced within the subtree of the updated entry.
uniqueness-top-entry-oc New Directory Server searches this object class in theparent entry of the updated object. If it was notfound, the search continues at the next higherlevel entry up to the root of the directory tree. Ifthe object class was found, Directory Serververifies that the value of the attribute set in uniqueness-attribute-name is unique in thissubtree.
uniqueness-subtree-entries-oc New Optionally, when using the uniqueness-top-
entry-oc parameter, you can configure that theAttribute Uniqueness plug-in only verifies if anattribute is unique, if the entry contains the objectclass set in this parameter. For details, seeSection 7.1.3, “Configuring Attribute Uniquenessover Object Classes”.
Administration Guide
150

nsslapd-pluginarg0 Old The plug-in-specific attribute equivalent of this nsslapd-pluginarg* parameter is uniqueness-attribute-name. See this parameter for adescription.
Set the attribute to attribute=attribute_name.
nsslapd-pluginarg[1-9] Old The plug-in-specific attribute equivalent of this nsslapd-pluginarg* parameter is uniqueness-top-entry-oc. See this parameter for adescription.
Set the attribute to markerObjectClass=object_class.
nsslapd-pluginarg[1-9] Old The equivalent plug-in-specific attribute is uniqueness-subtree-entries-oc. See thisparameter for a description.
Set the attribute to requiredObjectClass=object_class.
Parameter New or OldSyntax
Definition
7.2. ASSIGNING CLASS OF SERVICE
A class of service definition (CoS) shares attributes between entries in a way that is transparent toapplications. CoS simplifies entry management and reduces storage requirements.
Clients of the Directory Server read the attributes in a user's entry. With CoS, some attribute values maynot be stored within the entry itself. Instead, these attribute values are generated by class of servicelogic as the entry is sent to the client application.
Each CoS is comprised of two types of entry in the directory:
CoS definition entry. The CoS definition entry identifies the type of CoS used. Like the roledefinition entry, it inherits from the LDAPsubentry object class. The CoS definition entry isbelow the branch at which it is effective.
Template entry. The CoS template entry contains a list of the shared attribute values. Changesto the template entry attribute values are automatically applied to all the entries within thescope of the CoS. A single CoS might have more than one template entry associated with it.
The CoS definition entry and template entry interact to provide attribute information to their targetentries, any entry within the scope of the CoS.
7.2.1. About the CoS Definition Entry
The CoS definition entry is an instance of the cosSuperDefinition object class. The CoS definitionentry also contains one of three object class that specifies the type of template entry it uses togenerate the entry. The target entries which interact with the CoS share the same parent as the CoSdefinition entry.
There are three types of CoS, defined using three types of CoS definition entries:
CHAPTER 7. MANAGING ATTRIBUTES AND VALUES
151
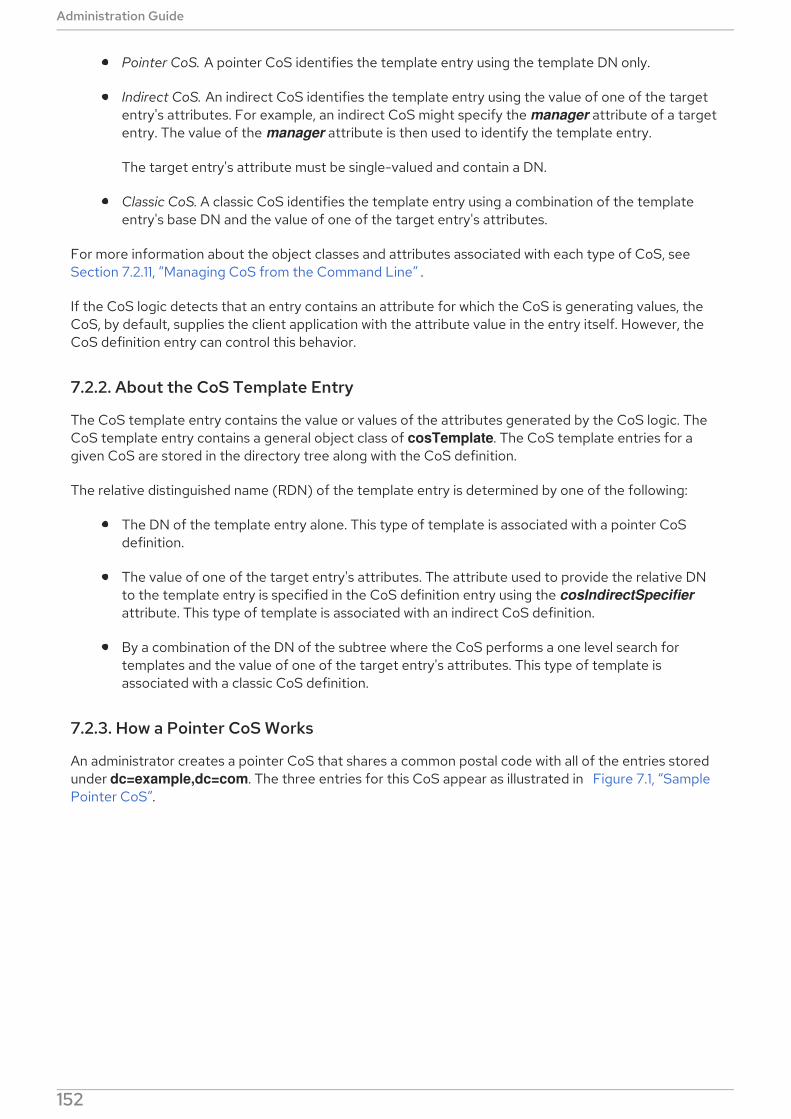
Pointer CoS. A pointer CoS identifies the template entry using the template DN only.
Indirect CoS. An indirect CoS identifies the template entry using the value of one of the targetentry's attributes. For example, an indirect CoS might specify the manager attribute of a targetentry. The value of the manager attribute is then used to identify the template entry.
The target entry's attribute must be single-valued and contain a DN.
Classic CoS. A classic CoS identifies the template entry using a combination of the templateentry's base DN and the value of one of the target entry's attributes.
For more information about the object classes and attributes associated with each type of CoS, seeSection 7.2.11, “Managing CoS from the Command Line” .
If the CoS logic detects that an entry contains an attribute for which the CoS is generating values, theCoS, by default, supplies the client application with the attribute value in the entry itself. However, theCoS definition entry can control this behavior.
7.2.2. About the CoS Template Entry
The CoS template entry contains the value or values of the attributes generated by the CoS logic. TheCoS template entry contains a general object class of cosTemplate. The CoS template entries for agiven CoS are stored in the directory tree along with the CoS definition.
The relative distinguished name (RDN) of the template entry is determined by one of the following:
The DN of the template entry alone. This type of template is associated with a pointer CoSdefinition.
The value of one of the target entry's attributes. The attribute used to provide the relative DNto the template entry is specified in the CoS definition entry using the cosIndirectSpecifier
attribute. This type of template is associated with an indirect CoS definition.
By a combination of the DN of the subtree where the CoS performs a one level search fortemplates and the value of one of the target entry's attributes. This type of template isassociated with a classic CoS definition.
7.2.3. How a Pointer CoS Works
An administrator creates a pointer CoS that shares a common postal code with all of the entries storedunder dc=example,dc=com. The three entries for this CoS appear as illustrated in Figure 7.1, “SamplePointer CoS”.
Administration Guide
152

Figure 7.1. Sample Pointer CoS
In this example, the template entry is identified by its DN, cn=exampleUS,cn=data, in the CoS definitionentry. Each time the postalCode attribute is queried on the entry cn=wholiday,ou=people,dc=example,dc=com, the Directory Server returns the value available in thetemplate entry cn=exampleUS,cn=data.
7.2.4. How an Indirect CoS Works
An administrator creates an indirect CoS that uses the manager attribute of the target entry to identifythe template entry. The three CoS entries appear as illustrated in Figure 7.2, “Sample Indirect CoS”.
CHAPTER 7. MANAGING ATTRIBUTES AND VALUES
153
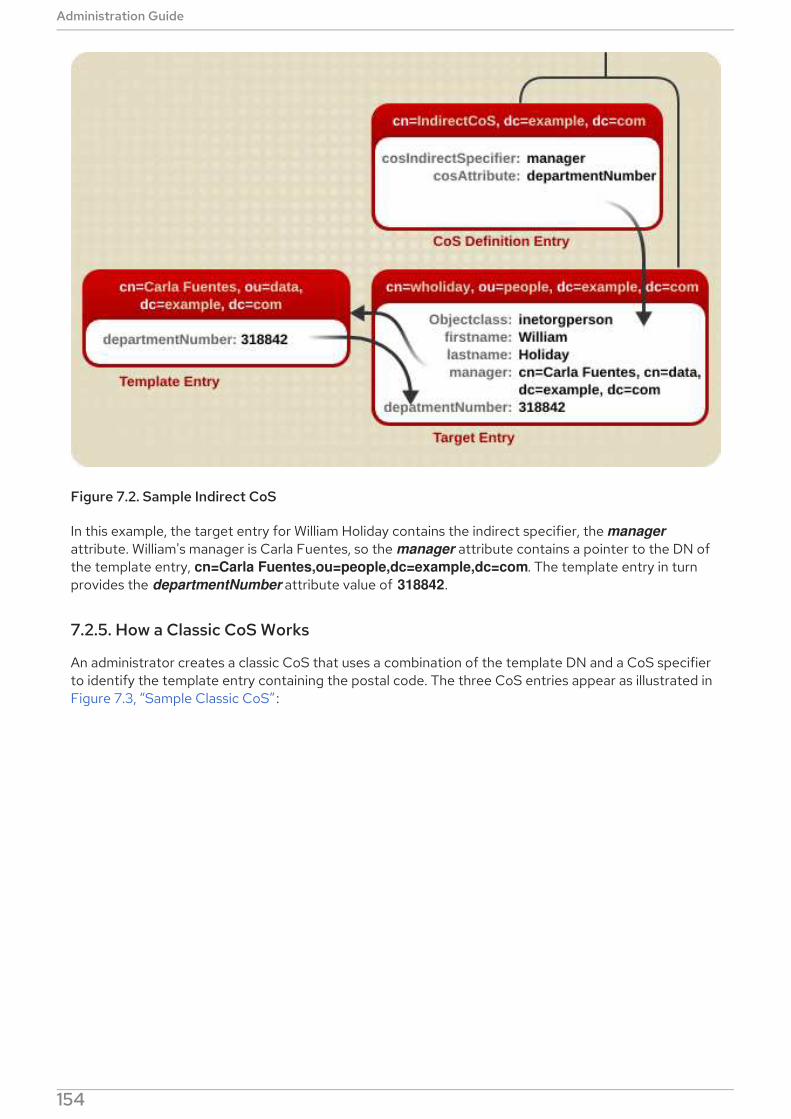
Figure 7.2. Sample Indirect CoS
In this example, the target entry for William Holiday contains the indirect specifier, the manager
attribute. William's manager is Carla Fuentes, so the manager attribute contains a pointer to the DN ofthe template entry, cn=Carla Fuentes,ou=people,dc=example,dc=com. The template entry in turnprovides the departmentNumber attribute value of 318842.
7.2.5. How a Classic CoS Works
An administrator creates a classic CoS that uses a combination of the template DN and a CoS specifierto identify the template entry containing the postal code. The three CoS entries appear as illustrated inFigure 7.3, “Sample Classic CoS” :
Administration Guide
154

Figure 7.3. Sample Classic CoS
In this example, the CoS definition entry's cosSpecifier attribute specifies the employeeType attribute.This attribute, in combination with the template DN, identify the template entry as cn=sales,cn=exampleUS,cn=data. The template entry then provides the value of the postalCode
attribute to the target entry.
7.2.6. Handling Physical Attribute Values
The cosAttribute attribute contains the name of another attribute which is governed by the class ofservice. This attribute allows an override qualifier after the attribute value which sets how the CoShandles existing attribute values on entries when it generates attribute values.
cosAttribute: attribute_name override
There are four override qualifiers:
default: Only returns a generated value if there is no corresponding attribute value stored withthe entry.
override: Always returns the value generated by the CoS, even when there is a value stored withthe entry.
operational: Returns a generated attribute only if it is explicitly requested in the search.Operational attributes do not need to pass a schema check in order to be returned. When operational is used, it also overrides any existing attribute values.
NOTE
CHAPTER 7. MANAGING ATTRIBUTES AND VALUES
155

NOTE
An attribute can only be made operational if it is defined as operational in theschema. For example, if the CoS generates a value for the description attribute,it is not possible to use the operational qualifier because this attribute is notmarked operational in the schema.
operational-default: Only returns a generated value if there is no corresponding attribute valuestored with the entry and if it is explicitly requested in the search.
If no qualifier is set, default is assumed.
For example, this pointer CoS definition entry indicates that it is associated with a template entry, cn=exampleUS,ou=data,dc=example,dc=com, that generates the value of the postalCode attribute.The override qualifier indicates that this value will take precedence over the value stored by the entriesfor the postalCode attribute:
dn: cn=pointerCoS,dc=example,dc=com
objectclass: top
objectclass: cosSuperDefinition
objectclass: cosPointerDefinition
cosTemplateDn: cn=exampleUS,ou=data,dc=example,dc=com
cosAttribute: postalCode override
NOTE
If an entry contains an attribute value generated by a CoS, the value of the attributecannot be manually updated if it is defined with the operational or override qualifiers.
For more information about the CoS attributes, see the Red Hat Directory Server
Configuration, Command, and File Reference.
7.2.7. Handling Multi-valued Attributes with CoS
Any attribute can be generated using a class of service — including multi-valued attributes. Thatintroduces the potential for confusion. Which CoS supplies a value? Any of them or all of them? How isthe value selected from competing CoS templates? Does the generated attribute use a single value ormultiple values?
There are two ways to resolve this:
Creating a rule to merge multiple CoS-generated attributes into the target entry. This results inmultiple values in the target entry.
Setting a priority to select one CoS value out of competing CoS definitions. This generates onesingle value for the target entry.
NOTE
Indirect CoS do not support the cosPriority attribute.
The way that the CoS handles multiple values for a CoS attribute is defined in whether it uses a merge-
schemes qualifier.
Administration Guide
156
cosAttribute: attribute override merge-schemes
NOTE
The merge-schemes qualifier does not affect how the CoS handles physical attributevalues or the override qualifier. If there are multiple competing CoS templates ordefinitions, then the same merge-schemes and override qualifiers have to be set on everycosAttribute for every competing CoS definition. Otherwise, one combination is chosenarbitrarily from all possible CoS definitions.
Using the merge-schemes qualifier tells the CoS that it will, or can, generate multiple values for themanaged attribute. There are two possible scenarios for having a multi-valued CoS attribute:
One CoS template entry contains multiple instances of the managed CoS attribute, resulting inmultiple values on the target entry. For example:
dn: cn=server access template,dc=example,dc=com
objectclass: top
objectclass: extensibleObject
objectclass: cosTemplate
accessTo: mail.example.com
accessTo: irc.example.com
NOTE
This method only works with classic CoS.
Multiple CoS definitions may define a class of service for the same target attribute, so there aremultiple template entries. For example:
dn: cn=mail template,dc=example,dc=com
objectclass: top
objectclass: extensibleObject
objectclass: cosTemplate
accessTo: mail.example.com
dn: cn=chat template,dc=example,dc=com
objectclass: top
objectclass: extensibleObject
objectclass: cosTemplate
accessTo: irc.example.com
However, it may be that even if there are multiple CoS definitions, only one value should be generatedfor the attribute. If there are multiple CoS definitions, then the value is chosen arbitrarily. This is anunpredictable and unwieldy option. The way to control which CoS template to use is to set a ranking onthe template — a priority — and the highest prioritized CoS always "wins" and provides the value.
It is fairly common for there to be multiple templates completing to provide a value. For example, therecan be a multi-valued cosSpecifier attribute in the CoS definition entry. The template priority is setusing the cosPriority attribute. This attribute represents the global priority of a particular template. Apriority of zero is the highest priority.
CHAPTER 7. MANAGING ATTRIBUTES AND VALUES
157
For example, a CoS template entry for generating a department number appears as follows:
dn: cn=data,dc=example,dc=com
objectclass: top
objectclass: extensibleObject
objectclass: cosTemplate
departmentNumber: 71776
cosPriority: 0
This template entry contains the value for the departmentNumber attribute. It has a priority of zero,meaning this template takes precedence over any other conflicting templates that define a different departmentNumber value.
Templates that contain no cosPriority attribute are considered the lowest priority. Where two or moretemplates are considered to supply an attribute value and they have the same (or no) priority, a value ischosen arbitrarily.
NOTE
The behavior for negative cosPriority values is not defined in Directory Server; do notenter negative values.
7.2.8. Searches for CoS-Specified Attributes
CoS definitions provide values for attributes in entries. For example, a CoS can set the postalCode
attribute for every entry in a subtree. Searches against those CoS-defined attributes, however, do notbehave like searches against regular entries.
If the CoS-defined attribute is indexed with any kind of index (including presence), then any attributewith a value set by the CoS is not returned with a search. For example:
The postalCode attribute for Ted Morris is defined by a CoS.
The postalCode attribute for Barbara Jensen is set in her entry.
The postalCode attribute is indexed.
If an ldapsearch command uses the filter (postalCode=*), then Barbara Jensen's entry is returned,while Ted Morris's is not.
If the CoS-defined attribute is not indexed, then every matching entry is returned in a search, regardlessof whether the attribute value is set locally or with CoS. For example:
The postalCode attribute for Ted Morris is defined by a CoS.
The postalCode attribute for Barbara Jensen is set in her entry.
The postalCode attribute is not indexed.
If an ldapsearch command uses the filter (postalCode=*), then both Barbara Jensen's and Ted Morris'sentries are returned.
CoS allows for an override, an identifier given to the cosAttribute attribute in the CoS entry, whichmeans that local values for an attribute can override the CoS value. If an override is set on the CoS, thenan ldapsearch operation will return a value for an entry even if the attribute is indexed, as long as there
Administration Guide
158

is a local value for the entry. Other entries which possess the CoS but do not have a local value will stillnot be returned in the ldapsearch operation.
Because of the potential issues with running LDAP search requests on CoS-defined attributes, takecare when deciding which attributes to generate using a CoS.
7.2.9. Access Control and CoS
The server controls access to attributes generated by a CoS in exactly the same way as regular storedattributes. However, access control rules depending upon the value of attributes generated by CoS willnot work. This is the same restriction that applies to using CoS-generated attributes in search filters.
7.2.10. Managing CoS Using the Console
This section describes creating and editing CoS through the Directory Server Console:
Section 7.2.10.1, “Creating a New CoS”
Section 7.2.10.2, “Creating the CoS Template Entry”
7.2.10.1. Creating a New CoS
1. In the Directory Server Console, select the Directory tab.
2. Browse the tree in the left navigation pane, and select the parent entry for the new class ofservice.
3. Go to the Object menu, and select New > Class of Service.
CHAPTER 7. MANAGING ATTRIBUTES AND VALUES
159

Alternatively, right-click the entry and select New > Class of Service.
4. Select General in the left pane. In the right pane, enter the name of the new class of service inthe Class Name field. Enter a description of the class in the Description field.
5. Click Attributes in the left pane. The right pane displays a list of attributes generated on thetarget entries.
Click Add to browse the list of possible attributes and add them to the list.
Administration Guide
160

6. After an attribute is added to the list, a drop-down list appears in the Class of Service
Behavior column.
Select Does not override target entry attribute to tell the directory to only return agenerated value if there is no corresponding attribute value stored with the entry.
Select Overrides target entry attribute to make the value of the attribute generated bythe CoS override the local value.
Select Overrides target entry attribute and is operational to make the attribute override
CHAPTER 7. MANAGING ATTRIBUTES AND VALUES
161

Select Overrides target entry attribute and is operational to make the attribute overridethe local value and to make the attribute operational, so that it is not visible to clientapplications unless explicitly requested.
Select Does not override target entry attribute and is operational to tell the directory toreturn a generated value only if there is no corresponding attribute value stored with theentry and to make the attribute operational (so that it is not visible to client applicationsunless explicitly requested).
NOTE
An attribute can only be made operational if it is also defined as operational in theschema. For example, if a CoS generates a value for the description attribute,you cannot select Overrides target entry attribute and is operational becausethis attribute is not marked operational in the schema.
7. Click Template in the left pane. In the right pane, select how the template entry is identified.
By its DN. To have the template entry identified by only its DN (a pointer CoS), enter theDN of the template in the Template DN field. Click Browse to locate the DN on the localserver. This will be an exact DN, such as cn=CoS
template,ou=People,dc=example,dc=com.
Using the value of one of the target entry's attribute. To have the template entry identifiedby the value of one of the target entry's attributes (an indirect CoS), enter the attributename in the Attribute Name field. Click Change to select a different attribute from the listof available attributes.
Using both its DN and the value of one of the target entry's attributes. To have the templateentry identified by both its DN and the value of one of the target entry's attributes (a classicCoS), enter both a template DN and an attribute name. The template DN in a classic CoS ismore general than for a pointer CoS; it references the suffix or subsuffix where thetemplate entries will be. There can be more than one template for a classic CoS.
Administration Guide
162
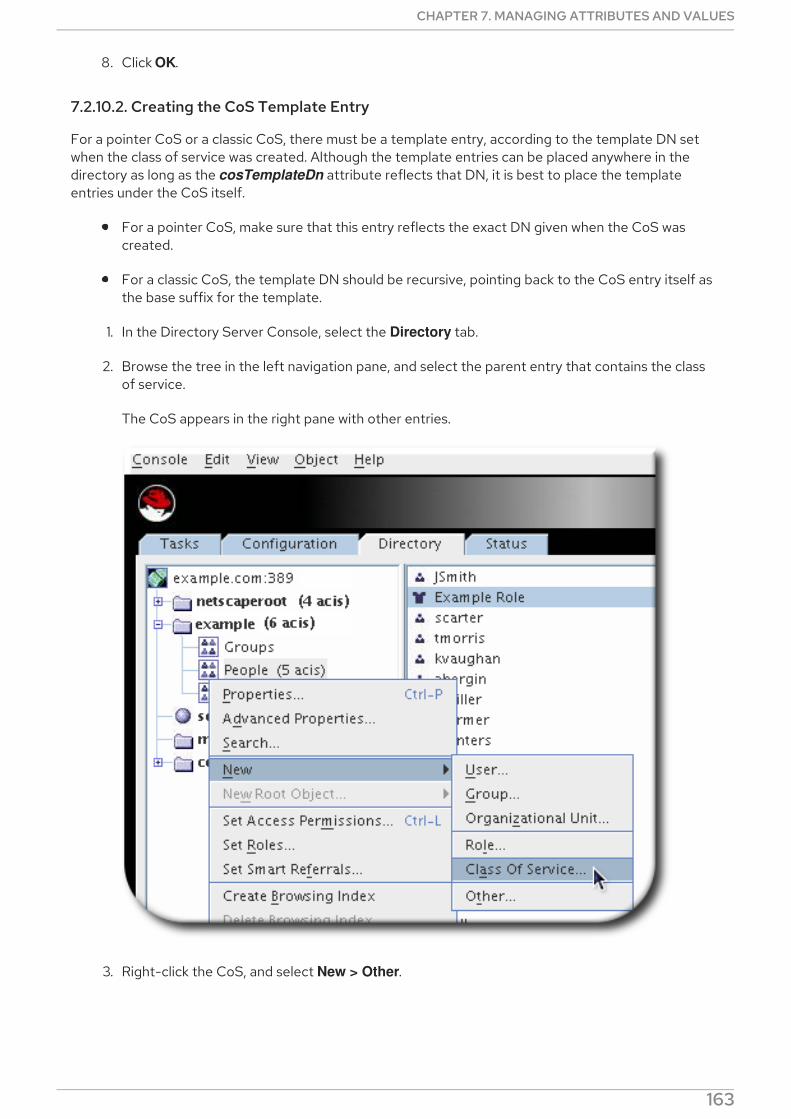
8. Click OK.
7.2.10.2. Creating the CoS Template Entry
For a pointer CoS or a classic CoS, there must be a template entry, according to the template DN setwhen the class of service was created. Although the template entries can be placed anywhere in thedirectory as long as the cosTemplateDn attribute reflects that DN, it is best to place the templateentries under the CoS itself.
For a pointer CoS, make sure that this entry reflects the exact DN given when the CoS wascreated.
For a classic CoS, the template DN should be recursive, pointing back to the CoS entry itself asthe base suffix for the template.
1. In the Directory Server Console, select the Directory tab.
2. Browse the tree in the left navigation pane, and select the parent entry that contains the classof service.
The CoS appears in the right pane with other entries.
3. Right-click the CoS, and select New > Other.
CHAPTER 7. MANAGING ATTRIBUTES AND VALUES
163

Alternatively, select the CoS in the right pane, click Object in the menu at the top, and select New > Other.
4. Select cosTemplate from the list of object classes.
NOTE
Administration Guide
164

NOTE
The LDAPsubentry object class can be added to a new template entry. Makingthe CoS template entry an instance of the LDAPsubentry object class allowsordinary searches to be performed unhindered by the configuration entries.However, if the template entry already exists and is used for something else (forexample, if it is a user entry), the LDAPsubentry object class does not need to beadded to the template entry.
5. Select the object classes attribute, and click Add Value.
6. Add the extensibleObject object class. This makes it possible to add any attribute available inthe directory.
CHAPTER 7. MANAGING ATTRIBUTES AND VALUES
165

7. Click the Add Attribute button.
8. Add the cn attribute, and give it a value that corresponds to the attribute value in the targetentry. For example, if the manager attribute is used to set the value for a classic CoS, give the
Administration Guide
166

cn a value of a manager's DN, such as uid=bparker,ou=people,dc=example,dc=com.Alternatively, set it to a role, such as cn=QA Role,dc=example,dc=com or a regular attributevalue. For example, if the employeeType attribute is selected, it can be full time or temporary.
9. Click the Change button in the lower right corner to change the naming attribute.
10. Use the cn of the entry as the naming attribute instead of cospriority.
CHAPTER 7. MANAGING ATTRIBUTES AND VALUES
167

11. Click the Add Attribute button, and add the attributes listed in the CoS. The values used herewill be used throughout the directory in the targeted entries.
12. Set the cospriority. There may be more than one CoS that applies to a given attribute in anentry; the cospriority attribute ranks the importance of that particular CoS. The higher cospriority will take precedence in a conflict. The highest priority is 0.
Templates that contain no cosPriority attribute are considered the lowest priority. In the casewhere two or more templates could supply an attribute value and they have the same (or no)priority, a value is chosen arbitrarily.
NOTE
The behavior for negative cosPriority values is not defined in Directory Server;do not enter negative values.
NOTE
The cosPriority attribute is not supported by indirect CoS.
Administration Guide
168

The CoS is visible in the left navigation pane once there are entries beneath it. For classic CoS, therecan be multiple entries, according to the different potential values of the attribute specifier.
To edit the description or attributes generated on the target entry of an existing CoS, simply double-click the CoS entry listed in the Directory tab, and make the appropriate changes in the editor window.
7.2.11. Managing CoS from the Command Line
Because all configuration information and template data is stored as entries in the directory, standardLDAP tools can be used for CoS configuration and management.
Section 7.2.11.1, “Creating the CoS Definition Entry from the Command Line”
Section 7.2.11.2, “Creating the CoS Template Entry from the Command Line”
Section 7.2.11.3, “Example of a Pointer CoS”
Section 7.2.11.4, “Example of an Indirect CoS”
Section 7.2.11.5, “Example of a Classic CoS”
Section 7.2.11.6, “Searching for CoS Entries”
7.2.11.1. Creating the CoS Definition Entry from the Command Line
Each type of CoS requires a particular object class to be specified in the definition entry. All CoSdefinition object classes inherit from the LDAPsubentry object class and the cosSuperDefinition
object class.
A pointer CoS uses the cosPointerDefinition object class. This object class identifies the templateentry using an entry DN value specified in the cosTemplateDn attribute, as shown in Example 7.3, “AnExample Pointer CoS Entry”.
Example 7.3. An Example Pointer CoS Entry
dn: cn=pointerCoS,dc=example,dc=com
objectclass: top
objectclass: cosSuperDefinition
objectclass: cosPointerDefinition
cosTemplateDn:DN_string
cosAttribute:list_of_attributes qualifier
cn: pointerCoS
An indirect CoS uses the cosIndirectDefinition object class. This type of CoS identifies the templateentry based on the value of one of the target entry's attributes, as specified in the cosIndirectSpecifier
attribute. This is illustrated in Example 7.4, “An Example Indirect CoS Entry”.
Example 7.4. An Example Indirect CoS Entry
dn: cn=indirectCoS,dc=example,dc=com
objectclass: top
objectclass: cosSuperDefinition
objectclass: cosIndirectDefinition
CHAPTER 7. MANAGING ATTRIBUTES AND VALUES
169

cosIndirectSpecifier:attribute_name
cosAttribute:list_of_attributes qualifier
cn: indirectCoS
A classic CoS uses the cosClassicDefinition object class. This identifies the template entry using boththe template entry's DN (set in the cosTemplateDn attribute) and the value of one of the target entry'sattributes (set in the cosSpecifier attribute). This is illustrated in Example 7.5, “An Example Classic CoSEntry”.
Example 7.5. An Example Classic CoS Entry
dn: cn=classicCoS,dc=example,dc=com
objectclass: top
objectclass: cosSuperDefinition
objectclass: cosClassicDefinition
cosTemplateDn:DN_string
cosSpecifier:attribute_name
cosAttribute:list_of_attributes qualifier
cn: classicCoS
For a class of service, the object class defines the type of CoS, and the supporting attributes identifywhich directory entries are affected by defining the CoS template. Every CoS has one additionalattribute which can be defined for it: cosAttribute. The purpose of a CoS is to supply attribute valuesacross multiple entries; the cosAttribute attribute defines which attribute the CoS generates values for.
7.2.11.2. Creating the CoS Template Entry from the Command Line
Each template entry is an instance of the cosTemplate object class.
NOTE
Consider adding the LDAPsubentry object class to a new template entry. Making theCoS template entry an instance of the LDAPsubentry object classes allows ordinarysearches to be performed unhindered by the configuration entries. However, if thetemplate entry already exists and is used for something else, such as a user entry, the LDAPsubentry object class does not need to be added to the template entry.
The CoS template entry also contains the attribute generated by the CoS (as specified in the cosAttribute attribute of the CoS definition entry) and the value for that attribute.
For example, a CoS template entry that provides a value for the postalCode attribute follows:
dn:cn=exampleUS,ou=data,dc=example,dc=com
objectclass: top
objectclass: extensibleObject
objectclass: cosTemplate
postalCode: 44438
The following sections provide examples of template entries along with examples of each type of CoSdefinition entry.
Administration Guide
170

Section 7.2.11.3, “Example of a Pointer CoS”
Section 7.2.11.4, “Example of an Indirect CoS”
Section 7.2.11.5, “Example of a Classic CoS”
7.2.11.3. Example of a Pointer CoS
Example Corporation's administrator is creating a pointer CoS that shares a common postal code withall entries in the dc=example,dc=com tree.
1. Add a new pointer CoS definition entry to the dc=example,dc=com suffix using ldapmodify:
dn: cn=pointerCoS,dc=example,dc=com
changetype: add
objectclass: top
objectclass: cosSuperDefinition
objectclass: cosPointerDefinition
cosTemplateDn: cn=exampleUS,ou=data,dc=example,dc=com
cosAttribute: postalCode
2. Create the template entry:
dn: cn=exampleUS,ou=data,dc=example,dc=com
changetype: add
objectclass: top
objectclass: extensibleObject
objectclass: cosTemplate
postalCode: 44438
The CoS template entry (cn=exampleUS,ou=data,dc=example,dc=com) supplies the value stored inits postalCode attribute to any entries located under the dc=example,dc=com suffix. These entries arethe target entries.
7.2.11.4. Example of an Indirect CoS
This indirect CoS uses the manager attribute of the target entry to identify the CoS template entry,which varies depending on the different values of the attribute.
1. Add a new indirect CoS definition entry to the dc=example,dc=com suffix using ldapmodify:
dn: cn=indirectCoS,dc=example,dc=com
changetype: add
objectclass: top
objectclass: cosSuperDefinition
objectclass: cosIndirectDefinition
cosIndirectSpecifier: manager
cosAttribute: departmentNumber
If the directory or modify the manager entries already contain the departmentNumber attribute, thenno other attribute needs to be added to the manager entries. The definition entry looks in the targetsuffix (the entries under dc=example,dc=com) for entries containing the manager attribute becausethis attribute is specified in the cosIndirectSpecifier attribute of the definition entry). It then checksthe departmentNumber value in the manager entry that is listed. The value of the departmentNumber
CHAPTER 7. MANAGING ATTRIBUTES AND VALUES
171
attribute will automatically be relayed to all of the manager's subordinates that have the manager
attribute. The value of departmentNumber will vary depending on the department number listed in thedifferent manager's entries.
7.2.11.5. Example of a Classic CoS
The Example Corporation administrator is creating a classic CoS that automatically generates postalcodes using a combination of the template DN and the attribute specified in the cosSpecifier attribute.
1. Add a new classic CoS definition entry to the dc=example,dc=com suffix using ldapmodify:
dn: cn=classicCoS,dc=example,dc=com
changetype: add
objectclass: top
objectclass: cosSuperDefinition
objectclass: cosClassicDefinition
cosTemplateDn: cn=classicCoS,dc=example,dc=com
cosSpecifier: businessCategory
cosAttribute: postalCode override
2. Create the template entries for the sales and marketing departments. Add the CoS attributesto the template entry. The cn of the template sets the value of the businessCategory
attribute in the target entry, and then the attributes are added or overwritten according to thevalue in the template:
dn: cn=sales,cn=classicCoS,dc=example,dc=com
changetype: add
objectclass: top
objectclass: extensibleObject
objectclass: cosTemplate
postalCode: 44438
dn: cn=marketing,cn=classicCoS,dc=example,dc=com
changetype: add
objectclass: top
objectclass: extensibleObject
objectclass: cosTemplate
postalCode: 99111
The classic CoS definition entry applies to all entries under the dc=example,dc=com suffix. Dependingupon the combination of the businessCategory attribute found in the entry and the cosTemplateDn,it can arrive at one of two templates. One, the sales template, provides a postal code specific toemployees in the sales department. The marketing template provides a postal code specific toemployees in the marketing department.
7.2.11.6. Searching for CoS Entries
CoS definition entries are operational entries and are not returned by default with regular searches. Thismeans that if a CoS is defined under ou=People,dc=example,dc=com, for example, the following ldapsearch command will not return them:
ldapsearch -x -s sub -b ou=People,dc=example,dc=com "(objectclass=*)"
To return the CoS definition entries, add the ldapSubEntry object class to the CoS definition entries.
Administration Guide
172

To return the CoS definition entries, add the ldapSubEntry object class to the CoS definition entries.For example:
dn: cn=pointerCoS,ou=People,dc=example,dc=com
objectclass: top
objectclass: cosSuperDefinition
objectclass: cosPointerDefinition
objectclass: ldapSubEntry
cosTemplateDn: cn=exampleUS,ou=data,dc=example,dc=com
cosAttribute: postalCode override
Then use a special search filter, (objectclass=ldapSubEntry), with the search. This filter can be addedto any other search filter using OR (|):
ldapsearch -x -s sub -b ou=People,dc=example,dc=com "(|(objectclass=*)
(objectclass=ldapSubEntry))"
This search returns all regular entries in addition to CoS definition entries in the ou=People,dc=example,dc=com subtree.
NOTE
The Console automatically shows CoS entries.
7.2.12. Creating Role-Based Attributes
Classic CoS schemes generate attribute values for an entry based on the role possessed by the entry.For example, role-based attributes can be used to set the server look-through limit on an entry-by-entrybasis.
To create a role-based attribute, use the nsRole attribute as the cosSpecifier in the CoS definitionentry of a classic CoS. Because the nsRole attribute can be multi-valued, CoS schemes can be definedthat have more than one possible template entry. To resolve the ambiguity of which template entry touse, include the cosPriority attribute in the CoS template entry.
For example, this CoS allows members of the manager role to exceed the standard mailbox quota. Themanager role entry is:
dn: cn=ManagerRole,ou=people,dc=example,dc=com
objectclass: top
objectclass: nsRoleDefinition
objectclass: nsComplexRoleDefinition
objectclass: nsFilteredRoleDefinition
cn: ManagerRole
nsRoleFilter: ou=managers
Description: filtered role for managers
IMPORTANT
The nsRoleFilter attribute cannot accept virtual attribute values.
The classic CoS definition entry looks like:
CHAPTER 7. MANAGING ATTRIBUTES AND VALUES
173
dn: cn=managerCOS,dc=example,dc=com
objectclass: top
objectclass: cosSuperDefinition
objectclass: cosClassicDefinition
cosTemplateDn: cn=managerCOS,dc=example,dc=com
cosSpecifier: nsRole
cosAttribute: mailboxquota override
The cosTemplateDn attribute provides a value that, in combination with the attribute specified in the cosSpecifier attribute (in the example, the nsRole attribute of the target entry), identifies the CoStemplate entry. The CoS template entry provides the value for the mailboxquota attribute. Anadditional qualifier of override tells the CoS to override any existing mailboxquota attributes values inthe target entry.
The corresponding CoS template entry looks as follows:
dn:cn="cn=ManagerRole,ou=people,dc=example,dc=com",cn=managerCOS,dc=example,dc=com
objectclass: top
objectclass: extensibleObject
objectclass: cosTemplate
mailboxquota: 1000000
The template provides the value for the mailboxquota attribute, 1000000.
NOTE
The role entry and the CoS definition and template entries should be located at the samelevel in the directory tree.
7.3. LINKING ATTRIBUTES TO MANAGE ATTRIBUTE VALUES
A class of service dynamically supplies attribute values for entries which all have attributes with the same
value, like building addresses, postal codes, or main office numbers. These are shared attribute values,which are updated in a single template entry.
Frequently, though, there are relationships between entries where there needs to be a way to expresslinkage between them, but the values (and possibly even the attributes) that express that relationshipare different. Red Hat Directory Server provides a way to link specified attributes together, so that whenone attribute in one entry is altered, a corresponding attribute on a related entry is automaticallyupdated. (The link and managed attributes both have DN values. The value of the link attribute containsthe DN of the entry for the plug-in to update; the managed attribute in the second entry has a DN valuewhich points back to the original link entry.)
7.3.1. About Linking Attributes
The Linked Attributes Plug-in, allows multiple instances of the plug-in. Each instance configures oneattribute which is manually maintained by the administrator (linkType) and one attribute which isautomatically maintained by the plug-in (managedType).
Administration Guide
174
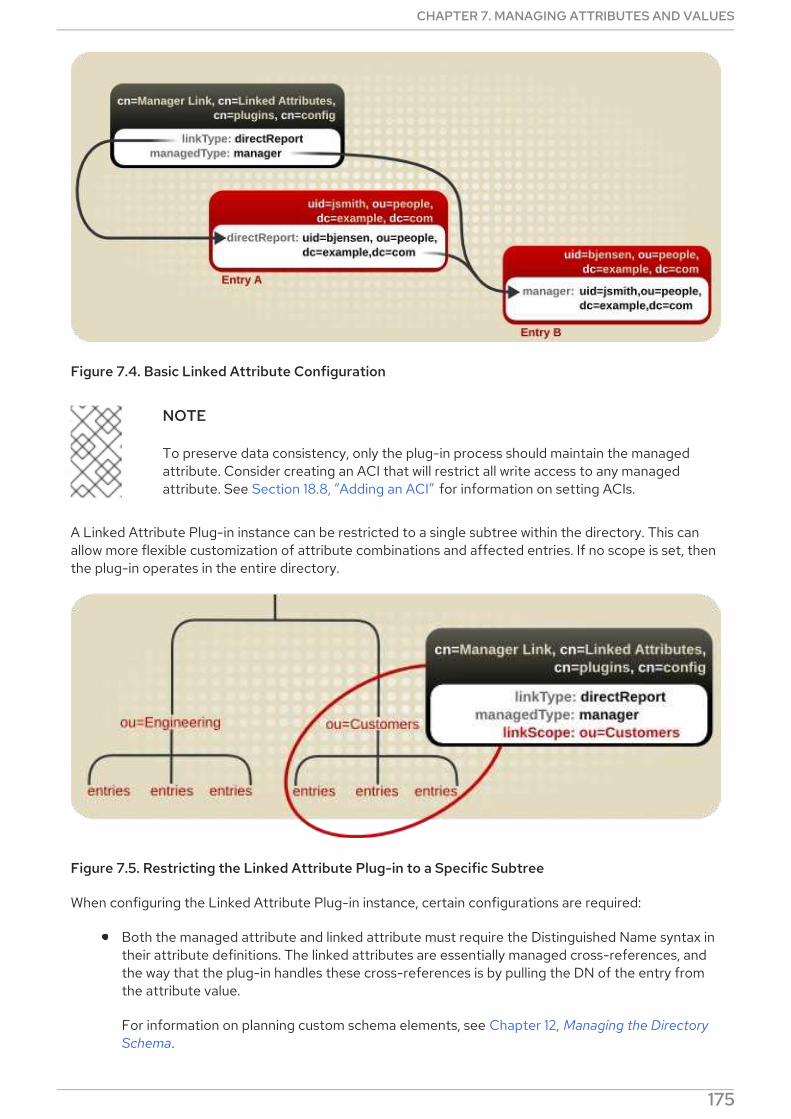
Figure 7.4. Basic Linked Attribute Configuration
NOTE
To preserve data consistency, only the plug-in process should maintain the managedattribute. Consider creating an ACI that will restrict all write access to any managedattribute. See Section 18.8, “Adding an ACI” for information on setting ACIs.
A Linked Attribute Plug-in instance can be restricted to a single subtree within the directory. This canallow more flexible customization of attribute combinations and affected entries. If no scope is set, thenthe plug-in operates in the entire directory.
Figure 7.5. Restricting the Linked Attribute Plug-in to a Specific Subtree
When configuring the Linked Attribute Plug-in instance, certain configurations are required:
Both the managed attribute and linked attribute must require the Distinguished Name syntax intheir attribute definitions. The linked attributes are essentially managed cross-references, andthe way that the plug-in handles these cross-references is by pulling the DN of the entry fromthe attribute value.
For information on planning custom schema elements, see Chapter 12, Managing the Directory
Schema.
CHAPTER 7. MANAGING ATTRIBUTES AND VALUES
175

Each Linked Attribute Plug-in instance must be local and any managed attributes must beblocked from replication using fractional replication.
Any changes that are made on one supplier will automatically trigger the plug-in to manage thevalues on the corresponding directory entries, so the data stay consistent across servers.However, the managed attributes must be maintained by the plug-in instance for the data to beconsistent between the linked entries. This means that managed attribute values should bemaintained solely by the plug-in processes, not the replication process, even in a multi-masterreplication environment.
For information on using fractional replication, see Section 15.1.7, “Replicating a Subset ofAttributes with Fractional Replication”.
7.3.2. Looking at the Linking Attributes Plug-in Syntax
The default Linked Attributes Plug-in entry is a container entry for each plug-in instance, similar to thepassword syntax plug-ins or the DNA Plug-in in the next section. Each entry beneath this container entrydefines a different link-managed attribute pair.
To create a new linking attribute pair, then, create a new plug-in instance beneath the container entry. Abasic linking attribute plug-in instance required defining two things:
The attribute that is managed manually by administrators, in the linkType attribute
The attribute that is created dynamically by the plug-in, in the managedType attribute
Optionally, a scope that restricts the plug-in to a specific part of the directory tree, in the linkScope attribute
Example 7.6. Example Linked Attributes Plug-in Instance Entry
dn: cn=Manager Link,cn=Linked Attributes,cn=plugins,cn=config
objectClass: top
objectClass: extensibleObject
cn: Manager Link
linkType: directReport
managedType: manager
linkScope: ou=people,dc=example,dc=com
All of the attributes available for an instance of the Linked Attributes Plug-in instance are listed inTable 7.2, “Linked Attributes Plug-in Instance Attributes” .
Table 7.2. Linked Attributes Plug-in Instance Attributes
Plug-in Attribute Description
cn Gives a unique name for the plug-in instance.
linkScope Contains the DN of a suffix to which to restrict the function of the plug-in instance.
Administration Guide
176
linkType Gives the attribute which is maintained by an administrator. This attribute is manuallymaintained and is used as the reference for the plug-in. This attribute must have a DNvalue format. When the attribute is added, modified, or deleted, then its value containsthe DN of the target entry for the plug-in to update.
managedType Gives the attribute which is maintained by the plug-in. This attribute is created andupdated on target entries. This attribute must have a DN value format. When theattribute is added to the entry, its value will point back as a cross-reference to themanaged entry.
Plug-in Attribute Description
7.3.3. Configuring Attribute Links
NOTE
The Linked Attribute Plug-in instance can be created in the Directory Server Console,but only through the Advanced Property Editor for the directory entry, by manuallyadding all of the required attributes, the same as creating the entry manually through thecommand line.
1. If it is not already enabled, enable the Linked Attributes Plug-in, as described in Section 1.9.2.2,“Enabling Plug-ins in the Directory Server Console” or Section 1.9.1, “Enabling Plug-insDynamically”.
2. Create the plug-in instance. Both the managedType and linkType attributes are required. Theplug-in syntax is covered in Section 7.3.2, “Looking at the Linking Attributes Plug-in Syntax” .The following example shows the plug-in instance created by using ldapmodify:
dn: cn=Manager Link,cn=Linked Attributes,cn=plugins,cn=config
changetype: add
objectClass: top
objectClass: extensibleObject
cn: Manager Link
linkType: directReport
managedType: manager
3. If the server is not configured to enable dynamic plug-ins using nsslapd-dynamic-plugins,restart the server to apply the new plug-in instance:
# systemctl restart dirsrv.target
7.3.4. Cleaning up Attribute Links
The managed-linked attributes can get out of sync. For instance, a linked attribute could be imported orreplicated over to a server, but the corresponding managed attribute was not because the link attributewas not properly configured. The managed-linked attribute pairs can be fixed by running a script (fixup-
linkedattrs.pl) or by launching a fix-up task.
The fixup task removes any managed attributes (attributes managed by the plug-in) that do not have a
CHAPTER 7. MANAGING ATTRIBUTES AND VALUES
177
The fixup task removes any managed attributes (attributes managed by the plug-in) that do not have acorresponding link attribute (attributes managed by the administrator) on the referenced entry.Conversely, the task adds any missing managed attributes if the link attribute exists in an entry.
7.3.4.1. Regenerating Linked Attributes Using fixup-linkedattrs.pl
The fixup-linkedattrs.pl script launches a special task to regenerate all of the managed-link attributepairs on directory entries. One or the other may be lost in certain situations. If the link attribute exists inan entry, the task traces the cross-referenced DN in the available attribute and creates thecorresponding configured managed attribute on the referenced entry. If a managed attribute exists withno corresponding link attribute, then the managed attribute value is removed.
To repair all configured link attribute pairs for the entire scope of the plug-in, then simply run thecommand as the Directory Manager:
# fixup-linkedattrs.pl -D "cn=Directory Manager" -w password
It is also possible to limit the fixup task to a single link-managed attribute pair, using the -l option tospecify the target plug-in instance DN:
# fixup-linkedattrs.pl -D "cn=Directory Manager" -w password -l "cn=Manager Link,cn=Linked
Attributes,cn=plugins,cn=config"
For information about the parameters used in the examples, see the description of the fixup-
linkedattrs.pl script in the Red Hat Directory Server Configuration, Command, and File Reference .
7.3.4.2. Regenerating Linked Attributes Using ldapmodify
Repairing linked attributes is one of the tasks which can be managed through a special taskconfiguration entry. Task entries occur under the cn=tasks configuration entry in the dse.ldif file, so it isalso possible to initiate a task by adding the entry using ldapmodify. When the task is complete, theentry is removed from the directory.
This task is the same one created automatically by the fixup-linkedattrs.pl script when it is run.
To initiate a linked attributes fixup task, add an entry under the cn=fixup linked
attributes,cn=tasks,cn=config entry. The only required attribute is the cn for the specific task, thoughit also allows the ttl attribute to set a timeout period. Using ldapmodify:
dn: cn=example,cn=fixup linked attributes,cn=tasks,cn=config
changetype: add
cn:example
ttl: 5
Once the task is completed, the entry is deleted from the dse.ldif configuration, so it is possible toreuse the same task entry continually.
The cn=fixup linked attributes task configuration is described in more detail in theConfiguration, Command, and File Reference.
7.4. ASSIGNING AND MANAGING UNIQUE NUMERIC ATTRIBUTEVALUES
Some entry attributes require having a unique number, such as uidNumber and gidNumber. The
Administration Guide
178
Some entry attributes require having a unique number, such as uidNumber and gidNumber. TheDirectory Server can automatically generate and supply unique numbers for specified attributes usingthe Distributed Numeric Assignment (DNA) Plug-in.
NOTE
Attribute uniqueness is not necessarily preserved with the DNA Plug-in. The plug-in onlyassigns non-overlapping ranges, but it does allow manually-assigned numbers for itsmanaged attributes, and it does not verify or require that the manually-assigned numbersare unique.
The issue with assigning unique numbers is not with generating the numbers but in effectively avoidingreplication conflicts. The DNA Plug-in assigns unique numbers across a single back end. For multi-master replication, when each master is running a local DNA Plug-in instance, there has to be a way toensure that each instance is using a truly unique set of numbers. This is done by assigning differentranges of numbers to each server to assign.
7.4.1. About Dynamic Number Assignments
The DNA Plug-in for a server assigns a range of available numbers that that instance can issue. Therange definition is very simple and is set by two attributes: the server's next available number (the lowend of the range) and its maximum value (the top end of the range). The initial bottom range is set whenthe plug-in instance is configured. After that, the bottom value is updated by the plug-in. By breakingthe available numbers into separate ranges on each replica, the servers can all continually assignnumbers without overlapping with each other.
7.4.1.1. Filters, Searches, and Target Entries
The server performs a sorted search, internally, to see if the next specified range is already taken,requiring the managed attribute to have an equality index with the proper ordering matching rule (asdescribed in Section 13.2, “Creating Standard Indexes” ).
The DNA Plug-in is applied, always, to a specific area of the directory tree (the scope) and to specificentry types within that subtree (the filter).
IMPORTANT
The DNA Plug-in only works on a single back end; it cannot manage number assignmentsfor multiple databases. The DNA plug-in uses the sort control when checking whether avalue has already been manually allocated outside of the DNA Plug-in. This validation,using the sort control, only works on a single back end.
7.4.1.2. Ranges and Assigning Numbers
There are several different ways that the Directory Server can handle generating attribute values:
In the simplest case, a user entry is added to the directory with an object class which requires theunique-number attribute, but without the attribute present. Adding an entry with no value forthe managed attribute triggers the DNA Plug-in to assign a value. This option only works if theDNA Plug-in has been configured to assign unique values to a single attribute.
A similar and more manageable option is to use a magic number. This magic number is atemplate value for the managed attribute, something outside the server's range, a number oreven a word, that the plug-in recognizes it needs to replace with a new assigned value. When an
CHAPTER 7. MANAGING ATTRIBUTES AND VALUES
179

entry is added with the magic value and the entry is within the scope and filter of the configuredDNA Plug-in, then using the magic number automatically triggers the plug-in to generate a newvalue. The following example, based on using ldapmodify, adds 0 as a magic number:
dn: uid=jsmith,ou=people,dc=example,dc=com
changetype: add
objectClass: top
objectClass: person
objectClass: posixAccount
uid: jsmith
cn: John Smith
uidNumber: 0
gidNumber: 0
....
The DNA Plug-in only generates new, unique values. If an entry is added or modified to use aspecific value for an attribute controlled by the DNA Plug-in, the specified number is used; theDNA Plug-in will not overwrite it.
7.4.1.3. Multiple Attributes in the Same Range
The DNA Plug-in can assign unique numbers to a single attribute type or across multiple attribute typesfrom a single range of unique numbers.
This provides several options for assigning unique numbers to attributes:
A single number assigned to a single attribute type from a single range of unique numbers.
The same unique number assigned to two attributes for a single entry.
Two different attributes assigned two different numbers from the same range of uniquenumbers.
In many cases, it is sufficient to have a unique number assigned per attribute type. When assigning an employeeID to a new employee entry, it is important each employee entry is assigned a unique employeeID.
However, there are cases where it may be useful to assign unique numbers from the same range ofnumbers to multiple attributes. For example, when assigning a uidNumber and a gidNumber to a posixAccount entry, the DNA Plug-in will assign the same number to both attributes. To do this, thenpass both managed attributes to the modify operation, specifying the magic value. Using ldapmodify:
# ldapmodify -D "cn=Directory Manager" -W -x
dn: uid=jsmith,ou=people,dc=example,dc=com
changetype: modify
add: uidNumber
uidNumber: 0
-
add:gidNumber
gidNumber: 0
When multiple attributes are handled by the DNA Plug-in, the plug-in can assign a unique value to onlyone of those attributes if the object class only allows one of them. For example, the posixGroup objectclass does not allow a uidNumber attribute but it does allow gidNumber. If the DNA Plug-in manages
Administration Guide
180
both uidNumber and gidNumber, then when a posixGroup entry is created, a unique number for gidNumber is assigned from the same range as the uidNumber and gidNumber attributes. Using thesame pool for all attributes manged by the plug-in keeps the assignment of unique numbers aligned andprevents situations where a uidNumber and a gidNumber on different entries are assigned fromdifferent ranges and result in the same unique number.
If multiple attributes are handled by the DNA Plug-in, then the same value will be assigned to all of thegiven managed attributes in an entry in a single modify operation. To assign different numbers from thesame range, then you must perform separate modify operations. The following example uses ldapmodify to do so:
# ldapmodify -D "cn=Directory Manager" -W -x
dn: uid=jsmith,ou=people,dc=example,dc=com
changetype: modify
add: uidNumber
uidNumber: 0
^D
# ldapmodify -D "cn=Directory Manager" -W -x
dn: uid=jsmith,ou=people,dc=example,dc=com
changetype: modify
add: employeeId
employeeId: magic
IMPORTANT
When the DNA Plug-in is configured to assign unique numbers to multiple attributes, it isnecessary to specify the magic value for each attribute that requires the unique number.While this is not necessary when the DNA plug-in has been configured to provide uniquenumbers for a single attribute, it is necessary for multiple attributes. There may beinstances where an entry does not allow each type of attribute defined for the range, or,more important, an entry allow all of the attributes types defined, but only a subset of theattributes require the unique value.
Example 7.7. DNA and Unique Bank Account Numbers
Example Bank wants to use the same unique number for a customer's primaryAccount and customerID attributes. The Example Bank administrator configured the DNA Plug-in to assignunique values for both attributes from the same range.
The bank also wants to assign numbers for secondary accounts from the same range as the customerID and primary account numbers, but these numbers cannot be the same as the primary accountnumbers. The Example Bank administrator configures the DNA Plug-in to also manage the secondaryAccount attribute, but will only add the secondaryAccount attribute to an entry after
the entry is created and the primaryAccount and customerID attributes are assigned. This ensuresthat primaryAccount and customerID share the same unique number, and any secondaryAccount
numbers are entirely unique but still from the same range of numbers.
7.4.2. Looking at the DNA Plug-in Syntax
The DNA Plug-in itself is a container entry, similar to the Password Storage Schemes Plug-in. Each DNAentry underneath the DNA Plug-in entry defines a new managed range for the DNA Plug-in.
CHAPTER 7. MANAGING ATTRIBUTES AND VALUES
181
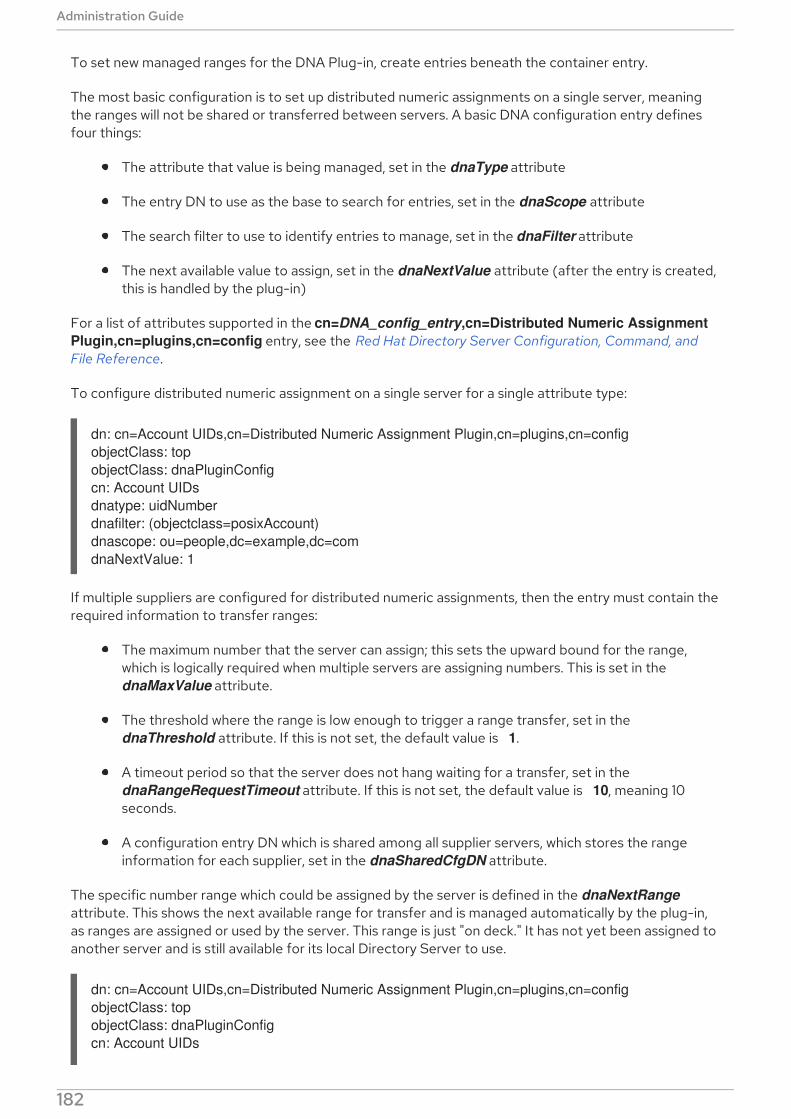
To set new managed ranges for the DNA Plug-in, create entries beneath the container entry.
The most basic configuration is to set up distributed numeric assignments on a single server, meaningthe ranges will not be shared or transferred between servers. A basic DNA configuration entry definesfour things:
The attribute that value is being managed, set in the dnaType attribute
The entry DN to use as the base to search for entries, set in the dnaScope attribute
The search filter to use to identify entries to manage, set in the dnaFilter attribute
The next available value to assign, set in the dnaNextValue attribute (after the entry is created,this is handled by the plug-in)
For a list of attributes supported in the cn=DNA_config_entry,cn=Distributed Numeric Assignment
Plugin,cn=plugins,cn=config entry, see the Red Hat Directory Server Configuration, Command, and
File Reference.
To configure distributed numeric assignment on a single server for a single attribute type:
dn: cn=Account UIDs,cn=Distributed Numeric Assignment Plugin,cn=plugins,cn=config
objectClass: top
objectClass: dnaPluginConfig
cn: Account UIDs
dnatype: uidNumber
dnafilter: (objectclass=posixAccount)
dnascope: ou=people,dc=example,dc=com
dnaNextValue: 1
If multiple suppliers are configured for distributed numeric assignments, then the entry must contain therequired information to transfer ranges:
The maximum number that the server can assign; this sets the upward bound for the range,which is logically required when multiple servers are assigning numbers. This is set in the dnaMaxValue attribute.
The threshold where the range is low enough to trigger a range transfer, set in the dnaThreshold attribute. If this is not set, the default value is 1.
A timeout period so that the server does not hang waiting for a transfer, set in the dnaRangeRequestTimeout attribute. If this is not set, the default value is 10, meaning 10seconds.
A configuration entry DN which is shared among all supplier servers, which stores the rangeinformation for each supplier, set in the dnaSharedCfgDN attribute.
The specific number range which could be assigned by the server is defined in the dnaNextRange
attribute. This shows the next available range for transfer and is managed automatically by the plug-in,as ranges are assigned or used by the server. This range is just "on deck." It has not yet been assigned toanother server and is still available for its local Directory Server to use.
dn: cn=Account UIDs,cn=Distributed Numeric Assignment Plugin,cn=plugins,cn=config
objectClass: top
objectClass: dnaPluginConfig
cn: Account UIDs
Administration Guide
182

dnatype: uidNumber
dnafilter: (objectclass=posixAccount)
dnascope: ou=People,dc=example,dc=com
dnanextvalue: 1
dnaMaxValue: 1300
dnasharedcfgdn: cn=Account UIDs,ou=Ranges,dc=example,dc=com
dnathreshold: 100
dnaRangeRequestTimeout: 60
dnaNextRange: 1301-2301
The dnaNextRange attribute should be set explicitly only if a separate, specific range has to beassigned to other servers. Any range set in the dnaNextRange attribute must be unique from theavailable range for the other servers to avoid duplication. If there is no request from the other serversand the server where dnaNextRange is set explicitly has reached its set dnaMaxValue, the next set ofvalues (part of the dnaNextRange) is allocated from this deck.
The dnaNextRange allocation is also limited by the dnaThreshold attribute that is set in the DNAconfiguration. Any range allocated to another server for dnaNextRange cannot violate the threshold forthe server, even if the range is available on the deck of dnaNextRange.
NOTE
If the dnaNextRange attribute is handled internally if it is not set explicitly. When it ishandled automatically, the dnaMaxValue attribute serves as upper limit for the nextrange.
Each supplier keeps a track of its current range in a separate configuration entry which containsinformation about its range and its connection settings. This entry is a child of the location in dnasharedcfgdn. The configuration entry is replicated to all of the other suppliers, so each supplier cancheck that configuration to find a server to contact for a new range. For example:
dn: dnaHostname=ldap1.example.com+dnaPortNum=389,cn=Account
UIDs,ou=Ranges,dc=example,dc=com
objectClass: dnaSharedConfig
objectClass: top
dnahostname: ldap1.example.com
dnaPortNum: 389
dnaSecurePortNum: 636
dnaRemainingValues: 1000
7.4.3. Configuring Unique Number Assignments
The unique number distribution is configured by creating different instances of the DNA Plug-in. TheseDNA Plug-in instances can only be created through the command line, but they can be edited throughthe Directory Server Console.
7.4.3.1. Configuring Unique Number Assignments
NOTE
CHAPTER 7. MANAGING ATTRIBUTES AND VALUES
183

NOTE
Any attribute which has a unique number assigned to it must have an equality index setfor it. The server must perform a sorted search, internally, to see if the dnaNextvalue isalready taken, which requires an equality index on an integer attribute, with the properordering matching rule.
Creating indexes is described in Section 13.2, “Creating Standard Indexes” .
NOTE
Set up the DNA Plug-in on every supplier server, and be careful not to overlap thenumber range values.
1. Create the shared container entry in the replicated subtree. The following example uses ldapmodify to do so:
dn: ou=Ranges,dc=example,dc=coma
changetype: add
objectclass: top
objectclass: extensibleObject
objectclass: organizationalUnit
ou: Ranges
dn: cn=Account UIDs,ou=Ranges,dc=example,dc=coma
changetype: add
objectclass: top
objectclass: extensibleObject
cn: Account UIDs
2. Enable the DNA Plug-in and configure it as dynamic. By default, the plug-in entry (which is thecontainer entry) is disabled. For details on configuring dynamic plug-ins, see Section 1.9.1,“Enabling Plug-ins Dynamically”.
3. Create the new DNA Plug-in instance beneath the container entry. For example:
NOTE
The plug-in attribute which sets which entry attributes have unique numberassignments, dnaType, is multi-valued. If multiple attributes are set in the sameplug-in instance, then their number assignments are taken from the same range.To use different ranges, configure different plug-in instances.
Using ldapmodify:
dn: cn=Account UIDs,cn=Distributed Numeric Assignment Plugin,cn=plugins,cn=config
changetype: add
objectClass: top
objectClass: dnaPluginConfig
cn: Account UIDs
dnatype: uidNumber
dnafilter: (objectclass=posixAccount)
Administration Guide
184

dnascope: ou=People,dc=example,dc=com
dnanextvalue: 1
dnaMaxValue: 1300
dnasharedcfgdn: cn=Account UIDs,ou=Ranges,dc=example,dc=com
dnathreshold: 100
dnaRangeRequestTimeout: 60
dnaMagicRegen: magic
For a list of attributes supported in the cn=DNA_config_entry,cn=Distributed Numeric
Assignment Plugin,cn=plugins,cn=config entry, see the Red Hat Directory Server
Configuration, Command, and File Reference.
4. For servers in multi-master replication, create a configuration entry for the host, which specifiesits connection information and range.
The DN of the entry is a combination of the host name and the port number(dnaHostname+dnaPortNum).
Using ldapmodify:
dn: dnaHostname=ldap1.example.com+dnaPortNum=389,cn=Account
UIDs,ou=Ranges,dc=example,dc=com
changetype: add
objectClass: dnaSharedConfig
objectClass: top
dnahostname: ldap1.example.com
dnaPortNum: 389
dnaSecurePortNum: 636
dnaRemainingValues: 1000
5. If the server is not configured to enable dynamic plug-in, restart the server to load the newplug-in instance.
# systemctl restart dirsrv@instance
7.4.3.2. Editing the DNA Plug-in in the Console
NOTE
Any attribute which has a unique number assigned to it must have an equality index setfor it. The server must perform a sorted search, internally, to see if the dnaNextvalue isalready taken, which requires an equality index on an integer attribute, with the properordering matching rule.
Creating indexes is described in Section 13.2, “Creating Standard Indexes” .
The Directory Server Console can be used to edit the DNA Plug-in instances.
1. Click the Directory tab.
2. Open the config folder, and then expand the plugins folder.
3. Click the Distributed Numeric Assignment plug-in folder. All of the DNA Plug-in instances arelisted in the main window.
CHAPTER 7. MANAGING ATTRIBUTES AND VALUES
185
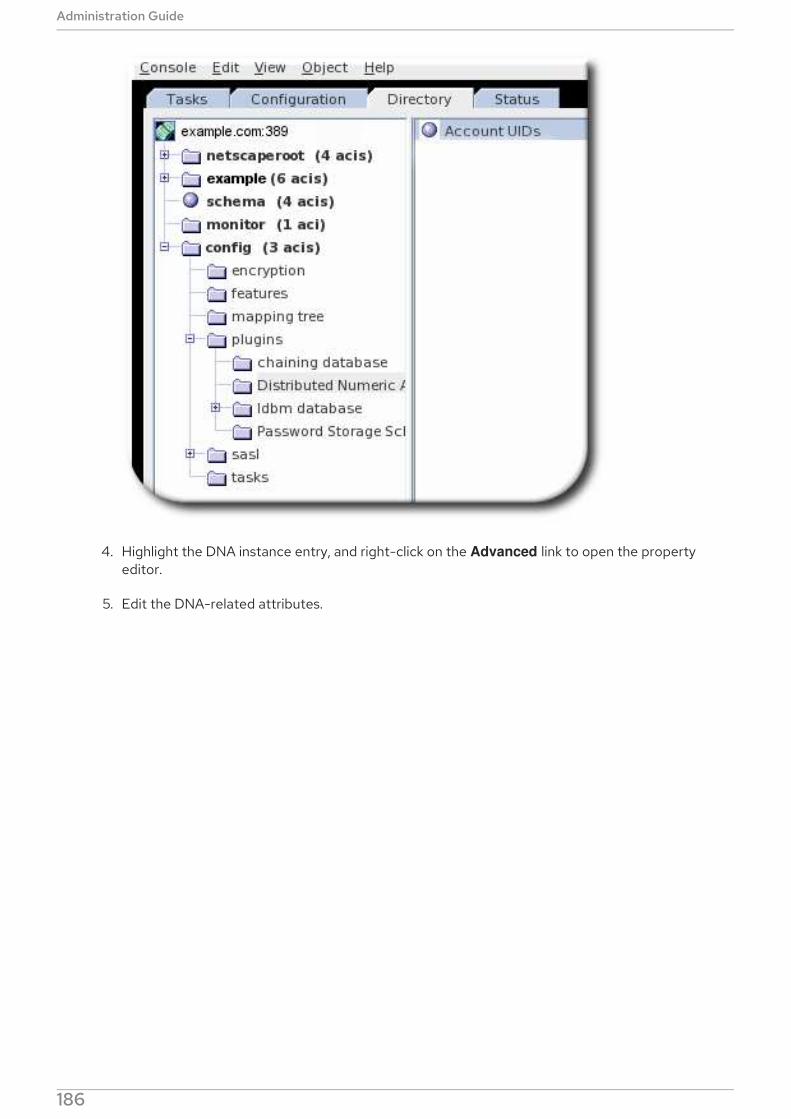
4. Highlight the DNA instance entry, and right-click on the Advanced link to open the propertyeditor.
5. Edit the DNA-related attributes.
Administration Guide
186

7.4.4. Distributed Number Assignment Plug-in Performance Notes
There can be thread locking issues as DNA configuration is changed dynamically, so that new operationswhich access the DNA configuration (such as a DNA task or additional changes to the DNAconfiguration) will access the old configuration because the thread with the new configuration has notyet been released. This can cause operations to use old configuration or simply cause operations tohang.
To avoid this, preserve an interval between dynamic DNA configuration changes of 35 seconds. Thismeans have a sleep or delay between both DNA configuration changes and any directory entry changeswhich would trigger a DNA plug-in operation.
CHAPTER 7. MANAGING ATTRIBUTES AND VALUES
187

CHAPTER 8. ORGANIZING AND GROUPING ENTRIES
Entries contained within the directory can be grouped in different ways to simplify the management ofuser accounts. Red Hat Directory Server supports a variety of methods for grouping entries and sharingattributes between entries. To take full advantage of the features offered by roles and class of service,determine the directory topology when planning the directory deployment.
8.1. USING GROUPS
Similar to the operating system, you can add users to groups in Directory Server. Groups work the otherway around as roles. If you are using roles, the DN of the assigned role is stored in the nsRoleDN
attribute in the user object. If you use groups, then the DN of the users who are members of this groupare stored in member attributes in the group object. If you enabled the memberOf plug-in, then thegroups the user is a member of, are additionally stored in memberOf attribute in the user object. Withthis plug-in enabled, groups additionally have the benefit of roles, that you can list the groupmemberships of a user, similar as when using roles. Additionally, groups are faster than roles.
For further details about using the memberOf plug-in, see Section 8.1.4, “Listing Group Membership inUser Entries”.
8.1.1. Creating Static Groups in the Console
Static groups organize entries by specifying the same group value in the DN attribute of any number ofusers.
NOTE
If a user has an entry on a remote Directory Server (for example, in a chained database),different from the Directory Server which has the entry that defines the static group, thenuse the Referential Integrity plug-in to ensure that deleted user entries are automaticallydeleted from the static group.
There are some performance and access control considerations with the ReferentialIntegrity plug-in. For more information about using referential integrity with chaining, seeSection 2.3.2, “Configuring the Chaining Policy” .
1. In the Directory Server Console, select the Directory tab.
2. In the left pane, right-click the entry under which to add a new group, and select New > Group.
Administration Guide
188

Alternatively, go to the Object menu, and select New > Group.
3. Click General in the left pane. Type a name for the new group in the Group Name field (thename is required), and enter a description of the new group in the Description field.
4. Click Members in the left pane. In the right pane, select the Static Group tab. Click Add to addnew members to the group.
5. In the Search drop-down list, select what sort of entries to search for (users, groups, or both)then click Search.
CHAPTER 8. ORGANIZING AND GROUPING ENTRIES
189
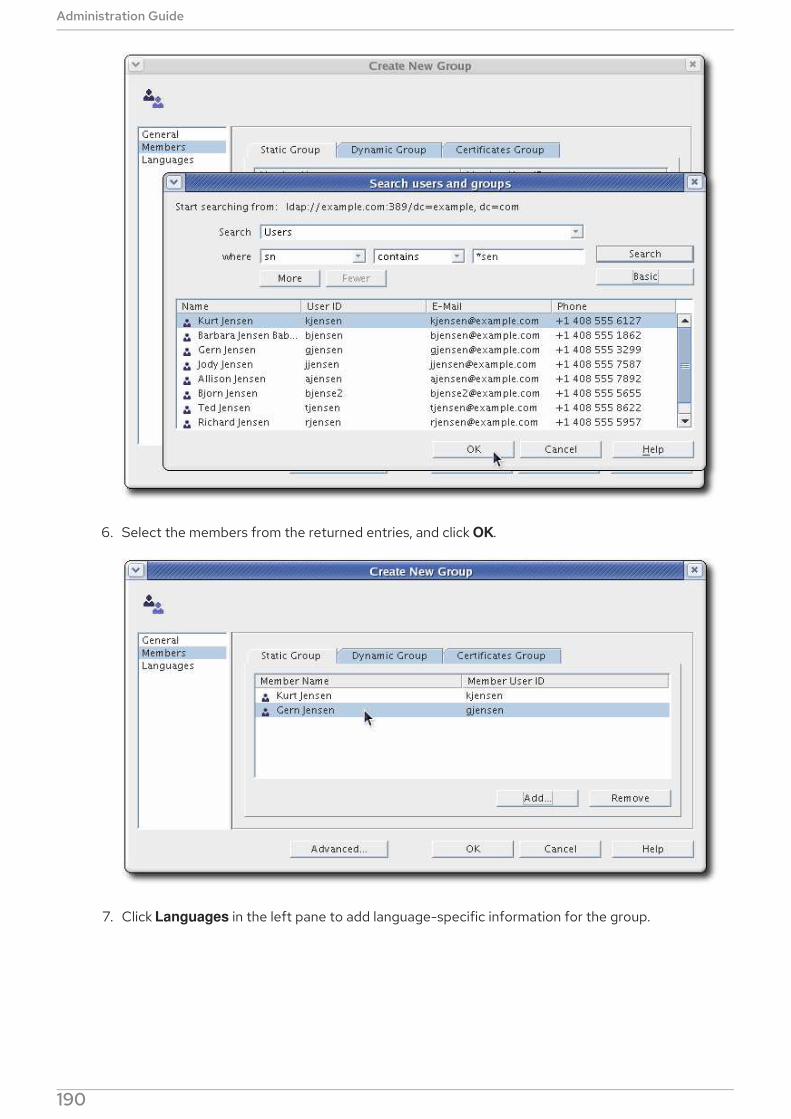
6. Select the members from the returned entries, and click OK.
7. Click Languages in the left pane to add language-specific information for the group.
Administration Guide
190

8. Click OK to create the new group. It appears in the right pane.
To edit a static group, double-click the group entry, and make the changes in the editor window. To viewthe changes, go to the View menu, and select Refresh.
NOTE
The Console for managing static groups may not display all possible selections during asearch operation if there is no VLV index for users' search. This problem occurs only whenthe number of users is 1000 or more and there is no VLV index for search. To workaround the problem, create a VLV index for the users suffix with the filter (objectclass=person) and scope sub-tree. See Section 13.4.2, “Creating BrowsingIndexes from the Command Line”.
8.1.2. Creating Dynamic Groups in the Console
Dynamic groups filter users based on their DN and include them in a single group.
1. In the Directory Server Console, select the Directory tab.
2. In the left pane, right-click the entry under which to add a new group, and select New > Group.
CHAPTER 8. ORGANIZING AND GROUPING ENTRIES
191

Alternatively, go to the Object menu, and select New > Group.
3. Click General in the left pane. Type a name for the new group in the Group Name field (thename is required), and enter a description of the new group in the Description field.
4. Click Members in the left pane. In the right pane, select the Dynamic Group tab. Click Add tocreate a LDAP URL for querying the database.
5. Enter an LDAP URL in the text field or select Construct to be guided through the constructionof an LDAP URL.
Administration Guide
192
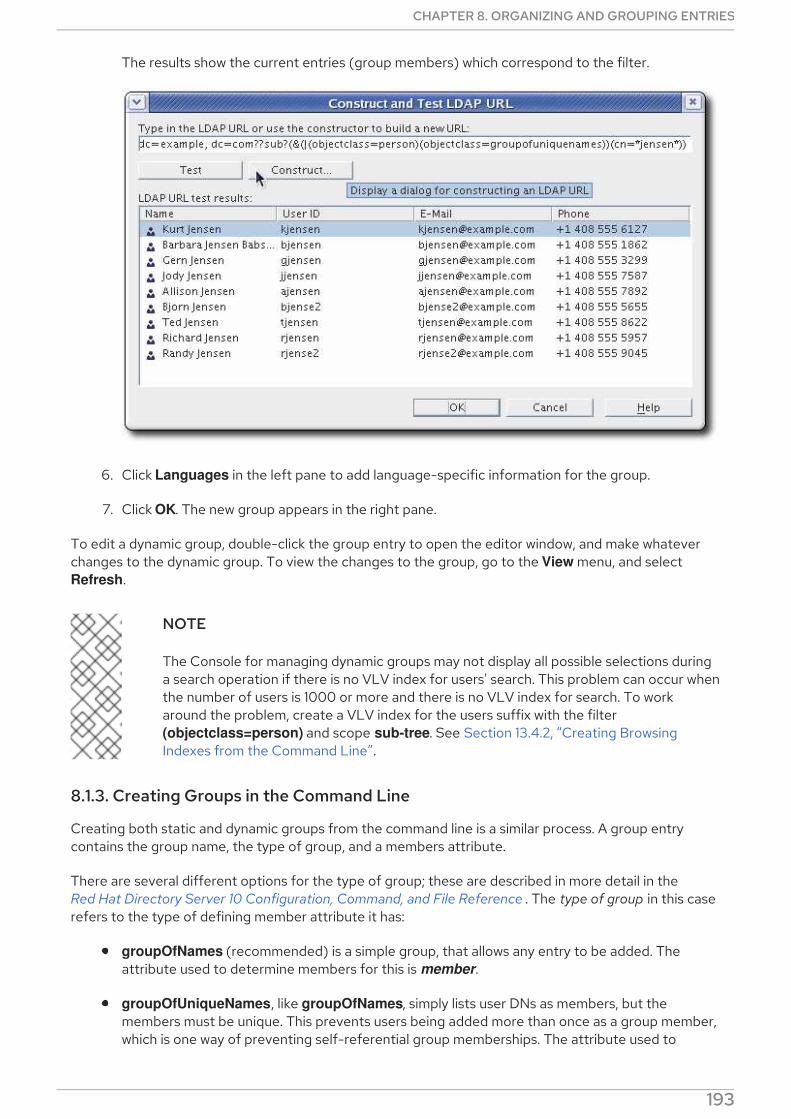
The results show the current entries (group members) which correspond to the filter.
6. Click Languages in the left pane to add language-specific information for the group.
7. Click OK. The new group appears in the right pane.
To edit a dynamic group, double-click the group entry to open the editor window, and make whateverchanges to the dynamic group. To view the changes to the group, go to the View menu, and select Refresh.
NOTE
The Console for managing dynamic groups may not display all possible selections duringa search operation if there is no VLV index for users' search. This problem can occur whenthe number of users is 1000 or more and there is no VLV index for search. To workaround the problem, create a VLV index for the users suffix with the filter (objectclass=person) and scope sub-tree. See Section 13.4.2, “Creating BrowsingIndexes from the Command Line”.
8.1.3. Creating Groups in the Command Line
Creating both static and dynamic groups from the command line is a similar process. A group entrycontains the group name, the type of group, and a members attribute.
There are several different options for the type of group; these are described in more detail in theRed Hat Directory Server 10 Configuration, Command, and File Reference . The type of group in this caserefers to the type of defining member attribute it has:
groupOfNames (recommended) is a simple group, that allows any entry to be added. Theattribute used to determine members for this is member.
groupOfUniqueNames, like groupOfNames, simply lists user DNs as members, but themembers must be unique. This prevents users being added more than once as a group member,which is one way of preventing self-referential group memberships. The attribute used to
CHAPTER 8. ORGANIZING AND GROUPING ENTRIES
193
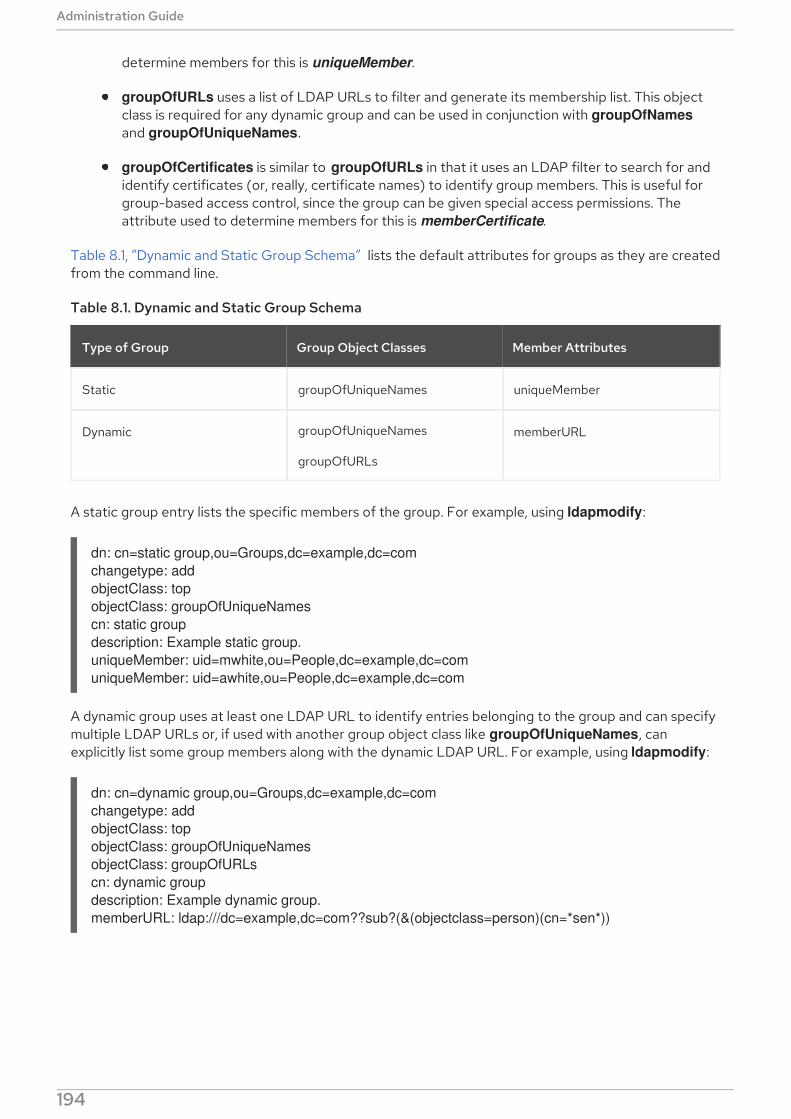
determine members for this is uniqueMember.
groupOfURLs uses a list of LDAP URLs to filter and generate its membership list. This objectclass is required for any dynamic group and can be used in conjunction with groupOfNames
and groupOfUniqueNames.
groupOfCertificates is similar to groupOfURLs in that it uses an LDAP filter to search for andidentify certificates (or, really, certificate names) to identify group members. This is useful forgroup-based access control, since the group can be given special access permissions. Theattribute used to determine members for this is memberCertificate.
Table 8.1, “Dynamic and Static Group Schema” lists the default attributes for groups as they are createdfrom the command line.
Table 8.1. Dynamic and Static Group Schema
Type of Group Group Object Classes Member Attributes
Static groupOfUniqueNames uniqueMember
Dynamic groupOfUniqueNames
groupOfURLs
memberURL
A static group entry lists the specific members of the group. For example, using ldapmodify:
dn: cn=static group,ou=Groups,dc=example,dc=com
changetype: add
objectClass: top
objectClass: groupOfUniqueNames
cn: static group
description: Example static group.
uniqueMember: uid=mwhite,ou=People,dc=example,dc=com
uniqueMember: uid=awhite,ou=People,dc=example,dc=com
A dynamic group uses at least one LDAP URL to identify entries belonging to the group and can specifymultiple LDAP URLs or, if used with another group object class like groupOfUniqueNames, canexplicitly list some group members along with the dynamic LDAP URL. For example, using ldapmodify:
dn: cn=dynamic group,ou=Groups,dc=example,dc=com
changetype: add
objectClass: top
objectClass: groupOfUniqueNames
objectClass: groupOfURLs
cn: dynamic group
description: Example dynamic group.
memberURL: ldap:///dc=example,dc=com??sub?(&(objectclass=person)(cn=*sen*))
NOTE
Administration Guide
194
NOTE
The memberOf plug-in does not support dynamically generated group memberships. Ifyou set the memberURL attribute instead of listing the group members in an attribute,the memberOf plug-in does not add the memberOf attribute to the user objects thatmatch the filter.
8.1.4. Listing Group Membership in User Entries
The entries which belong to a group are defined, in some way, in the group entry itself. This makes it veryeasy to look at a group and see its members and to manage group membership centrally. However,there is no good way to find out what groups a single user belongs to. There is nothing in a user entrywhich indicates its memberships, as there are with roles.
The MemberOf Plug-in correlates group membership lists to the corresponding user entries.
The MemberOf Plug-in analyzes the member attribute in a group entry and automatically writes acorresponding memberOf attribute in the member's entry. (By default, this checks the member
attribute, but multiple attribute instances can be used to support multiple different group types.)
As membership changes, the plug-in updates the memberOf attributes on the user entries. TheMemberOf Plug-in provides a way to view the groups to which a user belongs simply by looking at theentry, including nested group membership. It can be very difficult to backtrack memberships throughnested groups, but the MemberOf Plug-in shows memberships for all groups, direct and indirect.
The MemberOf Plug-in manages member attributes for static groups, not dynamic groups or circulargroups.
8.1.4.1. Considerations When Using the memberOf Plug-in
This section describes important considerations when you want to use the memberOf plug-in.
Using the memberOf Plug-in in a Replication Topology
There are two approaches to manage the memberOf attribute in a replication topology:
Enable the memberOf plug-in on all master and read-only replica servers in the topology. Inthis case, you must exclude the memberOf attribute from replication in all replicationagreements. For details about about excluding attributes, see Section 15.1.7, “Replicating aSubset of Attributes with Fractional Replication”.
Enable the memberOf plug-in only on all master servers in the topology. For this:
You must disable replication of the memberOf attribute to all write-enabled masters inthe replication agreement. For details about about excluding attributes, seeSection 15.1.7, “Replicating a Subset of Attributes with Fractional Replication” .
You must Enable replication of the memberOf attribute to all read-only replicas in theirreplication agreement.
You must not enable the memberOf plug-in on read-only replicas.
Using the memberOf plug-in With Distributed Databases
As described in Section 2.2.1, “Creating Databases”, you can store sub-trees of your directory inindividual databases. By default, the memberOf plug-in only updates user entries which are storedwithin the same database as the group. To enable the plug-in to also update users in different
CHAPTER 8. ORGANIZING AND GROUPING ENTRIES
195
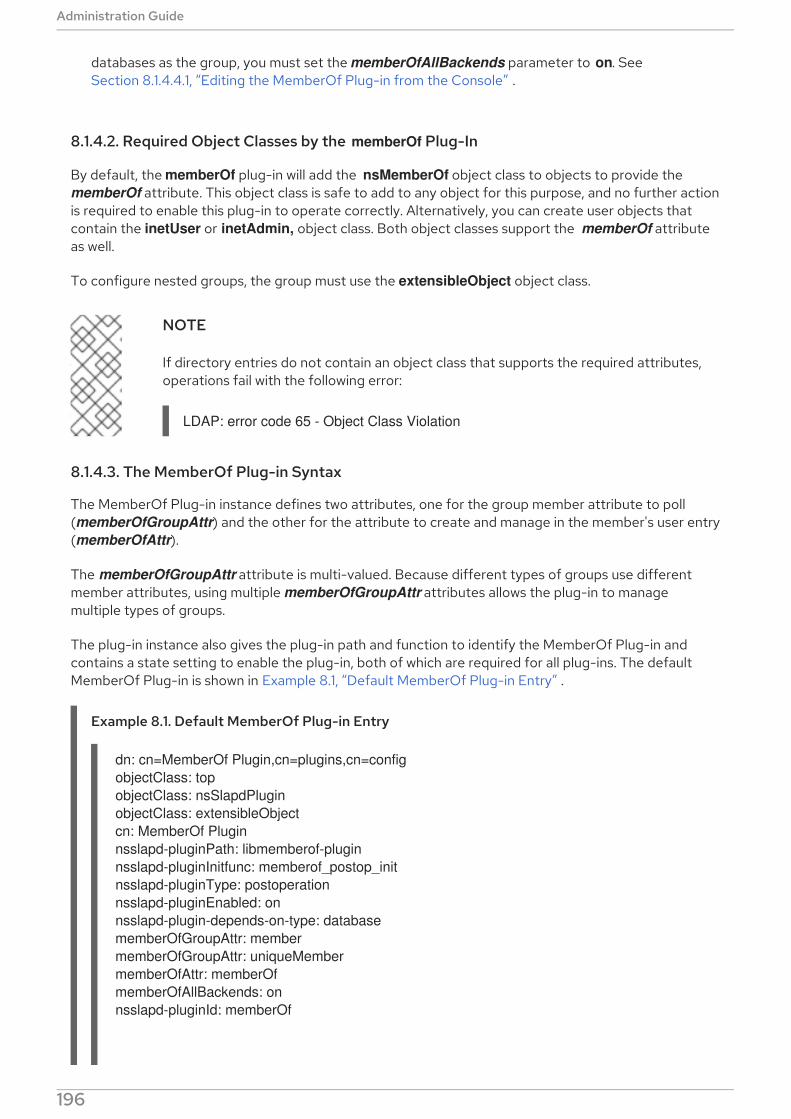
databases as the group, you must set the memberOfAllBackends parameter to on. SeeSection 8.1.4.4.1, “Editing the MemberOf Plug-in from the Console” .
8.1.4.2. Required Object Classes by the memberOf Plug-In
By default, the memberOf plug-in will add the nsMemberOf object class to objects to provide the memberOf attribute. This object class is safe to add to any object for this purpose, and no further actionis required to enable this plug-in to operate correctly. Alternatively, you can create user objects thatcontain the inetUser or inetAdmin, object class. Both object classes support the memberOf attributeas well.
To configure nested groups, the group must use the extensibleObject object class.
NOTE
If directory entries do not contain an object class that supports the required attributes,operations fail with the following error:
LDAP: error code 65 - Object Class Violation
8.1.4.3. The MemberOf Plug-in Syntax
The MemberOf Plug-in instance defines two attributes, one for the group member attribute to poll(memberOfGroupAttr) and the other for the attribute to create and manage in the member's user entry(memberOfAttr).
The memberOfGroupAttr attribute is multi-valued. Because different types of groups use differentmember attributes, using multiple memberOfGroupAttr attributes allows the plug-in to managemultiple types of groups.
The plug-in instance also gives the plug-in path and function to identify the MemberOf Plug-in andcontains a state setting to enable the plug-in, both of which are required for all plug-ins. The defaultMemberOf Plug-in is shown in Example 8.1, “Default MemberOf Plug-in Entry” .
Example 8.1. Default MemberOf Plug-in Entry
dn: cn=MemberOf Plugin,cn=plugins,cn=config
objectClass: top
objectClass: nsSlapdPlugin
objectClass: extensibleObject
cn: MemberOf Plugin
nsslapd-pluginPath: libmemberof-plugin
nsslapd-pluginInitfunc: memberof_postop_init
nsslapd-pluginType: postoperation
nsslapd-pluginEnabled: on
nsslapd-plugin-depends-on-type: database
memberOfGroupAttr: member
memberOfGroupAttr: uniqueMember
memberOfAttr: memberOf
memberOfAllBackends: on
nsslapd-pluginId: memberOf
Administration Guide
196
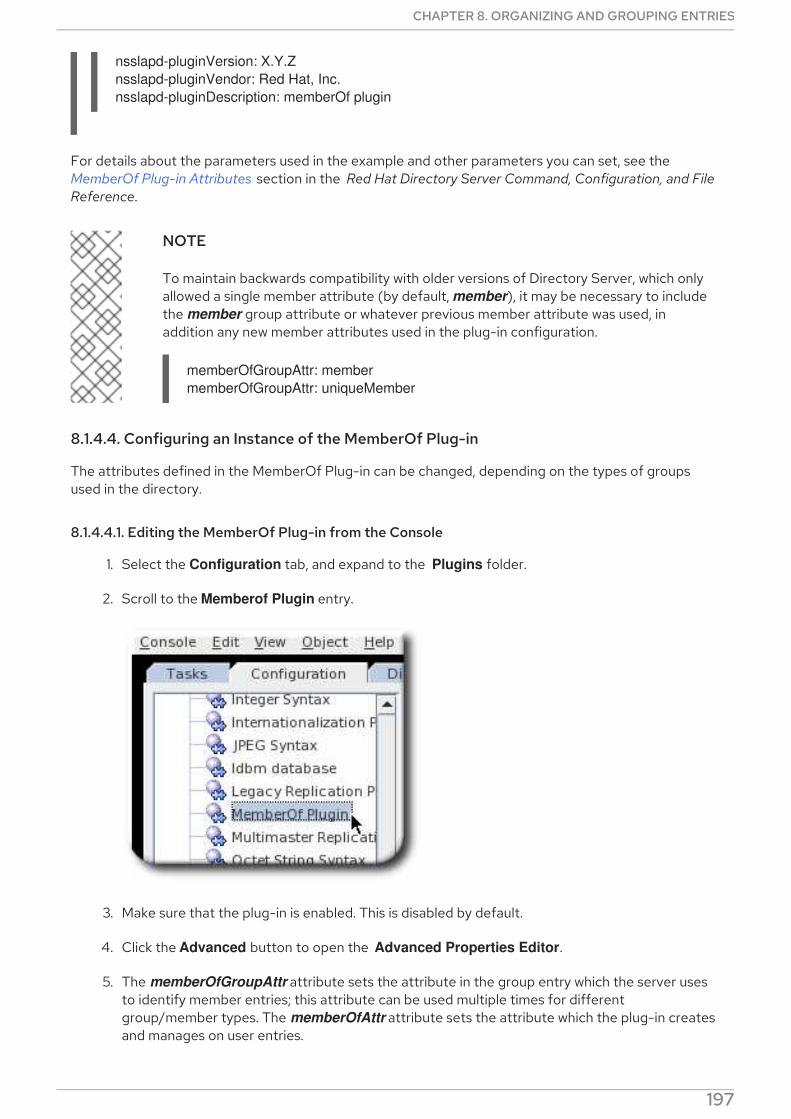
nsslapd-pluginVersion: X.Y.Z
nsslapd-pluginVendor: Red Hat, Inc.
nsslapd-pluginDescription: memberOf plugin
For details about the parameters used in the example and other parameters you can set, see theMemberOf Plug-in Attributes section in the Red Hat Directory Server Command, Configuration, and File
Reference.
NOTE
To maintain backwards compatibility with older versions of Directory Server, which onlyallowed a single member attribute (by default, member), it may be necessary to includethe member group attribute or whatever previous member attribute was used, inaddition any new member attributes used in the plug-in configuration.
memberOfGroupAttr: member
memberOfGroupAttr: uniqueMember
8.1.4.4. Configuring an Instance of the MemberOf Plug-in
The attributes defined in the MemberOf Plug-in can be changed, depending on the types of groupsused in the directory.
8.1.4.4.1. Editing the MemberOf Plug-in from the Console
1. Select the Configuration tab, and expand to the Plugins folder.
2. Scroll to the Memberof Plugin entry.
3. Make sure that the plug-in is enabled. This is disabled by default.
4. Click the Advanced button to open the Advanced Properties Editor.
5. The memberOfGroupAttr attribute sets the attribute in the group entry which the server usesto identify member entries; this attribute can be used multiple times for differentgroup/member types. The memberOfAttr attribute sets the attribute which the plug-in createsand manages on user entries.
CHAPTER 8. ORGANIZING AND GROUPING ENTRIES
197

6. Save the changes.
7. If the Directory Server is not configured to enable dynamic plug-ins, restart the server to updatethe plug-in.
8.1.4.4.2. Editing the MemberOf Plug-in from the Command Line
1. Enable the MemberOf Plug-in. Using ldapmodify:
dn: cn=MemberOf Plugin,cn=plugins,cn=config
changetype: modify
replace: nsslapd-pluginEnabled
nsslapd-pluginEnabled: on
2. Set the attribute to use for the group member entry attribute. The default attribute is member,which can be changed using the replace command, or, since the memberOfGroupAttr attributeis multi-valued, additional member types can be added to the definition. For example, using ldapmodify:
dn: cn=MemberOf Plugin,cn=plugins,cn=config
changetype: modify
add: memberOfGroupAttr
memberOfGroupAttr: uniqueMember
add: memberOfGroupAttr
memberOfGroupAttr: customMember-
3. Set the attribute to set on the user entries to show group membership. For example, using ldapmodify:
dn: cn=MemberOf Plugin,cn=plugins,cn=config
changetype: modify
replace: memberOfAttr
memberOfAttr: memberOf
4. Optional. If the deployment uses distributed databases, then enable the
Administration Guide
198

4. Optional. If the deployment uses distributed databases, then enable the memberOfAllBackends attribute to search through all databases, not just the local one, foruser entries. Using ldapmodify:
dn: cn=MemberOf Plugin,cn=plugins,cn=config
changetype: modify
replace: memberOfAllBackends
memberOfAllBackends: on
5. If the Directory Server is not configured to enable dynamic plug-ins, restart the server to loadthe modified new plug-in instance.
8.1.4.5. The memberOf Plug-In Shared Configuration
Replicating plug-in configuration helps maintain consistent configuration on the network, which isespecially useful in large deployments. You only need to update the configuration on a masterreplication server, and the change is then replicated to all other servers.
The memberOf plug-in configuration can be stored in a shared configuration entry in any back end orsuffix, outside of the cn=config suffix.
In the plug-in entry, the nsslapd-pluginConfigArea attribute is used to specify the location of theshared configuration:
nsslapd-pluginConfigArea: entry_DN
After you set the nsslapd-pluginConfigArea attribute to the same plug-in entry on all replicas, thereplication then handles all future configuration changes.
The following table described attributes that you can use in the shared configuration entry.
Table 8.2. Attributes of the memberOf Plug-in Shared Configuration
Configuration Attribute Value Example
memberOfAttr (required) Attribute Name memberOf
memberOfGroupAttr (required) Attribute Name uniqueMember
memberOfAllBackends on|off off
memberOfEntryScope Entry DN ou=people,dc=example,dc=com
memberOfSkipNested on|off on
memberOfEntryScopeExcludeSubtree
Entry DN ou=other,dc=example,dc=com
In the following example, nsslapd-pluginConfigArea is set. Therefore, the configuration in the plug-inentry is ignored.
dn: cn=MemberOf Plugin,cn=plugins,cn=config
CHAPTER 8. ORGANIZING AND GROUPING ENTRIES
199
objectClass: top
objectClass: nsSlapdPlugin
objectClass: extensibleObject
cn: MemberOf Plugin
nsslapd-pluginPath: libmemberof-plugin
nsslapd-pluginInitfunc: memberof_postop_init
nsslapd-pluginType: postoperation
nsslapd-pluginEnabled: on
nsslapd-plugin-depends-on-type: database
memberOfGroupAttr: member
memberOfAttr: memberOf
nsslapd-pluginConfigArea: cn=memberOf plugin configuration,dc=example,dc=com
In this example, the memberOf plug-in will use the uniquemember group attribute, rather than member.
dn: cn=memberOf plugin configuration,dc=example,dc=com
objectClass: top
objectClass: extensibleObject
cn: MemberOf Plugin Configuration
memberOfGroupAttr: uniquemember
memberOfAttr: memberOf
8.1.4.6. Setting the Scope of the MemberOf Plug-in
If you configured several back ends or multiple-nested suffixes, you can use the memberOfEntryScope
and memberOfEntryScopeExcludeSubtree parameters to set what suffixes the MemberOf plug-inworks on.
If you add a user to a group, the MemberOf plug-in only adds the memberOf attribute to the group ifboth the user and the group are in the plug-in's scope. For example, to configure the MemberOf plug-into work on all entries in dc=example,dc=com, but to exclude entries in ou=private,dc=example,dc=com, set:
memberOfEntryScope: dc=example,dc=com
memberOfEntryScopeExcludeSubtree: ou=private,dc=example,dc=com
If you moved a user entry out of the scope set in the memberOfEntryScope parameter:
The membership attribute, such as member, is updated in the group entry to remove the userDN value.
The memberOf attribute is updated in the user entry to remove the group DN value.
NOTE
The value set in the memberOfEntryScopeExcludeSubtree parameter has a higherpriority than values set in memberOfEntryScope. If the scopes set in both parametersoverlap, the MemberOf plug-in only works on the non-overlapping directory entries.
8.1.4.7. Synchronizing memberOf Values
The MemberOf Plug-in automatically manages the memberOf attribute on group member entries,based on the configuration in the group entry itself. However, the memberOf attribute can be edited on
Administration Guide
200

a user entry directly (which is improper) or new entries can be imported or replicated over to the serverthat have a memberOf attribute already set. These situations create inconsistencies between the memberOf configuration managed by the server plug-in and the actual memberships defined for anentry.
Directory Server has a memberOf repair task which manually runs the plug-in to make sure theappropriate memberOf attributes are set on entries. There are three ways to trigger this task:
In the Directory Server Console
Using the fixup-memberof.pl script
Running a cn=memberof task,cn=tasks,cn=config tasks entry
NOTE
The memberOf regeneration tasks are run locally, even if the entries themselves arereplicated. This means that the memberOf attributes for the entries on other servers arenot updated until the updated entry is replicated.
8.1.4.7.1. Initializing and Regenerating memberOf Attributes Using fixup-memberof.pl
fixup-memberof.pl is a Perl script wrapper used to regenerate memberOf attributes as described inSection 8.1.4.7.2, “Initializing and Regenerating memberOf Attributes Using ldapmodify” .
For more details, see also man fixup-memberof.pl.
8.1.4.7.2. Initializing and Regenerating memberOf Attributes Using ldapmodify
Regenerating memberOf attributes is one of the tasks which can be managed through a special taskconfiguration entry. Task entries occur under the cn=tasks configuration entry in the dse.ldif file, so it isalso possible to initiate a task by adding the entry using ldapmodify. As soon as the task is complete, theentry is removed from the directory.
The fixup-memberof.pl script creates a special task entry in a Directory Server instance whichregenerates the memberOf attributes.
To initiate a memberOf fixup task, add an entry under the cn=memberof task, cn=tasks,cn=config
entry. The only required attribute is the cn for the specific task. Using ldapmodify:
dn: cn=example memberOf,cn=memberof task,cn=tasks,cn=config
changetype: add
cn:example memberOf
As soon as the task is completed, the entry is deleted from the dse.ldif configuration, so it is possible toreuse the same task entry continually.
The cn=memberof task configuration is described in more detail in theConfiguration, Command, and File Reference.
8.1.5. Automatically Adding Entries to Specified Groups
Section 8.1.5.1, “Looking at the Structure of an Automembership Rule”
Section 8.1.5.2, “Examples of Automembership Rules”
CHAPTER 8. ORGANIZING AND GROUPING ENTRIES
201

Section 8.1.5.3, “Creating Automembership Definitions”
Group management can be a critical factor for managing directory data, especially for clients which useDirectory Server data and organization or which use groups to apply functionality to entries. Groupsmake it easier to apply policies consistently and reliably across the directory. Password policies, accesscontrol lists, and other rules can all be based on group membership.
Being able to assign new entries to groups, automatically, at the time that an account is created ensuresthat the appropriate policies and functionality are immediately applied to those entries — withoutrequiring administrator intervention.
Dynamic groups are one method of creating groups and assigning members automatically because anymatching entry is automatically included in the group. For applying Directory Server policies andsettings, this is sufficient. However, LDAP applications and clients commonly need a static and explicitlist of group members in order to perform whatever operation is required. And all of the members instatic groups have to be manually added to those groups.
The static group itself cannot search for members like a dynamic group, but there is a way to allow astatic group to have members added to it automatically — the Auto Membership Plug-in .
Automembership essentially allows a static group to act like a dynamic group. Differentautomembership definitions create searches that are automatically run on all new directory entries. Theautomembership rules search for and identify matching entries — much like the dynamic search filters —and then explicitly add those entries as members to the static group.
NOTE
By default, the autoMemberProcessModifyOps parameter in the cn=Auto
Membership Plugin,cn=plugins,cn=config entry is set to on. With this setting, theAutomembership plug-in also updates group memberships when an administrator movesa user to a different group by editing a user entry.
If you set autoMemberProcessModifyOps to off, Directory Server invokes the plug-inonly when you add a group entry to the user, and you must manually run a fix-up task toupdate the group membership.
The Auto Membership Plug-in can target any type of object stored in the directory: users, machines andnetwork devices, customer data, or other assets.
NOTE
The Auto Membership Plug-in adds a new entry to an existing group based on definedcriteria. It does not create a group for the new entry.
To create a corresponding group entry when a new entry of a certain type is created, usethe Managed Entries Plug-in. This is covered in Section 8.3, “Automatically Creating DualEntries”.
8.1.5.1. Looking at the Structure of an Automembership Rule
The Auto Membership Plug-in itself is a container entry in cn=plugins,cn=config. Group assignmentsare defined through child entries.
8.1.5.1.1. The Automembership Configuration Entry
Administration Guide
202

Automembership assignments are created through a main definition entry, a child of the AutoMembership Plug-in entry. Each definition entry defines three elements:
An LDAP search to identify entries, including both a search scope and a search filter(autoMemberScope and autoMemberFilter)
A default group to which to add the member entries (autoMemberDefaultGroup)
The member entry format, which is the attribute in the group entry, such as member, and theattribute value, such as dn (autoMemberGroupingAttr)
The definition is the basic configuration for an automember rule. It identifies all of the requiredinformation: what a matching member entry looks like and a group for that member to belong to.
For example, this definition assigns all Windows users to the cn=windows-users group:
dn: cn=Windows Users,cn=Auto Membership Plugin,cn=plugins,cn=config
objectclass: autoMemberDefinition
autoMemberScope: ou=People,dc=example,dc=com
autoMemberFilter: objectclass=ntUser
autoMemberDefaultGroup: cn=windows-group,cn=groups,dc=example,dc=com
autoMemberGroupingAttr: member:dn
For details about the attributes used in the example and other attributes you can set in this entry, seethe cn=Auto Membership Plugin,cn=plugins,cn=config entry description in theRed Hat Directory Server Configuration, Command, and File Reference .
8.1.5.1.2. Additional Regular Expression Entries
For something like a users group, where more than likely all matching entries should be added asmembers, a simple definition is sufficient. However, there can be instances where entries that match theLDAP search filter should be added to different groups, depending on the value of some other attribute.For example, machines may need to be added to different groups depending on their IP address orphysical location; users may need to be in different groups depending on their employee ID number.
The automember definition can use regular expressions to provide additional conditions on what entriesto include or exclude from a group, and then a new, specific group to add those selected entries to.
For example, an automember definition sets all machines to be added to a generic host group.
Example 8.2. Automember Definition for a Host Group
dn: cn=Hostgroups,cn=Auto Membership Plugin,cn=plugins,cn=config
objectclass: autoMemberDefinition
cn: Hostgroups
autoMemberScope: dc=example,dc=com
autoMemberFilter: objectclass=ipHost
autoMemberDefaultGroup: cn=systems,cn=hostgroups,dc=example,dc=com
autoMemberGroupingAttr: member:dn
A regular expression rule is added so that any machine with a fully-qualified domain name within a givenrange is added to a web server group.
Example 8.3. Regular Expression Condition for a Web Server Group
CHAPTER 8. ORGANIZING AND GROUPING ENTRIES
203
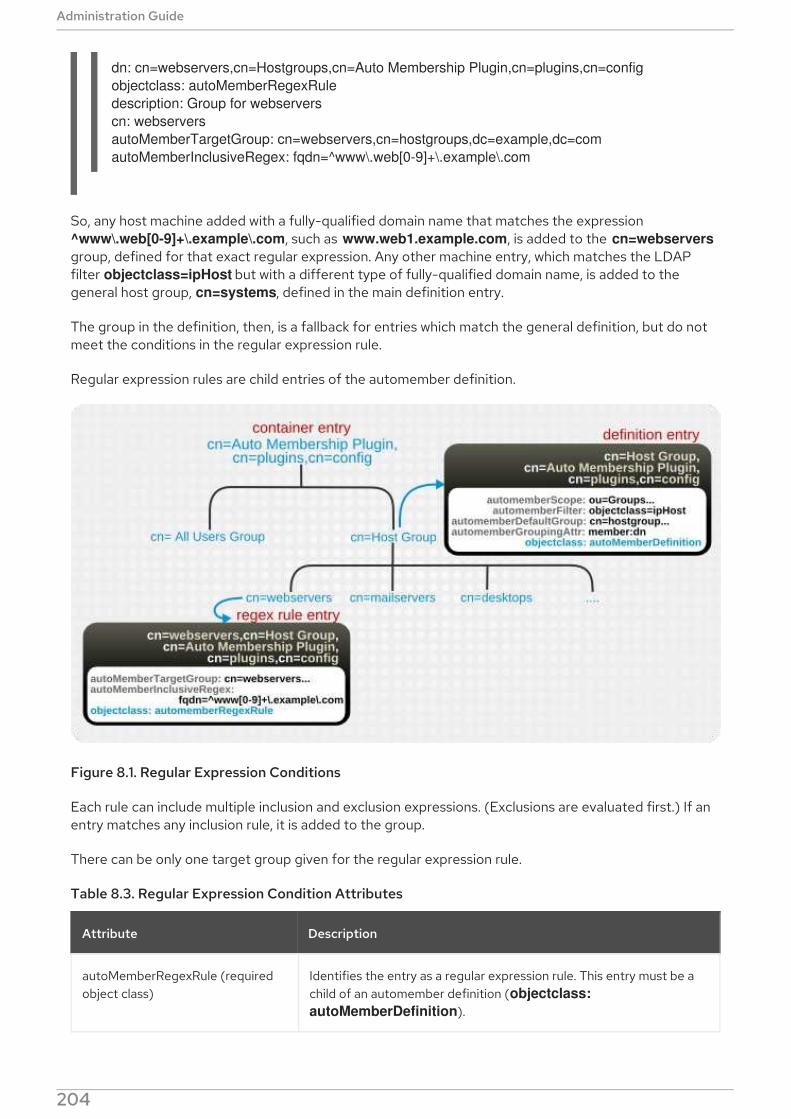
dn: cn=webservers,cn=Hostgroups,cn=Auto Membership Plugin,cn=plugins,cn=config
objectclass: autoMemberRegexRule
description: Group for webservers
cn: webservers
autoMemberTargetGroup: cn=webservers,cn=hostgroups,dc=example,dc=com
autoMemberInclusiveRegex: fqdn=^www\.web[0-9]+\.example\.com
So, any host machine added with a fully-qualified domain name that matches the expression ^www\.web[0-9]+\.example\.com, such as www.web1.example.com, is added to the cn=webservers
group, defined for that exact regular expression. Any other machine entry, which matches the LDAPfilter objectclass=ipHost but with a different type of fully-qualified domain name, is added to thegeneral host group, cn=systems, defined in the main definition entry.
The group in the definition, then, is a fallback for entries which match the general definition, but do notmeet the conditions in the regular expression rule.
Regular expression rules are child entries of the automember definition.
Figure 8.1. Regular Expression Conditions
Each rule can include multiple inclusion and exclusion expressions. (Exclusions are evaluated first.) If anentry matches any inclusion rule, it is added to the group.
There can be only one target group given for the regular expression rule.
Table 8.3. Regular Expression Condition Attributes
Attribute Description
autoMemberRegexRule (requiredobject class)
Identifies the entry as a regular expression rule. This entry must be achild of an automember definition (objectclass:
autoMemberDefinition).
Administration Guide
204

autoMemberInclusiveRegex Sets a regular expression to use to identify entries to include. Onlymatching entries are added to the group. Multiple regular expressionscould be used, and if an entry matches any one of those expressions, itis included in the group.The format of the expression is a Perl-compatible regular expression(PCRE). For more information on PCRE patterns, see the pcresyntax(3) man page.
This is a multi-valued attribute.
autoMemberExclusiveRegex Sets a regular expression to use to identify entries to exclude. If anentry matches the exclusion condition, then it is not included in thegroup. Multiple regular expressions could be used, and if an entrymatches any one of those expressions, it is excluded in the group.The format of the expression is a Perl-compatible regular expression(PCRE). For more information on PCRE patterns, see the pcresyntax(3) man page.
This is a multi-valued attribute.
NOTE
Exclude conditions are evaluated first and takeprecedence over include conditions.
autoMemberTargetGroup Sets which group to add the entry to as a member, if it meets theregular expression conditions.
Attribute Description
8.1.5.2. Examples of Automembership Rules
Automembership rules are usually going to applied to users and to machines (although they can beapplied to any type of entry). There are a handful of examples that may be useful in planningautomembership rules:
Different host groups based on IP address
Windows user groups
Different user groups based on employee ID
Example 8.4. Host Groups by IP Address
The automember rule first defines the scope and target of the rule. The example in Section 8.1.5.1.2,“Additional Regular Expression Entries” uses the configuration group to define the fallback groupand a regular expression entry to sort out matching entries.
The scope is used to find all host entries. The plug-in then iterates through the regular expressionentries. If an entry matches an inclusive regular expression, then it is added to that host group. If itdoes not match any group, it is added to the default group.
CHAPTER 8. ORGANIZING AND GROUPING ENTRIES
205
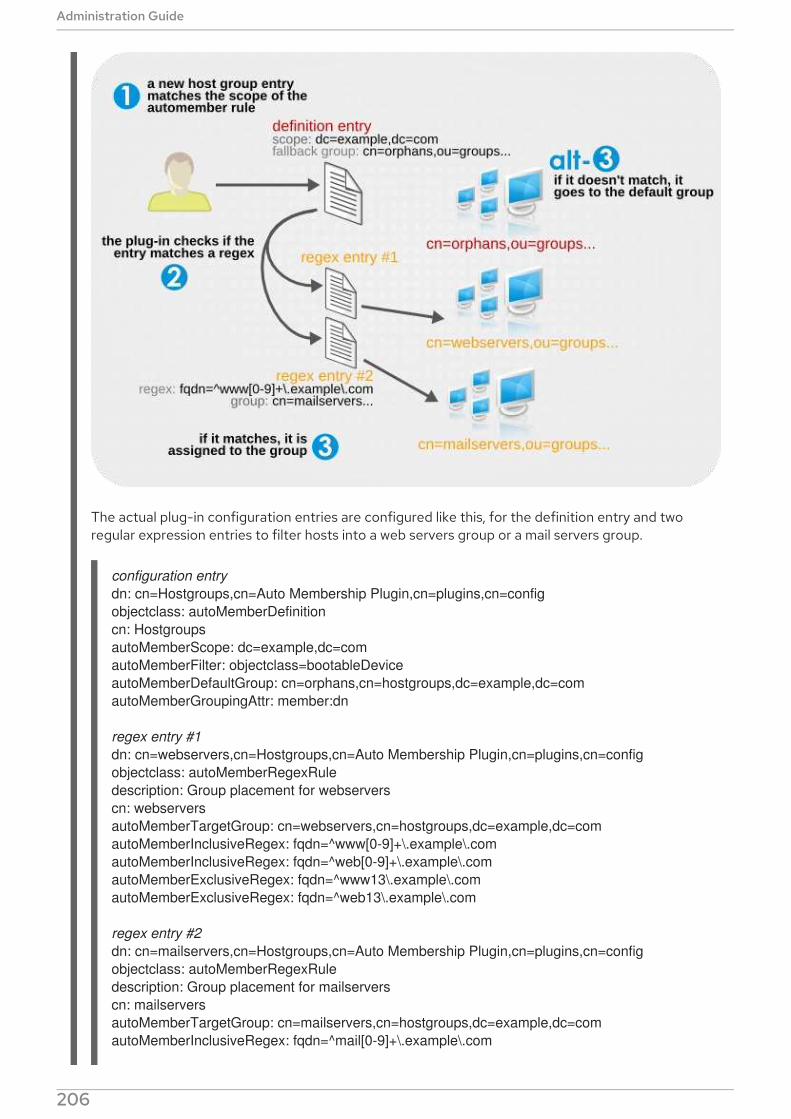
The actual plug-in configuration entries are configured like this, for the definition entry and tworegular expression entries to filter hosts into a web servers group or a mail servers group.
configuration entry
dn: cn=Hostgroups,cn=Auto Membership Plugin,cn=plugins,cn=config
objectclass: autoMemberDefinition
cn: Hostgroups
autoMemberScope: dc=example,dc=com
autoMemberFilter: objectclass=bootableDevice
autoMemberDefaultGroup: cn=orphans,cn=hostgroups,dc=example,dc=com
autoMemberGroupingAttr: member:dn
regex entry #1
dn: cn=webservers,cn=Hostgroups,cn=Auto Membership Plugin,cn=plugins,cn=config
objectclass: autoMemberRegexRule
description: Group placement for webservers
cn: webservers
autoMemberTargetGroup: cn=webservers,cn=hostgroups,dc=example,dc=com
autoMemberInclusiveRegex: fqdn=^www[0-9]+\.example\.com
autoMemberInclusiveRegex: fqdn=^web[0-9]+\.example\.com
autoMemberExclusiveRegex: fqdn=^www13\.example\.com
autoMemberExclusiveRegex: fqdn=^web13\.example\.com
regex entry #2
dn: cn=mailservers,cn=Hostgroups,cn=Auto Membership Plugin,cn=plugins,cn=config
objectclass: autoMemberRegexRule
description: Group placement for mailservers
cn: mailservers
autoMemberTargetGroup: cn=mailservers,cn=hostgroups,dc=example,dc=com
autoMemberInclusiveRegex: fqdn=^mail[0-9]+\.example\.com
Administration Guide
206
autoMemberInclusiveRegex: fqdn=^smtp[0-9]+\.example\.com
autoMemberExclusiveRegex: fqdn=^mail13\.example\.com
autoMemberExclusiveRegex: fqdn=^smtp13\.example\.com
Example 8.5. Windows User Group
The basic users group shown in Section 8.1.5.1.1, “The Automembership Configuration Entry” uses theposixAccount attribute to identify all new users. All new users created within Directory Server arecreated with the posixAccount attribute, so that is a safe catch-all for new Directory Server users.However, when user accounts are synchronized over from the Windows domain to theDirectory Server, the Windows user accounts are created without the posixAccount attribute.
Windows users are identified by the ntUser attribute. The basic, all-users group rule can be modifiedto target Windows users specifically, which can then be added to the default all-users group or to aWindows-specific group.
dn: cn=Windows Users,cn=Auto Membership Plugin,cn=plugins,cn=config
objectclass: autoMemberDefinition
autoMemberScope: dc=example,dc=com
autoMemberFilter: objectclass=ntUser
autoMemberDefaultGroup: cn=Windows Users,cn=groups,dc=example,dc=com
autoMemberGroupingAttr: member:dn
Example 8.6. User Groups by Employee Type
The Auto Membership Plug-in can work on custom attributes, which can be useful for entries whichare managed by other applications. For example, a human resources application may create and thenreference users based on the employee type, in a custom employeeType attribute.
Much like Example 8.4, “Host Groups by IP Address” , the user type rule uses two regular expressionfilters to sort full time and temporary employees, only this example uses an explicit value rather thana true regular expression. For other attributes, it may be more appropriate to use a regularexpression, like basing the filter on an employee ID number range.
configuration entry
dn: cn=Employee groups,cn=Auto Membership Plugin,cn=plugins,cn=config
objectclass: autoMemberDefinition
cn: Hostgroups
autoMemberScope: ou=employees,ou=people,dc=example,dc=com
autoMemberFilter: objectclass=inetorgperson
autoMemberDefaultGroup: cn=general,cn=employee groups,ou=groups,dc=example,dc=com
autoMemberGroupingAttr: member:dn
regex entry #1
dn: cn=full time,cn=Employee groups,cn=Auto Membership Plugin,cn=plugins,cn=config
objectclass: autoMemberRegexRule
description: Group for full time employees
cn: full time
autoMemberTargetGroup: cn=full time,cn=employee groups,ou=groups,dc=example,dc=com
autoMemberInclusiveRegex: employeeType=full
regex entry #2
CHAPTER 8. ORGANIZING AND GROUPING ENTRIES
207
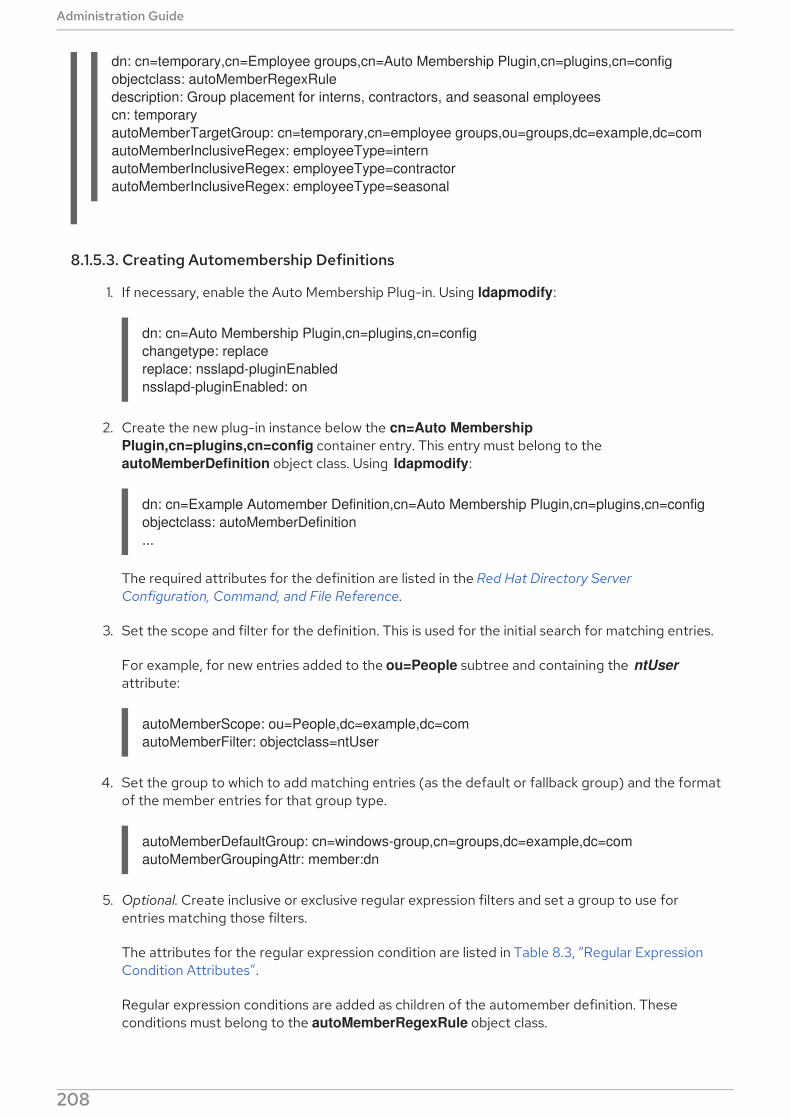
dn: cn=temporary,cn=Employee groups,cn=Auto Membership Plugin,cn=plugins,cn=config
objectclass: autoMemberRegexRule
description: Group placement for interns, contractors, and seasonal employees
cn: temporary
autoMemberTargetGroup: cn=temporary,cn=employee groups,ou=groups,dc=example,dc=com
autoMemberInclusiveRegex: employeeType=intern
autoMemberInclusiveRegex: employeeType=contractor
autoMemberInclusiveRegex: employeeType=seasonal
8.1.5.3. Creating Automembership Definitions
1. If necessary, enable the Auto Membership Plug-in. Using ldapmodify:
dn: cn=Auto Membership Plugin,cn=plugins,cn=config
changetype: replace
replace: nsslapd-pluginEnabled
nsslapd-pluginEnabled: on
2. Create the new plug-in instance below the cn=Auto Membership
Plugin,cn=plugins,cn=config container entry. This entry must belong to the autoMemberDefinition object class. Using ldapmodify:
dn: cn=Example Automember Definition,cn=Auto Membership Plugin,cn=plugins,cn=config
objectclass: autoMemberDefinition
...
The required attributes for the definition are listed in the Red Hat Directory Server
Configuration, Command, and File Reference.
3. Set the scope and filter for the definition. This is used for the initial search for matching entries.
For example, for new entries added to the ou=People subtree and containing the ntUser
attribute:
autoMemberScope: ou=People,dc=example,dc=com
autoMemberFilter: objectclass=ntUser
4. Set the group to which to add matching entries (as the default or fallback group) and the formatof the member entries for that group type.
autoMemberDefaultGroup: cn=windows-group,cn=groups,dc=example,dc=com
autoMemberGroupingAttr: member:dn
5. Optional. Create inclusive or exclusive regular expression filters and set a group to use forentries matching those filters.
The attributes for the regular expression condition are listed in Table 8.3, “Regular ExpressionCondition Attributes”.
Regular expression conditions are added as children of the automember definition. Theseconditions must belong to the autoMemberRegexRule object class.
Administration Guide
208

Using ldapmodify:
dn: cn=Example Regex,cn=Example Automember Definition,cn=Auto Membership
Plugin,cn=plugins,cn=config
objectclass: autoMemberRegexRule
...
Then add the target group name and any inclusive or exclusive regular expressions. Bothinclude and exclude conditions can be used, and multiple expressions of both types can beused.
autoMemberTargetGroup: cn=windows-admin-group,cn=groups,dc=example,dc=com
autoMemberInclusiveRegex: cn=\.* Administrator \*
If a new entry matches a regular expression condition, it is added to that group instead of thedefault group set in the automember definition.
6. If the Directory Server is not configured to enable dynamic plug-ins, restart the server to loadthe modified new plug-in instance.
8.1.5.4. Updating Existing Entries for Automembership Definitions
The Auto Member Plug-in only runs when new entries are added to the directory. The plug-in ignoresexisting entries or entries which are edited to match an automembership rule.
There is a directory task operation which can be run to check existing entries against automembershiprules and then update group membership accordingly. This task (cn=automember rebuild
membership) requires three elements to run, based on LDAP search parameters to identify whichexisting entries to process:
The search filter
The search scope
The base DN from which to begin the search
The specific task run also needs a name.
The task entry can be created using ldapmodify; when the task completes, the entry is automaticallyremoved. For example:
dn: cn=my rebuild task, cn=automember rebuild membership,cn=tasks,cn=config
objectClass: top
objectClass: extensibleObject
cn: my rebuild task
basedn: dc=example,dc=com
filter: (uid=*)
scope: sub
8.1.5.5. Testing Automembership Definitions
Because each instance of the Auto Member Plug-in is a set of related-but-separate entries for thedefinition and regular expression, it can be difficult to see exactly how users are going to be mapped togroups. This becomes even more difficult when there are multiple rules which target different subsets ofusers.
CHAPTER 8. ORGANIZING AND GROUPING ENTRIES
209

There are two dry-run tasks which can be useful to determine whether all of the different Auto MemberPlug-in definitions are assigning groups properly as designed.
Testing with Existing Entries
cn=automember export updates runs against existing entries in the directory and exports the resultsof what users would have been added to what groups, based on the rules. This is useful for testingexisting rules against existing users to see how your real deployment are performing.
This task requires the same information as the cn=automember rebuild membership task — the baseDN to search, search filter, and search scope — and has an additional parameter to specify an exportLDIF file to record the proposed entry updates.
Using ldapmodify:
dn: cn=test export, cn=automember export updates,cn=tasks,cn=config
objectClass: top
objectClass: extensibleObject
cn: test export
basedn: dc=example,dc=com
filter: (uid=*)
scope: sub
ldif: /tmp/automember-updates.ldif
Testing with an Import LDIF
cn=automember map updates takes an import LDIF of new users and then runs the new users againstthe current automembership rules. This can be very useful for testing a new rule, before applying it to(real) new or existing user entries.
This is called a map task because it maps or relates changes for proposed new entries to the existingrules.
This task only requires two attributes: the location of the input LDIF (which must contain at least someuser entries) and an output LDIF file to which to write the proposed entry updates. Both the input andoutput LDIF files are absolute paths on the local machine.
For example, using ldapmodify:
dn: cn=test mapping, cn=automember map updates,cn=tasks,cn=config
objectClass: top
objectClass: extensibleObject
cn: test mapping
ldif_in: /tmp/entries.ldif
ldif_out: /tmp/automember-updates.ldif
8.2. USING ROLES
Roles are an entry grouping mechanism that unify the static and dynamic groups described in theprevious sections. Roles are designed to be more efficient and easier to use for applications. Forexample, an application can get the list of roles of which an entry is a member by querying the entryitself, rather than selecting a group and browsing the members list of several groups.
8.2.1. About Roles
Administration Guide
210

Red Hat has two kinds of groups. Static groups have a finite and defined list of members. Dynamic
groups used filters to recognize which entries are members of the group, so the group membership isconstantly changed as the entries which match the group filter change. (Both kinds of groups aredescribed in Section 8.1, “Using Groups” .)
Roles are a sort of hybrid group, behaving as both a static and a dynamic group. With a group, entries areadded to a group entry as members. With a role, the role attribute is added to an entry and then thatattribute is used to identify members in the role entry automatically.
Role members are entries that possess the role. Members can be specified either explicitly ordynamically. How role membership is specified depends upon the type of role. Directory Server supportsthree types of roles:
Managed roles have an explicit enumerated list of members.
Filtered roles are assigned entries to the role depending upon the attribute contained by eachentry, specified in an LDAP filter. Entries that match the filter possess the role.
Nested roles are roles that contain other roles.
Managed roles can do everything that can normally be done with static groups. The role members canbe filtered using filtered roles, similarly to the filtering with dynamic groups. Roles are easier to use thangroups, more flexible in their implementation, and reduce client complexity.
When a role is created, determine whether a user can add themselves or remove themselves from therole. See Section 8.2.10, “Using Roles Securely” for more information about roles and access control.
NOTE
Evaluating roles is more resource-intensive for the Directory Server than evaluatinggroups because the server does the work for the client application. With roles, the clientapplication can check role membership by searching for the nsRole attribute. The nsRole attribute is a computed attribute, which identifies to which roles an entry belongs;the nsRole attribute is not stored with the entry itself. From the client application pointof view, the method for checking membership is uniform and is performed on the serverside.
Considerations for using roles are covered in the Red Hat Directory Server
Deployment Guide.
8.2.2. Creating a Managed Role
Managed roles have an explicit enumerated list of members. Managed roles are added to entries byadding the nsRoleDN attribute to the entry.
8.2.2.1. Creating a Managed Role in the Console
1. In the Directory Server Console, select the Directory tab.
2. Browse the tree in the left navigation pane, and select the parent entry for the new role.
3. Go to the Object menu, and select New > Role.
CHAPTER 8. ORGANIZING AND GROUPING ENTRIES
211

Alternatively, right-click the entry and select New > Role.
4. Click General in the left pane. Type a name for the new role in the Role Name field. The rolename is required.
5. Enter a description of the new role in the Description field.
6. Click Members in the left pane.
Administration Guide
212

7. In the right pane, select Managed Role. Click Add to add new entries to the list of members.
8. In the Search drop-down list, select Users from the Search drop-down list, then click Search.Select one of the entries returned, and click OK.
9. After adding all of the entries, click OK.
8.2.2.2. Creating Managed Roles through the Command Line
Roles inherit from the ldapsubentry object class, which is defined in the ITU X.509 standard. In addition,each managed role requires two object classes that inherit from the nsRoleDefinition object class:
nsSimpleRoleDefinition
nsManagedRoleDefinition
A managed role also allows an optional description attribute.
Members of a managed role have the nsRoleDN attribute in their entry.
This example creates a role which can be assigned to the marketing department.
1. Use ldapmodify with the -a option to add the managed role entry. The new entry must containthe nsManagedRoleDefinition object class, which in turn inherits from the LdapSubEntry, nsRoleDefinition, and nsSimpleRoleDefinition object classes.
dn: cn=Marketing,ou=people,dc=example,dc=com
objectclass: top
objectclass: LdapSubEntry
objectclass: nsRoleDefinition
objectclass: nsSimpleRoleDefinition
CHAPTER 8. ORGANIZING AND GROUPING ENTRIES
213

objectclass: nsManagedRoleDefinition
cn: Marketing
description: managed role for marketing staff
2. Assign the role to the marketing staff members, one by one, using ldapmodify:
dn: cn=Bob,ou=people,dc=example,dc=com
changetype: modify
add: nsRoleDN
nsRoleDN: cn=Marketing,ou=people,dc=example,dc=com
The nsRoleDN attribute in the entry indicates that the entry is a member of a managed role, cn=Marketing,ou=people,dc=example,dc=com.
8.2.3. Creating a Filtered Role
Entries are assigned to a filtered role depending whether the entry possesses a specific attribute definedin the role. The role definition specifies an LDAP filter for the target attributes. Entries that match thefilter possess (are members of) the role.
8.2.3.1. Creating a Filtered Role in the Console
1. In the Directory Server Console, select the Directory tab.
2. Browse the tree in the left navigation pane, and select the parent entry for the new role.
3. Go to the Object menu, and select New > Role.
Administration Guide
214
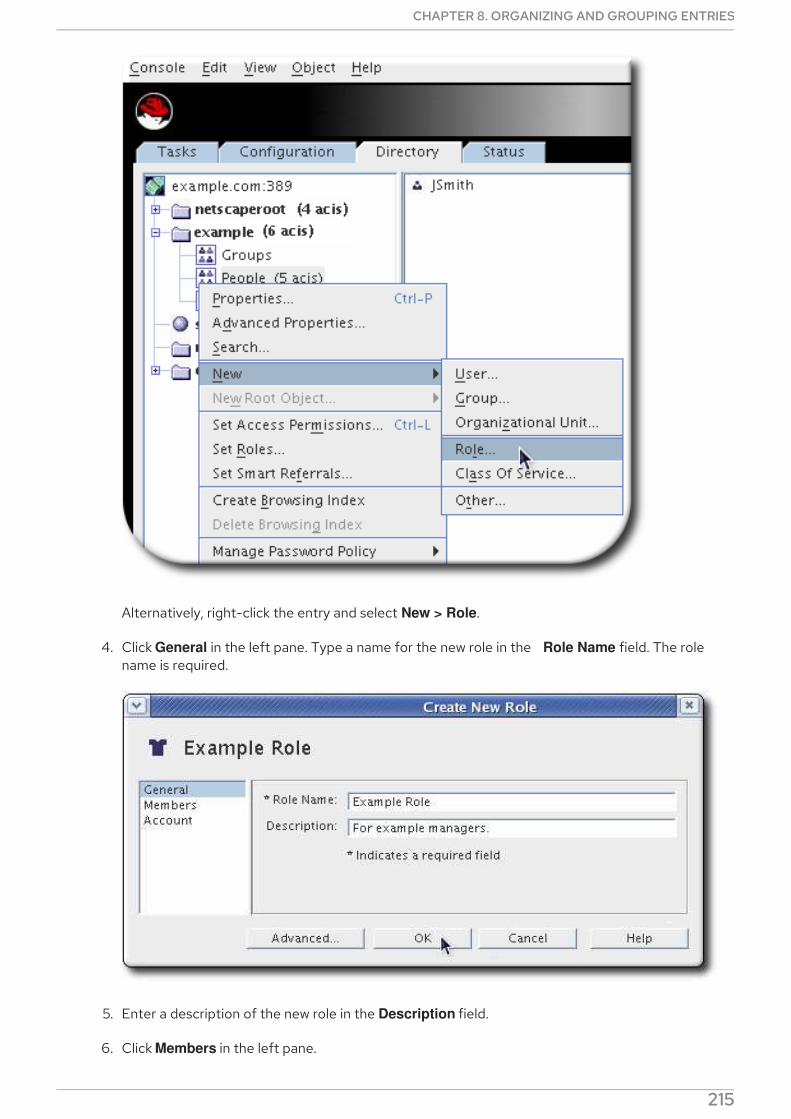
Alternatively, right-click the entry and select New > Role.
4. Click General in the left pane. Type a name for the new role in the Role Name field. The rolename is required.
5. Enter a description of the new role in the Description field.
6. Click Members in the left pane.
CHAPTER 8. ORGANIZING AND GROUPING ENTRIES
215

A search dialog box appears briefly.
7. In the right pane, select Filtered Role.
8. Enter an LDAP filter in the text field, or click Construct to be guided through the constructionof an LDAP filter.
The Construct opens the standard LDAP URL construction dialog. Ignore the fields for LDAP
Server Host, Port, Base DN, and Search (since the search scope cannot be set filtered roledefinitions).
Select the types of entries to filter from the For drop-down list. The entries can be users,groups, or both.
Select an attribute from the Where drop-down list. The two fields following it refine thesearch by selecting one of the qualifiers from the drop-down list, such as contains, does
not contain, is, or is not. Enter an attribute value in the text box. To add additional filters,click More. To remove unnecessary filters, click Fewer.
9. Click Test to try the filter.
Administration Guide
216

10. Click OK.
8.2.3.2. Creating a Filtered Role through the Command Line
Roles inherit from the ldapsubentry object class, which is defined in the ITU X.509 standard. In addition,each filtered role requires two object classes that inherit from the nsRoleDefinition object class:
nsComplexRoleDefinition
nsFilteredRoleDefinition
A filtered role entry also requires the nsRoleFilter attribute to define the LDAP filter to determine rolemembers. Optionally, the role can take a description attribute.
Members of a filtered role are entries that match the filter specified in the nsRoleFilter attribute.
CHAPTER 8. ORGANIZING AND GROUPING ENTRIES
217
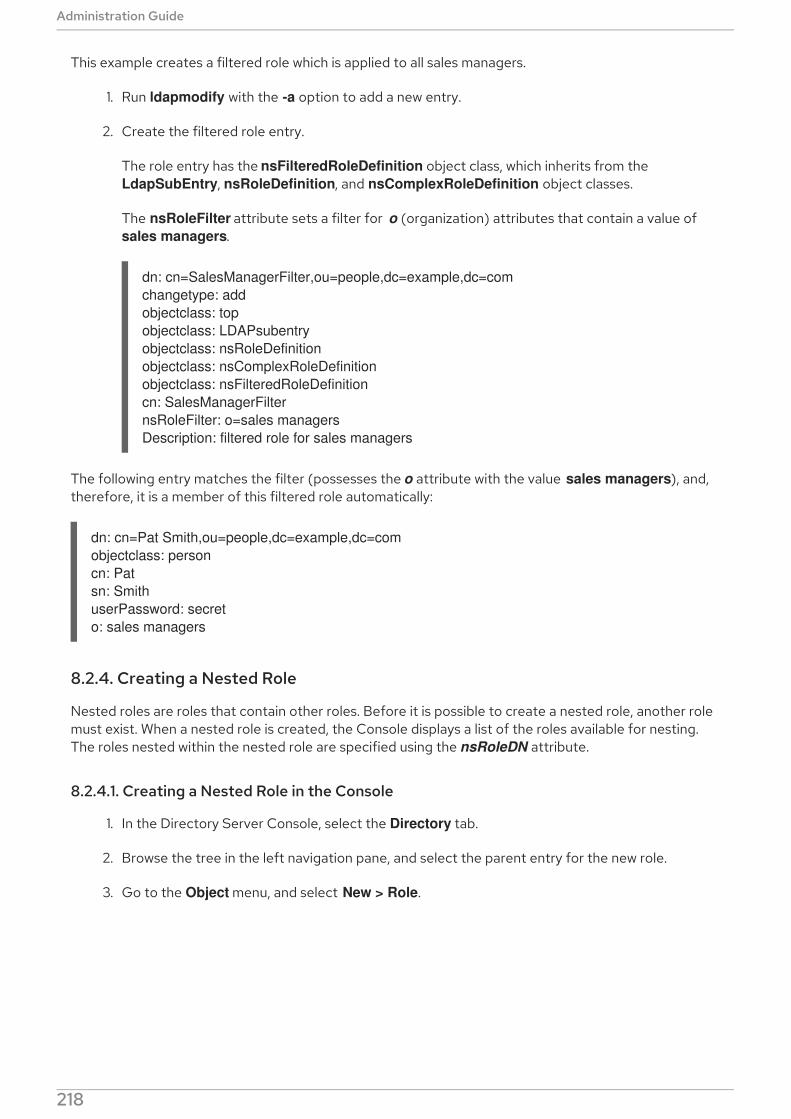
This example creates a filtered role which is applied to all sales managers.
1. Run ldapmodify with the -a option to add a new entry.
2. Create the filtered role entry.
The role entry has the nsFilteredRoleDefinition object class, which inherits from the LdapSubEntry, nsRoleDefinition, and nsComplexRoleDefinition object classes.
The nsRoleFilter attribute sets a filter for o (organization) attributes that contain a value of sales managers.
dn: cn=SalesManagerFilter,ou=people,dc=example,dc=com
changetype: add
objectclass: top
objectclass: LDAPsubentry
objectclass: nsRoleDefinition
objectclass: nsComplexRoleDefinition
objectclass: nsFilteredRoleDefinition
cn: SalesManagerFilter
nsRoleFilter: o=sales managers
Description: filtered role for sales managers
The following entry matches the filter (possesses the o attribute with the value sales managers), and,therefore, it is a member of this filtered role automatically:
dn: cn=Pat Smith,ou=people,dc=example,dc=com
objectclass: person
cn: Pat
sn: Smith
userPassword: secret
o: sales managers
8.2.4. Creating a Nested Role
Nested roles are roles that contain other roles. Before it is possible to create a nested role, another rolemust exist. When a nested role is created, the Console displays a list of the roles available for nesting.The roles nested within the nested role are specified using the nsRoleDN attribute.
8.2.4.1. Creating a Nested Role in the Console
1. In the Directory Server Console, select the Directory tab.
2. Browse the tree in the left navigation pane, and select the parent entry for the new role.
3. Go to the Object menu, and select New > Role.
Administration Guide
218

Alternatively, right-click the entry and select New > Role.
4. Click General in the left pane. Type a name for the new role in the Role Name field. The rolename is required.
5. Click Members in the left pane.
6. In the right pane, select Nested Role.
CHAPTER 8. ORGANIZING AND GROUPING ENTRIES
219
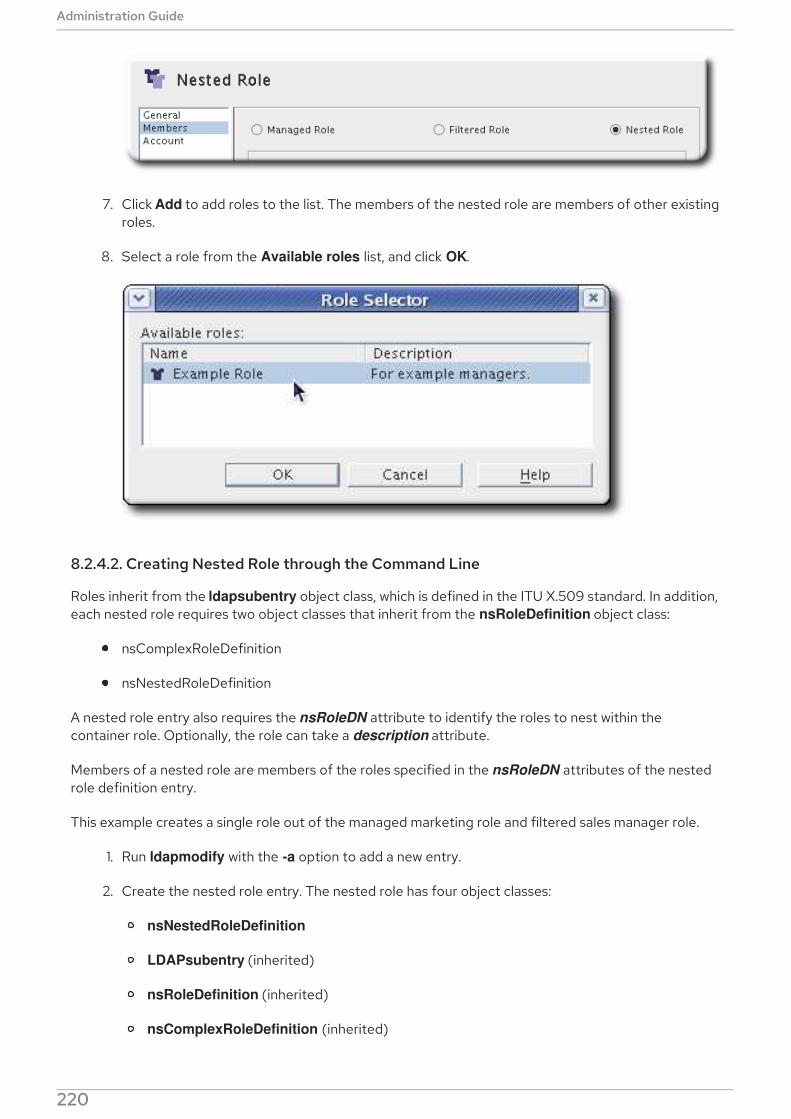
7. Click Add to add roles to the list. The members of the nested role are members of other existingroles.
8. Select a role from the Available roles list, and click OK.
8.2.4.2. Creating Nested Role through the Command Line
Roles inherit from the ldapsubentry object class, which is defined in the ITU X.509 standard. In addition,each nested role requires two object classes that inherit from the nsRoleDefinition object class:
nsComplexRoleDefinition
nsNestedRoleDefinition
A nested role entry also requires the nsRoleDN attribute to identify the roles to nest within thecontainer role. Optionally, the role can take a description attribute.
Members of a nested role are members of the roles specified in the nsRoleDN attributes of the nestedrole definition entry.
This example creates a single role out of the managed marketing role and filtered sales manager role.
1. Run ldapmodify with the -a option to add a new entry.
2. Create the nested role entry. The nested role has four object classes:
nsNestedRoleDefinition
LDAPsubentry (inherited)
nsRoleDefinition (inherited)
nsComplexRoleDefinition (inherited)
The nsRoleDN attributes contain the DNs for both the marketing managed role and the sales
Administration Guide
220

The nsRoleDN attributes contain the DNs for both the marketing managed role and the salesmanagers filtered role.
dn: cn=MarketingSales,ou=people,dc=example,dc=com
objectclass: top
objectclass: LDAPsubentry
objectclass: nsRoleDefinition
objectclass: nsComplexRoleDefinition
objectclass: nsNestedRoleDefinition
cn: MarketingSales
nsRoleDN: cn=SalesManagerFilter,ou=people,dc=example,dc=com
nsRoleDN: cn=Marketing,ou=people,dc=example,dc=com
Both of the users in the previous examples, Bob and Pat, are members of this new nested role.
8.2.5. Editing and Assigning Roles to an Entry
The entries which belong to a role are assigned on the role entry itself. For managed roles, user entriesare added explicitly; for filtered roles, they are added through the results of an LDAP filter.
User entries are assigned to the role through the command line by editing the role entry, either byadding the entry as a member or adjusting the filter so it is included. In the Directory Server Console,however, there is a shortcut to add entries to a role by apparently editing the required user entry (but,functionally, this really edits the role entry).
1. Select the Directory tab.
2. In the left navigation pane, browse the tree, and select the entry for which to view or edit a role.
3. Select Set Roles from the Object menu.
4. Select the Managed Roles tab to display the managed roles to which this entry belongs.
CHAPTER 8. ORGANIZING AND GROUPING ENTRIES
221

5. To add a new managed role, click Add, and select an available role from the Role Selector
window.
NOTE
The configuration for a managed role associated with an entry can be edited byclicking the Edit button. The Edit Entry dialog box opens, and the generalinformation or members for the role can be changed.
6. Select the Other Roles tab to view the filtered or nested roles to which this entry belongs.
Click Edit to make changes to any filtered or nested roles associated with the entry.
8.2.6. Viewing Roles for an Entry through the Command Line
Role assignments are always visible for an entry when it is displayed in the Directory Server Console.Role assignments are not returned automatically through the command line, however.
The nsRole attribute is an operational attribute. In LDAP, operational attributes must be requestedexplicitly. They are not returned by default with the regular attributes in the schema of the entry. Youcan either explicitly request single operational attributes by listing them or use + to output all operational
Administration Guide
222
attributes for result objects. For example, this ldapsearch command returns the list of roles of which uid=scarter is a member, in addition to the regular attributes for the entry:
# ldapsearch -D "cn=Directory Manager" -W -p 389 -h server.example.com -b "dc=example,dc=com"
-s sub -x "(uid=scarter)" \* nsRole
dn: uid=scarter,ou=people,dc=example,dc=com
objectClass: inetorgperson
objectClass: top
objectClass: person
objectClass: organizationalPerson
uid: scarter
cn: Sam Carter
sn: Carter
givenName: Sam
mail: [email protected]
userPassword: {SSHA}6BE31mhTfcYyIQF60kWlnEL8sIvPZ59hvFTRKw==
manager: uid=lbrown,ou=people,dc=example,dc=com
nsRole: cn=Role for Managers,dc=example,dc=com
nsRole: cn=Role for Accounting,dc=example,dc=com
IMPORTANT
Be sure to use the nsRole attribute, not the nsRoleDN attribute, to evaluate rolemembership.
8.2.7. Making a Role Inactive or Active
The concept of activating/inactivating roles allows entire groups of entries to be activated or inactivatedin just one operation. That is, the members of a role can be temporarily disabled by inactivating the roleto which they belong.
When a role is inactivated, it does not mean that the user cannot bind to the server using that role entry.The meaning of an inactivated role is that the user cannot bind to the server using any of the entriesthat belong to that role; the entries that belong to an inactivated role will have the nsAccountLock
attribute set to true.
Members of a role can be temporarily disabled by inactivating the role to which they belong. Inactivatinga role inactivates the entries possessed by the role, not the role itself.
1. Select the Directory tab.
2. Browse the navigation tree in the left pane to locate the base DN for the role. Roles appear inthe right pane with other entries.
CHAPTER 8. ORGANIZING AND GROUPING ENTRIES
223

3. Double-click the role, open the Account tab, and click the Inactivate button.
Alternatively, select the role. Right-click the role and select Inactivate from the menu.
The role is inactivated.
To reactivate a disabled role, re-open the role configuration or open the Object menu, and select Activate. All of the members of the role are re-enabled.
8.2.8. Viewing the Activation Status for Entries
When a nested role is inactivated, a user cannot bind to the server if it is a member of any role within thenested role. All the entries that belong to a role that directly or indirectly are members of the nested rolehave nsAccountLock set to true. There can be several layers of nested roles, and inactivating a nestedrole at any point in the nesting will inactivate all roles and users beneath it.
The Directory Server Console automatically shows the active or inactive status of entries.
To see the inactivated entries, select Inactivation State from the View menu. Members of aninactivated role have a red slash through them. For example, John Smith is a member of the inactiveExample Role.
The nsAccountLock attribute is an operational attribute and must be explicitly requested in the search
Administration Guide
224

The nsAccountLock attribute is an operational attribute and must be explicitly requested in the searchcommand in the list of search attributes or specify + to request all operational attributes. For example:
# ldapsearch -D "cn=Directory Manager" -W -p 389 -h server.example.com -b "dc=example,dc=com"
-s sub -x "(uid=scarter)" nsAccountLock
8.2.9. About Deleting Roles
Deleting a role deletes the role entry but does not delete the nsRoleDN attribute for each role member.To delete the nsRoleDN attribute for each role member, enable the Referential Integrity plug-in, andconfigure it to manage the nsRoleDN attribute. For more information on the Referential Integrity plug-in, see Chapter 5, Maintaining Referential Integrity .
8.2.10. Using Roles Securely
Not every role is suitable for use in a security context. When creating a new role, consider how easily therole can be assigned to and removed from an entry. Sometimes it is appropriate for users to be able toadd or remove themselves easily from a role. For example, if there is an interest group role called Mountain Biking, interested users should be able to add themselves or remove themselves easily.
However, it is inappropriate to have such open roles for some security situations. One potential securityrisk is inactivating user accounts by inactivating roles. Inactive roles have special ACIs defined for theirsuffix. If an administrator allows users to add and remove themselves from roles freely, then in somecircumstance, they may be able to remove themselves from an inactive role to prevent their accountsfrom being locked.
For example, user A possesses the managed role, MR. The MR role has been locked using accountinactivation. This means that user A cannot bind to the server because the nsAccountLock attribute iscomputed as true for that user. However, if user A was already bound to Directory Server and noticedthat he is now locked through the MR role, the user can remove the nsRoleDN attribute from his entryand unlock himself if there are no ACIs preventing him.
To prevent users from removing the nsRoleDN attribute, use the following ACIs depending upon thetype of role being used.
Managed roles. For entries that are members of a managed role, use the following ACI toprevent users from unlocking themselves by removing the appropriate nsRoleDN:
aci: (targetattr="nsRoleDN") (targattrfilters= add=nsRoleDN:(!
(nsRoleDN=cn=AdministratorRole,dc=example,dc=com)), del=nsRoleDN:(!
(nsRoleDN=cn=nsManagedDisabledRole,dc=example,dc=com))) (version3.0;acl "allow mod
of nsRoleDN by self but not to critical values"; allow(write) userdn=ldap:///self;)
Filtered roles. The attributes that are part of the filter should be protected so that the usercannot relinquish the filtered role by modifying an attribute. The user should not be allowed toadd, delete, or modify the attribute used by the filtered role. If the value of the filter attribute iscomputed, then all attributes that can modify the value of the filter attribute should beprotected in the same way.
Nested roles. A nested role is comprised of filtered and managed roles, so both ACIs should beconsidered for modifying the attributes (nsRoleDN or something else) of the roles thatcomprise the nested role.
For more information about account inactivation, see Section 19.15, “Manually Inactivating Users andRoles”.
CHAPTER 8. ORGANIZING AND GROUPING ENTRIES
225
8.3. AUTOMATICALLY CREATING DUAL ENTRIES
Some clients and integration with Red Hat Directory Server require dual entries. For example, both Posixsystems typically have a group for each user. The Directory Server's Managed Entries Plug-in creates anew managed entry, with accurate and specific values for attributes, automatically whenever anappropriate origin entry is created.
8.3.1. About Managed Entries
The basic idea behind the Managed Entries Plug-in is that there are situations when Entry A is createdand there should automatically be an Entry B with related attribute values. For example, when a Posixuser (posixAccount entry) is created, a corresponding group entry ( posixGroup entry) should also becreated. An instance of the Managed Entries Plug-in identifies what entry (the origin entry) triggers theplug-in to automatically generate a new entry (the managed entry).
The plug-in works within a defined scope of the directory tree, so only entries within that subtree andthat match the given search filter trigger a Managed Entries operation.
Much like configuring a class of service, a managed entry is configured through two entries:
A definition entry, that identifies the scope of the plug-in instance and the template to use
A template entry, that models what the final managed entry will look like
8.3.1.1. About the Instance Definition Entry
As with the Linked Attributes and DNA Plug-ins, the Managed Entries Plug-in has a container entry in cn=plugins,cn=config, and each unique configuration instance of the plug-in has a definition entrybeneath that container.
An instance of the Managed Entries Plug-in defines three things:
The search criteria to identify the origin entries (using a search scope and a search filter)
The subtree under which to create the managed entries (the new entry location)
The template entry to use for the managed entries
Administration Guide
226
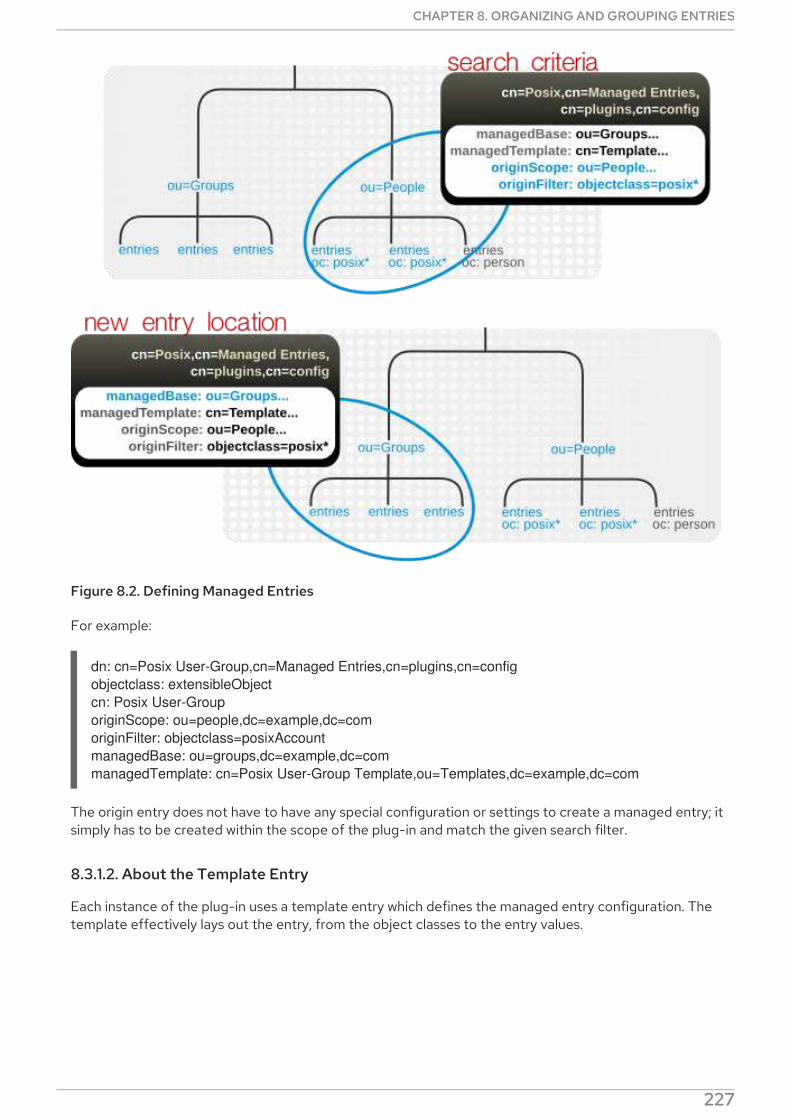
Figure 8.2. Defining Managed Entries
For example:
dn: cn=Posix User-Group,cn=Managed Entries,cn=plugins,cn=config
objectclass: extensibleObject
cn: Posix User-Group
originScope: ou=people,dc=example,dc=com
originFilter: objectclass=posixAccount
managedBase: ou=groups,dc=example,dc=com
managedTemplate: cn=Posix User-Group Template,ou=Templates,dc=example,dc=com
The origin entry does not have to have any special configuration or settings to create a managed entry; itsimply has to be created within the scope of the plug-in and match the given search filter.
8.3.1.2. About the Template Entry
Each instance of the plug-in uses a template entry which defines the managed entry configuration. Thetemplate effectively lays out the entry, from the object classes to the entry values.
NOTE
CHAPTER 8. ORGANIZING AND GROUPING ENTRIES
227
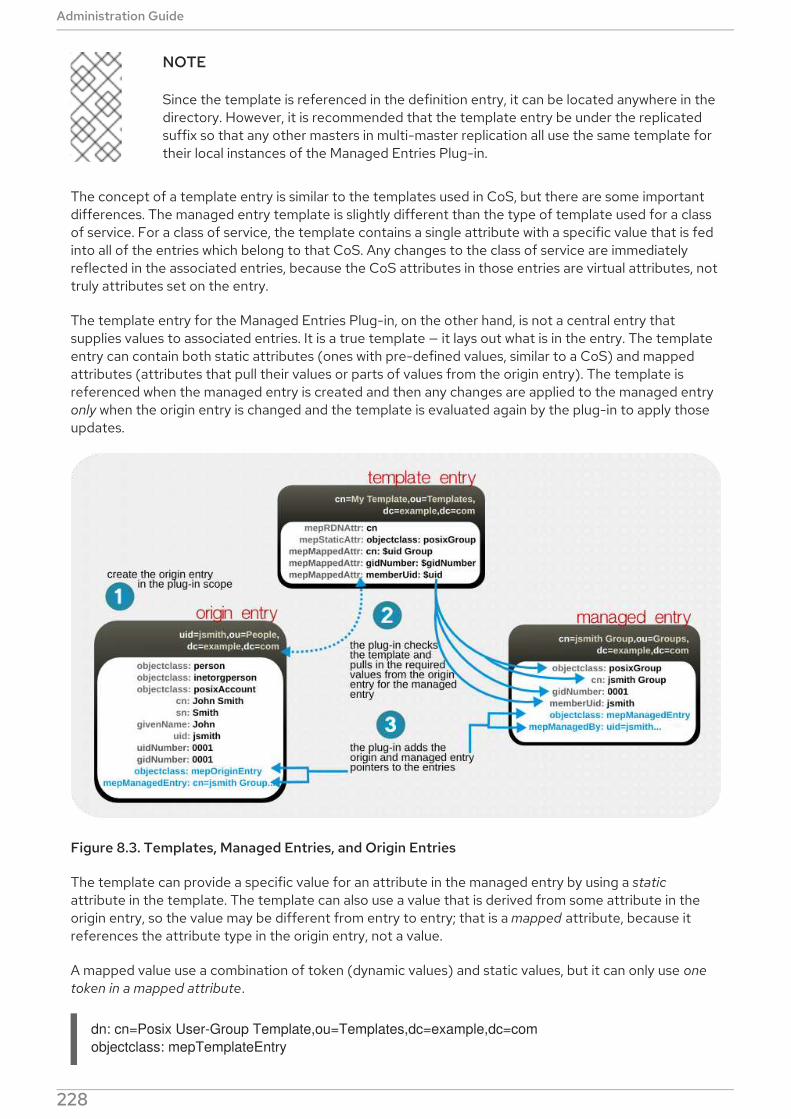
NOTE
Since the template is referenced in the definition entry, it can be located anywhere in thedirectory. However, it is recommended that the template entry be under the replicatedsuffix so that any other masters in multi-master replication all use the same template fortheir local instances of the Managed Entries Plug-in.
The concept of a template entry is similar to the templates used in CoS, but there are some importantdifferences. The managed entry template is slightly different than the type of template used for a classof service. For a class of service, the template contains a single attribute with a specific value that is fedinto all of the entries which belong to that CoS. Any changes to the class of service are immediatelyreflected in the associated entries, because the CoS attributes in those entries are virtual attributes, nottruly attributes set on the entry.
The template entry for the Managed Entries Plug-in, on the other hand, is not a central entry thatsupplies values to associated entries. It is a true template — it lays out what is in the entry. The templateentry can contain both static attributes (ones with pre-defined values, similar to a CoS) and mappedattributes (attributes that pull their values or parts of values from the origin entry). The template isreferenced when the managed entry is created and then any changes are applied to the managed entryonly when the origin entry is changed and the template is evaluated again by the plug-in to apply thoseupdates.
Figure 8.3. Templates, Managed Entries, and Origin Entries
The template can provide a specific value for an attribute in the managed entry by using a static
attribute in the template. The template can also use a value that is derived from some attribute in theorigin entry, so the value may be different from entry to entry; that is a mapped attribute, because itreferences the attribute type in the origin entry, not a value.
A mapped value use a combination of token (dynamic values) and static values, but it can only use one
token in a mapped attribute.
dn: cn=Posix User-Group Template,ou=Templates,dc=example,dc=com
objectclass: mepTemplateEntry
Administration Guide
228

cn: Posix User-Group Template
mepRDNAttr: cn
mepStaticAttr: objectclass: posixGroup
mepMappedAttr: cn: $cn Group Entry
mepMappedAttr: gidNumber: $gidNumber
mepMappedAttr: memberUid: $uid
The mapped attributes in the template use tokens, prepended by a dollar sign ($), to pull in values fromthe origin entry and use it in the managed entry. (If a dollar sign is actually in the managed attributevalue, then the dollar sign can be escaped by using two dollar signs in a row.)
A mapped attribute definition can be quoted with curly braces, such as Attr: ${cn}test. Quoting a tokenvalue is not required if the token name is not immediately followed by a character that is valid in anattribute name, such as a space or comma. For example, $cn test is acceptable in an attribute definitionbecause a space character immediately follow the attribute name, but $cntest is not valid because theManaged Entries Plug-in attempts to look for an attribute named cntest in the origin entry. Using curlybraces identifies the attribute token name.
NOTE
Make sure that the values given for static and mapped attributes comply with therequired attribute syntax.
8.3.1.3. Entry Attributes Written by the Managed Entries Plug-in
Both the origin entry and the managed entry have special managed entries attributes which indicate thatthey are being managed by an instance of the Managed Entries Plug-in. For the origin entry, the plug-inadds links to associated managed entries.
dn: uid=jsmith,ou=people,dc=example,dc=com
objectclass: mepOriginEntry
objectclass: posixAccount
...
sn: Smith
mail: [email protected]
mepManagedEntry: cn=jsmith Posix Group,ou=groups,dc=example,dc=com
On the managed entry, the plug-in adds attributes that point back to the origin entry, in addition to theattributes defined in the template.
dn: cn=jsmith Posix Group,ou=groups,dc=example,dc=com
objectclass: mepManagedEntry
objectclass: posixGroup
...
mepManagedBy: uid=jsmith,ou=people,dc=example,dc=com
Using special attributes to indicate managed and origin entries makes it easy to identify the relatedentries and to assess changes made by the Managed Entries Plug-in.
8.3.1.4. Managed Entries Plug-in and Directory Server Operations
The Managed Entries Plug-in has some impact on how the Directory Server carries out commonoperations, like add and delete operations.
CHAPTER 8. ORGANIZING AND GROUPING ENTRIES
229
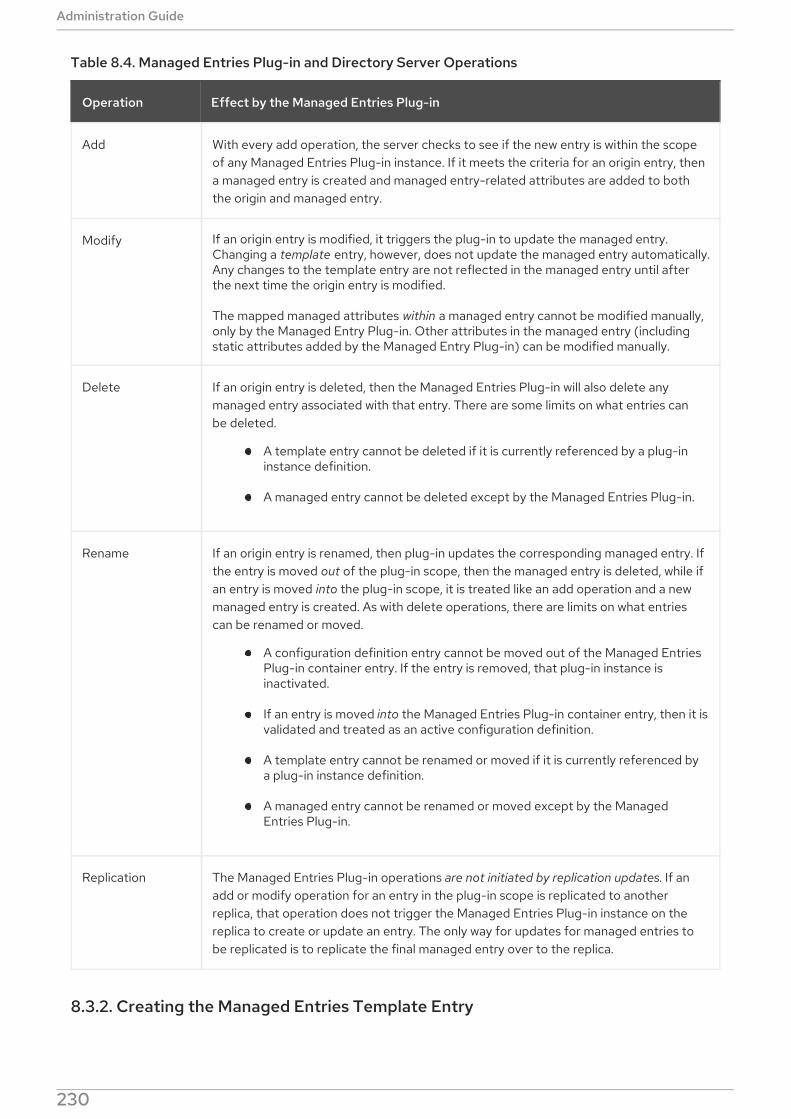
Table 8.4. Managed Entries Plug-in and Directory Server Operations
Operation Effect by the Managed Entries Plug-in
Add With every add operation, the server checks to see if the new entry is within the scopeof any Managed Entries Plug-in instance. If it meets the criteria for an origin entry, thena managed entry is created and managed entry-related attributes are added to boththe origin and managed entry.
Modify If an origin entry is modified, it triggers the plug-in to update the managed entry.Changing a template entry, however, does not update the managed entry automatically.Any changes to the template entry are not reflected in the managed entry until afterthe next time the origin entry is modified.
The mapped managed attributes within a managed entry cannot be modified manually,only by the Managed Entry Plug-in. Other attributes in the managed entry (includingstatic attributes added by the Managed Entry Plug-in) can be modified manually.
Delete If an origin entry is deleted, then the Managed Entries Plug-in will also delete anymanaged entry associated with that entry. There are some limits on what entries canbe deleted.
A template entry cannot be deleted if it is currently referenced by a plug-ininstance definition.
A managed entry cannot be deleted except by the Managed Entries Plug-in.
Rename If an origin entry is renamed, then plug-in updates the corresponding managed entry. Ifthe entry is moved out of the plug-in scope, then the managed entry is deleted, while ifan entry is moved into the plug-in scope, it is treated like an add operation and a newmanaged entry is created. As with delete operations, there are limits on what entriescan be renamed or moved.
A configuration definition entry cannot be moved out of the Managed EntriesPlug-in container entry. If the entry is removed, that plug-in instance isinactivated.
If an entry is moved into the Managed Entries Plug-in container entry, then it isvalidated and treated as an active configuration definition.
A template entry cannot be renamed or moved if it is currently referenced bya plug-in instance definition.
A managed entry cannot be renamed or moved except by the ManagedEntries Plug-in.
Replication The Managed Entries Plug-in operations are not initiated by replication updates. If anadd or modify operation for an entry in the plug-in scope is replicated to anotherreplica, that operation does not trigger the Managed Entries Plug-in instance on thereplica to create or update an entry. The only way for updates for managed entries tobe replicated is to replicate the final managed entry over to the replica.
8.3.2. Creating the Managed Entries Template Entry
The first entry to create is the template entry. The template entry must contain all of the configuration
Administration Guide
230
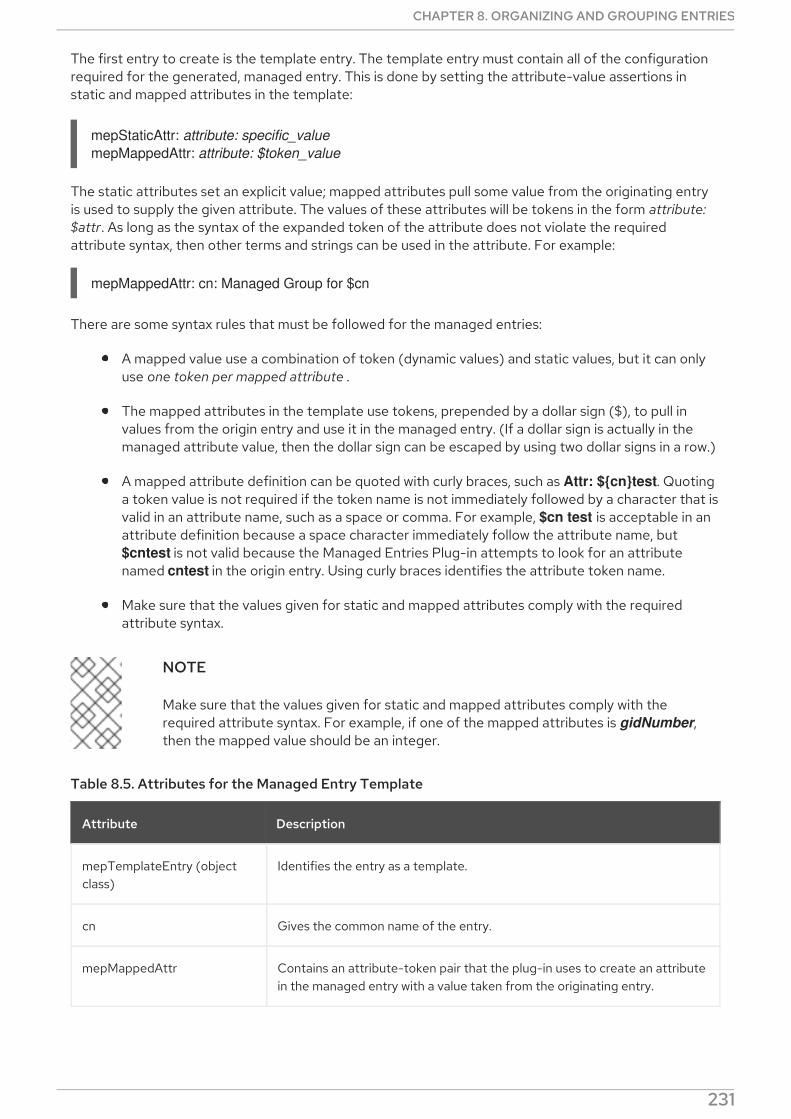
The first entry to create is the template entry. The template entry must contain all of the configurationrequired for the generated, managed entry. This is done by setting the attribute-value assertions instatic and mapped attributes in the template:
mepStaticAttr: attribute: specific_value
mepMappedAttr: attribute: $token_value
The static attributes set an explicit value; mapped attributes pull some value from the originating entryis used to supply the given attribute. The values of these attributes will be tokens in the form attribute:
$attr. As long as the syntax of the expanded token of the attribute does not violate the requiredattribute syntax, then other terms and strings can be used in the attribute. For example:
mepMappedAttr: cn: Managed Group for $cn
There are some syntax rules that must be followed for the managed entries:
A mapped value use a combination of token (dynamic values) and static values, but it can onlyuse one token per mapped attribute .
The mapped attributes in the template use tokens, prepended by a dollar sign ($), to pull invalues from the origin entry and use it in the managed entry. (If a dollar sign is actually in themanaged attribute value, then the dollar sign can be escaped by using two dollar signs in a row.)
A mapped attribute definition can be quoted with curly braces, such as Attr: ${cn}test. Quotinga token value is not required if the token name is not immediately followed by a character that isvalid in an attribute name, such as a space or comma. For example, $cn test is acceptable in anattribute definition because a space character immediately follow the attribute name, but $cntest is not valid because the Managed Entries Plug-in attempts to look for an attributenamed cntest in the origin entry. Using curly braces identifies the attribute token name.
Make sure that the values given for static and mapped attributes comply with the requiredattribute syntax.
NOTE
Make sure that the values given for static and mapped attributes comply with therequired attribute syntax. For example, if one of the mapped attributes is gidNumber,then the mapped value should be an integer.
Table 8.5. Attributes for the Managed Entry Template
Attribute Description
mepTemplateEntry (objectclass)
Identifies the entry as a template.
cn Gives the common name of the entry.
mepMappedAttr Contains an attribute-token pair that the plug-in uses to create an attributein the managed entry with a value taken from the originating entry.
CHAPTER 8. ORGANIZING AND GROUPING ENTRIES
231

mepRDNAttr Specifies which attribute to use as the naming attribute in the managedentry. The attribute used as the RDN must be a mapped attribute for theconfiguration to be valid.
mepStaticAttr Contains an attribute-value pair that will be used, with that specified value,in the managed entry.
Attribute Description
To create a template entry:
1. Run ldapmodify to add the entry. This entry can be located anywhere in the directory tree.
dn: cn=Posix User Template,ou=templates,dc=example,dc=com
cn: Posix User Template
...
You can also use the Directory Server Console to create the entry, as described in Section 3.2.2,“Creating Directory Entries”.
2. Give it the mepTemplateEntry object class to indicate that it is a template entry.
objectClass: top
objectclass: mepTemplateEntry
...
3. Set the attributes for the entry; these are described in Table 8.5, “Attributes for the ManagedEntry Template”. The RDN attribute (mepRDNAttr) is required. The attribute parameters areoptional and the values depend on the type of entry that the plug-in will create. Make sure thatwhatever attribute you use for the naming attribute is also contained in the template entry as amapped attribute.
NOTE
Attributes which will be the same for each managed entry — like the object classfor the entries — should use the mepStaticAttr attribute to set the valuesmanually.
mepRDNAttr: cn
mepStaticAttr: objectclass: posixGroup
mepMappedAttr: cn: $cn Group Entry
mepMappedAttr: gidNumber: $gidNumber
mepMappedAttr: memberUid: $uid
8.3.3. Creating the Managed Entries Instance Definition
Once the template entry is created, then it is possible to create a definition entry that points to thattemplate. The definition entry is an instance of the Managed Entries Plug-in.
NOTE
Administration Guide
232

NOTE
When the definition is created, the server checks to see if the specified template entryexists. If the template does not exist, then the server returns a warning that the definitionconfiguration is invalid.
The definition entry must define the parameters to recognize the potential origin entry and theinformation to create the managed entry. The attributes available for the plug-in instance are listed inTable 8.6, “Attributes for the Managed Entries Definition Entry” .
Table 8.6. Attributes for the Managed Entries Definition Entry
Attribute Name Description
originFilter The search filter to use to search for and identify the entries within thesubtree which require a managed entry. The syntax is the same as a regularsearch filter.
originScope The base subtree which contains the potential origin entries for the plug-into monitor.
managedTemplate Identifies the template entry to use to create the managed entry. This entrycan be located anywhere in the directory tree.
managedBase The subtree under which to create the managed entries.
NOTE
The Managed Entries Plug-in is enabled by default. If this plug-in is disabled, then re-enable it as described in Section 1.9.2.2, “Enabling Plug-ins in theDirectory Server Console”.
To create an instance:
1. Create the new plug-in instance below the cn=Managed Entries,cn=plugins,cn=config
container entry using ldapmodify.
dn: cn=instance,cn=Managed Entries,cn=plugins,cn=config
...
2. Set the scope and filter for the origin entry search, the location of the new managed entries, andthe template entry to use. These required attributes are listed in Table 8.6, “Attributes for theManaged Entries Definition Entry”.
objectClass: top
objectClass: extensibleObject
cn: Posix User-Group
originScope: ou=people,dc=example,dc=com
originFilter: objectclass=posixAccount
managedBase: ou=groups,dc=example,dc=com
managedTemplate: cn=Posix User-Group Template,ou=Templates,dc=example,dc=com
CHAPTER 8. ORGANIZING AND GROUPING ENTRIES
233
3. If the Directory Server is not configured to enable dynamic plug-ins, restart the server to loadthe modified new plug-in instance.
8.3.4. Putting Managed Entries Plug-in Configuration in a Replicated Database
As Section 8.3.1, “About Managed Entries” highlights, different instances of the Managed Entries Plug-in are created as children beneath the container plug-in entry in cn=plugins,cn=com. (This is commonfor plug-ins which allow multiple instances.) The drawback to this is that the configuration entries in cn=plugins,cn=com are not replicated, so the configuration has to be re-created on eachDirectory Server instance.
The Managed Entries Plug-in entry allows the nsslapd-pluginConfigArea attribute. This attribute toanother container entry, in the main database area, which contains the plug-in instance entries. Thiscontainer entry can be in a replicated database, which allows the plug-in configuration to be replicated.
1. Using ldapmodify, create a container entry in a subtree that is replicated.
dn: cn=managed entries container,ou=containers,dc=example,dc=com
objectclass: top
objectClass: extensibleObject
objectClass: nsContainer
cn: managed entries container
2. Using ldapmodify, add the nsslapd-pluginConfigArea attribute to the Managed Entries Plug-in entry that points back to the container entry.
dn: cn=Managed Entries,cn=plugins,cn=config
changetype: modify
add: nsslapd-pluginConfigArea
nsslapd-pluginConfigArea: cn=managed entries
container,ou=containers,dc=example,dc=com
3. Move or create the definition (Section 8.3.3, “Creating the Managed Entries InstanceDefinition”) and template (Section 8.3.2, “Creating the Managed Entries Template Entry” )entries under the new container entry.
8.4. USING VIEWS
Virtual directory tree views, or views, create a virtual directory hierarchy, so it is easy to navigate entries,without having to make sure those entries physically exist in any particular place. The view usesinformation about the entries to place them in the view hierarchy, similarly to members of a filtered roleor a dynamic group. Views superimpose a DIT hierarchy over a set of entries, and to client applications,views appear as ordinary container hierarchies.
8.4.1. About Views
Views create a directory tree similar to the regular hierarchy, such as using organizational unit entries forsubtrees, but views entries have an additional object class (nsview) and a filter attribute (nsviewfilter)that set up a filter for the entries which belong in that view. Once the view container entry is added, all ofthe entries that match the view filter instantly populate the view. The target entries only appear to existin the view; their true location never changes. For example, a view may be created as ou=Location
Views, and a filter is set for l=Mountain View. Every entry, such as cn=Jane Smith,l=Mountain
View,ou=People,dc=example,dc=com, is immediately listed under the ou=Location Views entry, butthe real cn=Jane Smith entry remains in the ou=People,dc=example,dc=com subtree.
Administration Guide
234

Figure 8.4. A Directory Tree with a Virtual DIT View hierarchy
Virtual DIT views behave like normal DITs in that a subtree or a one-level search can be performed withthe expected results being returned.
NOTE
There is a sample LDIF file with example views entries, Example-views.ldif, installed withDirectory Server. This file is in the /usr/share/dirsrv/data/ directory on Red HatEnterprise Linux 7. The sections in this chapter assume Example-views.ldif is importedto the server.
The Red Hat Directory Server Deployment Guide has more information on how to integrate views withthe directory tree hierarchy.
8.4.2. Creating Views in the Console
1. Select the Directory tab.
2. In the left navigation tree, create an organizational unit suffix to hold the views. For instance, forviews based on the locality (l) attribute, name this organizational unit Location Views. Creatingsub suffixes is described in Section 2.1.1.2, “Creating a New Sub Suffix Using the Console” .
3. Right-click ou=Location Views, and select New > Other.
CHAPTER 8. ORGANIZING AND GROUPING ENTRIES
235
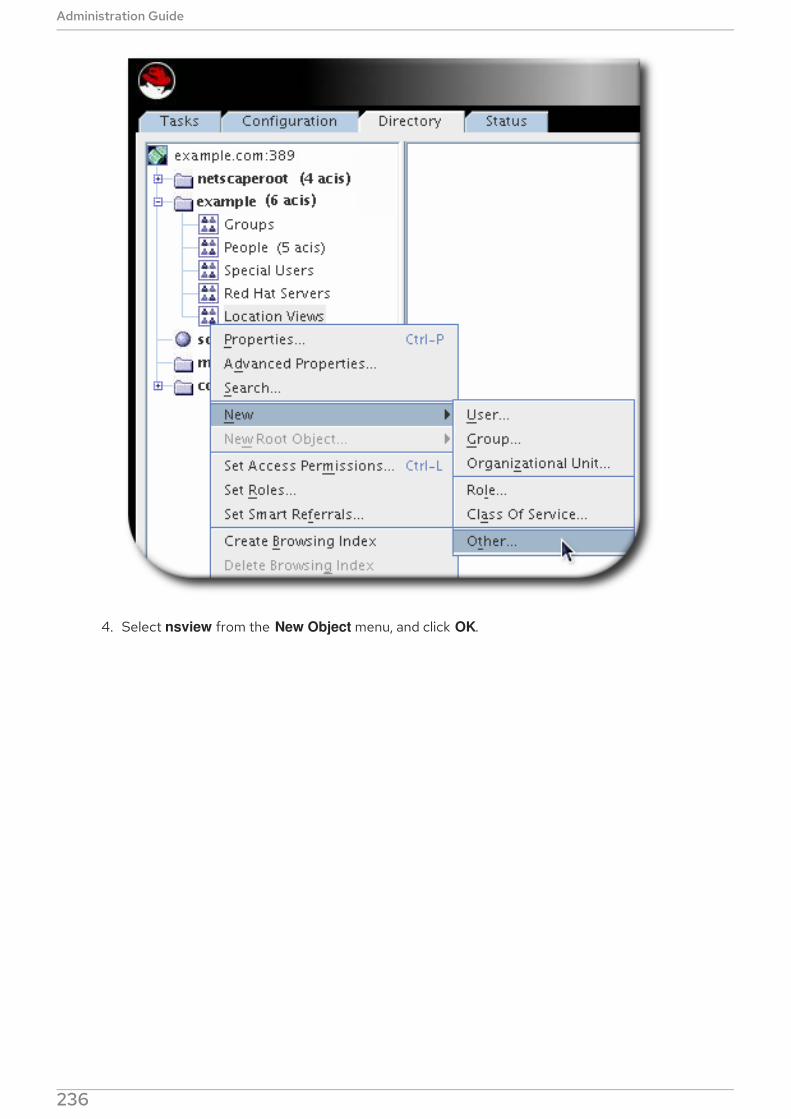
4. Select nsview from the New Object menu, and click OK.
Administration Guide
236
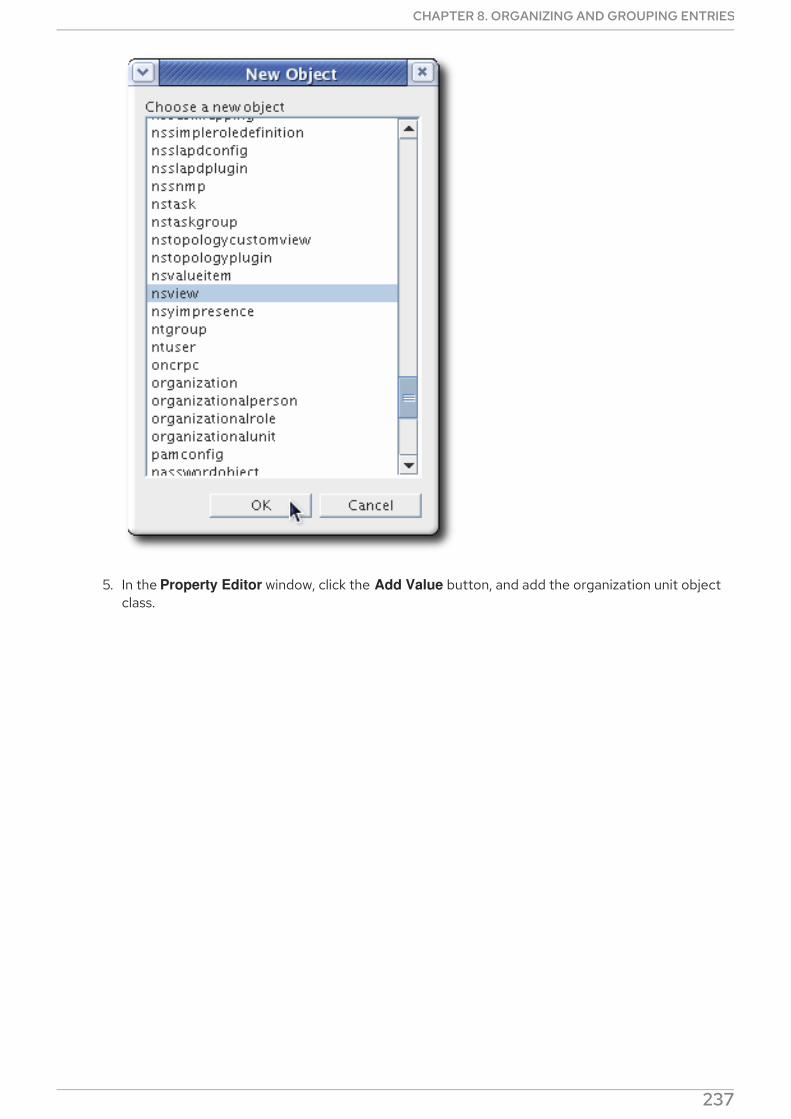
5. In the Property Editor window, click the Add Value button, and add the organization unit objectclass.
CHAPTER 8. ORGANIZING AND GROUPING ENTRIES
237
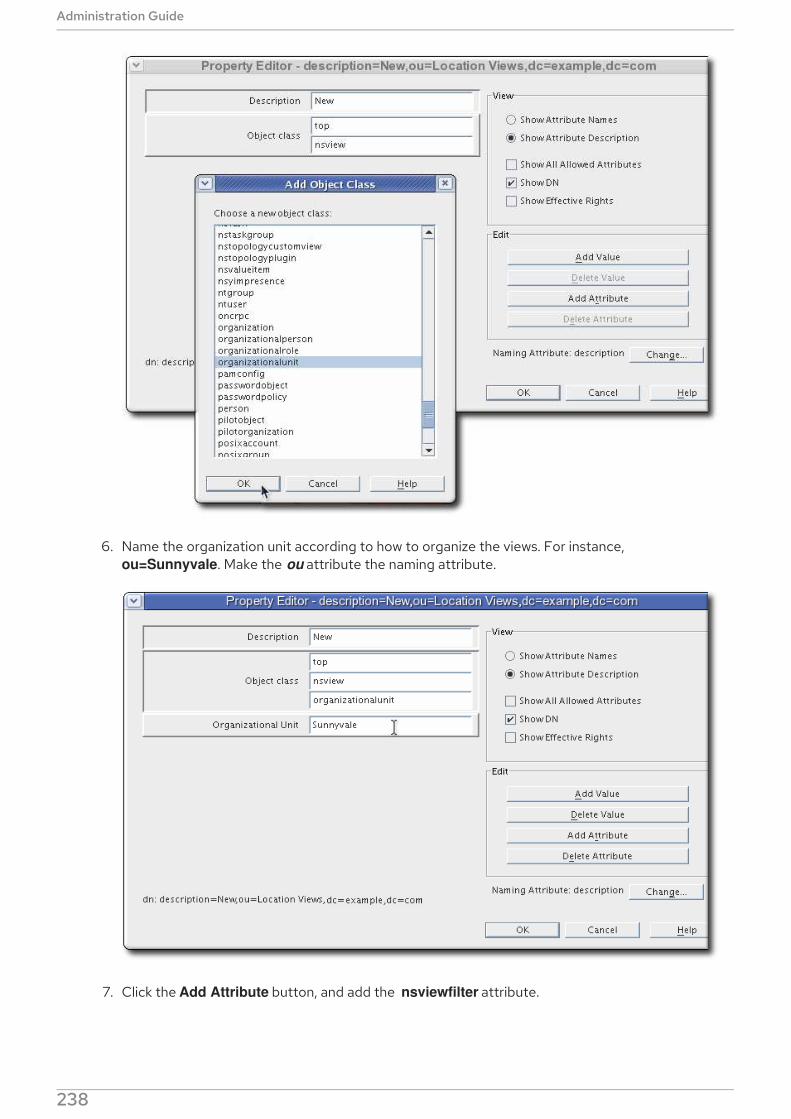
6. Name the organization unit according to how to organize the views. For instance, ou=Sunnyvale. Make the ou attribute the naming attribute.
7. Click the Add Attribute button, and add the nsviewfilter attribute.
Administration Guide
238
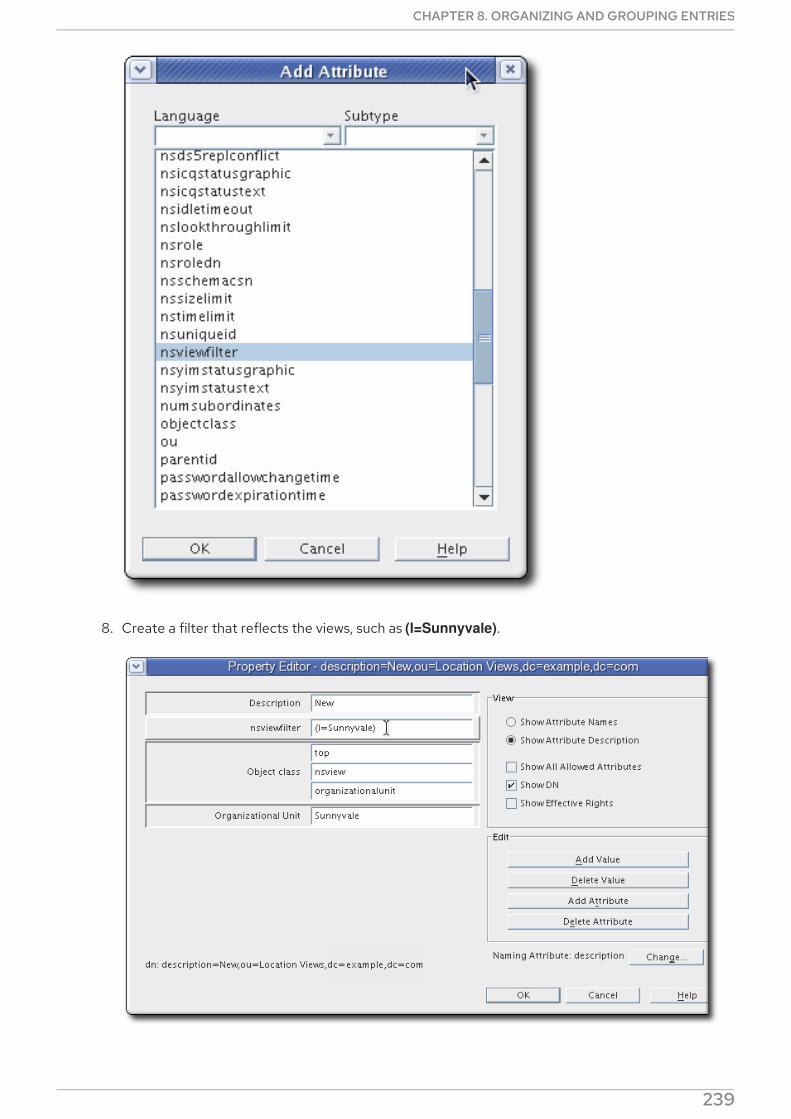
8. Create a filter that reflects the views, such as (l=Sunnyvale).
CHAPTER 8. ORGANIZING AND GROUPING ENTRIES
239
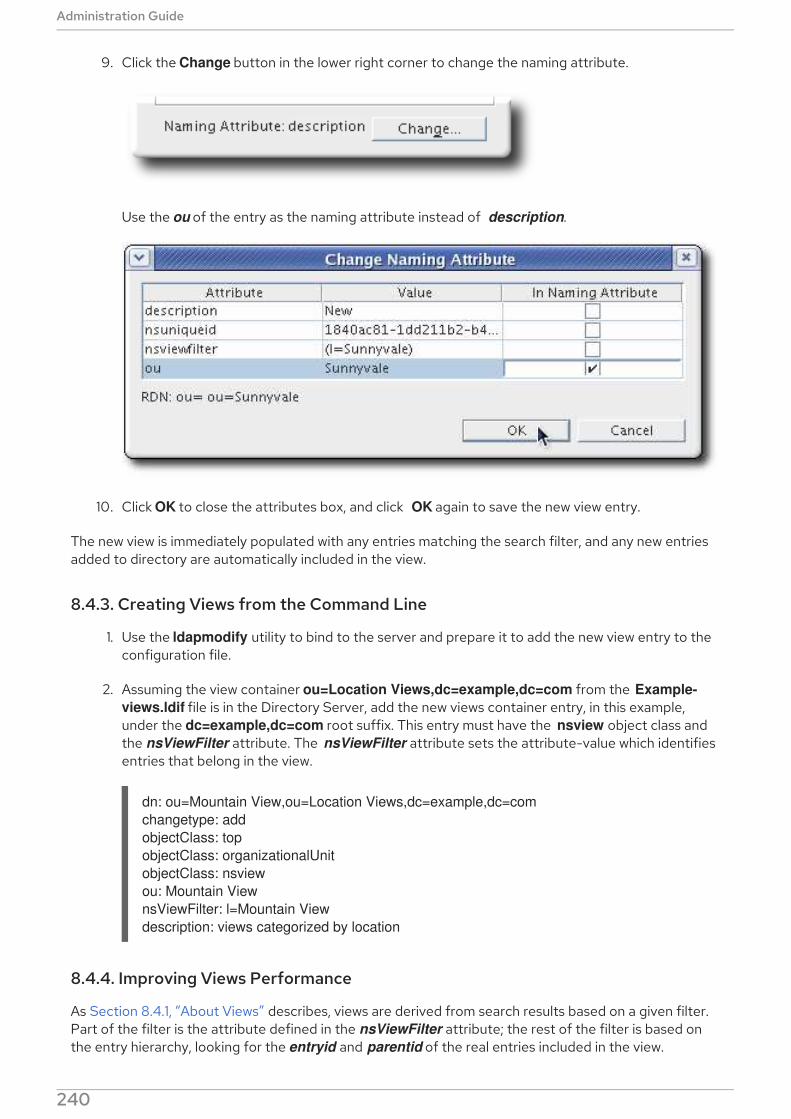
9. Click the Change button in the lower right corner to change the naming attribute.
Use the ou of the entry as the naming attribute instead of description.
10. Click OK to close the attributes box, and click OK again to save the new view entry.
The new view is immediately populated with any entries matching the search filter, and any new entriesadded to directory are automatically included in the view.
8.4.3. Creating Views from the Command Line
1. Use the ldapmodify utility to bind to the server and prepare it to add the new view entry to theconfiguration file.
2. Assuming the view container ou=Location Views,dc=example,dc=com from the Example-
views.ldif file is in the Directory Server, add the new views container entry, in this example,under the dc=example,dc=com root suffix. This entry must have the nsview object class andthe nsViewFilter attribute. The nsViewFilter attribute sets the attribute-value which identifiesentries that belong in the view.
dn: ou=Mountain View,ou=Location Views,dc=example,dc=com
changetype: add
objectClass: top
objectClass: organizationalUnit
objectClass: nsview
ou: Mountain View
nsViewFilter: l=Mountain View
description: views categorized by location
8.4.4. Improving Views Performance
As Section 8.4.1, “About Views” describes, views are derived from search results based on a given filter.Part of the filter is the attribute defined in the nsViewFilter attribute; the rest of the filter is based onthe entry hierarchy, looking for the entryid and parentid of the real entries included in the view.
Administration Guide
240
(|(parentid=search_base_id)(entryid=search_base_id)
If any of the searched-for attributes — entryid, parentid, or the attribute set in nsViewFilter — are notindexed, then the views search becomes an unindexed search because the views operation searches theentire tree for matching entries.
To improve views performance, create equality indexes for entryid, parentid, and the attribute setin nsViewFilter.
Creating equality indexes is covered in Section 13.2, “Creating Standard Indexes” , and updating existingindexes to include new attributes is covered in Section 13.3, “Generating New Indexes to ExistingDatabases”.
CHAPTER 8. ORGANIZING AND GROUPING ENTRIES
241

CHAPTER 9. CONFIGURING SECURE CONNECTIONS
By default, clients and users connect to the Red Hat Directory Server over a standard connection.Standard connections do not use any encryption, so information is sent back and forth between theserver and client in the clear.
Directory Server supports TLS connections, StartTLS connection, and SASL authentication, whichprovide layers of encryption and security that protect directory data from being read even if it isintercepted.
9.1. REQUIRING SECURE CONNECTIONS
Directory Server provides the following ways of using encrypted connections:
LDAPS
When you use the LDAPS protocol, the connection starts using encryption and either succeeds orfails. However, no unencrypted data is ever send over the network. For this reason, prefer LDAPSinstead of using StartTLS over unencrypted LDAP.
StartTLS over LDAP
Clients establish an unencrypted connection over the LDAP protocol and then send the StartTLS
command. If the command succeeds, all further communication is encrypted.
WARNING
If the StartTLS command fails and the client does not cancel the connection, allfurther data, including authentication information, is sent unencrypted over thenetwork.
SASL
Simple Authentication and Security Layer (SASL) enables you to authenticate a user using externalauthentication methods, such as Kerberos. For details, see Section 9.9, “Setting up SASL IdentityMapping”.
9.2. SETTING A MINIMUM STRENGTH FACTOR
For additional security, the Directory Server can be configured to require a certain level of encryptionbefore it allows a connection. The Directory Server can define and require a specific Security StrengthFactor (SFF) for any connection. The SSF sets a minimum encryption level, defined by its key strength,for any connection or operation.
To require a minimum SSF for any and all directory operations, set the nsslapd-minssf configurationattribute. When enforcing a minimum SSF, Directory Server looks at each available encryption type foran operation — TLS or SASL — and determines which has the higher SSF value and then compares thehigher value to the minimum SSF. It is possible for both SASL authentication and TLS to be configuredfor some server-to-server connections, such as replication.
NOTE
Administration Guide
242
NOTE
Alternatively, use the nsslapd-minssf-exclude-rootdse configuration attribute. This setsa minimum SSF setting for all connections to the Directory Server except for queriesagainst the root DSE. A client may need to obtain information about the serverconfiguration, like its default naming context, before initiating an operation. The nsslapd-minssf-exclude-rootdse attribute allows the client to get that informationwithout having to establish a secure connection first.
The SSF for a connection is evaluated when the first operation is initiated on a connection. This allows StartTLS and SASL binds to succeed, even though those two connections initially open a regularconnection. After the TLS or SASL session is opened, then the SSF is evaluated. Any connection whichdoes not meet the SSF requirements is closed with an LDAP unwilling to perform error.
Set a minimum SSF to disable insecure connections to a directory.
WARNING
If you connect to the directory using the unencrypted LDAP protocol without SASL,the first LDAP message can contain the bind request. In this case, the credentialsare sent unencrypted over the network before the server cancels the connection,because the SSF did not met the minimum value set.
Use the LDAPS protocol or SASL binds to ensure that the credentials are neversent unencrypted.
The default nsslapd-minssf attribute value is 0, which means there is no minimum SSF for serverconnections. The value can be set to any reasonable positive integer. The value represents the requiredkey strength for any secure connection.
The following example adds the nsslapd-minssf attribute to the cn=config entry:
# ldapmodify -D "cn=Directory Manager" -W -x
dn: cn=config
changetype: modify
replace: nsslapd-minssf
nsslapd-minssf: 128
NOTE
An ACI can be set to require an SSF for a specific type of operation, as inSection 18.13.2.4, “Requiring a Certain Level of Security in Connections” .
Secure connections can be required for bind operations by turning on the nsslapd-
require-secure-binds attribute, as in Section 19.11.1, “Requiring Secure Binds” .
9.3. MANAGING THE NSS DATABASE USED BY DIRECTORY SERVER
CHAPTER 9. CONFIGURING SECURE CONNECTIONS
243

When you set up TLS encryption or certificate-based authentication, you must manage the certificateswhich are stored in a Network Security Services (NSS). This section describes the most frequent actionsabout managing the Directory Server's NSS database.
9.3.1. Creating the NSS Database for a Directory Server Instance
Directory Server stores the certificates in an NSS database in the /etc/dirsrv/slapd-instance_name/
directory. Before you can manage the certificates, you must create the database.
NOTE
For security reasons, Red Hat recommends setting a strong password on the database.
9.3.1.1. Creating the NSS Database Using the Command Line
To create the NSS database using the command line:
1. Create the NSS database and set a password:
# certutil -d /etc/dirsrv/slapd-instance_name/ -N
Enter a password which will be used to encrypt your keys.
The password should be at least 8 characters long,
and should contain at least one non-alphabetic character.
Enter new password:
Re-enter password:
2. Set the permissions:
# chown dirsrv:dirsrv /etc/dirsrv/slapd-instance_name/*.db
# chown dirsrv:dirsrv /etc/dirsrv/slapd-instance_name/pkcs11.txt
# chmod 600 /etc/dirsrv/slapd-instance_name/*.db
# chmod 600 /etc/dirsrv/slapd-instance_name/pkcs11.txt
9.3.1.2. Creating the NSS Database Using the Console
Directory Server automatically creates the NSS database when you open the Manage Certificates taskentry in the Directory Server Console the first time.
To open the Manage Certificates task entry:
1. Open the Directory Server Console.
2. On the Tasks tab, click Manage Certificates, and set a password to protect the database.
Administration Guide
244

9.3.2. Creating a Certificate Signing Request
The Certificate Signing Request (CSR) is a request to the Certificate Authority (CA) to sign the key ofthe server. This section describes how to create the CSR including the private key.
9.3.2.1. Creating a Certificate Signing Request Using the Command Line
To create the key and a CSR, use the certutil utility:
# certutil -d instance_directory -R -g key_size -a \
-o output_file -8 FQDN -s "certificate_subject"
Example 9.1. Creating a Private Key and CSR for a Single Host Name
The following command generates a 4096 bit private key for the server.example.com host andstores the CSR in the /root/instance_name.csr file:
# certutil -d /etc/dirsrv/slapd-instance_name/ -R -g 4096 -a \
-o /root/instance_name.csr -8 server.example.com \
-s "CN=server.example.com,O=example_organization,OU=IT,ST=North Carolina,C=US"
The -8 server.example.com option adds the subject alternative name (SAN) extension with the DNS:server.example.com entry to the CSR. The string specified in the -s parameter must be a validsubject name according to RFC 1485. The CN field is required, and you must set it to the FullyQualified Domain Name (FQDN) of the server. The other fields are optional.
Example 9.2. Creating a Private Key and CSR for a Multi-homed Host
If a Directory Server host has multiple names, create a CSR with all host names in the SAN extensionof the CSR. The following command generates a 4096 bit private key and a CSR for the server.example.com and server.example.net host names. The command stores the CSR in the /root/instance_name.csr file.
CHAPTER 9. CONFIGURING SECURE CONNECTIONS
245
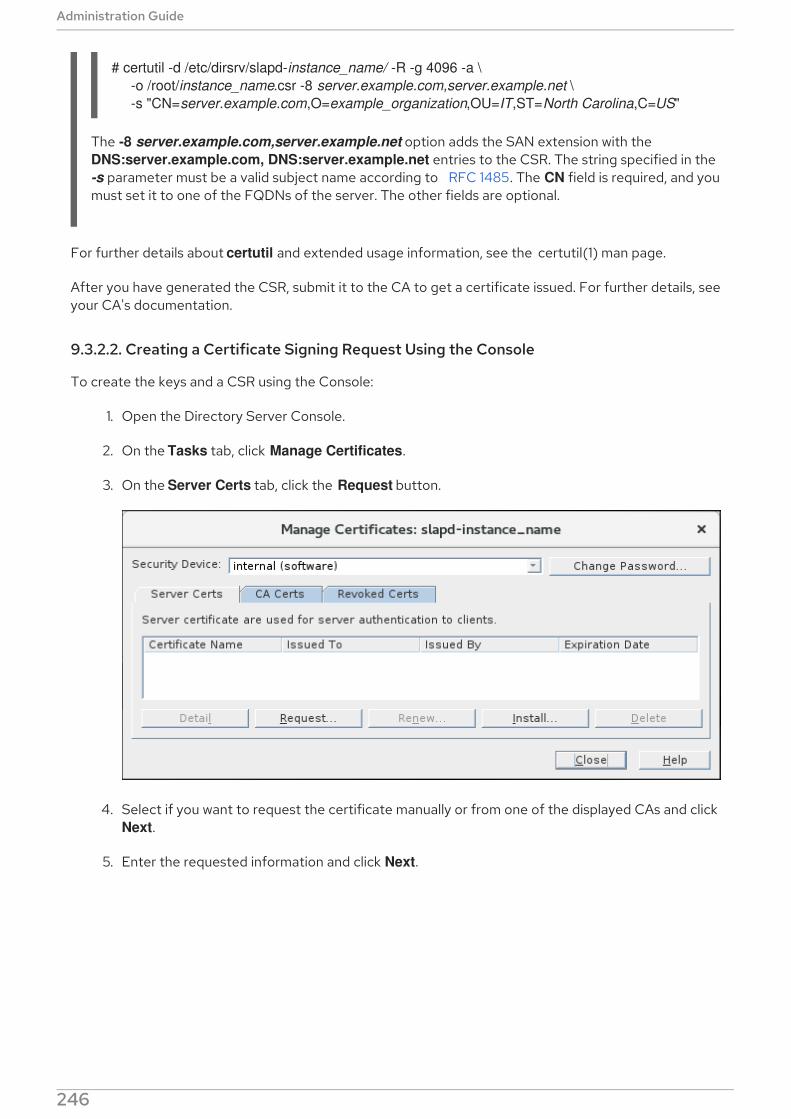
# certutil -d /etc/dirsrv/slapd-instance_name/ -R -g 4096 -a \
-o /root/instance_name.csr -8 server.example.com,server.example.net \
-s "CN=server.example.com,O=example_organization,OU=IT,ST=North Carolina,C=US"
The -8 server.example.com,server.example.net option adds the SAN extension with the DNS:server.example.com, DNS:server.example.net entries to the CSR. The string specified in the -s parameter must be a valid subject name according to RFC 1485. The CN field is required, and youmust set it to one of the FQDNs of the server. The other fields are optional.
For further details about certutil and extended usage information, see the certutil(1) man page.
After you have generated the CSR, submit it to the CA to get a certificate issued. For further details, seeyour CA's documentation.
9.3.2.2. Creating a Certificate Signing Request Using the Console
To create the keys and a CSR using the Console:
1. Open the Directory Server Console.
2. On the Tasks tab, click Manage Certificates.
3. On the Server Certs tab, click the Request button.
4. Select if you want to request the certificate manually or from one of the displayed CAs and click Next.
5. Enter the requested information and click Next.
Administration Guide
246

IMPORTANT
Enter the Fully-qualified Domain Name (FQDN) of the server into the Server
name field.
6. Select the key size and signing algorithm. Click Next.
For security reasons:
an RSA key size of 2048 bits or higher
a strong signing algorithm, such as SHA-256 or higher
7. Enter the password of the Network Security Services (NSS) database and click Done.
CHAPTER 9. CONFIGURING SECURE CONNECTIONS
247

If you use an Hardware Security Module (HSM) to store the certificates, the device is plugged in,and the module has been installed as described in Section 9.7, “Using Hardware SecurityModules”, then the module is available in the Active Encryption Token menu.
8. Copy the CSR to the clipboard or save it into a file.
9. Click Done.
After you generated the CSR, submit it to the CA to get a certificate issued. For further details, see yourCA's documentation.
9.3.3. Installing a CA Certificate
To enable Directory Server to trust the Certificate Authority (CA) you must install the certificate of theCA into the Network Security Services (NSS) database. During this process, you must set whichcertificates issued by the CA should be trusted:
Table 9.1. CA Trust Options
Console Option certutil Option Description
Accepting connections from clients
(Client Authentication)
T,, The server trusts this CA certificate forissuing client certificates suitable for TLS EXTERNAL binds.
Accepting connections to other
servers (Server Authentication)
C,, The server verifies that certificates, usedto establish an encrypted connection to areplication partner, have been issued by atrusted CA.
You can set both options for a CA. When you use certutil, pass the -T "CT,," parameter to the utility.
9.3.3.1. Installing a CA Certificate Using the Command Line
To install a CA certificate in the Directory Server's NSS database, use the certutil utility. For example, to
Administration Guide
248

To install a CA certificate in the Directory Server's NSS database, use the certutil utility. For example, toimport the CA certificate stored in the /etc/pki/CA/nss/ca.crt file:
# certutil -d /etc/dirsrv/slapd-instance_name/ -A -n "certificate_nickname" \
-t "C,," -i /etc/pki/CA/nss/ca.crt
The -t trust_options parameter sets which certificates issued by the CA should be trusted. SeeTable 9.1, “CA Trust Options” .
For further details about the parameters used in the previous command, see the certutil(1) man page.
9.3.3.2. Installing a CA Certificate Using the Console
To install a CA certificate using the Directory Server Console:
1. Open the Directory Server Console.
2. On the Tasks tab, click Manage Certificates.
3. Select the CA Certs tab and click the Install button.
4. Either select the file that contains the server certificate or paste the certificate into the field.Click Next.
5. Verify the certificate details and click Next.
6. Verify the certificate nickname and click Next.
7. Set which certificates issued by the CA should be trusted. You can select one or both of theoptions. See Table 9.1, “CA Trust Options” .
CHAPTER 9. CONFIGURING SECURE CONNECTIONS
249

9.3.4. Installing a Certificate
After the Certificate Authority (CA) issued the requested certificate, you must install it in the NetworkSecurity Services (NSS) database.
9.3.4.1. Installing a Server Certificate Using the Command Line
To install a server certificate in the Directory Server's NSS database, use the certutil utility. Forexample:
1. Install the CA certificate. See Section 9.3.3, “Installing a CA Certificate” .
2. Import the certificate. For example to import the certificate stored in the /root/instance_name.crt file:
# certutil -d /etc/dirsrv/slapd-instance_name/ -A \
-n "server-cert" -t ",," -a -i /root/instance_name.crt
3. Optionally, verify the certificate:
# certutil -d /etc/dirsrv/slapd-instance_name/ -V -n "server-cert" -u V
For further details about the parameters used in the previous certutil commands, see the certutil(1)man page.
9.3.4.2. Installing a Certificate Using the Console
To install a server certificate using the Console:
1. Install the CA certificate. See Section 9.3.3, “Installing a CA Certificate” .
2. Open the Directory Server Console.
3. On the Tasks tab, click Manage Certificates.
4. Click the Install button.
5. Select the file that contains the server certificate or, alternatively, paste the certificate into thefield. Click Next.
Administration Guide
250

6. Verify the certificate details and click Next.
7. Set a certificate nickname and click Next.
NOTE
The Directory Server Console does not support installing a certificate that usesthe same nickname as an existing one. To work around the problem, install thecertificate using the command line. See Section 9.3.4.1, “Installing a ServerCertificate Using the Command Line”.
8. Enter the password of the NSS database and click Done.
9.3.5. Generating and Installing a Self-signed Certificate
In certain situations, administrators want to use a self-signed certificate for encrypted connections toDirectory Server.
NOTE
You can only perform this operation using the command line.
To create and install a self-signed certificate:
1. Verify if the Network Security Services (NSS) database is already initialized:
# certutil -d /etc/dirsrv/slapd-instance_name -L
If the command fails, initalize the database. For details, see Section 9.3.1, “Creating the NSSDatabase for a Directory Server Instance”.
2. Generate a noise file with random data. For example, to generate a file with a size of 4096 bits:
# openssl rand -out /tmp/noise.bin 4096
CHAPTER 9. CONFIGURING SECURE CONNECTIONS
251

3. Create the self-signed certificate and add it to the NSS database:
# certutil -S -x -d /etc/dirsrv/slapd-instance_name/ -z /tmp/noise.bin \
-n "server-cert" -s "CN=$HOSTNAME" -t "CT,C,C" -m $RANDOM \
--keyUsage digitalSignature,nonRepudiation,keyEncipherment,dataEncipherment
Red Hat Enterprise Linux automatically replaces the $HOSTNAME variable with the FullyQualified Domain Name (FQDN) and $RANDOM with a randomly-generated number. Forfurther details about the parameters used in the previous commands, see the certutil(1) manpage.
4. Optionally, verify that the generated certificate is self-signed:
# certutil -L -d /etc/dirsrv/slapd-instance_name/ -n "server-cert" | egrep "Issuer|Subject"
Issuer: "CN=server.example.com"
Subject: "CN=server.example.com"
The output of this command must display the FQDN of the Directory Server host for both theissuer and subject of the certificate.
9.3.6. Renewing a Certificate
If a certificate will expire in the near future, you must renew it in time to continue establishing secureconnections.
9.3.6.1. Renewing a Certificate Using the Command Line
To renew a certificate:
1. Create a new Certificate Signing Request (CSR) with the same options, such as key size, hostname, and subject. For details about creating a CSR, see Section 9.3.2.1, “Creating a CertificateSigning Request Using the Command Line”
2. After you received the issued certificate from your CA, install it in the database using the samenickname. See Section 9.3.3.1, “Installing a CA Certificate Using the Command Line” .
Directory Server will automatically use the newer issued certificate.
9.3.6.2. Renewing a Certificate Using the Console
The process for renewing is similar to generating a Certificate Signing Request (CSR). Follow theprocedure in Section 9.3.3.2, “Installing a CA Certificate Using the Console” , but click the Renew insteadof the Request button in the Manage Certificates task.
9.3.7. Removing a Certificate
If a certificate is no longer needed, for example, because it has been exposed, remove it from thedatabase.
9.3.7.1. Removing a Certificate Using the Command Line
To remove a certificate using the command line:
1. Remove the private key. See Section 9.3.8, “Removing a Private Key”.
Administration Guide
252

2. Optionally, display the certificates in the database:
# certutil -d /etc/dirsrv/slapd-instance_name/ -L
Certificate Nickname Trust Attributes
SSL,S/MIME,JAR/XPI
Example CA CT,,
server-cert u,u,u
3. Remove the certificate. For example, to remove the certificate with the server-cert nickname:
# certutil -d /etc/dirsrv/slapd-instance_name/ -D -n "server-cert"
9.3.7.2. Removing a Certificate Using the Console
To remove a certificate using the Console:
1. Open the Directory Server Console.
2. On the Tasks tab, click Manage Certificates.
3. On the Server Certs tab, select the certificate and click the Delete button.
4. Click Yes to confirm.
9.3.8. Removing a Private Key
If a private key is no longer needed, for example, because you created a stronger key, remove it from thedatabase.
WARNING
If you remove a private key, certificates based on this key are no longer working.
9.3.8.1. Removing a Private Key Using the Command Line
To remove a private key:
1. Remove all certificates based on the key you want to delete. See Section 9.3.7, “Removing aCertificate”.
2. Optionally, display the keys in the database:
# certutil -d /etc/dirsrv/slapd-instance_name/ -K
certutil: Checking token "NSS Certificate DB" in slot "NSS User Private Key and Certificate
Services"
Enter Password or Pin for "NSS Certificate DB":
< 0> rsa 7a2fb6c269d83c4036eac7e4edb6aaf2ed08bc4a server-cert
< 1> rsa 662b826aa3dd4ca7fd7e6883558cf3866c42f4e2 example-cert
CHAPTER 9. CONFIGURING SECURE CONNECTIONS
253

3. Remove the private key. For example, to remove the private key with the example-cert
nickname:
# certutil -d /etc/dirsrv/slapd-instance_name/ -F -n "example-cert"
9.3.8.2. Removing a Private Key Using the Console
Removing a private key using the Console is not supported. However, if you request a new certificateusing the Console according to Section 9.3.2.2, “Creating a Certificate Signing Request Using theConsole”, the Console automatically generates a new private key and uses it.
9.3.9. Changing the CA Trust Options
In certain situations you need to update the trust option of a Certificate Authority (CA). This sectiondescribes this procedure.
9.3.9.1. Changing the CA Trust Options Using the Command Line
To change the trust options of a CA, pass the new options in the -t parameter to the certutil utility.
For example, to set that Directory Server trusts only client authentication certificates issued by the CAnamed example-CA:
# certutil -d /etc/dirsrv/slapd-instance_name/ -M -t "T,," -n "example-CA"
The -t trust_options parameter sets which certificates issued by the CA should be trusted. SeeTable 9.1, “CA Trust Options” .
For further details about the parameters and trust options, see the certutil(1) man page.
9.3.9.2. Changing the CA Trust Options Using the Console
To change the trust options of a CA using the Console:
1. Open the Directory Server Console.
2. On the Tasks tab, click Manage Certificates.
3. Select the CA Certs tab.
4. Select the CA to edit, click the Edit Trust button, and set which certificates issued by the CAshould be trusted. You can select one or both of the options. See Table 9.1, “CA Trust Options” .
Administration Guide
254

9.3.10. Changing the Password of the NSS Database
In certain situations, administrators want to change the password of the Network Security Services(NSS) database. This section describes this process.
IMPORTANT
If you use a password file to enable Directory Server to automatically open the NetworkSecurity Services (NSS) database, you must update the file after you set the newpassword. See Section 9.4.1.5, “Creating a Password File for Directory Server” .
9.3.10.1. Changing the Password of the NSS Database Using the Command Line
To change the password of the NSS database:
# certutil -d /etc/dirsrv/slapd-instance_name -W
Enter Password or Pin for "NSS Certificate DB":
Enter a password which will be used to encrypt your keys.
The password should be at least 8 characters long,
and should contain at least one non-alphabetic character.
Enter new password:
Re-enter password:
Password changed successfully.
9.3.10.2. Changing the Password of the NSS Database Using the Console
To change the password of the NSS database using the Console:
1. Open the Directory Server Console.
2. On the Tasks tab, click Manage Certificates.
3. Click the Change Password button.
CHAPTER 9. CONFIGURING SECURE CONNECTIONS
255

4. Enter the current and the new password and click OK
9.3.11. Adding a Certificate Revocation List
If a Certificate Authority (CA) revokes a certificate, the CA adds the certificate to its CertificateRevocation Lists (CRL). Directory Server can use this list to identify which certificates are no longertrusted by the CA and to deny access.
9.3.11.1. Adding a Certificate Revocation List Using the Command Line
To add a CRL using certutil, pass the -4 URL_to_CRL_file parameter to the utility when you install theCA certificate.
For details about installing a CA certificate, see Section 9.3.3.1, “Installing a CA Certificate Using theCommand Line”.
9.3.11.2. Adding a Certificate Revocation List Using the Console
To add a CRL using the Console:
1. Open the Directory Server Console.
2. On the Tasks tab, click Manage Certificates.
3. Select the Revoked Certs tab and click the Add button.
4. Enter the path to the file, select the list format, and click OK.
9.4. ENABLING TLS
Directory Server supports encrypted connections between clients and the server, as well as between
Administration Guide
256
Directory Server supports encrypted connections between clients and the server, as well as betweenservers in a replication environment. For this, Directory Server supports:
The LDAPS protocol: TLS encryption is used directly after the connection has been established.
The STARTTLS command over the LDAP protocol: The connection is unencrypted until theclient sends the STARTTLS command.
IMPORTANT
For security reasons, Red Hat recommends enabling TLS encryption.
You can use TLS with simple authentication using a bind Distinguished Name (DN) and password, orusing certificate-based authentication.
Directory Server's cryptographic services are provided by Mozilla Network Security Services (NSS), alibrary of TLS and base cryptographic functions. NSS includes a software-based cryptographic tokenwhich is Federal Information Processing Standard (FIPS) 140-2 certified.
9.4.1. Enabling TLS in Directory Server
This section describes how to enable TLS in Directory Server.
9.4.1.1. Enabling TLS in Directory Server Using the Command Line
To enable TLS using the command line:
1. Verify if the NSS database for Directory Server already exists:
# ls -1 /etc/dirsrv/slapd-instance_name/*.db
Create the databases if they do not exist. See Section 9.3.1.1, “Creating the NSS Database Usingthe Command Line”.
2. Request and install the certificate:
For a certificate issued by a Certificate Authority (CA):
1. Create a Certificate Signing Request (CSR). See Section 9.3.2.1, “Creating a CertificateSigning Request Using the Command Line”
2. Import the CA certificate. See Section 9.3.3.1, “Installing a CA Certificate Using theCommand Line”.
3. Import the server certificate issued by the CA. See Section 9.3.4.1, “Installing a ServerCertificate Using the Command Line”.
For a self-signed certificate, see Section 9.3.5, “Generating and Installing a Self-signedCertificate”.
3. Enable TLS and set the LDAPS port:
# ldapmodify -D "cn=Directory Manager" -W -p 389 -h server.example.com -x
dn: cn=config
changetype: modify
CHAPTER 9. CONFIGURING SECURE CONNECTIONS
257

replace: nsslapd-securePort
nsslapd-securePort: 636
-
replace: nsslapd-security
nsslapd-security: on
4. Display the nickname of the server certificate in the NSS database:
# certutil -L -d /etc/dirsrv/slapd-instance_name/
Certificate Nickname Trust Attributes
SSL,S/MIME,JAR/XPI
Example CA CT,,
server-cert u,u,u
You need the nickname in the next step.
5. To enable the RSA cipher family, setting the NSS database security device, and the servercertificate nickname, add the following entry to the directory:
# ldapadd -D "cn=Directory Manager" -W -p 389 -h server.example.com -x
dn: cn=RSA,cn=encryption,cn=config
cn: RSA
objectClass: top
objectClass: nsEncryptionModule
nsSSLToken: internal (software)
nsSSLPersonalitySSL: server-cert
nsSSLActivation: on
NOTE
By default, the name of the security device in the NSS database is internal
(software).
If the previous command fails, because the cn=RSA,cn=encryption,cn=config entry alreadyexists, update the corresponding attributes:
# ldapmodify -D "cn=Directory Manager" -W -p 389 -h server.example.com -x
dn: cn=RSA,cn=encryption,cn=config
changetype: modify
replace: nsSSLToken
nsSSLToken: internal (software)
-
replace: nsSSLPersonalitySSL
nsSSLPersonalitySSL: server-cert
-
replace: nsSSLActivation
nsSSLActivation: on
6. Optionally, update the list of ciphers Directory Server supports. For details, see Section 9.4.1.3.1,“Displaying and Setting the Ciphers Used by Directory Server Using the Command Line”.
7. Optionally, enable certificate-based authentication. For details, see Section 9.8, “Using
Administration Guide
258
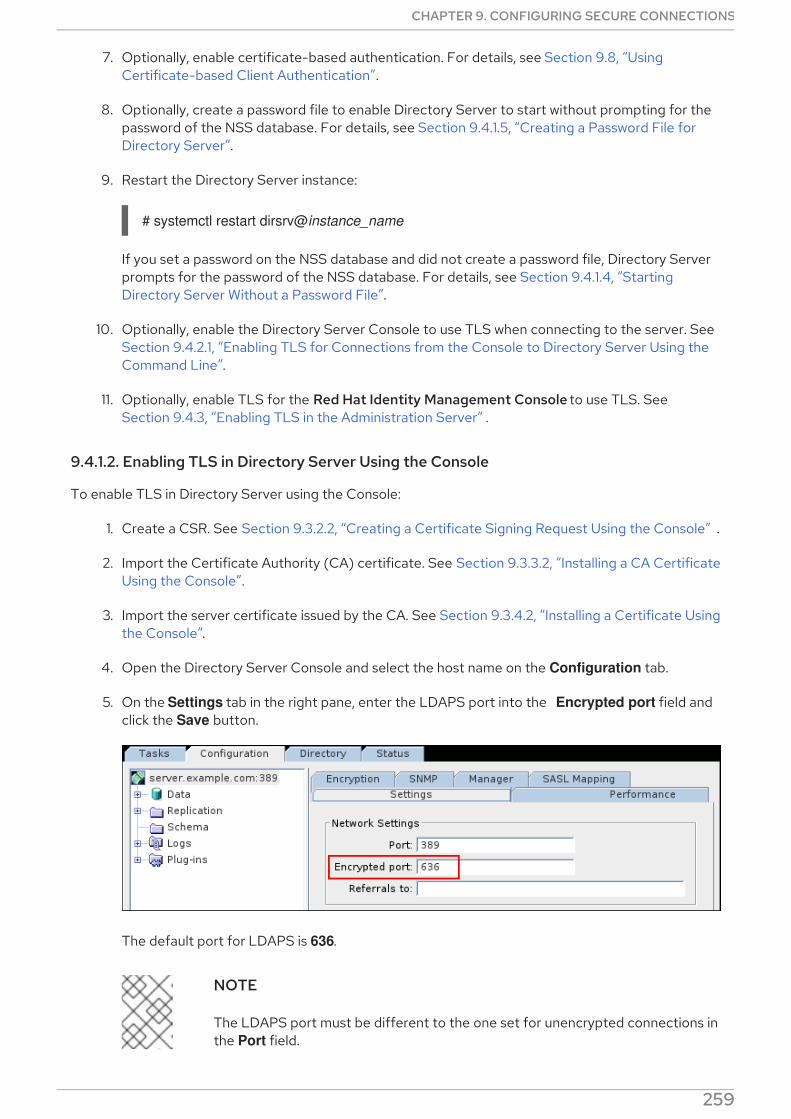
7. Optionally, enable certificate-based authentication. For details, see Section 9.8, “UsingCertificate-based Client Authentication”.
8. Optionally, create a password file to enable Directory Server to start without prompting for thepassword of the NSS database. For details, see Section 9.4.1.5, “Creating a Password File forDirectory Server”.
9. Restart the Directory Server instance:
# systemctl restart dirsrv@instance_name
If you set a password on the NSS database and did not create a password file, Directory Serverprompts for the password of the NSS database. For details, see Section 9.4.1.4, “StartingDirectory Server Without a Password File”.
10. Optionally, enable the Directory Server Console to use TLS when connecting to the server. SeeSection 9.4.2.1, “Enabling TLS for Connections from the Console to Directory Server Using theCommand Line”.
11. Optionally, enable TLS for the Red Hat Identity Management Console to use TLS. SeeSection 9.4.3, “Enabling TLS in the Administration Server” .
9.4.1.2. Enabling TLS in Directory Server Using the Console
To enable TLS in Directory Server using the Console:
1. Create a CSR. See Section 9.3.2.2, “Creating a Certificate Signing Request Using the Console” .
2. Import the Certificate Authority (CA) certificate. See Section 9.3.3.2, “Installing a CA CertificateUsing the Console”.
3. Import the server certificate issued by the CA. See Section 9.3.4.2, “Installing a Certificate Usingthe Console”.
4. Open the Directory Server Console and select the host name on the Configuration tab.
5. On the Settings tab in the right pane, enter the LDAPS port into the Encrypted port field andclick the Save button.
The default port for LDAPS is 636.
NOTE
The LDAPS port must be different to the one set for unencrypted connections inthe Port field.
CHAPTER 9. CONFIGURING SECURE CONNECTIONS
259
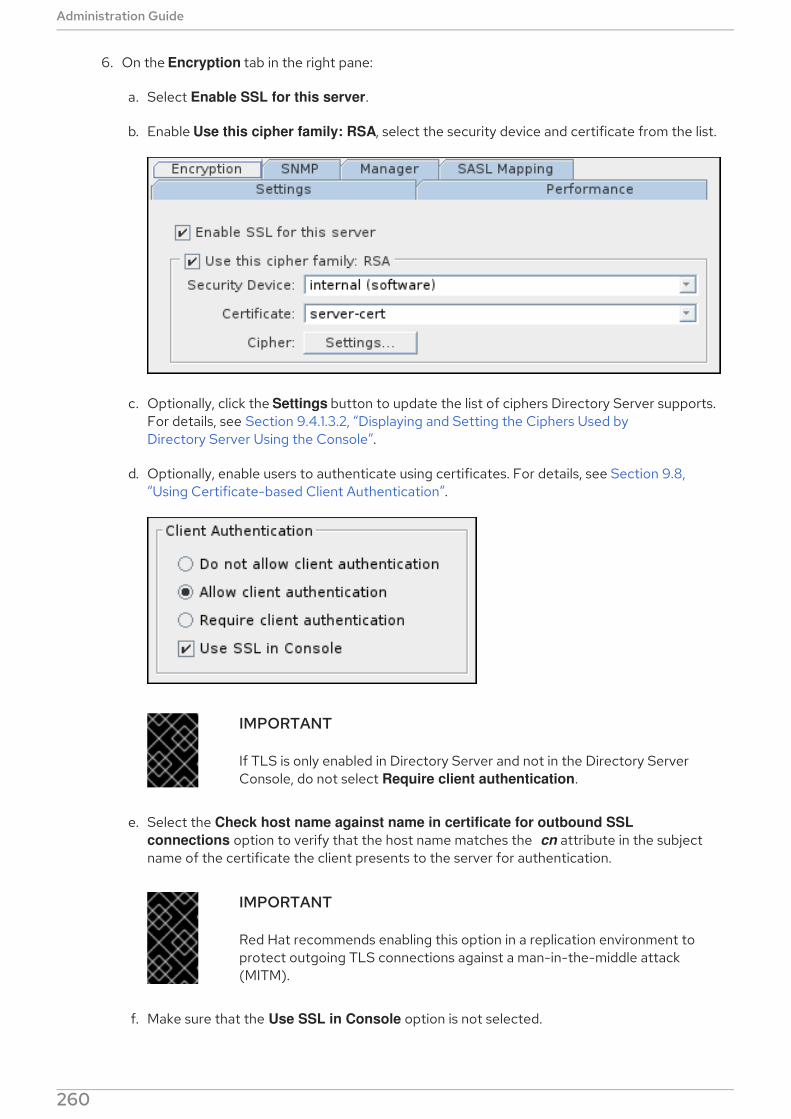
6. On the Encryption tab in the right pane:
a. Select Enable SSL for this server.
b. Enable Use this cipher family: RSA, select the security device and certificate from the list.
c. Optionally, click the Settings button to update the list of ciphers Directory Server supports.For details, see Section 9.4.1.3.2, “Displaying and Setting the Ciphers Used byDirectory Server Using the Console”.
d. Optionally, enable users to authenticate using certificates. For details, see Section 9.8,“Using Certificate-based Client Authentication”.
IMPORTANT
If TLS is only enabled in Directory Server and not in the Directory ServerConsole, do not select Require client authentication.
e. Select the Check host name against name in certificate for outbound SSL
connections option to verify that the host name matches the cn attribute in the subjectname of the certificate the client presents to the server for authentication.
IMPORTANT
Red Hat recommends enabling this option in a replication environment toprotect outgoing TLS connections against a man-in-the-middle attack(MITM).
f. Make sure that the Use SSL in Console option is not selected.
Administration Guide
260
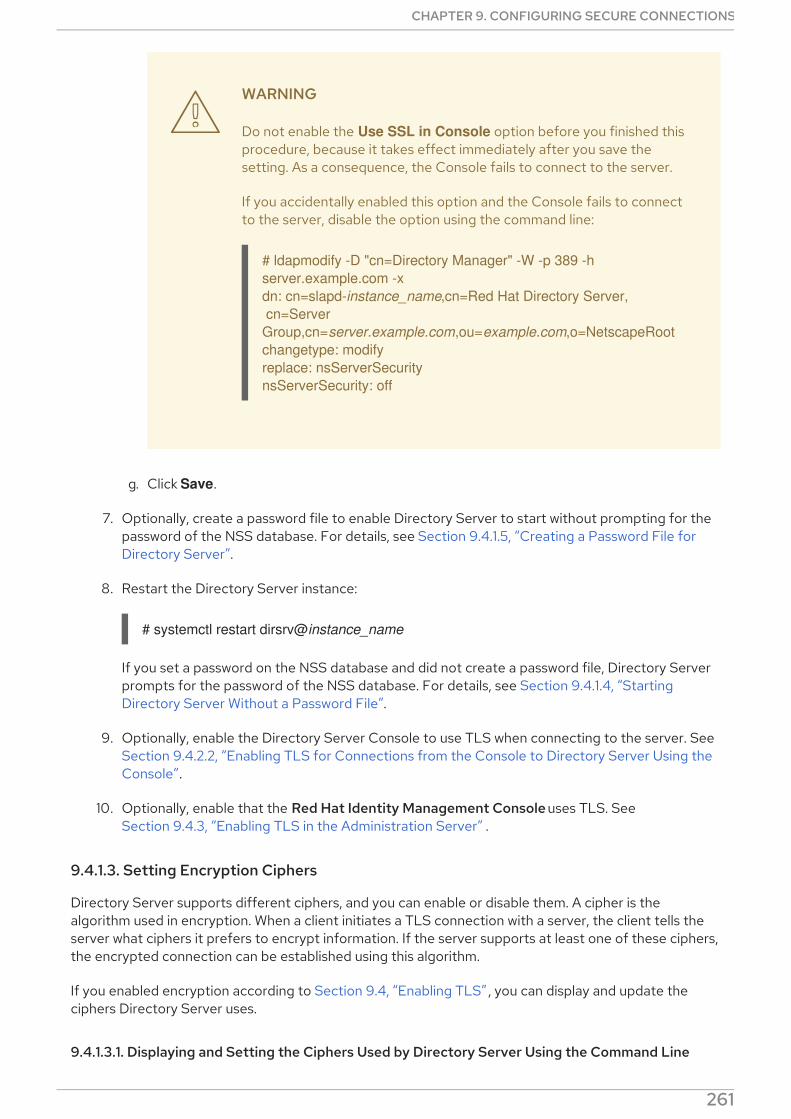
WARNING
Do not enable the Use SSL in Console option before you finished thisprocedure, because it takes effect immediately after you save thesetting. As a consequence, the Console fails to connect to the server.
If you accidentally enabled this option and the Console fails to connectto the server, disable the option using the command line:
# ldapmodify -D "cn=Directory Manager" -W -p 389 -h
server.example.com -x
dn: cn=slapd-instance_name,cn=Red Hat Directory Server,
cn=Server
Group,cn=server.example.com,ou=example.com,o=NetscapeRoot
changetype: modify
replace: nsServerSecurity
nsServerSecurity: off
g. Click Save.
7. Optionally, create a password file to enable Directory Server to start without prompting for thepassword of the NSS database. For details, see Section 9.4.1.5, “Creating a Password File forDirectory Server”.
8. Restart the Directory Server instance:
# systemctl restart dirsrv@instance_name
If you set a password on the NSS database and did not create a password file, Directory Serverprompts for the password of the NSS database. For details, see Section 9.4.1.4, “StartingDirectory Server Without a Password File”.
9. Optionally, enable the Directory Server Console to use TLS when connecting to the server. SeeSection 9.4.2.2, “Enabling TLS for Connections from the Console to Directory Server Using theConsole”.
10. Optionally, enable that the Red Hat Identity Management Console uses TLS. SeeSection 9.4.3, “Enabling TLS in the Administration Server” .
9.4.1.3. Setting Encryption Ciphers
Directory Server supports different ciphers, and you can enable or disable them. A cipher is thealgorithm used in encryption. When a client initiates a TLS connection with a server, the client tells theserver what ciphers it prefers to encrypt information. If the server supports at least one of these ciphers,the encrypted connection can be established using this algorithm.
If you enabled encryption according to Section 9.4, “Enabling TLS” , you can display and update theciphers Directory Server uses.
9.4.1.3.1. Displaying and Setting the Ciphers Used by Directory Server Using the Command Line
CHAPTER 9. CONFIGURING SECURE CONNECTIONS
261

Displaying all Available CiphersTo display the list of all available ciphers supported in Directory Server:
# ldapsearch -xLLL -H ldap://server.example.com:389 -D "cn=Directory Manager" -W \
-b 'cn=encryption,cn=config' -s base nsSSLSupportedCiphers -o ldif-wrap=no
dn: cn=encryption,cn=config
nsSSLSupportedCiphers: TLS_ECDHE_ECDSA_WITH_AES_128_GCM_SHA256::AES-
GCM::AEAD::128
...
nsSSLSupportedCiphers: SSL_CK_RC2_128_CBC_EXPORT40_WITH_MD5::RC2::MD5::128
This is only a list of available ciphers you can enable or disable. The list does not display the ciphersDirectory Server currently uses.
Displaying the Ciphers Directory Server UsesThe ciphers Directory Server currently uses are stored in the nsSSLEnabledCiphers read-onlyattribute. To display them:
# ldapsearch -xLLL -H ldap://server.example.com:389 -D "cn=Directory Manager" -W \
-b 'cn=encryption,cn=config' -s base nsSSLEnabledCiphers -o ldif-wrap=no
dn: cn=encryption,cn=config
nsSSLEnabledCiphers: TLS_RSA_WITH_AES_256_CBC_SHA::AES::SHA1::256
nsSSLEnabledCiphers: TLS_RSA_WITH_AES_128_CBC_SHA::AES::SHA1::128
...
Additionally, you can display the ciphers which are configured to be enabled and disabled:
# ldapsearch -xLLL -H ldap://server.example.com:389 -D "cn=Directory Manager" -W \
-b 'cn=encryption,cn=config' -s base nsSSL3Ciphers -o ldif-wrap=no
dn: cn=encryption,cn=config
nsSSL3Ciphers: -all,+tls_rsa_aes_128_sha,+tls_rsa_aes_256_sha,...
IMPORTANT
Directory Server uses the settings from the nsSSL3Ciphers attribute to generate thelist of ciphers which are actually used. However, if you enabled weak ciphers in nsSSL3Ciphers, but set the allowWeakCiphers parameter to off, which is the default,Directory Server only uses the strong ciphers and displays them in the nsSSLSupportedCiphers read-only attribute.
Updating the List of Enabled CiphersTo update the list of enabled ciphers:
1. Display the list of currently enabled ciphers. See the section called “Displaying the CiphersDirectory Server Uses”.
2. To enable only specific ciphers, update the nsSSL3Ciphers attribute. For example, to enableonly the TLS_RSA_WITH_AES_128_GCM_SHA256 cipher:
# ldapmodify -D "cn=Directory Manager" -W -p 389 -h server.example.com -x
Administration Guide
262

dn: cn=encryption,cn=config
changetype: modify
add: nsSSL3Ciphers
nsSSL3Ciphers: -all,+TLS_RSA_WITH_AES_128_GCM_SHA256
3. Restart the Directory Server instance:
# systemctl restart dirsrv@instance_name
4. Optionally, display the list of enabled ciphers to verify the result. See the section called“Displaying the Ciphers Directory Server Uses”.
9.4.1.3.2. Displaying and Setting the Ciphers Used by Directory Server Using the Console
To select and optionally update the ciphers using the Console:
1. Open the Directory Server Console.
2. On the Configuration tab, select the server name.
3. Select the Encryption tab in the right pane and click the Settings button.
4. Optionally, update the list of ciphers. For example:
CHAPTER 9. CONFIGURING SECURE CONNECTIONS
263
5. Click OK.
6. Click Save.
7. If you updated the list of ciphers, restart the Directory Server instance:
# systemctl restart dirsrv@instance_name
9.4.1.4. Starting Directory Server Without a Password File
If you start Directory Server with encryption enabled and a password set on the NSS database:
If the ns-slapd Directory Server process is started by the systemctl command, systemd
prompts for the password and automatically passes the input to the systemd-tty-ask-
password-agent utility. For example:
# systemctl start dirsrv
Enter PIN for Internal (Software) Token:
In rare cases, when the ns-slapd Directory Server process is not started by the systemctl utilityand is detached from the terminal, a message is send to all terminals using the wall command.For example:
Broadcast message from root@server (Fri 2017-01-01 06:00:00 CET):
Password entry required for 'Enter PIN for Internal (Software) Token:' (PID 1234).
Please enter password with the systemd-tty-ask-password-agent tool!
To enter the password, run:
# systemd-tty-ask-password-agent
Enter PIN for Internal (Software) Token:
9.4.1.5. Creating a Password File for Directory Server
If encryption is enabled and a password set on the NSS database, Directory Server prompts for thispassword when the service starts. See Section 9.4.1.4, “Starting Directory Server Without a PasswordFile”.
To bypass this prompt, you can store the NSS database password in the /etc/dirsrv/slapd-instance_name/pin.txt file. This enables Directory Server to start automaticallywithout prompting for this password.
WARNING
The password is stored in clear text. Do not use a password file if the server isrunning in an unsecured environment.
Administration Guide
264

To create the password file:
1. Create the /etc/dirsrv/slapd-instance_name/pin.txt file with the following content:
If you use the NSS software cryptography module, which is the default:
Internal (Software) Token:password
If you use a Hardware Security Module (HSM):
name_of_the_token:password
2. Set the permissions:
# chown dirsrv:dirsrv /etc/dirsrv/slapd-instance_name/pin.txt
# chmod 400 /etc/dirsrv/slapd-instance_name/pin.txt
9.4.1.6. Managing How Directory Server Behaves If the Certificate Has Been Expired
By default, if encryption is enabled and the certificate has expired, Directory Server logs a warning andthe service starts. To change this behavior, set the nsslapd-validate-cert attribute in the cn=config
entry. You can set it to the following values:
warn: The Directory Server instance starts and log a warning about the expired certificate intothe /var/log/dirsrv/slapd-instance_name/error log file. This is the default setting.
on: Directory Server validates the certificate and the instance fails to start if the certificate hasexpired.
off: Directory Server does not validate the certificate expiration date. The instance starts and nowarning will be logged.
Example 9.3. Preventing Directory Server to Start If the Certificate Has Been Expired
To prevent Directory Server from starting if the certificate has expired:
1. Set the nsslapd-validate-cert attribute to on:
# ldapmodify -D "cn=Directory Manager" -W -p 636 -h server.example.com -x
dn: cn=config
changetype: modify
replace: nsslapd-validate-cert
nsslapd-validate-cert: on
2. Restart the Directory Server instance:
# systemctl restart dirsrv@instance_name
9.4.2. Enabling TLS for Connections from the Console to Directory Server
This section describes how you configure the Directory Server Console to use TLS to access thedirectory.
CHAPTER 9. CONFIGURING SECURE CONNECTIONS
265

IMPORTANT
Before you can enable TLS in the Console, enable encryption in Directory Serveraccording to Section 9.4.1, “Enabling TLS in Directory Server” and restart the instance.
To configure an encrypted connection to the Red Hat Identity Management Console, seeSection 9.4.3, “Enabling TLS in the Administration Server” .
9.4.2.1. Enabling TLS for Connections from the Console to Directory Server Using theCommand Line
To enable TLS for connections from the Console to Directory Server:
# ldapmodify -D "cn=Directory Manager" -W -p 636 -h server.example.com -x
dn: cn=slapd-instance_name,cn=Red Hat Directory Server,
cn=Server Group,cn=server.example.com,ou=example.com,o=NetscapeRoot
changetype: modify
replace: nsServerSecurity
nsServerSecurity: on
When you start the Console the next time, it automatically uses TLS for connections to Directory Server.
9.4.2.2. Enabling TLS for Connections from the Console to Directory Server Using theConsole
To enable TLS for connections from the Console to Directory Server:
1. Open the Directory Server Console and select the host name on the Configuration tab.
2. On the Encryption tab in the right pane:
a. Select Use SSL in the Console.
b. Click Save
3. Restart the Directory Server Console.
9.4.3. Enabling TLS in the Administration Server
This section describes how to:
Enable the HTTPS protocol when connecting to the Red Hat Identity Management Consoleapplication
Set that the Administration Server stores its data in the o=NetscapeRoot entry using anencrypted connection to Directory Server
Enable the Red Hat Identity Management Console application to use the LDAPS protocol tomanage users and groups stored in the directory
IMPORTANT
Before you can enable these features, enable encryption in Directory Server according toSection 9.4.1, “Enabling TLS in Directory Server” and restart the instance.
Administration Guide
266
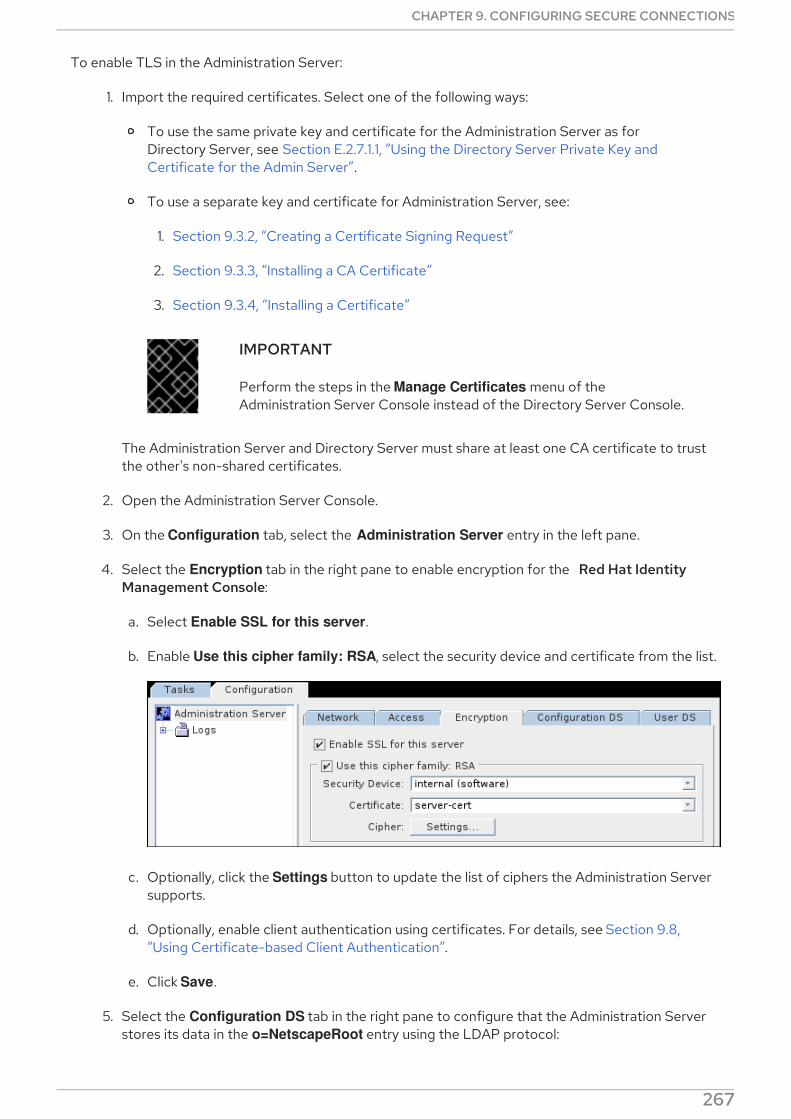
To enable TLS in the Administration Server:
1. Import the required certificates. Select one of the following ways:
To use the same private key and certificate for the Administration Server as forDirectory Server, see Section E.2.7.1.1, “Using the Directory Server Private Key andCertificate for the Admin Server”.
To use a separate key and certificate for Administration Server, see:
1. Section 9.3.2, “Creating a Certificate Signing Request”
2. Section 9.3.3, “Installing a CA Certificate”
3. Section 9.3.4, “Installing a Certificate”
IMPORTANT
Perform the steps in the Manage Certificates menu of theAdministration Server Console instead of the Directory Server Console.
The Administration Server and Directory Server must share at least one CA certificate to trustthe other's non-shared certificates.
2. Open the Administration Server Console.
3. On the Configuration tab, select the Administration Server entry in the left pane.
4. Select the Encryption tab in the right pane to enable encryption for the Red Hat IdentityManagement Console:
a. Select Enable SSL for this server.
b. Enable Use this cipher family: RSA, select the security device and certificate from the list.
c. Optionally, click the Settings button to update the list of ciphers the Administration Serversupports.
d. Optionally, enable client authentication using certificates. For details, see Section 9.8,“Using Certificate-based Client Authentication”.
e. Click Save.
5. Select the Configuration DS tab in the right pane to configure that the Administration Serverstores its data in the o=NetscapeRoot entry using the LDAP protocol:
CHAPTER 9. CONFIGURING SECURE CONNECTIONS
267

a. Set the LDAPS port of the Directory Server instance that stores the o=NetscapeRoot
entry. By default, LDAPS uses the 636 port.
b. Select Secure Connection.
c. Click Save.
6. Select the User DS tab in the right pane to configure that the Red Hat Identity ManagementConsole uses an encrypted connection to manage users and groups:
a. Select Set User Directory and fill the fields. For encrypted connections, the Secure
Connections option must be selected and the port port specified in the LDAP Host and
Port field must support LDAPS.
b. Click Save.
7. Optionally, set the minimum and maximum TLS version for connections from the Console to theserver in the ~/.redhat-idm-console/Console.version.Login.preferences file. For example:
sslVersionMin: TLS1.1
sslVersionMax: TLS1.2
8. Optionally, create a password file to enable the Administration Server to start without
Administration Guide
268

8. Optionally, create a password file to enable the Administration Server to start withoutprompting for the password of the Network Security Services (NSS) database. For details, seeSection E.2.7.3, “Creating a Password File for the Administration Server” .
9. Restart the Administration Server:
# systemctl restart dirsrv-admin
If you did not create a password file, the system prompts for the password of the NSS database.
10. To configure that the Console trusts the certificate, see Section 9.4.3.1, “Managing CertificatesUsed by the Directory Server Console”.
After you completed this procedure, you can connect to the Red Hat Identity Management Consoleusing the HTTPS protocol. For example:
# redhat-idm-console -a https://server.example.com:9830
9.4.3.1. Managing Certificates Used by the Directory Server Console
The certificates and keys used by the server are stored in NSS security databases in the /etc/dirsrv/slapd-instance_name/ directory. The Directory Server Console itself also uses certificatesand keys for TLS connections; these certificates are stored in a separate database in the user's homedirectory. If the Directory Server Console is used to connect to multiple instances of Directory Serverover TLS, then it is necessary to trust every CA which issued the certificates for every Directory Serverinstance.
When TLS is enabled for the Directory Server Console, the Directory Server Console must have a copyof the issuing CA certificate for it to trust the server's client certificates. Otherwise, the Console willreturn errors about not trusting the CA which issued the certificate.
NOTE
Only the CA certificates for the CA which issued the server's certificate is required. TheDirectory Server Console does not require its own client certificate.
Importing a CA Certificate When Using the Console on LinuxFor example, to add the CA certificate stored in the /root/ca.crt file to the database:
# certutil -d ~/.redhat-idm-console/ -A -n "Example CA" -t CT,, -a -i /root/ca.crt
Importing a CA Certificate When Using the Console on WindowsFor example, to add the CA certificate stored in the C:\ca.crt file to the database:
> cd C:\Program Files\Red Hat Identity Management Console\
> certutil.exe -d "C:\Documents and Settings\user_name\.389-console\" -A -n "Example CA" -t CT,, -a
-i C:\ca.crt
9.4.4. Adding the CA Certificate Used By Directory Server to the Trust Store ofRed Hat Enterprise Linux
When you enabled TLS encryption in Directory Server, you configured the instance to use a certificateissued by a CA. If a client now establishes a connection to the server using the LDAPS protocol or the
CHAPTER 9. CONFIGURING SECURE CONNECTIONS
269
STARTTLS command over LDAP, Directory Server uses this certificate to encrypt the connection.Client utilities use the CA certificate to verify if the server's certificate is valid. By default, these utilitiescancel the connection if they do not trust the certificate of the server.
Example 9.4. Possible Connection Error If a Client Utility Does Not Use the CA Certificate
If client utilities do not use the CA certificate, the utilities cannot validate the server's certificatewhen using TLS encryption. As a consequence, the connection to the server fails. For example:
# ldapsearch -H ldaps://server.example.com:636 -D "cn=Directory Manager" -W -b
"dc=example,dc=com" -x
Enter LDAP Password:
ldap_sasl_bind(SIMPLE): Can't contact LDAP server (-1)
To enable client utilities on Red Hat Enterprise Linux to verify the certificate that Directory Server uses,add the CA certificate to the trust store of the operating system:
1. If you do not have a local copy of the CA certificate used by Directory Server:
a. List the certificates in the server's NSS database:
# certutil -d /etc/dirsrv/slapd-instance_name/ -L
Certificate Nickname Trust Attributes
SSL,S/MIME,JAR/XPI
Example CA C,,
server-cert u,u,u
b. Use the nickname of the CA certificate in the NSS database to export the CA certificate:
# certutil -d /etc/dirsrv/slapd-instance_name/ -L -n "Example CA" -a > /tmp/ds-ca.crt
2. Copy the CA certificate to the /etc/pki/ca-trust/source/anchors/ directory. For example:
# cp /tmp/ds-ca.crt /etc/pki/ca-trust/source/anchors/
3. Rebuild the CA trust database:
# update-ca-trust
9.5. DISPLAYING THE ENCRYPTION PROTOCOLS ENABLED INDIRECTORY SERVER
To display the enabled encryption protocols in Directory Server:
# ldapsearch -D "cn=Directory Manager" -W -p 389 -h server.example.com -x \
-s base -b 'cn=encryption,cn=config' sslVersionMin sslVersionMax
Administration Guide
270

dn: cn=encryption,cn=config
sslVersionMin: TLS1.0
sslVersionMax: TLS1.2
The sslVersionMin and sslVersionMax parameter control which encryption protocol versionsDirectory Server uses. By default, only TLS 1.0 and later versions of the protocol are enabled.
IMPORTANT
For security reasons, none of the parameters should be set to the insecure SSL2 or SSL3
protocol versions.
9.6. SETTING THE ENCRYPTION PROTOCOL VERSIONS
Update the sslVersionMin and sslVersionMax parameters to set which encryption protocolsDirectory Server uses.
IMPORTANT
To always use the strongest supported encryption protocol version in the sslVersionMax
parameter, do not set this parameter. See Section 9.6.1, “Automatically Using theStrongest Protocol in the sslVersionMax Parameter”.
For example, to enable only TLS 1.1 and 1.2:
1. Update the sslVersionMin and sslVersionMax parameters:
# ldapmodify -D "cn=Directory Manager" -W -p 389 -h server.example.com -x
dn: cn=encryption,cn=config
changetype: modify
replace: sslVersionMin
sslVersionMin: TLS1.1
-
replace: sslVersionMax
sslVersionMax: TLS1.2
2. Restart the Directory Server instance:
# systemctl restart dirsrv@instance_name
9.6.1. Automatically Using the Strongest Protocol in the sslVersionMax Parameter
If the sslVersionMax parameter is not set, which is the default, Directory Server uses the strongestsupported encryption protocol version for this parameter. This enables you to always have the strongestprotocol version enabled after an update.
Identifying if sslVersionMax is Not SetEven if sslVersionMax is not set, the parameter is returned in a search. To identify if the parameter isnot set:
# grep sslVersionMax /etc/dirsrv/slapd-instance_name/dse.ldif
CHAPTER 9. CONFIGURING SECURE CONNECTIONS
271
If the command displays no output, the parameter is not set and uses the default, which is the strongestsupported encryption protocol.
Removing the sslVersionMax ParameterRemove the sslVersionMax parameter to use its default setting:
1. Remove the sslVersionMax parameter:
# ldapmodify -D "cn=Directory Manager" -W -p 389 -h server.example.com -x
dn: cn=encryption,cn=config
changetype: modify
delete: sslVersionMax
2. Restart the Directory Server instance:
# systemctl restart dirsrv@instance_name
9.7. USING HARDWARE SECURITY MODULES
A security module serves as a medium between the Directory Server and the TLS layer. The modulestores the keys and certificates used for encryption and decryption. The standard which defines thesemodules is Public Key Cryptography Standard (PKCS) #11, so these modules are PKCS#11 modules.
By default, Directory Server uses built-in security databases, key3.db and cert8.db, to store the keysand certificates used by the servers.
It is also possible to use external security devices to store Directory Server certificates and keys. ForDirectory Server to use an external PKCS#11 module, the module's drivers must be installed inDirectory Server.
For more information, consult the documentation for your hardware security module.
9.8. USING CERTIFICATE-BASED CLIENT AUTHENTICATION
Directory Server supports certificate-based authentication of LDAP clients and for server-to-serverconnection, such as replication.
Depending on the configuration, the client can or must authenticate using a certificate, if you enabledcertificate-based authentication. After verifying the certificate, the server searches for the user in thedirectory, based on the attributes in the subject field of the certiticate. If the search return exactly oneuser entry, Directory Server uses this user for all further operations. Optionally, you can configure thatthe certifiate used for authentication must match the Distinguished Encoding Rules (DER)-formattedcertificate stored in the userCertificate attribute of the user.
Benefits of using certificate-based authentication:
Improved efficiency. When using applications that prompt once for the certificate databasepassword and then use that certificate for all subsequent bind or authentication operations, it ismore efficient than continuously providing a bind DN and password.
Improved security. The use of certificate-based authentication is more secure than non-certificate bind operations because certificate-based authentication uses public-keycryptography. Bind credentials cannot be intercepted across the network. If the certificate or
Administration Guide
272

device is lost, it is useless without the PIN, so it is immune from third-party interference likephishing attacks.
9.8.1. Setting up Certificate-based Authentication
To enable certificate-based authentication:
1. Enable encrypted connections. For details, see Section 9.4, “Enabling TLS” .
2. Install the CA certificate and set the trust options for client and server connections. SeeSection 9.3.3, “Installing a CA Certificate” .
3. Optionally, verify that the CT,, trust options for client and server are set for the CA certificate:
# certutil -d /etc/dirsrv/slapd-instance_name/ -L
Certificate Nickname Trust Attributes
SSL,S/MIME,JAR/XPI
Example CA CT,,
4. Create the /etc/dirsrv/slapd-instance_name/certmap.conf file to map information from thecertificate to Directory Server users. For example:
certmap default default
default:DNComps dc
default:FilterComps mail,cn
default:VerifyCert on
certmap example o=Example Inc.,c=US
example:DNComps
This configures that for authenticating users who use a certificate that has the o=Example
Inc.,c=US issuer Distinguished Name (DN) set, Directory Server does not generate a base DNfrom the subject of the certificate, because the DNComps parameter is set empty for thisissuer. Additionally, the settings for the FilterComps and VerifyCert are inherited from thedefault entry.
Certificates that have a different issuer DN than the specified one will use the settings from thedefault entry and generate the base DN based on the cn attributes in the subject of thecertificate. This enables Directory Server to start the search under a specific DN, withoutsearching the whole directory.
For all certificates, Directory Server generates the search filter using the mail and the cn
attribute from the certificate's subject. However, if the mail does not exist in the subject,Directory Server will automatically use the value of the certificate's e attribute in the subject.
For further details and descriptions of the available parameters, see the description of the certmap.conf file in the Red Hat Directory Server Configuration, Command, and File Reference .
5. Enable client authentication. For example, to configure that client authentication is optional:
# ldapmodify -D "cn=Directory Manager" -W -p 389 -h server.example.com -x -Z
dn: cn=encryption,cn=config
CHAPTER 9. CONFIGURING SECURE CONNECTIONS
273

changetype: modify
replace: nsSSLClientAuth
nsSSLClientAuth: allowed
Alternatively, set the nsSSLClientAuth parameter to required to configure that clients mustuse a certificate to authenticate.
IMPORTANT
The Directory Server Console does not support client authentication. If you set nsSSLClientAuth to required, you cannot use the Console to manage theinstance.
6. If you enabled that the authenticating certificate must match the one stored in the userCertificate attribute of the user by setting alias_name:VerifyCert on in the /etc/dirsrv/slapd-instance_name/certmap.conf file, add the certificates to the user entries.See Section 9.8.2, “Adding a Certificate to a User” .
9.8.2. Adding a Certificate to a User
When you set up certificate-based authentication, you can set that the certificate used to authenticatemust match the one stored in the userCertificate binary attribute of the user. If you enabled this featureby setting alias_name:VerifyCert on in the /etc/dirsrv/slapd-instance_name/certmap.conf file, youmust add the certificate of the affected users to their directory entry.
IMPORTANT
You must store the certificate in the Distinguished Encoding Rules (DER) format in the userCertificate attribute.
To store a certificate in the userCertificate attribute of a user:
1. If the certificate is not DER-formatted, convert it. For example:
# openssl x509 -in /root/certificate.pem -out /root/certificate.der -outform DER
2. Add the certificate to the user's userCertificate attribute. For example:
# ldapmodify -D "cn=Directory Manager" -W -p 389 -h server.example.com -x
dn: uid=user_name,ou=People,dc=example,dc=com
changetype: modify
add: userCertificate
userCertificate: < /root/example.der
For further details about using binary attributes, see Section 3.1.8, “Using Binary Attributes” .
9.8.3. Forcing the EXTERNAL SASL Mechanism for Bind Requests
At the beginning of a TLS session, the client sends its certificate to the server. Then, it sends its bindrequest. Most clients issue the bind request using the EXTERNAL SASL mechanism, which signalsDirectory Server that it needs to use the identity in the certificate for the bind, instead of the credentials
Administration Guide
274
in the bind request.
However, if a client uses simple authentication or anonymous credentials, this information is missing. Inthis case, the TLS session fails with invalid credentials, even if the certificate and the client identity in thecertificate was valid.
To configure that Directory Server forces clients to use the EXTERNAL SASL mechanism and to ignoreany other bind method in the request:
# ldapmodify -D "cn=Directory Manager" -W -p 389 -h server.example.com -x
dn: cn=config
changetype: modify
replace: nsslapd-force-sasl-external
nsslapd-force-sasl-external: on
9.8.4. Authenticating Using a Certificate
To use the OpenLDAP client tools, to authenticate to a Directory Server instance that supportsauthentication using a certificate:
1. Set the following environment variables to the corresponding paths for the CA certificate, theuser key, and the user certificate. For example:
LDAPTLS_CACERT=/home/user_name/CA.crt
LDAPTLS_KEY=/home/user_name/user.key
LDAPTLS_CERT=/home/user_name/user.crt
Alternatively, set the TLS_CACERT, TLS_KEY, and TLS_CERT parameters in the ~/.ldaprc
file. For details, see the TLS OPTIONS section in the ldap.conf(5) man page.
2. Connect to the server. For example:
# ldapwhoami -H ldaps://server.example.com:636
If you use a different client, see the client application's documentation for how to connect usingcertificate-based authentication.
9.9. SETTING UP SASL IDENTITY MAPPING
Red Hat Directory Server supports LDAP client authentication through the Simple Authentication andSecurity Layer (SASL), an alternative to TLS and a native way for some applications to share informationsecurely.
Simple Authentication and Security Layer (SASL) is an abstraction layer between protocols like LDAPand authentication methods like GSS-API which allows any protocol which can interact with SASL toutilize any authentication mechanism which can work with SASL. Simply put, SASL is an intermediarythat makes authenticating to applications using different mechanisms easier. SASL can also be used toestablish an encrypted session between a client and server.
The SASL framework allows different mechanisms to be used to authenticate a user to the server,depending on what mechanism is enabled in both client and server applications. SASL also creates alayer for encrypted (secure) sessions. Using GSS-API, Directory Server utilizes Kerberos tickets toauthenticate sessions and encrypt data.
CHAPTER 9. CONFIGURING SECURE CONNECTIONS
275

9.9.1. About SASL Identity Mapping
When processing a SASL bind request, the server matches, or maps, the SASL authentication ID used toauthenticate to the Directory Server with an LDAP entry stored within the server. When using Kerberos,the SASL user ID usually has the format userid@REALM, such as [email protected]. This ID mustbe converted into the DN of the user's Directory Server entry, such as uid=scarter,ou=people,dc=example,dc=com.
If the authentication ID clearly corresponds to the LDAP entry for a person, it is possible to configurethe Directory Server to map the authentication ID automatically to the entry DN. Directory Server hassome pre-configured default mappings which handle most common configurations, and customizedmaps can be created. By default, during a bind attempt, only the first matching mapping rule is applied ifSASL mapping fallback is not enabled. For further details about SASL mapping fallback, seeSection 9.9.4, “Enabling SASL Mapping Fallback” .
Be sure to configure SASL maps so that only one mapping rule matches the authentication string.
SASL mappings are configured by entries under a container entry:
dn: cn=sasl,cn=config
objectClass: top
objectClass: nsContainer
cn: sasl
SASL identity mapping entries are children of this entry:
dn: cn=mapping,cn=sasl,cn=config
objectClass: top
objectClass: nsContainer
cn: mapping
Mapping entries are defined by the following attributes:
nsSaslMapRegexString: The regular expression which is used to map the elements of thesupplied authid.
nsSaslMapFilterTemplate: A template which applies the elements of the nsSaslMapRegexString to create the DN.
nsSaslMapBaseDNTemplate: Provides the search base or a specific entry DN to match againstthe constructed DN.
Optional: nsSaslMapPriority: Sets the priority of this SASL mapping. The priority value is used,if nsslapd-sasl-mapping-fallback is enabled in cn=config. For details, see Section 9.9.4.1,“Setting SASL Mapping Priorities”.
For further details, see the corresponding section in the Red Hat Directory Server Configuration,
Command, and File Reference.
For example:
dn: cn=mymap,cn=mapping,cn=sasl,cn=config
objectclass:top
objectclass:nsSaslMapping
cn: mymap
Administration Guide
276
nsSaslMapRegexString: \(.*\)@\(.*\)\.\(.*\)
nsSaslMapFilterTemplate: (objectclass=inetOrgPerson)
nsSaslMapBaseDNTemplate: uid=\1,ou=people,dc=\2,dc=\3
The nsSaslMapRegexString attribute sets variables of the form \1, \2, \3 for bind IDs which are filledinto the template attributes during a search. This example sets up a SASL identity mapping for any userin the ou=People,dc=example,dc=com subtree who belongs to the inetOrgPerson object class.
When a Directory Server receives a SASL bind request with [email protected] as the user ID(authid), the regular expression fills in the base DN template with uid=mconnors,ou=people,dc=EXAMPLE,dc=COM as the user ID, and authentication proceeds fromthere.
NOTE
The dc values are not case sensitive, so dc=EXAMPLE and dc=example are equivalent.
The Directory Server can also use a more inclusive mapping scheme, such as the following:
dn: cn=example map,cn=mapping,cn=sasl,cn=config
objectclass: top
objectclass: nsSaslMapping
cn: example map
nsSaslMapRegexString: \(.*\)
nsSaslMapBaseDNTemplate: ou=People,dc=example,dc=com
nsSaslMapFilterTemplate: (cn=\1)
This matches any user ID and map it an entry under the ou=People,dc=example,dc=com subtree whichmeets the filter cn=userId.
Mappings can be confined to a single realm by specifying the realm in the nsSaslMapRegexString
attribute. For example:
dn: cn=example map,cn=mapping,cn=sasl,cn=config
objectclass: top
objectclass: nsSaslMapping
cn: example map
nsSaslMapRegexString: \(.*\)@US.EXAMPLE.COM
nsSaslMapBaseDNTemplate: ou=People,dc=example,dc=com
nsSaslMapFilterTemplate: (cn=\1)
This mapping is identical to the previous mapping, except that it only applies to users authenticatingfrom the US.EXAMPLE.COM realm. (Realms are described in Section 9.10.2.1, “About Principals andRealms”.)
When a server connects to another server, such as during replication or with chaining, the defaultmappings for the will not properly map the identities. This is because the principal (SASL identity) forone server does not match the principal on the server where authentication is taking place, so it does notmatch the mapping entries.
To allow server to server authentication using SASL, create a mapping for the specific server principal toa specific user entry. For example, this mapping matches the ldap1.example.com server to the cn=replication manager,cn=config entry. The mapping entry itself is created on the second server,such as ldap2.example.com.
CHAPTER 9. CONFIGURING SECURE CONNECTIONS
277
dn: cn=z,cn=mapping,cn=sasl,cn=config
objectclass: top
objectclass: nsSaslMapping
cn: z
nsSaslMapRegexString: ldap/[email protected]
nsSaslMapBaseDNTemplate: cn=replication manager,cn=config
nsSaslMapFilterTemplate: (objectclass=*)
Sometimes, the realm name is not included in the principal name in SASL GSS-API configuration. Asecond mapping can be created which is identical to the first, only without specifying the realm in theprincipal name. For example:
dn: cn=y,cn=mapping,cn=sasl,cn=config
objectclass: top
objectclass: nsSaslMapping
cn: y
nsSaslMapRegexString: ldap/ldap1.example.com
nsSaslMapBaseDNTemplate: cn=replication manager,cn=config
nsSaslMapFilterTemplate: (objectclass=*)
Because the realm is not specified, the second mapping is more general (meaning, it has the potential tomatch more entries than the first. The best practice is to have more specific mappings processed firstand gradually progress through more general mappings.
If a priority is not set for a SASL mapping using the nsSaslMapPriority parameter, there is no way tospecify the order that mappings are processed. However, there is a way to control how SASL mappingsare processed: the name. The Directory Server processes SASL mappings in reverse ASCII order. In thepast two example, then the cn=z mapping (the first example) is processed first. If there is no match, theserver processes the cn=y mapping (the second example).
NOTE
SASL mappings can be added when an instance is created during a silent installation byspecifying the mappings in an LDIF file and adding the LDIF file with the ConfigFile
directive. Using silent installation is described in the Installation Guide.
9.9.2. Default SASL Mappings for Directory Server
The Directory Server has pre-defined SASL mapping rules to handle some of the most common usage.
Kerberos UID Mapping
This matches a Kerberos principal using a two part realm, such as [email protected]. The realm is thenused to define the search base, and the user ID (authid) defines the filter. The search base is dc=example,dc=com and the filter of (uid=user).
dn: cn=Kerberos uid mapping,cn=mapping,cn=sasl,cn=config
objectClass: top
objectClass: nsSaslMapping
cn: Kerberos uid mapping
nsSaslMapRegexString: \(.*\)@\(.*\)\.\(.*\)
nsSaslMapBaseDNTemplate: dc=\2,dc=\3
nsSaslMapFilterTemplate: (uid=\1)
RFC 2829 DN Syntax
Administration Guide
278
This mapping matches an authid that is a valid DN (defined in RFC 2829) prefixed by dn:. The authid
maps directly to the specified DN.
dn: cn=rfc 2829 dn syntax,cn=mapping,cn=sasl,cn=config
objectClass: top
objectClass: nsSaslMapping
cn: rfc 2829 dn syntax
nsSaslMapRegexString: ^dn:\(.*\)
nsSaslMapBaseDNTemplate: \1
nsSaslMapFilterTemplate: (objectclass=*)
RFC 2829 U Syntax
This mapping matches an authid that is a UID prefixed by u:. The value specified after the prefix definesa filter of (uid=value). The search base is hard-coded to be the suffix of the default userRoot
database.
dn: cn=rfc 2829 u syntax,cn=mapping,cn=sasl,cn=config
objectClass: top
objectClass: nsSaslMapping
cn: rfc 2829 u syntax
nsSaslMapRegexString: ^u:\(.*\)
nsSaslMapBaseDNTemplate: dc=example,dc=com
nsSaslMapFilterTemplate: (uid=\1)
UID Mapping
This mapping matches an authid that is any plain string that does not match the other default mappingrules. It use this value to define a filter of (uid=value). The search base is hard-coded to be the suffix ofthe default userRoot database.
dn: cn=uid mapping,cn=mapping,cn=sasl,cn=config
objectClass: top
objectClass: nsSaslMapping
cn: uid mapping
nsSaslMapRegexString: ^[^:@]+$
nsSaslMapBaseDNTemplate: dc=example,dc=com
nsSaslMapFilterTemplate: (uid=&)
9.9.3. Configuring SASL Identity Mapping
SASL identity mapping can be configured from either the Directory Server or the command line. ForSASL identity mapping to work for SASL authentication, the mapping must return one, and only one,entry that matches and Kerberos must be configured on the host machine.
9.9.3.1. Configuring SASL Identity Mapping from the Console
1. In the Directory Server Console, open the Configuration tab.
2. Select the SASL Mapping tab.
CHAPTER 9. CONFIGURING SECURE CONNECTIONS
279
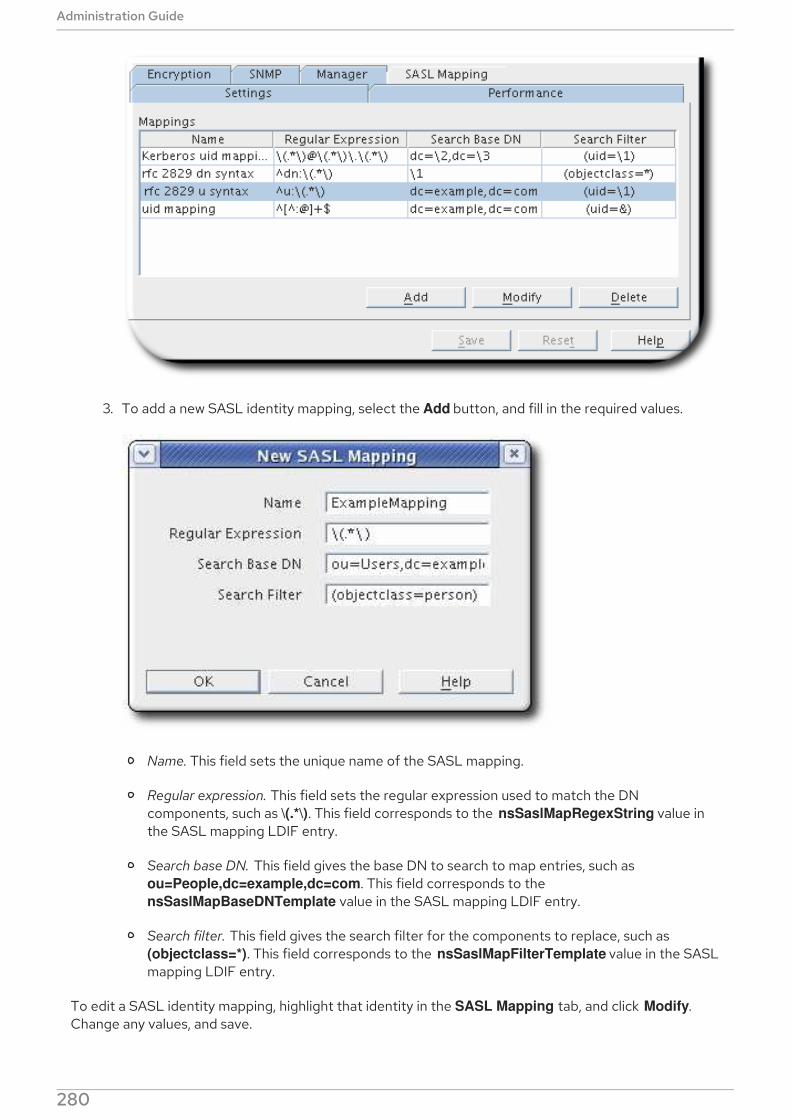
3. To add a new SASL identity mapping, select the Add button, and fill in the required values.
Name. This field sets the unique name of the SASL mapping.
Regular expression. This field sets the regular expression used to match the DNcomponents, such as \(.*\). This field corresponds to the nsSaslMapRegexString value inthe SASL mapping LDIF entry.
Search base DN. This field gives the base DN to search to map entries, such as ou=People,dc=example,dc=com. This field corresponds to the nsSaslMapBaseDNTemplate value in the SASL mapping LDIF entry.
Search filter. This field gives the search filter for the components to replace, such as (objectclass=*). This field corresponds to the nsSaslMapFilterTemplate value in the SASLmapping LDIF entry.
To edit a SASL identity mapping, highlight that identity in the SASL Mapping tab, and click Modify.Change any values, and save.
Administration Guide
280
To delete a SASL identity mapping, highlight it and hit Delete. A dialog box comes up to confirm thedeletion.
9.9.3.2. Configuring SASL Identity Mapping from the Command Line
To configure SASL identity mapping from the command line, use the ldapmodify utility to add theidentity mapping scheme. For example:
# ldapmodify -a -D "cn=Directory Manager" -W -p 389 -h server.example.com -x
dn: cn=example map,cn=mapping,cn=sasl,cn=config
changetype: add
objectclass: top
objectclass: nsSaslMapping
cn: example map
nsSaslMapRegexString: \(.*\)
nsSaslMapBaseDNTemplate: ou=People,dc=example,dc=com
nsSaslMapFilterTemplate: (cn=\1)
This matches any user's common name and maps it to the result of the subtree search with base ou=People,dc=example,dc=com, based on the filter cn=userId.
NOTE
When SASL maps are added over LDAP, they are not used by the server until it isrestarted. Adding the SASL map with ldapmodify adds the mapping to the end of the list,regardless of its ASCII order.
9.9.4. Enabling SASL Mapping Fallback
Using the default settings, Directory Server verifies only the first matching SASL mapping. If this firstmatching mapping fails, the bind operation fails and no further matching mappings are verified.
However, you can configure Directory Server to verify all matching mappings by enabling the nsslapd-
sasl-mapping-fallback parameter:
# ldapmodify -D "cn=Directory Manager" -W -p 389 -h server.example.com -x
dn: cn=config
changetype: modify
replace: nsslapd-sasl-mapping-fallback
nsslapd-sasl-mapping-fallback: on
If fallback is enabled and only one user identity is returned, the bind succeeds. If no user, or more thanone user is returned, the bind fails.
9.9.4.1. Setting SASL Mapping Priorities
If you enabled SASL mapping fallback using the nsslapd-sasl-mapping-fallback attribute, you canoptionally set the nsSaslMapPriority attribute in mapping configurations to prioritize them. The nsSaslMapPriority attribute supports values from 1 (highest priority) to 100 (lowest priority). Thedefault is 100.
For example, to set the highest priority for the cn=Kerberos uid
CHAPTER 9. CONFIGURING SECURE CONNECTIONS
281
For example, to set the highest priority for the cn=Kerberos uid
mapping,cn=mapping,cn=sasl,cn=config mapping:
# ldapmodify -D "cn=Directory Manager" -W -p 389 -h server.example.com -x
dn: cn=Kerberos uid mapping,cn=mapping,cn=sasl,cn=config
changetype: modify
replace: nsSaslMapPriority
nsSaslMapPriority: 1
9.10. USING KERBEROS GSS-API WITH SASL
Kerberos v5 must be deployed on the host for Directory Server to utilize the GSS-API mechanism forSASL authentication. GSS-API and Kerberos client libraries must be installed on the Directory Serverhost to take advantage of Kerberos services.
9.10.1. Authentication Mechanisms for SASL in Directory Server
Directory Server support the following SASL encryption mechanisms:
PLAIN. PLAIN sends cleartext passwords for simple password-based authentication.
EXTERNAL. EXTERNAL, as with TLS, performs certificate-based authentication. This methoduses public keys for strong authentication.
CRAM-MD5. CRAM-MD5 is a weak, simple challenge-response authentication method. It doesnot establish any security layer.
WARNING
Red Hat recommends not using the insecure CRAM-MD5 mechanism.
DIGEST-MD5. DIGEST-MD5 is a weak authentication method for LDAPv3 servers.
WARNING
Red Hat recommends not using the insecure DIGGEST-MD5 mechanism.
Generic Security Services (GSS-API). Generic Security Services (GSS) is a security API that isthe native way for UNIX-based operating systems to access and authenticate Kerberosservices. GSS-API also supports session encryption, similar to TLS. This allows LDAP clients toauthenticate with the server using Kerberos version 5 credentials (tickets) and to use networksession encryption.
For Directory Server to use GSS-API, Kerberos must be configured on the host machine. See
Administration Guide
282

For Directory Server to use GSS-API, Kerberos must be configured on the host machine. SeeSection 9.10, “Using Kerberos GSS-API with SASL”.
NOTE
GSS-API and, thus, Kerberos are only supported on platforms that have GSS-APIsupport. To use GSS-API, it may be necessary to install the Kerberos clientlibraries; any required Kerberos libraries will be available through the operatingsystem vendor.
9.10.2. About Kerberos in Directory Server
On Red Hat Enterprise Linux, the supported Kerberos libraries are MIT Kerberos version 5.
The concepts of Kerberos, as well as using and configuring Kerberos, are covered at the MIT Kerberoswebsite, http://web.mit.edu/Kerberos/.
9.10.2.1. About Principals and Realms
A principal is a user or service in the Kerberos environment. A realm defines what Kerberos manages interms of who can access what. The client, the KDC, and the host or service you want to access must usethe same realm.
NOTE
Kerberos realms are only supported for GSS-API authentication and encryption, not forDIGEST-MD5.
Realms are used by the server to associate the DN of the client in the following form, which looks like anLDAP DN:
uid=user_name/[server_instance],cn=realm,cn=mechanism,cn=auth
For example, Mike Connors in the engineering realm of the European division of example.com uses thefollowing association to access a server in the US realm:
uid=mconnors/cn=Europe.example.com,cn=engineering,cn=gssapi,cn=auth
Babara Jensen, from the accounting realm of US.example.com, does not have to specify a realm whento access a local server:
uid=bjensen,cn=accounting,cn=gssapi,cn=auth
If realms are supported by the mechanism and the default realm is not used to authenticate to theserver, then the realm must be specified in the Kerberos principal. Otherwise, the realm can be omitted.
NOTE
Kerberos systems treat the Kerberos realm as the default realm; other systems default tothe server.
9.10.2.2. About the KDC Server and Keytabs
CHAPTER 9. CONFIGURING SECURE CONNECTIONS
283
The Key Distribution Center (KDC) authenticates users and issues Ticket Granting Tickets (TGT) forthem. This enables users to authenticate to Directory Server using GSS-API. To respond to Kerberosoperations, Directory Server requires access to its keytab file. The keytab contains the cryptographickey that Directory Server uses to authenticate to other servers.
Directory Server uses the ldap service name in a Kerberos principal. For example:
ldap/server.example.com/EXAMPLE.COM
For details about creating the keytab, see your Kerberos documentation.
NOTE
You must create a Simple Authentication and Security Layer (SASL) mapping for theDirectory Server Kerberos principal that maps to an existing entry Distinguished Name(DN).
9.10.3. Configuring SASL Authentication at Directory Server Startup
SASL GSS-API authentication has to be activated in Directory Server so that Kerberos tickets can beused for authentication. This is done by supplying a system configuration file for the init scripts to usewhich identifies the variable to set the keytab file location. When the init script runs at Directory Serverstartup, SASL authentication is then immediately active.
The default SASL configuration is stored in the /etc/sysconfig/dirsrv file.
If there are multiple Directory Server instances and not all of them will use SASL authentication, thenthere can be instance-specific configuration files created in the /etc/sysconfig/ directory named dirsrv-instance. For example, dirsrv-example. The default dirsrv file can be used if there is a singleinstance on a host.
To enable SASL authentication, uncomment the KRB5_KTNAME line in the /etc/sysconfig/dirsrv (orinstance-specific) file, and set the keytab location for the KRB5_KTNAME variable. For example:
# In order to use SASL/GSSAPI the directory
# server needs to know where to find its keytab
# file - uncomment the following line and set
# the path and filename appropriately
KRB5_KTNAME=/etc/dirsrv/krb5.keytab
9.11. SETTING SASL MECHANISMS
Per default, Directory Server enables all mechanisms the simple authentication and security layer(SASL) library supports. These are listed in the root dse supportedSASLMechanisms parameter. Toenable specific SASL mechanisms, set the nsslapd-allowed-sasl-mechanisms attribute in the cn=config entry. For example, to enable only the GSSAPI and DIGEST-MD5 mechanism, run:
# ldapmodify -D "cn=Directory Manager" -W -x
dn: cn=config
changetype: modify
replace: nsslapd-allowed-sasl-mechanisms
nsslapd-allowed-sasl-mechanisms: GSSAPI, DIGEST-MD5
Administration Guide
284
NOTE
Even if EXTERNAL is not listed in the nsslapd-allowed-sasl-mechanisms attribute, thismechanism is always enabled.
For further details, see the corresponding section in the Red Hat Directory Server Configuration,
Command, and File Reference.
9.12. USING SASL WITH LDAP CLIENTS
To use SASL with the LDAP clients, such as ldapsearch, pass the -Y SASL_mechanism to thecommand. For example:
To use the GSSAPI SASL mechanism over the LDAP protocol:
# ldapsearch -Y GSSAPI -U "dn:uid=user_name,ou=people,dc=example,dc=com" -R
EXAMPLE.COM -H ldap://server.example.com -b "dc=example,dc=com"
To use the PLAIN SASL mechanism over the LDAPS protocol:
# ldapsearch -Y PLAIN -D "uid=user_name,ou=people,dc=example,dc=com" -W -H
ldaps://server.example.com -b "dc=example,dc=com"
NOTE
SASL proxy authorization is not supported in Directory Server. Therefore,Directory Server ignores any SASL authzid value supplied by the client.
CHAPTER 9. CONFIGURING SECURE CONNECTIONS
285

CHAPTER 10. CONFIGURING ATTRIBUTE ENCRYPTION
The Directory Server offers a number of mechanisms to secure access to sensitive data, such as accesscontrol rules to prevent unauthorized users from reading certain entries or attributes within entries andTLS to protect data from eavesdropping and tampering on untrusted networks. However, if a copy ofthe server's database files should fall into the hands of an unauthorized person, they could potentiallyextract sensitive information from those files. Because information in a database is stored in plain text,some sensitive information, such as government identification numbers or passwords, may not beprotected enough by standard access control measures.
For highly sensitive information, this potential for information loss could present a significant securityrisk. In order to remove that security risk, Directory Server allows portions of its database to beencrypted. Once encrypted, the data are safe even in the event that an attacker has a copy of theserver's database files.
Database encryption allows attributes to be encrypted in the database. Both encryption and theencryption cipher are configurable per attribute per back end. When configured, every instance of aparticular attribute, even index data, is encrypted for every entry stored in that database.
An additional benefit of attribute encryption is, that encrypted values can only be sent to a clients with aSecurity Strength Factor (SSF) greater than 1.
NOTE
There is one exception to encrypted data: any value which is used as the RDN for an entryis not encrypted within the entry DN. For example, if the uid attribute is encrypted, thevalue is encrypted in the entry but is displayed in the DN:
# entry-id: 16
dn: uid=jsmith1234,ou=People,dc=example,dc=com
nsUniqueId: ee91ea82-1dd111b2-9f36e9bc-39fb8550
objectClass: top
objectClass: person
objectClass: organizationalPerson
objectClass: inetorgperson
givenName: John
sn: Smith
uid:: Sf04P9nJWGU1qiW9JJCGRg==
That would allow someone to discover the encrypted value.
Any attribute used within the entry DN cannot be effectively encrypted, since it willalways be displayed in the DN. Be aware of what attributes are used to build the DN anddesign the attribute encryption model accordingly.
Indexed attributes may be encrypted, and attribute encryption is fully compatible with eq and pres
indexing. The contents of the index files that are normally derived from attribute values are alsoencrypted to prevent an attacker from recovering part or all of the encrypted data from an analysis ofthe indexes.
Since the server pre-encrypts all index keys before looking up an index for an encrypted attribute, thereis some effect on server performance for searches that make use of an encrypted index, but the effectis not serious enough that it is no longer worthwhile to use an index.
Administration Guide
286
10.1. ENCRYPTION KEYS
In order to use attribute encryption, the server must be configured for TLS and have TLS enabledbecause attribute encryption uses the server's TLS encryption key and the same PIN input methods asTLS. The PIN must either be entered manually upon server startup or a PIN file must be used.
Randomly generated symmetric cipher keys are used to encrypt and decrypt attribute data. A separatekey is used for each configured cipher. These keys are wrapped using the public key from the server'sTLS certificate, and the resulting wrapped key is stored within the server's configuration files. Theeffective strength of the attribute encryption is never higher than the strength of the server's TLS keyused for wrapping. Without access to the server's private key, it is not possible to recover the symmetrickeys from the wrapped copies.
WARNING
There is no mechanism for recovering a lost key. Therefore, it is especially importantto back up the server's certificate database safely. If the server's certificate werelost, it would not be possible to decrypt any encrypted data stored in its database.
WARNING
If the TLS certificate is expiring and needs to be renewed, export the encryptedback end instance before the renewal. Update the certificate, then re-import theexported LDIF file.
10.2. ENCRYPTION CIPHERS
The encryption cipher is configurable on a per-attribute basis and must be selected by the administratorat the time encryption is enabled for an attribute. Configuration can be done through the Console orthrough the command line.
The following ciphers are supported:
Advanced Encryption Standard (AES)
Triple Data Encryption Standard (3DES)
NOTE
For strong encryption, Red Hat recommends using only AES ciphers.
All ciphers are used in Cipher Block Chaining mode.
Once the encryption cipher is set, it should not be changed without exporting and re-importing the data.
CHAPTER 10. CONFIGURING ATTRIBUTE ENCRYPTION
287

10.3. CONFIGURING ATTRIBUTE ENCRYPTION FROM THE CONSOLE
1. In the Configuration tab, select the Data node.
2. Expand the suffix, and select the database to edit.
3. Select the Attribute Encryption tab.
4. Click the Add Attribute button to open the list of attributes. Select the attribute to encrypt.
NOTE
Administration Guide
288
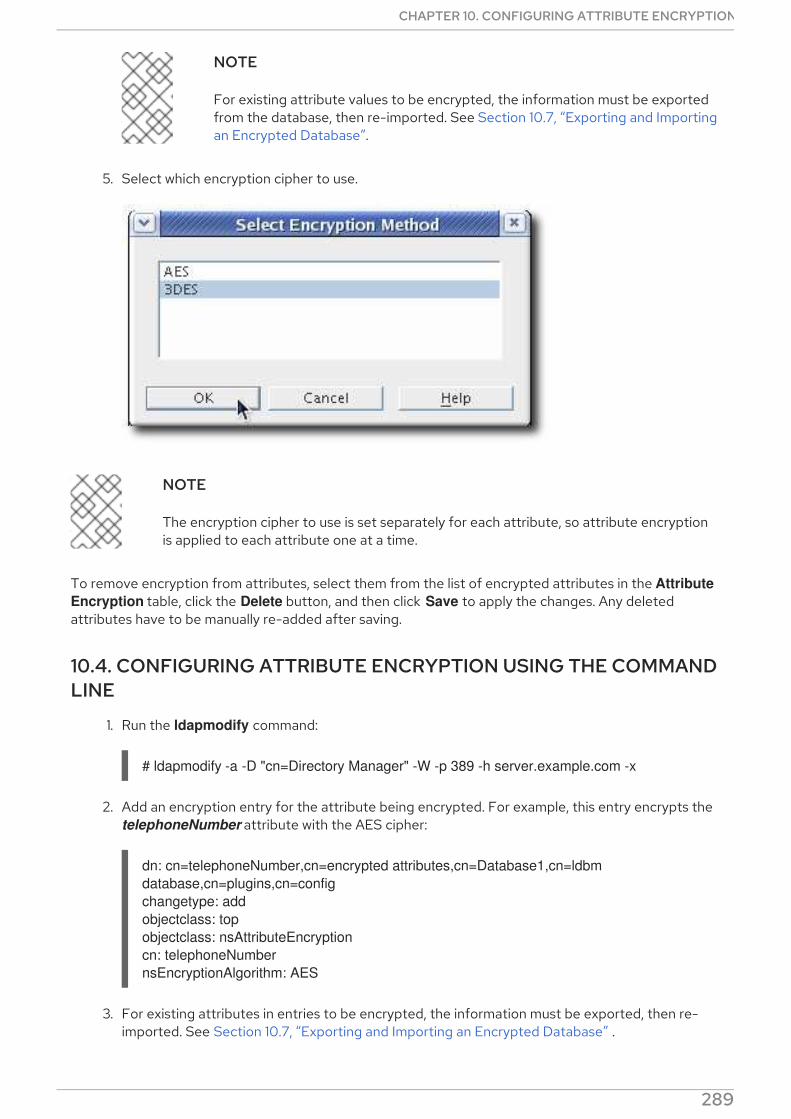
NOTE
For existing attribute values to be encrypted, the information must be exportedfrom the database, then re-imported. See Section 10.7, “Exporting and Importingan Encrypted Database”.
5. Select which encryption cipher to use.
NOTE
The encryption cipher to use is set separately for each attribute, so attribute encryptionis applied to each attribute one at a time.
To remove encryption from attributes, select them from the list of encrypted attributes in the Attribute
Encryption table, click the Delete button, and then click Save to apply the changes. Any deletedattributes have to be manually re-added after saving.
10.4. CONFIGURING ATTRIBUTE ENCRYPTION USING THE COMMANDLINE
1. Run the ldapmodify command:
# ldapmodify -a -D "cn=Directory Manager" -W -p 389 -h server.example.com -x
2. Add an encryption entry for the attribute being encrypted. For example, this entry encrypts the telephoneNumber attribute with the AES cipher:
dn: cn=telephoneNumber,cn=encrypted attributes,cn=Database1,cn=ldbm
database,cn=plugins,cn=config
changetype: add
objectclass: top
objectclass: nsAttributeEncryption
cn: telephoneNumber
nsEncryptionAlgorithm: AES
3. For existing attributes in entries to be encrypted, the information must be exported, then re-imported. See Section 10.7, “Exporting and Importing an Encrypted Database” .
For more information on attribute encryption configuration schema, see "Database Attributes under
CHAPTER 10. CONFIGURING ATTRIBUTE ENCRYPTION
289
For more information on attribute encryption configuration schema, see "Database Attributes undercn=attributeName,cn=encrypted attributes,cn=database_name,cn=ldbmdatabase,cn=plugins,cn=config" in the Red Hat Directory Server
Configuration, Command, and File Reference.
10.5. ENABLING ATTRIBUTE ENCRYPTION FOR EXISTING ATTRIBUTEVALUES
To enable attribute encryption on an attribute with existing stored data, export the database to LDIFfirst, then make the configuration change, then re-import the data to the database. The server does notenforce consistency between encryption configuration and stored data; therefore, pay careful attentionthat all existing data are exported before enabling or disabling encryption.
10.6. GENERAL CONSIDERATIONS AFTER ENABLING ATTRIBUTEENCRYPTION
When you enable encryption for data that is already in the database:
Unencrypted data can persist in the server's database page pool backing file. To remove thisdata:
1. Stop the instance:
# systemctl stop dirsrv@instance_name
2. Delete the /var/lib/dirsrv/slapd-instance_name/db/guardian file:
# rm /var/lib/dirsrv/slapd-instance_name/db/guardian
3. Start the instance:
# systemctl start dirsrv@instance_name
After you enabled encryption and successfully imported the data, delete the LDIF file with theunencrypted data.
After enabling encryption, the Directory Server deletes and creates a new database when re-importing the data.
The replication log file is not encrypted. To protect this data, store it on an encrypted disk.
Data in the server's memory (RAM) is unencrypted and can be temporarily stored in swappartitions. To protect this data, set up encrypted swap space.
IMPORTANT
Even if you delete files that contain unencrypted data, this data can be restored undercertain circumstances.
10.7. EXPORTING AND IMPORTING AN ENCRYPTED DATABASE
Exporting and importing encrypted databases is similar to exporting and importing regular databases.
Administration Guide
290

Exporting and importing encrypted databases is similar to exporting and importing regular databases.However, the encrypted information must be decrypted when you export the data and re-encryptedwhen you re-import it to the database.
10.7.1. Exporting an Encrypted Database
To export data from an encrypted database, pass the -E parameter to the db2ldif script. The script usesthe password stored in the Directory Sever configuration to decrypt the database.
To encrypt a complete database:
# db2ldif -Z instance_name -n database_name -E -a /tmp/data.ldif
Alternatively, you can export only a specific subtree. For example, to export all data from the ou=People,dc=example,dc=com entry into the /tmp/export.ldif file:
# db2ldif -Z instance_name -n database_name -E -s "ou=people,dc=example,dc=com" \
-a /tmp/data.ldif
IMPORTANT
The db2ldif script exports the content using the operating system account of theDirectory Server instance. Therefore, this account must be able to write to the file set inthe -a option.
10.7.2. Importing an LDIF File into an Encrypted Database
To import data to a database when encryption is enabled:
1. Stop the Directory Server instance:
# systemctl stop dirsrv@instance_name
2. If you replaced the certificate database between the last export and this import, edit the /etc/dirsrv/slapd-instance_name/dse.ldif file and remove the following entries including theirattributes:
cn=AES,cn=encrypted attribute keys,cn=database_name,cn=ldbm
database,cn=plugins,cn=config
cn=3DES,cn=encrypted attribute keys,cn=database_name,cn=ldbm
database,cn=plugins,cn=config
IMPORTANT
Remove the entries for all databases. If any entry that contains the nsSymmetricKey attribute is left in the /etc/dirsrv/slapd-instance_name/dse.ldif file, Directory Server will fail to start.
3. Import the LDIF file. For example:
# ldif2db -Z instance_name -n database_name -E -i /tmp/data.ldif
CHAPTER 10. CONFIGURING ATTRIBUTE ENCRYPTION
291
The -E parameter enables the script to encrypt attributes configure for encryption during theimport.
4. Start the instance:
# systemctl start dirsrv@instance_name
10.8. UPDATING THE TLS CERTIFICATES USED FOR ATTRIBUTEENCRYPTION
Attribute encryption is based on the TLS certificate. To prevent that attribute encryption fails afterrenewing or replacing the TLS certificate:
1. Export the database with decrypted attributes. See Section 10.7.1, “Exporting an EncryptedDatabase”.
2. Delete the existing private key and certificate from the Network Security Services (NSS)database. See Section 9.3.8, “Removing a Private Key”
3. Create a new Certificate Signing Request (CSR). See Section 9.3.2, “Creating a CertificateSigning Request”.
4. Install the new certificate. See Section 9.3.4, “Installing a Certificate” .
5. Stop the Directory Server instance:
# systemctl stop dirsrv@instance_name
6. Edit the /etc/dirsrv/slapd-instance_name/dse.ldif file and remove the following entriesincluding their attributes:
cn=AES,cn=encrypted attribute keys,cn=database_name,cn=ldbm
database,cn=plugins,cn=config
cn=3DES,cn=encrypted attribute keys,cn=database_name,cn=ldbm
database,cn=plugins,cn=config
IMPORTANT
Remove the entries for all databases. If any entry that contains the nsSymmetricKey attribute is left in the /etc/dirsrv/slapd-instance_name/dse.ldif file, Directory Server will fail to start.
7. Import the database. See Section 10.7.2, “Importing an LDIF File into an Encrypted Database” .
8. Start the instance:
# systemctl start dirsrv@instance_name
Administration Guide
292
CHAPTER 11. MANAGING FIPS MODE SUPPORT
Red Hat Directory Server fully supports the Federal Information Processing Standard (FIPS) 140-2.When Directory Server runs in FIPS mode, security-related settings change. For example, SSL isautomatically disabled and only TLS 1.1 and 1.2 encryption is used.
For general details about FIPS, see Federal Information Processing Standard (FIPS) in theRed Hat Enterprise Linux Security Guide.
Enabling FIPS Mode SupportTo enable FIPS mode support for Directory Server:
1. Optionally, enable FIPS mode in Red Hat Enterprise Linux. For details, see the correspondingsection in the Red Hat Enterprise Linux Security Guide.
2. Enable FIPS mode for the network security services (NSS) database:
# modutil -dbdir /etc/dirsrv/slapd-instance_name/ -fips true
3. Restart the Directory Server instance:
# systemctl restart dirsrv@instance_name
Disabling FIPS Mode SupportTo disable FIPS mode support for Directory Server:
1. Disable FIPS mode for the network security services (NSS) database:
# modutil -dbdir /etc/dirsrv/slapd-instance_name/ -fips false
2. Restart the Directory Server instance:
# systemctl restart dirsrv@instance_name
3. Optionally, disable FIPS mode in Red Hat Enterprise Linux. For details, see the correspondingsection in the Red Hat Enterprise Linux Security Guide.
CHAPTER 11. MANAGING FIPS MODE SUPPORT
293
Related Documents


