Red Hat CodeReady Studio 12.11 Getting Started with CodeReady Studio Tools Introduction to Using Red Hat CodeReady Studio Tools Last Updated: 2019-07-04

Welcome message from author
This document is posted to help you gain knowledge. Please leave a comment to let me know what you think about it! Share it to your friends and learn new things together.
Transcript

Red Hat CodeReady Studio 12.11
Getting Started with CodeReady Studio Tools
Introduction to Using Red Hat CodeReady Studio Tools
Last Updated: 2019-07-04


Red Hat CodeReady Studio 12.11 Getting Started with CodeReady StudioTools
Introduction to Using Red Hat CodeReady Studio Tools
Misha Husnain Ali
Supriya [email protected]

Legal Notice
Copyright © 2019 Red Hat, Inc.
The text of and illustrations in this document are licensed by Red Hat under a Creative CommonsAttribution–Share Alike 3.0 Unported license ("CC-BY-SA"). An explanation of CC-BY-SA isavailable athttp://creativecommons.org/licenses/by-sa/3.0/. In accordance with CC-BY-SA, if you distribute this document or an adaptation of it, you mustprovide the URL for the original version.
Red Hat, as the licensor of this document, waives the right to enforce, and agrees not to assert,Section 4d of CC-BY-SA to the fullest extent permitted by applicable law.
Red Hat, Red Hat Enterprise Linux, the Shadowman logo, the Red Hat logo, JBoss, OpenShift,Fedora, the Infinity logo, and RHCE are trademarks of Red Hat, Inc., registered in the United Statesand other countries.
Linux ® is the registered trademark of Linus Torvalds in the United States and other countries.
Java ® is a registered trademark of Oracle and/or its affiliates.
XFS ® is a trademark of Silicon Graphics International Corp. or its subsidiaries in the United Statesand/or other countries.
MySQL ® is a registered trademark of MySQL AB in the United States, the European Union andother countries.
Node.js ® is an official trademark of Joyent. Red Hat is not formally related to or endorsed by theofficial Joyent Node.js open source or commercial project.
The OpenStack ® Word Mark and OpenStack logo are either registered trademarks/service marksor trademarks/service marks of the OpenStack Foundation, in the United States and othercountries and are used with the OpenStack Foundation's permission. We are not affiliated with,endorsed or sponsored by the OpenStack Foundation, or the OpenStack community.
All other trademarks are the property of their respective owners.
Abstract
This compilation of topics contains information on how to start using Red Hat CodeReady StudioTools for efficient development.

. . . . . . . . . . . . . . . . . . . . . . . . . . . . . . . . . . . . . . . . . . . . . . . . . . . . . . . . . . . . . . . . . . . . . . . . . . . . . . . . . . . . . . . . . . . . . . . . . . . . . . . . . . . . . . . . . . . . . . . . . . . . . . . . . . . . . . . . . . . . . . . . . . . . . . . . . . . . . . . . . . . . . . . . . . . . . . . . . . . . . . . . . . . . . . . . . . . . . . . . . . . . . . . . . . . . . . . . . . . . . . . . . . . . . . . . . . . . . . . . . . . . . . . . . . . . . . . . . . . . . . . . . . . . . . . . . . . . . . . .
. . . . . . . . . . . . . . . . . . . . . . . . . . . . . . . . . . . . . . . . . . . . . . . . . . . . . . . . . . . . . . . . . . . . . . . . . . . . . . . . . . . . . . . . . . . . . . . . . . . . . . . . . . . . . . . . . . . . . . . . . . . . . . . . . . . . . . . . . . . . . . . . . . . . . . . . . . . . . . . . . . . . . . . . . . . . . . . . . . . . . . . . . . . . . . . . . . . . . . . . . . . . . . . . . . . . . . . . . . . . . . . . . . . . . . . . . . . . . . . . . . . . . . . . . . . . . . . . . . . . . . . . . . . . . . . . . . . . . . . .
. . . . . . . . . . . . . . . . . . . . . . . . . . . . . . . . . . . . . . . . . . . . . . . . . . . . . . . . . . . . . . . . . . . . . . . . . . . . . . . . . . . . . . . . . . . . . . . . . . . . . . . . . . . . . . . . . . . . . . . . . . . . . . . . . . . . . . . . . . . . . . . . . . . . . . . . . . . . . . . . . . . . . . . . . . . . . . . . . . . . . . . . . . . . . . . . . . . . . . . . . . . . . . . . . . . . . . . . . . . . . . . . . . . . . . . . . . . . . . . . . . . . . . . . . . . . . . . . . . . . . . . . . . . . . . . . . . . . . . . .
Table of Contents
CHAPTER 1. SETTING UP AND MANAGING A REPOSITORY FOR YOUR PROJECTS1.1. USING GIT WITH CODEREADY STUDIO
1.1.1. Setting Up the Git Perspective1.1.2. Setting up a Repository in the Git Perspective
1.1.2.1. Creating a New Git Repository1.1.2.2. Cloning an Existing Git Repository1.1.2.3. Adding an Existing Local Git Repository
Prerequisites1.1.3. Adding a Remote for the Repository1.1.4. Creating and Working With a New Branch
1.1.4.1. Creating a New Branch1.1.4.2. Working in the New Branch1.1.4.3. Updating the Branch Before Implementing the Changes
1.1.5. Committing and Merging the Changes1.1.5.1. Committing and Pushing the Changes1.1.5.2. Committing Without Pushing the ChangesAdditional Resources
CHAPTER 2. CONFIGURING MAVEN BASICS2.1. CREATING A NEW MAVEN PROJECT2.2. CREATING A NEW MAVEN MODULE
Prerequisites2.3. ADDING MAVEN SUPPORT TO AN EXISTING NON-MAVEN PROJECT2.4. TROUBLESHOOTING
2.4.1. Unidentifiable Dependency2.4.2. Some selected dependencies can not be resolved. Click here to configure repositories in yoursettings.xml.Additional Resources
CHAPTER 3. DEVELOPING FIRST APPLICATIONS WITH CODEREADY STUDIO TOOLS3.1. CONFIGURING CODEREADY STUDIO FOR USE WITH JBOSS EAP AND JBOSS WEB FRAMEWORK KIT
3.1.1. Setting up JBoss EAP3.1.1.1. Downloading, Installing, and Setting Up JBoss EAP from within the IDE3.1.1.2. Using Runtime Detection to Set Up JBoss EAP from within the IDE
3.1.2. Configuring Maven for JBoss EAP and JBoss Web Framework Kit Maven Repositories3.1.2.1. Specifying Maven settings.xml File Location
3.1.3. Using JBoss EAP and JBoss Web Framework Kit Maven Repositories3.1.3.1. Using the Offline Maven Repositories3.1.3.2. Using the Online Maven Repositories
3.2. CREATING AND IMPORTING NODE.JS APPLICATIONSPrerequisites3.2.1. Creating a new JavaScript Application3.2.2. Importing an Existing JavaScript Project3.2.3. Debugging a Node.js Application
3.3. DEVELOPING APPLICATIONS USING THE FORGE TOOL3.3.1. Creating a Forge Project3.3.2. Setting up Persistence3.3.3. Adding Fields to the Entity3.3.4. Creating a Scaffold3.3.5. Running and Testing the Application3.3.6. Creating Extensions or Add-ons
55555688
101111
121314141515
16161818222424
2525
27
272727282929303031323233363637373839404141
Table of Contents
1

PrerequisitesAdditional Resources
3.4. DEVELOPING APPLICATIONS USING THE HIBERNATE TOOLSPrerequisites3.4.1. Creating a JPA Project3.4.2. Generating DDL and Entities3.4.3. Creating a Hibernate Mapping File3.4.4. Creating a Hibernate Configuration File3.4.5. Creating a Hibernate Console Configuration File3.4.6. Modifying the Hibernate Configurations3.4.7. Generating Code and Reverse Engineering3.4.8. Troubleshooting
3.4.8.1. Problems While Loading Database DriverclassAdditional Resources
Adding LibrariesSetting up the Property FileSetting up the Configuration FileCreating, Managing, and Running the Configurations Window, Main tab, Check BoxesExporter Property and ValuesExporter
3.5. CREATING A MOBILE WEB APPLICATIONPrerequisites3.5.1. Creating an HTML5 Project3.5.2. Building and Deploying the Application3.5.3. Viewing the Application with BrowserSim3.5.4. Enabling LiveReload for BrowserSim3.5.5. Editing the Application
Additional Resources3.6. GENERATING AN HTML5 WEB APPLICATION USING THE MOBILE WEB PALETTE
3.6.1. Adding a New HTML5 jQuery Mobile File to a Project3.6.2. Adding New Pages to the Web Application3.6.3. Customizing the Home Page of the Web Application
3.6.3.1. Adding a Panel to the Page3.6.3.2. Adding a List to the Panel3.6.3.3. Adding a Button in the Header of the Page to Display the List
3.6.4. Running and Testing the HTML5 Mobile Application Using BrowserSimAdditional Resources
3.7. IMPORTING PROJECTS IN CODEREADY STUDIO USING GIT IMPORTProcedure3.7.1. Importing Projects from Git with Smart Import3.7.2. Importing Projects from Git
Procedure3.7.2.1. Importing Existing Eclipse Projects3.7.2.2. Importing Using the New Project Wizard3.7.2.3. Importing as a General Project
3.7.3. Importing Projects from the Remote Git Repository3.8. GETTING STARTED WITH JAVASCRIPT DEVELOPMENT FOR NEON 3
Prerequisites3.8.1. Installing node.js3.8.2. Installing the Package Managers (Bower and npm)
Procedure3.8.3. Using the Package Managers
Procedure
414445454548495051
535456565858585960606161
6262626466666667676869707072737475757575757576777880818181818181
Red Hat CodeReady Studio 12.11 Getting Started with CodeReady Studio Tools
2

. . . . . . . . . . . . . . . . . . . . . . . . . . . . . . . . . . . . . . . . . . . . . . . . . . . . . . . . . . . . . . . . . . . . . . . . . . . . . . . . . . . . . . . . . . . . . . . . . . . . . . . . . . . . . . . . . . . . . . . . . . . . . . . . . . . . . . . . . . . . . . . . . . . . . . . . . . . . . . . . . . . . . . . . . . . . . . . . . . . . . . . . . . . . . . . . . . . . . . . . . . . . . . . . . . . . . . . . . . . . . . . . . . . . . . . . . . . . . . . . . . . . . . . . . . . . . . . . . . . . . . . . . . . . . . . . . . . . . . . .
3.8.3.1. Creating a New ProjectProcedure
3.8.3.2. Enabling Bower InitProcedure
3.8.3.3. Enabling npm InitProcedure
3.8.3.4. Creating a New index.html FileProcedure
3.8.3.5. Using the Bower ToolProcedure
3.8.4. Using the Build SystemsPrerequisitesProcedure3.8.4.1. Adding Dependencies to the package.json File
Procedure3.8.4.2. Enabling the Gulp Plugin
Procedure3.8.4.3. Creating the gulpfile.js File
Procedure3.8.4.4. Using the Gulp Plugin
Procedure3.8.5. Working with the Node.js Application
PrerequisitesProcedure3.8.5.1. Importing the jsdt-node-test-project
Procedure3.8.5.2. Running the index.js File
Procedure3.8.5.3. Debugging the Node.js Application
ProcedureAdditional Resources
CHAPTER 4. DEPLOYING YOUR APPLICATIONS4.1. DEPLOYING APPLICATIONS TO A LOCAL SERVER
Procedure4.1.1. Configuring the IDE for a Local Runtime Server
Procedure4.1.2. Deploying an Application
Procedure4.1.3. Changing and Republishing the Application
ProcedureAdditional Resources
4.2. CONFIGURING A REMOTE SERVERProcedure4.2.1. Setting up a Remote Server
Procedure
818181
82828283838484858686868687878888898989898989899090909090
9292929292929293939393939393
Table of Contents
3

Red Hat CodeReady Studio 12.11 Getting Started with CodeReady Studio Tools
4

CHAPTER 1. SETTING UP AND MANAGING A REPOSITORYFOR YOUR PROJECTS
1.1. USING GIT WITH CODEREADY STUDIO
The IDE includes the Git Perspective to allow developers to create, add, and manage their Gitrepositories quickly and easily with a graphical interface. This article introduces the basic workflow of aGit project and how to accomplish the most common Git-related tasks via the Git perspective.
1.1.1. Setting Up the Git Perspective
To locate the Git Perspective in the IDE:
1. In the IDE, click Window > Perspective > Open Perspective > Other.
2. In the Open Perspective window, click Git and click Open. The Git Repositories view appears.
1.1.2. Setting up a Repository in the Git Perspective
The first step to using the Git Perspective in the IDE is to set up a Git repository.
1.1.2.1. Creating a New Git Repository
If a repository is not already created and available, use the following steps to create a new repository:
1. Click the Create a new Git Repository and add it to this view icon.
Figure 1.1. Click the Create a New Git Repository Button
2. In the Create a Git Repository window:
a. Ensure that the automatically populated default value for the Repository directory field iscorrect.
b. Optionally, click the Create a bare repository checkbox to create a new bare repository.For details about bare repositories and how they differ from a normal repository, see theAdditional Resources section.
Figure 1.2. Create a New Git Repository
CHAPTER 1. SETTING UP AND MANAGING A REPOSITORY FOR YOUR PROJECTS
5
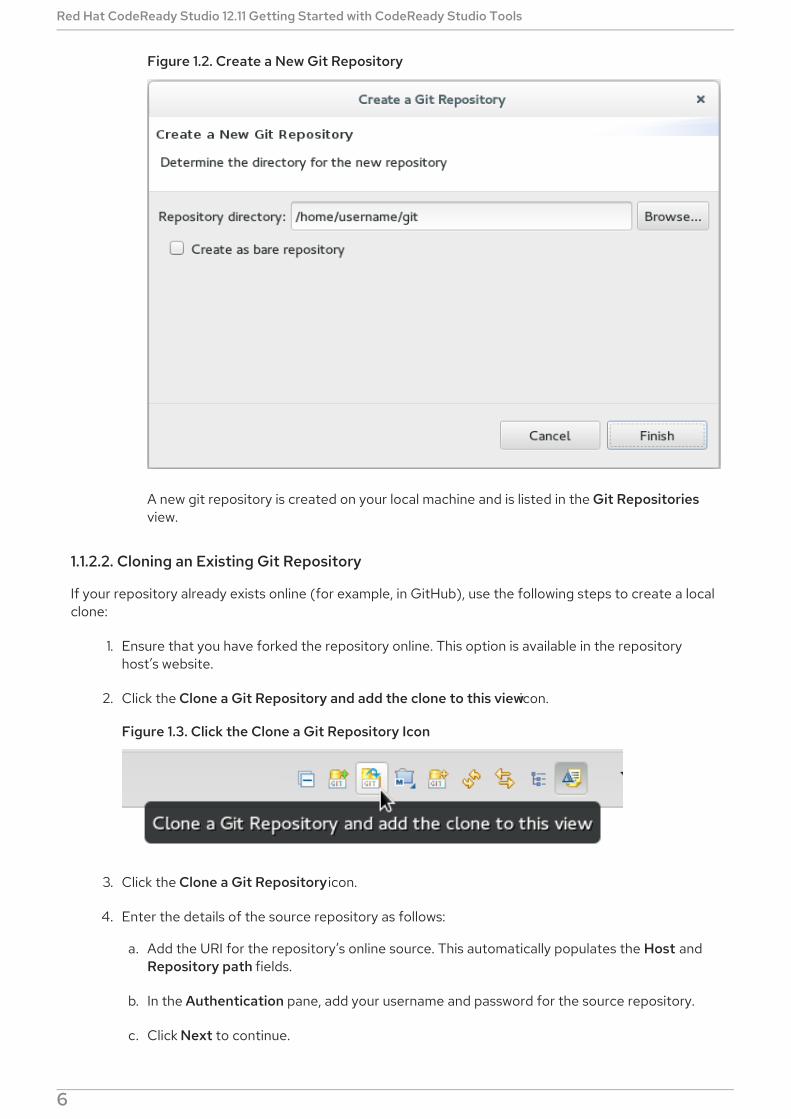
Figure 1.2. Create a New Git Repository
A new git repository is created on your local machine and is listed in the Git Repositoriesview.
1.1.2.2. Cloning an Existing Git Repository
If your repository already exists online (for example, in GitHub), use the following steps to create a localclone:
1. Ensure that you have forked the repository online. This option is available in the repositoryhost’s website.
2. Click the Clone a Git Repository and add the clone to this view icon.
Figure 1.3. Click the Clone a Git Repository Icon
3. Click the Clone a Git Repository icon.
4. Enter the details of the source repository as follows:
a. Add the URI for the repository’s online source. This automatically populates the Host andRepository path fields.
b. In the Authentication pane, add your username and password for the source repository.
c. Click Next to continue.
Figure 1.4. Enter the Source Repository Details
Red Hat CodeReady Studio 12.11 Getting Started with CodeReady Studio Tools
6

Figure 1.4. Enter the Source Repository Details
5. In the Clone Git Repository window, select the branches that you want to clone and click Next.
6. Customize the local version of your Git repository as follows:
a. Confirm that the automatically populated information for the destination Directory andInitial Branch are correctly populated.
b. Optionally, set a non-default name for the Remote name field.
c. Optionally, select the Add project to working sets check box and use the drop down menuand the Select button to select the appropriate working sets for this repository.
Figure 1.5. Customize the Local Version of the Git Repository
CHAPTER 1. SETTING UP AND MANAGING A REPOSITORY FOR YOUR PROJECTS
7

Figure 1.5. Customize the Local Version of the Git Repository
7. Click Finish to conclude cloning an existing Git repository. The new cloned repository is listed inthe Git Repositories view.
1.1.2.3. Adding an Existing Local Git Repository
If you have already cloned a Git repository locally, the following instructions are necessary to add yourGit repository to the IDE. If you have not yet cloned your repository, follow the instructions in thefollowing prerequisites section.
Prerequisites
1. Ensure that you have forked the repository online.
2. On the command line on your local system, navigate to the location where you want to store the
Red Hat CodeReady Studio 12.11 Getting Started with CodeReady Studio Tools
8

2. On the command line on your local system, navigate to the location where you want to store thelocal copy of the repository and enter the following command to clone the repository:
$ git clone _<repository URL>_
Use the following instructions to add your existing local Git Repository to CodeReady Studio’s GitPerspective:
1. Click the Add an existing local Git Repository to this view icon.
Figure 1.6. Click the Add an Existing Local Git Repository Icon
2. Select the local Git Repository as follows:
a. Click Browse to navigate to the local directory that contains the Git repository.
b. Optionally, select the Look for nested repositories checkbox to search for nestedrepositories.
c. In the Search results pane, ensure that the appropriate .git file is selected and click Finish.
Figure 1.7. Find and Add Local Repository
CHAPTER 1. SETTING UP AND MANAGING A REPOSITORY FOR YOUR PROJECTS
9

Figure 1.7. Find and Add Local Repository
The local repository now appears in the Git Repositories view.
1.1.3. Adding a Remote for the Repository
After setting up your repository for the first time, set up a remote for repository. This is a one-time setup step for newly created or added repository.
To set up the remote for your repository:
1. In the Git Repositories view, expand the target repository.
2. From the expanded options, right-click Remotes and then Create Remote.
3. In the New Remote dialog box:
a. Add a name in the Remote name field.
Red Hat CodeReady Studio 12.11 Getting Started with CodeReady Studio Tools
10

b. Ensure that Configure push is selected.
c. Click OK to continue.
4. In the Configure Push dialog box:
a. Click Change to view the Select a URI dialog box.
b. In the URI field, add the URI to your repository . This automatically populates the Host andRepository path fields.
c. In the Authentication pane, add your repository username and password and click Finish tocontinue.
5. Click Save to save your push configuration settings. Expand the Remotes folder in therepository view to see the newly added remote.
1.1.4. Creating and Working With a New Branch
This section provides instructions for creating a new branch and common tasks that you can perfromwith the new branch.
1.1.4.1. Creating a New Branch
If your repository is already set up in the IDE, create a new branch to make changes to the files.
To create a new branch:
1. In the Git Repositories view:
a. Expand the name of your Git Repository.
b. Click Branches to expand the branch view.
c. Click Remote Tracking to view all remote branches for the repository.
d. A branch displays with a name that begins with origin/master. Right-click this branch andclick Create Branch.
Figure 1.8. Create a Branch from Origin/Master
CHAPTER 1. SETTING UP AND MANAGING A REPOSITORY FOR YOUR PROJECTS
11

2. Add the required details about the new branch:
a. In the Branch name field, add the desired new branch name.
b. Ensure that the Configure upstream for push and pull checkbox is selected.
c. In the When pulling options, select the option that suits your requirement.
d. Ensure that the Checkout new branch check box is selected and click Finish.
Figure 1.9. Add Details for a New Branch
The new branch appears under {Repository_Name} > Branches > Local.
1.1.4.2. Working in the New Branch
After creating a new branch, you can implement changes in the new branch as follows:
1. Expand {Repository_Name} > Branches > Local and find the new branch where changes are tobe implemented.
2. Confirm that the target branch is checked out. The currently checked-out branch displays asmall check mark.
Figure 1.10. An Example of a Checked-out Branch
3. Right-click on the checked-out branch name and click Show In > Terminal.
Figure 1.11. The Show Branch in Terminal Option
Red Hat CodeReady Studio 12.11 Getting Started with CodeReady Studio Tools
12

Figure 1.11. The Show Branch in Terminal Option
4. Next to the Terminal tab that has just opened, click the Open a Terminal icon to view thecommand line prompt in this view.
Figure 1.12. The Open a Terminal Icon
5. In the Launch Terminal dialog box:
a. In the Choose a Terminal list, ensure that Local Terminal is selected.
b. In the Encoding list, click Default (ISO-8859-1). Click OK. Note that as a default, theterminal window is at the /home/YourCurrentUser/ directory.
The Terminal tab now displays a command line terminal. Use the terminal view to make the requiredchanges to your checked-out files.
1.1.4.3. Updating the Branch Before Implementing the Changes
When working locally on a branch, it is better to ensure the local branch is up to date before creating apull request (PR). As an example, if someone else has checked out the same repository and created anew branch, made changes, and merged the changes, use the following procedure to update yourrepository and branch before committing your own changes.
In the example below, a new branch called TrackingID-1234 is created using the IDE. Assuming that
CHAPTER 1. SETTING UP AND MANAGING A REPOSITORY FOR YOUR PROJECTS
13

someone else is working on the same repository and has created a new branch called NEWBRANCH,made changes to it, and then merged the changes back into the repository. The local branch(TrackingID-1234) is now out of date because it does not include the changes from NEWBRANCH. Usethe following instructions to update the branch:
1. Right-click the name of the repository to update and click Pull. A status menu appears thatdisplays the progress of the pull request. When the pull is complete, the Pull Result for{Repository_Name} window appears showing the results of the fetch and update operations.
2. Click Close to conclude the operation. The repository now contains the most updated versionof the contents.
1.1.5. Committing and Merging the Changes
After all the required changes are complete, commit the changes and then create a PR. PRs are thenevaluated by the repository owner and either merged into the repository or rejected.
To commit and merge the changes:
1. Expand {Repository_Name} > Branches > Local. Ensure that the check mark that indicates thecurrent branch appears at the correct working branch.
2. Right-click the name of the repository and click Commit.
3. In the Git Staging view:
a. In the Commit message field, add a commit message describing the changes.
b. Confirm that the automatically populated Author and Committer fields display the correctname and email address.
Figure 1.13. Add details in the Commit Changes Field
c. Click Commit to create a new commit (without creating a Pull Request) or click Commitand Push to commit the changes and create a Pull Request at the same time.
1.1.5.1. Committing and Pushing the Changes
If you selected Commit and Push in Section 1.1.5, “Committing and Merging the Changes” , use thefollowing instructions:
Red Hat CodeReady Studio 12.11 Getting Started with CodeReady Studio Tools
14
1. In the Login dialog box, enter your repository access username and password and click OK.
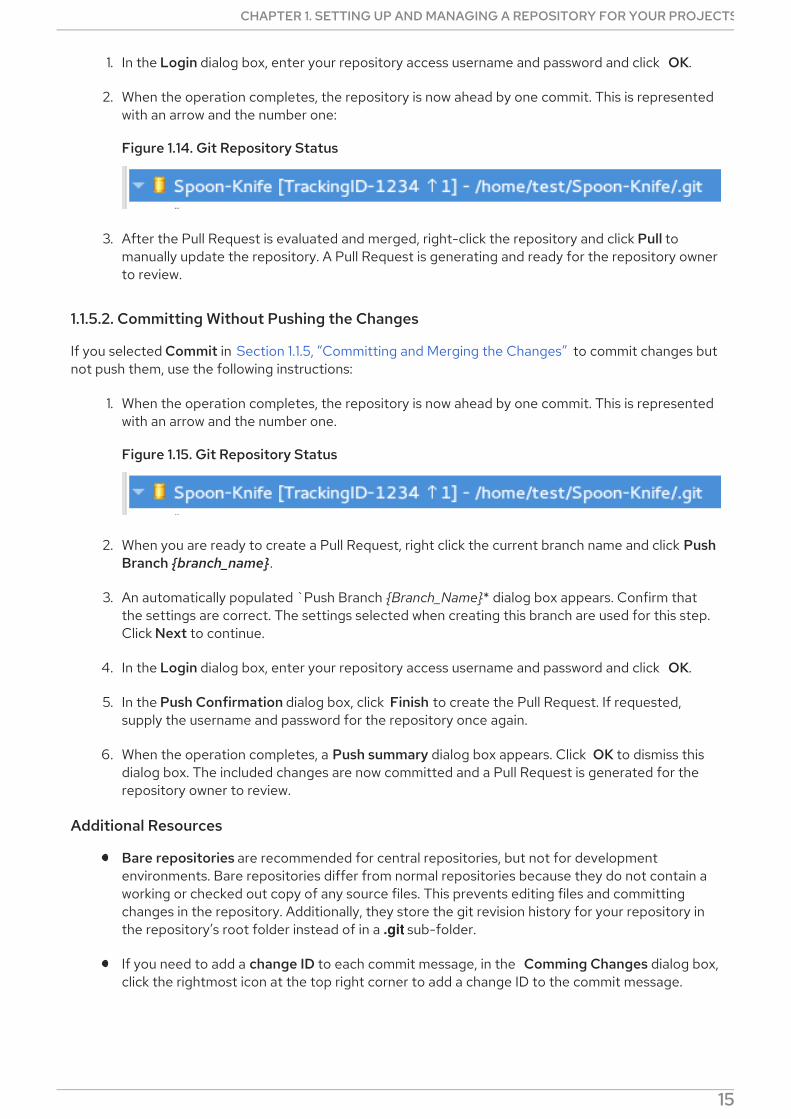
2. When the operation completes, the repository is now ahead by one commit. This is representedwith an arrow and the number one:
Figure 1.14. Git Repository Status
3. After the Pull Request is evaluated and merged, right-click the repository and click Pull tomanually update the repository. A Pull Request is generating and ready for the repository ownerto review.
1.1.5.2. Committing Without Pushing the Changes
If you selected Commit in Section 1.1.5, “Committing and Merging the Changes” to commit changes butnot push them, use the following instructions:
1. When the operation completes, the repository is now ahead by one commit. This is representedwith an arrow and the number one.
Figure 1.15. Git Repository Status
2. When you are ready to create a Pull Request, right click the current branch name and click PushBranch {branch_name}.
3. An automatically populated `Push Branch {Branch_Name}* dialog box appears. Confirm thatthe settings are correct. The settings selected when creating this branch are used for this step.Click Next to continue.
4. In the Login dialog box, enter your repository access username and password and click OK.
5. In the Push Confirmation dialog box, click Finish to create the Pull Request. If requested,supply the username and password for the repository once again.
6. When the operation completes, a Push summary dialog box appears. Click OK to dismiss thisdialog box. The included changes are now committed and a Pull Request is generated for therepository owner to review.
Additional Resources
Bare repositories are recommended for central repositories, but not for developmentenvironments. Bare repositories differ from normal repositories because they do not contain aworking or checked out copy of any source files. This prevents editing files and committingchanges in the repository. Additionally, they store the git revision history for your repository inthe repository’s root folder instead of in a .git sub-folder.
If you need to add a change ID to each commit message, in the Comming Changes dialog box,click the rightmost icon at the top right corner to add a change ID to the commit message.
CHAPTER 1. SETTING UP AND MANAGING A REPOSITORY FOR YOUR PROJECTS
15

CHAPTER 2. CONFIGURING MAVEN BASICSIn the context of application development, Maven provides a standardized build system for projects.One of the main benefits of using Maven with your project is that it facilitates fetching dependenciesfrom one or more repositories. This article serves as an introduction to using Maven with the IDE.
Root Maven projects can serve as aggregators for multiple Maven modules, also known as sub-projects.For each module that is part of a maven project, a <module> entry is added to the project’s pom.xml file.A pom.xml that contains <module> entries is often referred to as an aggregator pom.
When modules are included into a project it is possible to execute Maven goals across all of the modulesby a single command issued from the parent project directory.
NOTE
The provided instructions pertain to the creation of a parent+module project structure. Ifyou prefer to create a simple project, simply start with an archetype or don’t use the pompackaging in step 2.i of the Section 2.1, “Creating a New Maven Project” section.
2.1. CREATING A NEW MAVEN PROJECT
Use the following instructions to create the parent project of a multi-module Maven project. Theinstructions provided ensure that the packaging option is set to pom, which is a requirement for multi-module Maven projects. Alternately, to create a standalone Maven project instead, set the packagingoption to an option other than pom.
To create a new Maven project:
1. In the workspace, click File > New > Other.
2. In the Filter field, type maven and then click Maven Project from the search results.
3. Click Next to continue.
4. Enter the initial project details:
a. Click the Create a simple project (skip archetype selection) check box. If this check box isselected, the Select an Archetype step of the wizard is skipped and the project type is setto pom, which is required to create a Maven Module based on this Maven project.Alternately, to create a standalone project, clear the Create a simple project (skiparchetype selection) check box and follow the instructions in the wizard.
b. Ensure that the Use default Workspace location check box is clear and specify a non-default location for your workspace files using the Browse button. Using a non-defaultworkspace location is recommended because this allows other tools to access theworkspace location easily.
c. Optional, click the Add project(s) to working set check box to add the newly createdprojects to a working set.
d. Optional, click Advanced to view additional optional advanced configuration for the newMaven project, such as:
i. Resolve Workspace projects: Dependencies opened as workspace projects will beresolved without having to install them to your local Maven repository first. This way,any changes made to one of these dependencies will have an immediate effect on other
Red Hat CodeReady Studio 12.11 Getting Started with CodeReady Studio Tools
16
projects consuming it (compilation, refactoring, etc.). When Resolve Workspaceprojects is disabled, dependencies existing in the workspace must be installed to yourlocal Maven repository after any change (by running mvn install), in order to seeeffects in projects consuming them.
ii. Profiles: Select a set of Maven profiles to activate or deactivate in the workspace.Profiles are defined in the project pom.xml, or inherited from a parent pom.xml, ordefined in the relevant settings.xml.
iii. Name templates: Allows you to disambiguate project names in the workspace byprepending or appending the group ID or SCM branch names to the default artifact ID.
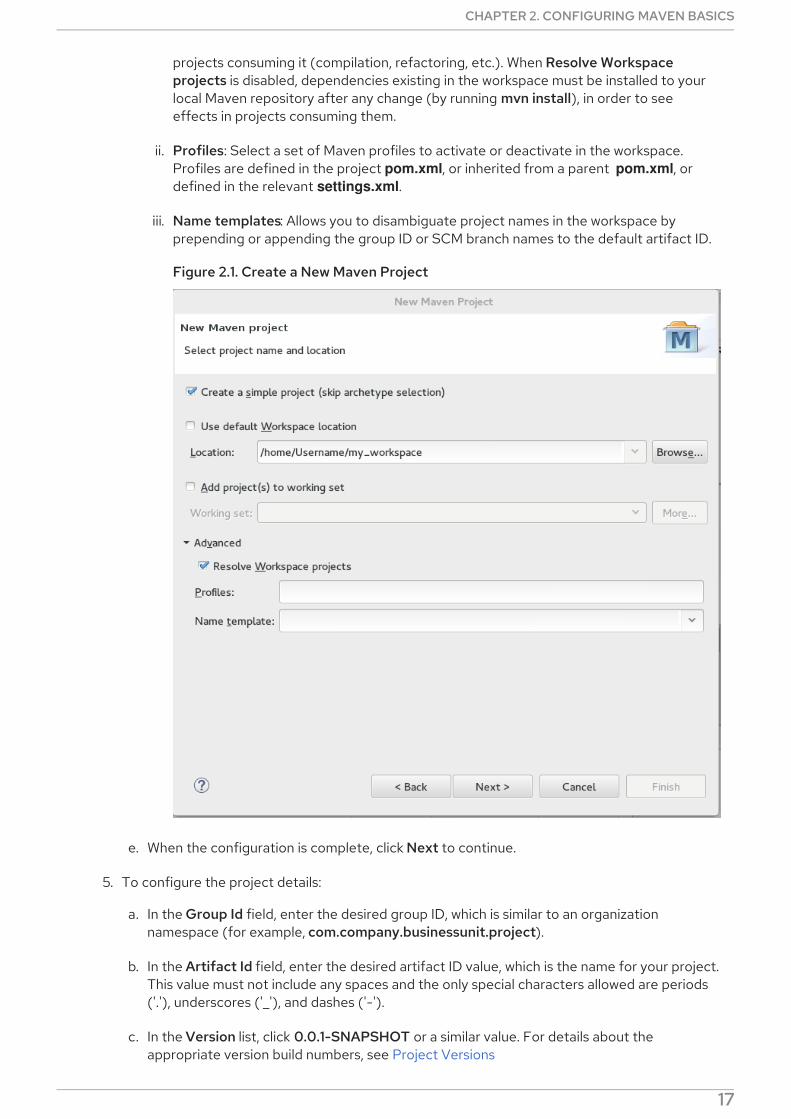
Figure 2.1. Create a New Maven Project
e. When the configuration is complete, click Next to continue.
5. To configure the project details:
a. In the Group Id field, enter the desired group ID, which is similar to an organizationnamespace (for example, com.company.businessunit.project).
b. In the Artifact Id field, enter the desired artifact ID value, which is the name for your project.This value must not include any spaces and the only special characters allowed are periods('.'), underscores ('_'), and dashes ('-').
c. In the Version list, click 0.0.1-SNAPSHOT or a similar value. For details about theappropriate version build numbers, see Project Versions
CHAPTER 2. CONFIGURING MAVEN BASICS
17
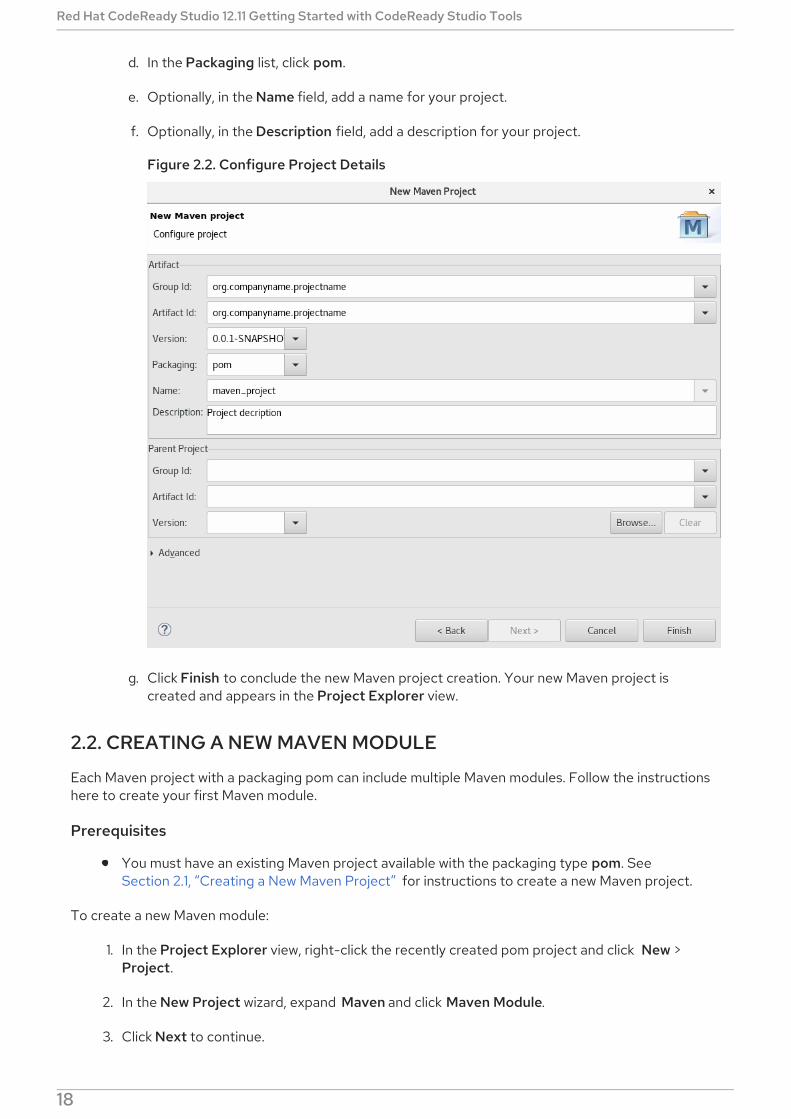
d. In the Packaging list, click pom.
e. Optionally, in the Name field, add a name for your project.
f. Optionally, in the Description field, add a description for your project.
Figure 2.2. Configure Project Details
g. Click Finish to conclude the new Maven project creation. Your new Maven project iscreated and appears in the Project Explorer view.
2.2. CREATING A NEW MAVEN MODULE
Each Maven project with a packaging pom can include multiple Maven modules. Follow the instructionshere to create your first Maven module.
Prerequisites
You must have an existing Maven project available with the packaging type pom. SeeSection 2.1, “Creating a New Maven Project” for instructions to create a new Maven project.
To create a new Maven module:
1. In the Project Explorer view, right-click the recently created pom project and click New >Project.
2. In the New Project wizard, expand Maven and click Maven Module.
3. Click Next to continue.
Red Hat CodeReady Studio 12.11 Getting Started with CodeReady Studio Tools
18

4. To enter the initial module details:
a. Ensure that the Create a simple project (skip archetype selection) check box is clear. Ifthis check box is clicked, the Select an Archetype step of the wizard is skipped.
b. In the Module Name field, enter the desired module name. This value corresponds to theMaven project’s Project ID.
c. Use the Browse button to locate the desired parent project and select it.
d. Optionally, clikc the Add project(s) to working set check box to add the newly createdprojects to a working set.
e. Optionally, click Advanced to view additional optional advanced configuration for the newMaven project, such as:
i. Resolve Workspace projects: Dependencies opened as workspace projects will beresolved without having to install them to your local Maven repository first. This way,any changes made to one of these dependencies will have an immediate effect on otherprojects consuming it (compilation, refactoring, etc.). When Resolve Workspaceprojects is disabled, dependencies existing in the workspace must be installed to yourlocal Maven repository after any change (by running mvn install), in order to seeeffects in projects consuming them.
ii. Profiles: Select a set of Maven profiles to activate or deactivate in the workspace.Profiles are defined in the project pom.xml, or inherited from a parent pom.xml, ordefined in the relevant settings.xml.
iii. Name templates: Allows you to disambiguate projects names in the workspace byprepending or appending the group ID or SCM branch names to the default artifact ID.
Figure 2.3. Set the Module Name and Parent
CHAPTER 2. CONFIGURING MAVEN BASICS
19

Figure 2.3. Set the Module Name and Parent
f. When the configuration is complete, click Next to continue.
5. To enter the module archetype information:
a. Ensure that the Show the last version of Archetype only check box is clicked. This ensuresthat only the latest version of each archetype displays.
b. Select an archetype based on the purpose of the project you are creating. Use the keywordmaven-archetype-quickstart in the Filter field to locate a sample Maven projectarchetype.
Figure 2.4. Select a Module Archetype
Red Hat CodeReady Studio 12.11 Getting Started with CodeReady Studio Tools
20
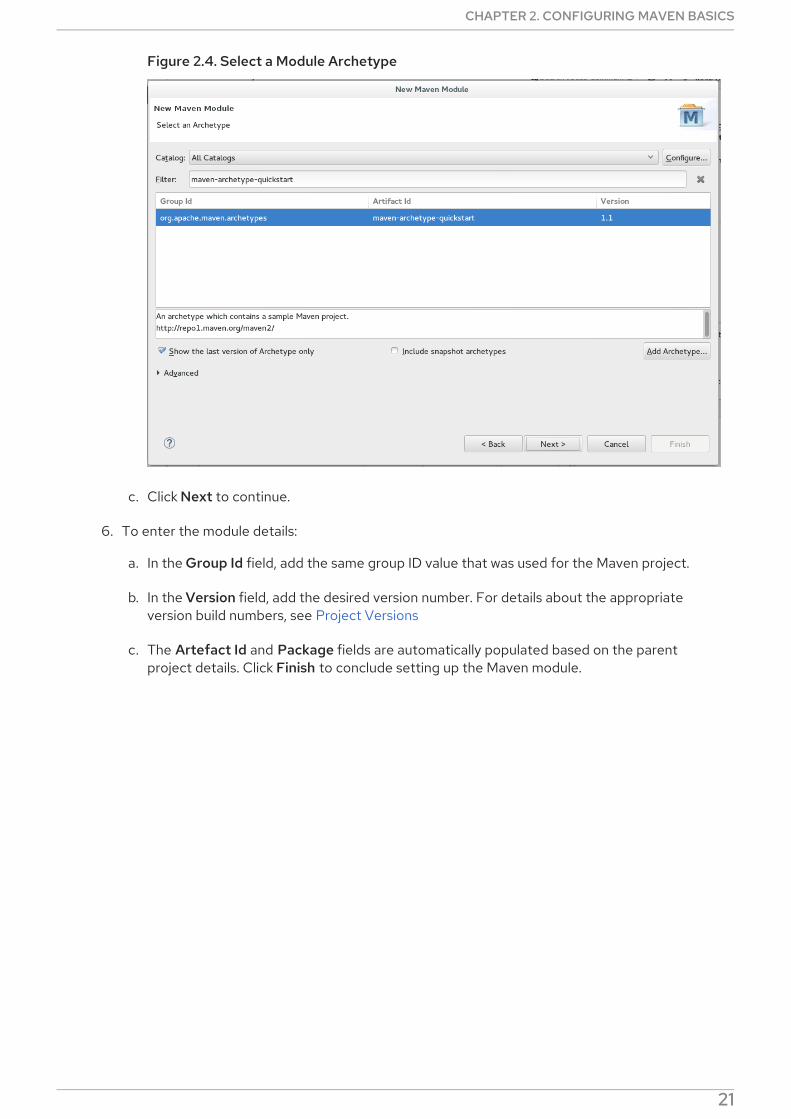
Figure 2.4. Select a Module Archetype
c. Click Next to continue.
6. To enter the module details:
a. In the Group Id field, add the same group ID value that was used for the Maven project.
b. In the Version field, add the desired version number. For details about the appropriateversion build numbers, see Project Versions
c. The Artefact Id and Package fields are automatically populated based on the parentproject details. Click Finish to conclude setting up the Maven module.
Figure 2.5. Configure the Module Archetype Parameters
CHAPTER 2. CONFIGURING MAVEN BASICS
21

Figure 2.5. Configure the Module Archetype Parameters
7. Optionally, to change the settings for the created Maven module, expand the module name inthe Project Explorer view and double click pom.xml from the expanded list. An Overview tabappears for you to chnage the settings if you wish to.
Figure 2.6. Change the Module Settings from the Overview View
Your new Maven module is created and appears in the Project Explorer view. Additionally, ahierarchical view of the nested projects is now available in the Project Explorer view as well (seeNested/Hierarchical view of projects).
2.3. ADDING MAVEN SUPPORT TO AN EXISTING NON-MAVENPROJECT
For an existing application that was not created with Maven support, use the following instructions to
Red Hat CodeReady Studio 12.11 Getting Started with CodeReady Studio Tools
22

For an existing application that was not created with Maven support, use the following instructions toadd Maven support to the non-Maven project:
1. In the Project Explorer view, right-click the project name and click Configure > Convert toMaven Project.
2. To configure details for the new pom file:
a. The basic fields for the new pom file are prepopulated based on the project details. Ifrequired, edit the existing values:
b. Optionally, in the Name field, add a name for the new project.
c. Optionally, in the Description field, add a brief description for the project.
Figure 2.7. Create a New Pom Descriptor
d. Click Finish to finalize the pom information.
3. If the project references java dependencies, a wizard appears displaying all these dependenciesand a green check mark when each dependency is identified. Learn more about dependencyidentification in the Troubleshooting section.
4. Check the Delete original references from project check box to avoid retaining duplicate orstale dependencies in your project.
Figure 2.8. Identify Maven Dependencies
CHAPTER 2. CONFIGURING MAVEN BASICS
23

Figure 2.8. Identify Maven Dependencies
5. Click Finish when all dependencies are converted. The existing project is now configured forMaven support.
2.4. TROUBLESHOOTING
2.4.1. Unidentifiable Dependency
Figure 2.9. Unidentifiable Dependency
Red Hat CodeReady Studio 12.11 Getting Started with CodeReady Studio Tools
24

Figure 2.9. Unidentifiable Dependency
Issue:
Either:
1. The jar file is corrupted/invalid.
2. The jar file is valid but does not contain any metadata used for identification.
Resolution:
1. Ensure that jar exists as a Maven artifact. If needed, you can install it to your local repository andthen click Identify dependencies.
2. Double-click the dependency, or click Edit and set the expected maven coordinates.
2.4.2. Some selected dependencies can not be resolved. Click here to configurerepositories in your settings.xml.
Figure 2.10. Dependencies Can Not Be Resolved Error
Issue: This error displays when a dependency can be identified (that is, whether it contains the pomproperties or other metadata) but the dependency is not available in any repository defined in yoursettings.xml file.
Resolution: Click the here link in the error message and compare the old and new settings for thedependency and add a new and correct repository. Users may choose to use one of the predefinedrepositories from Red Hat.
Additional Resources
CHAPTER 2. CONFIGURING MAVEN BASICS
25

The wizard used to convert a non-Maven project to a Maven project attempts to identify all theproject’s classpath entries and their equivalent Maven dependencies. From the list of identifieddependencies, users can select which ones will be added to the generated Maven pom.xml file.When identifying dependencies, one of several strategies may be used:
Checking if the jar contains the relevant maven metadata.
Identify the dependency using the Nexus indexer.
Identify the dependency using the JBoss Nexus instance REST API (if we are online) via aSHA1 search.
Identify the dependency using the search.maven.org REST API (if we are online) via a SHA1search.
All unchecked dependencies will be ignored and are not added to the generated pom.xml.However, some of these can be added as transitive dependencies to your project. For instance,if you add jsp-api but remove servlet-api, the latter appears in the project classpath, as it is adependency of jsp-api.
You can double-click on a dependency from a list (or click the Edit button) to edit its Mavencoordinates or scope. Selecting several dependencies (ctrl+click) and clicking the Edit buttonallows batch editing of their scope.
Red Hat CodeReady Studio 12.11 Getting Started with CodeReady Studio Tools
26
CHAPTER 3. DEVELOPING FIRST APPLICATIONS WITHCODEREADY STUDIO TOOLS
3.1. CONFIGURING CODEREADY STUDIO FOR USE WITH JBOSS EAPAND JBOSS WEB FRAMEWORK KIT
This article provides details for new and existing users who need to configure a fresh install of the IDE orupgrade the versions of Red Hat JBoss Enterprise Application Platform or JBoss Web Framework Kit inuse.
The IDE supports application development and deployment with JBoss EAP and JBoss Web FrameworkKit only after you configure the IDE for use with JBoss EAP and JBoss Web Framework Kit. Thisconfiguration is essential for using the enterprise versions of the example Maven projects provided inRed Hat Central. These projects are intended for deployment to JBoss EAP and necessitate IDE accessto the JBoss EAP and JBoss Web Framework Kit Maven repositories.
3.1.1. Setting up JBoss EAP
To set up JBoss EAP for use in the IDE, you must direct the IDE to the local or remote runtime servers.This establishes a communication channel between the IDE and the JBoss EAP server for efficientdeployment and server management workflows.
3.1.1.1. Downloading, Installing, and Setting Up JBoss EAP from within the IDE
If you have the IDE already installed but not JBoss EAP, you can download, install, and set up JBoss EAPfrom within the IDE. With this option, you can choose from a range of supported JBoss EAP versions; fordetails of supported JBoss EAP versions, see https://access.redhat.com/documentation/en-us/red_hat_codeready_studio/12.11/html/supported_configurations_and_components/.
To download, install, and set up JBoss EAP from within the IDE:
1. Start the IDE.
2. Click Window > Preferences, expand JBoss Tools, and then click JBoss Runtime Detection.
3. In the Paths pane, click Download.
4. In the Download Runtimes window, from the Download Runtimes table select the JBoss EAPversion that you want to download and click Next.
NOTE
For JBoss EAP 6.1.x and later, continue to follow the steps given here. For JBossEAP 6.0.x and earlier, follow the on-screen instructions for downloading JBossEAP from the Red Hat Customer Portal and after JBoss EAP is installed continueto Section 3.1.1.2, “Using Runtime Detection to Set Up JBoss EAP from within theIDE”.
Figure 3.1. Download Runtimes Window Listing Available JBoss EAP Versions
CHAPTER 3. DEVELOPING FIRST APPLICATIONS WITH CODEREADY STUDIO TOOLS
27

Figure 3.1. Download Runtimes Window Listing Available JBoss EAP Versions
5. In the JBoss.org Credentials window, enter your credentials and click Next.
6. In the Runtime JBoss EAP_version window, read the terms and conditions, and then click I accept the terms of the license agreement and then click Next. Note that if you havepreviously accepted the terms and conditions in the IDE or through the jboss.org website, thiswindow is skipped.
7. In the Download Runtime window, in the Install Folder field, click Browse and choose alocation in which to install JBoss EAP and click Finish. The Download 'JBoss EAP 1 windowshows the progress of the downlaod.
8. Click Apply and Close to close the Preferences window. The server is listed in the Serversview in stopped mode.
3.1.1.2. Using Runtime Detection to Set Up JBoss EAP from within the IDE
If the IDE and JBoss EAP are already installed, you can use runtime detection to set up JBoss EAP fromwithin the IDE. The runtime detection feature automatically identifies the JBoss EAP instance installedon your local system and generates a corresponding default server setup for use in the IDE. This featuremakes getting started with a default JBoss EAP server very quick.
NOTE
Red Hat CodeReady Studio 12.11 Getting Started with CodeReady Studio Tools
28

NOTE
Specific JBoss EAP versions are supported by each IDE release; for details of supportedJBoss EAP versions, see https://access.redhat.com/documentation/en-us/red_hat_codeready_studio/12.11/html/supported_configurations_and_components/.
To use runtime detection to set up JBoss EAP for use in the IDE:
1. Start the IDE.
2. Click Window → Preferences, expand JBoss Tools, and then select JBoss Runtime Detection.
3. Click Add.
4. Navigate to path/to/jboss-eap and click OK. JBoss Server Tools recursively scans the pathsearching for installed servers and displays a list of those it finds.
5. Ensure the jboss-eap-version check box is selected, where version denotes the JBoss EAPversion, and click OK.
Figure 3.2. Selecting a Runtime
6. Click Apply and Close to close the Preferences window. The server is listed in the Serversview in stopped mode.
3.1.2. Configuring Maven for JBoss EAP and JBoss Web Framework Kit MavenRepositories
To configure Maven to use the JBoss EAP and JBoss Web Framework Kit Maven repositories whenworking inside the IDE, you must ensure that the IDE knows the location of your Maven configuration settings.xml file and that the necessary profiles for the JBoss EAP and JBoss Web Framework KitMaven repositories are contained in that file. This ensures that Maven knows where to search for projectdependencies when it is called to build Maven projects from within the IDE.
3.1.2.1. Specifying Maven settings.xml File Location
If you have multiple Maven settings.xml files or you are using a shared settings.xml file, then this file
CHAPTER 3. DEVELOPING FIRST APPLICATIONS WITH CODEREADY STUDIO TOOLS
29

If you have multiple Maven settings.xml files or you are using a shared settings.xml file, then this filemay not be in the default location expected by the IDE. In this case, you must inform the IDE of the filelocation.
To specify the Maven settings.xml file location:
1. Start the IDE.
2. Click Window → Preferences, expand Maven, and then click User Settings.
3. For the User Settings field, click Browse and locate the settings.xml file.
4. Click Update Settings.
5. Click Apply and then click OK.
3.1.3. Using JBoss EAP and JBoss Web Framework Kit Maven Repositories
You can either download the JBoss EAP and JBoss Web Framework Kit Maven repositories from theRed Hat Customer Portal or use the online Maven repository located at https://maven.repository.redhat.com/ga.
3.1.3.1. Using the Offline Maven Repositories
If you have not previously used these versions of JBoss EAP and JBoss Web Framework Kit, you mustconfigure your Maven settings.xml file to use the associated product Maven repositories. You canmanually edit your settings.xml file in a text editor or use the CodeReady Studio Maven integrationfeature to automatically detect the JBoss repositories and appropriately edit your settings.xml file.
NOTE
The JBoss EAP and JBoss Web Framework Kit Maven repositories must be alreadyobtained from the Red Hat Customer Portal and located on a system that you can access.
To specify the JBoss EAP and JBoss Web Framework Kit Maven repositories locations using the IDE:
1. Start the IDE.
2. Click Window → Preferences, expand JBoss Tools, and then click JBoss Maven Integration.
3. Click Configure Maven Repositories.
4. Click Add Repository.
5. Click Recognize JBoss Maven Enterprise Repositories.
6. Navigate to path/to/jboss-eap-maven-repository and click OK. JBoss Maven Tools recursivelyscans the path searching for a Maven repository.
7. Modify the information in the ID and Name fields as desired, ensure the Active by defaultcheck box is selected, and then click OK.
Figure 3.3. Details of the Selected Maven Repository
Red Hat CodeReady Studio 12.11 Getting Started with CodeReady Studio Tools
30

Figure 3.3. Details of the Selected Maven Repository
8. Click Add Repository.
9. Click Recognize JBoss Maven Enterprise Repositories.
10. Navigate to path/to/jboss-wfk-maven-repository and click OK. JBoss Maven Tools recursivelyscans the path searching for a Maven repository.
11. Modify the information in the ID and Name fields as desired, ensure the Active by defaultcheck box is selected, and then click OK.
12. Click Finish and at the prompt asking if you are sure you want to update the Mavenconfiguration file click Yes. If the specified configuration file does not exist, JBoss Maven Toolscreates it.
13. Click Apply and click OK to close the Preferences window.
3.1.3.2. Using the Online Maven Repositories
Adding the online repository to the IDE, adds https://maven.repository.redhat.com/ga to your settings.xml , which takes care of all the dependencies.
To use the online Maven repositories:
1. Start the IDE.
2. Click Window → Preferences, expand JBoss Tools, and then click JBoss Maven Integration.
3. Click Configure Maven Repositories.
4. Click Add Repository.
5. In the Profile ID drop-down list, select redhat-ga-repository.
Figure 3.4. Add a Maven Repository
CHAPTER 3. DEVELOPING FIRST APPLICATIONS WITH CODEREADY STUDIO TOOLS
31

Figure 3.4. Add a Maven Repository
6. Click OK.
7. In the Configure Maven Repositories window, click Finish.
8. Click Apply and then click OK to close the Preferences window.
3.2. CREATING AND IMPORTING NODE.JS APPLICATIONS
Node.js is an event-based, asynchronous I/O framework and is used to develop applications that runJavaScript on the client and server side. This allows the application to re-use parts of the code and toavoid switching contexts. Node.js is commonly used to create applications such as static file servers,messaging middleware, HTML5 game servers, web application framework, and others.
CodeReady Studio supports node.js application development using the npm package installer and offersa built-in debugging tool to identify and fix issues with applications.
PrerequisitesEnsure that the following prerequisites are met to start developing node.js applications inCodeReady Studio:
1. Install npm. On Red Hat Enterprise Linux and Fedora, use the sudo dnf install npm command.
Red Hat CodeReady Studio 12.11 Getting Started with CodeReady Studio Tools
32

1. Install npm. On Red Hat Enterprise Linux and Fedora, use the sudo dnf install npm command.See the npm documentation (https://docs.npmjs.com/getting-started/installing-node) forinstallation information about other operating systems.
2. Install CodeReady Studio. You are now ready to start developing Node.js applications withCodeReady Studio.
3.2.1. Creating a new JavaScript Application
To create a new JavaScript project and application in CodeReady Studio:
1. To create a new JavaScript project:
a. Click File → New → Other and type JavaScript in the search text box.
b. Select JavaScript Project and click Next.
c. In the Project Name field, add a name for your new project.
d. Ensure that the rest of the fields, which are set to the default settings, are as required, andthen click Finish to create the new project.
e. If asked to view the JavaScript perspective, click Yes. Your new project is listed in the Project Explorer view.
2. To interactively create a package.json file:
a. Click File → New → Other and then type npm in the search box.
b. From the search results, click npm Init.
c. Set the Base directory to your JavaScript project folder in your CodeReady Studioworkspace.
d. Optionally, clear the Use default configuration check box to supply non-default values forthese fields.
e. Click Finish to continue with the default values for the package.json file or to continueafter changing the default values.
Figure 3.5. Generate a New package.json File
CHAPTER 3. DEVELOPING FIRST APPLICATIONS WITH CODEREADY STUDIO TOOLS
33

Figure 3.5. Generate a New package.json File
f. The new package.json file is generated and displayed for editing. If required, manually editthe file in the displayed pane and save the changes.
Figure 3.6. Manually Edit the Generated package.json File
Red Hat CodeReady Studio 12.11 Getting Started with CodeReady Studio Tools
34

Figure 3.6. Manually Edit the Generated package.json File
3. Manually edit the package.json file to add dependencies. Dependencies are modules whichprovide extended functionality, such as libraries and frameworks. See the following screencapture for an example of the required format for dependencies and developer dependencies.
Figure 3.7. Adding Dependencies to the package.json File
For further details about dependencies, see the NPM documentation:https://docs.npmjs.com/files/package.json#dependencies
4. Create a new JavaScript file with the required business logic:
a. In the Project Explorer view, right-click the name of your project, and select New → File.
b. In the dialog box, add a name for the new file, for example index.js, and click Finish tocreate the new file.
c. The new file displays for editing in a new tab. Add the required business logic to the yourJavaScript files and save the changes.
5. Run the project files by right-clicking the index.js file in your project and select Run As →
CHAPTER 3. DEVELOPING FIRST APPLICATIONS WITH CODEREADY STUDIO TOOLS
35
Node.js Application. The Console view appears and displays details about the application as itruns, or errors if it is unable to run the application. You have created a new JavaScript projectand application.
3.2.2. Importing an Existing JavaScript Project
You can import an existing JavaScript project directly into CodeReady Studio and then make changesand run the project as follows:
1. Click File → Import.
2. In the Import dialog box, expand the General option.
3. Click Existing Projects into Workspace and then click Next.
4. In the Import Projects dialog box:
a. Click either the Select root directory or Select archive file options based on your projectformat.
b. Click Browse to add the path to the project root directory or archive file.
c. In the Projects box, select one or more projects to import into the workspace.
d. If required, click the Search for nested projects option to locate nested projects in theroot directory or archive file.
e. Click the Copy projects into workspace option to save a copy of the imported project inthe workspace directory specified for CodeReady Studio.
f. If required, select the Add project to working sets checkbox and add the details for a newor existing working set.
g. Click Finish to add the project to the workspace. The Project Explorer view now containsyour imported project.
5. If required, expand the project in the Project Explorer view and either double-click the projectfiles to edit them, or right-click and select New → File to add a new JavaScript file for yourproject.
6. Run the project files by right-clicking the index.js file in your project and click Run As →Node.js Application. The Console view appears and displays details about the application as itruns, or errors if it is unable to run the application. You have imported an existing JavaScriptproject into CodeReady Studio.
3.2.3. Debugging a Node.js Application
After either creating a new Node.js project or importing an existing one and then running the project,some errors may appear. CodeReady Studio includes a debugger to help identify and resolve theseissues.
To use the debugging feature:
1. Start the debugger for your project:
a. In the Project Explorer view, expand your project.
Red Hat CodeReady Studio 12.11 Getting Started with CodeReady Studio Tools
36

b. Right-click the index.js file for your project and click Debug As → Node.js Project.
c. Select the Remember my decision check box in the dialog box to apply your selection tosubsequent perspective shifts and then click Yes or No to continue.
2. Review the elements of your project’s JavaScript files to locate errors in one of two ways:
a. Expand any variable listed in the Variables tab to view additional objects and edit thedetails for each item.
b. Hover the mouse cursor over any variables in the index.js tab to view and edit its propertydetails.
3. Make changes to the files to address the errors:
a. Edit the index.js file in the appropriate view.
b. Save the changes. The Console view runs the updated file and displays changes.
4. After debugging the errors, use the Resume, Suspend, and Terminate buttons (
) as follows to test your changes:
a. The Resume button (green triangle) continues running the project files.
b. The Suspend button (two yellow rectangles) temporarily stops running the project files toallow users to make changes.
c. The Terminate button (red square) ends the running of the project files.
5. Repeat steps 4 through 6 as necessary to locate and fix errors found by the debugger.
6. When debugging is concluded, click Window → Show View → Other and select Project Explorer from the options. This displays the list of projects again. You have debugged yourapplication and returned to the Project Explorer view.
3.3. DEVELOPING APPLICATIONS USING THE FORGE TOOL
CodeReady Studio offers Forge Tools for developing Java EE applications and to extend the IDEfunctionality in Eclipse. Start developing Java EE applications using either the Forge context menu orthe command line from the IDE.
3.3.1. Creating a Forge Project
After you have created a Forge project you can set up persistence, add entities and fields, and createscaffold for the project.
To create a new project:
1. Press Ctrl+4 to start Forge and open the JBoss Forge context menu.
2. Click Project:New to open the Create a new project window.
3. In the Create a new project window:
a. In the Project name field, type a project name.
CHAPTER 3. DEVELOPING FIRST APPLICATIONS WITH CODEREADY STUDIO TOOLS
37
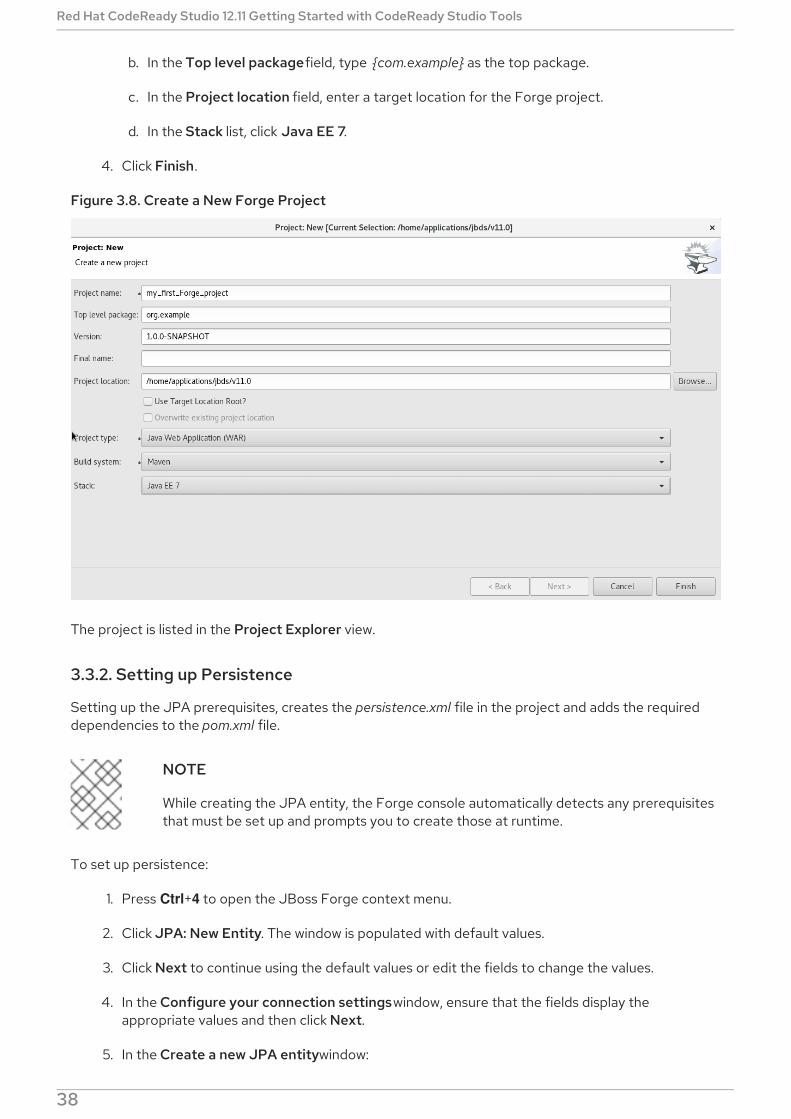
b. In the Top level package field, type {com.example} as the top package.
c. In the Project location field, enter a target location for the Forge project.
d. In the Stack list, click Java EE 7.
4. Click Finish.
Figure 3.8. Create a New Forge Project
The project is listed in the Project Explorer view.
3.3.2. Setting up Persistence
Setting up the JPA prerequisites, creates the persistence.xml file in the project and adds the requireddependencies to the pom.xml file.
NOTE
While creating the JPA entity, the Forge console automatically detects any prerequisitesthat must be set up and prompts you to create those at runtime.
To set up persistence:
1. Press Ctrl+4 to open the JBoss Forge context menu.
2. Click JPA: New Entity. The window is populated with default values.
3. Click Next to continue using the default values or edit the fields to change the values.
4. In the Configure your connection settings window, ensure that the fields display theappropriate values and then click Next.
5. In the Create a new JPA entity window:
Red Hat CodeReady Studio 12.11 Getting Started with CodeReady Studio Tools
38

a. The Package Name field shows the system defined name of the package, example:{your_Forge_project_name}.model. Edit the package name if desired.
b. In the Type Name field, type a name for the new entity. Example: Customer.
6. Click Finish. The new entity appears in the editor and is also listed in the Project Explorer viewwith the name: .java.
Figure 3.9. .java Displayed in the Editor
3.3.3. Adding Fields to the Entity
To add fields to the entity:
1. Press Ctrl+4 to open the JBoss Forge context menu.
2. Click JPA: New Field.
3. In the Create a new field window:
a. In the Target Entity field, select {package_name.model.entity}.
b. In the Field Name field, type FirstName.
4. Click Finish.
Figure 3.10. Add Field to the Entity
CHAPTER 3. DEVELOPING FIRST APPLICATIONS WITH CODEREADY STUDIO TOOLS
39
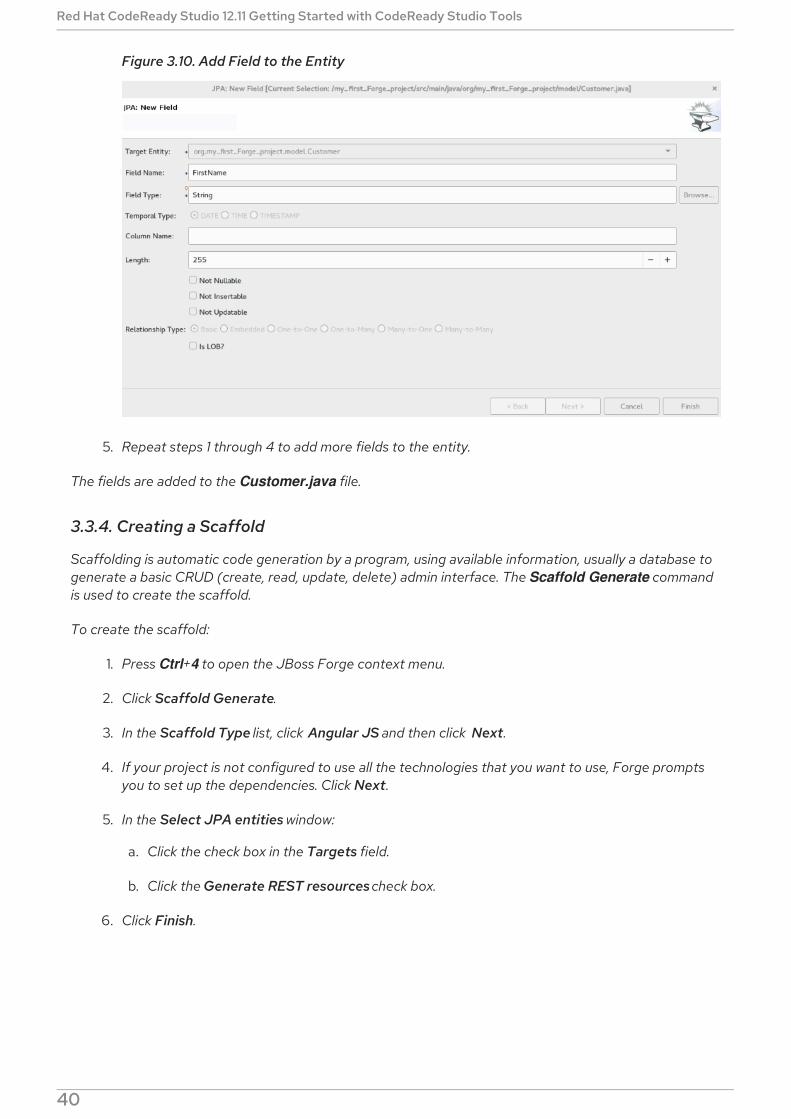
Figure 3.10. Add Field to the Entity
5. Repeat steps 1 through 4 to add more fields to the entity.
The fields are added to the Customer.java file.
3.3.4. Creating a Scaffold
Scaffolding is automatic code generation by a program, using available information, usually a database togenerate a basic CRUD (create, read, update, delete) admin interface. The Scaffold Generate commandis used to create the scaffold.
To create the scaffold:
1. Press Ctrl+4 to open the JBoss Forge context menu.
2. Click Scaffold Generate.
3. In the Scaffold Type list, click Angular JS and then click Next.
4. If your project is not configured to use all the technologies that you want to use, Forge promptsyou to set up the dependencies. Click Next.
5. In the Select JPA entities window:
a. Click the check box in the Targets field.
b. Click the Generate REST resources check box.
6. Click Finish.
Figure 3.11. Select JPA Entities to Create the Scaffold
Red Hat CodeReady Studio 12.11 Getting Started with CodeReady Studio Tools
40
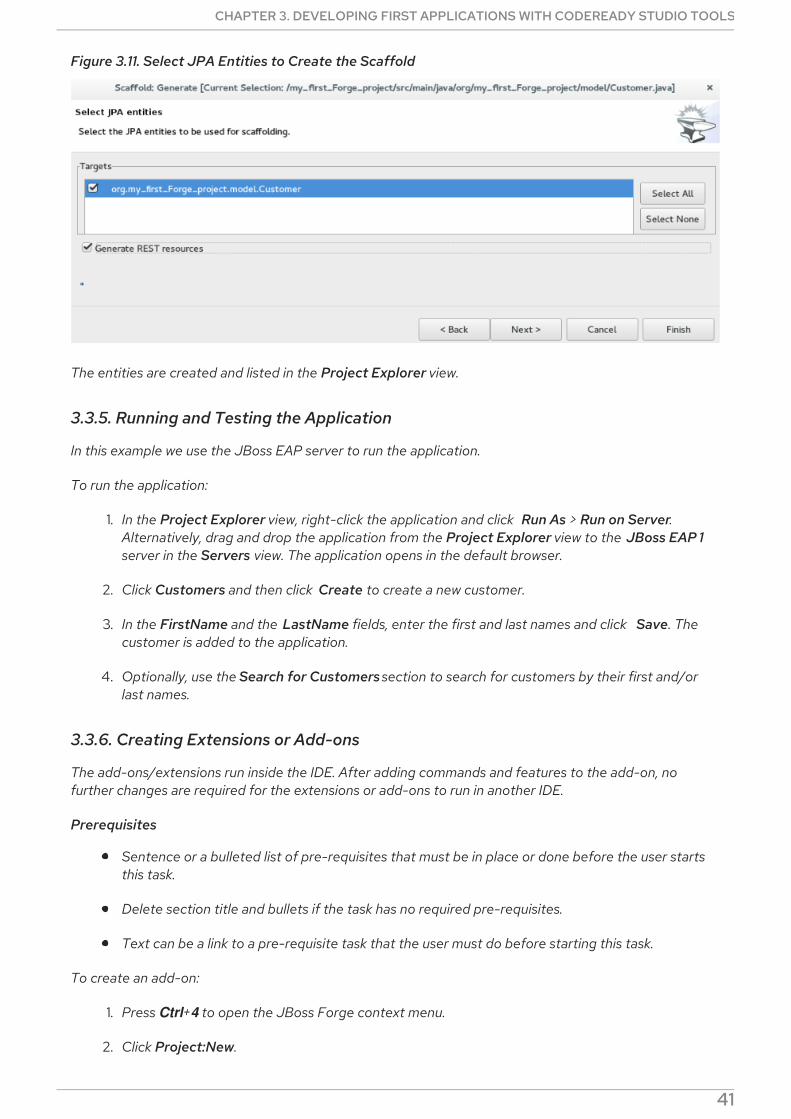
Figure 3.11. Select JPA Entities to Create the Scaffold
The entities are created and listed in the Project Explorer view.
3.3.5. Running and Testing the Application
In this example we use the JBoss EAP server to run the application.
To run the application:
1. In the Project Explorer view, right-click the application and click Run As > Run on Server.Alternatively, drag and drop the application from the Project Explorer view to the JBoss EAP 1server in the Servers view. The application opens in the default browser.
2. Click Customers and then click Create to create a new customer.
3. In the FirstName and the LastName fields, enter the first and last names and click Save. Thecustomer is added to the application.
4. Optionally, use the Search for Customers section to search for customers by their first and/orlast names.
3.3.6. Creating Extensions or Add-ons
The add-ons/extensions run inside the IDE. After adding commands and features to the add-on, nofurther changes are required for the extensions or add-ons to run in another IDE.
Prerequisites
Sentence or a bulleted list of pre-requisites that must be in place or done before the user startsthis task.
Delete section title and bullets if the task has no required pre-requisites.
Text can be a link to a pre-requisite task that the user must do before starting this task.
To create an add-on:
1. Press Ctrl+4 to open the JBoss Forge context menu.
2. Click Project:New.
CHAPTER 3. DEVELOPING FIRST APPLICATIONS WITH CODEREADY STUDIO TOOLS
41

3. In the Create a new project window:
a. In the Project name field, type a name for the add-on ( example_addon, in this case).
b. In the Project type list, click Forge Addon (JAR).
4. Click Next.
5. In the Furnace Addon Setup window, Depend on these addons section, Forge automaticallyselects the prerequisites. Review the dependencies and click Finish. The setting up of thesedependencies may take some time to complete. The add-on is listed in the Project Explorerview.
6. Press Ctrl+4 to open the Forge context menu.
7. Select Java: New Class to open the Java: New Class window.
8. In the Type Name field, type CustomCommand and click Finish. The CustomCommand.java fileopens in the editor.
9. To change this Java class into a Forge command:
a. Press Ctrl+4 to open the Forge context menu.
b. Select Addon: New UI Command to open the Generates a UICommand implementationwindow.
c. In the Generates a UICommand implementation window:
i. In the Type Name field, type CustomCommand.
ii. In the Command name field, type custom.
d. Click Finish.
Figure 3.12. Add a Command
The command is listed in the CustomerCommand.java file.
Red Hat CodeReady Studio 12.11 Getting Started with CodeReady Studio Tools
42

10. In the Project Explorer view, click the CustomerCommand.java file to select the file.
11. Press Ctrl+4 to open the Forge context menu.
12. Select Build and Install an Addon to open the Build and install a Forge addon window. TheProject directory field, by deafult, shows the path to the addon.
13. Click Finish to install the add-on into the IDE.
14. To execute the installed command:
a. Press Ctrl+4 to open the Forge context menu.
b. Select custom.
c. Add parameters to the method in order to add user input to the command. Copy and pastethe following command in the CustomCommand.java file and save the file.
package org.example_addon.commands;
import org.jboss.forge.addon.configuration.Configuration; import org.jboss.forge.addon.resource.URLResource; import org.jboss.forge.addon.ui.command.AbstractUICommand; import org.jboss.forge.addon.ui.context.UIBuilder; import org.jboss.forge.addon.ui.context.UIContext; import org.jboss.forge.addon.ui.context.UIExecutionContext; import org.jboss.forge.addon.ui.input.UIInput; import org.jboss.forge.addon.ui.metadata.UICommandMetadata; import org.jboss.forge.addon.ui.metadata.WithAttributes; import org.jboss.forge.addon.ui.util.Metadata; import org.jboss.forge.addon.ui.util.Categories; import org.jboss.forge.addon.ui.result.Result; import org.jboss.forge.addon.ui.result.Results;
import java.lang.Override; import java.lang.Exception;
import javax.inject.Inject;
public class CustomCommand extends AbstractUICommand { @Inject @WithAttributes(label = "JIRA URL", required = true) private UIInput<URLResource> url;
@Inject private Configuration config;
@Override public UICommandMetadata getMetadata(UIContext context) {
return Metadata.forCommand(getClass()) .name("JIRA: Setup") .description("Setup the JIRA Addon") .category(Categories.create("JIRA", "Setup")); }
CHAPTER 3. DEVELOPING FIRST APPLICATIONS WITH CODEREADY STUDIO TOOLS
43

15. To rebuild and install:
a. In the Project Explorer view, click the created add-on ( example_addon, in this case).
b. Press Ctrl+4 to open the Forge context menu.
c. Select Build and Install an Addon. The Project directory field, by deafult, shows the path tothe addon.
d. Click Finish to install the add-on into the IDE.
e. Press Ctrl+4 to open the Forge context menu.
f. Click JIRA: Setup.
Figure 3.13. Add-on Listed in the Forge Context Menu
The add-on is created and listed in the Forge context menu.
Additional Resources
You can launch the Forge Console by clicking Window > Show view > Forge Console. The ForgeConsole view opens in an inactive state.
You can start JBoss Forge by clicking the Start {JBoss Forge_version} button ).
To link the Forge Console output with the open editor, click the Link with Editor button ( ).
@Override public void initializeUI(UIBuilder builder) throws Exception
{ builder.add(url); }
@Override public Result execute(UIExecutionContext context) { String targetUrl = url.getValue().getFullyQualifiedName(); Configuration subset = config.subset("jira"); subset.setProperty("url", targetUrl); return Results.success("JIRA URL set to: "+targetUrl); } }
Red Hat CodeReady Studio 12.11 Getting Started with CodeReady Studio Tools
44

3.4. DEVELOPING APPLICATIONS USING THE HIBERNATE TOOLS
Hibernate Tools is a collection of tools for projects related to Hibernate version 5 and earlier. The toolsprovide Eclipse plugins for reverse engineering, code generation, visualization and interaction withHibernate.
PrerequisitesConnect to the sakila-h2 databass:
1. Download the sakila-h2 database from the h2 version of the Sakila database .
2. On the terminal, navigate to the directory where you have saved the sakila-h2.jar file and run thefollowing command to start the database: $ ./runh2.sh.
3.4.1. Creating a JPA Project
To create a JPA project and connect to the database:
1. In the workspace, click File > New > Other and then search for JPA Project and double-click it toopen the New JPA Project wizard.
2. In the New JPA Project wizard:
a. In the Project name field, type a name for the project.
b. In the Target runtime field, click a runtime server that you wish to use.
c. In the JPA version list, click 2.1.
3. Click Next.
Figure 3.14. Create a New JPA Project
CHAPTER 3. DEVELOPING FIRST APPLICATIONS WITH CODEREADY STUDIO TOOLS
45

Figure 3.14. Create a New JPA Project
4. In the New JPA Project - Java window, select the source folder on the build path and click Next.
5. In the JPA Facet window, click Add connection.
Red Hat CodeReady Studio 12.11 Getting Started with CodeReady Studio Tools
46

6. In the New Connection Profile window:
a. Click Generic JDBC.
b. In the Name field, type sakila.
7. Click Next.
8. In the New Connection Profile window:
a. Click the New Driver Definition icon ( ) located next to the Drivers field to open theNew Driver Definition window.
9. In the Name/Type tab, click Generic JBDC Driver and then click the JAR list tab.
10. Click Add JAR/Zip and then select the previously downloaded .jar file in the sakila-h2-masterfolder.
Figure 3.15. Select the JAR File
11. Click the Properties tab and enter the following details in the Properties table:
a. Click Connection URL and type jdbc:h2:tcp://localhost/sakila.
b. Click Driver Class, and then click the ellipsis icon .
c. In the Available Classes from Jar List window, click Browse for class. Click OK when therequired driver is found (org.h2.Driver, in this case).
CHAPTER 3. DEVELOPING FIRST APPLICATIONS WITH CODEREADY STUDIO TOOLS
47

d. Click User ID, type sa.
12. In the New Driver Definition window, click OK.
13. In the New Connection Profile window, click Finish to return to the JPA Facet window.
14. In the Platform list, click Hibernate (JPA 2.1).
15. In the JPA implementation pane, Type list, either click User Library and to add the libraries inthe Preferences (Filtered) window see, the Additional Resources, Adding Libraries section fordetailed steps, OR click Disable Library Configuration.
16. Click Finish.
17. If you see the Open Associated Perspective window asking if you want to open the JPAperspective, click Open Perspective. The project is created and is listed in the Project Explorerview.
3.4.2. Generating DDL and Entities
DDL, Data Definition Language, is a syntax to define data structures. Generate DDL and entities toenable Hibernate runtime support in an Eclipse JPA project.
To generate DDL and Entities:
1. In the Project Explorer view, right-click the .
2. Click JPA Tools > Generate Tables from Entities or Generate Entities from Tables. TheGenerate Entities window (or the Generate Tables from Entities window) appears.
3. In the Generate Entities window:
a. In the Output directory field, change the default directory, if required.
b. Ensure that the Use Console Configuration check box is clicked.
c. In the Console Configuration list, ensure that the relevant configuration is shown.
4. Click Finish.
Figure 3.16. Generate Entities
Red Hat CodeReady Studio 12.11 Getting Started with CodeReady Studio Tools
48

Figure 3.16. Generate Entities
3.4.3. Creating a Hibernate Mapping File
Hibernate mapping files specify how your objects relate to the database tables.
To create basic mappings for properties and associations, meaning, to generate the`.hbm.xml` files:
1. Create a new Hibernate Mapping file:
a. Click File > New > Other.
b. In the New wizard, locate Hibernate and expand it. Click Hibernate XML Mapping file(hbm.xml).
2. Click Next.
3. In the New Hibernate XML Mapping files (hbm.xml) window:
a. Click Add Class to add classes or click Add Packages to add packages. You can create anempty .hbm file by not selecting any packages or classes. An empty .hbm file is created inthe specified location.
b. Click the depth control check box to define the dependency depth used when choosingclasses.
c. Click Next.
d. Select the parent folder location.
e. In the File name field, type a name for the file (example: hibernate.hbm.xml) and click Finish.The hibernate.hbm.xml file opens in the default editor.
CHAPTER 3. DEVELOPING FIRST APPLICATIONS WITH CODEREADY STUDIO TOOLS
49

3.4.4. Creating a Hibernate Configuration File
For reverse engineering, prototype queries, or to simply use Hibernate Core, a hibernate.properties or a hibernate.cfg.xml file is needed. Hibernate Tools provides a wizard to generate the hibernate.cfg.xmlfile if required.
To create a Hibernate Configuration file:
1. Create a new cfg.xml file:
a. Click File > New > Other.
b. In the New wizard, locate Hibernate and then click Hibernate Configuration File (cfg.xml).
2. Click Next.
3. In the Create Hibernate Configuration File (cfg.xml) window, select the target folder for the fileand then click Next.
4. In the Hibernate Configuration File (cfg.xml) window:
a. The Container field, by default, shows the container folder.
b. The File name field, by default, shows the configuration file name ( hibernate.cfg.xml, in thiscase).
c. In the Database dialect list, click the relevant database ( H2, in this case).
d. In the Driver class list, click the driver class depending on the database dialect that you justselected (org.h2.Driver, in this case).
e. In the Connection URL list, click the relevant URL ( jdbc:h2:tcp://<server>[:<port>]/<databaseName>, in this case).
f. Click the Create a console configuration check box to use the hibernate.cfg.xml file as thebasis of the console configuration.
5. Click Finish.
Figure 3.17. Create a New cfg.xml File
Red Hat CodeReady Studio 12.11 Getting Started with CodeReady Studio Tools
50

Figure 3.17. Create a New cfg.xml File
The new hibernate.cfg.xml file opens in the default editor.
3.4.5. Creating a Hibernate Console Configuration File
A Console configuration file describes how the Hibernate plugin configures Hibernate. It also describesthe configuration files and classpaths needed to load the POJOs, JDBC drivers, etc. It is required to makeuse of query prototyping, reverse engineering and code generation. You can have multiple consoleconfigurations per project, but for most requirements, one configuration is sufficient.
To create a Hibernate console configuration file:
CHAPTER 3. DEVELOPING FIRST APPLICATIONS WITH CODEREADY STUDIO TOOLS
51

1. Create a cfg.xml file:
a. Click File > New > Other.
b. In the New wizard, locate Hibernate and then click Hibernate Console Configuration.
2. Click Next.
3. In the Main tab:
a. In the Name field, if required, edit the generated name provided by default.
b. In the Type pane, click Core.
c. In the Hibernate Version list, select the relevant version.
d. In the Project field, type a project name or click Browse to locate an existing project(my_JPA_project, in this case).
e. In the Database connection list, click New to configure a new database connection or leaveas is to use the default connection.
f. In the Property file field, click Setup to set the path to the first hibernate.properties filefound in the selected project (see, the Additional Resources, Setting up the Property Filesection for detailed steps). Once created the path of the .properties file displays in theProperty file field.
g. In the Configuration file field, click Setup to set the path to the first hibernate.cfg.xml filefound in the selected project (see, the Additional Resources, Setting up the ConfigurationFile section for detailed steps). Once created, the path of the hibernate.cfg.xml file displaysin the Configuration file field.
4. Click Finish.
Figure 3.18. Create Hibernate Console
Red Hat CodeReady Studio 12.11 Getting Started with CodeReady Studio Tools
52
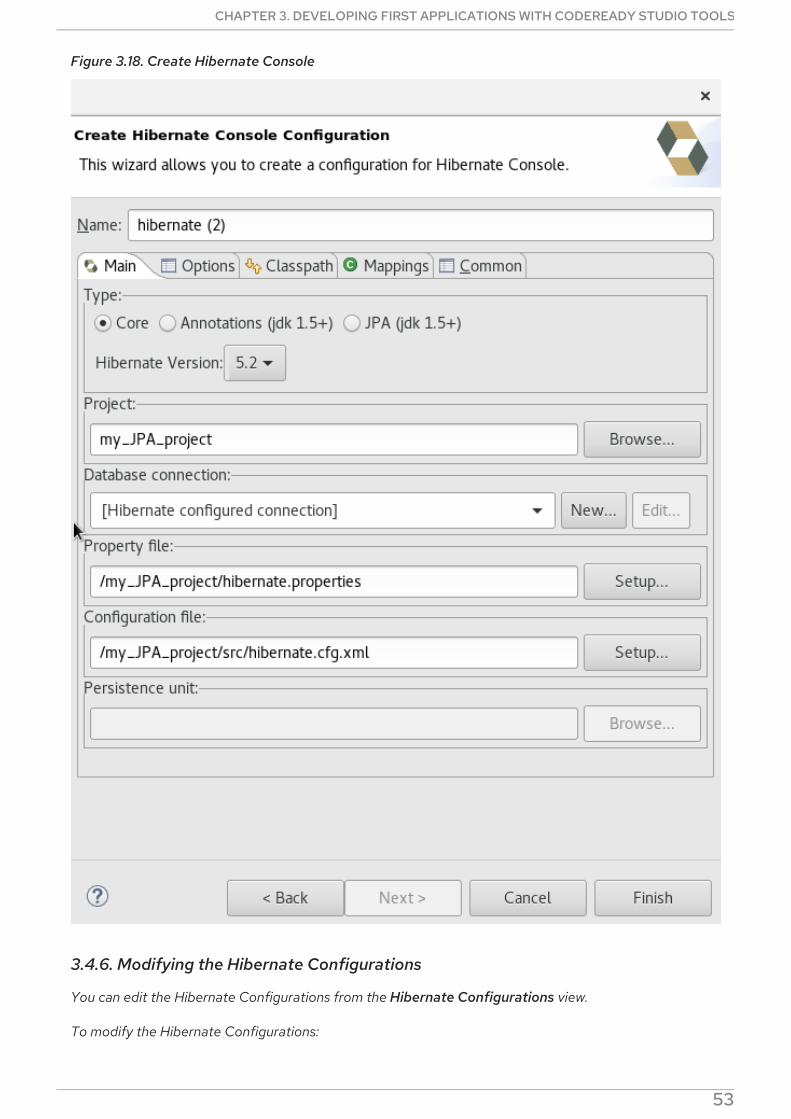
Figure 3.18. Create Hibernate Console
3.4.6. Modifying the Hibernate Configurations
You can edit the Hibernate Configurations from the Hibernate Configurations view.
To modify the Hibernate Configurations:
CHAPTER 3. DEVELOPING FIRST APPLICATIONS WITH CODEREADY STUDIO TOOLS
53

1. Click Window > Show View > Other. Click Hibernate Configurations and then click Open.
2. In the Hibernate Configurations view, right-click the and click Edit Configuration.
3. The Edit Configuration window displays. Edit the fields. Click Apply and then click OK.
3.4.7. Generating Code and Reverse Engineering
Hibernate tools’ reverse engineering and code generation features allow you to generate a range ofartifacts based on a database or an existing Hibernate configuration, like mapping files or annotatedclasses. Among others, these generated artifacts can be POJO Java source files, hibernate.hbm.xmlfiles, hibernate.cfg.xml generation and schema documentation.
To generate code:
1. Configure Hibernate:
a. Click Window > Perspective > Open Perspective > Other.
b. Search for Hibernate and double-click it. The Hibernate Configurations view appears.
2. View the Hibernate Code Generation Configurations:
a. In the toolbar, next to the Run icon, click the down arrow.
b. Click Hibernate Code Generation Configurations.
3. Expand Hibernate Code Generation and then click New_configuration.
4. In the Create, manage, and run configurations window, in the Name field, type a logical namefor the code generation launcher. If you do not specify a name, the default name,New_Generation, is used.
5. In the Main tab, enter the following details:
NOTE
The At least one exporter option must be selected warning indicates that for thelauncher to work you must select an exporter on the Exporter tab. The warningdisappears after you select an exporter.
a. In the Console Configuration list, click the name of the console configuration to be usedwhen generating code.
b. In the Output directory field, click Browse and select an output directory. This is the defaultlocation where all output will be written. You can enter absolute directory paths, for example:d:/temp. Note that existing files will be overwritten/ if the correct directory is not specified.
c. To reverse engineer the database defined in the connection information, click the Reverseengineering from JDBC connection check box. CodeReady Studio generates code based onthe database schema when this option is used.If this option is not enabled, the codegeneration is based on the existing mappings specified in the Hibernate Consoleconfiguration.
d. In the Package field, add a default package name for any entities found when reverseengineering.
Red Hat CodeReady Studio 12.11 Getting Started with CodeReady Studio Tools
54

e. In the reveng.xml field, click Setup to select an existing reveng.xml file, or create a new one.This file controls certain aspects of the reverse engineering process, such as:
how JDBC types are mapped to Hibernate types
which tables are included or excluded from the process
f. In the reveng. strategy field, click Browse and provide an implementation of aReverseEngineeringStrategy. this must be done if the reveng.xml file does not provideenough customization; the class must be in the classpath of the Console Configurationbecause if not, you will get a class not found exception.
NOTE
Refer to the Additional Resources, Creating, Managing, and RunningConfigurations Window, Main tab, Check Boxes section for details of theselected check boxes.
g. The Exporter tab specifies the type of code that is generated. Each selection represents anExporter that generates the code. In the Exporter tab:
h. Click the Use Java 5 syntax check box to use a Java 5 syntax for the Exporter
i. Click the Generate EJB3 annotations check box to generate EJB 3 annotations
ii. Select the Exporters from the Exporters table. Refer to the Additional Resources,Exporter section for details about the exporters.Each Exporter selected in the preceding step uses certain properties that can be set upin the Properties section. In the Properties section, you can add and remove predefinedor custom properties for each of the exporters.
6. Click Add next to the Properties table to add a property to the chosen Exporter. In the resultingdialog box, select the property from the proposed list and the appropriate value for it. For anexplanation of the property and its value, refer to the Additional Resources, Exporter Propertyand its Values section.
7. Click the Refresh tab and enter the following:
a. Click the Refresh resources upon completion check box to refresh the resources and clickone of the following:
The entire workspace: To refresh the entire workspace.
The selected resource: To only refresh the selected resource
The project containing the selected resource: To refresh the project containing theselected resource
The folder containing the selected resource: To refresh the folder containing theselected resource
Specific resources: To refresh specific resources; then click Specify Resources to openthe Edit Working Set window and select the working set.
b. Click the Recursively include sub-folders check box to refresh the sub-folders.
8. Click the Common tab and enter the following:
CHAPTER 3. DEVELOPING FIRST APPLICATIONS WITH CODEREADY STUDIO TOOLS
55
a. In the Save as pane, click Local file to save the configuration as a local file, OR click Sharedfile and then select a shared file location.
b. In the Display in favourites menu pane, click the menu to display the configuration.
c. In the Encoding pane, click the format that you want the configuration to be encoded to.
d. In the Standard Input and Output pane, click the Allocate console check box and optionallyclick the Input File and Output File check boxes and select the relevant options.
e. Click the Launch in background check box to show the configuration launch progress in thebackground.
9. Click Apply and then click Run.
3.4.8. Troubleshooting
3.4.8.1. Problems While Loading Database Driverclass
Red Hat CodeReady Studio 12.11 Getting Started with CodeReady Studio Tools
56

Error message: Problems while loading database driverclass (org.h2.Driver)
Resolution: To avoid this error, you must select a predefined DTP connection profile in the DatabaseConnection dropdown. Also, the jar can be added on the Classpath page of the Console Configurationwizard if you don’t want to have it on the project classpath.
CHAPTER 3. DEVELOPING FIRST APPLICATIONS WITH CODEREADY STUDIO TOOLS
57
1. Right-click {project_name} → Properties → Java Build Path.
2. Click the Libraries tab and then click Add External JARs.
3. Navigate to the downloaded database JAR file and click OK.
4. In the Properties for {project_name} window, click Apply and then click OK.
Additional ResourcesAdding LibrariesTo add libraries:
1. Download Hibernate ORM from http://hibernate.org/orm/.
2. Extract the file to locate the libraries in the lib/required folder.
3. In the JPA Facet window, Platform list, click * User Library*.
4. Click the Manage libraries icon ( ).
5. In the Preferences (Filtered) window, click New.
6. In the New User Library window, User library name field, type a name for the user library andclick OK (user_library, in this case).
7. Click the System library (added to the boot class path) check box and click OK.
8. In the Preferences (Filtered), click Add External JARs and locate the extracted hibernate-release-1/lib/required folder.
9. Click the first library and click OK. Repeat the above step to add all the libraries from thehibernate-release-1/lib/required` folder.
10. In the Preferences (Filtered), click Apply and Close.
Setting up the Property FileTo set up the property file:
1. In the Create Hibernate Configuration window, Main tab, click Setup.
2. In the Setup property file window, click Create new to create a new property file (or click Useexisting to choose an existing file as a property file).
3. In the Create Hibernate Properties file (.properties) window, click the parent folder name andthen click Finish.
Red Hat CodeReady Studio 12.11 Getting Started with CodeReady Studio Tools
58

Setting up the Configuration FileTo set up the configuration file:
1. In the Create Hibernate Configuration window, Main tab, click Setup.
2. In the Setup configuration file window, click Use existing to choose an existing file as a propertyfile (or click Create new to create a new property file).
3. In the Select hibernate.cfg.xml file window, expand the parent folder, choose the file to use asthe hibernate.cfg.xml file, and then click OK.
CHAPTER 3. DEVELOPING FIRST APPLICATIONS WITH CODEREADY STUDIO TOOLS
59

Creating, Managing, and Running the Configurations Window, Main tab, Check BoxesThe following check boxes are selected by default in the Create, manage, and run configurationswindow, in the Main tab:
Generate basic typed composite ids: When a table has a multi-column primary key, a<composite-id> mapping will always be created. If this option is enabled and there are matchingforeign-keys, each key column is still considered a 'basic' scalar (string, long, etc.) instead of areference to an entity. If you disable this option a <key-many-to-one> property is createdinstead. Note that a <many-to-one> property is still created, but is simply marked as non-updatable and non-insertable.
Detect optimistic lock columns: Automatically detects optimistic lock columns. Controllable viareveng. strategy; the current default is to use columns named VERSION or TIMESTAMP.
Detect many-to-many tables: Automatically detects many-to-many tables. Controllable viareveng. Strategy.
Detect one-to-one associations: Reverse engineering detects one-to-one associations viaprimary key and both the hbm.xml file and annotation generation generates the proper code forit. The detection is enabled by default (except for Seam 1.2 and Seam 2.0) reverse engineering.For Hibernate Tools generation there is a check box to disable this feature if it is not required.
Exporter Property and Values
jdj5: Generates Java 5 syntax
ejb3: Generates EJB 3 annotations
for_each: Specifies for which type of model elements the exporter should create a file and runthrough the templates. Possible values are: entity, component, configuration.
Red Hat CodeReady Studio 12.11 Getting Started with CodeReady Studio Tools
60

template_path: Creates a custom template directory for this specific exporter. You can useEclipse variables.
template_name: Name for template relative to the template path.
outputdir: Custom output directory for the specific exporter. You can use Eclipse variables.
file_pattern: Pattern to use for the generated files, with a path relative to the output dir. Example:/.java.
Dot.executable: Executable to run GraphViz (only relevant, but optional for Schemadocumentation).
Drop: Output will contain drop statements for the tables, indices, and constraints.
delimiter: Is used in the output file.
create: Output will contain create statements for the tables, indices, and constraints.
scriptToConsole: The script will be output to Console.
exportToDatabase: Executes the generated statements against the database.
outputFileName: If specified the statements will be dumped to this file.
haltOnError: Halts the build process if an error occurs.
Format: Applies basic formatting to the statements.
schemaUpdate: Updates a schema.
query: HQL Query template
Exporter
Domain code (.java): Generates POJOs for all the persistent classes and components found inthe given Hibernate configuration.
Hibernate XML Mappings (.hbm.xml): Generate mapping (hbm.xml) files for each entity.
DAO code (.java): Generates a set of DAOs for each entity found.
Generic Exporter (<hbmtemplate>): Generates a fully customizable exporter that can be used toperform custom generation.
Hibernate XML Configuration (.cfg.xml): Generates a hibernate.cfg.xml file; used to keep thehibernate.cfg.xml file updated with any newly discovered mapping files.
Schema Documentation (.html): Generates a set of HTML pages that document the databaseschema and some of the mappings.
Schema Export (.ddl): Generates the appropriate SQL DDL and allows you to store the result ina file or export it directly to the database.
HQL Query Execution Exporter: Generates HQL Query according to given properties.
3.5. CREATING A MOBILE WEB APPLICATION
CHAPTER 3. DEVELOPING FIRST APPLICATIONS WITH CODEREADY STUDIO TOOLS
61

Mobile Web Tools provides an HTML5 Project wizard that enables you to create web applicationsoptimized for mobile devices. The HTML5 Project wizard is a useful starting point for creating all newHTML5 web applications in the IDE. The wizard generates a sample ready-to-deploy HTML5 mobileapplication with REST resources from a Maven archetype.
You can customize the application using the JBoss Tools HTML Editor, deploy and view the applicationwith the mobile browser simulator BrowserSim, and use LiveReload to refresh BrowserSim as theapplication source code is modified and saved in the IDE.
PrerequisitesConfiguring the IDE for an Available Server
For information on configuring a local runtime server and deploying applications to it, see DeployingApplications to a Local Server.
The IDE must be configured for any servers to which you want to deploy applications, including thelocation and type of application server and any custom configuration or management settings. This articleassumes you completed the configuration in advance, but that step can be completed at deployment.
3.5.1. Creating an HTML5 Project
The HTML5 Project wizard generates a sample project based on a Maven archetype and the project andapplication identifiers provided by you. The Maven archetype version is indicated in the Description fieldin the first page of the wizard and you can change the version, and therefore the project look anddependencies, by selecting either an enterprise or non-enterprise target runtime within the wizard.
To create an HTML5 project:
1. In Red Hat Central, in the Getting Started tab, click HTML5 Project.
2. In the Target Runtime list, click an IDE-ready server and click Next.
3. In the New Project Example window, complete the fields about the HTML5 project as follows:
a. In the Project name field, type a name for the project.
b. In the Package field, type an alpha-numeric package for the project.
4. Click Finish.
5. When prompted with 'HTML5 Project' Project is now ready, click Finish. The project isgenerated and listed in the Project Explorer view.
3.5.2. Building and Deploying the Application
After the HTML5 project is generated, it can be built and deployed to an application server.
To build and deploy the application:
1. In the Project Explorer view, right-click {project name} and click Run As > Run on Server.
2. In the Run On Server window, ensure that Choose an existing server is selected.
3. From the table of servers, expand localhost, select the server on which to deploy the application,and click Finish.
Figure 3.19. Selecting the Server to Run the Application
Red Hat CodeReady Studio 12.11 Getting Started with CodeReady Studio Tools
62
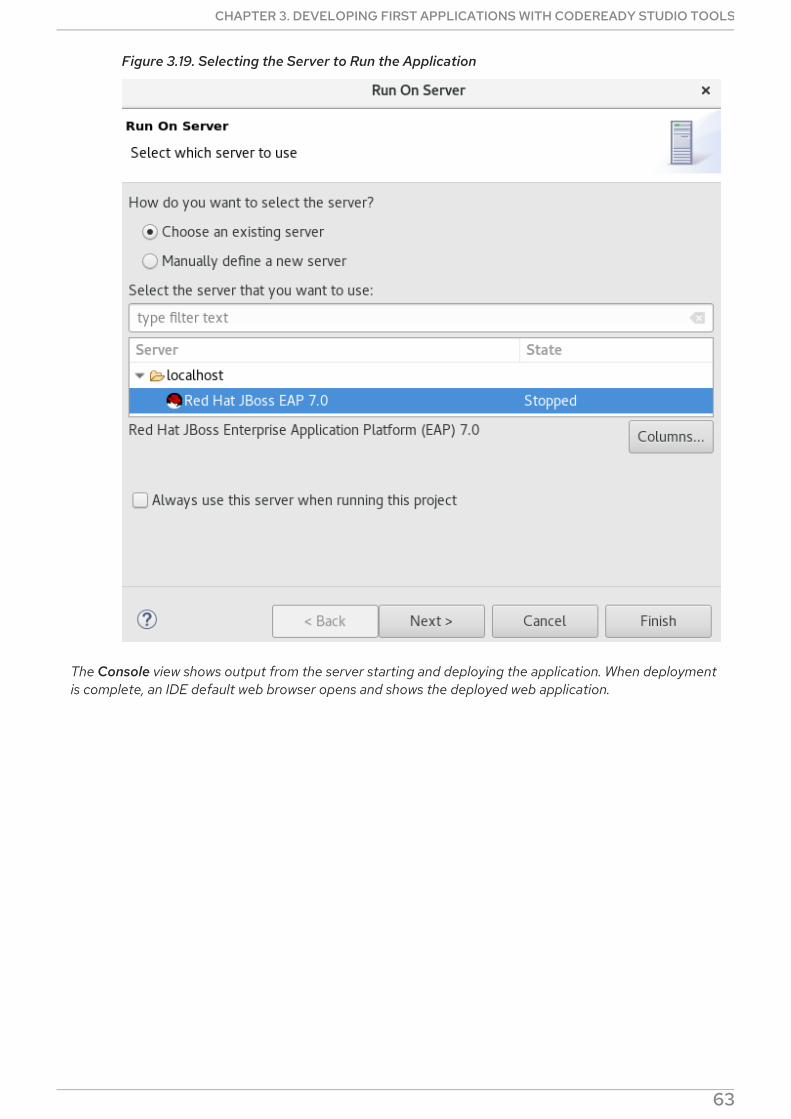
Figure 3.19. Selecting the Server to Run the Application
The Console view shows output from the server starting and deploying the application. When deploymentis complete, an IDE default web browser opens and shows the deployed web application.
Figure 3.20. Enterprise HTML5 web application Viewed in Browser
CHAPTER 3. DEVELOPING FIRST APPLICATIONS WITH CODEREADY STUDIO TOOLS
63
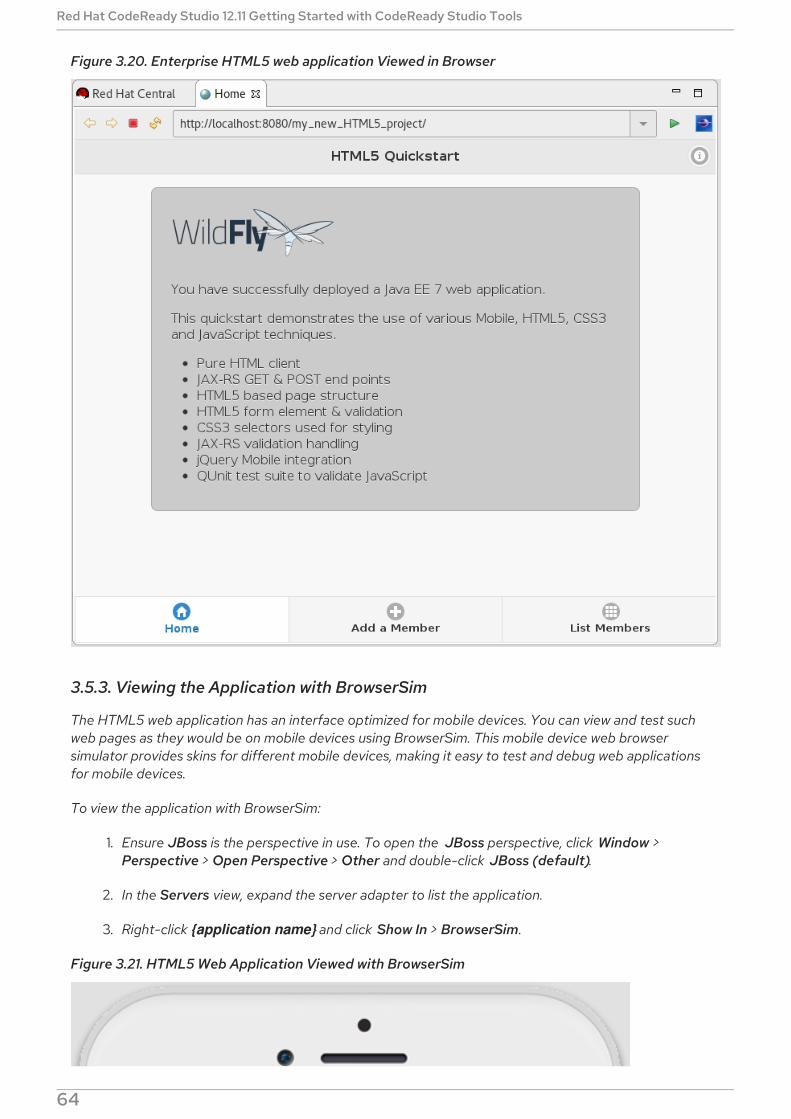
Figure 3.20. Enterprise HTML5 web application Viewed in Browser
3.5.3. Viewing the Application with BrowserSim
The HTML5 web application has an interface optimized for mobile devices. You can view and test suchweb pages as they would be on mobile devices using BrowserSim. This mobile device web browsersimulator provides skins for different mobile devices, making it easy to test and debug web applicationsfor mobile devices.
To view the application with BrowserSim:
1. Ensure JBoss is the perspective in use. To open the JBoss perspective, click Window >Perspective > Open Perspective > Other and double-click JBoss (default).
2. In the Servers view, expand the server adapter to list the application.
3. Right-click {application name} and click Show In > BrowserSim.
Figure 3.21. HTML5 Web Application Viewed with BrowserSim
Red Hat CodeReady Studio 12.11 Getting Started with CodeReady Studio Tools
64

CHAPTER 3. DEVELOPING FIRST APPLICATIONS WITH CODEREADY STUDIO TOOLS
65

3.5.4. Enabling LiveReload for BrowserSim
Mobile Web Tools supports the LiveReload protocol for automatic reloading of web pages in enabledbrowsers as the application source is modified and saved. LiveReload can be enabled for your systembrowsers and, as demonstrated here, BrowserSim. This provides an interactive web developmentexperience.
To enable LiveReload for BrowserSim, complete the following steps:
1. Close any open BrowserSim simulated devices.
2. In the Servers view, right-click an existing server to display the context menu and click New >Server.
3. From the list, expand Basic, click LiveReload Server and click Finish.
4. In the Servers view, right-click LiveReload Server and click Start.
5. In the Servers view, right-click {application name} and click Show In > BrowserSim.
LiveReload is automatically enabled for this BrowserSim simulated device and all subsequent devicesopened while the LiveReload server is running.
3.5.5. Editing the Application
With LiveReload enabled for BrowserSim, you can make changes to your application source code andBrowserSim automatically reloads the application when changes are saved. This is demonstrated here bymaking a simple change to the project index.html file, specifically changing the text in the applicationtitle banner.
To change your application:
1. In the Project Explorer view, expand {project name} > src > main > webapp.
2. Double-click index.html to open it for editing with the JBoss Tools HTML Editor.
3. Locate the following line of code inside the <body> tags:
and replace it with
4. Save the file by pressing Ctrl+S (or Cmd+S).
This code change modifies the heading displayed on the main application page. Notice that BrowserSimautomatically reloads the web page when you save the changed file and the application modifications areimmediately visible.
Additional Resources
<title>HTML5 Quickstart</title>
<title>My Quickstart</title>
Red Hat CodeReady Studio 12.11 Getting Started with CodeReady Studio Tools
66

You can launch the HTML5 Project wizard from the JBoss perspective by clicking File > New >HTML5 Project.
You can test an undeployed .html file with BrowserSim by right-clicking the .html file in theProject Explorer view and clicking Open With > BrowserSim.
To set BrowserSim as the IDE default web browser, in the JBoss perspective click Window > WebBrowser > BrowserSim or click Window > Preferences > General > Web Browser and from theExternal web browsers list select BrowserSim.
You can also enable LiveReload for already opened BrowserSim simulated devices. After startingthe LiveReload server, right-click the BrowserSim simulated device frame and click EnableLiveReload.
3.6. GENERATING AN HTML5 WEB APPLICATION USING THE MOBILEWEB PALETTE
The IDE provides the Mobile Web palette that allows the user to make interactive web applications. Thispalette offers a wide range of features including drag-and-drop widgets for adding common webinterface framework features such as HTML5, jQuery Mobile, and Ionic tags to html files. It also containswidgets like Panels, Pages, Lists, Buttons to make the applications more user friendly and efficient.
3.6.1. Adding a New HTML5 jQuery Mobile File to a Project
The HTML5 jQuery Mobile file template consists of JavaScript and CSS library references that areinserted in the file’s HTML header. The template also inserts a skeleton of the jQuery Mobile page andlistview widgets in the file’s HTML body. The following procedure details the steps to insert the templateinto your project.
To create a new HTML5 jQuery Mobile file in an existing project:
1. In the Project Explorer view, expand [project name] > src > main.
2. Right-click webapp and click New > HTML File.
3. Complete the fields about the html file as follows:
a. Ensure the parent folder field shows [project name]/src/main/webapp.
b. In the File name field, type a name for the HTML5 file.
4. Click Next.
5. From the Templates table, select HTML5 jQuery Mobile Page (1.4) and click Finish.
Figure 3.22. Selecting the HTML5 jQuery Mobile Page (1.4) Option
CHAPTER 3. DEVELOPING FIRST APPLICATIONS WITH CODEREADY STUDIO TOOLS
67

Figure 3.22. Selecting the HTML5 jQuery Mobile Page (1.4) Option
The new file is listed in the Project Explorer view under the project webapp directory and the file opensin the editor.
3.6.2. Adding New Pages to the Web Application
Use the jQuery Mobile Page widget to add pages to your mobile web application:
1. In the Project Explorer view, expand [project name] > src > main > webapp.
2. Right-click the new html file and click Open With > JBoss Tools HTML Editor.
3. In the Palette view, click the jQuery Mobile tab to view the available widgets and click Page.
4. Complete the fields about the page as follows:
a. In the Header field, type a name for the page header.
b. In the Footer field, type a name for the page footer.
5. Click Finish.
Figure 3.23. Adding a New Page
Red Hat CodeReady Studio 12.11 Getting Started with CodeReady Studio Tools
68

Figure 3.23. Adding a New Page
6. Save the changes to the file by clicking the Save icon.
A page is added to the html file. JS and CSS references are also automatically added to the file by the Page widget wizard.
Figure 3.24. New Page Added to the HTML File
3.6.3. Customizing the Home Page of the Web Application
Use the widgets in the jQuery Mobile palette to customize the page. Use the instructions to add a menuto the page. This menu links to three other pages: Home, Search, and the Add Contacts page.
CHAPTER 3. DEVELOPING FIRST APPLICATIONS WITH CODEREADY STUDIO TOOLS
69
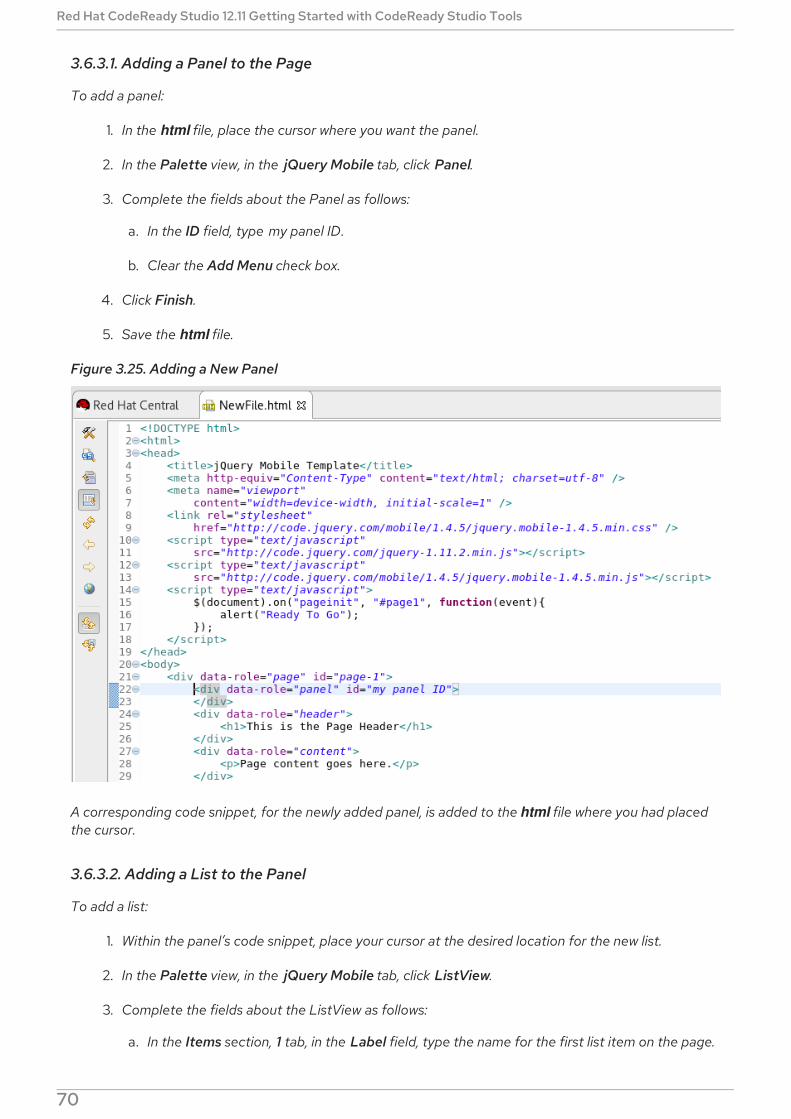
3.6.3.1. Adding a Panel to the Page
To add a panel:
1. In the html file, place the cursor where you want the panel.
2. In the Palette view, in the jQuery Mobile tab, click Panel.
3. Complete the fields about the Panel as follows:
a. In the ID field, type my panel ID.
b. Clear the Add Menu check box.
4. Click Finish.
5. Save the html file.
Figure 3.25. Adding a New Panel
A corresponding code snippet, for the newly added panel, is added to the html file where you had placedthe cursor.
3.6.3.2. Adding a List to the Panel
To add a list:
1. Within the panel’s code snippet, place your cursor at the desired location for the new list.
2. In the Palette view, in the jQuery Mobile tab, click ListView.
3. Complete the fields about the ListView as follows:
a. In the Items section, 1 tab, in the Label field, type the name for the first list item on the page.
Red Hat CodeReady Studio 12.11 Getting Started with CodeReady Studio Tools
70

b. In the URL (href) field, type a URL identifier for the label.
Figure 3.26. New Listitem Added to the Panel
4. Click Finish.
5. Save the html file.
The new list item name appears in the code snippet.
Figure 3.27. Code for the New Listitem in the Panel Added
CHAPTER 3. DEVELOPING FIRST APPLICATIONS WITH CODEREADY STUDIO TOOLS
71
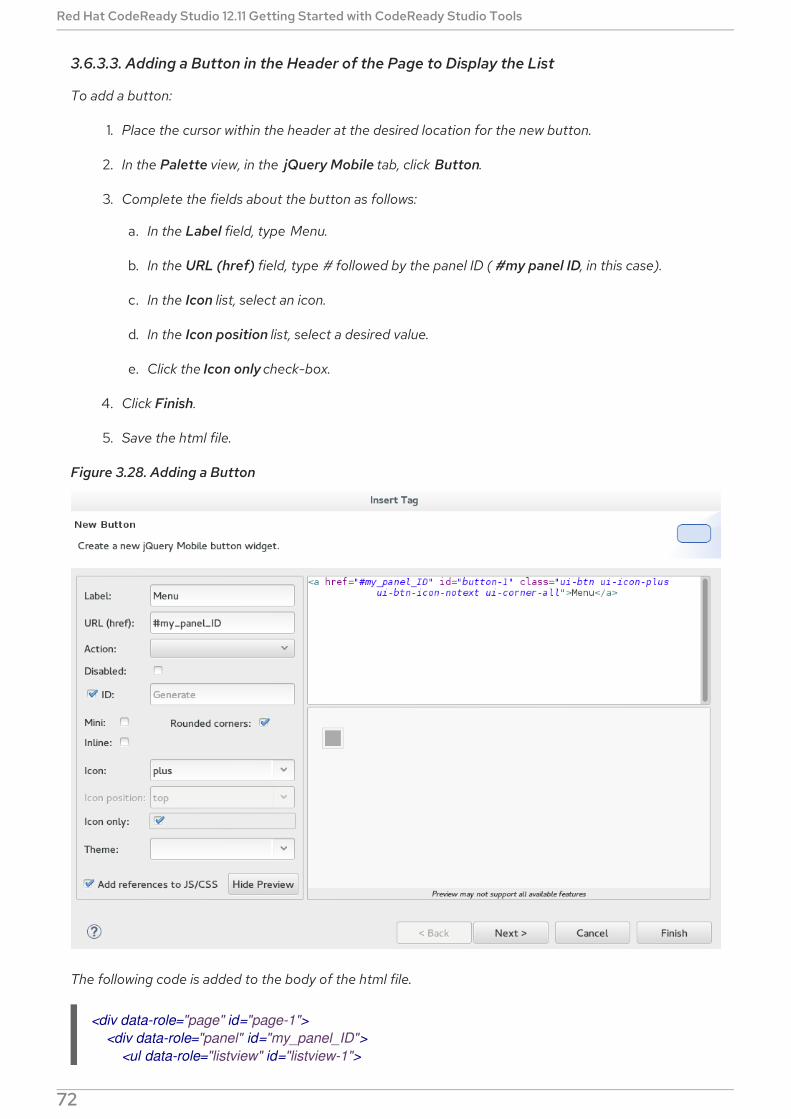
3.6.3.3. Adding a Button in the Header of the Page to Display the List
To add a button:
1. Place the cursor within the header at the desired location for the new button.
2. In the Palette view, in the jQuery Mobile tab, click Button.
3. Complete the fields about the button as follows:
a. In the Label field, type Menu.
b. In the URL (href) field, type # followed by the panel ID ( #my panel ID, in this case).
c. In the Icon list, select an icon.
d. In the Icon position list, select a desired value.
e. Click the Icon only check-box.
4. Click Finish.
5. Save the html file.
Figure 3.28. Adding a Button
The following code is added to the body of the html file.
<div data-role="page" id="page-1"> <div data-role="panel" id="my_panel_ID"> <ul data-role="listview" id="listview-1">
Red Hat CodeReady Studio 12.11 Getting Started with CodeReady Studio Tools
72
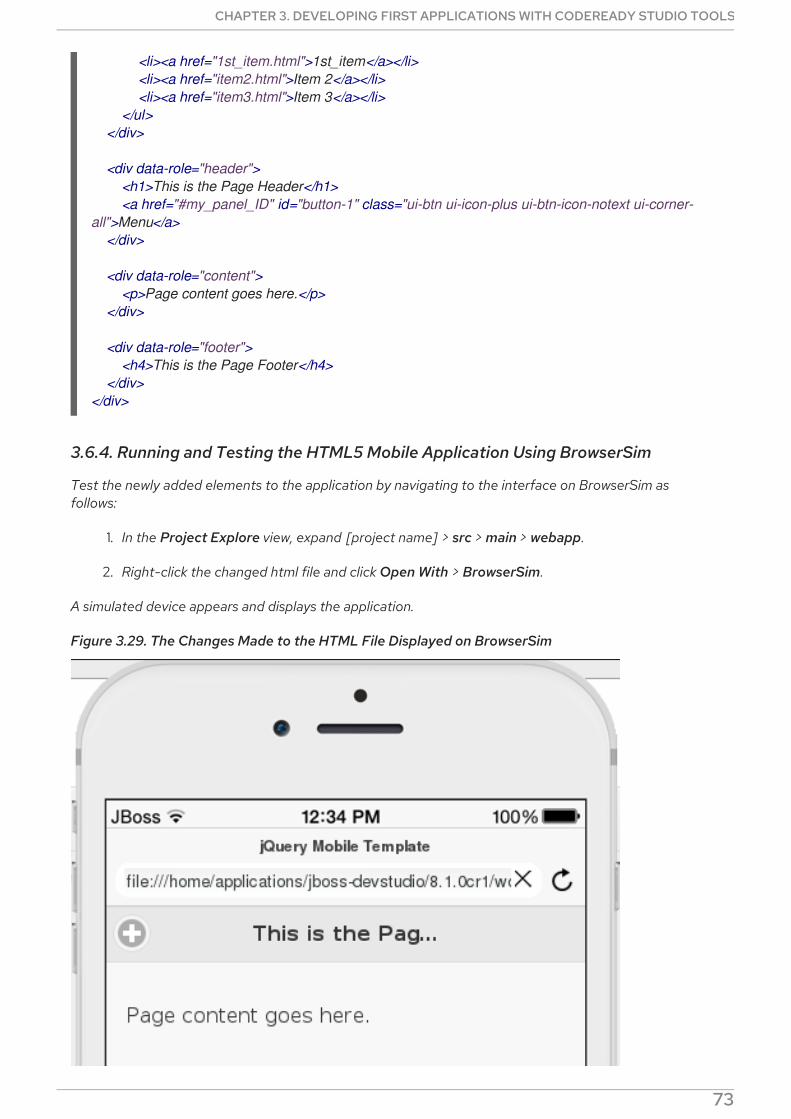
3.6.4. Running and Testing the HTML5 Mobile Application Using BrowserSim
Test the newly added elements to the application by navigating to the interface on BrowserSim asfollows:
1. In the Project Explore view, expand [project name] > src > main > webapp.
2. Right-click the changed html file and click Open With > BrowserSim.
A simulated device appears and displays the application.
Figure 3.29. The Changes Made to the HTML File Displayed on BrowserSim
<li><a href="1st_item.html">1st_item</a></li> <li><a href="item2.html">Item 2</a></li> <li><a href="item3.html">Item 3</a></li> </ul> </div>
<div data-role="header"> <h1>This is the Page Header</h1> <a href="#my_panel_ID" id="button-1" class="ui-btn ui-icon-plus ui-btn-icon-notext ui-corner-all">Menu</a> </div>
<div data-role="content"> <p>Page content goes here.</p> </div>
<div data-role="footer"> <h4>This is the Page Footer</h4> </div></div>
CHAPTER 3. DEVELOPING FIRST APPLICATIONS WITH CODEREADY STUDIO TOOLS
73
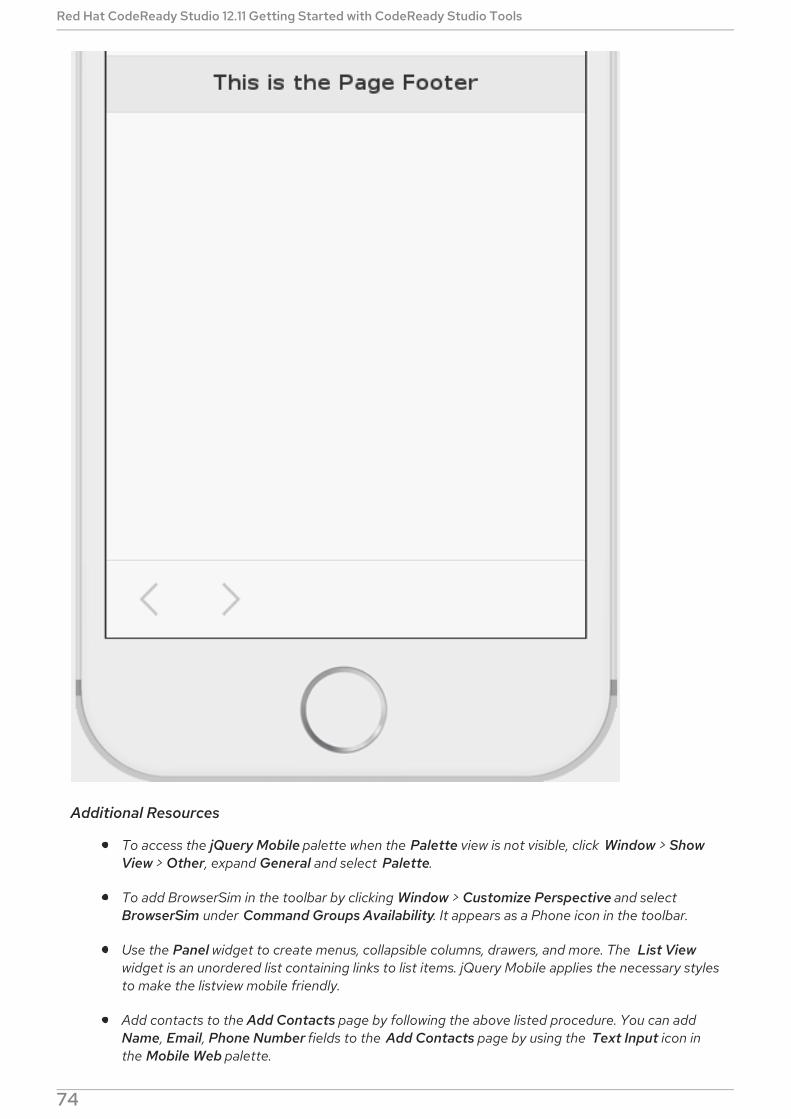
Additional Resources
To access the jQuery Mobile palette when the Palette view is not visible, click Window > ShowView > Other, expand General and select Palette.
To add BrowserSim in the toolbar by clicking Window > Customize Perspective and selectBrowserSim under Command Groups Availability. It appears as a Phone icon in the toolbar.
Use the Panel widget to create menus, collapsible columns, drawers, and more. The List Viewwidget is an unordered list containing links to list items. jQuery Mobile applies the necessary stylesto make the listview mobile friendly.
Add contacts to the Add Contacts page by following the above listed procedure. You can addName, Email, Phone Number fields to the Add Contacts page by using the Text Input icon inthe Mobile Web palette.
Red Hat CodeReady Studio 12.11 Getting Started with CodeReady Studio Tools
74
3.7. IMPORTING PROJECTS IN CODEREADY STUDIO USING GITIMPORT
The CodeReady Studio Git Import feature allows you to easily configure most of the settings required tomake a project workable immediately after it is imported in the IDE.
Procedure
3.7.1. Importing Projects from Git with Smart Import
Use the Project from Git (with smart import) option, if you are unaware of the type of the project thatyou want to import.
NOTE
We recommend using the Projects from Git (with smart import) option because it is theeasiest and most efficient way to import projects into the IDE with minimal effort.
The Import wizard will automatically detect the type of project being imported and will configure theproject so that you have to put in minimal effort to make the project workable.
The Git Import feature detects the various modules of a project that is a set of other individual projects. Itdetects markers such as pom.xml, MANIFEST.MF, etc. to determine the type of project that you areimporting.
To import projects from Git with smart import:
1. Click File > Import.
2. In the Import window, click Projects from Git (with smart import) and click Next.
3. In the Select Repository Source window, click Existing local repository or Clone URI.
4. Step through the wizard and click Finish for the wizard to analyze the content of the projectfolder to find projects for import and import them in the IDE. The imported project is listed in theProject Explorer view.
3.7.2. Importing Projects from Git
Use the Projects from Git option when you are aware of the type of project that you want to import intothe IDE. Use the Existing local repository option, if you have, at some point in time, cloned the remoteGit repository and the repository is present on your local system.
Procedure
3.7.2.1. Importing Existing Eclipse Projects
Use the Existing local repositories option to import Eclipse projects in the IDE. These projectsessentially have a .project file. This .project file contains the project description and settings needed toconfigure and build project in Eclipse.
To import projects as existing Eclipse projects:
1. Click File > Import.
CHAPTER 3. DEVELOPING FIRST APPLICATIONS WITH CODEREADY STUDIO TOOLS
75

2. In the Import wizard:
a. Expand Git and then click Projects from Git. Click Next.
b. Click Existing local repository and then click Next.
c. Click Git to choose one of the recently used repositories from the list or click Add to browseto any local repository. Click Next. In the Wizard for project import section, click Importexisting Eclipse project. Click Next.
d. In the Import Projects window, select all the projects that you want to import.
e. Ensure that the Select nested projects check box is clicked to import the nested projectsunder the parent project that you are importing.
f. Click Finish.
The imported project is listed in the Project Explorer view.
3.7.2.2. Importing Using the New Project Wizard
Use the Import using the New Project wizard option, if your repository is empty and you want to startdeveloping a new project from scratch and then push the code to the remote repository.
To import projects using the New Project wizard:
Red Hat CodeReady Studio 12.11 Getting Started with CodeReady Studio Tools
76
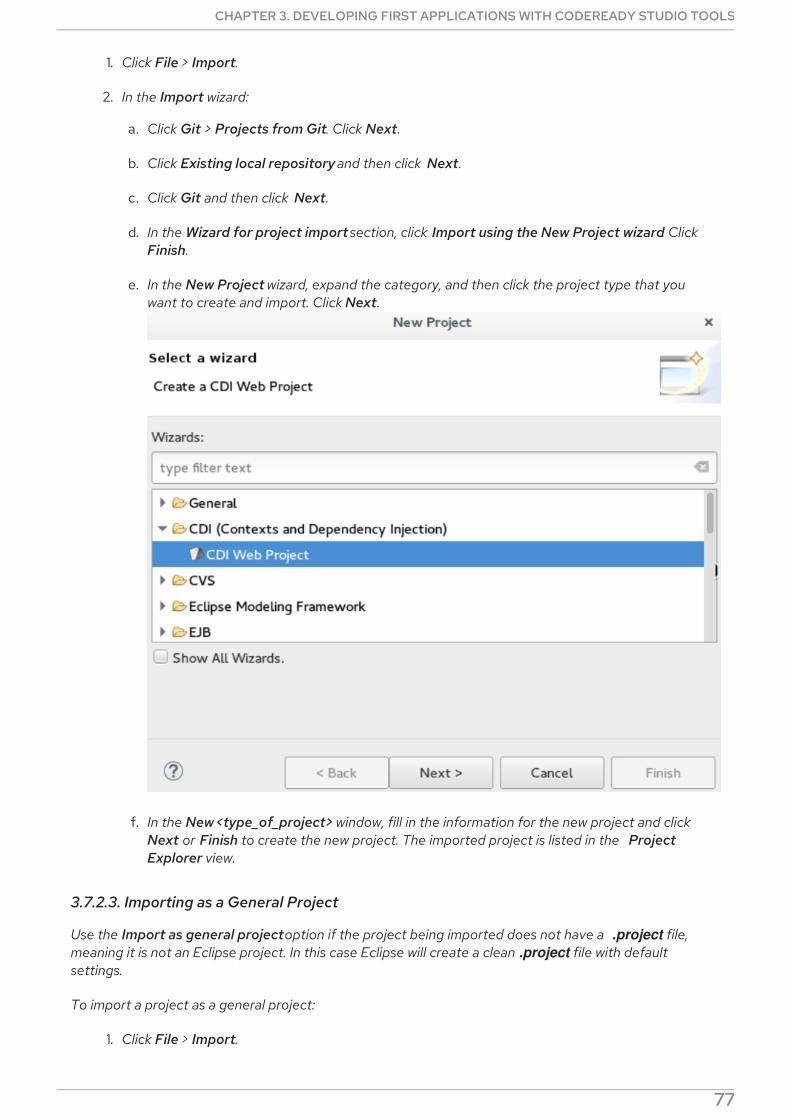
1. Click File > Import.
2. In the Import wizard:
a. Click Git > Projects from Git. Click Next.
b. Click Existing local repository and then click Next.
c. Click Git and then click Next.
d. In the Wizard for project import section, click Import using the New Project wizard. ClickFinish.
e. In the New Project wizard, expand the category, and then click the project type that youwant to create and import. Click Next.
f. In the New <type_of_project> window, fill in the information for the new project and clickNext or Finish to create the new project. The imported project is listed in the ProjectExplorer view.
3.7.2.3. Importing as a General Project
Use the Import as general project option if the project being imported does not have a .project file,meaning it is not an Eclipse project. In this case Eclipse will create a clean .project file with defaultsettings.
To import a project as a general project:
1. Click File > Import.
CHAPTER 3. DEVELOPING FIRST APPLICATIONS WITH CODEREADY STUDIO TOOLS
77
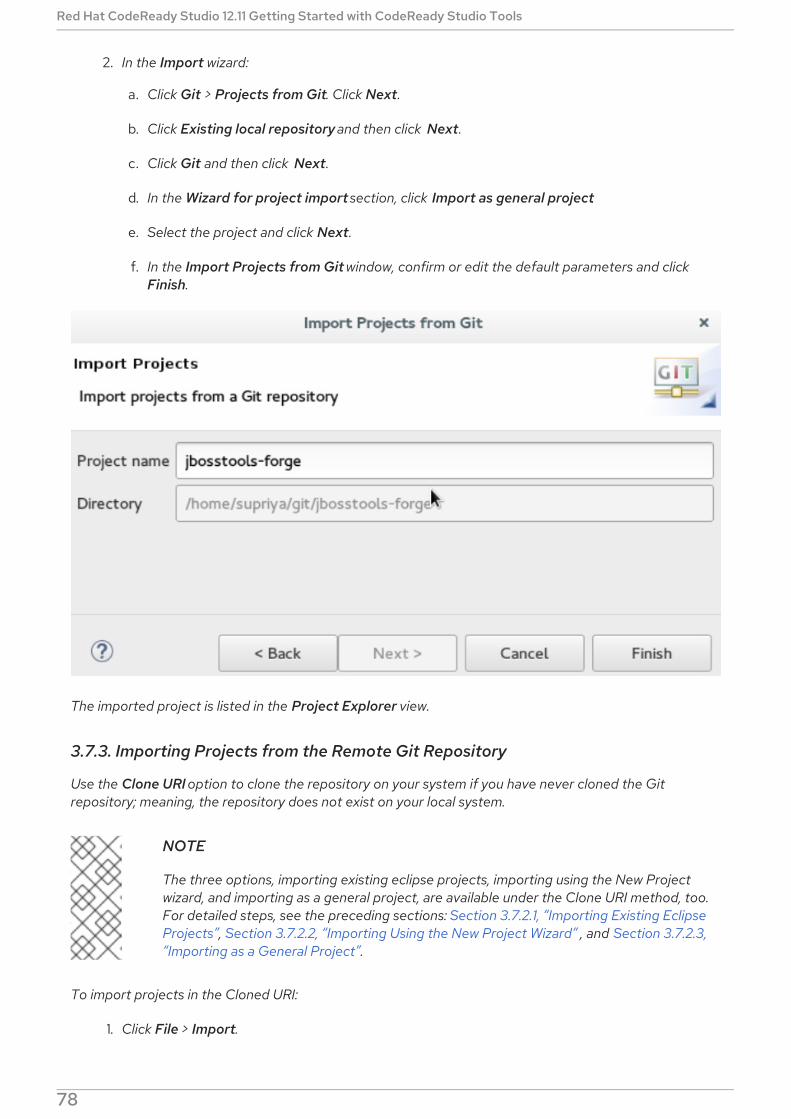
2. In the Import wizard:
a. Click Git > Projects from Git. Click Next.
b. Click Existing local repository and then click Next.
c. Click Git and then click Next.
d. In the Wizard for project import section, click Import as general project.
e. Select the project and click Next.
f. In the Import Projects from Git window, confirm or edit the default parameters and clickFinish.
The imported project is listed in the Project Explorer view.
3.7.3. Importing Projects from the Remote Git Repository
Use the Clone URI option to clone the repository on your system if you have never cloned the Gitrepository; meaning, the repository does not exist on your local system.
NOTE
The three options, importing existing eclipse projects, importing using the New Projectwizard, and importing as a general project, are available under the Clone URI method, too.For detailed steps, see the preceding sections: Section 3.7.2.1, “Importing Existing EclipseProjects”, Section 3.7.2.2, “Importing Using the New Project Wizard” , and Section 3.7.2.3,“Importing as a General Project”.
To import projects in the Cloned URI:
1. Click File > Import.
Red Hat CodeReady Studio 12.11 Getting Started with CodeReady Studio Tools
78

2. In the Import wizard:
a. Click Git > Projects from Git and then click Next.
b. Click Clone URI and click Next.
c. In the Source Git Repository window, in the URI field, enter an existing Git repository URL,either local or remote and click Next.
d. In the Branch Selection window, click all the branches that you want to clone from theremote repository and click Next.
CHAPTER 3. DEVELOPING FIRST APPLICATIONS WITH CODEREADY STUDIO TOOLS
79
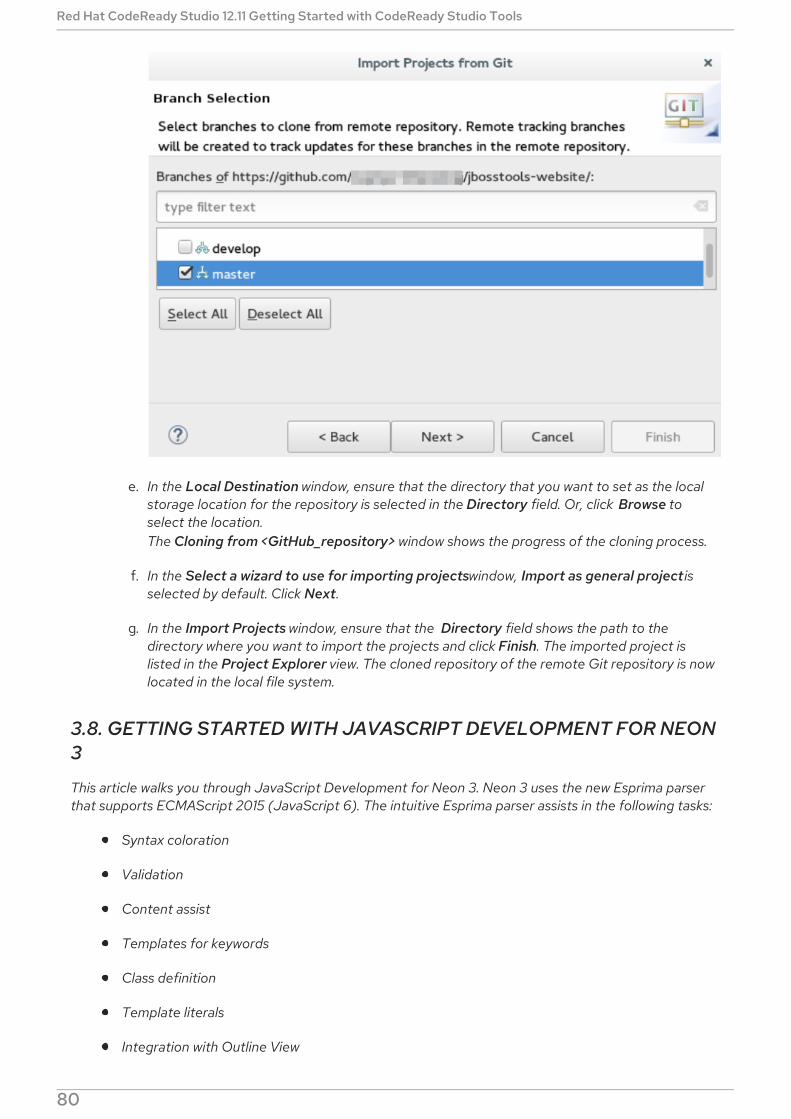
e. In the Local Destination window, ensure that the directory that you want to set as the localstorage location for the repository is selected in the Directory field. Or, click Browse toselect the location.The Cloning from <GitHub_repository> window shows the progress of the cloning process.
f. In the Select a wizard to use for importing projects window, Import as general project isselected by default. Click Next.
g. In the Import Projects window, ensure that the Directory field shows the path to thedirectory where you want to import the projects and click Finish. The imported project islisted in the Project Explorer view. The cloned repository of the remote Git repository is nowlocated in the local file system.
3.8. GETTING STARTED WITH JAVASCRIPT DEVELOPMENT FOR NEON3
This article walks you through JavaScript Development for Neon 3. Neon 3 uses the new Esprima parserthat supports ECMAScript 2015 (JavaScript 6). The intuitive Esprima parser assists in the following tasks:
Syntax coloration
Validation
Content assist
Templates for keywords
Class definition
Template literals
Integration with Outline View
Red Hat CodeReady Studio 12.11 Getting Started with CodeReady Studio Tools
80

Prerequisites
3.8.1. Installing node.js
To install node.js:
On Windows, macOS, and Linux, see https://nodejs.org/en/.
On RHEL, see https://www.softwarecollections.org/en/ .
3.8.2. Installing the Package Managers (Bower and npm)
You may choose to work with either npm or with Bower. However, if you are using npm you must use thefile package.json and if using Bower, use the file bower.json.
NOTE
If installing both npm and bower, ensure that you install npm before you install Bower.
To install npm: When you install node.js, npm will be available for use because npm is distributedwith node.js.
To install Bower: Run the command npm install -g bower as the root user.
Procedure
3.8.3. Using the Package Managers
Bower and npm are Package Managers that allow you to install, in a single click, all the dependenciesrequired for the plugins to work. In this section, we list steps for enabling Bower Init and npm Init. You maychoose to work with any one of these Package Managers and follow the respective procedure. However, ifyou are using npm you must use the file package.json and if using Bower, use the file bower.json.
Procedure
3.8.3.1. Creating a New Project
In this section, you create a new project so that you can later enable the dependencies and see how theNeon 3 features work with CodeReady Studio.
ProcedureTo create a project:
1. Click File > Project.
2. In the New Project wizard, click General > Project. Click Next.
3. In the Project name field, type the name of the project ( Neon3_features, in this example).
4. Edit the other fields if required and then click Finish. The new project is listed in the ProjectExplorer view.
3.8.3.2. Enabling Bower Init
CHAPTER 3. DEVELOPING FIRST APPLICATIONS WITH CODEREADY STUDIO TOOLS
81

After you have enabled Bower Init the result will be a bower.json file listed under the project in theProject Explorer view.
ProcedureTo enable Bower Init:
1. In the Project Explorer view, right-click Neon3_features and then click New > Other.
2. In the New wizard, type filter text field, type bower. After Bower Init is selected, click Next.
3. Optionally, in the Bower Initialization Wizard:
a. Clear the Use default configuration check box.
b. In the Version field, type 0.0.1.
c. In the License field, type MIT.
4. Click Finish. The bower.json file opens in the default editor.
Figure 3.30. Contents of the bower.json File
3.8.3.3. Enabling npm Init
ProcedureTo enable npm Init:
1. In the Project Explorer view, right-click Neon3_features and then click New > Other.
2. In the New wizard, type filter text field, type npm. After npm Init is selected, click Next.
3. Optionally, in the npm Initialization Wizard:
a. Clear the Use default configuration check box.
b. In the Version field, type 0.0.1.
Red Hat CodeReady Studio 12.11 Getting Started with CodeReady Studio Tools
82

c. In the License field, type MIT.
4. Click Finish. The package.json file opens in the default editor.
3.8.3.4. Creating a New index.html File
In this section, you create an index.html file so that you can use it in Section 3.8.3.5, “Using the BowerTool”.
ProcedureTo create an index.html file:
1. In the Project Explorer view, right-click Neon3_features and click New > File.
2. In the New File wizard:
a. Ensure that Neon3_features is selected as the parent folder.
b. In the File name field, type index.html.
3. Click Finish. The empty index.html file opens in the default editor.
4. Copy the following code snippet and paste it in the index.html file.
5. Save the file.
<!DOCTYPE html><html><head><title>npm / bower / JSON editor</title><script type="text/javascript" src="bower_components/jquery/dist/jquery.min.js"></script> <script type="text/javascript" src="bower_components/bootstrap/dist/js/bootstrap.min.js"></script><link rel="stylesheet" href="bower_components/bootstrap/dist/css/bootstrap.min.css"><link rel="stylesheet" href="bower_components/bootstrap/dist/css/bootstrap-theme.min.css"> </head><body><div class="container"><div class="jumbotron"><h1>My First Bootstrap Page</h1><p>Resize this responsive page to see the effect!</p></div><div class="row"><div class="col-sm-4"><h3>Column 1</h3></div><div class="col-sm-4"><h3>Column 2</h3></div><div class="col-sm-4"><h3>Column 3</h3></div></div></div></body></html>
CHAPTER 3. DEVELOPING FIRST APPLICATIONS WITH CODEREADY STUDIO TOOLS
83

3.8.3.5. Using the Bower Tool
ProcedureTo use the Bower tool:
1. In the Project Explorer view, expand Neon3_features to view bower.json and index.html.
2. Double-click index.html to open it in the default editor, if not already open. The editor shows thebootstrap template.
3. Right-click index.html and click Open With > Web Browser. Notice that the page does not showany bootstrap theme or style applied to it.
Figure 3.31. index.html Page without Theme and Style Applied to it
To be able to view the themes and styles applied to the page, you must edit the bower.json filethat contains the dependencies.
To edit the bower.json file:
4. In the Project Explorer view, double-click bower.json to open it in the default text editor. Thejson editor Outline support:
Allows you to navigate through the json file
Allows you to validate syntax errors
5. To define the jquery and bootstrap dependencies:
a. After the closing square bracket ], add a comma ( ,).
b. On the next line type:
6. Save the file. The contents of the file are as displayed in the following image.
Figure 3.32. bower.json File Edited
"dependencies" : { "jquery" : "*", "bootstrap" : "~3.3.6" }
Red Hat CodeReady Studio 12.11 Getting Started with CodeReady Studio Tools
84
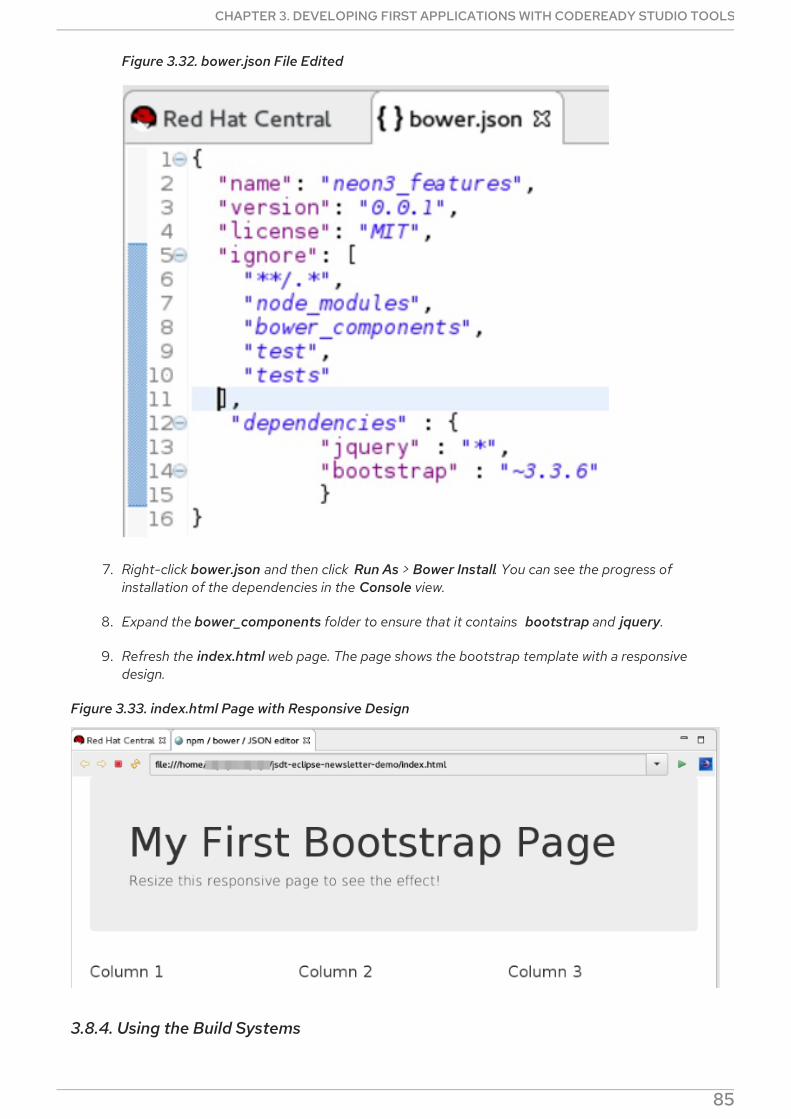
Figure 3.32. bower.json File Edited
7. Right-click bower.json and then click Run As > Bower Install. You can see the progress ofinstallation of the dependencies in the Console view.
8. Expand the bower_components folder to ensure that it contains bootstrap and jquery.
9. Refresh the index.html web page. The page shows the bootstrap template with a responsivedesign.
Figure 3.33. index.html Page with Responsive Design
3.8.4. Using the Build Systems
CHAPTER 3. DEVELOPING FIRST APPLICATIONS WITH CODEREADY STUDIO TOOLS
85

In this section, you will use the npm Package Manager and hence the package.json file.
You can either use the Grunt or the Gulp build systems to run your tasks directly from the IDE instead ofswitching to the CLI every time you want to run a task.
Prerequisites
Ensure that Gulp or Grunt plugins are installed on your system by running the followingcommand:
For Gulp plugin, run the command: gulp -v
For the Grunt plugin, run the command: grunt -v
If not installed, use the following commands to install them:
To install the Gulp plugin, run the command npm install --global gulp-cli as the root user.
To install the Grunt plugin, run the command npm install --global grunt-cli as the root user.
NOTE
This section describes the workflow for Gulp. However, Grunt and Gulp are both supportedand they both have similar workflows.
Procedure
3.8.4.1. Adding Dependencies to the package.json File
NOTE
This section is applicable only if you are using the package.json file. Skip this section ifyou are using the bower.json file.
You must add the dependencies to the package.json file to be able to use it in Section 3.8.4.2, “Enablingthe Gulp Plugin”.
ProcedureTo add the dependencies:
1. In the Project Explorer view, expand neon3_features and double-click package.json to openthe file in the default editor.
2. After "license": "ISC", add a comma ( ,).
3. On the next line add the following code snippet:
4. Save the file. The contents of the package.json file are as displayed in the following image.
Figure 3.34. package.json File as Edited
"devDependencies" : { "jquery" : "*", "angular" : "*", "bootstrap" : "~3.3.6" }
Red Hat CodeReady Studio 12.11 Getting Started with CodeReady Studio Tools
86

Figure 3.34. package.json File as Edited
3.8.4.2. Enabling the Gulp Plugin
To be able to use the task runners Grunt or Gulp, you must first define the following dependenciesrequired for these plugins:
In the bower.json file, under dependencies you must have “gulp”:”” or “grunt”:”*”.
In the package.json file, under dependencies you must have “gulp”:”” or “grunt”:””.
NOTE
In this section, we elaborate steps to enable the Gulp plugin. Use the same steps to enablethe Grunt plugin.
ProcedureTo enable the Gulp plugin:
1. In the Project Explorer view, expand neon3_features and double-click package.json to open itin the default editor.
2. In the package.json file, under devDependencies, after the last dependency defined in the file,type a comma (,).
3. On the next line, type "gulp": "*".
4. On the next line type "gulp-rename": "*" and save the file. The contents of the package.json fileare as displayed in the following image.
Figure 3.35. package.json File with Gulp Enabled
CHAPTER 3. DEVELOPING FIRST APPLICATIONS WITH CODEREADY STUDIO TOOLS
87
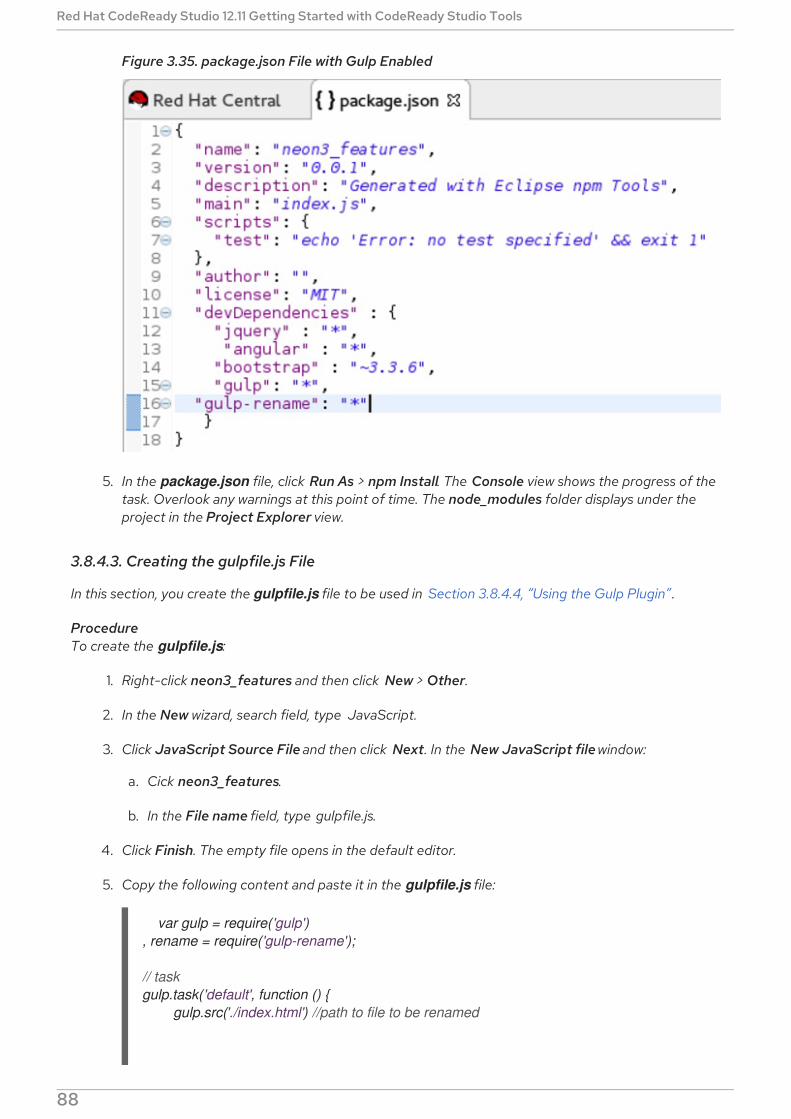
Figure 3.35. package.json File with Gulp Enabled
5. In the package.json file, click Run As > npm Install. The Console view shows the progress of thetask. Overlook any warnings at this point of time. The node_modules folder displays under theproject in the Project Explorer view.
3.8.4.3. Creating the gulpfile.js File
In this section, you create the gulpfile.js file to be used in Section 3.8.4.4, “Using the Gulp Plugin” .
ProcedureTo create the gulpfile.js:
1. Right-click neon3_features and then click New > Other.
2. In the New wizard, search field, type JavaScript.
3. Click JavaScript Source File and then click Next. In the New JavaScript file window:
a. Cick neon3_features.
b. In the File name field, type gulpfile.js.
4. Click Finish. The empty file opens in the default editor.
5. Copy the following content and paste it in the gulpfile.js file:
var gulp = require('gulp'), rename = require('gulp-rename');
// taskgulp.task('default', function () { gulp.src('./index.html') //path to file to be renamed
Red Hat CodeReady Studio 12.11 Getting Started with CodeReady Studio Tools
88

6. Save the file. The contents of the gulpfile.js file are as displayed in the following image.
Figure 3.36. gulpfile.js File
3.8.4.4. Using the Gulp Plugin
ProcedureTo use the Gulp plugin:
1. In the Project Explorer view, expand neon3_features and double-click gulpfile.js to open thefile in the editor. The file has several Gulp tasks defined.
2. Right-click gulpfile.js and click Run As > Gulp Task. The Console view shows the progress of thetask.
3. You may also choose to expand gulpfile.js in the Project Explorer view and view all the tasks.Right-click each task and click Run As > Gulp Task to view the task. A new directory namedrenamed-html is created under neon3_features. Expand the renamed-html directory to see therenamed.html file.
3.8.5. Working with the Node.js Application
In this section, you will use the project at: https://github.com/ibuziuk/jsdt-node-test-project.
Prerequisites
Ensure npm and node.js are installed. For details to install, see the Additional Resources section.
Procedure
3.8.5.1. Importing the jsdt-node-test-project
ProcedureTo import the jsdt-node-test-project:
1. Run the command git clone https://github.com/ibuziuk/jsdt-node-test-project to clone theproject on your local system: .
2. In the IDE, click File > Open Projects from File System.
3. In the Open Projects from File System or Archive window, click Directory next to the Open
.pipe(rename('renamed.html')) // rename index.html to renamed.html .pipe(gulp.dest('renamed-html')); // destination folder});
CHAPTER 3. DEVELOPING FIRST APPLICATIONS WITH CODEREADY STUDIO TOOLS
89
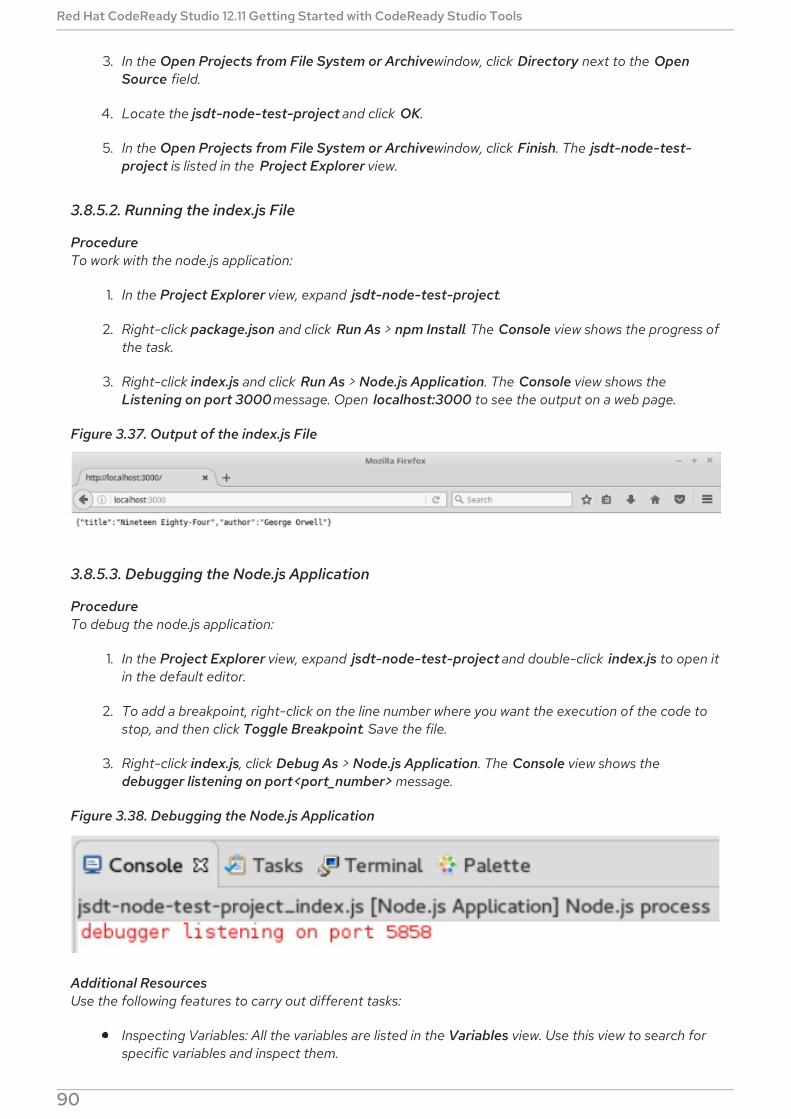
3. In the Open Projects from File System or Archive window, click Directory next to the OpenSource field.
4. Locate the jsdt-node-test-project and click OK.
5. In the Open Projects from File System or Archive window, click Finish. The jsdt-node-test-project is listed in the Project Explorer view.
3.8.5.2. Running the index.js File
ProcedureTo work with the node.js application:
1. In the Project Explorer view, expand jsdt-node-test-project.
2. Right-click package.json and click Run As > npm Install. The Console view shows the progress ofthe task.
3. Right-click index.js and click Run As > Node.js Application. The Console view shows theListening on port 3000 message. Open localhost:3000 to see the output on a web page.
Figure 3.37. Output of the index.js File
3.8.5.3. Debugging the Node.js Application
ProcedureTo debug the node.js application:
1. In the Project Explorer view, expand jsdt-node-test-project and double-click index.js to open itin the default editor.
2. To add a breakpoint, right-click on the line number where you want the execution of the code tostop, and then click Toggle Breakpoint. Save the file.
3. Right-click index.js, click Debug As > Node.js Application. The Console view shows thedebugger listening on port <port_number> message.
Figure 3.38. Debugging the Node.js Application
Additional ResourcesUse the following features to carry out different tasks:
Inspecting Variables: All the variables are listed in the Variables view. Use this view to search forspecific variables and inspect them.
Red Hat CodeReady Studio 12.11 Getting Started with CodeReady Studio Tools
90

Inspecting the main node.js file: The main node.js file opens in the default editor ( index.js, inthis case). You can hover the mouse over the variables to see the functions.
Editing the main node.js file: You can edit the main node.js file and save it to see the changesautomatically propagated to VM.
CHAPTER 3. DEVELOPING FIRST APPLICATIONS WITH CODEREADY STUDIO TOOLS
91

CHAPTER 4. DEPLOYING YOUR APPLICATIONS
4.1. DEPLOYING APPLICATIONS TO A LOCAL SERVER
In order to deploy applications to a server from within the IDE, you must configure the IDE withinformation about the server. For a local server this information includes the following:
A server runtime environment with details about the server location, runtime JRE, andconfiguration files
A server adapter with management settings for the server runtime environment, including accessparameters, launch arguments, and publishing options
JBoss Server Tools enables you to efficiently configure a local server ready for use with the IDE usingRuntime Detection. As demonstrated here, this feature is useful for quickly configuring a server fordeploying and testing an application.
Procedure
4.1.1. Configuring the IDE for a Local Runtime Server
Runtime Detection searches a given local system path to locate certain types of runtime servers. For anyservers found, Runtime Detection automatically generates both a default server runtime environment anda default server adapter. These items can be used as they are for immediate application deployment orcustomized to meet your requirements.
ProcedureTo configure the IDE for a local runtime server:
1. Click Window > Preferences.
2. In the Preferences window, locate and click JBoss Tools > JBoss Runtime Detection.
3. Click Add.
4. Locate the directory containing the runtime server and click OK.
5. In the table of located runtimes, ensure the runtime is selected and click OK.
6. Click Apply and Close to close the Preferences window. A default runtime environment andserver adapter are generated for the server, with the server adapter listed in the Servers view.
4.1.2. Deploying an Application
When you have configured the IDE for the server, you can deploy applications to the server from the IDEusing the server adapter. The server adapter enables runtime communication between the server and IDEfor easy deployment of applications and server management.
ProcedureTo deploy an application to the server:
1. In the Project Explorer view, right-click {project name} and click Run As > Run on Server.
2. Ensure Choose an existing server is selected.
Red Hat CodeReady Studio 12.11 Getting Started with CodeReady Studio Tools
92

3. From the table of servers, expand localhost, select the server on which to deploy the applicationand click Finish. The Console view shows output from the server starting and deploying theapplication. When deployment is complete, an IDE default web browser opens and shows thedeployed web application.
4.1.3. Changing and Republishing the Application
By default, the server adapter configures the server for automatic publishing when changed resources aresaved. This automatic publishing action applies to application resources that can be interchanged in thededicated deployment location of the server without requiring the application to stop and restart, such as .html files. For other changed resources, such as .java files, you need to republish the application suchthat it forces a rebuild of the application.
ProcedureTo republish the application to the server after changes that cannot be automatically published:
1. In the Servers view, expand the server adapter to list the applications allocated to the server.
2. Right-click {application name} and click Full Publish. The Console view shows the output fromthe server replacing the deploying application. Unless LiveReload is enabled in the web browser,you must manually reload the web browser to see the changed application.
Additional Resources
You can also configure servers by right-clicking the Servers view and selecting New > Server orby clicking Manually define a new server in the Run on Server wizard.
Paths previously searched by Runtime Detection can be automatically searched on everyworkspace start. Click Window > Preferences > JBoss Tools > JBoss Runtime Detection andfrom the Paths table select the check boxes of the appropriate paths. Click Apply and click OKto close the Preferences window.
You can customize the server adapter and server runtime environment with the Server Editor. Inthe Servers view, double-click the server adapter to open the Server Editor.
You can initiate download and installation of runtime servers from the IDE. Click Window >Preferences > JBoss Tools > JBoss Runtime Detection. Click Download and from the table ofruntime servers select the one to install and click Next. Follow the on-screen instructions tocomplete the download and installation process.
4.2. CONFIGURING A REMOTE SERVER
Remote servers allow developers to access and deploy to a JBoss instance that is not a local machine.Developers can use remote servers to set up multiple environments for development and testing purposesand share them with other developers. Another reason to use a remote server with Red HatCodeReady Studio is to allow developers to share and deploy automated tests to run in a non-localenvironment.
Procedure
4.2.1. Setting up a Remote Server
Procedure
The following instructions are used to set up a remote server for JBoss Enterprise Middleware application
CHAPTER 4. DEPLOYING YOUR APPLICATIONS
93

The following instructions are used to set up a remote server for JBoss Enterprise Middleware applicationservers. A complete server definition requires a server adapter (or server) that allows the IDE tocommunicate with and manage the remote server.
1. Click the Servers view. If the Servers view is not visible, click Window > Show View > Server.
2. Use the appropriate instructions depending on the number of existing servers listed in theServers tab:
a. If there are no existing servers, click No servers are available. Click this link to create a newserver.
b. If there are one or more existing servers, right-click an existing server and click New > Server.
3. In the New Server wizard:
a. From the Select the server type list, select a JBoss Enterprise Middleware application server.
b. The Server’s host name and Server name fields are completed by default. In the Servername field, you can type a custom name to later identify the server in the Servers view.
c. Click Next to continue.
Figure 4.1. Defining a New Remote Server
Red Hat CodeReady Studio 12.11 Getting Started with CodeReady Studio Tools
94
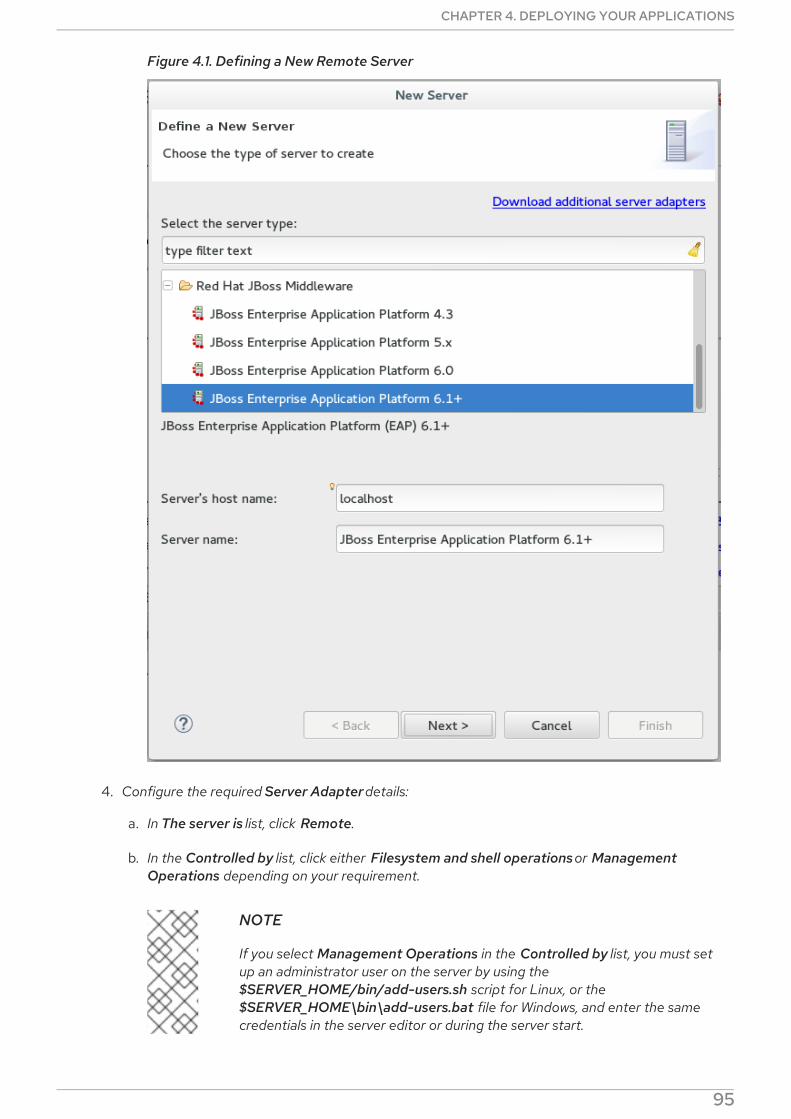
Figure 4.1. Defining a New Remote Server
4. Configure the required Server Adapter details:
a. In The server is list, click Remote.
b. In the Controlled by list, click either Filesystem and shell operations or ManagementOperations depending on your requirement.
NOTE
If you select Management Operations in the Controlled by list, you must setup an administrator user on the server by using the$SERVER_HOME/bin/add-users.sh script for Linux, or the$SERVER_HOME\bin\add-users.bat file for Windows, and enter the samecredentials in the server editor or during the server start.
CHAPTER 4. DEPLOYING YOUR APPLICATIONS
95

c. Click the Server lifecycle is externally managed. check box to deploy the server but to notexpect the IDE to stop or start the server.
d. Clear the Assign a runtime to this server check box to create a remote server withoutassigning a runtime to it.
NOTE
Creating a Remote Server without a runtime results in limitations. For example,the JMX connection does not work because it requires libraries from theruntime to connect via JMX. Additionally, automatic port detection occursusing the standalone.xml file, which is not available if a runtime is notspecified. These and other minor issues related to hard-coded minor fixes inmaintenance releases may occur if no runtime is specified for the RemoteServer.
5. From the drop-down list, click the relevant runtime server and click Next.
Figure 4.2. Creating a New Server Adapter
6. Add the remote system integration details as follows:
Red Hat CodeReady Studio 12.11 Getting Started with CodeReady Studio Tools
96
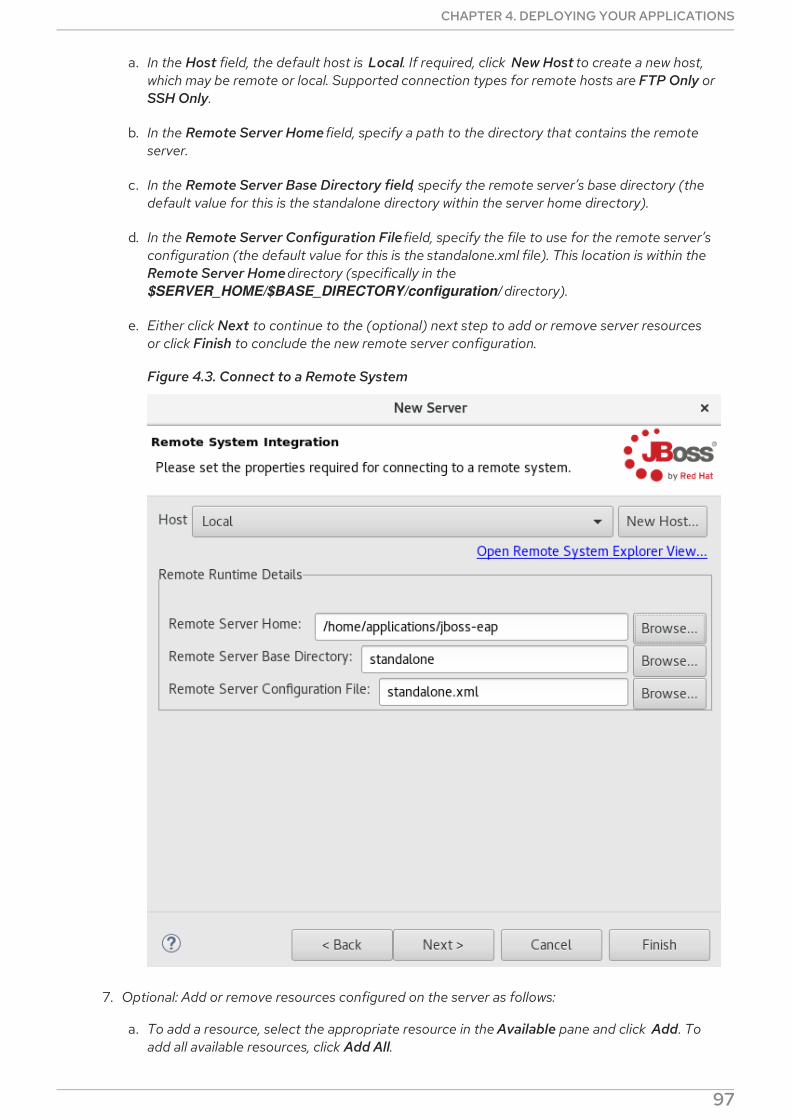
a. In the Host field, the default host is Local. If required, click New Host to create a new host,which may be remote or local. Supported connection types for remote hosts are FTP Only orSSH Only.
b. In the Remote Server Home field, specify a path to the directory that contains the remoteserver.
c. In the Remote Server Base Directory field, specify the remote server’s base directory (thedefault value for this is the standalone directory within the server home directory).
d. In the Remote Server Configuration File field, specify the file to use for the remote server’sconfiguration (the default value for this is the standalone.xml file). This location is within theRemote Server Home directory (specifically in the $SERVER_HOME/$BASE_DIRECTORY/configuration/ directory).
e. Either click Next to continue to the (optional) next step to add or remove server resourcesor click Finish to conclude the new remote server configuration.
Figure 4.3. Connect to a Remote System
7. Optional: Add or remove resources configured on the server as follows:
a. To add a resource, select the appropriate resource in the Available pane and click Add. Toadd all available resources, click Add All.
CHAPTER 4. DEPLOYING YOUR APPLICATIONS
97
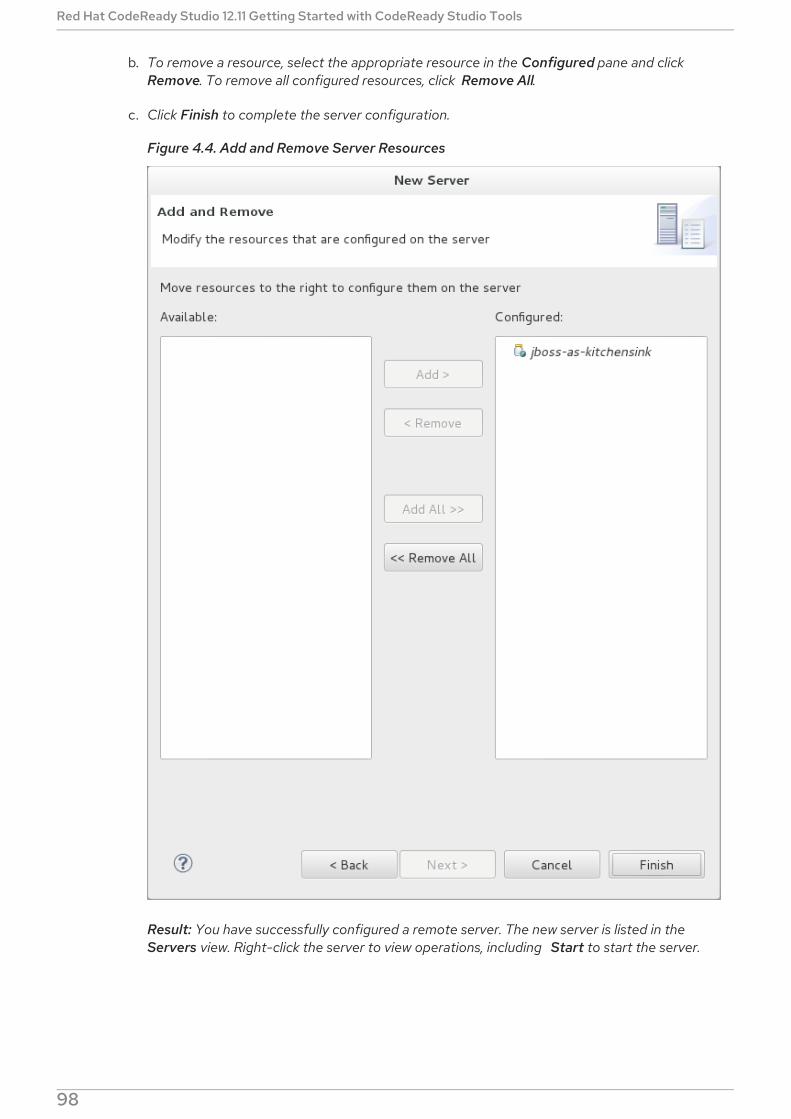
b. To remove a resource, select the appropriate resource in the Configured pane and clickRemove. To remove all configured resources, click Remove All.
c. Click Finish to complete the server configuration.
Figure 4.4. Add and Remove Server Resources
Result: You have successfully configured a remote server. The new server is listed in theServers view. Right-click the server to view operations, including Start to start the server.
NOTE
Red Hat CodeReady Studio 12.11 Getting Started with CodeReady Studio Tools
98

NOTE
If the Server lifecycle is externally managed. check box was selected in the steps above,clicking Start does not start the server. Instead, it marks the server to indicate that it hasstarted and the web poller checks whether the server is running.
CHAPTER 4. DEPLOYING YOUR APPLICATIONS
99
Related Documents