Red Hat Cloud Infrastructure: Managing a Red Hat Enterprise Virtualization 3.2 Infrastructure Using Red Hat CloudForms 2.0 Brett Thurber, Principal Software Engineer RHCA, RHCVA Version 1.4 January 2014

Welcome message from author
This document is posted to help you gain knowledge. Please leave a comment to let me know what you think about it! Share it to your friends and learn new things together.
Transcript
Red Hat Cloud Infrastructure:
Managing a Red Hat Enterprise Virtualization 3.2 Infrastructure Using Red Hat CloudForms 2.0
Brett Thurber, Principal Software Engineer
RHCA, RHCVA
Version 1.4
January 2014

100 East Davie StreetRaleigh NC 27601 USAPhone: +1 919 754 3700Phone: 888 733 4281Fax: +1 919 754 3701PO Box 13588Research Triangle Park NC 27709 USA
Linux is a registered trademark of Linus Torvalds. Red Hat, Red Hat Enterprise Linux and the Red Hat "Shadowman" logo are registered trademarks of Red Hat, Inc. in the United States and other countries.
Microsoft and Windows are U.S. registered trademarks of Microsoft Corporation.
UNIX is a registered trademark of The Open Group.
Intel, the Intel logo and Xeon are registered trademarks of Intel Corporation or its subsidiaries in the United States and other countries.
All other trademarks referenced herein are the property of their respective owners.
© 2014 by Red Hat, Inc. This material may be distributed only subject to the terms and conditions set forth in the Open Publication License, V1.0 or later (the latest version is presently available at http://www.opencontent.org/openpub/).
The information contained herein is subject to change without notice. Red Hat, Inc. shall not be liable for technical or editorial errors or omissions contained herein.
Distribution of modified versions of this document is prohibited without the explicit permission of Red Hat Inc.
Distribution of this work or derivative of this work in any standard (paper) book form for commercial purposes is prohibited unless prior permission is obtained from Red Hat Inc.
The GPG fingerprint of the [email protected] key is:CA 20 86 86 2B D6 9D FC 65 F6 EC C4 21 91 80 CD DB 42 A6 0E
www.redhat.com ii [email protected]

Comments and FeedbackIn the spirit of open source, we invite anyone to provide feedback and comments on any reference architectures. Although we review our papers internally, sometimes issues or typographical errors are encountered. Feedback allows us to not only improve the quality of the papers we produce, but allows the reader to provide their thoughts on potential improvements and topic expansion to the papers.
Feedback on the papers can be provided by emailing [email protected]. Please refer to the title within the email.
Staying In TouchJoin us on some of the popular social media sites where we keep our audience informed on new reference architectures as well as offer related information on things we find interesting.
Like us on Facebook:
https://www.facebook.com/rhrefarch
Follow us on Twitter:
https://twitter.com/RedHatRefArch
Plus us on Google+:
https://plus.google.com/u/0/b/114152126783830728030/
[email protected] III www.redhat.com
Table of Contents1 Executive Summary......................................................................................... 1
2 Components Overview..................................................................................... 2
2.1 Red Hat CloudForms 2.0................................................................................................... 2
2.2 Red Hat Enterprise Virtualization...................................................................................... 5
2.2.1 RHEV Hypervisor......................................................................................................... 52.2.2 Red Hat Enterprise Virtualization................................................................................. 6
3 Environment..................................................................................................... 8
3.1 Software............................................................................................................................. 9
3.1.1 CloudForms Management Engine............................................................................... 93.1.2 Red Hat Enterprise Virtualization................................................................................. 93.1.3 Red Hat Satellite Server............................................................................................ 103.1.4 Microsoft Windows..................................................................................................... 103.1.5 Red Hat Network ...................................................................................................... 10
3.2 Systems........................................................................................................................... 11
3.2.1 Server Hardware........................................................................................................ 113.2.2 Infrastructure Virtual Machines.................................................................................. 11
3.3 Storage............................................................................................................................ 13
4 Preparing the Infrastructure............................................................................ 14
4.1 Red Hat Enterprise Virtualization.................................................................................... 14
4.2 Microsoft Active Directory................................................................................................ 17
4.3 CloudForms Management Engine.................................................................................. 24
4.3.1 Management Engine Relationship............................................................................. 244.3.2 Regions and Zones.................................................................................................... 254.3.3 CloudForms Management Engine Role Resiliency................................................... 274.3.4 Secure LDAP Authentication..................................................................................... 334.3.5 Tags............................................................................................................................ 35
4.4 Red Hat Satellite Server.................................................................................................. 36
4.4.1 Custom Channel and Package.................................................................................. 364.4.2 iPXE........................................................................................................................... 40
4.5 Security............................................................................................................................ 42
5 Provisioning.................................................................................................... 43
5.1 PXE.................................................................................................................................. 43
www.redhat.com iv [email protected]
5.1.1 PXE Configuration..................................................................................................... 435.1.2 PXE Provisioning....................................................................................................... 49
5.2 ISO................................................................................................................................... 58
5.2.1 ISO Configuration...................................................................................................... 585.2.2 ISO Provisioning........................................................................................................ 61
6 Automation..................................................................................................... 66
6.1 Provisioning Tags............................................................................................................ 66
6.2 Policies............................................................................................................................ 67
6.2.1 Control Policy Creation.............................................................................................. 676.2.2 Control Policy Testing................................................................................................ 72
6.3 Automation Execution...................................................................................................... 74
6.3.1 Automate Model Configuration.................................................................................. 756.4 Testing Policy-based Automation.................................................................................... 80
7 Self-Service.................................................................................................... 86
7.1 LDAP User and Group Mappings.................................................................................... 86
7.2 Quotas and Resources.................................................................................................... 88
7.3 Testing Self-Service Provisioning.................................................................................... 90
8 Chargeback.................................................................................................... 99
8.1 Chargeback Rates........................................................................................................... 99
8.2 Reporting....................................................................................................................... 102
8.2.1 Chargeback Report Configuration........................................................................... 1028.2.2 Report Generation................................................................................................... 107
9 Conclusion.................................................................................................... 111
Appendix A: Revision History.......................................................................... 112
Appendix B: Contributors................................................................................ 112
Appendix C: iptables....................................................................................... 112
Appendix D: kickstart...................................................................................... 117
D.1 Post Install Scripts........................................................................................................ 126
Appendix E: Automate Method....................................................................... 128
[email protected] v www.redhat.com
Appendix F: Troubleshooting.......................................................................... 131
Appendix G: Configuration Files..................................................................... 132
www.redhat.com vi [email protected]
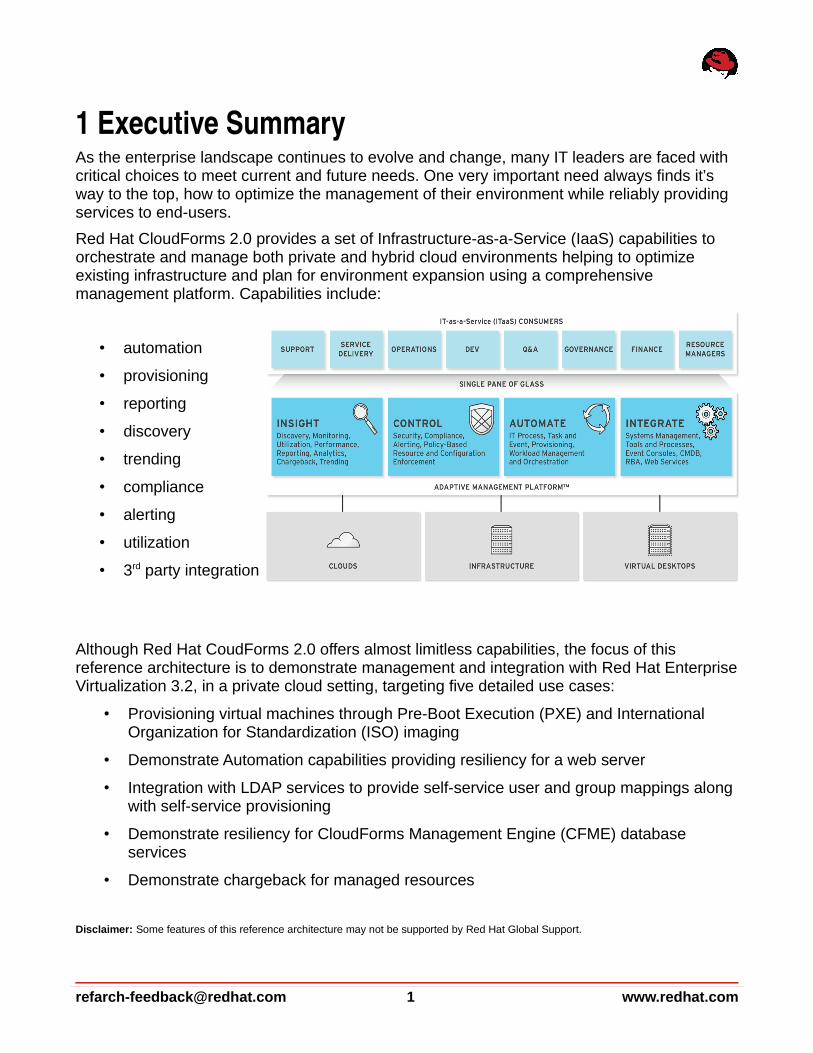
1 Executive SummaryAs the enterprise landscape continues to evolve and change, many IT leaders are faced with critical choices to meet current and future needs. One very important need always finds it’s way to the top, how to optimize the management of their environment while reliably providing services to end-users.
Red Hat CloudForms 2.0 provides a set of Infrastructure-as-a-Service (IaaS) capabilities to orchestrate and manage both private and hybrid cloud environments helping to optimize existing infrastructure and plan for environment expansion using a comprehensive management platform. Capabilities include:
• automation
• provisioning
• reporting
• discovery
• trending
• compliance
• alerting
• utilization
• 3rd party integration
Although Red Hat CoudForms 2.0 offers almost limitless capabilities, the focus of this reference architecture is to demonstrate management and integration with Red Hat Enterprise Virtualization 3.2, in a private cloud setting, targeting five detailed use cases:
• Provisioning virtual machines through Pre-Boot Execution (PXE) and International Organization for Standardization (ISO) imaging
• Demonstrate Automation capabilities providing resiliency for a web server
• Integration with LDAP services to provide self-service user and group mappings along with self-service provisioning
• Demonstrate resiliency for CloudForms Management Engine (CFME) database services
• Demonstrate chargeback for managed resources
Disclaimer: Some features of this reference architecture may not be supported by Red Hat Global Support.
[email protected] 1 www.redhat.com
2 Components Overview
2.1 Red Hat CloudForms 2.0
A Continuum of Management Capability:
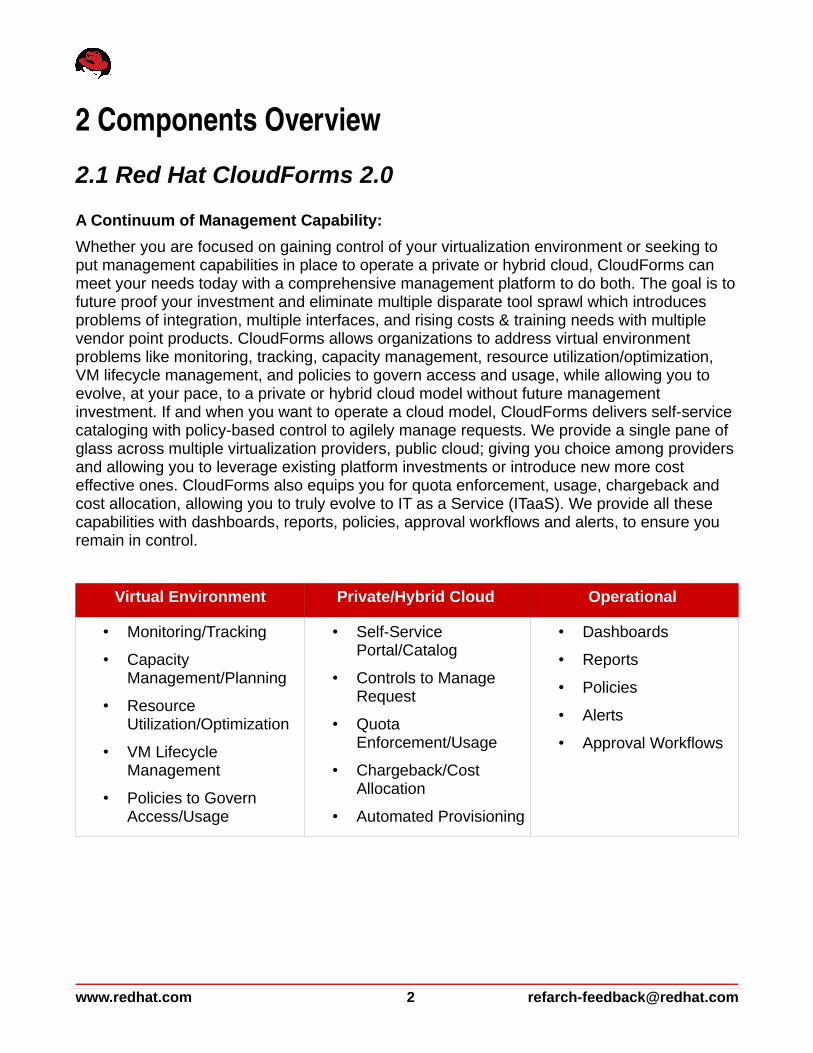
Whether you are focused on gaining control of your virtualization environment or seeking to put management capabilities in place to operate a private or hybrid cloud, CloudForms can meet your needs today with a comprehensive management platform to do both. The goal is to future proof your investment and eliminate multiple disparate tool sprawl which introduces problems of integration, multiple interfaces, and rising costs & training needs with multiple vendor point products. CloudForms allows organizations to address virtual environment problems like monitoring, tracking, capacity management, resource utilization/optimization, VM lifecycle management, and policies to govern access and usage, while allowing you to evolve, at your pace, to a private or hybrid cloud model without future management investment. If and when you want to operate a cloud model, CloudForms delivers self-service cataloging with policy-based control to agilely manage requests. We provide a single pane of glass across multiple virtualization providers, public cloud; giving you choice among providers and allowing you to leverage existing platform investments or introduce new more cost effective ones. CloudForms also equips you for quota enforcement, usage, chargeback and cost allocation, allowing you to truly evolve to IT as a Service (ITaaS). We provide all these capabilities with dashboards, reports, policies, approval workflows and alerts, to ensure you remain in control.
Virtual Environment Private/Hybrid Cloud Operational
• Monitoring/Tracking
• Capacity Management/Planning
• Resource Utilization/Optimization
• VM Lifecycle Management
• Policies to Govern Access/Usage
• Self-Service Portal/Catalog
• Controls to Manage Request
• Quota Enforcement/Usage
• Chargeback/Cost Allocation
• Automated Provisioning
• Dashboards
• Reports
• Policies
• Alerts
• Approval Workflows
www.redhat.com 2 [email protected]
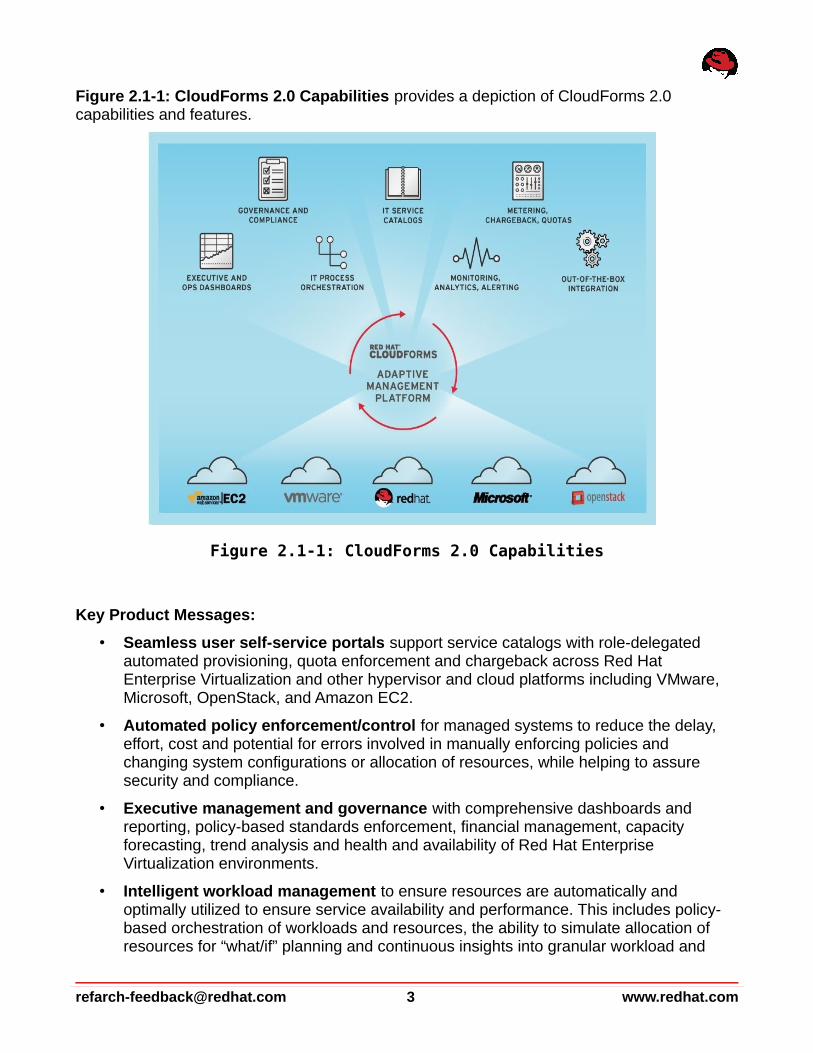
Figure 2.1-1: CloudForms 2.0 Capabilities provides a depiction of CloudForms 2.0 capabilities and features.
Key Product Messages:
• Seamless user self-service portals support service catalogs with role-delegated automated provisioning, quota enforcement and chargeback across Red Hat Enterprise Virtualization and other hypervisor and cloud platforms including VMware, Microsoft, OpenStack, and Amazon EC2.
• Automated policy enforcement/control for managed systems to reduce the delay, effort, cost and potential for errors involved in manually enforcing policies and changing system configurations or allocation of resources, while helping to assure security and compliance.
• Executive management and governance with comprehensive dashboards and reporting, policy-based standards enforcement, financial management, capacity forecasting, trend analysis and health and availability of Red Hat Enterprise Virtualization environments.
• Intelligent workload management to ensure resources are automatically and optimally utilized to ensure service availability and performance. This includes policy-based orchestration of workloads and resources, the ability to simulate allocation of resources for “what/if” planning and continuous insights into granular workload and
[email protected] 3 www.redhat.com
Figure 2.1-1: CloudForms 2.0 Capabilities
consumption levels to allow chargeback, showback and proactive planning and policy creation.
• Capacity Planning to anticipate and plan for future resource needs based on capacity, trending, data and analytics. This includes the abilities to classify resources based on configuration, performance, capacity, cost, acceptable use and locations.
• Capacity Management to dynamically and automatically assure the most efficient use of resources. This includes the ability to discover and track resource changes, provision and de-provision resources based on policies and demand, and identify the current condition of resources and the “best fit” for new workloads across compute, storage and network resources.
• Federated management of large and distributed Red Hat Enterprise Virtualization infrastructures from a single pane of glass, enabling enterprises to rapidly scale out their virtual and cloud deployments.
• Red Hat Enterprise Virtualization certified and optimized to run on Red Hat Enterprise Linux.
Key Business Messages:
• Low Acquisition Cost less than ½ the cost of other management technologies, over a 3 year period. Efficient subscription model allows for more of an annual rental model – no large upfront licensing fees. Tool consolidation and replacement can result in a zero net sum or even saving on current management spend.
• Fastest Time to Value installs rapidly as a Virtual Appliance and is agent-free, with no agents to license or maintain. Value is seen in hours versus days/weeks through auto-discovery of your environment. Operations specific use case implementations happen in days not months. One management system to learn vs multiple tools/interfaces, support costs, greater potential for vendor price hikes. Can integrate as needed with larger management systems (BMC, CA, HP, Microsoft, ServiceNow).
• Increased Automation and Continuous Optimization through policy based controls and automated responses allows you to maximize resource efficiency and control of IT capital costs by adaptively increasing utilization. Increased automation supports higher operational efficiency in build, test and automate sequences. Significantly reduce human interaction/errors and gain ability to manage with less people/labor costs.
• Open/Flexible solution prevents vendor lock-in and allows for choice of infrastructure by leverage low cost virtual platforms for your cloud. Leverages existing IT investments and supports seamless introduction of new lower cost platform alternatives. Choice among VMware, Red Hat, & Microsoft for virtualization platforms, Amazon as public cloud.
• More efficient users and customers through self service with web-based portals accompanied by fine-grained access control and support for request management, tracking and approval.
www.redhat.com 4 [email protected]
2.2 Red Hat Enterprise Virtualization
2.2.1 RHEV HypervisorA hypervisor is a computer software platform that allows multiple “guest” operating systems to run concurrently on a host computer. The guest virtual machine operating systems interact with the hypervisor which translates guest I/O, CPU, and memory requests into corresponding requests for resources on the host computer.
Running fully virtualized guests, i.e., virtual machine guests with unmodified operating systems, used to require complex hypervisors and previously incurred a performance penalty for emulation and translation of some system resource requests.
However, over the last few years CPU vendors Intel and AMD have been steadily adding CPU features that offer hardware enhancements to support virtualization. Most notable are:
1. First-generation hardware assisted virtualization: Removes the requirement for hypervisor to scan and rewrite privileged kernel instructions using Intel VT (Virtualization Technology) and AMD's SVM (Secure Virtual Machine) technology.
2. Second-generation hardware assisted virtualization: Offloads virtual to physical memory address translation to CPU/chip-set using Intel EPT (Extended Page Tables) and AMD RVI (Rapid Virtualization Indexing) technology. This provides significant reduction in memory address translation overhead in virtualized environments.
3. Third-generation hardware assisted virtualization: Allows PCI I/O devices to be attached directly to virtual machines using Intel VT-d (Virtualization Technology for directed I/O) and AMD IOMMU. Additionally, SR-IOV (Single Root I/O Virtualization), which allows special PCI devices to be split into multiple virtual devices, also provides significant improvement in guest I/O performance.
As the last decade has ushered in the creation and basic maturity of virtualization, it has also led to the creation of several different types of hypervisors. However, many of these pre-date hardware-assisted virtualization technologies (as noted above) and are by nature, generally considered more complex and less performant software platforms. Now, with the advent of the above noted hardware extensions, it is possible to gain the benefits of more advanced virtualization capabilities currently only available through existing open source projects and technologies.
[email protected] 5 www.redhat.com
Red Hat Enterprise Virtualization (RHEV) uses the Kernel-based Virtual Machine (KVM)1 technology, which turns the Linux kernel into a virtualization hypervisor. Red Hat Enterprise Linux (RHEL) 5.4 provided the first commercial-strength implementation of KVM, which has been continually developed as part of the upstream Linux community, and continues to be an integrated part of the latest Red Hat Enterprise Linux operating system. The Red Hat Enterprise Virtualization Hypervisor is based on this same hardened and proven KVM hypervisor technology, resulting in native advanced features and capabilities such as, record-setting performance and scalability, an expansive line of certified hardware support, and advanced OS-level features, only found in Red Hat Enterprise Linux 6.
2.2.2 Red Hat Enterprise VirtualizationVirtualization offers tremendous benefits for enterprise IT organizations – server consolidation, hardware abstraction, and internal clouds deliver a high degree of operational efficiency.
Red Hat Enterprise Virtualization (RHEV) combines the KVM hypervisor with an enterprise grade, multi-hypervisor management platform that provides key virtualization features such, as automated load balancing, live migration, high availability, role-based administration control, and virtual machine life cycle management. Red Hat Enterprise Virtualization delivers a secure, robust virtualization platform with industry-leading performance and scalability for Red Hat Enterprise Linux and Windows guests.
Red Hat Enterprise Virtualization consists of the following two components:
• RHEV MANAGER (RHEV-M): A feature-rich virtualization management suite that provides advanced capabilities for hosts, guests, and storage.
• RHEV HYPERVISOR: A modern, scalable, high performance hypervisor based on KVM. It can be deployed as RHEV-H, a small footprint secure hypervisor appliance included with the RHEV subscription, or as a RHEL server (purchased separately) managed by RHEV-M.
A HOST is a physical server which provides the CPU, memory, and connectivity to storage and networks that are used for the virtual machines (VM). The local storage of each host can be used for the RHEV-H executables, logs, and ISO uploads, as well as optionally for virtual machine data.
A CLUSTER is a group of host servers linked together to form a single resource pool. Virtual machines can be automatically or manually migrated from host to host within the cluster without having to shut down and restart the virtual machine. A cluster consists of one or more hosts, but a host can only be a member of one cluster.
A DATA CENTER is a collection of one or more clusters that have resources in common. Resources that have been allocated to a data center can be used only by the hosts belonging to that data center. The resources relate to storage and networks.
A STORAGE DOMAIN is a shared or local storage location for guest image files, import/export, or for ISO images. Storage domain types supported in RHEV 3 are NFS, iSCSI, Fibre Channel, and local disk storage.
1 http://www.linux-kvm.org/
www.redhat.com 6 [email protected]
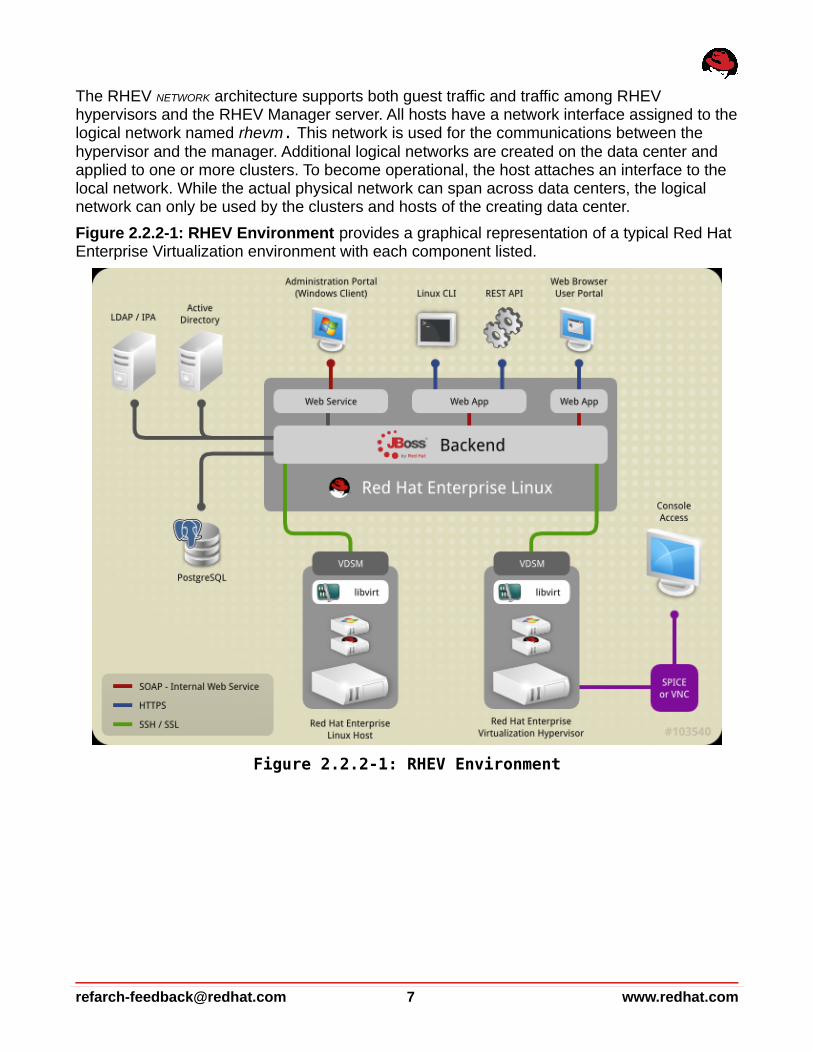
The RHEV NETWORK architecture supports both guest traffic and traffic among RHEV hypervisors and the RHEV Manager server. All hosts have a network interface assigned to the logical network named rhevm. This network is used for the communications between the hypervisor and the manager. Additional logical networks are created on the data center and applied to one or more clusters. To become operational, the host attaches an interface to the local network. While the actual physical network can span across data centers, the logical network can only be used by the clusters and hosts of the creating data center.
Figure 2.2.2-1: RHEV Environment provides a graphical representation of a typical Red Hat Enterprise Virtualization environment with each component listed.
[email protected] 7 www.redhat.com
Figure 2.2.2-1: RHEV Environment
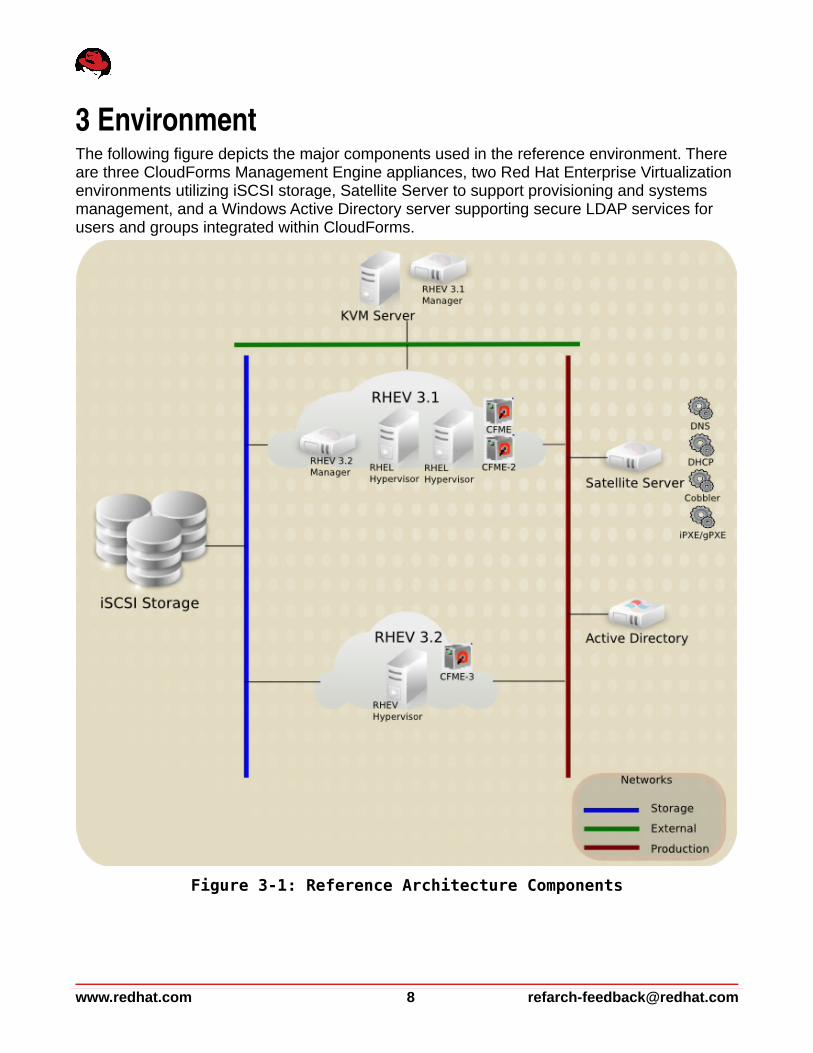
3 EnvironmentThe following figure depicts the major components used in the reference environment. There are three CloudForms Management Engine appliances, two Red Hat Enterprise Virtualization environments utilizing iSCSI storage, Satellite Server to support provisioning and systems management, and a Windows Active Directory server supporting secure LDAP services for users and groups integrated within CloudForms.
www.redhat.com 8 [email protected]
Figure 3-1: Reference Architecture Components
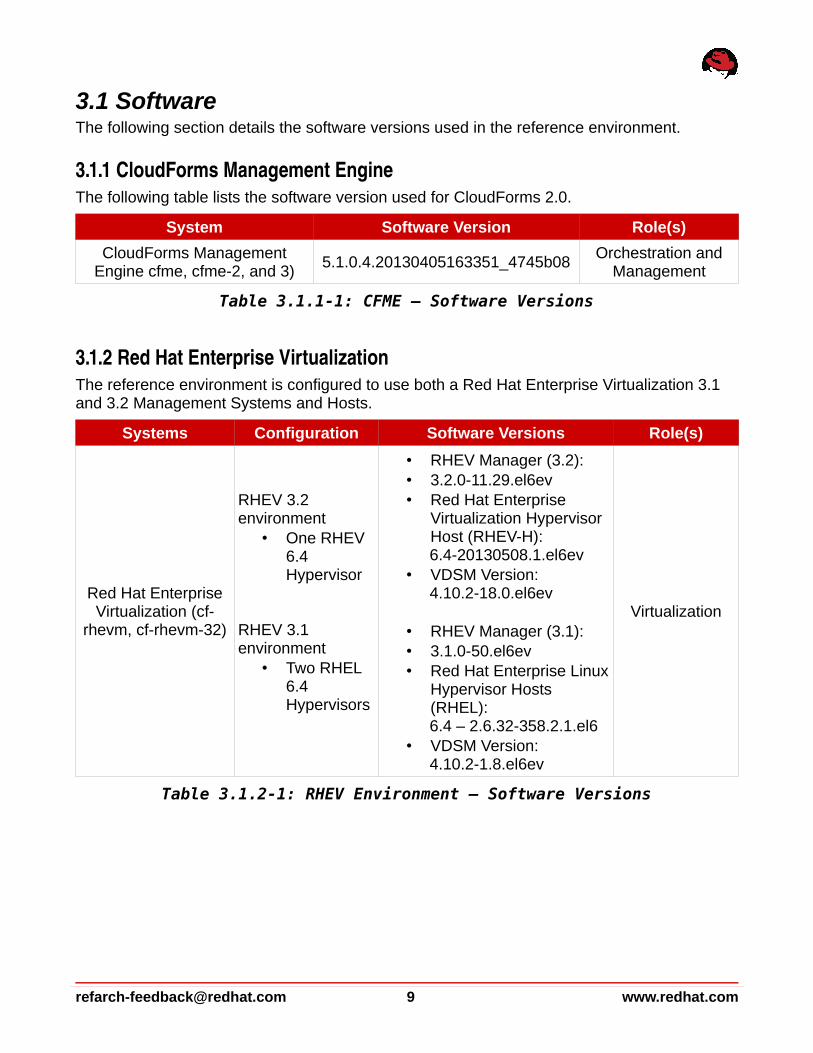
3.1 SoftwareThe following section details the software versions used in the reference environment.
3.1.1 CloudForms Management EngineThe following table lists the software version used for CloudForms 2.0.
System Software Version Role(s)
CloudForms Management Engine cfme, cfme-2, and 3)
5.1.0.4.20130405163351_4745b08Orchestration and
Management
Table 3.1.1-1: CFME – Software Versions
3.1.2 Red Hat Enterprise VirtualizationThe reference environment is configured to use both a Red Hat Enterprise Virtualization 3.1 and 3.2 Management Systems and Hosts.
Systems Configuration Software Versions Role(s)
Red Hat Enterprise Virtualization (cf-
rhevm, cf-rhevm-32)
RHEV 3.2 environment
• One RHEV 6.4 Hypervisor
RHEV 3.1 environment
• Two RHEL 6.4 Hypervisors
• RHEV Manager (3.2):• 3.2.0-11.29.el6ev• Red Hat Enterprise
Virtualization Hypervisor Host (RHEV-H):6.4-20130508.1.el6ev
• VDSM Version:4.10.2-18.0.el6ev
• RHEV Manager (3.1):• 3.1.0-50.el6ev• Red Hat Enterprise Linux
Hypervisor Hosts (RHEL):6.4 – 2.6.32-358.2.1.el6
• VDSM Version:4.10.2-1.8.el6ev
Virtualization
Table 3.1.2-1: RHEV Environment – Software Versions
[email protected] 9 www.redhat.com
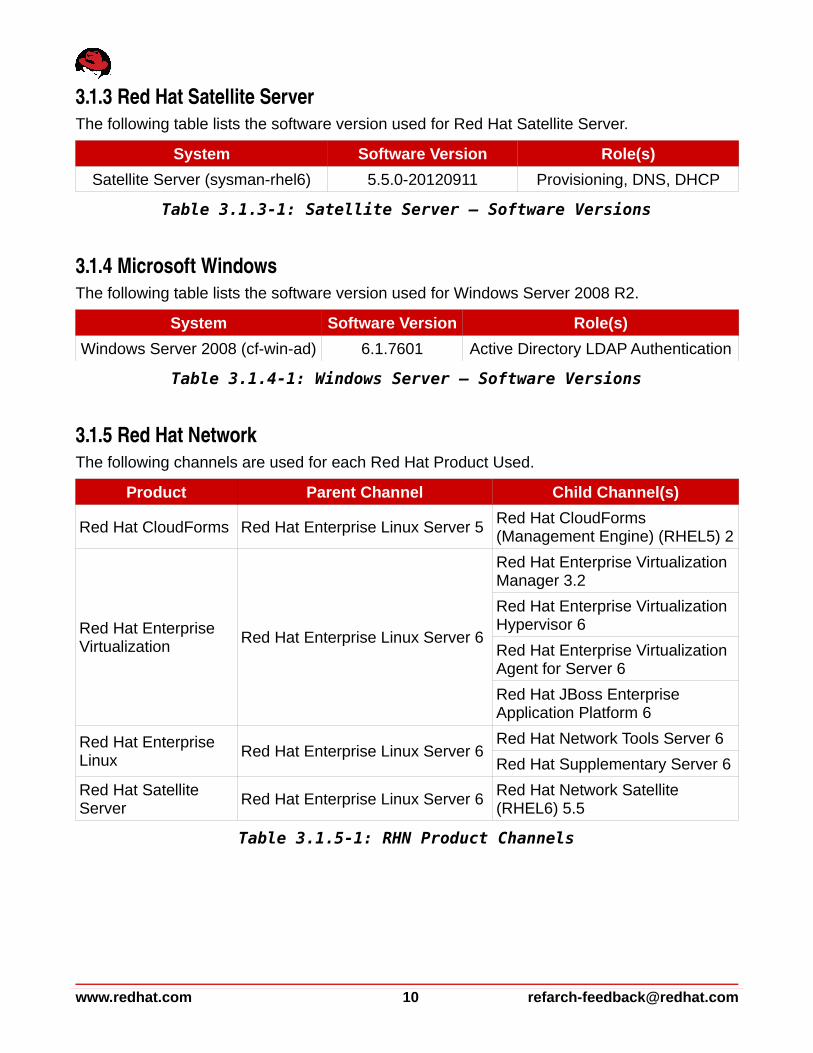
3.1.3 Red Hat Satellite ServerThe following table lists the software version used for Red Hat Satellite Server.
System Software Version Role(s)
Satellite Server (sysman-rhel6) 5.5.0-20120911 Provisioning, DNS, DHCP
Table 3.1.3-1: Satellite Server – Software Versions
3.1.4 Microsoft WindowsThe following table lists the software version used for Windows Server 2008 R2.
System Software Version Role(s)
Windows Server 2008 (cf-win-ad) 6.1.7601 Active Directory LDAP Authentication
Table 3.1.4-1: Windows Server – Software Versions
3.1.5 Red Hat Network The following channels are used for each Red Hat Product Used.
Product Parent Channel Child Channel(s)
Red Hat CloudForms Red Hat Enterprise Linux Server 5Red Hat CloudForms (Management Engine) (RHEL5) 2
Red Hat Enterprise Virtualization
Red Hat Enterprise Linux Server 6
Red Hat Enterprise Virtualization Manager 3.2
Red Hat Enterprise Virtualization Hypervisor 6
Red Hat Enterprise Virtualization Agent for Server 6
Red Hat JBoss Enterprise Application Platform 6
Red Hat Enterprise Linux
Red Hat Enterprise Linux Server 6Red Hat Network Tools Server 6
Red Hat Supplementary Server 6
Red Hat Satellite Server
Red Hat Enterprise Linux Server 6Red Hat Network Satellite (RHEL6) 5.5
Table 3.1.5-1: RHN Product Channels
www.redhat.com 10 [email protected]
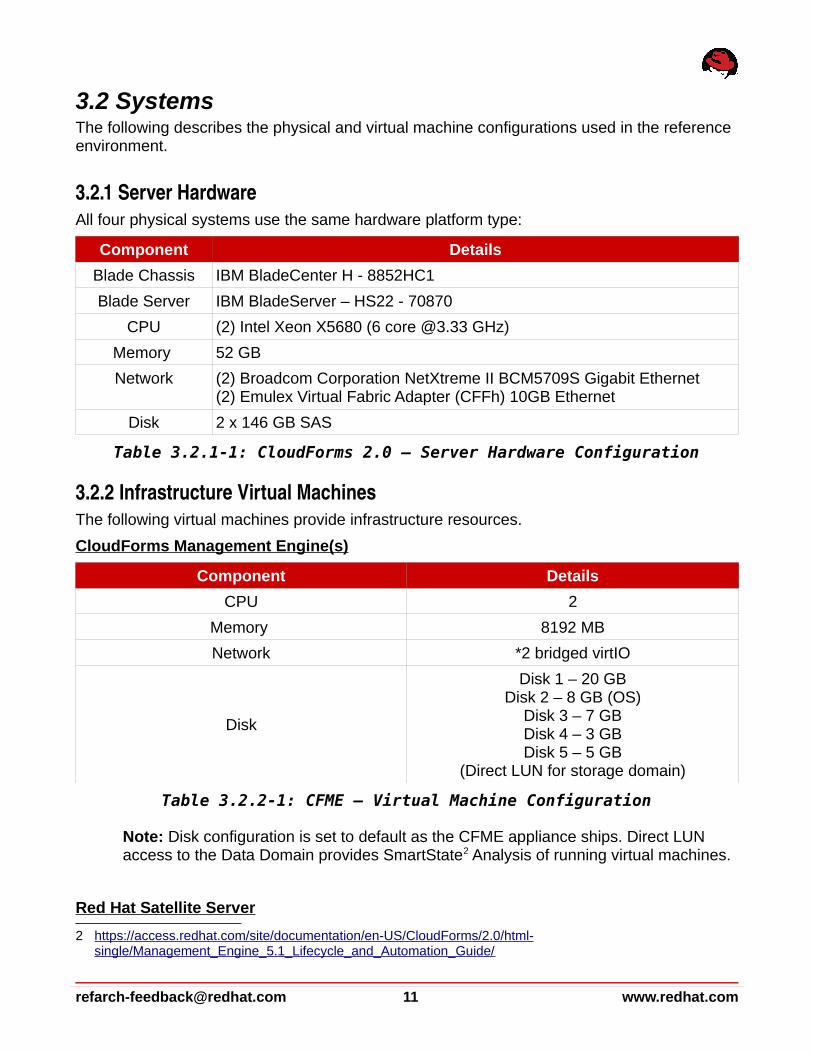
3.2 SystemsThe following describes the physical and virtual machine configurations used in the reference environment.
3.2.1 Server HardwareAll four physical systems use the same hardware platform type:
Component Details
Blade Chassis IBM BladeCenter H - 8852HC1
Blade Server IBM BladeServer – HS22 - 70870
CPU (2) Intel Xeon X5680 (6 core @3.33 GHz)
Memory 52 GB
Network (2) Broadcom Corporation NetXtreme II BCM5709S Gigabit Ethernet(2) Emulex Virtual Fabric Adapter (CFFh) 10GB Ethernet
Disk 2 x 146 GB SAS
Table 3.2.1-1: CloudForms 2.0 – Server Hardware Configuration
3.2.2 Infrastructure Virtual MachinesThe following virtual machines provide infrastructure resources.
CloudForms Management Engine(s)
Component Details
CPU 2
Memory 8192 MB
Network *2 bridged virtIO
Disk
Disk 1 – 20 GBDisk 2 – 8 GB (OS)
Disk 3 – 7 GBDisk 4 – 3 GBDisk 5 – 5 GB
(Direct LUN for storage domain)
Table 3.2.2-1: CFME – Virtual Machine Configuration
Note: Disk configuration is set to default as the CFME appliance ships. Direct LUN access to the Data Domain provides SmartState2 Analysis of running virtual machines.
Red Hat Satellite Server
2 https://access.redhat.com/site/documentation/en-US/CloudForms/2.0/html- single/Management_Engine_5.1_Lifecycle_and_Automation_Guide/
[email protected] 11 www.redhat.com
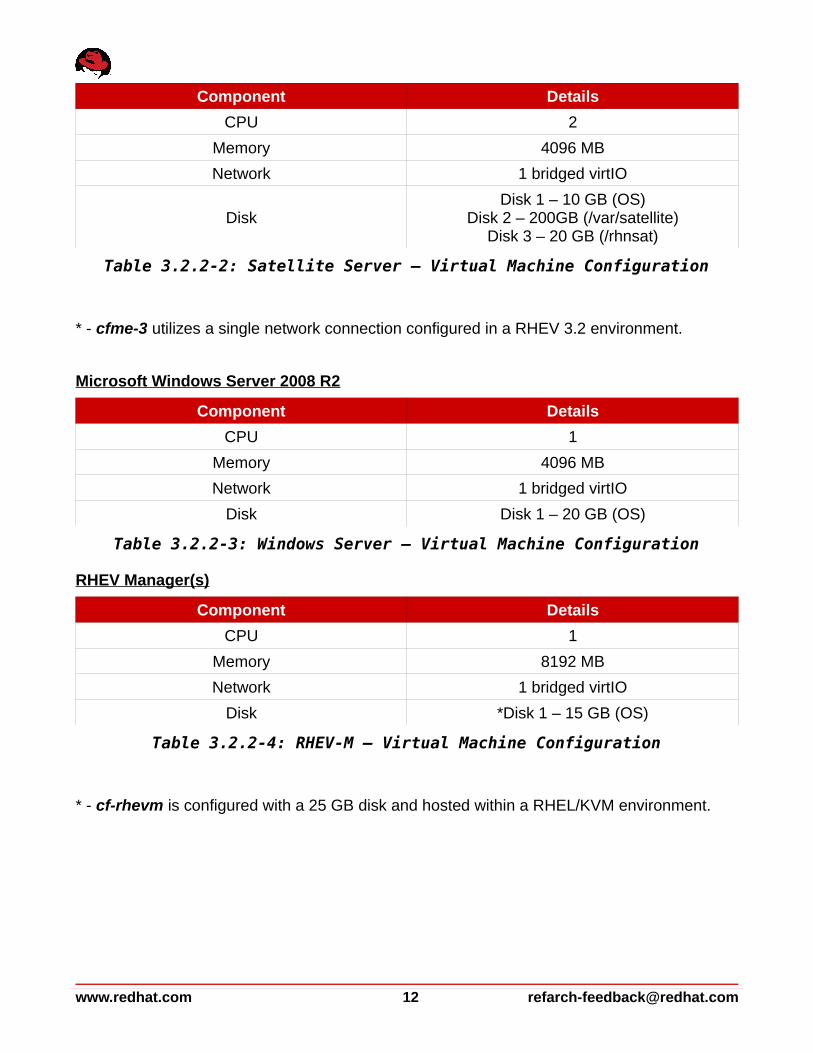
Component Details
CPU 2
Memory 4096 MB
Network 1 bridged virtIO
DiskDisk 1 – 10 GB (OS)
Disk 2 – 200GB (/var/satellite)Disk 3 – 20 GB (/rhnsat)
Table 3.2.2-2: Satellite Server – Virtual Machine Configuration
* - cfme-3 utilizes a single network connection configured in a RHEV 3.2 environment.
Microsoft Windows Server 2008 R2
Component Details
CPU 1
Memory 4096 MB
Network 1 bridged virtIO
Disk Disk 1 – 20 GB (OS)
Table 3.2.2-3: Windows Server – Virtual Machine Configuration
RHEV Manager(s)
Component Details
CPU 1
Memory 8192 MB
Network 1 bridged virtIO
Disk *Disk 1 – 15 GB (OS)
Table 3.2.2-4: RHEV-M – Virtual Machine Configuration
* - cf-rhevm is configured with a 25 GB disk and hosted within a RHEL/KVM environment.
www.redhat.com 12 [email protected]
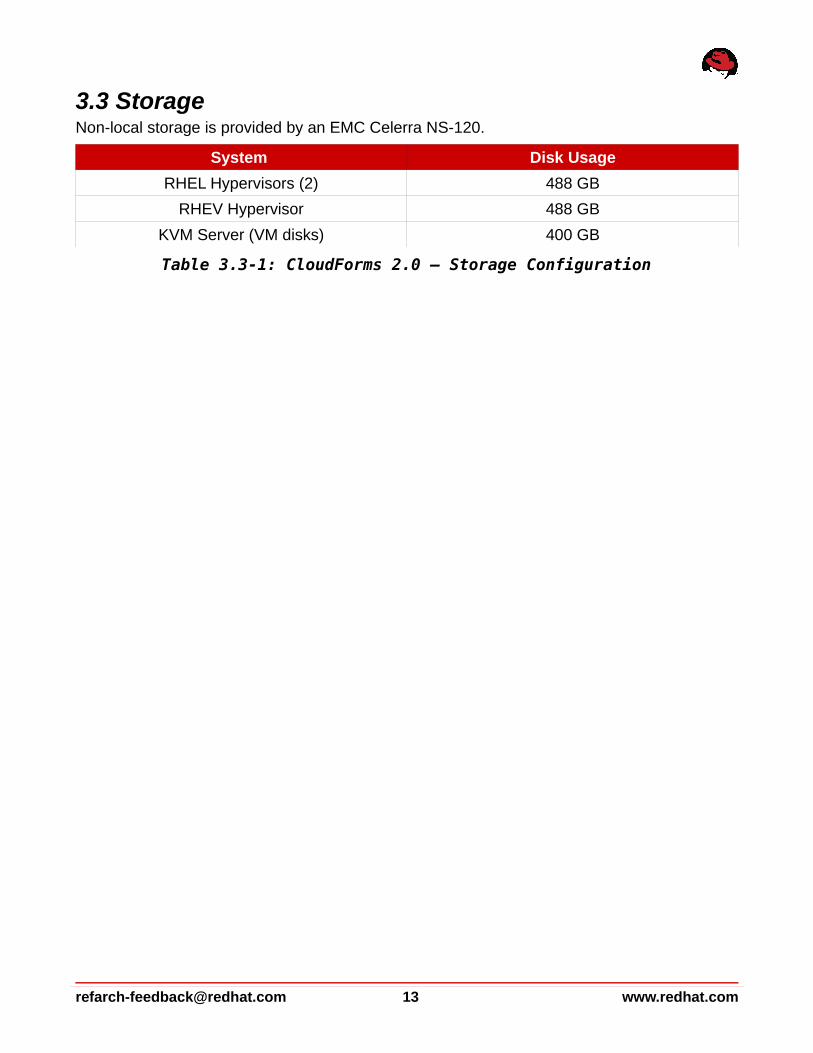
3.3 StorageNon-local storage is provided by an EMC Celerra NS-120.
System Disk Usage
RHEL Hypervisors (2) 488 GB
RHEV Hypervisor 488 GB
KVM Server (VM disks) 400 GB
Table 3.3-1: CloudForms 2.0 – Storage Configuration
[email protected] 13 www.redhat.com
4 Preparing the InfrastructureThis section describes the procedures used in preparing the infrastructure. This does not include installing each component from the ground up however discusses the specific configurations used for the reference environment.
4.1 Red Hat Enterprise VirtualizationSeveral items are configured within the Red Hat Enterprise Virtualization 3.2 environment to enable CloudForms 2.0 functionality and include:
• Capacity and Utilization3 access via RHEV data collection and reports4
• iSCSI direct LUN hook for storage domain
Capacity and Utilization
In order for CFME to be able to capture capacity and utilization data, access to the RHEV history database and reporting is required. On the RHEV Manager system install and configure the history database and reporting feature.
# yum install rhevm-reports
Configure the history database. Choose “yes” when prompted to stop the ovirt-engine service.
# rhevm-dwh-setupIn order to proceed the installer must stop the ovirt-engine service Would you like to stop the ovirt-engine service? (yes|no): yes
Configure the reporting feature. Choose “yes” when prompted to stop the ovirt-engine service. Also, provide a password for the rhev-admin and superuser users.
# rhevm-reports-setupIn order to proceed the installer must stop the ovirt-engine service Would you like to stop the ovirt-engine service? (yes|no): yes
Please choose a password for the admin users (rhevm-admin and superuser):
With the reports and history database installed, configure PostgreSQL to allow remote connections to the database and configure a new user that is used to connect from a CFME appliance.
3 https://access.redhat.com/site/documentation/en- US/CloudForms/2.0/html/Management_Engine_5.1_Insight_Guide/sect-Capacity_and_Utilization_Collection.html
4 https://access.redhat.com/site/documentation/en-US/Red_Hat_Enterprise_Virtualization/3.2- Beta/html/Installation_Guide/chap-Data_Collection_Setup_and_Reports_Installation.html
www.redhat.com 14 [email protected]
Edit /var/lib/pgsql/data/pg_hba.conf and add the following:
# CFME SmartSatate Analysis host all all 0.0.0.0/0 md5
Modify iptables to allow port 5432 connectivity:
# iptables -A RH-Firewall-1-INPUT -p tcp -m state --state NEW -m tcp --dport 5432 -j ACCEPT# service iptables save
Note: Specify the IP address of the CFME appliance to secure incoming traffic as needed.
Add a new user to PostgreSQL. The purpose of this user is to allow remote database authentication for the CFME appliance to capture reporting information from the RHEV environment.
# psql --username=postgres
=# CREATE ROLE cfme LOGIN UNENCRYPTED PASSWORD [REDACTED] SUPERUSER VALID UNTIL ‘infinity’;=# \q
Restart the PostgreSQL service:
# service postgresql restart
iSCSI Direct LUN hook
For SmartState2 Analysis of virtual machines running within a RHEV environment using iSCSI as the Data Domain type, a Direct LUN hook must be configured on the CFME appliance running within the RHEV environment5.
To configure a Direct LUN hook on the CFME appliance, perform a power down. Once the appliance is powered off, within the RHEV Management Portal click the Virtual Machines tab, select the CFME appliance and select the Disks tab in the bottom window pane. Click Add and choose External (Direct Lun).
5 https://access.redhat.com/site/articles/372783
[email protected] 15 www.redhat.com
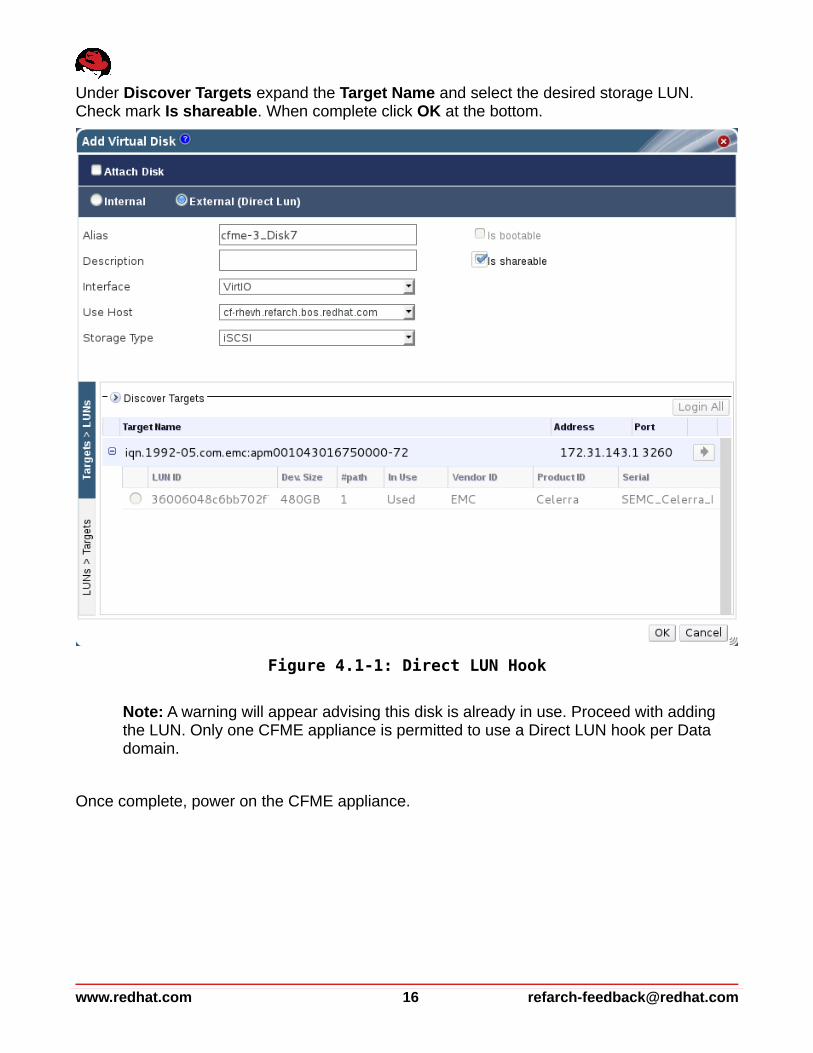
Under Discover Targets expand the Target Name and select the desired storage LUN. Check mark Is shareable. When complete click OK at the bottom.
Note: A warning will appear advising this disk is already in use. Proceed with adding the LUN. Only one CFME appliance is permitted to use a Direct LUN hook per Data domain.
Once complete, power on the CFME appliance.
www.redhat.com 16 [email protected]
Figure 4.1-1: Direct LUN Hook
4.2 Microsoft Active DirectoryMicrosoft Active Directory is used to provide secure LDAP user and group authentication for the reference environment. The following items are configured:
• Active Directory Users and Groups
• Active Directory Certificate Services for LDAPS support
Active Directory Users and Groups
The following users and groups are created and provide self-service functionality discussed in Section 7: Self-Service.
User Group
cf-admin admin
cf-dev dev
cf-test test
cf-prod prod
Table 4.2-1: Active Directory Users and Groups
Active Directory Certificate Services
Active Directory Certificate Services is required to enable secure Lightweight Directory Access Protocol (LDAP) authentication. For the reference environment Active Directory Certificate Services (AD CS) is installed on the same system as the Active Directory Domain Controller.
Note: Microsoft recommends a distributed environment using a stand alone certificate server6.
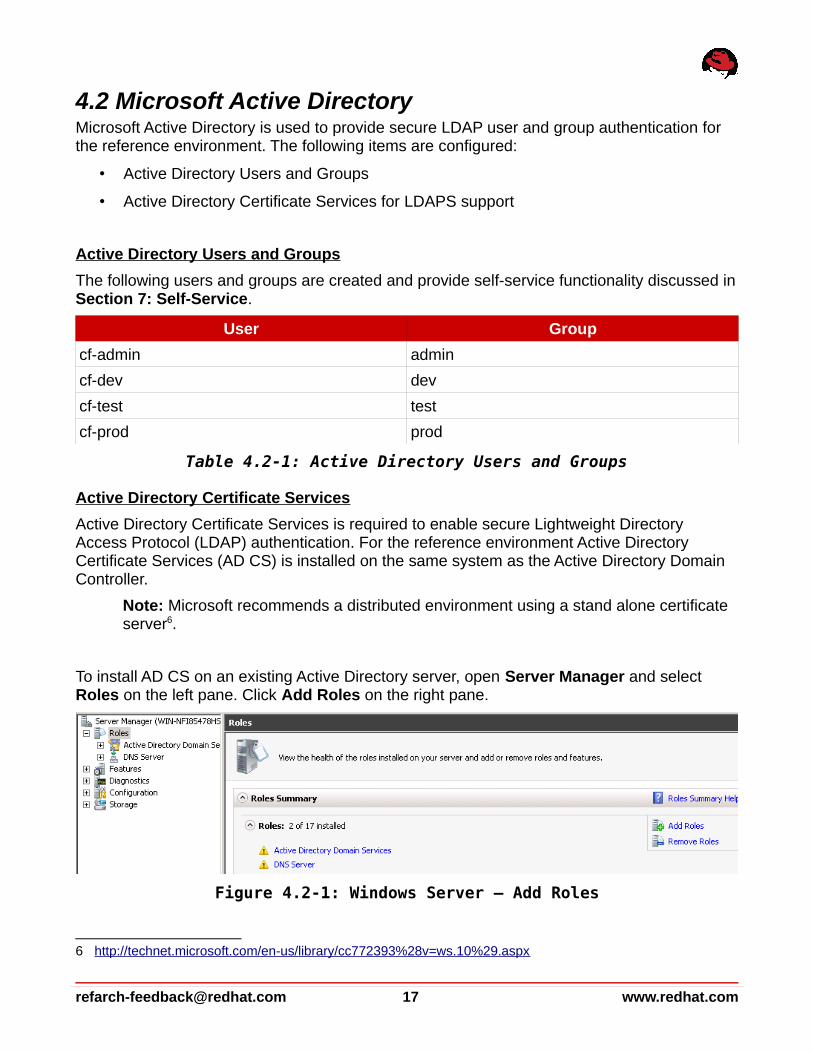
To install AD CS on an existing Active Directory server, open Server Manager and select Roles on the left pane. Click Add Roles on the right pane.
6 http://technet.microsoft.com/en-us/library/cc772393%28v=ws.10%29.aspx
[email protected] 17 www.redhat.com
Figure 4.2-1: Windows Server – Add Roles

Select the role for Active Directory Certificate Services and click Next.
Click Next again and choose Certificate Authority only. Click Next to proceed.
www.redhat.com 18 [email protected]
Figure 4.2-3: Windows Server – Certificate Authority
Figure 4.2-2: Windows Server – AD CS Role Selection
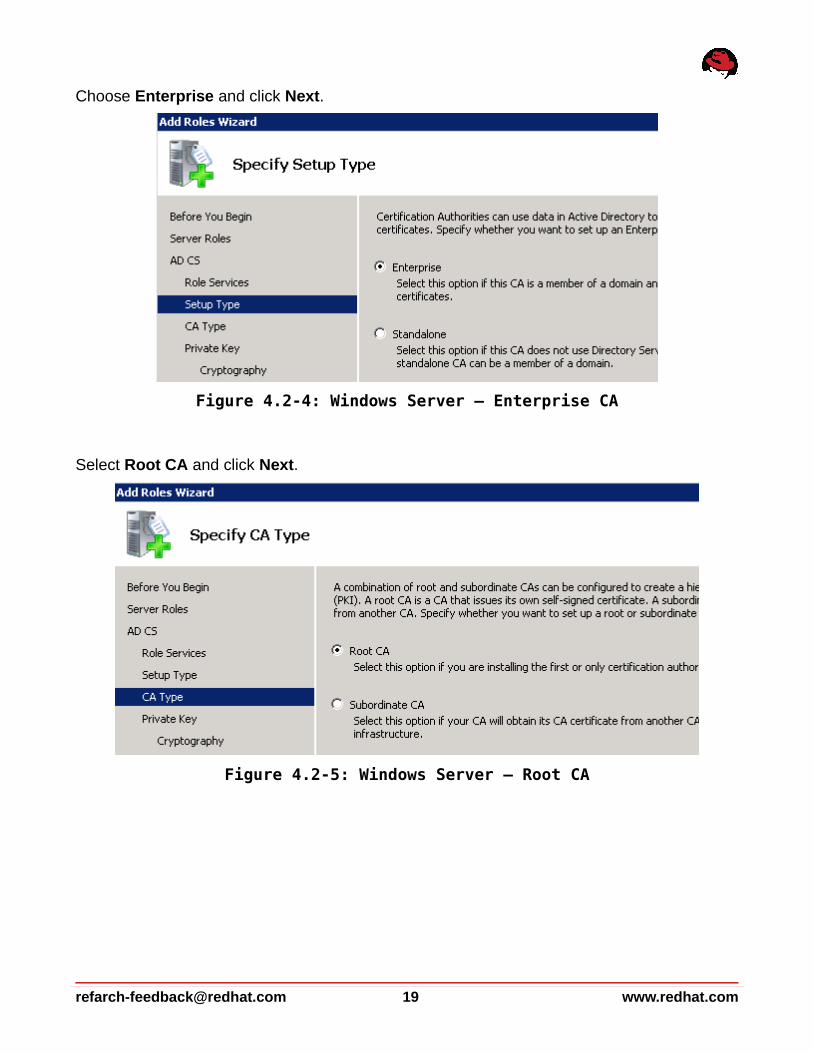
Choose Enterprise and click Next.
Select Root CA and click Next.
[email protected] 19 www.redhat.com
Figure 4.2-5: Windows Server – Root CA
Figure 4.2-4: Windows Server – Enterprise CA
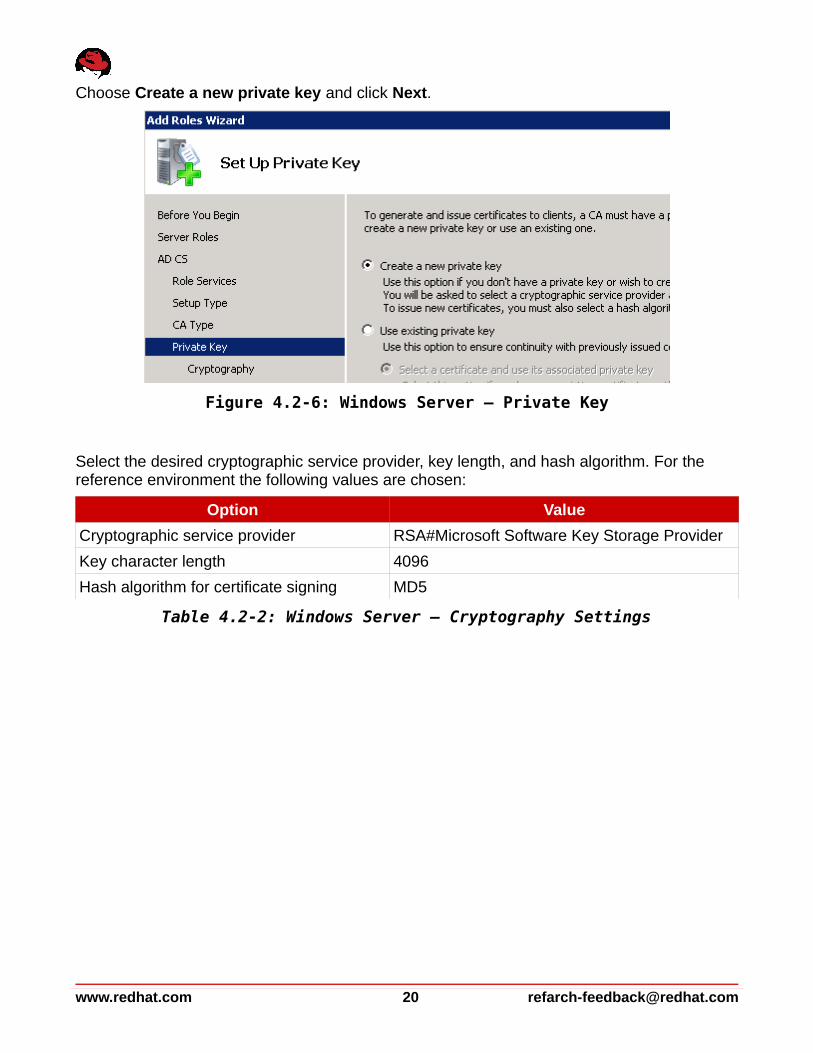
Choose Create a new private key and click Next.
Select the desired cryptographic service provider, key length, and hash algorithm. For the reference environment the following values are chosen:
Option Value
Cryptographic service provider RSA#Microsoft Software Key Storage Provider
Key character length 4096
Hash algorithm for certificate signing MD5
Table 4.2-2: Windows Server – Cryptography Settings
www.redhat.com 20 [email protected]
Figure 4.2-6: Windows Server – Private Key
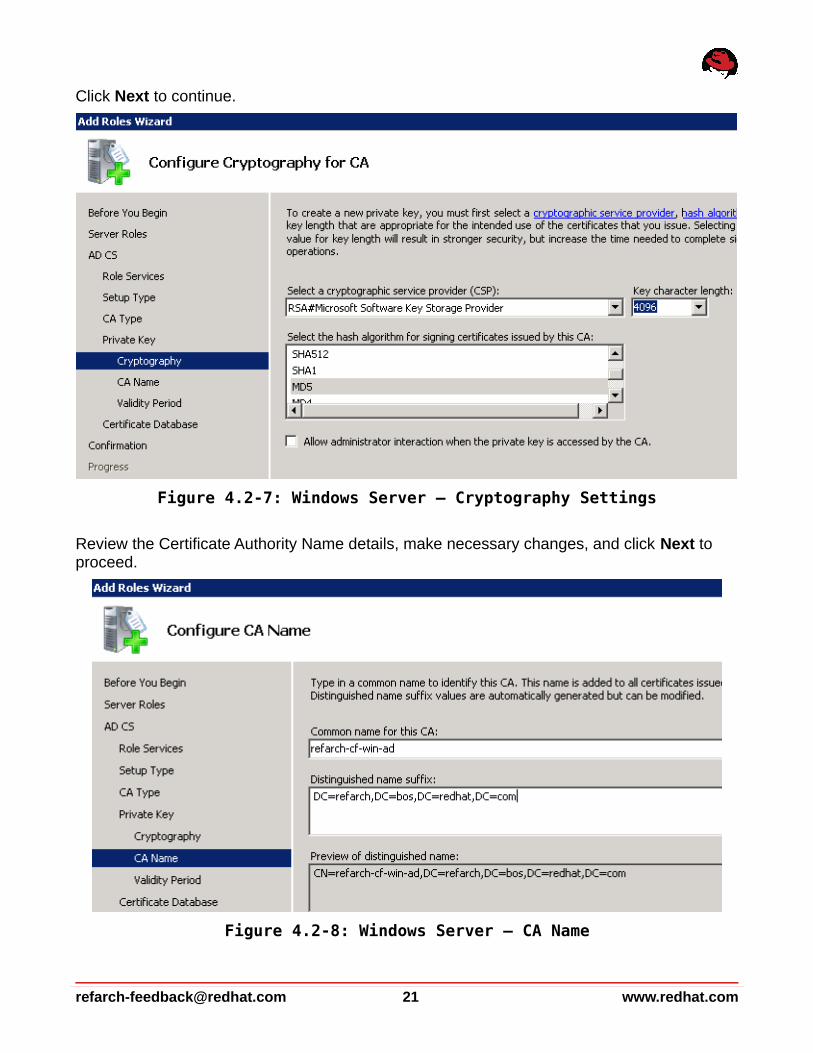
Click Next to continue.
Review the Certificate Authority Name details, make necessary changes, and click Next to proceed.
[email protected] 21 www.redhat.com
Figure 4.2-8: Windows Server – CA Name
Figure 4.2-7: Windows Server – Cryptography Settings

Choose the amount of time the CA certificate is valid for and click Next.
Select the location of the certificate database and log file. Click Next to continue.
www.redhat.com 22 [email protected]
Figure 4.2-10: Windows Server – Certificate File Location
Figure 4.2-9: Windows Server – CA Certificate Validity Period
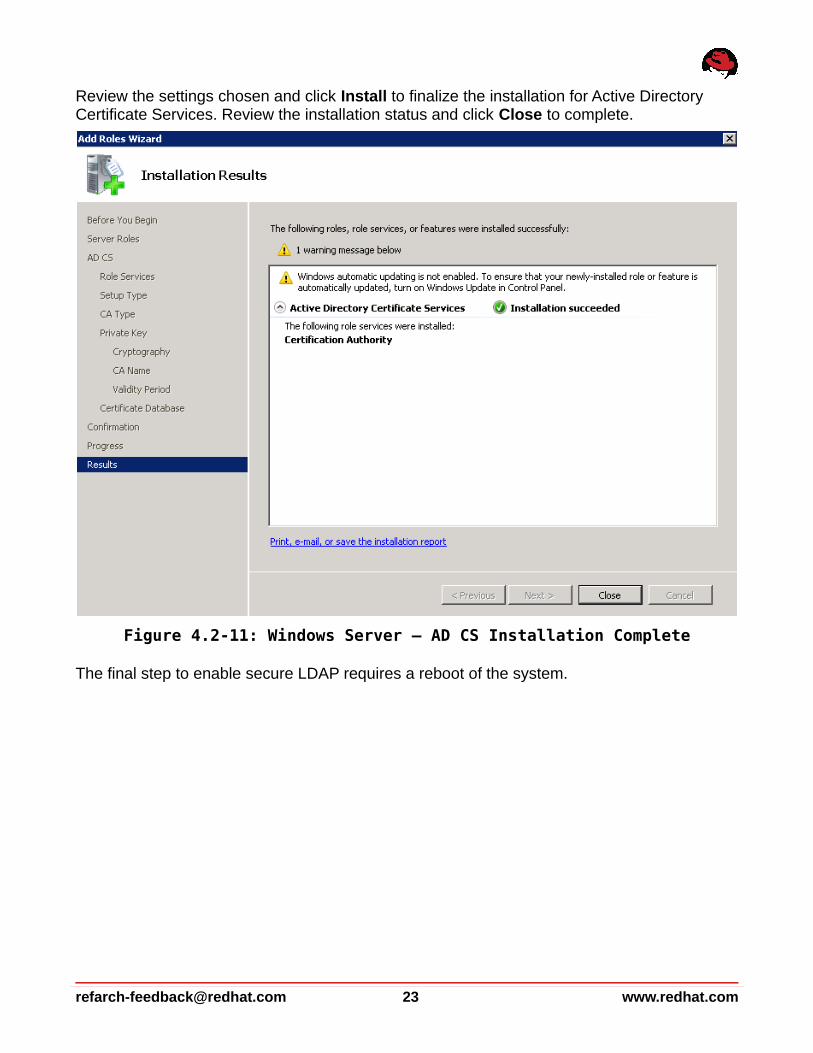
Review the settings chosen and click Install to finalize the installation for Active Directory Certificate Services. Review the installation status and click Close to complete.
The final step to enable secure LDAP requires a reboot of the system.
[email protected] 23 www.redhat.com
Figure 4.2-11: Windows Server – AD CS Installation Complete
4.3 CloudForms Management EngineFor the reference environment, several items are configured on the CFME appliances to provide enhanced functionality and integration however, the expectation is environment discovery7 is complete and therefore not covered. Items include configuring:
• Management Engine Relationship
• Regions and Zones
• Role Resiliency
• Lightweight Directory Access Protocol (LDAP) authentication
• Tags
4.3.1 Management Engine RelationshipIn addition to configuring the direct LUN hook to support SmartState Analysis for virtual machines running within the RHEV 3.2 environment, the CFME appliance Management Server Relationship must be set.
For the managed RHEV 3.2 environment, configure the CFME appliance by logging into the CFME Console as the admin account, hover over Services and select Virtual Machines.
On the accordion menu in the left window pane select the RHEV 3.2 management system.
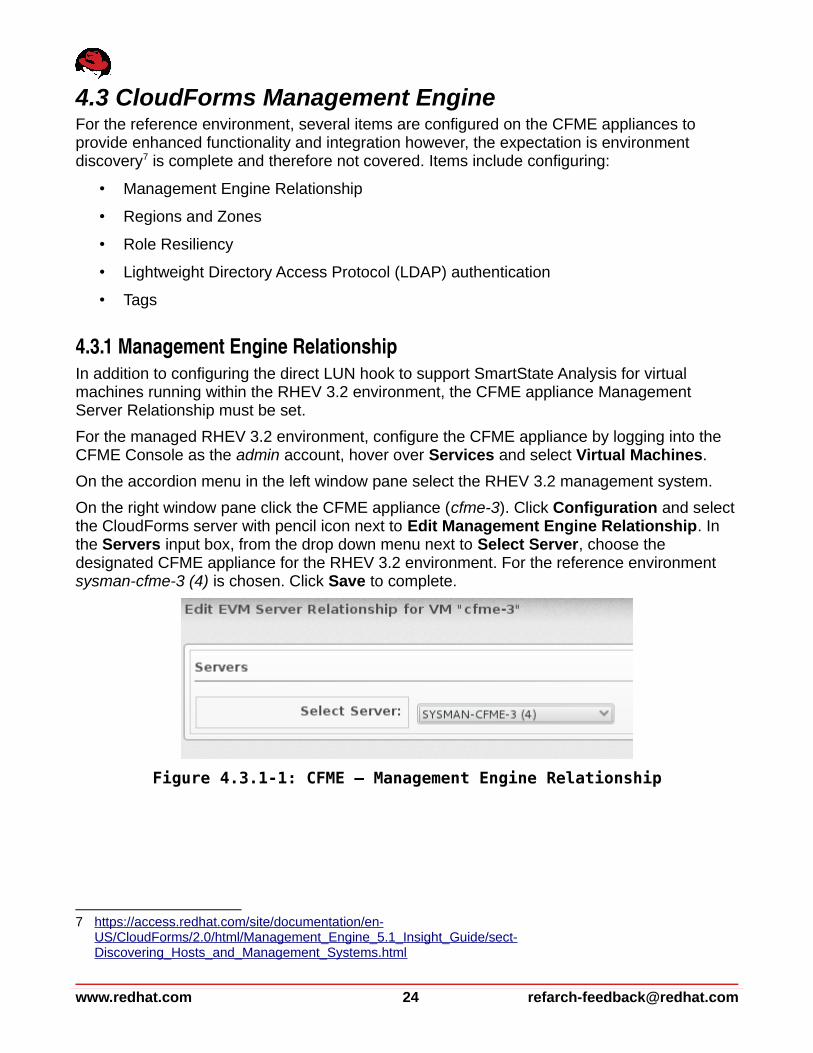
On the right window pane click the CFME appliance (cfme-3). Click Configuration and select the CloudForms server with pencil icon next to Edit Management Engine Relationship. In the Servers input box, from the drop down menu next to Select Server, choose the designated CFME appliance for the RHEV 3.2 environment. For the reference environment sysman-cfme-3 (4) is chosen. Click Save to complete.
7 https://access.redhat.com/site/documentation/en- US/CloudForms/2.0/html/Management_Engine_5.1_Insight_Guide/sect-Discovering_Hosts_and_Management_Systems.html
www.redhat.com 24 [email protected]
Figure 4.3.1-1: CFME – Management Engine Relationship
4.3.2 Regions and ZonesCloudForms 2.0 provides the capability to partition managed environments into Regions and Zones. Regions can represent a geographic location where zones may represent cities or separate environments within the region.
The top level region contains a centralized VMDB database for reporting. Subordinate regions can exist under the top level region which replicate to the top level region however they do not replicate databases to each other.
Zones are used to isolate traffic within a region. For example, one zone may contain a RHEV based management system and another zone contain a VMware based management system all within the same region.
Additional information regarding regions and zones can be found in the CloudForms 2.0, Management Engine 5.1 Settings and Operations Guide8.
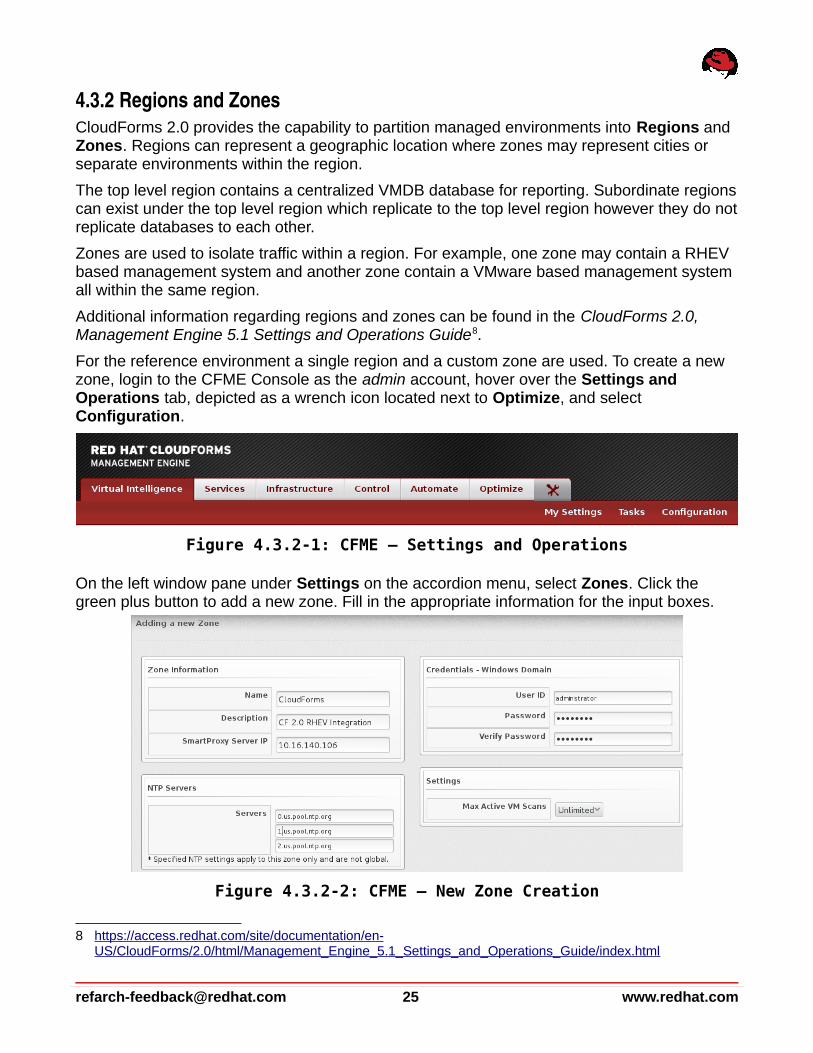
For the reference environment a single region and a custom zone are used. To create a new zone, login to the CFME Console as the admin account, hover over the Settings and Operations tab, depicted as a wrench icon located next to Optimize, and select Configuration.
On the left window pane under Settings on the accordion menu, select Zones. Click the green plus button to add a new zone. Fill in the appropriate information for the input boxes.
8 https://access.redhat.com/site/documentation/en- US/CloudForms/2.0/html/Management_Engine_5.1_Settings_and_Operations_Guide/index.html
[email protected] 25 www.redhat.com
Figure 4.3.2-2: CFME – New Zone Creation
Figure 4.3.2-1: CFME – Settings and Operations
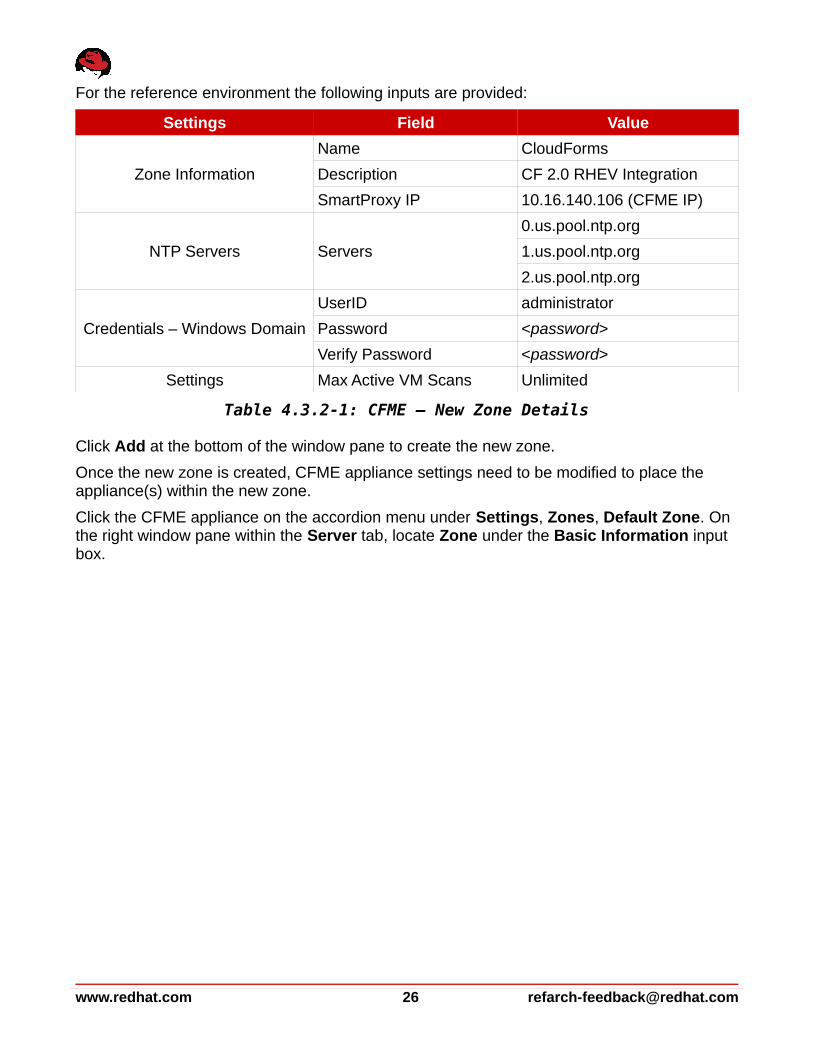
For the reference environment the following inputs are provided:
Settings Field Value
Zone Information
Name CloudForms
Description CF 2.0 RHEV Integration
SmartProxy IP 10.16.140.106 (CFME IP)
NTP Servers Servers
0.us.pool.ntp.org
1.us.pool.ntp.org
2.us.pool.ntp.org
Credentials – Windows Domain
UserID administrator
Password <password>
Verify Password <password>
Settings Max Active VM Scans Unlimited
Table 4.3.2-1: CFME – New Zone Details
Click Add at the bottom of the window pane to create the new zone.
Once the new zone is created, CFME appliance settings need to be modified to place the appliance(s) within the new zone.
Click the CFME appliance on the accordion menu under Settings, Zones, Default Zone. On the right window pane within the Server tab, locate Zone under the Basic Information input box.
www.redhat.com 26 [email protected]
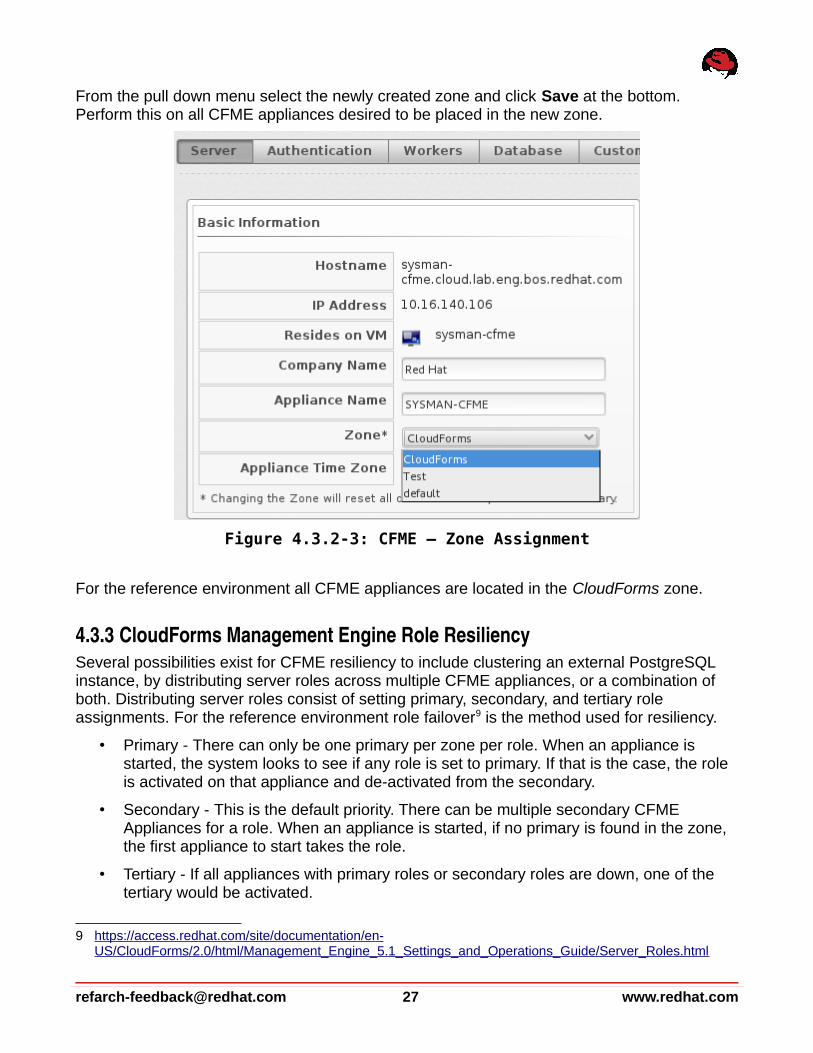
From the pull down menu select the newly created zone and click Save at the bottom. Perform this on all CFME appliances desired to be placed in the new zone.
For the reference environment all CFME appliances are located in the CloudForms zone.
4.3.3 CloudForms Management Engine Role ResiliencySeveral possibilities exist for CFME resiliency to include clustering an external PostgreSQL instance, by distributing server roles across multiple CFME appliances, or a combination of both. Distributing server roles consist of setting primary, secondary, and tertiary role assignments. For the reference environment role failover9 is the method used for resiliency.
• Primary - There can only be one primary per zone per role. When an appliance is started, the system looks to see if any role is set to primary. If that is the case, the role is activated on that appliance and de-activated from the secondary.
• Secondary - This is the default priority. There can be multiple secondary CFME Appliances for a role. When an appliance is started, if no primary is found in the zone, the first appliance to start takes the role.
• Tertiary - If all appliances with primary roles or secondary roles are down, one of the tertiary would be activated.
9 https://access.redhat.com/site/documentation/en- US/CloudForms/2.0/html/Management_Engine_5.1_Settings_and_Operations_Guide/Server_Roles.html
[email protected] 27 www.redhat.com
Figure 4.3.2-3: CFME – Zone Assignment
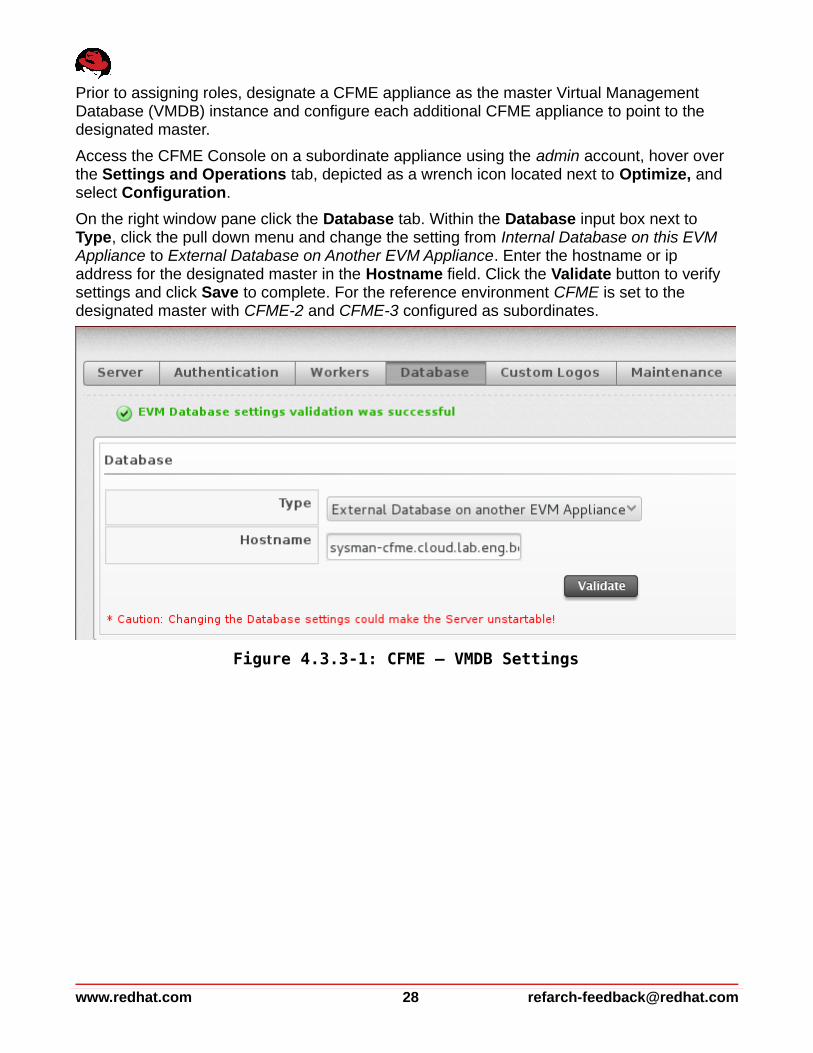
Prior to assigning roles, designate a CFME appliance as the master Virtual Management Database (VMDB) instance and configure each additional CFME appliance to point to the designated master.
Access the CFME Console on a subordinate appliance using the admin account, hover over the Settings and Operations tab, depicted as a wrench icon located next to Optimize, and select Configuration.
On the right window pane click the Database tab. Within the Database input box next to Type, click the pull down menu and change the setting from Internal Database on this EVM Appliance to External Database on Another EVM Appliance. Enter the hostname or ip address for the designated master in the Hostname field. Click the Validate button to verify settings and click Save to complete. For the reference environment CFME is set to the designated master with CFME-2 and CFME-3 configured as subordinates.
www.redhat.com 28 [email protected]
Figure 4.3.3-1: CFME – VMDB Settings
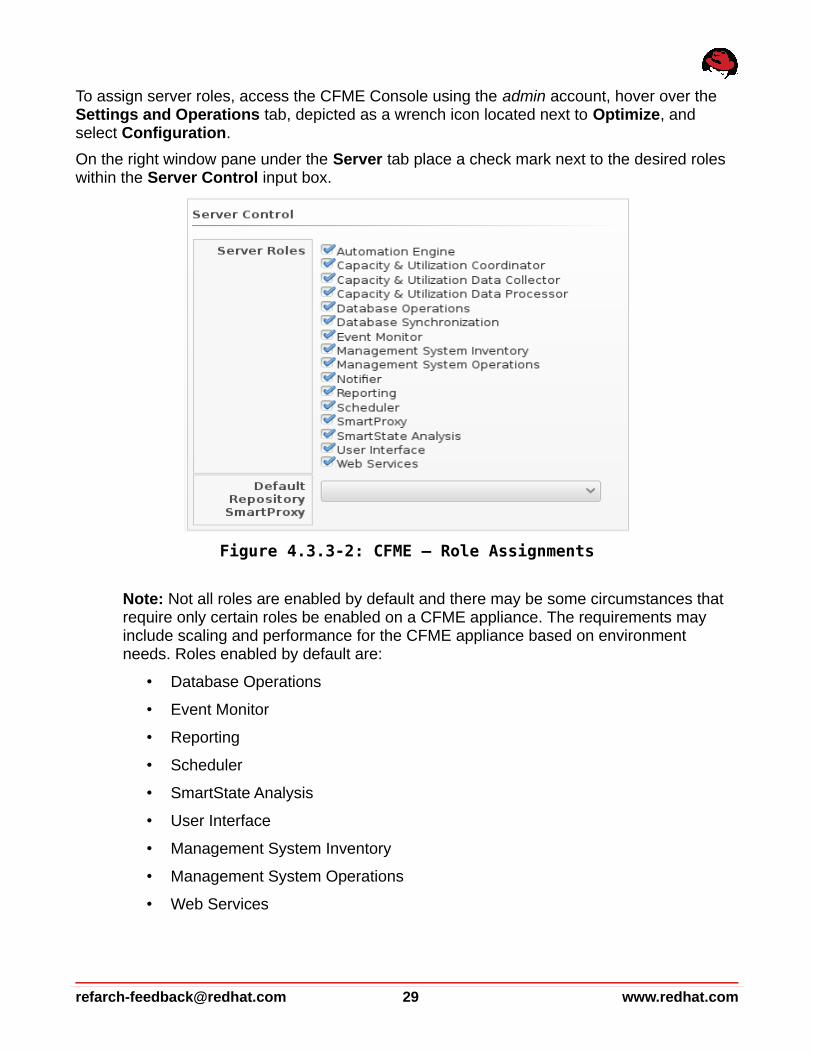
To assign server roles, access the CFME Console using the admin account, hover over the Settings and Operations tab, depicted as a wrench icon located next to Optimize, and select Configuration.
On the right window pane under the Server tab place a check mark next to the desired roles within the Server Control input box.
Note: Not all roles are enabled by default and there may be some circumstances that require only certain roles be enabled on a CFME appliance. The requirements may include scaling and performance for the CFME appliance based on environment needs. Roles enabled by default are:
• Database Operations
• Event Monitor
• Reporting
• Scheduler
• SmartState Analysis
• User Interface
• Management System Inventory
• Management System Operations
• Web Services
[email protected] 29 www.redhat.com
Figure 4.3.3-2: CFME – Role Assignments
The following server roles support failover:
Roles Type
Notifier Primary, Secondary, Tertiary
Capacity and Utilization Coordinator Primary, Secondary, Tertiary
Database Synchronization Primary, Secondary, Tertiary
Scheduler Primary, Secondary, Tertiary
Management System Inventory Primary, Secondary, Tertiary
Table 4.3.3-1: CFME Failover Roles
Additional roles exist on each CFME appliance however do not support failover. These roles work in conjunction amongst additional CFME appliances within the same zone to support increased capacity.
Roles Type
Automation Engine Distributed
Capacity and Utilization Data Collector Distributed
Capacity and Utilization Data Processor Distributed
Database Operations Distributed
Management System Operations Distributed
Event Monitor Distributed
Reporting Distributed
SmartProxy Distributed
SmartState Analysis Distributed
User Interface Distributed
Web Services Distributed
Table 4.3.3-2: CFME Distributed Roles
www.redhat.com 30 [email protected]
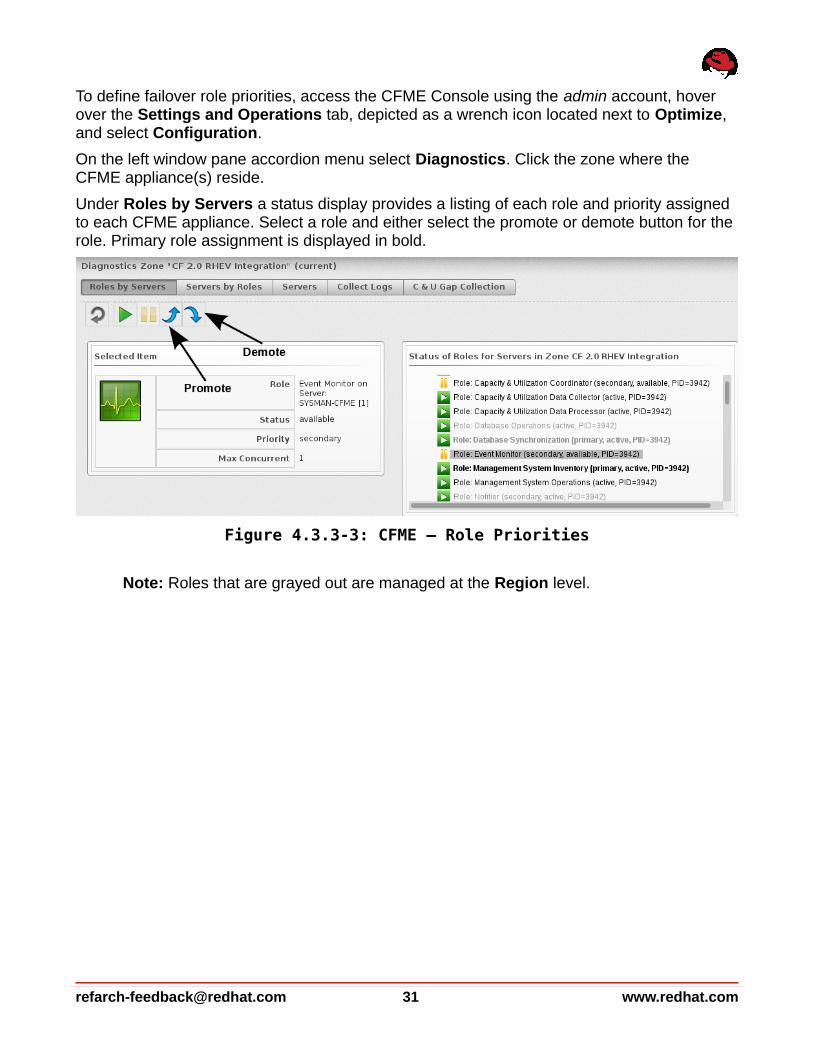
To define failover role priorities, access the CFME Console using the admin account, hover over the Settings and Operations tab, depicted as a wrench icon located next to Optimize, and select Configuration.
On the left window pane accordion menu select Diagnostics. Click the zone where the CFME appliance(s) reside.
Under Roles by Servers a status display provides a listing of each role and priority assigned to each CFME appliance. Select a role and either select the promote or demote button for the role. Primary role assignment is displayed in bold.
Note: Roles that are grayed out are managed at the Region level.
[email protected] 31 www.redhat.com
Figure 4.3.3-3: CFME – Role Priorities
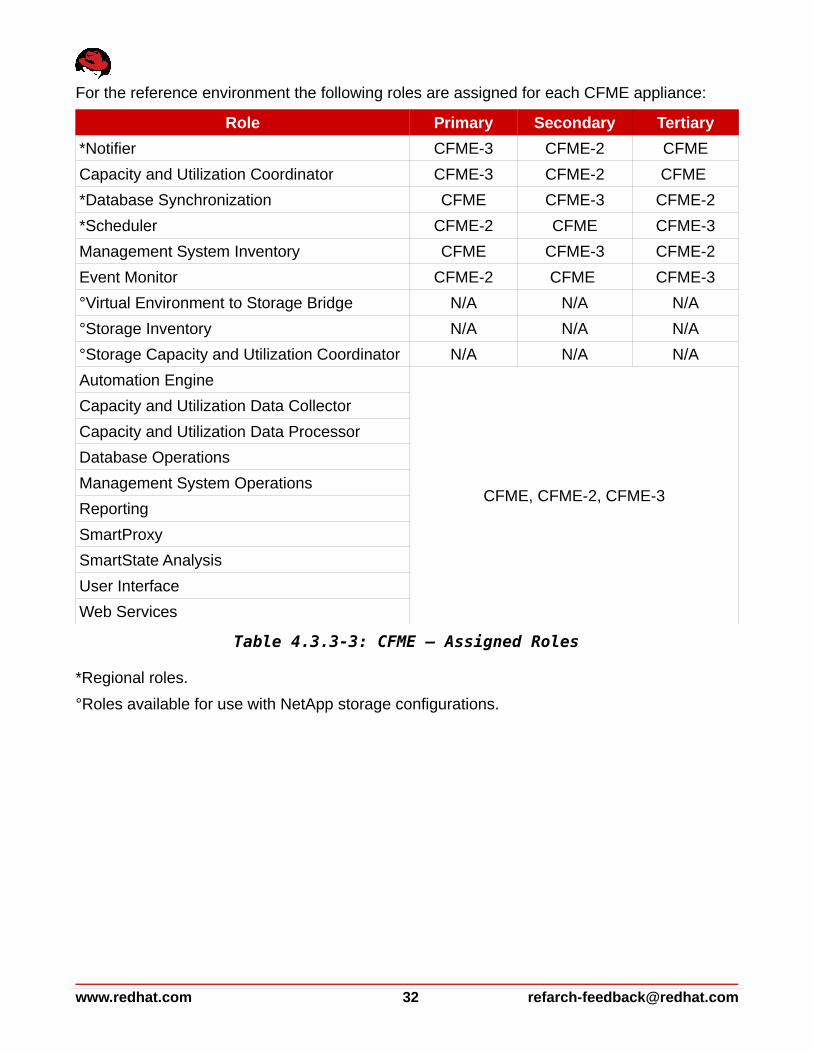
For the reference environment the following roles are assigned for each CFME appliance:
Role Primary Secondary Tertiary
*Notifier CFME-3 CFME-2 CFME
Capacity and Utilization Coordinator CFME-3 CFME-2 CFME
*Database Synchronization CFME CFME-3 CFME-2
*Scheduler CFME-2 CFME CFME-3
Management System Inventory CFME CFME-3 CFME-2
Event Monitor CFME-2 CFME CFME-3
°Virtual Environment to Storage Bridge N/A N/A N/A
°Storage Inventory N/A N/A N/A
°Storage Capacity and Utilization Coordinator N/A N/A N/A
Automation Engine
CFME, CFME-2, CFME-3
Capacity and Utilization Data Collector
Capacity and Utilization Data Processor
Database Operations
Management System Operations
Reporting
SmartProxy
SmartState Analysis
User Interface
Web Services
Table 4.3.3-3: CFME – Assigned Roles
*Regional roles.
°Roles available for use with NetApp storage configurations.
www.redhat.com 32 [email protected]
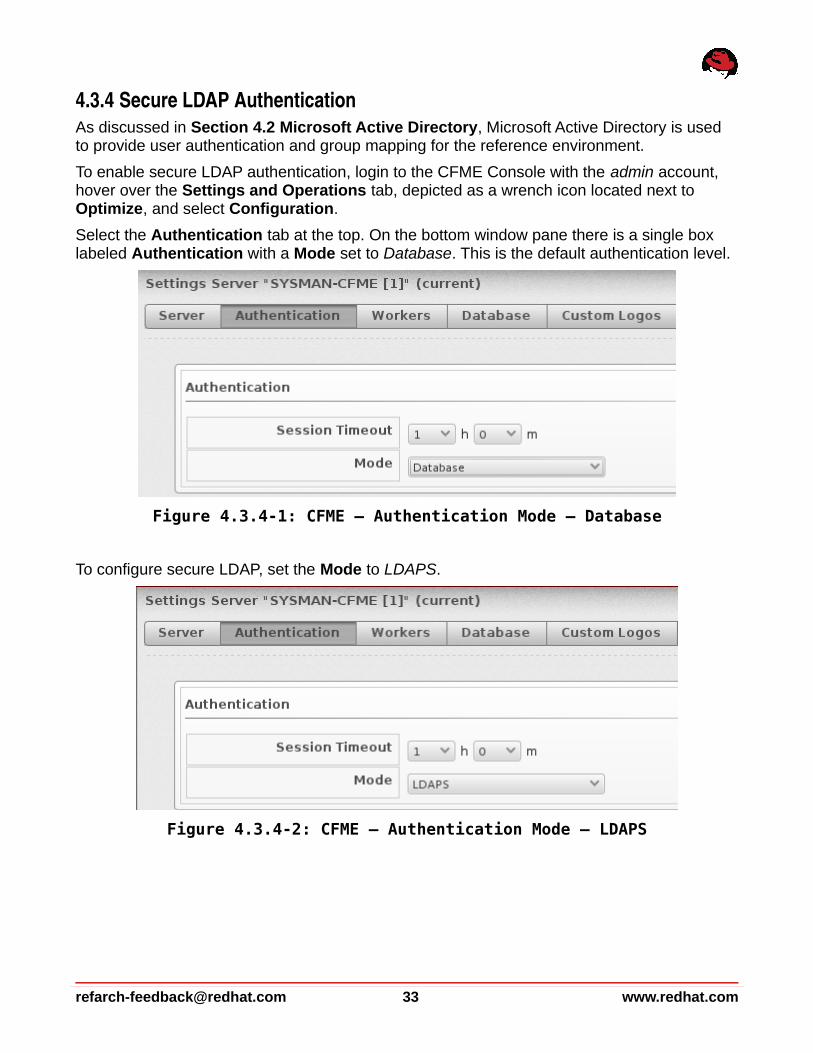
4.3.4 Secure LDAP AuthenticationAs discussed in Section 4.2 Microsoft Active Directory, Microsoft Active Directory is used to provide user authentication and group mapping for the reference environment.
To enable secure LDAP authentication, login to the CFME Console with the admin account, hover over the Settings and Operations tab, depicted as a wrench icon located next to Optimize, and select Configuration.
Select the Authentication tab at the top. On the bottom window pane there is a single box labeled Authentication with a Mode set to Database. This is the default authentication level.
To configure secure LDAP, set the Mode to LDAPS.
[email protected] 33 www.redhat.com
Figure 4.3.4-2: CFME – Authentication Mode – LDAPS
Figure 4.3.4-1: CFME – Authentication Mode – Database
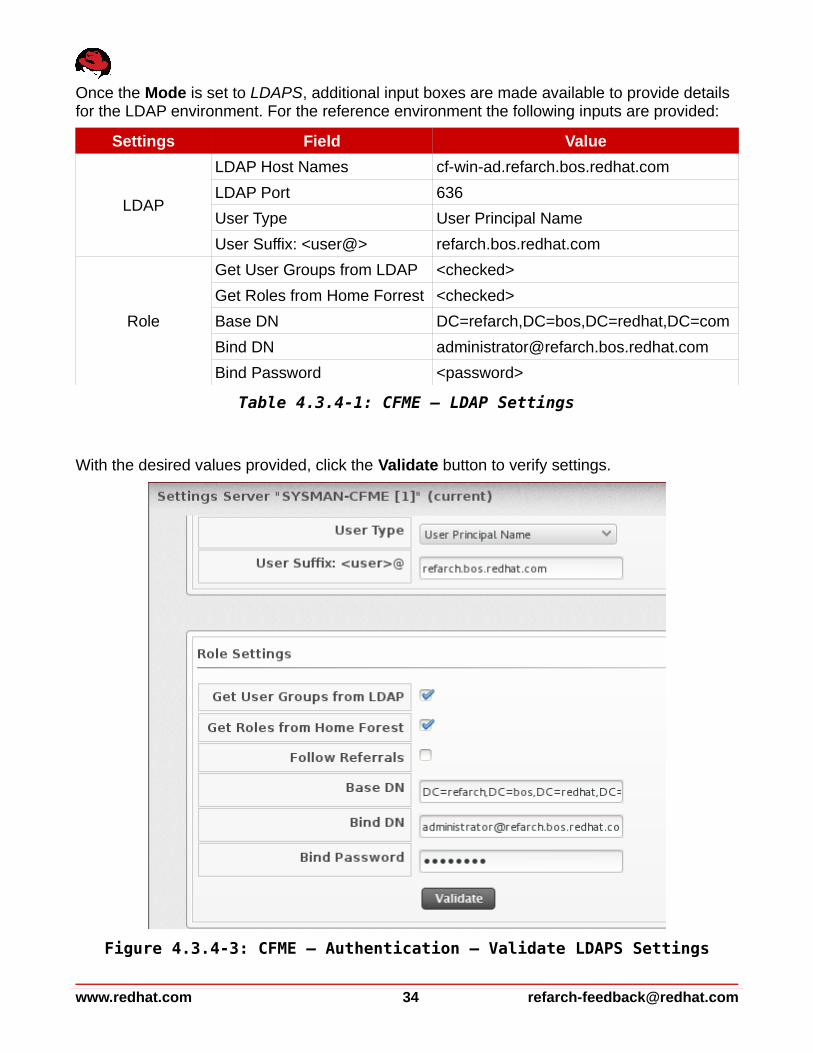
Once the Mode is set to LDAPS, additional input boxes are made available to provide details for the LDAP environment. For the reference environment the following inputs are provided:
Settings Field Value
LDAP
LDAP Host Names cf-win-ad.refarch.bos.redhat.com
LDAP Port 636
User Type User Principal Name
User Suffix: <user@> refarch.bos.redhat.com
Role
Get User Groups from LDAP <checked>
Get Roles from Home Forrest <checked>
Base DN DC=refarch,DC=bos,DC=redhat,DC=com
Bind DN [email protected]
Bind Password <password>
Table 4.3.4-1: CFME – LDAP Settings
With the desired values provided, click the Validate button to verify settings.
www.redhat.com 34 [email protected]
Figure 4.3.4-3: CFME – Authentication – Validate LDAPS Settings
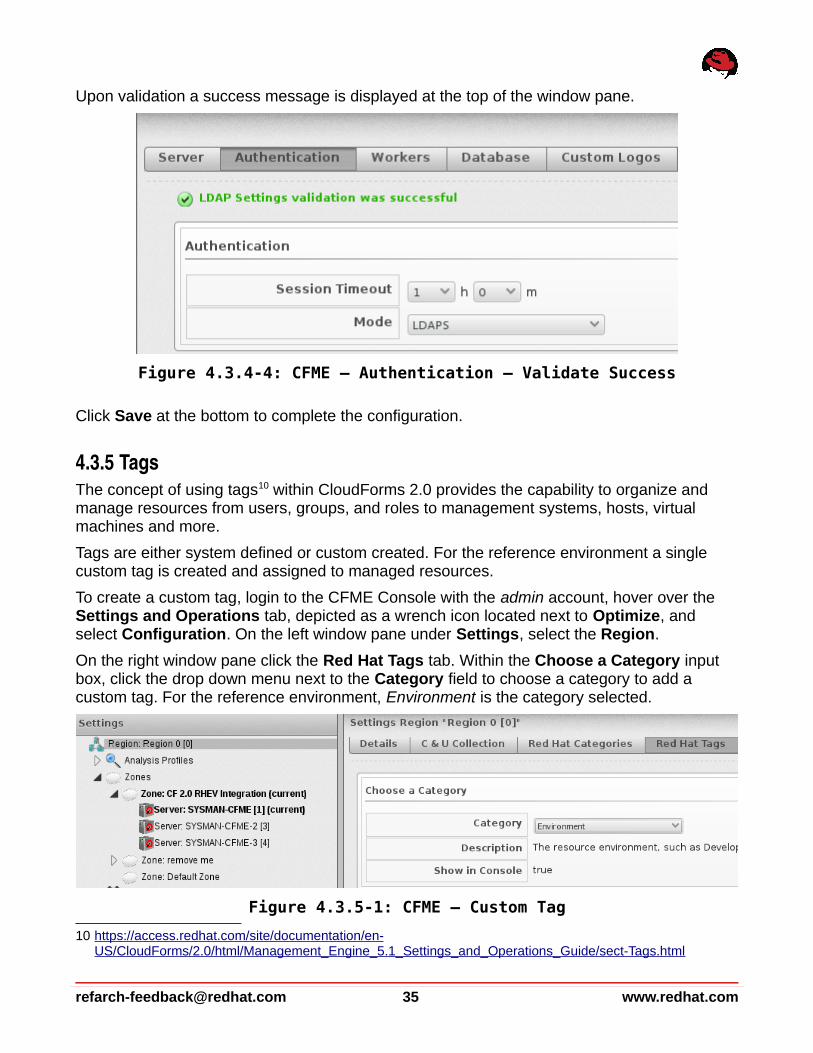
Upon validation a success message is displayed at the top of the window pane.
Click Save at the bottom to complete the configuration.
4.3.5 TagsThe concept of using tags10 within CloudForms 2.0 provides the capability to organize and manage resources from users, groups, and roles to management systems, hosts, virtual machines and more.
Tags are either system defined or custom created. For the reference environment a single custom tag is created and assigned to managed resources.
To create a custom tag, login to the CFME Console with the admin account, hover over the Settings and Operations tab, depicted as a wrench icon located next to Optimize, and select Configuration. On the left window pane under Settings, select the Region.
On the right window pane click the Red Hat Tags tab. Within the Choose a Category input box, click the drop down menu next to the Category field to choose a category to add a custom tag. For the reference environment, Environment is the category selected.
10 https://access.redhat.com/site/documentation/en- US/CloudForms/2.0/html/Management_Engine_5.1_Settings_and_Operations_Guide/sect-Tags.html
[email protected] 35 www.redhat.com
Figure 4.3.4-4: CFME – Authentication – Validate Success
Figure 4.3.5-1: CFME – Custom Tag
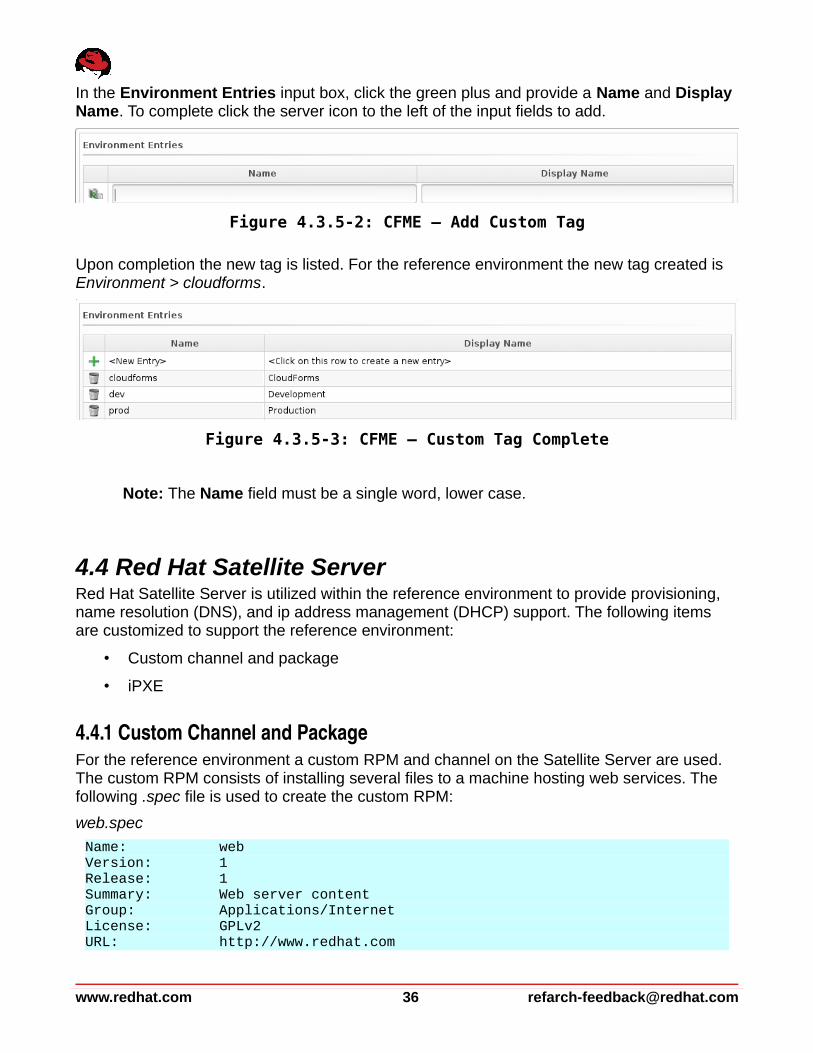
In the Environment Entries input box, click the green plus and provide a Name and Display Name. To complete click the server icon to the left of the input fields to add.
Upon completion the new tag is listed. For the reference environment the new tag created is Environment > cloudforms.
Note: The Name field must be a single word, lower case.
4.4 Red Hat Satellite ServerRed Hat Satellite Server is utilized within the reference environment to provide provisioning, name resolution (DNS), and ip address management (DHCP) support. The following items are customized to support the reference environment:
• Custom channel and package
• iPXE
4.4.1 Custom Channel and PackageFor the reference environment a custom RPM and channel on the Satellite Server are used. The custom RPM consists of installing several files to a machine hosting web services. The following .spec file is used to create the custom RPM:
web.spec
Name: web Version: 1 Release: 1 Summary: Web server content Group: Applications/Internet License: GPLv2 URL: http://www.redhat.com
www.redhat.com 36 [email protected]
Figure 4.3.5-3: CFME – Custom Tag Complete
Figure 4.3.5-2: CFME – Add Custom Tag
Source0: web.tar.gz BuildRoot: %(mktemp -ud %{_tmppath}/%{name}-%{version}-%{release}-XXXXXX)
%description Web content.
%prep %setup -q
%install rm -rf %{buildroot} mkdir -p %{buildroot}/tmp/web install -m 644 /home/bthurber/cfweb/{index.html,redhat.jpg} %{buildroot}/tmp/web
%clean rm -rf %{buildroot}
%files %defattr(-,root,root,-) %doc /tmp/web/index.html /tmp/web/redhat.jpg
%post cp /tmp/web/{index.html,redhat.jpg} /var/www/html %changelog *Tue May 21 2013 Brett Thurber [email protected] -1.0 Initial Release
Once the custom RPM is created, it needs to be signed using GPG. Begin by creating a GPG key. For the reference environment defaults are chosen.
$ gpg --gen-keygpg (GnuPG) 2.0.14; Copyright (C) 2009 Free Software Foundation, Inc. This is free software: you are free to change and redistribute it. There is NO WARRANTY, to the extent permitted by law.
Please select what kind of key you want: (1) RSA and RSA (default) (2) DSA and Elgamal (3) DSA (sign only) (4) RSA (sign only) Your selection? 1 RSA keys may be between 1024 and 4096 bits long. What keysize do you want? (2048) Requested keysize is 2048 bits Please specify how long the key should be valid. 0 = key does not expire <n> = key expires in n days <n>w = key expires in n weeks <n>m = key expires in n months <n>y = key expires in n years
[email protected] 37 www.redhat.com
Key is valid for? (0) Key does not expire at all Is this correct? (y/N)
GnuPG needs to construct a user ID to identify your key.
Real name: Warren Email address: [email protected] Comment: RPM Signing You selected this USER-ID: "Warren (RPM Signing) <[email protected]>"
Change (N)ame, (C)omment, (E)mail or (O)kay/(Q)uit? OYou need a Passphrase to protect your secret key.
gpg: problem with the agent: Not implemented We need to generate a lot of random bytes. It is a good idea to perform some other action (type on the keyboard, move the mouse, utilize the disks) during the prime generation; this gives the random number generator a better chance to gain enough entropy. We need to generate a lot of random bytes. It is a good idea to perform some other action (type on the keyboard, move the mouse, utilize the disks) during the prime generation; this gives the random number generator a better chance to gain enough entropy. gpg: key A1B024B4 marked as ultimately trusted public and secret key created and signed. gpg: checking the trustdb gpg: 3 marginal(s) needed, 1 complete(s) needed, PGP trust model gpg: depth: 0 valid: 2 signed: 0 trust: 0-, 0q, 0n, 0m, 0f, 2u pub 2048R/A1B024B4 2013-06-13 Key fingerprint = 1B1E 7FA2 DA97 D2CB F7A8 98C2 8517 AD9D A1B0 24B4 uid Warren (RPM Signing) <[email protected]> sub 2048R/8AF2D17B 2013-06-13
Verify the key is listed in the key ring:
$ gpg --list-keys /home/bthurber/.gnupg/pubring.gpg --------------------------------- pub 2048R/A1B024B4 2013-06-13 uid Warren (RPM Signing) <[email protected]> sub 2048R/8AF2D17B 2013-06-13
Export the public key from the key ring to a text file. The public key is used during provisioning to verify the RPM package during installation.
$ gpg --export -a Warren > public_key.txt
Note: The cat command can be used to verify the contents of the public key file.
www.redhat.com 38 [email protected]
Use scp to secure copy the public key to the Satellite Server. Appendix D.1 Post InstallScripts provides an example post installation script where the public key is sourced during deployment.
$ scp public_ket.txt root@sysman-rhel6:/root
Next sign the custom RPM package using the newly created GPG key. Edit .rpmmacros and add the following lines:
/home/<user>/.rpmmacros
%_signature gpg %_gpg_name A1B024B4 <----public signature ID derived from gpg --list-keys
Sign the custom RPM package:
$ rpm --resign web-1-1.x86_64.rpmEnter pass phrase: Pass phrase is good. web-1-1.x86_64.rpm:
Use scp to secure copy the custom RPM package to the Satellite Server.
$ scp web-1-1.x86_64.rpm root@sysman-rhel6:/root
On the Satellite Server, create a new custom channel and import the custom RPM package into the channel using rhnpush.
# rhnpush -c web-server-content --server=localhost web-1-1.x86_64.rpm
Instructions for creating a new channel and uploading packages within Red hat Satellite Server can be found in Red Hat Network Satellite 5.5, Channel Management Guide11. For the reference environment the custom channel created and package used are:
• Channel – web-server-content
• Package – web-1-1.x86_64.rpm
Note: web-server-content is created as a child channel under rhel-x86_64-server-6
11 https://access.redhat.com/site/documentation/en- US/Red_Hat_Network_Satellite/5.5/html/Channel_Management_Guide/sect-Red_Hat_Network_Satellite-Channel_Management_Guide-Custom_Channel_and_Package_Management-Creating_a_Software_Channel.html
[email protected] 39 www.redhat.com

4.4.2 iPXEiPXE is required by CloudForms 2.0 to provide provisioning for RHEV environments12. For the reference environment, iPXE is configured on the Satellite Server utilizing DHCP functions provided by cobbler.
Note: iPXE is not available from Red Hat Network. Contact a Red Hat Sales Associate to obtain.
To configure iPXE on the Satellite Server extract the files under /var/www/html/pub:
# cd /var/www/htmp/pub# tar -xvzf evm-ixpe.tar
Resolve any permission and SELinux context issues:
# chown -R nfsnobody.nfsnobody /var/www/html/pub/miq# restorecon -vR /var/www/html/pub/miq
Modify the cobbler DHCP configuration to point clients to the iPXE chainloader. Add the following lines:
/etc/cobbler/dhcp.template
# # DHCP Server Configuration file. # see /usr/share/doc/dhcp*/dhcpd.conf.sample # authoritive; ddns-update-style interim; ignore client-updates;
subnet 10.16.10.0 netmask 255.255.254.0 { option routers 10.16.11.254; option subnet-mask 255.255.254.0; option domain-name "refarch.bos.redhat.com"; option domain-name-servers 10.16.11.248,10.16.143.247,10.16.255.2; option time-offset -18000; # Eastern Standard Time option ntp-servers 10.16.255.2,10.16.255.3; filename "pxelinux.0"; range dynamic-bootp 10.16.11.151 10.16.11.200; default-lease-time 21600; max-lease-time 43200; next-server 10.16.11.248;
if exists user-class and option user-class = "iPXE" { filename "http://10.16.11.248/pub/miq/ipxe/boot.php";
12 https://access.redhat.com/site/documentation/en- US/CloudForms/2.0/html/Management_Engine_5.1_Lifecycle_and_Automation_Guide/Requirements_for_Provisioning_Virtual_Machines_from_Red_Hat_Enterprise_Virtualization_Managers1.html
www.redhat.com 40 [email protected]
} else if exists user-class and option user-class = "gPXE" { filename "http://10.16.11.248/pub/miq/gpxe/boot.php"; } else { filename "pxelinux.0"; }
<content removed for brevity>
Note: Customization of cobbler is not supported by Red Hat Global Support Services13.
CloudForms 2.0 supports either NFS or Samba as the Depot Type for the sharing of boot files. For the reference environment NFS is used.
To configure NFS sharing on the Satellite Server, modify /etc/exports and add the following:
/etc/exports
/var/www/html/pub/miq *(rw,sync,no_subtree_check)
Ensure NFS starts on boot:
# chkconfig nfs on
To configure samba, perform a yum install of samba and edit /etc/samba/smb.conf.
# yum install samba
Add the following lines:
/etc/samba/smb.conf
#============================ Share Definitions=============================
[homes] comment = Home Directories browseable = no writable = yes
; valid users = %S ; valid users = MYDOMAIN\%S
[printers]
comment = All Printers path = /var/spool/samba browseable = no guest ok = no writable = no printable = yes
[ipxe]
13 https://access.redhat.com/site/support/offerings/production/soc/
[email protected] 41 www.redhat.com
comment = iPXE Stuff path = /var/www/html/pub/miq/ipxe public = yes writable = yes printable = no guest ok = yes browsable = yes
<content removed for brevity>
Ensure samba starts on boot:
# chkconfig smb on
4.5 SecurityRHEL/RHEV
selinux is enabled and set to enforcing on all systems where applicable. iptables is enabled on all systems and necessary ports open where applicable. Refer to Appendix C iptables.
Microsoft Windows Server
Microsoft Windows firewall is enabled for Domain, Private, and Public profiles. Standard rules are used.
www.redhat.com 42 [email protected]
5 ProvisioningCloudForms 2.0 supports two types of provisioning with Red Hat Enterprise Virtualization; PXE and ISO. For the reference environment several items are configured to support the provision process.
The first item requires a template14 to exist within the virtualization environment whose virtual disk Allocation Policy is set to Thin Provision15.
The second item requires an ISO storage domain, with the required image(s), to be attached to the RHEV environment.
The third item involves the installation of the RHEV agent for the newly deployed virtual machine(s). Although not required this provides more granular management.
5.1 PXEPXE provisioning involves the following:
• Configuring the CFME appliance
• Executing the provisioning process
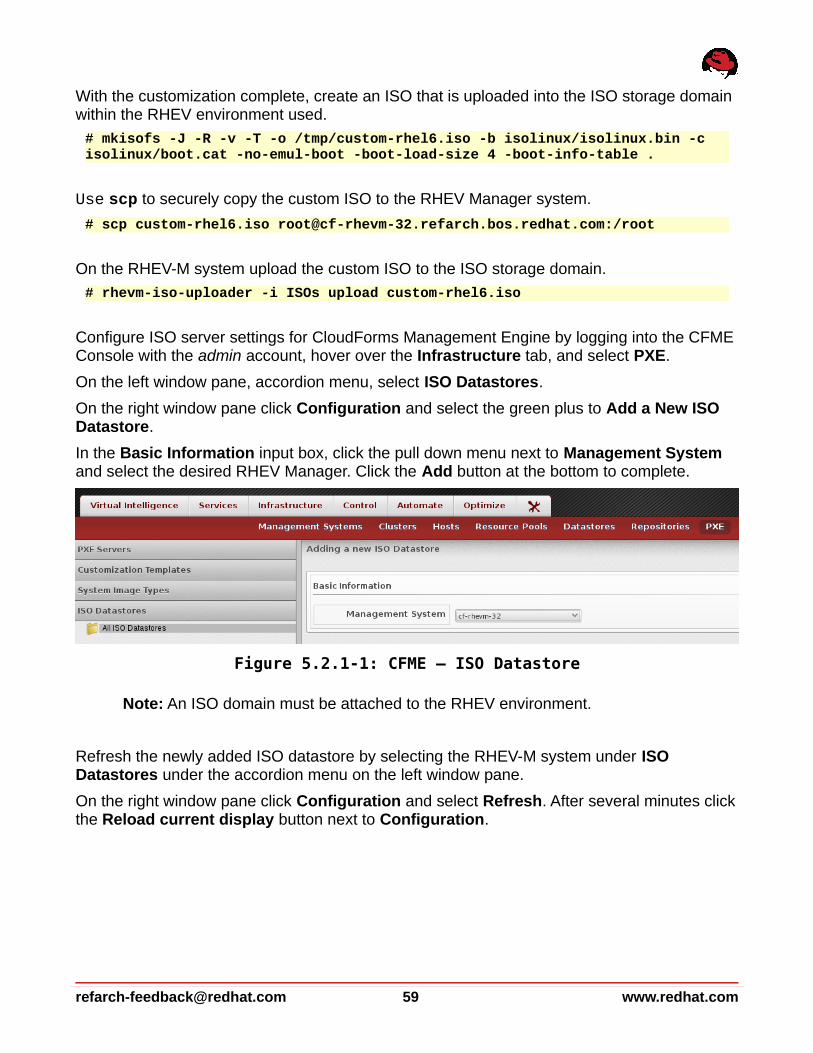
5.1.1 PXE ConfigurationConfigure PXE server settings for CloudForms Management Engine by logging into the CFME Console with the admin account, hover over the Infrastructure tab, and select PXE.
Click Configuration and select the green plus to Add a New PXE Server. Fill in the appropriate information for the PXE server configured in Section 4.4 Red Hat SatelliteServer.
14 https://access.redhat.com/site/documentation/en- US/Red_Hat_Enterprise_Virtualization/3.2/html/Administration_Guide/index.html
15 https://access.redhat.com/site/documentation/en- US/Red_Hat_Enterprise_Virtualization/3.2/html/Technical_Reference_Guide/sect-Block_based_storage_provisioning_mechanics.html
[email protected] 43 www.redhat.com
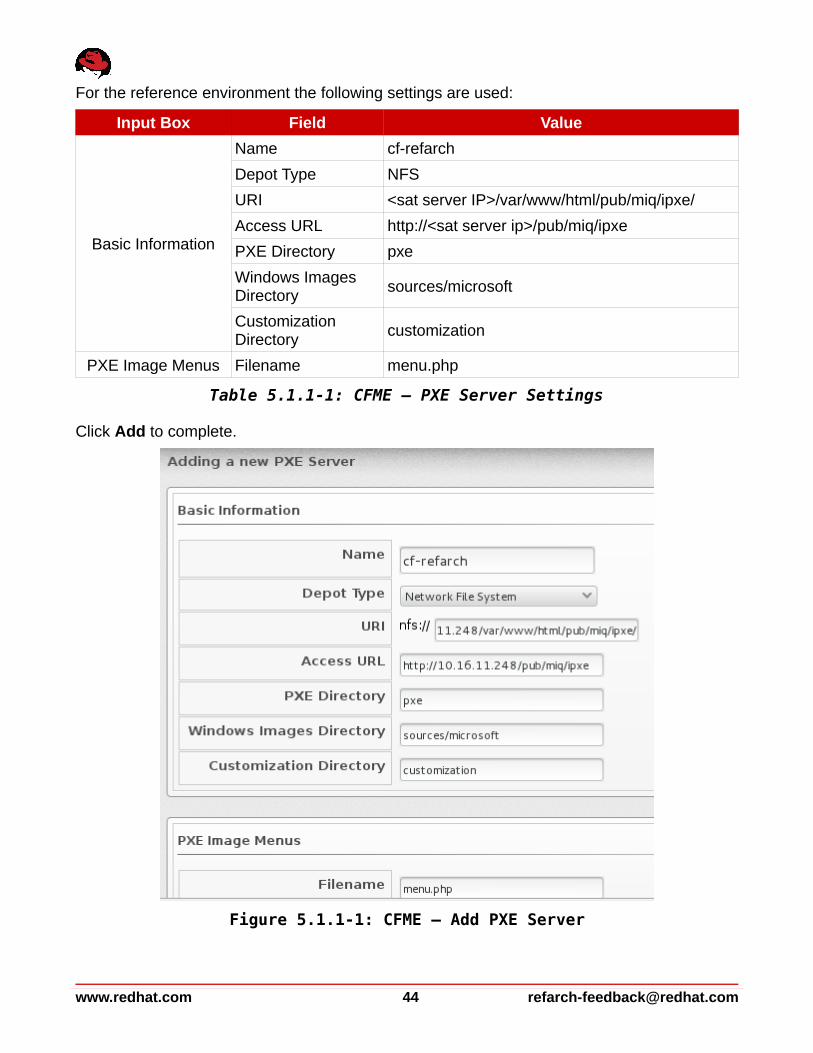
For the reference environment the following settings are used:
Input Box Field Value
Basic Information
Name cf-refarch
Depot Type NFS
URI <sat server IP>/var/www/html/pub/miq/ipxe/
Access URL http://<sat server ip>/pub/miq/ipxe
PXE Directory pxe
Windows Images Directory
sources/microsoft
Customization Directory
customization
PXE Image Menus Filename menu.php
Table 5.1.1-1: CFME – PXE Server Settings
Click Add to complete.
www.redhat.com 44 [email protected]
Figure 5.1.1-1: CFME – Add PXE Server
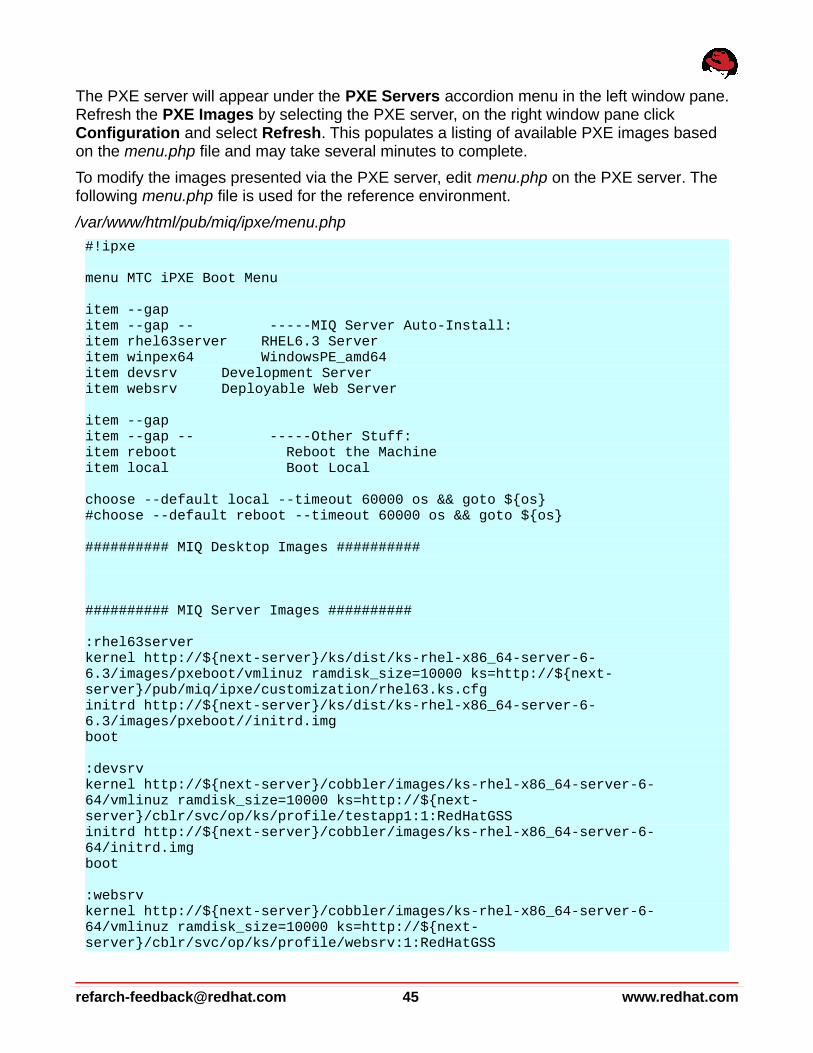
The PXE server will appear under the PXE Servers accordion menu in the left window pane. Refresh the PXE Images by selecting the PXE server, on the right window pane click Configuration and select Refresh. This populates a listing of available PXE images based on the menu.php file and may take several minutes to complete.
To modify the images presented via the PXE server, edit menu.php on the PXE server. The following menu.php file is used for the reference environment.
/var/www/html/pub/miq/ipxe/menu.php
#!ipxe
menu MTC iPXE Boot Menu
item --gap item --gap -- -----MIQ Server Auto-Install: item rhel63server RHEL6.3 Server item winpex64 WindowsPE_amd64 item devsrv Development Server item websrv Deployable Web Server
item --gap item --gap -- -----Other Stuff: item reboot Reboot the Machine item local Boot Local
choose --default local --timeout 60000 os && goto ${os} #choose --default reboot --timeout 60000 os && goto ${os}
########## MIQ Desktop Images ##########
########## MIQ Server Images ##########
:rhel63server kernel http://${next-server}/ks/dist/ks-rhel-x86_64-server-6-6.3/images/pxeboot/vmlinuz ramdisk_size=10000 ks=http://${next-server}/pub/miq/ipxe/customization/rhel63.ks.cfg initrd http://${next-server}/ks/dist/ks-rhel-x86_64-server-6-6.3/images/pxeboot//initrd.img boot
:devsrv kernel http://${next-server}/cobbler/images/ks-rhel-x86_64-server-6-64/vmlinuz ramdisk_size=10000 ks=http://${next-server}/cblr/svc/op/ks/profile/testapp1:1:RedHatGSS initrd http://${next-server}/cobbler/images/ks-rhel-x86_64-server-6-64/initrd.img boot
:websrv kernel http://${next-server}/cobbler/images/ks-rhel-x86_64-server-6-64/vmlinuz ramdisk_size=10000 ks=http://${next-server}/cblr/svc/op/ks/profile/websrv:1:RedHatGSS
[email protected] 45 www.redhat.com
initrd http://${next-server}/cobbler/images/ks-rhel-x86_64-server-6-64/initrd.img boot
:winpex64 kernel http://${next-server}/pub/miq/ipxe/sources/misc/memdisk iso raw initrd http://${next-server}/pub/miq/ipxe/sources/microsoft/winpe_amd64.iso boot
########## Other Stuff ##########
:reboot reboot
:local exit
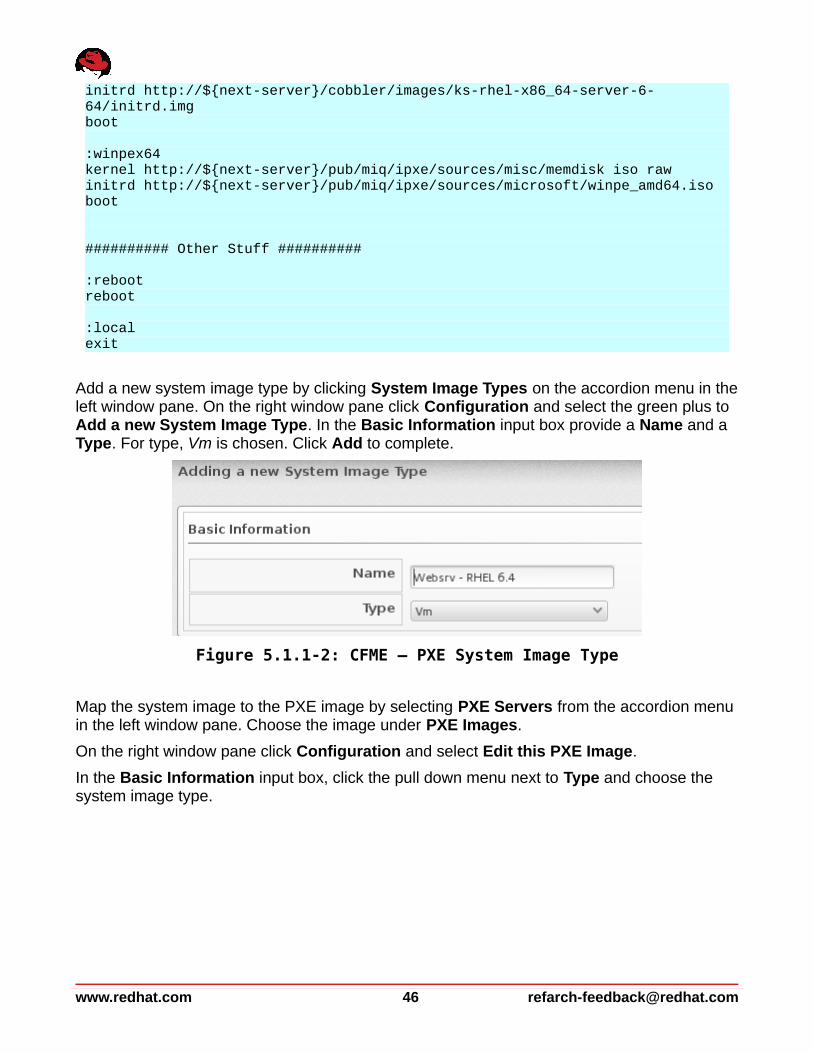
Add a new system image type by clicking System Image Types on the accordion menu in the left window pane. On the right window pane click Configuration and select the green plus to Add a new System Image Type. In the Basic Information input box provide a Name and a Type. For type, Vm is chosen. Click Add to complete.
Map the system image to the PXE image by selecting PXE Servers from the accordion menu in the left window pane. Choose the image under PXE Images.
On the right window pane click Configuration and select Edit this PXE Image.
In the Basic Information input box, click the pull down menu next to Type and choose the system image type.
www.redhat.com 46 [email protected]
Figure 5.1.1-2: CFME – PXE System Image Type
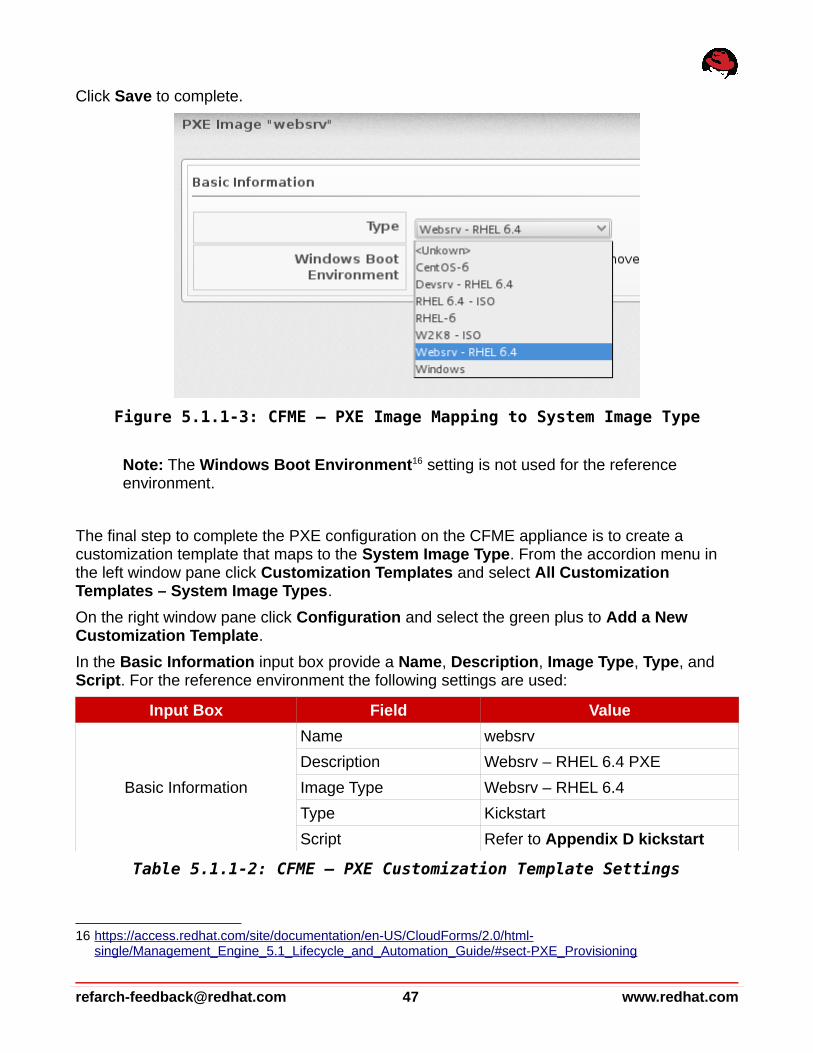
Click Save to complete.
Note: The Windows Boot Environment16 setting is not used for the reference environment.
The final step to complete the PXE configuration on the CFME appliance is to create a customization template that maps to the System Image Type. From the accordion menu in the left window pane click Customization Templates and select All Customization Templates – System Image Types.
On the right window pane click Configuration and select the green plus to Add a New Customization Template.
In the Basic Information input box provide a Name, Description, Image Type, Type, and Script. For the reference environment the following settings are used:
Input Box Field Value
Basic Information
Name websrv
Description Websrv – RHEL 6.4 PXE
Image Type Websrv – RHEL 6.4
Type Kickstart
Script Refer to Appendix D kickstart
Table 5.1.1-2: CFME – PXE Customization Template Settings
16 https://access.redhat.com/site/documentation/en-US/CloudForms/2.0/html- single/Management_Engine_5.1_Lifecycle_and_Automation_Guide/#sect-PXE_Provisioning
[email protected] 47 www.redhat.com
Figure 5.1.1-3: CFME – PXE Image Mapping to System Image Type
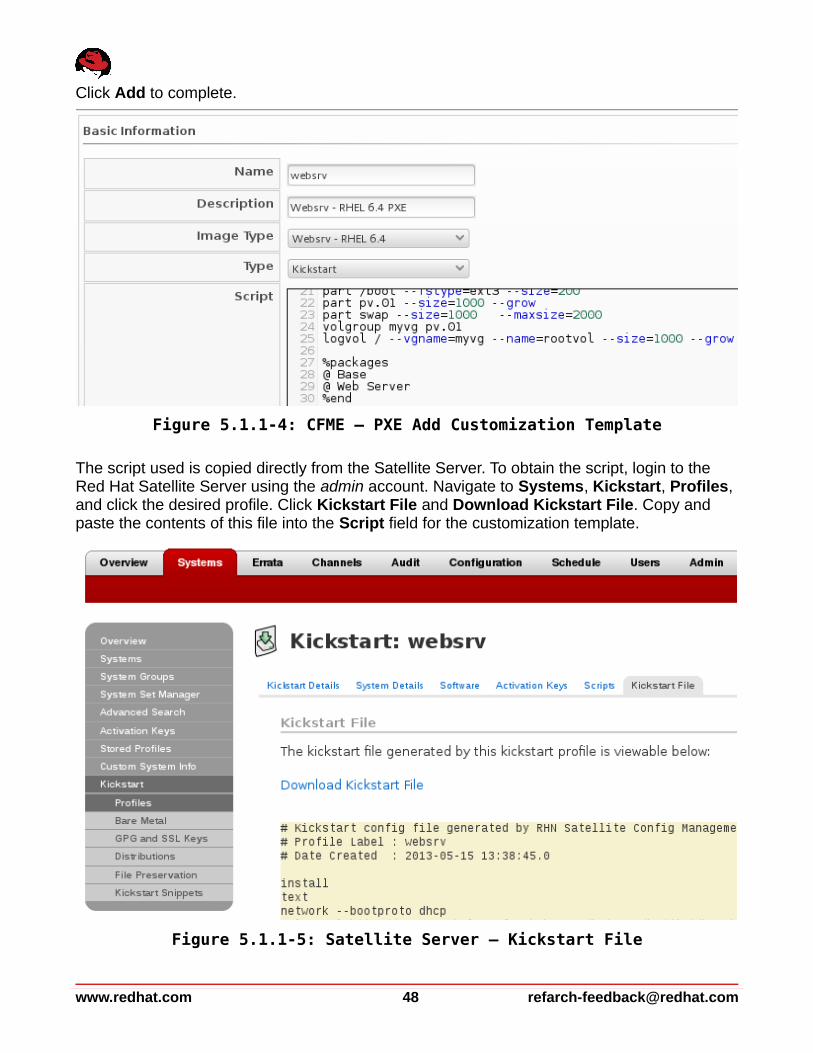
Click Add to complete.
The script used is copied directly from the Satellite Server. To obtain the script, login to the Red Hat Satellite Server using the admin account. Navigate to Systems, Kickstart, Profiles, and click the desired profile. Click Kickstart File and Download Kickstart File. Copy and paste the contents of this file into the Script field for the customization template.
www.redhat.com 48 [email protected]
Figure 5.1.1-5: Satellite Server – Kickstart File
Figure 5.1.1-4: CFME – PXE Add Customization Template
Note: For CloudForms support, the kickstart script contains a couple of modifications. The first modification is to change reboot to poweroff. The second change adds a call back to the CFME appliance for deployment status. This is placed in the %post section of the kickstart script.
%post#CFME Deployment Statuswget --no-check-certificate <%= evm[:callback_url_on_post_install] %>%end
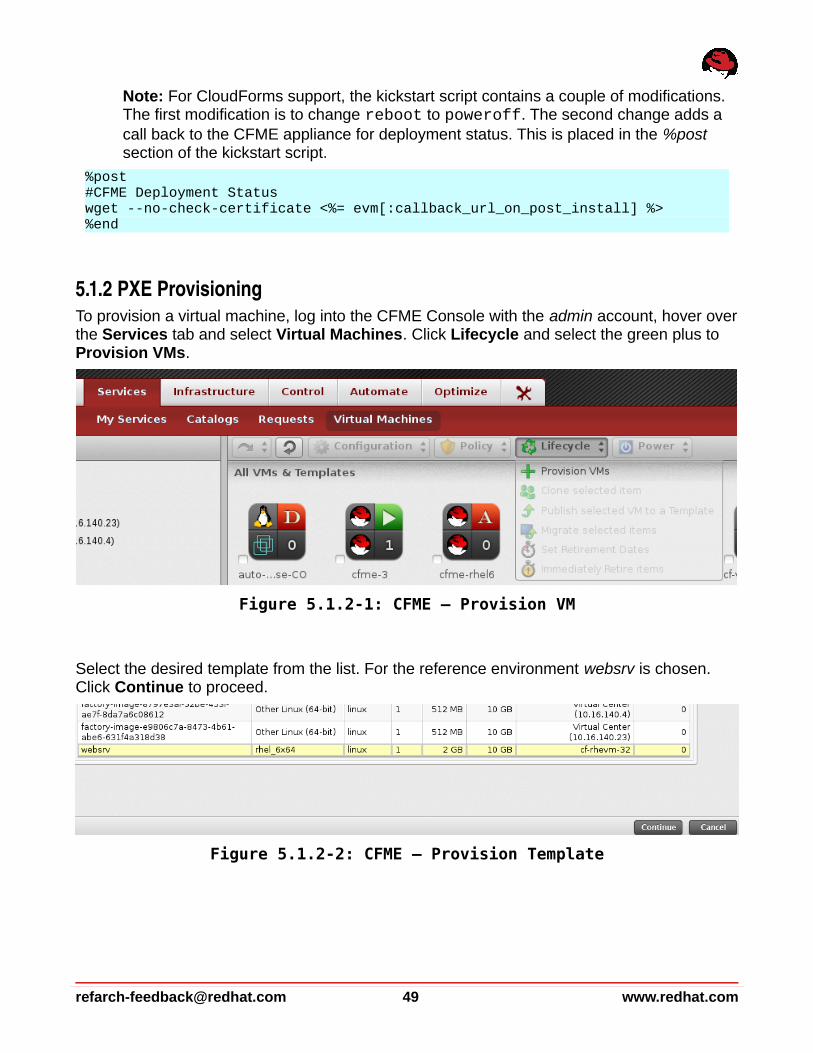
5.1.2 PXE ProvisioningTo provision a virtual machine, log into the CFME Console with the admin account, hover over the Services tab and select Virtual Machines. Click Lifecycle and select the green plus to Provision VMs.
Select the desired template from the list. For the reference environment websrv is chosen. Click Continue to proceed.
[email protected] 49 www.redhat.com
Figure 5.1.2-2: CFME – Provision Template
Figure 5.1.2-1: CFME – Provision VM
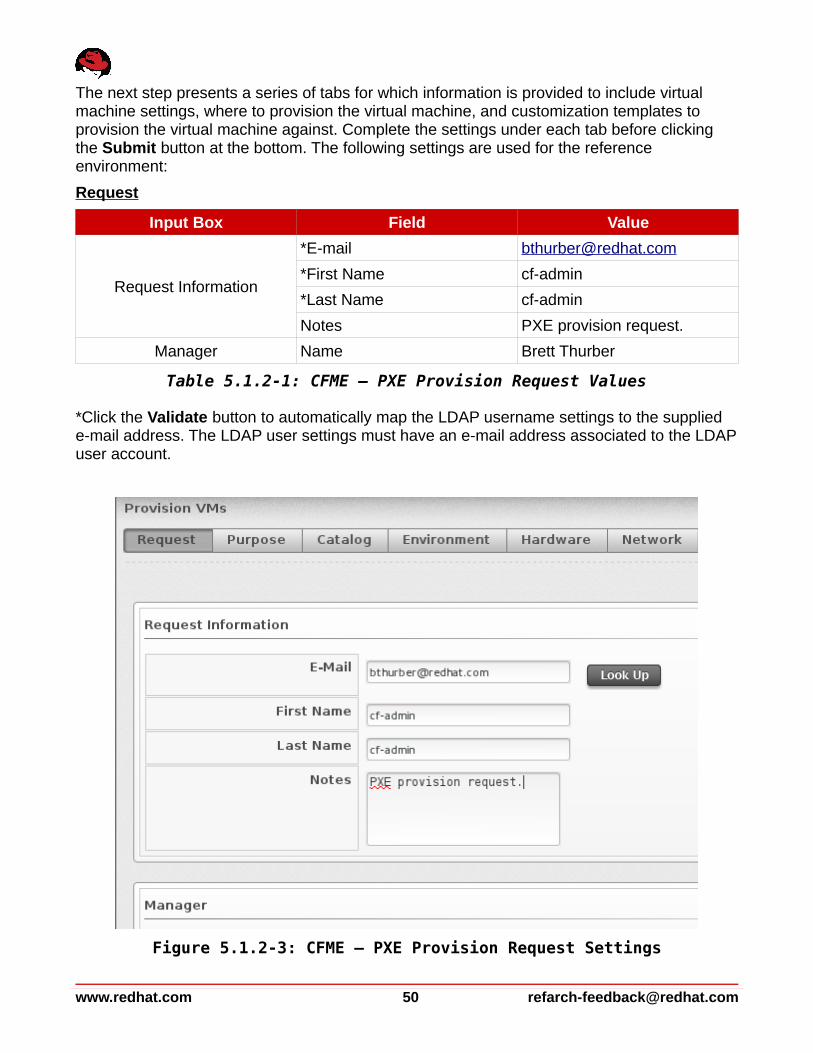
The next step presents a series of tabs for which information is provided to include virtual machine settings, where to provision the virtual machine, and customization templates to provision the virtual machine against. Complete the settings under each tab before clicking the Submit button at the bottom. The following settings are used for the reference environment:
Request
Input Box Field Value
Request Information
*E-mail [email protected]
*First Name cf-admin
*Last Name cf-admin
Notes PXE provision request.
Manager Name Brett Thurber
Table 5.1.2-1: CFME – PXE Provision Request Values
*Click the Validate button to automatically map the LDAP username settings to the supplied e-mail address. The LDAP user settings must have an e-mail address associated to the LDAP user account.
www.redhat.com 50 [email protected]
Figure 5.1.2-3: CFME – PXE Provision Request Settings
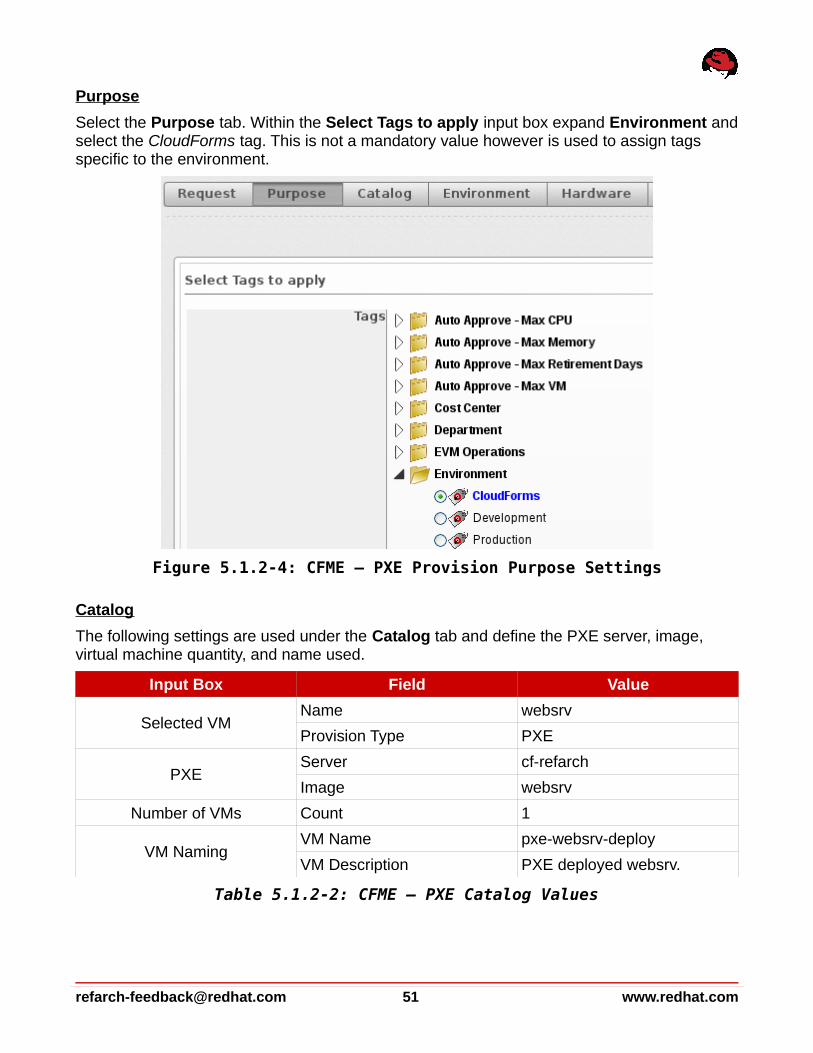
Purpose
Select the Purpose tab. Within the Select Tags to apply input box expand Environment and select the CloudForms tag. This is not a mandatory value however is used to assign tags specific to the environment.
Catalog
The following settings are used under the Catalog tab and define the PXE server, image, virtual machine quantity, and name used.
Input Box Field Value
Selected VMName websrv
Provision Type PXE
PXEServer cf-refarch
Image websrv
Number of VMs Count 1
VM NamingVM Name pxe-websrv-deploy
VM Description PXE deployed websrv.
Table 5.1.2-2: CFME – PXE Catalog Values
[email protected] 51 www.redhat.com
Figure 5.1.2-4: CFME – PXE Provision Purpose Settings
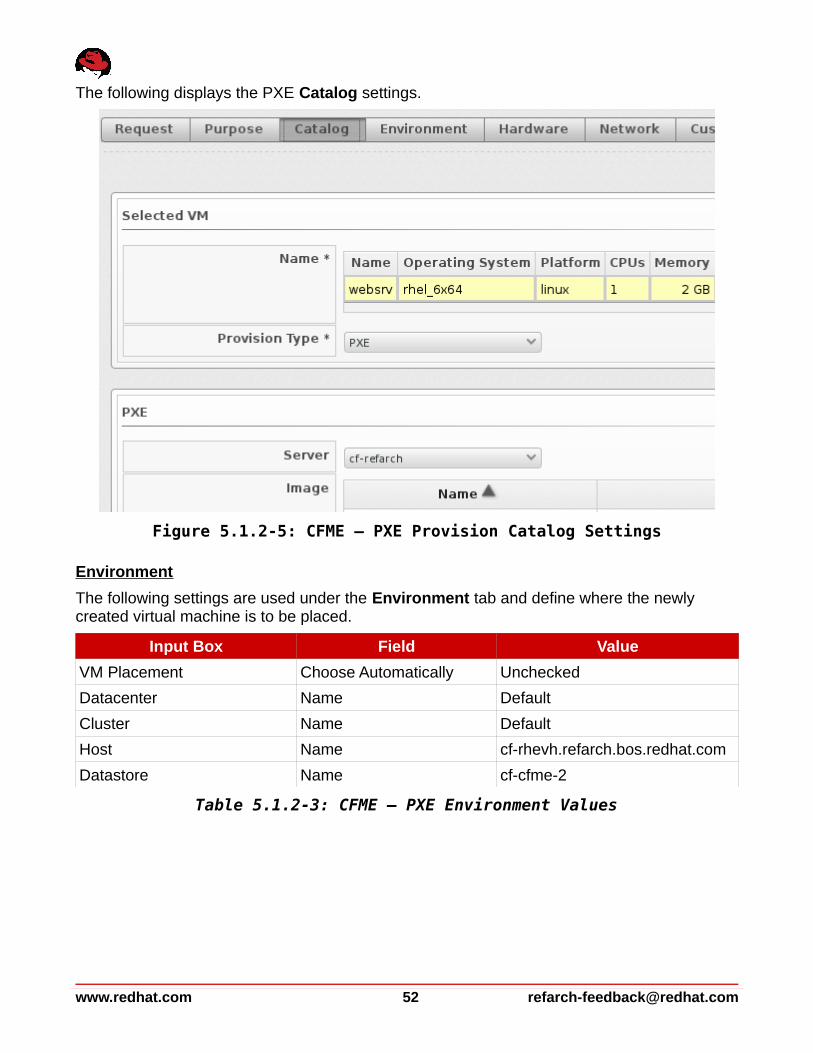
The following displays the PXE Catalog settings.
Environment
The following settings are used under the Environment tab and define where the newly created virtual machine is to be placed.
Input Box Field Value
VM Placement Choose Automatically Unchecked
Datacenter Name Default
Cluster Name Default
Host Name cf-rhevh.refarch.bos.redhat.com
Datastore Name cf-cfme-2
Table 5.1.2-3: CFME – PXE Environment Values
www.redhat.com 52 [email protected]
Figure 5.1.2-5: CFME – PXE Provision Catalog Settings
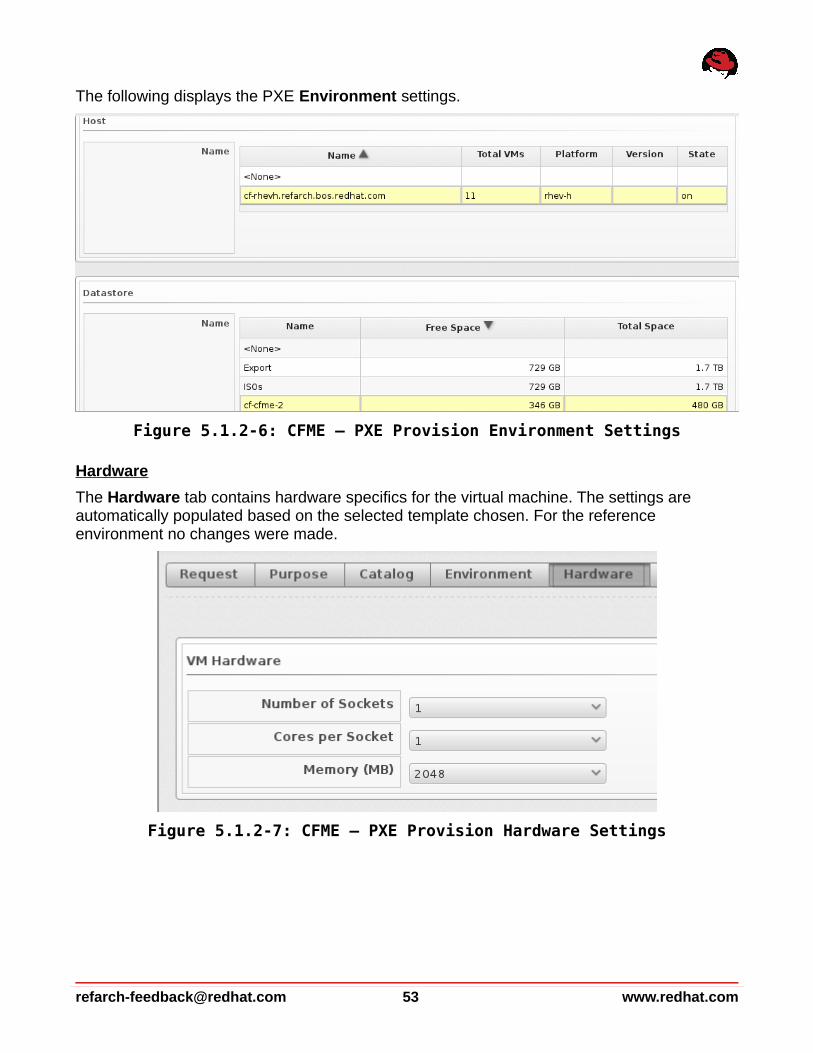
The following displays the PXE Environment settings.
Hardware
The Hardware tab contains hardware specifics for the virtual machine. The settings are automatically populated based on the selected template chosen. For the reference environment no changes were made.
[email protected] 53 www.redhat.com
Figure 5.1.2-7: CFME – PXE Provision Hardware Settings
Figure 5.1.2-6: CFME – PXE Provision Environment Settings

Network
The Network tab contains settings for the vLan value. This value is populated based on the template chosen. For the reference environment no changes were made.
Customize
The Customize tab contains settings for credentials, IP address information, DNS, and specifying a customization template. Credentials, IP address, and DNS information provide a method to deviate from the template settings. Customization template is an option presented based on the image chosen from the PXE environment. For the reference environment, Customization Template is the only setting changed.
www.redhat.com 54 [email protected]
Figure 5.1.2-9: CFME – PXE Provision Customize Settings
Figure 5.1.2-8: CFME – PXE Provision Network Settings
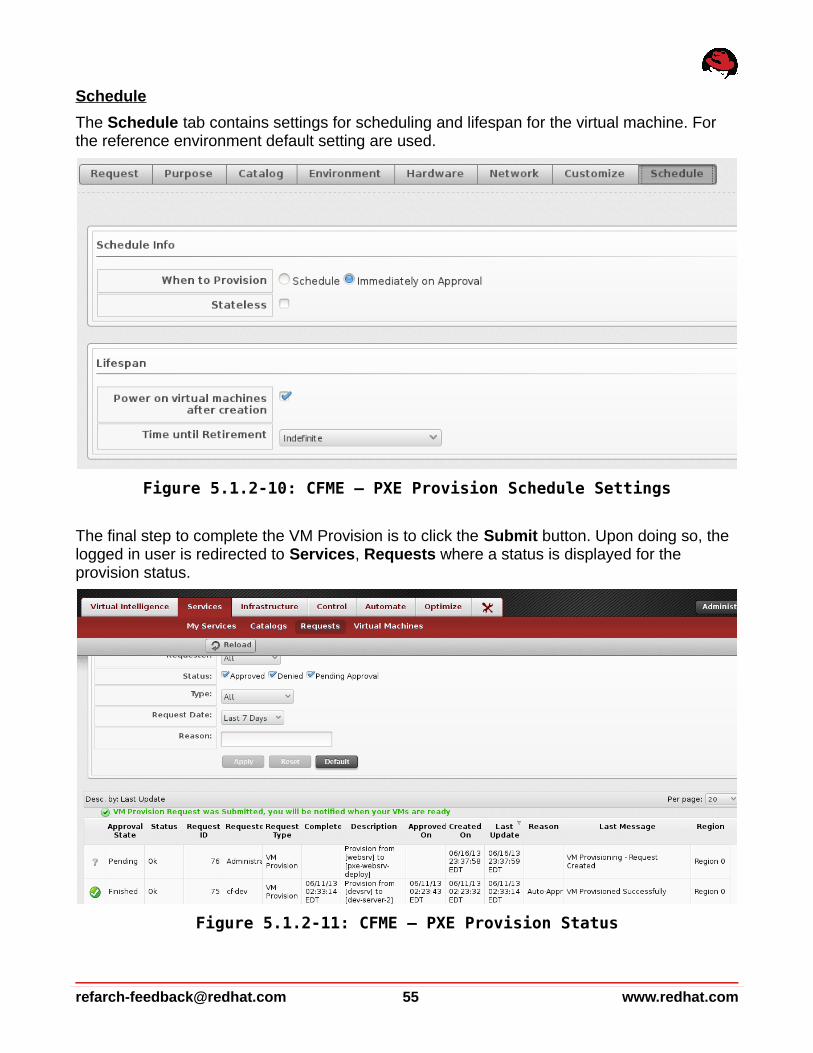
Schedule
The Schedule tab contains settings for scheduling and lifespan for the virtual machine. For the reference environment default setting are used.
The final step to complete the VM Provision is to click the Submit button. Upon doing so, the logged in user is redirected to Services, Requests where a status is displayed for the provision status.
[email protected] 55 www.redhat.com
Figure 5.1.2-11: CFME – PXE Provision Status
Figure 5.1.2-10: CFME – PXE Provision Schedule Settings
Alternatively, on the CFME appliance the following log files can be monitored for status:
• /var/www/miq/vmdb/log/automate.log
• /var/www/miq/vmdb/log/evm.log
Note: If there are multiple CFME appliances in the same zone with the Automation Engine role enabled, it may be necessary to monitor the log files across each appliance.
A status e-mail is sent to the requester indicating a request was received, approved, and is pending quota validation.
Hello, Your Virtual Machine Request was approved. If Quota validation is successful you will be notified via email when the VM is available.
Approvers notes:
To view this Request go to: https://<CFME_appliance>/miq_request/show/76
Thank you,Virtualization Infrastructure Team
Upon completion another e-mail is sent indicating the provision task has completed.
Hello,
Your request to provision a virtual machine was approved and completed on Sunday, June 16, 2013 at 11:48PM.
Virtual machine pxe-websrv-deploy will be available in approximately 15 minutes.
For Windows VM access is available via RDP and for Linux VM access is available via putty/ssh, etc. Or you can use the Console Access feature found in the detail view of your VM. As the designated owner you will receive expiration warnings at this email address: [email protected]
If you are not already logged in, you can access and manage your virtual machine here https://<CFME_appliance>/vm_or_template/show/102'
If you have any issues with your new virtual machine please contact Support.
Thank you,Virtualization Infrastructure Team
Note: Outgoing SMTP e-mail settings17 must be configured on the CFME appliance(s) to allow e-mail notifications to be sent.
17 https://access.redhat.com/site/documentation/en- US/CloudForms/2.0/html/Management_Engine_5.1_Settings_and_Operations_Guide/sect-E-mail_Settings.html
www.redhat.com 56 [email protected]
Custom e-mail notifications can be configured in the Automate18 model. To configure, hover over Automate and select Explorer. In the left window pane navigate to Alert/Email Notifications (Email Notifications). Choose the desired method for the action and modify as needed.
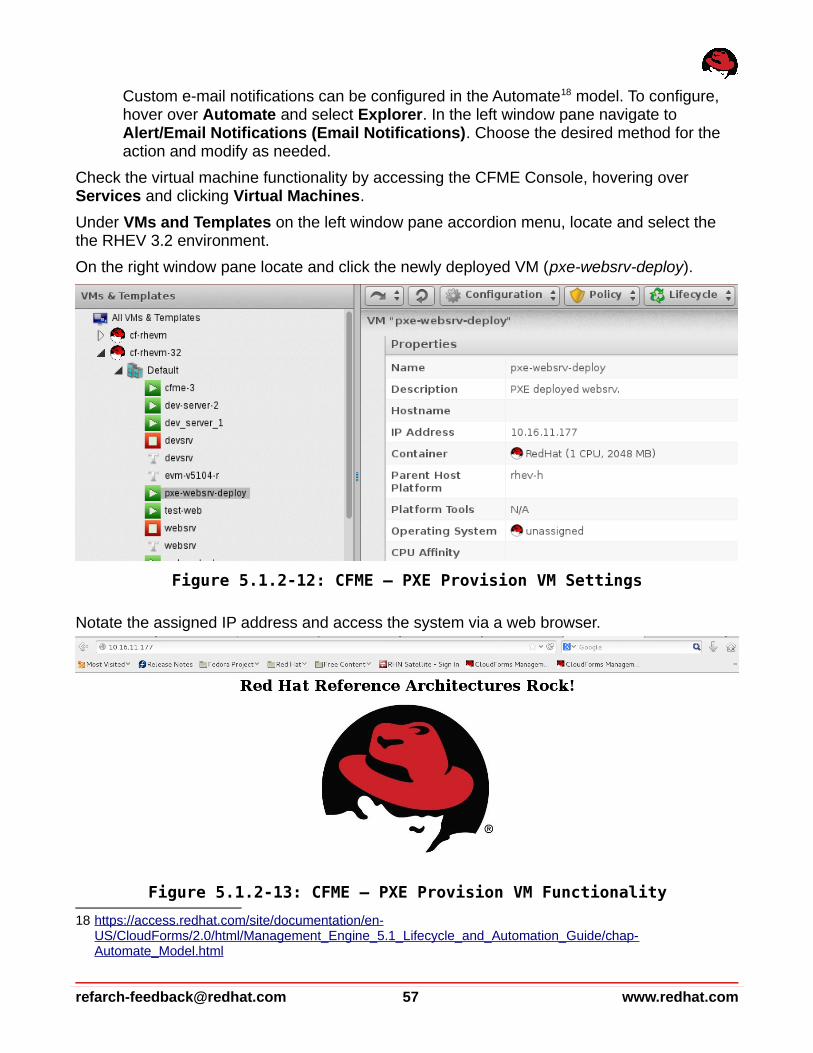
Check the virtual machine functionality by accessing the CFME Console, hovering over Services and clicking Virtual Machines.
Under VMs and Templates on the left window pane accordion menu, locate and select the the RHEV 3.2 environment.
On the right window pane locate and click the newly deployed VM (pxe-websrv-deploy).
Notate the assigned IP address and access the system via a web browser.
18 https://access.redhat.com/site/documentation/en- US/CloudForms/2.0/html/Management_Engine_5.1_Lifecycle_and_Automation_Guide/chap-Automate_Model.html
[email protected] 57 www.redhat.com
Figure 5.1.2-13: CFME – PXE Provision VM Functionality
Figure 5.1.2-12: CFME – PXE Provision VM Settings
5.2 ISOISO provisioning involves the following:
• Configuring the CFME appliance
• Executing the provisioning process
5.2.1 ISO ConfigurationFor the reference environment, the first step in preparing for ISO provisioning is to prepare an ISO image with the required customization. PXE provisioning utilizes customization templates where ISO provisioning customization can be built into the ISO image. The reference environment utilizes a custom RHEL 6.4 ISO image.
To create a custom image, download the desired ISO to a RHEL based system. Mount the ISO image and copy it’s contents to a temporary location.
# mount -o loop rhel-server-6.4-x86_64-dvd.iso /mnt/rhel
# rsync -avP /mnt/rhel /tmp/rhel
Create and populate a ks.cfg file in the top level directory where the .iso is copied to. The contents of this file are populated with the kickstart file generated from the Red Hat Satellite Server. Refer to Section 5.1 PXE for details on obtaining the contents. For the reference environment websrv is the kickstart file used for ISO provisioning. Refer to Appendix D kickstart for content details.
# vi /tmp/rhel/rhel/ks.cfg
Edit /tmp/rhel/rhel/isolinux/isolinux.cfg and modify the append lines with ks=cdrom:/ks.cfg.
label linux menu label ^Install or upgrade an existing system menu default kernel vmlinuz append initrd=initrd.img ks=cdrom:/ks.cfg label vesa menu label Install system with ^basic video driver kernel vmlinuz append initrd=initrd.img xdriver=vesa nomodeset ks=cdrom:/ks.cfg label rescue menu label ^Rescue installed system kernel vmlinuz append initrd=initrd.img rescue ks=cdrom:/ks.cfg
www.redhat.com 58 [email protected]
With the customization complete, create an ISO that is uploaded into the ISO storage domain within the RHEV environment used.
# mkisofs -J -R -v -T -o /tmp/custom-rhel6.iso -b isolinux/isolinux.bin -c isolinux/boot.cat -no-emul-boot -boot-load-size 4 -boot-info-table .
Use scp to securely copy the custom ISO to the RHEV Manager system.
# scp custom-rhel6.iso [email protected]:/root
On the RHEV-M system upload the custom ISO to the ISO storage domain.
# rhevm-iso-uploader -i ISOs upload custom-rhel6.iso
Configure ISO server settings for CloudForms Management Engine by logging into the CFME Console with the admin account, hover over the Infrastructure tab, and select PXE.
On the left window pane, accordion menu, select ISO Datastores.
On the right window pane click Configuration and select the green plus to Add a New ISO Datastore.
In the Basic Information input box, click the pull down menu next to Management System and select the desired RHEV Manager. Click the Add button at the bottom to complete.
Note: An ISO domain must be attached to the RHEV environment.
Refresh the newly added ISO datastore by selecting the RHEV-M system under ISO Datastores under the accordion menu on the left window pane.
On the right window pane click Configuration and select Refresh. After several minutes click the Reload current display button next to Configuration.
[email protected] 59 www.redhat.com
Figure 5.2.1-1: CFME – ISO Datastore
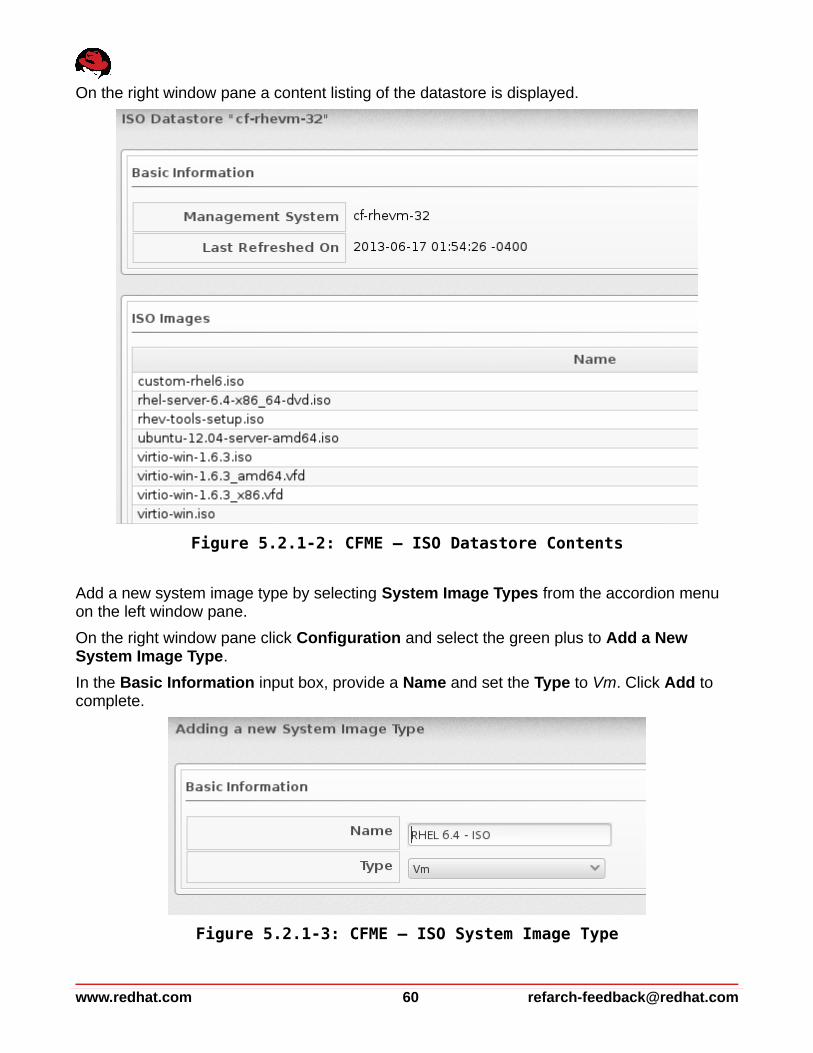
On the right window pane a content listing of the datastore is displayed.
Add a new system image type by selecting System Image Types from the accordion menu on the left window pane.
On the right window pane click Configuration and select the green plus to Add a New System Image Type.
In the Basic Information input box, provide a Name and set the Type to Vm. Click Add to complete.
www.redhat.com 60 [email protected]
Figure 5.2.1-3: CFME – ISO System Image Type
Figure 5.2.1-2: CFME – ISO Datastore Contents

Assign the system image type to the custom ISO. On the left window pane select ISO Datastore from the accordion menu. Expand ISO Images under the ISO domain and choose the custom ISO image.
On the right window pane click Configuration and select Edit this ISO Image.
In the Basic Information input box click the pull down menu next to Type and select the previously create system image type. Click Save to complete.
5.2.2 ISO ProvisioningTo provision a virtual machine, log into the CFME Console with the admin account, hover over the Services tab and select Virtual Machines. Click Lifecycle and select the green plus to Provision VMs.
Note: The process to provision a VM from ISO is the same as provisioning via PXE with subtle changes. Only the differences are covered for the reference environment.
Request
The only change under the Request tab is the Notes dialogue.
Input Box Field Value
Request Information Notes ISO provision request.
Table 5.2.2-1: CFME – ISO Provision Request Values
Purpose
Same as PXE provisioning.
[email protected] 61 www.redhat.com
Figure 5.2.2-1: CFME – ISO System Image Type Assignment
Catalog
The following changes are made.
Input Box Field Value
Selected VM Provision Type ISO
ISO Image custom-rhel6.iso
VM NamingVM Name iso-websrv-deploy
VM Description ISO deployed websrv.
Table 5.2.2-2: CFME – ISO Provision Catalog Values
Environment
Same as PXE provisioning.
Hardware
Same as PXE provisioning.
Network
Same as PXE provisioning.
Customize
The only change made under the Customize tab is the Script Name field.
Input Box Field Value
Customize Template Script Name None
Table 5.2.2-3: CFME – ISO Provision Customize Values
Schedule
Same as PXE provisioning.
www.redhat.com 62 [email protected]
Click the Submit button to initiate the deployment. Upon doing so, the logged in user is redirected to Services, Requests where a status is displayed for the provision status.
Note: Refer to PXE provisioning for additional location of log files to monitor during the provision process.
A status e-mail is sent to the requester indicating a request was received, approved, and is pending quota validation.
Hello, Your Virtual Machine Request was approved. If Quota validation is successful you will be notified via email when the VM is available.
Approvers notes:
To view this Request go to: https://<CFME_appliance>/miq_request/show/77
Thank you,Virtualization Infrastructure Team
Upon completion another e-mail is sent indicating the provision task has completed.
Hello,
Your request to provision a virtual machine was approved and completed on Monday, June 17, 2013 at 12:42PM.
Virtual machine iso-websrv-deploy will be available in approximately 15
[email protected] 63 www.redhat.com
Figure 5.2.2-2: CFME – ISO Provision Status
minutes.
For Windows VM access is available via RDP and for Linux VM access is available via putty/ssh, etc. Or you can use the Console Access feature found in the detail view of your VM. As the designated owner you will receive expiration warnings at this email address: [email protected]
If you are not already logged in, you can access and manage your virtual machine here https://<CFME_appliance>/vm_or_template/show/103'
If you have any issues with your new virtual machine please contact Support.
Thank you,
Check the virtual machine functionality by accessing the CFME Console, hovering over Services and clicking Virtual Machines. Under VMs and Templates on the left window pane accordion menu, locate and select the RHEV 3.2 environment.
On the right window pane locate and click the newly deployed VM (iso-websrv-deploy).
www.redhat.com 64 [email protected]
Figure 5.2.2-3: CFME – ISO Provision VM Settings
Notate the assigned IP address and access the system via a web browser.
[email protected] 65 www.redhat.com
Figure 5.2.2-4: CFME – ISO Provision VM Functionality
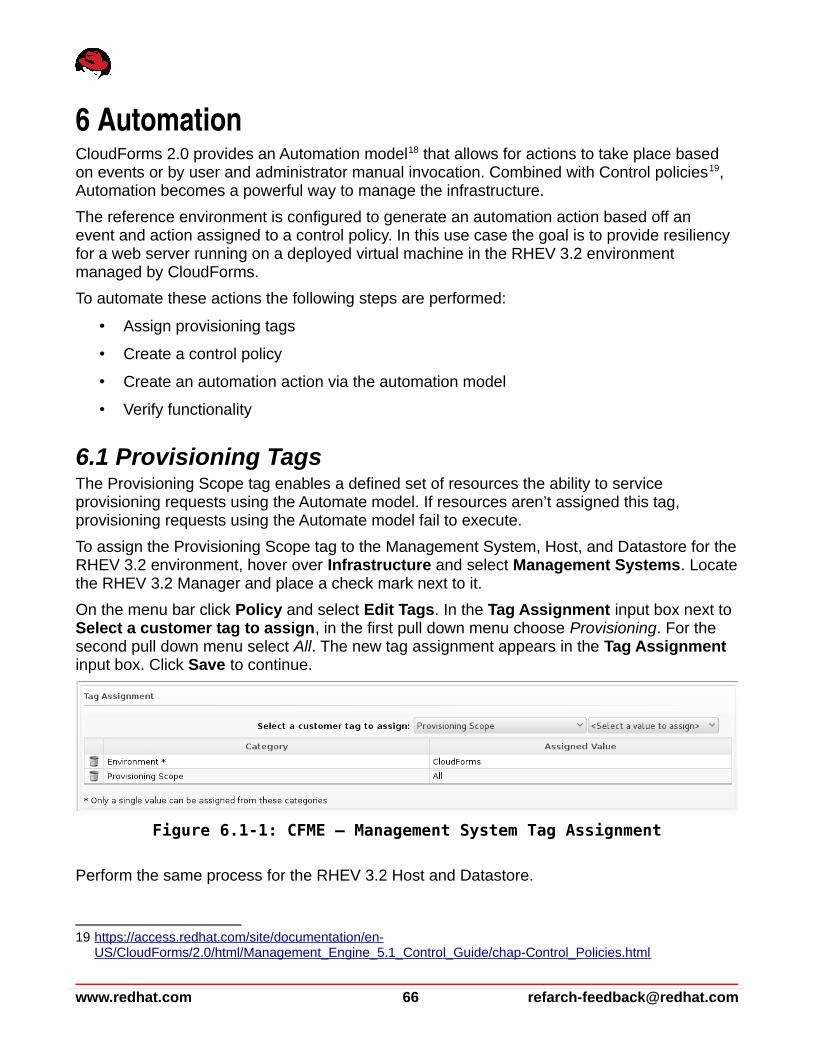
6 AutomationCloudForms 2.0 provides an Automation model18 that allows for actions to take place based on events or by user and administrator manual invocation. Combined with Control policies19, Automation becomes a powerful way to manage the infrastructure.
The reference environment is configured to generate an automation action based off an event and action assigned to a control policy. In this use case the goal is to provide resiliency for a web server running on a deployed virtual machine in the RHEV 3.2 environment managed by CloudForms.
To automate these actions the following steps are performed:
• Assign provisioning tags
• Create a control policy
• Create an automation action via the automation model
• Verify functionality
6.1 Provisioning TagsThe Provisioning Scope tag enables a defined set of resources the ability to service provisioning requests using the Automate model. If resources aren’t assigned this tag, provisioning requests using the Automate model fail to execute.
To assign the Provisioning Scope tag to the Management System, Host, and Datastore for the RHEV 3.2 environment, hover over Infrastructure and select Management Systems. Locate the RHEV 3.2 Manager and place a check mark next to it.
On the menu bar click Policy and select Edit Tags. In the Tag Assignment input box next to Select a customer tag to assign, in the first pull down menu choose Provisioning. For the second pull down menu select All. The new tag assignment appears in the Tag Assignment input box. Click Save to continue.
Perform the same process for the RHEV 3.2 Host and Datastore.
19 https://access.redhat.com/site/documentation/en- US/CloudForms/2.0/html/Management_Engine_5.1_Control_Guide/chap-Control_Policies.html
www.redhat.com 66 [email protected]
Figure 6.1-1: CFME – Management System Tag Assignment
The RHEV 3.2 infrastructure for the reference environment includes:
Component Resource
Management System cf-rhevm-32
Host cf-rhevh
Datastore cf-cfme-2
Table 6.1-1: CFME – RHEV 3.2 Managed Resources
6.2 PoliciesPolicies provide the capability to manage the environment. There are three types of policies to consider, alert, compliance, and control. Alert policies provide notification for significant environment events. Compliance policies provide the ability to check the environment for security compliance. Control policies provide the capability to take action based on an event or series of events that occur.
For the reference environment a control policy is used to take action based on a virtual machine event. The control policy invokes an automation action to deploy a virtual machine based on a virtual machine power off event. This provides resiliency for the web application running on the virtual machine.
6.2.1 Control Policy CreationTo create a control policy, log into the CFME Console with the admin account, hover over the Control tab and select Explorer.
On the accordion menu in the left window pane, select Actions.
On the right window pane click the Configuration button and select the green plus next to Add a new Action.
In the Basic Information input box provide a Name and choose Invoke a Custom Automation next to Action Type. This enables additional input boxes.
Under Custom Automation, Object Details, for Message enter create and for Request provide a name.
Note: The value for Request maps to an automate Instance18.
[email protected] 67 www.redhat.com
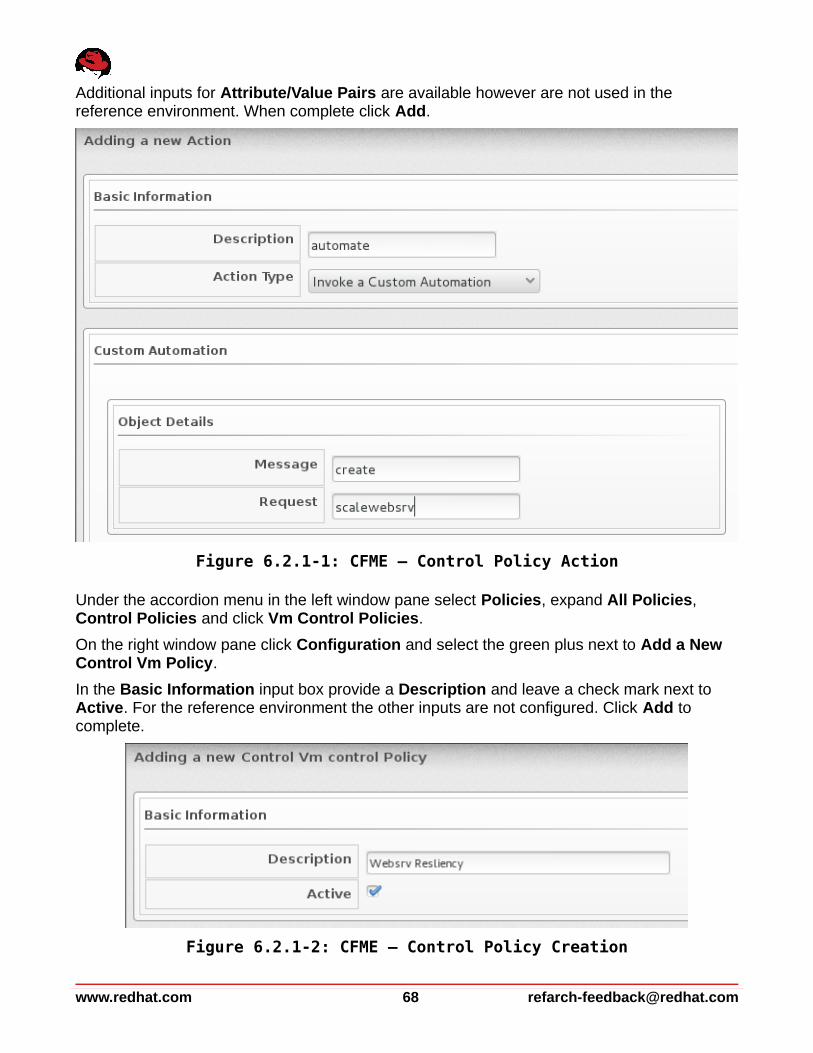
Additional inputs for Attribute/Value Pairs are available however are not used in the reference environment. When complete click Add.
Under the accordion menu in the left window pane select Policies, expand All Policies, Control Policies and click Vm Control Policies.
On the right window pane click Configuration and select the green plus next to Add a New Control Vm Policy.
In the Basic Information input box provide a Description and leave a check mark next to Active. For the reference environment the other inputs are not configured. Click Add to complete.
www.redhat.com 68 [email protected]
Figure 6.2.1-2: CFME – Control Policy Creation
Figure 6.2.1-1: CFME – Control Policy Action
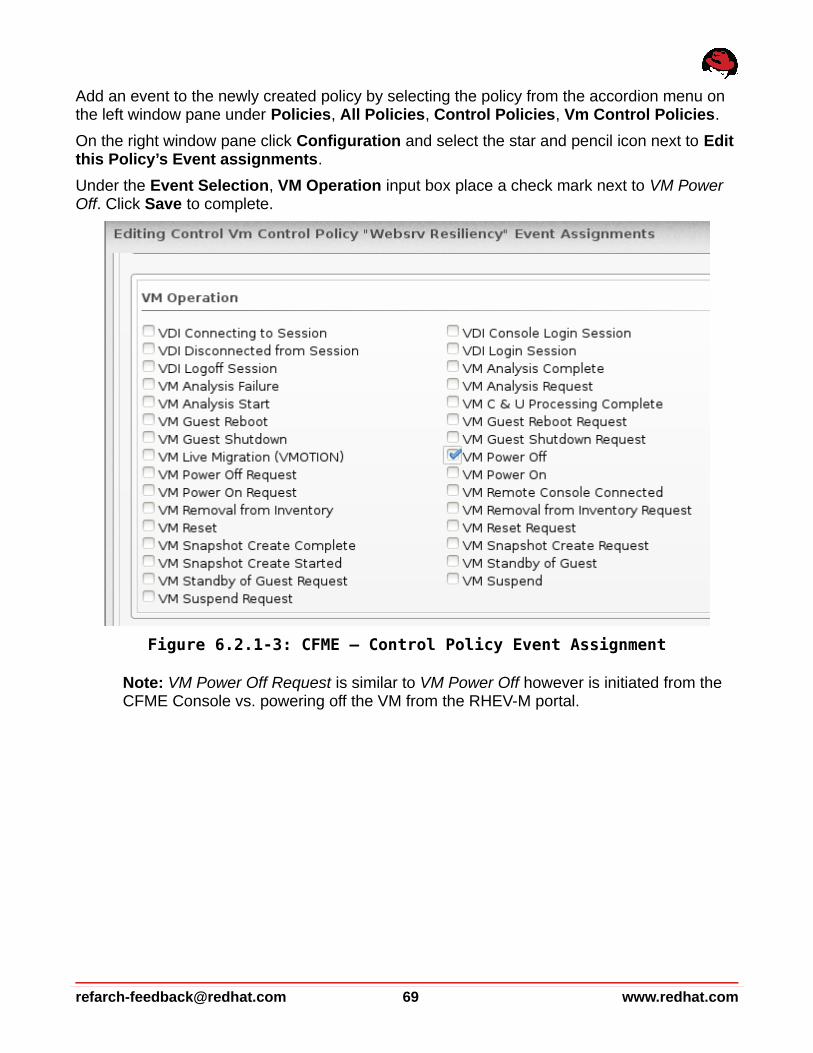
Add an event to the newly created policy by selecting the policy from the accordion menu on the left window pane under Policies, All Policies, Control Policies, Vm Control Policies.
On the right window pane click Configuration and select the star and pencil icon next to Edit this Policy’s Event assignments.
Under the Event Selection, VM Operation input box place a check mark next to VM Power Off. Click Save to complete.
Note: VM Power Off Request is similar to VM Power Off however is initiated from the CFME Console vs. powering off the VM from the RHEV-M portal.
[email protected] 69 www.redhat.com
Figure 6.2.1-3: CFME – Control Policy Event Assignment
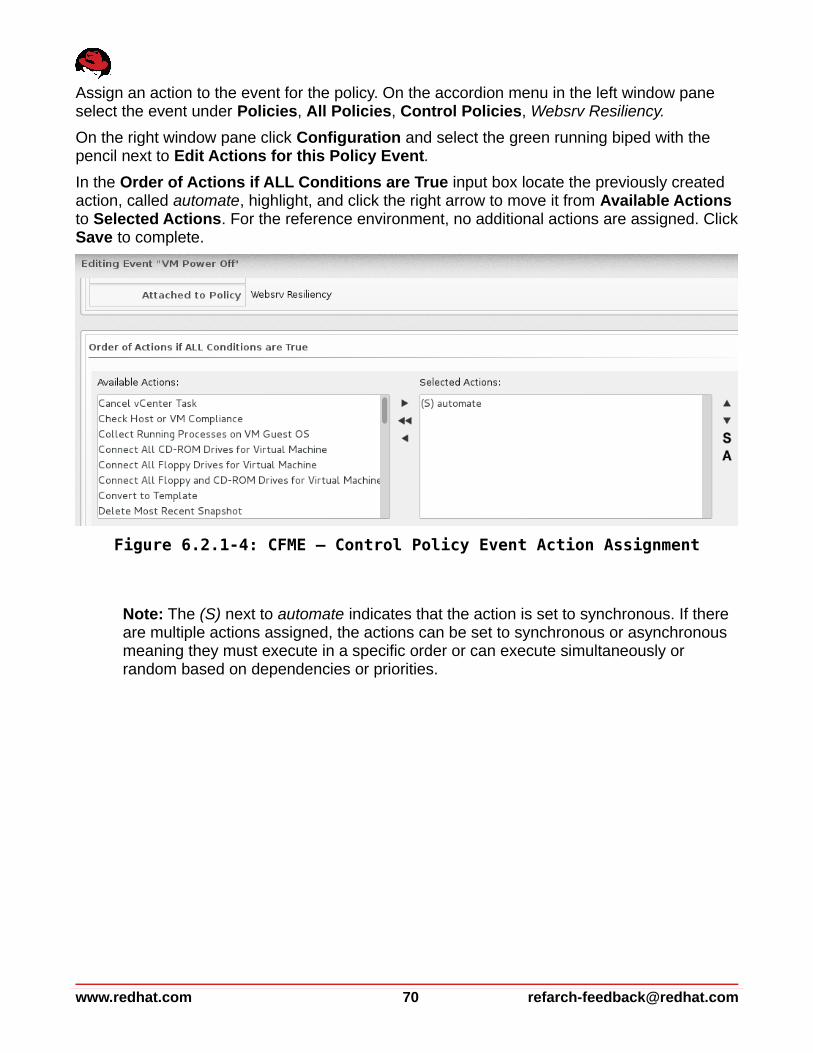
Assign an action to the event for the policy. On the accordion menu in the left window pane select the event under Policies, All Policies, Control Policies, Websrv Resiliency.
On the right window pane click Configuration and select the green running biped with the pencil next to Edit Actions for this Policy Event.
In the Order of Actions if ALL Conditions are True input box locate the previously created action, called automate, highlight, and click the right arrow to move it from Available Actions to Selected Actions. For the reference environment, no additional actions are assigned. Click Save to complete.
Note: The (S) next to automate indicates that the action is set to synchronous. If there are multiple actions assigned, the actions can be set to synchronous or asynchronous meaning they must execute in a specific order or can execute simultaneously or random based on dependencies or priorities.
www.redhat.com 70 [email protected]
Figure 6.2.1-4: CFME – Control Policy Event Action Assignment
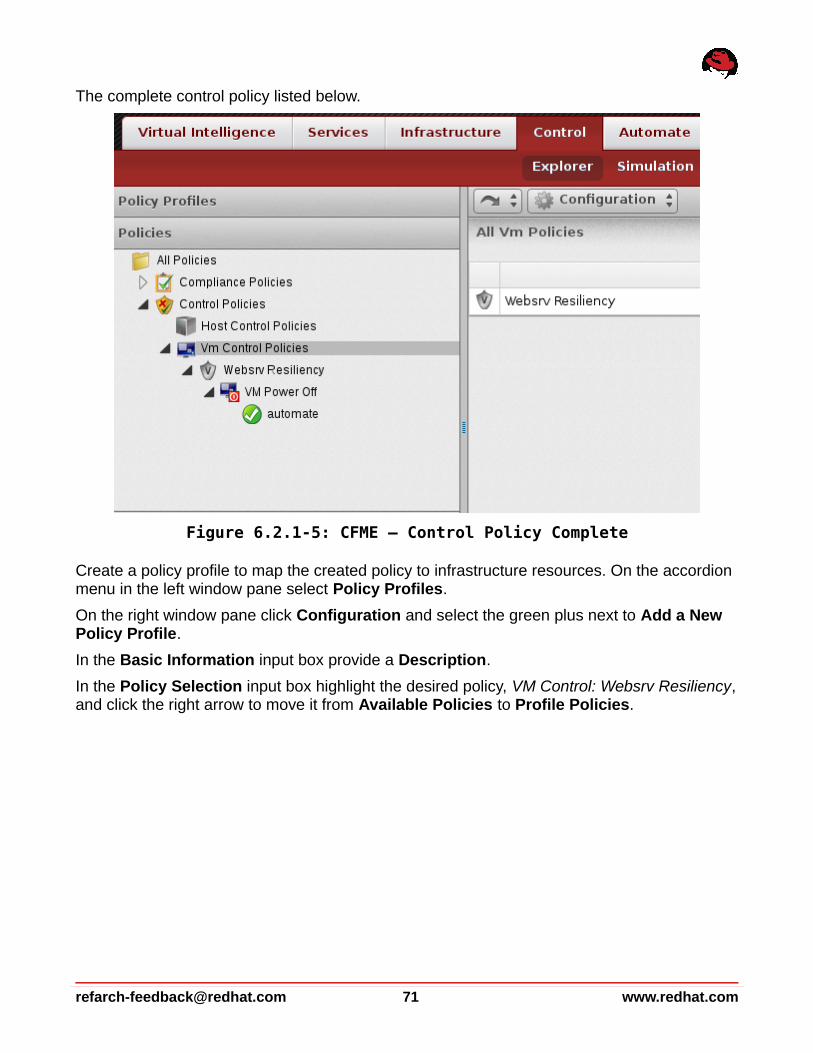
The complete control policy listed below.
Create a policy profile to map the created policy to infrastructure resources. On the accordion menu in the left window pane select Policy Profiles.
On the right window pane click Configuration and select the green plus next to Add a New Policy Profile.
In the Basic Information input box provide a Description.
In the Policy Selection input box highlight the desired policy, VM Control: Websrv Resiliency, and click the right arrow to move it from Available Policies to Profile Policies.
[email protected] 71 www.redhat.com
Figure 6.2.1-5: CFME – Control Policy Complete
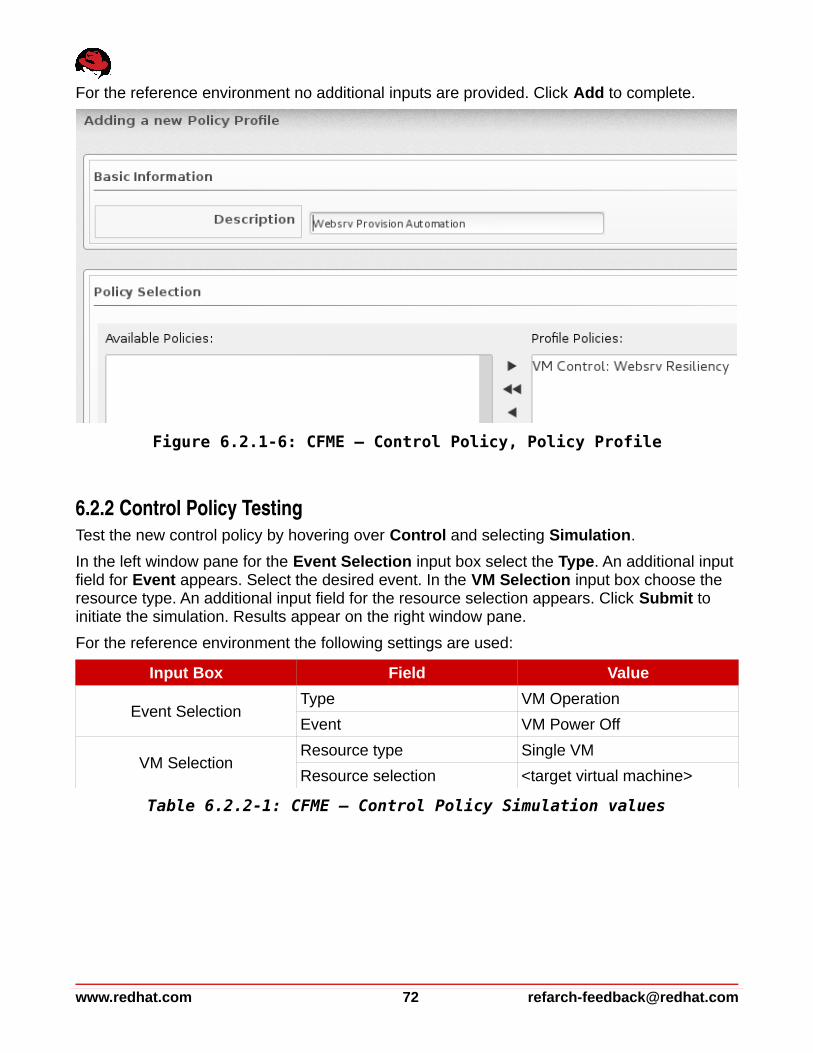
For the reference environment no additional inputs are provided. Click Add to complete.
6.2.2 Control Policy TestingTest the new control policy by hovering over Control and selecting Simulation.
In the left window pane for the Event Selection input box select the Type. An additional input field for Event appears. Select the desired event. In the VM Selection input box choose the resource type. An additional input field for the resource selection appears. Click Submit to initiate the simulation. Results appear on the right window pane.
For the reference environment the following settings are used:
Input Box Field Value
Event SelectionType VM Operation
Event VM Power Off
VM SelectionResource type Single VM
Resource selection <target virtual machine>
Table 6.2.2-1: CFME – Control Policy Simulation values
www.redhat.com 72 [email protected]
Figure 6.2.1-6: CFME – Control Policy, Policy Profile
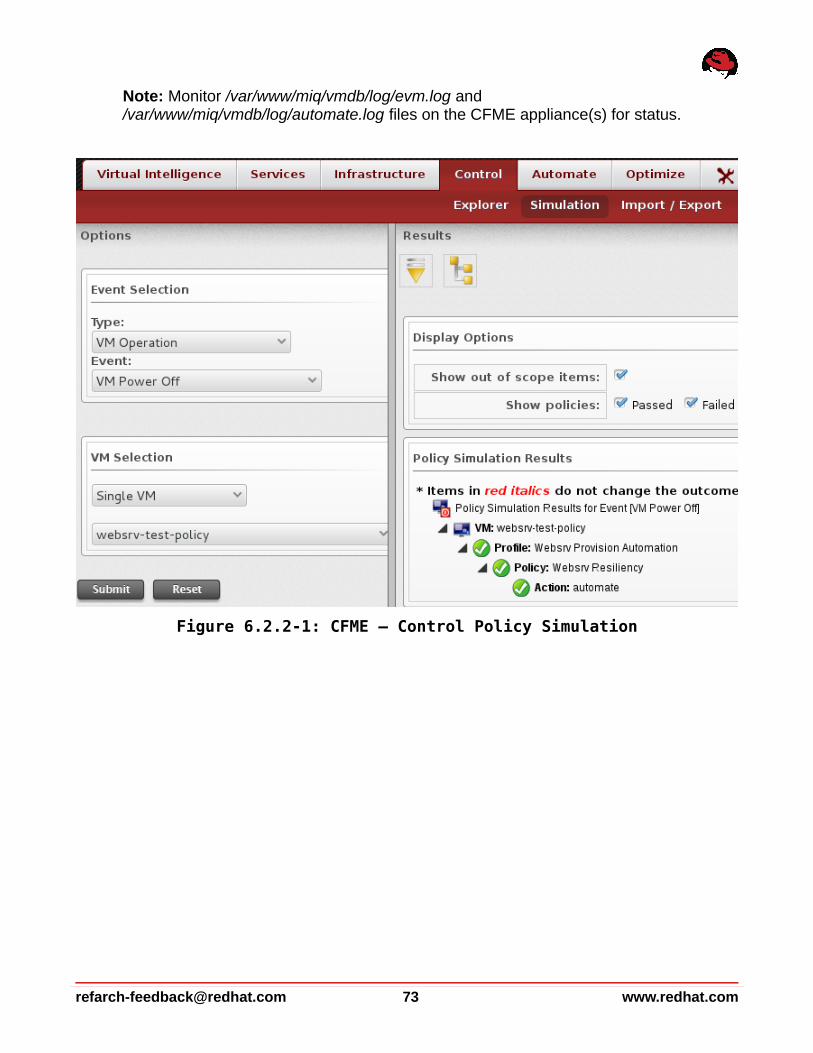
Note: Monitor /var/www/miq/vmdb/log/evm.log and /var/www/miq/vmdb/log/automate.log files on the CFME appliance(s) for status.
[email protected] 73 www.redhat.com
Figure 6.2.2-1: CFME – Control Policy Simulation

6.3 Automation ExecutionThe CloudForms 2.0 Automate model provides a mechanism to orchestrate actions within the managed environment. Specifics regarding the design and usage for the Automate model can be found in CloudForms 2.0, Management Engine 5.1 Lifecycle and Automation Guide18. For the reference environment a custom Class and Method are used. The process flow is outlined below.
www.redhat.com 74 [email protected]
Figure 6.3-1: CFME – Automation Process
Control Policy Action - scalewebsrv
Automate Instance/System/Request/scalewebsrv
Automate Relationship/Factory/Service/scalewebsrv
Automate Instanceexecute scalewebsrv
Automate Methodscalewebsrv
Provision Virtual Machine
Virtual MachineProvisionComplete
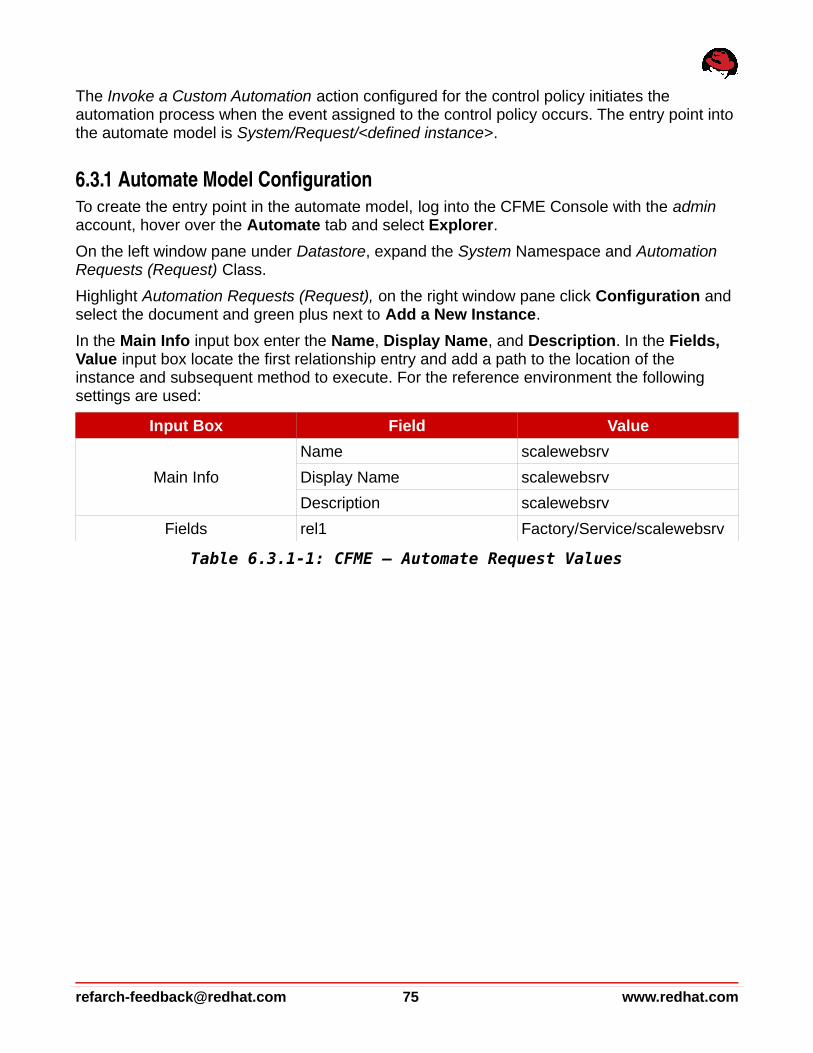
The Invoke a Custom Automation action configured for the control policy initiates the automation process when the event assigned to the control policy occurs. The entry point into the automate model is System/Request/<defined instance>.
6.3.1 Automate Model ConfigurationTo create the entry point in the automate model, log into the CFME Console with the admin account, hover over the Automate tab and select Explorer.
On the left window pane under Datastore, expand the System Namespace and Automation Requests (Request) Class.
Highlight Automation Requests (Request), on the right window pane click Configuration and select the document and green plus next to Add a New Instance.
In the Main Info input box enter the Name, Display Name, and Description. In the Fields, Value input box locate the first relationship entry and add a path to the location of the instance and subsequent method to execute. For the reference environment the following settings are used:
Input Box Field Value
Main Info
Name scalewebsrv
Display Name scalewebsrv
Description scalewebsrv
Fields rel1 Factory/Service/scalewebsrv
Table 6.3.1-1: CFME – Automate Request Values
[email protected] 75 www.redhat.com

Click Add to complete.
Note: The combination of methods, assertions, state, attribute, and relationships comprise a Schema that define the values for a Class. Instances use the Schema to obtain the values. The Class is contained within a Namespace18.
www.redhat.com 76 [email protected]
Figure 6.3.1-1: CFME – Automate Service Request Instance
Figure 6.3.1-2: CFME – Automate Model Hierarchy
Namespace
Class
Instance
Assertion
State
Attribute
Relationship
Method
Schema
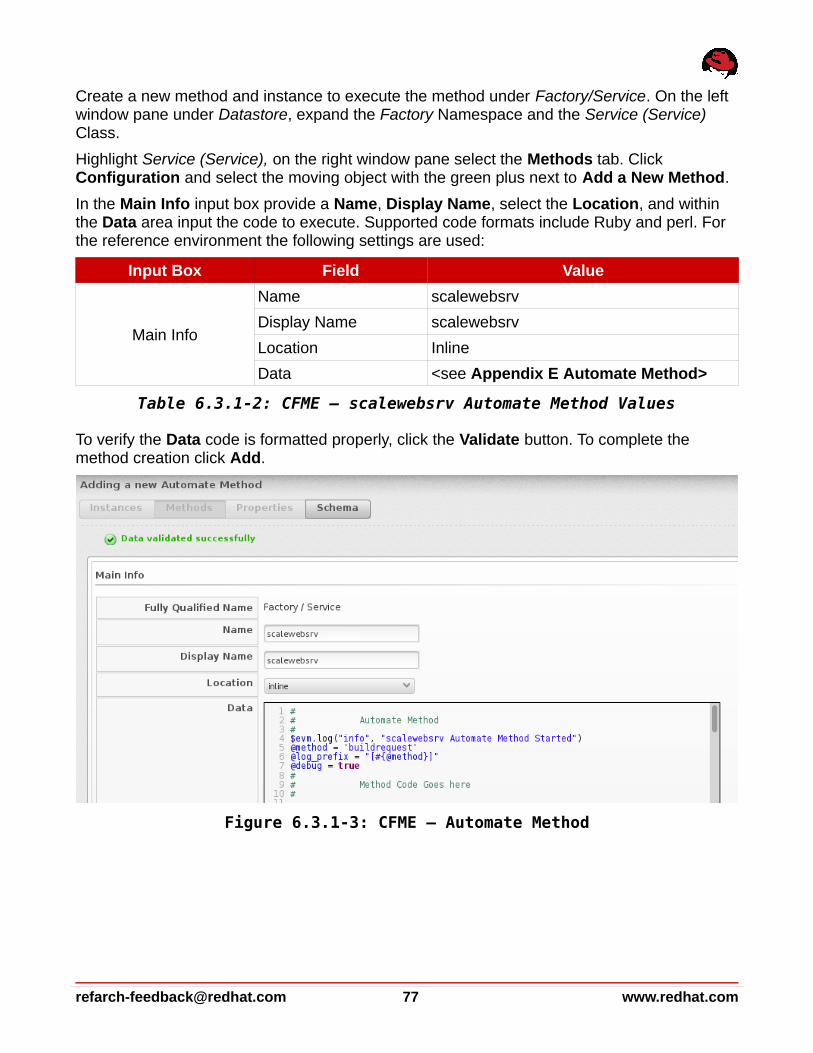
Create a new method and instance to execute the method under Factory/Service. On the left window pane under Datastore, expand the Factory Namespace and the Service (Service) Class.
Highlight Service (Service), on the right window pane select the Methods tab. Click Configuration and select the moving object with the green plus next to Add a New Method.
In the Main Info input box provide a Name, Display Name, select the Location, and within the Data area input the code to execute. Supported code formats include Ruby and perl. For the reference environment the following settings are used:
Input Box Field Value
Main Info
Name scalewebsrv
Display Name scalewebsrv
Location Inline
Data <see Appendix E Automate Method>
Table 6.3.1-2: CFME – scalewebsrv Automate Method Values
To verify the Data code is formatted properly, click the Validate button. To complete the method creation click Add.
[email protected] 77 www.redhat.com
Figure 6.3.1-3: CFME – Automate Method
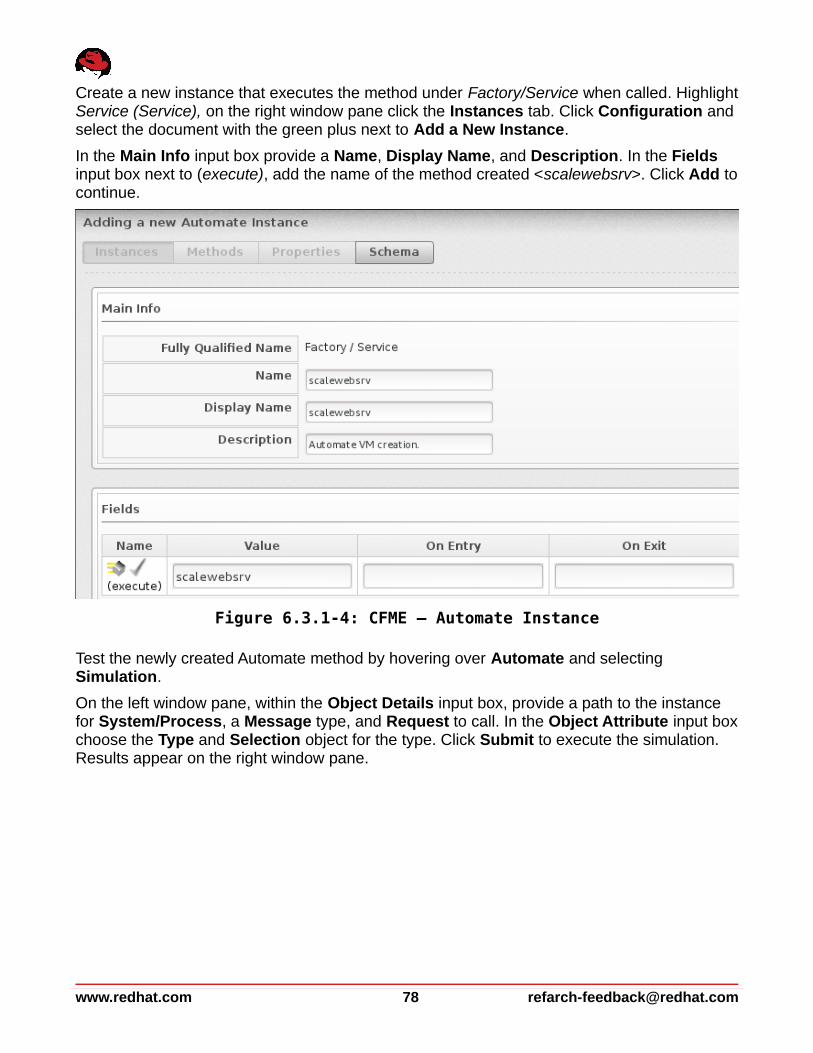
Create a new instance that executes the method under Factory/Service when called. Highlight Service (Service), on the right window pane click the Instances tab. Click Configuration and select the document with the green plus next to Add a New Instance.
In the Main Info input box provide a Name, Display Name, and Description. In the Fields input box next to (execute), add the name of the method created <scalewebsrv>. Click Add to continue.
Test the newly created Automate method by hovering over Automate and selecting Simulation.
On the left window pane, within the Object Details input box, provide a path to the instance for System/Process, a Message type, and Request to call. In the Object Attribute input box choose the Type and Selection object for the type. Click Submit to execute the simulation. Results appear on the right window pane.
www.redhat.com 78 [email protected]
Figure 6.3.1-4: CFME – Automate Instance
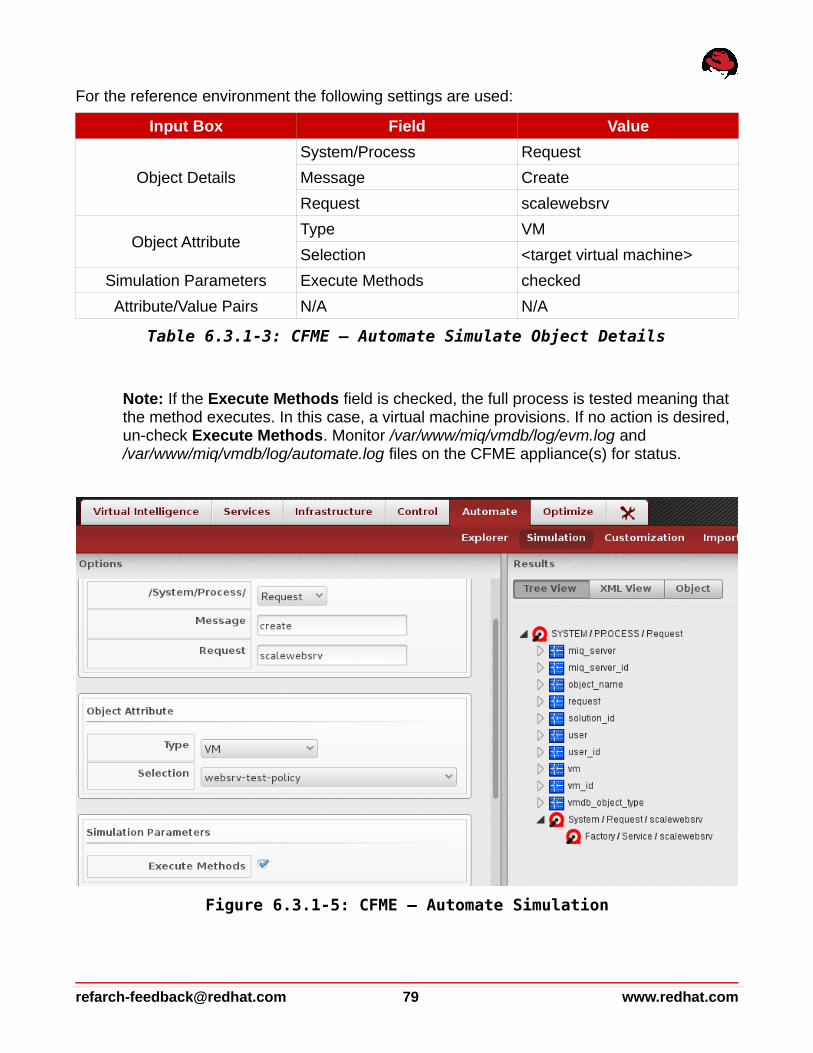
For the reference environment the following settings are used:
Input Box Field Value
Object Details
System/Process Request
Message Create
Request scalewebsrv
Object AttributeType VM
Selection <target virtual machine>
Simulation Parameters Execute Methods checked
Attribute/Value Pairs N/A N/A
Table 6.3.1-3: CFME – Automate Simulate Object Details
Note: If the Execute Methods field is checked, the full process is tested meaning that the method executes. In this case, a virtual machine provisions. If no action is desired, un-check Execute Methods. Monitor /var/www/miq/vmdb/log/evm.log and /var/www/miq/vmdb/log/automate.log files on the CFME appliance(s) for status.
[email protected] 79 www.redhat.com
Figure 6.3.1-5: CFME – Automate Simulation
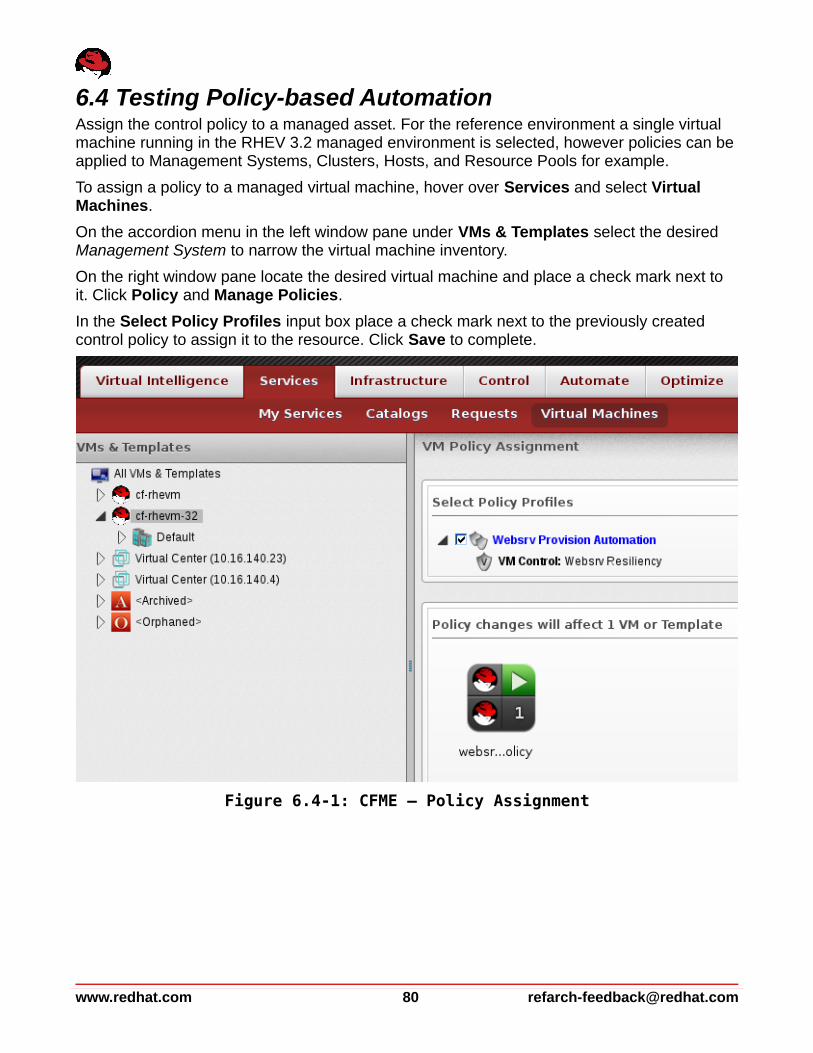
6.4 Testing Policy-based AutomationAssign the control policy to a managed asset. For the reference environment a single virtual machine running in the RHEV 3.2 managed environment is selected, however policies can be applied to Management Systems, Clusters, Hosts, and Resource Pools for example.
To assign a policy to a managed virtual machine, hover over Services and select Virtual Machines.
On the accordion menu in the left window pane under VMs & Templates select the desired Management System to narrow the virtual machine inventory.
On the right window pane locate the desired virtual machine and place a check mark next to it. Click Policy and Manage Policies.
In the Select Policy Profiles input box place a check mark next to the previously created control policy to assign it to the resource. Click Save to complete.
www.redhat.com 80 [email protected]
Figure 6.4-1: CFME – Policy Assignment
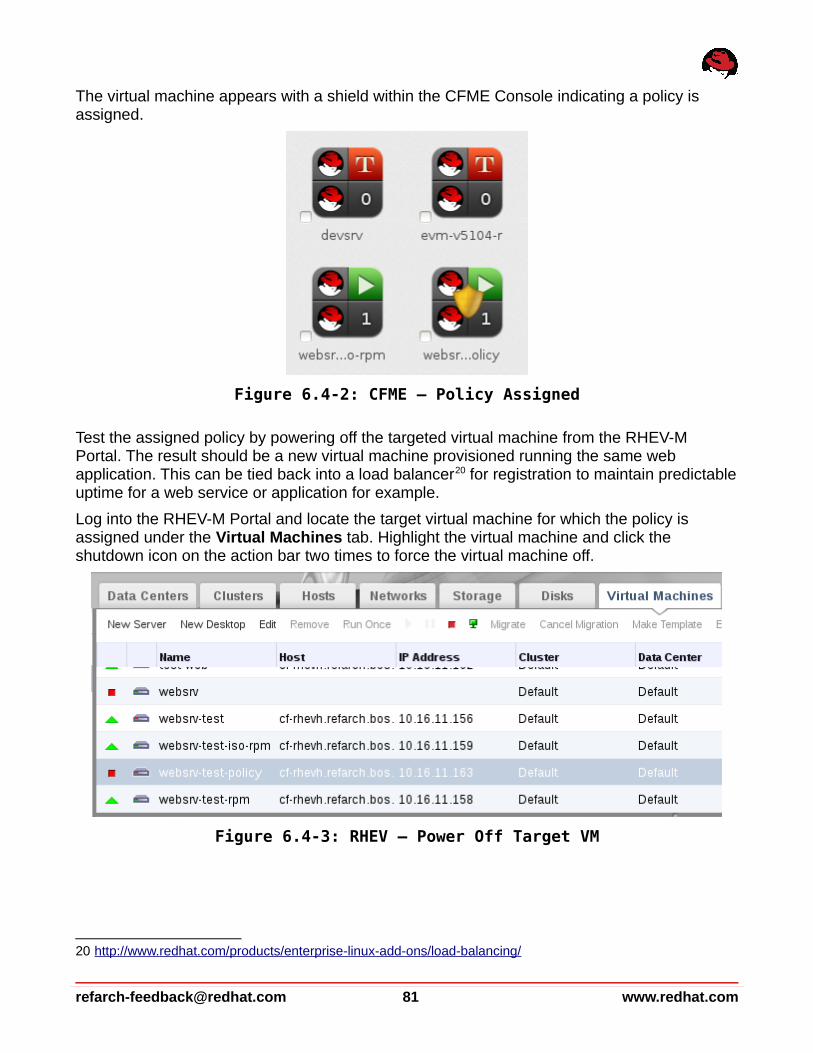
The virtual machine appears with a shield within the CFME Console indicating a policy is assigned.
Test the assigned policy by powering off the targeted virtual machine from the RHEV-M Portal. The result should be a new virtual machine provisioned running the same web application. This can be tied back into a load balancer20 for registration to maintain predictable uptime for a web service or application for example.
Log into the RHEV-M Portal and locate the target virtual machine for which the policy is assigned under the Virtual Machines tab. Highlight the virtual machine and click the shutdown icon on the action bar two times to force the virtual machine off.
20 http://www.redhat.com/products/enterprise-linux-add-ons/load-balancing/
[email protected] 81 www.redhat.com
Figure 6.4-3: RHEV – Power Off Target VM
Figure 6.4-2: CFME – Policy Assigned
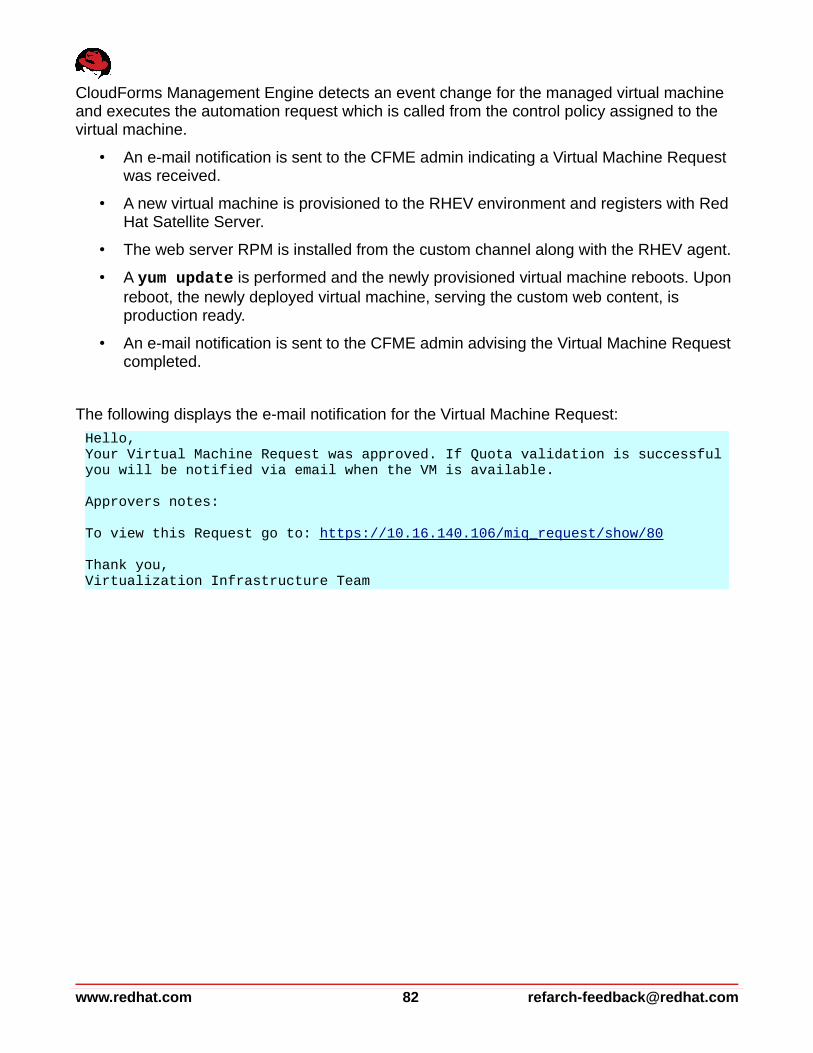
CloudForms Management Engine detects an event change for the managed virtual machine and executes the automation request which is called from the control policy assigned to the virtual machine.
• An e-mail notification is sent to the CFME admin indicating a Virtual Machine Request was received.
• A new virtual machine is provisioned to the RHEV environment and registers with Red Hat Satellite Server.
• The web server RPM is installed from the custom channel along with the RHEV agent.
• A yum update is performed and the newly provisioned virtual machine reboots. Upon reboot, the newly deployed virtual machine, serving the custom web content, is production ready.
• An e-mail notification is sent to the CFME admin advising the Virtual Machine Request completed.
The following displays the e-mail notification for the Virtual Machine Request:
Hello, Your Virtual Machine Request was approved. If Quota validation is successful you will be notified via email when the VM is available.
Approvers notes:
To view this Request go to: https://10.16.140.106/miq_request/show/80
Thank you,Virtualization Infrastructure Team
www.redhat.com 82 [email protected]
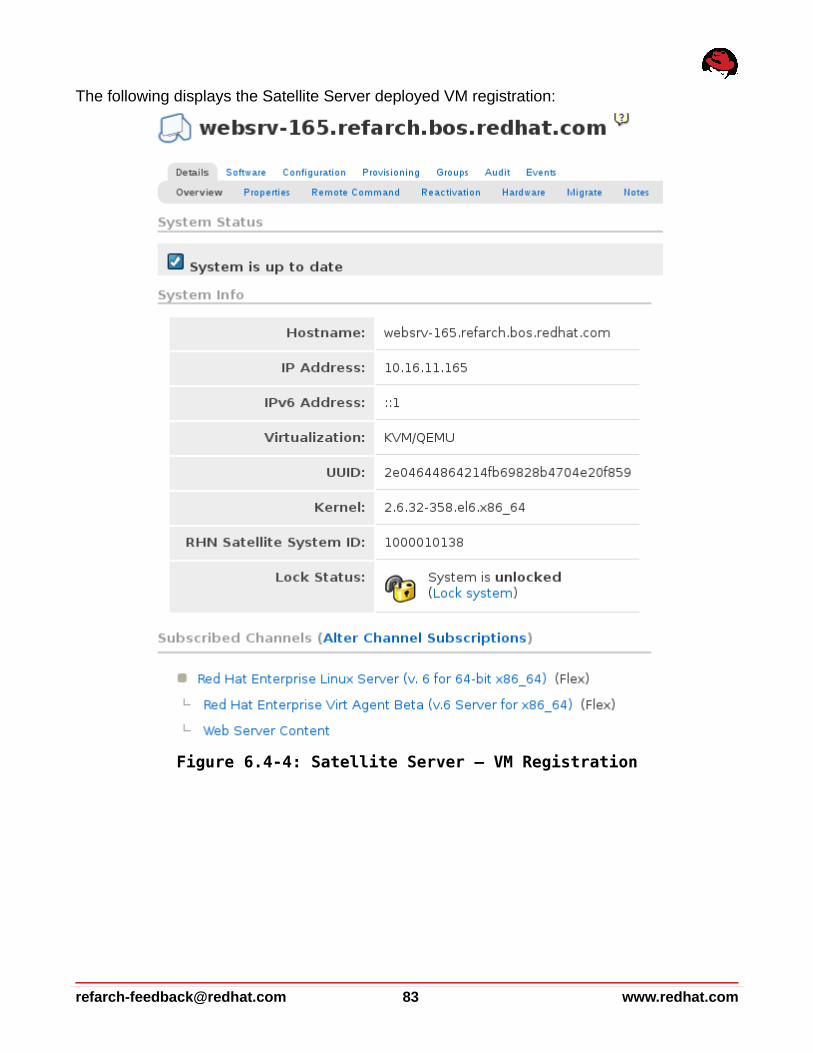
The following displays the Satellite Server deployed VM registration:
[email protected] 83 www.redhat.com
Figure 6.4-4: Satellite Server – VM Registration
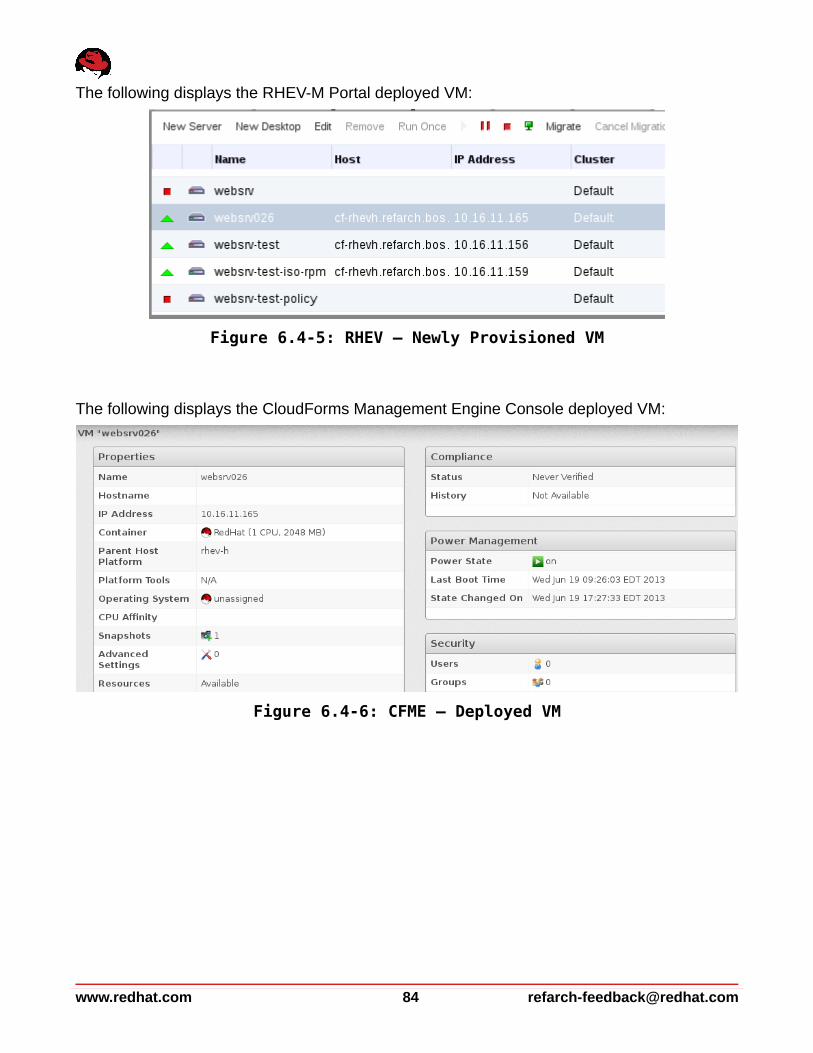
The following displays the RHEV-M Portal deployed VM:
The following displays the CloudForms Management Engine Console deployed VM:
www.redhat.com 84 [email protected]
Figure 6.4-6: CFME – Deployed VM
Figure 6.4-5: RHEV – Newly Provisioned VM
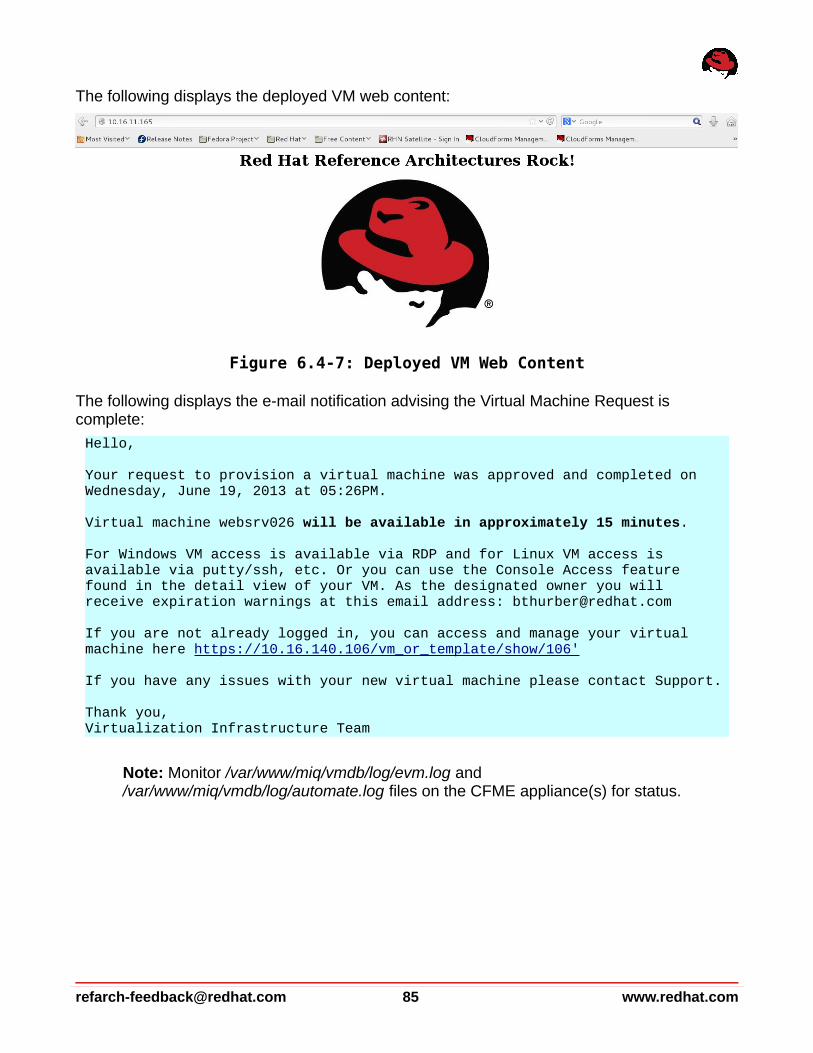
The following displays the deployed VM web content:
The following displays the e-mail notification advising the Virtual Machine Request is complete:
Hello,
Your request to provision a virtual machine was approved and completed on Wednesday, June 19, 2013 at 05:26PM.
Virtual machine websrv026 will be available in approximately 15 minutes.
For Windows VM access is available via RDP and for Linux VM access is available via putty/ssh, etc. Or you can use the Console Access feature found in the detail view of your VM. As the designated owner you will receive expiration warnings at this email address: [email protected]
If you are not already logged in, you can access and manage your virtual machine here https://10.16.140.106/vm_or_template/show/106'
If you have any issues with your new virtual machine please contact Support.
Thank you,Virtualization Infrastructure Team
Note: Monitor /var/www/miq/vmdb/log/evm.log and /var/www/miq/vmdb/log/automate.log files on the CFME appliance(s) for status.
[email protected] 85 www.redhat.com
Figure 6.4-7: Deployed VM Web Content
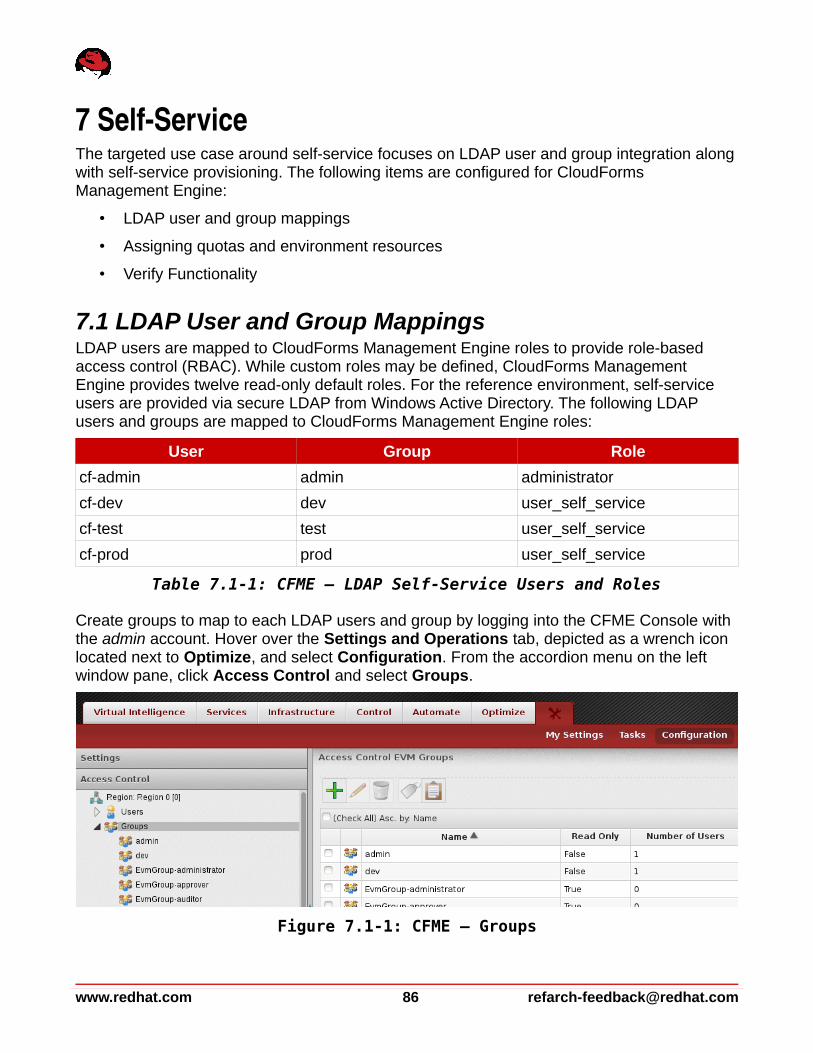
7 SelfServiceThe targeted use case around self-service focuses on LDAP user and group integration along with self-service provisioning. The following items are configured for CloudForms Management Engine:
• LDAP user and group mappings
• Assigning quotas and environment resources
• Verify Functionality
7.1 LDAP User and Group MappingsLDAP users are mapped to CloudForms Management Engine roles to provide role-based access control (RBAC). While custom roles may be defined, CloudForms Management Engine provides twelve read-only default roles. For the reference environment, self-service users are provided via secure LDAP from Windows Active Directory. The following LDAP users and groups are mapped to CloudForms Management Engine roles:
User Group Role
cf-admin admin administrator
cf-dev dev user_self_service
cf-test test user_self_service
cf-prod prod user_self_service
Table 7.1-1: CFME – LDAP Self-Service Users and Roles
Create groups to map to each LDAP users and group by logging into the CFME Console with the admin account. Hover over the Settings and Operations tab, depicted as a wrench icon located next to Optimize, and select Configuration. From the accordion menu on the left window pane, click Access Control and select Groups.
www.redhat.com 86 [email protected]
Figure 7.1-1: CFME – Groups
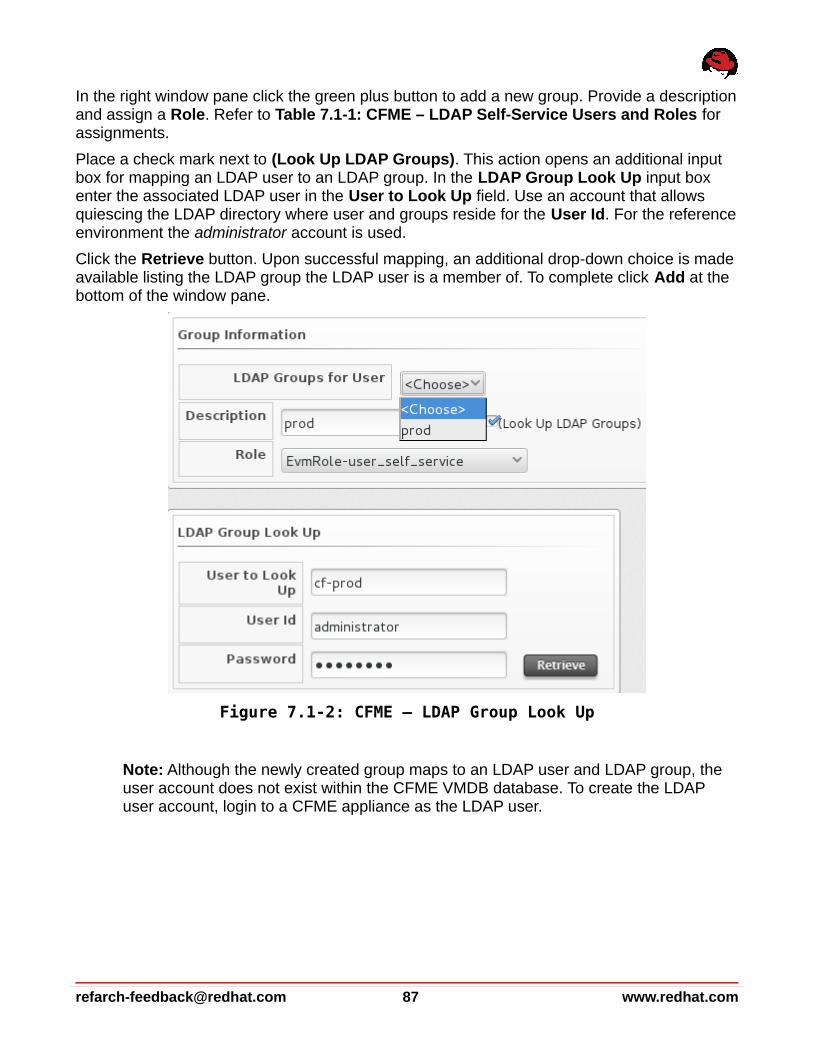
In the right window pane click the green plus button to add a new group. Provide a description and assign a Role. Refer to Table 7.1-1: CFME – LDAP Self-Service Users and Roles for assignments.
Place a check mark next to (Look Up LDAP Groups). This action opens an additional input box for mapping an LDAP user to an LDAP group. In the LDAP Group Look Up input box enter the associated LDAP user in the User to Look Up field. Use an account that allows quiescing the LDAP directory where user and groups reside for the User Id. For the reference environment the administrator account is used.
Click the Retrieve button. Upon successful mapping, an additional drop-down choice is made available listing the LDAP group the LDAP user is a member of. To complete click Add at the bottom of the window pane.
Note: Although the newly created group maps to an LDAP user and LDAP group, the user account does not exist within the CFME VMDB database. To create the LDAP user account, login to a CFME appliance as the LDAP user.
[email protected] 87 www.redhat.com
Figure 7.1-2: CFME – LDAP Group Look Up
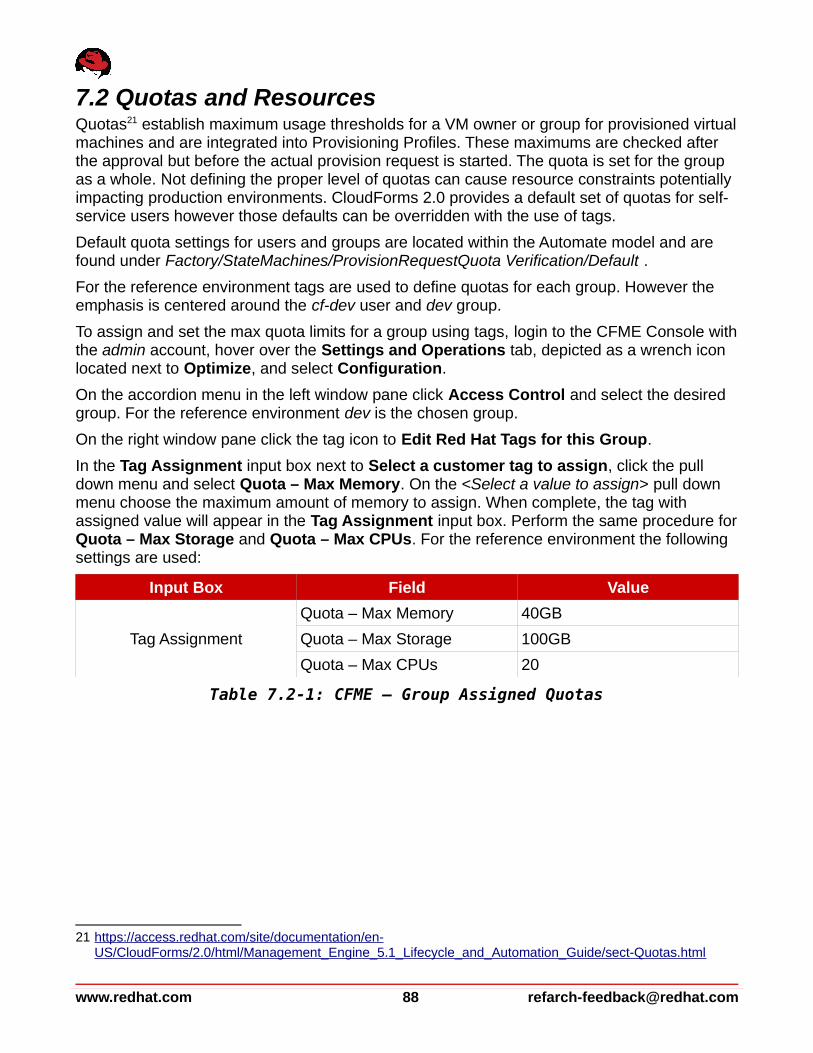
7.2 Quotas and ResourcesQuotas21 establish maximum usage thresholds for a VM owner or group for provisioned virtual machines and are integrated into Provisioning Profiles. These maximums are checked after the approval but before the actual provision request is started. The quota is set for the group as a whole. Not defining the proper level of quotas can cause resource constraints potentially impacting production environments. CloudForms 2.0 provides a default set of quotas for self-service users however those defaults can be overridden with the use of tags.
Default quota settings for users and groups are located within the Automate model and are found under Factory/StateMachines/ProvisionRequestQuota Verification/Default .
For the reference environment tags are used to define quotas for each group. However the emphasis is centered around the cf-dev user and dev group.
To assign and set the max quota limits for a group using tags, login to the CFME Console with the admin account, hover over the Settings and Operations tab, depicted as a wrench icon located next to Optimize, and select Configuration.
On the accordion menu in the left window pane click Access Control and select the desired group. For the reference environment dev is the chosen group.
On the right window pane click the tag icon to Edit Red Hat Tags for this Group.
In the Tag Assignment input box next to Select a customer tag to assign, click the pull down menu and select Quota – Max Memory. On the <Select a value to assign> pull down menu choose the maximum amount of memory to assign. When complete, the tag with assigned value will appear in the Tag Assignment input box. Perform the same procedure for Quota – Max Storage and Quota – Max CPUs. For the reference environment the following settings are used:
Input Box Field Value
Tag Assignment
Quota – Max Memory 40GB
Quota – Max Storage 100GB
Quota – Max CPUs 20
Table 7.2-1: CFME – Group Assigned Quotas
21 https://access.redhat.com/site/documentation/en- US/CloudForms/2.0/html/Management_Engine_5.1_Lifecycle_and_Automation_Guide/sect-Quotas.html
www.redhat.com 88 [email protected]
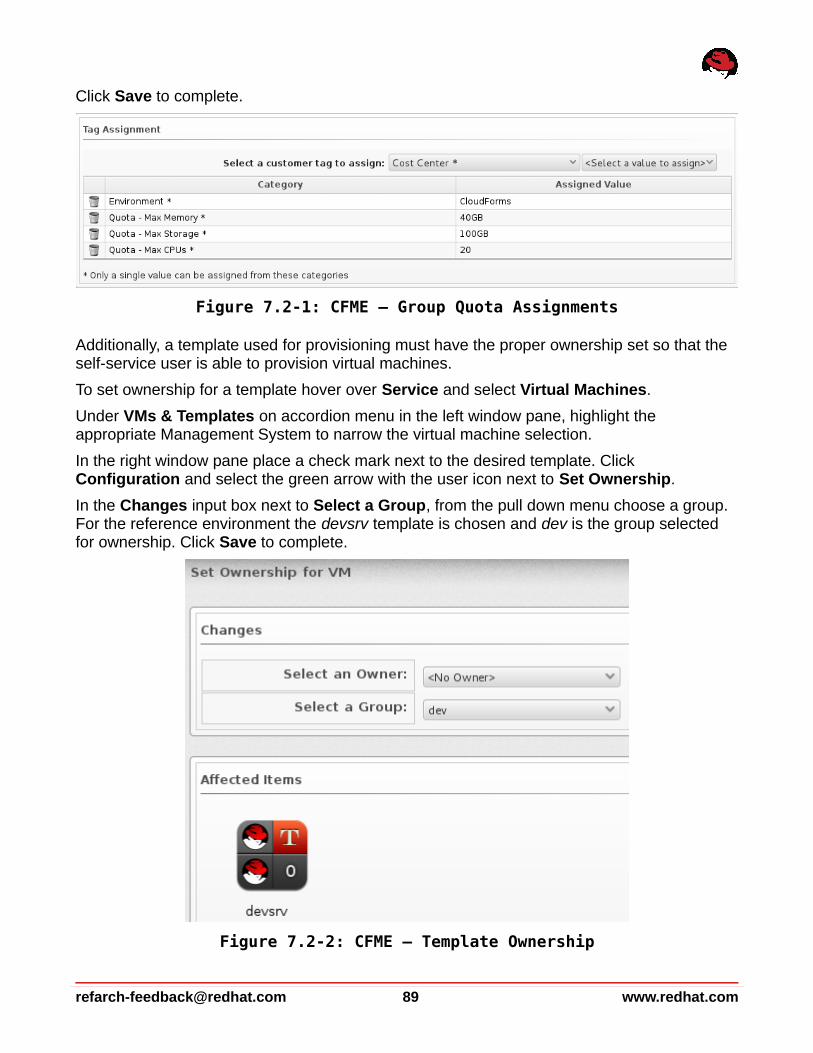
Click Save to complete.
Additionally, a template used for provisioning must have the proper ownership set so that the self-service user is able to provision virtual machines.
To set ownership for a template hover over Service and select Virtual Machines.
Under VMs & Templates on accordion menu in the left window pane, highlight the appropriate Management System to narrow the virtual machine selection.
In the right window pane place a check mark next to the desired template. Click Configuration and select the green arrow with the user icon next to Set Ownership.
In the Changes input box next to Select a Group, from the pull down menu choose a group. For the reference environment the devsrv template is chosen and dev is the group selected for ownership. Click Save to complete.
[email protected] 89 www.redhat.com
Figure 7.2-2: CFME – Template Ownership
Figure 7.2-1: CFME – Group Quota Assignments
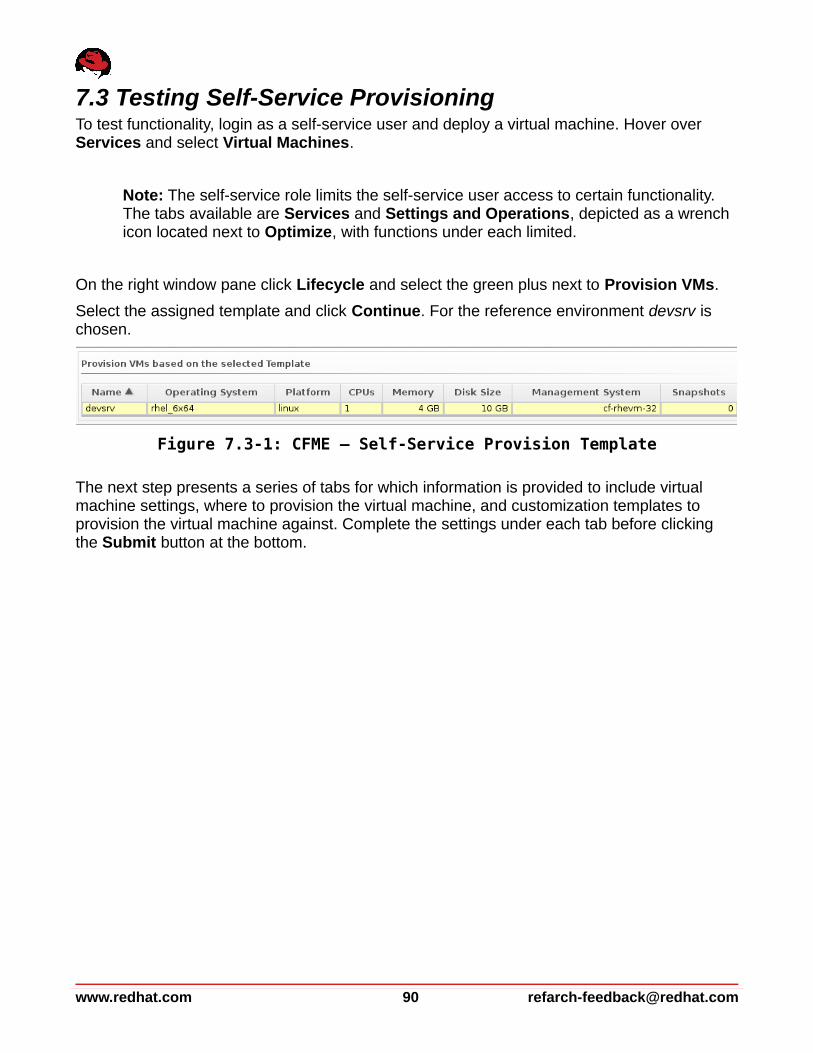
7.3 Testing Self-Service ProvisioningTo test functionality, login as a self-service user and deploy a virtual machine. Hover over Services and select Virtual Machines.
Note: The self-service role limits the self-service user access to certain functionality. The tabs available are Services and Settings and Operations, depicted as a wrench icon located next to Optimize, with functions under each limited.
On the right window pane click Lifecycle and select the green plus next to Provision VMs.
Select the assigned template and click Continue. For the reference environment devsrv is chosen.
The next step presents a series of tabs for which information is provided to include virtual machine settings, where to provision the virtual machine, and customization templates to provision the virtual machine against. Complete the settings under each tab before clicking the Submit button at the bottom.
www.redhat.com 90 [email protected]
Figure 7.3-1: CFME – Self-Service Provision Template
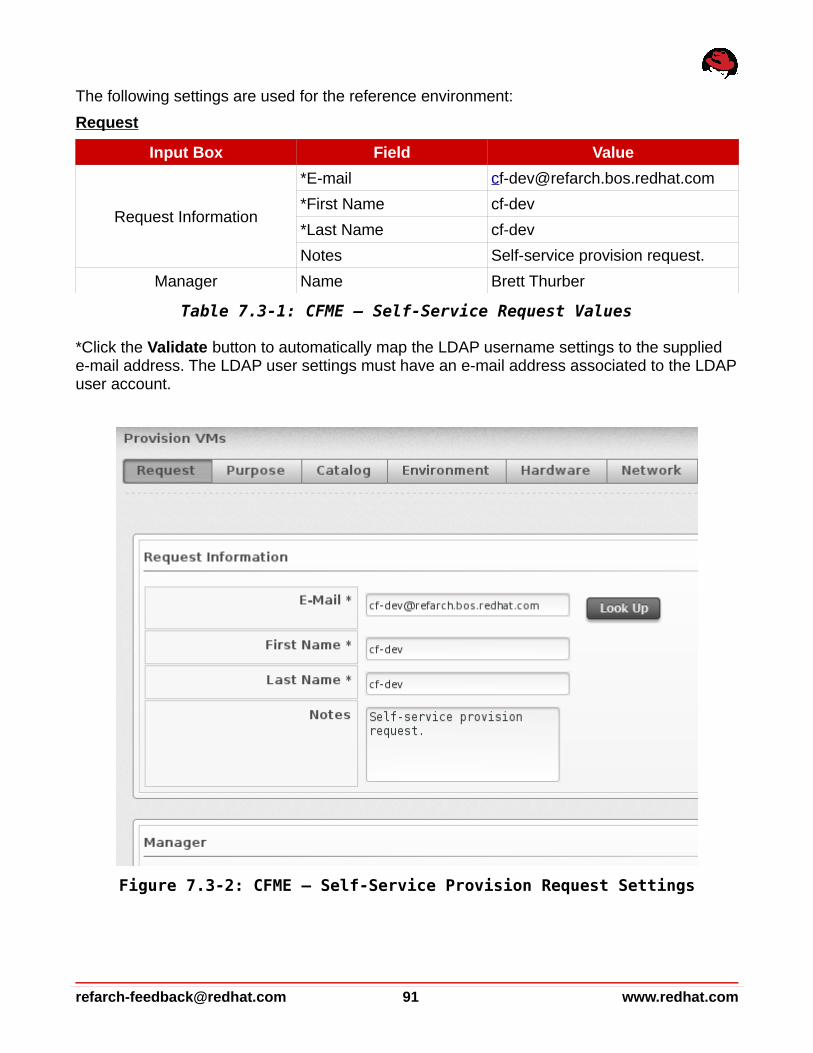
The following settings are used for the reference environment:
Request
Input Box Field Value
Request Information
*E-mail [email protected]
*First Name cf-dev
*Last Name cf-dev
Notes Self-service provision request.
Manager Name Brett Thurber
Table 7.3-1: CFME – Self-Service Request Values
*Click the Validate button to automatically map the LDAP username settings to the supplied e-mail address. The LDAP user settings must have an e-mail address associated to the LDAP user account.
[email protected] 91 www.redhat.com
Figure 7.3-2: CFME – Self-Service Provision Request Settings
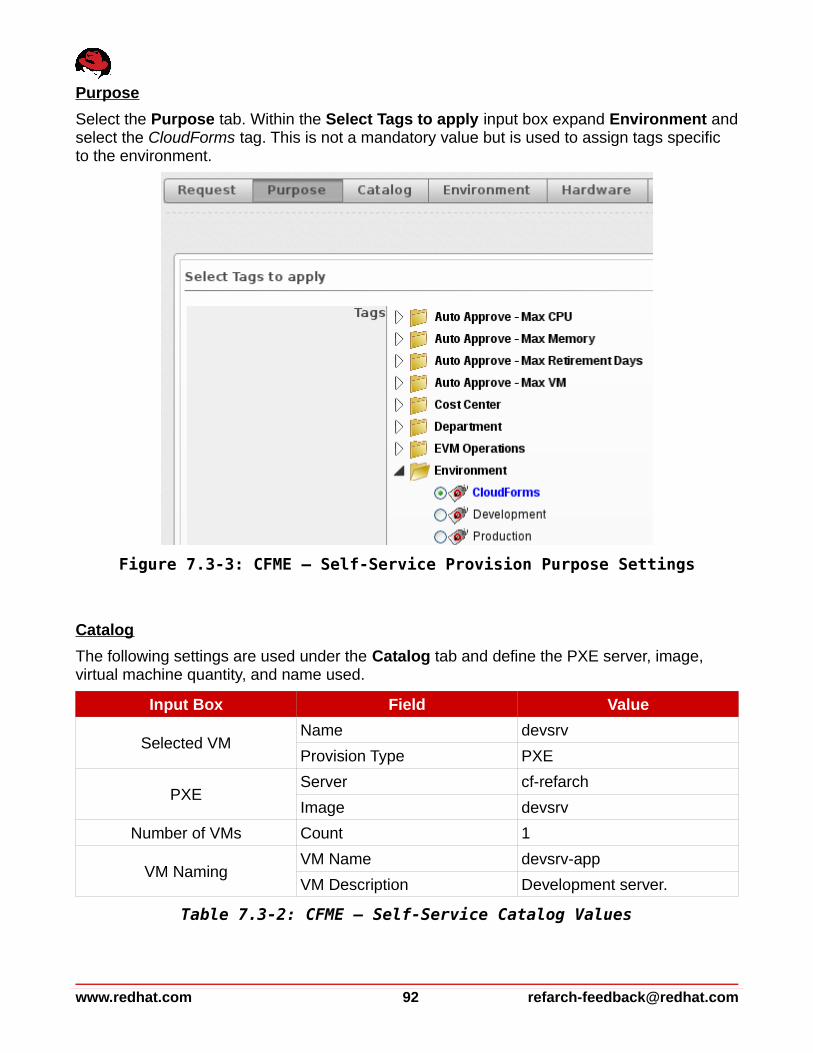
Purpose
Select the Purpose tab. Within the Select Tags to apply input box expand Environment and select the CloudForms tag. This is not a mandatory value but is used to assign tags specific to the environment.
Catalog
The following settings are used under the Catalog tab and define the PXE server, image, virtual machine quantity, and name used.
Input Box Field Value
Selected VMName devsrv
Provision Type PXE
PXEServer cf-refarch
Image devsrv
Number of VMs Count 1
VM NamingVM Name devsrv-app
VM Description Development server.
Table 7.3-2: CFME – Self-Service Catalog Values
www.redhat.com 92 [email protected]
Figure 7.3-3: CFME – Self-Service Provision Purpose Settings
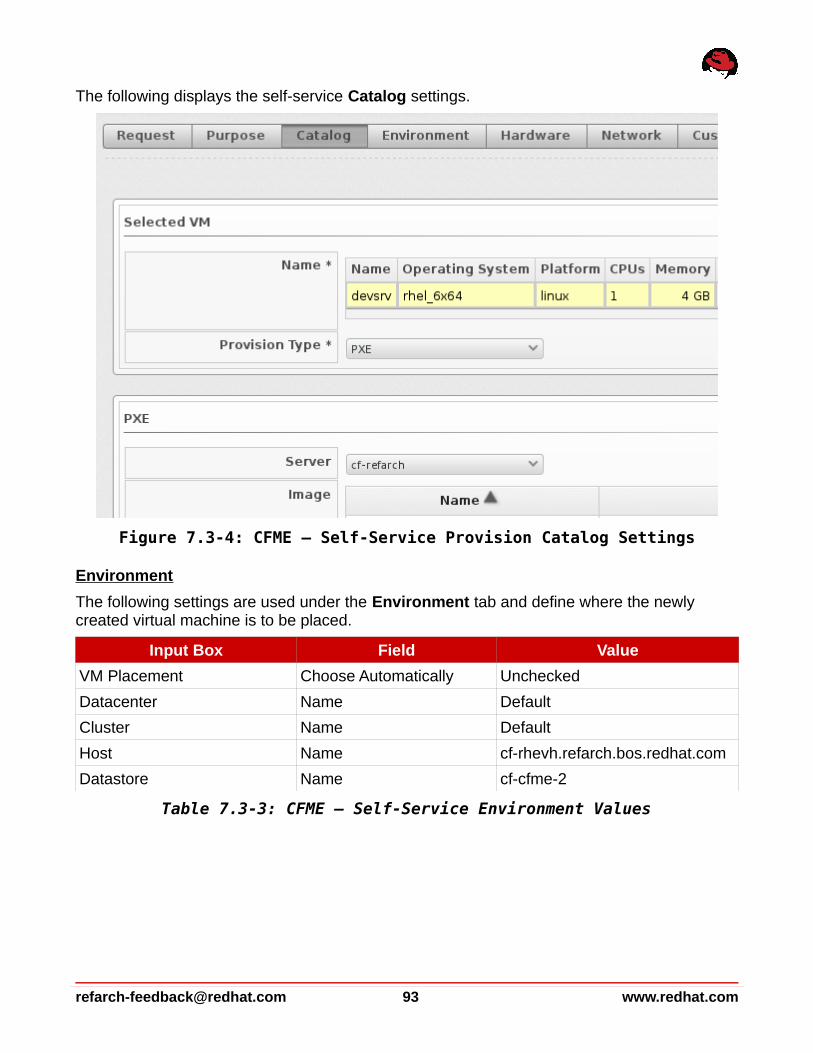
The following displays the self-service Catalog settings.
Environment
The following settings are used under the Environment tab and define where the newly created virtual machine is to be placed.
Input Box Field Value
VM Placement Choose Automatically Unchecked
Datacenter Name Default
Cluster Name Default
Host Name cf-rhevh.refarch.bos.redhat.com
Datastore Name cf-cfme-2
Table 7.3-3: CFME – Self-Service Environment Values
[email protected] 93 www.redhat.com
Figure 7.3-4: CFME – Self-Service Provision Catalog Settings
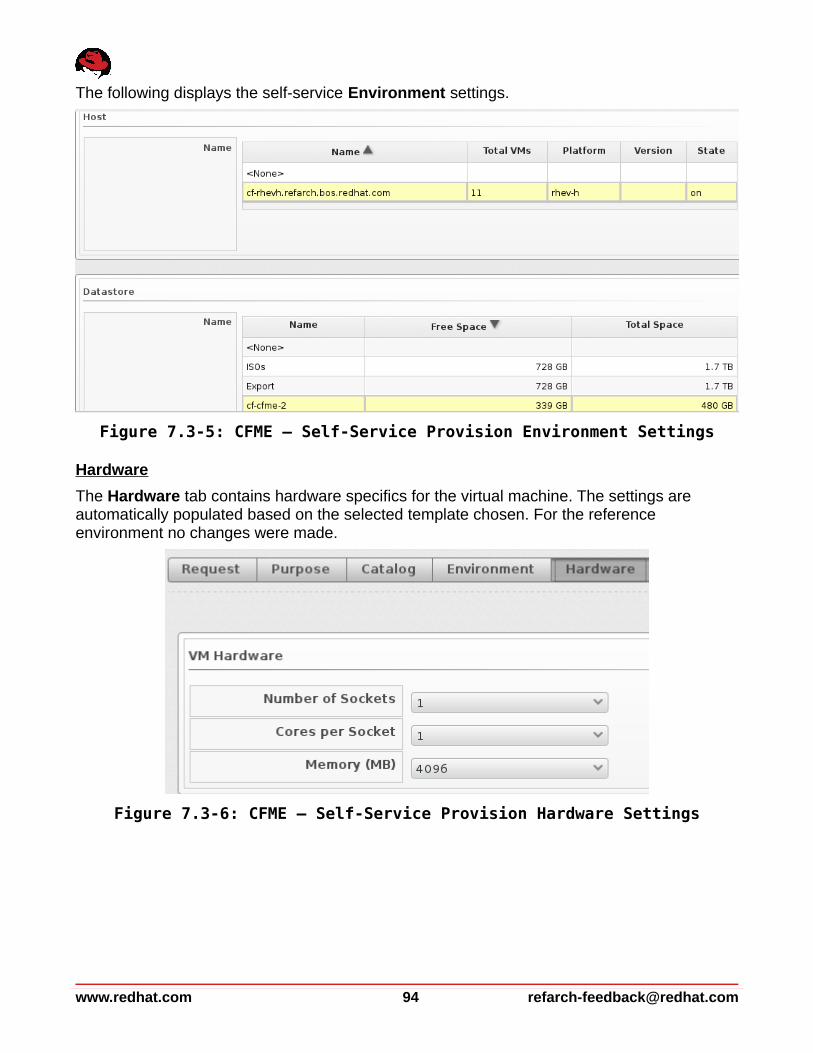
The following displays the self-service Environment settings.
Hardware
The Hardware tab contains hardware specifics for the virtual machine. The settings are automatically populated based on the selected template chosen. For the reference environment no changes were made.
www.redhat.com 94 [email protected]
Figure 7.3-5: CFME – Self-Service Provision Environment Settings
Figure 7.3-6: CFME – Self-Service Provision Hardware Settings
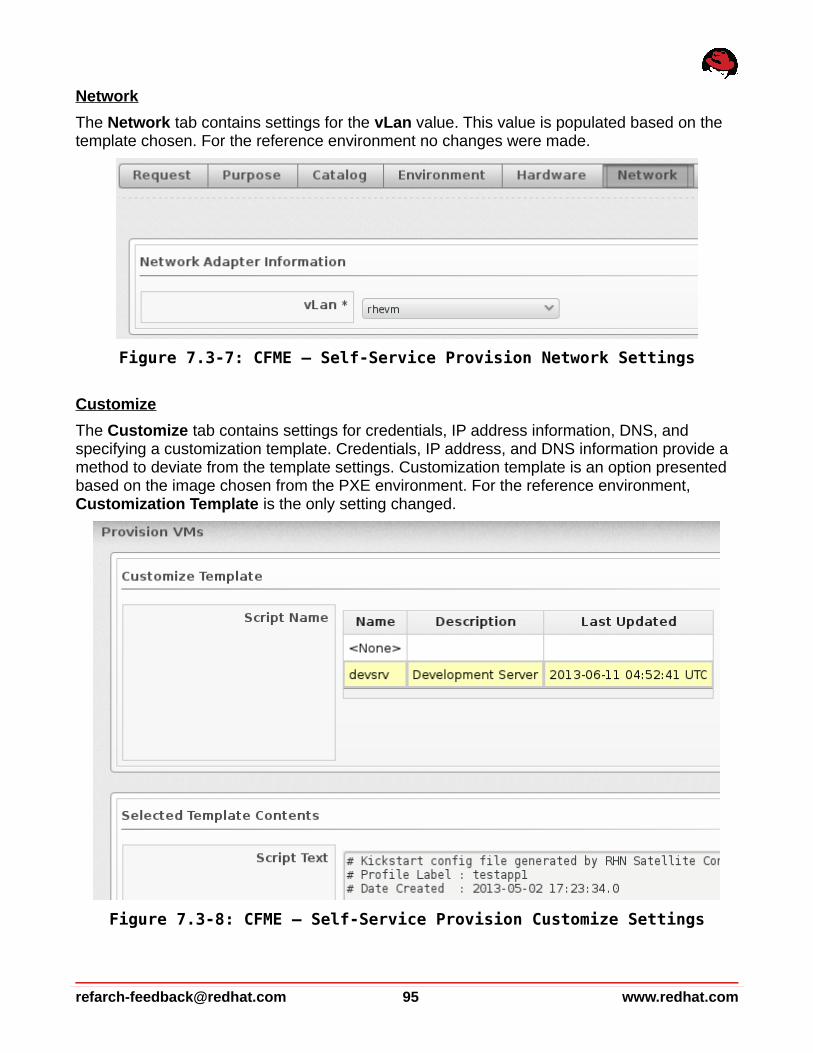
Network
The Network tab contains settings for the vLan value. This value is populated based on the template chosen. For the reference environment no changes were made.
Customize
The Customize tab contains settings for credentials, IP address information, DNS, and specifying a customization template. Credentials, IP address, and DNS information provide a method to deviate from the template settings. Customization template is an option presented based on the image chosen from the PXE environment. For the reference environment, Customization Template is the only setting changed.
[email protected] 95 www.redhat.com
Figure 7.3-8: CFME – Self-Service Provision Customize Settings
Figure 7.3-7: CFME – Self-Service Provision Network Settings
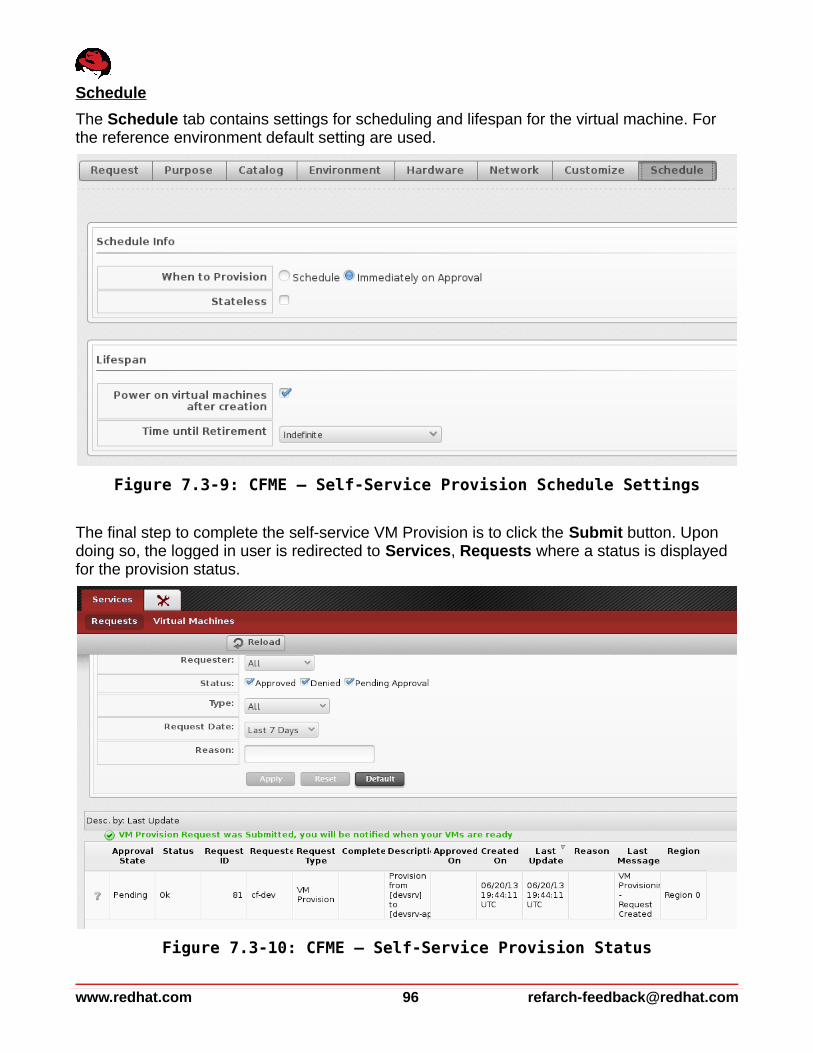
Schedule
The Schedule tab contains settings for scheduling and lifespan for the virtual machine. For the reference environment default setting are used.
The final step to complete the self-service VM Provision is to click the Submit button. Upon doing so, the logged in user is redirected to Services, Requests where a status is displayed for the provision status.
www.redhat.com 96 [email protected]
Figure 7.3-10: CFME – Self-Service Provision Status
Figure 7.3-9: CFME – Self-Service Provision Schedule Settings
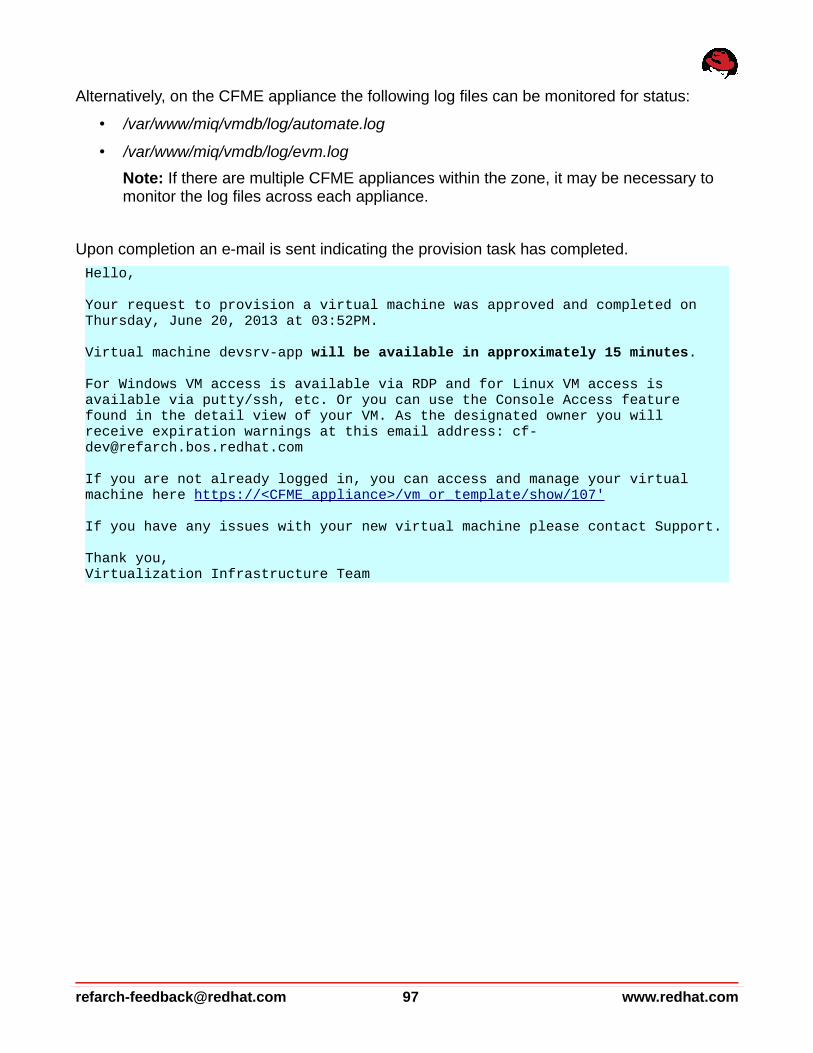
Alternatively, on the CFME appliance the following log files can be monitored for status:
• /var/www/miq/vmdb/log/automate.log
• /var/www/miq/vmdb/log/evm.log
Note: If there are multiple CFME appliances within the zone, it may be necessary to monitor the log files across each appliance.
Upon completion an e-mail is sent indicating the provision task has completed.
Hello,
Your request to provision a virtual machine was approved and completed on Thursday, June 20, 2013 at 03:52PM.
Virtual machine devsrv-app will be available in approximately 15 minutes.
For Windows VM access is available via RDP and for Linux VM access is available via putty/ssh, etc. Or you can use the Console Access feature found in the detail view of your VM. As the designated owner you will receive expiration warnings at this email address: [email protected]
If you are not already logged in, you can access and manage your virtual machine here https://<CFME_appliance>/vm_or_template/show/107'
If you have any issues with your new virtual machine please contact Support.
Thank you,Virtualization Infrastructure Team
[email protected] 97 www.redhat.com
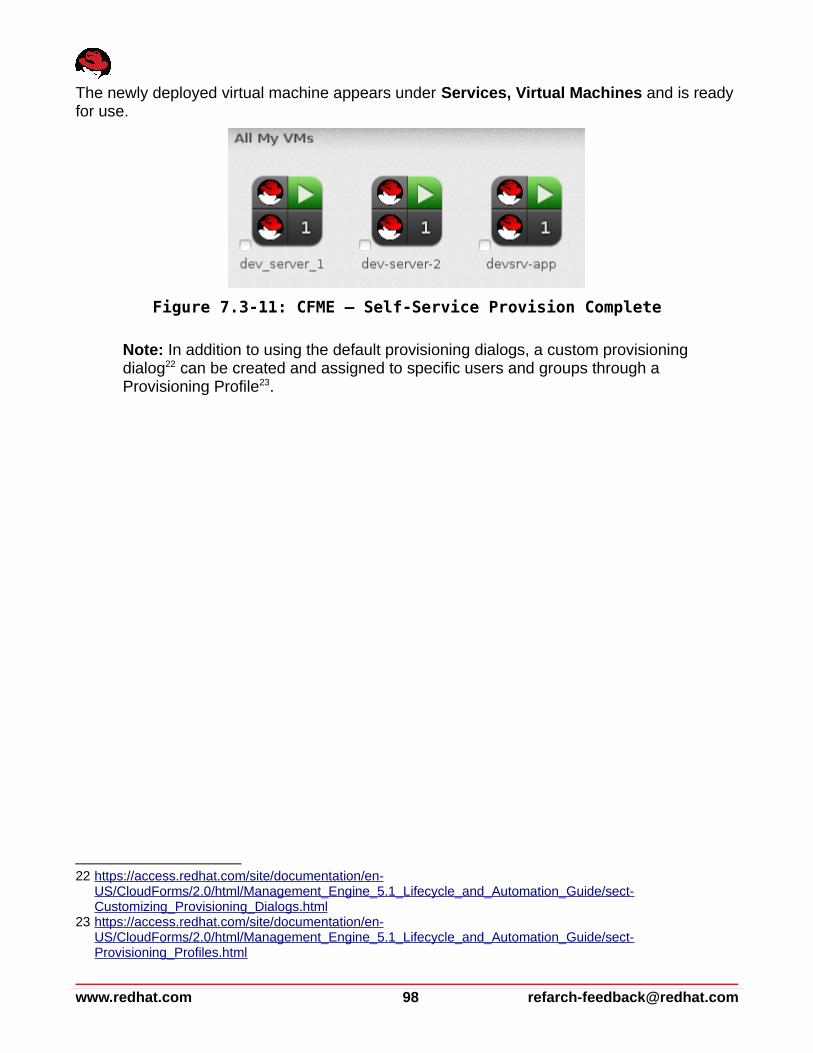
The newly deployed virtual machine appears under Services, Virtual Machines and is ready for use.
Note: In addition to using the default provisioning dialogs, a custom provisioning dialog22 can be created and assigned to specific users and groups through a Provisioning Profile23.
22 https://access.redhat.com/site/documentation/en- US/CloudForms/2.0/html/Management_Engine_5.1_Lifecycle_and_Automation_Guide/sect-Customizing_Provisioning_Dialogs.html
23 https://access.redhat.com/site/documentation/en- US/CloudForms/2.0/html/Management_Engine_5.1_Lifecycle_and_Automation_Guide/sect-Provisioning_Profiles.html
www.redhat.com 98 [email protected]
Figure 7.3-11: CFME – Self-Service Provision Complete
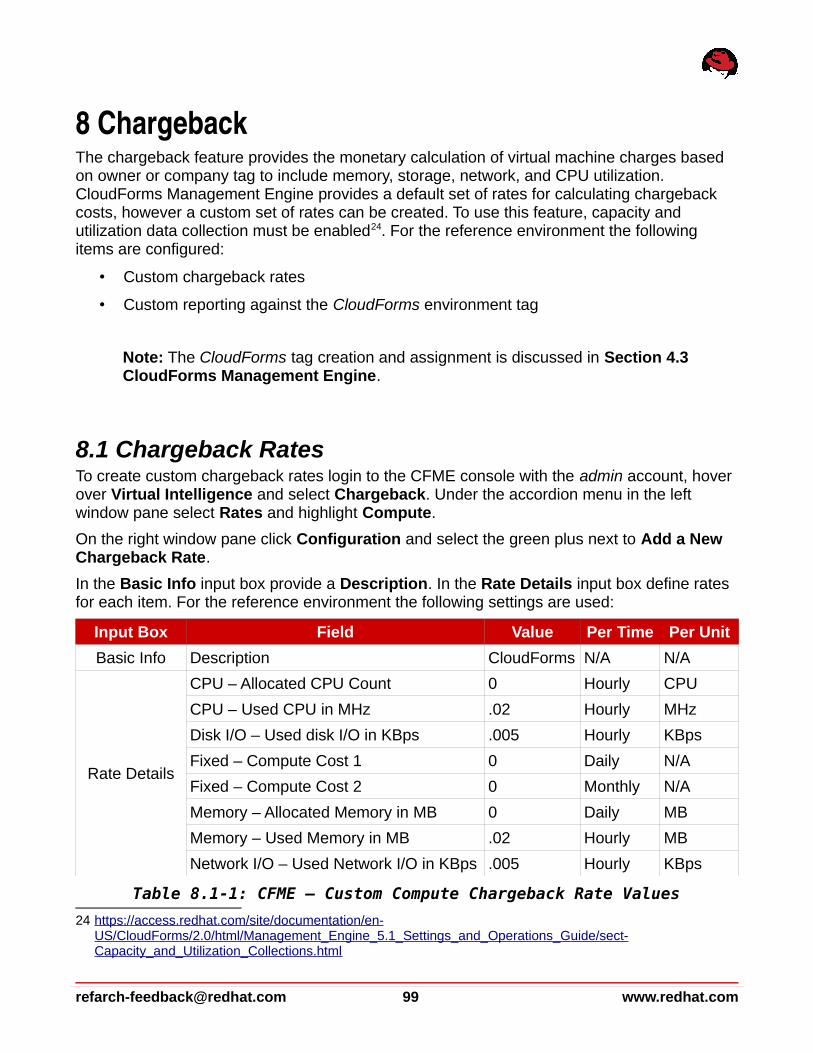
8 ChargebackThe chargeback feature provides the monetary calculation of virtual machine charges based on owner or company tag to include memory, storage, network, and CPU utilization. CloudForms Management Engine provides a default set of rates for calculating chargeback costs, however a custom set of rates can be created. To use this feature, capacity and utilization data collection must be enabled24. For the reference environment the following items are configured:
• Custom chargeback rates
• Custom reporting against the CloudForms environment tag
Note: The CloudForms tag creation and assignment is discussed in Section 4.3 CloudForms Management Engine.
8.1 Chargeback RatesTo create custom chargeback rates login to the CFME console with the admin account, hover over Virtual Intelligence and select Chargeback. Under the accordion menu in the left window pane select Rates and highlight Compute.
On the right window pane click Configuration and select the green plus next to Add a New Chargeback Rate.
In the Basic Info input box provide a Description. In the Rate Details input box define rates for each item. For the reference environment the following settings are used:
Input Box Field Value Per Time Per Unit
Basic Info Description CloudForms N/A N/A
Rate Details
CPU – Allocated CPU Count 0 Hourly CPU
CPU – Used CPU in MHz .02 Hourly MHz
Disk I/O – Used disk I/O in KBps .005 Hourly KBps
Fixed – Compute Cost 1 0 Daily N/A
Fixed – Compute Cost 2 0 Monthly N/A
Memory – Allocated Memory in MB 0 Daily MB
Memory – Used Memory in MB .02 Hourly MB
Network I/O – Used Network I/O in KBps .005 Hourly KBps
Table 8.1-1: CFME – Custom Compute Chargeback Rate Values
24 https://access.redhat.com/site/documentation/en- US/CloudForms/2.0/html/Management_Engine_5.1_Settings_and_Operations_Guide/sect-Capacity_and_Utilization_Collections.html
[email protected] 99 www.redhat.com

Click Add to complete.
On the left window pane highlight Storage under Rates.
On the right window pane click Configuration and select the green plus next to Add a New Chargeback Rate.
In the Basic Info input box provide a Description. In the Rate Details input box define rates for each item. For the reference environment the following settings are used:
Input Box Field Value Per Time Per Unit
Basic Info Description CloudForms N/A N/A
Rate Details
Fixed – Storage Cost 1 0 Hourly N/A
Fixed – Storage Cost 2 0 Hourly N/A
Storage – Allocated Disk Storage in Bytes 0 Hourly GB
Storage – Used Disk Storage in Bytes 2.0 Hourly GB
Table 8.1-2: CFME – CloudForms Storage Chargeback Rate Values
Note: Rates are measured in dollars.
www.redhat.com 100 [email protected]
Figure 8.1-1: CFME – CloudForms Compute Chargeback Rates
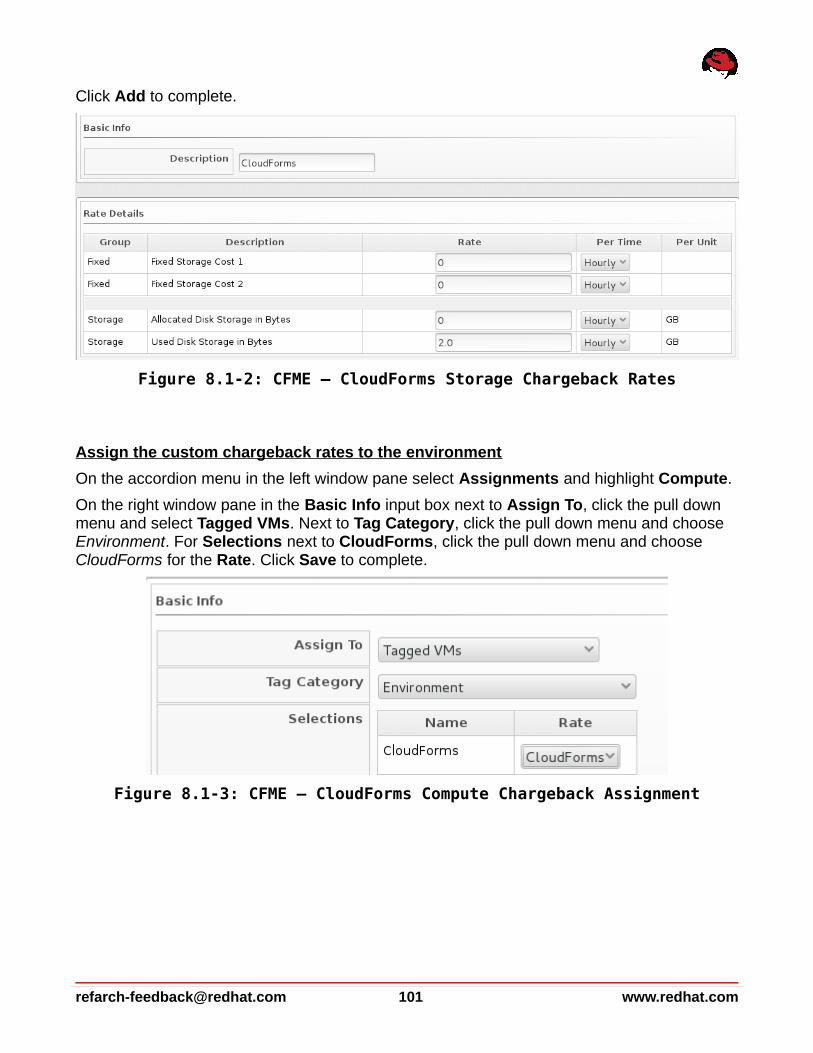
Click Add to complete.
Assign the custom chargeback rates to the environment
On the accordion menu in the left window pane select Assignments and highlight Compute.
On the right window pane in the Basic Info input box next to Assign To, click the pull down menu and select Tagged VMs. Next to Tag Category, click the pull down menu and choose Environment. For Selections next to CloudForms, click the pull down menu and choose CloudForms for the Rate. Click Save to complete.
[email protected] 101 www.redhat.com
Figure 8.1-3: CFME – CloudForms Compute Chargeback Assignment
Figure 8.1-2: CFME – CloudForms Storage Chargeback Rates
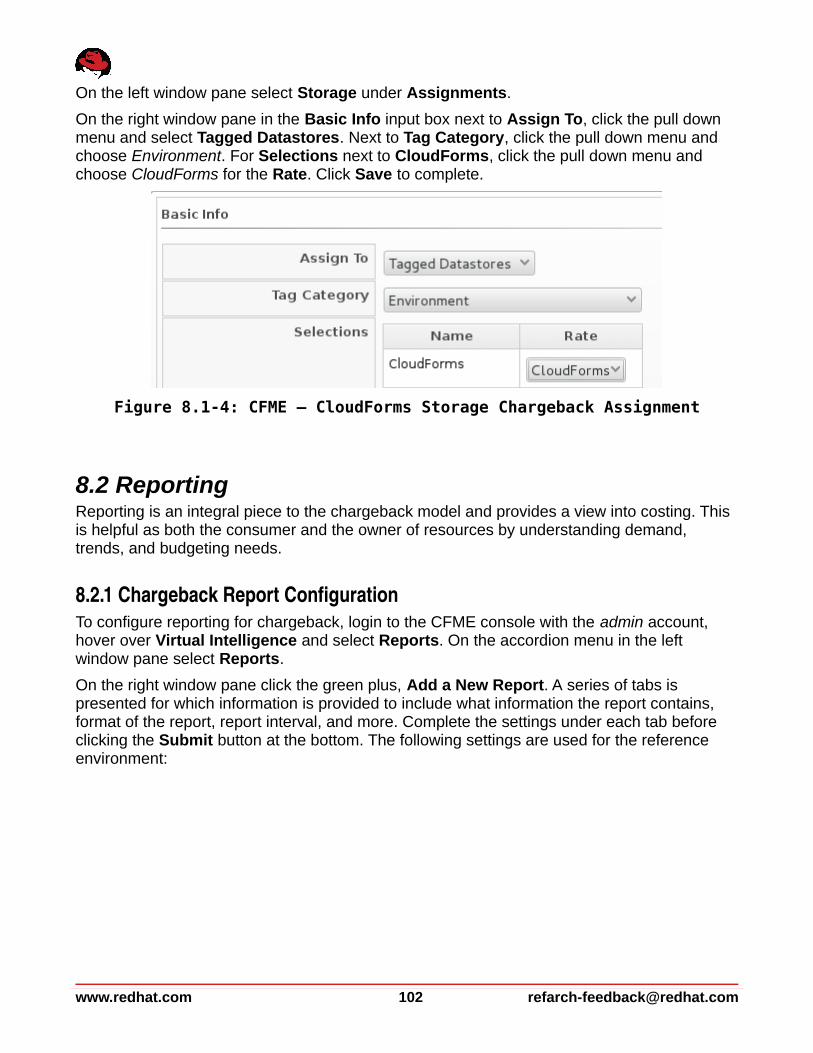
On the left window pane select Storage under Assignments.
On the right window pane in the Basic Info input box next to Assign To, click the pull down menu and select Tagged Datastores. Next to Tag Category, click the pull down menu and choose Environment. For Selections next to CloudForms, click the pull down menu and choose CloudForms for the Rate. Click Save to complete.
8.2 ReportingReporting is an integral piece to the chargeback model and provides a view into costing. This is helpful as both the consumer and the owner of resources by understanding demand, trends, and budgeting needs.
8.2.1 Chargeback Report ConfigurationTo configure reporting for chargeback, login to the CFME console with the admin account, hover over Virtual Intelligence and select Reports. On the accordion menu in the left window pane select Reports.
On the right window pane click the green plus, Add a New Report. A series of tabs is presented for which information is provided to include what information the report contains, format of the report, report interval, and more. Complete the settings under each tab before clicking the Submit button at the bottom. The following settings are used for the reference environment:
www.redhat.com 102 [email protected]
Figure 8.1-4: CFME – CloudForms Storage Chargeback Assignment
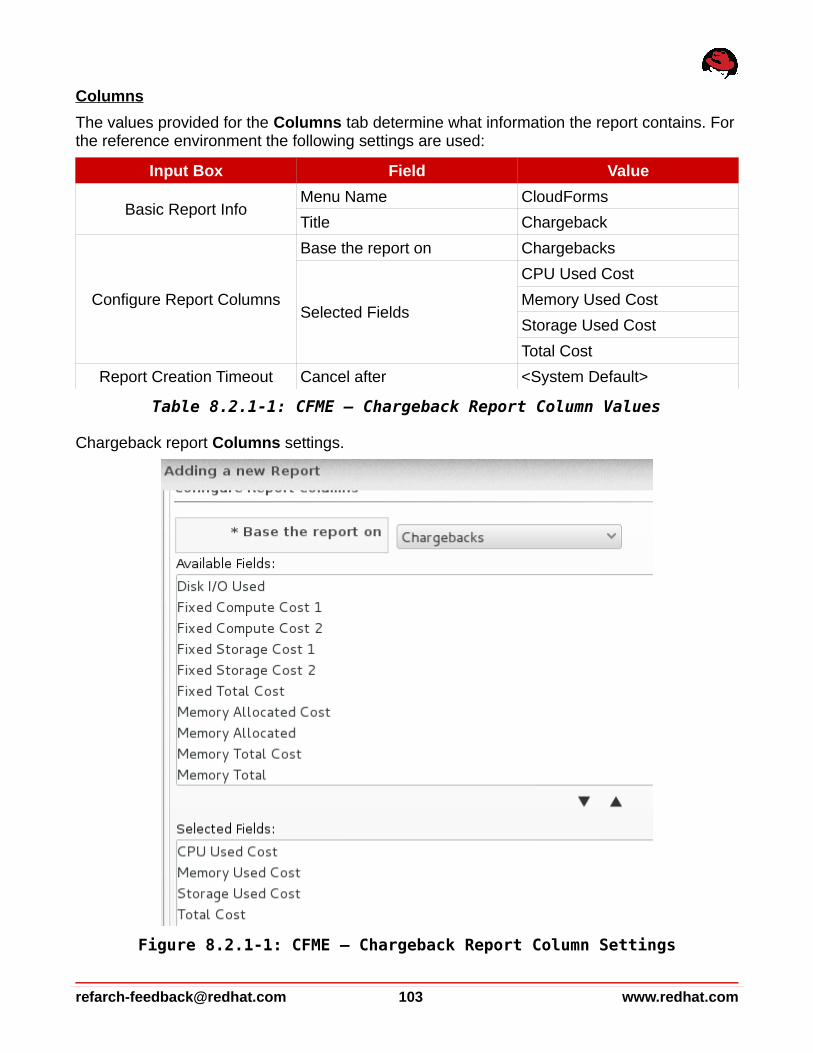
Columns
The values provided for the Columns tab determine what information the report contains. For the reference environment the following settings are used:
Input Box Field Value
Basic Report InfoMenu Name CloudForms
Title Chargeback
Configure Report Columns
Base the report on Chargebacks
Selected Fields
CPU Used Cost
Memory Used Cost
Storage Used Cost
Total Cost
Report Creation Timeout Cancel after <System Default>
Table 8.2.1-1: CFME – Chargeback Report Column Values
Chargeback report Columns settings.
[email protected] 103 www.redhat.com
Figure 8.2.1-1: CFME – Chargeback Report Column Settings
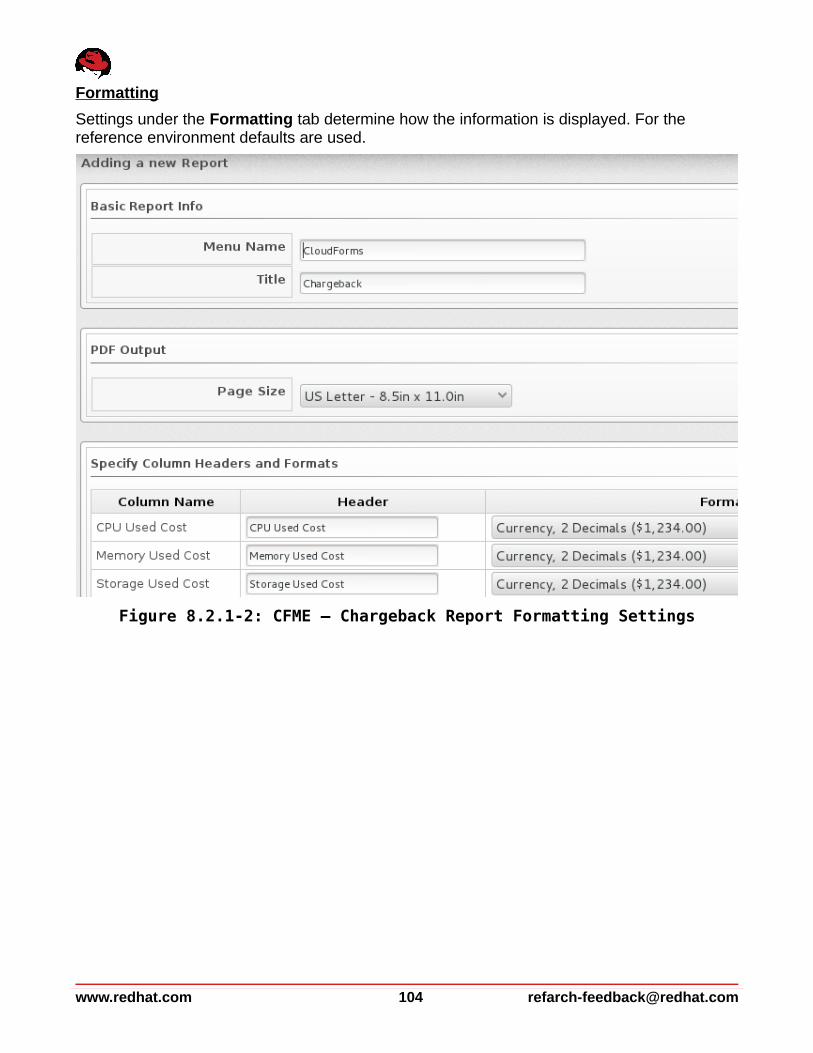
Formatting
Settings under the Formatting tab determine how the information is displayed. For the reference environment defaults are used.
www.redhat.com 104 [email protected]
Figure 8.2.1-2: CFME – Chargeback Report Formatting Settings
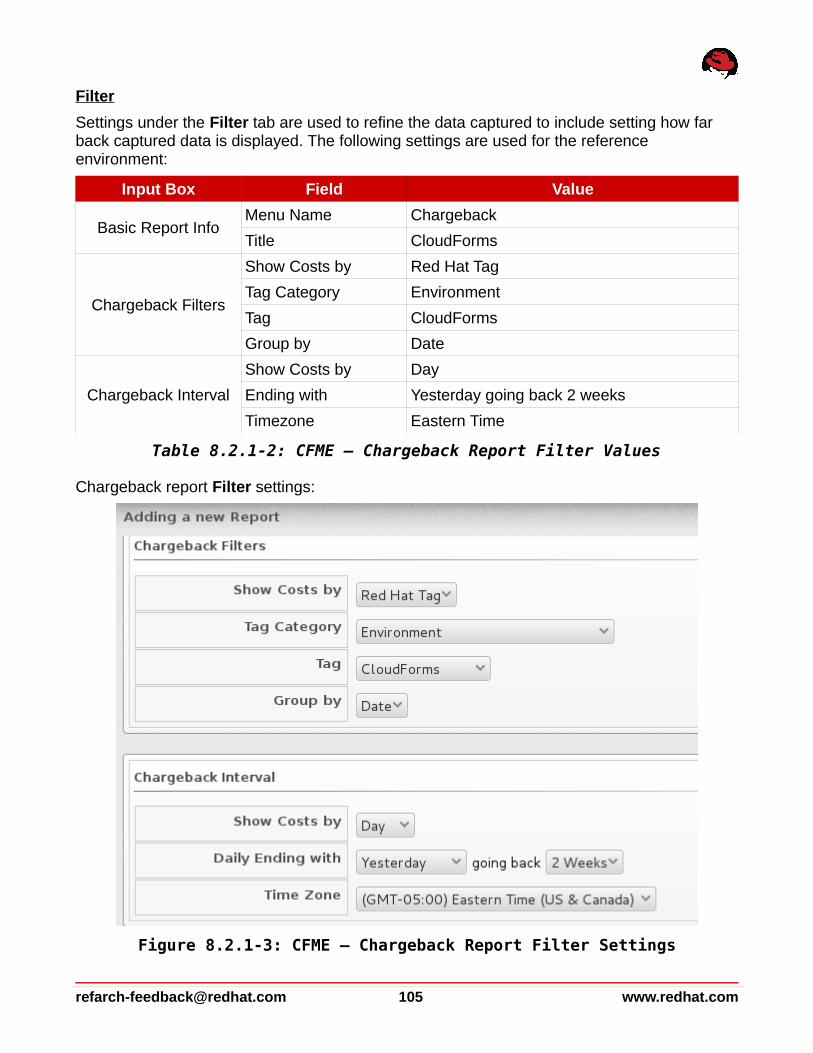
Filter
Settings under the Filter tab are used to refine the data captured to include setting how far back captured data is displayed. The following settings are used for the reference environment:
Input Box Field Value
Basic Report InfoMenu Name Chargeback
Title CloudForms
Chargeback Filters
Show Costs by Red Hat Tag
Tag Category Environment
Tag CloudForms
Group by Date
Chargeback Interval
Show Costs by Day
Ending with Yesterday going back 2 weeks
Timezone Eastern Time
Table 8.2.1-2: CFME – Chargeback Report Filter Values
Chargeback report Filter settings:
[email protected] 105 www.redhat.com
Figure 8.2.1-3: CFME – Chargeback Report Filter Settings
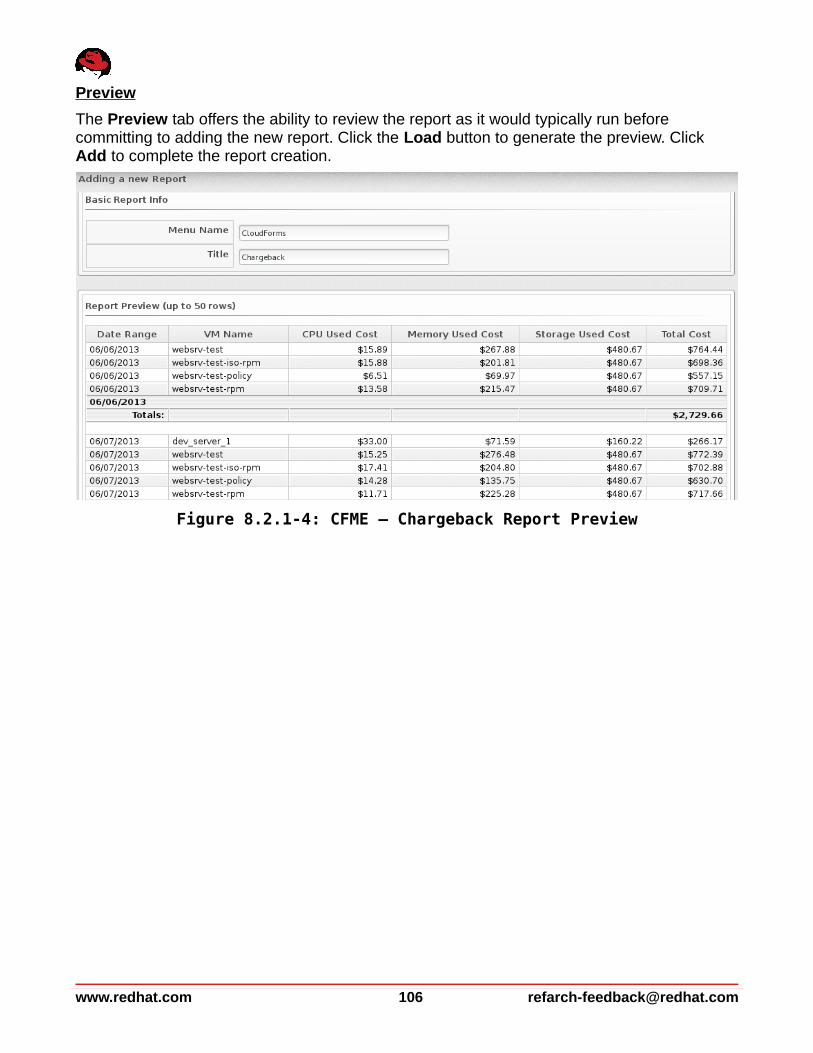
Preview
The Preview tab offers the ability to review the report as it would typically run before committing to adding the new report. Click the Load button to generate the preview. Click Add to complete the report creation.
www.redhat.com 106 [email protected]
Figure 8.2.1-4: CFME – Chargeback Report Preview
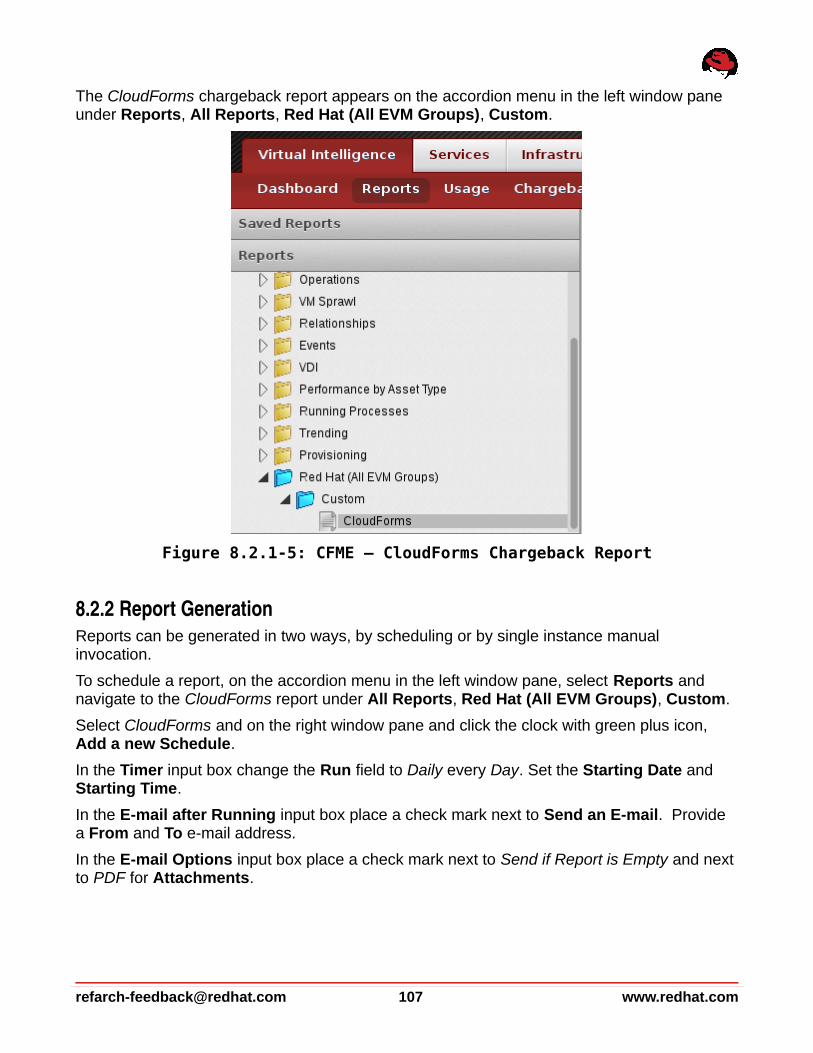
The CloudForms chargeback report appears on the accordion menu in the left window pane under Reports, All Reports, Red Hat (All EVM Groups), Custom.
8.2.2 Report GenerationReports can be generated in two ways, by scheduling or by single instance manual invocation.
To schedule a report, on the accordion menu in the left window pane, select Reports and navigate to the CloudForms report under All Reports, Red Hat (All EVM Groups), Custom.
Select CloudForms and on the right window pane and click the clock with green plus icon, Add a new Schedule.
In the Timer input box change the Run field to Daily every Day. Set the Starting Date and Starting Time.
In the E-mail after Running input box place a check mark next to Send an E-mail. Provide a From and To e-mail address.
In the E-mail Options input box place a check mark next to Send if Report is Empty and next to PDF for Attachments.
[email protected] 107 www.redhat.com
Figure 8.2.1-5: CFME – CloudForms Chargeback Report
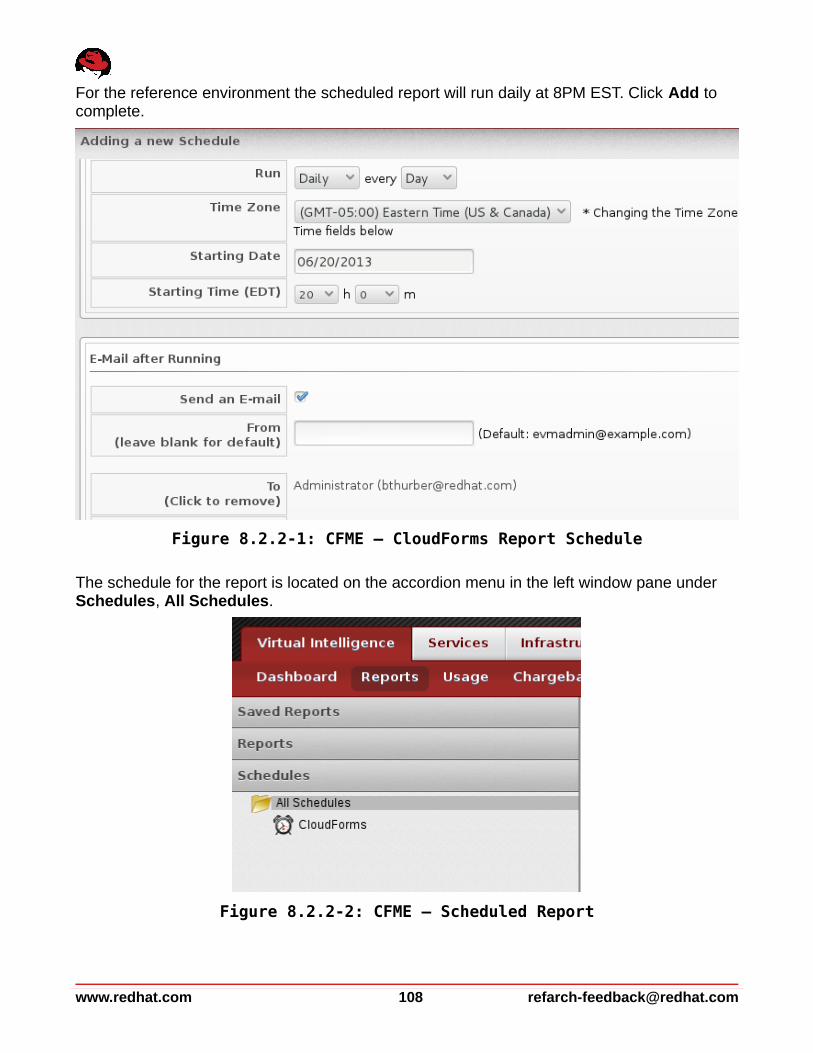
For the reference environment the scheduled report will run daily at 8PM EST. Click Add to complete.
The schedule for the report is located on the accordion menu in the left window pane under Schedules, All Schedules.
www.redhat.com 108 [email protected]
Figure 8.2.2-2: CFME – Scheduled Report
Figure 8.2.2-1: CFME – CloudForms Report Schedule
To manually invoke the CloudForms report at any time, on the accordion menu in the left window pane select Reports and navigate to All Reports, Red Hat (All EVM Groups), Custom.
Highlight the CloudForms report and on the right window pane click the gear cog icon, Queue this Report to be generated. Upon selection a status window is displayed on the right window pane.
Click the circular arrow icon to refresh the generation status.
[email protected] 109 www.redhat.com
Figure 8.2.2-4: CFME – CloudForms Manual Report Invocation Complete
Figure 8.2.2-3: CFME – CloudForms Manual Report Invocation Status
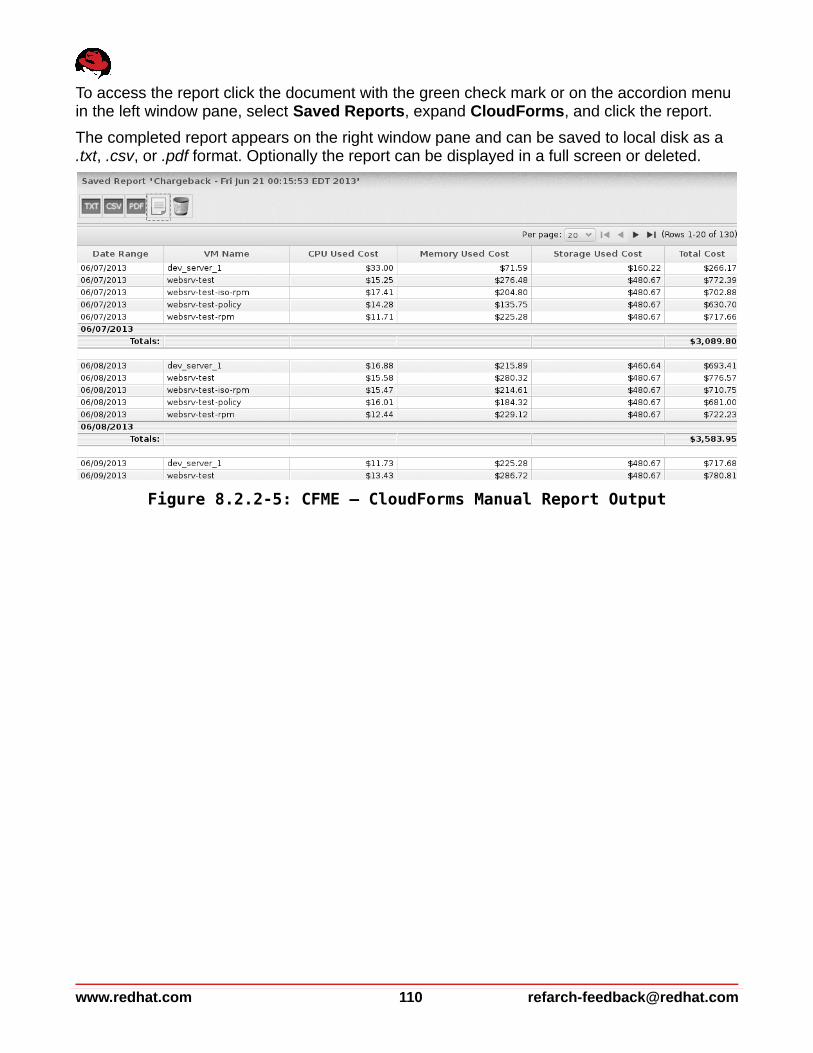
To access the report click the document with the green check mark or on the accordion menu in the left window pane, select Saved Reports, expand CloudForms, and click the report.
The completed report appears on the right window pane and can be saved to local disk as a .txt, .csv, or .pdf format. Optionally the report can be displayed in a full screen or deleted.
www.redhat.com 110 [email protected]
Figure 8.2.2-5: CFME – CloudForms Manual Report Output
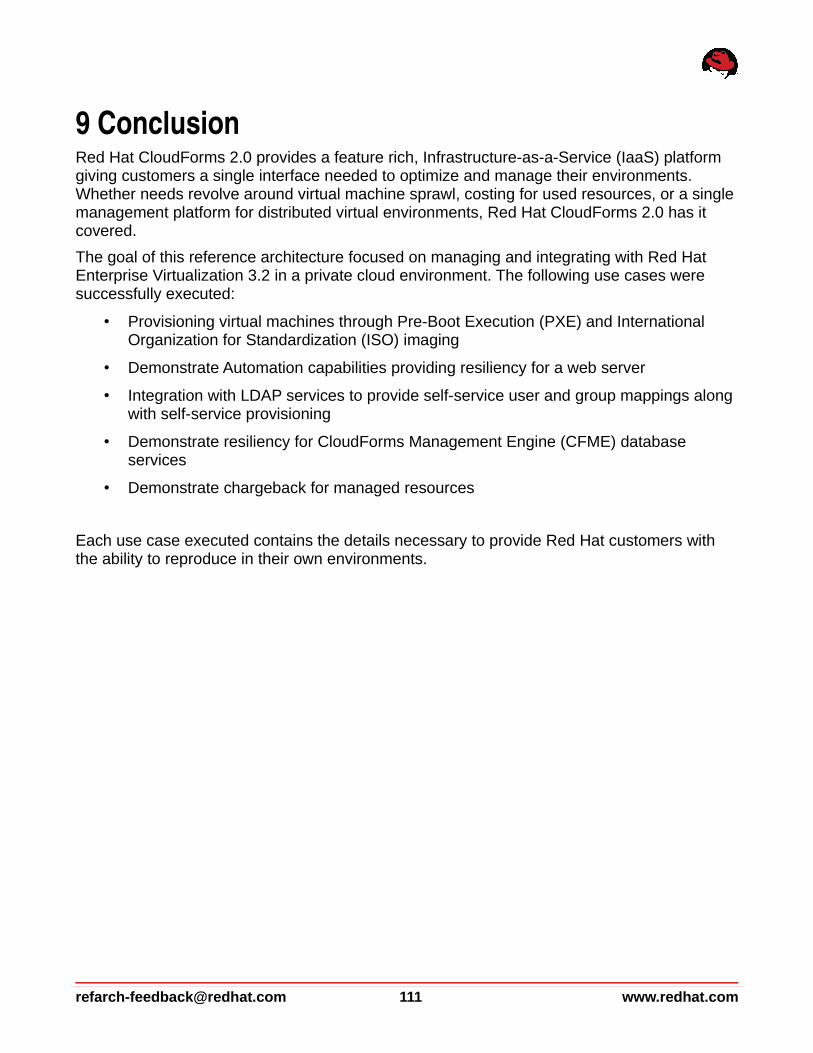
9 ConclusionRed Hat CloudForms 2.0 provides a feature rich, Infrastructure-as-a-Service (IaaS) platform giving customers a single interface needed to optimize and manage their environments. Whether needs revolve around virtual machine sprawl, costing for used resources, or a single management platform for distributed virtual environments, Red Hat CloudForms 2.0 has it covered.
The goal of this reference architecture focused on managing and integrating with Red Hat Enterprise Virtualization 3.2 in a private cloud environment. The following use cases were successfully executed:
• Provisioning virtual machines through Pre-Boot Execution (PXE) and International Organization for Standardization (ISO) imaging
• Demonstrate Automation capabilities providing resiliency for a web server
• Integration with LDAP services to provide self-service user and group mappings along with self-service provisioning
• Demonstrate resiliency for CloudForms Management Engine (CFME) database services
• Demonstrate chargeback for managed resources
Each use case executed contains the details necessary to provide Red Hat customers with the ability to reproduce in their own environments.
[email protected] 111 www.redhat.com
Appendix A: Revision History
Revision 1.0 Friday, June 28, 2013 Brett Thurber
Initial Release
Revision 1.1 Monday, July 8, 2013 Brett Thurber
Minor Edits
Revision 1.2 Wednesday, September 18, 2013 Brett Thurber
Title Change
Revision 1.3 Thursday, October 24, 2013 Brett Thurber
Fixed URI path for Table 5.1.1-1 on page 44. Updated address for corporate offices.
Revision 1.4 Thursday, January 10, 2014 Brett Thurber
Added Red Hat Global Support Services statements, support link, and minor edits.
Appendix B: Contributors
Contributor Title Contribution
Roger Lopez Sr. Software Engineer Review
James Labocki Principal Product Marketing Manager Content and Review
Xavier Lecauchois Principal Product Manager - Technical Review
Aaron Weitekamp Senior Quality Engineer Content and Review
Vincent Valdez Principal Architect Content and Review
Tom Hennessy Principal Software Engineer Review
Appendix C: iptablescfme, cfme-2, cfme-3 (CloudForms Management Engine)
/etc/sysconfig/iptables
# Generated by iptables-save v1.3.5 on Tue Oct 5 11:55:42 2010 *filter :INPUT ACCEPT [12246:3938412] :FORWARD ACCEPT [0:0] :OUTPUT ACCEPT [55985:245536782] -A INPUT -i lo -j ACCEPT -A INPUT -m state --state RELATED,ESTABLISHED -j ACCEPT
www.redhat.com 112 [email protected]

-A INPUT -p tcp -m tcp --dport 22 -j ACCEPT -A INPUT -p tcp -m tcp --dport 80 -j ACCEPT -A INPUT -p udp -m udp --dport 80 -j ACCEPT -A INPUT -p tcp -m tcp --dport 443 -j ACCEPT -A INPUT -p udp -m udp --dport 443 -j ACCEPT -A INPUT -p tcp -m tcp --dport 5432 -j ACCEPT -A INPUT -p icmp -j ACCEPT -A INPUT -m limit --limit 5/min --limit-burst 7 -j LOG --log-prefix "**iptables drop**" -A INPUT -j DROP -A FORWARD -p icmp -j ACCEPT -A OUTPUT -p icmp -j ACCEPT COMMIT # Completed on Tue Oct 5 11:55:42 2010
sysman-rhel6 (Satellite Server)
/etc/sysconfig/iptables
# Generated by iptables-save v1.3.5 on Tue Jan 11 09:19:06 2011 *filter :INPUT ACCEPT [0:0] :FORWARD ACCEPT [0:0] :OUTPUT ACCEPT [4418854:1249223840] -A INPUT -m state --state RELATED,ESTABLISHED -j ACCEPT -A INPUT -p icmp -j ACCEPT -A INPUT -i lo -j ACCEPT -A INPUT -p tcp -m state --state NEW -m tcp --dport 22 -j ACCEPT -A INPUT -p tcp -m state --state NEW -m tcp --dport 53 -j ACCEPT -A INPUT -p udp -m state --state NEW -m udp --dport 53 -j ACCEPT -A INPUT -p udp -m state --state NEW -m udp --dport 67 -j ACCEPT -A INPUT -p tcp -m state --state NEW -m tcp --dport 68 -j ACCEPT -A INPUT -p udp -m state --state NEW -m udp --dport 68 -j ACCEPT -A INPUT -p udp -m state --state NEW -m udp --dport 69 -j ACCEPT -A INPUT -p tcp -m state --state NEW -m tcp --dport 69 -j ACCEPT -A INPUT -p udp -m udp --dport 80 -j ACCEPT -A INPUT -p tcp -m tcp --dport 80 -j ACCEPT -A INPUT -p tcp -m tcp --dport 137 -j ACCEPT -A INPUT -p udp -m udp --dport 137 -j ACCEPT -A INPUT -p tcp -m tcp --dport 138 -j ACCEPT -A INPUT -p udp -m udp --dport 138 -j ACCEPT -A INPUT -p tcp -m tcp --dport 139 -j ACCEPT -A INPUT -p udp -m udp --dport 139 -j ACCEPT -A INPUT -p udp -m udp --dport 443 -j ACCEPT -A INPUT -p tcp -m tcp --dport 443 -j ACCEPT -A INPUT -p tcp -m tcp --dport 4545 -j ACCEPT -A INPUT -p udp -m udp --dport 4545 -j ACCEPT -A INPUT -p tcp -m tcp --dport 5222 -j ACCEPT -A INPUT -p udp -m udp --dport 5222 -j ACCEPT -A INPUT -p udp -m udp --dport 25150 -j ACCEPT -A INPUT -p tcp -m tcp --dport 25151 -j ACCEPT -A INPUT -p tcp -m tcp --dport 111 -j ACCEPT -A INPUT -p udp -m udp --dport 111 -j ACCEPT -A INPUT -p tcp -m tcp --dport 662 -j ACCEPT -A INPUT -p tcp -m tcp --dport 875 -j ACCEPT
[email protected] 113 www.redhat.com
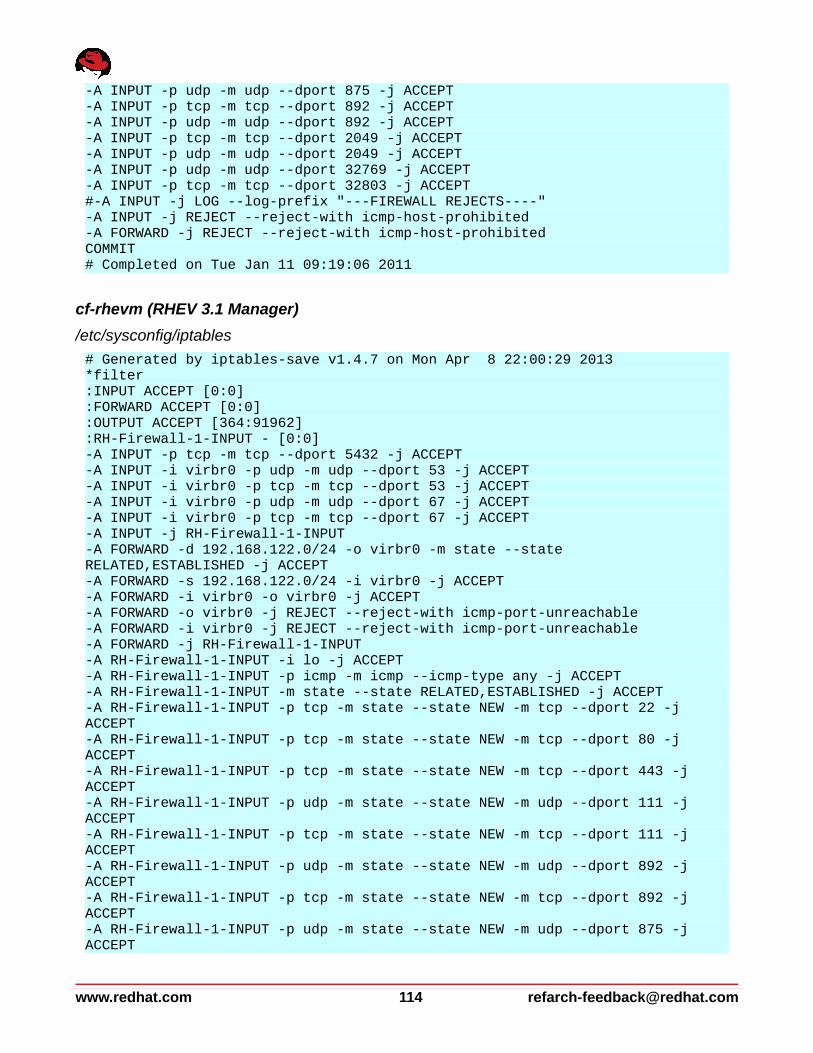
-A INPUT -p udp -m udp --dport 875 -j ACCEPT -A INPUT -p tcp -m tcp --dport 892 -j ACCEPT -A INPUT -p udp -m udp --dport 892 -j ACCEPT -A INPUT -p tcp -m tcp --dport 2049 -j ACCEPT -A INPUT -p udp -m udp --dport 2049 -j ACCEPT -A INPUT -p udp -m udp --dport 32769 -j ACCEPT -A INPUT -p tcp -m tcp --dport 32803 -j ACCEPT #-A INPUT -j LOG --log-prefix "---FIREWALL REJECTS----" -A INPUT -j REJECT --reject-with icmp-host-prohibited -A FORWARD -j REJECT --reject-with icmp-host-prohibited COMMIT # Completed on Tue Jan 11 09:19:06 2011
cf-rhevm (RHEV 3.1 Manager)
/etc/sysconfig/iptables
# Generated by iptables-save v1.4.7 on Mon Apr 8 22:00:29 2013 *filter :INPUT ACCEPT [0:0] :FORWARD ACCEPT [0:0] :OUTPUT ACCEPT [364:91962] :RH-Firewall-1-INPUT - [0:0] -A INPUT -p tcp -m tcp --dport 5432 -j ACCEPT -A INPUT -i virbr0 -p udp -m udp --dport 53 -j ACCEPT -A INPUT -i virbr0 -p tcp -m tcp --dport 53 -j ACCEPT -A INPUT -i virbr0 -p udp -m udp --dport 67 -j ACCEPT -A INPUT -i virbr0 -p tcp -m tcp --dport 67 -j ACCEPT -A INPUT -j RH-Firewall-1-INPUT -A FORWARD -d 192.168.122.0/24 -o virbr0 -m state --state RELATED,ESTABLISHED -j ACCEPT -A FORWARD -s 192.168.122.0/24 -i virbr0 -j ACCEPT -A FORWARD -i virbr0 -o virbr0 -j ACCEPT -A FORWARD -o virbr0 -j REJECT --reject-with icmp-port-unreachable -A FORWARD -i virbr0 -j REJECT --reject-with icmp-port-unreachable -A FORWARD -j RH-Firewall-1-INPUT -A RH-Firewall-1-INPUT -i lo -j ACCEPT -A RH-Firewall-1-INPUT -p icmp -m icmp --icmp-type any -j ACCEPT -A RH-Firewall-1-INPUT -m state --state RELATED,ESTABLISHED -j ACCEPT -A RH-Firewall-1-INPUT -p tcp -m state --state NEW -m tcp --dport 22 -j ACCEPT -A RH-Firewall-1-INPUT -p tcp -m state --state NEW -m tcp --dport 80 -j ACCEPT -A RH-Firewall-1-INPUT -p tcp -m state --state NEW -m tcp --dport 443 -j ACCEPT -A RH-Firewall-1-INPUT -p udp -m state --state NEW -m udp --dport 111 -j ACCEPT -A RH-Firewall-1-INPUT -p tcp -m state --state NEW -m tcp --dport 111 -j ACCEPT -A RH-Firewall-1-INPUT -p udp -m state --state NEW -m udp --dport 892 -j ACCEPT -A RH-Firewall-1-INPUT -p tcp -m state --state NEW -m tcp --dport 892 -j ACCEPT -A RH-Firewall-1-INPUT -p udp -m state --state NEW -m udp --dport 875 -j ACCEPT
www.redhat.com 114 [email protected]
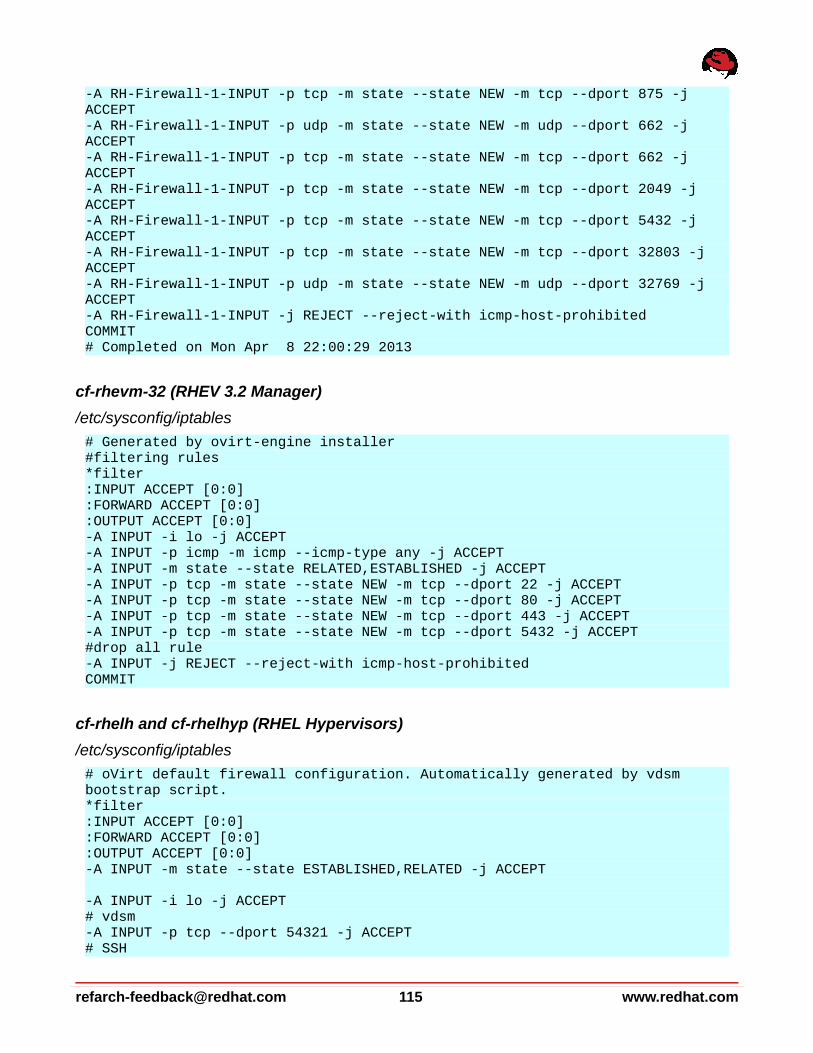
-A RH-Firewall-1-INPUT -p tcp -m state --state NEW -m tcp --dport 875 -j ACCEPT -A RH-Firewall-1-INPUT -p udp -m state --state NEW -m udp --dport 662 -j ACCEPT -A RH-Firewall-1-INPUT -p tcp -m state --state NEW -m tcp --dport 662 -j ACCEPT -A RH-Firewall-1-INPUT -p tcp -m state --state NEW -m tcp --dport 2049 -j ACCEPT -A RH-Firewall-1-INPUT -p tcp -m state --state NEW -m tcp --dport 5432 -j ACCEPT -A RH-Firewall-1-INPUT -p tcp -m state --state NEW -m tcp --dport 32803 -j ACCEPT -A RH-Firewall-1-INPUT -p udp -m state --state NEW -m udp --dport 32769 -j ACCEPT -A RH-Firewall-1-INPUT -j REJECT --reject-with icmp-host-prohibited COMMIT # Completed on Mon Apr 8 22:00:29 2013
cf-rhevm-32 (RHEV 3.2 Manager)
/etc/sysconfig/iptables
# Generated by ovirt-engine installer #filtering rules *filter :INPUT ACCEPT [0:0] :FORWARD ACCEPT [0:0] :OUTPUT ACCEPT [0:0] -A INPUT -i lo -j ACCEPT -A INPUT -p icmp -m icmp --icmp-type any -j ACCEPT -A INPUT -m state --state RELATED,ESTABLISHED -j ACCEPT -A INPUT -p tcp -m state --state NEW -m tcp --dport 22 -j ACCEPT -A INPUT -p tcp -m state --state NEW -m tcp --dport 80 -j ACCEPT -A INPUT -p tcp -m state --state NEW -m tcp --dport 443 -j ACCEPT -A INPUT -p tcp -m state --state NEW -m tcp --dport 5432 -j ACCEPT #drop all rule -A INPUT -j REJECT --reject-with icmp-host-prohibited COMMIT
cf-rhelh and cf-rhelhyp (RHEL Hypervisors)
/etc/sysconfig/iptables
# oVirt default firewall configuration. Automatically generated by vdsm bootstrap script. *filter :INPUT ACCEPT [0:0] :FORWARD ACCEPT [0:0] :OUTPUT ACCEPT [0:0] -A INPUT -m state --state ESTABLISHED,RELATED -j ACCEPT
-A INPUT -i lo -j ACCEPT # vdsm -A INPUT -p tcp --dport 54321 -j ACCEPT # SSH
[email protected] 115 www.redhat.com
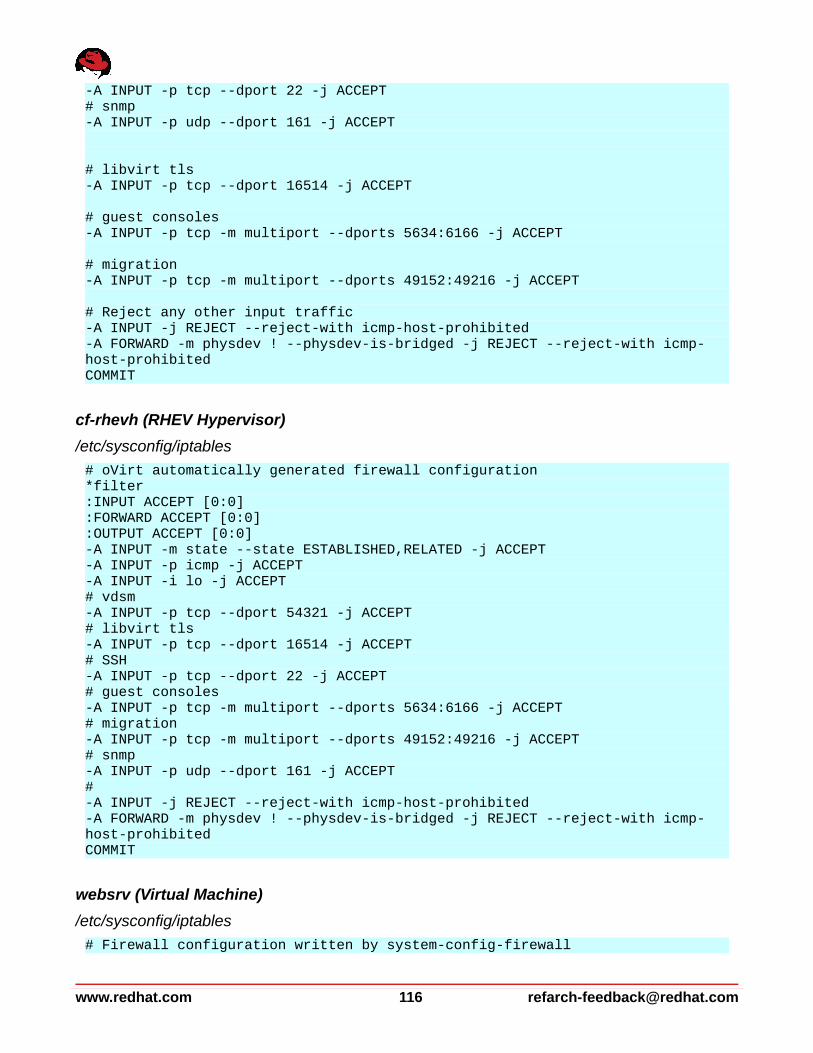
-A INPUT -p tcp --dport 22 -j ACCEPT # snmp -A INPUT -p udp --dport 161 -j ACCEPT
# libvirt tls -A INPUT -p tcp --dport 16514 -j ACCEPT
# guest consoles -A INPUT -p tcp -m multiport --dports 5634:6166 -j ACCEPT
# migration -A INPUT -p tcp -m multiport --dports 49152:49216 -j ACCEPT # Reject any other input traffic -A INPUT -j REJECT --reject-with icmp-host-prohibited -A FORWARD -m physdev ! --physdev-is-bridged -j REJECT --reject-with icmp-host-prohibited COMMIT
cf-rhevh (RHEV Hypervisor)
/etc/sysconfig/iptables
# oVirt automatically generated firewall configuration *filter :INPUT ACCEPT [0:0] :FORWARD ACCEPT [0:0] :OUTPUT ACCEPT [0:0] -A INPUT -m state --state ESTABLISHED,RELATED -j ACCEPT -A INPUT -p icmp -j ACCEPT -A INPUT -i lo -j ACCEPT # vdsm -A INPUT -p tcp --dport 54321 -j ACCEPT # libvirt tls -A INPUT -p tcp --dport 16514 -j ACCEPT # SSH -A INPUT -p tcp --dport 22 -j ACCEPT # guest consoles -A INPUT -p tcp -m multiport --dports 5634:6166 -j ACCEPT # migration -A INPUT -p tcp -m multiport --dports 49152:49216 -j ACCEPT # snmp -A INPUT -p udp --dport 161 -j ACCEPT # -A INPUT -j REJECT --reject-with icmp-host-prohibited -A FORWARD -m physdev ! --physdev-is-bridged -j REJECT --reject-with icmp-host-prohibited COMMIT
websrv (Virtual Machine)
/etc/sysconfig/iptables
# Firewall configuration written by system-config-firewall
www.redhat.com 116 [email protected]
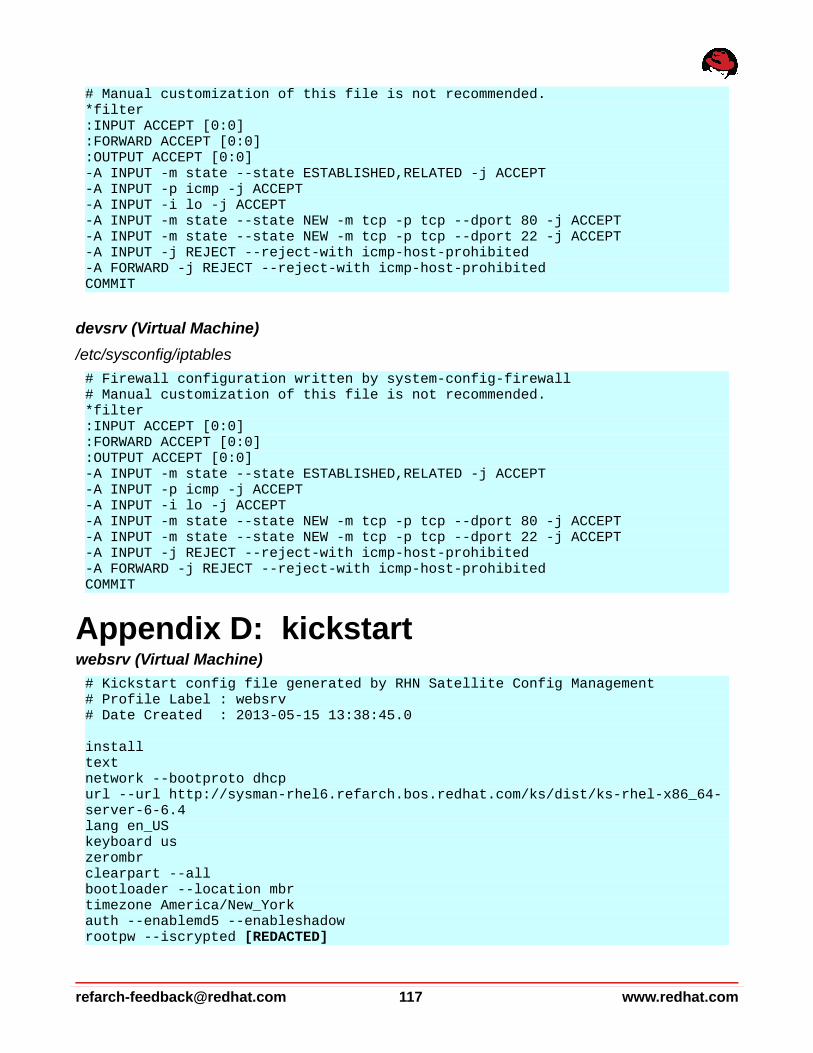
# Manual customization of this file is not recommended. *filter :INPUT ACCEPT [0:0] :FORWARD ACCEPT [0:0] :OUTPUT ACCEPT [0:0] -A INPUT -m state --state ESTABLISHED,RELATED -j ACCEPT -A INPUT -p icmp -j ACCEPT -A INPUT -i lo -j ACCEPT -A INPUT -m state --state NEW -m tcp -p tcp --dport 80 -j ACCEPT -A INPUT -m state --state NEW -m tcp -p tcp --dport 22 -j ACCEPT -A INPUT -j REJECT --reject-with icmp-host-prohibited -A FORWARD -j REJECT --reject-with icmp-host-prohibited COMMIT
devsrv (Virtual Machine)
/etc/sysconfig/iptables
# Firewall configuration written by system-config-firewall # Manual customization of this file is not recommended. *filter :INPUT ACCEPT [0:0] :FORWARD ACCEPT [0:0] :OUTPUT ACCEPT [0:0] -A INPUT -m state --state ESTABLISHED,RELATED -j ACCEPT -A INPUT -p icmp -j ACCEPT -A INPUT -i lo -j ACCEPT -A INPUT -m state --state NEW -m tcp -p tcp --dport 80 -j ACCEPT -A INPUT -m state --state NEW -m tcp -p tcp --dport 22 -j ACCEPT -A INPUT -j REJECT --reject-with icmp-host-prohibited -A FORWARD -j REJECT --reject-with icmp-host-prohibited COMMIT
Appendix D: kickstartwebsrv (Virtual Machine)
# Kickstart config file generated by RHN Satellite Config Management# Profile Label : websrv# Date Created : 2013-05-15 13:38:45.0
installtextnetwork --bootproto dhcpurl --url http://sysman-rhel6.refarch.bos.redhat.com/ks/dist/ks-rhel-x86_64-server-6-6.4lang en_USkeyboard uszerombrclearpart --allbootloader --location mbrtimezone America/New_Yorkauth --enablemd5 --enableshadowrootpw --iscrypted [REDACTED]
[email protected] 117 www.redhat.com
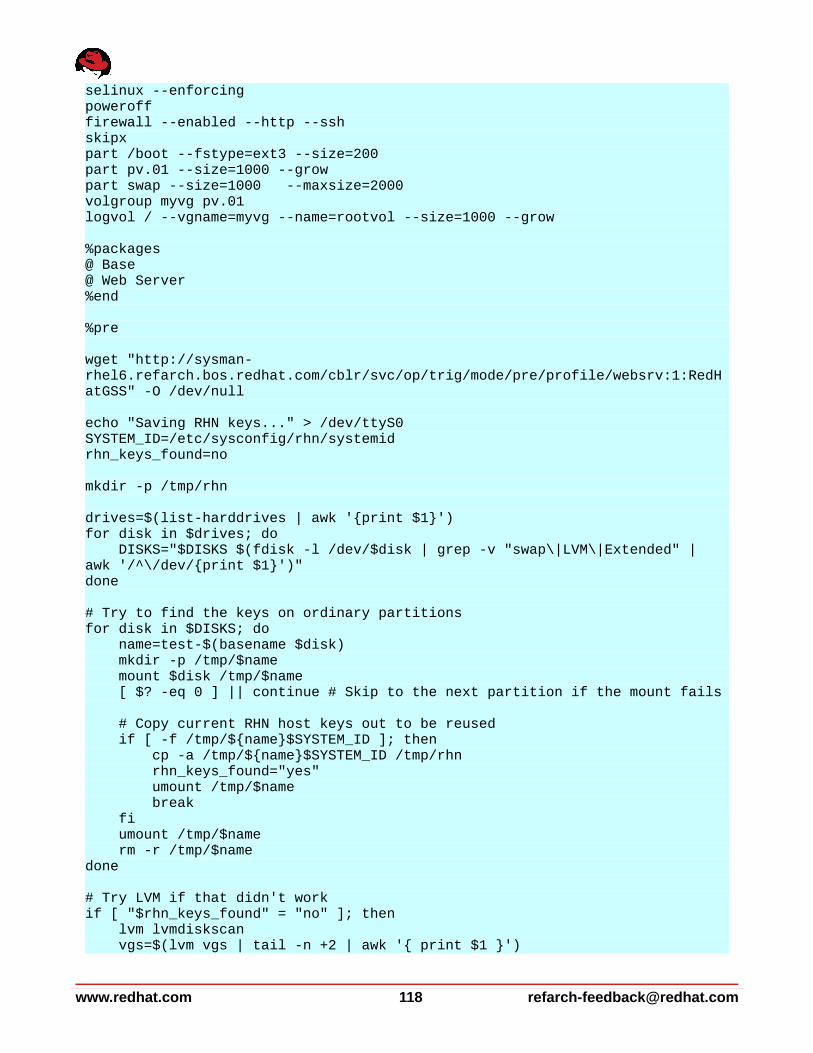
selinux --enforcingpowerofffirewall --enabled --http --sshskipxpart /boot --fstype=ext3 --size=200 part pv.01 --size=1000 --grow part swap --size=1000 --maxsize=2000 volgroup myvg pv.01 logvol / --vgname=myvg --name=rootvol --size=1000 --grow
%packages @ Base@ Web Server%end
%pre
wget "http://sysman-rhel6.refarch.bos.redhat.com/cblr/svc/op/trig/mode/pre/profile/websrv:1:RedHatGSS" -O /dev/null
echo "Saving RHN keys..." > /dev/ttyS0SYSTEM_ID=/etc/sysconfig/rhn/systemidrhn_keys_found=no
mkdir -p /tmp/rhn
drives=$(list-harddrives | awk '{print $1}')for disk in $drives; do DISKS="$DISKS $(fdisk -l /dev/$disk | grep -v "swap\|LVM\|Extended" | awk '/^\/dev/{print $1}')"done
# Try to find the keys on ordinary partitionsfor disk in $DISKS; do name=test-$(basename $disk) mkdir -p /tmp/$name mount $disk /tmp/$name [ $? -eq 0 ] || continue # Skip to the next partition if the mount fails
# Copy current RHN host keys out to be reused if [ -f /tmp/${name}$SYSTEM_ID ]; then cp -a /tmp/${name}$SYSTEM_ID /tmp/rhn rhn_keys_found="yes" umount /tmp/$name break fi umount /tmp/$name rm -r /tmp/$namedone
# Try LVM if that didn't workif [ "$rhn_keys_found" = "no" ]; then lvm lvmdiskscan vgs=$(lvm vgs | tail -n +2 | awk '{ print $1 }')
www.redhat.com 118 [email protected]
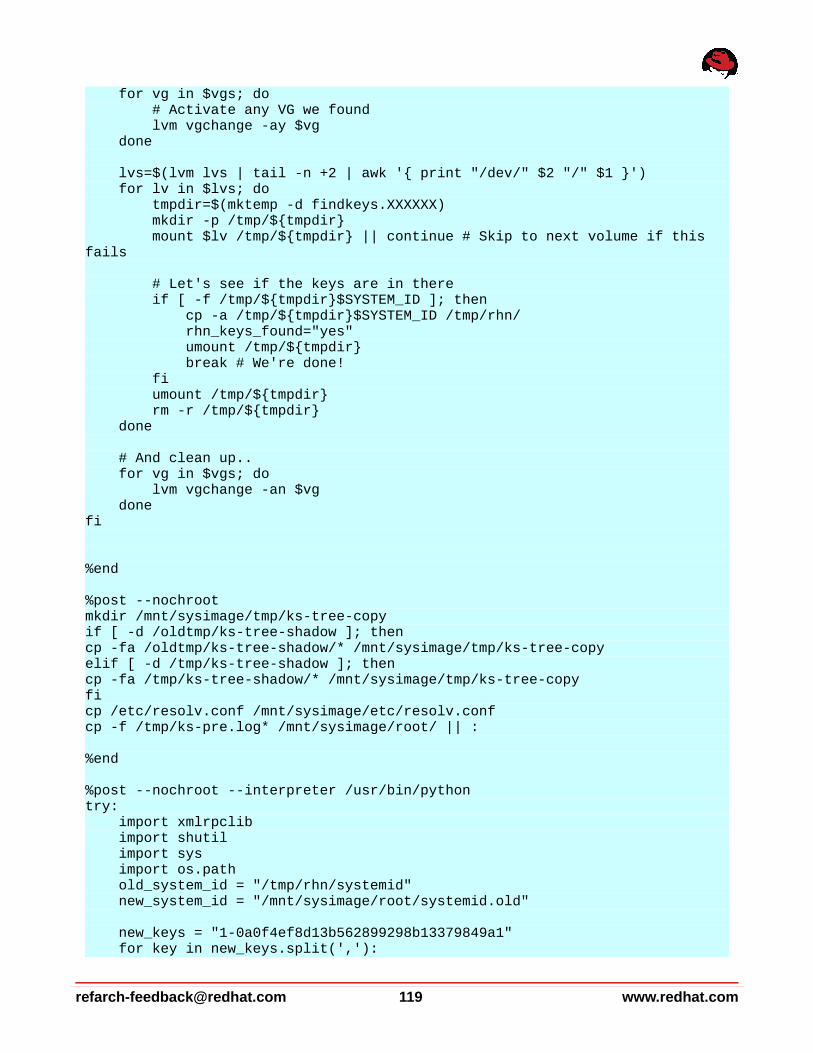
for vg in $vgs; do # Activate any VG we found lvm vgchange -ay $vg done lvs=$(lvm lvs | tail -n +2 | awk '{ print "/dev/" $2 "/" $1 }') for lv in $lvs; do tmpdir=$(mktemp -d findkeys.XXXXXX) mkdir -p /tmp/${tmpdir} mount $lv /tmp/${tmpdir} || continue # Skip to next volume if this fails
# Let's see if the keys are in there if [ -f /tmp/${tmpdir}$SYSTEM_ID ]; then cp -a /tmp/${tmpdir}$SYSTEM_ID /tmp/rhn/ rhn_keys_found="yes" umount /tmp/${tmpdir} break # We're done! fi umount /tmp/${tmpdir} rm -r /tmp/${tmpdir} done # And clean up.. for vg in $vgs; do lvm vgchange -an $vg donefi
%end
%post --nochrootmkdir /mnt/sysimage/tmp/ks-tree-copyif [ -d /oldtmp/ks-tree-shadow ]; thencp -fa /oldtmp/ks-tree-shadow/* /mnt/sysimage/tmp/ks-tree-copyelif [ -d /tmp/ks-tree-shadow ]; thencp -fa /tmp/ks-tree-shadow/* /mnt/sysimage/tmp/ks-tree-copyficp /etc/resolv.conf /mnt/sysimage/etc/resolv.confcp -f /tmp/ks-pre.log* /mnt/sysimage/root/ || :
%end
%post --nochroot --interpreter /usr/bin/pythontry: import xmlrpclib import shutil import sys import os.path old_system_id = "/tmp/rhn/systemid" new_system_id = "/mnt/sysimage/root/systemid.old"
new_keys = "1-0a0f4ef8d13b562899298b13379849a1" for key in new_keys.split(','):
[email protected] 119 www.redhat.com
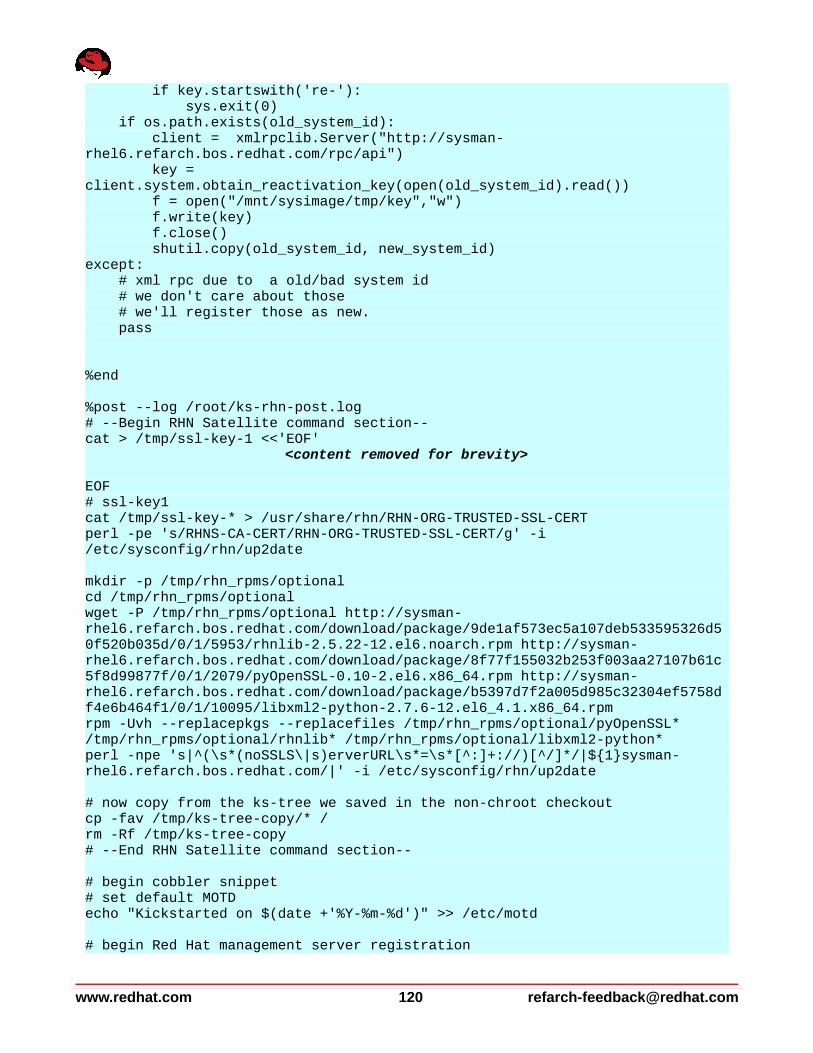
if key.startswith('re-'): sys.exit(0) if os.path.exists(old_system_id): client = xmlrpclib.Server("http://sysman-rhel6.refarch.bos.redhat.com/rpc/api") key = client.system.obtain_reactivation_key(open(old_system_id).read()) f = open("/mnt/sysimage/tmp/key","w") f.write(key) f.close() shutil.copy(old_system_id, new_system_id)except: # xml rpc due to a old/bad system id # we don't care about those # we'll register those as new. pass
%end
%post --log /root/ks-rhn-post.log# --Begin RHN Satellite command section--cat > /tmp/ssl-key-1 <<'EOF'
<content removed for brevity>
EOF# ssl-key1cat /tmp/ssl-key-* > /usr/share/rhn/RHN-ORG-TRUSTED-SSL-CERTperl -pe 's/RHNS-CA-CERT/RHN-ORG-TRUSTED-SSL-CERT/g' -i /etc/sysconfig/rhn/up2date
mkdir -p /tmp/rhn_rpms/optionalcd /tmp/rhn_rpms/optional wget -P /tmp/rhn_rpms/optional http://sysman-rhel6.refarch.bos.redhat.com/download/package/9de1af573ec5a107deb533595326d50f520b035d/0/1/5953/rhnlib-2.5.22-12.el6.noarch.rpm http://sysman-rhel6.refarch.bos.redhat.com/download/package/8f77f155032b253f003aa27107b61c5f8d99877f/0/1/2079/pyOpenSSL-0.10-2.el6.x86_64.rpm http://sysman-rhel6.refarch.bos.redhat.com/download/package/b5397d7f2a005d985c32304ef5758df4e6b464f1/0/1/10095/libxml2-python-2.7.6-12.el6_4.1.x86_64.rpm rpm -Uvh --replacepkgs --replacefiles /tmp/rhn_rpms/optional/pyOpenSSL* /tmp/rhn_rpms/optional/rhnlib* /tmp/rhn_rpms/optional/libxml2-python* perl -npe 's|^(\s*(noSSLS\|s)erverURL\s*=\s*[^:]+://)[^/]*/|${1}sysman-rhel6.refarch.bos.redhat.com/|' -i /etc/sysconfig/rhn/up2date
# now copy from the ks-tree we saved in the non-chroot checkoutcp -fav /tmp/ks-tree-copy/* /rm -Rf /tmp/ks-tree-copy# --End RHN Satellite command section--
# begin cobbler snippet# set default MOTDecho "Kickstarted on $(date +'%Y-%m-%d')" >> /etc/motd
# begin Red Hat management server registration
www.redhat.com 120 [email protected]
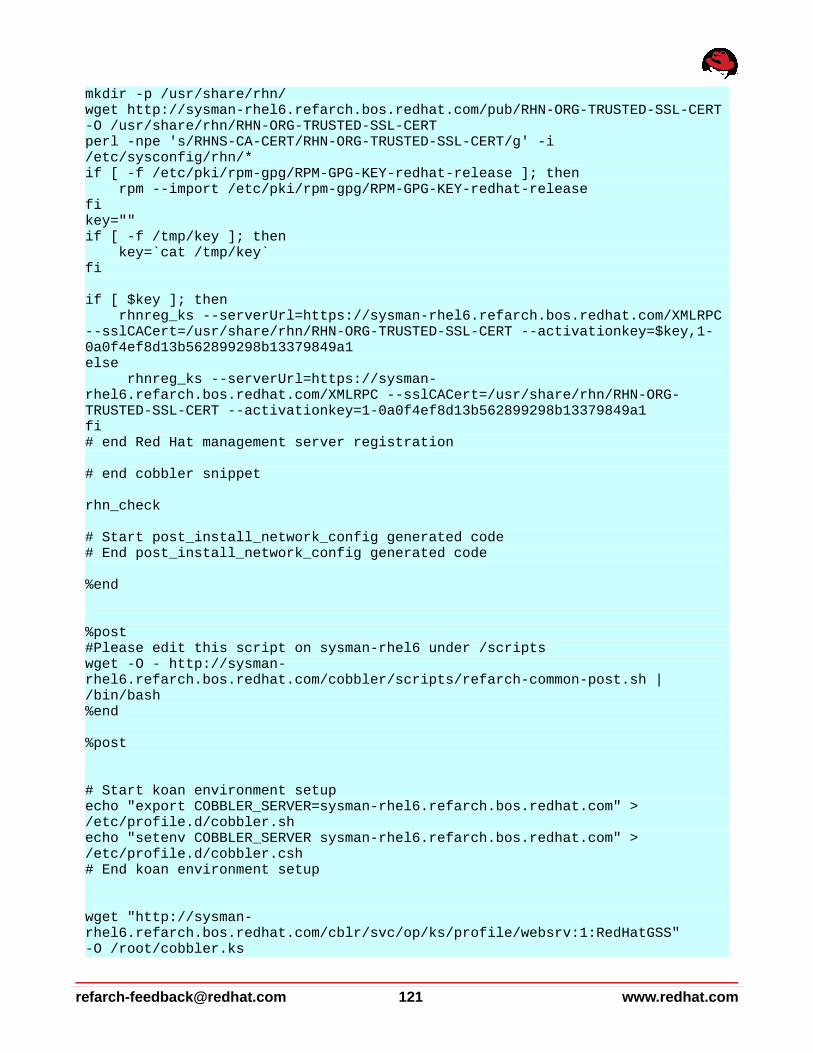
mkdir -p /usr/share/rhn/wget http://sysman-rhel6.refarch.bos.redhat.com/pub/RHN-ORG-TRUSTED-SSL-CERT -O /usr/share/rhn/RHN-ORG-TRUSTED-SSL-CERT perl -npe 's/RHNS-CA-CERT/RHN-ORG-TRUSTED-SSL-CERT/g' -i /etc/sysconfig/rhn/* if [ -f /etc/pki/rpm-gpg/RPM-GPG-KEY-redhat-release ]; then rpm --import /etc/pki/rpm-gpg/RPM-GPG-KEY-redhat-releasefikey=""if [ -f /tmp/key ]; then key=`cat /tmp/key`fi
if [ $key ]; then rhnreg_ks --serverUrl=https://sysman-rhel6.refarch.bos.redhat.com/XMLRPC --sslCACert=/usr/share/rhn/RHN-ORG-TRUSTED-SSL-CERT --activationkey=$key,1-0a0f4ef8d13b562899298b13379849a1else rhnreg_ks --serverUrl=https://sysman-rhel6.refarch.bos.redhat.com/XMLRPC --sslCACert=/usr/share/rhn/RHN-ORG-TRUSTED-SSL-CERT --activationkey=1-0a0f4ef8d13b562899298b13379849a1fi# end Red Hat management server registration
# end cobbler snippet
rhn_check
# Start post_install_network_config generated code# End post_install_network_config generated code
%end
%post#Please edit this script on sysman-rhel6 under /scriptswget -O - http://sysman-rhel6.refarch.bos.redhat.com/cobbler/scripts/refarch-common-post.sh | /bin/bash%end
%post
# Start koan environment setupecho "export COBBLER_SERVER=sysman-rhel6.refarch.bos.redhat.com" > /etc/profile.d/cobbler.shecho "setenv COBBLER_SERVER sysman-rhel6.refarch.bos.redhat.com" > /etc/profile.d/cobbler.csh# End koan environment setup
wget "http://sysman-rhel6.refarch.bos.redhat.com/cblr/svc/op/ks/profile/websrv:1:RedHatGSS" -O /root/cobbler.ks
[email protected] 121 www.redhat.com
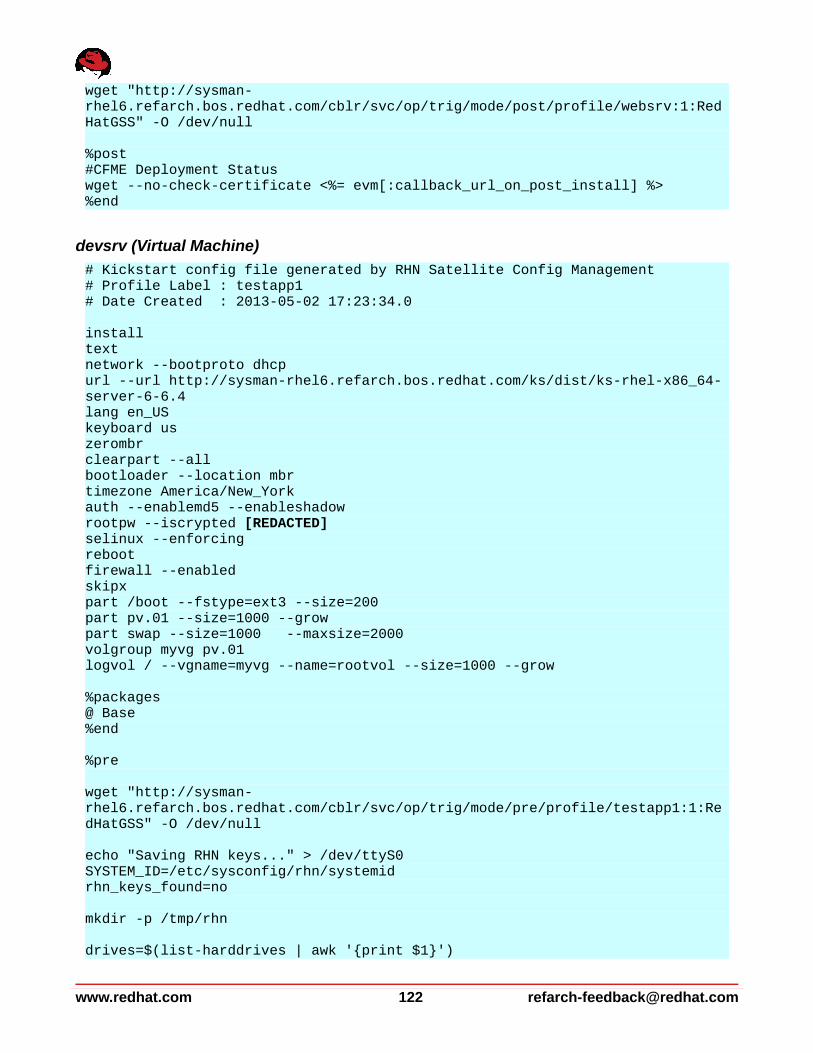
wget "http://sysman-rhel6.refarch.bos.redhat.com/cblr/svc/op/trig/mode/post/profile/websrv:1:RedHatGSS" -O /dev/null
%post#CFME Deployment Statuswget --no-check-certificate <%= evm[:callback_url_on_post_install] %>%end
devsrv (Virtual Machine)
# Kickstart config file generated by RHN Satellite Config Management# Profile Label : testapp1# Date Created : 2013-05-02 17:23:34.0
installtextnetwork --bootproto dhcpurl --url http://sysman-rhel6.refarch.bos.redhat.com/ks/dist/ks-rhel-x86_64-server-6-6.4lang en_USkeyboard uszerombrclearpart --allbootloader --location mbrtimezone America/New_Yorkauth --enablemd5 --enableshadowrootpw --iscrypted [REDACTED]selinux --enforcingrebootfirewall --enabledskipxpart /boot --fstype=ext3 --size=200 part pv.01 --size=1000 --grow part swap --size=1000 --maxsize=2000 volgroup myvg pv.01 logvol / --vgname=myvg --name=rootvol --size=1000 --grow
%packages @ Base%end
%pre
wget "http://sysman-rhel6.refarch.bos.redhat.com/cblr/svc/op/trig/mode/pre/profile/testapp1:1:RedHatGSS" -O /dev/null
echo "Saving RHN keys..." > /dev/ttyS0SYSTEM_ID=/etc/sysconfig/rhn/systemidrhn_keys_found=no
mkdir -p /tmp/rhn
drives=$(list-harddrives | awk '{print $1}')
www.redhat.com 122 [email protected]
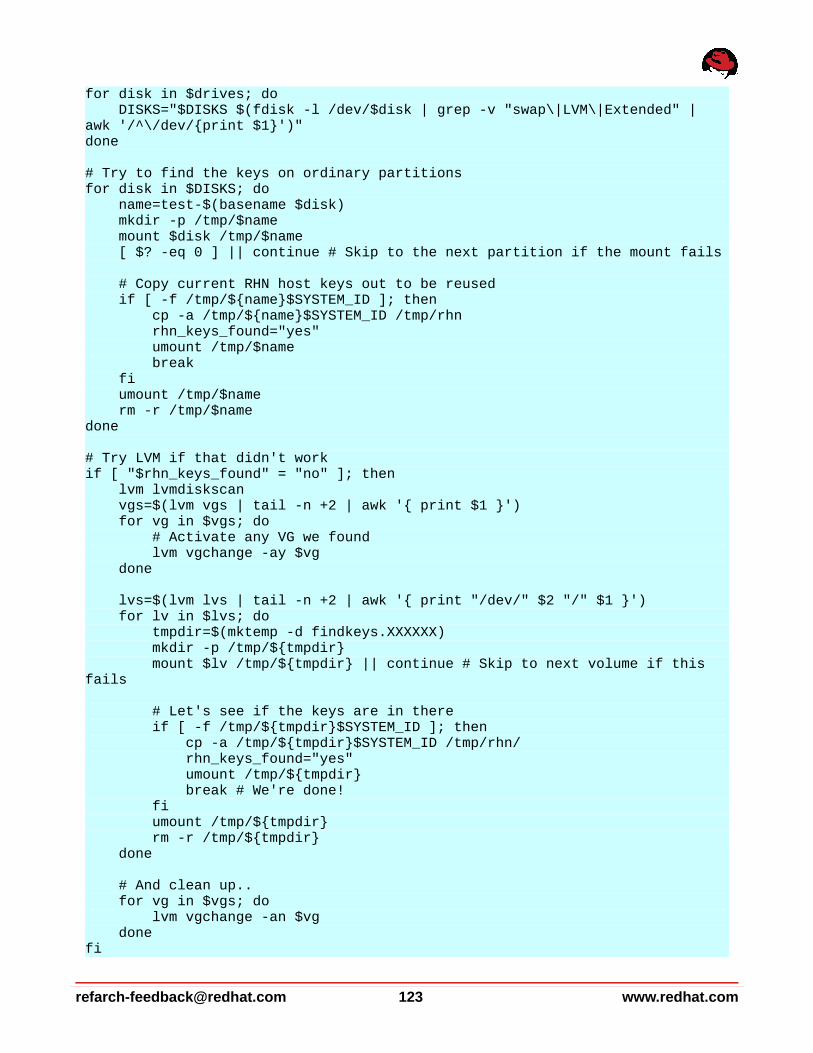
for disk in $drives; do DISKS="$DISKS $(fdisk -l /dev/$disk | grep -v "swap\|LVM\|Extended" | awk '/^\/dev/{print $1}')"done
# Try to find the keys on ordinary partitionsfor disk in $DISKS; do name=test-$(basename $disk) mkdir -p /tmp/$name mount $disk /tmp/$name [ $? -eq 0 ] || continue # Skip to the next partition if the mount fails
# Copy current RHN host keys out to be reused if [ -f /tmp/${name}$SYSTEM_ID ]; then cp -a /tmp/${name}$SYSTEM_ID /tmp/rhn rhn_keys_found="yes" umount /tmp/$name break fi umount /tmp/$name rm -r /tmp/$namedone
# Try LVM if that didn't workif [ "$rhn_keys_found" = "no" ]; then lvm lvmdiskscan vgs=$(lvm vgs | tail -n +2 | awk '{ print $1 }') for vg in $vgs; do # Activate any VG we found lvm vgchange -ay $vg done lvs=$(lvm lvs | tail -n +2 | awk '{ print "/dev/" $2 "/" $1 }') for lv in $lvs; do tmpdir=$(mktemp -d findkeys.XXXXXX) mkdir -p /tmp/${tmpdir} mount $lv /tmp/${tmpdir} || continue # Skip to next volume if this fails
# Let's see if the keys are in there if [ -f /tmp/${tmpdir}$SYSTEM_ID ]; then cp -a /tmp/${tmpdir}$SYSTEM_ID /tmp/rhn/ rhn_keys_found="yes" umount /tmp/${tmpdir} break # We're done! fi umount /tmp/${tmpdir} rm -r /tmp/${tmpdir} done # And clean up.. for vg in $vgs; do lvm vgchange -an $vg donefi
[email protected] 123 www.redhat.com
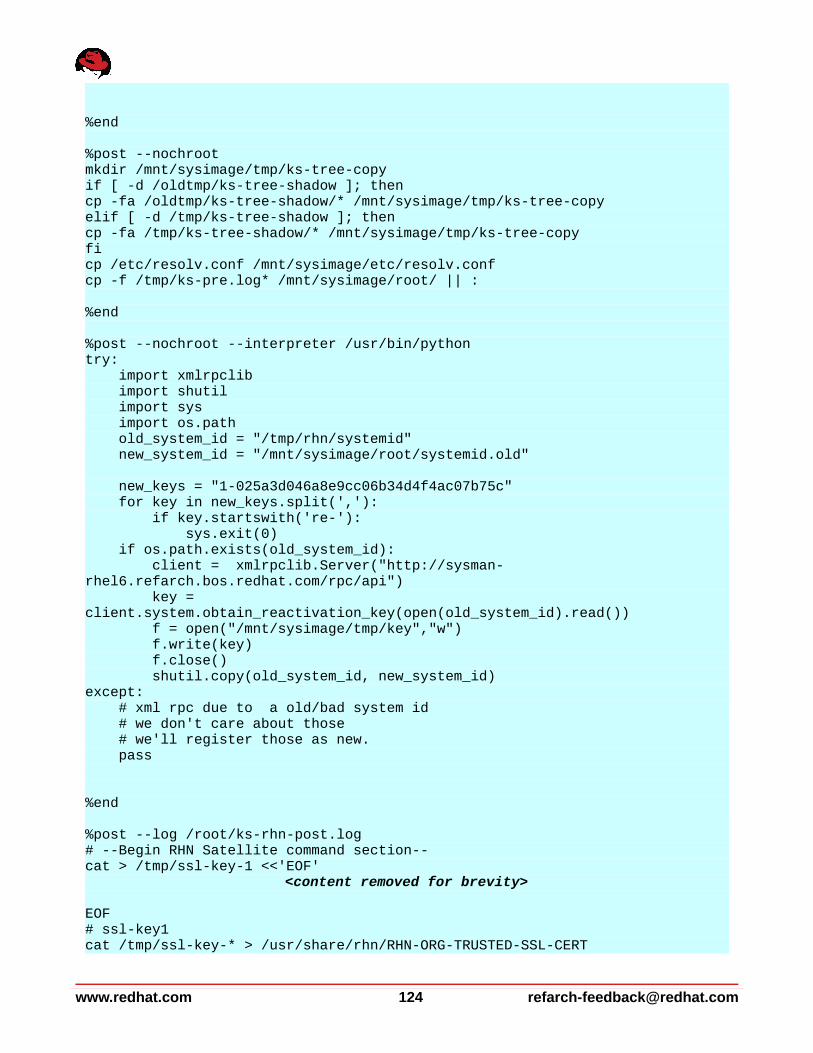
%end
%post --nochrootmkdir /mnt/sysimage/tmp/ks-tree-copyif [ -d /oldtmp/ks-tree-shadow ]; thencp -fa /oldtmp/ks-tree-shadow/* /mnt/sysimage/tmp/ks-tree-copyelif [ -d /tmp/ks-tree-shadow ]; thencp -fa /tmp/ks-tree-shadow/* /mnt/sysimage/tmp/ks-tree-copyficp /etc/resolv.conf /mnt/sysimage/etc/resolv.confcp -f /tmp/ks-pre.log* /mnt/sysimage/root/ || :
%end
%post --nochroot --interpreter /usr/bin/pythontry: import xmlrpclib import shutil import sys import os.path old_system_id = "/tmp/rhn/systemid" new_system_id = "/mnt/sysimage/root/systemid.old"
new_keys = "1-025a3d046a8e9cc06b34d4f4ac07b75c" for key in new_keys.split(','): if key.startswith('re-'): sys.exit(0) if os.path.exists(old_system_id): client = xmlrpclib.Server("http://sysman-rhel6.refarch.bos.redhat.com/rpc/api") key = client.system.obtain_reactivation_key(open(old_system_id).read()) f = open("/mnt/sysimage/tmp/key","w") f.write(key) f.close() shutil.copy(old_system_id, new_system_id)except: # xml rpc due to a old/bad system id # we don't care about those # we'll register those as new. pass
%end
%post --log /root/ks-rhn-post.log# --Begin RHN Satellite command section--cat > /tmp/ssl-key-1 <<'EOF'
<content removed for brevity>
EOF# ssl-key1cat /tmp/ssl-key-* > /usr/share/rhn/RHN-ORG-TRUSTED-SSL-CERT
www.redhat.com 124 [email protected]
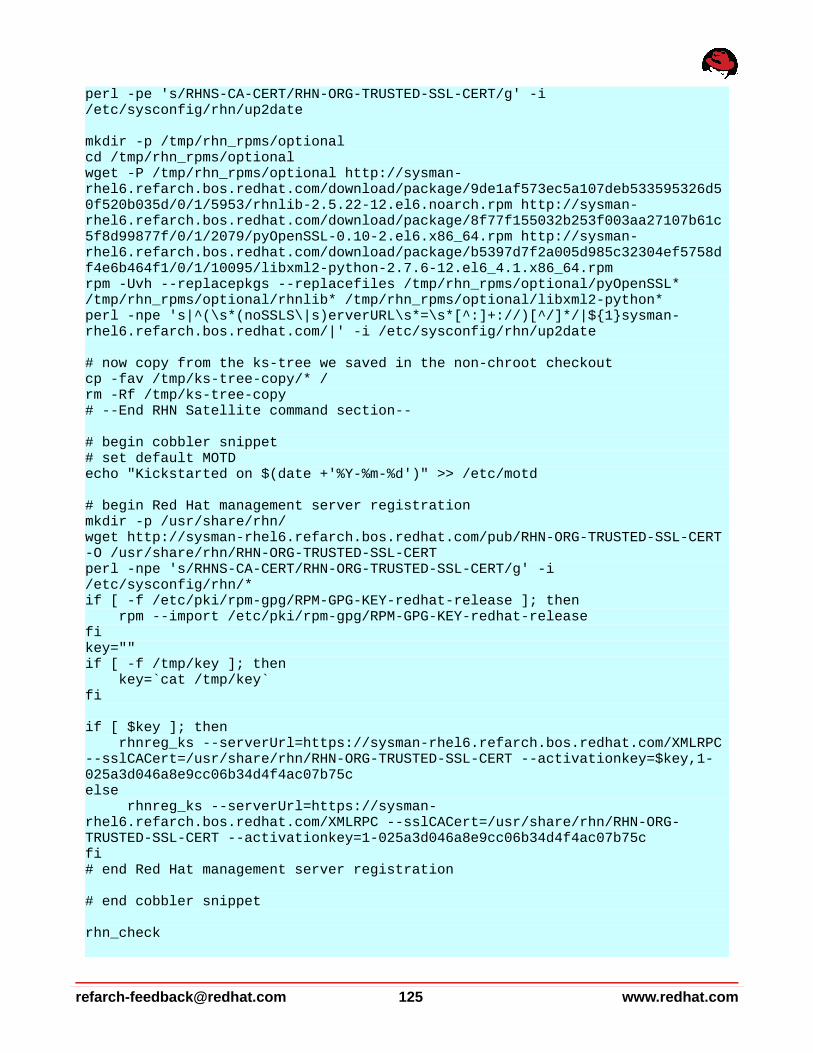
perl -pe 's/RHNS-CA-CERT/RHN-ORG-TRUSTED-SSL-CERT/g' -i /etc/sysconfig/rhn/up2date
mkdir -p /tmp/rhn_rpms/optionalcd /tmp/rhn_rpms/optional wget -P /tmp/rhn_rpms/optional http://sysman-rhel6.refarch.bos.redhat.com/download/package/9de1af573ec5a107deb533595326d50f520b035d/0/1/5953/rhnlib-2.5.22-12.el6.noarch.rpm http://sysman-rhel6.refarch.bos.redhat.com/download/package/8f77f155032b253f003aa27107b61c5f8d99877f/0/1/2079/pyOpenSSL-0.10-2.el6.x86_64.rpm http://sysman-rhel6.refarch.bos.redhat.com/download/package/b5397d7f2a005d985c32304ef5758df4e6b464f1/0/1/10095/libxml2-python-2.7.6-12.el6_4.1.x86_64.rpm rpm -Uvh --replacepkgs --replacefiles /tmp/rhn_rpms/optional/pyOpenSSL* /tmp/rhn_rpms/optional/rhnlib* /tmp/rhn_rpms/optional/libxml2-python* perl -npe 's|^(\s*(noSSLS\|s)erverURL\s*=\s*[^:]+://)[^/]*/|${1}sysman-rhel6.refarch.bos.redhat.com/|' -i /etc/sysconfig/rhn/up2date
# now copy from the ks-tree we saved in the non-chroot checkoutcp -fav /tmp/ks-tree-copy/* /rm -Rf /tmp/ks-tree-copy# --End RHN Satellite command section--
# begin cobbler snippet# set default MOTDecho "Kickstarted on $(date +'%Y-%m-%d')" >> /etc/motd
# begin Red Hat management server registrationmkdir -p /usr/share/rhn/wget http://sysman-rhel6.refarch.bos.redhat.com/pub/RHN-ORG-TRUSTED-SSL-CERT -O /usr/share/rhn/RHN-ORG-TRUSTED-SSL-CERT perl -npe 's/RHNS-CA-CERT/RHN-ORG-TRUSTED-SSL-CERT/g' -i /etc/sysconfig/rhn/* if [ -f /etc/pki/rpm-gpg/RPM-GPG-KEY-redhat-release ]; then rpm --import /etc/pki/rpm-gpg/RPM-GPG-KEY-redhat-releasefikey=""if [ -f /tmp/key ]; then key=`cat /tmp/key`fi
if [ $key ]; then rhnreg_ks --serverUrl=https://sysman-rhel6.refarch.bos.redhat.com/XMLRPC --sslCACert=/usr/share/rhn/RHN-ORG-TRUSTED-SSL-CERT --activationkey=$key,1-025a3d046a8e9cc06b34d4f4ac07b75celse rhnreg_ks --serverUrl=https://sysman-rhel6.refarch.bos.redhat.com/XMLRPC --sslCACert=/usr/share/rhn/RHN-ORG-TRUSTED-SSL-CERT --activationkey=1-025a3d046a8e9cc06b34d4f4ac07b75cfi# end Red Hat management server registration
# end cobbler snippet
rhn_check
[email protected] 125 www.redhat.com
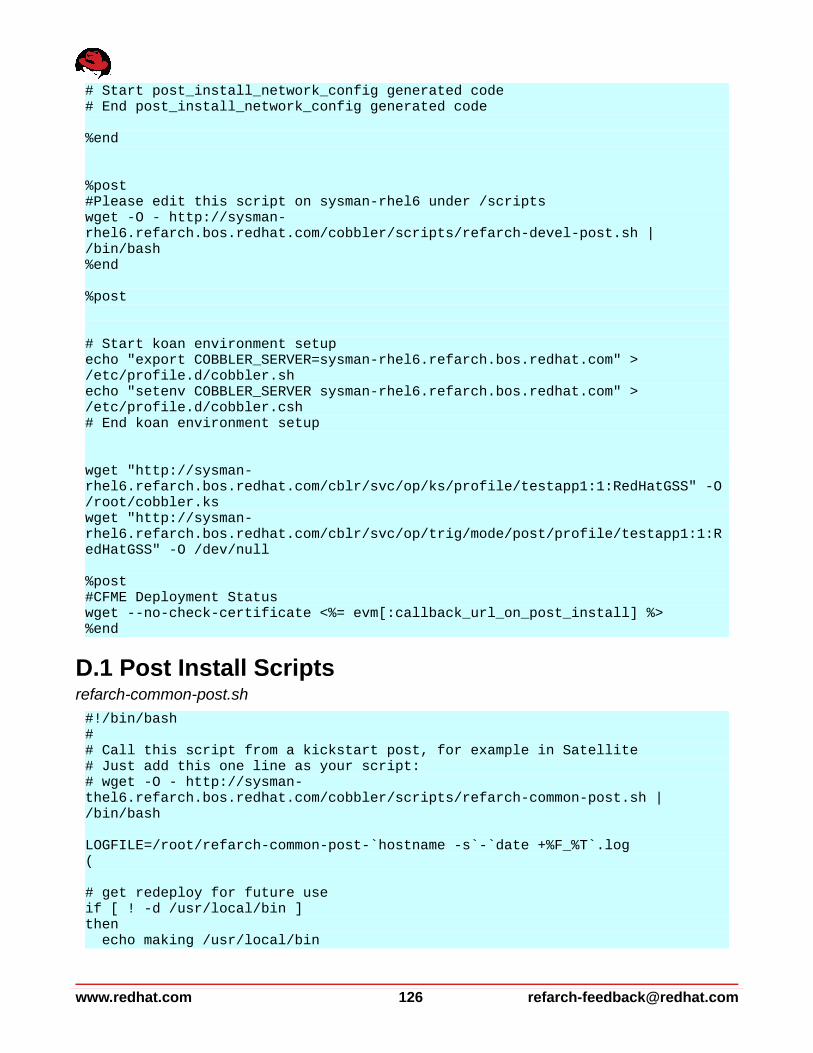
# Start post_install_network_config generated code# End post_install_network_config generated code
%end
%post#Please edit this script on sysman-rhel6 under /scriptswget -O - http://sysman-rhel6.refarch.bos.redhat.com/cobbler/scripts/refarch-devel-post.sh | /bin/bash%end
%post
# Start koan environment setupecho "export COBBLER_SERVER=sysman-rhel6.refarch.bos.redhat.com" > /etc/profile.d/cobbler.shecho "setenv COBBLER_SERVER sysman-rhel6.refarch.bos.redhat.com" > /etc/profile.d/cobbler.csh# End koan environment setup
wget "http://sysman-rhel6.refarch.bos.redhat.com/cblr/svc/op/ks/profile/testapp1:1:RedHatGSS" -O /root/cobbler.kswget "http://sysman-rhel6.refarch.bos.redhat.com/cblr/svc/op/trig/mode/post/profile/testapp1:1:RedHatGSS" -O /dev/null
%post#CFME Deployment Statuswget --no-check-certificate <%= evm[:callback_url_on_post_install] %>%end
D.1 Post Install Scriptsrefarch-common-post.sh
#!/bin/bash # # Call this script from a kickstart post, for example in Satellite # Just add this one line as your script: # wget -O - http://sysman-thel6.refarch.bos.redhat.com/cobbler/scripts/refarch-common-post.sh | /bin/bash
LOGFILE=/root/refarch-common-post-`hostname -s`-`date +%F_%T`.log (
# get redeploy for future use if [ ! -d /usr/local/bin ] then echo making /usr/local/bin
www.redhat.com 126 [email protected]
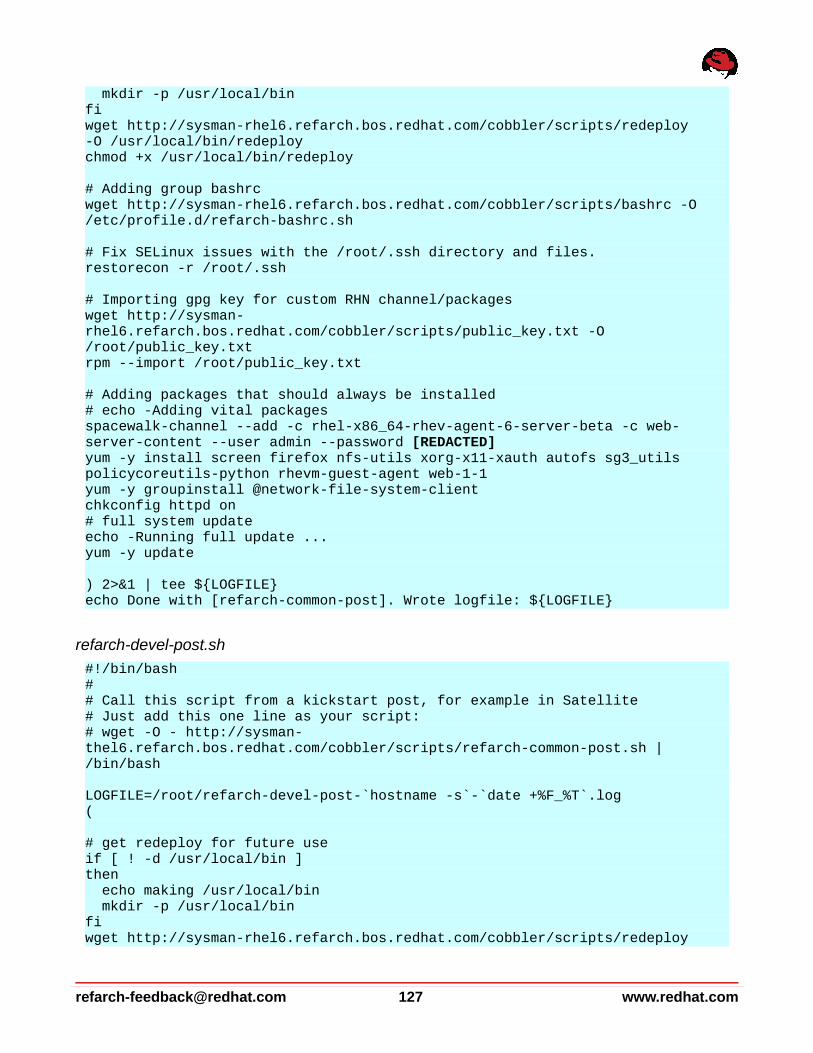
mkdir -p /usr/local/bin fi wget http://sysman-rhel6.refarch.bos.redhat.com/cobbler/scripts/redeploy -O /usr/local/bin/redeploy chmod +x /usr/local/bin/redeploy
# Adding group bashrc wget http://sysman-rhel6.refarch.bos.redhat.com/cobbler/scripts/bashrc -O /etc/profile.d/refarch-bashrc.sh
# Fix SELinux issues with the /root/.ssh directory and files. restorecon -r /root/.ssh
# Importing gpg key for custom RHN channel/packages wget http://sysman-rhel6.refarch.bos.redhat.com/cobbler/scripts/public_key.txt -O /root/public_key.txt rpm --import /root/public_key.txt
# Adding packages that should always be installed # echo -Adding vital packages spacewalk-channel --add -c rhel-x86_64-rhev-agent-6-server-beta -c web-server-content --user admin --password [REDACTED] yum -y install screen firefox nfs-utils xorg-x11-xauth autofs sg3_utils policycoreutils-python rhevm-guest-agent web-1-1 yum -y groupinstall @network-file-system-client chkconfig httpd on # full system update echo -Running full update ... yum -y update
) 2>&1 | tee ${LOGFILE} echo Done with [refarch-common-post]. Wrote logfile: ${LOGFILE}
refarch-devel-post.sh
#!/bin/bash # # Call this script from a kickstart post, for example in Satellite # Just add this one line as your script: # wget -O - http://sysman-thel6.refarch.bos.redhat.com/cobbler/scripts/refarch-common-post.sh | /bin/bash
LOGFILE=/root/refarch-devel-post-`hostname -s`-`date +%F_%T`.log (
# get redeploy for future use if [ ! -d /usr/local/bin ] then echo making /usr/local/bin mkdir -p /usr/local/bin fi wget http://sysman-rhel6.refarch.bos.redhat.com/cobbler/scripts/redeploy
[email protected] 127 www.redhat.com
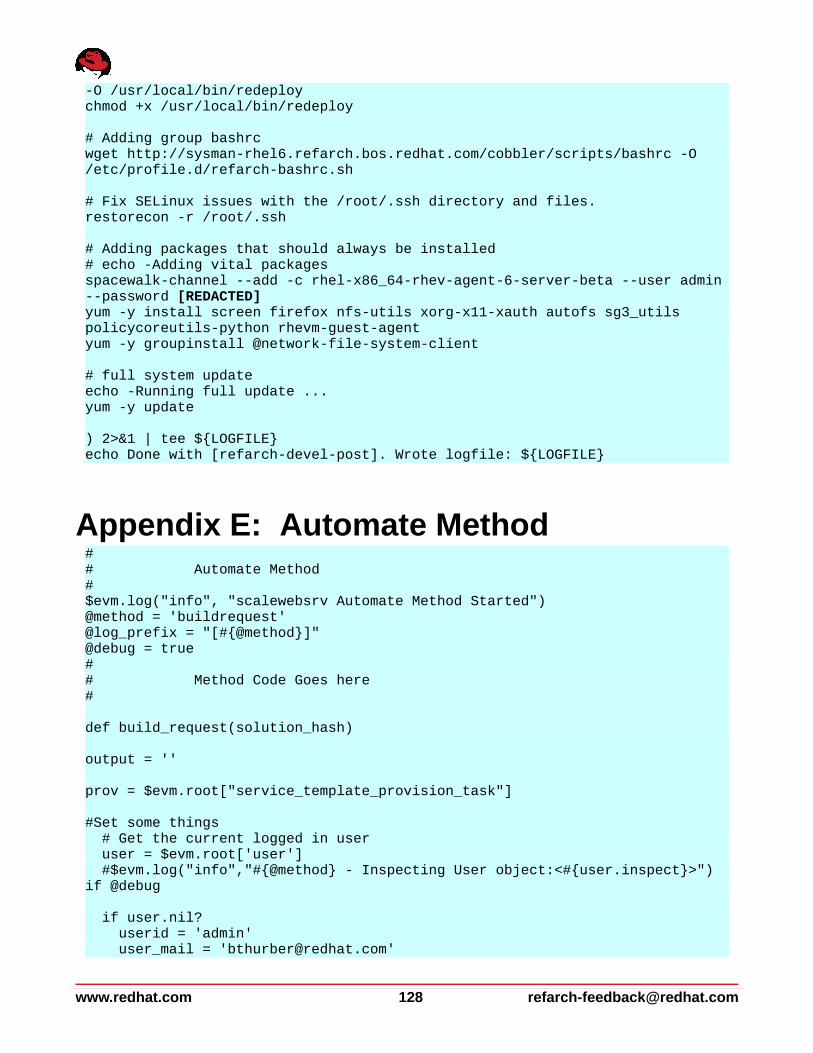
-O /usr/local/bin/redeploy chmod +x /usr/local/bin/redeploy
# Adding group bashrc wget http://sysman-rhel6.refarch.bos.redhat.com/cobbler/scripts/bashrc -O /etc/profile.d/refarch-bashrc.sh
# Fix SELinux issues with the /root/.ssh directory and files. restorecon -r /root/.ssh
# Adding packages that should always be installed # echo -Adding vital packages spacewalk-channel --add -c rhel-x86_64-rhev-agent-6-server-beta --user admin --password [REDACTED] yum -y install screen firefox nfs-utils xorg-x11-xauth autofs sg3_utils policycoreutils-python rhevm-guest-agent yum -y groupinstall @network-file-system-client
# full system update echo -Running full update ... yum -y update
) 2>&1 | tee ${LOGFILE} echo Done with [refarch-devel-post]. Wrote logfile: ${LOGFILE}
Appendix E: Automate Method# # Automate Method # $evm.log("info", "scalewebsrv Automate Method Started") @method = 'buildrequest' @log_prefix = "[#{@method}]" @debug = true # # Method Code Goes here #
def build_request(solution_hash)
output = ''
prov = $evm.root["service_template_provision_task"]
#Set some things # Get the current logged in user user = $evm.root['user'] #$evm.log("info","#{@method} - Inspecting User object:<#{user.inspect}>") if @debug
if user.nil? userid = 'admin' user_mail = '[email protected]'
www.redhat.com 128 [email protected]
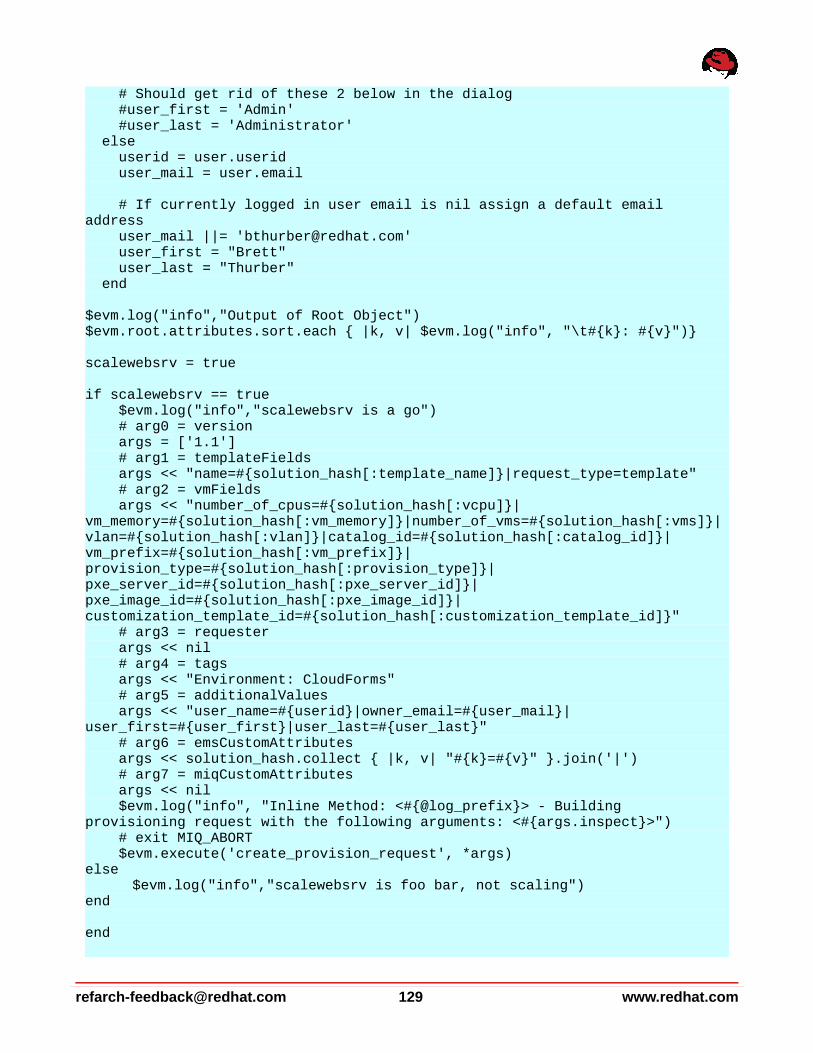
# Should get rid of these 2 below in the dialog #user_first = 'Admin' #user_last = 'Administrator' else userid = user.userid user_mail = user.email
# If currently logged in user email is nil assign a default email address user_mail ||= '[email protected]' user_first = "Brett" user_last = "Thurber" end
$evm.log("info","Output of Root Object") $evm.root.attributes.sort.each { |k, v| $evm.log("info", "\t#{k}: #{v}")}
scalewebsrv = true if scalewebsrv == true $evm.log("info","scalewebsrv is a go") # arg0 = version args = ['1.1'] # arg1 = templateFields args << "name=#{solution_hash[:template_name]}|request_type=template" # arg2 = vmFields args << "number_of_cpus=#{solution_hash[:vcpu]}|vm_memory=#{solution_hash[:vm_memory]}|number_of_vms=#{solution_hash[:vms]}|vlan=#{solution_hash[:vlan]}|catalog_id=#{solution_hash[:catalog_id]}|vm_prefix=#{solution_hash[:vm_prefix]}|provision_type=#{solution_hash[:provision_type]}|pxe_server_id=#{solution_hash[:pxe_server_id]}|pxe_image_id=#{solution_hash[:pxe_image_id]}|customization_template_id=#{solution_hash[:customization_template_id]}" # arg3 = requester args << nil # arg4 = tags args << "Environment: CloudForms" # arg5 = additionalValues args << "user_name=#{userid}|owner_email=#{user_mail}|user_first=#{user_first}|user_last=#{user_last}" # arg6 = emsCustomAttributes args << solution_hash.collect { |k, v| "#{k}=#{v}" }.join('|') # arg7 = miqCustomAttributes args << nil $evm.log("info", "Inline Method: <#{@log_prefix}> - Building provisioning request with the following arguments: <#{args.inspect}>") # exit MIQ_ABORT $evm.execute('create_provision_request', *args) else
$evm.log("info","scalewebsrv is foo bar, not scaling") end
end
[email protected] 129 www.redhat.com
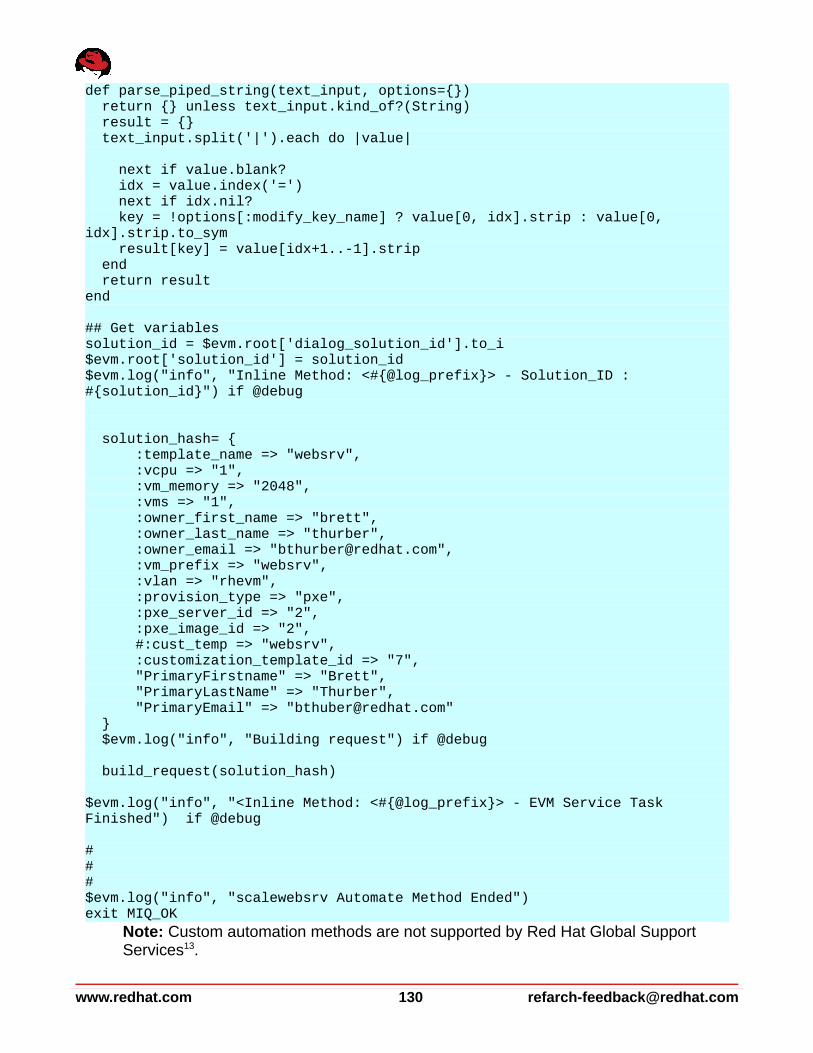
def parse_piped_string(text_input, options={}) return {} unless text_input.kind_of?(String) result = {} text_input.split('|').each do |value|
next if value.blank? idx = value.index('=') next if idx.nil? key = !options[:modify_key_name] ? value[0, idx].strip : value[0, idx].strip.to_sym result[key] = value[idx+1..-1].strip end return result end
## Get variables solution_id = $evm.root['dialog_solution_id'].to_i $evm.root['solution_id'] = solution_id $evm.log("info", "Inline Method: <#{@log_prefix}> - Solution_ID : #{solution_id}") if @debug
solution_hash= { :template_name => "websrv", :vcpu => "1", :vm_memory => "2048", :vms => "1", :owner_first_name => "brett", :owner_last_name => "thurber", :owner_email => "[email protected]", :vm_prefix => "websrv", :vlan => "rhevm", :provision_type => "pxe", :pxe_server_id => "2", :pxe_image_id => "2", #:cust_temp => "websrv", :customization_template_id => "7", "PrimaryFirstname" => "Brett", "PrimaryLastName" => "Thurber", "PrimaryEmail" => "[email protected]" } $evm.log("info", "Building request") if @debug
build_request(solution_hash)
$evm.log("info", "<Inline Method: <#{@log_prefix}> - EVM Service Task Finished") if @debug
# # # $evm.log("info", "scalewebsrv Automate Method Ended") exit MIQ_OK
Note: Custom automation methods are not supported by Red Hat Global Support Services13.
www.redhat.com 130 [email protected]
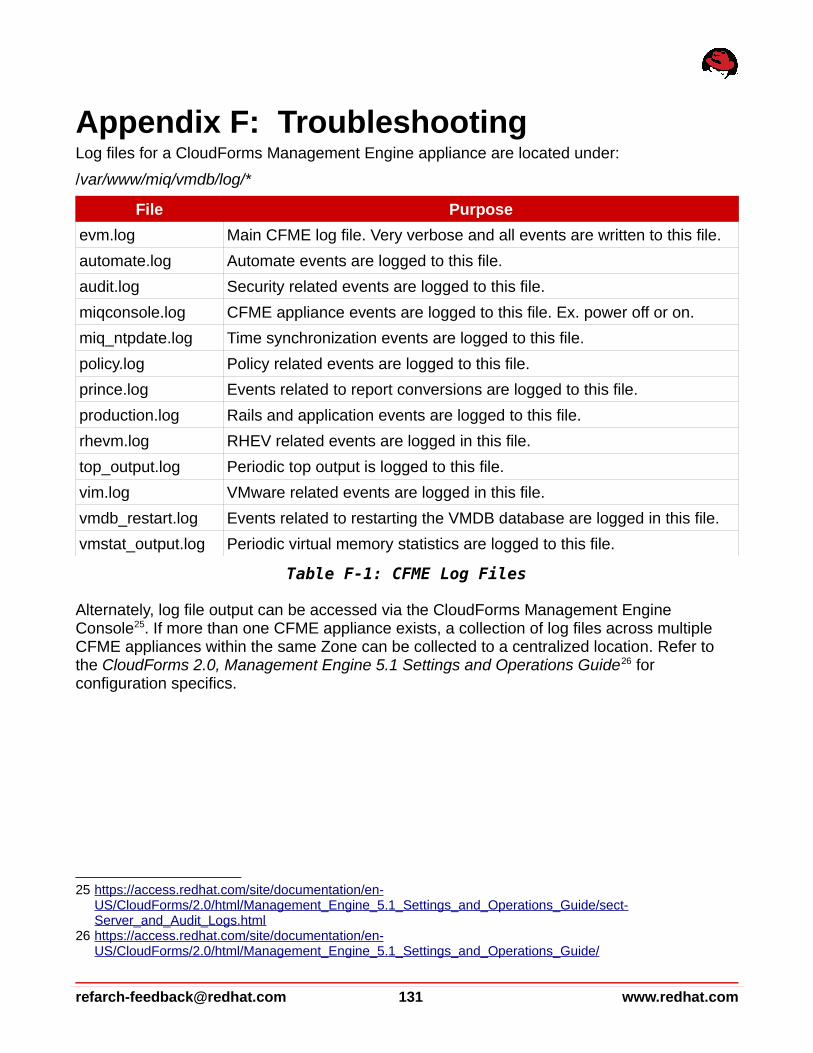
Appendix F: TroubleshootingLog files for a CloudForms Management Engine appliance are located under:
/var/www/miq/vmdb/log/*
File Purpose
evm.log Main CFME log file. Very verbose and all events are written to this file.
automate.log Automate events are logged to this file.
audit.log Security related events are logged to this file.
miqconsole.log CFME appliance events are logged to this file. Ex. power off or on.
miq_ntpdate.log Time synchronization events are logged to this file.
policy.log Policy related events are logged to this file.
prince.log Events related to report conversions are logged to this file.
production.log Rails and application events are logged to this file.
rhevm.log RHEV related events are logged in this file.
top_output.log Periodic top output is logged to this file.
vim.log VMware related events are logged in this file.
vmdb_restart.log Events related to restarting the VMDB database are logged in this file.
vmstat_output.log Periodic virtual memory statistics are logged to this file.
Table F-1: CFME Log Files
Alternately, log file output can be accessed via the CloudForms Management Engine Console25. If more than one CFME appliance exists, a collection of log files across multiple CFME appliances within the same Zone can be collected to a centralized location. Refer to the CloudForms 2.0, Management Engine 5.1 Settings and Operations Guide26 for configuration specifics.
25 https://access.redhat.com/site/documentation/en- US/CloudForms/2.0/html/Management_Engine_5.1_Settings_and_Operations_Guide/sect-Server_and_Audit_Logs.html
26 https://access.redhat.com/site/documentation/en- US/CloudForms/2.0/html/Management_Engine_5.1_Settings_and_Operations_Guide/
[email protected] 131 www.redhat.com
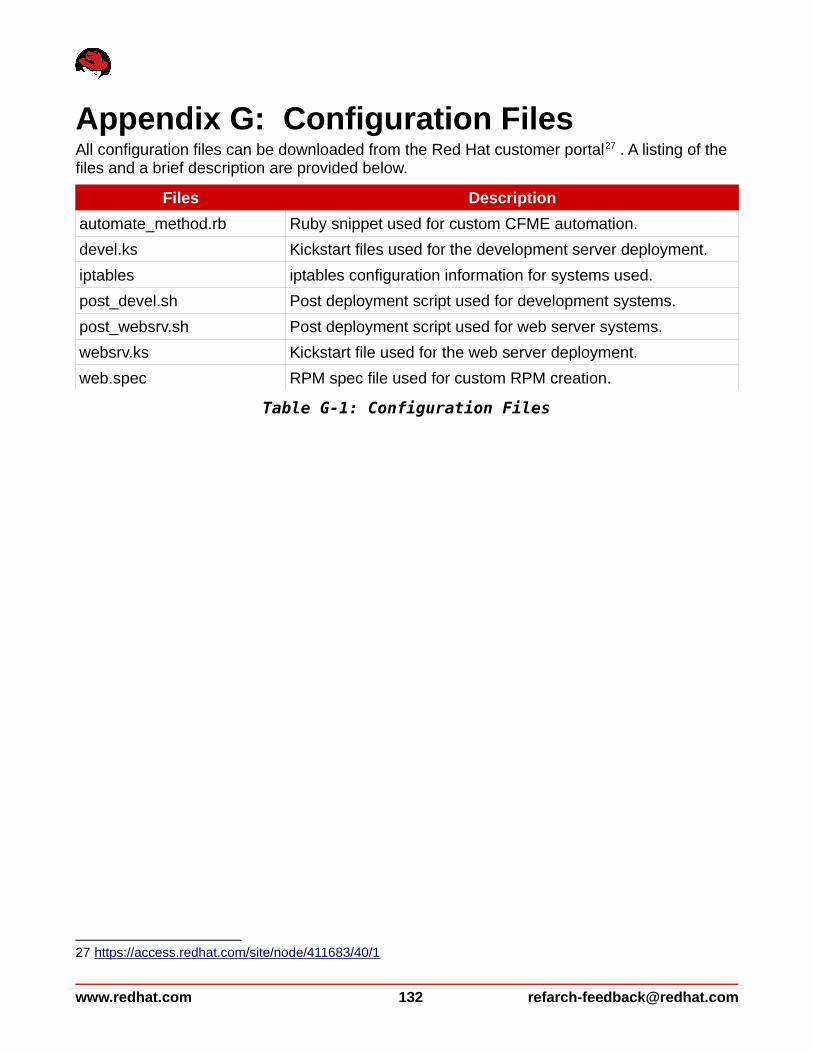
Appendix G: Configuration FilesAll configuration files can be downloaded from the Red Hat customer portal27 . A listing of the files and a brief description are provided below.
Files Description
automate_method.rb Ruby snippet used for custom CFME automation.
devel.ks Kickstart files used for the development server deployment.
iptables iptables configuration information for systems used.
post_devel.sh Post deployment script used for development systems.
post_websrv.sh Post deployment script used for web server systems.
websrv.ks Kickstart file used for the web server deployment.
web.spec RPM spec file used for custom RPM creation.
Table G-1: Configuration Files
27 https://access.redhat.com/site/node/411683/40/1
www.redhat.com 132 [email protected]

Related Documents


![Meet Your New Managed Private Cloud from Red Hat … [Hybrid] Infrastructure with Openstack and Ansible IBM Bluemix Private Cloud Overview Private cloud is a type of cloud computing](https://static.cupdf.com/doc/110x72/5afe17dd7f8b9a8b4d8e7f05/meet-your-new-managed-private-cloud-from-red-hat-hybrid-infrastructure-with.jpg)
