Prepared by: RecordPoint Shared Electronic Health Record System Clinical User Guide Version: 2.03 Date: 7 March 2012 Classification: Confidential Status: Released

Welcome message from author
This document is posted to help you gain knowledge. Please leave a comment to let me know what you think about it! Share it to your friends and learn new things together.
Transcript

Prepared by:
RecordPoint
Shared Electronic
Health Record System
Clinical User Guide
Version: 2.03 Date: 7 March 2012 Classification: Confidential Status: Released

RecordPoint Clinical User Guide V2.03
Confidential Page ii
For more information Level 17, 344 Queen St Brisbane QLD 4000 (07) 3292 0222 www.extensia.com.au © Copyright 2012 by Extensia. Notices Confidential The content of this document is Confidential. The information contained herein must only be used for the purpose for which it is supplied. Trademarks Company, product, and service names mentioned herein may be trademarks or service marks; such marks are the property of their respective owners.
RecordPoint Clinical User Guide V2.03
Confidential Page iii
Table of Contents
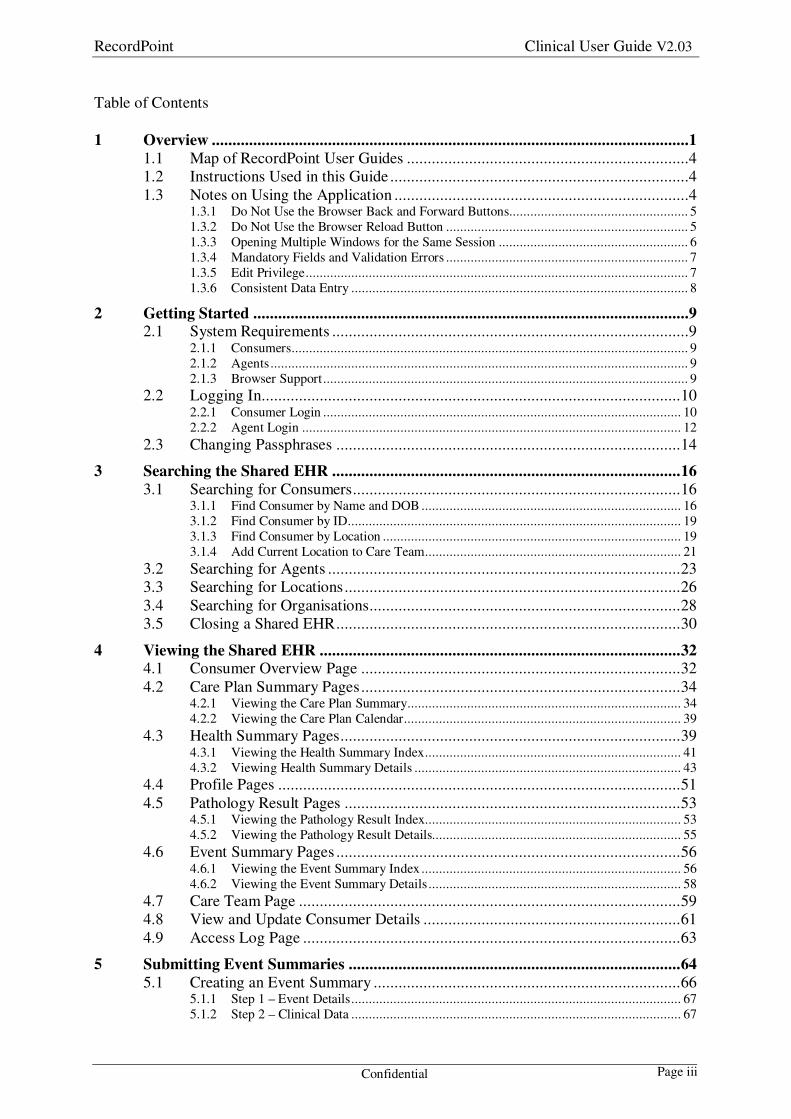
1 Overview ...................................................................................................................1
1.1 Map of RecordPoint User Guides ....................................................................4
1.2 Instructions Used in this Guide ........................................................................4
1.3 Notes on Using the Application .......................................................................4
1.3.1 Do Not Use the Browser Back and Forward Buttons ................................................... 5
1.3.2 Do Not Use the Browser Reload Button ..................................................................... 5
1.3.3 Opening Multiple Windows for the Same Session ...................................................... 6
1.3.4 Mandatory Fields and Validation Errors ..................................................................... 7
1.3.5 Edit Privilege ............................................................................................................. 7
1.3.6 Consistent Data Entry ................................................................................................ 8
2 Getting Started .........................................................................................................9
2.1 System Requirements ......................................................................................9
2.1.1 Consumers ................................................................................................................. 9
2.1.2 Agents ....................................................................................................................... 9
2.1.3 Browser Support ........................................................................................................ 9
2.2 Logging In..................................................................................................... 10
2.2.1 Consumer Login ...................................................................................................... 10
2.2.2 Agent Login ............................................................................................................ 12
2.3 Changing Passphrases ................................................................................... 14
3 Searching the Shared EHR .................................................................................... 16
3.1 Searching for Consumers ............................................................................... 16
3.1.1 Find Consumer by Name and DOB .......................................................................... 16
3.1.2 Find Consumer by ID............................................................................................... 19
3.1.3 Find Consumer by Location ..................................................................................... 19
3.1.4 Add Current Location to Care Team ......................................................................... 21
3.2 Searching for Agents ..................................................................................... 23
3.3 Searching for Locations ................................................................................. 26
3.4 Searching for Organisations ........................................................................... 28
3.5 Closing a Shared EHR ................................................................................... 30
4 Viewing the Shared EHR ....................................................................................... 32
4.1 Consumer Overview Page ............................................................................. 32
4.2 Care Plan Summary Pages ............................................................................. 34
4.2.1 Viewing the Care Plan Summary .............................................................................. 34
4.2.2 Viewing the Care Plan Calendar ............................................................................... 39
4.3 Health Summary Pages .................................................................................. 39
4.3.1 Viewing the Health Summary Index ......................................................................... 41
4.3.2 Viewing Health Summary Details ............................................................................ 43
4.4 Profile Pages ................................................................................................. 51
4.5 Pathology Result Pages ................................................................................. 53
4.5.1 Viewing the Pathology Result Index ......................................................................... 53
4.5.2 Viewing the Pathology Result Details....................................................................... 55
4.6 Event Summary Pages ................................................................................... 56
4.6.1 Viewing the Event Summary Index .......................................................................... 56
4.6.2 Viewing the Event Summary Details ........................................................................ 58
4.7 Care Team Page ............................................................................................ 59
4.8 View and Update Consumer Details .............................................................. 61
4.9 Access Log Page ........................................................................................... 63
5 Submitting Event Summaries ................................................................................ 64
5.1 Creating an Event Summary .......................................................................... 66
5.1.1 Step 1 – Event Details .............................................................................................. 67
5.1.2 Step 2 – Clinical Data .............................................................................................. 67
RecordPoint Clinical User Guide V2.03
Confidential Page iv
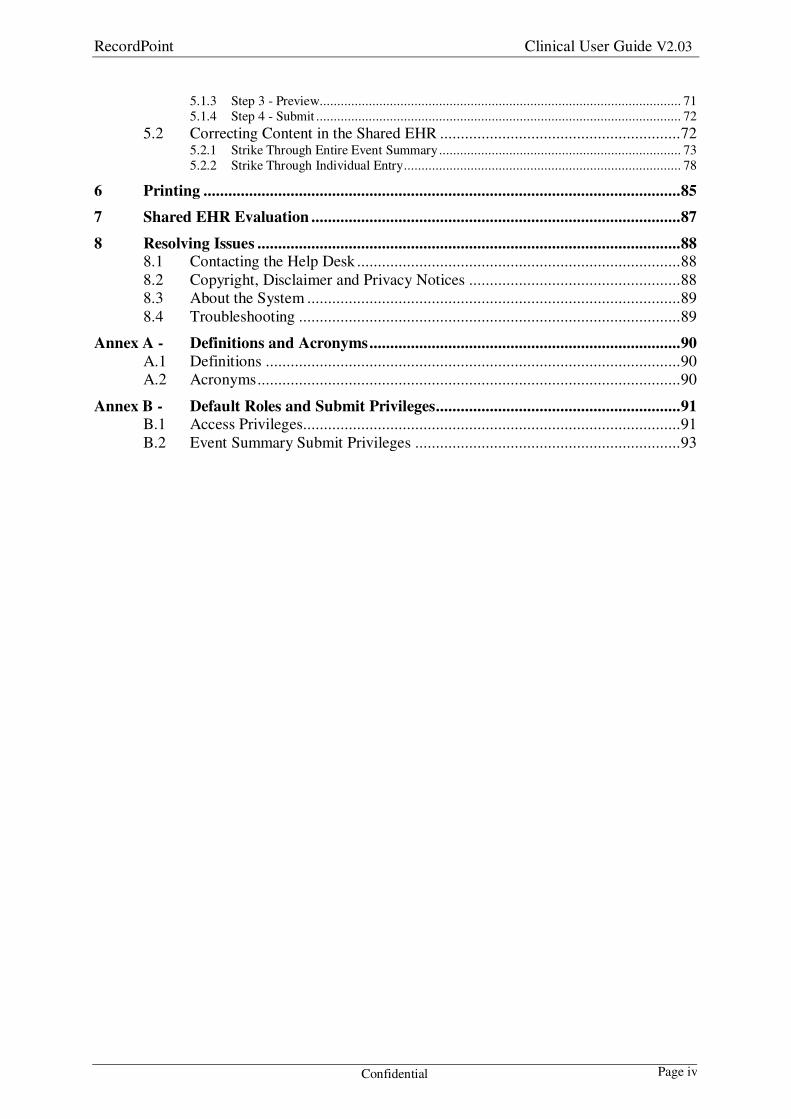
5.1.3 Step 3 - Preview....................................................................................................... 71
5.1.4 Step 4 - Submit ........................................................................................................ 72
5.2 Correcting Content in the Shared EHR .......................................................... 72
5.2.1 Strike Through Entire Event Summary ..................................................................... 73
5.2.2 Strike Through Individual Entry ............................................................................... 78
6 Printing ................................................................................................................... 85
7 Shared EHR Evaluation ......................................................................................... 87
8 Resolving Issues ...................................................................................................... 88
8.1 Contacting the Help Desk .............................................................................. 88
8.2 Copyright, Disclaimer and Privacy Notices ................................................... 88
8.3 About the System .......................................................................................... 89
8.4 Troubleshooting ............................................................................................ 89
Annex A - Definitions and Acronyms ........................................................................... 90
A.1 Definitions .................................................................................................... 90
A.2 Acronyms ...................................................................................................... 90
Annex B - Default Roles and Submit Privileges ........................................................... 91
B.1 Access Privileges........................................................................................... 91
B.2 Event Summary Submit Privileges ................................................................ 93
RecordPoint Clinical User Guide V2.03
Confidential Page 1
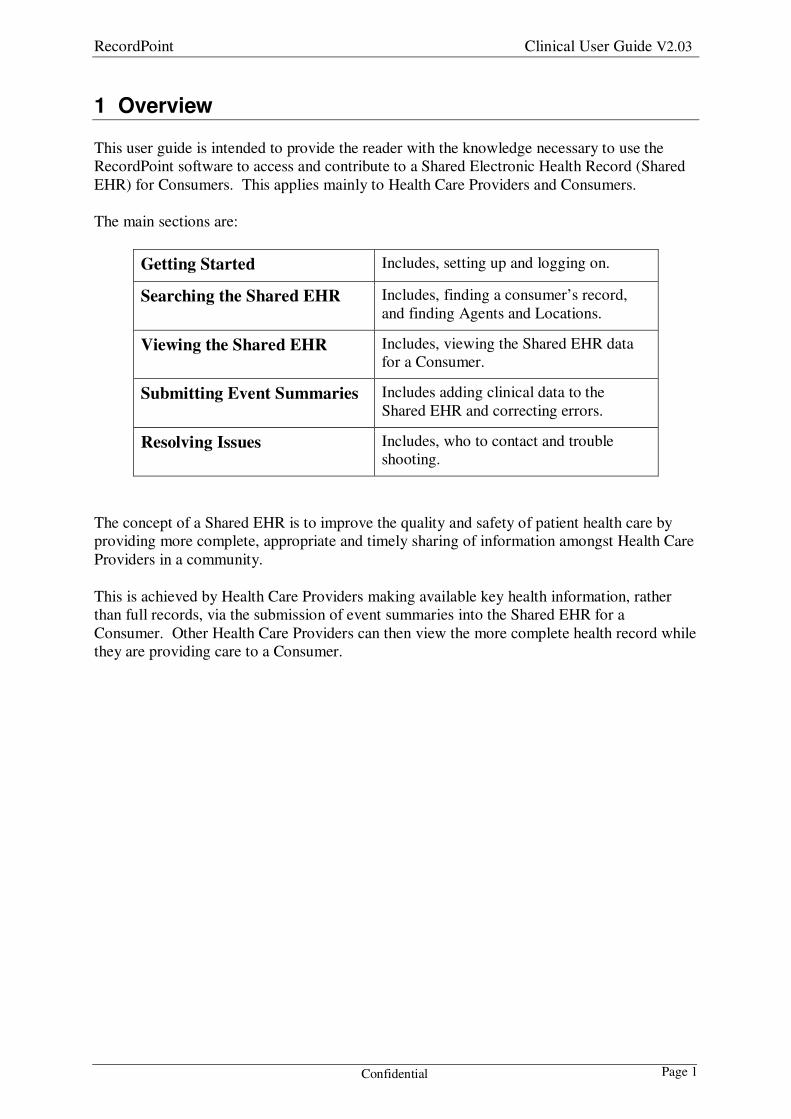
1 Overview
This user guide is intended to provide the reader with the knowledge necessary to use the
RecordPoint software to access and contribute to a Shared Electronic Health Record (Shared
EHR) for Consumers. This applies mainly to Health Care Providers and Consumers.
The main sections are:
Getting Started Includes, setting up and logging on.
Searching the Shared EHR Includes, finding a consumer’s record,
and finding Agents and Locations.
Viewing the Shared EHR Includes, viewing the Shared EHR data
for a Consumer.
Submitting Event Summaries Includes adding clinical data to the
Shared EHR and correcting errors.
Resolving Issues Includes, who to contact and trouble
shooting.
The concept of a Shared EHR is to improve the quality and safety of patient health care by
providing more complete, appropriate and timely sharing of information amongst Health Care
Providers in a community.
This is achieved by Health Care Providers making available key health information, rather
than full records, via the submission of event summaries into the Shared EHR for a
Consumer. Other Health Care Providers can then view the more complete health record while
they are providing care to a Consumer.

RecordPoint Clinical User Guide V2.03
Confidential Page 2
Figure 1 – Shared EHR Community
A key part of the Shared EHR is respecting the privacy of the Consumers and protecting the
integrity of the data. This is achieved at three levels as follows:
• All access to the system is authenticated. The user must identify themselves to the
system. For Consumers, this means entering their user name and password. For
Health Care Providers, this also includes use of a Medicare Australia location
certificate. The system also identifies itself to the user via a PKI certificate that the
user can validate.
• Access control is enforced based on participation, roles and care teams.
• Consumers, Agents and Locations must be registered and active in the system.
Immediately on withdrawal, access requests to information in the system related to
or by the withdrawn entity are rejected. For example, when a consumer
withdraws, Health Care Providers can no longer see the Shared EHR of the
consumer or add any further information to it.
• The role of the user grants them privileges to use certain system functions and
therefore restricts them from using others. For example a Consumer cannot add a
GP Event Summary or a Registration Officer cannot view clinical data.
Note: Due to variances in privileges between users, the pages, menu options, and
functions that are actually seen by each user will vary from the full functionality
that is presented in this user guide.
RecordPoint Clinical User Guide V2.03
Confidential Page 3
Default Roles and Submit Privileges on page 90 for details on the default roles and
privileges configured in the system.
• The Consumer (either directly or indirectly) maintains a list of locations on their
care team. Only Health Care Providers assigned a role at one of the locations on a
consumer’s care team can access the consumer’s Shared EHR. They must also be
connecting to the system from that location.
• All access (including read) is audited by the system. The audit trail can be viewed by
the Consumer and Health Care Providers.
The Shared EHR community will use the RecordPoint software to share Consumer centric
health data according to agreements and within integrated business processes. The software
and its functions support this community in establishing and maintaining a Shared EHR. The
software by itself does not seek to address the needs and obligations of a Shared EHR
community.
RecordPoint Clinical User Guide V2.03
Confidential Page 4
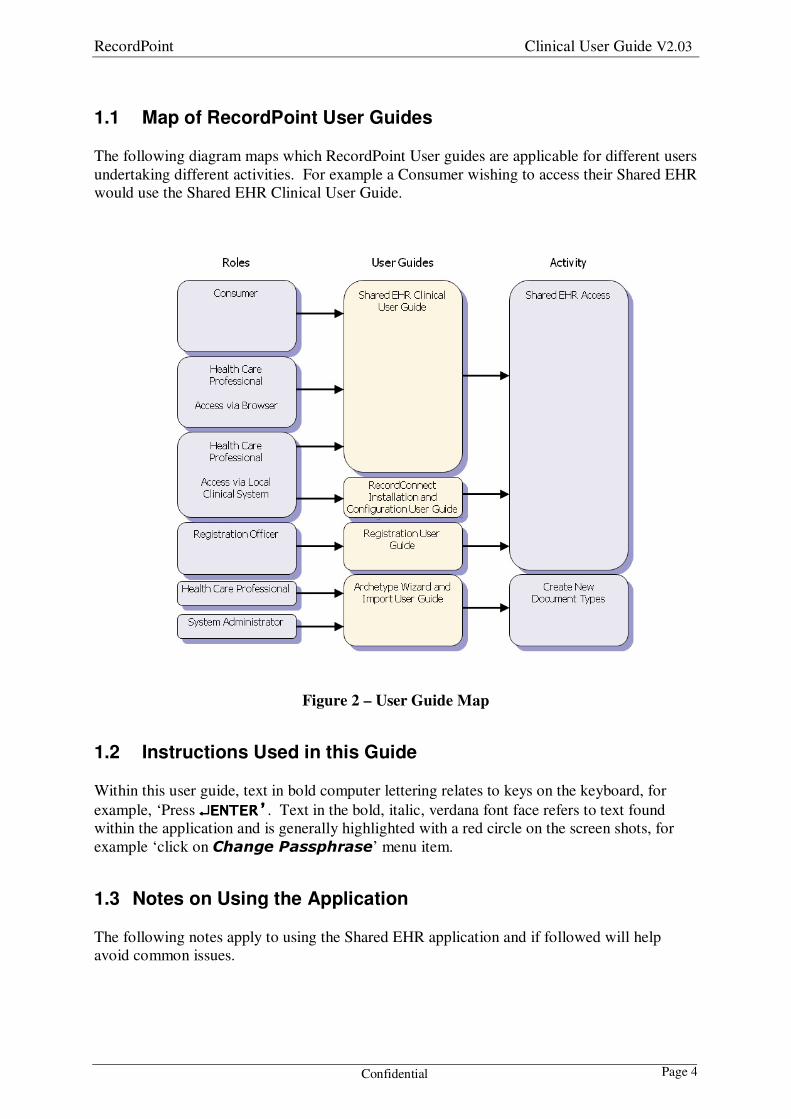
1.1 Map of RecordPoint User Guides
The following diagram maps which RecordPoint User guides are applicable for different users
undertaking different activities. For example a Consumer wishing to access their Shared EHR
would use the Shared EHR Clinical User Guide.
Figure 2 – User Guide Map
1.2 Instructions Used in this Guide
Within this user guide, text in bold computer lettering relates to keys on the keyboard, for
example, ‘Press ↵↵↵↵ENTER’ENTER’ENTER’ENTER’. Text in the bold, italic, verdana font face refers to text found
within the application and is generally highlighted with a red circle on the screen shots, for
example ‘click on Change Passphrase’ menu item.
1.3 Notes on Using the Application
The following notes apply to using the Shared EHR application and if followed will help
avoid common issues.

RecordPoint Clinical User Guide V2.03
Confidential Page 5
1.3.1 Do Not Use the Browser Back and Forward Buttons
The Shared EHR application is not designed to support use of the browser navigation
functions, including the Back and Forward buttons, menu items and keyboard shortcuts as
shown in Figure 3. To change pages and generally navigate around the Shared EHR
application please use the application menu system, buttons and links provided as shown in
this user guide.
Although use of the browser navigation functions will not damage the system they may
produce un-desirable results, including data loss and an unusable login session.
Figure 3 - Browser Back and Forward Functions
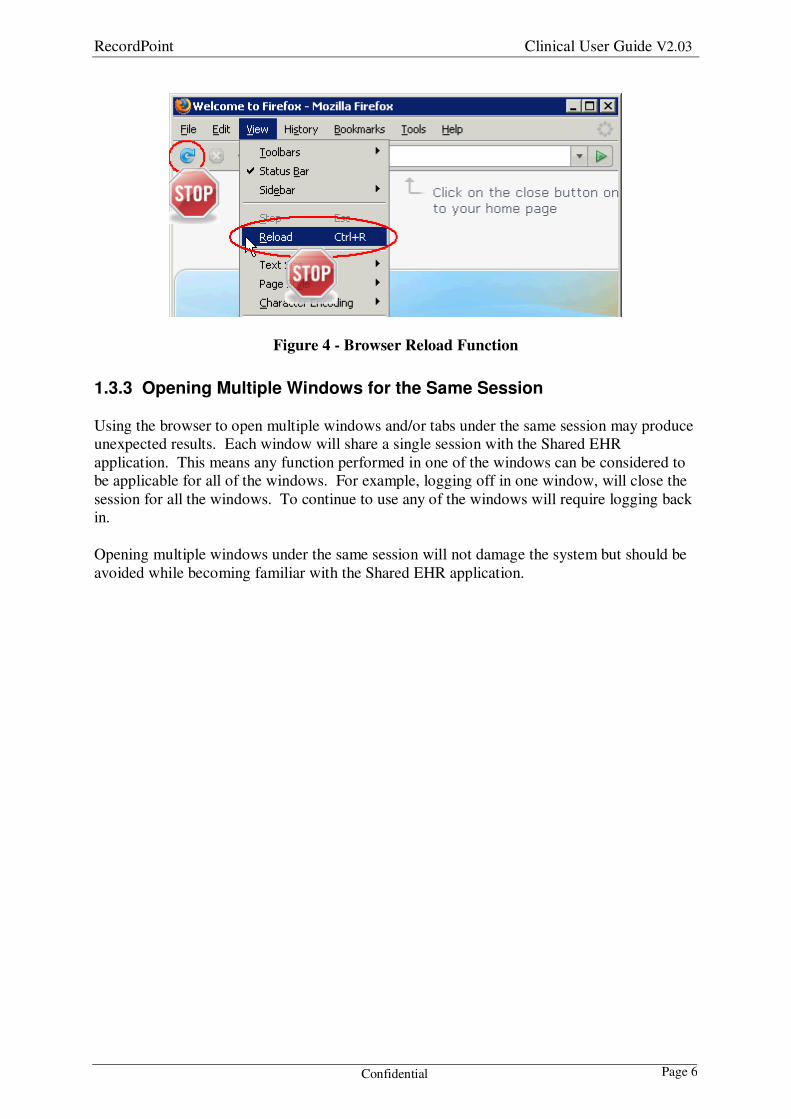
1.3.2 Do Not Use the Browser Reload Button
The Shared EHR application is not designed to support use of the browser reload function,
including the Reload button, menu item and keyboard shortcut as shown in Figure 4. If
refreshing the page is desired please use the application menu system, buttons and links
provided as shown in this user guide to re-display the same page.
Although use of the reload function will not damage the system it may produce un-desirable
results, including data loss and an unusable login session.
RecordPoint Clinical User Guide V2.03
Confidential Page 6
Figure 4 - Browser Reload Function
1.3.3 Opening Multiple Windows for the Same Session
Using the browser to open multiple windows and/or tabs under the same session may produce
unexpected results. Each window will share a single session with the Shared EHR
application. This means any function performed in one of the windows can be considered to
be applicable for all of the windows. For example, logging off in one window, will close the
session for all the windows. To continue to use any of the windows will require logging back
in.
Opening multiple windows under the same session will not damage the system but should be
avoided while becoming familiar with the Shared EHR application.

RecordPoint Clinical User Guide V2.03
Confidential Page 7
1.3.4 Mandatory Fields and Validation Errors
If parts of the data entry pages are incomplete or incorrectly filled out, errors will be displayed
on the current page after attempting to proceed to the next page. All the applicable errors for
the current page will be displayed at the top of the page in red and indicate which field is
incorrect or incomplete and allow correction prior to proceeding. The example shown in
Figure 5 occurred by clicking the Next button without any of the mandatory details being
completed.
Figure 5 – Field Error Examples
Note:
• Mandatory fields are preceded by a red asterisk (*).
1.3.5 Edit Privilege
The ability to use the Edit button is controlled by the update privilege which is not granted to
all users. When using Microsoft Internet Explorer, and viewing details without the update
privilege, the fields can be selected but the contents cannot be changed. In addition, any field
which is longer than the given display can only be viewed by double clicking in the field and
holding the left mouse button down whilst scrolling across the field. When using Mozilla
Firefox the fields cannot be selected or changed.
RecordPoint Clinical User Guide V2.03
Confidential Page 8
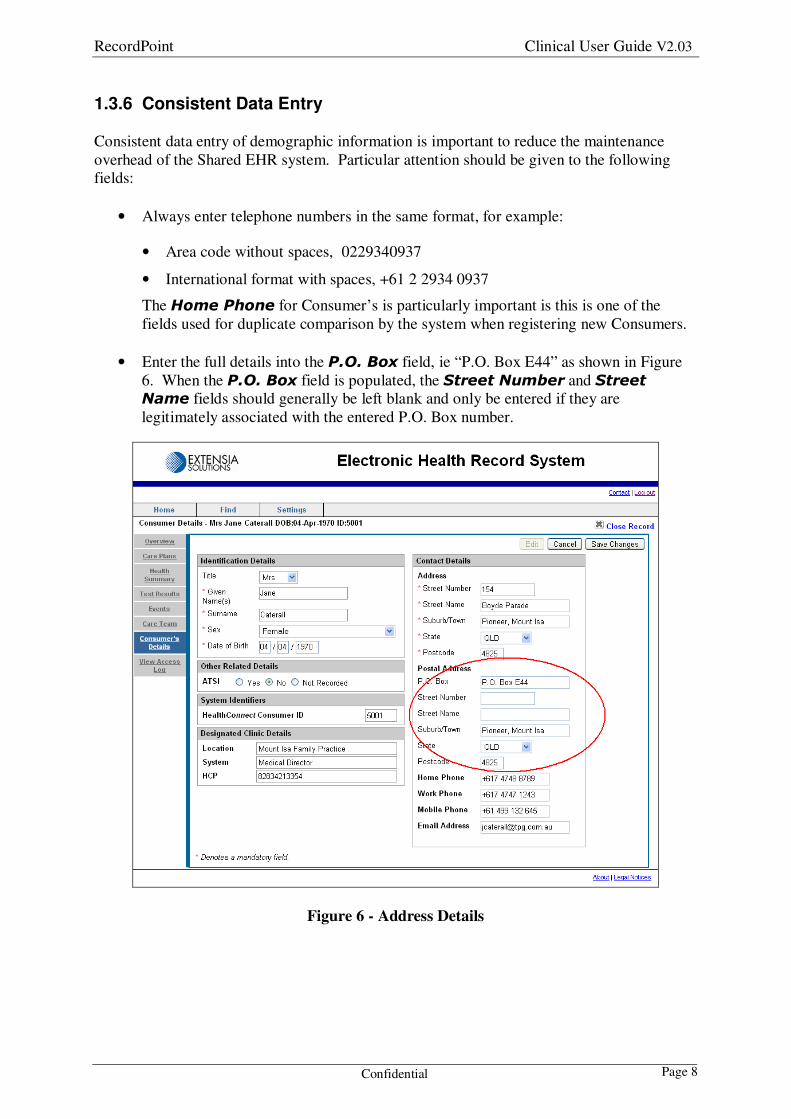
1.3.6 Consistent Data Entry
Consistent data entry of demographic information is important to reduce the maintenance
overhead of the Shared EHR system. Particular attention should be given to the following
fields:
• Always enter telephone numbers in the same format, for example:
• Area code without spaces, 0229340937
• International format with spaces, +61 2 2934 0937
The Home Phone for Consumer’s is particularly important is this is one of the
fields used for duplicate comparison by the system when registering new Consumers.
• Enter the full details into the P.O. Box field, ie “P.O. Box E44” as shown in Figure
6. When the P.O. Box field is populated, the Street Number and Street
Name fields should generally be left blank and only be entered if they are
legitimately associated with the entered P.O. Box number.
Figure 6 - Address Details

RecordPoint Clinical User Guide V2.03
Confidential Page 9
2 Getting Started
2.1 System Requirements
The requirements for accessing the system vary for Consumers and Agents. Agents are
effectively anyone who is not a Consumer, including Health Care Providers, Registration
Officers, Record Managers, System Administrators, etc. Agents are given greater privileges
than Consumers so the requirements for authentication are greater.
2.1.1 Consumers
Consumers wishing to access their Shared EHR will need access to a computer with a
standard web browser and internet connection, as well as an understanding of how to use the
internet. Accessing their Shared EHR requires a similar setup and similar skills to using
online banking applications.
2.1.2 Agents
Agents wishing to access the Shared EHR will need access to a computer with a standard web
browser and internet connection. They may also - subject to a suitable interface – access and
upload information into the Shared EHR via their local clinical system such as Medical
Director, practiX, pathology lab system, etc.
Agents will also require a Medicare Australia Location certificate for authentication purposes.
See the following website for details on obtaining a Medicare Australia Location certificate:
http://www.medicareaustralia.gov.au/provider/vendors/pki/. Once obtained, the Location
certificate will need to be installed into the browser either directly or via a smartcard (or other
token). The installation instructions that come with the certificate should be followed for
correct setup of the certificate.
2.1.3 Browser Support
Microsoft Internet Explorer (version 6 or higher) and Mozilla Firefox are known to work with
the Shared EHR application. Other browsers should also work but their compatibility would
need to be verified. The browser will require the Adobe Flash Player plugin (version 9 or
higher) installed.
RecordPoint Clinical User Guide V2.03
Confidential Page 10
2.2 Logging In
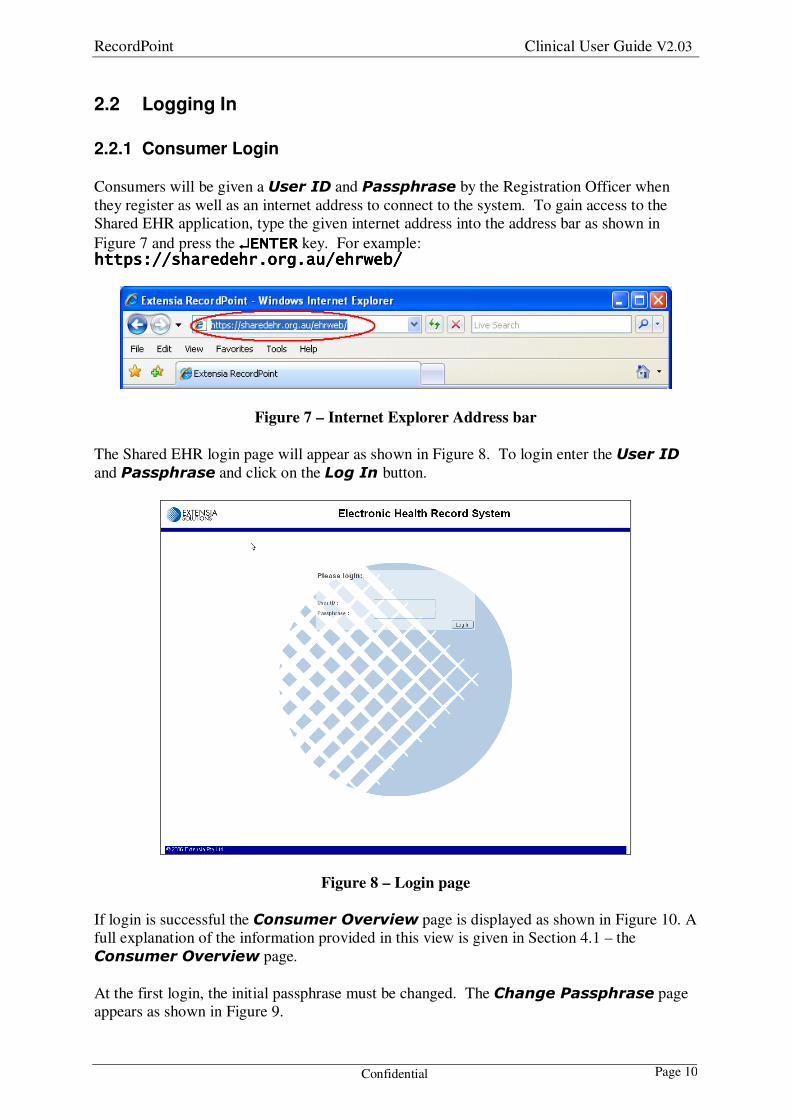
2.2.1 Consumer Login
Consumers will be given a User ID and Passphrase by the Registration Officer when
they register as well as an internet address to connect to the system. To gain access to the
Shared EHR application, type the given internet address into the address bar as shown in
Figure 7 and press the ↵↵↵↵ENTERENTERENTERENTER key. For example: httphttphttphttpssss://://://://sharedehrsharedehrsharedehrsharedehr....orgorgorgorg.au/ehrweb/.au/ehrweb/.au/ehrweb/.au/ehrweb/
Figure 7 – Internet Explorer Address bar
The Shared EHR login page will appear as shown in Figure 8. To login enter the User ID
and Passphrase and click on the Log In button.
Figure 8 – Login page
If login is successful the Consumer Overview page is displayed as shown in Figure 10. A
full explanation of the information provided in this view is given in Section 4.1 – the
Consumer Overview page.
At the first login, the initial passphrase must be changed. The Change Passphrase page
appears as shown in Figure 9.

RecordPoint Clinical User Guide V2.03
Confidential Page 11
Figure 9 – Change Initial Passphrase
Enter the Passphrase provided by the Registration Officer in the Current Passphrase
field and then enter a new passphrase twice (again in the Confirm New Passphrase field) and
click the Submit button. If this is successful the Consumer Overview page is displayed
as shown in Figure 10. On each subsequent login the Consumer Overview page will be
the first page displayed.
Note:
• The only way of successfully logging on to the system is to submit a new passphrase.

RecordPoint Clinical User Guide V2.03
Confidential Page 12
Figure 10 – Consumer Overview
If login is unsuccessful, the Login failure page will be displayed as shown in Figure 11.
Figure 11 – Login Failure
Re-enter your User ID and Passphrase. If you are still unsuccessful after two to three
attempts please contact Support.
2.2.2 Agent Login
The Agent login process is similar as that for Consumers, including the first time login steps
(see Figure 8 and Figure 9). In addition Agent logins require authentication of the Location
from which the login is being made via the Medicare Australia Location certificate (see

RecordPoint Clinical User Guide V2.03
Confidential Page 13
section 2.1.2). The Location is used with the Consumer nominated Care Teams to restrict
access to Shared EHRs. The Location is also used to assign the correct role and privileges for
the session. Agents may have different roles at different locations.
If login is successful, the Home page is displayed as shown in Figure 12.
Figure 12 – Home Page
2.2.2.1 Agent Identification
For ease of identification where workstations may be shared at a particular location, the
system provides a method to identify the agent currently logged on. By placing the cursor
over the Logout hyperlink, the name, role and location of the current user is displayed as
hovertext as shown in Figure 13.
Figure 13 - Agent Identification
RecordPoint Clinical User Guide V2.03
Confidential Page 14
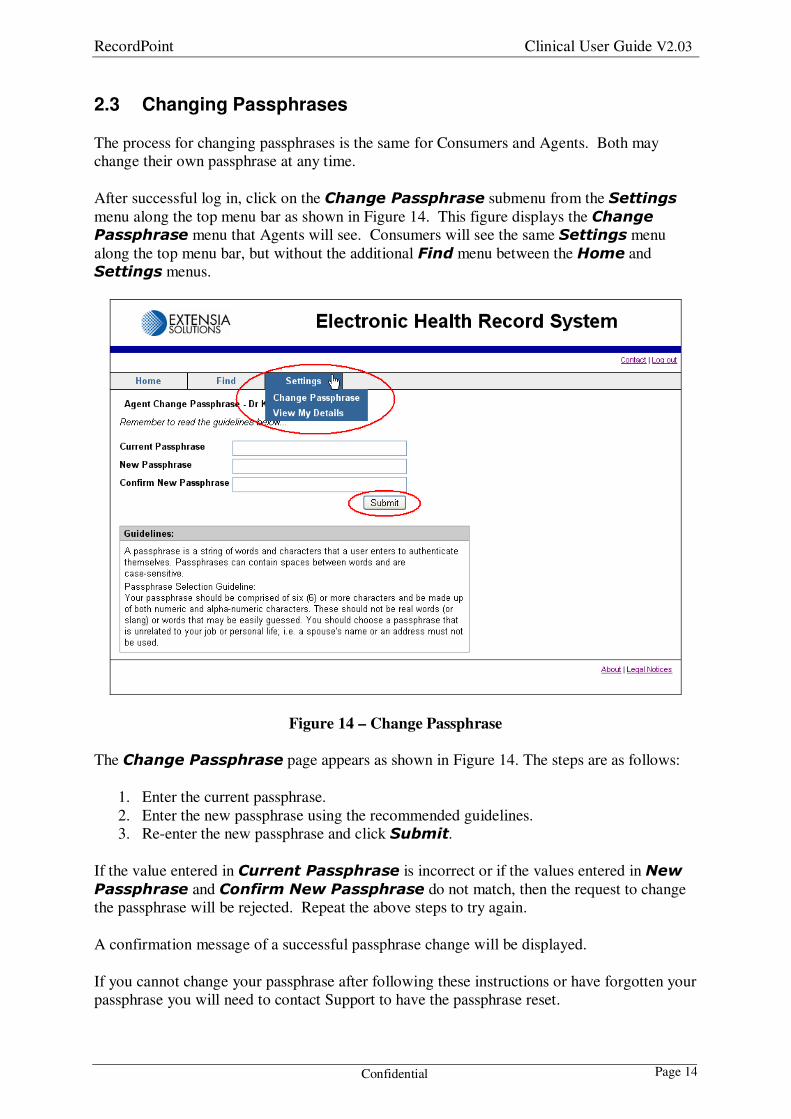
2.3 Changing Passphrases
The process for changing passphrases is the same for Consumers and Agents. Both may
change their own passphrase at any time.
After successful log in, click on the Change Passphrase submenu from the Settings
menu along the top menu bar as shown in Figure 14. This figure displays the Change
Passphrase menu that Agents will see. Consumers will see the same Settings menu
along the top menu bar, but without the additional Find menu between the Home and
Settings menus.
Figure 14 – Change Passphrase
The Change Passphrase page appears as shown in Figure 14. The steps are as follows:
1. Enter the current passphrase.
2. Enter the new passphrase using the recommended guidelines.
3. Re-enter the new passphrase and click Submit.
If the value entered in Current Passphrase is incorrect or if the values entered in New
Passphrase and Confirm New Passphrase do not match, then the request to change
the passphrase will be rejected. Repeat the above steps to try again.
A confirmation message of a successful passphrase change will be displayed.
If you cannot change your passphrase after following these instructions or have forgotten your
passphrase you will need to contact Support to have the passphrase reset.

RecordPoint Clinical User Guide V2.03
Confidential Page 15

RecordPoint Clinical User Guide V2.03
Confidential Page 16
3 Searching the Shared EHR
Be default, searching is only available to Agents. Consumers are not able to see other
Consumers or the demographic and personal contact details of Agents, Locations, or
Organisations.
Searches will only return matching records that the user has the authority to view. For
example, when a Health Care Provider performs a Consumer search, only those consumers
that match and have the Health Care Provider’s location on their care teams will be listed.
3.1 Searching for Consumers
There are three ways to search for consumers:
1. By Name and Date of Birth details
2. By Shared EHR Identifier
3. By Location
They are invoked from the Find menu along the top menu bar as shown in Figure 15.
Figure 15 –Find Consumer Menus
3.1.1 Find Consumer by Name and DOB
To find a consumer using their name and date of birth details invoke the Find -> Find
Consumer by Name menu item as shown in Figure 15.
The Find Consumer by Name page is displayed as shown in Figure 16 which requires
the entry and selection of one or more of the following parameters:
• Surname – a partial name may be entered i.e. ‘Jo’ for ‘Jones’, or even characters
within the name i.e. ‘hall’ will return all names containing the letters ‘hall’ within the
name.

RecordPoint Clinical User Guide V2.03
Confidential Page 17
• Given Name(s) - a partial name may be entered i.e. ‘An’ for ‘Ann’, or even
characters within the name i.e. ‘hall’ will return all names containing the letters ‘hall’
within the name.
• Date of Birth (partial search is not supported).
• Display – select from the drop down list the number of records to be displayed per
page i.e. 20 or All records.
These search fields ignore case, ie they will match any case.
Figure 16 - Find Consumer by Name
Click on the Search button to perform the search. The Reset button can be used to clear
the search fields back to their default values.
The result of the search is an alphabetical list of Consumers who match all of the specified
search criteria displaying Name, Sex, Date of Birth, Address and Consumer ID as
shown in Figure 17.
The sort order of the results can be changed, based on Name, Sex, DOB and Consumer ID,
by clicking on the blue underlined column heading.
If All was selected from the drop down list in the Display field, then a continuous list of
records are displayed. If 20 was selected and there are more than twenty records then
multiple pages of up to twenty records each are displayed with hyperlinks to each page
number and Previous and/or Next links.
The results page will always display the parameters that were specified for the search to allow
the search to be refined.

RecordPoint Clinical User Guide V2.03
Confidential Page 18
Figure 17 - Find Consumer by Name – Search Results
To open a particular Consumer’s Shared EHR, click on the name of the Consumer as shown
in Figure 17.
Note:
• Agents without Shared EHR access, (For example Registration Officers, System
Administrators and Health Care Administrators) will be taken to the Consumer
Details page rather than the Consumer Overview page as they are not
authorised to view clinical information.
RecordPoint Clinical User Guide V2.03
Confidential Page 19
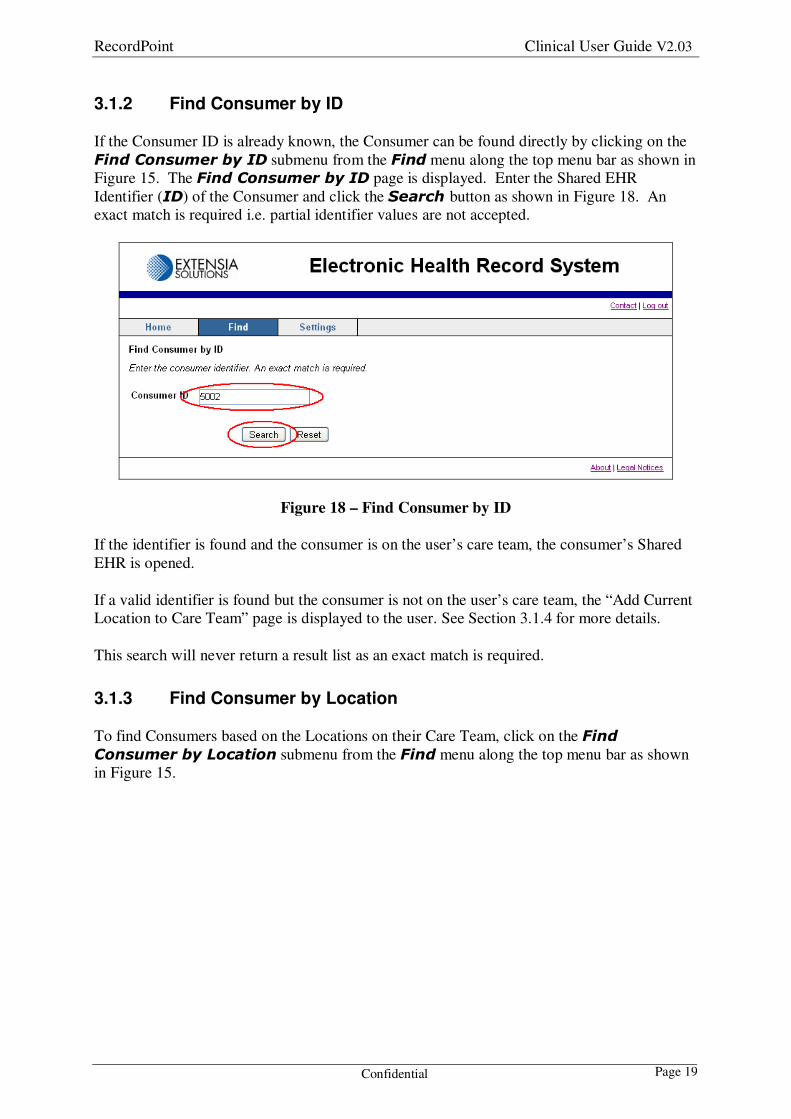
3.1.2 Find Consumer by ID
If the Consumer ID is already known, the Consumer can be found directly by clicking on the
Find Consumer by ID submenu from the Find menu along the top menu bar as shown in
Figure 15. The Find Consumer by ID page is displayed. Enter the Shared EHR
Identifier (ID) of the Consumer and click the Search button as shown in Figure 18. An
exact match is required i.e. partial identifier values are not accepted.
Figure 18 – Find Consumer by ID
If the identifier is found and the consumer is on the user’s care team, the consumer’s Shared
EHR is opened.
If a valid identifier is found but the consumer is not on the user’s care team, the “Add Current
Location to Care Team” page is displayed to the user. See Section 3.1.4 for more details.
This search will never return a result list as an exact match is required.
3.1.3 Find Consumer by Location
To find Consumers based on the Locations on their Care Team, click on the Find
Consumer by Location submenu from the Find menu along the top menu bar as shown
in Figure 15.

RecordPoint Clinical User Guide V2.03
Confidential Page 20
When the Find Consumer by Location page is displayed, select a value from the drop
down list and click the Search button as shown in Figure 19.
Figure 19 – Find Consumer by Location
The result of the search is an alphabetical list of Consumers (by Surname) who match all of
the specified search criteria displaying Name, Sex, Date of Birth, Consumer ID,
Primary Contact Name, and Primary Contact Phone as shown in Figure 20.
The sort order of the results can be changed, based on Name, Sex, DOB and Consumer ID,
by clicking on the blue underlined column heading.
If All was selected from the drop down list in the Display field, then a continuous list of
records are displayed. If 20 was selected and there are more than twenty records then
multiple pages of up to twenty records each are displayed with hyperlinks to each page
number and Previous and/or Next links.
The results page will always display the parameters that were specified for the search to allow
the search to be refined.
RecordPoint Clinical User Guide V2.03
Confidential Page 21
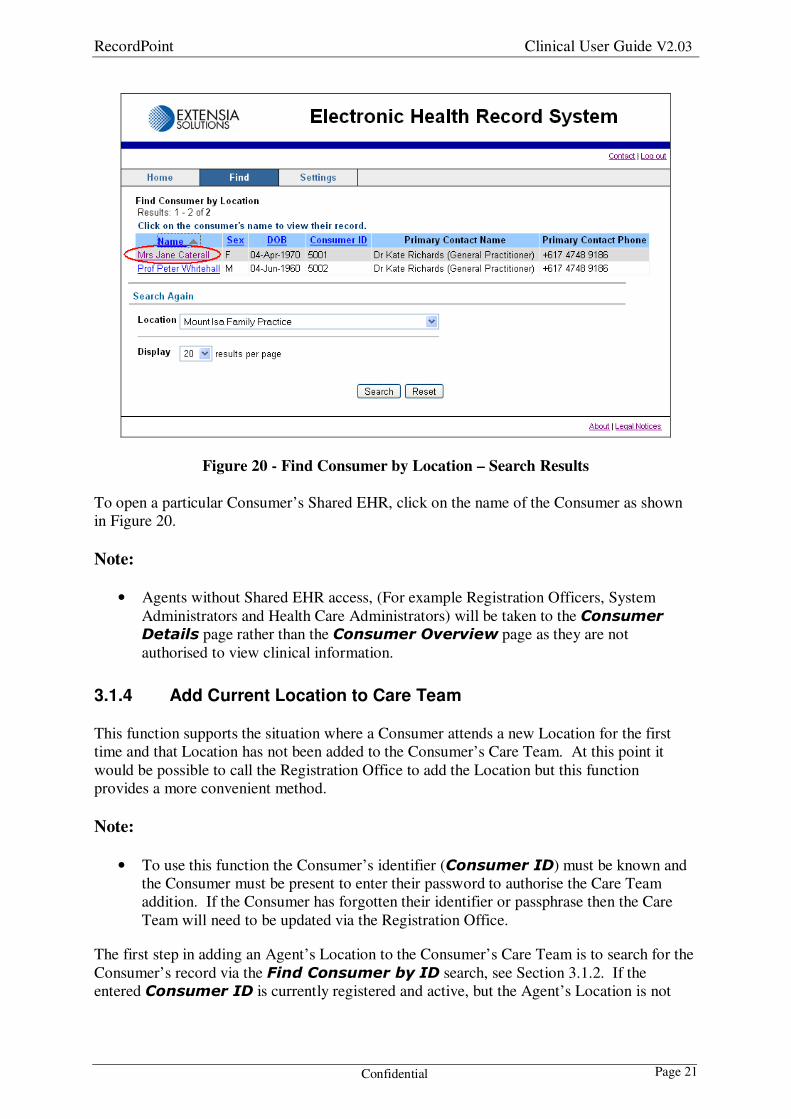
Figure 20 - Find Consumer by Location – Search Results
To open a particular Consumer’s Shared EHR, click on the name of the Consumer as shown
in Figure 20.
Note:
• Agents without Shared EHR access, (For example Registration Officers, System
Administrators and Health Care Administrators) will be taken to the Consumer
Details page rather than the Consumer Overview page as they are not
authorised to view clinical information.
3.1.4 Add Current Location to Care Team
This function supports the situation where a Consumer attends a new Location for the first
time and that Location has not been added to the Consumer’s Care Team. At this point it
would be possible to call the Registration Office to add the Location but this function
provides a more convenient method.
Note:
• To use this function the Consumer’s identifier (Consumer ID) must be known and
the Consumer must be present to enter their password to authorise the Care Team
addition. If the Consumer has forgotten their identifier or passphrase then the Care
Team will need to be updated via the Registration Office.
The first step in adding an Agent’s Location to the Consumer’s Care Team is to search for the
Consumer’s record via the Find Consumer by ID search, see Section 3.1.2. If the
entered Consumer ID is currently registered and active, but the Agent’s Location is not
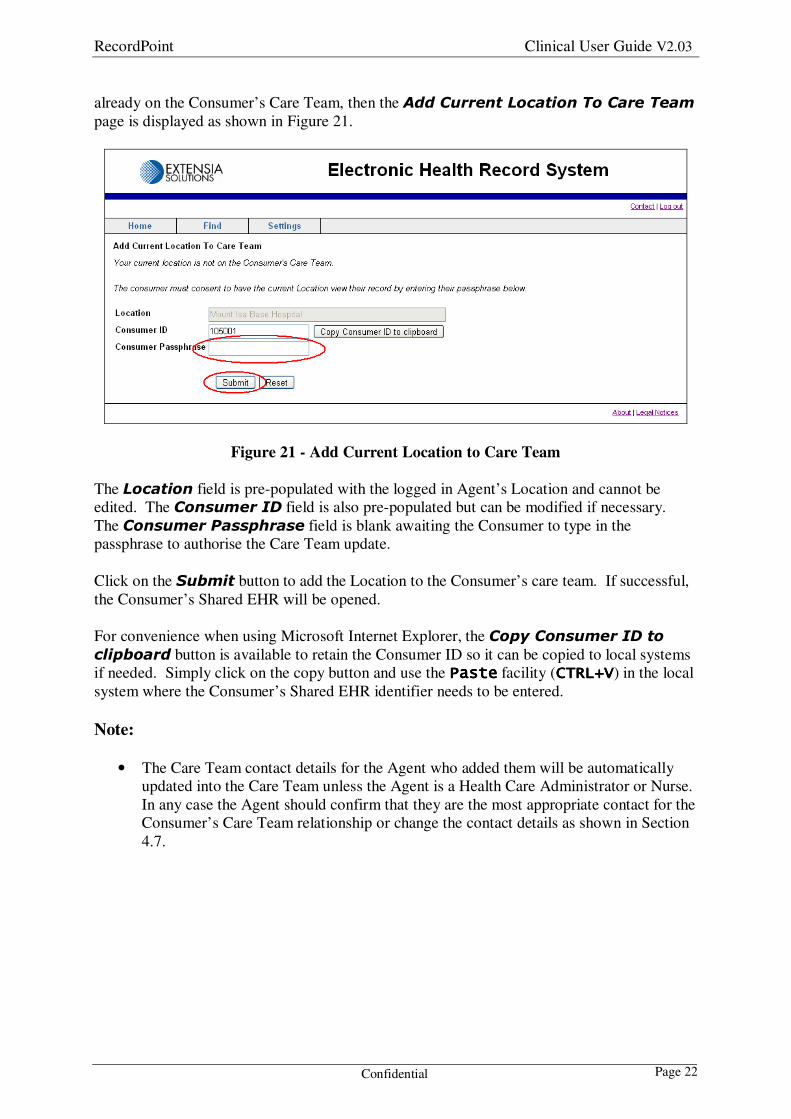
RecordPoint Clinical User Guide V2.03
Confidential Page 22
already on the Consumer’s Care Team, then the Add Current Location To Care Team
page is displayed as shown in Figure 21.
Figure 21 - Add Current Location to Care Team
The Location field is pre-populated with the logged in Agent’s Location and cannot be
edited. The Consumer ID field is also pre-populated but can be modified if necessary.
The Consumer Passphrase field is blank awaiting the Consumer to type in the
passphrase to authorise the Care Team update.
Click on the Submit button to add the Location to the Consumer’s care team. If successful,
the Consumer’s Shared EHR will be opened.
For convenience when using Microsoft Internet Explorer, the Copy Consumer ID to
clipboard button is available to retain the Consumer ID so it can be copied to local systems
if needed. Simply click on the copy button and use the PastePastePastePaste facility (CTRLCTRLCTRLCTRL++++VVVV) in the local
system where the Consumer’s Shared EHR identifier needs to be entered.
Note:
• The Care Team contact details for the Agent who added them will be automatically
updated into the Care Team unless the Agent is a Health Care Administrator or Nurse.
In any case the Agent should confirm that they are the most appropriate contact for the
Consumer’s Care Team relationship or change the contact details as shown in Section
4.7.
RecordPoint Clinical User Guide V2.03
Confidential Page 23
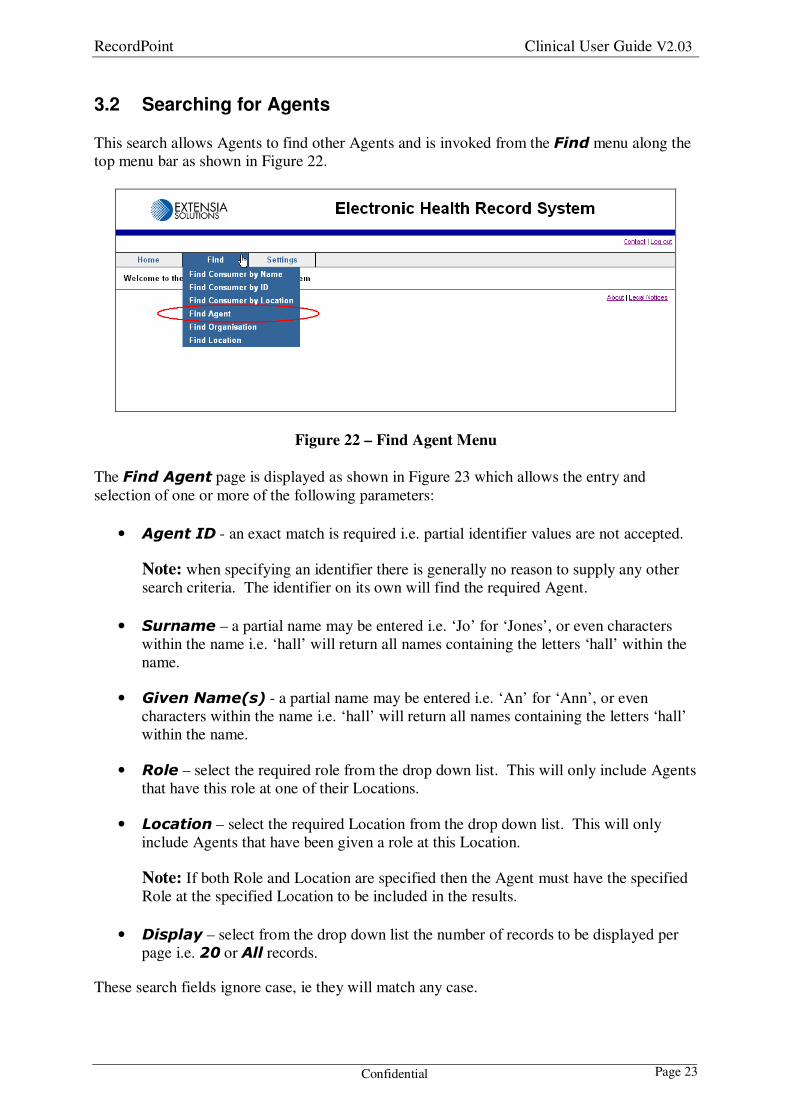
3.2 Searching for Agents
This search allows Agents to find other Agents and is invoked from the Find menu along the
top menu bar as shown in Figure 22.
Figure 22 – Find Agent Menu
The Find Agent page is displayed as shown in Figure 23 which allows the entry and
selection of one or more of the following parameters:
• Agent ID - an exact match is required i.e. partial identifier values are not accepted.
Note: when specifying an identifier there is generally no reason to supply any other
search criteria. The identifier on its own will find the required Agent.
• Surname – a partial name may be entered i.e. ‘Jo’ for ‘Jones’, or even characters
within the name i.e. ‘hall’ will return all names containing the letters ‘hall’ within the
name.
• Given Name(s) - a partial name may be entered i.e. ‘An’ for ‘Ann’, or even
characters within the name i.e. ‘hall’ will return all names containing the letters ‘hall’
within the name.
• Role – select the required role from the drop down list. This will only include Agents
that have this role at one of their Locations.
• Location – select the required Location from the drop down list. This will only
include Agents that have been given a role at this Location.
Note: If both Role and Location are specified then the Agent must have the specified
Role at the specified Location to be included in the results.
• Display – select from the drop down list the number of records to be displayed per
page i.e. 20 or All records.
These search fields ignore case, ie they will match any case.

RecordPoint Clinical User Guide V2.03
Confidential Page 24
Figure 23 - Find Agent
Click on the Search button to perform the search. The Reset button can be used to clear
the search fields back to their default values.
The result of the search is an alphabetical list of Agents (by Surname) who match all of the
specified search criteria displaying Name, Role, Location(s), and HCP Provider
Number(s) as shown in Figure 24.
The sort order of the results can be changed, based on Name by clicking on the blue
underlined column heading.
If All was selected from the drop down list in the Display field, then a continuous list of
records are displayed. If 20 was selected and there are more than twenty records then
multiple pages of up to twenty records each are displayed with hyperlinks to each page
number and Previous and/or Next links.
The results page will always display the parameters that were specified for the search to allow
the search to be refined.

RecordPoint Clinical User Guide V2.03
Confidential Page 25
Figure 24 – Find Agent - Search Results
To open a particular Consumer’s Shared EHR, click on the name of the Consumer, or to view
the Location details, click on the name of the Location as shown in Figure 24.

RecordPoint Clinical User Guide V2.03
Confidential Page 26
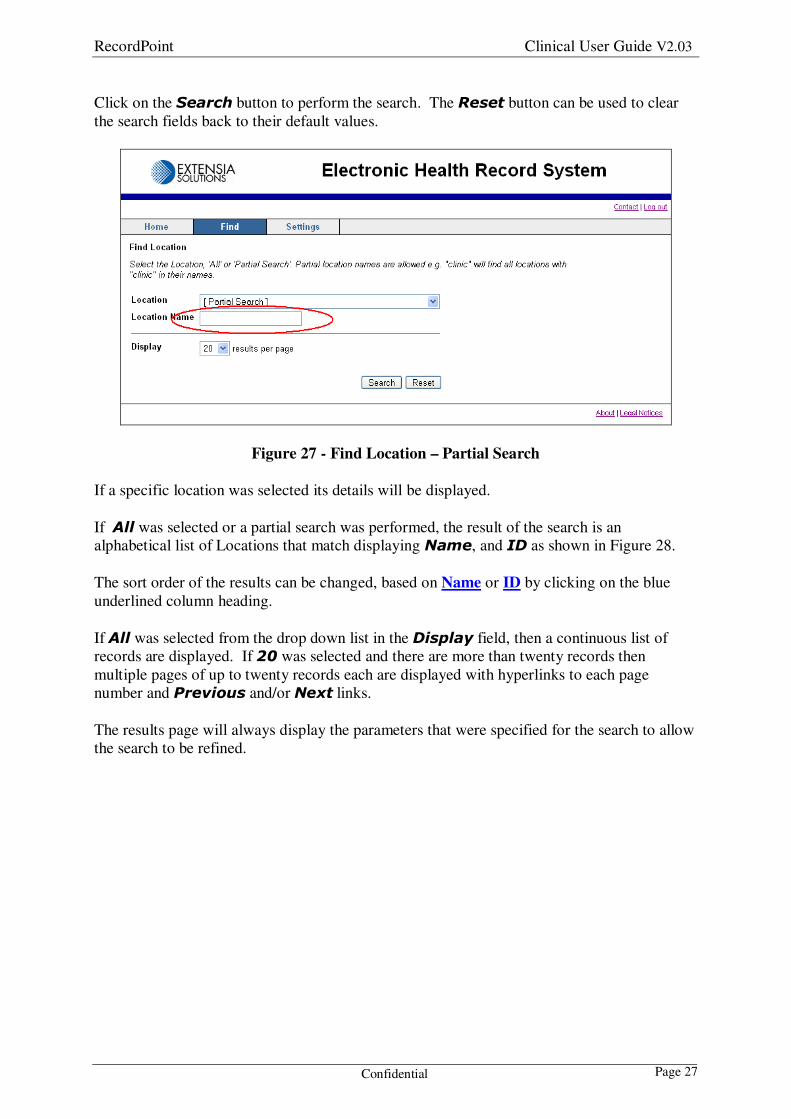
3.3 Searching for Locations
To find a Location, click on the Find Location submenu from the Find menu along the top
menu bar as shown in Figure 22.
Figure 25 – Find Location Menu
The Find Location page is displayed as shown in Figure 26 which requires the selection of
the required Location or option from the drop down list.
Figure 26 - Find Location
To find a location by Name, select Partial Search from the drop down list as shown in
Figure 27. The Location Name field will appear where a partial name may be entered i.e.
‘Ho’ for ‘Hospital’, or even characters within the name i.e. ‘ology’ will return all Location
names containing the letters ‘ology’ within the name. The Location Name search field
ignores case, ie it will match any case.
Select the required number of records to Display per page from the drop down list, i.e. 20
or All records.
RecordPoint Clinical User Guide V2.03
Confidential Page 27
Click on the Search button to perform the search. The Reset button can be used to clear
the search fields back to their default values.
Figure 27 - Find Location – Partial Search
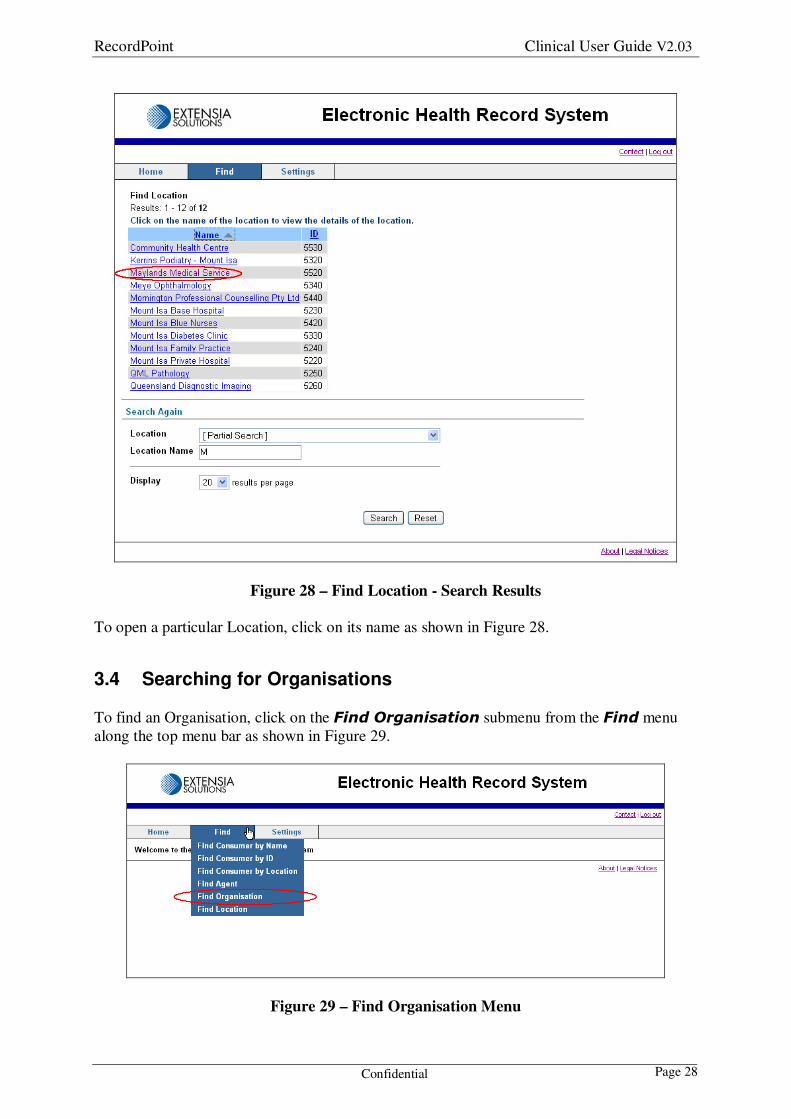
If a specific location was selected its details will be displayed.
If All was selected or a partial search was performed, the result of the search is an
alphabetical list of Locations that match displaying Name, and ID as shown in Figure 28.
The sort order of the results can be changed, based on Name or ID by clicking on the blue
underlined column heading.
If All was selected from the drop down list in the Display field, then a continuous list of
records are displayed. If 20 was selected and there are more than twenty records then
multiple pages of up to twenty records each are displayed with hyperlinks to each page
number and Previous and/or Next links.
The results page will always display the parameters that were specified for the search to allow
the search to be refined.
RecordPoint Clinical User Guide V2.03
Confidential Page 28
Figure 28 – Find Location - Search Results
To open a particular Location, click on its name as shown in Figure 28.
3.4 Searching for Organisations
To find an Organisation, click on the Find Organisation submenu from the Find menu
along the top menu bar as shown in Figure 29.
Figure 29 – Find Organisation Menu
RecordPoint Clinical User Guide V2.03
Confidential Page 29
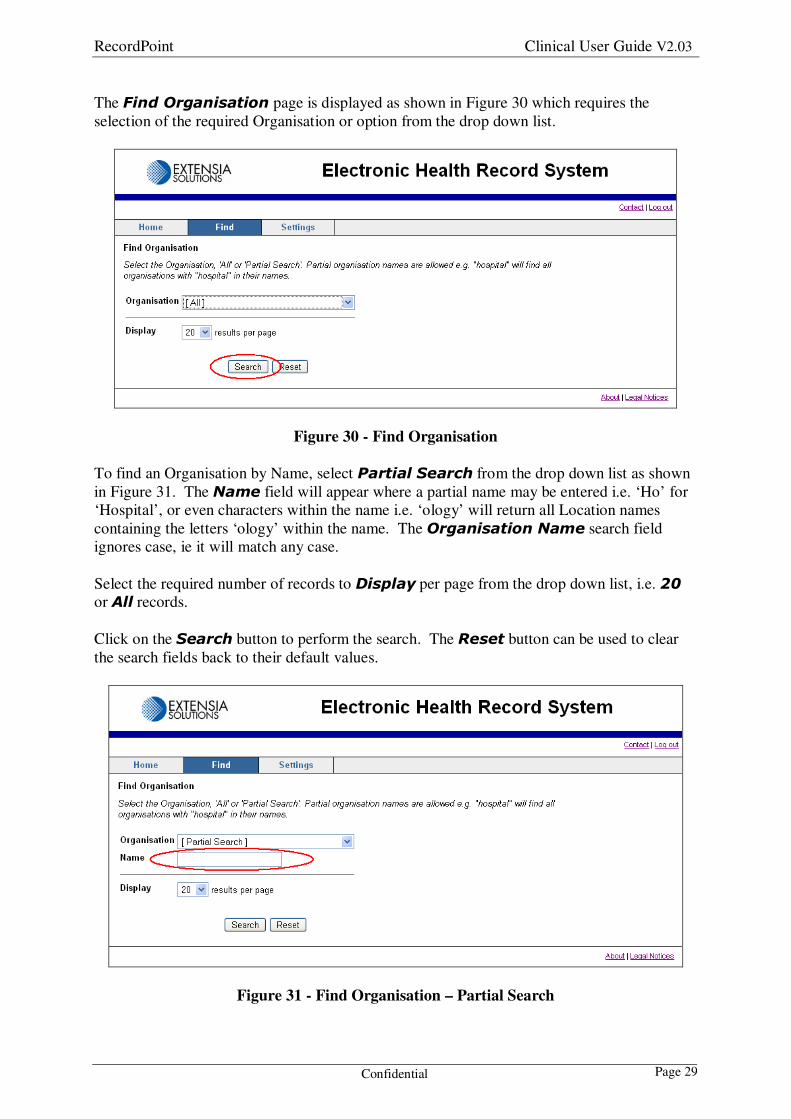
The Find Organisation page is displayed as shown in Figure 30 which requires the
selection of the required Organisation or option from the drop down list.
Figure 30 - Find Organisation
To find an Organisation by Name, select Partial Search from the drop down list as shown
in Figure 31. The Name field will appear where a partial name may be entered i.e. ‘Ho’ for
‘Hospital’, or even characters within the name i.e. ‘ology’ will return all Location names
containing the letters ‘ology’ within the name. The Organisation Name search field
ignores case, ie it will match any case.
Select the required number of records to Display per page from the drop down list, i.e. 20
or All records.
Click on the Search button to perform the search. The Reset button can be used to clear
the search fields back to their default values.
Figure 31 - Find Organisation – Partial Search
RecordPoint Clinical User Guide V2.03
Confidential Page 30
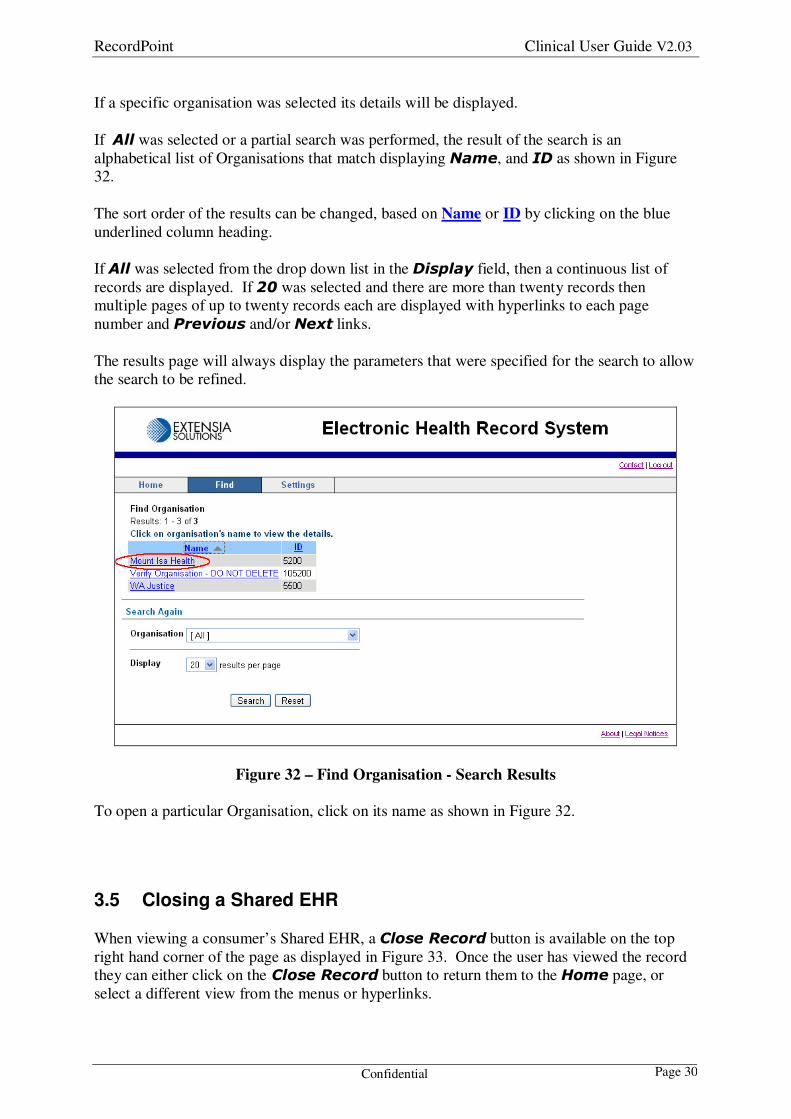
If a specific organisation was selected its details will be displayed.
If All was selected or a partial search was performed, the result of the search is an
alphabetical list of Organisations that match displaying Name, and ID as shown in Figure
32.
The sort order of the results can be changed, based on Name or ID by clicking on the blue
underlined column heading.
If All was selected from the drop down list in the Display field, then a continuous list of
records are displayed. If 20 was selected and there are more than twenty records then
multiple pages of up to twenty records each are displayed with hyperlinks to each page
number and Previous and/or Next links.
The results page will always display the parameters that were specified for the search to allow
the search to be refined.
Figure 32 – Find Organisation - Search Results
To open a particular Organisation, click on its name as shown in Figure 32.
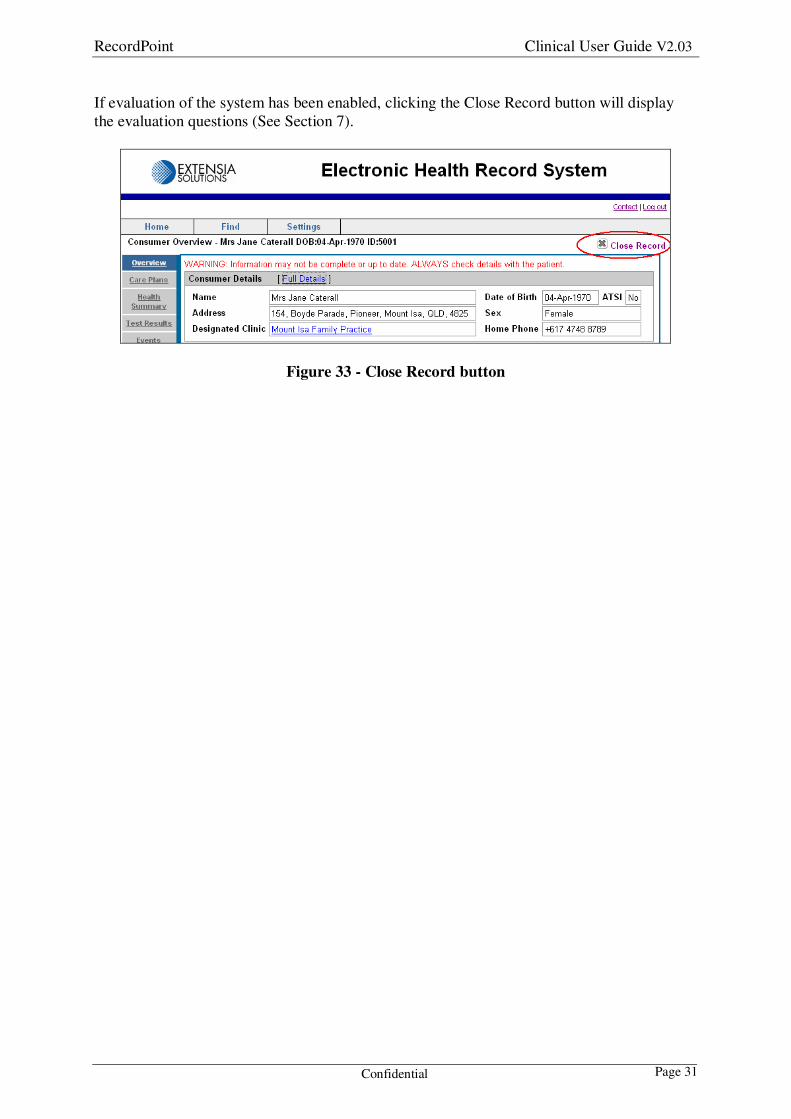
3.5 Closing a Shared EHR
When viewing a consumer’s Shared EHR, a Close Record button is available on the top
right hand corner of the page as displayed in Figure 33. Once the user has viewed the record
they can either click on the Close Record button to return them to the Home page, or
select a different view from the menus or hyperlinks.
RecordPoint Clinical User Guide V2.03
Confidential Page 31
If evaluation of the system has been enabled, clicking the Close Record button will display
the evaluation questions (See Section 7).
Figure 33 - Close Record button
RecordPoint Clinical User Guide V2.03
Confidential Page 32
4 Viewing the Shared EHR
A number of views are provided for authorised users to view summarised or aggregated
information gathered from a single Consumer’s Shared EHR. These views are available after
a Consumer’s Shared EHR has been opened (see Section 3.1) and are navigated via the Left
Hand Side Menu (LHS Menu) shown in Figure 34. These views mostly contain clinical data,
but also include demographic, care team and audit log details.
4.1 Consumer Overview Page
The Consumer Overview page is divided into three segments that summarise the
following:
1. The top segment displays a summary of the Consumer’s demographic details. This
segment is important when transferring from another system (for example Medical
Director or practiX) to confirm that the correct Consumer’s Shared EHR is being
viewed.
2. The middle segment displays the three main Health Summaries that have been
aggregated from the Shared EHR. Brief Health Summary details for the Adverse
Reactions and Alerts, Current Medications and Problem/Diagnosis
History show at a glance a key overview. Any Adverse Reactions and Alerts
data is highlighted in bold red characters to draw attention to any potential issues in
providing care to this Consumer. See section 4.3 for more details on Health
Summaries.
3. The bottom segment displays a care team summary. This segment provides a very
useful Consumer centric view of their recent health care activity. The locations where
the Consumer has received care are shown along with a key contact. Recent activity is
shown in the Last Event Summary column which represents the last time the
Consumer received care from that location (and also shows the name and role of who
provided that care). This can be used to review recent care provided and identify gaps
where the Consumer has not received the care they may need (for example regular
podiatrist checks). To view the details of the most recent visit to a location, click on
the hyperlink shown in this column, for example Pathology Event Summary as
shown in Figure 34.
From the overview page, authorised users can drill down for further information by clicking
on any of the available hyperlinks displayed in Figure 34 such as Full Details (same as
Consumer’s Details on the LHS Menu), Full Health Summary (same as Health
Summary on the LHS Menu), or Full Care Team (same as Care Team on the LHS
Menu).
The LHS Menu is the primary point of navigation around the Shared EHR views.
The warning message above the Consumer Details segment is displayed to remind
Providers to confirm all information with the Consumer where possible to ensure that it is
complete or up to date. The Shared EHR content should be viewed as one of the possible
sources of clinical information for the Consumer. It can be considered one of the broadest
sources available, but it can not and should not be considered the only or most authoritative
source. The Shared EHR is most successfully used as a convenient starting point when

RecordPoint Clinical User Guide V2.03
Confidential Page 33
establishing the relevant health background for a Consumer or reviewing recent activity
provided by other providers.
Figure 34 - Consumer Overview Page
RecordPoint Clinical User Guide V2.03
Confidential Page 34
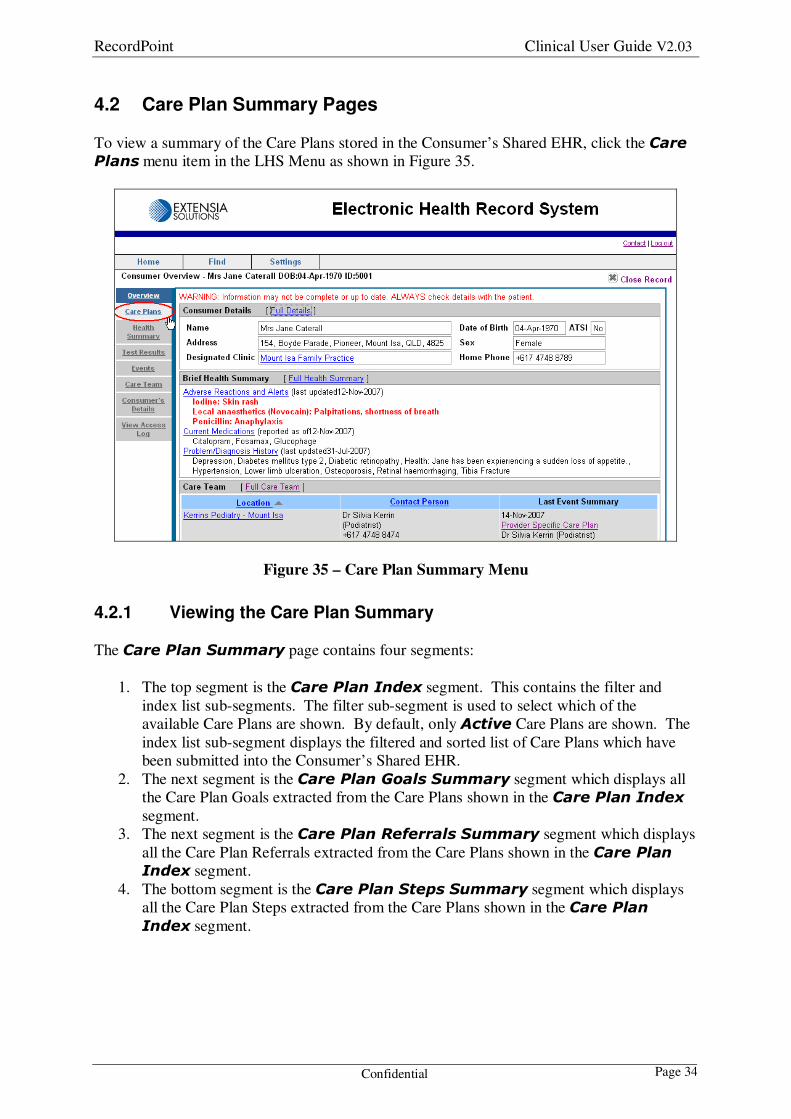
4.2 Care Plan Summary Pages
To view a summary of the Care Plans stored in the Consumer’s Shared EHR, click the Care
Plans menu item in the LHS Menu as shown in Figure 35.
Figure 35 – Care Plan Summary Menu
4.2.1 Viewing the Care Plan Summary
The Care Plan Summary page contains four segments:
1. The top segment is the Care Plan Index segment. This contains the filter and
index list sub-segments. The filter sub-segment is used to select which of the
available Care Plans are shown. By default, only Active Care Plans are shown. The
index list sub-segment displays the filtered and sorted list of Care Plans which have
been submitted into the Consumer’s Shared EHR.
2. The next segment is the Care Plan Goals Summary segment which displays all
the Care Plan Goals extracted from the Care Plans shown in the Care Plan Index
segment.
3. The next segment is the Care Plan Referrals Summary segment which displays
all the Care Plan Referrals extracted from the Care Plans shown in the Care Plan
Index segment.
4. The bottom segment is the Care Plan Steps Summary segment which displays
all the Care Plan Steps extracted from the Care Plans shown in the Care Plan
Index segment.

RecordPoint Clinical User Guide V2.03
Confidential Page 35
4.2.1.1 Care Plan Index Segment
By default, the index list is sorted in reverse chronological order displaying Date
Occurred, Item, Author, Role, and Location Name as shown in Figure 36.
The Date Occurred column is the date the Care Plan was originally recorded, as compared
to the date the Care Plan was actually submitted into the Shared EHR.
Figure 36 – Care Plan Summary Index
The Care Plans displayed in the index can be filtered (ie display only a subset of the available
records) by changing the filter criteria. Select the required status of Care Plan from the
Filter Status options and click the Filter button. Care Plans that match the selected status
will be displayed in the index. The filter can be reset to the default value by clicking the
Reset button.
The sort order of the index can be changed, based on Date Occurred, Item, Author, Role,
and Location Name, by clicking on the blue underlined column heading.
The full details of any Care Plan can be viewed by clicking on the link for the Care Plan
under the Item column, for example Team Care Arrangement as shown in Figure 36.
This will display the standard Event Summary Details page as described in section 4.6.2.

RecordPoint Clinical User Guide V2.03
Confidential Page 36
4.2.1.2 Care Plan Goals Summary Segment
The Care Plan Goals Summary displays all the Goals extracted from the Care Plans
shown in the Care Plan Index segment. The details displayed are Statement of Goal,
Status, Start Date, Next Review Date and Extracted from and are sorted by
Statement of Goal in alphabetical order as shown in Figure 37.
Figure 37 – Care Plan Goals Summary
If a status indicates that the Goal may need attention, the status will be highlighted in yellow.
If a Goal is overdue for review, the review date will be highlighted in red.
The Extracted from column shows which Care Plan contains the Goal. The full details of
the related Care Plan can be viewed by clicking on the link under the Extracted from
column, for example Team Care Arrangement as shown in Figure 37. This will display
the standard Event Summary Details page as described in section 4.6.2.
Click on the Calendar View link to open a calendar with the review milestones marked for
all the active care plans.
RecordPoint Clinical User Guide V2.03
Confidential Page 37
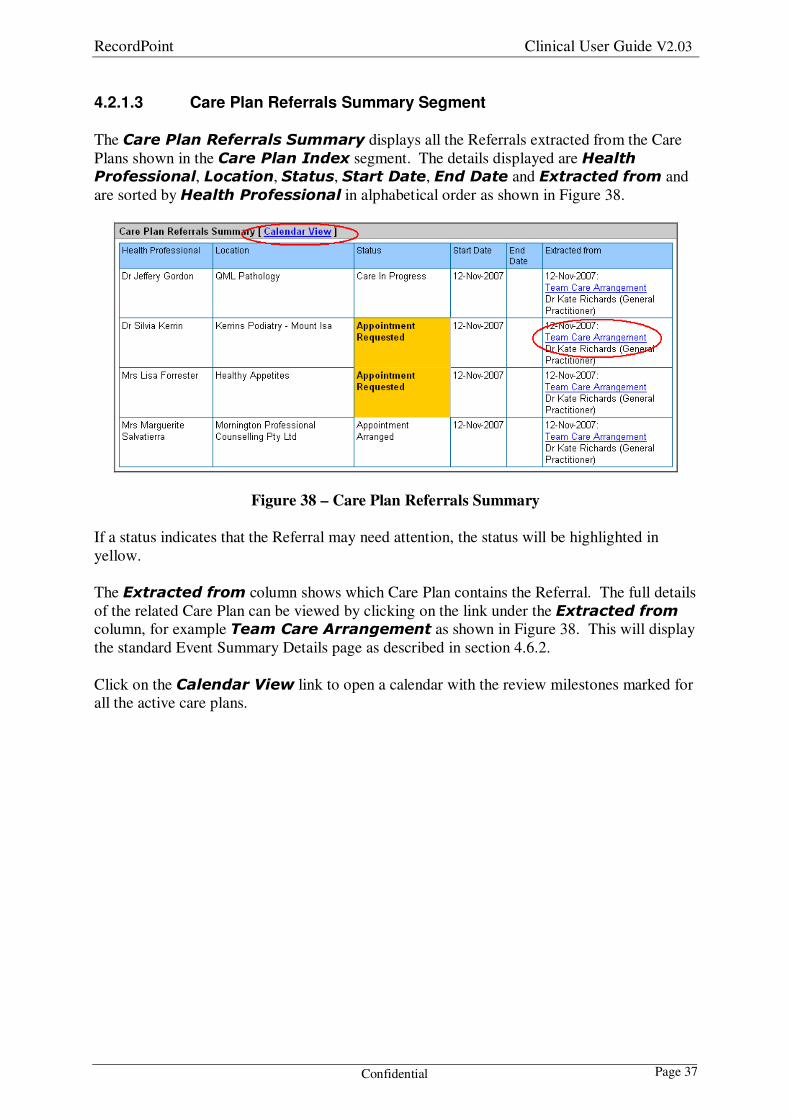
4.2.1.3 Care Plan Referrals Summary Segment
The Care Plan Referrals Summary displays all the Referrals extracted from the Care
Plans shown in the Care Plan Index segment. The details displayed are Health
Professional, Location, Status, Start Date, End Date and Extracted from and
are sorted by Health Professional in alphabetical order as shown in Figure 38.
Figure 38 – Care Plan Referrals Summary
If a status indicates that the Referral may need attention, the status will be highlighted in
yellow.
The Extracted from column shows which Care Plan contains the Referral. The full details
of the related Care Plan can be viewed by clicking on the link under the Extracted from
column, for example Team Care Arrangement as shown in Figure 38. This will display
the standard Event Summary Details page as described in section 4.6.2.
Click on the Calendar View link to open a calendar with the review milestones marked for
all the active care plans.

RecordPoint Clinical User Guide V2.03
Confidential Page 38
4.2.1.4 Care Plan Steps Summary Segment
The Care Plan Steps Summary displays all the Steps extracted from the Care Plans
shown in the Care Plan Index segment. The details displayed are Step Description,
Assigned To, Status, Start Date, Next Review Date and Extracted from and
are sorted by Step Description in alphabetical order as shown in Figure 39.
Figure 39 – Care Plan Steps Summary
If a status indicates that the Steps may need attention, the status will be highlighted in yellow.
If a Step is overdue for review, the review date will be highlighted in red.
The Extracted from column shows which Care Plan contains the Step. The full details of
the related Care Plan can be viewed by clicking on the link under the Extracted from
column, for example Provider Specific Care Plan as shown in Figure 39. This will
display the standard Event Summary Details page as described in section 4.6.2.
Click on the Calendar View link to open a calendar with the review milestones marked for
all the active care plans.

RecordPoint Clinical User Guide V2.03
Confidential Page 39
4.2.2 Viewing the Care Plan Calendar
The Care Plan Summary Calendar displays the review milestones of all the active
Care Plans stored in a Consumer’s Shared EHR as shown in Figure 40. To open the calendar
view, click any of the three Calendar View links on the Care Plan Summary page
(see section 4.2).
Figure 40 – Care Plan Summary Calendar
The full details of the related Care Plans can be viewed by clicking on the links in the relevant
calendar days, for example Review Goal: Team Care Arrangement by Dr Kate
Richards[General Practitioner] as shown in Figure 40. This will display the standard
Event Summary Details page as described in section 4.6.2.
4.3 Health Summary Pages
Health Summaries are collections of data taken from a single Consumer’s Shared EHR that
are related to a single topic or subject.

RecordPoint Clinical User Guide V2.03
Confidential Page 40
The following Health Summaries are supported:
• Adverse Reactions and Alerts – providing a list of all the distinct reactions,
precautions and alerts found in the Shared EHR.
• Problem/Diagnosis History – providing a list of all active and resolved
problems/diagnoses found in the Shared EHR.
• Current Medications – providing the most recent list of current medications
submitted to the system by the Consumer’s designated clinic.
• Prescribing History – providing a list of all the prescriptions found in the Shared
EHR.
• Procedure/Treatment History – providing a list of all the procedures and
treatments found in the Shared EHR.
• Lifestyle Health Summary – providing a list of all the general lifestyle entries
found in the Shared EHR, including details on smoking, exercise, diet assessment and
diet prescription.
• Family Clinical History – providing a list of all the general family history entries
found in the Shared EHR, including descriptions of any familial or hereditary
conditions.
• Immunisations Health Summary – providing a list of all immunisations found
in the Shared EHR.
RecordPoint Clinical User Guide V2.03
Confidential Page 41
4.3.1 Viewing the Health Summary Index
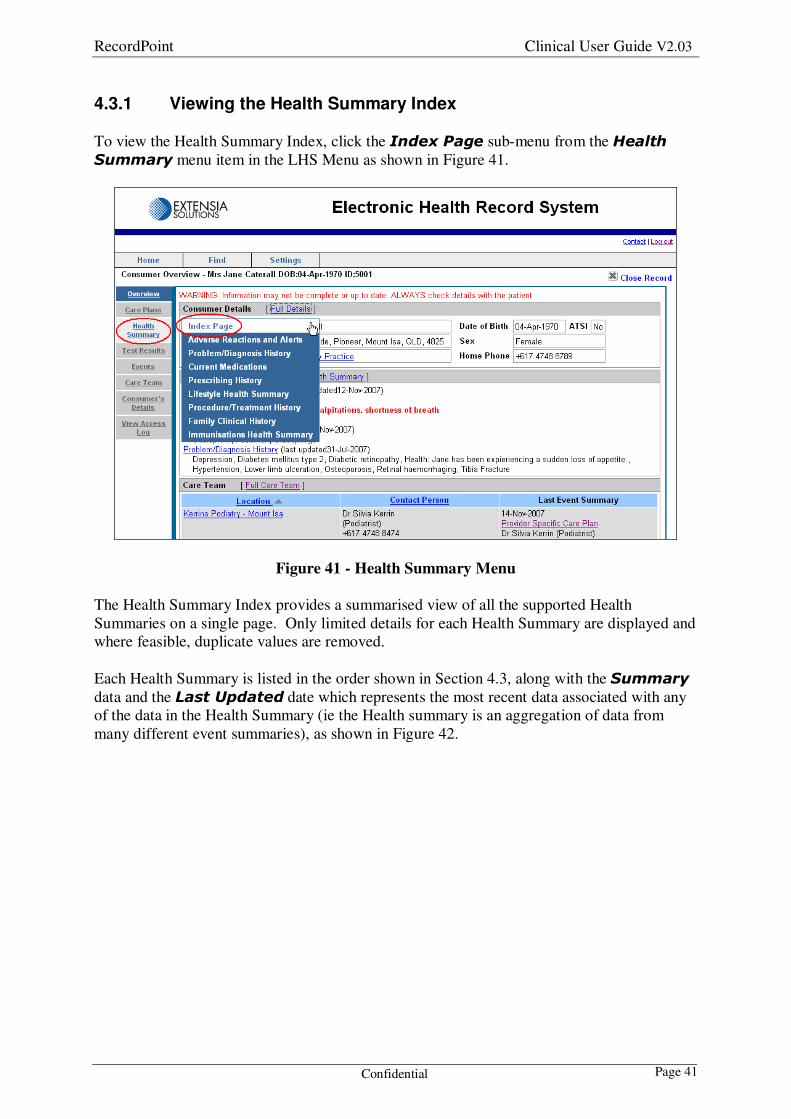
To view the Health Summary Index, click the Index Page sub-menu from the Health
Summary menu item in the LHS Menu as shown in Figure 41.
Figure 41 - Health Summary Menu
The Health Summary Index provides a summarised view of all the supported Health
Summaries on a single page. Only limited details for each Health Summary are displayed and
where feasible, duplicate values are removed.
Each Health Summary is listed in the order shown in Section 4.3, along with the Summary
data and the Last Updated date which represents the most recent data associated with any
of the data in the Health Summary (ie the Health summary is an aggregation of data from
many different event summaries), as shown in Figure 42.

RecordPoint Clinical User Guide V2.03
Confidential Page 42
Figure 42 - Health Summary Index
The following details are included in the Summary view:
• Adverse Reactions and Alerts – shows each distinct Description and
Reaction pair separated by a colon ‘:’.
• Problem/Diagnosis History – shows each distinct Problem/Diagnosis
Name along with the most recent date it was found in the Shared EHR and the
Provider details who recorded it.
• Current Medications – shows for each medication, Date of Script (followed
by a colon ‘:’), Drug Name, Strength, Form, Dose, Frequency, and
Instructions.
• Prescribing History – shows the most recent three distinct Drug Name,
Strength, Form, Dose, Frequency, and Instructions.
• Procedure/Treatment History – shows the most recent three distinct
Procedure/Treatment Date and Procedure/Treatment Type pairs
separated by a colon ‘:’.
• Lifestyle Health Summary - shows a summary line for each general lifestyle
entries as follows:
RecordPoint Clinical User Guide V2.03
Confidential Page 43
• Smoking - Frequency if Status is Yes.
• Exercise – Not shown in summary.
• Diet Assessment – Low Fat, Low GI, and Nutritionally Adequate on the
first line, and Understanding on the next line.
• Diet Prescription - Special Diet Required.
• Family Clinical History – shows each Description.
• Immunisations Health Summary – shows each Immunisation Date
(followed by a colon ‘:’), Vaccine Code, and Vaccine Name.
Click on the links under the Item column to view the details for a particular Health
Summary, for example Problem/Diagnosis History as shown in Figure 42.
4.3.2 Viewing Health Summary Details
To view the details of a Health Summary, either click the required Health Summary sub-menu
from the Health Summary menu item in the LHS Menu as shown in Figure 41, or click
the required link under the Item column in the Health Summary Index, as shown in
Figure 42.
All Health Summary detail pages provide Extracted from links to relate each data item in
the summary back to the source Event Summary. This provides the appropriate context for
the summaries items in the Health Summary. The full details of the related Event Summary
can be viewed by clicking on the link which will display the standard Event Summary Details
page as described in section 4.6.2.
RecordPoint Clinical User Guide V2.03
Confidential Page 44
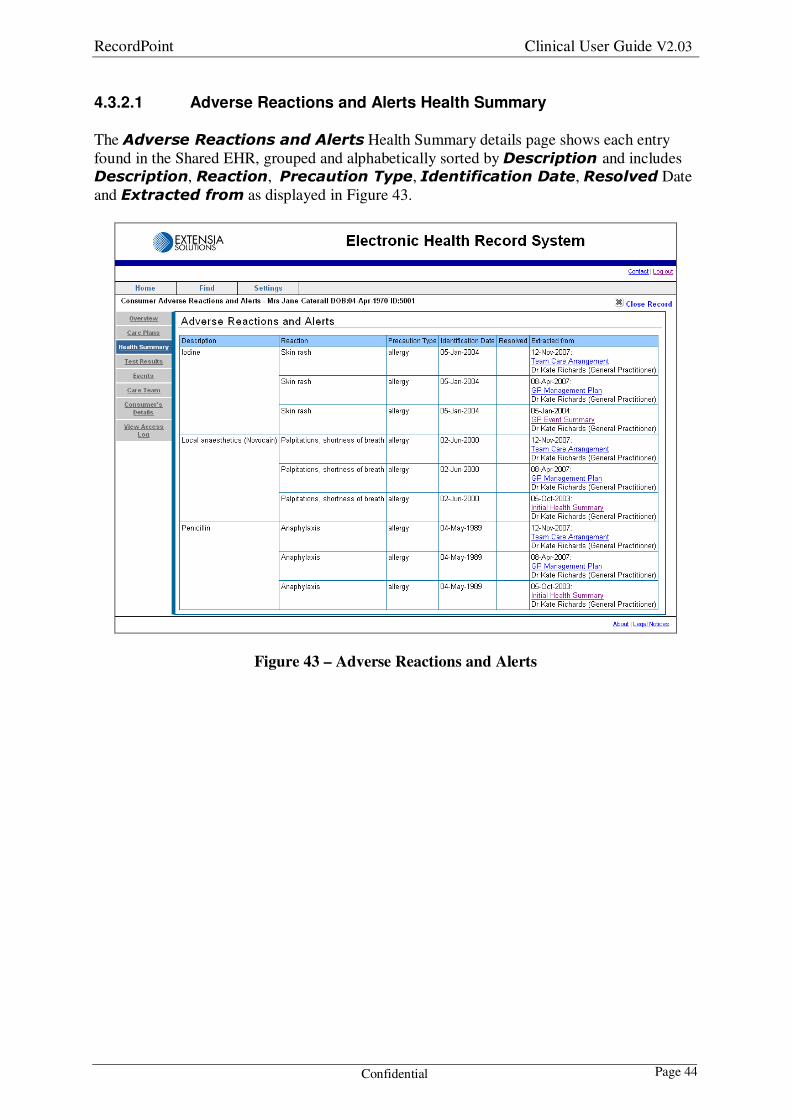
4.3.2.1 Adverse Reactions and Alerts Health Summary
The Adverse Reactions and Alerts Health Summary details page shows each entry
found in the Shared EHR, grouped and alphabetically sorted by Description and includes
Description, Reaction, Precaution Type, Identification Date, Resolved Date
and Extracted from as displayed in Figure 43.
Figure 43 – Adverse Reactions and Alerts

RecordPoint Clinical User Guide V2.03
Confidential Page 45
4.3.2.2 Problem/Diagnosis History Health Summary
The Problem/Diagnosis History Health Summary details page shows each entry found
in the Shared EHR, grouped and alphabetically sorted by Problem / Diagnosis Name
and includes Problem / Diagnosis Name and Extracted from as displayed in
Figure 44.
Figure 44 - Problem/Diagnosis History
This particular format and grouping allows patterns to be identified, for example the number
of times ‘Lower limb ulceration’ has been diagnosed.
RecordPoint Clinical User Guide V2.03
Confidential Page 46
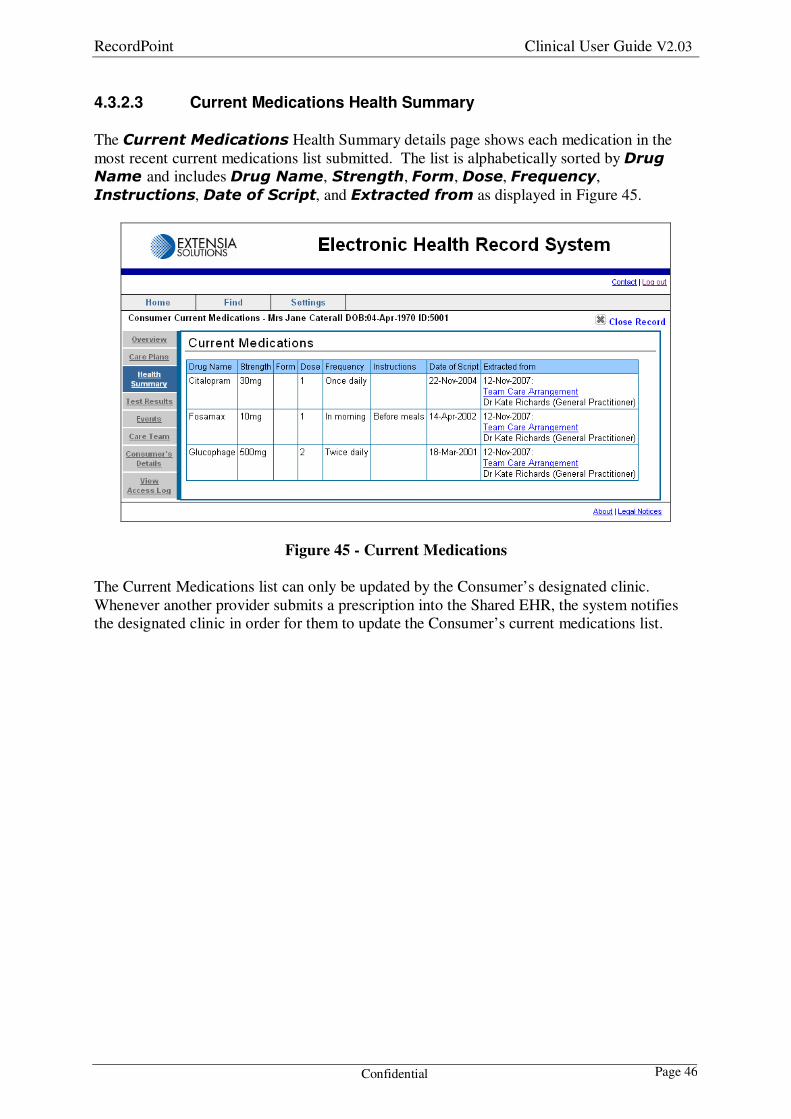
4.3.2.3 Current Medications Health Summary
The Current Medications Health Summary details page shows each medication in the
most recent current medications list submitted. The list is alphabetically sorted by Drug
Name and includes Drug Name, Strength, Form, Dose, Frequency,
Instructions, Date of Script, and Extracted from as displayed in Figure 45.
Figure 45 - Current Medications
The Current Medications list can only be updated by the Consumer’s designated clinic.
Whenever another provider submits a prescription into the Shared EHR, the system notifies
the designated clinic in order for them to update the Consumer’s current medications list.

RecordPoint Clinical User Guide V2.03
Confidential Page 47
4.3.2.4 Prescribing History Health Summary
The Prescribing History Health Summary details page shows each prescription entry
found in the Shared EHR, grouped and alphabetically sorted by Drug Name, Strength,
Form, Dose, Frequency, and Instructions and includes Drug Name, Strength,
Form, Dose, Frequency, Instructions, Date of Script, and Extracted from as
displayed in Figure 46.
Figure 46 - Prescribing History

RecordPoint Clinical User Guide V2.03
Confidential Page 48
4.3.2.5 Lifestyle Health Summary
The Lifestyle Health Summary details page shows each Smoking, Alcohol,
Exercise, Diet Assessment, and Diet Prescription entry found in the Shared EHR,
grouped by Lifestyle, Exercise, Diet Assessment, and Diet Prescription as
displayed in Figure 47.
Figure 47 - Lifestyle Health Summary
The Lifestyle entries include Substance Use, Status, Frequency, and Extracted
from. The Exercise entries include Activity, Level of Exertion, Frequency, and
Extracted from. The Diet Assessment and Diet Prescription entries include
Notes, Details, and Extracted from.
RecordPoint Clinical User Guide V2.03
Confidential Page 49
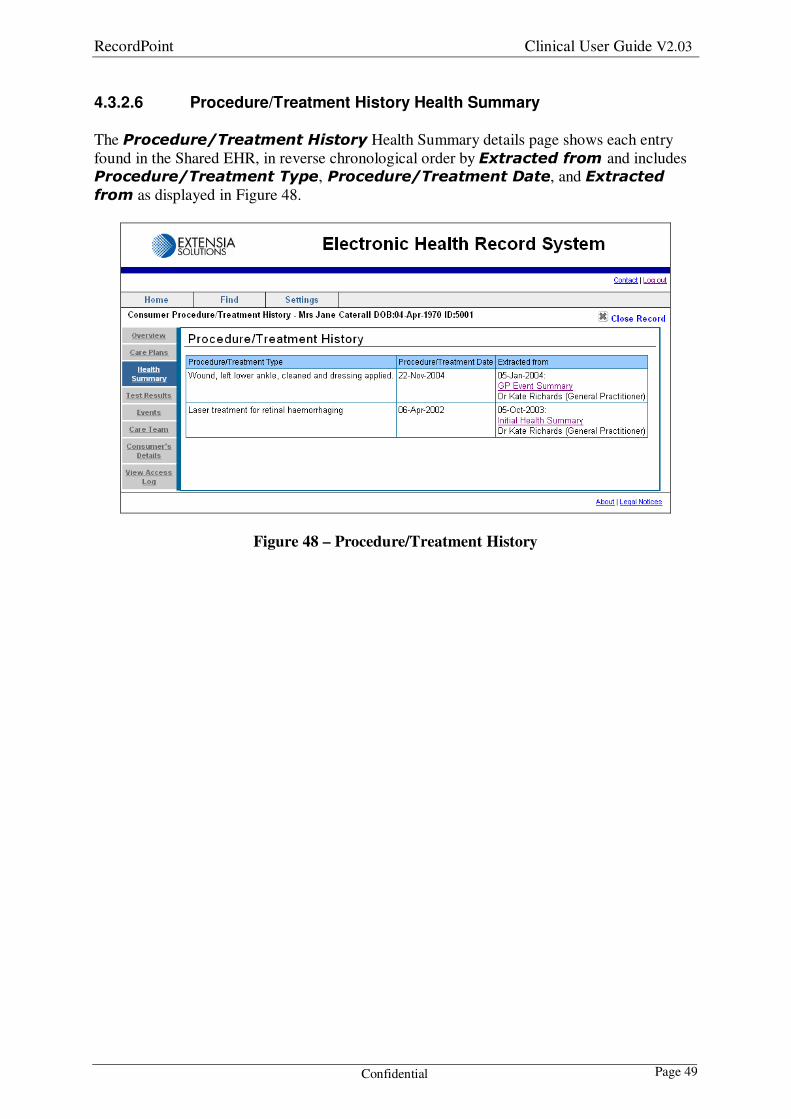
4.3.2.6 Procedure/Treatment History Health Summary
The Procedure/Treatment History Health Summary details page shows each entry
found in the Shared EHR, in reverse chronological order by Extracted from and includes
Procedure/Treatment Type, Procedure/Treatment Date, and Extracted
from as displayed in Figure 48.
Figure 48 – Procedure/Treatment History

RecordPoint Clinical User Guide V2.03
Confidential Page 50
4.3.2.7 Family Clinical History
The Family Clinical History Health Summary details page shows each entry found in the
Shared EHR, in reverse chronological order by Extracted from and includes
Description and Extracted from as displayed in Figure 48.
Figure 49 - Family Clinical History
4.3.2.8 Immunisations Health Summary
The Immunisations Health Summary details page shows each entry found in the
Shared EHR, in reverse chronological order by Extracted from and includes Vaccine
Code, Vaccine Name, Immunisation Date, Sequence, Batch Code, Notes and
Extracted from as displayed in Figure 50.
Figure 50 - Immunisations Health Summary
RecordPoint Clinical User Guide V2.03
Confidential Page 51
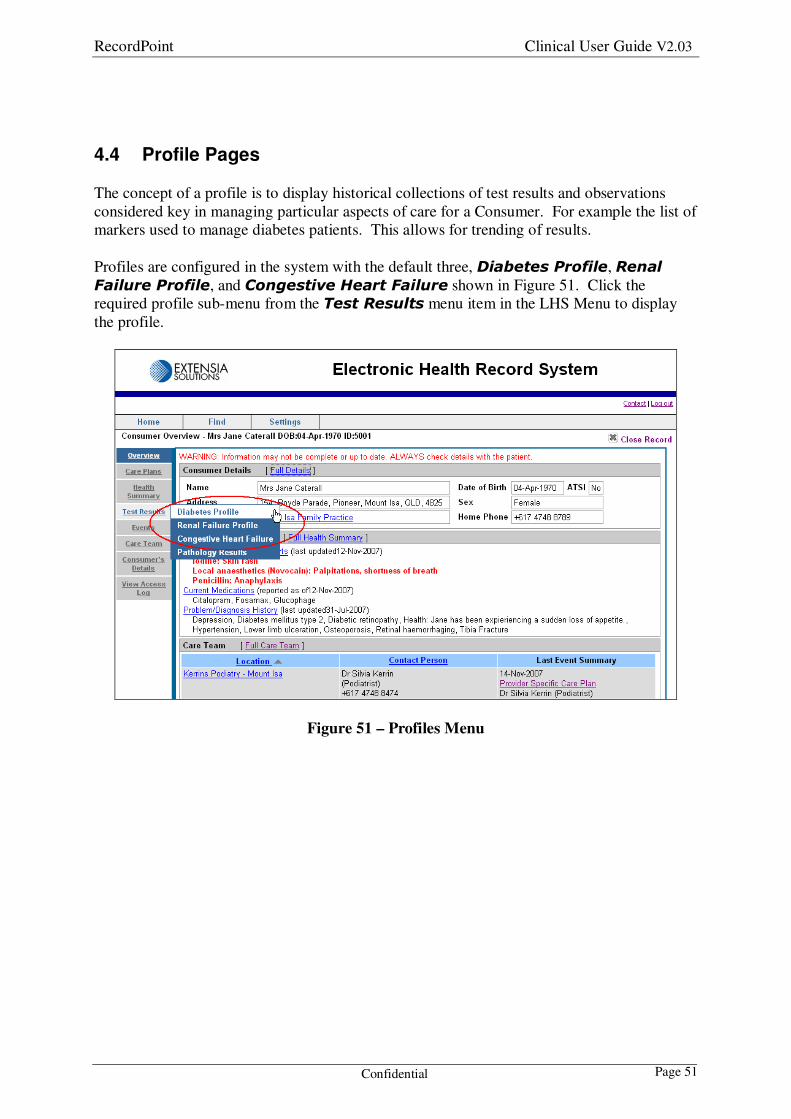
4.4 Profile Pages
The concept of a profile is to display historical collections of test results and observations
considered key in managing particular aspects of care for a Consumer. For example the list of
markers used to manage diabetes patients. This allows for trending of results.
Profiles are configured in the system with the default three, Diabetes Profile, Renal
Failure Profile, and Congestive Heart Failure shown in Figure 51. Click the
required profile sub-menu from the Test Results menu item in the LHS Menu to display
the profile.
Figure 51 – Profiles Menu
RecordPoint Clinical User Guide V2.03
Confidential Page 52
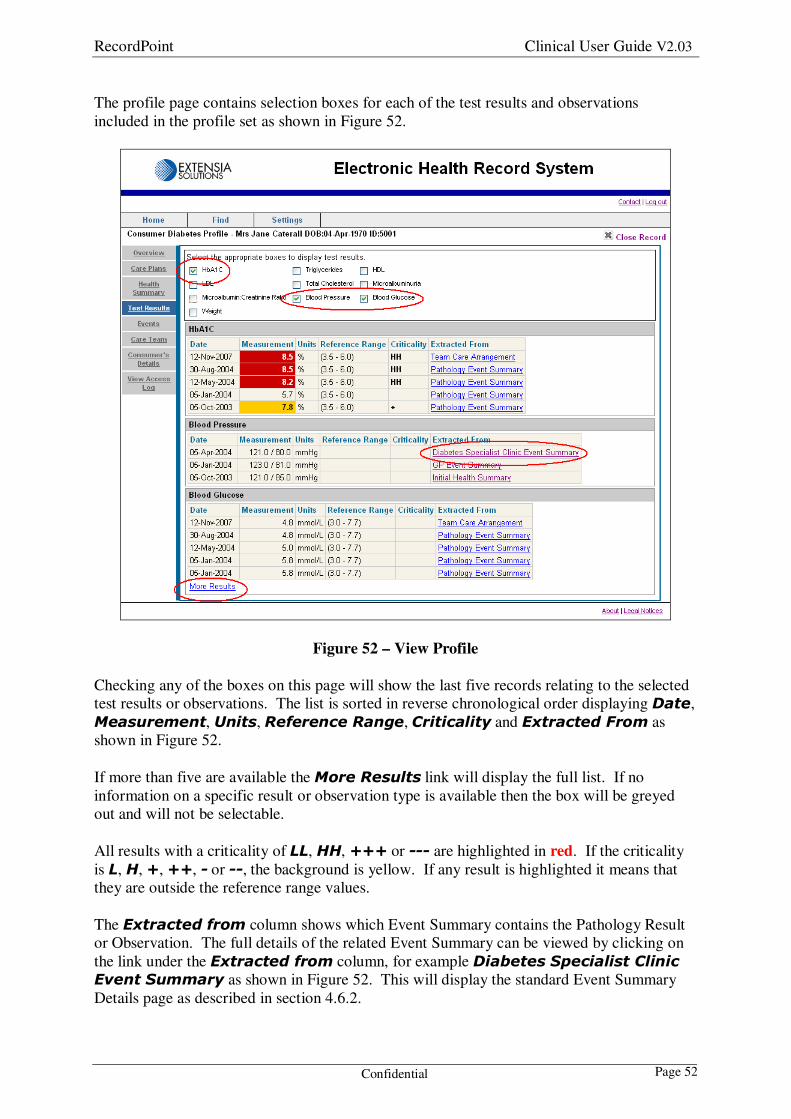
The profile page contains selection boxes for each of the test results and observations
included in the profile set as shown in Figure 52.
Figure 52 – View Profile
Checking any of the boxes on this page will show the last five records relating to the selected
test results or observations. The list is sorted in reverse chronological order displaying Date,
Measurement, Units, Reference Range, Criticality and Extracted From as
shown in Figure 52.
If more than five are available the More Results link will display the full list. If no
information on a specific result or observation type is available then the box will be greyed
out and will not be selectable.
All results with a criticality of LL, HH, +++ or --- are highlighted in red. If the criticality
is L, H, +, ++, - or --, the background is yellow. If any result is highlighted it means that
they are outside the reference range values.
The Extracted from column shows which Event Summary contains the Pathology Result
or Observation. The full details of the related Event Summary can be viewed by clicking on
the link under the Extracted from column, for example Diabetes Specialist Clinic
Event Summary as shown in Figure 52. This will display the standard Event Summary
Details page as described in section 4.6.2.
RecordPoint Clinical User Guide V2.03
Confidential Page 53
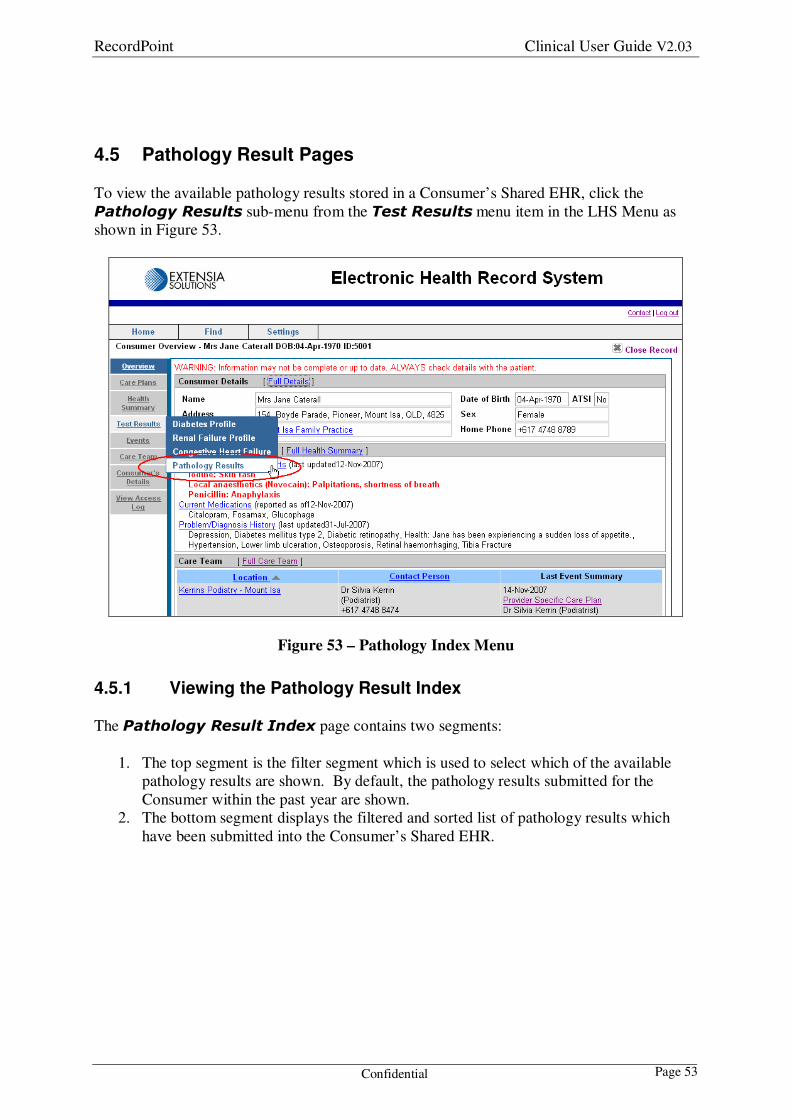
4.5 Pathology Result Pages
To view the available pathology results stored in a Consumer’s Shared EHR, click the
Pathology Results sub-menu from the Test Results menu item in the LHS Menu as
shown in Figure 53.
Figure 53 – Pathology Index Menu
4.5.1 Viewing the Pathology Result Index
The Pathology Result Index page contains two segments:
1. The top segment is the filter segment which is used to select which of the available
pathology results are shown. By default, the pathology results submitted for the
Consumer within the past year are shown.
2. The bottom segment displays the filtered and sorted list of pathology results which
have been submitted into the Consumer’s Shared EHR.

RecordPoint Clinical User Guide V2.03
Confidential Page 54
Figure 54 – Pathology Index
By default, the index list is sorted in reverse chronological order displaying Date/Time
Performed, Test Name, Results, Lab, Lab Reference and Extracted From as
shown in Figure 54.
The Date/Time Performed column is the date given to the pathology result from the
Lab, as compared to the date the pathology result was actually submitted into the Shared
EHR.
The pathology results displayed in the index can be filtered (ie display only a subset of the
available records) by changing the filter criteria. Select the required date period from the
Filter Period option and click the Filter button. Pathology results from within that period
will be displayed in the index. The filter can be reset to the default value by clicking the
Reset button.
The sort order of the index can be changed, based on Date/Time Performed, Test Name,
Lab, Lab Reference, and Extracted From, by clicking on the blue underlined column
heading.
The full details of any pathology result can be viewed by clicking on the View link under the
Results column as shown in Figure 54. This will display the Pathology Result Detail page
as described in section 4.5.2.
The Extracted from column shows which Event Summary contains the Pathology Result
(ie an Event Summary can contain many tests). The full details of the related Event Summary
can be viewed by clicking on the link under the Extracted from column, for example
Pathology Event Summary as shown in Figure 54. This will display the standard
Event Summary Details page as described in section 4.6.2.
RecordPoint Clinical User Guide V2.03
Confidential Page 55
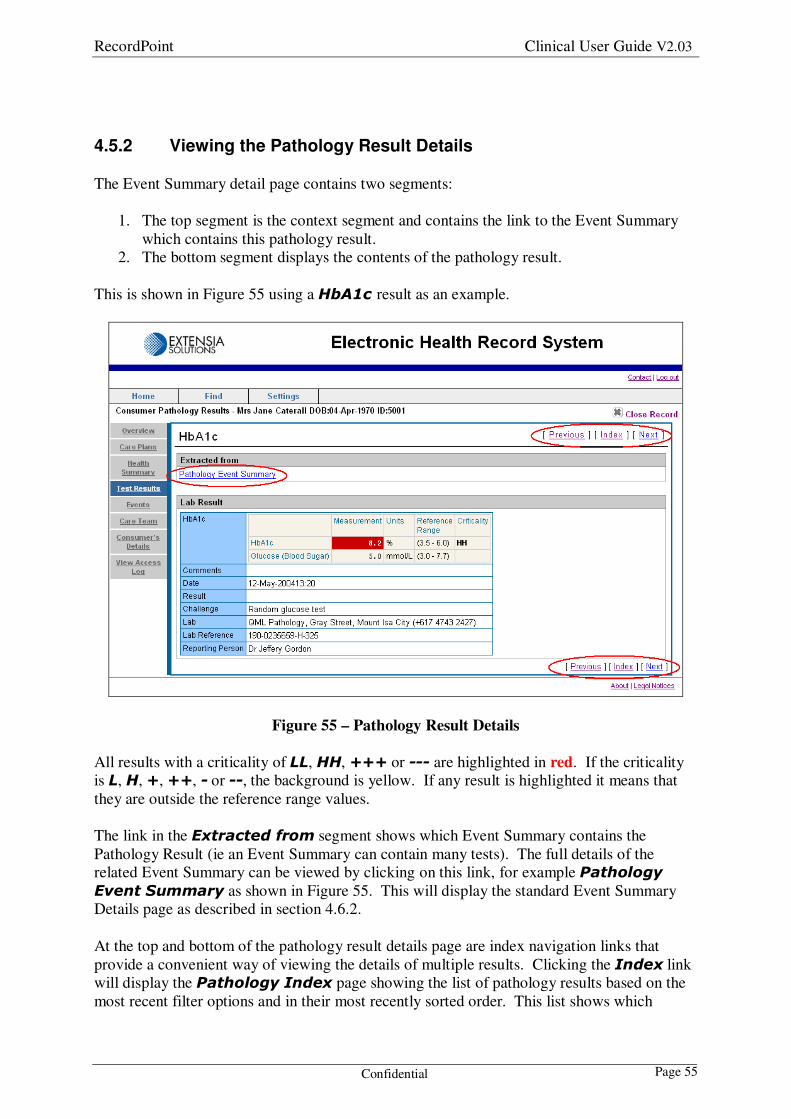
4.5.2 Viewing the Pathology Result Details
The Event Summary detail page contains two segments:
1. The top segment is the context segment and contains the link to the Event Summary
which contains this pathology result.
2. The bottom segment displays the contents of the pathology result.
This is shown in Figure 55 using a HbA1c result as an example.
Figure 55 – Pathology Result Details
All results with a criticality of LL, HH, +++ or --- are highlighted in red. If the criticality
is L, H, +, ++, - or --, the background is yellow. If any result is highlighted it means that
they are outside the reference range values.
The link in the Extracted from segment shows which Event Summary contains the
Pathology Result (ie an Event Summary can contain many tests). The full details of the
related Event Summary can be viewed by clicking on this link, for example Pathology
Event Summary as shown in Figure 55. This will display the standard Event Summary
Details page as described in section 4.6.2.
At the top and bottom of the pathology result details page are index navigation links that
provide a convenient way of viewing the details of multiple results. Clicking the Index link
will display the Pathology Index page showing the list of pathology results based on the
most recent filter options and in their most recently sorted order. This list shows which
RecordPoint Clinical User Guide V2.03
Confidential Page 56
pathology results and in which order they will be displayed by the Previous and Next
links. To change the filter or sort order in the Pathology Index page, see Section 4.5.1.
To return to the pathology result details page simply click any View link.
Clicking the Previous link will display the details of the pathology result above the current
pathology result in the Pathology Index page. Clicking the Next link will display the
details of the pathology result below the current pathology result in the Pathology Index
page. When there is no previous or next pathology result (ie the current pathology result is at
the top or the bottom of the list) the Previous and Next links will not be clickable.
If there is any struck through data shown on this page it will be clearly highlighted as struck
through as described in Section 5.2.
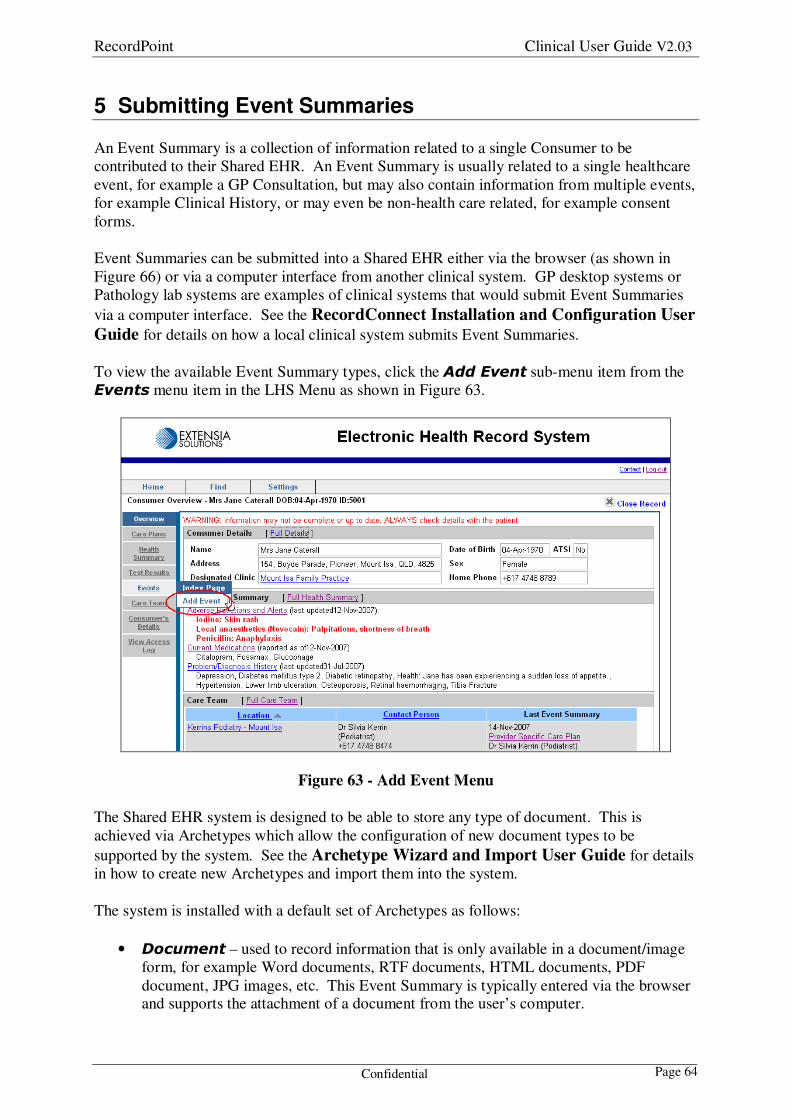
4.6 Event Summary Pages
To view the available event summaries for a Consumer’s Shared EHR, click the Index
Page sub-menu from the Events menu item in the LHS Menu as shown in Figure 56.
Figure 56 – Event Summary Index Menu
4.6.1 Viewing the Event Summary Index
The Event Summary Index page contains two segments:
1. The top segment is the filter segment which is used to select which of the available
event summaries are shown. By default, all event summaries submitted for the
Consumer within the past year are shown.
RecordPoint Clinical User Guide V2.03
Confidential Page 57
2. The bottom segment displays the filtered and sorted list of event summaries which
have been submitted into the Consumer’s Shared EHR.
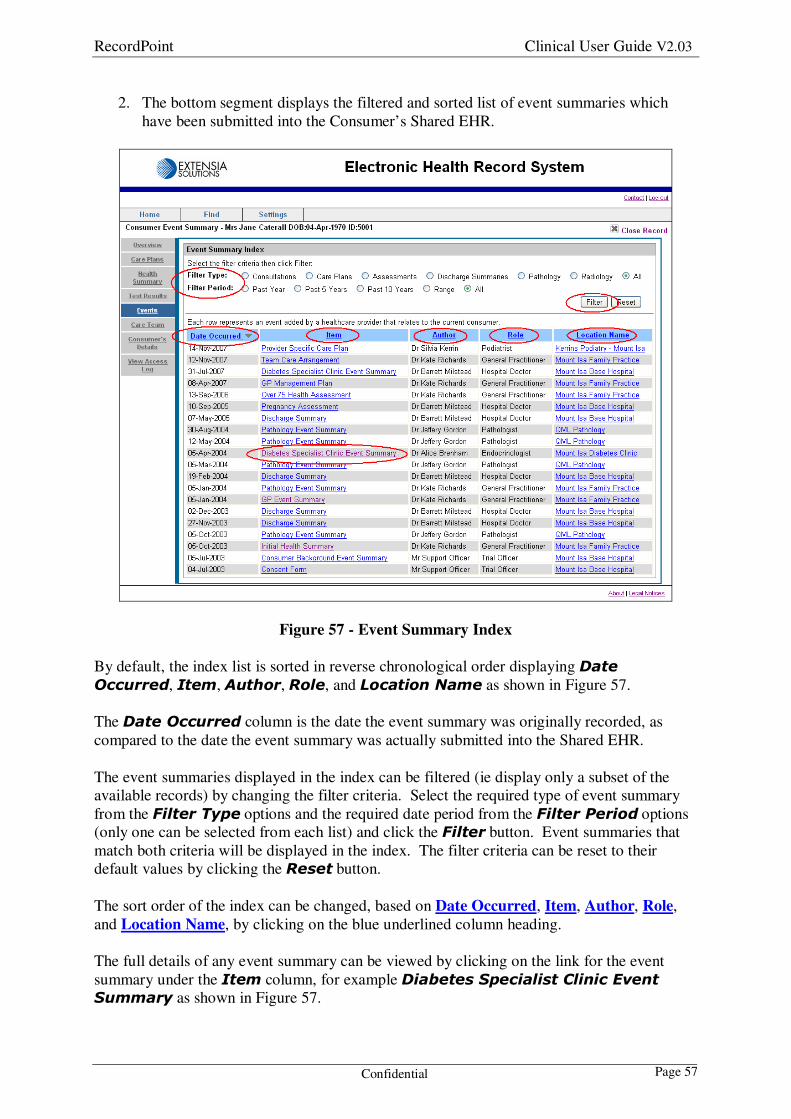
Figure 57 - Event Summary Index
By default, the index list is sorted in reverse chronological order displaying Date
Occurred, Item, Author, Role, and Location Name as shown in Figure 57.
The Date Occurred column is the date the event summary was originally recorded, as
compared to the date the event summary was actually submitted into the Shared EHR.
The event summaries displayed in the index can be filtered (ie display only a subset of the
available records) by changing the filter criteria. Select the required type of event summary
from the Filter Type options and the required date period from the Filter Period options
(only one can be selected from each list) and click the Filter button. Event summaries that
match both criteria will be displayed in the index. The filter criteria can be reset to their
default values by clicking the Reset button.
The sort order of the index can be changed, based on Date Occurred, Item, Author, Role,
and Location Name, by clicking on the blue underlined column heading.
The full details of any event summary can be viewed by clicking on the link for the event
summary under the Item column, for example Diabetes Specialist Clinic Event
Summary as shown in Figure 57.
RecordPoint Clinical User Guide V2.03
Confidential Page 58
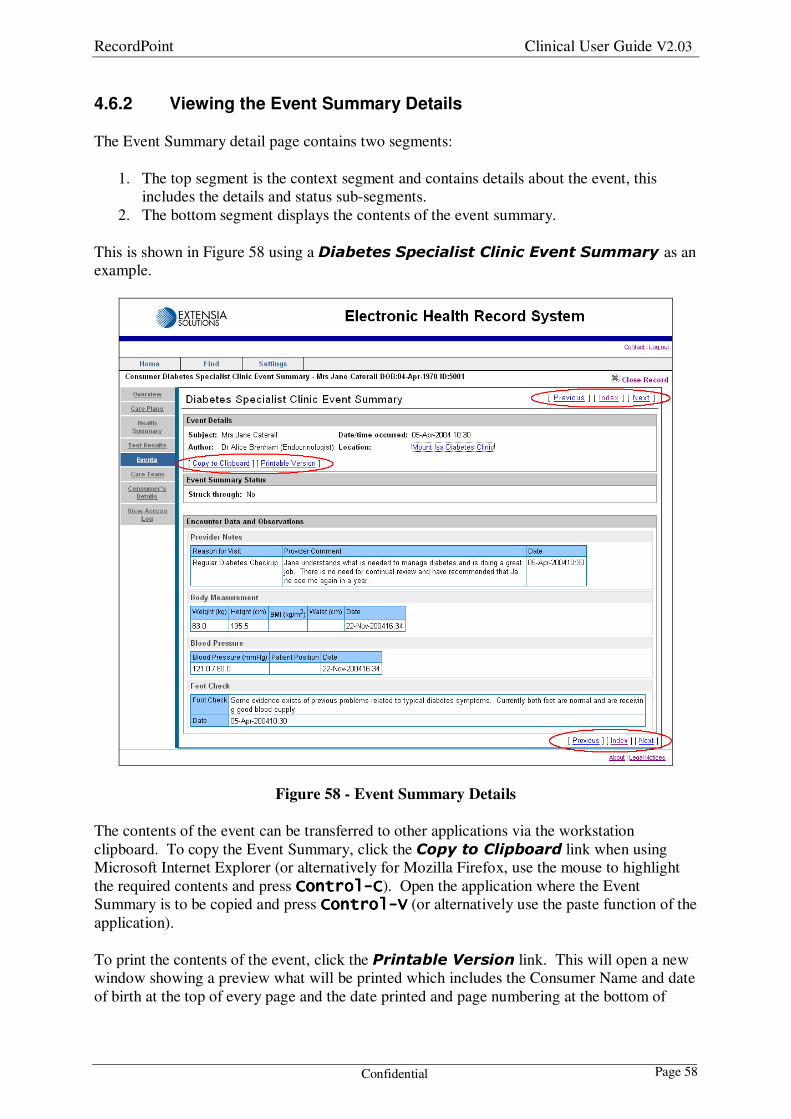
4.6.2 Viewing the Event Summary Details
The Event Summary detail page contains two segments:
1. The top segment is the context segment and contains details about the event, this
includes the details and status sub-segments.
2. The bottom segment displays the contents of the event summary.
This is shown in Figure 58 using a Diabetes Specialist Clinic Event Summary as an
example.
Figure 58 - Event Summary Details
The contents of the event can be transferred to other applications via the workstation
clipboard. To copy the Event Summary, click the Copy to Clipboard link when using
Microsoft Internet Explorer (or alternatively for Mozilla Firefox, use the mouse to highlight
the required contents and press ControlControlControlControl----CCCC). Open the application where the Event
Summary is to be copied and press ControlControlControlControl----VVVV (or alternatively use the paste function of the
application).
To print the contents of the event, click the Printable Version link. This will open a new
window showing a preview what will be printed which includes the Consumer Name and date
of birth at the top of every page and the date printed and page numbering at the bottom of

RecordPoint Clinical User Guide V2.03
Confidential Page 59
every page. This makes is suitable for including into a paper clinical record. To print, press
ControlControlControlControl----PPPP (or alternatively use the browser print function).
At the top and bottom of the Event Summary details page are index navigation links that
provide a convenient way of viewing the details of multiple events. Clicking the Index link
will display the Event Summary Index page showing the list of Event Summaries based
on the most recent filter options and in their most recently sorted order. This list shows which
Event Summaries and in which order they will be displayed by the Previous and Next
links. To change the filter or sort order in the Event Summary Index page, see Section
4.6.1. To return to the Event Summary details page simply click any link under the Item
column.
Clicking the Previous link will display the details of the Event Summary above the current
Event Summary in the Event Summary Index page. Clicking the Next link will
display the details of the Event Summary below the current Event Summary in the Event
Summary Index page. When there is no previous or next event summary (ie the current
Event Summary is at the top or the bottom of the list) the Previous and Next links will not
be clickable.
If there is any struck through data shown on this page it will be clearly highlighted as struck
through as described in Section 5.2.
4.7 Care Team Page
The Care Team is a list of Locations which provide health care to a Consumer. It is an
important entity because it is used for access control in that only Health Care Providers that
have been assigned a role at a Location on the Consumer’s care team are allowed access to the
Consumer’s Shared EHR. The Consumer, either directly themselves, or via an Agent acting
on the Consumer’s request is responsible for maintaining the Locations on the Care Team.
To view the Care Team details, click the Care Team menu item in the LHS Menu as shown
in Figure 59.
The Care Team page contains two segments:
1. The top segment lists the Locations currently on the Care Team. This contains the
same content as shown on the Consumer Overview page.
2. The bottom segment lists the Locations that have previously been on the Care Team
but have since been removed.

RecordPoint Clinical User Guide V2.03
Confidential Page 60
Figure 59 – Consumer Care Team
By default, the lists are sorted in alphabetical order by Location, displaying Location,
Contact Person, and Last Event Summary.
The sort order of the lists can be changed, based on Location and Contact Person, by
clicking on the blue underlined column heading.
The Contact Person is optional and can be used by Health Care Providers to contact a
Location about the care received by the Consumer at that Location.
Recent activity is shown in the Last Event Summary column which represents the last
time the Consumer received care from that Location (and also shows the name and role of
who provided that care). The full details of the most recent Event Summary can be viewed by
clicking on the link under the Last Event Summary column, for example Diabetes
Specialist Clinic Event Summary as shown in Figure 59. This will display the
standard Event Summary Details page as described in section 4.6.2.

RecordPoint Clinical User Guide V2.03
Confidential Page 61
4.8 View and Update Consumer Details
To view and update the demographic details of a Consumer, click the Consumer’s
Details menu on the LHS menu bar as shown in Figure 60.
Figure 60 - Consumer Details – View Mode
The Consumer Details page is opened in view mode. In this mode the contents cannot be
changed and the fields are greyed out and not selectable. This means the cursor cannot be
placed in the fields or any action performed on the fields, for example selecting the contents
for copying or showing a pull down list. The contents can only be viewed. The only
exceptions are view only fields which display normally (not greyed out) and their contents
can be selected in both modes, for example the HealthConnect Consumer ID.
To change to edit mode, click the Edit button. The editable fields will be displayed normally
(not greyed out) and the contents can now be changed.
RecordPoint Clinical User Guide V2.03
Confidential Page 62
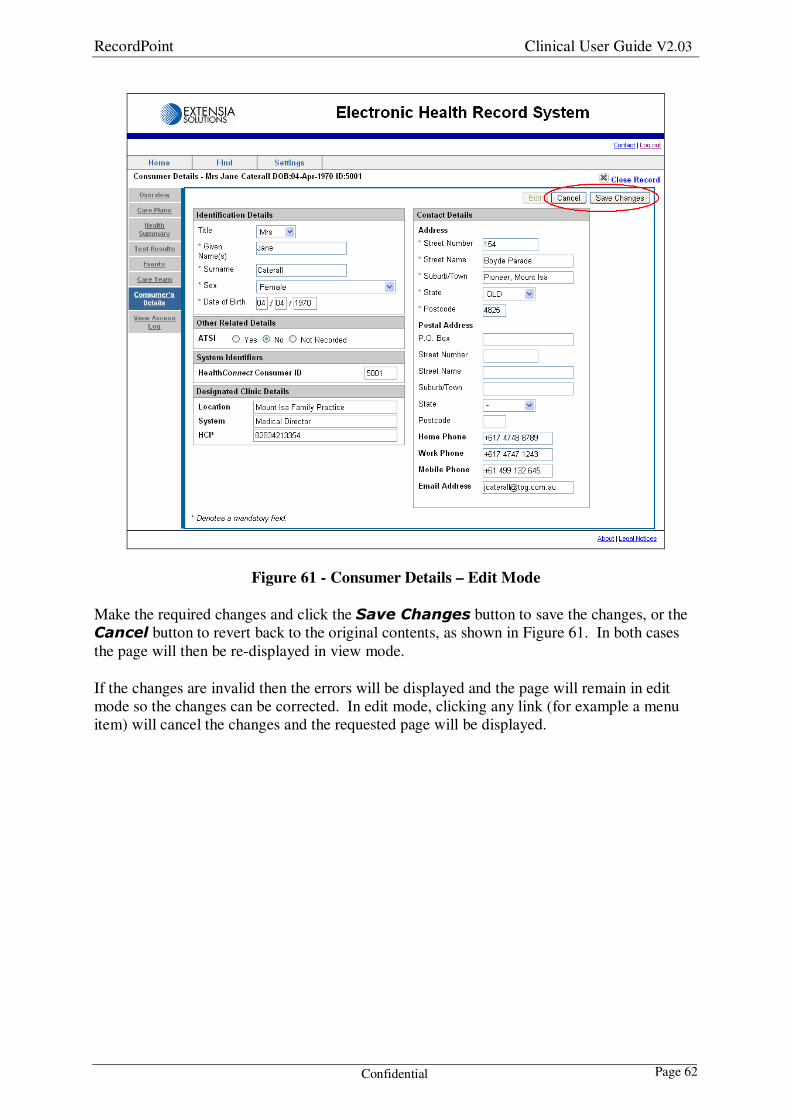
Figure 61 - Consumer Details – Edit Mode
Make the required changes and click the Save Changes button to save the changes, or the
Cancel button to revert back to the original contents, as shown in Figure 61. In both cases
the page will then be re-displayed in view mode.
If the changes are invalid then the errors will be displayed and the page will remain in edit
mode so the changes can be corrected. In edit mode, clicking any link (for example a menu
item) will cancel the changes and the requested page will be displayed.

RecordPoint Clinical User Guide V2.03
Confidential Page 63
4.9 Access Log Page
The Access Log shows all read and write access to a Consumer’s Shared EHR. To view
the Access Log, click the View Access Log menu item in the LHS Menu as shown in
Figure 62.
Figure 62 – View Access Log
By default, the Access Log is sorted in reverse chronological order displaying Access
Date, User, Role, and Location.
The sort order of the Access Log can be changed, based on Access Date, User, Role, and
Location, by clicking on the blue underlined column heading.
If there are more than twenty records then multiple pages of up to twenty records each are
displayed with hyperlinks to each page number and Previous and/or Next links as shown
in Figure 62.
RecordPoint Clinical User Guide V2.03
Confidential Page 64
5 Submitting Event Summaries
An Event Summary is a collection of information related to a single Consumer to be
contributed to their Shared EHR. An Event Summary is usually related to a single healthcare
event, for example a GP Consultation, but may also contain information from multiple events,
for example Clinical History, or may even be non-health care related, for example consent
forms.
Event Summaries can be submitted into a Shared EHR either via the browser (as shown in
Figure 66) or via a computer interface from another clinical system. GP desktop systems or
Pathology lab systems are examples of clinical systems that would submit Event Summaries
via a computer interface. See the RecordConnect Installation and Configuration User
Guide for details on how a local clinical system submits Event Summaries.
To view the available Event Summary types, click the Add Event sub-menu item from the
Events menu item in the LHS Menu as shown in Figure 63.
Figure 63 - Add Event Menu
The Shared EHR system is designed to be able to store any type of document. This is
achieved via Archetypes which allow the configuration of new document types to be
supported by the system. See the Archetype Wizard and Import User Guide for details
in how to create new Archetypes and import them into the system.
The system is installed with a default set of Archetypes as follows:
• Document – used to record information that is only available in a document/image
form, for example Word documents, RTF documents, HTML documents, PDF
document, JPG images, etc. This Event Summary is typically entered via the browser and supports the attachment of a document from the user’s computer.

RecordPoint Clinical User Guide V2.03
Confidential Page 65
• Over 75 Health Assessment – used to record assessment information on a
Consumer over 75 and typically is directly entered via the browser.
• Consumer Background Event Summary – used to record information about
the family history of the Consumer and typically is entered directly via the browser during the Consumer registration process.
• Diabetes Educator Event Summary – used to record information about a
Consumer’s consultation with a Diabetes Educator and typically is directly entered via
the browser.
• Diabetes Specialist Clinic Event Summary – used to record information
about a Consumer’s consultation with a Diabetes Specialist and may be either generated by the Diabetes Clinical System or directly entered via the browser.
• Dietitian Event Summary – used to record information about a Consumer’s consultation with a Dietitian and typically is directly entered via the browser.
• Discharge Summary – used to record information about a Consumer’s Hospital stay and typically is automatically generated by the Hospital Discharge System.
• GP Event Summary – used to record information about a Consumer’s
consultation with a GP and typically is automatically generated by a GP desktop
system (for example Medical Director or practiX).
• GP Management Plan – used to record GP centric care planning information about a Consumer and typically is directly entered via the browser.
• Initial Health Summary – used to record information about a Consumer's health
history and typically is automatically generated by a GP desktop system (for example
Medical Director or practiX). Ideally at least one of these would be submitted during the Consumer registration process.
• Nephrologist Event Summary – used to record information about a
Consumer’s consultation with a Nephrologist and typically is directly entered via the
browser.
• Ophthalmologist Event Summary – used to record information about a
Consumer’s consultation with an Ophthalmologist and typically is directly entered via the browser.
• Pathology Event Summary – used to record information on pathology results
and may be sourced directly from the pathology lab or via the GP desktop system (for
example Medical Director or practiX).
• Podiatrist Event Summary – used to record information about a Consumer’s consultation with a Podiatrist and typically is directly entered via the browser.
• Pregnancy Assessment – used to record assessment information about a Pregnancy and typically is directly entered via the browser
• Provider Specific Care Plan – used to record discipline centric (for example for
a podiatrist, or ophthalmologist) care planning information about a Consumer and
typically is directly entered via the browser.
• Team Care Arrangement – used to record team care planning information about a Consumer and typically is directly entered via the browser.
• Vascular Surgeon Event Summary – used to record information about a
Consumer’s consultation with a Vascular Surgeon and typically is directly entered via the browser.

RecordPoint Clinical User Guide V2.03
Confidential Page 66
The administrator of the system can customise the Archetypes as required by the users of the
system and also assign which roles have the privilege to submit each type of Event Summary.
It is expected that the list of available Event Summary types, as shown in Figure 64 will be
different to what is actually available for each user.
The tables in Annex B.2 contain the default privileges for the default list of Event Summary
types.
Figure 64 – Available Events List
The following section describes how to submit Event Summaries via the browser application
and will use the Dietitian Event Summary as an example. Although this Event
Summary type does not show all the data entry variations, the process and wizard in the
browser application is the same for all Event Summary types.
5.1 Creating an Event Summary
Click on the required link to begin the Event Summary data entry wizard, as shown in Figure
64. The Dietitian Event Summary is used as an example for the screen shots.
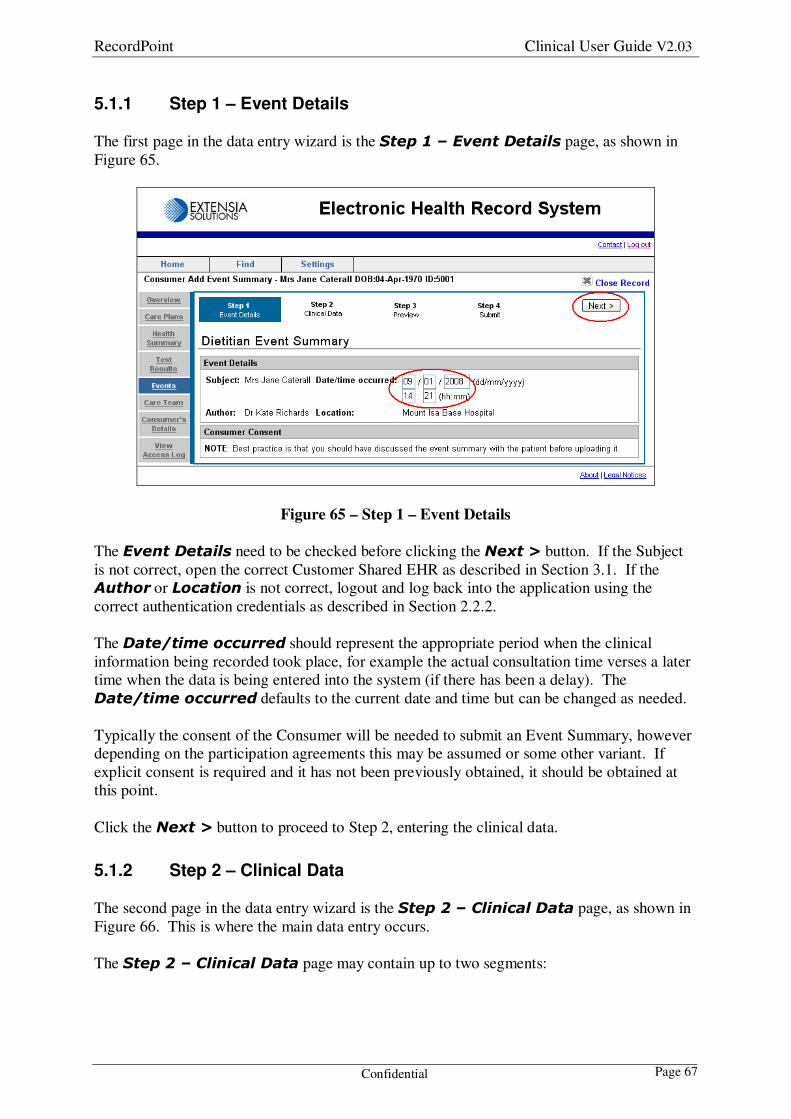
RecordPoint Clinical User Guide V2.03
Confidential Page 67
5.1.1 Step 1 – Event Details
The first page in the data entry wizard is the Step 1 – Event Details page, as shown in
Figure 65.
Figure 65 – Step 1 – Event Details
The Event Details need to be checked before clicking the Next > button. If the Subject
is not correct, open the correct Customer Shared EHR as described in Section 3.1. If the
Author or Location is not correct, logout and log back into the application using the
correct authentication credentials as described in Section 2.2.2.
The Date/time occurred should represent the appropriate period when the clinical
information being recorded took place, for example the actual consultation time verses a later
time when the data is being entered into the system (if there has been a delay). The
Date/time occurred defaults to the current date and time but can be changed as needed.
Typically the consent of the Consumer will be needed to submit an Event Summary, however
depending on the participation agreements this may be assumed or some other variant. If
explicit consent is required and it has not been previously obtained, it should be obtained at
this point.
Click the Next > button to proceed to Step 2, entering the clinical data.
5.1.2 Step 2 – Clinical Data
The second page in the data entry wizard is the Step 2 – Clinical Data page, as shown in
Figure 66. This is where the main data entry occurs.
The Step 2 – Clinical Data page may contain up to two segments:

RecordPoint Clinical User Guide V2.03
Confidential Page 68
1. The top segment shows the Event Summary Sections (if more than one) within the
Event Summary. By default none of the sections are selected.
2. The bottom segment is initially empty (unless there is only one Event Summary
Section), but as Event Summary Sections are selected the bottom segment will display
a data entry panel for each selected Event Summary Section.
Figure 66 - Step 2 – Clinical Data
Click on the required checkboxes in the top segment to open the data entry panels as shown in
Figure 66. The Diet Assessment and Exercise Event Summary Sections are used as
examples for the screen shot.
Enter the clinical data into the bottom segment as required. Any fields that are mandatory (ie
they need to be filled in) are marked with a small red asterisk (*).
Data can be freely typed into free text fields as shown in the Notes field of the Diet
Assessment Entry. If the browser being used supports spell checking, this can be turned
RecordPoint Clinical User Guide V2.03
Confidential Page 69
on to spell check the content typed. The text in these fields will automatically wrap to the
size of the field, but if content is entered that exceeds the size allocated scroll bars will
automatically appear to allow navigation to hidden text.
Radio buttons (as shown in the Low Fat field of the Diet Assessment Entry) are initially
set to all options off. Any one of the options can be selected. Once an option is selected, the
field cannot be returned to the blank state, ie one of the options must be selected.
Pull down lists allow selection from the pre-set list of values. The list is displayed by clicking
the downward facing arrow (as shown in the Level of Exertion field of the Exercise
Entry). Selection can also be made with the keyboard using the first letter of an option and/or
the upupupup and downdowndowndown arrow keys. For example clicking the ‘mmmm’ key will select the moderate
option, and then clicking the upupupup arrow key will select the light option. Selecting the ‘–‘
option at the top of the list of options will clear the field to empty.
Date and Time data entry fields support a default button (Left Facing Triangle as shown in
Figure 66) that will populate the field with the date and time entered in Step 1 for the Event
Summary. Some dates and times will automatically default to this date if the field is left
empty. For example, the date and time for each Entry (usually shown at the end of the data
entry panel) will automatically default if left empty. Figure 66 shows the default button has
been used for the Diet Assessment Entry and for the top Exercise Entry. The bottom Exercise
entry has been left blank, but as shown in Figure 68, this date will also default. The default
button is useful for pre-filling the fields to allow minor modifications, for example to enter the
date of the previous day.
Some Entries can be repeated, for example allowing multiple referrals to be recorded in the
one Event Summary. New blank Entries can be added by clicking the Add button as shown
in Figure 66.
Notes:
• If an Event Summary Section is left blank it will not be included into the Event
Summary. If too many entries are created via the Add buttons, they can just be left
blank and they will be ignored.
• If an Event Summary Section is de-selected from the top segment it will retain any
data that has been entered. This data will be visible if it is re-selected again, even after
proceeding to Step 3 and returning back to Step 2.
• If an Event Summary Section contains data, but has been de-selected in the top
segment it will not be included in the Event Summary.
• If the < Back button is clicked to go back to Step 1, any entered data on this page
will be retained. The data will be displayed again when returning to Step 2.
• If the < Next button is clicked to go to Step 3, any entered data on this page will be
retained. The data will be displayed again, upon returning to Step 2.
Click the Next > button to proceed to Step 3, to preview the entered clinical data. At this
point the system will validate the entered data to ensure the Event Summary is been correctly

RecordPoint Clinical User Guide V2.03
Confidential Page 70
completed. If there are any errors, they will be shown at the top of the page in red as shown
in Figure 67. The page will remain on Step 2 to allow correction of the errors before
proceeding to Step 3.
Figure 67 – Step 2 – Clinical Data - Errors
In this example, the day value in the date for the Diet Assessment Entry has an invalid
value as shown in Figure 67.

RecordPoint Clinical User Guide V2.03
Confidential Page 71
5.1.3 Step 3 - Preview
The third page in the data entry wizard is the Step 3 – Preview page, as shown in Figure
68. This is final stage in the data capture process before the Event Summary is submitted into
the Shared EHR. All the details should be carefully reviewed before proceeding.
Figure 68 – Step 3 - Preview
The Step 3 – Preview page contains two segments:
1. The top segment shows the Event Summary details from Step 1.
2. The bottom segment shows the Entry details entered in Step 2.
To make any changes to the data click the < Back button to go back to Step 2.
The top segment also contains two links allowing the data to be copied or printed. The Copy
to Clipboard and Printable Version links are documented in section 4.6.2. These
functions are useful for transferring the data into another filing system (paper or computer)
that is not integrated with the Shared EHR.
When all the previewed details have been reviewed, click on the Next > button to Step 4,
and submit the data into the Shared EHR. This is the final step and cannot be undone.
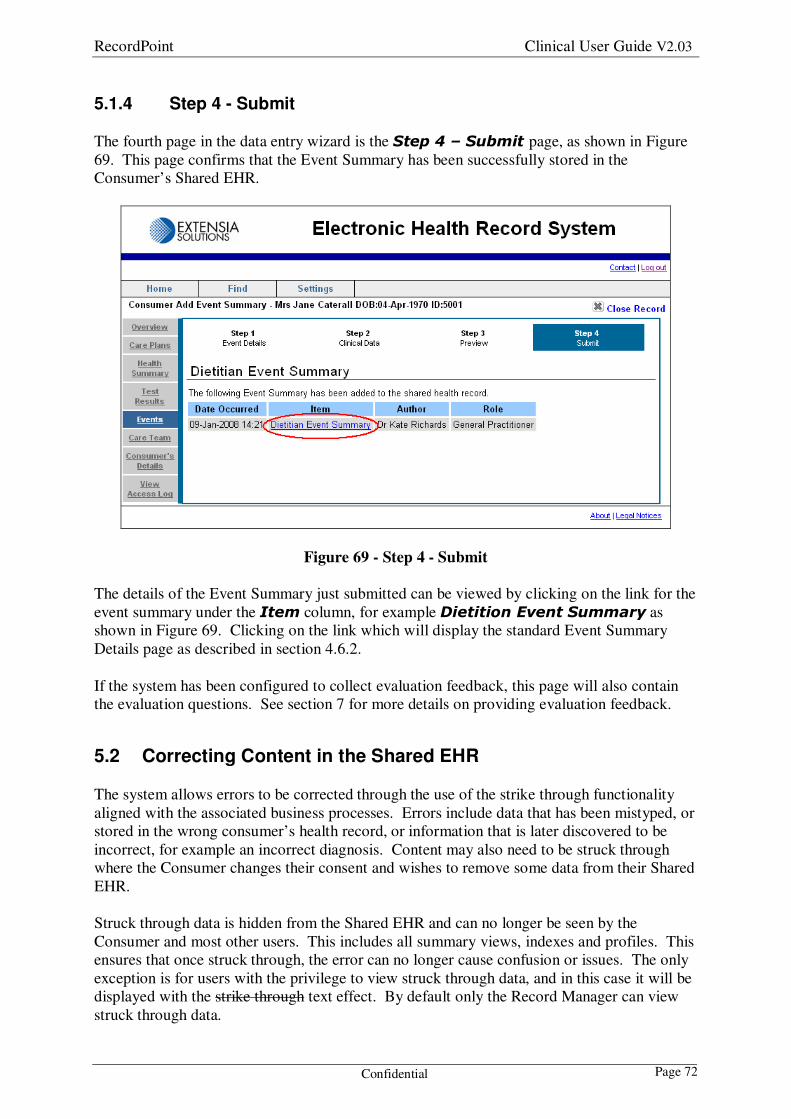
RecordPoint Clinical User Guide V2.03
Confidential Page 72
5.1.4 Step 4 - Submit
The fourth page in the data entry wizard is the Step 4 – Submit page, as shown in Figure
69. This page confirms that the Event Summary has been successfully stored in the
Consumer’s Shared EHR.
Figure 69 - Step 4 - Submit
The details of the Event Summary just submitted can be viewed by clicking on the link for the
event summary under the Item column, for example Dietition Event Summary as
shown in Figure 69. Clicking on the link which will display the standard Event Summary
Details page as described in section 4.6.2.
If the system has been configured to collect evaluation feedback, this page will also contain
the evaluation questions. See section 7 for more details on providing evaluation feedback.
5.2 Correcting Content in the Shared EHR
The system allows errors to be corrected through the use of the strike through functionality
aligned with the associated business processes. Errors include data that has been mistyped, or
stored in the wrong consumer’s health record, or information that is later discovered to be
incorrect, for example an incorrect diagnosis. Content may also need to be struck through
where the Consumer changes their consent and wishes to remove some data from their Shared
EHR.
Struck through data is hidden from the Shared EHR and can no longer be seen by the
Consumer and most other users. This includes all summary views, indexes and profiles. This
ensures that once struck through, the error can no longer cause confusion or issues. The only
exception is for users with the privilege to view struck through data, and in this case it will be
displayed with the strike through text effect. By default only the Record Manager can view
struck through data.
RecordPoint Clinical User Guide V2.03
Confidential Page 73
The ability to strike through is granted as a privilege and should only be made available to
those users who are trained on the associated business processes and implications of removing
data from the Shared EHR. By default only the Record Manager can strike through data.
Struck through data is not deleted from the Shared EHR to preserve the historical integrity of
the record. The data that is being struck through has been made available to the care team and
may have been previously viewed. Before data is struck through an assessment should be
made of how viewing the data could have impacted the care team or how now making it
invisible could impact the care team. If any issues arise, viewing the history of changes can
help resolve the issue. This can only be done by a user with the privilege to view struck
through data.
Strike through can be done for an entire Event Summary or for one or more Entries within an
Event Summary.
Note: Once an Entry or entire Event Summary has been struck through, it cannot be
unstruck.
5.2.1 Strike Through Entire Event Summary
When an entire Event Summary is struck through, all content is struck through and no part of
the Event Summary will be included in the Shared EHR views. The only exception is for
users with the privilege to view struck through data, and in this case, the Shared EHR views
will display the data with the strike through text effect according to the following notes:
• The Health Summary Index and Consumer Overview pages will not
include struck through data.
• The Care Plan Index, Care Plan Summary Calendar, Health Summary
detail views, Profile pages, Pathology Index, and Event Index, pages will
include struck through data shown with the strike through text effect.
To strike through an Event Summary open the Event Summary detail page as described in
Section 4.6.2.
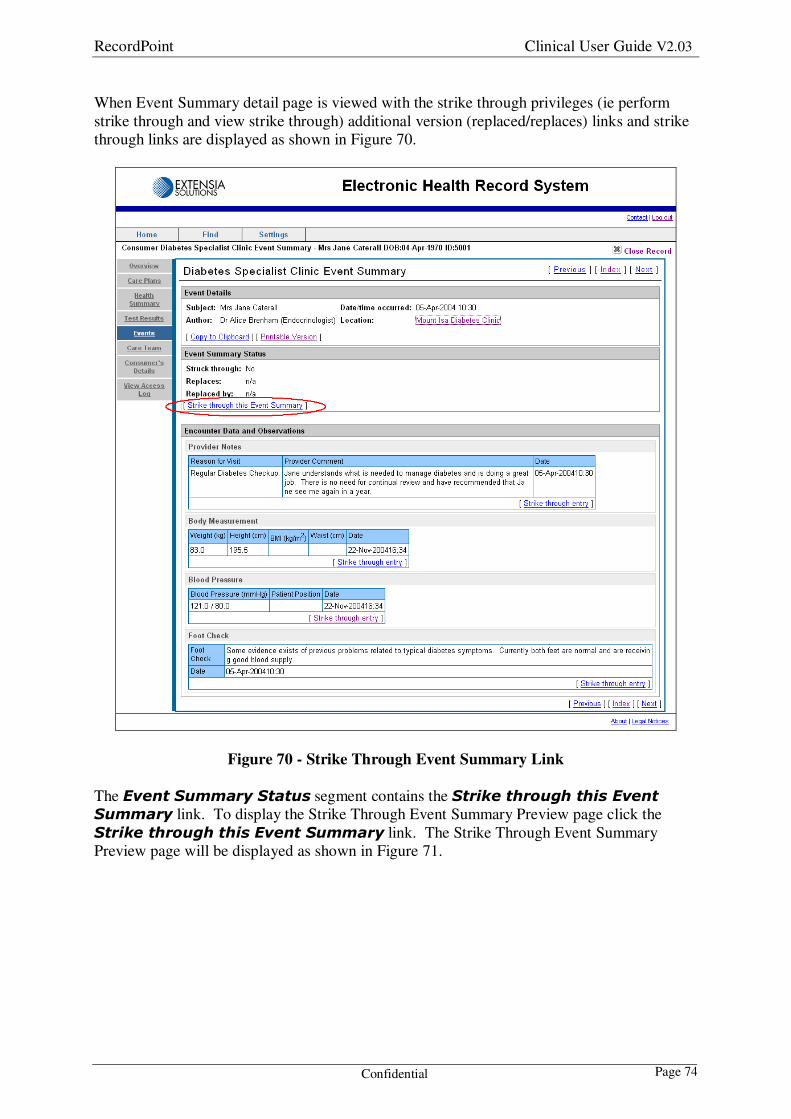
RecordPoint Clinical User Guide V2.03
Confidential Page 74
When Event Summary detail page is viewed with the strike through privileges (ie perform
strike through and view strike through) additional version (replaced/replaces) links and strike
through links are displayed as shown in Figure 70.
Figure 70 - Strike Through Event Summary Link
The Event Summary Status segment contains the Strike through this Event
Summary link. To display the Strike Through Event Summary Preview page click the
Strike through this Event Summary link. The Strike Through Event Summary
Preview page will be displayed as shown in Figure 71.
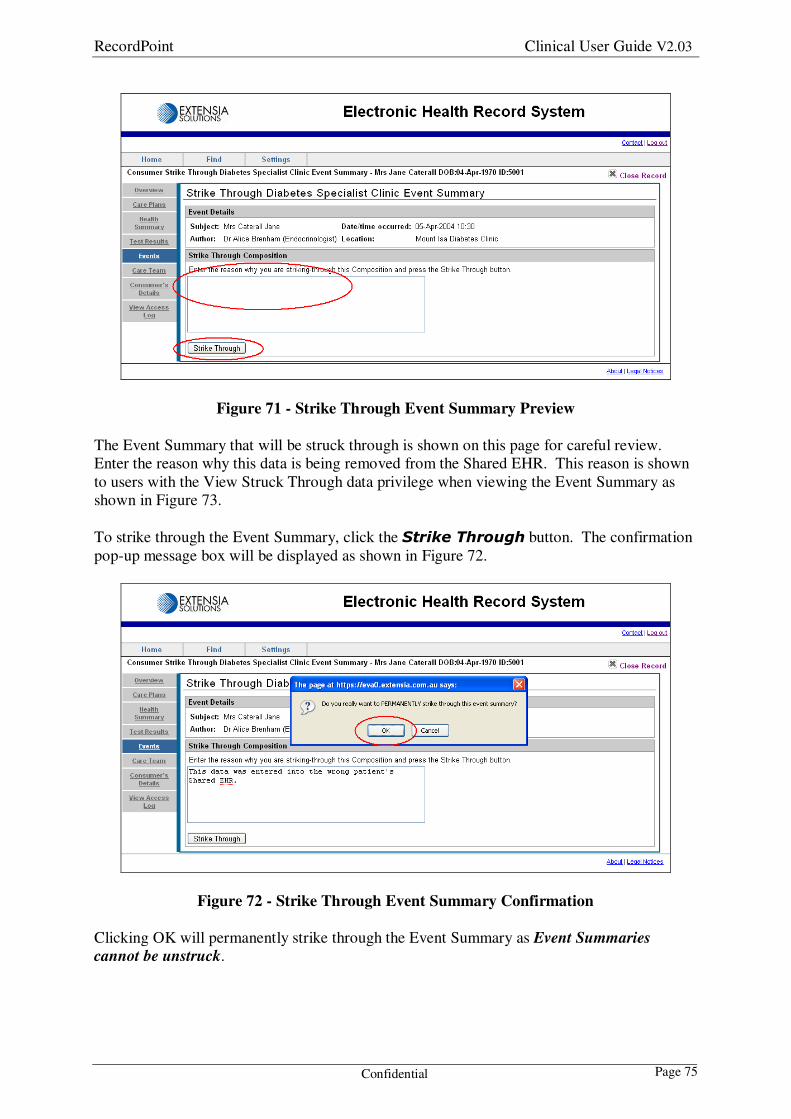
RecordPoint Clinical User Guide V2.03
Confidential Page 75
Figure 71 - Strike Through Event Summary Preview
The Event Summary that will be struck through is shown on this page for careful review.
Enter the reason why this data is being removed from the Shared EHR. This reason is shown
to users with the View Struck Through data privilege when viewing the Event Summary as
shown in Figure 73.
To strike through the Event Summary, click the Strike Through button. The confirmation
pop-up message box will be displayed as shown in Figure 72.
Figure 72 - Strike Through Event Summary Confirmation
Clicking OK will permanently strike through the Event Summary as Event Summaries
cannot be unstruck.

RecordPoint Clinical User Guide V2.03
Confidential Page 76
The Event Summary will be displayed with the content shown in the strike through text effect
and the strike through details will be displayed including the Strike Through Reason as
shown in Figure 73.
Figure 73 - Struck Through Event Summary Details
The page title and all the event contents are shown with the strike through text effect and the
Struck through status value is set to Yes.
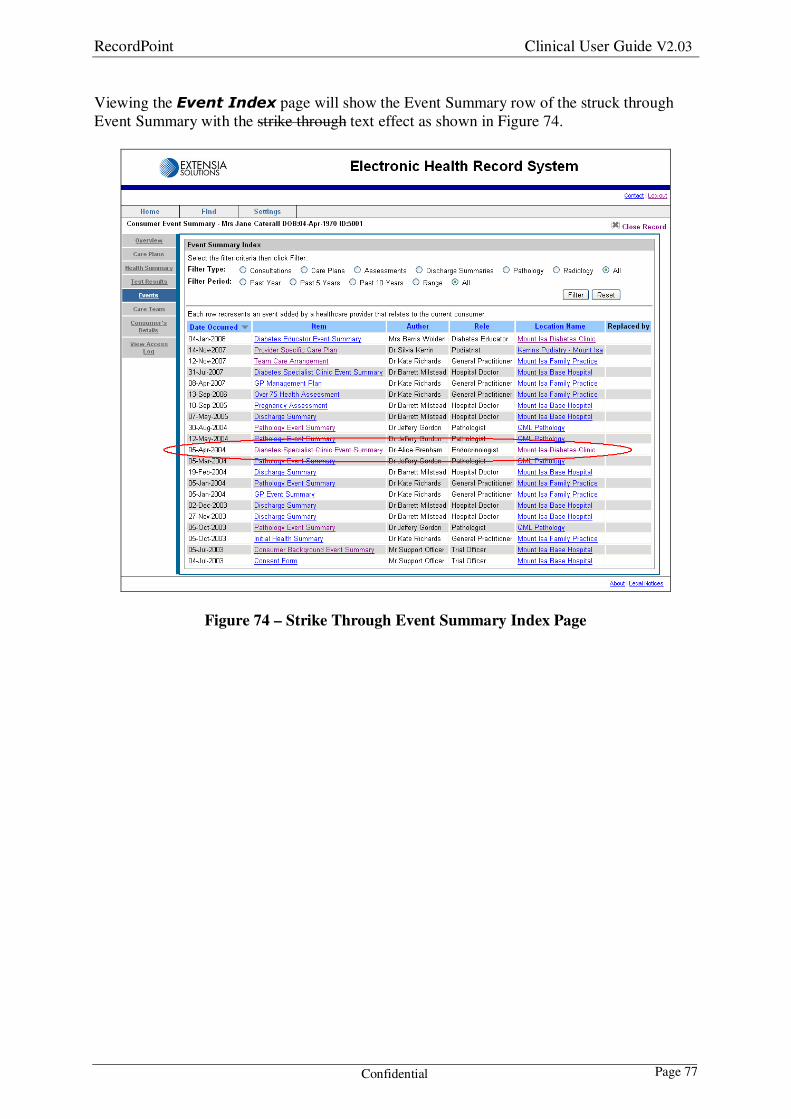
RecordPoint Clinical User Guide V2.03
Confidential Page 77
Viewing the Event Index page will show the Event Summary row of the struck through
Event Summary with the strike through text effect as shown in Figure 74.
Figure 74 – Strike Through Event Summary Index Page
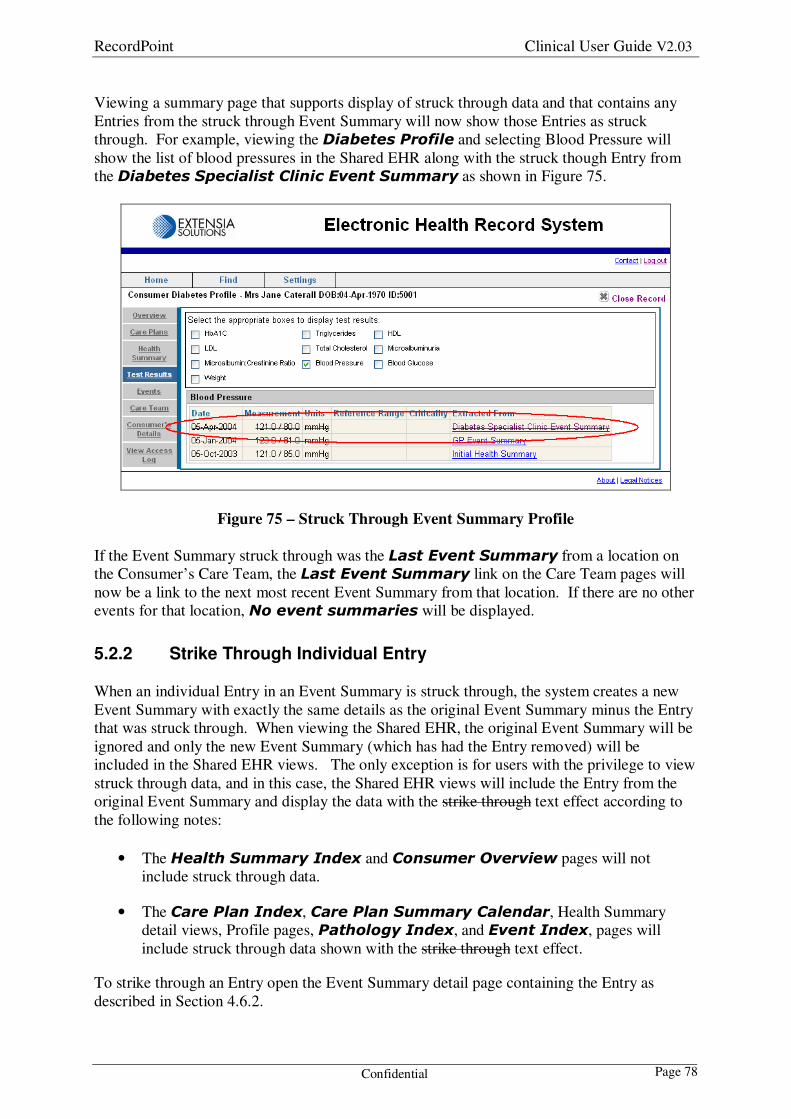
RecordPoint Clinical User Guide V2.03
Confidential Page 78
Viewing a summary page that supports display of struck through data and that contains any
Entries from the struck through Event Summary will now show those Entries as struck
through. For example, viewing the Diabetes Profile and selecting Blood Pressure will
show the list of blood pressures in the Shared EHR along with the struck though Entry from
the Diabetes Specialist Clinic Event Summary as shown in Figure 75.
Figure 75 – Struck Through Event Summary Profile
If the Event Summary struck through was the Last Event Summary from a location on
the Consumer’s Care Team, the Last Event Summary link on the Care Team pages will
now be a link to the next most recent Event Summary from that location. If there are no other
events for that location, No event summaries will be displayed.
5.2.2 Strike Through Individual Entry
When an individual Entry in an Event Summary is struck through, the system creates a new
Event Summary with exactly the same details as the original Event Summary minus the Entry
that was struck through. When viewing the Shared EHR, the original Event Summary will be
ignored and only the new Event Summary (which has had the Entry removed) will be
included in the Shared EHR views. The only exception is for users with the privilege to view
struck through data, and in this case, the Shared EHR views will include the Entry from the
original Event Summary and display the data with the strike through text effect according to
the following notes:
• The Health Summary Index and Consumer Overview pages will not
include struck through data.
• The Care Plan Index, Care Plan Summary Calendar, Health Summary
detail views, Profile pages, Pathology Index, and Event Index, pages will
include struck through data shown with the strike through text effect.
To strike through an Entry open the Event Summary detail page containing the Entry as
described in Section 4.6.2.
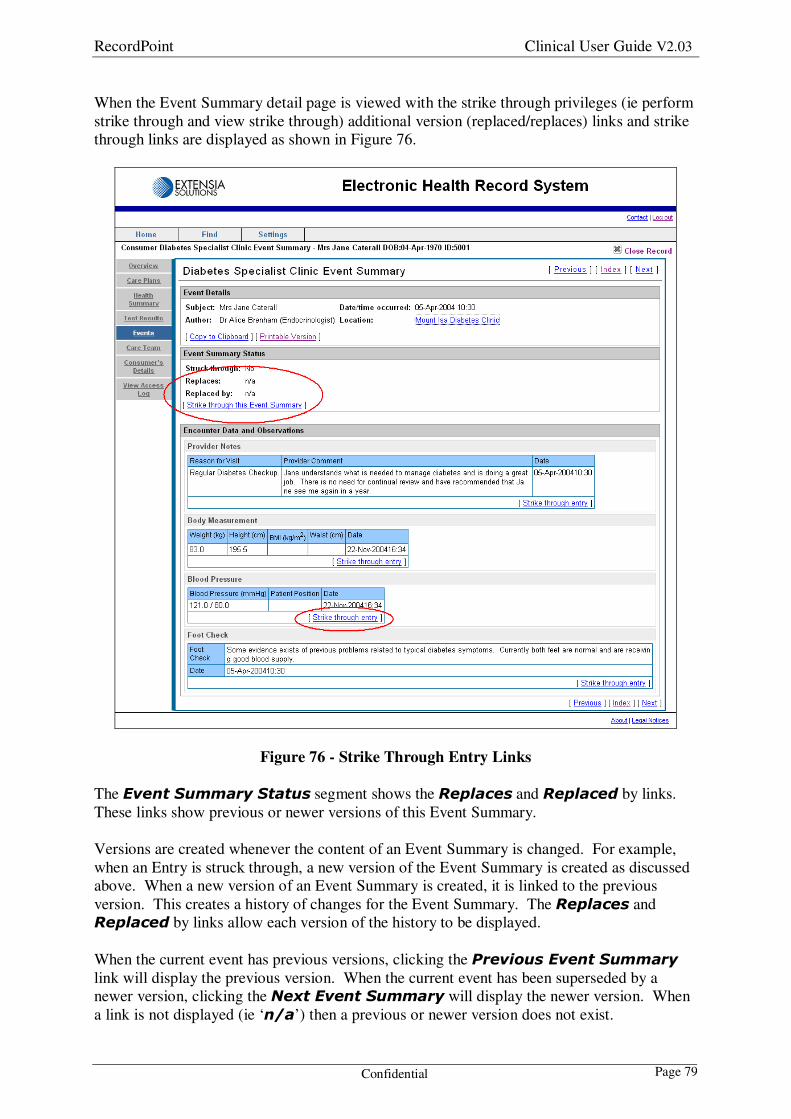
RecordPoint Clinical User Guide V2.03
Confidential Page 79
When the Event Summary detail page is viewed with the strike through privileges (ie perform
strike through and view strike through) additional version (replaced/replaces) links and strike
through links are displayed as shown in Figure 76.
Figure 76 - Strike Through Entry Links
The Event Summary Status segment shows the Replaces and Replaced by links.
These links show previous or newer versions of this Event Summary.
Versions are created whenever the content of an Event Summary is changed. For example,
when an Entry is struck through, a new version of the Event Summary is created as discussed
above. When a new version of an Event Summary is created, it is linked to the previous
version. This creates a history of changes for the Event Summary. The Replaces and
Replaced by links allow each version of the history to be displayed.
When the current event has previous versions, clicking the Previous Event Summary
link will display the previous version. When the current event has been superseded by a
newer version, clicking the Next Event Summary will display the newer version. When
a link is not displayed (ie ‘n/a’) then a previous or newer version does not exist.

RecordPoint Clinical User Guide V2.03
Confidential Page 80
Each Entry displayed will show a Strike Through entry link (unless the entry is not
eligible for strike through, see the Notes below). To display the Strike Through Entry
Preview page click the associated Strike Through entry link for the Entry that needs to
be struck through. The Strike Through Entry Preview page will be displayed as shown in
Figure 77.
Figure 77 - Strike Through Entry Preview
The details that will be struck through are shown on this page for careful review. The actual
Entry that will be struck though is shown along with the details of the Event Summary it
belongs to.
Enter the reason why this data is being removed from the Shared EHR. This reason is shown
to users with the View Struck Through data privilege when viewing the original version of the
Event Summary as shown in Figure 79.
To strike through the Entry, click the Strike Through button. The confirmation pop-up
message box will be displayed as shown in Figure 78.

RecordPoint Clinical User Guide V2.03
Confidential Page 81
Figure 78 - Strike Through Entry Confirmation
Clicking OK will permanently strike through the Entry as Entries cannot be unstruck. The
newly created Event Summary will be displayed showing that the Entry has been removed.
Clicking the Previous Event Summary link, next to the Replaces: label, will display
the original Event Summary showing the Entry with the strike through text effect and the
strike through details including the Strike Through Reason as shown in Figure 79.

RecordPoint Clinical User Guide V2.03
Confidential Page 82
Figure 79 - Strike Through Entry – Original Event Summary
The page title and Event Details are shown with the strike through text effect and the
Struck through status value is set to Yes as this entire Event Summary is a superseded
version and has been struck through (ie only the latest version is shown in the Shared EHR
views).
The content of the Event Summary highlights the difference between this version and the next
by just showing the removed Entry (Blood Pressure in this example) with the strike
through text effect.
Clicking the Next Event Summary link, next to the Replaced by: label, will display
the newly created Event Summary that contains the latest version (ie the struck through Entry
is not displayed).
Viewing the Event Index page will also show the Next Event link in the Replaced by
column for Event summaries that have been superseded as shown in Figure 80. The Event
Summary row of the struck through Event Summary will be shown with the strike through
text effect. Clicking the Next Event link will display the newly created Event Summary.
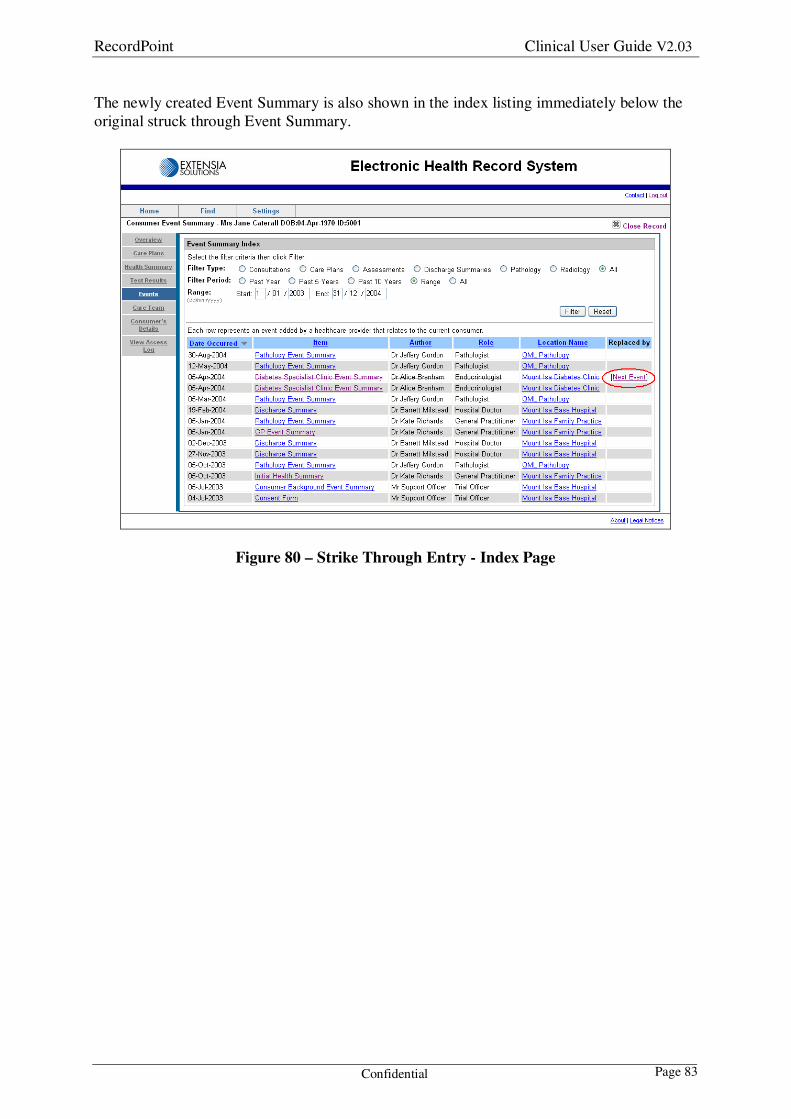
RecordPoint Clinical User Guide V2.03
Confidential Page 83
The newly created Event Summary is also shown in the index listing immediately below the
original struck through Event Summary.
Figure 80 – Strike Through Entry - Index Page

RecordPoint Clinical User Guide V2.03
Confidential Page 84
Viewing a summary page that supports display of struck through data and contains Blood
Pressure Entries will now show this Entry as struck through. For example, viewing the
Diabetes Profile and selecting Blood Pressure will show the list of blood pressures in the
Shared EHR along with the struck though Entry from the Diabetes Specialist Clinic
Event Summary as shown in Figure 81.
Figure 81 – Struck Through Entry – Profile View
The following notes relate to strike through of an Entry:
• If there is only one Entry in an Event Summary then the entire Event Summary must
be struck through – not just the Entry. In this case the Strike Through entry link
will not be shown against the Entry.
• If the last Entry is struck through in a Section, then the Section will be removed from
the Event Summary as well.
• If the Entry is mandatory then it cannot be struck through and the Strike Through
entry link will not be shown against the Entry.
• If the Entry struck through was contained in the Last Event Summary from a
location on the Consumer’s Care Team, the Last Event Summary link on the
Care Team pages will now be a link to the newly created Event Summary.
RecordPoint Clinical User Guide V2.03
Confidential Page 85
6 Printing
Any page displayed in the RecordPoint application is printable. The formatting of the printed
pages is slightly different to what is seen in the browser to better suit the printed format. Use
the Print Preview function of the browser to see the printed format that is applicable for
each page.
Click the Print Preview sub-menu from the File menu in the browser. Print Preview
is useful for selected the most appropriate printing orientation. In some cases landscape may
produce better results. If the orientation cannot be changed directly on the Print Preview
page, then use the Page Setup option.
The header and footer settings can also be checked via Print Preview. By default the
header and footer settings for the browser will output the title of the page, the page numbering
and the date and time printed. The page titles for the Shared EHR pages include the
Consumer’s name, date of birth and Shared EHR identifier which will be printed on every
page. This makes the printed pages suitable for including in paper medical records. If the
header and footer settings are not correct they can be changed with the Page Setup sub-
menu option under the File menu in the browser (this option is also generally available on the
Print Preview page).
The browser Print function is used to print the pages. This is generally invoked by pressing
CTRL+PCTRL+PCTRL+PCTRL+P or clicking the Print sub-menu from the File menu in the browser.

RecordPoint Clinical User Guide V2.03
Confidential Page 86
A sample print preview, for a Diabetes Specialist Clinic Event Summary, is shown in Figure
82.
Figure 82 - Sample Print Preview
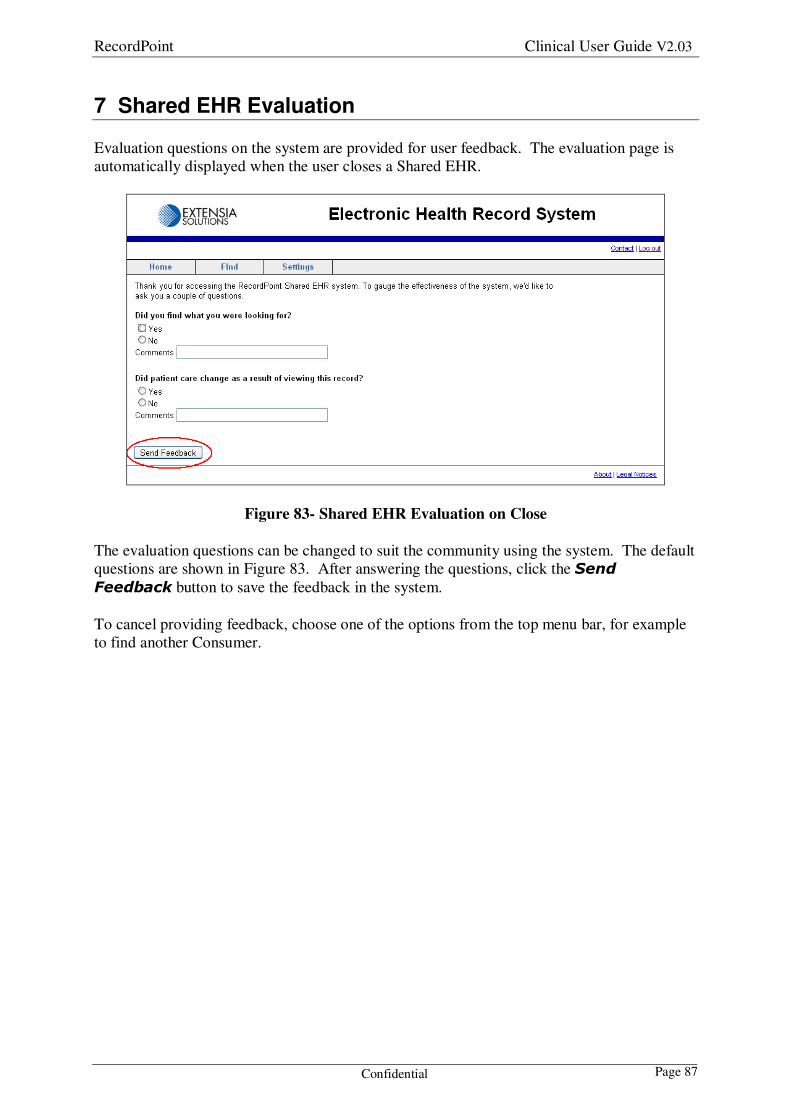
RecordPoint Clinical User Guide V2.03
Confidential Page 87
7 Shared EHR Evaluation
Evaluation questions on the system are provided for user feedback. The evaluation page is
automatically displayed when the user closes a Shared EHR.
Figure 83- Shared EHR Evaluation on Close
The evaluation questions can be changed to suit the community using the system. The default
questions are shown in Figure 83. After answering the questions, click the Send
Feedback button to save the feedback in the system.
To cancel providing feedback, choose one of the options from the top menu bar, for example
to find another Consumer.

RecordPoint Clinical User Guide V2.03
Confidential Page 88
8 Resolving Issues
8.1 Contacting the Help Desk
The Contact details page contains the details for getting help with the system and can be
accessed by clicking on the Contact link located at the top right corner of each page (after
successful log in) as displayed in Figure 84.
Figure 84 - Contact Details Link
8.2 Copyright, Disclaimer and Privacy Notices
To access the Legal Notices page, click on the Legal Notices link located on the bottom
right corner of each page (after successful log in) as displayed in Figure 85.
Figure 85 –Legal Notices Link

RecordPoint Clinical User Guide V2.03
Confidential Page 89
8.3 About the System
The About page contains the version of the system. This information is important when
getting help with the system or reporting issues. Click on the About link located on the
bottom right corner of each page (after successful log in) as displayed in Figure 86.
Figure 86 –About Link
8.4 Troubleshooting
This section will be expanded and updated as common issues are experienced by users of the
system. Users should always log out, log back in again, and retry a task as a first checkpoint
before calling the Help Desk.
Problem Resolution
I’m a Provider and I know my User ID and passphrase are correct but I still can’t login
Your Location certificate may have been revoked or incorrectly installed. Contact
Support.
I’m a Provider but can’t find a Consumer for
whom I know I am part of the care team
Check with the Registration Officer that the
Consumer is still participating in the Shared EHR system.
I used the web browser Back button and
now I get a message stating ‘The Page cannot
be displayed’.
The web browser Back button should not be
used as the system state cannot be guaranteed.
This also applies to the mouse right click,
Back and Forward commands. You may
need to log in again.

RecordPoint Clinical User Guide V2.03
Confidential Page 90
Annex A - Definitions and Acronyms
A number of terms and abbreviations are used throughout this document which are explained
below.
A.1 Definitions
Term Description
Agent is a person who is not a Consumer, for example Provider or
Registration Officer. By default they are granted privileges
to access the private data of other Consumers and/or Agents.
Consumer is a person who is receiving health care treatment
Event Summary is a set of information related to a single Consumer to be
contributed to their shared EHR as a logical unit. A logical
unit is usually related to a single healthcare event, but may
also be a history.
Health Summaries are collections of data taken from a single Consumer’s
Shared EHR that are related to a single topic or subject.
Location is an identifiable entity that has been issued with a Location
certificate. A Location is typically only related to a single
administrative entity, such as a general practice, a clinic or a
cell within a large hospital.
Organisation is an Organisational entity participating in the Shared EHR
community. Organisations can be large complex entities
with sub-groups such as the local Health Authority or a
hospital, or a smaller simple entity such as a GP clinic. An
Organisation may have one or more Locations.
Shared EHR is an EHR that is Consumer centric and available and
suitable for contribution by all the Providers that provide
care to a Consumer, regardless of which organisation they
work for or where they are located.
Provider is a person involved in the provision of health care to a
Consumer, and usually has some specialised healthcare
knowledge.
Location
Certificate
is a certificate issued by a PKI authority that verifies and
authenticates the validity of a location involved in an
internet transaction.
A.2 Acronyms
Acronym Expansion
EHR Electronic Health Record
GP General Practitioner
PKI Public Key Infrastructure
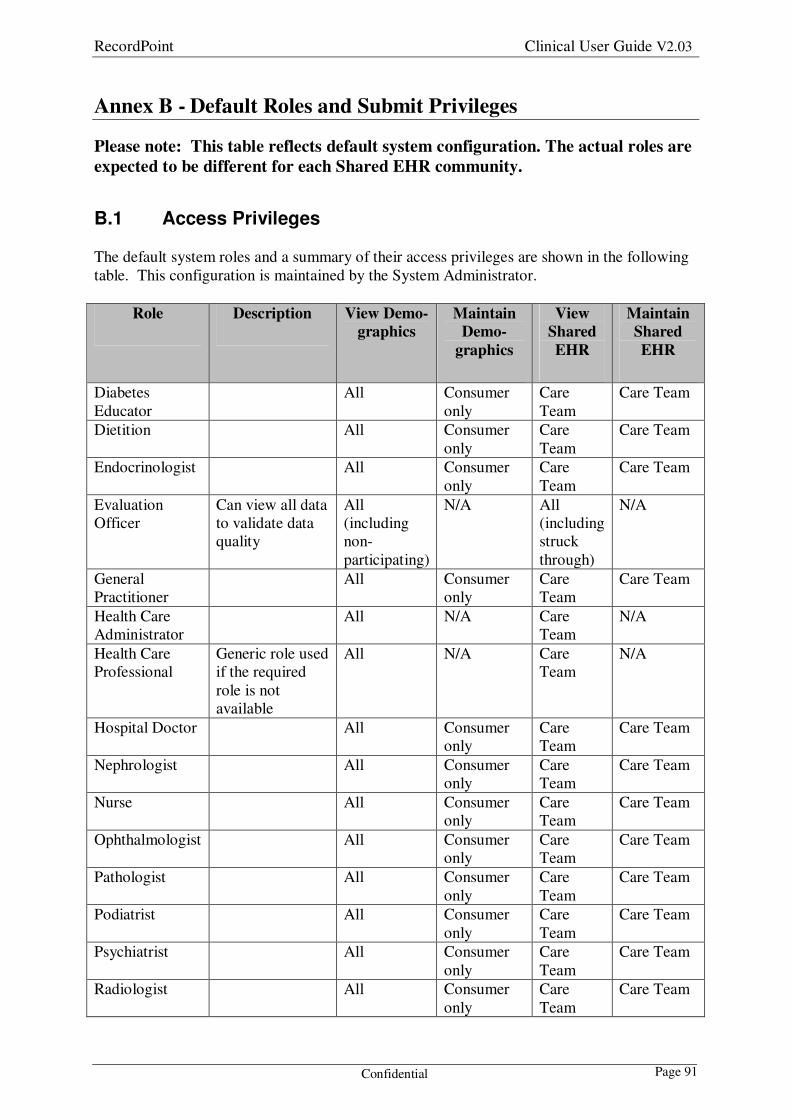
RecordPoint Clinical User Guide V2.03
Confidential Page 91
Annex B - Default Roles and Submit Privileges
Please note: This table reflects default system configuration. The actual roles are
expected to be different for each Shared EHR community.
B.1 Access Privileges
The default system roles and a summary of their access privileges are shown in the following
table. This configuration is maintained by the System Administrator.
Role Description View Demo-
graphics
Maintain
Demo-
graphics
View
Shared
EHR
Maintain
Shared
EHR
Diabetes
Educator
All Consumer
only
Care
Team
Care Team
Dietition All Consumer
only
Care
Team
Care Team
Endocrinologist All Consumer
only
Care
Team
Care Team
Evaluation
Officer
Can view all data
to validate data
quality
All
(including
non-
participating)
N/A All
(including
struck
through)
N/A
General
Practitioner
All Consumer
only
Care
Team
Care Team
Health Care
Administrator
All N/A Care
Team
N/A
Health Care
Professional
Generic role used
if the required
role is not
available
All N/A Care
Team
N/A
Hospital Doctor All Consumer
only
Care
Team
Care Team
Nephrologist All Consumer
only
Care
Team
Care Team
Nurse All Consumer
only
Care
Team
Care Team
Ophthalmologist All Consumer
only
Care
Team
Care Team
Pathologist All Consumer
only
Care
Team
Care Team
Podiatrist All Consumer
only
Care
Team
Care Team
Psychiatrist All Consumer
only
Care
Team
Care Team
Radiologist All Consumer
only
Care
Team
Care Team
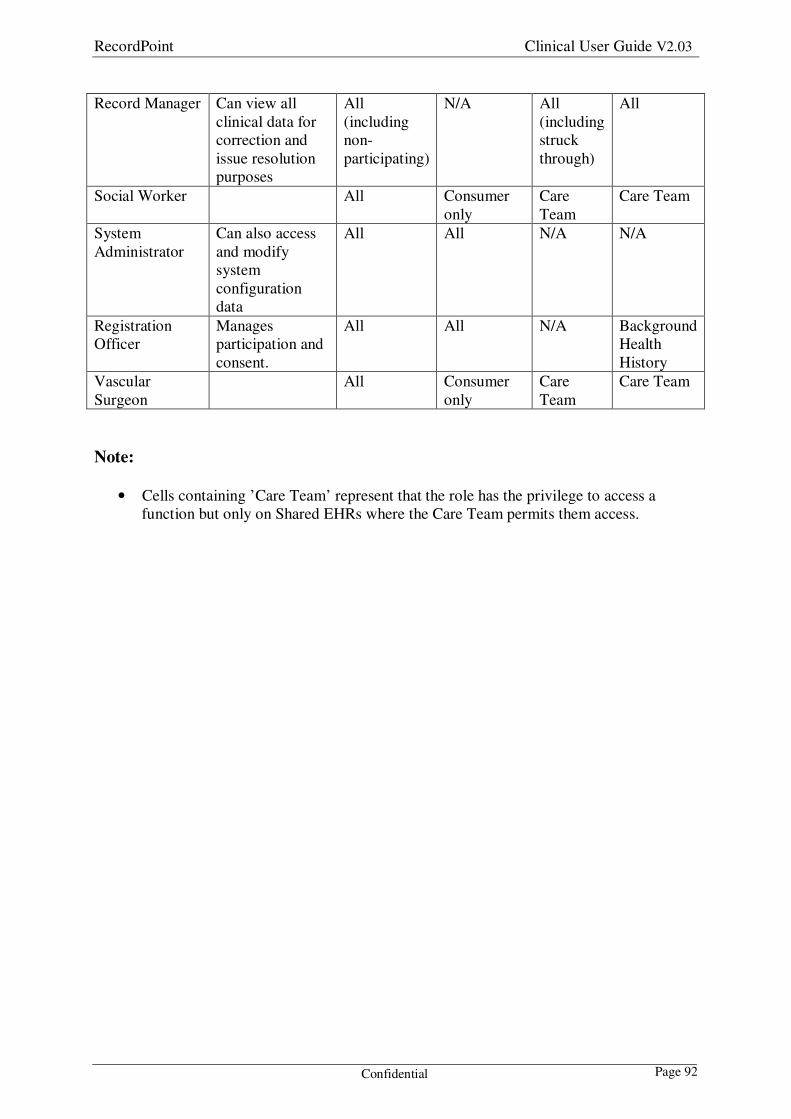
RecordPoint Clinical User Guide V2.03
Confidential Page 92
Record Manager Can view all
clinical data for
correction and
issue resolution
purposes
All
(including
non-
participating)
N/A All
(including
struck
through)
All
Social Worker All Consumer
only
Care
Team
Care Team
System
Administrator
Can also access
and modify
system
configuration
data
All All N/A N/A
Registration
Officer
Manages
participation and
consent.
All All N/A Background
Health
History
Vascular
Surgeon
All Consumer
only
Care
Team
Care Team
Note:
• Cells containing ’Care Team’ represent that the role has the privilege to access a
function but only on Shared EHRs where the Care Team permits them access.
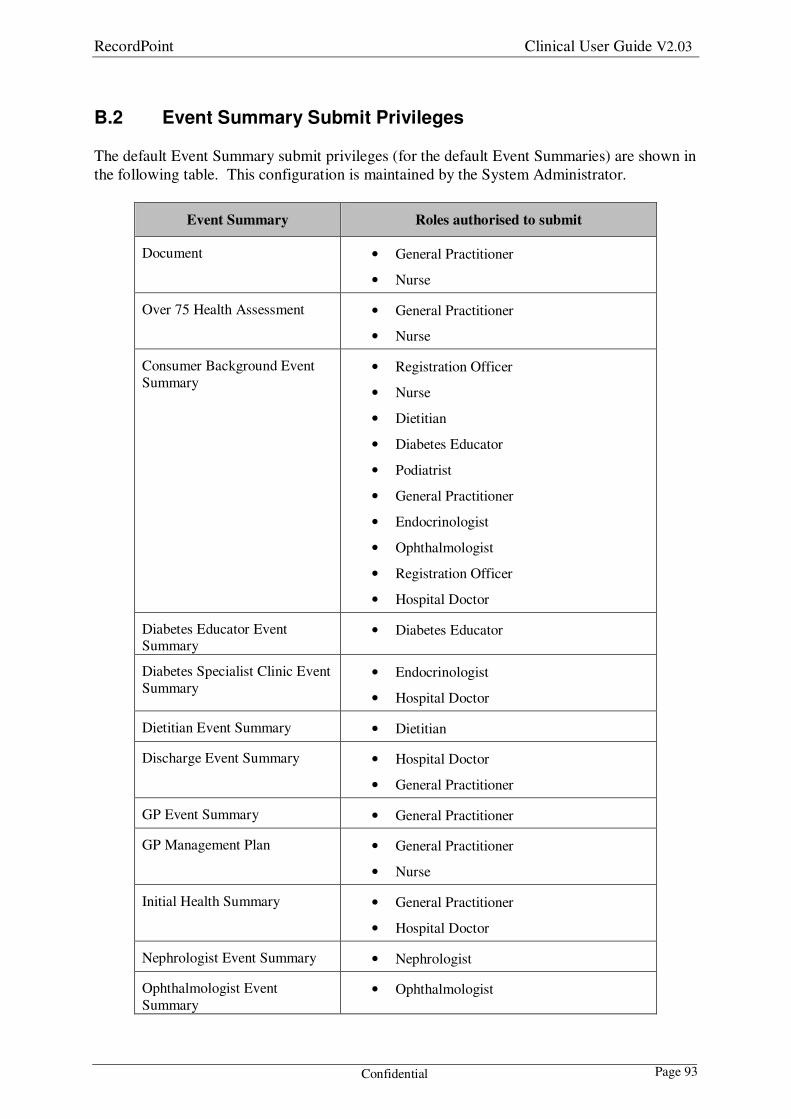
RecordPoint Clinical User Guide V2.03
Confidential Page 93
B.2 Event Summary Submit Privileges
The default Event Summary submit privileges (for the default Event Summaries) are shown in
the following table. This configuration is maintained by the System Administrator.
Event Summary Roles authorised to submit
Document • General Practitioner
• Nurse
Over 75 Health Assessment • General Practitioner
• Nurse
Consumer Background Event
Summary • Registration Officer
• Nurse
• Dietitian
• Diabetes Educator
• Podiatrist
• General Practitioner
• Endocrinologist
• Ophthalmologist
• Registration Officer
• Hospital Doctor
Diabetes Educator Event Summary
• Diabetes Educator
Diabetes Specialist Clinic Event
Summary • Endocrinologist
• Hospital Doctor
Dietitian Event Summary • Dietitian
Discharge Event Summary • Hospital Doctor
• General Practitioner
GP Event Summary • General Practitioner
GP Management Plan • General Practitioner
• Nurse
Initial Health Summary • General Practitioner
• Hospital Doctor
Nephrologist Event Summary • Nephrologist
Ophthalmologist Event
Summary • Ophthalmologist

RecordPoint Clinical User Guide V2.03
Confidential Page 94
Pathology Event Summary • General Practitioner
• Hospital Doctor
• Endocrinologist
Podiatrist Event Summary • Podiatrist
Pregnancy Assessment • Hospital Doctor
• General Practitioner
• Nurse
Provider Specific Care Plan • Nurse
• Dietitian
• Diabetes Educator
• Podiatrist
• General Practitioner
• Endocrinologist
• Ophthalmologist
• Hospital Doctor
Team Care Arrangement • General Practitioner
• Nurse
Vascular Surgeon Event
Summary • Vascular Surgeon
Related Documents