Recommended Settings for Oracle Hyperion Products Problem Oracle has recommended settings for Internet Explorer (IE7, IE8, IE9, IE10 and IE11) when using Hyperion products. I get this question a lot from my clients, so I thought I would share Oracles suggested settings. Without changing these, there will be intermittent problems, and frustration points. Solution Configure browser to check for new version every time user visits a page Open Internet Explorer Go to Tools > Internet options > General In “Browsing history” section click on “Settings” button and then select “Every time I visit the webpage” option Click OK, then Apply. Disable default pop-up blocking Open Internet Explorer Go to Tools > Internet options > Privacy tab Uncheck “Turn on Pop-up Blocker” Add Workspace URL to trusted sites Open Internet Explorer Go to Tools > Internet options > Security tab Select “Trusted sites” from “Select a zone to view or

Welcome message from author
This document is posted to help you gain knowledge. Please leave a comment to let me know what you think about it! Share it to your friends and learn new things together.
Transcript
Recommended Settings forOracle Hyperion Products
ProblemOracle has recommended settings for Internet Explorer (IE7,IE8, IE9, IE10 and IE11) when using Hyperion products. I getthis question a lot from my clients, so I thought I wouldshare Oracles suggested settings. Without changing these,there will be intermittent problems, and frustration points.
SolutionConfigure browser to check for newversion every time user visits a page
Open Internet ExplorerGo to Tools > Internet options > GeneralIn “Browsing history” section click on “Settings” buttonand then select “Every time I visit the webpage” optionClick OK, then Apply.
Disable default pop-up blockingOpen Internet ExplorerGo to Tools > Internet options > Privacy tabUncheck “Turn on Pop-up Blocker”
Add Workspace URL to trusted sitesOpen Internet ExplorerGo to Tools > Internet options > Security tabSelect “Trusted sites” from “Select a zone to view or
change security settings” window, then click on “Sites”button.Type your workspace URL in formhttp://workspaceserver:portnumber in “Add this websiteto the zone”Uncheck “Require server verification (https:) for allsites in this zone”Click Add, then Close.Click OK and Apply.
Customize security settingsOpen Internet ExplorerGo to Tools > Internet options > Security tabSelect “Trusted sites” from “Select a zone to view orchange security settings” windowSelect zone containing your Oracle Hyperion servers andclick on “Custom level…” buttonIn “Miscellaneous” section enable options “Access datasources across domains” and “Allow script-initiatedwindows without size or position constraints”In “ActiveX controls and plug-ins” section enable “RunActiveX controls and plug-ins” and “Script ActiveXcontrols marked safe for scripting”.Click OKClick Apply, then OK
Enable option “Always allow sessioncookies”.
Open Internet ExplorerGo to Tools > Internet options > Privacy Tab > Advanced.Check the “Override automatic cookie handling”, acceptthe first and third party cookies and check the “Alwaysallow session cookies” option.
Only for SSL enabled environments:Disable option “Do not save EncryptedPages to Disk”.
Open Internet ExplorerGo to Tools > Internet options > Advanced Tab. In“Security” section uncheck the option “Do not saveEncrypted Pages to Disk”.
Disable option “Enable Native XMLHTTP”.This setting is recommended only forcustomers using HFM 9.3.1 or older withIE 7. If you are using version 11.1.1.xof EPM products or newer, this optionshould be enabled.
Open Internet ExplorerGo to Tools > Internet options > Advanced Tab. In“Security” section uncheck the option “Enable NativeXMLHTTP”.
Using Internet Explorer 9 CompatibilityView option.
Open Internet ExplorerFor 11.1.2.1.600 Planning and EPMA: Compatibility Viewshould be enabled in Tools > Compatibility View SettingsFor EPM 11.1.2.2 products: Go to Tools > CompatibilityView Settings. Make sure EPM Workspace URL is notenabled for Compatibility View and uncheck all availableoptions at the bottom of the pop-up window.
For products using JRE Plugin (Web
Analysis, Performance Scorecard,Administration Services) make sure that acompatible version of plugin is installedon the client machine.
Check JRE Plugin certification for your EPM product insupport matrixCheck installed Java version in Control Panel > Java >General > About. If required update Java version to asupported release.Enable option “Always Auto-Download” in Control Panel >Java > Advanced > JRE Auto-Download=
Using Internet Explorer 11 EnterpriseMode. Limited support with EPM11.1.2.2.500 and 11.1.2.3.500. For moreinformation see Document 1920566.1.
Open Internet Explorer > ToolsSelect Enterprise Mode. This option is visible onlyafter enabling it in Windows Registry. See thisMicrosoft document for more details:http://msdn.microsoft.com/en-us/library/dn640687.aspx
Creating a SmartList: LinkingSmartlists to Web FormsWhat is a Smart List?
Allows for creation of custom lists that can be used indata forms
Goes beyond the limitations of Essbase: these lists arenot limited to numbers onlyUsers select a member from a designated list (each SmartList cell has a dropdown arrow that expands to allowmember selection in web forms)
Examples…
Active Period: Manage Forecast/Budget months by settingthem to either “Active” or “Inactive”Employee Status: Set employee status to “Full Time” or“Part Time”Justification: Choose from “Research”, “CustomerFeedback”, or “Expansion”
Creating a Smart List
First, create a new dimension (File-> New-> Dimension) withSmartList as the dimension type:
Next, create children of ActivePeriod. These will be themembers of the Smart List (Right click on ActivePeriod, CreateMember-> As Child):
Set the properties for each of the Smart List’s members. Thelabel will be what appears in the dropdown menu, while thevalue is the number that will be assigned to that member inEssbase. The list will be sorted from smallest to largest.Here are the properties for Inactive:
And the properties for Active:
The way this Smart List is currently set up, Inactive will
appear above Active because 0 precedes 1.
Set the properties for the Smart List:
Here is a description of each of the Smart List DimensionProperties referenced from Oracle’s knowledge base:
Property DescriptionLabel Enter the text to display when the Smart List is
selected. Smart Lists and Smart List members musthave a Label assigned. Spaces and special
characters are allowed.Auto Generate
IDGenerate a numeric ID for each Smart List entry. Ifyou do not select this option, you can customize
Smart List ID values.Start Value Populates the Value property of the first member in
the Smart List. For example, if the Smart Listdimension is ActivePeriod with Start Value set to0, the first member added to this list has a value
of 0.Increment This value is appended to the value of the last
member in the list to determine the value for theselected member. For example:
ActivePeriod (Start Value=0, Increment=1)Inactive (Value=0)Active (Value=1)
Display Order Smart Lists can be sorted in the dropdown menu by 1of 3 ways:
ID: Unique number that sets the order for the SmartList entry
Name: Unique name containing only letters/numbers &underscores. (i.e. “Active”). No special characters
or spaces.Label: Displayed text for the Smart List entry in
the dropdown
#Missing DataForm Label
How #Missing values are displayed in Smart Listcells:
Dropdown: Displays the label set in #Missing DropDown Label
Grid: This selection determines what the cell willdisplay on a form when the cell is not
highlighted/selected#Missing DropDown Label
Enter a label to be displayed as an entry in theSmart List whose value is #Missing
Linking a Smart List to a Web Form
Create and/or use an already existing member in a dimensionthat is being used in the application to be associated withthe Smart List. In this example the account associated withthe Smart List is called “Active Period”. Notice that thismember has a space in the middle, unlike our Smart Listdimension “ActivePeriod”, which is all one word:
Set the properties for “Active Period” so that the Smart Listproperty is tagged to ActivePeriod and the Data Type isSmartList:
The most critical step before deploying the application is toset the Data Type Evaluation Order for the Planningapplication. In order for Smart Lists to appear on web forms,the dimension that the Smart List is associated with (in thiscase the Account dimension) must be included in the evaluationorder. From the local library, right-click on the application:
Move the account dimension over to the selected dimensionspane for the selected plan type:
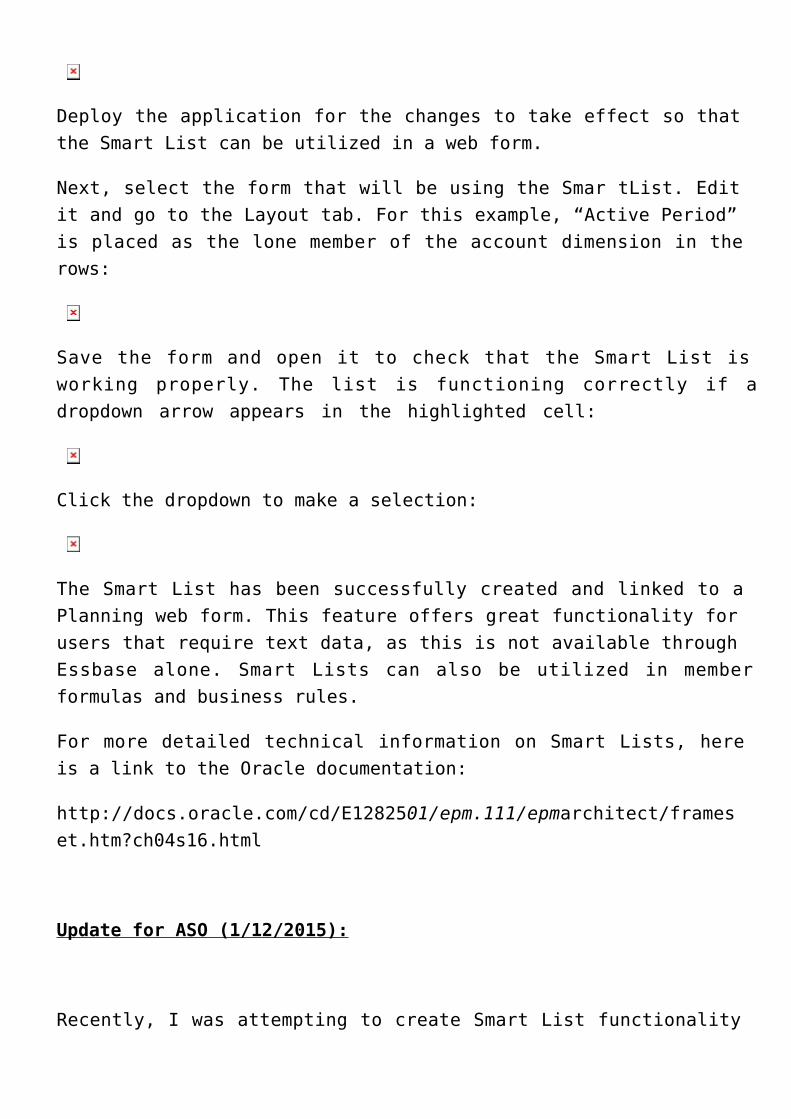
Deploy the application for the changes to take effect so thatthe Smart List can be utilized in a web form.
Next, select the form that will be using the Smar tList. Editit and go to the Layout tab. For this example, “Active Period”is placed as the lone member of the account dimension in therows:
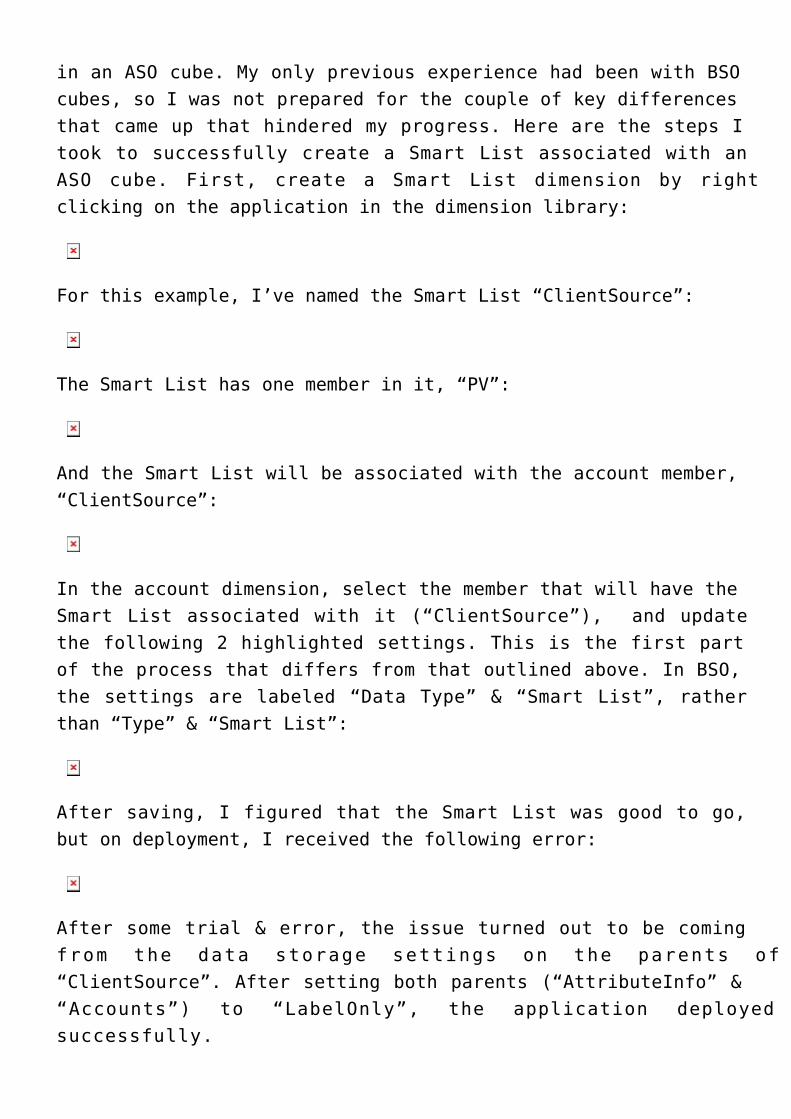
Save the form and open it to check that the Smart List isworking properly. The list is functioning correctly if adropdown arrow appears in the highlighted cell:
Click the dropdown to make a selection:
The Smart List has been successfully created and linked to aPlanning web form. This feature offers great functionality forusers that require text data, as this is not available throughEssbase alone. Smart Lists can also be utilized in memberformulas and business rules.
For more detailed technical information on Smart Lists, hereis a link to the Oracle documentation:
http://docs.oracle.com/cd/E1282501/epm.111/epmarchitect/frameset.htm?ch04s16.html
Update for ASO (1/12/2015):
Recently, I was attempting to create Smart List functionality
in an ASO cube. My only previous experience had been with BSOcubes, so I was not prepared for the couple of key differencesthat came up that hindered my progress. Here are the steps Itook to successfully create a Smart List associated with anASO cube. First, create a Smart List dimension by rightclicking on the application in the dimension library:
For this example, I’ve named the Smart List “ClientSource”:
The Smart List has one member in it, “PV”:
And the Smart List will be associated with the account member,“ClientSource”:
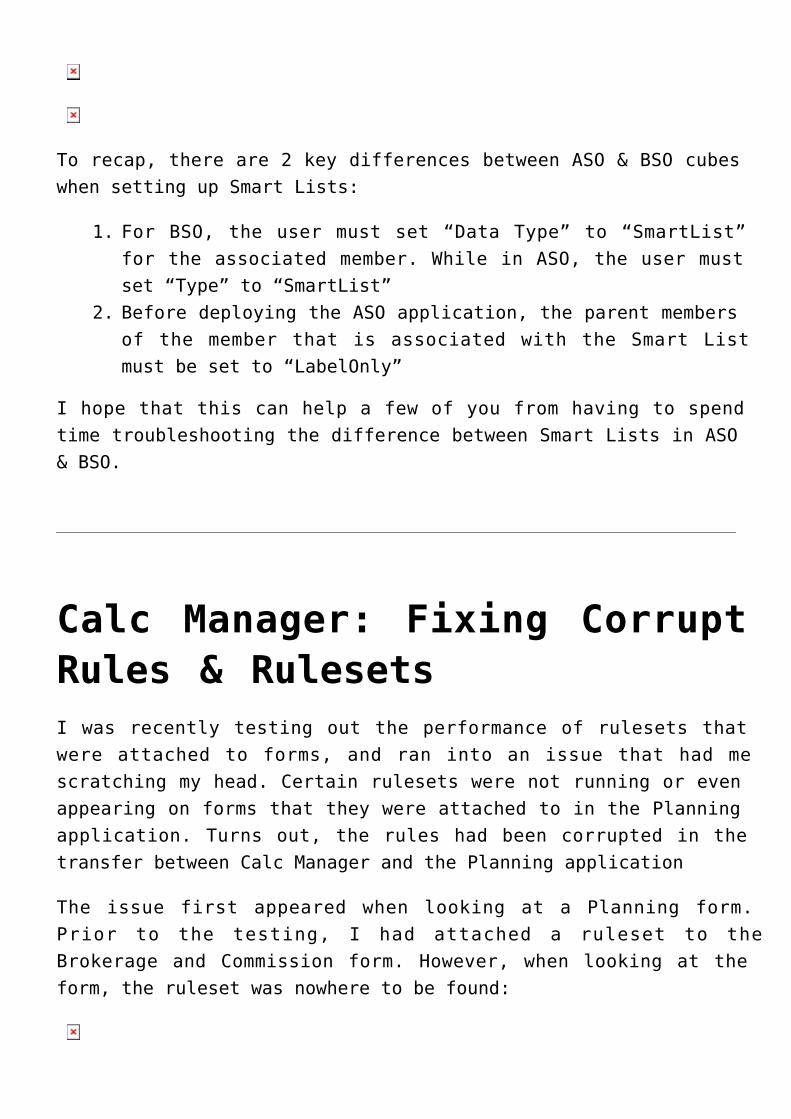
In the account dimension, select the member that will have theSmart List associated with it (“ClientSource”), and updatethe following 2 highlighted settings. This is the first partof the process that differs from that outlined above. In BSO,the settings are labeled “Data Type” & “Smart List”, ratherthan “Type” & “Smart List”:
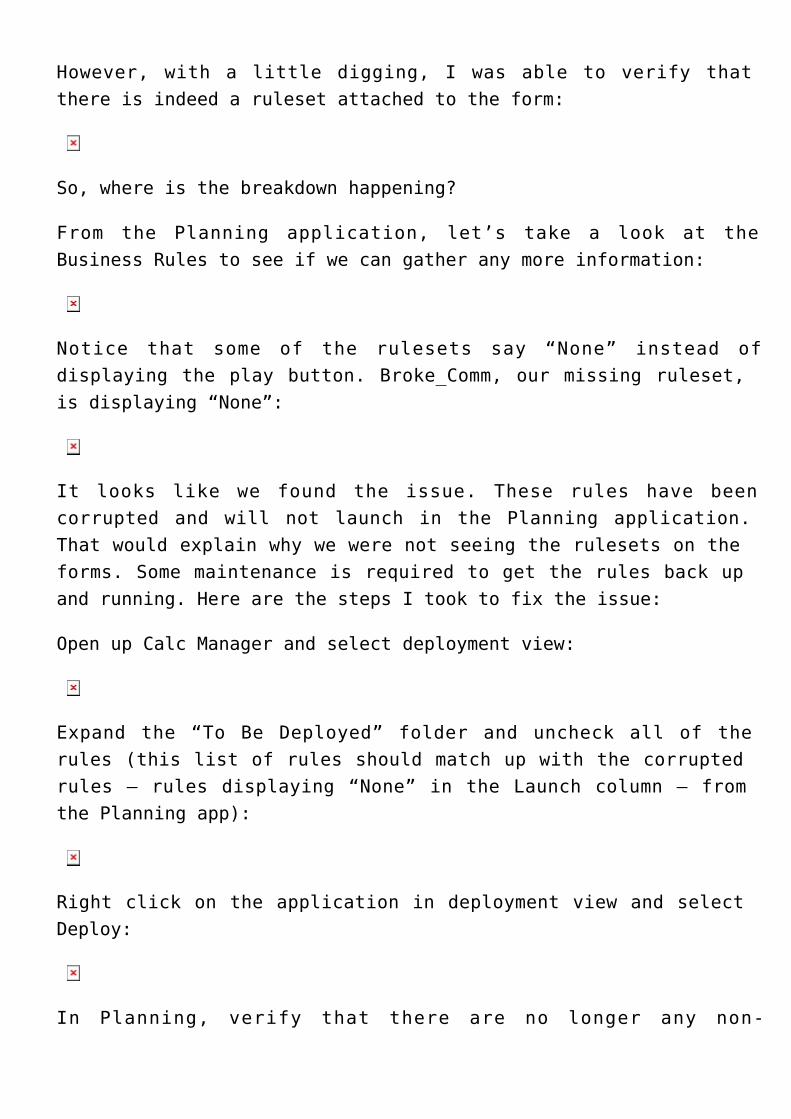
After saving, I figured that the Smart List was good to go,but on deployment, I received the following error:
After some trial & error, the issue turned out to be comingfrom the data storage settings on the parents of“ClientSource”. After setting both parents (“AttributeInfo” &“Accounts”) to “LabelOnly”, the application deployedsuccessfully.
To recap, there are 2 key differences between ASO & BSO cubeswhen setting up Smart Lists:
For BSO, the user must set “Data Type” to “SmartList”1.for the associated member. While in ASO, the user mustset “Type” to “SmartList”Before deploying the ASO application, the parent members2.of the member that is associated with the Smart Listmust be set to “LabelOnly”
I hope that this can help a few of you from having to spendtime troubleshooting the difference between Smart Lists in ASO& BSO.
Calc Manager: Fixing CorruptRules & RulesetsI was recently testing out the performance of rulesets thatwere attached to forms, and ran into an issue that had mescratching my head. Certain rulesets were not running or evenappearing on forms that they were attached to in the Planningapplication. Turns out, the rules had been corrupted in thetransfer between Calc Manager and the Planning application
The issue first appeared when looking at a Planning form.Prior to the testing, I had attached a ruleset to theBrokerage and Commission form. However, when looking at theform, the ruleset was nowhere to be found:
However, with a little digging, I was able to verify thatthere is indeed a ruleset attached to the form:
So, where is the breakdown happening?
From the Planning application, let’s take a look at theBusiness Rules to see if we can gather any more information:
Notice that some of the rulesets say “None” instead ofdisplaying the play button. Broke_Comm, our missing ruleset,is displaying “None”:
It looks like we found the issue. These rules have beencorrupted and will not launch in the Planning application.That would explain why we were not seeing the rulesets on theforms. Some maintenance is required to get the rules back upand running. Here are the steps I took to fix the issue:
Open up Calc Manager and select deployment view:
Expand the “To Be Deployed” folder and uncheck all of therules (this list of rules should match up with the corruptedrules – rules displaying “None” in the Launch column – fromthe Planning app):
Right click on the application in deployment view and selectDeploy:
In Planning, verify that there are no longer any non-
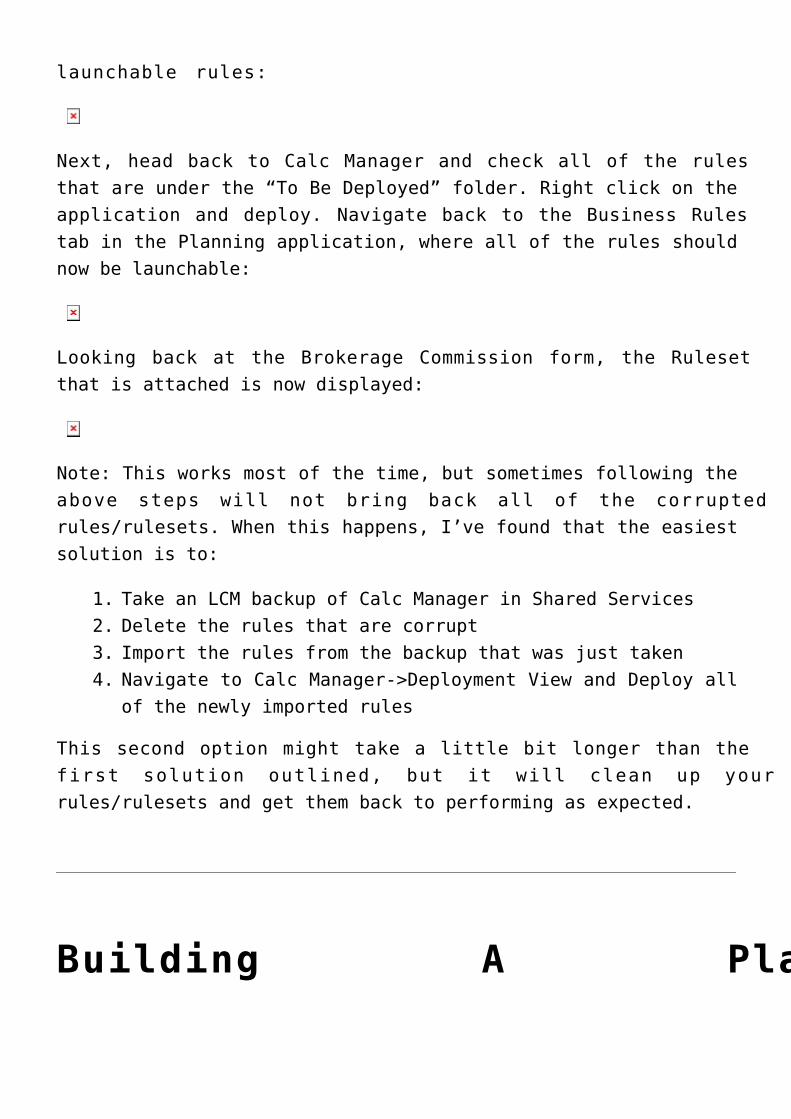
launchable rules:
Next, head back to Calc Manager and check all of the rulesthat are under the “To Be Deployed” folder. Right click on theapplication and deploy. Navigate back to the Business Rulestab in the Planning application, where all of the rules shouldnow be launchable:
Looking back at the Brokerage Commission form, the Rulesetthat is attached is now displayed:
Note: This works most of the time, but sometimes following theabove steps will not bring back all of the corruptedrules/rulesets. When this happens, I’ve found that the easiestsolution is to:
Take an LCM backup of Calc Manager in Shared Services1.Delete the rules that are corrupt2.Import the rules from the backup that was just taken3.Navigate to Calc Manager->Deployment View and Deploy all4.of the newly imported rules
This second option might take a little bit longer than thefirst solution outlined, but it will clean up yourrules/rulesets and get them back to performing as expected.
Building A Planning
Application Using EPMA(11.1.2.3)This post covers the basics of building a Planning app.Building a Planning application can be a straightforwardprocess; however, there are some pitfalls to watch out for.One or two mistakes can lead to some major headaches in tryingto decipher what went wrong. Whether a beginner or a seasonedvet looking for a quick refresher, this guide will outline thesteps necessary to successfully create/deploy a Planningapplication.
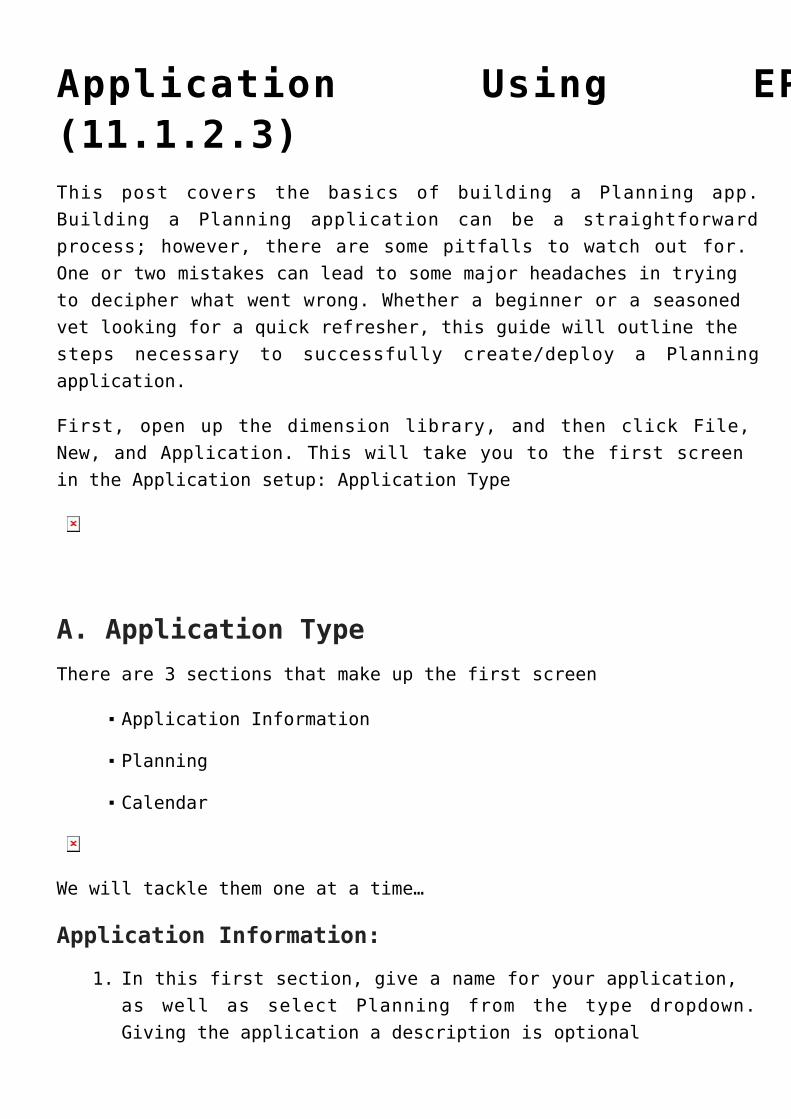
First, open up the dimension library, and then click File,New, and Application. This will take you to the first screenin the Application setup: Application Type
A. Application TypeThere are 3 sections that make up the first screen
Application Information
Planning
Calendar
We will tackle them one at a time…
Application Information:
In this first section, give a name for your application,1.as well as select Planning from the type dropdown.Giving the application a description is optional
Since we are creating an application using dimensions2.from the EPMA library, leave “Create Blank Application”& “Auto Create Local Dimensions” unchecked
Planning:
Select the application type (typically this will be1.General), and select the default currency for theapplication. You can select “Use Multiple Currencies”but this is not the most effective way of going aboutit. For more detailed insight on the utilization ofmultiple currencies in a Planning app, check out thefollowing article:
http://www.in2hyperion.com/post/2010/11/28/Why-Not-Using-the-Currenc
y-Option-with-Hyperion-Planning-has-Benefits.aspx
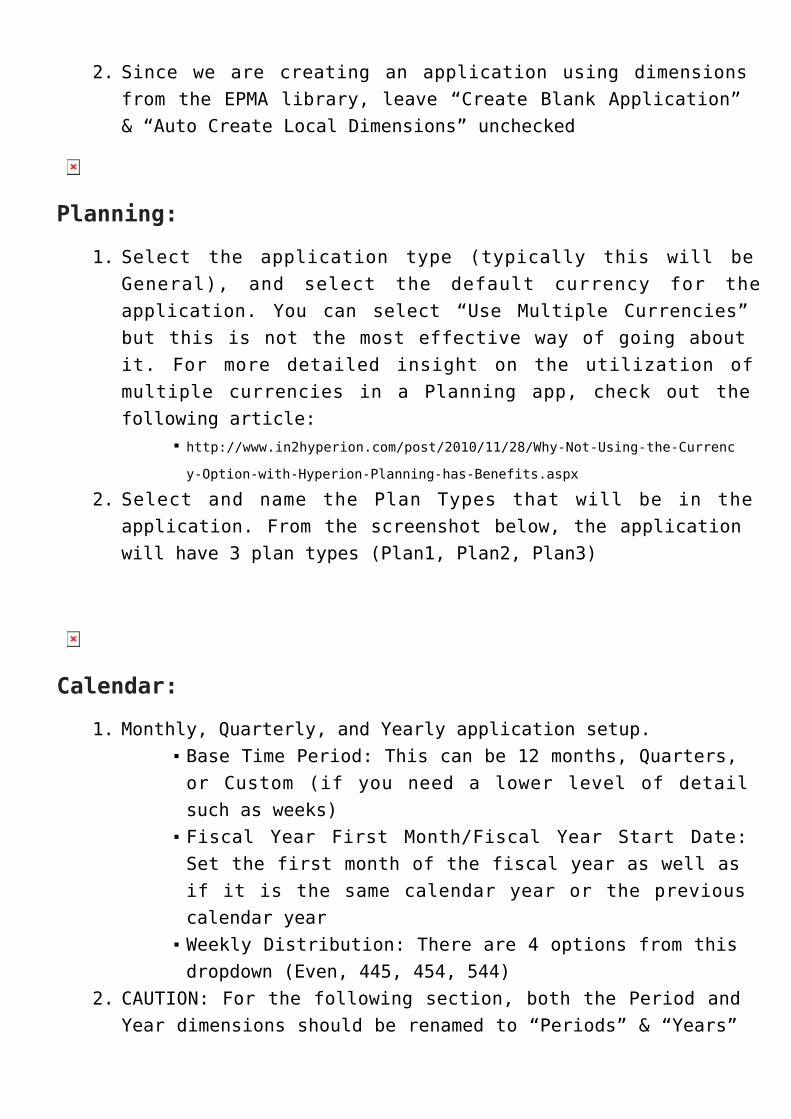
Select and name the Plan Types that will be in the2.application. From the screenshot below, the applicationwill have 3 plan types (Plan1, Plan2, Plan3)
Calendar:
Monthly, Quarterly, and Yearly application setup.1.Base Time Period: This can be 12 months, Quarters,or Custom (if you need a lower level of detailsuch as weeks)Fiscal Year First Month/Fiscal Year Start Date:Set the first month of the fiscal year as well asif it is the same calendar year or the previouscalendar yearWeekly Distribution: There are 4 options from thisdropdown (Even, 445, 454, 544)
CAUTION: For the following section, both the Period and2.Year dimensions should be renamed to “Periods” & “Years”

if Dynamic Time Series is going be turned on for theapplication (M-T-D, Q-T-D, Y-T-D, etc). If thedimensions are named Year and Period, Planning will notbe able to differentiate between the dimensions and thedynamic time series members, causing errors.Name the dimension “Years” and select the first fiscal3.year/number of fiscal years. The number of years rangesfrom 1-100.
After completing all of the above settings, click next to moveon to the next screen, Dimension Selection:
B. Dimension Selection
This screen will have sections for the required, custom, aswell as other dimensions for the application. First, thescreen will auto populate whatever dimensions are already inthe EPMA library. In this example, Entity, Account, and Aliasare already filled in. The remaining dimensions (Version &Scenario) need to be populated via the dropdown menu:
These dimensions will be added as local dimensions to theapplication. Give the dimensions a name and make sure that thetype matches the dimension that is being updated:
After setting the required dimensions, the custom dimensionscan be selected in the next section. By clicking on the“[Select]” dropdown, the rest of the dimensions from EPMA willbe available for selection in the application (note: yourdropdown menu will not display the same selection as in this
screenshot, as these dimensions had to be created in theShared Library first):
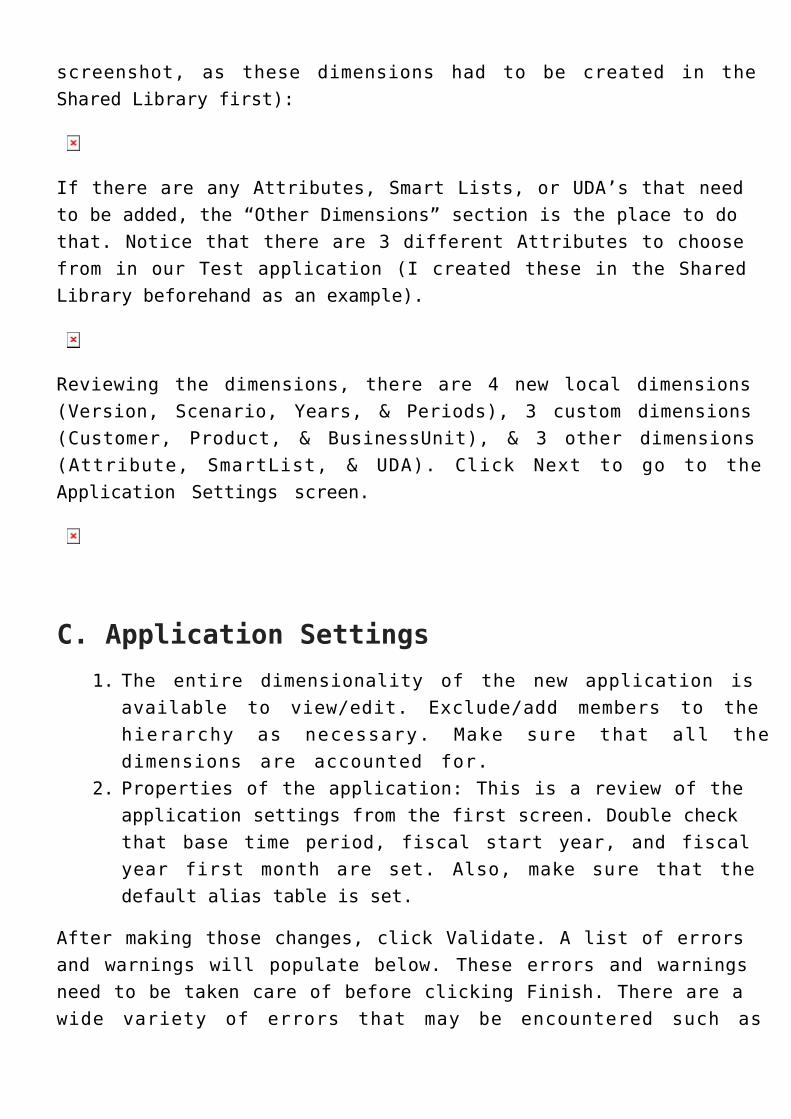
If there are any Attributes, Smart Lists, or UDA’s that needto be added, the “Other Dimensions” section is the place to dothat. Notice that there are 3 different Attributes to choosefrom in our Test application (I created these in the SharedLibrary beforehand as an example).
Reviewing the dimensions, there are 4 new local dimensions(Version, Scenario, Years, & Periods), 3 custom dimensions(Customer, Product, & BusinessUnit), & 3 other dimensions(Attribute, SmartList, & UDA). Click Next to go to theApplication Settings screen.
C. Application SettingsThe entire dimensionality of the new application is1.available to view/edit. Exclude/add members to thehierarchy as necessary. Make sure that all thedimensions are accounted for.Properties of the application: This is a review of the2.application settings from the first screen. Double checkthat base time period, fiscal start year, and fiscalyear first month are set. Also, make sure that thedefault alias table is set.
After making those changes, click Validate. A list of errorsand warnings will populate below. These errors and warningsneed to be taken care of before clicking Finish. There are awide variety of errors that may be encountered such as
duplicate members, duplicate aliases, invalid members, invalidplan types, etc. depending on your application. After fixingan error, click validate again and the error will disappearfrom the list.
Once there are no more errors, the application is ready to bedeployed. Click Finish and go to the Application Library andright click, then deploy the application.
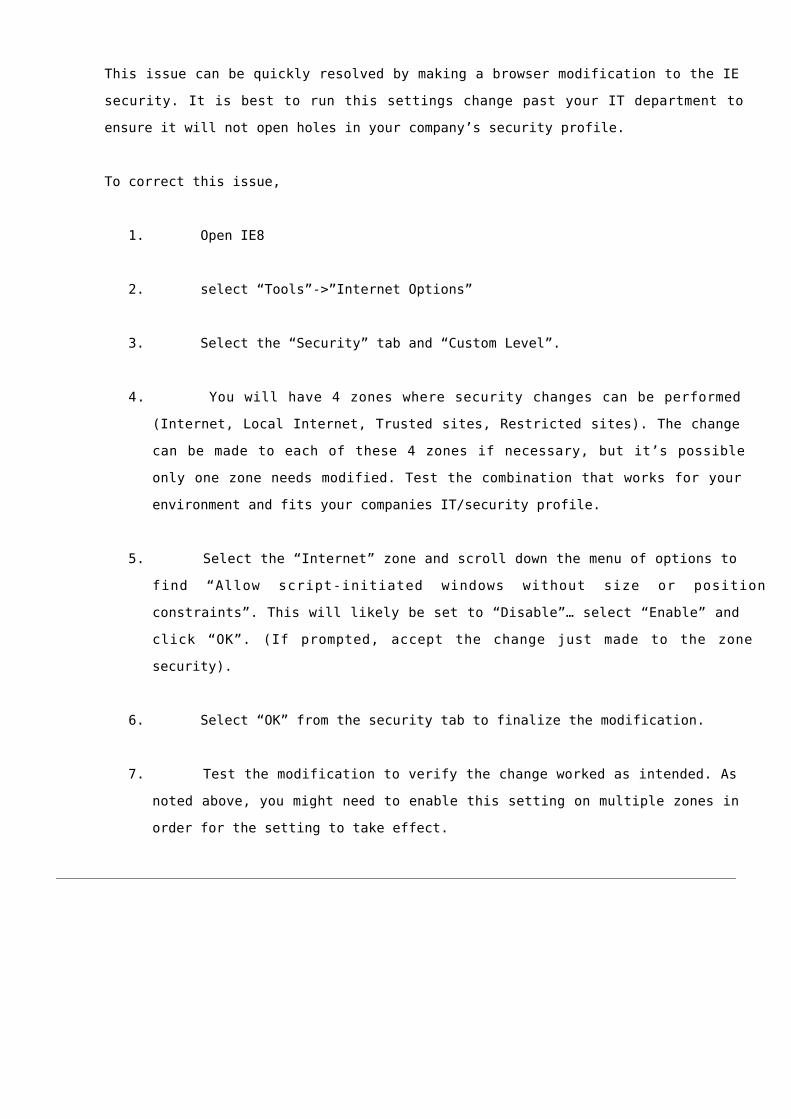
Navigating Misaligned Menusin Workspace with IE8
If you have recently upgraded your web browser to IE8 and attempted to use
Hyperion Workspace, you’ve likely encountered difficulty in navigating the
interface. When a user clicks on the wheel in the upper left hand corner,
selects “Applications,” they can’t see the menu as it apearrs to be
condensed.
This issue can be quickly resolved by making a browser modification to the IE
security. It is best to run this settings change past your IT department to
ensure it will not open holes in your company’s security profile.
To correct this issue,
1. Open IE8
2. select “Tools”->”Internet Options”
3. Select the “Security” tab and “Custom Level”.
4. You will have 4 zones where security changes can be performed
(Internet, Local Internet, Trusted sites, Restricted sites). The change
can be made to each of these 4 zones if necessary, but it’s possible
only one zone needs modified. Test the combination that works for your
environment and fits your companies IT/security profile.
5. Select the “Internet” zone and scroll down the menu of options to
find “Allow script-initiated windows without size or position
constraints”. This will likely be set to “Disable”… select “Enable” and
click “OK”. (If prompted, accept the change just made to the zone
security).
6. Select “OK” from the security tab to finalize the modification.
7. Test the modification to verify the change worked as intended. As
noted above, you might need to enable this setting on multiple zones in
order for the setting to take effect.
Getting large numbers in FRReports?When using Workspace to view reports, some users have seen excessivelylarge numbers that don’t belong. If you are having this issue, it couldvery well be because the default Essbase query engine in 11.1.1.x is theMDX query engine, which can cause documented bug 9062413. Essentially,this bug will cause users to see the same astronomical number in everycell that sits on an intersection to which the user does not havesecurity access. Understandably, this can cause some concern. This issueis expected to be fixed in a future release, but until then, the queryengine will need to be manually changed.The first option is to fix the issue at a report level. This is arelatively quick process and is a good idea if you only have a handful ofreports. To change the query engine setting for a particular report,follow the steps below:
1. Open the report.2. For each grid, select the entire grid.3. Right-click and select Data Query Optimization Settings.4. Deselect the option “Essbase Queries Use MDX.”5. Save the report.
Repeat the above process for each report.
For users that have a larger number of reports, a better option may be tochange the query engine in the properties file on the server. Thebenefit to fixing the issue in the properties file is that changes onlyneed to be made once, and all reports will reflect this change.The file that needs to be edited is located on the Financial Reporting(app) server, typically on the path D:\<HyperionHome>\products\biplus\lib where <Hyperion Home> represents the rootlocation of the Hyperion install. The file that needs adjusted is thefr_global.properties file.Open the properties file and add these lines:[crayon-61f28434c073a855833520/]
[crayon-61f28434c0747864527504/][crayon-61f28434c0749392941179/][crayon-61f28434c074b747312926/]Any line preceded by “#” is commented out. Therefore, these can saywhatever you prefer, but should give anyone that views this file a goodindication why this text is in the file.
Once the properties file has been updated, the following services mustall be stopped in the following order, then started in the same order forthe changes to take effect.
1. Hyperion Financial Reporting – Print Server2. Hyperion Financial Reporting – Report Server3. Hyperion Financial Reporting – Scheduler Server4. Hyperion Financial Reporting – Web Application (Note – This servicemay be on the FR (Web) server, not the FR(App) server like the otherthree services.)
Note – This modification will apply to everyone using the server on whichthey are made, so be careful when making changes to a shared server.
Business Rules That Take MoreThan Five Minutes to ExecuteAre Re-launched RepeatedlyThere is, what appears to be, a bug in Hyperion Planning thatcauses business rules that take longer than 5 minutes to re-launch. The following, published by Oracle, explains the rootissue of this problem. It is not a bug, but a setting in thehost web server that causes the request post multiple times. This explaination from Oracle clearly states that this is ONLYan issue when accessing Hyperion Planning through Hyperion
Workspace. I have seen the same response while accessingHyperion Planning directly. Regardless of your entry point,it is a good proctice account for either entry method andshould be applied.
This applies to Hyperion Planning, Version: 9.3.1.0.00 to11.1.1.3.00 and is applicable to all operating systems.
SymptomsWhen accessing Planning, Business Rules that normally takemore than 5 minutes to completerun for an unlimited period of time. By viewing the runningEssbase sessions in the EAS console, you can see that theBusiness Rules “Calculate” sessions are being re-launchedevery 5 minutes, so that a new instance of the Rule islaunched before the first can complete.
This issue only affects Business Rules that normally take morethan 5 minutes to complete.
This issue does not affect Business Rules launched directlyfrom Planning (accessing Planning directly on its own URL,bypassing the Workspace). This issue does not affect BusinessRules launched from the EAS console. This issue only affectssystems using Weblogic as a web application server.
CauseThis issue is caused by a default timeout setting of 5 minutes(300 seconds) in the Weblogic HTTP Server Plugin. This pluginis a set of configuration files in which Weblogic defines howit will interact with the HTTP Server through which Workspaceis accessed. More information on Weblogic Plugins isavailable here: http://download.oracle.com/docs/cd/E13222_01/wls/docs92/pdf/plugins.pdf

SolutionHyperion System 9 and Oracle EPM 11.1.1.x support the use ofeither Microsoft Internet Information Services (IIS) or Apacheas an HTTP server. The steps to increase the timeout depend onwhich you are using. The new timeout value should be set to avalue larger than the time the longest-running Business Ruletakes to execute. The examples below use a setting of 30minutes (1800 seconds).
Apache HTTP ServerStep 1
Edit%HYPERION_HOME%\common\httpServers\Apache\2.0.52\conf\HYSL-WebLogic.conf
Step 2
Add (or edit, if already present) the following parameters tothe two sections for Planning, and also to the two sectionsfor Financial Reporting and Workspace, as the 5 minute timeoutissue can cause problems in all three products.Each sectionbegins with an XML tag.[crayon-61f28434c10a7244186271/]Add the new “WLIOTimeoutSecs 1800” and “HungServerRecoverSecs1800” properties as new lines within the tags. If you areusing a version of Weblogic prior to 9.x you need to add thesecond line “HungServerRecoverSecs 1800” in addition to the“WLIOTimeoutSecs 1800” parameter. This second parameter is notnecessary for Weblogic 9.x and later (though it will do noharm).[crayon-61f28434c10b2426256894/]
Internet Information Services (IIS)Step 1
There are several copies of the iisproxy.ini file. Oracle
recommends you modify the files for Planning, FinancialReporting and Workspace, as the 5 minute timeout issue cancause problems in all three products.
Paths (note that “hr” below stands for Financial Reporting):
%HYPERION_HOME%\deployments\WebLogic9\VirtualHost\hr%HYPERION_HOME%\deployments\WebLogic9\VirtualHost\HyperionPlanning%HYPERION_HOME%\deployments\WebLogic9\VirtualHost\workspace
Step 2
For each copy of iisproxy.ini, add the following lines at theend of each file. If you are using a version of Weblogicprior to 9.x you need to add the second line“HungServerRecoverSecs=1800” in addition to the“WLIOTimeoutSecs=1800” parameter. This second parameter is notnecessary for Weblogic 9.x and later (though it will do noharm).
WLIOTimeoutSecs=1800HungServerRecoverSecs=1800
Step 3
Restart IIS from the IIS Manager and restart the Workspace webapplication service
Oracle HTTP Server is usedStep 1
Modify the file mod_wl_ohs.conf file under the directory,$EPM_ORACLE_INSTANCE\httpConfig\ohs\config\OHS\ohs_componentwith the following content:[crayon-61f28434c10b5819839632/]Step 2
Restart the Oracle HTTP server and the Workspace web
application services after the modifications are complete.
Collaborative Decision Makingusing Annotation ServiceAs Enterprise Performance Management and Business Intelligencesystems become adopted as the core decision support mechanismswithin organizations, the need for transparent, fact-baseddecisions increases. It not enough for these systems toprovide the voluminous amount of data to the end user foranalysis, but to tie data and decision inputs to thecollaborative decisions that these systems support.
Although the organizational adoption of this style of decisionmaking may face challenges, the technological groundwork isalready in place. Oracle’s addition of Annotation Service toFinancial Reporting 11.1.x allows the capture of sharedinformation against reporting objects and data. This toolallows for threaded discussions and comments within EPMWorkspace.
Let’s take a look at how users can utilize this tool against aFinancial Report for a Planning application.
Hyperion Annotation Service
View more presentations from NicholasYezza.
Hyperion Release 11Architecture andInstallation, Part 2 of 5
“Pre-Installation Requirements”In installment #1 of this guide, we reviewed the architectureconsiderations and defined a simplistic architecture to use asa reference moving forward. I recommend you read the previouspost before you pick up this one. I also recommend reading
“Oracle Hyperion Enterprise Performance Management SystemInstallation Start Here Release 11.1.1.2.pdf (128 pages)” fromthe Oracle Documentation Library.
To reiterate our general approach, the Hyperion architectureestablishment and installation activities in our organizationcover the following five areas.
Defining an Architecture – Work with the client to1.define the hardware, software, and the distribution ofHyperion componentsProvide Pre-Installation Requirements – Provide the2.client with a detailed list of activities prior to theinstallationInstallation – Running the installation and3.configuration utilitiesValidation – Perform all functional activities necessary4.to validate the environment readinessDocumentation – Provide the client with all the details5.of the environment as it is configured.
In this post, I will go through step 2 that the Hyperionarchitect, should deliver. Steps 3-5 will be available in thecoming weeks. For the sake of simplicity I will be using the
example of a common installation, primarily Hyperion Planning,Hyperion Financial Management (HFM), and the core BIapplications.
As part of any installation, some items need to take placebefore the Fusion Installer is started. I like to create achecklist of things that need to be done. Often times thesethings are out of my control and I will rely on DatabaseAdministrator, Network Administrators, and other SystemAdministrators. This checklist contains the followingelements.
Web Application Server SpecificationsRelational Repository InformationGeneral System AdministrationNetwork InformationAdditional ComponentsDCOM ConfigurationIIS and .NET Configuration
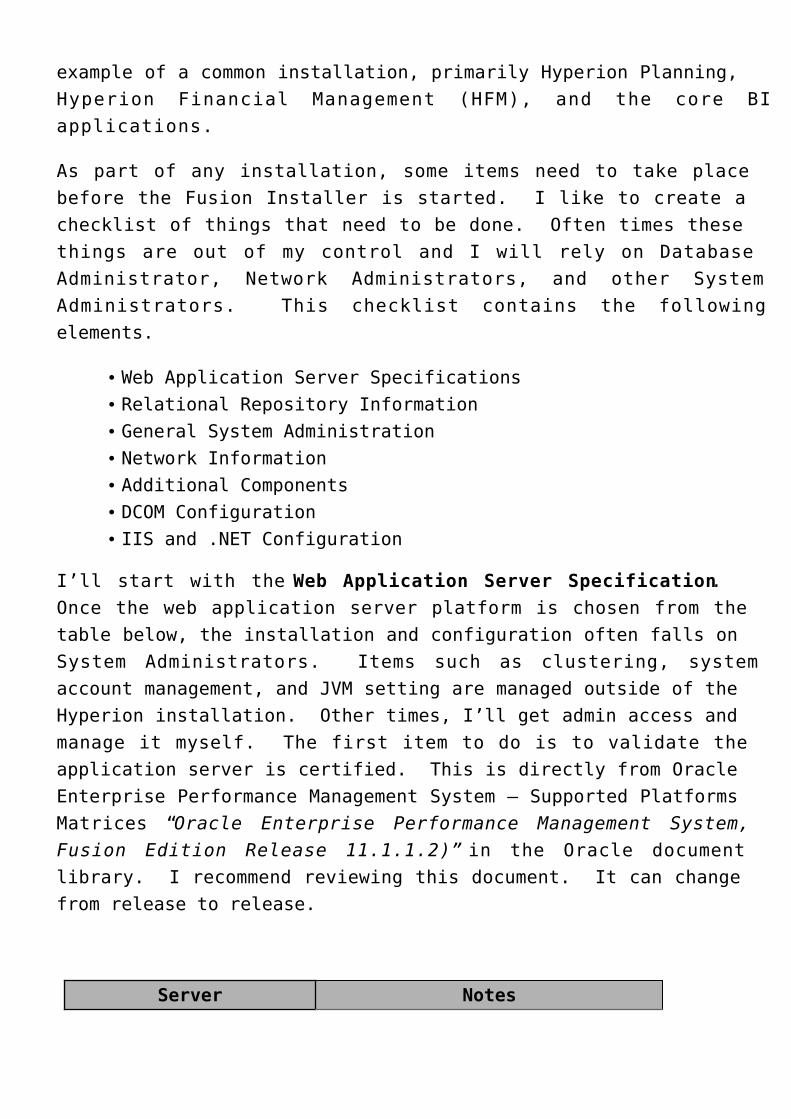
I’ll start with the Web Application Server Specification. Once the web application server platform is chosen from thetable below, the installation and configuration often falls onSystem Administrators. Items such as clustering, systemaccount management, and JVM setting are managed outside of theHyperion installation. Other times, I’ll get admin access andmanage it myself. The first item to do is to validate theapplication server is certified. This is directly from OracleEnterprise Performance Management System – Supported PlatformsMatrices “Oracle Enterprise Performance Management System,Fusion Edition Release 11.1.1.2)” in the Oracle documentlibrary. I recommend reviewing this document. It can changefrom release to release.
Server Notes

Oracle ApplicationServer 10g
(10.1.3.3.x) a
If Oracle Application Serveris used as the Web applicationserver, Oracle HTTP Server isalso required. Profitabilityand Cost Management supportsonly Oracle Application Server
10.1.3.x.Oracle WebLogicServer 9.2 (MP1
minimum) / 9.2.xb
Shared Services requiresWebLogic Server patch
CR283953” for all platforms.You can obtain this patch at
the BEA web site.IBM WebSphere
6.1.0.17 / 6.1.x C
Embedded Java
container d
a Supports these editions: Java, Standard One,Standard & Enterprise. Includes support for Oracle
Application Server Single Sign-On.b WebLogic Express is supported for each supportedversion of WebLogic Server; non-base versions are
supported only via manual deployment.c WebSphere Express, ND, and XD Editions are supportedfor each supported version of WebSphere; ND and XD
are supported only via manual deployment.d For this release, Apache Tomcat 5.5.17 is the
embedded Java container that is installedautomatically on all platforms. Apache Tomcat is
supported only in this capacity. If future EPM Systemreleases embed different Java application servers,Apache Tomcat will no longer be supported. Fordeployments that require high availability or
failover, Oracle recommends using a commerciallysupported Web application server that supports high
availability and failover.
I request the URL and authentication information since thiswill be needed during the deployment. If I am doing a manualdeployment, I will request contact information from the webapplication server administrator and work in collaboration onthe deployment.
The next item on my checklist is to get the RelationalRepositories Information set up. This is mostlystraightforward. In general, I like to create atablespace/database for each component ((Hyperion Foundation,Essbase Admin Services / Business Rules, EPMA, Planning,Financial Management, etc). A distinct tablespace/databasefor each component makes it easier to manage in my opinion. Although it may not be strictly necessary, the documentationdoes not seem to be clear on the matter. I say ‘better safethan sorry’. For the installation and deployment, I’ll needcredentials for each table. Based upon some Q&A, I’ll makeinitial size recommendations.
The target installation servers have a General SystemAdministration checklist containing the information that I’llneed to execute the installation. This is made of thefollowing items.
Operating Systems version/buildAccount on each server to run the Hyperion services andaccount requirementsExternal Authentication information (MSAD, LDAP, or OIDif applicable)Drive/Volume information identified for installation ofthe Hyperion software.DCOM and .NET account information if HFM or FDM are tobe installed
Next, I identify the Network Information necessities forappropriate communication between servers. This includes IPaddresses, DNS information, validation of name resolution,trace between servers, subnet configuration, etc. This is
vital so the components can communicate via Fully QualifiedDomain Name, Short Name, and IP address. Some components usedifferent variations of name resolution probably because thecomponents were developed separately and have not been fullystandardized.
In addition to the Hyperion Software, Web Application Servers,and Relational Repositories there are a few AdditionalComponents that need to be installed. A PDF writer is neededfor Reports Server to render .pdf reports in Workspace. Thiscan be GhostScript or Acrobat distiller. I suggest referringto the “Start Here” documentation to see what is currentlysupported but we often go with GhostScript due to its cost.
For the Windows Administration, we provide the DCOMConfiguration information needed to support FDM, EPMA, andFDM. This includes the DCOM account information, permissions,and authentication information. Although this is spelled outin detail in the “Start Here” manual, I like to provide step-by-step information with screen shots since DCOM is oftenconfusing…well it is to me at least.
The last thing we review is the IIS and .NET Configuration. IIS is often not installed as part of a standard OS build. Wemake sure this requirement is specified, ensuring .NET isinstalled, and validate it is the appropriate version.
As with any installation, I recommend the InstallationArchitect read, and re-read, the Hyperion Manuals on there ownrather than relying on this information or intuition. It canalways change and your installation may have some caveats thatI have not covered. For our purposes, with all the aboveactivities completed and validated, we should be ready tostart laying out the binaries and start the HyperionInstallation. We will review the Fusion Installer andHyperion Configuration Utility in our next installment.
Related Documents