Username/Email: Password: Login Register | Forgot your password? Rebuilding a Laptop Batte ry Oct 05, 2008 By Phil Hughes (/user/800012) When your laptop battery is about to give up the ghost, you are probably thinking of the typical three alternatives. The most obvious, of course, is "wow, what a great justification for buying a new laptop". With laptop prices falling and no such luck with battery prices, this almost makes sense. But, most of us will probably just bite the bullet and buy a new battery. The third alternative would be to replace the cells in the battery you already have. This article is about the third alternative. If you are not fairly skilled in working on electronics, this is not necessarily a good alternative. But, it is possible. Personally, I was inspired to do this the first time because the small (3-cell) battery for my ASUS laptop was very ill and I couldn't find a replacement. Financially, it also looked like a good choice. The out of stock new battery cost $129. I found the cells for a bit over $5 each. So, I ordered the cells and, expecting to have a success, ordered six more for a sick battery for one of my T23 ThinkPads. The first trick is to open the old battery without destroying the plastic or anything important inside. What you need to do is find where the two parts are glued together and work on the glue line with something sharp until you can open the battery. In the case of ThinkPad batteries, there are labels over parts of the glue line. So, first cut through the labels with a sharp knife. I then chose to use a wood chisel to first find parts of the plastic that will flex because there is open space behind them and then start opening in these areas. You may have better luck with a utility knife. Once you get the opening process started, a utility knife works best in some parts, the wood chisel in others. Just be careful not to cut too deep or you could damage circuitry or wiring inside. Also, remember that the goal is to be able to glue the battery case back together and have it fit in the laptop so cutting out a little plastic (possibly with a fine saw) may be better than an attempt to just open it up with the result of warping or breaking the plastic.

Welcome message from author
This document is posted to help you gain knowledge. Please leave a comment to let me know what you think about it! Share it to your friends and learn new things together.
Transcript

8/9/2019 Rebuilding Laptop
http://slidepdf.com/reader/full/rebuilding-laptop 1/12
Username/Email: Password: LoginRegister | Forgot your password?
Rebuilding a Laptop Battery
Oct 05, 2008 By Phil Hughes (/user/800012)
When your laptop battery is about to give up the ghost, you are probably thinking of the typicalthree alternatives. The most obvious, of course, is "wow, what a great justification for buying a
new laptop". With laptop prices falling and no such luck with battery prices, this almost makes
sense. But, most of us will probably just bite the bullet and buy a new battery. The third
alternative would be to replace the cells in the battery you already have.
This article is about the third alternative. If you are not fairly skilled in working on electronics,
this is not necessarily a good alternative. But, it is possible. Personally, I was inspired to do this
the first time because the small (3-cell) battery for my ASUS laptop was very ill and I couldn't
find a replacement.
Financially, it also looked like a good choice. The out of stock new battery cost $129. I found
the cells for a bit over $5 each. So, I ordered the cells and, expecting to have a success, ordered
six more for a sick battery for one of my T23 ThinkPads.
The first trick is to open the old battery without destroying the plastic or anything important
inside. What you need to do is find where the two parts are glued together and work on the
glue line with something sharp until you can open the battery.
In the case of ThinkPad batteries, there are labels over parts of the glue line. So, first cut
through the labels with a sharp knife. I then chose to use a wood chisel to first find parts of the
plastic that will flex because there is open space behind them and then start opening in these
areas. You may have better luck with a utility knife.
Once you get the opening process started, a utility knife works best in some parts, the wood
chisel in others. Just be careful not to cut too deep or you could damage circuitry or wiring
inside. Also, remember that the goal is to be able to glue the battery case back together and
have it fit in the laptop so cutting out a little plastic (possibly with a fine saw) may be better than
an attempt to just open it up with the result of warping or breaking the plastic.

8/9/2019 Rebuilding Laptop
http://slidepdf.com/reader/full/rebuilding-laptop 2/12
Once you have the battery pack open, it is analysis time. The most common battery packs
contain three, six or nine Li-ion cells of size 18650. Typically they are in strings of three in
series (that gives you about 11V) and then each string is paralleled. But, that may not be the
case. Do a bit of analysis before you start cutting wires.
Note that the cell size is not something that indicates that there are at least 18,649 other choices.
It is actually the diameter of the cell in millimeters (18) followed by the length in millimeters
(650). The big advantage with this system is that if the cell isn't marked with a size, a metric
ruler can help you out.
As Li-ion batteries need special "care and feeding", you will find a circuit board within the
battery pack, Wires will go from the circuit board to each cell junction so that the voltages can
be monitored. Also, there will be a thermistor and a thermal circuit breaker within the pack.
There are lots of places that sell replacement Li-ion cells. One is Battery Junction
(http://www.batteryjunction.com) . On their site you will find all the common battery sizes. They also
have both PC boards to protect sets of cells and a special 18650 cell with a built-in protection
circuit. Assuming you are replacing cells in an existing pack, you just need to buy regular cells.
One thing you do need to watch for, however, is tabs. Typically you can ask to have solder
tabs spot welded to the cells. This is the right way to go rather than trying to solder directly to
the cell which could easily damage the seals.
8/9/2019 Rebuilding Laptop
http://slidepdf.com/reader/full/rebuilding-laptop 3/12
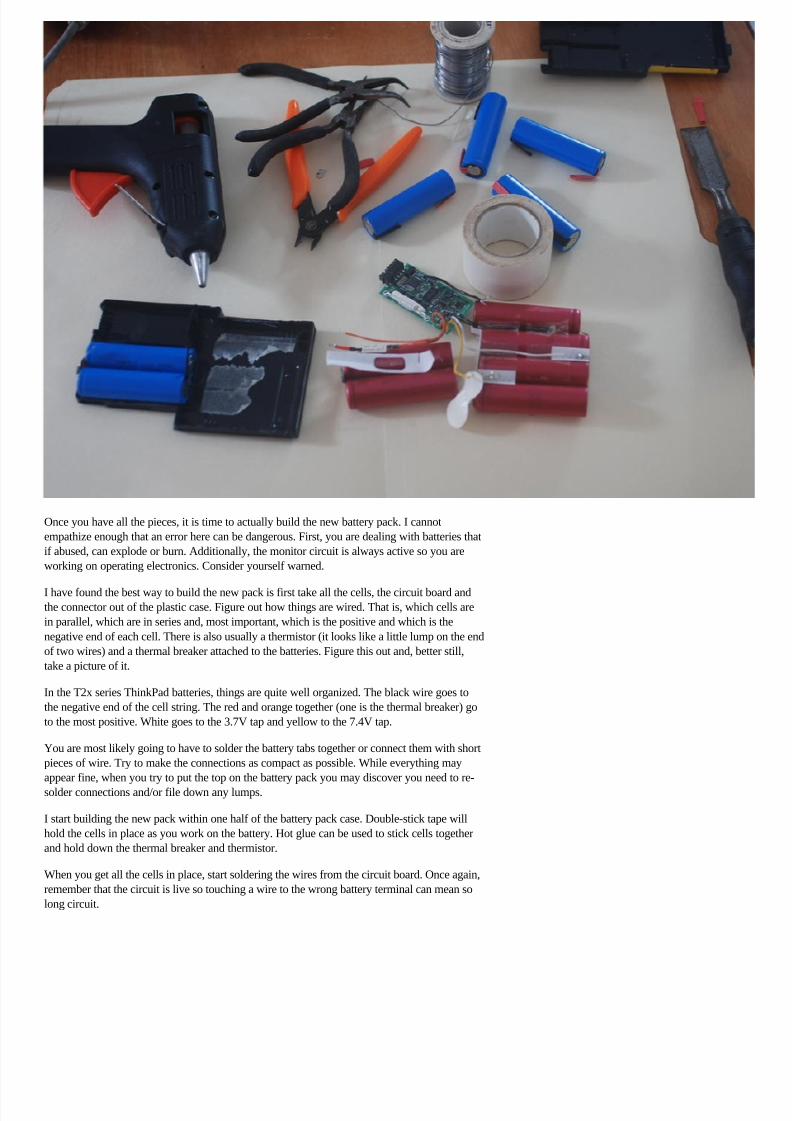
Once you have all the pieces, it is time to actually build the new battery pack. I cannot
empathize enough that an error here can be dangerous. First, you are dealing with batteries that
if abused, can explode or burn. Additionally, the monitor circuit is always active so you are
working on operating electronics. Consider yourself warned.
I have found the best way to build the new pack is first take all the cells, the circuit board andthe connector out of the plastic case. Figure out how things are wired. That is, which cells are
in parallel, which are in series and, most important, which is the positive and which is the
negative end of each cell. There is also usually a thermistor (it looks like a little lump on the end
of two wires) and a thermal breaker attached to the batteries. Figure this out and, better still,
take a picture of it.
In the T2x series ThinkPad batteries, things are quite well organized. The black wire goes to
the negative end of the cell string. The red and orange together (one is the thermal breaker) go
to the most positive. White goes to the 3.7V tap and yellow to the 7.4V tap.
You are most likely going to have to solder the battery tabs together or connect them with short
pieces of wire. Try to make the connections as compact as possible. While everything may
appear fine, when you try to put the top on the battery pack you may discover you need to re-
solder connections and/or file down any lumps.
I start building the new pack within one half of the battery pack case. Double-stick tape will
hold the cells in place as you work on the battery. Hot glue can be used to stick cells together
and hold down the thermal breaker and thermistor.
When you get all the cells in place, start soldering the wires from the circuit board. Once again,
remember that the circuit is live so touching a wire to the wrong battery terminal can mean so
long circuit.

8/9/2019 Rebuilding Laptop
http://slidepdf.com/reader/full/rebuilding-laptop 4/12
Once all the connections are made, it is a good idea to check the voltages to see if they make
sense. Starting at the negative end, each cell or set of parallel cells should add about 3.7 volts to
the total. The exact voltage will depend, of course, on the state of charge of the cells but a fairly
fresh cell should read 3.5 volts or more with no load.
If everything checks out, put the top on the battery case. If it doesn't fit, file, adjust, re-solder
and such until it does. It is then a good idea to test the battery in the laptop. A bit of tape can be
used to hold the battery together for testing.
If all goes well, you need to glue the two battery halves back together. While model cement can
be used, I prefer a hot glue gun. Work slowly, preparing one side or part of a side, holding it
together and let the glue set. Then move along until the entire battery is sealed. Then, with a
knife, cut off any glue that extends beyond the seams.
That's it. You just proved you could save $100 by spending half a day playing with hand tools
and glue.
______________________
Phil Hughes

8/9/2019 Rebuilding Laptop
http://slidepdf.com/reader/full/rebuilding-laptop 5/12
(/users/battshoping)
Comments
Comment viewing optionsThreaded list - expanded Date - newest first 50 comments per page Save settings
Select your preferred way to display the comments and click "Save settings" to activate your changes.
anyway (/content/rebuilding-laptop-battery#comment-353375)
Submitted by nb-4l (http://www.powerlinebattery.com/canon/nb-4l/battery+charger.htm) (not verified) on Jul 01,
2010.
the 'memory' of the old, crappy cells appears to have l ingered in the on-board electronics of the batt ery
management. That i s to say, the meter reports my battery as running down fast. Funny thing, though,
when it gets to about 2 - 3%, it stays there for about 2 hours or more before the l aptop finally cuts off. I
hope that this situation will rectify itself after a few charge/discharge cycles as the management circuitry 'learns' the
new cells capacity
i agree your mind (/content/rebuilding-laptop-battery#comment-352992)
Submitted by battshoping (/users/battshoping) on Jun 19, 2010.
This is an awesome howto that shows just how easily these can be replaced, thanks!
replace the battery cell (/content/rebuilding-laptop-battery#comment-352824)
Submitted by Jack (http://www.laptops-battery.co.uk) (not verified) on Jun 14, 2010.
A good article about how to replace the batt ery cell inside the laptop battery. If you can make a video
about it, it is more great.
my hp 9000dv (/content/rebuilding-laptop-battery#comment-352112)
Submitted by aussieOZ (not verified) on May 20, 2010.
if you add all the cel ls up that your buying it is more then what your paying for a new battery if i buy all
the cel ls for my battery it i s $70 and for my batte ry on ebay its $50
yes, and... (/content/rebuilding-laptop-battery#comment-353728)
Submitted by rhombus (not verified) on Jul 13, 2010.
...your $50 Ebay replacement i s al so junk.
Doing it this way, you can buy top qualit y cells. The st uff in those cheap aftermarket packs
is usually also cheap :)
Touch Screen LCD Monitor (/content/rebuilding-laptop-battery#comment-351079)
Submitted by Anonymous (http://www.global-e-world.com/Touch-Screen-LCD-Monitor/)(not verified) on Apr 21,
Laptop Battery Manufacturver 550 models,1year warranty,very highuality but the lowest price
ww.bndbattery.com
68815-001 Laptop Batteryenuine Laptop Parts & Accessories Mostgressive prices on the net!
ww.getpartsonline.com

8/9/2019 Rebuilding Laptop
http://slidepdf.com/reader/full/rebuilding-laptop 6/12
2010.
That is to say, the meter reports my battery as running down fast. Funny thing, though, when it gets to
about 2 - 3%, it st ays there for about 2 hours or more before the laptop finally cuts off. I hope that this
situation will rectify itself after a few charge/discharge cycles as the management circuitry 'learns' the
new cells capacity.
It's so easy to mock others not knowing what could be around the corner.
Rebuilt IBM A31 laptop battery pack... (/content/rebuilding-laptop-battery#comment-350647)
Submitted by leccyrob (not verified) on Apr 11, 2010.
Hi,
I've just purchased 6 x 18650 2.8Ah batteries and rebuilt my old A31 pack. I had al ready bought an
'after-market' replacement pack for $43AUD and so had nothing to lose by having a bash at re-cel ling
the old pack.I paid $20AUD for the 6 cel ls and spent about 1.5 hours doing the re-build (I'm a TV repair technician and so have about
20 years experience with me ssing about soldering wires).
As reported by others here, the 'memory' of the old, crappy cell s appears to have l ingered in the on-board electronics of
the battery management. That is to say, the meter reports my battery as running down fast. Funny thing, though, when it
gets to about 2 - 3%, it stays there for about 2 hours or more before the laptop finally cuts off. I hope that this situat ion
will rectify itself after a few charge/discharge cycles as the management circuitry 'learns' the new cells capacity.
I have disabled the low-battery standby feature within XP to make sure that the cells become as discharged as possible.
I'll report back t o this disc ussion any new findings.......
How to Increase 6 cells to 9 cells - Laptop Battery (/content/rebuilding-laptop-battery#comment-350626)
Submitted by Khan (not verified) on Apr 10, 2010.
i hv a compaq 6710b as with many laptops you can buy them with 6 ce ll bat tery of if you add more
money, you get 9 cel ls
i was wondering if i could replace the batteries and make it a 9 cell battery
my question is wouldn't it add more volts to the batte ry if you add 3 more cells to an ordinary 6 cell bat tery?
anyone any idea about difference in 6 cel l and 9 cell , how it is made to work with same laptop?
would i be able to use the same chip board as 6 cell one with 9 cells?
my battery v10.8 55wh 6 cell
laptop batteries (/content/rebuilding-laptop-battery#comment-350254)
Submitted by laptop battery (http://www.globallaptopbattery.co.uk) (not verified) on Apr 02, 2010.
What the commenter before me doesn't realize is that some of these laptops have lost their worth and
wouldn't pull more than $300 - $400 on ebay. http:// www.adapterli st.com is a good laptop batte ry online
shop.It's not viable t o spend %25-30 of your laptops worth to replace the batteries. Now if i t were a
spanking new $2000 laptop by opinion would be different, but then it would probably be covered by a
warranty still.
Not worth the effort or price (/content/rebuilding-laptop-battery#comment-349425)
Submitted by Anonymous (not verified) on Mar 11, 2010.
I took my Lenovo X60 Tablet Pc battery appart. First I had to real ly mangle the case to get it open.
Second, mine had two different shaped batteries 4 where round 4 where rectangle. Finally, the model
numbers on each batte ry where different and I was not able to find exact matches or the rec tangle ones
at a ll. When I did find simular batteries they were $8.95 each x4 $36 and I was only half way. Plus there
were too many wires, solder joints and gluing I would need to put i t al l back t ogether with no warranty if it didn't work. I
found a complete bat tery al reay in t he case from gogo-power.com for $49 with free shipping and a warranty. So for me
rebuilding my own batte ry was not worth the effort or price.
http://www.gogo-power.com/4000mAh-Laptop-Battery-ThinkPad-X60-X61-Tablet-PC-p/li 35.htm
X60 battery replacement (/content/rebuilding-laptop-battery#comment-349445)
Submitted by Anonymous (not verified) on Mar 11, 2010.
Thanks for the info on the X60 replacement try and the cheap alt ernative. which battery
did you have on your X60? i have the la rge capacit y (7-hr) battery, and wondering if that's
the same one you have or the smaller, 3-hr battery. stil l great info though, thnx again.
help me (/content/rebuilding-laptop-battery#comment-348678)
Submitted by dida (not verified) on Feb 27, 2010.
hey, i have a IBM t20 and the batt i s dead ... i do not know how to find tha battery cell model so can
anybody help me pleae.. my email is soldier1@mail .org

8/9/2019 Rebuilding Laptop
http://slidepdf.com/reader/full/rebuilding-laptop 7/12
which battery to use (/content/rebuilding-laptop-battery#comment-345683)
Submitted by Ramesh (not verified) on Nov 25, 2009.
please suggest me some nice battery brand of 3.7volts and 2500mAh. i also want to rebuild my lenovo
laptop battery pack.
Li-Ion cells (/content/rebuilding-laptop-battery#comment-345856)
Submitted by Anonymous (not verified) on Nov 29, 2009.
I rebuilt my Dell E1505 6 cell battery yesterday. I used cells from
www.batte ryjunction.com 18650 cells 3.7V 2600mAh. The 6 cells with meta l ta bs welded
on the ends were ~$52.00 including shipping. You can get cheaper cell s with less mAh, but
you don't want to put smal ler capacity batt eries in your pack, for a number of reasons.
The battery works just fine and the batte ry meter on the computer seems to be adapti ng slowly to the new
higher capacity pack. The hardest part of the process is getting the battery case apart.
Good luck.
Awsome Post (/content/rebuilding-laptop-battery#comment-344397)
Submitted by Anonymous (not verified) on Oct 22, 2009.
Such a great idea... I'm definitely going to try replacing the cel ls in my wife's Dell D610 laptop. We got
it 1yr ago as an off-lease system. I've already replaced the battery once (with an ebay "genuine"
replacement) but it only lasted a few months. Now both batteries will only hold a charge for approx.
45min. I've got some experience working with electronics / soldering so this process doesn't seem too
daunting. If it works, it'd be a super economical way to breath new life into the laptop.
Rebuilding a Laptop Battery (/content/rebuilding-laptop-battery#comment-342631)Submitted by Anthony (http://www.batterieswholesale.net) (not verified) on Sep 05, 2009.
It's good if you know how to or you have a knowledge in e lect ronics coz i f you try to risk your laptop it
could be blown away. Some people are troubleshooting their laptop battery but the success rate isn't
good... If you want a risk then try it....
I replaced it, but charge AND discharge really fast (/content/rebuilding-laptop-battery#comment-338142)
Submitted by diegugawa (not verified) on Jun 10, 2009.
I replace the old cells from my battery as well, but when I charge the battery it charges really fast, and
later it discharges at almost the same speed.
I put new 18650 with "2400ma" each, and the other cel ls were 1800ma. I wondering if the circuit doesn't
like this higher amount of amps in the battery.
How can I fix this?!?!
I am using a apple powerbook G4 with Leopard in it. I have 2gb of ram... (just in case someone wondered)
Thanks!!!
I think the circuit inside (/content/rebuilding-laptop-battery#comment-339400)
Submitted by Cimo (not verified) on Jul 08, 2009.
I think the circuit inside the batt ery records the charge of the battery and when new cells
are installed the charge and discharge cycles are as they were last recorded (this is a
protection mechanism) - to be able to use the new batte ries I think you have to reset the
microcontroller in the circuit.
The higher mA is OK - the higher it is, more time you can get. But there is also a limitation circuit inside
some batteries that won't allow more current to flow than designed for.
Hope it helps.
regards.
I think the circuit inside (/content/rebuilding-laptop-battery#comment-352785)
Submitted by leo hemmerly (not verified) on Jun 11, 2010.
I think the circuit inside the bat tery records the charge of the battery and when
new cells are installed the charge and discharge cycles are as they were last
recorded (this is a protection mechanism) - to be able to use the new batteries
I think you have to reset the microcontroller in the circuit.
The higher mA is OK - the higher it is, more time you can get. But there is also a limitation
circuit inside some batte ries that won't al low more current to flow than designed for.
Hope it helps
how do you reset the microcontroller... i have the sa me problem..???

8/9/2019 Rebuilding Laptop
http://slidepdf.com/reader/full/rebuilding-laptop 8/12
FUJITSU FPCBP192 replacement Notebook Batteries (/content/rebuilding-laptop-battery#comment-336075)
Submitted by battery (http://www.power-tool-battery.com/)(not verified) on Apr 22, 2009.
Do want to own some bette ries which have more function , more economical and long life? Please visit
the following Web si te: http://www.power-tool-batte ry.com/notebook-batte ry/fujitsu-fpcbp192-
1001721.htm FUJITSU FPCBP192 replacement Notebook Batteries,it will help you find the ideal
battery.
Oops (/content/rebuilding-laptop-battery#comment-334102)
Submitted by Jerry Spoor (not verified) on Mar 03, 2009.
My previous message said to discharge the batte ry before hooking it up. This should not be done with a
lithium bat tery. You should leave the bat teries charged up and then connect them carefully as to avoid
shorting anything out.
Once my project was completed the charging light on my notebook computer indicat ed everything was
ok. So I published the previous articl e. It was not OK. When I disconnected the external charging circuit t he computer
shut down immediately.
I tried to charge the lithium batteries with an external charger and series resisters to limit the charge rate. The batteries
appear to have an internal short and they will not charge up. Either an irreversible chemica l change has occurred or a
disabling circuit in the battery has activated.
All I am left with i s a good control circuit for future batte ry repairs.
Yes, I would still encourage battery repair but you really need to know what you are doing.
Please note the following information from Wikipedia and I would advise reading the full article at Wikipedia.
Li-ion batteries are not as durable as nickel meta l hydride or nickel-cadmium designs, and can be extremely dangerous
if mist reated. They may explode if overheated or if charged to an excessi vely high voltage. Furthermore, they may be
irreversibly damaged if discharged below a certain voltage. To reduce these risks, li-ion batteries generally contain a
small c ircuit that shuts down the battery when discharged below a certain threshold (typically 3 V) or charged above a
certain limit (typically 4.2 V).
This circuit prevents deep discharge in normal use. However, when stored for long periods, the small current drawn by
the protection circuitry may deeply drain the battery. Some applications attempt to recover deeply discharged cells by
slow-charging them.
Furthermore, this ci rcuit adds to the cost of lithium-ion batteries, which is usually higher than that of comparable-
capacity NiMH or NiCD batteries.
I paid 400$ for this laptop (/content/rebuilding-laptop-battery#comment-334076)
Submitted by Plasmatic (http://www.annihilation.info) (not verified) on Mar 02, 2009.
I paid 400$ for this laptop 2 years ago, and it st ill does everything I need it for. No way I'm spending
$129 for a new battery. Thanks guys!
Additional notes (/content/rebuilding-laptop-battery#comment-334075)
Submitted by Jerry Spoor (http://www.tkpro.com/)(not verified) on Mar 02, 2009.
This artic le has been incouraging and resulted in saving me a lot of money.
Before ordering new batteries you need to know if the batteries are bad or if it is the bat tery module
elect ronics. If the batteries are very old and have gradually decreased in power then they should be
replaced. If the problem occurred abruptly you may have one bad cell or a bad elect ronics chip in the
battery pack.
Take a volt meter and check the voltage at each cell level of each parallel set of batteries. If one cell is shorted it will
drain the voltage in all cells that are wired in parallel to it. If each of the 3 sets of series connections have about 4 volts
each then there is a good chance the electronic circuitry is bad. It would be of no value to replace the batteries unless
you have the right e lect ronic circuit ry that works for your battery pack and your computer. You do not want to blow out
the charging ci rcuitry of your computer.
My battery pack went bad abruptly and the computer will not accept i t. Each bank of cells shows the same 4 volts. The
battery pack will light up some bright automobile 12 volt brake light bulbs for a long time.
There is nothing wrong with putting the lamps on the battery and draining it completel y. Then you can try recharging it
again in the computer. This may reset the electronics and reestablish operation with the computer. This did not work
with mine.
While draining a batte ry with about 12 volts you can easily see if one of the 3 secti ons discharges faster than another by
measuring the voltage at each cell level. If there is an open battery in any section, that section or that battery voltage
will drop faster. That is bec ause the current going through each series sec tion is equal and a bad section will discharge
faster.
I will not replace the electronics unless I have a complete electrical schematic of the existing and the new electronic
module. I must know they are compatible. Keep in mi nd that some elec tronic modules will l ast longer than others. The
manufactures of computer batteries use sufficient technology to dissuade all but the most ambitious techies.
My old computer battery (3 years old) still runs the computer but the batt eries are very weak. So I put the new batteries
from the defective battery module in the older battery pack. This worked fine. Keep in mind I complete ly discharge the

8/9/2019 Rebuilding Laptop
http://slidepdf.com/reader/full/rebuilding-laptop 9/12
batteries before doing this. I do not want to hook the battery wires up in the wrong order or short things out.
The wire routing was different but the electrical connections were the same as viewed on an electronic schematic.
I test t he battery before sealing the case and have not decided what type of glue to use. I want to be able t o break it apart
in the future if I need the electronics, the case or the batteries.
Now I need another spare battery. I have found the IBM $185 battery is good for 6.5 hours in my T41p notebook.(When
new) The $80 online purchase from Comptick.com is good for about 4.5 hours when new. This is wi th the same purchase
rating specifications. The main concern is the short life span of the electronic module in the Comptick.com battery
pack. I have no idea where to get a good batte ry other than IBM and that may not be a sure thing for a replacement
battery.
I got the right info about (/content/rebuilding-laptop-battery#comment-333604)
Submitted by Anonymous (http://www.adapterlist.com) (not verified) on Feb 20, 2009.
I got the right info about toshiba portege 4000 battery on http://www.adapterlis t.com/toshiba/portege-
4000.htm toshiba portege 4000 battery ,i sure it will fit my notebook .
What about 'blind' cells? (/content/rebuilding-laptop-battery#comment-333449)
Submitted by Anonymous (not verified) on Feb 16, 2009.
I have a pack with cel ls that look the same, but the strange thing is, there i s nothing on the net about the
markings...
I have the in a red-translucent wrapping, with a big "B" on one side, and arond the other side it says:
HJMFHHR
Now that's not a lot of information..
I tried to measure them, but a ll I get is 18 diameter and 62 in length. 18620 does not exist according to google..
The pack as 4 parallel cells, 8 in total.
It's rated 4000mA and 14.8v, now using that information, I think they should be 3.7v each, and have about 500mA, right?
If I just could find some cells that match the size.. What would cell s with 2400mA do to the controller?
I guess it'd fry and have me cook potatoes on it..
How right is my direct ion?
Sorry for trying to resurrect an old post in here..
You might be missing the (/content/rebuilding-laptop-battery#comment-346448)
Submitted by Anonymous (not verified) on Dec 16, 2009.
You might be missing the "button" on the end of the cell when measuring its length -
18mm X 65mm (18650) is pretty popular, my guess i s this is what you have.
Also, your cells a probably setup like mi ne: two pairs in parallel inside of a pair of series.
(((b1)parallel(b2))Series((b3)parallel(b4)))
in Series with
(((b5)parallel(b6))Series((b7)parallel(b8)))
This would give you "2000"mAh @ 14.8V (or 3.7V*2*2)
Me too, me too! (/content/rebuilding-laptop-battery#comment-333806)
Submitted by Jeremy (http://fixedd.com) (not verified) on Feb 25, 2009.
I was curious about adding cells that had more capacity then the originals as well.
Will the protection circuit be able to tell that there's a higher capacity, or will you be
limited to the battery's original capacity? I found some that were rated WAY higher than
my stock cells and I'd like to use them if they'll work, but if it'll just default to it's stock
capacity then I don't want to waste my money on them.
I realize that nobody can/will provide guarantees that it'll work, anecdotal evidence is fine :) Thanks, in
advance, for any help.
I'm a student in Computer (/content/rebuilding-laptop-battery#comment-332198)
Submitted by Anonymous (not verified) on Jan 27, 2009.
I'm a student in Computer Engineering, so things like t his to me are a learning experience. I'll have to
look at doing this to my laptop as it only has 56% of its original bat tery life.
I would get about 3hr 20mins, now I get about 1hr 45mins. Doesn't even last me a whole class and many
don't have plugs.
- (/content/rebuilding-laptop-battery#comment-327052)

8/9/2019 Rebuilding Laptop
http://slidepdf.com/reader/full/rebuilding-laptop 10/12
(/users/waparmley)
Submitted by Tomi (not verified) on Oct 17, 2008.
Thank You for this article, i was searching for a site where i can see that it's possible to disassemble a
laptop battery without wrecking it.I succeeded to do it too.
Cool, Very Cool (/content/rebuilding-laptop-battery#comment-326977)
Submitted by ridshack (not verified) on Oct 16, 2008.
What! Come on you guys. One of the things that makes us geeks is our need and want to figure out how
things work. This is a great tutorial, thanks for sharing. I am shocked to see how simple it is, +1 to
Knowledge.
Ridshack
Careful (/content/rebuilding-laptop-battery#comment-326331)
Submitted by Freddy (http://www.barbaropoli.com) (not verified) on Oct 07, 2008.
Always ask to have the pads already soldered on the battery because applying excess heat while
soldering you risk an explosion.
Also I would advise NOT to travel with such a bat tery unless you want to be questi oned for hours at the
airport (especiall y in the notsofreeanymore US and Aiiiih).
While you're on the (/content/rebuilding-laptop-battery#comment-326860)
Submitted by Anonymous (not verified) on Oct 14, 2008.
While you're on the fashionable anti-US bandwagon, you may want to include B ritain
which has also has a ll t he dystopian Orwellian goodness you could ask for.
Great Article (/content/rebuilding-laptop-battery#comment-326254)
Submitted by waparmley (/users/waparmley) on Oct 06, 2008.
I've rebuilt many NiC d and Nimh packs over the years -- l ooking forward to trying my
first Li-ion pack sometime. Thanx!
Interesting... Thanks (/content/rebuilding-laptop-battery#comment-326240)
Submitted by Anonymous (not verified) on Oct 06, 2008.
Thanks for the How-To. I found it interesting, and had no idea I could do this on my own.
nice tut (/content/rebuilding-laptop-battery#comment-326226)
Submitted by Anonymous (not verified) on Oct 06, 2008.
you lot are gett ing off point and fil ling the comments page with rubbish.
point is, great tutorial for those interested.
will
Nice, but what about the memory chip? (/content/rebuilding-laptop-battery#comment-326219)
Submitted by cct surf (not verified) on Oct 06, 2008.
I've done exact ly this process, however, you missed one large problem, the memory chip in the battery
may (as it was in my case) be saying that the batte ry is too old to repair. Does anyone have any thoughts
on that problem? I've thought of hacking it, but I'm rather a noob at hacking in that manner.
Poor measurements (/content/rebuilding-laptop-battery#comment-326215)
Submitted by Anonymous (not verified) on Oct 06, 2008.
18mm diameter...OK. 650mm length = 25.5 inches...not likely. 65.0mm far more li kely. Otherwise a
nice tutorial.
Its not just $100... (/content/rebuilding-laptop-battery#comment-326208)
Submitted by Kumaran (http://www.susegeek.com) (not verified) on Oct 06, 2008.
Great article...
This isn't just about $100 but it is more about being eco-friendly and even more...u had the fun of learing

8/9/2019 Rebuilding Laptop
http://slidepdf.com/reader/full/rebuilding-laptop 11/12
(/users/tracyanne)
(/users/augmentedfourth)
the trade..
Good Idea (/content/rebuilding-laptop-battery#comment-326200)
Submitted by tracyanne (/users/tracyanne) on Oct 05, 2008.
In fact there are several places here in Australia that rebuild laptop batteries. In fact I
opted for that option fo a 6 year old Asus I had, I sent i t to a friend, in San Antonio
Texas, complete with Mandriva Linux 2008.1, because she was out of work at the time
and couldn't afford a computer. The only problem wi th the bat tery rebuild was that the
new cells have a higher charge density, so now the batte ry charge status reads wrong.
Nice way to save money (/content/rebuilding-laptop-battery#comment-326199)
Submitted by Anonymous (not verified) on Oct 05, 2008.
What the commenter before me doesn't realize is that some of these laptops have lost their worth and
wouldn't pull more than $300 - $400 on ebay. It's not viable to spend %25-30 of your laptops worth to
replace t he batte ries. Now if it were a spanking new $2000 laptop by opinion would be different, but
then it would probably be covered by a warranty stil l.
This is an awesome howto that shows just how easily these can be replaced, thanks!
Oh jeeze. You can't be (/content/rebuilding-laptop-battery#comment-326196)
Submitted by Anonymous (not verified) on Oct 05, 2008.
Oh jeeze. You can't be serious, just spend the $100 to let someone else do the work for you. This way
you don't short out your laptop because you did a terrible job rebuilding the bat tery.
I agree (/content/rebuilding-laptop-battery#comment-326201)
Submitted by augmentedfourth (/users/augmentedfourth)on Oct 05, 2008.
"Half a day" to save $100? I'll bet your time is worth more than that.
Even applying a discount for the fun hackiness of the project, $100 is
only worth it to me i f the project only takes 4-5 hours.
8 hour work day * 1/2 = 4 (/content/rebuilding-laptop-battery#comment-351434)
Submitted by Anonymous (not verified) on Apr 30, 2010.
8 hour work day * 1/2 = 4 hours.
Obviously not a math major!
100 worth of who's time? (/content/rebuilding-laptop-battery#comment-326202)
Submitted by Anonymous (not verified) on Oct 06, 2008.
When you live in the t hird world, 100dls a day means too much.
At the end of the day ... (/content/rebuilding-laptop-battery#comment-326262)
Submitted by Anonymous (not verified) on Oct 07, 2008.
"When you live in t he third world, 100dls a day means too much."
Exactly, and that i s why augmentedfour's job could be outsourced
to third world country. LOL. Nothing to worry though, he could
then start his own business repairing laptop batterie s for, say, $20
a piece . Maybe then he would appreciate this how2?
It's soooooo eeeeasy to mock others not knowing what c ould be around the corner.
OMG, at least think before you spit!
Seriously, I do appreciate this nice how2. I guess I'll give i t a t ry with my old G40.
Post new commentPlease note that comments may not appear immediate ly, so there is no need to repost your comment.
Your name:
Anonymous
E-mail:
The content of this field is kept private and will not be shown publicly.

8/9/2019 Rebuilding Laptop
http://slidepdf.com/reader/full/rebuilding-laptop 12/12
All comments Replies to my comment
Homepage:
Subject:
Comment: *
Allowed HTML tags: <a> <em> <strong> <cite> <code> <pre><tt> <ul> <ol> <li> <dl> <dt> <dd> <i> <b><blockquote>Lines and paragraphs break automatically.Use to create page breaks.
More information about formatting options (/filter/tips)
Notify me when new comments are posted
Preview
Related Documents