IFB122 Linux Software User’s Manual

Welcome message from author
This document is posted to help you gain knowledge. Please leave a comment to let me know what you think about it! Share it to your friends and learn new things together.
Transcript
IFB122
Linux
Software User’s Manual
ii
Disclaimers
This manual has been carefully checked and believed to contain accurate information. Axiomtek Co., Ltd. assumes no responsibility for any infringements of patents or any third party’s rights, and any liability arising from such use.
Axiomtek does not warrant or assume any legal liability or responsibility for the accuracy, completeness or usefulness of any information in this document. Axiomtek does not make any commitment to update the information in this manual.
Axiomtek reserves the right to change or revise this document and/or product at any time without notice.
No part of this document may be reproduced, stored in a retrieval system, or transmitted, in any form or by any means, electronic, mechanical, photocopying, recording, or otherwise, without the prior written permission of Axiomtek Co., Ltd.
Trademarks Acknowledgments
Axiomtek is a trademark of Axiomtek Co., Ltd.
Windows®
is a trademark of Microsoft Corporation.
Other brand names and trademarks are the properties and registered brands of their respective owners.
Copyright 2017 Axiomtek Co., Ltd.
All Rights Reserved
December 2017, Version A3
Printed in Taiwan

iii
Table of Contents
Disclaimers ..................................................................................................... ii
Chapter 1 Introduction ................................................ 1
1.1 Specifications ...................................................................................... 2
Chapter 2 Getting Started ........................................... 5
2.1 Connecting the IFB122 ....................................................................... 5
2.1.1 Serial Console ............................................................................................. 7 2.1.2 SSH over Ethernet ...................................................................................... 9
2.2 How to Develop a Sample Program ................................................. 11
2.2.1 Install Yocto Toolchain ................................................................................ 11 2.2.2 Setting Up the Cross-Development Environment ..................................... 13 2.2.3 Write and Compile Sample Program ......................................................... 13
2.3 How to Put and Run a Sample Program .......................................... 14
2.3.1 Via FTP ..................................................................................................... 14 2.3.2 Via USB Flash Drive .................................................................................. 16 2.3.3 Via TFTP ................................................................................................... 17
2.4 How to Recovery System ................................................................. 18
2.4.1 Via run_rescue System Script (under Linux System) ............................... 18 2.4.2 Via rescue.scr Script (under u-boot) ......................................................... 18
2.5 How to Update System ..................................................................... 19
2.5.1 Via USB Flash Drive .................................................................................. 19
2.6 How to use MFG tool to download image ....................................... 22
Chapter 3 The Embedded Linux ................................ 25
3.1 Embedded Linux Image Managing .................................................. 25
3.1.1 System Version ......................................................................................... 25 3.1.2 System Time .............................................................................................. 25 3.1.3 Internal RTC Time ..................................................................................... 25 3.1.4 External RTC Time .................................................................................... 26 3.1.5 Watchdog timer ......................................................................................... 26 3.1.6 Adjusting System Time .............................................................................. 26 3.1.7 LEDs Control ............................................................................................. 27
3.2 Networking ......................................................................................... 27
3.2.1 FTP – File Transfer Protocol ..................................................................... 27 3.2.2 TFTP – Trivial File Transfer Protocol ......................................................... 27 3.2.3 NFS – Network File System ...................................................................... 28 3.2.4 How to use 3G or 4G module (Optional) ................................................... 28 3.2.5 How to use Wi-Fi module (Optional) ......................................................... 32

iv
Chapter 4 Programming Guide .................................. 33
4.1 librsb10x API Functions ................................................................... 33
4.2 Compile Demo Program ................................................................... 41
4.2.1 Install IFB122 I/O Library .......................................................................... 41 4.2.2 Run demo program ................................................................................... 42
Chapter 5 Board Support Package (BSP) .................. 43
5.1 Host Development System Installation ........................................... 43
5.1.1 Install Host System.................................................................................... 43 5.1.2 Install Yocto Development ......................................................................... 44
5.2 U-Boot for IFB122 .............................................................................. 48
5.2.1 Booting the System with an NFS Filesystem ............................................ 48 5.2.2 Booting the System from eMMC (IFB122 default) .................................... 49 5.2.3 Booting the Rescue System from eMMC .................................................. 49
Appendix Frequently Asked Questions ..................... 51

IFB122 Linux User’s Manual
Introduction 1
Chapter 1
Introduction The extreme compact IFB122 supports the low power RISC-based module (i.MX6UL) processor with extended temperature range of -40°C to +70°C for using in wide range operating environments. Multiple built-in serial ports, high-speed LANs and USB 2.0 ports enable fast and efficient data computation, communication and acquisition. Its digital I/O feature provides users with the convenience of digital devices connection. Besides, Its compact size with Din-rail mounting allows for easy installation into control This user’s manual is for the embedded Linux preinstalled in IFB122. The embedded Linux is derived from Linux Yocto Board Support Package, which is based on Linux Kernel 3.14.52 and our hardware patches to suit IFB122.
Software structure The preinstalled embedded Linux image is located in eMMC Flash memory which is partitioned and formatted to accommodate boot loader, kernel and root filesystem. It follows standard Linux architecture to allow user to easily develop and deploy application software that follows Portable Operating System Interface (POSIX). To facilitate user program in monitoring and controlling I/O device such as DIO, Watchdog Timer, the IFB122 includes ‘librsb10x.so’ shared library. In addition to ext3 and ext4 file system, this embedded Linux kernel is compiled with support for NFS, including server-side, client-side functionality and ‘Root file system on NFS’. Using an NFS root mount we have several advantages such as: The root file system is not size-restricted by the device’s storage like Flash memory. Change made to application files during development is immediately available to the
target device.
For connectivity, this image includes most popular internet protocols, some servers and utilities not only making it easy for downloading/uploading files (Linux kernel, application program) or for debugging, but also communicating to outside world via Ethernet, WiFi and 3G. For the convenience of manipulating embedded Linux, this image includes lots of popular packages such as busybox, udev, etc.

IFB122 Linux User ’s Manual
2 Introduction
1.1 Specifications
OS: Linux
Kernel: 3.14.52 (with NXP and Axiomtek hardware modified patch) Support Protocol Types
ICMP. TCP/IP. UDP, DHCP, Telnet, HTTP, HTTPS, SSL, SMTP, NTP, DNS, PPP, PPPoE, FTP,
TFTP, NFS.
Shell
Bash Support storage format
FAT32 /FAT/EXT2/EXT3/EXT4
BSP: IFB122-LINUX-bsp
AxTools Image Yocto patches Toolchain

IFB122 Linux User’s Manual
Introduction 3
Daemons
Telnetd: Telnet server daemon FTPD: FTP server daemon
Utilities
Telnet: Telnet client program FTP: FTP client program TFTP: Trivial File Transfer Protocol client
Packages
Busybox(1.23.1): Small collection of standard Linux command-line utilities udev: A device manager for Linux kernel dosfstools : Utilities for making and checking MS-DOS FAT file system e2fsprogs: A set of utilities for maintaining the ext2, ext3 and ext4 file systems ethtool: A Linux command for displaying or modifying the Network Interface
Controller (NIC) parameters i2c-tools : A heterogeneous set of I2C tools for Linux procps : Utilities to report on the state of the system, including the states of running
processes, amount of memory wireless-tools: A package of Linux commands (simple text-based utilities/tools)
intended to support and facilitate the configuration of wireless devices using the Linux Wireless Extension
Development Environment
Host OS/ development OS: Ubuntu 14.04 LTS 32/64bit kernel: version: 4.2.0-42
machine running Ubuntu, the minimum hard disk space required is about 50 GB for the X11 backend. It is recommended that at least 120 GB is provided, which is enough to compile all backends together.
Toolchain/ cross compiler: ARM, gcc-4.9.2 (Yocto project 1.8.1 Fido) HW’s Lib (Hardware’s Library)
Digital I/O - Read digital input - Write digital output
COM
- RS-232/422/485 mode setting(Default RS232)

IFB122 Linux User ’s Manual
4 Introduction
Relay
Note
Set relay high or low.
1. All specifications and images are subject to change without notice..
http://www.axiomtek.com/Default.aspx?MenuId=Products&FunctionId=ProductView&ItemId=17865&upcat=134 .
1. 2. Command definition:
Command Definition Example
=> U-Boot Ex: => setenv ipaddr 192.168.1.103 Meaning: U-Boot setenv ipaddr 192.168.1.103
~$ Host PC Ex: ~$ sudo apt-get install subversion Meaning: To command sudo apt-get install subverhsion on host PC
~# Target (IFB122):
Ex: ~# /etc/run_rescue Meaning: To command /etc/run_rescue on IFB122
IFB122 Linux User’s Manual
Getting Started 5
Chapter 2
Getting Started
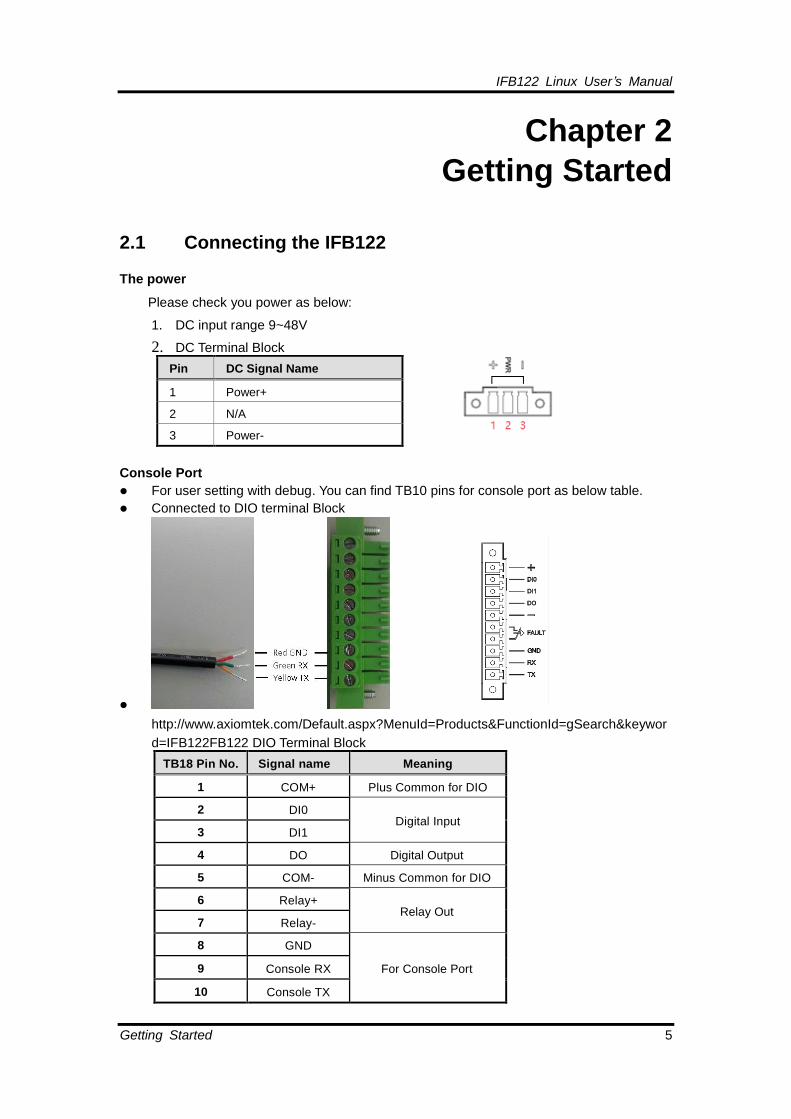
2.1 Connecting the IFB122 The power
Please check you power as below:
1. DC input range 9~48V
2. DC Terminal Block
Pin DC Signal Name
1 Power+
2 N/A
3 Power-
Console Port
For user setting with debug. You can find TB10 pins for console port as below table.
Connected to DIO terminal Block
http://www.axiomtek.com/Default.aspx?MenuId=Products&FunctionId=gSearch&keywor
d=IFB122FB122 DIO Terminal Block
TB18 Pin No. Signal name Meaning
1 COM+ Plus Common for DIO
2 DI0 Digital Input
3 DI1
4 DO Digital Output
5 COM- Minus Common for DIO
6 Relay+ Relay Out
7 Relay-
8 GND
For Console Port 9 Console RX
10 Console TX
IFB122 Linux User ’s Manual
6 Getting Started
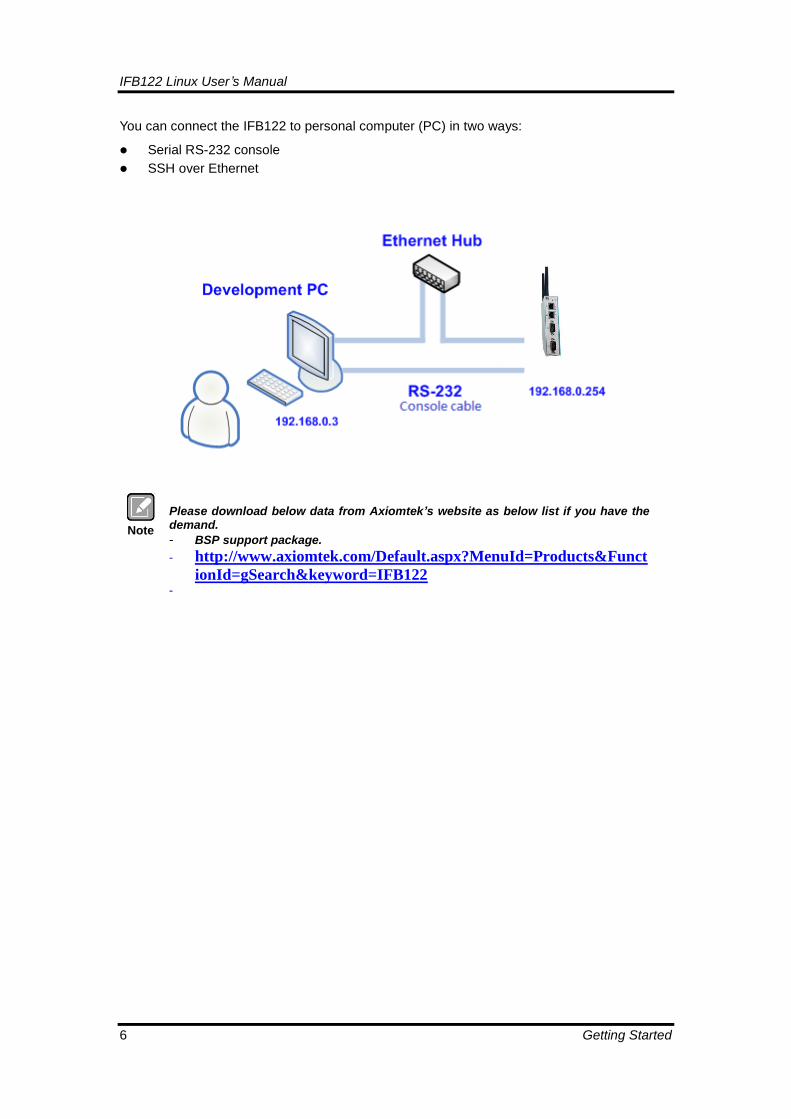
You can connect the IFB122 to personal computer (PC) in two ways:
Serial RS-232 console
SSH over Ethernet
Note
Please download below data from Axiomtek’s website as below list if you have the demand.
- BSP support package.
- http://www.axiomtek.com/Default.aspx?MenuId=Products&Funct
ionId=gSearch&keyword=IFB122
-

IFB122 Linux User’s Manual
Getting Started 7
2.1.1 Serial Console
The serial console is a convenient interface for connecting IFB122 to PC. First of all, it is very important to make sure that your desktop connects to IFB122 by console cable. Please set the system as follows:
Baudrate: 115200 bps Parity: None Data bits: 8 Stop bit: 1 Flow Control: None Here we use PuTTY to setup and link to the IFB122. Learn how to do it with these step by step instructions: 1. Open PuTTY and choose ‘Serial’ as the connection type.
2. Configure the serial port correctly (see image below). Click Open and power on the IFB122.
IFB122 Linux User ’s Manual
8 Getting Started
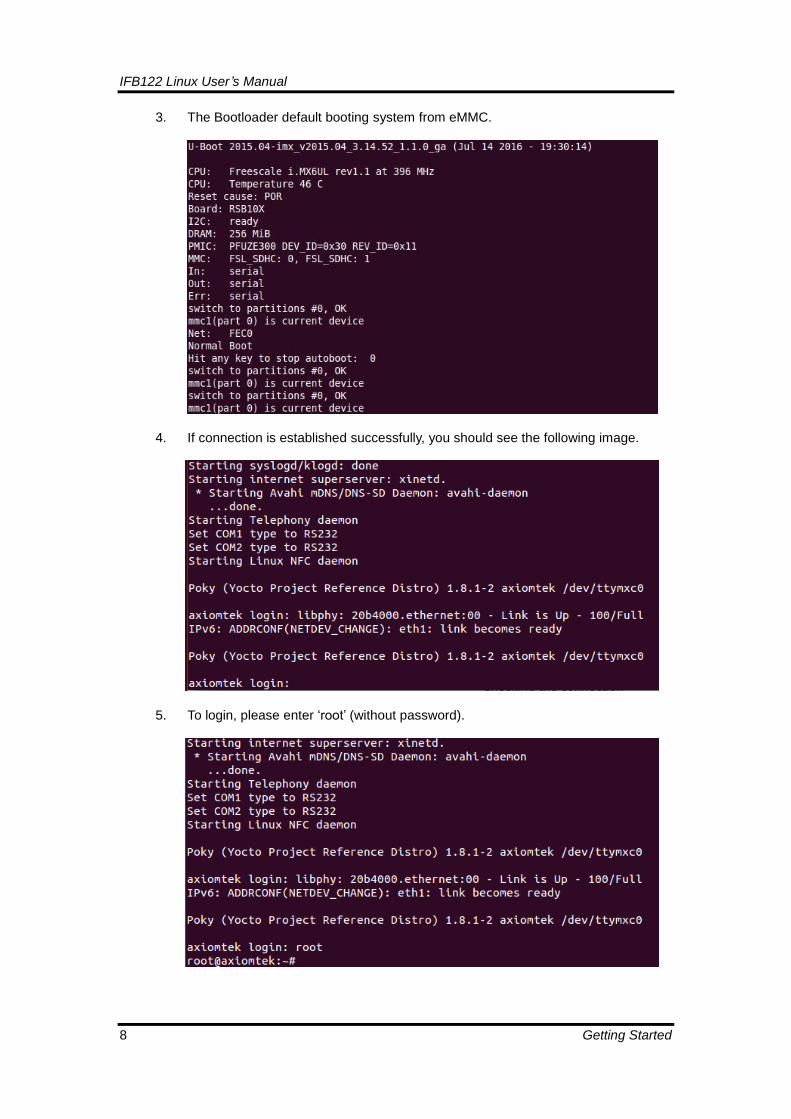
3. The Bootloader default booting system from eMMC.
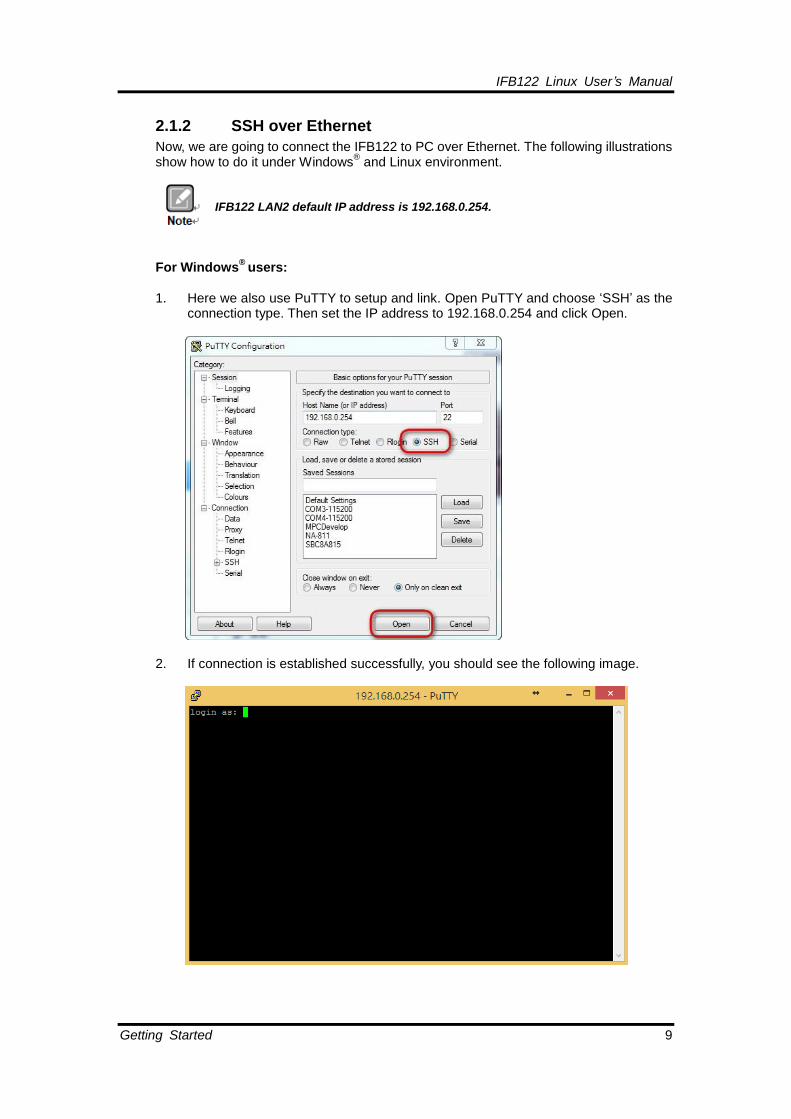
4. If connection is established successfully, you should see the following image.
5. To login, please enter ‘root’ (without password).
IFB122 Linux User’s Manual
Getting Started 9
2.1.2 SSH over Ethernet
Now, we are going to connect the IFB122 to PC over Ethernet. The following illustrations show how to do it under Windows
® and Linux environment.
IFB122 LAN2 default IP address is 192.168.0.254.
For Windows
® users:
1. Here we also use PuTTY to setup and link. Open PuTTY and choose ‘SSH’ as the
connection type. Then set the IP address to 192.168.0.254 and click Open.
2. If connection is established successfully, you should see the following image.

IFB122 Linux User ’s Manual
10 Getting Started
3. To login IFB122, please enter ‘root’ (with no password).
For Linux users: 1. Open terminal and keyin ‘ssh’ command.
~$ ssh -l root 192.168.0.254
2. After the connection is established successfully.

IFB122 Linux User’s Manual
Getting Started 11
2.2 How to Develop a Sample Program
In this section, learn how to develop a sample program for IFB122 with the following step by step instructions. The sample program is named ‘hello.c’.
1. To Create a directory for IFB122 BSP ()(IFB122-Linux-bsp-x.x.x.tar.gz); related to
IFB122 file ~$ mkdir project ~$ cd project
2. After extracted the file, you will find a directory IFB122-LINUX-bsp-x.x.x
AxTools : This directory include hardware driver and API library Image : This directory include kernel, rootfilesystem Yocto patches : This directory include IFB122 hardware patches for Yocto Project 1.8.1 Toolchain : This directory include cross compiler toolchain build from Yocto Project 1.8.1 README.txt : This BSP's documentation file
2.2.1 Install Yocto Toolchain
Before you develop and compile sample program, you should install Yocto toolchain into development PC. You can follow below step to install Yocto toolchain or refer to Chapter 5 Board Support Package to build the toolchain for IFB122.
1. To check your Ubuntu version on your host PC.
~$ uname -m Ubuntu 32-bit (i686):
Ubuntu 64-bit (x86_64):

IFB122 Linux User ’s Manual
12 Getting Started
2. Copy the toolchain script to home directory.
i686 for 32-bit machines or x86_64 for 64-bit machines.
3 Execute the toolchain script and press Enter to install to default directory. 32-bit machines: ~$ bash poky-glibc-i686-meta-toolchain-cortexa7hf-vfp-neon-toolchain-1.8.1.sh
64-bit machines: ~$bash poky-glibc-x86_64-meta-toolchain-cortexa7hf-vfp-neon-toolchain-1.8.1.sh
4 Check the directory.
5 Wait to installation.
6 Install finish.

IFB122 Linux User’s Manual
Getting Started 13
2.2.2 Setting Up the Cross-Development Environment
Before you can develop using the cross-toolchain, you need to set up the cross-development environment, and then you can find this script in the directory you chose for installation. 1. To set up cross-toolchain environment.
~$ source /opt/poky/1.8.1/environment-setup-cortexa7hf-vfp-neon-poky-linux-gnueabi
2. To check Cross-Development Environment whether successful or not
It is successful, if you can find the information as below. ~$ echo $CC
2.2.3 Write and Compile Sample Program
1. Create a directory on your host PC ~$ mkdir -p example ~$ cd example
2. Use vi to edit hello.c.
~$ vi hello.c #include<stdio.h> int main() { printf(“hello world\n”); return 0; }
3. To compile the program, please do:
~$ $CC hello.c -o hello
4. After compiling, enter the following command and you can see the ‘hello’ execution
file. ~$ ls -l
IFB122 Linux User ’s Manual
14 Getting Started
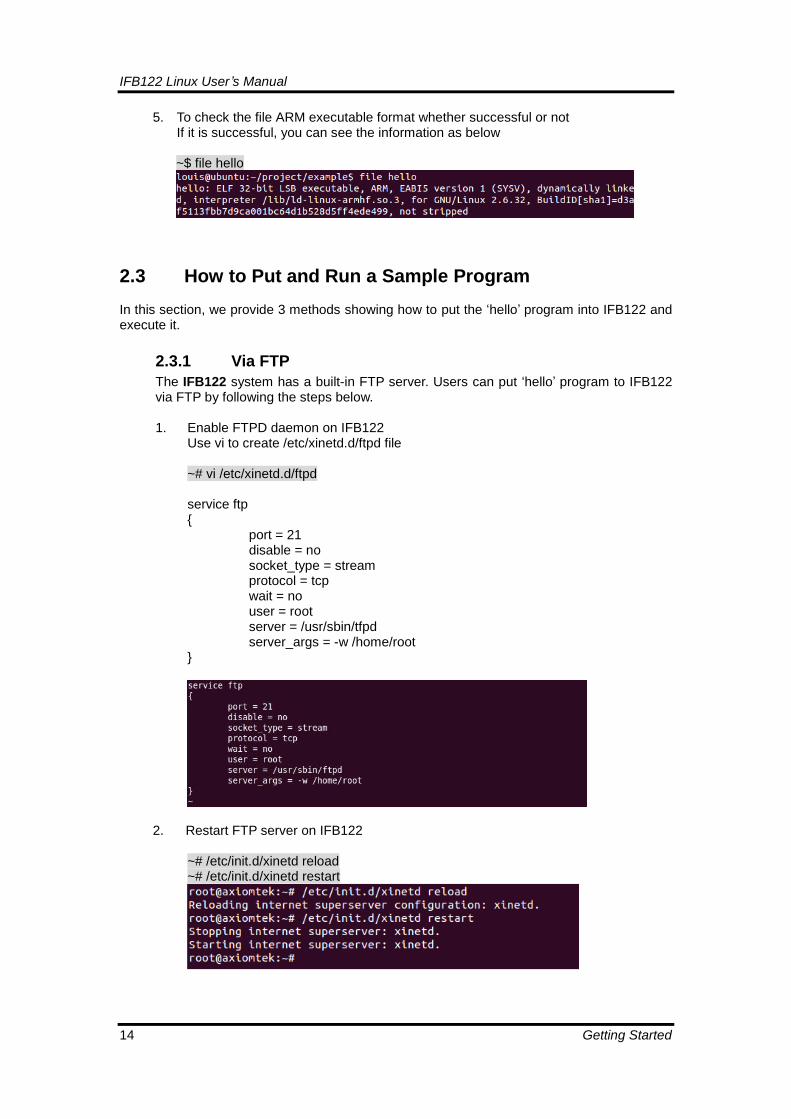
5. To check the file ARM executable format whether successful or not
If it is successful, you can see the information as below ~$ file hello
2.3 How to Put and Run a Sample Program In this section, we provide 3 methods showing how to put the ‘hello’ program into IFB122 and execute it.
2.3.1 Via FTP
The IFB122 system has a built-in FTP server. Users can put ‘hello’ program to IFB122 via FTP by following the steps below. 1. Enable FTPD daemon on IFB122
Use vi to create /etc/xinetd.d/ftpd file ~# vi /etc/xinetd.d/ftpd service ftp { port = 21 disable = no socket_type = stream protocol = tcp wait = no user = root server = /usr/sbin/tfpd server_args = -w /home/root }
2. Restart FTP server on IFB122 ~# /etc/init.d/xinetd reload ~# /etc/init.d/xinetd restart

IFB122 Linux User’s Manual
Getting Started 15
3. To connect your host PC to IFB122.
~$ ftp 192.168.0.254 (username ‘root’ without password)
4. Upload “hello” program to IFB122 from your host PC
ftp> put hello
5. If the operation is successful on IFB122, you can see ‘hello’ program on IFB122’s
/home/root directory.
6. To change file permission for executable on IFB122.
~# chmod a+x hello
7. Run the ‘hello’ program on IFB122. ~# ./hello
IFB122 Linux User ’s Manual
16 Getting Started
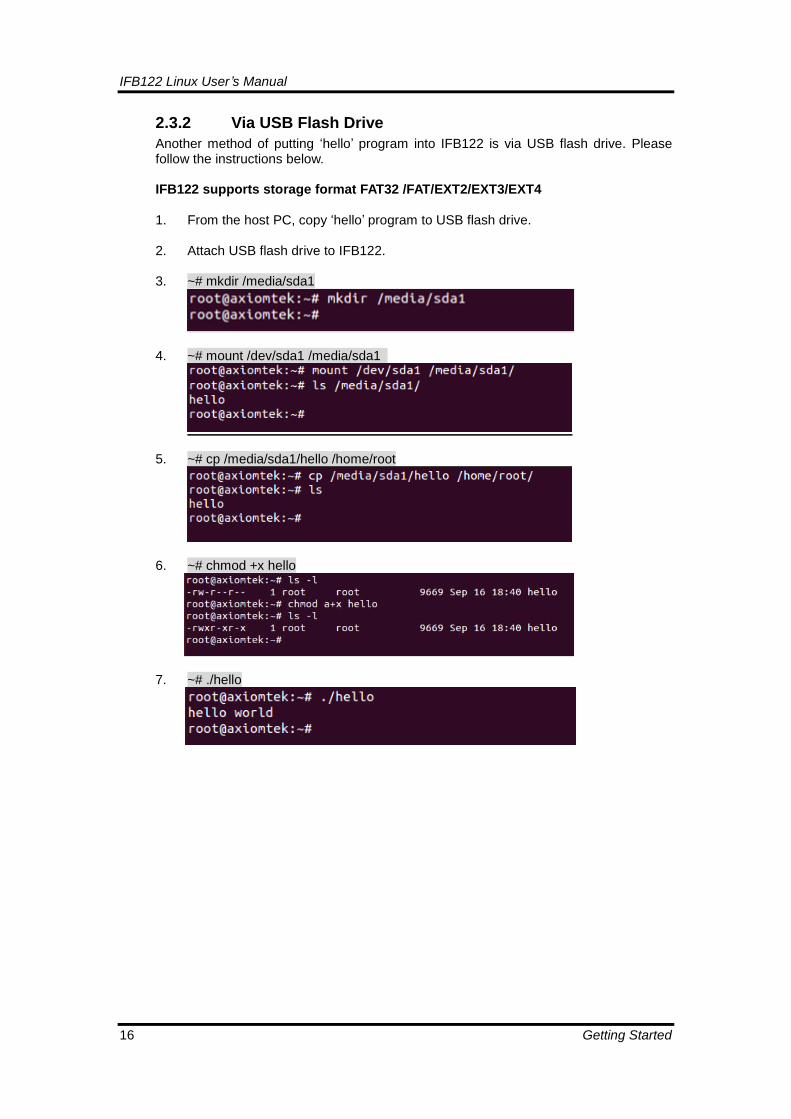
2.3.2 Via USB Flash Drive
Another method of putting ‘hello’ program into IFB122 is via USB flash drive. Please follow the instructions below. IFB122 supports storage format FAT32 /FAT/EXT2/EXT3/EXT4
1. From the host PC, copy ‘hello’ program to USB flash drive. 2. Attach USB flash drive to IFB122.
3. ~# mkdir /media/sda1
4. ~# mount /dev/sda1 /media/sda1
5. ~# cp /media/sda1/hello /home/root
6. ~# chmod +x hello
7. ~# ./hello

IFB122 Linux User’s Manual
Getting Started 17
2.3.3 Via TFTP
Originally the Host Development System Installation already has TFTP server installed. You can put the ‘hello’ program into IFB122 via TFTP. Please follow the instructions below. 1. Refer to section 5.1.1 step 4. Install and configure TFTP server for install and setup
your TFTP:
2. To copy “hello” program to “tftpboot” folder in host PC ~$ cp hello /tftpboot
3. To enter the following command on IFB122
~# tftp -g -r hello 192.168.0.3 (tftp server IP depend on host PC’s IP)
4. To enter the following command on IFB122
~# chmod a+x hello
5. Run the ‘hello’ program on IFB122. ~# ./hello

IFB122 Linux User ’s Manual
18 Getting Started
2.4 How to Recovery System In this section, we provide 2 methods showing you how to recovery IFB122 system to default.
2.4.1 Via run_rescue System Script (under Linux System)
There is a recovery script in /etc folder on IFB122 Embedded Linux system. If you want to recovery your system to factory default settings, you can follow the instructions. 1. Run the run_rescue shell script
~# /etc/run_rescue
2. When the system reboot, it will auto switch to rescue mode under u-boot, and start
to recovery procedure. During this procedure, four custom LEDs will blink like marquee.
3. After recovery procedure finish, the system will reboot again automatically, and
system status LED from blinking to always on.
2.4.2 Via rescue.scr Script (under u-boot)
Refer to section 5.2.3 for detailed information.
IFB122 Linux User’s Manual
Getting Started 19
2.5 How to Update System
2.5.1 Via USB Flash Drive
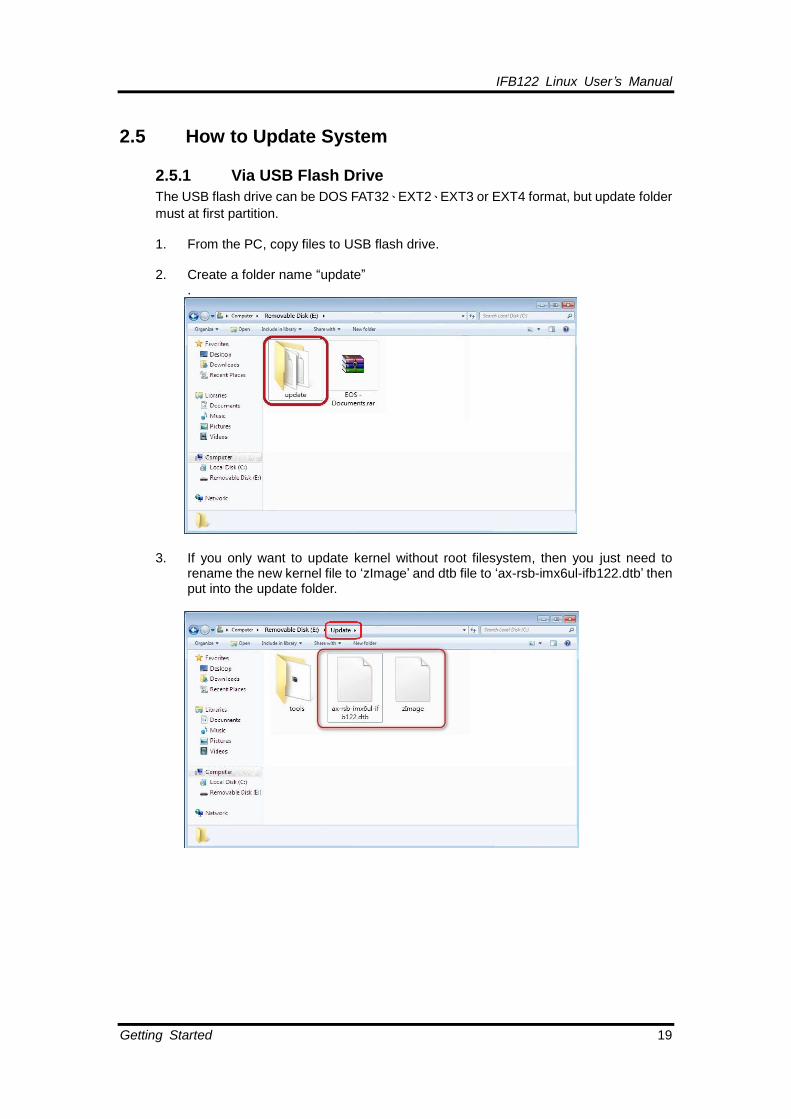
The USB flash drive can be DOS FAT32、EXT2、EXT3 or EXT4 format, but update folder
must at first partition. 1. From the PC, copy files to USB flash drive. 2. Create a folder name “update”
.
3. If you only want to update kernel without root filesystem, then you just need to
rename the new kernel file to ‘zImage’ and dtb file to ‘ax-rsb-imx6ul-ifb122.dtb’ then put into the update folder.

IFB122 Linux User ’s Manual
20 Getting Started
4. If you only want to update root filesystem without kernel, then you just need to put
‘axl-*.rootfs.tar.gz’ into the update folder.
5. If you want to update kernel and root filesystem, and then put this three file into update folder.
6. If Axiomtek provide other apps or tools to install, create a tools folder under update
folder for upgrading and installing.
7. Attach USB flash drive to IFB122.
IFB122 Linux User’s Manual
Getting Started 21
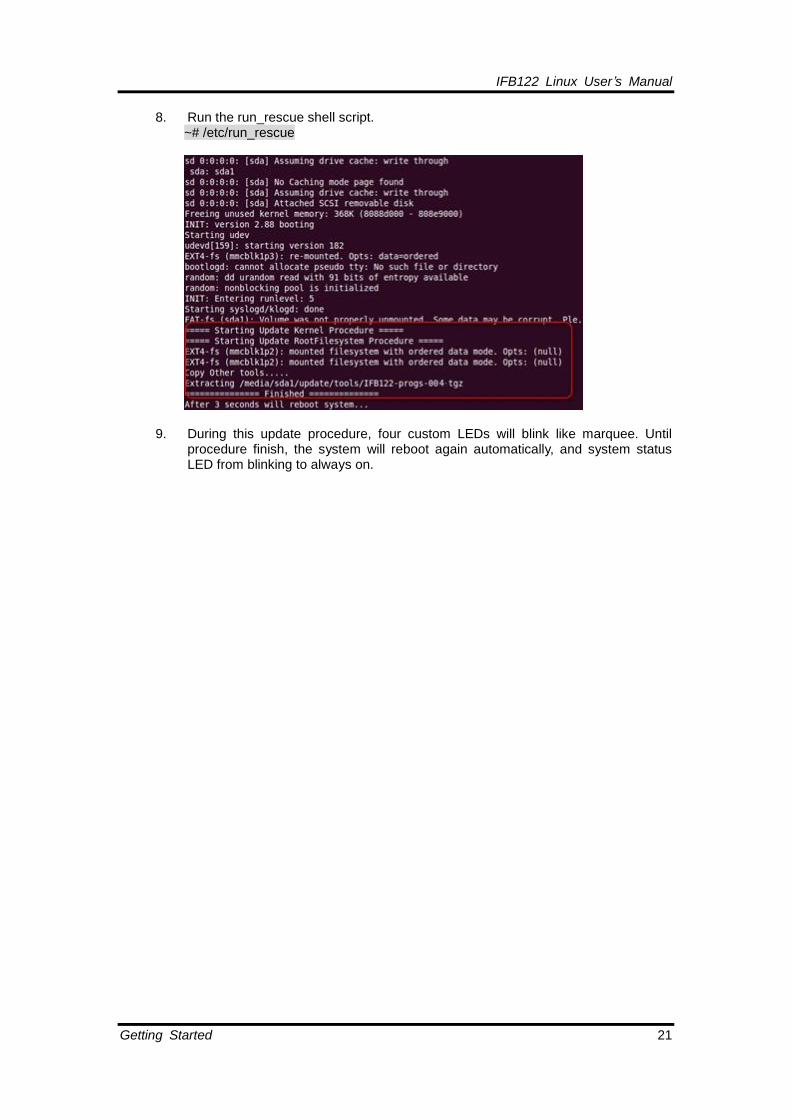
8. Run the run_rescue shell script.
~# /etc/run_rescue
9. During this update procedure, four custom LEDs will blink like marquee. Until
procedure finish, the system will reboot again automatically, and system status LED from blinking to always on.

IFB122 Linux User ’s Manual
22 Getting Started
2.6 How to use MFG tool to download image We show you how to use MFG tool to download bin image to the IFB122 system.
1. Before using the MFG tool, you have to change the IFB122 JP1 boot mode (default emmc boot) to OTG serial downloader mode. Then change the JP3 USB mode (default OTG host mode) to OTC client mode. Connect the IFB122 and PC with a USB cable.
2. Extract Axiomtek’s Yocto BSP and you will see
IFB122-mfgtools_1.x.x.rar in the AxTools directory
3. Extract IFB122-mfgtools_1.x.x.rar,and enter directory
4. After double clicking mfgtools-IFB122.vbs, click “Start” to start burning.

IFB122 Linux User’s Manual
Getting Started 23
5. After burning has completed, the status will change to “Done” as below.
6. For detailed information about MFG tool, please refer to “Manufacturing Tool V2
Quick Start Guide.docx” in the “Document\V2” directory.

IFB122 Linux User ’s Manual
24 Getting Started
This page is intentionally left blank.
IFB122 Linux User’s Manual
The Embedded Linux 25
Chapter 3
The Embedded Linux
3.1 Embedded Linux Image Managing
3.1.1 System Version
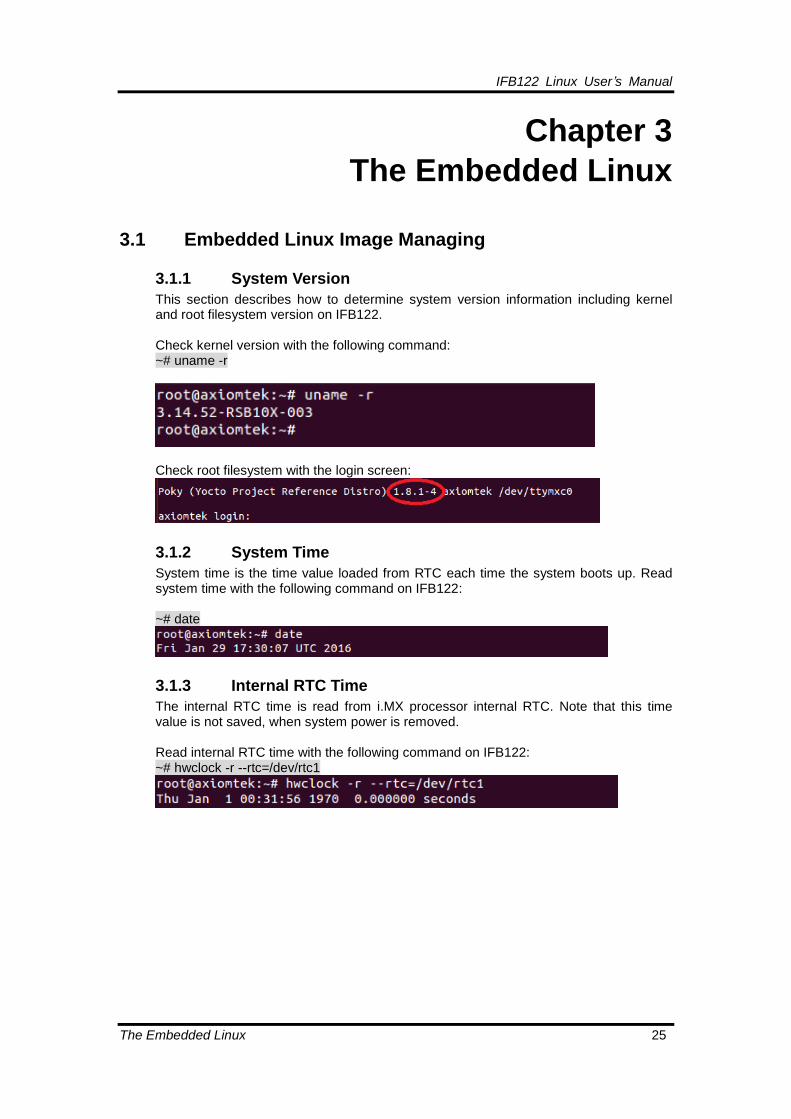
This section describes how to determine system version information including kernel and root filesystem version on IFB122. Check kernel version with the following command: ~# uname -r
Check root filesystem with the login screen:
3.1.2 System Time
System time is the time value loaded from RTC each time the system boots up. Read system time with the following command on IFB122: ~# date
3.1.3 Internal RTC Time
The internal RTC time is read from i.MX processor internal RTC. Note that this time value is not saved, when system power is removed. Read internal RTC time with the following command on IFB122: ~# hwclock -r --rtc=/dev/rtc1

IFB122 Linux User ’s Manual
26 The Embedded Linux
3.1.4 External RTC Time
The external RTC time is read from RS5C372 external RTC. When system power is removed, this time value is kept as RS5C372 is powered by battery. Read external RTC time with the following command: ~# hwclock -r
3.1.5 Watchdog timer
Function: wdt_driver_test.out Description: When <sleep> parameters is more than <timeout> parameters, watchdog timer will be trigger Note: IFB122 has been enabled for default setting, and the default parameters is 10 5 0 Commands example: ~# wdt 10 5 0 &
3.1.6 Adjusting System Time
1. Manually set up the system time. Format: YYYYMMDDHHmm.SS ~# date -s date -s 201509161714.05
2. Write sync time to internal RTC ~# hwclock -w --rtc=/dev/rtc1
3. Write sync time to external RTC ~# hwclock -w

IFB122 Linux User’s Manual
The Embedded Linux 27
3.1.7 LEDs Control
Four custom LEDs are supported by IFB122: LED1, LED2, LED3 and LED4. Use sysfs filesystem to control LED on/off state. 1. Turn on LED1 ~# echo 255 > /sys/class/leds/LED1/brightness
2. Turn on LED2 ~# echo 255 > /sys/class/leds/LED2/brightness
3. Turn off LED1 ~# echo 0 > /sys/class/leds/LED1/brightness
3.2 Networking
3.2.1 FTP – File Transfer Protocol
FTP is a standard network protocol used to transfer files from one host to another host over TCP-based network. The IFB122 comes with a built-in FTP server. Section 2.1 shows the steps to put ‘hello’ program to IFB122 via FTP.
3.2.2 TFTP – Trivial File Transfer Protocol
TFTP is a lightweight protocol of transfer files between a TFTP server and TFTP client over Ethernet. To support TFTP, this embedded Linux image has built-in TFTP client, so does its accompanying bootloader U-boot. In Chapter 5, there are descriptions of TFTP server installation and kernel boot up process via TFTP. Section 2.3.3 shows you how to transfer file between server and client.

IFB122 Linux User ’s Manual
28 The Embedded Linux
3.2.3 NFS – Network File System
NFS enables you to export a directory on an NFS server and mount that directory on remote client machine as if it were a local file system. Using NFS on target machine, we can have access to a huge number of files, libraries, and utilities during development and debugging, as well as booting up kernel. This embedded Linux kernel is compiled with support for NFS, including server-side, client-side functionality and ‘Root file system on NFS’. Section 5.1 and 5.2.1 show you how to boot up embedded Linux with an NFS support.
3.2.4 How to use 3G or 4G module (Optional)
1. 3G / 4G module connection to the Internet with PPP
This section describes how to use 3G or 4G module connect to the Internet with PPP
1.1 If your 3G module is Quectel UC20, you can follow the instructions as below.
Please execute script for internet connection. ~# /etp/ppp/ppp-quectel-on
When you execute script, you may find the information as below.
You can execute command ,ifconfig to examine PPP0 connection. ~# ifconfig
PPP0 will be shown after successful connection.

IFB122 Linux User’s Manual
The Embedded Linux 29
1.2 If your 4G module is Sierra MC7304, you can follow the instructions as below. Please execute script for internet connection. ~# /etp/ppp/ppp-sierra-on
When you execute script, you may find the information as below.
You can execute command ,ifconfig to examine PPP0 connection. ~# ifconfig
PPP0 will be shown after successful connection.
IFB122 Linux User ’s Manual
30 The Embedded Linux
2 3G / 4G module connection to the Internet with wvdial Tool
2.1 If your 3G module is Quectel UC20, you can follow the instructions as below.
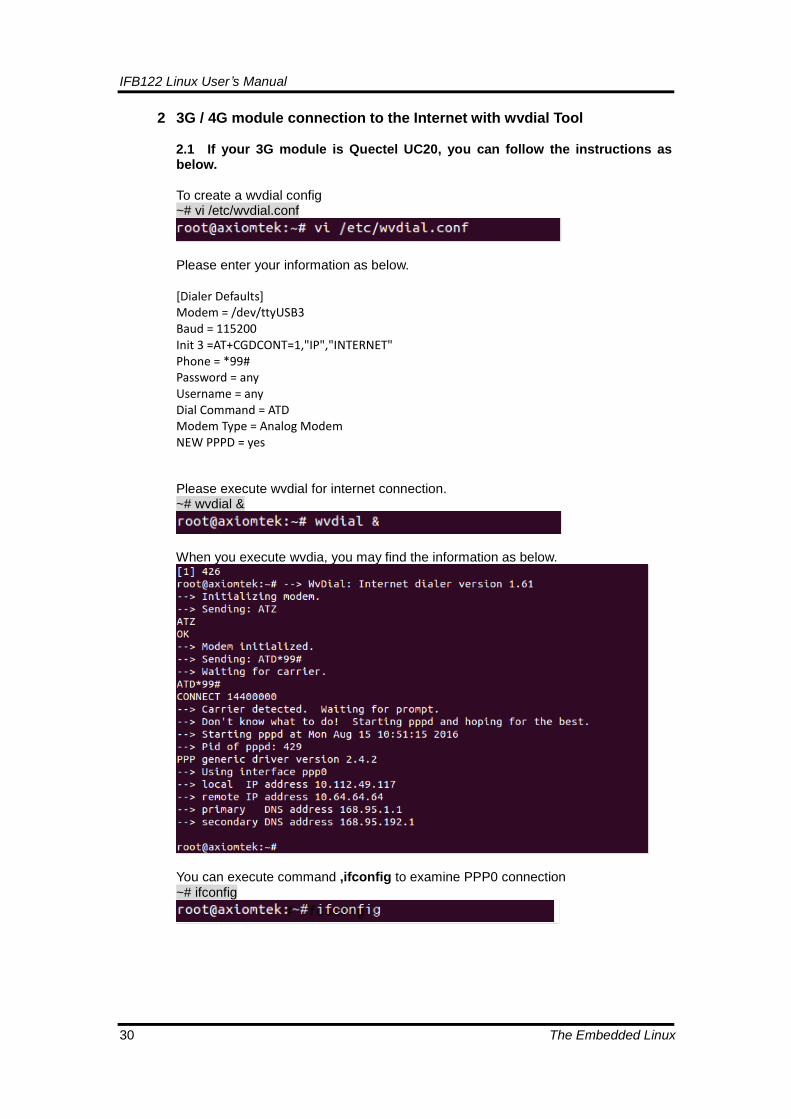
To create a wvdial config ~# vi /etc/wvdial.conf
Please enter your information as below.
[Dialer Defaults] Modem = /dev/ttyUSB3 Baud = 115200 Init 3 =AT+CGDCONT=1,"IP","INTERNET" Phone = *99# Password = any Username = any Dial Command = ATD Modem Type = Analog Modem NEW PPPD = yes Please execute wvdial for internet connection. ~# wvdial &
When you execute wvdia, you may find the information as below.
You can execute command ,ifconfig to examine PPP0 connection ~# ifconfig

IFB122 Linux User’s Manual
The Embedded Linux 31
PPP0 will be shown after successful connection.
2.2 If your 4G module is Sierra MC7304, you can follow the instructions as
below. To create a wvdial config ~# vi /etc/wvdial.conf
Please enter your information as below.
[Dialer Defaults] Modem = /dev/ttyUSB2 Baud = 115200 Init 3 =AT+CGDCONT=1,"IP","INTERNET" Phone = *99# Password = any Username = any Dial Command = ATD Modem Type = Analog Modem NEW PPPD = yes Please execute wvdial for internet connection. ~# wvdial &
When you execute wvdia, you may find the information as below.
You can execute command ,ifconfig to examine PPP0 connection ~# ifconfig
IFB122 Linux User ’s Manual
32 The Embedded Linux
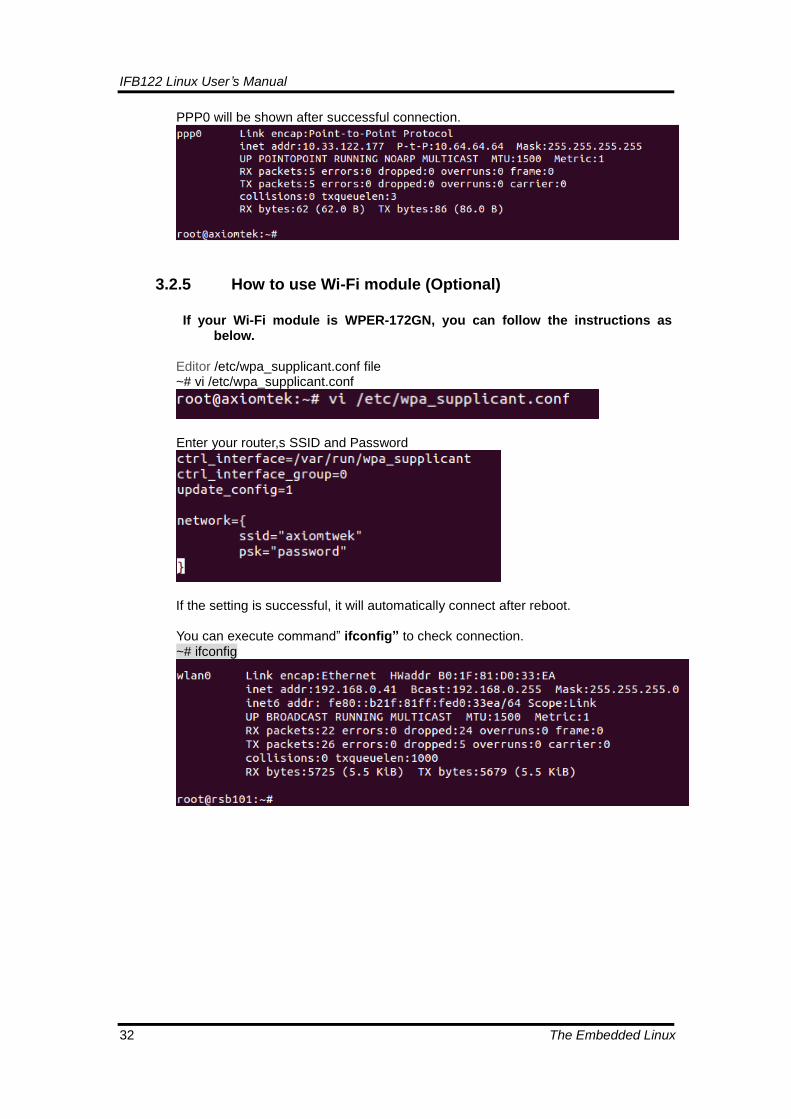
PPP0 will be shown after successful connection.
3.2.5 How to use Wi-Fi module (Optional)
If your Wi-Fi module is WPER-172GN, you can follow the instructions as
below. Editor /etc/wpa_supplicant.conf file ~# vi /etc/wpa_supplicant.conf
Enter your router,s SSID and Password
If the setting is successful, it will automatically connect after reboot. You can execute command” ifconfig” to check connection. ~# ifconfig

IFB122 Linux User’s Manual
Programming Guide 33
Chapter 4
Programming Guide We release a set of application programming interface (API) functions for users to access/control hardware. With these API functions, users can more easily design their own software. This chapter includes detailed description of each API function and step-by-step code samples showing how it works.
4.1 librsb10x API Functions The IFB122 BSP includes ‘librsb10x.so’ shared library for users to access I/O and read back system information. This shared library is kept in BSP, you can find it in RSB10X-rsb_lib-x.x.x.tar.bz2 of AxTools. Extract the compressed file, then besides the shared library you can also see a demo folder containing API header file and example programs. Summary table of available API functions
No. Function Description
1 Set_COMType() Set COM port communication mode type.
2 Get_DI0() Read high or low state on digital input channels.
3 Get_DI1() Read high or low state on digital input channels.
4 Set_DO() Set digital output channels to high or low state.
5 Set_RELAY() Set relay high or low state.
6 Control_LED() Set LED enable or disable
7 Control_WDT() Set WDT funciotn
Function: Set_COMType()
Function int Set_COMType(int number, int type);
Description Set COM port communication mode type.
Arguments number: COM port number.
1: COM1.
2: COM2.
type: COM port mode type
0: Reserved.
1: RS232 Enable.
2: RS422/RS485_4W Enable.
3: RS485_2W Enable.
Return 0: No error.
1: Function fails.
Others None.

IFB122 Linux User ’s Manual
34 Programming Guide
COM sample code: COM receive #include <stdio.h> #include <termios.h> //header contains the definitions used by the terminal I/O interfaces #include <unistd.h> //read() write() close() #include <fcntl.h> #include <string.h> //Serial port defines and variables: #define SERIAL_BAUDRATE B9600 #define SERIAL_DEVICE "/dev/ttyUSB0" //#define SERIAL_DEVICE "/dev/ttymxc2" #define SERIAL_BUFFER_SIZE 256 struct termios serial_settings; int serial_fd, serial_read_ret, serial_write_ret; //char serial_buffer_send[SERIAL_BUFFER_SIZE]="hello word"; char serial_buffer_recv[SERIAL_BUFFER_SIZE]; int initport(int serial_fd) { struct termios options; // Get the current options for the port... tcgetattr(serial_fd, &options); // Set the baud rates to 9600 cfsetispeed(&options, SERIAL_BAUDRATE); cfsetospeed(&options, SERIAL_BAUDRATE); // Enable the receiver and set local mode... options.c_cflag &= ~PARENB; options.c_cflag &= ~CSTOPB; options.c_cflag &= ~CSIZE; options.c_cflag |= CS8; // Set the new options for the port... tcsetattr(serial_fd, TCSANOW, &options); return 1; } int main() { //Try opening serial port //serial_fd = open(SERIAL_DEVICE, O_RDWR | O_NOCTTY | O_NDELAY); serial_fd = open(SERIAL_DEVICE, O_RDWR|O_NOCTTY); if(serial_fd == -1) { //Checks the availability of the Serial Port printf("Opening %s Failed.\n",SERIAL_DEVICE); fflush(stdout); return 0; } printf("Opening %s Success.\n",SERIAL_DEVICE); fflush(stdout); initport(serial_fd); printf("start read\n"); while(1) { serial_read_ret = read(serial_fd, serial_buffer_recv, SERIAL_BUFFER_SIZE); serial_buffer_recv[serial_read_ret]=0;

IFB122 Linux User’s Manual
Programming Guide 35
printf("res=%d buf=%s\n", serial_read_ret, serial_buffer_recv);
if (serial_buffer_recv[0] == '@') break; } serial_read_ret = close(serial_fd); //Close the serial port printf("Serial port closed.\n"); return 0; } COM send:
#include <stdio.h> #include <termios.h> //header contains the definitions used by the terminal I/O interfaces #include <unistd.h> //read() write() close() #include <fcntl.h> #include <string.h> //Serial port defines and variables: #define SERIAL_BAUDRATE B9600 //#define SERIAL_DEVICE "/dev/ttyUSB0" #define SERIAL_DEVICE "/dev/ttymxc1" #define SERIAL_BUFFER_SIZE 256 struct termios serial_settings; int serial_fd, serial_read_ret, serial_write_ret; char serial_buffer_send[SERIAL_BUFFER_SIZE]="hello word"; //char serial_buffer_recv[SERIAL_BUFFER_SIZE]; int initport(int serial_fd) { struct termios options; // Get the current options for the port... tcgetattr(serial_fd, &options); // Set the baud rates to 9600 cfsetispeed(&options, SERIAL_BAUDRATE); cfsetospeed(&options, SERIAL_BAUDRATE); // Enable the receiver and set local mode... options.c_cflag &= ~PARENB; options.c_cflag &= ~CSTOPB; options.c_cflag &= ~CSIZE; options.c_cflag |= CS8; // Set the new options for the port... tcsetattr(serial_fd, TCSANOW, &options); return 1; } int main() { //Try opening serial port serial_fd = open(SERIAL_DEVICE, O_RDWR | O_NOCTTY | O_NDELAY); if(serial_fd == -1) { //Checks the availability of the Serial Port printf("Opening %s Failed.\n",SERIAL_DEVICE); fflush(stdout); return 0; } printf("Opening %s Success.\n",SERIAL_DEVICE); fflush(stdout); initport(serial_fd); printf("start write\n");

IFB122 Linux User ’s Manual
36 Programming Guide

IFB122 Linux User’s Manual
Programming Guide 37
int len = strlen(serial_buffer_send); serial_buffer_send[len] = 0x0d; // stick a <CR> after the command serial_buffer_send[len+1] = 0x00; // terminate the string properly serial_write_ret = write(serial_fd,serial_buffer_send,strlen(serial_buffer_send)); if(serial_write_ret < 0) printf("Sent to serial port fail\n"); else printf("Sent to serial port = %s\n",serial_buffer_send); serial_read_ret = close(serial_fd); //Close the serial port printf("Serial port closed.\n"); return 0; }
Function: Get_DI0()
Function int Get_DI0(__u8 *data);
Description Read high or low state on digital input channels.
Arguments data: This function will store digital input data in this argument.
Return 0: No error.
1: Function fails.
Others None.
Function: Get_DI1()
Function int Get_DO1(__u8 *data);
Description Read high or low state on digital output channels.
Arguments data: This function will store digital output data in this argument.
Return 0: No error.
1: Function fails.
Others None.
Function: Set_DO()
Function int Set_DO(__u8 data);
Description Set digital output channels to high or low state.
Arguments data: Data to be written to digital output channels.
Return 0: No error.
1: Function fails.
Others None.

IFB122 Linux User ’s Manual
38 Programming Guide
DIO sample code: #include <stdio.h> #include <stdlib.h> #include <unistd.h> #include <linux/types.h> #include "librsb10x.h" int main(int argc, char* argv[]) { unsigned char xch, xi=1; Set_DO(xi); Get_DI0(&xch); printf("DI0 Input = %d\n", xch); Get_DI1(&xch); printf("DI1 Input = %d\n", xch); return 0; }
Function: Set_RELAY ()
Function int Set_RELAY(int hl);
Description Set relay high or low state.
Arguments hl: relay state.
0: LOW.
1: HIGH.
Return 0: No error.
1: Function fails.
Others None.
Relay sample code: #include <stdio.h> #include <stdlib.h> #include <unistd.h> #include <linux/types.h> #include "librsb10x.h" #define HIGH 1 #define LOW 0 int main(int argc, char* argv[]) { printf("Turn relay on\n"); Set_RELAY(HIGH); sleep(2); printf("Turn relay off\n"); Set_RELAY(LOW); return 0;

IFB122 Linux User’s Manual
Programming Guide 39
}
Function: Control_LED ()
Function int Control_LED(int num,int enable);
Description Set LED enable or disable
Arguments Num : LED number,default as 1 ~ 4
Enable : enable or disable led
0: disable
1: enable
Return 0: No error.
1: Function fails.
Others None.
LED sample code: #include <stdio.h> #include <stdlib.h> int Control_LED(int num,int enable); int main() { printf("Function Name : Control_LED(num,enable)\n"); printf("num: LED number,default 1~4 \n"); printf("enable: 1 - enable LED , 2 - Disable LED\n"); printf("turn on LED 1\n"); Control_LED(1,1); sleep(1); printf("turn on LED 2\n"); Control_LED(2,1); sleep(1); printf("turn on LED 3\n"); Control_LED(3,1); sleep(1); printf("turn on LED 4\n"); Control_LED(4,1); sleep(1); printf("turn off LED 1\n"); Control_LED(1,0); sleep(1); printf("turn off LED 2\n"); Control_LED(2,0); sleep(1); printf("turn off LED 3\n"); Control_LED(3,0); sleep(1); printf("turn off LED 4\n"); Control_LED(4,0); return 0; }

IFB122 Linux User ’s Manual
40 Programming Guide
Function: Control_WDT ()
Function int Control_WDT(int timeout,int sleep_time,int test);
Description Set WDT Function
Arguments timeout : value in seconds to cause wdt timeout/reset
sleep_time : value in seconds to service the wdt
test : 0 – service wdt with ioctl(), 1 – with write()
Return 0: No error.
1: Function fails.
WDT sample code: #include <stdio.h> #include <stdlib.h>, int main() { printf("Function Name : Control_WDT(timeout,sleep_time,test)\n"); printf("timeout: value in seconds to cause wdt timeout/reset \n"); printf("sleep_time: value in seconds to service the wdt \n"); printf("test: 0 - Service wdt with ioctl(), 1 - with write()\n"); printf("\nRun Contrl_WDT(10,5,0)\n"); Contrl_WDT(10,5,0); return 0; }

IFB122 Linux User’s Manual
Programming Guide 41
4.2 Compile Demo Program
4.2.1 Install IFB122 I/O Library
Before you develop and compile the sample program, you should install Yocto toolchain into development PC. You can refer to Chapter 5 Board Support Package. 1. Set up the cross-development environment on your host PC. ~$ source /opt/poky/1.8.1/environment-setup-cortexa7hf-vfp-neon-poky-linux-gnueabi
2. To compile and build demo program for IFB122, please do: Change to your project directory. ~$ cd project/IFB122-LINUX-bsp-1.0.0/AxTools
3. Extract driver source to your project directory. ~$ tar -xvf IFB122-rsb-lib-1.0.2.tar.bz2
4. Change to rsb_lib/demo directory. ~$ cd ~/project/rsb_lib/demo

IFB122 Linux User ’s Manual
42 Programming Guide
5. Build the demo program. ~$ make
6. You should have example programs such as open_comport, diotest, and
commode.
4.2.2 Run demo program
Refer to section 2.3 for detailed information.

IFB122 Linux User’s Manual
Board Support Package (BSP) 43
Chapter 5
Board Support Package (BSP)
5.1 Host Development System Installation
5.1.1 Install Host System
1. Download Ubuntu 14.04 LTS iso image.
2. Install Ubuntu 14.04.
3. Install host packages needed by Yocto development as follows: ~$sudo apt-get install wget git-core unzip texinfo libsdl1.2-dev gawk diffstat \ wget git-core unzip texinfo libsdl1.2-dev gawk diffstat \ texi2html docbook-utils python-pysqlite2 help2man \ make gcc g++ desktop-file-utils libgl1-mesa-dev \ libglu1-mesa-dev mercurial autoconf \ automake groff curl lzop asciidoc xterm chrpath
i.MX layers host packages for a Ubuntu 14.04 host setup only are: ~$ sudo apt-get install u-boot-tools
4. Install and configure TFTP server:
After tftpd is installed, configure it by editing /etc/xinetd.d/tftp. Change the default export path (it is either /usr/var/tftpboot or /var/lib/tftpboot) to /. Or change the default export path to whatever directory you want to download from. Then reboot the hardware. To install tftpd / tftp/ xineted SOFTWARE ~$ sudo apt-get install tftpd tftp xinetd To create tftp directory ~$ sudo mkdir /tftpboot ~$ sudo chmod -R 777 /tftpboot ~$ sudo chown -R nobody /tftpboot To configure tftp sever. ~$ sudo vi /etc/xinetd.d/tftp service tftp { socket_type = dgram protocol = udp wait = yes user = root server = /usr/sbin/in.tftpd server_args = -s /tftpboot disable = no per_source = 11 cps = 100 2 flags = IPv4 }

IFB122 Linux User ’s Manual
44 Board Support Package (BSP)
Then restart the TFTP server. ~$ sudo /etc/init.d/xinetd restart
5. Install and configure NFS server: ~$ sudo aptitude -y install nfs-common nfs-kernel-server portmap To configure nfs server, add lines to /etc/exports as follows: /tools/rootfs *(rw,sync,no_root_squash) ~$ sudo vi /etc/exports Create a symbolic link to root filesystem which your build. ~$ sudo mkdir /tools ~$ sudo ln -s ~/project/rootfs /tools/rootfs Then restart the NFS server. ~$ sudo /etc/init.d/nfs-kernel-server restart
5.1.2 Install Yocto Development
1. Setting up the repo utility.
Create a bin folder in the home directory. ~$ mkdir ~/bin (this step may not be needed if the bin folder already exists) ~$ curl http://commondatastorage.googleapis.com/git-repo-downloads/repo > ~/bin/repo
~$ chmod a+x ~/bin/repo
Add the following line to the .bashrc file to ensure that the ~/binfolder is in your PATH variable. ~$ export PATH=~/bin:$PATH
2. Setting up the Git environment ~$ git config --global user.name “Your Name” ~$ git config --global user.email “Your Email”
3. Download the Freescale’s Yocto BSP source ~$ mkdir fsl-community-bsp ~$ cd fsl-community-bsp ~$ repo init -u git://git.freescale.com/imx/fsl-arm-yocto-bsp.git -b imx-3.14.52-1.1.0_ga

IFB122 Linux User’s Manual
Board Support Package (BSP) 45
~$ repo sync
Clone Finish
4. Extract Axiomtek’s Yocto BSP source ~$ tar -xvf ../IFB122-LINUX-bsp-1.0.0/Yocto\ patches/meta-axiomtek-2.5.0.tar.gz -C sources
Check meta-axiomtek
5. Update bblayers.conf ~$ vi fsl-community-bsp/sources/base/conf/bblayers.conf And add this line after ${BSPDIR}/sources/meta-fsl-demos \ ${BSPDIR}/sources/meta-axiomtek \

IFB122 Linux User ’s Manual
46 Board Support Package (BSP)
6. First build
Choose your board ~$ DISTRO=poky MACHINE=rsb101 EULA=1 source fsl-setup-release.sh -b build
Start to build image ~$ bitbake axl-image-base
7. After build image finish, you can find the file path. The file path: project/fsl-community-bsp/build/tmp/deploy/images/rsb101
IFB122 Linux User’s Manual
Board Support Package (BSP) 47
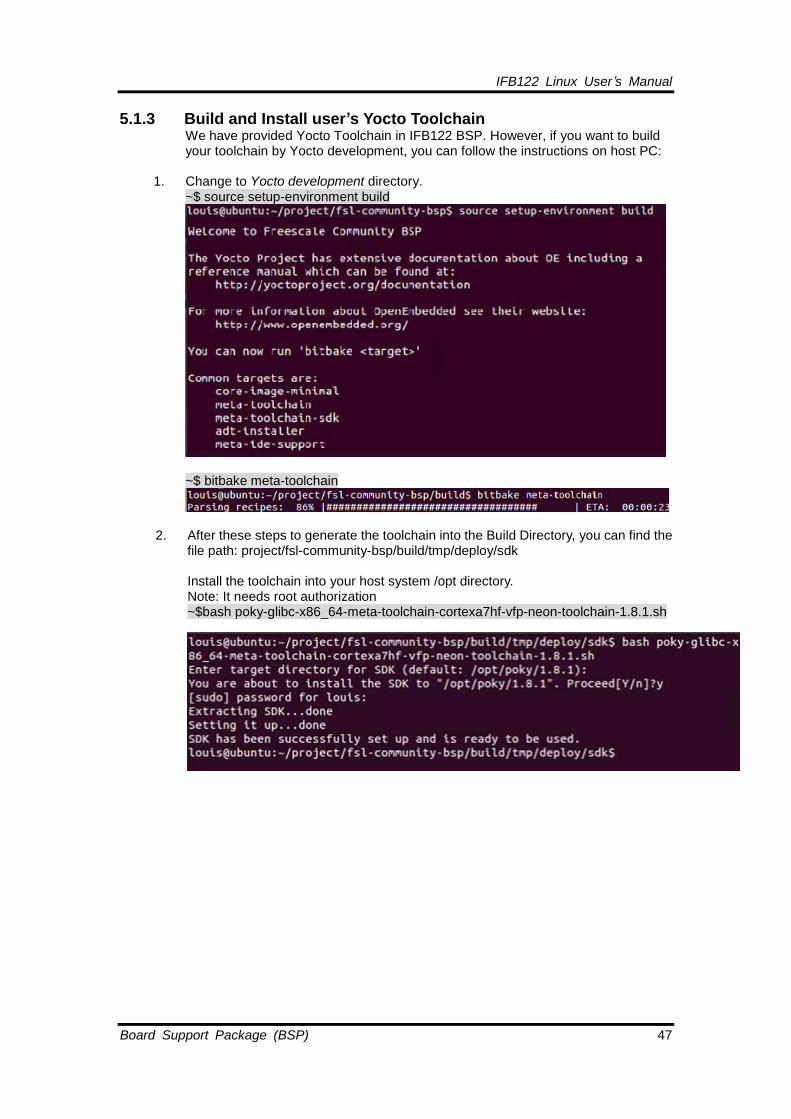
5.1.3 Build and Install user’s Yocto Toolchain
We have provided Yocto Toolchain in IFB122 BSP. However, if you want to build your toolchain by Yocto development, you can follow the instructions on host PC:
1. Change to Yocto development directory. ~$ source setup-environment build
~$ bitbake meta-toolchain
2. After these steps to generate the toolchain into the Build Directory, you can find the file path: project/fsl-community-bsp/build/tmp/deploy/sdk Install the toolchain into your host system /opt directory. Note: It needs root authorization ~$bash poky-glibc-x86_64-meta-toolchain-cortexa7hf-vfp-neon-toolchain-1.8.1.sh
IFB122 Linux User ’s Manual
48 Board Support Package (BSP)
5.2 U-Boot for IFB122
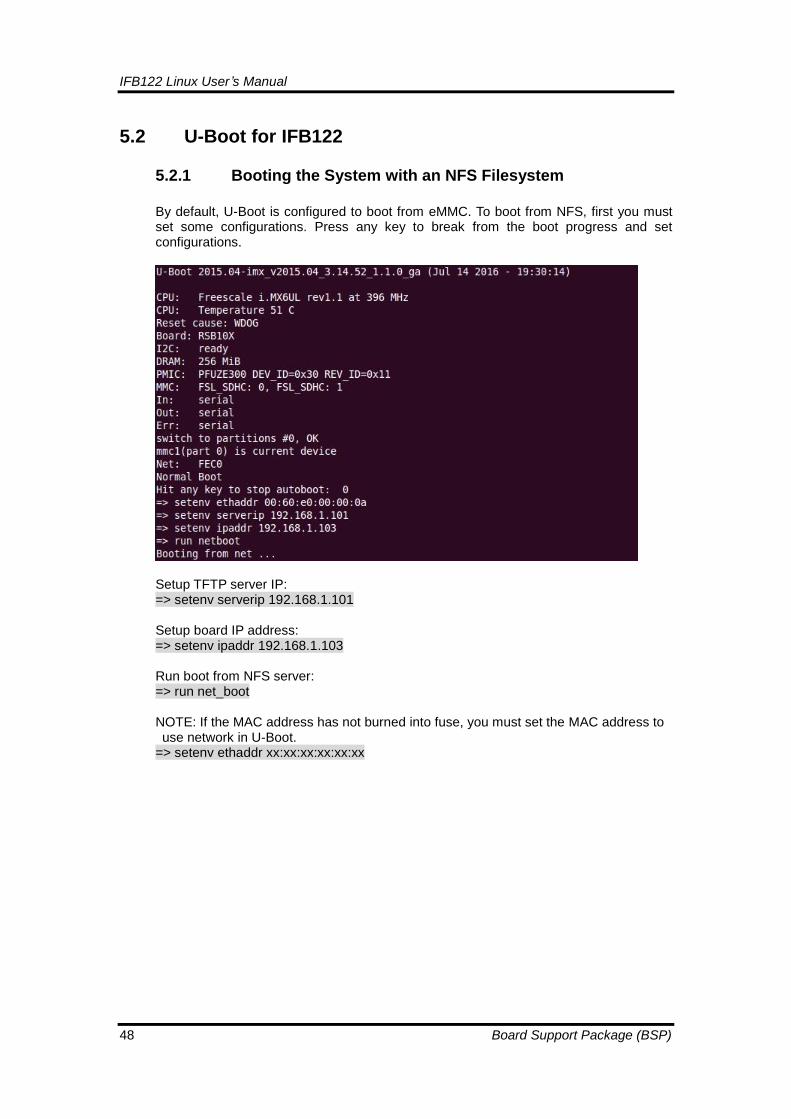
5.2.1 Booting the System with an NFS Filesystem
By default, U-Boot is configured to boot from eMMC. To boot from NFS, first you must set some configurations. Press any key to break from the boot progress and set configurations.
Setup TFTP server IP: => setenv serverip 192.168.1.101 Setup board IP address: => setenv ipaddr 192.168.1.103 Run boot from NFS server: => run net_boot NOTE: If the MAC address has not burned into fuse, you must set the MAC address to use network in U-Boot. => setenv ethaddr xx:xx:xx:xx:xx:xx
IFB122 Linux User’s Manual
Board Support Package (BSP) 49
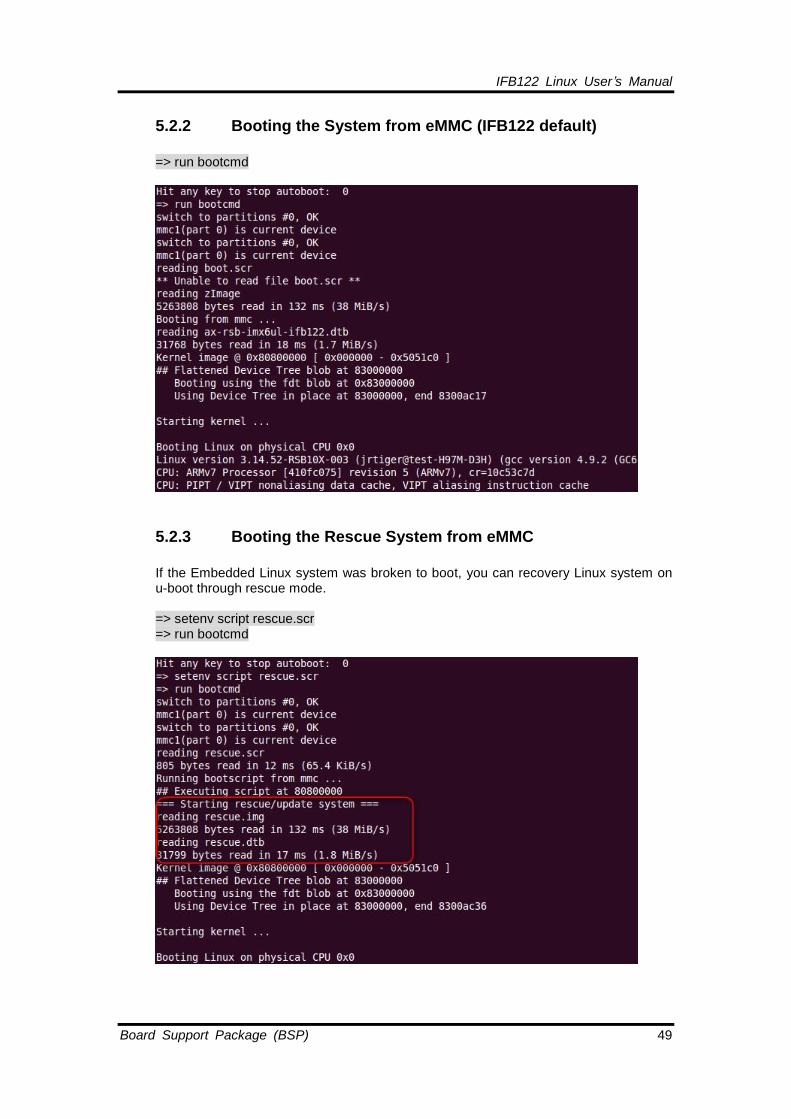
5.2.2 Booting the System from eMMC (IFB122 default)
=> run bootcmd
5.2.3 Booting the Rescue System from eMMC
If the Embedded Linux system was broken to boot, you can recovery Linux system on u-boot through rescue mode. => setenv script rescue.scr => run bootcmd

IFB122 Linux User ’s Manual
50 Board Support Package (BSP)
This page is intentionally left blank.

IFB122 Linux User’s Manual
Frequently Asked Questions 51
Appendix
Frequently Asked Questions
Q1. When I use toolchain to compile, I can’t find “ include” file. A1: Refer to section 2.3 for detailed information 2.2.2 Setting up the
Cross-Development Environment For example: $CC hello.c -o hello
Q2. Why do I follow section 2.1.1 to set up, the screen is shown as below?
A2. Please follow steps as below
1. To check your power. 2. To check serial item “COM port” name and Device Manager “COM port”
name are both the same as below.

IFB122 Linux User ’s Manual
52 Frequently Asked Questions
3. To check if your RS232 port jumper.
Q3. Why can’t transfer the file to FTP、TFTP、NFS after following the
instructions, or disconnect.
A3: To check your firewall been blocked in your host PC or router.
Related Documents