Version 1.8 D202503-18 MIMAKI ENGINEERING CO., LTD. URL: http://mimaki.com/ Network Connection Guide

Welcome message from author
This document is posted to help you gain knowledge. Please leave a comment to let me know what you think about it! Share it to your friends and learn new things together.
Transcript

Version 1.8D202503-18
MIMAKI ENGINEERING CO., LTD.
URL: http://mimaki.com/
Network Connection Guide
2
Notice• It is strictly prohibited to write or copy a part or whole of this document without our approval.• The contents of this document may be subject to change without notice.• Due to improvement or change of this software, the description of this document could be partially
different in specification, for which your understanding is requested.• It is strictly prohibited to copy this software to other disk (excluding the case for making backup) or
to load on the memory for the purpose other than executing it.• With the exception of what is provided for in the warranty provisions of MIMAKI ENGINEERING
CO., LTD., we do not assume any liability against the damages (including but not limited to the lossof profit, indirect damage, special damage or other monetary damages) arisen out of the use or fail-ure to use of this product. The same shall also apply to the case even if MIMAKI ENGINEERINGCO., LTD. had been notified of the possibility of arising damages in advance. As an example, weshall not be liable for any loss of the media (works) made using this product or indirect damagescaused by the product made using this media.
Adobe, the Adobe logo, Photoshop, Illustrator and PostScript are trademarks of Adobe System Incorporated.Apple, Macintosh, Mac OSX and macOS are registered trademarks of Apple Inc.Microsoft, Windows, Windows XP, Windows Vista, Windows 7, Windows 8.1 and Windows 10 are trademarks of Microsoft Corporation and other countries.All brand names and product names are trademarks or registered trademarks of their respective companies.
3
About this manual
About this manualThis manual explains how to set PC for installing RasterLink6 and the procedure for installing a printer driver in a client PC.This document explains the installation procedure using Windows 7 as an example.Unless otherwise specified, use the same procedure for Windows XP, Windows Vista, Windows 8.1 and Windows 10.
NotationsMenu items are enclosed in quotation marks like “Full Color”.Buttons in dialog box are framed like .This manual is based on RasterLink6 SG. Please replace software and printer names used in this manual with those of the software and printer you are using.
SymbolIndicates a caution you must observe when operating the product.
Describes a useful procedure.
Shows the number of the page that has related contents.
Close
4
Table of ContentsNotice ....................................................................................................2
About this manual .................................................................................3
System requirements ............................................................................7Operating System for Windows client PC........................................................7Operating System for Macintosh client PC......................................................8
Method for printing from client PC.........................................................9Printing by using hot folder ..............................................................................9Printing by using printer driver .......................................................................10
Set PC with RasterLink6 installed..................................... 11
How to Open the Control Panel ..........................................................12Windows 10 ...................................................................................................12Windows 8.1 ..................................................................................................13Windows 7 .....................................................................................................14Windows Vista ...............................................................................................15Windows XP ..................................................................................................16
Change the OS Setting .......................................................................17Change the Host Name .................................................................................17Workgroup Settings .......................................................................................20Set the Local Security Policy (with Windows 7 / Windows Vista) ..................23Guest account settings ..................................................................................26
For Windows 8.1 / Windows 7 / Windows Vista...............................................26For Windows XP..............................................................................................28
Create a Hot Folder/Printer after Printer Registration .........................29
Change the setting to share folders and printers ................................31Sharing and Discovery settings .....................................................................31
Windows 10/ Windows 8.1...............................................................................31Windows 7 .......................................................................................................33Windows Vista .................................................................................................35
Enable file sharing (with Windows Vista) .......................................................38Enable file sharing (with Windows XP) ..........................................................40
5
Print from Client PCs ......................................................... 43
Changing OS Settings.........................................................................44Workgroup Settings (For Windows 10 / Windows 8.1 / Windows 7 / Windows Vista/ Windows XP) ....................................................................... 44Workgroup Settings (For Mac OS X 10.3 to 10.4) ........................................ 47Workgroup Settings (For Mac OS X 10.5 to 10.11/macOS 10.12)................ 48
Set Windows XP Client PC .................................................................49Install the printer driver.................................................................................. 49
Set Windows Vista Client PC ..............................................................53Sharing and Discovery settings..................................................................... 53Install the printer driver.................................................................................. 55
Set Windows 7 Client PC....................................................................58Sharing and Discovery settings..................................................................... 58Install the printer driver.................................................................................. 59
Set Windows 10/ Windows 8.1 Client PC ...........................................62Sharing and Discovery settings..................................................................... 62Install the printer driver.................................................................................. 63
Set Macintosh Client PC (OS 10.3).....................................................66Hot folder setting by Finder ........................................................................... 66Printer setting ................................................................................................ 68
Set Macintosh Client PC (OS 10.4).....................................................71Hot folder setting by Finder ........................................................................... 71Printer setting ................................................................................................ 73
Set Macintosh Client PC (OS 10.5 ~ 10.12) .......................................76Hot folder setting by Finder ........................................................................... 76Printer setting ................................................................................................ 78Add a printer manually (MaxOSX10.5 and later) .......................................... 81
Confirm the address............................................................................84

6
7
System requirements
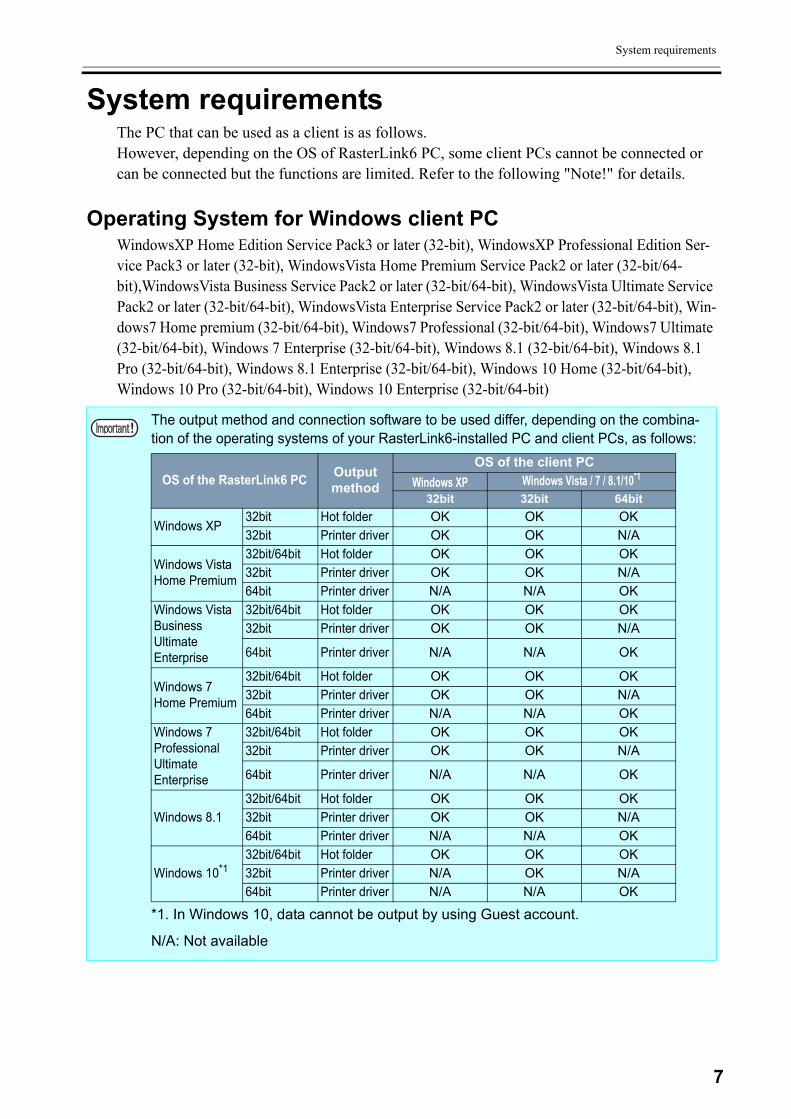
System requirementsThe PC that can be used as a client is as follows.However, depending on the OS of RasterLink6 PC, some client PCs cannot be connected or can be connected but the functions are limited. Refer to the following "Note!" for details.
Operating System for Windows client PCWindowsXP Home Edition Service Pack3 or later (32-bit), WindowsXP Professional Edition Ser-vice Pack3 or later (32-bit), WindowsVista Home Premium Service Pack2 or later (32-bit/64-bit),WindowsVista Business Service Pack2 or later (32-bit/64-bit), WindowsVista Ultimate Service Pack2 or later (32-bit/64-bit), WindowsVista Enterprise Service Pack2 or later (32-bit/64-bit), Win-dows7 Home premium (32-bit/64-bit), Windows7 Professional (32-bit/64-bit), Windows7 Ultimate (32-bit/64-bit), Windows 7 Enterprise (32-bit/64-bit), Windows 8.1 (32-bit/64-bit), Windows 8.1 Pro (32-bit/64-bit), Windows 8.1 Enterprise (32-bit/64-bit), Windows 10 Home (32-bit/64-bit), Windows 10 Pro (32-bit/64-bit), Windows 10 Enterprise (32-bit/64-bit)
The output method and connection software to be used differ, depending on the combina-tion of the operating systems of your RasterLink6-installed PC and client PCs, as follows:
N/A: Not available
OS of the RasterLink6 PC Output method
OS of the client PCWindows XP Windows Vista / 7 / 8.1/10*1
32bit 32bit 64bit
Windows XP32bit Hot folder OK OK OK32bit Printer driver OK OK N/A
Windows VistaHome Premium
32bit/64bit Hot folder OK OK OK32bit Printer driver OK OK N/A64bit Printer driver N/A N/A OK
Windows VistaBusinessUltimateEnterprise
32bit/64bit Hot folder OK OK OK32bit Printer driver OK OK N/A
64bit Printer driver N/A N/A OK
Windows 7Home Premium
32bit/64bit Hot folder OK OK OK32bit Printer driver OK OK N/A64bit Printer driver N/A N/A OK
Windows 7ProfessionalUltimateEnterprise
32bit/64bit Hot folder OK OK OK32bit Printer driver OK OK N/A
64bit Printer driver N/A N/A OK
Windows 8.132bit/64bit Hot folder OK OK OK32bit Printer driver OK OK N/A64bit Printer driver N/A N/A OK
Windows 10*1
*1. In Windows 10, data cannot be output by using Guest account.
32bit/64bit Hot folder OK OK OK32bit Printer driver N/A OK N/A64bit Printer driver N/A N/A OK

8
Operating System for Macintosh client PCMac OS X 10.3.9 ~ 10.11, macOS 10.12 (After MacOS X, only SMB connection is supported. (Apple Talk cannot be used.))
The output method and connection software to be used differ, depending on the combina-tion of the operating systems of your RasterLink6-installed PC and client PCs, as follows:
N/A: Not available
OS of the RasterLink6 PC
Output method
OS of the client PCMac OS X macOS
10.3 10.4 10.5 10.6 10.7 10.8 10.9 10.10 10.11 10.12
Windows XPHot folder OK OK OK OK OK OK OK OK OK OKPrinter driver OK OK OK OK OK OK N/A OK OK OK
Windows VistaHome Premium
Hot folder OK OK OK OK OK OK OK OK OK OKPrinter driver N/A N/A N/A N/A OK OK OK OK OK OK
Windows VistaBusinessUltimateEnterprise
Hot folder OK OK OK OK OK OK OK OK OK OK
Printer driver OK OK OK OK OK OK OK OK OK OK
Windows 7Home Premium
Hot folder N/A OK OK OK OK OK OK OK OK OKPrinter driver N/A N/A OK OK OK OK OK OK OK OK
Windows 7ProfessionalUltimateEnterprise
Hot folder N/A OK OK OK OK OK OK OK OK OK
Printer driver N/A OK OK OK OK OK OK OK OK OK
Windows 8.1Hot folder OK OK OK OK OK OK OK OK OK OKPrinter driver N/A N/A N/A N/A OK OK OK OK OK OK
Windows 10*1
*1. In Windows 10, data cannot be output by using Guest account.
Hot folder N/A N/A OK OK OK OK OK OK OK OKPrinter driver N/A N/A N/A N/A OK OK OK OK OK OK
9
Method for printing from client PC
Method for printing from client PC
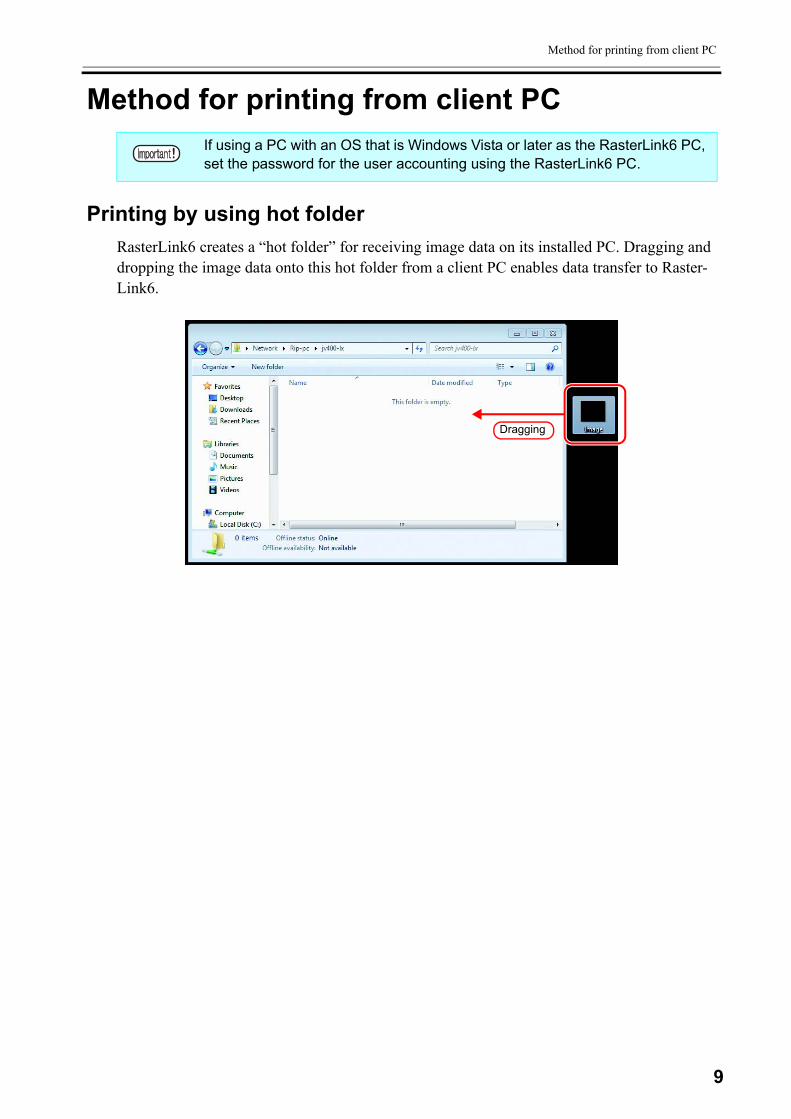
Printing by using hot folderRasterLink6 creates a “hot folder” for receiving image data on its installed PC. Dragging and dropping the image data onto this hot folder from a client PC enables data transfer to Raster-Link6.
If using a PC with an OS that is Windows Vista or later as the RasterLink6 PC, set the password for the user accounting using the RasterLink6 PC.
Dragging
10
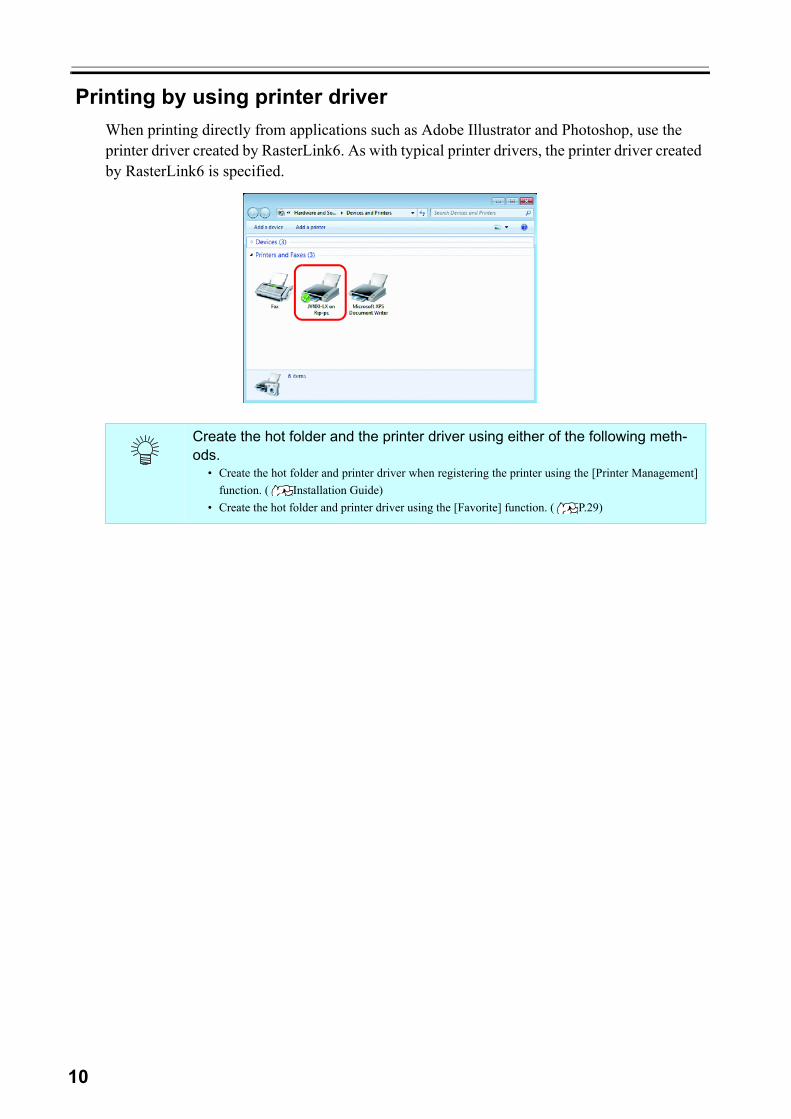
Printing by using printer driverWhen printing directly from applications such as Adobe Illustrator and Photoshop, use the printer driver created by RasterLink6. As with typical printer drivers, the printer driver created by RasterLink6 is specified.
Create the hot folder and the printer driver using either of the following meth-ods.
• Create the hot folder and printer driver when registering the printer using the [Printer Management]function. ( Installation Guide)
• Create the hot folder and printer driver using the [Favorite] function. ( P.29)

11
Set PC with RasterLink6 installedRasterLink6 PC is a PC on which RasterLink6 is to be installed or already installed.This is the explanation about necessary settings and the procedure of installation for operating RasterLink6 properly.
In this Installation Guide, the RasterLink6 PC host name is described as “Ras-terLink”. Where the explanation mentions “RasterLink”, substitute the host name of your RasterLink6 PC.
Perform before installing RasterLink6.
Change the OS Setting ( P.17)
Change the following settings.• Host name• Local security policy• Guest account setting
Install RasterLink6 and register the printer ( Installation Guide)
Install RasterLink6 and then register the printer.
Perform after installing RasterLink6.
Change the setting to share folders and printers ( P.31)
Change the RasterLink6 PC setting to connect and share folders and printers of client PC.

12
How to Open the Control PanelOpen the Control Panel window as follows.
Windows 10
1 Select [All apps] - [Windows Sys-tem] - [Control Panel] in the Start menu.The “Control Panel” window opens.
2 If “Category” is selected on “View by”, change to “Large icons” or “Small icons”.
Click
When changed to “Small icons”
13
How to Open the Control Panel
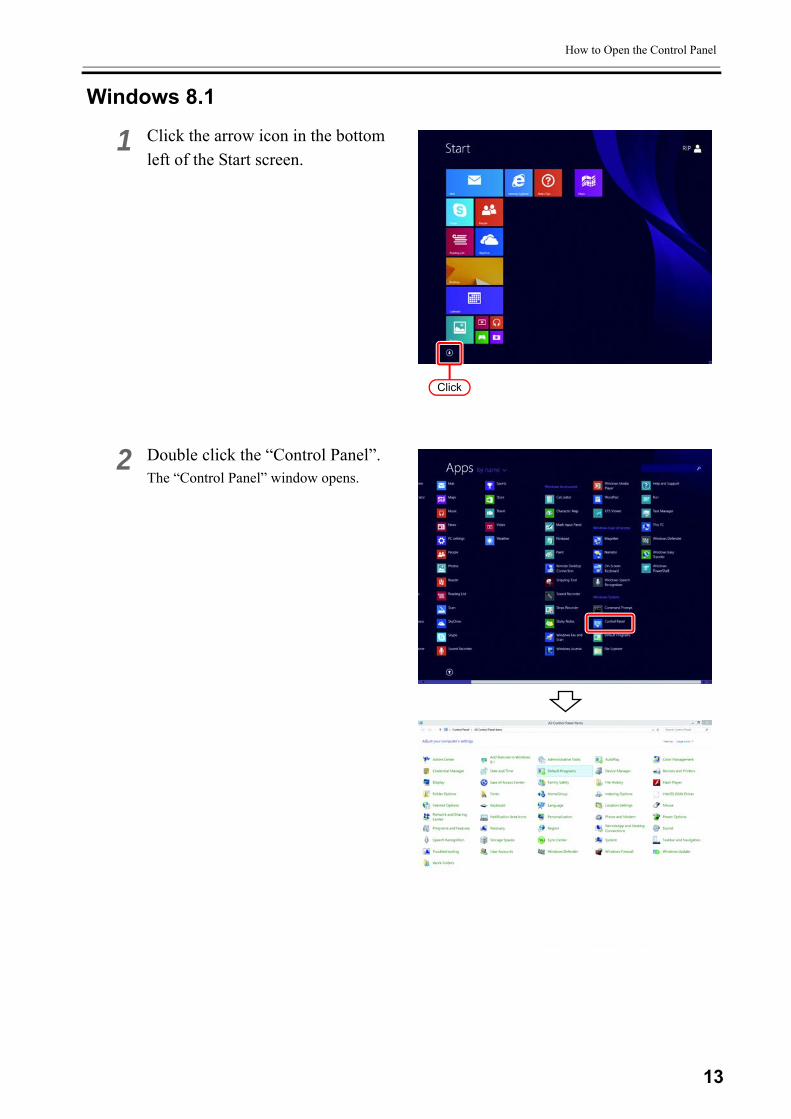
Windows 8.1
1 Click the arrow icon in the bottom left of the Start screen.
2 Double click the “Control Panel”.The “Control Panel” window opens.
Click
14
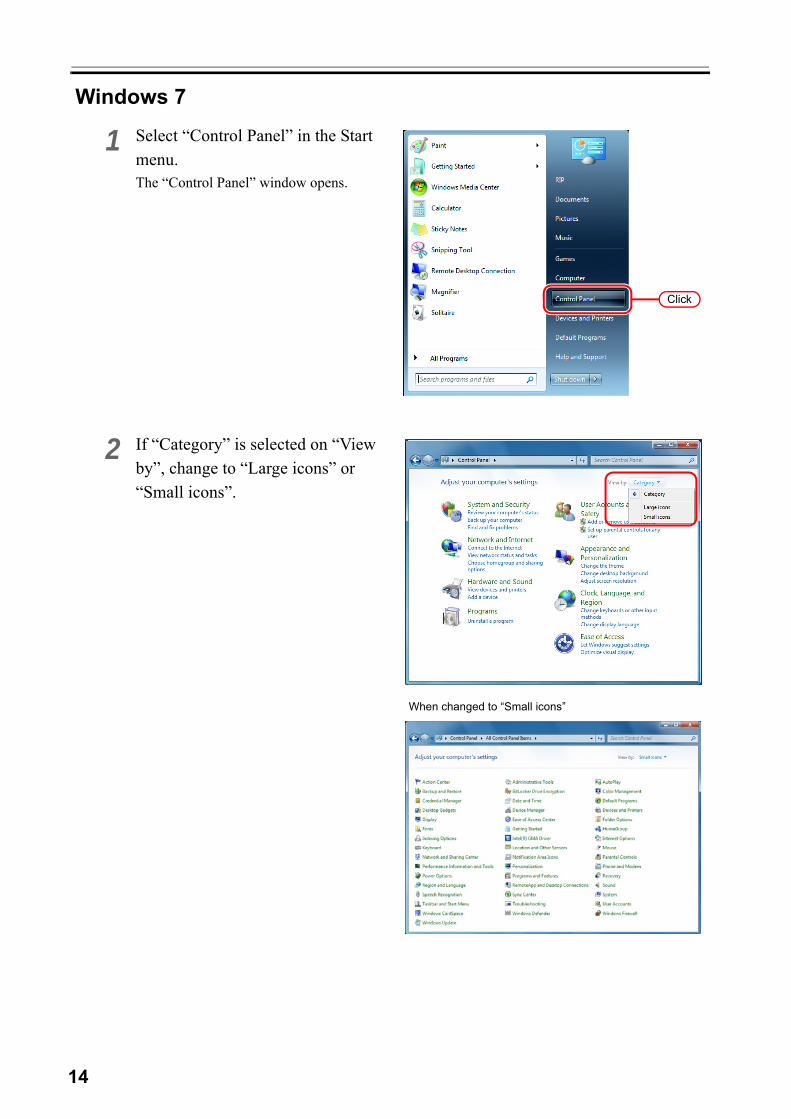
Windows 7
1 Select “Control Panel” in the Start menu.The “Control Panel” window opens.
2 If “Category” is selected on “View by”, change to “Large icons” or “Small icons”.
Click
When changed to “Small icons”
15
How to Open the Control Panel
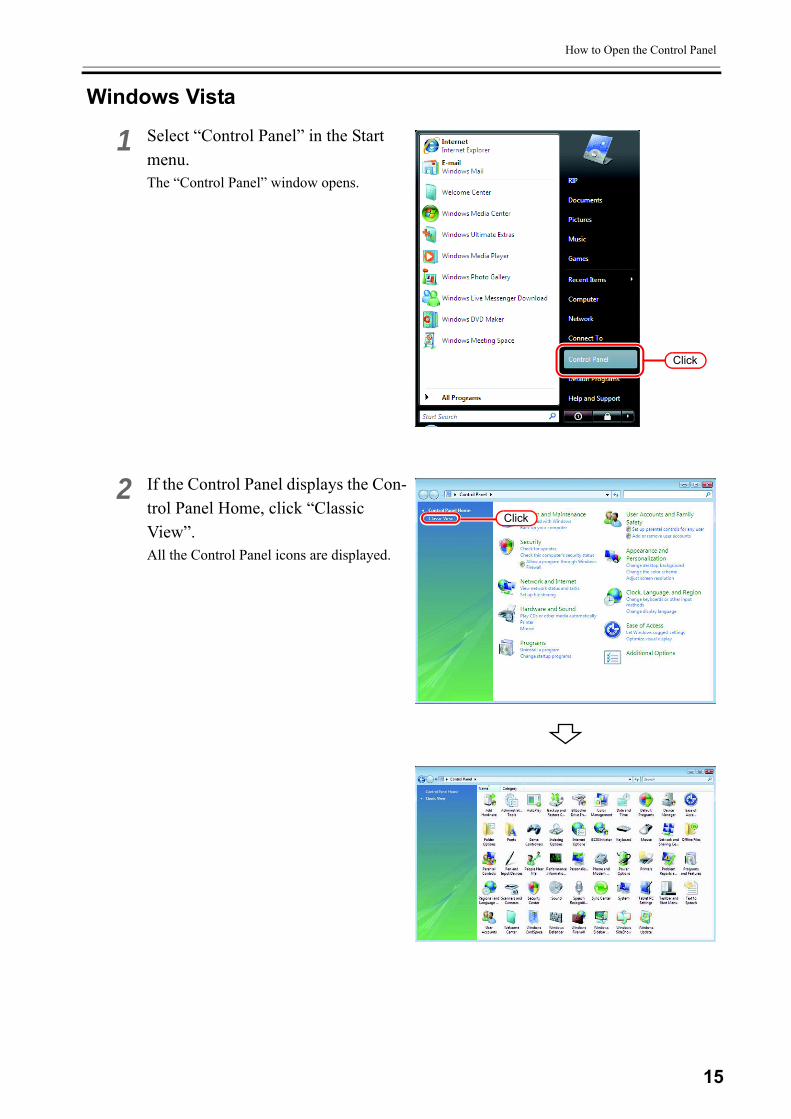
Windows Vista
1 Select “Control Panel” in the Start menu.The “Control Panel” window opens.
2 If the Control Panel displays the Con-trol Panel Home, click “Classic View”.All the Control Panel icons are displayed.
Click
Click

16
Windows XP
1 Select “Control Panel” in the Start menu.The “Control Panel” window opens.
2 If the Control Panel is in the Cate-gory View, click “Switch to Classic View”.All the Control Panel icons are displayed.
Click
Click
17
Change the OS Setting
Change the OS Setting
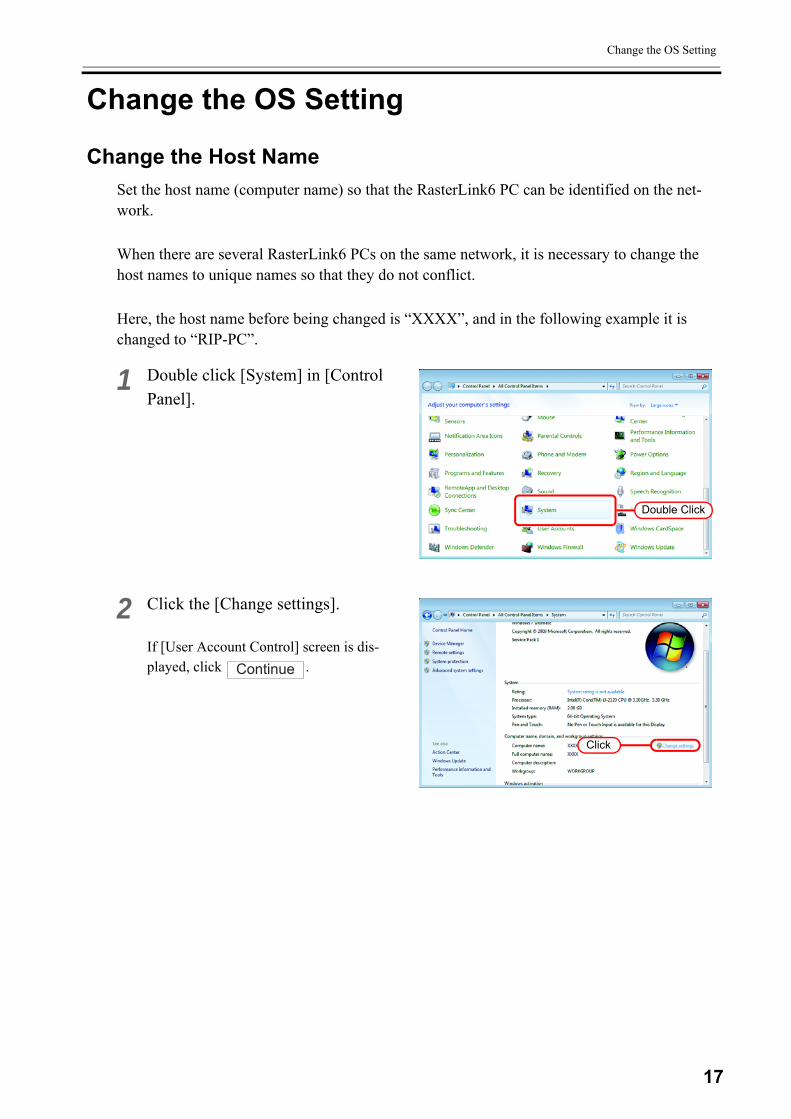
Change the Host NameSet the host name (computer name) so that the RasterLink6 PC can be identified on the net-work.
When there are several RasterLink6 PCs on the same network, it is necessary to change the host names to unique names so that they do not conflict.
Here, the host name before being changed is “XXXX”, and in the following example it is changed to “RIP-PC”.
1 Double click [System] in [Control Panel].
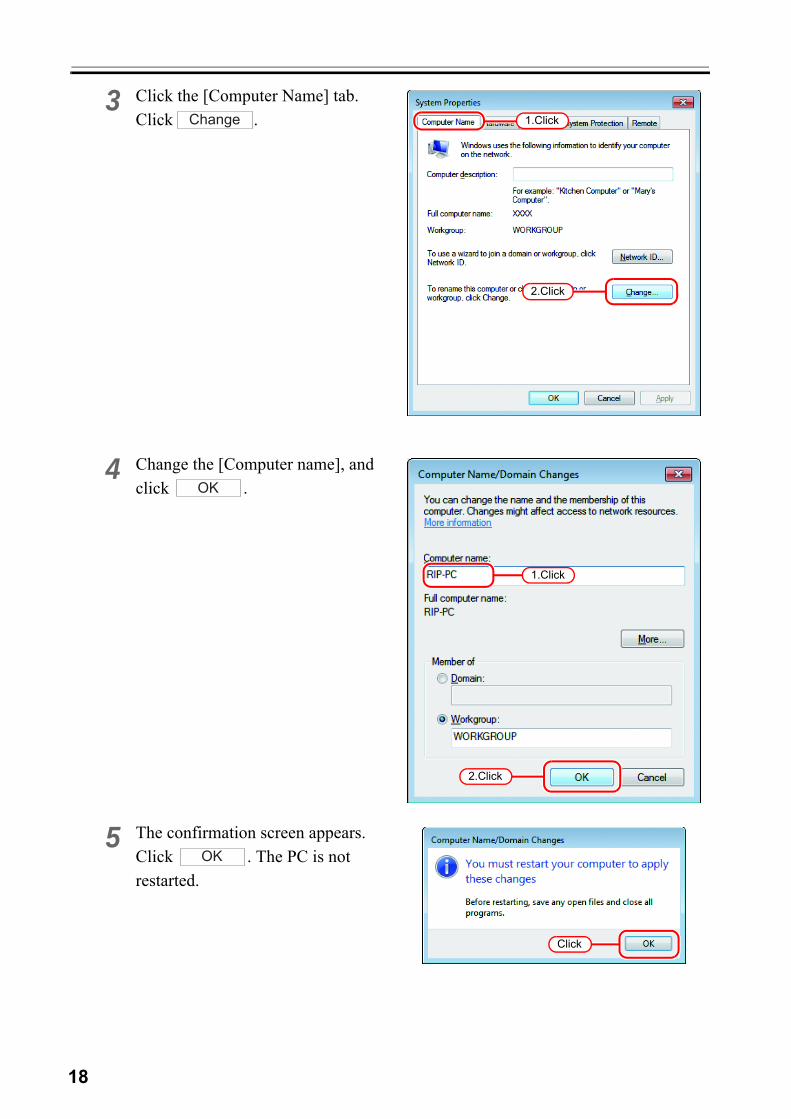
2 Click the [Change settings].
If [User Account Control] screen is dis-played, click .
Double Click
Click
Continue
18
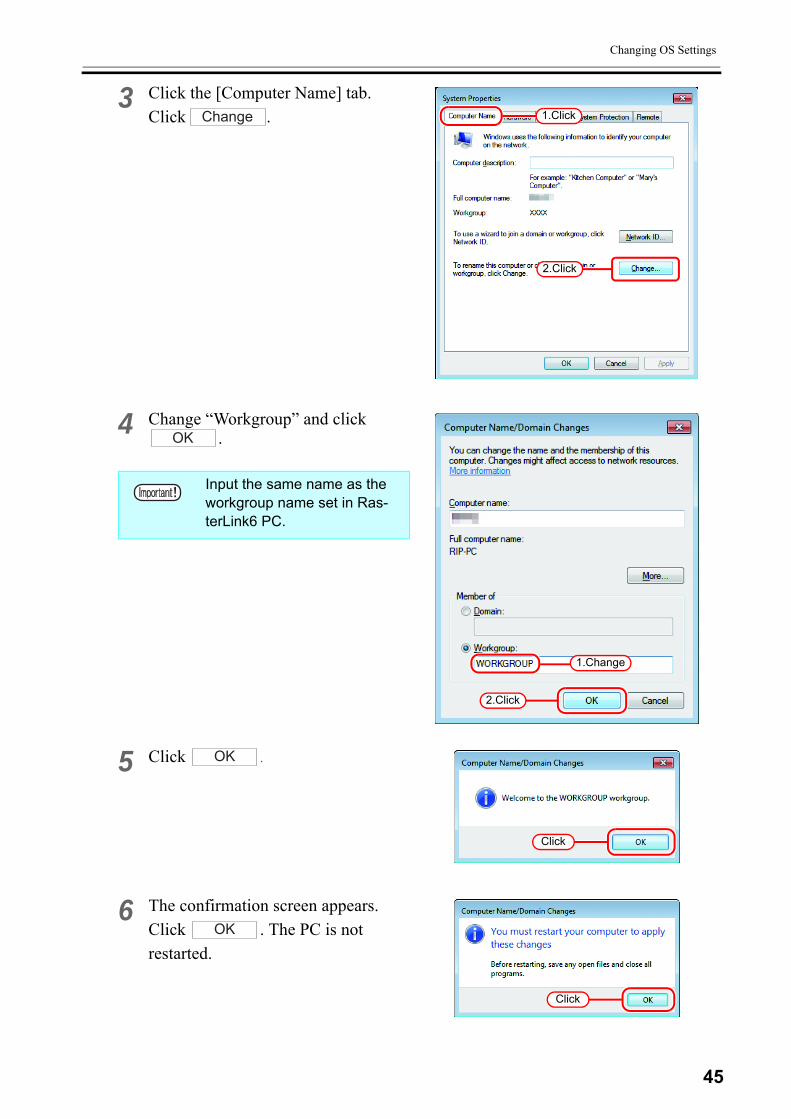
3 Click the [Computer Name] tab.Click .
4 Change the [Computer name], and click .
5 The confirmation screen appears. Click . The PC is not restarted.
2.Click
1.ClickChange
1.Click
2.Click
OK
Click
OK
19
Change the OS Setting
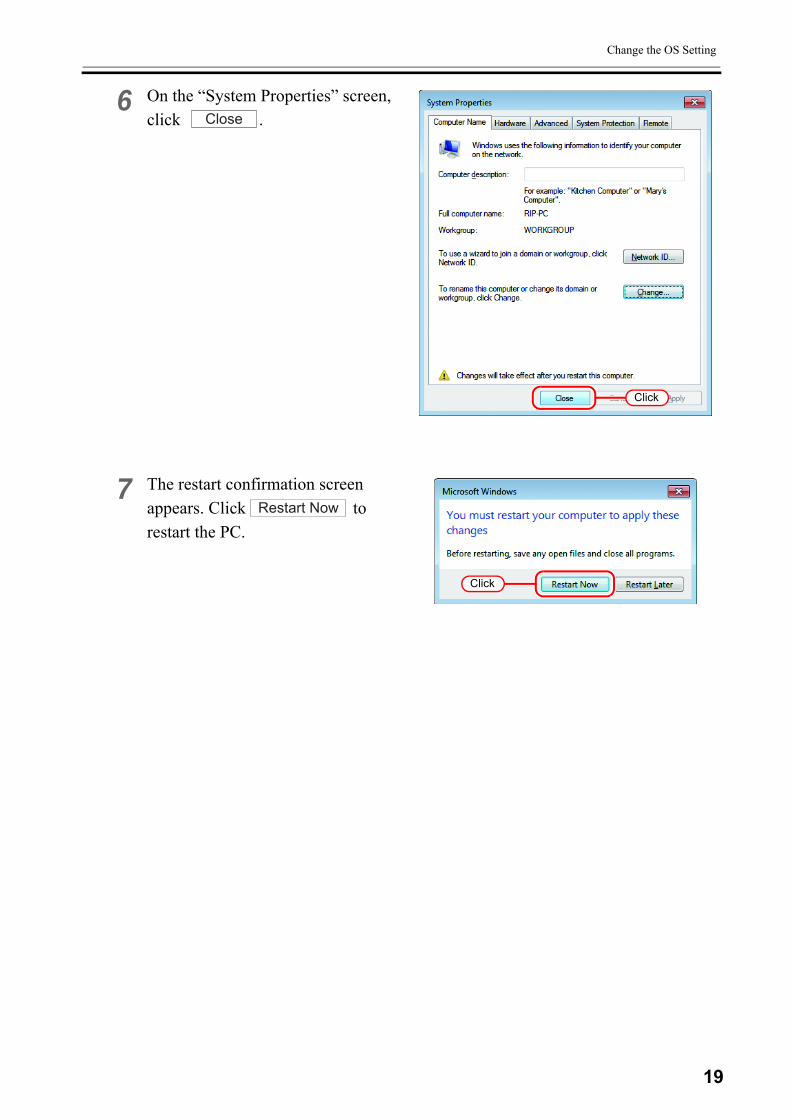
6 On the “System Properties” screen, click .
7 The restart confirmation screen appears. Click to restart the PC.
Click
Close
Click
Restart Now
20
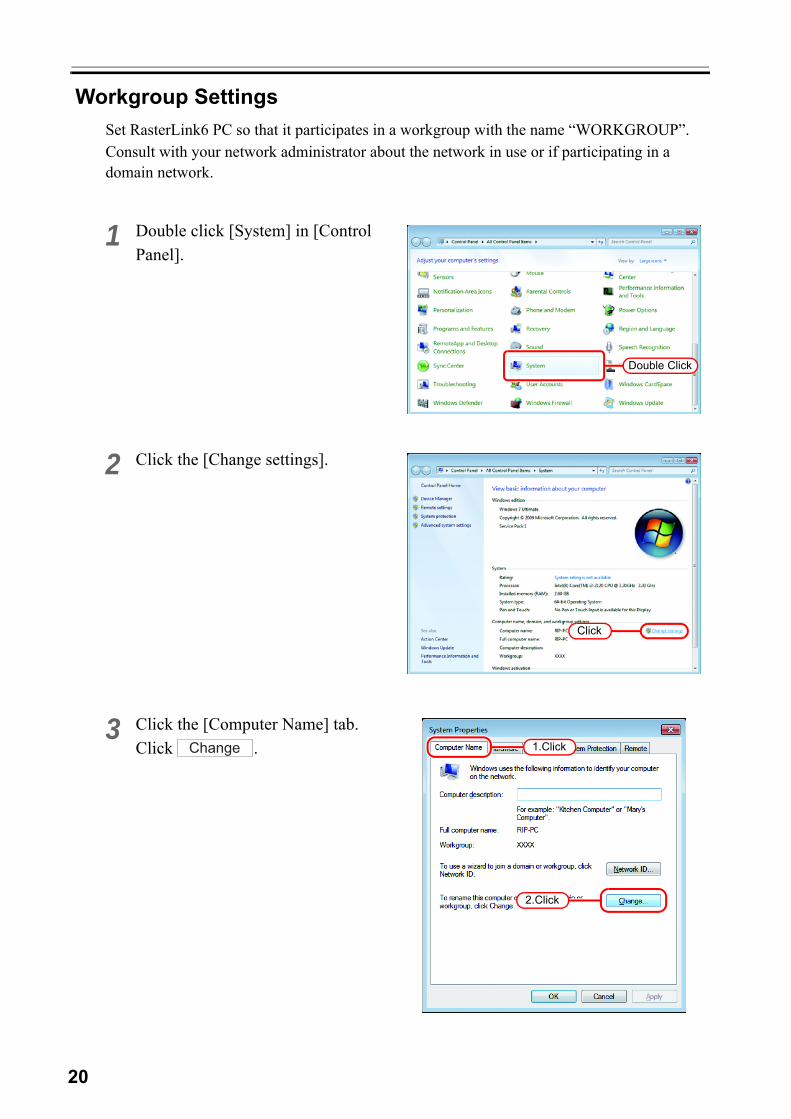
Workgroup SettingsSet RasterLink6 PC so that it participates in a workgroup with the name “WORKGROUP”.Consult with your network administrator about the network in use or if participating in a domain network.
1 Double click [System] in [Control Panel].
2 Click the [Change settings].
3 Click the [Computer Name] tab.Click .
Double Click
Click
1.Click
2.Click
Change

21
Change the OS Setting
4 Change “Workgroup” and click .
5 Click .
6 The confirmation screen appears. Click . The PC is not restarted.
1.Change
2.Click
OK
Click
OK
Click
OK
22
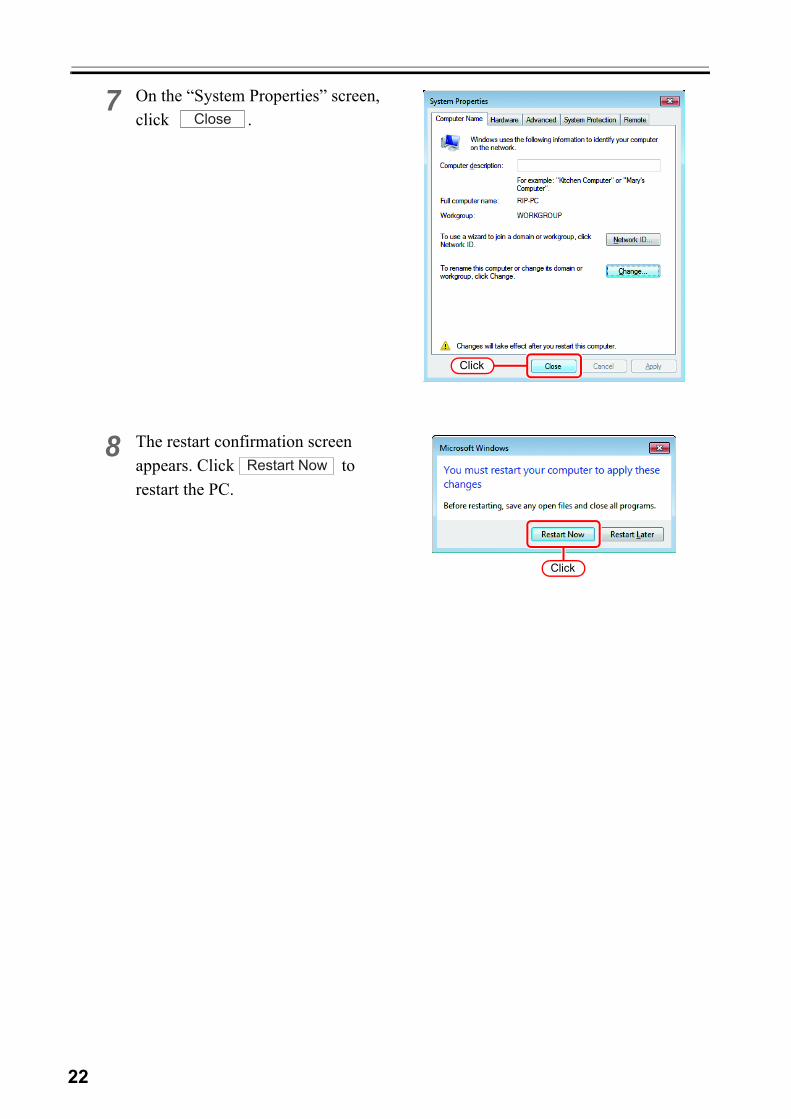
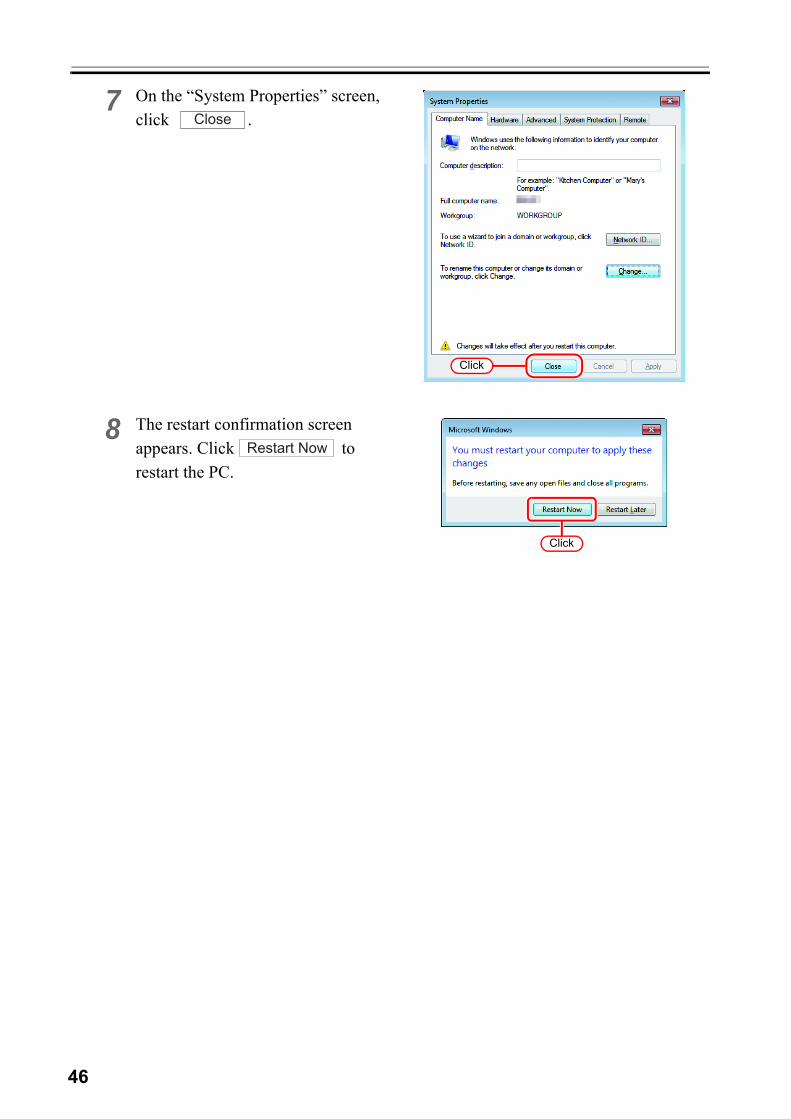
7 On the “System Properties” screen, click .
8 The restart confirmation screen appears. Click to restart the PC.
Click
Close
Click
Restart Now

23
Change the OS Setting
Set the Local Security Policy (with Windows 7 / WindowsVista)
If you plan to install RasterLink6 on a PC running Windows 7 or Windows Vista PC and use a MacOSX PC as a client PC to connect to the RasterLink6 PC via SMB, you need to change local security policies before installation. If the RasterLink6 PC is in your domain network, you may not have to do this. For more infor-mation, contact your network administrator.
1 Double click “Administrative Tools” on [Control Panel].[Administrative Tools] window opens.
2 Double click “Local Security Policy” on [Administrative Tools] window.The “User Account Control” screen is dis-played, click .
[Local Security Policy] window opens.
3 Select [Security Options] from [Security Settings].
Double click [Network access: Let Everyone permissions apply to anon-ymous users].[Network access: Let Everyone permissions apply to anonymous users] dialog is dis-played.
The following OSs do not have a local security policy function.• Windows Vista Home Premium• Windows 7 Home Premium
Double Click
Double ClickContinue
1.Select
2.Double Click
24
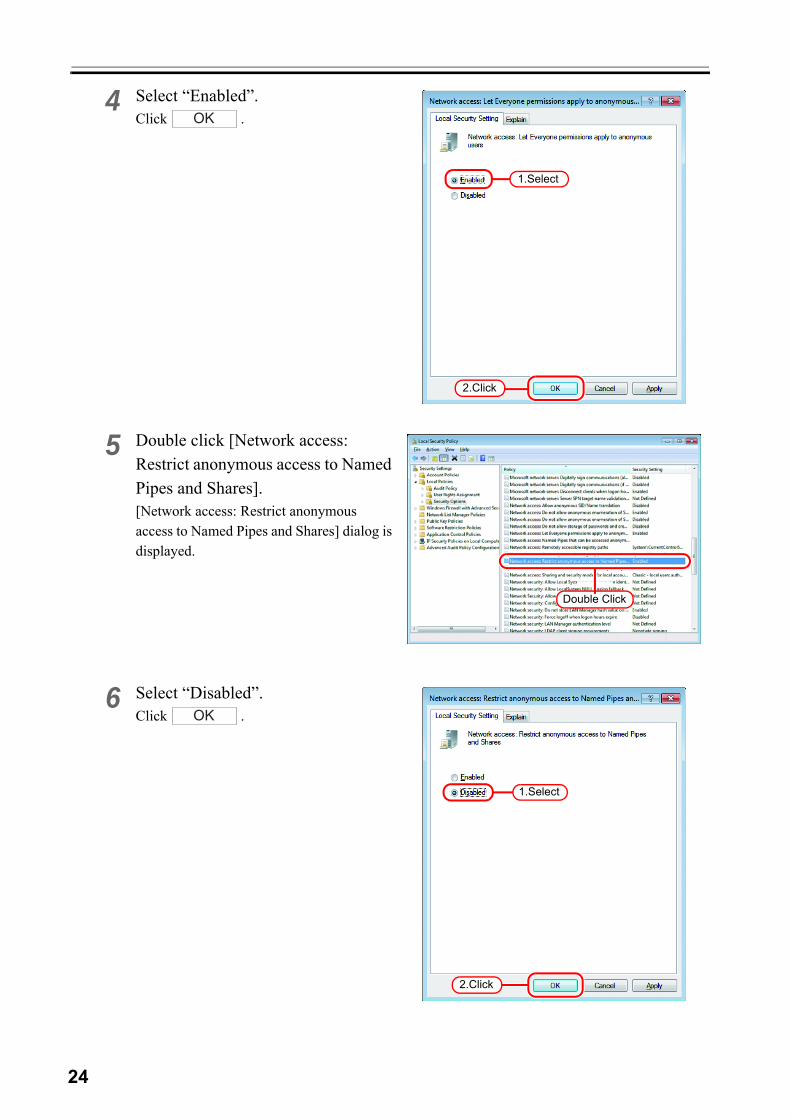
4 Select “Enabled”.Click .
5 Double click [Network access: Restrict anonymous access to Named Pipes and Shares].[Network access: Restrict anonymous access to Named Pipes and Shares] dialog is displayed.
6 Select “Disabled”.Click .
1.Select
2.Click
OK
Double Click
1.Select
2.Click
OK
25
Change the OS Setting
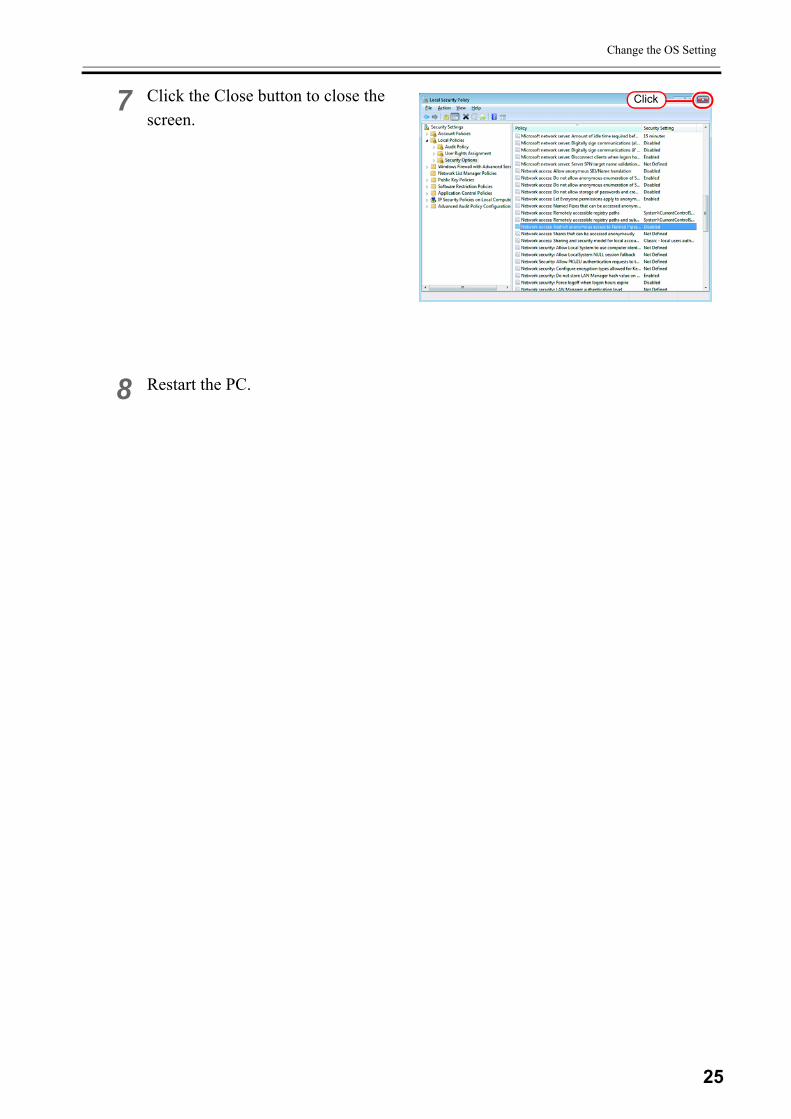
7 Click the Close button to close the screen.
8 Restart the PC.
Click
26
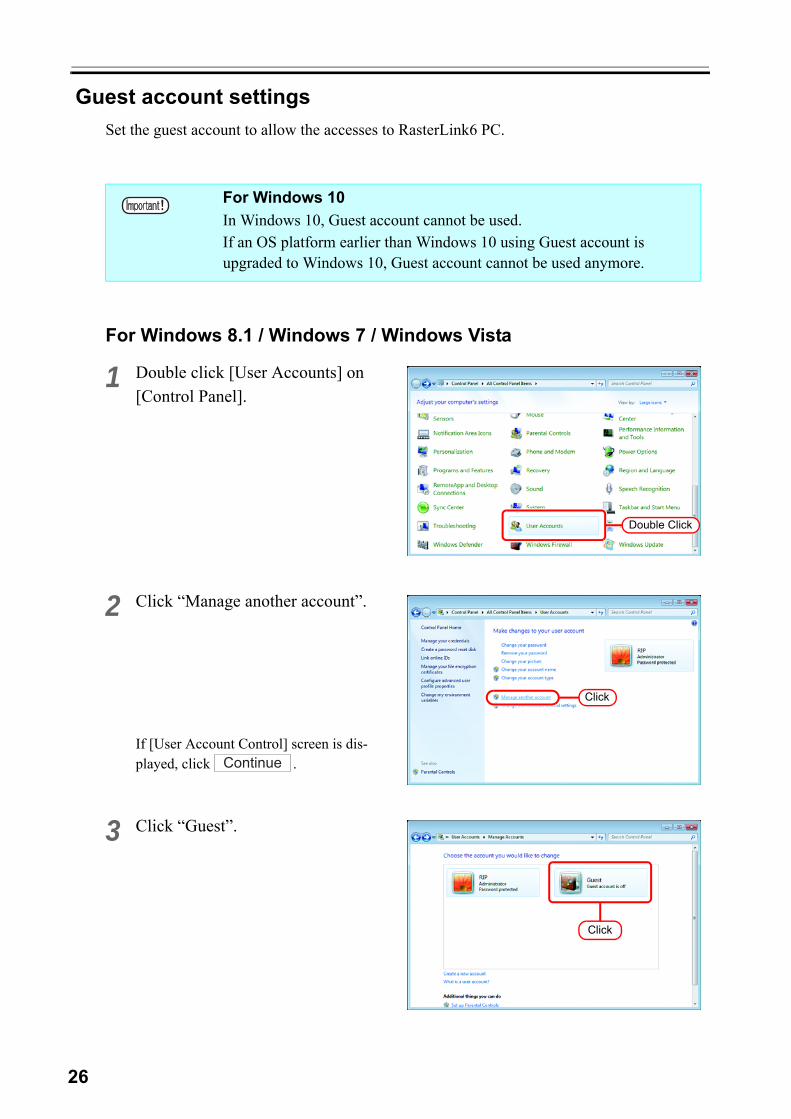
Guest account settingsSet the guest account to allow the accesses to RasterLink6 PC.
For Windows 8.1 / Windows 7 / Windows Vista
1 Double click [User Accounts] on [Control Panel].
2 Click “Manage another account”.
If [User Account Control] screen is dis-played, click .
3 Click “Guest”.
For Windows 10In Windows 10, Guest account cannot be used.If an OS platform earlier than Windows 10 using Guest account is upgraded to Windows 10, Guest account cannot be used anymore.
Double Click
Click
Continue
Click
27
Change the OS Setting
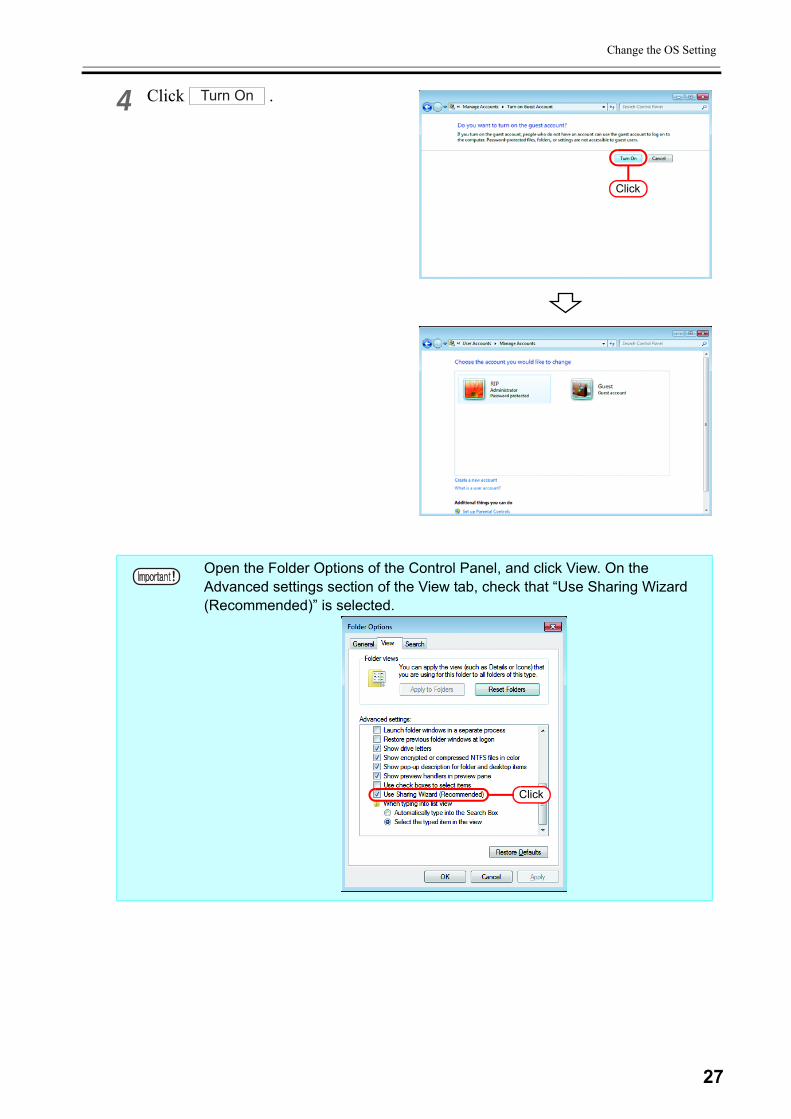
4 Click .
Open the Folder Options of the Control Panel, and click View. On the Advanced settings section of the View tab, check that “Use Sharing Wizard (Recommended)” is selected.
Click
Turn On
Click
28
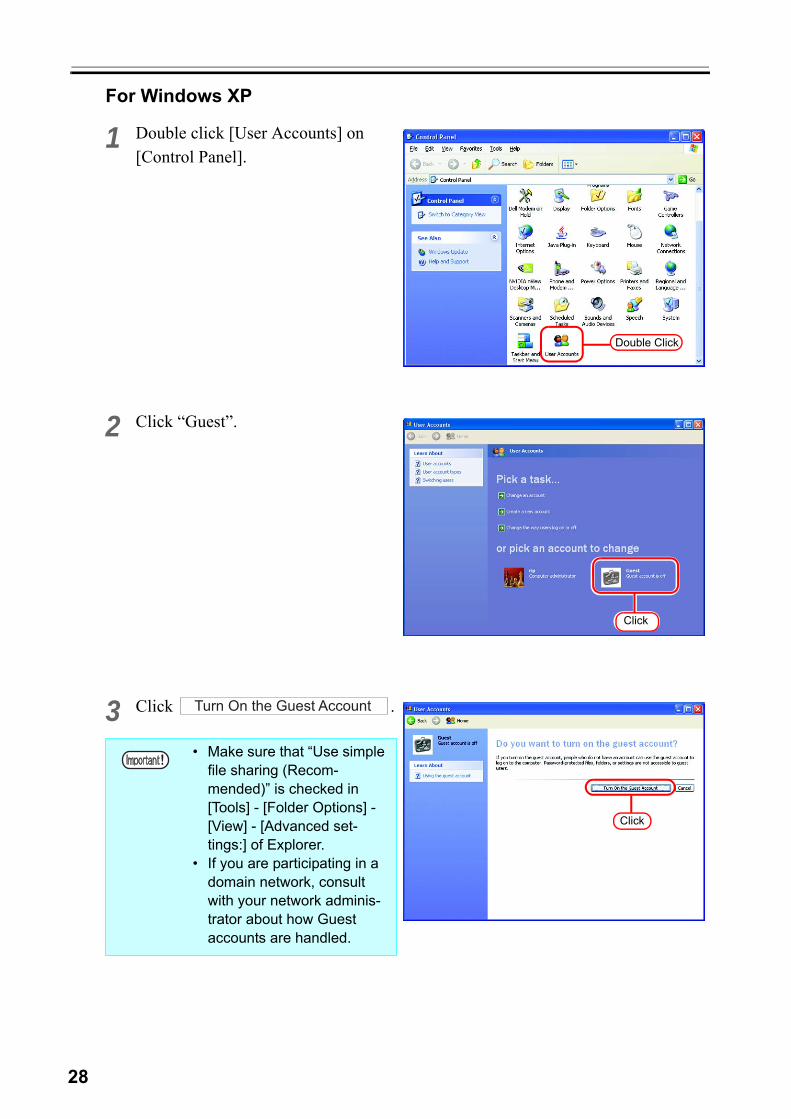
For Windows XP
1 Double click [User Accounts] on [Control Panel].
2 Click “Guest”.
3 Click .
• Make sure that “Use simple file sharing (Recom-mended)” is checked in [Tools] - [Folder Options] - [View] - [Advanced set-tings:] of Explorer.
• If you are participating in a domain network, consult with your network adminis-trator about how Guest accounts are handled.
Double Click
Click
Click
Turn On the Guest Account
29
Create a Hot Folder/Printer after Printer Registration
Create a Hot Folder/Printer after Printer Reg-istration
If the hot folder and printer driver were not created when the printer was registered, create them using the following procedure.
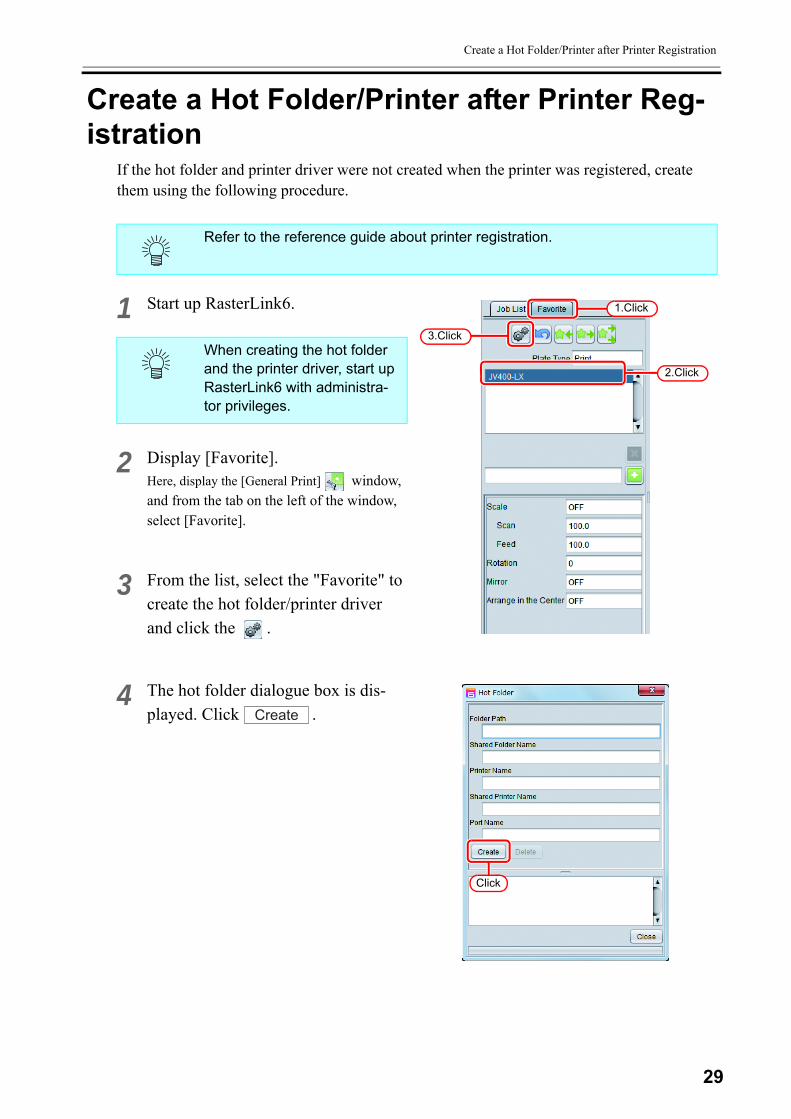
1 Start up RasterLink6.
2 Display [Favorite].Here, display the [General Print] window, and from the tab on the left of the window, select [Favorite].
3 From the list, select the "Favorite" to create the hot folder/printer driver and click the .
4 The hot folder dialogue box is dis-played. Click .
Refer to the reference guide about printer registration.
When creating the hot folder and the printer driver, start up RasterLink6 with administra-tor privileges.
1.Click
2.Click
3.Click
Click
Create
30
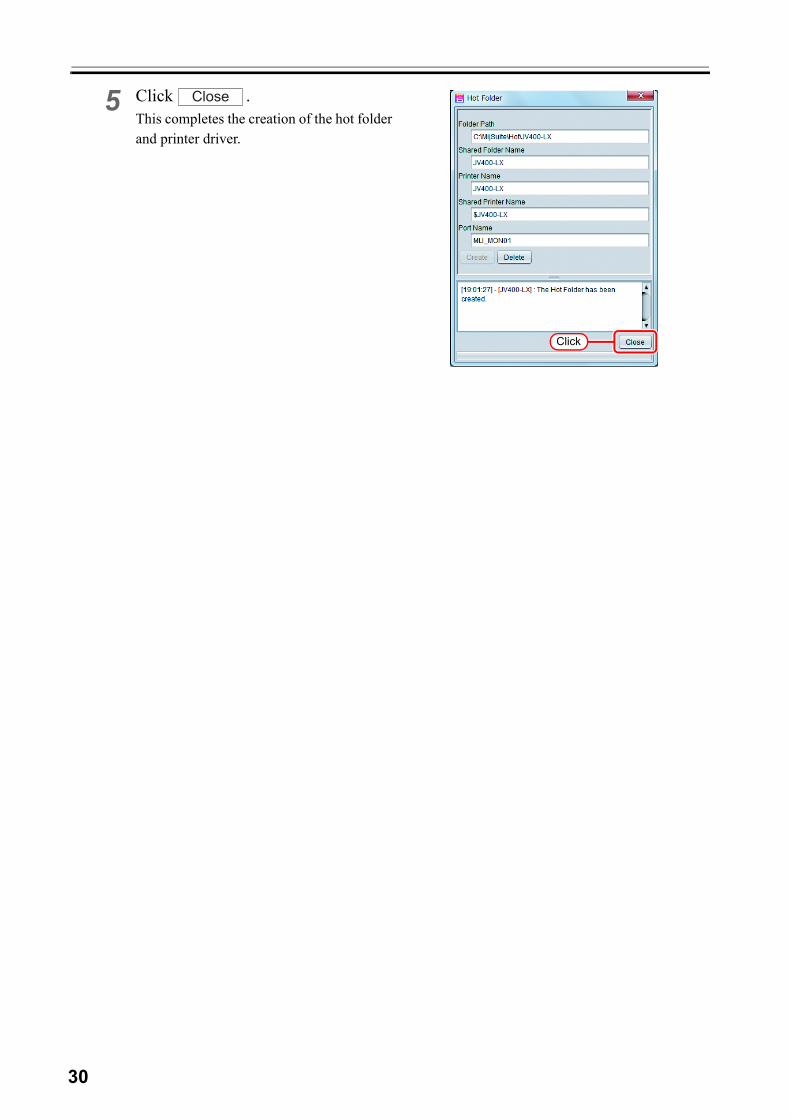
5 Click .This completes the creation of the hot folder and printer driver.
Click
Close
31
Change the setting to share folders and printers
Change the setting to share folders and print-ers
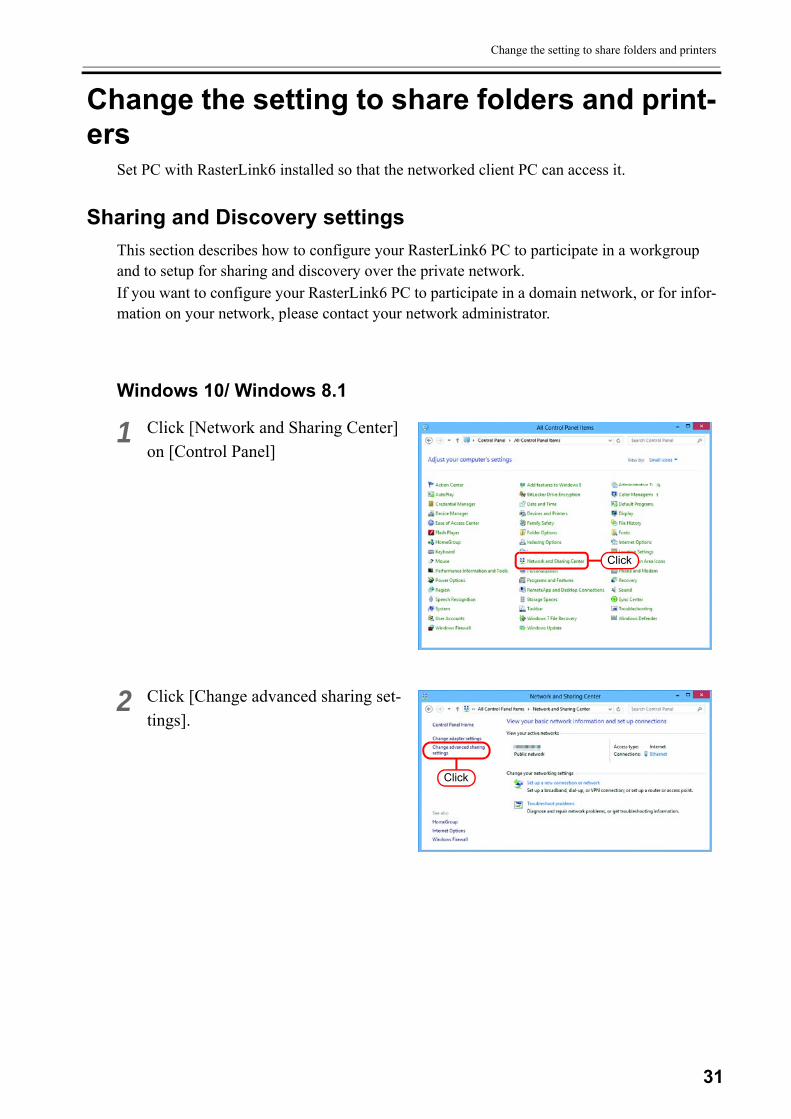
Set PC with RasterLink6 installed so that the networked client PC can access it.
Sharing and Discovery settingsThis section describes how to configure your RasterLink6 PC to participate in a workgroup and to setup for sharing and discovery over the private network. If you want to configure your RasterLink6 PC to participate in a domain network, or for infor-mation on your network, please contact your network administrator.
Windows 10/ Windows 8.1
1 Click [Network and Sharing Center] on [Control Panel]
2 Click [Change advanced sharing set-tings].
Click
Click
32
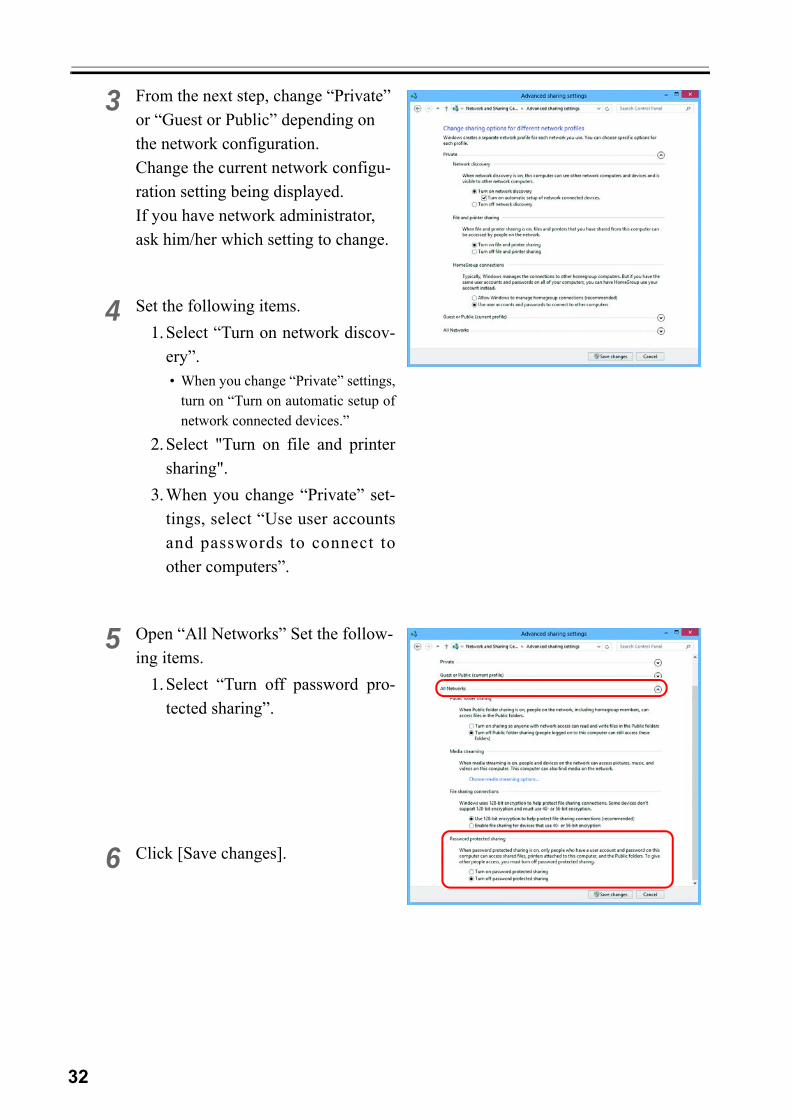
3 From the next step, change “Private” or “Guest or Public” depending on the network configuration.Change the current network configu-ration setting being displayed.If you have network administrator, ask him/her which setting to change.
4 Set the following items.1.Select “Turn on network discov-
ery”.• When you change “Private” settings,
turn on “Turn on automatic setup ofnetwork connected devices.”
2.Select "Turn on file and printersharing".
3.When you change “Private” set-tings, select “Use user accountsand passwords to connect toother computers”.
5 Open “All Networks” Set the follow-ing items.
1.Select “Turn off password pro-tected sharing”.
6 Click [Save changes].
33
Change the setting to share folders and printers
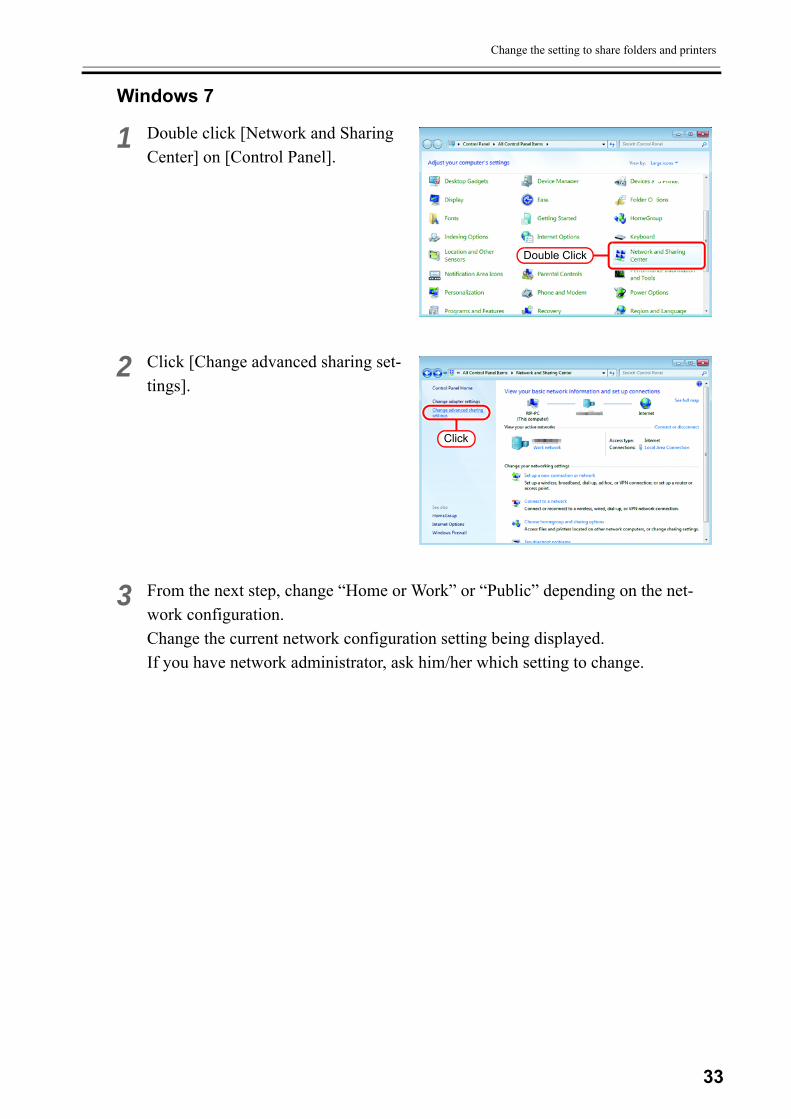
Windows 7
1 Double click [Network and Sharing Center] on [Control Panel].
2 Click [Change advanced sharing set-tings].
3 From the next step, change “Home or Work” or “Public” depending on the net-work configuration.Change the current network configuration setting being displayed.If you have network administrator, ask him/her which setting to change.
Double Click
Click

34
4 Select the following items.1. Select “Turn on network discov-
ery”.2. Select "Turn on file and printer
sharing".
3. Select “Turn off password pro-tected sharing”.Click .
2.Select
1.Select
3.Select
4.Click
Save changes

35
Change the setting to share folders and printers
Windows Vista
1 Double click [Network and Sharing Center] on [Control Panel].
2 Click of “Network discovery”.
3 Select “Turn on network discovery”.
Click .
If "User Account Control" screen is dis-played, click .
Double Click
Click
1.Click2.Click
Apply
Continue
36
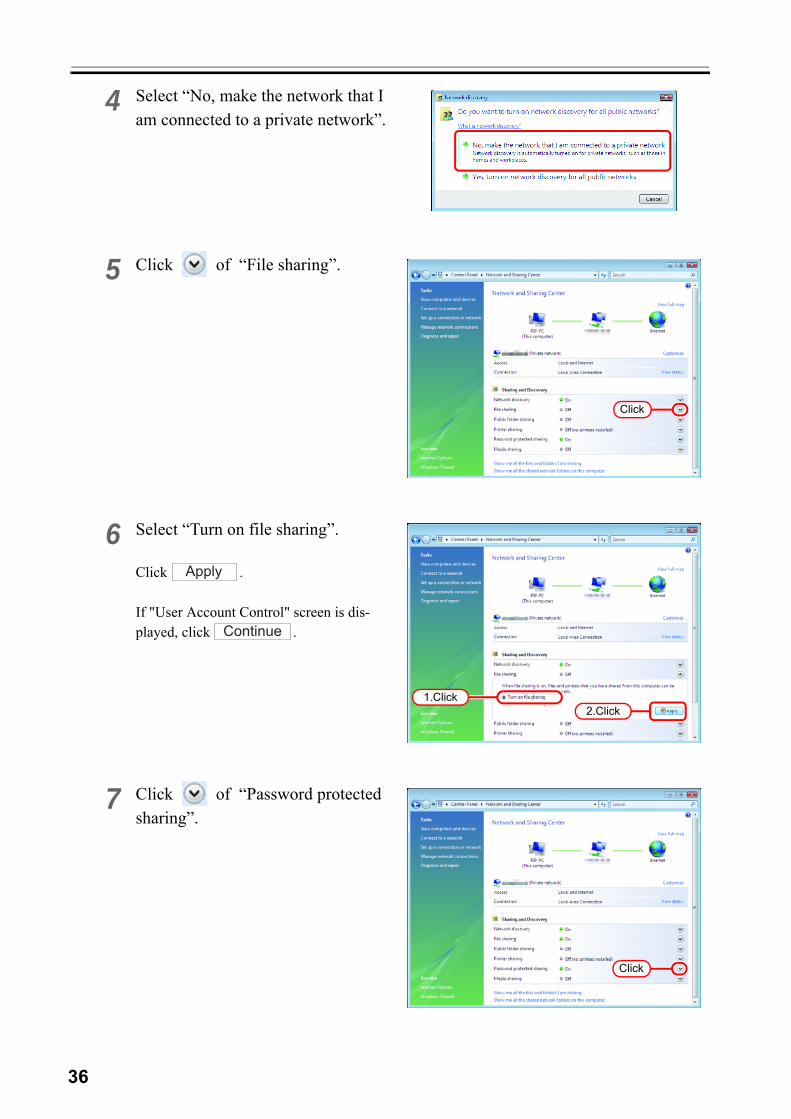
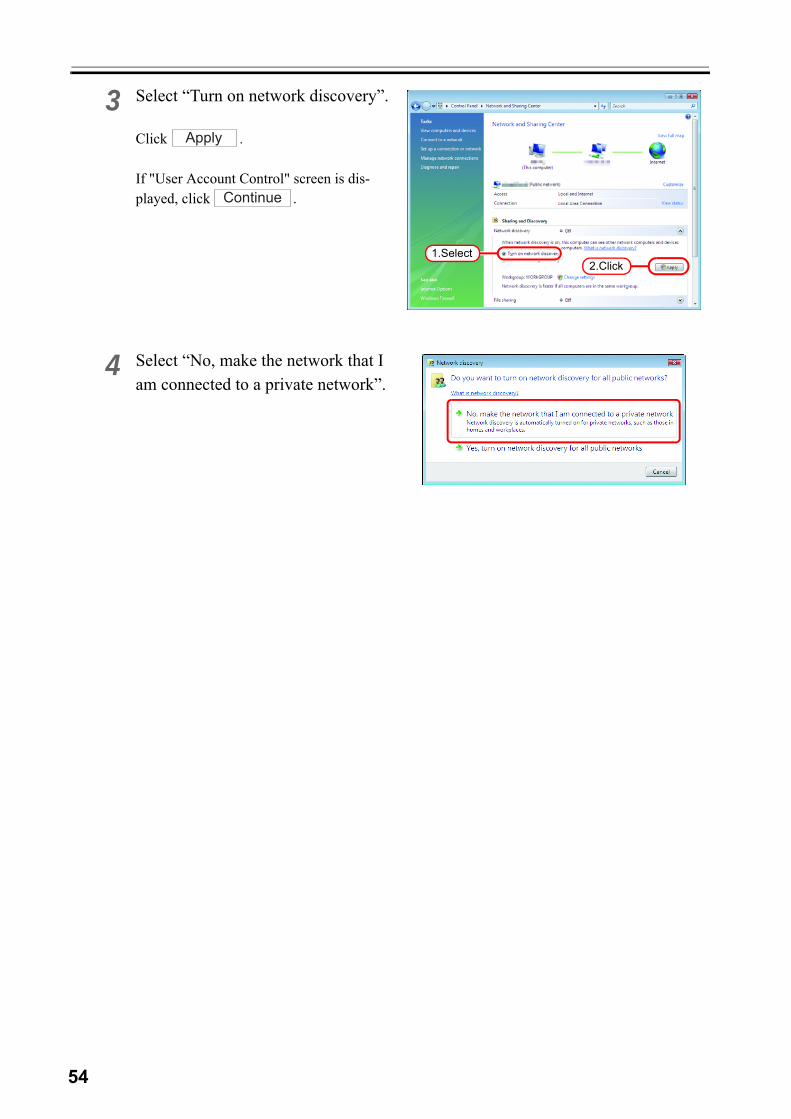
4 Select “No, make the network that I am connected to a private network”.
5 Click of “File sharing”.
6 Select “Turn on file sharing”.
Click .
If "User Account Control" screen is dis-played, click .
7 Click of “Password protected sharing”.
Click
1.Click2.Click
Apply
Continue
Click
37
Change the setting to share folders and printers
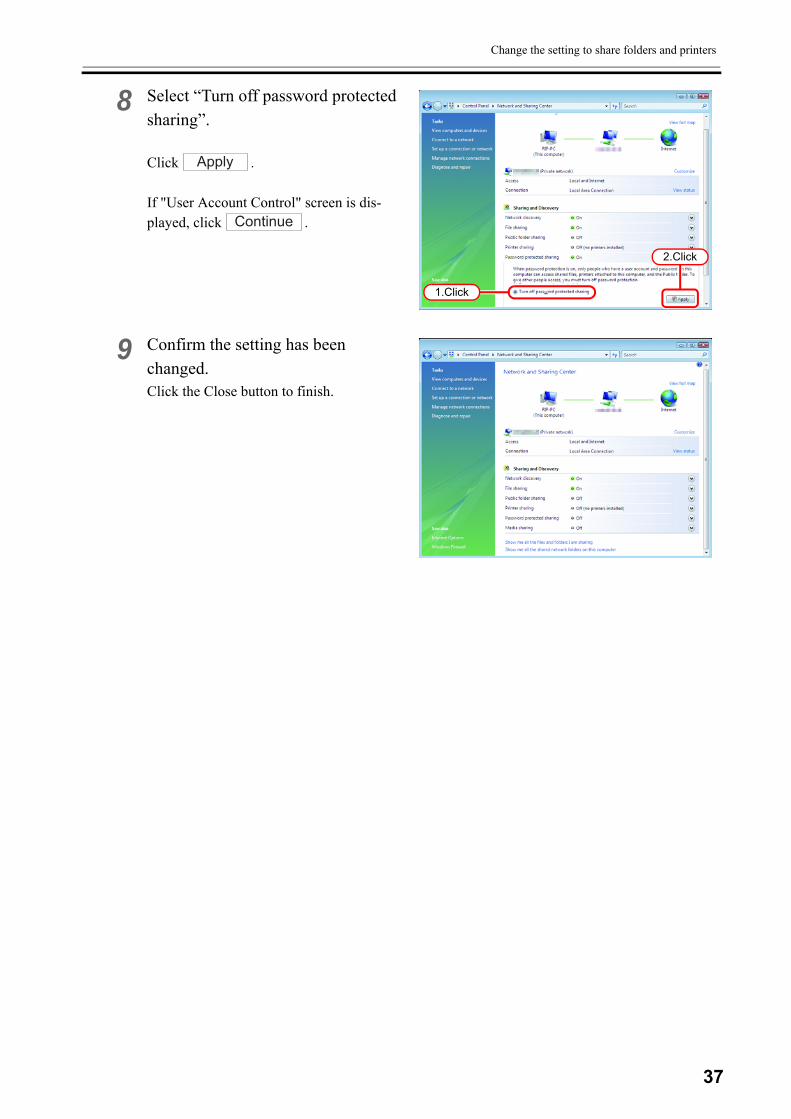
8 Select “Turn off password protected sharing”.
Click .
If "User Account Control" screen is dis-played, click .
9 Confirm the setting has been changed.Click the Close button to finish.
1.Click
2.Click
Apply
Continue
38
Enable file sharing (with Windows Vista)
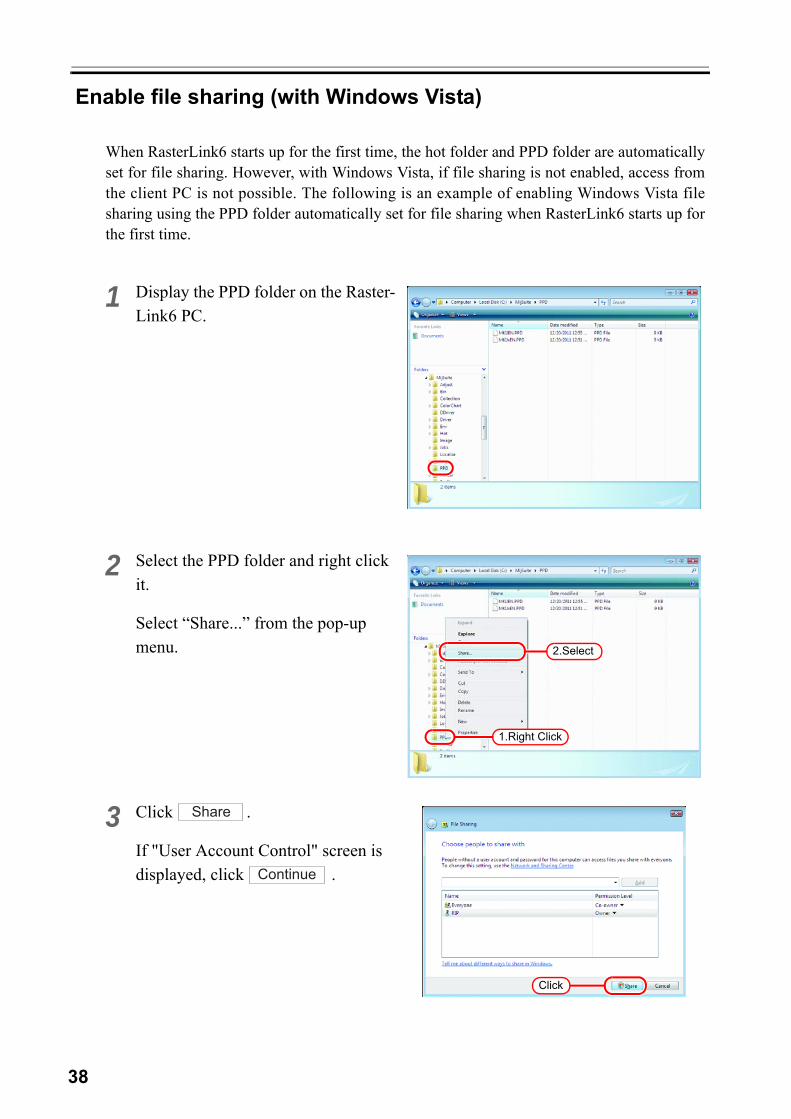
When RasterLink6 starts up for the first time, the hot folder and PPD folder are automaticallyset for file sharing. However, with Windows Vista, if file sharing is not enabled, access fromthe client PC is not possible. The following is an example of enabling Windows Vista filesharing using the PPD folder automatically set for file sharing when RasterLink6 starts up forthe first time.
1 Display the PPD folder on the Raster-Link6 PC.
2 Select the PPD folder and right click it.
Select “Share...” from the pop-up menu.
3 Click .
If "User Account Control" screen is displayed, click .
1.Right Click
2.Select
Click
Share
Continue
39
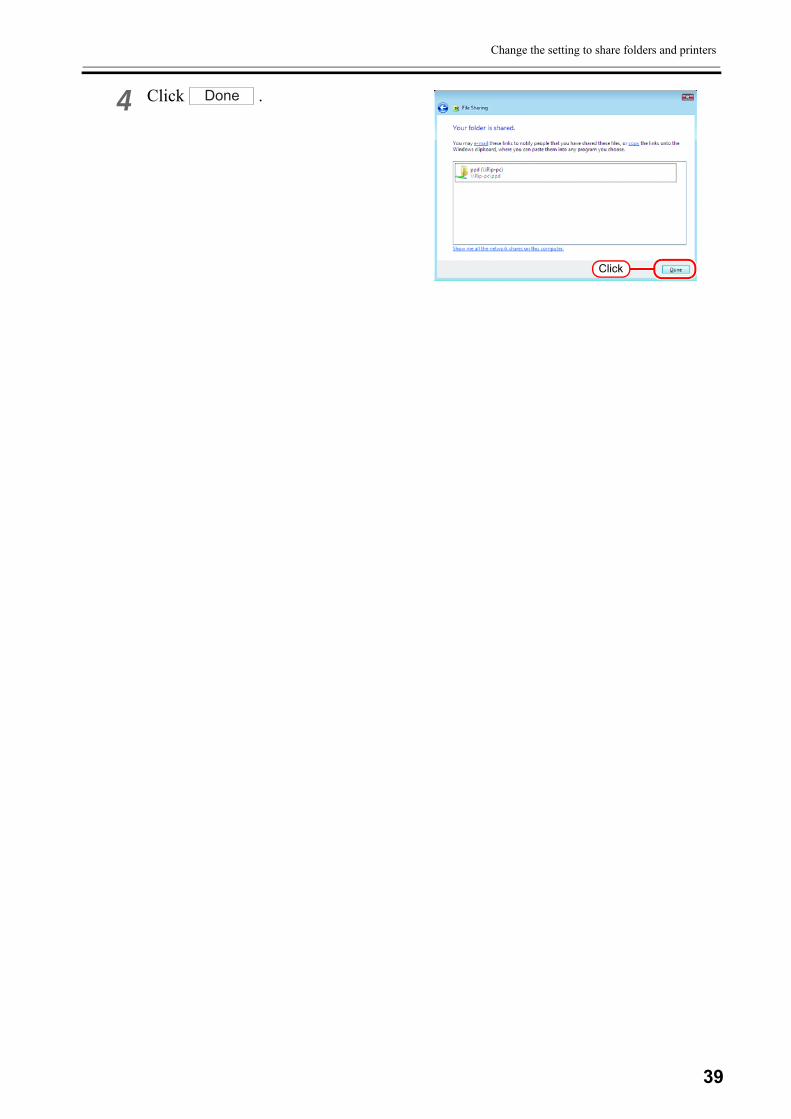
Change the setting to share folders and printers
4 Click .
Click
Done
40
Enable file sharing (with Windows XP)
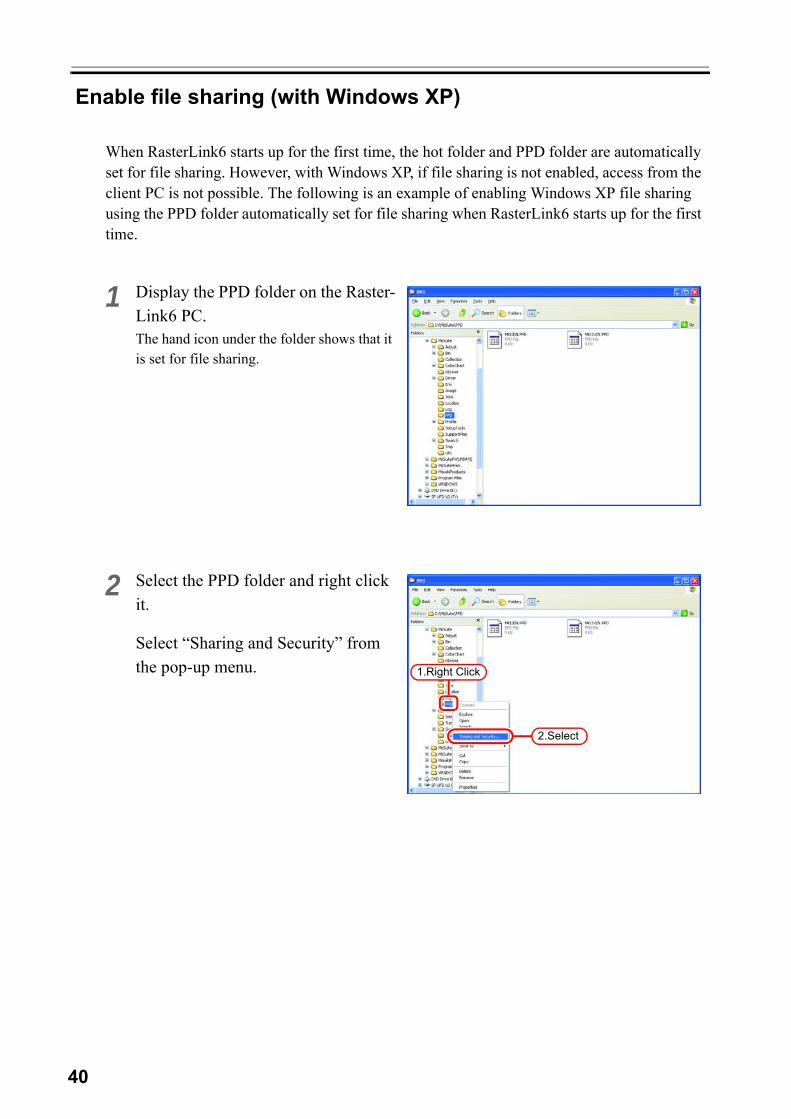
When RasterLink6 starts up for the first time, the hot folder and PPD folder are automatically set for file sharing. However, with Windows XP, if file sharing is not enabled, access from the client PC is not possible. The following is an example of enabling Windows XP file sharing using the PPD folder automatically set for file sharing when RasterLink6 starts up for the first time.
1 Display the PPD folder on the Raster-Link6 PC.The hand icon under the folder shows that it is set for file sharing.
2 Select the PPD folder and right click it.
Select “Sharing and Security” from the pop-up menu.
2.Select
1.Right Click

41
Change the setting to share folders and printers
3 If the screen at right appears, file sharing is not enabled. Click “If you understand the security risks but want to share files without running the wizard, click here”.If the screen in 4 appears, file sharing is already enabled so it is not necessary to change the setting.
Select “Just enable file sharing”.
Click .
4 When RasterLink6 starts up for the first time, the PPD folder is set for file sharing, so “Share this folder on the network” is checked. Without making any changes, click to close the screen.
To run the Network Setup Wizard, specialist knowledge of networks is required. If you are not confident about mak-ing network settings, do not run the Network Setup Wiz-ard.
1.Click
3.Click
2.Select
OK
Click
OK

42
43
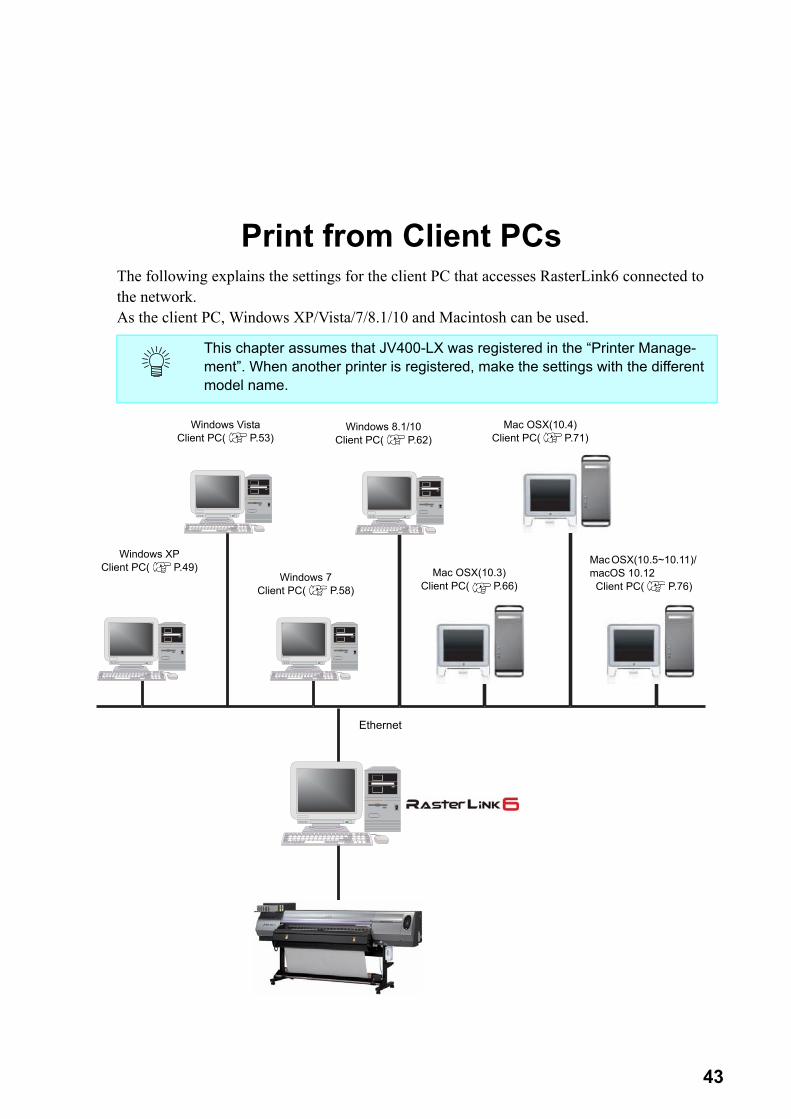
Print from Client PCsThe following explains the settings for the client PC that accesses RasterLink6 connected to the network. As the client PC, Windows XP/Vista/7/8.1/10 and Macintosh can be used.
This chapter assumes that JV400-LX was registered in the “Printer Manage-ment”. When another printer is registered, make the settings with the different model name.
Windows XPClient PC( P.49)
Windows 7Client PC( P.58)
Mac OSX(10.3)Client PC( P.66)
Ethernet
Windows VistaClient PC( P.53)
Mac OSX(10.4)Client PC( P.71)
Mac OSX(10.5~10.11)/ macOS 10.12
Client PC( P.76)
Windows 8.1/10Client PC( P.62)
44
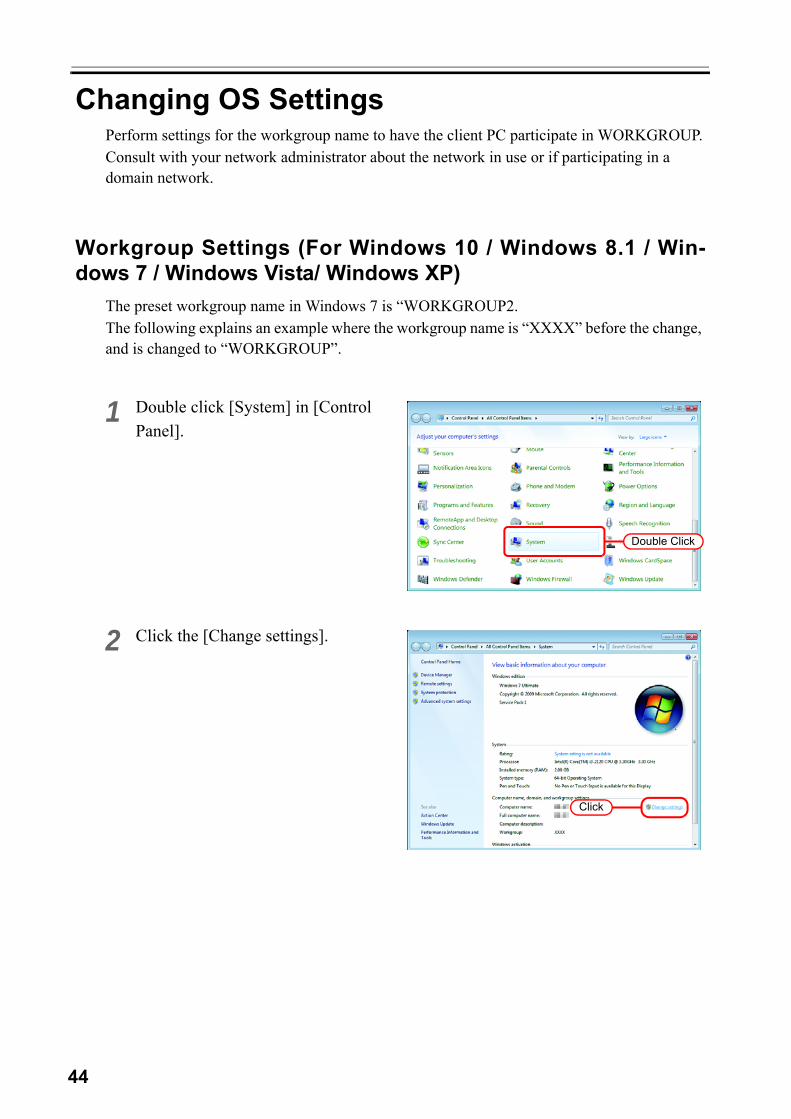
Changing OS SettingsPerform settings for the workgroup name to have the client PC participate in WORKGROUP.Consult with your network administrator about the network in use or if participating in a domain network.
Workgroup Settings (For Windows 10 / Windows 8.1 / Win-dows 7 / Windows Vista/ Windows XP)
The preset workgroup name in Windows 7 is “WORKGROUP2.The following explains an example where the workgroup name is “XXXX” before the change, and is changed to “WORKGROUP”.
1 Double click [System] in [Control Panel].
2 Click the [Change settings].
Double Click
Click
45
Changing OS Settings
3 Click the [Computer Name] tab.Click .
4 Change “Workgroup” and click .
5 Click .
6 The confirmation screen appears. Click . The PC is not restarted.
Input the same name as the workgroup name set in Ras-terLink6 PC.
1.Click
2.Click
Change
1.Change
2.Click
OK
Click
OK
Click
OK
46
7 On the “System Properties” screen, click .
8 The restart confirmation screen appears. Click to restart the PC.
Click
Close
Click
Restart Now
47
Changing OS Settings
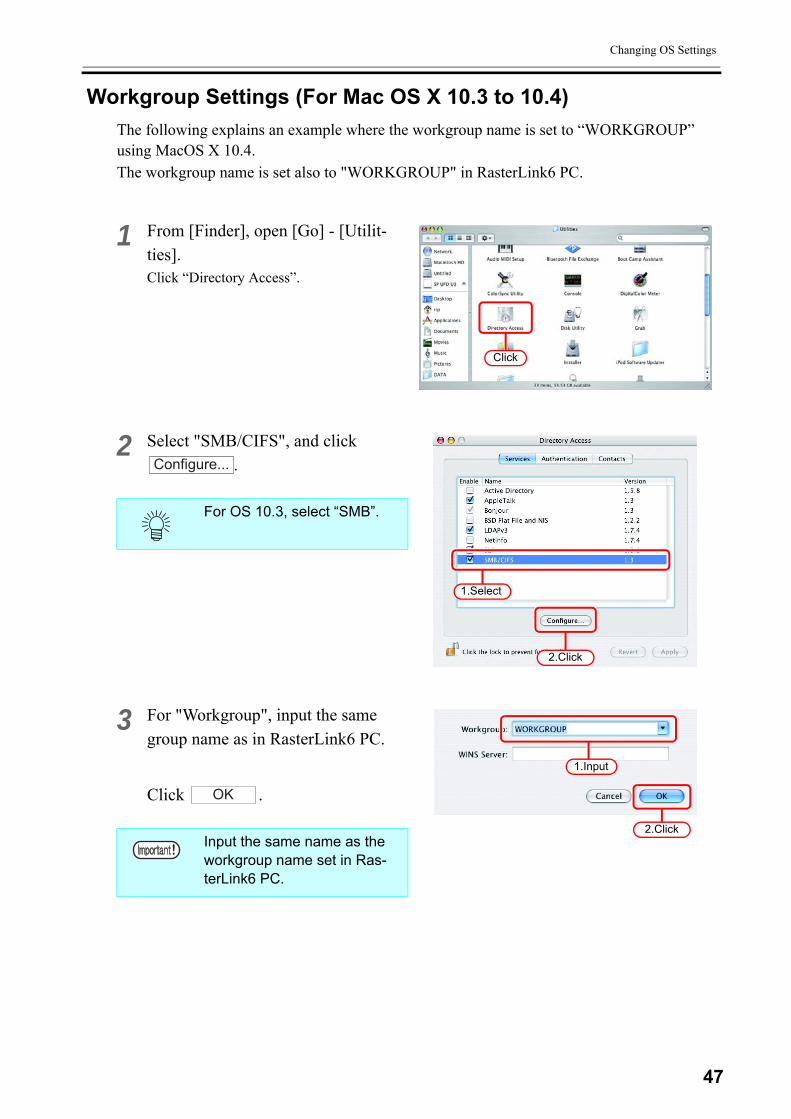
Workgroup Settings (For Mac OS X 10.3 to 10.4)The following explains an example where the workgroup name is set to “WORKGROUP” using MacOS X 10.4.The workgroup name is set also to "WORKGROUP" in RasterLink6 PC.
1 From [Finder], open [Go] - [Utilit-ties].Click “Directory Access”.
2 Select "SMB/CIFS", and click .
3 For "Workgroup", input the same group name as in RasterLink6 PC.
Click .
For OS 10.3, select “SMB”.
Input the same name as the workgroup name set in Ras-terLink6 PC.
Click
2.Click
1.Select
Configure...
1.Input
2.Click
OK
48
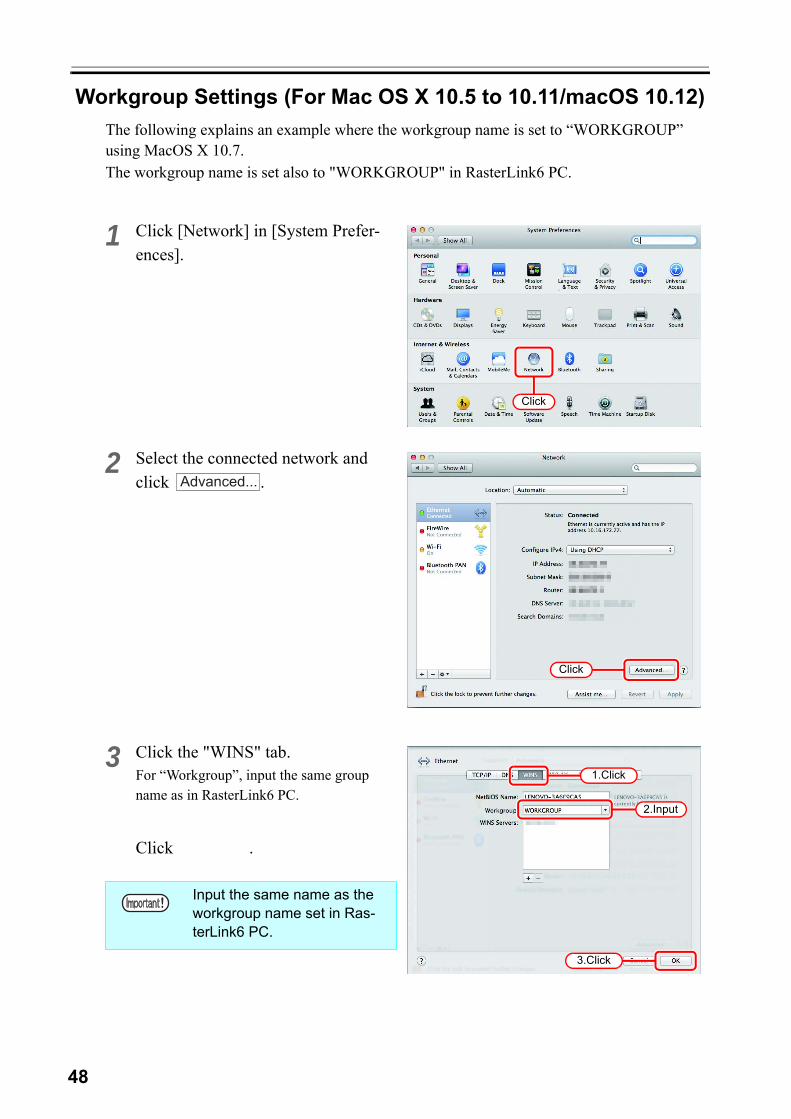
Workgroup Settings (For Mac OS X 10.5 to 10.11/macOS 10.12)The following explains an example where the workgroup name is set to “WORKGROUP” using MacOS X 10.7.The workgroup name is set also to "WORKGROUP" in RasterLink6 PC.
1 Click [Network] in [System Prefer-ences].
2 Select the connected network and click .
3 Click the "WINS" tab.For “Workgroup”, input the same group name as in RasterLink6 PC.
Click .
Input the same name as the workgroup name set in Ras-terLink6 PC.
Click
Click
Advanced...
2.Input
3.Click
1.Click

49
Set Windows XP Client PC
Set Windows XP Client PC
Install the printer driverDescribed below is the procedure for installing the printer driver on Windows XP.
1 In the Start menu, select "Control Panel".Open the “Printers and Faxes” win-dow.
Click “Add a printer”.
2 On the “Add Printer Wizard” win-dow, click .
3 Select the “A network printer, or a printer attached to another com-puter”.
Click .
Click
Click
Next
1.Select
2.Click
Next

50
4 Select the “Browse for a printer”.
Click .
5 From the list of Shared printers, select the PC on which RasterLink6 has been installed.
Select the printer driver “Printer Name” which you prepared on “Printer Management”.
6 When “Connect to Printer” dialog box warning appears, click “Yes”.
7 Click .
1.Select
2.Click
Next
1.Select
2.Click
Click
Click
Finish
51
Set Windows XP Client PC
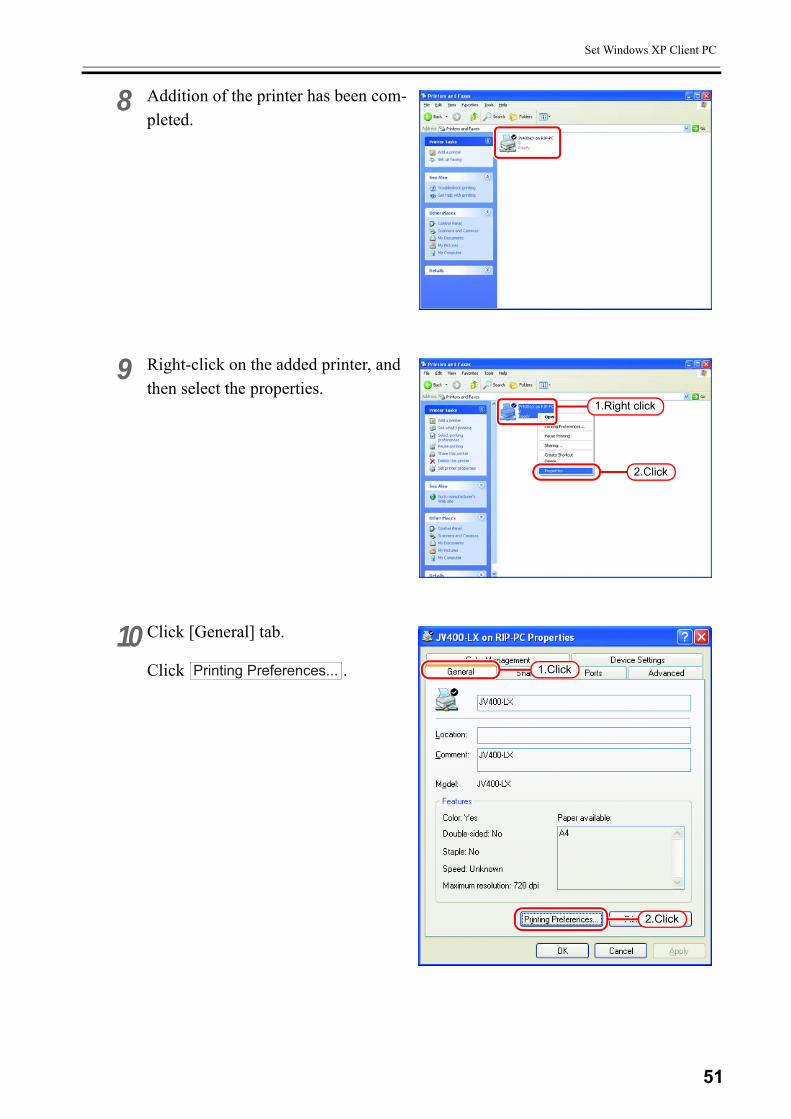
8 Addition of the printer has been com-pleted.
9 Right-click on the added printer, and then select the properties.
10 Click [General] tab.
Click .
1.Right click
2.Click
2.Click
1.ClickPrinting Preferences...

52
11 Click .
12 Select “Download as Softfont”.
Click .
Click
Advanced...
1.Select
2.Click
OK

53
Set Windows Vista Client PC
Set Windows Vista Client PC
Sharing and Discovery settingsThis section describes how to configure your Windows Vista PC to participate in a workgroup and to setup for sharing and discovery over the private network. If you want to configure your Windows Vista PC to participate in a domain network, or for information on your network, please contact your network administrator.
1 Double click [Network and Sharing Center] on [Control Panel].
2 Click of “Network discovery”.
Double Click
Click
54
3 Select “Turn on network discovery”.
Click .
If "User Account Control" screen is dis-played, click .
4 Select “No, make the network that I am connected to a private network”.
2.Click1.Select
Apply
Continue
55
Set Windows Vista Client PC
Install the printer driverDescribed below is the procedure for installing the printer driver on Windows Vista.
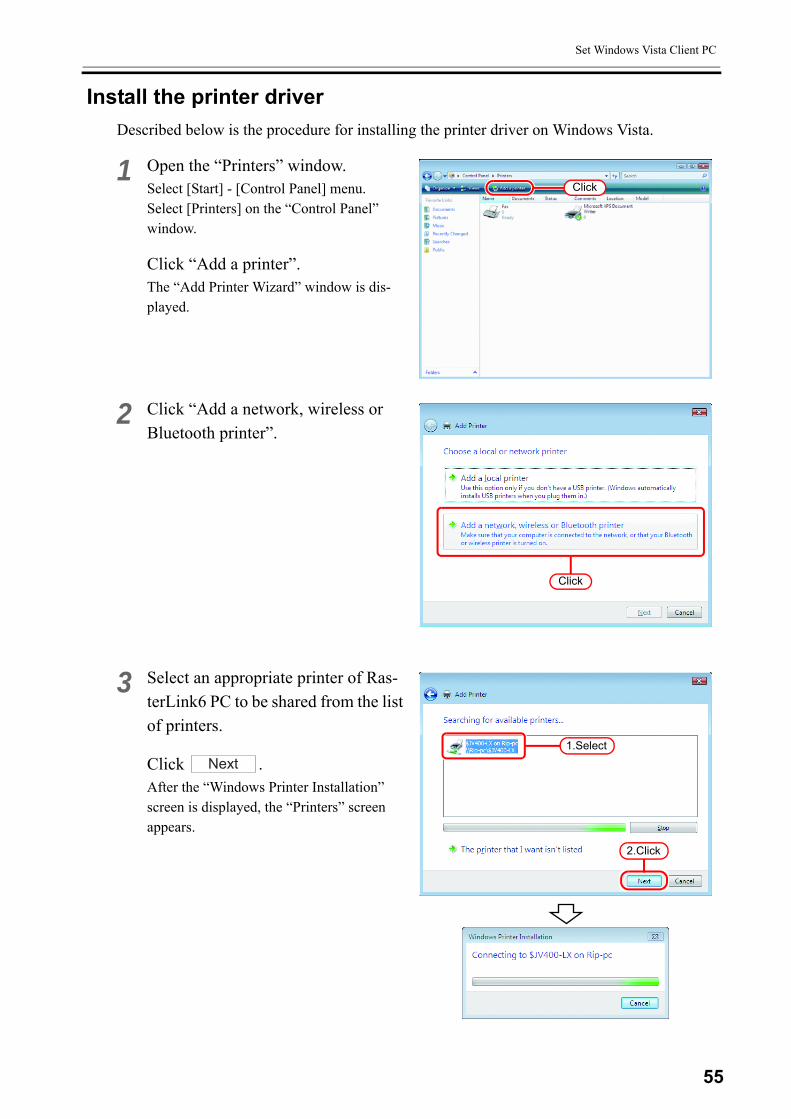
1 Open the “Printers” window.Select [Start] - [Control Panel] menu.Select [Printers] on the “Control Panel” window.
Click “Add a printer”.The “Add Printer Wizard” window is dis-played.
2 Click “Add a network, wireless or Bluetooth printer”.
3 Select an appropriate printer of Ras-terLink6 PC to be shared from the list of printers.
Click .After the “Windows Printer Installation” screen is displayed, the “Printers” screen appears.
Click
Click
2.Click
1.Select
Next

56
4 Click “Install driver”.If "User Account Control" screen is dis-played, click .
5 Click .
6 Click .Addition of the printer has been completed.
7 Set the added printer.Right-click on the added printer, and then select the properties from the pop-up menu.
Click
Continue
Click
Next
Click
Finish
2.Click
1.Right click
57
Set Windows Vista Client PC
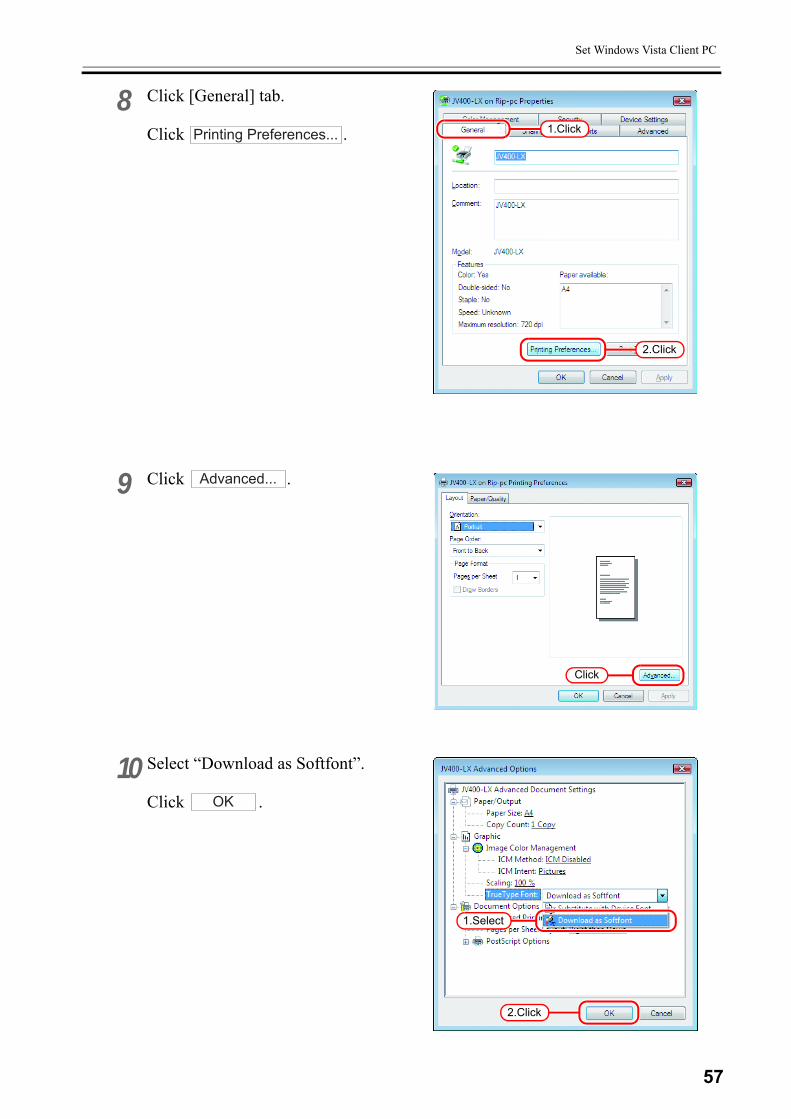
8 Click [General] tab.
Click .
9 Click .
10 Select “Download as Softfont”.
Click .
1.Click
2.Click
Printing Preferences...
Click
Advanced...
2.Click
1.Select
OK
58
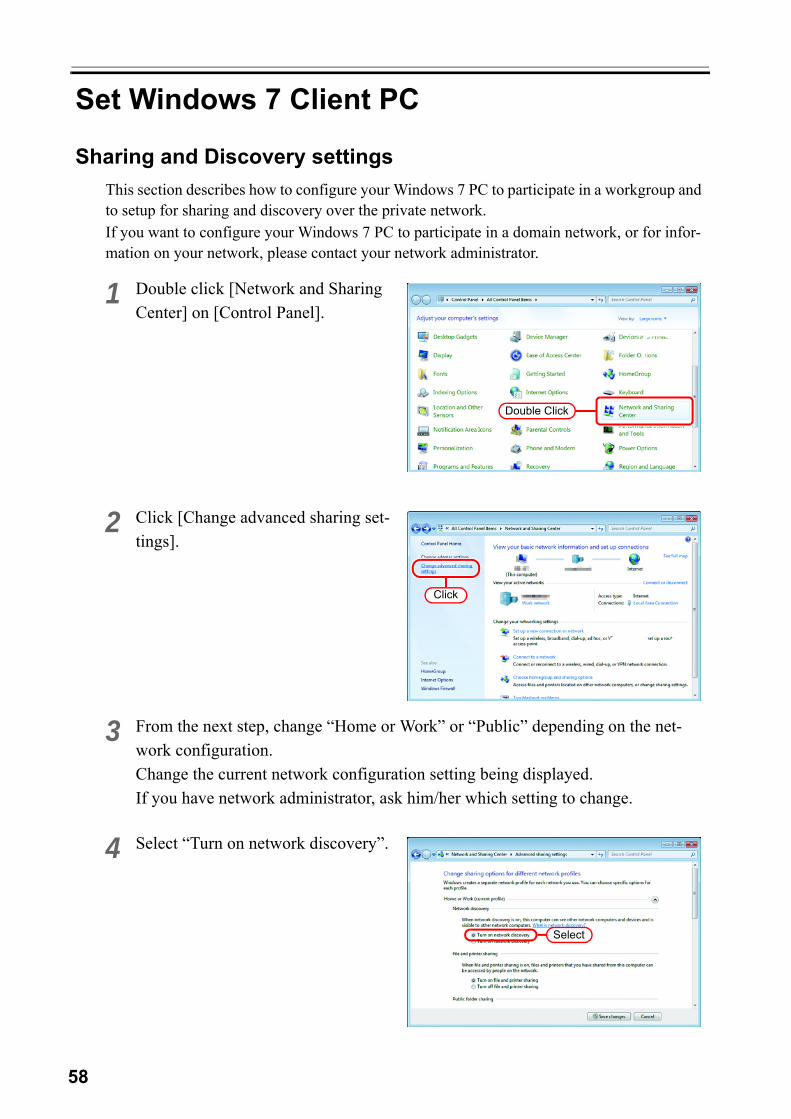
Set Windows 7 Client PC
Sharing and Discovery settingsThis section describes how to configure your Windows 7 PC to participate in a workgroup and to setup for sharing and discovery over the private network. If you want to configure your Windows 7 PC to participate in a domain network, or for infor-mation on your network, please contact your network administrator.
1 Double click [Network and Sharing Center] on [Control Panel].
2 Click [Change advanced sharing set-tings].
3 From the next step, change “Home or Work” or “Public” depending on the net-work configuration.Change the current network configuration setting being displayed.If you have network administrator, ask him/her which setting to change.
4 Select “Turn on network discovery”.
Double Click
Click
Select
59
Set Windows 7 Client PC
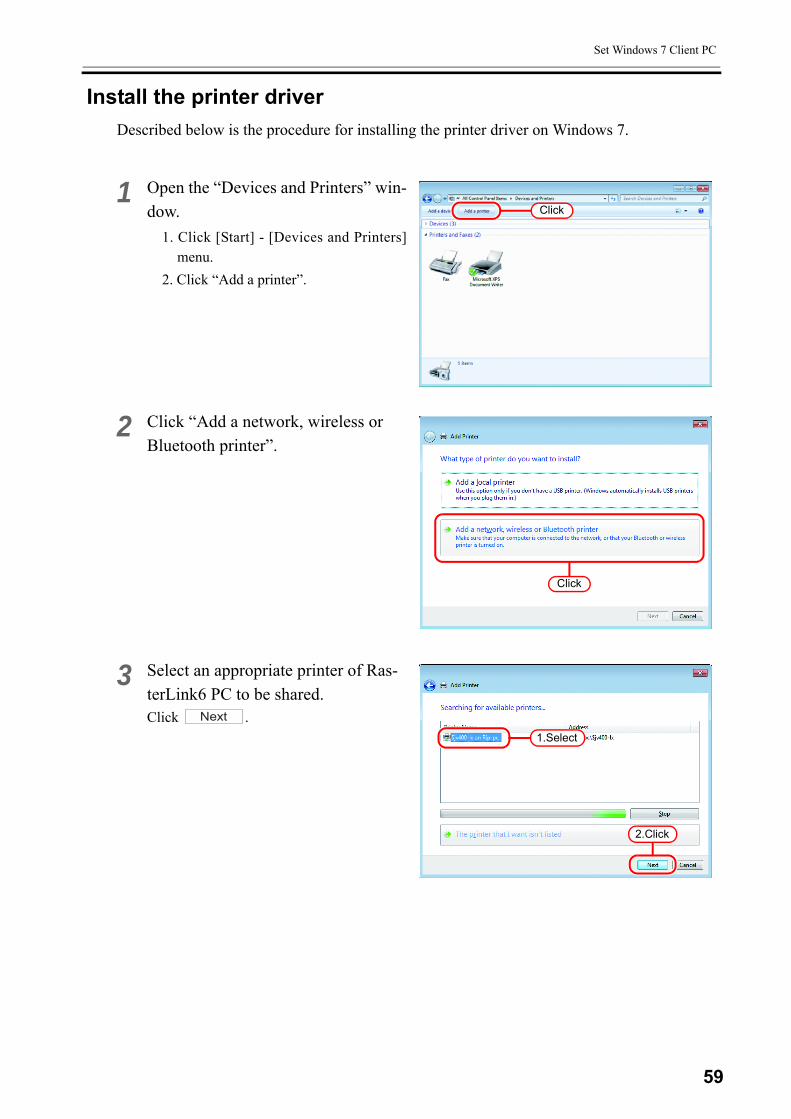
Install the printer driverDescribed below is the procedure for installing the printer driver on Windows 7.
1 Open the “Devices and Printers” win-dow.
1. Click [Start] - [Devices and Printers]menu.
2. Click “Add a printer”.
2 Click “Add a network, wireless or Bluetooth printer”.
3 Select an appropriate printer of Ras-terLink6 PC to be shared.Click .
Click
Click
2.Click
1.Select
Next
60
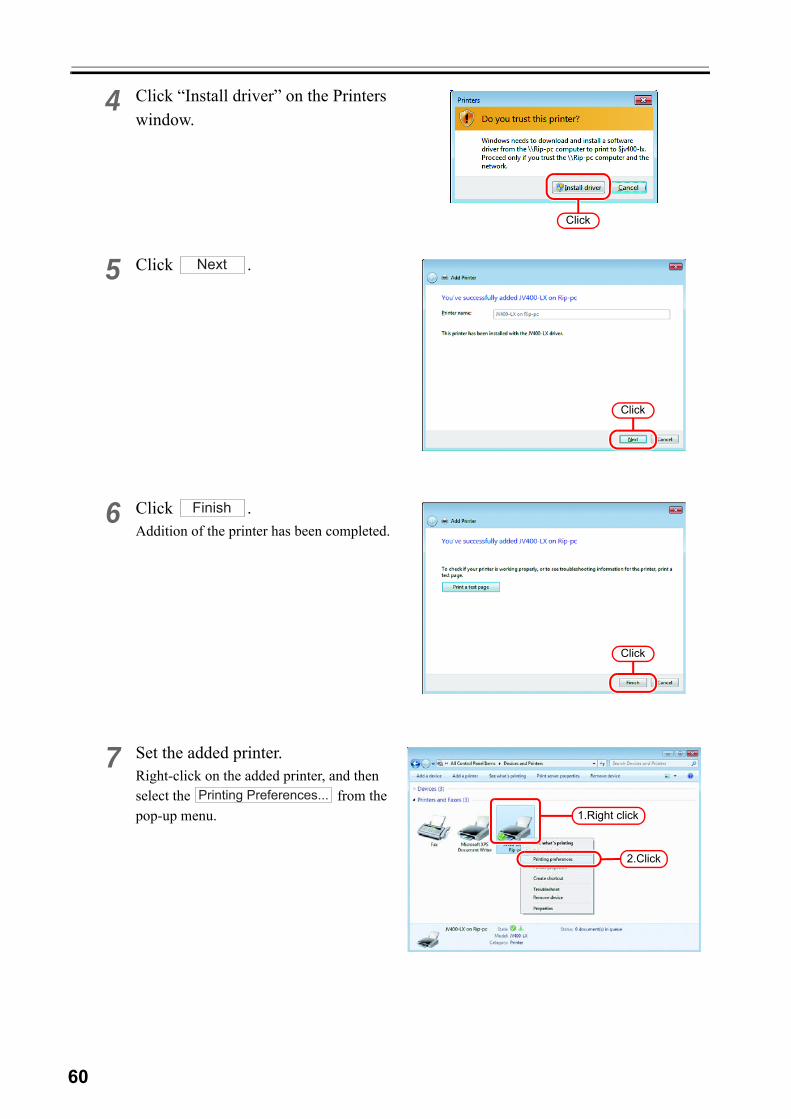
4 Click “Install driver” on the Printers window.
5 Click .
6 Click .Addition of the printer has been completed.
7 Set the added printer.Right-click on the added printer, and then select the from the pop-up menu.
Click
Click
Next
Click
Finish
2.Click
1.Right click
Printing Preferences...
61
Set Windows 7 Client PC
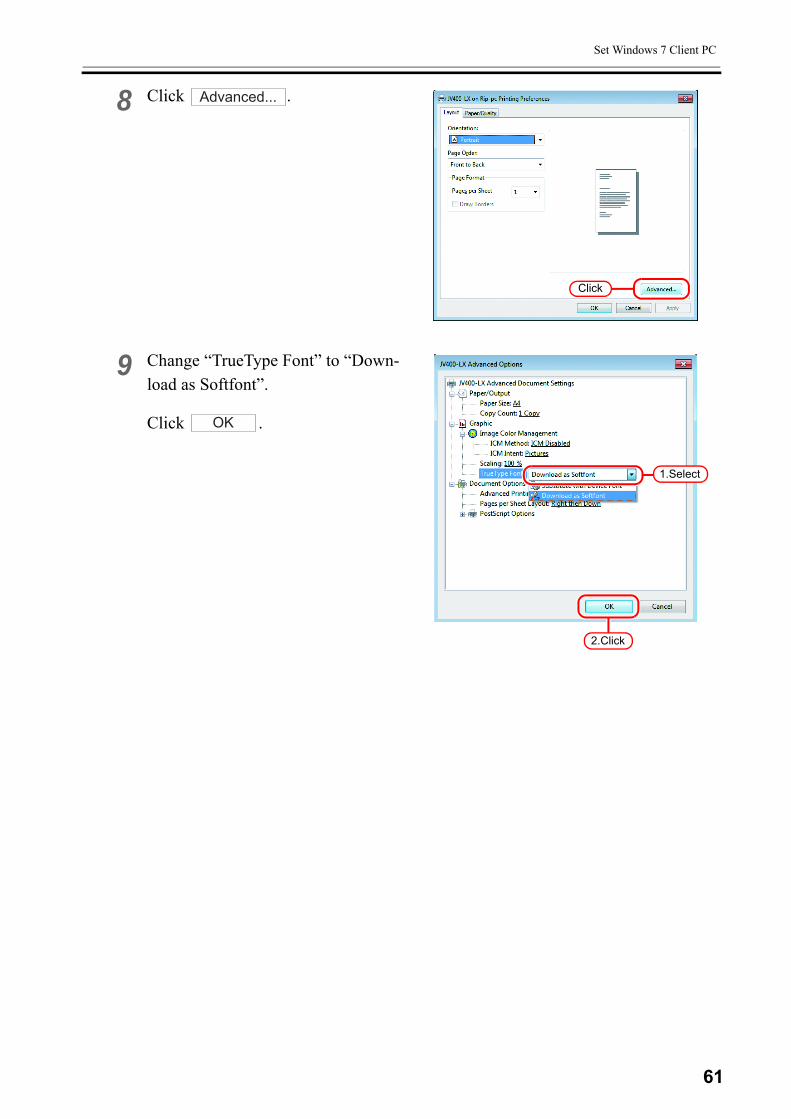
8 Click .
9 Change “TrueType Font” to “Down-load as Softfont”.
Click .
Click
Advanced...
2.Click
1.Select
OK
62
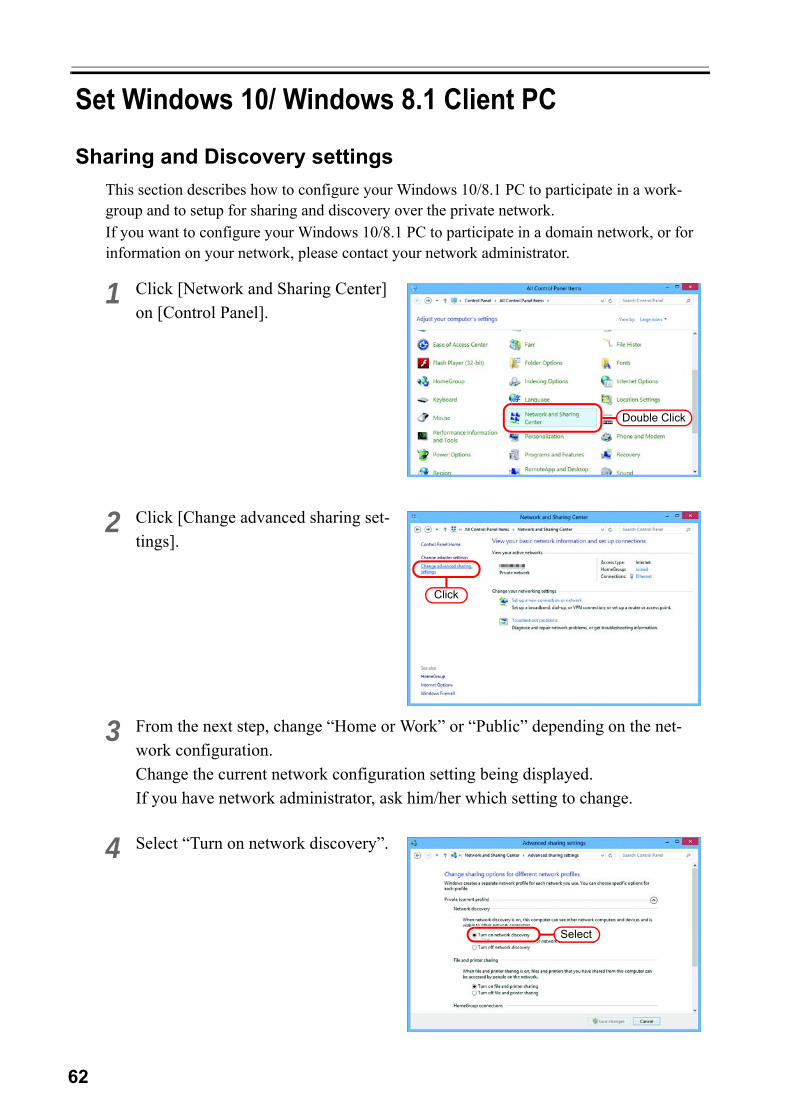
Set Windows 10/ Windows 8.1 Client PC
Sharing and Discovery settingsThis section describes how to configure your Windows 10/8.1 PC to participate in a work-group and to setup for sharing and discovery over the private network. If you want to configure your Windows 10/8.1 PC to participate in a domain network, or for information on your network, please contact your network administrator.
1 Click [Network and Sharing Center] on [Control Panel].
2 Click [Change advanced sharing set-tings].
3 From the next step, change “Home or Work” or “Public” depending on the net-work configuration.Change the current network configuration setting being displayed.If you have network administrator, ask him/her which setting to change.
4 Select “Turn on network discovery”.
Double Click
Click
Select
63
Set Windows 10/ Windows 8.1 Client PC
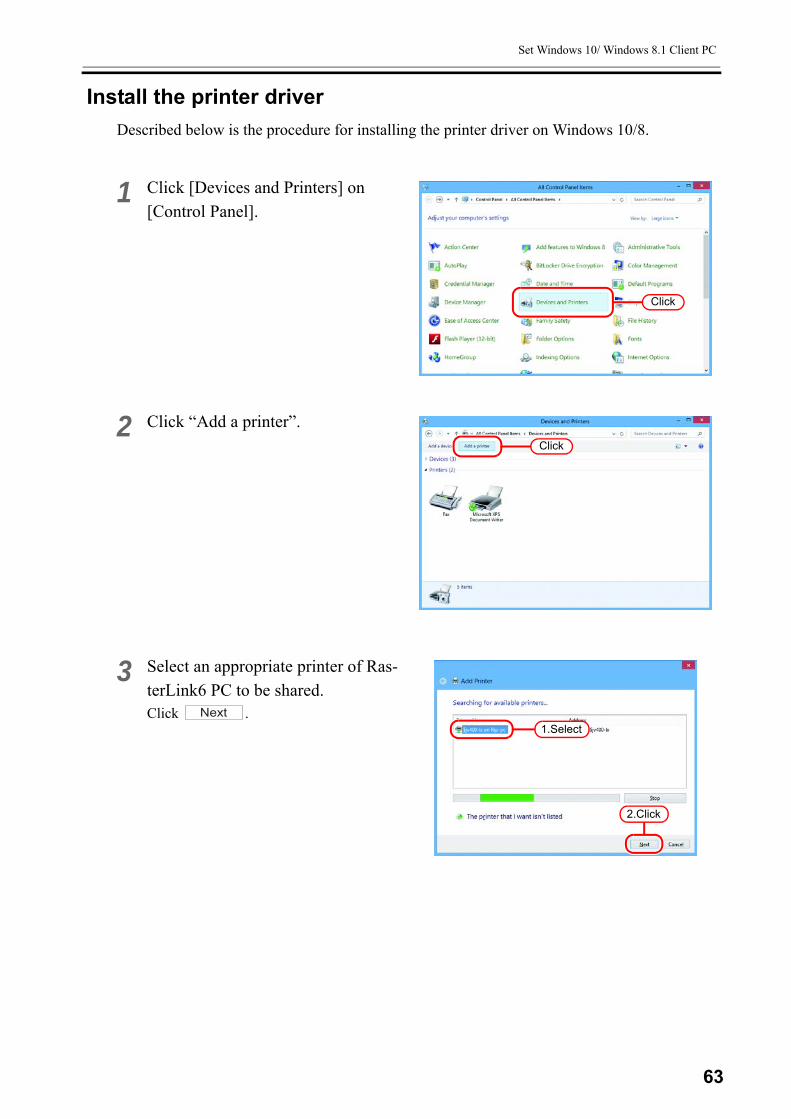
Install the printer driverDescribed below is the procedure for installing the printer driver on Windows 10/8.
1 Click [Devices and Printers] on [Control Panel].
2 Click “Add a printer”.
3 Select an appropriate printer of Ras-terLink6 PC to be shared.Click .
Click
Click
2.Click
1.SelectNext
64
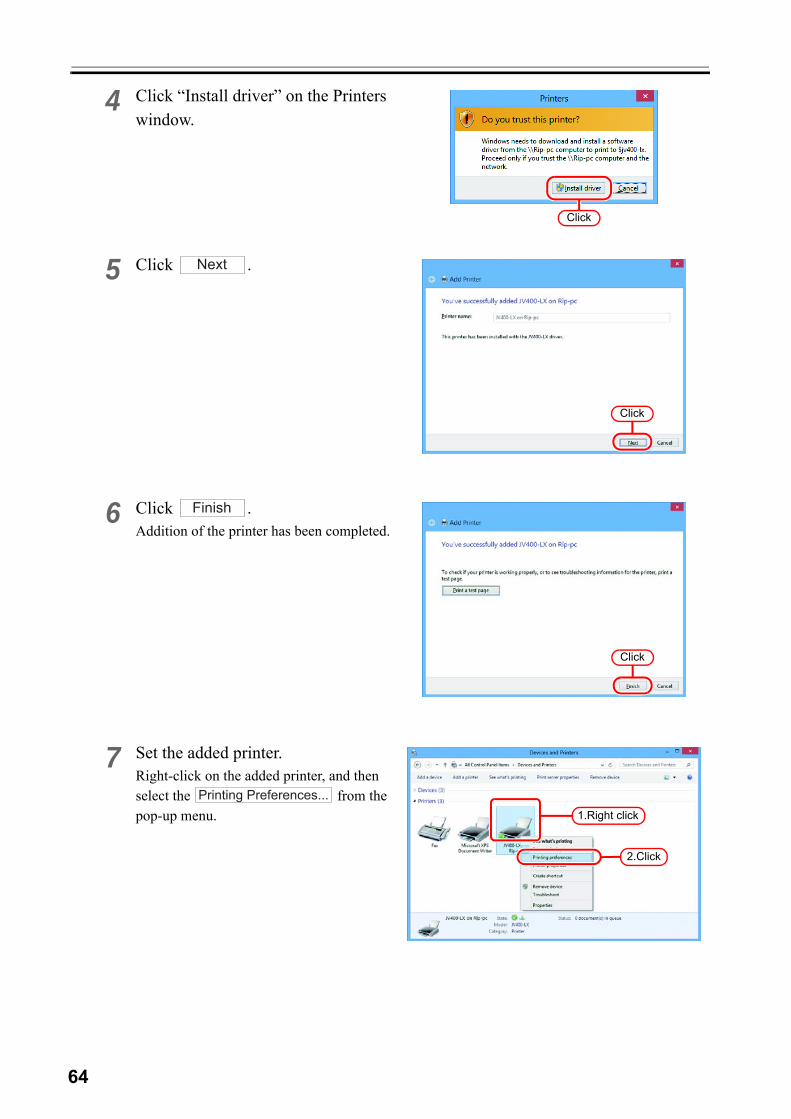
4 Click “Install driver” on the Printers window.
5 Click .
6 Click .Addition of the printer has been completed.
7 Set the added printer.Right-click on the added printer, and then select the from the pop-up menu.
Click
Click
Next
Click
Finish
2.Click
1.Right click
Printing Preferences...

65
Set Windows 10/ Windows 8.1 Client PC
8 Click .
9 Change “TrueType Font” to “Down-load as Softfont”.
Click .
Click
Advanced...
2.Click
1.Select
OK

66
Set Macintosh Client PC (OS 10.3)
Hot folder setting by FinderSelect a file server by Finder to access the hot folder of the RasterLink6 from the Macintosh client.
1 Open [Go] - [Connect to Server] from [Finder].
2 Enter the “Server Address” as fol-lows.“afp:/at/RasterLink6 PC host name” or “afp://RasterLink6 PC IP address”
Click .
3 Select the hot folder you want to use.
Click .
Select [Utilities] from [Finder], select [Directory Access], and check that the option to use SMB is selected.
Click
1.Enter
2.Click
Connect
2.Click
2.SelectOK
67
Set Macintosh Client PC (OS 10.3)
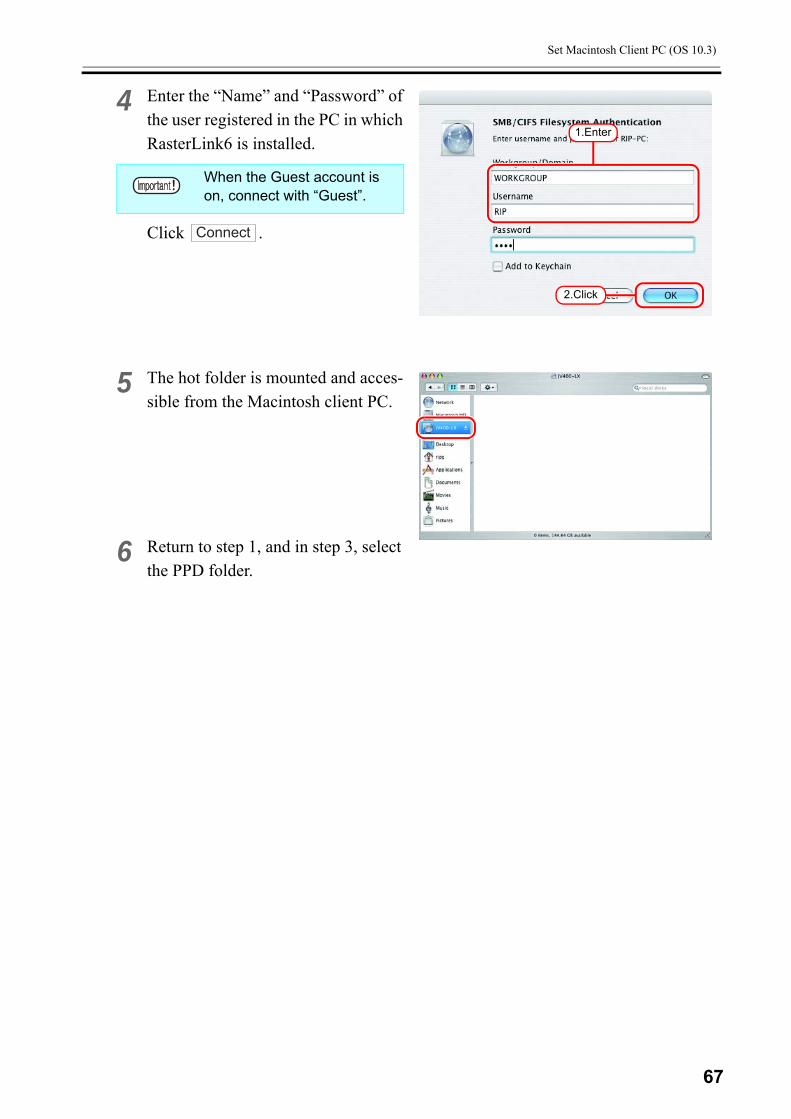
4 Enter the “Name” and “Password” of the user registered in the PC in which RasterLink6 is installed.
Click .
5 The hot folder is mounted and acces-sible from the Macintosh client PC.
6 Return to step 1, and in step 3, select the PPD folder.
When the Guest account is on, connect with “Guest”.
1.Enter
2.Click
Connect
68
Printer setting
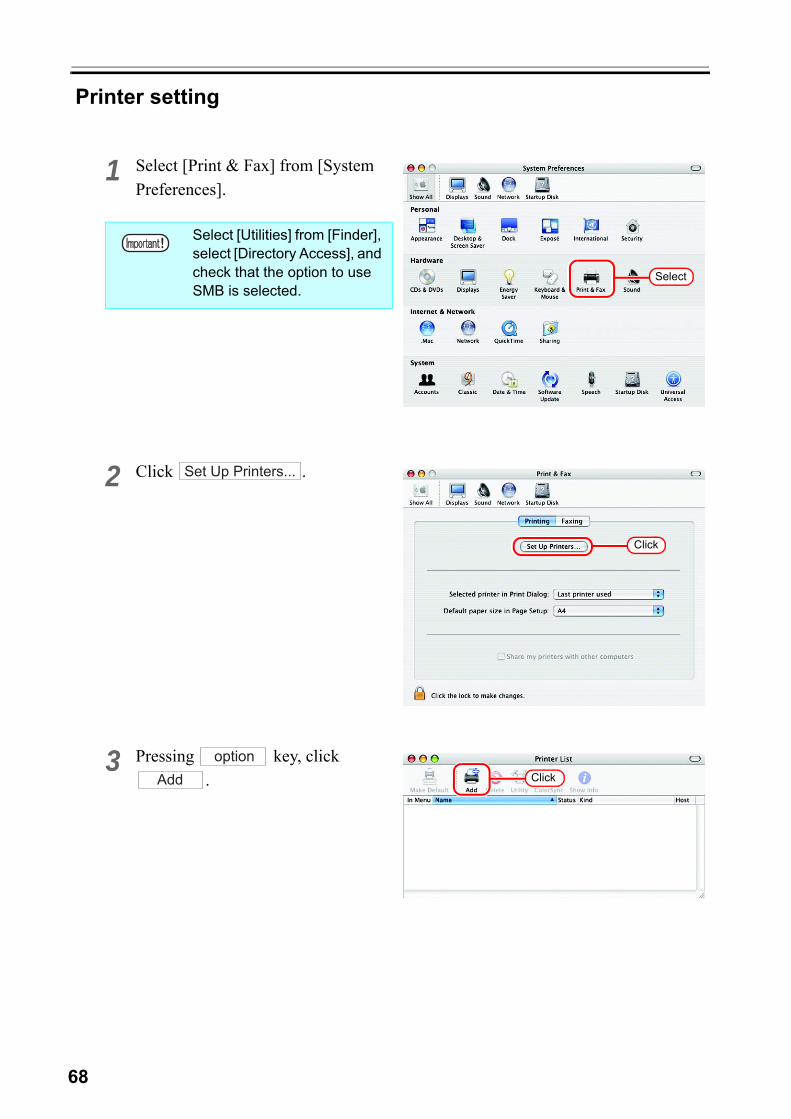
1 Select [Print & Fax] from [System Preferences].
2 Click .
3 Pressing key, click .
Select [Utilities] from [Finder], select [Directory Access], and check that the option to use SMB is selected.
Select
Click
Set Up Printers...
Click
option
Add

69
Set Macintosh Client PC (OS 10.3)
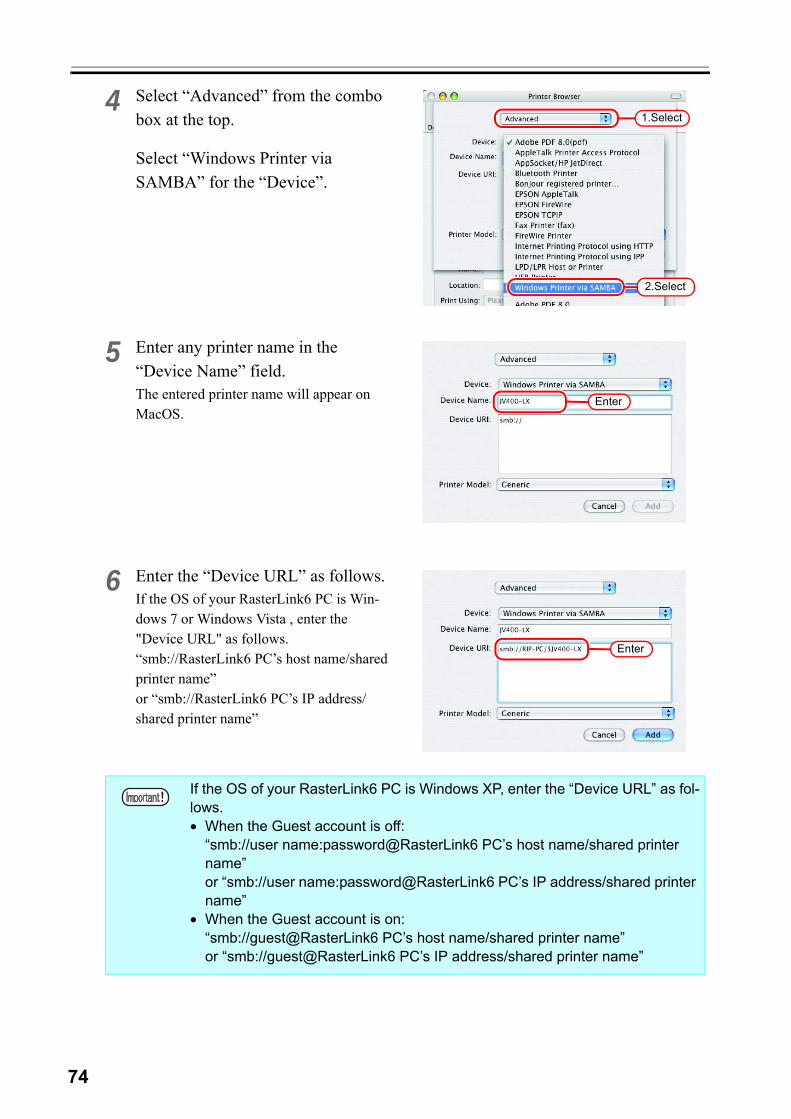
4 Select “Advanced” from the combo box at the top.
Select “Windows Printer via SAMBA” for the “Device”.
5 Enter any printer name in the “Device Name” field. The entered printer name will appear on MacOS.
6 Enter the “Device URL” as follows.If the OS of your RasterLink6 PC is Win-dows 7 or Windows Vista , enter the "Device URL" as follows.“smb://RasterLink6 PC’s host name/shared printer name”or “smb://RasterLink6 PC’s IP address/shared printer name”
If the OS of your RasterLink6 PC is Windows XP, enter the “Device URL” as follows.• When the Guest account is off:
“smb://user name:password@RasterLink6 PC’s host name/shared printer name”or “smb://user name:password@RasterLink6 PC’s IP address/shared printer name”
• When the Guest account is on:“smb://guest@RasterLink6 PC’s host name/shared printer name”or “smb://guest@RasterLink6 PC’s IP address/shared printer name”
2.Select
1.Select
Input
Input

70
7 Select the printer to be used.Select “Other...” for the “Printer Model”.
8 Select “MKRL5xEN.PPD” in the mounted PPD folder.
Click .
9 Check that the PPD file selected in Step 8 is displayed at the “Printer Model”.
Click .
10 The new printer is added to the [Printer List].
11 Repeat steps 3 to 10 to add the required Printers.
Do not use “MKIJEN.PPD” with Mac OS X.
Select
1.Select
2.Click
Choose
2.Click
1.Check
Add
71
Set Macintosh Client PC (OS 10.4)
Set Macintosh Client PC (OS 10.4)
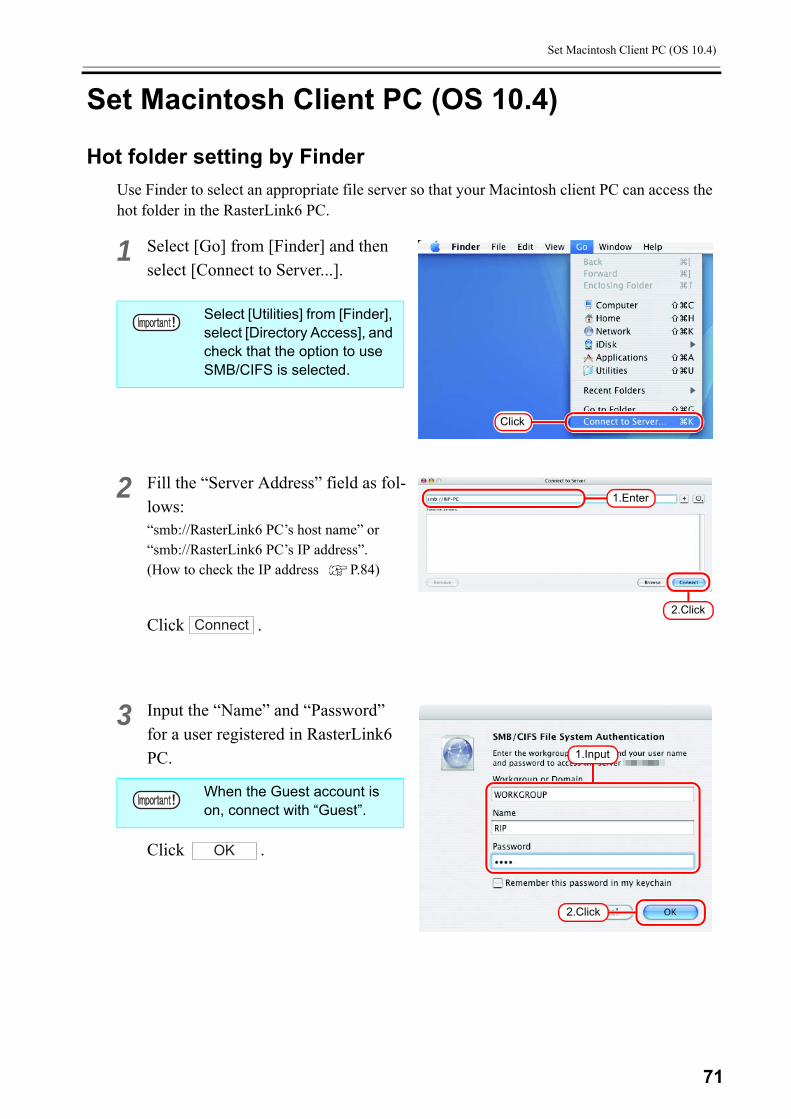
Hot folder setting by FinderUse Finder to select an appropriate file server so that your Macintosh client PC can access the hot folder in the RasterLink6 PC.
1 Select [Go] from [Finder] and then select [Connect to Server...].
2 Fill the “Server Address” field as fol-lows:“smb://RasterLink6 PC’s host name” or “smb://RasterLink6 PC’s IP address”.(How to check the IP address P.84)
Click .
3 Input the “Name” and “Password” for a user registered in RasterLink6 PC.
Click .
Select [Utilities] from [Finder], select [Directory Access], and check that the option to use SMB/CIFS is selected.
When the Guest account is on, connect with “Guest”.
Click
1.Enter
2.ClickConnect
2.Click
1.Input
OK
72
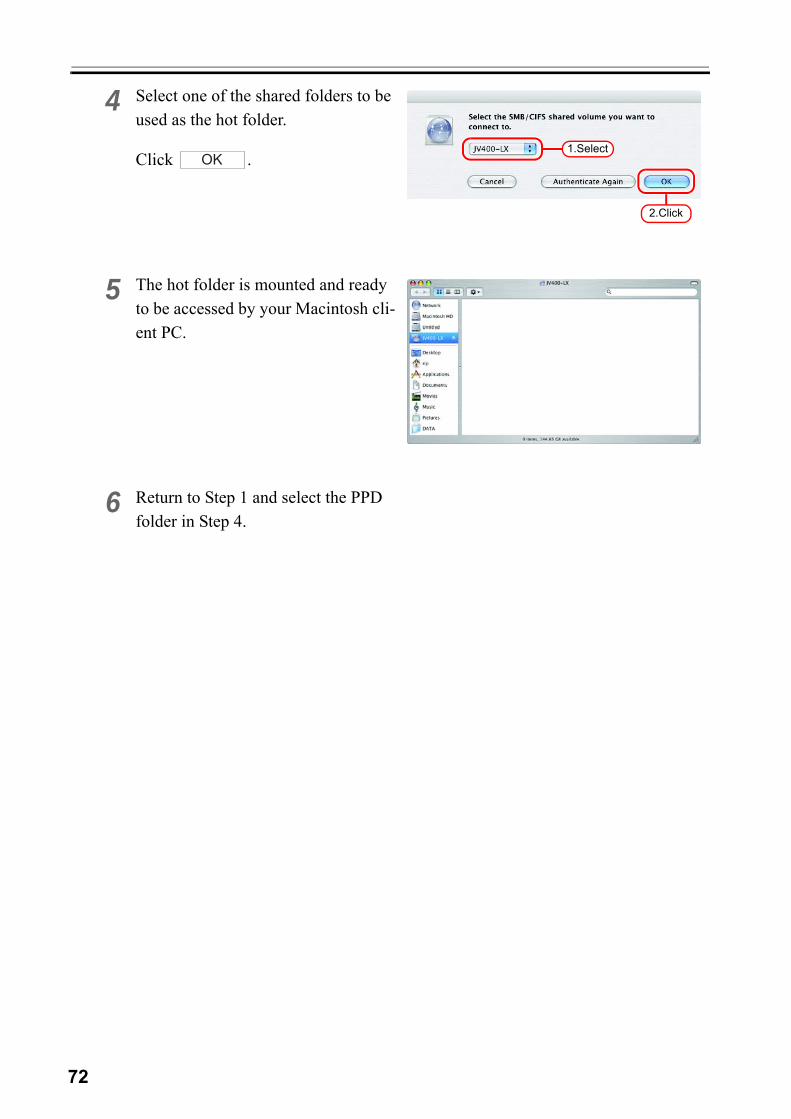
4 Select one of the shared folders to be used as the hot folder.
Click .
5 The hot folder is mounted and ready to be accessed by your Macintosh cli-ent PC.
6 Return to Step 1 and select the PPD folder in Step 4.
1.Select
2.Click
OK
73
Set Macintosh Client PC (OS 10.4)
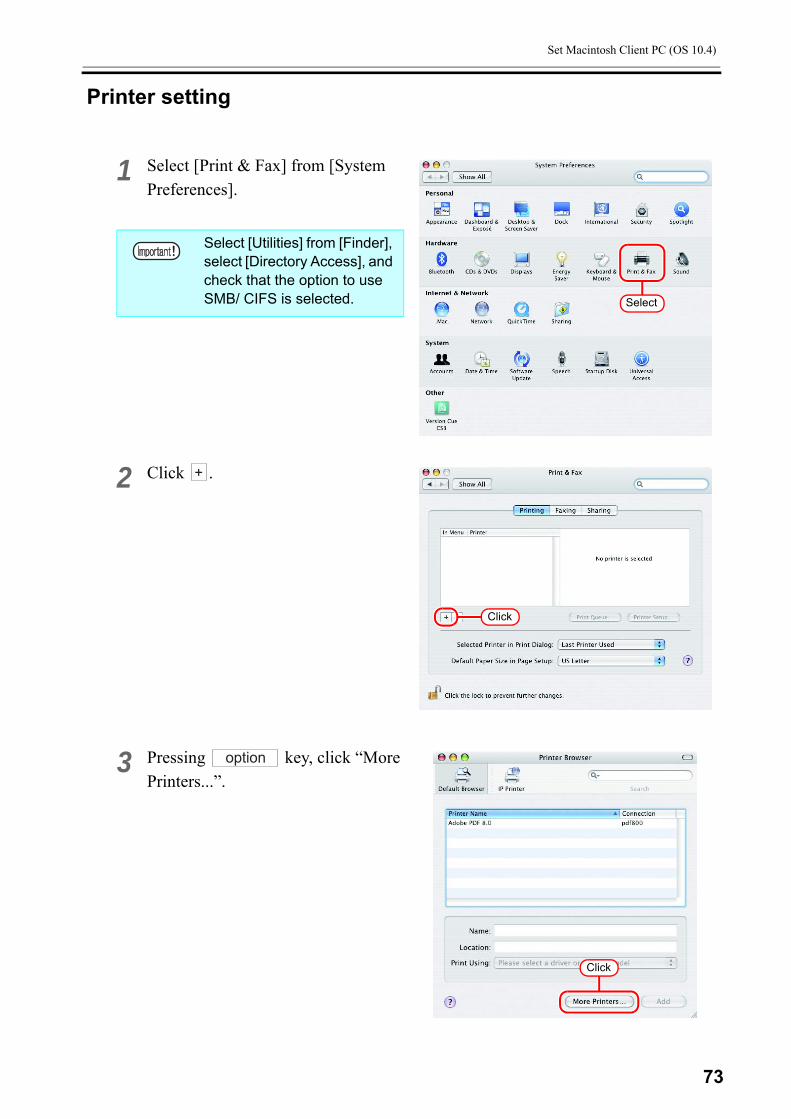
Printer setting
1 Select [Print & Fax] from [System Preferences].
2 Click .
3 Pressing key, click “More Printers...”.
Select [Utilities] from [Finder], select [Directory Access], and check that the option to use SMB/ CIFS is selected. Select
Click
+
Click
option
74
4 Select “Advanced” from the combo box at the top.
Select “Windows Printer via SAMBA” for the “Device”.
5 Enter any printer name in the “Device Name” field. The entered printer name will appear on MacOS.
6 Enter the “Device URL” as follows.If the OS of your RasterLink6 PC is Win-dows 7 or Windows Vista , enter the "Device URL" as follows.“smb://RasterLink6 PC’s host name/shared printer name”or “smb://RasterLink6 PC’s IP address/shared printer name”
If the OS of your RasterLink6 PC is Windows XP, enter the “Device URL” as fol-lows.• When the Guest account is off:
“smb://user name:password@RasterLink6 PC’s host name/shared printer name”or “smb://user name:password@RasterLink6 PC’s IP address/shared printer name”
• When the Guest account is on:“smb://guest@RasterLink6 PC’s host name/shared printer name”or “smb://guest@RasterLink6 PC’s IP address/shared printer name”
2.Select
1.Select
Enter
Enter

75
Set Macintosh Client PC (OS 10.4)
7 Select the printer to be used.Select “Other...” for the “Printer Model”.
8 Select “MKRL5xEN.PPD” from the mounted PPD folder.
Click .
9 Check that the PPD file selected in Step 8 is displayed at the “Printer Model”.
Click .
10 The new printer is added to the [Printer List].
11 Repeat Steps 3 to 10 to add the required printers.
Do not use “MKRL5EN.PPD” with OS X.
Select
1.Select
2.Click
Choose
1.Check
2.Click
Add

76
Set Macintosh Client PC (OS 10.5 ~ 10.12)
Hot folder setting by FinderUse Finder to select an appropriate file server so that your Macintosh client PC can access the hot folder in the RasterLink6 PC.
1 Open [Go] - [Connect to Server] in the [Finder].
2 Enter the “Server Address” as fol-lows.“smb://RasterLink6 PC host name” or “smb://RasterLink6 PC IP address”(How to check the IP address P.84)
Click .
3 Enter the “Name” and “Password” of the user registered in the PC in which RasterLink6 is installed.
Click .
The following explains an example in Mac OSX 10.7. Unless otherwise speci-fied, the procedure is the same in other OSs.
When the Guest account is on, connect with “Guest”.
Click
1.Enter
2.Click
Connect
1.Enter
2.Click
Connect

77
Set Macintosh Client PC (OS 10.5 ~ 10.12)
4 Select the hot folder and the PPD folder.
Click .
5 The hot folder and the PPD folder are mounted and accessible from the Macintosh client PC.
1.Select
2.Click
OK

78
Printer setting
1 Select [Print & Scan] from [System Preferences].
2 Click .
3 Select “Windows” from the menu.
Select “rip-pc” from printer browse list.
For OS 10.5 to 10.6, select [Print & Fax].For OS 10.9 and later, select "Print & Scan".
If the RasterLink6 PC cannot be found in this screen, refer to “Add a printer manually” ( P.81) to add the printer.
Select
Click
+
1.Select
2.Click
79
Set Macintosh Client PC (OS 10.5 ~ 10.12)
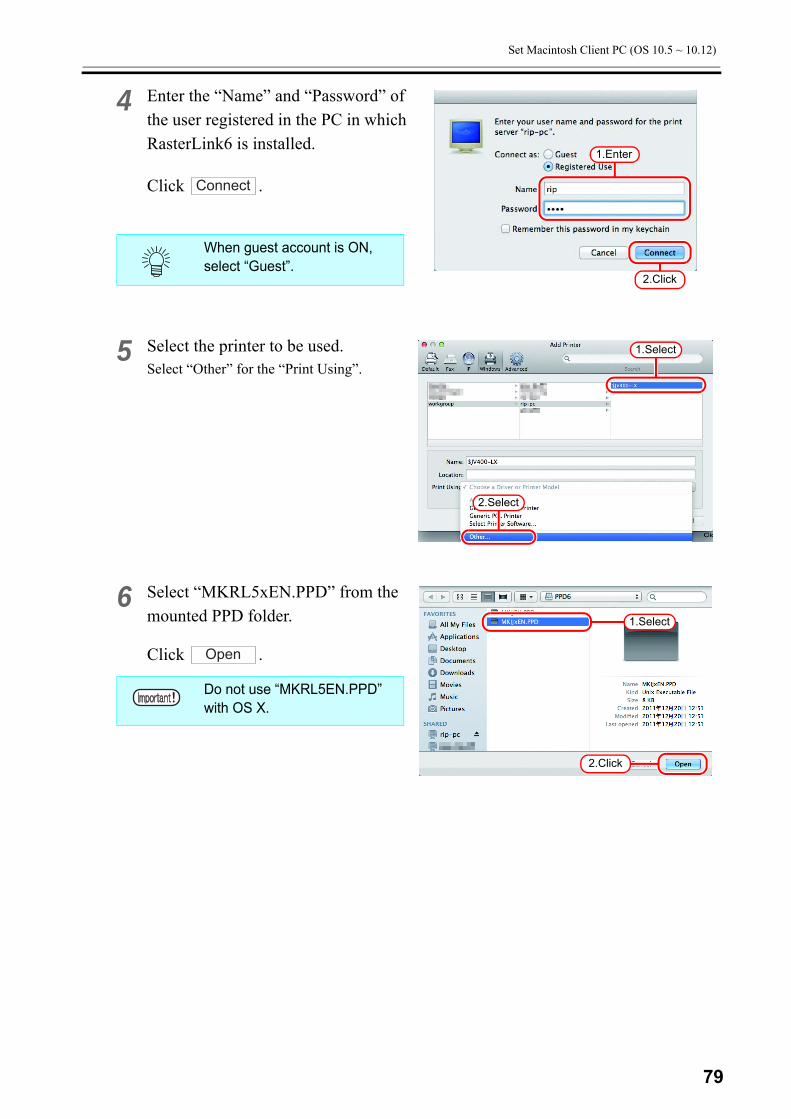
4 Enter the “Name” and “Password” of the user registered in the PC in which RasterLink6 is installed.
Click .
5 Select the printer to be used.Select “Other” for the “Print Using”.
6 Select “MKRL5xEN.PPD” from the mounted PPD folder.
Click .
When guest account is ON, select “Guest”.
Do not use “MKRL5EN.PPD” with OS X.
1.Enter
2.Click
Connect
1.Select
2.Select
2.Click
1.Select
Open

80
7 Check that “RasterLink6 (for OSX)” is displayed in “Print Using”.
Click .
8 The new printer is added to the [Print & Fax] list.
9 Repeat Steps 2 to 8 to add the required printers.
1.Check
2.Click
Add
81
Set Macintosh Client PC (OS 10.5 ~ 10.12)
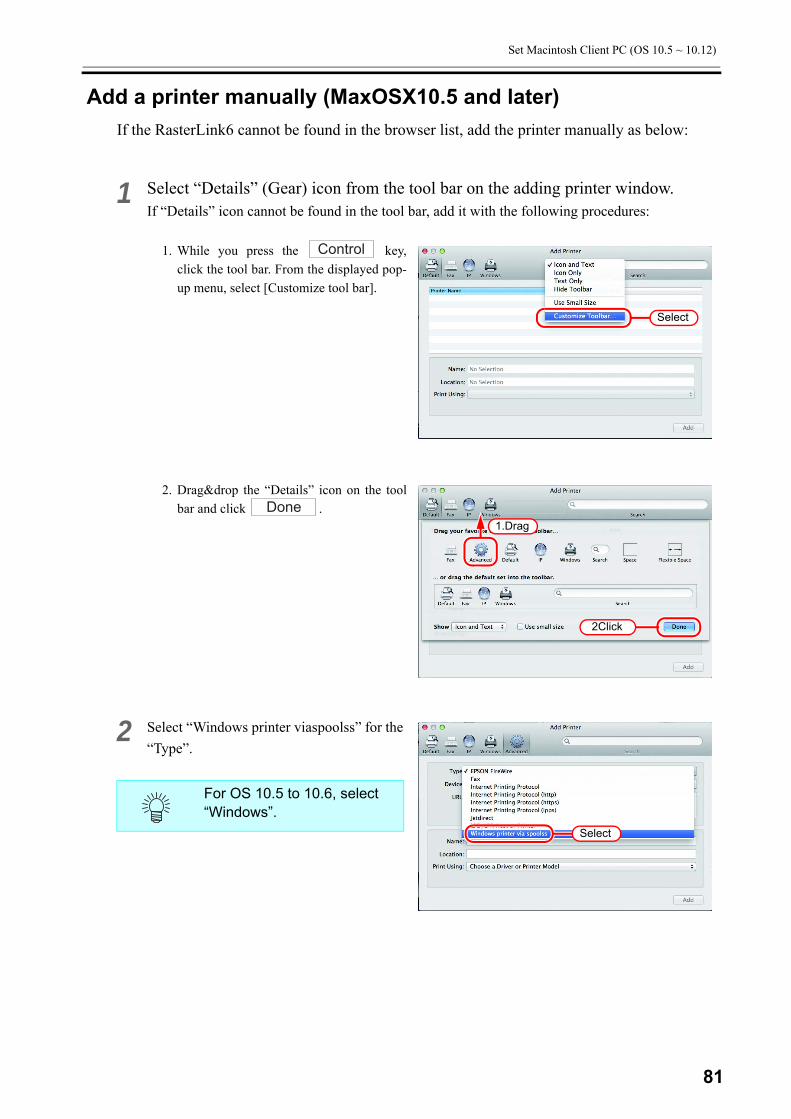
Add a printer manually (MaxOSX10.5 and later)If the RasterLink6 cannot be found in the browser list, add the printer manually as below:
1 Select “Details” (Gear) icon from the tool bar on the adding printer window.If “Details” icon cannot be found in the tool bar, add it with the following procedures:
1. While you press the key,click the tool bar. From the displayed pop-up menu, select [Customize tool bar].
2. Drag&drop the “Details” icon on the toolbar and click .
2 Select “Windows printer viaspoolss” for the “Type”.
For OS 10.5 to 10.6, select “Windows”.
Select
Control
1.Drag
2Click
Done
Select
82
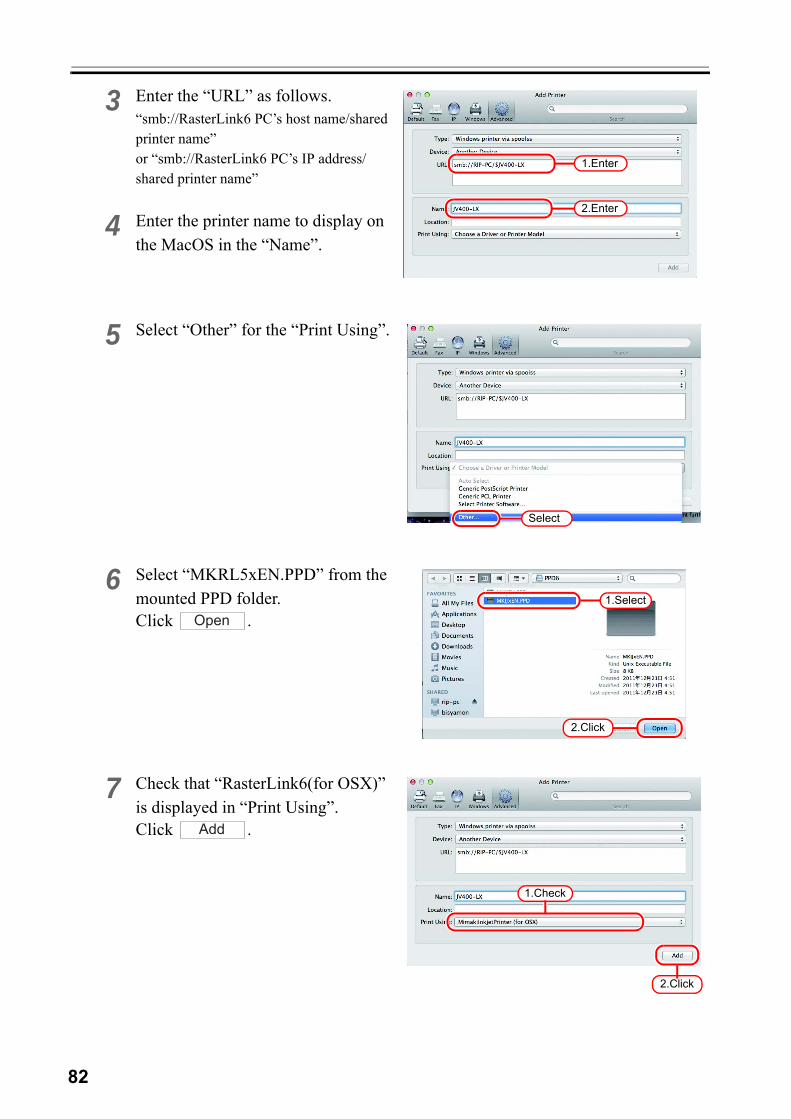
3 Enter the “URL” as follows.“smb://RasterLink6 PC’s host name/shared printer name”or “smb://RasterLink6 PC’s IP address/shared printer name”
4 Enter the printer name to display on the MacOS in the “Name”.
5 Select “Other” for the “Print Using”.
6 Select “MKRL5xEN.PPD” from the mounted PPD folder.Click .
7 Check that “RasterLink6(for OSX)” is displayed in “Print Using”.Click .
2.Enter
1.Enter
Select
2.Click
1.Select
Open
2.Click
1.Check
Add
83
Set Macintosh Client PC (OS 10.5 ~ 10.12)
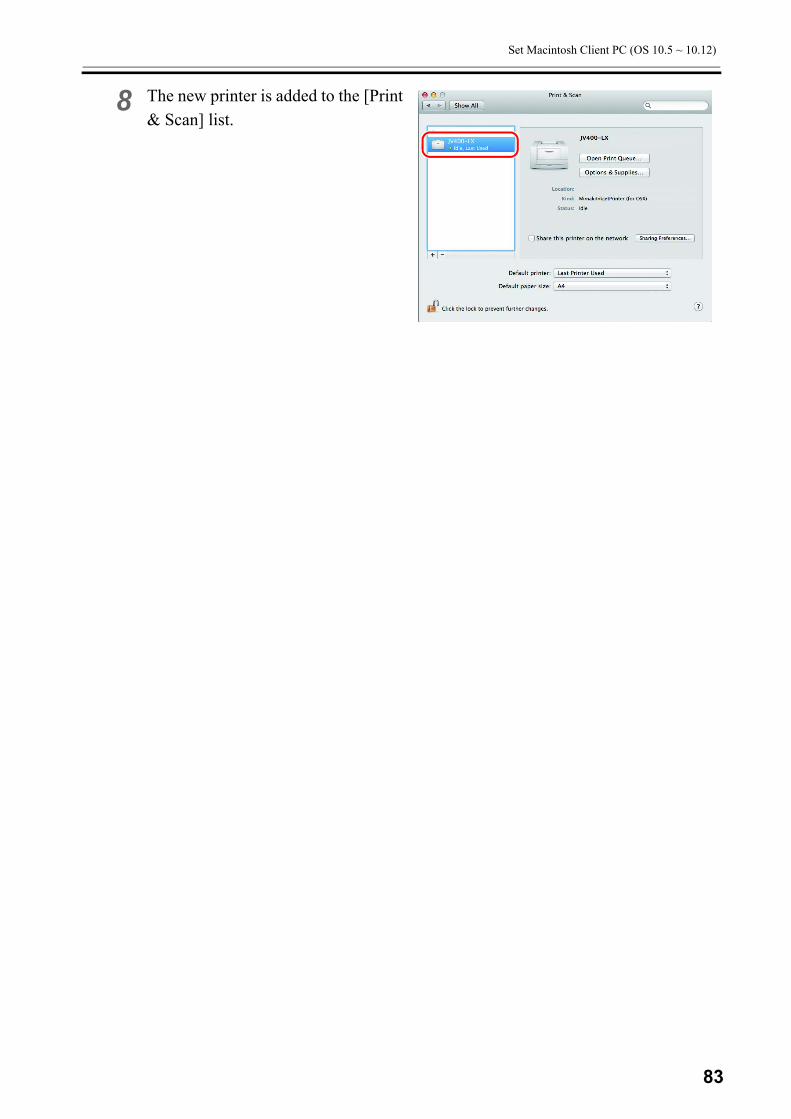
8 The new printer is added to the [Print & Scan] list.
84
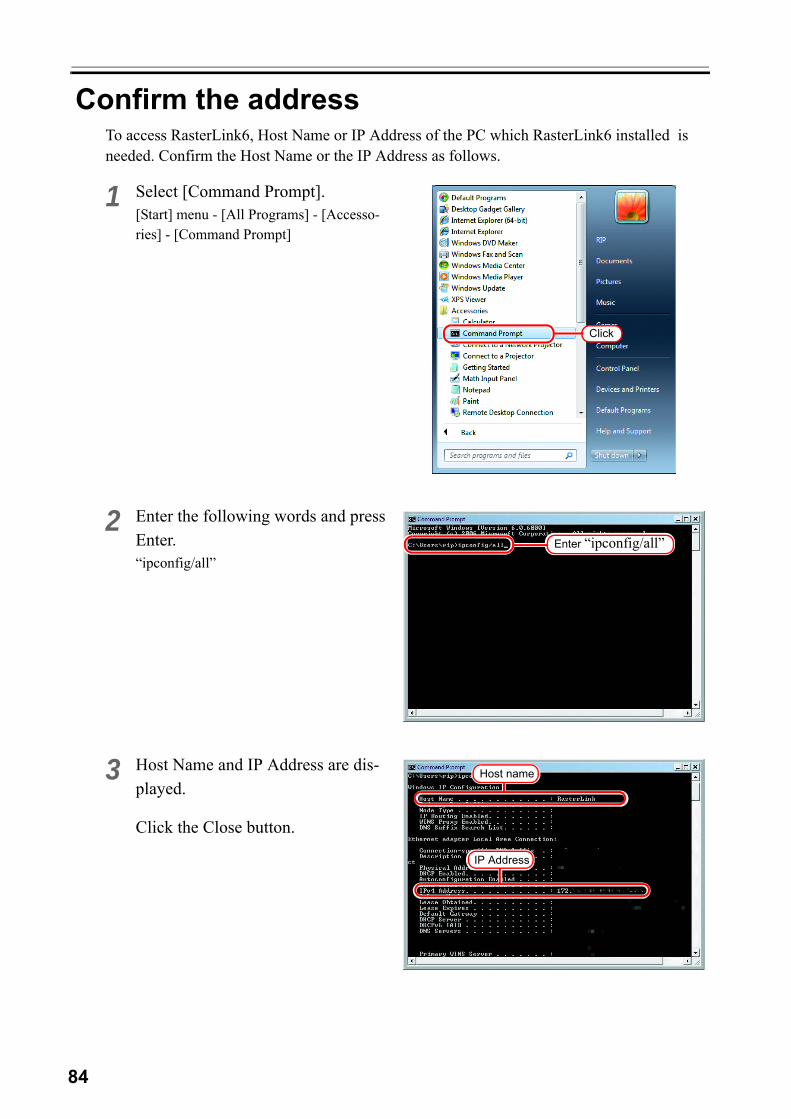
Confirm the addressTo access RasterLink6, Host Name or IP Address of the PC which RasterLink6 installed is needed. Confirm the Host Name or the IP Address as follows.
1 Select [Command Prompt].[Start] menu - [All Programs] - [Accesso-ries] - [Command Prompt]
2 Enter the following words and press Enter.“ipconfig/all”
3 Host Name and IP Address are dis-played.
Click the Close button.
Click
Enter “ipconfig/all”
IP Address
Host name


D202503-18-02062017© 2016 MIMAKI ENGINEERING CO., LTD. All rights reserved.
MMSW: 5.14
Related Documents


![MIMAKI ENGINEERING CO., LTD. D202454-13 - bompan.it · 3 ˇ 6 ˆ “RasterLink6”. Not [Full Color]. ˇ ˆ ˛ ˘ med like . S Job : “” RasterLink6.](https://static.cupdf.com/doc/110x72/5c67eda409d3f2bb148c7d1b/mimaki-engineering-co-ltd-d202454-13-3-6-rasterlink6-not-full.jpg)
