Radio Controlled Clock with FM Radio CR-335 For information and support www.lenco.eu

Welcome message from author
This document is posted to help you gain knowledge. Please leave a comment to let me know what you think about it! Share it to your friends and learn new things together.
Transcript

Radio Controlled Clock with FM Radio
CR-335
For information and support www.lenco.eu

2
Table of content
Warning ....……………………………………………………………………..3
Important Safety Instructions.............................................……………… 3
Features........................………………………………………………………5
Installation ....................................................………………………………6
Description of Parts ................……………………………………………... 7
Radio Tuner Operation .........................…………………………………… 9
Listening to External Audio Source...........................…………………….10
Clock Setting................................................................………………….10
Alarm Operation.............................................….…………………………11
Sleep Timer Function............................................................……..…….14
Wave Sensing Function and LED Display ………………………………..15
Care and Maintenance..................……………………………………….. 15
Specifications............................................………………………………. 17

3
Warning
* See Rear of the UnitWARNING :To reduce the risk of fire or electric shock, do not expose this apparatusto rain or moisture. The apparatus shall not be exposed to dripping or splashing and that no objects filled with liquid such as vases, shall be placed on the apparatus.
Important Safety Instructions
When used in the directed manner, this unit has been designed and manufactured to ensure your personal safety. However, improper use can result in potential electrical shock or fire hazards. Please read all safety and operating instructions carefully before installation and use,and keep these instructions handy for future reference. Take special noteof all warnings listed in these instructions and on the unit.
1. Water and Moisture The unit should not be used near water. For example: near a bathtub, washbowl, kitchen sink, laundry tub, swimming pool or in a setbasement.
2. VentilationThe unit should be situated so that its location or position does notinterfere with its proper ventilation. For example, it should not be situated on a bed, sofa, rug or similar surface that may block the

4
ventilation openings. The ventilation should not be impeded by covering the ventilation openings with items, such as newspapers, table-cloths, curtains, etc. Also, it should not be placed in a built-in installation, such as a bookcase or cabinet, which may impede the flow of air through the ventilation openings.
3. Heat & Flame The unit should be situated away from heat sources such as radiators, heat registers, stoves or other appliances (including amplifiers) that produce heat. No naked flame sources, such as lighted candles, should be placed on the apparatus.
4. Power Source The unit should be connected to a power supply only of the type described in the operating instructions or as marked on the appliance. Where the power cord is used as the disconnect device, the disconnect device shall remain readily operable.
5. Power Cord Protection Power supply cords should be routed so that they are not likely to be walked on or pinched by items placed upon or against them. It is always best to have a clear area from where the cord exits the unit to where it is plugged into an AC outlet.
6. Cleaning The unit should be cleaned only as recommended. See the section "Care and Maintenance" of this manual for cleaning instructions.
7. Object and Liquid Entry Care should be taken so that objects do not fall and liquids are not spilled into any openings or vents located on the product. It shall not be exposed to dripping or splashing and that no objects filled with liquids, such as vases, shall be placed on the apparatus.
8. Attachments Do not use attachments not recommended by the product manufacturer.
9. Lightning and Power Surge Protection Unplug the unit from the wall outlet and disconnect the periods of time. This will prevent damage to the product due to lightning and power-line surges.
10.OverloadingDo not overload wall outlets, extension cords, or integral convenience receptacles as this can result in a risk of fire of electric shock.
11. Damage Requiring Service This unit should be serviced by qualified service personnel when: A. The power supply cord or plug has been damaged.
5
B. Objects have fallen into or liquid has been spilled into the enclosure. C. The unit has been exposed to rain. D. The unit has been dropped or the enclosure damaged. E. The unit exhibits a marked change in performance or does not operate normally.
12. Periods of Nonuse If the unit is to be left unused for an extended period of time, such as a month or longer, the power cord should be unplugged from the unit to prevent damage or corrosion.
13. Servicing The user should not attempt to service the unit beyond those methods described in the user's operating instructions. Service methods not covered in the operating instructions should be referred to qualified service personnel.
Features
Thank you for purchasing the Radio Controlled Clock Radio. This model incorporates following features:
FM Tuner RCC clock (Radio Controlled Clock) Daylight Savings Time setting Dual Alarm timer function Wake up to Alarm (Buzzer) or Radio with Snooze function Wave sensing to activate snooze timer Sleep timer function LED display Audio line-in (AUX-IN) for connecting other digital audio player Built-in High Fidelity Speaker
6
Installation
Clock setting battery back-upA backup battery compartment located at bottom of the unit. (1) Open the battery compartment lid. (2) For clock setting backup, follow the polarity diagram shown inside
the compartment and install 2 x AAA (UM-4) batteries (purchase separately).
(3) Close the battery compartment lid.
Warnings: - Batteries shall not be exposed to excessive heat such as sunshine,
fire or the like. - Be sure that the batteries are installed correctly. Wrong polarity may
damage the unit. - Do not mix old and new batteries. - Do not mix alkaline, standard (carbon-zinc) or rechargeable (nickel-
cadmium) batteries. - Only batteries of the same or equivalent type as recommend are to
be used. - If the unit is not to be used for an extended period of time, remove
the battery. - Do not dispose of batteries in fire, battery may explode or leak. - Danger of explosion if battery is incorrectly replaced.
AC Power ConnectionCAUTION: Before operate the unit; check the ac voltage marked at the rating plate located on the unit which matches the power system of your area.
Connect the AC power plug into your household AC power outlet.

7
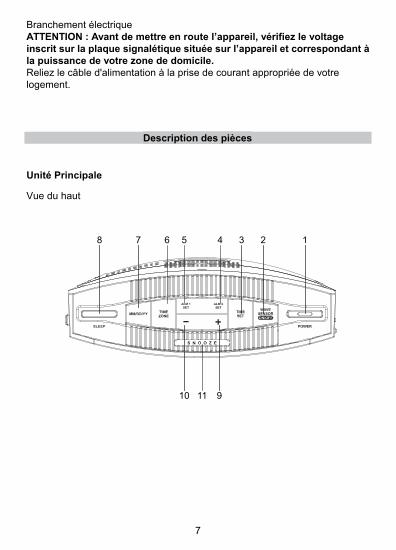
Description of Parts
Main Unit Top View
Front View
12
91110
345678
13 18
16
15
17
21
20
19
22
2324
14 1

8
Rear View
Description of Parts
Main Unit
1. POWER button ----- To turn the unit on and off 2. WAVE SENSOR ON/OFF button ----- To enable / disable Snooze
To enable / disable wave triggering of “the LED display bright for few seconds” function.
3. TIME SET button ----- Set 12/24 hour format, clock, year and date 4. ALM2 SET button ---- Set Alarm 2 alarm time5. ALM1 SET button ---- Set Alarm 1 alarm time6. TIME ZONE button ----- Select daylight savings time (DST) 7. MM/DD/YY button ----- Press to view month, date and year8. SLEEP button ---- Select the time duration of the sleep timer 9. + button ---- In setting mode: press to advance setting value 10. - button ---- In setting mode: press to decrease setting value 11. SNOOZE button ----- Activate the snooze function
262729 28
25

9
12. WAVE Sensor13. LED Display14. PM LED indicator ----- In 12 hours display format mode: LED on for
pm, LED off for am 15. Radio mode LED Indicator 16. ALM 1 switch ---- Select alarm source or disable alarm 1 17. ALM 2 switch ---- Select alarm source or disable alarm 2 18. ALARM 1 LED indicator 19. ALARM 2 LED indicator 20. AUX (auxiliary) mode LED indicator 21. VOLUME wheel ----- Adjust volume level 22. TUNING wheel ---- Tuning FM radio frequency23. FM frequency dial scale24. Clock backup battery compartment ---- Located at bottom of the unit25. Speaker26. AC Power Cord 27. FM Antenna wire28. RESET button ---- For resetting the unit 29. AUX-IN jack ---- Auxiliary audio signal input
Radio Tuner Operation
FM AntennaFully extend the FM antenna wire for the best FM radio reception.
Radio Tuning1. Press the POWER button to turn on the unit, where the Radio mode
LED indicator light on. Note: When a 3.5mm auxiliary plug is inserted in the AUX-IN jack,the unit will be at auxiliary mode and the AUX LED indicator lightson. If it is the case, unplug the auxiliary plug at rear of the unit and the Radio mode LED indicator lights on again.
2. Turn the TUNING wheel tuning to a desired radio station. 3. Turn the VOLUME wheel to adjust the volume to a desired level.

10
Listening to an External Audio Source
1. Connect an audio cable (not included) with 3.5mm stereo plug froman auxiliary audio device to the AUX-IN jack of the unit.
2. Press the POWER button to turn on the unit and the AUX LEDindicator lights on.
3. Turn on the external auxiliary audio device. 4. The volume level can now be controlled through the unit. 5. Operate all other functions on the external device as usual.
Notes: Press the POWER button to turn off the unit when you finishlistening.Don't forget to switch off the power of the external audio device as well.
Clock Setting
When the unit is OFF (power off mode):
Set 12/24 Hour format1. Press the TIME SET button entering 12/24 hour format setting
mode.2. Press the +/- button to select 12 or 24 hour display format.
Set Clock3. Press the TIME SET button again and the clock Hour digits blink.4. Press the +/- button to set hour. 5. Press the TIME SET button and the clock Minute digits blink.6. Press the +/- button to set minute.
Set Year7. Press the TIME SET button and the Year digits blink. 8. Press the +/- button to set year.
Set Month and Date9. Press the TIME SET button and the Month digit blinks.10. Press the +/- button to set month. 11. Press the TIME SET button and the Date digits blink.12. Press the +/- button to set date.

11
Exit setting mode13. To save all settings, press the TIME SET button or wait for a few
seconds.
Radio Controlled ClockThe unit is able to receive Radio Controlled Clock signal automatically which will synchronize and displays much accurate time.
Daylight Savings Time (DST) You may press the TIME ZONE button to suit the daylight savings time of your area. 1. Press the TIME ZONE button once and the display blinks. 2. Press the + or – button to select the DST. 3. Press the TIME ZONE button again to confirm the selection.
View Year, month and date At power off mode, you can press the MM/DD/YY button to view the current setting of year, month and date.
Alarm Operation
The unit incorporated dual alarm (alarm 1 and alarm 2) for your selection.
When the unit is OFF (power off mode):
Setting the alarm time1. Press the ALM 1 (ALM 2) SET button once and the alarm Hour
digits blink. 2. Press the +/- button to set alarm hour. 3. Press the ALM 1 (ALM 2) SET button again and the alarm Minute
digits blink. 4. Press the +/- button to set alarm minute.
Set the alarm days5. Press the ALM 1 (ALM 2) SET button and alarm days blink. 6. Press the +/- button to select alarm days, where alarm days display
with following meaning : “1 – 7” ----- All days

12
“1 – 5” ----- Monday to Friday“6 – 7” ----- Saturday and Sunday
Save alarm settings7. To save the settings, press the ALM 1 (ALM 2) SET button or wait
for a few seconds to auto-exit the setting mode.
Select wake up alarm source1. Slide the ALM 1 (ALM 2) switch to BUZZER or RADIO position as
desired.2. When the alarm is enabled and the ALARM 1 (ALARM 2) LED
indicator should lights on.
Notes:- If "Wake to Radio" is selected and an external playing device is
connected into the AUX-IN jack, the alarm source will be redirectedto the Alarm Buzzer (beep) automatically when the alarm isreached.
- When "Wake to Radio" is selected, make sure the radio station which you want to wake to is tuned. Adjust the volume level to a desired level for the wake up.
- To activate the alarm, slide the ALM 1 (ALM 2) switch to BUZZER or RADIO position and the corresponding alarm source indicator appears on the LED display.
Enable / Disable Snooze WAVE Sensor- When alarm sound is activating, you may either press SNOOZE
button or wave in front of the unit to activate the snooze timer. - To enable / disable the wave sensing function, you can press the
WAVE SENSOR ON/OFF button. Note: The wave sensing function cannot be enabled / disabled bypressing the WAVE SENSOR ON/OFF button when the alarm sound is activating or at snooze mode.
Wake to Buzzer
- When the alarm time is reached, the buzzer alarm will sound for 3 Minutes.
- It goes into Auto-snooze mode if no further button has beenpressed.

13
The ALARM 1 (ALARM 2) LED indicator blinks. The buzzer turns off for the snooze time (around 10 minutes) then comes on again. This operation will be repeated five times. After the sixth alarm is finished, the alarm will shut off until the same alarm time on the next selected alarm day.
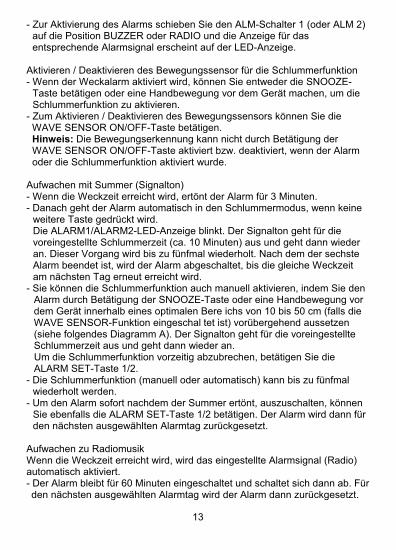
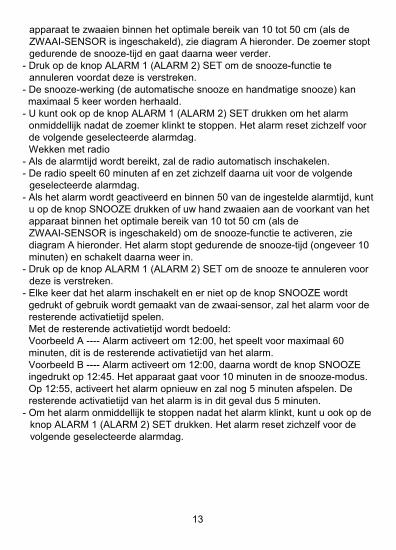
- You may also activate the snooze function manually after the alarm sounds by pressing the SNOOZE button or wave your hand in front of the unit at an optimum range 10 to 50 cm (in the case of WAVE SENSOR was set to ON), see following diagram A. The buzzer stops for the snooze time then comes again.
- To cancel the snooze before it expires, press the ALARM 1 (ALARM 2) SET button.
- The snooze operation (including auto-snooze and manual snooze) can be repeated by 5 times only.
- To stop the alarm immediately after the buzzer sounds, you can also press the ALARM 1 (ALARM 2) SET button. It resets itself for the next selected alarm day.
Wake to Radio- When the alarm time is reached, the selected alarm source Radio
will automatically turn on. - It plays for 60 minutes then shuts off and resets itself for the next
selected alarm day. - During activation of the alarm source and within 50 minutes from
the set alarm time, you may press the SNOOZE button or wave your hand in front of the unit at an optimum range 10 to 50 cm (in the case of the WAVE SENSOR was set to ON) to activate the snooze function, see following diagram A. The alarm stops for the snooze time (around 10 minutes) then turns on again.
- To cancel the snooze before it expires, press the ALARM 1 (ALARM 2) SET button.
- Each time the alarm turns on and without pressing the SNOOZE button or activate the WAVE Sensor, it plays for the remaining alarm activation time.
The remaining alarm activation time means: Example A ---- Alarm activates at 12:00, it plays for maximum 60
minutes remaining alarm activation time. Example B ---- Alarm activates at 12:00 then press the SNOOZE
button at 12:45. The unit goes into snooze mode for 10 minutes. At 12:55, the unit alarm activates again and will play for 5 minutes remaining alarm activation time.
- To stop the alarm immediately after the alarm sounds, you may also press the ALARM 1 (ALARM 2) SET button. It resets itself for

14
the next selected alarm day.
Note:- With the sensor is set to ON:
When the alarm is activating and pressing the SNOOZE button or wave your hand in front of the unit at the optimum range, where the LED display will light brightly for few seconds then return to normal(dim) as well.
Sleep Timer Function
Sleep to timer
This feature allows you to fall asleep to the radio for up to 90 Minutes.The unit shuts off automatically when the time expires.
1. Press the POWER button to turn the unit on. 2. Tune to the desired radio station in radio mode. 3. To select the sleep timer to turn the unit off after 15, 30, 45, 60 or
90 minutes, press the SLEEP button repeatedly. The display showsthe sleep time. The unit plays for the selected length of time then automatically turns off.
4. To view the remaining sleep time, press the SLEEP button once.
Diagram A
10cm
WAVE SENSOR
To active the WAVE SENSOR :Wave your hand
Wave your hand
in front of the unit at an optimum range 10 to 50cm.
50cm
15
press the POWER button at any time.
Notes:- If you are falling asleep to music from an external device connected
to the AUX input, the sleep timer will shut off the power to this system but it will not turn off the external device.
- In power off mode, you can also press the SLEEP button directly to activate the sleep timer.
Wave Sensing Function and LED Display
You can press the WAVE SENSOR ON/OFF button to enable / disable the wave sensing function. It works when unit is not in alarm activating or at snooze mode.
- When the sensor is set to OFF: The LED display always lights brightly.
- When the sensor is set to ON: The LED display lights normal (dim). Each time the wave sensor is activated (wave your hand in front of the unit at an optimum range 10 to 50 cm, see diagram A above) and the LED display will light brightly for few seconds then return to normal (dim).
Care and Maintenance
- Do not subject the unit to excessive force, shock, dust or extreme temperature.
- Do not tamper the internal components of the unit. - Clean your unit with a damp (never wet) cloth. Solvent or detergent
should never be used. - Avoid leaving your unit in direct sunlight or in hot, humid or dusty
places.- Keep your unit away from heating appliances and sources of
electrical noise such as fluorescent lamps or motors.
5. To turn the unit off before the sleep timer counts down to zero,

16
Resetting the Unit
If the unit experiences a power surge or electric shock, it is possible that the internal micro-controller may lock up and the unit will not respond to any commands from the panel controls.
1. In this event, unplug and then reconnect the AC po wer plug into the wall outlet.
2. Use a straightened paper clip, toothpick or similar objects to press the RESET button located at the rear of the main unit (see the below figure). The reset operation clears the system memory and all of your previous settings will be erased.
CAUTION: DO NOT USE SHARP, POINTED OBJECT TO PRESS THE RESET BUTTON. IT MAY DAMAGE THE RESET SWITCH INSIDE THE UNIT.
RESET button

17
Specifications
Power Supply AC 230V ~ 50Hz
Battery Back-up for clock / memory: DC3V--- AAA (UM-4) type x 2
(not included)
Speaker Output 0.5W
Radio Controlled Clock system DCF77 / Germany
THE SPECIFICATION AND EXTERNAL APPEARANCE OF THE SET ARE SUBJECT TO CHANGE WITHOUT PRIOR NOTICE.
If at any time in the future you should need to dispose of this product please note that: Waste electrical products should not be disposed of with household waste. Please recycle where facilities exist. Check with your Local Authority or retailer for recycling advice. (Waste Electrical and Electronic Equipment Directive)
For information and support www.lenco.eu

Funkuhr mit UKW-Radio
CR-335
Informationen und Hilfe finden Sie unter www.lenco.eu

2
Inhalt
Warnhinweise.................................................................................................. 3 Wichtige Sicherheitshinweise...........................................................................4Eigenschaften und Funktionen.........................................................................6Beschreibung der Bedienelemente..................................................................7Radiobetrieb...................................................................................................10Benutzung externer Audiogeräte...................................................................10 Uhrzeiteinstellung..........................................................................................10Weckfunktion.................................................................................................12 Einschlaf-Timer-Funktion...............................................................................15 Bewegungserkennung und LED-Anzeige......................................................15 Pflege und Wartung.......................................................................................16 Technische Daten..........................................................................................17

3
Warnhinweise
DasDreieckszeichenmit Blitzsymbolverweist aufgefährlicheSpannungen imGerätegehäuse,die so hoch seinkönnen, dass sieeine Gefahr vonStromschlägenbilden.
ACHTUNGSTROMSCHLAGGEFAHR!NICHT ÖFFNENWARNUNG: UM DAS RISIKOEINES STROMSCHLAGS ZUSENKEN, ÖFFNEN SIENICHT DIE ABDECKUNG(ODERGERÄTERÜCKSEITE). IMINNEREN DES GERÄTSBEFINDEN SICH KEINEBAUTEILE, DIE VOMBENUTZER GEWARTETWERDEN KÖNNEN.WENDEN SIE SICHSTATTDESSEN ANQUALIFIZIERTESFACHPERSONAL.
Das DreieckszeichenmitAusrufungszeichenverweist auf wichtigeFunktions- undWartungshinweise(Reparatur) in derdem GerätbeigelegtenBedienungsanleitung.
* Siehe Geräterückseite
WARNHINWEISE:Um Feuer und elektrischen Schlägen vorzubeugen, vermeiden Sie es dasGerät Regen oder Feuchtigkeit auszusetzen.Dieses Gerät sollte keinen Wassertropfen und -spritzern ausgesetzt werden.Gegenstände, die mit Flüssigkeiten gefüllt sind sollten nicht auf das Gerätgestellt werden.

4
Wichtige Sicherheitshinweise
Wenn das Gerät entsprechend der Anweisungen benutzt wird, kann aufgrund des Gerätedesign Ihre persönliche Sicherheit gewährleistet werden. Bei unsachgemäßer Benutzung besteht allerdings Stromschlag- und Brandgefahr. Bitte lesen Sie alle Sicherheits- und Bedienungshinweise sorgfältig vor der Inbetriebnahme durch und bewahren Sie diese Anleitung zum späteren Nachschlagen auf. Beachten Sie besonders alle Warnhinweise in dieser Anleitung und auf dem Gerät. 1. Wasser und Feuchtigkeit
Das Gerät darf nicht in der Nähe von Wasser benutzt werden. Beispiel: in der Nähe von Badewannen, Spülen, Waschbecken, Schwimmbecken oder feuchten Kellerräumen.
2. Belüftung Das Gerät sollte so aufgestellt werden, dass die Luftzirkulation nicht beeinträchtigt wird. Das Gerät sollte z. B. nicht auf ein Bett, Sofa, Bettvorleger oder eine andere weiche Unterlage gestellt werden, bei der die Ventilationsöffnungen blockiert werden könnten. Vergewissern Sie sich, dass keine der Ventilationsöffnungen durch Gegenstände wie z. B. Zeitungen, Tischtücher, Vorhänge o. Ä. abgedeckt ist. Das Gerät sollte nicht an Orten, wie z. B. Schränke oder Bücherregale, aufgestellt werden, an denen die Luftzufuhr zu den Ventilationsöffnungen beeinträchtigt werden könnte.
3. Hitze und Flammen Installieren Sie das Gerät nicht in der Nähe von Hitzequellen, wie z. B. Heizungen, Herden oder anderen Geräten die Hitze produzieren (z. B. Verstärker) auf. Gegenstände mit offenen Flammen, wie z. B. Kerzen, dürfen nicht auf das Gerät gestellt werden.
4. Stromversorgung Das Gerät darf nur mit der auf dem Gerät oder der Bedienungsanleitung angegebenen Netzspannung betrieben werden. Das Netzkabel dient dazu das Gerät vom Strom zu trennen und sollte deshalb immer leicht zugänglich bleiben.
5. Netzkabelschutz Das Netzkabel muss so verlegt werden, dass es nicht durch Gegenstände eingeklemmt werden kann bzw. darauf gestellt werden. Achten Sie außerdem darauf, dass niemand auf das Netzkabel treten kann. Es ist immer sinnvoll den Bereich, an dem das Kabel aus dem Gerät austritt und den Bereich um die Steckdose herum, frei zu halten.
6. Reinigung Das Gerät darf nur den Anweisungen nach gereinigt werden. Siehe

5
Abschnitt "Pflege und Wartung" dieses Handbuchs für Anweisungen zur Reinigung des Geräts.
7. Fremdgegenstände und Flüssigkeiten im Gerät Bitte achten Sie darauf, dass keine Gegenstände und Flüssigkeiten in die Ventilationsöffnungen des Geräts gelangen. Dieses Gerät darf keinen Wassertropfen und -spritzern ausgesetzt werden. Gegenstände die mit Flüssigkeiten gefüllt sind dürfen nicht auf das Gerät gestellt werden.
8. Zubehör Verwenden Sie keine Aufsätze, die nicht vom Hersteller angegeben wurden.
9. Blitz- und Überspannungsschutz Ziehen Sie den Stecker aus der Steckdose, wenn Sie das Gerät über einen längeren Zeitraum nicht benutzen. Damit werden aufgrund von Blitzeinschlägen und Überspannung entstehende Schäden am Gerät verhindert.
10. Überlastung Überlasten Sie niemals Steckdosen, Verlängerungskabel oder Geräteanschlüsse, da dies zu Feuer- oder Stromschlaggefahr führen kann.
11. Schäden, die Reparaturen erfordern Dieses Gerät muss durch entsprechend ausgebildetes Personal repariert werden, wenn: A. Das Netzkabel oder der Netzstecker beschädigt sind. B. Fremdgegenstände oder Flüssigkeiten in das Gehäuse gelangt sind. C. Wenn das Gerät Regenwasser ausgesetzt wurde. D. Das Gerät heruntergefallen ist oder das Gehäuse beschädigt wurde. E. Das Gerät nicht wie gewohnt funktioniert oder einen starken Leistungsabfall zeigt.
12. Bei Nicht-Benutzung Wenn das Gerät über einen gewissen Zeitraum nicht benutzt wird, um für einen längeren Zeitraum, z. B. einen Monat oder länger, sollten Sie das Netzkabel aus der Steckdose ziehen, um Schäden oder Korrosion zu vermeiden.
13. Wartung Der Benutzer sollte keine Versuche anstellen das Gerät eigenhändig zu warten, es sei denn es wurde entsprechend in der Bedienungsanleitung beschrieben. Wartungsmethoden, die nicht in der Bedienungsanleitung beschrieben werden, dürfen nur von entsprechend ausgebildetem Fachpersonal ausgeführt werden.

6
Eigenschaften und Funktionen
Vielen Dank für den Kauf dieses funkgesteuerten Weckerradios.Dieses Modell verfügt über die folgenden Leistungsmerkmale:- UKW-Radio- RCC-Uhr (Funkuhr)- Sommerzeiteinstellung- Dual-Alarm-Funktion- Aufwachen zu Alarm (Signalton) oder Radio mit Schlummerfunktion- Bewegungserkennung zum Auslösen der Schlummerfunktion- Einschlaf-Timer-Funktion- LED-Anzeige- Audioeingang (AUX) zum Anschluss externer Audiogeräte- Eingebaute Hi-Fi-Lautsprecher
Inbetriebnahme
Einrichten des ReservebatteriesystemsAn der Unterseite des Geräts befindet sich ein Reservebatteriefach.1. Öffnen Sie das Batteriefach.2. Um die Uhrzeiteinstellungen mit Reservestrom jederzeit aufrecht erhalten
zu können, folgen Sie der Zeichnung innerhalb des Batteriefachs und legenSie 2 Batterien der Größe AAA (UM-4) ein (nicht im Lieferumfang).
3. Schließen Sie das Batteriefach wieder.
Warnung:Die Batterien dürfen niemals starker Hitze, wie z. B. Sonnenlicht, Feuer o. ä.ausgesetzt werden.- Vergewissern Sie sich, dass die Batterien auf die richtige Weise eingelegt
werden. Die falsche Polarität kann das Gerät beschädigen.- Benutzen Sie niemals alte und neue Batterien zusammen.- Verwenden Sie niemals verschiedenenartige Batterien zusammen, wie z. B.
alkalische, Zink-Kohle-Batterien oder wiederaufladbare (Nickel-Cadmium).- Nur Batterien des empfohlenen oder eines gleichwertigen Typs dürfenverwendet werden.
- Wenn das Gerät für längere Zeit nicht benutzt wird, entfernen Sie bitte dieBatterien aus dem Gerät.
- Werfen Sie die Batterien nicht ins Feuer, da sie dadurch explodieren oderauslaufen können.
- Bei falsch eingelegten Batterien besteht Explosionsgefahr!

7
NetzanschlussACHTUNG: Bevor Sie das Gerät benutzen, überprüfen Sie, ob dieBetriebsspannung, die auf dem Typenschild an dem Gerät angegebenwird, mit der Netzspannung Ihres Wohnorts übereinstimmt.
Stecken Sie den Netzstecker in eine Steckdose.
Beschreibung der Bedienelemente
HauptgerätOberseitenansicht
12
91110
345678

8
Vorderansicht
Rückseitenansicht
262729 28
25
13 18
16
15
17
21
20
19
22
2324
14 1

9
Beschreibung der Bedienelemente
Hauptgerät1. POWER ---- Ein-/Ausschalten des Geräts2. WAVE SENSOR ON/OFF ---- Zum Aktivieren / Deaktivieren der
Schlummerfunktion mit dem Bewegungssensor,Zum Aktivieren / Deaktivieren der LED-Beleuchtung für einige Sekunden.
3. TIME SET ----- Einstellen des 12/24-Stundenformats, Uhrzeit, Jahr undTag
4. ALM2 SET ---- Einstellen der Weckzeit für Alarm 25. ALM1 SET ---- Einstellen der Weckzeit für Alarm 16. TIME ZONE ----- Aktivieren der Sommerzeit (DST)7. MM/DD/YY ----- Anzeige von Monat, Datum und Jahr8. SLEEP ---- Zeiteinstellung des Einschlaf-Timers9. + ---- Im Einstellmodus: Einstellwert erhöhen10. - ---- Im Einstellmodus: Einstellwert verringern11. SNOOZE ---- Aktivieren der Schlummerfunktion.12. BEWEGUNGSSENSOR13. LED-Anzeige14. PM-LED-Anzeige ------ Anzeige-LED für das 12-Stundenanzeigeformat.
LED ein für PM, LED aus für AM.15. Radiomodus-LED-Anzeige16. ALM-Schalter 1 ---- Auswahl des Wecksignal oder Deaktivieren von
Alarm17. ALM-Schalter 2 ---- Auswahl des Wecksignal oder Deaktivieren von
Alarm18. ALARM-LED-Anzeige 119. ALARM-LED-Anzeige 220. AUX-LED-Anzeige (AUX-Eingang)21. VOLUME-Drehknopf ----- Einstellen der Lautstärke22. TUNING-Drehknopf ---- Einstellen der Radiofrequenz23. UKW-Frequenzanzeige24. Reservebatteriefach ---- auf der Unterseite des Geräts25. Lautsprecher26. Netzkabel 27. UKW-Antennenkabel28. RESET ---- Zurücksetzen des Geräts29. AUX-IN-Eingang ---- AUX-Audiosignaleingang
10
Radio betrieb
UKW-Antenne Ziehen Sie die UKW-Kabelantenne für einen optimalen UKW-Radioempfang vollständig heraus. Sendersuche 1. Betätigen Sie die POWER-Taste, um das Gerät einzuschalten und die
Radio-Modus-LED-Anzeige geht an. Hinweis: Wenn ein 3,5-mm-Aux-Kabel am AUX-IN-Anschluss angeschlossen ist, geht das Gerät in den AUX-Modus und die AUX-LED-Anzeige leuchtet auf. Wenn dies der Fall ist, ziehen Sie den AUX-Stecker an der Geräterückseite heraus und die Radiomodus-LED-Anzeige leuchtet wieder auf.
2. Drehen Sie den TUNING-Drehknopf zur Auswahl des gewünschten Senders.
3. Drehen Sie am VOLUME-Drehknopf, um die Lautstärke auf das gewünschte Niveau einzustellen.
Wiedergabe eines externen Audiosignals
1. Schließen Sie das externe Audiogerät mit einem 3,5-mm-Audiokabel (nicht im Lieferumfang) am AUX-IN-Eingang des Geräts an.
2. Betätigen Sie die POWER-Taste, um das Gerät einzuschalten. Die AUX-LED leuchtet daraufhin auf.
3. Schalten Sie das externe Audiogerät ein. 4. Sie können das Lautstärkeniveau nun über das Geräts einstellen. 5. Alle anderen Funktionen können am externen Gerät wie gewohnt
gesteuert werden.
Hinweis: Betätigen Sie die POWER-Taste, um das Gerät nach der Benutzung auszuschalten. Vergessen Sie dabei nicht das externe Gerät ebenfalls auszuschalten.
Uhrzeiteinstellung
Schalten Sie das Gerät aus. Zeitformat einstellen 1. Betätigen Sie die TIME SET-Taste zum Einstellen der 12/24-Stunden-
Zeitformats.2. Benutzen Sie die Tasten +/- zur Auswahl des gewünschten Zeitformats

11
(12/24-Stundenformat).Einstellen der Uhrzeit
3. Betätigen Sie die TIME SET-Taste und die Stundenanzeige fängt an zublinken.
4. Benutzen Sie die Tasten +/- zum Einstellen der Stunden.5. Betätigen Sie die TIME SET-Taste und die Minutenanzeige fängt an zu
blinken.6. Benutzen Sie die Tasten +/- zum Einstellen der Minuten.
Einstellen des Jahrs7. Betätigen Sie die TIME SET-Taste und die Jahresanzeige fängt an zu
blinken.8. Benutzen Sie die Tasten +/- zum Einstellen des Jahrs.
Monat und Datum einstellen9. Betätigen Sie die TIME SET-Taste und die Monatsanzeige fängt an zu
blinken.10. Benutzen Sie die Tasten +/- zum Einstellen des Monats.11. Betätigen Sie die TIME SET-Taste und die Datumsanzeige fängt an zu
blinken.12. Benutzen Sie die Tasten +/- zum Einstellen des Datums.
Verlassen des Einstellungsmodus13. Zum Speichern aller Einstellungen betätigen Sie die TIME SET-Taste
oder warten Sie ein paar Sekunden.
FunkuhrDas Gerät ist in der Lage Funkuhrsignale automatisch zu empfangen und diedann zu synchronisieren. Auf diese Weise erhalten Sie ein viel genauereUhrzeitanzeige.
Sommerzeit (DST)Sie können mit der TIME ZONE-Taste die Sommerzeit an IhrenAufenthaltsort anpassen.1. Betätigen Sie die TIME ZONE-Taste und die Anzeige fängt an zu blinken.2. Betätigen Sie die Taste + oder -, um die Sommerzeit einzustellen.3. Betätigen Sie die TIME ZONE-Taste erneut, um die Auswahl zu bestätigen.
Jahres-, Monats- und DatumsanzeigeSie können im ausgeschaltetem Modus die MM/DD/YY-Taste betätigen, umdie aktuelle Jahres-, Monats und Datumseinstellung anzeigen.

12
Weckfunktion
Dieses Gerät verfügt über einen Doppelalarm (Alarm 1 und Alarm 2). Siekönnen einen oder beide Weckzeit bei Bedarf einstellen.Schalten Sie das Gerät aus.Einstellen der Weckzeit1. Betätigen Sie die ALM SET-Taste 1 (oder ALM 2) und die Alarmstunden
fangen an zu blinken.2. Benutzen Sie die Tasten +/- zum Einstellen der Alarmstunden.3. Betätigen Sie die ALM SET-Taste 1 (oder ALM 2) erneut und die
Alarmminuten fangen an zu blinken.4. Benutzen Sie die Tasten +/- zum Einstellen der Alarmminuten.
Eintellen des Wecktags5. Betätigen Sie die ALM SET-Taste 1 (oder ALM 2) und der Alarmtag fängt
an zu blinken.6. Benutzen Sie die Tasten +/-, um den Alarmtag einstellen. Wählen Sie eine
der folgenden Optionen:"1 - 7" ----- Alle Tage"1 - 5" ----- Montags bis Freitags"6 - 7" ----- Samstags und Sonntags
Alarmeinstellungen speichern7. Um die Einstellungen zu speichern, betätigen Sie die ALM SET-Taste 1
(oder ALM 2) oder warten Sie ein paar Sekunden, bis das Gerät denEinstellmodus automatisch verlässt.
Auswahl des Alarmsignals1. Schieben Sie den ALM-Schalter 1 (oder ALM 2) nach Bedarf auf die
Position BUZZER oder RADIO.2. Wenn der Alarm aktiviert ist leuchtet die ALARM LED-Anzeige 1 (oder 2)
auf.
Hinweise:- Wenn Sie Aufwachen zum Radiosignal gewählt haben und ein externes
Abspielgerät am AUX-IN-Eingang angeschlossen ist, wird automatisch derSummer (Signalton) als Alarmsignal verwendet, wenn die einstellteWeckzeit erreicht wird.
- Wenn Sie Aufwachen zum Radiosignal ausgewählt haben, vergewissernSie sich, dass die von Ihnen ausgewählte Frequenz über ein Radiosignalverfügt. Stellen Sie die Lautstärke auf das gewünschte Niveau, mit dem Sieaufgeweckt werden wollen.
13
- Zur Aktivierung des Alarms schieben Sie den ALM-Schalter 1 (oder ALM 2)auf die Position BUZZER oder RADIO und die Anzeige für dasentsprechende Alarmsignal erscheint auf der LED-Anzeige.
Aktivieren / Deaktivieren des Bewegungssensor für die Schlummerfunktion- Wenn der Weckalarm aktiviert wird, können Sie entweder die SNOOZE-
Taste betätigen oder eine Handbewegung vor dem Gerät machen, um dieSchlummerfunktion zu aktivieren.
- Zum Aktivieren / Deaktivieren des Bewegungssensors können Sie dieWAVE SENSOR ON/OFF-Taste betätigen.Hinweis: Die Bewegungserkennung kann nicht durch Betätigung derWAVE SENSOR ON/OFF-Taste aktiviert bzw. deaktiviert, wenn der Alarmoder die Schlummerfunktion aktiviert wurde.
Aufwachen mit Summer (Signalton)- Wenn die Weckzeit erreicht wird, ertönt der Alarm für 3 Minuten.- Danach geht der Alarm automatisch in den Schlummermodus, wenn keine
weitere Taste gedrückt wird.Die ALARM1/ALARM2-LED-Anzeige blinkt. Der Signalton geht für dievoreingestellte Schlummerzeit (ca. 10 Minuten) aus und geht dann wiederan. Dieser Vorgang wird bis zu fünfmal wiederholt. Nach dem der sechsteAlarm beendet ist, wird der Alarm abgeschaltet, bis die gleiche Weckzeitam nächsten Tag erneut erreicht wird.
- Sie können die Schlummerfunktion auch manuell aktivieren, indem Sie denAlarm durch Betätigung der SNOOZE-Taste oder eine Handbewegung vordem Gerät innerhalb eines optimalen Bere ichs von 10 bis 50 cm (falls dieWAVE SENSOR-Funktion eingeschal tet ist) vorübergehend aussetzen(siehe folgendes Diagramm A). Der Signalton geht für die voreingestellteSchlummerzeit aus und geht dann wieder an.Um die Schlummerfunktion vorzeitig abzubrechen, betätigen Sie dieALARM SET-Taste 1/2.
- Die Schlummerfunktion (manuell oder automatisch) kann bis zu fünfmalwiederholt werden.
- Um den Alarm sofort nachdem der Summer ertönt, auszuschalten, könnenSie ebenfalls die ALARM SET-Taste 1/2 betätigen. Der Alarm wird dann fürden nächsten ausgewählten Alarmtag zurückgesetzt.
Aufwachen zu RadiomusikWenn die Weckzeit erreicht wird, wird das eingestellte Alarmsignal (Radio)automatisch aktiviert.- Der Alarm bleibt für 60 Minuten eingeschaltet und schaltet sich dann ab. Fürden nächsten ausgewählten Alarmtag wird der Alarm dann zurückgesetzt.

14
- Während der Alarm aktiv ist und innerhalb von 50 Minuten von derAlarmzeit ist, können Sie die Schlummerfunktion manuell aktivieren, indemSie den Alarm durch Betätigung der SNOOZE-Taste oder einerHandbewegung vor dem Gerät innerhalb eines optimalen Bereichs von 10bis 50 cm (falls die WAVE SENSOR-Funktion eingeschaltet ist)vorübergehend aussetzen (siehe folgendes Diagramm A). Der Alarmstoppt für die voreingestellte Schlummerzeit (ca. 10 Minuten) und gehtdann wieder an.
- Um die Schlummerfunktion vorzeitig abzubrechen, betätigen Sie dieALARM SET-Taste 1/2.
- Jedes Mal, wenn der Alarm eingeschaltet wird und weder die SNOOZE-Taste betätigt noch der Bewegungssensor ausgelöst werden, bleibt derAlarm für die restliche Alarmzeit eingeschaltet.Die verbleibende Alarmzeit wird wie folgt berechnet:Beispiel A ---- Der Alarm wurde um 12:00 Uhr aktiviert bleibt für maximal60 Minuten eingeschaltet.Beispiel B ---- Der Alarm wurde um 12:00 Uhr aktiviert und Sie betätigendann die SNOOZE-Taste um 12:45 Uhr. Das Gerät geht für 10 Minuten inden Schlummermodus. Um 12:55 Uhr aktiviert das Gerät den Alarm erneut.Der Alarm bleibt dann für weitere 5 Minuten eingeschaltet.
- Um den Alarm sofort nachdem er aktiviert wird, auszuschalten, betätigenSie die ALARM SET-Taste 1/2. Der Alarm wird dann für den nächstenausgewählten Alarmtag zurückgesetzt.
Aktivierungdes Bewegungs sensors:BewegenSie Ihre Hand in einem optimalen Bereich von 10 bis 50 cm vordemGerät..
10cm
WAVE SENSOR
Wave your hand
50cm
Diagramm A

15
Hinweis:-Wenn der Bewegungssensor einschaltet ist:-Wenn der Alarm aktiviert und durch Betätigung der SNOOZE-Taste odereiner Handbewegung vor dem Gerät im optimalen Bereich dieSchlummerfunktion aktiviert wurde, leuchtet die LED-Anzeige für ein paarSekunden hell auf und geht dann wieder in den normalen (abgedunkelten)Zustand zurück.
Einschlaf-Timer-Funktion
Mit Musik einschlafenDiese Funktion erlaubt Ihnen zu bis zu 90 Minuten Radiomusik einzuschlafen.Das Gerät schaltet sich automatisch ab, wenn die eingestellte Zeitabgelaufen ist.1. Betätigen Sie die POWER-Taste zum Einschalten des Geräts.2. Stellen Sie den gewünschten Sender im Radiobetrieb ein.3. Zum Einstellen der Einschlaf-Timer-Zeit auf 15, 30, 45, 60 oder 90 Minuten,
betätigen Sie wiederholt die SLEEP-Taste. In der Anzeige erscheint dieEinschlafzeit. Das Gerät bleibt für die gewählte Zeitspanne eingeschaltetund schaltet sich dann automatisch aus.
4. Um die verbleibende Einschlafzeit anzuzeigen, betätigen Sie kurz dieSLEEP-Taste.
5. Um das Gerät auszuschalten, bevor die eingestellte Zeit erreicht ist,können Sie jederzeit die POWER-Taste betätigen.
Hinweise:Wenn Sie die Einschlaffunktion mit einem am AUX-Eingangangeschlossenen externen Gerät benutzen, wird das Radio bei Erreichender eingestellten Zeit ausgeschaltet, das externe Gerät aber nicht.-Im ausgeschalteten Zustand können Sie auch durch Betätigung derSLEEP
-Taste den Einschlaf-Timer direkt aktivieren.
Bewegungserkennung und LED-Anzeige
Sie können die WAVE SENSOR ON/OFF-Taste zum Aktivieren /Deaktivieren des Bewegungssensors betätigen. Dieser Vorgang funktioniertnur dann, wenn der Alarm des Geräts nicht aktiviert wurde und sich nicht imSchlummermodus.- Wenn der Sensor ausgeschaltet ist: Die LED-Anzeige leuchtet hell auf.- Wenn der Sensor auf eingeschaltet ist: Die LED-Anzeige leuchtet normal
(abgedunkelt). Jedes Mal wenn der Bewegungssensor aktiviert wird

16
(wenn Sie Ihre Hand vor dem Gerät innerhalb eines optimalen Bereichsvon 10 bis 50 cm, siehe Diagramm A oben) und die LED-Anzeige für einigeSekunden hell aufleuchtet. Danach leuchtet sie wieder normal(abgedunkelt).
Pflege und Wartung
- Setzen Sie das Gerät niemals übermäßiger Gewalt, Erschütterungen, Stauboder extremen Temperaturen aus.
- Versuchen Sie nicht die inneren Bauelemente des Geräts zu manipulieren.- Reinigen Sie das Gerät mit einem feuchten (aber niemals nassen) Tuch.Lösungsmittel oder Reinigungsmittel dürfen niemals verwendet werden.
- Vermeiden Sie es das Gerät direkter Sonnenstrahlung auszusetzen undlassen Sie es niemals an besonders heißen, feuchten oder staubigenOrten.
- Halten Sie Ihr Gerät fern von Heizkörpern und elektrischen Störquellen, wiez. B. Leuchtstofflampen oder Motoren.
Reset des GerätsBei starken Spannungsspitzen oder elektrischen Entladungen kann es dazukommen, dass der interne Mikrokontroller aufhört zu funktionieren und dasGerät nicht mehr auf Tastenbetätigungen reagiert.1. Ziehen Sie in diesem Fall den Netzstecker aus der Steckdose und stecken
Sie ihn wieder zurück in die Steckdose.2. Benutzen Sie einen dünnen Gegenstand, wie z. B. eine lang gezogene
Büroklammer oder einen Zahnstocher, und betätigen Sie den RESET-Knopf auf der Unterseite des Geräts (siehe Abbildung unten). Mit demReset wird der gesamte Systemspeicher gelöscht und alle vorherigenEinstellungen gehen verloren.
BENUTZEN SIE KEINE SPITZEN ODER SCHARFEN GEGENSTÄNDEZUR BETÄTIGUNG DES RESET-KNOPFS.DADURCH KANN DER KNOPF INNERHALB DES GERÄTS BESCHÄDIGTWERDEN.

17
Technische Daten
Stromversorgung AC 230 V ~ 50 HzReservebatterie für Uhrzeit/Speicher: 2 3V-Batterien der Größe AAA(UM-4) (nicht im Lieferumfang)Lautsprecherausgabe 0,5 WFunkuhrsystem DCF77 / Deutschland
ÄNDERUNGEN AM ÄUSSEREN AUSSEHEN UND DEN TECHNISCHENDATEN VORBEHALTEN.
Sollten Sie dieses Produkt zu einem späteren Zeitpunkt entsorgenmüssen, beachten Sie bitte:Elektro- und Elektronik-Altgeräte dürfen nicht mit dem Hausmüllentsorgt werden. Bitte wiederverwerten, falls entsprechendeEinrichtungen vorhanden sind. Für Hinweise zur Wiederverwertungwenden Sie sich an die zuständigen örtlichen Stellen oder IhrenHändler. (Richtlinie über Elektro- und Elektronik-Altgeräte)
Informationen und Hilfe finden Sie unter www.lenco.eu
RESET - Taste

Radiogestuurde klok met FM-radio
CR-335
Voor informatie en ondersteuning, www.lenco.eu

2
Inhoudsopgave Waarschuwing....................................................................................................3
Belangrijke veiligheidsinstructies........................................................................4
Functies..............................................................................................................6
Installatie.............................................................................................................8
Beschrijving van onderdelen...............................................................................7
Bediening radiotuner..........................................................................................9
Luisteren naar een externe alarmbron..............................................................10
Instelling klok.....................................................................................................10
Bediening alarm................................................................................................11
Slaaptimer-functie.............................................................................................14
De zwaaifunctie en het LED-display..................................................................15
Zorg en onderhoud............................................................................................15
Specificaties......................................................................................................17
3
Waarschuwing
Het bliksemschichtmet pijlpuntsymbool in eengelijkzijdigedriehoek is bedoeldom de gebruikerattent te maken opde aanwezigheidvan “gevaarlijkespanning” binneninde behuizing vanhet product diesterk genoeg kanzijn om te leiden toteen gevaar opelektrischeschokken.
LET OPRISICO VAN ELEKTRISCHESCHOK NIET OPENEN
WAARSCHUWING: OM HETRISICO VAN ELEKTRISCHESCHOKKEN TEVERMINDEREN, OPEN DEBEHUIZING (OFACHTERKANT) NIET, GEENDOOR DE GEBRUIKER TEONDERHOUDENONDERDELEN IN APPARAAT.LAAT ONDERHOUD OVERAAN GEKWALIFICEERDPERSONEEL.
Het uitroepteken ineen gelijkzijdigedriehoek is bedoeldde gebruiker attent temaken op deaanwezigheid vanbelangrijkebedienings- enonderhoudsinstructiesin de literatuur die bijhet apparaat wordtgeleverd.
* Zie achterkant van apparaat
WAARSCHUWING :Om het risico van brand of elektrische schokken te verminderen, stel hetapparaat neit bloot aan regen of vocht.Het apparaat mag niet worden blootgesteld aan druppend of spattend water ener mogen geen voorwerpen gevuld met vloeistof, zoals vazen, op het apparaatworden geplaatst.

4
Belangrijke veiligheidsinstructies
Dit apparaat is, bij gebruik volgens de instructies, ontworpen en vervaardigd om uw persoonlijke veiligheid te waarborgen. Echter, oneigenlijk gebruik kan resulteren in potentiële elektrische schokken of brandgevaar. Lees voor de installatie en het gebruik de veiligheids- en bedieningsinstructies zorgvuldig door en bewaar deze instructies op een geschikte plaats voor toekomstige referentie. Let ook goed op alle waarschuwingen die in deze handleiding en op het apparaat staan. 1. Water en vocht
Het apparaat moet niet worden gebruikt in de buurt van water. Bijvoorbeeld: in de buurt van een badkuip, wasbak, aanrecht, zwembad of een natte kelder.
2. Ventilatie Het apparaat moet zo worden geplaatst, dat de plaats of positie de eigen ventilatie niet in de weg staat. Zo moet het niet geplaatst worden op een bed, sofa, tapijt of soortgelijk oppervlak, dat de ventilatieopeningen kan blokkeren. De ventilatie mag niet worden belemmerd door de ventilatieopeningen te bedekken met voorwerpen, zoals kranten, tafelkleden, gordijnen, etc. Ook moet het apparaat niet worden geplaatst in een ingebouwde installatie, zoals een boekenkast of kast, die de doorstroming van lucht door de ventilatieopeningen belemmeren.
3. Warmte & vlammen Het apparaat moet uit de buurt van warmtebronnen, zoals radiotoren, warmte-uitlaten, kachels of andere apparaten (inclusief versterkers) die warmte produceren, geplaatst worden. Plaats geen voorwerpen met naakte vlam, zoals kaarsen, op het apparaat.
4. Voeding Het apparaat moet alleen worden aangesloten op een voeding van het type dat beschreven is in de bedieningsinstructies of zoals aangegeven op het apparaat. Wanneer het netsnoer wordt gebruikt als het ontkoppelapparaat, moet het eenvoudig bedienbaar blijven.
5. Bescherming netsnoer Voedingskabels moeten zo worden gelegd, dat het niet waarschijnlijk is dat er op gestapt wordt of dat ze bekneld raken door andere voorwerpen. Het is altijd het beste om een schoon gebied te hebben van waar de kabel het apparaat verlaat naar waar het in het stopcontact zit.
6. Reinigen Het apparaat dient alleen zoals aangeraden te worden gereinigd. Kijk in de “Zorg en Onderhoud” sectie van deze handleiding voor reiniginstructies.

5
7. Voorwerpen en vloeistoffen Zorg ervoor dat er geen voorwerpen en vloeistoffen in de ventilatieopeningen van het product vallen. Het moet niet worden blootgesteld aan druppend of spattend water en er mogen geen voorwerpen gevuld met vloeistof, zoals vazen, op het apparaat gezet worden.
8. Hulpstukken Gebruik alleen hulpstukken die worden aangeraden door de fabrikant.
9. Bliksem en Stroompiek Bescherming Haal de stekker uit het stopcontact en verbreek de verbinding in deze perioden. Dit voorkomt schade aan het product als gevolg van blikseminslag en stroompieken.
10. Overbelasting Voorkom overbelasting van stopcontacten, verlengsnoeren of stekkerdozen, omdat dit kan leiden tot risico van brand of elektrische schok.
11. Schade die Onderhoud Vereist Dit apparaat dient door gekwalificeerd onderhoudspersoneel onderhouden te worden als:A. Het netsnoer of stekker beschadigd is.B. Voorwerpen of vloeistof in de behuizing zijn gevallen.C. Het apparaat is blootgesteld aan regen.D. Het apparaat is gevallen of de behuizing is beschadigd.E. Het apparaat vertoont een duidelijke verandering in prestaties of functioneert niet normaal.
12. Perioden van Niet Gebruik Als het apparaat voor een langere periode niet gebruikt wordt, zoals een maand of langer, haal het netsnoer uit het apparaat om schade of corrosie te voorkomen.
13. Onderhoud De gebruiker moet niet proberen het apparaat te onderhouden op methoden die verder gaan dan de methoden die beschreven worden in de gebruiksaanwijzing. Onderhoudsmethoden die niet worden besproken in de gebruiksaanwijzing moeten worden overgedragen aan gekwalificeerd onderhoudspersoneel.

6
Functies
Bedankt voor de aanschaf van deze radiogestuurde wekkerradio.Dit model beschikt over de volgende functies:
- FM-tuner- RCC-klok (radiogestuurde klok)- Instelling voor zomertijd- Twee alarmtimers- Wekken met alarm (zoemer) of radio met snooze-functie- Zwaaien om de snooze-timer te activeren- Slaaptimer- LED-display- Audio line-in (AUX-IN) voor het aansluiten van andere digitale audiospelers- Ingebouwde high-fidelity luidspreker
Installatie
Backup-batterij voor instelling klokEr zit een batterijcompartiment voor de backup-batterij op de onderkant van hetapparaat.(1) Open het deksel van het batterijcompartiment.(2) Installeer 2 x AAA (UM-4) batterijen (apart aanschaffen) en volg het polariteitsdiagram aan de binnenkant van het compartiment.(3) Sluit het deksel van het batterijcompartiment.
Waarschuwingen:- Batterijen mogen niet worden blootgesteld aan extreme warmte, zoals zonlicht,
vuur en dergelijke.- Controleer of de batterijen juist zijn geïnstalleerd. Onjuist plaatsen (polariteit)
kan het apparaat beschadigen.- Mix geen oude en nieuwe batterijen.- Mix geen alkaline, standaard (koolstofzink) en oplaadbare (nikkelcadmium)
batterijen.- Alleen batterijen van eenzelfde of equivalent type als aangeraden moeten
gebruikt worden.- Haal de batterijen uit het apparaat als het langere tijd niet gebruikt wordt.- Gooi geen batterijen weg in vuur, batterijen kunnen dan ontploffen of lekken.- Explosiegevaar als batterijen onjuist worden vervangen.

7
Aansluiten voedingLET OP: Controleer voordat u het apparaat gebruikt of de spanning op hettypeplaatje op het apparaat overeenkomt met uw lokale netspanning.
Sluit de stekker aan op een stopcontact in uw woning.
Beschrijving van onderdelenHoofdapparaat
Bovenaanzicht
13 18
16
15
17
21
20
19
22
2324
14 1
12
91110
345678

8
Achteraanzicht
Beschrijving van onderdelenHoofdapparaat1. POWER ----- Om het apparaat aan of uit te zetten2. WAVE SENSOR AAN/UIT ---- Om de zwaaifunctie in of uit te schakelen,
Voor het in-/uitschakelen van de functie om het LED-display een paarseconden te laten oplichten als er wordt gezwaaid.
3. TIME SET ----- Stel 12/24-uursformaat in, de klok, het jaar en de datum4. ALM2 SET ---- Instellen alarmtijd Alarm 25. ALM1 SET ---- Instellen alarmtijd Alarm 16. TIME ZONE ----- Gebruik deze knop voor het instellen van de zomertijd
(DST)7. MM/DD/YY ----- Druk op deze knop om de maand, datum en het jaar te
bekijken8. SLEEP ---- Selecteer de tijdsduur van de slaaptimer9. + ---- In instelmodus: druk om de instelwaarde te verhogen
262729 28
25

9
10. ---- In instelmodus: druk om de instelwaarde te verlagen11. SNOOZE ----- Activeer de snooze-functie12. ZWAAI-sensor13. LED-display14. PM LED-indicator ----- Bij weergave 12-uursformaat: LED opgelicht voor PM,
LED uit voor AM15. Radio-modus LED-Indicator16. ALM 1 schakelaar ---- Selecteer alarmbron of schakel alarm 1 uit17. ALM 2 schakelaar ---- Selecteer alarmbron of schakel alarm 2 uit18. ALARM 1 LED-indicator19. ALARM 2 LED-indicator20. AUX-modus LED-indicator21. VOLUMEWIEL ----- Voor het instellen van het volumeniveau22. TUNINGWIEL ---- Voor het afstemmen van de FM-frequentie van de radio23. Afstemschaal FM-frequentie24. Compartiment voor backup-batterij klok ---- Op de onderkant van het
apparaat25. Luidspreker26. Netsnoer27. FM-draadantenne28. RESET ---- Voor het resetten van het apparaat29. AUX-INGANG ---- Ingang voor signaal hulp-audioapparaat
Bediening radiotuner
FM-antenneStrek de FM-antenne volledig uit voor de beste radio-ontvangst in FM.
Afstemmen radio1. Druk op de knop POWER om het apparaat aan te zetten, de radio-modus
LED-indicator zal oplichten.Opmerking: Als er een 3.5mm aux-stekker in de AUX INGANG is gestoken, zalhet apparaat in de AUX-modus zijn en de AUX LED-indicator zal oplichten. In ditgeval kunt u de aux-stekker op de achterkant van het apparaat uit het apparaathalen om terug te schakelen naar de radio-modus, de radio-modusLED-indicator licht weer op.2. Draai aan het AFSTEMWIEL om af te stemmen op de gewenste zender.3. Draai aan het VOLUMEWIEL om het volume naar wens in te stellen.

10
Naar een externe audiobron luisteren
1. Sluit een audiokabel (niet meegeleverd) met 3.5mm stereostekker aan op een hulp-audioapparaat en de AUX INGANG van het apparaat.
2. Druk op de knop POWER op het apparaat, de AUX LED-indicator licht op. 3. Zet het externe hulp-audioapparaat aan. 4. Het volume kan nu worden ingesteld op dit apparaat. 5. Bedien alle andere functies op het externe apparaat, zoals gebruikelijk.
Opmerkingen: Druk op de knop POWER om het apparaat uit te zetten als u klaar bent met luisteren. Vergeet niet om ook het externe audioapparaat uit te schakelen.
Instellen klok
Als het apparaat UIT staat (uitgeschakeld): 12/24-uursformaat instellen 1.Druk op de knop TIME SET om de instelmodus voor 12/24-uursformaat te
openen.2. Druk op de knop +/- om het 12- of 24-uursformaat te selecteren.
De klok instellen 3. Druk nogmaals op de knop TIME SET, de uurcijfers knipperen. 4. Druk op de knop +/- om de uren in te stellen. 5. Druk op de knop TIME SET, de minuutcijfers knipperen. 6. Druk op de knop +/- om de minuten in te stellen.
Het jaar instellen 7. Druk op de knop TIME SET, de jaarcijfers knipperen. 8. Druk op de knop +/- om het jaar in te stellen.
De maand en datum instellen 9. Druk op de knop TIME SET, de maandcijfers knipperen. 10. Druk op de knop +/- om de maand in te stellen. 11. Druk op de knop TIME SET, de datumcijfers knipperen. 12. Druk op de knop +/- om de datum in te stellen.
De instelmodus verlaten 13. Druk om alle instellingen op te slaan op de knop TIME SET of wacht een
11
paar seconden.
Radiogestuurde klok Het apparaat is in staat om automatisch een radiogestuurd kloksignaal te ontvangen, de klok zal automatisch worden gesynchroniseerd en zeer accuraat worden weergegeven.
Zomertijd (DST) U kunt op de knop TIME ZONE drukken om de zomertijd in uw omgeving te selecteren.1. Druk één keer op de knop TIME ZONE, het display knippert. 2. Druk op de knop + of – om de zomertijd te selecteren. 3. Druk nogmaals op de knop TIME ZONE om de selectie te bevestigen.
Het jaar, de maand en de datum bekijken Druk als het apparaat is uitgeschakeld op de knop MM/DD/YY om de huidige instelling van het jaar, de maand en de datum te bekijken.
Bediening alarm
Het apparaat is uitgerust met twee alarmen (alarm 1 en alarm 2) die u kunt instellen.Als het apparaat UIT staat (uitgeschakeld): De alarmtijd instellen 1. Druk één keer op de knop ALM 1 (ALM 2) SET, de uurcijfers van het alarm
knipperen.2. Druk op de knop +/- om de alarmuren in te stellen. 3. Druk nogmaals op de knop ALM 1 (ALM 2) SET, de minuutcijfers van het
alarm knipperen. 4. Druk op de knop +/- om de alarmminuten in te stellen.
De alarmdagen instellen 5. Druk op de knop ALM 1 (ALM 2) SET, de alarmdagen knipperen. 6. Druk op de knop +/- om de alarmdagen te selecteren. De alarmdagen zullen
als volgt worden getoond: “1 – 7” ----- Elke dag “1 – 5” ----- Maandag tot vrijdag “6 – 7” ----- Zaterdag en zondag
Alarminstellingen opslaan

12
7. Druk om de instellingen op te slaan op de knop ALM 1 (ALM 2) SET of wachteen paar seconden tot de instelmodus automatisch wordt verlaten.
De wekbron van het alarm selecteren1. Schuif de ALM 1 (ALM 2) schakelaar naar de stand BUZZER (zoemer) of
RADIO.2. Als het alarm is ingeschakeld, dan moet de ALARM 1 (ALARM 2)
LED-indicator opgelicht zijn.
Opmerkingen:- Als "Wake to Radio" is geselecteerd en er een extern afspeelapparaat isaangesloten op de AUX INGANG, zal de alarmbron automatisch wordeningesteld op de BUZZER (zoemer/pieptoon) als de alarmtijd wordt bereikt.
- Als "Wake to Radio" is geselecteerd, zorg er dan voor dat de radiozenderwaarmee u gewekt wilt worden is geselecteerd. Stel het volumeniveau in opeen gewenst niveau voor het alarm.
- Om het alarm te activeren, schuif de ALM 1 (ALM 2) schakelaar naar de standBUZZER of RADIO, de corresponderende alarmbron-indicator zal op hetLED-display verschijnen.
De zwaai-sensor met snooze-functie in-/uitschakelen- Als het alarmgeluid wordt geactiveerd, kunt op de knop SNOOZE drukken ofaan de voorkant van het apparaat zwaaien om de snooze-timer te activeren.
- Om de zwaaifunctie in of uit te schakelen kunt u op de knop WAVE SENSORAAN/UIT drukken.
Opmerking: De zwaaifunctie kan niet worden in-/uitgeschakeld door op deknop WAVE SENSOR AAN/UIT te drukken als het alarmgeluid al klinkt of in desnooze-modus.
Wekken met zoemer- Als de alarmtijd wordt bereikt, zal het zoemeralarm voor 3 minuten klinken.- Als er geen knoppen worden ingedrukt, zal het alarm automatisch in
desnooze-modus gaan.De ALARM 1 (ALARM 2) LED-indicator knippert. De zoemer schakelt uitgedurende de snooze-tijd (ongeveer 10 minuten) en zal daarna weerinschakelen. Dit cyclus zal vijf keer worden herhaald. Als het alarm voor dezesde keer wordt uitgeschakeld, zal het alarm uitschakelen tot de alarmtijd opde volgende geselecteerde alarmdag.
- U kunt de snooze-functie ook handmatig inschakelen nadat het alarm klinkt,door op de knop SNOOZE te drukken of uw hand aan de voorkant van het
13
apparaat te zwaaien binnen het optimale bereik van 10 tot 50 cm (als deZWAAI-SENSOR is ingeschakeld), zie diagram A hieronder. De zoemer stoptgedurende de snooze-tijd en gaat daarna weer verder.
- Druk op de knop ALARM 1 (ALARM 2) SET om de snooze-functie teannuleren voordat deze is verstreken.
- De snooze-werking (de automatische snooze en handmatige snooze) kanmaximaal 5 keer worden herhaald.
- U kunt ook op de knop ALARM 1 (ALARM 2) SET drukken om het alarmonmiddellijk nadat de zoemer klinkt te stoppen. Het alarm reset zichzelf voorde volgende geselecteerde alarmdag.Wekken met radio
- Als de alarmtijd wordt bereikt, zal de radio automatisch inschakelen.- De radio speelt 60 minuten af en zet zichzelf daarna uit voor de volgende
geselecteerde alarmdag.- Als het alarm wordt geactiveerd en binnen 50 van de ingestelde alarmtijd, kunt
u op de knop SNOOZE drukken of uw hand zwaaien aan de voorkant van hetapparaat binnen het optimale bereik van 10 tot 50 cm (als deZWAAI-SENSOR is ingeschakeld) om de snooze-functie te activeren, ziediagram A hieronder. Het alarm stopt gedurende de snooze-tijd (ongeveer 10minuten) en schakelt daarna weer in.
- Druk op de knop ALARM 1 (ALARM 2) SET om de snooze te annuleren voordeze is verstreken.
- Elke keer dat het alarm inschakelt en er niet op de knop SNOOZE wordtgedrukt of gebruik wordt gemaakt van de zwaai-sensor, zal het alarm voor deresterende activatietijd spelen.Met de resterende activatietijd wordt bedoeld:Voorbeeld A ---- Alarm activeert om 12:00, het speelt voor maximaal 60minuten, dit is de resterende activatietijd van het alarm.Voorbeeld B ---- Alarm activeert om 12:00, daarna wordt de knop SNOOZEingedrukt op 12:45. Het apparaat gaat voor 10 minuten in de snooze-modus.Op 12:55, activeert het alarm opnieuw en zal nog 5 minuten afspelen. Deresterende activatietijd van het alarm is in dit geval dus 5 minuten.
- Om het alarm onmiddellijk te stoppen nadat het alarm klinkt, kunt u ook op deknop ALARM 1 (ALARM 2) SET drukken. Het alarm reset zichzelf voor devolgende geselecteerde alarmdag.

14
Diagram A
Opmerking:- Als de sensor is ingeschakeld (AAN):
Als het alarm wordt geactiveerd en u op de knop SNOOZE drukt of uw handaan de voorkant van het apparaat zwaait binnen het optimale bereik, zal hetLED-display een paar seconden oplichten en daarna terugkeren naar denormale (gedimde) toestand.
Slaaptimer-functie
In slaap vallen met de slaaptimerDeze functie geeft u de mogelijkheid om in te slaap te vallen tijdens het luisterennaar de radio. De slaaptimer kan maximaal op 90 minuten worden ingesteld.Het apparaat schakelt automatisch uit als de ingestelde tijd is verstreken.1. Druk op de knop POWER om het apparaat in te schakelen.2. Stem af op de gewenste zender in de radio-modus.3. Druk herhaaldelijk op de knop SLEEP om de slaaptimer in te stellen op 15, 30,
45, 60 of 90 minuten. Het apparaat zal automatisch uitschakelen als deingestelde tijd is verstreken en het display toont de slaaptijd. Het apparaatspeelt dus voor de geselecteerde tijdsduur af en schakelt daarna automatischuit.
4. Druk één keer op de knop SLEEP om de resterende slaaptijd te bekijken.5. Druk op elk gewenst moment op de knop POWER om de radio uit te
10cm
WAVE SENSOR
Wave your hand
50cm
De ZWAAI-SENSOR activeren:Zwaai uw hand aan de voorkant van het apparaat binnen het optimale bereik van 10 tot 50cm.

15
schakelen voordat de slaaptimer is afgeteld tot nul.Opmerkingen:- Als u in slaap valt met muziek van een extern apparaat dat is aangesloten opde AUX INGANG, vergeet dan niet dat de slaaptimer alleen de wekkerradiouitschakelt en niet het extern apparaat.
- Als het apparaat is uitgeschakeld kunt u ook rechtstreeks op de knop SLEEPdrukken om de slaaptimer te activeren.
De zwaaifunctie en LED-display
U kunt op de knop WAVE SENSOR AAN/UIT drukken om de zwaaifunctie in/uitte schakelen. Dit werkt niet als het alarm is geactiveerd of als het apparaat insnooze-modus is.- Als de sensor is ingesteld op UIT (OFF): Het LED-display zal altijd helder zijn
opgelicht.- Als de sensor is ingesteld op AAN (ON): Het LED-display is normaal opgelicht
voorkant van het apparaat binnen het optimale bereik van 10 tot 50 cm, ziediagram A hierboven), het LED-display zal kort oplichten en daarnaterugkeren naar de normale (gedimde) toestand.
Zorg en onderhoud
temperaturen.- Knoei niet met de interne onderdelen van het apparaat.- Maak uw apparaat schoon met een vochtige (nooit natte) doek. Oplosmiddel
of afwasmiddel mag nooit gebruikt worden.- Laat uw apparaat niet achter in direct zonlicht of op hete, vochtige of stoffige
plaatsen.- Houd uw apparaat uit de buurt van verwarmingstoestellen en bronnen vanelektrische ruis, zoals fluorescentielampen of motoren.
Het apparaat resettenAls het apparaat is blootgesteld aan een stroomstoot of elektrische schok, danis het mogelijk dat de interne microcontroller vastloopt en het apparaat nietmeer reageert op commando’s van de bedieningselementen op het paneel.1. In dit geval, haal de stekker uit het stopcontact en steek de stekker
vervolgens weer terug in het stopcontact.2. Gebruik een rechtgebogen paperclip, tandenstoker of soortgelijk voorwerp
om op de RESET-knop op de achterkant van het hoofdapparaat te drukken

16
(zie in de afbeelding hieronder). De Reset operatie wist het systeemgeheugen en al uw eerder ingestelde instellingen zullen gewist worden.
LET OP: GEBRUIK GEEN SCHERP, SPITS VOORWERP OM DE RESET-KNOP IN TE DRUKKEN. DIT KAN DE RESETSCHAKELAAR IN HET APPARAAT BESCHADIGEN.
RESET-knop
17
Specificaties
Backup-batterij voor klok / geheugen: DC3V--- AAA (UM-4) type x 2(niet meegeleverd)Vermogen luidspreker 0.5WRadiogestuurd kloksysteem DCF77 / Germany
DE SPECIFICATIES EN HET UITERLIJK VOORKOMEN VAN HETBAPPARAAT ZIJN ONDERHEVIG AAN VERANDERING ZONDERVOORAFGAANDE KENNISGEVING.
Indien u zich in de toekomst van dit toestel wenst te ontdoen, let erdan op dat elektrisch afvalmateriaal niet met het huishoudelijkafval mag worden verwijderd. Breng het toestel naar eenkringloopwinkel of andere voorziening voor recycling. Neemcontact op met uw plaatselijke autoriteit of winkelier indien u meerinformatie wenst over recycling. (Richtlijn voor Afval vanElektrische en Elektronische Apparaten, AEEA).
Voor informatie en ondersteuning, www.lenco.eu

Radio réveil et Radio FM
CR-335
Pour plus d'informations ou si vous avez besoin d'aide : www.lenco.eu

2
Table des matières
Avertissement.................................................................................................. 3
Consignes de Sécurité Importantes.................................................................4
Installation........................................................................................................6
Description des pièces.....................................................................................7
Fonctionnement du Tuner radio.....................................................................10
Ecoute d'une Source Audio Externe...............................................................10
Réglage du réveil............................................................................................11
Fonctionnement de l'alarme...........................................................................12
Fonction Mise en sommeil..............................................................................15
Fonction Saisie de longueur d'onde et Affichage LED....................................16
Soin et entretien.............................................................................................16
Caractéristiques techniques...........................................................................17

3
Avertissement
Le symbole éclair àpointe de flècheinscrit dans untriangle équilatéralvise à avertirl'utilisateur de laprésence de« 'voltagedangereux » nonisolé dans le boitierdu produit,susceptible deprésenter un risqued'électrocution despersonnes enraison de sapuissance.
ATTENTION RISQUED'ELECTROCUTIONNE PAS OUVRIRATTENTION : Afin de réduirele risque d’électrocution, nepas démonter le cadre (ou lepanneau arrière). L’appareil necontient aucun composantréparable par l’utilisateur.Confier toute réparation à unréparateur qualifié.
Le pointd’exclamationinscrit dans untriangle équilatéralvise à avertirl'utilisateur derègles importantesde fonctionnementet d'entretiendécrites dans ladocumentation quiaccompagne leproduit.
* Voir Façade arrière de l'appareil
MISE EN GARDE : Afin de réduire les risques d’incendie ou d’électrocution,protégez cet appareil de la pluie et de l’humidité.L'appareil ne doit en aucun cas être mis en présence d'eau (gouttes ouéclaboussures), ni surmonté d'objets emplis d'eau, tels que des vases.

4
Consignes de sécurité importantes
Cet appareil a été conçu et fabriqué afin de vous assurer une sécurité maximum dans le cadre d'une utilisation conforme à nos directives. Toutefois, une utilisation non-conforme peut être la source de chocs électriques ou de risques d'incendie. Avant de mettre l’appareil en marche, veuillez lire attentivement l’ensemble des instructions concernant la sécurité et le fonctionnement, et conservez ce manuel à portée de main pour toute référence ultérieure. Portez une attention particulière à tous les avertissements qui s’y trouvent ainsi qu'à ceux situés sur l’appareil. 1. Eau et humidité
Ne pas utiliser l’appareil près d’une source d’eau, telle qu’une baignoire, un lavabo, un évier ou un baquet, près d’une piscine ou dans un sous-sol humide.
2. Ventilation Il est préférable de placer l'appareil de telle sorte que son emplacement ou sa position n'entravent pas une ventilation correcte. Par exemple, il vaut mieux ne pas le placer sur un lit, un canapé, un tapis ou une surface similaire susceptible de bloquer les ouvertures d'aération. La ventilation ne doit absolument pas être entravée par des objets placés sur les ouvertures d'aération, tels que journaux, nappes, rideaux, etc. De même, il convient de ne pas le poser dans des meubles intégrés, tels que des étagères ou une bibliothèque, susceptibles de gêner la circulation d'air autour des ouvertures d'aération.
3. Chaleur et flammes Il importe de tenir l'appareil éloigné de sources de chaleur telles que des radiateurs, des thermomètres, des poêles ou autres appareils (y compris des amplificateurs) produisant de la chaleur. Aucune flamme nue, comme par exemple une bougie allumée, ne doit être placée sur l'appareil. Veillez à ne relier l'appareil qu'à une alimentation électrique identique à celle
4. Alimentation électrique décrite dans les consignes d’utilisation ou figurant sur l’appareil. Lorsque l'on se sert du cordon d'alimentation pour arrêter l'appareil, ce dernier doit être accessible immédiatement.
5. Protection du cordon d'alimentation Les cordons d'alimentation doivent être installés de telle sorte que l'on ne puisse pas marcher dessus ou qu'ils ne soient pas écrasés par des objets posés dessus ou contre eux. Il est toujours préférable d'avoir un espace dégagé entre l'endroit où le cordon sort de l'appareil et la prise où on le branche.
6. Nettoyage

5
On doit impérativement nettoyer l'appareil conformément auxrecommandations. Veuillez vous rendre à la section « Soin et entretien » duprésent manuel pour lire les recommandations de nettoyage.
7. Introduction malencontreuse d'objets ou de liquidesVeillez à ce qu'aucun objet ni liquide ne soit introduit par les fentes etouvertures se trouvant sur l’appareil. On ne soumettra pas ce dernier à desfilets ou de l'aspersion de liquides, et l'on veillera à ne pas placer au-dessusdes objets remplis de liquides, tels que des vases.
8. FixationsN'utilisez pas de fixations qui ne soit pas recommandées par le fabriquantdu produit.
9. Protection anti-foudre et surtensionDébranchez l’appareil de la prise murale et arrêtez les programmations.Ceci évitera que l'appareil soit endommagé par la foudre ou les surtensionsélectriques.
10. SurchargesNe surchargez pas les prise murales, les rallonges (câbles ou boitiersintégraux), ceci pouvant entraîner un risque d'incendie ou d'électrocution.
11. Dommages réclamant une réparationIl convient de faire réparer cet appareil par un technicien qualifié dans lescas suivants :A. le cordon d’alimentation ou la prise ont été endommagés ;B. un corps étranger ou un liquide a pénétré à l’intérieur de l’appareil ;C. l’appareil a été exposé à de la pluie ;D. l’appareil a subi une chute ou son châssis est endommagé ;E. l’appareil semble ne pas fonctionner normalement ou ses performancesse sont dégradées.
12. Périodes de non-utilisationSi vous pensez ne pas vous servir de l'appareil pendant une longue période,telle qu'un mois ou plus, il convient de débrancher le cordon de l'appareilpour éviter que l'unité soit endommagée ou pour prévenir la corrosion.
13. RéparationsL'utilisateur ne doit pas tenter de réparer de lui-même l’appareil dans toutescirconstances autres que celles précisées dans ce mode d'emploi. Lesréparations non traitées dans ce mode d'emploi doivent être confiées à dupersonnel qualifié.

6
Caractéristiques
Merci d'avoir acheté notre Radio Réveil. Ce modèle comprend les caractéristiques suivantes : - Tuner FM. - Réveil par Radio. - Programmation fuseau horaire réglable. - Fonction programmation double réveil. - Fonction éveil par sonnerie (vibreur) ou par radio avec temporisation. - Détection d'onde pour active le temporisateur. - Fonction mise en sommeil. - Affichage LED - Entrée Audio (AUX-IN) permettant de relier un autre lecteur audio
numérique. - Enceinte incorporée haute Fidélité
Installation
Sauvegarde par pile des réglages du réveil. A Logement de piles situé sur le bas de l'unité. (1) Ouvrez le couvercle du logement de piles. (2) En ce qui concerne la sauvegarde des réglages du réveil, conformez-vous
au schéma de polarité indiqué dans le logement et mettez en place 2 piles AAA (UM-4) (vous devez vous les procurer séparément).
(3) Refermez le couvercle du logement de piles. Attention : - Il convient de ne pas exposer les piles à une chaleur excessive (rayons du
soleil, feu ou autre). - Vérifiez que les piles sont installées convenablement. Une polarité erronée
peut endommager l’appareil. - Ne mélangez pas piles neuves et piles usagées. - Ne mélangez pas des piles alcalines et des piles standard (au zinc-carbone)
ou rechargeables (cadmium-nickel). - Seules des piles d'un type identique ou équivalent doivent être utilisées. - Si vous pensez ne pas avoir à vous servir de l'appareil pendant longtemps,
ôtez les piles. - Ne jetez pas les piles au feu, elles peuvent exploser ou fuir. - Il y a danger d'explosion si une pile est replacée dans le mauvais sens.
7
Branchement électriqueATTENTION : Avant de mettre en route l’appareil, vérifiez le voltageinscrit sur la plaque signalétique située sur l’appareil et correspondant àla puissance de votre zone de domicile.Reliez le câble d'alimentation à la prise de courant appropriée de votrelogement.
Description des pièces
Unité Principale
Vue du haut
12
91110
345678

8
Vue de face
Vue arrière
262729 28
25
13 18
16
15
17
21
20
19
22
2324
14 1

9
Description des piècesUnité principale1.Touche POWER ----- Permet d’allumer et d’éteindre l’appareil2.Touche WAVE SENSOR ON/OFF ---- Active ou éteint la fonction mise en
veille par onde.Active ou éteint le déclenchement par onde de la fonction « éclairage del'affichage LED pendant quelques secondes ».
3. Touche TIME SET ----- Permet de régler le format 12 ou 24 heures, le réveil,l’année, et le jour.
4. Touche ALM2 SET ---- permet le réglage de la sonnerie Alarme 25. Touche ALM1 SET ---- permet le réglage de la sonnerie Alarme 16. Touche TIME ZONE ----- permet le réglage du fuseau horaire (DST)7. Touche MM/DD/YY ----- Appuyez pour voir le mois, le jour et l'année.8. Touche SLEEP ---- Permet la sélection de la durée de la minuterie sommeil.9. Touche + ---- En mode réglages, appuyez sur cette touche pour avancer la
valeur du réglage10.Touche - ---- En mode réglages, appuyez pour réduire la valeur du
réglage11.Touche SNOOZE ----- Active la fonction snooze 12.Capteur d'onde WAVE13.Affichage LED14.Indication PM LED ----- en affichage réglé sur 12 heures: la LED est allumée pour marquer l'après-midi, éteinte le matin.
15.Indication mode Radio LED16.Contacteur ALM 1 ---- Sélectionne la source de la sonnerie ou coupe
l’alarme 117.Contacteur ALM 2 ---- Sélectionne la source de la sonnerie ou coupe
l’alarme 218.Indication LED ALARM 119.Indication LED ALARM 220.Indication LED mode AUX (auxiliaire)21.Rotacteur VOLUME ----- Permet d'ajuster le niveau du volume sonore22.Rotacteur réglage fin TUNING ---- Ajuste le réglage de fréquence station
radio FM23.Echelle graduée fréquences FM24.Logement de sauvegarde Réveil par piles. ---- Situé sur le fond de l'unité.25.Haut parleur26.Cordon d'alimentation électrique27.Fil d'antenne FM28.Touche RESET ----Permet de reconfigurer les réglages de l'unité à leur
état initial sortie d'usine.

10
29. Prise jack AUX-IN ---- Entrée du signal audio auxiliaire.
Fonctionnement du Tuner Radio
Antenne FM Allongez complètement l'antenne FM pour obtenir une réception FM optimale.
Réglage Fin Radio 1. Appuyez sur la touche POWER pour allumer l'unité, lorsque l'indication
LED du mode radio est allumée. Remarque : Lorsque l'on branche une fiche auxiliaire de 3,5 mm dans la prise jack AUX-IN, l'unité passe en mode auxiliaire et l'indicateur LED AUX s'allume. Si vous vous trouvez dans cette situation, débranchez la prise auxiliaire située au dos de l'appareil et l'indication LED AUX s'allume de nouveau.
2. Ajustez le bouton TUNING sur la station radio que vous souhaitez entendre.
3. Ajustez le bouton VOLUME pour régler le volume au niveau souhaité.
Ecoute d'une source audio externe
1. Reliez un câble audio (non fourni) provenant d'un appareil audio et équipé d'une fiche stéréo de 3,5mm à la prise jack AUX-IN de l'unité.
2. Appuyez sur la touche POWER pour allumer l’appareil et l'indicateur LED AUX s'allume.
3. Allumez l'appareil audio externe. 4. Vous pouvez dorénavant contrôler le niveau du volume à partir de
l’appareil. 5. Effectuez toutes les autres opérations sur votre appareil externe comme à
l'accoutumée.
Remarques : Appuyez sur la touche POWER pour éteindre votre appareil lorsque vous avez terminé votre écoute. N'oubliez pas non plus de couper le courant de l'appareil externe.

11
Réglage du Réveil
Lorsque l’appareil est éteint (OFF) (mode courant électrique coupé) : Réglez le format 12 ou 24 heures 1. Appuyez sur la touche TIME SET pour entrer en mode réglage 12 ou 24
heures.2. Appuyez sur la touche +/- pour sélectionner le format d'affichage 12 ou 24
heures.
Réglez le réveil 3. Appuyez encore une fois sur la touche TIME SET et vous verrez les chiffres
indiquant l'heure clignoter. 4. Appuyez sur la touche +/-pour régler l'heure. 5. Appuyez sur la touche TIME SET; les chiffres indiquant les minutes
clignotent.6. Appuyez sur la touche +/- pour régler les minutes.
Réglage de l'année 7. Appuyez sur la touche TIME SET. Les chiffres indiquent l'année clignotent. 8. Appuyez sur la touche +/- pour régler l'année.
Réglez le mois et le jour. 9. Appuyez sur la touche TIME SET; les chiffres indiquant le mois clignotent. 10. Appuyez sur la touche +/- pour régler le mois. 11. Appuyez sur la touche TIME SET ; les chiffres indiquant le jour clignotent. 12. Appuyez sur la touche +/- pour régler le jour.
Sortie du mode réglage 13. Afin de sauvegarder tous les réglages, appuyez sur la touche TIME SET
ou attendez quelques instants. Réveil par Radio L'unité peut recevoir un signal radio automatiquement, ce qui permet une meilleure synchronisation et un affichage plus précis de l'heure. Fuseau horaire (DST) Vous avez la possibilité d'appuyer sur la touche TIME ZONE pour adapter le fuseau horaire à votre zone d'habitation. 1. Appuyez une fois sur la touche TIME ZONE ; l'affichage clignote. 2. Appuyez sur la touche + ou –pour sélectionner le bon fuseau horaire. 3. Appuyez une nouvelle fois sur la touche TIME ZONE pour confirmer votre
choix.

12
Vérifier l'année, le mois et le jour Lorsque l'on se trouve en mode éteint, on peut appuyer sur la touche MM/DD/YY pour vérifier le réglage de l'année, du mois et du jour du moment.
Fonctionnement de la sonnerie
L'unité comporte le choix à votre convenance d'une sonnerie double (alarme 1 et alarme 2). Lorsque l'unité est éteinte (OFF) (mode power off) : Réglage de l'heure de sonnerie : 1. Appuyez une fois sur la touche ALM 1 (ALM 2) SET; les chiffres de l'heure
prévue pour la sonnerie clignotent. 2. Appuyez sur la touche +/- pour régler l'heure de la sonnerie. 3. Appuyez une nouvelle fois sur la touche ALM 1 (ALM 2) SET ; les chiffres
indiquant les minutes de la sonnerie clignotent. 4. Appuyez sur la touche +/- pour régler les minutes de la sonnerie.
Réglage des jours de sonnerie. 5. Appuyez sur la touche ALM 1 (ALM 2) SET; les jours où la sonnerie est
possible clignotent. 6. Appuyez sur la touche +/-pour sélectionner les jours où vous souhaitez voir
la sonnerie se déclencher; les affichages en seront: “1 – 7” ----- Tous les jours “1 – 5” ----- Du lundi au vendredi “6 – 7” ----- Le samedi et le dimanche
Sauvegarde des réglages de la sonnerie 7. Pour sauvegarder les réglages, appuyez sur la touche ALM 1 (ALM 2) SET
ou attendez quelques instants pour sortir automatiquement du mode réglage.
Sélection de la source de sonnerie réveil 1. Faites glisser l'interrupteur ALM 1 (ALM 2) sur la position BUZZER ou
RADIO suivant ce que vous désirez. 2. Une fois la sonnerie activée, l'indication LED ALARM 1 (ALARM 2) devrait
s'éclairer.Remarques :- Si l’option « Wake to Radio » est sélectionnée et qu'un lecteur externe est
relié à la prise jack AUX-IN, la source de sonnerie sera automatiquement redirigée vers le vibreur au moment de déclenchement de la sonnerie.

13
- Lorsque « Wake to Radio » est sélectionné, vérifiez que la station de radioque vous souhaitez entendre est bien réglée. Ajustez le niveau de volumeselon vos souhaits pour le moment du réveil.
- Pour activer l'alarme, faites glisser l'interrupteur ALM 1 (ALM 2) sur laposition BUZZER ou RADIO et la source de sonnerie correspondantes'affiche sur l'écran LED.
Activer ou désactiver le capteur d'onde de veille WAVE- Lorsque la sonnerie se déclenche, vous avez le choix entre appuyer sur la
touche SNOOZE ou agiter les mains le long de la façade de l'unité pouractiver la minuterie de la mise en veille.
- Pour activer ou désactiver la fonction détection d'onde, vous pouvez appuyersur la touche WAVE SENSOR ON/OFF.Remarque : On ne peut activer ou désactiver la fonction détection d'ondeen appuyant sur la touche WAVE SENSOR ON/OFF pendant que lasonnerie se déclenche ou que l'on est en mode veille.Eveil avec le vibreur.
- Lorsque l'heure de sonnerie est atteinte, le vibreur émet un son pendant 3minutes.
- Il passe en mode veille automatique si l'on n'appuie sur aucune autre touche.L'indication LED ALARM 1 (ALARM 2) clignote. Le vibreur s'éteint pendantle temps de veille (environ 10 minutes) puis se rallume. Cette opération serépète cinq fois. A la fin de la sixième sonnerie, la sonnerie s'éteint jusqu'aujour suivant déterminé, même heure.
- Vous pouvez également activer manuellement la fonction veille après ledéclenchement de la sonnerie en appuyant sur la touche SNOOZE ou enagitant les mains devant l'unité à une distance comprise au maximum entre10 et 50 cm (à condition d'avoir placé le WAVE SENSOR sur ON); voir leschéma A suivant. Le vibreur s'arrête pendant le temps de veille prévu, puisredémarre.
- Pour annuler la veille avant l'expiration du délai imparti, appuyer sur latouche ALARM 1 (ALARM 2) SET
- On ne peut répéter le fonctionnement de la veille (en automatique comme enmanuel) que 5 fois.
- Pour interrompre immédiatement la sonnerie après déclenchement duvibreur, on peut également appuyer sur la touche ALARM 1 (ALARM 2)SET. Elle se réenclenche pour le jour suivant déterminé.
Réveil avec la radio- Lorsque l'heure prévue pour la sonnerie intervient, la source Radio
sélectionnée pour la sonnerie s'allume automatiquement.

14
- Elle fonctionne pendant 60 minutes puis s'éteint et se réenclenched'elle-même en vue du jour suivant sélectionné.
- Pendant le déclenchement de la sonnerie et dans les 50 minutes qui suiventl'heure de sonnerie prévue, vous pouvez appuyer sur la touche SNOOZEou agiter les mains devant la façade de l'unité à une distance comprise aumaximum entre 10 et 50 cm (à condition d'avoir placé le WAVE SENSORsur ON) pour activer la fonction veille; voir le schéma A suivant. La sonneries'arrête pendant le temps de veille prévu (environ 10 minutes), puisredémarre.
- Pour interrompre la veille avant la fin du délai prévu, appuyez sur la toucheALARM 1 (ALARM 2) SET.
- A chaque fois que la sonnerie se déclenche, et si l'on n'appuie pas sur latouche SNOOZE ni n'active le capteur WAVE, l'appareil fonctionne pendantla durée restante de sonnerie.La durée restante de sonnerie signifie que :Exemple A ---- La sonnerie se déclenche à 12:00 h, l'appareil fonctionnependant les 60 minutes maximum restant après le déclenchement de lasonnerie radio.Exemple B ---- La sonnerie se déclenche à 12:00 h et l'on appuie sur latouche SNOOZE à 12:45. L'unité passe en mode snooze pendant 10minutes. A 12:55 h, l'unité se déclenche de nouveau, et fonctionne pendantles 5 minutes restant sur le temps de l'activation de la sonnerie radio.
- Pour arrêter la sonnerie dès son déclenchement, vous pouvez égalementappuyer sur la touche ALARM 1 (ALARM 2) SET. Elle se réenclenched'elle-même en vue du jour suivant sélectionné.
10cm
WAVE SENSOR
Wave your hand
50cm
Pour active le CAPTEUR D'ONDE (WAVE SENSOR) :Agitez les mains devant l'unité à une distance maximum comprise entre 10 et 50 cm.
Schéma A

15
Remarque:- Avec le capteur enclenché (ON) :
Lorsque la sonnerie se déclenche et que l'on appuie sur la touche SNOOZEou que l'on agite les mains devant l'unité à la distance maximum prévue,l'affichage LED s'allume fortement pendant quelques instants puis revient àla normale (pâle).
Fonction minuterie sommeil
Minuterie mise en sommeilCette caractéristique vous permet de vous endormir en écoutant la radiopendant un temps pouvant aller jusqu'à 90 minutes.L’appareil s'éteint automatiquement lorsque le délai expire.1. Appuyez sur la touche POWER pour allumer l’appareil.2. Choisissez, en mode radio, la station radio que vous souhaitez écouter.3. Pour sélectionner la minuterie qui éteindra l'appareil après 15, 30, 45, 60 or
90 minutes, appuyez plusieurs fois sur la touche SLEEP. L'affichageindique l'heure du sommeil. L'unité fonctionne pendant le délai choisi puiss'éteint automatiquement.
4. Pour vérifier le temps restant avant extinction, appuyez une fois sur latouche SLEEP.
5. Pour éteindre l'unité avant l'achèvement complet du cycle de la minuterie,appuyez sur la touche POWER à n'importe quel moment.Remarques :
- Si vous vous endormez au son d'un appareil externe branché à l'entrée AUX,la minuterie coupera le courant allant vers cet appareil, mais pas l'appareillui-même.
- En mode coupure du courant, vous pouvez également appuyer sur la toucheSLEEP directement pour activer la minuterie.

16
Fonction capteur d'onde et affichage LED
Vous pouvez appuyer sur la touche WAVE SENSOR ON/OFF pour activer oudésactiver la fonction capteur d'onde. Celle-ci fonctionne lorsque 'unité n'estpas en mode activation de la sonnerie ou veille.
- Lorsque le capteur est réglé sur OFF : l'affichage LED s'éclaire toujoursbrillamment.
- Lorsque le capteur est réglé sur ON : l'affichage LED s'éclaire normalement(couleur pâle). A chaque fois que le capteur d'onde est activé (Agitez lesmains devant l'unité à une distance maximum comprise entre 10 et 50 cm,voir le schéma A ci-dessus), l'affichage LED s'éclaire fortement pendantquelques instants puis revient à la normale (clarté pâle)
Soin et entretien
- Ne soumettez pas l'appareil à des forces excessive, à des chocs, à de lapoussière ou à des températures extrêmes.
- Ne manipulez pas les composants internes de l’appareil.- Utilisez un chiffon humide (mais jamais très mouillé) pour nettoyer appareil.
Vous ne devez jamais utiliser de dissolvant ni de détergent.- Evitez de laisser votre appareil directement exposée aux rayons du soleil ou
dans des lieux humides, brûlants ou poussiéreux.- Maintenez votre unité à l'écart d'autres appareils de chauffage ou de sources
de bruit électrique telles que des néons ou des moteurs.Réinitialisation de l’appareilSi l'unité a subi une surtension ou un choc électrique, le microcontrôleurintérieur peut s'en trouver bloqué, et l'unité ne répond plus à la moindrecommande émanant du tableau de bord.
1.Dans ce cas, débranchez puis rebranchez le câble d'alimentation surla prise murale.
2.Servez vous d'un trombone, ou d'un cure-dent ou de tout autre objetsimilaire pour appuyer sur la touche RESET située au dos de l'unitéprincipale (voir dessin ci-dessous). La manipulation de réinitialisationvide la mémoire du système et efface tous les réglages que vousaviez précédemment enregistrés.

17
ATTENTION : NE VOUS SERVEZ PAS D'UN OBJET POINTU OU ACÉRÉ POUR APPUYER SUR LE BOUTON RESET. CECI RISQUERAIT D'ENDOMMAGER LE BOUTON RESET SITUÉ DANS L'APPAREIL.
Caractéristiques
Alimentation électrique AC 230V ~ 50Hz Piles de secours pour réveil ou mémoire : 2 piles DC3V--- type AAA (UM-4) (non fournies) Sortie haut-parleur 0.5W Système Radio Réveil DCF77 / Allemagne
SOUS RESERVE DE MODIFICATION DES CARACTÉRISTIQUES AINSI QUE DE L'ASPECT EXTÉRIEUR DE L'APPAREIL SANS PRÉAVIS.
Si à l'avenir vous devez vous débarrasser de ce produit, veuillez noter que : Les produits électriques ne peuvent pas être jetés avec le reste des déchets ménagers. Si possible, amenez l'appareil à un centre de recyclage. Vérifiez auprès de votre municipalité ou de votre détaillant pour en savoir plus sur le recyclage. (Directive relative aux déchets d’équipements électriques et électroniques).
Pour plus d'informations ou si vous avez besoin d'aide : www.lenco.eu
Bouton RESET

Reloj Controlado por Radio con
Radio FM
CR-335
Para información y ayuda, www.lenco.eu

2
Tabla de contenidos
Advertencia.....................................................................................................3
Importantes instrucciones de seguridad..........................................................4
Características.................................................................................................6
Instalación........................................................................................................6
Descripción de las partes.................................................................................7
Funcionamiento del sintonizador de radio......................................................10
Para escuchar de fuentes de audio externas.................................................10
Ajuste de la hora.............................................................................................11
Programación de la alarma............................................................................12
Función de temporizador de apagado automático (Sleep).............................15
Función de sensor de movimiento y display LED...........................................16
Cuidado y mantenimiento…………………………………………………………16
Especificaciones…………………………………………………………….……..18

3
Advertencia
El símbolo del rayoen un triánguloequilátero pretendealertar al usuario dela presencia de"voltaje peligroso"no aislado en elinterior delproducto, quepodría ser de lasuficiente magnitudcomo paraconstituir un riesgode descargaeléctrica..
PRECAUCIÓNRIESGO DE DESCARGAELÉCTRICA. NO ABRIR.
ADVERTENCIA: PARAREDUCIR EL RIESGO DEDESCARGA ELÉCTRICA,NO RETIRE LA CUBIERTA(O TAPA).EXCLUSIVAMENTEPERSONAL CUALIFICADOPODRÁ HACERSECARGO DE LAS TAREASDE REVISIÓN YREPARACIÓN DELAPARATO.
El símbolo deexclamación en untriángulo equiláteropretende alertar alusuario de lapresencia deimportantesinstrucciones defuncionamiento ymantenimiento(reparación)acompañando alos impresos delaparato.
* Vea Parte posterior de la unidad
ADVERTENCIA:Para reducir el riesgo de incendio o descarga eléctrica, no exponga esteaparato a la lluvia o la humedad.No exponga el aparato a goteos ni salpicaduras, y no coloque objetos quecontengan líquidos, como jarrones, sobre este.

4
Importantes instrucciones de seguridad
Cuando se use directamente, esta unidad ha sido diseñada y fabricada para garantizar su seguridad personal. Sin embargo, un uso inadecuado podrá resultar en una potencial descarga eléctrica o riesgo de incendio. Por favor, lea atentamente todas las instrucciones de seguridad y mantenimiento antes de la instalación y el uso del aparato, y conserve estas instrucciones a mano para futuras referencias. Preste especial atención a todas las advertencias presentes en estas instrucciones y en el cuerpo de la unidad. 1. Agua y humedad
No use la unidad cerca del agua. Por ejemplo: cerca de una bañera, barreño, fregadero, lavandero, piscina o un sótano húmedo.
2. Ventilación La unidad deberá colocarse de modo que su ubicación o posición no interfiera con su adecuada ventilación. Por ejemplo, no deberá colocarse sobre una cama, alfombra, sofá o superficie similar que pudiera bloquear la aberturas de ventilación. La ventilación no deberá quedar impedida cubriendo las aberturas de ventilación con elementos como periódicos, manteles, cortinas, etc. Tampoco deberá ser instalada en un mueble de manera que quede empotrada, como sería el caso de una estantería o un armario. Si lo hiciera estaría impidiendo el paso de aire por las aberturas de ventilación.
3. Calor y llama Mantenga la unidad alejada de fuentes de calor, como radiadores, salidas de calefacción, fogones u otros elementos (incluyendo amplificadores) que produzcan calor. No coloque fuentes de llama viva, como velas encendidas, sobre el aparato.
4. Alimentación La unidad deberá conectarse únicamente a una toma de corriente del tipo especificado en las instrucciones de funcionamiento o en la indicación del aparato.El cable de alimentación se usa como elemento de desconexión, por lo que deberá permanecer accesible en todo momento.
5. Protección del cable de alimentación Los cables de alimentación deberán guiarse de modo que sea improbable tropezarse con ellos o que puedan quedar pellizcados contra elementos colocados sobre o contra estos. Le recomendamos dejar la zona por la que el cable de alimentación sale del aparato y en la de conexión a la toma de corriente despejada de obstáculos.
6. Limpieza

5
Limpie la unidad sólo como se especifica. Vea la sección de "Cuidado y mantenimiento" de este manual para obtener instrucciones
de limpieza. 7. Entrada de objetos y líquidos
Evite que ningún objeto caiga o que se derrame ningún líquido por las aberturas de ventilación del producto. No lo exponga a goteos ni salpicaduras ni coloque objetos que contengan líquidos sobre este.
8. Accesorios Utilice únicamente accesorios recomendados por el fabricante.
9. Protección contra las tormentas eléctricas y las subidas de tensión Desenchufe la unidad de la toma de pared cuando no piense usar el aparato durante un tiempo. Esto evitará los posibles daños producidos durante las tormentas eléctricas y las subidas de tensión.
10. Sobrecarga No sobrecargue las tomas de pared, cables extensores o regletas, ya que esto podría suponer un riesgo de incendio o descarga eléctrica.
11. Daños que requieran reparación Está unidad deberá ser reparada por personal cualificado cuando: A. El cable de alimentación o el enchufe estén dañados. B. Hayan caído objetos o se haya derramado líquido en el interior del aparato.C. La unidad haya sido expuesta a la lluvia. D. La unidad ha recibido un impacto o su carcasa ha resultado dañada. E. La unidad exhibe un marcado cambio en sus prestaciones o no funciona con normalidad.
12. Periodos de falta de uso Si piensa dejar la unidad falta de uso durante un periodo prolongado, como un mes, o incluso más tiempo. Desenchufe el cable de alimentación de la toma de corriente para evitar daños y corrosión.
13. Reparación El usuario no deberá intentar reparar la unidad yendo más allá de los límites descritos en las instrucciones de funcionamiento del usuario. Los métodos de reparación no observados en las instrucciones de funcionamiento deberán ser encomendados a personal cualificado.

6
Características
Le agradecemos la compra de la radio con reloj controlado por radio Este modelo incorpora las siguientes características: -Sintonizador FM - Reloj RCC (Reloj Controlado por Radio) - Ajuste del Horario de Verano - Función de temporizador de alarma doble - Despertador por alarma (timbre) o radio con función de cabezada (Snooze) - Sensor de movimiento para la activación de la función Snooze - Función de apagado automático (Sleep) - Display LED - Audio line-in (AUX-IN) para la conexión de otros reproductores de audio digitales
- Altavoces de alta fidelidad integrados
Instalación
Pila para la alimentación del reloj Hay un compartimento para pilas situado en la parte inferior de la unidad. (1) Abra la tapa del compartimento para pilas. (2) Para poder alimentar el reloj de la unidad, siga las indicaciones de
polaridad que hay en el interior del compartimento para pilas e instale 2 pilas del tipo AAA (UM-4) (vendidas por separado).
(3) Cierre la tapa del compartimento para pilas.
Advertencias: - Las pilas no deberán ser sometidas a un calor excesivo, como el acumulado
por la exposición al sol,fuego o similares. - Asegúrese de que las pilas están instaladas correctamente. Una polaridad
incorrecta podría estropear la unidad. - No mezcle pilas nuevas con pilas usadas. - No mezcle pilas alcalinas, con estándar (carbón-zinc) o recargables (níquel-
cadmio).- Recomendamos sólo el uso de pilas del mismo tipo o de tipo equivalente. - Si no piensa usar la unidad durante un periodo prolongado, quite las pilas. - No deseche las pilas en el fuego, ya que estas podrían explotar o perder.

7
- Existe el peligro de explosión si las pilas no ha sido sustituidacorrectamente.
Conexión a la toma de alimentaciónPRECAUCIÓN: Antes de operar con la unidad; compruebe el voltaje ACde la placa de clasificación situada en la unidad, asegurándose de quecoincide con el de la red de suministro de su área.
Conecte el enchufe a una toma de corriente de su hogar.
Descripción de las partesUnidad principal
Vista superior
12
91110
345678

8
Vista frontal
Vista posterior
262729 28
25
13 18
16
15
17
21
20
19
22
2324
14 1

9
Descripción de las partes
Unidad principal1. Botón POWER ----- Para encender y apagar la unidad2. Botón WAVE SENSOR ON/OFF ---- Para activar / desactivar el sensor de
movimiento de la función Snooze.Para activar / desactivar el desencadenamiento de movimiento de lafunción de “iluminación LED durante unos segundos”
3. Botón TIME SET ----- Selección del formato de 12/24 horas, hora, año yfecha
4. Botón ALM2 SET ---- Programación de la hora de la Alarma 25. Botón ALM1 SET ---- Programación de la hora de la Alarma 16. Botón TIME ZONE ----- Selección del horario de verano (DST)7. Botón MM/DD/YY ----- Púlselo para ver el mes, el día y el año8. Botón SLEEP ---- Seleccione el tiempo que transcurrirá antes del apagado
automático9. Botón + ---- En el modo de ajuste: púlselo para sumar en el valor de ajuste10. Botón - ---- En el modo de ajuste: púlselo para restar en el valor de ajuste11. Botón SNOOZE ----- Activación/desactivación de la función de cabezada
(Snooze)12. Sensor WAVE13. Display LED14. Indicador LED de PM ----- En el modo de formato de 12 horas: LED
encendido para pm, apagado para am15. Indicador LED de modo radio16. Interruptor ALM 1 ---- Selección de la fuente de Alarma 1 o su
desactivación17. Interruptor ALM 2 ---- Selección de la fuente de Alarma 2 o su
desactivación18. Indicador LED ALARM 119. Indicador LED ALARM 220. Indicador LED de modo AUX (auxiliar)21. Ruedecilla VOLUME ----- Ajuste del nivel de volumen22. Ruedecilla TUNING ---- Sintonización de la frecuencia de radio FM23. Dial de escala de frecuencia FM24. Compartimento para pilas de alimentación del reloj ---- Situado en la parte
inferior de la unidad25. Altavoz26. Cable de alimentación AC27. Antena de cable FM28. Botón RESET ---- Para el reseteado de la unidad29. Toma AUX-IN ---- Entrada para señal de audio auxiliar

10
Funcionamiento del sintonizador de radio
Antena FM Extienda por completo el cable de la antena FM para una recepción óptima de la radio FM.
Sintonización de radio 1. Pulse el botón POWER para encender la unidad, el indicador LED de modo
radio se encenderá.Nota: Cuando se haya conectado una clavija auxiliar de 3,5mm en la toma AUX-IN, la unidad se encontrará en el modo auxiliar y el indicador LED AUX de modo auxiliar estará encendido. Si este fuera el caso, desconecte la clavija auxiliar de la parte posterior de la unidad y el indicador LED del modo radio se volverá a encender.¡
2. Gire la ruedecilla de sintonización TUNING hasta la emisora de radio que desee.
3. Gire la ruedecilla VOLUME para ajustar el volumen al nivel deseado.
Para escuchar de fuentes de audio externas
1. Conecte un cable de audio (no incluido) con una clavija estéreo de 3,5mm a un aparato de audio auxiliar y la toma AUX-IN de la unidad.
2. Pulse el botón POWER para encender la unidad y el indicador AUX LED se encenderá.
3. Encienda el aparato de audio auxiliar. 4. El volumen podrá ahora controlarse desde la unidad. 5. El resto de funciones se controlarán desde el aparato auxiliar.
Notas: Pulse el botón POWER para apagar la unidad cuando haya terminado de escucharla. No olvide apagar también la unidad de audio auxiliar.

11
Ajuste de la hora
Cuando la unidad se encuentre en OFF (modo apagado):Seleccione el formato de 12/24 horas.1. Pulse el botón TIME SET para entrar en el formato de selección de 12/24
horas.2. Pulse el botón +/- para seleccionar el formato de visualización de 12/24
horas.Ajuste de la hora3. Pulse el botón TIME SET de nuevo y los dígitos de las horas parpadearán.4. Pulse el botón +/- para ajustar las horas.5. Pulse entonces el botón TIME SET y los dígitos de los minutos
parpadearán.6. Pulse el botón +/- para ajustar los minutos.Ajuste del año7. Pulse el botón TIME SET y los dígitos del año parpadearán.8. Pulse el botón +/- para seleccionar el año.
Ajuste del mes y el día9. Pulse el botón TIME SET y los dígitos de los meses parpadearán.10. Pulse el botón +/- para seleccionar el mes.11. Pulse el botón TIME SET y los dígitos de la fecha (días) parpadearán.12. Pulse el botón +/- para seleccionar la fecha.
Para salir del modo de ajuste13. Para guardar todos los ajustes, pulse el botón TIME SET o espere unos
segundos.Reloj controlado por radioLa unidad puede recibir señales de reloj controlado por radioautomáticamente, que sincronizará y mostrará la hora de un modo máspreciso.Horario de verano (DST)Pulse el botón TIME ZONE para ajustarse al horario de verano de su área.1. Pulse el botón TIME ZONE una vez y el display parpadeará.2. Pulse el botón + o – para seleccionar el DST.3. Pulse el botón TIME ZONE de nuevo para conformar su selección.Año, mes y díaEn el modo de apagado, podrá pulsar el botón MM/DD/YY para mostrar elaño, el mes y el día.

12
Programación de la alarma
La unidad incorpora una alarma doble (alarma 1 y alarma 2) que usted mismo podrá programar a su conveniencia. Cuando la unidad se encuentre en OFF (modo apagado): Programación de la hora de la alarma 1. Pulse el botón ALM 1 (ALM 2) SET una vez, y los dígitos de las horas de la
alarma parpadearán en el display. 2. Pulse el botón +/- para seleccionar la hora de la alarma. 3. Pulse el botón ALM 1 (ALM 2) SET de nuevo y los dígitos de los minutos de
la alarma parpadearán en el display. 4. Pulse el botón +/- para seleccionar los minutos de la alarma.
Selección de los días de la alarma 5. Pulse el botón ALM 1 (ALM 2) SET y los días de la alarma parpadearán en
el display. 6. Pulse el botón +/- para seleccionar los días de la alarma, cuyo significado
se explica a continuación : “1 – 7” ----- Todos los días “1 – 5” ----- De lunes a viernes “6 – 7” ----- Sábado y domingo
Para guardar los ajustes de la alarma 7. Para guardar los ajustes de la alarma, pulse el botón ALM 1 (ALM 2) SET o
espere unos segundos para salir del modo de programación de alarma y guardar los ajustes automáticamente.
Selección de fuente de alarma 1. Posicione el interruptor ALM 1 (ALM 2) en BUZZER o RADIO a su
conveniencia. 2. Cuando la alarma esté activada, el indicador LED ALARM 1 (ALARM 2)
estará encendido.
Notas:- Si selecciona "Wake to Radio", y además se ha conectado una unidad
auxiliar en la toma AUX-IN, la fuente de alarma pasará automáticamente a ser del tipo de timbre (Alarm Buzzer) cuando llegue la hora en la que deber sonar la alarma.
- Si selecciona "Wake to Radio", asegúrese de haber sintonizado antes la emisora de radio con la que quiere despertarse. Podrá también ajustar el volumen al nivel deseado.

13
- Para activar la alarma, posicione el interruptor ALM 1 (ALM 2) en BUZZER o RADIO, y el indicador de la fuente de alarma correspondiente aparecerá en el display LED.
Activación / desactivación del sensor de momiviento de Snooze- Cuando la alarma esté sonando, podrá pulsar el botón SNOOZE o agitar la
mano por delante de la unidad para activar el temporizador de cabezada(Snooze).
- Para activar/desactivar la función de sensor de movimiento, podrá pulsar elbotón WAVE SENSOR ON/OFF.Nota: La función de sensor de movimiento no podrá activarse/desactivarsepulsando el botón WAVE SENSOR ON/OFF cuando la alarma estésonando o en el modo Snooze.
Despertador por timbre - Cuando se haya alcanzado la hora en la que deba sonar la alarma, esta
sonará en su modo de timbre durante 3 minutos (si se seleccionó la fuentede timbre).
- La alarma pasará al modo cabezada (Snooze) automáticamente si no sepulsa ningún otro botón.El indicador LED ALARM 1 (ALARM 2) parpadeará. El timbre dejará desonar durante el tiempo de cabezada (Snooze) que será de 10 minutos,transcurridos los cuales, volverá a sonar. Este proceso se repetirá cincoveces. Una vez deje de sonar la sexta alarma, esta se desactivará hastaque se alcance la hora del siguiente día de alarma seleccionado.
- Podrá también activar la función Snooze manualmente, una vez suene laalarma, pulsando el botón SNOOZE o agitando su mano delante de launidad a una distancia de entre 10 y 50 cm (en caso de que se hayaactivado el sensor de movimiento, WAVE SENSOR ON), por favor, vea eldiagrama A. El timbre dejará de sonar durante el tiempo de cabezada(Snooze) y volverá a sonar una vez transcurrido este.
- Para cancelar la función Snooze, pulse el botón ALARM 1 (ALARM 2) SET.- La función Snooze (la automática y la manual) podrá repetirse un máximo de
5 veces. .- Para detener la alarma inmediatamente después de que suene el timbre,
podrá también pulsar el botón ALARM 1 (ALARM 2) SET. De hacerlo, laalarma volverá a programarse por sí sola para el siguiente día de alarmaseleccionado.
Despertador por radio- Cuando se alcance la hora en la que deba sonar la alarma, la fuente de
alarma por radio sonará automáticamente (si fue esta la fuente

14
seleccionada).- La alarma por radio sonará durante 60 minutos, después se apagará y volverá a programarse para el siguiente día de alarma seleccionado.
- Durante la activación de la fuente de alarma y dentro de los 50 minutosdesde la hora programada de alarma, pulse el botón SNOOZE o agite sumano delante de la unidad a una distancia de entre 10 y 50 cm (en caso deque se haya activado el sensor de movimiento, WAVE SENSOR ON), paraactivar la función Snooze, por favor, vea el diagrama. La alarma dejará desonar durante el tiempo de cabezada (Snooze) y volverá a sonar una veztranscurrido este.
- Para cancelar la función Snooze, pulse el botón ALARM 1 (ALARM 2) SET.- Cada vez que la alarma suene y sin pulsar el botón SNOOZE o activar el
sensor WAVE, esta sonará durante el tiempo restante de activación de laalarma.El tiempo restante de activación de la alarma significa:Ejemplo A ---- La alarma se activa a las 12:00, por lo que el tiempo restantede activación de la alarma será de 60 minutos.Ejemplo B ---- La alarma se activa a las 12:00, después pulse el botónSNOOZE a las 12:45. La unidad pasará al modo cabezada (Snooze), quedurará 10 minutos. A las 12:55, la alarma de la unidad se activará de nuevoy sonará durante otros 5 minutos, que es el tiempo de activación de alarmarestante hasta completar los 60 minutos.
- Para detener la alarma inmediatamente después de que suene, podrátambién pulsar el botón ALARM 1 (ALARM 2) SET. De hacerlo, la alarmavolverá a programarse por sí sola para el siguiente día de alarmaseleccionado.
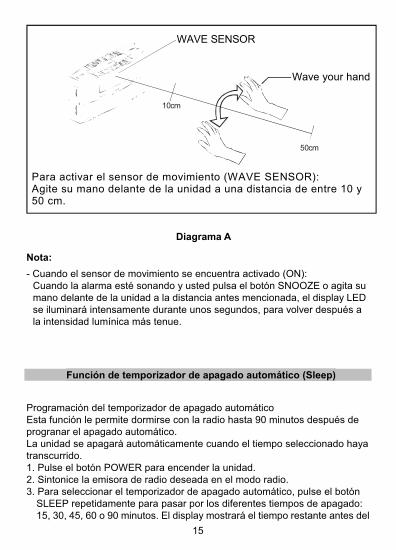
15
10cm
WAVE SENSOR
Wave your hand
50cm
Para activar el sensor de movimiento (WAVE SENSOR):Agite su mano delante de la unidad a una distancia de entre 10 y50 cm.
Diagrama A
Nota:- Cuando el sensor de movimiento se encuentra activado (ON):
Cuando la alarma esté sonando y usted pulsa el botón SNOOZE o agita sumano delante de la unidad a la distancia antes mencionada, el display LEDse iluminará intensamente durante unos segundos, para volver después ala intensidad lumínica más tenue.
Función de temporizador de apagado automático (Sleep)
Programación del temporizador de apagado automáticoEsta función le permite dormirse con la radio hasta 90 minutos después deprogranar el apagado automático.La unidad se apagará automáticamente cuando el tiempo seleccionado hayatranscurrido.1. Pulse el botón POWER para encender la unidad.2. Sintonice la emisora de radio deseada en el modo radio.3. Para seleccionar el temporizador de apagado automático, pulse el botón
SLEEP repetidamente para pasar por los diferentes tiempos de apagado:15, 30, 45, 60 o 90 minutos. El display mostrará el tiempo restante antes del

16
apagado. La unidad seguirá en funcionamiento durante el tiempo que ustedhaya decidido para el apagado automático.
4. Para poder ver el tiempo restante antes del apagado, pulse el botón SLEEPuna vez.
5. Para apagar la unidad antes de que transcurra el tiempo de apagadoautomático que usted seleccionó, pulse el botón POWER.
Notas:- Si quiere irse a dormir con música de una fuente de audio externa conectadaa la unidad por la toma AUX IN, el temporizador de apagado automáticoapagará la unidad, pero no la fuente de audio externa.
- En el modo de apagado, podrá también pulsar el botón SLEEP directamentepara activar el temporizador de apagado automático.
Función de sensor de movimiento y display LED
Podrá pulsar el botón WAVE SENSOR ON/OFF para activar / desactivar lafunción de sensor de movimiento. Esta funcionará cuando la unidad no seencuentre en los modos de alarma activada o cabezada (Snooze).- Cuando el sensor esté desactivado (OFF): El display LED estará iluminado
intensamente.- Cuando el sensor esté activado (ON): El display LED estará iluminado con
una intensidad tenue. Cada vez que se active el sensor de movimiento(agite su mano delante de la unidad a una distancia de entre 10 y 50 cm,vea el diagrama A de arriba), el display LED se iluminará intensamentedurante unos segundos, para volver después a la intensidad lumínica mástenue.
Cuidado y mantenimiento
- No someta la unidad a una presión excesiva, impactos, polvo otemperaturas extremas.
- No altere los componentes internos de la unidad.- Limpie la unidad con un trapo húmedo (no mojado). No use disolventes ni
detergentes.- Evite dejar la unidad a la luz solar directa o en lugares cálidos, húmedos o
polvorientos.

17
- Mantenga la unidad alejada de aparatos que produzcan calor o ruido eléctrico, como lámparas fluorescentes o motores.
Reseteado de la unidad Si la unidad experimentara una subida de tensión o una descarga eléctrica, es posible que el microcontrolador interno del aparato se bloquee y no responda a los comandos del panel de control. 1. En dicho caso, desenchufe el aparato reconectándolo después. 2. Utilice un clip sujetapapeles extendido, un palillo o un objeto similar para
pulsar el botón RESET, ubicado en la parte posterior de la unidad principal (vea la ilustración de debajo). La operación de reseteado despeja la memoria del sistema, así que los ajustes que usted haya realizado previamente se eliminarán.
PRECAUCIÓN: NO USE UN OBJETO AFILADO O PUNTIAGUDO PARA PULSAR EL BOTÓN RESET. SI LO HICIERA, PODRÍA DAÑAR EL INTERRUPTOR DE RESETEADO DEL INTERIOR DE LA UNIDAD.

18
Especificaciones
Suministro eléctrico AC 230V ~ 50HzPilas para la alimentación del reloj / memoria: DC3V--- del tipo AAA (UM-4)x 2 (no incluidas)Salida del altavoz 0.5WSistema de reloj controlado por radio DCF77 / Alemania
LAS ESPECIFICACIONES Y APARIENCIA EXTERNA DE LA UNIDADESTÁN SUJETAS A CAMBIOS SIN NOTIFICACIÓN PREVIA.
Si requiere desechar este producto en cualquier momento futuro,por favor note que: Los residuos de productos eléctricos no debentirarse en la basura doméstica. Por favor recicle donde existancentros para ello. Consulte con su autoridad local o minorista paraobtener información sobre el reciclaje (Directiva de Residuos deAparatos Eléctricos y Electrónicos).
Para información y ayuda, www.lenco.eu
Related Documents