RAD-80211-XD and RAD-80211-XD-WM 802.11a/b/g Transceiver with Serial Link Quick Start Guide

Welcome message from author
This document is posted to help you gain knowledge. Please leave a comment to let me know what you think about it! Share it to your friends and learn new things together.
Transcript
1
RAD-80211-XD andRAD-80211-XD-WM802.11a/b/g Transceiver with Serial Link
Quick Start Guide
2
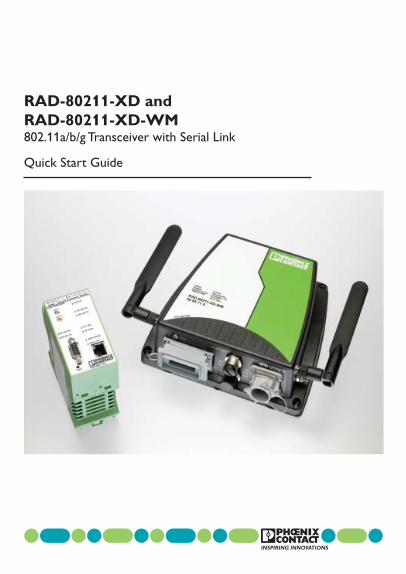
This Quick Start Guide is intended to provide adequate information necessary to get a functional system operating. For more detailed information, please consult the User Manual.
The RAD-80211-XD and RAD-80211-XD-WM are wireless transceivers that can function as an Access Point, Bridge or Client. They can send Ethernet data with the option of adding serial data over the wireless link. These products conform to IEEE 802.11a, b, and g standards. This Quick Start Guide will show how to configure all three modes: Access Point, Client and Bridge.
Figure 1. Access Point mode broadcasting to two clients
Figure 2. Two Bridges, each connected to hardwired Ethernet networks
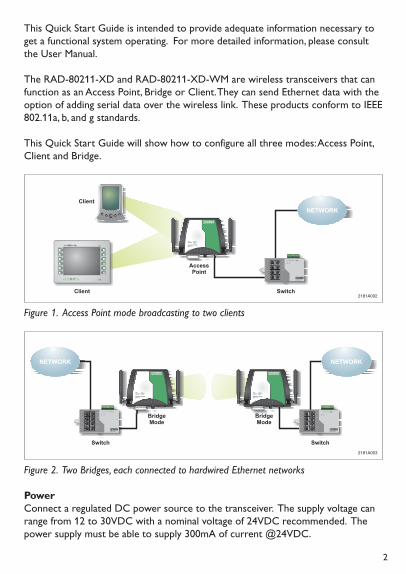
PowerConnect a regulated DC power source to the transceiver. The supply voltage can range from 12 to 30VDC with a nominal voltage of 24VDC recommended. The power supply must be able to supply 300mA of current @24VDC.
3
Figure 3. Power wiring diagram
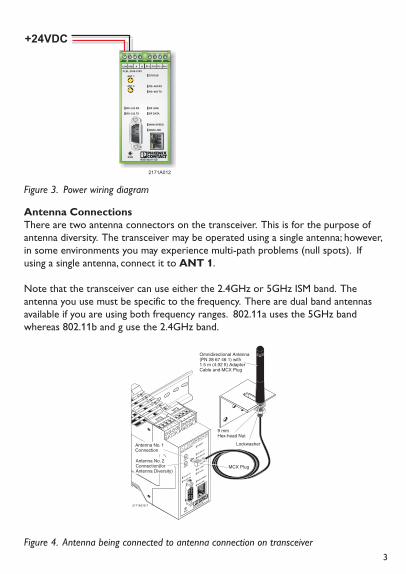
Antenna ConnectionsThere are two antenna connectors on the transceiver. This is for the purpose of antenna diversity. The transceiver may be operated using a single antenna; however, in some environments you may experience multi-path problems (null spots). If using a single antenna, connect it to ANT 1.
Note that the transceiver can use either the 2.4GHz or 5GHz ISM band. The antenna you use must be specific to the frequency. There are dual band antennas available if you are using both frequency ranges. 802.11a uses the 5GHz band whereas 802.11b and g use the 2.4GHz band.
5 6
7 8
1 2
3 4
54
32
1
98
76
POWER
RS-485 TX
RS-485 RX
RF LINK
RF DATA
WAN SPEED
WAN LINK
RS-232 TX
RS-232 RX
ANT 1
ANT 2
RSSI
RAD-80211-XD
FLBL-2938-0
1R1LA
LB
–
+
RX+RX–
TX+TX–
MCX Plug
2171A015-7
Antenna No. 1Connection
Antenna No. 2Connection(forAntenna Diversity)
9 mmHex-head Nut
Lockwasher
Omnidirectional Antenna(PN 28 67 46 1) with1.5 m (4.92 ft) AdapterCable and MCX Plug
Figure 4. Antenna being connected to antenna connection on transceiver
4
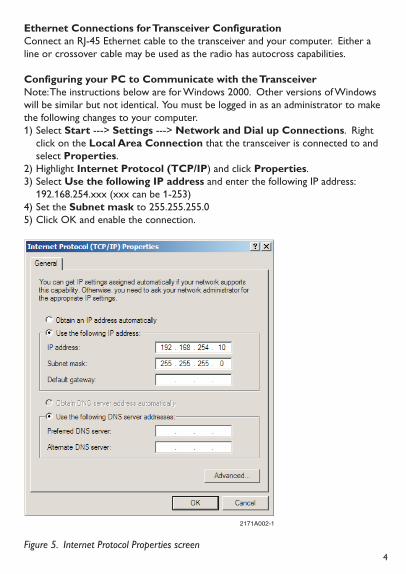
Ethernet Connections for Transceiver ConfigurationConnect an RJ-45 Ethernet cable to the transceiver and your computer. Either a line or crossover cable may be used as the radio has autocross capabilities.
Configuring your PC to Communicate with the TransceiverNote: The instructions below are for Windows 2000. Other versions of Windows will be similar but not identical. You must be logged in as an administrator to make the following changes to your computer.1) Select Start ---> Settings ---> Network and Dial up Connections. Right click on the Local Area Connection that the transceiver is connected to and select Properties. 2) Highlight Internet Protocol (TCP/IP) and click Properties.3) Select Use the following IP address and enter the following IP address: 192.168.254.xxx (xxx can be 1-253)4) Set the Subnet mask to 255.255.255.05) Click OK and enable the connection.
Figure 5. Internet Protocol Properties screen
5
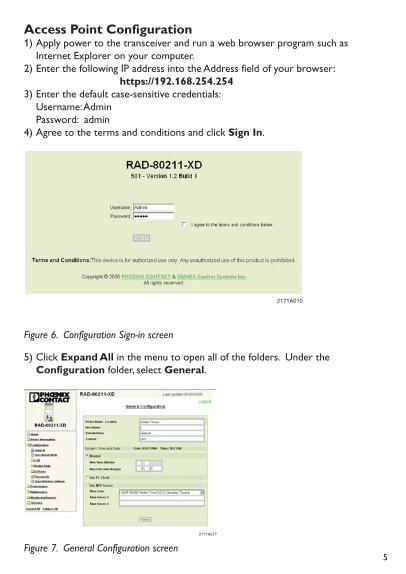
Access Point Configuration1) Apply power to the transceiver and run a web browser program such as Internet Explorer on your computer.2) Enter the following IP address into the Address field of your browser: https://192.168.254.2543) Enter the default case-sensitive credentials: Username: Admin Password: admin4) Agree to the terms and conditions and click Sign In.
Figure 6. Configuration Sign-in screen
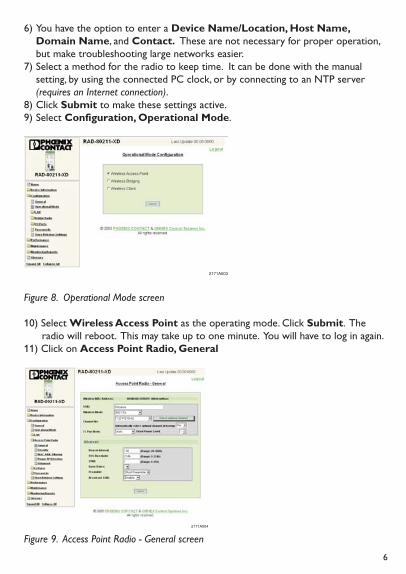
5) Click Expand All in the menu to open all of the folders. Under the Configuration folder, select General.
Figure 7. General Configuration screen
6
6) You have the option to enter a Device Name/Location, Host Name, Domain Name, and Contact. These are not necessary for proper operation, but make troubleshooting large networks easier.7) Select a method for the radio to keep time. It can be done with the manual setting, by using the connected PC clock, or by connecting to an NTP server (requires an Internet connection). 8) Click Submit to make these settings active.9) Select Configuration, Operational Mode.
Figure 8. Operational Mode screen
10) Select Wireless Access Point as the operating mode. Click Submit. The radio will reboot. This may take up to one minute. You will have to log in again.11) Click on Access Point Radio, General
Figure 9. Access Point Radio - General screen
7
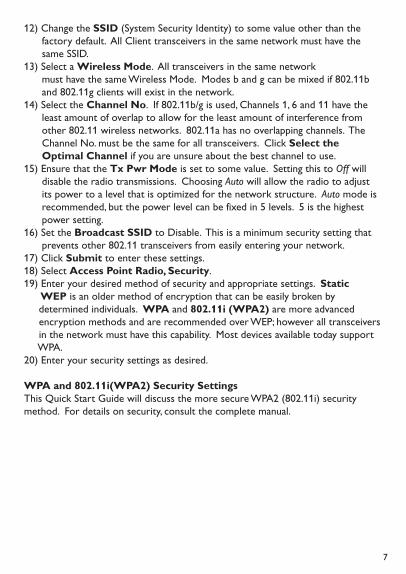
12) Change the SSID (System Security Identity) to some value other than the factory default. All Client transceivers in the same network must have the same SSID.13) Select a Wireless Mode. All transceivers in the same network must have the same Wireless Mode. Modes b and g can be mixed if 802.11b and 802.11g clients will exist in the network.14) Select the Channel No. If 802.11b/g is used, Channels 1, 6 and 11 have the least amount of overlap to allow for the least amount of interference from other 802.11 wireless networks. 802.11a has no overlapping channels. The Channel No. must be the same for all transceivers. Click Select the Optimal Channel if you are unsure about the best channel to use.15) Ensure that the Tx Pwr Mode is set to some value. Setting this to Off will disable the radio transmissions. Choosing Auto will allow the radio to adjust its power to a level that is optimized for the network structure. Auto mode is recommended, but the power level can be fixed in 5 levels. 5 is the highest power setting. 16) Set the Broadcast SSID to Disable. This is a minimum security setting that prevents other 802.11 transceivers from easily entering your network.17) Click Submit to enter these settings. 18) Select Access Point Radio, Security.19) Enter your desired method of security and appropriate settings. Static WEP is an older method of encryption that can be easily broken by determined individuals. WPA and 802.11i (WPA2) are more advanced encryption methods and are recommended over WEP; however all transceivers in the network must have this capability. Most devices available today support WPA.20) Enter your security settings as desired.
WPA and 802.11i(WPA2) Security SettingsThis Quick Start Guide will discuss the more secure WPA2 (802.11i) security method. For details on security, consult the complete manual.
8
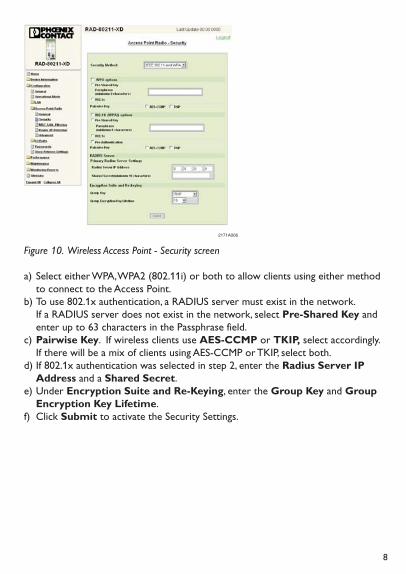
Figure 10. Wireless Access Point - Security screen
a) Select either WPA, WPA2 (802.11i) or both to allow clients using either method to connect to the Access Point.b) To use 802.1x authentication, a RADIUS server must exist in the network. If a RADIUS server does not exist in the network, select Pre-Shared Key and enter up to 63 characters in the Passphrase field.c) Pairwise Key. If wireless clients use AES-CCMP or TKIP, select accordingly. If there will be a mix of clients using AES-CCMP or TKIP, select both.d) If 802.1x authentication was selected in step 2, enter the Radius Server IP Address and a Shared Secret.e) Under Encryption Suite and Re-Keying, enter the Group Key and Group Encryption Key Lifetime. f) Click Submit to activate the Security Settings.
9
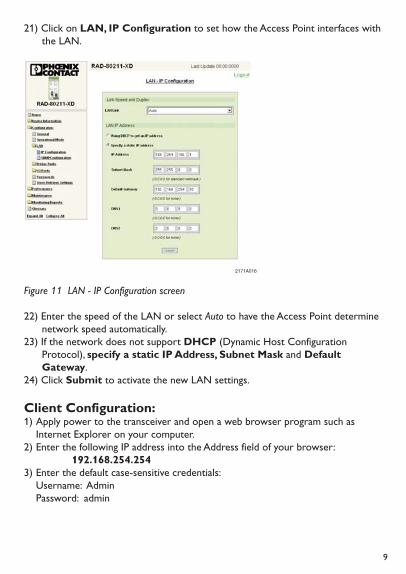
21) Click on LAN, IP Configuration to set how the Access Point interfaces with the LAN.
Figure 11 LAN - IP Configuration screen
22) Enter the speed of the LAN or select Auto to have the Access Point determine network speed automatically.23) If the network does not support DHCP (Dynamic Host Configuration Protocol), specify a static IP Address, Subnet Mask and Default Gateway.24) Click Submit to activate the new LAN settings.
Client Configuration:1) Apply power to the transceiver and open a web browser program such as Internet Explorer on your computer.2) Enter the following IP address into the Address field of your browser: 192.168.254.2543) Enter the default case-sensitive credentials: Username: Admin Password: admin
10
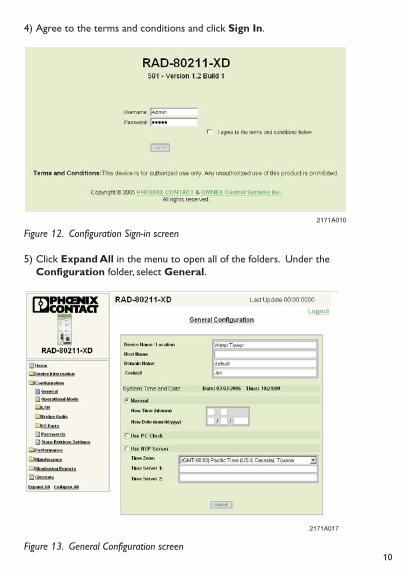
4) Agree to the terms and conditions and click Sign In.
Figure 12. Configuration Sign-in screen
5) Click Expand All in the menu to open all of the folders. Under the Configuration folder, select General.
Figure 13. General Configuration screen
11
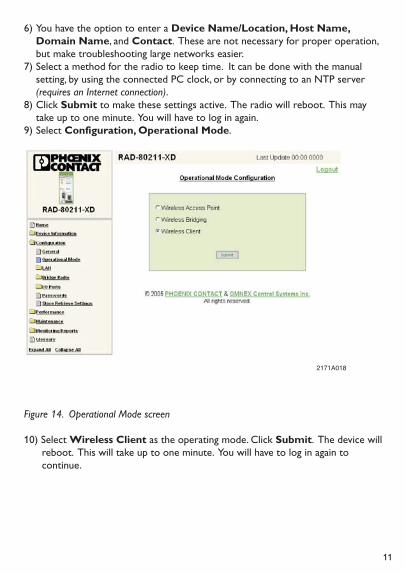
6) You have the option to enter a Device Name/Location, Host Name, Domain Name, and Contact. These are not necessary for proper operation, but make troubleshooting large networks easier.7) Select a method for the radio to keep time. It can be done with the manual setting, by using the connected PC clock, or by connecting to an NTP server (requires an Internet connection). 8) Click Submit to make these settings active. The radio will reboot. This may take up to one minute. You will have to log in again.9) Select Configuration, Operational Mode.
Figure 14. Operational Mode screen
10) Select Wireless Client as the operating mode. Click Submit. The device will reboot. This will take up to one minute. You will have to log in again to continue.
12
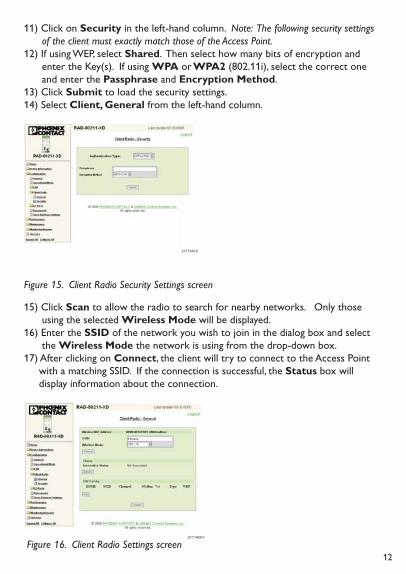
11) Click on Security in the left-hand column. Note: The following security settings of the client must exactly match those of the Access Point.12) If using WEP, select Shared. Then select how many bits of encryption and enter the Key(s). If using WPA or WPA2 (802.11i), select the correct one and enter the Passphrase and Encryption Method. 13) Click Submit to load the security settings. 14) Select Client, General from the left-hand column.
Figure 15. Client Radio Security Settings screen
15) Click Scan to allow the radio to search for nearby networks. Only those using the selected Wireless Mode will be displayed.16) Enter the SSID of the network you wish to join in the dialog box and select the Wireless Mode the network is using from the drop-down box. 17) After clicking on Connect, the client will try to connect to the Access Point with a matching SSID. If the connection is successful, the Status box will display information about the connection.
Figure 16. Client Radio Settings screen
13
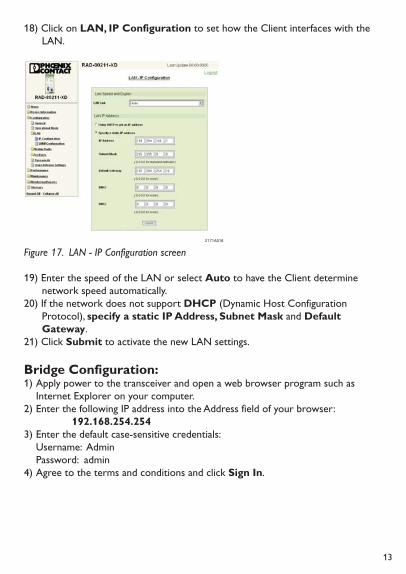
18) Click on LAN, IP Configuration to set how the Client interfaces with the LAN.
Figure 17. LAN - IP Configuration screen 19) Enter the speed of the LAN or select Auto to have the Client determine network speed automatically.20) If the network does not support DHCP (Dynamic Host Configuration Protocol), specify a static IP Address, Subnet Mask and Default Gateway.21) Click Submit to activate the new LAN settings.
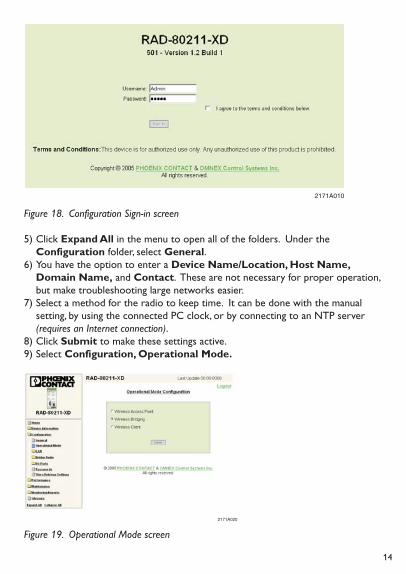
Bridge Configuration:1) Apply power to the transceiver and open a web browser program such as Internet Explorer on your computer.2) Enter the following IP address into the Address field of your browser: 192.168.254.2543) Enter the default case-sensitive credentials: Username: Admin Password: admin4) Agree to the terms and conditions and click Sign In.
14
Figure 18. Configuration Sign-in screen
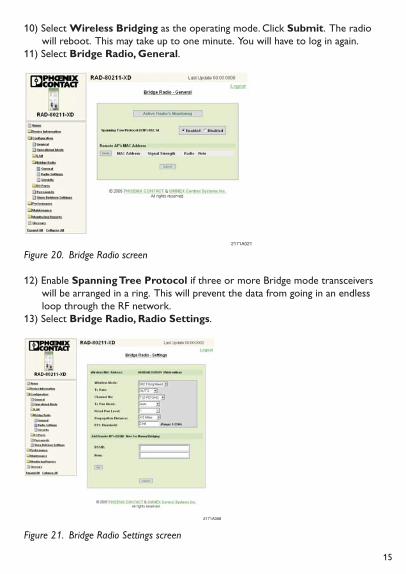
5) Click Expand All in the menu to open all of the folders. Under the Configuration folder, select General.6) You have the option to enter a Device Name/Location, Host Name, Domain Name, and Contact. These are not necessary for proper operation, but make troubleshooting large networks easier.7) Select a method for the radio to keep time. It can be done with the manual setting, by using the connected PC clock, or by connecting to an NTP server (requires an Internet connection).8) Click Submit to make these settings active.9) Select Configuration, Operational Mode.
Figure 19. Operational Mode screen
15
10) Select Wireless Bridging as the operating mode. Click Submit. The radio will reboot. This may take up to one minute. You will have to log in again.11) Select Bridge Radio, General.
Figure 20. Bridge Radio screen
12) Enable Spanning Tree Protocol if three or more Bridge mode transceivers will be arranged in a ring. This will prevent the data from going in an endless loop through the RF network.13) Select Bridge Radio, Radio Settings.
Figure 21. Bridge Radio Settings screen
16
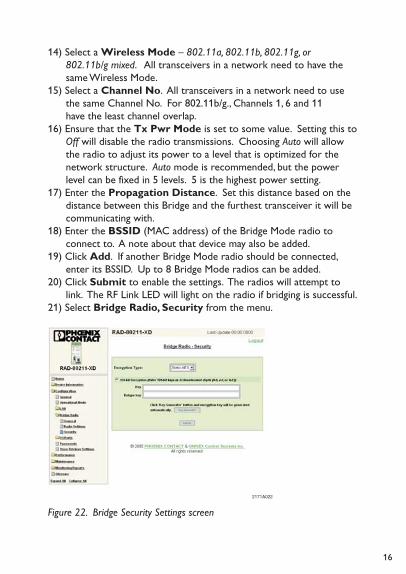
14) Select a Wireless Mode – 802.11a, 802.11b, 802.11g, or 802.11b/g mixed. All transceivers in a network need to have the same Wireless Mode.15) Select a Channel No. All transceivers in a network need to use the same Channel No. For 802.11b/g., Channels 1, 6 and 11 have the least channel overlap.16) Ensure that the Tx Pwr Mode is set to some value. Setting this to Off will disable the radio transmissions. Choosing Auto will allow the radio to adjust its power to a level that is optimized for the network structure. Auto mode is recommended, but the power level can be fixed in 5 levels. 5 is the highest power setting.17) Enter the Propagation Distance. Set this distance based on the distance between this Bridge and the furthest transceiver it will be communicating with.18) Enter the BSSID (MAC address) of the Bridge Mode radio to connect to. A note about that device may also be added. 19) Click Add. If another Bridge Mode radio should be connected, enter its BSSID. Up to 8 Bridge Mode radios can be added. 20) Click Submit to enable the settings. The radios will attempt to link. The RF Link LED will light on the radio if bridging is successful.21) Select Bridge Radio, Security from the menu.
Figure 22. Bridge Security Settings screen
17
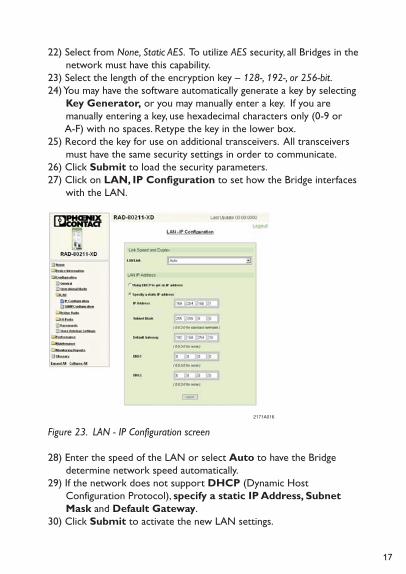
22) Select from None, Static AES. To utilize AES security, all Bridges in the network must have this capability.23) Select the length of the encryption key – 128-, 192-, or 256-bit. 24) You may have the software automatically generate a key by selecting Key Generator, or you may manually enter a key. If you are manually entering a key, use hexadecimal characters only (0-9 or A-F) with no spaces. Retype the key in the lower box.25) Record the key for use on additional transceivers. All transceivers must have the same security settings in order to communicate. 26) Click Submit to load the security parameters.27) Click on LAN, IP Configuration to set how the Bridge interfaces with the LAN.
Figure 23. LAN - IP Configuration screen 28) Enter the speed of the LAN or select Auto to have the Bridge determine network speed automatically.29) If the network does not support DHCP (Dynamic Host Configuration Protocol), specify a static IP Address, Subnet Mask and Default Gateway.30) Click Submit to activate the new LAN settings.
18
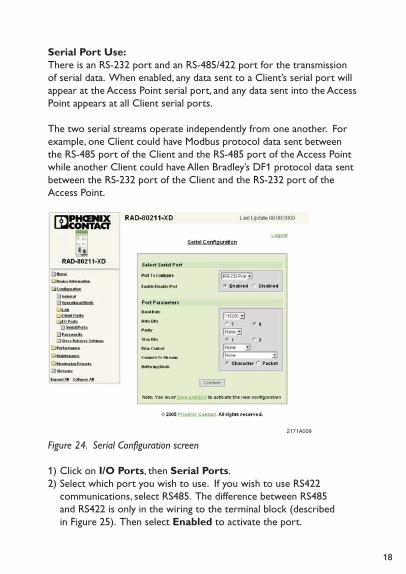
Serial Port Use:There is an RS-232 port and an RS-485/422 port for the transmission of serial data. When enabled, any data sent to a Client’s serial port will appear at the Access Point serial port, and any data sent into the Access Point appears at all Client serial ports.
The two serial streams operate independently from one another. For example, one Client could have Modbus protocol data sent between the RS-485 port of the Client and the RS-485 port of the Access Point while another Client could have Allen Bradley’s DF1 protocol data sent between the RS-232 port of the Client and the RS-232 port of the Access Point.
Figure 24. Serial Configuration screen
1) Click on I/O Ports, then Serial Ports.2) Select which port you wish to use. If you wish to use RS422 communications, select RS485. The difference between RS485 and RS422 is only in the wiring to the terminal block (described in Figure 25). Then select Enabled to activate the port.
19
3) Select the Baud Rate, Data Bits, Parity, Stop Bits and Flow Control such that the transceiver’s settings are the same as the serial device connected to it.4) Under Connect to Stream, select which of the serial channels you wish the transceiver to use. The Modbus TCP Channel acts like a Modbus gateway, converting Modbus RTU to Modbus TCP.5) Under Buffer Mode, select either Character (no buffering) or Packet (buffering enabled). If you are not sure which mode your protocol requires, select Packet.6) Select Save and Exit.
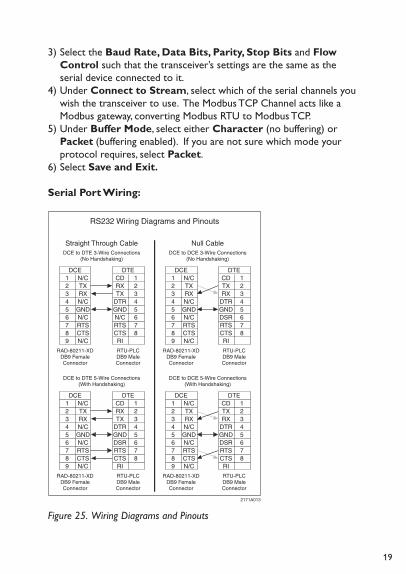
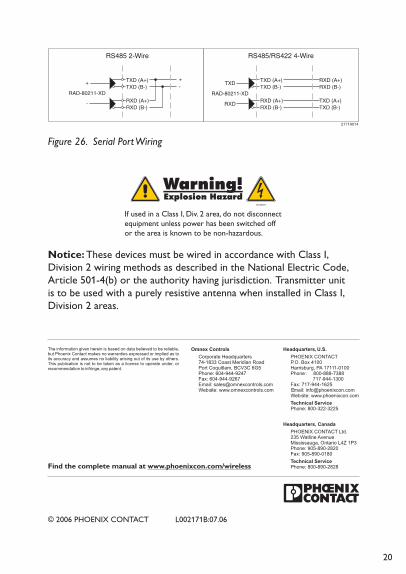
Serial Port Wiring:
Figure 25. Wiring Diagrams and Pinouts
20
Figure 26. Serial Port Wiring
If used in a Class I, Div. 2 area, do not disconnect equipment unless power has been switched off or the area is known to be non-hazardous.
Notice: These devices must be wired in accordance with Class I, Division 2 wiring methods as described in the National Electric Code, Article 501-4(b) or the authority having jurisdiction. Transmitter unit is to be used with a purely resistive antenna when installed in Class I, Division 2 areas.
© 2006 PHOENIX CONTACT L002171B:07.06
Find the complete manual at www.phoenixcon.com/wireless
Related Documents