©2017 Kardex VCA Pty Ltd All Rights Reserved RackMAN™ Mobile User Guide Issue Date: NOV 2017

Welcome message from author
This document is posted to help you gain knowledge. Please leave a comment to let me know what you think about it! Share it to your friends and learn new things together.
Transcript

©2017 Kardex VCA Pty Ltd All Rights Reserved
R a c k M A N ™
M o b i l e
U s e r G u i d e
Issue Date: NOV 2017

RackMAN Mobile USER GUIDE
DocID: RackMAN Mobile User Guide v1.4.docx ii
©2017 Kardex VCA Pty Ltd All Rights Reserved
Kardex VCA Pty Ltd PO BOX 1082 Wodonga, VIC 3689 Australia p: +61 2 6056 1202 e: [email protected] w: www.kardex.com.au
RackMAN Mobile USER GUIDE
Doc ID: RackMAN Mobile User Guide v1.4.docx iii
©2017 Kardex VCA Pty Ltd All Rights Reserved
TABLE OF CONTENTS
1 Introduction ...................................................................................................... 1
2 Configuration .................................................................................................... 3
2.1 Communication ................................................................................................ 3
2.1.1 RackMAN Host ................................................................................................. 3 2.1.2 Device ID.......................................................................................................... 3
2.2 General ............................................................................................................ 4
2.2.1 Configuration Access through Login only .......................................................... 4 2.2.2 Only Display the Full Location .......................................................................... 4 2.2.3 Do Not Auto Switch Tabs.................................................................................. 4
2.3 Lists .................................................................................................................. 5
2.3.1 Standard Lists Title ........................................................................................... 5 2.3.2 Special Lists...................................................................................................... 5 2.3.3 On Hold Lists Title ............................................................................................ 5 2.3.4 List Threshold (5) ............................................................................................. 5 2.3.5 List Threshold (x) .............................................................................................. 5
2.4 Scanner ............................................................................................................ 6
2.4.1 Tone 1 ............................................................................................................. 6 2.4.2 Tone 2 ............................................................................................................. 6 2.4.3 Location Barcode ............................................................................................. 6
2.5 Plugins ............................................................................................................. 7
2.5.1 Installed Plugins ............................................................................................... 7
3 Getting Started ................................................................................................. 8
3.1 Logging in to RackMAN Mobile™ ...................................................................... 8
3.2 Getting around the Main Menu ........................................................................ 2
3.3 Logout and Close RackMAN Mobile .................................................................. 2
4 Pick Introduction ............................................................................................... 2
4.1 Pick Methods ................................................................................................... 3
4.1.1 Pick \ Single ..................................................................................................... 3 STEP 1 Enter Part Number ....................................................................... 3 STEP 2 Enter Quantity .............................................................................. 3 STEP 4 Confirm Quantity .......................................................................... 4 STEP 5 Is Location Empty? ........................................................................ 5 STEP 5A Is Location Empty? Yes ................................................................. 5 STEP 5B Is Location Empty? No .................................................................. 5 STEP 6 Insufficient Stock .......................................................................... 6 STEP 6A Confirm Quantity No – Change Pick Quantity ................................ 6 STEP 6B Confirm Quantity No - Insufficient Stock ....................................... 7
4.1.2 Pick Method – With Lot Number ...................................................................... 7 4.1.3 Pick \ List ......................................................................................................... 8
RackMAN Mobile USER GUIDE
Doc ID: RackMAN Mobile User Guide v1.4.docx iv
©2017 Kardex VCA Pty Ltd All Rights Reserved
4.1.4 Pick \ List Process ............................................................................................. 9
5 Place Introduction ........................................................................................... 11
5.1 Place Methods ............................................................................................... 12
5.1.1 Place \ Single ................................................................................................. 12 STEP 4 Enter Quantity ............................................................................ 13 STEP 7 Count and Place Parts ................................................................. 16 STEP 8 Confirm Quantity ........................................................................ 16 STEP 8A Confirm Quantity - Yes ................................................................ 16 STEP 8B Confirm Quantity - No ................................................................ 17
5.1.2 Place \ List ..................................................................................................... 18 5.1.3 Place \ List \ Process ...................................................................................... 19
6 Verify Operation ............................................................................................. 21
6.1 Verify Methods .............................................................................................. 21
6.3 Verify \ Single ................................................................................................. 22
STEP 1 Enter Part Number ..................................................................... 22 STEP 2 Enter Lot Number ....................................................................... 22 STEP 3 Visit Locations ............................................................................ 23 STEP 4 Count Location Quantity ............................................................. 23 STEP 5 Confirm Quantity .......................................................................... 2
7 Find Part Number .............................................................................................. 3
STEP A Use Find Button ( ) ..................................................................... 3 STEP B Enter Text in Part No. Box ............................................................. 3 STEP C Enter Text in Description Box ........................................................ 3 STEP D Enter Text in Part No. and Description Box.................................... 3 STEP E Choose Part Number .................................................................... 3
8 Shortcut Keys .................................................................................................... 4
9 Troubleshooting ................................................................................................ 4
Valid for RackMAN Mobile release 1.1.nn

RackMAN Mobile USER GUIDE
Doc ID: RackMAN Mobile User Guide v1.4.docx v
©2017 Kardex VCA Pty Ltd All Rights Reserved
IMPORTANT NOTICE
This software is made available for use under the terms of your ‘Software
Licence Agreement’.
For new equipment installations Kardex Vertical Storage System software
is configured by our staff and operation of the equipment (Carousel /
Shuttle® / SortBench) and utility software is confirmed as part of the
commissioning process.
The software warranty will be voided if the Customer or their
representative changes, modifies or makes any additions to the hardware
and/or software of the Vertical Storage System without the written
permission of Kardex VCA Pty Ltd. Kardex will not withhold that
permission if the changes will have no material effect on the system
operation or performance.
The Customer is responsible for the maintenance of all system and data
files including backup and restoration procedures.

RackMAN Mobile USER GUIDE
Doc ID: RackMAN Mobile User Guide v1.4.docx Page 1 of 34
©2017 Kardex VCA Pty Ltd All Rights Reserved
1 Introduction
Kardex has designed RackMAN Mobile as an expansion to the PC based RackMAN inventory application for use in small to medium sized warehouses. RackMAN Mobile helps facilitates the simple management of inventory stored in STATIC RACKING or SHELVING by being able to use
a mobile device. RackMAN Mobile operates under Windows Mobile 5 and using Wifi connectivity.
RackMAN Mobile functionality is teamed up with RackMAN and based on our proven
Carousel inventory management product KARMAN, and has all the basic features necessary to account for inventory movements in your warehouse. If you are an existing Carousel user,
RackMAN Mobile will be a transparent introduction into your warehouse and you will benefit from being able to manage all your warehouse orders through the common interface associated with Kardex’s Inventory Handling System.
RackMAN Mobile is part of Kardex’s complete SME Inventory Handling System (IHS) which extends to Management browsers, utility file and data handling, full warehouse order printing,
zone distribution, and seamless integration with Kardex’s Carousel and SortBench for high throughput order picking across the warehouse.
The following functionality is available in the standard RackMAN Mobile product:
Range of Storage (Place) Modes.
Range of Retrieval (Pick) Modes.
Barcode Product Identification
Integrated Lot Number Support
Comprehensive text file based interface for data exchange and
Support for peripheral equipment such as Barcode Scanners.
Individual Cyclic Stocktake (Verify) functionality.
Support for processing multiple Pick & Place lists for multi orders.
Customised User Profiles for operator access
Sorting of locations throughout the warehouse for the most efficient picking path
Support for customised functionality using system Plug-ins, such as block stock transfer
All forms are colour coded for ease of identification.
Dial-up diagnostic support
Can share the Carousel system KARMAN Database for system simplification and database maintenance.

RackMAN Mobile USER GUIDE
Doc ID: RackMAN Mobile User Guide v1.4.docx Page 2 of 34
©2017 Kardex VCA Pty Ltd All Rights Reserved
RackMAN Mobile is used by using the touch screen. All menus and forms have been designed with this functionality to use touch screen.
The main operations that RackMAN Mobile offers are:
Pick For retrieval of items from the static racking
Place For storage of items into the static racking
Verify For confirmation that location quantities are correct Each of these processes is explained in this manual.
The other operations that RackMAN Mobile offers is via the Tools Menu .
These are:
Configuration [ Menu] To customise RackMAN Mobile for your site

RackMAN Mobile USER GUIDE
Doc ID: RackMAN Mobile User Guide v1.4.docx Page 3 of 34
©2017 Kardex VCA Pty Ltd All Rights Reserved
2 Configuration
The configuration settings can be access by pressing the spanner symbol ( ) in the bottom right corner. To access you will need to use the stylus pen and click on this button.
If there are any changes made within this area make sure press the accept button with the stylus pen to Accept and changes, if you would like to exit press the Cancel button.
2.1 Communication
The communication tab looks like the following:
2.1.1 RackMAN Host
To communicate with the RackMAN host on the PC, in this field needs to be the IP address of RackMAN Host PC.
2.1.2 Device ID
Due to the capabilities of having multiple devices connected to one RackMAN Host, each RackMAN Mobile device needs to have their own individual Device ID set here.

RackMAN Mobile USER GUIDE
Doc ID: RackMAN Mobile User Guide v1.4.docx Page 4 of 34
©2017 Kardex VCA Pty Ltd All Rights Reserved
2.2 General
The General tab looks like the following:
2.2.1 Configuration Access through Login only
If the Configuration Access through Login only is ticked on this means that the operator has to log into RackMAN Mobile first to access the configuration settings, but if it’s unticked this means the operator can access the configuration settings as soon as RackMAN Mobile is started in the Login main menu.
2.2.2 Only Display the Full Location
This will allow RackMAN Mobile to display your full location instead of individual values of Face, Shelf, Bay and Location.
Not Checked Checked
2.2.3 Do Not Auto Switch Tabs
On default when processing items you will rotate between the 4 tabs Part, Location, Detail and Pick/Place/Verify as shown in Section 4.1.1 Step 3 (Pick), Section 5.1.1 Step 7 (Place) and Section 6.3 Step 3 (Verify).

RackMAN Mobile USER GUIDE
Doc ID: RackMAN Mobile User Guide v1.4.docx Page 5 of 34
©2017 Kardex VCA Pty Ltd All Rights Reserved
2.3 Lists
The Lists tab looks like the following:
2.3.1 Standard Lists Title
This is a text field that displays a heading in the Pick and Place Lists window. Default text for this is ‘Standard’.
2.3.2 Special Lists
This is a text field that displays a heading in the Pick and Place Lists window. Default text for this is ‘Special’.
2.3.3 On Hold Lists Title
This is a text field that displays a heading in the Pick and Place Lists window. Default text for this Orders on Hold.
2.3.4 List Threshold (5)
The list threshold is the maximum amount of lines to process when selecting a group of five lists. Once this threshold has been reached, it will stop looking for new lists to process even if the amount of lists is less than five. Default amount is set to 15.
2.3.5 List Threshold (x)
The list threshold is the maximum amount of lines to process when selecting a group of ten lists. Once this threshold has been reached, it will stop looking for new lists to process even if the amount of lists is less than ten. Default amount is set to 20.

RackMAN Mobile USER GUIDE
Doc ID: RackMAN Mobile User Guide v1.4.docx Page 6 of 34
©2017 Kardex VCA Pty Ltd All Rights Reserved
2.4 Scanner
The Scanner tab looks like the following:
2.4.1 Tone 1
Tone 1 points to a .wav file which the generic tone used for scanning.
2.4.2 Tone 2
Tone 2 points to a .wav file which is used for special tones in this case only used in the Pick List Tally window.
2.4.3 Location Barcode
2.4.3.1 Start
This is where the Location Barcode will start from. The default value of zero will start from the beginning of the scanned code, grater values will skip that amount of characters from the start of the Location Barcode. 2.4.3.2 Max. Length
This is the amount of characters scanned from the desired start of the Location Barcode.
RackMAN Mobile USER GUIDE
Doc ID: RackMAN Mobile User Guide v1.4.docx Page 7 of 34
©2017 Kardex VCA Pty Ltd All Rights Reserved
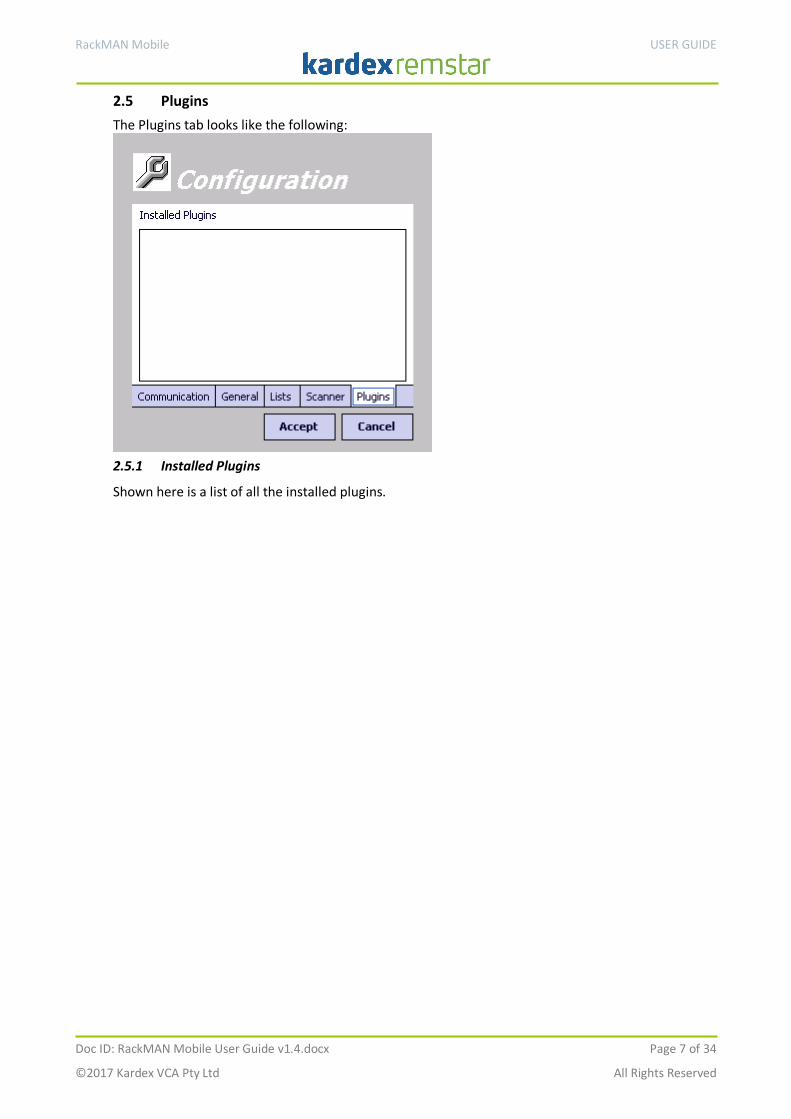
2.5 Plugins
The Plugins tab looks like the following:
2.5.1 Installed Plugins
Shown here is a list of all the installed plugins.

RackMAN Mobile USER GUIDE
Doc ID: RackMAN Mobile User Guide v1.4.docx Page 8 of 34
©2017 Kardex VCA Pty Ltd All Rights Reserved
3 Getting Started
RackMAN Mobile™ runs when the user double clicks on the RackMAN Mobile Shortcut on the mobile device screen:
C:\Windows\Desktop\ - For Easy Desktop Access
C:\Windows\Start Menu\Programs\ - For Easy Programs Access
The Welcome screen is the first window seen in RackMAN Mobile™. It has two functions; one is to LOGIN to RackMAN Mobile™ and the other is to EXIT RackMAN Mobile™.
3.1 Logging in to RackMAN Mobile™
When RackMAN Mobile™ is first started, press the Login button on the touch screen. The default user is Admin with no password.
Type your user name in the Name box then Enter to the Password box and type your password then press Enter. The password and user names are not case sensitive.
If you enter an incorrect user name or password, an error will be displayed informing you of the reason.
To clear this error, press Enter and you will return to the Login screen. Try to Login again. If you are not successful, contact your supervisor for assistance.

RackMAN Mobile USER GUIDE
Doc ID: RackMAN Mobile User Guide v1.4.docx Page 2 of 34
©2017 Kardex VCA Pty Ltd All Rights Reserved
3.2 Getting around the Main Menu
The Main Menu is used to select the functions you wish to use in RackMAN Mobile™.
To expand a menu, press one of the main menu buttons on the touch screen and to collapse a menu press the same menu button to go back to the main menu screen.
3.3 Logout and Close RackMAN Mobile
Press the logout button ( ) on the touch screen in bottom right corner to Logout from the Main Menu.
At the confirm message press Enter or use the stylus to press the Yes button. Pressing FUNC+7 or the No button will return you to the main menu.
To exit the application, press the Exit button at the Welcome screen.
At the confirm message press Enter or use the stylus to press the Yes button. Pressing FUNC+7 or the No button will return you to the Welcome screen.

RackMAN Mobile USER GUIDE
Doc ID: RackMAN Mobile User Guide v1.4.docx Page 2 of 34
©2017 Kardex VCA Pty Ltd All Rights Reserved
4 Pick Introduction
RackMAN Mobile™ has a variety of Bin Selection Modes (BSM) for retrieving parts from static racking. RackMAN Mobile™ also has a variety of Bin Allocation Modes (BAM) for storage of parts. Please see details below:
Bin Allocation Modes (BAM) When picking parts from static racking, RackMAN Mobile may respond differently i.e. present different information or questions, depending on the type of BAM selected within the RackMAN Console.
Please refer to RackMAN Technical Manual section 6.3 Placing.
Bin Selection Modes (BSM) When picking parts from static racking, RackMAN Mobile will have a certain configuration to pick parts. This setting is set within the RackMAN Console.
Please refer to RackMAN Technical Manual section 6.4 Picking.
NOTE: If you are unsure of your RackMAN Mobile setup, please ask your supervisor.
The ‘Pick’ Screen – at a glance
Item Description
1 Part Number Box Displays the current found part number, Find button and Info button
2 Lot Number Box * Displays the Lot Number. *This will only be displayed if it is selected in the Placing Configuration form.
3 Description Box Displays the current parts description
4 Small Quantity Box Displays the total quantity to Pick

RackMAN Mobile USER GUIDE
Doc ID: RackMAN Mobile User Guide v1.4.docx Page 3 of 34
©2017 Kardex VCA Pty Ltd All Rights Reserved
4.1 Pick Methods
The Pick form is available from the Main Menu. Use the stylus pen to press the Pick button on the screen to expand the Pick options and press the Pick button again to collapse the Pick options.
Pick menu items have the following functionality:
Single Use this method to pick / confirm small numbers of items directly on the RackMAN Mobile. You can manual Enter information or scan a Product or Bit label to enter the data.
List Use this method to pick a range of items from specific lists by entering the list name in the field, groups of 5 or 10 lists, also by selecting specific number of lists you would like to process and also Special lists as specified by your configuration one at a time.
4.1.1 Pick \ Single
STEP 1 Enter Part Number
Enter a Part number by typing or click on Find ( ) the item you are going to Pick then press Enter. When you press the Enter key the cursor will move down to the Lot Number field.
STEP 2 Enter Quantity
Type in the quantity that you want to Pick then press Enter.
RackMAN Mobile™ will then locate the part as determined by the Bin Selection Mode (BSM).
Please refer to RackMAN Technical Manual section 6.4 for ‘Pick’ configuration details.

RackMAN Mobile USER GUIDE
Doc ID: RackMAN Mobile User Guide v1.4.docx Page 4 of 34
©2017 Kardex VCA Pty Ltd All Rights Reserved
STEP 3 Count and Pick Parts
Go to the shelf location shown in large red text in the Location tab and count the parts as you Pick them from storage. There will be 4 tabs that it automatically scrolls through Part, Location, Detail and Pick.
STEP 4 Confirm Quantity
To confirm the Pick quantity you must have the Pick tab displayed, if you are on any other window and the Green confirm button is used, it will take you to the Pick tab automatically. You can confirm by pressing Enter button, the Green button or use the stylus pen to click on Yes. The quantity to confirm is shown in large blue text on the screen.
At this point the following could be true:
If the pick quantity reduces the RackMAN Mobile location quantity to zero, proceed to STEP 5.
If there was insufficient stock for you to Pick, proceed to STEP 6.
The Pick operation is now complete. Return to STEP 1 to pick the next item using Pick \ Single.
NOTE: The range of questions presented in the ‘Notification’ area on the Pick form will vary depending on the system configuration parameters. The following examples are based on no ‘Auto Answer’ responses in the RackMAN configuration.
Refer to the RackMAN Technical Manual for details regarding system ‘Auto Answer’ settings.

RackMAN Mobile USER GUIDE
Doc ID: RackMAN Mobile User Guide v1.4.docx Page 5 of 34
©2017 Kardex VCA Pty Ltd All Rights Reserved
STEP 5 Is Location Empty?
RackMAN Mobile will present the question ‘Is Location Empty?’.
STEP 5A Is Location Empty? Yes
If the location is empty, confirm this by pressing Enter, Green button or click Yes with the stylus pen.
The Pick operation is now complete. Return to STEP 1 to pick the next item using Pick \ Single.
STEP 5B Is Location Empty? No
If the location is not empty, Tab to the No button and press Enter, pressing the Red button or clicking No with the stylus pen. The following ‘Quantity’ form will be displayed:
Type in the quantity that is left in the bin and press Enter.
RackMAN Mobile will update the location with the quantity entered, correcting the stock error. These items will be picked next time the part is required.
The Pick operation is now complete. Return to STEP 1 to pick the next item using Pick \ Single.
RackMAN Mobile USER GUIDE
Doc ID: RackMAN Mobile User Guide v1.4.docx Page 6 of 34
©2017 Kardex VCA Pty Ltd All Rights Reserved
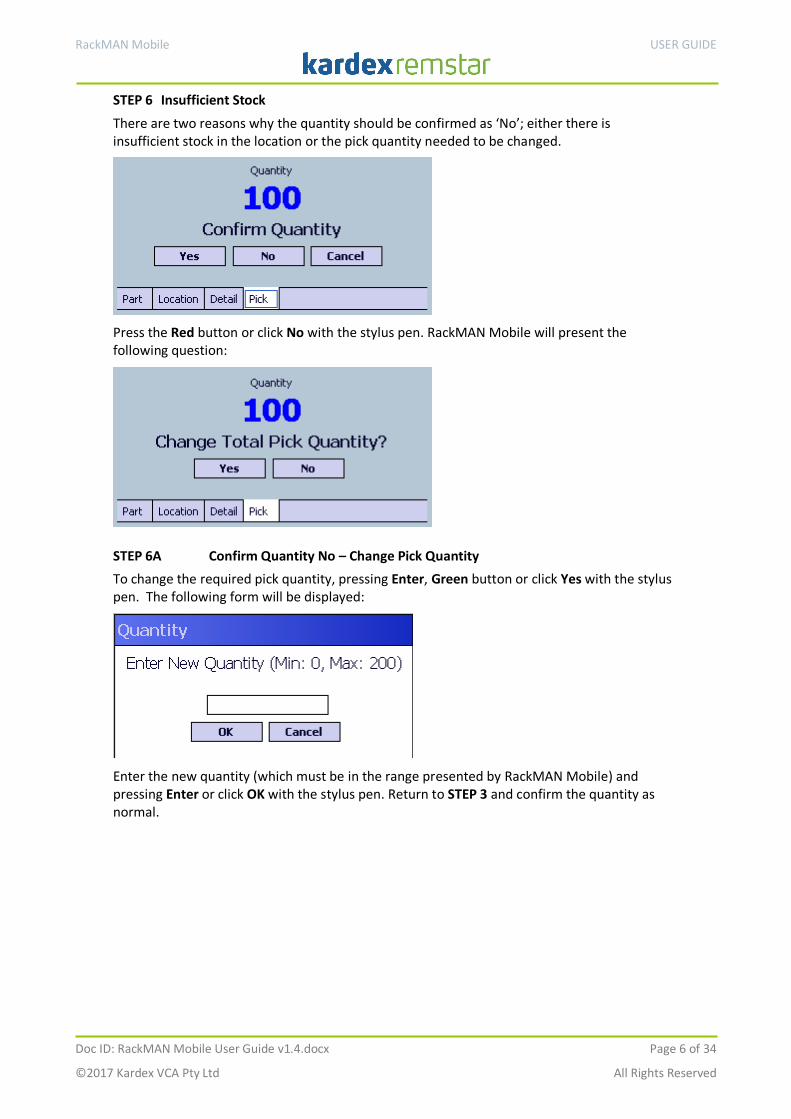
STEP 6 Insufficient Stock
There are two reasons why the quantity should be confirmed as ‘No’; either there is insufficient stock in the location or the pick quantity needed to be changed.
Press the Red button or click No with the stylus pen. RackMAN Mobile will present the following question:
STEP 6A Confirm Quantity No – Change Pick Quantity
To change the required pick quantity, pressing Enter, Green button or click Yes with the stylus pen. The following form will be displayed:
Enter the new quantity (which must be in the range presented by RackMAN Mobile) and pressing Enter or click OK with the stylus pen. Return to STEP 3 and confirm the quantity as normal.
RackMAN Mobile USER GUIDE
Doc ID: RackMAN Mobile User Guide v1.4.docx Page 7 of 34
©2017 Kardex VCA Pty Ltd All Rights Reserved
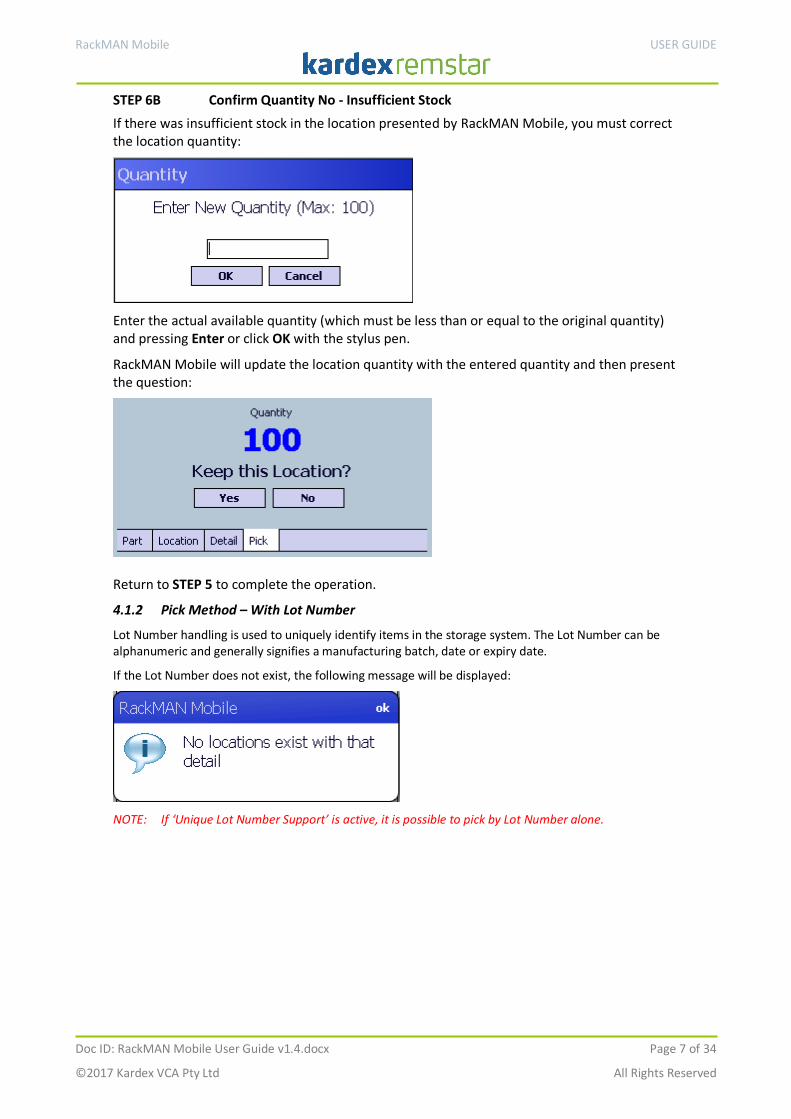
STEP 6B Confirm Quantity No - Insufficient Stock
If there was insufficient stock in the location presented by RackMAN Mobile, you must correct the location quantity:
Enter the actual available quantity (which must be less than or equal to the original quantity) and pressing Enter or click OK with the stylus pen.
RackMAN Mobile will update the location quantity with the entered quantity and then present the question:
Return to STEP 5 to complete the operation.
4.1.2 Pick Method – With Lot Number
Lot Number handling is used to uniquely identify items in the storage system. The Lot Number can be alphanumeric and generally signifies a manufacturing batch, date or expiry date.
If the Lot Number does not exist, the following message will be displayed:
NOTE: If ‘Unique Lot Number Support’ is active, it is possible to pick by Lot Number alone.

RackMAN Mobile USER GUIDE
Doc ID: RackMAN Mobile User Guide v1.4.docx Page 8 of 34
©2017 Kardex VCA Pty Ltd All Rights Reserved
4.1.3 Pick \ List
When picking by List there are two types of lists, Standard and Special. The Pick List window will have the following appearance:
Standard 5:
By selecting the button 5 with the stylus pen this will start orders within RackMAN Mobile with a maximum of five standard orders at a time.
If there is a line threshold set for Groups of five and this is reached within one list then it will only pick that list (minimum of one list), otherwise it will select what come first the threshold or maximum of five lists.
Please refer to Configurations for the threshold settings.
Standard 10:
By selecting the button 10 with the stylus pen this will start orders within RackMAN Mobile with a maximum of ten standard orders at a time.
If there is a line threshold set for Groups of ten and this is reached within one list then it will only pick that list (minimum of one list), otherwise it will select what come first the threshold or maximum of ten lists.
Please refer to Configurations for the threshold settings.
Standard x:
By selecting the button x with the stylus pen within RackMAN Mobile another window will appear asking how many orders you would like to process.
The Pick List window will have the following appearance:
Enter the amount of list you would like to process and press Enter or click OK with the stylus pen.
RackMAN Mobile USER GUIDE
Doc ID: RackMAN Mobile User Guide v1.4.docx Page 9 of 34
©2017 Kardex VCA Pty Ltd All Rights Reserved
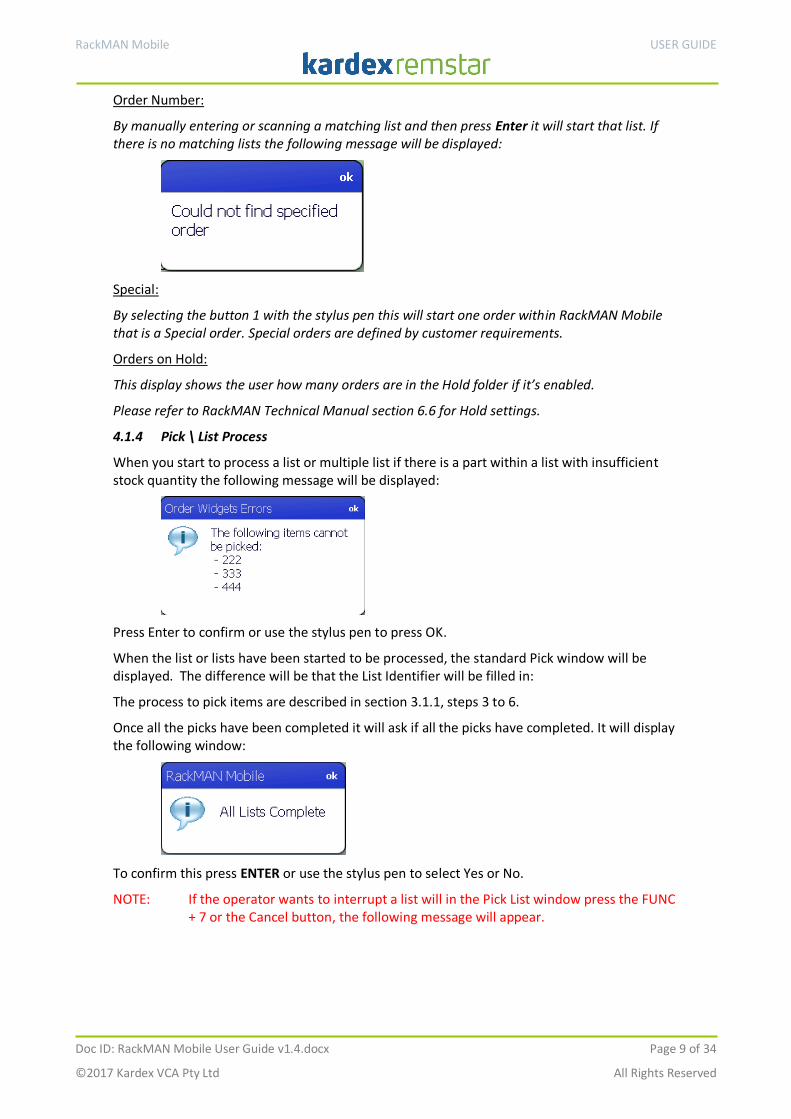
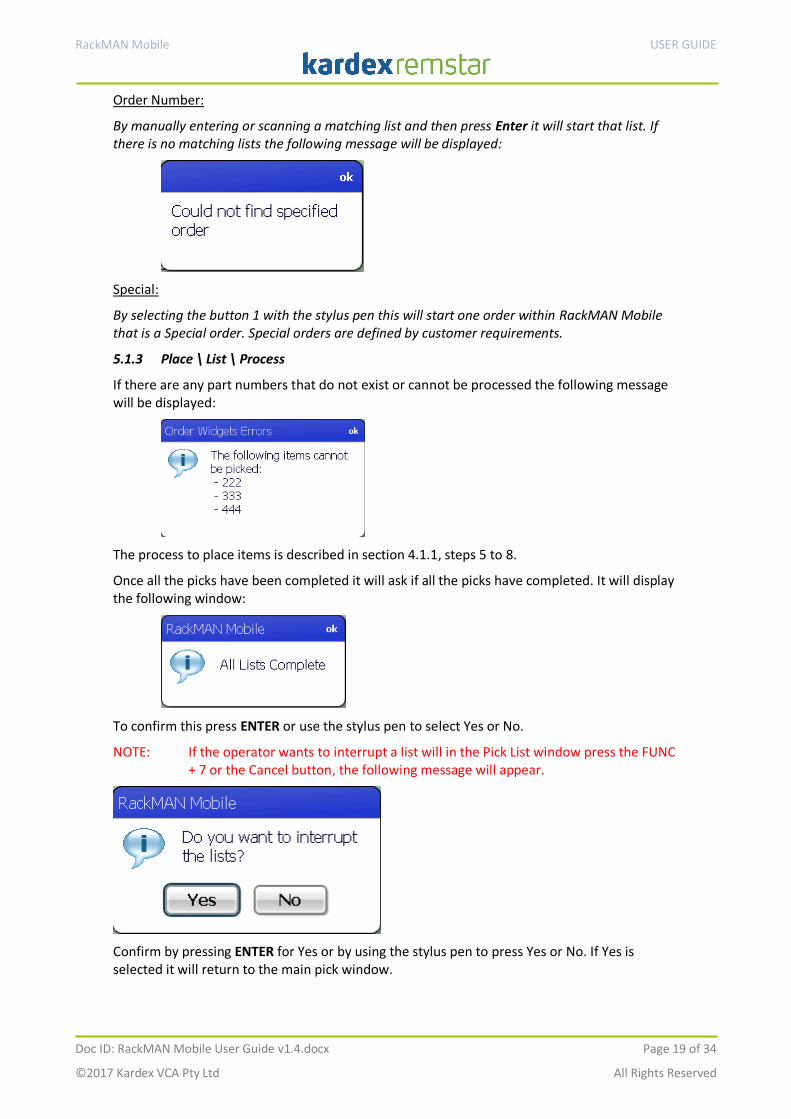
Order Number:
By manually entering or scanning a matching list and then press Enter it will start that list. If there is no matching lists the following message will be displayed:
Special:
By selecting the button 1 with the stylus pen this will start one order within RackMAN Mobile that is a Special order. Special orders are defined by customer requirements.
Orders on Hold:
This display shows the user how many orders are in the Hold folder if it’s enabled.
Please refer to RackMAN Technical Manual section 6.6 for Hold settings.
4.1.4 Pick \ List Process
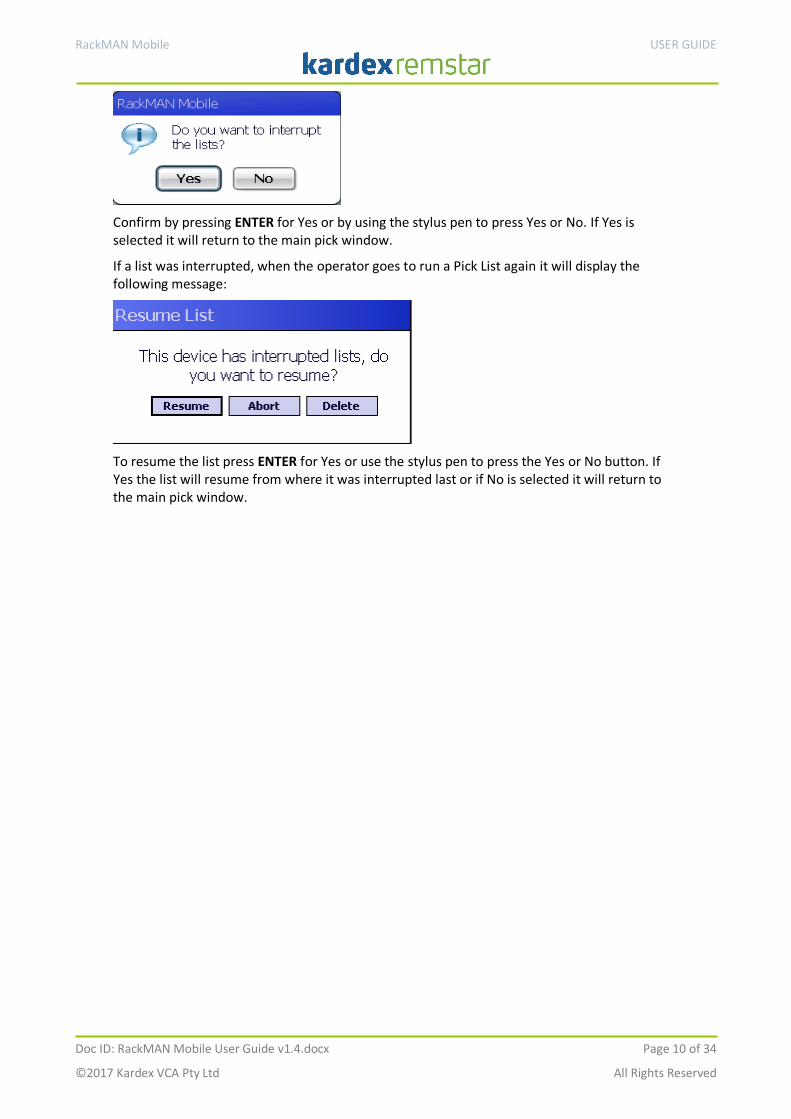
When you start to process a list or multiple list if there is a part within a list with insufficient stock quantity the following message will be displayed:
Press Enter to confirm or use the stylus pen to press OK.
When the list or lists have been started to be processed, the standard Pick window will be displayed. The difference will be that the List Identifier will be filled in:
The process to pick items are described in section 3.1.1, steps 3 to 6.
Once all the picks have been completed it will ask if all the picks have completed. It will display the following window:
To confirm this press ENTER or use the stylus pen to select Yes or No.
NOTE: If the operator wants to interrupt a list will in the Pick List window press the FUNC + 7 or the Cancel button, the following message will appear.
RackMAN Mobile USER GUIDE
Doc ID: RackMAN Mobile User Guide v1.4.docx Page 10 of 34
©2017 Kardex VCA Pty Ltd All Rights Reserved
Confirm by pressing ENTER for Yes or by using the stylus pen to press Yes or No. If Yes is selected it will return to the main pick window.
If a list was interrupted, when the operator goes to run a Pick List again it will display the following message:
To resume the list press ENTER for Yes or use the stylus pen to press the Yes or No button. If Yes the list will resume from where it was interrupted last or if No is selected it will return to the main pick window.
RackMAN Mobile USER GUIDE
Doc ID: RackMAN Mobile User Guide v1.4.docx Page 11 of 34
©2017 Kardex VCA Pty Ltd All Rights Reserved
5 Place Introduction
RackMAN Mobile™ offers a variety of Bin Allocation Methods (BAM) for storage of parts into your static racking. Your system has been configured in one of the ways described below.
Please refer to RackMAN Technical Manual Section 6.3 for more information.
NOTE: If you are unsure of your system type, please ask your supervisor
For alternatives when Placing, refer to the following sections:
4.1.1 Step 5B
Change Place Quantity When placing parts you may have a quantity discrepancy, RackMAN Mobile™ easily allows you to change the quantity you are placing.
4.1.1 Step 5B
Split Placing When placing parts to a bin that already has stock, you may not be able to fit all the stock in the bin. You can easily Split the Place over multiple locations.
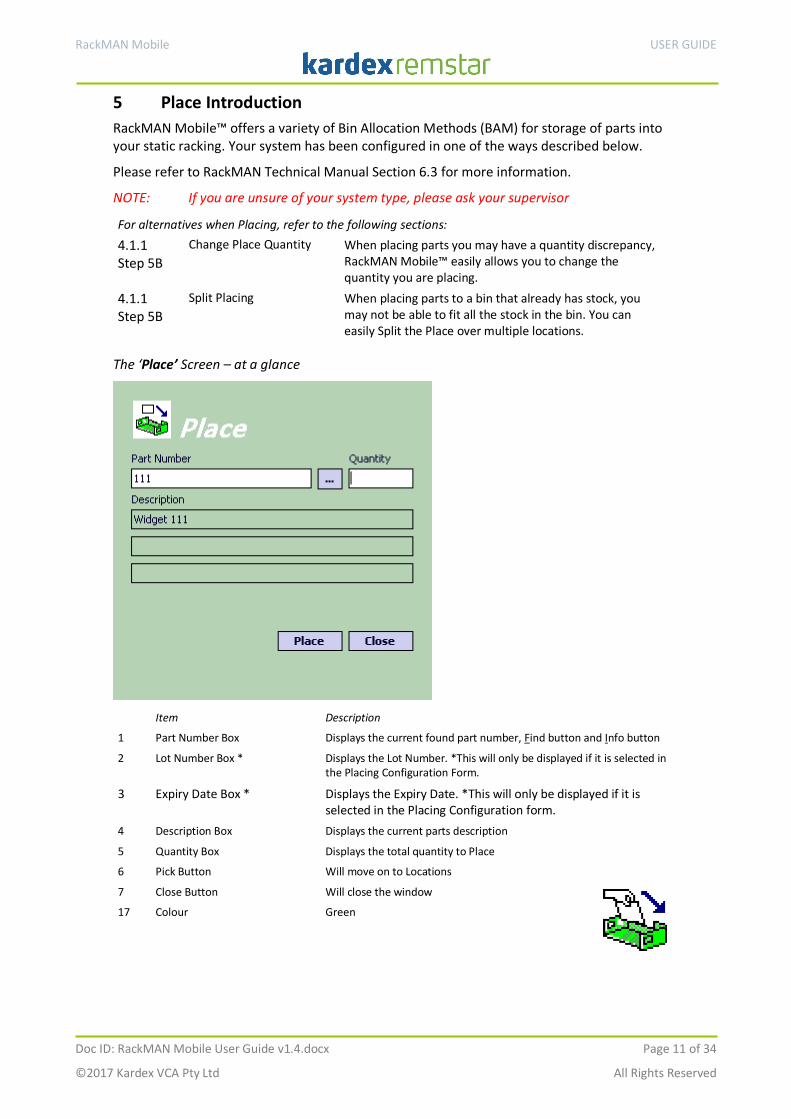
The ‘Place’ Screen – at a glance
Item Description
1 Part Number Box Displays the current found part number, Find button and Info button
2 Lot Number Box * Displays the Lot Number. *This will only be displayed if it is selected in the Placing Configuration Form.
3 Expiry Date Box * Displays the Expiry Date. *This will only be displayed if it is selected in the Placing Configuration form.
4 Description Box Displays the current parts description
5 Quantity Box Displays the total quantity to Place
6 Pick Button Will move on to Locations
7 Close Button Will close the window
17 Colour Green

RackMAN Mobile USER GUIDE
Doc ID: RackMAN Mobile User Guide v1.4.docx Page 12 of 34
©2017 Kardex VCA Pty Ltd All Rights Reserved
5.1 Place Methods
The Place form is available from the Main Menu. Use the stylus pen to press the Place button on the screen to expand the Place options and press the Place button again to collapse the Place options:
Place menu items have the following functionality:
Single Use this method to place / confirm small numbers of items directly at the RackMAN Mobile. You can manually enter the information or scan a Product or Bit to enter the data automatically.
List Use this method to place a range of items from specific lists by entering the list name in the field, groups of 5 or 10 lists, also by selecting specific number of lists you would like to process and also Distribution Partner lists one at a time.
5.1.1 Place \ Single
STEP 1 Enter Part Number
Enter a part number by typing or click on Find ( ) the part you are going to Pick by selecting it and press Enter.
STEP 2 Enter Lot Number
If Lot Number support is enabled, when you press the Enter key the cursor will move down to the Lot Number field. Enter the detail you require and press Enter.
RackMAN Mobile USER GUIDE
Doc ID: RackMAN Mobile User Guide v1.4.docx Page 13 of 34
©2017 Kardex VCA Pty Ltd All Rights Reserved
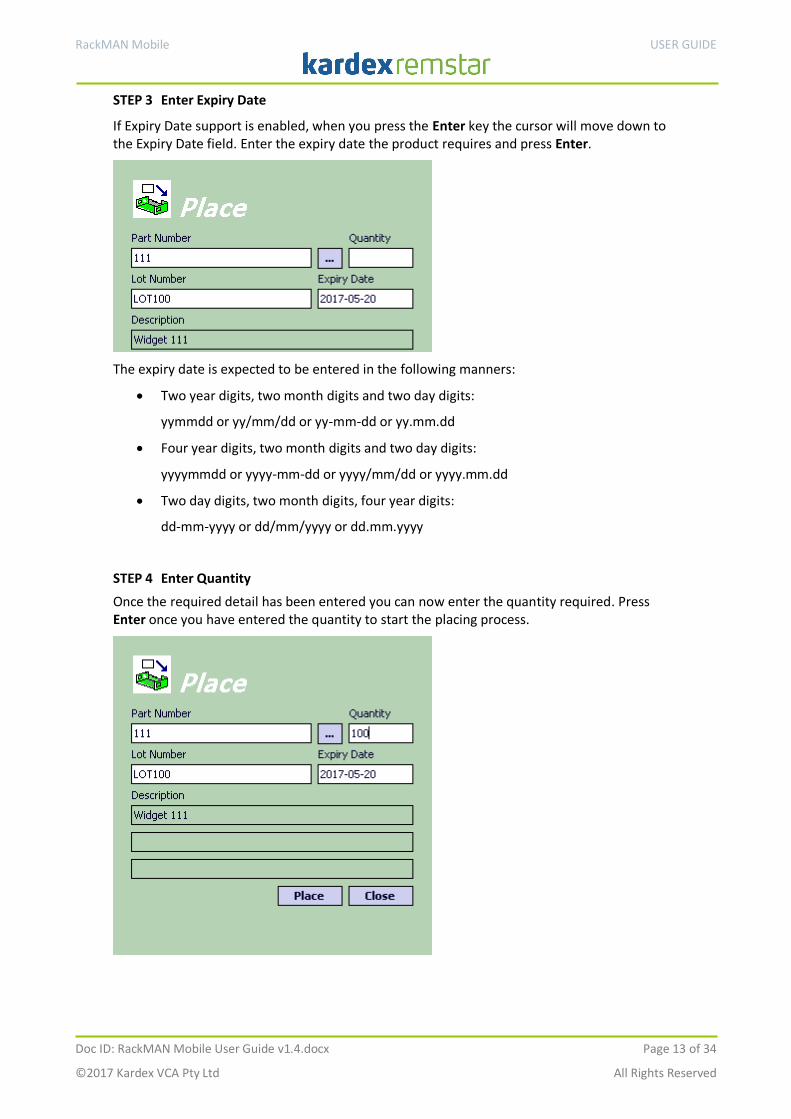
STEP 3 Enter Expiry Date
If Expiry Date support is enabled, when you press the Enter key the cursor will move down to the Expiry Date field. Enter the expiry date the product requires and press Enter.
The expiry date is expected to be entered in the following manners:
Two year digits, two month digits and two day digits:
yymmdd or yy/mm/dd or yy-mm-dd or yy.mm.dd
Four year digits, two month digits and two day digits:
yyyymmdd or yyyy-mm-dd or yyyy/mm/dd or yyyy.mm.dd
Two day digits, two month digits, four year digits:
dd-mm-yyyy or dd/mm/yyyy or dd.mm.yyyy
STEP 4 Enter Quantity
Once the required detail has been entered you can now enter the quantity required. Press Enter once you have entered the quantity to start the placing process.
RackMAN Mobile USER GUIDE
Doc ID: RackMAN Mobile User Guide v1.4.docx Page 14 of 34
©2017 Kardex VCA Pty Ltd All Rights Reserved
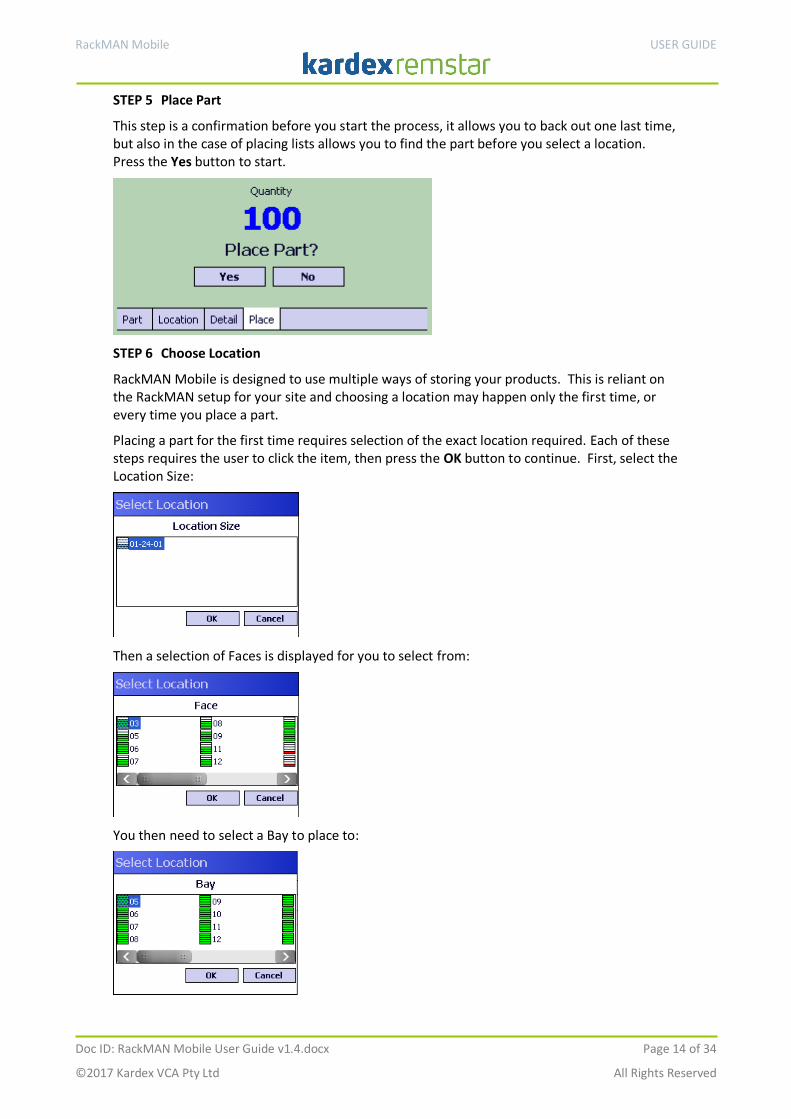
STEP 5 Place Part
This step is a confirmation before you start the process, it allows you to back out one last time, but also in the case of placing lists allows you to find the part before you select a location. Press the Yes button to start.
STEP 6 Choose Location
RackMAN Mobile is designed to use multiple ways of storing your products. This is reliant on the RackMAN setup for your site and choosing a location may happen only the first time, or every time you place a part.
Placing a part for the first time requires selection of the exact location required. Each of these steps requires the user to click the item, then press the OK button to continue. First, select the Location Size:
Then a selection of Faces is displayed for you to select from:
You then need to select a Bay to place to:

RackMAN Mobile USER GUIDE
Doc ID: RackMAN Mobile User Guide v1.4.docx Page 15 of 34
©2017 Kardex VCA Pty Ltd All Rights Reserved
Then a Shelf:
Finally, you need to choose the location:
At this point, the placing process will continue to STEP 6.
In the future, placing a product in ‘Fixed Multi’ mode will give you another choice:
This allows you to place to the same location again, or create a new location.
In other modes, Fixed Single will always return you to the location you have already placed to, and Dynamic will give you a new location every time.
Proceed to STEP 6.

RackMAN Mobile USER GUIDE
Doc ID: RackMAN Mobile User Guide v1.4.docx Page 16 of 34
©2017 Kardex VCA Pty Ltd All Rights Reserved
STEP 7 Count and Place Parts
There will be 4 tabs that it automatically scrolls through Part, Location, Detail and Pick.
The required location is shown in red text on the screen under the Location tab. Count the parts as you Place the parts away into the location.
STEP 8 Confirm Quantity
To confirm the Place quantity you must have the Place tab displayed, if you are on any other window and the Green confirm button is used, it will take you to the Place tab automatically. You can confirm by pressing Enter button, the Green button or use the stylus pen to click on Yes. The quantity to confirm is shown in large blue text on the screen.
STEP 8A Confirm Quantity - Yes
The quantity to confirm is shown in large blue text on the screen.
After a part is placed, RackMAN Mobile™ will record the location and quantity details for the item.
The Place process is now complete. Return to STEP 1

RackMAN Mobile USER GUIDE
Doc ID: RackMAN Mobile User Guide v1.4.docx Page 17 of 34
©2017 Kardex VCA Pty Ltd All Rights Reserved
STEP 8B Confirm Quantity - No
The RackMAN Mobile will then display the following message:
This question is only asked if you are in Fixed Multi or Dynamic mode, and is wanting to know if you are changing the quantity for this location due to not having enough stock or if the location you have selected was too small to contain all the stock.
Selecting Yes will split this place over multiple locations but still place the same total stock. Selecting No will change the amount of stock you wish to place.
Selecting Yes Selecting No
You now need to enter the adjusted or split stock amounts you require for this location.
Proceed to STEP 5 for each split location or the adjusted stock for this location.

RackMAN Mobile USER GUIDE
Doc ID: RackMAN Mobile User Guide v1.4.docx Page 18 of 34
©2017 Kardex VCA Pty Ltd All Rights Reserved
5.1.2 Place \ List
When placing by List there are two types of lists Standard and Special. The Place List window will have the following appearance:
Standard 5:
By selecting the button 5 with the stylus pen this will start orders within RackMAN Mobile with a maximum of five standard orders at a time.
If there is a line threshold set for Groups of five and this is reached within one list then it will only pick that list (minimum of one list), otherwise it will select what come first the threshold or maximum of five lists.
Please refer to Configurations for the threshold settings.
Standard 10:
By selecting the button 10 with the stylus pen this will start orders within RackMAN Mobile with a maximum of ten standard orders at a time.
If there is a line threshold set for Groups of ten and this is reached within one list then it will only pick that list (minimum of one list), otherwise it will select what come first the threshold or maximum of ten lists.
Please refer to Configurations for the threshold settings.
Standard x:
By selecting the button x with the stylus pen within RackMAN Mobile another window will appear asking how many orders you would like to process.
Enter the amount of list you would like to process and press Enter or click OK with the stylus pen.
RackMAN Mobile USER GUIDE
Doc ID: RackMAN Mobile User Guide v1.4.docx Page 19 of 34
©2017 Kardex VCA Pty Ltd All Rights Reserved
Order Number:
By manually entering or scanning a matching list and then press Enter it will start that list. If there is no matching lists the following message will be displayed:
Special:
By selecting the button 1 with the stylus pen this will start one order within RackMAN Mobile that is a Special order. Special orders are defined by customer requirements.
5.1.3 Place \ List \ Process
If there are any part numbers that do not exist or cannot be processed the following message will be displayed:
The process to place items is described in section 4.1.1, steps 5 to 8.
Once all the picks have been completed it will ask if all the picks have completed. It will display the following window:
To confirm this press ENTER or use the stylus pen to select Yes or No.
NOTE: If the operator wants to interrupt a list will in the Pick List window press the FUNC + 7 or the Cancel button, the following message will appear.
Confirm by pressing ENTER for Yes or by using the stylus pen to press Yes or No. If Yes is selected it will return to the main pick window.

RackMAN Mobile USER GUIDE
Doc ID: RackMAN Mobile User Guide v1.4.docx Page 20 of 34
©2017 Kardex VCA Pty Ltd All Rights Reserved
If a list was interrupted, when the operator goes to run a Pick List again it will display the following message:
To resume the list press ENTER for Yes or use the stylus pen to press the Yes or No button. If Yes the list will resume from where it was interrupted last or if No is selected it will return to the main pick window.

RackMAN Mobile USER GUIDE
Doc ID: RackMAN Mobile User Guide v1.4.docx Page 21 of 34
©2017 Kardex VCA Pty Ltd All Rights Reserved
6 Verify Operation
Verify is Kardex’s terminology for the stocktake process.
The Verify form is available from the Main Menu. Use the stylus pen to press the Verify button on the screen to expand the Verify options and press the Verify button again to collapse the Verify options:
6.1 Verify Methods
Single Verify \ Single is used to check the location quantity of a single item using RackMAN Mobile. The item may exist in one or more locations. RackMAN Mobile will present the locations sequentially and require the count for each location to be entered. The location quantity will be updated in the system database.
The ‘Verify’ Screen - at a Glance
The Verify screen shows the following information:
Item Description
1 Part Number Box Displays the current found part number, Find button and Info button
2 Lot Number Box * Displays the current parts Lot Number. *Will only be displayed if chosen in configuration.
3 Pick Button Will move on to Locations 4 Close Button Will close the window 5 Colour Pink

RackMAN Mobile USER GUIDE
Doc ID: RackMAN Mobile User Guide v1.4.docx Page 22 of 34
©2017 Kardex VCA Pty Ltd All Rights Reserved
6.3 Verify \ Single
STEP 1 Enter Part Number
Enter a part number by typing or click on Find ( ) the part you going to verify then press Enter.
STEP 2 Enter Lot Number
If Lot Number support is enabled, when you press the Enter key the cursor will move down to the Lot Number field. Enter the detail you require and press Enter.

RackMAN Mobile USER GUIDE
Doc ID: RackMAN Mobile User Guide v1.4.docx Page 23 of 34
©2017 Kardex VCA Pty Ltd All Rights Reserved
STEP 3 Visit Locations
Go to the shelf location shown in large red text in the Location tab and count the parts. There will be 4 tabs that it automatically scrolls through Part, Location, Detail and Verify.
To proceed to confirm the quantity counted you must have the Verify tab displayed and then you can confirm by pressing Enter, the Green button or use the stylus pen to click on Yes to being counting the current locations quantity.
STEP 4 Count Location Quantity
Type the quantity that you counted in the location then press Enter or press the OK button.

RackMAN Mobile USER GUIDE
Doc ID: RackMAN Mobile User Guide v1.4.docx Page 2 of 34
©2017 Kardex VCA Pty Ltd All Rights Reserved
STEP 5 Confirm Quantity
To confirm the Verify quantity press Enter button, the Green button or use the stylus pen to click on Yes. The quantity to confirm is shown in large blue text on the screen.
The Verify Process is now complete for that location. If there are more locations to count, RackMAN Mobile will progress to the next location and repeat the process from STEP 2.
RackMAN Mobile USER GUIDE
Doc ID: RackMAN Mobile User Guide v1.4.docx Page 3 of 34
©2017 Kardex VCA Pty Ltd All Rights Reserved
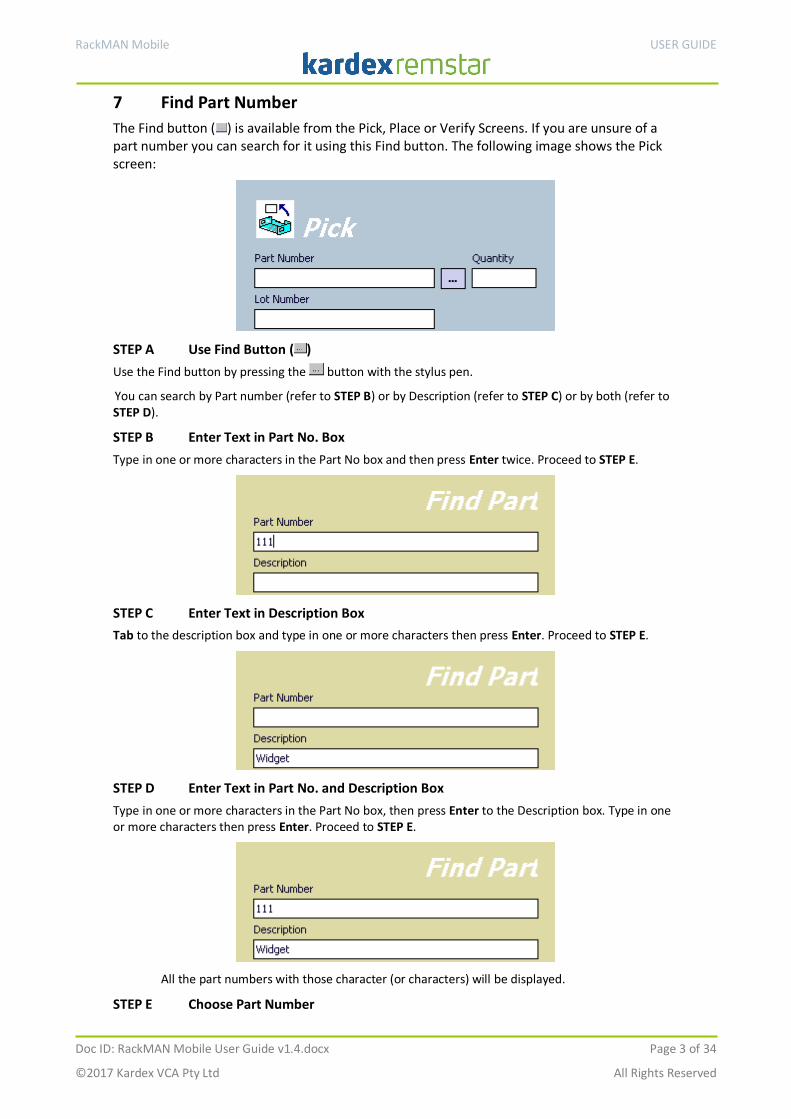
7 Find Part Number
The Find button ( ) is available from the Pick, Place or Verify Screens. If you are unsure of a part number you can search for it using this Find button. The following image shows the Pick screen:
STEP A Use Find Button ( )
Use the Find button by pressing the button with the stylus pen.
You can search by Part number (refer to STEP B) or by Description (refer to STEP C) or by both (refer to STEP D).
STEP B Enter Text in Part No. Box
Type in one or more characters in the Part No box and then press Enter twice. Proceed to STEP E.
STEP C Enter Text in Description Box
Tab to the description box and type in one or more characters then press Enter. Proceed to STEP E.
STEP D Enter Text in Part No. and Description Box
Type in one or more characters in the Part No box, then press Enter to the Description box. Type in one or more characters then press Enter. Proceed to STEP E.
All the part numbers with those character (or characters) will be displayed.
STEP E Choose Part Number

RackMAN Mobile USER GUIDE
Doc ID: RackMAN Mobile User Guide v1.4.docx Page 4 of 34
©2017 Kardex VCA Pty Ltd All Rights Reserved
Choose the required part number by selecting them with the stylus pen and the will be highlighted once selected and then press ENTER for the part you require.
The Pick, Place or Verify screen will then automatically be updated with the part number that you have chosen.
8 Shortcut Keys
Green Button The Green Circled button is generically used for YES.
Red Button The Red Circled button is generically used for NO.
Navigation The screen is full touch screen. Navigate by using the stylus pen and
pressing the on screen buttons.
9 Troubleshooting
If you encounter problems in the use of this application, please contact Kardex for support as follows:
Site Support Team
Wodonga Office
Phone: +61 2 6056 5173
Fax: +61 2 6056 2422
Email: [email protected]
Web: www.kardex.com.au
Please quote your ‘Site ID’ code to assist us to find your site details. Your site code is listed on the site software licence or your service agreement document.
Related Documents