Page 1 This tutorial is provided as a courtesy by ECS Tuning. Proper service and repair procedures are vital to the safe, reliable operation of all motor vehicles as well as the personal safety of those performing the repairs. Standard safety procedures and precautions (including use of safety goggles and proper tools and equipment) should be followed at all times to eliminate the possibility of personal injury or improper service which could damage the vehicle or compromise its safety. Although this material has been prepared with the intent to provide reliable information, no warranty (express or implied) is made as to its accuracy or completeness. Neither is any liability assumed for loss or damage resulting from reliance on this mate- rial. SPECIFICALLY, NO WARRANTY OF MERCHANTABILITY, FITNESS FOR A PARTICULAR PURPOSE OR ANY OTHER WARRANTY IS MADE OR TO BE IMPLIED WITH RESPECT TO THIS MATERIAL. In no event will ECS Tuning, Incorporated or its affiliates be liable for any damages, direct or indirect, consequential or compensatory, arising out of the use of this material. R ECS Hybrid 1.8T Oil Pan Conversion Installation Part Number ES2102397 VW MKIV Hybrid Oil Pan

Welcome message from author
This document is posted to help you gain knowledge. Please leave a comment to let me know what you think about it! Share it to your friends and learn new things together.
Transcript
Page 1
This tutorial is provided as a courtesy by ECS Tuning.
Proper service and repair procedures are vital to the safe, reliable operation of all motor vehicles as well as the personal safety of those performing the repairs. Standard safety procedures and precautions (including use of safety goggles and proper tools and equipment) should be followed at all times to eliminate the possibility of personal injury or improper service which could damage the vehicle or compromise its safety.
Although this material has been prepared with the intent to provide reliable information, no warranty (express or implied) is made as to its accuracy or completeness. Neither is any liability assumed for loss or damage resulting from reliance on this mate-rial. SPECIFICALLY, NO WARRANTY OF MERCHANTABILITY, FITNESS FOR A PARTICULAR PURPOSE OR ANY OTHER WARRANTY IS MADE OR TO BE IMPLIED WITH RESPECT TO THIS MATERIAL. In no event will ECS Tuning, Incorporated or its affiliates be liable for any damages, direct or indirect, consequential or compensatory, arising out of the use of this material.
R
ECS Hybrid 1.8T Oil Pan Conversion Installation
Part Number ES2102397
VW MKIV Hybrid Oil Pan
R
Address: 1000 Seville Road, Wadsworth, OH 44281 Phone: 1.800.924.5172 Web: www.ecstuning.com
Page - 2
ECS Hybrid 1.8T Oil Pan Conversion
ES2102397
Parts Required:
ECS Hybrid 1.8T Oil Pan Conversion KitVolkswagen 337/20AE and 1.8T Jetta, GolfES2102397
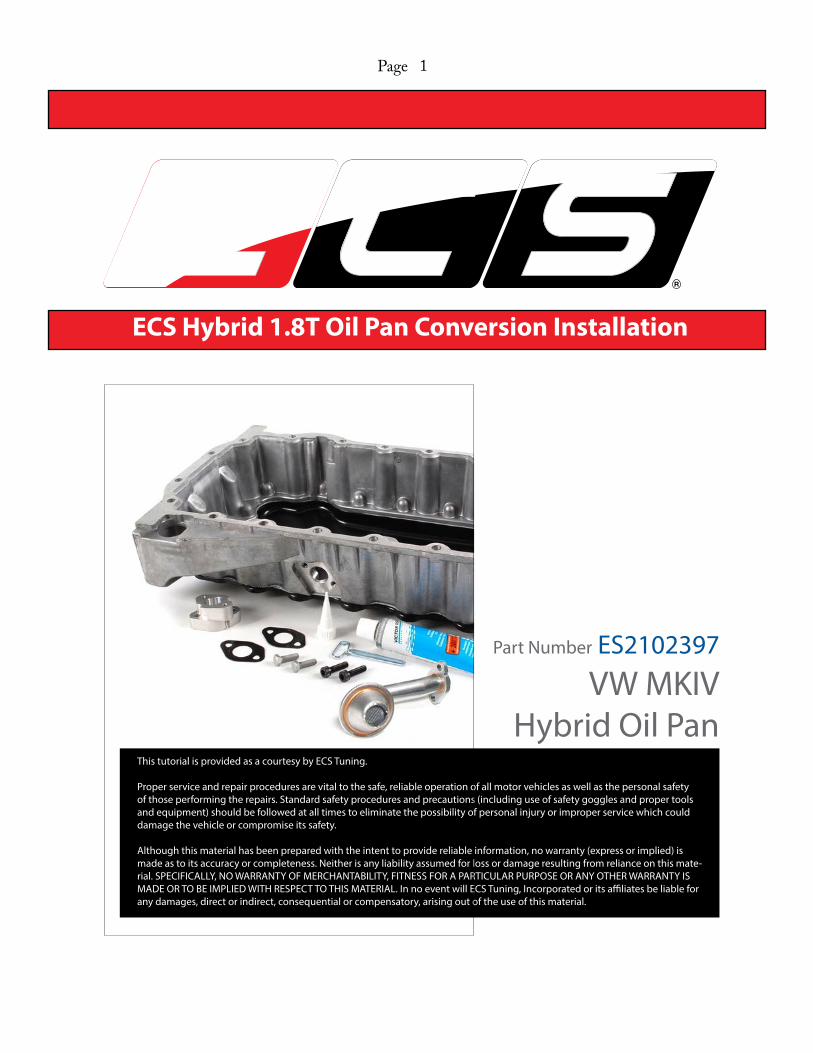
Kit Contents:Hybrid Oil Pan1) Oil pickup tube with o-ring2) Tube sealer3) Drain tube adapter-to-oil pan bolts (qty 2)4) Drain tube adapter gaskets5) Drain tube adapter6) Drain tube-to-adapter bolts (qty 2)
Also needed:4-5 quarts engine oiloil filter (optional)
Preparations
Estimated Installation Time: 2.0 Hour
Tools Required: • 3/8-inch ratchet • 5mm Allen-head• 5mm long reach, ball-head Allen driver• 8mm Allen-head• 16mm socket or box end
R
Address: 1000 Seville Road, Wadsworth, OH 44281 Phone: 1.800.924.5172 Web: www.ecstuning.com
Page - 3
ECS Hybrid 1.8T Oil Pan Conversion
ES2102397
This sequence shows how to install a hybrid oil pan on your 1.8T. The pan is “hybrid” because it has an aluminum upper housing with a stamped steel bottom that dents on minor impact, without shattering or cracking.
We have raised the car on a lift, and drained the oil in preparation.
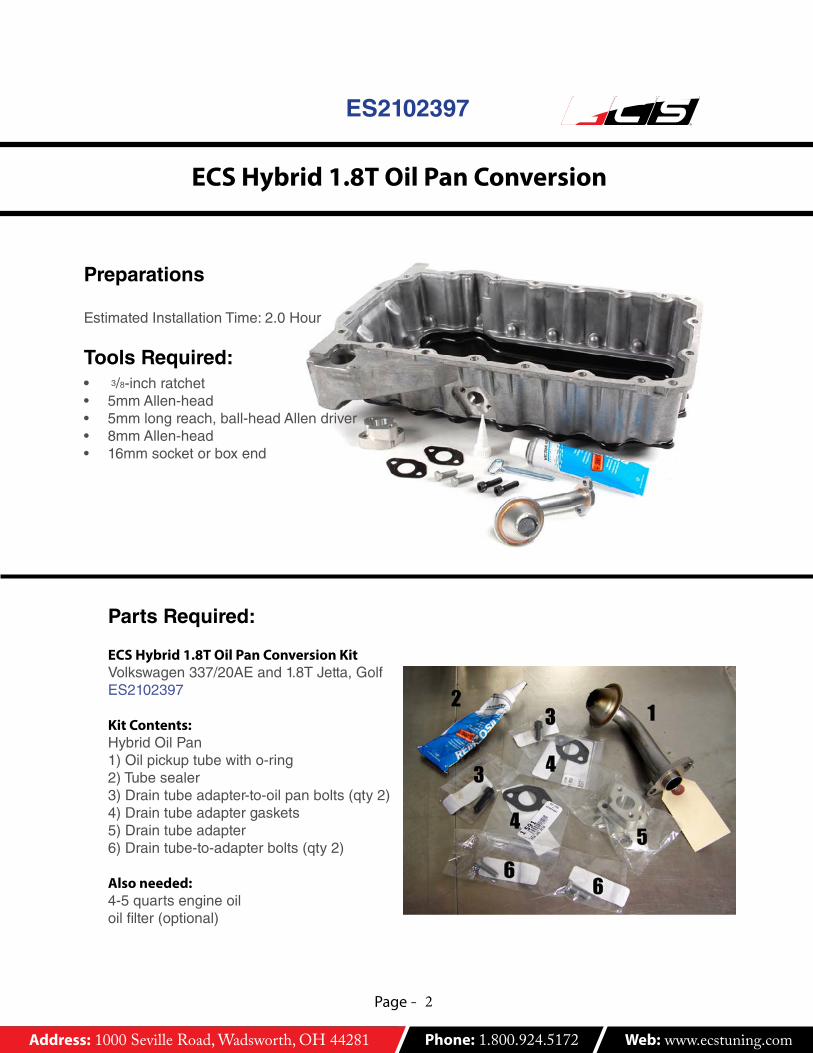
Step 1.Disconnect the turbo drain from the rear of the old oil pan. Two bolts.
Clean old gasketing from the drain tube flange.
Step 2 Work your way around the perimeter of the oil pan, removing the M7 (5 mm Allen-head) pan bolts.
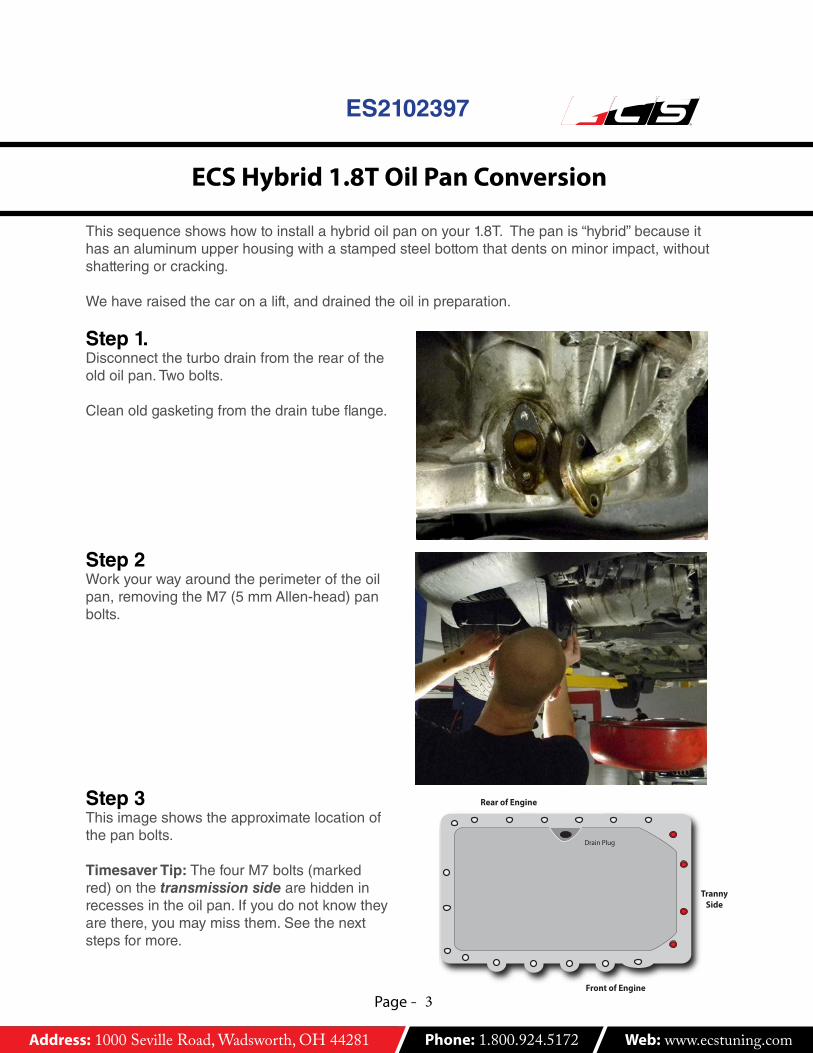
Drain Plug
TrannySide
Front of Engine
Rear of EngineStep 3This image shows the approximate location of the pan bolts.
Timesaver Tip: The four M7 bolts (marked red) on the transmission side are hidden in recesses in the oil pan. If you do not know they are there, you may miss them. See the next steps for more.
R
Address: 1000 Seville Road, Wadsworth, OH 44281 Phone: 1.800.924.5172 Web: www.ecstuning.com
Page - 4
ECS Hybrid 1.8T Oil Pan Conversion
ES2102397
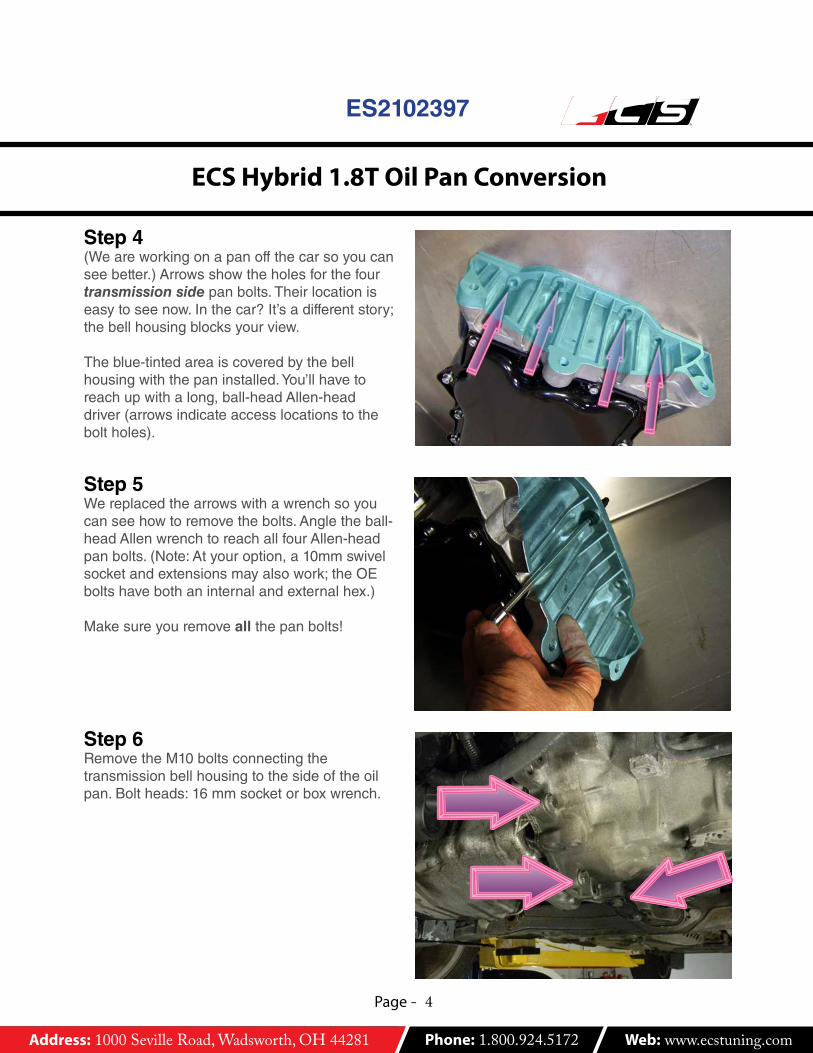
Step 4 (We are working on a pan off the car so you can see better.) Arrows show the holes for the four transmission side pan bolts. Their location is easy to see now. In the car? It’s a different story; the bell housing blocks your view.
The blue-tinted area is covered by the bell housing with the pan installed. You’ll have to reach up with a long, ball-head Allen-head driver (arrows indicate access locations to the bolt holes).
Step 5 We replaced the arrows with a wrench so you can see how to remove the bolts. Angle the ball-head Allen wrench to reach all four Allen-head pan bolts. (Note: At your option, a 10mm swivel socket and extensions may also work; the OE bolts have both an internal and external hex.)
Make sure you remove all the pan bolts!
Step 6 Remove the M10 bolts connecting the transmission bell housing to the side of the oil pan. Bolt heads: 16 mm socket or box wrench.

R
Address: 1000 Seville Road, Wadsworth, OH 44281 Phone: 1.800.924.5172 Web: www.ecstuning.com
Page - 5
ECS Hybrid 1.8T Oil Pan Conversion
ES2102397
Step 7Remove the old oil pan. There is no pan gasket; only sealer. Remove all traces of sealer from the block sealing surface (tinted blue).
Clean the sealing area with spray gasket remover or other aromatic cleaner, like brake cleaner. Then wipe down the surface with a clean cloth. Make sure the engine block sealing surface is dry and oil-free.
Step 8 Unbolt the oil pickup and bolt the new pickup in its place. Install a new o-ring, included in the kit.
Step 9 Prepare the new pan. Clean it as you did the engine block, even though it is new. We want a clean, dry surface.
Run a 2-3 mm bead of sealer on the pan sealing surface. That’s about 1/8 inch. No need for cake decorating! Too much sealant is a bad idea and does not seal better.
Why? Extra sealant can squeeze out, fall into the pan, and clog the oil pump pickup. Bad news.
R
Address: 1000 Seville Road, Wadsworth, OH 44281 Phone: 1.800.924.5172 Web: www.ecstuning.com
Page - 6
ECS Hybrid 1.8T Oil Pan Conversion
ES2102397
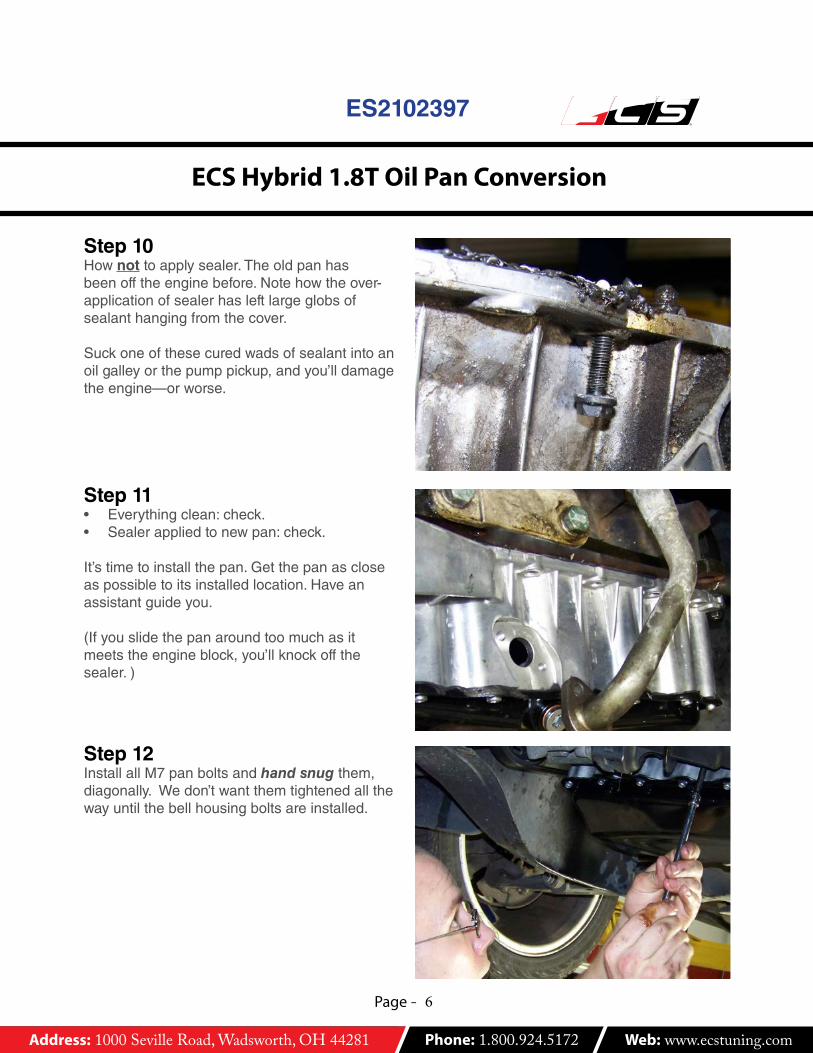
Step 10 How not to apply sealer. The old pan has been off the engine before. Note how the over-application of sealer has left large globs of sealant hanging from the cover.
Suck one of these cured wads of sealant into an oil galley or the pump pickup, and you’ll damage the engine—or worse.
Step 11 • Everything clean: check. • Sealer applied to new pan: check.
It’s time to install the pan. Get the pan as close as possible to its installed location. Have an assistant guide you.
(If you slide the pan around too much as it meets the engine block, you’ll knock off the sealer. )
Step 12 Install all M7 pan bolts and hand snug them, diagonally. We don’t want them tightened all the way until the bell housing bolts are installed.
R
Address: 1000 Seville Road, Wadsworth, OH 44281 Phone: 1.800.924.5172 Web: www.ecstuning.com
Page - 7
ECS Hybrid 1.8T Oil Pan Conversion
ES2102397
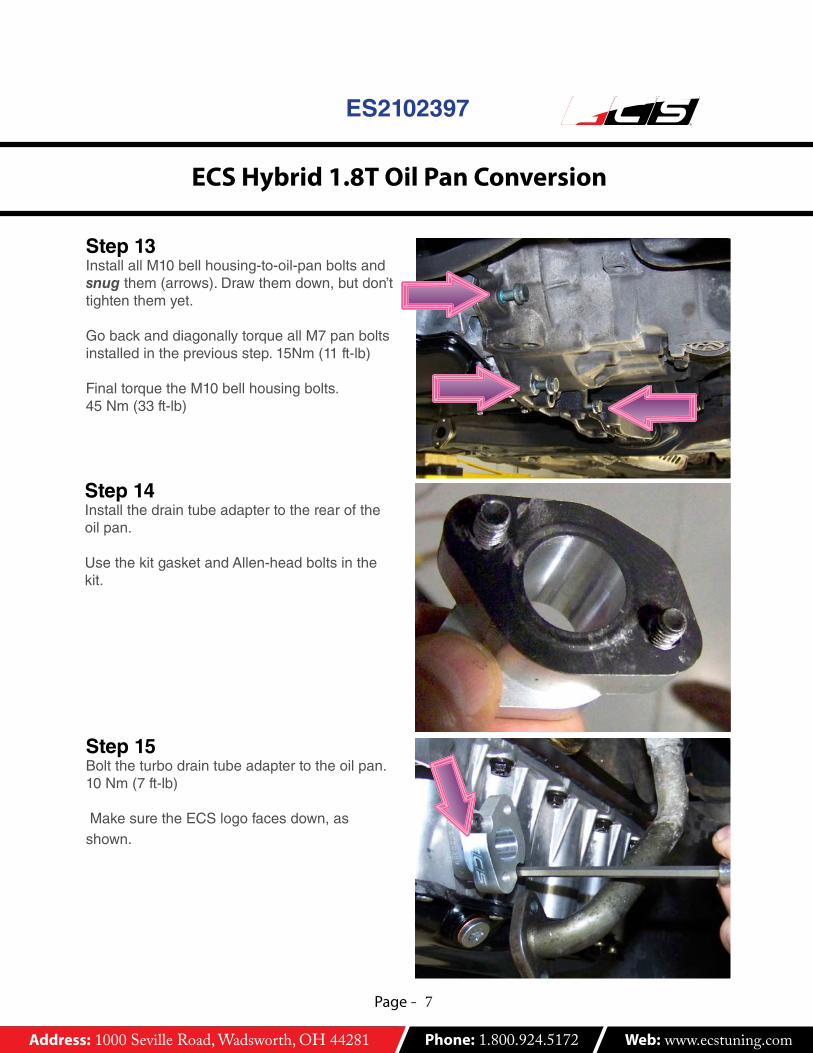
Step 13 Install all M10 bell housing-to-oil-pan bolts and snug them (arrows). Draw them down, but don’t tighten them yet.
Go back and diagonally torque all M7 pan bolts installed in the previous step. 15Nm (11 ft-lb)
Final torque the M10 bell housing bolts. 45 Nm (33 ft-lb)
Step 15Bolt the turbo drain tube adapter to the oil pan. 10 Nm (7 ft-lb)
Make sure the ECS logo faces down, as shown.
Step 14Install the drain tube adapter to the rear of the oil pan.
Use the kit gasket and Allen-head bolts in the kit.
R
Address: 1000 Seville Road, Wadsworth, OH 44281 Phone: 1.800.924.5172 Web: www.ecstuning.com
Page - 8
ECS Hybrid 1.8T Oil Pan Conversion
ES2102397
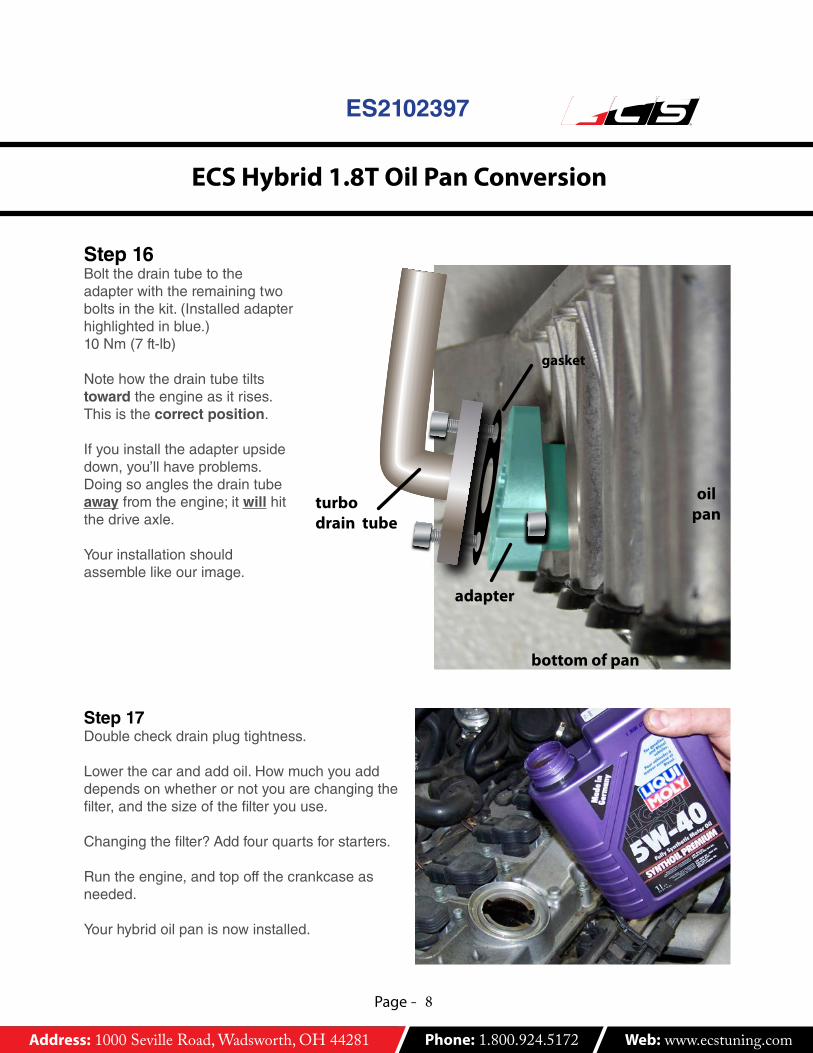
Step 16Bolt the drain tube to the adapter with the remaining two bolts in the kit. (Installed adapter highlighted in blue.)10 Nm (7 ft-lb)
Note how the drain tube tilts toward the engine as it rises. This is the correct position.
If you install the adapter upside down, you’ll have problems. Doing so angles the drain tube away from the engine; it will hit the drive axle.
Your installation should assemble like our image.
bottom of pan
oilpan
adapter
turbo drain tube
gasket
Step 17Double check drain plug tightness.
Lower the car and add oil. How much you add depends on whether or not you are changing the filter, and the size of the filter you use.
Changing the filter? Add four quarts for starters.
Run the engine, and top off the crankcase as needed.
Your hybrid oil pan is now installed.
Related Documents