QUICK USER GUIDE 유저 가이드 クイックガイド 用户快速指南(簡體) 用户快速指南(繁體) GUIDE RAPIDE D’UTILISATION GUÍA RÁPIDA GUIDA RAPIDA KURZANLEITUNG PRODUCT WARRANTY 04 08 14 18 22 26 30 34 38 42 Product features and specifications in this user guide are subject to change without prior notice for performance improvement purpose. 유저가이드 상의 제품 특징 및 일부 사양은 성능 개선을 위하여 사전 공지없이 변경될 수 있습니다. Les caractéristiques du produit et les spécifications de ce mode d'emploi sont sujettes à modification sans préavis à des fins d'amélioration des performances. Las características y especificaciones de esta guía del usuario están sujetos a cambios sin previo aviso y por finalidad la mejora del rendimiento. Caratteristiche del prodotto e le specifiche in questo manuale sono soggette a modifiche senza preavviso a scopo di miglioramento delle prestazioni. Produktmerkmale und Spezifikationen in dieser Bedienungsanleitung können ohne vorherige Ankündigung, zum Zweck der Leistungsverbesserung, geändert werden. 为了改善产品性能, 使用说明书上的产品特征及一些规格有可能无事先通知变更。 爲了改善産品性能, 使用說明書上的産品特征及壹些規格有可能無事先通知變更。 ユーザーガイド上に記されている製品の特徴や仕様などにおける情報は、 機能向上等の理由により予告なく変更されることがあります。

Welcome message from author
This document is posted to help you gain knowledge. Please leave a comment to let me know what you think about it! Share it to your friends and learn new things together.
Transcript
QUICK USER GUIDE
유저 가이드
クイックガイド
用户快速指南(簡體)
用户快速指南(繁體)
GUIDE RAPIDE D’UTILISATION
GUÍA RÁPIDA
GUIDA RAPIDA
KURZANLEITUNG
PRODUCT WARRANTY
04
08
14
18
22
26
30
34
38
42
Product features and specifications in this user guide are subject to change without prior notice
for performance improvement purpose.
유저가이드 상의 제품 특징 및 일부 사양은 성능 개선을
위하여 사전 공지없이 변경될 수 있습니다.
Les caractéristiques du produit et les spécifications de ce mode d'emploi sont sujettes à modification sans préavis à des fins d'amélioration des performances.
Las características y especificaciones de esta guía del usuario están sujetos a cambios sin previo aviso
y por finalidad la mejora del rendimiento.
Caratteristiche del prodotto e le specifiche in questo manuale sono soggette a modifiche senza preavviso
a scopo di miglioramento delle prestazioni.
Produktmerkmale und Spezifikationen in dieser Bedienungsanleitung können ohne vorherige Ankündigung, zum Zweck der Leistungsverbesserung, geändert werden.
为了改善产品性能,
使用说明书上的产品特征及一些规格有可能无事先通知变更。
爲了改善産品性能,
使用說明書上的産品特征及壹些規格有可能無事先通知變更。
ユーザーガイド上に記されている製品の特徴や仕様などにおける情報は、機能向上等の理由により予告なく変更されることがあります。

(4) LED color status display
Status LED Color
Power ON illuminating
Power OFF
Being charged illuminating
Fully charged
Low battery power notification Flashing
During USB connection Illuminated
Bluetooth connection standby Flashing
During App connection (1)Dimming
Low storage notification Flashing
During firmware update (1)Dimming
Firmware update failure Flashing(2)Verify optical sensor or usage environment Illuminated (with alarms)
(1)Dimming : Indicates slowly getting dark and then bright while flashing.(2)Check if there’s any dirt around optical sensor or on papers.
illuminating and thenturned OFF
- - (1)Dimming
1. How to use Neo smartpen
(1) Charging the pen • Make sure to charge the product after the purchase as it may have low battery.
• The LED lamp will turn red while the battery is being charged. Once charging is complete, it’ll change back to green.(If the battery is being charged with PC, PC will recognize the pen as a removable disk an the LED light turns violet.)
(2) Power ON/OFF • If you press the power button or put the pen tip on the paper, the pen will be activated
with LED lights on within a second.(The Auto Power function is enabled when the pen is firstconnected to the App. You can change the setting in the App.)
• When the power is on, hold the power button for more than 2 seconds, and the powerwill turn off with flashing LED lights.
• If there is no action taken for more than 20 minutes, the power will be turned off automatically.(You can change the auto-power-off time in the setting. The longer auto-power-off time is set, the shorter pen usage time is available.)
• If you do not use this product for more than 10 seconds, it will automatically change to standby (low power consumption) mode to reduce battery power consumption.
(3) How to grip The recognition rate is heavily affected by the direction of the optical sensor’s angle. Sensor(oval shaped part adjacent to the pen tip) should face downwards. Deviating from the appropriate degree, or holding the pen in the wrong direction could cause difficulties with capturing your writing or drawing.
Usage AngleHold the pen that does not cause
pressure on the wrist and maintain a natural writing angle.
Allowable Recognition AngleProduct’s acceptable recognition
angle is -20° ~ +40°. (90° vertical standard)
04_QUICK USER GUIDE
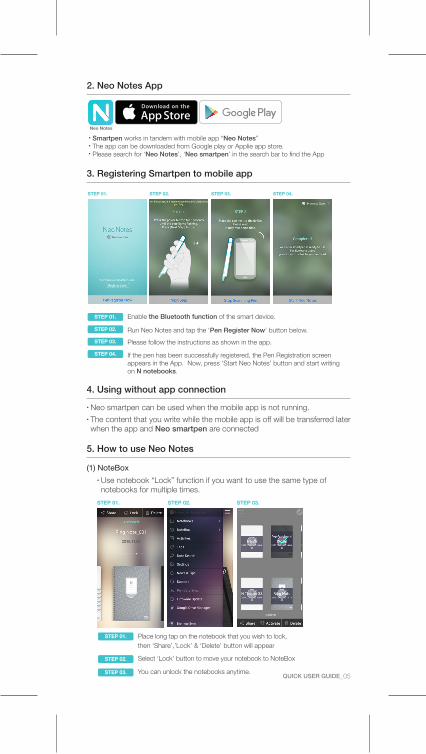
2. Neo Notes App
• Smartpen works in tandem with mobile app “Neo Notes”• The app can be downloaded from Google play or Applie app store.• Please search for ‘Neo Notes’, ‘Neo smartpen’ in the search bar to find the App
Neo Notes
4. Using without app connection
• Neo smartpen can be used when the mobile app is not running. • The content that you write while the mobile app is off will be transferred laterwhen the app and Neo smartpen are connected
Enable the Bluetooth function of the smart device.
Run Neo Notes and tap the ‘Pen Register Now’ button below.
Please follow the instructions as shown in the app.
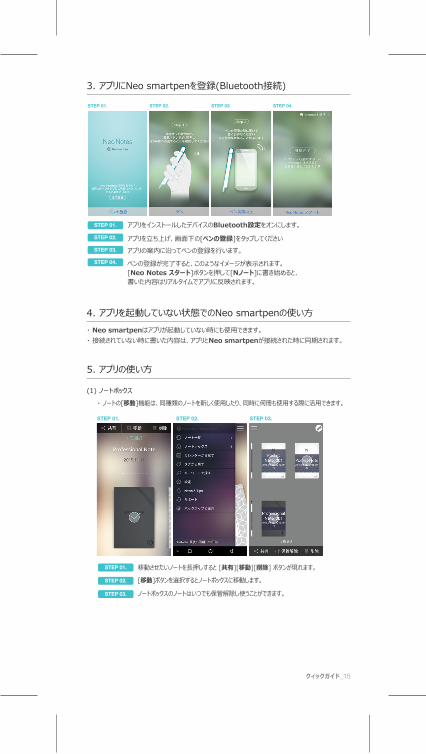
STEP 01.
STEP 02.
STEP 03.
If the pen has been successfully registered, the Pen Registration screen appears in the App. Now, press ‘Start Neo Notes’ button and start writing on N notebooks.
STEP 04.
3. Registering Smartpen to mobile app
STEP 04.STEP 01. STEP 02. STEP 03.
5. How to use Neo Notes
Place long tap on the notebook that you wish to lock, then ‘Share’,’Lock’ & ‘Delete’ button will appear
Select ‘Lock’ button to move your notebook to NoteBox
You can unlock the notebooks anytime.
STEP 01. STEP 02. STEP 03.
(1) NoteBox• Use notebook “Lock” function if you want to use the same type of notebooks for multiple times.
STEP 01.
STEP 02.
STEP 03.QUICK USER GUIDE_05

NotebooksCheck your current notebooks
NoteboxCheck Your locked notebooks to NoteBox
ActivitiesCheck your writing by date
TagsSearch tagged pages
Note SearchSearch transcribed text
SettingsSelect your pen & app settings
News & TipsCheck latest news & updated tips
Pen Data SyncTransfer stored writing data to the app
Firmware UpdateUpdate pen’s firmware to the latest version
(3) Pen preference settings• Press button to see pen setting menu.
• Press button on your note page to see.
(2) Using button
Edit ModeEdit,erase,change color/thickness or highlight your writing in the notebooks
TranscribeTranscribe your handwritten notes into digital text
TagTag your notes to organiza and search them
RecordingRecord voice while writing notes
ReplayReplay your written notes and/with voice
ShareShare the notes in PNG,PDF, TEXT & SVG format
06_QUICK USER GUIDE

Pen Data SyncTransfer stored writing data to the app
Firmware UpdateUpdate pen’s firmware to the latest version
• Tap on icon, then a color palette will open and select a thickness and color(while the smartpen is connected to the app)
• Tap anywhere outside the palette to make it disappear.
(4) Color & Thickness change
• You have various pen colors and thickness settings to choose from in the app.
6. Notebooks & Stores
Find the perfect fit for among our wide range of notebooks.
World
shop.neosmartpen.com (except Latin America and Africa)
* Pentips are D1 type which you can buy from any online or stationery store
* Direct sunshine or any strong light may cause the loss of recognition of writing.
Product specification table
Model Name NWP-F121
Support Supported OS / Bluetooth Specification
OS version Bluetooth version
Android Kitkat 4.4 or higher 2.1 or higher
iOSiOS 8.1[iPhone 5 / iPad 3 / iPad mini /
iPad Air 1] or higher4.0 LE
Wireless Connection Bluetooth 4.2 (CLASSIC / BLE)
Receiving / Transmitting Frequency 2402 ~ 2480MHz
Antenna Output 3mW / Class 2
Storage Media 90MB of internal memory
Battery Rechargeable Lithium Polymer Battery 3.7V / 300mAh
Charging Time About 2 hours
Rated Input DC 5V / 300mA
Usage Time 125 days in standby mode, 5 hours for continuous writing
PC Connection Method USB2.0HS (microUSB)
Usage Environment Temperature: 10~35℃ / humidity: ~95%
Ink refills D1 multi pen ink refills
Size and WeightLength: 156mm (without a pen cap), thickness: 11.5~11.8mm / 22g (without a pen cap)
KCC: MSIP-CRM-NCV-NWP-F121FCC ID: 2AALG-NWP-F121MIC: 007-AF0079CMIIT ID: 2017DJ3496BSMI: R3B232NCC: CCAH17LP1950T6
QUICK USER GUIDE_07

(1) 배터리 충전
•제품을 처음 사용하기 전에 반드시 충전 완료해 주세요.
•충전중에는 LED가 빨간색으로 표시되고, 충전이 완료되면 녹색으로 표시됩니다. (PC에 연결하여 충전할 경우 이동식 디스크로 인식되어 LED가 보라색으로 표시됩니다.)
(2) 전원 On/Off & 리셋
(3) 올바른 필기 방법
•펜의 전원버튼을 누르거나 펜팁을 종이 위에 가볍게 대면 1초 이내에 LED가 켜지며 전원이 켜집니다.
(Auto Power기능은 펜을 APP에 처음 연결할 때 활성화 되며, APP에서 해당 기능을 On/Off할 수 있습니다.)
•전원이 켜진 상태에서 전원버튼을 2초 이상 길게 누르면 LED가 깜박이며 전원이 꺼집니다. 20분 이상
아무런 입력이 없을 경우 자동으로 전원이 꺼집니다.
(APP에서 종료 시간을 설정할 수 있으며, 시간을 길게 설정할수록 펜의 사용 시간은 줄어듭니다.)
•본 제품은 배터리 소모를 줄이기 위해 10초 이상 사용하지 않을 경우 대기(저전력)상태로
자동 전환 됩니다.
입력 센서의 위치는 필기 인식률에 큰 영향을 미칩니다. 필기 적정 각도를 벗어나거나 잘못된 방향으로
펜을 쥐고 사용할 경우 인식이 되지 않을 수 있으니 주의하세요.
올바른 파지 방법
펜을 쥘 때는 볼펜심이 위를 향하도록 잡아야 합니다. 필기할 때 펜을 쥐는 방향을 유의해 주세요.
인식 허용 각도
인식 허용 각도는 -20°~+40°입니다.(90°수직 기준)
1. 스마트펜 사용하기
(4) LED 상태 표시 안내
2. 앱 다운로드
전용 앱은 안드로이드 구글플레이와 애플 앱스토어에서 다운로드 받을 수 있습니다.
검색창에 Neo Notes, Neo smartpen 등으로 검색해 보세요.
Neo Notes
08_유저가이드
상태 LED 컬러
(1)Dimming : 천천히 흐려졌다가 천천히 밝아지며 점멸 (2)광학센서 부위 이물질 및 필기 용지 상태 확인
전원on
전원off
충전중
충전완료
배터리 부족
USB 연결 시
블루투스 연결 대기
앱과 연결 시
저장공간 부족
펌웨어 업데이트 중
펌웨어 업데이트 실패
(2)광학센서 또는 사용환경 점검 필요
점등
(1)Dimming
점등
점등 유지 후 꺼짐
점멸
점등
점멸
(1)Dimming
점멸
(1)Dimming
점멸
점등(with 알람)
- -
블루투스 연결 및 펜 등록
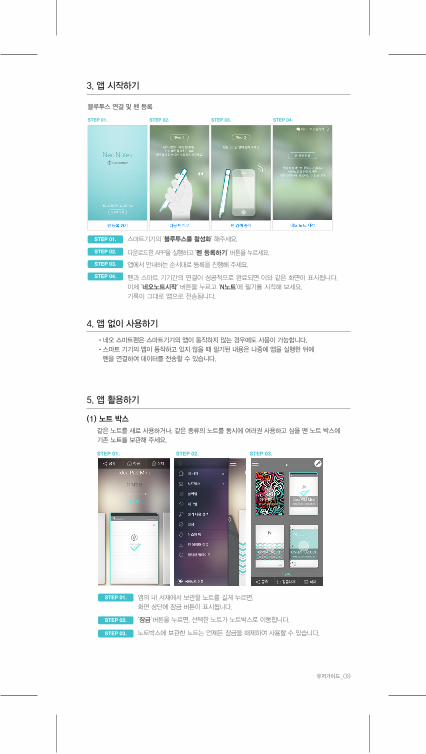
3. 앱 시작하기
스마트기기의 ‘블루투스를 활성화’ 해주세요.
다운로드한 APP을 실행하고 ‘펜 등록하기’ 버튼을 누르세요.
앱에서 안내하는 순서대로 등록을 진행해 주세요.
STEP 01.
STEP 02.
STEP 03.
펜과 스마트 기기간의 연결이 성공적으로 완료되면 이와 같은 화면이 표시됩니다.
이제 ‘네오노트시작’ 버튼을 누르고 ‘N노트’에 필기를 시작해 보세요.
기록이 그대로 앱으로 전송됩니다.
STEP 04.
STEP 04.STEP 01. STEP 02. STEP 03.
4. 앱 없이 사용하기
•네오 스마트펜은 스마트기기의 앱이 동작하지 않는 경우에도 사용이 가능합니다.
•스마트 기기의 앱이 동작하고 있지 않을 때 필기된 내용은 나중에 앱을 실행한 뒤에
펜을 연결하여 데이터를 전송할 수 있습니다.
5. 앱 활용하기
STEP 01. STEP 02. STEP 03.
(1) 노트 박스
같은 노트를 새로 사용하거나, 같은 종류의 노트를 동시에 여러권 사용하고 싶을 땐 노트 박스에
기존 노트를 보관해 주세요.
앱의 내 서재에서 보관할 노트를 길게 누르면,
화면 상단에 잠금 버튼이 표시됩니다.
‘잠금ʼ버튼을 누르면, 선택한 노트가 노트박스로 이동합니다.
노트박스에 보관한 노트는 언제든 잠금을 해제하여 사용할 수 있습니다.
STEP 01.
STEP 02.
STEP 03.
유저가이드_09
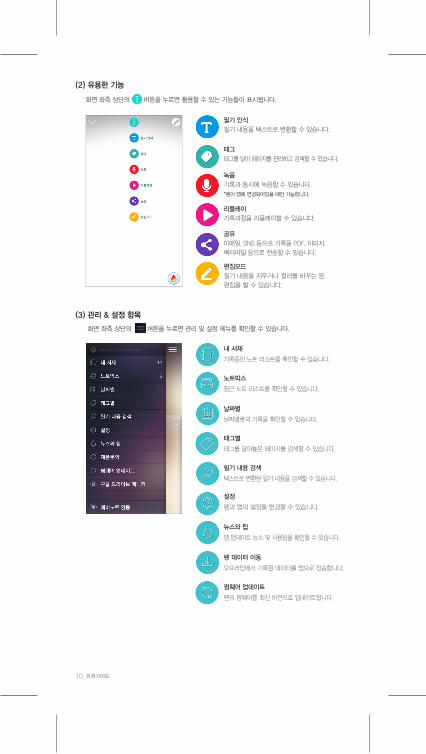
화면 좌측 상단의 버튼을 누르면 활용할 수 있는 기능들이 표시됩니다.
(2) 유용한 기능
편집모드
필기 내용을 지우거나 컬러를 바꾸는 등
편집을 할 수 있습니다.
필기 인식
필기 내용을 텍스트로 변환할 수 있습니다.
태그
태그를 달아 페이지를 관리하고 검색할 수 있습니다.
녹음
기록과 동시에 녹음할 수 있습니다.
*펜이 앱에 연결되어있을 때만 가능합니다.
리플레이
기록과정을 리플레이할 수 있습니다.
공유
이메일, SNS 등으로 기록을 PDF, 이미지,
벡터파일 등으로 전송할 수 있습니다.
내 서재
기록중인 노트 리스트를 확인할 수 있습니다.
노트박스
잠근 노트 리스트를 확인할 수 있습니다.
날짜별
날짜별로의 기록을 확인할 수 있습니다.
태그별
태그를 달아놓은 페이지를 검색할 수 있습니다.
필기 내용 검색
텍스트로 변환된 필기 내용을 검색할 수 있습니다.
설정
펜과 앱의 설정을 변경할 수 있습니다.
뉴스와 팁
앱 업데이트 뉴스 및 사용팁을 확인할 수 있습니다.
펜 데이터 이동
오프라인에서 기록된 데이터를 앱으로 전송합니다.
펌웨어 업데이트
펜의 펌웨어를 최신 버전으로 업데이트합니다.
(3) 관리 & 설정 항목
화면 좌측 상단의 버튼을 누르면 관리 및 설정 메뉴를 확인할 수 있습니다.
10_유저가이드

•펜이 앱에 연결된 상태에서, 필기 중인 페이지의 화면을 터치해 주세요.
•우측 하단에 아이콘이 나타납니다.
• 아이콘을 누르면, 컬러와 굵기를 변경할 수 있는 팔레트가 나타납니다.
(4) 컬러 & 굵기 변경
앱에 기록되는 글씨의 컬러와 굵기를 변경할 수 있습니다.
태그
태그를 달아 페이지를 관리하고 검색할 수 있습니다.
필기 내용 검색
텍스트로 변환된 필기 내용을 검색할 수 있습니다.
펜 데이터 이동
오프라인에서 기록된 데이터를 앱으로 전송합니다.
펌웨어 업데이트
펜의 펌웨어를 최신 버전으로 업데이트합니다.
6. 노트 종류 및 판매처 안내
네오스마트펜을 더욱 가치있게 만들어 주는 다양한 노트와 액세서리들을 만나보세요.
World
한국 공식 판매처storefarm.naver.com/neosmartpen
공식 홈페이지 www.neosmartpen.com/kr
글로벌 공식 판매처shop.neosmartpen.com (남아메리카 및 아프리카 제외)
제품 상세 정보
* 해당 무선설비는 운용 중 전파 혼선 가능성이 있으므로 인명 안전과 관련된 서비스는 할 수 없습니다.
* 이 기기는 가정용(B급) 전자파 적합기기로서 주로 가정에서 사용하는 것을 목적으로 하며, 모든 지역에서 사용할 수 있습니다.
* 야외 등 강한 빛의 환경에서는 필기 누락이 발생될 수 있습니다.
모델명 NWP-F121
지원 OS / Bluetooth 사양
OS version Bluetooth version
Android Kitkat 4.4 이상 2.1 이상
iOSiOS 8.1[iPhone 5 / iPad 3 / iPad mini /
iPad Air 1] 이상 지원4.0 LE
무선연결 Bluetooth 4.2 (CLASSIC / BLE)
송수신 주파수 2402 ~ 2480MHz
공중선 출력 3mW / Class 2
저장매체 내장 90MB 메모리
배터리 충전식 Lithium Polymer Battery 3.7V / 300mAh
충전시간 약 2시간
정격입력 DC 5V / 300mA
사용시간 대기 125일, 연속 필기 5시간
PC 연결방식 USB2.0HS (microUSB)
사용환경 온도: 10~35℃ / 습도: ~95%
사용 볼펜심 D1 멀티 볼펜심
길이: 156mm (펜캡 제외),
두께: 11.5~11.8mm / 22g (펜캡 제외)크기 및 무게
유저가이드_11
KCC: MSIP-CRM-NCV-NWP-F121FCC ID: 2AALG-NWP-F121MIC: 007-AF0079CMIIT ID: 2017DJ3496BSMI: R3B232NCC: CCAH17LP1950T6

1. 무상 A/S 요건 : 정품 구입 후, 품질 보증기간 내에 고객의 과실이 아닌 성능 및 기기상의 문제로 고장이 발생한 경우
2. 무상 A/S 보증기간 : 제품(액세서리, 내장 배터리 포함) 구입 후 1년 이내
(구입 영수증 또는 구입일자를 메모해 주세요.) 구입일자가 확인되지 않는 경우에는 부득이
‘제조일로부터 1개월(30일)을 가산한 기간’으로 무상 A/S 기간을 산정합니다.
3. 의 소모품 : 볼펜심 및 N2 전용 노트는 초기 불량에 한해 교환이 가능합니다.
· 무상 A/S 접수 및 처리 시 왕복 택배비(대한민국 내)는 당사가 부담합니다.
· A/S 진행 시 펜에 저장된 데이터는 초기화될 수 있습니다.
1. 유상 A/S 요건 : 품질 보증기간(구입 후 1년) 경과 후, 부품 보유기간(5년) 내 기기 및
액세서리의 성능, 기능상의 고장 발생 시
· 제품 내에 물, 음료수 등 이물질을 투입하여 고장이 발생한 경우
· 제품을 떨어뜨리거나 충격으로 파손 및 기능상 고장이 발생한 경우
· 신나 등의 유기용제에 의한 외관 손상 및 변형이 된 경우
· 다른 곳에서 제품을 수리 및 개조하여 고장이 발생한 경우
· 천재지변에 의해 고장이 발생된 경우
· 제품을 임의로 분해하여 부속품이 분실 및 파손된 경우
· 기타 고객 과실에 의해 제품 고장이 발생된 경우
2. 유상 A/S 보증기간 : 부품 보유기간 이내
3. 유상 A/S 대상 : 및 액세서리
· 유상 A/S 접수 및 처리 시 왕복 택배비는 고객 부담입니다.
유상 A/S
제품 상담 및 A/S문의 네오랩 컨버전스 고객지원실 1588-6239
평일 오전 10시~오후 6시 (점심시간 오후 12시~오후 1시) / 토요일, 공휴일 제외
소비자 피해 유형별 A/S 처리 정책
상품 사용 전 미개봉 제품의 반품/환불 문의
제품 반품 후 구입처 환불(봉인 라벨을 제거하지 않은 경우에만 가능) 사용 전 환불
문의는
구입처에서
가능합니다.구입 후 10일 이내에 정상적인 사용 상태에서 발생한 성능,
기능상의 하자로 중요한 수리를 요할 때
제품 교환 또는 반품 후구입처 환불
구입 후 30일 이내 제품 자체의 문제로중요한 수리를 요하는 경우
무상 수리 또는 제품 교환 제품 A/S(교환/수리) 문의
네오랩 컨버전스
고객지원실
1588-6239
고객의 수리 의뢰 제품을 사업자가 분실 또는 파손한 경우
제품 구입 시 운송과정 중에 피해가 발생한 경우
내부 펌웨어 및 콘텐츠 작동 오류 A/S 접수 후 상황별 응대
제품 교환이 불가능한 경우 환불
고객 지원
고객지원 정책
무상 A/S
12_유저가이드
여러 하자가 수리 후 4회째 재발하는 경우
동일 하자가 수리 후 3회째 재발하는 경우
자주 묻는 질문
펜이 켜지지 않아요.
· 전원버튼을 1초 이상 눌러보세요.
· 배터리가 방전되었을 수 있습니다. 최소 30분 이상 충전 후 사용해 주세요.
펜 연결이 제대로 되지 않아요.
· 먼저 스마트기기의 블루투스 기능이 활성화 되어 있는지 확인해 주세요.
· 펜과 APP을 완전히 종료시킨 후 처음 등록 과정부터 다시 실행해 주세요.
노트는 꼭 전용 노트만을 사용해야 하나요?
· 는 네오랩 컨버전스의 n코드 기술을 기반으로 제작되었기 때문에
n코드가 적용된 전용 노트에서만 사용 가능합니다.
Beep 소리가 나지 않게 사용하고 싶어요.
· 펜을 APP과 연결한 후 펜 설정 항목에서 기능을 설정 또는 해제할 수 있습니다.
펜이 자동으로 켜지지 않아요.
· 펜을 APP과 연결한 후 펜 설정 항목에서 기능을 설정 또는 해제할 수 있습니다.
펜에 비밀번호를 설정하고 싶어요.
· 펜과 APP을 연결한 후 ‘설정-펜 정보-비밀번호 설정’ 에서 비밀번호 설정 및 변경이 가능합니다.
어떤 볼펜심을 사용할 수 있나요?
· 공식몰에서 판매하는 N2 전용 볼펜심 사용을 권장합니다. (인식률 보증)
· 권장 펜심 리스트는 www.neolab.kr/cs의 FAQ에서 확인할 수 있습니다.
펜으로 노트에 작성한 내용이 APP에서 보이지 않아요.
· Neo smartpen 전용 노트에 기록했는지 확인해 주세요.
· 스마트기기와 펜의 블루투스 연결 상태를 확인해 주세요.
펜의 LED가 흰색으로 서서히 깜박거리면 정상적으로 연결된 상태입니다.
· 펜이 정상적으로 작동되고 있는지 확인해 주세요. 전원이 켜있지 않다면
펜을 종이에 눌러 전원을 켜고, APP에 연결한 뒤에 사용하기 바랍니다.
· 볼펜팁 하단의 광학센서에 이물질이 묻어 있을 수 있습니다.
이물질이 있는 경우 면봉으로 가볍게 제거해 주세요.
상황별 대처 방법
펜이 물에 침수되었을 때
· 즉시 펜에 남아 있는 물기를 제거하고 서늘한 곳에서 최대한 펜의 물기를 말린 후,
네오랩 컨버전스 고객지원실로 문의해 주세요.
· 물기가 남아있는 상태에서 절대 전원을 켜지 마세요.
전기적 쇼트가 발생하여 제품이 손상될 수 있습니다.
펜이 파손된 경우(꺾이거나, 금이 간 경우 등)
· 내부 배터리로 인한 전기적 충격이 전달될 수 있으므로 제품을 사용하거나 임의로 분해하지 마시고,
즉시 네오랩 컨버전스 고객지원실로 문의해 주세요.
(소비자 과실로 인한 파손일 경우, 왕복 택배비와 유상 수리비가 발생됩니다.)
제조원
(주)네오랩컨버전스
서울시 구로구 디지털로30길 28 마리오타워 15층
www.neolab.net
AS센터
경기도 수원시 권선구 산업로155번길 50
엘림광통신빌딩 B동 4층 네오랩AS센터
1588-6239
고객 지원
유저가이드_13

(4) LEDカラーのステータス
ペンの状態 LEDの状態電源オン 点灯電源オフ 充電中 点灯
充電完了 暫く点灯後、オフバッテリー残量わずかのお知らせ 点滅
USB接続状態 点灯Bluetooth接続待機 点滅アプリに接続されている時メモリの空き容量わずか 点灯ペンのアップデート中ペンのアップデート失敗 点滅
(2)光学センサーまたは使用環境の確認 点灯(with アラーム) (1)Dimming : ゆっくりとぼやけてゆっくりと明るくなることを繰り返す (2)光学センサー部分の異物の有無、及び用紙の状態を確認
(1)Dimming
(1)Dimming
- - (1)Dimming
2. Neo Notes App
・ Neo Notesと入力して検索してください。・ Neo smartpen の専用アプリはAndroid Google play™とApple App store℠でダウンロードすることができます。・ [Neo Notes]、[ネオノート]または[Neo smartpen]で検索してください。
Neo Notes
1. Neo smartpenの使用方法
(1) バッテリーを充電する
・購入時は、バッテリーが十分に充電されていない場合があります。必ず充電してからご使用ください。・充電中はLEDライトが赤く表示され、充電が完了するとLEDライトが緑に表示され、しばらくすると電源がオフになります。(パソコンのUSB端子に接続し、充電している間はUSBメモリとして認識されLEDライトが紫に表示されます。)
(2) 電源のオン/オフ・ペン電源ボタンを短く押すとLEDライトが点灯し電源が入り、長押しで電源が切れます。・電源が入っている状態で電源ボタンを2秒以上長押しすると、LEDが点滅しながら電源が切れます。・20分以上、何も書かなかった場合、自動的に電源が切れます。(アプリでシャットダウンタイムを設定することができ、時間を短く設定するほど電源が節約できます。)
・本製品はバッテリーの消耗を減らすため、10秒以上使用しない場合、待機(省エネ)モードに切り替わります。
(3) 正しいペンの握り方光学センサーの位置は手書きの認識のクオリティーに大きく影響を与えます。筆記時の適切な角度を外れたり、光学センサーの向きが画面に向いていない場合は、筆記した内容が認識されない場合があるのでご注意ください。
使用角度手首に無理がかからないように紙面と自然な
筆記角度を維持してください。
認識可能な角度認識が可能な角度は
-20°~+40°です。(90°垂直からの基準)
14_クィックガイド
アプリをインストールしたデバイスのBluetooth設定をオンにします。
アプリを立ち上げ、画面下の[ペンの登録]をタップしてくださいアプリの案内に沿ってペンの登録を行います。
STEP 01.
STEP 02.
STEP 03.
ペンの登録が完了すると、このようなイメージが表示されます。[Neo Notes スタート]ボタンを押して[Nノート]に書き始めると、書いた内容はリアルタイムでアプリに反映されます。
STEP 04.
3. アプリにNeo smartpenを登録(Bluetooth接続)
STEP 04.STEP 01. STEP 02. STEP 03.
4. アプリを起動していない状態でのNeo smartpenの使い方・ Neo smartpenはアプリが起動していない時にも使用できます。・ 接続されていない時に書いた内容は、アプリとNeo smartpenが接続された時に同期されます。
5. アプリの使い方
移動させたいノートを長押しすると [共有][移動][削除] ボタンが現れます。
[移動]ボタンを選択するとノートボックスに移動します。
ノートボックスのノートはいつでも保管解除し使うことができます。
STEP 01. STEP 02. STEP 03.
(1) ノートボックス
・ ノートの[移動]機能は、同種類のノートを新しく使用したり、同時に何冊も使用する際に活用できます。
STEP 01.
STEP 02.
STEP 03.
クィックガイド_15

16_クィックガイド
ノート一覧使用中のノートを確認することができます。
ノートボックスノートボックスでは保管したノートを確認することができます。
カレンダーから探すカレンダーからページを検索できます。
タグから探すタグからページを検索できます。
キーワードで探すテキスト変換した内容からキーワード検索ができます。
設定ペンとアプリの設定を変更できます。
News & Tips最新ニュースやアップデート情報を確認できます。
ペンのデータ移動オフラインで記録したデータをアプリに同期します。
ペンのアップデートペンのバージョンを最新にアップデートします。
(3) 設定・ 画面左上の ボタンをタップするとメニューが表示されます
・ ボタンを押すとオプションメニューが表示されます。
(2) ボタンの使い方
[編集]では作成した内容のハイライト、削除などができます。
筆記した内容はテキスト変換することができます。
ノートにタグ付けをするとタグ名で検索と管理ができます。
[音声メモ]を選ぶと筆記と同時に録音ができます。
筆記ストロークや音声メモを再生することができます。
[共有]からノートの内容をPNGやPDF、Text、SVGフォーマットで共有できます。

クィックガイド_17
設定ペンとアプリの設定を変更できます。
ペンのデータ移動オフラインで記録したデータをアプリに同期します。
ペンのアップデートペンのバージョンを最新にアップデートします。
(4) カラー&太さの変更
・ アプリに記録する筆記のカラーと太さを変更できます。
6. ストア下記リンクからNeo smartpen、Nノート、アクセサリーをお求めください
Japan
http://www.amazon.co.jp/shops/A1FHJMBBXJCT3N
又は、www.neosmartpen.com/jp日本語製品ページ「shop」より
国内と海外では取扱い内容が異なります。
*D1標準タイプのボールペン芯が使用できます。(メーカー毎に型番が異なります)
*屋外など直射日光の下で使用する場合、筆記認識率が低下することがあります。
製品仕様型番 NWP-F121対応デバイス OS/Bluetooth 仕様
OS version Bluetooth version
Android Kitkat 4.4以上 2.1以上
iOS8.1 [iPhone 5 / iPad 3 / iPad mini / iPad Air 1] 以上 4.0 LE
通信方式 Bluetooth 4.2 (CLASSIC / BLE)送受信周波数 2402 ~ 2480MHz電波強度 3mW / Class2電波形式 F1Dメモリ 90MB内蔵メモリバッテリー
充電時間 約2時間定格入力 DC 5V / 300mA使用時間 待機 125日、連続使用 5Hr
PC通信方式 USB2.0HS (microUSB)
使用環境
ボールペン芯 D1標準タイプのボールペン芯
寸法 長さ156mm(キャップを除く), 厚さ11.5~11.8mm, 重さ22g (キャップを除く)
保管時温度(非動作時): -10~50˚C/動作温度: 10~35˚C相対湿度: ~90%
充電式 Lithium Polymerバッテリー 3.7V / 300mAh
• ペンがアプリと接続した状態で、筆記中のページの画面をタップしてください。• 画面右下に アイコンが表示されます。• アイコンをタップすると、カラーと太さを設定するパレットが表示されます。
(NWP-F121)007-AF0079

2. Neo Notes应用
・ Neo smartpen与Neo Notes应用配套使用
・ 可从谷歌市场或苹果应用商场
・ 请使用“Neo Notes”或“Neo smartpen”为关键词进行搜索
Neo Notes
1. 如何使用 Neo smartpen
(1) 请将您的笔充满电
・请确保使用前将您的笔充满电,您所购买的笔可能处于低电量状态
・红灯亮起,充电开始;绿灯亮起,充满结束(若使用电脑进行充电,电脑将自动将该笔识别为可移动磁盘,此时紫灯常亮)
(2) 开/关电源
・按压按键或将笔尖置于纸上,笔将被激活。此时灯随即亮起
(第一次将笔连接到应用程序时,自动电源功可使用。您可以更改应用程序的设置。)
・持续按压按键超过一秒可将笔电源关闭,此时灯将闪烁
・若笔处于闲置状态超过20分钟,电源将自动关闭(您可在设置中修改自动关机时长。您所设置的时间越长,笔的使用时间将相应减断)
・若笔处于闲置状态超过10秒,笔将自动转入待机模式(低能耗),以减少电量消耗。
(3) 如何持握
光学传感器的角度方向很大程度上将影响笔的识别率。光学传感器(靠近笔尖椭圆状部分)朝向应当垂直向下。偏离适当角度或持笔方向偏误将有可能导致笔对您的书写或绘画轨迹识别困难
使用角度持笔状态应以腕部不受力为宜,
并保持自然状态书写
智能笔可接受的识别角度是负20度角到正40度角(90度垂直标准)
(4) 灯光色彩说明
状态 灯光颜色
电源打开 常亮
电源关闭
正在充电 常亮
蓝牙连接待机 闪烁
存储空间低提醒 闪烁
USB连接中 常亮
蓝牙连接待机 闪烁
链接APP中 (1)变暗
低电量提醒 闪烁
固件升级 (1)变暗
固件升级失败 闪烁
(2)需要检查光学传感器或者使用环境 粉色点灯(with闹铃)(1)Dimming : Indicates slowly getting dark and then bright while flashing.
(2)确认光学传感器部分是否有异物以及笔记用纸状态
(1)依次渐变
18_用户快速指南(Simplified)

打开您的智能设备端的蓝牙功能
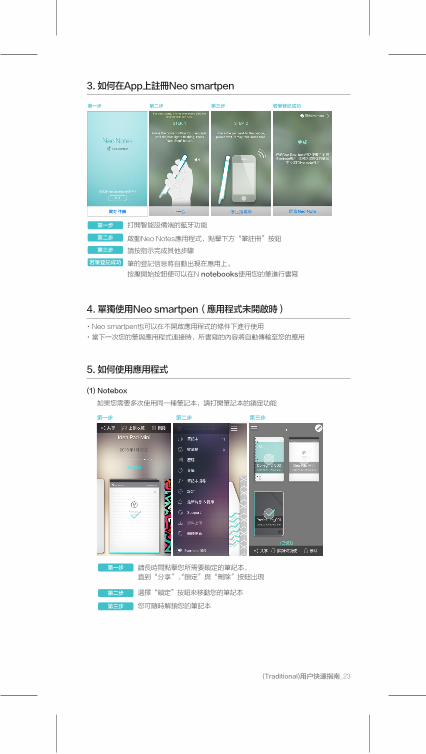
运行Neo Notes应用, 点击下方“立即注册” 按钮。
请按应用指示完成余下步骤
第一步
第二步
第三步
若笔注册成功,笔的注册信息将自动出现在应用上。
按压“启动Neo Notes”按钮便可以在Neo smartpen使用您的笔进行书写
第四步
3. 如何在应用上注册Neo smartpen
第四步第一步 第二步 第三步
4. 单独使用Neo smartpen(与应用断开连接)
・ Neo smartpen也可以在不运行应用的条件下进行使用
・ 当下一次您的笔与应用连接时,所书写的内容将自动传输至您的应用
5. 如何使用应用
请长时间点击您所需要锁定的笔记本,直到“分享”,“上锁收藏 ”与“删除”按钮出现
选择“上锁收藏”按钮来移动您的笔记本
您可随时激活您的笔记本
第一步 第二步 第三步
(1) 收藏柜
如果您需要多次使用同一种笔记本,请打开笔记本的锁定功能
第一步
第二步
第三步
(Simplified)用户快速指南_19

20_用户快速指南(Simplified)
(3) 收藏柜
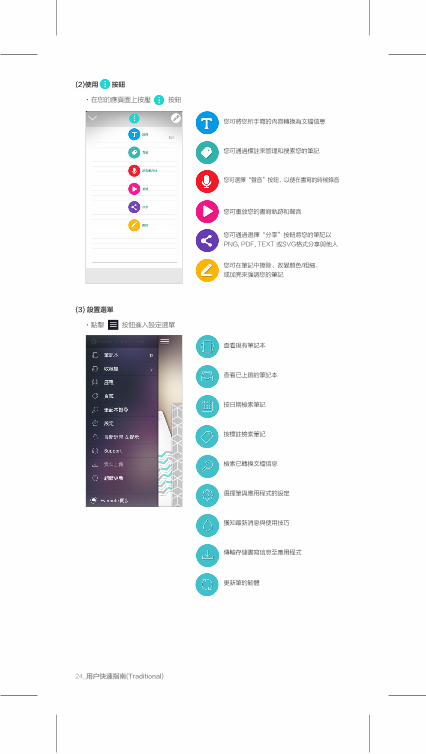
・ 点击 按钮进入设置菜单
・ 在您的应用页面上按压 按钮
(2)使用 按钮
您可在笔记本中擦除、改变颜色/粗细、
或高亮您的笔记
您可将您所手写的内容转换为文档信息
您可通过标注来管理和搜索您的笔记
您可通过标注来管理和搜索您的笔记
您可重放您的书写轨迹和声音
查看现有笔记本
查看上锁收藏的笔记本
按日期检索笔记
按标注检索笔记
检索已转换文档信息
选择笔&应用设定
最新信息&提示
传输存储书写信息至应用
更新笔的固件
您可通过选择“共享”按钮将您的笔记以
PNG, PDF, TEXT 或 SVG格式共享与他人

(Simplified)用户快速指南_21
KCC: MSIP-CRM-NCV-NWP-F121FCC ID: 2AALG-NWP-F121MIC: 007-AF0079CMIIT ID: 2017DJ3496BSMI: R3B232NCC: CCAH17LP1950T6
(4) 颜色 & 粗细 变更
可变更应用程序上记录的字体颜色和粗细。
• 请在笔连接应用程序的状态下,触摸笔记中的页面。右侧下端出现 图标。
• 点击 图标,将出现可变更颜色和粗细的调色板。在户外等强光下有可能发生笔记遗漏。
6. 笔记本与存储
World
shop.neosmartpen.com (except Latin America and Africa)
*替芯为D1国际标准笔芯,大多数文具店有售
*在户外等强光下有可能发生笔记遗漏。
型号及规格参数
型号 NWP-F121
支持 OS/Bluetooth 规范
OS 版本 Bluetooth 版本
Android Kitkat 4.4 或更高 2.1 或更高
iOSiOS 8.1[iPhone 5 / iPad 3 / iPad mini / iPad Air 1]或更高
4.0 LE
无线连接 蓝牙4.2(CLASSIC / BLE)
接收/发射频率 2402 ~ 2480MHz
天线输出 3mW / 二类
存储媒介 90MB内存储器
电池
充电时间 大约两小时
额定输入功率 DC 5V / 300mA
使用时长 可待机125天,连续使用5小时
电脑连接方式 USB2.0HS (microUSB)
使用环境 温度:10~35℃ 湿度:~95%
替芯 D1标准墨水替芯
长:156毫米(不包含笔帽)直径:11.5~11.8mm / 重量:22g(不包含笔帽)
可重复充电锂离子聚合物电池 3.7V/300mAh
尺寸及重量

2. Neo Notes應用
・ Neo smartpen與Neo Notes App配套使用
・ 可從Google play或Apple App store下載
・ 請使用“Neo Notes”或“Neo smartpen”為關鍵詞進行搜索
Neo Notes
1. 如何使用Neo smartpen
(1) 請將您的筆充飽電
・您所購買的筆可能處於低電量狀態,請確保使用前將您筆充滿電
・紅燈亮起,開始充電;充電完成時,呈現綠燈。(若使用電腦進行充電,電腦將自動將該筆識別為可移動硬碟,此時亮紫色燈)
(2) 開/關電源
・按壓按鍵或將筆尖點於紙上,即可開啟電源,此時燈隨即亮起
(第一次將筆連接到應用程序時,自動電源功可使用。您可以更改應用程序的設定。)
・當電源開啟時,持續按壓按鍵超過一秒,燈號閃爍後電源即將關閉
・若筆處於閒置狀態超過20分鐘,電源將自動關閉(您可在設定中修改自動關機時間。您所設置的時間越長,筆可使用的時間將越短)
・若筆處於閒置狀態超過10秒,筆將自動轉入待機模式(低能耗),以減少電量消耗
(3) 如何握筆
光學傳感器的角度方向會直接影響筆的識別率。光學傳感器(靠近筆尖橢圓形部分)朝向應當垂直向下。偏離適當角度或錯誤的持筆方向將有可能導致書寫或繪畫的筆跡識別困難。
使用角度持筆狀態應以腕部不受力為宜,
並保持自然狀態書寫
可識別書寫角度偏離垂直狀態 -20 ~ +40內
22_用户快速指南(Traditional)
(4) 灯光色彩说明
狀態 燈光顏色
電源打開 常亮
電源關閉
正在充電 常亮
充電完成 亮後熄滅
低電量提醒 閃爍
USB連接中 常亮
藍牙連接待機 閃爍
連接APP中 (1)變暗
存儲空間不足提醒 閃爍
韌體升級 (1)變暗
韌體升級失敗 閃爍
(2)需要檢查光學傳感器或者使用環境 粉色点灯(with闹铃)
(1)依次漸變- -
(1)Dimming : Indicates slowly getting dark and then bright while flashing.(2)確認光學傳感器部分是否有異物以及筆記用紙狀態
打開智能設備端的藍牙功能
啟動Neo Notes應用程式,點擊下方“筆註冊”按鈕
請按指示完成其他步驟
第一步
第二步
第三步
筆的登記信息將自動出現在應用上。
按壓開始按鈕便可以在N notebooks使用您的筆進行書寫
若筆登記成功
3. 如何在App上註冊Neo smartpen
若筆登記成功第一步 第二步 第三步
4. 單獨使用Neo smartpen(應用程式未開啟時)
・ Neo smartpen也可以在不開啟應用程式的條件下進行使用
・ 當下一次您的筆與應用程式連接時,所書寫的內容將自動傳輸至您的應用
5. 如何使用應用程式
請長時間點擊您所需要鎖定的筆記本,直到“分享”、“鎖定”與“刪除”按鈕出現
選擇“鎖定”按鈕來移動您的筆記本
您可隨時解鎖您的筆記本
第一步 第二步 第三步
(1) Notebox
如果您需要多次使用同一種筆記本,請打開筆記本的鎖定功能
第一步
第二步
第三步
(Traditional)用户快速指南_23
(3) 設置選單
・ 點擊 按鈕進入設定選單
・ 在您的應頁面上按壓 按鈕
(2)使用 按鈕
您可在筆記中擦除、改變顏色/粗細、
或加亮來強調您的筆記
您可將您所手寫的內容轉換為文檔信息
您可通過標註來管理和搜索您的筆記
您可選擇“聲音”按鈕,以便在書寫的時候錄音
您可重放您的書寫軌跡和聲音
查看現有筆記本
查看已上鎖的筆記本
按日期檢索筆記
按標註檢索筆記
檢索已轉換文檔信息
選擇筆與應用程式的設定
獲知最新消息與使用技巧
傳輸存儲書寫信息至應用程式
更新筆的韌體
您可通過選擇“分享”按鈕將您的筆記以
PNG, PDF, TEXT 或SVG格式分享與他人
24_用户快速指南(Traditional)
您可選擇“聲音”按鈕,以便在書寫的時候錄音
6. 筆記本與儲存
World
shop.neosmartpen.com (except Latin America and Africa)
*替換筆芯為D1國際標準筆芯,大多數文具店有售
型號及規格
型號 NWP-F121
支持 OS/Bluetooth 規範
OS 版本 Bluetooth 版本
Android Kitkat 4.4 或更高 2.1 或更高
iOSiOS 8.1[iPhone 5 / iPad 3 /
iPad mini / iPad Air 1] 或更高4.0 LE
無線連接 藍牙4.2(CLASSIC / BLE)
接收/發射頻率 2402 ~ 2480MHz
天線輸出 3mW / 二類
存儲媒介 90MB內存儲器
電池
充電時間 大約兩小時
額定輸入功率 DC 5V / 300mA
使用時長 可待機125天,連續使用5小時
電腦連接方式 USB2.0HS (microUSB)
使用環境 溫度:10~35℃ 濕度:~95%
替芯 D1標準墨水替芯
長:156毫米(不包含筆帽)直徑 :11.5~11.8mm / 重量 :22g(不包含筆帽)
可重複充電鋰離子聚合物電池3.7V/300mAh
尺寸及重量
(Traditional)用户快速指南_25
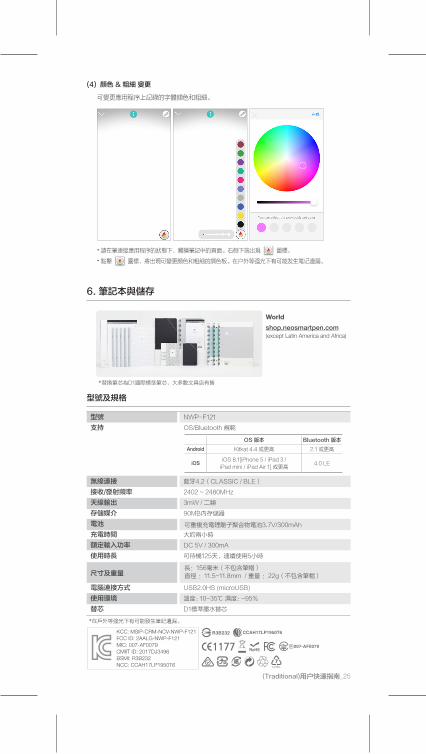
(4) 顔色 & 粗細 變更
可變更應用程序上記錄的字體顔色和粗細。
• 請在筆連接應用程序的狀態下,觸摸筆記中的頁面。右側下端出現 圖標。
• 點擊 圖標,將出現可變更顔色和粗細的調色板。在户外等强光下有可能发生笔记遗漏。
KCC: MSIP-CRM-NCV-NWP-F121FCC ID: 2AALG-NWP-F121MIC: 007-AF0079CMIIT ID: 2017DJ3496BSMI: R3B232NCC: CCAH17LP1950T6
*在戶外等強光下有可能發生筆記遺漏。
2. Neo Notes App
• Neo smartpen fonctionne en tandem avec la Neo Notes App. • Vous pouvez télécharger l'App sur l'App Store d'Apple ou Google Play• Pour trouver l'App, tapez <Neo Notes>, <Neo smartpen> dans le barre de recherche.
Neo Notes
1. Utilisation de Neo smartpen
(1) Chargement du stylo• Assurez-vous de charger le stylo après I’avoir acheté car sa batterie pourrait être faible. • Le voyant LED deviendra rouge durant le chargement de la batterie. II redeviendra vert
une tois le chargement terminé. (Si vous chargez la batterie via un PC, celui-ci reconnaîtra le stylo comme un disque amovible et le voyant LED deviendra violet).
(2) Activation/Désactivation du stylo• Si vous pressez le bouton d’alimentation ou posez la pointe du stylo sur le papier,
le stylo et le voyant LED s’allumeront en une seconde. (La fonction d’alimentation automatique s’active lorsque le stylo est connecté en premier à l’App. Vous pouvez modifier ce réglage dans l’App).
• Le stylo allumé, pressez le bouton d’alimentation pendant 2 secondes. Le voyant LED commencera à clignoter et le stylo s’éteindra.
• Si vous n’utilisez pas le stylo pendant plus de 20 minutes, il s’éteindra automatiquement.(Vous pouvez modifier le réglage du temps de désactivation automatique. Plus le temps dedésactivation automatique est long, plus le temps d’utilisation du stylo sera court).
• Si vous n’utilisez pas le stylo pendant plus de 10 secondes, il passera automatiquement en mode veille (faible consommation d’énergie) afin d’économiser la batterie.
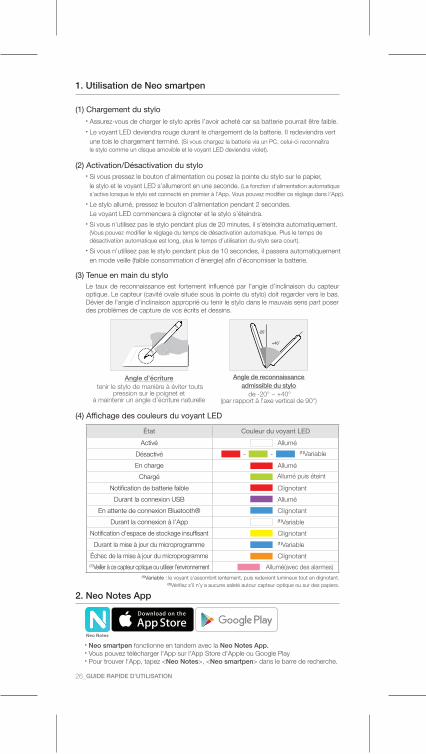
(3) Tenue en main du styloLe taux de reconnaissance est fortement influencé par I’angie d’inclinaison du capteur optique. Le capteur (cavité ovale située sous la pointe du stylo) doit regarder vers le bas. Dévier de I’angie d’inclinaison approprié ou tenir le stylo dans le mauvais sens part poser des problèmes de capture de vos écrits et dessins.
Angle d’écriture tenir le stylo de manière à éviter touts
pression sur le poignet et à maintenir un angle d’écriture naturelle
Angle de reconnaissance admissible du stylo
de -20° ~ +40° (par rapport à l’axe vertical de 90°)
26_GUIDE RAPIDE D’UTILISATION
(4) Affichage des couleurs du voyant LED
État Couleur du voyant LED
Allumé
Allumé
Clignotant
Allumé
Clignotant(1)Variable
Clignotant(1)Variable
Clignotant
(1)Variable : le voyant s’assombrit lentement, puis redevient lumineux tout en dignotant. (2)Vérifiez s’il n’y a aucune saleté autour capteur optique ou sur des papiers.
Allumé puis éteint
Allumé(avec des alarmes)
- - (1)Variable
Activé
Désactivé
En charge
Chargé
Notification de batterie faible
Durant la connexion USB
En attente de connexion Bluetooth®
Durant la connexion à I’App
Notification d’espace de stockage insuffisant
Durant la mise à jour du microprogramme
Échec de la mise à jour du microprogramme
(2)Veiller à ce capteur optique ou utiliser l’environnement

ÉTAPE 04ÉTAPE 03
Activez la fonction Bluetooth de l’appareil intelligent
Executez le Neo Notes App et appuyez sur le bouton <Enreg maint.> situé en dessous.
Suivez les instructions de l’App.
ÉTAPE 01
ÉTAPE 02
ÉTAPE 03
Si le stylo a bien été enregistré, l’écran de’enregistrement du stylo s’afficera dans l’App. Pressez le bouton <Démarrer Neo Notes> et commencez à écrire sur N notebooks
ÉTAPE 04
3. Enregistrement de Neo smartpen dur l’App
ÉTAPE 01 ÉTAPE 02
4. Utilisation de Neo smartpen sans le connecter à I’App
• Vous pouvez utiliser le stylo hors exécution de l’App.
• Ce que vous écrivez hors exécution de l’App sera transféré plus tard, lorsque l’App et le stylo seront connectés.
5. Utilisation de la Neo Notes App
Appuyez longuement sur le bloc-notes que vous voulez verrouiller. Les boutons<Share> (Partager),<Lock>(Verrouiller) et <Delete> (Supprimer) s'afficheront.
ÉTAPE 01 ÉTAPE 02 ÉTAPE 03
(1) Notebox
• Utilisez la fonction« Lock»(Verrouiller) si vous voulez utiliser plusieurs fois le meme type de bloc-notes.
ÉTAPE 01
Sélectionnez le bouton «Lock»(Verrouiller) pour transférer votre bloc-notes à NoteBox.
Vous pouvez déverrouiller les bloc-notes à tout moment.
ÉTAPE 02
ÉTAPE 03
GUIDE RAPIDE D’UTILISATION_27

28_GUIDE RAPIDE D’UTILISATION
ModeModifModifier, effacer, chager de couleur/épaisseur ou surligner ce que vous avez écrit dans les blocs-notes.
TranscrireTransformer vos notes manuscrites en texts numérique
ÉtiÉtiqueter vos notes pour les organiser et les rechercher
VoixEnregistere la voix tout en prenant des notes
RelectRelire vos notes manuscrites et vocales
PrtagPartager vos notes aux formats PNG,PDF,TEXT et SVG
Bloc-notes vérifier vos bloc-notes actifs
NoteBoxvérifier vos bloc-notes verrouillés dans NoteBox
Activités rechercher vos notes par date
Étiqrechercher du texte transcritétiqutées
RecherNoterechercher du texte transcrit
Réglagessélectionner vos reglagés de Neo smartpen et l’App
Inf/Conseilvérifier la mise à jour des infos et conseils
SyncDonnéesSttransférer vos notes mémorisées à l’APP
Mise à jour microprogrammemettre à jour le microprogramme du style (dernière version)
(3) Menu de réglage• Pressez le bouton pour afficher le menu de réglage du stylo pour
• Pressez le bouton situé sur votre page de notes pour
(2) Utilisation du bouton

GUIDE RAPIDE D’UTILISATION_29
SyncDonnéesSttransférer vos notes mémorisées à l’APP
• Pressez le bouton pour afficher le menu de réglage du stylo pour
• Appuyez sur l'icône , puis une palette de couleurs va ouvrir et sélectionnez une épaisseur et la couleur tandis que le smartpen est connecté à l'application.• Touchez partout en dehors de la palette pour le faire disparaître.• Haut de page lorsque Neo smartpen est connecté à l'application
(4) Changement de couleur et l’épaisseur
• Vous avez différentes couleurs de stylo et les paramètres d’épaisseur à choisir dans l’application.
6. Bloc-notes et Magasins
Vous trouverez la solution idéale dans notre gamme de bloc-notes compatibles.
Le Magasin Officiel
shop.neosmartpen.com (excepté l’Amérique latine et l’Africa)
* Les pointes du stylo, du type D1, sont en vente dans tous les magasins de fournitures de bureau ou en ligne.
* Les rayons du soleil ou toute lumière forte peut provoquer la perte de la reconnaissance de l’écriture.
Tableau des spécifications du modèleNom du modèle NWP-F121
Prise en charge Spécification de prise en charge OS/Bluetooth
Connexion sans fil Bluetooth 4.2 (CLASSIC / BLE)
Fréquence de réceptlon/transmission 2402 ~ 2480MHz
Sortie de I’antenne 3mW / Class 2
Support de stockage Mémoire interne de 90 Mo
Batterie Batterie lithium-polymère rechargeable de 3.7 V/300 mAh
Temps de chargement Environ 2 heures
Tension d’entrée nominale 5VCC/300 mA
Temps d’utilisation 125 jours en mode veille, 5 heures en utilisation continue
Mode de connexion USB2.0HS (micro USB)
Conditions amblantes d’utlllsatlon Température : 10~35° C - 50~95° F / Humidité : -95 %
Recharges d’encre multi-pen D1
Dimensions et poidsLongueur: 156 mm - 6 1/4” (stylo sans capuchon)Épaisseur: 11.5-11.8 mm-0.45- 0.46”Poids: 22g - 0.77 oz (stylo sans capuchon)
Version OS Version Bluetooth
Android Kitkat 4.4 ou version ultérieure 2.1 ou version ultérieure
iOS iOS 8.1 [iPhone 5 / iPad 3 / iPad mini / iPad Air 1] ou version ultérieure 4.0 LE
KCC: MSIP-CRM-NCV-NWP-F121FCC ID: 2AALG-NWP-F121MIC: 007-AF0079CMIIT ID: 2017DJ3496BSMI: R3B232NCC: CCAH17LP1950T6
(4) Leyenda de colores del led
1. Instrucciones de uso de Neo smartpen
(1) Cargar el bolígrafo• Antes de utilizar el bolígrafo por primera vez, recárgalo, porque su batería puede
tener un nivel bajo de carga. • Mientras el bolígrafo se recarga, el led permanece iluminado en rojo.
Cuando la carga está completa, el led vuelve a iluminarse en verde.(Si recargas la batería conectando el bolígrafo a un PC, el PC interpreta que el bolígrafo es un disco extraible y el led se ilumina en color violeta).
(2) Encender/apagar• Pulsa el botón de encendido o coloca la punta del bolígrafo sobre un papel.
Al cabo de un segundo, el bolígrafo se activará y se encenderá el led.(La función de autoencendido se activa la primera vez que se conecta el bolígrafo a la App. Este ajuste puede modificarse desde la App).
• Con el boligrafo activado, pulsa el bot6n de encendido durante 2 segundos : el led empieza a parpadear y el dispositivo se apaga.
• El bolígrafo se apaga automáticamente si permanece inactivo durante más de 20 minutos.(El tiempo de apagado automático puede ajustarse. Cuanto más tarda en activarse el apagadoautomático, menos dura la batería del bolígrafo)
• Si no utilizas el bolígrafo durante mds de 10 segundos, pasarS automaticamente al modo en espera (bajo consumo de energfa), con el fin de redudr el consumo de la baterfa.
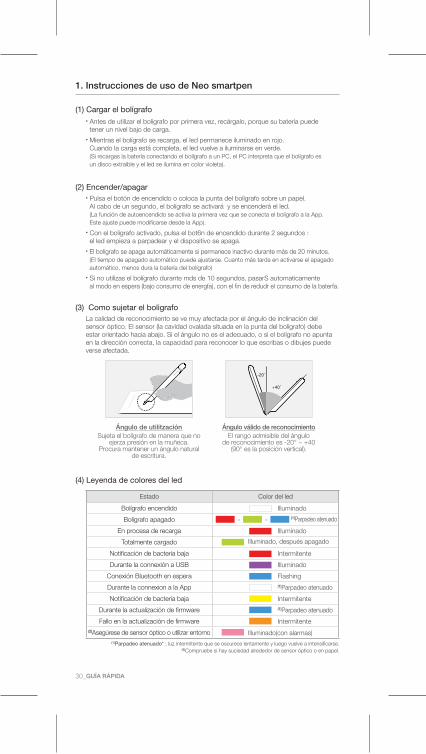
(3) Como sujetar el boligrafo La calidad de reconocimiento se ve muy afectada por el ángulo de inclinación del sensor óptico. El sensor (la cavidad ovalada situada en la punta del bolígrafo) debe estar orientado hacia abajo. Si el ángulo no es el adecuado, o si el bolígrafo no apunta en la dirección correcta, la capacidad para reconocer lo que escribas o dibujes puede verse afectada.
Ángulo de utilitzaciónSujeta el bolígrafo de manera que no
ejerza presión en la muñeca. Procura mantener un ángulo natural
de escritura.
Ángulo válido de reconocimientoEl rango admisible del ángulo
de reconocimiento es -20° ~ +40 (90° es la posición vertical).
30_GUÍA RÁPIDA
Estado Color del led
Illuminado
Illuminado
Intermitente
Illuminado
Flashing(1)Parpadeo atenuado
Intermitente(1)Parpadeo atenuado
Intermitente
(1)Parpadeo atenuado* : luz intermitente que se oscurece lentamente y luego vuelve a intensificarse.
Illuminado, después apagado
Illuminado(con alarmas)
- - (1)Parpadeo atenuado
Bolígrafo encendido
Bolígrafo apagado
En procesa de recarga
Totalmente cargado
Notificación de bacteria baja
Durante la connexión a USB
Conexión Bluetooth en espera
Durante la connexion a la App
Notificación de bacteria baja
Durante la actualización de firmware
Fallo en la actualización de firmware(2)Asegúrese de sensor óptico o utilizar entorno
(2)Compruebe si hay suciedad alrededor de sensor óptico o en papel.

2. Neo Notes App
• Neo smartpen trabaja conjuntamente con la aplicación Neo Notes App.• La App puede descargarse desde la App Store de Apple.• Para localizar la App escribe las palabras "Neo Notes", "Neo smartpen" en la barra de búsqueda
Neo Notes
4. Utilitzación de Neo smartpen sin conexión a la App
• Neo smartpen puede utilizarse aunque la App no esté funcionando. • El contenido que escribes mientras la App está apagada se transfiere cuando la App y Neo smartpen vuelven a conectarse.
Activa la función Bluetooth de tu dispositivo.
Abre Neo Notes App y pulsa el botón “Regis. ahora”.
Sigue las instrucciones que aparecen en la App.
PASO 01.
PASO 02.
PASO 03.
Si el bolígrafo se ha registrado correctamente, aparece la pantalla de registro del bolígrafo de la App. A continuación, pulsa “Iniciar Neo Notes” y empieza a escribir en la N notebooks.
PASO 04.
3. Registro de Neo smartpen en Neo Notes App PASO 04.PASO 01. PASO 02. PASO 03.
5. Cómo utilizar Neo Notes App
Haz una pulsación larga sobre la libreta que desees bloquear; aparecerán los botones "Share"(Compartir), "Lock"(Bloquear) y "Delete"(Eliminar).
Pulsa el botón "Lock"(Bloquear) para mover la libreta a NoteBox
Puedes desbloquear la libreta en cualquier momento.
PASO 01. PASO 02. PASO 03.
(1) NoteBox• Utiliza la función “Lock” (Bloquear) de la libreta si deseas utilizar el mismo tipo de libreta en sucesivas ocasiones.
PASO 01.
PASO 02.
PASO 03.
GUÍA RÁPIDA_31

LibretasComprobar tus libretas actuales
NoteboxComprobar tus libretas bloqueadas en NoteBox
Activid.Buscar texto por fecha
EtqBuscar página etiquetadas
Búsq.notasBuscar texto transcrito
AjustesSeleccionar los ajustes de Neo smarpen de la App
News/Infocomprobar la información actualizada y consejos
Sincr. D bolTransfiera sus notas almacenados en el APP
Act. FirmwareActualización del firmware de la lente a la última versión
(3) Menú de ajustes
• Pulsa el botón para ver el menú de ajustes del bolígrafo pagina de notas para:
• Pulsa el botón de tu página de notas para
(2) Utilización del botón
Modo EdicEditar,borrar,cambiar el color/grosor del trazo o resaltar texto de las libretas
TranscribPasar tus notas manuscritas a texto digital
EtqEtiquetar tus notas para organizarlas y facilitar búsquedas
VozGrabar voz al mismo tiempo que escribes notas
RepVer tus notas escritas de forma sincronizada con la grabación de voz
Comp.Compartir las notas en formato PNG,PDF,TEXT o SVG
32_GUÍA RÁPIDA

Sincr. D bolTransfiera sus notas almacenados en el APP
Act. FirmwareActualización del firmware de la lente a la última versión
• Pulse sobre el icono , a continuación, una paleta de colores se abrirá y seleccione un grosor y color, mientras que el bolígrafo inteligente está conectado a la aplicación.• Toque en cualquier lugar fuera de la gama de colores para hacerla desaparecer.• Página de la cima cuando Neo smartpen está conectado a la aplicación.
(4) El cambio de color y el grosor
• Tiene varios colores de las plumas y los ajustes de grosor para elegir en la aplicación.
6. Cuadernos y TiendasEncuenctra el cuaderno compatible perfecto
La tienda oficial
shop.neosmartpen.com (excepto a la Amércia del Sur y el Africa )
* Las puntas del bolígrafo son de tipo D1. Puedes encontrarlas en cualquler papelería o tienda online
Tabla de especificaciones del producto
Nombre del modelo NWP-F121
Support SO compatible / Especificaciones de Bluetooth
Versión de SO Versión de Bluetooth
Android Kitkat 4.4 o superior 2.1 o superior
iOSiOS 8.1 [iPhone 5 / iPad 3 / iPad mini /
iPad Air 1] o superior4.0 LE
Conexión inalámbrica Bluetooth 4.2 (CLASSIC/BLE)
Frecuencia de recepción/transmisión 2402 ~ 2480MHz
Salida de antena 3mW / Class 2
Medios de almacenamiento 90 MB de memoria interna
Batería Batería recargable de polímero de litio de 3,7 V / 300 mAh
Tiempo de carga Aproximadamente 2 horas
Tensión nominal de entrada 5 VCC / 300 mA
Autonomía 125 días en modo de espera, 5 horas de escritura continua
Método de conexión al PC USB2.0HS(microUSB
Entomo de uso Temperatura: 10~35° C - 50~95° F/Humedad:~95%
Recambios de tinta Recambios de tinta para bolfgrafo D1, varios modelos
Dimensiones y pesoLongitud: 156 mm - 6 1/4’ (bolígrafo sin capuchón) Grosor: 11.5 ~11.8 mm- 0.45 ~0.46’Peso: 22g - 0.77 oz (bolígrafo sin capuchón)
GUÍA RÁPIDA_33
* La luz solar directa ni a una luz fuerte puede causar la pérdida de reconocimiento de escritura.
KCC: MSIP-CRM-NCV-NWP-F121FCC ID: 2AALG-NWP-F121MIC: 007-AF0079CMIIT ID: 2017DJ3496BSMI: R3B232NCC: CCAH17LP1950T6
34_GUIDA RAPIDA
(4) Funzionamento del LED colorato
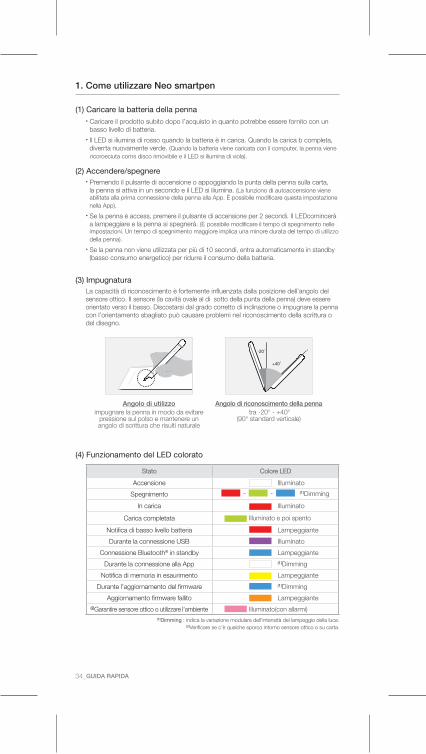
Stato Colore LED
Accensione Illuminato
Spegnimento
In carica Illuminato
Carica completata
Notifica di basso livello batteria Lampeggiante
Durante la connessione USB Illuminato
Connessione Bluetooth® in standby Lampeggiante
Durante la connessione alla App (1)Dimming
Notifica di memoria in esaurimento Lampeggiante
Durante l’aggiornamento del firmware (1)Dimming
Aggiornamento firmware fallito Lampeggiante(2)Garantire sensore ottico o utilizzare l’ambiente
(1)Dimming : indica la variazione modulare dell’intensità del lampeggio della luce.
Illuminato e poi spento
Illuminato(con allarmi)
- - (1)Dimming
1. Come utilizzare Neo smartpen
(1) Caricare la batteria della penna• Caricare il prodotto subito dopo I’acquisto in quanto potrebbe essere fornito con un
basso livello di batteria. • Il LED si iliumina di rosso quando la batteria è in carica. Quando la carica b completa, diverrta nuovamente verde. (Quando la batteria viene caricata con il computer, la penna viene ricoroeciuta corns disco rimovibile e il LED si iliumina di viola).
(2) Accendere/spegnere• Premendo il pulsante di accensione o appoggiando la punta della penna sulla carta,
la penna si attiva in un secondo e il LED si iliumina. (La funziono di autoaccensione viene abilitata alla prima connessione della penna alla App. È possibile modificare questa impostazionenella App).
• Se la penna è access, premere il pulsante di accensione per 2 secondi. II LEDcominceràa lampeggiare e la penna si spegnerà. (È possibile modificare il tempo di spegnimento nelleimpostazioni. Un tempo di spegnimento maggiore implica una minore durata del tempo di utilizzodella penna).
• Se la penna non viene utilizzata per più di 10 secondi, entra automaticamente in standby(basso consumo energetico) per ridurre il consumo della batteria.
(3) ImpugnaturaLa capacità di riconoscimento è fortemente influenzata dalla posizione dell’angolo del sensore ottico. II sensore (la cavità ovale al di sotto della punta della penna) deve essere orientato verso il basso. Discostarsi dal grado corretto di inclinazione o impugnare la penna con l’orientamento sbagliato può causare problemi nel riconoscimento della scrittura o del disegno.
Angolo di utilizzoimpugnare la penna in modo da evitare
pressione sul polso e mantenere un angolo di scrittura che risulti naturale
Angolo di riconoscimento della penna tra -20° - +40°
(90° standard verticale)
(2)Verificare se c’è qualche sporco intorno sensore ottico o su carta.
GUIDA RAPIDA_35
2. Neo Notes App
• Neo smartpen funziona in assooiazione con la Neo Notes App.• È possibile scaricare la App dall'App Store di Apple o il Google Play .• Per trovare la App, digitare ''Neo Notes", "Neo smartpen" nella barra di ricerca.
Neo Notes
Abilitare il Bluetooth sul vostro dispositivo.
Avviare Neo Notes App e selezionare il pulsante “Reg. adesso” in basso.
Seguire le istruzioni mostrate della App.
STEP 01.
STEP 02.
STEP 03.
Se la penna è stata registrata con successo, la App visualizza la schermata di registrazione della penna. Quindi premere il pulsante “Avvia Neo Notes”e cominciare a scrivere sul Paper N notebooks
STEP 04.
3. Registrazione di Neo smartpen nella Neo Notes App
STEP 04.STEP 01. STEP 02. STEP 03.
4. Utilizzare Neo smartpen senza connessione alia App
• Neo smartpen può essere utilizzata anche quando la App non è in funzione.
• Il contenuto inserito quando la App è spenta viene tranferito non appena laApp e Neo smartpen si connettono.
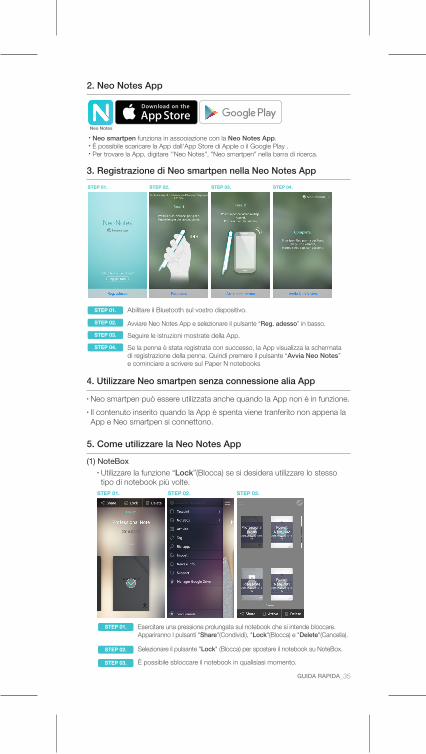
5. Come utilizzare la Neo Notes App
(1) NoteBox• Utilizzare la funzione “Lock”(Blocca) se si desidera utilizzare lo stesso tipo di notebook più volte.
Esercitare una pressione prolungata sul notebook che si intende bloccare. Appariranno I pulsanti "Share"(Condividi), "Lock"(Blocca) e "Delete"(Cancella).
Selezionare il pulsante "Lock" (Blocca) per spostare il notebook su NoteBox.
È possibile sbloccare il notebook in qualisiasi momento.
STEP 01. STEP 02. STEP 03.
STEP 01.
STEP 02.
STEP 03.

Taccuini Controlla I notebook esistenti
NoteboxControlla I notebook bloccati su NoteBox
AttivitàCerca gli appunti per data
TagCerca le pagine taggate
Ric. app.Cerca testo trascritto
Impost.Impostazioni Neo smartpen e App
News e Infocontrollare le informazioni aggiornate e consigli
Sinc.dati pentrasferire i vostri appunti memorizzati nel APP
Agg.firmwareAggiornamento lente firmware alla versione più recente
(3) Menu Impostazioni• Premere il pulsante per visualizzare il menu impostazioni della penna.
• Premere il pulsante sulla pagina apputi per
(2) Utilizzare il pulsante
EditModiflcare, cancellare, cambiare il colore/lo spessore del tratto o evidenziare gli appunti scritti nei notebook
TranscribeTrascrivere gli appunti scritti a mano in testo digitale
TagTaggare gli appunti per organizzarli e ricercarli
RecordingRegistrazione vocale durante la stesura degli appunti
ReplayRiprodurre gli appunti scritti/vocali
ShareCondividere gli appunti in formato PNG, PDF, TEXT e SVG
36_GUIDA RAPIDA
Sinc.dati pentrasferire i vostri appunti memorizzati nel APP
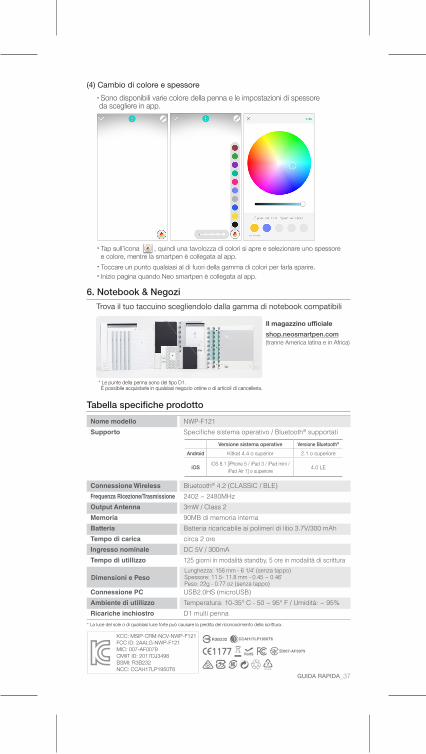
• Tap sull’icona , quindi una tavolozza di colori si apre e selezionare uno spessore e colore, mentre la smartpen è collegata al app.• Toccare un punto qualsiasi al di fuori della gamma di colori per farla sparire.• Inizio pagina quando Neo smartpen è collegata al app.
(4) Cambio di colore e spessore
• Sono disponibili varie colore della penna e le impostazioni di spessore da scegliere in app.
6. Notebook & Negozi
Trova il tuo taccuino scegliendolo dalla gamma di notebook compatibili
Il magazzino ufficiale
shop.neosmartpen.com (tranne America latina e in Africa)
* Le punte della penna sono del tipo D1. È possibile acquistarle in qualsiasi negozio online o di articoli di cancelleria.
Tabella specifiche prodotto
Nome modello NWP-F121
Supporto Specifiche sistema operativo / Bluetooth® supportati
Versione sistema operative Versione Bluetooth®
Android Kitkat 4.4 o superior 2.1 o superiore
iOSiOS 8.1 [iPhone 5 / iPad 3 / iPad mini /
iPad Air 1] o superiore4.0 LE
Connessione Wireless Bluetooth® 4.2 (CLASSIC / BLE)
Frequenza Ricezione/Trasmissione 2402 ~ 2480MHz
Output Antenna 3mW / Class 2
Memoria 90MB di memoria interna
Batteria Batteria ricaricabile ai polimeri di litio 3.7V/300 mAh
Tempo di carica circa 2 ore
Ingresso nominale DC 5V / 300mA
Tempo di utillizzo 125 giorni in modalità standby, 5 ore in modalità di scrittura
Connessione PC USB2.0HS (microUSB)
Ambiente di utillizzo Temperatura: 10-35° C - 50 ~ 95° F / Umidità: ~ 95%
Ricariche inchiostro D1 multi penna
Dimensioni e Peso Lunghezza: 156 mm - 6 1/4’ (senza tappo)Spessore: 11.5- 11.8 mm - 0.45 ~ 0.46’Peso: 22g - 0.77 oz (senza tappo)
* La luce del sole o di qualsiasi luce forte può causare la perdita del riconoscimento della scrittura.
KCC: MSIP-CRM-NCV-NWP-F121FCC ID: 2AALG-NWP-F121MIC: 007-AF0079CMIIT ID: 2017DJ3496BSMI: R3B232NCC: CCAH17LP1950T6
GUIDA RAPIDA_37
1. So verwenden Sie den Neo smartpen
(1) Aufladen des Pen • Wir empfehlen, das Gerät vor der ersten Anwendung vollständig aufzuladen,
da die Batteriespannung nach dem Kauf zu niedrig sein kann. • Während des Ladevorgangs leuchtet die LED rot. Sobald der Vorgang abgeschlossen ist,
ändert sich die Farbe in grün. Wird der Akku über USB am PC geladen, wird das Gerät vom PC als Wechseldatenträger erkannt und die LED brennt violett.
(2) Ein- und Ausschalten • Sobald Sie den Power Schalter am Gerät drücken oder die Spitze des Pens auf ein
Papier halten, aktiviert sich der Pen innerhalb einer Sekunde und die LED leuchtet. (Die automatische Einschaltung erfolgt nur, wenn der Pen vorher mit der App verbunden wurde. Sie können dies in den Einstellungen der App ändern.)
• Wenn der Pen eingeschaltet ist, drücken Sie die Power Taste eine Sekunde lang, und der Pen schaltet sich wieder aus, wobei die LED Leuchte kurz aufblinkt.
• Wenn Sie den Pen für mehr als 20 Minuten nicht verwenden, schaltet er sich automatisch ab.(Sie können diese Zeitspanne in der App jederzeit ändern. Je länger Sie diese Zeitspanne wählen,umso kürzer ist die Anwendungszeit!)
• Wenn Sie das Gerät länger als 10 Sekunden nicht verwenden, geht der Pen in den Standby Modus (Stromreduzierung).
(3) So halten Sie den Pen beim Schreiben Die Schrifterkennungsrate ist stark von der Haltung des Pens beim Schreiben abhängig. Der Sensor (eine ovale Kameralinse neben der Schreibspitze des Pens) sollte immer nach unten zeigen. Wenn Sie den Pen nicht im korrekten Winkel halten, kommt es zu Ungenauigkeiten, da der Pen nicht erkennen kann, was Sie schreiben..
Anwendungswinkel
Halten Sie den Pen locker in der Hand und nehmen Sie damit eine normale
Schreibhaltung ein.
Erlaubte Winkeltoleranzen
Akzeptable Winkelabweichungen sind -20° ~ +40°.
(ausgehend von 90° vertikalem Standard)
2. Neo Notes App
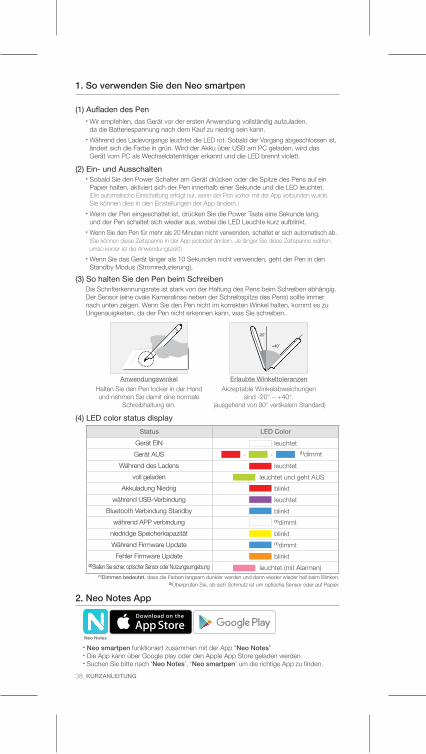
• Neo smartpen funktioniert zusammen mit der App “Neo Notes”• Die App kann über Google play oder den Apple App Store geladen werden.• Suchen Sie bitte nach ‘Neo Notes’, ‘Neo smartpen’ um die richtige App zu finden.
Neo Notes
38_KURZANLEITUNG
(4) LED color status display
Status LED Color
leuchtet
leuchtet
leuchtet und geht AUS
blinkt
leuchtet
blinkt
(1)dimmt
blinkt
(1)dimmt
blinkt
leuchtet (mit Alarmen) (1)Dimmen bedeutet, dass die Farben langsam dunkler werden und dann wieder wieder hell beim Blinken.
(2)Überprüfen Sie, ob sich Schmutz ist um optische Sensor oder auf Papier.
- - (1)dimmt
Gerät EIN
Gerät AUS
Während des Ladens
voll geladen
Akkuladung Niedrig
während USB-Verbindung
Bluetooth Verbindung Standby
während APP verbindung
niedridge Speicherkapazität
Während Firmware Update
Fehler Firmware Update(2)Stellen Sie sicher, optischer Sensor oder Nutzungsumgebung
4. Anwendung ohne Verbindung mit der App
• Sie können Ihren Neo smartpen auch verwenden, wenn die mobile App nicht gleichzeitig läuft.
• Was immer Sie dann zeichnen oder schreiben, wird bei der nächstenVerbindung des Neo smartpen mit der App automatisch übertragen.
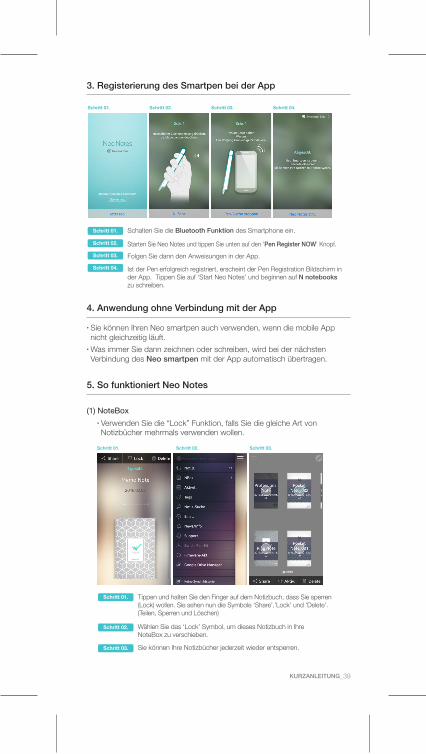
3. Registerierung des Smartpen bei der App
Schalten Sie die Bluetooth Funktion des Smartphone ein.
Starten Sie Neo Notes und tippen Sie unten auf den ‘Pen Register NOW’ Knopf.
Folgen Sie dann den Anweisungen in der App.
Schritt 01.
Schritt 02.
Schritt 03.
Ist der Pen erfolgreich registriert, erscheint der Pen Registration Bildschirm in der App. Tippen Sie auf ‘Start Neo Notes’ und beginnen auf N notebooks zu schreiben.
Schritt 04.
Schritt 04.Schritt 01. Schritt 02. Schritt 03.
5. So funktioniert Neo Notes
Schritt 01. Schritt 02. Schritt 03.
(1) NoteBox• Verwenden Sie die “Lock” Funktion, falls Sie die gleiche Art von Notizbücher mehrmals verwenden wollen.
Tippen und halten Sie den Finger auf dem Notizbuch, dass Sie sperren (Lock) wollen. Sie sehen nun die Symbole ‘Share’,’Lock’ und ‘Delete’. (Teilen, Sperren und Löschen)
Wählen Sie das ‘Lock’ Symbol, um dieses Notizbuch in Ihre NoteBox zu verschieben.
Sie können Ihre Notizbücher jederzeit wieder entsperren.
Schritt 01.
Schritt 02.
Schritt 03.
KURZANLEITUNG_39

Notebooks (Notizbücher)Sehen Sie sich Ihre aktuellen Notizbücher an
NBoxHier finden Sie Ihre gesperrten Notizbücher
AktivitätÜberprüfen Sie Ihr Schreiben von Datum
TagsSuchen Sie nach Schlüsselwörtern
Notiz-SucheSuchen Sie in transkribierten Texten
EinstellungenWählen Sie hier Ihre Pen bzw. App Einstellungen
News/InfoÜberprüfen Sie die neuesten Nachrichten und Tipps
Synch. Pen-DtÜbertragung gespeichert Schreiben von Daten in der App
Firmware-Akt.Objektiv Firmware-Update auf die neueste Version
(3) Voreinstellungen Ihres Pens• Drücken Sie die Taste, um in das Einstellungsmenü des Pens zu gelangen
• Dieser Button öffnet folgende Optionen.
(2) Benutzen des Symbols
Edit ModeEditieren, löschen und markieren Sie den Text bzw. die Farbe oder die Schriftstärke Ihrer geschriebenen Notizen in den Notizbüchern.
TranskribWandelt Ihre handschriftlichen Notizen in digitalen Text um.
TagVerleiht Ihren Notizen ein Schlüsselwort bzw. einen „Anhänger“, um sie leichter finden und organisieren zu können
Stm.Nehmen Sie Sprachaufnahmen auf, während Sie Notizen schreiben.
ReplayWiedergabe Ihrer Notizen mit Sprachaufzeichnungen
ShareTeilen Sie Ihre Notizen im PNG,PDF, TEXT und im SVG Format
40_KURZANLEITUNG
Notebooks (Notizbücher)Sehen Sie sich Ihre aktuellen Notizbücher an
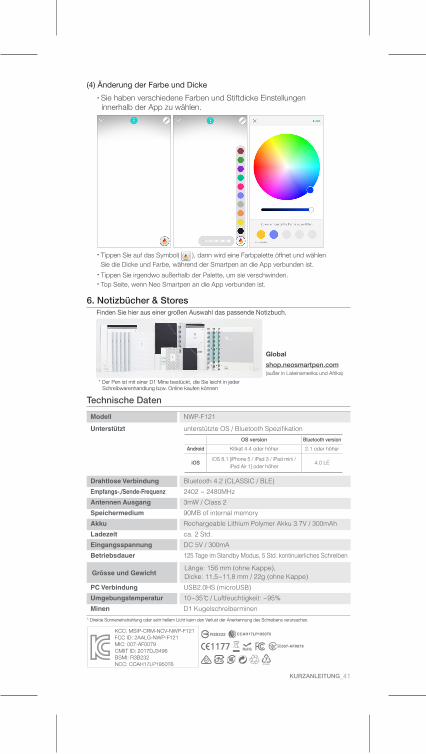
• Tippen Sie auf das Symbol( ), dann wird eine Farbpalette öffnet und wählen Sie die Dicke und Farbe, während der Smartpen an die App verbunden ist. • Tippen Sie irgendwo außerhalb der Palette, um sie verschwinden.• Top Seite, wenn Neo Smartpen an die App verbunden ist.
(4) Änderung der Farbe und Dicke
• Sie haben verschiedene Farben und Stiftdicke Einstellungen innerhalb der App zu wählen.
6. Notizbücher & StoresFinden Sie hier aus einer großen Auswahl das passende Notizbuch.
Global
shop.neosmartpen.com (außer in Lateinamerika und Afrika)
* Der Pen ist mit einer D1 Mine bestückt, die Sie leicht in jeder Schreibwarenhandlung bzw. Online kaufen können
Technische Daten
Modell NWP-F121
Unterstützt unterstützte OS / Bluetooth Spezifikation
OS version Bluetooth version
Android Kitkat 4.4 oder höher 2.1 oder höher
iOSiOS 8.1 [iPhone 5 / iPad 3 / iPad mini /
iPad Air 1] oder höher4.0 LE
Drahtlose Verbindung Bluetooth 4.2 (CLASSIC / BLE)
Empfangs-,/Sende-Frequenz 2402 ~ 2480MHz
Antennen Ausgang 3mW / Class 2
Speichermedium 90MB of internal memory
Akku Rechargeable Lithium Polymer Akku 3.7V / 300mAh
Ladezeit ca. 2 Std.
Eingangsspannung DC 5V / 300mA
Betriebsdauer 125 Tage im Standby Modus, 5 Std. kontinuierliches Schreiben
PC Verbindung USB2.0HS (microUSB)
Umgebungstemperatur 10~35 / Luftfeuchtigkeit: ~95%
Minen D1 Kugelschreiberminen
Grösse und GewichtLänge: 156 mm (ohne Kappe), Dicke: 11,5~11,8 mm / 22g (ohne Kappe)
KURZANLEITUNG_41
* Direkte Sonneneinstrahlung oder sehr hellem Licht kann den Verlust der Anerkennung des Schreibens verursachen.
KCC: MSIP-CRM-NCV-NWP-F121FCC ID: 2AALG-NWP-F121MIC: 007-AF0079CMIIT ID: 2017DJ3496BSMI: R3B232NCC: CCAH17LP1950T6

PRODUCT WARRANTY
FCC Information to UserThis equipment has been tested and found to comply with the limits for a Class B digital device, pursuant to Part 15 of the FCC Rules. These limits are designed to provide reasonable protection against harmful interference in a residential installation. This equipment generates, uses and can radiate radio frequency energy and, if not installed and used in accordance with the instructions, may cause harmful interference to radio communications. However, there is no guarantee that interference will not occur in a particular installation. If this equipment does cause harmful interference to radio or television reception, which can be determined by turning the equipment off and on, the user is encouraged to try to correct the interference by one of the following measures:· Reorient or relocate the receiving antenna.· Increase the separation between the equipment and receiver.· Connect the equipment into an outlet on a circuit different from that to which the receiver is connected.· Consult the dealer or an experienced radio/TV technician for help.CautionModifications not expressly approved by the party responsible for compliance could void the user’s authority to operate the equipment.
IMPORTANT NOTE : FCC RF Radiation Exposure StatementThis equipment complies with FCC RF radiation exposure limits set forth for an uncontrolled environment. This equipment should be installed and operated with a minimum distance of 20 centimeters between the radiator and your body. This transmitter must not be co-located or operating in conjunction with any other antenna or transmitter.
NOTE : THE GRANTEE IS NOT RESPONSIBLE FOR ANY CHANGES OR MODIFICATIONS NOT EXPRESSLY APPROVED BY THE PARTY RESPONSIBLE FOR COMPLIANCE. SUCH MODIFICATIONS COULD VOID THE USER’S AUTHORITY TO OPERATE THE EQUIPMENT.THIS DEVICE COMPLIES WITH PART 15 OF THE FCC RULES. OPERATION IS SUBJECT TO THE FOLLOWING TWO CONDITIONS: (1)THIS DEVICE MAY NOT CAUSE HARMFUL INTERFERENCE, AND (2) THIS DEVICE MUST ACCEPT ANY INTERFERENCE RECEIVED, INCLUDING INTERFERENCE THAT MAY CAUSE UNDESIRED OPERATION.
CE Information to UserHereby, NeoLAB Convergence Declares that this NWP-F110 is in compliance with the essential requirements and other relevant provisions of derective 1999/5/EC/R1: Any dangerous activities with the pen tip are prohibited.R2: Stop the usage when the product gets heated.R5: Do not store the product after the usage where room temperature is possibly high, such as interior of vehicle.R7: Ink or any dirt in the product may cause illness in case of putting it one’s mouth during usage.
IC Information to User
This device complies with Industry Canada’s licence-exempt RSSs. Operation is subject to the following two conditions:(1) This device may not cause interference; and (2) This device must accept any interference, including interference that may cause undesired operation of the device
Le présent appareil est conforme aux CNR d’Industrie Canada applicables aux appareils radio exempts de licence. L’exploitation est autorisée aux deux conditions suivantes : (1) l’appareil ne doit pas produire de brouillage, et(2) l’utilisateur de l’appareil doit accepter tout brouillage radioélectrique subi, même si le brouillage est susceptible d’en compromettre le fonctionnement.
IC : 21452-NWPF110
PRODUCT WARRANTY
· 품목별 소비자 피해 보상규정에 따라 아래와 같이 제품에 대한 보증을 시행합니다.· 보상 여부 및 내용 통보는 요구일로부터 7일 이내, 피해 보상은 통보일로부터 14일 이내에 해결해 드립니다.· 제품 번호(Serial No.)는 A/S 신청 시 제품 보증기간을 확인하기 위해 꼭 필요한 항목이니 분실되지 않도록 주의해 주세요.· 제품 번호(Serial No.)는 제품의 제품 포장물 겉면에 부착되어 있습니다.
제품 보증서
의 품질 보증 기간은 1년이며,
부품 보유 기간은 2년 입니다.
제품 보증서
Please contact the store where you purchased the product or NeoLAB Convergence for customer service/support.
· Keep the product no. (serial no.) in a safe place as it is required for checking the product warranty period when requesting customer service / support.
· The product no. is attached on the surface of the product package.
Product Warranty
Product Name
Product No. (Serial No.)
Purchase Date
Seller
Purchase Price
제품명
제품번호(Serial No.)
구입일자
구입처
구입가격
Neo smartpen provides guaranteed warranty in accordance with relevant laws of the specified country
PRODUCT WARRANTY_43
1.本製品の保証期間は、お買上げ日から1年間とします。弊社は、保証期間中に正常な使用状態で本製品の故障等が発生した場合、本製品の無料修理を行います。修理をご依頼される場合は、本製品保証書を添付の上、本製品を下記住所までご送付ください。なお、弊社の判断により、新品またはメーカーリファビッシュ品(NeoLAB Convergence品質認定の整備済製品)と交換となる場合があります。
2.以下の各号に該当する場合には、有償による対応となります。有償対応の場合、送料はお客様にご負担いただくことになります。
3. 理由を問わず、お買い上げいただいた本製品の返品には応じることができません。また、理由を問わず、本製品の故障等によりお客様に損害が生じた場合にも、弊社は損害賠償責任を負いません。また、修理期間中の対象機器の使用不能による補償等は、一切行われません。弊社は、修理期間中の代替機の貸し出しは行わないものとします。4. 修理に際しては再生部品、再利用品を使用することがあります。また、修理のために本製品から取り外した部品は、弊社の所有に帰すこととします。5. 本製品の記録媒体(クラウド方式による記録媒体を含みます)に記録されたデータその他情報の消失、破損、変更等について、弊社は一切責任を負いません。また、修理の際に、記録媒体に記録された情報が消去、変更されることがあります。修理をご依頼される際には、お客様においてバックアップをとっていただくものとします。6. 本製品保証書に基づく無料修理(製品交換を含みます)後の製品保証については、当初のご購入時からの保証期間が適用されます。
7. 本製品保証書は、日本国内においてのみ有効です。なお、本製品保証書は再発行いたしません。
(1)ご送付いただいた本製品に本製品保証書またはお買上げ店が発行したレシート(お買上げ日が記載されているもの)が添付されていない場合
(2)本製品保証書に必要事項(お買上げ日、お買上げ店を含みます)の記入がない場合、または内容が書き替えられていた場合、その他事実と異なる記載がされていた場合
(3)水没、液体こぼれ、落下等、不適当なお取り扱いや誤使用(取扱説明書に従って正常な使用がなされなかった場合を含みます)により生じた故障等の場合(4)不適切な使用環境や維持・管理に起因して生じた故障等の場合(5)地震、水害、停電、火災、落雷その他天災地変、異常電圧、弊社以外による本製品の修理、改造、その他本製品に起因しない事由により故障等が生じた場合
(6)ご購入後に傷、変色など外見上の変化が生じた場合(7)消耗、磨耗、汚損、劣化等により部品の交換が必要となった場合(ご使用開始後にバッテリー交換が必要になった場合、ペン芯など消耗品に不良が生じた場合を含みます)(8)本製品以外の機器、非純正品、不適当な消耗品や部品等により生じた故障等の場合(9)本製品を事業、業務目的など一般家庭用以外で使用された場合(10)お客様の故意、過失により故障等が生じた場合(11)保証期間経過後に修理依頼された場合
品名
製造番号(シリアルナンバー)
お買い上げ日
保証期間 お買い上げ日より1年間
Product Warranty
この度は、弊社製品 (以下「本製品」といいます) をご購入いただき有難うございました。本製品保証書は、本製品に瑕疵があり、または本製品に損傷、故障や不具合が生じた場合 (以下「故障等」といいます)に、弊社が負担する責任の内容について記載したものです。
製品保証書
ご住所 〒 TEL - -
お名前
取扱い販売店名・住所・電話番号
お客様
様
販売元 : NeoLAB株式会社 〒101-0024東京都千代田区神田和泉町1-6-1インターナショナルビル7F
44_PRODUCT WARRANTY
产品名称
产品序列号
购买日期
售货员
购买价
·请保留产品的产品序列号(serial no.),申请产品保固时必须一并提供
·产品序列号(SN)可在产品包装上查到,请妥善收藏,作为保固证明
Neo smartpen根据各国的相关法律提供产品保固
产品保证
产品保证
產品名稱
產品序列號
購買日期
經銷商
售價
·請保留產品的產品序號(serial no.), 申請產品保固時必須一併提
·產品序號(SN)可在產品包裝上查到,請妥善收藏,作為保固證明
根據交通部低功率電波輻射性電機管理辦法 規定:
第十二條
經型式認證合格之低功率射頻電機,非經許可,公司、商號或使用者均不得擅自變更頻率、
加大功率或變更原設計之特性及功能。
第十四條
低功率射頻電機之使用不得影響飛航安全及干擾合法通信;經發現有干擾現象時,
應立即停用,並改善至無干擾時方得繼續使用。
前項合法通信,指依電信法規定作業之無線電通信。
低功率射頻電機須忍受合法通信或工業、科學及醫療用電波輻射性電機設備之干擾。
Neo smartpen根據各國的相關法律提供產品保固
產品保固
請與購買商店或直接與本公司聯繫售後及客戶服務事宜
產品保固
请与购买商店或直接与本公司联系售后及客户服务事宜
PRODUCT WARRANTY_45
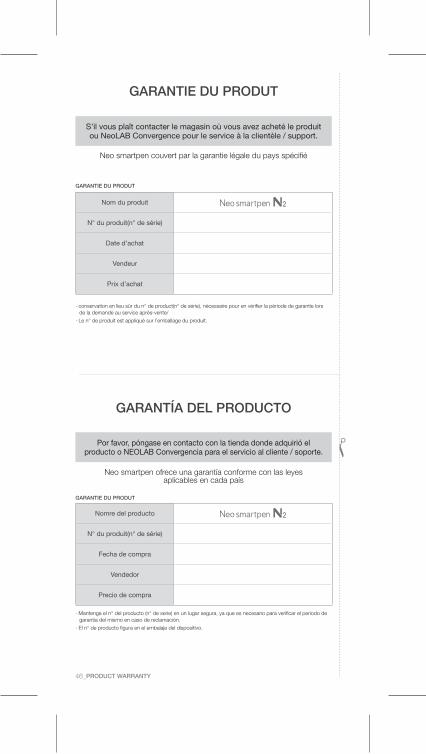
Nom du produit
N° du produit(n° de série)
Date d’achat
Vendeur
Prix d’achat
· conservation en lieu sûr du n° de product(n° de série), nécessaire pour en vérifier la période de garantie lors de la demande au service après-vente/
· Le n° de produit est appliqué sur l’emballage du produit.
Neo smartpen couvert par la garantie légale du pays spécifié
GARANTIE DU PRODUT
GARANTIE DU PRODUT
Nomre del producto
N° du produit(n° de série)
Fecha de compra
Vendedor
Precio de compra
· Mantenga el n° del producto (n° de serie) en un lugar segura, ya que es necesario para verificar el periodo de garantía del mismo en caso de reclamación.
· El n° de producto figura en el embalaje del dispositivo.
Neo smartpen ofrece una garantía conforme con las leyes aplicables en cada país
GARANTIE DU PRODUT
GARANTÍA DEL PRODUCTO
S’il vous plaît contacter le magasin où vous avez acheté le produit ou NeoLAB Convergence pour le service à la clientèle / support.
Por favor, póngase en contacto con la tienda donde adquirió el producto o NEOLAB Convergencia para el servicio al cliente / soporte.
46_PRODUCT WARRANTY
Related Documents


