QUICK START MANUAL

Welcome message from author
This document is posted to help you gain knowledge. Please leave a comment to let me know what you think about it! Share it to your friends and learn new things together.
Transcript

QUICK START MANUAL

2018-04-25
IMPORTANT NOTES
It is very important that you read this Manual before proceeding with installing and using
QFloors.
It is very important that you read and utilize the Getting Started Checklist and the
General Ledger Conversion sections of this Manual. These sections explain the process of
switching from your previous system to QFloors.
Be prepared to evaluate your business systems, policies, and procedures, and to make
plans for changes, as you learn how QFloors can help you run your business more efficiently
and profitably.
QFloors is an accrual basis accounting system. It does not do cash basis accounting at all.
You should set up an automated backup system to back up your QFloors database and other
files daily to protect your business against the risk of data loss. Power outages, power surges,
lightning, computer viruses, operating system glitches, overheating and other unwelcome events
may occur that put your data at risk. QFloors cannot prevent these situations. See Backing Up
Your Data in this manual for instructions.
Other product names appearing in this document are for identification purpose only. Trademarks
and product names or brand names appearing in this document are the property of their respective
owners.

Table of Contents
TABLE OF CONTENTS ................................................................................................................................ 3
GETTING STARTED CHECKLIST .............................................................................................................. 1
GENERAL LEDGER CONVERSION ........................................................................................................... 3
THE QFLOORS PROCESS ............................................................................................................................ 7
ARE YOU AN EFFICIENT QFLOORS USER? ............................................................................................ 8
SYSTEM REQUIREMENTS ......................................................................................................................... 9
HARDWARE REQUIREMENTS ....................................................................................................................... 9 SUPPORTED OPERATING SYSTEMS ............................................................................................................ 9
New Versions of Windows ................................................................................................................... 9
NETWORK REQUIREMENTS ..................................................................................................................... 9
General Networking Information ....................................................................................................... 10 Firewall Ports ....................................................................................................................................... 10
QFLOORS SMALL BUSINESS AND QFLOORS BASIC INSTALLATION ........................................... 11
INSTALLING QFLOORS SMALL BUSINESS OR QFLOORS BASIC ON SERVER/MAIN COMPUTER .............. 11 INSTALLING QFLOORS SMALL BUSINESS OR QFLOORS BASIC ON CLIENT/WORKSTATION COMPUTERS
................................................................................................................................................................... 16
QFLOORS HIGH PERFORMANCE INSTALLATION ............................................................................. 18
INSTALLING QFLOORS HIGH PERFORMANCE ON SERVER/MAIN COMPUTER.......................................... 18 INSTALLING QFLOORS HIGH PERFORMANCE ON CLIENT/WORKSTATION COMPUTERS ......................... 26
USING QFLOORS AT A REMOTE LOCATION ....................................................................................... 27
BACKING UP YOUR DATA ...................................................................................................................... 28
AUTOMATED BACKUPS .............................................................................................................................. 28 MANUAL BACKUP ...................................................................................................................................... 28
CONTACTING QFLOORS .......................................................................................................................... 30
TRAINING AND SUPPORT ........................................................................................................................... 30 SALES ........................................................................................................................................................ 30

1
Getting Started Checklist Use this list to help get your business running on QFloors. You should also use the Training
Videos and the Knowledge Base and Application Notes articles on the QFloors website.
Do the steps in this checklist in the order they are presented to ensure a smooth transition to
QFloors.
1. Preliminary Tasks
a. Computer Setup
i. Purchase computers and network equipment (if necessary)
ii. Set up computers and network (if necessary)
b. Arrange for Preprinted Forms – Login to the QFloors website, click Application Notes > General, then click the View button for one of the samples. NOTE: If you purchased QReporter, you do not need to arrange for preprinted Sales Orders. Sales Orders Checks and Deposit Tickets
c. Decide on a Cutoff Date – See step 8 of this Checklist, and also see the General Ledger Conversion section in this manual.
d. Request B2B account settings from B2B compliant vendors. At the QFloors website, place your mouse cursor over the Partners button, then click B2B in the menu that appears, then read the instructions at the top of that page. It might take a week or more for some vendors to send your B2B account settings to you.
2. Install QFloors – If you are on our QCloud hosting service, your software programs are already installed. Otherwise, instructions are later in this manual.
IMPORTANT! Before you give the installation instructions to your computer/network administrator so that they may install the software, you must read the Manual Payroll Setup knowledge base article on our website, then inform your computer/network tech which option you are selecting.
a. Using an outside payroll service. We strongly recommend you choose this option. See Choosing a Payroll Service Provider.
b. Using the 2017 payroll withholding tax tables, if you purchased them. If you purchased QFloors during or after the year 2017, the 2017 tables were included with your QFloors purchase.
c. Using 2016 payroll withholding tax tables.
d. Using the manual payroll features in QFloors.
3. Employees and Installers, Including Passwords and Access Settings for Employees (Employees/Subs screen)
4. Watch training videos at www.qfloors.com – Learn how to set up and use QFloors by watching the Short Basic Training Videos and other videos.

2
5. Setups – Click Setup on the menu bar, then select one of the menu items. IMPORTANT! Set up all of these before proceeding. NOTE: Some Setup menu items are not listed here. Watch training videos and/or contact QFloors Support to discuss these and other Setup items, but be certain to set up those listed here before proceeding.
a. Company Information b. Locations c. Profit Centers d. Sales Tax e. Employees/Subs f. Leads Management g. Advertising
h. Misc i. Chart of Accounts j. Labor Types k. Sales Commissions l. Vendor Accounts m. Customer Accounts n. Retail Price Formulas
6. Product Catalog Setup
a. Set up Product Types. If you’ll be using B2B features, you must set up the Product Types that meet the B2B standard. See Product Types - Simple List and Instructions for the most commonly needed B2B types. You may also add other product types, but do not give them a code that starts with the same three letters as any of the B2B codes.
b. Create Manufacturer names. NOTE: For B2B with distributors, we recommend NOT creating the distributor’s company name as a Manufacturer, then during the B2B import, do not select a Manufacturer name. By not doing those things, while importing the distributor’s B2B price list, QFloors will create for you each of the manufacturer names that are included in the file.
c. Import price lists from B2B vendors.
d. Key Vendors that Do Not do B2B – Ideally, obtain a price list in CSV format from them, then format it and import it according to our CSV Price List Import instructions. If you are not able to obtain a workable CSV file from your vendor, then enter manually enter the styles and colors that you need the most. You do not need to enter all of a manufacturer’s styles and colors in order to start using QFloors, although the more you have entered, the easier some procedures will be.
e. Other Vendors – Add styles and colors over time as you use QFloors day to day. Or you may work on obtaining and importing a CSV price list file.
7. Watch training videos at www.qfloors.com – Learn how to set up and use QFloors by watching the Short Basic Training Videos, and other videos. You need to understand how to create Materials, Sales, and Bills before proceeding with the next step.
8. General Ledger Conversion – See the General Ledger Conversion section of this manual (this paragraph here is just an outline of the full General Ledger Conversion process). At this point, you should become familiar with and DO the conversion process. You will be inputting transactions into QFloors during this process, and this will be your “hands-on” training for learning the software.
a. Decide on a cutoff date (you should have already selected this date – see step 1 of this Checklist)
b. Enter existing inventory. It is extremely helpful if this is done before proceeding.
c. Create Sales Orders for jobs in process
d. Create Sales Orders for previous-system receivables
e. Create Bills/Credits for previous-system payables

2
9. Daily Operations – When the cutoff date has passed, you’re into day 1 of QFloors helping you manage and build your business. As normal business activities occur, you’ll enter transactions right into QFloors. You shouldn’t enter data into or use your previous system other than for reference (except for a few payables – see the General Ledger Conversion section of this manual for details about them).
10. Clean Up the No Bill List – The No Bill list (one of the tabs in the Materials screen) should contain only materials for which you are actually waiting for the payable to arrive in the mail. For instructions, see No Bill List Cleanup.
11. Finalize Sales Tax Report as of your cutoff date. Click Reports > Sales Tax, type in your cutoff date and press the Enter key. Click the Finalize Report button, then click OK to save the report.
12. Enter Accounting Balances – Create a general journal entry to adjust QFloors balances to match previous-system GL balances, as of your cutoff date. See the General Ledger Conversion section of this manual for details.
13. End of Period Procedures – Do all of the QFloors End of Period Procedures soon after you have finished the general ledger conversion adjusting entry. The procedure document is found Application Notes page of our website, in the Accounting section.
3
General Ledger Conversion
You need to read and understand this section if you plan on using the QFloors general
ledger immediately or at some point in the future.
You DO NOT need to read and understand this section if one of the following three
statements applies to your business.
You are a new business and don’t have any previous accounting transactions to enter into
QFloors.
You use an accountant or another system to keep your general ledger.
You do not wish to use the QFloors General Ledger.
If any of these apply, you may skip this section and begin entering new transactions into
QFloors (sales, payables, checks, deposits, etc).
IMPORTANT NOTES:
Don’t stop using your previous system until you are sure that you will accomplish the
conversion steps by the cutoff date that you select.
If you would like to, you may begin entering new transactions into QFloors before
you finish these procedures, but those new transactions should not be entered into
your previous system.
Even if your old-system general ledger is not up-to-date, on your go live date (the
day after your cutoff date) you should start entering all new transactions into
QFloors. Work on getting the old-system account balances current on the side, but
don’t get behind on “today’s” work in QFloors.
Prior to the cutoff date, you need to have completed steps 1 - 8 of the Getting Started
Checklist.
You may need to have your accountant assist you in the general ledger conversion
process. If you purchased QFloors onsite training, we will enter the accounting
balances for you.
Financial reports in QFloors will not be accurate until you have your old-system
general ledger in order and the balances transferred to QFloors.
1. Decide on a Cutoff Date
This is the last day that your previous system will account for and manage your business.
On the next day, start using QFloors to manage all of your business transactions.
NOTE: Even if your old-system general ledger is not up-to-date, you should decide on a
day to cut off from your previous system. Then on the next day, start entering all new
transactions into QFloors. You can get your previous general ledger up-to-date as you
go, and do the following steps to enter your in-process data into QFloors. But you should
do everything possible to not get behind with day-do-day activities after your cutoff date.
You may change your cutoff date if needed, but don’t stop using your previous system
until you have officially set up QFloors, met your cutoff date, and started using QFloors.

4
2. One or Two Days Before the Cutoff Date
A. Enter Existing Inventory
You don’t want to enter your existing inventory too far in advance of your cutoff date
because your inventory is changing constantly. By “inventory”, we mean all
materials for resale, whether special ordered for just one job, or kept in stock all the
time.
i. Create a Material item for all items that will be in your possession on the cutoff
date (both sold and unsold items). Assign each of these a Stock status and select
the appropriate Location.
ii. Create a Material item for all items that will still be on order on the cutoff date
(neither received at your location nor picked up from vendors). Assign these a
On Order status and select In Transit as the Location.
iii. Create a Material item for all materials that need to be ordered. Assign these a
Pur. Orders status and select In Transit as the Location.
B. Enter Receivables
i. Create a new sales order for each receivable from your old system (jobs that were
completely finished with installation but not paid in full by your cutoff date).
a. Use the actual sale and completion dates from the original sales.
b. Instead of filling in line item details such as Style, Color, Quantity, Labor, etc., type the word Receivable into the Style field of line item one, then
skip the Color and Prod# fields. Select Each for Units and type in 1 for
Quantity.
c. In the Total field at the bottom of the sales order, type in the amount that the
customer owes you as of the cutoff date (NOT the original sale total).
d. If you don’t owe any more sales tax on this sale, change the sale to a tax-
exempt sale by clicking the checkbox next to Sales Tax at the bottom of the
sales order. If you still owe any sales tax on this sale, double right-click the
sales tax amount and change it to the amount you still owe.
e. Click the Payments button at the bottom of the sales order. Enter a $0.00
amount payment and select Finance as the type in the Payments window.
f. Complete each sale by opening the Job Cost window and clicking in the
checkbox next to the zero ($0.00) amount for line 1. The sale is then in a
Completed status and appears in the receivables list.
NOTE: If you want to pay commissions on these sales when the receivables are
collected, you must figure the commissions manually or through your old system.

5
C. Enter Uncompleted Sales (jobs still in process)
Enlist your sales team to enter their own jobs into QFloors. This way they will learn
by doing and when your start date comes (the day after the cutoff date), they’ll know
how to enter their live sales into the program.
i. Create a new sales order for each job that was not completely finished with
installation by your cutoff date.
a. Use the actual sale date from the original sales.
b. Include ALL information from the original sale (Style, Color, Quantity,
Labor, etc.) and assign material numbers to the sales order lines from the
material items created in Step 2.A. above.
c. Any payments already received on these sales should be entered in the
Payment screen using the date they were originally received.
d. Any lines of the sale that have already been delivered or installed need to be
job costed in the Sales screen.
e. After creating sales and payments for all in-process sales from your old
system, post a deposit in the checkbook to clear these payments out of the
checkbook screen. Use the cutoff date as the deposit date. (Don't worry
about the checkbook balance not being correct at this point. General Journal
entries will be added later to make the balance correct.)
D. Enter Payables
i. Create a new bill or credit in the QFloors Bills/Credits screen for each unpaid bill
or credit from suppliers (payables) in your old system.
a. Use the actual dates from the original vendor invoices.
b. On bills from suppliers (for materials that you re-sell), select the Inventory
account so that the Description field will show you the materials in your
system. If you cannot find the applicable material item in the Description
field drop-down list (preferably by PO#), you may skip the Description field.
c. On bills from other vendors (phone, rent, etc.), select the appropriate account
and fill in the remaining fields. Enter only the amount that you owe the
vendor as of the cutoff date.
d. After the cutoff date has passed, you will have bills trickle in that are dated
earlier than the cutoff date. Those should be entered into your previous
system, AND into QFloors.

6
3. Enter Accounting Balances
A. After you have entered all of the above transactions into your old system (steps 2A –
2D above), you should then obtain a Trial Balance report from either your previous
system or your accountant, dated as of the cutoff date.
IMPORTANT! QFloors is an accrual basis accounting system. It does not do cash
basis accounting at all. Therefore, the financial reports you obtain from your
previous system or you accountant for this GL conversion should also be in accrual
basis.
B. Do all of the QFloors End of Period Procedures. This will ensure that any problem
transactions in QFloors that are dated on or before your cutoff date have been
resolved. If you don’t do the procedures and you later discover that a transaction
dated on or before your cutoff date does have a problem, you will need to re-do at
least part of the journal entry you’ll do in step 3.D. below.
C. Print a Trial Balance report from QFloors, dated as of your cutoff date.
D. Compare the two trial balance reports and determine the debit or credit amount that it
will take to force the balance in each account in QFloors to match the ending
balances from your previous system. Then create a general journal entry in QFloors
using those adjusting amounts. See How to Create a Journal Entry.
E. Close the journal. Click File > Close Period, type in the cutoff date and press the
Enter key on your keyboard, then click the OK button. For more information about,
and instructions on how to close the journal, see the QFloors End of Period
Procedures.

7
The QFloors Process The following list is an outline of the general, overall process you should follow to run your business on QFloors. In parentheses are
the Screen Name, and List Tab or Menu Item you will need to use to perform the tasks.
1. Create Lead (Leads)
2. Create Sales Order – Proposal or Sale (Sales)
3. Sales Confirmation – create PO’s and assign inventory to sales orders (Materials, Sales Confirmation list)
4. Order Inventory (Materials, Purchase Orders list)
5. Receive Inventory (Materials, On Order list)
6. Schedule installation and print Work Order (Sales)
7. Job Costing – after you receive installer’s bill (Sales)
8. Enter Payables (Bills/Credits)
9. Pay Bills and Post Deposits (Checkbook)
10. Pay Sales Commissions (Reports > Sales Commissions; then enter amount into Employees/Subs)
11. Pay Installers (Reports > Contract Labor; then enter amount into Employees/Subs)
12. Pay Sales/Use Tax (Reports > Sales Tax; then create payable in Bills/Credits)
13. Pay Withholding Taxes (Reports > Employees/Subs Pay Totals; then create payable in Bills/Credits)
14. Management and Financial Reports (Reports menu)

8
Are You An Efficient QFloors User?
Processes to ensure efficiency and maximize your bottom line.
Do Sales Confirmation daily Order all materials from the Purchase
Orders list
Do Job Costing ASAP after receiving installer’s bill
Enter Bills ASAP as they arrive in the mail
Create a Deposit in QFloors before going
to the bank
Pay installers from the Contract Labor report
Pay salespeople from the Sales
Commissions report
Pay Sales/Use tax from the Sales/Use Tax report
9
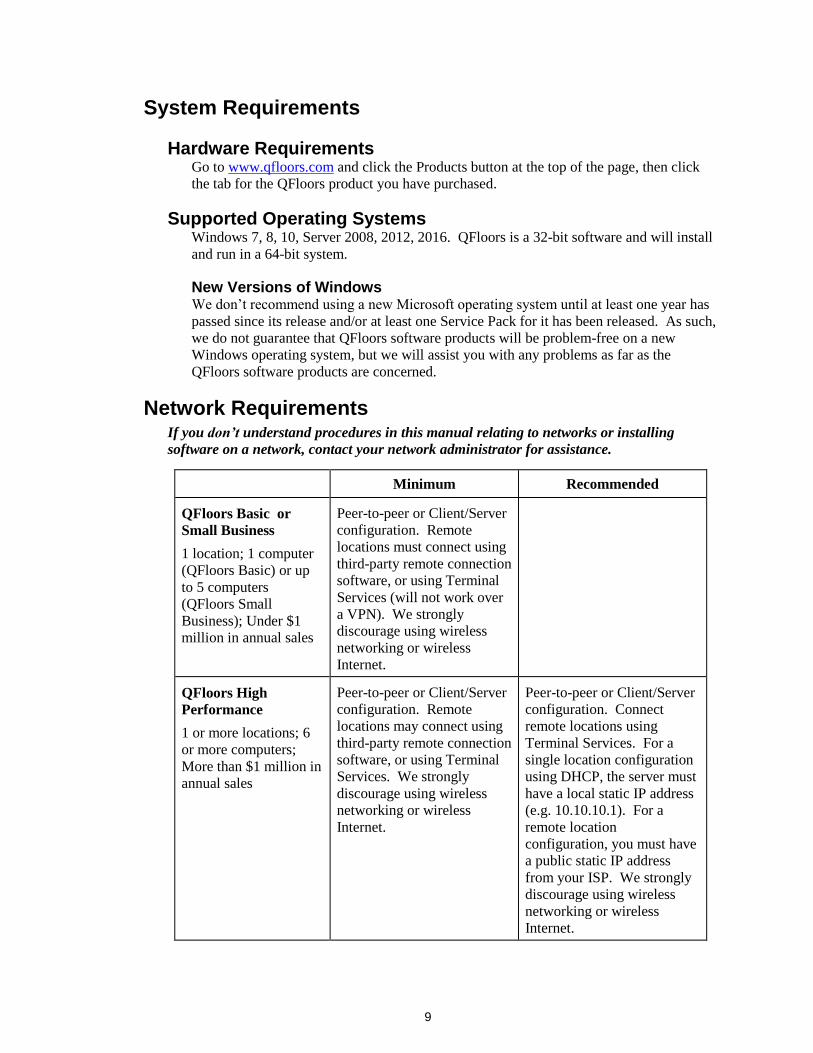
System Requirements
Hardware Requirements Go to www.qfloors.com and click the Products button at the top of the page, then click
the tab for the QFloors product you have purchased.
Supported Operating Systems Windows 7, 8, 10, Server 2008, 2012, 2016. QFloors is a 32-bit software and will install
and run in a 64-bit system.
New Versions of Windows We don’t recommend using a new Microsoft operating system until at least one year has
passed since its release and/or at least one Service Pack for it has been released. As such,
we do not guarantee that QFloors software products will be problem-free on a new
Windows operating system, but we will assist you with any problems as far as the
QFloors software products are concerned.
Network Requirements If you don’t understand procedures in this manual relating to networks or installing
software on a network, contact your network administrator for assistance.
Minimum Recommended
QFloors Basic or
Small Business
1 location; 1 computer
(QFloors Basic) or up
to 5 computers
(QFloors Small
Business); Under $1
million in annual sales
Peer-to-peer or Client/Server
configuration. Remote
locations must connect using
third-party remote connection
software, or using Terminal
Services (will not work over
a VPN). We strongly
discourage using wireless
networking or wireless
Internet.
QFloors High
Performance
1 or more locations; 6
or more computers;
More than $1 million in
annual sales
Peer-to-peer or Client/Server
configuration. Remote
locations may connect using
third-party remote connection
software, or using Terminal
Services. We strongly
discourage using wireless
networking or wireless
Internet.
Peer-to-peer or Client/Server
configuration. Connect
remote locations using
Terminal Services. For a
single location configuration
using DHCP, the server must
have a local static IP address
(e.g. 10.10.10.1). For a
remote location
configuration, you must have
a public static IP address
from your ISP. We strongly
discourage using wireless
networking or wireless
Internet.

10
General Networking Information Make sure your network is correctly configured before installing and using QFloors.
We strongly recommend that you do not use wireless networking. If interference
disconnects the wireless connection long enough to cut off the Windows ODBC
connection to the database, users will be forced to close and reopen QFloors, losing
any unsaved data.
Firewall Ports For QFloors Small Business and QFloors Basic:
Ports 2850 through 2859 must be open for doing B2B transactions with some
vendors.
Ports 21 and 22 must be open for most vendors’ B2B transactions, and for QFloors
registration.
For QFloors High Performance only: Port 2638 – The Sybase database communicates through this port for TCP/IP
communications. This port must be open at the server for a LAN configuration. If
you have direct remote connections (not Remote Desktop or remote software
connections), this port must be open at your router.
11
QFloors Small Business and QFloors Basic Installation
Setting up a network and installing software on a network can be very complex. Make sure
your network is correctly configured before installing and using QFloors. We recommend
that your network administrator perform the QFloors installation.
Do not open the QFloors program until instructed to do so.
QFloors Basic may be installed on only one computer, unless additional licenses were
purchased.
Installing QFloors Small Business or QFloors Basic on Server/Main Computer 1. Serial Number
Make sure you have the QFloors serial number on hand before starting the installation.
You’ll find your serial number in the “welcome” e-mail we sent to you when you first
purchased QFloors. During the software installation you will be required to input this
number and will be unable to complete the installation without it.
2. Obtain Passwords There are two sets of usernames and passwords that you’ll need as you install QFloors.
To obtain them, call QFloors Support during business hours at 801-563-0140. See
Contacting QFloors in this manual for hours.
A. QFloors.com login – To obtain the latest updates to the QFloors software and access
various support resources, you will need a username and password to login to the
QFloors website. You should have received an e-mail from us with this information.
If you don’t have it, please call us.
B. “override” username and password – After installing QFloors and the latest updates,
you will need a Username and Password to open QFloors for the first time. Call or e-
mail us Mon-Fri the day of the installation, or on the Friday before if you're installing
on a weekend.
3. Install ShowMyPC
A. Go to www.qfloors.com.
B. Hover your mouse arrow over the Partners button at the top (don’t click it), then
click ShowMyPC in the menu.
C. You need to know how to operate your computer and your Internet browser to allow
the file to Run, or to Save it first then find it and Run it.
D. Running it the first time puts a ShowMyPC shortcut on the desktop.
E. Close the ShowMyPC window.
4. Preliminary Steps IMPORTANT! Before installing QFloors, make sure the following steps have been
followed:
A. Windows User Account – You need to be logged into an Administrative Windows

12
user account (no restrictions) that others will have access to if technical support is
needed in the future.
B. Firewalls – make sure that all software firewalls on the server have been disabled.
C. If Windows 7, disable “Visual Styles on Windows & Buttons”
i. Go to the control panel and select System.
ii. Click on the Advanced Tab
iii. Select Settings under the Performance section of this Window.
iv. Scroll to the bottom of the list and uncheck the entry named: “Use Visual Styles
on Windows and Buttons”.
D. If installing in a Windows Server operating system, open a Command window, type
in the following command, then press Enter: change user /install
5. Install QFloors on Your Server/Main Computer A. Login to the QFloors website and click the Updates button, then click the QFloors
Small Business link (or QFloors Basic).
B. Click the Download button on the right side of line, QFloors SBL Server (Full Install). (For QFloors Basic, find QFloors BL Server (Full Install).) You need to
know how to operate your computer and your Internet browser to allow the file to
Run, or to Save it first then find it and Run it.
C. Welcome to the QFloors Small Business Setup Wizard – Click the Next button.
D. End-User License Agreement – To install QFloors, you must select “I accept the
terms in this License Agreement”, then click the Next button.
E. Select Installation Folder – The default installation location is C:\QFloors\.
Click the Next button to accept that, or you may type in or browse to a different
location.
F. Ready To Install – Click the Install button.
G. Completing the QFloors Small Business Setup Wizard – Click the Finish button.
6. Install QFloors Updates A. Login to the QFloors website and click the Updates button, then click the QFloors
Small Business link (or QFloors Basic).
B. QFloors Small Business (or Basic)Update
i. Click the Download button on the right side of line, QFloors Small Business L Update X.xxx,. (For QFloors Basic, find QFloors Basic L Update X.xxx)
You need to know how to operate your computer and your Internet browser to
allow the file to Run, or to Save it first then find it and Run it.
ii. Welcome to the Small Business Update Setup Wizard – Click the Next button.

13
iii. Select Installation Folder –Click the Next button (do not change the installation
path).
iv. Ready To Install –Click the Install button.
v. Completing the Small Business Update Setup Wizard – Click the Finish button
C. Tax Table – This is the payroll withholding tax table (not available for QFloors
Basic). If you are a computer/network tech, the QFloors customer should have told
you which option they are choosing (see the Install QFloors section on page 1).
i. Choose ONE of the following four options (a, b, c, or d):
a. You are using an outside payroll service (recommended). You do not need
to download a tax table. Go to step 7.
b. Using the 2017 payroll withholding tables.
(1) Click the Back button in your Internet browser to go back to the main
Updates page.
(2) Click the Payroll Tables link. If you do not see this link, our records
show that you did not purchase the 2017 tax tables.
(3) Click the Download button on right side of the line, Tax Table 2017 (08-11-2017-R9). You need to know how to operate your computer
and your Internet browser to allow the file to Run, or to Save it first then
find it and Run it.
(4) Go to the next step in this section.
c. Using the 2016 payroll withholding tables.
(1) While still in the QFloors Small Business updates page, click the
Download button on the right side of line, Tax Table 2016 (12/29/2015 R1) New LIC You need to know how to operate your
computer and your Internet browser to allow the file to Run, or to Save it
first then find it and Run it.
(2) Go to the next step in this section.
d. Using the manual payroll features in QFloors. You do not need to download
a tax table. Go to step 7.
ii. Welcome to the QFloors TaxLib Setup Wizard – Click the Next button.
iii. Select Installation Folder – Click the Next button (do not change the installation
path).
iv. Ready To Install –Click the Install button.
v. Completing the QFloors TaxLib Setup Wizard – Click the Finish button.

14
7. Create an Employee with Master + Access
A. Open the QFloors program.
i. If you get a message that QFloors is already open, click OK then close any “File
Explorer” windows that you have open, then open QFloors again.
ii. If you get a message that “QFloors has been upgraded to version X.x and
QFloors will now upgrade the database,”
a. Click No.
b. Continue With Upgrade? – Click Yes.
c. Wait while the database upgrade proceeds.
d. Upgrade Complete – Click OK.
B. Database Serial Number
i. Enter Serial Number – Type in the database serial number then click OK.
ii. Enter Serial Number – Type in the database serial number again and click OK.
iii. Registration Complete – Click OK.
C. Click the Logon button in the middle of the screen. Type in the “override”
Username and Password obtained from QFloors Support in step 2, then click the OK
button.
D. Verify that you have installed the latest QFloors update by clicking Help on the
Menu Bar, then clicking About QFloors. If the version number doesn’t match the
one downloaded from the QFloors.com website, go back to step 4.
E. Click the Employees/Subs button at the top right corner of the QFloors screen.
F. Create a new employee
i. Click the New button in the top, center area of the Employees/Subs screen.
ii. Type in an employee’s first name (probably one of the owners or managers) and
press the Enter key. Then type in their last name and press the Enter key. You
may fill in the rest of the personal information fields, or fill them in later.
iii. Click the red Save button at the top of the Employees/Subs screen.
G. Set User Access settings
i. Click the Access button at the top, right corner of the Employees/Subs screen.
ii. In the User Access window that opens, enter a Username and Password at the
bottom, right corner. Keep in mind the following when creating passwords:

15
a. The Username and Password are case-sensitive; therefore, the employee
must type them in exactly how you set them up here. Users may change their
password by clicking File > Preferences > Change Password.
b. The username and password must be between 1 and 10 characters long.
c. Don’t give multiple people in the company the same Username AND
Password. You may give them all the same Username but different
Passwords, or vice versa, but we recommend that each username and
password be unique.
d. Only those employees who will be using QFloors need to have a Username,
Password and Access settings.
iii. For the owner or main QFloors user, click the Master + button on the right side
of the window then click the OK button.
iv. Click Logoff on the Menu Bar.
v. Click the Logon button in the middle of the screen then type in the Username
and Password you just created to verify that they work. If they don’t work, logon
using the “Override” Username and Password received from QFloors Support,
then check the User Access settings you just created. Repeat until you are able to
login with the user’s credentials.
H. Close QFloors.
8. Install QTools If you purchased any QTools software products, (Document Manager, QReporter,
QSched), login to the QFloors website and click the Updates button, then click the
QTools link. Download the Installation Instructions for QTools document and follow
those instructions.
9. If installing in a Windows Server operating system, open a Command window, type in
the following command, then press Enter: change user /execute
10. Share the QFloors Directory on the Network Your network tech will probably need to do this step.
IMPORTANT! You must share the QFloors directory folder on the server so that all
users on the network have full, unrestricted access to it. This applies to both the Share
and the Security options for the folder. Again, users must be given “Full Control”,
“Change”, “Read”, etc. access to these directories (typically to the “Everyone” and the
“Users” groups).
11. Set Windows Power Options so that Computer Does Not Sleep
A. Click Start > Control Panel.
B. Click Power Options (or click System and Security > Power Options).
C. Click the Change Plan Settings link on the line of the active power plan.
D. Set “Put the computer to sleep” to Never.

16
12. Turn on Firewall and Configure Firewall Ports See Firewall Ports in the Network Requirements section of this Quick Start Manual.
13. Set Up Your Automated Backup System IMPORTANT! Do this now!!! See the Backing Up Your Data section later in this
manual.
Installing QFloors Small Business or QFloors Basic on Client/Workstation Computers Setting up a network and installing software on a network can be very complex. Make sure
your network is correctly configured before installing and using QFloors. We recommend
that your network administrator perform the QFloors installation.
Do not open the QFloors program until instructed to do so.
QFloors Basic may be installed on only one computer, unless additional licenses were
purchased.
1. Preliminary Steps
IMPORTANT! Before installing QFloors, make sure the following steps have been
followed:
A. Windows User Account - you need to be logged into an Administrative Windows
user account (no restrictions) that others will have access to if technical support is
needed in the future. If you need QFloors Support to help with any Sybase technical
issues, and you can’t login to the same Windows user account in which Sybase was
installed, QFloors Support will not be able to access necessary Sybase components.
B. Firewalls – make sure that all software firewalls on the server have been disabled.
C. If Windows 7, disable “Visual Styles on Windows & Buttons”
i. Go to the control panel and select System.
ii. Click the Advanced Tab
iii. Select Settings under the Performance section of this Window.
iv. Scroll to the bottom of the list and uncheck the entry named: “Use Visual Styles
on Windows and Buttons”.
2. Install ShowMyPC
A. Go to www.qfloors.com.
B. Hover your mouse arrow over the Partners button at the top (don’t click it), then
click ShowMyPC in the menu.

17
C. You need to know how to operate your computer and your Internet browser to allow
the file to Run, or to Save it first then find it and Run it.
D. Running it the first time puts a ShowMyPC shortcut on the desktop.
E. Close the ShowMyPC window.
3. Install QFloors
A. Sitting at the workstation, browse to and find the shared QFloors folder (where
QFloors was installed) on the main/server computer. Inside of this folder is a file
named Client Install Basic or Client Install SBL.msi. Double-click the file to start
the installation. Leave the installation path pointed to the server.
B. Welcome to QFloors – Click the Next button.
C. Select Installation Folder – This folder must be the same folder where QFloors was
originally installed on the server/main computer. If the correct path is displayed,
click the Next button. Note: If the path begins with C:\, there is a problem and you
should start over.
D. Ready To Install – Verify that the information is correct then click the Next button.
E. Completing QFloors Setup – Click the Finish button.
4. Install QTools If you purchased any QTools software products, (Document Manager, QReporter, or
QSched), follow the instructions in the Installation Instructions for QTools document
you used at the server.
5. Set Windows Power Options so that Computer Does Not Sleep A. Click Start > Control Panel
B. Click Power Options (or click System and Security > Power Options)
C. Click the Change Plan Settings link on the line of the active power plan
D. Set “Put the computer to sleep” to Never

18
QFloors High Performance Installation
Setting up a network and installing software on a network can be very complex. Make sure
your network is correctly configured before installing and using QFloors. We recommend
that your network administrator perform the QFloors installation.
Do not open the QFloors program until instructed to do so.
Installing QFloors High Performance on Server/Main Computer 1. Serial Number
Make sure you have the QFloors serial number on hand before starting the installation.
You’ll find your serial number in the “welcome” e-mail we sent to you when you first
purchased QFloors. During the software installation you will be required to input this
number and will be unable to complete the installation without it.
2. Obtain Passwords There are two sets of usernames and passwords that you’ll need as you install QFloors.
To obtain them, call QFloors Support during business hours at 801-563-0140. See
Contacting QFloors in this manual for hours.
A. QFloors.com login – To obtain the latest updates to the QFloors software and access
various support resources, you will need a username and password to login to the
QFloors website. You should have received an e-mail from us with this information.
If you don’t have it, please call us.
B. “Override” username and password – After installing QFloors and the latest
updates, you will need a Username and Password to open QFloors for the first time.
Call or e-mail us Mon-Fri the day of the installation, or on the Friday before if you're
installing on a weekend.
3. Install ShowMyPC A. Go to www.qfloors.com.
B. Hover your mouse arrow over the Partners button at the top (don’t click it), then
click ShowMyPC in the menu.
C. You need to know how to operate your computer and your Internet browser to allow
the file to Run, or to Save it first then find it and Run it.
D. Running it the first time puts a ShowMyPC shortcut on the desktop.
E. Close the ShowMyPC window.
4. Install QFloors on Your Server/Main Computer IMPORTANT! Before installing QFloors, make sure the following steps have been
followed:
A. Windows User Account - you need to be logged into an Administrative Windows
user account (no restrictions) that others will have access to if technical support is
needed in the future. If you need QFloors Support to help with any Sybase technical
issues, and you can’t login to the same Windows user account in which Sybase was
installed, QFloors Support will not be able to access necessary Sybase components.

19
B. Firewalls – make sure that all software firewalls on the server have been disabled.
C. If Windows 7, disable Visual Styles on Windows & Buttons
i. Go to the control panel and select System
ii. Click Advanced System Settings on the left
iii. In the Performance section, click the Settings button
iv. Scroll to the bottom of the list and uncheck Use visual styles on windows and
buttons
D. If installing in a Windows Server operating system, open a Command window, type
in the following command, then press Enter: change user /install
64-bit Server A. Login to the QFloors website and click the Updates button, then click the QFloors
High Performance link.
B. Click the Download button on the right side of line, QFloors HP Server 64bit (Full Install). You need to know how to operate your computer and your Internet browser
to allow the file to Run, or to Save it first then find it and Run it.
i. If you get a message telling you that you’re installing a 32-bit program and it
asks if you want to terminate the installation, click No.
ii. Welcome to the QFloors High Performance Setup Wizard – Click the Next button.
iii. End-User License Agreement – To install QFloors, you must select “I accept the
terms in this License Agreement”, then click the Next button.
iv. Select Installation Folder – The default installation location is C:\QFloors\.
Click the Next button to accept that, or you may type in or browse to a different
location.
v. Ready To Install – Click the Install button.
vi. Completing the QFloors High Performance Setup Wizard – Click the Finish button.
vii. Click Yes to allow the server to restart.
viii. If Windows 7, go to Step 4. If Windows 8 or Windows Server, go to Step C
below.
C. Install Sybase SQL Anywhere
i. If installing in a Windows Server operating system, open a Command window,
type in the following command, then press Enter: change user /install

20
ii. Browse to C:\QFloors\Installation Files\SQLANYWHERE9INSTALL\
iii. Right-click the file, Setup.exe, then click Run as administrator
iv. Choose Setup Language – Select English and click Next.
v. Question – “Setup has detected that you are running… Do you want to terminate
now?” Click No.
vi. Welcome – Click Next
vii. License Agreement – Select your country, then select “I accept the terms…”, then
click Next.
viii. Registration or Install Key – Type in (or copy/paste) the following Registration
Key and click Next:
EEPCAANRREJD2130018010500
ix. Choose Location – IMPORTANT! Click the Browse button and change the path
to C:\QFloors\Sybase9\ (The Sybase9 folder must be a subfolder of the
QFloors folder.) Then click Next.
x. Choose Shared Components Location – IMPORTANT! Click the Browse button
and change the path to C:\QFloors\Sybase9\Shared\ (The Shared
folder must be a subfolder of the Sybase9 folder.) Then click Next.
xi. Select Components – The only items that need to be checked are below – you
should uncheck all others. Then click Next.
Databases
Adaptive Server Anywhere (leave all of its subcomponents checked)
Tools
Sybase Central
jConnect
xii. Server License –
Name – The company owner’s or CEO’s name
Company – The name of the company
Licensed Units – The quantity of QFloors/Sybase licenses/seats purchased
Select Networked Seat (per seat) Model Click Next.
xiii. Select Program Folder – Click Next.
xiv. Start Copying Files – Click Next.
xv. If you get any Windows Security Alerts from Windows Defender Firewall, check
Private networks, and uncheck Public networks, then click Allow Access.
xvi. Setup Complete – Uncheck all of the options and click Finish.

21
xvii. InstallShield Wizard Complete – Select Yes, I want to restart my computer now, then click Finish.
D. Install the Sybase update
i. If installing in a Windows Server operating system, open a Command window,
type in the following command, then press Enter: change user /install
ii. Browse to C:\QFloors\Installation Files\EBF_SA9_32bit\
iii. Right-click the file, Setup.exe, then click Run as administrator.
iv. Choose Setup Language – Select English and click Next
v. Question – “Setup has detected that you are running… Do you want to terminate
now?” Click No.
vi. SQL Anywhere 9 EBF – Click Next
vii. License Agreement – Select your country, then select “I accept the terms…”, then
click Next
viii. Choose Location – IMPORTANT! Click the Browse button and change the path
to C:\QFloors\Sybase9\ (The Sybase9 folder must be a subfolder of the
QFloors folder.) Then click Next.
ix. Choose Shared Components Location – IMPORTANT! Click the Browse button
and change the path to C:\QFloors\Sybase9\Shared\ (The Shared
folder must be a subfolder of the Sybase9 folder.) Then click Next.
x. Choose Samples Location – IMPORTANT! Click the Browse button and change
the path to C:\QFloors\Sybase9\Samples\ (The Samples folder must
be a subfolder of the Sybase9 folder.) Then click Next.
xi. Select Components – The only items that need to be checked are below – you
should uncheck all others. Then click Next.
Databases
Adaptive Server Anywhere (leave all of its subcomponents checked)
Tools
Sybase Central
jConnect
xii. Start Copying Files – Click the Next button
a. You will not get a “Finish” button or any other notice that the installation is
complete other than the setup window closing.
b. Restart the server.
xiii. Configure Sybase Central
22
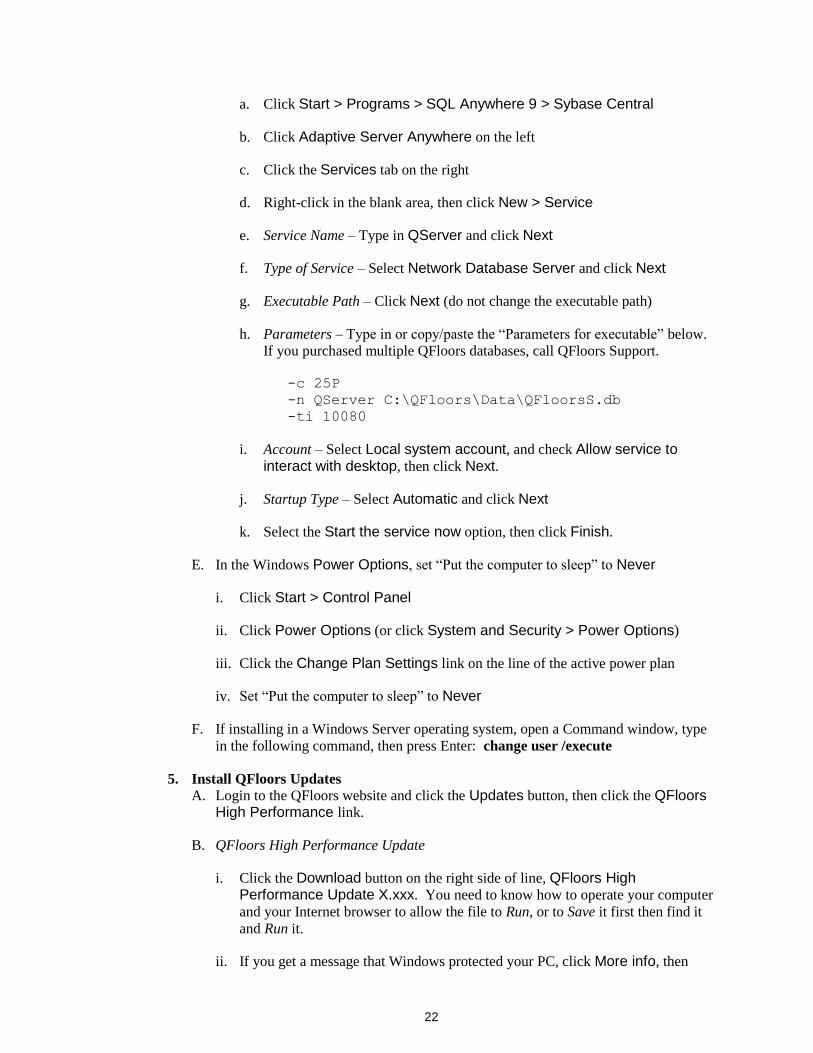
a. Click Start > Programs > SQL Anywhere 9 > Sybase Central
b. Click Adaptive Server Anywhere on the left
c. Click the Services tab on the right
d. Right-click in the blank area, then click New > Service
e. Service Name – Type in QServer and click Next
f. Type of Service – Select Network Database Server and click Next
g. Executable Path – Click Next (do not change the executable path)
h. Parameters – Type in or copy/paste the “Parameters for executable” below.
If you purchased multiple QFloors databases, call QFloors Support.
-c 25P
-n QServer C:\QFloors\Data\QFloorsS.db
-ti 10080
i. Account – Select Local system account, and check Allow service to interact with desktop, then click Next.
j. Startup Type – Select Automatic and click Next
k. Select the Start the service now option, then click Finish.
E. In the Windows Power Options, set “Put the computer to sleep” to Never
i. Click Start > Control Panel
ii. Click Power Options (or click System and Security > Power Options)
iii. Click the Change Plan Settings link on the line of the active power plan
iv. Set “Put the computer to sleep” to Never
F. If installing in a Windows Server operating system, open a Command window, type
in the following command, then press Enter: change user /execute
5. Install QFloors Updates A. Login to the QFloors website and click the Updates button, then click the QFloors
High Performance link.
B. QFloors High Performance Update
i. Click the Download button on the right side of line, QFloors High Performance Update X.xxx. You need to know how to operate your computer
and your Internet browser to allow the file to Run, or to Save it first then find it
and Run it.
ii. If you get a message that Windows protected your PC, click More info, then

23
click Run anyway.
iii. Welcome to the High Performance Update Setup Wizard – Click Next.
iv. Select Installation Folder – Click Next (do not change the installation path).
v. Ready To Install – Click Install.
vi. Completing the High Performance Update Setup Wizard – Click Finish
C. Tax Table – This is the payroll withholding tax table. If you are a computer/network
tech, the QFloors customer should have told you which option they are choosing (see
the Install QFloors section on page 1).
i. Choose ONE of the following four options (a, b, c, or d):
a. You are using an outside payroll service (recommended). You do not need
to download a tax table. Go to step 6.
b. Using the 2017 payroll withholding tables.
(1) Click the Back button in your Internet browser to go back to the main
Updates page.
(2) Click the Payroll Tables link. If you do not see this link, our records
show that you did not purchase the 2017 tax tables.
(3) Click the Download button on right side of the line, Tax Table 2017 (08-11-2017-R9). You need to know how to operate your computer
and your Internet browser to allow the file to Run, or to Save it first then
find it and Run it.
(4) Go to the next step in this section.
c. Using the 2016 payroll withholding tables.
(1) While still in the QFloors Small Business updates page, click the
Download button on the right side of line, Tax Table 2016 (12/29/2015 R1) New LIC. You need to know how to operate your
computer and your Internet browser to allow the file to Run, or to Save it
first then find it and Run it.
(2) Go to the next step in this section.
d. Using the manual payroll features in QFloors. You do not need to download
a tax table. Go to step 6.
ii. Welcome to the QFloors TaxLib Setup Wizard – Click Next.
iii. Select Installation Folder – Click Next (do not change the installation path).
iv. Ready To Install –Click Install.

24
v. Completing the QFloors TaxLib Setup Wizard – Click Finish.
6. Create an Employee with Master + Access
A. Open the QFloors program.
i. If you get a message that QFloors is already open, click OK, then close any “File
Explorer” windows that you have open, then open QFloors again.
ii. If you get a message that “QFloors has been upgraded to version X.x and
QFloors will now upgrade the database”
a. Click No.
b. Continue With Upgrade? – Click Yes.
c. Wait while the database upgrade proceeds.
d. Upgrade Complete – Click OK.
B. Database Serial Number
i. Enter Serial Number – Type in the database serial number then click OK.
ii. Enter Serial Number – Type in the database serial number again and click OK.
iii. Registration Complete – Click OK.
C. Click the Logon button in the middle of the screen. Type in the “override”
Username and Password obtained from QFloors Support in step 2, then click the OK
button.
D. Verify that you have installed the latest QFloors update by clicking Help on the
Menu Bar, then clicking About QFloors. If the version number doesn’t match the
one downloaded from the QFloors.com website, go back to step 4.
E. Click the Employees/Subs button at the top right corner of the QFloors screen.
F. Create a new employee
i. Click the New button in the top center area of the Employees/Subs screen.
ii. Type in an employee’s first name (probably one of the owners or managers) and
press the Enter key. Then type in their last name and press the Enter key. You
may fill in the rest of the personal information fields, or fill them in later.
iii. Click the red Save button at the top of the Employees/Subs screen.
G. Set User Access settings
i. Click the Access button at the top right corner of the Employees/Subs screen.
ii. In the User Access window that opens, enter a Username and Password at the
bottom right corner. Keep in mind the following:

25
a. The Username and Password are case-sensitive; therefore, the employee
must type them in exactly how you set them up here. Users may change their
password by clicking File > Preferences > Change Password.
b. The username and password must be between 1 and 10 characters long.
c. Don’t give multiple people in the company the same Username AND
Password. You may give them all the same Username but different
Passwords, or vice versa, but we recommend that each username and
password be unique.
d. Only those employees who will be using QFloors need to have a Username,
Password and Access settings.
iii. For the owner or main QFloors user, click the Master + button on the right side
of the window, then click OK.
iv. Click Logoff on the Menu Bar.
v. Click the Logon button in the middle of the screen then type in the Username
and Password you just created to verify that they work. If they don’t work, logon
using the “Override” Username and Password received from QFloors Support,
then check the User Access settings you just created. Repeat until you are able to
login with the user’s credentials.
H. Close QFloors.
7. Install QTools
If you purchased any QTools software products, (Document Manager, QReporter, or
QSched), login to the QFloors website and click the Updates button, then click the
QTools link. Download the Installation Instructions for QTools document and follow
those instructions.
8. Share the QFloors Directories on the Network
Your network tech will probably need to do this step.
IMPORTANT! You must share the QFloors directory folder on the server so that all
users on the network have full, unrestricted access to it. This applies to both the Share
and the Security options for the folder. Again, users must be given “Full Control”,
“Change”, “Read”, etc. access to these directories (typically to the “Everyone” and the
“Users” groups).
8. Set Windows Power Options so that Computer Does Not Sleep
A. Click Start > Control Panel
B. Click Power Options (or click System and Security > Power Options)
C. Click the Change Plan Settings link on the line of the active power plan
D. Set “Put the computer to sleep” to Never
9. Turn on Firewall and Configure Firewall Ports See Firewall Ports in the Network Requirements section of this Quick Start Manual.

26
10. Set Up Your Automated Backup System IMPORTANT! Do this now!!! See the Backing Up Your Data section later in this
manual.
Installing QFloors High Performance on Client/Workstation Computers Setting up a network and installing software on a network can be very complex. Make sure
your network is correctly configured before installing and using QFloors. We recommend
that your network administrator perform the QFloors installation.
Do not open the QFloors program until instructed to do so.
If you are installing QFloors High Performance on computers at a remote location, see
Installing QFloors High Performance at a Remote Location in this manual.
1. Preliminary Steps
IMPORTANT! Before installing QFloors, make sure the following steps have been
followed:
A. Windows User Account - you need to be logged into an Administrative Windows
user account (no restrictions) that others will have access to if technical support is
needed in the future. If you need QFloors Support to help with any Sybase technical
issues, and you can’t login to the same Windows user account in which Sybase was
installed, QFloors Support will not be able to access necessary Sybase components.
B. Firewalls – make sure that all software firewalls on the server have been disabled.
C. If Windows 7, disable “Visual Styles on Windows & Buttons”
i. Go to the control panel and select System.
ii. Click on the Advanced Tab
iii. Select Settings under the Performance section of this Window.
iv. Scroll to the bottom of the list and uncheck the entry named: “Use Visual Styles
on Windows and Buttons”.
2. Install ShowMyPC A. Go to www.qfloors.com.
B. Hover your mouse arrow over the Partners button at the top (don’t click it), then
click ShowMyPC in the menu.
C. You need to know how to operate your computer and your Internet browser to allow
the file to Run, or to Save it first then find it and Run it.
D. Running it the first time puts a ShowMyPC shortcut on the desktop.
E. Close the ShowMyPC window.

27
3. Install QFloors A. Sitting at the workstation, browse to and find the shared QFloors folder (where
QFloors was installed) on the main or server computer. Inside of this folder is a file
named Client Install HP.msi. Double-click this file to start the installation. Leave
the installation path pointed to the server.
B. Welcome to QFloors – Click the Next button.
C. Select Installation Folder – This folder must be the same folder where QFloors was
originally installed on the server/main computer. If the correct path is displayed,
click the Next button. Note: If the path begins with C:\, there is a problem and you
should start over.
D. Ready To Install – Verify that the information is correct then click the Next button.
E. Completing QFloors Setup – Click the Finish button.
4. Install QTools If you purchased any QTools software products, (Document Manager, QReporter,
QSched), follow the instructions in the Installation Instructions for QTools document
you used at the server.
5. Set Windows Power Options so that Computer Does Not Sleep A. Click Start > Control Panel.
B. Click Power Options (or click System and Security > Power Options).
C. Click the Change Plan Settings link on the line of the active power plan.
D. Set “Put the computer to sleep” to Never.
4. Turn on firewall if desired.
Using QFloors at a Remote Location
QCloud is a hosting service we offer to help you with your remote access needs. Contact us
for pricing and more information and let us help you take the worry and risk out of your
technology maintenance.
If you have remote locations that will be using QFloors and you will be managing your own
server and IT, we recommend that you connect using Windows Terminal Services/Remote
Desktop. Your network administrator may recommend a different solution.
28
Backing Up Your Data
We recommend that you use an automated, remote backup system.
Power outages, power surges, lightning, computer viruses, operating system glitches,
overheating, computer theft, and other undesirable events may occur that put your data at
risk. QFloors cannot prevent these situations. To avoid losing vital information you should
backup your data regularly. We recommend daily backups: The more time between
backups, the more time you’ll spend recreating lost data.
Also, you should take your backup data with you out of the building in case your computers
are stolen, you have a fire in your offices, etc.
If you’re not using an automated, remote backup system, there are various technologies and
media for storing your backup data manually. Talk with your computer or network
consultant to help you decide what you will use.
Automated Backups IMPORTANT! Go to www.qfloors.com and login, then click Application Notes > Data, Importing, Moving, and Technical Items. There you’ll find instruction documents for
setting up automated backups for QFloors Small Business (and Basic) and QFloors High
Performance.
Manual Backup IMPORTANT! Backing up QFloors High Performance must be done at the server/main
computer. QFloors Small Business and QFloors Basic may be backed up from any computer.
1. Open QFloors
2. Click File > Backup and read the message that opens regarding backing up your data,
then click the OK button.
3. In the Windows Save As dialog box, select the location where you would like the
database files saved. If the location is already selected, click the Save button. If not,
proceed with the steps 3A – 3D. If you need assistance with the following, please contact
your network or computer consultant.
A. Click the drop-down arrow at the right side of the Save in field at the top of the
dialog box.
B. Double-click the appropriate drive. If necessary, then double-click the appropriate
folders until you have selected the location you want.
C. In the File name field, you can either rename the file to be saved or you can leave it
as it is. (This file name will actually be a folder name after the backup is done.)
D. Click the Save button.
4. The Backup Completed window will open when the process is finished.
IMPORTANT! If you are planning on copying the backup to a flash drive, CD, etc., you
should make a note of the path to where you created the backup, then click OK.

29
5. You should also back up the contents of the Reports directory. By default this is located
on the server at C:\QFloors\Reports. If you need assistance with the following
steps, please contact your network or computer consultant.
A. Close QFloors on all computers.
B. Browse to the \QFloors\Reports directory on the server.
C. Copy the Reports directory and its contents, then paste them to your backup media.
6. If you use any QTools programs (Document Manager, QSched, or QReporter), you
should also back up the QTools Data directory. By default this is located on the server at
C:\QFloors\QTools\Data. If you need assistance with the following steps, please
contact your network or computer consultant.
A. Close QFloors and all QTools programs on all computers.
B. Browse to the \QFloors\QTools directory on the server.
C. Copy the Data directory and its contents, then paste them to your backup media.
30
Contacting QFloors
Training and Support Phone 801-563-0140
Fax 801-566-2528
Hours (Mountain Time Zone)
Monday – Thursday 8:00 am – 5:00 pm
Friday 8:00 am – 5:00 pm (closed 12:00 pm – 1:00pm)
After Hours Emergency Service (Must be current on Maintenance Plan)
Daily 6:30 am – 11:00 pm
Call and follow instructions
E-mail [email protected]
Website www.qfloors.com
Address QFloors
889 W Baxter Dr
South Jordan, UT 84095
Sales Phone 801-563-0140
Fax 801-566-2528
Hours (Mountain Time Zone)
Monday – Friday 8:00 am – 5:00 pm
E-mail [email protected]
Website www.qfloors.com
Address QFloors
889 W Baxter Dr
South Jordan, UT 84095
Related Documents