Quick Start Education April 2021

Welcome message from author
This document is posted to help you gain knowledge. Please leave a comment to let me know what you think about it! Share it to your friends and learn new things together.
Transcript

Quick Start
Education
April 2021


Contents
1. Introduction ......................................................................................................................... 3
2. Toolbar ................................................................................................................................. 4
Exercise 1 Starting Read&Write ................................................................................................ 4
Exercise 2 Positioning the toolbar ............................................................................................. 4
Exercise 3 Understanding the toolbar ....................................................................................... 4
3. Speech .................................................................................................................................. 5
Exercise 1 Reading text in documents ...................................................................................... 5
Exercise 2 Changing the voice ................................................................................................... 6
4. Read the Web ....................................................................................................................... 7
Exercise 1 Reading webpages in Internet Explorer ................................................................... 7
Exercise 2 Reading webpages in Edge ....................................................................................... 7
Exercise 3 Reading webpages in Chrome .................................................................................. 7
Exercise 4 Reading webpages in Firefox ................................................................................... 7
5. Screenshot Reader ................................................................................................................ 8
Exercise 1 Using the Screenshot Reader ................................................................................... 8
6. Audio Maker ......................................................................................................................... 9
Exercise 1 Converting text into an MP3 .................................................................................... 9
7. Screen Masking................................................................................................................... 11
Exercise 1 Using Screen Masking ............................................................................................ 11
Exercise 2 Changing the Screen Masking settings .................................................................. 11
Exercise 3 Using the Reading Light .......................................................................................... 13
8. PDF Reader ......................................................................................................................... 14
Exercise 1 Reading PDF documents ........................................................................................ 14
9. Scan ................................................................................................................................... 16
Exercise 1 Performing a scan to Word .................................................................................... 16
Exercise 2 Scanning from a Smartphone ................................................................................. 16
10. Dictionary ........................................................................................................................... 18
Exercise 1 Using the Dictionary ............................................................................................... 18
11. Picture Dictionary ............................................................................................................... 20
Exercise 1 Using the Picture Dictionary .................................................................................. 20
12. Highlighters ........................................................................................................................ 21
Exercise 1 Collecting text for your studies .............................................................................. 21
13. Vocabulary List ................................................................................................................... 23
Exercise 1 Creating a vocabulary list for your studies ............................................................. 23
14. Research Folder .................................................................................................................. 24
Adding text to the Research Folder ....................................................................... 24

Adding images to the Research Folder .................................................................. 26
Exporting from the Research Folder ...................................................................... 27
15. Voice Note .......................................................................................................................... 28
Exercise 1 Adding a Voice Note as a comment in Microsoft Word ........................................ 28
16. Check It .............................................................................................................................. 29
Exercise 1 Using Check It ......................................................................................................... 29
17. Prediction ........................................................................................................................... 32
Exercise 1 Using Prediction ..................................................................................................... 32
18. Talk&Type .......................................................................................................................... 34
Exercise 1 Preparing to use Talk&Type ................................................................................... 34
Exercise 2 Create text using Talk&Type .................................................................................. 34
Exercise 3 Correcting text using Talk&Type ............................................................................ 35
19. Translator ........................................................................................................................... 38
Exercise 1 Translating text ...................................................................................................... 38
Exercise 2 Changing the languages the Translator uses ......................................................... 39
Page 3
1. Introduction This is a very quick introduction to using Read&Write for Windows. For further
information on using the software, please refer to:
• The Read&Write for Windows Training Guide
• The Read&Write Help
• The Read&Write videos
➢ The “What else can you do?” sections lists the various options that are in the
software. If any of these interests, you please see the video for that feature.
Page 4
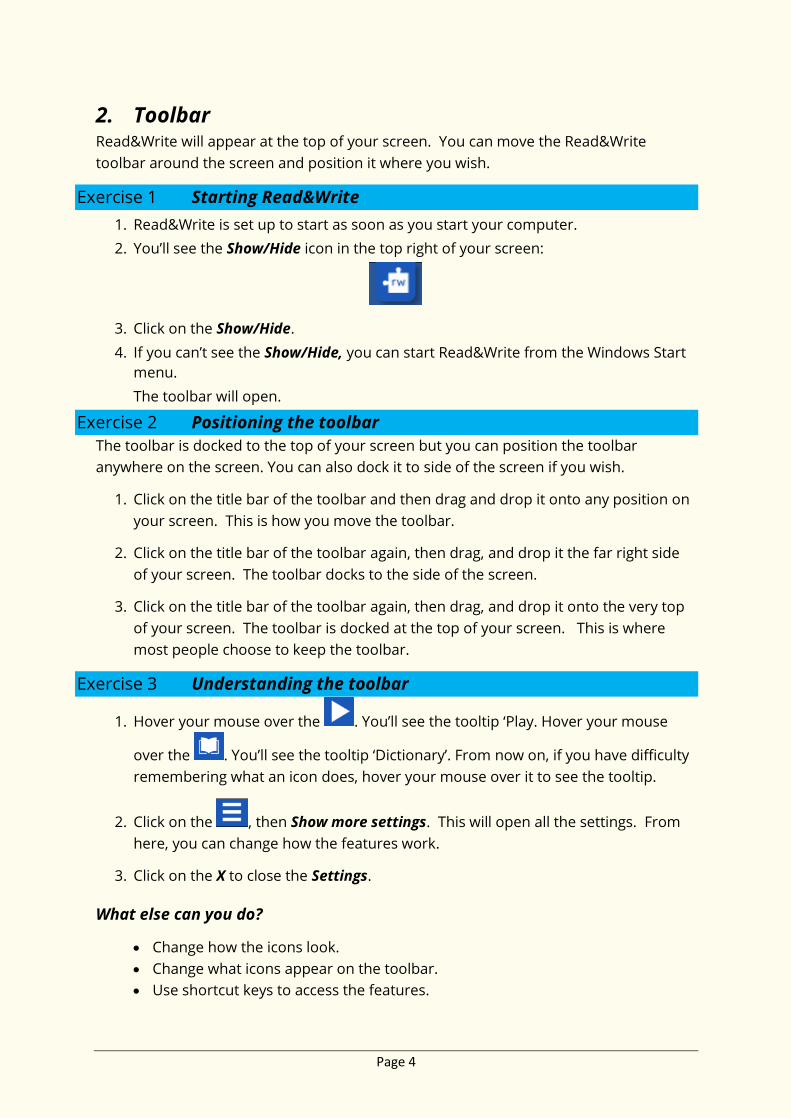
2. Toolbar Read&Write will appear at the top of your screen. You can move the Read&Write
toolbar around the screen and position it where you wish.
Exercise 1 Starting Read&Write
1. Read&Write is set up to start as soon as you start your computer.
2. You’ll see the Show/Hide icon in the top right of your screen:
3. Click on the Show/Hide.
4. If you can’t see the Show/Hide, you can start Read&Write from the Windows Start
menu.
The toolbar will open.
Exercise 2 Positioning the toolbar
The toolbar is docked to the top of your screen but you can position the toolbar
anywhere on the screen. You can also dock it to side of the screen if you wish.
1. Click on the title bar of the toolbar and then drag and drop it onto any position on
your screen. This is how you move the toolbar.
2. Click on the title bar of the toolbar again, then drag, and drop it the far right side
of your screen. The toolbar docks to the side of the screen.
3. Click on the title bar of the toolbar again, then drag, and drop it onto the very top
of your screen. The toolbar is docked at the top of your screen. This is where
most people choose to keep the toolbar.
Exercise 3 Understanding the toolbar
1. Hover your mouse over the . You’ll see the tooltip ‘Play. Hover your mouse
over the . You’ll see the tooltip ‘Dictionary’. From now on, if you have difficulty
remembering what an icon does, hover your mouse over it to see the tooltip.
2. Click on the , then Show more settings. This will open all the settings. From
here, you can change how the features work.
3. Click on the X to close the Settings.
What else can you do?
• Change how the icons look.
• Change what icons appear on the toolbar.
• Use shortcut keys to access the features.
Page 5
3. Speech Text-to-speech is one of the most important support features in Read&Write. Text can
be read as you type or from any document. It will read each word, sentence, paragraph
or selected text. There is a choice of different voices, which can be adjusted to suit you
by altering the pitch, speed, and volume. You can choose the way text is displayed or
highlighted during speech.
By hearing your work read, you’ll be able to identify mistakes in punctuation, spelling
and meaning. Having documents read to you will also increase your recognition of
words and understanding of the text.
Exercise 1 Reading text in documents
Open a Word document with some text in it or type the following text into a blank
Microsoft Word document:
A volcano tends to occur where tectonic plates meet. The earth is made up of about 8
big tectonic plates. When volcanoes erupt they can throw out lava, ash and gases. An
example of a volcano is Mount Rinjani. This volcano is found on the island of Lombok.
It has a long history of eruptions and erupted in 1994 and more recently in May 2010.
Volcanoes can cause major destruction.
Note: It’s recommended that you save this document, as you’ll use it later in the guide.
Remember to check that your sound is enabled!
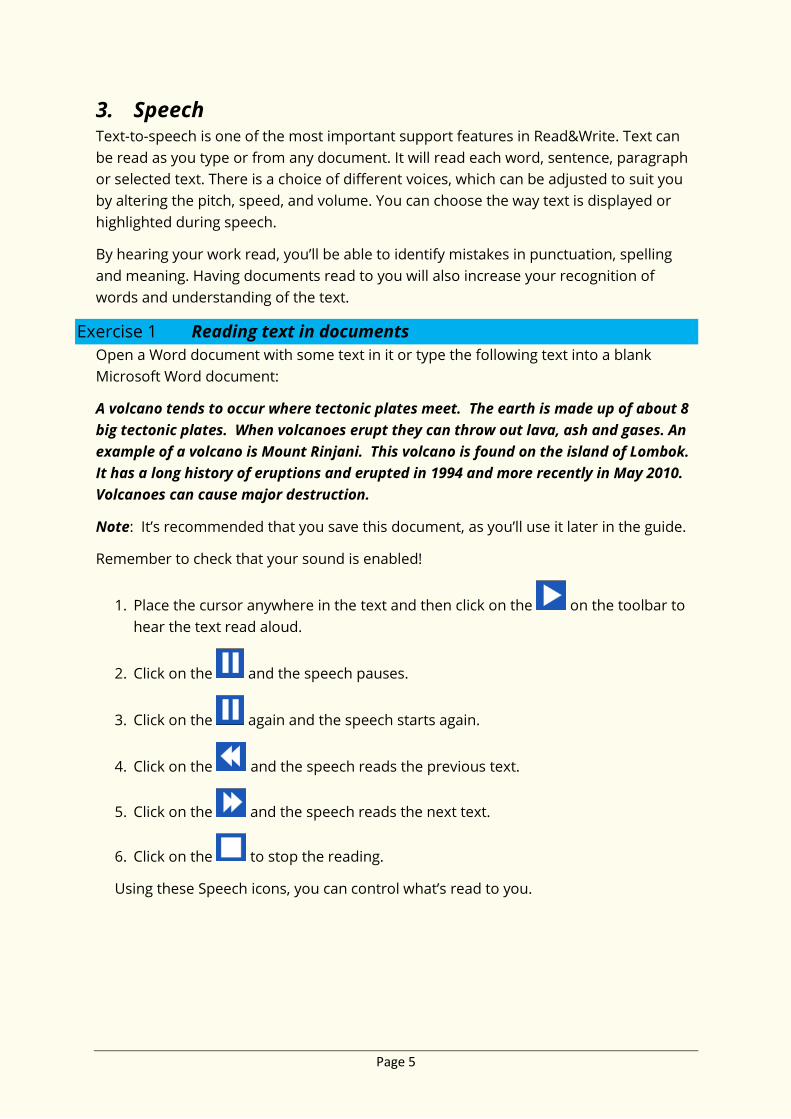
1. Place the cursor anywhere in the text and then click on the on the toolbar to
hear the text read aloud.
2. Click on the and the speech pauses.
3. Click on the again and the speech starts again.
4. Click on the and the speech reads the previous text.
5. Click on the and the speech reads the next text.
6. Click on the to stop the reading.
Using these Speech icons, you can control what’s read to you.
Page 6
Exercise 2 Changing the voice
If you’re not happy with the voice that is used to read the text, you can change it. To do
this:
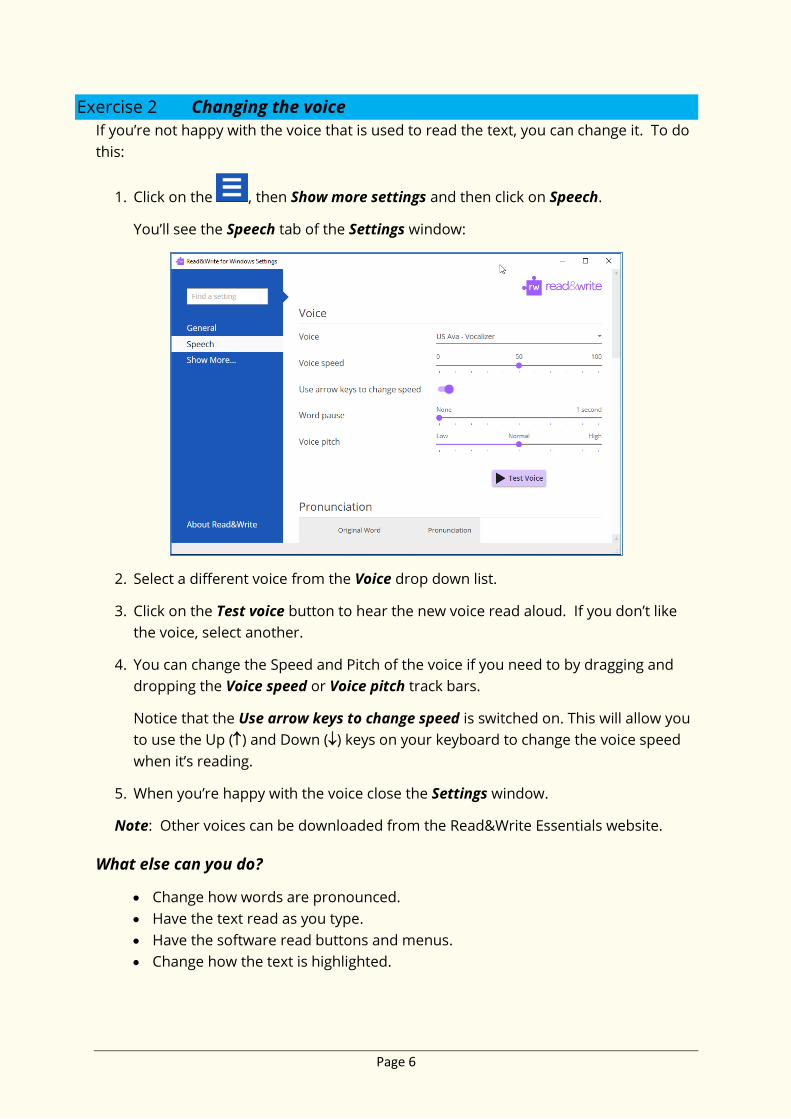
1. Click on the , then Show more settings and then click on Speech.
You’ll see the Speech tab of the Settings window:
2. Select a different voice from the Voice drop down list.
3. Click on the Test voice button to hear the new voice read aloud. If you don’t like
the voice, select another.
4. You can change the Speed and Pitch of the voice if you need to by dragging and
dropping the Voice speed or Voice pitch track bars.
Notice that the Use arrow keys to change speed is switched on. This will allow you
to use the Up () and Down () keys on your keyboard to change the voice speed
when it’s reading.
5. When you’re happy with the voice close the Settings window.
Note: Other voices can be downloaded from the Read&Write Essentials website.
What else can you do?
• Change how words are pronounced.
• Have the text read as you type.
• Have the software read buttons and menus.
• Change how the text is highlighted.
Page 7
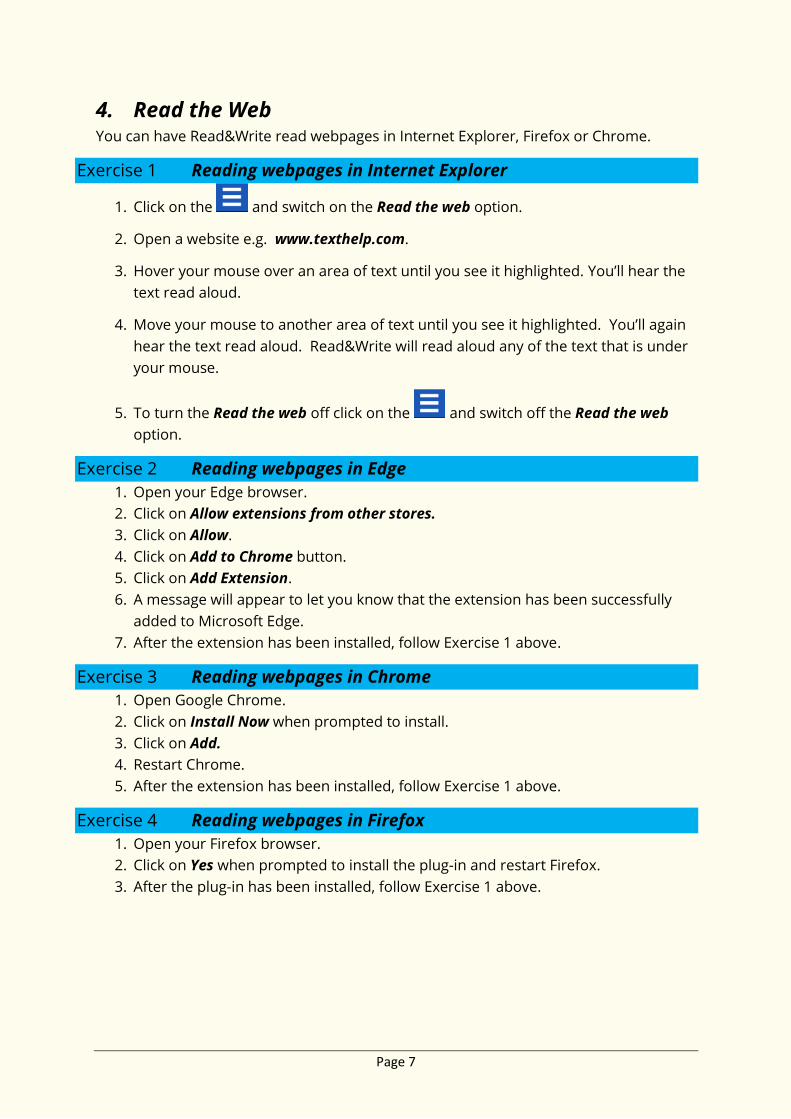
4. Read the Web You can have Read&Write read webpages in Internet Explorer, Firefox or Chrome.
Exercise 1 Reading webpages in Internet Explorer
1. Click on the and switch on the Read the web option.
2. Open a website e.g. www.texthelp.com.
3. Hover your mouse over an area of text until you see it highlighted. You’ll hear the
text read aloud.
4. Move your mouse to another area of text until you see it highlighted. You’ll again
hear the text read aloud. Read&Write will read aloud any of the text that is under
your mouse.
5. To turn the Read the web off click on the and switch off the Read the web
option.
Exercise 2 Reading webpages in Edge
1. Open your Edge browser.
2. Click on Allow extensions from other stores.
3. Click on Allow.
4. Click on Add to Chrome button.
5. Click on Add Extension.
6. A message will appear to let you know that the extension has been successfully
added to Microsoft Edge.
7. After the extension has been installed, follow Exercise 1 above.
Exercise 3 Reading webpages in Chrome
1. Open Google Chrome.
2. Click on Install Now when prompted to install.
3. Click on Add.
4. Restart Chrome.
5. After the extension has been installed, follow Exercise 1 above.
Exercise 4 Reading webpages in Firefox
1. Open your Firefox browser.
2. Click on Yes when prompted to install the plug-in and restart Firefox.
3. After the plug-in has been installed, follow Exercise 1 above.

Page 8
5. Screenshot Reader
In most cases simply using the or the Read the web option will enable the text in a
document or webpage to be read to you. However, there are some programs where
the text is inaccessible. For example: inaccessible Flash, locked PDF documents and text
in images. When you want to have text read in these applications, you’ll need to use the
Screenshot Reader.
Exercise 1 Using the Screenshot Reader
In this exercise, you’ll learn how to use the Screenshot Reader to read aloud text in
pictures.
Note: The Screenshot Reader can be used with inaccessible Flash and locked PDF
documents as well as pictures.
1. Open Google and search for “picture with text in it”.
2. Click on one of the pictures.
3. Click on the . Your cursor now looks like this +.
4. Click and hold your left mouse button on the top left-hand corner of the picture,
then drag and drop the rectangle to the bottom right-hand corner. After a
moment Read&Write reads the text aloud:
If you wish the text re-read click on the button that has appeared within the
picture.
5. Click on the to close the Screenshot Reader window.
What else can you do?
• Screenshot to Microsoft Word
• Change the Screenshot Reader options.

Page 9
6. Audio Maker It is possible to convert your text into an MP£. Once converted the MP3 can be put onto
an audio device such as an iPod, MP3 player or smart phone and listened to whenever
and wherever you wish.
This feature is ideal for revising work at the end of the day on the way home from
school, college or work. You could convert text from a novel or magazine to listen to
when relaxing or studying.
Exercise 1 Converting text into an MP3
1. Highlight the following text in your document:
A volcano tends to occur where tectonic plates meet. The earth is made up of
about 8 big tectonic plates. When volcanoes erupt they can throw out lava, ash
and gases. An example of a volcano is Mount Rinjani. This volcano is found on
the island of Lombok. It has a long history of eruptions and erupted in 1994 and
more recently in May 2010. Volcanoes can cause major destruction.
2. Click on the button on the toolbar.
3. The text you highlighted will appear in the Audio Maker panel:
Note: You can type into this window if you wish to add further text or delete
unwanted text.
4. If you want to hear what the MP3 is going to sound like click on Preview Audio.
5. To choose somewhere other than the folder shown in the Where area click on the
button.
6. In the Browse for Folder panel choose or create the folder you want to save your
MP3 in.

Page 10
7. To give the file a different name to that which is already there, click into the File
Name area and edit.
8. Click on Create MP3.
9. After a moment a message will appear saying Your MP3 has been successfully
created.
10. Click on Show.
11. A Windows Explore panel will appear with the MP3 already highlighted.
12. Double click on the MP3 to have it open and play.

Page 11
7. Screen Masking Many people, particularly those with dyslexia, find reading text easier when certain
colours are used. The Screen Masking in Read&Write has screen tinting options to
make reading from a computer screen less stressful. In addition, there is the ability to
underline text or block out unnecessary text to aid concentration.
There are many choices to suit individual preferences. The Screen Masking feature
therefore enhances your reading ability, improves focus and concentration levels and
ultimately provides a more relaxed and enjoyable reading experience.
Exercise 1 Using Screen Masking
In this exercise, you’ll learn how to use the Screen Masking.
1. Open a Microsoft Word document and then click on the .
The screen now has a light blue tint.
2. Notice the small Screen Masking toolbar that has appeared in the bottom right of
your screen:
3. Click on the button in this toolbar and it will turn off Screen Masking so the
screen tint is removed.
Note: You can click on the to turn it off instead.
Exercise 2 Changing the Screen Masking settings
In this exercise, you’ll learn how to change the colours and masking type used by Screen
Masking.
1. Click on the , then Show more settings, Show More and then click on Screen
Masking.

Page 12
You’ll see the Screen Masking tab of the Settings window:
3. There are different masking types available:
a. Tint whole screen
b. Underline typing line
c. Tint typing line
d. Change page colour
e. Underline cursor
4. Select the Tint typing line option.
5. Select a green colour from the Line colour palette.
6. Adjust the Line opacity track bar until you have selected a more transparent
colour, i.e. move the scale more to the left.
7. Close the Settings.
8. Click on the .
9. Type the following text into a blank Microsoft Word document:
This is Screen Masking.
Notice how the Screen Masking facility tints the line of text you’re typing.
10. Click the to turn off the facility.
You can practice setting up some of your own display options.

Page 13
Exercise 3 Using the Reading Light
In this exercise, you’ll learn how to use the Reading Light.
1. Click on the , then Show more settings, Show More and then click on Screen
Masking.
2. You’ll see the Screen Masking tab of the Settings window:
2. Select the Tint whole screen option.
Note: You can only enable the Reading Light when you have chosen to tint the
whole screen.
3. Adjust the Background Opacity track bar until you have selected a more opaque
colour, i.e. move the scale more to the right.
4. Notice the Reading light switch is on.
5. Click on the Reading light colour palette and choose a colour.
6. Make the spotlight smaller by moving the Reading light height track bar more to
the left.
7. Close the Settings.
8. Click on the .
9. Move your mouse across the screen and notice how the spotlight works.
10. Click on the to turn off Screen Masking when you have finished.

Page 14
8. PDF Reader PDF Reader will read text aloud from a PDF document.
Government, education and organisations, to make documents available on the
Internet, are increasingly using PDF documents. By providing PDF Reader, these
documents are accessible to those with reading difficulties. It’s also used in conjunction
with the Scanning feature in Read&Write.
Exercise 1 Reading PDF documents
In this exercise, you’ll learn how to read text aloud in PDF documents using PDF Reader.
Click on the button and open a PDF document.
The PDF document will open and look something like this:
Click on the text. PDF Reader reads aloud the text in your document.
Click on the to stop it reading.
In the top left window of PDF Reader is this button . This is Click to Speak.
It’s switched on by default, which is why just clicking on the text sets it reading
aloud.
Click on the Click to Speak to turn it off. The button will look like this: ..
Now you’ll be able to select text to use with the Dictionary, or Highlighters if you
need them.
If you want to read text with Click to Speak off just select the text and click .
There are other controls in the toolbar at the bottom of PDF Reader:
• - Table of Contents when clicked will show the contents of the PDF.

Page 15
• - Rotate Counter clockwise will turn the page counter clockwise.
• - Rotate Clockwise will turn the page clockwise
• - Print will open the Printer controls in order to print the document
• - Find in document will open a search box
• - Zoom In to zoom in to your document.
• - Zoom out to zoom out of your document.
• - Zoom to choose from a number of pre-set zoom
options
• - Previous Page to go to previous page
• - Next Page to go to next page
• - Current Page/Total number of pages.

Page 16
9. Scan Read&Write allows you to scan any paper document into PDF, Word, HTML or ePub. Not
only can the scanning function be used with a scanner, but also you can use it with a
smartphone or digital camera. For example, you could take a picture of a poster while
you’re out, and then use Read&Write to read it aloud for you at home.
Note: To complete this section, you must ensure that you have set up your scanner
correctly and have two A4 coloured documents containing text and pictures.
Exercise 1 Performing a scan to Word
In this exercise, you’ll learn how to scan a single page into PDF or Microsoft Word.
1. Place a page into your scanner.
2. Click on the .
3. You’ll see the Scan window. In the Make me a area select Word Doc:
4. Click on Scan.
5. Once the scan is complete, you’ll see the Save As window displayed.
6. Type My Scan to Word in the File Name field, find a location in which to save the
scan, and then click on the Save button.
You’ll see the scanned image displayed in Microsoft Word. This type of scan is
recommended if you want to edit the scanned document.
Exercise 2 Scanning from a Smartphone
In this exercise, you’ll learn how to scan from a photo you have taken with your
Smartphone. This is useful if you don’t have access to a scanner.
1. Place an A4 page of paper containing text on your desk and take a photo of it.
2. Connect your phone to your computer using your USB cable.
3. Make sure you allow this device to access to your photos.
Page 17
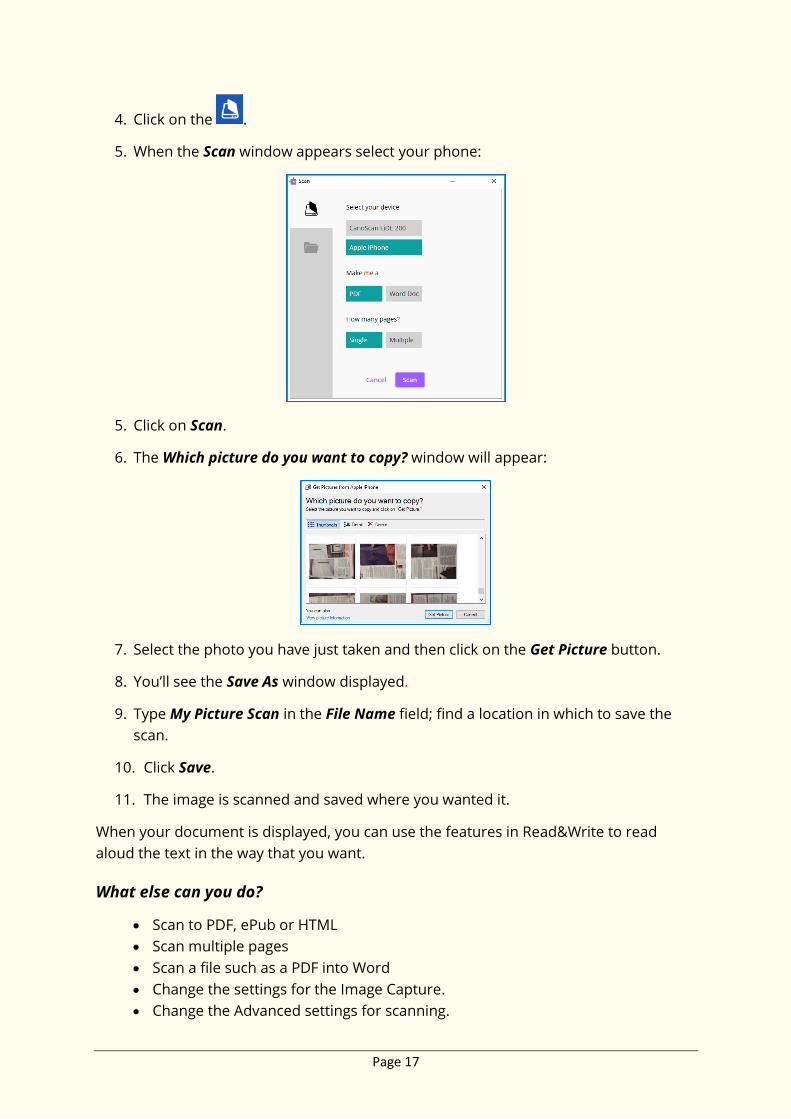
4. Click on the .
5. When the Scan window appears select your phone:
5. Click on Scan.
6. The Which picture do you want to copy? window will appear:
7. Select the photo you have just taken and then click on the Get Picture button.
8. You’ll see the Save As window displayed.
9. Type My Picture Scan in the File Name field; find a location in which to save the
scan.
10. Click Save.
11. The image is scanned and saved where you wanted it.
When your document is displayed, you can use the features in Read&Write to read
aloud the text in the way that you want.
What else can you do?
• Scan to PDF, ePub or HTML
• Scan multiple pages
• Scan a file such as a PDF into Word
• Change the settings for the Image Capture.
• Change the Advanced settings for scanning.

Page 18
10. Dictionary Read&Write has a Dictionary to improve your word comprehension. It allows you to find
alternative suggestions for words and provides audible definitions and sample sentence
for each selected word.
By providing a dictionary with descriptions and sample sentences that can be read to
aid understanding, Read&Write provides the means to increase vocabulary and
understanding.
Type the following text onto a new line in your document:
The earth revolves around the sun.
Exercise 1 Using the Dictionary
1. Highlight the word ‘earth’.
2. The Pop-up Dictionary will appear beside the word.
You’ll see a simple definition for the word ‘earth’ displayed
3. Click on the More >> button.
The Google Dictionary will appear in your browser:
3. Close your browser.
Page 19
4. Click on the to close the Pop-up Dictionary.
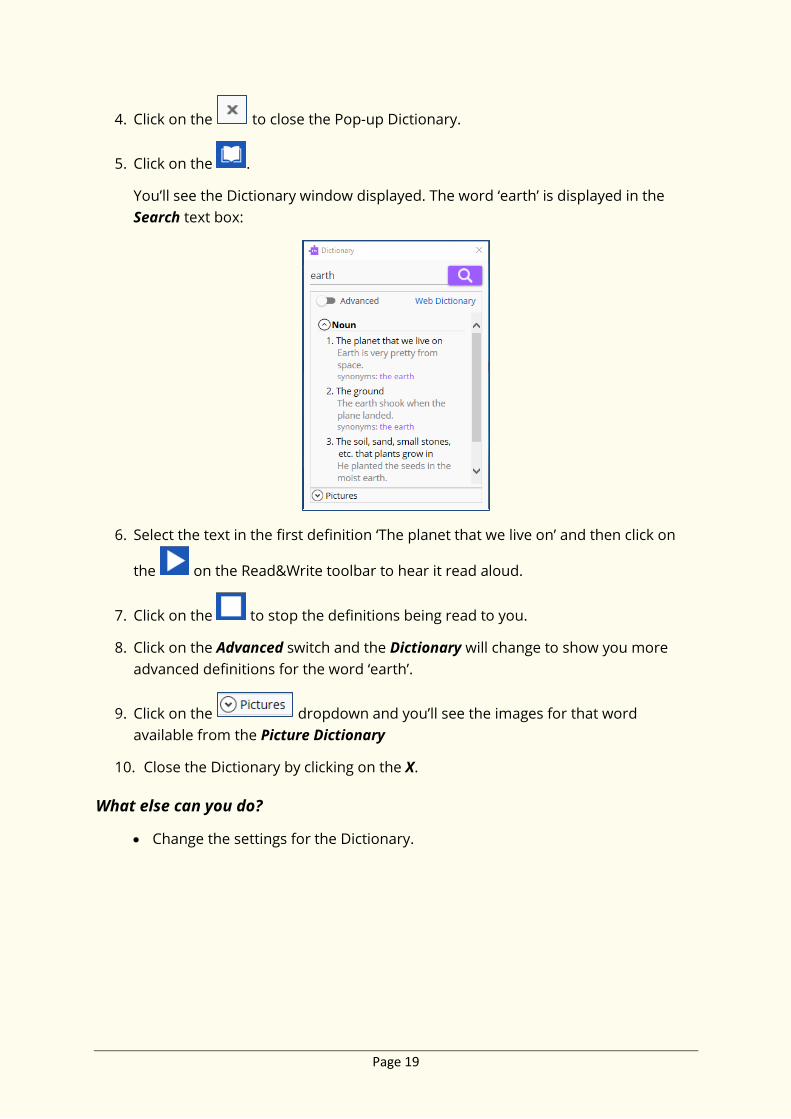
5. Click on the .
You’ll see the Dictionary window displayed. The word ‘earth’ is displayed in the
Search text box:
6. Select the text in the first definition ‘The planet that we live on’ and then click on
the on the Read&Write toolbar to hear it read aloud.
7. Click on the to stop the definitions being read to you.
8. Click on the Advanced switch and the Dictionary will change to show you more
advanced definitions for the word ‘earth’.
9. Click on the dropdown and you’ll see the images for that word
available from the Picture Dictionary
10. Close the Dictionary by clicking on the X.
What else can you do?
• Change the settings for the Dictionary.

Page 20
11. Picture Dictionary Read&Write has a Picture Dictionary to improve your word comprehension. It shows
you images for any word you select.
Note: You must be online in order to use the Picture Dictionary.
Exercise 1 Using the Picture Dictionary
1. Click on the . Highlight the word ‘world’.
You’ll see the Picture Dictionary window displayed:
2. Highlight the word ‘revolve’ in your document.
The Picture Dictionary window displays a picture representing the word revolve.
3. Click on the ‘revolve’ hyperlink. This will open the Dictionary.
4. Close the Dictionary.
Note: You can highlight words in any of the Read&Write facilities to display pictures
in the Picture Dictionary window.
5. Click on the button on the top right-hand corner of the Picture Dictionary
window to close it.

Page 21
12. Highlighters Often when reading notes, books or journals we use coloured markers to highlight
pieces of text, which are of particular relevance to the subject we are studying. With the
Highlighters in Read&Write, this same ability is brought to the computer.
You can use Highlighters to highlight text in Microsoft Word, Internet Explorer, Firefox
and Chrome using different colours. You can then collect the highlighted text and insert
it into a new document.
This is particularly useful when you have a large piece of text with multiple themes or
categories that are important. You can give each category a different colour and collate
each colour’s information later.
Exercise 1 Collecting text for your studies
In this exercise, you’ll learn how to collect different types of text and then insert them
into a new document in the order in which you want them displayed.
1. Open your Internet browser window and then open one of your favourite
websites.
Alternatively, open a Microsoft Word document of your choice.
2. Highlight some text on the page and then click on the (Highlight green).
Read&Write highlights the text in green. An example is shown below:
3. Highlight some more text on this page and then click on the (Highlight pink).
Read&Write highlights the text in pink.
4. Repeat step 3 to highlight two further separate paragraphs in pink.
5. Highlight some of the text in pink and then click on the .
Read&Write de-selects the highlighted text in pink.
6. Open another one of your favourite websites.
Alternatively, open another Microsoft Word document of your choice.
7. Highlight some text on the page and then click on the (Highlight green).
Read&Write highlights the text in green.
8. Click on the .

Page 22
9. Read&Write collects the highlighted text from both of the webpages (or Word
documents) and inserts it into a new Microsoft Word document. It also inserts a
bibliography at the bottom of the page.
What else can you do?
• Change the settings for the Highlighters.
Page 23
13. Vocabulary List You can use Vocabulary List feature to highlight words in Microsoft Word and in Internet
Explorer using different colours. You can then collect the highlighted words and insert it
into a new document with the Dictionary definitions and Picture Dictionary definitions.
Exercise 1 Creating a vocabulary list for your studies
1. Open your Internet browser window and then a website of your choice.
Alternatively, open a Microsoft Word document of your choice.
2. Highlight a word on the page and then click on the (Highlight green). Repeat
this step until you have several words highlighted.
Note: You can use any highlighter with the Vocabulary List.
3. Click on the on the toolbar.
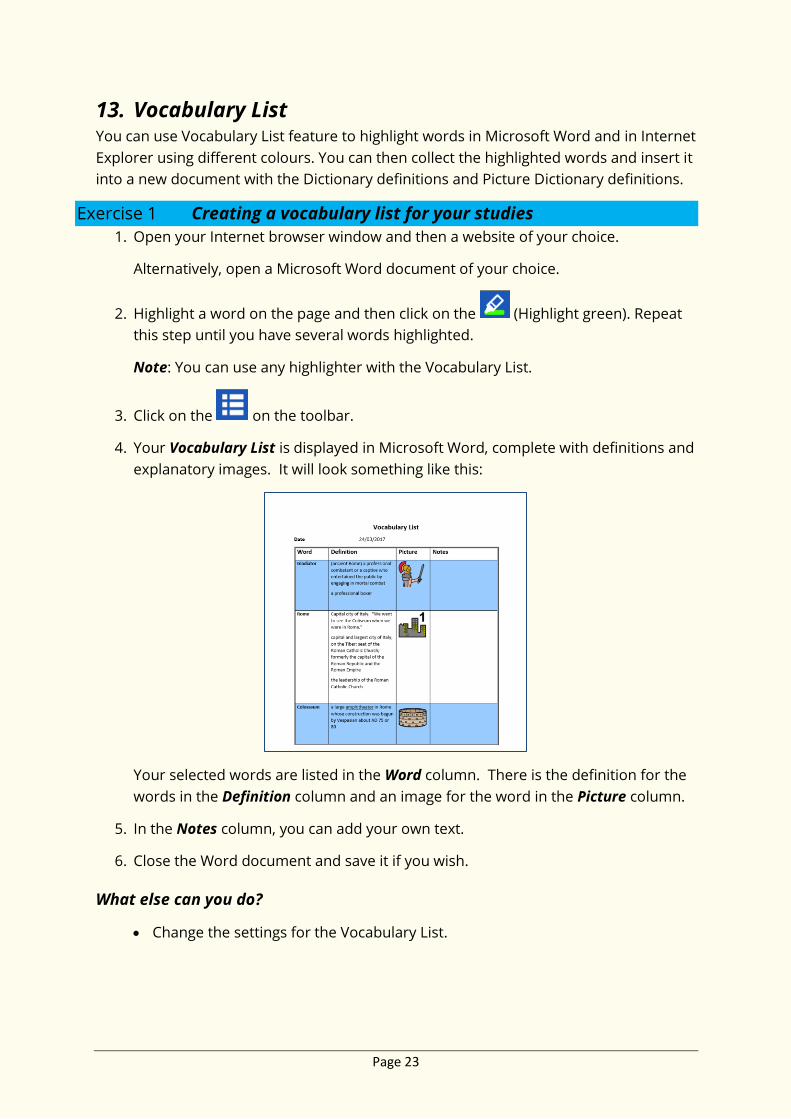
4. Your Vocabulary List is displayed in Microsoft Word, complete with definitions and
explanatory images. It will look something like this:
Your selected words are listed in the Word column. There is the definition for the
words in the Definition column and an image for the word in the Picture column.
5. In the Notes column, you can add your own text.
6. Close the Word document and save it if you wish.
What else can you do?
• Change the settings for the Vocabulary List.
Page 24
14. Research Folder The Research Folder can be used to quickly collect and save information that you want
to keep. This information can later be exported to Microsoft Word and include a
Bibliography.
Adding text to the Research Folder
In this exercise, you’ll learn how to add text to the Research Folder.
1. Open Internet Explorer and using www.google.com search for information on any
topic that appeals to you.
2. Choose one of the results and click on the link.
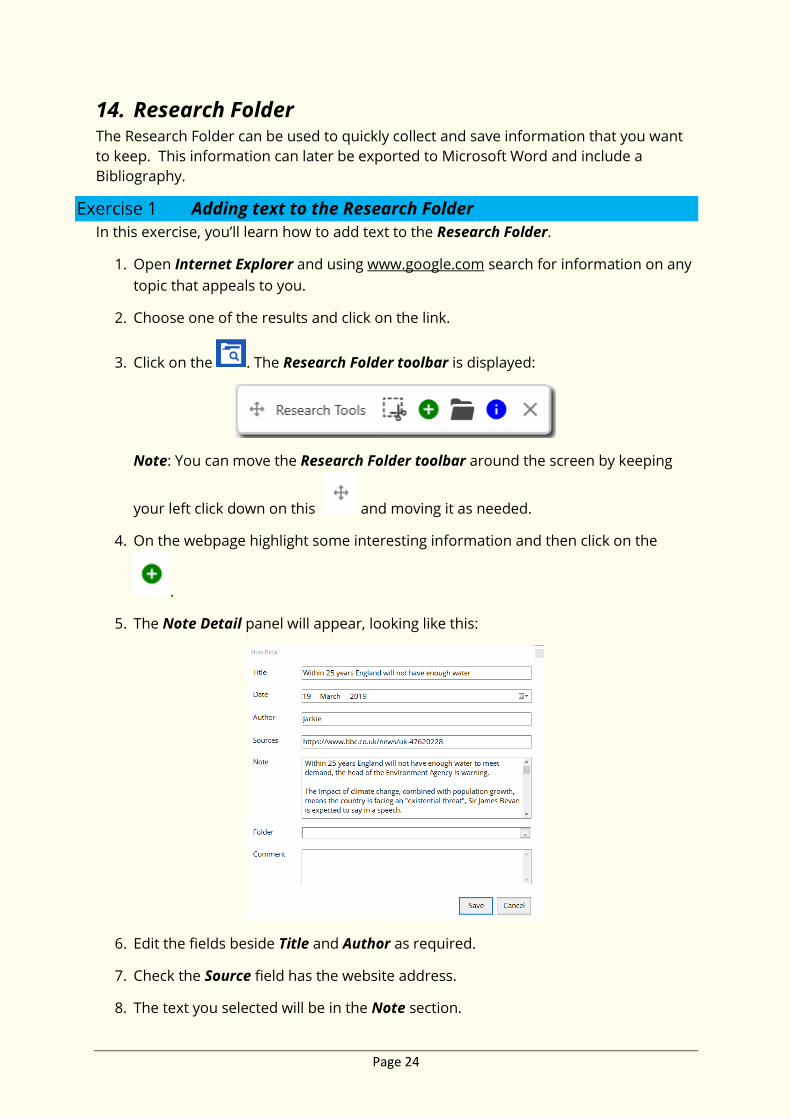
3. Click on the . The Research Folder toolbar is displayed:
Note: You can move the Research Folder toolbar around the screen by keeping
your left click down on this and moving it as needed.
4. On the webpage highlight some interesting information and then click on the
.
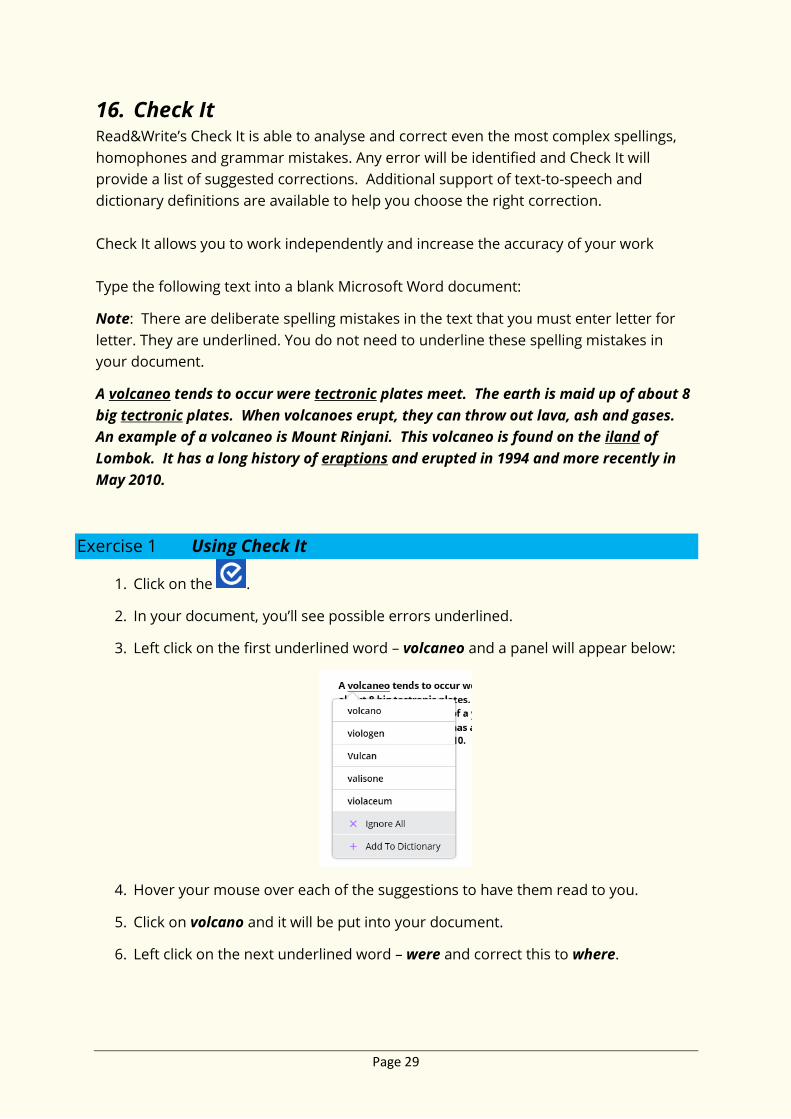
5. The Note Detail panel will appear, looking like this:
6. Edit the fields beside Title and Author as required.
7. Check the Source field has the website address.
8. The text you selected will be in the Note section.

Page 25
9. Click on the beside the Folder field. The Select Folders panel will appear:
10. Click on Add to open the Edit Folder Name panel:
11. Type in a Folder name that relates to the text you are adding then click OK. You
will be returned to the Select Folders panel. It will look like this:
12. Check the box that is beside the Folder name that you have just added, then click
OK. You will be returned to the Note Details panel.
13. Click Save.
14. The text that you selected will be saved in your Research Folder.

Page 26
Adding images to the Research Folder
In this exercise, you’ll learn how to add images to the Research Folder.
1. Look for a picture on the webpage you have open. If you can’t find one, navigate
to another website that contains images.
2. If you have closed the Research Folder toolbar, click on the to open it.
3. Click on the .
4. Your cursor will change to look like this +.
5. Using this cursor draw a box round the image you would like to save. When you
release your click the Note Details panel will automatically appear, looking like
this:
6. Edit the fields beside Title and Author as required.
7. Check the Source field has the website address. If this is blank type in the source.
8. The text “Your image has been collected” will be in the Note section.
9. Click on the beside the Folder field. The Select Folders panel will appear.
10. Check the box that is beside the Folder name that you have just added, then click
OK. You will be returned to the Note Details panel.
11. Click Save.

Page 27
Exporting from the Research Folder
In this exercise, you’ll learn how to export from your Research Folder.
1. If you have closed the Research Folder toolbar click on the to open it.
2. Click the to open your Research Folder. It will look like this:
3. Click the boxes that appear beside each of the items you saved to your Research
Folder that you would like to export.
4. Click on Export.
5. A Microsoft Word document will be created with each of the items you had
selected in the Research Folder.
6. Under each item with be the reference details that were entered for it in the Notes
Detail panel. This information can be used to create a bibliography.
What else can you do?
• Change the style that the reference is provided in – Change the reference style
used.

Page 28
15. Voice Note You can use the Voice Note to add comments or instructions to a Microsoft document.
You can also save the Voice note independently and use with other applications that
support audio files such as PowerPoint.
Exercise 1 Adding a Voice Note as a comment in Microsoft Word
1. Open a Microsoft Word document.
2. Click in the document where you would like to place the Voice Note.
3. Click on the button.
4. The Voice Note panel will appear:
5. When you are ready click on Record Audio.
6. Speak into your microphone what you would like to say.
7. When you have finished click on Stop.
8. You can Replay the Voice Note by clicking on Play.
9. Click on Insert to put the Voice Note into the document.
10. In the Word document a comment will appear beside where you clicked which
look something like this:
11. You can listen to the Voice Note by double clicking on this icon .
What else can you do?
• Create a Voice Note to add to an application.
• Change how the Voice Note is displayed in Microsoft Word.
Page 29
16. Check It Read&Write’s Check It is able to analyse and correct even the most complex spellings,
homophones and grammar mistakes. Any error will be identified and Check It will
provide a list of suggested corrections. Additional support of text-to-speech and
dictionary definitions are available to help you choose the right correction.
Check It allows you to work independently and increase the accuracy of your work
Type the following text into a blank Microsoft Word document:
Note: There are deliberate spelling mistakes in the text that you must enter letter for
letter. They are underlined. You do not need to underline these spelling mistakes in
your document.
A volcaneo tends to occur were tectronic plates meet. The earth is maid up of about 8
big tectronic plates. When volcanoes erupt, they can throw out lava, ash and gases.
An example of a volcaneo is Mount Rinjani. This volcaneo is found on the iland of
Lombok. It has a long history of eraptions and erupted in 1994 and more recently in
May 2010.
Exercise 1 Using Check It
1. Click on the .
2. In your document, you’ll see possible errors underlined.
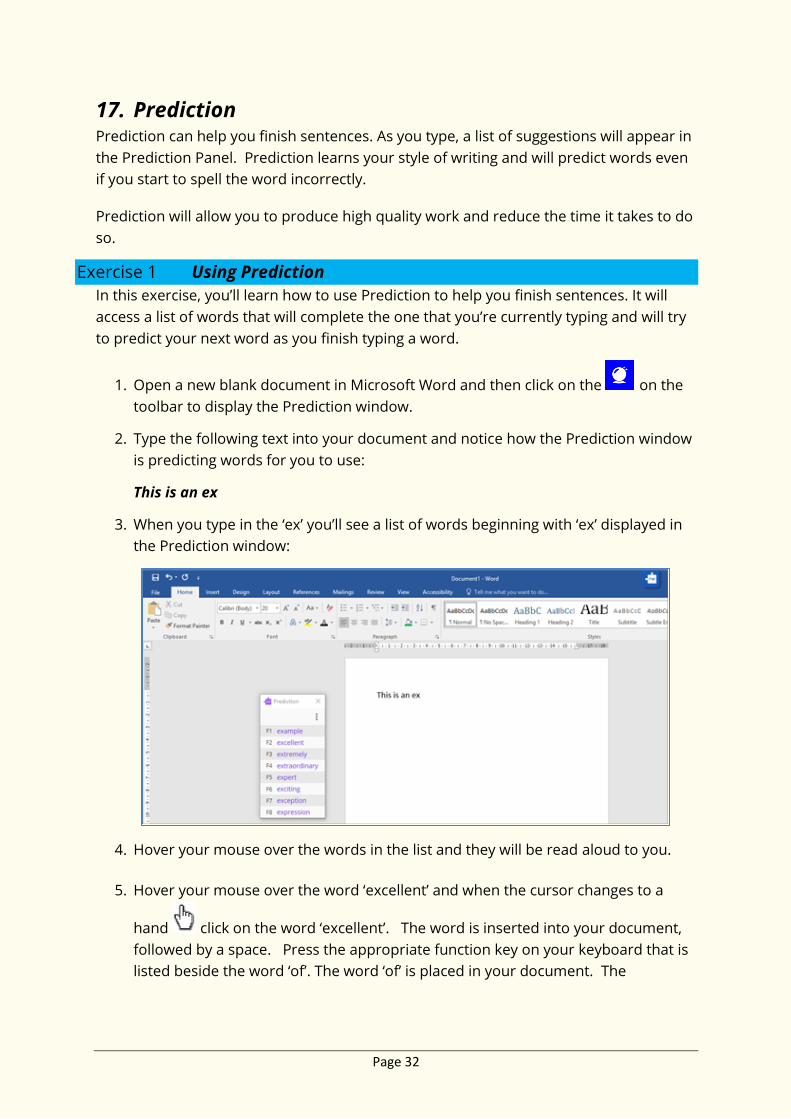
3. Left click on the first underlined word – volcaneo and a panel will appear below:
4. Hover your mouse over each of the suggestions to have them read to you.
5. Click on volcano and it will be put into your document.
6. Left click on the next underlined word – were and correct this to where.

Page 30
Note: This is the quickest way to correct your work in Microsoft Word. However, if
you’re working in a different application, or for additional support when proofing
your work, use the Check It window.
7. To open the Check It window click on this button in the bottom right of your
screen.
8. The Check It window will open with the next error:
9. Click on .
10. Check It moves on to the next error tectronic. This time you have a choice of
suggestions. Hover over any of the suggestions and it will be read aloud.
11. Click on tectonic and beside it the definition will appear to the right.
12. Click on the second definition and then click Play. The definition will be read to
you.
13. Click on .
14. Correct volcaneo to volcano.
15. Rinjani is the correct word so click on to ignore.
16. Replace iland with island.
17. Ignore Lombok.
18. Correct eraptions to eruptions.
The Check It window closes as soon as it’s complete and your document will now have
all the corrections.

Page 31
What else can you do?
• Use Spell Check instead of Check It.
• Change how the Spell Check window behaves.
• Change the vocabulary that the Check It/Spell Check uses.
Page 32
17. Prediction Prediction can help you finish sentences. As you type, a list of suggestions will appear in
the Prediction Panel. Prediction learns your style of writing and will predict words even
if you start to spell the word incorrectly.
Prediction will allow you to produce high quality work and reduce the time it takes to do
so.
Exercise 1 Using Prediction
In this exercise, you’ll learn how to use Prediction to help you finish sentences. It will
access a list of words that will complete the one that you’re currently typing and will try
to predict your next word as you finish typing a word.
1. Open a new blank document in Microsoft Word and then click on the on the
toolbar to display the Prediction window.
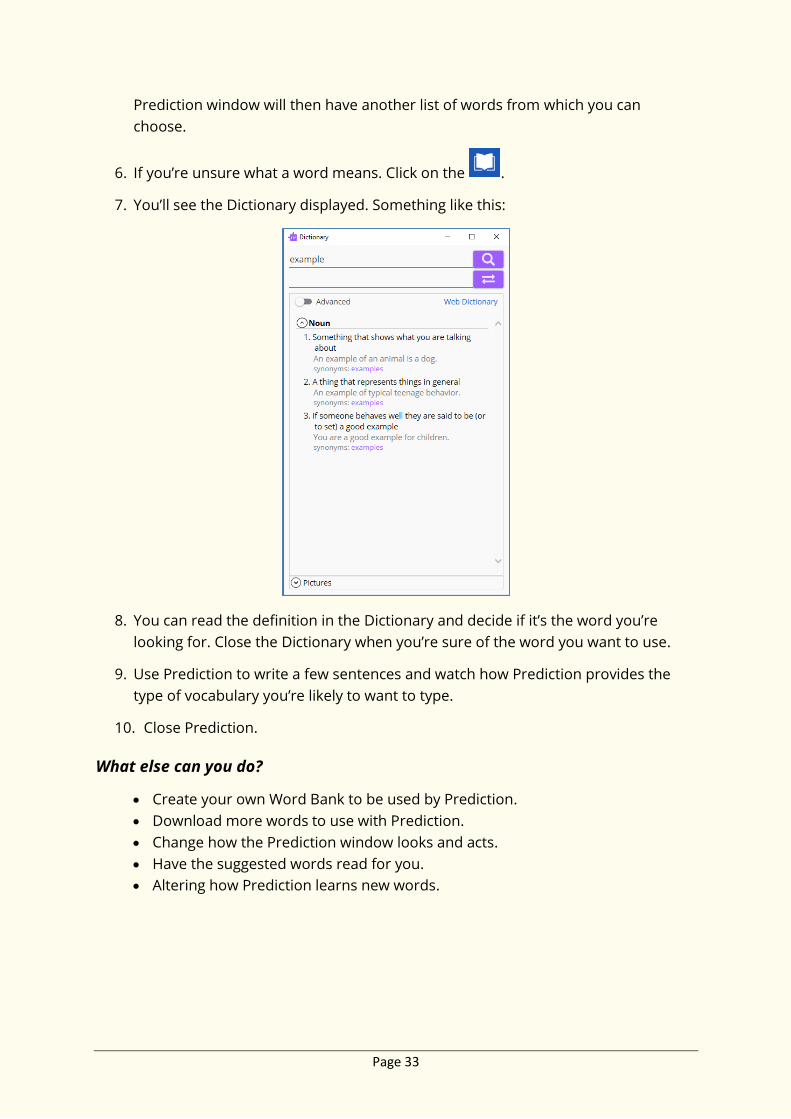
2. Type the following text into your document and notice how the Prediction window
is predicting words for you to use:
This is an ex
3. When you type in the ‘ex’ you’ll see a list of words beginning with ‘ex’ displayed in
the Prediction window:
4. Hover your mouse over the words in the list and they will be read aloud to you.
5. Hover your mouse over the word ‘excellent’ and when the cursor changes to a
hand click on the word ‘excellent’. The word is inserted into your document,
followed by a space. Press the appropriate function key on your keyboard that is
listed beside the word ‘of’. The word ‘of’ is placed in your document. The
Page 33
Prediction window will then have another list of words from which you can
choose.
6. If you’re unsure what a word means. Click on the .
7. You’ll see the Dictionary displayed. Something like this:
8. You can read the definition in the Dictionary and decide if it’s the word you’re
looking for. Close the Dictionary when you’re sure of the word you want to use.
9. Use Prediction to write a few sentences and watch how Prediction provides the
type of vocabulary you’re likely to want to type.
10. Close Prediction.
What else can you do?
• Create your own Word Bank to be used by Prediction.
• Download more words to use with Prediction.
• Change how the Prediction window looks and acts.
• Have the suggested words read for you.
• Altering how Prediction learns new words.

Page 34
18. Talk&Type Using Read&Write you can dictate what you want to type. It uses Microsoft’s voice
recognition. This helps those who have difficulty typing.
To complete this section, you must ensure that you are in a quiet room and are not
likely to be distracted.
Note: This exercise assumes that the Talk&Type has not been previously used.
Exercise 1 Preparing to use Talk&Type
In this exercise, you’ll learn how to start Talk&Type and carry out a training exercise.
1. Click on the button on the toolbar.
The Speech Recognition Voice Training Wizard is displayed:
2. Follow the instructions in the wizard to train Talk&Type to recognise your voice.
You can pause the training at any stage by clicking on the button. The
more training you do the better Talk&Type will be at recognising your voice.
Exercise 2 Create text using Talk&Type
In this exercise you’ll learn how to use Talk&Type to create text by reading into the
microphone.
1. Click on the button on the toolbar.
You’ll see the ‘Listening’ mode displayed:
2. Open Microsoft Word.
3. Speak the following text into the microphone:

Page 35
‘A volcano tends to occur where tectonic plates meet. The earth is made up of
about 8 big tectonic plates. When volcanoes erupt they can throw out lava, ash
and gases.’
Note: Don’t worry if it makes a mistake. You’ll learn how to correct mistakes in the next
exercise.
4. Click on Insert to put the text in your Word document.
5. Click on the button on the toolbar.
The text you just spoke into the microphone is read back to you.
6. Click on the button to turn off the ‘Listening’ mode.
The panel changes to ‘Off’ mode.
You can toggle between the ‘Listening’ and ‘Off’ modes by clicking on the button.
Note: Remember you can complete more training to make Talk&Type more accurate.
Exercise 3 Correcting text using Talk&Type
In this exercise you’ll learn how to correct any mistakes Talk&Type may have made.
1. Open a new Microsoft Word document.
2. Click on the button on the toolbar.
3. Speak some text into the microphone and stop immediately after a word is
recorded incorrectly.
4. Speak the following into the microphone:
Correct that.
You’ll see the Alternates panel displayed which will look something like this:
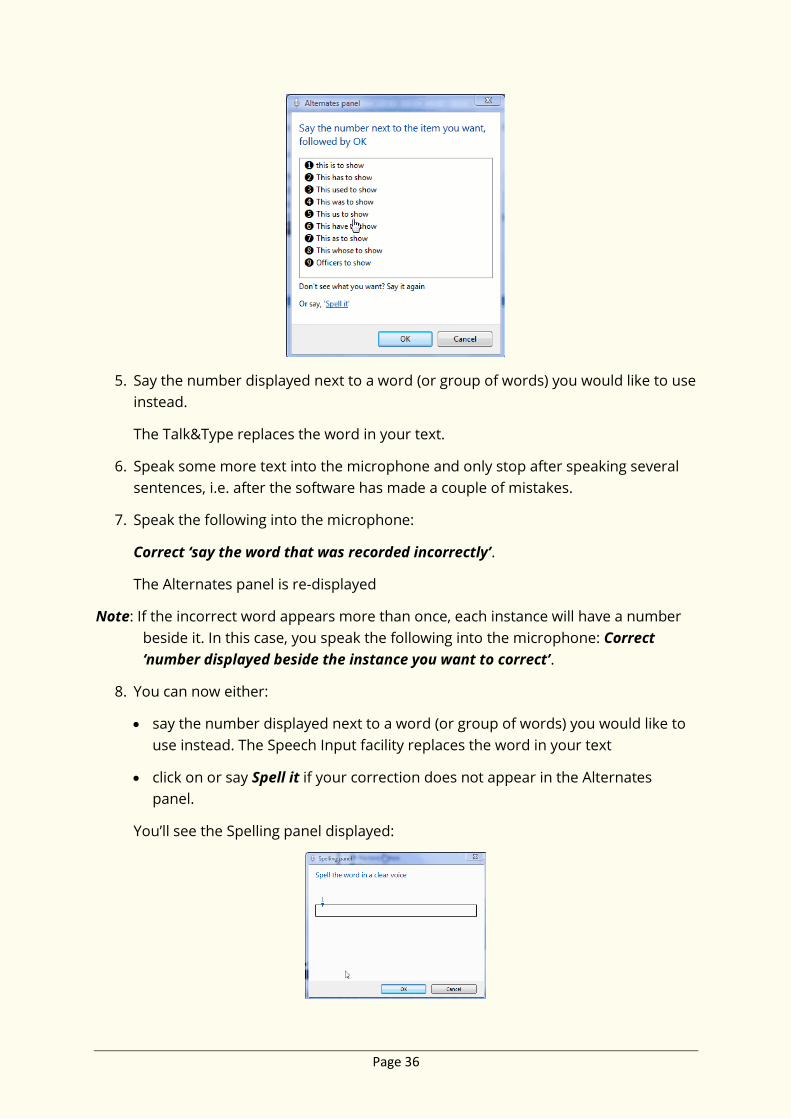
Page 36
5. Say the number displayed next to a word (or group of words) you would like to use
instead.
The Talk&Type replaces the word in your text.
6. Speak some more text into the microphone and only stop after speaking several
sentences, i.e. after the software has made a couple of mistakes.
7. Speak the following into the microphone:
Correct ‘say the word that was recorded incorrectly’.
The Alternates panel is re-displayed
Note: If the incorrect word appears more than once, each instance will have a number
beside it. In this case, you speak the following into the microphone: Correct
‘number displayed beside the instance you want to correct’.
8. You can now either:
• say the number displayed next to a word (or group of words) you would like to
use instead. The Speech Input facility replaces the word in your text
• click on or say Spell it if your correction does not appear in the Alternates
panel.
You’ll see the Spelling panel displayed:

Page 37
9. Spell aloud the word you would like to insert in the text, in place of the original
word, and then click on the OK button.
10. Close the Alternates panel.
What else can you do?
• Add words to the Speech Dictionary
• Set up your microphone
Page 38
19. Translator Read&Write can translate text in to over 50 different languages. This helps those who
are English language learners or those learning another language.
Type the following text into a blank Microsoft Word document:
A volcano tends to occur where tectonic plates meet. The earth is made up of
about 8 big tectonic plates.
Note: You must be online in order to use the Translator facility.
Exercise 1 Translating text
In this exercise, you’ll learn how to translate text from English into French.
1. Highlight the following text in your document:
A volcano tends to occur where tectonic plates meet. The earth is made up of
about 8 big tectonic plates.
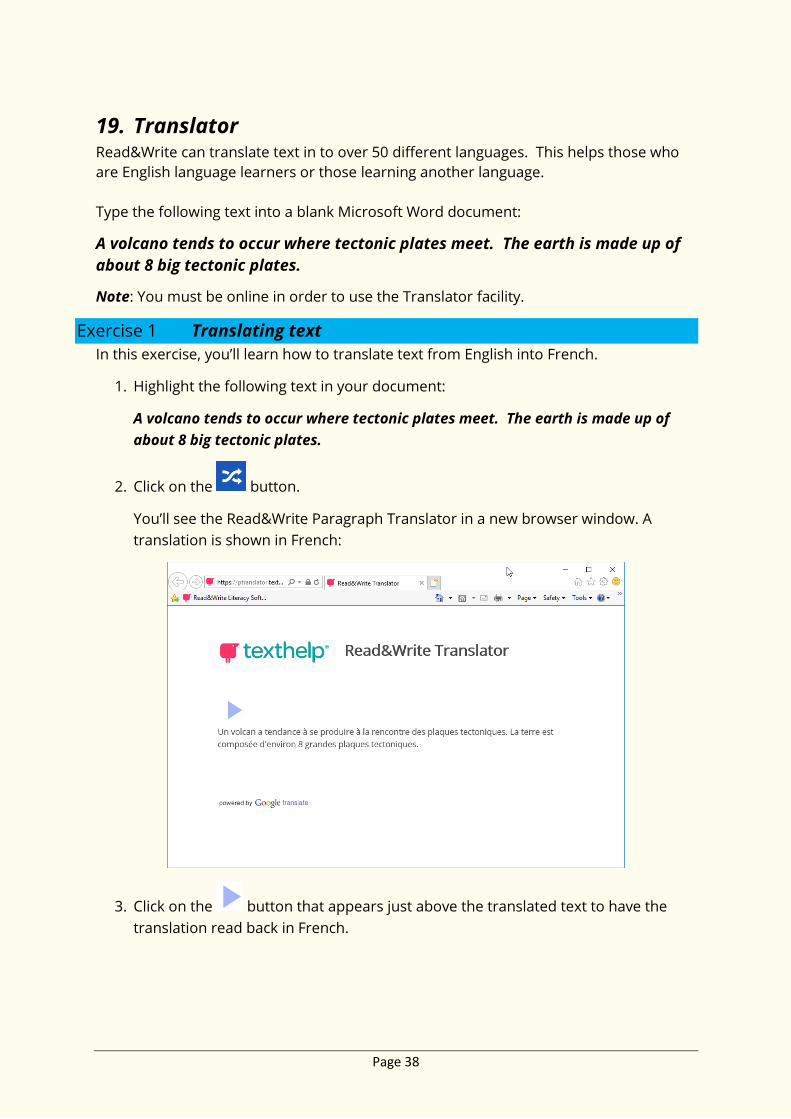
2. Click on the button.
You’ll see the Read&Write Paragraph Translator in a new browser window. A
translation is shown in French:
3. Click on the button that appears just above the translated text to have the
translation read back in French.
Page 39
Exercise 2 Changing the languages the Translator uses
In this exercise, you’ll learn how to change the languages that the Translator translates
from and to.
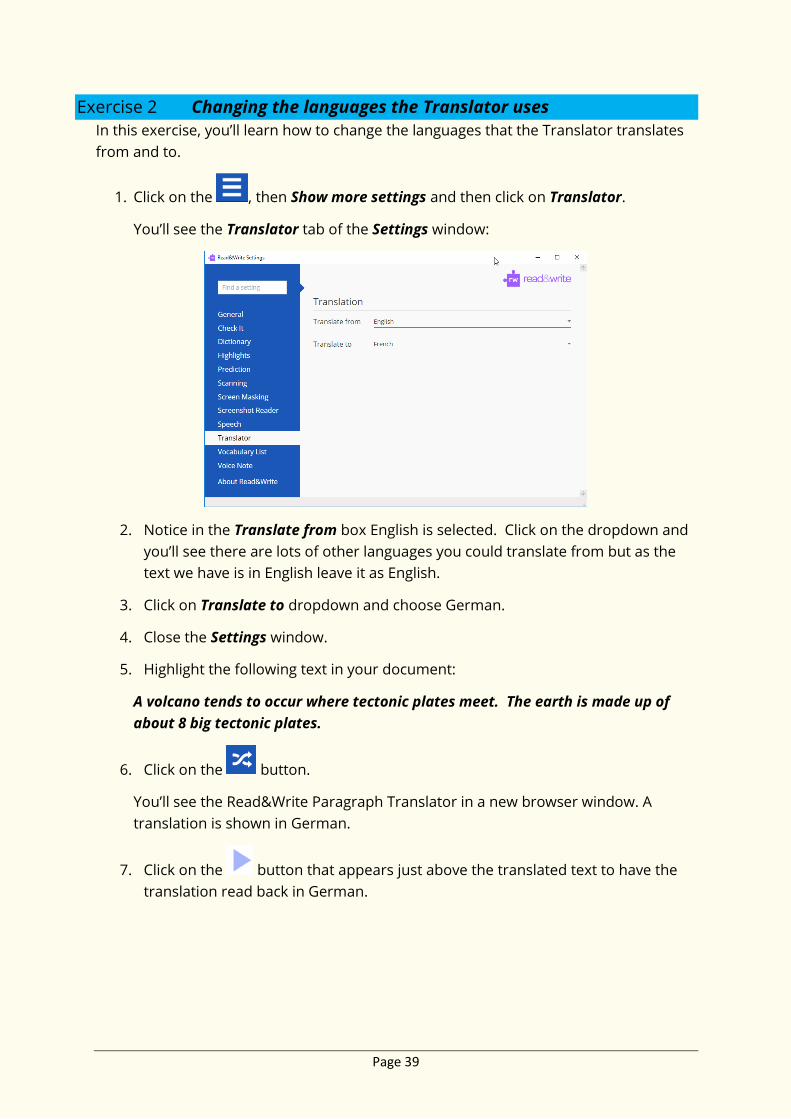
1. Click on the , then Show more settings and then click on Translator.
You’ll see the Translator tab of the Settings window:
2. Notice in the Translate from box English is selected. Click on the dropdown and
you’ll see there are lots of other languages you could translate from but as the
text we have is in English leave it as English.
3. Click on Translate to dropdown and choose German.
4. Close the Settings window.
5. Highlight the following text in your document:
A volcano tends to occur where tectonic plates meet. The earth is made up of
about 8 big tectonic plates.
6. Click on the button.
You’ll see the Read&Write Paragraph Translator in a new browser window. A
translation is shown in German.
7. Click on the button that appears just above the translated text to have the
translation read back in German.

Related Documents