Quick Start Guide

Welcome message from author
This document is posted to help you gain knowledge. Please leave a comment to let me know what you think about it! Share it to your friends and learn new things together.
Transcript

Quick Start Guide

bizhub 658e/558e/458e/368e/308e Contents-1
Table of contents
1 Introduction1.1 Environmental information............................................................................................................. 1-2
Environmental initiatives .....................................................................................................................1-2ENERGY STAR® .................................................................................................................................1-2What is an ENERGY STAR® product?................................................................................................1-3Environmental benefits of power management ..................................................................................1-3Recycled paper...................................................................................................................................1-3Duplex printing....................................................................................................................................1-3
1.2 Certification for USA, Canada, Mexico, Brazil and Europe area ................................................ 1-4For U.S.A.............................................................................................................................................1-4For Canada .........................................................................................................................................1-4For Mexico ..........................................................................................................................................1-4For Brazil .............................................................................................................................................1-4For Europe ..........................................................................................................................................1-4
1.3 Safety information........................................................................................................................... 1-5Warning and precaution symbols .......................................................................................................1-5These are some of major exemplary graphical symbols. ...................................................................1-5<Power source connection>...............................................................................................................1-6<Installation>.......................................................................................................................................1-7<Using the product> ...........................................................................................................................1-8<Consumables>................................................................................................................................1-10
1.4 Regulation notices ........................................................................................................................ 1-11CE Marking (Declaration of Conformity) for users of the European Union (EU)................................1-11USER INSTRUCTIONS FCC PART 15 - RADIO FREQUENCY DEVICES (for U.S.A. users).............1-11INTERFERENCE-CAUSING EQUIPMENT STANDARD (ICES-003 ISSUE 5) (for Canada users) .....1-11For users in countries not subject to class B regulations.................................................................1-11GS Certification.................................................................................................................................1-12Laser safety.......................................................................................................................................1-12Internal laser radiation.......................................................................................................................1-12CDRH regulations .............................................................................................................................1-13For European users...........................................................................................................................1-13Laser safety label ..............................................................................................................................1-13Ozone release ...................................................................................................................................1-14Acoustic noise (for European users only)..........................................................................................1-14Notification for California customers ................................................................................................1-14Recycling batteries (for Taiwan users only) ......................................................................................1-15For EU member states only ..............................................................................................................1-15Telephone cable (for users in countries subject to class B regulations)...........................................1-15USB Host ..........................................................................................................................................1-15Graphic symbols used on this machine............................................................................................1-15
1.5 Caution notations and labels ....................................................................................................... 1-17bizhub 658e/558e/458e ....................................................................................................................1-17bizhub 368e/308e .............................................................................................................................1-18
1.6 Special notice to user ................................................................................................................... 1-19For Canada .......................................................................................................................................1-19For U.S.A...........................................................................................................................................1-19For Europe ........................................................................................................................................1-20
1.7 Space requirements...................................................................................................................... 1-21bizhub 658e/558e/458e ....................................................................................................................1-21bizhub 368e/308e .............................................................................................................................1-22
1.8 Operation precautions.................................................................................................................. 1-23Power source ....................................................................................................................................1-23Operating environment .....................................................................................................................1-23Storage of copies..............................................................................................................................1-23Data stored in this machine ..............................................................................................................1-23
1.9 Legal restrictions on reproduction.............................................................................................. 1-24

Contents-2 bizhub 658e/558e/458e/368e/308e
1.10 Trademark acknowledgements................................................................................................... 1-25Copyright ..........................................................................................................................................1-26Note ..................................................................................................................................................1-26
1.11 SOFTWARE LICENSE AGREEMENT ........................................................................................... 1-271.12 i-Option LK-105 v4 (Searchable PDFs) End User License Agreement..................................... 1-28
2 About this machine2.1 Intended use of office MFP devices.............................................................................................. 2-2
Intended use .......................................................................................................................................2-2Impermissible operating conditions....................................................................................................2-2Exclusion of liability.............................................................................................................................2-2
2.2 Introduction to user's guide........................................................................................................... 2-32.2.1 User's Guide CD .................................................................................................................................2-3
Layout of top page..............................................................................................................................2-4Operating environment .......................................................................................................................2-4Viewing the top page ..........................................................................................................................2-4
2.2.2 Target groups......................................................................................................................................2-52.2.3 Symbols and notations used in this manual .......................................................................................2-5
Procedural instruction.........................................................................................................................2-5Symbols and notations .......................................................................................................................2-5Screens ...............................................................................................................................................2-6Names and notations of applications .................................................................................................2-6
2.3 About this machine ......................................................................................................................... 2-72.3.1 Optional components (bizhub 658e/558e/458e).................................................................................2-7
List of optional components ...............................................................................................................2-7List of other optional components ......................................................................................................2-9
2.3.2 Optional components (bizhub 368e/308e)........................................................................................2-11List of optional components .............................................................................................................2-11List of other optional components ....................................................................................................2-13
2.3.3 Name of parts (MFP) (bizhub 658e/558e/458e) ................................................................................2-15Front..................................................................................................................................................2-15Side/rear............................................................................................................................................2-16
2.3.4 Name of parts (MFP) (bizhub 368e/308e) .........................................................................................2-17Front..................................................................................................................................................2-17Side/rear............................................................................................................................................2-18
2.3.5 Name of parts (Optional units) ..........................................................................................................2-20Finisher FS-537/Finisher FS-537 SD/Punch Kit PK-523/Z Folding Unit ZU-609 (bizhub 658e/558e/458e) ..................................................................................................................2-20Job Separator JS-602 (bizhub 658e/558e/458e)..............................................................................2-22Post Inserter PI-507 (bizhub 658e/558e/458e) .................................................................................2-23Finisher FS-533/Punch Kit PK-519 (bizhub 558e/458e/368e/308e).................................................2-24Job Separator JS-506 (bizhub 558e/458e/368e/308e).....................................................................2-25Finisher FS-536/Finisher FS-536 SD/Punch Kit PK-520 ..................................................................2-26Large Capacity Unit LU-302/LU-207 (bizhub 658e/558e/458e) .......................................................2-28
2.4 Power supply ................................................................................................................................. 2-292.4.1 Turning the power on and off............................................................................................................2-292.4.2 Operating the Power key ..................................................................................................................2-292.4.3 Power save function .........................................................................................................................2-30
Reducing power consumption..........................................................................................................2-30
2.5 Control Panel................................................................................................................................. 2-322.5.1 Name of parts ...................................................................................................................................2-322.6 Touch Panel................................................................................................................................... 2-342.6.1 Main Menu ........................................................................................................................................2-34
Layout of main menu ........................................................................................................................2-34Customizing the main menu .............................................................................................................2-35
2.6.2 Slide menu ........................................................................................................................................2-35Customizing the slide menu..............................................................................................................2-35

bizhub 658e/558e/458e/368e/308e Contents-3
2.6.3 Operating the Touch Panel ...............................................................................................................2-36Tap ....................................................................................................................................................2-36Double-tap ........................................................................................................................................2-36Flick...................................................................................................................................................2-36Drag ..................................................................................................................................................2-37Pan....................................................................................................................................................2-37Long-tap ...........................................................................................................................................2-37Drag & Drop ......................................................................................................................................2-38Pinch-in / Pinch-out ..........................................................................................................................2-38Rotation.............................................................................................................................................2-38Precautions for using the Touch Panel .............................................................................................2-39
2.6.4 How to display the Keypad...............................................................................................................2-40How to move the Keypad .................................................................................................................2-40How to close the Keypad..................................................................................................................2-41To display the Keypad all the time....................................................................................................2-41
2.6.5 Entering characters...........................................................................................................................2-41When typing in "Group1": .................................................................................................................2-41
2.7 Jobs................................................................................................................................................ 2-432.7.1 Job screen ........................................................................................................................................2-432.7.2 Multi-job function..............................................................................................................................2-432.8 Loading Paper ............................................................................................................................... 2-442.8.1 Loading paper in Tray 1 to Tray 4.....................................................................................................2-44
Applicable paper types .....................................................................................................................2-44Applicable paper sizes......................................................................................................................2-44How to load paper ............................................................................................................................2-44
2.8.2 LCT (built-in)......................................................................................................................................2-45Applicable paper types .....................................................................................................................2-45Applicable paper sizes......................................................................................................................2-45How to load paper ............................................................................................................................2-46
2.8.3 Loading paper into the Large Capacity Unit .....................................................................................2-47Applicable paper types .....................................................................................................................2-47Applicable paper sizes......................................................................................................................2-47How to load paper ............................................................................................................................2-47
2.8.4 Bypass Tray ......................................................................................................................................2-48Applicable paper types .....................................................................................................................2-48Applicable paper sizes......................................................................................................................2-48Paper not available ...........................................................................................................................2-49How to load paper ............................................................................................................................2-49Loading postcards ............................................................................................................................2-51Loading transparencies ....................................................................................................................2-52Loading envelopes............................................................................................................................2-53Loading label sheets .........................................................................................................................2-55Loading index papers .......................................................................................................................2-56
3 Basic Settings and Operations3.1 Print function ................................................................................................................................... 3-23.1.1 Required settings and basic operations (for Windows OS) ................................................................3-2
Preparation flow..................................................................................................................................3-2Operation flow.....................................................................................................................................3-2Checking the cable connection ..........................................................................................................3-3Checking network settings of this machine........................................................................................3-3Installing the printer driver ..................................................................................................................3-3Printing data........................................................................................................................................3-5Types of printer drivers .......................................................................................................................3-6
3.1.2 Required settings and basic operations (for Mac OS) ........................................................................3-7Preparation flow..................................................................................................................................3-7Operation flow.....................................................................................................................................3-7Checking the cable connection ..........................................................................................................3-8Checking network settings of this machine........................................................................................3-8Installing the printer driver ................................................................................................................3-10Adding and configuring a printer driver ............................................................................................3-12Printing data......................................................................................................................................3-13
Contents-4 bizhub 658e/558e/458e/368e/308e
3.2 Scan-to-Send function ................................................................................................................. 3-153.2.1 Various transmission methods..........................................................................................................3-15
Sending data to your computer (SMB Send)....................................................................................3-15Transmitting data as E-mail attachment (E-mail TX).........................................................................3-15Saving data to the USB memory device (External memory).............................................................3-15Various methods for transmitting and saving data ...........................................................................3-16
3.2.2 Sending data to your Windows computer (SMB Send) ....................................................................3-16Preparation flow................................................................................................................................3-16Operation flow...................................................................................................................................3-17Checking the cable connection ........................................................................................................3-17Checking network settings of this machine......................................................................................3-17Checklist ...........................................................................................................................................3-18Checking computer information .......................................................................................................3-18Configuring your computer ...............................................................................................................3-19Registering destinations ...................................................................................................................3-21Sending the original ..........................................................................................................................3-23
3.2.3 Sending data to your Mac computer (SMB Send)............................................................................3-25Preparation flow................................................................................................................................3-25Operation flow...................................................................................................................................3-25Checking the cable connection ........................................................................................................3-26Checking network settings of this machine......................................................................................3-26Configuring this machine ..................................................................................................................3-27Checklist ...........................................................................................................................................3-27Checking computer information .......................................................................................................3-28Configuring your computer ...............................................................................................................3-28Registering destinations ...................................................................................................................3-30Sending the original ..........................................................................................................................3-32
3.2.4 Transmit the scanned data via E-mail (E-mail TX) ............................................................................3-34Preparation flow................................................................................................................................3-34Operation flow...................................................................................................................................3-34Checking the cable connection ........................................................................................................3-35Checking network settings of this machine......................................................................................3-35Configuring the E-mail transmission environment ............................................................................3-36Configuring administrator information ..............................................................................................3-37Sending the original ..........................................................................................................................3-38
3.3 Fax function ................................................................................................................................... 3-413.3.1 Required settings and basic operations ...........................................................................................3-41
Preparation flow................................................................................................................................3-41Operation flow...................................................................................................................................3-41Checking the cable connection ........................................................................................................3-42Registering transmission information ...............................................................................................3-42Selecting the dialing method ............................................................................................................3-44Sending the original ..........................................................................................................................3-45
3.3.2 Sending a fax directly from a PC (PC-FAX TX) .................................................................................3-47Preparation flow................................................................................................................................3-48Operation flow...................................................................................................................................3-48Checking the cable connection ........................................................................................................3-48Checking network settings of this machine......................................................................................3-49Installing the fax driver ......................................................................................................................3-49Sending data.....................................................................................................................................3-51
3.4 Copy function ................................................................................................................................ 3-54Basic operations ...............................................................................................................................3-54User authentication...........................................................................................................................3-56
3.5 Registering a destination ............................................................................................................. 3-573.5.1 Registering an address book ............................................................................................................3-57
Using the Control Panel to register an address book - Registration from [Utility]............................3-57Using the Control Panel to register an address book - Registration from [Address book] ..............3-59Using the Control Panel to register an address book - Registration in scan/fax mode ...................3-60Using a computer to register a one-touch destination .....................................................................3-64
3.5.2 Information required to register a destination...................................................................................3-653.5.3 Registering a group...........................................................................................................................3-66
Registering a new group...................................................................................................................3-66

bizhub 658e/558e/458e/368e/308e Contents-5
3.5.4 Retrieving a registered destination ...................................................................................................3-69Retrieving a destination ....................................................................................................................3-69Specifying a destination....................................................................................................................3-70
3.6 Using a USB memory device ....................................................................................................... 3-713.6.1 Printing data in a USB memory device .............................................................................................3-71
Printing data......................................................................................................................................3-71
3.6.2 Saving the scanned data in the USB memory device (External memory) ........................................3-73Specifying functions to be permitted for external memory...............................................................3-73Saving data in the USB memory device ...........................................................................................3-74
3.7 Using the guidance function ........................................................................................................ 3-773.7.1 Guidance screen...............................................................................................................................3-77
Getting help on the currently displayed screen: ...............................................................................3-77Getting help on the desired function or procedure:..........................................................................3-79Help Menu list ...................................................................................................................................3-81
3.8 Using the [Quick Security] function ............................................................................................ 3-823.8.1 [Quick Security].................................................................................................................................3-82
Required settings..............................................................................................................................3-82
4 Advanced Functions4.1 Using advanced functions.............................................................................................................. 4-24.1.1 What are advanced functions? ...........................................................................................................4-24.1.2 Association with application ...............................................................................................................4-34.1.3 Registering the i-Option license..........................................................................................................4-3
Preparation flow..................................................................................................................................4-3Enabling the i-Option function ............................................................................................................4-3Registering the i-Option license..........................................................................................................4-5Enabling the i-Option function using the license (Administrator)........................................................4-7Configuring each function...................................................................................................................4-8
4.2 Using the Web browser function ................................................................................................... 4-94.2.1 Required settings and procedures......................................................................................................4-9
Preparation flow..................................................................................................................................4-9Operation flow.....................................................................................................................................4-9Enabling the Web browser function..................................................................................................4-10Registering the license......................................................................................................................4-11Enabling the Web browser using the license....................................................................................4-12Starting the Web browser .................................................................................................................4-16Displaying Web pages ......................................................................................................................4-17Printing the currently displayed page or the linked file.....................................................................4-18
4.3 Using the voice guidance............................................................................................................. 4-214.3.1 Required settings and procedures....................................................................................................4-21
Preparation flow................................................................................................................................4-21Operation flow...................................................................................................................................4-21Enabling the voice guidance function...............................................................................................4-22Assigning the voice guidance function to a Register key or to the slide menu ................................4-22Specifying the volume and speed.....................................................................................................4-23Operating the voice guidance...........................................................................................................4-24Keypad operations for voice guidance .............................................................................................4-25Voice guidance on the scan/fax screen............................................................................................4-27
5 Frequently Asked Questions5.1 Print .................................................................................................................................................. 5-25.1.1 Q1. Can I print data on an envelope or postcard? .............................................................................5-2
Operation procedure...........................................................................................................................5-2
5.1.2 Q2. Can I print on custom size paper? ...............................................................................................5-6Operation procedure...........................................................................................................................5-6
5.1.3 Q3. Can I directly print a file in a USB memory device?.....................................................................5-8Operation procedure...........................................................................................................................5-8
5.1.4 Q4. Can printing be restricted by user?..............................................................................................5-9How to set...........................................................................................................................................5-9

Contents-6 bizhub 658e/558e/458e/368e/308e
5.1.5 Q5. What types are available for printing finish? ..............................................................................5-12Staple ................................................................................................................................................5-12Punch................................................................................................................................................5-12Center Staple ....................................................................................................................................5-12Fold ...................................................................................................................................................5-13Operation procedure.........................................................................................................................5-13
5.1.6 Q6. Can I print on very long sheets of paper such as a banner? .....................................................5-14How to set.........................................................................................................................................5-14
5.2 Scan................................................................................................................................................ 5-165.2.1 Q1. Can frequently used destinations be registered? ......................................................................5-165.3 Fax .................................................................................................................................................. 5-175.3.1 Q1. Can I check fax transmission and reception logs? ....................................................................5-17
Operation procedure.........................................................................................................................5-17
5.3.2 Q2. Can I collectively send data to multiple destinations?...............................................................5-17Operation procedure: Selecting multiple addresses from the address book ...................................5-17Operation procedure: Directly entering multiple destinations ..........................................................5-18
5.3.3 Q3. Can I register multiple sender names displayed on the fax to use them depending on purposes? .........................................................................................................................................5-19How to set: Registering sender names.............................................................................................5-19How to set: Selecting a sender name upon fax transmission...........................................................5-20
5.3.4 Q4. Can I avoid expensive communication charges using the network?.........................................5-21Operation procedure: Sending an Internet fax .................................................................................5-21Operation procedure: Sending an IP address fax ............................................................................5-22
5.3.5 Q5. How can I avoid printing out unwanted faxes?..........................................................................5-23Operation procedure: Configuring to save received faxes in a User Box.........................................5-23How to set: Printing faxes saved in a User Box................................................................................5-23
5.3.6 Q6. Can I forward an incoming fax? .................................................................................................5-24How to set.........................................................................................................................................5-24
5.3.7 Q7. Can I directly fax a file on my computer without leaving my desk?...........................................5-25Operation procedure.........................................................................................................................5-26
5.4 Copy ............................................................................................................................................... 5-275.4.1 Q1. Can I copy on an envelope or postcard?...................................................................................5-27
Operation procedure: Copying on envelopes...................................................................................5-27Operation procedure: Copying on postcards ...................................................................................5-30
5.4.2 Q2. Can I copy on custom size paper? ............................................................................................5-32Operation procedure: Copying on paper of a custom size...............................................................5-32Operation procedure: Registering a custom size of paper in memory .............................................5-33Operation procedure: Recalling the custom size registered in memory...........................................5-35
5.4.3 Q3. Can I check the finish before starting copying?.........................................................................5-37How to set: Checking the finish with a preview image .....................................................................5-37How to set: Checking the finish by outputting one copy..................................................................5-38
5.4.4 Q4. Can I easily copy various cards such as an insurance card or driver license card?..................5-38Operation procedure.........................................................................................................................5-38
5.5 User Box ........................................................................................................................................ 5-415.5.1 Q1. Can I create a User Box, or print or download a file in a User Box from my computer?...........5-41
Operation procedure: Using Web Connection..................................................................................5-41Operation procedure: Using the Windows file sharing function .......................................................5-41
5.6 Other............................................................................................................................................... 5-435.6.1 Q1. Can more than one computer use the same settings for the printer driver ? ............................5-43
Operation procedure: Preparing for an install package....................................................................5-43Operation procedure: Creating an install package ...........................................................................5-43Operation procedure: Executing the install package........................................................................5-44
5.6.2 Q2. Can I restrict available functions by user? .................................................................................5-44How to set.........................................................................................................................................5-44
5.6.3 Q3. Can I change the keying and operation sounds of this machine? .............................................5-46How to set.........................................................................................................................................5-46
5.6.4 Q4. User authentication seems to be enabled on this machine. How can I be authenticated and allowed to operate this machine?..............................................................................................5-49How to set: Getting authenticated as a user on this machine..........................................................5-49How to set: Getting authenticated as a user on the printer driver....................................................5-49
bizhub 658e/558e/458e/368e/308e Contents-7
5.6.5 Q5. The power is input all day. Is there any way to alleviate concerns about electricity charges? ...........................................................................................................................................5-51How to set.........................................................................................................................................5-51
5.6.6 Q6. What action should be taken if the administrator password is lost? .........................................5-53
6 Troubleshooting6.1 Main messages and remedies ....................................................................................................... 6-26.1.1 When a message appears to replace consumables or carry out cleaning.........................................6-26.1.2 When a paper jam message persists..................................................................................................6-36.1.3 When an error message appears........................................................................................................6-36.1.4 When [Stabilizing image.] appears......................................................................................................6-46.2 When printing quality has deteriorated......................................................................................... 6-56.2.1 Cleaning the Print Head Glass............................................................................................................6-56.3 When the machine cannot be powered on................................................................................... 6-76.4 When the Touch Panel is not visible ............................................................................................. 6-86.5 When a message appears to replace consumables or carry out cleaning ............................... 6-9
When staples in the Finisher have run out..........................................................................................6-9When the punch scrap box is full .....................................................................................................6-10When toner is running out in the Toner Cartridge.............................................................................6-10When it is time to replace a Toner Cartridge ....................................................................................6-10When it is time to replace a Drum Unit .............................................................................................6-11When it is time to replace a Developing Unit ....................................................................................6-11When the Waste Toner Box is full .....................................................................................................6-12
6.5.1 Replacing a Toner Cartridge.............................................................................................................6-13bizhub 658e/558e/458e ....................................................................................................................6-13bizhub 368e/308e .............................................................................................................................6-14
6.5.2 Replacing a Waste Toner Box ..........................................................................................................6-15bizhub 658e/558e/458e ....................................................................................................................6-15bizhub 368e/308e .............................................................................................................................6-16
6.5.3 Replacing a Drum Unit ......................................................................................................................6-17bizhub 658e/558e/458e ....................................................................................................................6-17bizhub 368e/308e .............................................................................................................................6-18
6.5.4 Replacing a Staple Cartridge............................................................................................................6-19Finisher FS-537/Finisher FS-537 SD ................................................................................................6-19Finisher FS-536/Finisher FS-536 SD ................................................................................................6-20Finisher FS-533.................................................................................................................................6-21
6.5.5 Replacing a Saddle Staple Cartridge................................................................................................6-22Finisher FS-537 SD...........................................................................................................................6-22Finisher FS-536 SD...........................................................................................................................6-23
7 Index

Contents-8 bizhub 658e/558e/458e/368e/308e

1
Intr
oduc
tion
Cha
pter
1
Introduction
1-2 bizhub 658e/558e/458e/368e/308e
Environmental information1 1.1
Intr
oduc
tion
Cha
pter
1
1 IntroductionThis [Quick Start Guide] uses illustrations to describe operating procedures for the most commonly used functions in an easy-to-understand way.
Start by using this manual to become proficient with the useful functions that this machine offers.
For details on the various functions, refer to the User’s Guides on the User’s Guide CD included with this machine.
In order to operate the machine safely and properly, be sure to read the safety information on page 1-5 of this manual before use.
In addition, this manual contains the following information. Be sure to read the manual before using the ma-chine.
- Items that must be observed to use the machine safely
- Information regarding product safety- Precautions when using the machine
- Descriptions on trademarks and copyrights
The illustrations and screens used in this manual may appear slightly different from views of the actual equip-ment and screens.
Tips- Please keep this manual as well as the attached CD/DVD in a safe place where you can access them
easily.
1.1 Environmental information
Environmental initiativesThe company continuously strives to reduce the negative environmental impacts of all stages of its business operations.
As part of such activities, the company is implementing resource-saving steps by reducing the number of pages in the User's Guide.
For the information necessary to operate the machine, please refer to the bundled User's Guide CD (HTML format). This guide has an excellent search function.
Functions such as keyword search and filtering by purpose are very useful to help users find what they need to know.
ENERGY STAR®
As an ENERGY STAR® Partner, this machine meets the ENERGY STAR® Guidelines for energy efficiency.

bizhub 658e/558e/458e/368e/308e 1-3
1.1 Environmental information 1
Intr
oduc
tion
Cha
pter
1
What is an ENERGY STAR® product?An ENERGY STAR® product has a special feature that allows it to automatically switch to a "low-power mode" after a period of inactivity. An ENERGY STAR® product uses energy more efficiently, saves you money on utility bills and helps protect the environment.
Environmental benefits of power managementElectricity consumption of a device depends on both its properties and the way of using the device.
Suitable power management setting offers you resource saving usage way. By setting the time to go into power saving modes (e.g. sleep mode) shorter (or optimal), electricity consumption can be reduced.
Recycled paperThis product can print on recycled paper and environmental stewardship initiatives certified paper which complies with European standard EN 12281 as well as virgin paper. In addition it can print on lighter paper, 64g/m2 for example. Using such light paper contributes to resources-saving.
Duplex printingWith a product which has a duplex unit, you can print on both sides of paper automatically.
Using this function leads to reducing consumption of natural resources and your cost.
Attached printer driver provides this duplex printing function as initial setting in your computer (The setting can be changed after installation manually).

1-4 bizhub 658e/558e/458e/368e/308e
Certification for USA, Canada, Mexico, Brazil and Europe area1 1.2
Intr
oduc
tion
Cha
pter
1
1.2 Certification for USA, Canada, Mexico, Brazil and Europe area
For U.S.AThis product is certified by the following model name in U.S.A.
KONICA MINOLTA branded model 302303 (bizhub 368e and bizhub 308e).
For CanadaThis product is certified by the following model name in Canada.
KONICA MINOLTA branded model 302303 (bizhub 368e and bizhub 308e).
For MexicoThis product is certified by the following model name in Mexico.
KONICA MINOLTA branded model 302303 (bizhub 368e and bizhub 308e).
For BrazilThis product is certified by the following model name in Brazil.
KONICA MINOLTA branded model 302303 (bizhub 368e and bizhub 308e).
For EuropeThis product is certified by the following model name in Europe.
KONICA MINOLTA branded model 302303 (bizhub 368e and bizhub 308e).
bizhub 658e/558e/458e/368e/308e 1-5
1.3 Safety information 1
Intr
oduc
tion
Cha
pter
1
1.3 Safety informationThis section contains detailed instructions on the operation and maintenance of this machine. To achieve op-timum utility of this device, all operators should carefully read and follow the instructions in this manual.
Please read the following section before connecting the machine to the supply. It contains important infor-mation related to user safety and preventing equipment problems.
Make sure that you observe all of the precautions that appear in different sections of this manual.
KMI_Ver.03_E
Reference
- Some parts of the contents of this section may not correspond with the purchased product.
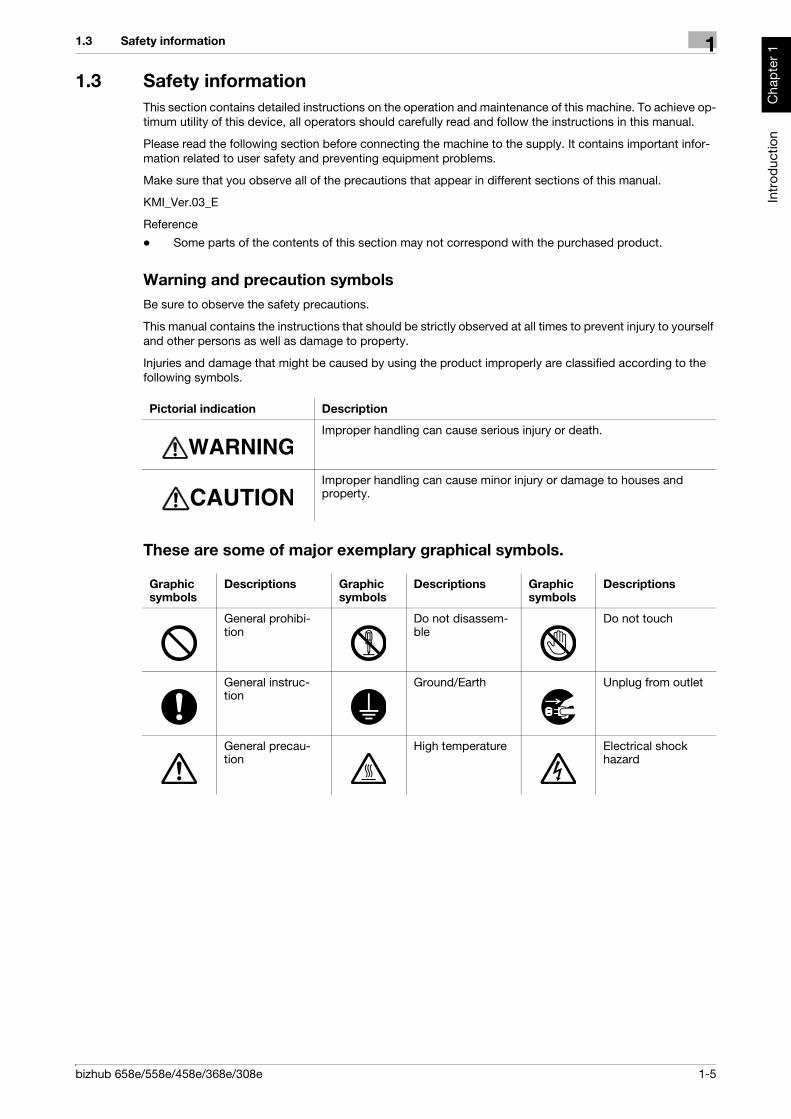
Warning and precaution symbolsBe sure to observe the safety precautions.
This manual contains the instructions that should be strictly observed at all times to prevent injury to yourself and other persons as well as damage to property.
Injuries and damage that might be caused by using the product improperly are classified according to the following symbols.
These are some of major exemplary graphical symbols.
Pictorial indication Description
Improper handling can cause serious injury or death.
Improper handling can cause minor injury or damage to houses and property.
Graphic symbols
Descriptions Graphic symbols
Descriptions Graphic symbols
Descriptions
General prohibi-tion
Do not disassem-ble
Do not touch
General instruc-tion
Ground/Earth Unplug from outlet
General precau-tion
High temperature Electrical shock hazard

1-6 bizhub 658e/558e/458e/368e/308e
Safety information1 1.3
Intr
oduc
tion
Cha
pter
1
<Power source connection>
Descriptions Graphic symbols
Do not use any power cord other than the one supplied in the package or attached on the products. If a power cord is not supplied, use only the power cord and plug that are specified in the user documentation. Failure to use this cord could result in a fire or electrical shock. If the power cord supplied in the package cannot be used in the country where this product was sold, use a power cord that meets the following conditions or con-tact your Technical Representative.• The power cord has voltage and current rating appropriate for the rat-
ing plate on this machine.• The power cord meets regulatory requirements for the area.• The power cord is provided with grounding pin/terminal.
Do not use the power cord to other products. Failure to do that could re-sult in a fire or electrical shock.
Do not scratch, abrade, place a heavy object on, heat, twist, bend, step on, pull on, or damage the power cord. Use of a damaged power cord (exposed core wire, broken wire, etc.) could result in a fire or breakdown. Should any of these conditions be found, immediately turn OFF the pow-er switch, unplug the power cord from the power outlet, and then call your authorized service representative.
Do not use the power source voltage other than being specified on the machine. Failure to do that could result in a fire or electrical shock.
Do not use a multiple outlet adapter to connect any other appliances or machines.Use of a power outlet for more than the marked current value could result in a fire or electrical shock.
Do not use an extension cord. Use of an extension cord could cause a fire or electric shock. If the power cord furnished with the product is not long enough to be plugged into a wall outlet, contact your Technical Rep-resentative.
Do not unplug and plug in the power cord with a wet hand, as an electri-cal shock could result.
Plug the power cord all the way into the power outlet. Failure to do this could result in a fire or electrical shock.
Make sure to ground this product. (Connect the power cord to an electri-cal outlet that is equipped with a grounding terminal.) Failure to do so and an unlikely event of leakage could result in a fire or electrical shock.

bizhub 658e/558e/458e/368e/308e 1-7
1.3 Safety information 1
Intr
oduc
tion
Cha
pter
1
<Installation>
Descriptions Graphic symbols
The outlet must be near the equipment and easily accessible. Otherwise you can not pull out the power plug when an emergency occurs.
Do not place any objects around the power plug, as the power plug may be difficult to pull out when an emergency occurs.
Do not tug the power cord when unplugging. Pulling on the power cord could damage the cord, resulting in a fire or electrical shock.
Remove the power plug from the outlet more than one time a year and clean the area between the plug terminals. Dust that accumulates be-tween the plug terminals may cause a fire.
Descriptions Graphic symbols
Keep this bag away from babies and children. Do not use in cribs, beds, carriages, or playpens. The thin film may cling to nose and mouth and prevent breathing. This bag is not a toy.
Do not place a flower vase or other container that contains water, or met-al clips or other small metallic objects on this product. Spilled water or metallic objects dropped inside the product could result in a fire, electri-cal shock, or breakdown.Should a piece of metal, water, or any other similar foreign matter get in-side the product, immediately turn OFF the power switch, unplug the power cord from the power outlet, and then call your Technical Repre-sentative or your authorized service representative.
Make sure that the power cord is placed on a site in which no person would step on or trip over it. Stepping on or tripping over the power cord could heat the power cord, resulting in a fire or electric shock.
1-8 bizhub 658e/558e/458e/368e/308e
Safety information1 1.3
Intr
oduc
tion
Cha
pter
1
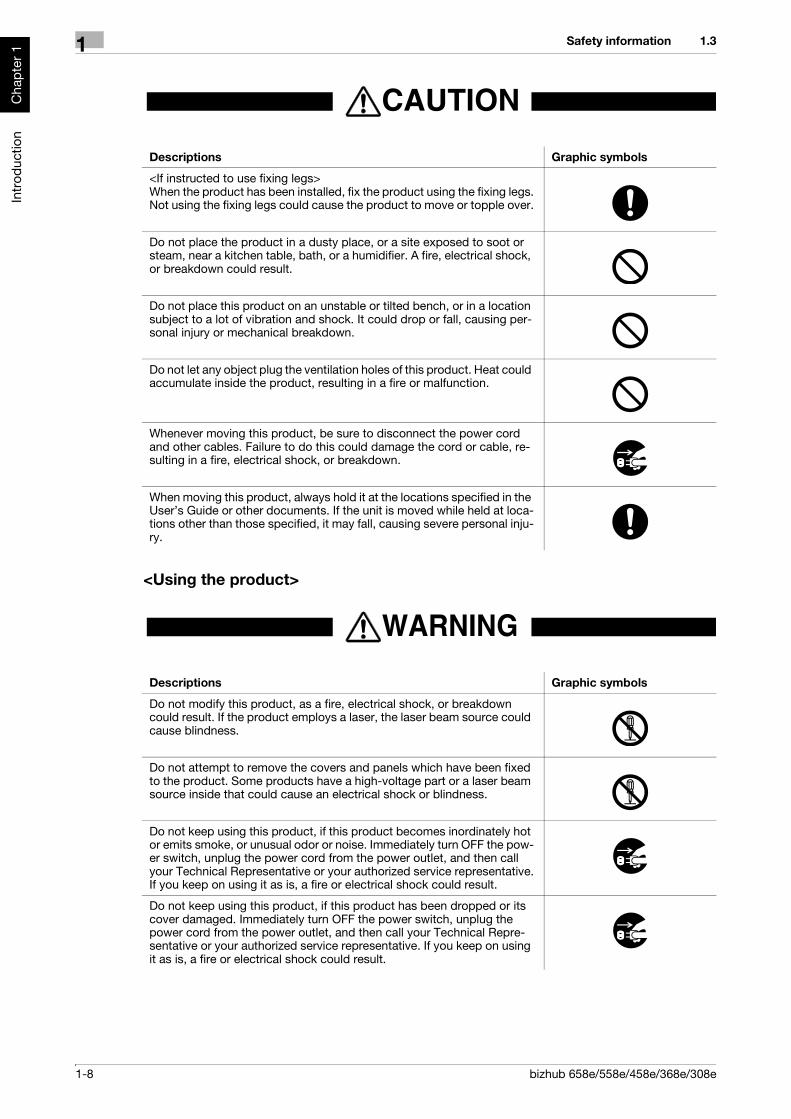
<Using the product>
Descriptions Graphic symbols
<If instructed to use fixing legs>When the product has been installed, fix the product using the fixing legs.Not using the fixing legs could cause the product to move or topple over.
Do not place the product in a dusty place, or a site exposed to soot or steam, near a kitchen table, bath, or a humidifier. A fire, electrical shock, or breakdown could result.
Do not place this product on an unstable or tilted bench, or in a location subject to a lot of vibration and shock. It could drop or fall, causing per-sonal injury or mechanical breakdown.
Do not let any object plug the ventilation holes of this product. Heat could accumulate inside the product, resulting in a fire or malfunction.
Whenever moving this product, be sure to disconnect the power cord and other cables. Failure to do this could damage the cord or cable, re-sulting in a fire, electrical shock, or breakdown.
When moving this product, always hold it at the locations specified in the User’s Guide or other documents. If the unit is moved while held at loca-tions other than those specified, it may fall, causing severe personal inju-ry.
Descriptions Graphic symbols
Do not modify this product, as a fire, electrical shock, or breakdown could result. If the product employs a laser, the laser beam source could cause blindness.
Do not attempt to remove the covers and panels which have been fixed to the product. Some products have a high-voltage part or a laser beam source inside that could cause an electrical shock or blindness.
Do not keep using this product, if this product becomes inordinately hot or emits smoke, or unusual odor or noise. Immediately turn OFF the pow-er switch, unplug the power cord from the power outlet, and then call your Technical Representative or your authorized service representative.If you keep on using it as is, a fire or electrical shock could result.
Do not keep using this product, if this product has been dropped or its cover damaged. Immediately turn OFF the power switch, unplug the power cord from the power outlet, and then call your Technical Repre-sentative or your authorized service representative. If you keep on using it as is, a fire or electrical shock could result.

bizhub 658e/558e/458e/368e/308e 1-9
1.3 Safety information 1
Intr
oduc
tion
Cha
pter
1
Do not use flammable sprays, liquids, or gases inside or near this ma-chine. Do not clean the inside of this machine using a flammable gas duster. A fire or explosion could result.
<If an RFID module (limited only to 13.56 MHz) for use in inside-the-ma-chine proximity communication or electromagnetic induction heating (IH) technology (limited only to 20.05 kHz to 100 kHz) is being used>This machine generates a weak magnetic field.If you experience any unusual symptoms with your implantable medical equipment (cardiac pacemaker, etc.) while near the machine, move away from the machine and see a doctor immediately.Please call your Technical Representative or your authorized service rep-resentative if you do not understand the purchased product corresponds or not.
<If a non-contact IC card reader is being used>If you use an implantable medical equipment (cardiac pacemaker, etc.), do not bring the IC card reader close from the implant within 12 cm at all times.The radio waves may affect implantable medical equipment (cardiac pacemaker, etc.) operations.
Descriptions Graphic symbols
Using this product in a poorly ventilated room for a long time or produc-ing a large volume of copies or prints may cause the odor of exhaust air from the machine. Ventilate the room well.
The inside of this product has areas subject to high temperature, which may cause burns.When checking the inside of the unit for malfunctions such as a paper misfeed, do not touch the locations (around the fusing unit, etc.) which are indicated by a "Caution HOT" caution label. A burn could result.
Unplug the product when you will not use the product for long periods of time.
When using the machine, do not look at the light of the lamp for a pro-longed time. Eyestrain could result.
Do not use stapled paper, conductive paper (such as silver paper or car-bon paper) or treated heat-sensitive/inkjet paper, otherwise a fire may re-sult.
Descriptions Graphic symbols

1-10 bizhub 658e/558e/458e/368e/308e
Safety information1 1.3
Intr
oduc
tion
Cha
pter
1
<Consumables>
Descriptions Graphic symbols
Do not throw toner or a container that contains toner (e.g., toner car-tridge, developing unit and Waste Toner Box) into an open flame. The hot toner may scatter and cause burns or other damage.
Descriptions Graphic symbols
Do not leave toner-related parts (e.g., toner cartridge, developing unit and Waste Toner Box) within easy reach of children. Licking any of these parts or ingesting toner could damage your health.
Do not store toner-related parts (e.g., toner cartridge, developing unit and Waste Toner Box) near devices susceptible to magnetism, such as pre-cision equipment and data storage devices, otherwise they may malfunc-tion. They could cause these products to malfunction.
Do not force open the toner-related parts (e.g., toner cartridge, develop-ing unit and Waste Toner Box). If toner tumbles from the toner bottle, take utmost care to avoid inhaling it or even getting skin contact.
If toner lands on your skin or clothing, wash thoroughly with soap and wa-ter.
If you inhale toner, move to a place with fresh air and gargle with a lot of water repeatedly. Should you get symptoms such as coughing, seek medical advice.
If you get toner into your eyes, immediately rinse them with running water for over 15 minutes. Seek medical advice if irritation persists.
If you swallow toner, rinse out your mouth and drink a few glasses of wa-ter. Seek medical advice if necessary.
Never touch the electrical contacts of the units (e.g., toner cartridge and developing unit), as an electrostatic discharge may damage the product.
Before handling, see the user documentation for the safety information.
<If instructed to replace the fusing unit>The fusing section is extremely hot. Before replacing the fusing unit, be sure to open doors and covers of the machine. Then, leave the machine to stand idle for a specified period of time and make sure that the fusing section has cooled down to room temperature. Failure to follow these in-structions could result in a burn.

bizhub 658e/558e/458e/368e/308e 1-11
1.4 Regulation notices 1
Intr
oduc
tion
Cha
pter
1
1.4 Regulation notices
CE Marking (Declaration of Conformity) for users of the European Union (EU)Hereby, Konica Minolta declares that the radio equipment types mentioned above are in compliance with Di-rective 2014/53/EU.
The full text of the EU declaration of conformity is available at the following internet address:"https://www.konicaminolta.eu/en/business-solutions/support/download-center.html".Choose your product and open the section "Safety Documents".
Maximum radio-frequency power transmitted in the frequency band (EIRP):
Restrictions for use: Wireless module 5 GHz outdoor not allowed in all EU member states
Note: 5 GHz may not be available
USER INSTRUCTIONS FCC PART 15 - RADIO FREQUENCY DEVICES (for U.S.A. users)NOTE: This equipment has been tested and found to comply with the limits for a Class A digital device, pur-suant to Part 15 of the FCC Rules.
These limits are designed to provide reasonable protection against harmful interference when the equipment is operated in a commercial environment. This equipment generates, uses and can radiate radio frequency energy and, if not installed and used in accordance with the instruction manual, may cause harmful interfer-ence to radio communications. Operation of this equipment in a residential area is likely to cause harmful in-terference in which case the user will be required to correct the interference at his own expense.
7WARNING- The design and production of this unit conform to FCC regulations, and any changes or modifications
must be registered with the FCC and are subject to FCC control. Any changes made by the purchaser or user without first contacting the manufacturer will be subject to penalty under FCC regulations.
- This device must be used with a shielded interface cable. The use of non-shielded cables is likely to result in interference with radio communications and is prohibited under FCC rules.
INTERFERENCE-CAUSING EQUIPMENT STANDARD (ICES-003 ISSUE 5) (for Canada users)This Class A digital apparatus complies with Canadian ICES-003.
Cet appareil numérique de la classe A est conforme à la norme NMB-003 du Canada.
For users in countries not subject to class B regulations
7WARNING- This is a Class A product. In a domestic environment this product may cause radio interference in which
case the user may be required to take adequate measures.- This device must be used with a shielded interface cable. The use of non-shielded cables is likely to
result in interference with radio communications and is prohibited under CISPR rules and local rules.
Module Name, Option Frequency Band Radiation. Power
UK-215 includes approved Wireless module, MODEL DAUB-KM66:
2.4 GHz Max. 20 dBm
5 GHz Max. 23 dBm
EK-609 includes approved Wireless module, MOD-EL MBH7BLZ02:
2.4 GHz Max. 3 dBm
AU-201S Authentication Unit: 13.56 MHz Max. -27 dBm
1-12 bizhub 658e/558e/458e/368e/308e
Regulation notices1 1.4
Intr
oduc
tion
Cha
pter
1
GS CertificationThis device is not intended for use in the direct field of view at visual display workplaces. To avoid incom-moding reflexions at visual display workplaces this device must not be placed in the direct field of view.
Das Gerät ist nicht für die Benutzung im unmittelbaren Gesichtsfeld am Bildschirmarbeitsplatz vorgesehen. Um störende Reflexionen am Bildschirmarbeitsplatz zu vermeiden, darf dieses Produkt nicht im unmittel-baren Gesichtsfeld platziert werden.
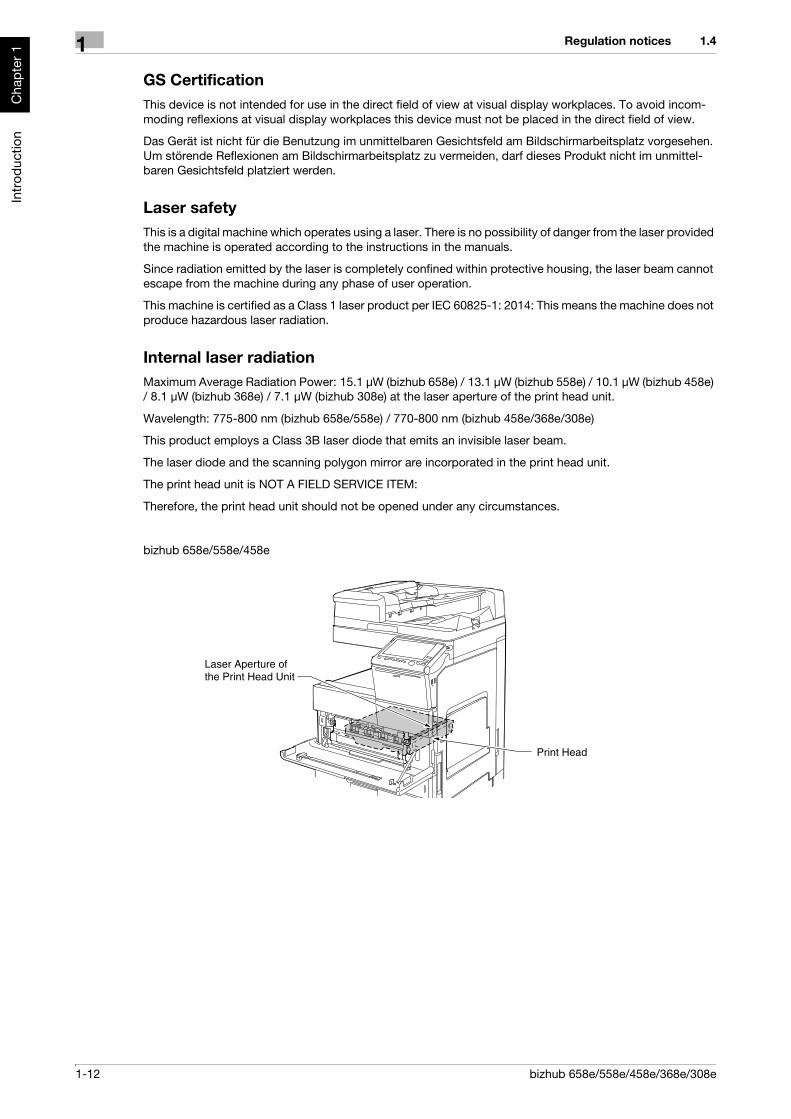
Laser safetyThis is a digital machine which operates using a laser. There is no possibility of danger from the laser provided the machine is operated according to the instructions in the manuals.
Since radiation emitted by the laser is completely confined within protective housing, the laser beam cannot escape from the machine during any phase of user operation.
This machine is certified as a Class 1 laser product per IEC 60825-1: 2014: This means the machine does not produce hazardous laser radiation.
Internal laser radiationMaximum Average Radiation Power: 15.1 μW (bizhub 658e) / 13.1 μW (bizhub 558e) / 10.1 μW (bizhub 458e) / 8.1 μW (bizhub 368e) / 7.1 μW (bizhub 308e) at the laser aperture of the print head unit.
Wavelength: 775-800 nm (bizhub 658e/558e) / 770-800 nm (bizhub 458e/368e/308e)
This product employs a Class 3B laser diode that emits an invisible laser beam.
The laser diode and the scanning polygon mirror are incorporated in the print head unit.
The print head unit is NOT A FIELD SERVICE ITEM:
Therefore, the print head unit should not be opened under any circumstances.
bizhub 658e/558e/458e
Laser Aperture ofthe Print Head Unit
Print Head
bizhub 658e/558e/458e/368e/308e 1-13
1.4 Regulation notices 1
Intr
oduc
tion
Cha
pter
1
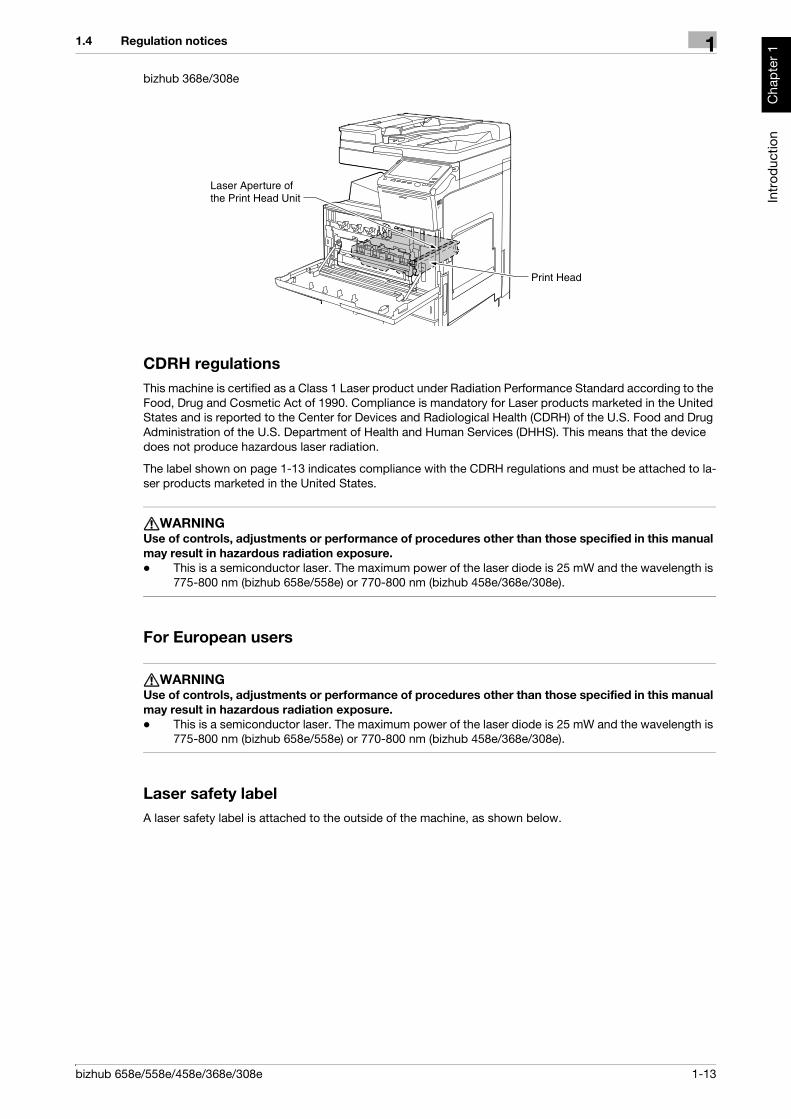
bizhub 368e/308e
CDRH regulationsThis machine is certified as a Class 1 Laser product under Radiation Performance Standard according to the Food, Drug and Cosmetic Act of 1990. Compliance is mandatory for Laser products marketed in the United States and is reported to the Center for Devices and Radiological Health (CDRH) of the U.S. Food and Drug Administration of the U.S. Department of Health and Human Services (DHHS). This means that the device does not produce hazardous laser radiation.
The label shown on page 1-13 indicates compliance with the CDRH regulations and must be attached to la-ser products marketed in the United States.
7WARNINGUse of controls, adjustments or performance of procedures other than those specified in this manual may result in hazardous radiation exposure.- This is a semiconductor laser. The maximum power of the laser diode is 25 mW and the wavelength is
775-800 nm (bizhub 658e/558e) or 770-800 nm (bizhub 458e/368e/308e).
For European users
7WARNINGUse of controls, adjustments or performance of procedures other than those specified in this manual may result in hazardous radiation exposure.- This is a semiconductor laser. The maximum power of the laser diode is 25 mW and the wavelength is
775-800 nm (bizhub 658e/558e) or 770-800 nm (bizhub 458e/368e/308e).
Laser safety labelA laser safety label is attached to the outside of the machine, as shown below.
Laser Aperture ofthe Print Head Unit
Print Head

1-14 bizhub 658e/558e/458e/368e/308e
Regulation notices1 1.4
Intr
oduc
tion
Cha
pter
1
bizhub 658e/558e/458e
bizhub 368e/308e
Ozone releaseLocate the Machine in a Well-Ventilated RoomA negligible amount of ozone is generated during normal operation of this machine. An unpleasant odor may, however, be created in poorly ventilated rooms during extensive machine operations. For a comfortable, healthy and safe operating environment, it is recommended that the room be well ventilated.
Placer l’appareil dans une pièce largement ventiléeUne quantité d’ozone négligable est dégagée pendant le fonctionnement de l’appareil quand celui-ci est uti-lisé normalement. Cependant, une odeur désagréable peut être ressentie dans les pièces dont l’aération est insuffisante et lorsque une utilisation prolongée de l’appareil est effectuée. Pour avoir la certitude de travailler dans un environnment réunissant des conditions de confort, santé et de sécurité, il est préférable de bien aérer la pièce ou se trouve l’appareil.
Acoustic noise (for European users only)Der höchste Schalldruckpegel beträgt 70 dB(A) oder weniger gemäß EN ISO 7779.
Notification for California customersThis product uses a CR Lithium Battery which contains perchlorate material.
This perchlorate warning applies to perchlorate-containing lithium batteries sold or distributed in California, USA.
"Perchlorate Material - Special handling may apply, See www.dtsc.ca.gov/hazardouswaste/perchlorate."

bizhub 658e/558e/458e/368e/308e 1-15
1.4 Regulation notices 1
Intr
oduc
tion
Cha
pter
1
Recycling batteries (for Taiwan users only)
For EU member states onlyThis product complies with RoHS (2011/65/EU) Directive.
Telephone cable (for users in countries subject to class B regulations)Connect a telephone cable with a ferrite core to the telecommunication port of this machine. (Connect the modular jack on the ferrite-core-equipped end of the telephone cable to the telecommunication port.)
USB HostConnect USB devices (Memory, Authentication, Hub etc.) devices directly to the USB host. If an extension cable is used, electromagnetic interference could occur.
Graphic symbols used on this machineThese are some of major exemplary graphical symbols.
This symbol means: Do not dispose of this product together with your household waste!
Please refer to the information of your local community or contact our dealers re-grading the proper handling of end-of-life electric and electronic equipments. Re-cycling of this product will help to conserve natural resources and prevent potential negative consequences for the environment and human health caused by inappropriate waste handling.

1-16 bizhub 658e/558e/458e/368e/308e
Regulation notices1 1.4
Intr
oduc
tion
Cha
pter
1
Graphic symbols
Descriptions Graphic symbols
Descriptions Graphic symbols
Descriptions
"ON" position "OFF" position STAND-BY
push-push type switches
Ground/Earth (Protective bonding termi-nal)
Ground/Earth (Protec-tive earthing)
CLASS II EQUIP-MENT
Class II equip-ment with func-tional earthing
Functional earthing
General precau-tion
High tempera-ture
Electrical shock hazard
CAUTIONmoving fan blade
CAUTIONDOUBLE POLE / NEUTRAL FUS-ING

bizhub 658e/558e/458e/368e/308e 1-17
1.5 Caution notations and labels 1
Intr
oduc
tion
Cha
pter
1
1.5 Caution notations and labelsSafety precaution notations and labels appear on this machine at the following positions. Be very careful that an accident does not occur when operations such as removing paper jams and staple jams are performed.
bizhub 658e/558e/458e
NOTICEDo not remove caution labels or notations. If any caution label or caution notation is soiled, please clean to make legible. If you cannot make them legible, or if the caution label or notation is damaged, please contact your service representative.

1-18 bizhub 658e/558e/458e/368e/308e
Caution notations and labels1 1.5
Intr
oduc
tion
Cha
pter
1
bizhub 368e/308e
NOTICEDo not remove caution labels or notations. If any caution label or caution notation is soiled, please clean to make legible. If you cannot make them legible, or if the caution label or notation is damaged, please contact your service representative.

bizhub 658e/558e/458e/368e/308e 1-19
1.6 Special notice to user 1
Intr
oduc
tion
Cha
pter
1
1.6 Special notice to user
For CanadaThis product meets the applicable Innovation, Science and Economic Development Canada technical spec-ifications.
Le présent produit est conforme aux spécifications techniques applicables d’Innovation, Sciences et Dével-oppement économique Canada.
The Ringer Equivalence Number (REN) indicates the maximum number of devices allowed to be connected to a telephone interface. The termination of an interface may consist of any combination of devices subject only to the requirement that the sum of the RENs of all the devices not exceed five.
L’indice d’équivalence de la sonnerie (IES) sert à indiquer le nombre maximal de dispositifs qui peuvent étre raccordés à une interface téléphonique. La terminaison d’une interface peut consister en une combinaison quelconque de dispositifs, à la seule condition que la somme des IES de tous les dispositifs n’excède pas cinq.
For U.S.A.FCC PART 68 REQUIREMENTS:
This equipment complies with Part 68 of the FCC rules and the requirements adopted by the ACTA. On the cover of this equipment is a label that contains, among other information, a product identifier in the format US:AAAEQ##TXXXX. If required, this information must be provided to the telephone company.
This equipment uses certification jack USOC RJ11C.
A plug and jack used to connect this equipment to the premises wiring and telephone network must comply with the applicable FCC Part 68 rules and requirements adopted by the ACTA.
A compliant telephone cord and modular plug is provided with this product. It is designed to be connected to a compatible modular jack that is also compliant. See installation instructions for details.
The REN is used to determine the number of devices that may be connected to a telephone line. Excessive RENs on a telephone line may result in the devices not ringing in response to an incoming call. In most but not all areas, the sum of RENs should not exceed five (5.0).
To be certain of the number of devices that may be connected to a line, as determined by the total RENs, contact the local telephone company. For products approved after July 23, 2001, the REN for this product is part of the product identifier that has the format US: AAAEQ##TXXXX. The digits represented by ## are the REN without a decimal point (e.g., 03 is a REN of 0.3). For earlier products, the REN is separately shown on the label.
If this equipment FK-514 or FK-515 causes harm to the telephone network, the telephone company will notify you in advance that temporary discontinuance of service may be required. But if advance notice isn’t practi-cal, the telephone company will notify the customer as soon as possible. Also, you will be advised of your right to file a complaint with the FCC if you believe it is necessary.
The telephone company may make changes in its facilities, equipment, operations or procedures that could affect the operation of the equipment. If this happens the telephone company will provide advance notice in order for you to make necessary modifications to maintain uninterrupted service.
If trouble is experienced with this equipment FK-514 or FK-515, for repair or warranty information, please contact the Konica Minolta dealer location where you purchased this equipment. If the equipment is causing harm to the telephone network, the telephone company may request that you disconnect the equipment until the problem is resolved.
1-20 bizhub 658e/558e/458e/368e/308e
Special notice to user1 1.6
Intr
oduc
tion
Cha
pter
1
Connection to party line service is subject to state tariffs. Contact the state public utility commission, public service commission or corporation commission for information. If you home has specially wired alarm equip-ment connected to the telephone line, ensure the installation of FK-514 or FK-515 does not disable you alarm equipment. If you have questions about what will disable alarm equipment, consult your telephone company or a qualified installer.
The Telephone Consumer Protection Act of 1991 makes it unlawful for any person to use a computer or other electronic device, including FAX machines, to send any message unless such message clearly contains in a margin at the top or bottom of each transmitted page or on the first page of the transmission, the date and time it is sent and an identification of the business or other entity, or other individual sending the message and the telephone number of the sending machine or such business, other entity, or individual. (The tele-phone number provided may not be a 900 number or any other number for which charges exceed local or long-distance transmission charges.)
In order to program this information into your FAX machine, you should complete the following steps: See [Sending by Renaming the Sender ([Fax Header Settings])], of the User's Guide [Fax].
WARNING/CAUTION Explained
7WARNING- The exclamation point within an equilateral triangle followed by the word "Warning" is intended to alert
the user to the possibility that a disregard for the warning may result in fatal hazards or critical injuries. Be sure to focus your attention on the Warning headings when reading this Quick Start Guide.
7CAUTION - The exclamation point within an equilateral triangle followed by the word "Caution" is intended to alert
the user to the possibility that a disregard for the caution may result in minor injuries or in physical dam-age. Be sure to focus your attention on the Caution headings when reading this Quick Start Guide.
For EuropeThe Facsimile has been confirmed to meet the standards (or requirements) ETSI for pan-European single ter-minal connection to the public switched telephone network (PSTN).

bizhub 658e/558e/458e/368e/308e 1-21
1.7 Space requirements 1
Intr
oduc
tion
Cha
pter
1
1.7 Space requirementsTo ensure that machine operation, consumables replenishing, part replacement, and regular maintenance can easily be performed, adhere to the recommended space requirements detailed below.
bizhub 658e/558e/458e
NOTICEBe sure to allow a clearance of 8 inches (200 mm) or more at the back of this machine for the ventilation duct.
97-1/2 (2477)
Unit: inch (mm)
30-3/4 (781)
24-3/16 (615)
19 (483)
5-3/4 (146)
17-13/16 (452)
49-7/8 (1267)
61-7
/16
(156
0.5)
37-1
3/16
(9
61)
13-1
5/16
(3
53.5
)
16-7/8 (428)
33-1/16 (839)
9-11
/16
(246
)bizhub 658e/558e/458e + PC-215 + FS-537 SD + RU-513 + PI-507 + LU-207
bizhub 658e/558e/458e + PC-215 + FS-536 SD + RU-513 + LU-302
82-3/8 (2092)
Unit: inch (mm)
20-13/16 (528)
4-1/2 (115)
9/16 (15)
38-11/16 (982)
17-13/16 (452)
49-7/8 (1267)
61-7
/16
(156
0.5)
37-1
3/16
(9
61)
13-1
5/16
(3
53.5
)
16-7/8 (428)
33-1/16 (839)
9-11
/16
(246
)
bizhub 558e/458e + PC-215 + FS-533 + MK-730 + CU-102
52-7/16 (1332)
Unit: inch (mm)
6-11/16 (170)
9-15/16 (252)
24-3/16 (615)
11-5/8 (295)
49-7/8 (1267)
61-7
/16
(156
0.5)
37-1
3/16
(9
61)
13-1
5/16
(3
53.5
)
16-7/8 (428)
33-1/16 (839)
9-11
/16
(246
)

1-22 bizhub 658e/558e/458e/368e/308e
Space requirements1 1.7
Intr
oduc
tion
Cha
pter
1
bizhub 368e/308e
NOTICEBe sure to allow a clearance of 8 inches (200 mm) or more at the back of this machine for the ventilation duct.
bizhub 368e/308e + DF-629 + PC-215 + FS-536 SD + RU-513 + LU-302
82-3/8 (2092)
Unit: inch (mm)
20-13/16 (528)
4-1/2 (115)
9/16 (15)
38-11/16 (982)
17-13/16 (452)
48-13/16 (1240)
60-1
1/16
(15
42)
35-3
/8
(898
)15
-11/
16
(398
)
16-7/8 (428)
31-15/16 (812)
9-11
/16
(246
)
bizhub 368e/308e + DF-704 + PC-215 + FS-533
49-15/16 (1268)
Unit: inch (mm)
6-11/16 (170)
12-11/16 (322)
24-3/16 (615)
6-5/16 (161)
49-1/16 (1246)61
-1/8
(15
53)
36-1
/4
(921
)15
-3/1
6 (3
86)
16-7/8 (428)
32-3/16 (818)
9-11
/16
(246
)
bizhub 368e/308e + DF-629 + PC-215 + JS-506 + MK-730 + CU-101 + MK-745 Unit: inch (mm)
45-3/4 (1162)
34-1/8(867)
11-5/8(295)
16-7/8(428)
15-1
1/16
(398
)35
-3/8
(898
)9-
11/1
6 (2
46)
31-15/16(812)
48-13/16 (1240)
60-1
1/16
(15
42)

bizhub 658e/558e/458e/368e/308e 1-23
1.8 Operation precautions 1
Intr
oduc
tion
Cha
pter
1
1.8 Operation precautionsTo ensure the optimum performance of this machine, observe the precautions described below.
Power sourceThe power source requirements are as follows.
- Voltage fluctuation: Maximum ^ 10% (at 110 V/120 V/220 to 240 V AC)- Frequency fluctuation: Maximum ^ 3 Hz (at 50 Hz/60 Hz)
- Use a power source with as little voltage or frequency fluctuations as possible.
Operating environmentThe environmental requirements for correct operation of the machine are as follows.
- Temperature: 50°F (10°C) to 86°F (30°C) with fluctuations of no more than 18°F (10°C) within an hour
- Humidity: 15% to 85% with fluctuations of no more than 10% within an hour
Storage of copiesTo store copies, follow the recommendation listed below.
- Copies that are to be kept for a long time should be kept where they are not exposed to light in order to prevent them from fading.
- Adhesive that contains solvent (e.g., spray glue) may dissolve the toner on copies.
- Color copies have a thicker layer of toner than normal black-and-white copies. Therefore, when a color copy is folded, the toner at the fold may peel off.
Data stored in this machineFor the machine with hard disk, it is suggested to delete all data stored in all hard disk areas using the over-write all data function to prevent leakage of data prior to transfer or disposal of the machine, or returning of the leased machine.
For details of the overwrite all data function, refer to the User's Guide. Contact your service representative before deleting data.
It is recommended to backup HDD periodically as the measures for HDD defect. For the detail information of HDD backup, contact your service representative.

1-24 bizhub 658e/558e/458e/368e/308e
Legal restrictions on reproduction1 1.9
Intr
oduc
tion
Cha
pter
1
1.9 Legal restrictions on reproductionCertain types of originals must never be reproduced with the purpose or intent to pass reproductions of such originals off as the originals.
The following is not a complete list, but is meant to be used as a guide to responsible reproduction.
<Financial Instruments>
- Personal checks- Traveler’s checks
- Money orders
- Certificates of deposit- Bonds or other certificates of indebtedness
- Stock certificates
<Legal Originals>
- Food stamps
- Postage stamps (canceled or uncanceled)- Checks or drafts drawn by government agencies
- Internal revenue stamps (canceled or uncanceled)- Passports
- Immigration papers- Motor vehicle licenses and titles
- House and property titles and deeds
<General>- Identification cards, badges, or insignias
- Copyrighted works without permission of the copyright owner
In addition, it is prohibited under any circumstances to reproduce domestic or foreign currencies, or works of art without permission of the copyright owner.
When in doubt about the nature of an original, consult with legal counsel.
NOTICEThis machine provides the forgery prevention function in order to prevent financial instruments from being re-produced illegally.
We appreciate your understanding that printed images may infrequently have some noise or image data may not be stored under certain circumstances due to this forgery prevention function.

bizhub 658e/558e/458e/368e/308e 1-25
1.10 Trademark acknowledgements 1
Intr
oduc
tion
Cha
pter
1
1.10 Trademark acknowledgementsKONICA MINOLTA, the KONICA MINOLTA logo, Giving Shape to Ideas, PageScope, and bizhub are regis-tered trademarks or trademarks of KONICA MINOLTA, INC.
Mozilla and Firefox are trademarks of the Mozilla Foundation.
Microsoft, Windows, Windows 7, Windows 8.1, and Windows 10 are either registered trademarks or trade-marks of Microsoft Corporation in the United States and/or other countries.
PowerPC is a trademark of IBM Corporation in the United States, or other countries, or both.
Citrix®, XenApp®, XenDesktop® and XenServer® are registered trademarks of Citrix Systems, Inc. and/or one or more of its subsidiaries, and may be registered in the United States Patent and Trademark Office and in other countries.
Apple, Safari, iPad, iPhone, iPod touch, Macintosh, Mac OS, OS X, macOS and Bonjour are trademarks of Apple Inc., registered in the U.S. and other countries. AirPrint and the AirPrint logo are trademarks of Apple Inc.
CUPS and CUPS logo are trademarks of Apple Inc.
Google, Google Chrome, Android, and Google Cloud Print are registered trademarks or trademarks of Goog-le Inc.
Mopria®, the Mopria® Logo and Mopria® Alliance logo are registered trademarks and service marks of Mo-pria Alliance, Inc. in the United States and other countries. Unauthorized use is strictly prohibited.
Adobe, the Adobe logo, Acrobat and PostScript are either registered trademarks or trademarks of Adobe Systems Incorporated in the United States and/or other countries.
This [Sublicensee Product] contains Adobe® Reader® LE software under license from Adobe Systems Incor-porated, Copyright © 1995-2009 Adobe Systems Incorporated. All rights reserved. Adobe and Reader are trademarks of Adobe Systems Incorporated.
Ethernet is a registered trademark of Xerox Corporation.
PCL is a registered trademark of Hewlett-Packard Company Limited.
This machine and PageScope Box Operator are based in part on the work of the Independent JPEG Group.
Compact-VJECopyright 1986-2009 Yahoo Japan Corp.
RC4® is a registered trademark or trademark of EMC Corporation in the United States and/or other countries.
RSA and BSAFE are registered trademarks or trademarks of EMC Corporation in the United States and other countries.
License information
[This product/Product name] includes RSA BSAFE® Cryptographic software from EMC Corporation.
1-26 bizhub 658e/558e/458e/368e/308e
Trademark acknowledgements1 1.10
Intr
oduc
tion
Cha
pter
1
Advanced Wnn"Advanced Wnn"© OMRON SOFTWARE CO., Ltd. 2006 All Rights Reserved.
ABBYY and FineReader are registered trade marks of ABBYY Software House.
ThinPrint is a registered trademark or trademark of Cortado AG in Germany and other countries.
QR Code is a registered trademark of DENSO WAVE INCORPORATED.
Wi-Fi, the Wi-Fi CERTIFIED logo, Wi-Fi Alliance, Wi-Fi Direct, Wi-Fi Protected Setup, the Wi-Fi Protected Set-up logo, WPA, and WPA2 are either registered trademarks or trademarks of the Wi-Fi Alliance.
FeliCa is a registered trademark of Sony Corporation.
MIFARE is a registered trademark of NXP Semiconductors.
Bluetooth is a registered trademark of Bluetooth SIG, Inc.
All other product and brand names are trademarks or registered trademarks of their respective companies or organizations.
CopyrightKONICA MINOLTA, INC. maintains the copyright of the printer drivers.
© 2017 KONICA MINOLTA, INC. All Rights Reserved.
NoteUser's Guide may not be reproduced in part or in full without permission.
KONICA MINOLTA, INC. will not be held liable for any incidents caused by using this printing system or Us-er's Guide.
Information included in User's Guide is subject to change without notice.

bizhub 658e/558e/458e/368e/308e 1-27
1.11 SOFTWARE LICENSE AGREEMENT 1
Intr
oduc
tion
Cha
pter
1
1.11 SOFTWARE LICENSE AGREEMENTThis package contains the following materials provided by KONICA MINOLTA, INC. (KM): software included as part of the printing system ("Printing Software"), the digitally-encoded machine-readable outline data en-coded in the special format and in the encrypted form ("Font Programs"), other software which runs on a computer system for use in conjunction with the Printing Software ("Host Software"), and related explanatory written materials ("Documentation"). The term "Software" shall be used to describe Printing Software, Font Programs and/or Host Software and also include any upgrades, modified versions, additions, and copies of the Software.
The Software is being licensed to you under the terms of this Agreement.
KM grants to you a non-exclusive sublicense to use the Software and Documentation, provided that you agree to the following:
1. You may use the Software and accompanying Font Programs for imaging to the licensed output de-vice(s), solely for your own internal business purposes.
2. In addition to the license for Font Programs set forth in Section 1 above, you may use Roman Font Pro-grams to reproduce weights, styles, and versions of letters, numerals, characters and symbols ("Type-faces") on the display or monitor for your own internal business purposes.
3. You may make one backup copy of the Host Software, provided your backup copy is not installed or used on any computer. Notwithstanding the above restrictions, you may install the on any number of computers solely for use with one or more printing systems running the Printing Software.
4. You may assign its rights under this Agreement to an assignee of all of Licensee's right and interest to such Software and Documentation ("Assignee") provided you transfer to Assignee all copies of such Software and Documentation Assignee agrees to be bound by all of the terms and conditions of this Agreement.
5. You agree not to modify, adapt or translate the Software and Documentation.
6. You agree that you will not attempt to alter, disassemble, decrypt, reverse engineer or decompile the Software.
7. Title to and ownership of the Software and Documentation and any reproductions thereof shall remain with KM and its licensor.
8. Trademarks shall be used in accordance with accepted trademark practice, including identification of the trademark owner's name. Trademarks can only be used to identify printed output produced by the Software. Such use of any trademark does not give you any rights of ownership in that trademark.
9. You may not rent, lease, sublicense, lend or transfer versions or copies of the Software Licensee does not use, or Software contained on any unused media, except as part of the permanent transfer of all Software and Documentation as described above.
10. IN NO EVENT WILL KM OR ITS LICENSOR BE LIABLE TO YOU FOR ANY CONSEQUENTIAL, INCI-DENTAL INDIRECT, PUNITIVE OR SPECIAL DAMAGES, INCLUDING ANY LOST PROFITS OR LOST SAVING, EVEN IF KM HAS BEEN ADVISED OF THE POSSIBILITY OF SUCH DAMAGES, OR FOR ANY CLAIM BY ANY THIRD PARTY. KM OR ITS LICENSOR DISCLAIMS ALL WARRANTIES WITH REGARD TO THE SOFTWARE, EXPRESS OR IMPLIED, INCLUDING, WITHOUT LIMITATION IMPLIED WAR-RANTIES OF MERCHANTABILITY, FITNESS FOR A PARTICULAR PURPOSE, TITLE AND NON-IN-FRINGEMENT OF THIRD PARTY RIGHTS. SOME STATES OR JURISDICTIONS DO NOT ALLOW THE EXCLUSION OR LIMITATION OF INCIDENTIAL, CONSEQUENTIAL OR SPECIAL DAMAGES, SO THE ABOVE LIMITATIONS MAY NOT APPLY TO YOU.
11. Notice to Government End Users: The Software is a "commercial item," as that term is defined at 48 C.F.R.2.101, consisting of "commercial computer software" and "commercial computer software doc-umentation," as such terms are used in 48 C.F.R. 12.212. Consistent with 48 C.F.R. 12.212 and 48 C.F.R. 227.7202-1 through 227.7202-4, all U.S. Government End Users acquire the Software with only those rights set forth herein.
12. You agree that you will not export the Software in any form in violation of any applicable laws and reg-ulations regarding export control of any countries.

1-28 bizhub 658e/558e/458e/368e/308e
i-Option LK-105 v4 (Searchable PDFs) End User License Agreement1 1.12
Intr
oduc
tion
Cha
pter
1
1.12 i-Option LK-105 v4 (Searchable PDFs) End User License Agree-mentSubject to your purchase of a license key of i-Option LK-105 v4 (searchable PDFs, or "Program"), KONICA MINOLTA, INC. (KM) grants you a non-exclusive and non-transferable sublicense to use the Program provid-ed that you comply with all terms and conditions stated in this Agreement.
1. You agree not to reproduce, modify, or adapt the Program. You may not allow a third party to use the Program or transfer it to a third party.
2. You agree that you will not attempt to alter, disassemble, decrypt, reverse engineer, or decompile the Program.
3. KM or its licensor own the copyright and other intellectual property rights. No copyright or other intel-lectual property rights shall be transferred to you through the granting to you of a license to use the Program.
4. IN NO EVENT WILL KM OR ITS LICENSOR BE LIABLE TO YOU FOR ANY CONSEQUENTIAL, INCI-DENTAL INDIRECT, PUNITIVE OR SPECIAL DAMAGES, INCLUDING ANY LOST PROFITS OR LOST SAVING, EVEN IF KM HAS BEEN ADVISED OF THE POSSIBILITY OF SUCH DAMAGES, OR FOR ANY CLAIM BY ANY THIRD PARTY. KM OR ITS LICENSOR DISCLAIMS ALL WARRANTIES WITH REGARD TO THE PROGRAM, EXPRESS OR IMPLIED, INCLUDING, WITHOUT LIMITATION IMPLIED WARRAN-TIES OF MERCHANTABILITY, FITNESS FOR A PARTICULAR PURPOSE, TITLE AND NON-INFRINGE-MENT OF THIRD PARTY RIGHTS. SOME STATES OR JURISDICTIONS DO NOT ALLOW THE EXCLUSION OR LIMITATION OF INCIDENTAL, CONSEQUENTIAL OR SPECIAL DAMAGES, SO THE ABOVE LIMITATIONS MAY NOT APPLY TO YOU.
5. You agree that you will not export the Program in any form in violation of any applicable laws and reg-ulations regarding export control of any countries.
6. Notice to Government End Users (this provision shall apply to U.S. government end users only) The Pro-gram is a "commercial item," as that term is defined at 48 C.F.R.2.101, consisting of "commercial com-puter software" and "commercial computer software documentation," as such terms are used in 48 C.F.R. 12.212. Consistent with 48 C.F.R. 12.212 and 48 C.F.R. 227.7202-1 through 227.7202-4, all U.S. Government End Users acquire the Program with only those rights set forth herein.
7. This license shall automatically terminate upon a failure on your part to comply with any term or condi-tion of this Agreement, in which case you agree to immediately stop use of the Program.
8. This Agreement shall be governed by the laws of Japan.

2
Abo
ut th
is m
achi
neC
hapt
er 2
About this machine

2-2 bizhub 658e/558e/458e/368e/308e
Intended use of office MFP devices2 2.1
Abo
ut th
is m
achi
neC
hapt
er 2
2 About this machine
2.1 Intended use of office MFP devices
Intended useThis Multi Function Product incorporates the functionality of multiple office devices in one. It is designed to be used as an office system for the following purposes:
- Print, copy, scan and fax documents.- Use available finishing functions such as duplexing, stapling, hole-punching and booklet creation if ap-
propriate options are installed.- Store scanned documents on external USB memory devices; send scanned documents to network
scan destinations such as FTP, WebDAV and E-mail.
The intended use also requires that:- The system is used within the limits of device specifications and specifications of optional components,
- All safety instructions in the related user's guides are observed,- Legal restrictions on reproduction (see page 1-24) are observed,
- Inspection and maintenance instructions are adhered to,
- General, national and company safety provisions are observed.
Impermissible operating conditionsThe system may not be operated if:
- Errors or damage have been discovered,- Maintenance intervals have been exceeded,
- Mechanical or electrical functions do not work as they should.
Exclusion of liabilityThe manufacturer of the system assumes no liability for damages if the system was operated under imper-missible conditions.
bizhub 658e/558e/458e/368e/308e 2-3
2.2 Introduction to user's guide 2
Abo
ut th
is m
achi
neC
hapt
er 2
2.2 Introduction to user's guideThe user's guide of this product consists of the booklet manual and the User's Guide CD.
The booklet manual describes basic machine procedures and frequently asked questions.
If you want to learn about more detailed functions or operation methods, refer to the User's Guide included in the User's Guide CD.
In addition, you can access [Frequently Asked Questions] on the top page (home) of the relevant file on the User's Guide CD for detailed information on "Frequently Asked Questions" and "Troubleshooting".
2.2.1 User's Guide CDThe User's Guide CD is provided with this machine.
Select a desired function on the top page (Home), and check the details of the function.
Selecting [Introduction] on the top page (Home) allows you to view detailed methods for using the User's Guide.
Name Overview
Quick Start Guide This manual describes basic procedures users will need to know in order to use this machine, as well as setting proce-dures. It also introduces major functions, FAQs, and basic troubleshooting procedures to make use of this machine more conveniently.This manual also contains notes and precautions that should be followed in order to use this machine. Please be sure to read this manual before using this machine.
User's Guide CD This CD contains basic and detailed information on the func-tions of this product and also explanations of other various setting functions.
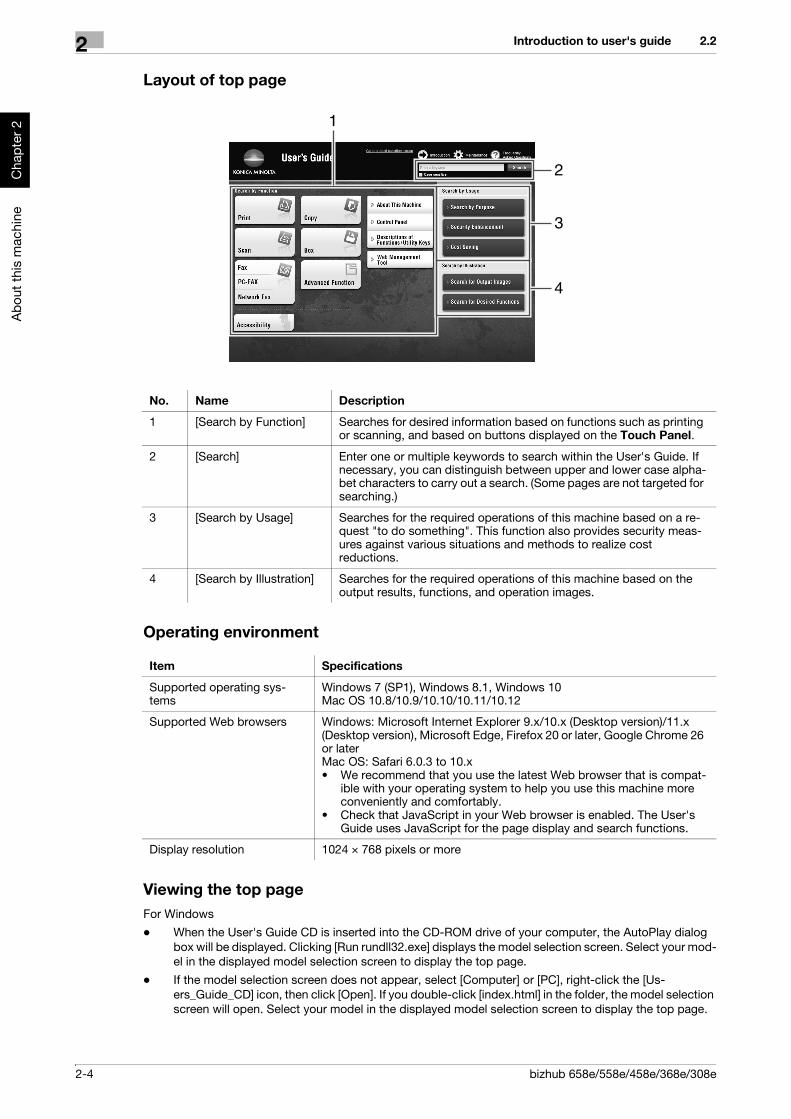
2-4 bizhub 658e/558e/458e/368e/308e
Introduction to user's guide2 2.2
Abo
ut th
is m
achi
neC
hapt
er 2
Layout of top page
Operating environment
Viewing the top pageFor Windows
- When the User's Guide CD is inserted into the CD-ROM drive of your computer, the AutoPlay dialog box will be displayed. Clicking [Run rundll32.exe] displays the model selection screen. Select your mod-el in the displayed model selection screen to display the top page.
- If the model selection screen does not appear, select [Computer] or [PC], right-click the [Us-ers_Guide_CD] icon, then click [Open]. If you double-click [index.html] in the folder, the model selection screen will open. Select your model in the displayed model selection screen to display the top page.
No. Name Description
1 [Search by Function] Searches for desired information based on functions such as printing or scanning, and based on buttons displayed on the Touch Panel.
2 [Search] Enter one or multiple keywords to search within the User's Guide. If necessary, you can distinguish between upper and lower case alpha-bet characters to carry out a search. (Some pages are not targeted for searching.)
3 [Search by Usage] Searches for the required operations of this machine based on a re-quest "to do something". This function also provides security meas-ures against various situations and methods to realize cost reductions.
4 [Search by Illustration] Searches for the required operations of this machine based on the output results, functions, and operation images.
1
2
3
4
Item Specifications
Supported operating sys-tems
Windows 7 (SP1), Windows 8.1, Windows 10Mac OS 10.8/10.9/10.10/10.11/10.12
Supported Web browsers Windows: Microsoft Internet Explorer 9.x/10.x (Desktop version)/11.x (Desktop version), Microsoft Edge, Firefox 20 or later, Google Chrome 26 or laterMac OS: Safari 6.0.3 to 10.x• We recommend that you use the latest Web browser that is compat-
ible with your operating system to help you use this machine more conveniently and comfortably.
• Check that JavaScript in your Web browser is enabled. The User's Guide uses JavaScript for the page display and search functions.
Display resolution 1024 e 768 pixels or more

bizhub 658e/558e/458e/368e/308e 2-5
2.2 Introduction to user's guide 2
Abo
ut th
is m
achi
neC
hapt
er 2
For Macintosh
- Double-click the CD icon on the desktop, then [index.html] to display the model selection screen. Select your model in the displayed model selection screen to display the top page.
2.2.2 Target groupsThe user's guides (see page 2-3) are intended for the following users of the system:
Everyone who uses this system must have read and understood the related user's guides.
2.2.3 Symbols and notations used in this manual
Procedural instruction0 This check mark symbol shows a precondition of a procedure.
1 This format number "1" represents the first step.
2 This format number represents the order of serial steps.
% This symbol indicates a supplementary explanation of a procedural instruction.
Symbols and notations
Target group Description
User Persons using the system for its intended use (see page 2-2) as well as man-aging system functions and consumables according to the assigned user rights.
Administrator Persons managing consumables, system functions, users and access rights; adjusting system settings, and establishing network connections.
Symbols/Notations Description
Improper handling can cause serious injury or death.
Improper handling can cause minor injury or dam-age to houses and property.
This symbol indicates a risk that may result in dam-age to this machine or documents.Follow the instructions to avoid property damage.
This symbol indicates supplemental information of a topic as well as options required to use a func-tion.

2-6 bizhub 658e/558e/458e/368e/308e
Introduction to user's guide2 2.2
Abo
ut th
is m
achi
neC
hapt
er 2
ScreensSome of the screen displays for this machine vary depending on whether the fax function is available.
This manual describes procedures using the screen displays when the fax function is available. When the fax function is not available, change "Scan/Fax" to "SCAN" to read a description.
Names and notations of applicationsThis manual uses a notation for each application name as shown below.
This symbol indicates reference functions related to a topic.
This shows the settings related to a particular topic for any user.
This shows the settings related to a topic only for administrators.
This check mark symbol shows a precondition of a procedure.
This symbol indicates a supplementary explanation of a procedural instruction.
[ ] An item enclosed by brackets [ ] indicates a key name on the Touch Panel or computer screen, or the name of a user's guide.
Bold text This presents a key name, part name, product name, or option name on the Control Panel.
Symbols/Notations Description
Name Notations used in this manual
PageScope Web Connection Web Connection
PageScope My Panel Manager My Panel Manager
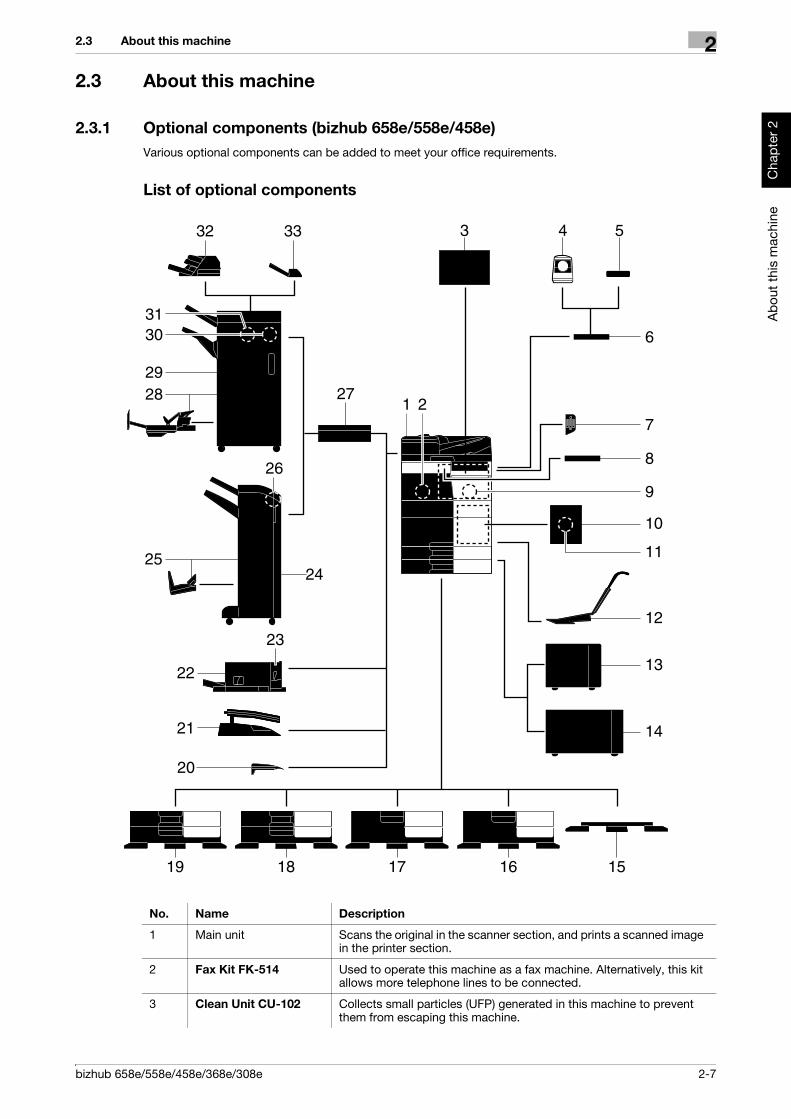
bizhub 658e/558e/458e/368e/308e 2-7
2.3 About this machine 2
Abo
ut th
is m
achi
neC
hapt
er 2
2.3 About this machine
2.3.1 Optional components (bizhub 658e/558e/458e)Various optional components can be added to meet your office requirements.
List of optional components
No. Name Description
1 Main unit Scans the original in the scanner section, and prints a scanned image in the printer section.
2 Fax Kit FK-514 Used to operate this machine as a fax machine. Alternatively, this kit allows more telephone lines to be connected.
3 Clean Unit CU-102 Collects small particles (UFP) generated in this machine to prevent them from escaping this machine.
721
19 18 17 16 15
13
12
9
14
10
4 53
6
8
112524
20
3031
26
27
3332
2829
21
23
22

2-8 bizhub 658e/558e/458e/368e/308e
About this machine2 2.3
Abo
ut th
is m
achi
neC
hapt
er 2
4 Authentication Unit AU-102
Performs user authentication by scanning vein patterns in the finger.The Working Table WT-506 is required to install the Authentication Unit AU-102.
5 Authentication Unit AU-201S
Performs user authentication by scanning information recorded on the IC card or NFC-compatible Android terminal.The Mount Kit MK-735 is required to install the Authentication Unit AU-201S.This unit can also be installed on the Working Table WT-506.
6 Working Table WT-506
Provides an area to temporarily place an original or other materials. This is also used when the Authentication Unit AU-102 or Authenti-cation Unit AU-201S is installed.
7 Keypad KP-101 It is equipped on the side of the Control Panel.Allows you to enter numbers by using the Hardware Keypad.
8 Keyboard Holder KH-102
Install this holder to use a external keyboard.For details on external keyboards, contact your service representa-tive.
9 Security Kit SC-508 Supports the copy guard and password copy functions to prevent un-authorized copying.
10 Fax Mount Kit MK-742 This unit is required to install FAX Kit FK-515.This option can be used in North America.
11 FAX Kit FK-515 Used to add telephone lines.Fax Mount Kit MK-742 is required to install FAX Kit FK-515.This option can be used in North America.
12 Mount Kit MK-730 Used to print data on banner paper.
13 Large Capacity Unit LU-302
Allows you to load up to 3000 sheets of 8-1/2 e 11 (A4) size.To install the Large Capacity Unit LU-302, the Paper Feed Cabinet PC-415, Paper Feed Cabinet PC-115, or Paper Feed Cabinet PC-215 must be installed on this machine.
14 Large Capacity Unit LU-207
Allows you to load up to 2500 sheets of SRA3 or 11 e 17 (A3) size.To install the Large Capacity Unit LU-207, the Paper Feed Cabinet PC-415, Paper Feed Cabinet PC-115, or Paper Feed Cabinet PC-215 must be installed on this machine.
15 Desk DK-705 Used to install this machine on the floor.
16 Desk DK-510 Used to install this machine on the floor.
17 Paper Feed Cabinet PC-415
Allows you to load up to 2500 sheets of 8-1/2 e 11 (A4) size.
18 Paper Feed Cabinet PC-215
Allows you to load up to 500 sheets respectively in the top and bottom trays.
19 Paper Feed Cabinet PC-115
Allows you to load up to 500 sheets in the top tray and use the bottom tray as a storage box.
20 Output Tray OT-506 Outputs printed pages.
21 Job Separator JS-506 Install this unit onto the output tray of this machine.This unit sorts printed sheets.This unit can only be installed in the bizhub 558e/458e.
22 Finisher FS-533 Install this unit onto the output tray of this machine.Sorts, groups and staples printed paper before outputting it.This unit can only be installed in the bizhub 558e/458e.
23 Punch Kit PK-519 Install this unit onto the Finisher FS-533.This unit supports the punching function.This unit can only be installed in the bizhub 558e/458e.
24 Finisher FS-536 Sorts, groups and staples printed paper before outputting it.To install the Finisher FS-536, the Relay Unit RU-513 is required. Al-so, Desk DK-510, Paper Feed Cabinet PC-415, Paper Feed Cabi-net PC-115, or Paper Feed Cabinet PC-215 must be installed on this machine.
No. Name Description

bizhub 658e/558e/458e/368e/308e 2-9
2.3 About this machine 2
Abo
ut th
is m
achi
neC
hapt
er 2
List of other optional componentsThe following options are built into this machine and are not shown in the figure.
25 Finisher FS-536 SD Sorts, groups, staples, folds, and binds printed paper before output-ting it.To install the Finisher FS-536 SD, the Relay Unit RU-513 is required. Also, Desk DK-510, Paper Feed Cabinet PC-415, Paper Feed Cab-inet PC-115, or Paper Feed Cabinet PC-215 must be installed on this machine.The Finisher FS-536 contains the Saddle Stitcher.
26 Punch Kit PK-520 Install this unit onto the Finisher FS-536/FS-536 SD.This unit supports the punching function.
27 Relay Unit RU-513 This unit is required to install the Finisher FS-537/FS-537 SD/FS-536/FS-536 SD on this machine.
28 Finisher FS-537 SD Sorts, groups, staples, folds, and binds printed paper before output-ting it.To install the Finisher FS-537 SD, the Relay Unit RU-513 is required. Also, Desk DK-510, Paper Feed Cabinet PC-415, Paper Feed Cab-inet PC-115, or Paper Feed Cabinet PC-215 must be installed on this machine.The Finisher FS-537 contains the Saddle Stitcher.
29 Finisher FS-537 Sorts, groups and staples printed paper before outputting it.To install the Finisher FS-537, the Relay Unit RU-513 is required. Al-so, Desk DK-510, Paper Feed Cabinet PC-415, Paper Feed Cabi-net PC-115, or Paper Feed Cabinet PC-215 must be installed on this machine.
30 Punch Kit PK-523 Install this unit onto the Finisher FS-537/FS-537 SD.This unit supports the punching function.
31 Z Folding Unit ZU-609 Install this unit onto the Finisher FS-537/FS-537 SD.This unit supports the Z-fold function.
32 Post Inserter PI-507 Install this unit onto the Finisher FS-537/FS-537 SD.This unit allows you to insert cover sheets into the copied or printed sheets. This unit also allows you to manually operate the finisher (only the lower tray is available).
33 Job Separator JS-602 Install this unit onto the Finisher FS-537/FS-537 SD.This unit sorts printed sheets.
No. Name Description
No. Name Description
1 Stamp Unit SP-501 Stamps a scanned original when sending a fax. This unit allows you to check that the original has been scanned.
2 Spare TX Marker Stamp 2
A replacement stamp for the Stamp Unit SP-501.
3 Local Interface Kit EK-608
Install this unit when using the voice guidance function.The speaker and USB port are added.
4 Local Interface Kit EK-609
Install this unit when using the voice guidance function or the connec-tion function with a Bluetooth LE-compatible iOS terminal.The speaker, USB port, and receiving device for Bluetooth LE com-munication are added.For details on the association with an iOS terminal, refer to the User's Guide CD.
5 i-Option LK-102 v3 Supports the PDF processing function that is one of the advanced functions.
6 i-Option LK-104 v3 Supports the voice guidance function that is one of the advanced functions.
7 i-Option LK-105 v4 Supports the searchable PDF function that is one of the advanced functions.
8 i-Option LK-106 Used to add a bar code font that is one of special fonts.

2-10 bizhub 658e/558e/458e/368e/308e
About this machine2 2.3
Abo
ut th
is m
achi
neC
hapt
er 2
9 i-Option LK-107 Used to add a unicode font that is one of special fonts.
10 i-Option LK-108 Used to add an OCR font that is one of special fonts.In the standard, the OCR-B font (PostScript) is available. Installing the i-Option LK-108 allows use of the OCR-A font (PCL).
11 i-Option LK-110 v2 Used to add an advanced function that converts a file into the DOCX or XLSX type or generates highly-functional and high-quality data.i-Option LK-110 v2 includes the function licenses for i-Option LK-102 v3 and LK-105 v4. If you purchase i-Option LK-110 v2, you do not need to purchase i-Option LK-102 v3 or LK-105 v4.For details about functions able to be added, refer to the User's Guide CD.
12 i-Option LK-111 Supports the ThinPrint function that is one of the advanced functions.
13 i-Option LK-114 Supports the serverless pull printing function that is one of the ad-vanced functions.
14 i-Option LK-115 v2 You can use TPM (Trusted Platform Module) that is one of the ad-vanced functions. Security enhancement is realized by encrypting confidential information such as certificates and passwords of this machine.
15 Upgrade Kit UK-212 Allows you to use this machine in a wireless network environment.
16 Upgrade Kit UK-215 Allows you to use this machine in a wireless network environment.
17 Heater HT-509 Prevents paper in a paper tray from being affected by humidity.The Heater HT-509 can be mounted when you purchase the Paper Feed Cabinet PC-115, Paper Feed Cabinet PC-215, Paper Feed Cabinet PC-415, or Desk DK-510.
18 Power Supply BOX MK-734
Turns on/off the Heater operations.The Power Supply BOX MK-734 can be mounted when you pur-chase the Paper Feed Cabinet PC-115, Paper Feed Cabinet PC-215, Paper Feed Cabinet PC-415, or Desk DK-510.
19 Transformer kit TK-101
This unit is required to enable the Heater of the Large Capacity Unit LU-302 or Large Capacity Unit LU-207 to function.
20 Double feed detection Kit UK-501
This unit allows you to detect that pages of the original are multi-plexed on the ADF.
21 Mount Kit MK-735 Required to have Authentication Unit AU-201S built in to the main unit.
22 Hard Disk HD-524 Install this unit to perform mirroring of the hard disk contained in the main unit.
No. Name Description

bizhub 658e/558e/458e/368e/308e 2-11
2.3 About this machine 2
Abo
ut th
is m
achi
neC
hapt
er 2
2.3.2 Optional components (bizhub 368e/308e)Various optional components can be added to meet your office requirements.
List of optional components
No. Name Description
1 Main unit Scans the original in the scanner section, and prints a scanned image in the printer section.
2 Original Cover OC-511
Used to fix the loaded originals.
3 Reverse Automatic Document Feeder DF-629
Automatically feeds and scans originals by page. This unit also revers-es and automatically scans 2-sided originals.
1
432
5
27
24
23
28
29
22 21 20 19 18
17
16
1325 26
14
87 96
10
15
11
12
2-12 bizhub 658e/558e/458e/368e/308e
About this machine2 2.3
Abo
ut th
is m
achi
neC
hapt
er 2
4 Dual Scan Document Feeder DF-704
Automatically feeds and scans originals by page. This unit scans a 2-sided original by only requiring the paper be fed into the machine once without reversing.
5 Fax Kit FK-514 Used to operate this machine as a fax machine. Alternatively, this kit allows more telephone lines to be connected.
6 Clean Unit CU-101 Collects small particles (UFP) generated in this machine to prevent them from escaping this machine.The Mount Kit MK-745 is required to install Clean Unit CU-101.
7 Mount Kit MK-745 This unit is required to install Clean Unit CU-101.
8 Authentication Unit AU-102
Performs user authentication by scanning vein patterns in the finger.The Working Table WT-506 is required to install the Authentication Unit AU-102.
9 Authentication Unit AU-201S
Performs user authentication by scanning information recorded on the IC card or NFC-compatible Android terminal.The Mount Kit MK-735 is required to install the Authentication Unit AU-201S.This unit can also be installed on the Working Table WT-506.
10 Working Table WT-506
Provides an area to temporarily place an original or other materials. This is also used when the Authentication Unit AU-102 or Authenti-cation Unit AU-201S is installed.
11 Keypad KP-101 It is equipped on the side of the Control Panel.Allows you to enter numbers by using the Hardware Keypad.
12 Keyboard Holder KH-102
Install this holder to use a external keyboard.For details on external keyboards, contact your service representa-tive.
13 Security Kit SC-508 Supports the copy guard and password copy functions to prevent un-authorized copying.
14 Fax Mount Kit MK-742 This unit is required to install FAX Kit FK-515.This option can be used in North America.
15 FAX Kit FK-515 Used to add telephone lines.Fax Mount Kit MK-742 is required to install FAX Kit FK-515.This option can be used in North America.
16 Mount Kit MK-730 Used to print data on banner paper.
17 Large Capacity Unit LU-302
Allows you to load up to 3000 sheets of 8-1/2 e 11 (A4) size.To install the Large Capacity Unit LU-302, the Paper Feed Cabinet PC-415, Paper Feed Cabinet PC-115, or Paper Feed Cabinet PC-215 must be installed on this machine.
18 Desk DK-705 Used to install this machine on the floor.
19 Desk DK-510 Used to install this machine on the floor.
20 Paper Feed Cabinet PC-415
Allows you to load up to 2500 sheets of 8-1/2 e 11 (A4) size.
21 Paper Feed Cabinet PC-215
Allows you to load up to 500 sheets respectively in the top and bottom trays.
22 Paper Feed Cabinet PC-115
Allows you to load up to 500 sheets in the top tray and use the bottom tray as a storage box.
23 Finisher FS-536 Sorts, groups and staples printed paper before outputting it.To install the Finisher FS-536, the Relay Unit RU-513 is required. Al-so, Desk DK-510, Paper Feed Cabinet PC-415, Paper Feed Cabi-net PC-115, or Paper Feed Cabinet PC-215 must be installed on this machine.
24 Finisher FS-536 SD Sorts, groups, staples, folds, and binds printed paper before output-ting it.To install the Finisher FS-536 SD, the Relay Unit RU-513 is required. Also, Desk DK-510, Paper Feed Cabinet PC-415, Paper Feed Cab-inet PC-115, or Paper Feed Cabinet PC-215 must be installed on this machine.The Finisher FS-536 contains the Saddle Stitcher.
No. Name Description

bizhub 658e/558e/458e/368e/308e 2-13
2.3 About this machine 2
Abo
ut th
is m
achi
neC
hapt
er 2
List of other optional componentsThe following options are built into this machine and are not shown in the figure.
25 Punch Kit PK-520 Install this unit onto the Finisher FS-536/FS-536 SD.This unit supports the punching function.
26 Relay Unit RU-513 This unit is required to install the Finisher FS-536/FS-536 SD on this machine.
27 Finisher FS-533 Install this unit onto the output tray of this machine.Sorts, groups and staples printed paper before outputting it.
28 Punch Kit PK-519 Install this unit onto the Finisher FS-533.This unit supports the punching function.
29 Job Separator JS-506 Install this unit onto the output tray of this machine.This unit sorts printed sheets.
No. Name Description
No. Name Description
1 Stamp Unit SP-501 Stamps a scanned original when sending a fax. This unit allows you to check that the original has been scanned.
2 Spare TX Marker Stamp 2
A replacement stamp for the Stamp Unit SP-501.
3 Local Interface Kit EK-608
Install this unit when using the voice guidance function.The speaker and USB port are added.
4 Local Interface Kit EK-609
Install this unit when using the voice guidance function or the connec-tion function with a Bluetooth LE-compatible iOS terminal.The speaker, USB port, and receiving device for Bluetooth LE com-munication are added.For details on the association with an iOS terminal, refer to the User's Guide CD.
5 i-Option LK-102 v3 Supports the PDF processing function that is one of the advanced functions.
6 i-Option LK-104 v3 Supports the voice guidance function that is one of the advanced functions.
7 i-Option LK-105 v4 Supports the searchable PDF function that is one of the advanced functions.
8 i-Option LK-106 Used to add a bar code font that is one of special fonts.
9 i-Option LK-107 Used to add a unicode font that is one of special fonts.
10 i-Option LK-108 Used to add an OCR font that is one of special fonts.In the standard, the OCR-B font (PostScript) is available. Installing the i-Option LK-108 allows use of the OCR-A font (PCL).
11 i-Option LK-110 v2 Used to add an advanced function that converts a file into the DOCX or XLSX type or generates highly-functional and high-quality data.i-Option LK-110 v2 includes the function licenses for i-Option LK-102 v3 and LK-105 v4. If you purchase i-Option LK-110 v2, you do not need to purchase i-Option LK-102 v3 or LK-105 v4.For details about functions able to be added, refer to the User's Guide CD.
12 i-Option LK-111 Supports the ThinPrint function that is one of the advanced functions.
13 i-Option LK-114 Supports the serverless pull printing function that is one of the ad-vanced functions.
14 i-Option LK-115 v2 You can use TPM (Trusted Platform Module) that is one of the ad-vanced functions. Security enhancement is realized by encrypting confidential information such as certificates and passwords of this machine.

2-14 bizhub 658e/558e/458e/368e/308e
About this machine2 2.3
Abo
ut th
is m
achi
neC
hapt
er 2
15 Upgrade Kit UK-211 • Install this unit when using i-Option LK-102 v3, LK-104 v3, LK-105 v4, LK-106, LK-107, LK-108, LK-110 v2, or LK-114.
• Install this unit when using My Address in association with My Panel Manager.
This unit is referred to as Extension Memory in the manual.
16 Upgrade Kit UK-212 Allows you to use this machine in a wireless network environment.
17 Upgrade Kit UK-215 Allows you to use this machine in a wireless network environment.
18 Heater HT-509 Prevents paper in a paper tray from being affected by humidity.The Heater HT-509 can be mounted when you purchase the Paper Feed Cabinet PC-115, Paper Feed Cabinet PC-215, Paper Feed Cabinet PC-415, or Desk DK-510.
19 Power Supply BOX MK-734
Turns on/off the Heater operations.The Power Supply BOX MK-734 can be mounted when you pur-chase the Paper Feed Cabinet PC-115, Paper Feed Cabinet PC-215, Paper Feed Cabinet PC-415, or Desk DK-510.
20 Transformer kit TK-101
This unit is required to enable the function Heater of the Large Ca-pacity Unit LU-302 to function.
21 Mount Kit MK-735 Required to have Authentication Unit AU-201S built in to the main unit.
22 Hard Disk HD-524 Install this unit to perform mirroring of the hard disk contained in the main unit.
No. Name Description

bizhub 658e/558e/458e/368e/308e 2-15
2.3 About this machine 2
Abo
ut th
is m
achi
neC
hapt
er 2
2.3.3 Name of parts (MFP) (bizhub 658e/558e/458e)
FrontThe illustration shows the main unit with Output Tray OT-506, and Paper Feed Cabinet PC-215.
No. Name Description
1 Control Panel Use the Touch Panel or buttons on this panel to operate this ma-chine.
2 Original Tray Load the original.
3 Stylus Pen Used to operate the Touch Panel.
4 USB Port (Type A) USB2.0/1.1
Used to connect an external memory unit (USB memory unit) to this machine.
5 Bypass Tray Used to load custom-size paper or special paper.
6 Paper-Empty Indica-tor
Flashes orange when a tray runs low on paper and lights up orange when the tray runs out of paper.
7 Paper Tray Used to load standard-size paper. The number of trays varies de-pending on the installed Paper Feed Cabinet.
8 Lower Front Door Open this door to replace consumables or to maintenance this ma-chine.
9 Upper Front Door Open this door to replace a Toner Cartridge.
10 Data Indicator Flashes blue while this machine is receiving a job. If a job is currently spooled, this indicator lamp lights up blue.
11 Status Indicator Flashes white during printing.
7
5
6
11
12
8
9
10
21
3
4

2-16 bizhub 658e/558e/458e/368e/308e
About this machine2 2.3
Abo
ut th
is m
achi
neC
hapt
er 2
Side/rearThe illustration shows the main unit with Paper Feed Cabinet PC-215, Fax Kit FK-514, FAX Kit FK-515, Fax Mount Kit MK-742, Power Supply BOX MK-734, and Clean Unit CU-102.
(FAX Kit FK-515 and Fax Mount Kit MK-742 can be used in North America.)
Tips- The network port of this product is following No.9 and No.10. A port is activated when a network port
inserts a cable.
12 Warning Indicator Flashes orange if a warning occurs. Lights up orange if this machine has stopped due to an error.
No. Name Description
No. Name
1 Heater Power Switch
2 Power Cord
3 Telephone Jack 4 (LINE PORT4)
4 Telephone Jack 3 (LINE PORT3)
5 Jack for connecting a telephone (TEL PORT1)
6 Telephone Jack 1 (LINE PORT1)
7 Telephone Jack 2 (LINE PORT2)
8 USB Port (Type A) USB2.0/1.1
9 Network Connector (10Base-T/100Base-TX/1000Base-T)
10 USB Port (Type B) USB2.0/1.1
109
8
7
2
34
1
65
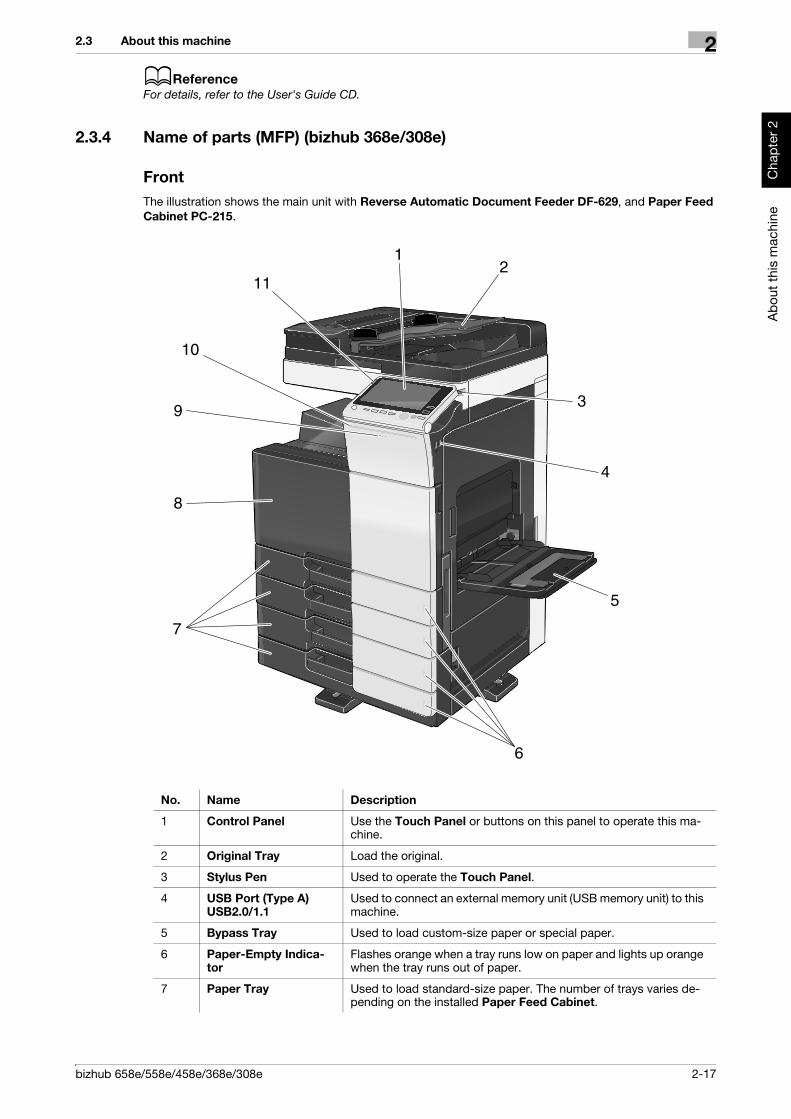
bizhub 658e/558e/458e/368e/308e 2-17
2.3 About this machine 2
Abo
ut th
is m
achi
neC
hapt
er 2
dReferenceFor details, refer to the User's Guide CD.
2.3.4 Name of parts (MFP) (bizhub 368e/308e)
FrontThe illustration shows the main unit with Reverse Automatic Document Feeder DF-629, and Paper Feed Cabinet PC-215.
No. Name Description
1 Control Panel Use the Touch Panel or buttons on this panel to operate this ma-chine.
2 Original Tray Load the original.
3 Stylus Pen Used to operate the Touch Panel.
4 USB Port (Type A) USB2.0/1.1
Used to connect an external memory unit (USB memory unit) to this machine.
5 Bypass Tray Used to load custom-size paper or special paper.
6 Paper-Empty Indica-tor
Flashes orange when a tray runs low on paper and lights up orange when the tray runs out of paper.
7 Paper Tray Used to load standard-size paper. The number of trays varies de-pending on the installed Paper Feed Cabinet.
12
3
5
6
7
8
9
10
11
4

2-18 bizhub 658e/558e/458e/368e/308e
About this machine2 2.3
Abo
ut th
is m
achi
neC
hapt
er 2
Side/rearThe illustration shows the main unit with Reverse Automatic Document Feeder DF-629, Paper Feed Cab-inet PC-215, Fax Kit FK-514, FAX Kit FK-515, Fax Mount Kit MK-742, Power Supply BOX MK-734, Clean Unit CU-101, and Mount Kit MK-745.
(FAX Kit FK-515 and Fax Mount Kit MK-742 can be used in North America.)
8 Front Door Open this door to replace consumables or to maintenance this ma-chine.
9 Data Indicator Flashes blue while this machine is receiving a job. If a job is current-ly spooled, this indicator lamp lights up blue.
10 Status Indicator Flashes white during printing.
11 Warning Indicator Flashes orange if a warning occurs. Lights up orange if this machine has stopped due to an error.
No. Name Description
No. Name
1 Heater Power Switch
2 Power Cord
3 Telephone Jack 4 (LINE PORT4)
4 Telephone Jack 3 (LINE PORT3)
5 Jack for connecting a telephone (TEL PORT1)
6 Telephone Jack 1 (LINE PORT1)
7 Telephone Jack 2 (LINE PORT2)
8 USB Port (Type A) USB2.0/1.1
9 Network Connector (10Base-T/100Base-TX/1000Base-T)
10 USB Port (Type B) USB2.0/1.1
109
8
7
2
34
1
65

bizhub 658e/558e/458e/368e/308e 2-19
2.3 About this machine 2
Abo
ut th
is m
achi
neC
hapt
er 2
Tips- The network port of this product is following No.9 and No.10. A port is activated when a network port
inserts a cable.
dReferenceFor details, refer to the User's Guide CD.

2-20 bizhub 658e/558e/458e/368e/308e
About this machine2 2.3
Abo
ut th
is m
achi
neC
hapt
er 2
2.3.5 Name of parts (Optional units)This section shows the names of distinctive parts for each optional unit that can be installed in this machine.
Finisher FS-537/Finisher FS-537 SD/Punch Kit PK-523/Z Folding Unit ZU-609 (bizhub 658e/558e/458e)
No. Name
1 Output Tray
2 Staple Cartridge
3 Punch Kit
4 Punch Scrap Box
5 Saddle Stitcher
1 2 3
4
5

bizhub 658e/558e/458e/368e/308e 2-21
2.3 About this machine 2
Abo
ut th
is m
achi
neC
hapt
er 2
No. Name
1 Z Folding Unit
2 Saddle Staple Cartridge 1
3 Saddle Staple Cartridge 2
4 Folding Output Tray
5 Stopper
1
32
5 4

2-22 bizhub 658e/558e/458e/368e/308e
About this machine2 2.3
Abo
ut th
is m
achi
neC
hapt
er 2
Job Separator JS-602 (bizhub 658e/558e/458e)
No. Name
1 Output Tray
1
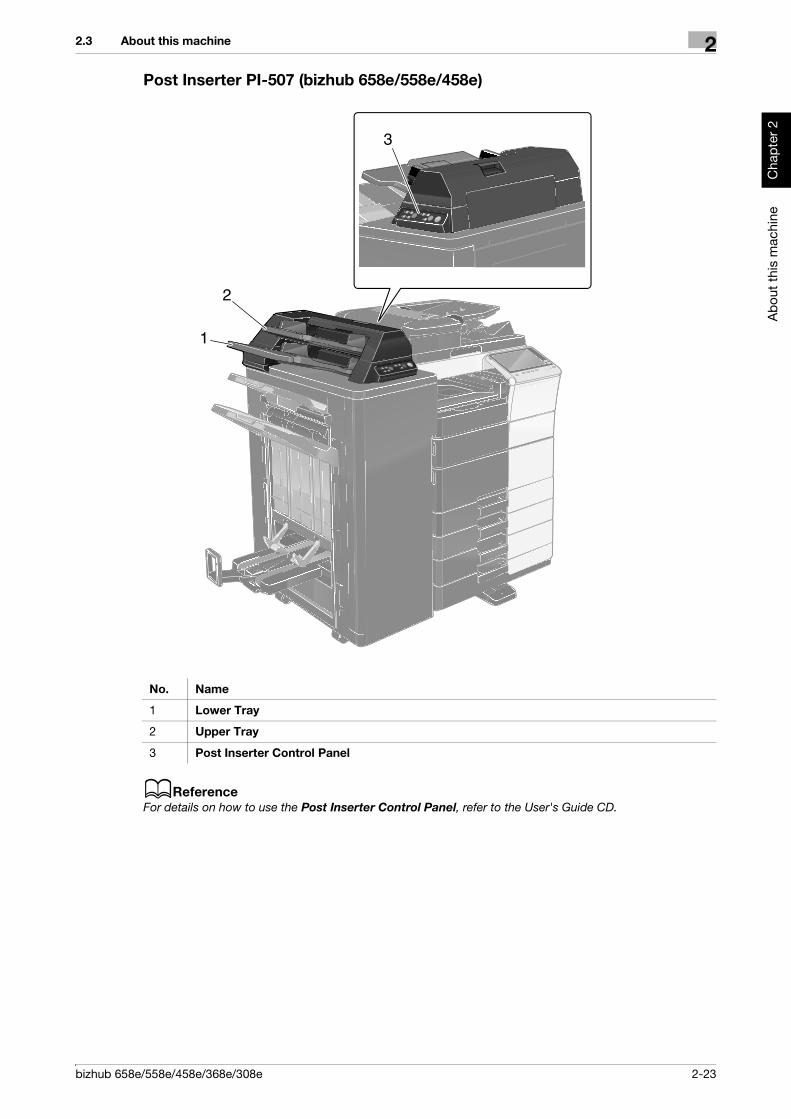
bizhub 658e/558e/458e/368e/308e 2-23
2.3 About this machine 2
Abo
ut th
is m
achi
neC
hapt
er 2
Post Inserter PI-507 (bizhub 658e/558e/458e)
dReferenceFor details on how to use the Post Inserter Control Panel, refer to the User's Guide CD.
No. Name
1 Lower Tray
2 Upper Tray
3 Post Inserter Control Panel
1
2
3

2-24 bizhub 658e/558e/458e/368e/308e
About this machine2 2.3
Abo
ut th
is m
achi
neC
hapt
er 2
Finisher FS-533/Punch Kit PK-519 (bizhub 558e/458e/368e/308e)
No. Name
1 Punch Kit
2 Staple Cartridge
3 Output Tray
4 Tray Extension
12
4
3
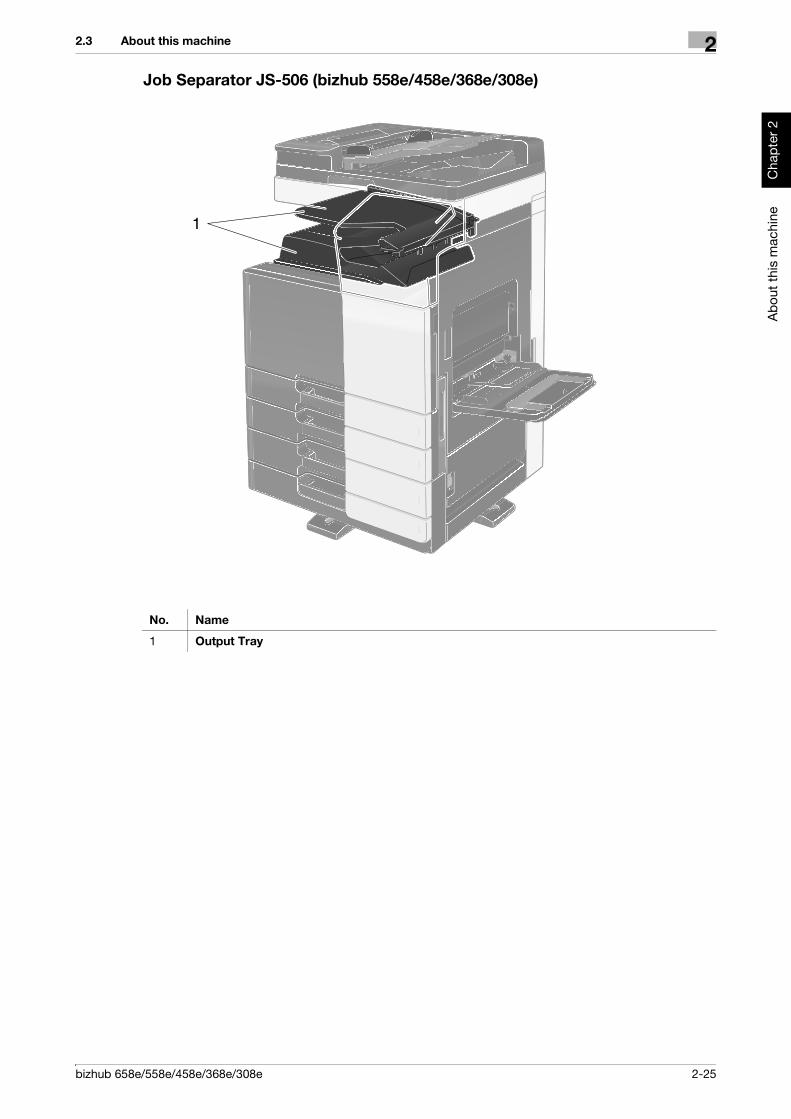
bizhub 658e/558e/458e/368e/308e 2-25
2.3 About this machine 2
Abo
ut th
is m
achi
neC
hapt
er 2
Job Separator JS-506 (bizhub 558e/458e/368e/308e)
No. Name
1 Output Tray
1

2-26 bizhub 658e/558e/458e/368e/308e
About this machine2 2.3
Abo
ut th
is m
achi
neC
hapt
er 2
Finisher FS-536/Finisher FS-536 SD/Punch Kit PK-520
No. Name
1 Output Tray
2 Staple Cartridge
3 Punch Scrap Box
4 Saddle Stitcher
2
3
4
1

bizhub 658e/558e/458e/368e/308e 2-27
2.3 About this machine 2
Abo
ut th
is m
achi
neC
hapt
er 2
No. Name
1 Punch Kit
2 Saddle Staple Cartridge 1
3 Saddle Staple Cartridge 2
4 Folding Output Tray
4
32
1
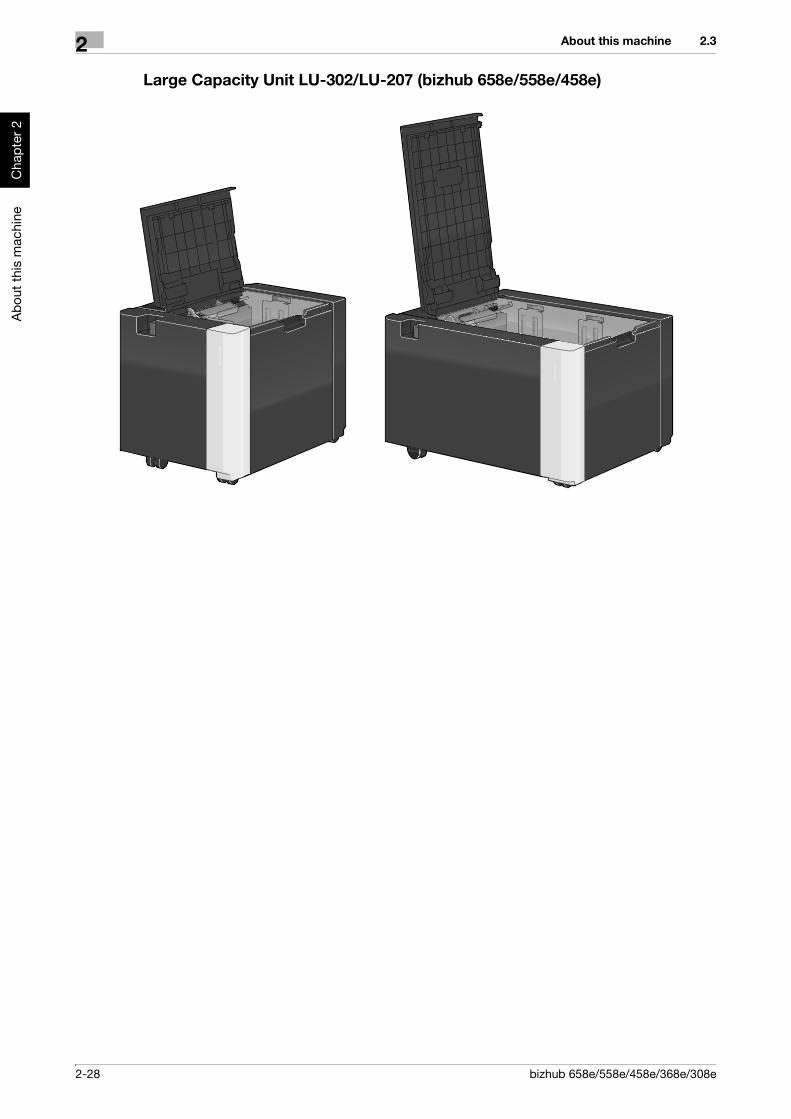
2-28 bizhub 658e/558e/458e/368e/308e
About this machine2 2.3
Abo
ut th
is m
achi
neC
hapt
er 2
Large Capacity Unit LU-302/LU-207 (bizhub 658e/558e/458e)
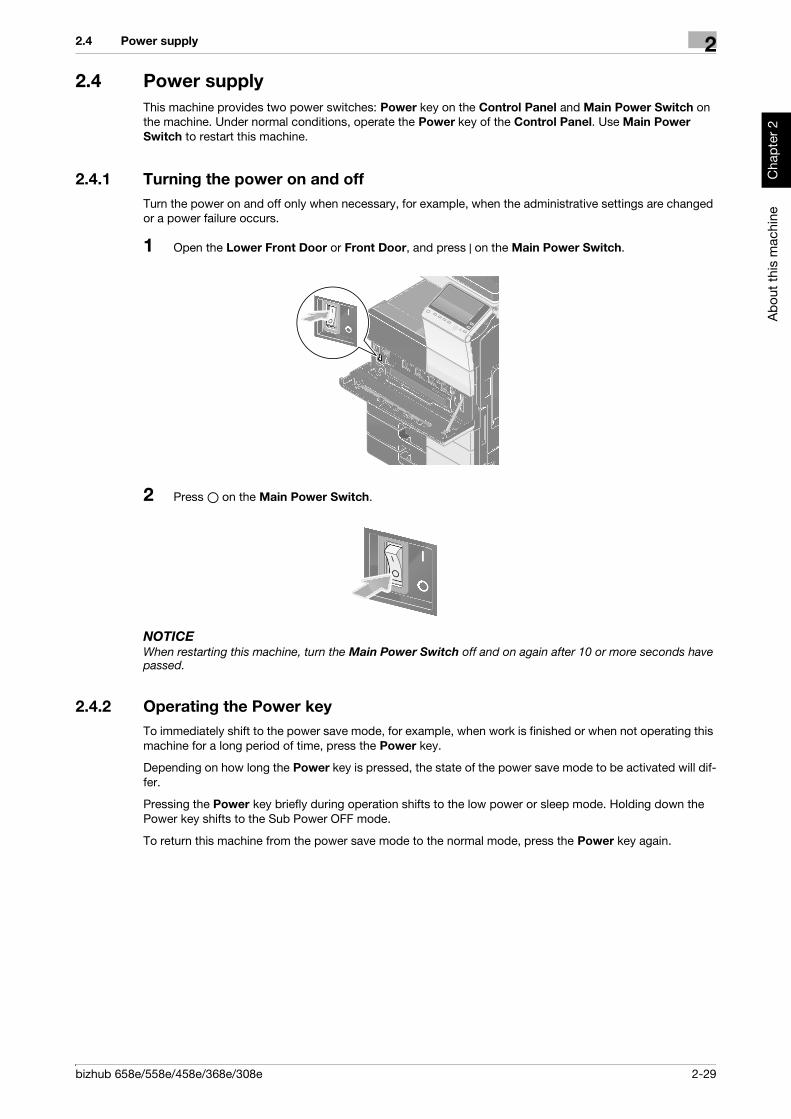
bizhub 658e/558e/458e/368e/308e 2-29
2.4 Power supply 2
Abo
ut th
is m
achi
neC
hapt
er 2
2.4 Power supplyThis machine provides two power switches: Power key on the Control Panel and Main Power Switch on the machine. Under normal conditions, operate the Power key of the Control Panel. Use Main Power Switch to restart this machine.
2.4.1 Turning the power on and offTurn the power on and off only when necessary, for example, when the administrative settings are changed or a power failure occurs.
1 Open the Lower Front Door or Front Door, and press n on the Main Power Switch.
2 Press o on the Main Power Switch.
NOTICEWhen restarting this machine, turn the Main Power Switch off and on again after 10 or more seconds have passed.
2.4.2 Operating the Power keyTo immediately shift to the power save mode, for example, when work is finished or when not operating this machine for a long period of time, press the Power key.
Depending on how long the Power key is pressed, the state of the power save mode to be activated will dif-fer.
Pressing the Power key briefly during operation shifts to the low power or sleep mode. Holding down the Power key shifts to the Sub Power OFF mode.
To return this machine from the power save mode to the normal mode, press the Power key again.

2-30 bizhub 658e/558e/458e/368e/308e
Power supply2 2.4
Abo
ut th
is m
achi
neC
hapt
er 2
In the low power or sleep mode, you can return this machine from the power save mode to the normal mode simply by placing your hand close to the Control Panel.
2.4.3 Power save functionIf the specified time elapses after the machine becomes inactive, the machine automatically shifts to the pow-er save mode; for example, the Touch Panel display is turned off. The Power key flashes blue in the power save mode. The power save mode returns to the normal mode by pressing any key on the Control Panel for instance.
There are two power save modes: the low power mode and the sleep mode. Sleep mode provides a greater power saving effect than Low Power mode. However, the time required to return to Normal mode is longer than the time required to revert to Low Power mode.
dReferenceThe time required to shift to each mode can be changed in the Administrator Settings. For details, refer to the User's Guide CD.
Reducing power consumptionTo reduce power consumption in the standby state, change [Power Key Setting] to [Sub Power OFF].
Tap [Utility], and select [Administrator Settings] - [System Settings] - [Power Supply/Power Save Settings] - [Power Key Setting].
Status of this machine Description
Power Save mode
Low Power or Sleep mode
Flashes blue.This machine returns to the normal mode when data or faxes are re-ceived.
Sub Power OFF mode
Lights up orange.This machine can receive data or faxes, but cannot scan or print an original. If data or faxes are received when the machine is in the Sub Power OFF mode, they are printed when the machine returns to the normal mode.
Normal mode During opera-tion
Lights up blue.

bizhub 658e/558e/458e/368e/308e 2-31
2.4 Power supply 2
Abo
ut th
is m
achi
neC
hapt
er 2
For information on the default administrator password, refer to page 5-53.
After the setting is changed, the power save mode shifts as shown below depending on how the Power key is pressed.- Pressing the Power key
- This machine shifts to the Sub Power OFF mode.- In the Sub Power OFF mode, the machine can receive data or faxes, but cannot scan or print an original.- If data or faxes are received when the machine is in the Sub Power OFF mode, they are printed when
the machine returns to the normal mode.- Holding down the Power key
- This machine shifts to the ErP Auto Power OFF mode.- In the ErP Auto Power OFF mode, this machine cannot receive data or faxes and also cannot scan or
print an original.- This function provides a greater power saving effect than the sub power off mode, which is close to the
state where the main power is turned off.
To enable the machine to return to the normal mode from the Sub Power OFF or ErP Auto Power OFF mode, press the Power key again.
dReferenceFor details, refer to the User's Guide CD.

2-32 bizhub 658e/558e/458e/368e/308e
Control Panel2 2.5
Abo
ut th
is m
achi
neC
hapt
er 2
2.5 Control PanelThe optional Keypad KP-101 is equipped on the right side of the Control Panel.
2.5.1 Name of parts
No. Name Description
1 Touch Panel Displays setting screens and messages.Directly press this panel to carry out operations.
2 Mobile touch area Used to associate this machine with an NFC-compatible Android ter-minal.You can place an Android terminal with PageScope Mobile for An-droid installed on the mobile touch area to register this machine or to perform user authentication.This area is also used to associate this machine with an iOS terminal that supports Bluetooth LE. The optional Local Interface Kit EK-609 is required to use the Bluetooth LE function.Bringing the iOS terminal closer to this machine allows you to register this machine or perform user authentication with an operation from PageScope Mobile for iPhone/iPad.For details, refer to the User's Guide CD.
3 Access If user authentication or account track is enabled, enter the user name and password for user authentication or the account name and pass-word for account track, then press this key to start the use of this ma-chine. After a target operation is completed, press this key once again to end the use of this machine.
4 Menu Press this key to display the Main Menu.
5 Reset Press this key to reset the settings you entered or changed on the Control Panel.
6 Stop Press this key to temporarily stop an active copy, scan, or print job.
7 Start Press this key to start an operation such as copying, scanning, faxing, or printing.
1
10
9 8 7 6 5
4
3
2

bizhub 658e/558e/458e/368e/308e 2-33
2.5 Control Panel 2
Abo
ut th
is m
achi
neC
hapt
er 2
Equipped with the optional Keypad KP-101
8 1 - 4 Press each key to switch the display of the Touch Panel to a function assigned to a Register key.• 1 ([Enlarge Display]): Enters Enlarge Display mode.• 2 ([Guidance]): Press this key to display the Help Menu. You can
display descriptions of the functions and operating procedures on the screen.
• 3 ([10 Keypad]): Displays the Keypad on the Touch Panel.• 4 ([Preview]): Press this key to display a finishing image with the
current settings on the Touch Panel. This function can also print a single proof copy to be checked before printing a large number of copies.
These keys can be assigned to any function in the Administrator Set-tings to be easy to use.
9 Power Press this key to switch this machine to the Power Save mode.In the normal mode, the key lights up blue. In the power save mode, the key blinks blue or lights up orange.To create a higher power saving effect, you can change the setting in [Power Key Setting] of Administrator Settings. For [Power Key Set-ting], refer to page 2-30.
10 Warning Indicator Flashes orange if a warning occurs.Lights up orange if this machine has stopped due to an error.
No. Name Description
1 Voice Guide Press this key to start the voice guidance function (optional).
2 Keypad Use this keypad to enter numeric values such as the number of cop-ies, zoom ratio, and fax number.
3 C (Clear) All the numeric values(number of pages, magnification, size, etc), which have been entered by Keypad, are canceled.
No. Name Description
2
1
3

2-34 bizhub 658e/558e/458e/368e/308e
Touch Panel2 2.6
Abo
ut th
is m
achi
neC
hapt
er 2
2.6 Touch Panel
2.6.1 Main MenuPress the Menu key on the Control Panel to display the main menu. In the main menu, you can configure settings such as frequently used functions or a shortcut key for jumping to each mode.
Layout of main menu
No. Name Description
1 [Accessibility] Tap this button to adjust a Touch Panel tapping position, change keying sounds, and configure the operating environment of the Con-trol Panel.
[Counter] The total number of pages printed by this machine will be displayed while being summarized by each function.
User/Account Name This area displays the name of the current login user or the account track name when User Authentication or Account Track is enabled.When User Authentication and Account Track are used together, the user name is displayed.
[Language] Tap this button to temporarily change the language to be displayed on the panel. For details on how to display [Language], refer to the User's Guide CD.
[Function Search] Tap this button to search for copy settings or fax/scan settings to go to the target function screen from the search result.
[Job List] Tap this button to display current or standby jobs. If necessary, you can check job logs or print a communication report. This list displays the operation status of the current job when it is running. For details, refer to page 2-43.
2 Page Indicator Allows you to check which page is currently displayed when main menu keys are assigned to multiple pages.
3 Main menu keys Display shortcut keys assigned to any function.By default, the main menu shows [Copy], [Scan/Fax], [User Box], [Sound Setting], [Address book], and [Utility].• In some areas, [Quick Security] is located on the main menu by de-
fault.
[Utility] Tap this button to configure settings of this machine or check the use status of this machine.• [Utility] is always displayed.
4 Page switching key Tap this key to switch pages when main menu keys are assigned to multiple pages.
1
2
3
4

bizhub 658e/558e/458e/368e/308e 2-35
2.6 Touch Panel 2
Abo
ut th
is m
achi
neC
hapt
er 2
Customizing the main menuThe main menu can be extended to three screens as necessary. Up to 25 keys can be assigned to three main menu screens which can be switched.
In addition, you can specify your favorite background pattern. If necessary, you can add a background pat-tern by registering an image on this machine.
dReferenceFor details, refer to the User's Guide CD.
2.6.2 Slide menuTapping a tab key on the Touch Panel slides open the menu. The setting of the slide menu can be changed to suit your environment.
Customizing the slide menuUp to five slide menus can be set.
You can configure the setting to prevent the slide menu. Also, you can display the Keypad or change the background color.
dReferenceFor details, refer to the User's Guide CD.
Name Description
Tab key Tap this key to open and close the slide menu.
Slide menu key Display function keys assigned to any function.By default, the main menu shows [Copy], [Scan/Fax], [User Box], and [Inter-rupt].

2-36 bizhub 658e/558e/458e/368e/308e
Touch Panel2 2.6
Abo
ut th
is m
achi
neC
hapt
er 2
2.6.3 Operating the Touch PanelThe Touch Panel of this machine supports user-friendly operations, such as, sliding a finger on the Touch Panel.
TapLightly touch the screen with your finger, then remove your finger from the screen immediately. This action is available when selecting or determining a menu.
Double-tapLightly touch the screen with your finger twice in succession. Used to retrieve detailed information, to enlarge a thumbnail or preview image, and to open a User Box.
FlickMake a slight fillip while sliding your finger on the screen. Used to scroll the destination/job list or to feed a page in the Main menu screen/Preview screen.

bizhub 658e/558e/458e/368e/308e 2-37
2.6 Touch Panel 2
Abo
ut th
is m
achi
neC
hapt
er 2
DragTo move the scroll bar or document, place your finger on it and move your finger. Used to move the scroll bar or document.
PanSlide your finger parallel in a front-to-back and side-to-side direction on the screen. Used to move to the in-tended display location if data spans multiple screens.
Long-tap Hold down the document by the finger. Used to display the icon related to the document.
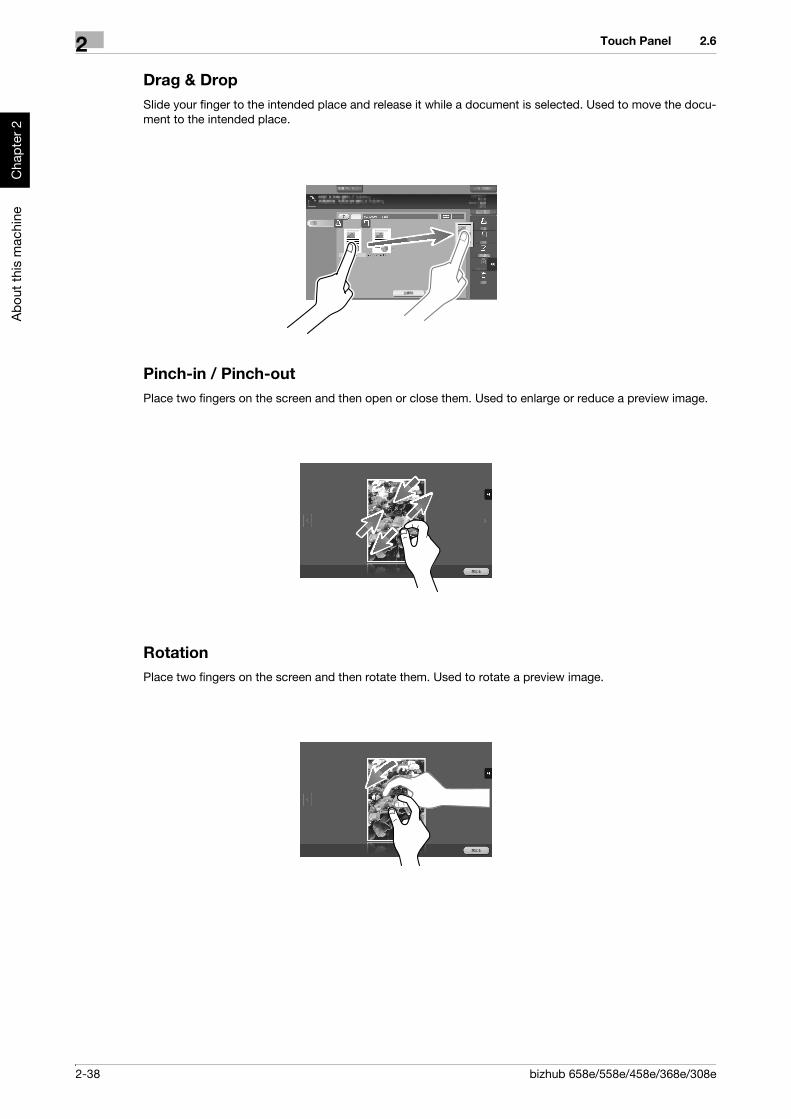
2-38 bizhub 658e/558e/458e/368e/308e
Touch Panel2 2.6
Abo
ut th
is m
achi
neC
hapt
er 2
Drag & Drop Slide your finger to the intended place and release it while a document is selected. Used to move the docu-ment to the intended place.
Pinch-in / Pinch-outPlace two fingers on the screen and then open or close them. Used to enlarge or reduce a preview image.
RotationPlace two fingers on the screen and then rotate them. Used to rotate a preview image.

bizhub 658e/558e/458e/368e/308e 2-39
2.6 Touch Panel 2
Abo
ut th
is m
achi
neC
hapt
er 2
Precautions for using the Touch PanelThis machine features a capacitance-base touch panel. Note the following points when operating the Touch Panel.- Use your finger or the Stylus Pen supplied with this machine. Note that the Touch Panel will not re-
spond appropriately if you operate it using your nail or a pen tip instead of your finger or the Stylus Pen.- Applying a strong force to the Touch Panel will damages the Touch Panel, and potentially cause a
breakage.
- When operating the Touch Panel, do not press on it using excessive force or with a pointed object such as a mechanical pencil.
- Be careful not to operate Touch Panel with wet fingers. It may cause Touch Panel to be improperly operated.
- If you operate the Touch Panel with a gloved finger, the Touch Panel will not respond normally. You should operate it with a bare finger or using the Stylus Pen supplied with this machine.
- Note that the Touch Panel may not respond normally if the distance between the user and fluorescent light is 19-11/16 inches (500 mm) or less when you operate the Touch Panel.
- You must not use the Touch Panel near equipment that generates electrical noises such as an electric generator or air conditioner. Otherwise a malfunction may be caused by an influence of electrical nois-es.

2-40 bizhub 658e/558e/458e/368e/308e
Touch Panel2 2.6
Abo
ut th
is m
achi
neC
hapt
er 2
2.6.4 How to display the KeypadWhen tapping the input area on the copy screen and etc. for entering the number of copies or entering ad-justment values, the Keypad will be displayed.
It can also be displayed by pressing the 10 Keypad key (default: Register key 3).
Input area for entering the number of copies
Input area for entering values
How to move the KeypadMove your finger while the upper side of Keypad is being pressed.
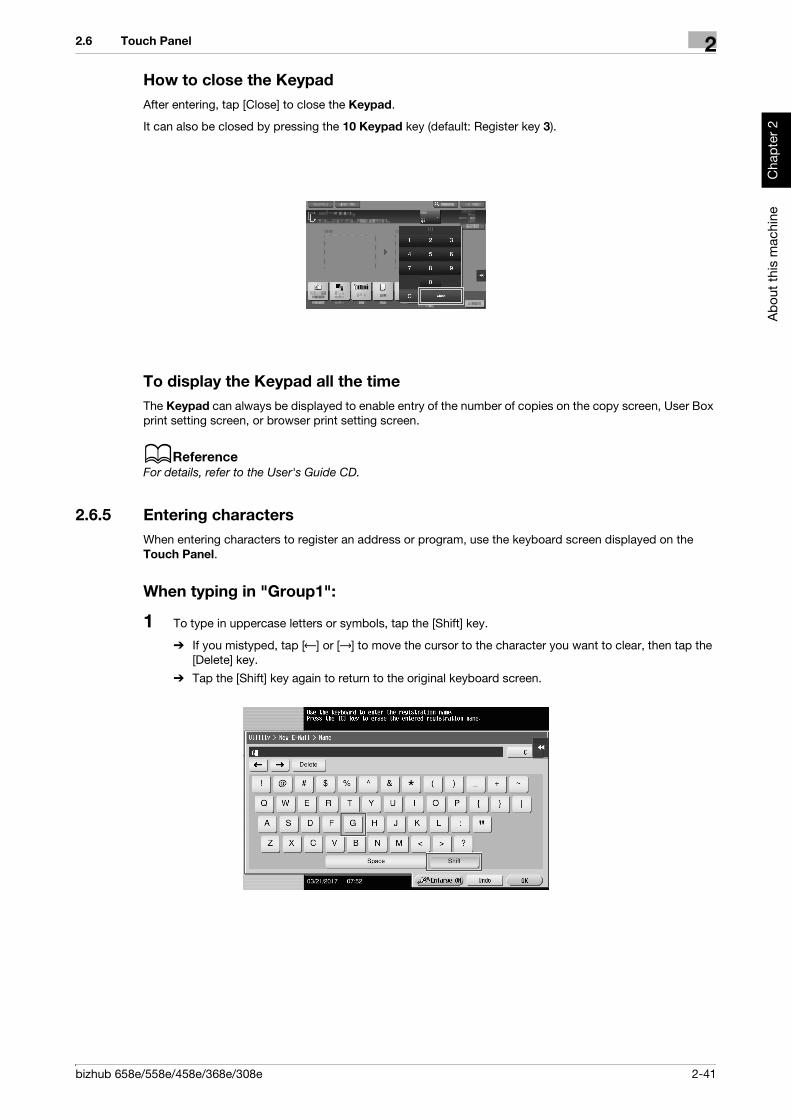
bizhub 658e/558e/458e/368e/308e 2-41
2.6 Touch Panel 2
Abo
ut th
is m
achi
neC
hapt
er 2
How to close the KeypadAfter entering, tap [Close] to close the Keypad.
It can also be closed by pressing the 10 Keypad key (default: Register key 3).
To display the Keypad all the timeThe Keypad can always be displayed to enable entry of the number of copies on the copy screen, User Box print setting screen, or browser print setting screen.
dReferenceFor details, refer to the User's Guide CD.
2.6.5 Entering charactersWhen entering characters to register an address or program, use the keyboard screen displayed on the Touch Panel.
When typing in "Group1":
1 To type in uppercase letters or symbols, tap the [Shift] key.
% If you mistyped, tap [ ] or [ ] to move the cursor to the character you want to clear, then tap the [Delete] key.
% Tap the [Shift] key again to return to the original keyboard screen.

2-42 bizhub 658e/558e/458e/368e/308e
Touch Panel2 2.6
Abo
ut th
is m
achi
neC
hapt
er 2
2 After typing completes, tap [OK].
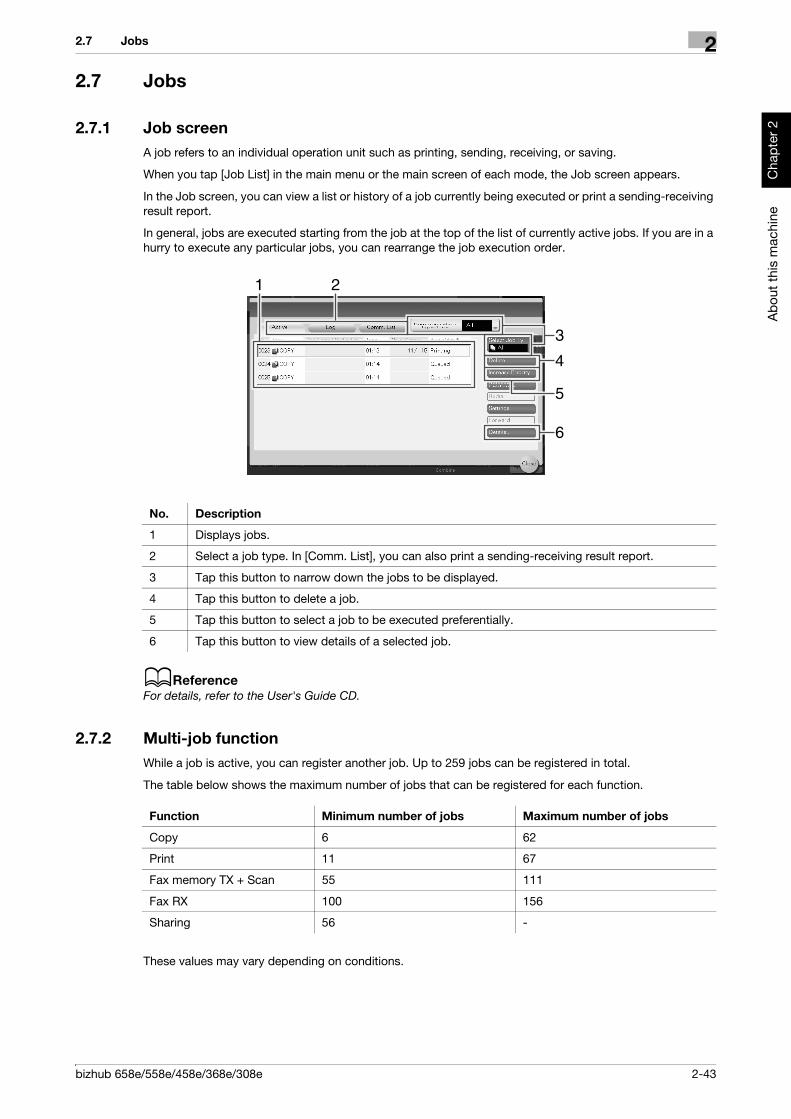
bizhub 658e/558e/458e/368e/308e 2-43
2.7 Jobs 2
Abo
ut th
is m
achi
neC
hapt
er 2
2.7 Jobs
2.7.1 Job screenA job refers to an individual operation unit such as printing, sending, receiving, or saving.
When you tap [Job List] in the main menu or the main screen of each mode, the Job screen appears.
In the Job screen, you can view a list or history of a job currently being executed or print a sending-receiving result report.
In general, jobs are executed starting from the job at the top of the list of currently active jobs. If you are in a hurry to execute any particular jobs, you can rearrange the job execution order.
dReferenceFor details, refer to the User's Guide CD.
2.7.2 Multi-job functionWhile a job is active, you can register another job. Up to 259 jobs can be registered in total.
The table below shows the maximum number of jobs that can be registered for each function.
These values may vary depending on conditions.
No. Description
1 Displays jobs.
2 Select a job type. In [Comm. List], you can also print a sending-receiving result report.
3 Tap this button to narrow down the jobs to be displayed.
4 Tap this button to delete a job.
5 Tap this button to select a job to be executed preferentially.
6 Tap this button to view details of a selected job.
3
4
5
6
21
Function Minimum number of jobs Maximum number of jobs
Copy 6 62
Print 11 67
Fax memory TX + Scan 55 111
Fax RX 100 156
Sharing 56 -
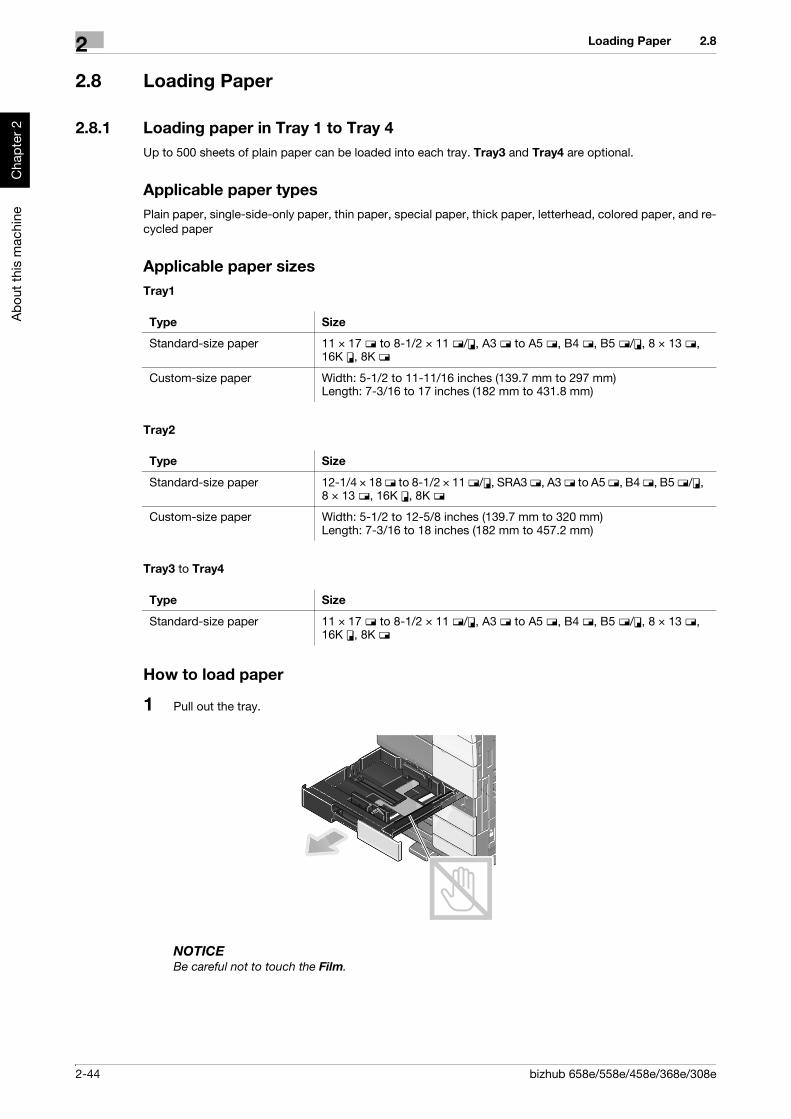
2-44 bizhub 658e/558e/458e/368e/308e
Loading Paper2 2.8
Abo
ut th
is m
achi
neC
hapt
er 2
2.8 Loading Paper
2.8.1 Loading paper in Tray 1 to Tray 4Up to 500 sheets of plain paper can be loaded into each tray. Tray3 and Tray4 are optional.
Applicable paper typesPlain paper, single-side-only paper, thin paper, special paper, thick paper, letterhead, colored paper, and re-cycled paper
Applicable paper sizesTray1
Tray2
Tray3 to Tray4
How to load paper
1 Pull out the tray.
NOTICEBe careful not to touch the Film.
Type Size
Standard-size paper 11 e 17 w to 8-1/2 e 11 w/v, A3 w to A5 w, B4 w, B5 w/v, 8 e 13 w, 16K v, 8K w
Custom-size paper Width: 5-1/2 to 11-11/16 inches (139.7 mm to 297 mm)Length: 7-3/16 to 17 inches (182 mm to 431.8 mm)
Type Size
Standard-size paper 12-1/4 e 18 w to 8-1/2 e 11 w/v, SRA3 w, A3 w to A5 w, B4 w, B5 w/v, 8 e 13 w, 16K v, 8K w
Custom-size paper Width: 5-1/2 to 12-5/8 inches (139.7 mm to 320 mm)Length: 7-3/16 to 18 inches (182 mm to 457.2 mm)
Type Size
Standard-size paper 11 e 17 w to 8-1/2 e 11 w/v, A3 w to A5 w, B4 w, B5 w/v, 8 e 13 w, 16K v, 8K w

bizhub 658e/558e/458e/368e/308e 2-45
2.8 Loading Paper 2
Abo
ut th
is m
achi
neC
hapt
er 2
2 Slide the Lateral Guide to fit the size of the loaded paper.
3 Load paper into the tray with the print side facing up.
4 Close the Tray.
When you change the paper type or change to custom size paper, proceed to step 5 to change the setting on this machine.When you do not change the paper type or change to custom size paper when adding paper, you can use the current setting without making any changes.
5 Change the paper type and paper size settings.
% When loading paper other than plain paper, change the paper type setting.% When loading custom sized paper, change the paper type setting.
% For details, refer to the User's Guide CD.
2.8.2 LCT (built-in)Up to 2500 sheets of plain paper can be loaded into the LCT (built-in). The LCT (built-in) is an option.
Applicable paper typesPlain paper, single-side-only paper, thin paper, special paper, thick paper, letterhead, colored paper, and re-cycled paper
Applicable paper sizes
Type Size
Standard-size paper 8-1/2 e 11 v, A4 v

2-46 bizhub 658e/558e/458e/368e/308e
Loading Paper2 2.8
Abo
ut th
is m
achi
neC
hapt
er 2
How to load paper
1 Pull out the tray.
NOTICEBe careful not to touch the Film.
2 Load paper into the right side of the tray so that the side to be printed faces up.
NOTICEDo not load the tray with paper of a size other than that previously specified. When changing the paper size, contact your service representative.
3 Load paper into the left side of the tray so that the side to be printed faces up.
4 Close the Tray.
When you change the paper type, proceed to step 5 to change the setting on this machine.When you do not change the paper type when adding paper, you can use the current setting without making any changes.

bizhub 658e/558e/458e/368e/308e 2-47
2.8 Loading Paper 2
Abo
ut th
is m
achi
neC
hapt
er 2
5 Change the paper type setting.
% When loading paper other than plain paper, change the paper type setting. For details, refer to the User's Guide CD.
2.8.3 Loading paper into the Large Capacity UnitUp to 3000 sheets of plain paper can be loaded into Large Capacity Unit LU-302, and up to 2500 sheets of plain paper into Large Capacity Unit LU-207. The Large Capacity Unit is an option.
Applicable paper typesPlain paper, single-side-only paper, thin paper, special paper, thick paper, letterhead, colored paper, recy-cled paper
Applicable paper sizesLarge Capacity Unit LU-302
Large Capacity Unit LU-207
How to load paper
1 Open the Upper Door.
NOTICEBe careful not to touch the surface of the Paper Feed Rollers with your hand.
Type Size
Standard-size paper 8-1/2 e 11 v, A4 v
Type Size
Standard-size paper 12 e 18 w, 11 e 17 w to 8-1/2 e 11 w/v, SRA3 w, A3 w, B4 w, A4 w/v
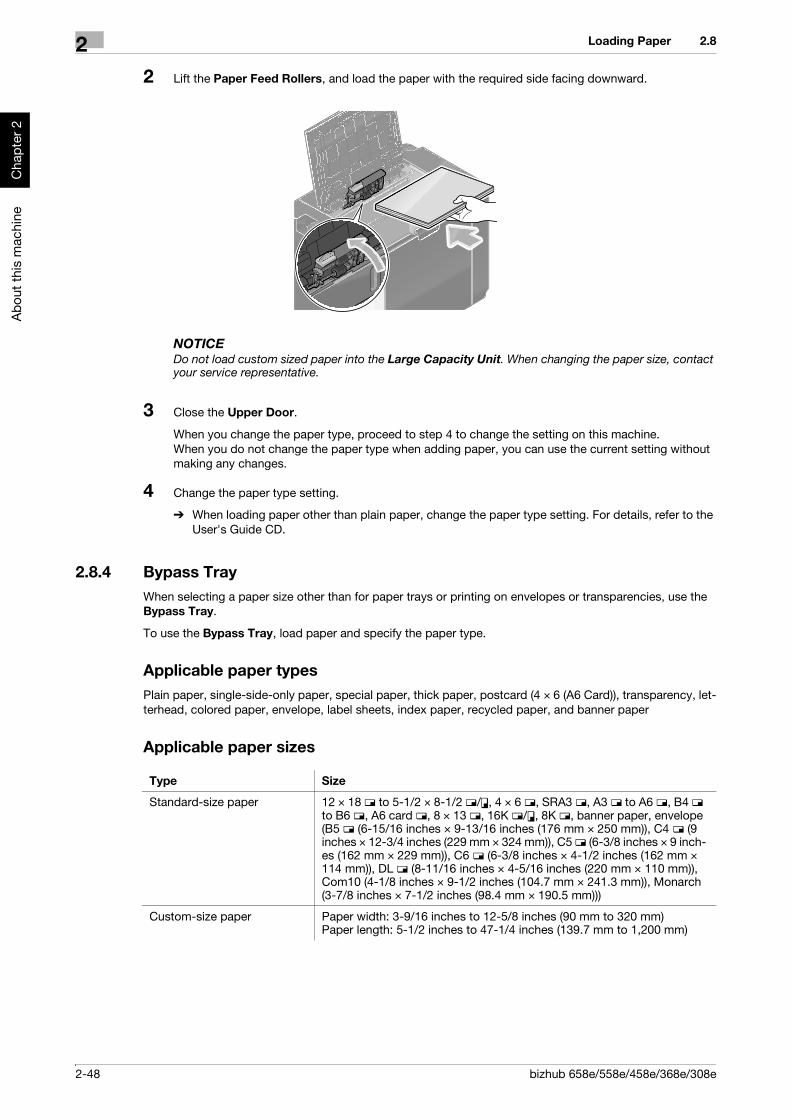
2-48 bizhub 658e/558e/458e/368e/308e
Loading Paper2 2.8
Abo
ut th
is m
achi
neC
hapt
er 2
2 Lift the Paper Feed Rollers, and load the paper with the required side facing downward.
NOTICEDo not load custom sized paper into the Large Capacity Unit. When changing the paper size, contact your service representative.
3 Close the Upper Door.
When you change the paper type, proceed to step 4 to change the setting on this machine.When you do not change the paper type when adding paper, you can use the current setting without making any changes.
4 Change the paper type setting.
% When loading paper other than plain paper, change the paper type setting. For details, refer to the User's Guide CD.
2.8.4 Bypass TrayWhen selecting a paper size other than for paper trays or printing on envelopes or transparencies, use the Bypass Tray.
To use the Bypass Tray, load paper and specify the paper type.
Applicable paper typesPlain paper, single-side-only paper, special paper, thick paper, postcard (4 e 6 (A6 Card)), transparency, let-terhead, colored paper, envelope, label sheets, index paper, recycled paper, and banner paper
Applicable paper sizes
Type Size
Standard-size paper 12 e 18 w to 5-1/2 e 8-1/2 w/v, 4 e 6 w, SRA3 w, A3 w to A6 w, B4 w to B6 w, A6 card w, 8 e 13 w, 16K w/v, 8K w, banner paper, envelope (B5 w (6-15/16 inches e 9-13/16 inches (176 mm e 250 mm)), C4 w (9 inches e 12-3/4 inches (229 mm e 324 mm)), C5 w (6-3/8 inches e 9 inch-es (162 mm e 229 mm)), C6 w (6-3/8 inches e 4-1/2 inches (162 mm e 114 mm)), DL w (8-11/16 inches e 4-5/16 inches (220 mm e 110 mm)), Com10 (4-1/8 inches e 9-1/2 inches (104.7 mm e 241.3 mm)), Monarch (3-7/8 inches e 7-1/2 inches (98.4 mm e 190.5 mm)))
Custom-size paper Paper width: 3-9/16 inches to 12-5/8 inches (90 mm to 320 mm)Paper length: 5-1/2 inches to 47-1/4 inches (139.7 mm to 1,200 mm)
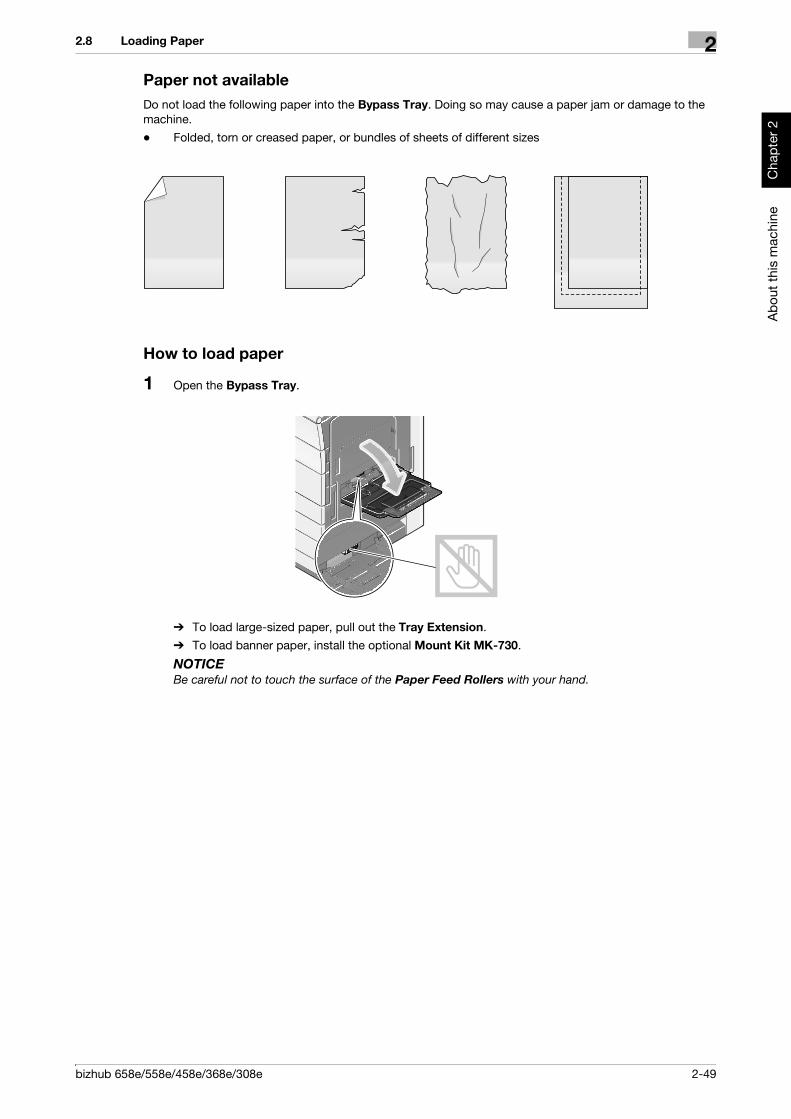
bizhub 658e/558e/458e/368e/308e 2-49
2.8 Loading Paper 2
Abo
ut th
is m
achi
neC
hapt
er 2
Paper not availableDo not load the following paper into the Bypass Tray. Doing so may cause a paper jam or damage to the machine.- Folded, torn or creased paper, or bundles of sheets of different sizes
How to load paper
1 Open the Bypass Tray.
% To load large-sized paper, pull out the Tray Extension.% To load banner paper, install the optional Mount Kit MK-730.
NOTICEBe careful not to touch the surface of the Paper Feed Rollers with your hand.
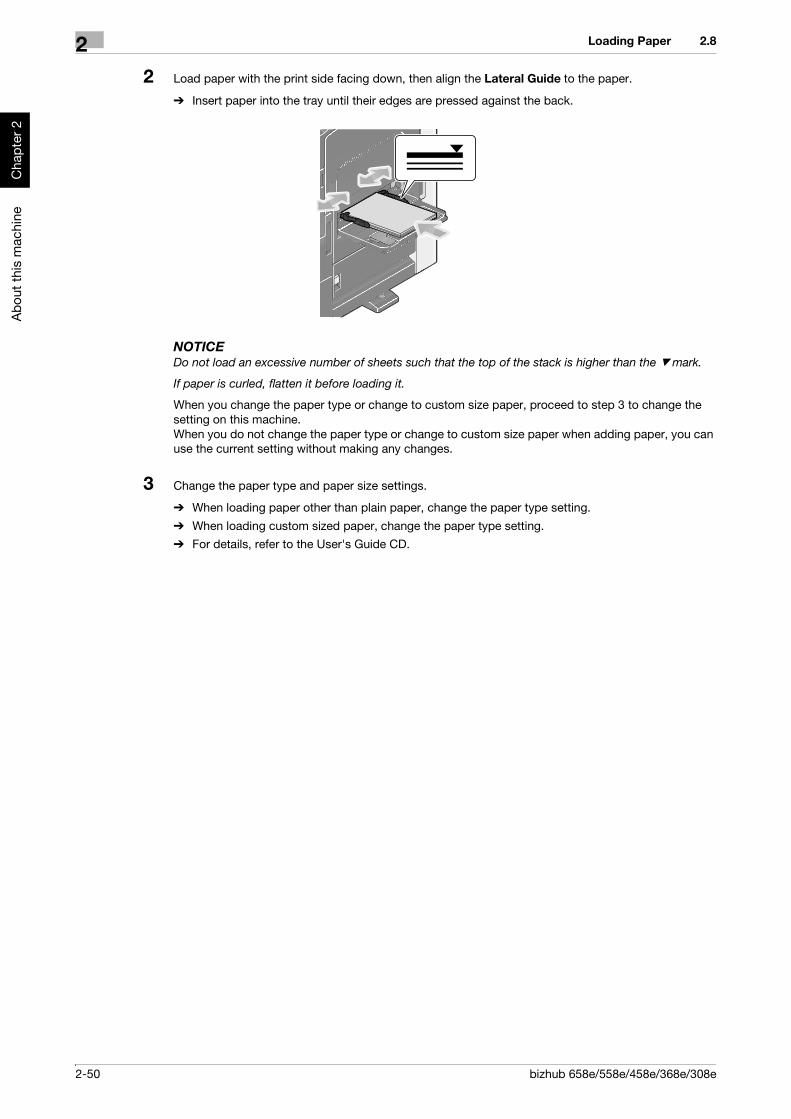
2-50 bizhub 658e/558e/458e/368e/308e
Loading Paper2 2.8
Abo
ut th
is m
achi
neC
hapt
er 2
2 Load paper with the print side facing down, then align the Lateral Guide to the paper.
% Insert paper into the tray until their edges are pressed against the back.
NOTICEDo not load an excessive number of sheets such that the top of the stack is higher than the , mark.
If paper is curled, flatten it before loading it.
When you change the paper type or change to custom size paper, proceed to step 3 to change the setting on this machine.When you do not change the paper type or change to custom size paper when adding paper, you can use the current setting without making any changes.
3 Change the paper type and paper size settings.
% When loading paper other than plain paper, change the paper type setting.
% When loading custom sized paper, change the paper type setting.% For details, refer to the User's Guide CD.

bizhub 658e/558e/458e/368e/308e 2-51
2.8 Loading Paper 2
Abo
ut th
is m
achi
neC
hapt
er 2
Loading postcardsUp to 20 postcards can be loaded into the tray.
1 Load postcards in the w direction as shown in the figure with the print side facing down, then align the Lateral Guide to the paper.
% Insert postcards into the tray until their edges are pressed against the back.
NOTICEWhen loading postcards into the Bypass Tray, note the following points.
% When loading curled postcards, uncurl the postcards as shown in the figure in advance.
% Do not put spare postcards in the Bypass Tray. Doing so causes a size detection error.
The screen for selecting the paper type and paper size appears.

2-52 bizhub 658e/558e/458e/368e/308e
Loading Paper2 2.8
Abo
ut th
is m
achi
neC
hapt
er 2
2 Change the paper size setting.
% In [Paper Size] - [Envelope/4 e 6] ([Envelope/A6 Card]), select [4 e 6] ([A6 Card]). Selecting [4 e 6] ([A6 Card]) sets [Paper Type] to [Thick3].
Loading transparenciesUp to 20 transparencies can be loaded into the tray.
1 Load transparencies in the v direction as shown in the figure with the print side facing down, then align the Lateral Guide to the paper.
% Insert transparencies into the tray until their edges are pressed against the back.
The screen for selecting the paper type and paper size appears.
2 Change the paper type setting.
% Select [Transparency] from [Paper Type].

bizhub 658e/558e/458e/368e/308e 2-53
2.8 Loading Paper 2
Abo
ut th
is m
achi
neC
hapt
er 2
Loading envelopesUp to 10 envelopes can be loaded into the tray.
Image of a long envelope
Image of a Western-style envelope
1 Load envelopes as shown in the figure with the flap part facing up, then align the Lateral Guide to them.
% Insert envelopes into the tray until their edges are pressed against the back.% The flap side of envelopes cannot be printed on.
NOTICEWhen loading envelopes into the Bypass Tray, note the following points.
% When loading envelopes, remove air from them, and securely press along the flap fold line. Other-wise, it will result in an envelope wrinkle or paper jam.

2-54 bizhub 658e/558e/458e/368e/308e
Loading Paper2 2.8
Abo
ut th
is m
achi
neC
hapt
er 2
% Do not use envelopes that have glue or release paper on the flap or the part covered by the flap on the body. Otherwise, the machine may be damaged or a failure may occur.
% Do not put spare envelopes in the Bypass Tray. Doing so causes a size detection error.
The screen for selecting the paper type and paper size appears.
2 Tap [Envelope/4 e 6] ([Envelope/A6 Card]) from [Paper Size].
3 Select the envelope size from [Envelope/4 e 6] ([Envelope/A6 Card]).
% Various sizes of envelopes are available. Specify the correct paper size for the envelopes you have loaded. When the envelope size is specified, [Paper Type] is automatically set to [Envelope].
NOTICEWhen loading envelopes with flaps opened, also select the standard size that matches them. You do not have to measure the size of the envelope with the flap opened to set the size as a custom-sized enve-lope.

bizhub 658e/558e/458e/368e/308e 2-55
2.8 Loading Paper 2
Abo
ut th
is m
achi
neC
hapt
er 2
Loading label sheetsUp to 20 label sheets can be loaded into the tray.
1 Load label sheets in the w direction as shown in the figure with the print side facing down, then align the Lateral Guide to the paper.
% Insert label sheets into the tray until their edges are pressed against the back.
The screen for selecting the paper type and paper size appears.
2 Change the paper type setting.
% Select [Thick 1+] from [Paper Type].

2-56 bizhub 658e/558e/458e/368e/308e
Loading Paper2 2.8
Abo
ut th
is m
achi
neC
hapt
er 2
Loading index papersUp to 20 index papers can be loaded into the tray.
1 Put the tab side in the direction opposite to this machine with the print side facing down, then align the Lateral Guide to the paper.
% Insert index papers into the tray until their edges are pressed against the back.
The screen for selecting the paper type and paper size appears.
2 Change the paper type setting.
% Select [Index Paper] from [Paper Type].

3
Bas
ic S
ettin
gs a
nd O
pera
tions
Cha
pter
3
Basic Settings and Operations
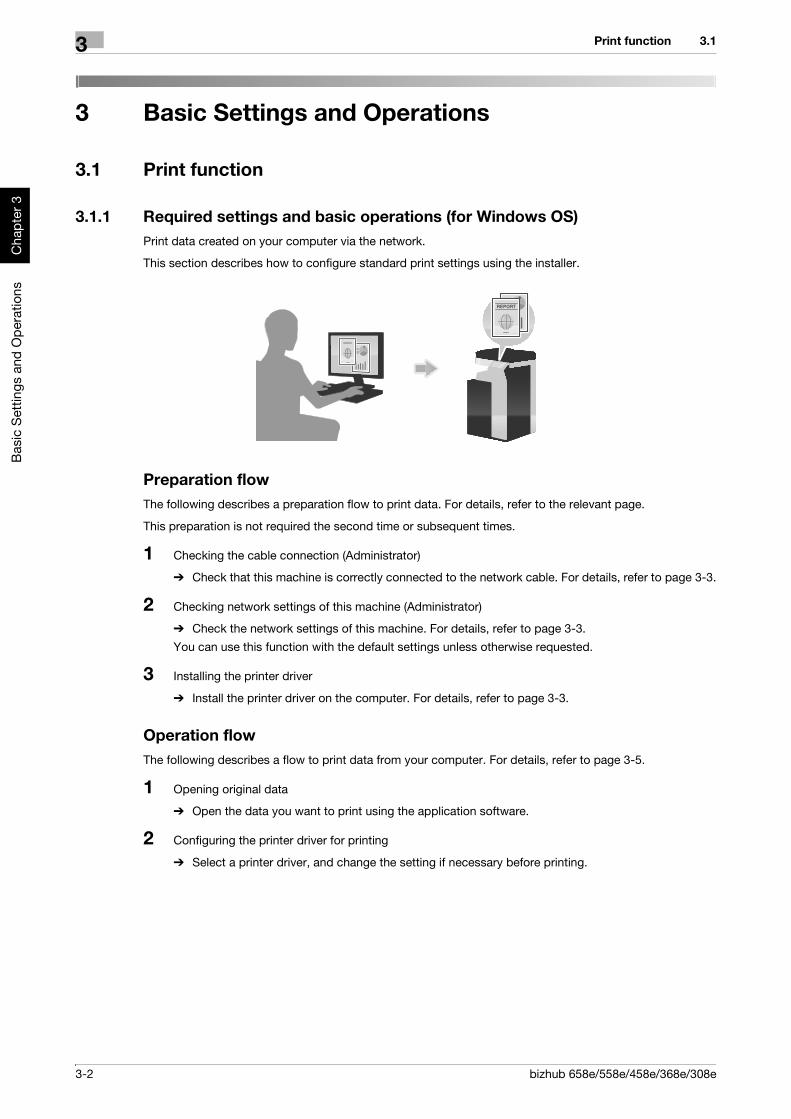
3-2 bizhub 658e/558e/458e/368e/308e
Print function3 3.1
Bas
ic S
ettin
gs a
nd O
pera
tions
Cha
pter
3
3 Basic Settings and Operations
3.1 Print function
3.1.1 Required settings and basic operations (for Windows OS)Print data created on your computer via the network.
This section describes how to configure standard print settings using the installer.
Preparation flowThe following describes a preparation flow to print data. For details, refer to the relevant page.
This preparation is not required the second time or subsequent times.
1 Checking the cable connection (Administrator)
% Check that this machine is correctly connected to the network cable. For details, refer to page 3-3.
2 Checking network settings of this machine (Administrator)
% Check the network settings of this machine. For details, refer to page 3-3.
You can use this function with the default settings unless otherwise requested.
3 Installing the printer driver
% Install the printer driver on the computer. For details, refer to page 3-3.
Operation flowThe following describes a flow to print data from your computer. For details, refer to page 3-5.
1 Opening original data
% Open the data you want to print using the application software.
2 Configuring the printer driver for printing
% Select a printer driver, and change the setting if necessary before printing.

bizhub 658e/558e/458e/368e/308e 3-3
3.1 Print function 3
Bas
ic S
ettin
gs a
nd O
pera
tions
Cha
pter
3
Checking the cable connectionCheck that a LAN cable is connected to the LAN port of this machine and the green LED is on.
Checking network settings of this machineTap [Utility], and select [Device Information]. Check that the IP address is displayed.
Tips- In general, the default settings are available for network connection; however, some network environ-
ments require a change on network settings.
- If no IP address is displayed, you need to set up the network. Tap [Utility], and select [Administrator Settings] - [Network Settings] - [TCP/IP Settings]. Configure the required settings to suit your environ-ment. For details, refer to the User's Guide CD.
- For information on the default administrator password, refer to page 5-53.
Installing the printer driverInstall the printer driver using the installer.
0 Administrator privileges are required to perform this task.
1 Insert the printer driver DVD into the DVD drive of the computer.

3-4 bizhub 658e/558e/458e/368e/308e
Print function3 3.1
Bas
ic S
ettin
gs a
nd O
pera
tions
Cha
pter
3
2 Select [Agree the Software End User License Agreement.] and [Install printers/MFPs], and click [Next].
3 Select this machine from the list of detected printers.
% If multiple identical models are displayed, check the IP address to select an appropriate one. For details on how to check the IP address of this machine, refer to page 3-3.
4 As needed, select [Specify manually.], specify the type of the printer driver you want to install.

bizhub 658e/558e/458e/368e/308e 3-5
3.1 Print function 3
Bas
ic S
ettin
gs a
nd O
pera
tions
Cha
pter
3
5 Click [Next].
6 Click [Install].
7 Click [Finish].
Printing data
1 Open the data you want to print using the application software.
2 In the [File] menu, click [Print].

3-6 bizhub 658e/558e/458e/368e/308e
Print function3 3.1
Bas
ic S
ettin
gs a
nd O
pera
tions
Cha
pter
3
3 Select the installed printer driver, and click [Print].
Tips- Clicking [Preferences] can change the setting of the printer driver as required.- If user authentication is enabled in this machine, specify the required data such as the user name and
password.
Types of printer driversSelect a printer driver that will meet your printing requirements.
Driver type Description
PCL This is a standard driver for printing general office documents. Among the three drivers, this driver provides the fastest printing speed.
PS This driver is effective for high-definition printing of data created in PostScript-supporting application software from Adobe or other vendors. This driver is of-ten used in graphics and light printing applications where good color repro-ducibility is important.

bizhub 658e/558e/458e/368e/308e 3-7
3.1 Print function 3
Bas
ic S
ettin
gs a
nd O
pera
tions
Cha
pter
3
3.1.2 Required settings and basic operations (for Mac OS)Print data created on your computer via the network.
This section describes how to configure a printer driver, for Mac OS 10.9 environment, Bonjour connection, and use of metric-size paper as major conditions.
Preparation flowThe following describes a preparation flow to print data. For details, refer to the relevant page.
This preparation is not required the second time or subsequent times.
1 Checking the cable connection (Administrator)
% Check that this machine is correctly connected to the network cable. For details, refer to page 3-8.
2 Checking network settings of this machine (Administrator)
% Check the network settings of this machine. For details, refer to page 3-8.
You can use this function with the default settings unless otherwise requested.
3 Installing the printer driver
% Install the printer driver on the computer. For details, refer to page 3-10.
4 Adding and configuring a printer driver
% Set up your computer so that data can be printed using the installed printer driver. For details, refer to page 3-12.
Operation flowThe following describes a flow to print data from your computer. For details, refer to page 3-13.
1 Opening original data
% Open the data you want to print using the application software.
2 Configuring the printer driver for printing
% Select a printer driver, and change the setting if necessary before printing.
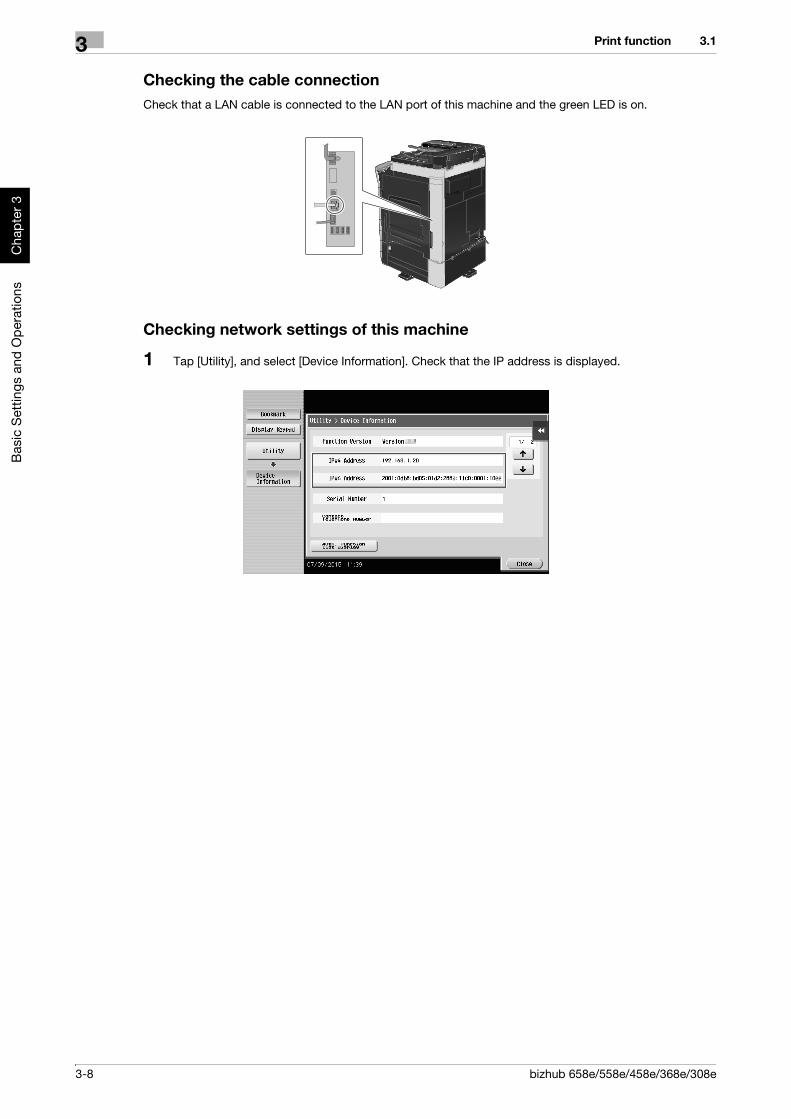
3-8 bizhub 658e/558e/458e/368e/308e
Print function3 3.1
Bas
ic S
ettin
gs a
nd O
pera
tions
Cha
pter
3
Checking the cable connectionCheck that a LAN cable is connected to the LAN port of this machine and the green LED is on.
Checking network settings of this machine
1 Tap [Utility], and select [Device Information]. Check that the IP address is displayed.
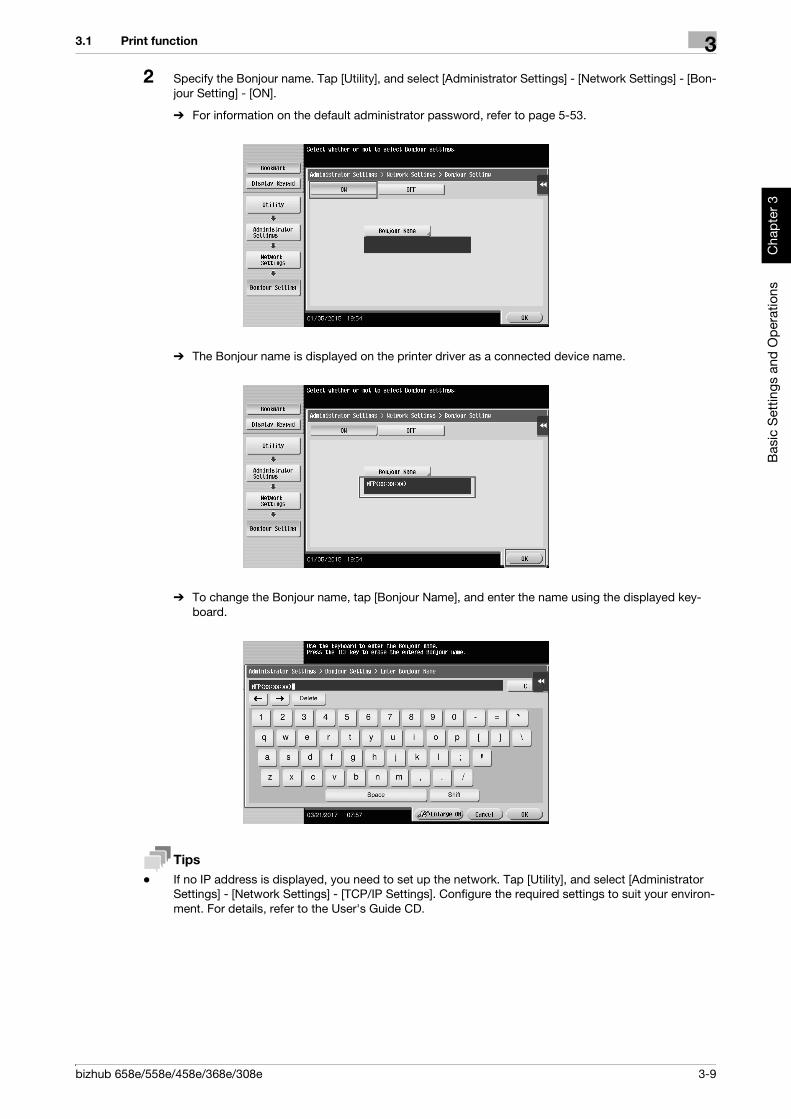
bizhub 658e/558e/458e/368e/308e 3-9
3.1 Print function 3
Bas
ic S
ettin
gs a
nd O
pera
tions
Cha
pter
3
2 Specify the Bonjour name. Tap [Utility], and select [Administrator Settings] - [Network Settings] - [Bon-jour Setting] - [ON].
% For information on the default administrator password, refer to page 5-53.
% The Bonjour name is displayed on the printer driver as a connected device name.
% To change the Bonjour name, tap [Bonjour Name], and enter the name using the displayed key-board.
Tips- If no IP address is displayed, you need to set up the network. Tap [Utility], and select [Administrator
Settings] - [Network Settings] - [TCP/IP Settings]. Configure the required settings to suit your environ-ment. For details, refer to the User's Guide CD.

3-10 bizhub 658e/558e/458e/368e/308e
Print function3 3.1
Bas
ic S
ettin
gs a
nd O
pera
tions
Cha
pter
3
- For information on the default administrator password, refer to page 5-53.
Installing the printer driverInstall the printer driver using the installer.
0 Administrator privileges are required to perform this task.
1 Insert the printer driver DVD into the DVD drive of the computer.
2 Select the target printer driver, and copy it to the desktop.
Example: /Driver/OS_10_9_x/Letter/XXX_109.pkg (Printer driver for Mac OS 10.9 or later) % "XXX" indicates the model name.
% When ordinarily using metric-sized paper, select a printer driver in the "A4" directory.% The last three digits of the printer driver name indicate the version of the operating system.
3 Double-click the file copied onto the desktop.

bizhub 658e/558e/458e/368e/308e 3-11
3.1 Print function 3
Bas
ic S
ettin
gs a
nd O
pera
tions
Cha
pter
3
4 Proceed with the procedure according to the on-screen instructions until the installation screen ap-pears.
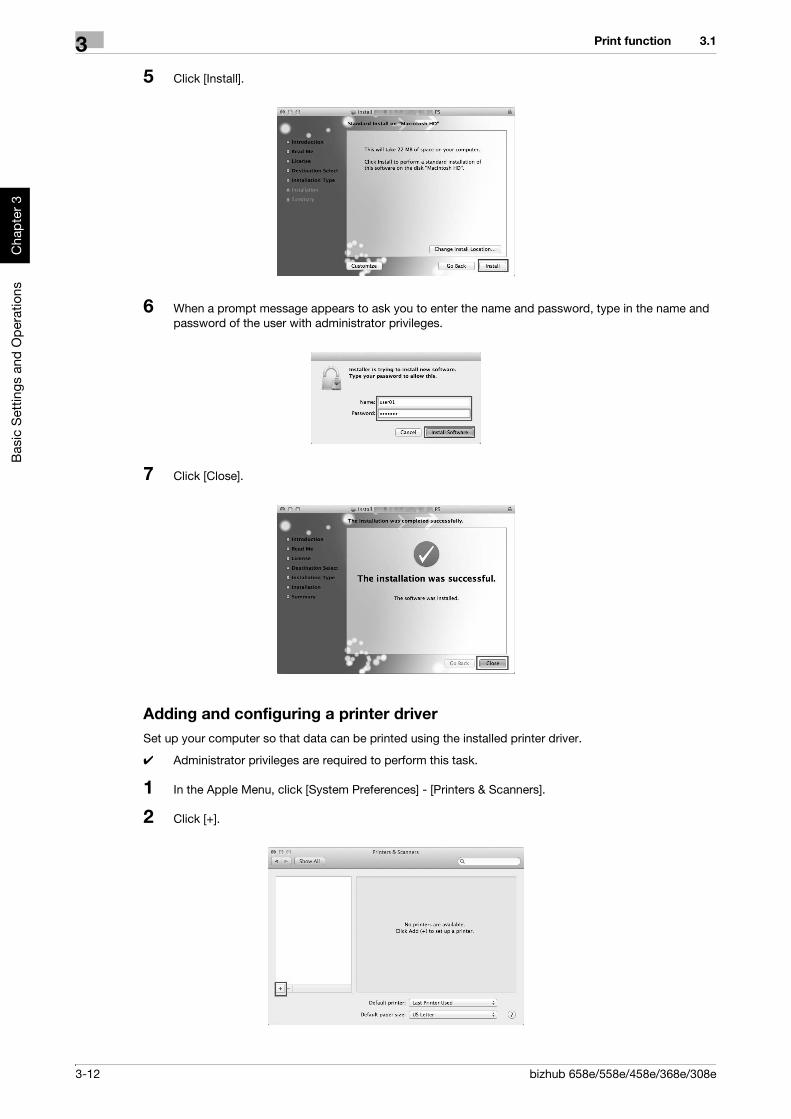
3-12 bizhub 658e/558e/458e/368e/308e
Print function3 3.1
Bas
ic S
ettin
gs a
nd O
pera
tions
Cha
pter
3
5 Click [Install].
6 When a prompt message appears to ask you to enter the name and password, type in the name and password of the user with administrator privileges.
7 Click [Close].
Adding and configuring a printer driverSet up your computer so that data can be printed using the installed printer driver.
0 Administrator privileges are required to perform this task.
1 In the Apple Menu, click [System Preferences] - [Printers & Scanners].
2 Click [+].
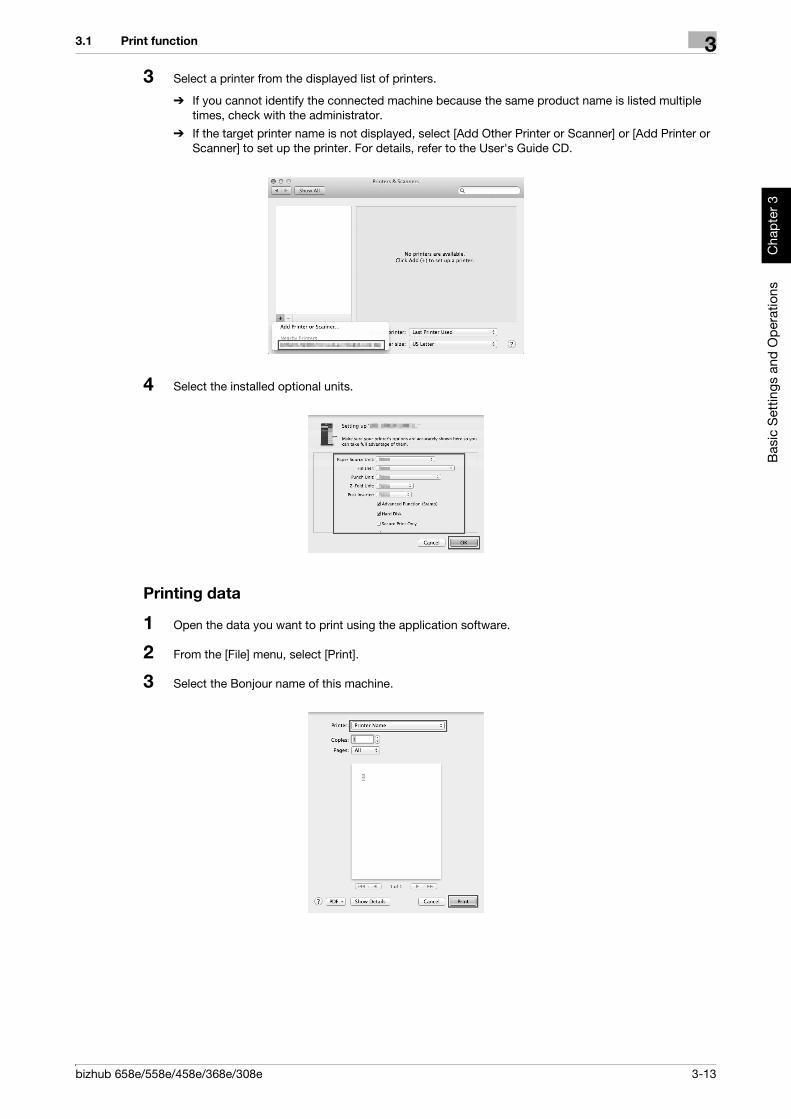
bizhub 658e/558e/458e/368e/308e 3-13
3.1 Print function 3
Bas
ic S
ettin
gs a
nd O
pera
tions
Cha
pter
3
3 Select a printer from the displayed list of printers.
% If you cannot identify the connected machine because the same product name is listed multiple times, check with the administrator.
% If the target printer name is not displayed, select [Add Other Printer or Scanner] or [Add Printer or Scanner] to set up the printer. For details, refer to the User's Guide CD.
4 Select the installed optional units.
Printing data
1 Open the data you want to print using the application software.
2 From the [File] menu, select [Print].
3 Select the Bonjour name of this machine.

3-14 bizhub 658e/558e/458e/368e/308e
Print function3 3.1
Bas
ic S
ettin
gs a
nd O
pera
tions
Cha
pter
3
Tips- If necessary, you can click [Show Details] to change the settings of the printer driver.

bizhub 658e/558e/458e/368e/308e 3-15
3.2 Scan-to-Send function 3
Bas
ic S
ettin
gs a
nd O
pera
tions
Cha
pter
3
3.2 Scan-to-Send function
3.2.1 Various transmission methodsThe original data scanned by this machine can be sent and saved using a variety of methods.
Sending data to your computer (SMB Send)Send scanned data to a computer on the network. Once settings are configured, you can send data easily. For details, refer to page 3-16 and page 3-25.
Transmitting data as E-mail attachment (E-mail TX)Send scanned data as an E-mail attachment. This function is useful when you want to forward data to an outside location. For details, refer to page 3-34.
Saving data to the USB memory device (External memory)Directly save scanned data on the USB memory device connected to this machine. For details, refer to page 3-73.

3-16 bizhub 658e/558e/458e/368e/308e
Scan-to-Send function3 3.2
Bas
ic S
ettin
gs a
nd O
pera
tions
Cha
pter
3
Various methods for transmitting and saving dataIn addition to the above, data can be sent and saved in various methods. Select the appropriate one to meet your needs.- Issuing a scan instruction from a computer (Web service function)
- Saving data to a User Box on the HDD (Save in User Box)- Sending to an FTP server (FTP Send)
- Sending to a WebDAV server (WebDAV Send)
dReferenceFor details, refer to the User's Guide CD.
3.2.2 Sending data to your Windows computer (SMB Send)Send scanned data to a computer on the network.
Once settings are configured, you can send data easily.
Preparation flowThe following describes a preparation flow for sending scanned data. For details, refer to the relevant page.
This preparation is not required the second time or subsequent times.
1 Checking the cable connection (Administrator)
% Check that this machine is correctly connected to the network cable. For details, refer to page 3-17.
2 Checking network settings of this machine (Administrator)
% Check the network settings of this machine. For details, refer to page 3-17.
You can use this function with the default settings unless otherwise requested.
3 Checking computer information
% Check the information required for Store Address, and fill out the checklist. For details, refer to page 3-18.
4 Configuring your computer
% Configure settings to share a computer, or create a dedicated folder to receive files. For details, refer to page 3-19.
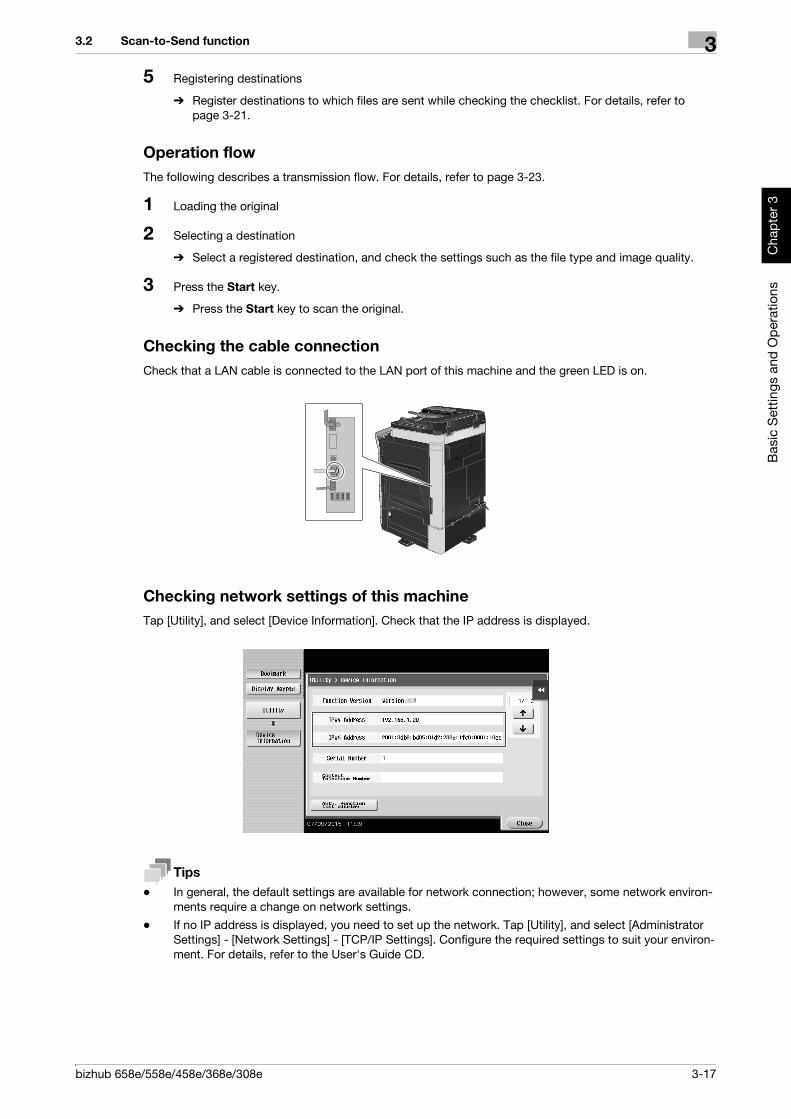
bizhub 658e/558e/458e/368e/308e 3-17
3.2 Scan-to-Send function 3
Bas
ic S
ettin
gs a
nd O
pera
tions
Cha
pter
3
5 Registering destinations
% Register destinations to which files are sent while checking the checklist. For details, refer to page 3-21.
Operation flowThe following describes a transmission flow. For details, refer to page 3-23.
1 Loading the original
2 Selecting a destination
% Select a registered destination, and check the settings such as the file type and image quality.
3 Press the Start key.
% Press the Start key to scan the original.
Checking the cable connectionCheck that a LAN cable is connected to the LAN port of this machine and the green LED is on.
Checking network settings of this machineTap [Utility], and select [Device Information]. Check that the IP address is displayed.
Tips- In general, the default settings are available for network connection; however, some network environ-
ments require a change on network settings.- If no IP address is displayed, you need to set up the network. Tap [Utility], and select [Administrator
Settings] - [Network Settings] - [TCP/IP Settings]. Configure the required settings to suit your environ-ment. For details, refer to the User's Guide CD.

3-18 bizhub 658e/558e/458e/368e/308e
Scan-to-Send function3 3.2
Bas
ic S
ettin
gs a
nd O
pera
tions
Cha
pter
3
- For information on the default administrator password, refer to page 5-53.
ChecklistWhile making notes in the checklist shown below, check computer information and configure settings for preparation. The completed checklist is used for Store Address.
Checking computer informationCheck the host address and user ID, and write them down.
1 Display the Properties window of the computer.
% In Windows 8.1/10, while pressing the [Windows] ( ) key, press the [X] key, and then select [System properties] in the displayed menu.
% In Windows 7, from the Start menu, select [Computer] - [System properties].
2 Check the computer name, and write it down in the Host address column of the checklist.
Name Entry column Detail
Host Address Host name or IP address to which the scanned data is sent page 3-18
File Path Name of the dedicated folder to receive the scanned data page 3-19
User ID User name required to log in to the computer page 3-18
Password Password required to log in to the computer• You should not enter this column for security reasons.
Contact your sys-tem administrator.
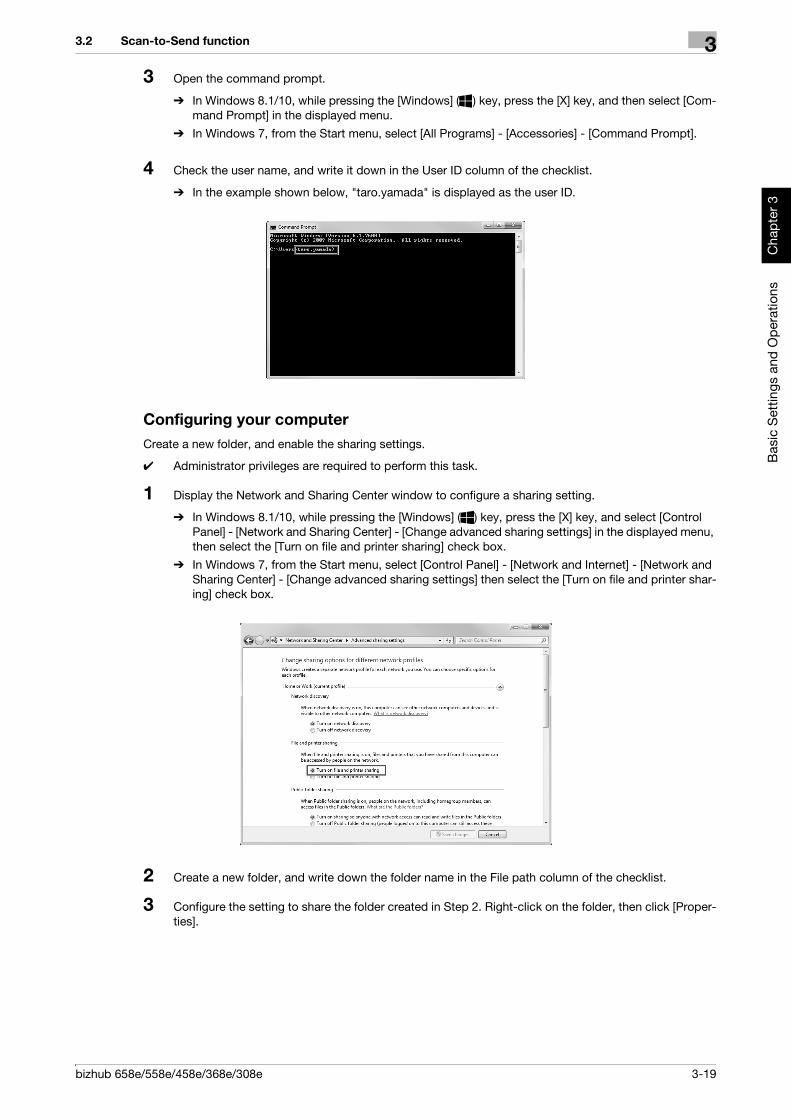
bizhub 658e/558e/458e/368e/308e 3-19
3.2 Scan-to-Send function 3
Bas
ic S
ettin
gs a
nd O
pera
tions
Cha
pter
3
3 Open the command prompt.
% In Windows 8.1/10, while pressing the [Windows] ( ) key, press the [X] key, and then select [Com-mand Prompt] in the displayed menu.
% In Windows 7, from the Start menu, select [All Programs] - [Accessories] - [Command Prompt].
4 Check the user name, and write it down in the User ID column of the checklist.
% In the example shown below, "taro.yamada" is displayed as the user ID.
Configuring your computerCreate a new folder, and enable the sharing settings.
0 Administrator privileges are required to perform this task.
1 Display the Network and Sharing Center window to configure a sharing setting.
% In Windows 8.1/10, while pressing the [Windows] ( ) key, press the [X] key, and select [Control Panel] - [Network and Sharing Center] - [Change advanced sharing settings] in the displayed menu, then select the [Turn on file and printer sharing] check box.
% In Windows 7, from the Start menu, select [Control Panel] - [Network and Internet] - [Network and Sharing Center] - [Change advanced sharing settings] then select the [Turn on file and printer shar-ing] check box.
2 Create a new folder, and write down the folder name in the File path column of the checklist.
3 Configure the setting to share the folder created in Step 2. Right-click on the folder, then click [Proper-ties].

3-20 bizhub 658e/558e/458e/368e/308e
Scan-to-Send function3 3.2
Bas
ic S
ettin
gs a
nd O
pera
tions
Cha
pter
3
4 Click the [Sharing] tab, and also click [Advanced Sharing].
5 Select the [Share this folder] check box, then click [Permissions].
6 Select [Everyone] from the [Group or user names:] list, then select all of the [Allow] check boxes.

bizhub 658e/558e/458e/368e/308e 3-21
3.2 Scan-to-Send function 3
Bas
ic S
ettin
gs a
nd O
pera
tions
Cha
pter
3
Registering destinationsWhile checking the created checklist, register the folder for receiving the scanned data as an address book of this machine.
1 Tap [Utility], and select [One-Touch/User Box Registration] - [Create One-Touch Destination] - [Address Book] - [PC (SMB)].
2 Tap [New].
3 For [Name], specify the name to be displayed on the assigned key.
% For [Sort Character], enter the same name as [Name].
% This sets the appropriate index for the name, which you entered into [Name], to [Index]. To change the setting, tap [Index].

3-22 bizhub 658e/558e/458e/368e/308e
Scan-to-Send function3 3.2
Bas
ic S
ettin
gs a
nd O
pera
tions
Cha
pter
3
4 While checking the checklist, enter the user ID and password you wrote down.
5 While checking the checklist, enter the host address and file path you wrote down.
6 Tap [Close].
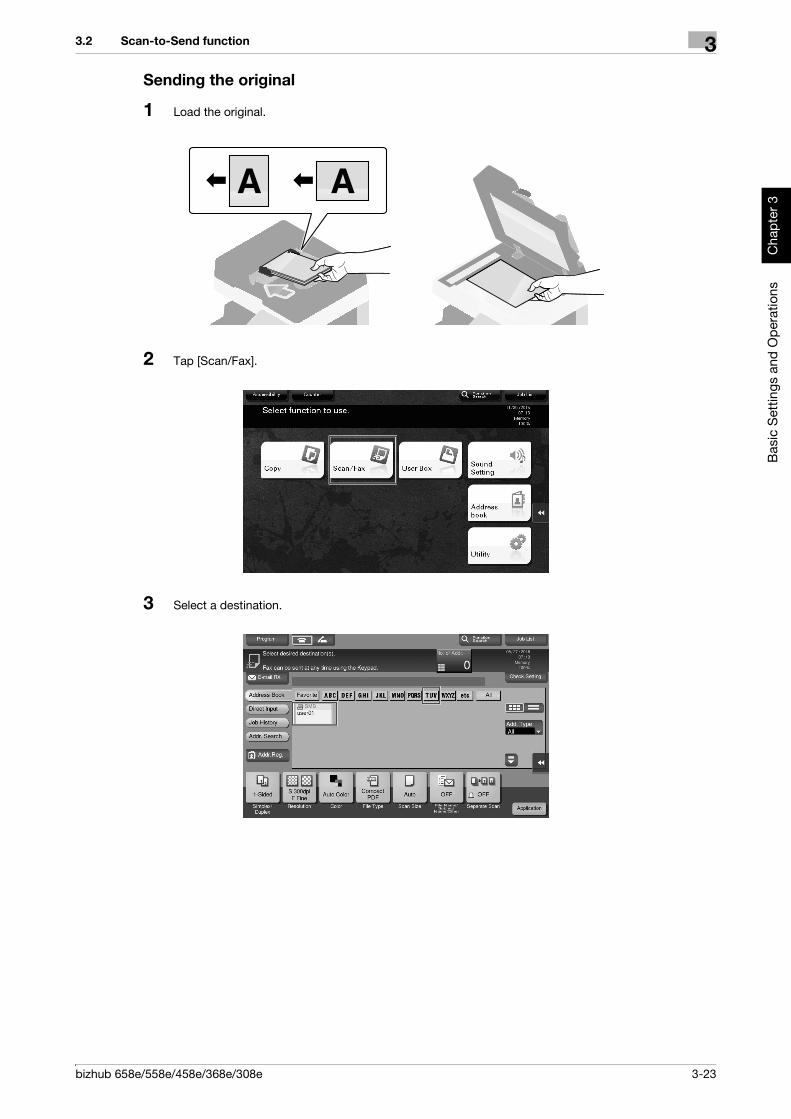
bizhub 658e/558e/458e/368e/308e 3-23
3.2 Scan-to-Send function 3
Bas
ic S
ettin
gs a
nd O
pera
tions
Cha
pter
3
Sending the original
1 Load the original.
2 Tap [Scan/Fax].
3 Select a destination.
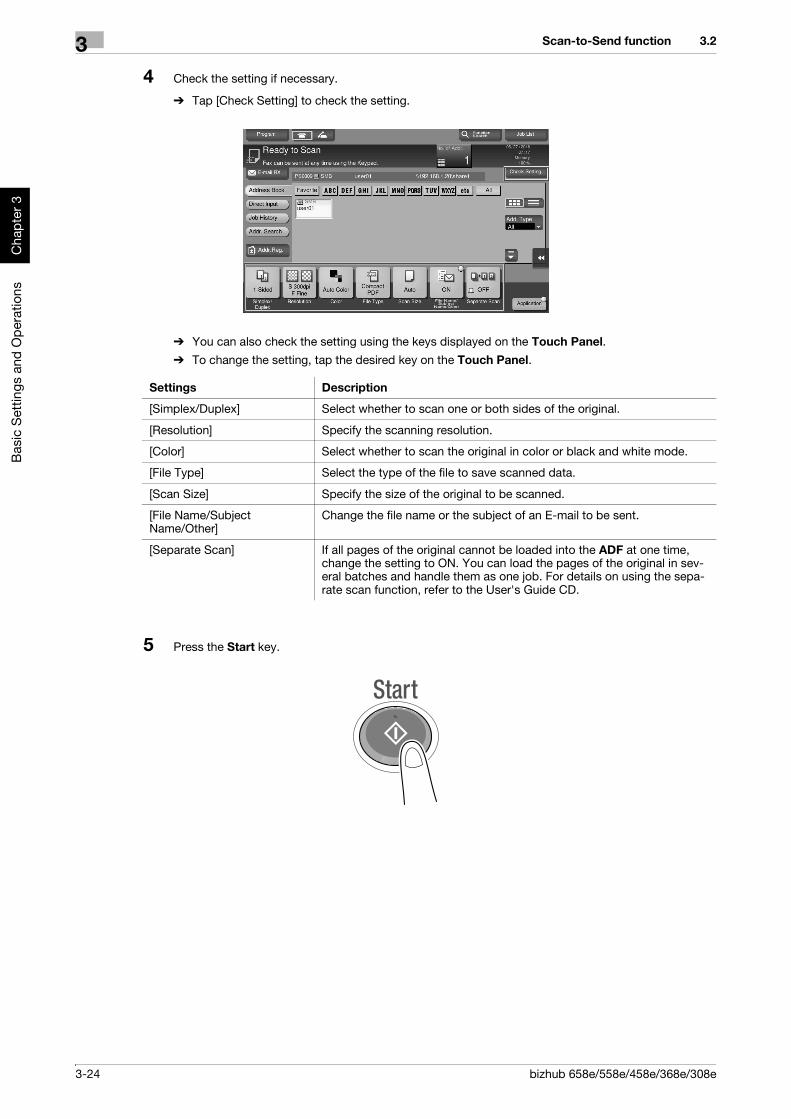
3-24 bizhub 658e/558e/458e/368e/308e
Scan-to-Send function3 3.2
Bas
ic S
ettin
gs a
nd O
pera
tions
Cha
pter
3
4 Check the setting if necessary.
% Tap [Check Setting] to check the setting.
% You can also check the setting using the keys displayed on the Touch Panel.
% To change the setting, tap the desired key on the Touch Panel.
5 Press the Start key.
Settings Description
[Simplex/Duplex] Select whether to scan one or both sides of the original.
[Resolution] Specify the scanning resolution.
[Color] Select whether to scan the original in color or black and white mode.
[File Type] Select the type of the file to save scanned data.
[Scan Size] Specify the size of the original to be scanned.
[File Name/Subject Name/Other]
Change the file name or the subject of an E-mail to be sent.
[Separate Scan] If all pages of the original cannot be loaded into the ADF at one time, change the setting to ON. You can load the pages of the original in sev-eral batches and handle them as one job. For details on using the sepa-rate scan function, refer to the User's Guide CD.

bizhub 658e/558e/458e/368e/308e 3-25
3.2 Scan-to-Send function 3
Bas
ic S
ettin
gs a
nd O
pera
tions
Cha
pter
3
3.2.3 Sending data to your Mac computer (SMB Send)Send scanned data to a computer on the network.
Once settings are configured, you can send data easily.
Preparation flowThe following describes a preparation flow for sending scanned data. For details, refer to the relevant page.
This preparation is not required the second time or subsequent times.
1 Checking the cable connection (Administrator)
% Check that this machine is correctly connected to the network cable. For details, refer to page 3-26.
2 Checking network settings of this machine (Administrator)
% Check the network settings of this machine. For details, refer to page 3-26.
3 Checking computer information
% Check the information required for Store Address, and fill out the checklist. For details, refer to page 3-28.
4 Configuring your computer
% Configure settings to share a computer, or create a dedicated folder to receive files. For details, refer to page 3-28.
5 Registering destinations
% Register destinations to which files are sent while checking the checklist. For details, refer to page 3-30.
Operation flowThe following describes a transmission flow. For details, refer to page 3-32.
1 Load the Original
2 Selecting a destination
% Select a registered destination, and check the settings such as the file type and image quality.
3 Press the Start key.
% Press the Start key to scan the original.

3-26 bizhub 658e/558e/458e/368e/308e
Scan-to-Send function3 3.2
Bas
ic S
ettin
gs a
nd O
pera
tions
Cha
pter
3
Checking the cable connectionCheck that a LAN cable is connected to the LAN port of this machine and the green LED is on.
Checking network settings of this machineTap [Utility], and select [Device Information]. Check that the IP address is displayed.
Tips- If no IP address is displayed, you need to set up the network. Tap [Utility], and select [Administrator
Settings] - [Network Settings] - [TCP/IP Settings]. Configure the required settings to suit your environ-ment. For details, refer to the User's Guide CD.
- For information on the default administrator password, refer to page 5-53.
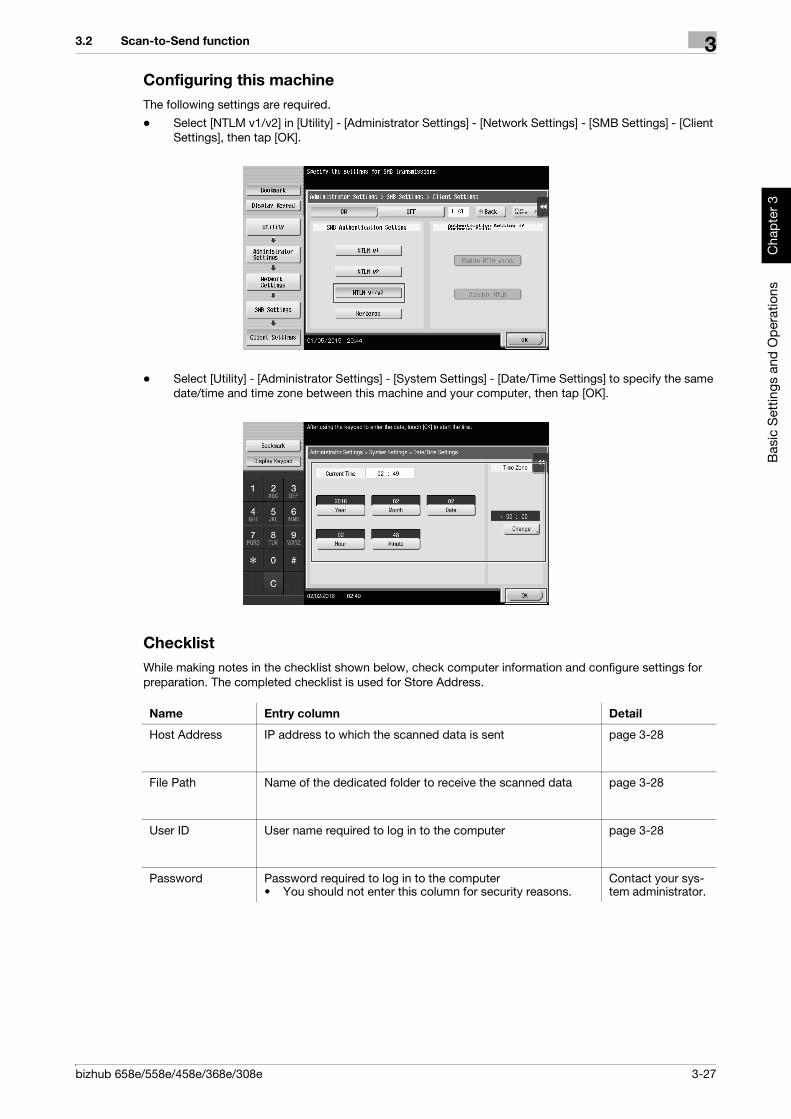
bizhub 658e/558e/458e/368e/308e 3-27
3.2 Scan-to-Send function 3
Bas
ic S
ettin
gs a
nd O
pera
tions
Cha
pter
3
Configuring this machineThe following settings are required.
- Select [NTLM v1/v2] in [Utility] - [Administrator Settings] - [Network Settings] - [SMB Settings] - [Client Settings], then tap [OK].
- Select [Utility] - [Administrator Settings] - [System Settings] - [Date/Time Settings] to specify the same date/time and time zone between this machine and your computer, then tap [OK].
ChecklistWhile making notes in the checklist shown below, check computer information and configure settings for preparation. The completed checklist is used for Store Address.
Name Entry column Detail
Host Address IP address to which the scanned data is sent page 3-28
File Path Name of the dedicated folder to receive the scanned data page 3-28
User ID User name required to log in to the computer page 3-28
Password Password required to log in to the computer• You should not enter this column for security reasons.
Contact your sys-tem administrator.
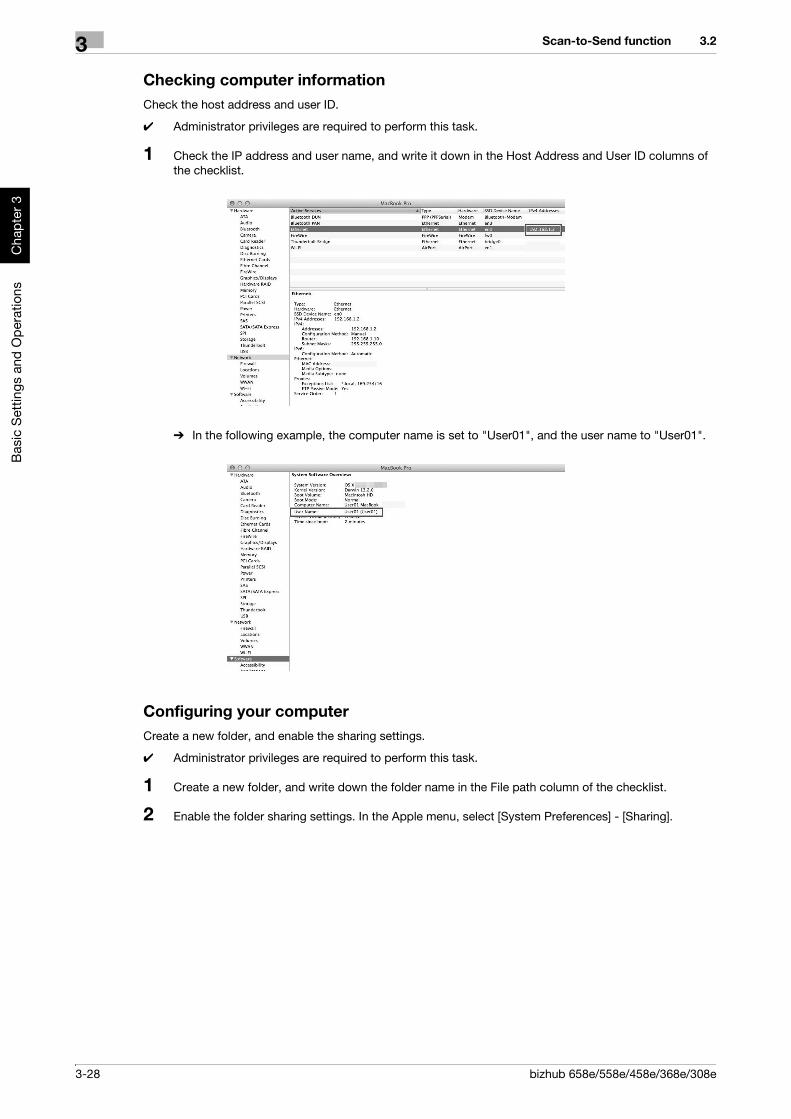
3-28 bizhub 658e/558e/458e/368e/308e
Scan-to-Send function3 3.2
Bas
ic S
ettin
gs a
nd O
pera
tions
Cha
pter
3
Checking computer informationCheck the host address and user ID.
0 Administrator privileges are required to perform this task.
1 Check the IP address and user name, and write it down in the Host Address and User ID columns of the checklist.
% In the following example, the computer name is set to "User01", and the user name to "User01".
Configuring your computerCreate a new folder, and enable the sharing settings.
0 Administrator privileges are required to perform this task.
1 Create a new folder, and write down the folder name in the File path column of the checklist.
2 Enable the folder sharing settings. In the Apple menu, select [System Preferences] - [Sharing].
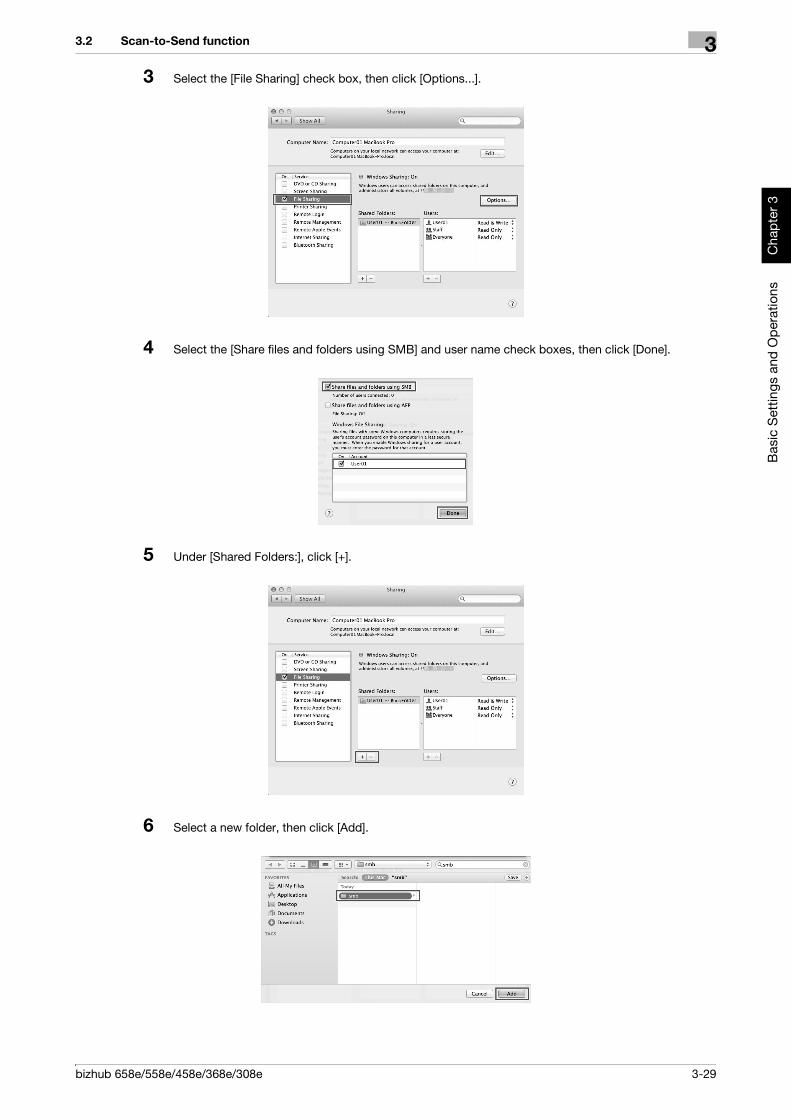
bizhub 658e/558e/458e/368e/308e 3-29
3.2 Scan-to-Send function 3
Bas
ic S
ettin
gs a
nd O
pera
tions
Cha
pter
3
3 Select the [File Sharing] check box, then click [Options...].
4 Select the [Share files and folders using SMB] and user name check boxes, then click [Done].
5 Under [Shared Folders:], click [+].
6 Select a new folder, then click [Add].

3-30 bizhub 658e/558e/458e/368e/308e
Scan-to-Send function3 3.2
Bas
ic S
ettin
gs a
nd O
pera
tions
Cha
pter
3
7 Click the new folder to check the access right.
If the access right is changed to [Read & Write], the setting is completed.
Registering destinationsWhile checking the created checklist, register the folder for receiving the scanned data as an address book of this machine.
1 Tap [Utility], and select [One-Touch/User Box Registration] - [Create One-Touch Destination] - [Address Book] - [PC (SMB)].
2 Tap [New].
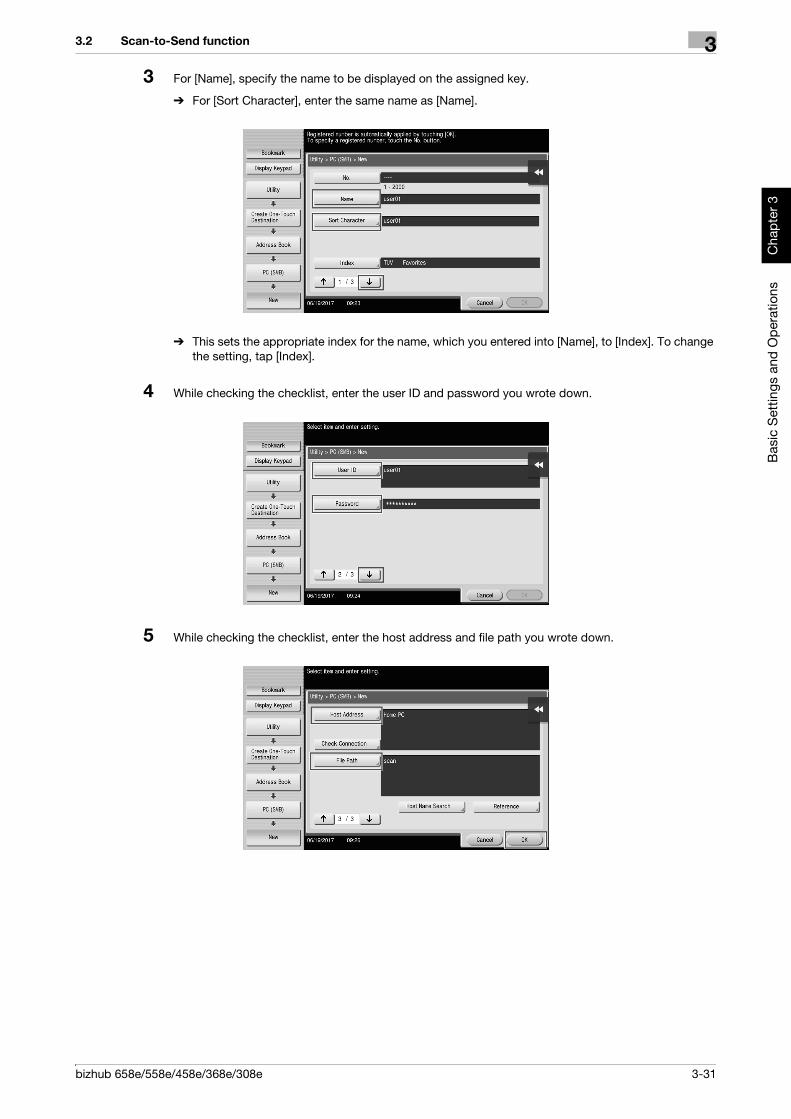
bizhub 658e/558e/458e/368e/308e 3-31
3.2 Scan-to-Send function 3
Bas
ic S
ettin
gs a
nd O
pera
tions
Cha
pter
3
3 For [Name], specify the name to be displayed on the assigned key.
% For [Sort Character], enter the same name as [Name].
% This sets the appropriate index for the name, which you entered into [Name], to [Index]. To change the setting, tap [Index].
4 While checking the checklist, enter the user ID and password you wrote down.
5 While checking the checklist, enter the host address and file path you wrote down.
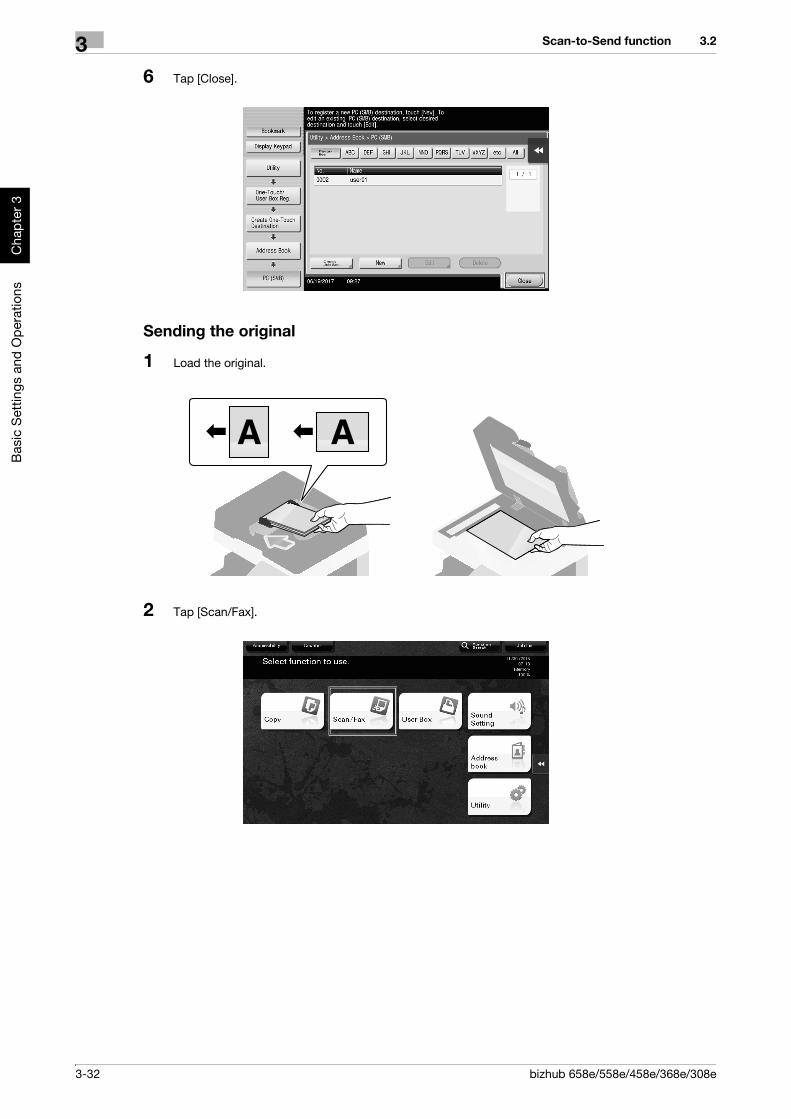
3-32 bizhub 658e/558e/458e/368e/308e
Scan-to-Send function3 3.2
Bas
ic S
ettin
gs a
nd O
pera
tions
Cha
pter
3
6 Tap [Close].
Sending the original
1 Load the original.
2 Tap [Scan/Fax].
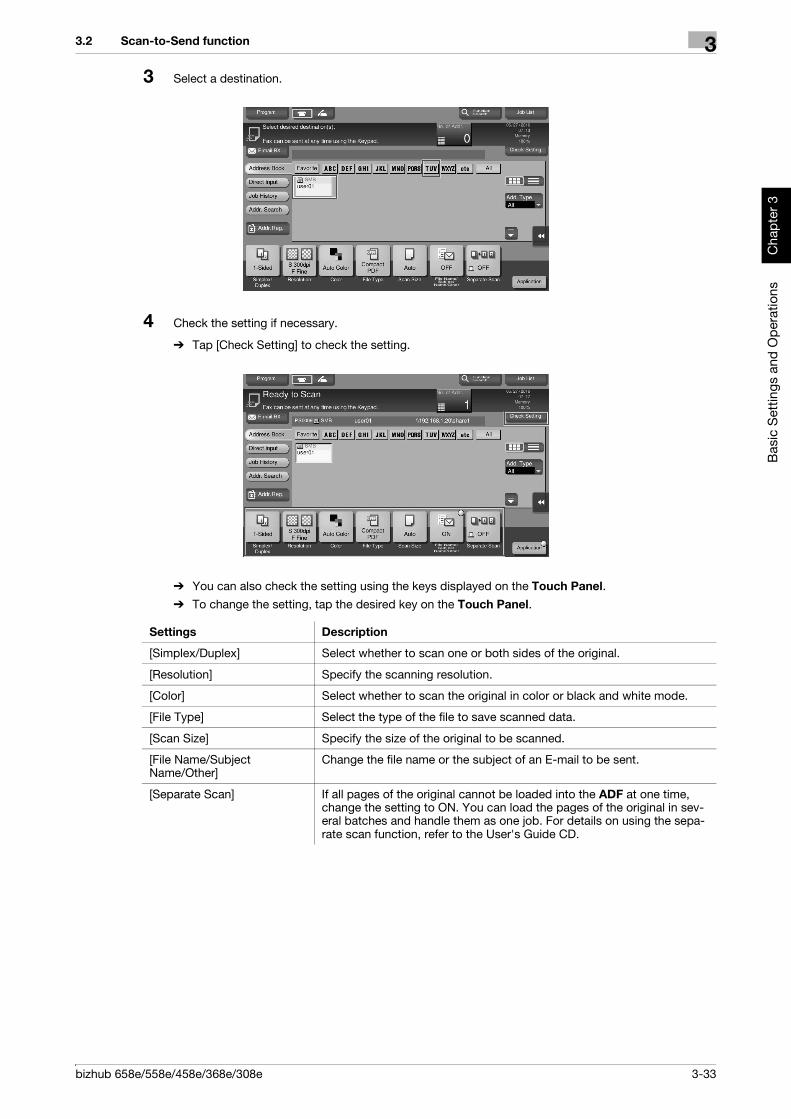
bizhub 658e/558e/458e/368e/308e 3-33
3.2 Scan-to-Send function 3
Bas
ic S
ettin
gs a
nd O
pera
tions
Cha
pter
3
3 Select a destination.
4 Check the setting if necessary.
% Tap [Check Setting] to check the setting.
% You can also check the setting using the keys displayed on the Touch Panel.% To change the setting, tap the desired key on the Touch Panel.
Settings Description
[Simplex/Duplex] Select whether to scan one or both sides of the original.
[Resolution] Specify the scanning resolution.
[Color] Select whether to scan the original in color or black and white mode.
[File Type] Select the type of the file to save scanned data.
[Scan Size] Specify the size of the original to be scanned.
[File Name/Subject Name/Other]
Change the file name or the subject of an E-mail to be sent.
[Separate Scan] If all pages of the original cannot be loaded into the ADF at one time, change the setting to ON. You can load the pages of the original in sev-eral batches and handle them as one job. For details on using the sepa-rate scan function, refer to the User's Guide CD.

3-34 bizhub 658e/558e/458e/368e/308e
Scan-to-Send function3 3.2
Bas
ic S
ettin
gs a
nd O
pera
tions
Cha
pter
3
5 Press the Start key.
3.2.4 Transmit the scanned data via E-mail (E-mail TX)Send scanned data as an E-mail attachment.
This function allows you to receive data at an outside location, which is useful when a quick measure is re-quired.
Preparation flowThe following describes a preparation flow for sending scanned data. For details, refer to the relevant page.
This preparation is not required the second time or subsequent times.
1 Checking the cable connection (Administrator)
% Check that this machine is correctly connected to the network cable. For details, refer to page 3-35.
2 Checking network settings of this machine (Administrator)
% Check the network settings of this machine. For details, refer to page 3-35.
3 Configuring the E-mail transmission environment (Administrator)
% Configure a server for E-mail TX. For details, refer to page 3-36.
4 Configuring administrator information (Administrator)
% Register the administrator name and E-mail address used as the sender's address of an E-mail to be sent. For details, refer to page 3-37.
Operation flowThe following describes a transmission flow. For details, refer to page 3-38.
1 Load the Original
2 Entering a destination
% Enter the destination E-mail address, and check the settings such as the file type and image quality.
3 Press the Start key.
% Press the Start key to scan the original.
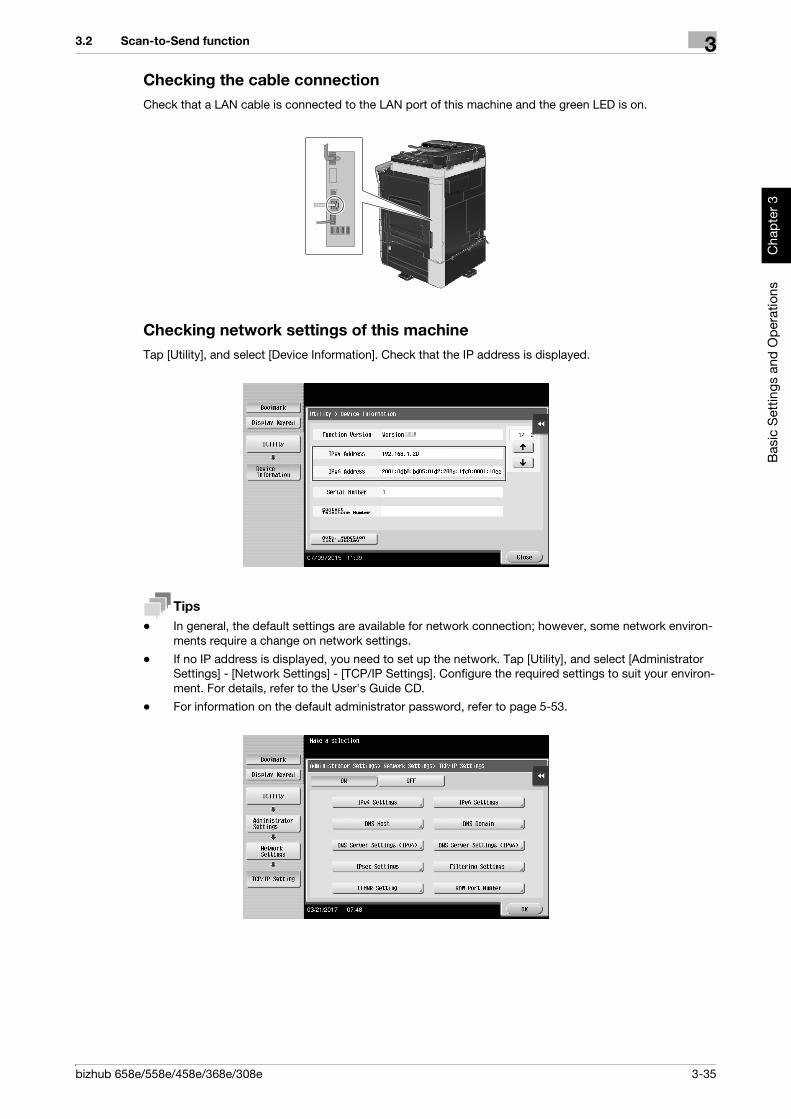
bizhub 658e/558e/458e/368e/308e 3-35
3.2 Scan-to-Send function 3
Bas
ic S
ettin
gs a
nd O
pera
tions
Cha
pter
3
Checking the cable connectionCheck that a LAN cable is connected to the LAN port of this machine and the green LED is on.
Checking network settings of this machineTap [Utility], and select [Device Information]. Check that the IP address is displayed.
Tips- In general, the default settings are available for network connection; however, some network environ-
ments require a change on network settings.
- If no IP address is displayed, you need to set up the network. Tap [Utility], and select [Administrator Settings] - [Network Settings] - [TCP/IP Settings]. Configure the required settings to suit your environ-ment. For details, refer to the User's Guide CD.
- For information on the default administrator password, refer to page 5-53.

3-36 bizhub 658e/558e/458e/368e/308e
Scan-to-Send function3 3.2
Bas
ic S
ettin
gs a
nd O
pera
tions
Cha
pter
3
Configuring the E-mail transmission environment
1 Tap [Utility], and select [Administrator Settings] - [Network Settings] - [E-Mail Settings].
% For information on the default administrator password, refer to page 5-53.
2 Tap [E-Mail TX (SMTP)].
3 Select [ON] to enable E-mail TX (SMTP) settings and E-mail TX function.

bizhub 658e/558e/458e/368e/308e 3-37
3.2 Scan-to-Send function 3
Bas
ic S
ettin
gs a
nd O
pera
tions
Cha
pter
3
4 Enter the SMTP server address.
Configuring administrator information
1 Tap [Utility], and select [Administrator Settings] - [Administrator/Machine Settings] - [Administrator Reg-istration].
2 Enter the required information, then tap [OK].
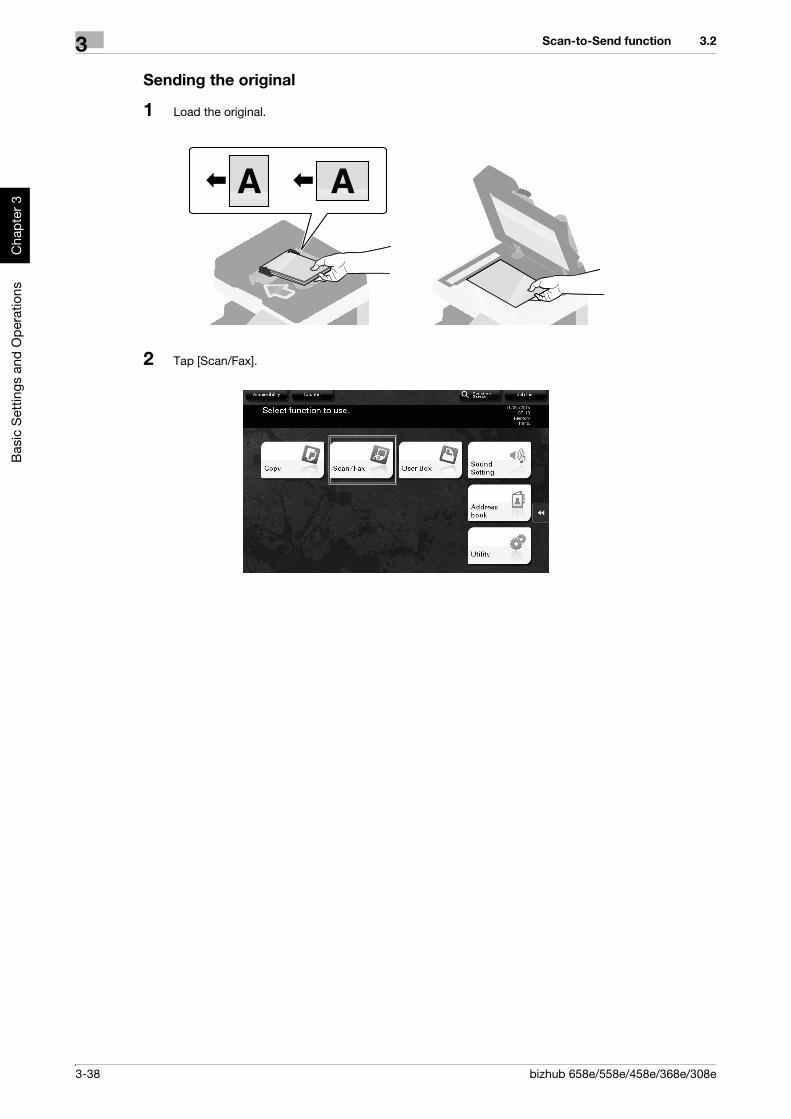
3-38 bizhub 658e/558e/458e/368e/308e
Scan-to-Send function3 3.2
Bas
ic S
ettin
gs a
nd O
pera
tions
Cha
pter
3
Sending the original
1 Load the original.
2 Tap [Scan/Fax].

bizhub 658e/558e/458e/368e/308e 3-39
3.2 Scan-to-Send function 3
Bas
ic S
ettin
gs a
nd O
pera
tions
Cha
pter
3
3 Enter a destination.
4 Check the setting if necessary.
% Tap [Check Setting] to check the setting.
% You can also check the setting using the keys displayed on the Touch Panel.
% To change the setting, tap the desired key on the Touch Panel.
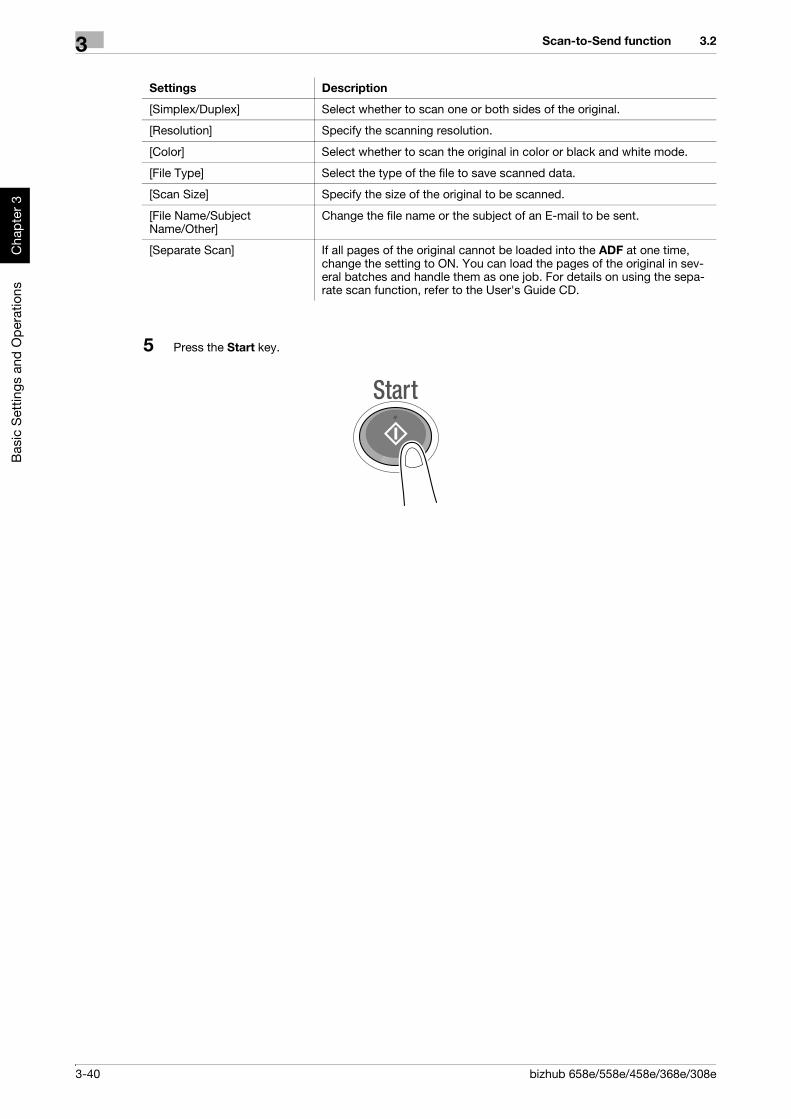
3-40 bizhub 658e/558e/458e/368e/308e
Scan-to-Send function3 3.2
Bas
ic S
ettin
gs a
nd O
pera
tions
Cha
pter
3
5 Press the Start key.
Settings Description
[Simplex/Duplex] Select whether to scan one or both sides of the original.
[Resolution] Specify the scanning resolution.
[Color] Select whether to scan the original in color or black and white mode.
[File Type] Select the type of the file to save scanned data.
[Scan Size] Specify the size of the original to be scanned.
[File Name/Subject Name/Other]
Change the file name or the subject of an E-mail to be sent.
[Separate Scan] If all pages of the original cannot be loaded into the ADF at one time, change the setting to ON. You can load the pages of the original in sev-eral batches and handle them as one job. For details on using the sepa-rate scan function, refer to the User's Guide CD.

bizhub 658e/558e/458e/368e/308e 3-41
3.3 Fax function 3
Bas
ic S
ettin
gs a
nd O
pera
tions
Cha
pter
3
3.3 Fax function
3.3.1 Required settings and basic operationsThis section describes the settings required to send and receive a fax via a telephone line as well as the basic operations.
Tips- To use the Fax function, the optional Fax Kit is required.
Preparation flowThe following describes a preparation flow to send a fax. For details, refer to the relevant page.
This preparation is not required the second time or subsequent times.
1 Checking the cable connection (Administrator)
% Check that this machine is correctly connected to the telephone line. For details, refer to page 3-42.
2 Registering transmission information (Administrator)
% Specify the name and fax number to be displayed as a sender when sending a fax from this ma-chine. For details, refer to page 3-42.
3 Selecting the dialing method (Administrator)
% Select the dialing method to suit your environment. For details, refer to page 3-44.
Operation flowThe following describes a flow to send a fax. For details, refer to page 3-45.
1 Load the Original
2 Entering a destination
% Enter the destination fax number, and check the settings such as the image quality.
3 Press the Start key.
% Press the Start key to send the original.
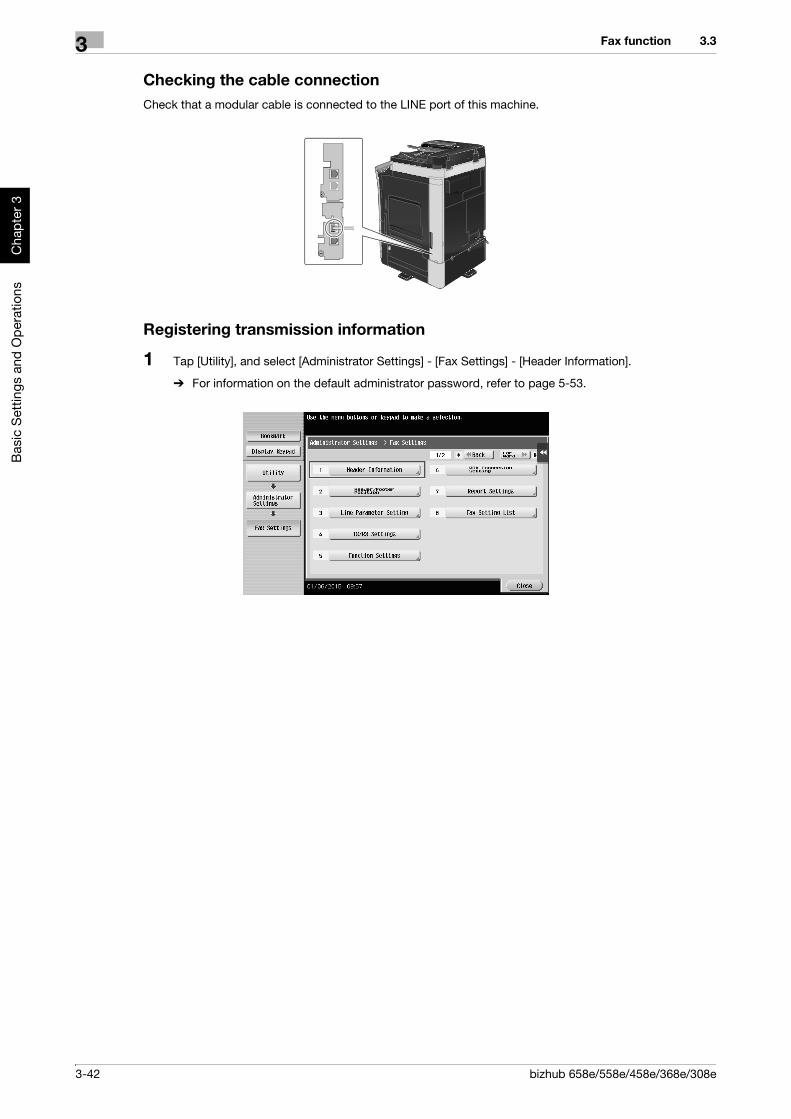
3-42 bizhub 658e/558e/458e/368e/308e
Fax function3 3.3
Bas
ic S
ettin
gs a
nd O
pera
tions
Cha
pter
3
Checking the cable connectionCheck that a modular cable is connected to the LINE port of this machine.
Registering transmission information
1 Tap [Utility], and select [Administrator Settings] - [Fax Settings] - [Header Information].
% For information on the default administrator password, refer to page 5-53.
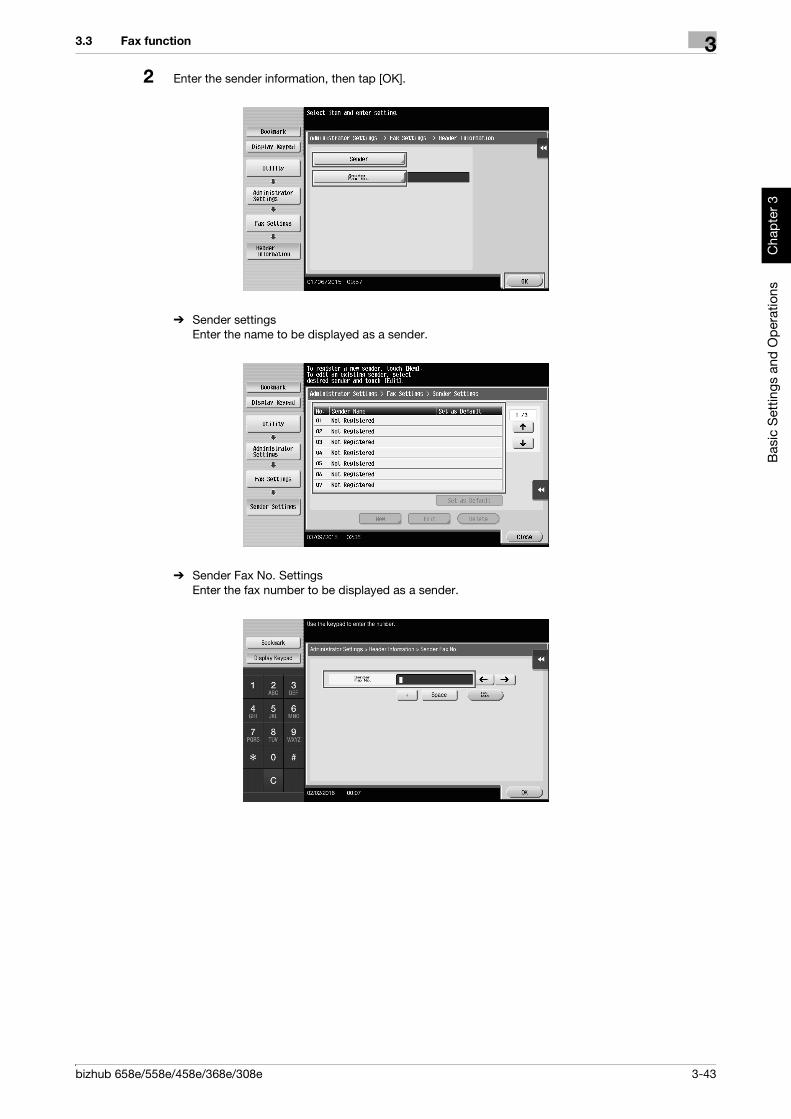
bizhub 658e/558e/458e/368e/308e 3-43
3.3 Fax function 3
Bas
ic S
ettin
gs a
nd O
pera
tions
Cha
pter
3
2 Enter the sender information, then tap [OK].
% Sender settingsEnter the name to be displayed as a sender.
% Sender Fax No. SettingsEnter the fax number to be displayed as a sender.

3-44 bizhub 658e/558e/458e/368e/308e
Fax function3 3.3
Bas
ic S
ettin
gs a
nd O
pera
tions
Cha
pter
3
Selecting the dialing method
1 Tap [Utility], and select [Administrator Settings] - [Fax Settings] - [Line Parameter Setting].
2 Tap [Dialing Method].
3 For the push-button type, select [PB], and for the dial-pulse type, select [10pps].
If you do not know the type of the dialing method:- If you do not know the type of the dialing method, operate push buttons of your phone. When you hear
"beep boop beep", set [Dialing Method] to [PB].- If you do not hear "beep boop beep" after operating push buttons, select [10pps].
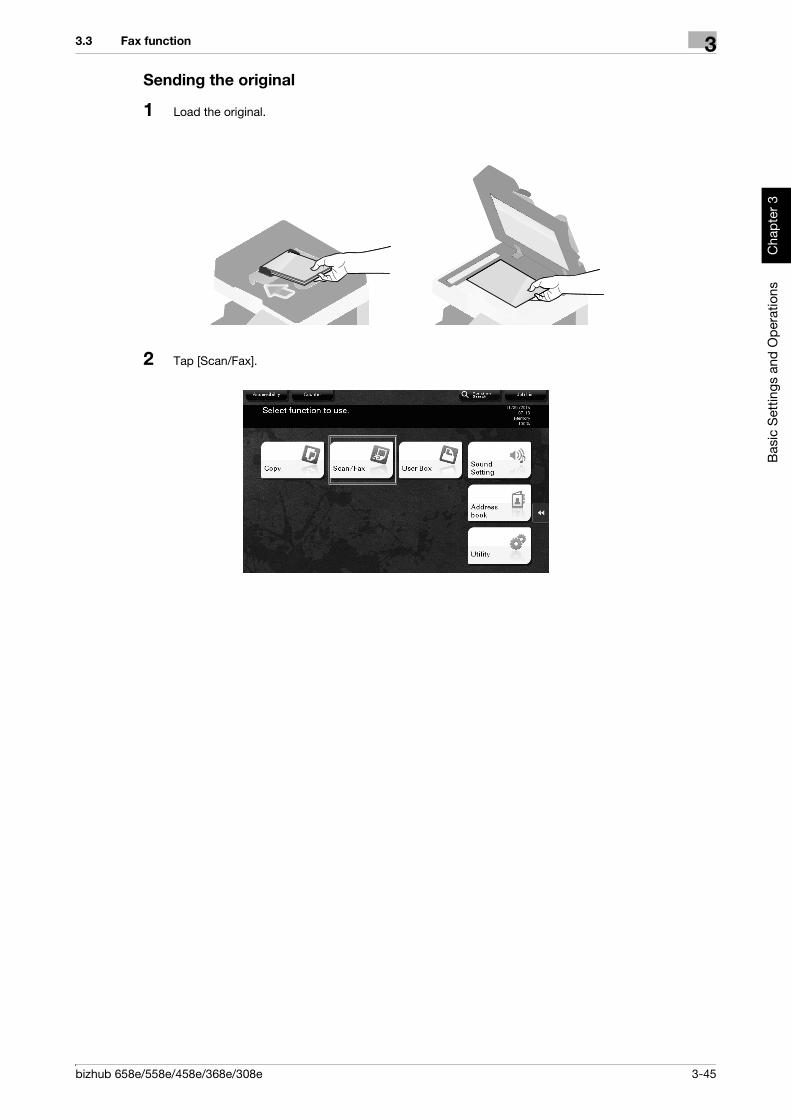
bizhub 658e/558e/458e/368e/308e 3-45
3.3 Fax function 3
Bas
ic S
ettin
gs a
nd O
pera
tions
Cha
pter
3
Sending the original
1 Load the original.
2 Tap [Scan/Fax].

3-46 bizhub 658e/558e/458e/368e/308e
Fax function3 3.3
Bas
ic S
ettin
gs a
nd O
pera
tions
Cha
pter
3
3 Enter a destination.
4 Check the setting if necessary.
% Tap [Check Setting] to check the setting.
% You can also check the setting using the keys displayed on the Touch Panel.
% To change the setting, tap the desired key on the Touch Panel.
[Color], [File Type], and [File Name/Subject Name/Other] are not available when sending to a fax num-ber.
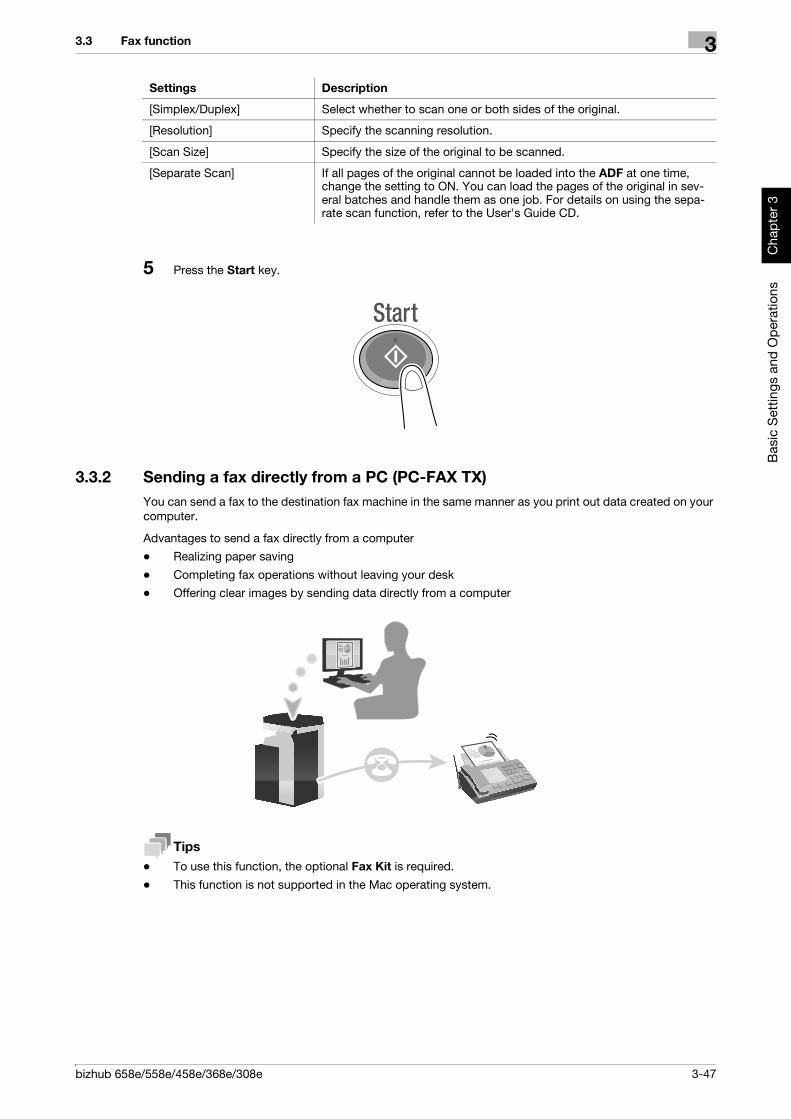
bizhub 658e/558e/458e/368e/308e 3-47
3.3 Fax function 3
Bas
ic S
ettin
gs a
nd O
pera
tions
Cha
pter
3
5 Press the Start key.
3.3.2 Sending a fax directly from a PC (PC-FAX TX)You can send a fax to the destination fax machine in the same manner as you print out data created on your computer.
Advantages to send a fax directly from a computer- Realizing paper saving
- Completing fax operations without leaving your desk- Offering clear images by sending data directly from a computer
Tips- To use this function, the optional Fax Kit is required.
- This function is not supported in the Mac operating system.
Settings Description
[Simplex/Duplex] Select whether to scan one or both sides of the original.
[Resolution] Specify the scanning resolution.
[Scan Size] Specify the size of the original to be scanned.
[Separate Scan] If all pages of the original cannot be loaded into the ADF at one time, change the setting to ON. You can load the pages of the original in sev-eral batches and handle them as one job. For details on using the sepa-rate scan function, refer to the User's Guide CD.

3-48 bizhub 658e/558e/458e/368e/308e
Fax function3 3.3
Bas
ic S
ettin
gs a
nd O
pera
tions
Cha
pter
3
Preparation flowThe following describes a preparation flow to send a fax from a computer. For details, refer to the relevant page.
This preparation is not required the second time or subsequent times.
1 Checking the cable connection (Administrator)
% Check that this machine is correctly connected to the telephone line and network cable. For details, refer to page 3-48.
2 Checking network settings of this machine (Administrator)
% Check the network settings of this machine. For details, refer to page 3-49.
You can use this function with the default settings unless otherwise requested.
3 Installing the fax driver on your computer
% Installing the fax driver on your computer For details, refer to page 3-49.
Operation flowThe following describes a flow to send a fax. For details, refer to page 3-51.
1 Creating data
% Create data to be sent using application software.
2 Configuring the fax driver
% Select a fax driver, and change the setting if necessary.
3 Entering a destination to send data
% Enter a destination to send data.
Checking the cable connection
1 Check that a modular cable is connected to the LINE port of this machine.
2 Check that a LAN cable is connected to the LAN port of this machine and the green LED is on.

bizhub 658e/558e/458e/368e/308e 3-49
3.3 Fax function 3
Bas
ic S
ettin
gs a
nd O
pera
tions
Cha
pter
3
Checking network settings of this machineTap [Utility], and select [Device Information]. Check that the IP address is displayed.
Tips- In general, the default settings are available for network connection; however, some network environ-
ments require a change on network settings.
- If no IP address is displayed, you need to set up the network. Tap [Utility], and select [Administrator Settings] - [Network Settings] - [TCP/IP Settings]. Configure the required settings to suit your environ-ment. For details, refer to the User's Guide CD.
- For information on the default administrator password, refer to page 5-53.
Installing the fax driverInstall the fax driver on the PC by using the installer.
This section describes how to configure the standard print settings.
0 Administrator privileges are required to perform this task.
1 Insert the fax driver DVD into the DVD drive of the computer.
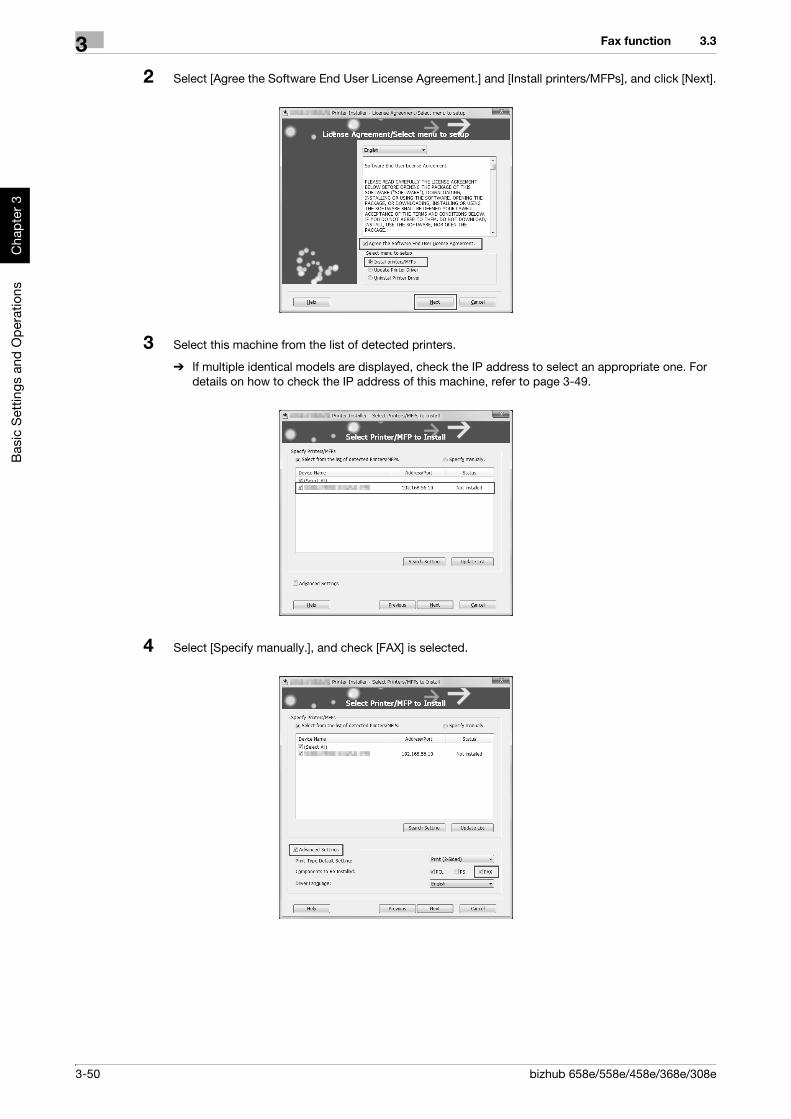
3-50 bizhub 658e/558e/458e/368e/308e
Fax function3 3.3
Bas
ic S
ettin
gs a
nd O
pera
tions
Cha
pter
3
2 Select [Agree the Software End User License Agreement.] and [Install printers/MFPs], and click [Next].
3 Select this machine from the list of detected printers.
% If multiple identical models are displayed, check the IP address to select an appropriate one. For details on how to check the IP address of this machine, refer to page 3-49.
4 Select [Specify manually.], and check [FAX] is selected.
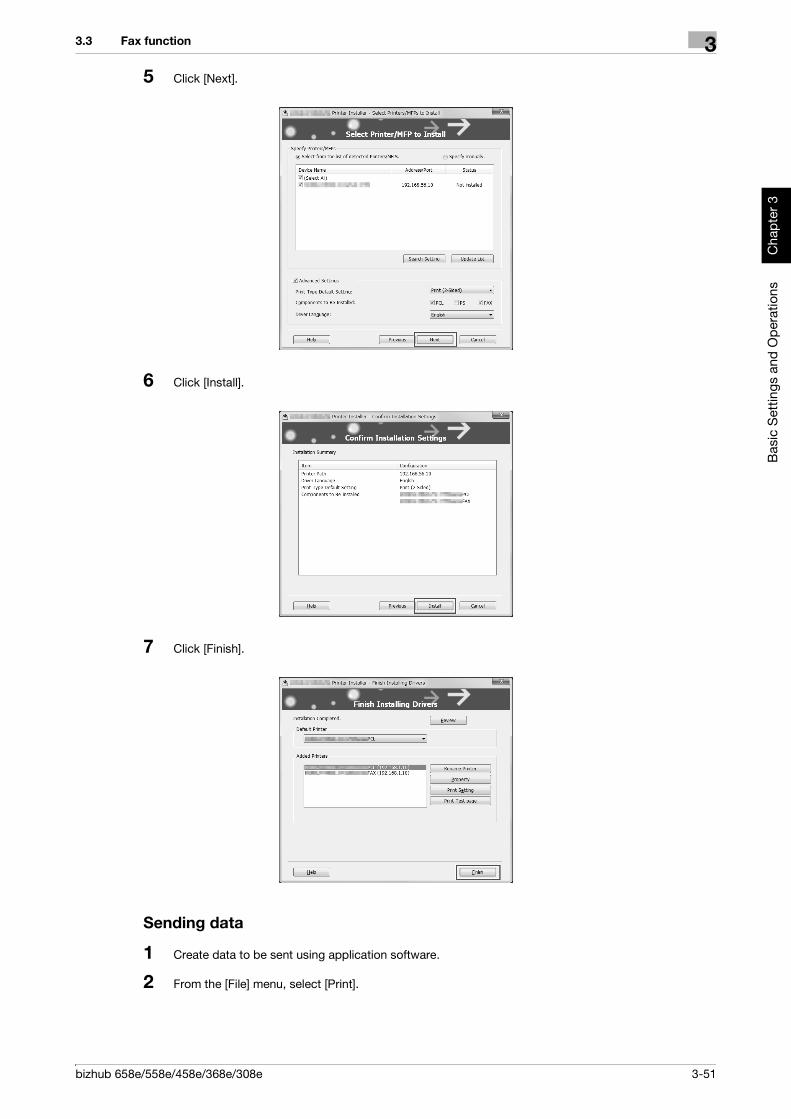
bizhub 658e/558e/458e/368e/308e 3-51
3.3 Fax function 3
Bas
ic S
ettin
gs a
nd O
pera
tions
Cha
pter
3
5 Click [Next].
6 Click [Install].
7 Click [Finish].
Sending data
1 Create data to be sent using application software.
2 From the [File] menu, select [Print].

3-52 bizhub 658e/558e/458e/368e/308e
Fax function3 3.3
Bas
ic S
ettin
gs a
nd O
pera
tions
Cha
pter
3
3 Select the fax driver of this machine, and click [Print].
% Clicking [Preferences] can change the setting of the printer driver as required.
% If user authentication is enabled in this machine, specify the required data such as the user name and password.
4 Enter the destination [Name] and [FAX Number].
% To send data to more than one destination, repeat this step.% Clicking [Add from Address Book] can retrieve the registered destinations of this machine.

bizhub 658e/558e/458e/368e/308e 3-53
3.3 Fax function 3
Bas
ic S
ettin
gs a
nd O
pera
tions
Cha
pter
3
5 Click [OK].
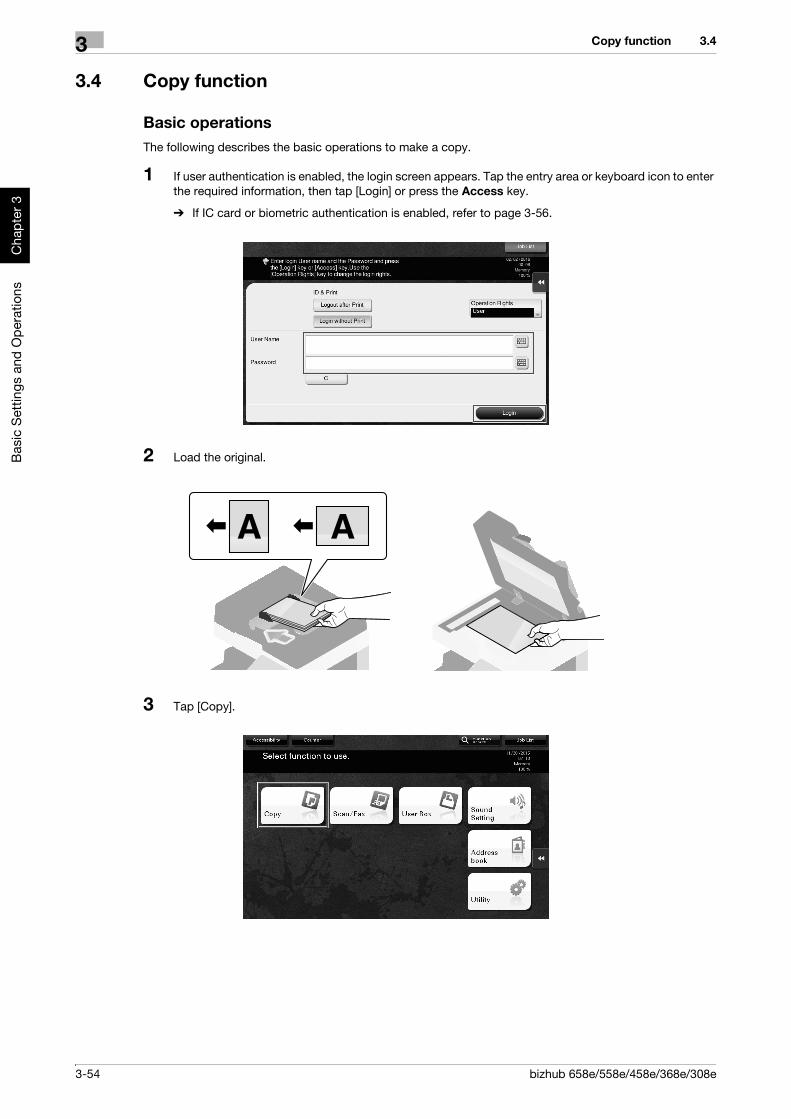
3-54 bizhub 658e/558e/458e/368e/308e
Copy function3 3.4
Bas
ic S
ettin
gs a
nd O
pera
tions
Cha
pter
3
3.4 Copy function
Basic operationsThe following describes the basic operations to make a copy.
1 If user authentication is enabled, the login screen appears. Tap the entry area or keyboard icon to enter the required information, then tap [Login] or press the Access key.
% If IC card or biometric authentication is enabled, refer to page 3-56.
2 Load the original.
3 Tap [Copy].
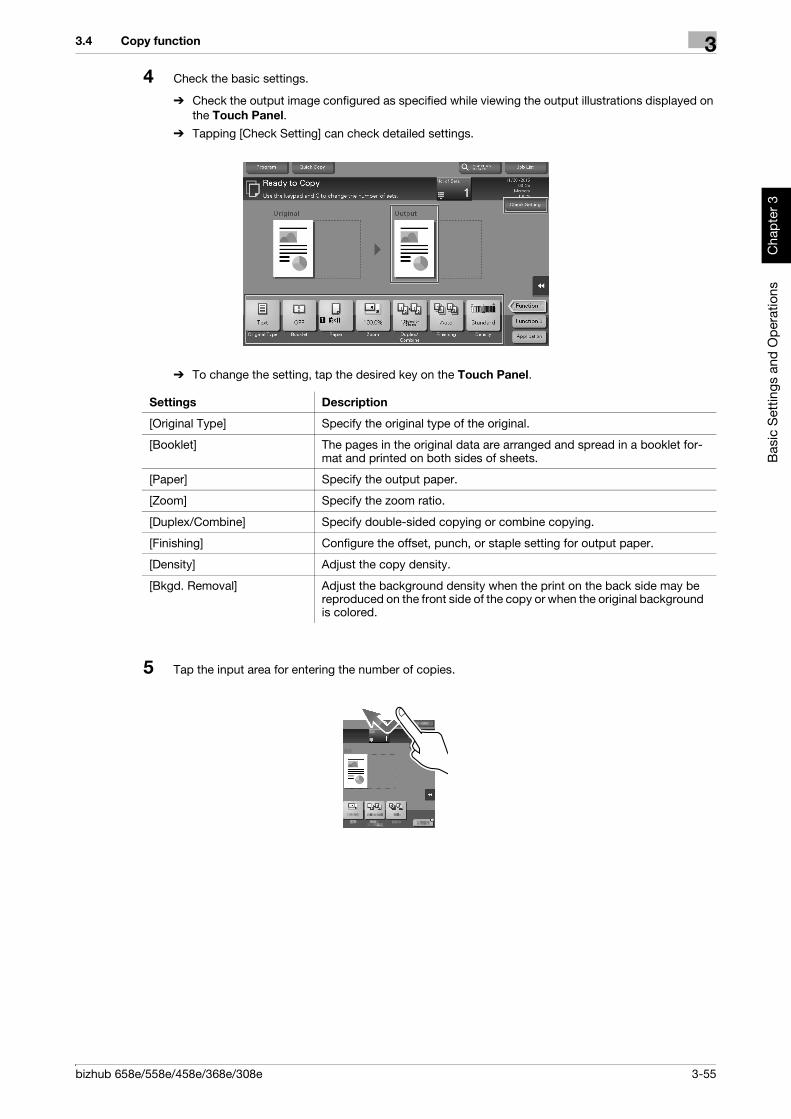
bizhub 658e/558e/458e/368e/308e 3-55
3.4 Copy function 3
Bas
ic S
ettin
gs a
nd O
pera
tions
Cha
pter
3
4 Check the basic settings.
% Check the output image configured as specified while viewing the output illustrations displayed on the Touch Panel.
% Tapping [Check Setting] can check detailed settings.
% To change the setting, tap the desired key on the Touch Panel.
5 Tap the input area for entering the number of copies.
Settings Description
[Original Type] Specify the original type of the original.
[Booklet] The pages in the original data are arranged and spread in a booklet for-mat and printed on both sides of sheets.
[Paper] Specify the output paper.
[Zoom] Specify the zoom ratio.
[Duplex/Combine] Specify double-sided copying or combine copying.
[Finishing] Configure the offset, punch, or staple setting for output paper.
[Density] Adjust the copy density.
[Bkgd. Removal] Adjust the background density when the print on the back side may be reproduced on the front side of the copy or when the original background is colored.

3-56 bizhub 658e/558e/458e/368e/308e
Copy function3 3.4
Bas
ic S
ettin
gs a
nd O
pera
tions
Cha
pter
3
6 Enter the number of copies using the Keypad, and press the Start key.
User authenticationYou can perform authentication by user or group in this machine.
Installing optional units enables IC card, NFC, or biometric authentication.
If IC card or NFC authentication is enabled, place the IC card or Android terminal on the card reader of the authentication unit.
If biometric authentication is enabled, put your finger on the finger vein reader of the authentication unit.
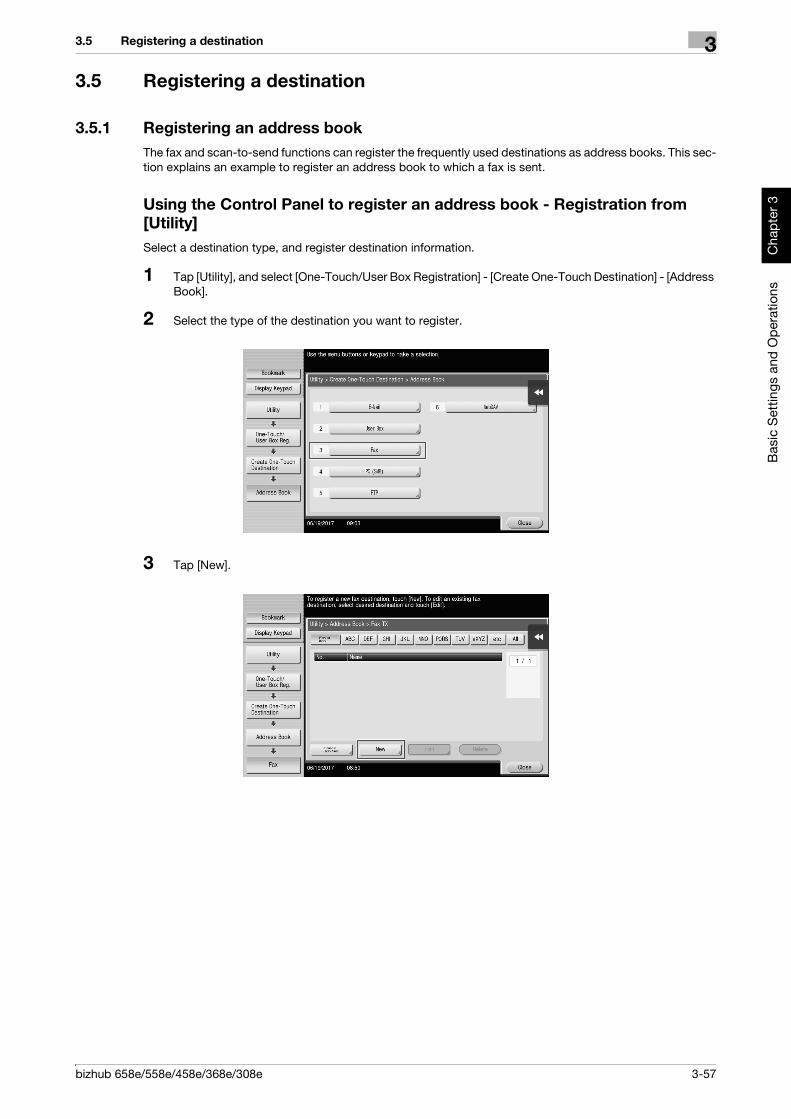
bizhub 658e/558e/458e/368e/308e 3-57
3.5 Registering a destination 3
Bas
ic S
ettin
gs a
nd O
pera
tions
Cha
pter
3
3.5 Registering a destination
3.5.1 Registering an address bookThe fax and scan-to-send functions can register the frequently used destinations as address books. This sec-tion explains an example to register an address book to which a fax is sent.
Using the Control Panel to register an address book - Registration from [Utility]Select a destination type, and register destination information.
1 Tap [Utility], and select [One-Touch/User Box Registration] - [Create One-Touch Destination] - [Address Book].
2 Select the type of the destination you want to register.
3 Tap [New].

3-58 bizhub 658e/558e/458e/368e/308e
Registering a destination3 3.5
Bas
ic S
ettin
gs a
nd O
pera
tions
Cha
pter
3
4 Enter the destination name you want to register.
% For [Name], enter the destination name using the displayed keyboard.
% For [Sort Character], enter the same name as [Name].
% This sets the appropriate index for the name, which you entered into [Name], to [Index]. To change the setting, tap [Index].
% Entry items and the number of setting screens vary depending on the destination type. Use [ ] or [ ] to switch setting screens while entering the required items. For information on entry items, refer to page 3-65.
5 Enter the fax number.
% Tap [Display Keypad] to display the Keypad, and enter the fax number.
6 Tap [Close].

bizhub 658e/558e/458e/368e/308e 3-59
3.5 Registering a destination 3
Bas
ic S
ettin
gs a
nd O
pera
tions
Cha
pter
3
Using the Control Panel to register an address book - Registration from [Address book]Select a destination type, and register destination information.
1 Tap [Address book].
2 Tap [New].
3 Select the type of the destination you want to register.

3-60 bizhub 658e/558e/458e/368e/308e
Registering a destination3 3.5
Bas
ic S
ettin
gs a
nd O
pera
tions
Cha
pter
3
4 Enter the destination name you want to register.
% For [Name], enter the destination name using the displayed keyboard.
% For [Sort Character], enter the same name as [Name].
% This sets the appropriate index for the name, which you entered into [Name], to [Index]. To change the setting, tap the [Index] field.
% Entry items and the number of setting screens vary depending on the destination type. For informa-tion on entry items, refer to page 3-65.
5 Enter the fax number.
6 Tap [Close].
Using the Control Panel to register an address book - Registration in scan/fax modeSelect a destination type, and register destination information.
1 Display the scan/fax screen.

bizhub 658e/558e/458e/368e/308e 3-61
3.5 Registering a destination 3
Bas
ic S
ettin
gs a
nd O
pera
tions
Cha
pter
3
2 Tap [Address Reg.].
3 Tap [New].
4 Select the type of the destination you want to register.
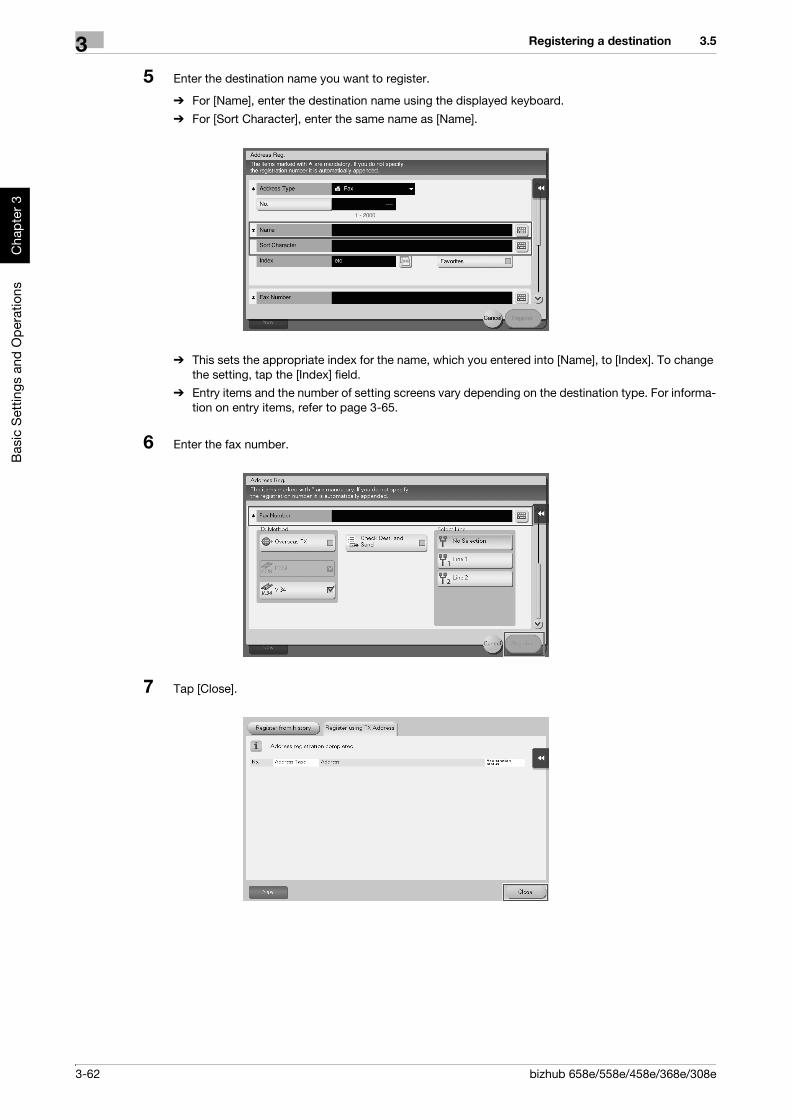
3-62 bizhub 658e/558e/458e/368e/308e
Registering a destination3 3.5
Bas
ic S
ettin
gs a
nd O
pera
tions
Cha
pter
3
5 Enter the destination name you want to register.
% For [Name], enter the destination name using the displayed keyboard.
% For [Sort Character], enter the same name as [Name].
% This sets the appropriate index for the name, which you entered into [Name], to [Index]. To change the setting, tap the [Index] field.
% Entry items and the number of setting screens vary depending on the destination type. For informa-tion on entry items, refer to page 3-65.
6 Enter the fax number.
7 Tap [Close].

bizhub 658e/558e/458e/368e/308e 3-63
3.5 Registering a destination 3
Bas
ic S
ettin
gs a
nd O
pera
tions
Cha
pter
3
Registration by Direct Input
- The destination entered by using the [Direct Input] button can be registered before sending data as well. To register the destination, tap [Address Reg.] after entering the destination using direct input, and then select the destination.
What is an index?- This is used as an index of a registered destination. Tap the Index key to narrow down a target desti-
nation.
- If [Favorite] is selected as an index, the destination appears in the basic screen of the transmission screen after it has been registered in the address book; enabling the user to easily select a destination.
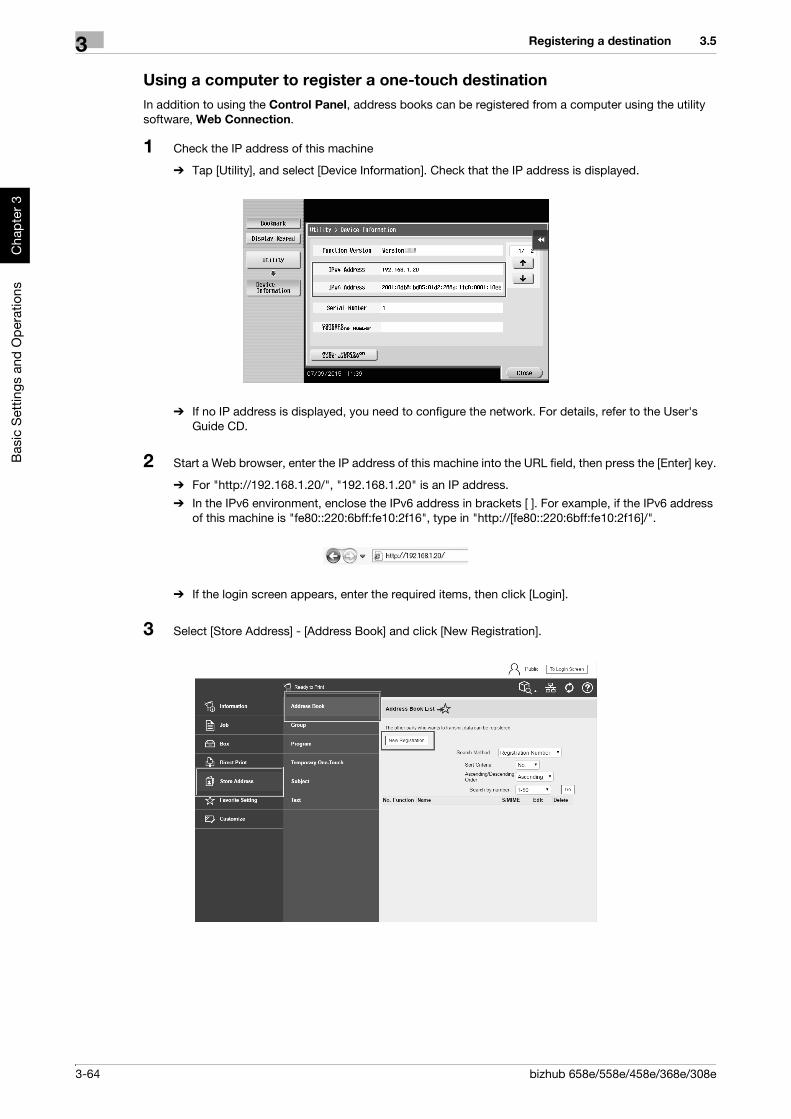
3-64 bizhub 658e/558e/458e/368e/308e
Registering a destination3 3.5
Bas
ic S
ettin
gs a
nd O
pera
tions
Cha
pter
3
Using a computer to register a one-touch destinationIn addition to using the Control Panel, address books can be registered from a computer using the utility software, Web Connection.
1 Check the IP address of this machine
% Tap [Utility], and select [Device Information]. Check that the IP address is displayed.
% If no IP address is displayed, you need to configure the network. For details, refer to the User's Guide CD.
2 Start a Web browser, enter the IP address of this machine into the URL field, then press the [Enter] key.
% For "http://192.168.1.20/", "192.168.1.20" is an IP address.
% In the IPv6 environment, enclose the IPv6 address in brackets [ ]. For example, if the IPv6 address of this machine is "fe80::220:6bff:fe10:2f16", type in "http://[fe80::220:6bff:fe10:2f16]/".
% If the login screen appears, enter the required items, then click [Login].
3 Select [Store Address] - [Address Book] and click [New Registration].

bizhub 658e/558e/458e/368e/308e 3-65
3.5 Registering a destination 3
Bas
ic S
ettin
gs a
nd O
pera
tions
Cha
pter
3
4 Select the type of the destination you want to register, and enter the required information such as the name, fax number, and index.
3.5.2 Information required to register a destinationThe items to be entered or the number of screens required to register a destination vary depending on the transmission type. This section describes specific information required to register a destination.
Tips- Setting items that can generally be used with defaults are omitted in this table.
Item Description
[E-Mail] [Name] Enter the name of the destination to be registered as an address book.
[E-Mail Address] Enter the E-mail address used as the destination.
[User Box] [Name] Enter the name of the destination to be registered as an address book.
[User Box] Select a User Box to be used as a des-tination.
[Fax] [Name] Enter the name of the destination to be registered as an address book.
[Fax Number] Enter the fax number of the destination.
[PC (SMB)] [Name] Enter the name of the destination to be registered as an address book.
[User ID] Enter the login name of the destination computer.
[Password] Enter the password required to log in to the computer.
[Host Address] Enter the computer name or IP address.
[File Path] Enter the folder name to be used as the destination.
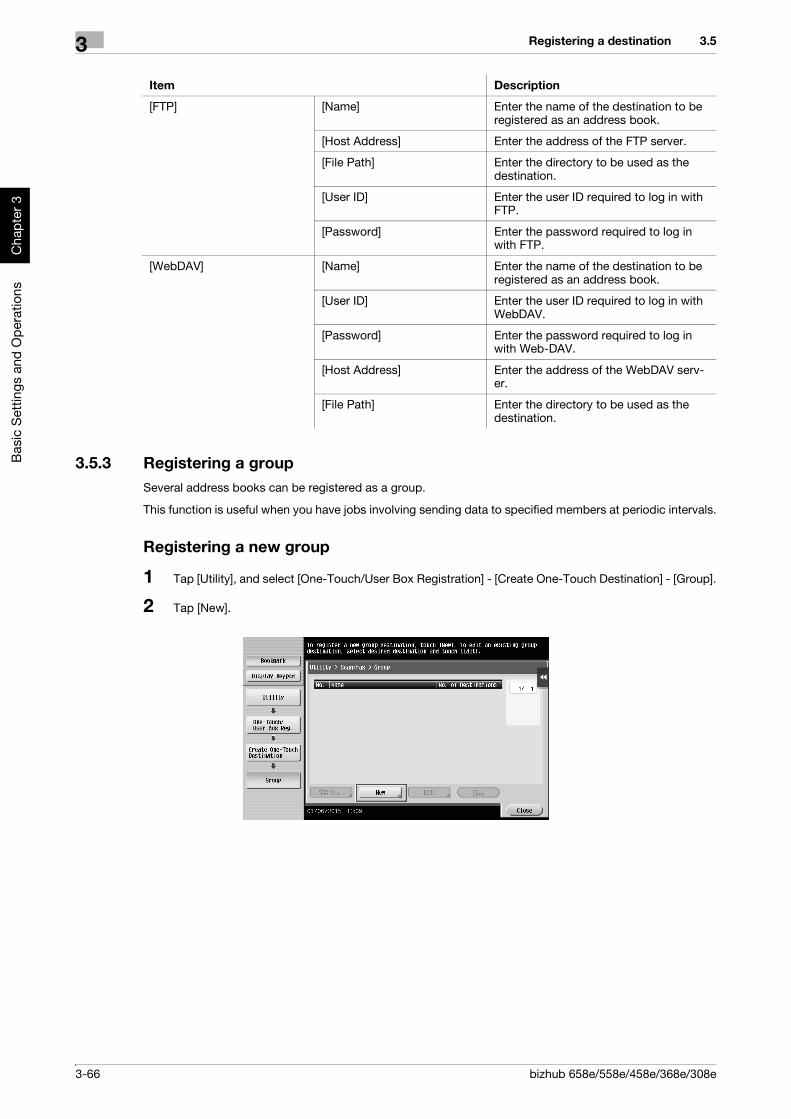
3-66 bizhub 658e/558e/458e/368e/308e
Registering a destination3 3.5
Bas
ic S
ettin
gs a
nd O
pera
tions
Cha
pter
3
3.5.3 Registering a groupSeveral address books can be registered as a group.
This function is useful when you have jobs involving sending data to specified members at periodic intervals.
Registering a new group
1 Tap [Utility], and select [One-Touch/User Box Registration] - [Create One-Touch Destination] - [Group].
2 Tap [New].
[FTP] [Name] Enter the name of the destination to be registered as an address book.
[Host Address] Enter the address of the FTP server.
[File Path] Enter the directory to be used as the destination.
[User ID] Enter the user ID required to log in with FTP.
[Password] Enter the password required to log in with FTP.
[WebDAV] [Name] Enter the name of the destination to be registered as an address book.
[User ID] Enter the user ID required to log in with WebDAV.
[Password] Enter the password required to log in with Web-DAV.
[Host Address] Enter the address of the WebDAV serv-er.
[File Path] Enter the directory to be used as the destination.
Item Description

bizhub 658e/558e/458e/368e/308e 3-67
3.5 Registering a destination 3
Bas
ic S
ettin
gs a
nd O
pera
tions
Cha
pter
3
3 Enter the destination name you want to register.
% For [Name], enter the destination name using the displayed keyboard.
% For [Sort Character], enter the same name as [Name].
% This sets the appropriate index for the name, which you entered into [Name], to [Index]. To change the setting, tap [Index].

3-68 bizhub 658e/558e/458e/368e/308e
Registering a destination3 3.5
Bas
ic S
ettin
gs a
nd O
pera
tions
Cha
pter
3
4 Select destinations to be grouped.
Display and select the target address book on the destination selection screen. The following two meth-ods can be used to search for a destination.
% [Index]: Searches for the target destination name using an index.
% [Registration Number]: Searches for the target destination using a registration number.
5 Repeat Step 4 until you select all address books to be grouped.
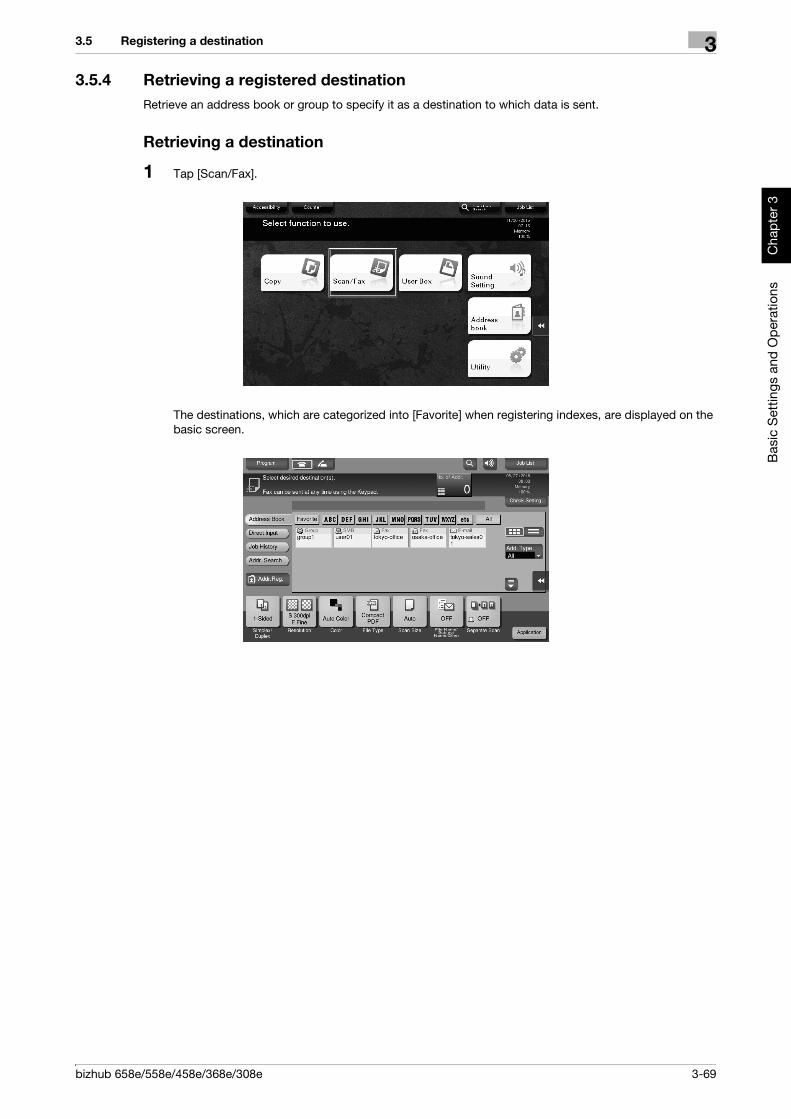
bizhub 658e/558e/458e/368e/308e 3-69
3.5 Registering a destination 3
Bas
ic S
ettin
gs a
nd O
pera
tions
Cha
pter
3
3.5.4 Retrieving a registered destinationRetrieve an address book or group to specify it as a destination to which data is sent.
Retrieving a destination
1 Tap [Scan/Fax].
The destinations, which are categorized into [Favorite] when registering indexes, are displayed on the basic screen.
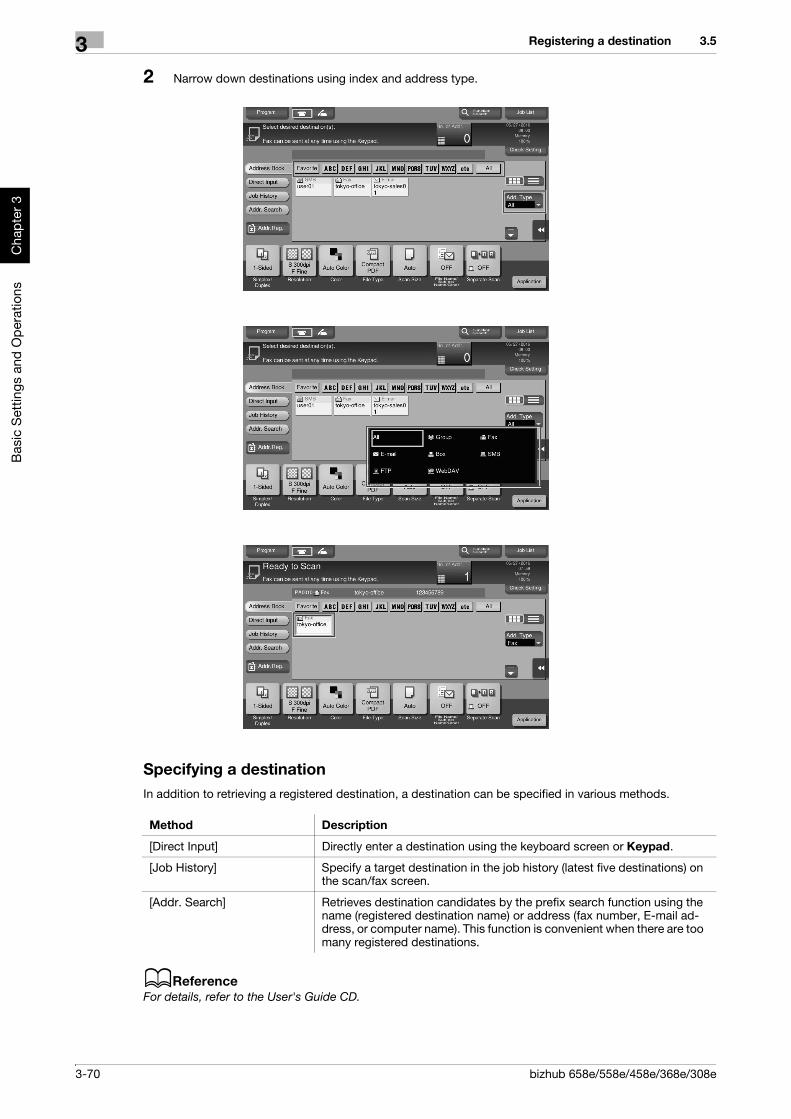
3-70 bizhub 658e/558e/458e/368e/308e
Registering a destination3 3.5
Bas
ic S
ettin
gs a
nd O
pera
tions
Cha
pter
3
2 Narrow down destinations using index and address type.
Specifying a destinationIn addition to retrieving a registered destination, a destination can be specified in various methods.
dReferenceFor details, refer to the User's Guide CD.
Method Description
[Direct Input] Directly enter a destination using the keyboard screen or Keypad.
[Job History] Specify a target destination in the job history (latest five destinations) on the scan/fax screen.
[Addr. Search] Retrieves destination candidates by the prefix search function using the name (registered destination name) or address (fax number, E-mail ad-dress, or computer name). This function is convenient when there are too many registered destinations.
bizhub 658e/558e/458e/368e/308e 3-71
3.6 Using a USB memory device 3
Bas
ic S
ettin
gs a
nd O
pera
tions
Cha
pter
3
3.6 Using a USB memory device
3.6.1 Printing data in a USB memory deviceData saved in the USB memory device can be printed. This function is useful when printing data created on a computer that is not connected to the network.
Available USB memory device
- Compatible with USB Version 2.0/1.1 interface- Formatted in FAT32
- Without security function added, or with security function that can be turned off as required- There is no upper limit for the memory size.
Available printing file types
- PDF, Compact PDF, JPEG, TIFF, XPS, Compact XPS, OOXML (.docx/.xlsx/.pptx), and PPML (.ppml/.vdx/.zip)
- Other file types are not supported on this machine.
Printing data
1 Insert a USB memory device into the USB port of the machine.
NOTICEUse the USB connector on the side that is near the Control Panel.
Do not use a USB device other than a flash-memory device.
2 Tap [Print a document from External Memory.].

3-72 bizhub 658e/558e/458e/368e/308e
Using a USB memory device3 3.6
Bas
ic S
ettin
gs a
nd O
pera
tions
Cha
pter
3
3 Select data to be printed, and tap [Print].
4 Check print settings.
5 Press the Start key.
NOTICEDo not disconnect the USB memory device during data printing.

bizhub 658e/558e/458e/368e/308e 3-73
3.6 Using a USB memory device 3
Bas
ic S
ettin
gs a
nd O
pera
tions
Cha
pter
3
3.6.2 Saving the scanned data in the USB memory device (External memory)The data scanned on this machine can be saved to the USB memory device, so it is convenient when printing data created on a computer that is not connected to the network.
Available USB memory device
- Compatible with USB Version 2.0/1.1 interface- Formatted in FAT32
- Without security function added, or with security function that can be turned off as required- There is no upper limit for the memory size.
Specifying functions to be permitted for external memoryChange the settings to save documents in the USB memory device.
1 Tap [Utility], and select [Administrator Settings] - [System Settings] - [User Box Settings].
% For information on the default administrator password, refer to page 5-53.
2 Tap [External Memory Functional Settings].

3-74 bizhub 658e/558e/458e/368e/308e
Using a USB memory device3 3.6
Bas
ic S
ettin
gs a
nd O
pera
tions
Cha
pter
3
3 Select [Save Document] and [ON]. Tap [OK].
Saving data in the USB memory device
1 Load the original.
2 Connect a USB memory device to this machine.
NOTICEUse the USB connector on the side that is near the Control Panel.
Do not use a USB device other than a flash-memory device.
bizhub 658e/558e/458e/368e/308e 3-75
3.6 Using a USB memory device 3
Bas
ic S
ettin
gs a
nd O
pera
tions
Cha
pter
3
3 Tap [Save a document to External Memory.].
4 Check the file name.
5 If necessary, check the setting to save data.
% Tap [Check Setting] to check the setting.
% To change a file name, tap the file name or keyboard icon.
% You can also check the setting using the keys displayed on the Touch Panel.
% To change the setting, tap the desired key on the Touch Panel.
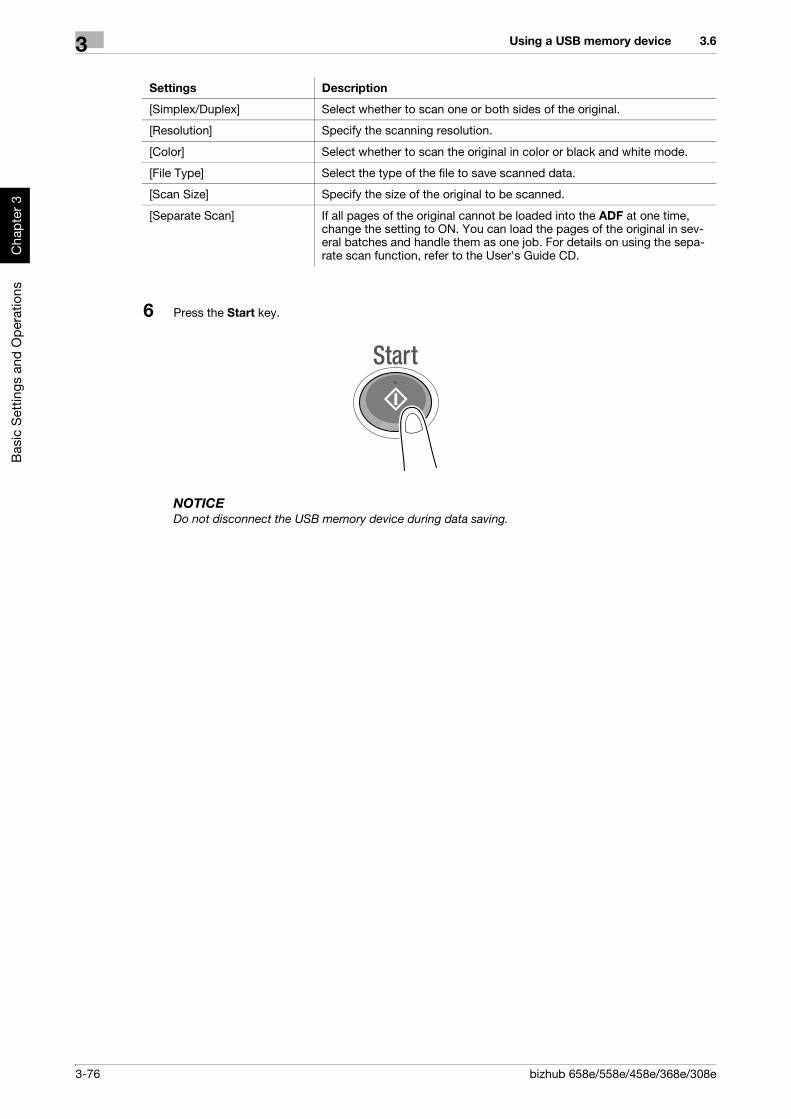
3-76 bizhub 658e/558e/458e/368e/308e
Using a USB memory device3 3.6
Bas
ic S
ettin
gs a
nd O
pera
tions
Cha
pter
3
6 Press the Start key.
NOTICEDo not disconnect the USB memory device during data saving.
Settings Description
[Simplex/Duplex] Select whether to scan one or both sides of the original.
[Resolution] Specify the scanning resolution.
[Color] Select whether to scan the original in color or black and white mode.
[File Type] Select the type of the file to save scanned data.
[Scan Size] Specify the size of the original to be scanned.
[Separate Scan] If all pages of the original cannot be loaded into the ADF at one time, change the setting to ON. You can load the pages of the original in sev-eral batches and handle them as one job. For details on using the sepa-rate scan function, refer to the User's Guide CD.

bizhub 658e/558e/458e/368e/308e 3-77
3.7 Using the guidance function 3
Bas
ic S
ettin
gs a
nd O
pera
tions
Cha
pter
3
3.7 Using the guidance function
3.7.1 Guidance screenThis machine provides the guidance function to display the description of a function on the screen and view an operation procedure with moving images.
If you have any questions during operation, try to use this guidance function.
Getting help on the currently displayed screen:Select [Function] on the Help Menu to display the guidance screen.
1 Press the Guidance key (default: Register key 2).
2 Select a menu.

3-78 bizhub 658e/558e/458e/368e/308e
Using the guidance function3 3.7
Bas
ic S
ettin
gs a
nd O
pera
tions
Cha
pter
3
3 Narrow down the information you want to know.
Name Description
[Exit] Returns to the screen that is displayed before the guidance screen.
[To Menu] Returns to the Help Menu.

bizhub 658e/558e/458e/368e/308e 3-79
3.7 Using the guidance function 3
Bas
ic S
ettin
gs a
nd O
pera
tions
Cha
pter
3
Getting help on the desired function or procedure:Open the Help Menu, and select a menu depending on an objective to display the guidance screen.
1 Press the Guidance key (default: Register key 2).
2 Select a menu.
[Close] Returns to the preceding screen.
Name Description

3-80 bizhub 658e/558e/458e/368e/308e
Using the guidance function3 3.7
Bas
ic S
ettin
gs a
nd O
pera
tions
Cha
pter
3
3 Narrow down the information you want to know.

bizhub 658e/558e/458e/368e/308e 3-81
3.7 Using the guidance function 3
Bas
ic S
ettin
gs a
nd O
pera
tions
Cha
pter
3
4 Tapping [Go to function] opens the setting screen of a target function, enabling you to configure the settings immediately.
Help Menu listThe Help Menu provides the following information:
Name Description
[Function] Tap this button to display the guidance menu that has been sorted ac-cording to the function names to be displayed in the screen.
[Search by Operation] Tap this button to display operation examples and explanations of this machine sorted by function.
[Other Functions] Tap this button to display the guidance menu of the functions and set-tings that make it easier to use this machine.
[Name and Function of Parts] Tap this button to check the name or function of each part of this ma-chine.
[Service/Admin. Information] Tap this button to display the service or administrator information, ad-ministrator name, extension number, and E-mail address.
[Consumables Replace/Pro-cessing Procedure]
Tap this button to check how to replace consumables or dispose of punch scraps.
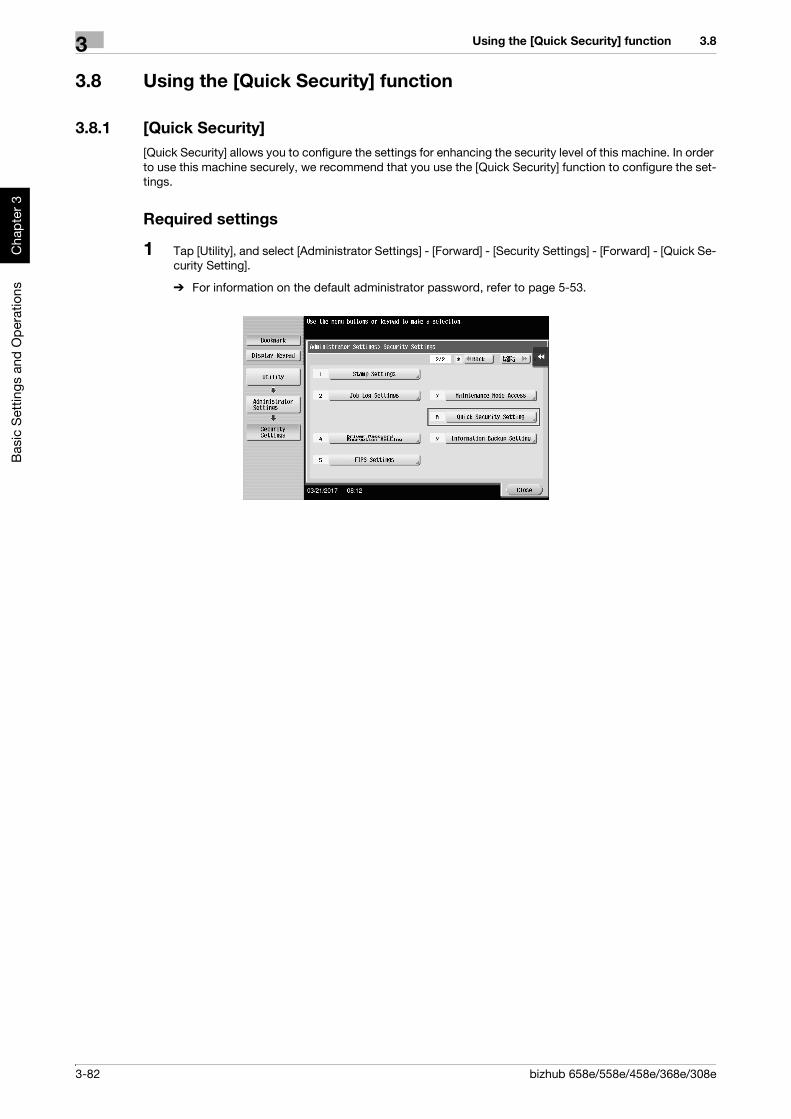
3-82 bizhub 658e/558e/458e/368e/308e
Using the [Quick Security] function3 3.8
Bas
ic S
ettin
gs a
nd O
pera
tions
Cha
pter
3
3.8 Using the [Quick Security] function
3.8.1 [Quick Security][Quick Security] allows you to configure the settings for enhancing the security level of this machine. In order to use this machine securely, we recommend that you use the [Quick Security] function to configure the set-tings.
Required settings
1 Tap [Utility], and select [Administrator Settings] - [Forward] - [Security Settings] - [Forward] - [Quick Se-curity Setting].
% For information on the default administrator password, refer to page 5-53.

bizhub 658e/558e/458e/368e/308e 3-83
3.8 Using the [Quick Security] function 3
Bas
ic S
ettin
gs a
nd O
pera
tions
Cha
pter
3
2 Configure a setting for each option.
% When [Security Warning Display Setting] is set to [ON], the following security warning screen ap-pears if the administrator password remains set to the default or if password rules are not satisfied. Tap [Set Now] to configure the [Quick Security] function.
Tips- You can specify whether to display the [Quick Security] key on the main menu. This key is not displayed
in the default state. To display the key, tap [Utility], and select [Administrator Settings] - [System Set-tings] - [Custom Display Settings] - [Main Menu Default Settings] - [Main Menu Key].
- In some areas, the [Quick Security] key is displayed on the main menu by default. However, if [Admin-istrator Password] in [Quick Security Setting] was changed from the default setting and [Password Rules] is set to [Enable], the [Quick Security] key will not be displayed on the main menu. To display the key again, tap [Utility], and select [Administrator Settings] - [System Settings] - [Custom Display Set-tings] - [Main Menu Default Settings] - [Main Menu Key].
- For information on the default administrator password, refer to page 5-53.
dReferenceFor details, refer to the User's Guide CD.
Settings Description
[Administrator Password] Change the administrator password of this machine.
[USB Enable Settings] Specify whether to permit a function that requires the USB Port.
[Password Rules] Configure whether to enable the password rules. Once you enable it, the number of characters and text types that are available for passwords is restricted.
[Quick IP Filtering] Allows you to restrict the devices that can access this machine using the IP address (IPv4/IPv6). The range of IP addresses for which access is to be restricted is specified automatically.
[PSWC Setting] Select whether to use Web Connection.
[Security Warning Display Setting]
Select whether to display the security warning screen if the administrator password remains set to the default or if password rules are not satisfied.

3-84 bizhub 658e/558e/458e/368e/308e
Using the [Quick Security] function3 3.8
Bas
ic S
ettin
gs a
nd O
pera
tions
Cha
pter
3

4
Adv
ance
d Fu
nctio
nsC
hapt
er 4
Advanced Functions

4-2 bizhub 658e/558e/458e/368e/308e
Using advanced functions4 4.1
Adv
ance
d Fu
nctio
nsC
hapt
er 4
4 Advanced Functions
4.1 Using advanced functions
4.1.1 What are advanced functions?Various functions for further enhancement of the MFP operability are expressed as advanced functions in this manual.
This machine provides the following advanced functions.
Tips- To use an advanced function, you need to register i-Option or associate with the My Panel Manager
application.
Name Description
PDF processing You can configure the required settings when converting scanned data to a PDF file.• This requires the registration of i-Option LK-102 v3 or i-Option LK-
110 v2.
Voice guidance You can use the voice guidance in order to assist operations or prevent the machine from operating incorrectly.• This requires the registration of i-Option LK-104 v3.
Searchable PDF You can convert the scanned data to a searchable PDF file.• This requires the registration of i-Option LK-105 v4 or i-Option LK-
110 v2.
File Type Extension Supports functions such as a function that converts a file into a DOCX or XLSX type, a function that generates highly-functional and high quality data, and the E-mail RX Print function.• This requires the registration of i-Option LK-110 v2.
ThinPrint Allows you to use this machine as ThinPrint Client (.print Client) when ThinPrint is enabled.• This requires the registration of i-Option LK-111.
TPM You can use the Trusted Platform Module to enhance security by en-crypting confidential information such as certificates and passwords of this machine.• This requires the registration of i-Option LK-115 v2.
Serverless Pull Printing Allows you to execute print jobs, which were stored on a device from your computer, from any device in the same serverless pull printing group.• This requires the registration of i-Option LK-114.
My Panel You can customize the Control Panel display of this machine for each user.• This requires the association with My Panel Manager.
My Address You can use the address book for personal use (My Address Book).• This requires the association with My Panel Manager.
bizhub 658e/558e/458e/368e/308e 4-3
4.1 Using advanced functions 4
Adv
ance
d Fu
nctio
nsC
hapt
er 4
In addition, this machine supports advanced functions such as the barcode font, unicode font, and OCR font.
dReferenceFor details, refer to the User's Guide CD.
4.1.2 Association with applicationTo use the My Panel or My Address function, you need to purchase My Panel Manager and enable the target function in the application side.
For details on how to enable such a function, refer to the My Panel Manager User's Guide.
Tips- The optional Extension Memory is required to use the My Address function. bizhub 658e/558e/458e
provides Extension Memory as standard.
4.1.3 Registering the i-Option licenseTo add an optional function to this machine, you need to purchase i-Option and register its license.
Tips- Check that this machine can be connected to the Internet.- When enabling the i-Option function via the Internet, connect this machine to the License Management
Server (LMS) through the proxy server used for remote diagnosis. For details on configuring the proxy server used for remote diagnosis, refer to the User's Guide CD.
- The optional Extension Memory is required to use i-Option LK-102 v3/LK-104 v3/LK-105 v4/LK-106/LK-107/LK-108/LK-110 v2/LK-114. bizhub 658e/558e/458e provides Extension Memory as standard.
- i-Option LK-110 v2 includes the function licenses for i-Option LK-102 v3 and LK-105 v4. If you pur-chase i-Option LK-110 v2, you do not need to purchase i-Option LK-102 v3 or LK-105 v4.
For details on how to purchase or install an optional unit, contact your service representative.
Preparation flowThe following describes a preparation flow to use advanced functions. For details, refer to the relevant page.
This preparation is not required the second time or subsequent times.
1 Enabling the i-Option function (Administrator)
% Enable the i-Option function on this machine. For details, refer to page 4-3.
% If you cannot enable the function above, proceed to steps 2 and 3.
2 Registering the i-Option license (Administrator)
% Register the license on a dedicated Web site. For details, refer to page 4-5.
3 Enabling the i-Option function using the license (Administrator)
% Enter the license code to enable the function. For details, refer to page 4-7.
4 Configuring each function (Administrator)
% Configure the required settings for each advanced function. For details, refer to page 4-8.
dReferenceFor details on the procedure, refer to the User's Guide CD.
Enabling the i-Option function
1 Prepare at hand the token certificate supplied with i-Option.
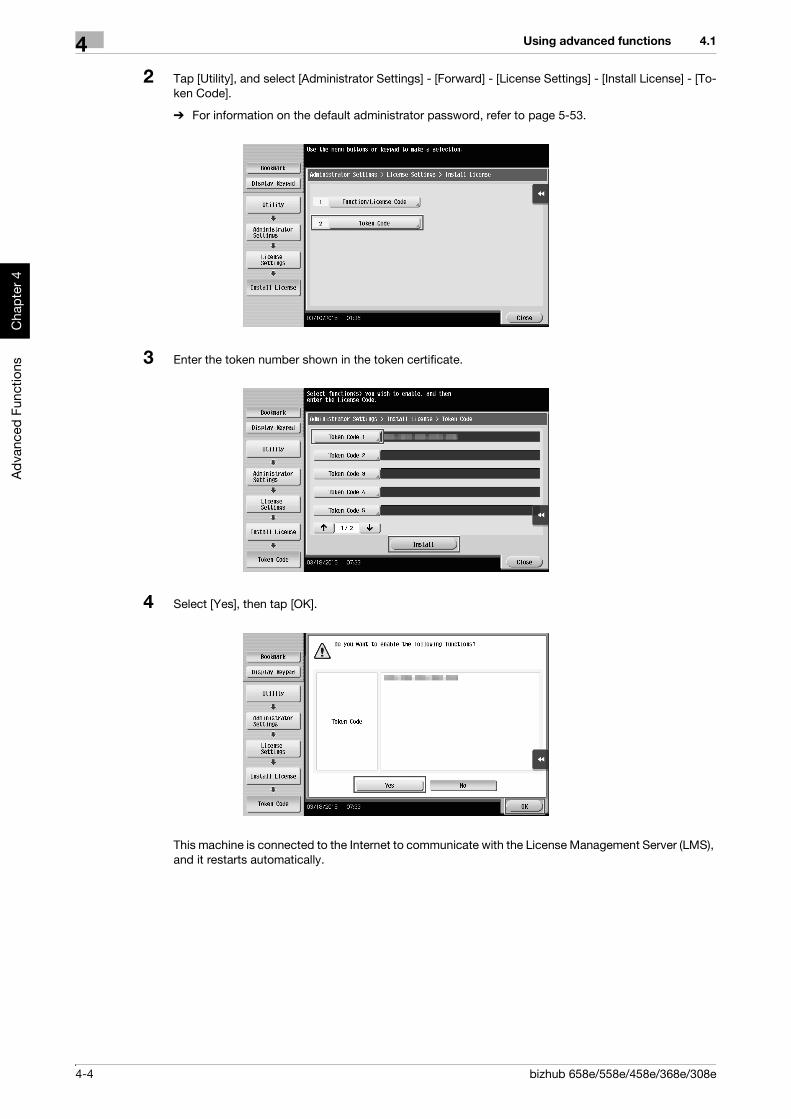
4-4 bizhub 658e/558e/458e/368e/308e
Using advanced functions4 4.1
Adv
ance
d Fu
nctio
nsC
hapt
er 4
2 Tap [Utility], and select [Administrator Settings] - [Forward] - [License Settings] - [Install License] - [To-ken Code].
% For information on the default administrator password, refer to page 5-53.
3 Enter the token number shown in the token certificate.
4 Select [Yes], then tap [OK].
This machine is connected to the Internet to communicate with the License Management Server (LMS), and it restarts automatically.

bizhub 658e/558e/458e/368e/308e 4-5
4.1 Using advanced functions 4
Adv
ance
d Fu
nctio
nsC
hapt
er 4
Registering the i-Option licenseRegister the request code and the contents of the token certificate on the Web site of the License Manage-ment Server (LMS).
This procedure is available when this machine cannot be connected to the Internet.
1 Tap [Utility], and select [Administrator Settings] - [Forward] - [License Settings] - [Get Request Code].
% For information on the default administrator password, refer to page 5-53.
2 Tap [Yes] and [OK].
3 Tapping [Print] prints the serial number and request code.
% Prepare at hand the printed serial number, request code, and token certificate supplied with i-Op-tion.
4 Access the Web site of the License Management Server (LMS). Enter the [MFP Serial Number] and [Re-quest Code], then click [Next].
% The URL is https://lms.konicaminolta.com/index.aspx.

4-6 bizhub 658e/558e/458e/368e/308e
Using advanced functions4 4.1
Adv
ance
d Fu
nctio
nsC
hapt
er 4
5 Enter the [Token Number], select the option you want to register from the [Product Description] list, then click [Next].
6 Confirm the registration contents, then click [Generate License Code].
7 The license code and function code are issued.
Tips- The issued license code and function code are required to enable i-Option. You should write them
down on a memo pad or print them out on paper by clicking [Print].
- You could also store them in your USB memory device. The license code input could be omitted by using a USB memory device to achieve a convenient operation.
- When using a USB memory device, insert the USB memory device and click [Download] to store the license code.

bizhub 658e/558e/458e/368e/308e 4-7
4.1 Using advanced functions 4
Adv
ance
d Fu
nctio
nsC
hapt
er 4
Enabling the i-Option function using the license (Administrator)Register the license and function codes in this machine.
This procedure is available when this machine cannot be connected to the Internet.
By inputting the codes
1 Tap [Utility], and select [Administrator Settings] - [Forward] - [License Settings] - [Install License] - [Function/Licence Code].
% For information on the default administrator password, refer to page 5-53.
2 Enter the license and function codes you wrote down.
3 Select [Yes], then tap [OK].
This machine restarts automatically.
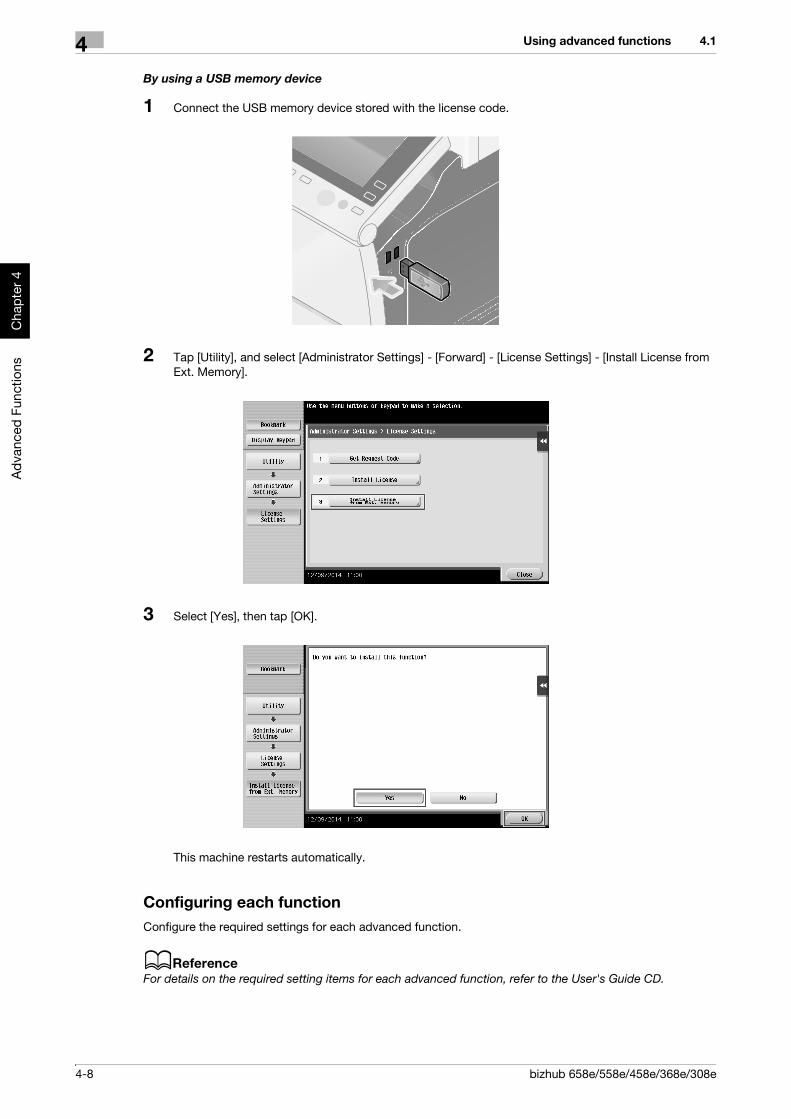
4-8 bizhub 658e/558e/458e/368e/308e
Using advanced functions4 4.1
Adv
ance
d Fu
nctio
nsC
hapt
er 4
By using a USB memory device
1 Connect the USB memory device stored with the license code.
2 Tap [Utility], and select [Administrator Settings] - [Forward] - [License Settings] - [Install License from Ext. Memory].
3 Select [Yes], then tap [OK].
This machine restarts automatically.
Configuring each functionConfigure the required settings for each advanced function.
dReferenceFor details on the required setting items for each advanced function, refer to the User's Guide CD.

bizhub 658e/558e/458e/368e/308e 4-9
4.2 Using the Web browser function 4
Adv
ance
d Fu
nctio
nsC
hapt
er 4
4.2 Using the Web browser function
4.2.1 Required settings and proceduresThe Web browser can be used on the Touch Panel of this machine.
This section describes how to display and print a Web page on the Touch Panel of this machine.
Tips- Check that this machine can be connected to the Internet.- When enabling the Web browser function via the Internet, connect this machine to the License Man-
agement Server (LMS) through the proxy server used for remote diagnosis. For details on configuring the proxy server used for remote diagnosis, refer to the User's Guide CD.
- To use the Web browser, administrator settings are required in advance.
Preparation flowThe following describes a preparation flow to use the Web browser function. For details, refer to the relevant page.
This preparation is not required the second time or subsequent times.
1 Enabling the Web browser function (Administrator)
% Enable the Web browser function on this machine. For details, refer to page 4-10.% If you cannot enable the Web browser above, proceed to steps 2 and 3.
2 Registering the license (Administrator)
% Register the license on a dedicated Web site. For details, refer to page 4-11.
3 Enabling the Web browser using the license (Administrator)
% Enter the license code to enable the function. For details, refer to page 4-12.
Operation flowThe following describes an operation flow. For details, refer to the relevant page.
1 Starting the Web browser
% For details, refer to page 4-16.
2 Displaying Web pages
% For details, refer to page 4-17.
3 Printing the currently displayed page or the linked file
% For details, refer to page 4-18.

4-10 bizhub 658e/558e/458e/368e/308e
Using the Web browser function4 4.2
Adv
ance
d Fu
nctio
nsC
hapt
er 4
dReferenceFor details, refer to the User's Guide CD.
Enabling the Web browser function
1 Tap [Utility], and select [Administrator Settings] - [Network Settings] - [Forward] (twice) - [Web Browser Settings] - [Web Browser Usage Settings].
% For information on the default administrator password, refer to page 5-53.
2 Select [ON], then tap [OK].
This machine is connected to the Internet to communicate with the License Management Server (LMS), and it restarts automatically.

bizhub 658e/558e/458e/368e/308e 4-11
4.2 Using the Web browser function 4
Adv
ance
d Fu
nctio
nsC
hapt
er 4
Registering the licenseRegister the serial number of this machine on the Web site of the License Management Server (LMS).
This procedure is available when this machine cannot be connected to the Internet.
1 Display the serial number of this machine. Tap [Utility], and select [Device Information].
2 Write down the serial number of this machine.
3 Access the Web site of the License Management Server (LMS). Enter the [MFP Serial Number], then click [Next].
% The URL is https://lms.konicaminolta.com/activate.
4 Check the message, then click [OK].

4-12 bizhub 658e/558e/458e/368e/308e
Using the Web browser function4 4.2
Adv
ance
d Fu
nctio
nsC
hapt
er 4
5 The license code is issued.
Tips- The issued license code is required to enable Web browser function. You should write them down on
a memo pad or print them out on paper by clicking [Print].
- You could also store them in your USB memory device. The license code input could be omitted by using a USB memory device to achieve a convenient operation.
- When using a USB memory device, insert the USB memory device and click [Download] to store the license code.
Enabling the Web browser using the licenseRegister the license code in this machine.
This procedure is available when this machine cannot be connected to the Internet.
By inputting the codes
1 Tap [Utility], and select [Administrator Settings] - [Network Settings] - [Forward] (twice) - [Web Browser Settings] - [Web Browser Usage Settings].
% For information on the default administrator password, refer to page 5-53.
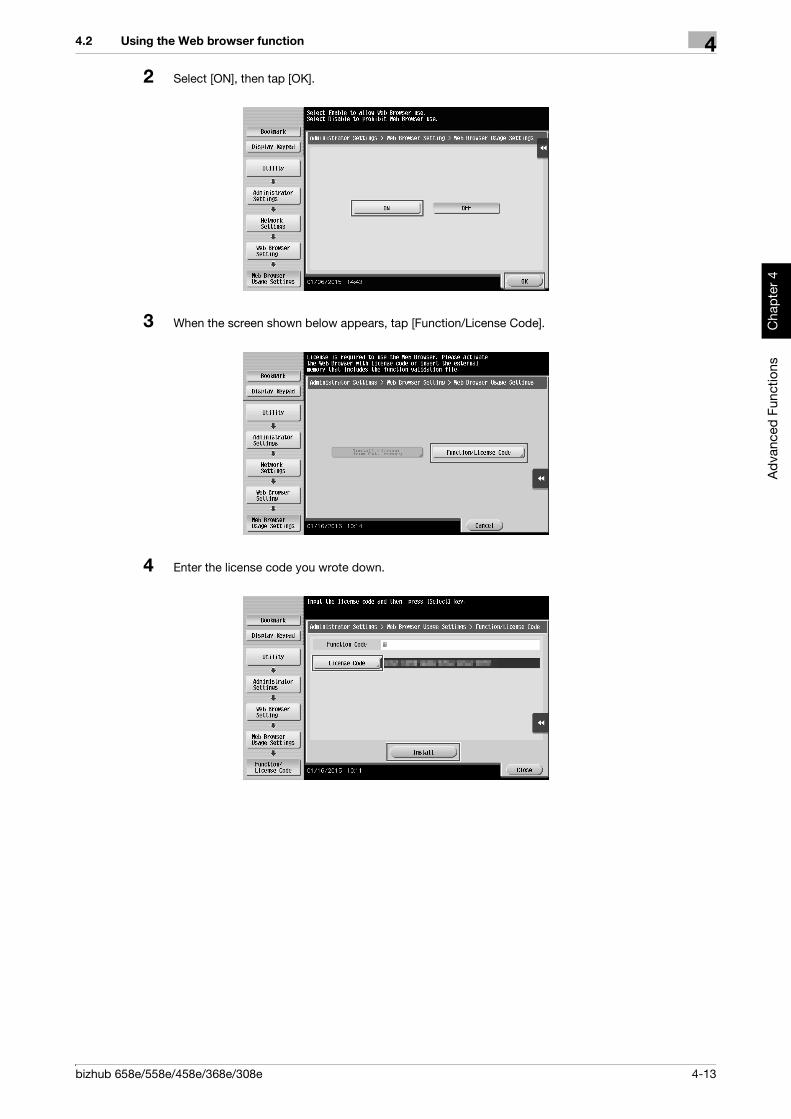
bizhub 658e/558e/458e/368e/308e 4-13
4.2 Using the Web browser function 4
Adv
ance
d Fu
nctio
nsC
hapt
er 4
2 Select [ON], then tap [OK].
3 When the screen shown below appears, tap [Function/License Code].
4 Enter the license code you wrote down.

4-14 bizhub 658e/558e/458e/368e/308e
Using the Web browser function4 4.2
Adv
ance
d Fu
nctio
nsC
hapt
er 4
5 Select [Yes], then tap [OK].
This machine restarts automatically.
By using a USB memory device
1 Tap [Utility], and select [Administrator Settings] - [Network Settings] - [Forward] (twice) - [Web Browser Settings] - [Web Browser Usage Settings].
2 Select [ON], then tap [OK].

bizhub 658e/558e/458e/368e/308e 4-15
4.2 Using the Web browser function 4
Adv
ance
d Fu
nctio
nsC
hapt
er 4
3 Wait a few moments until the screen shown below appears.
4 Connect the USB memory device stored with the license code.
5 Select [Install License from Ext. Memory].
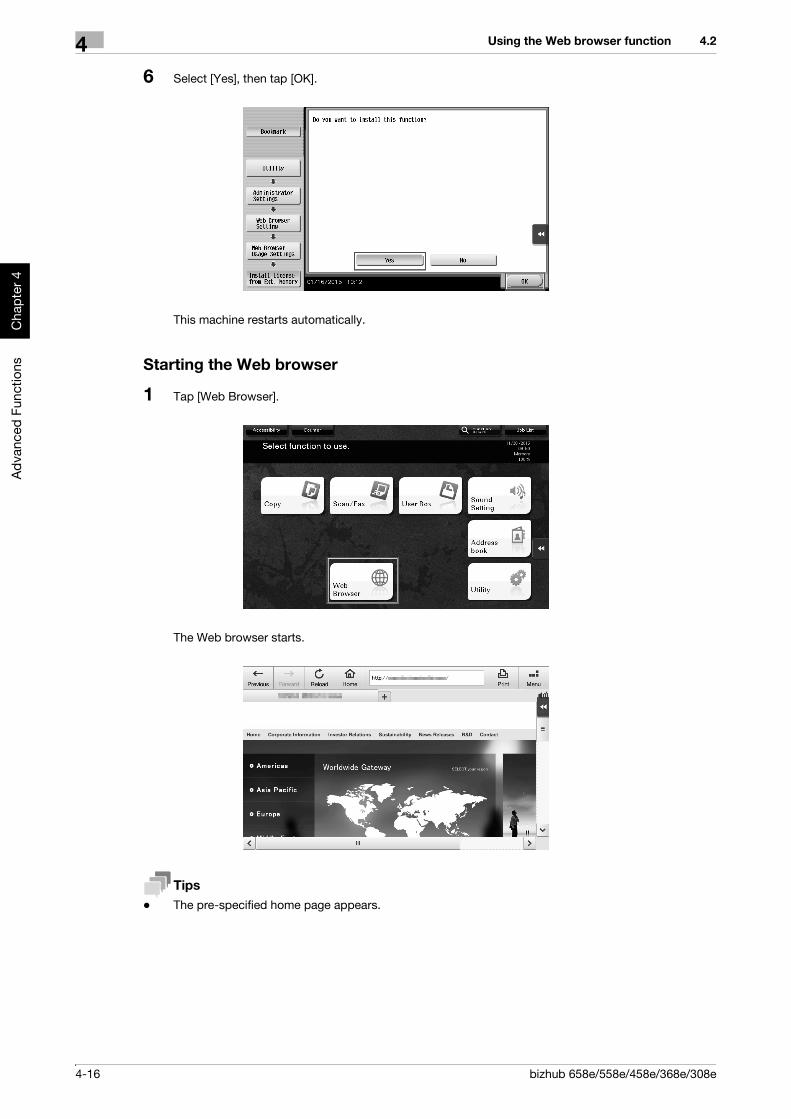
4-16 bizhub 658e/558e/458e/368e/308e
Using the Web browser function4 4.2
Adv
ance
d Fu
nctio
nsC
hapt
er 4
6 Select [Yes], then tap [OK].
This machine restarts automatically.
Starting the Web browser
1 Tap [Web Browser].
The Web browser starts.
Tips- The pre-specified home page appears.
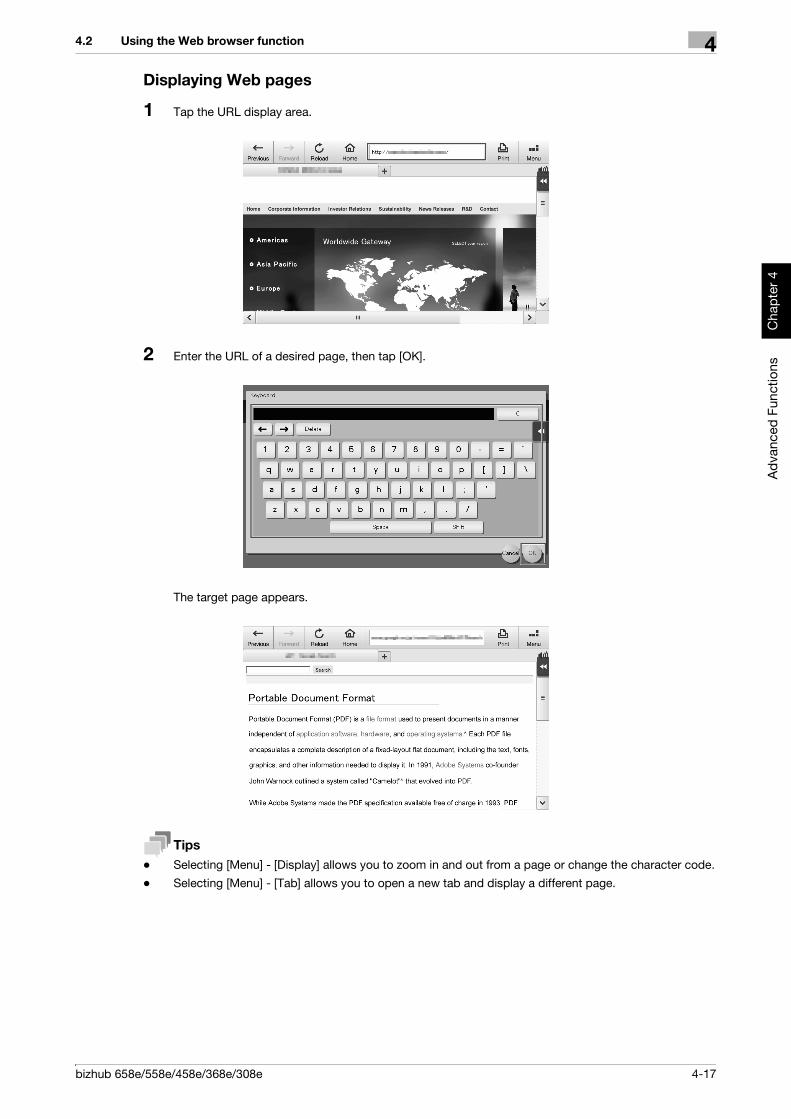
bizhub 658e/558e/458e/368e/308e 4-17
4.2 Using the Web browser function 4
Adv
ance
d Fu
nctio
nsC
hapt
er 4
Displaying Web pages
1 Tap the URL display area.
2 Enter the URL of a desired page, then tap [OK].
The target page appears.
Tips- Selecting [Menu] - [Display] allows you to zoom in and out from a page or change the character code.
- Selecting [Menu] - [Tab] allows you to open a new tab and display a different page.

4-18 bizhub 658e/558e/458e/368e/308e
Using the Web browser function4 4.2
Adv
ance
d Fu
nctio
nsC
hapt
er 4
Printing the currently displayed page or the linked fileFor the currently displayed page
1 Tap [Print].
2 Specify the output paper.
% To change the setting, tap the desired key on the Touch Panel.
3 Press the Start key.
Settings Description
[Simplex/Duplex] Select whether to print one side or both sides of sheets of paper.To specify 2-sided printing, select the binding position.
[Finishing] Configure the offset, punch, or staple setting for output paper.

bizhub 658e/558e/458e/368e/308e 4-19
4.2 Using the Web browser function 4
Adv
ance
d Fu
nctio
nsC
hapt
er 4
For the linked file
This machine provides a capability that prints a PDF file, XPS file, OOXML file, PPML file, or TIFF file.
1 Select a link to the printed file.
2 Tap [Print].
% When linking to a PDF file, you can tap [View] to check its contents before printing the file.
3 Specify the output paper.
% To change the setting, tap the desired key on the Touch Panel.
Settings Description
[Simplex/Duplex] Select whether to print one side or both sides of sheets of paper.To specify 2-sided printing, select the binding position.
[Finishing] Configure the offset, punch, or staple setting for output paper.

4-20 bizhub 658e/558e/458e/368e/308e
Using the Web browser function4 4.2
Adv
ance
d Fu
nctio
nsC
hapt
er 4
4 Press the Start key.

bizhub 658e/558e/458e/368e/308e 4-21
4.3 Using the voice guidance 4
Adv
ance
d Fu
nctio
nsC
hapt
er 4
4.3 Using the voice guidance
4.3.1 Required settings and proceduresUsing the voice guidance, you can confirm explanations of screens, keys, and key-related operations by voice.
The voice guidance is available on the Enlarge Display screen, Guidance screen, and Accessibility Settings screen, and useful to assist operations or prevent this machine from operating incorrectly.
The scan/fax screen allows this machine to read out the procedure via the voice guidance when you directly enter a fax number.
Tips- The optional Extension Memory is required to use the voice guidance. bizhub 658e/558e/458e pro-
vides Extension Memory as standard.- You need to purchase i-Option LK-104 v3 and register its license. For details, refer to page 4-3.
- You need to install the optional Local Interface Kit on this machine.
- To use the voice guidance, administrator settings are required in advance.- When the optional Keypad KP-101 is installed on this machine, you do not need to assign the voice
guidance function to a Register key or to the slide menu. Also, the voice guidance can be operated by using the Keypad.
Preparation flowThe following describes a preparation flow to use the voice guidance. For details, refer to the relevant page.
This preparation is not required the second time or subsequent times.
1 Enabling the voice guidance function (Administrator)
% Enable the voice guidance function on this machine. For details, refer to page 4-22.
2 Assigning the voice guidance function to a Register key or to the slide menu (Administrator)
% For details, refer to page 4-22.
% This setting is not required when the optional Keypad KP-101 is equipped on this machine.
3 Specifying the volume and speed
% Specify the volume or speed to read out. For details, refer to page 4-23.
Operation flowThe following describes an operation flow. For details, refer to page 4-24.
1 Starting the voice guidance
2 Playing the voice guidance
% Move the voice cursor to operate the voice guidance.
3 Ending the voice guidance

4-22 bizhub 658e/558e/458e/368e/308e
Using the voice guidance4 4.3
Adv
ance
d Fu
nctio
nsC
hapt
er 4
Enabling the voice guidance function
1 Tap [Utility], and select [Administrator Settings] - [Forward] - [Voice Guidance Settings].
% For information on the default administrator password, refer to page 5-53.
Assigning the voice guidance function to a Register key or to the slide menuAssign the voice guidance function to any Register key or to the slide menu.
This section describes a procedure example to assign the voice guidance function to a Register key.
1 Tap [Utility], and select [Administrator Settings] - [System Settings] - [Forward] - [Registered Key Set-tings] - [Hard Key].
2 Select the [Register key] to be assigned with the voice guidance function.
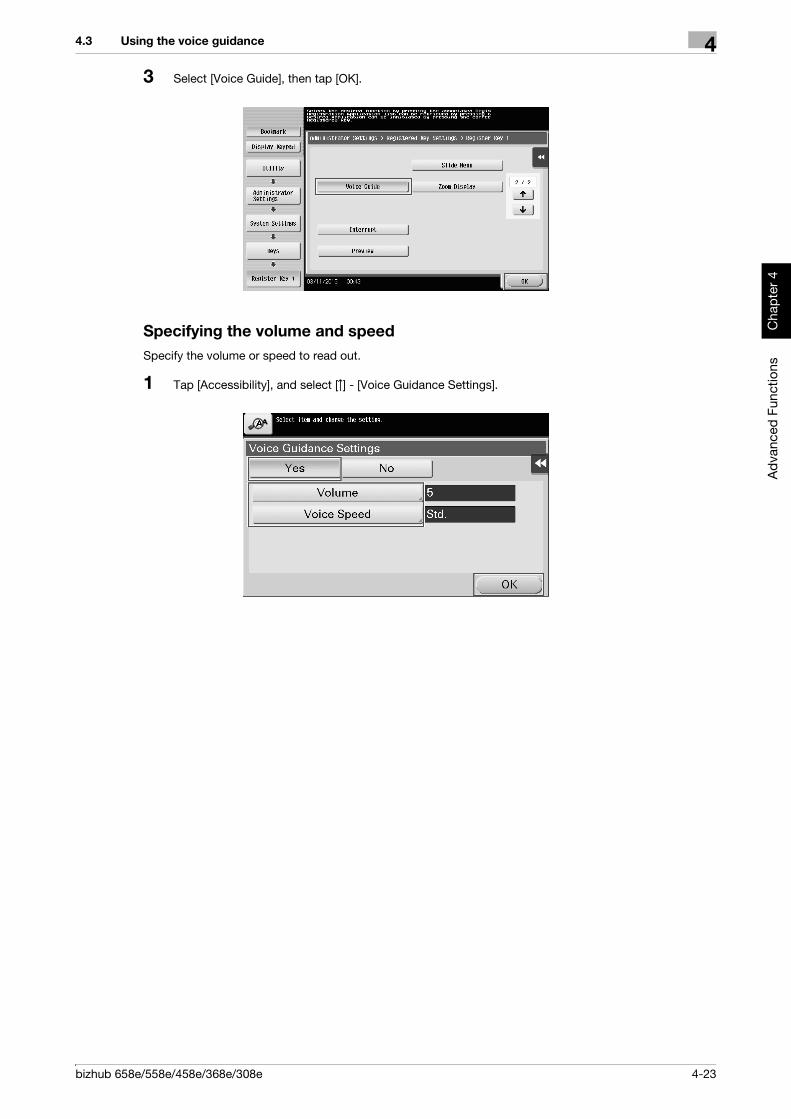
bizhub 658e/558e/458e/368e/308e 4-23
4.3 Using the voice guidance 4
Adv
ance
d Fu
nctio
nsC
hapt
er 4
3 Select [Voice Guide], then tap [OK].
Specifying the volume and speedSpecify the volume or speed to read out.
1 Tap [Accessibility], and select [ ] - [Voice Guidance Settings].

4-24 bizhub 658e/558e/458e/368e/308e
Using the voice guidance4 4.3
Adv
ance
d Fu
nctio
nsC
hapt
er 4
2 Specify the volume or speed.
% [Volume]: Use [Higher] or [Lower] to adjust the volume.
% [Voice Speed]: Select the speed to read out.
Operating the voice guidance
1 Press the Register key assigned with the voice guidance on the screen that supports the voice guid-ance.
% For information on the operations when the optional Keypad KP-101 is equipped, refer to page 4-25.
% The following screens support the voice guidance.Enlarge Display screenGuidance screenAccessibility Settings screen

bizhub 658e/558e/458e/368e/308e 4-25
4.3 Using the voice guidance 4
Adv
ance
d Fu
nctio
nsC
hapt
er 4
You will hear a voice to announce the start of the voice guidance, and the blue-frame voice cursor will be displayed.
2 Tap the key for which a voice guidance is required.
3 Press the Register key assigned with the voice guidance to exit the voice guidance function.
Keypad operations for voice guidance
1 Press the Voice Guide key on the screen that supports the voice guidance.
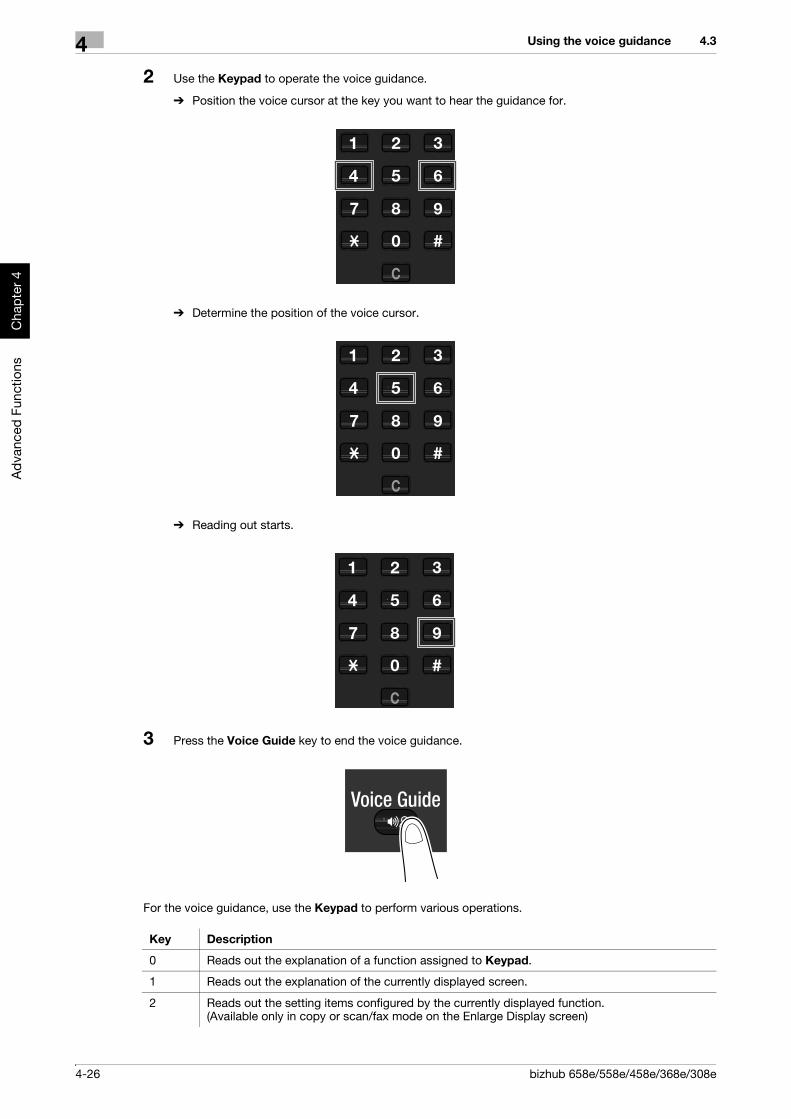
4-26 bizhub 658e/558e/458e/368e/308e
Using the voice guidance4 4.3
Adv
ance
d Fu
nctio
nsC
hapt
er 4
2 Use the Keypad to operate the voice guidance.
% Position the voice cursor at the key you want to hear the guidance for.
% Determine the position of the voice cursor.
% Reading out starts.
3 Press the Voice Guide key to end the voice guidance.
For the voice guidance, use the Keypad to perform various operations.
Key Description
0 Reads out the explanation of a function assigned to Keypad.
1 Reads out the explanation of the currently displayed screen.
2 Reads out the setting items configured by the currently displayed function.(Available only in copy or scan/fax mode on the Enlarge Display screen)

bizhub 658e/558e/458e/368e/308e 4-27
4.3 Using the voice guidance 4
Adv
ance
d Fu
nctio
nsC
hapt
er 4
Voice guidance on the scan/fax screenIf you tap the voice icon on the screen, this machine reads out the operation procedure when you directly enter a fax number. Also, when selecting a destination from the address book or history, this machine reads out the operation procedure.
To stop reading, tap the voice icon again.
3 Stops the currently replayed voice guidance.
4 Moves the voice cursor to the previous.
5 Determines the position of the voice cursor.
6 Moves the voice cursor to the next.
7 Reads out the setting items configured by the currently displayed function.(Available only in copy or scan/fax mode on the Enlarge Display screen)
8 Reads out the previously read-out information again.
9 Reads out the currently selected key.
# Turns up the volume one level.• The volume can be adjusted at any time while using the voice guidance.
* Turns down the volume one level.• The volume can be adjusted at any time while using the voice guidance.
Key Description

4-28 bizhub 658e/558e/458e/368e/308e
Using the voice guidance4 4.3
Adv
ance
d Fu
nctio
nsC
hapt
er 4

5
Freq
uent
ly A
sked
Que
stio
nsC
hapt
er 5
Frequently Asked Questions

5-2 bizhub 658e/558e/458e/368e/308e
Print5 5.1
Freq
uent
ly A
sked
Que
stio
nsC
hapt
er 5
5 Frequently Asked Questions
5.1 Print
5.1.1 Q1. Can I print data on an envelope or postcard?A1. Yes, you can also print on envelopes and postcards.
Execute a print job on your computer then load envelopes or postcards into this machine to execute a print job on it.
Operation procedure
1 Open the file in the application, and click [File]. Then click [Print] from the menu.
2 Select this product from [Select Printer] (or [Printer Name]) then click [Preferences] (or [Properties]).
3 In [Original Size] on the [Basic] tab, select [Envelope] or [Postcard].
% Various sizes of envelopes are available. Select the correct paper size for the envelopes you have loaded.
% If [Postcard] is selected, [Paper Type] is automatically set to [Thick 3]. If [Envelope] is selected, [Pa-per Type] is automatically set to [Envelope].
4 Check that [Paper Size] is set to [Same as Original Size].
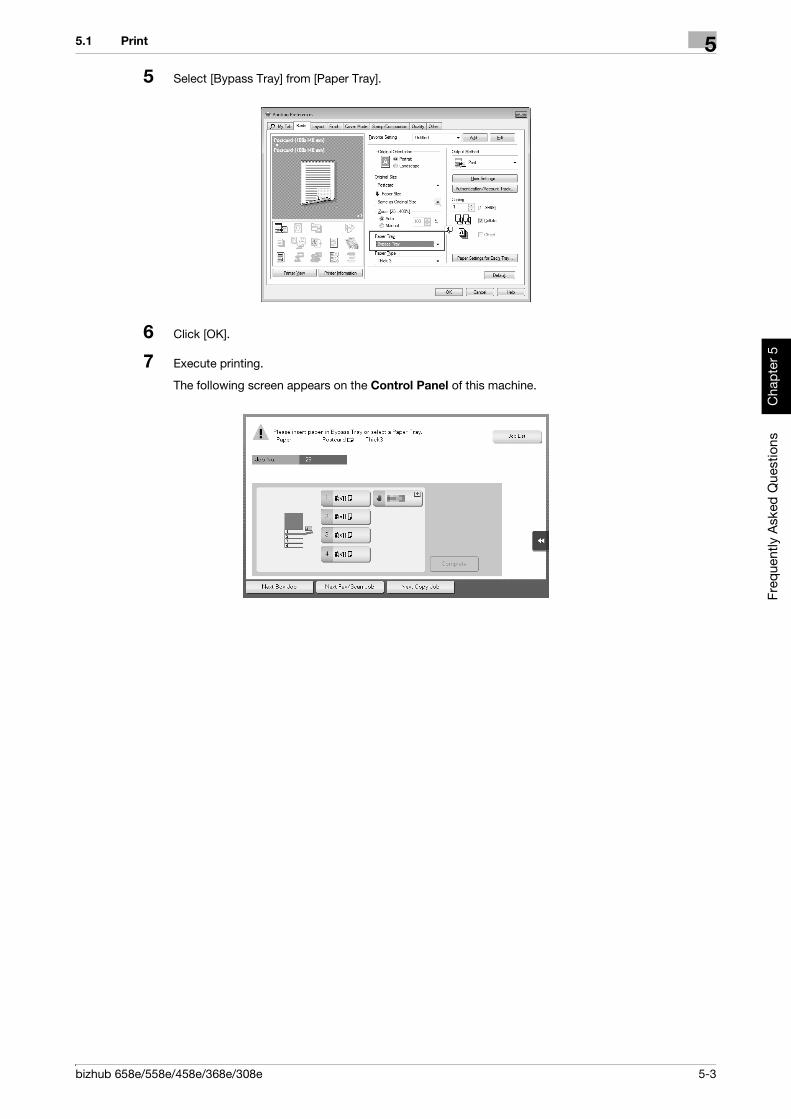
bizhub 658e/558e/458e/368e/308e 5-3
5.1 Print 5
Freq
uent
ly A
sked
Que
stio
nsC
hapt
er 5
5 Select [Bypass Tray] from [Paper Tray].
6 Click [OK].
7 Execute printing.
The following screen appears on the Control Panel of this machine.

5-4 bizhub 658e/558e/458e/368e/308e
Print5 5.1
Freq
uent
ly A
sked
Que
stio
nsC
hapt
er 5
8 Load envelopes or postcards into the Bypass Tray with the print side facing down.
% Insert envelopes or postcards into the tray until their edges are pressed against the back.
NOTICEWhen loading envelopes or postcards into the Bypass Tray, note the following points.
% When loading envelopes, remove air from them, and securely press along the flap fold line. Other-wise, it will result in an envelope wrinkle or paper jam.
% Do not use envelopes that have glue or release paper on the flap or the part covered by the flap on the body. Otherwise, the machine may be damaged or a failure may occur.
% When loading curled postcards, uncurl the postcards as shown in the figure in advance.

bizhub 658e/558e/458e/368e/308e 5-5
5.1 Print 5
Freq
uent
ly A
sked
Que
stio
nsC
hapt
er 5
9 Slide the Lateral Guide to fit the size of the loaded paper.
NOTICEWhen using the Bypass Tray, note the following points.
% Do not put spare envelopes in the Bypass Tray. Doing so causes a size detection error.
% Do not put spare postcards in the Bypass Tray. Doing so causes a size detection error.

5-6 bizhub 658e/558e/458e/368e/308e
Print5 5.1
Freq
uent
ly A
sked
Que
stio
nsC
hapt
er 5
10 Tapping [Complete] starts printing.
% If you cannot tap [Complete], check whether the paper setting of the printer driver matches that of the main unit. In addition, remove envelopes or postcards loaded in the Bypass Tray, then reload them.
5.1.2 Q2. Can I print on custom size paper?A2. The custom size paper can be loaded into Tray1, Tray2, or Bypass Tray.
On the Print screen, specify the tray containing custom size paper; this will enable you to print on custom size paper.
Operation procedureThe following explains how to load custom size paper into the Bypass Tray.
1 Open the file in the application, and click [File]. Then click [Print] from the menu.
2 Select this product from [Select Printer] (or [Printer Name]) then click [Preferences] (or [Properties]).
3 In [Original Size] on the [Basic] tab, select [Custom Size].
4 Enter the size of the paper you have loaded, then click [OK].

bizhub 658e/558e/458e/368e/308e 5-7
5.1 Print 5
Freq
uent
ly A
sked
Que
stio
nsC
hapt
er 5
5 Check that [Paper Size] is set to [Same as Original Size].
6 Select [Bypass Tray] from [Paper Tray].
7 Select the relevant paper type from [Paper Type].
8 Click [OK].
9 Execute printing.
10 Load custom size paper into the Bypass Tray with the print side facing down.
% For details on how to load paper into the Bypass Tray, refer to page 2-48.
% For details on how to load paper into Tray1 or Tray2, refer to page 2-44.
11 Tap [Complete] on the Control Panel of the machine.

5-8 bizhub 658e/558e/458e/368e/308e
Print5 5.1
Freq
uent
ly A
sked
Que
stio
nsC
hapt
er 5
5.1.3 Q3. Can I directly print a file in a USB memory device?A3. Yes. You can print a file simply by inserting the USB memory into the USB Port of the machine.
See the table below for the types of files that can be printed and the operating conditions of the USB memory.
Operation procedure
1 Insert a USB memory into the USB Port of the machine.
2 Tap [Print a document from External Memory].
Item Specifications
Supported standards USB 2.0/1.1
File system FAT32
Types of printable files PDF, Compact PDF, JPEG, TIFF, XPS, Compact XPS, OOXML (.docx/.xlsx/.pptx), and PPML (.ppml/.vdx/.zip)

bizhub 658e/558e/458e/368e/308e 5-9
5.1 Print 5
Freq
uent
ly A
sked
Que
stio
nsC
hapt
er 5
3 Select a file to print, then tap [Print].
% Select a folder, then tap [Open] to list documents and folders in the folder. Tap [Top] to return to the location one layer above.
4 Change the print settings as necessary, and press the Start key on the Control Panel.
5.1.4 Q4. Can printing be restricted by user?A4. Yes. You can set user authentication to restrict printing by user. That enables output control by user, lead-ing to cost reductions.
How to set
1 Tap [Utility], then select [Administrator Settings].
2 Enter the password, then tap [OK].
3 Select [User Authentication/Account Track] - [General Settings] - [User Authentication].

5-10 bizhub 658e/558e/458e/368e/308e
Print5 5.1
Freq
uent
ly A
sked
Que
stio
nsC
hapt
er 5
4 Select [Authenticate], select an authentication method, then tap [OK].
% The authentication status may be [ON (MFP)], [External Server Authentication], [Main + External Server], [Enhanced Server Authentication], or [Main + Enhanced Server] authentication. For informa-tion on server-based user authentication, contact the server administrator.
5 Tap [OK].
6 Select [Yes], then tap [OK].
7 Select [User Authentication Settings] - [User Registration].
8 Select the registration number of a target user, then tap [Edit].
9 Enter the user name and password in [User Name] and [Password].
% If you have selected a registered user in Step 8, no information has to be entered.

bizhub 658e/558e/458e/368e/308e 5-11
5.1 Print 5
Freq
uent
ly A
sked
Que
stio
nsC
hapt
er 5
10 Tap [Max. Allowance Set], then enter the maximum allowance for the number of originals that the user can print, using the Keypad.
11 Tap [OK].
12 Tap [Function Permission/Authority] - [Function Permission] to set the limit for the respective functions.
13 Tap [OK].
14 Tap [Close].
15 Tap [OK].
Settings Description
[Copy] Specify whether to allow a copy job.
[Scan] Specify whether to allow a scan job.
[Fax] Specify whether to allow a fax job.
[Print] Specify whether to allow a print job for a file.
[User Box] Specify whether to allow any operation of a file saved in the User Box.
[Print Scan/Fax TX] Specify whether to allow a print job for a file to send.
[Save to External Mem-ory]
Specify whether to permit saving of files to an external memory.
[External Memory Doc-ument Scan]
Specify whether to allow scanning of files saved in the User Box.
[Manual Destination In-put]
Specify whether to allow manual input of a destination.
[Web Browser] Specify whether to allow use of the Web browser.
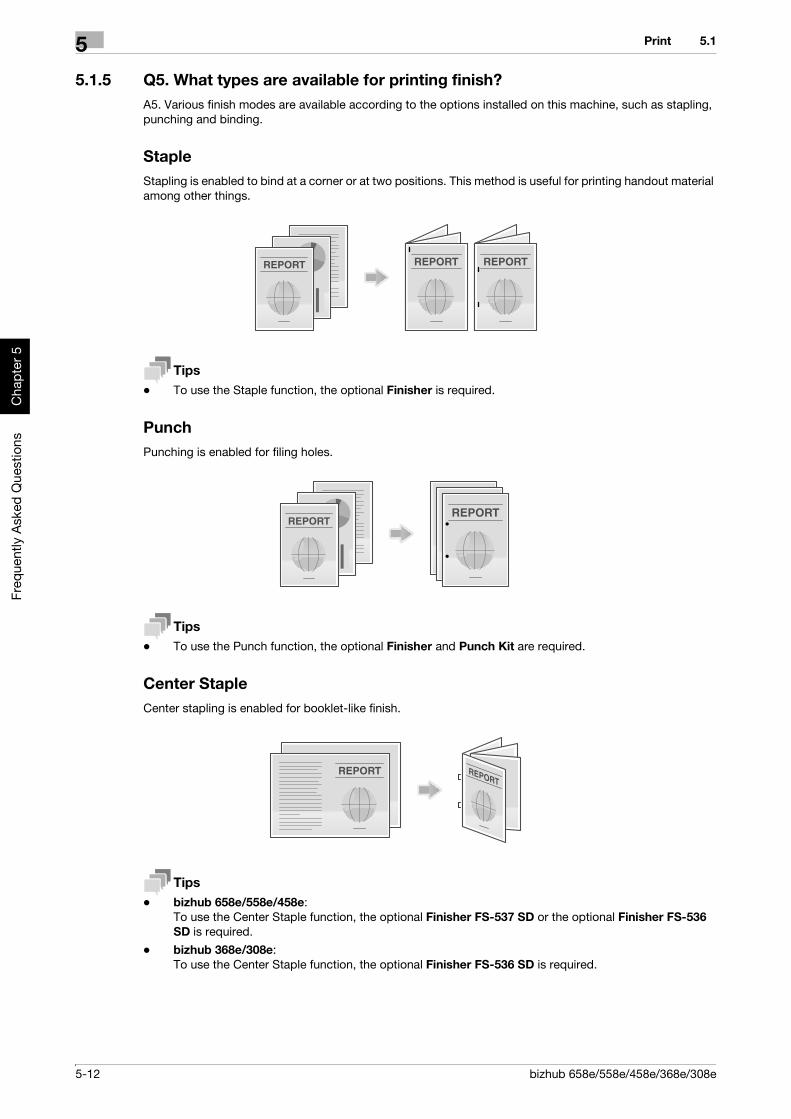
5-12 bizhub 658e/558e/458e/368e/308e
Print5 5.1
Freq
uent
ly A
sked
Que
stio
nsC
hapt
er 5
5.1.5 Q5. What types are available for printing finish?A5. Various finish modes are available according to the options installed on this machine, such as stapling, punching and binding.
StapleStapling is enabled to bind at a corner or at two positions. This method is useful for printing handout material among other things.
Tips- To use the Staple function, the optional Finisher is required.
PunchPunching is enabled for filing holes.
Tips- To use the Punch function, the optional Finisher and Punch Kit are required.
Center StapleCenter stapling is enabled for booklet-like finish.
Tips- bizhub 658e/558e/458e:
To use the Center Staple function, the optional Finisher FS-537 SD or the optional Finisher FS-536 SD is required.
- bizhub 368e/308e:To use the Center Staple function, the optional Finisher FS-536 SD is required.

bizhub 658e/558e/458e/368e/308e 5-13
5.1 Print 5
Freq
uent
ly A
sked
Que
stio
nsC
hapt
er 5
FoldHalf-folding, tri-folding, and Z-folding are enabled. This function is useful for direct mail and information notes.
Tips- bizhub 658e/558e/458e:
To use the Half-Fold or Tri-Fold function, the optional Finisher FS-537 SD or the optional Finisher FS-536 SD is required.To use the Z-Fold function, the optional Finisher FS-537/FS-537 SD and Z Folding Unit are required.
- bizhub 368e/308e:To use the Half-Fold or Tri-Fold function, the optional Finisher FS-536 SD is required.
Operation procedure
1 Open the file in the application, and click [File]. Then click [Print] from the menu.
2 Select this product from [Select Printer] (or [Printer Name]) then click [Preferences] (or [Properties]).
3 Select the check box for the desired finish on the [Finish] tab. If you have selected the [Staple], [Punch] or [Fold] check box, specify the quantity, positions and other necessary settings.
% The number of punched holes varies depending on the area you are in.
4 Click [OK].
5 Click [Print].
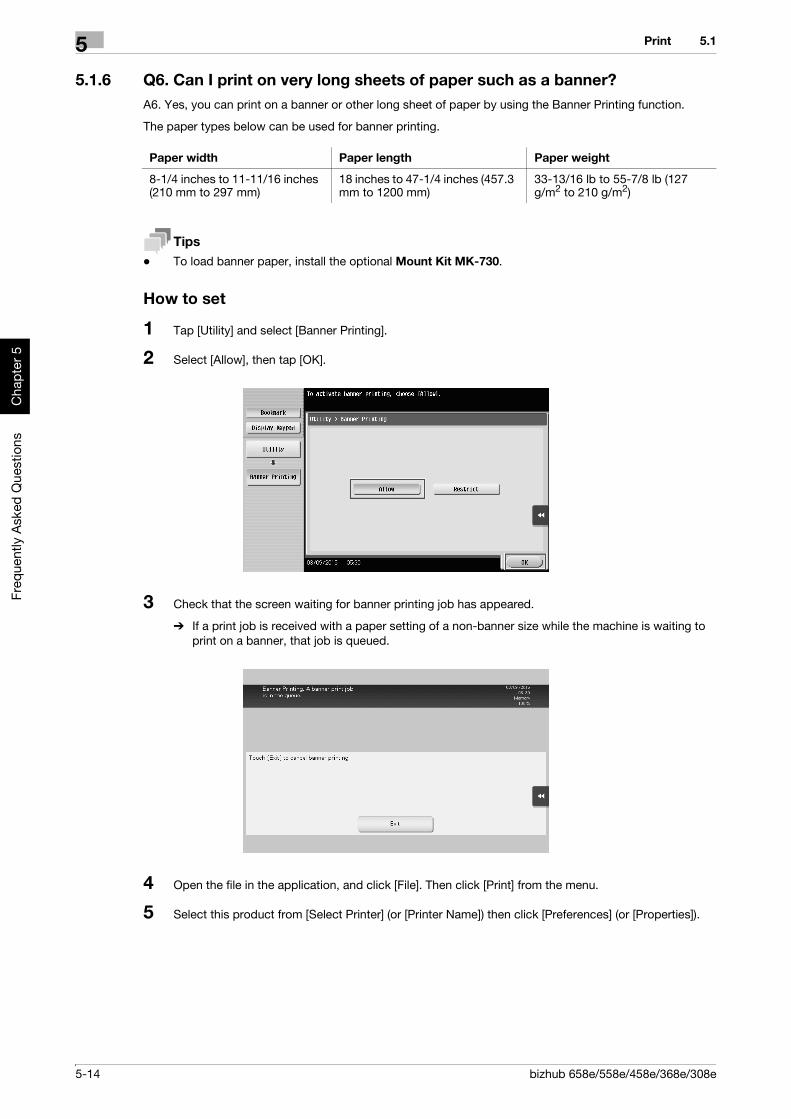
5-14 bizhub 658e/558e/458e/368e/308e
Print5 5.1
Freq
uent
ly A
sked
Que
stio
nsC
hapt
er 5
5.1.6 Q6. Can I print on very long sheets of paper such as a banner?A6. Yes, you can print on a banner or other long sheet of paper by using the Banner Printing function.
The paper types below can be used for banner printing.
Tips- To load banner paper, install the optional Mount Kit MK-730.
How to set
1 Tap [Utility] and select [Banner Printing].
2 Select [Allow], then tap [OK].
3 Check that the screen waiting for banner printing job has appeared.
% If a print job is received with a paper setting of a non-banner size while the machine is waiting to print on a banner, that job is queued.
4 Open the file in the application, and click [File]. Then click [Print] from the menu.
5 Select this product from [Select Printer] (or [Printer Name]) then click [Preferences] (or [Properties]).
Paper width Paper length Paper weight
8-1/4 inches to 11-11/16 inches (210 mm to 297 mm)
18 inches to 47-1/4 inches (457.3 mm to 1200 mm)
33-13/16 lb to 55-7/8 lb (127 g/m2 to 210 g/m2)

bizhub 658e/558e/458e/368e/308e 5-15
5.1 Print 5
Freq
uent
ly A
sked
Que
stio
nsC
hapt
er 5
6 In [Original Size] or [Paper Size] on the [Basic] tab, select [Custom Size].
7 Enter values for [Width] and [Length] of the paper for printing, then click [OK].
8 Check the paper tray and paper type settings automatically changed, then click [Yes].
9 Click [OK].
10 Click [Print].
11 Load paper for banner printing with the print side face down then tap [Complete].
Printing on the banner paper starts. Support the ejected banner paper by hand.
% To continue banner printing, execute printing from the computer.
12 Tap [Exit].
13 Tap [Yes].
5-16 bizhub 658e/558e/458e/368e/308e
Scan5 5.2
Freq
uent
ly A
sked
Que
stio
nsC
hapt
er 5
5.2 Scan
5.2.1 Q1. Can frequently used destinations be registered?A1. Yes. You can register frequently used destinations in the address book. For details, refer to page 3-57.
You can also put a number of one-touch destinations in one group and register them as a group. For details, refer to page 3-66.
Once you have registered a one-touch or group destination, you can recall it by simply tapping the assigned key. For details, refer to page 3-69.
Tips- You can register up to 2000 one-touch destinations in the address book.
- You can register up to 100 group destinations in the address book.- To register a group destination, members must have been registered as one-touch destinations.

bizhub 658e/558e/458e/368e/308e 5-17
5.3 Fax 5
Freq
uent
ly A
sked
Que
stio
nsC
hapt
er 5
5.3 Fax
5.3.1 Q1. Can I check fax transmission and reception logs?A1. Yes. You can print out transmission and reception logs as a report.
Reports can be prepared for scan and send logs, fax communications (transmission and reception logs), fax transmission logs and fax reception logs.
Operation procedure
1 Tap [Job List].
2 Specify a report type in [Report Type] on the [Comm. List] tab, and tap [Selection Confirm], then press the Start key.
% Set [Output Limit] to specify the number of transmission and reception records to print.
5.3.2 Q2. Can I collectively send data to multiple destinations?A2. Yes, you can.It eases the operation to register a group that contains a number of destinations beforehand.
The maximum number of destinations that you can specify for a single transmission depends on how the des-tinations are set.
Tips- When registering a group, even destinations of different types can be registered in one group.
Operation procedure: Selecting multiple addresses from the address book
1 Load the original.
Item Specifications
When using the address book 500 addressesUp to 30 User Boxes
When directly entering addresses
E-mail 5 addresses
User Box 1 User Box
Fax 100 addresses

5-18 bizhub 658e/558e/458e/368e/308e
Fax5 5.3
Freq
uent
ly A
sked
Que
stio
nsC
hapt
er 5
2 Tap [Scan/Fax] and select a destination.
% You can select more than one one-touch destination from the address book. Tap [No. of Addr.] to display the broadcast destination list and check or delete the specified destinations.
% To cancel the destination setting, tap the Address Book key for the destination to be canceled.
% Select an index to narrow down destinations to display. % Specify [Add. Type] to narrow down the types of destinations to display.
% Tap [Check Setting] to check detailed information on the destinations you have set or to cancel des-tinations.
% You can also select a group.
3 Press the Start key to start scanning of the original.
Operation procedure: Directly entering multiple destinations
1 Load the original.
2 Tap [Scan/Fax] and select an destination type from [Direct Input].

bizhub 658e/558e/458e/368e/308e 5-19
5.3 Fax 5
Freq
uent
ly A
sked
Que
stio
nsC
hapt
er 5
3 Enter a destination, then tap [OK].
% Tap [Next Dest.] on the address input screen to continue address entry (not enabled for a User Box).
4 Repeat Steps 2 and 3 to complete entry of all destinations.
[No. of Addr.] displays the number of entered destinations.% Tap [Check Setting] to check detailed information on the destinations you have entered or to cancel
destinations.
5 Press the Start key to start scanning of the original.
5.3.3 Q3. Can I register multiple sender names displayed on the fax to use them depending on purposes?A3. Yes, you can register multiple sender names and select one when sending a fax.
How to set: Registering sender names
1 Tap [Utility], then select [Administrator Settings].
2 Enter the password, then tap [OK].
3 Select [Fax Settings] - [Header Information] - [Sender].

5-20 bizhub 658e/558e/458e/368e/308e
Fax5 5.3
Freq
uent
ly A
sked
Que
stio
nsC
hapt
er 5
4 Select a number, then select [New].
5 Enter the sender name, then tap [OK].
6 Repeat Steps 4 and 5 to complete entry of all sender names.
% You can register up to 20 sender names.% To edit a registered sender name, select a sender name and tap [Edit], change the sender name and
tap [OK].% To delete a registered sender name, select the sender name and tap [Delete], select [Yes], then tap
[OK].
% To set the default sender name, select a sender name and tap [Set as Default].
Tips- If [Administrator Settings] - [Fax Settings] - [TX/RX Settings] - [Individual Sender Line Setup] is set to
[ON] while multiple lines are used, the default sender name can be specified for each line.
How to set: Selecting a sender name upon fax transmission
1 Load the original.
2 Tap [Scan/Fax] and select a destination.
3 Tap [Application] and select [Fax Header Settings].
4 Select a sender name to print on the fax and tap [OK].
5 Press the Start key to start fax transmission.

bizhub 658e/558e/458e/368e/308e 5-21
5.3 Fax 5
Freq
uent
ly A
sked
Que
stio
nsC
hapt
er 5
5.3.4 Q4. Can I avoid expensive communication charges using the network?A4. Yes. Use the Internet Fax function to send an E-mail message with an attachment containing the scanned data merely at expenses for online communications via the Internet.
Within your intranet, the IP Address Fax function can be used. For IP Address Fax, specify either the IP ad-dress, host name or E-mail address of the destination fax machine to directly send a fax to that destination. No mail server is required.
Tips- To use the Internet Fax and IP Address Fax functions, ask your service representative to configure set-
tings. For details, contact your service representative.
- To use the Internet Fax function, this machine must be connected to the network. In addition, you must have an environment enabled for E-mail transmissions and receptions.
- To use the IP Address Fax function, the optional Fax Kit is required.
- The IP Address Fax function is only available between our models supporting the function or between devices matching the DirectSMTP standard. We do not give operational warranties for devices other than the models supporting the function.
Operation procedure: Sending an Internet fax
1 Load the original.
2 Tap [Scan/Fax] and select [Internet Fax] from [Direct Input].
% If you have registered one-touch destinations for the Internet Fax function, you can select them from [Address Book].
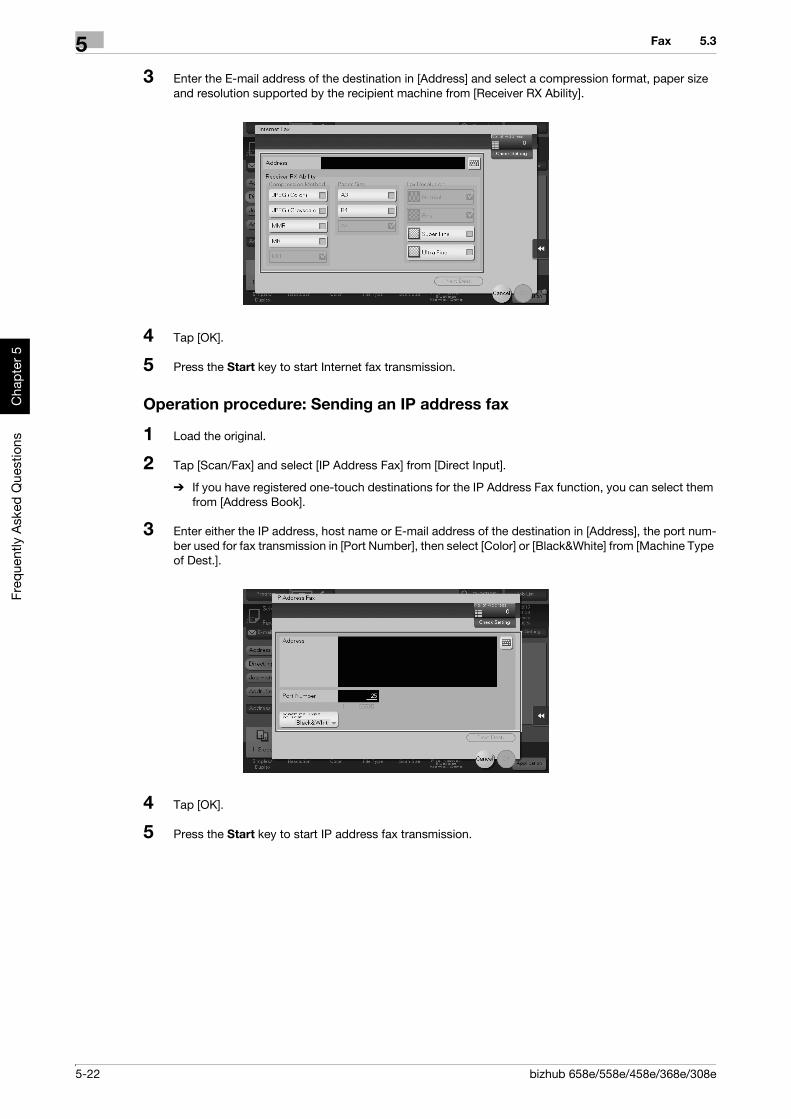
5-22 bizhub 658e/558e/458e/368e/308e
Fax5 5.3
Freq
uent
ly A
sked
Que
stio
nsC
hapt
er 5
3 Enter the E-mail address of the destination in [Address] and select a compression format, paper size and resolution supported by the recipient machine from [Receiver RX Ability].
4 Tap [OK].
5 Press the Start key to start Internet fax transmission.
Operation procedure: Sending an IP address fax
1 Load the original.
2 Tap [Scan/Fax] and select [IP Address Fax] from [Direct Input].
% If you have registered one-touch destinations for the IP Address Fax function, you can select them from [Address Book].
3 Enter either the IP address, host name or E-mail address of the destination in [Address], the port num-ber used for fax transmission in [Port Number], then select [Color] or [Black&White] from [Machine Type of Dest.].
4 Tap [OK].
5 Press the Start key to start IP address fax transmission.

bizhub 658e/558e/458e/368e/308e 5-23
5.3 Fax 5
Freq
uent
ly A
sked
Que
stio
nsC
hapt
er 5
5.3.5 Q5. How can I avoid printing out unwanted faxes?A5. Save received faxes in a User Box without printing them out then print out only the faxes you need.
Operation procedure: Configuring to save received faxes in a User Box
1 Tap [Utility], then select [Administrator Settings].
2 Enter the password, then tap [OK].
3 Select [Fax Settings] - [Function Settings] - [Memory RX Setting].
4 Tap [Yes], enter the password for processing faxes saved in a User Box using the Keypad, then tap [OK].
Tips- If [Administrator Settings] - [Fax Settings] - [TX/RX Settings] - [Individual Receiving Line Setup] is set to
[ON] while multiple lines are used, you can specify whether to use the Memory RX function for each line.
How to set: Printing faxes saved in a User Box
1 Tap [User Box].

5-24 bizhub 658e/558e/458e/368e/308e
Fax5 5.3
Freq
uent
ly A
sked
Que
stio
nsC
hapt
er 5
2 From [System], select [Memory RX].
3 Enter the password, then tap [OK].
4 Select a file then tap [Print].
% You can also long-tap the target file to display the menu icon, then drag and drop it to to get the same result.
5 Check the message, then tap [Yes].
The fax is printed and automatically deleted from the Memory RX User Box.
5.3.6 Q6. Can I forward an incoming fax?A6. Yes, you can forward a received fax to another fax machine, a computer or an E-mail address by regis-tering forwarding destinations beforehand.
How to set
1 Tap [Utility], then select [Administrator Settings].
2 Enter the password, then tap [OK].
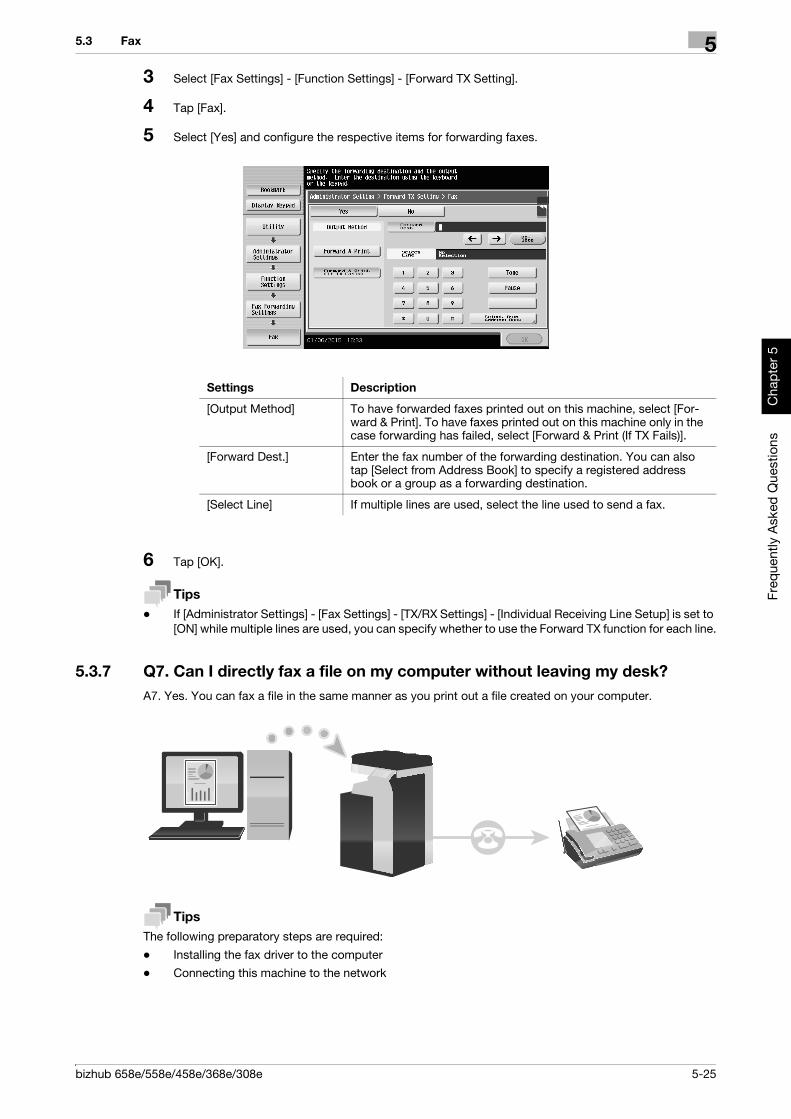
bizhub 658e/558e/458e/368e/308e 5-25
5.3 Fax 5
Freq
uent
ly A
sked
Que
stio
nsC
hapt
er 5
3 Select [Fax Settings] - [Function Settings] - [Forward TX Setting].
4 Tap [Fax].
5 Select [Yes] and configure the respective items for forwarding faxes.
6 Tap [OK].
Tips- If [Administrator Settings] - [Fax Settings] - [TX/RX Settings] - [Individual Receiving Line Setup] is set to
[ON] while multiple lines are used, you can specify whether to use the Forward TX function for each line.
5.3.7 Q7. Can I directly fax a file on my computer without leaving my desk?A7. Yes. You can fax a file in the same manner as you print out a file created on your computer.
TipsThe following preparatory steps are required:
- Installing the fax driver to the computer- Connecting this machine to the network
Settings Description
[Output Method] To have forwarded faxes printed out on this machine, select [For-ward & Print]. To have faxes printed out on this machine only in the case forwarding has failed, select [Forward & Print (If TX Fails)].
[Forward Dest.] Enter the fax number of the forwarding destination. You can also tap [Select from Address Book] to specify a registered address book or a group as a forwarding destination.
[Select Line] If multiple lines are used, select the line used to send a fax.

5-26 bizhub 658e/558e/458e/368e/308e
Fax5 5.3
Freq
uent
ly A
sked
Que
stio
nsC
hapt
er 5
Operation procedure
1 Open the file in the application, and click [File]. Then click [Print] from the menu.
2 Select a fax driver from [Select Printer] (or [Printer Name]) then click [Print] (or [OK]).
3 Enter the name and the fax number of the destination, then click [Add Recipients].
% You can also specify the destination by clicking [Add from Address Book] and selecting one from registered one-touch destinations.
% To specify more than one destination, repeat step 3.
% To delete a destination you have specified, select the destination to delete from [Recipient List] and click [Delete From List].
4 Click [OK] to start fax transmission.
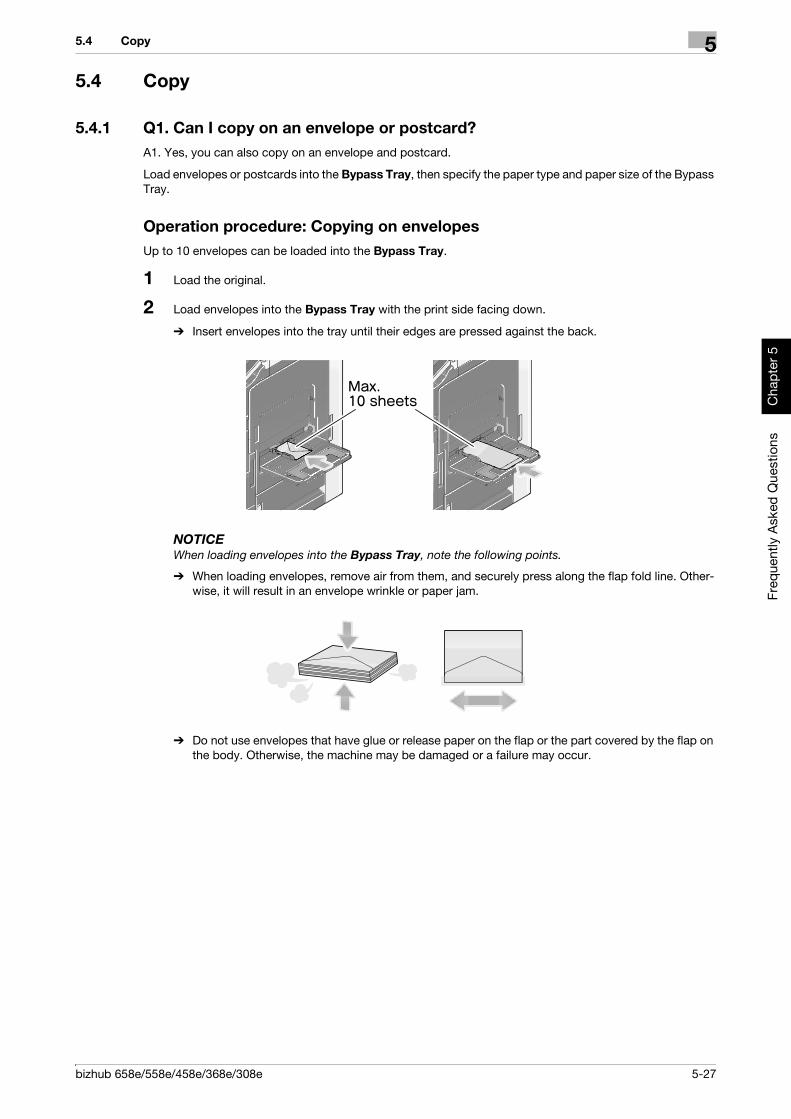
bizhub 658e/558e/458e/368e/308e 5-27
5.4 Copy 5
Freq
uent
ly A
sked
Que
stio
nsC
hapt
er 5
5.4 Copy
5.4.1 Q1. Can I copy on an envelope or postcard?A1. Yes, you can also copy on an envelope and postcard.
Load envelopes or postcards into the Bypass Tray, then specify the paper type and paper size of the Bypass Tray.
Operation procedure: Copying on envelopesUp to 10 envelopes can be loaded into the Bypass Tray.
1 Load the original.
2 Load envelopes into the Bypass Tray with the print side facing down.
% Insert envelopes into the tray until their edges are pressed against the back.
NOTICEWhen loading envelopes into the Bypass Tray, note the following points.
% When loading envelopes, remove air from them, and securely press along the flap fold line. Other-wise, it will result in an envelope wrinkle or paper jam.
% Do not use envelopes that have glue or release paper on the flap or the part covered by the flap on the body. Otherwise, the machine may be damaged or a failure may occur.

5-28 bizhub 658e/558e/458e/368e/308e
Copy5 5.4
Freq
uent
ly A
sked
Que
stio
nsC
hapt
er 5
3 Slide the Lateral Guide to fit the size of the loaded paper.
NOTICEWhen using the Bypass Tray, note the following points.
% Do not put spare envelopes in the Bypass Tray. Doing so causes a size detection error.
The screen for selecting the paper type and paper size appears.
4 Tap [Envelope/4 e 6] ([Envelope/A6 Card]) from [Paper Size].

bizhub 658e/558e/458e/368e/308e 5-29
5.4 Copy 5
Freq
uent
ly A
sked
Que
stio
nsC
hapt
er 5
5 Select the envelope size from [Envelope/4 e 6] ([Envelope/A6 Card]).
% Various sizes of envelopes are available. Specify the correct paper size for the envelopes you have loaded. When the envelope size is specified, the paper type is automatically set to [Envelope].
NOTICEWhen loading envelopes with flaps opened, also select the standard size that matches them. You do not have to measure the size of the envelope with the flap opened to set the size as a custom-sized enve-lope.
6 Tap [Close].
7 Press the Start key to start copying of the original on envelopes.

5-30 bizhub 658e/558e/458e/368e/308e
Copy5 5.4
Freq
uent
ly A
sked
Que
stio
nsC
hapt
er 5
Operation procedure: Copying on postcardsUp to 20 postcards can be loaded into the Bypass Tray.
1 Load the original.
2 Load postcards into the Bypass Tray with the print side face down.
% Insert postcards into the tray until their edges are pressed against the back.
NOTICEWhen loading postcards into the Bypass Tray, note the following points.
% When loading curled postcards, uncurl the postcards as shown in the figure in advance.
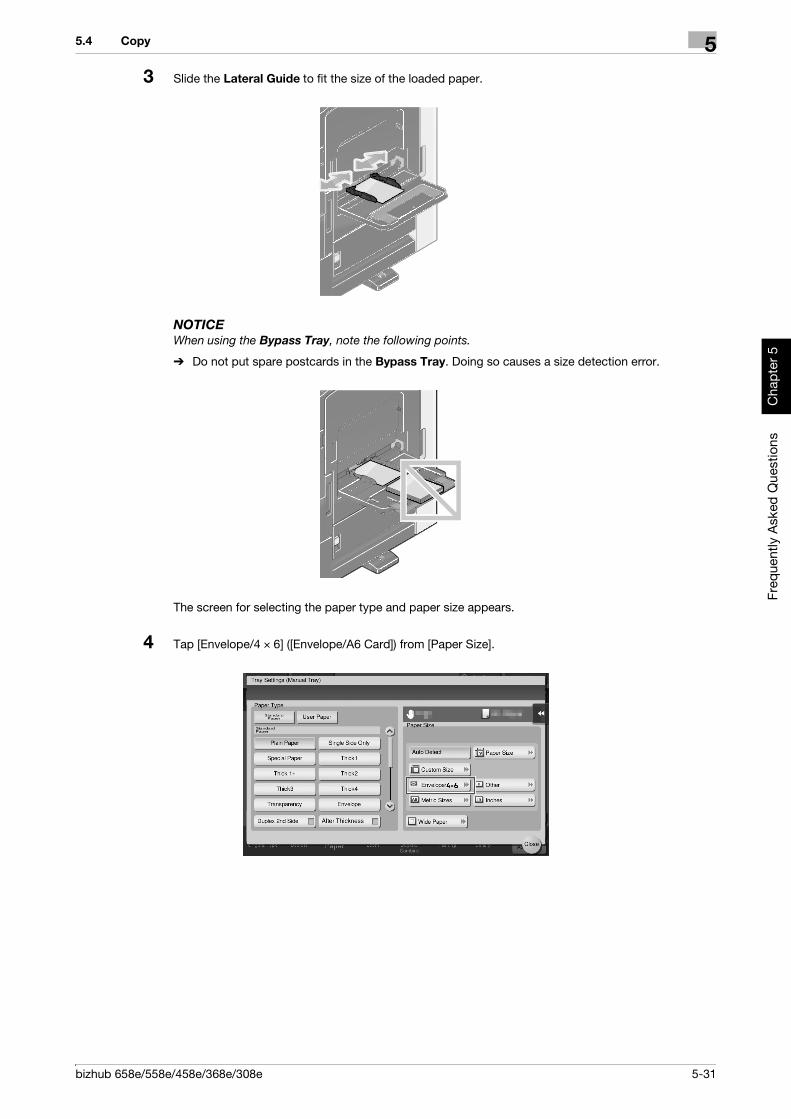
bizhub 658e/558e/458e/368e/308e 5-31
5.4 Copy 5
Freq
uent
ly A
sked
Que
stio
nsC
hapt
er 5
3 Slide the Lateral Guide to fit the size of the loaded paper.
NOTICEWhen using the Bypass Tray, note the following points.
% Do not put spare postcards in the Bypass Tray. Doing so causes a size detection error.
The screen for selecting the paper type and paper size appears.
4 Tap [Envelope/4 e 6] ([Envelope/A6 Card]) from [Paper Size].
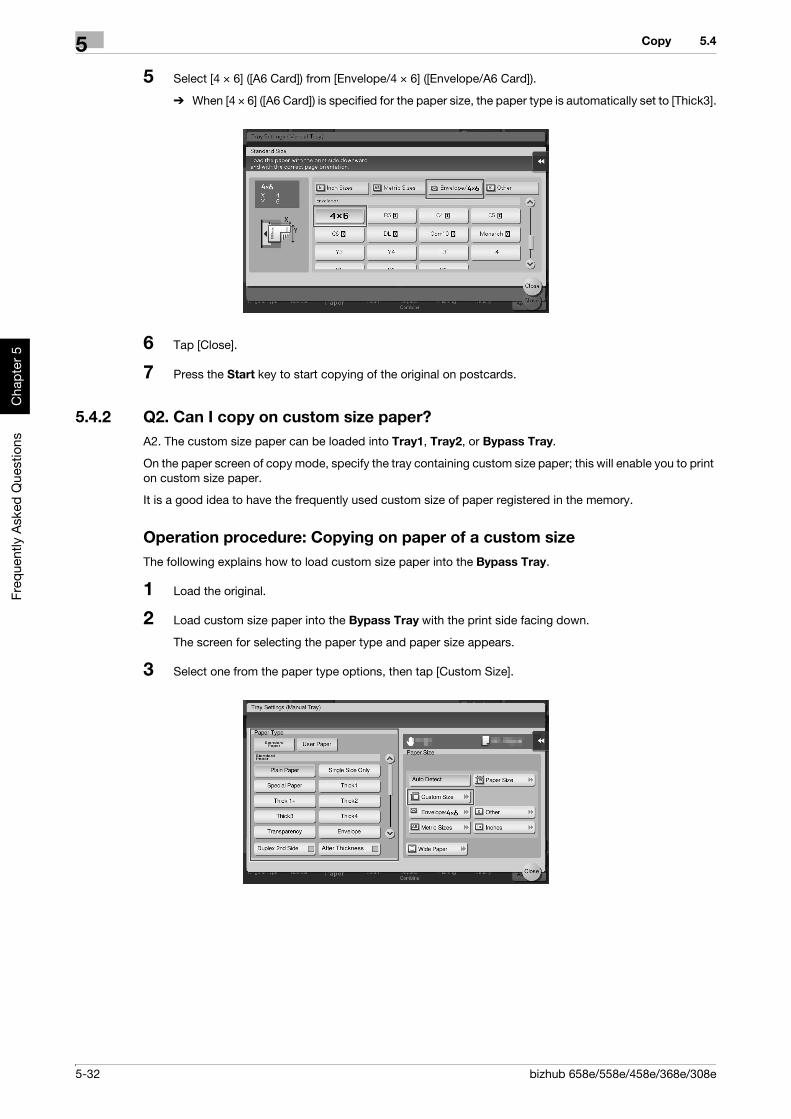
5-32 bizhub 658e/558e/458e/368e/308e
Copy5 5.4
Freq
uent
ly A
sked
Que
stio
nsC
hapt
er 5
5 Select [4 e 6] ([A6 Card]) from [Envelope/4 e 6] ([Envelope/A6 Card]).
% When [4 e 6] ([A6 Card]) is specified for the paper size, the paper type is automatically set to [Thick3].
6 Tap [Close].
7 Press the Start key to start copying of the original on postcards.
5.4.2 Q2. Can I copy on custom size paper?A2. The custom size paper can be loaded into Tray1, Tray2, or Bypass Tray.
On the paper screen of copy mode, specify the tray containing custom size paper; this will enable you to print on custom size paper.
It is a good idea to have the frequently used custom size of paper registered in the memory.
Operation procedure: Copying on paper of a custom sizeThe following explains how to load custom size paper into the Bypass Tray.
1 Load the original.
2 Load custom size paper into the Bypass Tray with the print side facing down.
The screen for selecting the paper type and paper size appears.
3 Select one from the paper type options, then tap [Custom Size].

bizhub 658e/558e/458e/368e/308e 5-33
5.4 Copy 5
Freq
uent
ly A
sked
Que
stio
nsC
hapt
er 5
4 In [Custom Size Settings], specify the paper size by entering values for the lengths along [X] and [Y], then tap [Close].
% To specify a size registered in the memory, select the desired size from [Registered Paper Sizes], then tap [Recall].
5 Press the Start key to start copying of the original.
Operation procedure: Registering a custom size of paper in memorybizhub 658e/558e/458e:
1 Tap [Copy].
2 Tap [Paper], select Tray1, Tray2, or Bypass Tray, and tap [Change Tray Setting].
3 Tap [Specify Paper Size].

5-34 bizhub 658e/558e/458e/368e/308e
Copy5 5.4
Freq
uent
ly A
sked
Que
stio
nsC
hapt
er 5
4 Load a single sheet to be measured on the ADF or Original Glass.
NOTICEIf a sheet is loaded on the Original Glass, leave the Original Cover open.
If the weight of thick paper exceeds the paper weight that can be loaded into the ADF, an ADF failure may occur. For paper with a weight that exceeds the paper weight that can be loaded into the ADF, load the paper on the Original Glass. For details on the paper weight that can be loaded into the ADF, refer to User's Guide CD.
5 Press the Start key.
When measurement is completed, the screen for confirming the measurement result is displayed.
6 Tap [Store Size].
7 In [Registered Paper Sizes], select the key of the memory to register data in.
% To change the name of the selected memory key, tap [Edit Name].
8 Tap [OK].
9 To set the detected size to the paper size, tap [OK].
bizhub 368e/308e:
1 Tap [Copy].
2 Tap [Paper], select Tray1, Tray2, or Bypass Tray, and tap [Change Tray Setting].

bizhub 658e/558e/458e/368e/308e 5-35
5.4 Copy 5
Freq
uent
ly A
sked
Que
stio
nsC
hapt
er 5
3 Tap [Specify Paper Size].
4 Load a single sheet to be measured on the Original Glass.
NOTICEIf a sheet is loaded on the Original Glass, leave the Original Cover open.
5 Press the Start key.
When measurement is completed, the screen for confirming the measurement result is displayed.
6 Tap [Store Size].
7 In [Registered Paper Sizes], select the key of the memory to register data in.
% To change the name of the selected memory key, tap [Edit Name].
8 Tap [OK].
9 To set the detected size to the paper size, tap [OK].
Operation procedure: Recalling the custom size registered in memory
1 Tap [Copy].

5-36 bizhub 658e/558e/458e/368e/308e
Copy5 5.4
Freq
uent
ly A
sked
Que
stio
nsC
hapt
er 5
2 Tap [Paper], select Tray1, Tray2, or Bypass Tray, and tap [Change Tray Setting].
3 Tap [Custom Size].
4 Select the paper size to recall from [Registered Paper Sizes], then tap [Recall].
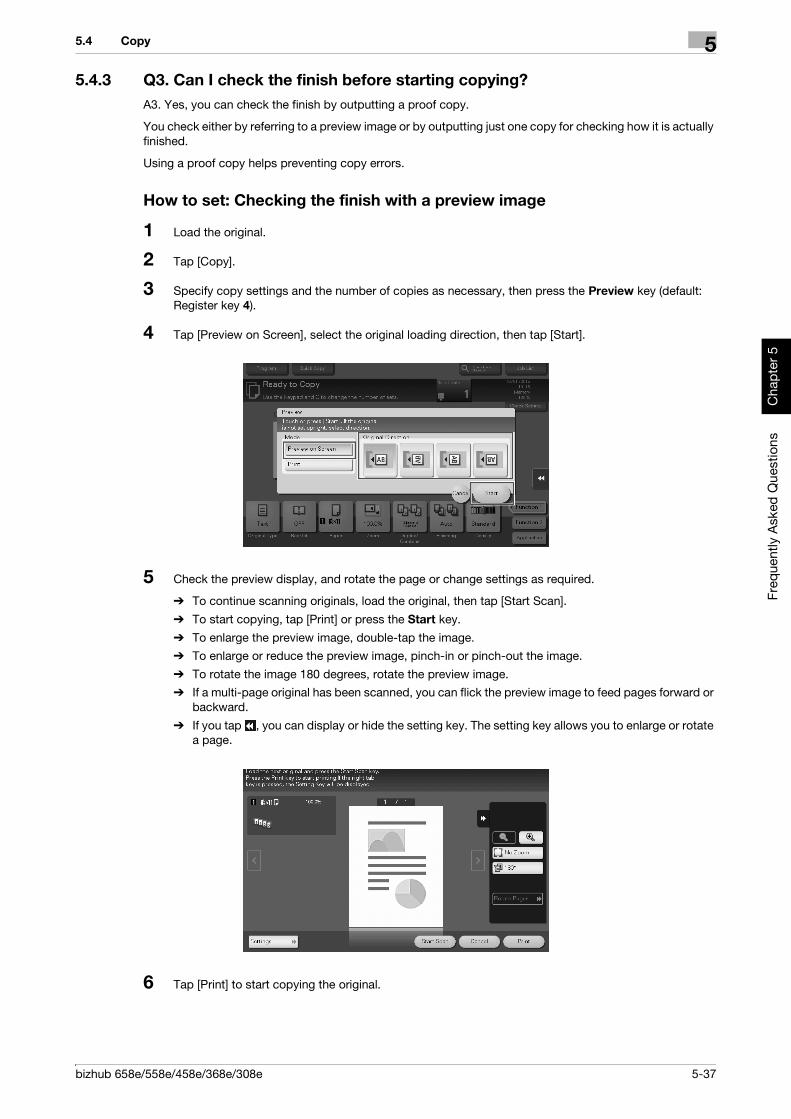
bizhub 658e/558e/458e/368e/308e 5-37
5.4 Copy 5
Freq
uent
ly A
sked
Que
stio
nsC
hapt
er 5
5.4.3 Q3. Can I check the finish before starting copying?A3. Yes, you can check the finish by outputting a proof copy.
You check either by referring to a preview image or by outputting just one copy for checking how it is actually finished.
Using a proof copy helps preventing copy errors.
How to set: Checking the finish with a preview image
1 Load the original.
2 Tap [Copy].
3 Specify copy settings and the number of copies as necessary, then press the Preview key (default: Register key 4).
4 Tap [Preview on Screen], select the original loading direction, then tap [Start].
5 Check the preview display, and rotate the page or change settings as required.
% To continue scanning originals, load the original, then tap [Start Scan].
% To start copying, tap [Print] or press the Start key.
% To enlarge the preview image, double-tap the image.% To enlarge or reduce the preview image, pinch-in or pinch-out the image.
% To rotate the image 180 degrees, rotate the preview image.% If a multi-page original has been scanned, you can flick the preview image to feed pages forward or
backward.
% If you tap , you can display or hide the setting key. The setting key allows you to enlarge or rotate a page.
6 Tap [Print] to start copying the original.

5-38 bizhub 658e/558e/458e/368e/308e
Copy5 5.4
Freq
uent
ly A
sked
Que
stio
nsC
hapt
er 5
How to set: Checking the finish by outputting one copy
1 Load the original.
2 Tap [Copy].
3 Specify copy settings and the number of copies as necessary, then press the Preview key (default: Register key 4).
4 Tap [Print], select the original loading direction, then tap [Start].
One copy is output.
5 Check the finishing of the copy.
6 If the finishing is acceptable, press the Start key.
5.4.4 Q4. Can I easily copy various cards such as an insurance card or driver li-cense card?A4. Yes, you can copy the front and back sides of a card, side by side, on the same side of one sheet of paper.
Operation procedure
1 Place a card on the Original Glass.

bizhub 658e/558e/458e/368e/308e 5-39
5.4 Copy 5
Freq
uent
ly A
sked
Que
stio
nsC
hapt
er 5
2 Tap [Copy].
3 Tap [Paper], select a paper tray to load paper into in order to copy a card, then tap [Close].
% If you specify [Card Shot], you must specify a paper tray other than [Auto].
4 Tap [Application], then select [Card Shot].
5 Tap [ON], then configure each item so that it corresponds with the finishing image.
6 Tap [OK].
7 Press the Start key.
The front side of the card is scanned.
8 Turn the card over, and place it on the Original Glass.
Settings Description
[Original Size] Enter the size of a card to be copied. Alternatively, you can recall the preregistered size from [Registered Paper Size].After you have entered the size, select a key in [Registered Paper Size], and tap [Register]. Then the size you have entered is regis-tered in the memory.
[Registered Paper Size] Displays the sizes registered in memory.When you call a registered size from the memory, tap the key of the desired registration name, then tap [Recall].To change a registration name, select a desired key, then tap [Change registered size name].
[Layout] Select how to arrange the front and back sides of a card on paper.
[Zoom] Select a zoom ratio for copying.• [Full Size]: Copy by enlarging according to the paper size.• [x1.0]: Copy with the same size as the card.
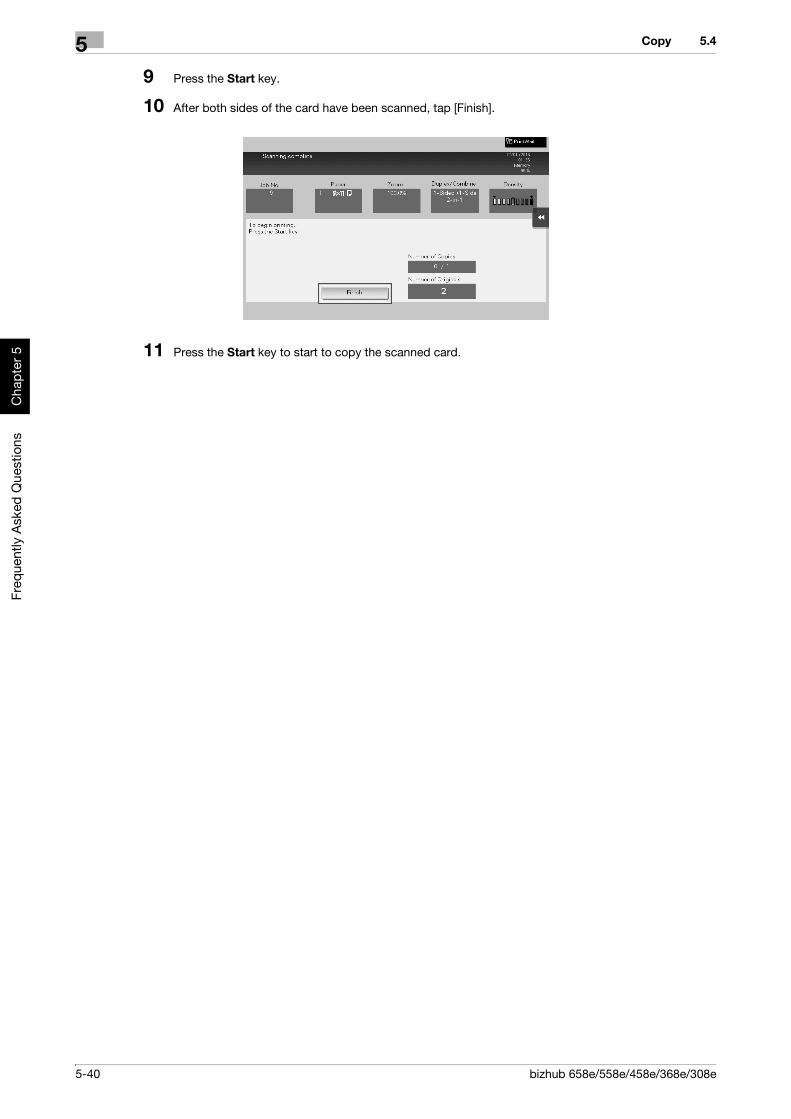
5-40 bizhub 658e/558e/458e/368e/308e
Copy5 5.4
Freq
uent
ly A
sked
Que
stio
nsC
hapt
er 5
9 Press the Start key.
10 After both sides of the card have been scanned, tap [Finish].
11 Press the Start key to start to copy the scanned card.
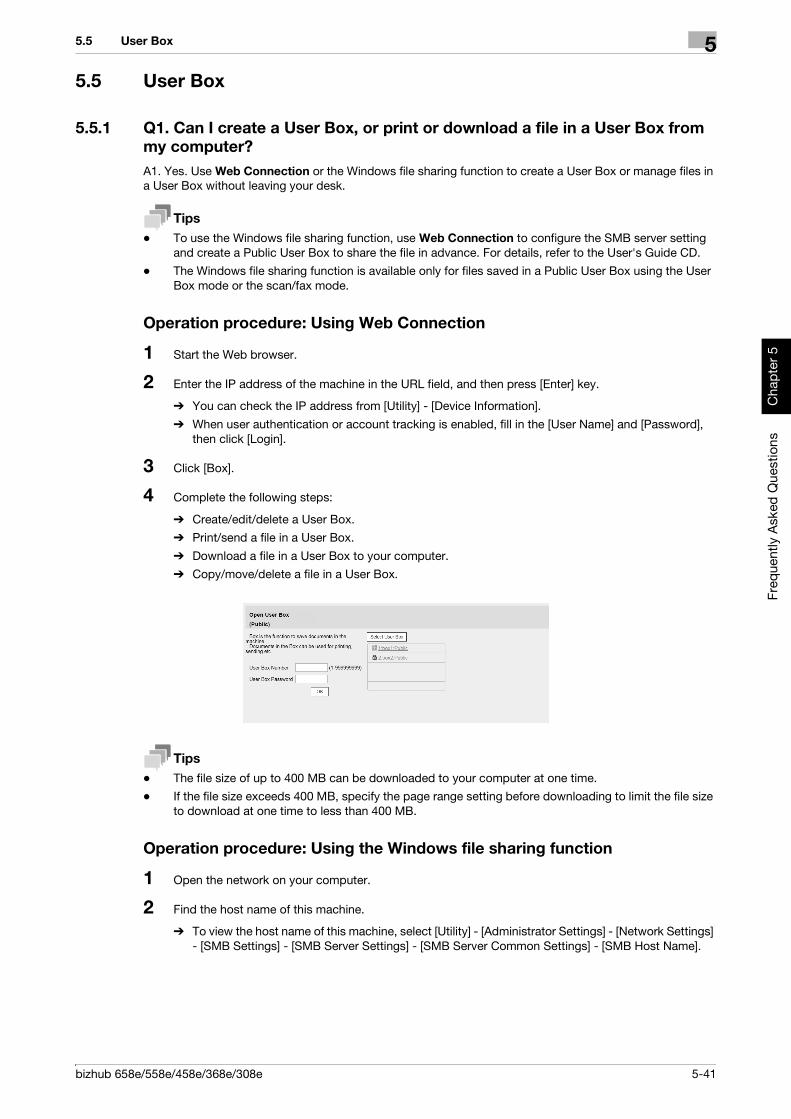
bizhub 658e/558e/458e/368e/308e 5-41
5.5 User Box 5
Freq
uent
ly A
sked
Que
stio
nsC
hapt
er 5
5.5 User Box
5.5.1 Q1. Can I create a User Box, or print or download a file in a User Box from my computer?A1. Yes. Use Web Connection or the Windows file sharing function to create a User Box or manage files in a User Box without leaving your desk.
Tips- To use the Windows file sharing function, use Web Connection to configure the SMB server setting
and create a Public User Box to share the file in advance. For details, refer to the User's Guide CD.- The Windows file sharing function is available only for files saved in a Public User Box using the User
Box mode or the scan/fax mode.
Operation procedure: Using Web Connection
1 Start the Web browser.
2 Enter the IP address of the machine in the URL field, and then press [Enter] key.
% You can check the IP address from [Utility] - [Device Information].
% When user authentication or account tracking is enabled, fill in the [User Name] and [Password], then click [Login].
3 Click [Box].
4 Complete the following steps:
% Create/edit/delete a User Box.% Print/send a file in a User Box.
% Download a file in a User Box to your computer.% Copy/move/delete a file in a User Box.
Tips- The file size of up to 400 MB can be downloaded to your computer at one time.- If the file size exceeds 400 MB, specify the page range setting before downloading to limit the file size
to download at one time to less than 400 MB.
Operation procedure: Using the Windows file sharing function
1 Open the network on your computer.
2 Find the host name of this machine.
% To view the host name of this machine, select [Utility] - [Administrator Settings] - [Network Settings] - [SMB Settings] - [SMB Server Settings] - [SMB Server Common Settings] - [SMB Host Name].

5-42 bizhub 658e/558e/458e/368e/308e
User Box5 5.5
Freq
uent
ly A
sked
Que
stio
nsC
hapt
er 5
3 Open the shared folder of this machine to search for the target file.
% The shared folder of this machine is named in the format, "(9-digit User Box No.)_(User Box name)".
% If the ID and password are required to open the shared folder, enter the following information.ID: User Box numberPassword: Password specified for the Public User Box
4 Complete the following steps:
% Download a file to your computer.% Copy or delete a file.

bizhub 658e/558e/458e/368e/308e 5-43
5.6 Other 5
Freq
uent
ly A
sked
Que
stio
nsC
hapt
er 5
5.6 Other
5.6.1 Q1. Can more than one computer use the same settings for the printer driver ?A1. Yes. The same settings can be configured using Driver Packaging Utility.
The Driver Packaging Utility can be used to create an install package with various settings registered for a printer driver.
First, the administrator uses the Driver Packaging Utility to create an install package for the printer driver. Next, simply execute that install package on a computer to apply identical settings to, and the printer driver configured with the same settings is installed.
Operation procedure: Preparing for an install package
1 Insert Driver & Utilities DVD in the DVD drive.
2 Select [PageScope Utilities].
3 Download the Driver Packaging Utility file from the download page to a desired location.
4 Double-click the Driver Packaging Utility file you have downloaded and decompress it to a desired location.
Operation procedure: Creating an install package
1 Double-click [DPU.exe] in the [DPU] folder.
2 Select a language and click [Agree].
3 Click [Edit] and click [Add Printer] on the menu.
4 Select a reference printer for the install package, then click [OK]. Select a printer that satisfies the fol-lowing requirements:
% The printer is supported by the Driver Packaging Utility.
% The printer has already been installed on the computer you are currently using.% The printer is to be connected to a TCP/IP or Internet port.
5 On the [Printer] tab, check that the name of the printer selected in Step 4 is displayed in [Printer Name].
6 On the [Preferences], select [Copy from this printer], then check the [Set as default printing preferences] box.
7 On the [Driver] tab, click [Browser] for the [Path to Printer Driver] to specify the folder containing the printer driver selected in Step 4.
8 Click [OK].
9 Click [Configuration] and click [DPU Folder] on the menu.
10 In [Common Folder Path] or [Individual Folder Path], specify the path to the location to save the install package to, then click [OK].
% Click [Browser] to specify the location in a folder tree.
11 Click [File] - [Save As].
12 Configure settings for respective items and click [Save].
Settings Description
[DPU Folder] Select a desired location for saving the install package.

5-44 bizhub 658e/558e/458e/368e/308e
Other5 5.6
Freq
uent
ly A
sked
Que
stio
nsC
hapt
er 5
13 After the creation of the install package is completed, click [OK].
14 Distribute the install package created to users sharing the printer driver settings.
% In Driver Packaging Utility, click [Configuration] - [Package File] to display the folder storing the install package.
Operation procedure: Executing the install package
1 Copy the folder for the install package to a desired location.
2 Double-click the execution file of the install package you have created.
3 Select a language and click [Agree].
4 Select a package to install and click [Start].
5 After the installation of the printer driver is completed, click [Finish].
6 Open the properties for the installed printer driver and check the settings.
% For the display of the properties, refer to User's Guide CD.
5.6.2 Q2. Can I restrict available functions by user?A2. Yes. With user authentication enabled, you can restrict functions available by user.
How to set
1 Tap [Utility], then select [Administrator Settings].
2 Enter the password, then tap [OK].
3 Select [User Authentication/Account Track] - [User Authentication Settings] - [User Registration].
4 Select a user whose access to functions needs to be limited, then tap [Edit].
[Package Name] Enter a name for the install package. A folder is created for the install package under the name entered here.
[Comment] Enter description of the install package.
[Switch to the following user when executing the package]
Check the box and fill [User Name], [Password] and [Domain Name], and the user is switched to the specified user when the install package is executed.
[Destination for saving package log]
Specify the path to the location for saving install package creation logs. Click [Browser] to specify the location in a folder tree.
[Open the folder con-taining the package file.]
Check the box if you wish to display the folder for saving the install package when saving it.
Settings Description

bizhub 658e/558e/458e/368e/308e 5-45
5.6 Other 5
Freq
uent
ly A
sked
Que
stio
nsC
hapt
er 5
5 Tap [Function Permission/Authority] - [Function Permission] to set the limit for the respective functions.
6 Tap [OK].
7 Tap [Close].
8 Tap [OK].
9 Repeat steps 4 to 8 to restrict available functions by user.
Tips- If an attempt is made to execute a restricted function, a message appears notifying the user that it is
prohibited.
Settings Description
[Copy] To allow copying, select [Allow]. To prohibit copying, select [Restrict].
[Scan] To allow using the full scan function, select [Full Color/Black]. To allow scan-ning in black and white scan, select [Black Only]. To prohibit scanning, select [Restrict].
[Fax] To allow using the full fax function, select [Full Color/Black]. To allow only black-and-white fax transmission, select [Black Only]. To prohibit fax transmis-sion, select [Restrict].
[Print] To allow printing, select [Allow]. To prohibit printing, select [Restrict].
[User Box] To allow operating files in User Boxes, select [Allow]. To prohibit operating files in User Boxes, select [Restrict].
[Print Scan/Fax TX] To allow printing of outgoing files, select [Allow]. To prohibit printing of outgo-ing files, select [Restrict].
[Save to External Mem-ory]
To allow saving of data to an external memory device, select [Allow]. To pro-hibit saving of data to an external memory device, select [Restrict].
[External Memory Doc-ument Scan]
To allow loading data from an external memory device, select [Allow]. To pro-hibit loading data from an external memory device, select [Restrict].
[Manual Destination In-put]
To allow manual entry of destinations, select [Allow]. To prohibit manual entry of destinations, select [Restrict].
[Web Browser] To give permission to use Web browser, select [Allow]. To give no permission to use Web browser, select [Restrict].

5-46 bizhub 658e/558e/458e/368e/308e
Other5 5.6
Freq
uent
ly A
sked
Que
stio
nsC
hapt
er 5
5.6.3 Q3. Can I change the keying and operation sounds of this machine?A3. Can delete the operation sound of the Touch Panel, and adjust the sound type and volume.
How to set
1 Tap [Accessibility] and select [Sound Setting].
2 To set whether to output keying and other sounds, select [Sound Setting] and set whether to output respective sounds.
3 Tap [OK].
4 Tap [Sound Type/Volume Setting], and set the sound type and volume.
% The sound type and volume can not be set for the item where the [Sound Setting] is set to [No].
Settings Description
[All Sounds] Specify whether to output all sounds.
[Confirmation Sound] Set whether or not to output a sound notifying that an operation takes place on the Control Panel or Touch Panel.
[Successful Completion Sound]
Set whether or not to output a sound notifying successful completion of an op-eration.
[Completed Prepara-tion Sound]
Set whether or not to output a sound notifying that this machine is ready for operation.
[Caution Sound] Set whether or not to output a sound notifying the need for part replacement or occurrence of an error.
[Deletion Sound] Set whether or not to output a sound when Document or Job is deleted.
[Authentication Sound] Set whether or not to output a sound in association with the authentication re-sult when logging in.
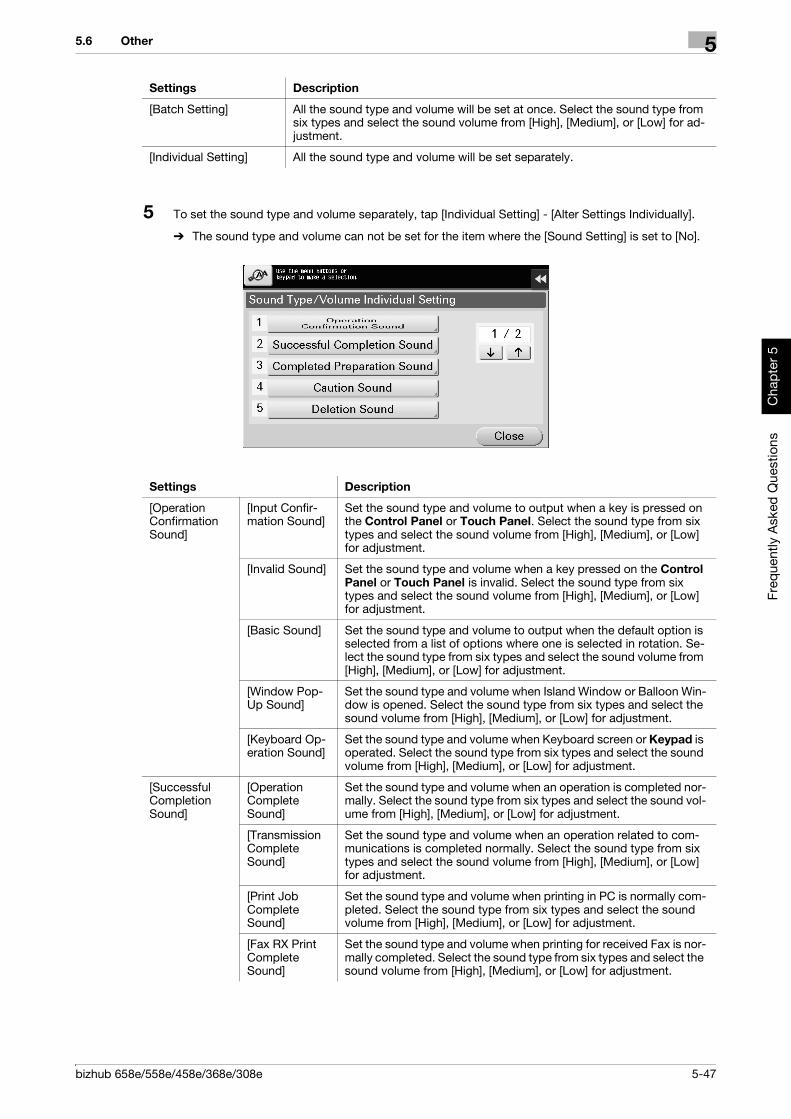
bizhub 658e/558e/458e/368e/308e 5-47
5.6 Other 5
Freq
uent
ly A
sked
Que
stio
nsC
hapt
er 5
5 To set the sound type and volume separately, tap [Individual Setting] - [Alter Settings Individually].
% The sound type and volume can not be set for the item where the [Sound Setting] is set to [No].
Settings Description
[Batch Setting] All the sound type and volume will be set at once. Select the sound type from six types and select the sound volume from [High], [Medium], or [Low] for ad-justment.
[Individual Setting] All the sound type and volume will be set separately.
Settings Description
[Operation Confirmation Sound]
[Input Confir-mation Sound]
Set the sound type and volume to output when a key is pressed on the Control Panel or Touch Panel. Select the sound type from six types and select the sound volume from [High], [Medium], or [Low] for adjustment.
[Invalid Sound] Set the sound type and volume when a key pressed on the Control Panel or Touch Panel is invalid. Select the sound type from six types and select the sound volume from [High], [Medium], or [Low] for adjustment.
[Basic Sound] Set the sound type and volume to output when the default option is selected from a list of options where one is selected in rotation. Se-lect the sound type from six types and select the sound volume from [High], [Medium], or [Low] for adjustment.
[Window Pop-Up Sound]
Set the sound type and volume when Island Window or Balloon Win-dow is opened. Select the sound type from six types and select the sound volume from [High], [Medium], or [Low] for adjustment.
[Keyboard Op-eration Sound]
Set the sound type and volume when Keyboard screen or Keypad is operated. Select the sound type from six types and select the sound volume from [High], [Medium], or [Low] for adjustment.
[Successful Completion Sound]
[Operation Complete Sound]
Set the sound type and volume when an operation is completed nor-mally. Select the sound type from six types and select the sound vol-ume from [High], [Medium], or [Low] for adjustment.
[Transmission Complete Sound]
Set the sound type and volume when an operation related to com-munications is completed normally. Select the sound type from six types and select the sound volume from [High], [Medium], or [Low] for adjustment.
[Print Job Complete Sound]
Set the sound type and volume when printing in PC is normally com-pleted. Select the sound type from six types and select the sound volume from [High], [Medium], or [Low] for adjustment.
[Fax RX Print Complete Sound]
Set the sound type and volume when printing for received Fax is nor-mally completed. Select the sound type from six types and select the sound volume from [High], [Medium], or [Low] for adjustment.

5-48 bizhub 658e/558e/458e/368e/308e
Other5 5.6
Freq
uent
ly A
sked
Que
stio
nsC
hapt
er 5
6 Select the sound type and volume, then tap [OK].
Tips- When the Control Panel of this machine is remote-controlled from an Android/iOS terminal using
bizhub Remote Access, tap [Alter Settings Individually] to display [Device Sound] as a sound type op-tion. Tapping [Device Sound] enables you to specify the Android/iOS terminal output sound from the list of device sound files.
- When [Operation Confirmation Sound] - [Window Pop-Up Sound] is set to [On], no sound is output if the pop-up window is not displayed in animation view. For details, refer to the User's Guide CD.
[Completed Preparation Sound] Set the sound type and volume when the preparation of this machine has completed. Select the sound type from six types and select the sound volume from [High], [Medium], or [Low] for adjustment.
[Caution Sound]
[Low Caution Sound (Level 1)]
Set the volume of sound output when a message is displayed on the Touch Panel indicating that the replacement time is nearing for sup-plies or replaceable parts. Select the sound type from six types and select the sound volume from [High], [Medium], or [Low] for adjust-ment.
[Low Caution Sound (Level 2)]
Set the sound type and volume when the user has made a mistake while operating this machine. Select the sound type from six types and select the sound volume from [High], [Medium], or [Low] for ad-justment.
[Low Caution Sound (Level 3)]
Set the sound type and volume when an error has occurred that can be addressed by referring to the message on the screen or instruc-tions in the manual. Select the sound type from six types and select the sound volume from [High], [Medium], or [Low] for adjustment.
[Severe Cau-tion Sound]
Set the sound type and volume when a Toner Cartridge or Waste Toner Box installation failure or an error to be addressed by a ser-vice representative has occurred. Select the sound type from six types and select the sound volume from [High], [Medium], or [Low] for adjustment.
[Deletion Sound] Set the sound type and volume when Document or Job is deleted. Select the sound type from six types and select the sound volume from [High], [Medium], or [Low] for adjustment.
[Authentica-tion Sound]
[Authentica-tion Success-ful Sound]
Tap [Login] on the Login screen or press the Access key, then set the sound type and volume when user authentication or account track has succeeded. Select the sound type from six types and se-lect the sound volume from [High], [Medium], or [Low] for adjust-ment.
[Authentica-tion Failure Sound]
Tap [Login] on the Login screen or press the Access key, then set the sound type and volume when user authentication or account track has failed. Select the sound type from six types and select the sound volume from [High], [Medium], or [Low] for adjustment.
Settings Description

bizhub 658e/558e/458e/368e/308e 5-49
5.6 Other 5
Freq
uent
ly A
sked
Que
stio
nsC
hapt
er 5
5.6.4 Q4. User authentication seems to be enabled on this machine. How can I be authenticated and allowed to operate this machine?A4. Check with the administrator whether you are a user registered in this machine.
If you are a registered user, obtain the user name and password from the administrator, perform user authen-tication using this machine, printer driver, and log in to this machine.
Otherwise, log in to this machine with public users' privileges.
How to set: Getting authenticated as a user on this machine
1 Enter the [User Name] and [Password] registered in this machine and tap [Login]. When successfully authenticated, you are allowed to operate this machine.
How to set: Getting authenticated as a user on the printer driver
1 Open the file in the application, and click [File]. Then click [Print] from the menu.
2 Select this product from [Select Printer] (or [Printer Name]) then click [Preferences] (or [Properties]).
3 On the [Basic] tab, click [Authentication/Account Track].
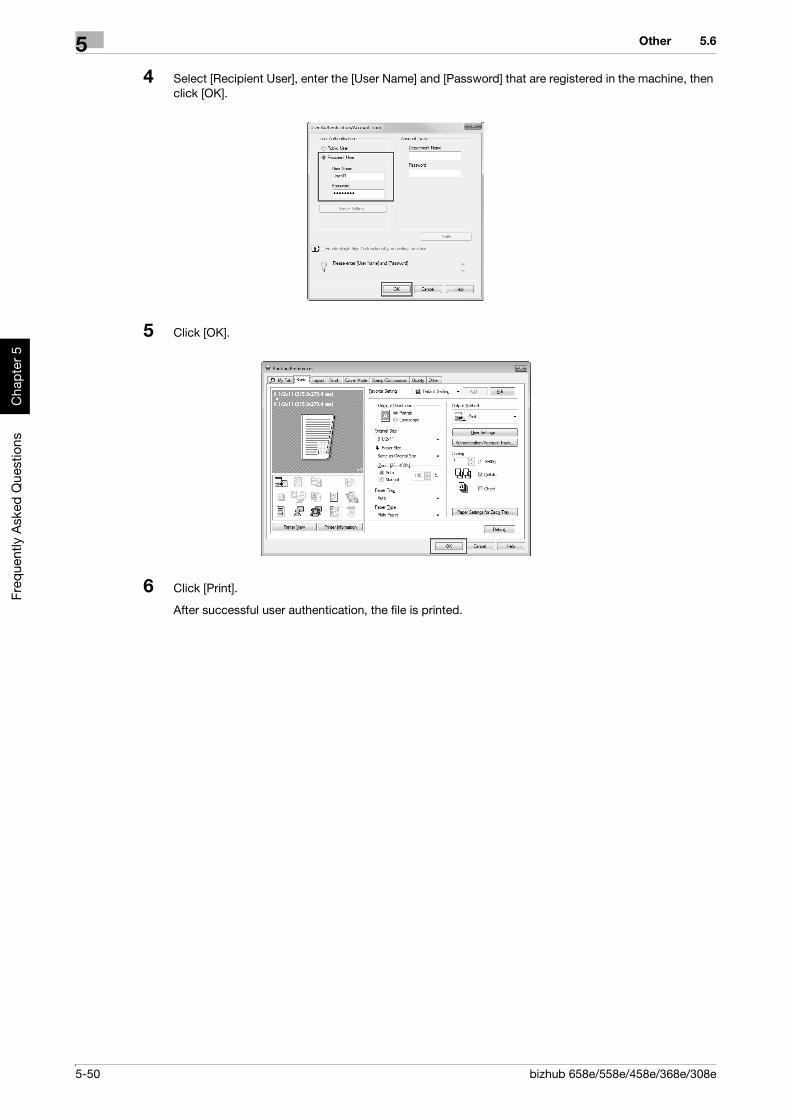
5-50 bizhub 658e/558e/458e/368e/308e
Other5 5.6
Freq
uent
ly A
sked
Que
stio
nsC
hapt
er 5
4 Select [Recipient User], enter the [User Name] and [Password] that are registered in the machine, then click [OK].
5 Click [OK].
6 Click [Print].
After successful user authentication, the file is printed.

bizhub 658e/558e/458e/368e/308e 5-51
5.6 Other 5
Freq
uent
ly A
sked
Que
stio
nsC
hapt
er 5
5.6.5 Q5. The power is input all day. Is there any way to alleviate concerns about electricity charges?A5. If no operation takes place for a certain period of time, the power-saving function starts automatically, and the machine enters the power-saving mode.
Using the weekly timer function automatically switches this machine to the normal mode and power save mode at the pre-specified time.
The weekly timer function provides the following functions:
How to set
1 Tap [Utility], then select [Administrator Settings].
2 Enter the password, then tap [OK].
3 Select [System Settings] - [Weekly Timer Settings] - [Weekly Timer ON/OFF Settings].
4 Select [ON], select [ErP Auto Power OFF] or [Sleep], then tap [OK].
% Select [ErP Auto Power OFF] when there is no need to receive a job in the power save mode and you wish to cut off power consumption whenever you can.
% Select [Sleep] if a Fax Kit is installed and you need to receive a job even in the power save mode.
5 Tap [Time Settings].
Function Description
[Time Settings] Specify the time for switching to the power save mode and the time for return-ing to the normal mode for each day of the week. For example, you can set it up so that the power turns off at the close of business on work days and omit settings for weekends since no one uses the machine.
[Date Settings] Configure the days you want to apply the weekly timer to one by one. This function is useful when the schedule for holidays is irregular or when this ma-chine must be powered on or off on a specific day regardless of the setting in [Time Settings].
[Select Time for Power Save]
Specify the time period to temporarily switch to the power save mode. This al-lows you to temporarily switch to the power save mode in the time period such as a lunch break in which this machine is inactive.
[Password for Non-Business Hours]
Using the weekly timer restricts the use of this machine in the Power Save mode with a password.
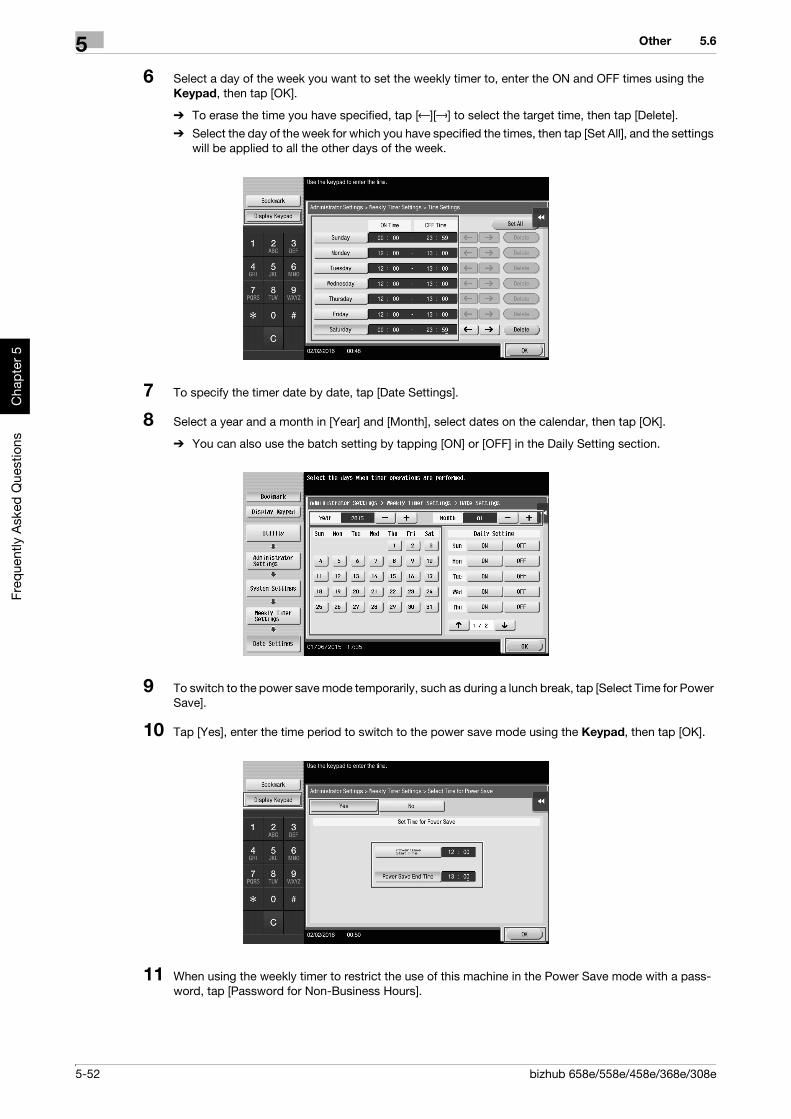
5-52 bizhub 658e/558e/458e/368e/308e
Other5 5.6
Freq
uent
ly A
sked
Que
stio
nsC
hapt
er 5
6 Select a day of the week you want to set the weekly timer to, enter the ON and OFF times using the Keypad, then tap [OK].
% To erase the time you have specified, tap [ ][ ] to select the target time, then tap [Delete].% Select the day of the week for which you have specified the times, then tap [Set All], and the settings
will be applied to all the other days of the week.
7 To specify the timer date by date, tap [Date Settings].
8 Select a year and a month in [Year] and [Month], select dates on the calendar, then tap [OK].
% You can also use the batch setting by tapping [ON] or [OFF] in the Daily Setting section.
9 To switch to the power save mode temporarily, such as during a lunch break, tap [Select Time for Power Save].
10 Tap [Yes], enter the time period to switch to the power save mode using the Keypad, then tap [OK].
11 When using the weekly timer to restrict the use of this machine in the Power Save mode with a pass-word, tap [Password for Non-Business Hours].
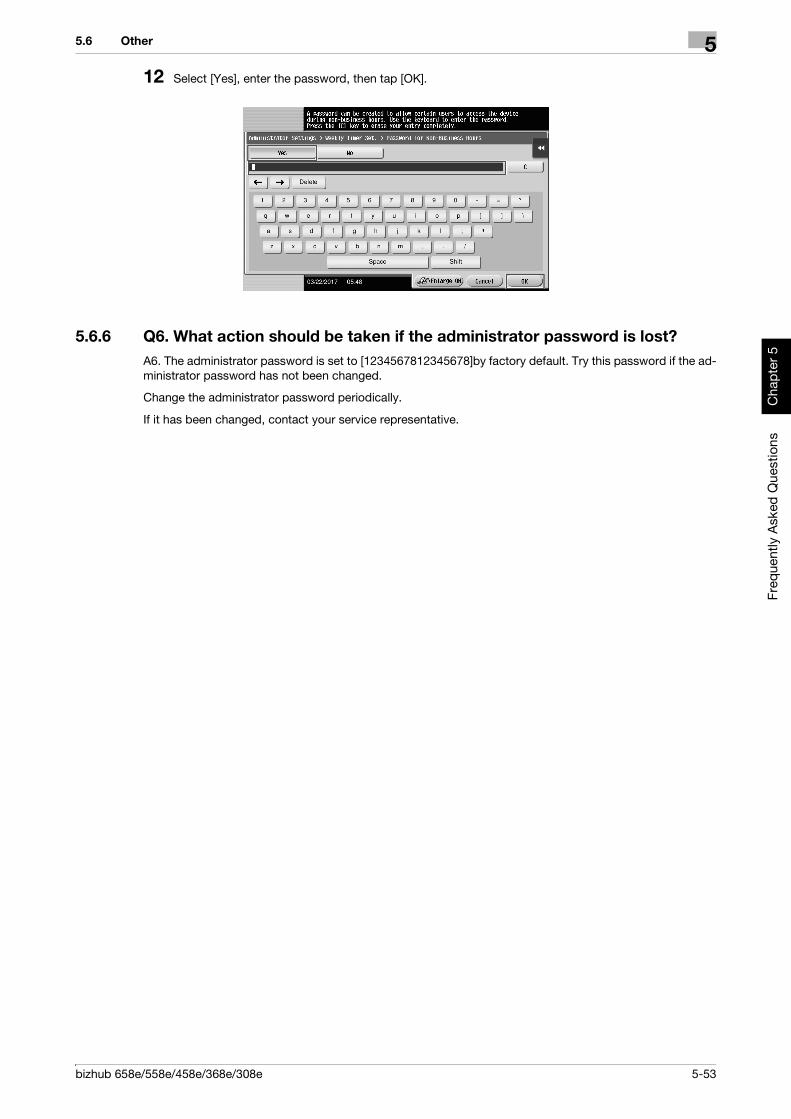
bizhub 658e/558e/458e/368e/308e 5-53
5.6 Other 5
Freq
uent
ly A
sked
Que
stio
nsC
hapt
er 5
12 Select [Yes], enter the password, then tap [OK].
5.6.6 Q6. What action should be taken if the administrator password is lost?A6. The administrator password is set to [1234567812345678]by factory default. Try this password if the ad-ministrator password has not been changed.
Change the administrator password periodically.
If it has been changed, contact your service representative.

5-54 bizhub 658e/558e/458e/368e/308e
Other5 5.6
Freq
uent
ly A
sked
Que
stio
nsC
hapt
er 5

6
Trou
bles
hoot
ing
Cha
pter
6
Troubleshooting

6-2 bizhub 658e/558e/458e/368e/308e
Main messages and remedies6 6.1
Trou
bles
hoot
ing
Cha
pter
6
6 Troubleshooting
6.1 Main messages and remedies
6.1.1 When a message appears to replace consumables or carry out cleaningA message appears indicating the time(s) that expiring consumables used in this machine should be re-placed. Also, a message appears when the Slit Scan Glass is dirty.
Replace consumables mentioned in the displayed message or clean the Slit Scan Glass.
A message recommending that parts be replaced indicates that certain consumables are running out. Al-though you can still continue to print for a while after the message is displayed, it is advisable to promptly prepare replacement consumables.- For Toner Cartridge: [Toner is low. Replace when indicated.] appears, followed by [Replace Toner Car-
tridge.]. Replace the Toner Cartridge based on the maintenance contract.- For Staple Cartridge/Saddle Staple Cartridge: When the message [Replace the Staple Cartridge.] or
[Replace the Saddle Staple Cartridge 1 or 2.] appears, replace the staples.
- For Drum Unit: When the message [The Drum Unit needs to be replaced soon.] or [The Drum Unit needs to be replaced.] appears, replace it based on the maintenance contract.
- For Developing Unit: When the message [The Developing Unit needs to be replaced.] appears, contact your service representative.
- For Waste Toner Box: When the message [Waste Toner Box needs to be replaced.] appears, replace it based on the maintenance contract.
Contact your service representative if the messages continue to appear even after replacement or cleaning has been carried out.
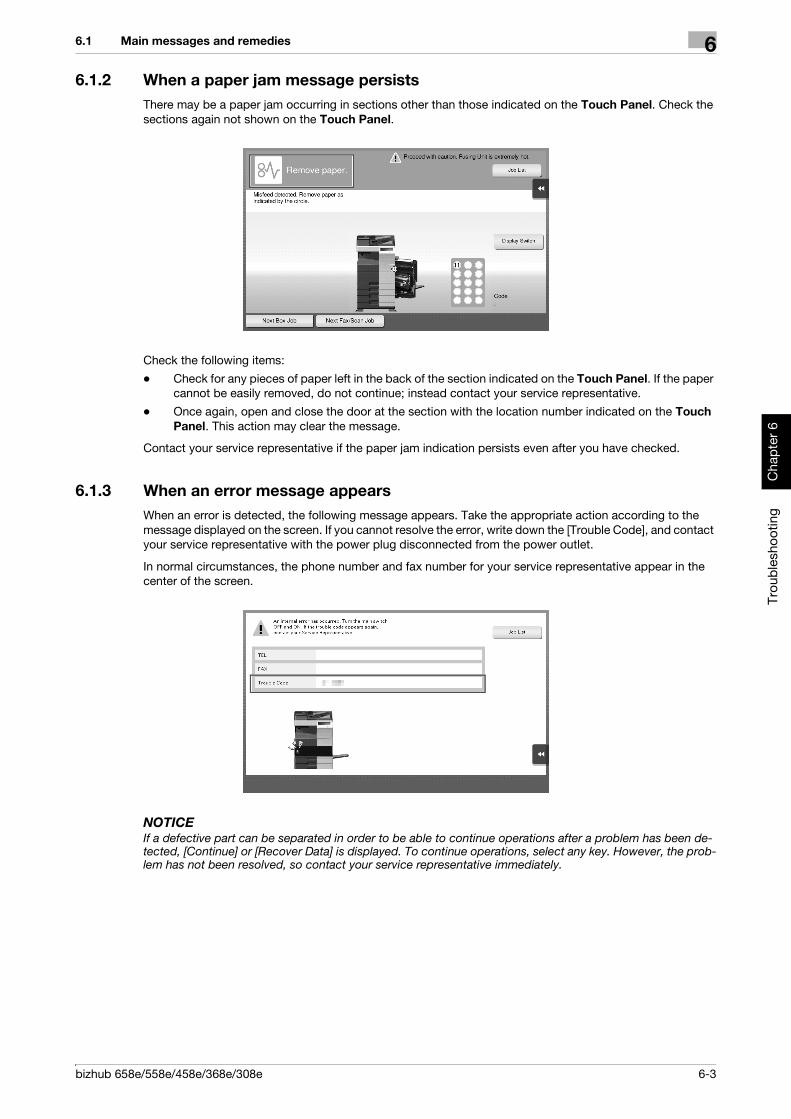
bizhub 658e/558e/458e/368e/308e 6-3
6.1 Main messages and remedies 6
Trou
bles
hoot
ing
Cha
pter
6
6.1.2 When a paper jam message persistsThere may be a paper jam occurring in sections other than those indicated on the Touch Panel. Check the sections again not shown on the Touch Panel.
Check the following items:
- Check for any pieces of paper left in the back of the section indicated on the Touch Panel. If the paper cannot be easily removed, do not continue; instead contact your service representative.
- Once again, open and close the door at the section with the location number indicated on the Touch Panel. This action may clear the message.
Contact your service representative if the paper jam indication persists even after you have checked.
6.1.3 When an error message appearsWhen an error is detected, the following message appears. Take the appropriate action according to the message displayed on the screen. If you cannot resolve the error, write down the [Trouble Code], and contact your service representative with the power plug disconnected from the power outlet.
In normal circumstances, the phone number and fax number for your service representative appear in the center of the screen.
NOTICEIf a defective part can be separated in order to be able to continue operations after a problem has been de-tected, [Continue] or [Recover Data] is displayed. To continue operations, select any key. However, the prob-lem has not been resolved, so contact your service representative immediately.

6-4 bizhub 658e/558e/458e/368e/308e
Main messages and remedies6 6.1
Trou
bles
hoot
ing
Cha
pter
6
6.1.4 When [Stabilizing image.] appearsThis automatically performs a function to adjust printing quality in order to maintain a certain level of color reproduction quality. This "printing quality adjustment" is referred to as "image stabilization".
Image stabilization is performed while a large number of copies are being output or the temperature or hu-midity inside the machine has changed.
Upon completion of image stabilization, printing is automatically resumed. Wait for a moment.
In case image stabilization does not finish after a short while, contact your service representative.
NOTICEYou cannot interrupt or prohibit image stabilization.
dReferenceTo perform image stabilization on a voluntary basis, refer to the User's Guide CD.

bizhub 658e/558e/458e/368e/308e 6-5
6.2 When printing quality has deteriorated 6
Trou
bles
hoot
ing
Cha
pter
6
6.2 When printing quality has deteriorated
6.2.1 Cleaning the Print Head GlassPrinting quality deteriorates if the Print Head Glass is dirty. If this occurs, clean the Print Head Glass ac-cording to the following procedure.
1 Open the Lower Front Door or Front Door of the machine.
2 Release the Waste Toner Box Lock Lever, then remove the Waste Toner Box.
3 Remove the Printhead Cleaner from the Lower Front Door or Front Door of this machine.
1
2

6-6 bizhub 658e/558e/458e/368e/308e
When printing quality has deteriorated6 6.2
Trou
bles
hoot
ing
Cha
pter
6
4 Slowly insert the Printhead Cleaner all the way to the back end of the Print Head Glass, and then slowly pull it out.
% Repeat this operation for approximately three times.
5 Mount the Printhead Cleaner onto the Lower Front Door or Front Door of this machine.
6 Install the Waste Toner Box.
7 Close the Lower Front Door or Front Door of the machine.

bizhub 658e/558e/458e/368e/308e 6-7
6.3 When the machine cannot be powered on 6
Trou
bles
hoot
ing
Cha
pter
6
6.3 When the machine cannot be powered onThis machine has two power sources. Check the Main Power Switch and the Power key for the status.- Check whether the power plug of this machine is firmly plugged into the power outlet. Also check that
the breaker has not tripped.- Check to see that the Main Power Switch and the Power key are turned ON.
In case the machine cannot be powered on even after checking, contact your service representative.

6-8 bizhub 658e/558e/458e/368e/308e
When the Touch Panel is not visible6 6.4
Trou
bles
hoot
ing
Cha
pter
6
6.4 When the Touch Panel is not visibleIf a certain length of time has elapsed without any operations being carried out on this machine, the Touch Panel may turn off.
Check the following items:- Tap [Accessibility] and select [Brightness Adjustment], and select [Low] or [High] to adjust the contrast
for the Touch Panel.
- Touch the Touch Panel. In Power Save (Low Power/Sleep) mode, this machine returns from Power Save mode when the Touch Panel is touched or a key on the Control Panel is pressed, and the Touch Panel appears normally.
- On the Control Panel, press the Power key. If the Weekly Timer setting has put the machine in Erp Auto Power off mode, press the Power key to display the Touch Panel. To use it outside the preset operating hours, follow the on-screen instructions.
- Check to see that the Main Power Switch and the Power key are turned ON.
In case the Touch Panel does not appear even after checking it, contact your service representative.

bizhub 658e/558e/458e/368e/308e 6-9
6.5 When a message appears to replace consumables or carry out cleaning 6
Trou
bles
hoot
ing
Cha
pter
6
6.5 When a message appears to replace consumables or carry out cleaning
When staples in the Finisher have run outWhen staples in the Finisher have run out, a message appears to prompt you to make replenish them.
Take action while referring to the label inside the machine.
dReferenceFor details on how to replace a staple cartridge when [Replace the Staple Cartridge.] is displayed, refer to page 6-19.
For details on how to replace a saddle staple cartridge when [Replace the Saddle Staple Cartridge 1 or 2.] is displayed, refer to page 6-22.

6-10 bizhub 658e/558e/458e/368e/308e
When a message appears to replace consumables or carry out cleaning6 6.5
Trou
bles
hoot
ing
Cha
pter
6
When the punch scrap box is fullWhen the punch scrap box is full, a message appears to prompt you to dispose of the punch scraps (at re-placement by user).
Take action while referring to the label inside the machine.
When toner is running out in the Toner CartridgeWhen it is almost time to replace a Toner Cartridge, an advanced warning message appears. Prepare a re-placement Toner Cartridge based on the maintenance contract.
When it is time to replace a Toner CartridgeWhen it is time to replace a Toner Cartridge, a replacement prompt message appears. Replace it based on the maintenance contract. Tap [Start Guidance] to display the replacement procedure on the screen and check it.
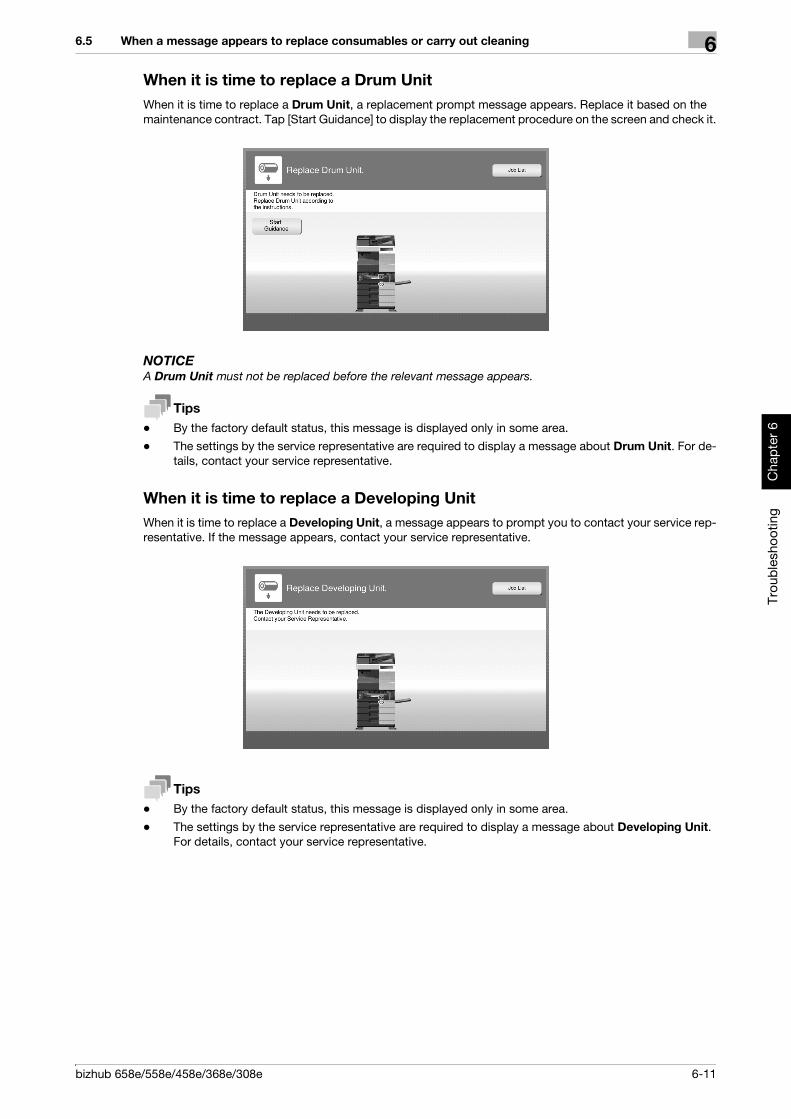
bizhub 658e/558e/458e/368e/308e 6-11
6.5 When a message appears to replace consumables or carry out cleaning 6
Trou
bles
hoot
ing
Cha
pter
6
When it is time to replace a Drum UnitWhen it is time to replace a Drum Unit, a replacement prompt message appears. Replace it based on the maintenance contract. Tap [Start Guidance] to display the replacement procedure on the screen and check it.
NOTICEA Drum Unit must not be replaced before the relevant message appears.
Tips- By the factory default status, this message is displayed only in some area.- The settings by the service representative are required to display a message about Drum Unit. For de-
tails, contact your service representative.
When it is time to replace a Developing UnitWhen it is time to replace a Developing Unit, a message appears to prompt you to contact your service rep-resentative. If the message appears, contact your service representative.
Tips- By the factory default status, this message is displayed only in some area.- The settings by the service representative are required to display a message about Developing Unit.
For details, contact your service representative.

6-12 bizhub 658e/558e/458e/368e/308e
When a message appears to replace consumables or carry out cleaning6 6.5
Trou
bles
hoot
ing
Cha
pter
6
When the Waste Toner Box is full When the Waste Toner Box is full, a message appears to prompt you to replace it (at replacement by user). Tap [Start Guidance], then follow the displayed guidance to take an action.

bizhub 658e/558e/458e/368e/308e 6-13
6.5 When a message appears to replace consumables or carry out cleaning 6
Trou
bles
hoot
ing
Cha
pter
6
6.5.1 Replacing a Toner Cartridge
bizhub 658e/558e/458e
Tips- Shake a new Toner Cartridge well, approximately 5 to 10 times, before installing it.
- Do not forcedly open or disassemble a Toner Cartridge (toner container).- Do not forcedly remove or dispose of toner that remains in a Toner Cartridge (toner container).
7WARNING- Do not throw toner or a container that contains toner (e.g., toner cartridge, developing unit and Waste
Toner Box) into an open flame. The hot toner may scatter and cause burns or other damage.
7CAUTION - Do not leave toner-related parts (e.g., toner cartridge, developing unit and Waste Toner Box) within easy
reach of children. Licking any of these parts or ingesting toner could damage your health.
- Do not store toner-related parts (e.g., toner cartridge, developing unit and Waste Toner Box) near de-vices susceptible to magnetism, such as precision equipment and data storage devices, otherwise they may malfunction. They could cause these products to malfunction.
- Do not force open the toner-related parts (e.g., toner cartridge, developing unit and Waste Toner Box). If toner tumbles from the toner bottle, take utmost care to avoid inhaling it or even getting skin contact.
- If toner lands on your skin or clothing, wash thoroughly with soap and water.- If you inhale toner, move to a place with fresh air and gargle with a lot of water repeatedly. Should you
get symptoms such as coughing, seek medical advice.
- If you get toner into your eyes, immediately rinse them with running water for over 15 minutes. Seek medical advice if irritation persists.
- If you swallow toner, rinse out your mouth and drink a few glasses of water. Seek medical advice if nec-essary.
1
2 3
4
6-14 bizhub 658e/558e/458e/368e/308e
When a message appears to replace consumables or carry out cleaning6 6.5
Trou
bles
hoot
ing
Cha
pter
6
bizhub 368e/308e
Tips- Shake a new Toner Cartridge well, approximately 5 to 10 times, before installing it.
- Do not forcedly open or disassemble a Toner Cartridge (toner container).- Do not forcedly remove or dispose of toner that remains in a Toner Cartridge (toner container).
7WARNING- Do not throw toner or a container that contains toner (e.g., toner cartridge, developing unit and Waste
Toner Box) into an open flame. The hot toner may scatter and cause burns or other damage.
7CAUTION - Do not leave toner-related parts (e.g., toner cartridge, developing unit and Waste Toner Box) within easy
reach of children. Licking any of these parts or ingesting toner could damage your health.- Do not store toner-related parts (e.g., toner cartridge, developing unit and Waste Toner Box) near de-
vices susceptible to magnetism, such as precision equipment and data storage devices, otherwise they may malfunction. They could cause these products to malfunction.
- Do not force open the toner-related parts (e.g., toner cartridge, developing unit and Waste Toner Box). If toner tumbles from the toner bottle, take utmost care to avoid inhaling it or even getting skin contact.
- If toner lands on your skin or clothing, wash thoroughly with soap and water.- If you inhale toner, move to a place with fresh air and gargle with a lot of water repeatedly. Should you
get symptoms such as coughing, seek medical advice.
- If you get toner into your eyes, immediately rinse them with running water for over 15 minutes. Seek medical advice if irritation persists.
- If you swallow toner, rinse out your mouth and drink a few glasses of water. Seek medical advice if nec-essary.
1
2 3
4

bizhub 658e/558e/458e/368e/308e 6-15
6.5 When a message appears to replace consumables or carry out cleaning 6
Trou
bles
hoot
ing
Cha
pter
6
6.5.2 Replacing a Waste Toner Box
bizhub 658e/558e/458e
Tips- After removing the Waste Toner Box, quickly install the cap. If the Waste Toner Box is tilted, waste
toner may spill.- Your service representative will collect your used Waste Toner Box. Place a cap on it, put it in a plastic
bag, and store it in a box by itself.
7WARNING- Do not throw toner or a container that contains toner (e.g., toner cartridge, developing unit and Waste
Toner Box) into an open flame. The hot toner may scatter and cause burns or other damage.
7CAUTION - Do not leave toner-related parts (e.g., toner cartridge, developing unit and Waste Toner Box) within easy
reach of children. Licking any of these parts or ingesting toner could damage your health.- Do not store toner-related parts (e.g., toner cartridge, developing unit and Waste Toner Box) near de-
vices susceptible to magnetism, such as precision equipment and data storage devices, otherwise they may malfunction. They could cause these products to malfunction.
- Do not force open the toner-related parts (e.g., toner cartridge, developing unit and Waste Toner Box). If toner tumbles from the toner bottle, take utmost care to avoid inhaling it or even getting skin contact.
- If toner lands on your skin or clothing, wash thoroughly with soap and water.
- If you inhale toner, move to a place with fresh air and gargle with a lot of water repeatedly. Should you get symptoms such as coughing, seek medical advice.
- If you get toner into your eyes, immediately rinse them with running water for over 15 minutes. Seek medical advice if irritation persists.
- If you swallow toner, rinse out your mouth and drink a few glasses of water. Seek medical advice if nec-essary.
1
2 3
4

6-16 bizhub 658e/558e/458e/368e/308e
When a message appears to replace consumables or carry out cleaning6 6.5
Trou
bles
hoot
ing
Cha
pter
6
bizhub 368e/308e
Tips- After removing the Waste Toner Box, quickly install the cap. If the Waste Toner Box is tilted, waste
toner may spill.
- Your service representative will collect your used Waste Toner Box. Place a cap on it, put it in a plastic bag, and store it in a box by itself.
7WARNING- Do not throw toner or a container that contains toner (e.g., toner cartridge, developing unit and Waste
Toner Box) into an open flame. The hot toner may scatter and cause burns or other damage.
7CAUTION - Do not leave toner-related parts (e.g., toner cartridge, developing unit and Waste Toner Box) within easy
reach of children. Licking any of these parts or ingesting toner could damage your health.
- Do not store toner-related parts (e.g., toner cartridge, developing unit and Waste Toner Box) near de-vices susceptible to magnetism, such as precision equipment and data storage devices, otherwise they may malfunction. They could cause these products to malfunction.
- Do not force open the toner-related parts (e.g., toner cartridge, developing unit and Waste Toner Box). If toner tumbles from the toner bottle, take utmost care to avoid inhaling it or even getting skin contact.
- If toner lands on your skin or clothing, wash thoroughly with soap and water.
- If you inhale toner, move to a place with fresh air and gargle with a lot of water repeatedly. Should you get symptoms such as coughing, seek medical advice.
- If you get toner into your eyes, immediately rinse them with running water for over 15 minutes. Seek medical advice if irritation persists.
- If you swallow toner, rinse out your mouth and drink a few glasses of water. Seek medical advice if nec-essary.
1
2 3
4

bizhub 658e/558e/458e/368e/308e 6-17
6.5 When a message appears to replace consumables or carry out cleaning 6
Trou
bles
hoot
ing
Cha
pter
6
6.5.3 Replacing a Drum Unit
bizhub 658e/558e/458e
Tips- Your service representative will collect your used Drum Unit. Put it in a black plastic bag and store it
in a box by itself.- A Drum Unit may be damaged due to exposure to light. Do not take it out of a black plastic bag until
just before it is to installed.
- After replacing a Drum Unit, be sure to clean the Print Head Glass. For details on how to clean the Print Head Glass, refer to page 6-5.
1
2
3
4
7
8
6
5
1 2 3 4

6-18 bizhub 658e/558e/458e/368e/308e
When a message appears to replace consumables or carry out cleaning6 6.5
Trou
bles
hoot
ing
Cha
pter
6
bizhub 368e/308e
Tips- Your service representative will collect your used Drum Unit. Put it in a black plastic bag and store it
in a box by itself.
- A Drum Unit may be damaged due to exposure to light. Do not take it out of a black plastic bag until just before it is to installed.
- After replacing a Drum Unit, be sure to clean the Print Head Glass. For details on how to clean the Print Head Glass, refer to page 6-5.
1
2
3
4
7
8
6
5
1 2 3 4
bizhub 658e/558e/458e/368e/308e 6-19
6.5 When a message appears to replace consumables or carry out cleaning 6
Trou
bles
hoot
ing
Cha
pter
6
6.5.4 Replacing a Staple Cartridge
Finisher FS-537/Finisher FS-537 SD
Tips- The figure shows the Finisher FS-537 SD equipped with Punch Kit PK-523, Z Folding Unit ZU-609,
and Relay Unit RU-513.- Do not remove staples that remain in the machine. Otherwise, the stapling function will activate but no
sheets will be stapled.
NOTICEBe sure to replace the Staple Cartridge after the relevant message has appeared. If a Staple Cartridge is removed before the relevant message appears, it may result in a failure.
1
2
3
1
1
1
1
2
2
2
2
1

6-20 bizhub 658e/558e/458e/368e/308e
When a message appears to replace consumables or carry out cleaning6 6.5
Trou
bles
hoot
ing
Cha
pter
6
Finisher FS-536/Finisher FS-536 SD
Tips- The figure shows the Finisher FS-536 SD equipped with Punch Kit PK-520 and Relay Unit RU-513.
- Do not remove staples that remain in the machine. Otherwise, the stapling function will activate but no sheets will be stapled.
NOTICEBe sure to replace the Staple Cartridge after the relevant message has appeared. If a Staple Cartridge is removed before the relevant message appears, it may result in a failure.
1
2
3
1
2
1
2
1
1
2

bizhub 658e/558e/458e/368e/308e 6-21
6.5 When a message appears to replace consumables or carry out cleaning 6
Trou
bles
hoot
ing
Cha
pter
6
Finisher FS-533
Tips- The figure above shows the Finisher FS-533 that is equipped with Punch Kit PK-519.- Do not remove staples that remain in the machine. Otherwise, the stapling function will activate but no
sheets will be stapled.
NOTICEBe sure to replace the Staple Cartridge after the relevant message has appeared. If a Staple Cartridge is removed before the relevant message appears, it may result in a failure.
3
2
1
4
5
FS2
1
2
1
1
2
1
2
1
2
1
2

6-22 bizhub 658e/558e/458e/368e/308e
When a message appears to replace consumables or carry out cleaning6 6.5
Trou
bles
hoot
ing
Cha
pter
6
6.5.5 Replacing a Saddle Staple Cartridge
Finisher FS-537 SD
Tips- The figure shows the Finisher FS-537 SD equipped with Punch Kit PK-523, Z Folding Unit ZU-609,
and Relay Unit RU-513.
- Do not remove staples that remain in the machine. Otherwise, the stapling function will activate but no sheets will be stapled.
NOTICEWhen moving the Saddle Stitcher, be sure to only hold the handle. Otherwise, your hand or finger may get caught in the machine.
Be sure to replace the Saddle Staple Cartridge after the relevant message has appeared. If a Saddle Staple Cartridge is removed before the relevant message appears, it may result in a failure.
SD1
1
2
3
2
1
1
2
2
2
1
1
1
1
1
2
bizhub 658e/558e/458e/368e/308e 6-23
6.5 When a message appears to replace consumables or carry out cleaning 6
Trou
bles
hoot
ing
Cha
pter
6
Finisher FS-536 SD
Tips- The figure shows the Finisher FS-536 SD equipped with Punch Kit PK-520 and Relay Unit RU-513.- Do not remove staples that remain in the machine. Otherwise, the stapling function will activate but no
sheets will be stapled.
NOTICEWhen moving the Saddle Stitcher, be sure to only hold the handle. Otherwise, your hand or finger may get caught in the machine.
Be sure to replace the Saddle Staple Cartridge after the relevant message has appeared. If a Saddle Staple Cartridge is removed before the relevant message appears, it may result in a failure.
1
2
3
SD1
1
12
2
1
1
2
21
1
1
1
2
2
12
1
1

6-24 bizhub 658e/558e/458e/368e/308e
When a message appears to replace consumables or carry out cleaning6 6.5
Trou
bles
hoot
ing
Cha
pter
6

7
Inde
xC
hapt
er 7
Index

7-2 bizhub 658e/558e/458e/368e/308e
7In
dex
Cha
pter
7
7 IndexAAddress Book ............................................................3-57Advanced Functions ...................................................4-2
CControl Panel .............................................................2-32Copy function ............................................................3-54
DDialing Method ..........................................................3-44
EE-mail TX ...................................................................3-34Entering Characters ..................................................2-41ErP Auto Power OFF .................................................2-30
FFax TX .......................................................................3-41
GGroup ........................................................................3-66Guidance function .....................................................3-77
HHelp Menu .......................................................3-77, 3-81
IInstalling the fax driver ..............................................3-49Installing the printer driver .................................3-3, 3-10i-Option .......................................................................4-3
JJob ............................................................................2-43
KKeypad ......................................................................2-40
LLicense Management Server (LMS) ..................4-5, 4-11Loading Paper ............................ 2-44, 2-45, 2-47, 2-48Low Power mode ......................................................2-30
MMain Menu .................................................................2-34MFP .................................................................2-15, 2-17Multi-job ....................................................................2-43
OOptions ....................................................2-7, 2-11, 2-20
PPC-Fax TX ................................................................. 3-47PCL .............................................................................3-6Power Save mode .....................................................2-30Print Function ......................................................3-2, 3-7Printing from a USB memory device .........................3-71PS ................................................................................3-6
QQuick Security ........................................................... 3-82
RRequest Code ............................................................. 4-5
SSafety information .......................................................1-5Saving the scanned data .......................................... 3-73Search .......................................................................3-69Sender Fax No. Settings ...........................................3-42Sender settings .........................................................3-42Sleep mode ...............................................................2-30Slide Menu ................................................................2-35SMB Send .......................................................3-16, 3-25Sub Power OFF .........................................................2-29
TToken Certificate .........................................................4-3Touch Panel ....................................................2-34, 2-36
UUser authentication ...................................................3-56
VVoice Guidance .........................................................4-21
WWeb Browser ..............................................................4-9

Printed in China
2017. 8AA6R-9565-00
http://konicaminolta.com
© 2017
Related Documents