Finale 2014 for Windows ® FGC346-1 Quick Reference Guide

Welcome message from author
This document is posted to help you gain knowledge. Please leave a comment to let me know what you think about it! Share it to your friends and learn new things together.
Transcript
Finale 2014 for Windows®
FGC346-1
Quick Reference Guide

WINDOWS FINALE2
Multiple Voices: Layers 13
Playing in Music: HyperScribe 14A. To set the smallest note value . . . . . . . . . . . . . . . . . . . . . . . . . . . . . . 14
B. To record a performance . . . . . . . . . . . . . . . . . . . . . . . . . . . . . . . . . . 14
C. To change the recording tempo and countoff . . . . . . . . . . . . . . . . 15
Selecting Music 16A. To select a portion of music . . . . . . . . . . . . . . . . . . . . . . . . . . . . . . . 16
B. To expand the selection . . . . . . . . . . . . . . . . . . . . . . . . . . . . . . . . . . . .17
Copying, Pasting, and Inserting 18A. To drag-copy . . . . . . . . . . . . . . . . . . . . . . . . . . . . . . . . . . . . . . . . . . . . . 18
B. To copy using the clipboard . . . . . . . . . . . . . . . . . . . . . . . . . . . . . . . . 18
C. To insert music . . . . . . . . . . . . . . . . . . . . . . . . . . . . . . . . . . . . . . . . . . . 19
D. To copy specific items . . . . . . . . . . . . . . . . . . . . . . . . . . . . . . . . . . . . 20
Transposing 21
Working with Measures 22A. To add measures at the end of the score . . . . . . . . . . . . . . . . . . . . 22
B. To insert empty measures in the score . . . . . . . . . . . . . . . . . . . . . . 22
C. To fit a certain number of measures per system . . . . . . . . . . . . . . 23
D. To adjust the measure layout manually . . . . . . . . . . . . . . . . . . . . . . 23
QUICK REFERENCE GUIDE FOR WINDOWS
Authorization Information 4
Getting Started 5A. To create a new document . . . . . . . . . . . . . . . . . . . . . . . . . . . . . . . . . . 5
B. To open files . . . . . . . . . . . . . . . . . . . . . . . . . . . . . . . . . . . . . . . . . . . . . . 6
C. To share files . . . . . . . . . . . . . . . . . . . . . . . . . . . . . . . . . . . . . . . . . . . . . . 6
D. To scan a document . . . . . . . . . . . . . . . . . . . . . . . . . . . . . . . . . . . . . . . 6
Finale Screen View 7
Navigating Your Music 8A. To choose a view . . . . . . . . . . . . . . . . . . . . . . . . . . . . . . . . . . . . . . . . . . 8
B. To zoom in and zoom out . . . . . . . . . . . . . . . . . . . . . . . . . . . . . . . . . . . 9
C. To drag the visible score region . . . . . . . . . . . . . . . . . . . . . . . . . . . . . 9
D. To switch pages . . . . . . . . . . . . . . . . . . . . . . . . . . . . . . . . . . . . . . . . . . . 9
Entering the Music: Simple Entry 10A. To enter notes with your mouse . . . . . . . . . . . . . . . . . . . . . . . . . . . . 10
B. To enter notes with your mouse and computer keyboard . . . . . . . . . . . . . . . . . . . . . . . . . . . . . . . . . . . . 11
C. To type notes into the score with your computer keyboard . . . . . . . . . . . . . . . . . . . . . . . . . . . . . . . . . . . 12
D. To play notes into the score with a MIDI keyboard . . . . . . . . . . . . . 12
WINDOWSFINALEMUSIC .COM/SUPPORT 3
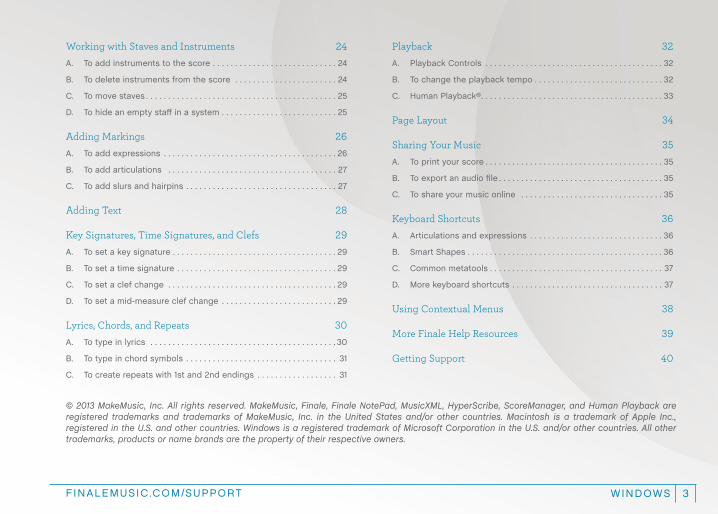
Working with Staves and Instruments 24A. To add instruments to the score . . . . . . . . . . . . . . . . . . . . . . . . . . . . 24
B. To delete instruments from the score . . . . . . . . . . . . . . . . . . . . . . . 24
C. To move staves . . . . . . . . . . . . . . . . . . . . . . . . . . . . . . . . . . . . . . . . . . . 25
D. To hide an empty staff in a system . . . . . . . . . . . . . . . . . . . . . . . . . . 25
Adding Markings 26A. To add expressions . . . . . . . . . . . . . . . . . . . . . . . . . . . . . . . . . . . . . . . 26
B. To add articulations . . . . . . . . . . . . . . . . . . . . . . . . . . . . . . . . . . . . . . 27
C. To add slurs and hairpins . . . . . . . . . . . . . . . . . . . . . . . . . . . . . . . . . . 27
Adding Text 28
Key Signatures, Time Signatures, and Clefs 29A. To set a key signature . . . . . . . . . . . . . . . . . . . . . . . . . . . . . . . . . . . . . 29
B. To set a time signature . . . . . . . . . . . . . . . . . . . . . . . . . . . . . . . . . . . . 29
C. To set a clef change . . . . . . . . . . . . . . . . . . . . . . . . . . . . . . . . . . . . . . 29
D. To set a mid-measure clef change . . . . . . . . . . . . . . . . . . . . . . . . . . 29
Lyrics, Chords, and Repeats 30A. To type in lyrics . . . . . . . . . . . . . . . . . . . . . . . . . . . . . . . . . . . . . . . . . . 30
B. To type in chord symbols . . . . . . . . . . . . . . . . . . . . . . . . . . . . . . . . . . 31
C. To create repeats with 1st and 2nd endings . . . . . . . . . . . . . . . . . . 31
Playback 32A. Playback Controls . . . . . . . . . . . . . . . . . . . . . . . . . . . . . . . . . . . . . . . . 32
B. To change the playback tempo . . . . . . . . . . . . . . . . . . . . . . . . . . . . . 32
C. Human Playback® . . . . . . . . . . . . . . . . . . . . . . . . . . . . . . . . . . . . . . . . . 33
Page Layout 34
Sharing Your Music 35A. To print your score . . . . . . . . . . . . . . . . . . . . . . . . . . . . . . . . . . . . . . . . 35
B. To export an audio file . . . . . . . . . . . . . . . . . . . . . . . . . . . . . . . . . . . . . 35
C. To share your music online . . . . . . . . . . . . . . . . . . . . . . . . . . . . . . . . 35
Keyboard Shortcuts 36A. Articulations and expressions . . . . . . . . . . . . . . . . . . . . . . . . . . . . . . 36
B. Smart Shapes . . . . . . . . . . . . . . . . . . . . . . . . . . . . . . . . . . . . . . . . . . . . 36
C. Common metatools . . . . . . . . . . . . . . . . . . . . . . . . . . . . . . . . . . . . . . . 37
D. More keyboard shortcuts . . . . . . . . . . . . . . . . . . . . . . . . . . . . . . . . . . 37
Using Contextual Menus 38
More Finale Help Resources 39
Getting Support 40
© 2013 MakeMusic, Inc. All rights reserved. MakeMusic, Finale, Finale NotePad, MusicXML, HyperScribe, ScoreManager, and Human Playback are registered trademarks and trademarks of MakeMusic, Inc. in the United States and/or other countries. Macintosh is a trademark of Apple Inc., registered in the U.S. and other countries. Windows is a registered trademark of Microsoft Corporation in the U.S. and/or other countries. All other trademarks, products or name brands are the property of their respective owners.
WINDOWS FINALE4
AUTHORIZATION INFORMATION
The Finale End User License Agreement allows the registered user to install Finale® on a maximum of two operating systems for that user only (Site Licenses excluded).
To use Finale after installing it on a computer, you’ll need to authorize each installation.
To authorize, you’ll need to use your license’s unique serial number. If you upgraded from an earlier version of Finale, your serial number stays the same each time you upgrade.
You can find your serial number…
• On a yellow sticker inside the Finale DVD or CD case of the earliest version purchased.
• If you’ve authorized any version of Finale on a different computer, you can find your serial number in the About Finale screen in the Help menu on that computer.
• If you’ve registered your serial number previously, you can find your serial number in your online account at www.finalemusic.com.
Once you’ve installed Finale and have your serial number ready, simply follow the on-screen instructions to authorize when you start the program. You must authorize within 30 days after installation, or printing and saving will temporarily be disabled until you do so.
WINDOWSFINALEMUSIC .COM/SUPPORT 5
GETTING STARTED
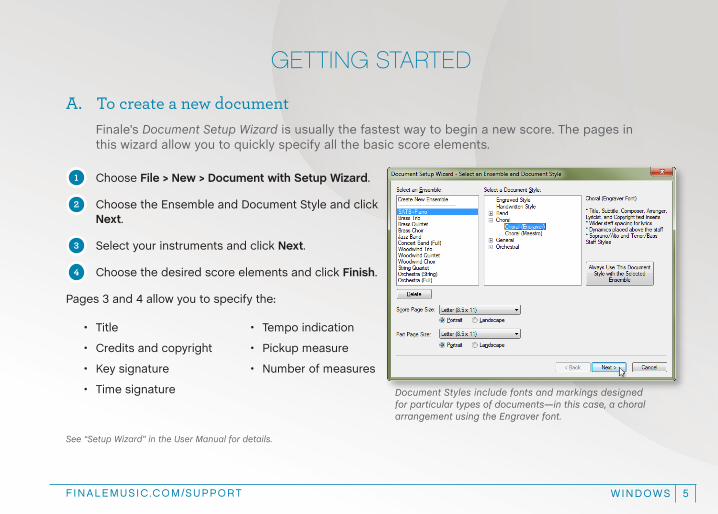
A. To create a new documentFinale’s Document Setup Wizard is usually the fastest way to begin a new score. The pages in this wizard allow you to quickly specify all the basic score elements.
1 Choose File > New > Document with Setup Wizard.
2 Choose the Ensemble and Document Style and click
Next.
3 Select your instruments and click Next.
4 Choose the desired score elements and click Finish.
Pages 3 and 4 allow you to specify the:
• Title
• Credits and copyright
• Key signature
• Time signature
• Tempo indication
• Pickup measure
• Number of measures
Document Styles include fonts and markings designed for particular types of documents—in this case, a choral arrangement using the Engraver font.
See “Setup Wizard” in the User Manual for details.
WINDOWS FINALE6
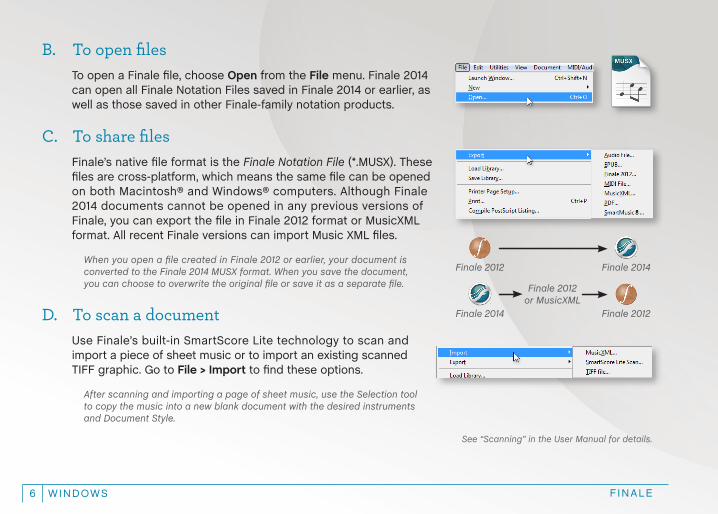
B. To open filesTo open a Finale file, choose Open from the File menu. Finale 2014 can open all Finale Notation Files saved in Finale 2014 or earlier, as well as those saved in other Finale-family notation products.
C. To share filesFinale’s native file format is the Finale Notation File (*.MUSX). These files are cross-platform, which means the same file can be opened on both Macintosh® and Windows® computers. Although Finale 2014 documents cannot be opened in any previous versions of Finale, you can export the file in Finale 2012 format or MusicXML format. All recent Finale versions can import Music XML files.
When you open a file created in Finale 2012 or earlier, your document is converted to the Finale 2014 MUSX format. When you save the document, you can choose to overwrite the original file or save it as a separate file.
D. To scan a documentUse Finale’s built-in SmartScore Lite technology to scan and import a piece of sheet music or to import an existing scanned TIFF graphic. Go to File > Import to find these options.
After scanning and importing a page of sheet music, use the Selection tool to copy the music into a new blank document with the desired instruments and Document Style.
Finale 2012
Finale 2012
Finale 2012 or MusicXML
Finale 2014
Finale 2014
See “Scanning” in the User Manual for details.
WINDOWSFINALEMUSIC .COM/SUPPORT 7
FINALE SCREEN VIEW
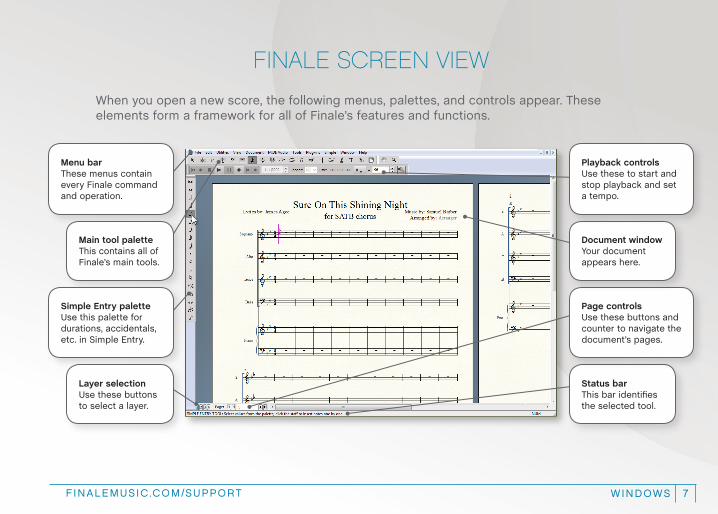
When you open a new score, the following menus, palettes, and controls appear. These elements form a framework for all of Finale’s features and functions.
Menu bar These menus contain every Finale command and operation.
Main tool palette This contains all of Finale’s main tools.
Simple Entry palette Use this palette for durations, accidentals, etc. in Simple Entry.
Layer selection Use these buttons to select a layer.
Status bar This bar identifies the selected tool.
Page controls Use these buttons and counter to navigate the document’s pages.
Document window Your document appears here.
Playback controls Use these to start and stop playback and set a tempo.
WINDOWS FINALE8
NAVIGATING YOUR MUSIC
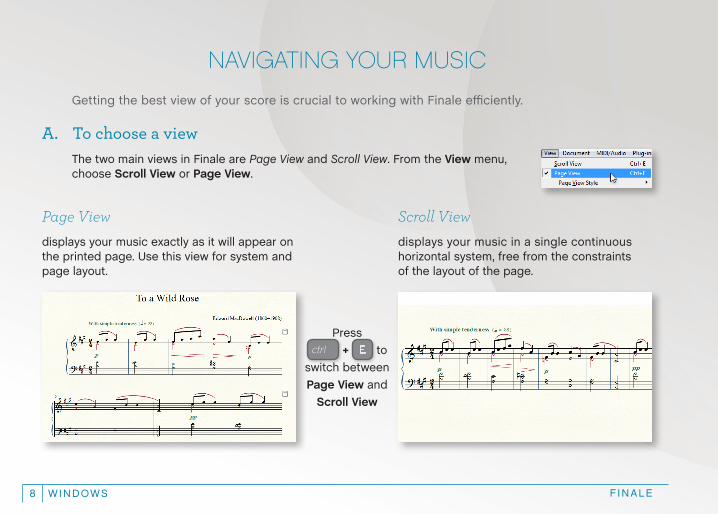
Getting the best view of your score is crucial to working with Finale efficiently.
A. To choose a viewThe two main views in Finale are Page View and Scroll View. From the View menu, choose Scroll View or Page View.
Page Viewdisplays your music exactly as it will appear on the printed page. Use this view for system and page layout.
Scroll Viewdisplays your music in a single continuous horizontal system, free from the constraints of the layout of the page.
Press ctrl + E to
switch between Page View and
Scroll View
WINDOWSFINALEMUSIC .COM/SUPPORT 9
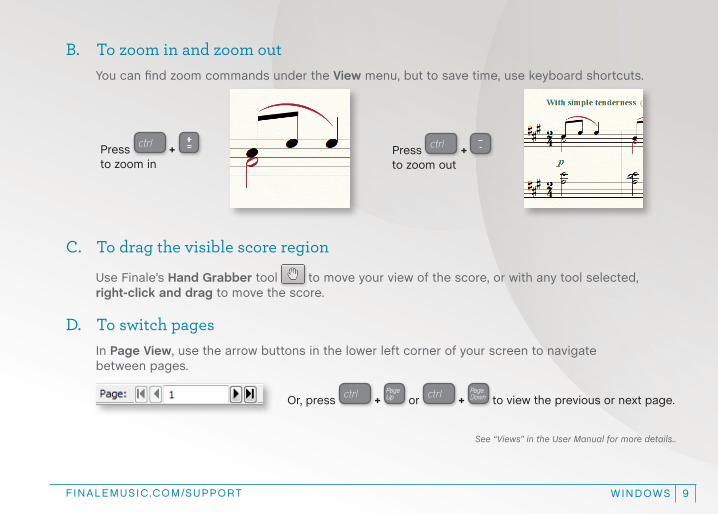
B. To zoom in and zoom outYou can find zoom commands under the View menu, but to save time, use keyboard shortcuts.
C. To drag the visible score region
Use Finale’s Hand Grabber tool to move your view of the score, or with any tool selected, right-click and drag to move the score.
D. To switch pagesIn Page View, use the arrow buttons in the lower left corner of your screen to navigate between pages.
See “Views” in the User Manual for more details..
Press ctrl +
+ =
to zoom inPress
ctrl + _-
to zoom out
Or, press ctrl +
Page Up
or ctrl + Page Down
to view the previous or next page.

WINDOWS FINALE10
ENTERING MUSIC: SIMPLE ENTRY
Use the Simple menu (a) at the top your screen to change settings and refer to keyboard shortcuts. Use the Simple Entry palette (b) to specify note durations and other note properties.
A. To enter notes with your mouse1
Choose the Simple Entry tool .
2 Click the note duration in the Simple Entry palette, as
well as the accidental, tie, tuplet, or grace note.
3 Position your mouse cursor where you would like to
enter the note.
4 Click to enter the note. Finale flips the stem direction
when appropriate.
Double-click one of these tools to cancel all other tools in the Simple Entry palette.
a.
b.
Search for “Palettes” in the User Manual to learn how to resize and relocate palettes.
WINDOWSFINALEMUSIC .COM/SUPPORT 1 1
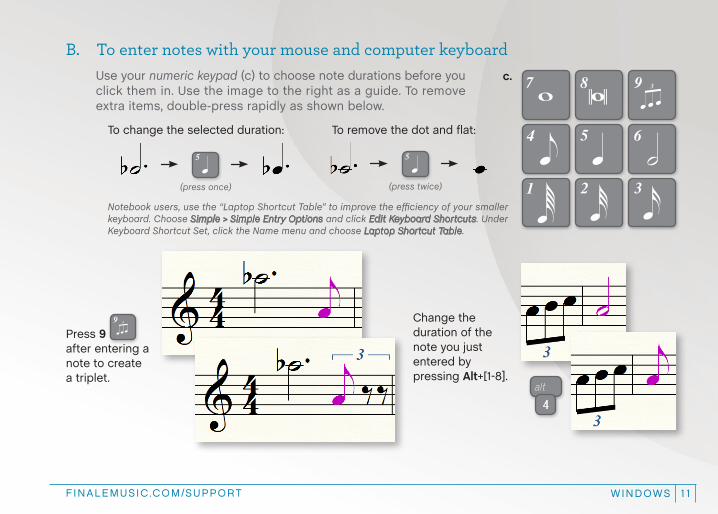
B. To enter notes with your mouse and computer keyboardUse your numeric keypad (c) to choose note durations before you click them in. Use the image to the right as a guide. To remove extra items, double-press rapidly as shown below.
c.
Press 9 after entering a note to create a triplet.
Change the duration of the note you just entered by pressing Alt+[1-8].
(press once) (press twice)
To change the selected duration: To remove the dot and flat:
Notebook users, use the “Laptop Shortcut Table” to improve the efficiency of your smaller keyboard. Choose Simple > Simple Entry Options and click Edit Keyboard Shortcuts. Under Keyboard Shortcut Set, click the Name menu and choose Laptop Shortcut Table.
alt
4

WINDOWS FINALE12
C. To type notes into the score with your computer keyboardUsing your computer keyboard to enter notes is faster than clicking. After typing the duration:
1 Press Enter to activate the Simple Entry Caret, which is
Finale’s entry cursor.
2 Use the up and down arrows to choose the pitch.
3 Press Enter to enter the note.
4 Or, type the letter of the desired pitch or 0 (zero) for a
rest. Use left and right arrows to move the selection.
5 Press Shift + down arrow to move down an octave (and press Enter).
6 Type a number on the number row to add an interval.
7 Press Ctrl + down arrow to select a lower note in a chord.
D. To play notes into the score with a MIDI keyboardYou can use your MIDI keyboard (or other MIDI device) to quickly enter notes. With the caret active, simply play a note or chord to add it to the score.
Check Simple > Use MIDI Device for Input to use a MIDI keyboard for note entry.
See “Simple Entry” in the User Manual for more information.
See “Speedy Entry” and “HyperScribe” in the User Manual for other ways to enter music using a MIDI keyboard.
ctrl
enterenter
shift 3A C0B
Common ways to modify a selected note:
(press twice)
+ =
_- T L \
Sharp Flat Add tie Flip stem Flip enharmonic
NNatural
//Break/join beam
WINDOWSFINALEMUSIC .COM/SUPPORT 13
MULTIPLE VOICES: LAYERS
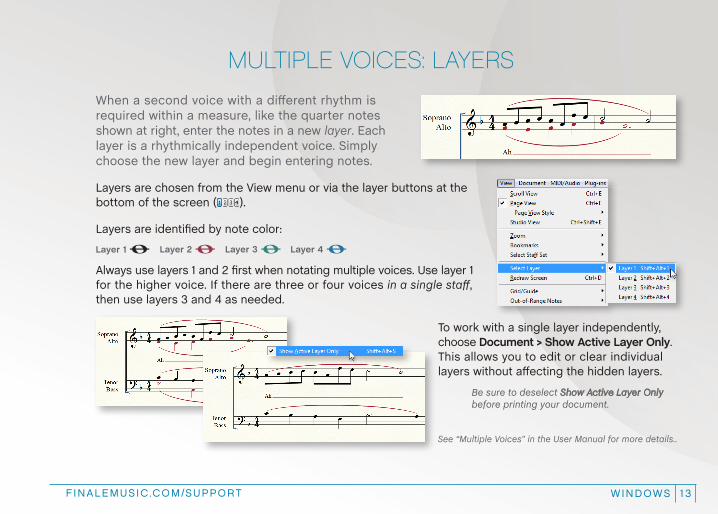
When a second voice with a different rhythm is required within a measure, like the quarter notes shown at right, enter the notes in a new layer. Each layer is a rhythmically independent voice. Simply choose the new layer and begin entering notes.
Layers are chosen from the View menu or via the layer buttons at the bottom of the screen ( ).
Layers are identified by note color:
Always use layers 1 and 2 first when notating multiple voices. Use layer 1 for the higher voice. If there are three or four voices in a single staff, then use layers 3 and 4 as needed.
Layer 1 Layer 2 Layer 3 Layer 4
To work with a single layer independently, choose Document > Show Active Layer Only. This allows you to edit or clear individual layers without affecting the hidden layers.
Be sure to deselect Show Active Layer Only before printing your document.
See “Multiple Voices” in the User Manual for more details..
WINDOWS FINALE14
PLAYING IN MUSIC: HYPERSCRIBE
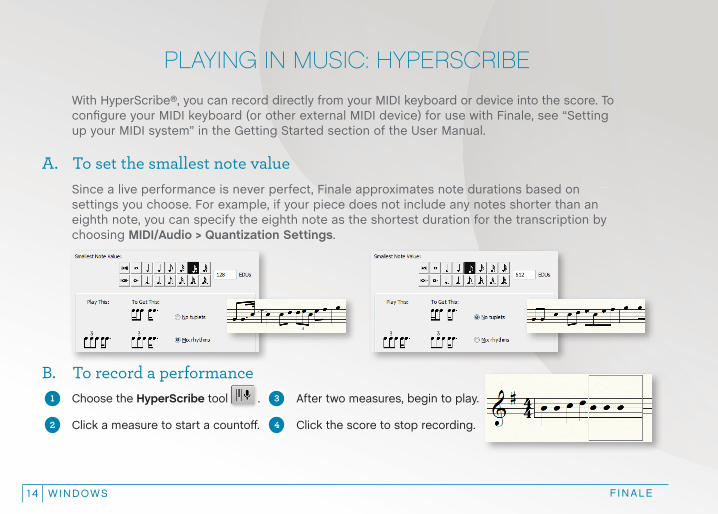
With HyperScribe®, you can record directly from your MIDI keyboard or device into the score. To configure your MIDI keyboard (or other external MIDI device) for use with Finale, see “Setting up your MIDI system” in the Getting Started section of the User Manual.
B. To record a performance1
Choose the HyperScribe tool .
2 Click a measure to start a countoff.
3 After two measures, begin to play.
4 Click the score to stop recording.
A. To set the smallest note valueSince a live performance is never perfect, Finale approximates note durations based on settings you choose. For example, if your piece does not include any notes shorter than an eighth note, you can specify the eighth note as the shortest duration for the transcription by choosing MIDI/Audio > Quantization Settings.
WINDOWSFINALEMUSIC .COM/SUPPORT 15
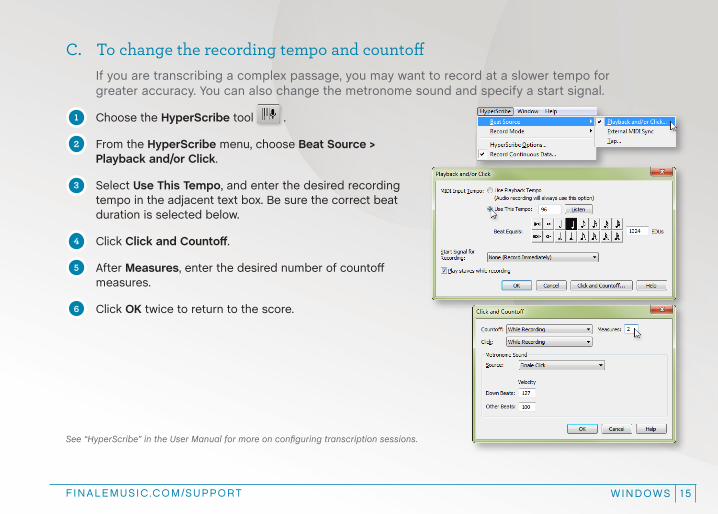
C. To change the recording tempo and countoffIf you are transcribing a complex passage, you may want to record at a slower tempo for greater accuracy. You can also change the metronome sound and specify a start signal.
1 Choose the HyperScribe tool .
2 From the HyperScribe menu, choose Beat Source >
Playback and/or Click.
3 Select Use This Tempo, and enter the desired recording
tempo in the adjacent text box. Be sure the correct beat duration is selected below.
4 Click Click and Countoff.
5 After Measures, enter the desired number of countoff
measures.
6 Click OK twice to return to the score.
See “HyperScribe” in the User Manual for more on configuring transcription sessions.
WINDOWS FINALE16
SELECTING MUSIC
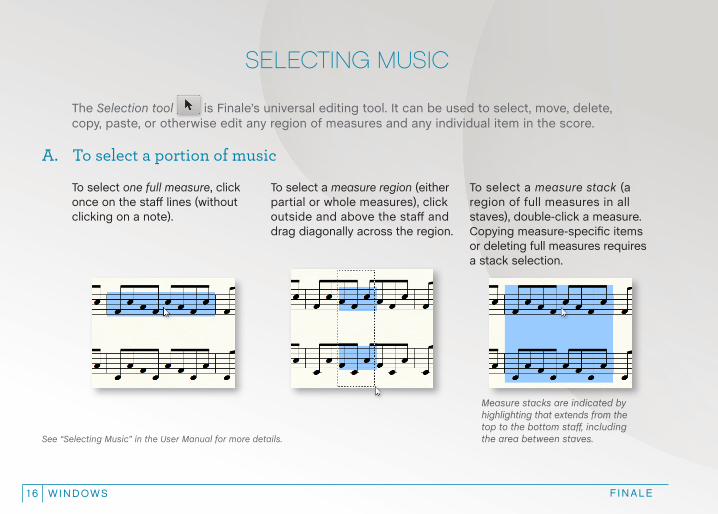
The Selection tool is Finale’s universal editing tool. It can be used to select, move, delete, copy, paste, or otherwise edit any region of measures and any individual item in the score.
A. To select a portion of music
Measure stacks are indicated by highlighting that extends from the top to the bottom staff, including the area between staves.
To select one full measure, click once on the staff lines (without clicking on a note).
To select a measure region (either partial or whole measures), click outside and above the staff and drag diagonally across the region.
To select a measure stack (a region of full measures in all staves), double-click a measure. Copying measure-specific items or deleting full measures requires a stack selection.
See “Selecting Music” in the User Manual for more details.
WINDOWSFINALEMUSIC .COM/SUPPORT 1 7
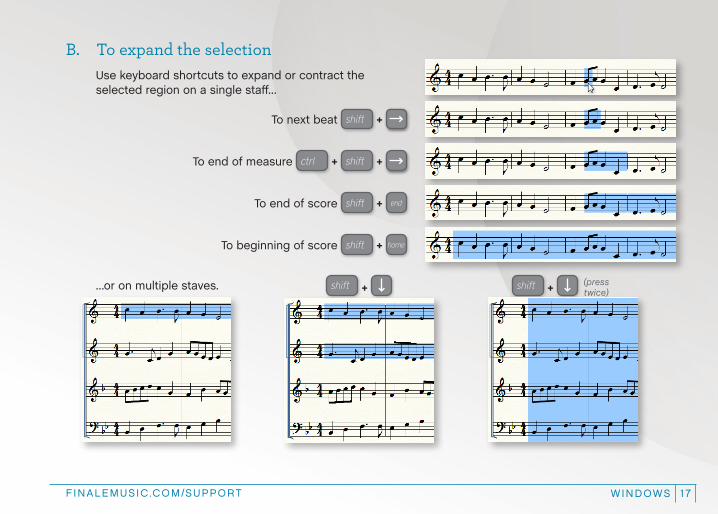
B. To expand the selectionUse keyboard shortcuts to expand or contract the selected region on a single staff…
To next beat shift +
To end of measure ctrl + shift +
To end of score shift + end
To beginning of score shift + home
…or on multiple staves. shift + shift + (press twice)
WINDOWS FINALE18
COPYING, PASTING, AND INSERTING
Finale offers a great deal of control over copying, inserting, and pasting (replacing).
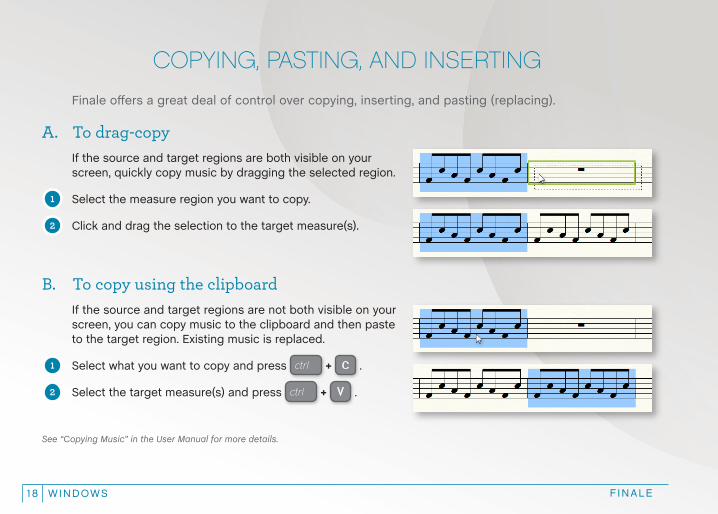
A. To drag-copyIf the source and target regions are both visible on your screen, quickly copy music by dragging the selected region.
1 Select the measure region you want to copy.
2 Click and drag the selection to the target measure(s).
B. To copy using the clipboardIf the source and target regions are not both visible on your screen, you can copy music to the clipboard and then paste to the target region. Existing music is replaced.
1 Select what you want to copy and press ctrl + C .
2 Select the target measure(s) and press ctrl + V .
See “Copying Music” in the User Manual for more details.
WINDOWSFINALEMUSIC .COM/SUPPORT 19
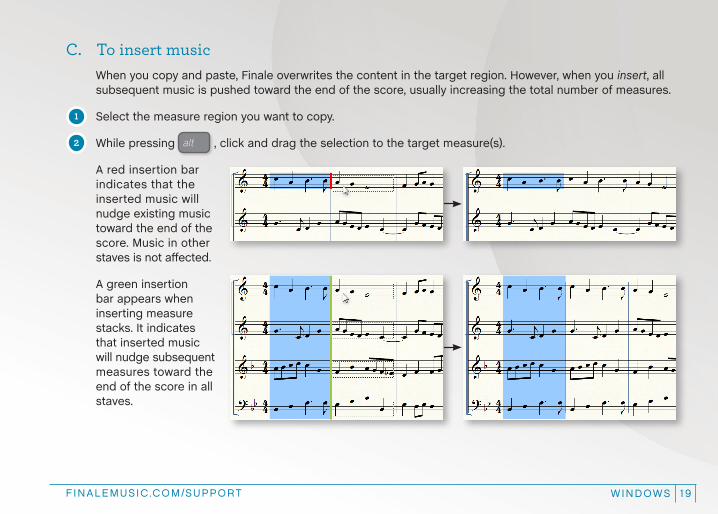
C. To insert musicWhen you copy and paste, Finale overwrites the content in the target region. However, when you insert, all subsequent music is pushed toward the end of the score, usually increasing the total number of measures.
1 Select the measure region you want to copy.
2 While pressing alt , click and drag the selection to the target measure(s).
A red insertion bar indicates that the inserted music will nudge existing music toward the end of the score. Music in other staves is not affected.
A green insertion bar appears when inserting measure stacks. It indicates that inserted music will nudge subsequent measures toward the end of the score in all staves.
WINDOWS FINALE20
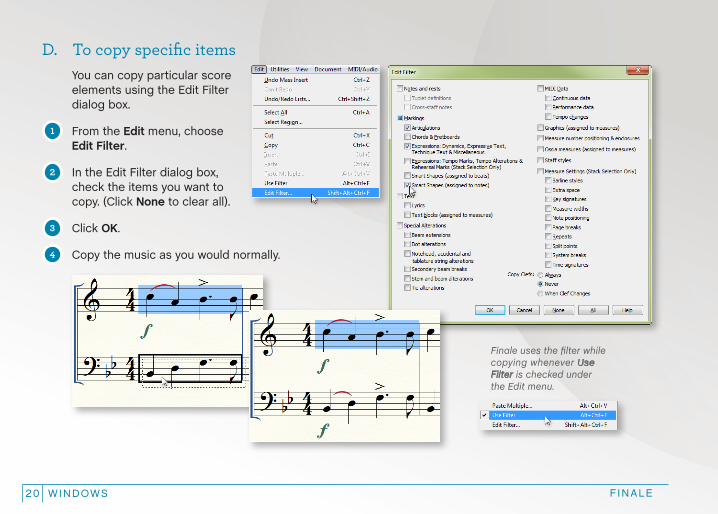
D. To copy specific itemsYou can copy particular score elements using the Edit Filter dialog box.
1 From the Edit menu, choose
Edit Filter.
2 In the Edit Filter dialog box,
check the items you want to copy. (Click None to clear all).
3 Click OK.
4 Copy the music as you would normally.
Finale uses the filter while copying whenever Use Filter is checked under the Edit menu.
WINDOWSFINALEMUSIC .COM/SUPPORT 21
TRANSPOSING
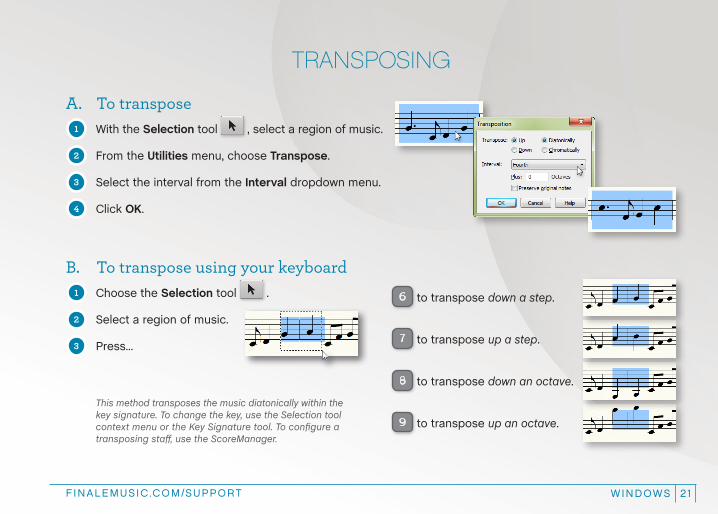
A. To transpose1
With the Selection tool , select a region of music.
2 From the Utilities menu, choose Transpose.
3 Select the interval from the Interval dropdown menu.
4 Click OK.
B. To transpose using your keyboard1
Choose the Selection tool .
2 Select a region of music.
3 Press...
9 to transpose up an octave.
8 to transpose down an octave.
7 to transpose up a step.
6 to transpose down a step.
This method transposes the music diatonically within the key signature. To change the key, use the Selection tool context menu or the Key Signature tool. To configure a transposing staff, use the ScoreManager.
WINDOWS FINALE22
WORKING WITH MEASURES
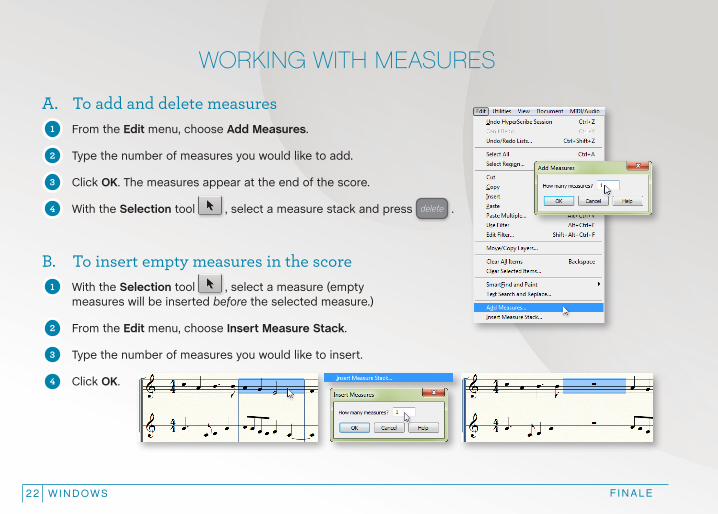
A. To add and delete measures1
From the Edit menu, choose Add Measures.
2 Type the number of measures you would like to add.
3 Click OK. The measures appear at the end of the score.
4 With the Selection tool , select a measure stack and press delete .
B. To insert empty measures in the score1
With the Selection tool , select a measure (empty measures will be inserted before the selected measure.)
2 From the Edit menu, choose Insert Measure Stack.
3 Type the number of measures you would like to insert.
4 Click OK.
WINDOWSFINALEMUSIC .COM/SUPPORT 23
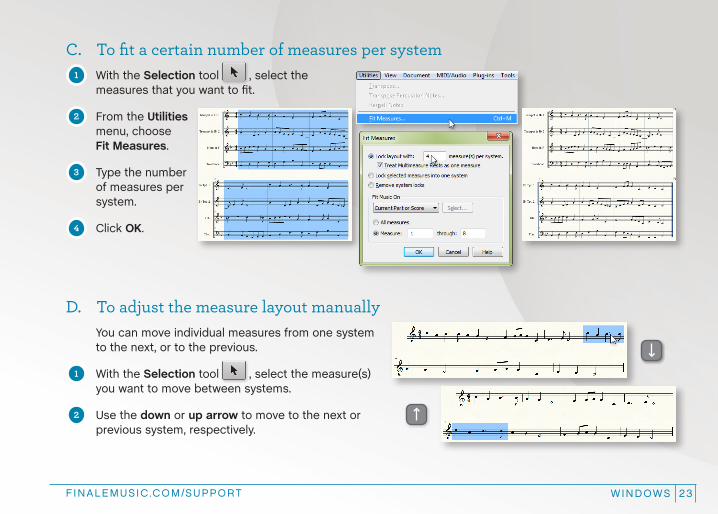
C. To fit a certain number of measures per system1
With the Selection tool , select the measures that you want to fit.
2 From the Utilities
menu, choose Fit Measures.
3 Type the number
of measures per system.
4 Click OK.
D. To adjust the measure layout manuallyYou can move individual measures from one system to the next, or to the previous.
1 With the Selection tool , select the measure(s)
you want to move between systems.
2 Use the down or up arrow to move to the next or
previous system, respectively.
WINDOWS FINALE24
WORKING WITH STAVES AND INSTRUMENTS
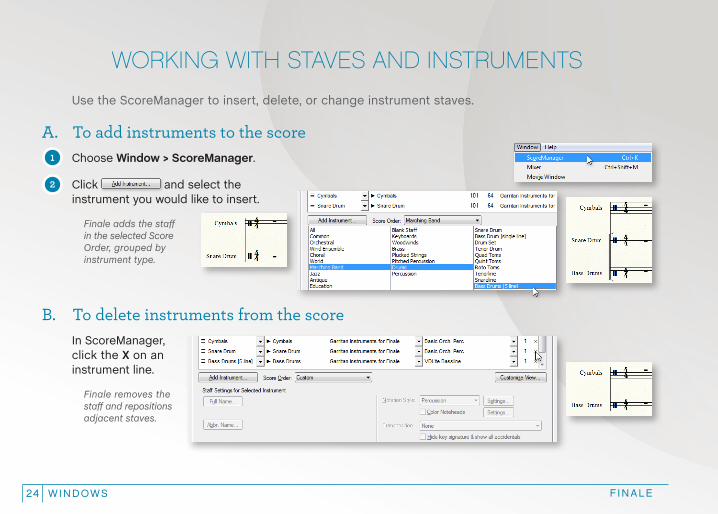
Use the ScoreManager to insert, delete, or change instrument staves.
A. To add instruments to the score1
Choose Window > ScoreManager.
2 Click and select the
instrument you would like to insert.
Finale adds the staff in the selected Score Order, grouped by instrument type.
B. To delete instruments from the score
In ScoreManager, click the X on an instrument line.
Finale removes the staff and repositions adjacent staves.
WINDOWSFINALEMUSIC .COM/SUPPORT 25
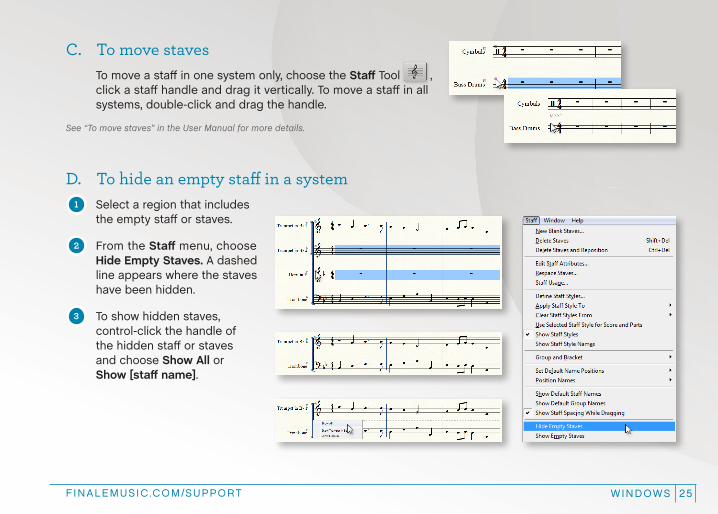
C. To move stavesTo move a staff in one system only, choose the Staff Tool , click a staff handle and drag it vertically. To move a staff in all systems, double-click and drag the handle.
See “To move staves” in the User Manual for more details.
D. To hide an empty staff in a system1
Select a region that includes the empty staff or staves.
2 From the Staff menu, choose
Hide Empty Staves. A dashed line appears where the staves have been hidden.
3 To show hidden staves,
control-click the handle of the hidden staff or staves and choose Show All or Show [staff name].
WINDOWS FINALE26
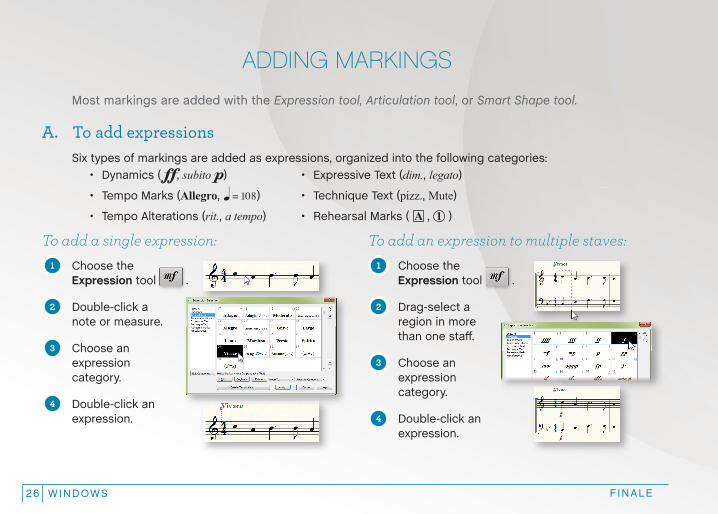
ADDING MARKINGS
Most markings are added with the Expression tool, Articulation tool, or Smart Shape tool.
A. To add expressionsSix types of markings are added as expressions, organized into the following categories:
To add a single expression:1
Choose the Expression tool .
2 Double-click a
note or measure.
3 Choose an
expression category.
4 Double-click an
expression.
To add an expression to multiple staves:1
Choose the Expression tool .
2 Drag-select a
region in more than one staff.
3 Choose an
expression category.
4 Double-click an
expression.
• Dynamics ( , subito p)• Tempo Marks (Allegro, q = 108)
• Tempo Alterations (rit., a tempo)
• Expressive Text (dim., legato)
• Technique Text (pizz., Mute)
• Rehearsal Marks ( A , 1 )
WINDOWSFINALEMUSIC .COM/SUPPORT 27
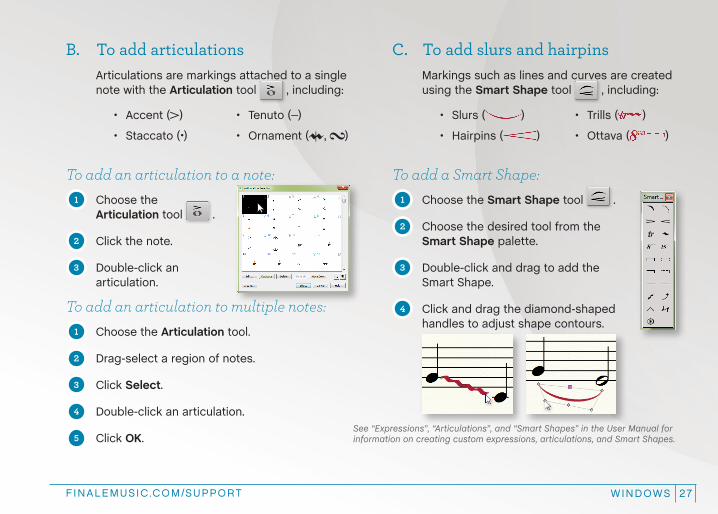
B. To add articulationsArticulations are markings attached to a single note with the Articulation tool , including:
To add an articulation to a note:1
Choose the Articulation tool .
2 Click the note.
3 Double-click an
articulation.
To add an articulation to multiple notes:1
Choose the Articulation tool.
2 Drag-select a region of notes.
3 Click Select.
4 Double-click an articulation.
5 Click OK.
C. To add slurs and hairpinsMarkings such as lines and curves are created using the Smart Shape tool , including:
To add a Smart Shape:1
Choose the Smart Shape tool .
2 Choose the desired tool from the
Smart Shape palette.
3 Double-click and drag to add the
Smart Shape.
4 Click and drag the diamond-shaped
handles to adjust shape contours.
• Accent (>)• Staccato (.)
• Slurs ( )
• Hairpins ( )
• Trills ( )
• Ottava ( )
See “Expressions”, “Articulations”, and “Smart Shapes” in the User Manual for information on creating custom expressions, articulations, and Smart Shapes.
• Tenuto (-)• Ornament (M, T)
WINDOWS FINALE28
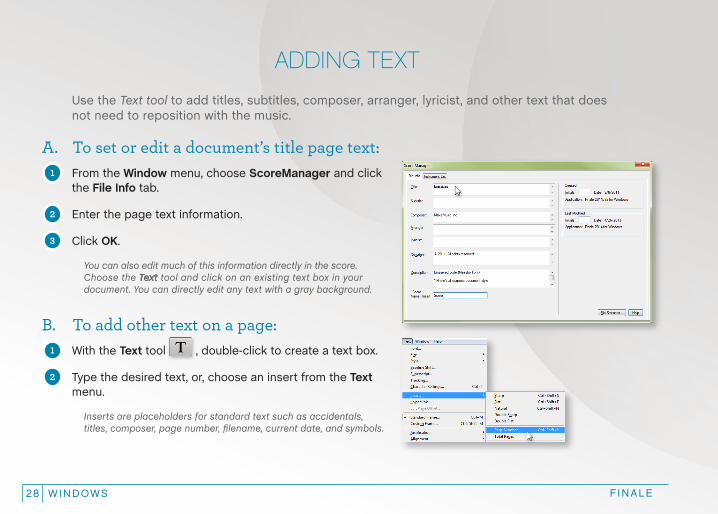
Use the Text tool to add titles, subtitles, composer, arranger, lyricist, and other text that does not need to reposition with the music.
A. To set or edit a document’s title page text:1
From the Window menu, choose ScoreManager and click the File Info tab.
2 Enter the page text information.
3 Click OK.
You can also edit much of this information directly in the score. Choose the Text tool and click on an existing text box in your document. You can directly edit any text with a gray background.
ADDING TEXT
B. To add other text on a page:1
With the Text tool , double-click to create a text box.
2 Type the desired text, or, choose an insert from the Text
menu.
Inserts are placeholders for standard text such as accidentals, titles, composer, page number, filename, current date, and symbols.
WINDOWSFINALEMUSIC .COM/SUPPORT 29
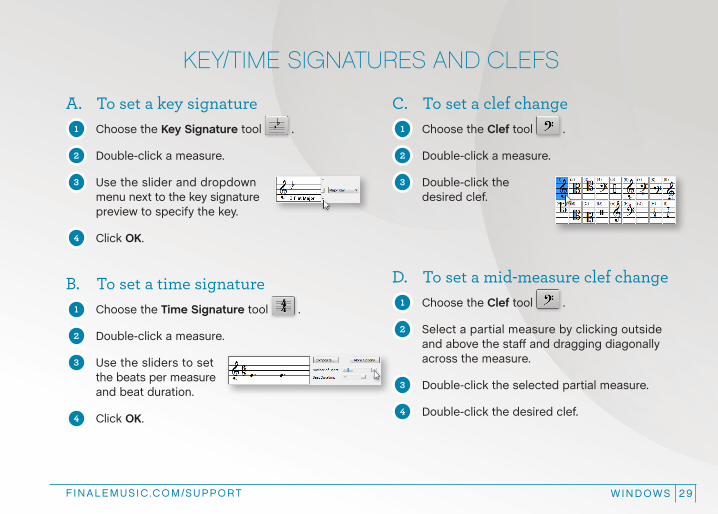
KEY/TIME SIGNATURES AND CLEFS
A. To set a key signature1
Choose the Key Signature tool .
2 Double-click a measure.
3 Use the slider and dropdown
menu next to the key signature preview to specify the key.
4 Click OK.
B. To set a time signature1
Choose the Time Signature tool .
2 Double-click a measure.
3 Use the sliders to set
the beats per measure and beat duration.
4 Click OK.
C. To set a clef change1
Choose the Clef tool .
2 Double-click a measure.
3 Double-click the
desired clef.
D. To set a mid-measure clef change1
Choose the Clef tool .
2 Select a partial measure by clicking outside
and above the staff and dragging diagonally across the measure.
3 Double-click the selected partial measure.
4 Double-click the desired clef.
WINDOWS FINALE30
LYRICS, CHORDS, AND REPEATS
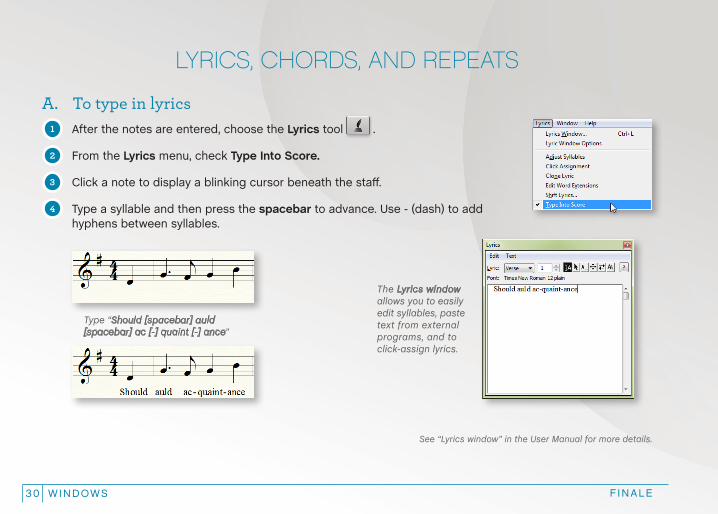
A. To type in lyrics1
After the notes are entered, choose the Lyrics tool .
2 From the Lyrics menu, check Type Into Score.
3 Click a note to display a blinking cursor beneath the staff.
4 Type a syllable and then press the spacebar to advance. Use - (dash) to add
hyphens between syllables.
Type “Should [spacebar] auld [spacebar] ac [-] quaint [-] ance”
See “Lyrics window” in the User Manual for more details.
The Lyrics window allows you to easily edit syllables, paste text from external programs, and to click-assign lyrics.
WINDOWSFINALEMUSIC .COM/SUPPORT 31
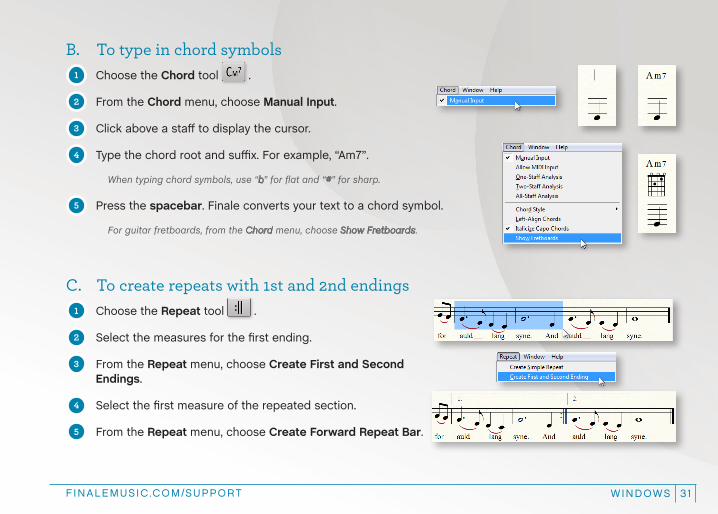
B. To type in chord symbols1
Choose the Chord tool .
2 From the Chord menu, choose Manual Input.
3 Click above a staff to display the cursor.
4 Type the chord root and suffix. For example, “Am7”.
When typing chord symbols, use “b” for flat and “#” for sharp.
5 Press the spacebar. Finale converts your text to a chord symbol.
For guitar fretboards, from the Chord menu, choose Show Fretboards.
C. To create repeats with 1st and 2nd endings1
Choose the Repeat tool .
2 Select the measures for the first ending.
3 From the Repeat menu, choose Create First and Second
Endings.
4 Select the first measure of the repeated section.
5 From the Repeat menu, choose Create Forward Repeat Bar.
WINDOWS FINALE32
PLAYBACK
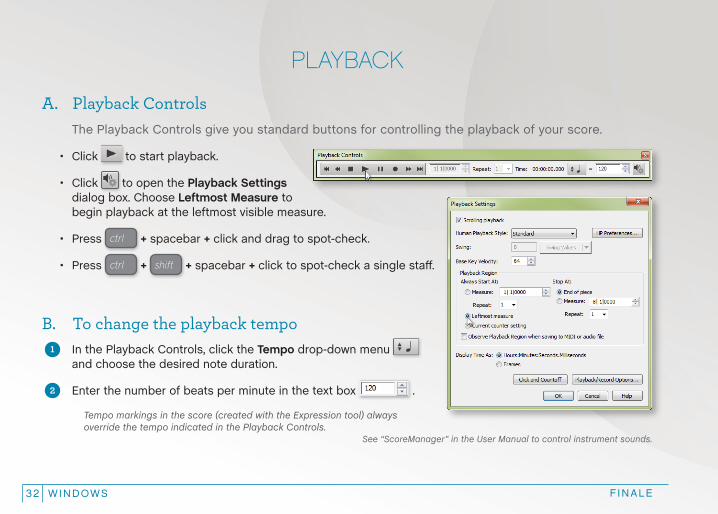
A. Playback ControlsThe Playback Controls give you standard buttons for controlling the playback of your score.
• Click to start playback.
• Click to open the Playback Settings dialog box. Choose Leftmost Measure to begin playback at the leftmost visible measure.
• Press ctrl + spacebar + click and drag to spot-check.
• Press ctrl + shift + spacebar + click to spot-check a single staff.
B. To change the playback tempo1
In the Playback Controls, click the Tempo drop-down menu and choose the desired note duration.
2 Enter the number of beats per minute in the text box .
Tempo markings in the score (created with the Expression tool) always override the tempo indicated in the Playback Controls.
See “ScoreManager” in the User Manual to control instrument sounds.
WINDOWSFINALEMUSIC .COM/SUPPORT 33
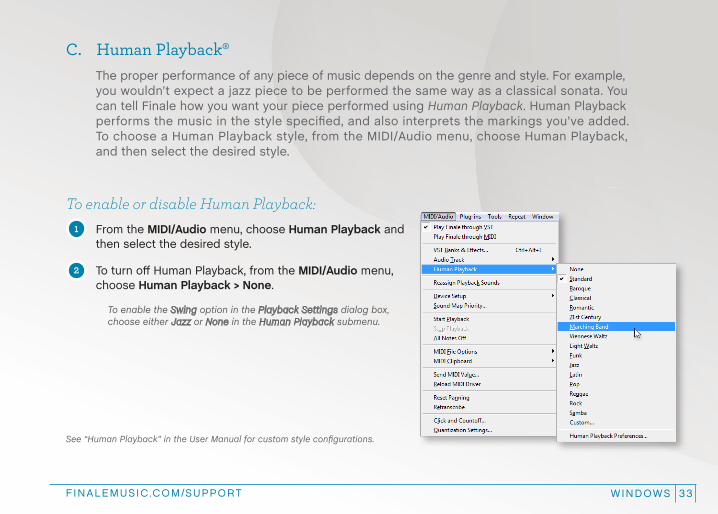
C. Human Playback®The proper performance of any piece of music depends on the genre and style. For example, you wouldn’t expect a jazz piece to be performed the same way as a classical sonata. You can tell Finale how you want your piece performed using Human Playback. Human Playback performs the music in the style specified, and also interprets the markings you’ve added. To choose a Human Playback style, from the MIDI/Audio menu, choose Human Playback, and then select the desired style.
To enable or disable Human Playback:1
From the MIDI/Audio menu, choose Human Playback and then select the desired style.
2 To turn off Human Playback, from the MIDI/Audio menu,
choose Human Playback > None.
To enable the Swing option in the Playback Settings dialog box, choose either Jazz or None in the Human Playback submenu.
See “Human Playback” in the User Manual for custom style configurations.
WINDOWS FINALE34
PAGE LAYOUT
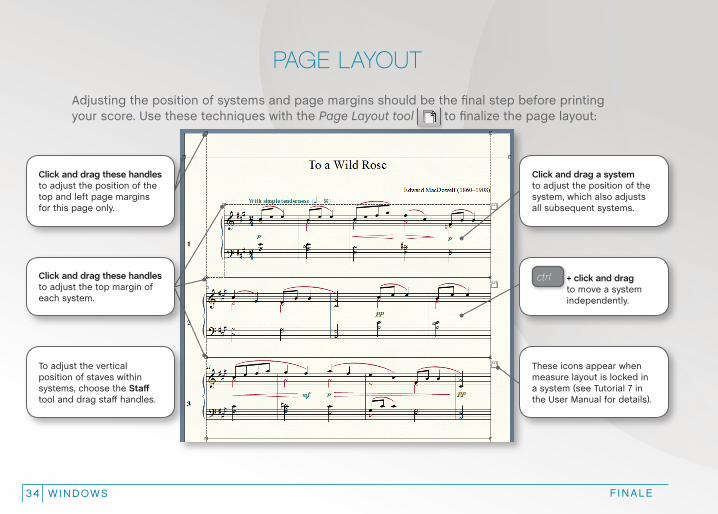
Adjusting the position of systems and page margins should be the final step before printing your score. Use these techniques with the Page Layout tool to finalize the page layout:
To adjust the vertical position of staves within systems, choose the Staff tool and drag staff handles.
Click and drag these handles to adjust the position of the top and left page margins for this page only.
Click and drag these handles to adjust the top margin of each system.
Click and drag a system to adjust the position of the system, which also adjusts all subsequent systems.
ctrl + click and drag to move a system independently.
These icons appear when measure layout is locked in a system (see Tutorial 7 in the User Manual for details).
WINDOWSFINALEMUSIC .COM/SUPPORT 35
SHARING YOUR MUSIC
A. To print your scoreTo print, press ctrl +
P and click OK.
To create a PDF, choose File > Export > PDF.
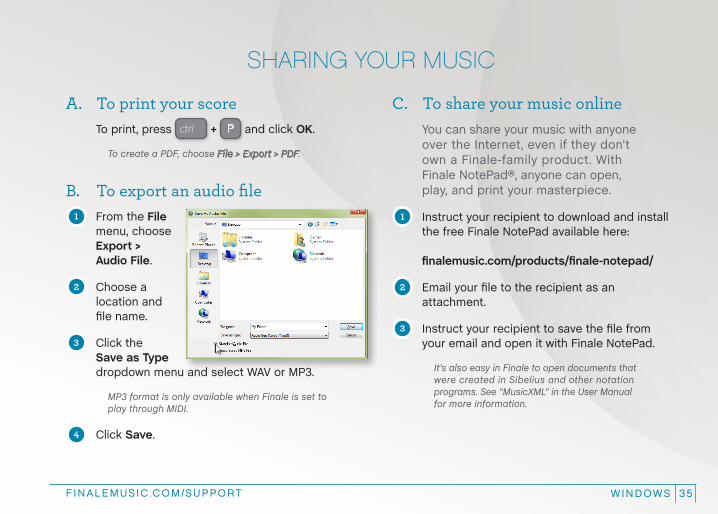
B. To export an audio file1
From the File menu, choose Export > Audio File.
2 Choose a
location and file name.
3 Click the
Save as Type dropdown menu and select WAV or MP3.
MP3 format is only available when Finale is set to play through MIDI.
4 Click Save.
C. To share your music onlineYou can share your music with anyone over the Internet, even if they don’t own a Finale-family product. With Finale NotePad®, anyone can open, play, and print your masterpiece.
1 Instruct your recipient to download and install
the free Finale NotePad available here: finalemusic.com/products/finale-notepad/
2 Email your file to the recipient as an
attachment.
3 Instruct your recipient to save the file from
your email and open it with Finale NotePad.
It’s also easy in Finale to open documents that were created in Sibelius and other notation programs. See “MusicXML” in the User Manual for more information.
WINDOWS FINALE36
KEYBOARD SHORTCUTS
Finale provides keyboard shortcuts called Metatools that you can use to quickly add markings to your score. You can also customize metatools by assigning one to a particular marking.
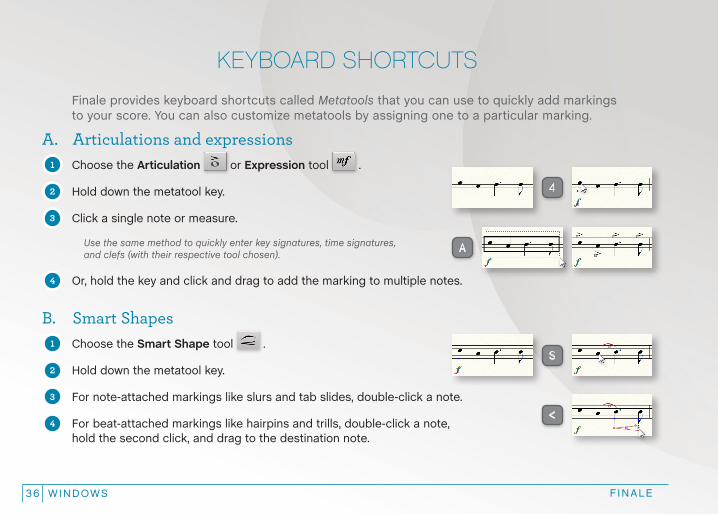
A. Articulations and expressions1
Choose the Articulation or Expression tool .
2 Hold down the metatool key.
3 Click a single note or measure.
Use the same method to quickly enter key signatures, time signatures, and clefs (with their respective tool chosen).
4 Or, hold the key and click and drag to add the marking to multiple notes.
B. Smart Shapes1
Choose the Smart Shape tool .
2 Hold down the metatool key.
3 For note-attached markings like slurs and tab slides, double-click a note.
4 For beat-attached markings like hairpins and trills, double-click a note,
hold the second click, and drag to the destination note.
A
4
S
<
WINDOWSFINALEMUSIC .COM/SUPPORT 37
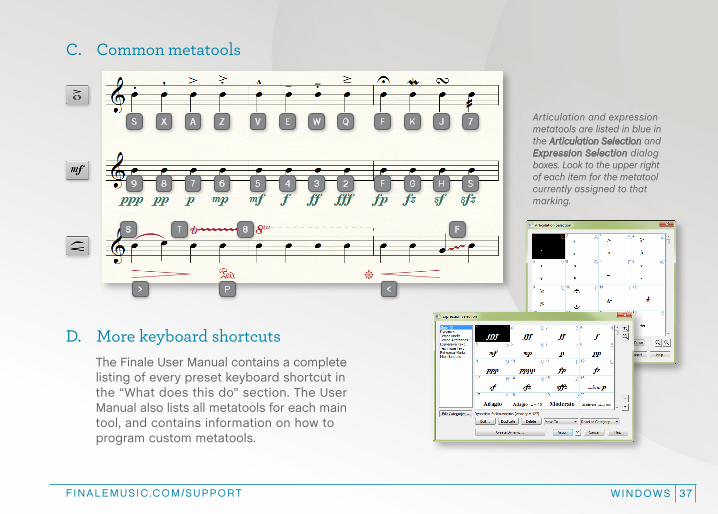
C. Common metatools
9 8 7 6 5 4 3 2 F G H S
S X A Z V E W Q F K J 7
S T 8 F
> P <
Articulation and expression metatools are listed in blue in the Articulation Selection and Expression Selection dialog boxes. Look to the upper right of each item for the metatool currently assigned to that marking.
D. More keyboard shortcutsThe Finale User Manual contains a complete listing of every preset keyboard shortcut in the “What does this do” section. The User Manual also lists all metatools for each main tool, and contains information on how to program custom metatools.
WINDOWS FINALE38
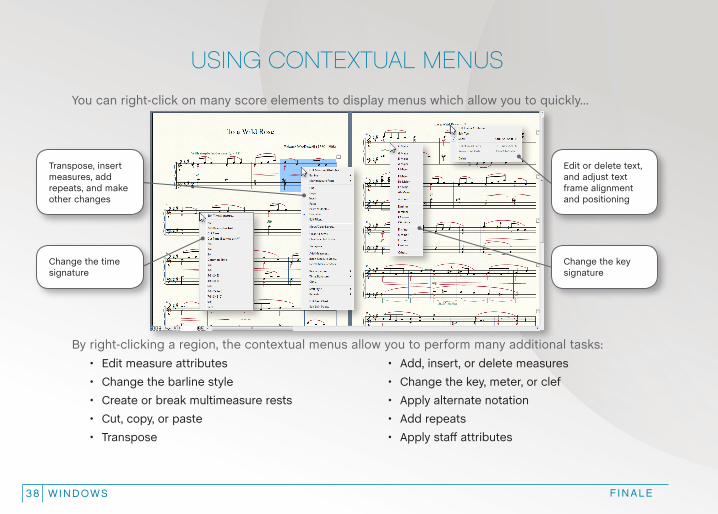
USING CONTEXTUAL MENUS
You can right-click on many score elements to display menus which allow you to quickly…
By right-clicking a region, the contextual menus allow you to perform many additional tasks:• Edit measure attributes
• Change the barline style
• Create or break multimeasure rests
• Cut, copy, or paste
• Transpose
• Add, insert, or delete measures
• Change the key, meter, or clef
• Apply alternate notation
• Add repeats
• Apply staff attributes
Transpose, insert measures, add repeats, and make other changes
Change the time signature
Change the key signature
Edit or delete text, and adjust text frame alignment and positioning
WINDOWSFINALEMUSIC .COM/SUPPORT 39
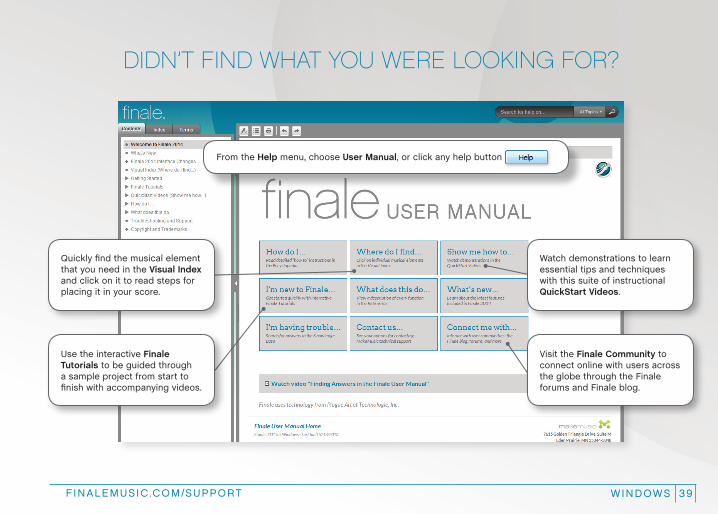
DIDN’T FIND WHAT YOU WERE LOOKING FOR?
From the Help menu, choose User Manual, or click any help button
Watch demonstrations to learn essential tips and techniques with this suite of instructional QuickStart Videos.
Quickly find the musical element that you need in the Visual Index and click on it to read steps for placing it in your score.
Use the interactive Finale Tutorials to be guided through a sample project from start to finish with accompanying videos.
Visit the Finale Community to connect online with users across the globe through the Finale forums and Finale blog.
WINDOWS FINALE40
GETTING SUPPORT
Tutorial SupportFor more learning resources and additional solutions to common Finale questions, visit our Support Portal at finalemusic.com/support. There, you can also contact our support team directly through email/web-based support cases.
Technical SupportTroubleshooting for technical problems is available online at finalemusic.com/support or by phone at (952) 937-9703 between 8:30 AM and 5:00 PM CST, Monday through Friday.
Phone support is free of charge (although MakeMusic does not reimburse long-distance charges). Please have your serial number ready. Note that in order for MakeMusic to continue offering free, efficient phone support, we limit phone contacts to technical problems only. To learn how to use Finale, please consult one of Finale’s many ‘how-to’ resources, including this Quick Reference Guide, the Finale Tutorials, the QuickStart Videos, and the comprehensive, searchable User Manual.
Other InquiriesFor authorization or sales questions, contact us at (800) 843-2066, or (952) 937-9611 outside the US. MakeMusic can also be reached by fax at (952) 937-9760, or by mail at 7615 Golden Triangle Drive, Suite M, Eden Prairie, MN 55344-3848. Visit us online at finalemusic.com.
Related Documents