Traditional Roofing • 2006 Joseph Jenkins, Inc. 143 Forest Lane, Grove City, PA 16127 USA (866) 641-7141 • traditionalroofing.com Quaint Slate Roofs AN EASY STYLE THAT’S FUN AND CREATIVE I T MAY BE HARD TO THINK OF ROOFING WORK AS “FUN,” but slate roofing can be both fun and creative when standard installation tech- niques are set aside and new ones are employed. Standard American slate roofs include field slates that are all the same length and width and usually the same color. Yet, slate roofing allows for a number of variations, including length, width, shape, color, thickness, and recycled content. All of these variations can be blended on one roof — the combinations are endless. The technique is simple enough. On a standard installation, say all 18” long slates, the field of the roof is chalked for the exposure on 18” slates, usually with a 3” headlap. That exposure is 7.5”, so the chalk lines are set 7.5” apart up the roof deck. Now, let’s add 20” and 22” slates to the mix. They are also installed on the same chalk lines, but the extra length is left to simply hang down. Because the extra slate length creates extra headlap, these longer slates can also be lift- ed above the chalk line an inch or two in order to adjust the appear- ance of the finished roof. Add a variety of colors, which, in the U.S. include various shades of gray, purple, mottled green and purple, red, “sea green,” various shades of green, and black, in whatever combination suits your desire. And make sure you are using a variety of widths, such as 9”, 10”, 11”, 12” and 14”. If you want to throw some thicker slates into the mix, go ahead. Same for salvaged, weathered slates — they can add some character. In the end you can obliterate any semblance of uniformity on the roof. Or you can install a more conservative style that retains some uniformity. The advantages of this roof style include a very tight roof due to the extra headlap, not to mention the unique, one-of-a-kind artistic character of the roof. You can also take a mix of sizes and col- ors of slates that are lying around left-over and make a beautiful roof out of them. You can create a color scheme that suits your needs, matches your house, or just appeals to your sense of artistry. There is a trick to the system, however — blend the slates on the ground before you send them up onto the roof. Let’s say you’re installing 1/3 18”, 1/3 20” and 1/3 22” slates. Then for every 12 slates sent up to the roof, there will be four of each length. If your 18” slates are two colors, or maybe half new and half salvaged, then, of those four, two are one type and two are the other. Etc. You have to figure out your blend ahead of time this way, then blend the slates on the ground — a job usually done by the ground worker(s), and an important job as well (Figure 1). The slates are then sent up already pre-mixed so the installers just have to look at each one to make sure they’re grabbing the correct width. Each overlying slate should lap the underlying slate down the center, if possible, although a 3” lateral overlap is permissible. The installers are also looking at the lengths and colors, trying to not lay the same length and/or same color beside each other. In other words, the installer is looking at every slate prior to nailing it. This is what creates the artistry. For this article, we have installed six such roofs on small buildings using different combi- nations of lengths, widths, col- ors and recycled content. Each roof is totally unique in its own way. 1 2 Figure 1: The slates are blended or “shuffled” on the ground. The slates are sent up onto the scaffolding pre-mixed. by Joseph Jenkins Continued next page All photos this article by Joe Jenkins.

Welcome message from author
This document is posted to help you gain knowledge. Please leave a comment to let me know what you think about it! Share it to your friends and learn new things together.
Transcript

14 Traditional Roofing • 2006 Joseph Jenkins, Inc. 143 Forest Lane, Grove City, PA 16127 USA (866) 641-7141 • traditionalroofing.com
Quaint
Cottage Style
Slate RoofsAN EASY STYLE THAT’S FUN
AND CREATIVE
IT MAY BE HARD TO THINK OF ROOFING WORK AS “FUN,” but slate roofing
can be both fun and creative when standard installation tech-
niques are set aside and new ones are employed. Standard
American slate roofs include field slates that are all the same length
and width and usually the same color. Yet, slate roofing allows for a
number of variations, including length, width, shape, color, thickness,
and recycled content. All of these variations can be blended on one
roof — the combinations are endless.
The technique is simple enough. On a standard installation, say
all 18” long slates, the field of the roof is chalked for the exposure on
18” slates, usually with a 3” headlap. That exposure is 7.5”, so the
chalk lines are set 7.5” apart up the roof deck. Now, let’s add 20” and
22” slates to the mix. They are also installed on the same chalk lines,
but the extra length is left to simply hang down. Because the extra
slate length creates extra headlap, these longer slates can also be lift-
ed above the chalk line an inch or two in order to adjust the appear-
ance of the finished roof.
Add a variety of colors, which, in the U.S. include various shades
of gray, purple, mottled green and purple, red, “sea green,” various
shades of green, and black, in whatever combination suits your
desire. And make sure you are using a variety of widths, such as 9”,
10”, 11”, 12” and 14”. If you want to throw some thicker slates into the
mix, go ahead. Same for salvaged, weathered slates — they can add
some character.
In the end you can obliterate any semblance of uniformity on the
roof. Or you can install a more conservative style that retains some
uniformity. The advantages of this roof style include a very tight roof
due to the extra headlap, not to mention the unique, one-of-a-kind
artistic character of the roof. You can also take a mix of sizes and col-
ors of slates that are lying around left-over and make a beautiful roof
out of them. You can create a color scheme that suits your needs,
matches your house, or just appeals to your sense of artistry.
There is a trick to the system, however — blend the slates on the
ground before you send them up onto the roof. Let’s say you’re
installing 1/3 18”, 1/3 20” and 1/3 22” slates. Then for every 12 slates
sent up to the roof, there will be four of each length. If your 18” slates
are two colors, or maybe half new and half salvaged, then, of those
four, two are one type and two are the other. Etc. You have to figure
out your blend ahead of time this way, then blend the slates on
the ground — a job usually done by the ground worker(s), and
an important job as well (Figure 1). The slates are then sent up
already pre-mixed so the installers just have to look at each
one to make sure they’re grabbing the correct width. Each
overlying slate should lap the underlying slate down the center,
if possible, although a 3” lateral overlap is permissible. The
installers are also looking at the lengths and colors, trying to
not lay the same length and/or same color beside each other.
In other words, the installer is looking at every slate prior to
nailing it. This is what creates
the artistry.
For this article, we have
installed six such roofs on small
buildings using different combi-
nations of lengths, widths, col-
ors and recycled content. Each
roof is totally unique in its own
way.
1
2
Figure 1: The slates are blended or “shuffled” on the ground.
The slates are sent up onto
the scaffolding pre-mixed.
by Joseph Jenkins
eContinued next page
All
ph
oto
s t
his
art
icle
by J
oe
Je
nkin
s.
Joseph Jenkins, Inc., 143 Forest Lane, Grove City, PA 16127 USA (866) 641-7141 • traditionalroofing.com Traditional Roofing • 2006 15
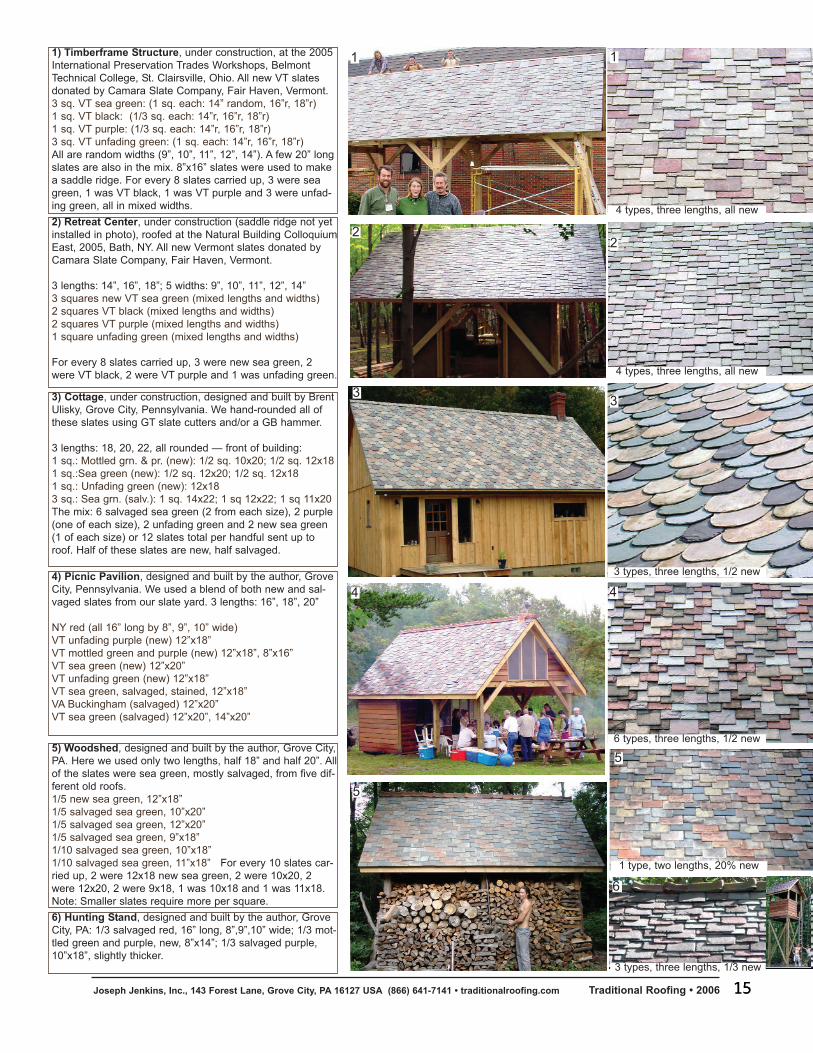
1) Timberframe Structure, under construction, at the 2005
International Preservation Trades Workshops, Belmont
Technical College, St. Clairsville, Ohio. All new VT slates
donated by Camara Slate Company, Fair Haven, Vermont.
3 sq. VT sea green: (1 sq. each: 14” random, 16”r, 18”r)
1 sq. VT black: (1/3 sq. each: 14”r, 16”r, 18”r)
1 sq. VT purple: (1/3 sq. each: 14”r, 16”r, 18”r)
3 sq. VT unfading green: (1 sq. each: 14”r, 16”r, 18”r)
All are random widths (9”, 10”, 11”, 12”, 14”). A few 20” long
slates are also in the mix. 8”x16” slates were used to make
a saddle ridge. For every 8 slates carried up, 3 were sea
green, 1 was VT black, 1 was VT purple and 3 were unfad-
ing green, all in mixed widths.
2) Retreat Center, under construction (saddle ridge not yet
installed in photo), roofed at the Natural Building Colloquium
East, 2005, Bath, NY. All new Vermont slates donated by
Camara Slate Company, Fair Haven, Vermont.
3 lengths: 14”, 16”, 18”; 5 widths: 9”, 10”, 11”, 12”, 14”
3 squares new VT sea green (mixed lengths and widths)
2 squares VT black (mixed lengths and widths)
2 squares VT purple (mixed lengths and widths)
1 square unfading green (mixed lengths and widths)
For every 8 slates carried up, 3 were new sea green, 2
were VT black, 2 were VT purple and 1 was unfading green.
3) Cottage, under construction, designed and built by Brent
Ulisky, Grove City, Pennsylvania. We hand-rounded all of
these slates using GT slate cutters and/or a GB hammer.
3 lengths: 18, 20, 22, all rounded — front of building:
1 sq.: Mottled grn. & pr. (new): 1/2 sq. 10x20; 1/2 sq. 12x18
1 sq.:Sea green (new): 1/2 sq. 12x20; 1/2 sq. 12x18
1 sq.: Unfading green (new): 12x18
3 sq.: Sea grn. (salv.): 1 sq. 14x22; 1 sq 12x22; 1 sq 11x20
The mix: 6 salvaged sea green (2 from each size), 2 purple
(one of each size), 2 unfading green and 2 new sea green
(1 of each size) or 12 slates total per handful sent up to
roof. Half of these slates are new, half salvaged.
4) Picnic Pavilion, designed and built by the author, Grove
City, Pennsylvania. We used a blend of both new and sal-
vaged slates from our slate yard. 3 lengths: 16”, 18”, 20”
NY red (all 16” long by 8”, 9”, 10” wide)
VT unfading purple (new) 12”x18”
VT mottled green and purple (new) 12”x18”, 8”x16”
VT sea green (new) 12”x20”
VT unfading green (new) 12”x18”
VT sea green, salvaged, stained, 12”x18”
VA Buckingham (salvaged) 12”x20”
VT sea green (salvaged) 12”x20”, 14”x20”
5) Woodshed, designed and built by the author, Grove City,
PA. Here we used only two lengths, half 18” and half 20”. All
of the slates were sea green, mostly salvaged, from five dif-
ferent old roofs.
1/5 new sea green, 12”x18”
1/5 salvaged sea green, 10”x20”
1/5 salvaged sea green, 12”x20”
1/5 salvaged sea green, 9”x18”
1/10 salvaged sea green, 10”x18”
1/10 salvaged sea green, 11”x18” For every 10 slates car-
ried up, 2 were 12x18 new sea green, 2 were 10x20, 2
were 12x20, 2 were 9x18, 1 was 10x18 and 1 was 11x18.
Note: Smaller slates require more per square.
6) Hunting Stand, designed and built by the author, Grove
City, PA: 1/3 salvaged red, 16” long, 8”,9”,10” wide; 1/3 mot-
tled green and purple, new, 8”x14”; 1/3 salvaged purple,
10”x18”, slightly thicker.
1 1
22
33
4 4
5
5
6
4 types, three lengths, all new
4 types, three lengths, all new
3 types, three lengths, 1/2 new
6 types, three lengths, 1/2 new
1 type, two lengths, 20% new
3 types, three lengths, 1/3 new
Related Documents