QASHQAI נהג ספר

Welcome message from author
This document is posted to help you gain knowledge. Please leave a comment to let me know what you think about it! Share it to your friends and learn new things together.
Transcript
עובי שדרה מבוסס על 332 עמודים צבי קרני 16-9-2014 W:\CARASSO\Nissan\OMs\140450 - New Qashqai - J11 Translation\Translated\140450 - New Qashqai - J11 Cover S1 YO.indd
NIS
SA
N Q
AS
HQ
AI
J1
1-U
NIS
SA
N Q
AS
HQ
AI
J1
1-U נדפס בישראל 09/2014
OM14E-0J11E0E :תורגם מפרסום
נדפס בישראל 09/2014OM14E-0J11E0E :תורגם מפרסום
QASHQAIספר נהג
QASHQAIספר נהג

ForewordWelcome to the growing family of new NISSAN owners. This vehicle has been delivered to you with confidence. It has been produced using the latest techniquesand strict quality control.
This manual was prepared to help you understand the operation and maintenance of your vehicle so that you may enjoy many kilometres (miles) of driving pleasure.Please read through this manual before operating your vehicle.
A separate Warranty Information & Maintenance Booklet explains in detail the warranty coverage that applies to your vehicle.
Your NISSAN dealer knows your vehicle best. When you require any service or have any questions, your NISSAN dealer will be glad to assist you with the extensiveresources available for you.
IMPORTANT SAFETY INFORMATION
REMINDERS FOR SAFETY!Follow these important driving rules to help ensure a safe and complete trip foryou and your passengers!
• NEVER drive under the influence of alcohol or drugs.
• ALWAYS observe posted speed limits and never drive too fast for condi-tions.
• ALWAYS use your seat belts and appropriate child restraint systems.Preteen children should be seated in the rear seat.
• ALWAYS provide information about the proper use of vehicle safety fea-tures to all occupants of the vehicle.
• ALWAYS review this Owner’s Manual for important safety information.
WHEN READING THE MANUALThis manual includes information for all options available on this model. There-fore, you may find some information that does not apply to your vehicle.
All information, specifications and illustrations in this manual are those in effectat the time of printing. NISSAN reserves the right to change specifications ordesigns at any time without notice and without obligation.
MODIFICATION OF YOUR VEHICLEThis vehicle should not be modified. Modifications could affect its performance,safety or durability, and may even violate governmental regulations. In addition,damage or performance problems resulting from modifications may not be cov-ered under NISSAN warranties.
READ FIRST — THEN DRIVE SAFELYBefore driving your vehicle, read this Owner’s Manual carefully. This will ensurefamiliarity with controls and maintenance requirements, assisting you in the safeoperation of your vehicle.
Throughout this manual the following symbols and words are used:
WARNING
Indicates the presence of a hazard that could cause death or serious per-sonal injury. To avoid or reduce the risk, the procedures described must befollowed precisely.
CAUTION
Indicates the presence of a hazard that could cause minor or moderate per-sonal injury, or damage to your vehicle. To avoid or reduce the risk, the pro-cedures described must be followed carefully.
NOTE
Indicates additional helpful information.
The Blue Citizenship symbol indicates environmentally friendly information andbest practices.
This symbol means “Do not do this” or “Do not let this happen”.
Arrows in an illustration that are similar to these point to the front of the vehicle.
Arrows in an illustration that are similar to these indicate movement or action.
Arrows in an illustration that are similar to these call attention to an item in theillustration.
“NEVER use a rearward facing child restraint on a seat protected by an ACTIVEAIRBAG in front of it, DEATH or SERIOUS INJURY to the CHILD can occur.”
Be sure to read the “Airbag warning labels” description in the Safety section ofthis manual; and the “Airbag label” description at the end of this manual.
ON-PAVEMENT AND OFF-ROAD DRIVING (4WD models)This vehicle will handle and manoeuvre differently from an ordinary passengervehicle, because it has a higher centre of gravity. As with other vehicles with fea-tures of this type, failure to operate this vehicle correctly may result in loss ofcontrol or an accident.
Be sure to read “On-pavement and off-road driving precautions” and “Four-wheel drive (4WD)” in the “5. Starting and driving” section of this manual.
BATTERY DISPOSALCAUTION
An improperly disposed battery can harm the environment. Always confirmlocal regulations for battery disposal.
Examples of the batteries that the vehicle contains:
• Vehicle battery
• Remote controller battery (for Intelligent Key and/or Remote keyless entrysystem)
• Tyre Pressure Monitoring System (TPMS) sensor battery
• Remote controller battery (for Mobile Entertainment system)
If in doubt, contact your local authority, or a NISSAN dealer, or a qualified work-shop for advice on disposal.
m Bluetooth® is a trademark owned by Bluetooth SIG, Inc.
miPod® is a trademark of Apple Inc.
mGracenote® and CDDB are registered trademarks ofGracenote, Inc. The Gracenote logo and logo type, andthe “Powered by Gracenote” logo are trademarks ofGracenote.
Contents Illustrated table of contents 0
Safety — Seats, Seat belts and SupplementalRestraint System 1
Instruments and controls 2
Pre-driving checks and adjustments 3
Display screen, heater and air conditioner, andaudio system 4
Starting and driving 5
In case of emergency 6
Appearance and care 7
Maintenance and do-it-yourself 8
Technical information 9
Index 10

0 Illustrated table of contentsIllustrated table of contents
Seat belts and supplemental restraint system ........... 0-2Exterior front ............................................................ 0-3Exterior rear............................................................. 0-4Passenger compartment .......................................... 0-5Cockpit ................................................................... 0-6Left hand drive.................................................... 0-6Right hand drive ................................................. 0-7
Instrument and control layout ................................... 0-8
Left hand drive.................................................... 0-8Right hand drive ................................................. 0-9
Meters and gauges .................................................. 0-10Engine compartment................................................ 0-11HRA2DDT engine............................................... 0-12MR20DD engine................................................. 0-12K9K engine......................................................... 0-13R9M engine........................................................ 0-14
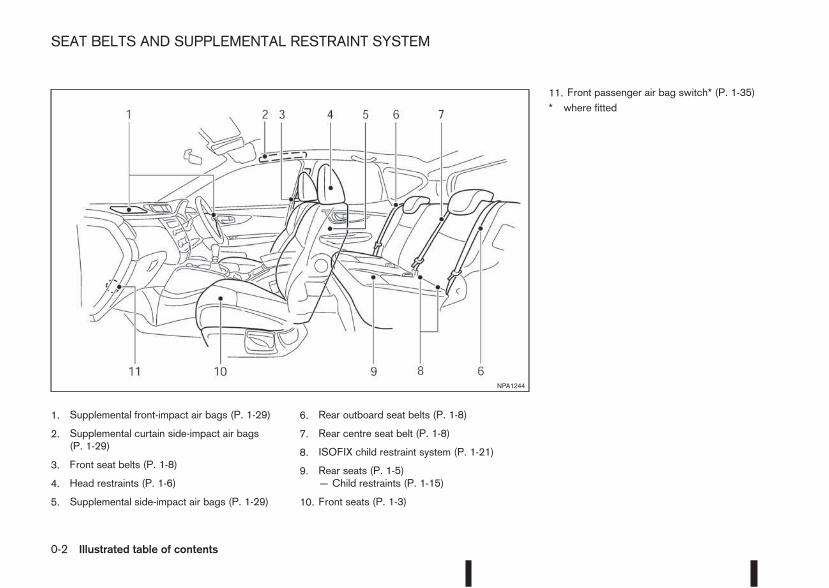
1. Supplemental front-impact air bags (P. 1-29)
2. Supplemental curtain side-impact air bags(P. 1-29)
3. Front seat belts (P. 1-8)
4. Head restraints (P. 1-6)
5. Supplemental side-impact air bags (P. 1-29)
6. Rear outboard seat belts (P. 1-8)
7. Rear centre seat belt (P. 1-8)
8. ISOFIX child restraint system (P. 1-21)
9. Rear seats (P. 1-5)— Child restraints (P. 1-15)
10. Front seats (P. 1-3)
11. Front passenger air bag switch* (P. 1-35)* where fitted
NPA1244
SEAT BELTS AND SUPPLEMENTAL RESTRAINT SYSTEM
0-2 Illustrated table of contents
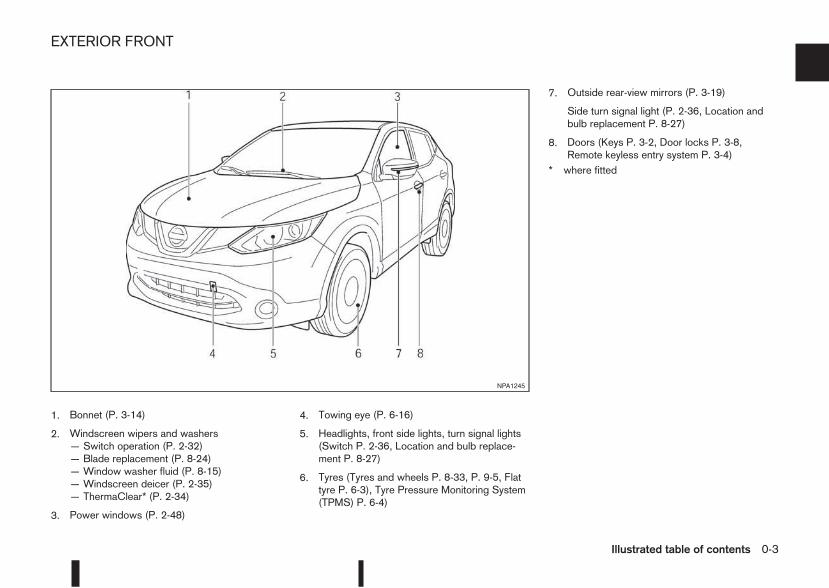
1. Bonnet (P. 3-14)
2. Windscreen wipers and washers— Switch operation (P. 2-32)— Blade replacement (P. 8-24)— Window washer fluid (P. 8-15)— Windscreen deicer (P. 2-35)— ThermaClear* (P. 2-34)
3. Power windows (P. 2-48)
4. Towing eye (P. 6-16)
5. Headlights, front side lights, turn signal lights(Switch P. 2-36, Location and bulb replace-ment P. 8-27)
6. Tyres (Tyres and wheels P. 8-33, P. 9-5, Flattyre P. 6-3), Tyre Pressure Monitoring System(TPMS) P. 6-4)
7. Outside rear-view mirrors (P. 3-19)
Side turn signal light (P. 2-36, Location andbulb replacement P. 8-27)
8. Doors (Keys P. 3-2, Door locks P. 3-8,Remote keyless entry system P. 3-4)
* where fitted
NPA1245
EXTERIOR FRONT
Illustrated table of contents 0-3
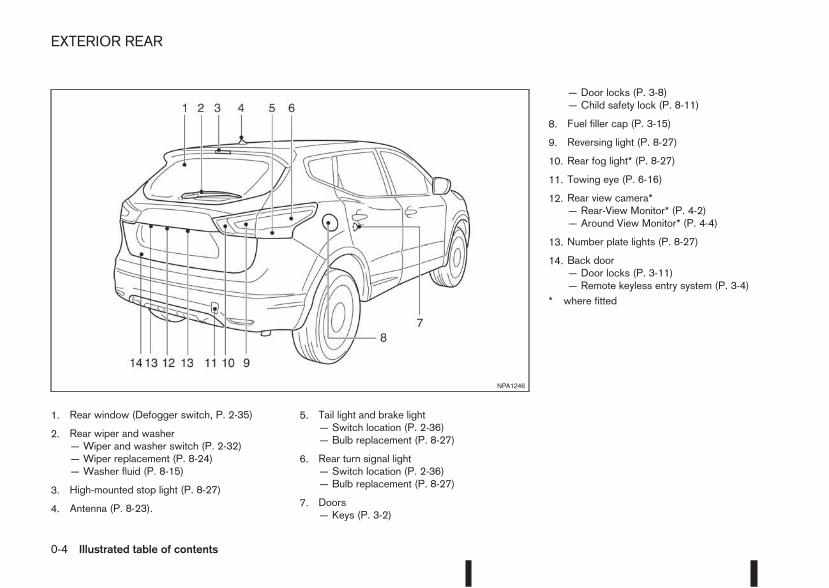
1. Rear window (Defogger switch, P. 2-35)
2. Rear wiper and washer— Wiper and washer switch (P. 2-32)— Wiper replacement (P. 8-24)— Washer fluid (P. 8-15)
3. High-mounted stop light (P. 8-27)
4. Antenna (P. 8-23).
5. Tail light and brake light— Switch location (P. 2-36)— Bulb replacement (P. 8-27)
6. Rear turn signal light— Switch location (P. 2-36)— Bulb replacement (P. 8-27)
7. Doors— Keys (P. 3-2)
— Door locks (P. 3-8)— Child safety lock (P. 8-11)
8. Fuel filler cap (P. 3-15)
9. Reversing light (P. 8-27)
10. Rear fog light* (P. 8-27)
11. Towing eye (P. 6-16)
12. Rear view camera*— Rear-View Monitor* (P. 4-2)— Around View Monitor* (P. 4-4)
13. Number plate lights (P. 8-27)
14. Back door— Door locks (P. 3-11)— Remote keyless entry system (P. 3-4)
* where fitted
NPA1246
EXTERIOR REAR
0-4 Illustrated table of contents
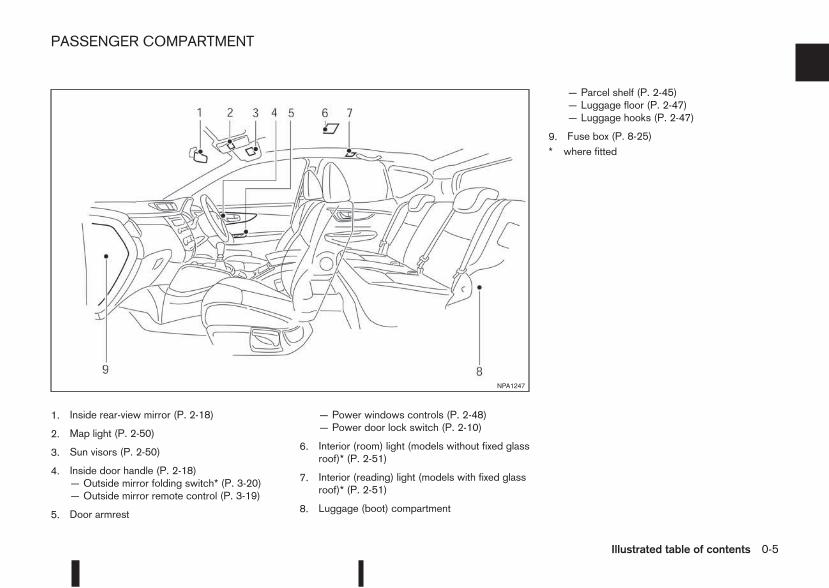
1. Inside rear-view mirror (P. 2-18)
2. Map light (P. 2-50)
3. Sun visors (P. 2-50)
4. Inside door handle (P. 2-18)— Outside mirror folding switch* (P. 3-20)— Outside mirror remote control (P. 3-19)
5. Door armrest
— Power windows controls (P. 2-48)— Power door lock switch (P. 2-10)
6. Interior (room) light (models without fixed glassroof)* (P. 2-51)
7. Interior (reading) light (models with fixed glassroof)* (P. 2-51)
8. Luggage (boot) compartment
— Parcel shelf (P. 2-45)— Luggage floor (P. 2-47)— Luggage hooks (P. 2-47)
9. Fuse box (P. 8-25)* where fitted
NPA1247
PASSENGER COMPARTMENT
Illustrated table of contents 0-5
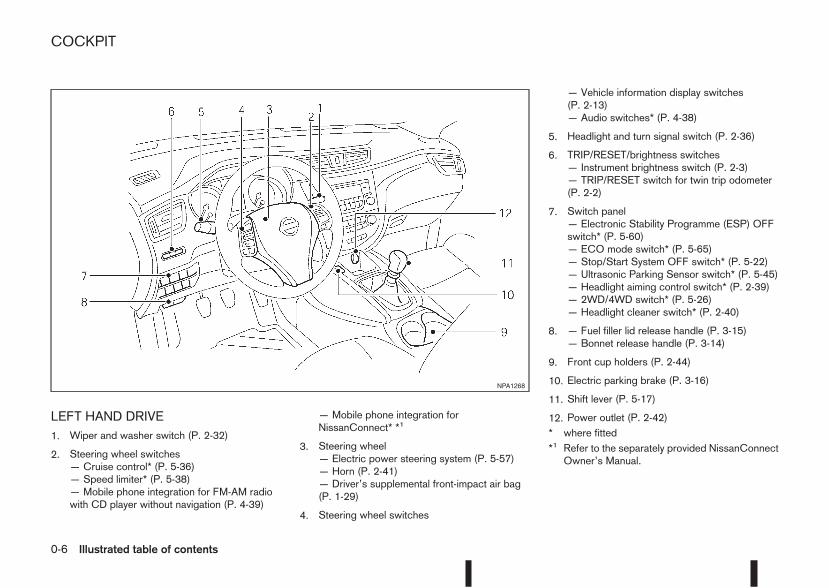
LEFT HAND DRIVE1. Wiper and washer switch (P. 2-32)
2. Steering wheel switches— Cruise control* (P. 5-36)— Speed limiter* (P. 5-38)— Mobile phone integration for FM-AM radiowith CD player without navigation (P. 4-39)
— Mobile phone integration forNissanConnect* *1
3. Steering wheel— Electric power steering system (P. 5-57)— Horn (P. 2-41)— Driver’s supplemental front-impact air bag(P. 1-29)
4. Steering wheel switches
— Vehicle information display switches(P. 2-13)— Audio switches* (P. 4-38)
5. Headlight and turn signal switch (P. 2-36)
6. TRIP/RESET/brightness switches— Instrument brightness switch (P. 2-3)— TRIP/RESET switch for twin trip odometer(P. 2-2)
7. Switch panel— Electronic Stability Programme (ESP) OFFswitch* (P. 5-60)— ECO mode switch* (P. 5-65)— Stop/Start System OFF switch* (P. 5-22)— Ultrasonic Parking Sensor switch* (P. 5-45)— Headlight aiming control switch* (P. 2-39)— 2WD/4WD switch* (P. 5-26)— Headlight cleaner switch* (P. 2-40)
8. — Fuel filler lid release handle (P. 3-15)— Bonnet release handle (P. 3-14)
9. Front cup holders (P. 2-44)
10. Electric parking brake (P. 3-16)
11. Shift lever (P. 5-17)
12. Power outlet (P. 2-42)* where fitted*1 Refer to the separately provided NissanConnectOwner’s Manual.
NPA1268
COCKPIT
0-6 Illustrated table of contents
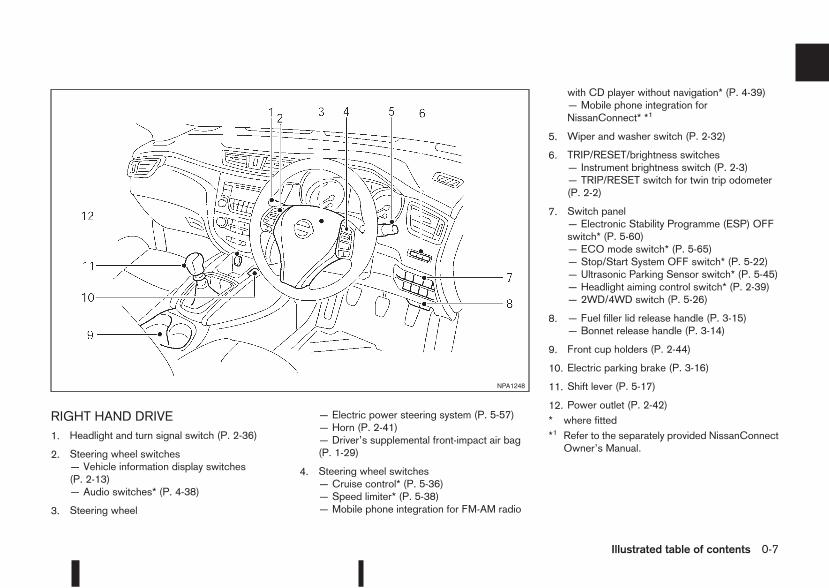
RIGHT HAND DRIVE1. Headlight and turn signal switch (P. 2-36)
2. Steering wheel switches— Vehicle information display switches(P. 2-13)— Audio switches* (P. 4-38)
3. Steering wheel
— Electric power steering system (P. 5-57)— Horn (P. 2-41)— Driver’s supplemental front-impact air bag(P. 1-29)
4. Steering wheel switches— Cruise control* (P. 5-36)— Speed limiter* (P. 5-38)— Mobile phone integration for FM-AM radio
with CD player without navigation* (P. 4-39)— Mobile phone integration forNissanConnect* *1
5. Wiper and washer switch (P. 2-32)
6. TRIP/RESET/brightness switches— Instrument brightness switch (P. 2-3)— TRIP/RESET switch for twin trip odometer(P. 2-2)
7. Switch panel— Electronic Stability Programme (ESP) OFFswitch* (P. 5-60)— ECO mode switch* (P. 5-65)— Stop/Start System OFF switch* (P. 5-22)— Ultrasonic Parking Sensor switch* (P. 5-45)— Headlight aiming control switch* (P. 2-39)— 2WD/4WD switch (P. 5-26)
8. — Fuel filler lid release handle (P. 3-15)— Bonnet release handle (P. 3-14)
9. Front cup holders (P. 2-44)
10. Electric parking brake (P. 3-16)
11. Shift lever (P. 5-17)
12. Power outlet (P. 2-42)* where fitted*1 Refer to the separately provided NissanConnectOwner’s Manual.
NPA1248
Illustrated table of contents 0-7
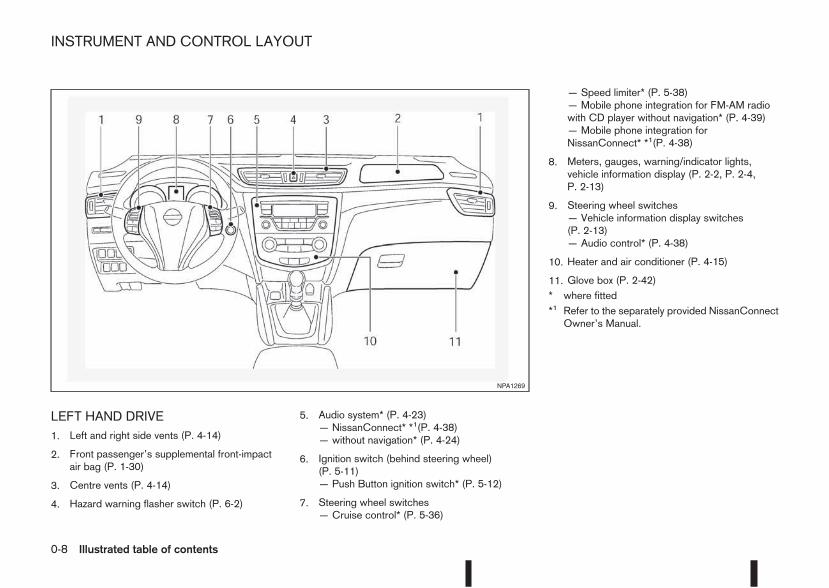
LEFT HAND DRIVE1. Left and right side vents (P. 4-14)
2. Front passenger’s supplemental front-impactair bag (P. 1-30)
3. Centre vents (P. 4-14)
4. Hazard warning flasher switch (P. 6-2)
5. Audio system* (P. 4-23)— NissanConnect* *1(P. 4-38)— without navigation* (P. 4-24)
6. Ignition switch (behind steering wheel)(P. 5-11)— Push Button ignition switch* (P. 5-12)
7. Steering wheel switches— Cruise control* (P. 5-36)
— Speed limiter* (P. 5-38)— Mobile phone integration for FM-AM radiowith CD player without navigation* (P. 4-39)— Mobile phone integration forNissanConnect* *1(P. 4-38)
8. Meters, gauges, warning/indicator lights,vehicle information display (P. 2-2, P. 2-4,P. 2-13)
9. Steering wheel switches— Vehicle information display switches(P. 2-13)— Audio control* (P. 4-38)
10. Heater and air conditioner (P. 4-15)
11. Glove box (P. 2-42)* where fitted*1 Refer to the separately provided NissanConnectOwner’s Manual.
NPA1269
INSTRUMENT AND CONTROL LAYOUT
0-8 Illustrated table of contents
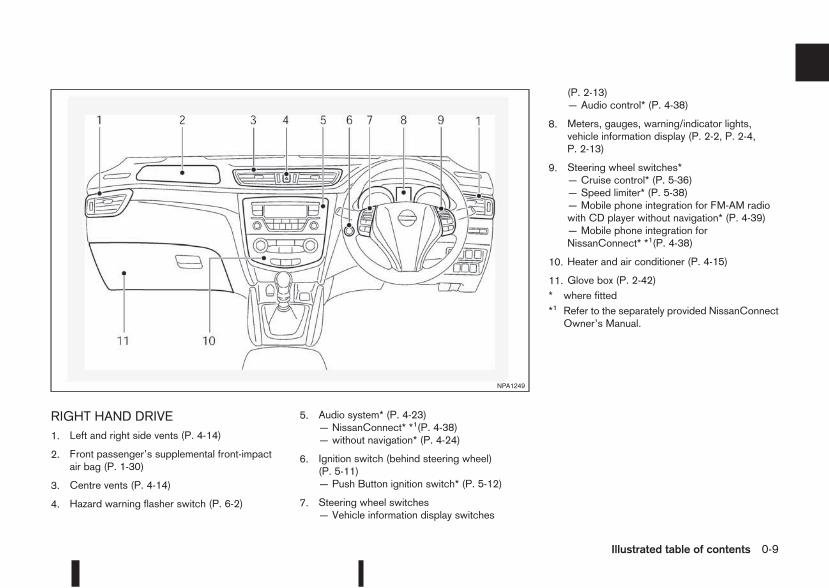
RIGHT HAND DRIVE1. Left and right side vents (P. 4-14)
2. Front passenger’s supplemental front-impactair bag (P. 1-30)
3. Centre vents (P. 4-14)
4. Hazard warning flasher switch (P. 6-2)
5. Audio system* (P. 4-23)— NissanConnect* *1(P. 4-38)— without navigation* (P. 4-24)
6. Ignition switch (behind steering wheel)(P. 5-11)— Push Button ignition switch* (P. 5-12)
7. Steering wheel switches— Vehicle information display switches
(P. 2-13)— Audio control* (P. 4-38)
8. Meters, gauges, warning/indicator lights,vehicle information display (P. 2-2, P. 2-4,P. 2-13)
9. Steering wheel switches*— Cruise control* (P. 5-36)— Speed limiter* (P. 5-38)— Mobile phone integration for FM-AM radiowith CD player without navigation* (P. 4-39)— Mobile phone integration forNissanConnect* *1(P. 4-38)
10. Heater and air conditioner (P. 4-15)
11. Glove box (P. 2-42)* where fitted*1 Refer to the separately provided NissanConnectOwner’s Manual.
NPA1249
Illustrated table of contents 0-9
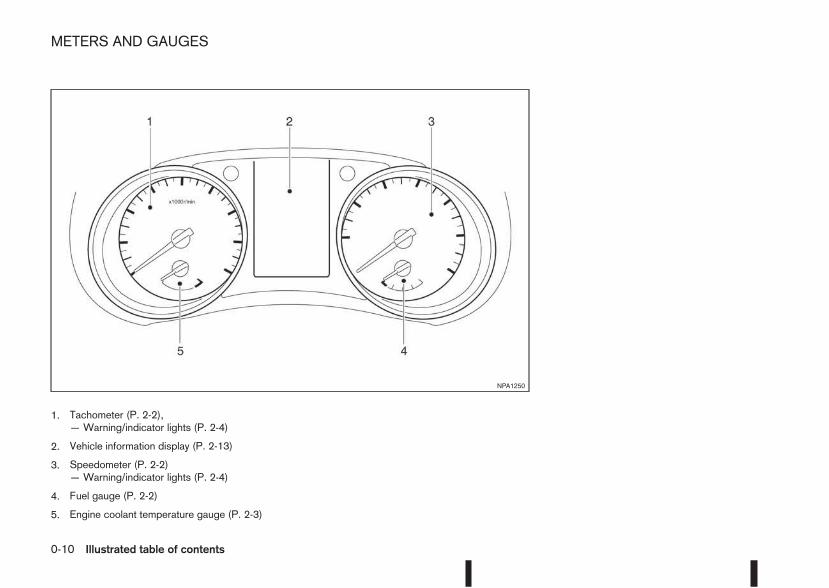
1. Tachometer (P. 2-2),— Warning/indicator lights (P. 2-4)
2. Vehicle information display (P. 2-13)
3. Speedometer (P. 2-2)— Warning/indicator lights (P. 2-4)
4. Fuel gauge (P. 2-2)
5. Engine coolant temperature gauge (P. 2-3)
NPA1250
METERS AND GAUGES
0-10 Illustrated table of contents
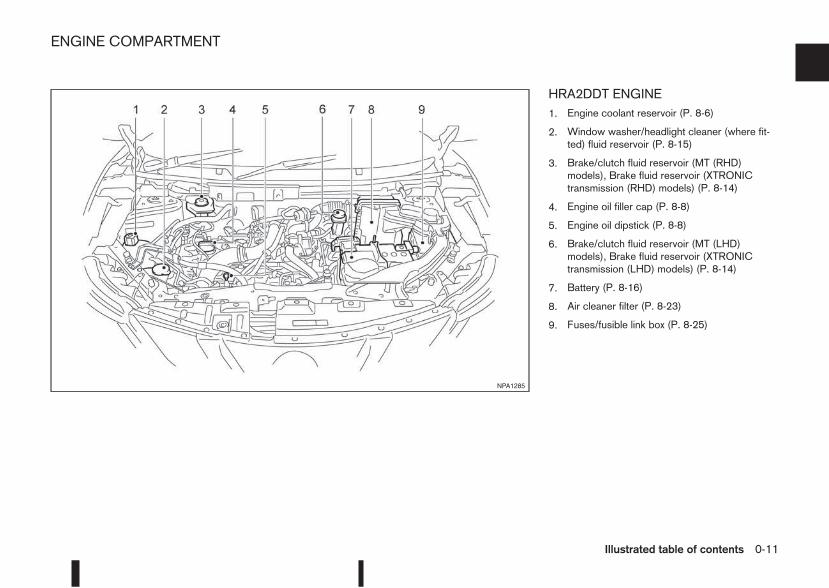
HRA2DDT ENGINE1. Engine coolant reservoir (P. 8-6)
2. Window washer/headlight cleaner (where fit-ted) fluid reservoir (P. 8-15)
3. Brake/clutch fluid reservoir (MT (RHD)models), Brake fluid reservoir (XTRONICtransmission (RHD) models) (P. 8-14)
4. Engine oil filler cap (P. 8-8)
5. Engine oil dipstick (P. 8-8)
6. Brake/clutch fluid reservoir (MT (LHD)models), Brake fluid reservoir (XTRONICtransmission (LHD) models) (P. 8-14)
7. Battery (P. 8-16)
8. Air cleaner filter (P. 8-23)
9. Fuses/fusible link box (P. 8-25)
NPA1285
ENGINE COMPARTMENT
Illustrated table of contents 0-11
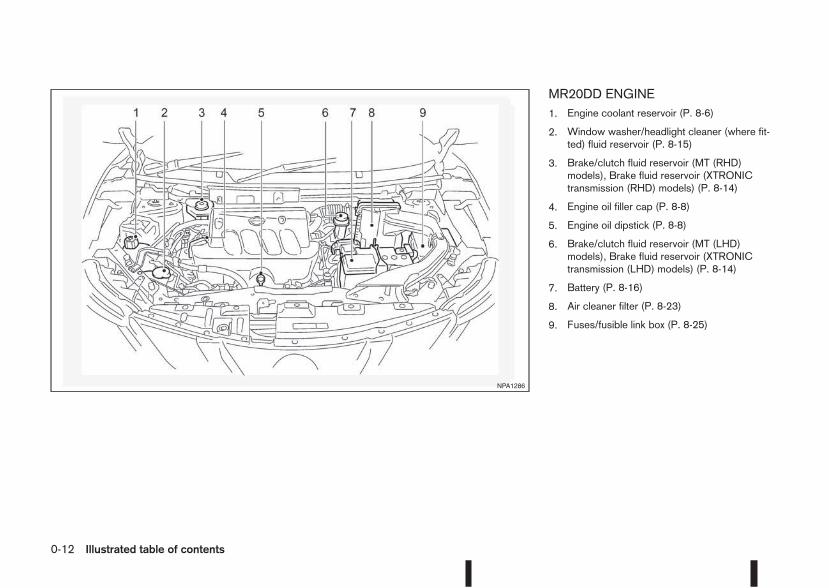
MR20DD ENGINE1. Engine coolant reservoir (P. 8-6)
2. Window washer/headlight cleaner (where fit-ted) fluid reservoir (P. 8-15)
3. Brake/clutch fluid reservoir (MT (RHD)models), Brake fluid reservoir (XTRONICtransmission (RHD) models) (P. 8-14)
4. Engine oil filler cap (P. 8-8)
5. Engine oil dipstick (P. 8-8)
6. Brake/clutch fluid reservoir (MT (LHD)models), Brake fluid reservoir (XTRONICtransmission (LHD) models) (P. 8-14)
7. Battery (P. 8-16)
8. Air cleaner filter (P. 8-23)
9. Fuses/fusible link box (P. 8-25)
NPA1286
0-12 Illustrated table of contents
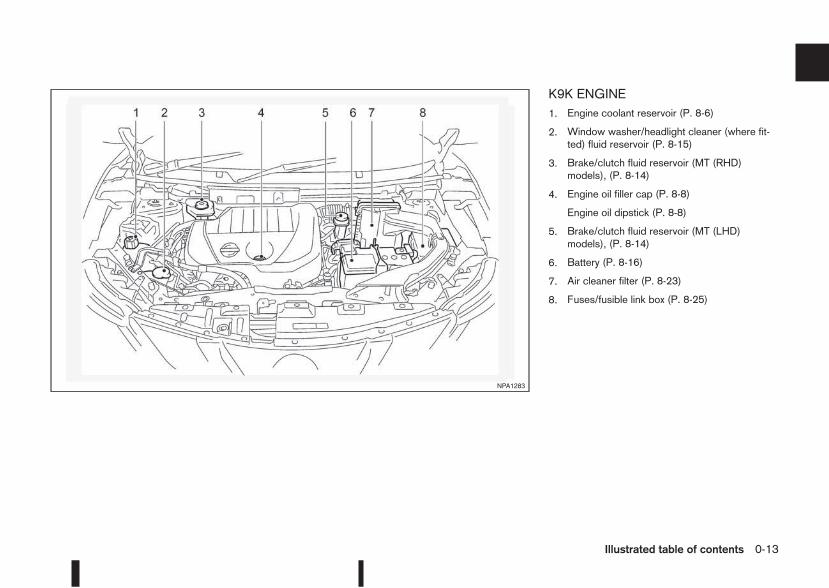
K9K ENGINE1. Engine coolant reservoir (P. 8-6)
2. Window washer/headlight cleaner (where fit-ted) fluid reservoir (P. 8-15)
3. Brake/clutch fluid reservoir (MT (RHD)models), (P. 8-14)
4. Engine oil filler cap (P. 8-8)
Engine oil dipstick (P. 8-8)
5. Brake/clutch fluid reservoir (MT (LHD)models), (P. 8-14)
6. Battery (P. 8-16)
7. Air cleaner filter (P. 8-23)
8. Fuses/fusible link box (P. 8-25)
NPA1283
Illustrated table of contents 0-13
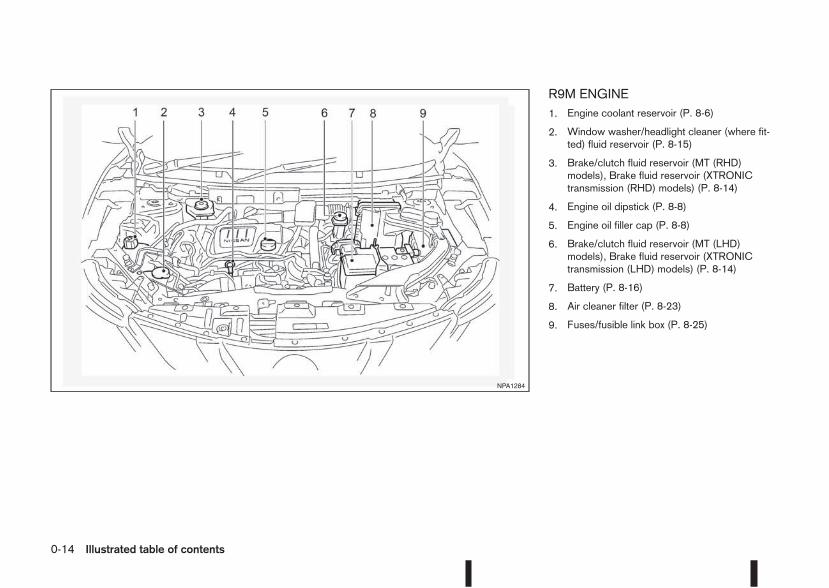
R9M ENGINE1. Engine coolant reservoir (P. 8-6)
2. Window washer/headlight cleaner (where fit-ted) fluid reservoir (P. 8-15)
3. Brake/clutch fluid reservoir (MT (RHD)models), Brake fluid reservoir (XTRONICtransmission (RHD) models) (P. 8-14)
4. Engine oil dipstick (P. 8-8)
5. Engine oil filler cap (P. 8-8)
6. Brake/clutch fluid reservoir (MT (LHD)models), Brake fluid reservoir (XTRONICtransmission (LHD) models) (P. 8-14)
7. Battery (P. 8-16)
8. Air cleaner filter (P. 8-23)
9. Fuses/fusible link box (P. 8-25)
NPA1284
0-14 Illustrated table of contents
1 Safety — seats, seat belts and supplementalrestraint systemSafety — seats, seat belts and supplementalrestraint system
Seats....................................................................... 1-2Front seats ......................................................... 1-3Seat heater (where fitted) ................................... 1-4Rear seats .......................................................... 1-5Armrests (where fitted) ....................................... 1-5
Head restraints ........................................................ 1-6Adjustable head restraint components................. 1-6Non-adjustable head restraint components.......... 1-6Remove .............................................................. 1-7Install.................................................................. 1-7Adjust................................................................. 1-7
Seat belts ................................................................ 1-8Precautions on seat belt usage ........................... 1-8Child safety ........................................................ 1-9Pregnant women ................................................ 1-10Injured persons................................................... 1-10Seat belt warnings.............................................. 1-10Three-point type seat belt.................................... 1-11Seat belt maintenance ........................................ 1-12
Pre-tensioner seat belt system ................................. 1-13Child safety ............................................................. 1-14Infants ................................................................ 1-14Small children..................................................... 1-14Larger children ................................................... 1-15Legal requirements ............................................. 1-15
Child restraints ........................................................ 1-15Precautions on child restraints ............................ 1-15Child restraint and ISOFIX information................ 1-16ISOFIX child restraint system.............................. 1-21Child restraint anchorage.................................... 1-22Child restraint installation using ISOFIX .............. 1-23Child restraint installation using three-pointtype seat belt ...................................................... 1-25
Supplemental Restraint System (SRS) ..................... 1-29Precautions on Supplemental RestraintSystem (SRS)..................................................... 1-29Supplemental air bag systems ............................ 1-33Repair and replacement procedure ..................... 1-37
WARNING
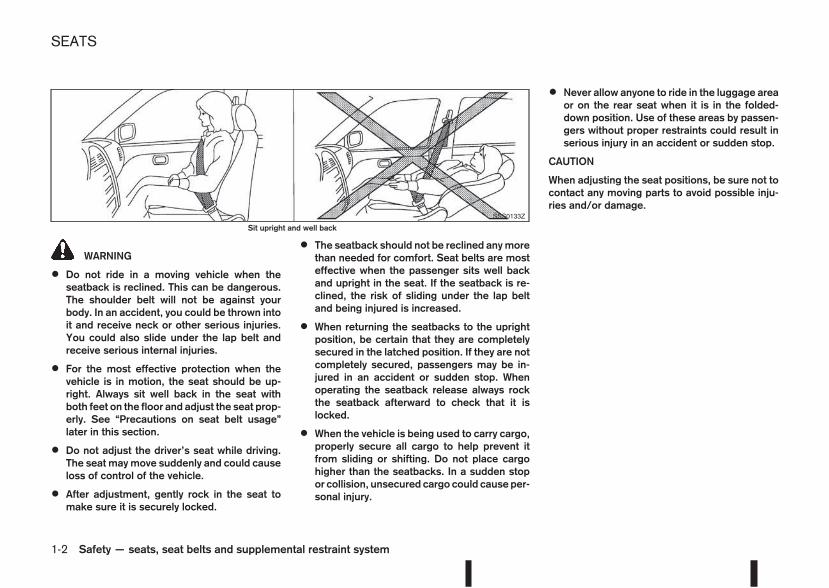
• Do not ride in a moving vehicle when theseatback is reclined. This can be dangerous.The shoulder belt will not be against yourbody. In an accident, you could be thrown intoit and receive neck or other serious injuries.You could also slide under the lap belt andreceive serious internal injuries.
• For the most effective protection when thevehicle is in motion, the seat should be up-right. Always sit well back in the seat withboth feet on the floor and adjust the seat prop-erly. See “Precautions on seat belt usage”later in this section.
• Do not adjust the driver’s seat while driving.The seat maymove suddenly and could causeloss of control of the vehicle.
• After adjustment, gently rock in the seat tomake sure it is securely locked.
• The seatback should not be reclined anymorethan needed for comfort. Seat belts are mosteffective when the passenger sits well backand upright in the seat. If the seatback is re-clined, the risk of sliding under the lap beltand being injured is increased.
• When returning the seatbacks to the uprightposition, be certain that they are completelysecured in the latched position. If they are notcompletely secured, passengers may be in-jured in an accident or sudden stop. Whenoperating the seatback release always rockthe seatback afterward to check that it islocked.
• When the vehicle is being used to carry cargo,properly secure all cargo to help prevent itfrom sliding or shifting. Do not place cargohigher than the seatbacks. In a sudden stopor collision, unsecured cargo could cause per-sonal injury.
• Never allow anyone to ride in the luggage areaor on the rear seat when it is in the folded-down position. Use of these areas by passen-gers without proper restraints could result inserious injury in an accident or sudden stop.
CAUTION
When adjusting the seat positions, be sure not tocontact any moving parts to avoid possible inju-ries and/or damage.
SSS0133Z
Sit upright and well back
SEATS
1-2 Safety — seats, seat belts and supplemental restraint system
FRONT SEATS
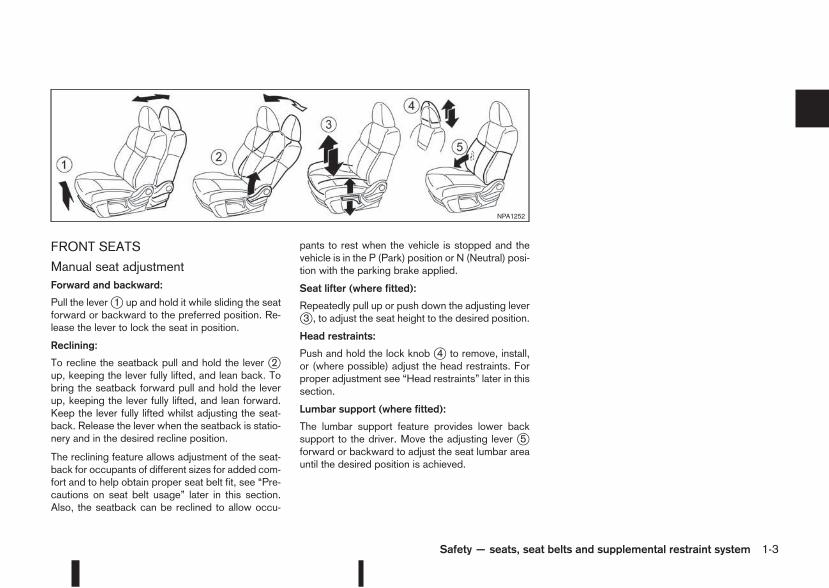
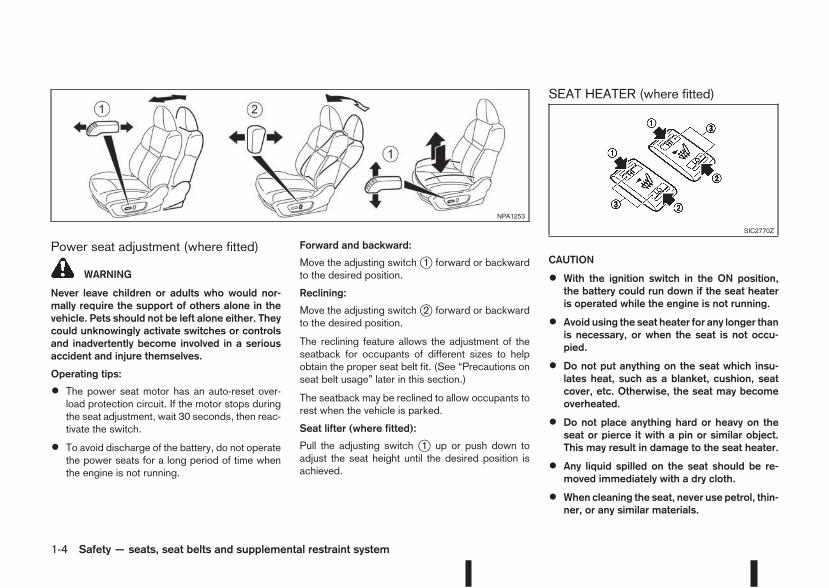
Manual seat adjustmentForward and backward:
Pull the leverj1 up and hold it while sliding the seatforward or backward to the preferred position. Re-lease the lever to lock the seat in position.
Reclining:
To recline the seatback pull and hold the lever j2up, keeping the lever fully lifted, and lean back. Tobring the seatback forward pull and hold the leverup, keeping the lever fully lifted, and lean forward.Keep the lever fully lifted whilst adjusting the seat-back. Release the lever when the seatback is statio-nery and in the desired recline position.
The reclining feature allows adjustment of the seat-back for occupants of different sizes for added com-fort and to help obtain proper seat belt fit, see “Pre-cautions on seat belt usage” later in this section.Also, the seatback can be reclined to allow occu-
pants to rest when the vehicle is stopped and thevehicle is in the P (Park) position or N (Neutral) posi-tion with the parking brake applied.
Seat lifter (where fitted):
Repeatedly pull up or push down the adjusting leverj3 , to adjust the seat height to the desired position.
Head restraints:
Push and hold the lock knob j4 to remove, install,or (where possible) adjust the head restraints. Forproper adjustment see “Head restraints” later in thissection.
Lumbar support (where fitted):
The lumbar support feature provides lower backsupport to the driver. Move the adjusting lever j5forward or backward to adjust the seat lumbar areauntil the desired position is achieved.
NPA1252
Safety — seats, seat belts and supplemental restraint system 1-3
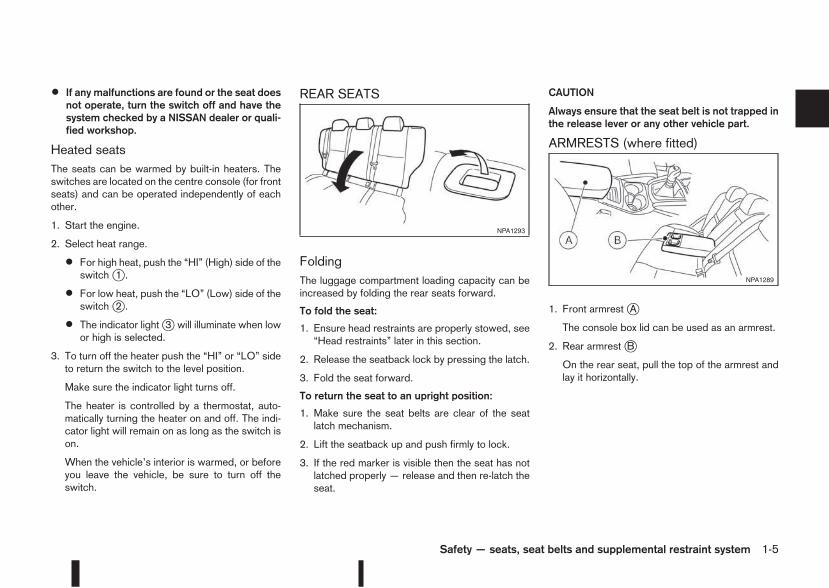
Power seat adjustment (where fitted)
WARNING
Never leave children or adults who would nor-mally require the support of others alone in thevehicle. Pets should not be left alone either. Theycould unknowingly activate switches or controlsand inadvertently become involved in a seriousaccident and injure themselves.
Operating tips:
• The power seat motor has an auto-reset over-load protection circuit. If the motor stops duringthe seat adjustment, wait 30 seconds, then reac-tivate the switch.
• To avoid discharge of the battery, do not operatethe power seats for a long period of time whenthe engine is not running.
Forward and backward:
Move the adjusting switchj1 forward or backwardto the desired position.
Reclining:
Move the adjusting switchj2 forward or backwardto the desired position.
The reclining feature allows the adjustment of theseatback for occupants of different sizes to helpobtain the proper seat belt fit. (See “Precautions onseat belt usage” later in this section.)
The seatback may be reclined to allow occupants torest when the vehicle is parked.
Seat lifter (where fitted):
Pull the adjusting switch j1 up or push down toadjust the seat height until the desired position isachieved.
SEAT HEATER (where fitted)
CAUTION
• With the ignition switch in the ON position,the battery could run down if the seat heateris operated while the engine is not running.
• Avoid using the seat heater for any longer thanis necessary, or when the seat is not occu-pied.
• Do not put anything on the seat which insu-lates heat, such as a blanket, cushion, seatcover, etc. Otherwise, the seat may becomeoverheated.
• Do not place anything hard or heavy on theseat or pierce it with a pin or similar object.This may result in damage to the seat heater.
• Any liquid spilled on the seat should be re-moved immediately with a dry cloth.
• When cleaning the seat, never use petrol, thin-ner, or any similar materials.
NPA1253
SIC2770Z
1-4 Safety — seats, seat belts and supplemental restraint system
• If any malfunctions are found or the seat doesnot operate, turn the switch off and have thesystem checked by a NISSAN dealer or quali-fied workshop.
Heated seatsThe seats can be warmed by built-in heaters. Theswitches are located on the centre console (for frontseats) and can be operated independently of eachother.
1. Start the engine.
2. Select heat range.
• For high heat, push the “HI” (High) side of theswitchj1 .
• For low heat, push the “LO” (Low) side of theswitchj2 .
• The indicator lightj3 will illuminate when lowor high is selected.
3. To turn off the heater push the “HI” or “LO” sideto return the switch to the level position.
Make sure the indicator light turns off.
The heater is controlled by a thermostat, auto-matically turning the heater on and off. The indi-cator light will remain on as long as the switch ison.
When the vehicle’s interior is warmed, or beforeyou leave the vehicle, be sure to turn off theswitch.
REAR SEATS
FoldingThe luggage compartment loading capacity can beincreased by folding the rear seats forward.
To fold the seat:
1. Ensure head restraints are properly stowed, see“Head restraints” later in this section.
2. Release the seatback lock by pressing the latch.
3. Fold the seat forward.
To return the seat to an upright position:
1. Make sure the seat belts are clear of the seatlatch mechanism.
2. Lift the seatback up and push firmly to lock.
3. If the red marker is visible then the seat has notlatched properly — release and then re-latch theseat.
CAUTION
Always ensure that the seat belt is not trapped inthe release lever or any other vehicle part.
ARMRESTS (where fitted)
1. Front armrestjA
The console box lid can be used as an armrest.
2. Rear armrestjB
On the rear seat, pull the top of the armrest andlay it horizontally.
NPA1293
NPA1289
Safety — seats, seat belts and supplemental restraint system 1-5
WARNING
Head restraints supplement the other vehiclesafety systems. They may provide additional pro-tection against injury in certain rear end colli-sions. Adjust the head restraints properly, asspecified in this section. Check the adjustmentafter someone else uses the seat. Do not attachanything to the head restraint stalks or removethe head restraint. Do not use the seat if thehead restraint has been removed. If the headrestraint was removed, reinstall and properly ad-just the head restraint before an occupant usesthe seating position. Failure to follow these in-structions can reduce the effectiveness of thehead restraints. This may increase the risk of se-rious injury or death in a collision.
• Your vehicle is equipped with head restraints.On the front seats they are adjustable. On therear seats, where fitted, they are non-adjustablebut have a lower storage position.
• Adjustable head restraints have multiple notchesalong the stalk to lock them in a desired adjust-ment position.
• The non-adjustable head restraints have a singlelocking notch to secure them to the seat frame.
• Proper Adjustment:
– For the adjustable type, align the head re-straint so the centre of your ear is approxi-mately level with the centre of the head re-straint.
– If your ear position is still higher than the rec-ommended alignment, place the headrestraint at the highest position.
– For the non-adjustable type, raise into lock-ing position before use. The seat should notbe occupied with the head restraint in thelower storage position.
• If the head restraint has been removed, ensurethat it is reinstalled and locked in place beforeriding in that designated seating position.
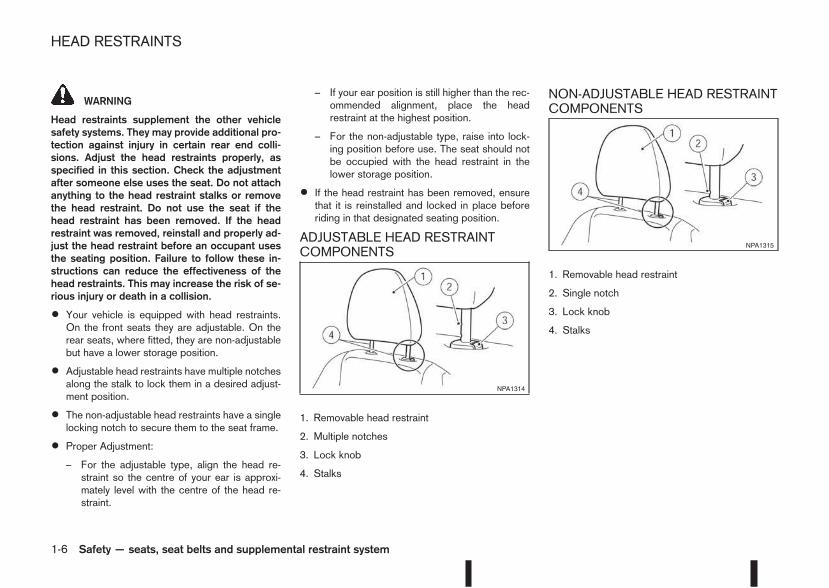
ADJUSTABLE HEAD RESTRAINTCOMPONENTS
1. Removable head restraint
2. Multiple notches
3. Lock knob
4. Stalks
NON-ADJUSTABLE HEAD RESTRAINTCOMPONENTS
1. Removable head restraint
2. Single notch
3. Lock knob
4. Stalks
NPA1314
NPA1315
HEAD RESTRAINTS
1-6 Safety — seats, seat belts and supplemental restraint system
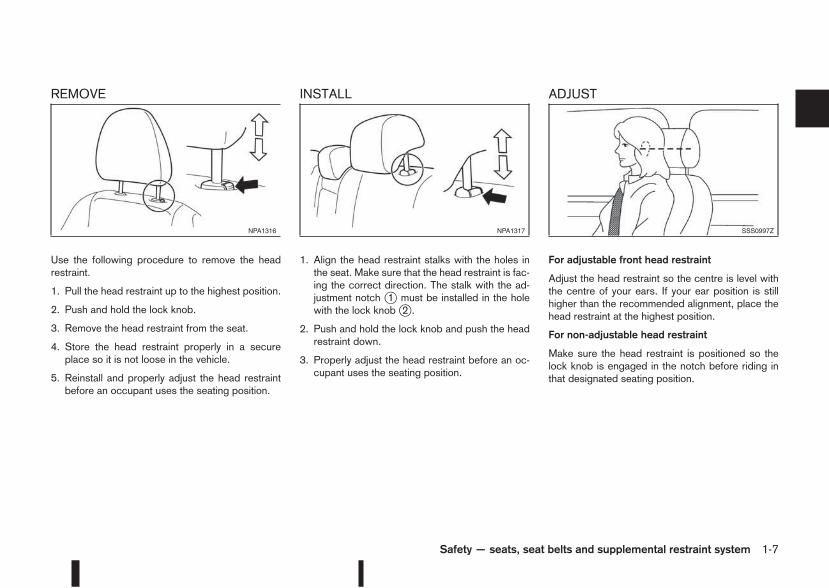
REMOVE
Use the following procedure to remove the headrestraint.
1. Pull the head restraint up to the highest position.
2. Push and hold the lock knob.
3. Remove the head restraint from the seat.
4. Store the head restraint properly in a secureplace so it is not loose in the vehicle.
5. Reinstall and properly adjust the head restraintbefore an occupant uses the seating position.
INSTALL
1. Align the head restraint stalks with the holes inthe seat. Make sure that the head restraint is fac-ing the correct direction. The stalk with the ad-justment notch j1 must be installed in the holewith the lock knobj2 .
2. Push and hold the lock knob and push the headrestraint down.
3. Properly adjust the head restraint before an oc-cupant uses the seating position.
ADJUST
For adjustable front head restraint
Adjust the head restraint so the centre is level withthe centre of your ears. If your ear position is stillhigher than the recommended alignment, place thehead restraint at the highest position.
For non-adjustable head restraint
Make sure the head restraint is positioned so thelock knob is engaged in the notch before riding inthat designated seating position.
NPA1316 NPA1317 SSS0997Z
Safety — seats, seat belts and supplemental restraint system 1-7
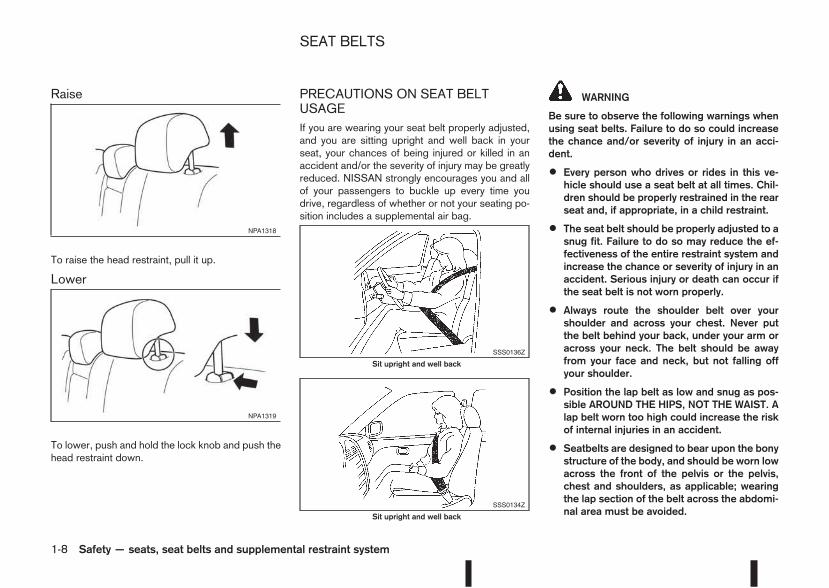
Raise
To raise the head restraint, pull it up.
Lower
To lower, push and hold the lock knob and push thehead restraint down.
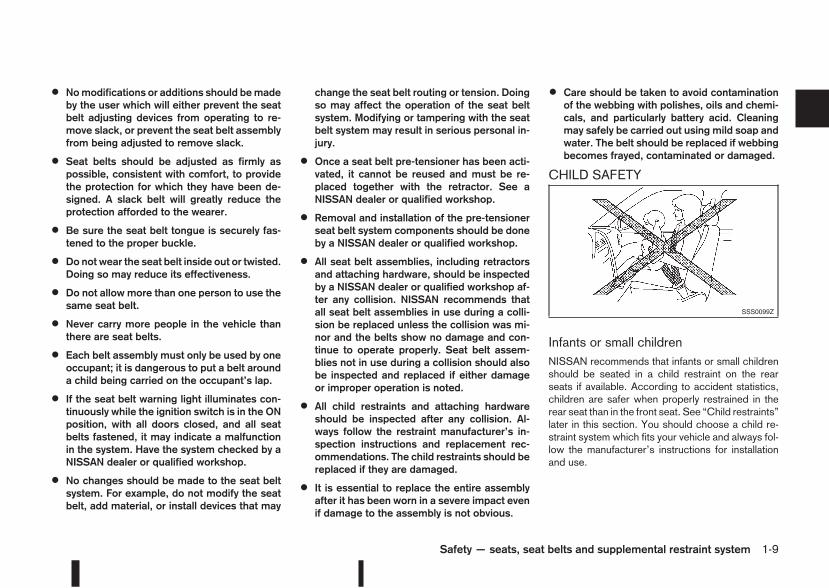
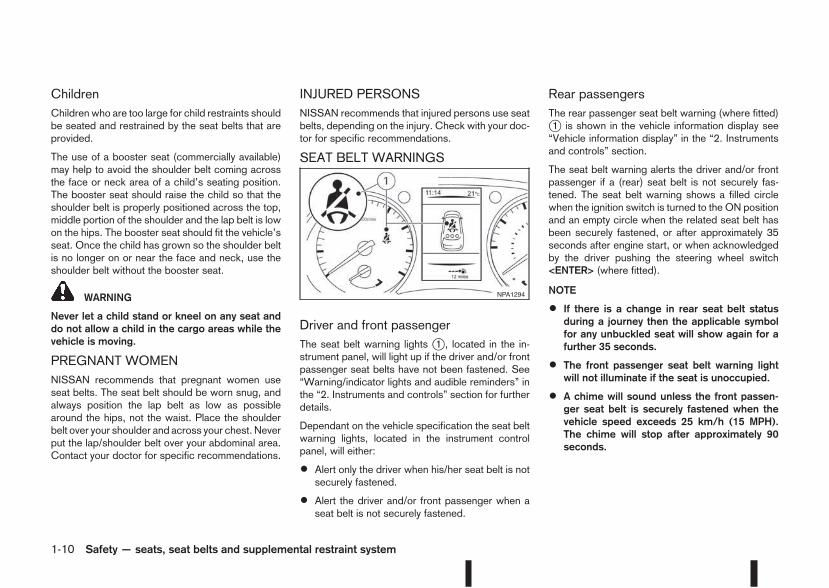
PRECAUTIONS ON SEAT BELTUSAGEIf you are wearing your seat belt properly adjusted,and you are sitting upright and well back in yourseat, your chances of being injured or killed in anaccident and/or the severity of injury may be greatlyreduced. NISSAN strongly encourages you and allof your passengers to buckle up every time youdrive, regardless of whether or not your seating po-sition includes a supplemental air bag.
WARNING
Be sure to observe the following warnings whenusing seat belts. Failure to do so could increasethe chance and/or severity of injury in an acci-dent.
• Every person who drives or rides in this ve-hicle should use a seat belt at all times. Chil-dren should be properly restrained in the rearseat and, if appropriate, in a child restraint.
• The seat belt should be properly adjusted to asnug fit. Failure to do so may reduce the ef-fectiveness of the entire restraint system andincrease the chance or severity of injury in anaccident. Serious injury or death can occur ifthe seat belt is not worn properly.
• Always route the shoulder belt over yourshoulder and across your chest. Never putthe belt behind your back, under your arm oracross your neck. The belt should be awayfrom your face and neck, but not falling offyour shoulder.
• Position the lap belt as low and snug as pos-sible AROUND THE HIPS, NOT THE WAIST. Alap belt worn too high could increase the riskof internal injuries in an accident.
• Seatbelts are designed to bear upon the bonystructure of the body, and should be worn lowacross the front of the pelvis or the pelvis,chest and shoulders, as applicable; wearingthe lap section of the belt across the abdomi-nal area must be avoided.
NPA1318
NPA1319
SSS0136Z
Sit upright and well back
SSS0134Z
Sit upright and well back
SEAT BELTS
1-8 Safety — seats, seat belts and supplemental restraint system
• Nomodifications or additions should bemadeby the user which will either prevent the seatbelt adjusting devices from operating to re-move slack, or prevent the seat belt assemblyfrom being adjusted to remove slack.
• Seat belts should be adjusted as firmly aspossible, consistent with comfort, to providethe protection for which they have been de-signed. A slack belt will greatly reduce theprotection afforded to the wearer.
• Be sure the seat belt tongue is securely fas-tened to the proper buckle.
• Do not wear the seat belt inside out or twisted.Doing so may reduce its effectiveness.
• Do not allow more than one person to use thesame seat belt.
• Never carry more people in the vehicle thanthere are seat belts.
• Each belt assembly must only be used by oneoccupant; it is dangerous to put a belt arounda child being carried on the occupant’s lap.
• If the seat belt warning light illuminates con-tinuously while the ignition switch is in the ONposition, with all doors closed, and all seatbelts fastened, it may indicate a malfunctionin the system. Have the system checked by aNISSAN dealer or qualified workshop.
• No changes should be made to the seat beltsystem. For example, do not modify the seatbelt, add material, or install devices that may
change the seat belt routing or tension. Doingso may affect the operation of the seat beltsystem. Modifying or tampering with the seatbelt system may result in serious personal in-jury.
• Once a seat belt pre-tensioner has been acti-vated, it cannot be reused and must be re-placed together with the retractor. See aNISSAN dealer or qualified workshop.
• Removal and installation of the pre-tensionerseat belt system components should be doneby a NISSAN dealer or qualified workshop.
• All seat belt assemblies, including retractorsand attaching hardware, should be inspectedby a NISSAN dealer or qualified workshop af-ter any collision. NISSAN recommends thatall seat belt assemblies in use during a colli-sion be replaced unless the collision was mi-nor and the belts show no damage and con-tinue to operate properly. Seat belt assem-blies not in use during a collision should alsobe inspected and replaced if either damageor improper operation is noted.
• All child restraints and attaching hardwareshould be inspected after any collision. Al-ways follow the restraint manufacturer’s in-spection instructions and replacement rec-ommendations. The child restraints should bereplaced if they are damaged.
• It is essential to replace the entire assemblyafter it has been worn in a severe impact evenif damage to the assembly is not obvious.
• Care should be taken to avoid contaminationof the webbing with polishes, oils and chemi-cals, and particularly battery acid. Cleaningmay safely be carried out using mild soap andwater. The belt should be replaced if webbingbecomes frayed, contaminated or damaged.
CHILD SAFETY
Infants or small childrenNISSAN recommends that infants or small childrenshould be seated in a child restraint on the rearseats if available. According to accident statistics,children are safer when properly restrained in therear seat than in the front seat. See “Child restraints”later in this section. You should choose a child re-straint system which fits your vehicle and always fol-low the manufacturer’s instructions for installationand use.
SSS0099Z
Safety — seats, seat belts and supplemental restraint system 1-9
ChildrenChildren who are too large for child restraints shouldbe seated and restrained by the seat belts that areprovided.
The use of a booster seat (commercially available)may help to avoid the shoulder belt coming acrossthe face or neck area of a child’s seating position.The booster seat should raise the child so that theshoulder belt is properly positioned across the top,middle portion of the shoulder and the lap belt is lowon the hips. The booster seat should fit the vehicle’sseat. Once the child has grown so the shoulder beltis no longer on or near the face and neck, use theshoulder belt without the booster seat.
WARNING
Never let a child stand or kneel on any seat anddo not allow a child in the cargo areas while thevehicle is moving.
PREGNANT WOMENNISSAN recommends that pregnant women useseat belts. The seat belt should be worn snug, andalways position the lap belt as low as possiblearound the hips, not the waist. Place the shoulderbelt over your shoulder and across your chest. Neverput the lap/shoulder belt over your abdominal area.Contact your doctor for specific recommendations.
INJURED PERSONSNISSAN recommends that injured persons use seatbelts, depending on the injury. Check with your doc-tor for specific recommendations.
SEAT BELT WARNINGS
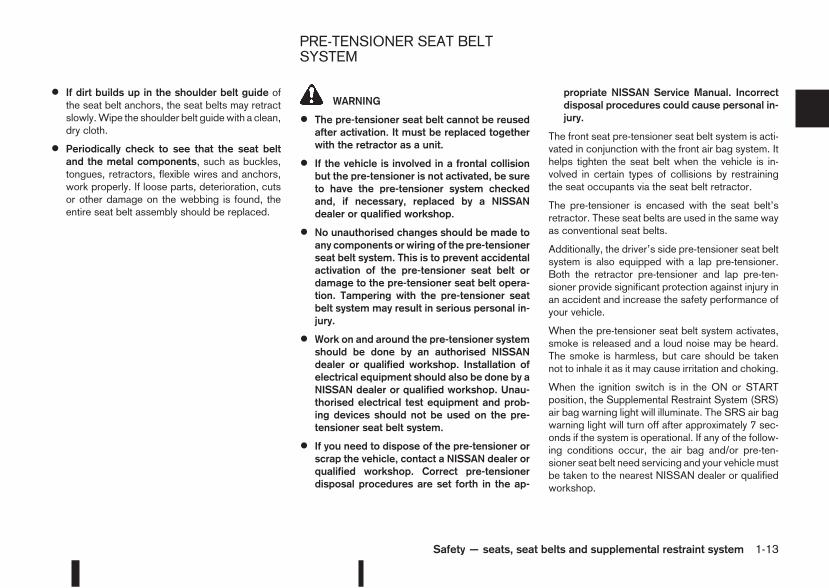
Driver and front passengerThe seat belt warning lights j1 , located in the in-strument panel, will light up if the driver and/or frontpassenger seat belts have not been fastened. See“Warning/indicator lights and audible reminders” inthe “2. Instruments and controls” section for furtherdetails.
Dependant on the vehicle specification the seat beltwarning lights, located in the instrument controlpanel, will either:
• Alert only the driver when his/her seat belt is notsecurely fastened.
• Alert the driver and/or front passenger when aseat belt is not securely fastened.
Rear passengersThe rear passenger seat belt warning (where fitted)j1 is shown in the vehicle information display see“Vehicle information display” in the “2. Instrumentsand controls” section.
The seat belt warning alerts the driver and/or frontpassenger if a (rear) seat belt is not securely fas-tened. The seat belt warning shows a filled circlewhen the ignition switch is turned to the ON positionand an empty circle when the related seat belt hasbeen securely fastened, or after approximately 35seconds after engine start, or when acknowledgedby the driver pushing the steering wheel switch<ENTER> (where fitted).
NOTE
• If there is a change in rear seat belt statusduring a journey then the applicable symbolfor any unbuckled seat will show again for afurther 35 seconds.
• The front passenger seat belt warning lightwill not illuminate if the seat is unoccupied.
• A chime will sound unless the front passen-ger seat belt is securely fastened when thevehicle speed exceeds 25 km/h (15 MPH).The chime will stop after approximately 90seconds.
NPA1294
1-10 Safety — seats, seat belts and supplemental restraint system

THREE-POINT TYPE SEAT BELT
WARNING
• Do not ride in a moving vehicle when theseatback is reclined. This can be dangerous.The shoulder belt will not be against yourbody. In an accident, you could be thrown intoit and receive neck or other serious injuries.You could also slide under the lap belt andreceive serious internal injuries.
• For the most effective protection when thevehicle is in motion, the seat should be up-right. Always sit well back in the seat withboth feet on the floor and adjust the seat beltproperly.
Fastening the seat belts1. Adjust the seat. (See “Seats” earlier in this sec-tion.)
2. Slowly pull the seat belt out of the retractor andinsert the tongue into the buckle until you hearand feel the latch engage.
• The retractor is designed to lock during asudden stop or on impact. A slow pullingmotion permits the belt to move and al-lows you some freedom of movement inthe seat.
• If the seat belt cannot be pulled from itsfully retracted position, firmly pull the beltand release it. Then smoothly pull the beltout of the retractor.
3. Position the lap belt portion low and snug onthe hips as shown
4. Pull the shoulder belt portion toward the retrac-tor to take up extra slack. Be sure the shoulderbelt is routed over your shoulder and across yourchest.
Unfastening the seat belts
To unfasten the seat belt, push the button on thebuckle. The seat belt automatically retracts.
SSS0292Z SSS0290Z
SSS0326Z
Safety — seats, seat belts and supplemental restraint system 1-11

Checking seat belt operationSeat belt retractors are designed to lock seat beltmovement by two separate methods:
• When the belt is pulled quickly from the retrac-tor.
• When the vehicle slows down rapidly.
To increase your confidence in the seat belts, checkthe operation as follows:
• Grasp the shoulder belt and pull forward quickly.The retractor should lock and restrict further beltmovement.
If the retractor does not lock during this check or ifyou have any questions about seat belt operation,see a NISSAN dealer or qualified workshop.
Shoulder belt height adjustment(where fitted)
The shoulder belt anchor height should be adjustedto the position that is best for you. (See “Precau-tions on seat belt usage” earlier in this section.)
To adjust, push (squeeze) the adjustment buttonj1 , and then move the shoulder belt anchor to thepreferred position j2 so that the belt passes overthe centre of the shoulder. The belt should be awayfrom your face and neck, but not falling off of yourshoulder. Release the adjustment button to lock theshoulder belt anchor into position.
WARNING
• After adjustment, release the adjustment but-ton and then try to move the shoulder beltanchor up and down to make sure that it issecurely fixed in position.
• The shoulder belt anchor height should beadjusted to the position that is best for you.Failure to do so may reduce the effectivenessof the entire restraint system and increase thechance or severity of injury in an accident.
Centre of rear seat
Selecting the correct seat buckle:
The centre seat belt buckle is identified by theCENTREmarkjA . The centre seat belt tonguemustonly be fastened into the centre seat belt buckle.
SEAT BELT MAINTENANCE
• To clean the seat belt webbing, apply a mildsoap solution or any solution recommended forcleaning upholstery or carpets. Then wipe with acloth and allow the seat belts to dry in the shade.Do not allow the seat belts to retract until theyare completely dry.
NPA1254
LVR0006XZ
1-12 Safety — seats, seat belts and supplemental restraint system
• If dirt builds up in the shoulder belt guide ofthe seat belt anchors, the seat belts may retractslowly.Wipe the shoulder belt guidewith a clean,dry cloth.
• Periodically check to see that the seat beltand the metal components, such as buckles,tongues, retractors, flexible wires and anchors,work properly. If loose parts, deterioration, cutsor other damage on the webbing is found, theentire seat belt assembly should be replaced.
WARNING
• The pre-tensioner seat belt cannot be reusedafter activation. It must be replaced togetherwith the retractor as a unit.
• If the vehicle is involved in a frontal collisionbut the pre-tensioner is not activated, be sureto have the pre-tensioner system checkedand, if necessary, replaced by a NISSANdealer or qualified workshop.
• No unauthorised changes should be made toany components or wiring of the pre-tensionerseat belt system. This is to prevent accidentalactivation of the pre-tensioner seat belt ordamage to the pre-tensioner seat belt opera-tion. Tampering with the pre-tensioner seatbelt system may result in serious personal in-jury.
• Work on and around the pre-tensioner systemshould be done by an authorised NISSANdealer or qualified workshop. Installation ofelectrical equipment should also be done by aNISSAN dealer or qualified workshop. Unau-thorised electrical test equipment and prob-ing devices should not be used on the pre-tensioner seat belt system.
• If you need to dispose of the pre-tensioner orscrap the vehicle, contact a NISSAN dealer orqualified workshop. Correct pre-tensionerdisposal procedures are set forth in the ap-
propriate NISSAN Service Manual. Incorrectdisposal procedures could cause personal in-jury.
The front seat pre-tensioner seat belt system is acti-vated in conjunction with the front air bag system. Ithelps tighten the seat belt when the vehicle is in-volved in certain types of collisions by restrainingthe seat occupants via the seat belt retractor.
The pre-tensioner is encased with the seat belt’sretractor. These seat belts are used in the same wayas conventional seat belts.
Additionally, the driver’s side pre-tensioner seat beltsystem is also equipped with a lap pre-tensioner.Both the retractor pre-tensioner and lap pre-ten-sioner provide significant protection against injury inan accident and increase the safety performance ofyour vehicle.
When the pre-tensioner seat belt system activates,smoke is released and a loud noise may be heard.The smoke is harmless, but care should be takennot to inhale it as it may cause irritation and choking.
When the ignition switch is in the ON or STARTposition, the Supplemental Restraint System (SRS)air bag warning light will illuminate. The SRS air bagwarning light will turn off after approximately 7 sec-onds if the system is operational. If any of the follow-ing conditions occur, the air bag and/or pre-ten-sioner seat belt need servicing and your vehicle mustbe taken to the nearest NISSAN dealer or qualifiedworkshop.
PRE-TENSIONER SEAT BELTSYSTEM
Safety — seats, seat belts and supplemental restraint system 1-13
• The air bag warning light remains on after ap-proximately 7 seconds.
• The air bag warning light flashes intermittently.
• The air bag warning light does not come on atall.
Unless checked and repaired, the Supplemental Re-straint System (SRS) and/or pre-tensioner seat beltmay not function properly. It must be checked andrepaired.
When selling your vehicle, we request that you in-form the buyer about the pre-tensioner seat belt sys-tem and guide the buyer to the appropriate sectionsin this Owner’s Manual.
Children need adults to help protect them.
They need to be properly restrained.
In addition to the general information in this manual,child safety information is available from many othersources, including doctors, teachers, governmenttraffic safety offices, and community organisations.Every child is different, so be sure to learn the bestway to transport your child.
There are two basic types of child restraint system:
• Rear-facing child restraints
• Front-facing child restraints
The proper restraint depends on the child’s size.Generally, infants (up to about 1 year and less than9 kg) should be placed in rear-facing child restraints.Front-facing child restraints are available for chil-dren who outgrow rear-facing child restraints andare at least 1 year old.
WARNING
Infants and children need special protection. Thevehicle’s seat belts may not fit them properly.The shoulder belt may come too close to theface or neck. The lap belt may not fit over theirsmall hip bones. In an accident, an improperly fit-ting seat belt could cause serious or fatal injury.Always use appropriate child restraints.
A child restraint may be secured in the vehicle byusing either the ISOFIX child restraint system orwith the vehicle seat belt, see “Child restraints” laterin this section for more information.
NISSAN recommends that all pre-teens and chil-dren be restrained in the rear seat. According toaccident statistics, children are safer when prop-erly restrained in the rear seat than in the frontseat.
This is especially important because your vehiclehas a supplemental restraint system (air bag sys-tem) for the front passenger. (See “Supplemen-tal Restraint System (SRS)” later in this section.)
INFANTSInfants up to at least 1 year old should be placed ina rear-facing child restraint. You should choose achild restraint that fits your vehicle and always followthe manufacturer’s instructions for installation anduse.
SMALL CHILDRENChildren that are over 1 year old and weigh at least9 kg can be placed in a front-facing child restraint.Refer to the manufacturer’s instructions for mini-mum and maximum weight and height recommen-dations. You should choose a child restraint that fitsyour vehicle and always follow the manufacturer’sinstructions for installation and use.
LARGER CHILDRENChildren who are too large for a child restraint sys-tem should be seated and restrained by the seatbelts that are provided. If the child’s seating positionhas a shoulder belt that fits close to the face orneck, the use of a booster seat (commercially avail-able) may help overcome this. The booster seatshould raise the child so that the shoulder belt is
CHILD SAFETY
1-14 Safety — seats, seat belts and supplemental restraint system
properly positioned across the top, middle portionof the shoulder and the lap belt is low on the hips.The booster seat should also fit the vehicle seat.Once the child has grown so that the shoulder beltis no longer on or near the face or neck of the child,use the shoulder belt without the booster seat. Inaddition, there are many types of child restraint sys-tem available for larger children that should be usedfor maximum protection.
LEGAL REQUIREMENTSCheck any legal requirements applicable in your lo-cation. For example, the U.K. has legal requirementsto use child restraints based on height and age, see“Child restraints” later in this section for more infor-mation
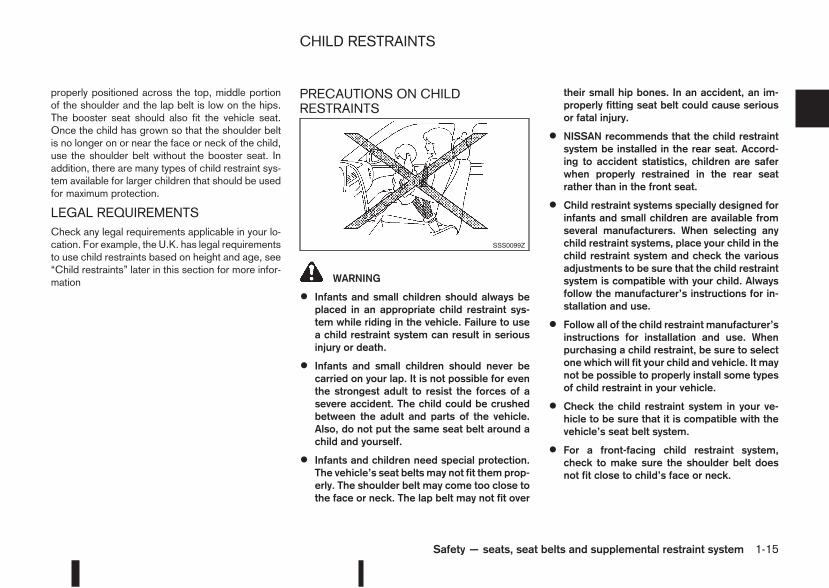
PRECAUTIONS ON CHILDRESTRAINTS
WARNING
• Infants and small children should always beplaced in an appropriate child restraint sys-tem while riding in the vehicle. Failure to usea child restraint system can result in seriousinjury or death.
• Infants and small children should never becarried on your lap. It is not possible for eventhe strongest adult to resist the forces of asevere accident. The child could be crushedbetween the adult and parts of the vehicle.Also, do not put the same seat belt around achild and yourself.
• Infants and children need special protection.The vehicle’s seat belts may not fit them prop-erly. The shoulder belt may come too close tothe face or neck. The lap belt may not fit over
their small hip bones. In an accident, an im-properly fitting seat belt could cause seriousor fatal injury.
• NISSAN recommends that the child restraintsystem be installed in the rear seat. Accord-ing to accident statistics, children are saferwhen properly restrained in the rear seatrather than in the front seat.
• Child restraint systems specially designed forinfants and small children are available fromseveral manufacturers. When selecting anychild restraint systems, place your child in thechild restraint system and check the variousadjustments to be sure that the child restraintsystem is compatible with your child. Alwaysfollow the manufacturer’s instructions for in-stallation and use.
• Follow all of the child restraint manufacturer’sinstructions for installation and use. Whenpurchasing a child restraint, be sure to selectone which will fit your child and vehicle. It maynot be possible to properly install some typesof child restraint in your vehicle.
• Check the child restraint system in your ve-hicle to be sure that it is compatible with thevehicle’s seat belt system.
• For a front-facing child restraint system,check to make sure the shoulder belt doesnot fit close to child’s face or neck.
SSS0099Z
CHILD RESTRAINTS
Safety — seats, seat belts and supplemental restraint system 1-15
• Never install a rear-facing child restraint sys-tem on the front passenger seat without firstdeactivating the passenger air bag with thefront passenger air bag switch (where fitted),see “Front passenger air bag switch (wherefitted)” later in this section. In a frontal colli-sion, supplemental front-impact air bags in-flate with great force. An inflating supplemen-tal front-impact air bag could seriously injureor kill your child.
• Adjustable seatbacks should be positioned tofit the child restraint system, but as upright aspossible.
• If the seat belt in the position where a childrestraint system is installed requires a lockingdevice and if it is not used, injuries could re-sult from a child restraint system tipping overduring normal vehicle braking or cornering.
• After attaching a child restraint system, test itbefore you place the child in it. Push it fromside to side and tug it forward to make surethat it is held securely in place. The child re-straint system should not move more than 25mm (1 in). If the restraint is not secure, tightenthe belt as necessary, or install the restraint inanother seat and test it again.
• If a child restraint system is not anchoredproperly, the risk of a child being injured in acollision or a sudden stop greatly increases.
• Improper use of a child restraint system canincrease the risk or severity of injury for boththe child and other occupants in the vehicle.
• When the child restraint system is not in use,keep it secured with the ISOFIX child restraintsystem or a seat belt to prevent it from beingthrown around in case of a sudden stop oraccident.
NISSAN recommends that infants and small chil-dren be seated in a child restraint system. Youshould choose a child restraint system that fits yourvehicle and always follow the manufacturer’s in-structions for installation and use. In addition, thereare many types of child restraint systems availablefor larger children that should be used for maximumprotection.
CAUTION
Remember that a child restraint left in a closedvehicle can become very hot. Check the seatingsurface and buckles before placing your child ina child restraint.
CHILD RESTRAINT AND ISOFIXINFORMATIONWhen selecting any child restraint, keep the follow-ing points in mind:
• Choose a child restraint that complies with thelatest European safety standard, ECE Regula-tion 44.04.
• Place your child in the child restraint and checkthe various adjustments to be sure the child re-straint is compatible with your child. Always fol-low all of the recommended procedures.
• Check the child restraint in your vehicle to besure it is compatible with vehicle’s seat belt sys-tem.
• Refer to the tables later in this section for a list ofthe recommended fitment positions and the ap-proved child restraints for your vehicle.
1-16 Safety — seats, seat belts and supplemental restraint system

Approved universal child restraint positions
Mass group
SuitabilityFront passenger
seatAir bag ON
Front passengerseat
Air bag OFFRear outer seat Rear centre seat
0 <10 kg X U U X0+ <13 kg X j1 U/Lj2 j1 U/Lj2 XI 9 to 18 kg X j3 U j3 U XII 15 to 25 kg X j4 UF j4 UF/Lj5 XIII 22 to 36 kg X j6 UF j6 UF/Lj7 X
X: Not suitable for child restraint system
U: Suitable for universal category child restraint system approved for this weight (mass) group
UF: Suitable for forward-facing universal category child restraint system approved for this weight (mass) group
L: Suitable for particular child restraints given in the following table or vehicle list of child restraint manufacturer
j# : The circled numbers in the table above correspond to the circled numbers in the following table
Safety — seats, seat belts and supplemental restraint system 1-17
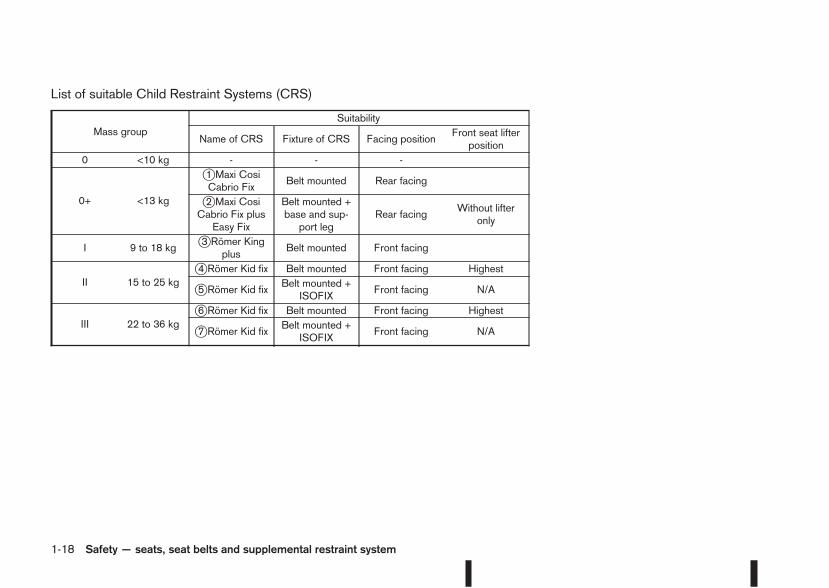
List of suitable Child Restraint Systems (CRS)
Mass groupSuitability
Name of CRS Fixture of CRS Facing positionFront seat lifterposition
0 <10 kg - - -
0+ <13 kg
j1 Maxi CosiCabrio Fix
Belt mounted Rear facing
j2 Maxi CosiCabrio Fix plusEasy Fix
Belt mounted +base and sup-port leg
Rear facingWithout lifter
only
I 9 to 18 kgj3 Römer King
plusBelt mounted Front facing
II 15 to 25 kgj4 Römer Kid fix Belt mounted Front facing Highest
j5 Römer Kid fix Belt mounted +ISOFIX
Front facing N/A
III 22 to 36 kgj6 Römer Kid fix Belt mounted Front facing Highest
j7 Römer Kid fix Belt mounted +ISOFIX
Front facing N/A
1-18 Safety — seats, seat belts and supplemental restraint system
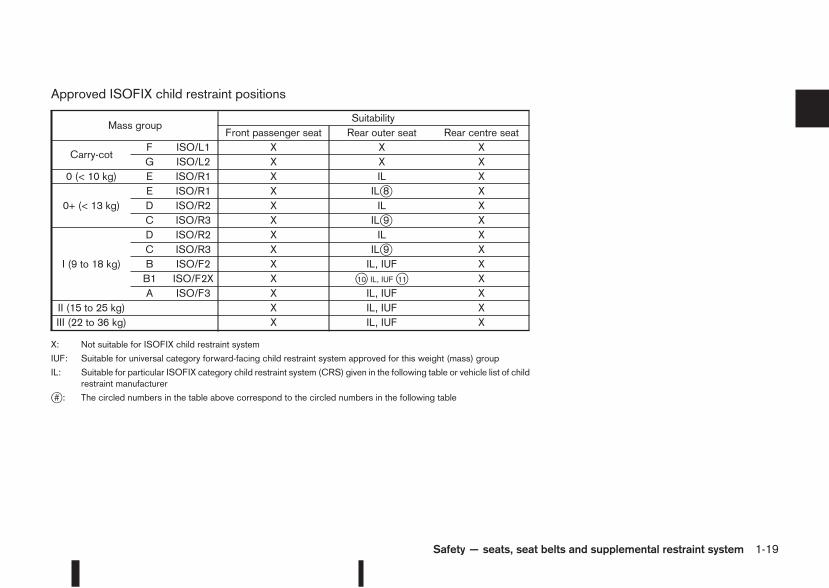
Approved ISOFIX child restraint positions
Mass groupSuitability
Front passenger seat Rear outer seat Rear centre seat
Carry-cotF ISO/L1 X X XG ISO/L2 X X X
0 (< 10 kg) E ISO/R1 X IL X
0+ (< 13 kg)E ISO/R1 X ILj8 XD ISO/R2 X IL XC ISO/R3 X ILj9 X
I (9 to 18 kg)
D ISO/R2 X IL XC ISO/R3 X ILj9 XB ISO/F2 X IL, IUF XB1 ISO/F2X X j10 IL, IUFj11 XA ISO/F3 X IL, IUF X
II (15 to 25 kg) X IL, IUF XIII (22 to 36 kg) X IL, IUF X
X: Not suitable for ISOFIX child restraint system
IUF: Suitable for universal category forward-facing child restraint system approved for this weight (mass) group
IL: Suitable for particular ISOFIX category child restraint system (CRS) given in the following table or vehicle list of childrestraint manufacturer
j# : The circled numbers in the table above correspond to the circled numbers in the following table
Safety — seats, seat belts and supplemental restraint system 1-19
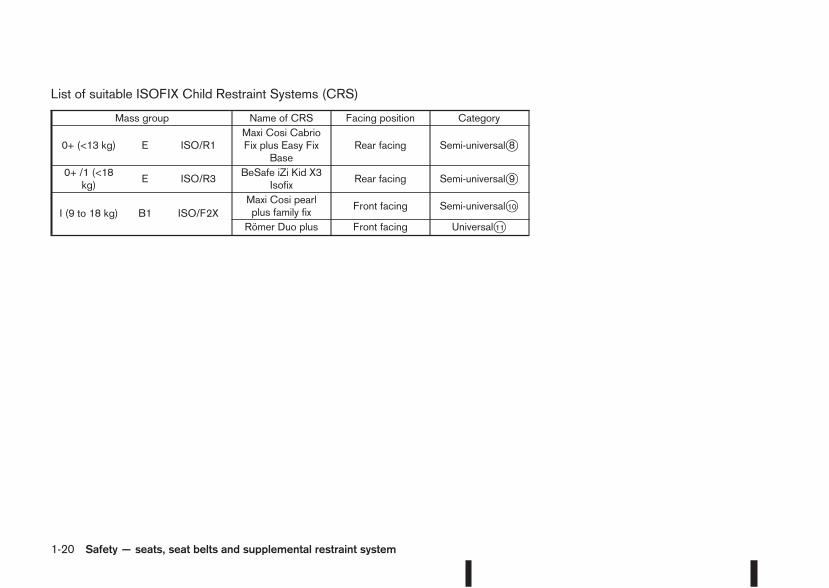
List of suitable ISOFIX Child Restraint Systems (CRS)
Mass group Name of CRS Facing position Category
0+ (<13 kg) E ISO/R1Maxi Cosi CabrioFix plus Easy Fix
BaseRear facing Semi-universalj8
0+ /1 (<18kg)
E ISO/R3BeSafe iZi Kid X3
IsofixRear facing Semi-universalj9
I (9 to 18 kg) B1 ISO/F2XMaxi Cosi pearlplus family fix
Front facing Semi-universalj10
Römer Duo plus Front facing Universalj11
1-20 Safety — seats, seat belts and supplemental restraint system
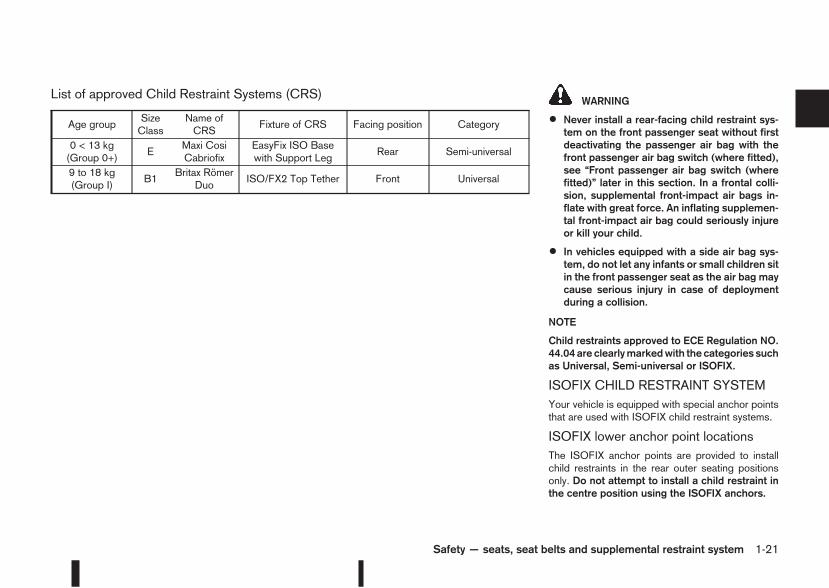
List of approved Child Restraint Systems (CRS)WARNING
• Never install a rear-facing child restraint sys-tem on the front passenger seat without firstdeactivating the passenger air bag with thefront passenger air bag switch (where fitted),see “Front passenger air bag switch (wherefitted)” later in this section. In a frontal colli-sion, supplemental front-impact air bags in-flate with great force. An inflating supplemen-tal front-impact air bag could seriously injureor kill your child.
• In vehicles equipped with a side air bag sys-tem, do not let any infants or small children sitin the front passenger seat as the air bag maycause serious injury in case of deploymentduring a collision.
NOTE
Child restraints approved to ECE Regulation NO.44.04 are clearlymarkedwith the categories suchas Universal, Semi-universal or ISOFIX.
ISOFIX CHILD RESTRAINT SYSTEMYour vehicle is equipped with special anchor pointsthat are used with ISOFIX child restraint systems.
ISOFIX lower anchor point locationsThe ISOFIX anchor points are provided to installchild restraints in the rear outer seating positionsonly. Do not attempt to install a child restraint inthe centre position using the ISOFIX anchors.
Age groupSizeClass
Name ofCRS
Fixture of CRS Facing position Category
0 < 13 kg(Group 0+)
EMaxi CosiCabriofix
EasyFix ISO Basewith Support Leg
Rear Semi-universal
9 to 18 kg(Group I)
B1Britax Römer
DuoISO/FX2 Top Tether Front Universal
Safety — seats, seat belts and supplemental restraint system 1-21
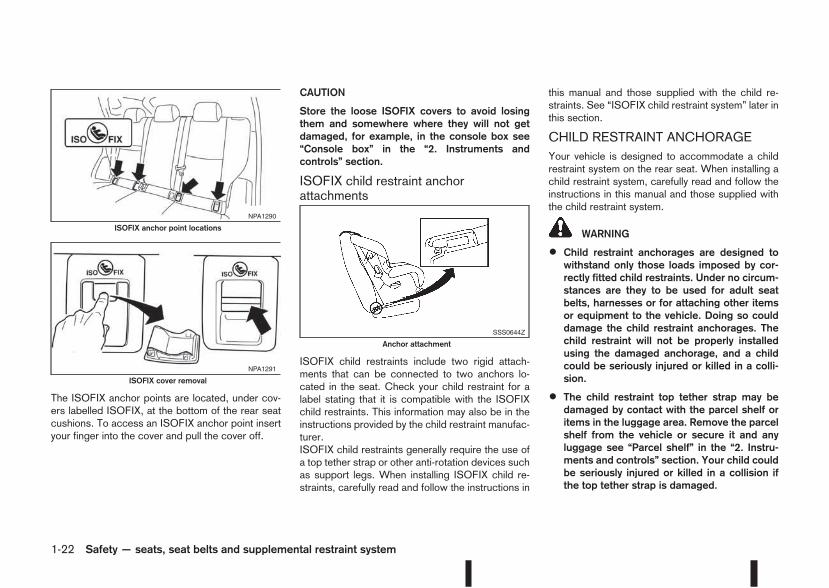
The ISOFIX anchor points are located, under cov-ers labelled ISOFIX, at the bottom of the rear seatcushions. To access an ISOFIX anchor point insertyour finger into the cover and pull the cover off.
CAUTION
Store the loose ISOFIX covers to avoid losingthem and somewhere where they will not getdamaged, for example, in the console box see“Console box” in the “2. Instruments andcontrols” section.
ISOFIX child restraint anchorattachments
ISOFIX child restraints include two rigid attach-ments that can be connected to two anchors lo-cated in the seat. Check your child restraint for alabel stating that it is compatible with the ISOFIXchild restraints. This information may also be in theinstructions provided by the child restraint manufac-turer.ISOFIX child restraints generally require the use ofa top tether strap or other anti-rotation devices suchas support legs. When installing ISOFIX child re-straints, carefully read and follow the instructions in
this manual and those supplied with the child re-straints. See “ISOFIX child restraint system” later inthis section.
CHILD RESTRAINT ANCHORAGEYour vehicle is designed to accommodate a childrestraint system on the rear seat. When installing achild restraint system, carefully read and follow theinstructions in this manual and those supplied withthe child restraint system.
WARNING
• Child restraint anchorages are designed towithstand only those loads imposed by cor-rectly fitted child restraints. Under no circum-stances are they to be used for adult seatbelts, harnesses or for attaching other itemsor equipment to the vehicle. Doing so coulddamage the child restraint anchorages. Thechild restraint will not be properly installedusing the damaged anchorage, and a childcould be seriously injured or killed in a colli-sion.
• The child restraint top tether strap may bedamaged by contact with the parcel shelf oritems in the luggage area. Remove the parcelshelf from the vehicle or secure it and anyluggage see “Parcel shelf” in the “2. Instru-ments and controls” section. Your child couldbe seriously injured or killed in a collision ifthe top tether strap is damaged.
NPA1290
ISOFIX anchor point locations
NPA1291
ISOFIX cover removal
SSS0644Z
Anchor attachment
1-22 Safety — seats, seat belts and supplemental restraint system
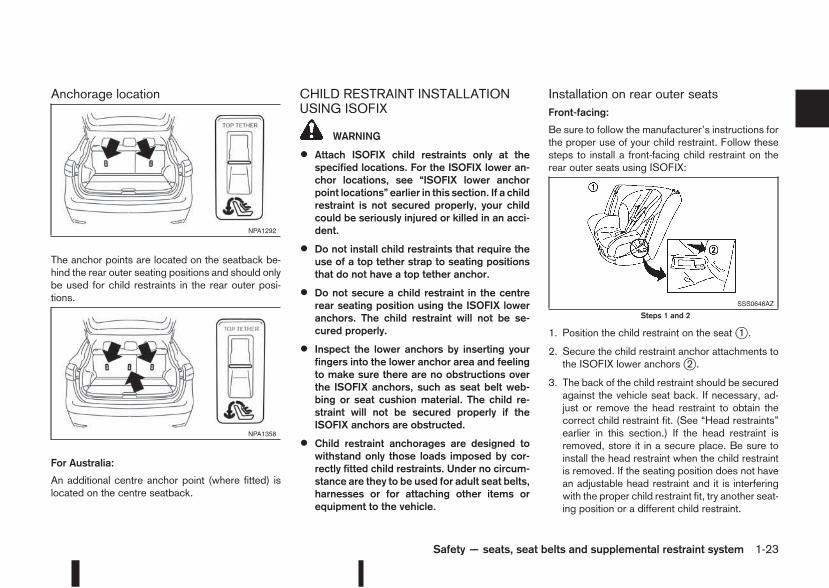
Anchorage location
The anchor points are located on the seatback be-hind the rear outer seating positions and should onlybe used for child restraints in the rear outer posi-tions.
For Australia:
An additional centre anchor point (where fitted) islocated on the centre seatback.
CHILD RESTRAINT INSTALLATIONUSING ISOFIX
WARNING
• Attach ISOFIX child restraints only at thespecified locations. For the ISOFIX lower an-chor locations, see “ISOFIX lower anchorpoint locations” earlier in this section. If a childrestraint is not secured properly, your childcould be seriously injured or killed in an acci-dent.
• Do not install child restraints that require theuse of a top tether strap to seating positionsthat do not have a top tether anchor.
• Do not secure a child restraint in the centrerear seating position using the ISOFIX loweranchors. The child restraint will not be se-cured properly.
• Inspect the lower anchors by inserting yourfingers into the lower anchor area and feelingto make sure there are no obstructions overthe ISOFIX anchors, such as seat belt web-bing or seat cushion material. The child re-straint will not be secured properly if theISOFIX anchors are obstructed.
• Child restraint anchorages are designed towithstand only those loads imposed by cor-rectly fitted child restraints. Under no circum-stance are they to be used for adult seat belts,harnesses or for attaching other items orequipment to the vehicle.
Installation on rear outer seatsFront-facing:
Be sure to follow the manufacturer’s instructions forthe proper use of your child restraint. Follow thesesteps to install a front-facing child restraint on therear outer seats using ISOFIX:
1. Position the child restraint on the seatj1 .
2. Secure the child restraint anchor attachments tothe ISOFIX lower anchorsj2 .
3. The back of the child restraint should be securedagainst the vehicle seat back. If necessary, ad-just or remove the head restraint to obtain thecorrect child restraint fit. (See “Head restraints”earlier in this section.) If the head restraint isremoved, store it in a secure place. Be sure toinstall the head restraint when the child restraintis removed. If the seating position does not havean adjustable head restraint and it is interferingwith the proper child restraint fit, try another seat-ing position or a different child restraint.
NPA1292
NPA1358
SSS0646AZ
Steps 1 and 2
Safety — seats, seat belts and supplemental restraint system 1-23
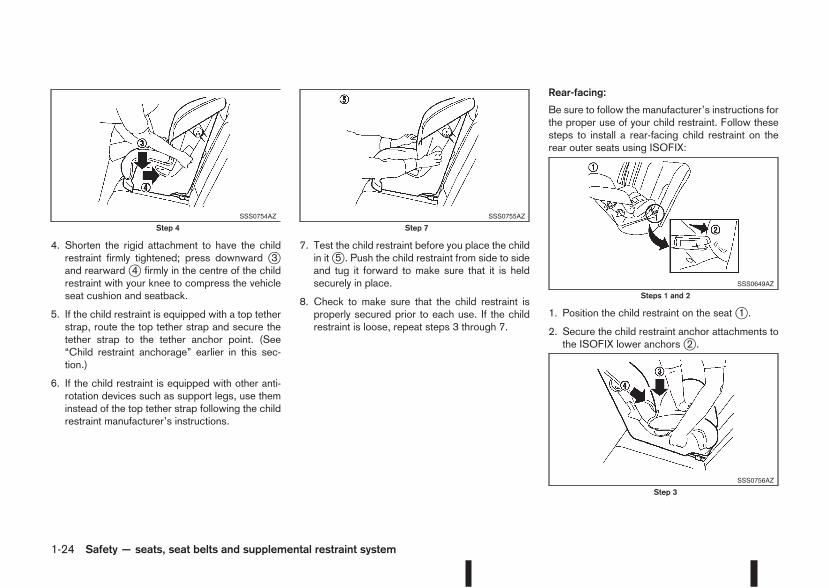
4. Shorten the rigid attachment to have the childrestraint firmly tightened; press downward j3and rearward j4 firmly in the centre of the childrestraint with your knee to compress the vehicleseat cushion and seatback.
5. If the child restraint is equipped with a top tetherstrap, route the top tether strap and secure thetether strap to the tether anchor point. (See“Child restraint anchorage” earlier in this sec-tion.)
6. If the child restraint is equipped with other anti-rotation devices such as support legs, use theminstead of the top tether strap following the childrestraint manufacturer’s instructions.
7. Test the child restraint before you place the childin itj5 . Push the child restraint from side to sideand tug it forward to make sure that it is heldsecurely in place.
8. Check to make sure that the child restraint isproperly secured prior to each use. If the childrestraint is loose, repeat steps 3 through 7.
Rear-facing:
Be sure to follow the manufacturer’s instructions forthe proper use of your child restraint. Follow thesesteps to install a rear-facing child restraint on therear outer seats using ISOFIX:
1. Position the child restraint on the seatj1 .
2. Secure the child restraint anchor attachments tothe ISOFIX lower anchorsj2 .
SSS0754AZ
Step 4
SSS0755AZ
Step 7
SSS0649AZ
Steps 1 and 2
SSS0756AZ
Step 3
1-24 Safety — seats, seat belts and supplemental restraint system
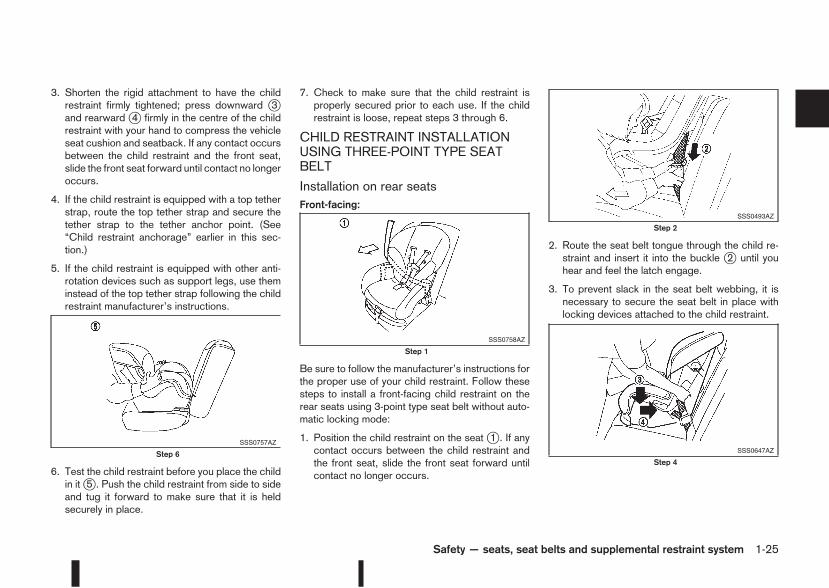
3. Shorten the rigid attachment to have the childrestraint firmly tightened; press downward j3and rearward j4 firmly in the centre of the childrestraint with your hand to compress the vehicleseat cushion and seatback. If any contact occursbetween the child restraint and the front seat,slide the front seat forward until contact no longeroccurs.
4. If the child restraint is equipped with a top tetherstrap, route the top tether strap and secure thetether strap to the tether anchor point. (See“Child restraint anchorage” earlier in this sec-tion.)
5. If the child restraint is equipped with other anti-rotation devices such as support legs, use theminstead of the top tether strap following the childrestraint manufacturer’s instructions.
6. Test the child restraint before you place the childin itj5 . Push the child restraint from side to sideand tug it forward to make sure that it is heldsecurely in place.
7. Check to make sure that the child restraint isproperly secured prior to each use. If the childrestraint is loose, repeat steps 3 through 6.
CHILD RESTRAINT INSTALLATIONUSING THREE-POINT TYPE SEATBELT
Installation on rear seatsFront-facing:
Be sure to follow the manufacturer’s instructions forthe proper use of your child restraint. Follow thesesteps to install a front-facing child restraint on therear seats using 3-point type seat belt without auto-matic locking mode:
1. Position the child restraint on the seatj1 . If anycontact occurs between the child restraint andthe front seat, slide the front seat forward untilcontact no longer occurs.
2. Route the seat belt tongue through the child re-straint and insert it into the buckle j2 until youhear and feel the latch engage.
3. To prevent slack in the seat belt webbing, it isnecessary to secure the seat belt in place withlocking devices attached to the child restraint.
SSS0757AZ
Step 6
SSS0758AZ
Step 1
SSS0493AZ
Step 2
SSS0647AZ
Step 4
Safety — seats, seat belts and supplemental restraint system 1-25
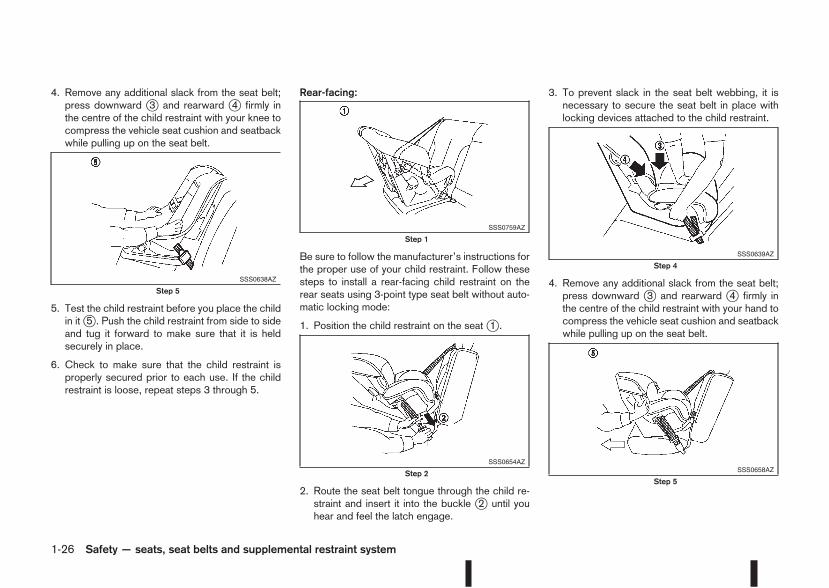
4. Remove any additional slack from the seat belt;press downward j3 and rearward j4 firmly inthe centre of the child restraint with your knee tocompress the vehicle seat cushion and seatbackwhile pulling up on the seat belt.
5. Test the child restraint before you place the childin itj5 . Push the child restraint from side to sideand tug it forward to make sure that it is heldsecurely in place.
6. Check to make sure that the child restraint isproperly secured prior to each use. If the childrestraint is loose, repeat steps 3 through 5.
Rear-facing:
Be sure to follow the manufacturer’s instructions forthe proper use of your child restraint. Follow thesesteps to install a rear-facing child restraint on therear seats using 3-point type seat belt without auto-matic locking mode:
1. Position the child restraint on the seatj1 .
2. Route the seat belt tongue through the child re-straint and insert it into the buckle j2 until youhear and feel the latch engage.
3. To prevent slack in the seat belt webbing, it isnecessary to secure the seat belt in place withlocking devices attached to the child restraint.
4. Remove any additional slack from the seat belt;press downward j3 and rearward j4 firmly inthe centre of the child restraint with your hand tocompress the vehicle seat cushion and seatbackwhile pulling up on the seat belt.
SSS0638AZ
Step 5
SSS0759AZ
Step 1
SSS0654AZ
Step 2
SSS0639AZ
Step 4
SSS0658AZ
Step 5
1-26 Safety — seats, seat belts and supplemental restraint system
5. Test the child restraint before you place the childin itj5 . Push the child restraint from side to sideand tug it forward to make sure that it is heldsecurely in place.
6. Check to make sure that the child restraint isproperly secured prior to each use. If the childrestraint is loose, repeat steps 3 through 5.
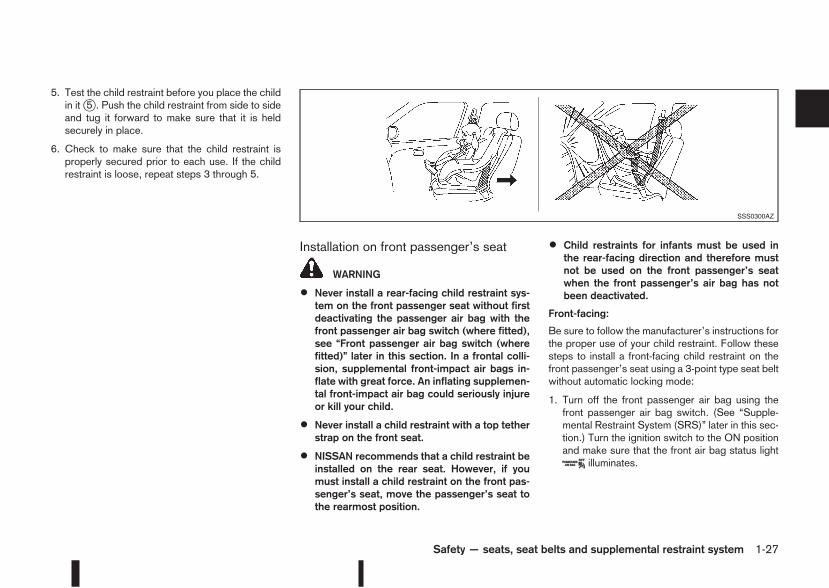
Installation on front passenger’s seat
WARNING
• Never install a rear-facing child restraint sys-tem on the front passenger seat without firstdeactivating the passenger air bag with thefront passenger air bag switch (where fitted),see “Front passenger air bag switch (wherefitted)” later in this section. In a frontal colli-sion, supplemental front-impact air bags in-flate with great force. An inflating supplemen-tal front-impact air bag could seriously injureor kill your child.
• Never install a child restraint with a top tetherstrap on the front seat.
• NISSAN recommends that a child restraint beinstalled on the rear seat. However, if youmust install a child restraint on the front pas-senger’s seat, move the passenger’s seat tothe rearmost position.
• Child restraints for infants must be used inthe rear-facing direction and therefore mustnot be used on the front passenger’s seatwhen the front passenger’s air bag has notbeen deactivated.
Front-facing:
Be sure to follow the manufacturer’s instructions forthe proper use of your child restraint. Follow thesesteps to install a front-facing child restraint on thefront passenger’s seat using a 3-point type seat beltwithout automatic locking mode:
1. Turn off the front passenger air bag using thefront passenger air bag switch. (See “Supple-mental Restraint System (SRS)” later in this sec-tion.) Turn the ignition switch to the ON positionand make sure that the front air bag status light
illuminates.
SSS0300AZ
Safety — seats, seat belts and supplemental restraint system 1-27
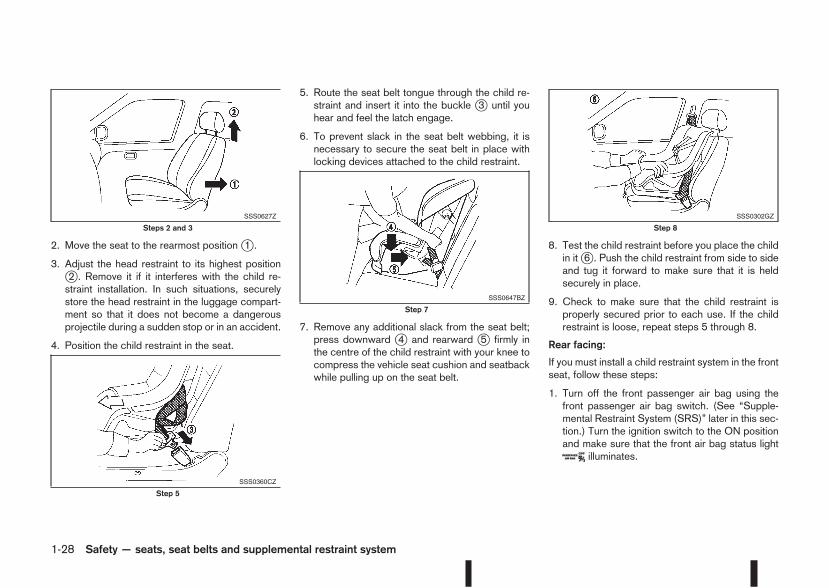
2. Move the seat to the rearmost positionj1 .
3. Adjust the head restraint to its highest positionj2 . Remove it if it interferes with the child re-straint installation. In such situations, securelystore the head restraint in the luggage compart-ment so that it does not become a dangerousprojectile during a sudden stop or in an accident.
4. Position the child restraint in the seat.
5. Route the seat belt tongue through the child re-straint and insert it into the buckle j3 until youhear and feel the latch engage.
6. To prevent slack in the seat belt webbing, it isnecessary to secure the seat belt in place withlocking devices attached to the child restraint.
7. Remove any additional slack from the seat belt;press downward j4 and rearward j5 firmly inthe centre of the child restraint with your knee tocompress the vehicle seat cushion and seatbackwhile pulling up on the seat belt.
8. Test the child restraint before you place the childin itj6 . Push the child restraint from side to sideand tug it forward to make sure that it is heldsecurely in place.
9. Check to make sure that the child restraint isproperly secured prior to each use. If the childrestraint is loose, repeat steps 5 through 8.
Rear facing:
If you must install a child restraint system in the frontseat, follow these steps:
1. Turn off the front passenger air bag using thefront passenger air bag switch. (See “Supple-mental Restraint System (SRS)” later in this sec-tion.) Turn the ignition switch to the ON positionand make sure that the front air bag status light
illuminates.
SSS0627Z
Steps 2 and 3
SSS0360CZ
Step 5
SSS0647BZ
Step 7
SSS0302GZ
Step 8
1-28 Safety — seats, seat belts and supplemental restraint system
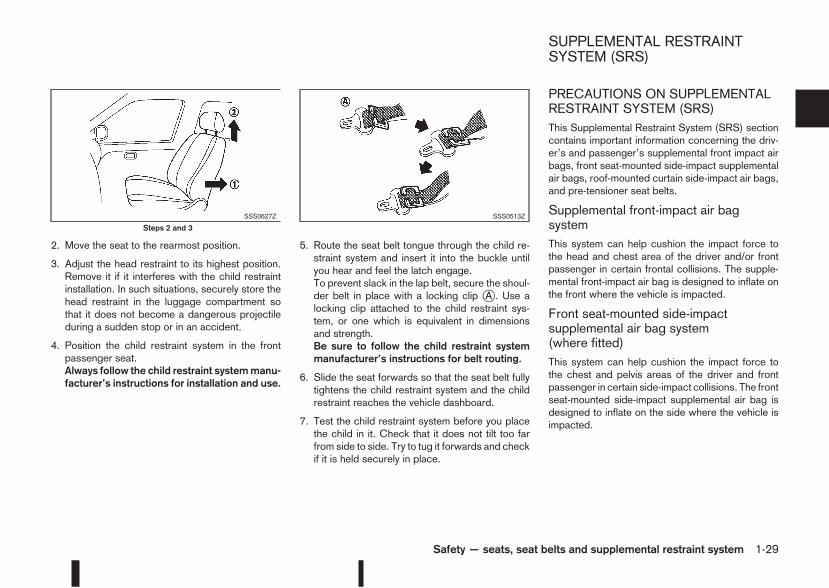
2. Move the seat to the rearmost position.
3. Adjust the head restraint to its highest position.Remove it if it interferes with the child restraintinstallation. In such situations, securely store thehead restraint in the luggage compartment sothat it does not become a dangerous projectileduring a sudden stop or in an accident.
4. Position the child restraint system in the frontpassenger seat.Always follow the child restraint systemmanu-facturer’s instructions for installation and use.
5. Route the seat belt tongue through the child re-straint system and insert it into the buckle untilyou hear and feel the latch engage.To prevent slack in the lap belt, secure the shoul-der belt in place with a locking clip jA . Use alocking clip attached to the child restraint sys-tem, or one which is equivalent in dimensionsand strength.Be sure to follow the child restraint systemmanufacturer’s instructions for belt routing.
6. Slide the seat forwards so that the seat belt fullytightens the child restraint system and the childrestraint reaches the vehicle dashboard.
7. Test the child restraint system before you placethe child in it. Check that it does not tilt too farfrom side to side. Try to tug it forwards and checkif it is held securely in place.
PRECAUTIONS ON SUPPLEMENTALRESTRAINT SYSTEM (SRS)This Supplemental Restraint System (SRS) sectioncontains important information concerning the driv-er’s and passenger’s supplemental front impact airbags, front seat-mounted side-impact supplementalair bags, roof-mounted curtain side-impact air bags,and pre-tensioner seat belts.
Supplemental front-impact air bagsystemThis system can help cushion the impact force tothe head and chest area of the driver and/or frontpassenger in certain frontal collisions. The supple-mental front-impact air bag is designed to inflate onthe front where the vehicle is impacted.
Front seat-mounted side-impactsupplemental air bag system(where fitted)This system can help cushion the impact force tothe chest and pelvis areas of the driver and frontpassenger in certain side-impact collisions. The frontseat-mounted side-impact supplemental air bag isdesigned to inflate on the side where the vehicle isimpacted.
SSS0627Z
Steps 2 and 3
SSS0513Z
SUPPLEMENTAL RESTRAINTSYSTEM (SRS)
Safety — seats, seat belts and supplemental restraint system 1-29
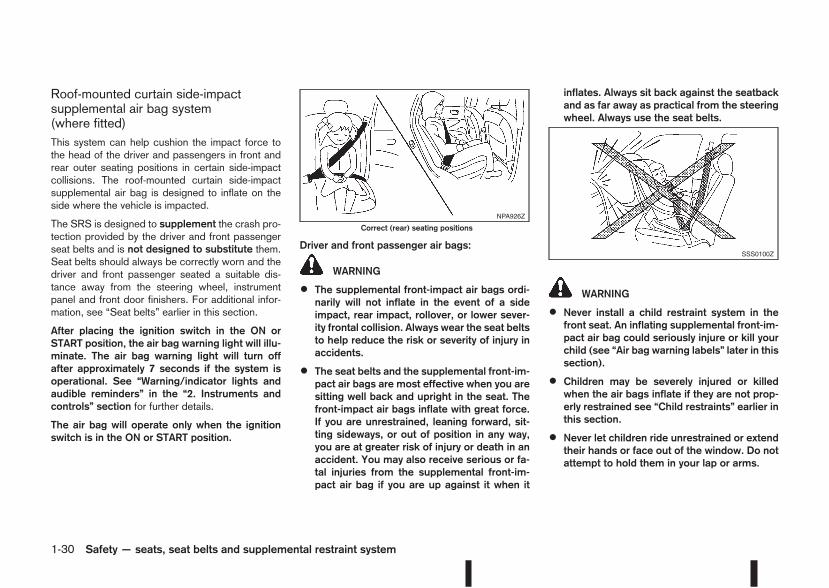
Roof-mounted curtain side-impactsupplemental air bag system(where fitted)This system can help cushion the impact force tothe head of the driver and passengers in front andrear outer seating positions in certain side-impactcollisions. The roof-mounted curtain side-impactsupplemental air bag is designed to inflate on theside where the vehicle is impacted.
The SRS is designed to supplement the crash pro-tection provided by the driver and front passengerseat belts and is not designed to substitute them.Seat belts should always be correctly worn and thedriver and front passenger seated a suitable dis-tance away from the steering wheel, instrumentpanel and front door finishers. For additional infor-mation, see “Seat belts” earlier in this section.
After placing the ignition switch in the ON orSTART position, the air bag warning light will illu-minate. The air bag warning light will turn offafter approximately 7 seconds if the system isoperational. See “Warning/indicator lights andaudible reminders” in the “2. Instruments andcontrols” section for further details.
The air bag will operate only when the ignitionswitch is in the ON or START position.
Driver and front passenger air bags:
WARNING
• The supplemental front-impact air bags ordi-narily will not inflate in the event of a sideimpact, rear impact, rollover, or lower sever-ity frontal collision. Always wear the seat beltsto help reduce the risk or severity of injury inaccidents.
• The seat belts and the supplemental front-im-pact air bags are most effective when you aresitting well back and upright in the seat. Thefront-impact air bags inflate with great force.If you are unrestrained, leaning forward, sit-ting sideways, or out of position in any way,you are at greater risk of injury or death in anaccident. You may also receive serious or fa-tal injuries from the supplemental front-im-pact air bag if you are up against it when it
inflates. Always sit back against the seatbackand as far away as practical from the steeringwheel. Always use the seat belts.
WARNING
• Never install a child restraint system in thefront seat. An inflating supplemental front-im-pact air bag could seriously injure or kill yourchild (see “Air bag warning labels” later in thissection).
• Children may be severely injured or killedwhen the air bags inflate if they are not prop-erly restrained see “Child restraints” earlier inthis section.
• Never let children ride unrestrained or extendtheir hands or face out of the window. Do notattempt to hold them in your lap or arms.
NPA926Z
Correct (rear) seating positions
SSS0100Z
1-30 Safety — seats, seat belts and supplemental restraint system
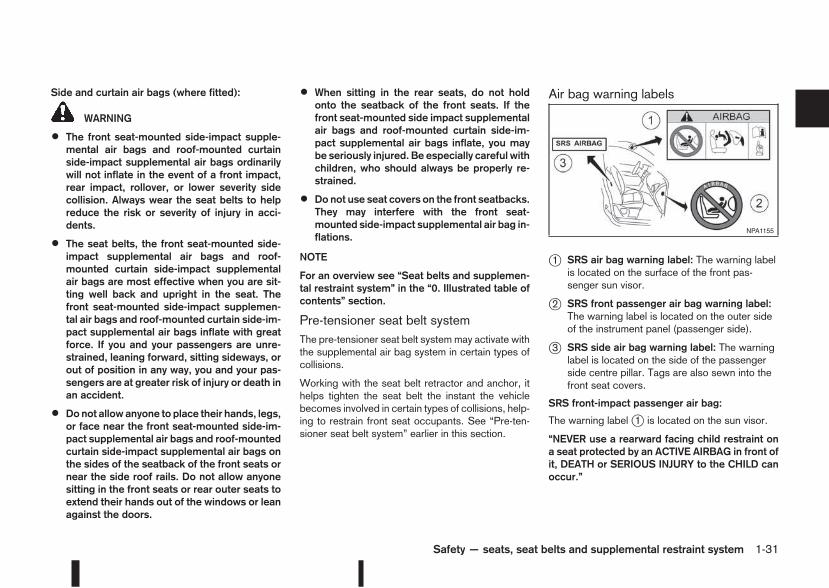
Side and curtain air bags (where fitted):
WARNING
• The front seat-mounted side-impact supple-mental air bags and roof-mounted curtainside-impact supplemental air bags ordinarilywill not inflate in the event of a front impact,rear impact, rollover, or lower severity sidecollision. Always wear the seat belts to helpreduce the risk or severity of injury in acci-dents.
• The seat belts, the front seat-mounted side-impact supplemental air bags and roof-mounted curtain side-impact supplementalair bags are most effective when you are sit-ting well back and upright in the seat. Thefront seat-mounted side-impact supplemen-tal air bags and roof-mounted curtain side-im-pact supplemental air bags inflate with greatforce. If you and your passengers are unre-strained, leaning forward, sitting sideways, orout of position in any way, you and your pas-sengers are at greater risk of injury or death inan accident.
• Do not allow anyone to place their hands, legs,or face near the front seat-mounted side-im-pact supplemental air bags and roof-mountedcurtain side-impact supplemental air bags onthe sides of the seatback of the front seats ornear the side roof rails. Do not allow anyonesitting in the front seats or rear outer seats toextend their hands out of the windows or leanagainst the doors.
• When sitting in the rear seats, do not holdonto the seatback of the front seats. If thefront seat-mounted side impact supplementalair bags and roof-mounted curtain side-im-pact supplemental air bags inflate, you maybe seriously injured. Be especially careful withchildren, who should always be properly re-strained.
• Do not use seat covers on the front seatbacks.They may interfere with the front seat-mounted side-impact supplemental air bag in-flations.
NOTE
For an overview see “Seat belts and supplemen-tal restraint system” in the “0. Illustrated table ofcontents” section.
Pre-tensioner seat belt systemThe pre-tensioner seat belt systemmay activate withthe supplemental air bag system in certain types ofcollisions.
Working with the seat belt retractor and anchor, ithelps tighten the seat belt the instant the vehiclebecomes involved in certain types of collisions, help-ing to restrain front seat occupants. See “Pre-ten-sioner seat belt system” earlier in this section.
Air bag warning labels
j1 SRS air bag warning label: The warning labelis located on the surface of the front pas-senger sun visor.
j2 SRS front passenger air bag warning label:The warning label is located on the outer sideof the instrument panel (passenger side).
j3 SRS side air bag warning label: The warninglabel is located on the side of the passengerside centre pillar. Tags are also sewn into thefront seat covers.
SRS front-impact passenger air bag:
The warning labelj1 is located on the sun visor.
“NEVER use a rearward facing child restraint ona seat protected by an ACTIVE AIRBAG in front ofit, DEATH or SERIOUS INJURY to the CHILD canoccur.”
NPA1155
Safety — seats, seat belts and supplemental restraint system 1-31
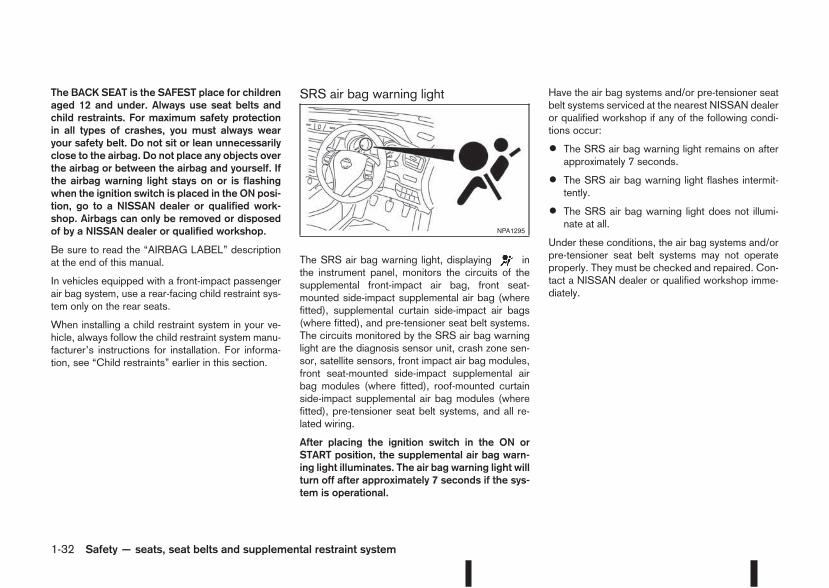
The BACK SEAT is the SAFEST place for childrenaged 12 and under. Always use seat belts andchild restraints. For maximum safety protectionin all types of crashes, you must always wearyour safety belt. Do not sit or lean unnecessarilyclose to the airbag. Do not place any objects overthe airbag or between the airbag and yourself. Ifthe airbag warning light stays on or is flashingwhen the ignition switch is placed in the ON posi-tion, go to a NISSAN dealer or qualified work-shop. Airbags can only be removed or disposedof by a NISSAN dealer or qualified workshop.
Be sure to read the “AIRBAG LABEL” descriptionat the end of this manual.
In vehicles equipped with a front-impact passengerair bag system, use a rear-facing child restraint sys-tem only on the rear seats.
When installing a child restraint system in your ve-hicle, always follow the child restraint system manu-facturer’s instructions for installation. For informa-tion, see “Child restraints” earlier in this section.
SRS air bag warning light
The SRS air bag warning light, displaying inthe instrument panel, monitors the circuits of thesupplemental front-impact air bag, front seat-mounted side-impact supplemental air bag (wherefitted), supplemental curtain side-impact air bags(where fitted), and pre-tensioner seat belt systems.The circuits monitored by the SRS air bag warninglight are the diagnosis sensor unit, crash zone sen-sor, satellite sensors, front impact air bag modules,front seat-mounted side-impact supplemental airbag modules (where fitted), roof-mounted curtainside-impact supplemental air bag modules (wherefitted), pre-tensioner seat belt systems, and all re-lated wiring.
After placing the ignition switch in the ON orSTART position, the supplemental air bag warn-ing light illuminates. The air bag warning light willturn off after approximately 7 seconds if the sys-tem is operational.
Have the air bag systems and/or pre-tensioner seatbelt systems serviced at the nearest NISSAN dealeror qualified workshop if any of the following condi-tions occur:
• The SRS air bag warning light remains on afterapproximately 7 seconds.
• The SRS air bag warning light flashes intermit-tently.
• The SRS air bag warning light does not illumi-nate at all.
Under these conditions, the air bag systems and/orpre-tensioner seat belt systems may not operateproperly. They must be checked and repaired. Con-tact a NISSAN dealer or qualified workshop imme-diately.
NPA1295
1-32 Safety — seats, seat belts and supplemental restraint system
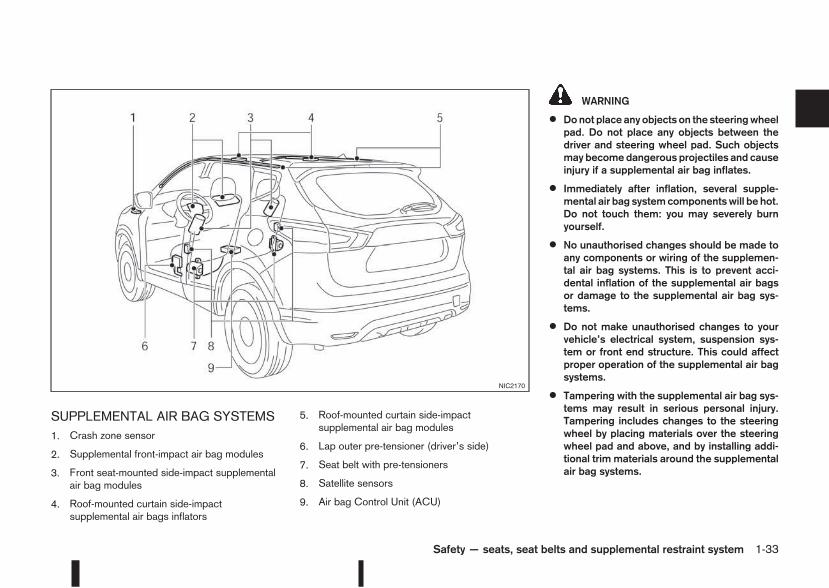
SUPPLEMENTAL AIR BAG SYSTEMS1. Crash zone sensor
2. Supplemental front-impact air bag modules
3. Front seat-mounted side-impact supplementalair bag modules
4. Roof-mounted curtain side-impactsupplemental air bags inflators
5. Roof-mounted curtain side-impactsupplemental air bag modules
6. Lap outer pre-tensioner (driver’s side)
7. Seat belt with pre-tensioners
8. Satellite sensors
9. Air bag Control Unit (ACU)
WARNING
• Donot place any objects on the steeringwheelpad. Do not place any objects between thedriver and steering wheel pad. Such objectsmay become dangerous projectiles and causeinjury if a supplemental air bag inflates.
• Immediately after inflation, several supple-mental air bag systemcomponentswill be hot.Do not touch them: you may severely burnyourself.
• No unauthorised changes should be made toany components or wiring of the supplemen-tal air bag systems. This is to prevent acci-dental inflation of the supplemental air bagsor damage to the supplemental air bag sys-tems.
• Do not make unauthorised changes to yourvehicle’s electrical system, suspension sys-tem or front end structure. This could affectproper operation of the supplemental air bagsystems.
• Tampering with the supplemental air bag sys-tems may result in serious personal injury.Tampering includes changes to the steeringwheel by placing materials over the steeringwheel pad and above, and by installing addi-tional trim materials around the supplementalair bag systems.
NIC2170
Safety — seats, seat belts and supplemental restraint system 1-33
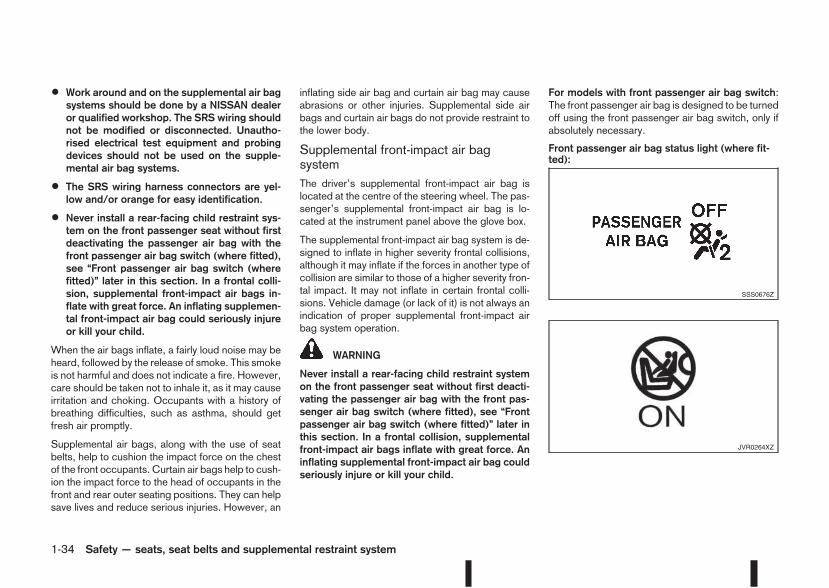
• Work around and on the supplemental air bagsystems should be done by a NISSAN dealeror qualified workshop. The SRS wiring shouldnot be modified or disconnected. Unautho-rised electrical test equipment and probingdevices should not be used on the supple-mental air bag systems.
• The SRS wiring harness connectors are yel-low and/or orange for easy identification.
• Never install a rear-facing child restraint sys-tem on the front passenger seat without firstdeactivating the passenger air bag with thefront passenger air bag switch (where fitted),see “Front passenger air bag switch (wherefitted)” later in this section. In a frontal colli-sion, supplemental front-impact air bags in-flate with great force. An inflating supplemen-tal front-impact air bag could seriously injureor kill your child.
When the air bags inflate, a fairly loud noise may beheard, followed by the release of smoke. This smokeis not harmful and does not indicate a fire. However,care should be taken not to inhale it, as it may causeirritation and choking. Occupants with a history ofbreathing difficulties, such as asthma, should getfresh air promptly.
Supplemental air bags, along with the use of seatbelts, help to cushion the impact force on the chestof the front occupants. Curtain air bags help to cush-ion the impact force to the head of occupants in thefront and rear outer seating positions. They can helpsave lives and reduce serious injuries. However, an
inflating side air bag and curtain air bag may causeabrasions or other injuries. Supplemental side airbags and curtain air bags do not provide restraint tothe lower body.
Supplemental front-impact air bagsystemThe driver’s supplemental front-impact air bag islocated at the centre of the steering wheel. The pas-senger’s supplemental front-impact air bag is lo-cated at the instrument panel above the glove box.
The supplemental front-impact air bag system is de-signed to inflate in higher severity frontal collisions,although it may inflate if the forces in another type ofcollision are similar to those of a higher severity fron-tal impact. It may not inflate in certain frontal colli-sions. Vehicle damage (or lack of it) is not always anindication of proper supplemental front-impact airbag system operation.
WARNING
Never install a rear-facing child restraint systemon the front passenger seat without first deacti-vating the passenger air bag with the front pas-senger air bag switch (where fitted), see “Frontpassenger air bag switch (where fitted)” later inthis section. In a frontal collision, supplementalfront-impact air bags inflate with great force. Aninflating supplemental front-impact air bag couldseriously injure or kill your child.
For models with front passenger air bag switch:The front passenger air bag is designed to be turnedoff using the front passenger air bag switch, only ifabsolutely necessary.
Front passenger air bag status light (where fit-ted):
SSS0676Z
JVR0264XZ
1-34 Safety — seats, seat belts and supplemental restraint system

WARNING
• Since your vehicle is equipped with a frontpassenger air bag, it is not permitted to installa rearward facing child restraint on the frontpassenger seat unless the front passenger airbag has been deactivated first.
• Do not fit a rearward facing child seat on thefront passenger seat if the air bag activation/deactivation system (where fitted) is malfunc-tioning. Your vehicle must immediately betaken to a NISSAN dealer or qualified work-shop in such a situation.
The front passenger air bag status lights andare located on the instrument panel above the
shift lever.
When the ignition switch is placed in the ON posi-tion, the front passenger air bag status ON andOFF lights illuminate and then turn off or remain ondepending on the front passenger air bag status.
• When the ignition switch is placed in the ONposition and the front passenger air bag is ac-tive, both the front passenger air bag status OFFlight , and the Supplemental Restraint Sys-tem (SRS) air bag warning light in the com-bination meterj1 will turn off after about 7 sec-onds.
The front passenger air bag statusON lightwill illuminate and then turn off after a period oftime when the front passenger air bag switch isin the ON position.
• When the ignition switch is placed in the ONposition and the front passenger air bag is inac-tive, both the front passenger air bag status ONlight , and the Supplemental Restraint Sys-tem (SRS) air bag warning light in the com-bination meterj1 will turn on after about 7 sec-onds.
The front passenger air bag status OFF lightwill illuminate and remain on as long as the
front passenger air bag switch is in the OFFposition.
If the front passenger air bag status light operates ina way other than described above, the front passen-ger air bag may not function properly. Have the sys-tem checked, and if necessary repaired, by aNISSAN dealer or qualified workshop promptly.
Front passenger air bag switch (where fitted):
The front passenger air bag can be turned off withthe front passenger air bag switchjA located insidethe glove box.
jA Air bag switch (where fitted)
jB Left Hand Drive models
jC Right Hand Drive models
To turn off the front passenger air bag:
1. Place the ignition switch in the “OFF” position.
2. Open the glove box and insert the key into thefront passenger air bag switch. For IntelligentKey equipped models, see “Keys” in the “3. Pre-driving checks and adjustments” section for me-chanical key usage.
3. Push and turn the key to the OFF position.
4. Place the ignition switch in the ON position. Thefront passenger air bag status OFF lightwill illuminate and remain on.
NPA1296
NPA1297
Safety — seats, seat belts and supplemental restraint system 1-35
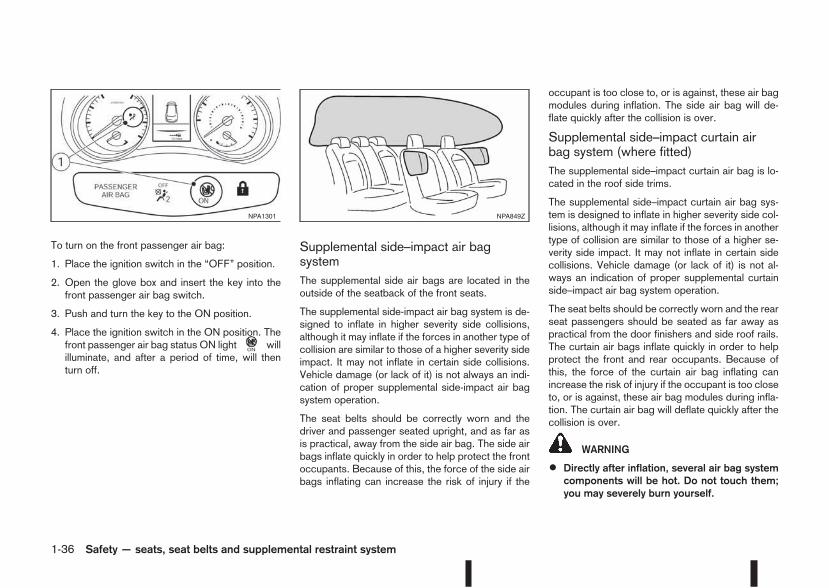
To turn on the front passenger air bag:
1. Place the ignition switch in the “OFF” position.
2. Open the glove box and insert the key into thefront passenger air bag switch.
3. Push and turn the key to the ON position.
4. Place the ignition switch in the ON position. Thefront passenger air bag status ON light willilluminate, and after a period of time, will thenturn off.
Supplemental side–impact air bagsystemThe supplemental side air bags are located in theoutside of the seatback of the front seats.
The supplemental side-impact air bag system is de-signed to inflate in higher severity side collisions,although it may inflate if the forces in another type ofcollision are similar to those of a higher severity sideimpact. It may not inflate in certain side collisions.Vehicle damage (or lack of it) is not always an indi-cation of proper supplemental side-impact air bagsystem operation.
The seat belts should be correctly worn and thedriver and passenger seated upright, and as far asis practical, away from the side air bag. The side airbags inflate quickly in order to help protect the frontoccupants. Because of this, the force of the side airbags inflating can increase the risk of injury if the
occupant is too close to, or is against, these air bagmodules during inflation. The side air bag will de-flate quickly after the collision is over.
Supplemental side–impact curtain airbag system (where fitted)The supplemental side–impact curtain air bag is lo-cated in the roof side trims.
The supplemental side–impact curtain air bag sys-tem is designed to inflate in higher severity side col-lisions, although it may inflate if the forces in anothertype of collision are similar to those of a higher se-verity side impact. It may not inflate in certain sidecollisions. Vehicle damage (or lack of it) is not al-ways an indication of proper supplemental curtainside–impact air bag system operation.
The seat belts should be correctly worn and the rearseat passengers should be seated as far away aspractical from the door finishers and side roof rails.The curtain air bags inflate quickly in order to helpprotect the front and rear occupants. Because ofthis, the force of the curtain air bag inflating canincrease the risk of injury if the occupant is too closeto, or is against, these air bag modules during infla-tion. The curtain air bag will deflate quickly after thecollision is over.
WARNING
• Directly after inflation, several air bag systemcomponents will be hot. Do not touch them;you may severely burn yourself.
NPA1301 NPA849Z
1-36 Safety — seats, seat belts and supplemental restraint system
• No unauthorised changes should be made toany components or wiring of the air bag sys-tem. This is to prevent accidental inflation ofthe air bag or damage to the air bag system.
• Tampering with the air bag system may resultin serious personal injury. Tampering includesmaking changes to the steering wheel andthe instrument panel assembly by placingma-terial over the steering pad and above thedashboard, or by installing additional trimma-terial around the air bag system.
• Do not attach any objects to the steeringwheel pad or to the instrument panel. Objectsattached to the steering wheel pad and in-strument panel may become dangerous pro-jectiles and cause injury if the air bag inflates.
• Work on and around the air bag system shouldbe done by a NISSAN dealer or qualified work-shop. Installation of electrical equipmentshould be done by a NISSAN dealer or quali-fied workshop. The yellow SRS wiring har-nesses* should not be modified or discon-nected. Unauthorised electrical test equip-ment and probing devices should not be usedon the air bag system.
* SRS wiring harnesses are covered with yellowinsulation either just before the harness con-nectors or on the complete harness, for easyidentification.
REPAIR AND REPLACEMENTPROCEDURE
WARNING
• Once the air bags have been inflated, the airbag modules will not function and must bereplaced. The air bag modules must be re-placed by a NISSAN dealer or qualified work-shop. The inflated air bag modules cannot berepaired.
• The air bag systems should be inspected by aNISSAN dealer or qualified workshop if thereis any damage to the front end portion of thevehicle.
• When selling your vehicle, we request that youinform the buyer about the air bag system andguide the buyer to the appropriate sections inthis Owner’s Manual.
• If you need to dispose of the SRS or scrap thevehicle, contact a NISSAN dealer or qualifiedworkshop. Correct disposal procedures areset forth in the appropriate NISSAN ServiceManual. Incorrect disposal procedures couldcause personal injury.
The air bags and pre-tensioner seat belts are de-signed to activate on a one-time-only basis. As areminder, unless the SRS air bag warning light isdamaged, the SRS air bag warning light remainsilluminated after inflation has occurred. The repairand replacement of the SRS should be done only bya NISSAN dealer or qualified workshop.
When maintenance work is required on the vehicle,information about the air bags, pre-tensioner seatbelts and related parts should be pointed out to theperson performing the maintenance. The ignitionswitch should always be in the LOCK position whenworking under the bonnet or inside the vehicle.
Safety — seats, seat belts and supplemental restraint system 1-37
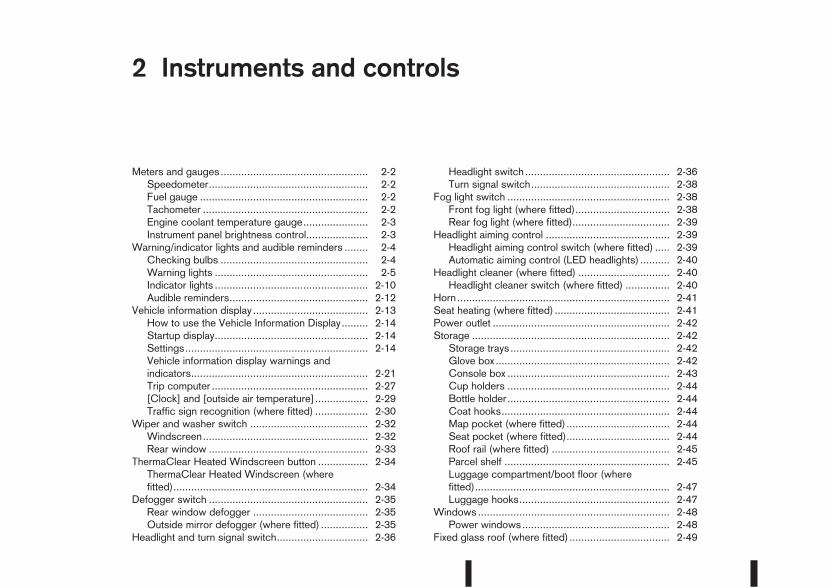
2 Instruments and controlsInstruments and controls
Meters and gauges .................................................. 2-2Speedometer...................................................... 2-2Fuel gauge ......................................................... 2-2Tachometer ........................................................ 2-2Engine coolant temperature gauge...................... 2-3Instrument panel brightness control..................... 2-3
Warning/indicator lights and audible reminders ........ 2-4Checking bulbs .................................................. 2-4Warning lights .................................................... 2-5Indicator lights .................................................... 2-10Audible reminders............................................... 2-12
Vehicle information display ....................................... 2-13How to use the Vehicle Information Display......... 2-14Startup display.................................................... 2-14Settings.............................................................. 2-14Vehicle information display warnings andindicators............................................................ 2-21Trip computer ..................................................... 2-27[Clock] and [outside air temperature].................. 2-29Traffic sign recognition (where fitted) .................. 2-30
Wiper and washer switch ........................................ 2-32Windscreen........................................................ 2-32Rear window ...................................................... 2-33
ThermaClear Heated Windscreen button ................. 2-34ThermaClear Heated Windscreen (wherefitted).................................................................. 2-34
Defogger switch ...................................................... 2-35Rear window defogger ....................................... 2-35Outside mirror defogger (where fitted) ................ 2-35
Headlight and turn signal switch............................... 2-36
Headlight switch ................................................. 2-36Turn signal switch............................................... 2-38
Fog light switch ....................................................... 2-38Front fog light (where fitted)................................ 2-38Rear fog light (where fitted)................................. 2-39
Headlight aiming control .......................................... 2-39Headlight aiming control switch (where fitted) ..... 2-39Automatic aiming control (LED headlights) .......... 2-40
Headlight cleaner (where fitted) ............................... 2-40Headlight cleaner switch (where fitted) ............... 2-40
Horn........................................................................ 2-41Seat heating (where fitted) ....................................... 2-41Power outlet ............................................................ 2-42Storage ................................................................... 2-42Storage trays...................................................... 2-42Glove box ........................................................... 2-42Console box ....................................................... 2-43Cup holders ....................................................... 2-44Bottle holder....................................................... 2-44Coat hooks......................................................... 2-44Map pocket (where fitted) ................................... 2-44Seat pocket (where fitted)................................... 2-44Roof rail (where fitted) ........................................ 2-45Parcel shelf ........................................................ 2-45Luggage compartment/boot floor (wherefitted).................................................................. 2-47Luggage hooks................................................... 2-47
Windows ................................................................. 2-48Power windows.................................................. 2-48
Fixed glass roof (where fitted) .................................. 2-49
Sunshade operation............................................ 2-50Interior lights............................................................ 2-50Room light control switch.................................... 2-50Map lights (where fitted) ..................................... 2-50
Rear room/reading light (where fitted) ................. 2-51Luggage compartment light ................................ 2-51Vanity mirror light (where fitted)........................... 2-51
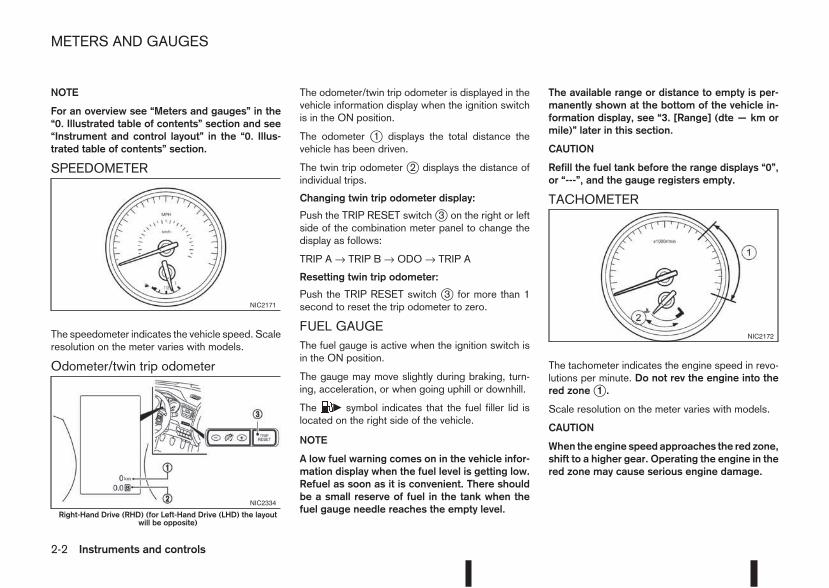
NOTE
For an overview see “Meters and gauges” in the“0. Illustrated table of contents” section and see“Instrument and control layout” in the “0. Illus-trated table of contents” section.
SPEEDOMETER
The speedometer indicates the vehicle speed. Scaleresolution on the meter varies with models.
Odometer/twin trip odometer
The odometer/twin trip odometer is displayed in thevehicle information display when the ignition switchis in the ON position.
The odometer j1 displays the total distance thevehicle has been driven.
The twin trip odometer j2 displays the distance ofindividual trips.
Changing twin trip odometer display:
Push the TRIP RESET switchj3 on the right or leftside of the combination meter panel to change thedisplay as follows:
TRIP A → TRIP B → ODO → TRIP A
Resetting twin trip odometer:
Push the TRIP RESET switch j3 for more than 1second to reset the trip odometer to zero.
FUEL GAUGEThe fuel gauge is active when the ignition switch isin the ON position.
The gauge may move slightly during braking, turn-ing, acceleration, or when going uphill or downhill.
The c symbol indicates that the fuel filler lid islocated on the right side of the vehicle.
NOTE
A low fuel warning comes on in the vehicle infor-mation display when the fuel level is getting low.Refuel as soon as it is convenient. There shouldbe a small reserve of fuel in the tank when thefuel gauge needle reaches the empty level.
The available range or distance to empty is per-manently shown at the bottom of the vehicle in-formation display, see “3. [Range] (dte — km ormile)” later in this section.
CAUTION
Refill the fuel tank before the range displays “0”,or “---”, and the gauge registers empty.
TACHOMETER
The tachometer indicates the engine speed in revo-lutions per minute. Do not rev the engine into thered zonej1 .
Scale resolution on the meter varies with models.
CAUTION
When the engine speed approaches the red zone,shift to a higher gear. Operating the engine in thered zone may cause serious engine damage.
NIC2171
NIC2334
Right-Hand Drive (RHD) (for Left-Hand Drive (LHD) the layoutwill be opposite)
NIC2172
METERS AND GAUGES
2-2 Instruments and controls
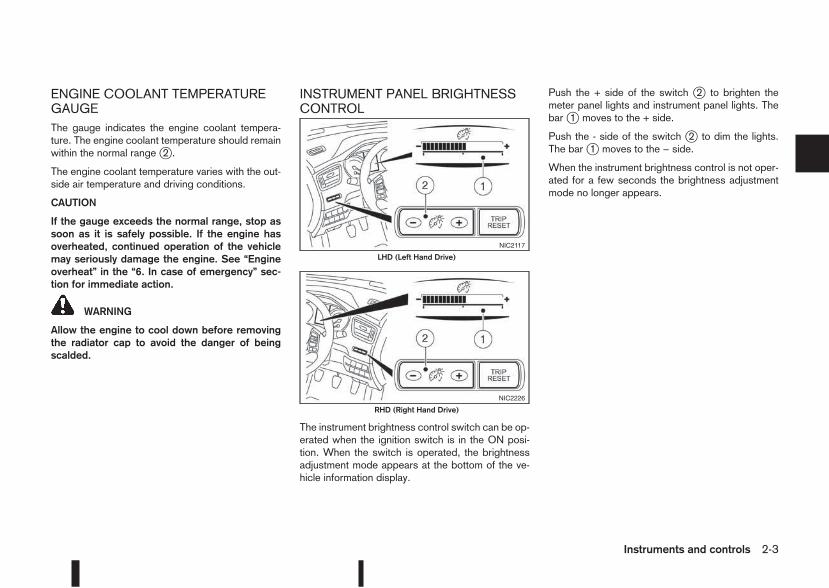
ENGINE COOLANT TEMPERATUREGAUGEThe gauge indicates the engine coolant tempera-ture. The engine coolant temperature should remainwithin the normal rangej2 .
The engine coolant temperature varies with the out-side air temperature and driving conditions.
CAUTION
If the gauge exceeds the normal range, stop assoon as it is safely possible. If the engine hasoverheated, continued operation of the vehiclemay seriously damage the engine. See “Engineoverheat” in the “6. In case of emergency” sec-tion for immediate action.
WARNING
Allow the engine to cool down before removingthe radiator cap to avoid the danger of beingscalded.
INSTRUMENT PANEL BRIGHTNESSCONTROL
The instrument brightness control switch can be op-erated when the ignition switch is in the ON posi-tion. When the switch is operated, the brightnessadjustment mode appears at the bottom of the ve-hicle information display.
Push the + side of the switch j2 to brighten themeter panel lights and instrument panel lights. Thebarj1 moves to the + side.
Push the - side of the switch j2 to dim the lights.The barj1 moves to the − side.
When the instrument brightness control is not oper-ated for a few seconds the brightness adjustmentmode no longer appears.
NIC2117
LHD (Left Hand Drive)
NIC2226
RHD (Right Hand Drive)
Instruments and controls 2-3
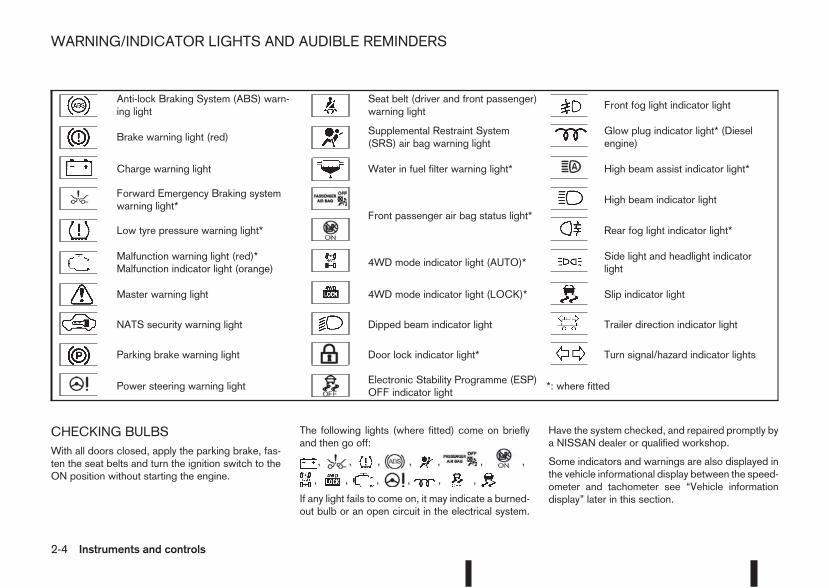
Anti-lock Braking System (ABS) warn-ing light
Seat belt (driver and front passenger)warning light
Front fog light indicator light
Brake warning light (red)Supplemental Restraint System(SRS) air bag warning light
Glow plug indicator light* (Dieselengine)
Charge warning light Water in fuel filter warning light* High beam assist indicator light*
Forward Emergency Braking systemwarning light*
Front passenger air bag status light*
High beam indicator light
Low tyre pressure warning light* Rear fog light indicator light*
Malfunction warning light (red)*Malfunction indicator light (orange)
4WD mode indicator light (AUTO)*Side light and headlight indicatorlight
Master warning light 4WD mode indicator light (LOCK)* Slip indicator light
NATS security warning light Dipped beam indicator light Trailer direction indicator light
Parking brake warning light Door lock indicator light* Turn signal/hazard indicator lights
Power steering warning lightElectronic Stability Programme (ESP)OFF indicator light
*: where fitted
CHECKING BULBSWith all doors closed, apply the parking brake, fas-ten the seat belts and turn the ignition switch to theON position without starting the engine.
The following lights (where fitted) come on brieflyand then go off:
, , , , , , ,
, , , , , ,
If any light fails to come on, it may indicate a burned-out bulb or an open circuit in the electrical system.
Have the system checked, and repaired promptly bya NISSAN dealer or qualified workshop.
Some indicators and warnings are also displayed inthe vehicle informational display between the speed-ometer and tachometer see “Vehicle informationdisplay” later in this section.
WARNING/INDICATOR LIGHTS AND AUDIBLE REMINDERS
2-4 Instruments and controls
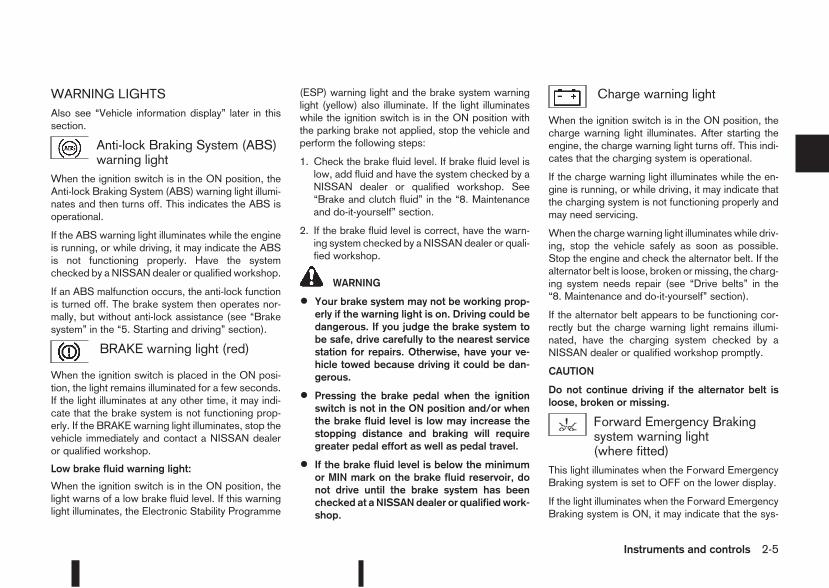
WARNING LIGHTSAlso see “Vehicle information display” later in thissection.
Anti-lock Braking System (ABS)warning light
When the ignition switch is in the ON position, theAnti-lock Braking System (ABS) warning light illumi-nates and then turns off. This indicates the ABS isoperational.
If the ABS warning light illuminates while the engineis running, or while driving, it may indicate the ABSis not functioning properly. Have the systemchecked by a NISSAN dealer or qualified workshop.
If an ABS malfunction occurs, the anti-lock functionis turned off. The brake system then operates nor-mally, but without anti-lock assistance (see “Brakesystem” in the “5. Starting and driving” section).
BRAKE warning light (red)
When the ignition switch is placed in the ON posi-tion, the light remains illuminated for a few seconds.If the light illuminates at any other time, it may indi-cate that the brake system is not functioning prop-erly. If the BRAKE warning light illuminates, stop thevehicle immediately and contact a NISSAN dealeror qualified workshop.
Low brake fluid warning light:
When the ignition switch is in the ON position, thelight warns of a low brake fluid level. If this warninglight illuminates, the Electronic Stability Programme
(ESP) warning light and the brake system warninglight (yellow) also illuminate. If the light illuminateswhile the ignition switch is in the ON position withthe parking brake not applied, stop the vehicle andperform the following steps:
1. Check the brake fluid level. If brake fluid level islow, add fluid and have the system checked by aNISSAN dealer or qualified workshop. See“Brake and clutch fluid” in the “8. Maintenanceand do-it-yourself” section.
2. If the brake fluid level is correct, have the warn-ing system checked by a NISSAN dealer or quali-fied workshop.
WARNING
• Your brake system may not be working prop-erly if the warning light is on. Driving could bedangerous. If you judge the brake system tobe safe, drive carefully to the nearest servicestation for repairs. Otherwise, have your ve-hicle towed because driving it could be dan-gerous.
• Pressing the brake pedal when the ignitionswitch is not in the ON position and/or whenthe brake fluid level is low may increase thestopping distance and braking will requiregreater pedal effort as well as pedal travel.
• If the brake fluid level is below the minimumor MIN mark on the brake fluid reservoir, donot drive until the brake system has beenchecked at a NISSAN dealer or qualified work-shop.
Charge warning light
When the ignition switch is in the ON position, thecharge warning light illuminates. After starting theengine, the charge warning light turns off. This indi-cates that the charging system is operational.
If the charge warning light illuminates while the en-gine is running, or while driving, it may indicate thatthe charging system is not functioning properly andmay need servicing.
When the chargewarning light illuminates while driv-ing, stop the vehicle safely as soon as possible.Stop the engine and check the alternator belt. If thealternator belt is loose, broken or missing, the charg-ing system needs repair (see “Drive belts” in the“8. Maintenance and do-it-yourself” section).
If the alternator belt appears to be functioning cor-rectly but the charge warning light remains illumi-nated, have the charging system checked by aNISSAN dealer or qualified workshop promptly.
CAUTION
Do not continue driving if the alternator belt isloose, broken or missing.
Forward Emergency Brakingsystem warning light(where fitted)
This light illuminates when the Forward EmergencyBraking system is set to OFF on the lower display.
If the light illuminates when the Forward EmergencyBraking system is ON, it may indicate that the sys-
Instruments and controls 2-5

tem is unavailable. See “Forward emergency brak-ing system (where fitted)” in the “5. Starting anddriving” section for more details.
Low tyre pressure warning light(where fitted)
Your vehicle is equipped with a Tyre Pressure Moni-toring System (TPMS) that monitors the tyre pres-sure of all tyres except the spare.
The low tyre pressure warning light warns of lowtyre pressure or indicates that the TPMS is not func-tioning properly.
After the ignition switch is placed in the ON posi-tion, this light illuminates for about 1 second andturns off.
Low tyre pressure warning:
If the vehicle is being driven with low tyre pressure,the warning light will illuminate. A low tyre pressurewarning (e.g., [Low tyre pressure]) also appears inthe vehicle information display.
When the low tyre pressurewarning light illuminates,you should stop and adjust the tyre pressure of all 4tyres to the recommended COLD tyre pressureshown on the tyre placard located on the driver sidecentre pillar see “Tyre placard” in the “9. Technicalinformation” section. The low tyre pressure warninglight does not automatically turn off when the tyrepressure is adjusted. After the tyre is inflated to therecommended pressure, the vehicle must be drivenat speeds above 25 km/h (16 MPH) to activate the
TPMS and turn off the low tyre pressure warninglight. Use a tyre pressure gauge to check the tyrepressure.
The low tyre pressure (e.g., [Low tyre pressure])warning appears each time the ignition switch isplaced in the ON position as long as the low tyrepressure warning light remains illuminated.
For additional information, see “Vehicle informationdisplay” later in this section and “Tyre PressureMonitoring System (TPMS)” later in this section.
TPMS resetting must be also performed after a tyreor a wheel is replaced, or the tyres are rotated.
Depending on a change in the outside temperature,the low tyre pressure warning light may illuminateeven if the tyre pressure has been adjusted prop-erly. Adjust the tyre pressure to the recommendedCOLD tyre pressure again when the tyres are cold,and reset the TPMS.
If the low tyre pressure warning light still continuesto illuminate after the resetting operation, it may indi-cate that the TPMS is not functioning properly. Havethe system checked by a NISSAN dealer or quali-fied workshop.
For additional information, see “Tyre Pressure Moni-toring System (TPMS)” in the “5. Starting anddriving” section and “Vehicle information display”later in this section.
TPMS malfunction:
If the TPMS is not functioning properly, the low tyrepressure warning light will flash for approximately 1minute when the ignition switch is placed in the ON
position. The light will remain on after 1 minute. Havethe system checked by a NISSAN dealer or quali-fied workshop. The low tyre pressure warning doesnot appear if the low tyre pressure warning light illu-minates to indicate a TPMS malfunction.
For additional information, see “Tyre Pressure Moni-toring System (TPMS)” in the “5. Starting anddriving” section.
WARNING
• Radio waves could adversely affect electricmedical equipment. Those who use a pace-maker should contact the electric medicalequipment manufacturer for the possible in-fluences before use.
• If the light does not illuminate with the igni-tion switch pushed ON, have the vehiclechecked by a NISSAN dealer or qualifiedworkshop as soon as possible.
• If the low tyre pressure warning light illumi-nates while driving, avoid sudden steeringmanoeuvres or abrupt braking, reduce vehiclespeed, pull off the road to a safe location andstop the vehicle as soon as possible. Drivingwith under-inflated tyres may permanentlydamage the tyres and increase the likelihoodof tyre failure. Serious vehicle damage couldoccur and may lead to an accident and couldresult in serious personal injury. Check thetyre pressure for all four tyres. Adjust the tyrepressure to the recommended COLD tyrepressure shown on the tyre placard, located
2-6 Instruments and controls
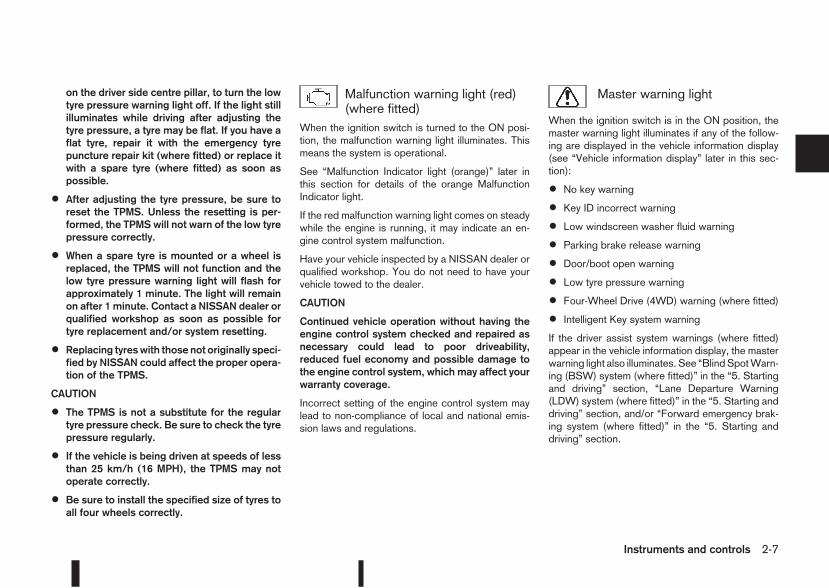
on the driver side centre pillar, to turn the lowtyre pressure warning light off. If the light stillilluminates while driving after adjusting thetyre pressure, a tyre may be flat. If you have aflat tyre, repair it with the emergency tyrepuncture repair kit (where fitted) or replace itwith a spare tyre (where fitted) as soon aspossible.
• After adjusting the tyre pressure, be sure toreset the TPMS. Unless the resetting is per-formed, the TPMS will not warn of the low tyrepressure correctly.
• When a spare tyre is mounted or a wheel isreplaced, the TPMS will not function and thelow tyre pressure warning light will flash forapproximately 1 minute. The light will remainon after 1 minute. Contact a NISSAN dealer orqualified workshop as soon as possible fortyre replacement and/or system resetting.
• Replacing tyreswith those not originally speci-fied by NISSAN could affect the proper opera-tion of the TPMS.
CAUTION
• The TPMS is not a substitute for the regulartyre pressure check. Be sure to check the tyrepressure regularly.
• If the vehicle is being driven at speeds of lessthan 25 km/h (16 MPH), the TPMS may notoperate correctly.
• Be sure to install the specified size of tyres toall four wheels correctly.
Malfunction warning light (red)(where fitted)
When the ignition switch is turned to the ON posi-tion, the malfunction warning light illuminates. Thismeans the system is operational.
See “Malfunction Indicator light (orange)” later inthis section for details of the orange MalfunctionIndicator light.
If the red malfunction warning light comes on steadywhile the engine is running, it may indicate an en-gine control system malfunction.
Have your vehicle inspected by a NISSAN dealer orqualified workshop. You do not need to have yourvehicle towed to the dealer.
CAUTION
Continued vehicle operation without having theengine control system checked and repaired asnecessary could lead to poor driveability,reduced fuel economy and possible damage tothe engine control system, which may affect yourwarranty coverage.
Incorrect setting of the engine control system maylead to non-compliance of local and national emis-sion laws and regulations.
Master warning light
When the ignition switch is in the ON position, themaster warning light illuminates if any of the follow-ing are displayed in the vehicle information display(see “Vehicle information display” later in this sec-tion):
• No key warning
• Key ID incorrect warning
• Low windscreen washer fluid warning
• Parking brake release warning
• Door/boot open warning
• Low tyre pressure warning
• Four-Wheel Drive (4WD) warning (where fitted)
• Intelligent Key system warning
If the driver assist system warnings (where fitted)appear in the vehicle information display, the masterwarning light also illuminates. See “BlindSpotWarn-ing (BSW) system (where fitted)” in the “5. Startingand driving” section, “Lane Departure Warning(LDW) system (where fitted)” in the “5. Starting anddriving” section, and/or “Forward emergency brak-ing system (where fitted)” in the “5. Starting anddriving” section.
Instruments and controls 2-7
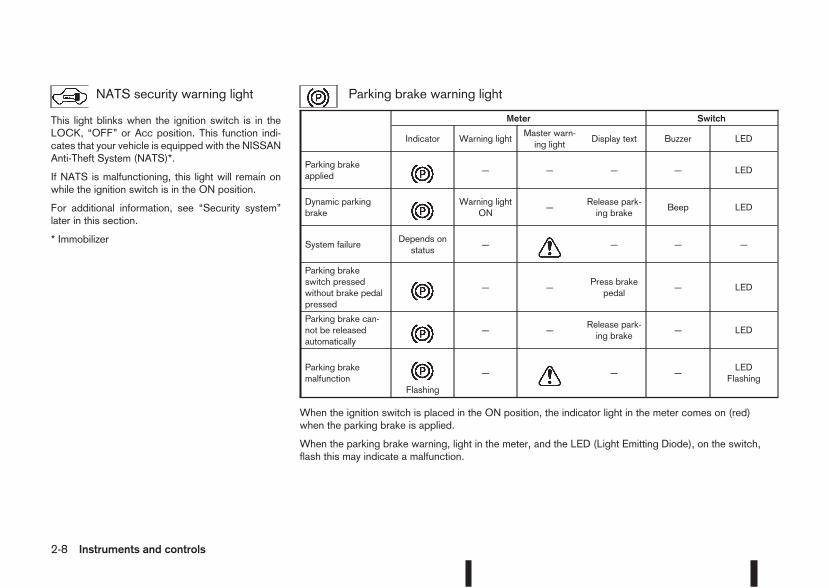
NATS security warning light
This light blinks when the ignition switch is in theLOCK, “OFF” or Acc position. This function indi-cates that your vehicle is equipped with the NISSANAnti-Theft System (NATS)*.
If NATS is malfunctioning, this light will remain onwhile the ignition switch is in the ON position.
For additional information, see “Security system”later in this section.
* Immobilizer
Parking brake warning light
When the ignition switch is placed in the ON position, the indicator light in the meter comes on (red)when the parking brake is applied.
When the parking brake warning, light in the meter, and the LED (Light Emitting Diode), on the switch,flash this may indicate a malfunction.
Meter Switch
Indicator Warning lightMaster warn-ing light
Display text Buzzer LED
Parking brakeapplied m — — — — LED
Dynamic parkingbrake m
Warning lightON
—Release park-ing brake
Beep LED
System failureDepends onstatus
— m — — —
Parking brakeswitch pressedwithout brake pedalpressed
m — —Press brakepedal
— LED
Parking brake can-not be releasedautomatically m — —
Release park-ing brake
— LED
Parking brakemalfunction m
Flashing
— m — —LED
Flashing
2-8 Instruments and controls
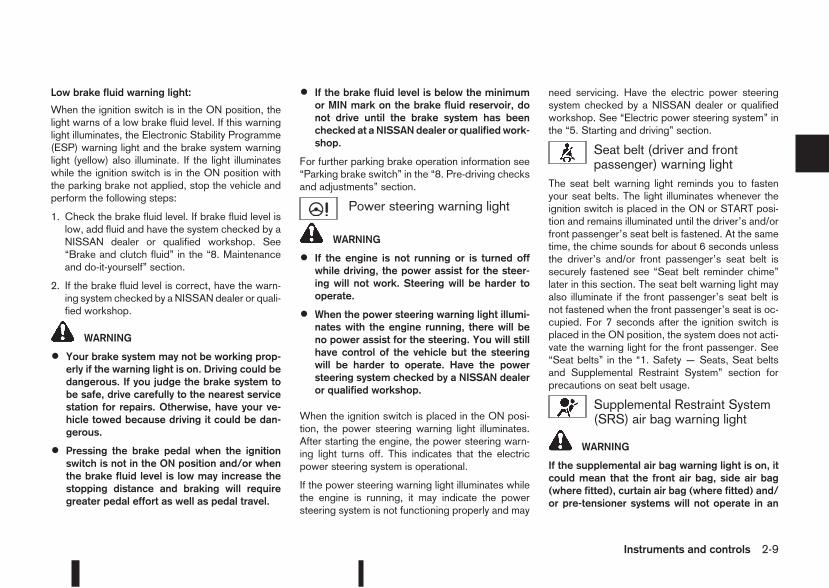
Low brake fluid warning light:
When the ignition switch is in the ON position, thelight warns of a low brake fluid level. If this warninglight illuminates, the Electronic Stability Programme(ESP) warning light and the brake system warninglight (yellow) also illuminate. If the light illuminateswhile the ignition switch is in the ON position withthe parking brake not applied, stop the vehicle andperform the following steps:
1. Check the brake fluid level. If brake fluid level islow, add fluid and have the system checked by aNISSAN dealer or qualified workshop. See“Brake and clutch fluid” in the “8. Maintenanceand do-it-yourself” section.
2. If the brake fluid level is correct, have the warn-ing system checked by a NISSAN dealer or quali-fied workshop.
WARNING
• Your brake system may not be working prop-erly if the warning light is on. Driving could bedangerous. If you judge the brake system tobe safe, drive carefully to the nearest servicestation for repairs. Otherwise, have your ve-hicle towed because driving it could be dan-gerous.
• Pressing the brake pedal when the ignitionswitch is not in the ON position and/or whenthe brake fluid level is low may increase thestopping distance and braking will requiregreater pedal effort as well as pedal travel.
• If the brake fluid level is below the minimumor MIN mark on the brake fluid reservoir, donot drive until the brake system has beenchecked at a NISSAN dealer or qualified work-shop.
For further parking brake operation information see“Parking brake switch” in the “8. Pre-driving checksand adjustments” section.
Power steering warning light
WARNING
• If the engine is not running or is turned offwhile driving, the power assist for the steer-ing will not work. Steering will be harder tooperate.
• When the power steering warning light illumi-nates with the engine running, there will beno power assist for the steering. You will stillhave control of the vehicle but the steeringwill be harder to operate. Have the powersteering system checked by a NISSAN dealeror qualified workshop.
When the ignition switch is placed in the ON posi-tion, the power steering warning light illuminates.After starting the engine, the power steering warn-ing light turns off. This indicates that the electricpower steering system is operational.
If the power steering warning light illuminates whilethe engine is running, it may indicate the powersteering system is not functioning properly and may
need servicing. Have the electric power steeringsystem checked by a NISSAN dealer or qualifiedworkshop. See “Electric power steering system” inthe “5. Starting and driving” section.
Seat belt (driver and frontpassenger) warning light
The seat belt warning light reminds you to fastenyour seat belts. The light illuminates whenever theignition switch is placed in the ON or START posi-tion and remains illuminated until the driver’s and/orfront passenger’s seat belt is fastened. At the sametime, the chime sounds for about 6 seconds unlessthe driver’s and/or front passenger’s seat belt issecurely fastened see “Seat belt reminder chime”later in this section. The seat belt warning light mayalso illuminate if the front passenger’s seat belt isnot fastened when the front passenger’s seat is oc-cupied. For 7 seconds after the ignition switch isplaced in the ON position, the system does not acti-vate the warning light for the front passenger. See“Seat belts” in the “1. Safety — Seats, Seat beltsand Supplemental Restraint System” section forprecautions on seat belt usage.
Supplemental Restraint System(SRS) air bag warning light
WARNING
If the supplemental air bag warning light is on, itcould mean that the front air bag, side air bag(where fitted), curtain air bag (where fitted) and/or pre-tensioner systems will not operate in an
Instruments and controls 2-9
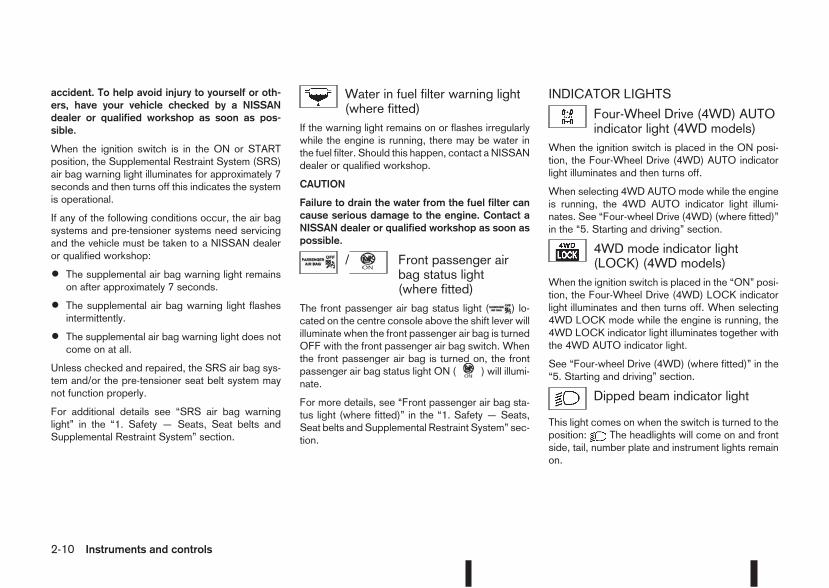
accident. To help avoid injury to yourself or oth-ers, have your vehicle checked by a NISSANdealer or qualified workshop as soon as pos-sible.
When the ignition switch is in the ON or STARTposition, the Supplemental Restraint System (SRS)air bag warning light illuminates for approximately 7seconds and then turns off this indicates the systemis operational.
If any of the following conditions occur, the air bagsystems and pre-tensioner systems need servicingand the vehicle must be taken to a NISSAN dealeror qualified workshop:
• The supplemental air bag warning light remainson after approximately 7 seconds.
• The supplemental air bag warning light flashesintermittently.
• The supplemental air bag warning light does notcome on at all.
Unless checked and repaired, the SRS air bag sys-tem and/or the pre-tensioner seat belt system maynot function properly.
For additional details see “SRS air bag warninglight” in the “1. Safety — Seats, Seat belts andSupplemental Restraint System” section.
Water in fuel filter warning light(where fitted)
If the warning light remains on or flashes irregularlywhile the engine is running, there may be water inthe fuel filter. Should this happen, contact a NISSANdealer or qualified workshop.
CAUTION
Failure to drain the water from the fuel filter cancause serious damage to the engine. Contact aNISSAN dealer or qualified workshop as soon aspossible.
/ Front passenger airbag status light(where fitted)
The front passenger air bag status light ( ) lo-cated on the centre console above the shift lever willilluminate when the front passenger air bag is turnedOFF with the front passenger air bag switch. Whenthe front passenger air bag is turned on, the frontpassenger air bag status light ON ( ) will illumi-nate.
For more details, see “Front passenger air bag sta-tus light (where fitted)” in the “1. Safety — Seats,Seat belts and Supplemental Restraint System” sec-tion.
INDICATOR LIGHTS
Four-Wheel Drive (4WD) AUTOindicator light (4WD models)
When the ignition switch is placed in the ON posi-tion, the Four-Wheel Drive (4WD) AUTO indicatorlight illuminates and then turns off.
When selecting 4WD AUTO mode while the engineis running, the 4WD AUTO indicator light illumi-nates. See “Four-wheel Drive (4WD) (where fitted)”in the “5. Starting and driving” section.
4WD mode indicator light(LOCK) (4WD models)
When the ignition switch is placed in the “ON” posi-tion, the Four-Wheel Drive (4WD) LOCK indicatorlight illuminates and then turns off. When selecting4WD LOCK mode while the engine is running, the4WD LOCK indicator light illuminates together withthe 4WD AUTO indicator light.
See “Four-wheel Drive (4WD) (where fitted)” in the“5. Starting and driving” section.
Dipped beam indicator light
This light comes on when the switch is turned to theposition: The headlights will come on and frontside, tail, number plate and instrument lights remainon.
2-10 Instruments and controls
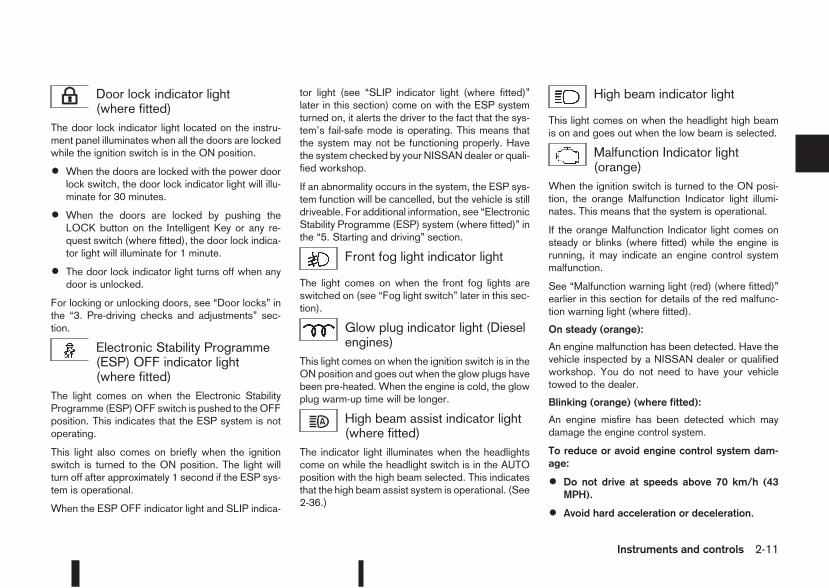
Door lock indicator light(where fitted)
The door lock indicator light located on the instru-ment panel illuminates when all the doors are lockedwhile the ignition switch is in the ON position.
• When the doors are locked with the power doorlock switch, the door lock indicator light will illu-minate for 30 minutes.
• When the doors are locked by pushing theLOCK button on the Intelligent Key or any re-quest switch (where fitted), the door lock indica-tor light will illuminate for 1 minute.
• The door lock indicator light turns off when anydoor is unlocked.
For locking or unlocking doors, see “Door locks” inthe “3. Pre-driving checks and adjustments” sec-tion.
Electronic Stability Programme(ESP) OFF indicator light(where fitted)
The light comes on when the Electronic StabilityProgramme (ESP)OFF switch is pushed to theOFFposition. This indicates that the ESP system is notoperating.
This light also comes on briefly when the ignitionswitch is turned to the ON position. The light willturn off after approximately 1 second if the ESP sys-tem is operational.
When the ESP OFF indicator light and SLIP indica-
tor light (see “SLIP indicator light (where fitted)”later in this section) come on with the ESP systemturned on, it alerts the driver to the fact that the sys-tem’s fail-safe mode is operating. This means thatthe system may not be functioning properly. Havethe system checked by your NISSAN dealer or quali-fied workshop.
If an abnormality occurs in the system, the ESP sys-tem function will be cancelled, but the vehicle is stilldriveable. For additional information, see “ElectronicStability Programme (ESP) system (where fitted)” inthe “5. Starting and driving” section.
Front fog light indicator light
The light comes on when the front fog lights areswitched on (see “Fog light switch” later in this sec-tion).
Glow plug indicator light (Dieselengines)
This light comes on when the ignition switch is in theON position and goes out when the glow plugs havebeen pre-heated. When the engine is cold, the glowplug warm-up time will be longer.
High beam assist indicator light(where fitted)
The indicator light illuminates when the headlightscome on while the headlight switch is in the AUTOposition with the high beam selected. This indicatesthat the high beam assist system is operational. (See2-36.)
High beam indicator light
This light comes on when the headlight high beamis on and goes out when the low beam is selected.
Malfunction Indicator light(orange)
When the ignition switch is turned to the ON posi-tion, the orange Malfunction Indicator light illumi-nates. This means that the system is operational.
If the orange Malfunction Indicator light comes onsteady or blinks (where fitted) while the engine isrunning, it may indicate an engine control systemmalfunction.
See “Malfunction warning light (red) (where fitted)”earlier in this section for details of the red malfunc-tion warning light (where fitted).
On steady (orange):
An engine malfunction has been detected. Have thevehicle inspected by a NISSAN dealer or qualifiedworkshop. You do not need to have your vehicletowed to the dealer.
Blinking (orange) (where fitted):
An engine misfire has been detected which maydamage the engine control system.
To reduce or avoid engine control system dam-age:
• Do not drive at speeds above 70 km/h (43MPH).
• Avoid hard acceleration or deceleration.
Instruments and controls 2-11
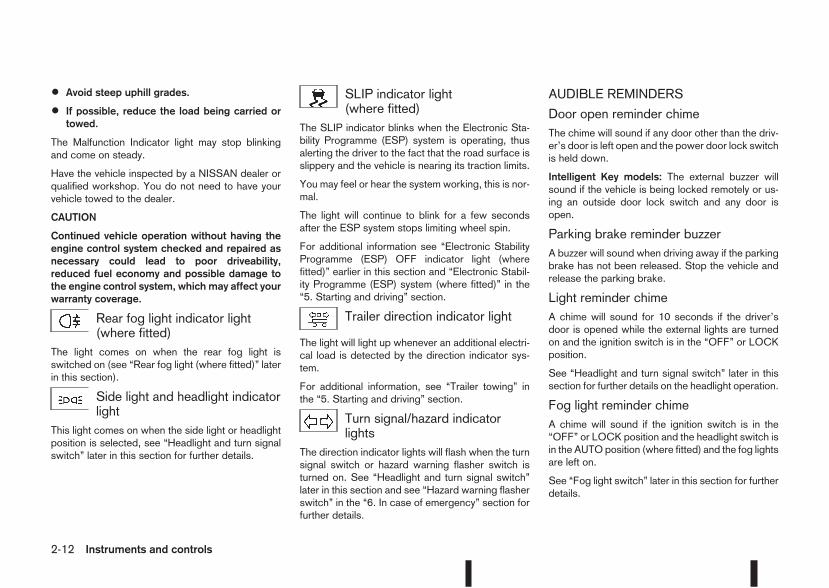
• Avoid steep uphill grades.
• If possible, reduce the load being carried ortowed.
The Malfunction Indicator light may stop blinkingand come on steady.
Have the vehicle inspected by a NISSAN dealer orqualified workshop. You do not need to have yourvehicle towed to the dealer.
CAUTION
Continued vehicle operation without having theengine control system checked and repaired asnecessary could lead to poor driveability,reduced fuel economy and possible damage tothe engine control system, which may affect yourwarranty coverage.
Rear fog light indicator light(where fitted)
The light comes on when the rear fog light isswitched on (see “Rear fog light (where fitted)” laterin this section).
Side light and headlight indicatorlight
This light comes on when the side light or headlightposition is selected, see “Headlight and turn signalswitch” later in this section for further details.
SLIP indicator light(where fitted)
The SLIP indicator blinks when the Electronic Sta-bility Programme (ESP) system is operating, thusalerting the driver to the fact that the road surface isslippery and the vehicle is nearing its traction limits.
You may feel or hear the system working, this is nor-mal.
The light will continue to blink for a few secondsafter the ESP system stops limiting wheel spin.
For additional information see “Electronic StabilityProgramme (ESP) OFF indicator light (wherefitted)” earlier in this section and “Electronic Stabil-ity Programme (ESP) system (where fitted)” in the“5. Starting and driving” section.
Trailer direction indicator light
The light will light up whenever an additional electri-cal load is detected by the direction indicator sys-tem.
For additional information, see “Trailer towing” inthe “5. Starting and driving” section.
Turn signal/hazard indicatorlights
The direction indicator lights will flash when the turnsignal switch or hazard warning flasher switch isturned on. See “Headlight and turn signal switch”later in this section and see “Hazard warning flasherswitch” in the “6. In case of emergency” section forfurther details.
AUDIBLE REMINDERS
Door open reminder chimeThe chime will sound if any door other than the driv-er’s door is left open and the power door lock switchis held down.
Intelligent Key models: The external buzzer willsound if the vehicle is being locked remotely or us-ing an outside door lock switch and any door isopen.
Parking brake reminder buzzerA buzzer will sound when driving away if the parkingbrake has not been released. Stop the vehicle andrelease the parking brake.
Light reminder chimeA chime will sound for 10 seconds if the driver’sdoor is opened while the external lights are turnedon and the ignition switch is in the “OFF” or LOCKposition.
See “Headlight and turn signal switch” later in thissection for further details on the headlight operation.
Fog light reminder chimeA chime will sound if the ignition switch is in the“OFF” or LOCK position and the headlight switch isin the AUTO position (where fitted) and the fog lightsare left on.
See “Fog light switch” later in this section for furtherdetails.
2-12 Instruments and controls
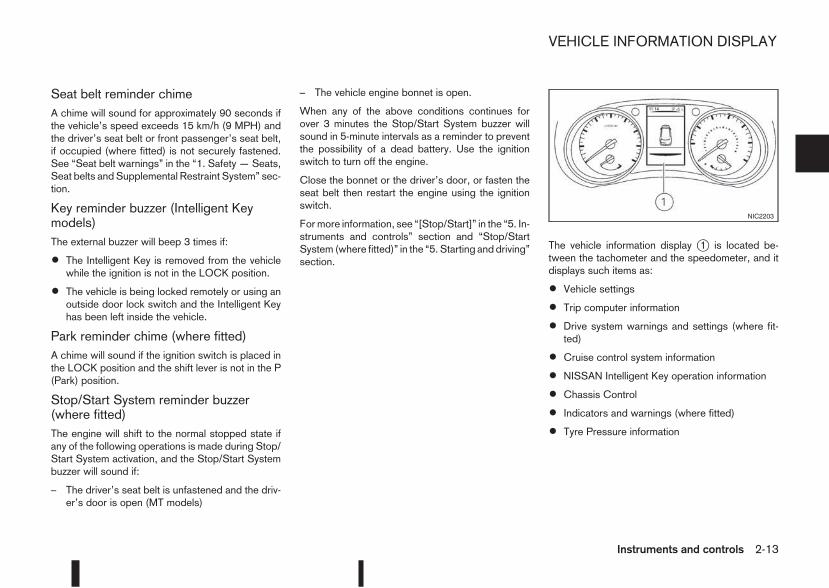
Seat belt reminder chimeA chime will sound for approximately 90 seconds ifthe vehicle’s speed exceeds 15 km/h (9 MPH) andthe driver’s seat belt or front passenger’s seat belt,if occupied (where fitted) is not securely fastened.See “Seat belt warnings” in the “1. Safety — Seats,Seat belts and Supplemental Restraint System” sec-tion.
Key reminder buzzer (Intelligent Keymodels)The external buzzer will beep 3 times if:
• The Intelligent Key is removed from the vehiclewhile the ignition is not in the LOCK position.
• The vehicle is being locked remotely or using anoutside door lock switch and the Intelligent Keyhas been left inside the vehicle.
Park reminder chime (where fitted)A chime will sound if the ignition switch is placed inthe LOCK position and the shift lever is not in the P(Park) position.
Stop/Start System reminder buzzer(where fitted)The engine will shift to the normal stopped state ifany of the following operations is made during Stop/Start System activation, and the Stop/Start Systembuzzer will sound if:
– The driver’s seat belt is unfastened and the driv-er’s door is open (MT models)
– The vehicle engine bonnet is open.
When any of the above conditions continues forover 3 minutes the Stop/Start System buzzer willsound in 5-minute intervals as a reminder to preventthe possibility of a dead battery. Use the ignitionswitch to turn off the engine.
Close the bonnet or the driver’s door, or fasten theseat belt then restart the engine using the ignitionswitch.
Formore information, see “[Stop/Start]” in the “5. In-struments and controls” section and “Stop/StartSystem (where fitted)” in the “5. Starting and driving”section.
The vehicle information display j1 is located be-tween the tachometer and the speedometer, and itdisplays such items as:
• Vehicle settings
• Trip computer information
• Drive system warnings and settings (where fit-ted)
• Cruise control system information
• NISSAN Intelligent Key operation information
• Chassis Control
• Indicators and warnings (where fitted)
• Tyre Pressure information
NIC2203
VEHICLE INFORMATION DISPLAY
Instruments and controls 2-13
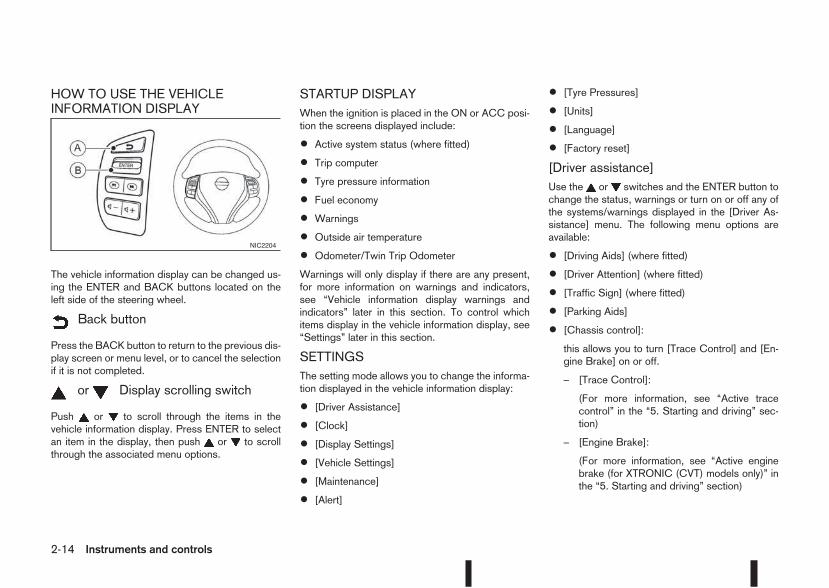
HOW TO USE THE VEHICLEINFORMATION DISPLAY
The vehicle information display can be changed us-ing the ENTER and BACK buttons located on theleft side of the steering wheel.
m Back button
Press the BACK button to return to the previous dis-play screen or menu level, or to cancel the selectionif it is not completed.
m or m Display scrolling switch
Push or to scroll through the items in thevehicle information display. Press ENTER to selectan item in the display, then push or to scrollthrough the associated menu options.
STARTUP DISPLAYWhen the ignition is placed in the ON or ACC posi-tion the screens displayed include:
• Active system status (where fitted)
• Trip computer
• Tyre pressure information
• Fuel economy
• Warnings
• Outside air temperature
• Odometer/Twin Trip Odometer
Warnings will only display if there are any present,for more information on warnings and indicators,see “Vehicle information display warnings andindicators” later in this section. To control whichitems display in the vehicle information display, see“Settings” later in this section.
SETTINGSThe setting mode allows you to change the informa-tion displayed in the vehicle information display:
• [Driver Assistance]
• [Clock]
• [Display Settings]
• [Vehicle Settings]
• [Maintenance]
• [Alert]
• [Tyre Pressures]
• [Units]
• [Language]
• [Factory reset]
[Driver assistance]Use the or switches and the ENTER button tochange the status, warnings or turn on or off any ofthe systems/warnings displayed in the [Driver As-sistance] menu. The following menu options areavailable:
• [Driving Aids] (where fitted)
• [Driver Attention] (where fitted)
• [Traffic Sign] (where fitted)
• [Parking Aids]
• [Chassis control]:
this allows you to turn [Trace Control] and [En-gine Brake] on or off.
– [Trace Control]:
(For more information, see “Active tracecontrol” in the “5. Starting and driving” sec-tion)
– [Engine Brake]:
(For more information, see “Active enginebrake (for XTRONIC (CVT) models only)” inthe “5. Starting and driving” section)
NIC2204
2-14 Instruments and controls
• [Steering effort]: this can be set to [Normal] or[Sport].
The [Driving Aids] option has a sub-menu, fromwhich you can choose whether or not to have fur-ther items displayed. These items are:
• [Lane] (Lane Departure Warning system)
• [Blind Spot] Blind Spot Warning system)
• [Emergency Brake] (Forward Emergency Brakesystem)
The [Driver Attention] option can be used to activateor deactivate the Driver Attention Support feature(where fitted). This system is able to detect whetherthe driver is displaying a lack of attention, or is dis-tracted. It does this by monitoring driving style, andsteering behaviour, and it notes deviations from thenormal pattern. If the system detects that driver at-tention is decreasing, the system uses an audibleand visual warning to suggest that the driver takes abreak.
[Clock]For details of how to set the clock, see “Setting theclock” in the “4. Display screen, heater and air con-ditioner, and audio system” section or the separateNissanConnect Owner’s manual.
[Display settings]Use the or switches to scroll and the ENTERbutton to change the status, warnings or turn on oroff any of the systems/warnings displayed in the[Display Settings] menu. The following menu op-tions are available:
• [Contents selection]
• [Body Colour]
• [ECO Mode Settings] (where fitted)
• [Stop/Start]
• [ECO Drive Report]
• [Welcome Effect]
[Contents selection]:
The items that display when the ignition switch isplaced in the ON position can be enabled/disabled.To change the items that are displayed, use theor buttons to scroll and the ENTER button toselect a menu item: The following items (where fit-ted) are available in the [Meter Settings] menu:
• [Home]
• [Average speed]
• [Trip]
• [Fuel economy]
• [Navigation] (where fitted)
• [Traffic Sign] (where fitted)
• [Audio]
• [Driving aids] (where fitted)
• [Tyre pressures]
• [Driver Attention] (where fitted)
• [Chassis control]
The [Driving Aids] option has a sub-menu, fromwhich you can choose whether or not to have fur-ther items displayed. These items are:
• [Lane] (Lane Departure Warning system)
• [Blind Spot] Blind Spot Warning system)
• [Emergency Brake] (Forward Emergency Brak-ing system)
[Body Colour]:
The colour of the vehicle that displays in the vehicleinformation display when the ignition switch isplaced in the ON position can be changed.
[ECO mode settings] (where fitted):
You can choose which of the ECO mode featuresyou wish to see displayed. These include the ECOindicator ([ECO glow]), and from the Display sub-menu, the [Pedal Guide] and Instant fuel economy([Fuel econ.]) display.
[Stop/Start]:
The [Stop/Start] system mode shows the CO2 sav-ings and the engine stop time. (See “Stop/Start Sys-tem (where fitted)” in the “5. Starting and driving”section.)
Instruments and controls 2-15

The following options are available in the [Stop/Start] menu:
• [Display]:You can choose whether on not to display stop/start information.
• [Trip CO2 saving]:The [Trip CO2 saving] and engine stop timemode shows the CO2 saving and engine stoptime since the last reset. The CO2 saving andengine stop time can be reset by pushing ENTERfor longer than 1 second.
• [Total CO2 saving]:
The [Total CO2 saving] and engine stop timemode shows:
– The estimated CO2 exhaust emissions pre-vented.
– The engine stop time that the engine has beenstopped by the [Stop/Start] System
NOTE
The [Total CO2 saving] and engine stoptime values cannot be reset and show ac-cumulated [Stop/Start] System informa-tion since the vehicle was built.
[ECO Drive Report]:
You can choose whether or not to display ECOinformation in the vehicle information display whenthe ignition switch is placed in the ON position.
From the Main Menu Selection select [ECO DriveReport] to display the information when the ignitionswitch is placed in the ON position.
Select [Display] then On or Off to display the infor-mation when the ignition switch is placed in the ONposition. The ECO Drive Report is displayed whenthe ignition switch is in the OFF position.
You can also view the ECO drive report history.
[Welcome Effect]:
You can choose whether or not to display the wel-come screen when the ignition switch is placed inthe ACC (where fitted) or ON position. You canalso choose the following items to define how thewelcome screen looks:
• [Dial and pointer]
• [Display effect]
To enable/disable the welcome screen, and set howit appears:
1. Use the or buttons to select [Settings], andpress ENTER.
2. Select [Welcome Effects] using the or but-tons and press ENTER to select this menu. Usethe or buttons to navigate between themenu options and press ENTER to turn eachfunction ON or OFF.
[Vehicle settings]Use the or switches and the ENTER button tochange the status, warnings or turn on or off any ofthe systems/warnings displayed in the [Vehicle set-
tings] menu. The following menu options, each lead-ing to a further sub-menu, are available:
• [Lighting]
• [Turn indicator]
• [Unlocking]
• [Wipers]
[Lighting]:
The [Lighting] menu has the following options:
• [Welcome light]:The welcome lighting can be set to be ON orOFF. From the [Lighting] menu, select [Wel-come Light]. Use the ENTER button to turn thisfeature ON or OFF. When set to ON, front andrear lamps will stay on for 30 seconds after un-locking. They will also stay on for 10 secondsafter locking.
• [Int. Lamp timer]:The internal light timer can be set to be ON orOFF. From the [Lighting]menu, select [Int. Lamptimer]. Use the ENTER button to turn this featureON or OFF.
• [Mood lighting]:The mood lighting can be dimmed or brightened.From the [Lighting] menu, select [Mood light-ing]. Use the ENTER button and the orswitches to adjust the brightness.
2-16 Instruments and controls
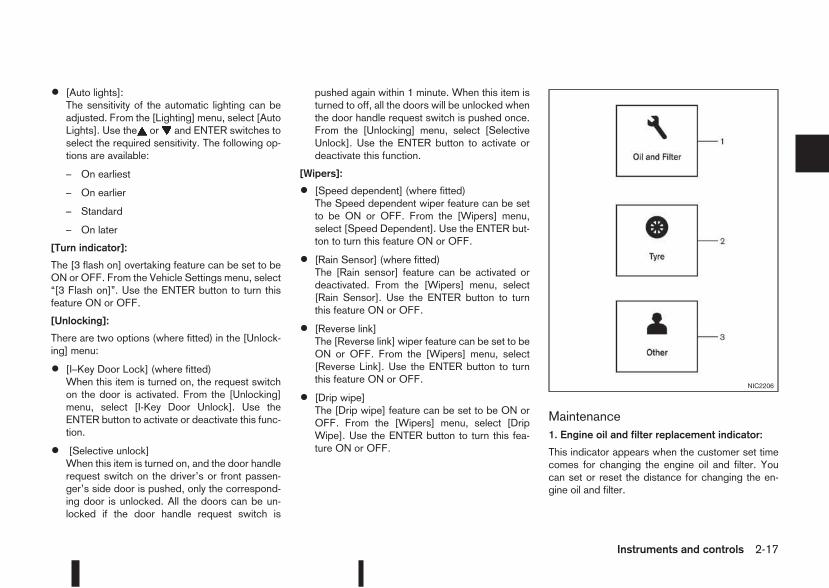
• [Auto lights]:The sensitivity of the automatic lighting can beadjusted. From the [Lighting] menu, select [AutoLights]. Use the or and ENTER switches toselect the required sensitivity. The following op-tions are available:
– On earliest
– On earlier
– Standard
– On later
[Turn indicator]:
The [3 flash on] overtaking feature can be set to beON or OFF. From the Vehicle Settings menu, select“[3 Flash on]”. Use the ENTER button to turn thisfeature ON or OFF.
[Unlocking]:
There are two options (where fitted) in the [Unlock-ing] menu:
• [I–Key Door Lock] (where fitted)When this item is turned on, the request switchon the door is activated. From the [Unlocking]menu, select [I-Key Door Unlock]. Use theENTER button to activate or deactivate this func-tion.
• [Selective unlock]When this item is turned on, and the door handlerequest switch on the driver’s or front passen-ger’s side door is pushed, only the correspond-ing door is unlocked. All the doors can be un-locked if the door handle request switch is
pushed again within 1 minute. When this item isturned to off, all the doors will be unlocked whenthe door handle request switch is pushed once.From the [Unlocking] menu, select [SelectiveUnlock]. Use the ENTER button to activate ordeactivate this function.
[Wipers]:
• [Speed dependent] (where fitted)The Speed dependent wiper feature can be setto be ON or OFF. From the [Wipers] menu,select [Speed Dependent]. Use the ENTER but-ton to turn this feature ON or OFF.
• [Rain Sensor] (where fitted)The [Rain sensor] feature can be activated ordeactivated. From the [Wipers] menu, select[Rain Sensor]. Use the ENTER button to turnthis feature ON or OFF.
• [Reverse link]The [Reverse link] wiper feature can be set to beON or OFF. From the [Wipers] menu, select[Reverse Link]. Use the ENTER button to turnthis feature ON or OFF.
• [Drip wipe]The [Drip wipe] feature can be set to be ON orOFF. From the [Wipers] menu, select [DripWipe]. Use the ENTER button to turn this fea-ture ON or OFF.
Maintenance1. Engine oil and filter replacement indicator:
This indicator appears when the customer set timecomes for changing the engine oil and filter. Youcan set or reset the distance for changing the en-gine oil and filter.
NIC2206
Instruments and controls 2-17
NOTE
Diesel models with diesel engines make use ofan Oil Condition Supervisor (OCS) function.Petrol engines have a basic service reminder.
1. Use the or buttons to select [Settings], andpress ENTER.
2. Select [Maintenance], followed by [Service] us-ing the or and ENTER switches. In the[Service] menu, use the or buttons to navi-gate between the menu options and pressENTER to set or reset the distance for changingthe engine oil.
3. (Diesel models only) Select [Maintenance], fol-lowed by [Filter] using the or and ENTERswitches. In the [Filter] menu, use the orbuttons to navigate between the menu optionsand press ENTER to set or reset the distance fordraining the diesel fuel filter.
For scheduled maintenance items and intervals, seeyour NISSAN Service and Maintenance Guide.
2. Tyre replacement indicator:
This indicator appears when the customer set dis-tance comes for replacing tyres. You can set orreset the distance for replacing tyres.
1. Use the or buttons to select [Settings], andpress ENTER.
2. Select [Maintenance], followed by [Tyre] usingthe or and ENTER switches. In the [Tyre]
menu, use the or buttons to navigate be-tween the menu options and press ENTER to setor reset the distance for replacing tyres.
WARNING
The tyre replacement indicator is not a substitutefor regular tyre checks, including tyre pressurechecks. See “Wheels and tyres” in the “8. Main-tenance and do-it-yourself” section. Many factorsincluding tyre inflation, alignment, driving habitsand road conditions affect tyre wear and whentyres should be replaced. Setting the tyre re-placement indicator for a certain driving distancedoes not mean your tyres will last that long. Usethe tyre replacement indicator as a guide onlyand always perform regular tyre checks. Failureto perform regular tyre checks, including tyrepressure checks could result in tyre failure. Seri-ous vehicle damage could occur and may lead toa collision, which could result in serious personalinjury or death.
3. Other indicator:
This indicator appears when the customer set timecomes for replacing items other than the engine oil,fuel filter and tyres. You can set or reset the dis-tance for replacing the items.
[Alert]You can specify that an alert occurs to notify thedriver that a certain event has occurred. You can setalerts for the following items:
• [Timer]
• [Navigation] (where fitted)
• [Phone]
• [Mail] (where fitted)
To set an alert:
1. Use the or buttons to select the item re-quired, and press ENTER.
2. For [Phone], [Navigation] or [Mail] use theENTER button to toggle between YES and NO.For the [Timer], to change the timer value, usethe or buttons and the ENTER button tosave the selected length of time.
[Tyre pressures]The settings in the Tyre pressures] menu are allrelated to the Tyre pressure monitoring systemTPMS (see “Tyre Pressure Monitoring System(TPMS)” in the “5. Starting and driving” section).
• [Target front]
• [Target rear]
• [Tyre pressure unit]
• [Calibrate]
[Target front]:
The [target front] tyre pressure is the pressure speci-fied for the front tyres on the tyre placard (see “Tyreplacard” in the “9. Technical information” sectionand “Tyre Pressure Monitoring System (TPMS)” inthe “5. Starting and driving” section).
2-18 Instruments and controls
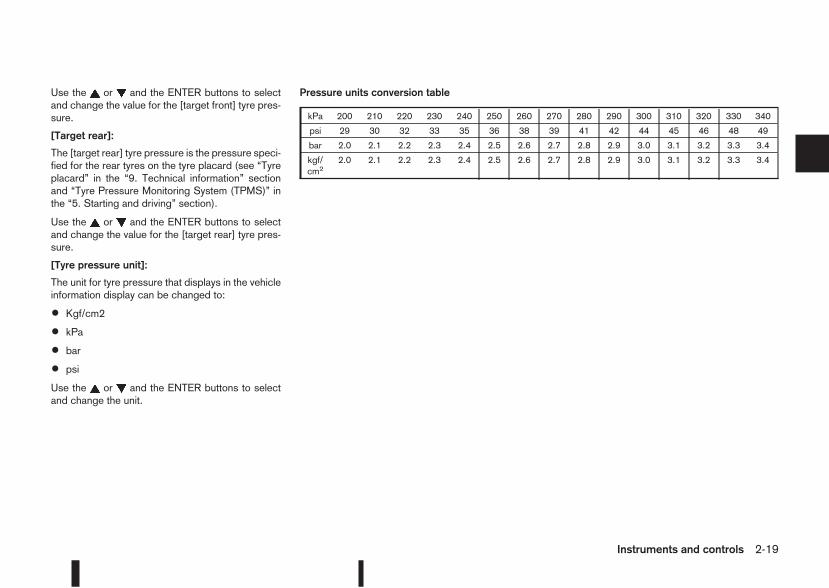
Use the or and the ENTER buttons to selectand change the value for the [target front] tyre pres-sure.
[Target rear]:
The [target rear] tyre pressure is the pressure speci-fied for the rear tyres on the tyre placard (see “Tyreplacard” in the “9. Technical information” sectionand “Tyre Pressure Monitoring System (TPMS)” inthe “5. Starting and driving” section).
Use the or and the ENTER buttons to selectand change the value for the [target rear] tyre pres-sure.
[Tyre pressure unit]:
The unit for tyre pressure that displays in the vehicleinformation display can be changed to:
• Kgf/cm2
• kPa
• bar
• psi
Use the or and the ENTER buttons to selectand change the unit.
Pressure units conversion table
kPa 200 210 220 230 240 250 260 270 280 290 300 310 320 330 340
psi 29 30 32 33 35 36 38 39 41 42 44 45 46 48 49
bar 2.0 2.1 2.2 2.3 2.4 2.5 2.6 2.7 2.8 2.9 3.0 3.1 3.2 3.3 3.4
kgf/cm2
2.0 2.1 2.2 2.3 2.4 2.5 2.6 2.7 2.8 2.9 3.0 3.1 3.2 3.3 3.4
Instruments and controls 2-19
[Calibrate]:
The tyre pressure is affected by the temperature ofthe tyre; the tyre temperature increases when thevehicle is driven. The TPMS system uses tempera-ture sensors in the tyres to compensate for changesin temperature in order to prevent false TPMS warn-ings.
The [CALIBRATE] function resets the previouslystored temperature value. It is recommended thatthis function is performed after the tyre pressuresare adjusted.
See “Tyre Pressure Monitoring System (TPMS)” inthe “5. Starting and driving” section
Use the or and the ENTER buttons to start orcancel the calibration process. While the calibrationprocess is active, themessage: [Resetting tyre pres-sure system] will be displayed.
[Units]
• [Distance/Fuel]
• [Tyre pressures]
• [Temperature]
[Distance/Fuel]:
The unit for the distance and fuel consumption thatdisplays in the vehicle information display can bechanged to:
• miles, MPG
• km, km/l
• km, l/100km
Use the or and the ENTER buttons to selectand change the unit.
[Tyre pressures]:
The unit for tyre pressure that displays in the vehicleinformation display can be changed to:
• Kgf/cm2
• kPa
• bar
• psi
Use the or and the ENTER buttons to selectand change the unit.
[Temperature]:
The temperature that displays in the vehicle informa-tion display can be changed from:
• °C (Celsius)
• °F (Fahrenheit)
Use the ENTER button to toggle choices.
[Language]The [language] of the vehicle information displaycan be changed to:
• [English]
• [French]
• [German]
• [Italian]
• [Portuguese]
• [Dutch]
• [Spanish]
• [Turkish]
• [Russian]
Use the or and the ENTER buttons to selectand change the language of the vehicle informationdisplay.
[Factory reset]The settings in the vehicle information display canbe reset back to the factory default. To reset thevehicle information display:
1. Use the or buttons to select [Settings], andpress the ENTER button
2. Select [Factory Reset] using the or buttonsand press the ENTER button
3. Select [YES] to return all settings back to defaultby pressing the ENTER button
2-20 Instruments and controls

VEHICLE INFORMATION DISPLAY WARNINGS AND INDICATORS
NIC2331
Instruments and controls 2-21
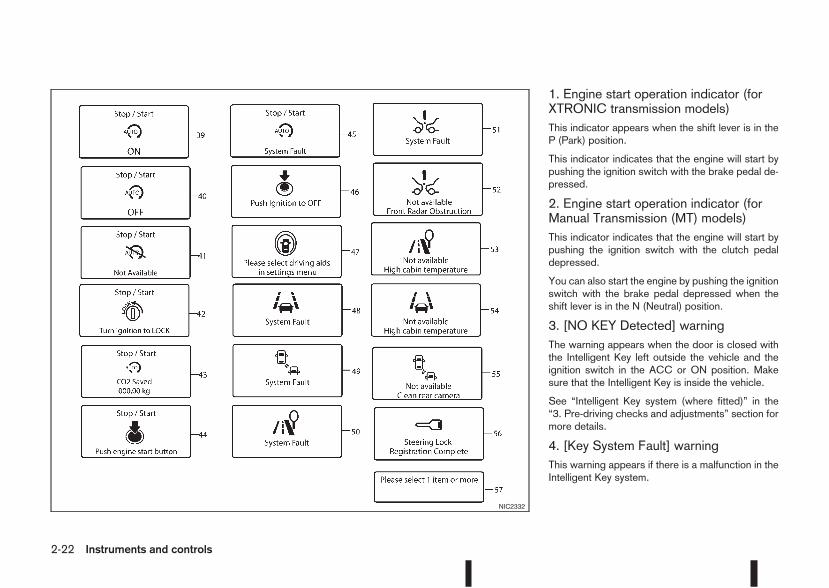
1. Engine start operation indicator (forXTRONIC transmission models)This indicator appears when the shift lever is in theP (Park) position.
This indicator indicates that the engine will start bypushing the ignition switch with the brake pedal de-pressed.
2. Engine start operation indicator (forManual Transmission (MT) models)This indicator indicates that the engine will start bypushing the ignition switch with the clutch pedaldepressed.
You can also start the engine by pushing the ignitionswitch with the brake pedal depressed when theshift lever is in the N (Neutral) position.
3. [NO KEY Detected] warningThe warning appears when the door is closed withthe Intelligent Key left outside the vehicle and theignition switch in the ACC or ON position. Makesure that the Intelligent Key is inside the vehicle.
See “Intelligent Key system (where fitted)” in the“3. Pre-driving checks and adjustments” section formore details.
4. [Key System Fault] warningThis warning appears if there is a malfunction in theIntelligent Key system.
NIC2332
2-22 Instruments and controls
If this warning appears while the engine is stopped,the engine cannot be started. If this warning ap-pears while the engine is running, the vehicle can bedriven. However, contact a NISSAN dealer or quali-fied workshop for repair as soon as possible.
5. [Key battery low] indicatorThis indicator appears when the Intelligent Key bat-tery is running out of power.
If this indicator appears, replace the battery with anew one. (See “Integrated keyfob/Intelligent Keybattery replacement” in the “8. Maintenance anddo-it-yourself” section.)
6. [Key ID Incorrect] warningThis warning appears when the ignition switch ispushed from the LOCK position and the IntelligentKey cannot be recognised by the system. You can-not start the engine with an unregistered key. Usethe registered Intelligent Key. See “Intelligent Keysystem (where fitted)” in the “3. Pre-driving checksand adjustments” section.
7. Engine start operation for IntelligentKey system indicatorThis indicator appears when the Intelligent Key bat-tery is running out of power and the Intelligent Keysystem and vehicle are not communicating normally.
If this indicator appears, touch the ignition switchwith the Intelligent Key while depressing the brakepedal. (See “Push-button ignition switch (wherefitted)” in the “5. Starting and driving” section.)
8. [Release parking brake] warningThis warning appears when the vehicle speed isabove 7 km/h (4 MPH) and the parking brake isapplied. Stop the vehicle and release the parkingbrake. This warning may a occur if the driver hasattempted to release the parking brake automati-cally, but did not succeed.
9. Low fuel ([Range]) warningThis warning appears when the fuel level in the tankis getting low. Refuel as soon as it is convenient,preferably before the fuel gauge reaches the empty(0) position.
There is a small reserve of fuel remaining in thetank when the fuel gauge reaches the empty (0)position.
10. [Low washer fluid] warningThis warning appears when the washer tank fluid isat a low level. Add washer fluid as necessary. (See“Windowwasher fluid/headlight cleaner fluid (wherefitted)” in the “8. Maintenance and do-it-yourself”section.)
11. Door/boot open warningThis warning appears if any of the doors and/or theboot lid are open or not closed securely. The vehicleicon indicates which door or whether the boot lid isopen on the display.
12. [SHIFT to Park] warning (XTRONICtransmission models)This warning appears when the ignition switch ispushed to stop the engine with the shift lever in anyposition except the P (Park) position.
If this warning appears, move the shift lever to the P(Park) position or place the ignition switch in the ONposition.
An inside warning chime will also sound. (See“Push-button ignition switch (where fitted)” in the“5. Starting and driving” section.)
13. [Loose Fuel Cap] warningThis warning appears when the fuel-filler cap is nottightened correctly after the vehicle has been refu-elled. See “Fuel filler lid” in the “3. Pre-drivingchecks and adjustments” section section of thismanual.
14. [Battery Voltage Low ChargeBattery] warningThis warning appears when the battery voltage islow and the battery needs to be charged.
15. [Press Brake Pedal] warningThis warning appears to remind you that you mustpress the brake pedal before you can release theparking brake. This warning may also be displayedif the parking brake is activated, but the vehicle isstill rolling back.
Instruments and controls 2-23
16. [Low Tyre Pressure] warningThis warning ([Low Tyre Pressure] and a vehicleicon - where fitted) appears when the low tyre pres-sure warning light in the meter illuminates and lowtyre pressure is detected. Thewarning appears eachtime the ignition switch is placed in the ON positionas long as the low tyre pressure warning light re-mains illuminated. If this warning appears, stop thevehicle and adjust the pressure to the recommendedCOLD tyre pressure shown on the tyre placard.(See “Low tyre pressurewarning light (where fitted)”earlier in this section and “Tyre Pressure MonitoringSystem (TPMS)” in the “5. Starting and driving” sec-tion.)
17. [Low oil pressure stop vehicle]warningThis warning appears in message area of the ve-hicle information display if low oil pressure is de-tected. This gauge is not designed to indicate lowoil level. The low oil pressure warning is not de-signed to indicate a low oil level. Use the dipstick tocheck the oil level. See “Engine oil” in the “8. Main-tenance and do-it-yourself” section.)
CAUTION
The oil level should be checked regularly usingthe engine oil dipstick. Operating with an insuffi-cient amount of oil can damage the engine andsuch damage is not covered by the warranty.
18. [Oil Level Low] warningThis warning appears in message area of the ve-hicle information display if the oil level is not suffi-cient for driving. Park the vehicle at a safe locationas soon as possible and use the dipstick to checkthe oil level. See “Engine oil” in the “8. Maintenanceand do-it-yourself” section If the oil level is not suf-ficient for driving, top up the engine oil with the rec-ommended engine oil. “Engine oil” in the “8. Main-tenance and do-it-yourself” section.)
CAUTION
The oil level should be checked regularly usingthe engine oil dipstick. Operating with an insuffi-cient amount of oil can damage the engine andsuch damage is not covered by the warranty.
19. [4WD System Fault] warningThis warning appears when the four wheel drive(4WD) system is not functioning properly while theengine is running.
20. [4WD high temp. stop vehicle]warningThis warning may appear while trying to free a stuckvehicle due to increased oil temperature. The driv-ing mode may change to Two-Wheel Drive (2WD).If this warning is displayed, stop the vehicle with theengine idling, as soon as it is safe to do so. Then ifthe warning turns off, you can continue driving.
21. [4WD tyre size incorrect] warningThis warning may appear if there is a large differ-ence between the diameters of the front and rearwheels and tyres. Pull off the road in a safe area,with the engine idling. Check that all the tyre sizesare the same, that tyre pressures are correct andthat the tyres are not excessively worn.
22. [Shipping mode on push storagefuse] warningThis warning may appear if the extended storagefuse switch is not pushed in (switched on). Whenthis warning appears, push in (switch on) the ex-tended storage fuse switch to turn off the warning.For more information, see “Fuses” in the “8. Main-tenance and do-it-yourself” section.
23. [Power will turn off to save thebattery] warningThis warning appears after a period of time if theshift lever has not moved from the P (Park) positionwhile the ignition is in the ON position for a certainperiod of time.
24. [Power turned off to save thebattery] warningThis warning appears after the ignition switch is au-tomatically turned OFF to save the battery.
2-24 Instruments and controls
25. [Reminder turn off headlights]warningThis warning appears when the driver side door isopened while the headlight switch is left ON and theignition switch is placed in the ACC, “OFF” orLOCK position. Place the headlight switch in “OFF”or “AUTO” position. For additional information, see“Headlight and turn signal switch” later in this sec-tion.
26. [Time for a driver break?] indicatorThis indicator appears when the set “TIMER” indi-cator activates. You can set the time for up to 6hours.
27. [Low outside temperature] warningThis warning appears if the outside temperature isbelow 3°C (37°F). The warning can be set not to bedisplayed. (See “[Clock] and [outside airtemperature]” later in this section or the separateNissanConnect Owner’s manual.)
28. [Chassis control system fault]warningThis warning appears if the chassis control moduledetects an error in the Chassis Control System(where fitted). Have the system checked by aNISSAN dealer or qualified workshop. (See “Chas-sis control” in the “5. Starting and driving” section.)
29. Cruise control indicatorThis indicator shows the cruise control system sta-tus. The status is shown by the colour.
See “Cruise control (where fitted)” in the “5. Start-ing and driving” section for details.
30. Speed limiter indicatorThis indicator shows the status of the speed limitersystem . If the system is in turned on and in use, thespeed that the speed limiter is set to is also dis-played.
See “Speed limiter (where fitted)” in the “5. Startingand driving” section for details.
31. Shift lever position indicatorThis indicator shows the shift lever position.
See “Shift lever indicator (where fitted)” in the“5. Starting and driving” section for further details.
32. [Tyre Pressure System Fault]warningThis warning illuminates when there is a problemwith the Tyre Pressure Monitoring System (TPMS).If this warning comes on, have the system checkedby a NISSAN dealer or qualified workshop. See“Tyre Pressure Monitoring System (TPMS)” in the“5. Starting and driving” section for further details.
33. [Resetting Tyre Pressure System]indicatorThis warning illuminates when the TPMS tempera-ture calibration is in progress. See “TPMS tempera-ture calibration” in the “5. Starting and driving” sec-tion for further details.
34. [Parking Sensor System Fault]warning (where fitted)This warning illuminates when there is a problemwith the parking sensor system. If this warningcomes on, have the system checked by a NISSANdealer or qualified workshop.
35. [Vehicle Overheating Stop Vehicle]warningThis warning illuminates is the engine coolant tem-perature is too high, indicating that the engine isoverheating. See “Engine overheat” in the “6. Incase of emergency” section for further details.
36. [CVT System Fault] warning(where fitted)This warning illuminates when there is a problemwith the XTRONIC transmission (CVT) system. Ifthis warning comes on, have the system checked bya NISSAN dealer or qualified workshop.
Instruments and controls 2-25
37. [Adaptive Front-Lighting SystemFault] warning (where fitted)This warning illuminates when there is a problemwith the dynamic high beam assistant system. See“Dynamic high beam assistant (where fitted)” laterin this section. If this warning comes on, have thesystem checked by a NISSAN dealer or qualifiedworkshop.
38. [Headlight System Fault] warning(where fitted)This warning illuminates when the LED headlightsneed to be replaced. If this warning comes on, havethe system checked by a NISSAN dealer or quali-fied workshop. See “LED headlight (where fitted)”later in this section
39–45. [Stop/Start] SystemThese indicators show the Stop/Start System sta-tus. See “Stop/Start System (where fitted)” in the“5. Starting and driving” section.
46. [Push Ignition to OFF] warningThis warning will illuminate if the ignition switch isplaced in the ACC position when the shift lever ismoved to the P (Park) position. To turn off the Pushwarning, place the ignition switch in the ON positionand then in the LOCK position.
47. [Please Select Driving Aids inSettings Menu] warningThis warning is displayed if the Driving Aids itemsare not available because they are turned off in theSettings menu.
48–51. [System Fault] warningThis warning appears when the Blind Spot Warn-ing, (where fitted), Lane Departure Warning (wherefitted), Traffic Sign Recognition (where fitted), orForward Emergency Braking systems (where fitted)are not functioning properly.
52. [Not Available Front RadarObstruction] warning (where fitted)If the sensor area of the front bumper is coveredwith dirt or obstructed, making it impossible to de-tect a vehicle ahead, the forward emergency brak-ing system is automatically turned off. The forwardemergency braking system warning light (orange)and the forward collision warning light (orange) willilluminate and the [Not Available Front Radar Ob-struction] warning message will appear in the ve-hicle information display. If the [Not Available FrontRadar Obstruction] warning message appears, parkthe vehicle in a safe location and turn the engine off.Check to see if the sensor area of the front bumperis blocked. If the sensor area of the front bumper isblocked, remove the blocking material. Restart theengine. If the warning light continues to illuminate,have the forward emergency braking systemchecked by a NISSAN dealer or qualified workshop.
53–54. [Not Available High CabinTemperature] warning (where fitted)This warning appears if the interior temperature ofthe vehicle has reached such a high temperaturethat the sensor for the Traffic Sign Recognition andLane Departure warning systems can no longerfunction reliably. Once the interior temperature hasreached normal levels, the warning should disap-pear. If the warning continues to display, have thesystem checked by a NISSAN dealer or qualifiedworkshop
55. [Not Available Clean Rear Camera]warning (where fitted)This message is displayed if the rear camera usedby the Blind Spot Warning system is dirty or cov-ered with snow or rain. If the message appears,park the vehicle in a safe place, turn off the engine,and clean the camera unit with a soft cloth. Thenrestart the engine.
56. [Steering lock RegistrationComplete] indicatorThis appears when a new intelligent key is regis-tered to the vehicle.
57. [Please select 1 item or more]indicatorThis message appears when you are in the mainmenu of the vehicle information display to remindyou to select at least one item.
2-26 Instruments and controls
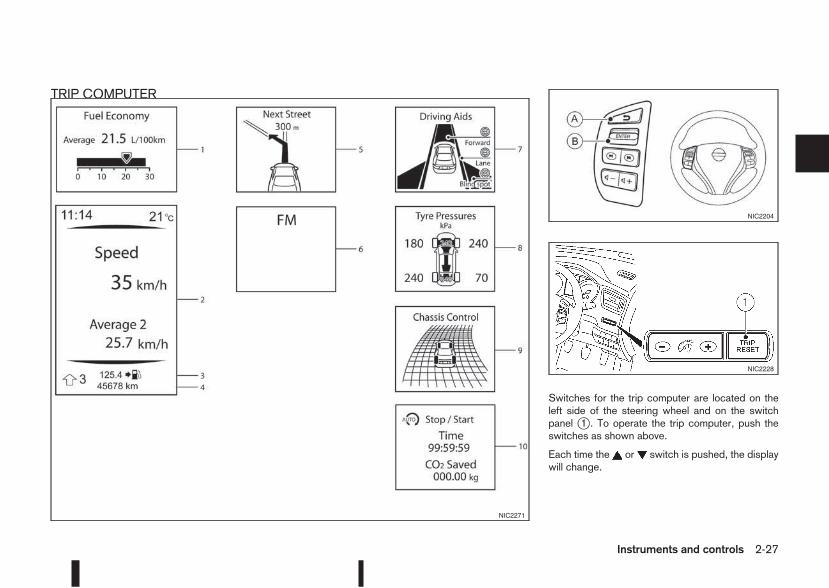
TRIP COMPUTER
Switches for the trip computer are located on theleft side of the steering wheel and on the switchpanel j1 . To operate the trip computer, push theswitches as shown above.
Each time the or switch is pushed, the displaywill change.
NIC2271
NIC2204
NIC2228
Instruments and controls 2-27
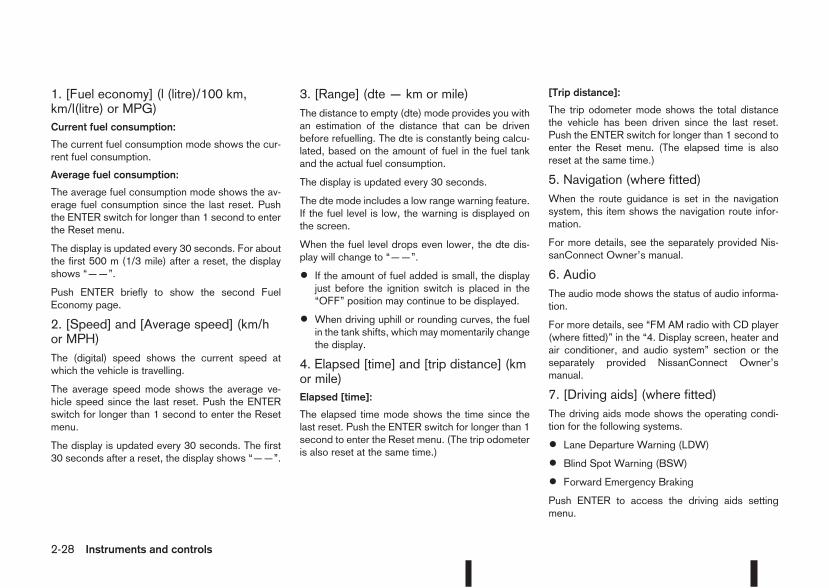
1. [Fuel economy] (l (litre)/100 km,km/l(litre) or MPG)Current fuel consumption:
The current fuel consumption mode shows the cur-rent fuel consumption.
Average fuel consumption:
The average fuel consumption mode shows the av-erage fuel consumption since the last reset. Pushthe ENTER switch for longer than 1 second to enterthe Reset menu.
The display is updated every 30 seconds. For aboutthe first 500 m (1/3 mile) after a reset, the displayshows “——”.
Push ENTER briefly to show the second FuelEconomy page.
2. [Speed] and [Average speed] (km/hor MPH)The (digital) speed shows the current speed atwhich the vehicle is travelling.
The average speed mode shows the average ve-hicle speed since the last reset. Push the ENTERswitch for longer than 1 second to enter the Resetmenu.
The display is updated every 30 seconds. The first30 seconds after a reset, the display shows “——”.
3. [Range] (dte — km or mile)The distance to empty (dte) mode provides you withan estimation of the distance that can be drivenbefore refuelling. The dte is constantly being calcu-lated, based on the amount of fuel in the fuel tankand the actual fuel consumption.
The display is updated every 30 seconds.
The dte mode includes a low range warning feature.If the fuel level is low, the warning is displayed onthe screen.
When the fuel level drops even lower, the dte dis-play will change to “——”.
• If the amount of fuel added is small, the displayjust before the ignition switch is placed in the“OFF” position may continue to be displayed.
• When driving uphill or rounding curves, the fuelin the tank shifts, which may momentarily changethe display.
4. Elapsed [time] and [trip distance] (kmor mile)Elapsed [time]:
The elapsed time mode shows the time since thelast reset. Push the ENTER switch for longer than 1second to enter the Reset menu. (The trip odometeris also reset at the same time.)
[Trip distance]:
The trip odometer mode shows the total distancethe vehicle has been driven since the last reset.Push the ENTER switch for longer than 1 second toenter the Reset menu. (The elapsed time is alsoreset at the same time.)
5. Navigation (where fitted)When the route guidance is set in the navigationsystem, this item shows the navigation route infor-mation.
For more details, see the separately provided Nis-sanConnect Owner’s manual.
6. AudioThe audio mode shows the status of audio informa-tion.
For more details, see “FM AM radio with CD player(where fitted)” in the “4. Display screen, heater andair conditioner, and audio system” section or theseparately provided NissanConnect Owner’smanual.
7. [Driving aids] (where fitted)The driving aids mode shows the operating condi-tion for the following systems.
• Lane Departure Warning (LDW)
• Blind Spot Warning (BSW)
• Forward Emergency Braking
Push ENTER to access the driving aids settingmenu.
2-28 Instruments and controls

For more details, see “Blind Spot Warning (BSW)system (where fitted)” in the “5. Starting and driving”section, “Lane Departure Warning (LDW) system(where fitted)” in the “5. Starting and driving” sec-tion, and/or “Forward emergency braking system(where fitted)” in the “5. Starting and driving” sec-tion.
8. [Tyre pressures] (where fitted)The tyre pressure mode shows the pressure of allfour tyres. The displayed values are only availablewhile the vehicle is being driven.
When the [Low Tyre Pressure] warning appears,the display can be switched to the tyre pressuremode by pushing the ENTER switch to reveal addi-tional details on the displayed warning.
9. [Chassis control]When either the Active Trace Control (where fitted),Active Engine Brake (where fitted), Hill start Assist(where fitted) or the Active Ride Control system isoperated, it shows the operating condition. See“Chassis control” in the “5. Starting and driving”section and “Hill Start Assist (HSA) system” in the“5. Starting and driving” section for more details.
10. [Stop/Start] system (where fitted)The Stop/Start system mode shows the CO2 sav-ings and the engine stop time. (See “Stop/Start Sys-tem (where fitted)” in the “5. Starting and driving”section.)
[Trip CO2 saving] and engine stop time:
The trip CO2 saving and engine stop time modeshows the CO2 saving and engine stop time sincethe last reset.
The CO2 saving and engine stop time can be resetby pushing the ENTER switch for longer than 1 sec-ond.
[Total CO2 saving] and engine stop time:
The total CO2 saving and engine stop time modeshows:
• The estimated CO2 exhaust emissionsprevented.
• The engine stop time that the engine has beenstopped by the Stop/Start System.
NOTE
The Total CO2 saving and engine stop time val-ues cannot be reset and show accumulatedStop/Start System information since the vehiclewas built.
11. Warning checkThe current warnings are displayed. If no warning ispresent, “No Warnings” is displayed.
[CLOCK] AND [OUTSIDE AIRTEMPERATURE]
The clock j1 and outside air temperature j2 aredisplayed on the upper side of the vehicle informa-tion display.
[Clock]For details of how to set the clock, see “Setting theclock” in the “4. Display screen, heater and air con-ditioner, and audio system” section or the sepa-rately provided NissanConnect Owner’s manual.
[Outside air temperature] (°C or °F)The [outside air temperature] is displayed in °C or°F in the range of −40 to 60°C (−40 to 140°F).
The outside temperature sensor is located in front ofthe radiator. The sensor may be affected by road orengine heat, wind directions and other driving con-ditions. The display may differ from the actual out-side temperature or the temperature displayed onvarious signs or billboards.
JVI0724XZ
Instruments and controls 2-29
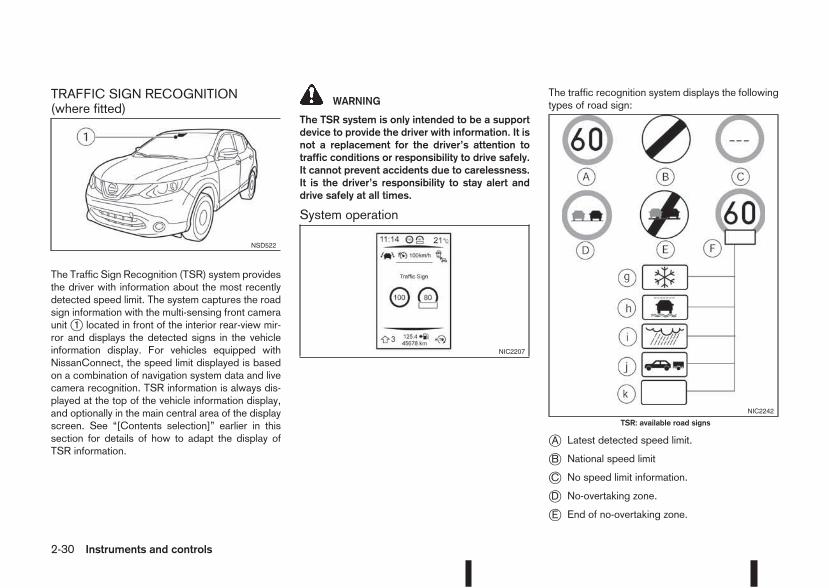
TRAFFIC SIGN RECOGNITION(where fitted)
The Traffic Sign Recognition (TSR) system providesthe driver with information about the most recentlydetected speed limit. The system captures the roadsign information with the multi-sensing front cameraunitj1 located in front of the interior rear-view mir-ror and displays the detected signs in the vehicleinformation display. For vehicles equipped withNissanConnect, the speed limit displayed is basedon a combination of navigation system data and livecamera recognition. TSR information is always dis-played at the top of the vehicle information display,and optionally in the main central area of the displayscreen. See “[Contents selection]” earlier in thissection for details of how to adapt the display ofTSR information.
WARNING
The TSR system is only intended to be a supportdevice to provide the driver with information. It isnot a replacement for the driver’s attention totraffic conditions or responsibility to drive safely.It cannot prevent accidents due to carelessness.It is the driver’s responsibility to stay alert anddrive safely at all times.
System operation
The traffic recognition system displays the followingtypes of road sign:
jA Latest detected speed limit.
jB National speed limit
jC No speed limit information.
jD No-overtaking zone.
jE End of no-overtaking zone.
NSD522
NIC2207
NIC2242
TSR: available road signs
2-30 Instruments and controls
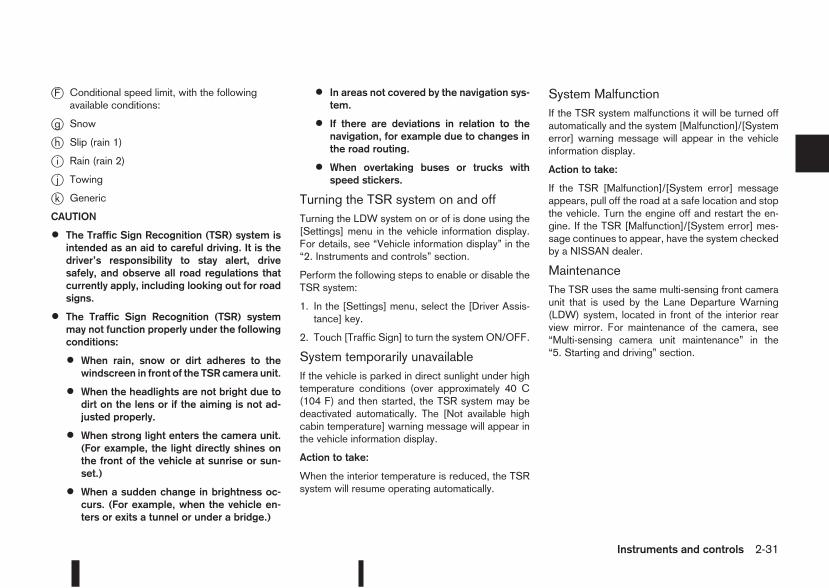
jF Conditional speed limit, with the followingavailable conditions:
jg Snow
jh Slip (rain 1)
ji Rain (rain 2)
jj Towing
jk Generic
CAUTION
• The Traffic Sign Recognition (TSR) system isintended as an aid to careful driving. It is thedriver’s responsibility to stay alert, drivesafely, and observe all road regulations thatcurrently apply, including looking out for roadsigns.
• The Traffic Sign Recognition (TSR) systemmay not function properly under the followingconditions:
• When rain, snow or dirt adheres to thewindscreen in front of the TSR camera unit.
• When the headlights are not bright due todirt on the lens or if the aiming is not ad-justed properly.
• When strong light enters the camera unit.(For example, the light directly shines onthe front of the vehicle at sunrise or sun-set.)
• When a sudden change in brightness oc-curs. (For example, when the vehicle en-ters or exits a tunnel or under a bridge.)
• In areas not covered by the navigation sys-tem.
• If there are deviations in relation to thenavigation, for example due to changes inthe road routing.
• When overtaking buses or trucks withspeed stickers.
Turning the TSR system on and offTurning the LDW system on or of is done using the[Settings] menu in the vehicle information display.For details, see “Vehicle information display” in the“2. Instruments and controls” section.
Perform the following steps to enable or disable theTSR system:
1. In the [Settings] menu, select the [Driver Assis-tance] key.
2. Touch [Traffic Sign] to turn the system ON/OFF.
System temporarily unavailableIf the vehicle is parked in direct sunlight under hightemperature conditions (over approximately 40 C(104 F) and then started, the TSR system may bedeactivated automatically. The [Not available highcabin temperature] warning message will appear inthe vehicle information display.
Action to take:
When the interior temperature is reduced, the TSRsystem will resume operating automatically.
System MalfunctionIf the TSR system malfunctions it will be turned offautomatically and the system [Malfunction]/[Systemerror] warning message will appear in the vehicleinformation display.
Action to take:
If the TSR [Malfunction]/[System error] messageappears, pull off the road at a safe location and stopthe vehicle. Turn the engine off and restart the en-gine. If the TSR [Malfunction]/[System error] mes-sage continues to appear, have the system checkedby a NISSAN dealer.
MaintenanceThe TSR uses the same multi-sensing front cameraunit that is used by the Lane Departure Warning(LDW) system, located in front of the interior rearview mirror. For maintenance of the camera, see“Multi-sensing camera unit maintenance” in the“5. Starting and driving” section.
Instruments and controls 2-31
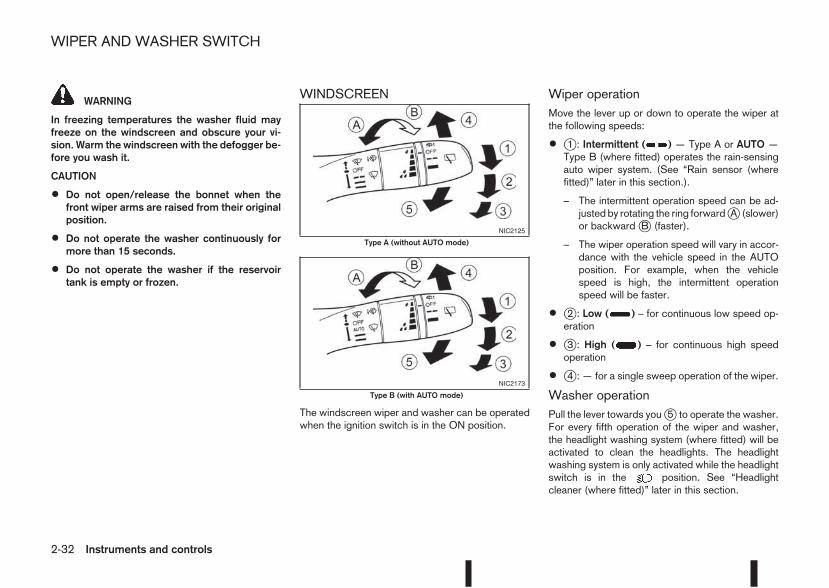
WARNING
In freezing temperatures the washer fluid mayfreeze on the windscreen and obscure your vi-sion. Warm the windscreen with the defogger be-fore you wash it.
CAUTION
• Do not open/release the bonnet when thefront wiper arms are raised from their originalposition.
• Do not operate the washer continuously formore than 15 seconds.
• Do not operate the washer if the reservoirtank is empty or frozen.
WINDSCREEN
The windscreen wiper and washer can be operatedwhen the ignition switch is in the ON position.
Wiper operationMove the lever up or down to operate the wiper atthe following speeds:
• j1 : Intermittent ( ) — Type A or AUTO —Type B (where fitted) operates the rain-sensingauto wiper system. (See “Rain sensor (wherefitted)” later in this section.).
– The intermittent operation speed can be ad-justed by rotating the ring forwardjA (slower)or backwardjB (faster).
– The wiper operation speed will vary in accor-dance with the vehicle speed in the AUTOposition. For example, when the vehiclespeed is high, the intermittent operationspeed will be faster.
• j2 : Low ( ) – for continuous low speed op-eration
• j3 : High ( ) – for continuous high speedoperation
• j4 : — for a single sweep operation of the wiper.
Washer operationPull the lever towards youj5 to operate the washer.For every fifth operation of the wiper and washer,the headlight washing system (where fitted) will beactivated to clean the headlights. The headlightwashing system is only activated while the headlightswitch is in the position. See “Headlightcleaner (where fitted)” later in this section.
NIC2125
Type A (without AUTO mode)
NIC2173
Type B (with AUTO mode)
WIPER AND WASHER SWITCH
2-32 Instruments and controls
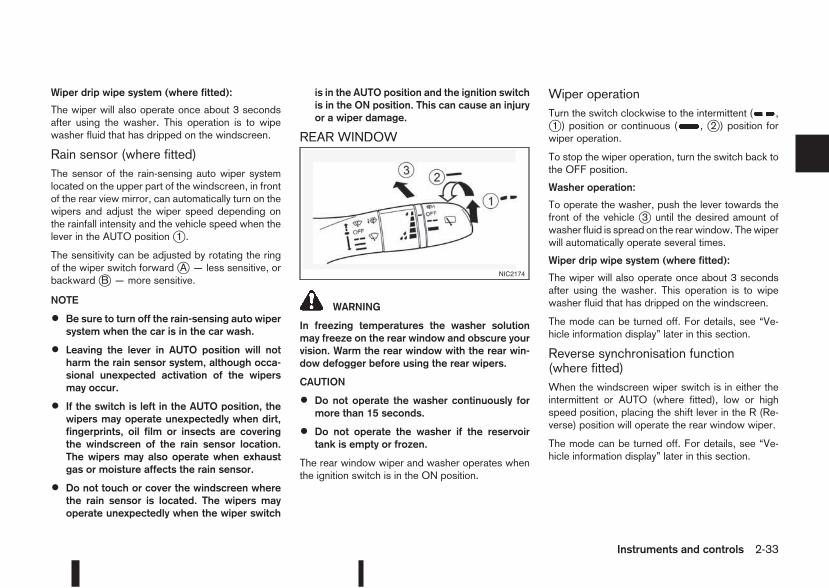
Wiper drip wipe system (where fitted):
The wiper will also operate once about 3 secondsafter using the washer. This operation is to wipewasher fluid that has dripped on the windscreen.
Rain sensor (where fitted)The sensor of the rain-sensing auto wiper systemlocated on the upper part of the windscreen, in frontof the rear view mirror, can automatically turn on thewipers and adjust the wiper speed depending onthe rainfall intensity and the vehicle speed when thelever in the AUTO positionj1 .
The sensitivity can be adjusted by rotating the ringof the wiper switch forwardjA — less sensitive, orbackwardjB — more sensitive.
NOTE
• Be sure to turn off the rain-sensing auto wipersystem when the car is in the car wash.
• Leaving the lever in AUTO position will notharm the rain sensor system, although occa-sional unexpected activation of the wipersmay occur.
• If the switch is left in the AUTO position, thewipers may operate unexpectedly when dirt,fingerprints, oil film or insects are coveringthe windscreen of the rain sensor location.The wipers may also operate when exhaustgas or moisture affects the rain sensor.
• Do not touch or cover the windscreen wherethe rain sensor is located. The wipers mayoperate unexpectedly when the wiper switch
is in the AUTO position and the ignition switchis in the ON position. This can cause an injuryor a wiper damage.
REAR WINDOW
WARNING
In freezing temperatures the washer solutionmay freeze on the rear window and obscure yourvision. Warm the rear window with the rear win-dow defogger before using the rear wipers.
CAUTION
• Do not operate the washer continuously formore than 15 seconds.
• Do not operate the washer if the reservoirtank is empty or frozen.
The rear window wiper and washer operates whenthe ignition switch is in the ON position.
Wiper operationTurn the switch clockwise to the intermittent ( ,j1 ) position or continuous ( , j2 ) position forwiper operation.
To stop the wiper operation, turn the switch back tothe OFF position.
Washer operation:
To operate the washer, push the lever towards thefront of the vehicle j3 until the desired amount ofwasher fluid is spread on the rear window. Thewiperwill automatically operate several times.
Wiper drip wipe system (where fitted):
The wiper will also operate once about 3 secondsafter using the washer. This operation is to wipewasher fluid that has dripped on the windscreen.
The mode can be turned off. For details, see “Ve-hicle information display” later in this section.
Reverse synchronisation function(where fitted)When the windscreen wiper switch is in either theintermittent or AUTO (where fitted), low or highspeed position, placing the shift lever in the R (Re-verse) position will operate the rear window wiper.
The mode can be turned off. For details, see “Ve-hicle information display” later in this section.
NIC2174
Instruments and controls 2-33
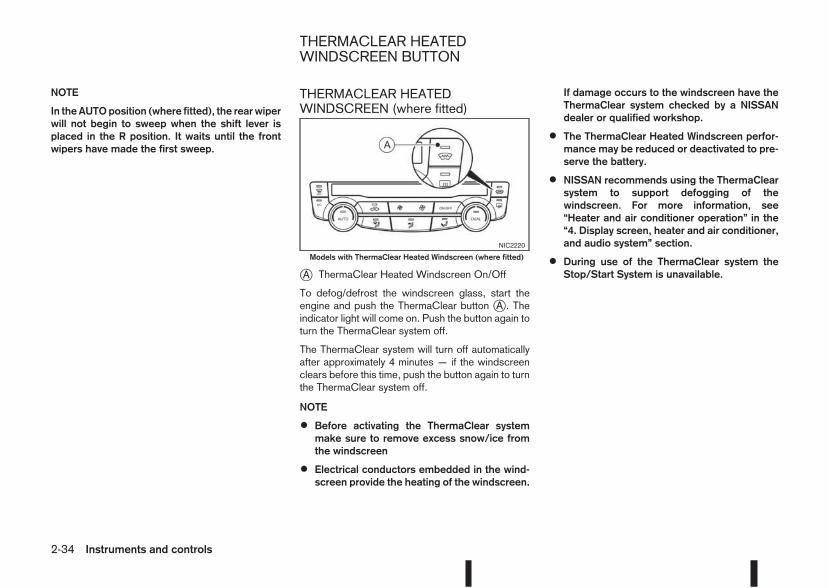
NOTE
In the AUTOposition (where fitted), the rearwiperwill not begin to sweep when the shift lever isplaced in the R position. It waits until the frontwipers have made the first sweep.
THERMACLEAR HEATEDWINDSCREEN (where fitted)
jA ThermaClear Heated Windscreen On/Off
To defog/defrost the windscreen glass, start theengine and push the ThermaClear button jA . Theindicator light will come on. Push the button again toturn the ThermaClear system off.
The ThermaClear system will turn off automaticallyafter approximately 4 minutes — if the windscreenclears before this time, push the button again to turnthe ThermaClear system off.
NOTE
• Before activating the ThermaClear systemmake sure to remove excess snow/ice fromthe windscreen
• Electrical conductors embedded in the wind-screen provide the heating of the windscreen.
If damage occurs to the windscreen have theThermaClear system checked by a NISSANdealer or qualified workshop.
• The ThermaClear Heated Windscreen perfor-mance may be reduced or deactivated to pre-serve the battery.
• NISSAN recommends using the ThermaClearsystem to support defogging of thewindscreen. For more information, see“Heater and air conditioner operation” in the“4. Display screen, heater and air conditioner,and audio system” section.
• During use of the ThermaClear system theStop/Start System is unavailable.
NIC2220
Models with ThermaClear Heated Windscreen (where fitted)
THERMACLEAR HEATEDWINDSCREEN BUTTON
2-34 Instruments and controls
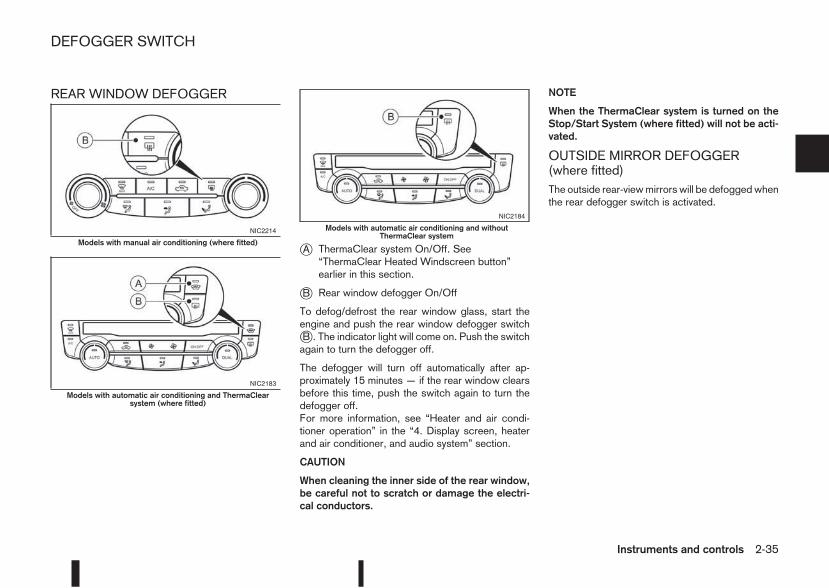
REAR WINDOW DEFOGGER
jA ThermaClear system On/Off. See“ThermaClear Heated Windscreen button”earlier in this section.
jB Rear window defogger On/Off
To defog/defrost the rear window glass, start theengine and push the rear window defogger switchjB . The indicator light will come on. Push the switchagain to turn the defogger off.
The defogger will turn off automatically after ap-proximately 15 minutes — if the rear window clearsbefore this time, push the switch again to turn thedefogger off.For more information, see “Heater and air condi-tioner operation” in the “4. Display screen, heaterand air conditioner, and audio system” section.
CAUTION
When cleaning the inner side of the rear window,be careful not to scratch or damage the electri-cal conductors.
NOTE
When the ThermaClear system is turned on theStop/Start System (where fitted) will not be acti-vated.
OUTSIDE MIRROR DEFOGGER(where fitted)The outside rear-viewmirrors will be defoggedwhenthe rear defogger switch is activated.
NIC2214
Models with manual air conditioning (where fitted)
NIC2183
Models with automatic air conditioning and ThermaClearsystem (where fitted)
NIC2184
Models with automatic air conditioning and withoutThermaClear system
DEFOGGER SWITCH
Instruments and controls 2-35
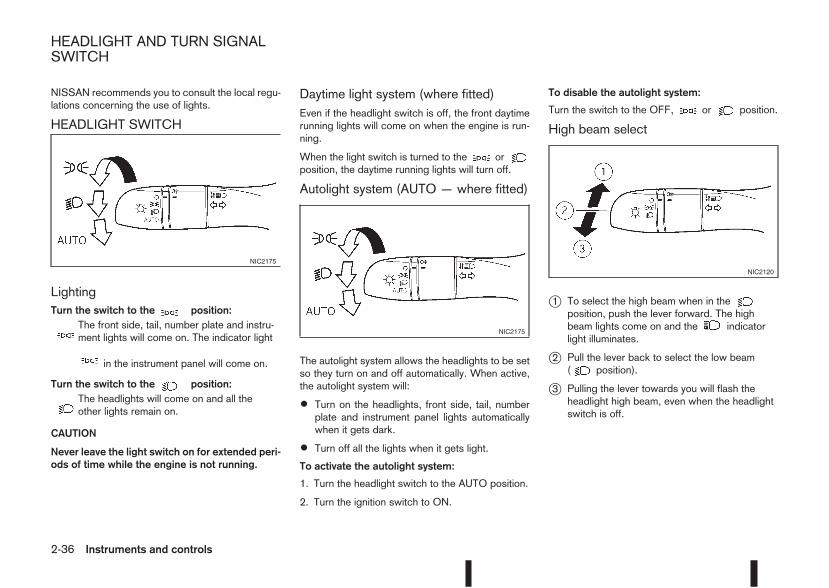
NISSAN recommends you to consult the local regu-lations concerning the use of lights.
HEADLIGHT SWITCH
LightingTurn the switch to them position:
mThe front side, tail, number plate and instru-ment lights will come on. The indicator light
m in the instrument panel will come on.
Turn the switch to them position:
mThe headlights will come on and all theother lights remain on.
CAUTION
Never leave the light switch on for extended peri-ods of time while the engine is not running.
Daytime light system (where fitted)Even if the headlight switch is off, the front daytimerunning lights will come on when the engine is run-ning.
When the light switch is turned to the orposition, the daytime running lights will turn off.
Autolight system (AUTO — where fitted)
The autolight system allows the headlights to be setso they turn on and off automatically. When active,the autolight system will:
• Turn on the headlights, front side, tail, numberplate and instrument panel lights automaticallywhen it gets dark.
• Turn off all the lights when it gets light.
To activate the autolight system:
1. Turn the headlight switch to the AUTO position.
2. Turn the ignition switch to ON.
To disable the autolight system:
Turn the switch to the OFF, or position.
High beam select
j1 To select the high beam when in theposition, push the lever forward. The highbeam lights come on and the indicatorlight illuminates.
j2 Pull the lever back to select the low beam( position).
j3 Pulling the lever towards you will flash theheadlight high beam, even when the headlightswitch is off.
NIC2175
NIC2175
NIC2120
HEADLIGHT AND TURN SIGNALSWITCH
2-36 Instruments and controls
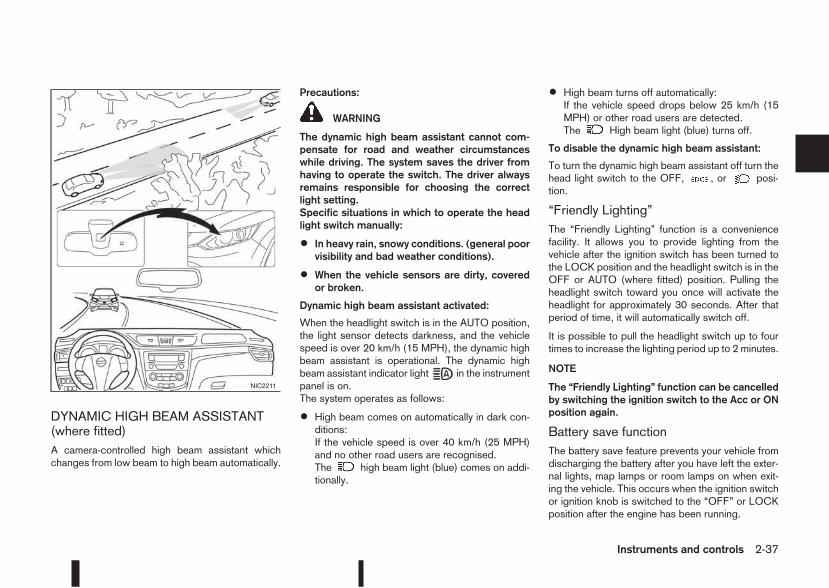
DYNAMIC HIGH BEAM ASSISTANT(where fitted)A camera-controlled high beam assistant whichchanges from low beam to high beam automatically.
Precautions:
WARNING
The dynamic high beam assistant cannot com-pensate for road and weather circumstanceswhile driving. The system saves the driver fromhaving to operate the switch. The driver alwaysremains responsible for choosing the correctlight setting.Specific situations in which to operate the headlight switch manually:
• In heavy rain, snowy conditions. (general poorvisibility and bad weather conditions).
• When the vehicle sensors are dirty, coveredor broken.
Dynamic high beam assistant activated:
When the headlight switch is in the AUTO position,the light sensor detects darkness, and the vehiclespeed is over 20 km/h (15 MPH), the dynamic highbeam assistant is operational. The dynamic highbeam assistant indicator light in the instrumentpanel is on.The system operates as follows:
• High beam comes on automatically in dark con-ditions:If the vehicle speed is over 40 km/h (25 MPH)and no other road users are recognised.The high beam light (blue) comes on addi-tionally.
• High beam turns off automatically:If the vehicle speed drops below 25 km/h (15MPH) or other road users are detected.The High beam light (blue) turns off.
To disable the dynamic high beam assistant:
To turn the dynamic high beam assistant off turn thehead light switch to the OFF, , or posi-tion.
“Friendly Lighting”The “Friendly Lighting” function is a conveniencefacility. It allows you to provide lighting from thevehicle after the ignition switch has been turned tothe LOCK position and the headlight switch is in theOFF or AUTO (where fitted) position. Pulling theheadlight switch toward you once will activate theheadlight for approximately 30 seconds. After thatperiod of time, it will automatically switch off.
It is possible to pull the headlight switch up to fourtimes to increase the lighting period up to 2 minutes.
NOTE
The “Friendly Lighting” function can be cancelledby switching the ignition switch to the Acc or ONposition again.
Battery save functionThe battery save feature prevents your vehicle fromdischarging the battery after you have left the exter-nal lights, map lamps or room lamps on when exit-ing the vehicle. This occurs when the ignition switchor ignition knob is switched to the “OFF” or LOCKposition after the engine has been running.
NIC2211
Instruments and controls 2-37
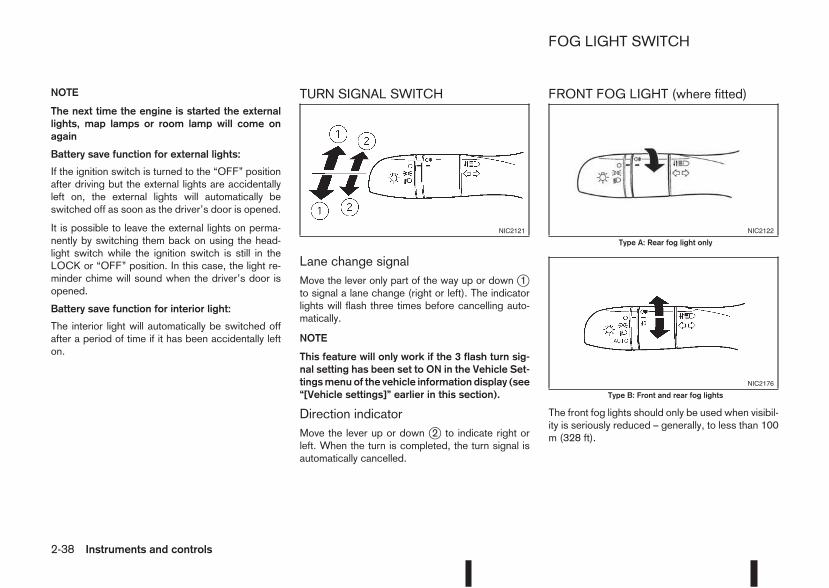
NOTE
The next time the engine is started the externallights, map lamps or room lamp will come onagain
Battery save function for external lights:
If the ignition switch is turned to the “OFF” positionafter driving but the external lights are accidentallyleft on, the external lights will automatically beswitched off as soon as the driver’s door is opened.
It is possible to leave the external lights on perma-nently by switching them back on using the head-light switch while the ignition switch is still in theLOCK or “OFF” position. In this case, the light re-minder chime will sound when the driver’s door isopened.
Battery save function for interior light:
The interior light will automatically be switched offafter a period of time if it has been accidentally lefton.
TURN SIGNAL SWITCH
Lane change signalMove the lever only part of the way up or down j1to signal a lane change (right or left). The indicatorlights will flash three times before cancelling auto-matically.
NOTE
This feature will only work if the 3 flash turn sig-nal setting has been set to ON in the Vehicle Set-tingsmenuof the vehicle information display (see“[Vehicle settings]” earlier in this section).
Direction indicatorMove the lever up or down j2 to indicate right orleft. When the turn is completed, the turn signal isautomatically cancelled.
FRONT FOG LIGHT (where fitted)
The front fog lights should only be used when visibil-ity is seriously reduced – generally, to less than 100m (328 ft).
NIC2121 NIC2122
Type A: Rear fog light only
NIC2176
Type B: Front and rear fog lights
FOG LIGHT SWITCH
2-38 Instruments and controls
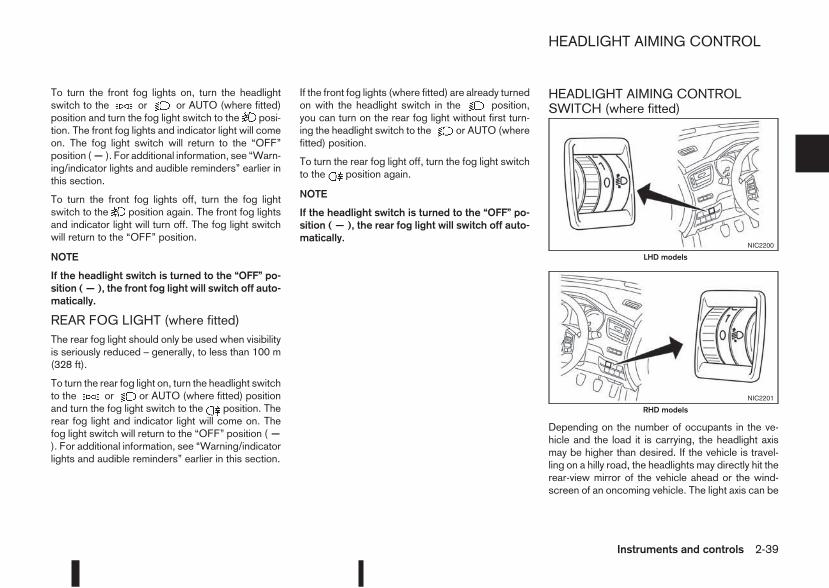
To turn the front fog lights on, turn the headlightswitch to the or or AUTO (where fitted)position and turn the fog light switch to the posi-tion. The front fog lights and indicator light will comeon. The fog light switch will return to the “OFF”position (— ). For additional information, see “Warn-ing/indicator lights and audible reminders” earlier inthis section.
To turn the front fog lights off, turn the fog lightswitch to the position again. The front fog lightsand indicator light will turn off. The fog light switchwill return to the “OFF” position.
NOTE
If the headlight switch is turned to the “OFF” po-sition ( — ), the front fog light will switch off auto-matically.
REAR FOG LIGHT (where fitted)The rear fog light should only be used when visibilityis seriously reduced – generally, to less than 100 m(328 ft).
To turn the rear fog light on, turn the headlight switchto the or or AUTO (where fitted) positionand turn the fog light switch to the position. Therear fog light and indicator light will come on. Thefog light switch will return to the “OFF” position (—). For additional information, see “Warning/indicatorlights and audible reminders” earlier in this section.
If the front fog lights (where fitted) are already turnedon with the headlight switch in the position,you can turn on the rear fog light without first turn-ing the headlight switch to the or AUTO (wherefitted) position.
To turn the rear fog light off, turn the fog light switchto the position again.
NOTE
If the headlight switch is turned to the “OFF” po-sition ( — ), the rear fog light will switch off auto-matically.
HEADLIGHT AIMING CONTROLSWITCH (where fitted)
Depending on the number of occupants in the ve-hicle and the load it is carrying, the headlight axismay be higher than desired. If the vehicle is travel-ling on a hilly road, the headlights may directly hit therear-view mirror of the vehicle ahead or the wind-screen of an oncoming vehicle. The light axis can be
NIC2200
LHD models
NIC2201
RHD models
HEADLIGHT AIMING CONTROL
Instruments and controls 2-39
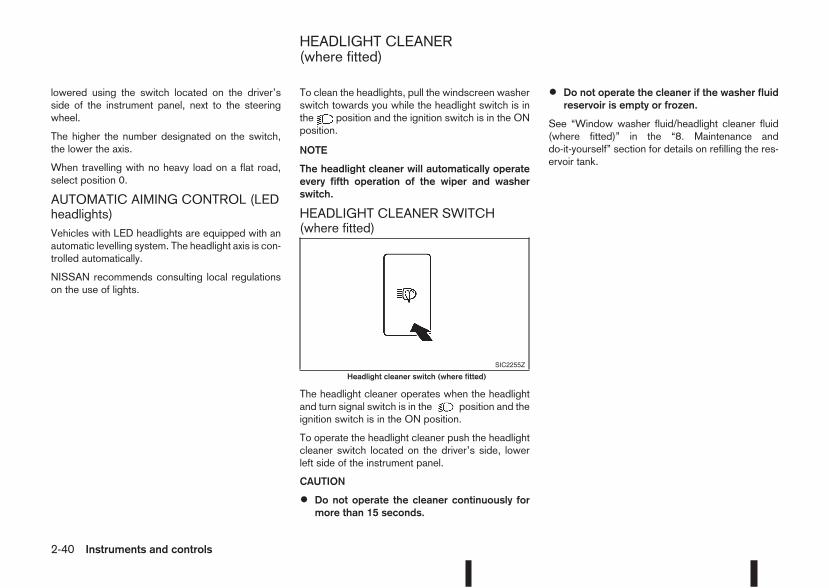
lowered using the switch located on the driver’sside of the instrument panel, next to the steeringwheel.
The higher the number designated on the switch,the lower the axis.
When travelling with no heavy load on a flat road,select position 0.
AUTOMATIC AIMING CONTROL (LEDheadlights)Vehicles with LED headlights are equipped with anautomatic levelling system. The headlight axis is con-trolled automatically.
NISSAN recommends consulting local regulationson the use of lights.
To clean the headlights, pull the windscreen washerswitch towards you while the headlight switch is inthe position and the ignition switch is in the ONposition.
NOTE
The headlight cleaner will automatically operateevery fifth operation of the wiper and washerswitch.
HEADLIGHT CLEANER SWITCH(where fitted)
The headlight cleaner operates when the headlightand turn signal switch is in the position and theignition switch is in the ON position.
To operate the headlight cleaner push the headlightcleaner switch located on the driver’s side, lowerleft side of the instrument panel.
CAUTION
• Do not operate the cleaner continuously formore than 15 seconds.
• Do not operate the cleaner if the washer fluidreservoir is empty or frozen.
See “Window washer fluid/headlight cleaner fluid(where fitted)” in the “8. Maintenance anddo-it-yourself” section for details on refilling the res-ervoir tank.
SIC2255Z
Headlight cleaner switch (where fitted)
HEADLIGHT CLEANER(where fitted)
2-40 Instruments and controls
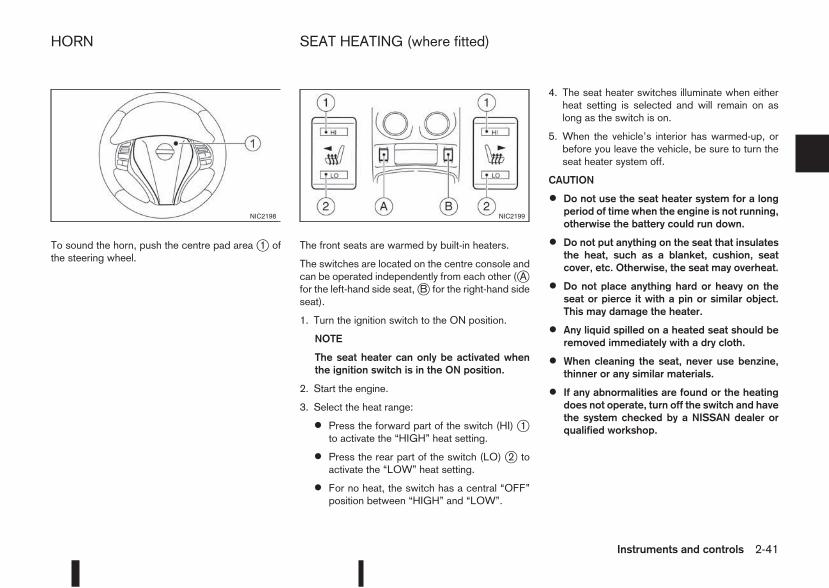
To sound the horn, push the centre pad area j1 ofthe steering wheel.
The front seats are warmed by built-in heaters.
The switches are located on the centre console andcan be operated independently from each other (jAfor the left-hand side seat,jB for the right-hand sideseat).
1. Turn the ignition switch to the ON position.
NOTE
The seat heater can only be activated whenthe ignition switch is in the ON position.
2. Start the engine.
3. Select the heat range:
• Press the forward part of the switch (HI) j1to activate the “HIGH” heat setting.
• Press the rear part of the switch (LO) j2 toactivate the “LOW” heat setting.
• For no heat, the switch has a central “OFF”position between “HIGH” and “LOW”.
4. The seat heater switches illuminate when eitherheat setting is selected and will remain on aslong as the switch is on.
5. When the vehicle’s interior has warmed-up, orbefore you leave the vehicle, be sure to turn theseat heater system off.
CAUTION
• Do not use the seat heater system for a longperiod of time when the engine is not running,otherwise the battery could run down.
• Do not put anything on the seat that insulatesthe heat, such as a blanket, cushion, seatcover, etc. Otherwise, the seat may overheat.
• Do not place anything hard or heavy on theseat or pierce it with a pin or similar object.This may damage the heater.
• Any liquid spilled on a heated seat should beremoved immediately with a dry cloth.
• When cleaning the seat, never use benzine,thinner or any similar materials.
• If any abnormalities are found or the heatingdoes not operate, turn off the switch and havethe system checked by a NISSAN dealer orqualified workshop.
NIC2198 NIC2199
HORN SEAT HEATING (where fitted)
Instruments and controls 2-41
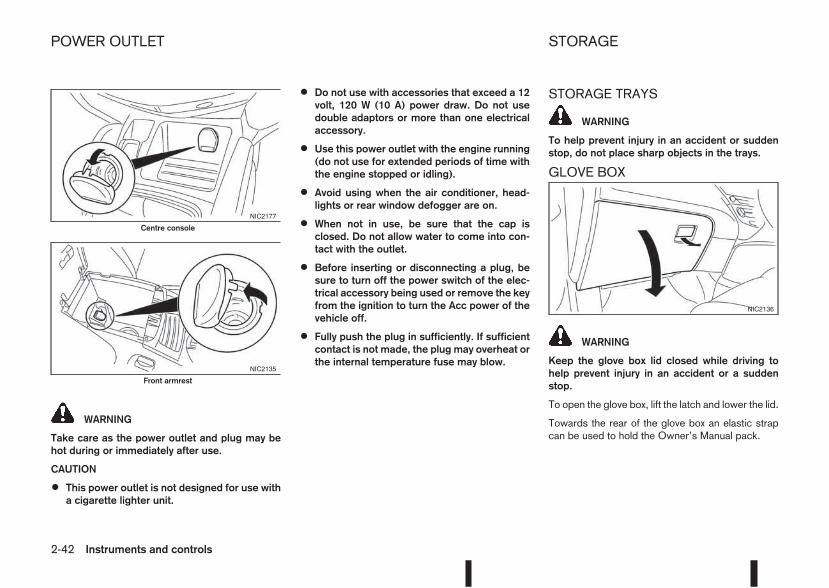
WARNING
Take care as the power outlet and plug may behot during or immediately after use.
CAUTION
• This power outlet is not designed for use witha cigarette lighter unit.
• Do not use with accessories that exceed a 12volt, 120 W (10 A) power draw. Do not usedouble adaptors or more than one electricalaccessory.
• Use this power outlet with the engine running(do not use for extended periods of time withthe engine stopped or idling).
• Avoid using when the air conditioner, head-lights or rear window defogger are on.
• When not in use, be sure that the cap isclosed. Do not allow water to come into con-tact with the outlet.
• Before inserting or disconnecting a plug, besure to turn off the power switch of the elec-trical accessory being used or remove the keyfrom the ignition to turn the Acc power of thevehicle off.
• Fully push the plug in sufficiently. If sufficientcontact is not made, the plug may overheat orthe internal temperature fuse may blow.
STORAGE TRAYS
WARNING
To help prevent injury in an accident or suddenstop, do not place sharp objects in the trays.
GLOVE BOX
WARNING
Keep the glove box lid closed while driving tohelp prevent injury in an accident or a suddenstop.
To open the glove box, lift the latch and lower the lid.
Towards the rear of the glove box an elastic strapcan be used to hold the Owner’s Manual pack.
NIC2177
Centre console
NIC2135
Front armrest
NIC2136
POWER OUTLET STORAGE
2-42 Instruments and controls
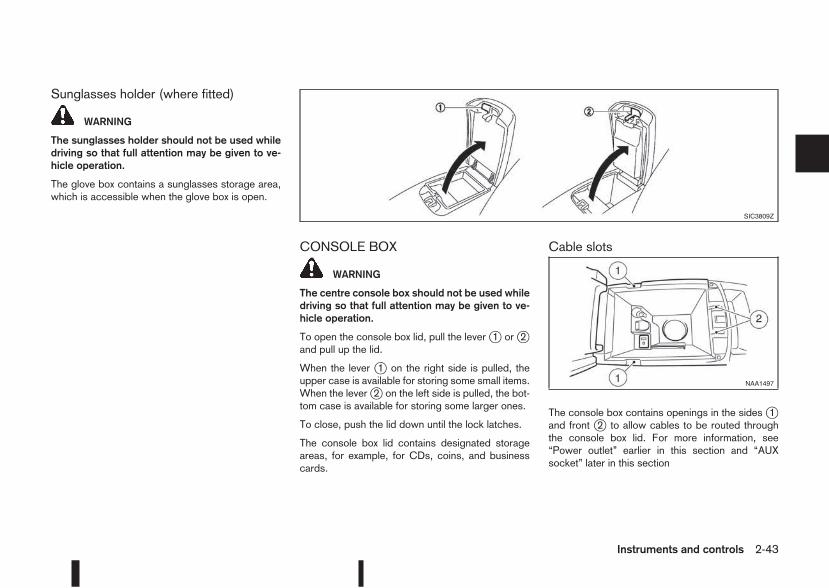
Sunglasses holder (where fitted)
WARNING
The sunglasses holder should not be used whiledriving so that full attention may be given to ve-hicle operation.
The glove box contains a sunglasses storage area,which is accessible when the glove box is open.
CONSOLE BOX
WARNING
The centre console box should not be used whiledriving so that full attention may be given to ve-hicle operation.
To open the console box lid, pull the leverj1 orj2and pull up the lid.
When the lever j1 on the right side is pulled, theupper case is available for storing some small items.When the leverj2 on the left side is pulled, the bot-tom case is available for storing some larger ones.
To close, push the lid down until the lock latches.
The console box lid contains designated storageareas, for example, for CDs, coins, and businesscards.
Cable slots
The console box contains openings in the sidesj1and front j2 to allow cables to be routed throughthe console box lid. For more information, see“Power outlet” earlier in this section and “AUXsocket” later in this section
SIC3809Z
NAA1497
Instruments and controls 2-43
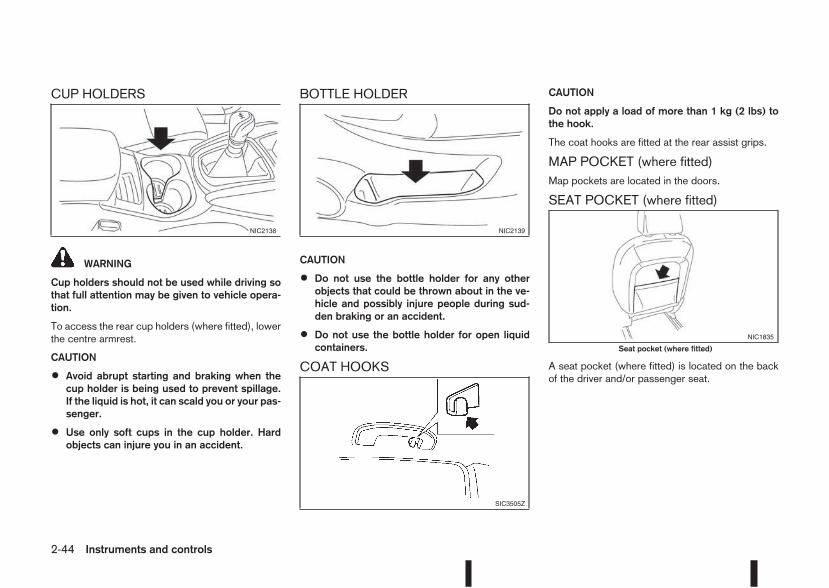
CUP HOLDERS
WARNING
Cup holders should not be used while driving sothat full attention may be given to vehicle opera-tion.
To access the rear cup holders (where fitted), lowerthe centre armrest.
CAUTION
• Avoid abrupt starting and braking when thecup holder is being used to prevent spillage.If the liquid is hot, it can scald you or your pas-senger.
• Use only soft cups in the cup holder. Hardobjects can injure you in an accident.
BOTTLE HOLDER
CAUTION
• Do not use the bottle holder for any otherobjects that could be thrown about in the ve-hicle and possibly injure people during sud-den braking or an accident.
• Do not use the bottle holder for open liquidcontainers.
COAT HOOKS
CAUTION
Do not apply a load of more than 1 kg (2 lbs) tothe hook.
The coat hooks are fitted at the rear assist grips.
MAP POCKET (where fitted)Map pockets are located in the doors.
SEAT POCKET (where fitted)
A seat pocket (where fitted) is located on the backof the driver and/or passenger seat.
NIC2138 NIC2139
SIC3505Z
NIC1835
Seat pocket (where fitted)
2-44 Instruments and controls
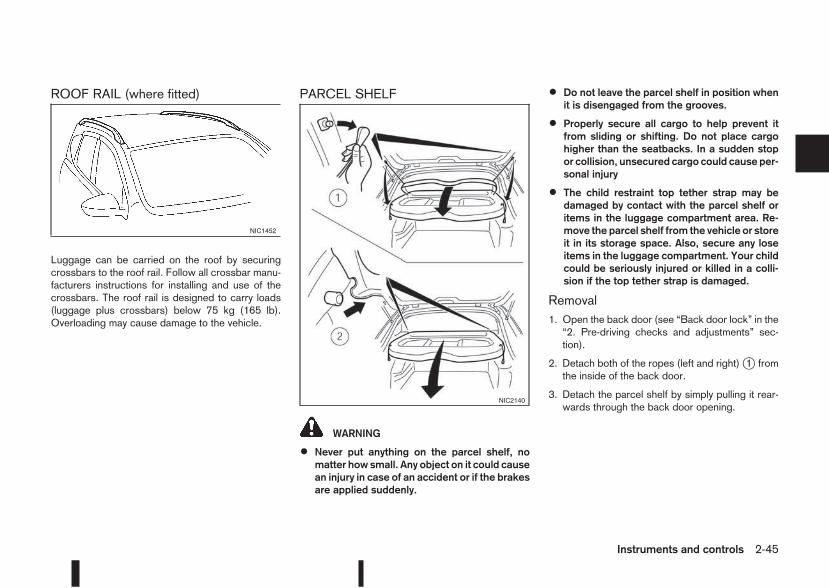
ROOF RAIL (where fitted)
Luggage can be carried on the roof by securingcrossbars to the roof rail. Follow all crossbar manu-facturers instructions for installing and use of thecrossbars. The roof rail is designed to carry loads(luggage plus crossbars) below 75 kg (165 lb).Overloading may cause damage to the vehicle.
PARCEL SHELF
WARNING
• Never put anything on the parcel shelf, nomatter how small. Any object on it could causean injury in case of an accident or if the brakesare applied suddenly.
• Do not leave the parcel shelf in position whenit is disengaged from the grooves.
• Properly secure all cargo to help prevent itfrom sliding or shifting. Do not place cargohigher than the seatbacks. In a sudden stopor collision, unsecured cargo could cause per-sonal injury
• The child restraint top tether strap may bedamaged by contact with the parcel shelf oritems in the luggage compartment area. Re-move the parcel shelf from the vehicle or storeit in its storage space. Also, secure any loseitems in the luggage compartment. Your childcould be seriously injured or killed in a colli-sion if the top tether strap is damaged.
Removal1. Open the back door (see “Back door lock” in the“2. Pre-driving checks and adjustments” sec-tion).
2. Detach both of the ropes (left and right)j1 fromthe inside of the back door.
3. Detach the parcel shelf by simply pulling it rear-wards through the back door opening.
NIC1452
NIC2140
Instruments and controls 2-45
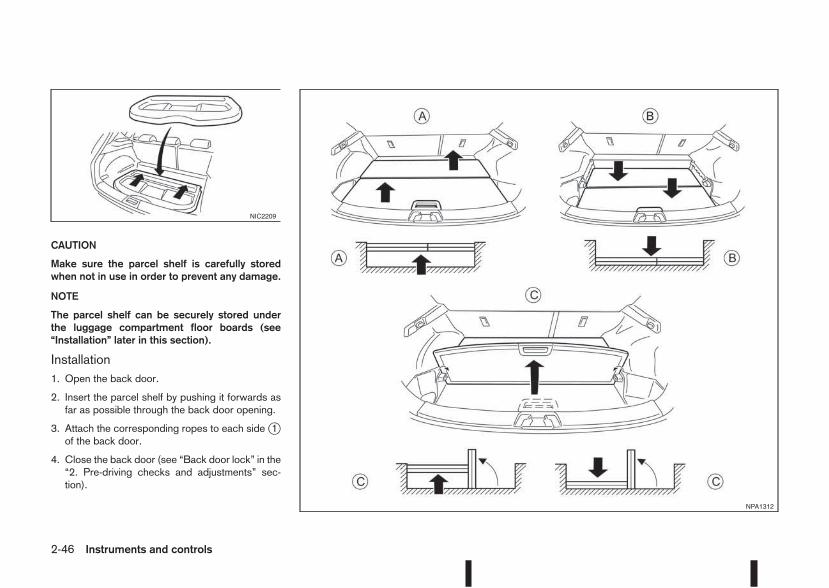
CAUTION
Make sure the parcel shelf is carefully storedwhen not in use in order to prevent any damage.
NOTE
The parcel shelf can be securely stored underthe luggage compartment floor boards (see“Installation” later in this section).
Installation1. Open the back door.
2. Insert the parcel shelf by pushing it forwards asfar as possible through the back door opening.
3. Attach the corresponding ropes to each sidej1of the back door.
4. Close the back door (see “Back door lock” in the“2. Pre-driving checks and adjustments” sec-tion).
NIC2209
NPA1312
2-46 Instruments and controls

LUGGAGE COMPARTMENT/BOOTFLOOR (where fitted)
WARNING
• Properly secure all cargo with ropes or strapsto help prevent it from sliding or shifting. Donot place cargo higher than the seatbacks. Ina sudden stop or collision, unsecured cargocould cause personal injury.
• Do not put objects heavier than 50 kg (110lbs) on the load floor.
• Never allow anyone to ride in the luggagearea. It is extremely dangerous to ride in aluggage area inside of a vehicle. In a collision,people riding in these areas are more likely tobe seriously injured or killed.
• Only two anchorage points identified by thetop tether labels can be used for top tetherstrap anchorage. Under no circumstancesshould the luggage hooks be used for toptether strap anchorage.
The luggage (cargo) compartment or boot floor hasa dual surface (wet and dry), or dual position systemwith loose floorboards that allow different luggagecompartment arrangements.
CAUTION
• The carpet finish should face up for all dry useapplications.
• The smooth surface should be usedonlywhenloading wet objects.
• The load should be distributed evenly andshould not exceed 50 kg (110 lb) on any of theboards/panels.
• To avoid any damage, the panels/boardsshould be placed in the lower position jB forheavy loads and securely held with ropes orstraps to prevent any load shift.
Upper positionjAThis position provides a flat load floor when the rearseat backs are folded forward. It also serves as aconcealed load area for objects placed below theboards.
NOTE
The parcel shelf can be securely stored underthe luggage compartment floor boards.
Move the boards as illustrated by lifting and slidingeach board into the upper positionjA .
1) Remove the larger floorboard as illustrated bylifting and sliding it into the upper positionjA .
2) Repeat the operation with the smaller board.
Lower positionjBThis position maximises the load space in the lug-gage compartment.
Move both boards as illustrated by lifting and slidingeach board into the lower positionjB .
Vertical positionsjCThese positions provide further subdivisions of theluggage space by standing either one of the boardsvertically in the midway slots provided in the sidetrim.
LUGGAGE HOOKS
The luggage hooks are for shopping bags, etc.
WARNING
• Do not apply a total load of more than 3 kg (7lb) to the hook.
JVI0509XZ
Instruments and controls 2-47
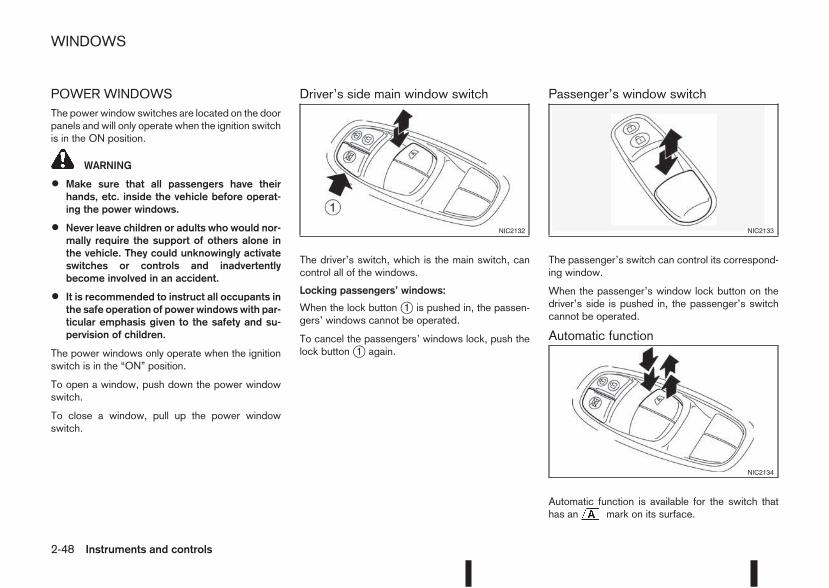
POWER WINDOWSThe power window switches are located on the doorpanels and will only operate when the ignition switchis in the ON position.
WARNING
• Make sure that all passengers have theirhands, etc. inside the vehicle before operat-ing the power windows.
• Never leave children or adults who would nor-mally require the support of others alone inthe vehicle. They could unknowingly activateswitches or controls and inadvertentlybecome involved in an accident.
• It is recommended to instruct all occupants inthe safe operation of power windowswith par-ticular emphasis given to the safety and su-pervision of children.
The power windows only operate when the ignitionswitch is in the “ON” position.
To open a window, push down the power windowswitch.
To close a window, pull up the power windowswitch.
Driver’s side main window switch
The driver’s switch, which is the main switch, cancontrol all of the windows.
Locking passengers’ windows:
When the lock button j1 is pushed in, the passen-gers’ windows cannot be operated.
To cancel the passengers’ windows lock, push thelock buttonj1 again.
Passenger’s window switch
The passenger’s switch can control its correspond-ing window.
When the passenger’s window lock button on thedriver’s side is pushed in, the passenger’s switchcannot be operated.
Automatic function
Automatic function is available for the switch thathas an mark on its surface.
NIC2132 NIC2133
NIC2134
WINDOWS
2-48 Instruments and controls

The automatic function enables a window to fullyopen or close without holding the switch down orup.
To fully open the window, push the power windowswitch down to the second detent and release theswitch. To fully close the window, pull the powerwindow switch up to the second detent and releasethe switch. The switch does not have to be held dur-ing window operation.
To stop the window open/close operation duringthe automatic function, push down or pull up theswitch in opposite direction.
Auto-reverse function:
WARNING
• There is a small distance just before theclosed position which cannot be detected.Make sure that all passengers have theirhands, etc. inside the vehicle before closingthe windows.
• The auto-reverse function does not workwhen the window is closed manually (holdingthe switch in the close position).
The auto-reverse function enables a window to au-tomatically reverse when something is caught in thewindow as it is closing by the automatic function.When the control unit detects an obstacle, the win-dow will be lowered immediately.
Depending on the environment or driving conditions,the auto-reverse function may activate if an impactor load similar to something being caught in the win-dow occurs.
Reinitialisation procedure after batteryreconnectionSome power window functions (automatic closefunction, auto-reverse function) will not operate asdescribed after the battery cable is disconnected orthe electrical supply is interrupted. Perform the fol-lowing procedure to initialise the power windowfunctions.
1. Place the ignition switch in the “ON” position.
2. If the driver’s window is closed, open it com-pletely by operating the driver’s window switch.
3. Pull up and hold the driver’s window switch toclose the driver’s window. Hold the switch forapproximately 5 seconds after the window hasbeen fully closed, and then release it.
4. Check if the power window functions operateproperly.
If you open or close the power window continu-ously, it may cause the power window not to oper-ate properly. Perform the above procedure.
If the power window functions do not operate prop-erly after performing the above procedure, repeatthe steps. See a NISSAN dealer or qualified work-shop, if necessary, for checking the power windowsystem.
j1 Close
j2 Open
CAUTION
• Do not place heavy objects on the glass roofor surrounding area.
• Do not hang from the sunshade or hang anyobjects from it. It may cause damage or de-formation to the sunshade.
• Close the sunshade when you leave the ve-hicle for extended periods of time to preventthe inside of the vehicle from reaching hightemperatures.
NIC2178
FIXED GLASS ROOF (where fitted)
Instruments and controls 2-49

SUNSHADE OPERATIONThe sunshade operates onlywhen the ignition switchis in the ON position.
WARNING
Never allow hands or fingers, or any part of yourbodywithin operating range of the sunshade. Youcould be injured.
Opening and closingManual control:
To close the sunshade, press and hold the “CLOSE”side of the switch j1 To stop the sunshade fromclosing fully, release the switch.
To open the sunshade press and hold the “OPEN”side of the switch j2 To stop the sunshade fromopening fully, release the switch.
Automatic operation:
To fully open or close the sunshade automatically,press briefly on the open or close side of the switchand then release. To stop the sunshade from open-ing or closing, press either side of the switch.
Auto-reverse function:
When the control unit detects something caught inthe sunshade, the sunshade will open automatically.
NOTE
The auto-reverse function remains activewhether the sunshade is being closed manuallyor automatically.
CAUTION
Do not use for extended periods of time with theengine stopped. This could discharge the bat-tery.
NOTE
The interior lights will go off after a period of timeunless the ignition switch is in the Acc or ONposition.
ROOM LIGHT CONTROL SWITCH
The room light control switch has three positions:ONj1 , OFFj2 and centrej3 .
ON positionWhen the switch is in the ON position j1 , the lightwill illuminate.
OFF positionWhen the switch is in the OFF positionj2 , the lightwill not illuminate, regardless of the condition.
Centre positionWhen the switch is in the centre position, the lightcomes on when a door is opened
ROOM LIGHT TIMER (where fitted)The room light will stay on for a period of time when:
• The ignition is switched off.
• The doors are unlocked.
• Any door is opened and then closed.
The timer is cancelled, and the interior light will turnoff when:
• The doors are locked.
• The ignition switch is turned to the ON position.
MAP LIGHTS (where fitted)
Operate the map light switch to turn the map lighton or off.
j1 : ON position
SIC4573Z
SIC4572Z
INTERIOR LIGHTS
2-50 Instruments and controls
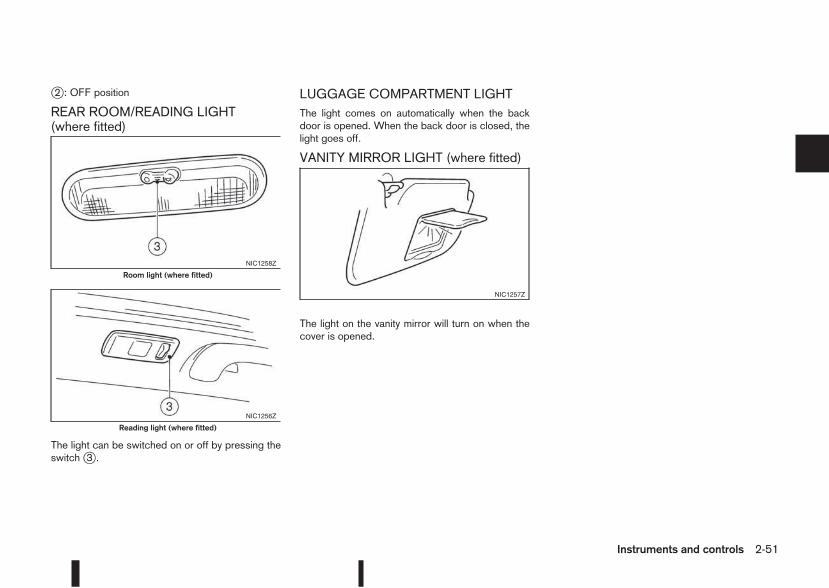
j2 : OFF position
REAR ROOM/READING LIGHT(where fitted)
The light can be switched on or off by pressing theswitchj3 .
LUGGAGE COMPARTMENT LIGHTThe light comes on automatically when the backdoor is opened. When the back door is closed, thelight goes off.
VANITY MIRROR LIGHT (where fitted)
The light on the vanity mirror will turn on when thecover is opened.
NIC1258Z
Room light (where fitted)
NIC1256Z
Reading light (where fitted)
NIC1257Z
Instruments and controls 2-51

NOTE
2-52 Instruments and controls
3 Pre-driving checks and adjustmentsPre-driving checks and adjustments
Keys ........................................................................ 3-2NISSAN Anti-Theft System (NATS)* key ............. 3-2Intelligent Key (where fitted)................................ 3-2Key number ........................................................ 3-3New keys ........................................................... 3-3Emergency/mechanical key (Intelligent Keymodels) .............................................................. 3-3
Integrated keyfob/remote control system.................. 3-4Switching from Convenience mode toAnti-hijack mode (where fitted)............................ 3-5Using the remote keyless entry system................ 3-5Locking the doors............................................... 3-5Unlocking the doors............................................ 3-5Keyfob operation failure ...................................... 3-5
Intelligent Key system (where fitted) ......................... 3-6Intelligent Key operating range............................ 3-6Using Intelligent Key system................................ 3-6Locking/unlocking .............................................. 3-7Starting the engine with the Intelligent Key .......... 3-8
Door locks ............................................................... 3-8Super Lock system (RHD models) ...................... 3-8Locking/unlocking with the key (vehicle deadbattery)............................................................... 3-9
Inside door handle .............................................. 3-10Power door lock switch ...................................... 3-10Child safety lock — rear doors............................ 3-11Back door lock ................................................... 3-11
Security system ....................................................... 3-12Alarm system (where fitted) ................................ 3-12NISSAN Anti-Theft System (NATS)..................... 3-13
Bonnet release ........................................................ 3-14Fuel filler lid ............................................................. 3-15Fuel filler lid opener lever .................................... 3-15Fuel filler cap...................................................... 3-15
Parking brake switch ............................................... 3-16Driving away when towing a trailer ...................... 3-17
Steering wheel......................................................... 3-18Sun visors ............................................................... 3-18Mirrors..................................................................... 3-18Inside rear-view mirror ........................................ 3-18Automatic anti-dazzling inside mirror (wherefitted).................................................................. 3-19Outside rear-view mirrors.................................... 3-19Vanity mirror ....................................................... 3-20
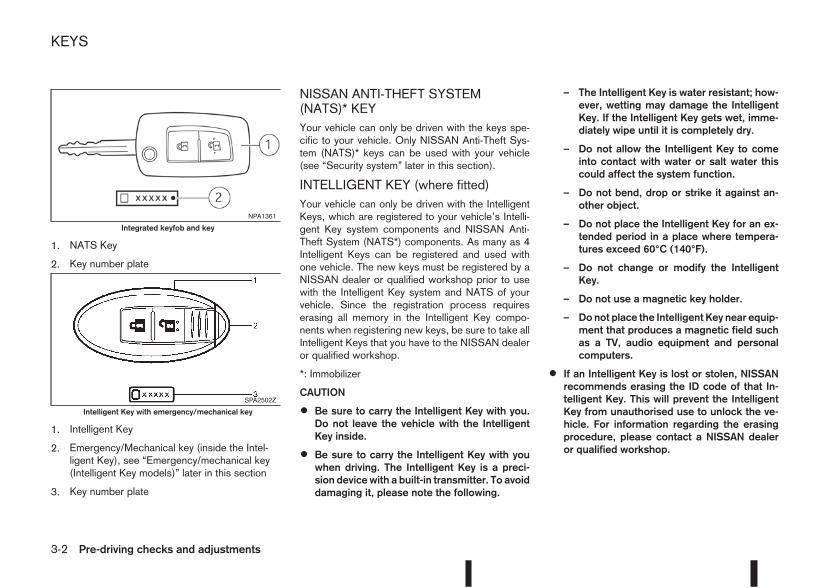
1. NATS Key
2. Key number plate
1. Intelligent Key
2. Emergency/Mechanical key (inside the Intel-ligent Key), see “Emergency/mechanical key(Intelligent Key models)” later in this section
3. Key number plate
NISSAN ANTI-THEFT SYSTEM(NATS)* KEYYour vehicle can only be driven with the keys spe-cific to your vehicle. Only NISSAN Anti-Theft Sys-tem (NATS)* keys can be used with your vehicle(see “Security system” later in this section).
INTELLIGENT KEY (where fitted)Your vehicle can only be driven with the IntelligentKeys, which are registered to your vehicle’s Intelli-gent Key system components and NISSAN Anti-Theft System (NATS*) components. As many as 4Intelligent Keys can be registered and used withone vehicle. The new keys must be registered by aNISSAN dealer or qualified workshop prior to usewith the Intelligent Key system and NATS of yourvehicle. Since the registration process requireserasing all memory in the Intelligent Key compo-nents when registering new keys, be sure to take allIntelligent Keys that you have to the NISSAN dealeror qualified workshop.
*: Immobilizer
CAUTION
• Be sure to carry the Intelligent Key with you.Do not leave the vehicle with the IntelligentKey inside.
• Be sure to carry the Intelligent Key with youwhen driving. The Intelligent Key is a preci-sion devicewith a built-in transmitter. To avoiddamaging it, please note the following.
– The Intelligent Key is water resistant; how-ever, wetting may damage the IntelligentKey. If the Intelligent Key gets wet, imme-diately wipe until it is completely dry.
– Do not allow the Intelligent Key to comeinto contact with water or salt water thiscould affect the system function.
– Do not bend, drop or strike it against an-other object.
– Do not place the Intelligent Key for an ex-tended period in a place where tempera-tures exceed 60°C (140°F).
– Do not change or modify the IntelligentKey.
– Do not use a magnetic key holder.
– Do not place the Intelligent Key near equip-ment that produces a magnetic field suchas a TV, audio equipment and personalcomputers.
• If an Intelligent Key is lost or stolen, NISSANrecommends erasing the ID code of that In-telligent Key. This will prevent the IntelligentKey from unauthorised use to unlock the ve-hicle. For information regarding the erasingprocedure, please contact a NISSAN dealeror qualified workshop.
NPA1361
Integrated keyfob and key
SPA2502Z
Intelligent Key with emergency/mechanical key
KEYS
3-2 Pre-driving checks and adjustments
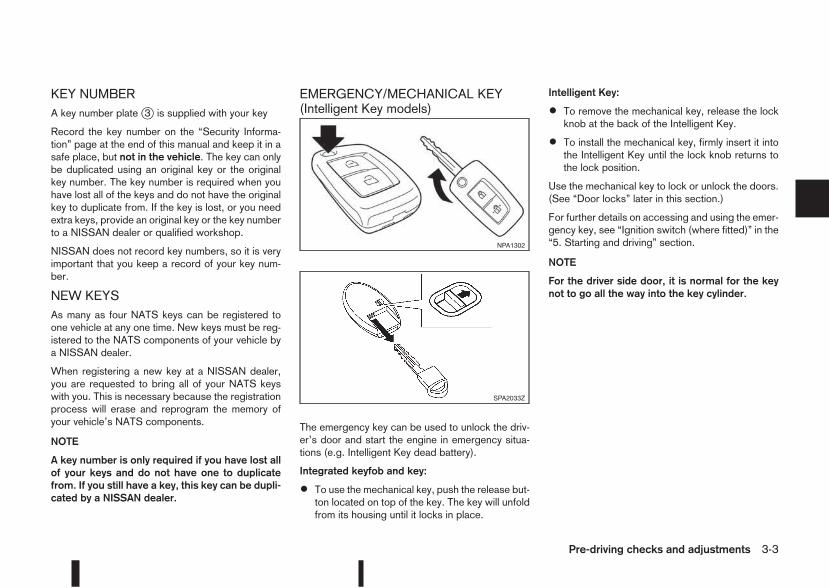
KEY NUMBERA key number platej3 is supplied with your key
Record the key number on the “Security Informa-tion” page at the end of this manual and keep it in asafe place, but not in the vehicle. The key can onlybe duplicated using an original key or the originalkey number. The key number is required when youhave lost all of the keys and do not have the originalkey to duplicate from. If the key is lost, or you needextra keys, provide an original key or the key numberto a NISSAN dealer or qualified workshop.
NISSAN does not record key numbers, so it is veryimportant that you keep a record of your key num-ber.
NEW KEYSAs many as four NATS keys can be registered toone vehicle at any one time. New keys must be reg-istered to the NATS components of your vehicle bya NISSAN dealer.
When registering a new key at a NISSAN dealer,you are requested to bring all of your NATS keyswith you. This is necessary because the registrationprocess will erase and reprogram the memory ofyour vehicle’s NATS components.
NOTE
A key number is only required if you have lost allof your keys and do not have one to duplicatefrom. If you still have a key, this key can be dupli-cated by a NISSAN dealer.
EMERGENCY/MECHANICAL KEY(Intelligent Key models)
The emergency key can be used to unlock the driv-er’s door and start the engine in emergency situa-tions (e.g. Intelligent Key dead battery).
Integrated keyfob and key:
• To use the mechanical key, push the release but-ton located on top of the key. The key will unfoldfrom its housing until it locks in place.
Intelligent Key:
• To remove the mechanical key, release the lockknob at the back of the Intelligent Key.
• To install the mechanical key, firmly insert it intothe Intelligent Key until the lock knob returns tothe lock position.
Use the mechanical key to lock or unlock the doors.(See “Door locks” later in this section.)
For further details on accessing and using the emer-gency key, see “Ignition switch (where fitted)” in the“5. Starting and driving” section.
NOTE
For the driver side door, it is normal for the keynot to go all the way into the key cylinder.
NPA1302
SPA2033Z
Pre-driving checks and adjustments 3-3
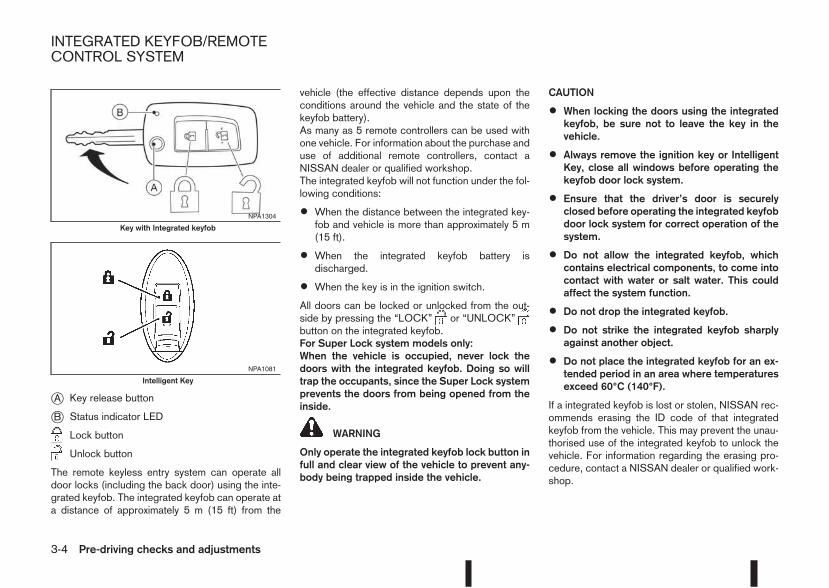
jA Key release button
jB Status indicator LED
Lock button
Unlock button
The remote keyless entry system can operate alldoor locks (including the back door) using the inte-grated keyfob. The integrated keyfob can operate ata distance of approximately 5 m (15 ft) from the
vehicle (the effective distance depends upon theconditions around the vehicle and the state of thekeyfob battery).As many as 5 remote controllers can be used withone vehicle. For information about the purchase anduse of additional remote controllers, contact aNISSAN dealer or qualified workshop.The integrated keyfob will not function under the fol-lowing conditions:
• When the distance between the integrated key-fob and vehicle is more than approximately 5 m(15 ft).
• When the integrated keyfob battery isdischarged.
• When the key is in the ignition switch.
All doors can be locked or unlocked from the out-side by pressing the “LOCK” or “UNLOCK”button on the integrated keyfob.For Super Lock system models only:When the vehicle is occupied, never lock thedoors with the integrated keyfob. Doing so willtrap the occupants, since the Super Lock systemprevents the doors from being opened from theinside.
WARNING
Only operate the integrated keyfob lock button infull and clear view of the vehicle to prevent any-body being trapped inside the vehicle.
CAUTION
• When locking the doors using the integratedkeyfob, be sure not to leave the key in thevehicle.
• Always remove the ignition key or IntelligentKey, close all windows before operating thekeyfob door lock system.
• Ensure that the driver’s door is securelyclosed before operating the integrated keyfobdoor lock system for correct operation of thesystem.
• Do not allow the integrated keyfob, whichcontains electrical components, to come intocontact with water or salt water. This couldaffect the system function.
• Do not drop the integrated keyfob.
• Do not strike the integrated keyfob sharplyagainst another object.
• Do not place the integrated keyfob for an ex-tended period in an area where temperaturesexceed 60°C (140°F).
If a integrated keyfob is lost or stolen, NISSAN rec-ommends erasing the ID code of that integratedkeyfob from the vehicle. This may prevent the unau-thorised use of the integrated keyfob to unlock thevehicle. For information regarding the erasing pro-cedure, contact a NISSAN dealer or qualified work-shop.
NPA1304
Key with Integrated keyfob
NPA1081
Intelligent Key
INTEGRATED KEYFOB/REMOTECONTROL SYSTEM
3-4 Pre-driving checks and adjustments
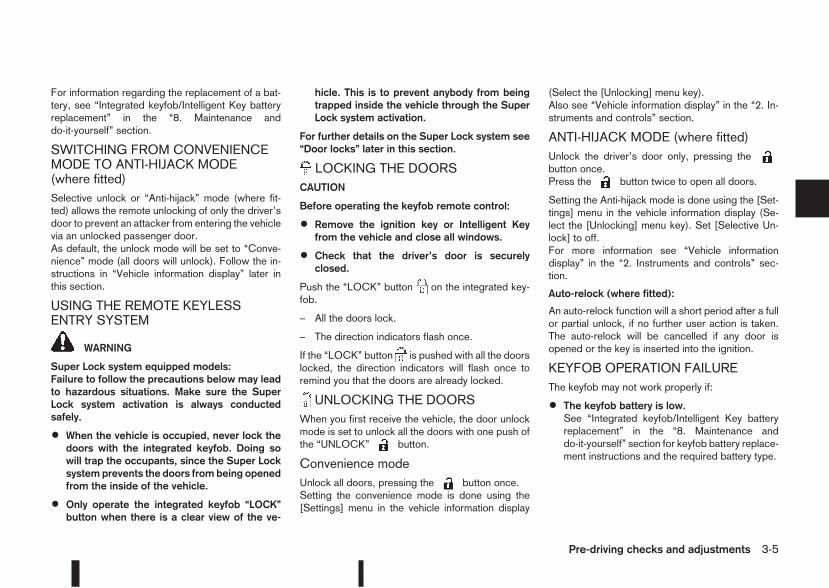
For information regarding the replacement of a bat-tery, see “Integrated keyfob/Intelligent Key batteryreplacement” in the “8. Maintenance anddo-it-yourself” section.
SWITCHING FROM CONVENIENCEMODE TO ANTI-HIJACK MODE(where fitted)Selective unlock or “Anti-hijack” mode (where fit-ted) allows the remote unlocking of only the driver’sdoor to prevent an attacker from entering the vehiclevia an unlocked passenger door.As default, the unlock mode will be set to “Conve-nience” mode (all doors will unlock). Follow the in-structions in “Vehicle information display” later inthis section.
USING THE REMOTE KEYLESSENTRY SYSTEM
WARNING
Super Lock system equipped models:Failure to follow the precautions below may leadto hazardous situations. Make sure the SuperLock system activation is always conductedsafely.
• When the vehicle is occupied, never lock thedoors with the integrated keyfob. Doing sowill trap the occupants, since the Super Locksystem prevents the doors from being openedfrom the inside of the vehicle.
• Only operate the integrated keyfob “LOCK”button when there is a clear view of the ve-
hicle. This is to prevent anybody from beingtrapped inside the vehicle through the SuperLock system activation.
For further details on the Super Lock system see“Door locks” later in this section.
LOCKING THE DOORSCAUTION
Before operating the keyfob remote control:
• Remove the ignition key or Intelligent Keyfrom the vehicle and close all windows.
• Check that the driver’s door is securelyclosed.
Push the “LOCK” button on the integrated key-fob.
– All the doors lock.
– The direction indicators flash once.
If the “LOCK” button is pushed with all the doorslocked, the direction indicators will flash once toremind you that the doors are already locked.
UNLOCKING THE DOORSWhen you first receive the vehicle, the door unlockmode is set to unlock all the doors with one push ofthe “UNLOCK” button.
Convenience modeUnlock all doors, pressing the button once.Setting the convenience mode is done using the[Settings] menu in the vehicle information display
(Select the [Unlocking] menu key).Also see “Vehicle information display” in the “2. In-struments and controls” section.
ANTI-HIJACK MODE (where fitted)Unlock the driver’s door only, pressing thebutton once.Press the button twice to open all doors.
Setting the Anti-hijack mode is done using the [Set-tings] menu in the vehicle information display (Se-lect the [Unlocking] menu key). Set [Selective Un-lock] to off.For more information see “Vehicle informationdisplay” in the “2. Instruments and controls” sec-tion.
Auto-relock (where fitted):
An auto-relock function will a short period after a fullor partial unlock, if no further user action is taken.The auto-relock will be cancelled if any door isopened or the key is inserted into the ignition.
KEYFOB OPERATION FAILUREThe keyfob may not work properly if:
• The keyfob battery is low.See “Integrated keyfob/Intelligent Key batteryreplacement” in the “8. Maintenance anddo-it-yourself” section for keyfob battery replace-ment instructions and the required battery type.
Pre-driving checks and adjustments 3-5
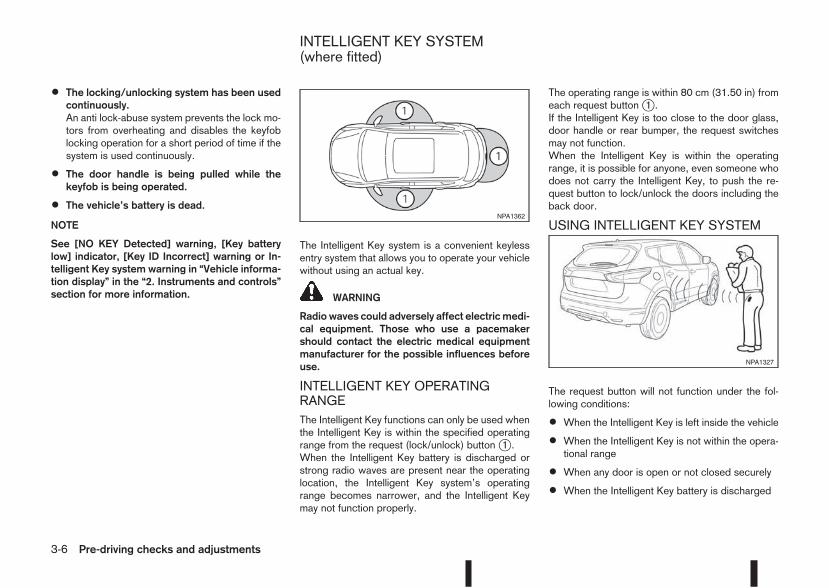
• The locking/unlocking system has been usedcontinuously.An anti lock-abuse system prevents the lock mo-tors from overheating and disables the keyfoblocking operation for a short period of time if thesystem is used continuously.
• The door handle is being pulled while thekeyfob is being operated.
• The vehicle’s battery is dead.
NOTE
See [NO KEY Detected] warning, [Key batterylow] indicator, [Key ID Incorrect] warning or In-telligent Key system warning in “Vehicle informa-tion display” in the “2. Instruments and controls”section for more information.
The Intelligent Key system is a convenient keylessentry system that allows you to operate your vehiclewithout using an actual key.
WARNING
Radio waves could adversely affect electricmedi-cal equipment. Those who use a pacemakershould contact the electric medical equipmentmanufacturer for the possible influences beforeuse.
INTELLIGENT KEY OPERATINGRANGEThe Intelligent Key functions can only be used whenthe Intelligent Key is within the specified operatingrange from the request (lock/unlock) buttonj1 .When the Intelligent Key battery is discharged orstrong radio waves are present near the operatinglocation, the Intelligent Key system’s operatingrange becomes narrower, and the Intelligent Keymay not function properly.
The operating range is within 80 cm (31.50 in) fromeach request buttonj1 .If the Intelligent Key is too close to the door glass,door handle or rear bumper, the request switchesmay not function.When the Intelligent Key is within the operatingrange, it is possible for anyone, even someone whodoes not carry the Intelligent Key, to push the re-quest button to lock/unlock the doors including theback door.
USING INTELLIGENT KEY SYSTEM
The request button will not function under the fol-lowing conditions:
• When the Intelligent Key is left inside the vehicle
• When the Intelligent Key is not within the opera-tional range
• When any door is open or not closed securely
• When the Intelligent Key battery is discharged
NPA1362
NPA1327
INTELLIGENT KEY SYSTEM(where fitted)
3-6 Pre-driving checks and adjustments
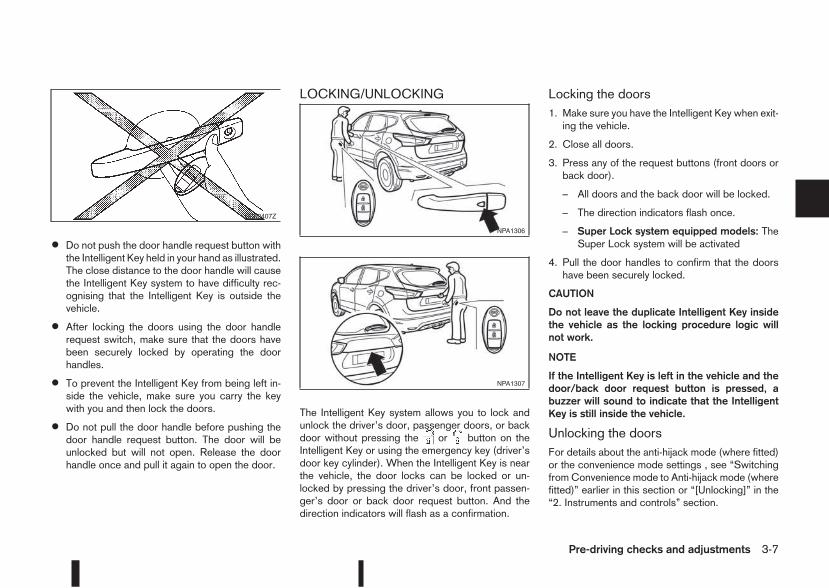
• Do not push the door handle request button withthe Intelligent Key held in your hand as illustrated.The close distance to the door handle will causethe Intelligent Key system to have difficulty rec-ognising that the Intelligent Key is outside thevehicle.
• After locking the doors using the door handlerequest switch, make sure that the doors havebeen securely locked by operating the doorhandles.
• To prevent the Intelligent Key from being left in-side the vehicle, make sure you carry the keywith you and then lock the doors.
• Do not pull the door handle before pushing thedoor handle request button. The door will beunlocked but will not open. Release the doorhandle once and pull it again to open the door.
LOCKING/UNLOCKING
The Intelligent Key system allows you to lock andunlock the driver’s door, passenger doors, or backdoor without pressing the or button on theIntelligent Key or using the emergency key (driver’sdoor key cylinder). When the Intelligent Key is nearthe vehicle, the door locks can be locked or un-locked by pressing the driver’s door, front passen-ger’s door or back door request button. And thedirection indicators will flash as a confirmation.
Locking the doors1. Make sure you have the Intelligent Key when exit-ing the vehicle.
2. Close all doors.
3. Press any of the request buttons (front doors orback door).
– All doors and the back door will be locked.
– The direction indicators flash once.
– Super Lock system equipped models: TheSuper Lock system will be activated
4. Pull the door handles to confirm that the doorshave been securely locked.
CAUTION
Do not leave the duplicate Intelligent Key insidethe vehicle as the locking procedure logic willnot work.
NOTE
If the Intelligent Key is left in the vehicle and thedoor/back door request button is pressed, abuzzer will sound to indicate that the IntelligentKey is still inside the vehicle.
Unlocking the doorsFor details about the anti-hijack mode (where fitted)or the convenience mode settings , see “SwitchingfromConvenience mode to Anti-hijack mode (wherefitted)” earlier in this section or “[Unlocking]” in the“2. Instruments and controls” section.
SPA2407Z
NPA1306
NPA1307
Pre-driving checks and adjustments 3-7
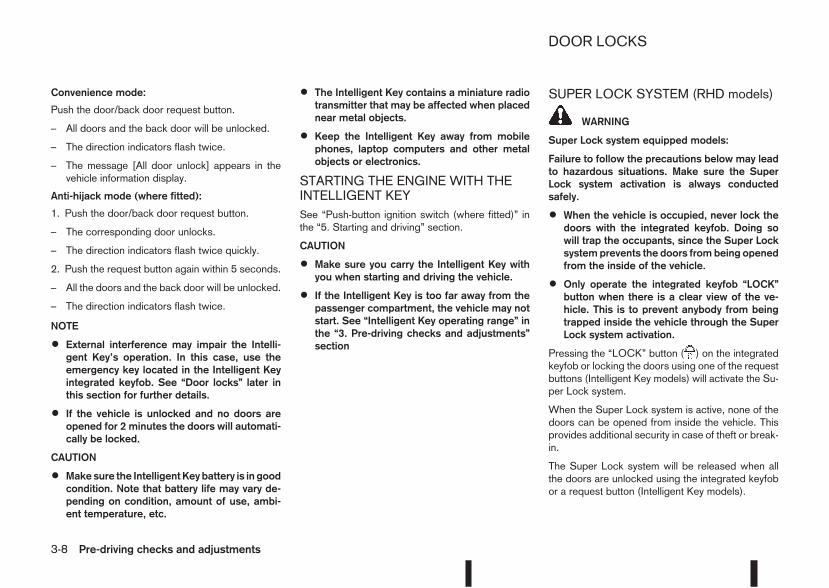
Convenience mode:
Push the door/back door request button.
– All doors and the back door will be unlocked.
– The direction indicators flash twice.
– The message [All door unlock] appears in thevehicle information display.
Anti-hijack mode (where fitted):
1. Push the door/back door request button.
– The corresponding door unlocks.
– The direction indicators flash twice quickly.
2. Push the request button again within 5 seconds.
– All the doors and the back door will be unlocked.
– The direction indicators flash twice.
NOTE
• External interference may impair the Intelli-gent Key’s operation. In this case, use theemergency key located in the Intelligent Keyintegrated keyfob. See “Door locks” later inthis section for further details.
• If the vehicle is unlocked and no doors areopened for 2 minutes the doors will automati-cally be locked.
CAUTION
• Make sure the Intelligent Key battery is in goodcondition. Note that battery life may vary de-pending on condition, amount of use, ambi-ent temperature, etc.
• The Intelligent Key contains a miniature radiotransmitter that may be affected when placednear metal objects.
• Keep the Intelligent Key away from mobilephones, laptop computers and other metalobjects or electronics.
STARTING THE ENGINE WITH THEINTELLIGENT KEYSee “Push-button ignition switch (where fitted)” inthe “5. Starting and driving” section.
CAUTION
• Make sure you carry the Intelligent Key withyou when starting and driving the vehicle.
• If the Intelligent Key is too far away from thepassenger compartment, the vehicle may notstart. See “Intelligent Key operating range” inthe “3. Pre-driving checks and adjustments”section
SUPER LOCK SYSTEM (RHD models)
WARNING
Super Lock system equipped models:
Failure to follow the precautions below may leadto hazardous situations. Make sure the SuperLock system activation is always conductedsafely.
• When the vehicle is occupied, never lock thedoors with the integrated keyfob. Doing sowill trap the occupants, since the Super Locksystem prevents the doors from being openedfrom the inside of the vehicle.
• Only operate the integrated keyfob “LOCK”button when there is a clear view of the ve-hicle. This is to prevent anybody from beingtrapped inside the vehicle through the SuperLock system activation.
Pressing the “LOCK” button ( ) on the integratedkeyfob or locking the doors using one of the requestbuttons (Intelligent Key models) will activate the Su-per Lock system.
When the Super Lock system is active, none of thedoors can be opened from inside the vehicle. Thisprovides additional security in case of theft or break-in.
The Super Lock system will be released when allthe doors are unlocked using the integrated keyfobor a request button (Intelligent Key models).
DOOR LOCKS
3-8 Pre-driving checks and adjustments
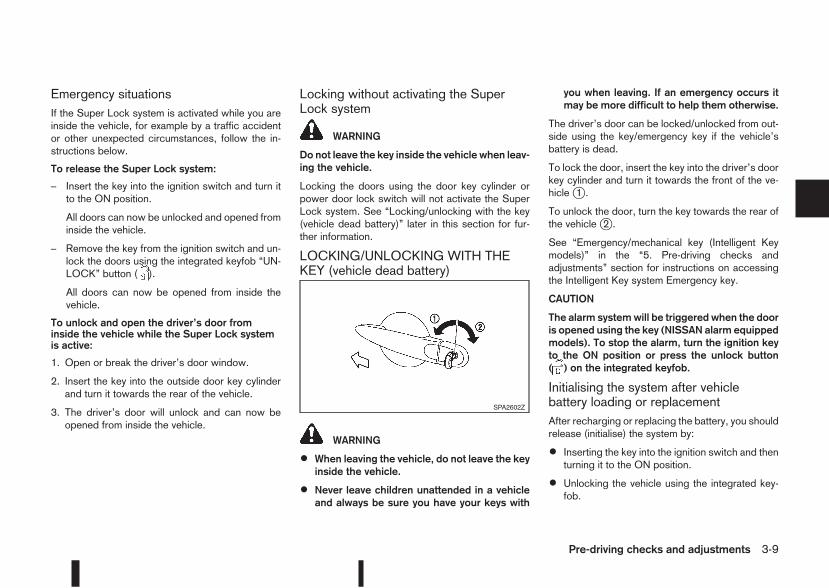
Emergency situationsIf the Super Lock system is activated while you areinside the vehicle, for example by a traffic accidentor other unexpected circumstances, follow the in-structions below.
To release the Super Lock system:
– Insert the key into the ignition switch and turn itto the ON position.
All doors can now be unlocked and opened frominside the vehicle.
– Remove the key from the ignition switch and un-lock the doors using the integrated keyfob “UN-LOCK” button ( ).
All doors can now be opened from inside thevehicle.
To unlock and open the driver’s door frominside the vehicle while the Super Lock systemis active:
1. Open or break the driver’s door window.
2. Insert the key into the outside door key cylinderand turn it towards the rear of the vehicle.
3. The driver’s door will unlock and can now beopened from inside the vehicle.
Locking without activating the SuperLock system
WARNING
Do not leave the key inside the vehicle when leav-ing the vehicle.
Locking the doors using the door key cylinder orpower door lock switch will not activate the SuperLock system. See “Locking/unlocking with the key(vehicle dead battery)” later in this section for fur-ther information.
LOCKING/UNLOCKING WITH THEKEY (vehicle dead battery)
WARNING
• When leaving the vehicle, do not leave the keyinside the vehicle.
• Never leave children unattended in a vehicleand always be sure you have your keys with
you when leaving. If an emergency occurs itmay be more difficult to help them otherwise.
The driver’s door can be locked/unlocked from out-side using the key/emergency key if the vehicle’sbattery is dead.
To lock the door, insert the key into the driver’s doorkey cylinder and turn it towards the front of the ve-hiclej1 .
To unlock the door, turn the key towards the rear ofthe vehiclej2 .
See “Emergency/mechanical key (Intelligent Keymodels)” in the “5. Pre-driving checks andadjustments” section for instructions on accessingthe Intelligent Key system Emergency key.
CAUTION
The alarm systemwill be triggered when the dooris opened using the key (NISSAN alarm equippedmodels). To stop the alarm, turn the ignition keyto the ON position or press the unlock button( ) on the integrated keyfob.
Initialising the system after vehiclebattery loading or replacementAfter recharging or replacing the battery, you shouldrelease (initialise) the system by:
• Inserting the key into the ignition switch and thenturning it to the ON position.
• Unlocking the vehicle using the integrated key-fob.
SPA2602Z
Pre-driving checks and adjustments 3-9
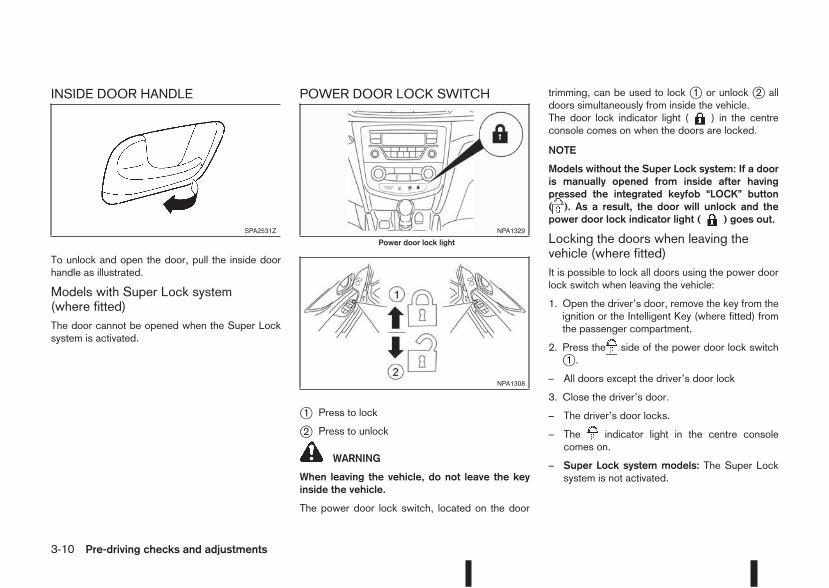
INSIDE DOOR HANDLE
To unlock and open the door, pull the inside doorhandle as illustrated.
Models with Super Lock system(where fitted)The door cannot be opened when the Super Locksystem is activated.
POWER DOOR LOCK SWITCH
j1 Press to lock
j2 Press to unlock
WARNING
When leaving the vehicle, do not leave the keyinside the vehicle.
The power door lock switch, located on the door
trimming, can be used to lock j1 or unlock j2 alldoors simultaneously from inside the vehicle.The door lock indicator light ( ) in the centreconsole comes on when the doors are locked.
NOTE
Models without the Super Lock system: If a dooris manually opened from inside after havingpressed the integrated keyfob “LOCK” button( ). As a result, the door will unlock and thepower door lock indicator light ( ) goes out.
Locking the doors when leaving thevehicle (where fitted)It is possible to lock all doors using the power doorlock switch when leaving the vehicle:
1. Open the driver’s door, remove the key from theignition or the Intelligent Key (where fitted) fromthe passenger compartment.
2. Press the side of the power door lock switchj1 .
– All doors except the driver’s door lock
3. Close the driver’s door.
– The driver’s door locks.
– The indicator light in the centre consolecomes on.
– Super Lock system models: The Super Locksystem is not activated.
SPA2531Z NPA1329
Power door lock light
NPA1308
3-10 Pre-driving checks and adjustments
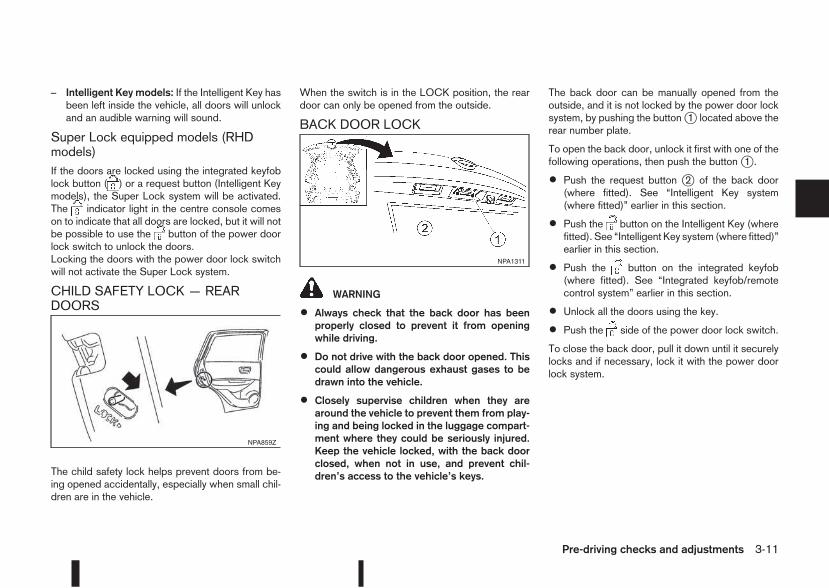
– Intelligent Key models: If the Intelligent Key hasbeen left inside the vehicle, all doors will unlockand an audible warning will sound.
Super Lock equipped models (RHDmodels)If the doors are locked using the integrated keyfoblock button ( ) or a request button (Intelligent Keymodels), the Super Lock system will be activated.The indicator light in the centre console comeson to indicate that all doors are locked, but it will notbe possible to use the button of the power doorlock switch to unlock the doors.Locking the doors with the power door lock switchwill not activate the Super Lock system.
CHILD SAFETY LOCK — REARDOORS
The child safety lock helps prevent doors from be-ing opened accidentally, especially when small chil-dren are in the vehicle.
When the switch is in the LOCK position, the reardoor can only be opened from the outside.
BACK DOOR LOCK
WARNING
• Always check that the back door has beenproperly closed to prevent it from openingwhile driving.
• Do not drive with the back door opened. Thiscould allow dangerous exhaust gases to bedrawn into the vehicle.
• Closely supervise children when they arearound the vehicle to prevent them from play-ing and being locked in the luggage compart-ment where they could be seriously injured.Keep the vehicle locked, with the back doorclosed, when not in use, and prevent chil-dren’s access to the vehicle’s keys.
The back door can be manually opened from theoutside, and it is not locked by the power door locksystem, by pushing the buttonj1 located above therear number plate.
To open the back door, unlock it first with one of thefollowing operations, then push the buttonj1 .
• Push the request button j2 of the back door(where fitted). See “Intelligent Key system(where fitted)” earlier in this section.
• Push the button on the Intelligent Key (wherefitted). See “Intelligent Key system (where fitted)”earlier in this section.
• Push the button on the integrated keyfob(where fitted). See “Integrated keyfob/remotecontrol system” earlier in this section.
• Unlock all the doors using the key.
• Push the side of the power door lock switch.
To close the back door, pull it down until it securelylocks and if necessary, lock it with the power doorlock system.
NPA859Z
NPA1311
Pre-driving checks and adjustments 3-11
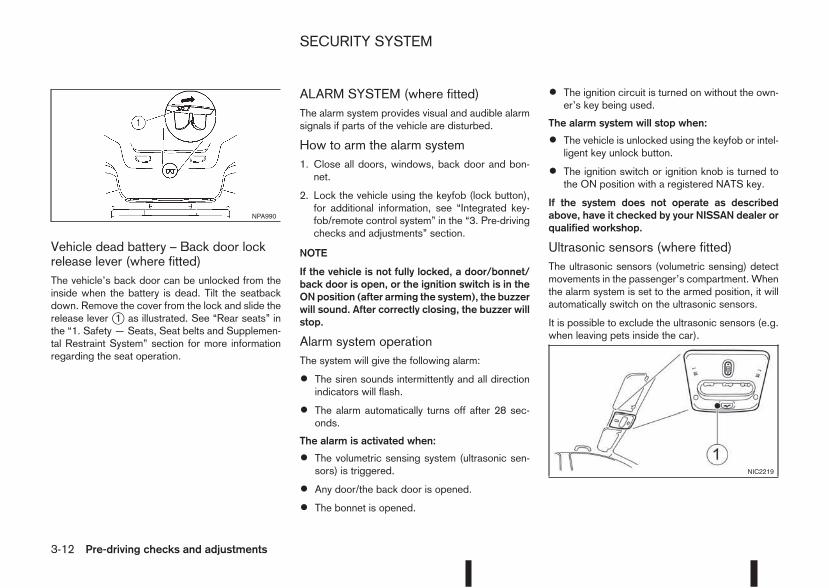
Vehicle dead battery – Back door lockrelease lever (where fitted)The vehicle’s back door can be unlocked from theinside when the battery is dead. Tilt the seatbackdown. Remove the cover from the lock and slide therelease lever j1 as illustrated. See “Rear seats” inthe “1. Safety — Seats, Seat belts and Supplemen-tal Restraint System” section for more informationregarding the seat operation.
ALARM SYSTEM (where fitted)The alarm system provides visual and audible alarmsignals if parts of the vehicle are disturbed.
How to arm the alarm system1. Close all doors, windows, back door and bon-net.
2. Lock the vehicle using the keyfob (lock button),for additional information, see “Integrated key-fob/remote control system” in the “3. Pre-drivingchecks and adjustments” section.
NOTE
If the vehicle is not fully locked, a door/bonnet/back door is open, or the ignition switch is in theON position (after arming the system), the buzzerwill sound. After correctly closing, the buzzer willstop.
Alarm system operationThe system will give the following alarm:
• The siren sounds intermittently and all directionindicators will flash.
• The alarm automatically turns off after 28 sec-onds.
The alarm is activated when:
• The volumetric sensing system (ultrasonic sen-sors) is triggered.
• Any door/the back door is opened.
• The bonnet is opened.
• The ignition circuit is turned on without the own-er’s key being used.
The alarm system will stop when:
• The vehicle is unlocked using the keyfob or intel-ligent key unlock button.
• The ignition switch or ignition knob is turned tothe ON position with a registered NATS key.
If the system does not operate as describedabove, have it checked by your NISSAN dealer orqualified workshop.
Ultrasonic sensors (where fitted)The ultrasonic sensors (volumetric sensing) detectmovements in the passenger’s compartment. Whenthe alarm system is set to the armed position, it willautomatically switch on the ultrasonic sensors.
It is possible to exclude the ultrasonic sensors (e.g.when leaving pets inside the car).
NPA990
NIC2219
SECURITY SYSTEM
3-12 Pre-driving checks and adjustments
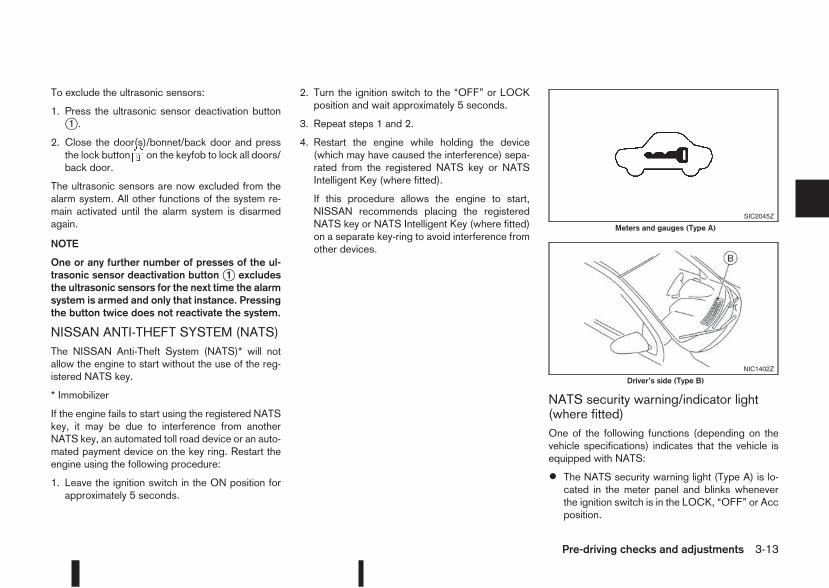
To exclude the ultrasonic sensors:
1. Press the ultrasonic sensor deactivation buttonj1 .
2. Close the door(s)/bonnet/back door and pressthe lock button on the keyfob to lock all doors/back door.
The ultrasonic sensors are now excluded from thealarm system. All other functions of the system re-main activated until the alarm system is disarmedagain.
NOTE
One or any further number of presses of the ul-trasonic sensor deactivation button j1 excludesthe ultrasonic sensors for the next time the alarmsystem is armed and only that instance. Pressingthe button twice does not reactivate the system.
NISSAN ANTI-THEFT SYSTEM (NATS)The NISSAN Anti-Theft System (NATS)* will notallow the engine to start without the use of the reg-istered NATS key.
* Immobilizer
If the engine fails to start using the registered NATSkey, it may be due to interference from anotherNATS key, an automated toll road device or an auto-mated payment device on the key ring. Restart theengine using the following procedure:
1. Leave the ignition switch in the ON position forapproximately 5 seconds.
2. Turn the ignition switch to the “OFF” or LOCKposition and wait approximately 5 seconds.
3. Repeat steps 1 and 2.
4. Restart the engine while holding the device(which may have caused the interference) sepa-rated from the registered NATS key or NATSIntelligent Key (where fitted).
If this procedure allows the engine to start,NISSAN recommends placing the registeredNATS key or NATS Intelligent Key (where fitted)on a separate key-ring to avoid interference fromother devices.
NATS security warning/indicator light(where fitted)One of the following functions (depending on thevehicle specifications) indicates that the vehicle isequipped with NATS:
• The NATS security warning light (Type A) is lo-cated in the meter panel and blinks wheneverthe ignition switch is in the LOCK, “OFF” or Accposition.
SIC2045Z
Meters and gauges (Type A)
NIC1402Z
Driver’s side (Type B)
Pre-driving checks and adjustments 3-13
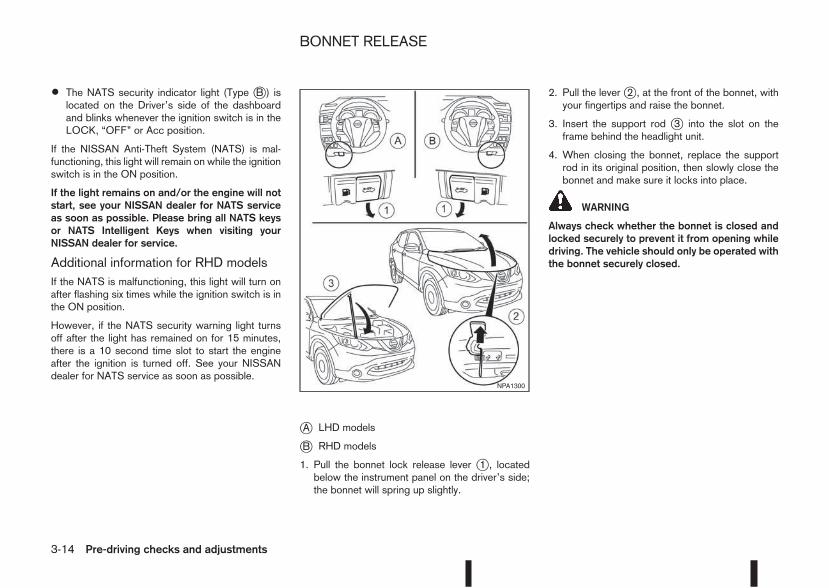
• The NATS security indicator light (Type jB ) islocated on the Driver’s side of the dashboardand blinks whenever the ignition switch is in theLOCK, “OFF” or Acc position.
If the NISSAN Anti-Theft System (NATS) is mal-functioning, this light will remain on while the ignitionswitch is in the ON position.
If the light remains on and/or the engine will notstart, see your NISSAN dealer for NATS serviceas soon as possible. Please bring all NATS keysor NATS Intelligent Keys when visiting yourNISSAN dealer for service.
Additional information for RHD modelsIf the NATS is malfunctioning, this light will turn onafter flashing six times while the ignition switch is inthe ON position.
However, if the NATS security warning light turnsoff after the light has remained on for 15 minutes,there is a 10 second time slot to start the engineafter the ignition is turned off. See your NISSANdealer for NATS service as soon as possible.
jA LHD models
jB RHD models
1. Pull the bonnet lock release lever j1 , locatedbelow the instrument panel on the driver’s side;the bonnet will spring up slightly.
2. Pull the leverj2 , at the front of the bonnet, withyour fingertips and raise the bonnet.
3. Insert the support rod j3 into the slot on theframe behind the headlight unit.
4. When closing the bonnet, replace the supportrod in its original position, then slowly close thebonnet and make sure it locks into place.
WARNING
Always check whether the bonnet is closed andlocked securely to prevent it from opening whiledriving. The vehicle should only be operated withthe bonnet securely closed.
NPA1300
BONNET RELEASE
3-14 Pre-driving checks and adjustments
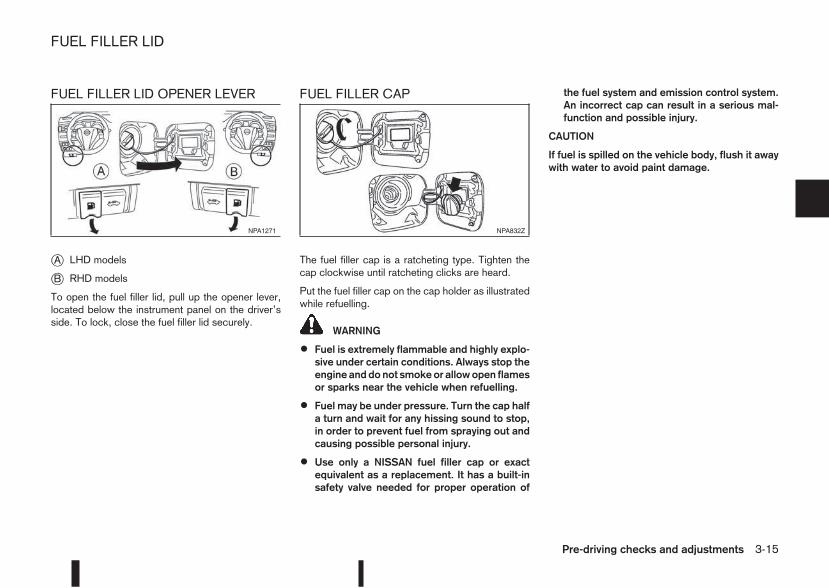
FUEL FILLER LID OPENER LEVER
jA LHD models
jB RHD models
To open the fuel filler lid, pull up the opener lever,located below the instrument panel on the driver’sside. To lock, close the fuel filler lid securely.
FUEL FILLER CAP
The fuel filler cap is a ratcheting type. Tighten thecap clockwise until ratcheting clicks are heard.
Put the fuel filler cap on the cap holder as illustratedwhile refuelling.
WARNING
• Fuel is extremely flammable and highly explo-sive under certain conditions. Always stop theengine and do not smokeor allowopen flamesor sparks near the vehicle when refuelling.
• Fuel may be under pressure. Turn the cap halfa turn and wait for any hissing sound to stop,in order to prevent fuel from spraying out andcausing possible personal injury.
• Use only a NISSAN fuel filler cap or exactequivalent as a replacement. It has a built-insafety valve needed for proper operation of
the fuel system and emission control system.An incorrect cap can result in a serious mal-function and possible injury.
CAUTION
If fuel is spilled on the vehicle body, flush it awaywith water to avoid paint damage.
NPA1271 NPA832Z
FUEL FILLER LID
Pre-driving checks and adjustments 3-15
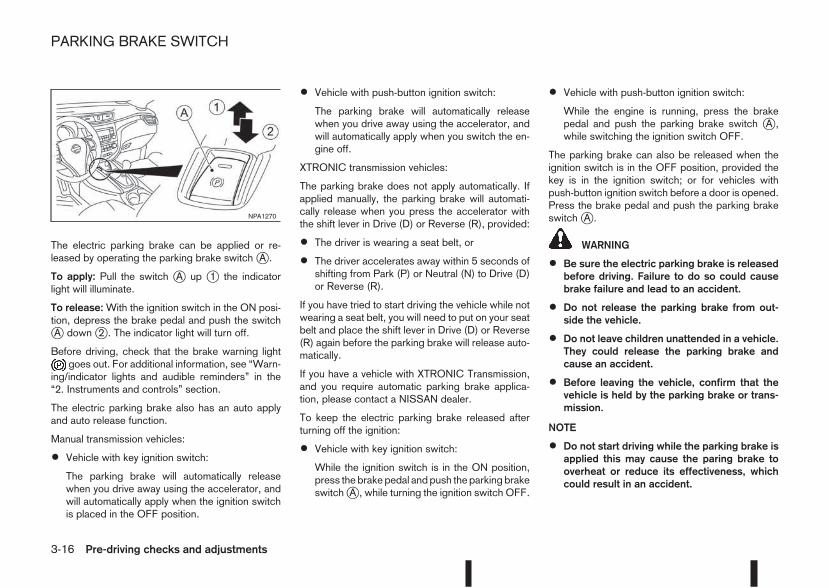
The electric parking brake can be applied or re-leased by operating the parking brake switchjA .
To apply: Pull the switch jA up j1 the indicatorlight will illuminate.
To release:With the ignition switch in the ON posi-tion, depress the brake pedal and push the switchjA downj2 . The indicator light will turn off.
Before driving, check that the brake warning lightgoes out. For additional information, see “Warn-
ing/indicator lights and audible reminders” in the“2. Instruments and controls” section.
The electric parking brake also has an auto applyand auto release function.
Manual transmission vehicles:
• Vehicle with key ignition switch:
The parking brake will automatically releasewhen you drive away using the accelerator, andwill automatically apply when the ignition switchis placed in the OFF position.
• Vehicle with push-button ignition switch:
The parking brake will automatically releasewhen you drive away using the accelerator, andwill automatically apply when you switch the en-gine off.
XTRONIC transmission vehicles:
The parking brake does not apply automatically. Ifapplied manually, the parking brake will automati-cally release when you press the accelerator withthe shift lever in Drive (D) or Reverse (R), provided:
• The driver is wearing a seat belt, or
• The driver accelerates away within 5 seconds ofshifting from Park (P) or Neutral (N) to Drive (D)or Reverse (R).
If you have tried to start driving the vehicle while notwearing a seat belt, you will need to put on your seatbelt and place the shift lever in Drive (D) or Reverse(R) again before the parking brake will release auto-matically.
If you have a vehicle with XTRONIC Transmission,and you require automatic parking brake applica-tion, please contact a NISSAN dealer.
To keep the electric parking brake released afterturning off the ignition:
• Vehicle with key ignition switch:
While the ignition switch is in the ON position,press the brake pedal and push the parking brakeswitchjA , while turning the ignition switch OFF.
• Vehicle with push-button ignition switch:
While the engine is running, press the brakepedal and push the parking brake switch jA ,while switching the ignition switch OFF.
The parking brake can also be released when theignition switch is in the OFF position, provided thekey is in the ignition switch; or for vehicles withpush-button ignition switch before a door is opened.Press the brake pedal and push the parking brakeswitchjA .
WARNING
• Be sure the electric parking brake is releasedbefore driving. Failure to do so could causebrake failure and lead to an accident.
• Do not release the parking brake from out-side the vehicle.
• Do not leave children unattended in a vehicle.They could release the parking brake andcause an accident.
• Before leaving the vehicle, confirm that thevehicle is held by the parking brake or trans-mission.
NOTE
• Do not start driving while the parking brake isapplied this may cause the paring brake tooverheat or reduce its effectiveness, whichcould result in an accident.
NPA1270
PARKING BRAKE SWITCH
3-16 Pre-driving checks and adjustments

• A buzzer will sound if the vehicle is drivenwithout releasing the parking brake. See “Au-dible reminders” in the “2. Instruments andcontrols” section.
• While the electric parking brake is applied orreleased, an operating sound is heard fromthe lower side of the rear seat. This is normaland does not indicate a malfunction.
• When the electric parking brake is frequentlyapplied and released in a short period of time,the parking brake may not operate in order toprevent the parking brake system from over-heating. If this occurs, operate the electricparking brake switch again after waiting ap-proximately 1 minute.
• The electric parking brake can only be re-leased with the ignition switch in the ON posi-tion.
• If the electric parking brake must be appliedwhile driving in an emergency, pull up andhold the parking brake switch. When you re-lease the parking brake switch, the parkingbrake will be released.
• While pulling up the electric parking brakeswitch while driving, the parking brake is ap-plied and a chime sounds. The parking brakeindicator light in the meter and in the parkingbrake switch illuminate. This does not indi-cate a malfunction. The electric parking brakeindicator lights in the meter and in the parkingbrake switch turn off when the parking brakeis released.
• Pull up the electric parking brake switch twiceso that the maximum electric parking brakeforce is applied to the vehicle.
• When pulling the electric parking brake switchup with the ignition switch in the OFF or ACCposition, the parking brake switch indicatorlight will continue to illuminate for a short pe-riod of time.
CAUTION
To park the vehicle in cold climates place theshift lever in 1st (1) or Reverse (R) (or in Park (P)for automatic (AT) vehicles), and place suitablechocks at both the front and back of a wheel withthe electric parking brake released. If the electricparking brake is applied in cold climates, thebrake may become frozen and cannot be re-leased.
DRIVING AWAY WHEN TOWING ATRAILERPlease note the following points to prevent the ve-hicle from rolling back unintentionally on a gradient.
• Pull and hold the parking brake switch and pressthe accelerator. The parking brake will remainengaged and prevent any tendency to roll backdown the slope.
• You can release the parking brake switch assoon as the engine is delivering enough powerto the wheels.
Depending on the weight of the vehicle and trailerand the steepness of the slope, there may be a ten-
dency to roll back downhill when driving away froma standstill. You can prevent this by pulling up theparking brake switch as you press the accelerator(in the same way as with a conventional handbrake).
Pre-driving checks and adjustments 3-17
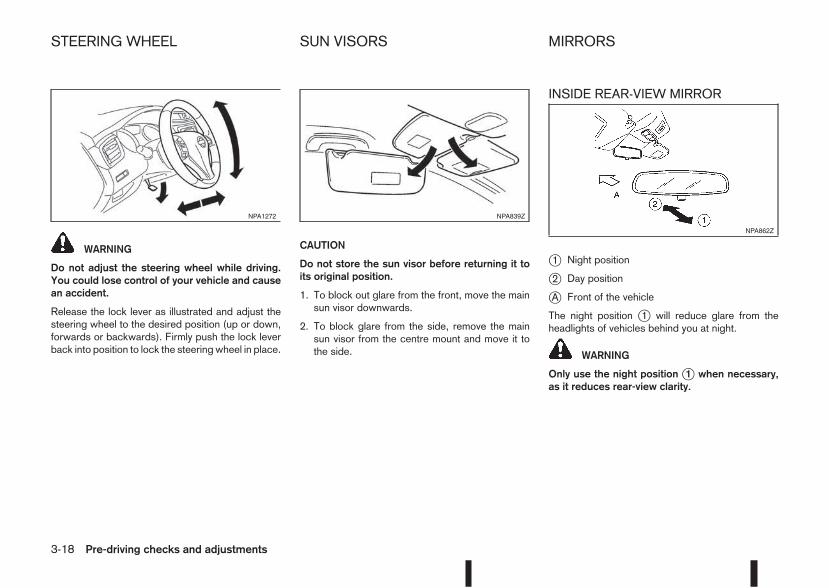
WARNING
Do not adjust the steering wheel while driving.You could lose control of your vehicle and causean accident.
Release the lock lever as illustrated and adjust thesteering wheel to the desired position (up or down,forwards or backwards). Firmly push the lock leverback into position to lock the steering wheel in place.
CAUTION
Do not store the sun visor before returning it toits original position.
1. To block out glare from the front, move the mainsun visor downwards.
2. To block glare from the side, remove the mainsun visor from the centre mount and move it tothe side.
INSIDE REAR-VIEW MIRROR
j1 Night position
j2 Day position
jA Front of the vehicle
The night position j1 will reduce glare from theheadlights of vehicles behind you at night.
WARNING
Only use the night position j1 when necessary,as it reduces rear-view clarity.
NPA1272 NPA839Z
NPA862Z
STEERING WHEEL SUN VISORS MIRRORS
3-18 Pre-driving checks and adjustments
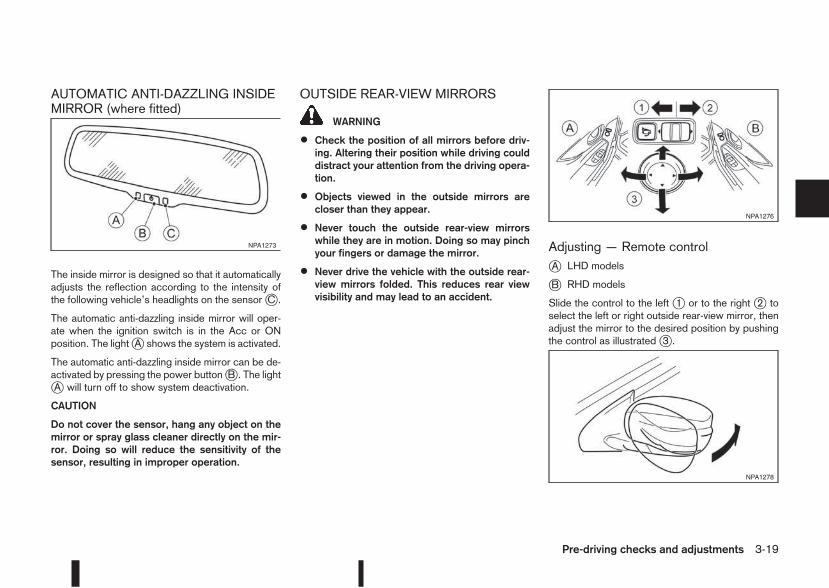
AUTOMATIC ANTI-DAZZLING INSIDEMIRROR (where fitted)
The inside mirror is designed so that it automaticallyadjusts the reflection according to the intensity ofthe following vehicle’s headlights on the sensorjC .
The automatic anti-dazzling inside mirror will oper-ate when the ignition switch is in the Acc or ONposition. The lightjA shows the system is activated.
The automatic anti-dazzling inside mirror can be de-activated by pressing the power buttonjB . The lightjA will turn off to show system deactivation.
CAUTION
Do not cover the sensor, hang any object on themirror or spray glass cleaner directly on the mir-ror. Doing so will reduce the sensitivity of thesensor, resulting in improper operation.
OUTSIDE REAR-VIEW MIRRORS
WARNING
• Check the position of all mirrors before driv-ing. Altering their position while driving coulddistract your attention from the driving opera-tion.
• Objects viewed in the outside mirrors arecloser than they appear.
• Never touch the outside rear-view mirrorswhile they are in motion. Doing so may pinchyour fingers or damage the mirror.
• Never drive the vehicle with the outside rear-view mirrors folded. This reduces rear viewvisibility and may lead to an accident.
Adjusting — Remote controljA LHD models
jB RHD models
Slide the control to the left j1 or to the right j2 toselect the left or right outside rear-view mirror, thenadjust the mirror to the desired position by pushingthe control as illustratedj3 .
NPA1273
NPA1276
NPA1278
Pre-driving checks and adjustments 3-19
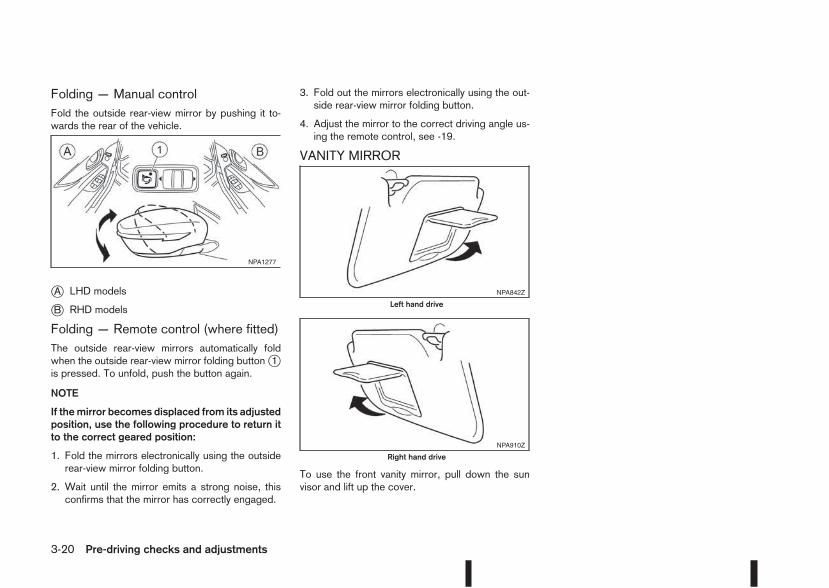
Folding — Manual controlFold the outside rear-view mirror by pushing it to-wards the rear of the vehicle.
jA LHD models
jB RHD models
Folding — Remote control (where fitted)The outside rear-view mirrors automatically foldwhen the outside rear-view mirror folding buttonj1is pressed. To unfold, push the button again.
NOTE
If themirror becomes displaced from its adjustedposition, use the following procedure to return itto the correct geared position:
1. Fold the mirrors electronically using the outsiderear-view mirror folding button.
2. Wait until the mirror emits a strong noise, thisconfirms that the mirror has correctly engaged.
3. Fold out the mirrors electronically using the out-side rear-view mirror folding button.
4. Adjust the mirror to the correct driving angle us-ing the remote control, see -19.
VANITY MIRROR
To use the front vanity mirror, pull down the sunvisor and lift up the cover.
NPA1277
NPA842Z
Left hand drive
NPA910Z
Right hand drive
3-20 Pre-driving checks and adjustments
4 Display screen, heater and air conditioner,and audio systemDisplay screen, heater and air conditioner,and audio system
Safety precautions ................................................... 4-2Rear-view monitor (where fitted)............................... 4-2How to read the displayed lines .......................... 4-3Rear-view monitor setting.................................... 4-3Operating tips..................................................... 4-3
Around View Monitor (where fitted) .......................... 4-4Operation ........................................................... 4-7Guide lines ......................................................... 4-7Difference between predictive and actualdistances............................................................ 4-9Moving object detection (MOD) .......................... 4-12How to adjust the screen view ............................ 4-13Around View Monitor settings ............................. 4-13Operating tips..................................................... 4-13
Vents....................................................................... 4-14Side and centre vents ......................................... 4-14
Heater and air conditioner operation ........................ 4-15Manual air conditioner......................................... 4-16Automatic dual zone air conditioner (wherefitted).................................................................. 4-20
Audio system........................................................... 4-23
Audio operation precautions ............................... 4-23Antenna.............................................................. 4-23
FM AM radio with CD player (where fitted) .............. 4-24Audio main operation .......................................... 4-25Radio operation .................................................. 4-25SETUP button .................................................... 4-26Compact Disc (CD) operation ............................ 4-28AUX socket ........................................................ 4-30USB Memory operation (where fitted) ................. 4-30iPod® player operation (where fitted).................. 4-31Bluetooth® operation.......................................... 4-32
NissanConnect (where fitted)................................... 4-38Steering wheel switch for audio control (wherefitted)....................................................................... 4-38Main operation.................................................... 4-38
Mobile phone integration for FM AM radio withCD player (where fitted)........................................... 4-39Bluetooth® mobile phone feature........................ 4-39Hands-free telephone control .............................. 4-42Steering wheel switches (where fitted)................ 4-44
Car phone or CB radio ............................................ 4-45
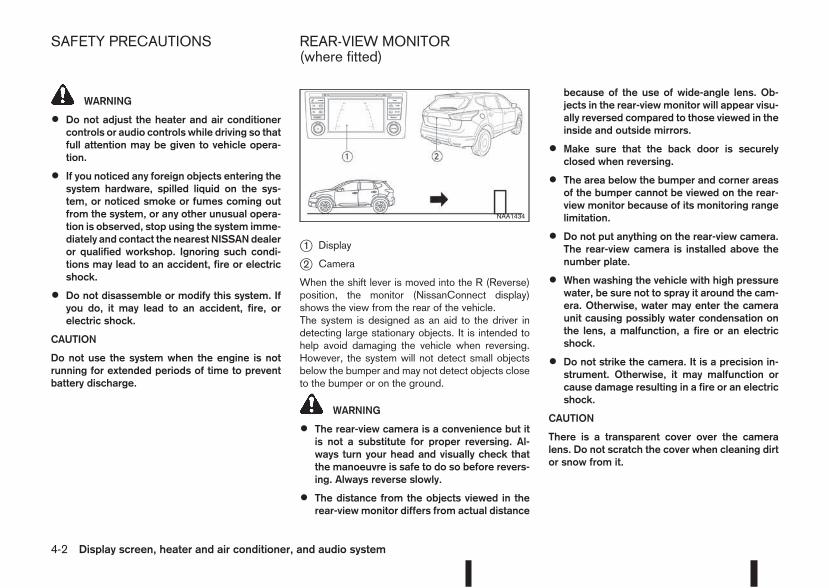
WARNING
• Do not adjust the heater and air conditionercontrols or audio controls while driving so thatfull attention may be given to vehicle opera-tion.
• If you noticed any foreign objects entering thesystem hardware, spilled liquid on the sys-tem, or noticed smoke or fumes coming outfrom the system, or any other unusual opera-tion is observed, stop using the system imme-diately and contact the nearest NISSAN dealeror qualified workshop. Ignoring such condi-tions may lead to an accident, fire or electricshock.
• Do not disassemble or modify this system. Ifyou do, it may lead to an accident, fire, orelectric shock.
CAUTION
Do not use the system when the engine is notrunning for extended periods of time to preventbattery discharge.
j1 Display
j2 Camera
When the shift lever is moved into the R (Reverse)position, the monitor (NissanConnect display)shows the view from the rear of the vehicle.The system is designed as an aid to the driver indetecting large stationary objects. It is intended tohelp avoid damaging the vehicle when reversing.However, the system will not detect small objectsbelow the bumper and may not detect objects closeto the bumper or on the ground.
WARNING
• The rear-view camera is a convenience but itis not a substitute for proper reversing. Al-ways turn your head and visually check thatthe manoeuvre is safe to do so before revers-ing. Always reverse slowly.
• The distance from the objects viewed in therear-view monitor differs from actual distance
because of the use of wide-angle lens. Ob-jects in the rear-view monitor will appear visu-ally reversed compared to those viewed in theinside and outside mirrors.
• Make sure that the back door is securelyclosed when reversing.
• The area below the bumper and corner areasof the bumper cannot be viewed on the rear-view monitor because of its monitoring rangelimitation.
• Do not put anything on the rear-view camera.The rear-view camera is installed above thenumber plate.
• When washing the vehicle with high pressurewater, be sure not to spray it around the cam-era. Otherwise, water may enter the cameraunit causing possibly water condensation onthe lens, a malfunction, a fire or an electricshock.
• Do not strike the camera. It is a precision in-strument. Otherwise, it may malfunction orcause damage resulting in a fire or an electricshock.
CAUTION
There is a transparent cover over the cameralens. Do not scratch the cover when cleaning dirtor snow from it.
NAA1434
SAFETY PRECAUTIONS REAR-VIEW MONITOR(where fitted)
4-2 Display screen, heater and air conditioner, and audio system
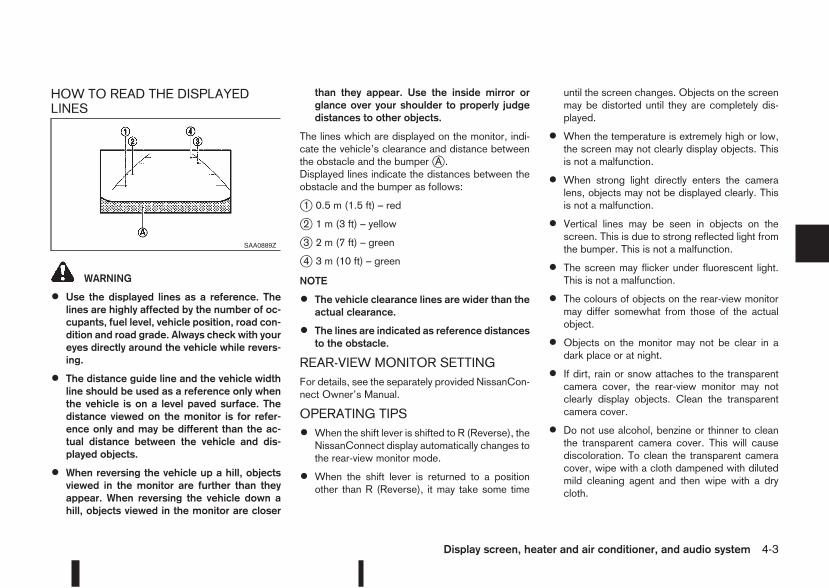
HOW TO READ THE DISPLAYEDLINES
WARNING
• Use the displayed lines as a reference. Thelines are highly affected by the number of oc-cupants, fuel level, vehicle position, road con-dition and road grade. Always check with youreyes directly around the vehicle while revers-ing.
• The distance guide line and the vehicle widthline should be used as a reference only whenthe vehicle is on a level paved surface. Thedistance viewed on the monitor is for refer-ence only and may be different than the ac-tual distance between the vehicle and dis-played objects.
• When reversing the vehicle up a hill, objectsviewed in the monitor are further than theyappear. When reversing the vehicle down ahill, objects viewed in the monitor are closer
than they appear. Use the inside mirror orglance over your shoulder to properly judgedistances to other objects.
The lines which are displayed on the monitor, indi-cate the vehicle’s clearance and distance betweenthe obstacle and the bumperjA .Displayed lines indicate the distances between theobstacle and the bumper as follows:
j1 0.5 m (1.5 ft) – red
j2 1 m (3 ft) – yellow
j3 2 m (7 ft) – green
j4 3 m (10 ft) – green
NOTE
• The vehicle clearance lines are wider than theactual clearance.
• The lines are indicated as reference distancesto the obstacle.
REAR-VIEW MONITOR SETTINGFor details, see the separately provided NissanCon-nect Owner’s Manual.
OPERATING TIPS
• When the shift lever is shifted to R (Reverse), theNissanConnect display automatically changes tothe rear-view monitor mode.
• When the shift lever is returned to a positionother than R (Reverse), it may take some time
until the screen changes. Objects on the screenmay be distorted until they are completely dis-played.
• When the temperature is extremely high or low,the screen may not clearly display objects. Thisis not a malfunction.
• When strong light directly enters the cameralens, objects may not be displayed clearly. Thisis not a malfunction.
• Vertical lines may be seen in objects on thescreen. This is due to strong reflected light fromthe bumper. This is not a malfunction.
• The screen may flicker under fluorescent light.This is not a malfunction.
• The colours of objects on the rear-view monitormay differ somewhat from those of the actualobject.
• Objects on the monitor may not be clear in adark place or at night.
• If dirt, rain or snow attaches to the transparentcamera cover, the rear-view monitor may notclearly display objects. Clean the transparentcamera cover.
• Do not use alcohol, benzine or thinner to cleanthe transparent camera cover. This will causediscoloration. To clean the transparent cameracover, wipe with a cloth dampened with dilutedmild cleaning agent and then wipe with a drycloth.
SAA0889Z
Display screen, heater and air conditioner, and audio system 4-3
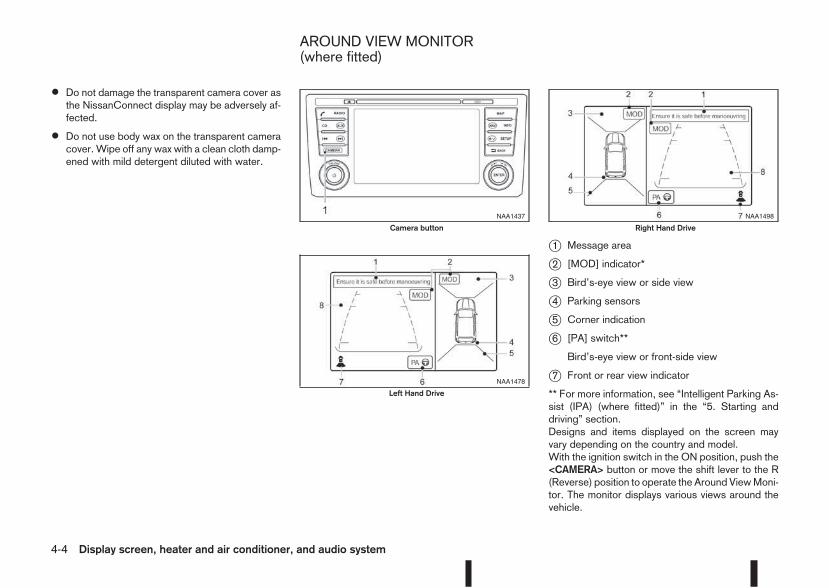
• Do not damage the transparent camera cover asthe NissanConnect display may be adversely af-fected.
• Do not use body wax on the transparent cameracover. Wipe off any wax with a clean cloth damp-ened with mild detergent diluted with water.
j1 Message area
j2 [MOD] indicator*
j3 Bird’s-eye view or side view
j4 Parking sensors
j5 Corner indication
j6 [PA] switch**
Bird’s-eye view or front-side view
j7 Front or rear view indicator
** For more information, see “Intelligent Parking As-sist (IPA) (where fitted)” in the “5. Starting anddriving” section.Designs and items displayed on the screen mayvary depending on the country and model.With the ignition switch in the ON position, push the<CAMERA> button or move the shift lever to the R(Reverse) position to operate the Around ViewMoni-tor. The monitor displays various views around thevehicle.
NAA1437
Camera button
NAA1478
Left Hand Drive
NAA1498
Right Hand Drive
AROUND VIEW MONITOR(where fitted)
4-4 Display screen, heater and air conditioner, and audio system
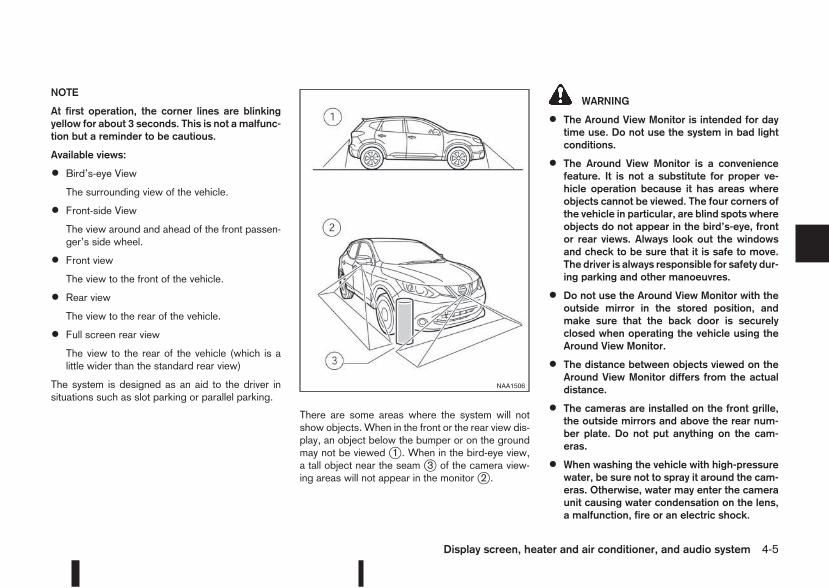
NOTE
At first operation, the corner lines are blinkingyellow for about 3 seconds. This is not a malfunc-tion but a reminder to be cautious.
Available views:
• Bird’s-eye View
The surrounding view of the vehicle.
• Front-side View
The view around and ahead of the front passen-ger’s side wheel.
• Front view
The view to the front of the vehicle.
• Rear view
The view to the rear of the vehicle.
• Full screen rear view
The view to the rear of the vehicle (which is alittle wider than the standard rear view)
The system is designed as an aid to the driver insituations such as slot parking or parallel parking.
There are some areas where the system will notshow objects. When in the front or the rear view dis-play, an object below the bumper or on the groundmay not be viewed j1 . When in the bird-eye view,a tall object near the seam j3 of the camera view-ing areas will not appear in the monitorj2 .
WARNING
• The Around View Monitor is intended for daytime use. Do not use the system in bad lightconditions.
• The Around View Monitor is a conveniencefeature. It is not a substitute for proper ve-hicle operation because it has areas whereobjects cannot be viewed. The four corners ofthe vehicle in particular, are blind spots whereobjects do not appear in the bird’s-eye, frontor rear views. Always look out the windowsand check to be sure that it is safe to move.The driver is always responsible for safety dur-ing parking and other manoeuvres.
• Do not use the Around View Monitor with theoutside mirror in the stored position, andmake sure that the back door is securelyclosed when operating the vehicle using theAround View Monitor.
• The distance between objects viewed on theAround View Monitor differs from the actualdistance.
• The cameras are installed on the front grille,the outside mirrors and above the rear num-ber plate. Do not put anything on the cam-eras.
• When washing the vehicle with high-pressurewater, be sure not to spray it around the cam-eras. Otherwise, water may enter the cameraunit causing water condensation on the lens,a malfunction, fire or an electric shock.
NAA1506
Display screen, heater and air conditioner, and audio system 4-5
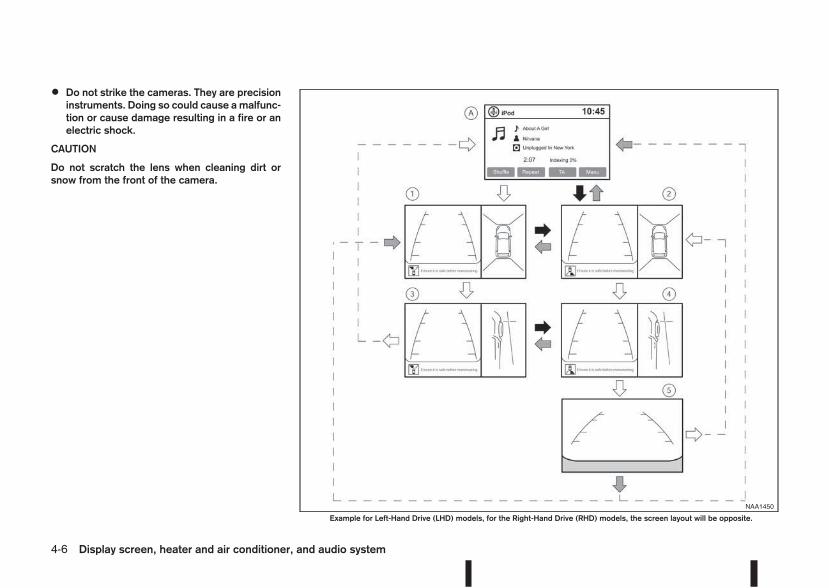
• Do not strike the cameras. They are precisioninstruments. Doing so could cause amalfunc-tion or cause damage resulting in a fire or anelectric shock.
CAUTION
Do not scratch the lens when cleaning dirt orsnow from the front of the camera.
NAA1450
Example for Left-Hand Drive (LHD) models, for the Right-Hand Drive (RHD) models, the screen layout will be opposite.
4-6 Display screen, heater and air conditioner, and audio system
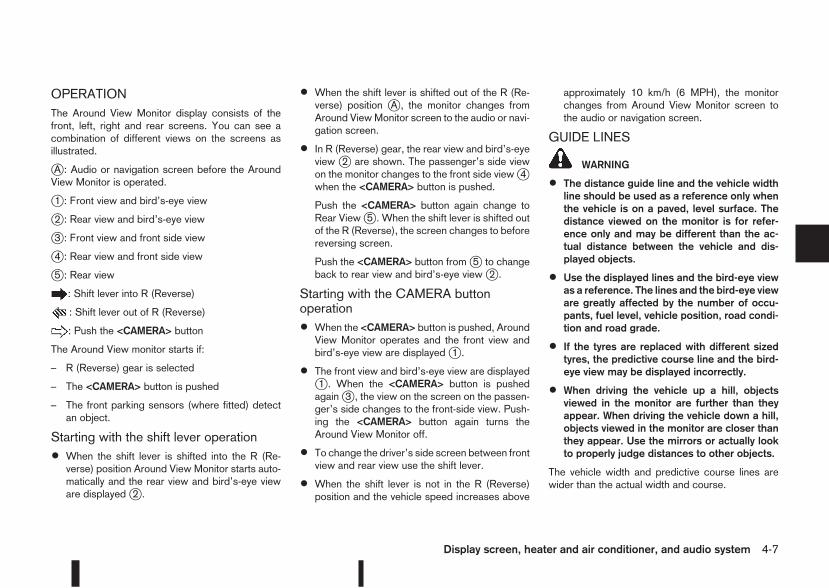
OPERATIONThe Around View Monitor display consists of thefront, left, right and rear screens. You can see acombination of different views on the screens asillustrated.
jA : Audio or navigation screen before the AroundView Monitor is operated.
j1 : Front view and bird’s-eye view
j2 : Rear view and bird’s-eye view
j3 : Front view and front side view
j4 : Rear view and front side view
j5 : Rear view
: Shift lever into R (Reverse)
: Shift lever out of R (Reverse)
: Push the <CAMERA> button
The Around View monitor starts if:
– R (Reverse) gear is selected
– The <CAMERA> button is pushed
– The front parking sensors (where fitted) detectan object.
Starting with the shift lever operation
• When the shift lever is shifted into the R (Re-verse) position Around View Monitor starts auto-matically and the rear view and bird’s-eye vieware displayedj2 .
• When the shift lever is shifted out of the R (Re-verse) position jA , the monitor changes fromAround ViewMonitor screen to the audio or navi-gation screen.
• In R (Reverse) gear, the rear view and bird’s-eyeview j2 are shown. The passenger’s side viewon the monitor changes to the front side viewj4when the <CAMERA> button is pushed.
Push the <CAMERA> button again change toRear Viewj5 . When the shift lever is shifted outof the R (Reverse), the screen changes to beforereversing screen.
Push the <CAMERA> button fromj5 to changeback to rear view and bird’s-eye viewj2 .
Starting with the CAMERA buttonoperation
• When the <CAMERA> button is pushed, AroundView Monitor operates and the front view andbird’s-eye view are displayedj1 .
• The front view and bird’s-eye view are displayedj1 . When the <CAMERA> button is pushedagainj3 , the view on the screen on the passen-ger’s side changes to the front-side view. Push-ing the <CAMERA> button again turns theAround View Monitor off.
• To change the driver’s side screen between frontview and rear view use the shift lever.
• When the shift lever is not in the R (Reverse)position and the vehicle speed increases above
approximately 10 km/h (6 MPH), the monitorchanges from Around View Monitor screen tothe audio or navigation screen.
GUIDE LINES
WARNING
• The distance guide line and the vehicle widthline should be used as a reference only whenthe vehicle is on a paved, level surface. Thedistance viewed on the monitor is for refer-ence only and may be different than the ac-tual distance between the vehicle and dis-played objects.
• Use the displayed lines and the bird-eye viewas a reference. The lines and the bird-eye vieware greatly affected by the number of occu-pants, fuel level, vehicle position, road condi-tion and road grade.
• If the tyres are replaced with different sizedtyres, the predictive course line and the bird-eye view may be displayed incorrectly.
• When driving the vehicle up a hill, objectsviewed in the monitor are further than theyappear. When driving the vehicle down a hill,objects viewed in the monitor are closer thanthey appear. Use the mirrors or actually lookto properly judge distances to other objects.
The vehicle width and predictive course lines arewider than the actual width and course.
Display screen, heater and air conditioner, and audio system 4-7
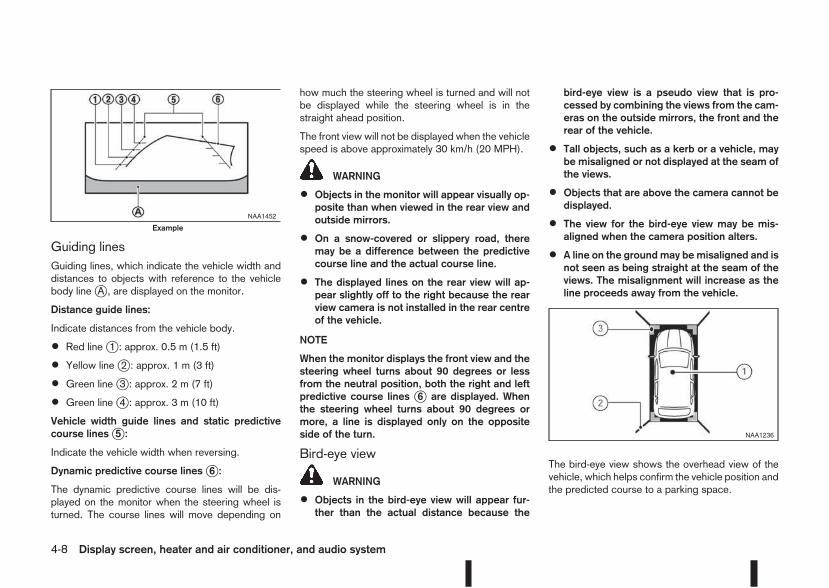
Guiding linesGuiding lines, which indicate the vehicle width anddistances to objects with reference to the vehiclebody linejA , are displayed on the monitor.
Distance guide lines:
Indicate distances from the vehicle body.
• Red linej1 : approx. 0.5 m (1.5 ft)
• Yellow linej2 : approx. 1 m (3 ft)
• Green linej3 : approx. 2 m (7 ft)
• Green linej4 : approx. 3 m (10 ft)
Vehicle width guide lines and static predictivecourse linesj5 :
Indicate the vehicle width when reversing.
Dynamic predictive course linesj6 :
The dynamic predictive course lines will be dis-played on the monitor when the steering wheel isturned. The course lines will move depending on
how much the steering wheel is turned and will notbe displayed while the steering wheel is in thestraight ahead position.
The front view will not be displayed when the vehiclespeed is above approximately 30 km/h (20 MPH).
WARNING
• Objects in the monitor will appear visually op-posite than when viewed in the rear view andoutside mirrors.
• On a snow-covered or slippery road, theremay be a difference between the predictivecourse line and the actual course line.
• The displayed lines on the rear view will ap-pear slightly off to the right because the rearview camera is not installed in the rear centreof the vehicle.
NOTE
When the monitor displays the front view and thesteering wheel turns about 90 degrees or lessfrom the neutral position, both the right and leftpredictive course lines j6 are displayed. Whenthe steering wheel turns about 90 degrees ormore, a line is displayed only on the oppositeside of the turn.
Bird-eye view
WARNING
• Objects in the bird-eye view will appear fur-ther than the actual distance because the
bird-eye view is a pseudo view that is pro-cessed by combining the views from the cam-eras on the outside mirrors, the front and therear of the vehicle.
• Tall objects, such as a kerb or a vehicle, maybe misaligned or not displayed at the seam ofthe views.
• Objects that are above the camera cannot bedisplayed.
• The view for the bird-eye view may be mis-aligned when the camera position alters.
• A line on the ground may be misaligned and isnot seen as being straight at the seam of theviews. The misalignment will increase as theline proceeds away from the vehicle.
The bird-eye view shows the overhead view of thevehicle, which helps confirm the vehicle position andthe predicted course to a parking space.
NAA1452
Example
NAA1236
4-8 Display screen, heater and air conditioner, and audio system
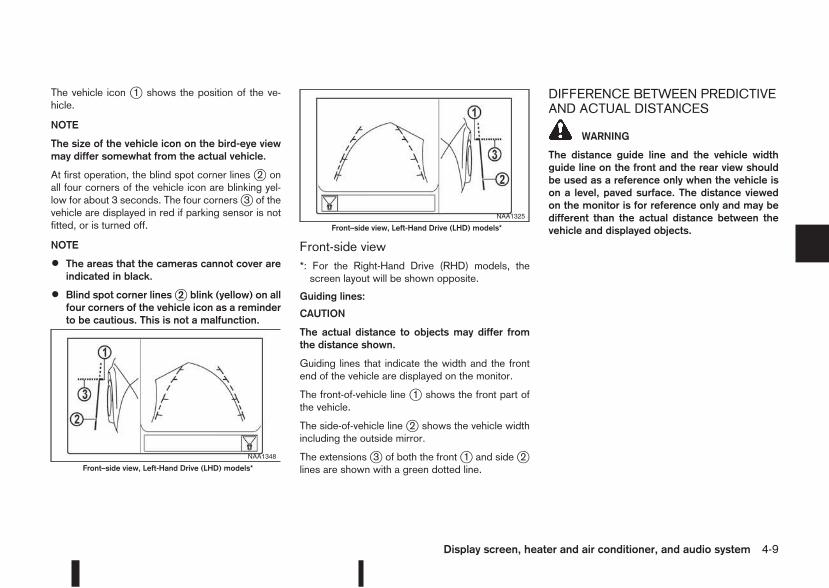
The vehicle icon j1 shows the position of the ve-hicle.
NOTE
The size of the vehicle icon on the bird-eye viewmay differ somewhat from the actual vehicle.
At first operation, the blind spot corner lines j2 onall four corners of the vehicle icon are blinking yel-low for about 3 seconds. The four cornersj3 of thevehicle are displayed in red if parking sensor is notfitted, or is turned off.
NOTE
• The areas that the cameras cannot cover areindicated in black.
• Blind spot corner linesj2 blink (yellow) on allfour corners of the vehicle icon as a reminderto be cautious. This is not a malfunction.
Front-side view*: For the Right-Hand Drive (RHD) models, thescreen layout will be shown opposite.
Guiding lines:
CAUTION
The actual distance to objects may differ fromthe distance shown.
Guiding lines that indicate the width and the frontend of the vehicle are displayed on the monitor.
The front-of-vehicle line j1 shows the front part ofthe vehicle.
The side-of-vehicle line j2 shows the vehicle widthincluding the outside mirror.
The extensionsj3 of both the frontj1 and sidej2lines are shown with a green dotted line.
DIFFERENCE BETWEEN PREDICTIVEAND ACTUAL DISTANCES
WARNING
The distance guide line and the vehicle widthguide line on the front and the rear view shouldbe used as a reference only when the vehicle ison a level, paved surface. The distance viewedon the monitor is for reference only and may bedifferent than the actual distance between thevehicle and displayed objects.
NAA1348
Front–side view, Left-Hand Drive (LHD) models*
NAA1325
Front–side view, Left-Hand Drive (LHD) models*
Display screen, heater and air conditioner, and audio system 4-9
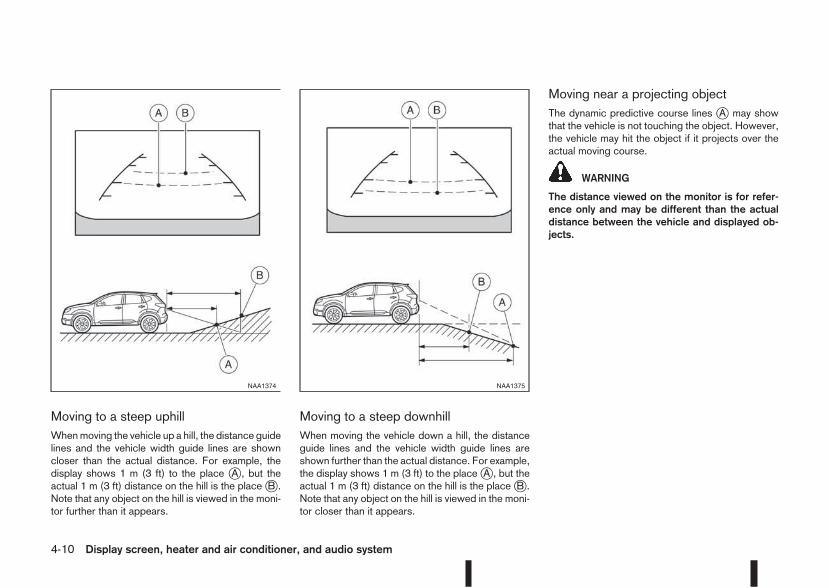
Moving to a steep uphillWhenmoving the vehicle up a hill, the distance guidelines and the vehicle width guide lines are showncloser than the actual distance. For example, thedisplay shows 1 m (3 ft) to the place jA , but theactual 1 m (3 ft) distance on the hill is the placejB .Note that any object on the hill is viewed in the moni-tor further than it appears.
Moving to a steep downhillWhen moving the vehicle down a hill, the distanceguide lines and the vehicle width guide lines areshown further than the actual distance. For example,the display shows 1 m (3 ft) to the placejA , but theactual 1 m (3 ft) distance on the hill is the placejB .Note that any object on the hill is viewed in the moni-tor closer than it appears.
Moving near a projecting objectThe dynamic predictive course lines jA may showthat the vehicle is not touching the object. However,the vehicle may hit the object if it projects over theactual moving course.
WARNING
The distance viewed on the monitor is for refer-ence only and may be different than the actualdistance between the vehicle and displayed ob-jects.
NAA1374 NAA1375
4-10 Display screen, heater and air conditioner, and audio system
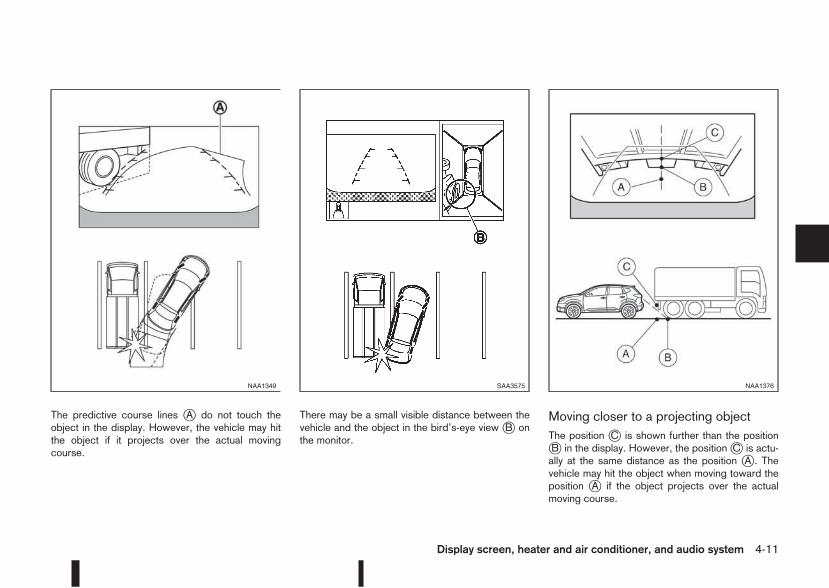
The predictive course lines jA do not touch theobject in the display. However, the vehicle may hitthe object if it projects over the actual movingcourse.
There may be a small visible distance between thevehicle and the object in the bird’s-eye view jB onthe monitor.
Moving closer to a projecting objectThe position jC is shown further than the positionjB in the display. However, the positionjC is actu-ally at the same distance as the position jA . Thevehicle may hit the object when moving toward theposition jA if the object projects over the actualmoving course.
NAA1349 SAA3575 NAA1376
Display screen, heater and air conditioner, and audio system 4-11
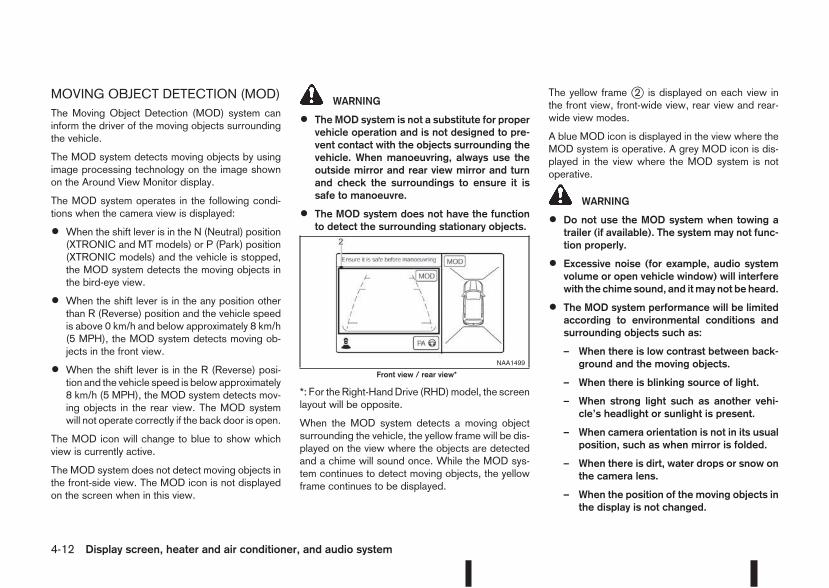
MOVING OBJECT DETECTION (MOD)The Moving Object Detection (MOD) system caninform the driver of the moving objects surroundingthe vehicle.
The MOD system detects moving objects by usingimage processing technology on the image shownon the Around View Monitor display.
The MOD system operates in the following condi-tions when the camera view is displayed:
• When the shift lever is in the N (Neutral) position(XTRONIC and MT models) or P (Park) position(XTRONIC models) and the vehicle is stopped,the MOD system detects the moving objects inthe bird-eye view.
• When the shift lever is in the any position otherthan R (Reverse) position and the vehicle speedis above 0 km/h and below approximately 8 km/h(5 MPH), the MOD system detects moving ob-jects in the front view.
• When the shift lever is in the R (Reverse) posi-tion and the vehicle speed is below approximately8 km/h (5 MPH), the MOD system detects mov-ing objects in the rear view. The MOD systemwill not operate correctly if the back door is open.
The MOD icon will change to blue to show whichview is currently active.
The MOD system does not detect moving objects inthe front-side view. The MOD icon is not displayedon the screen when in this view.
WARNING
• The MOD system is not a substitute for propervehicle operation and is not designed to pre-vent contact with the objects surrounding thevehicle. When manoeuvring, always use theoutside mirror and rear view mirror and turnand check the surroundings to ensure it issafe to manoeuvre.
• The MOD system does not have the functionto detect the surrounding stationary objects.
*: For the Right-HandDrive (RHD)model, the screenlayout will be opposite.
When the MOD system detects a moving objectsurrounding the vehicle, the yellow frame will be dis-played on the view where the objects are detectedand a chime will sound once. While the MOD sys-tem continues to detect moving objects, the yellowframe continues to be displayed.
The yellow frame j2 is displayed on each view inthe front view, front-wide view, rear view and rear-wide view modes.
A blue MOD icon is displayed in the view where theMOD system is operative. A grey MOD icon is dis-played in the view where the MOD system is notoperative.
WARNING
• Do not use the MOD system when towing atrailer (if available). The system may not func-tion properly.
• Excessive noise (for example, audio systemvolume or open vehicle window) will interferewith the chime sound, and itmay not be heard.
• The MOD system performance will be limitedaccording to environmental conditions andsurrounding objects such as:
– When there is low contrast between back-ground and the moving objects.
– When there is blinking source of light.
– When strong light such as another vehi-cle’s headlight or sunlight is present.
– When camera orientation is not in its usualposition, such as when mirror is folded.
– When there is dirt, water drops or snow onthe camera lens.
– When the position of the moving objects inthe display is not changed.
NAA1499
Front view / rear view*
4-12 Display screen, heater and air conditioner, and audio system
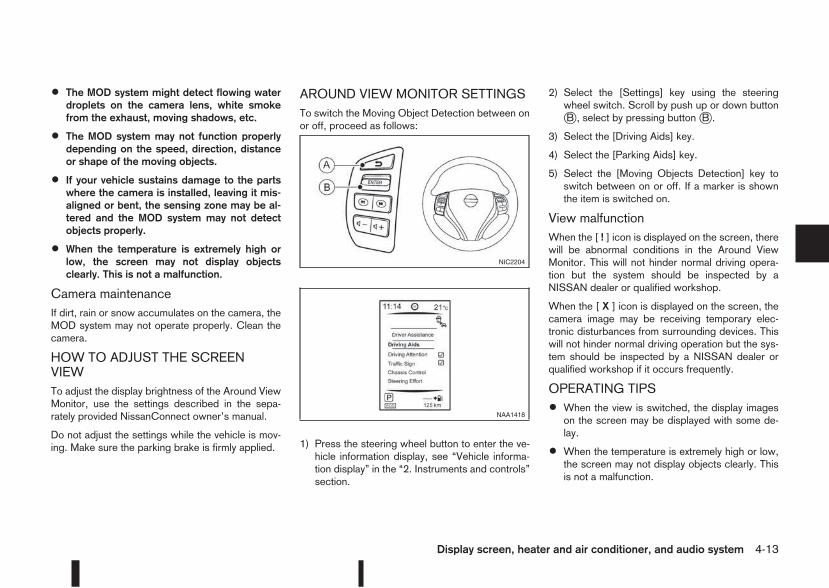
• The MOD system might detect flowing waterdroplets on the camera lens, white smokefrom the exhaust, moving shadows, etc.
• The MOD system may not function properlydepending on the speed, direction, distanceor shape of the moving objects.
• If your vehicle sustains damage to the partswhere the camera is installed, leaving it mis-aligned or bent, the sensing zone may be al-tered and the MOD system may not detectobjects properly.
• When the temperature is extremely high orlow, the screen may not display objectsclearly. This is not a malfunction.
Camera maintenanceIf dirt, rain or snow accumulates on the camera, theMOD system may not operate properly. Clean thecamera.
HOW TO ADJUST THE SCREENVIEWTo adjust the display brightness of the Around ViewMonitor, use the settings described in the sepa-rately provided NissanConnect owner’s manual.
Do not adjust the settings while the vehicle is mov-ing. Make sure the parking brake is firmly applied.
AROUND VIEW MONITOR SETTINGSTo switch the Moving Object Detection between onor off, proceed as follows:
1) Press the steering wheel button to enter the ve-hicle information display, see “Vehicle informa-tion display” in the “2. Instruments and controls”section.
2) Select the [Settings] key using the steeringwheel switch. Scroll by push up or down buttonjB , select by pressing buttonjB .
3) Select the [Driving Aids] key.
4) Select the [Parking Aids] key.
5) Select the [Moving Objects Detection] key toswitch between on or off. If a marker is shownthe item is switched on.
View malfunctionWhen the [ ! ] icon is displayed on the screen, therewill be abnormal conditions in the Around ViewMonitor. This will not hinder normal driving opera-tion but the system should be inspected by aNISSAN dealer or qualified workshop.
When the [ X ] icon is displayed on the screen, thecamera image may be receiving temporary elec-tronic disturbances from surrounding devices. Thiswill not hinder normal driving operation but the sys-tem should be inspected by a NISSAN dealer orqualified workshop if it occurs frequently.
OPERATING TIPS
• When the view is switched, the display imageson the screen may be displayed with some de-lay.
• When the temperature is extremely high or low,the screen may not display objects clearly. Thisis not a malfunction.
NIC2204
NAA1418
Display screen, heater and air conditioner, and audio system 4-13
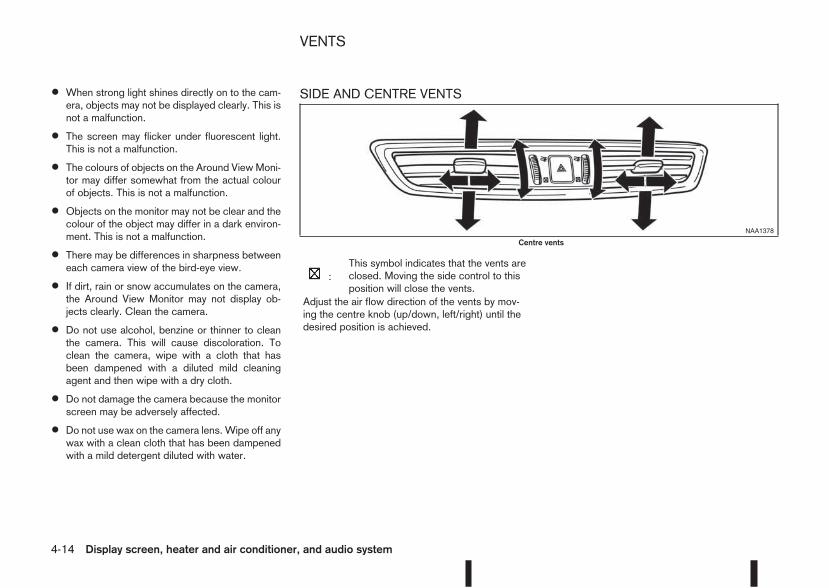
• When strong light shines directly on to the cam-era, objects may not be displayed clearly. This isnot a malfunction.
• The screen may flicker under fluorescent light.This is not a malfunction.
• The colours of objects on the Around ViewMoni-tor may differ somewhat from the actual colourof objects. This is not a malfunction.
• Objects on the monitor may not be clear and thecolour of the object may differ in a dark environ-ment. This is not a malfunction.
• There may be differences in sharpness betweeneach camera view of the bird-eye view.
• If dirt, rain or snow accumulates on the camera,the Around View Monitor may not display ob-jects clearly. Clean the camera.
• Do not use alcohol, benzine or thinner to cleanthe camera. This will cause discoloration. Toclean the camera, wipe with a cloth that hasbeen dampened with a diluted mild cleaningagent and then wipe with a dry cloth.
• Do not damage the camera because the monitorscreen may be adversely affected.
• Do not use wax on the camera lens. Wipe off anywax with a clean cloth that has been dampenedwith a mild detergent diluted with water.
SIDE AND CENTRE VENTS
m :This symbol indicates that the vents areclosed. Moving the side control to thisposition will close the vents.
Adjust the air flow direction of the vents by mov-ing the centre knob (up/down, left/right) until thedesired position is achieved.
NAA1378
Centre vents
VENTS
4-14 Display screen, heater and air conditioner, and audio system
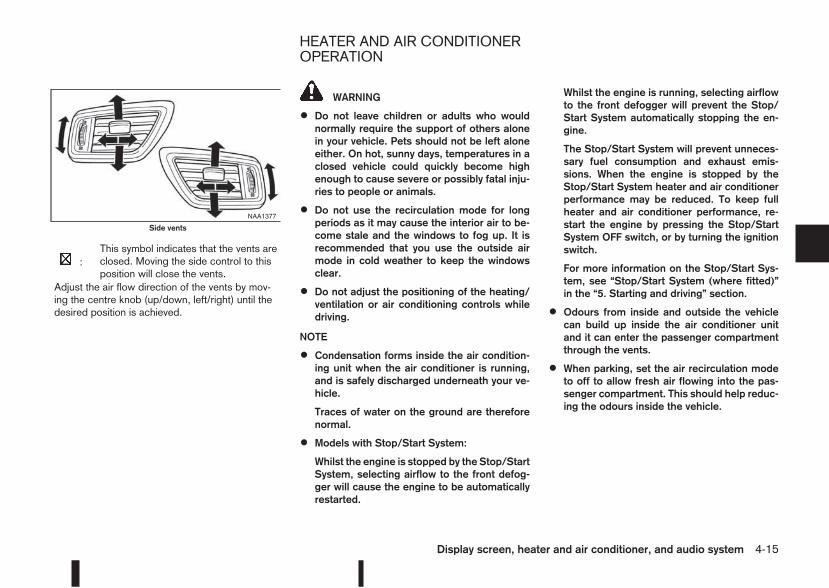
m :This symbol indicates that the vents areclosed. Moving the side control to thisposition will close the vents.
Adjust the air flow direction of the vents by mov-ing the centre knob (up/down, left/right) until thedesired position is achieved.
WARNING
• Do not leave children or adults who wouldnormally require the support of others alonein your vehicle. Pets should not be left aloneeither. On hot, sunny days, temperatures in aclosed vehicle could quickly become highenough to cause severe or possibly fatal inju-ries to people or animals.
• Do not use the recirculation mode for longperiods as it may cause the interior air to be-come stale and the windows to fog up. It isrecommended that you use the outside airmode in cold weather to keep the windowsclear.
• Do not adjust the positioning of the heating/ventilation or air conditioning controls whiledriving.
NOTE
• Condensation forms inside the air condition-ing unit when the air conditioner is running,and is safely discharged underneath your ve-hicle.
Traces of water on the ground are thereforenormal.
• Models with Stop/Start System:
Whilst the engine is stopped by the Stop/StartSystem, selecting airflow to the front defog-ger will cause the engine to be automaticallyrestarted.
Whilst the engine is running, selecting airflowto the front defogger will prevent the Stop/Start System automatically stopping the en-gine.
The Stop/Start System will prevent unneces-sary fuel consumption and exhaust emis-sions. When the engine is stopped by theStop/Start System heater and air conditionerperformance may be reduced. To keep fullheater and air conditioner performance, re-start the engine by pressing the Stop/StartSystem OFF switch, or by turning the ignitionswitch.
For more information on the Stop/Start Sys-tem, see “Stop/Start System (where fitted)”in the “5. Starting and driving” section.
• Odours from inside and outside the vehiclecan build up inside the air conditioner unitand it can enter the passenger compartmentthrough the vents.
• When parking, set the air recirculation modeto off to allow fresh air flowing into the pas-senger compartment. This should help reduc-ing the odours inside the vehicle.
NAA1377
Side vents
HEATER AND AIR CONDITIONEROPERATION
Display screen, heater and air conditioner, and audio system 4-15
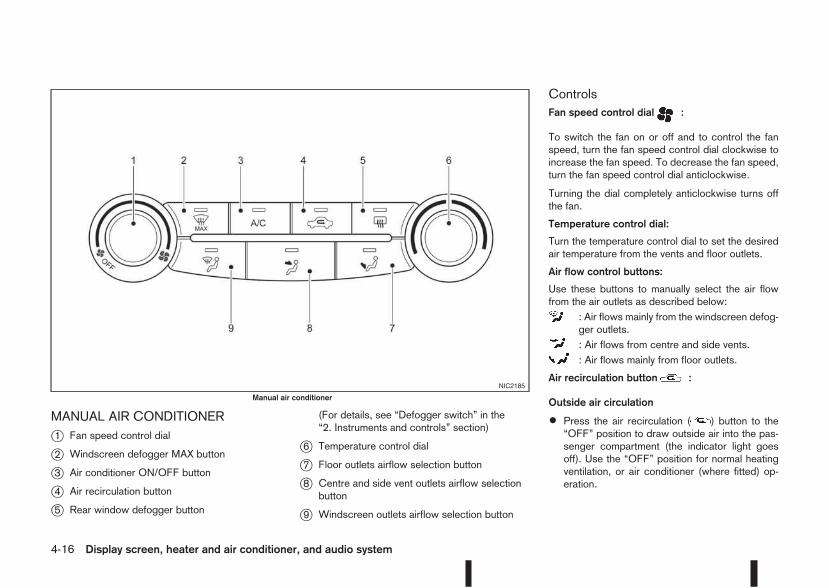
MANUAL AIR CONDITIONERj1 Fan speed control dial
j2 Windscreen defogger MAX button
j3 Air conditioner ON/OFF button
j4 Air recirculation button
j5 Rear window defogger button
(For details, see “Defogger switch” in the“2. Instruments and controls” section)
j6 Temperature control dial
j7 Floor outlets airflow selection button
j8 Centre and side vent outlets airflow selectionbutton
j9 Windscreen outlets airflow selection button
ControlsFan speed control dial m :
To switch the fan on or off and to control the fanspeed, turn the fan speed control dial clockwise toincrease the fan speed. To decrease the fan speed,turn the fan speed control dial anticlockwise.
Turning the dial completely anticlockwise turns offthe fan.
Temperature control dial:
Turn the temperature control dial to set the desiredair temperature from the vents and floor outlets.
Air flow control buttons:
Use these buttons to manually select the air flowfrom the air outlets as described below:
: Air flows mainly from the windscreen defog-ger outlets.: Air flows from centre and side vents.: Air flows mainly from floor outlets.
Air recirculation buttonm :
Outside air circulation
• Press the air recirculation ( ) button to the“OFF” position to draw outside air into the pas-senger compartment (the indicator light goesoff). Use the “OFF” position for normal heatingventilation, or air conditioner (where fitted) op-eration.
NIC2185
Manual air conditioner
4-16 Display screen, heater and air conditioner, and audio system
• Air recirculation
Press the air recirculation ( ) button to the“ON” position (the indicator light goes on). Usethe “ON” position in situations such as: drivingon a dust raised road, avoiding traffic fumes orhaving maximum cooling from the air conditioner(where fitted).
If the windows fog up, switch on the air condi-tioning (where fitted).
A/C (Air Conditioner) button (where fitted):
Press the A/C button to turn the air conditioner onor off. When the air conditioner is on, the A/C indi-cator light illuminates.
OperationThe heater and air conditioner operate when theengine is running. The air blower will operate even ifthe engine is turned off and the ignition switch is inthe ON position.
NOTE
The air conditioner cooling function operates onlywhen the engine is running and the fan is acti-vated.
1. Press the air recirculation ( ) button to the“OFF” position.
2. Use the airflow control buttons for:
– Cooling: select the or setting.
– Heating: select the or setting.
– Heating and defogging: select the set-ting.
– Ventilation: select the or setting.
– Windscreen defogging: select the set-ting.
3. Set the fan speed to the desired position.
4. Turn the temperature control dial to the desiredposition.
NOTE
When selecting the or setting, turnthe temperature control dial to the desiredposition between the middle and the maxi-mum “HOT” (right) position.
5. Press the A/C button (where fitted) to the “ON”position and the indicator light will come on.Switch this mode on for dehumidified heating orcooling.
NOTE
• The air conditioner mode is used to cool anddehumidify. For quick cooling when the out-side temperature is high, select the air recir-culation mode position ( ). Be sure to re-turn to the outside air mode to avoid windowsfrom fogging-up and interior air from becom-ing stale.
A visible mist may be seen coming from thevents in hot, humid conditions as the air iscooled rapidly this is not a malfunction.
• For quick heating, press the air recirculation( ) button to the “ON” position. Be sure toreturn to the “OFF” position for normal heat-ing (no indicator light) in order to avoid win-dow fog and stale interior.
Windscreen defogger m (manual mode):
Use this mode for defogging the windscreen as fol-lows:
1. Press the button.The system will set the fan speed to maximum.Air circulation is cancelled, the airflow modeand the air conditioner is activated automatically.Air flows mainly from the defogger outlets.
2. Set the temperature control dial to the maximum(HOT) position.
3. To switch off, press the button to return tothe previous mode.
NOTE
• To quickly defrost/defog the windscreen, setthe fan speed to the maximum position.
• As soon as possible after the windscreen hasbeen cleared of ice or fog, press the wind-screen defogger button.
• When the windscreen defogging mode is acti-vated, the air conditioner will automaticallyswitch on at outside temperatures above –2°C(28°F) and the air recirculation mode will beswitched off.
Display screen, heater and air conditioner, and audio system 4-17
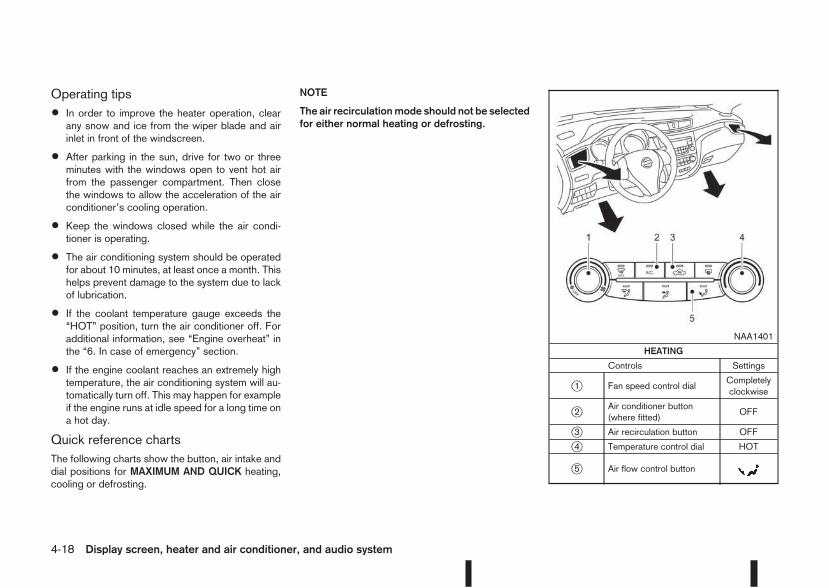
Operating tips
• In order to improve the heater operation, clearany snow and ice from the wiper blade and airinlet in front of the windscreen.
• After parking in the sun, drive for two or threeminutes with the windows open to vent hot airfrom the passenger compartment. Then closethe windows to allow the acceleration of the airconditioner’s cooling operation.
• Keep the windows closed while the air condi-tioner is operating.
• The air conditioning system should be operatedfor about 10 minutes, at least once a month. Thishelps prevent damage to the system due to lackof lubrication.
• If the coolant temperature gauge exceeds the“HOT” position, turn the air conditioner off. Foradditional information, see “Engine overheat” inthe “6. In case of emergency” section.
• If the engine coolant reaches an extremely hightemperature, the air conditioning system will au-tomatically turn off. This may happen for exampleif the engine runs at idle speed for a long time ona hot day.
Quick reference chartsThe following charts show the button, air intake anddial positions for MAXIMUM AND QUICK heating,cooling or defrosting.
NOTE
The air recirculationmode should not be selectedfor either normal heating or defrosting.
mNAA1401
HEATING
Controls Settings
j1 Fan speed control dialCompletelyclockwise
j2 Air conditioner button(where fitted)
OFF
j3 Air recirculation button OFF
j4 Temperature control dial HOT
j5 Air flow control button m
4-18 Display screen, heater and air conditioner, and audio system
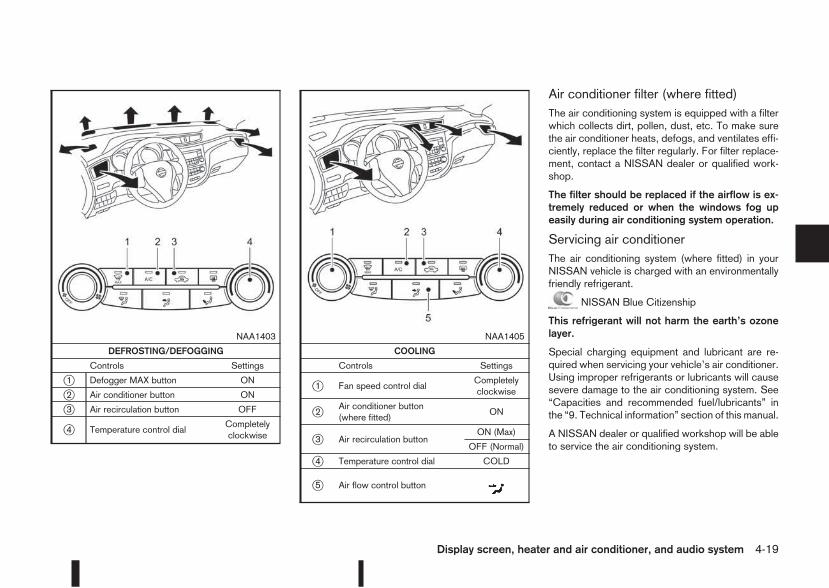
mNAA1403
DEFROSTING/DEFOGGING
Controls Settings
j1 Defogger MAX button ON
j2 Air conditioner button ON
j3 Air recirculation button OFF
j4 Temperature control dialCompletelyclockwise
mNAA1405
COOLING
Controls Settings
j1 Fan speed control dialCompletelyclockwise
j2 Air conditioner button(where fitted)
ON
j3 Air recirculation buttonON (Max)
OFF (Normal)
j4 Temperature control dial COLD
j5 Air flow control button m
Air conditioner filter (where fitted)The air conditioning system is equipped with a filterwhich collects dirt, pollen, dust, etc. To make surethe air conditioner heats, defogs, and ventilates effi-ciently, replace the filter regularly. For filter replace-ment, contact a NISSAN dealer or qualified work-shop.
The filter should be replaced if the airflow is ex-tremely reduced or when the windows fog upeasily during air conditioning system operation.
Servicing air conditionerThe air conditioning system (where fitted) in yourNISSAN vehicle is charged with an environmentallyfriendly refrigerant.
NISSAN Blue Citizenship
This refrigerant will not harm the earth’s ozonelayer.
Special charging equipment and lubricant are re-quired when servicing your vehicle’s air conditioner.Using improper refrigerants or lubricants will causesevere damage to the air conditioning system. See“Capacities and recommended fuel/lubricants” inthe “9. Technical information” section of this manual.
A NISSAN dealer or qualified workshop will be ableto service the air conditioning system.
Display screen, heater and air conditioner, and audio system 4-19
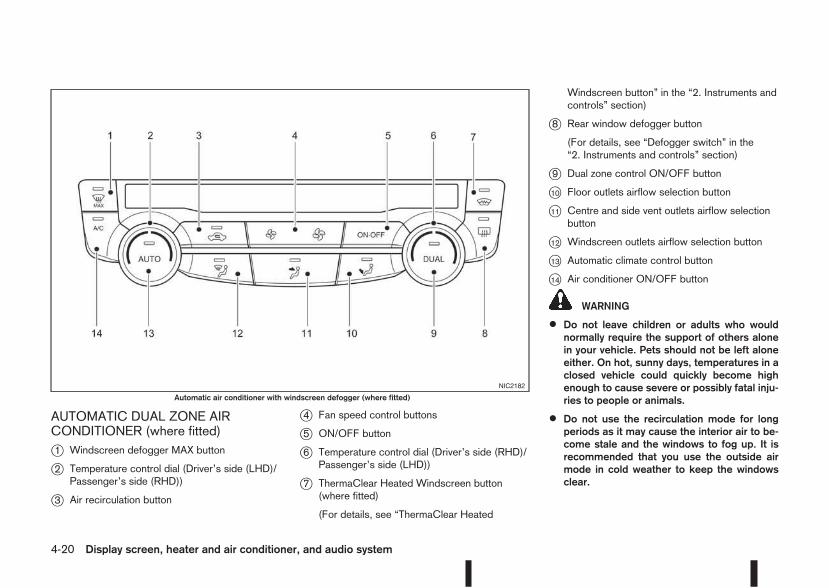
AUTOMATIC DUAL ZONE AIRCONDITIONER (where fitted)j1 Windscreen defogger MAX button
j2 Temperature control dial (Driver’s side (LHD)/Passenger’s side (RHD))
j3 Air recirculation button
j4 Fan speed control buttons
j5 ON/OFF button
j6 Temperature control dial (Driver’s side (RHD)/Passenger’s side (LHD))
j7 ThermaClear Heated Windscreen button(where fitted)
(For details, see “ThermaClear Heated
Windscreen button” in the “2. Instruments andcontrols” section)
j8 Rear window defogger button
(For details, see “Defogger switch” in the“2. Instruments and controls” section)
j9 Dual zone control ON/OFF button
j10 Floor outlets airflow selection button
j11 Centre and side vent outlets airflow selectionbutton
j12 Windscreen outlets airflow selection button
j13 Automatic climate control button
j14 Air conditioner ON/OFF button
WARNING
• Do not leave children or adults who wouldnormally require the support of others alonein your vehicle. Pets should not be left aloneeither. On hot, sunny days, temperatures in aclosed vehicle could quickly become highenough to cause severe or possibly fatal inju-ries to people or animals.
• Do not use the recirculation mode for longperiods as it may cause the interior air to be-come stale and the windows to fog up. It isrecommended that you use the outside airmode in cold weather to keep the windowsclear.
NIC2182
Automatic air conditioner with windscreen defogger (where fitted)
4-20 Display screen, heater and air conditioner, and audio system
• Do not adjust the positioning of the heating/ventilation or air conditioning controls whiledriving.
NOTE
• The air conditioner cooling function operatesonly when the engine is running, and the am-bient temperature is above -2°C (28°F).
• The air conditioner can be used to dehumidifywhen heating, or to reduce air temperatureand dehumidify when cooling. This is possiblein both auto or manual control mode as longas the fan speed is at minimum (first bar) orhigher.
• When the AUTO mode is selected, the tem-perature of the passenger compartment willbe maintained automatically. Air flow distribu-tion and fan speed will also be controlled au-tomatically.
Controls
NOTE
Before any selection or change is made, pressthe AUTO button to activate the heater and airconditioner system.
Cooling and/or dehumidified heating (AUTOmode):
This mode may be used all year round. The systemworks automatically to control the inside tempera-ture, air flow distribution and fan speed after thepreferred temperature is set manually.
1. Press the AUTO button (the indicator light willilluminate).
2. Operate the driver’s side temperature control dialto set the desired temperature.
Adjust the temperature to about 22°C (72°F) fornormal operation.
3. Driver’s side and passenger side temperaturescan be set independently using the individualtemperature control dial. When the passengerside temperature control dial is turned, the DUALindicator light will come on. To turn off the pas-senger side temperature control, press theDUALbutton.
NOTE
• A visible mist may be seen coming from thevents in hot, humid conditions as the air iscooled rapidly, this is not a malfunction.
Heating (AUTO mode):
Use this mode for heating purposes only.
1. Press the A/C button to turn off the air condi-tioner cooling function (A/C indicator light goesoff).
2. Select the desired temperature with the tempera-ture control dial.
• Do not set the temperature at a lower level thanthe one of the outside air temperature. Other-wise the system may not work properly.
• Thismode is not recommended if thewindscreenfogs up.
Airflow control buttons:
Use these buttons to manually select the air flowform these outlets as described below:
: Air flows mainly from the windscreen defog-ger outlets.: Air flows from centre and side vents.: Air flows mainly from floor outlets.
Windscreen defogger m (manual mode):
Use this mode for defogging the windscreen as fol-lows:
1. Press the button.The system will set the fan speed to maximum.Air circulation is cancelled, the airflow modeand the air conditioner is activated automatically.Air flows mainly from the defogger outlets.
2. To switch off, press the button to return tothe previous mode or the AUTO button for autoclimate control mode.
NOTE
• To quickly defrost/defog the windscreen, setthe fan speed to the maximum position.
• As soon as possible after the windscreen hasbeen cleared of ice or fog, press either thewindscreen defogger button or AUTO button.
• When the windscreen defogging mode is acti-vated, the air conditioner will automaticallyswitch on at outside temperatures above –2°C(28°F) and the air recirculation mode will beswitched off.
Display screen, heater and air conditioner, and audio system 4-21
Heating and defogging (Manual mode):
This mode heats the interior and defogs the wind-screen.
Use the airflow control buttons to select thebutton is pressed. Switch on the air-conditioning toimprove the defogging and adjust the preferred fanspeed and temperature.
Fan speed control m (Manual mode):
Press the fan speed control buttons to adjust the fanspeed.
Press the AUTO button to change the fan speed toautomatic mode.
Air recirculation:
Use this mode to recirculate interior air inside thepassenger compartment in situations such as driv-ing on a dust raised road, avoiding traffic fumes orhaving maximum cooling from the air conditioner.
Press the < > button to recirculate interior air.The indicator light illuminates and the air conditionerwill automatically come on.
When the air recirculation mode is switched off, out-side air is drawn into the passenger compartment.
Outside air circulation :
Use this mode to draw outside air into the passen-ger compartment for normal heating, ventilation orair conditioner operation.
Press the < > button to change the air intakefrom the air recirculation to the outside air mode.The indicator light ( ) turns off.
To turn the system on/off:
Press the “ON/OFF” button to turn the system on oroff.
Operating tips
• In order to improve the heater operation, clearthe snow and ice from the wiper blade and airinlet in front of the windscreen.
• When the engine coolant temperature and out-side air temperature are low, the airflow from thefloor outlets may not operate for a maximum of150 seconds. However, this is not a malfunction.After the coolant temperature has warmed up,the airflow from the floor outlets will operate nor-mally.
• After parking in the sun, drive for two or threeminutes with the windows open to vent hot airfrom the passenger compartment. Then, closethe windows. This will allow the acceleration ofthe air conditioner’s cooling operation.
• Keep windows closed while the air conditioner isoperating.
• The air conditioning system should be operatedfor about 10 minutes, at least once a month. Thishelps prevent damage to the system due to lackof lubrication.
• If the coolant temperature gauge exceeds the“HOT” position, turn the air conditioner off. Foradditional information, see “Engine overheat” inthe “6. In case of emergency” section.
• If the engine coolant reaches an extremely hightemperature, the air conditioning system will au-tomatically turn off. This may happen for exampleif the engine runs at idle speed for a long time ona hot day.
Air conditioner filterThe air conditioning system is equipped with a filterwhich collects dirt, pollen, dust, etc. To make surethe air conditioner heats, defogs, and ventilates effi-ciently, replace the filter regularly. To replace the fil-ter, contact a NISSAN dealer or qualified workshop.
The filter should be replaced if the airflow is ex-tremely reduced or when the windows fog upeasily while operating the heater or air condition-ing system.
Servicing air conditionerThe air conditioning system in your NISSAN vehicleis charged with an environmentally friendly refriger-ant.
NISSAN Blue Citizenship
This refrigerant will not harm the earth’s ozonelayer.
Special charging equipment and lubricant are re-quired when servicing the NISSAN air conditioner.Using improper refrigerants or lubricants will causesevere damage to the air conditioning system. See“Capacities and recommended fuel/lubricants” inthe “9. Technical information” section.
A NISSAN dealer or qualified workshop will be ableto service the air conditioning system.
4-22 Display screen, heater and air conditioner, and audio system
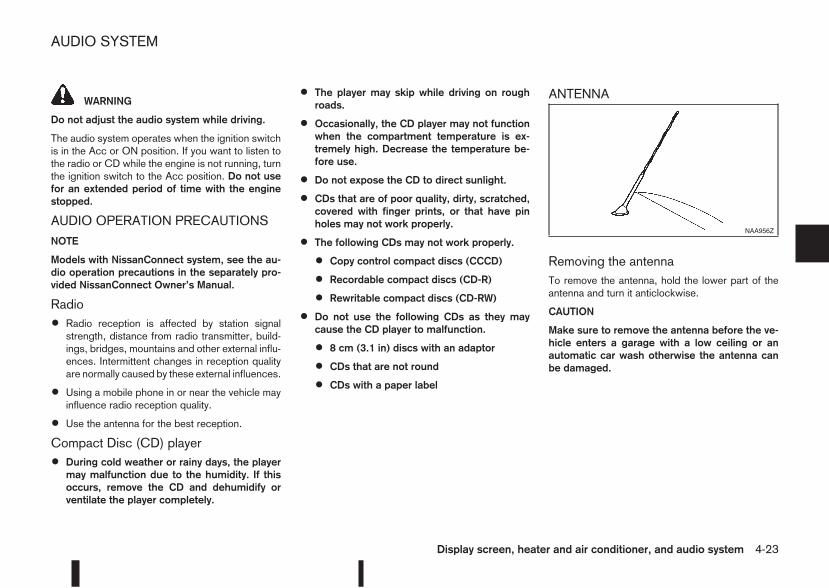
WARNING
Do not adjust the audio system while driving.
The audio system operates when the ignition switchis in the Acc or ON position. If you want to listen tothe radio or CD while the engine is not running, turnthe ignition switch to the Acc position. Do not usefor an extended period of time with the enginestopped.
AUDIO OPERATION PRECAUTIONS
NOTE
Models with NissanConnect system, see the au-dio operation precautions in the separately pro-vided NissanConnect Owner’s Manual.
Radio
• Radio reception is affected by station signalstrength, distance from radio transmitter, build-ings, bridges, mountains and other external influ-ences. Intermittent changes in reception qualityare normally caused by these external influences.
• Using a mobile phone in or near the vehicle mayinfluence radio reception quality.
• Use the antenna for the best reception.
Compact Disc (CD) player
• During cold weather or rainy days, the playermay malfunction due to the humidity. If thisoccurs, remove the CD and dehumidify orventilate the player completely.
• The player may skip while driving on roughroads.
• Occasionally, the CD player may not functionwhen the compartment temperature is ex-tremely high. Decrease the temperature be-fore use.
• Do not expose the CD to direct sunlight.
• CDs that are of poor quality, dirty, scratched,covered with finger prints, or that have pinholes may not work properly.
• The following CDs may not work properly.
• Copy control compact discs (CCCD)
• Recordable compact discs (CD-R)
• Rewritable compact discs (CD-RW)
• Do not use the following CDs as they maycause the CD player to malfunction.
• 8 cm (3.1 in) discs with an adaptor
• CDs that are not round
• CDs with a paper label
ANTENNA
Removing the antennaTo remove the antenna, hold the lower part of theantenna and turn it anticlockwise.
CAUTION
Make sure to remove the antenna before the ve-hicle enters a garage with a low ceiling or anautomatic car wash otherwise the antenna canbe damaged.
NAA956Z
AUDIO SYSTEM
Display screen, heater and air conditioner, and audio system 4-23

1. (Day/Night) button(Display brightness (Day/Night mode) button)Turn the MENU button to set the displaybrightness
The illumination brightness level is linked to theheadlight switch. When the headlights areswitched “ON” the brightness is dimmedautomatically. Press the button to toggle
illumination brightness levels between daytimesetting and nighttime setting independent ofheadlamp status.
2. CD slot
3. Display
4. CD eject button
5. MEDIA button
Switch between the audio sources (CD, USB,AUX, BT Audio)(if connected)
6. Telephone button
7. Radio mode: TUNE dialAudio unit mode: MENU dialConfirmation (ENTER) button
8. Back button
9. Radio mode: Preset buttonUSB/MP3 CD or Phone mode: Quick searchbutton
10. SETUP button
11. Radio mode: Preset buttons
12. Fast Forward (Cue)/Forward Track andRewind/Previous Track buttons
13. Radio mode: Preset buttonCD/iPod/USB/Bluetooth audio mode: MIXbutton
14. Traffic Announcement (TA) button
15. Radio mode: Preset buttonCD/iPod/USB/Bluetooth audio mode: Repeat(RPT) button
16. Power ON·OFF button/Volume control (VOL)knob
17. DISP buttonProvides on screen information when available(music tags, RDS, etc.)
18. RADIO button
NAA1387
FM AM RADIO WITH CD PLAYER (where fitted)
4-24 Display screen, heater and air conditioner, and audio system
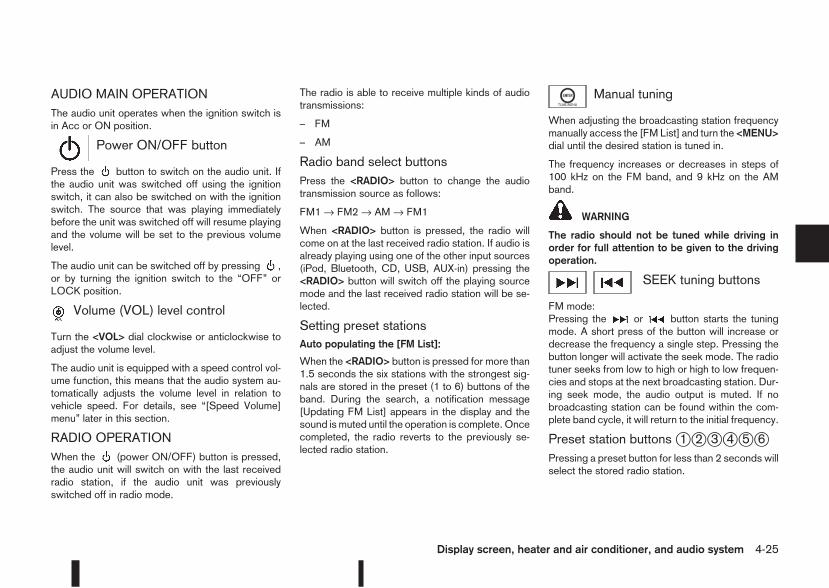
AUDIO MAIN OPERATIONThe audio unit operates when the ignition switch isin Acc or ON position.
m Power ON/OFF button
Press the button to switch on the audio unit. Ifthe audio unit was switched off using the ignitionswitch, it can also be switched on with the ignitionswitch. The source that was playing immediatelybefore the unit was switched off will resume playingand the volume will be set to the previous volumelevel.
The audio unit can be switched off by pressing ,or by turning the ignition switch to the “OFF” orLOCK position.
m Volume (VOL) level control
Turn the <VOL> dial clockwise or anticlockwise toadjust the volume level.
The audio unit is equipped with a speed control vol-ume function, this means that the audio system au-tomatically adjusts the volume level in relation tovehicle speed. For details, see “[Speed Volume]menu” later in this section.
RADIO OPERATIONWhen the (power ON/OFF) button is pressed,the audio unit will switch on with the last receivedradio station, if the audio unit was previouslyswitched off in radio mode.
The radio is able to receive multiple kinds of audiotransmissions:
– FM
– AM
Radio band select buttonsPress the <RADIO> button to change the audiotransmission source as follows:
FM1 → FM2 → AM → FM1
When <RADIO> button is pressed, the radio willcome on at the last received radio station. If audio isalready playing using one of the other input sources(iPod, Bluetooth, CD, USB, AUX-in) pressing the<RADIO> button will switch off the playing sourcemode and the last received radio station will be se-lected.
Setting preset stationsAuto populating the [FM List]:
When the <RADIO> button is pressed for more than1.5 seconds the six stations with the strongest sig-nals are stored in the preset (1 to 6) buttons of theband. During the search, a notification message[Updating FM List] appears in the display and thesound is muted until the operation is complete. Oncecompleted, the radio reverts to the previously se-lected radio station.
Manual tuning
When adjusting the broadcasting station frequencymanually access the [FM List] and turn the <MENU>dial until the desired station is tuned in.
The frequency increases or decreases in steps of100 kHz on the FM band, and 9 kHz on the AMband.
WARNING
The radio should not be tuned while driving inorder for full attention to be given to the drivingoperation.
SEEK tuning buttons
FM mode:Pressing the or button starts the tuningmode. A short press of the button will increase ordecrease the frequency a single step. Pressing thebutton longer will activate the seek mode. The radiotuner seeks from low to high or high to low frequen-cies and stops at the next broadcasting station. Dur-ing seek mode, the audio output is muted. If nobroadcasting station can be found within the com-plete band cycle, it will return to the initial frequency.
Preset station buttonsj1 j2 j3 j4 j5 j6Pressing a preset button for less than 2 seconds willselect the stored radio station.
Display screen, heater and air conditioner, and audio system 4-25
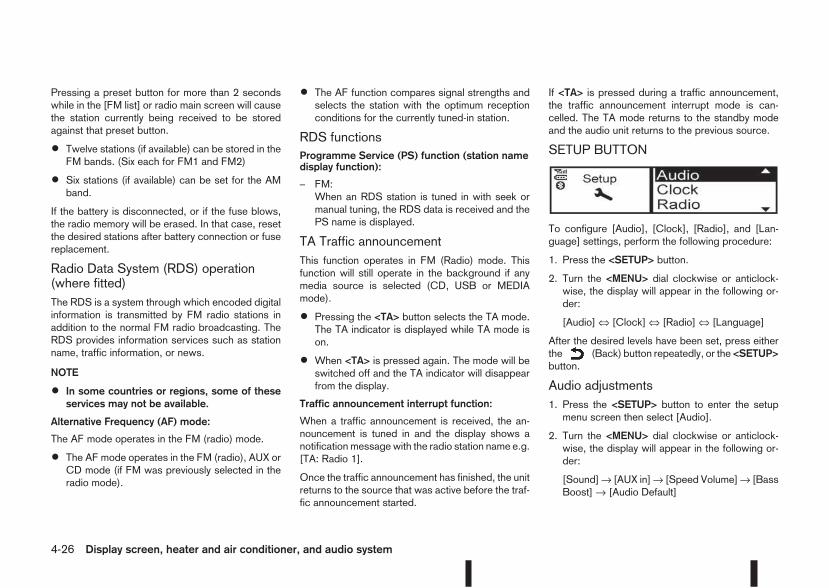
Pressing a preset button for more than 2 secondswhile in the [FM list] or radio main screen will causethe station currently being received to be storedagainst that preset button.
• Twelve stations (if available) can be stored in theFM bands. (Six each for FM1 and FM2)
• Six stations (if available) can be set for the AMband.
If the battery is disconnected, or if the fuse blows,the radio memory will be erased. In that case, resetthe desired stations after battery connection or fusereplacement.
Radio Data System (RDS) operation(where fitted)The RDS is a system through which encoded digitalinformation is transmitted by FM radio stations inaddition to the normal FM radio broadcasting. TheRDS provides information services such as stationname, traffic information, or news.
NOTE
• In some countries or regions, some of theseservices may not be available.
Alternative Frequency (AF) mode:
The AF mode operates in the FM (radio) mode.
• The AF mode operates in the FM (radio), AUX orCD mode (if FM was previously selected in theradio mode).
• The AF function compares signal strengths andselects the station with the optimum receptionconditions for the currently tuned-in station.
RDS functionsProgramme Service (PS) function (station namedisplay function):
– FM:When an RDS station is tuned in with seek ormanual tuning, the RDS data is received and thePS name is displayed.
TA Traffic announcementThis function operates in FM (Radio) mode. Thisfunction will still operate in the background if anymedia source is selected (CD, USB or MEDIAmode).
• Pressing the <TA> button selects the TA mode.The TA indicator is displayed while TA mode ison.
• When <TA> is pressed again. The mode will beswitched off and the TA indicator will disappearfrom the display.
Traffic announcement interrupt function:
When a traffic announcement is received, the an-nouncement is tuned in and the display shows anotification message with the radio station name e.g.[TA: Radio 1].
Once the traffic announcement has finished, the unitreturns to the source that was active before the traf-fic announcement started.
If <TA> is pressed during a traffic announcement,the traffic announcement interrupt mode is can-celled. The TA mode returns to the standby modeand the audio unit returns to the previous source.
SETUP BUTTON
To configure [Audio], [Clock], [Radio], and [Lan-guage] settings, perform the following procedure:
1. Press the <SETUP> button.
2. Turn the <MENU> dial clockwise or anticlock-wise, the display will appear in the following or-der:
[Audio] ⇔ [Clock] ⇔ [Radio] ⇔ [Language]
After the desired levels have been set, press eitherthe (Back) button repeatedly, or the <SETUP>button.
Audio adjustments1. Press the <SETUP> button to enter the setupmenu screen then select [Audio].
2. Turn the <MENU> dial clockwise or anticlock-wise, the display will appear in the following or-der:
[Sound]→ [AUX in]→ [Speed Volume]→ [BassBoost] → [Audio Default]
4-26 Display screen, heater and air conditioner, and audio system
[Sound] menu:
Submenus in the sound menu:
[Bass] Use this control to enhance orattenuate bass response sound.Turn the <MENU> dial clockwiseor anticlockwise to adjust the basssettings then press <ENTER> toconfirm.
[Treble] Use this control to enhance orattenuate the treble.Turn the <MENU> dial clockwiseor anticlockwise to adjust thetreble settings then press<ENTER> to confirm.
[Balance] Use this control to adjust the bal-ance of the volume between theleft and right speakers.Turn the <MENU> dialanticlockwise or clockwise toadjust the left/right balance thenpress <ENTER> to confirm.
[Fade] Use this control to adjust the bal-ance of the volume between thefront and rear speakers.Turn the <MENU> dialanticlockwise or clockwise toadjust the front/rear balance thenpress <ENTER> to confirm.
[AUX in] menu:
Use this control to adjust the volume output from theauxiliary source.Turn the <MENU> dial anticlockwise or clockwiseto select [Low], [Medium], or [High] mode thenpress <ENTER> to confirm.
Set the AUX-in volume. Select one of the submenusin the [AUX in] menu:
– [Low]
– [Medium]
– [High]
[Speed Volume] menu:
Set the audio system to automatically adjust the vol-ume level in relation to vehicle speed.Turn the <MENU> dial anticlockwise or clockwiseto adjust the volume, higher (more) bars mean thevolume level relatively changes more when the ve-hicle speed increase or decreases. Press <ENTER>to confirm.
This mode controls the volume output from thespeakers automatically in relation to vehicle speed.When [Speed Volume] is displayed, turn the<MENU> dial clockwise or anticlockwise to adjustthe volume level.Adjusting the setting to 0 (zero) turns off the speedvolume feature. Increasing the speed volume settingresults in the audio volume increasing more rapidlywith vehicle speed. Once chosen, press <ENTER>to save the setting.
[Bass Boost] menu:
Switch [Bass boost] [ON] or [OFF]
[Audio default] menu:
The audio unit has a saved preset settings as a fac-tory default. Select [Yes] to change all settings backto the factory preset settings. Select [No] to exit themenu keeping the current settings.
Setting the clockThe clock menu screen set up screen will appearwhen selecting the [Clock] item from the set upmenu.
[Set Time]:
Select [Set Time] then adjust the clock as follows:
1. The hour display will start flashing. Turn the<MENU> dial to adjust the hour.
2. Press the <ENTER> button. The minute displaywill start flashing.
3. Turn the <MENU> dial to adjust the minute.
4. Press <ENTER> to finish the clock adjustment.
[On/Off]:
Set the clock display between on or off when theaudio unit is turned off.
If set in the [ON] position, the clock will be dis-played when the audio unit is turned off either bypressing the button or when the ignition switchis placed in the “OFF” position.
Display screen, heater and air conditioner, and audio system 4-27
[Format]:
Set the clock display between 24-hour mode and12-hour clock mode.
[Radio] menuFor activation or deactivation details, see “SETUPbutton” later in this section.
Language settingsSelect the appropriate language and press the<ENTER> button. Upon completion, the screen willautomatically adapt the language setting.
• [AUTO](Factory preset language connected with themeter language)
• [Chinese]
• [Chinese Simplified]
• [Deutsch]
• [Español]
• [Français]
• [Italiano]
• [Nederlands]
• [Polski]
• [Português]
• [Türkçe]
• [UK English]
• [русский]
COMPACT DISC (CD) OPERATIONThe CD player can play a music CD or an encodedMP3/WMA CD and while listening to those CD’smusic information tags (track and artist information)can be displayed (when CD encoded with text isbeing used).
Press the <MEDIA> button and the CD (if loaded)will start to play.
When <MEDIA> is pressed and the radio or anothersource mode is already operating, it will automati-cally turn off the playing source and the CD playmode will start.
CAUTION
• Do not force the CD into the slot. This coulddamage the player.
• Do not use 8 cm (3.1 in) discs.
CD insert (CD player)Insert the CD disc into the slot with the label sidefacing up. The disc will be guided automatically intothe slot and will start playing. After loading the disc,track information will be displayed.
NOTE
• The CD player accepts normal audio CD orCD recorded with MP3/WMA files.
• Inserting a CD recorded with MP3/WMA files,the audio unit will automatically detect and[MP3CD] will be indicated.
• An error notification message will bedisplayed when inserting a wrong disc type(e.g. DVD), or the player cannot read the CDdisc. Eject the disc and insert another disc.
MEDIA buttonLoad a CD disc. After a short loading period the CDstarts playing.
If the disc was already loaded:Press the <MEDIA> button (depending on otherconnected audio sources if necessary multipletimes) to select CD. Playing starts from the trackthat was being played when the CD play mode wasswitched off.
Audio main operationList view:
While the track is being played, either press the<ENTER> button or turn the MENU dial to displaythe available tracks in a listed view mode. To selecta track from the list, or a track to start listening from,turn the <MENU> dial then press <ENTER>.Press the button to return to the song.
Fast Forward (Cue), FastReverse (Review) buttons:
When the (Cue) or (Review) button ispressed continuously, the track will be played athigh speed. When the button is released, the trackwill be played at normal playing speed.
4-28 Display screen, heater and air conditioner, and audio system
Track up/down buttons:
Pressing the or button once, the track willbe skipped forward to the next track or backward tothe beginning of the current played track. Press the
or button more than once to skip throughthe tracks.
Folder browsing:
If the recorded media contains folders with musicfiles, pressing the or button will play insequence the tracks of each folder.
To select a preferred folder:
1. Press the <ENTER> button or turn the <MENU>dial and a list of tracks in the current folder is dis-played.
2. Turn the <MENU> dial for the preferred folder.
3. Press <ENTER> to access the folder. Press<ENTER> again to start playing the first track orturn the <MENU> dial, and press <ENTER> toselect another track.
If the current selected folder contains sub folders,press <ENTER>, a new screen with a list of subfolders will be displayed. Turn the <MENU> dial forthe sub folder then press <ENTER> to select. Se-lect the [Root] folder item when songs are recordedadditionally in the root folder.
To return to the previous folder screen, press .
Repeat button:
Push the j1 button and the current track willbe played continuously.
button:
Push the j2 button and all the tracks in thecurrent folder (MP3 CD/USB) or playlist (iPod) willbe played in a random order.
When the entire folder/playlist has been played thesystem will start playing the next folder/playlist.
button:
While a CD with recorded music information tags(CD-text/ID3–text tags) is being played, the title ofthe played track is displayed. If the title informationis not provided then [Track] is displayed.
When the j5 button is pressed repeatedly,further information about the track can be displayedalong with the track title as follows:
CD:
Track time → Artist name → Album title → Tracktime
CD with MP3/WMA:
Track time → Artist name → Album title → Foldername → Track time
The track name is always displayed.
Track details:
A long press on the j5 button will turn thedisplay into a detailed overview and after a few sec-onds it returns to the main display, or pressj5 briefly.
Quick search:
When a MP3 CD with recorded music informationtags (ID3–text tags) is being played from list viewmode, a quick search can be performed to find atrack from the list.
Push the <A-Z> j6 button then turn the <MENU>dial for the first alphabetic/numerical letter of thetrack title then press <ENTER>. When found, a listof the available tracks will be displayed. When thereis no match (the display shows [No match] the nextitem will be shown. Select, and press <ENTER> toplay the preferred track.
CD eject buttonCD player:
Press the (eject) button and the CD will beejected.
Ejecting CD (with ignition switch in “OFF” orLOCK):
When the ignition switch is in the “OFF” or LOCKposition it is possible to eject the currently playedCD. However the audio unit will not be activated.
Display screen, heater and air conditioner, and audio system 4-29
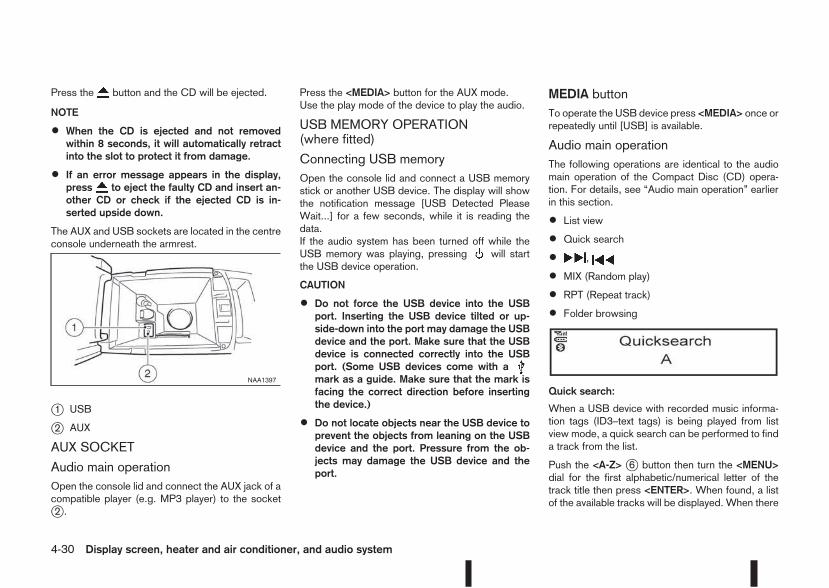
Press the button and the CD will be ejected.
NOTE
• When the CD is ejected and not removedwithin 8 seconds, it will automatically retractinto the slot to protect it from damage.
• If an error message appears in the display,press to eject the faulty CD and insert an-other CD or check if the ejected CD is in-serted upside down.
The AUX and USB sockets are located in the centreconsole underneath the armrest.
j1 USB
j2 AUX
AUX SOCKET
Audio main operationOpen the console lid and connect the AUX jack of acompatible player (e.g. MP3 player) to the socketj2 .
Press the <MEDIA> button for the AUX mode.Use the play mode of the device to play the audio.
USB MEMORY OPERATION(where fitted)
Connecting USB memoryOpen the console lid and connect a USB memorystick or another USB device. The display will showthe notification message [USB Detected PleaseWait...] for a few seconds, while it is reading thedata.If the audio system has been turned off while theUSB memory was playing, pressing will startthe USB device operation.
CAUTION
• Do not force the USB device into the USBport. Inserting the USB device tilted or up-side-down into the port may damage the USBdevice and the port. Make sure that the USBdevice is connected correctly into the USBport. (Some USB devices come with amark as a guide. Make sure that the mark isfacing the correct direction before insertingthe device.)
• Do not locate objects near the USB device toprevent the objects from leaning on the USBdevice and the port. Pressure from the ob-jects may damage the USB device and theport.
MEDIA buttonTo operate the USB device press <MEDIA> once orrepeatedly until [USB] is available.
Audio main operationThe following operations are identical to the audiomain operation of the Compact Disc (CD) opera-tion. For details, see “Audio main operation” earlierin this section.
• List view
• Quick search
• ,
• MIX (Random play)
• RPT (Repeat track)
• Folder browsing
Quick search:
When a USB device with recorded music informa-tion tags (ID3–text tags) is being played from listview mode, a quick search can be performed to finda track from the list.
Push the <A-Z> j6 button then turn the <MENU>dial for the first alphabetic/numerical letter of thetrack title then press <ENTER>. When found, a listof the available tracks will be displayed. When there
NAA1397
4-30 Display screen, heater and air conditioner, and audio system
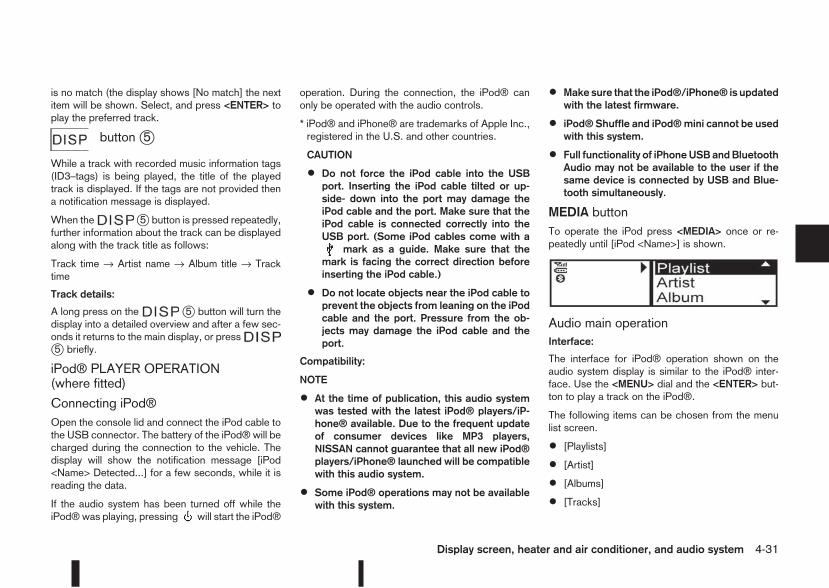
is no match (the display shows [No match] the nextitem will be shown. Select, and press <ENTER> toplay the preferred track.
buttonj5
While a track with recorded music information tags(ID3–tags) is being played, the title of the playedtrack is displayed. If the tags are not provided thena notification message is displayed.
When the j5 button is pressed repeatedly,further information about the track can be displayedalong with the track title as follows:
Track time → Artist name → Album title → Tracktime
Track details:
A long press on the j5 button will turn thedisplay into a detailed overview and after a few sec-onds it returns to the main display, or pressj5 briefly.
iPod® PLAYER OPERATION(where fitted)
Connecting iPod®Open the console lid and connect the iPod cable tothe USB connector. The battery of the iPod® will becharged during the connection to the vehicle. Thedisplay will show the notification message [iPod<Name> Detected...] for a few seconds, while it isreading the data.
If the audio system has been turned off while theiPod®was playing, pressing will start the iPod®
operation. During the connection, the iPod® canonly be operated with the audio controls.
* iPod® and iPhone® are trademarks of Apple Inc.,registered in the U.S. and other countries.
CAUTION
• Do not force the iPod cable into the USBport. Inserting the iPod cable tilted or up-side- down into the port may damage theiPod cable and the port. Make sure that theiPod cable is connected correctly into theUSB port. (Some iPod cables come with a
mark as a guide. Make sure that themark is facing the correct direction beforeinserting the iPod cable.)
• Do not locate objects near the iPod cable toprevent the objects from leaning on the iPodcable and the port. Pressure from the ob-jects may damage the iPod cable and theport.
Compatibility:
NOTE
• At the time of publication, this audio systemwas tested with the latest iPod® players/iP-hone® available. Due to the frequent updateof consumer devices like MP3 players,NISSAN cannot guarantee that all new iPod®players/iPhone® launched will be compatiblewith this audio system.
• Some iPod® operations may not be availablewith this system.
• Make sure that the iPod®/iPhone® is updatedwith the latest firmware.
• iPod® Shuffle and iPod®mini cannot be usedwith this system.
• Full functionality of iPhoneUSB and BluetoothAudio may not be available to the user if thesame device is connected by USB and Blue-tooth simultaneously.
MEDIA buttonTo operate the iPod press <MEDIA> once or re-peatedly until [iPod <Name>] is shown.
Audio main operationInterface:
The interface for iPod® operation shown on theaudio system display is similar to the iPod® inter-face. Use the <MENU> dial and the <ENTER> but-ton to play a track on the iPod®.
The following items can be chosen from the menulist screen.
• [Playlists]
• [Artist]
• [Albums]
• [Tracks]
Display screen, heater and air conditioner, and audio system 4-31
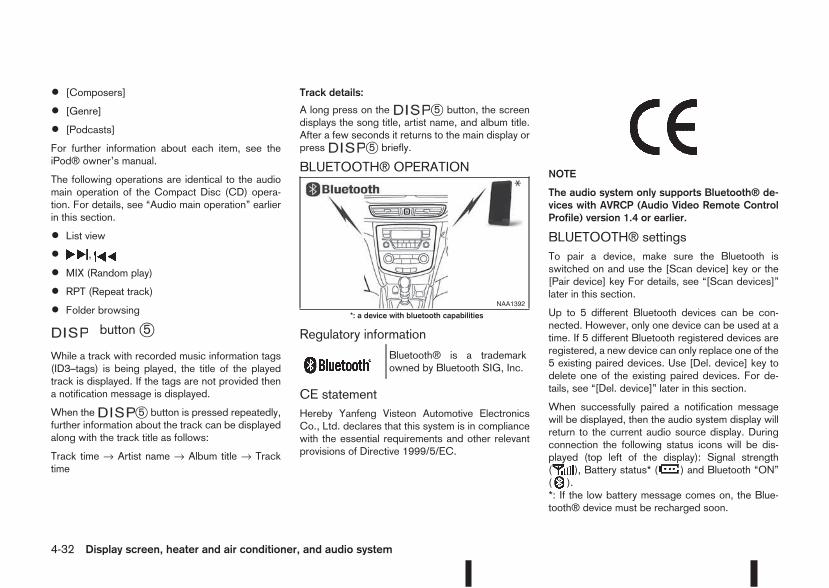
• [Composers]
• [Genre]
• [Podcasts]
For further information about each item, see theiPod® owner’s manual.
The following operations are identical to the audiomain operation of the Compact Disc (CD) opera-tion. For details, see “Audio main operation” earlierin this section.
• List view
• ,
• MIX (Random play)
• RPT (Repeat track)
• Folder browsing
m buttonj5
While a track with recorded music information tags(ID3–tags) is being played, the title of the playedtrack is displayed. If the tags are not provided thena notification message is displayed.
When the j5 button is pressed repeatedly,further information about the track can be displayedalong with the track title as follows:
Track time → Artist name → Album title → Tracktime
Track details:
A long press on the j5 button, the screendisplays the song title, artist name, and album title.After a few seconds it returns to the main display orpress j5 briefly.
BLUETOOTH® OPERATION
Regulatory information
mBluetooth® is a trademarkowned by Bluetooth SIG, Inc.
CE statementHereby Yanfeng Visteon Automotive ElectronicsCo., Ltd. declares that this system is in compliancewith the essential requirements and other relevantprovisions of Directive 1999/5/EC.
mNOTE
The audio system only supports Bluetooth® de-vices with AVRCP (Audio Video Remote ControlProfile) version 1.4 or earlier.
BLUETOOTH® settingsTo pair a device, make sure the Bluetooth isswitched on and use the [Scan device] key or the[Pair device] key For details, see “[Scan devices]”later in this section.
Up to 5 different Bluetooth devices can be con-nected. However, only one device can be used at atime. If 5 different Bluetooth registered devices areregistered, a new device can only replace one of the5 existing paired devices. Use [Del. device] key todelete one of the existing paired devices. For de-tails, see “[Del. device]” later in this section.
When successfully paired a notification messagewill be displayed, then the audio system display willreturn to the current audio source display. Duringconnection the following status icons will be dis-played (top left of the display): Signal strength( ), Battery status* ( ) and Bluetooth “ON”( ).*: If the low battery message comes on, the Blue-tooth® device must be recharged soon.
NAA1392
*: a device with bluetooth capabilities
4-32 Display screen, heater and air conditioner, and audio system
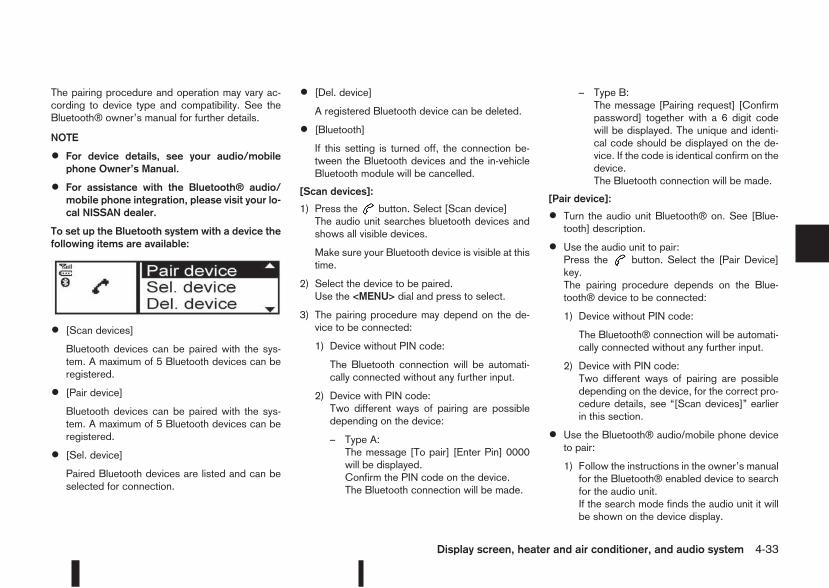
The pairing procedure and operation may vary ac-cording to device type and compatibility. See theBluetooth® owner’s manual for further details.
NOTE
• For device details, see your audio/mobilephone Owner’s Manual.
• For assistance with the Bluetooth® audio/mobile phone integration, please visit your lo-cal NISSAN dealer.
To set up the Bluetooth system with a device thefollowing items are available:
• [Scan devices]
Bluetooth devices can be paired with the sys-tem. A maximum of 5 Bluetooth devices can beregistered.
• [Pair device]
Bluetooth devices can be paired with the sys-tem. A maximum of 5 Bluetooth devices can beregistered.
• [Sel. device]
Paired Bluetooth devices are listed and can beselected for connection.
• [Del. device]
A registered Bluetooth device can be deleted.
• [Bluetooth]
If this setting is turned off, the connection be-tween the Bluetooth devices and the in-vehicleBluetooth module will be cancelled.
[Scan devices]:
1) Press the button. Select [Scan device]The audio unit searches bluetooth devices andshows all visible devices.
Make sure your Bluetooth device is visible at thistime.
2) Select the device to be paired.Use the <MENU> dial and press to select.
3) The pairing procedure may depend on the de-vice to be connected:
1) Device without PIN code:
The Bluetooth connection will be automati-cally connected without any further input.
2) Device with PIN code:Two different ways of pairing are possibledepending on the device:
– Type A:The message [To pair] [Enter Pin] 0000will be displayed.Confirm the PIN code on the device.The Bluetooth connection will be made.
– Type B:The message [Pairing request] [Confirmpassword] together with a 6 digit codewill be displayed. The unique and identi-cal code should be displayed on the de-vice. If the code is identical confirm on thedevice.The Bluetooth connection will be made.
[Pair device]:
• Turn the audio unit Bluetooth® on. See [Blue-tooth] description.
• Use the audio unit to pair:Press the button. Select the [Pair Device]key.The pairing procedure depends on the Blue-tooth® device to be connected:
1) Device without PIN code:
The Bluetooth® connection will be automati-cally connected without any further input.
2) Device with PIN code:Two different ways of pairing are possibledepending on the device, for the correct pro-cedure details, see “[Scan devices]” earlierin this section.
• Use the Bluetooth® audio/mobile phone deviceto pair:
1) Follow the instructions in the owner’s manualfor the Bluetooth® enabled device to searchfor the audio unit.If the search mode finds the audio unit it willbe shown on the device display.
Display screen, heater and air conditioner, and audio system 4-33
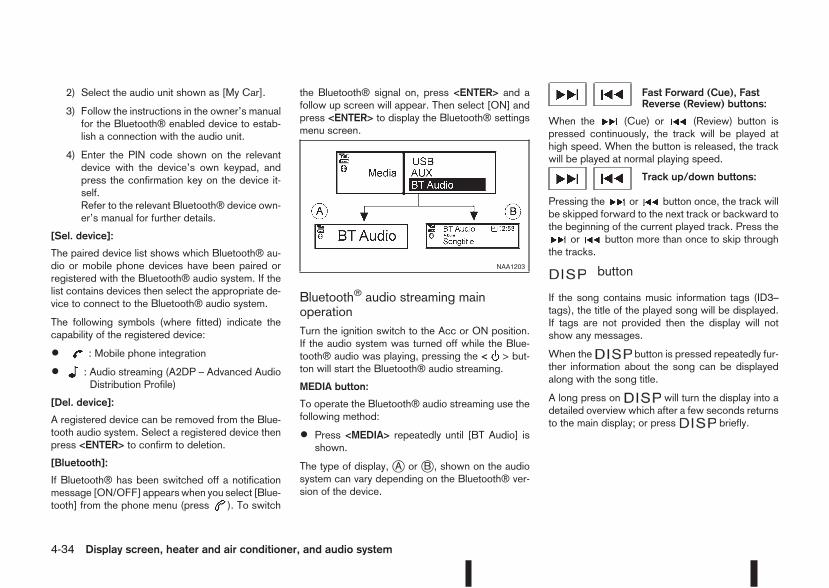
2) Select the audio unit shown as [My Car].
3) Follow the instructions in the owner’s manualfor the Bluetooth® enabled device to estab-lish a connection with the audio unit.
4) Enter the PIN code shown on the relevantdevice with the device’s own keypad, andpress the confirmation key on the device it-self.Refer to the relevant Bluetooth® device own-er’s manual for further details.
[Sel. device]:
The paired device list shows which Bluetooth® au-dio or mobile phone devices have been paired orregistered with the Bluetooth® audio system. If thelist contains devices then select the appropriate de-vice to connect to the Bluetooth® audio system.
The following symbols (where fitted) indicate thecapability of the registered device:
• : Mobile phone integration
• : Audio streaming (A2DP – Advanced AudioDistribution Profile)
[Del. device]:
A registered device can be removed from the Blue-tooth audio system. Select a registered device thenpress <ENTER> to confirm to deletion.
[Bluetooth]:
If Bluetooth® has been switched off a notificationmessage [ON/OFF] appearswhen you select [Blue-tooth] from the phone menu (press ). To switch
the Bluetooth® signal on, press <ENTER> and afollow up screen will appear. Then select [ON] andpress <ENTER> to display the Bluetooth® settingsmenu screen.
Bluetooth® audio streaming mainoperationTurn the ignition switch to the Acc or ON position.If the audio system was turned off while the Blue-tooth® audio was playing, pressing the < > but-ton will start the Bluetooth® audio streaming.
MEDIA button:
To operate the Bluetooth® audio streaming use thefollowing method:
• Press <MEDIA> repeatedly until [BT Audio] isshown.
The type of display, jA or jB , shown on the audiosystem can vary depending on the Bluetooth® ver-sion of the device.
Fast Forward (Cue), FastReverse (Review) buttons:
When the (Cue) or (Review) button ispressed continuously, the track will be played athigh speed. When the button is released, the trackwill be played at normal playing speed.
Track up/down buttons:
Pressing the or button once, the track willbe skipped forward to the next track or backward tothe beginning of the current played track. Press the
or button more than once to skip throughthe tracks.
m button
If the song contains music information tags (ID3–tags), the title of the played song will be displayed.If tags are not provided then the display will notshow any messages.
When the button is pressed repeatedly fur-ther information about the song can be displayedalong with the song title.
A long press on will turn the display into adetailed overview which after a few seconds returnsto the main display; or press briefly.
NAA1203
4-34 Display screen, heater and air conditioner, and audio system
Bluetooth® mobile phone featureThis system offers a hands-free facility for your mo-bile telephone with Bluetooth® to enhance drivingsafety, and comfort.For details, see “Mobile phone integration for FMAM radio with CD player (where fitted)” later in thissection.
Display screen, heater and air conditioner, and audio system 4-35
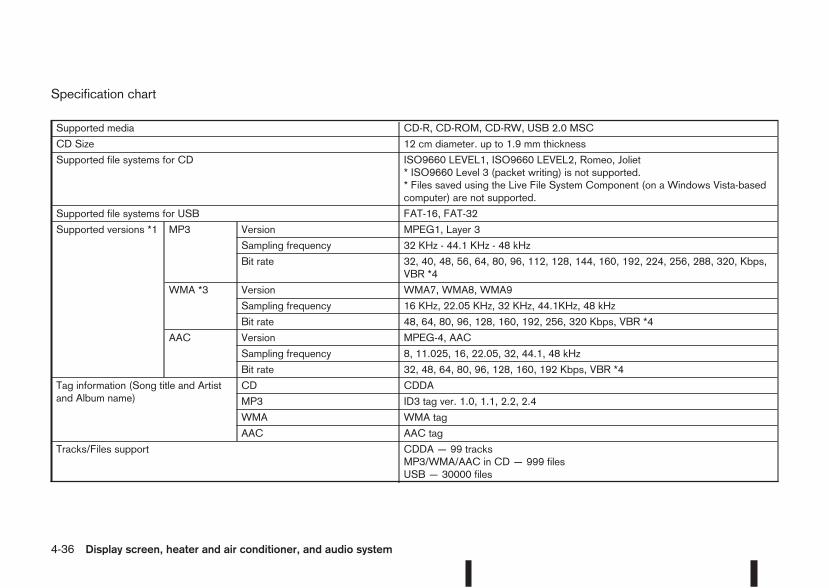
Specification chart
Supported media CD-R, CD-ROM, CD-RW, USB 2.0 MSC
CD Size 12 cm diameter. up to 1.9 mm thickness
Supported file systems for CD ISO9660 LEVEL1, ISO9660 LEVEL2, Romeo, Joliet* ISO9660 Level 3 (packet writing) is not supported.* Files saved using the Live File System Component (on a Windows Vista-basedcomputer) are not supported.
Supported file systems for USB FAT-16, FAT-32
Supported versions *1 MP3 Version MPEG1, Layer 3
Sampling frequency 32 KHz - 44.1 KHz - 48 kHz
Bit rate 32, 40, 48, 56, 64, 80, 96, 112, 128, 144, 160, 192, 224, 256, 288, 320, Kbps,VBR *4
WMA *3 Version WMA7, WMA8, WMA9
Sampling frequency 16 KHz, 22.05 KHz, 32 KHz, 44.1KHz, 48 kHz
Bit rate 48, 64, 80, 96, 128, 160, 192, 256, 320 Kbps, VBR *4
AAC Version MPEG-4, AAC
Sampling frequency 8, 11.025, 16, 22.05, 32, 44.1, 48 kHz
Bit rate 32, 48, 64, 80, 96, 128, 160, 192 Kbps, VBR *4
Tag information (Song title and Artistand Album name)
CD CDDA
MP3 ID3 tag ver. 1.0, 1.1, 2.2, 2.4
WMA WMA tag
AAC AAC tag
Tracks/Files support CDDA — 99 tracksMP3/WMA/AAC in CD — 999 filesUSB — 30000 files
4-36 Display screen, heater and air conditioner, and audio system
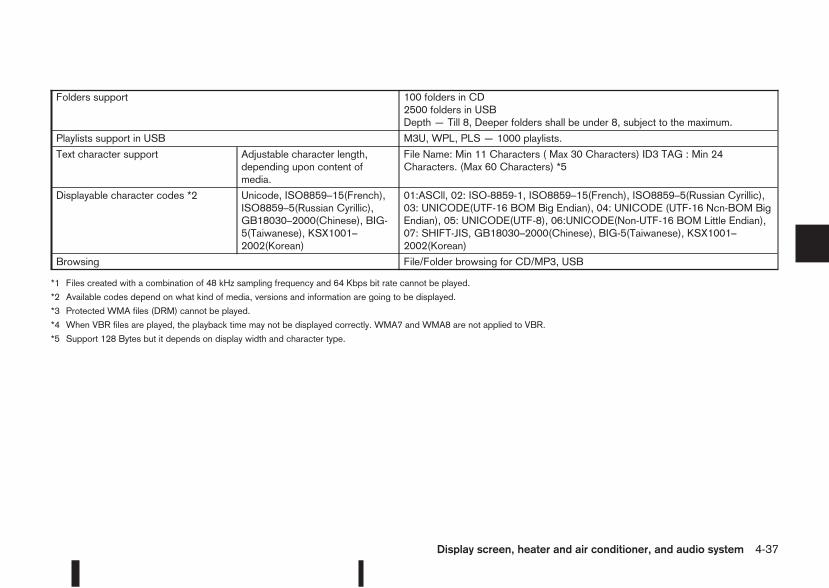
Folders support 100 folders in CD2500 folders in USBDepth — Till 8, Deeper folders shall be under 8, subject to the maximum.
Playlists support in USB M3U, WPL, PLS — 1000 playlists.
Text character support Adjustable character length,depending upon content ofmedia.
File Name: Min 11 Characters ( Max 30 Characters) ID3 TAG : Min 24Characters. (Max 60 Characters) *5
Displayable character codes *2 Unicode, ISO8859–15(French),ISO8859–5(Russian Cyrillic),GB18030–2000(Chinese), BIG-5(Taiwanese), KSX1001–2002(Korean)
01:ASCll, 02: ISO-8859-1, ISO8859–15(French), ISO8859–5(Russian Cyrillic),03: UNICODE(UTF-16 BOM Big Endian), 04: UNICODE (UTF-16 Ncn-BOM BigEndian), 05: UNICODE(UTF-8), 06:UNICODE(Non-UTF-16 BOM Little Endian),07: SHIFT-JIS, GB18030–2000(Chinese), BIG-5(Taiwanese), KSX1001–2002(Korean)
Browsing File/Folder browsing for CD/MP3, USB
*1 Files created with a combination of 48 kHz sampling frequency and 64 Kbps bit rate cannot be played.
*2 Available codes depend on what kind of media, versions and information are going to be displayed.
*3 Protected WMA files (DRM) cannot be played.
*4 When VBR files are played, the playback time may not be displayed correctly. WMA7 and WMA8 are not applied to VBR.
*5 Support 128 Bytes but it depends on display width and character type.
Display screen, heater and air conditioner, and audio system 4-37
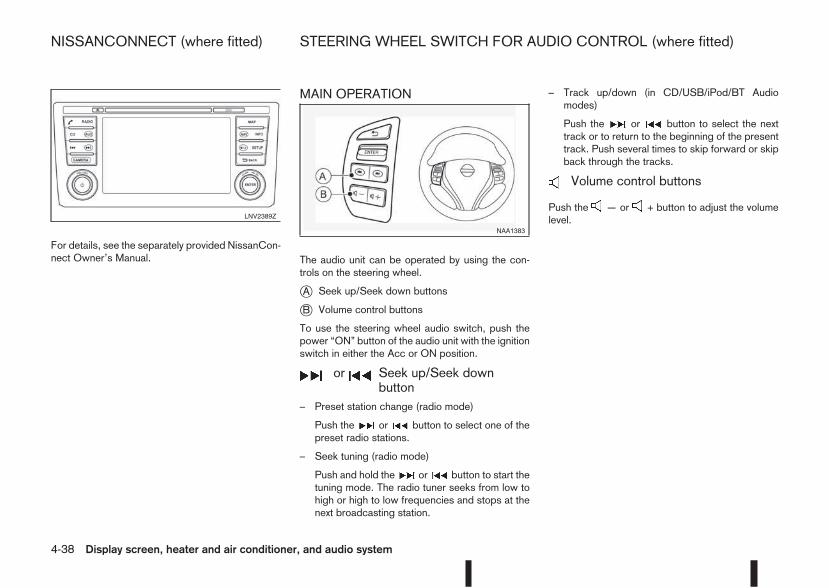
For details, see the separately provided NissanCon-nect Owner’s Manual.
MAIN OPERATION
The audio unit can be operated by using the con-trols on the steering wheel.
jA Seek up/Seek down buttons
jB Volume control buttons
To use the steering wheel audio switch, push thepower “ON” button of the audio unit with the ignitionswitch in either the Acc or ON position.
m or m Seek up/Seek downbutton
– Preset station change (radio mode)
Push the or button to select one of thepreset radio stations.
– Seek tuning (radio mode)
Push and hold the or button to start thetuning mode. The radio tuner seeks from low tohigh or high to low frequencies and stops at thenext broadcasting station.
– Track up/down (in CD/USB/iPod/BT Audiomodes)
Push the or button to select the nexttrack or to return to the beginning of the presenttrack. Push several times to skip forward or skipback through the tracks.
m Volume control buttons
Push the — or + button to adjust the volumelevel.LNV2389Z
NAA1383
NISSANCONNECT (where fitted) STEERING WHEEL SWITCH FOR AUDIO CONTROL (where fitted)
4-38 Display screen, heater and air conditioner, and audio system
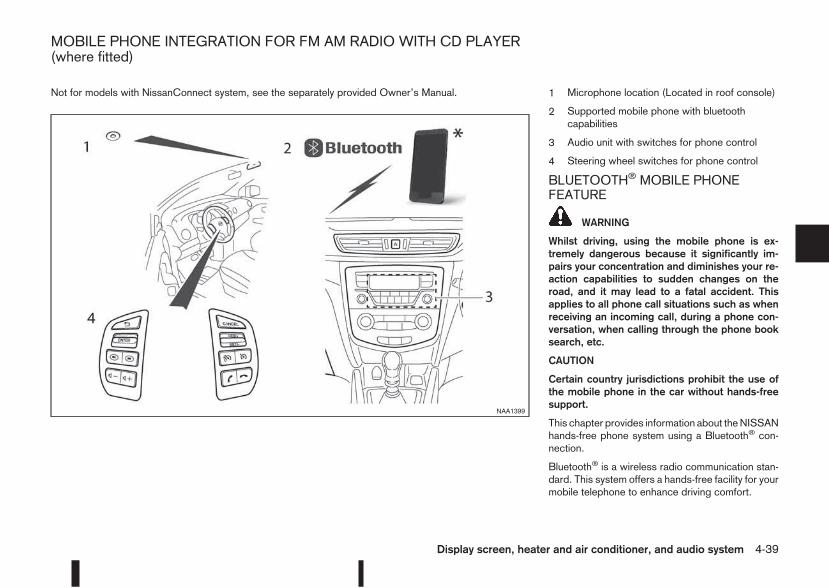
Not for models with NissanConnect system, see the separately provided Owner’s Manual. 1 Microphone location (Located in roof console)
2 Supported mobile phone with bluetoothcapabilities
3 Audio unit with switches for phone control
4 Steering wheel switches for phone control
BLUETOOTH® MOBILE PHONEFEATURE
WARNING
Whilst driving, using the mobile phone is ex-tremely dangerous because it significantly im-pairs your concentration and diminishes your re-action capabilities to sudden changes on theroad, and it may lead to a fatal accident. Thisapplies to all phone call situations such as whenreceiving an incoming call, during a phone con-versation, when calling through the phone booksearch, etc.
CAUTION
Certain country jurisdictions prohibit the use ofthe mobile phone in the car without hands-freesupport.
This chapter provides information about theNISSANhands-free phone system using a Bluetooth® con-nection.
Bluetooth® is a wireless radio communication stan-dard. This system offers a hands-free facility for yourmobile telephone to enhance driving comfort.
NAA1399
MOBILE PHONE INTEGRATION FOR FM AM RADIO WITH CD PLAYER(where fitted)
Display screen, heater and air conditioner, and audio system 4-39

In order to use your mobile phone with the Blue-tooth® of the audio system, the mobile phone mustfirst be setup. For details, see “BLUETOOTH®settings” later in this section. Once it has beensetup, the hands-free mode is automatically acti-vated on the registered mobile phone (via Blue-tooth®) when it comes into range.
A notification message appears on the audio displaywhen the phone is connected, when an incomingcall is being received, as well as when a call is initi-ated.
When a call is active, the audio system, microphone(located in the ceiling in front of the rear view mir-ror), and steering wheel switches enable hands-freecommunication.
If the audio system is in use at the time, the radio,CD, iPod, USB audio, Bluetooth audio or AUXsource mode will be muted and will stay muted untilthe active call has ended.
The Bluetooth® system may not be able to connectwith your mobile phone for the following reasons:
• The mobile phone is too far away from the ve-hicle.
• The Bluetooth® mode on your mobile phone hasnot been activated.
• Your mobile phone has not been paired with theBluetooth® system of the audio unit.
• The mobile phone does not support Bluetooth®
technology (BT Core v2.0).
NOTE
• For models with NissanConnect (Audio withNavigation system) see the separately pro-vided Owner’s Manual.
• For details, see your mobile phone’s Owner’sManual.
• For assistance with your mobile phone inte-gration, please visit your local NISSAN dealer.
j1 Phone book quick search button A-Z
j2 (Back) button
j3 Phone button
j4 <MENU> or <ENTER> button (rotate andpush to select)
BLUETOOTH® settingsEnter the phone setup menu via the (phone)button, select the [Bluetooth] key, and then check ifthe bluetooth is set to on (default setting is on, pushthe <ENTER> button if not).
To setup the Bluetooth system to pair (connect orregister) your preferred mobile phone, follow the fol-lowing procedure.To pair a device, use the [Scan device] key or the[Pair device] key.Up to 5 different Bluetooth devices can be con-nected. However, only one device can be used at atime. If 5 different Bluetooth registered devices areregistered, a new device can only replace one of the5 existing paired devices. Use [Del. device] key todelete one of the existing paired devices. For de-tails, see “BLUETOOTH® settings” later in this sec-tion.
When successfully paired a notification messagewill be displayed, then the audio system display willreturn to the current audio source display. Duringconnection the following status icons will be dis-played (top left of the display): Signal strength( ), Battery status* ( ) and Bluetooth “ON”( ).*: If the low battery message comes on, the Blue-tooth® device must be recharged soon.The pairing procedure and operation may vary ac-cording to device type and compatibility. See theBluetooth® owner’s manual for further details.
NOTE
• For device details, see your audio/mobilephone Owner’s Manual.
• For assistance with the Bluetooth® audio/mobile phone integration, please visit your lo-cal NISSAN dealer.
NAA1398
4-40 Display screen, heater and air conditioner, and audio system
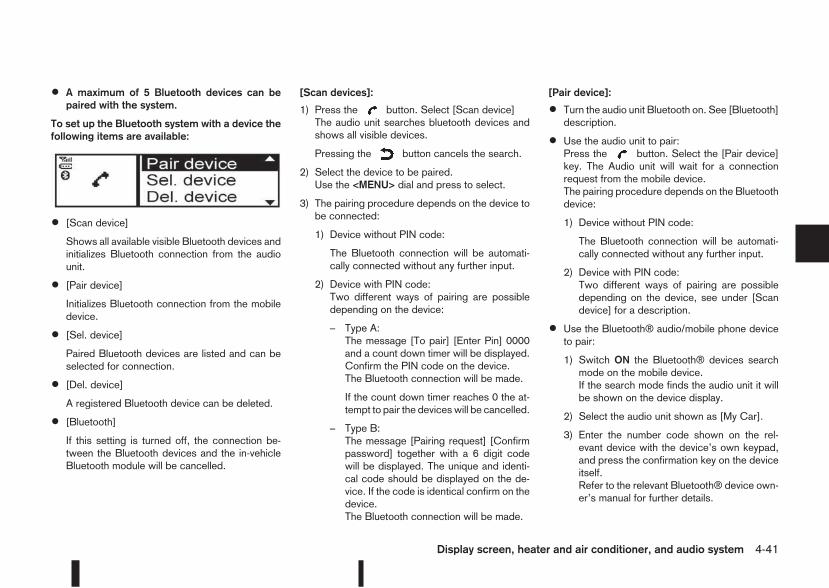
• A maximum of 5 Bluetooth devices can bepaired with the system.
To set up the Bluetooth system with a device thefollowing items are available:
• [Scan device]
Shows all available visible Bluetooth devices andinitializes Bluetooth connection from the audiounit.
• [Pair device]
Initializes Bluetooth connection from the mobiledevice.
• [Sel. device]
Paired Bluetooth devices are listed and can beselected for connection.
• [Del. device]
A registered Bluetooth device can be deleted.
• [Bluetooth]
If this setting is turned off, the connection be-tween the Bluetooth devices and the in-vehicleBluetooth module will be cancelled.
[Scan devices]:
1) Press the button. Select [Scan device]The audio unit searches bluetooth devices andshows all visible devices.
Pressing the button cancels the search.
2) Select the device to be paired.Use the <MENU> dial and press to select.
3) The pairing procedure depends on the device tobe connected:
1) Device without PIN code:
The Bluetooth connection will be automati-cally connected without any further input.
2) Device with PIN code:Two different ways of pairing are possibledepending on the device:
– Type A:The message [To pair] [Enter Pin] 0000and a count down timer will be displayed.Confirm the PIN code on the device.The Bluetooth connection will be made.
If the count down timer reaches 0 the at-tempt to pair the deviceswill be cancelled.
– Type B:The message [Pairing request] [Confirmpassword] together with a 6 digit codewill be displayed. The unique and identi-cal code should be displayed on the de-vice. If the code is identical confirm on thedevice.The Bluetooth connection will be made.
[Pair device]:
• Turn the audio unit Bluetooth on. See [Bluetooth]description.
• Use the audio unit to pair:Press the button. Select the [Pair device]key. The Audio unit will wait for a connectionrequest from the mobile device.The pairing procedure depends on the Bluetoothdevice:
1) Device without PIN code:
The Bluetooth connection will be automati-cally connected without any further input.
2) Device with PIN code:Two different ways of pairing are possibledepending on the device, see under [Scandevice] for a description.
• Use the Bluetooth® audio/mobile phone deviceto pair:
1) Switch ON the Bluetooth® devices searchmode on the mobile device.If the search mode finds the audio unit it willbe shown on the device display.
2) Select the audio unit shown as [My Car].
3) Enter the number code shown on the rel-evant device with the device’s own keypad,and press the confirmation key on the deviceitself.Refer to the relevant Bluetooth® device own-er’s manual for further details.
Display screen, heater and air conditioner, and audio system 4-41
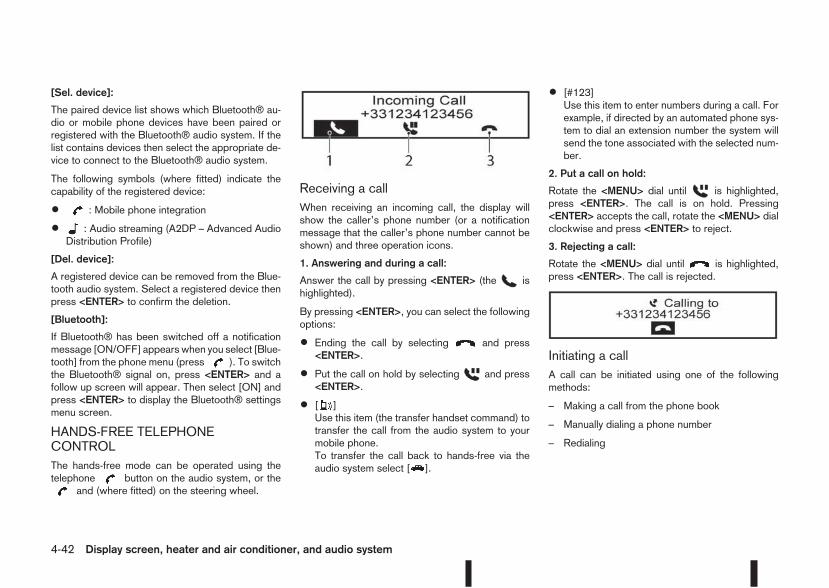
[Sel. device]:
The paired device list shows which Bluetooth® au-dio or mobile phone devices have been paired orregistered with the Bluetooth® audio system. If thelist contains devices then select the appropriate de-vice to connect to the Bluetooth® audio system.
The following symbols (where fitted) indicate thecapability of the registered device:
• : Mobile phone integration
• : Audio streaming (A2DP – Advanced AudioDistribution Profile)
[Del. device]:
A registered device can be removed from the Blue-tooth audio system. Select a registered device thenpress <ENTER> to confirm the deletion.
[Bluetooth]:
If Bluetooth® has been switched off a notificationmessage [ON/OFF] appearswhen you select [Blue-tooth] from the phone menu (press ). To switchthe Bluetooth® signal on, press <ENTER> and afollow up screen will appear. Then select [ON] andpress <ENTER> to display the Bluetooth® settingsmenu screen.
HANDS-FREE TELEPHONECONTROLThe hands-free mode can be operated using thetelephone button on the audio system, or the
and (where fitted) on the steering wheel.
Receiving a callWhen receiving an incoming call, the display willshow the caller’s phone number (or a notificationmessage that the caller’s phone number cannot beshown) and three operation icons.
1. Answering and during a call:
Answer the call by pressing <ENTER> (the ishighlighted).
By pressing <ENTER>, you can select the followingoptions:
• Ending the call by selecting and press<ENTER>.
• Put the call on hold by selecting and press<ENTER>.
• [ ]Use this item (the transfer handset command) totransfer the call from the audio system to yourmobile phone.To transfer the call back to hands-free via theaudio system select [ ].
• [#123]Use this item to enter numbers during a call. Forexample, if directed by an automated phone sys-tem to dial an extension number the system willsend the tone associated with the selected num-ber.
2. Put a call on hold:
Rotate the <MENU> dial until is highlighted,press <ENTER>. The call is on hold. Pressing<ENTER> accepts the call, rotate the <MENU> dialclockwise and press <ENTER> to reject.
3. Rejecting a call:
Rotate the <MENU> dial until is highlighted,press <ENTER>. The call is rejected.
Initiating a callA call can be initiated using one of the followingmethods:
– Making a call from the phone book
– Manually dialing a phone number
– Redialing
4-42 Display screen, heater and air conditioner, and audio system
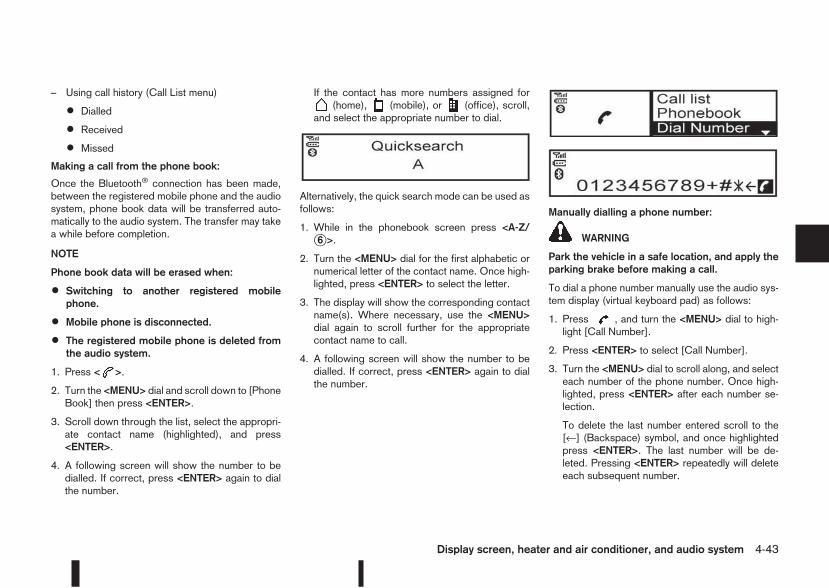
– Using call history (Call List menu)
• Dialled
• Received
• Missed
Making a call from the phone book:
Once the Bluetooth® connection has been made,between the registered mobile phone and the audiosystem, phone book data will be transferred auto-matically to the audio system. The transfer may takea while before completion.
NOTE
Phone book data will be erased when:
• Switching to another registered mobilephone.
• Mobile phone is disconnected.
• The registered mobile phone is deleted fromthe audio system.
1. Press < >.
2. Turn the <MENU> dial and scroll down to [PhoneBook] then press <ENTER>.
3. Scroll down through the list, select the appropri-ate contact name (highlighted), and press<ENTER>.
4. A following screen will show the number to bedialled. If correct, press <ENTER> again to dialthe number.
If the contact has more numbers assigned for(home), (mobile), or (office), scroll,
and select the appropriate number to dial.
Alternatively, the quick search mode can be used asfollows:
1. While in the phonebook screen press <A-Z/j6 >.
2. Turn the <MENU> dial for the first alphabetic ornumerical letter of the contact name. Once high-lighted, press <ENTER> to select the letter.
3. The display will show the corresponding contactname(s). Where necessary, use the <MENU>dial again to scroll further for the appropriatecontact name to call.
4. A following screen will show the number to bedialled. If correct, press <ENTER> again to dialthe number.
Manually dialling a phone number:
WARNING
Park the vehicle in a safe location, and apply theparking brake before making a call.
To dial a phone number manually use the audio sys-tem display (virtual keyboard pad) as follows:
1. Press , and turn the <MENU> dial to high-light [Call Number].
2. Press <ENTER> to select [Call Number].
3. Turn the <MENU> dial to scroll along, and selecteach number of the phone number. Once high-lighted, press <ENTER> after each number se-lection.
To delete the last number entered scroll to the[←] (Backspace) symbol, and once highlightedpress <ENTER>. The last number will be de-leted. Pressing <ENTER> repeatedly will deleteeach subsequent number.
Display screen, heater and air conditioner, and audio system 4-43
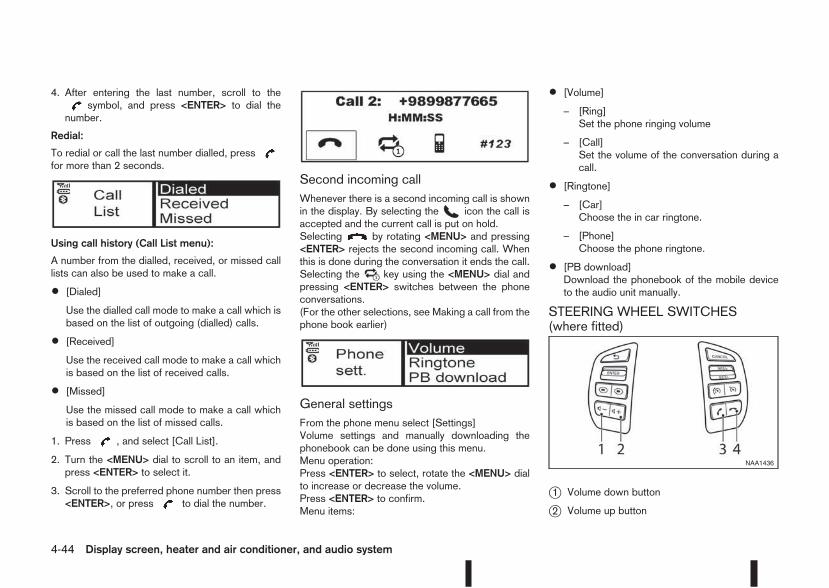
4. After entering the last number, scroll to thesymbol, and press <ENTER> to dial the
number.
Redial:
To redial or call the last number dialled, pressfor more than 2 seconds.
Using call history (Call List menu):
A number from the dialled, received, or missed calllists can also be used to make a call.
• [Dialed]
Use the dialled call mode to make a call which isbased on the list of outgoing (dialled) calls.
• [Received]
Use the received call mode to make a call whichis based on the list of received calls.
• [Missed]
Use the missed call mode to make a call whichis based on the list of missed calls.
1. Press , and select [Call List].
2. Turn the <MENU> dial to scroll to an item, andpress <ENTER> to select it.
3. Scroll to the preferred phone number then press<ENTER>, or press to dial the number.
Second incoming callWhenever there is a second incoming call is shownin the display. By selecting the icon the call isaccepted and the current call is put on hold.Selecting by rotating <MENU> and pressing<ENTER> rejects the second incoming call. Whenthis is done during the conversation it ends the call.Selecting the key using the <MENU> dial andpressing <ENTER> switches between the phoneconversations.(For the other selections, see Making a call from thephone book earlier)
General settingsFrom the phone menu select [Settings]Volume settings and manually downloading thephonebook can be done using this menu.Menu operation:Press <ENTER> to select, rotate the <MENU> dialto increase or decrease the volume.Press <ENTER> to confirm.Menu items:
• [Volume]
– [Ring]Set the phone ringing volume
– [Call]Set the volume of the conversation during acall.
• [Ringtone]
– [Car]Choose the in car ringtone.
– [Phone]Choose the phone ringtone.
• [PB download]Download the phonebook of the mobile deviceto the audio unit manually.
STEERING WHEEL SWITCHES(where fitted)
j1 Volume down button
j2 Volume up button
NAA1436
4-44 Display screen, heater and air conditioner, and audio system
j3 Phone button
j4 Phone end/reject button
The hands-free mode can be operated using thesteering wheel switches.
Volume down buttonPress the volume down button to decrease the vol-ume of the speakers.
Volume up buttonPress the volume up button to increase the volumeof the speakers.
Phone buttonThe phone button allows you to:
• Accept an incoming call by pressing once.
• Redial the last outgoing call by pressing the formore than 2 seconds.
Phone END button
• Reject an incoming call by pressing duringan incoming call.
• End an active call by pressing once.
When installing large capacity wireless equipmentor a car phone in your NISSAN, be sure to observethe following as it may adversely affect the Enginecontrol system and other electronic parts depend-ing on its installation location.
CAUTION
• Keep the antenna as far as possible away fromthe Electric Control Module.
• Also keep the antenna wire more than 20 cm(8 inches) away from the Electro Injection har-ness. Do not route the antenna wire next toany harness.
• Adjust the antenna standing-wave ratio as rec-ommended by the manufacturer.
• Connect the ground wire from the radio chas-sis to the body.
NOTE
For further information, visit theNISSANweb site:www.nissan-europe.com. Select your countryfrom the list and go to the “SERVICES” menu. Ifnot available on the web site, contact a NISSANdealer or qualified workshop.
CAR PHONE OR CB RADIO
Display screen, heater and air conditioner, and audio system 4-45
5 Starting and drivingStarting and driving
Running-in schedule ................................................ 5-2Before starting the engine ........................................ 5-2Precautions when starting and driving ...................... 5-3Exhaust gas (Carbon Monoxide) ......................... 5-3
Tyre Pressure Monitoring System (TPMS)................ 5-4Meter information................................................ 5-7Activation............................................................ 5-7TPMS sensor ID and position recognition ........... 5-7Adjusting TPMS target pressure ......................... 5-8Tyre pressure units ............................................. 5-8[Check cold tyre] message ................................. 5-8TPMS temperature calibration............................. 5-8
On-pavement and off-road driving precautions ......... 5-9Three-way catalyst (Petrol engine models)................ 5-9To help prevent damage ..................................... 5-9
Turbocharger system (Diesel engine models) ........... 5-10Care when driving ................................................... 5-10Engine cold start period...................................... 5-10Loading luggage................................................. 5-10Driving on wet roads........................................... 5-10Driving under winter conditions ........................... 5-10
Ignition switch (where fitted) .................................... 5-11Manual transmission ........................................... 5-11XTRONIC transmission (CVT) ............................ 5-11Steering lock ...................................................... 5-11Key positions ...................................................... 5-11NISSAN Anti-Theft System (NATS) (wherefitted).................................................................. 5-12
Push-button ignition switch (where fitted) ................. 5-12
Precautions on push-button ignition switchoperation ............................................................ 5-12Intelligent Key system ......................................... 5-12Ignition switch positions...................................... 5-13Emergency engine shut off.................................. 5-14Steering lock ...................................................... 5-14Intelligent Key battery discharge.......................... 5-14
Starting engine ........................................................ 5-15Models with Intelligent Key system...................... 5-15Models without Intelligent Key system................. 5-16
Driving the vehicle.................................................... 5-17Driving with manual transmission......................... 5-17Driving with XTRONIC Transmission (CVT) ........ 5-18
Stop/Start System (where fitted) .............................. 5-22Normal operation ................................................ 5-22Precautions ........................................................ 5-24Stop/Start System OFF switch ........................... 5-25Environmental savings ........................................ 5-25
Four-wheel Drive (4WD) (where fitted)..................... 5-264WD mode operations........................................ 5-274WD shift tips .................................................... 5-274WD Mode indicator lights ................................. 5-28Driving four-wheel drive (4WD) safely ................. 5-28
Blind Spot Warning (BSW) system (where fitted)..... 5-30BSW system operation....................................... 5-30BSW driving situations ....................................... 5-32BSW temporary disabled status.......................... 5-32BSW automatic deactivation ............................... 5-33BSW malfunction ............................................... 5-33BSW camera unit maintenance........................... 5-33
Lane Departure Warning (LDW) system (wherefitted)....................................................................... 5-33LDW system operation ....................................... 5-34LDW temporary disabled status .......................... 5-35LDW automatic deactivation ............................... 5-35LDW malfunction................................................ 5-35Multi-sensing camera unit maintenance ............... 5-35
Cruise control (where fitted) .................................... 5-36Precautions on cruise control.............................. 5-36Cruise control system operations ........................ 5-37
Speed limiter (where fitted) ...................................... 5-38Speed limiter operations ..................................... 5-39
Forward emergency braking system (where fitted) ... 5-40System operation................................................ 5-41
Parking.................................................................... 5-43Ultrasonic Parking Sensors (where fitted)................. 5-45Operation ........................................................... 5-45
Intelligent Parking Assist (IPA) (where fitted) ............ 5-46Deactivation of the IPA system............................ 5-47Parking procedure using the IPA system............. 5-48Operating tips..................................................... 5-52
Trailer towing........................................................... 5-54Operating precautions ........................................ 5-54Maximum load limits (for Australia) ...................... 5-55Tyre pressure ..................................................... 5-55Safety chains...................................................... 5-55Trailer brakes...................................................... 5-55Trailer detection (where fitted) ............................ 5-56
Installation of coupling device (except forAustralia) ............................................................ 5-56
Vehicle security........................................................ 5-57Electric power steering system ................................ 5-57Brake system........................................................... 5-58Brake precautions .............................................. 5-58
Anti-lock Braking System (ABS)............................... 5-59Using system...................................................... 5-59Self-test feature .................................................. 5-59Normal operation ................................................ 5-60
Electronic Stability Programme (ESP) system(where fitted) ........................................................... 5-60Electronic Stability Programme (ESP) OFFswitch................................................................. 5-61
Chassis control........................................................ 5-62Active trace control............................................. 5-62Active engine brake (for XTRONIC (CVT)models only) ....................................................... 5-63Active ride control............................................... 5-64
Hill Start Assist (HSA) system.................................. 5-64ECO mode system (where fitted) ............................. 5-65Cold weather driving................................................ 5-66Battery ............................................................... 5-66Engine coolant.................................................... 5-66Tyre equipment................................................... 5-66Special winter equipment.................................... 5-67Corrosion protection........................................... 5-67
During the first 1,600 km (1,000 miles), follow theserecommendations for the future reliability andeconomy of your new vehicle. Failure to follow therecommendations may result in shortened enginelife and reduced engine performance.
• Avoid driving for long periods at a constantspeed, either fast or slow.
• Do not accelerate at full throttle in any gear.
• Avoid quick starts.
• Avoid hard braking as much as possible.
• Do not tow a trailer during the first 800 km (500miles).
NOTE
Models with K9K diesel engine will achieve topperformance only after approximately 5,000 km(3,000 miles).
WARNING
The driving characteristics of your vehicle can bechanged remarkably by any additional load andits distribution as well as by adding optionalequipment (trailer couplings, roof racks, etc.).Your driving style and speed have to be adjustedaccordingly. Especially when carrying heavyloads, your speed must be reduced adequately.
• Make sure the area around the vehicle is free ofobstacles.
• Check fluid levels such as engine oil, coolant,brake and clutch fluid, and window washer fluidas frequently as possible, at least whenever yourefuel.
• Visually inspect tyres for their appearance andcondition. Also check the tyre pressure forproper inflation.
• Maintenance items in the “8. Maintenance anddo-it-yourself” section should be checked peri-odically.
• Check that all windows and light lenses areclean.
• Check that all doors are closed.
• Position the seat and adjust the head restraints.
• Adjust the inside and outside mirrors.
• Fasten your seat belt and ask all passengers todo likewise.
• Check the operation of the warning/indicatorlights when the ignition switch is turned to theON position.
• Do not place hard or heavy objects on the dash-board or rear parcel shelf in order to preventinjury in the event of a sudden stop.
RUNNING-IN SCHEDULE BEFORE STARTING THE ENGINE
5-2 Starting and driving
WARNING
• Do not leave children or adults who wouldnormally require the support of others alonein your vehicle. Pets should also not be leftalone. They could accidentally injure them-selves or others through inadvertent opera-tion of the vehicle. Also, on hot, sunny days,temperatures in a closed vehicle could quicklybecome high enough to cause severe or pos-sibly fatal injuries to people or animals.
• To prevent luggage or packages from slidingforward during braking, do not stack anythingin the cargo area higher than the seatbacks.
• Secure all cargo with ropes or straps to pre-vent it from sliding or shifting.
• Failure to follow proper seating instructionssee “Seats” in the “1. Safety — Seats, Seatbelts and Supplemental Restraint System”section, could result in serious personal injuryin an accident or sudden stop.
EXHAUST GAS (Carbon Monoxide)
WARNING
• Do not breathe exhaust gases; they containcolourless and odourless carbon monoxide.Carbon monoxide is a dangerous gas and cancause unconsciousness or death.
• If you suspect that exhaust fumes are enter-ing the vehicle, drive with all windows fullyopen and have the vehicle inspected immedi-ately.
• Do not run the engine in closed spaces, suchas a garage, for any longer than is absolutelynecessary.
• Do not park the vehicle with the engine run-ning for any extended length of time.
• Keep the back door closed while driving, oth-erwise exhaust gases could be drawn into thepassenger compartment. If you must drive inthis way for some reason, take the followingsteps:
1) Open all the windows.
2) Set the air recirculation mode ( ) to the“OFF” position.
3) Set the fan speed control to the maximumposition to circulate the air.
• If electrical wiring or other cable connectionsmust pass to a trailer through the seal of thebody, follow the manufacturer’s recommen-dations to prevent carbonmonoxide entry intothe vehicle.
• When a vehicle has been stopped in an openarea with its engine running for any significantlength of time, turn the fan on to force outsideair into the vehicle.
• The exhaust system and body should be in-spected by a NISSAN dealer or qualified work-shop whenever:
– the vehicle is raised for service.
– you suspect that exhaust fumes are enter-ing into the passenger compartment.
– you notice a change in the sound of theexhaust system.
– you have had an accident involving dam-age to the exhaust system, underbody, orrear of the vehicle.
PRECAUTIONS WHEN STARTINGAND DRIVING
Starting and driving 5-3
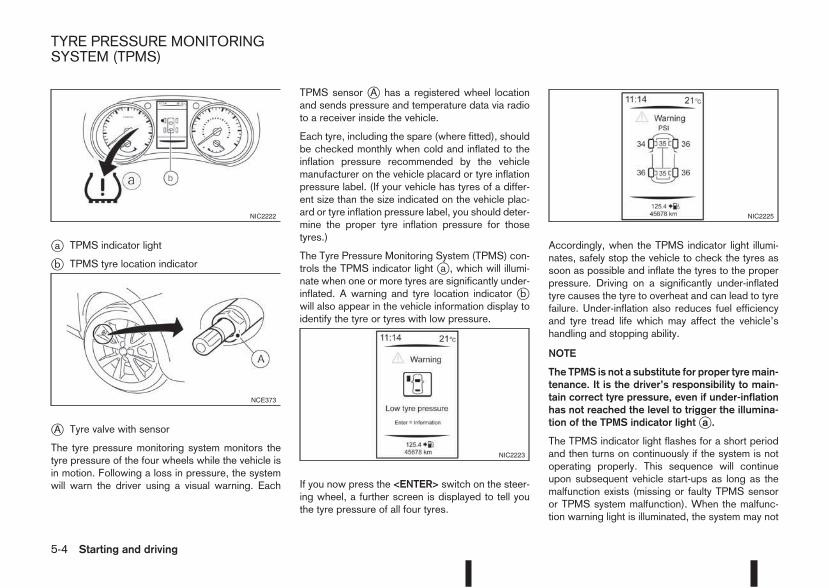
ja TPMS indicator light
jb TPMS tyre location indicator
jA Tyre valve with sensor
The tyre pressure monitoring system monitors thetyre pressure of the four wheels while the vehicle isin motion. Following a loss in pressure, the systemwill warn the driver using a visual warning. Each
TPMS sensor jA has a registered wheel locationand sends pressure and temperature data via radioto a receiver inside the vehicle.
Each tyre, including the spare (where fitted), shouldbe checked monthly when cold and inflated to theinflation pressure recommended by the vehiclemanufacturer on the vehicle placard or tyre inflationpressure label. (If your vehicle has tyres of a differ-ent size than the size indicated on the vehicle plac-ard or tyre inflation pressure label, you should deter-mine the proper tyre inflation pressure for thosetyres.)
The Tyre Pressure Monitoring System (TPMS) con-trols the TPMS indicator light ja , which will illumi-nate when one or more tyres are significantly under-inflated. A warning and tyre location indicator jbwill also appear in the vehicle information display toidentify the tyre or tyres with low pressure.
If you now press the <ENTER> switch on the steer-ing wheel, a further screen is displayed to tell youthe tyre pressure of all four tyres.
Accordingly, when the TPMS indicator light illumi-nates, safely stop the vehicle to check the tyres assoon as possible and inflate the tyres to the properpressure. Driving on a significantly under-inflatedtyre causes the tyre to overheat and can lead to tyrefailure. Under-inflation also reduces fuel efficiencyand tyre tread life which may affect the vehicle’shandling and stopping ability.
NOTE
The TPMS is not a substitute for proper tyremain-tenance. It is the driver’s responsibility to main-tain correct tyre pressure, even if under-inflationhas not reached the level to trigger the illumina-tion of the TPMS indicator lightja .
The TPMS indicator light flashes for a short periodand then turns on continuously if the system is notoperating properly. This sequence will continueupon subsequent vehicle start-ups as long as themalfunction exists (missing or faulty TPMS sensoror TPMS system malfunction). When the malfunc-tion warning light is illuminated, the system may not
NIC2222
NCE373
NIC2223
NIC2225
TYRE PRESSURE MONITORINGSYSTEM (TPMS)
5-4 Starting and driving
be able to detect or signal low tyre pressure asintended. TPMS malfunctions may occur for a vari-ety of reasons including the installation of replace-ment or alternate tyres or wheels on the vehicle thatprevent the TPMS from functioning properly. Alwayscheck the TPMS indicator light after replacing oneor more tyres or wheels on your vehicle to ensurethat the replacement or alternate tyres and wheelsallow the TPMS to continue to function properly.
• The TPMS does not monitor the tyre pressure ofthe spare tyre.
• The TPMS will activate only when the vehicle isdriven at speeds above 25 km/h (16 MPH). Also,this system may not detect a sudden drop in tyrepressure (for example a flat tyre while driving).
• The TPMS indicator light may not automaticallyturn off when the tyre pressure is adjusted. Afterthe tyre is inflated to the recommended COLDtyre pressure, drive the vehicle at speeds above25 km/h (16 MPH) to activate the TPMS. See“TPMS sensor ID and position recognition” laterin this section
• Following a change in the outside temperature,the TPMS indicator light may illuminate even ifthe tyre pressure has been adjusted properly.Adjust the tyre pressure to the recommendedCOLD tyre pressure again when the tyres arecold, and reset the TPMS.For additional information, see “[Check cold tyre]message” later in this section.
WARNING
• If the TPMS indicator light illuminates whiledriving:
– avoid sudden steering manoeuvres
– avoid abrupt braking
– reduce vehicle speed
– pull off the road to a safe location
– stop the vehicle as soon as possible
• Driving with under-inflated tyres may perma-nently damage the tyres and increase the like-lihood of tyre failure. Serious vehicle damagecould occur which may lead to an accidentand could result in serious personal injury.
• Check the tyre pressure for all four tyres. Ad-just the tyre pressure to the recommendedCOLD tyre pressure shown on the tyre plac-ard to turn the TPMS indicator light “OFF”. Incase of a flat tyre, replace it with a spare tyreas soon as possible. (See “Flat tyre” in the“6. In case of emergency” section for chang-ing a flat tyre.)
• When a spare tyre is mounted or a wheel isreplaced, the TPMS will not function and theTPMS indicator light will flash for approxi-mately 1 minute. The light will remain on after1 minute. Be sure to follow all instructions forwheel replacement and mount the TPMS sys-tem correctly.
• Replacing tyreswith those not originally speci-fied by NISSAN could affect the proper opera-tion of the TPMS.
• The Genuine NISSAN Emergency Tyre RepairSealant or equivalent can be used for tempo-rarily repairing a tyre. Do not inject any othertyre liquid or aerosol tyre sealant into thetyres, as this may cause a malfunction of thetyre pressure sensors.
• NISSAN recommends using only GenuineNISSAN Emergency Tyre Sealant providedwith your vehicle. Other tyre sealants maydamage the valve stem seal which can causethe tyre to lose air pressure. Visit a NISSANdealer or qualified workshop as soon as pos-sible after using tyre repair sealant (for mod-els equipped with the emergency tyre punc-ture repair kit).
CAUTION
• The TPMSmay not function properly when thewheels are equipped with tyre chains or thewheels are buried in snow.
• Do not place metalised film or any metal parts(antenna, etc.) on the windows. This maycause poor reception of the signals from thetyre pressure sensors, and the TPMS will notfunction properly.
Starting and driving 5-5
Some devices and transmitters may tempo-rarily interfere with the operation of the TPMSand cause the TPMS indicator light to illumi-nate. Some examples are:
– Facilities or electric devices using similarradio frequencies are near the vehicle.
– If a transmitter set to similar frequencies isbeing used in or near the vehicle.
– If a computer (or similar equipment) or aDC/AC converter is being used in or nearthe vehicle.
– If devices which transmit electrical noiseare connected to the vehicle’s 12V powersupply.
• When inflating the tyres and checking the tyrepressure, never bend the valves.
• Special aluminium valves are fitted to mountthe TPMS sensors on the wheels. The TPMSsensor is fixed at the wheels by a nut. The nutneeds to be correctly fitted at a torque settingof 7.5 ± 0.5 N•m. If the TPMS sensor is tight-ened exceeding the limit, there is a possibilitythe sensor grommet will be damaged. If thesensor is tightened under the limit, there is apossibility of causing an air leak.
• Use Genuine NISSAN valve caps that complywith the factory-fitted valve cap specifications.
• Do not use metal valve caps.
• Fit the valve caps properly. Without the valvecaps the valve and tyre pressure monitor sen-sors could be damaged.
• Do not damage the valves and sensors whenstoring the wheels or fitting different tyres.
• Replace the sensor grommet and washer dur-ing a tyre change. Once they have been re-moved, the sensor grommet and washer can-not be reused and must be replaced. TheTPMS sensors can be used again.
• Use caution when using tyre inflation equip-ment with a rigid air supply tube, as leverageapplied by the long nozzle can damage thevalve stem.
5-6 Starting and driving
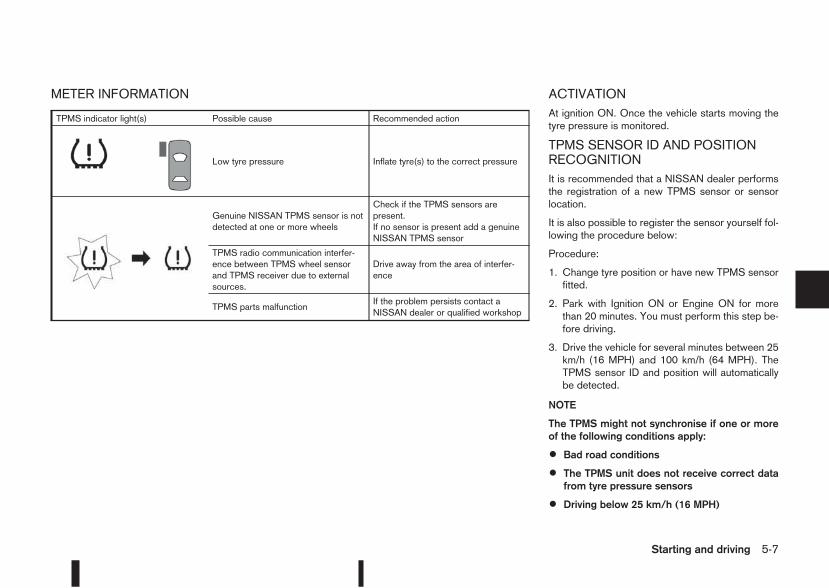
METER INFORMATION ACTIVATIONAt ignition ON. Once the vehicle starts moving thetyre pressure is monitored.
TPMS SENSOR ID AND POSITIONRECOGNITIONIt is recommended that a NISSAN dealer performsthe registration of a new TPMS sensor or sensorlocation.
It is also possible to register the sensor yourself fol-lowing the procedure below:
Procedure:
1. Change tyre position or have new TPMS sensorfitted.
2. Park with Ignition ON or Engine ON for morethan 20 minutes. You must perform this step be-fore driving.
3. Drive the vehicle for several minutes between 25km/h (16 MPH) and 100 km/h (64 MPH). TheTPMS sensor ID and position will automaticallybe detected.
NOTE
The TPMS might not synchronise if one or moreof the following conditions apply:
• Bad road conditions
• The TPMS unit does not receive correct datafrom tyre pressure sensors
• Driving below 25 km/h (16 MPH)
TPMS indicator light(s) Possible cause Recommended action
m Low tyre pressure Inflate tyre(s) to the correct pressure
mGenuine NISSAN TPMS sensor is notdetected at one or more wheels
Check if the TPMS sensors arepresent.If no sensor is present add a genuineNISSAN TPMS sensor
TPMS radio communication interfer-ence between TPMS wheel sensorand TPMS receiver due to externalsources.
Drive away from the area of interfer-ence
TPMS parts malfunctionIf the problem persists contact aNISSAN dealer or qualified workshop
Starting and driving 5-7
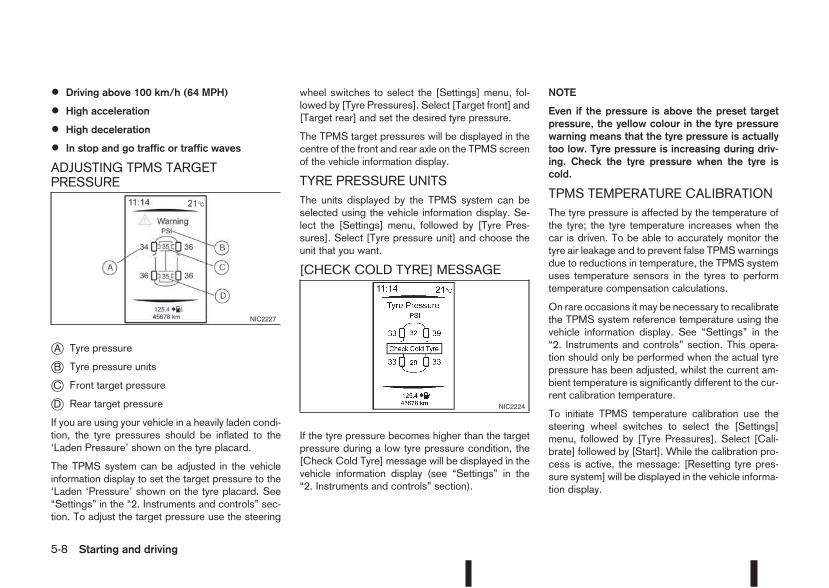
• Driving above 100 km/h (64 MPH)
• High acceleration
• High deceleration
• In stop and go traffic or traffic waves
ADJUSTING TPMS TARGETPRESSURE
jA Tyre pressure
jB Tyre pressure units
jC Front target pressure
jD Rear target pressure
If you are using your vehicle in a heavily laden condi-tion, the tyre pressures should be inflated to the‘Laden Pressure’ shown on the tyre placard.
The TPMS system can be adjusted in the vehicleinformation display to set the target pressure to the‘Laden ‘Pressure’ shown on the tyre placard. See“Settings” in the “2. Instruments and controls” sec-tion. To adjust the target pressure use the steering
wheel switches to select the [Settings] menu, fol-lowed by [Tyre Pressures]. Select [Target front] and[Target rear] and set the desired tyre pressure.
The TPMS target pressures will be displayed in thecentre of the front and rear axle on the TPMS screenof the vehicle information display.
TYRE PRESSURE UNITSThe units displayed by the TPMS system can beselected using the vehicle information display. Se-lect the [Settings] menu, followed by [Tyre Pres-sures]. Select [Tyre pressure unit] and choose theunit that you want.
[CHECK COLD TYRE] MESSAGE
If the tyre pressure becomes higher than the targetpressure during a low tyre pressure condition, the[Check Cold Tyre] message will be displayed in thevehicle information display (see “Settings” in the“2. Instruments and controls” section).
NOTE
Even if the pressure is above the preset targetpressure, the yellow colour in the tyre pressurewarning means that the tyre pressure is actuallytoo low. Tyre pressure is increasing during driv-ing. Check the tyre pressure when the tyre iscold.
TPMS TEMPERATURE CALIBRATIONThe tyre pressure is affected by the temperature ofthe tyre; the tyre temperature increases when thecar is driven. To be able to accurately monitor thetyre air leakage and to prevent false TPMSwarningsdue to reductions in temperature, the TPMS systemuses temperature sensors in the tyres to performtemperature compensation calculations.
On rare occasions it may be necessary to recalibratethe TPMS system reference temperature using thevehicle information display. See “Settings” in the“2. Instruments and controls” section. This opera-tion should only be performed when the actual tyrepressure has been adjusted, whilst the current am-bient temperature is significantly different to the cur-rent calibration temperature.
To initiate TPMS temperature calibration use thesteering wheel switches to select the [Settings]menu, followed by [Tyre Pressures]. Select [Cali-brate] followed by [Start]. While the calibration pro-cess is active, the message: [Resetting tyre pres-sure system] will be displayed in the vehicle informa-tion display.
NIC2227
NIC2224
5-8 Starting and driving
Utility vehicles have a significantly higher rolloverrate than other types of vehicles.
They have higher ground clearance than passengercars to make them capable of performing in a widevariety of on-pavement and off-road applications.This gives them a higher centre of gravity than ordi-nary cars. An advantage of higher ground clearanceis a better view of the road, allowing you to antici-pate problems. However, they are not designed forcornering at the same speeds as conventional two-wheel drive (2WD) vehicles any more than low-slungsports cars are designed to perform satisfactorilyunder off-road conditions. If possible, avoid sharpturns or abrupt manoeuvres, particularly at highspeeds. As with other vehicles of this type, failure tooperate this vehicle correctly may result in loss ofcontrol or vehicle rollover. In a rollover accident anunbelted person is significantly more likely to beinjured than a person who is wearing a seat belt.
NISSAN Blue Citizenship
The three-way catalyst is an emission control deviceinstalled in the exhaust system. In the converter,exhaust gases are burned at high temperatures tohelp reduce pollutants.
CAUTION
• The exhaust gas and the exhaust system arevery hot. While the engine is running, keeppeople or flammable materials away from theexhaust pipe.
• Do not stop or park the vehicle over flam-mable materials such as dry grass, waste pa-per or rags, as they may burn easily.
• When parking, ensure that people or flam-mable materials are kept away from the ex-haust pipe.
TO HELP PREVENT DAMAGECAUTION
• Use UNLEADED PETROL ONLY, specificallythe recommended type. For details, see “Ca-pacities and recommended fuel/lubricants” inthe “9. Technical information” section.
• Do not use leaded petrol. Leaded petrol willseriously damage three-way catalyst.
Deposits from leaded petrol will seriously re-duce the three-way catalyst’s ability to helpreduce exhaust pollutants.
• Keep your engine tuned up. Malfunctions inthe ignition, fuel injection, or electrical sys-tems can cause over-rich fuel flow into theconverter, causing it to overheat.
• Avoid driving with an extremely low fuel level.Running out of fuel could cause the engine tomisfire, damaging the three-way catalyst.
• Do not keep driving if the engine misfires, orif noticeable loss of performance or other un-usual operating conditions are detected. Havethe vehicle inspected promptly by a NISSANdealer or qualified workshop.
• Do not race the engine while warming it up.
• Do not push or tow your vehicle to start theengine.
ON-PAVEMENT AND OFF-ROADDRIVING PRECAUTIONS
THREE-WAY CATALYST (Petrolengine models)
Starting and driving 5-9
The turbocharger system uses engine oil for lubrica-tion and cooling of its rotating components. The tur-bocharger turbine turns at extremely high speedsand it can reach an extremely high temperature. It isessential to maintain a flow of clean oil through theturbocharger system. A sudden interruption to theoil supply may cause a malfunction in the turbo-charger.
To ensure prolonged life and performance of theturbocharger, it is essential to comply with the fol-lowing maintenance procedure:
CAUTION
• Change the engine oil of the turbo-chargeddiesel engine as prescribed. See the sepa-rately provided Warranty Information & Main-tenance Booklet for additional information.
• Use only the recommended engine oil. See“Capacities and recommended fuel/lubricants” in the “9. Technical information”section.
• If the engine has been operating at high rpmfor an extended period of time, let it idle for afew minutes prior to shutdown.
• Do not accelerate the engine to high rpm im-mediately after starting it.
Driving your vehicle to fit the circumstances is es-sential for your safety and comfort. As a driver, youshould be the one who knows best how to drive inthe given circumstances.
ENGINE COLD START PERIODDue to the higher engine speeds when the engine iscold, extra caution must be exercised when select-ing a gear during the engine warm-up period afterstarting the engine.
LOADING LUGGAGELoads, their distribution and the attachment of equip-ment (coupling devices, roof luggage carriers, etc.)will change the driving characteristics of the vehicleconsiderably. Driving style and speed must be ad-justed accordingly.
DRIVING ON WET ROADS
• Avoid starting off, accelerating and stopping sud-denly.
• Avoid sharp turns or lane changes.
• Extra distance should be kept from the vehicle infront.
• When water covers the road surface in puddles,small streams, etc, REDUCE SPEED to preventaquaplaning which will cause skidding and lossof control. Worn tyres increase this risk.
DRIVING UNDER WINTERCONDITIONS
• Drive safely.
• Avoid starting off, accelerating or stopping sud-denly.
• Avoid sharp turns or lane changes.
• Avoid sudden steering actions.
• Extra distance should be kept from the vehicle infront.
TURBOCHARGER SYSTEM(Diesel engine models)
CARE WHEN DRIVING
5-10 Starting and driving
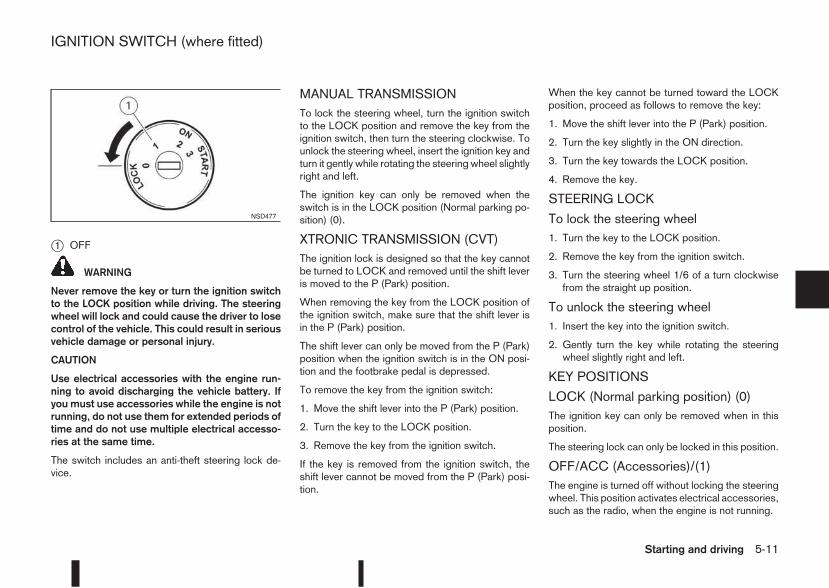
j1 OFF
WARNING
Never remove the key or turn the ignition switchto the LOCK position while driving. The steeringwheel will lock and could cause the driver to losecontrol of the vehicle. This could result in seriousvehicle damage or personal injury.
CAUTION
Use electrical accessories with the engine run-ning to avoid discharging the vehicle battery. Ifyou must use accessories while the engine is notrunning, do not use them for extended periods oftime and do not use multiple electrical accesso-ries at the same time.
The switch includes an anti-theft steering lock de-vice.
MANUAL TRANSMISSIONTo lock the steering wheel, turn the ignition switchto the LOCK position and remove the key from theignition switch, then turn the steering clockwise. Tounlock the steering wheel, insert the ignition key andturn it gently while rotating the steering wheel slightlyright and left.
The ignition key can only be removed when theswitch is in the LOCK position (Normal parking po-sition) (0).
XTRONIC TRANSMISSION (CVT)The ignition lock is designed so that the key cannotbe turned to LOCK and removed until the shift leveris moved to the P (Park) position.
When removing the key from the LOCK position ofthe ignition switch, make sure that the shift lever isin the P (Park) position.
The shift lever can only be moved from the P (Park)position when the ignition switch is in the ON posi-tion and the footbrake pedal is depressed.
To remove the key from the ignition switch:
1. Move the shift lever into the P (Park) position.
2. Turn the key to the LOCK position.
3. Remove the key from the ignition switch.
If the key is removed from the ignition switch, theshift lever cannot be moved from the P (Park) posi-tion.
When the key cannot be turned toward the LOCKposition, proceed as follows to remove the key:
1. Move the shift lever into the P (Park) position.
2. Turn the key slightly in the ON direction.
3. Turn the key towards the LOCK position.
4. Remove the key.
STEERING LOCK
To lock the steering wheel1. Turn the key to the LOCK position.
2. Remove the key from the ignition switch.
3. Turn the steering wheel 1/6 of a turn clockwisefrom the straight up position.
To unlock the steering wheel1. Insert the key into the ignition switch.
2. Gently turn the key while rotating the steeringwheel slightly right and left.
KEY POSITIONS
LOCK (Normal parking position) (0)The ignition key can only be removed when in thisposition.
The steering lock can only be locked in this position.
OFF/ACC (Accessories)/(1)The engine is turned off without locking the steeringwheel. This position activates electrical accessories,such as the radio, when the engine is not running.
NSD477
IGNITION SWITCH (where fitted)
Starting and driving 5-11
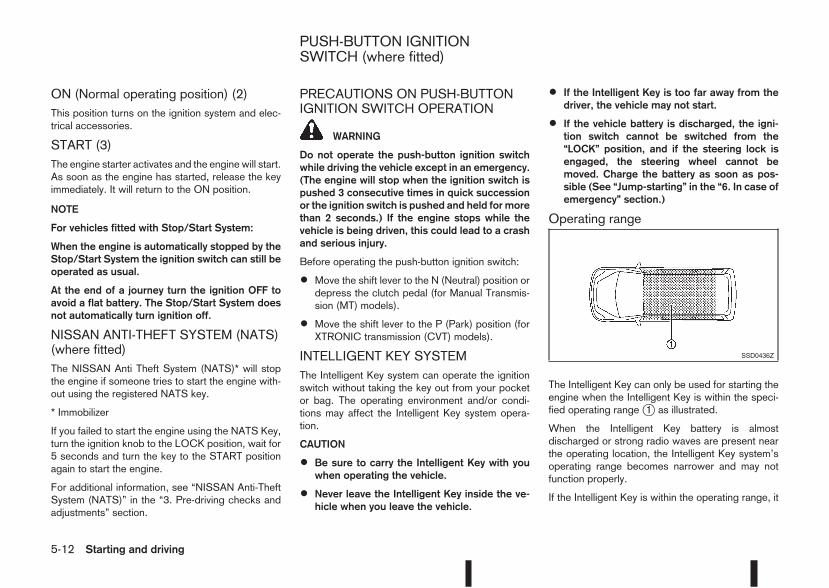
ON (Normal operating position) (2)This position turns on the ignition system and elec-trical accessories.
START (3)The engine starter activates and the engine will start.As soon as the engine has started, release the keyimmediately. It will return to the ON position.
NOTE
For vehicles fitted with Stop/Start System:
When the engine is automatically stopped by theStop/Start System the ignition switch can still beoperated as usual.
At the end of a journey turn the ignition OFF toavoid a flat battery. The Stop/Start System doesnot automatically turn ignition off.
NISSAN ANTI-THEFT SYSTEM (NATS)(where fitted)The NISSAN Anti Theft System (NATS)* will stopthe engine if someone tries to start the engine with-out using the registered NATS key.
* Immobilizer
If you failed to start the engine using the NATS Key,turn the ignition knob to the LOCK position, wait for5 seconds and turn the key to the START positionagain to start the engine.
For additional information, see “NISSAN Anti-TheftSystem (NATS)” in the “3. Pre-driving checks andadjustments” section.
PRECAUTIONS ON PUSH-BUTTONIGNITION SWITCH OPERATION
WARNING
Do not operate the push-button ignition switchwhile driving the vehicle except in an emergency.(The engine will stop when the ignition switch ispushed 3 consecutive times in quick successionor the ignition switch is pushed and held for morethan 2 seconds.) If the engine stops while thevehicle is being driven, this could lead to a crashand serious injury.
Before operating the push-button ignition switch:
• Move the shift lever to the N (Neutral) position ordepress the clutch pedal (for Manual Transmis-sion (MT) models).
• Move the shift lever to the P (Park) position (forXTRONIC transmission (CVT) models).
INTELLIGENT KEY SYSTEMThe Intelligent Key system can operate the ignitionswitch without taking the key out from your pocketor bag. The operating environment and/or condi-tions may affect the Intelligent Key system opera-tion.
CAUTION
• Be sure to carry the Intelligent Key with youwhen operating the vehicle.
• Never leave the Intelligent Key inside the ve-hicle when you leave the vehicle.
• If the Intelligent Key is too far away from thedriver, the vehicle may not start.
• If the vehicle battery is discharged, the igni-tion switch cannot be switched from the“LOCK” position, and if the steering lock isengaged, the steering wheel cannot bemoved. Charge the battery as soon as pos-sible (See “Jump-starting” in the “6. In case ofemergency” section.)
Operating range
The Intelligent Key can only be used for starting theengine when the Intelligent Key is within the speci-fied operating rangej1 as illustrated.
When the Intelligent Key battery is almostdischarged or strong radio waves are present nearthe operating location, the Intelligent Key system’soperating range becomes narrower and may notfunction properly.
If the Intelligent Key is within the operating range, it
SSD0436Z
PUSH-BUTTON IGNITIONSWITCH (where fitted)
5-12 Starting and driving
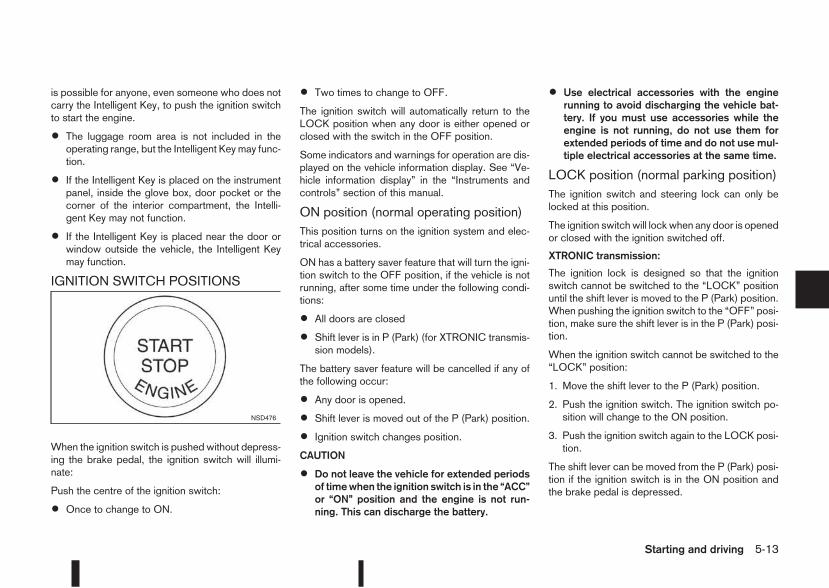
is possible for anyone, even someone who does notcarry the Intelligent Key, to push the ignition switchto start the engine.
• The luggage room area is not included in theoperating range, but the Intelligent Key may func-tion.
• If the Intelligent Key is placed on the instrumentpanel, inside the glove box, door pocket or thecorner of the interior compartment, the Intelli-gent Key may not function.
• If the Intelligent Key is placed near the door orwindow outside the vehicle, the Intelligent Keymay function.
IGNITION SWITCH POSITIONS
When the ignition switch is pushed without depress-ing the brake pedal, the ignition switch will illumi-nate:
Push the centre of the ignition switch:
• Once to change to ON.
• Two times to change to OFF.
The ignition switch will automatically return to theLOCK position when any door is either opened orclosed with the switch in the OFF position.
Some indicators and warnings for operation are dis-played on the vehicle information display. See “Ve-hicle information display” in the “Instruments andcontrols” section of this manual.
ON position (normal operating position)This position turns on the ignition system and elec-trical accessories.
ON has a battery saver feature that will turn the igni-tion switch to the OFF position, if the vehicle is notrunning, after some time under the following condi-tions:
• All doors are closed
• Shift lever is in P (Park) (for XTRONIC transmis-sion models).
The battery saver feature will be cancelled if any ofthe following occur:
• Any door is opened.
• Shift lever is moved out of the P (Park) position.
• Ignition switch changes position.
CAUTION
• Do not leave the vehicle for extended periodsof timewhen the ignition switch is in the “ACC”or “ON” position and the engine is not run-ning. This can discharge the battery.
• Use electrical accessories with the enginerunning to avoid discharging the vehicle bat-tery. If you must use accessories while theengine is not running, do not use them forextended periods of time and do not use mul-tiple electrical accessories at the same time.
LOCK position (normal parking position)The ignition switch and steering lock can only belocked at this position.
The ignition switchwill lockwhen any door is openedor closed with the ignition switched off.
XTRONIC transmission:
The ignition lock is designed so that the ignitionswitch cannot be switched to the “LOCK” positionuntil the shift lever is moved to the P (Park) position.When pushing the ignition switch to the “OFF” posi-tion, make sure the shift lever is in the P (Park) posi-tion.
When the ignition switch cannot be switched to the“LOCK” position:
1. Move the shift lever to the P (Park) position.
2. Push the ignition switch. The ignition switch po-sition will change to the ON position.
3. Push the ignition switch again to the LOCK posi-tion.
The shift lever can be moved from the P (Park) posi-tion if the ignition switch is in the ON position andthe brake pedal is depressed.
NSD476
Starting and driving 5-13
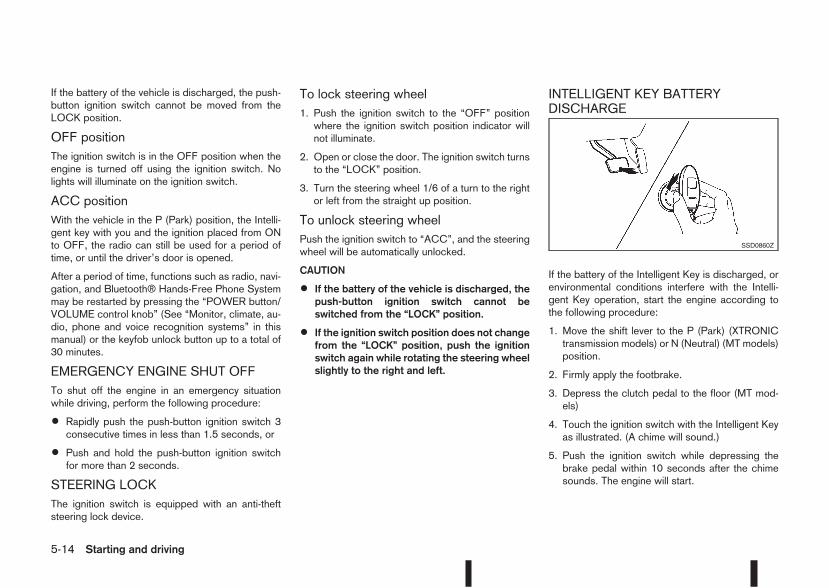
If the battery of the vehicle is discharged, the push-button ignition switch cannot be moved from theLOCK position.
OFF positionThe ignition switch is in the OFF position when theengine is turned off using the ignition switch. Nolights will illuminate on the ignition switch.
ACC positionWith the vehicle in the P (Park) position, the Intelli-gent key with you and the ignition placed from ONto OFF, the radio can still be used for a period oftime, or until the driver’s door is opened.
After a period of time, functions such as radio, navi-gation, and Bluetooth® Hands-Free Phone Systemmay be restarted by pressing the “POWER button/VOLUME control knob” (See “Monitor, climate, au-dio, phone and voice recognition systems” in thismanual) or the keyfob unlock button up to a total of30 minutes.
EMERGENCY ENGINE SHUT OFFTo shut off the engine in an emergency situationwhile driving, perform the following procedure:
• Rapidly push the push-button ignition switch 3consecutive times in less than 1.5 seconds, or
• Push and hold the push-button ignition switchfor more than 2 seconds.
STEERING LOCKThe ignition switch is equipped with an anti-theftsteering lock device.
To lock steering wheel1. Push the ignition switch to the “OFF” positionwhere the ignition switch position indicator willnot illuminate.
2. Open or close the door. The ignition switch turnsto the “LOCK” position.
3. Turn the steering wheel 1/6 of a turn to the rightor left from the straight up position.
To unlock steering wheelPush the ignition switch to “ACC”, and the steeringwheel will be automatically unlocked.
CAUTION
• If the battery of the vehicle is discharged, thepush-button ignition switch cannot beswitched from the “LOCK” position.
• If the ignition switch position does not changefrom the “LOCK” position, push the ignitionswitch again while rotating the steering wheelslightly to the right and left.
INTELLIGENT KEY BATTERYDISCHARGE
If the battery of the Intelligent Key is discharged, orenvironmental conditions interfere with the Intelli-gent Key operation, start the engine according tothe following procedure:
1. Move the shift lever to the P (Park) (XTRONICtransmission models) or N (Neutral) (MT models)position.
2. Firmly apply the footbrake.
3. Depress the clutch pedal to the floor (MT mod-els)
4. Touch the ignition switch with the Intelligent Keyas illustrated. (A chime will sound.)
5. Push the ignition switch while depressing thebrake pedal within 10 seconds after the chimesounds. The engine will start.
SSD0860Z
5-14 Starting and driving
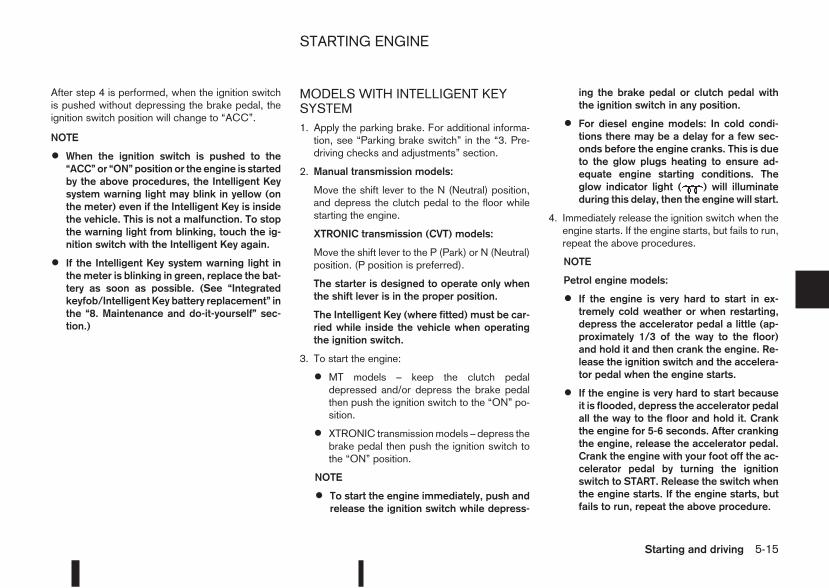
After step 4 is performed, when the ignition switchis pushed without depressing the brake pedal, theignition switch position will change to “ACC”.
NOTE
• When the ignition switch is pushed to the“ACC” or “ON” position or the engine is startedby the above procedures, the Intelligent Keysystem warning light may blink in yellow (onthe meter) even if the Intelligent Key is insidethe vehicle. This is not a malfunction. To stopthe warning light from blinking, touch the ig-nition switch with the Intelligent Key again.
• If the Intelligent Key system warning light inthe meter is blinking in green, replace the bat-tery as soon as possible. (See “Integratedkeyfob/Intelligent Key battery replacement” inthe “8. Maintenance and do-it-yourself” sec-tion.)
MODELS WITH INTELLIGENT KEYSYSTEM1. Apply the parking brake. For additional informa-tion, see “Parking brake switch” in the “3. Pre-driving checks and adjustments” section.
2. Manual transmission models:
Move the shift lever to the N (Neutral) position,and depress the clutch pedal to the floor whilestarting the engine.
XTRONIC transmission (CVT) models:
Move the shift lever to the P (Park) or N (Neutral)position. (P position is preferred).
The starter is designed to operate only whenthe shift lever is in the proper position.
The Intelligent Key (where fitted) must be car-ried while inside the vehicle when operatingthe ignition switch.
3. To start the engine:
• MT models – keep the clutch pedaldepressed and/or depress the brake pedalthen push the ignition switch to the “ON” po-sition.
• XTRONIC transmissionmodels – depress thebrake pedal then push the ignition switch tothe “ON” position.
NOTE
• To start the engine immediately, push andrelease the ignition switch while depress-
ing the brake pedal or clutch pedal withthe ignition switch in any position.
• For diesel engine models: In cold condi-tions there may be a delay for a few sec-onds before the engine cranks. This is dueto the glow plugs heating to ensure ad-equate engine starting conditions. Theglow indicator light ( ) will illuminateduring this delay, then the engine will start.
4. Immediately release the ignition switch when theengine starts. If the engine starts, but fails to run,repeat the above procedures.
NOTE
Petrol engine models:
• If the engine is very hard to start in ex-tremely cold weather or when restarting,depress the accelerator pedal a little (ap-proximately 1/3 of the way to the floor)and hold it and then crank the engine. Re-lease the ignition switch and the accelera-tor pedal when the engine starts.
• If the engine is very hard to start becauseit is flooded, depress the accelerator pedalall the way to the floor and hold it. Crankthe engine for 5-6 seconds. After crankingthe engine, release the accelerator pedal.Crank the engine with your foot off the ac-celerator pedal by turning the ignitionswitch to START. Release the switch whenthe engine starts. If the engine starts, butfails to run, repeat the above procedure.
STARTING ENGINE
Starting and driving 5-15

CAUTION
• As soon as the engine has started, releasethe ignition switch immediately.
• Do not operate the starter for more than15 seconds at a time. If the engine doesnot start, turn the ignition switch to the“OFF” position and wait 10 seconds (Petrolengine models) or 20 seconds (Diesel en-gine models) before cranking again, oth-erwise the starter could be damaged.
• If it becomes necessary to start the enginewith a booster battery and jumper cables,the instructions and cautions contained inthe “6. In case of emergency” sectionshould be carefully followed.
5. After starting, allow the engine to idle for at least30 seconds to warm-up. Drive at moderatespeeds for a short distance first, especially incold weather.
CAUTION
Do not leave the vehicle unattended while theengine is warming up.
6. To stop the engine:
– Manual transmission models: apply the park-ing brake and push the ignition switch to the“OFF” position.
– XTRONIC transmission models: move theshift lever to the P (Park) position, apply theparking brake and push the switch to the“OFF” position.
7. The steering wheel lock engages when ignitionis off and a door is opened or closed.
MODELS WITHOUT INTELLIGENTKEY SYSTEM1. Apply the parking brake. For additional informa-tion, see “Parking brake switch” in the “3. Pre-driving checks and adjustments” section.
2. Manual transmission models:
Move the shift lever to the N (Neutral) position,and depress the clutch pedal to the floor whilestarting the engine.
XTRONIC transmission (CVT) models:
Move the shift lever to the P (Park) or N (Neutral)position. (P position is preferred).
The starter is designed to operate only whenthe shift lever is in the proper position.
3. Rotate the steering wheel left to right to releasethe ignition lock whilst turning the ignition switchto the ON position.
4. For diesel engine models: Wait until the glowindicator light ( ) goes out.
5. With your foot on the brake pedal, not on theaccelerator pedal, crank the engine by turningthe ignition switch to START.
6. Immediately release the ignition switch when theengine starts. If the engine starts, but fails to run,repeat the above procedures.
NOTE
Petrol engine models:
• If the engine is very hard to start in ex-tremely cold weather or when restarting,depress the accelerator pedal a little (ap-proximately 1/3 of the way to the floor)and hold it and then crank the engine. Re-lease the ignition switch and the accelera-tor pedal when the engine starts.
• If the engine is very hard to start becauseit is flooded, depress the accelerator pedalall the way to the floor and hold it. Crankthe engine for 5-6 seconds. After crankingthe engine, release the accelerator pedal.Crank the engine with your foot off the ac-celerator pedal by turning the ignitionswitch to START. Release the switch whenthe engine starts. If the engine starts, butfails to run, repeat the above procedure.
CAUTION
• As soon as the engine has started, releasethe ignition switch immediately.
• Do not operate the starter for more than15 seconds at a time. If the engine doesnot start, turn the ignition switch to the“OFF” position and wait 10 seconds (Petrolengine models) or 20 seconds (Diesel en-gine models) before cranking again, oth-erwise the starter could be damaged.
5-16 Starting and driving
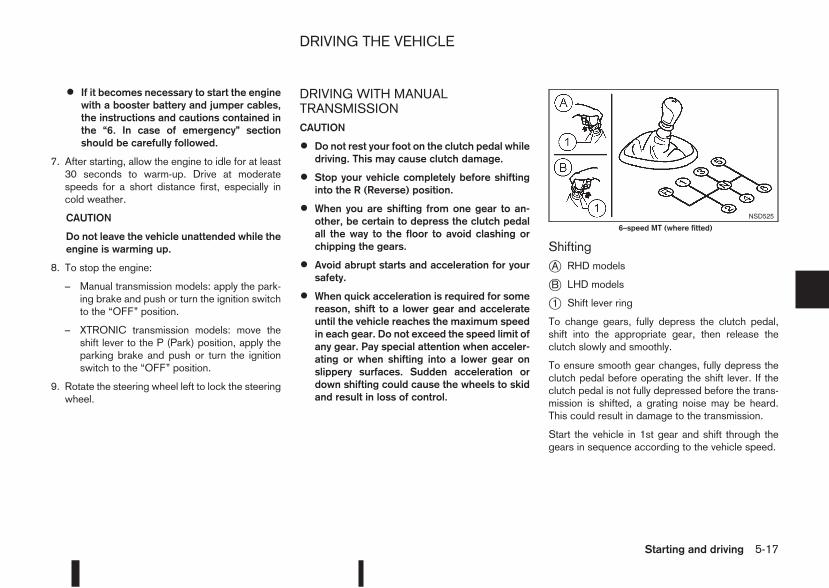
• If it becomes necessary to start the enginewith a booster battery and jumper cables,the instructions and cautions contained inthe “6. In case of emergency” sectionshould be carefully followed.
7. After starting, allow the engine to idle for at least30 seconds to warm-up. Drive at moderatespeeds for a short distance first, especially incold weather.
CAUTION
Do not leave the vehicle unattended while theengine is warming up.
8. To stop the engine:
– Manual transmission models: apply the park-ing brake and push or turn the ignition switchto the “OFF” position.
– XTRONIC transmission models: move theshift lever to the P (Park) position, apply theparking brake and push or turn the ignitionswitch to the “OFF” position.
9. Rotate the steering wheel left to lock the steeringwheel.
DRIVING WITH MANUALTRANSMISSIONCAUTION
• Do not rest your foot on the clutch pedal whiledriving. This may cause clutch damage.
• Stop your vehicle completely before shiftinginto the R (Reverse) position.
• When you are shifting from one gear to an-other, be certain to depress the clutch pedalall the way to the floor to avoid clashing orchipping the gears.
• Avoid abrupt starts and acceleration for yoursafety.
• When quick acceleration is required for somereason, shift to a lower gear and accelerateuntil the vehicle reaches the maximum speedin each gear. Do not exceed the speed limit ofany gear. Pay special attention when acceler-ating or when shifting into a lower gear onslippery surfaces. Sudden acceleration ordown shifting could cause the wheels to skidand result in loss of control.
ShiftingjA RHD models
jB LHD models
j1 Shift lever ring
To change gears, fully depress the clutch pedal,shift into the appropriate gear, then release theclutch slowly and smoothly.
To ensure smooth gear changes, fully depress theclutch pedal before operating the shift lever. If theclutch pedal is not fully depressed before the trans-mission is shifted, a grating noise may be heard.This could result in damage to the transmission.
Start the vehicle in 1st gear and shift through thegears in sequence according to the vehicle speed.
NSD525
6–speed MT (where fitted)
DRIVING THE VEHICLE
Starting and driving 5-17
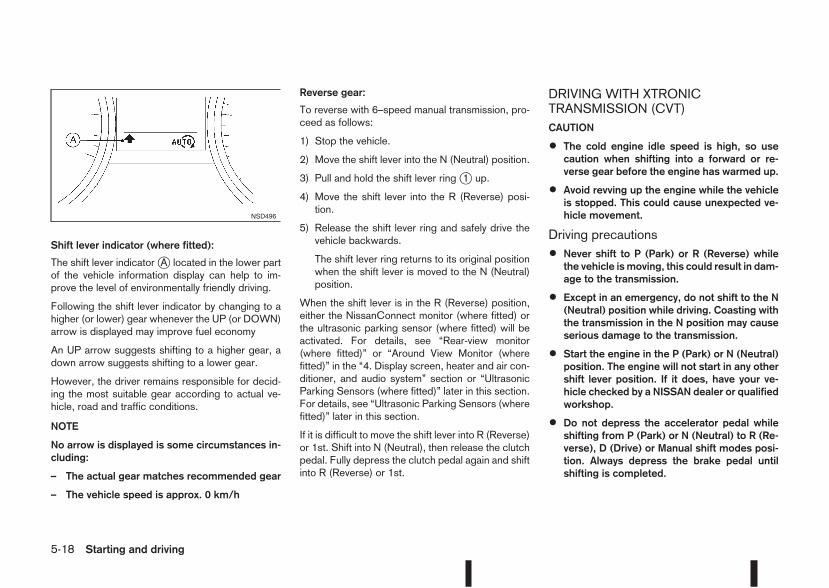
Shift lever indicator (where fitted):
The shift lever indicatorjA located in the lower partof the vehicle information display can help to im-prove the level of environmentally friendly driving.
Following the shift lever indicator by changing to ahigher (or lower) gear whenever the UP (or DOWN)arrow is displayed may improve fuel economy
An UP arrow suggests shifting to a higher gear, adown arrow suggests shifting to a lower gear.
However, the driver remains responsible for decid-ing the most suitable gear according to actual ve-hicle, road and traffic conditions.
NOTE
No arrow is displayed is some circumstances in-cluding:
– The actual gear matches recommended gear
– The vehicle speed is approx. 0 km/h
Reverse gear:
To reverse with 6–speed manual transmission, pro-ceed as follows:
1) Stop the vehicle.
2) Move the shift lever into the N (Neutral) position.
3) Pull and hold the shift lever ringj1 up.
4) Move the shift lever into the R (Reverse) posi-tion.
5) Release the shift lever ring and safely drive thevehicle backwards.
The shift lever ring returns to its original positionwhen the shift lever is moved to the N (Neutral)position.
When the shift lever is in the R (Reverse) position,either the NissanConnect monitor (where fitted) orthe ultrasonic parking sensor (where fitted) will beactivated. For details, see “Rear-view monitor(where fitted)” or “Around View Monitor (wherefitted)” in the “4. Display screen, heater and air con-ditioner, and audio system” section or “UltrasonicParking Sensors (where fitted)” later in this section.For details, see “Ultrasonic Parking Sensors (wherefitted)” later in this section.
If it is difficult to move the shift lever into R (Reverse)or 1st. Shift into N (Neutral), then release the clutchpedal. Fully depress the clutch pedal again and shiftinto R (Reverse) or 1st.
DRIVING WITH XTRONICTRANSMISSION (CVT)CAUTION
• The cold engine idle speed is high, so usecaution when shifting into a forward or re-verse gear before the engine has warmed up.
• Avoid revving up the engine while the vehicleis stopped. This could cause unexpected ve-hicle movement.
Driving precautions
• Never shift to P (Park) or R (Reverse) whilethe vehicle is moving, this could result in dam-age to the transmission.
• Except in an emergency, do not shift to the N(Neutral) position while driving. Coasting withthe transmission in the N position may causeserious damage to the transmission.
• Start the engine in the P (Park) or N (Neutral)position. The engine will not start in any othershift lever position. If it does, have your ve-hicle checked by a NISSAN dealer or qualifiedworkshop.
• Do not depress the accelerator pedal whileshifting from P (Park) or N (Neutral) to R (Re-verse), D (Drive) or Manual shift modes posi-tion. Always depress the brake pedal untilshifting is completed.
NSD496
5-18 Starting and driving
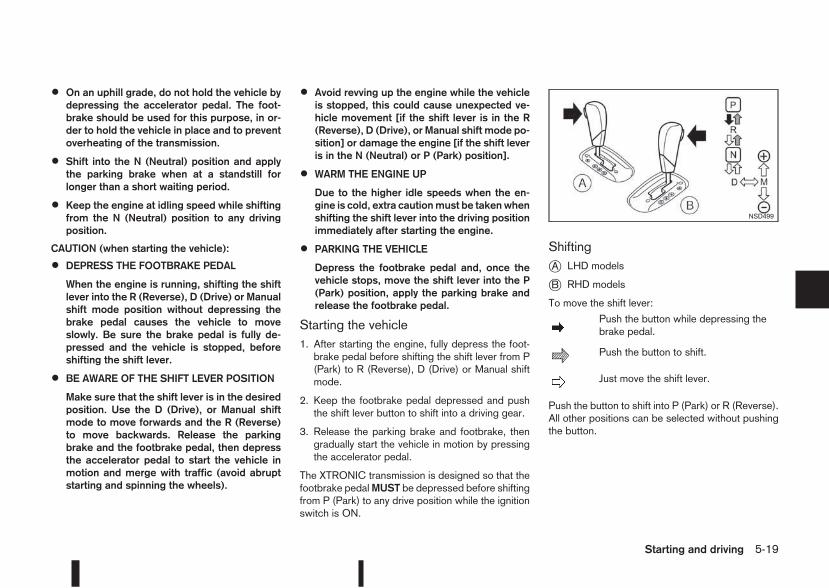
• On an uphill grade, do not hold the vehicle bydepressing the accelerator pedal. The foot-brake should be used for this purpose, in or-der to hold the vehicle in place and to preventoverheating of the transmission.
• Shift into the N (Neutral) position and applythe parking brake when at a standstill forlonger than a short waiting period.
• Keep the engine at idling speed while shiftingfrom the N (Neutral) position to any drivingposition.
CAUTION (when starting the vehicle):
• DEPRESS THE FOOTBRAKE PEDAL
When the engine is running, shifting the shiftlever into the R (Reverse), D (Drive) or Manualshift mode position without depressing thebrake pedal causes the vehicle to moveslowly. Be sure the brake pedal is fully de-pressed and the vehicle is stopped, beforeshifting the shift lever.
• BE AWARE OF THE SHIFT LEVER POSITION
Make sure that the shift lever is in the desiredposition. Use the D (Drive), or Manual shiftmode to move forwards and the R (Reverse)to move backwards. Release the parkingbrake and the footbrake pedal, then depressthe accelerator pedal to start the vehicle inmotion and merge with traffic (avoid abruptstarting and spinning the wheels).
• Avoid revving up the engine while the vehicleis stopped, this could cause unexpected ve-hicle movement [if the shift lever is in the R(Reverse), D (Drive), or Manual shift mode po-sition] or damage the engine [if the shift leveris in the N (Neutral) or P (Park) position].
• WARM THE ENGINE UP
Due to the higher idle speeds when the en-gine is cold, extra cautionmust be takenwhenshifting the shift lever into the driving positionimmediately after starting the engine.
• PARKING THE VEHICLE
Depress the footbrake pedal and, once thevehicle stops, move the shift lever into the P(Park) position, apply the parking brake andrelease the footbrake pedal.
Starting the vehicle1. After starting the engine, fully depress the foot-brake pedal before shifting the shift lever from P(Park) to R (Reverse), D (Drive) or Manual shiftmode.
2. Keep the footbrake pedal depressed and pushthe shift lever button to shift into a driving gear.
3. Release the parking brake and footbrake, thengradually start the vehicle in motion by pressingthe accelerator pedal.
The XTRONIC transmission is designed so that thefootbrake pedalMUST be depressed before shiftingfrom P (Park) to any drive position while the ignitionswitch is ON.
ShiftingjA LHD models
jB RHD models
To move the shift lever:
mPush the button while depressing thebrake pedal.
m Push the button to shift.
m Just move the shift lever.
Push the button to shift into P (Park) or R (Reverse).All other positions can be selected without pushingthe button.
NSD499
Starting and driving 5-19
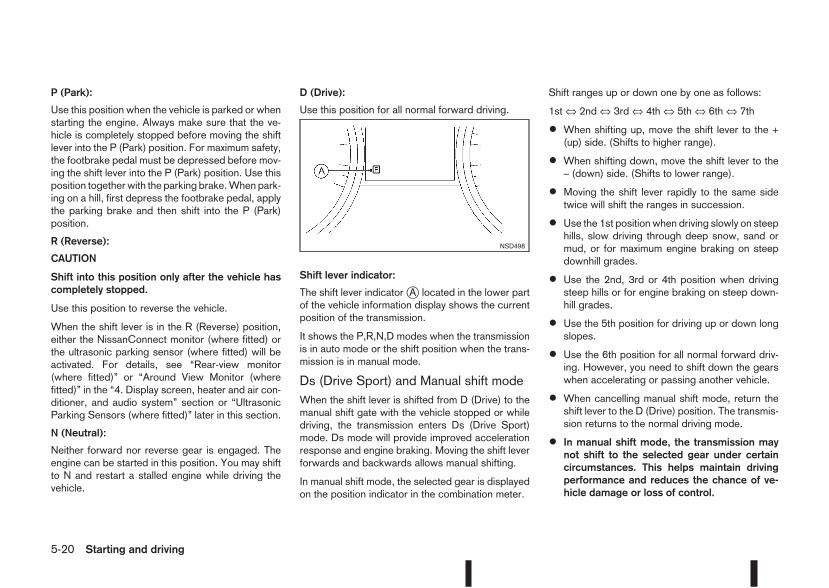
P (Park):
Use this position when the vehicle is parked or whenstarting the engine. Always make sure that the ve-hicle is completely stopped before moving the shiftlever into the P (Park) position. For maximum safety,the footbrake pedal must be depressed before mov-ing the shift lever into the P (Park) position. Use thisposition together with the parking brake.When park-ing on a hill, first depress the footbrake pedal, applythe parking brake and then shift into the P (Park)position.
R (Reverse):
CAUTION
Shift into this position only after the vehicle hascompletely stopped.
Use this position to reverse the vehicle.
When the shift lever is in the R (Reverse) position,either the NissanConnect monitor (where fitted) orthe ultrasonic parking sensor (where fitted) will beactivated. For details, see “Rear-view monitor(where fitted)” or “Around View Monitor (wherefitted)” in the “4. Display screen, heater and air con-ditioner, and audio system” section or “UltrasonicParking Sensors (where fitted)” later in this section.
N (Neutral):
Neither forward nor reverse gear is engaged. Theengine can be started in this position. You may shiftto N and restart a stalled engine while driving thevehicle.
D (Drive):
Use this position for all normal forward driving.
Shift lever indicator:
The shift lever indicatorjA located in the lower partof the vehicle information display shows the currentposition of the transmission.
It shows the P,R,N,D modes when the transmissionis in auto mode or the shift position when the trans-mission is in manual mode.
Ds (Drive Sport) and Manual shift modeWhen the shift lever is shifted from D (Drive) to themanual shift gate with the vehicle stopped or whiledriving, the transmission enters Ds (Drive Sport)mode. Ds mode will provide improved accelerationresponse and engine braking. Moving the shift leverforwards and backwards allows manual shifting.
In manual shift mode, the selected gear is displayedon the position indicator in the combination meter.
Shift ranges up or down one by one as follows:
1st ⇔ 2nd ⇔ 3rd ⇔ 4th ⇔ 5th ⇔ 6th ⇔ 7th
• When shifting up, move the shift lever to the +(up) side. (Shifts to higher range).
• When shifting down, move the shift lever to the– (down) side. (Shifts to lower range).
• Moving the shift lever rapidly to the same sidetwice will shift the ranges in succession.
• Use the 1st position when driving slowly on steephills, slow driving through deep snow, sand ormud, or for maximum engine braking on steepdownhill grades.
• Use the 2nd, 3rd or 4th position when drivingsteep hills or for engine braking on steep down-hill grades.
• Use the 5th position for driving up or down longslopes.
• Use the 6th position for all normal forward driv-ing. However, you need to shift down the gearswhen accelerating or passing another vehicle.
• When cancelling manual shift mode, return theshift lever to the D (Drive) position. The transmis-sion returns to the normal driving mode.
• In manual shift mode, the transmission maynot shift to the selected gear under certaincircumstances. This helps maintain drivingperformance and reduces the chance of ve-hicle damage or loss of control.
NSD498
5-20 Starting and driving
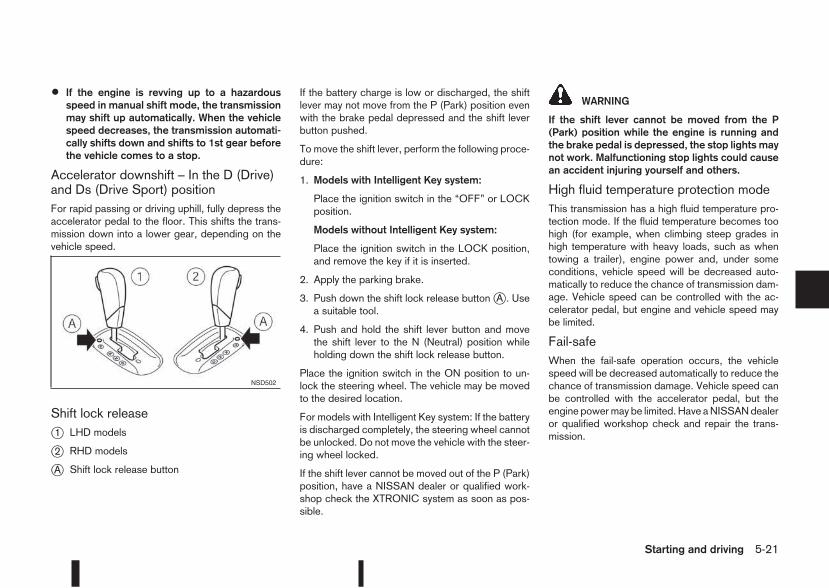
• If the engine is revving up to a hazardousspeed in manual shift mode, the transmissionmay shift up automatically. When the vehiclespeed decreases, the transmission automati-cally shifts down and shifts to 1st gear beforethe vehicle comes to a stop.
Accelerator downshift – In the D (Drive)and Ds (Drive Sport) positionFor rapid passing or driving uphill, fully depress theaccelerator pedal to the floor. This shifts the trans-mission down into a lower gear, depending on thevehicle speed.
Shift lock releasej1 LHD models
j2 RHD models
jA Shift lock release button
If the battery charge is low or discharged, the shiftlever may not move from the P (Park) position evenwith the brake pedal depressed and the shift leverbutton pushed.
To move the shift lever, perform the following proce-dure:
1. Models with Intelligent Key system:
Place the ignition switch in the “OFF” or LOCKposition.
Models without Intelligent Key system:
Place the ignition switch in the LOCK position,and remove the key if it is inserted.
2. Apply the parking brake.
3. Push down the shift lock release buttonjA . Usea suitable tool.
4. Push and hold the shift lever button and movethe shift lever to the N (Neutral) position whileholding down the shift lock release button.
Place the ignition switch in the ON position to un-lock the steering wheel. The vehicle may be movedto the desired location.
For models with Intelligent Key system: If the batteryis discharged completely, the steering wheel cannotbe unlocked. Do not move the vehicle with the steer-ing wheel locked.
If the shift lever cannot be moved out of the P (Park)position, have a NISSAN dealer or qualified work-shop check the XTRONIC system as soon as pos-sible.
WARNING
If the shift lever cannot be moved from the P(Park) position while the engine is running andthe brake pedal is depressed, the stop lights maynot work. Malfunctioning stop lights could causean accident injuring yourself and others.
High fluid temperature protection modeThis transmission has a high fluid temperature pro-tection mode. If the fluid temperature becomes toohigh (for example, when climbing steep grades inhigh temperature with heavy loads, such as whentowing a trailer), engine power and, under someconditions, vehicle speed will be decreased auto-matically to reduce the chance of transmission dam-age. Vehicle speed can be controlled with the ac-celerator pedal, but engine and vehicle speed maybe limited.
Fail-safeWhen the fail-safe operation occurs, the vehiclespeed will be decreased automatically to reduce thechance of transmission damage. Vehicle speed canbe controlled with the accelerator pedal, but theengine powermay be limited. Have aNISSANdealeror qualified workshop check and repair the trans-mission.
NSD502
Starting and driving 5-21
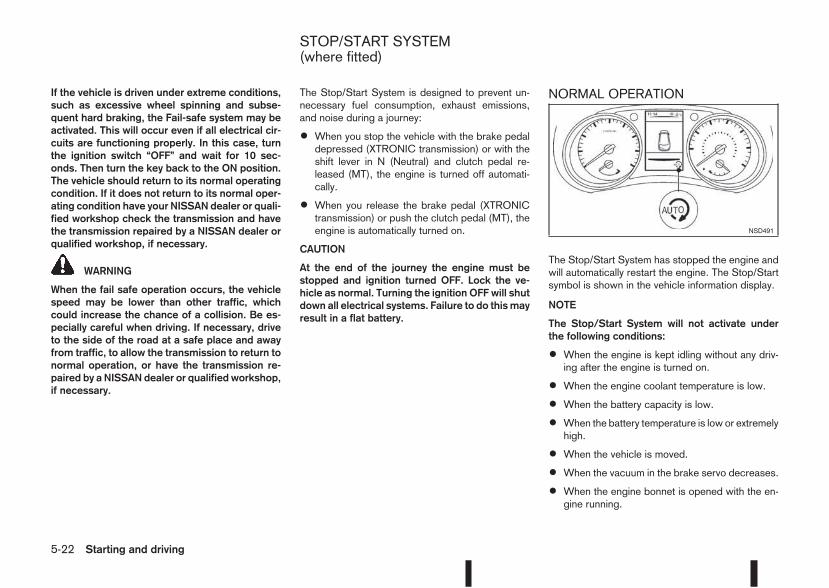
If the vehicle is driven under extreme conditions,such as excessive wheel spinning and subse-quent hard braking, the Fail-safe system may beactivated. This will occur even if all electrical cir-cuits are functioning properly. In this case, turnthe ignition switch “OFF” and wait for 10 sec-onds. Then turn the key back to the ON position.The vehicle should return to its normal operatingcondition. If it does not return to its normal oper-ating condition have your NISSAN dealer or quali-fied workshop check the transmission and havethe transmission repaired by a NISSAN dealer orqualified workshop, if necessary.
WARNING
When the fail safe operation occurs, the vehiclespeed may be lower than other traffic, whichcould increase the chance of a collision. Be es-pecially careful when driving. If necessary, driveto the side of the road at a safe place and awayfrom traffic, to allow the transmission to return tonormal operation, or have the transmission re-paired by a NISSAN dealer or qualified workshop,if necessary.
The Stop/Start System is designed to prevent un-necessary fuel consumption, exhaust emissions,and noise during a journey:
• When you stop the vehicle with the brake pedaldepressed (XTRONIC transmission) or with theshift lever in N (Neutral) and clutch pedal re-leased (MT), the engine is turned off automati-cally.
• When you release the brake pedal (XTRONICtransmission) or push the clutch pedal (MT), theengine is automatically turned on.
CAUTION
At the end of the journey the engine must bestopped and ignition turned OFF. Lock the ve-hicle as normal. Turning the ignition OFF will shutdown all electrical systems. Failure to do thismayresult in a flat battery.
NORMAL OPERATION
The Stop/Start System has stopped the engine andwill automatically restart the engine. The Stop/Startsymbol is shown in the vehicle information display.
NOTE
The Stop/Start System will not activate underthe following conditions:
• When the engine is kept idling without any driv-ing after the engine is turned on.
• When the engine coolant temperature is low.
• When the battery capacity is low.
• When the battery temperature is low or extremelyhigh.
• When the vehicle is moved.
• When the vacuum in the brake servo decreases.
• When the engine bonnet is opened with the en-gine running.
NSD491
STOP/START SYSTEM(where fitted)
5-22 Starting and driving
• When the engine is turned on with the enginebonnet open.
• When the driver’s seat belt is not fastened.
• When the driver’s door is open.
• When the steering wheel is operated.
• When the Stop/Start System indicator blinks ata low speed.
• When the accelerator pedal is depressed(XTRONIC transmission models).
• When the shift lever is in the R (Reverse) posi-tion.
• When the fan speed control dial is in any posi-tion other than “OFF” (0) while the air flow con-trol dial is in the front defogger position (manualair conditioner).
• When the front defogger switch is on (automaticair conditioner).
• When the Stop/Start System OFF switch isturned on.
• When the electric power steering warning light,the Anti-lock Braking System (ABS) warninglight, or the Electronic Stability Programme(ESP) warning light illuminates.
• When the brake pedal is not fully depressed(XTRONIC transmission models).
• When stopping the vehicle on steep slopingroads (XTRONIC transmission models).
• When the power consumption is large.
• When the vehicle is travelling at altitudes higherthan 2000 m (6562 ft) (MT models).
• When the vehicle is travelling at altitudes higherthan 1500m (4922 ft) (R9M engine in combina-tion with XTRONIC transmission models).
NOTE
It may take some time until the Stop/Start Sys-tem activates under the following conditions:
• When the battery is discharged.
• When the outside temperature is low.
• When the battery is replaced or the battery ter-minal is disconnected for extended periods andthen reconnected.
NOTE
The engine will not restart even if the brake pedalis released (XTRONIC transmission ) or clutchpedal is pressed (MT) while the Stop/Start Sys-tem is activated under the following condition:
• When the shift lever is in the P (Park) position(XTRONIC transmission models).
• When the engine bonnet is opened.
• When the driver seat belt is unfastened and thedriver’s door is opened (MT models).
• When the gear shift lever is not in the Neutralposition. (MT models)
NOTE
The engine will restart without releasing the
brake pedal (XTRONIC transmission models) orwithout depressing the clutch pedal (MT models)while the Stop/Start System is activated underthe following conditions:
• When the Stop/Start System OFF switch ispushed.
• When the fan speed control dial is in any posi-tion other than “OFF” (0) while the air flow con-trol dial is in the front defogger position (manualair conditioner).
• When the front defogger switch is set to “ON”(automatic air conditioner).
• When the accelerator pedal is depressed.(XTRONIC transmission models)
• When the steeringwheel is operated. (XTRONICtransmission models)
• When the battery capacity is low.
• When the power consumption is large.
• When the brake pedal is released on slopingroads and the vehicle is moved.
• When the force to the brake pedal is reducedwhile the shift lever is in the D (Drive) or N (Neu-tral) position. (XTRONIC transmission models)
• When the shift lever is placed in the L (Low), D(Drive) or R (Reverse) position from the N or Pposition. (XTRONIC transmission models)
• When the vacuum of the brake servo is insuffi-cient as a result of depressing the brake pedalseveral times.
Starting and driving 5-23
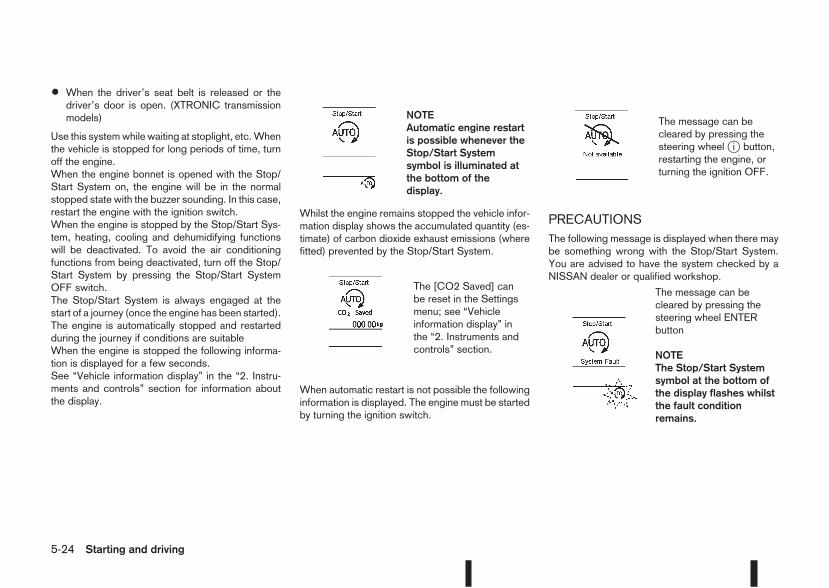
• When the driver’s seat belt is released or thedriver’s door is open. (XTRONIC transmissionmodels)
Use this systemwhile waiting at stoplight, etc.Whenthe vehicle is stopped for long periods of time, turnoff the engine.When the engine bonnet is opened with the Stop/Start System on, the engine will be in the normalstopped state with the buzzer sounding. In this case,restart the engine with the ignition switch.When the engine is stopped by the Stop/Start Sys-tem, heating, cooling and dehumidifying functionswill be deactivated. To avoid the air conditioningfunctions from being deactivated, turn off the Stop/Start System by pressing the Stop/Start SystemOFF switch.The Stop/Start System is always engaged at thestart of a journey (once the engine has been started).The engine is automatically stopped and restartedduring the journey if conditions are suitableWhen the engine is stopped the following informa-tion is displayed for a few seconds.See “Vehicle information display” in the “2. Instru-ments and controls” section for information aboutthe display.
mNOTEAutomatic engine restartis possible whenever theStop/Start Systemsymbol is illuminated atthe bottom of thedisplay.
Whilst the engine remains stopped the vehicle infor-mation display shows the accumulated quantity (es-timate) of carbon dioxide exhaust emissions (wherefitted) prevented by the Stop/Start System.
mThe [CO2 Saved] canbe reset in the Settingsmenu; see “Vehicleinformation display” inthe “2. Instruments andcontrols” section.
When automatic restart is not possible the followinginformation is displayed. The engine must be startedby turning the ignition switch.
mThe message can becleared by pressing thesteering wheelji button,restarting the engine, orturning the ignition OFF.
PRECAUTIONSThe following message is displayed when there maybe something wrong with the Stop/Start System.You are advised to have the system checked by aNISSAN dealer or qualified workshop.
mThe message can becleared by pressing thesteering wheel ENTERbutton
NOTEThe Stop/Start Systemsymbol at the bottom ofthe display flashes whilstthe fault conditionremains.
5-24 Starting and driving
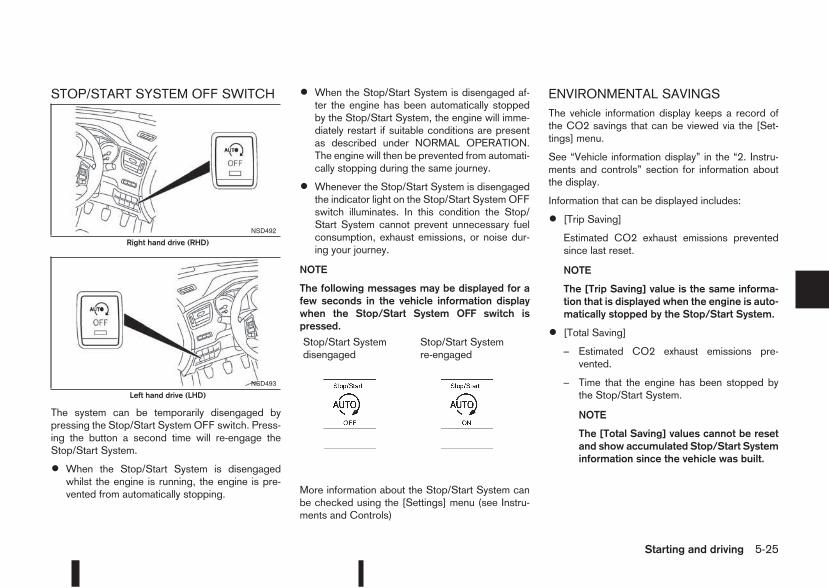
STOP/START SYSTEM OFF SWITCH
The system can be temporarily disengaged bypressing the Stop/Start System OFF switch. Press-ing the button a second time will re-engage theStop/Start System.
• When the Stop/Start System is disengagedwhilst the engine is running, the engine is pre-vented from automatically stopping.
• When the Stop/Start System is disengaged af-ter the engine has been automatically stoppedby the Stop/Start System, the engine will imme-diately restart if suitable conditions are presentas described under NORMAL OPERATION.The engine will then be prevented from automati-cally stopping during the same journey.
• Whenever the Stop/Start System is disengagedthe indicator light on the Stop/Start System OFFswitch illuminates. In this condition the Stop/Start System cannot prevent unnecessary fuelconsumption, exhaust emissions, or noise dur-ing your journey.
NOTE
The following messages may be displayed for afew seconds in the vehicle information displaywhen the Stop/Start System OFF switch ispressed.
Stop/Start Systemdisengaged
mStop/Start Systemre-engaged
mMore information about the Stop/Start System canbe checked using the [Settings] menu (see Instru-ments and Controls)
ENVIRONMENTAL SAVINGSThe vehicle information display keeps a record ofthe CO2 savings that can be viewed via the [Set-tings] menu.
See “Vehicle information display” in the “2. Instru-ments and controls” section for information aboutthe display.
Information that can be displayed includes:
• [Trip Saving]
Estimated CO2 exhaust emissions preventedsince last reset.
NOTE
The [Trip Saving] value is the same informa-tion that is displayed when the engine is auto-matically stopped by the Stop/Start System.
• [Total Saving]
– Estimated CO2 exhaust emissions pre-vented.
– Time that the engine has been stopped bythe Stop/Start System.
NOTE
The [Total Saving] values cannot be resetand show accumulated Stop/Start Systeminformation since the vehicle was built.
NSD492
Right hand drive (RHD)
NSD493
Left hand drive (LHD)
Starting and driving 5-25

The Four Wheel Drive (4WD) system is used toselect 2WD, AUTO, or LOCK depending on thedriving conditions.
The Four Wheel Drive (4WD) system controls thecoupling operation. Switch the control switch (seeillustration) to select each mode: 2WD, AUTO orLOCK depending on the driving conditions.
AUTO: Switch the control switch to the neutral(AUTO) position and the Four-Wheel Drive (4WD)AUTO indicator light on the combinationmeterilluminates.
2WD: Switch the control switch to the 2WD posi-tion.
LOCK: When the control is switched to the LOCKposition, it springs back to the AUTO position whenreleased. The 4WD LOCKmode indicator lightilluminates on the combination meter, to showLOCK mode is engaged. To disengage LOCKmode, switch the control switch again to the LOCKposition and release. The 4WD LOCK mode indica-tor light will go out.
NSD494
Right hand drive (RHD)
NSD495
Left hand drive (LHD)
FOUR-WHEEL DRIVE (4WD)(where fitted)
5-26 Starting and driving
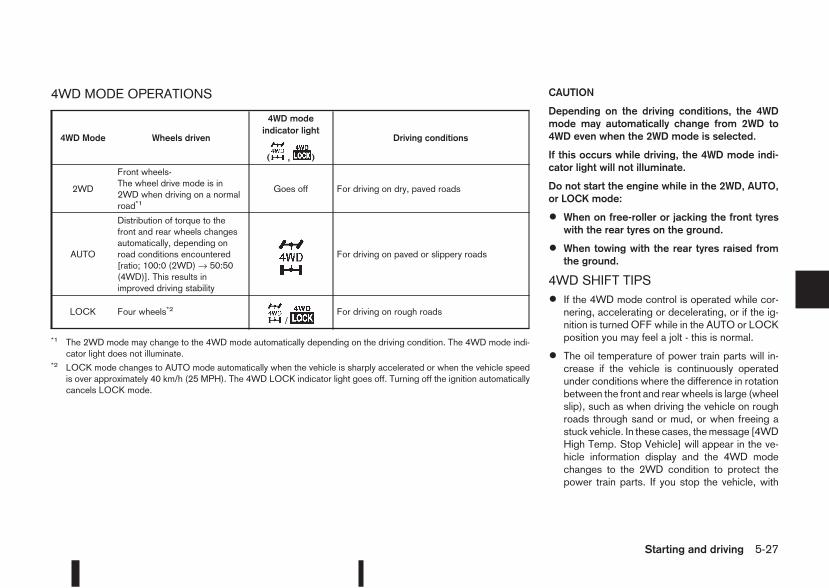
4WD MODE OPERATIONS CAUTION
Depending on the driving conditions, the 4WDmode may automatically change from 2WD to4WD even when the 2WD mode is selected.
If this occurs while driving, the 4WD mode indi-cator light will not illuminate.
Do not start the engine while in the 2WD, AUTO,or LOCK mode:
• When on free-roller or jacking the front tyreswith the rear tyres on the ground.
• When towing with the rear tyres raised fromthe ground.
4WD SHIFT TIPS
• If the 4WD mode control is operated while cor-nering, accelerating or decelerating, or if the ig-nition is turned OFF while in the AUTO or LOCKposition you may feel a jolt - this is normal.
• The oil temperature of power train parts will in-crease if the vehicle is continuously operatedunder conditions where the difference in rotationbetween the front and rear wheels is large (wheelslip), such as when driving the vehicle on roughroads through sand or mud, or when freeing astuck vehicle. In these cases, themessage [4WDHigh Temp. Stop Vehicle] will appear in the ve-hicle information display and the 4WD modechanges to the 2WD condition to protect thepower train parts. If you stop the vehicle, with
4WD Mode Wheels driven
4WD modeindicator light
(m ,m )
Driving conditions
2WD
Front wheels-The wheel drive mode is in2WD when driving on a normalroad*1
Goes off For driving on dry, paved roads
AUTO
Distribution of torque to thefront and rear wheels changesautomatically, depending onroad conditions encountered[ratio; 100:0 (2WD) → 50:50(4WD)]. This results inimproved driving stability
m For driving on paved or slippery roads
LOCK Four wheels*2 m /m For driving on rough roads
*1 The 2WD mode may change to the 4WD mode automatically depending on the driving condition. The 4WD mode indi-cator light does not illuminate.
*2 LOCK mode changes to AUTO mode automatically when the vehicle is sharply accelerated or when the vehicle speedis over approximately 40 km/h (25 MPH). The 4WD LOCK indicator light goes off. Turning off the ignition automaticallycancels LOCK mode.
Starting and driving 5-27
the engine idling, and wait until the warning mes-sage is no longer displayed, the 4WD mode re-turns to the AUTO mode.
• Braking distance in 4WD mode is the same as in2WD mode.
• Even if the mode automatically changes to AUTOmode, when driving in the LOCK mode, the indi-cator light stays in the LOCK mode.
CAUTION
• Only use the 4WD mode control when drivingin a straight direction (to select 2WD, AUTO orLOCK).
• Do not use the 4WD mode control when turn-ing or reversing.
• Do not use the 4WD mode control with thefront wheels spinning (to select 2WD, AUTO,or LOCK).
• Be especially careful when starting or drivingon slippery surfaces with the 4WD mode setto AUTO.
• Never drive on dry hard surface roads in theLOCK position as this will overload the powertrain and may cause serious malfunctions.
4WD MODE INDICATOR LIGHTS
• 4WD mode indicator light (LOCK):
This light comes on when the ignition switch isturned to the ON position, and turns off within 1second. When selecting LOCK mode while the
engine is running, this light will illuminate simul-taneously along with the 4WD mode indicatorlight (AUTO).
• 4WD mode indicator light (AUTO):
This light comes on when the ignition switch isturned to the ON position, and turns off within 1second. If the engine is running, this light will illu-minate when selecting AUTO mode.
The 4WD mode indicator light is located in theinstrument panel.
The light should turn off within 1 second of theignition switch being turned to the ON position.
While the engine is running, the 4WDmode indi-cator light will display the position selected bythe 4WD mode control.
NOTE
The 4WD mode indicator light may blink whileshifting from one drive mode to another. Onceshifting is completed, the 4WD mode indicatorlight will come on. If the indicator light does notcome on immediately, make sure that the areaaround the vehicle is safe and free from ob-stacles. Drive the vehicle straight (DO NOT ac-celerate, decelerate or reverse), then turn the4WD mode control.
If the 4WD warning lights comes on, the 4WD indi-cator light(s) will go out.
DRIVING FOUR-WHEEL DRIVE (4WD)SAFELYYour NISSAN is designed for both normal and off-road use. However, avoid driving in deep water ormud as your NISSAN is mainly designed for leisureuse, unlike a conventional off-road vehicle.
Remember that Two-Wheel drive (2WD)models areless capable than Four-Wheel Drive (4WD) modelsfor rough road driving and extrication when stuck,for example, in deep snow or mud.
Please observe the following precautions:
• Drive carefully when off-road and avoid danger-ous areas. Always wear seat belts to help keepyou and your passengers in position when driv-ing over rough terrain.
• Do not drive across steep slopes. Instead driveeither straight up or straight down the slope. Off-road vehicles can tip over sideways much moreeasily than they can forwards or backwards.
• Many hills are too steep for any vehicle. If youdrive up them, you may stall. If you drive downthem, you may not be able to control your speed.If you drive across them, you may roll over.
• Do not shift gears when driving on downhillgrades as this could cause loss of control of thevehicle.
• Stay alert when driving to the top of a hill. At thetop there could be a drop-off or other hazard thatcould cause an accident.
5-28 Starting and driving
• If the engine of the vehicle stalls or you cannotmake it to the top of a steep grade, never at-tempt to turn around. Your vehicle could tip orroll over. Always drive backwards and straightdown in R (reverse) gear.
Never drive backwards with the shift lever in N(Neutral) and/or with the clutch depressed andusing the brake as this could result in loss ofcontrol.
• Heavy braking down a hill could cause yourbrakes to overheat and fade, resulting in loss ofcontrol and an accident. Apply the brakes lightlyand use a low gear to control your vehicle speed.
• Unsecured cargo can be thrown around whendriving over rough terrain. Properly secure it sothat it will not be thrown forwards and causeinjury to you or your passengers.
• To avoid raising the centre of gravity excessively,do not exceed the rated capacity of the roof rack/gear bin (where fitted) and evenly distribute theload. Secure heavy loads in the luggage area asfar forwards and as low as possible. Do not equipthe vehicle with tyres larger than specified. Thiscould cause your vehicle to roll over.
• Accelerating quickly, sharp steering manoeuvresor sudden braking may cause loss of control.
• Do not drive beyond the performance of thetyres, even with 4WD. Sudden acceleration,steering or braking may result in loss of controland could cause the vehicle to become stuck.
• If at all possible, avoid sharp turningmanoeuvres,particularly at high speeds. Your 4WD vehiclehas a higher centre of gravity than a 2WD ve-hicle and can tip over more easily. The vehicle isnot designed for cornering at the same speedsas conventional 2WD models any more than lowsports cars are designed to perform satisfacto-rily under off-road conditions. Failure to operatethis vehicle correctly could result in loss of con-trol and/or a rollover accident.
• Do not grip the inside or spokes of the steeringwheel when driving off-road. The steering wheelcould jerk and injure your hands. Instead, drivewith your fingers and thumbs on the outside ofthe rim.
• Before operating the vehicle, ensure that thedriver and all passengers have their seat beltsfastened.
• Always drive with the floor mats in place as thefloor may become very hot. Particular careshould be taken if you are barefoot.
• Lower your speed when encountering strongcrosswinds.With its higher centre of gravity yourNISSAN is more affected by gusty side winds.Slower speeds ensure better vehicle control.
• Be sure to check the brakes immediately afterdriving in mud or water as specified in “Wetbrakes” later in this section.
• Whenever you drive off-road through sand, mudor water as deep as the wheel hub, more fre-
quent maintenance may be required. For details,refer to the separately provided Warranty Infor-mation and Maintenance Booklet.
• Rinse the underside of the vehicle with freshwater after driving through mud or sand. Re-move any brush or sticks that are trapped.
• Install the same size of winter tyres on all four (4)wheels (such as studless tyres) or install snowchains to the front wheels when driving on slip-pery roads (e.g. after a snowfall) and drive care-fully using 4WD.
• Avoid parking your vehicle on steep hills. If youget out of the vehicle and it rolls forwards, back-wards or sideways, you could be injured.
Starting and driving 5-29
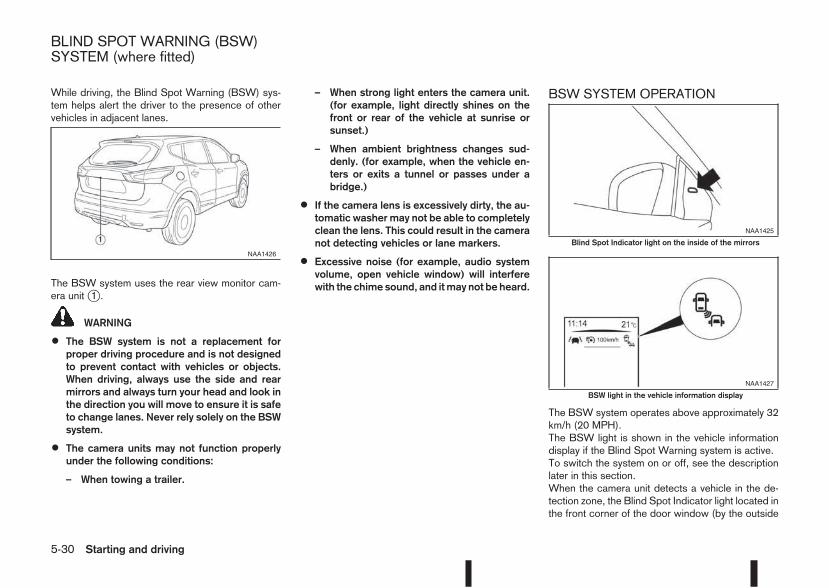
While driving, the Blind Spot Warning (BSW) sys-tem helps alert the driver to the presence of othervehicles in adjacent lanes.
The BSW system uses the rear view monitor cam-era unitj1 .
WARNING
• The BSW system is not a replacement forproper driving procedure and is not designedto prevent contact with vehicles or objects.When driving, always use the side and rearmirrors and always turn your head and look inthe direction you will move to ensure it is safeto change lanes. Never rely solely on the BSWsystem.
• The camera units may not function properlyunder the following conditions:
– When towing a trailer.
– When strong light enters the camera unit.(for example, light directly shines on thefront or rear of the vehicle at sunrise orsunset.)
– When ambient brightness changes sud-denly. (for example, when the vehicle en-ters or exits a tunnel or passes under abridge.)
• If the camera lens is excessively dirty, the au-tomatic washer may not be able to completelyclean the lens. This could result in the cameranot detecting vehicles or lane markers.
• Excessive noise (for example, audio systemvolume, open vehicle window) will interferewith the chime sound, and itmay not be heard.
BSW SYSTEM OPERATION
The BSW system operates above approximately 32km/h (20 MPH).The BSW light is shown in the vehicle informationdisplay if the Blind Spot Warning system is active.To switch the system on or off, see the descriptionlater in this section.When the camera unit detects a vehicle in the de-tection zone, the Blind Spot Indicator light located inthe front corner of the door window (by the outside
NAA1426
NAA1425
Blind Spot Indicator light on the inside of the mirrors
NAA1427
BSW light in the vehicle information display
BLIND SPOT WARNING (BSW)SYSTEM (where fitted)
5-30 Starting and driving
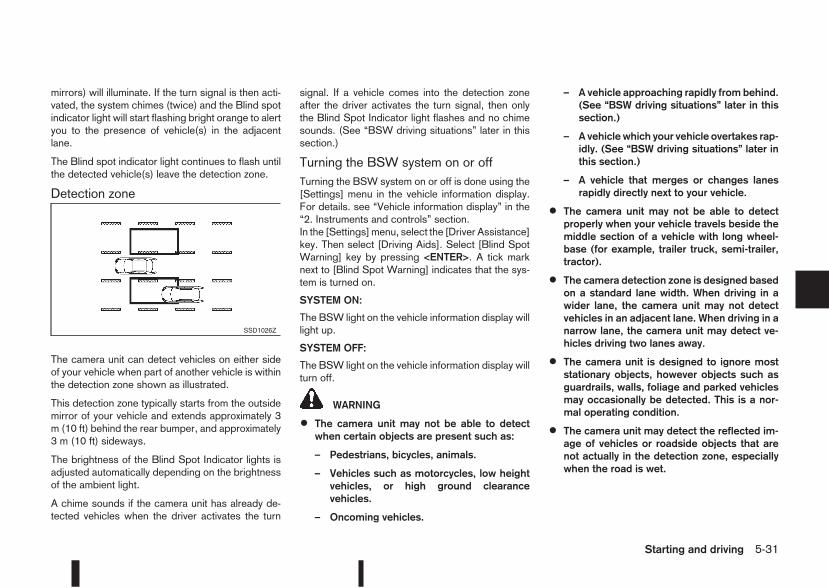
mirrors) will illuminate. If the turn signal is then acti-vated, the system chimes (twice) and the Blind spotindicator light will start flashing bright orange to alertyou to the presence of vehicle(s) in the adjacentlane.
The Blind spot indicator light continues to flash untilthe detected vehicle(s) leave the detection zone.
Detection zone
The camera unit can detect vehicles on either sideof your vehicle when part of another vehicle is withinthe detection zone shown as illustrated.
This detection zone typically starts from the outsidemirror of your vehicle and extends approximately 3m (10 ft) behind the rear bumper, and approximately3 m (10 ft) sideways.
The brightness of the Blind Spot Indicator lights isadjusted automatically depending on the brightnessof the ambient light.
A chime sounds if the camera unit has already de-tected vehicles when the driver activates the turn
signal. If a vehicle comes into the detection zoneafter the driver activates the turn signal, then onlythe Blind Spot Indicator light flashes and no chimesounds. (See “BSW driving situations” later in thissection.)
Turning the BSW system on or offTurning the BSW system on or off is done using the[Settings] menu in the vehicle information display.For details. see “Vehicle information display” in the“2. Instruments and controls” section.In the [Settings]menu, select the [Driver Assistance]key. Then select [Driving Aids]. Select [Blind SpotWarning] key by pressing <ENTER>. A tick marknext to [Blind Spot Warning] indicates that the sys-tem is turned on.
SYSTEM ON:
The BSW light on the vehicle information display willlight up.
SYSTEM OFF:
The BSW light on the vehicle information display willturn off.
WARNING
• The camera unit may not be able to detectwhen certain objects are present such as:
– Pedestrians, bicycles, animals.
– Vehicles such as motorcycles, low heightvehicles, or high ground clearancevehicles.
– Oncoming vehicles.
– A vehicle approaching rapidly from behind.(See “BSW driving situations” later in thissection.)
– A vehicle which your vehicle overtakes rap-idly. (See “BSW driving situations” later inthis section.)
– A vehicle that merges or changes lanesrapidly directly next to your vehicle.
• The camera unit may not be able to detectproperly when your vehicle travels beside themiddle section of a vehicle with long wheel-base (for example, trailer truck, semi-trailer,tractor).
• The camera detection zone is designed basedon a standard lane width. When driving in awider lane, the camera unit may not detectvehicles in an adjacent lane. When driving in anarrow lane, the camera unit may detect ve-hicles driving two lanes away.
• The camera unit is designed to ignore moststationary objects, however objects such asguardrails, walls, foliage and parked vehiclesmay occasionally be detected. This is a nor-mal operating condition.
• The camera unit may detect the reflected im-age of vehicles or roadside objects that arenot actually in the detection zone, especiallywhen the road is wet.
SSD1026Z
Starting and driving 5-31
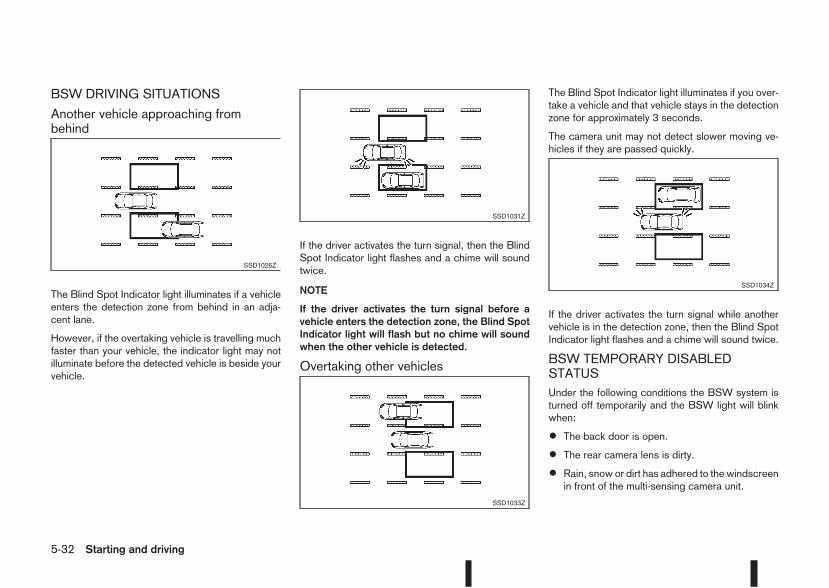
BSW DRIVING SITUATIONS
Another vehicle approaching frombehind
The Blind Spot Indicator light illuminates if a vehicleenters the detection zone from behind in an adja-cent lane.
However, if the overtaking vehicle is travelling muchfaster than your vehicle, the indicator light may notilluminate before the detected vehicle is beside yourvehicle.
If the driver activates the turn signal, then the BlindSpot Indicator light flashes and a chime will soundtwice.
NOTE
If the driver activates the turn signal before avehicle enters the detection zone, the Blind SpotIndicator light will flash but no chime will soundwhen the other vehicle is detected.
Overtaking other vehicles
The Blind Spot Indicator light illuminates if you over-take a vehicle and that vehicle stays in the detectionzone for approximately 3 seconds.
The camera unit may not detect slower moving ve-hicles if they are passed quickly.
If the driver activates the turn signal while anothervehicle is in the detection zone, then the Blind SpotIndicator light flashes and a chime will sound twice.
BSW TEMPORARY DISABLEDSTATUSUnder the following conditions the BSW system isturned off temporarily and the BSW light will blinkwhen:
• The back door is open.
• The rear camera lens is dirty.
• Rain, snow or dirt has adhered to the windscreenin front of the multi-sensing camera unit.
SSD1026Z
SSD1031Z
SSD1033Z
SSD1034Z
5-32 Starting and driving
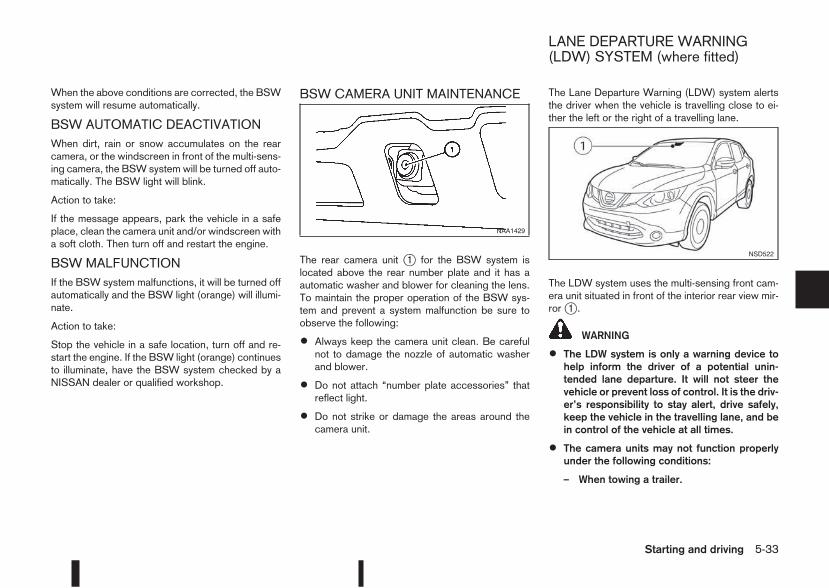
When the above conditions are corrected, the BSWsystem will resume automatically.
BSW AUTOMATIC DEACTIVATIONWhen dirt, rain or snow accumulates on the rearcamera, or the windscreen in front of the multi-sens-ing camera, the BSW system will be turned off auto-matically. The BSW light will blink.
Action to take:
If the message appears, park the vehicle in a safeplace, clean the camera unit and/or windscreen witha soft cloth. Then turn off and restart the engine.
BSW MALFUNCTIONIf the BSW system malfunctions, it will be turned offautomatically and the BSW light (orange) will illumi-nate.
Action to take:
Stop the vehicle in a safe location, turn off and re-start the engine. If the BSW light (orange) continuesto illuminate, have the BSW system checked by aNISSAN dealer or qualified workshop.
BSW CAMERA UNIT MAINTENANCE
The rear camera unit j1 for the BSW system islocated above the rear number plate and it has aautomatic washer and blower for cleaning the lens.To maintain the proper operation of the BSW sys-tem and prevent a system malfunction be sure toobserve the following:
• Always keep the camera unit clean. Be carefulnot to damage the nozzle of automatic washerand blower.
• Do not attach “number plate accessories” thatreflect light.
• Do not strike or damage the areas around thecamera unit.
The Lane Departure Warning (LDW) system alertsthe driver when the vehicle is travelling close to ei-ther the left or the right of a travelling lane.
The LDW system uses the multi-sensing front cam-era unit situated in front of the interior rear view mir-rorj1 .
WARNING
• The LDW system is only a warning device tohelp inform the driver of a potential unin-tended lane departure. It will not steer thevehicle or prevent loss of control. It is the driv-er’s responsibility to stay alert, drive safely,keep the vehicle in the travelling lane, and bein control of the vehicle at all times.
• The camera units may not function properlyunder the following conditions:
– When towing a trailer.
NAA1429
NSD522
LANE DEPARTURE WARNING(LDW) SYSTEM (where fitted)
Starting and driving 5-33
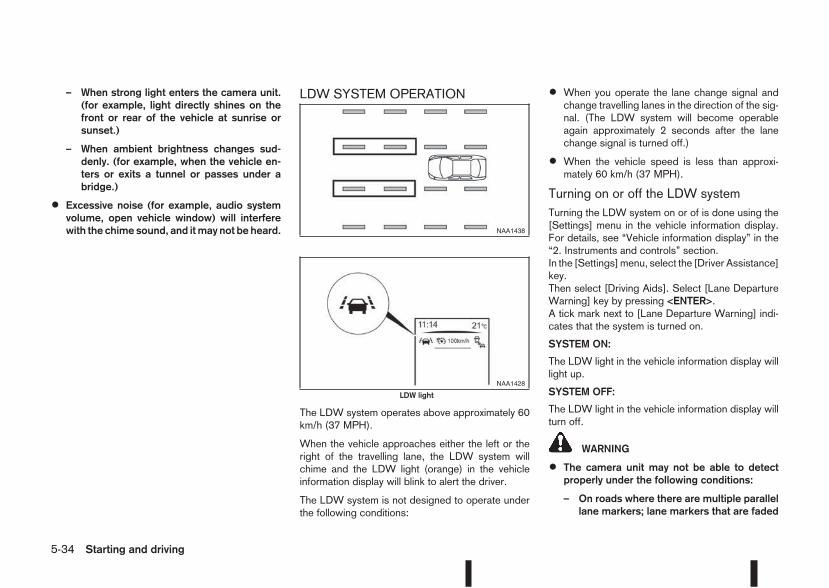
– When strong light enters the camera unit.(for example, light directly shines on thefront or rear of the vehicle at sunrise orsunset.)
– When ambient brightness changes sud-denly. (for example, when the vehicle en-ters or exits a tunnel or passes under abridge.)
• Excessive noise (for example, audio systemvolume, open vehicle window) will interferewith the chime sound, and itmay not be heard.
LDW SYSTEM OPERATION
The LDW system operates above approximately 60km/h (37 MPH).
When the vehicle approaches either the left or theright of the travelling lane, the LDW system willchime and the LDW light (orange) in the vehicleinformation display will blink to alert the driver.
The LDW system is not designed to operate underthe following conditions:
• When you operate the lane change signal andchange travelling lanes in the direction of the sig-nal. (The LDW system will become operableagain approximately 2 seconds after the lanechange signal is turned off.)
• When the vehicle speed is less than approxi-mately 60 km/h (37 MPH).
Turning on or off the LDW systemTurning the LDW system on or of is done using the[Settings] menu in the vehicle information display.For details, see “Vehicle information display” in the“2. Instruments and controls” section.In the [Settings]menu, select the [Driver Assistance]key.Then select [Driving Aids]. Select [Lane DepartureWarning] key by pressing <ENTER>.A tick mark next to [Lane Departure Warning] indi-cates that the system is turned on.
SYSTEM ON:
The LDW light in the vehicle information display willlight up.
SYSTEM OFF:
The LDW light in the vehicle information display willturn off.
WARNING
• The camera unit may not be able to detectproperly under the following conditions:
– On roads where there are multiple parallellane markers; lane markers that are faded
NAA1438
NAA1428
LDW light
5-34 Starting and driving
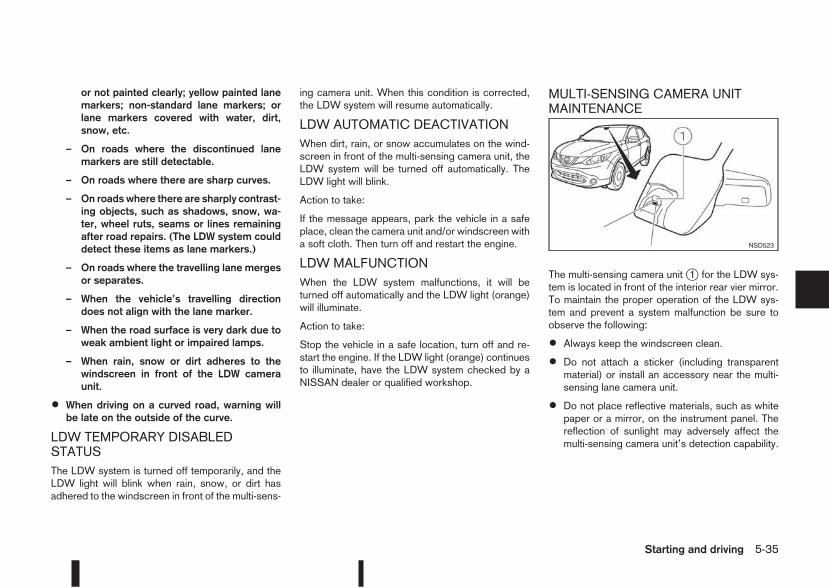
or not painted clearly; yellow painted lanemarkers; non-standard lane markers; orlane markers covered with water, dirt,snow, etc.
– On roads where the discontinued lanemarkers are still detectable.
– On roads where there are sharp curves.
– On roads where there are sharply contrast-ing objects, such as shadows, snow, wa-ter, wheel ruts, seams or lines remainingafter road repairs. (The LDW system coulddetect these items as lane markers.)
– On roads where the travelling lane mergesor separates.
– When the vehicle’s travelling directiondoes not align with the lane marker.
– When the road surface is very dark due toweak ambient light or impaired lamps.
– When rain, snow or dirt adheres to thewindscreen in front of the LDW cameraunit.
• When driving on a curved road, warning willbe late on the outside of the curve.
LDW TEMPORARY DISABLEDSTATUSThe LDW system is turned off temporarily, and theLDW light will blink when rain, snow, or dirt hasadhered to the windscreen in front of the multi-sens-
ing camera unit. When this condition is corrected,the LDW system will resume automatically.
LDW AUTOMATIC DEACTIVATIONWhen dirt, rain, or snow accumulates on the wind-screen in front of the multi-sensing camera unit, theLDW system will be turned off automatically. TheLDW light will blink.
Action to take:
If the message appears, park the vehicle in a safeplace, clean the camera unit and/or windscreen witha soft cloth. Then turn off and restart the engine.
LDW MALFUNCTIONWhen the LDW system malfunctions, it will beturned off automatically and the LDW light (orange)will illuminate.
Action to take:
Stop the vehicle in a safe location, turn off and re-start the engine. If the LDW light (orange) continuesto illuminate, have the LDW system checked by aNISSAN dealer or qualified workshop.
MULTI-SENSING CAMERA UNITMAINTENANCE
The multi-sensing camera unitj1 for the LDW sys-tem is located in front of the interior rear vier mirror.To maintain the proper operation of the LDW sys-tem and prevent a system malfunction be sure toobserve the following:
• Always keep the windscreen clean.
• Do not attach a sticker (including transparentmaterial) or install an accessory near the multi-sensing lane camera unit.
• Do not place reflective materials, such as whitepaper or a mirror, on the instrument panel. Thereflection of sunlight may adversely affect themulti-sensing camera unit’s detection capability.
NSD523
Starting and driving 5-35
• Do not strike or damage the areas around themulti-sensing lane camera unit. Do not touch thecamera lens or remove the screw located on thecamera unit. If the camera unit is damaged dueto an accident, contact a NISSAN dealer orqualified workshop.
The cruise control system allows driving at constantspeeds without keeping your foot on the acceleratorpedal.
WARNING
• The cruise control system ONLY maintains aconstant vehicle speed, it does not replacethe driver.
• Always observe the posted speed limits anddo not set the speed above them.
• Do not use the cruise control system whendriving under the following conditions. Doingso could cause a loss of vehicle control andresult in an accident.
– When it is not possible to keep the vehicleat a constant speed
– When driving in heavy traffic
– When driving in traffic that varies speed
– When driving in windy areas
– When driving on winding or hilly roads
– When driving on slippery (rain, snow, ice,etc.) roads
CAUTION
Onmanual transmission models, do not shift intoN (Neutral) without depressing the clutch pedalwhen the cruise control is set. Should this occur,depress the clutch pedal and turn the cruise con-trol main switch off immediately. Failure to do somay cause engine damage.
When the cruise control system is on the speed lim-iter cannot be operated.
The cruise control system operation switches arelocated on the steering wheel (right side).
The cruise control system operating condition isshown in the vehicle information display.
PRECAUTIONS ON CRUISECONTROL
• The cruise control system will be automaticallycancelled when there is a malfunction. Have thesystem checked by a NISSAN dealer or quali-fied workshop.
• To properly set the cruise control system, per-form the steps as described in “Setting a cruis-ing speed” later in this section.
CRUISE CONTROL (where fitted)
5-36 Starting and driving
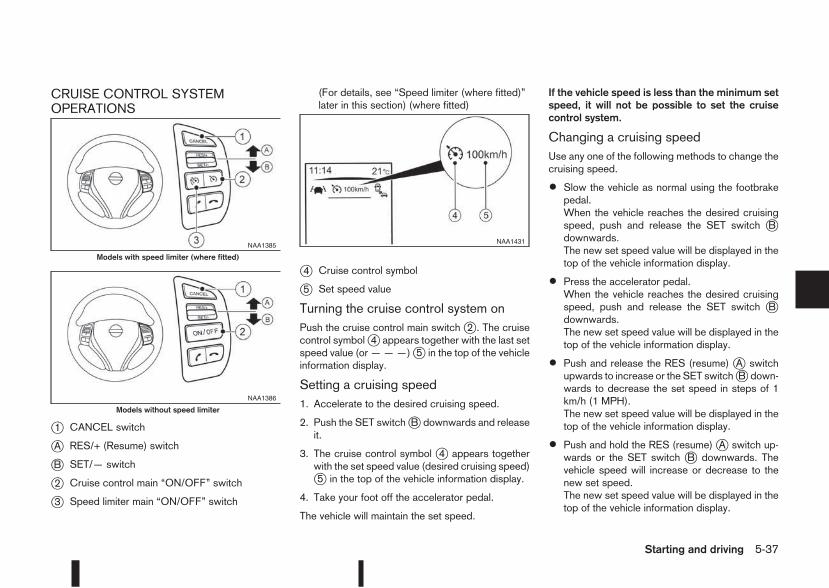
CRUISE CONTROL SYSTEMOPERATIONS
j1 CANCEL switch
jA RES/+ (Resume) switch
jB SET/— switch
j2 Cruise control main “ON/OFF” switch
j3 Speed limiter main “ON/OFF” switch
(For details, see “Speed limiter (where fitted)”later in this section) (where fitted)
j4 Cruise control symbol
j5 Set speed value
Turning the cruise control system onPush the cruise control main switchj2 . The cruisecontrol symbolj4 appears together with the last setspeed value (or ———)j5 in the top of the vehicleinformation display.
Setting a cruising speed1. Accelerate to the desired cruising speed.
2. Push the SET switchjB downwards and releaseit.
3. The cruise control symbol j4 appears togetherwith the set speed value (desired cruising speed)j5 in the top of the vehicle information display.
4. Take your foot off the accelerator pedal.
The vehicle will maintain the set speed.
If the vehicle speed is less than the minimum setspeed, it will not be possible to set the cruisecontrol system.
Changing a cruising speedUse any one of the following methods to change thecruising speed.
• Slow the vehicle as normal using the footbrakepedal.When the vehicle reaches the desired cruisingspeed, push and release the SET switch jBdownwards.The new set speed value will be displayed in thetop of the vehicle information display.
• Press the accelerator pedal.When the vehicle reaches the desired cruisingspeed, push and release the SET switch jBdownwards.The new set speed value will be displayed in thetop of the vehicle information display.
• Push and release the RES (resume) jA switchupwards to increase or the SET switchjB down-wards to decrease the set speed in steps of 1km/h (1 MPH).The new set speed value will be displayed in thetop of the vehicle information display.
• Push and hold the RES (resume) jA switch up-wards or the SET switch jB downwards. Thevehicle speed will increase or decrease to thenew set speed.The new set speed value will be displayed in thetop of the vehicle information display.
NAA1385
Models with speed limiter (where fitted)
NAA1386
Models without speed limiter
NAA1431
Starting and driving 5-37
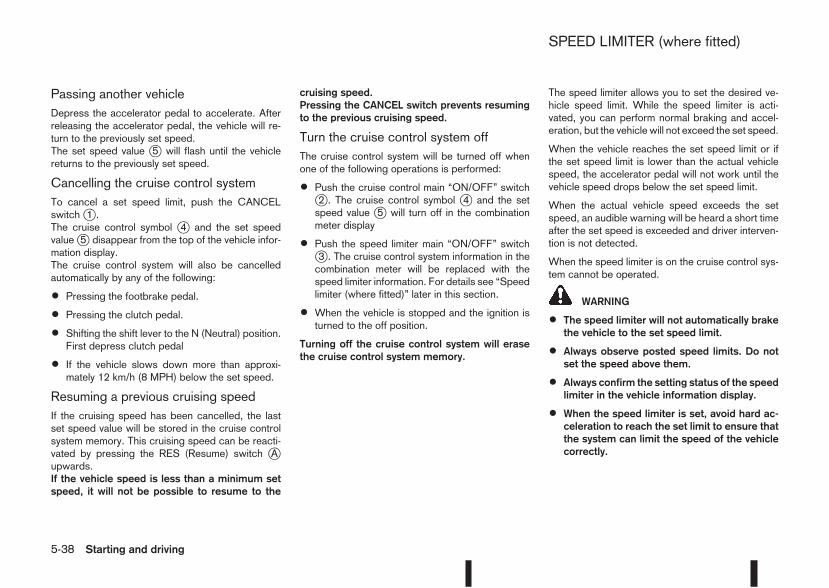
Passing another vehicleDepress the accelerator pedal to accelerate. Afterreleasing the accelerator pedal, the vehicle will re-turn to the previously set speed.The set speed value j5 will flash until the vehiclereturns to the previously set speed.
Cancelling the cruise control systemTo cancel a set speed limit, push the CANCELswitchj1 .The cruise control symbol j4 and the set speedvaluej5 disappear from the top of the vehicle infor-mation display.The cruise control system will also be cancelledautomatically by any of the following:
• Pressing the footbrake pedal.
• Pressing the clutch pedal.
• Shifting the shift lever to the N (Neutral) position.First depress clutch pedal
• If the vehicle slows down more than approxi-mately 12 km/h (8 MPH) below the set speed.
Resuming a previous cruising speedIf the cruising speed has been cancelled, the lastset speed value will be stored in the cruise controlsystem memory. This cruising speed can be reacti-vated by pressing the RES (Resume) switch jAupwards.If the vehicle speed is less than a minimum setspeed, it will not be possible to resume to the
cruising speed.Pressing the CANCEL switch prevents resumingto the previous cruising speed.
Turn the cruise control system offThe cruise control system will be turned off whenone of the following operations is performed:
• Push the cruise control main “ON/OFF” switchj2 . The cruise control symbol j4 and the setspeed value j5 will turn off in the combinationmeter display
• Push the speed limiter main “ON/OFF” switchj3 . The cruise control system information in thecombination meter will be replaced with thespeed limiter information. For details see “Speedlimiter (where fitted)” later in this section.
• When the vehicle is stopped and the ignition isturned to the off position.
Turning off the cruise control system will erasethe cruise control system memory.
The speed limiter allows you to set the desired ve-hicle speed limit. While the speed limiter is acti-vated, you can perform normal braking and accel-eration, but the vehicle will not exceed the set speed.
When the vehicle reaches the set speed limit or ifthe set speed limit is lower than the actual vehiclespeed, the accelerator pedal will not work until thevehicle speed drops below the set speed limit.
When the actual vehicle speed exceeds the setspeed, an audible warning will be heard a short timeafter the set speed is exceeded and driver interven-tion is not detected.
When the speed limiter is on the cruise control sys-tem cannot be operated.
WARNING
• The speed limiter will not automatically brakethe vehicle to the set speed limit.
• Always observe posted speed limits. Do notset the speed above them.
• Always confirm the setting status of the speedlimiter in the vehicle information display.
• When the speed limiter is set, avoid hard ac-celeration to reach the set limit to ensure thatthe system can limit the speed of the vehiclecorrectly.
SPEED LIMITER (where fitted)
5-38 Starting and driving
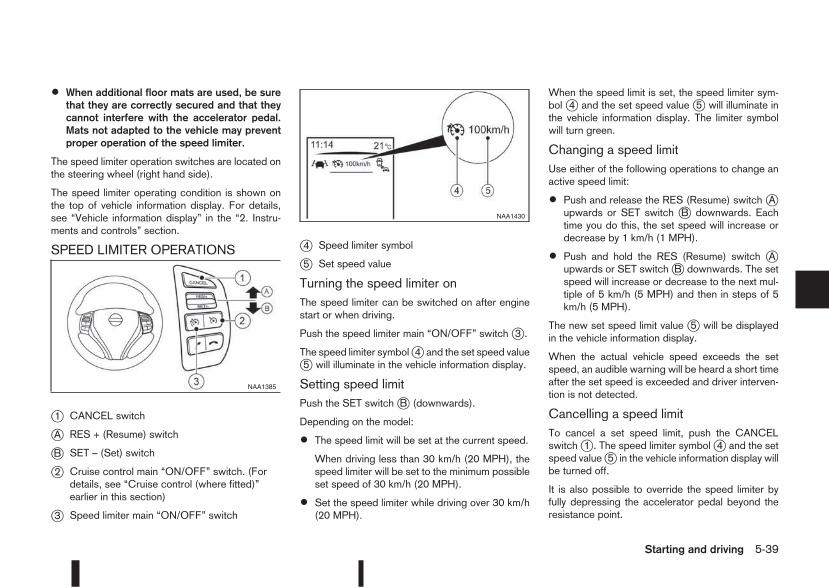
• When additional floor mats are used, be surethat they are correctly secured and that theycannot interfere with the accelerator pedal.Mats not adapted to the vehicle may preventproper operation of the speed limiter.
The speed limiter operation switches are located onthe steering wheel (right hand side).
The speed limiter operating condition is shown onthe top of vehicle information display. For details,see “Vehicle information display” in the “2. Instru-ments and controls” section.
SPEED LIMITER OPERATIONS
j1 CANCEL switch
jA RES + (Resume) switch
jB SET – (Set) switch
j2 Cruise control main “ON/OFF” switch. (Fordetails, see “Cruise control (where fitted)”earlier in this section)
j3 Speed limiter main “ON/OFF” switch
j4 Speed limiter symbol
j5 Set speed value
Turning the speed limiter onThe speed limiter can be switched on after enginestart or when driving.
Push the speed limiter main “ON/OFF” switchj3 .
The speed limiter symbolj4 and the set speed valuej5 will illuminate in the vehicle information display.
Setting speed limitPush the SET switchjB (downwards).
Depending on the model:
• The speed limit will be set at the current speed.
When driving less than 30 km/h (20 MPH), thespeed limiter will be set to the minimum possibleset speed of 30 km/h (20 MPH).
• Set the speed limiter while driving over 30 km/h(20 MPH).
When the speed limit is set, the speed limiter sym-bol j4 and the set speed value j5 will illuminate inthe vehicle information display. The limiter symbolwill turn green.
Changing a speed limitUse either of the following operations to change anactive speed limit:
• Push and release the RES (Resume) switch jAupwards or SET switch jB downwards. Eachtime you do this, the set speed will increase ordecrease by 1 km/h (1 MPH).
• Push and hold the RES (Resume) switch jAupwards or SET switchjB downwards. The setspeed will increase or decrease to the next mul-tiple of 5 km/h (5 MPH) and then in steps of 5km/h (5 MPH).
The new set speed limit value j5 will be displayedin the vehicle information display.
When the actual vehicle speed exceeds the setspeed, an audible warning will be heard a short timeafter the set speed is exceeded and driver interven-tion is not detected.
Cancelling a speed limitTo cancel a set speed limit, push the CANCELswitchj1 . The speed limiter symbolj4 and the setspeed valuej5 in the vehicle information display willbe turned off.
It is also possible to override the speed limiter byfully depressing the accelerator pedal beyond theresistance point.
NAA1385
NAA1430
Starting and driving 5-39
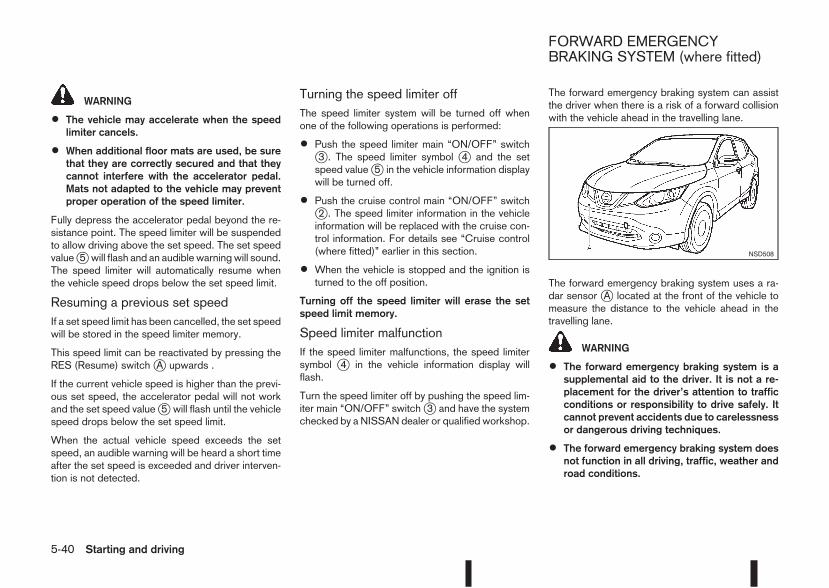
WARNING
• The vehicle may accelerate when the speedlimiter cancels.
• When additional floor mats are used, be surethat they are correctly secured and that theycannot interfere with the accelerator pedal.Mats not adapted to the vehicle may preventproper operation of the speed limiter.
Fully depress the accelerator pedal beyond the re-sistance point. The speed limiter will be suspendedto allow driving above the set speed. The set speedvaluej5 will flash and an audible warningwill sound.The speed limiter will automatically resume whenthe vehicle speed drops below the set speed limit.
Resuming a previous set speedIf a set speed limit has been cancelled, the set speedwill be stored in the speed limiter memory.
This speed limit can be reactivated by pressing theRES (Resume) switchjA upwards .
If the current vehicle speed is higher than the previ-ous set speed, the accelerator pedal will not workand the set speed valuej5 will flash until the vehiclespeed drops below the set speed limit.
When the actual vehicle speed exceeds the setspeed, an audible warning will be heard a short timeafter the set speed is exceeded and driver interven-tion is not detected.
Turning the speed limiter offThe speed limiter system will be turned off whenone of the following operations is performed:
• Push the speed limiter main “ON/OFF” switchj3 . The speed limiter symbol j4 and the setspeed valuej5 in the vehicle information displaywill be turned off.
• Push the cruise control main “ON/OFF” switchj2 . The speed limiter information in the vehicleinformation will be replaced with the cruise con-trol information. For details see “Cruise control(where fitted)” earlier in this section.
• When the vehicle is stopped and the ignition isturned to the off position.
Turning off the speed limiter will erase the setspeed limit memory.
Speed limiter malfunctionIf the speed limiter malfunctions, the speed limitersymbol j4 in the vehicle information display willflash.
Turn the speed limiter off by pushing the speed lim-iter main “ON/OFF” switchj3 and have the systemchecked by a NISSAN dealer or qualified workshop.
The forward emergency braking system can assistthe driver when there is a risk of a forward collisionwith the vehicle ahead in the travelling lane.
The forward emergency braking system uses a ra-dar sensor jA located at the front of the vehicle tomeasure the distance to the vehicle ahead in thetravelling lane.
WARNING
• The forward emergency braking system is asupplemental aid to the driver. It is not a re-placement for the driver’s attention to trafficconditions or responsibility to drive safely. Itcannot prevent accidents due to carelessnessor dangerous driving techniques.
• The forward emergency braking system doesnot function in all driving, traffic, weather androad conditions.
NSD508
FORWARD EMERGENCYBRAKING SYSTEM (where fitted)
5-40 Starting and driving
SYSTEM OPERATIONThe forward emergency braking system will func-tion when your vehicle is driven at speeds aboveapproximately 5 km/h (3 MPH).
If a risk of a forward collision is detected, the for-ward emergency braking system will provide thefirst warning to the driver by flashing the forwardcollision warning light (orange) and providing an au-dible warning.
If the driver applies the brakes quickly and forcefullyafter the warning, and the forward emergency brak-ing system detects that there is still the possibility ofa forward collision, the system will automatically in-crease the braking force.
If the driver does not take action, the forward emer-gency braking system issues the second visualwarning (red) and audible warning. If the driver re-leases the accelerator pedal, then the system ap-plies partial braking
If the risk of a collision becomes imminent, the for-ward emergency braking system applies harderbraking automatically.
NOTE
The vehicle’s brake lights come on when brakingis performed by the forward emergency brakingsystem.
Depending on vehicle speed and distance to thevehicle ahead, as well as driving and roadway con-ditions, the system may help the driver avoid a for-
ward collision or may help mitigate theconsequences if a collision should one be unavoid-able.
If the driver is handling the steering wheel, acceler-ating or braking, the forward emergency brakingsystem will function later or will not function.
The automatic braking will cease under the follow-ing conditions:
• When the steering wheel is turned as far as nec-essary to avoid a collision.
• When the accelerator pedal is depressed.
• When there is no longer a vehicle detectedahead.
If the forward emergency braking system hasstopped the vehicle, the vehicle will remain at astandstill for approximately 2 seconds before thebrakes are released.
WARNING
• The radar sensor does not detect the follow-ing objects:
– Pedestrians, animals or obstacles in theroadway
– Oncoming vehicles
– Crossing vehicles
• The radar sensor has some performance limi-tations. If a stationary vehicle is in the vehi-cle’s path, the forward emergency braking
system will not function when the vehicle isdriven at speeds over approximately 45 MPH(70 km/h).
• The radar sensor may not detect a vehicleahead in the following conditions:
– Dirt, ice, snow or other material coveringthe radar sensor.
– Interference by other radar sources.
– Snow or road spray from travellingvehicles.
– If the vehicle ahead is narrow (e.g. motor-cycle).
– When driving on a steep downhill slope orroads with sharp curves.
– When towing a trailer.
• In some road or traffic conditions, the forwardemergency braking systemmay unexpectedlyapply partial braking. When acceleration isnecessary, continue to depress the accelera-tor pedal to override the system.
• Braking distances increase on slippery sur-faces.
• Excessive noise will interfere with the warn-ing chime sound, and the chime may not beheard.
• The system is designed to automaticallycheck the sensor’s functionality, within cer-tain limitations. The system may not detectsome forms of obstruction of the sensor area
Starting and driving 5-41
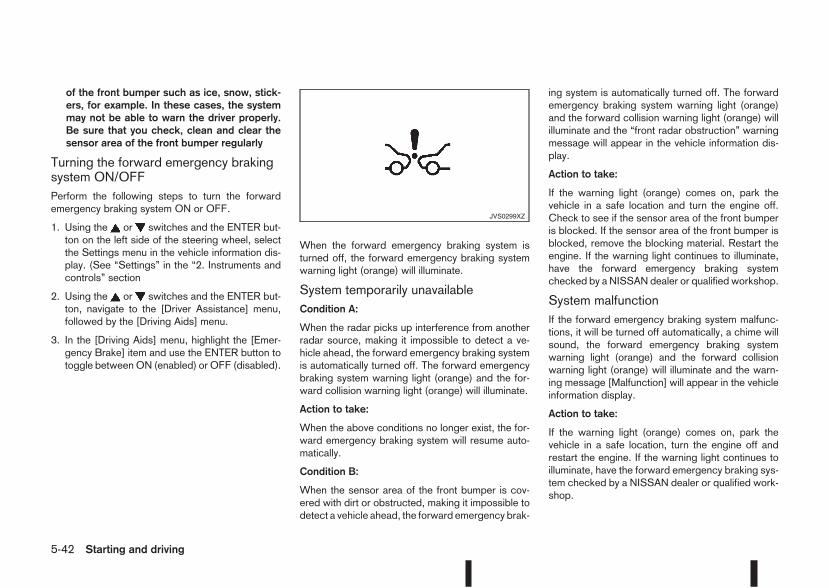
of the front bumper such as ice, snow, stick-ers, for example. In these cases, the systemmay not be able to warn the driver properly.Be sure that you check, clean and clear thesensor area of the front bumper regularly
Turning the forward emergency brakingsystem ON/OFFPerform the following steps to turn the forwardemergency braking system ON or OFF.
1. Using the or switches and the ENTER but-ton on the left side of the steering wheel, selectthe Settings menu in the vehicle information dis-play. (See “Settings” in the “2. Instruments andcontrols” section
2. Using the or switches and the ENTER but-ton, navigate to the [Driver Assistance] menu,followed by the [Driving Aids] menu.
3. In the [Driving Aids] menu, highlight the [Emer-gency Brake] item and use the ENTER button totoggle betweenON (enabled) or OFF (disabled).
When the forward emergency braking system isturned off, the forward emergency braking systemwarning light (orange) will illuminate.
System temporarily unavailableCondition A:
When the radar picks up interference from anotherradar source, making it impossible to detect a ve-hicle ahead, the forward emergency braking systemis automatically turned off. The forward emergencybraking system warning light (orange) and the for-ward collision warning light (orange) will illuminate.
Action to take:
When the above conditions no longer exist, the for-ward emergency braking system will resume auto-matically.
Condition B:
When the sensor area of the front bumper is cov-ered with dirt or obstructed, making it impossible todetect a vehicle ahead, the forward emergency brak-
ing system is automatically turned off. The forwardemergency braking system warning light (orange)and the forward collision warning light (orange) willilluminate and the “front radar obstruction” warningmessage will appear in the vehicle information dis-play.
Action to take:
If the warning light (orange) comes on, park thevehicle in a safe location and turn the engine off.Check to see if the sensor area of the front bumperis blocked. If the sensor area of the front bumper isblocked, remove the blocking material. Restart theengine. If the warning light continues to illuminate,have the forward emergency braking systemchecked by a NISSAN dealer or qualified workshop.
System malfunctionIf the forward emergency braking system malfunc-tions, it will be turned off automatically, a chime willsound, the forward emergency braking systemwarning light (orange) and the forward collisionwarning light (orange) will illuminate and the warn-ing message [Malfunction] will appear in the vehicleinformation display.
Action to take:
If the warning light (orange) comes on, park thevehicle in a safe location, turn the engine off andrestart the engine. If the warning light continues toilluminate, have the forward emergency braking sys-tem checked by a NISSAN dealer or qualified work-shop.
JVS0299XZ
5-42 Starting and driving
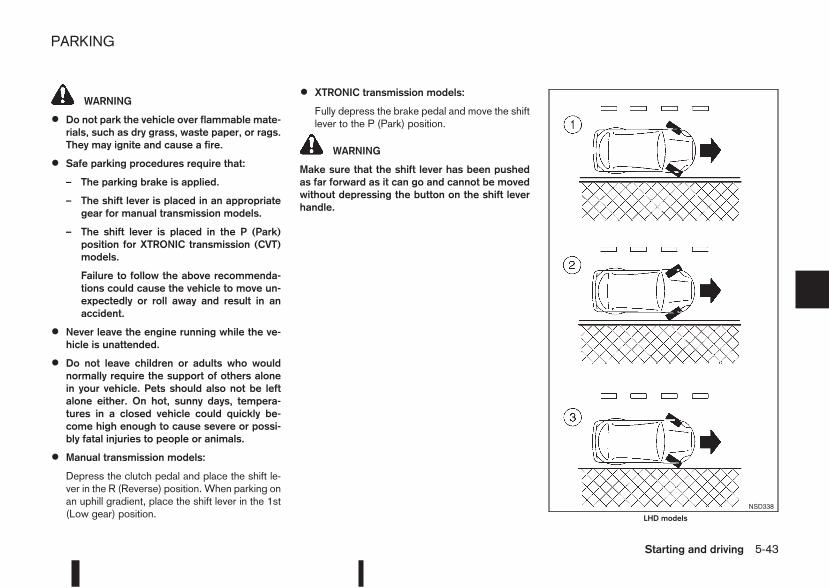
WARNING
• Do not park the vehicle over flammable mate-rials, such as dry grass, waste paper, or rags.They may ignite and cause a fire.
• Safe parking procedures require that:
– The parking brake is applied.
– The shift lever is placed in an appropriategear for manual transmission models.
– The shift lever is placed in the P (Park)position for XTRONIC transmission (CVT)models.
Failure to follow the above recommenda-tions could cause the vehicle to move un-expectedly or roll away and result in anaccident.
• Never leave the engine running while the ve-hicle is unattended.
• Do not leave children or adults who wouldnormally require the support of others alonein your vehicle. Pets should also not be leftalone either. On hot, sunny days, tempera-tures in a closed vehicle could quickly be-come high enough to cause severe or possi-bly fatal injuries to people or animals.
• Manual transmission models:
Depress the clutch pedal and place the shift le-ver in the R (Reverse) position. When parking onan uphill gradient, place the shift lever in the 1st(Low gear) position.
• XTRONIC transmission models:
Fully depress the brake pedal and move the shiftlever to the P (Park) position.
WARNING
Make sure that the shift lever has been pushedas far forward as it can go and cannot be movedwithout depressing the button on the shift leverhandle.
NSD338
LHD models
PARKING
Starting and driving 5-43
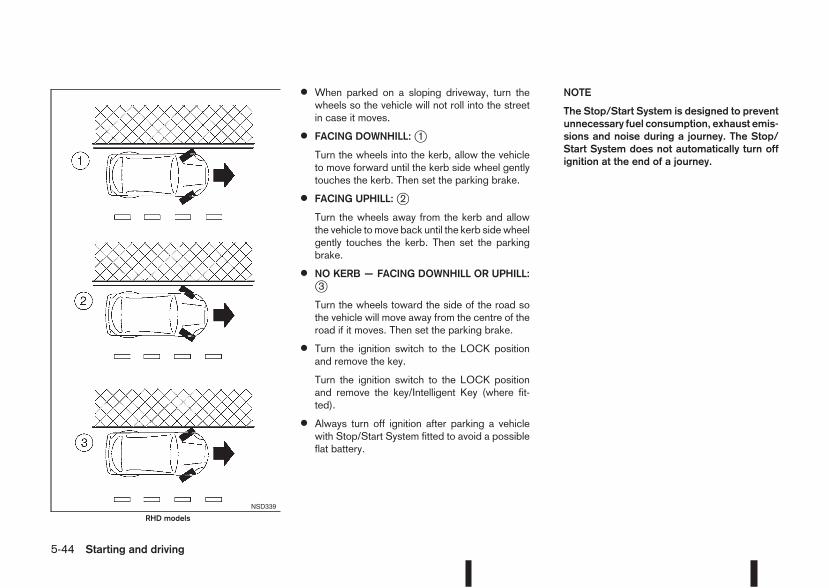
• When parked on a sloping driveway, turn thewheels so the vehicle will not roll into the streetin case it moves.
• FACING DOWNHILL:j1
Turn the wheels into the kerb, allow the vehicleto move forward until the kerb side wheel gentlytouches the kerb. Then set the parking brake.
• FACING UPHILL:j2
Turn the wheels away from the kerb and allowthe vehicle to move back until the kerb side wheelgently touches the kerb. Then set the parkingbrake.
• NO KERB — FACING DOWNHILL OR UPHILL:j3
Turn the wheels toward the side of the road sothe vehicle will move away from the centre of theroad if it moves. Then set the parking brake.
• Turn the ignition switch to the LOCK positionand remove the key.
Turn the ignition switch to the LOCK positionand remove the key/Intelligent Key (where fit-ted).
• Always turn off ignition after parking a vehiclewith Stop/Start System fitted to avoid a possibleflat battery.
NOTE
The Stop/Start System is designed to preventunnecessary fuel consumption, exhaust emis-sions and noise during a journey. The Stop/Start System does not automatically turn offignition at the end of a journey.
NSD339
RHD models
5-44 Starting and driving
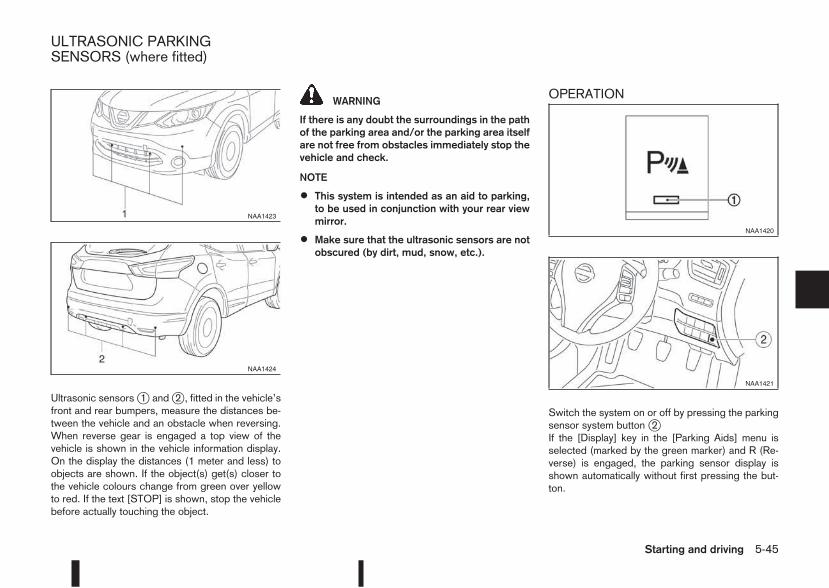
Ultrasonic sensorsj1 andj2 , fitted in the vehicle’sfront and rear bumpers, measure the distances be-tween the vehicle and an obstacle when reversing.When reverse gear is engaged a top view of thevehicle is shown in the vehicle information display.On the display the distances (1 meter and less) toobjects are shown. If the object(s) get(s) closer tothe vehicle colours change from green over yellowto red. If the text [STOP] is shown, stop the vehiclebefore actually touching the object.
WARNING
If there is any doubt the surroundings in the pathof the parking area and/or the parking area itselfare not free from obstacles immediately stop thevehicle and check.
NOTE
• This system is intended as an aid to parking,to be used in conjunction with your rear viewmirror.
• Make sure that the ultrasonic sensors are notobscured (by dirt, mud, snow, etc.).
OPERATION
Switch the system on or off by pressing the parkingsensor system buttonj2If the [Display] key in the [Parking Aids] menu isselected (marked by the green marker) and R (Re-verse) is engaged, the parking sensor display isshown automatically without first pressing the but-ton.
NAA1423
NAA1424
NAA1420
NAA1421
ULTRASONIC PARKINGSENSORS (where fitted)
Starting and driving 5-45
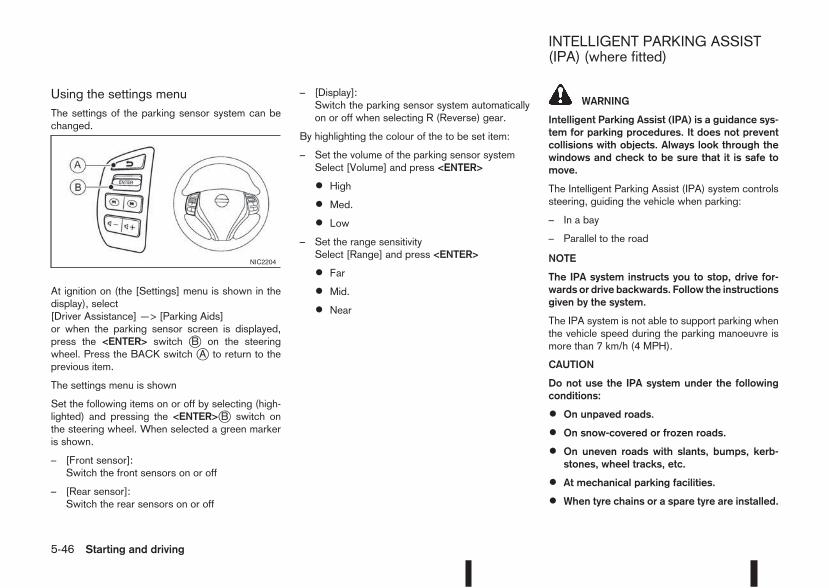
Using the settings menuThe settings of the parking sensor system can bechanged.
At ignition on (the [Settings] menu is shown in thedisplay), select[Driver Assistance] —> [Parking Aids]or when the parking sensor screen is displayed,press the <ENTER> switch jB on the steeringwheel. Press the BACK switch jA to return to theprevious item.
The settings menu is shown
Set the following items on or off by selecting (high-lighted) and pressing the <ENTER>jB switch onthe steering wheel. When selected a green markeris shown.
– [Front sensor]:Switch the front sensors on or off
– [Rear sensor]:Switch the rear sensors on or off
– [Display]:Switch the parking sensor system automaticallyon or off when selecting R (Reverse) gear.
By highlighting the colour of the to be set item:
– Set the volume of the parking sensor systemSelect [Volume] and press <ENTER>
• High
• Med.
• Low
– Set the range sensitivitySelect [Range] and press <ENTER>
• Far
• Mid.
• Near
WARNING
Intelligent Parking Assist (IPA) is a guidance sys-tem for parking procedures. It does not preventcollisions with objects. Always look through thewindows and check to be sure that it is safe tomove.
The Intelligent Parking Assist (IPA) system controlssteering, guiding the vehicle when parking:
– In a bay
– Parallel to the road
NOTE
The IPA system instructs you to stop, drive for-wards or drive backwards. Follow the instructionsgiven by the system.
The IPA system is not able to support parking whenthe vehicle speed during the parking manoeuvre ismore than 7 km/h (4 MPH).
CAUTION
Do not use the IPA system under the followingconditions:
• On unpaved roads.
• On snow-covered or frozen roads.
• On uneven roads with slants, bumps, kerb-stones, wheel tracks, etc.
• At mechanical parking facilities.
• When tyre chains or a spare tyre are installed.
NIC2204
INTELLIGENT PARKING ASSIST(IPA) (where fitted)
5-46 Starting and driving
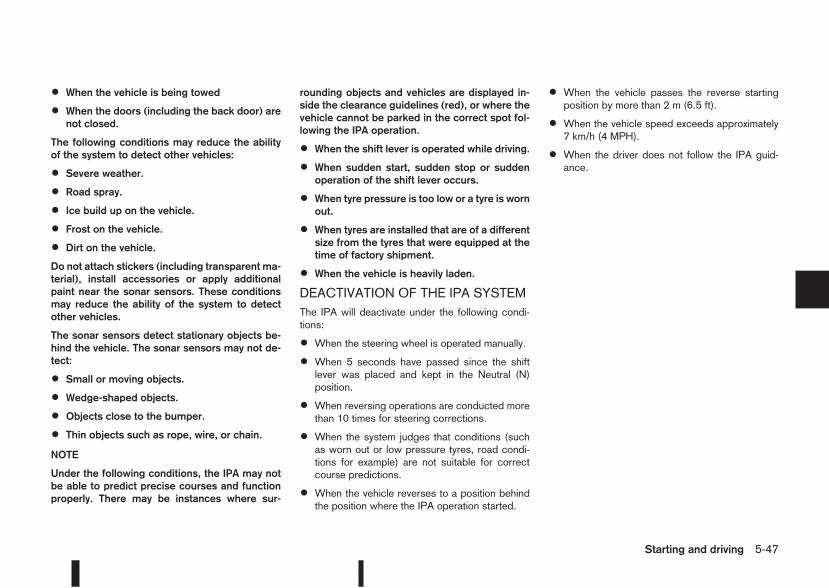
• When the vehicle is being towed
• When the doors (including the back door) arenot closed.
The following conditions may reduce the abilityof the system to detect other vehicles:
• Severe weather.
• Road spray.
• Ice build up on the vehicle.
• Frost on the vehicle.
• Dirt on the vehicle.
Do not attach stickers (including transparent ma-terial), install accessories or apply additionalpaint near the sonar sensors. These conditionsmay reduce the ability of the system to detectother vehicles.
The sonar sensors detect stationary objects be-hind the vehicle. The sonar sensors may not de-tect:
• Small or moving objects.
• Wedge-shaped objects.
• Objects close to the bumper.
• Thin objects such as rope, wire, or chain.
NOTE
Under the following conditions, the IPA may notbe able to predict precise courses and functionproperly. There may be instances where sur-
rounding objects and vehicles are displayed in-side the clearance guidelines (red), or where thevehicle cannot be parked in the correct spot fol-lowing the IPA operation.
• When the shift lever is operated while driving.
• When sudden start, sudden stop or suddenoperation of the shift lever occurs.
• When tyre pressure is too low or a tyre is wornout.
• When tyres are installed that are of a differentsize from the tyres that were equipped at thetime of factory shipment.
• When the vehicle is heavily laden.
DEACTIVATION OF THE IPA SYSTEMThe IPA will deactivate under the following condi-tions:
• When the steering wheel is operated manually.
• When 5 seconds have passed since the shiftlever was placed and kept in the Neutral (N)position.
• When reversing operations are conducted morethan 10 times for steering corrections.
• When the system judges that conditions (suchas worn out or low pressure tyres, road condi-tions for example) are not suitable for correctcourse predictions.
• When the vehicle reverses to a position behindthe position where the IPA operation started.
• When the vehicle passes the reverse startingposition by more than 2 m (6.5 ft).
• When the vehicle speed exceeds approximately7 km/h (4 MPH).
• When the driver does not follow the IPA guid-ance.
Starting and driving 5-47
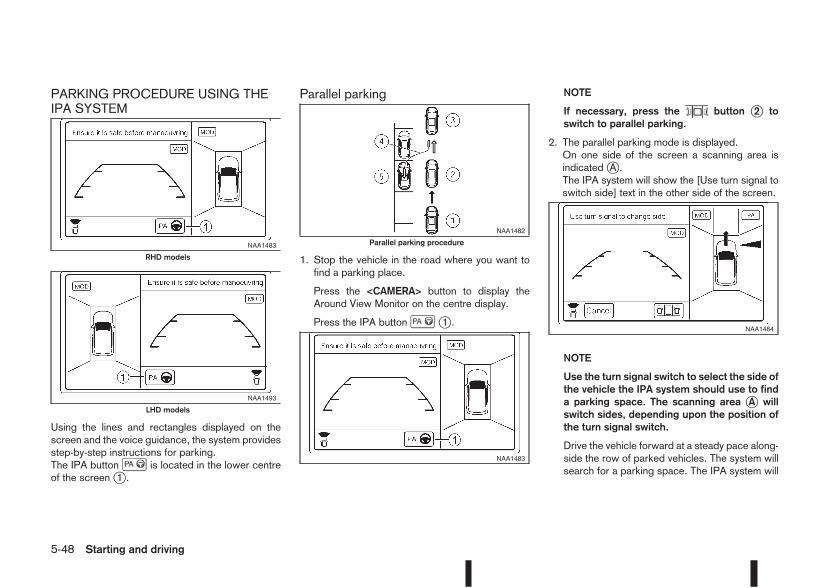
PARKING PROCEDURE USING THEIPA SYSTEM
Using the lines and rectangles displayed on thescreen and the voice guidance, the system providesstep-by-step instructions for parking.The IPA button is located in the lower centreof the screenj1 .
Parallel parking
1. Stop the vehicle in the road where you want tofind a parking place.
Press the <CAMERA> button to display theAround View Monitor on the centre display.
Press the IPA button j1 .
NOTE
If necessary, press the button j2 toswitch to parallel parking.
2. The parallel parking mode is displayed.On one side of the screen a scanning area isindicatedjA .The IPA system will show the [Use turn signal toswitch side] text in the other side of the screen.
NOTE
Use the turn signal switch to select the side ofthe vehicle the IPA system should use to finda parking space. The scanning area jA willswitch sides, depending upon the position ofthe turn signal switch.
Drive the vehicle forward at a steady pace along-side the row of parked vehicles. The system willsearch for a parking space. The IPA system will
NAA1483
RHD models
NAA1493
LHD models
NAA1482
Parallel parking procedure
NAA1483
NAA1484
5-48 Starting and driving
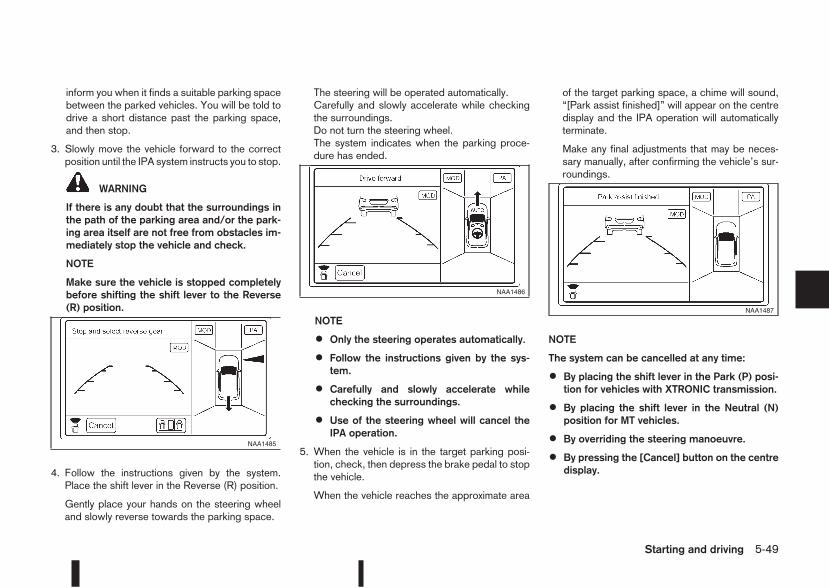
inform you when it finds a suitable parking spacebetween the parked vehicles. You will be told todrive a short distance past the parking space,and then stop.
3. Slowly move the vehicle forward to the correctposition until the IPA system instructs you to stop.
WARNING
If there is any doubt that the surroundings inthe path of the parking area and/or the park-ing area itself are not free from obstacles im-mediately stop the vehicle and check.
NOTE
Make sure the vehicle is stopped completelybefore shifting the shift lever to the Reverse(R) position.
4. Follow the instructions given by the system.Place the shift lever in the Reverse (R) position.
Gently place your hands on the steering wheeland slowly reverse towards the parking space.
The steering will be operated automatically.Carefully and slowly accelerate while checkingthe surroundings.Do not turn the steering wheel.The system indicates when the parking proce-dure has ended.
NOTE
• Only the steering operates automatically.
• Follow the instructions given by the sys-tem.
• Carefully and slowly accelerate whilechecking the surroundings.
• Use of the steering wheel will cancel theIPA operation.
5. When the vehicle is in the target parking posi-tion, check, then depress the brake pedal to stopthe vehicle.
When the vehicle reaches the approximate area
of the target parking space, a chime will sound,“[Park assist finished]” will appear on the centredisplay and the IPA operation will automaticallyterminate.
Make any final adjustments that may be neces-sary manually, after confirming the vehicle’s sur-roundings.
NOTE
The system can be cancelled at any time:
• By placing the shift lever in the Park (P) posi-tion for vehicles with XTRONIC transmission.
• By placing the shift lever in the Neutral (N)position for MT vehicles.
• By overriding the steering manoeuvre.
• By pressing the [Cancel] button on the centredisplay.
NAA1485
NAA1486
NAA1487
Starting and driving 5-49
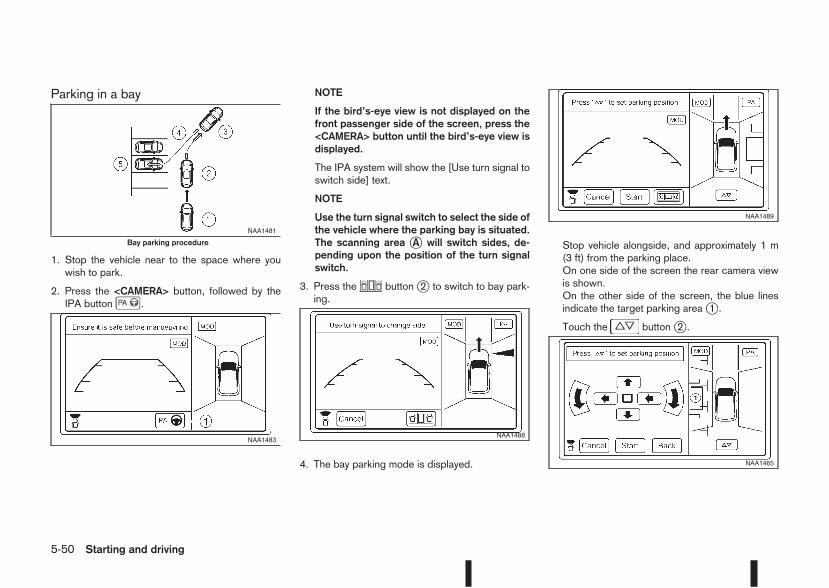
Parking in a bay
1. Stop the vehicle near to the space where youwish to park.
2. Press the <CAMERA> button, followed by theIPA button .
NOTE
If the bird’s-eye view is not displayed on thefront passenger side of the screen, press the<CAMERA> button until the bird’s-eye view isdisplayed.
The IPA system will show the [Use turn signal toswitch side] text.
NOTE
Use the turn signal switch to select the side ofthe vehicle where the parking bay is situated.The scanning area jA will switch sides, de-pending upon the position of the turn signalswitch.
3. Press the buttonj2 to switch to bay park-ing.
4. The bay parking mode is displayed.
Stop vehicle alongside, and approximately 1 m(3 ft) from the parking place.On one side of the screen the rear camera viewis shown.On the other side of the screen, the blue linesindicate the target parking areaj1 .
Touch the buttonj2 .
NAA1481
Bay parking procedure
NAA1483NAA1488
NAA1489
NAA1465
5-50 Starting and driving
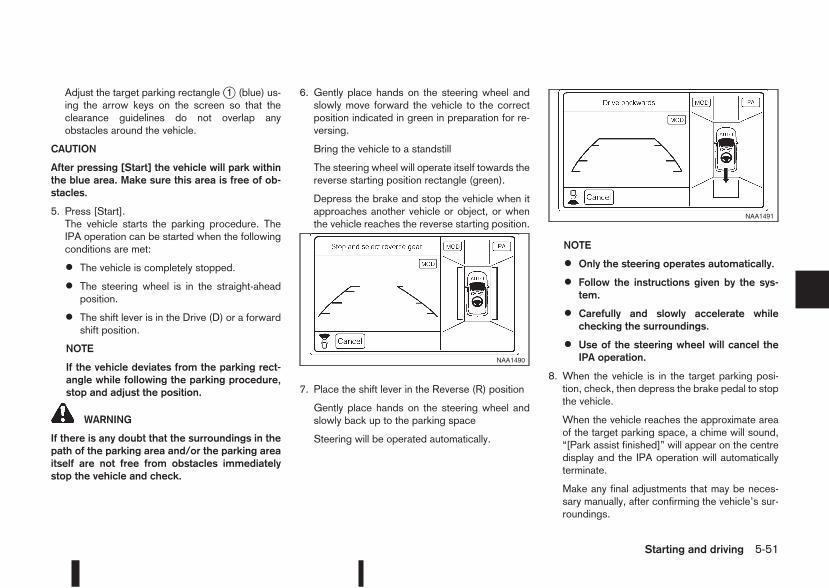
Adjust the target parking rectanglej1 (blue) us-ing the arrow keys on the screen so that theclearance guidelines do not overlap anyobstacles around the vehicle.
CAUTION
After pressing [Start] the vehicle will park withinthe blue area. Make sure this area is free of ob-stacles.
5. Press [Start].The vehicle starts the parking procedure. TheIPA operation can be started when the followingconditions are met:
• The vehicle is completely stopped.
• The steering wheel is in the straight-aheadposition.
• The shift lever is in the Drive (D) or a forwardshift position.
NOTE
If the vehicle deviates from the parking rect-angle while following the parking procedure,stop and adjust the position.
WARNING
If there is any doubt that the surroundings in thepath of the parking area and/or the parking areaitself are not free from obstacles immediatelystop the vehicle and check.
6. Gently place hands on the steering wheel andslowly move forward the vehicle to the correctposition indicated in green in preparation for re-versing.
Bring the vehicle to a standstill
The steering wheel will operate itself towards thereverse starting position rectangle (green).
Depress the brake and stop the vehicle when itapproaches another vehicle or object, or whenthe vehicle reaches the reverse starting position.
7. Place the shift lever in the Reverse (R) position
Gently place hands on the steering wheel andslowly back up to the parking space
Steering will be operated automatically.
NOTE
• Only the steering operates automatically.
• Follow the instructions given by the sys-tem.
• Carefully and slowly accelerate whilechecking the surroundings.
• Use of the steering wheel will cancel theIPA operation.
8. When the vehicle is in the target parking posi-tion, check, then depress the brake pedal to stopthe vehicle.
When the vehicle reaches the approximate areaof the target parking space, a chime will sound,“[Park assist finished]” will appear on the centredisplay and the IPA operation will automaticallyterminate.
Make any final adjustments that may be neces-sary manually, after confirming the vehicle’s sur-roundings.
NAA1490
NAA1491
Starting and driving 5-51
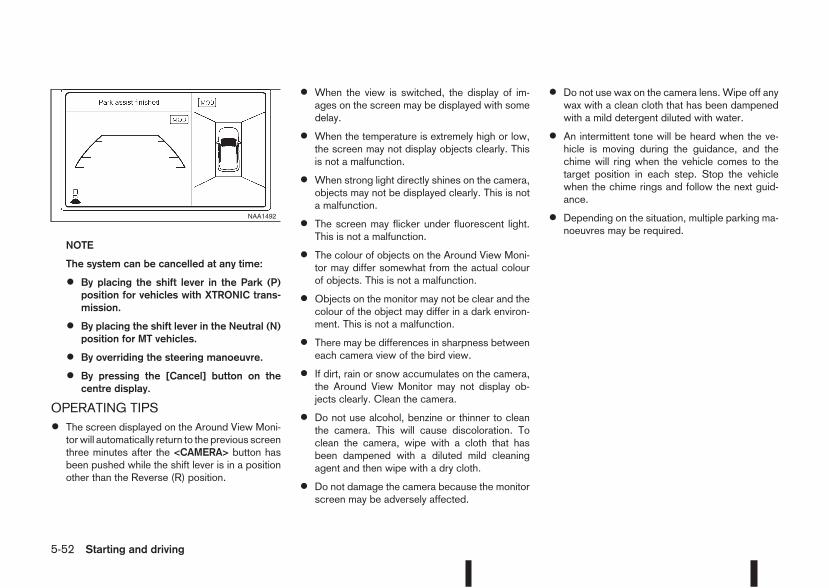
NOTE
The system can be cancelled at any time:
• By placing the shift lever in the Park (P)position for vehicles with XTRONIC trans-mission.
• By placing the shift lever in the Neutral (N)position for MT vehicles.
• By overriding the steering manoeuvre.
• By pressing the [Cancel] button on thecentre display.
OPERATING TIPS
• The screen displayed on the Around View Moni-torwill automatically return to the previous screenthree minutes after the <CAMERA> button hasbeen pushed while the shift lever is in a positionother than the Reverse (R) position.
• When the view is switched, the display of im-ages on the screen may be displayed with somedelay.
• When the temperature is extremely high or low,the screen may not display objects clearly. Thisis not a malfunction.
• When strong light directly shines on the camera,objects may not be displayed clearly. This is nota malfunction.
• The screen may flicker under fluorescent light.This is not a malfunction.
• The colour of objects on the Around View Moni-tor may differ somewhat from the actual colourof objects. This is not a malfunction.
• Objects on the monitor may not be clear and thecolour of the object may differ in a dark environ-ment. This is not a malfunction.
• There may be differences in sharpness betweeneach camera view of the bird view.
• If dirt, rain or snow accumulates on the camera,the Around View Monitor may not display ob-jects clearly. Clean the camera.
• Do not use alcohol, benzine or thinner to cleanthe camera. This will cause discoloration. Toclean the camera, wipe with a cloth that hasbeen dampened with a diluted mild cleaningagent and then wipe with a dry cloth.
• Do not damage the camera because the monitorscreen may be adversely affected.
• Do not use wax on the camera lens. Wipe off anywax with a clean cloth that has been dampenedwith a mild detergent diluted with water.
• An intermittent tone will be heard when the ve-hicle is moving during the guidance, and thechime will ring when the vehicle comes to thetarget position in each step. Stop the vehiclewhen the chime rings and follow the next guid-ance.
• Depending on the situation, multiple parking ma-noeuvres may be required.
NAA1492
5-52 Starting and driving
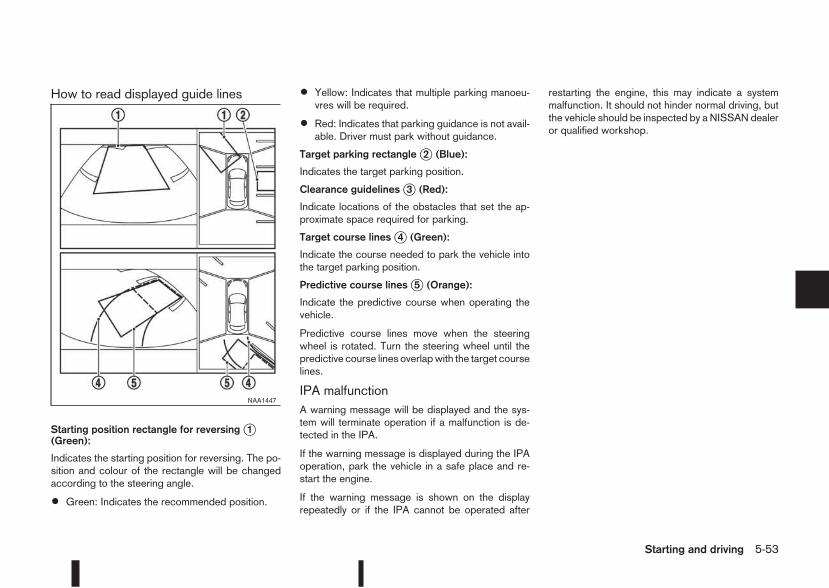
How to read displayed guide lines
Starting position rectangle for reversingj1(Green):
Indicates the starting position for reversing. The po-sition and colour of the rectangle will be changedaccording to the steering angle.
• Green: Indicates the recommended position.
• Yellow: Indicates that multiple parking manoeu-vres will be required.
• Red: Indicates that parking guidance is not avail-able. Driver must park without guidance.
Target parking rectanglej2 (Blue):
Indicates the target parking position.
Clearance guidelinesj3 (Red):
Indicate locations of the obstacles that set the ap-proximate space required for parking.
Target course linesj4 (Green):
Indicate the course needed to park the vehicle intothe target parking position.
Predictive course linesj5 (Orange):
Indicate the predictive course when operating thevehicle.
Predictive course lines move when the steeringwheel is rotated. Turn the steering wheel until thepredictive course lines overlapwith the target courselines.
IPA malfunctionA warning message will be displayed and the sys-tem will terminate operation if a malfunction is de-tected in the IPA.
If the warning message is displayed during the IPAoperation, park the vehicle in a safe place and re-start the engine.
If the warning message is shown on the displayrepeatedly or if the IPA cannot be operated after
restarting the engine, this may indicate a systemmalfunction. It should not hinder normal driving, butthe vehicle should be inspected by a NISSAN dealeror qualified workshop.
NAA1447
Starting and driving 5-53

Your new vehicle was designed to be used primarilyto carry passengers and luggage.
Remember that towing a trailer will place additionalloads on your vehicle’s engine, drive-train, steering,braking and other systems. Towing a trailer will alsoexaggerate other conditions, such as sway causedby crosswinds, rough road surfaces or passingtrucks. Driving style and speed must be adjustedaccording to the circumstances. Before towing atrailer, see a NISSAN dealer or qualified workshopfor an explanation of towing equipment and itsproper use.
OPERATING PRECAUTIONS
• Avoid towing a trailer during the running-inschedule.
• Choose proper coupling devices (trailer hitch,safety chain, roof carrier, etc.) for your vehicleand trailer. These devices are available from aNISSAN dealer or qualified workshop where youcan also obtain more detailed information abouttrailer towing.
Heavy-duty kits are available at a NISSAN dealeror qualified workshop.
• It is advisable to contact a NISSAN dealer orqualified workshop for towing details, beforetowing a trailer up steep slopes for long dis-tances.
• Never allow the total trailer load (trailer weightplus its cargo weight) to exceed the maximumset for the coupling device.
Contact a NISSAN dealer or qualified workshopfor more information on this matter.
• The trailer must be loaded so that heavy goodsare distributed over the axle and as low in thetrailer as possible. Poor load distribution can se-riously affect the stability of the trailer and towvehicle.
• Do not exceed the maximum permitted verticalload on the trailer hitch.
• Before driving, make sure that the lighting sys-tem of the trailer works properly.
• When towing with 4WDmodels, the 4WDmodeswitch should be in the AUTO position. Usingthe vehicle in AUTO mode gives better traction,particularly when moving off from stationary and/or on an incline, as the vehicle is less likely towheel spin.
• Avoid abrupt starts, accelerations and stops.
• Avoid sharp turns and lane changes.
• Always drive your vehicle at a moderate speed.
• Always block the wheels on both vehicle andtrailer when parking. Apply the handbrake (wherefitted) on the trailer. Parking on a steep slope isnot recommended.
If parking on a steep slope is unavoidable it isalso advisable to put the vehicle into gear, orselect P (Park (XTRONIC models)), and turn thefront wheels into the kerb (in addition to the otherprecautions described). Before parking on a
steep slope consider the incline (the towingweights quoted are for a 12% slope).
• Follow the trailer manufacturer’s instructions.
• Have your vehicle serviced more often than atthe intervals specified in the separately providedWarranty Information and Maintenance booklet.
• Trailer towing requires more fuel than under nor-mal circumstances because of a considerableincrease in traction power required and resis-tance.
• When towing a trailer, observe the following re-stricted towing speed:Speed: below 100 km/h (62 MPH)
• Observe the legal maximum speeds for traileroperation.
CAUTION
While towing a trailer, check the engine coolanttemperature gauge regularly to prevent engineoverheating.
NSD239Z
TRAILER TOWING
5-54 Starting and driving
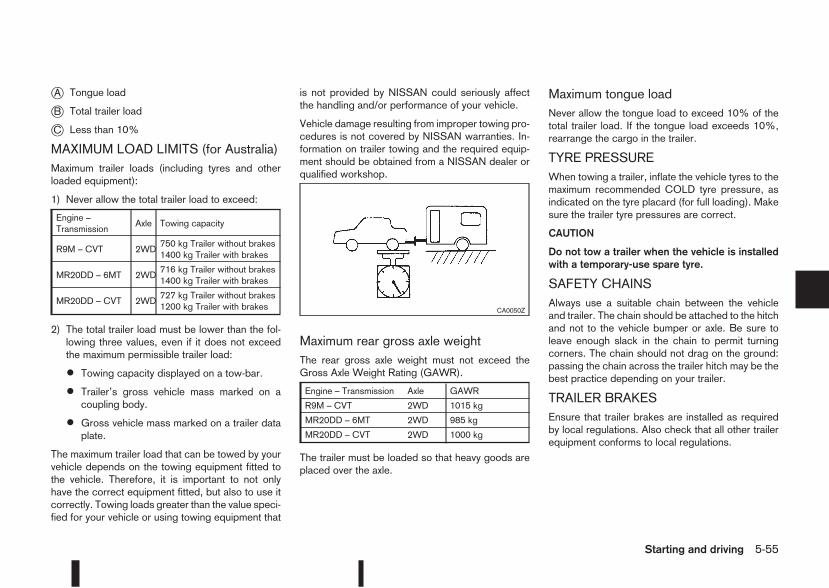
jA Tongue load
jB Total trailer load
jC Less than 10%
MAXIMUM LOAD LIMITS (for Australia)Maximum trailer loads (including tyres and otherloaded equipment):
1) Never allow the total trailer load to exceed:
Engine –Transmission
Axle Towing capacity
R9M – CVT 2WD750 kg Trailer without brakes1400 kg Trailer with brakes
MR20DD – 6MT 2WD716 kg Trailer without brakes1400 kg Trailer with brakes
MR20DD – CVT 2WD727 kg Trailer without brakes1200 kg Trailer with brakes
2) The total trailer load must be lower than the fol-lowing three values, even if it does not exceedthe maximum permissible trailer load:
• Towing capacity displayed on a tow-bar.
• Trailer’s gross vehicle mass marked on acoupling body.
• Gross vehicle mass marked on a trailer dataplate.
The maximum trailer load that can be towed by yourvehicle depends on the towing equipment fitted tothe vehicle. Therefore, it is important to not onlyhave the correct equipment fitted, but also to use itcorrectly. Towing loads greater than the value speci-fied for your vehicle or using towing equipment that
is not provided by NISSAN could seriously affectthe handling and/or performance of your vehicle.
Vehicle damage resulting from improper towing pro-cedures is not covered by NISSAN warranties. In-formation on trailer towing and the required equip-ment should be obtained from a NISSAN dealer orqualified workshop.
Maximum rear gross axle weightThe rear gross axle weight must not exceed theGross Axle Weight Rating (GAWR).
Engine – Transmission Axle GAWR
R9M – CVT 2WD 1015 kg
MR20DD – 6MT 2WD 985 kg
MR20DD – CVT 2WD 1000 kg
The trailer must be loaded so that heavy goods areplaced over the axle.
Maximum tongue loadNever allow the tongue load to exceed 10% of thetotal trailer load. If the tongue load exceeds 10%,rearrange the cargo in the trailer.
TYRE PRESSUREWhen towing a trailer, inflate the vehicle tyres to themaximum recommended COLD tyre pressure, asindicated on the tyre placard (for full loading). Makesure the trailer tyre pressures are correct.
CAUTION
Do not tow a trailer when the vehicle is installedwith a temporary-use spare tyre.
SAFETY CHAINSAlways use a suitable chain between the vehicleand trailer. The chain should be attached to the hitchand not to the vehicle bumper or axle. Be sure toleave enough slack in the chain to permit turningcorners. The chain should not drag on the ground:passing the chain across the trailer hitch may be thebest practice depending on your trailer.
TRAILER BRAKESEnsure that trailer brakes are installed as requiredby local regulations. Also check that all other trailerequipment conforms to local regulations.
CA0050Z
Starting and driving 5-55
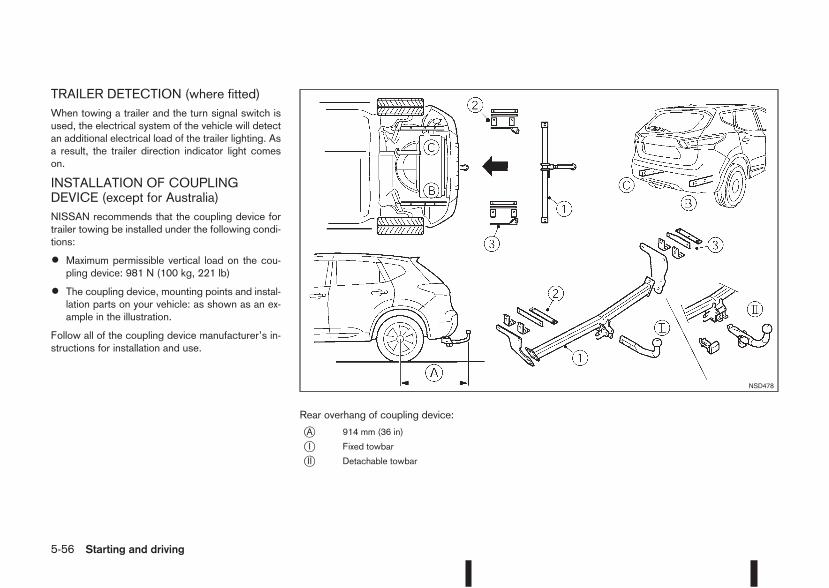
TRAILER DETECTION (where fitted)When towing a trailer and the turn signal switch isused, the electrical system of the vehicle will detectan additional electrical load of the trailer lighting. Asa result, the trailer direction indicator light comeson.
INSTALLATION OF COUPLINGDEVICE (except for Australia)NISSAN recommends that the coupling device fortrailer towing be installed under the following condi-tions:
• Maximum permissible vertical load on the cou-pling device: 981 N (100 kg, 221 lb)
• The coupling device, mounting points and instal-lation parts on your vehicle: as shown as an ex-ample in the illustration.
Follow all of the coupling device manufacturer’s in-structions for installation and use.
Rear overhang of coupling device:
jA 914 mm (36 in)
jI Fixed towbar
jII Detachable towbar
NSD478
5-56 Starting and driving
When leaving your vehicle unoccupied:
• Always remove the ignition key and take it withyou – even in your own garage.
• Always remove the ignition key or Intelligent Key(where fitted) and take it with you – even in yourown garage.
• Close all windows completely and lock all doors.
• Always park your vehicle where it can be seen.At night, park in a well lit area.
• If the vehicle is equipped with an alarm or immo-bilization device, use it – even for short periods.
• Do not leave children and pets in the vehicleunattended.
• Do not leave valuables on view to tempt a thief.Always take your valuables with you. If you mustleave something in your vehicle, lock it in the lug-gage compartment or hide it out of sight.
• Do not leave the vehicle documents in your ve-hicle. In the unfortunate event of your vehiclebeing stolen, the documents will only help a thiefto sell the vehicle.
• Do not leave articles on a roof rack as they areparticularly vulnerable. If possible, remove themfrom the rack and lock them inside the vehicle.
• Do not leave the spare key in the vehicle – keepit in a safe place at home.
• Do not leave the spare key or Intelligent Key inthe vehicle – keep it in a safe place at home.
• Do not leave a note of your vehicle’s key numberin the vehicle. A thief may break into the vehicle,note the key number and return with a new keyand drive the vehicle.
WARNING
• If the engine is not running or is turned offwhile driving, the power assistance for thesteering will not work. The steering will beharder to operate.
• When the electric power steeringwarning lightilluminateswith the engine running, the powerassistance for the steering will cease opera-tion. You will still have control of the vehiclebut the steering will be harder to operate.
The electric power steering system is designed toprovide power assistance while driving to allow youto operate the steering wheel with light force.
The steering effort can be set to [Normal] or [Sport]in the vehicle information display under the heading[Driver assistance]. (See “[Driver assistance]” in the“2. Instruments and controls” section.)
NOTE
When the steering wheel is operated repeatedlyor continuously while parking or driving at a verylow speed, the power assistance for the steeringwheel will be reduced. This is to prevent over-heating of the electric power steering system andprotect it from becoming damaged. While thepower assistance is reduced, steering wheel op-eration will become heavy. When the tempera-ture of the electric power steering system de-creases, the power assistance level will return tonormal. Avoid repeating such steering wheel op-erations that could cause the electric powersteering system to overheat.
VEHICLE SECURITY ELECTRIC POWER STEERINGSYSTEM
Starting and driving 5-57
You may hear a sound when the steering wheelis operated quickly. However, this is not a mal-function.
If the electric power steering warning light illu-minates while the engine is running, it may indicatethe electric power steering system is not functioningproperly and may need servicing. Have the electricpower steering systemchecked by aNISSANdealeror qualified workshop. (See “ Power steering warn-ing light” in the “2. Instruments and controls” sec-tion.)
When the electric power steering warning light illu-minates with the engine running, the power assis-tance for the steering will cease operation. You willstill have control of the vehicle. However, greatersteering effort is needed, especially in sharp turnsand at low speeds.
The brake system has two separate hydraulic cir-cuits. If one circuit malfunctions, two wheels will stillhave braking ability.
BRAKE PRECAUTIONS
Vacuum assisted brakeThe brake booster aids braking by using enginevacuum or vacuum from an engine-driven pump. Ifthe engine stops or the drive belt is broken, you canstop the vehicle by depressing the brake pedal.However, greater foot pressure on the brake pedalwill be required to stop the vehicle and the stoppingdistance will be longer.
Wet brakesWhen the vehicle is washed or driven through wa-ter, the brakes may get wet. As a result, your brak-ing distance will be longer and the vehicle may pullto one side during braking.
To dry brakes, drive the vehicle at a safe speedwhile lightly pressing the brake pedal to heat up thebrakes. Do this until the brakes return to normal.Avoid driving the vehicle at high speeds until thebrakes function correctly.
Using the brakesAvoid resting your foot on the brake pedal whiledriving. This will overheat the brakes, wear out thebrake linings and pads faster and reduce fueleconomy performance.
To help reduce brakewear and to prevent the brakesfrom overheating, reduce speed and shift to a lowergear before going down a slope or long downhill
gradient. Overheated brakes may reduce brakingperformance and could result in loss of vehicle con-trol.
CAUTION
While driving on a slippery surface, be carefulwhen braking, accelerating or downshifting.Abrupt braking actions or sudden accelerationcould cause the wheels to skid and result in anaccident.
Be aware that brakes will fade if repeated heavybrake applications are made.
Driving uphillWhen starting on a steep gradient, it is sometimesdifficult to operate the brake or both the brake andclutch (MT models). Use the parking brake to holdthe vehicle. Do not slip the clutch (MT models).When ready to start, make sure that the shift lever isin an appropriate forward or reverse driving posi-tion, slowly release the parking brake while depress-ing the accelerator pedal and releasing the clutch(MT models) or depressing the accelerator pedal(XTRONIC transmission models). If your vehicle hasan electric parking brake, this will automatically re-lease when you depress the accelerator pedal andrelease the clutch (MT models) or depress the ac-celerator pedal (XTRONIC transmission models).
BRAKE SYSTEM
5-58 Starting and driving
Driving downhillThe engine braking action is effective for controllingthe vehicle while descending hills.
The shift lever (MT models) should be placed in agear position low enough to obtain sufficient enginebraking.
For XTRONIC transmission models, a low gear po-sition in the manual shift mode, low enough to obtainsufficient engine braking, should be selected.
WARNING
• The Anti-lock Braking System (ABS) is a so-phisticated device, but it cannot prevent acci-dents resulting from careless or dangerousdriving techniques. It can help maintain ve-hicle control during braking on slippery sur-faces. Remember that stopping distances onslippery surfaces will be longer than on nor-mal surfaces even with ABS. Stopping dis-tances may also be longer on rough, gravel orsnow covered roads, or if you are using snowchains. Always maintain a safe distance fromthe vehicle in front of you. Ultimately, thedriver is responsible for safety.
• Tyre type and condition may also affect brak-ing effectiveness.
– When replacing tyres, install the specifiedsize of tyres on all four wheels.
– When installing a spare tyre, make surethat it is the proper size and type as speci-fied on the tyre placard. (See “Vehicleidentification” in the “9. Technicalinformation” section.)
– For detailed information, see “Wheels andtyres” in the “8. Maintenance anddo-it-yourself” section.
The Anti-lock Braking System (ABS) controls thebrakes so the wheels do not lock during hard brak-ing or when braking on slippery surfaces. The sys-tem detects the rotation speed at each wheel andvaries the brake fluid pressure to prevent eachwheel
from locking and sliding. By preventing each wheelfrom locking, the system helps the driver maintainsteering control and helps to minimise swerving andspinning on slippery surfaces.
USING SYSTEMDepress the brake pedal and hold it down. Depressthe brake pedal with firm steady pressure, but donot pump the brakes. The ABS will operate to pre-vent the wheels from locking up. Steer the vehicle toavoid obstacles.
WARNING
Do not pump the brake pedal. Doing so may re-sult in increased stopping distances.
SELF-TEST FEATUREThe ABS includes electronic sensors, electricpumps, hydraulic solenoids and a computer. Thecomputer has a built-in diagnostic feature that teststhe system each time you start the engine and movethe vehicle at a low speed in forward or reverse.When the self-test occurs, you may hear a “clunk”noise and/or feel a pulsation in the brake pedal. Thisis normal and does not indicate a malfunction. If thecomputer senses a malfunction, it switches the ABSoff and illuminates the ABS warning light on theinstrument panel. The brake system then operatesnormally, but without anti-lock assistance.
If the ABS warning light illuminates during the self-test or while driving, have the vehicle checked by aNISSAN dealer or qualified workshop.
ANTI-LOCK BRAKING SYSTEM(ABS)
Starting and driving 5-59
NORMAL OPERATIONThe ABS operates at speeds above 5 to 10 km/h (3to 6 MPH). The speed varies according to road con-ditions.
When the ABS senses that one or more wheels areclose to locking up, the actuator rapidly applies andreleases hydraulic pressure. This action is similar topumping the brakes very quickly. You may feel apulsation in the brake pedal and hear a noise fromunder the bonnet or feel a vibration from the actua-tor when it is operating. This is normal and indicatesthat the ABS is operating properly. However, thepulsation may indicate that road conditions are haz-ardous and extra care is required while driving.
When accelerating, driving on slippery surfaces orsuddenly avoiding obstacles on roads, the vehiclemight swerve or slip. The Electronic Stability Pro-gramme (ESP) system continuously monitors andcompares the driver’s intended speed and the traveldirection. The system adjusts wheel brake pressureand engine torque to assist in improving vehicle sta-bility.
• When the ESP system is operating, the “SLIP”indicator light ( ) in the combination meterblinks.
• When only the traction control (TCS) system inthe ESP system is operating, the “SLIP” indica-tor light ( ) in the combination meter will alsoblink.
• If the “SLIP” indicator light ( ) blinks, the roadconditions are slippery. Be sure to drive care-fully. See “Warning/indicator lights and audiblereminders” in the “2. Instruments and controls”section.
• Indicator light
If a malfunction occurs in the system, the “SLIP”indicator light ( ) will come on in the combina-tion meter.
As long as these indicator lights are on, the trac-tion control function is cancelled.
The ESP system uses Active Brake Limited Slip(ABLS) system to improve vehicle traction. The Ac-tive Brake Limited Slip (ABLS) system works whenone of the driving wheels is spinning on a slippery
surface. The Active Brake Limited Slip (ABLS) sys-tem, brakes the spinning wheel to distribute the driv-ing power to the other driving wheel.
If the vehicle is operated with the ESP system turnedoff, all ESP and TCS functions will be turned off.The Active Brake Limited Slip (ABLS) system andABS will still operate with the ESP system off. If theActive Brake Limited Slip (ABLS) system is acti-vated, the “SLIP” indicator light ( ) will blink andyou may hear a clunk noise and/or feel a pulsation inthe brake pedal. This is normal and does not indi-cate a malfunction.
While the ESP system is operating, you may feel apulsation in the brake pedal and hear a noise orvibration from under the bonnet. This is normal andindicates that the ESP system is working properly.
The ESP computer has a built in diagnostic featurethat tests the system each time the engine is startedand the vehicle moves forwards or reverses at aslow speed. When the self-test occurs, you mayhear a clunk noise and/or feel a pulsation in thebrake pedal. This is normal and is not an indicationof a malfunction.
WARNING
• The ESP system is designed to help improvedriving stability but does not prevent accidentscaused by abrupt steering operation at highspeeds, or careless or dangerous drivingtechniques. Reduce vehicle speed and be es-pecially careful when driving and cornering onslippery surfaces. Always drive carefully.
ELECTRONIC STABILITY PROGRAMME (ESP) SYSTEM (where fitted)
5-60 Starting and driving
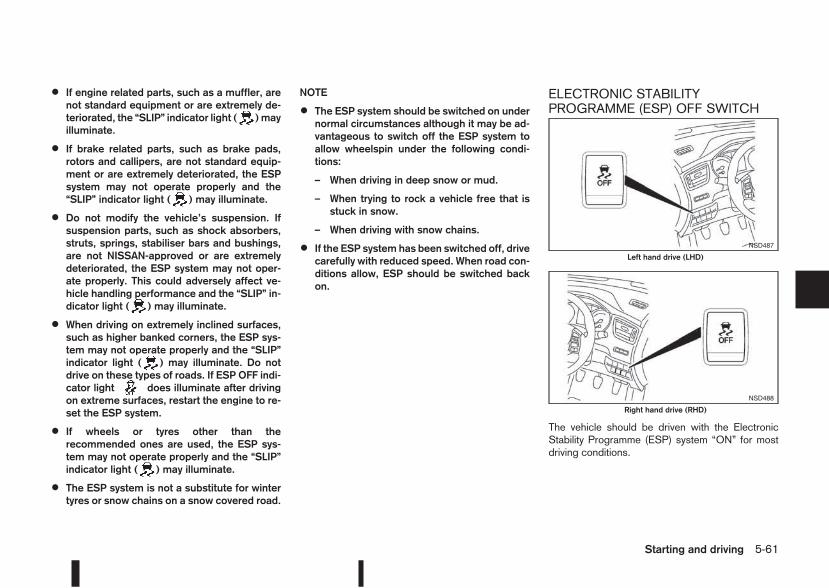
• If engine related parts, such as a muffler, arenot standard equipment or are extremely de-teriorated, the “SLIP” indicator light ( ) mayilluminate.
• If brake related parts, such as brake pads,rotors and callipers, are not standard equip-ment or are extremely deteriorated, the ESPsystem may not operate properly and the“SLIP” indicator light ( ) may illuminate.
• Do not modify the vehicle’s suspension. Ifsuspension parts, such as shock absorbers,struts, springs, stabiliser bars and bushings,are not NISSAN-approved or are extremelydeteriorated, the ESP system may not oper-ate properly. This could adversely affect ve-hicle handling performance and the “SLIP” in-dicator light ( ) may illuminate.
• When driving on extremely inclined surfaces,such as higher banked corners, the ESP sys-tem may not operate properly and the “SLIP”indicator light ( ) may illuminate. Do notdrive on these types of roads. If ESP OFF indi-cator light does illuminate after drivingon extreme surfaces, restart the engine to re-set the ESP system.
• If wheels or tyres other than therecommended ones are used, the ESP sys-tem may not operate properly and the “SLIP”indicator light ( ) may illuminate.
• The ESP system is not a substitute for wintertyres or snow chains on a snow covered road.
NOTE
• The ESP system should be switched on undernormal circumstances although it may be ad-vantageous to switch off the ESP system toallow wheelspin under the following condi-tions:
– When driving in deep snow or mud.
– When trying to rock a vehicle free that isstuck in snow.
– When driving with snow chains.
• If the ESP system has been switched off, drivecarefully with reduced speed. When road con-ditions allow, ESP should be switched backon.
ELECTRONIC STABILITYPROGRAMME (ESP) OFF SWITCH
The vehicle should be driven with the ElectronicStability Programme (ESP) system “ON” for mostdriving conditions.
NSD487
Left hand drive (LHD)
NSD488
Right hand drive (RHD)
Starting and driving 5-61
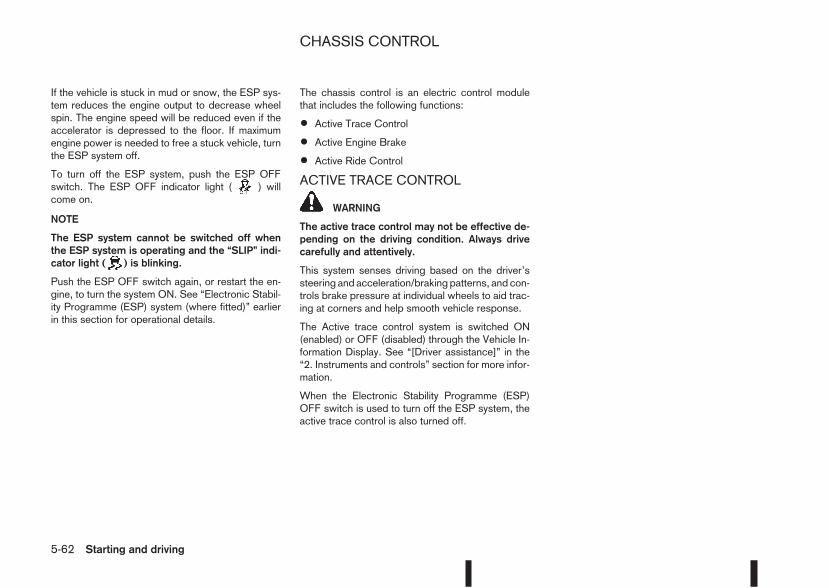
If the vehicle is stuck in mud or snow, the ESP sys-tem reduces the engine output to decrease wheelspin. The engine speed will be reduced even if theaccelerator is depressed to the floor. If maximumengine power is needed to free a stuck vehicle, turnthe ESP system off.
To turn off the ESP system, push the ESP OFFswitch. The ESP OFF indicator light ( ) willcome on.
NOTE
The ESP system cannot be switched off whenthe ESP system is operating and the “SLIP” indi-cator light ( ) is blinking.
Push the ESP OFF switch again, or restart the en-gine, to turn the system ON. See “Electronic Stabil-ity Programme (ESP) system (where fitted)” earlierin this section for operational details.
The chassis control is an electric control modulethat includes the following functions:
• Active Trace Control
• Active Engine Brake
• Active Ride Control
ACTIVE TRACE CONTROL
WARNING
The active trace control may not be effective de-pending on the driving condition. Always drivecarefully and attentively.
This system senses driving based on the driver’ssteering and acceleration/braking patterns, and con-trols brake pressure at individual wheels to aid trac-ing at corners and help smooth vehicle response.
The Active trace control system is switched ON(enabled) or OFF (disabled) through the Vehicle In-formation Display. See “[Driver assistance]” in the“2. Instruments and controls” section for more infor-mation.
When the Electronic Stability Programme (ESP)OFF switch is used to turn off the ESP system, theactive trace control is also turned off.
CHASSIS CONTROL
5-62 Starting and driving
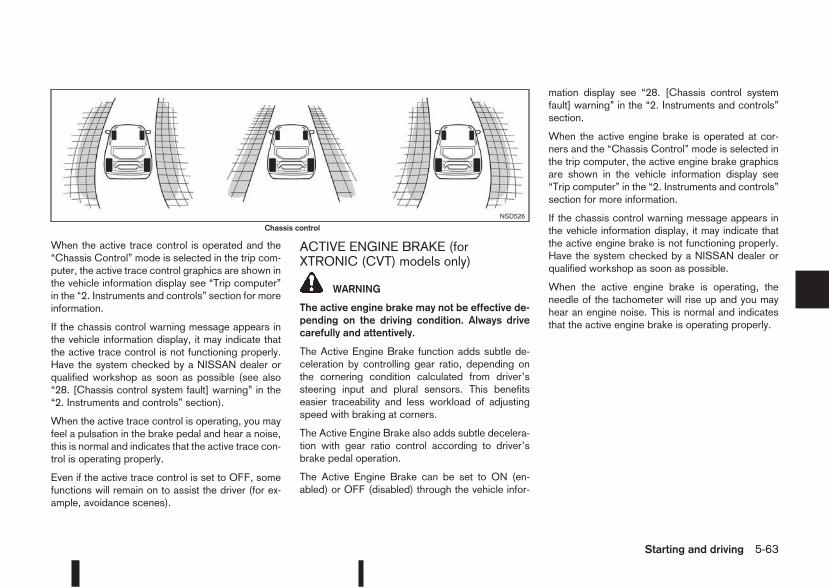
When the active trace control is operated and the“Chassis Control” mode is selected in the trip com-puter, the active trace control graphics are shown inthe vehicle information display see “Trip computer”in the “2. Instruments and controls” section for moreinformation.
If the chassis control warning message appears inthe vehicle information display, it may indicate thatthe active trace control is not functioning properly.Have the system checked by a NISSAN dealer orqualified workshop as soon as possible (see also“28. [Chassis control system fault] warning” in the“2. Instruments and controls” section).
When the active trace control is operating, you mayfeel a pulsation in the brake pedal and hear a noise,this is normal and indicates that the active trace con-trol is operating properly.
Even if the active trace control is set to OFF, somefunctions will remain on to assist the driver (for ex-ample, avoidance scenes).
ACTIVE ENGINE BRAKE (forXTRONIC (CVT) models only)
WARNING
The active engine brake may not be effective de-pending on the driving condition. Always drivecarefully and attentively.
The Active Engine Brake function adds subtle de-celeration by controlling gear ratio, depending onthe cornering condition calculated from driver’ssteering input and plural sensors. This benefitseasier traceability and less workload of adjustingspeed with braking at corners.
The Active Engine Brake also adds subtle decelera-tion with gear ratio control according to driver’sbrake pedal operation.
The Active Engine Brake can be set to ON (en-abled) or OFF (disabled) through the vehicle infor-
mation display see “28. [Chassis control systemfault] warning” in the “2. Instruments and controls”section.
When the active engine brake is operated at cor-ners and the “Chassis Control” mode is selected inthe trip computer, the active engine brake graphicsare shown in the vehicle information display see“Trip computer” in the “2. Instruments and controls”section for more information.
If the chassis control warning message appears inthe vehicle information display, it may indicate thatthe active engine brake is not functioning properly.Have the system checked by a NISSAN dealer orqualified workshop as soon as possible.
When the active engine brake is operating, theneedle of the tachometer will rise up and you mayhear an engine noise. This is normal and indicatesthat the active engine brake is operating properly.
NSD526
Chassis control
Starting and driving 5-63
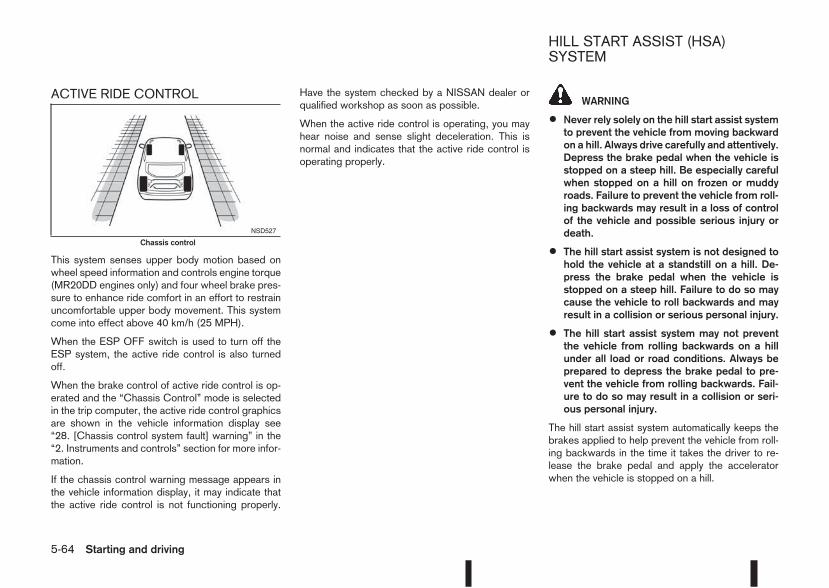
ACTIVE RIDE CONTROL
This system senses upper body motion based onwheel speed information and controls engine torque(MR20DD engines only) and four wheel brake pres-sure to enhance ride comfort in an effort to restrainuncomfortable upper body movement. This systemcome into effect above 40 km/h (25 MPH).
When the ESP OFF switch is used to turn off theESP system, the active ride control is also turnedoff.
When the brake control of active ride control is op-erated and the “Chassis Control” mode is selectedin the trip computer, the active ride control graphicsare shown in the vehicle information display see“28. [Chassis control system fault] warning” in the“2. Instruments and controls” section for more infor-mation.
If the chassis control warning message appears inthe vehicle information display, it may indicate thatthe active ride control is not functioning properly.
Have the system checked by a NISSAN dealer orqualified workshop as soon as possible.
When the active ride control is operating, you mayhear noise and sense slight deceleration. This isnormal and indicates that the active ride control isoperating properly.
WARNING
• Never rely solely on the hill start assist systemto prevent the vehicle from moving backwardon a hill. Always drive carefully and attentively.Depress the brake pedal when the vehicle isstopped on a steep hill. Be especially carefulwhen stopped on a hill on frozen or muddyroads. Failure to prevent the vehicle from roll-ing backwards may result in a loss of controlof the vehicle and possible serious injury ordeath.
• The hill start assist system is not designed tohold the vehicle at a standstill on a hill. De-press the brake pedal when the vehicle isstopped on a steep hill. Failure to do so maycause the vehicle to roll backwards and mayresult in a collision or serious personal injury.
• The hill start assist system may not preventthe vehicle from rolling backwards on a hillunder all load or road conditions. Always beprepared to depress the brake pedal to pre-vent the vehicle from rolling backwards. Fail-ure to do so may result in a collision or seri-ous personal injury.
The hill start assist system automatically keeps thebrakes applied to help prevent the vehicle from roll-ing backwards in the time it takes the driver to re-lease the brake pedal and apply the acceleratorwhen the vehicle is stopped on a hill.
NSD527
Chassis control
HILL START ASSIST (HSA)SYSTEM
5-64 Starting and driving
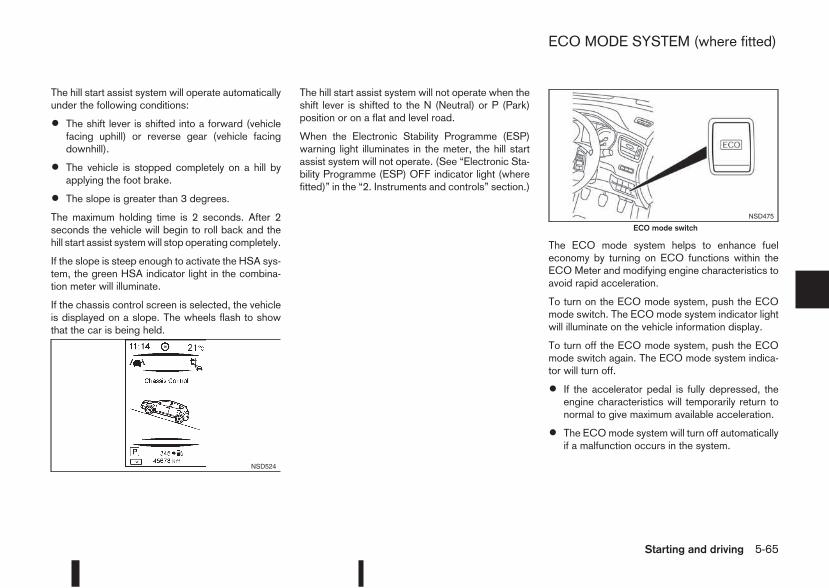
The hill start assist system will operate automaticallyunder the following conditions:
• The shift lever is shifted into a forward (vehiclefacing uphill) or reverse gear (vehicle facingdownhill).
• The vehicle is stopped completely on a hill byapplying the foot brake.
• The slope is greater than 3 degrees.
The maximum holding time is 2 seconds. After 2seconds the vehicle will begin to roll back and thehill start assist systemwill stop operating completely.
If the slope is steep enough to activate the HSA sys-tem, the green HSA indicator light in the combina-tion meter will illuminate.
If the chassis control screen is selected, the vehicleis displayed on a slope. The wheels flash to showthat the car is being held.
The hill start assist system will not operate when theshift lever is shifted to the N (Neutral) or P (Park)position or on a flat and level road.
When the Electronic Stability Programme (ESP)warning light illuminates in the meter, the hill startassist system will not operate. (See “Electronic Sta-bility Programme (ESP) OFF indicator light (wherefitted)” in the “2. Instruments and controls” section.)
The ECO mode system helps to enhance fueleconomy by turning on ECO functions within theECO Meter and modifying engine characteristics toavoid rapid acceleration.
To turn on the ECO mode system, push the ECOmode switch. The ECO mode system indicator lightwill illuminate on the vehicle information display.
To turn off the ECO mode system, push the ECOmode switch again. The ECO mode system indica-tor will turn off.
• If the accelerator pedal is fully depressed, theengine characteristics will temporarily return tonormal to give maximum available acceleration.
• The ECOmode system will turn off automaticallyif a malfunction occurs in the system.
NSD524
NSD475
ECO mode switch
ECO MODE SYSTEM (where fitted)
Starting and driving 5-65
• Turn off the ECO mode system when accelera-tion is required, such as when:
– driving with a heavy load of passengers orcargo in the vehicle
– driving on a steep uphill slope
WARNING
• Whatever the conditions, drive with caution.Accelerate and decelerate with great care. Ifaccelerating or decelerating too fast, the drivewheels will lose even more traction.
• Allow more stopping distance in cold weatherdriving. Braking should be started sooner thanon dry surfaces.
• Keep at a greater distance from the vehicle infront of you on slippery roads.
• Wet ice (0°C, 32°F and freezing rain), very coldsnow and ice can be slick and very difficult todrive on. The vehicle will have a lot less trac-tion or grip under these conditions. Try toavoid driving on wet ice until the road is saltedor sanded.
• Watch for slippery spots (black ice). Thesemay appear on an otherwise clear road inshaded areas. If a patch of ice is seen ahead,brake before driving on it. Try not to brakewhile actually on the ice and avoid any sud-den steering manoeuvres.
• Do not use cruise control (where fitted) onslippery roads.
• Snow can trap dangerous exhaust gas underyour vehicle. Keep snow clear of the exhaustpipe and from around your vehicle.
BATTERYIf the battery is not fully charged during extremelycold weather conditions, the battery fluid may freezeand damage the battery. To maintain maximum effi-ciency, the battery should be checked regularly. Fordetails, see “Battery” in the “8. Maintenance anddo-it-yourself” section.
ENGINE COOLANTIf the vehicle is to be left outside without anti-freeze,drain the cooling system. Refill before operating thevehicle. For details, see “Engine cooling system” inthe “8. Maintenance and do-it-yourself” section.
TYRE EQUIPMENT1) The SUMMER tyres are of a tread design to pro-vide superior performance on dry surfaces. How-ever, the performance of these tyres will be sub-stantially reduced in snowy and icy conditions. Ifyou operate your vehicle on snowy or icy roads,NISSAN recommends the use of MUD&SNOWor ALL SEASON tyres on all four wheels. Pleaseconsult a NISSAN dealer or qualified workshopfor tyre type, size, speed rating and availabilityinformation.
2) For additional traction on icy roads, studdedtyres may be used. However, some countries,provinces and states prohibit their use. Checkapplicable laws before installing studded tyres.
COLD WEATHER DRIVING
5-66 Starting and driving

CAUTION
Skid and traction capabilities of studded snowtyres on wet or dry surfaces may be poorerthan that of non-studded snow tyres.
3) Snow chains may be used, if desired. But theuse of snow chains may be prohibited in someareas. Therefore, check the local laws beforeinstalling snow chains. When installing snowchains, make sure they are of proper size for thetyres on your vehicle and are installed accordingto the snow chain manufacturer’s instructions.Use chain tensioners when recommended by thesnow chain manufacturer to ensure a tight fit.Loose end links of the snow chain must be se-cured or removed to prevent the possibility ofwhipping action damage to the wings or under-carriage. In addition, drive at a reduced speed,otherwise, your vehicle may be damaged and/orvehicle handling and performance may be ad-versely affected.
SPECIAL WINTER EQUIPMENTIt is recommended to carry the following items in thevehicle during winter:
• A scraper and stiff-bristled brush to remove iceand snow from the windows.
• A sturdy, flat board to be placed under the jackto give it firm support.
• A shovel to dig the vehicle out of snowdrifts.
• Extra windscreen washer fluid to refill the reser-voir tank.
CORROSION PROTECTIONChemicals used for road surface de-icing are ex-tremely corrosive and will accelerate corrosion andthe deterioration of underbody components such asthe exhaust system, fuel and brake lines, brakecables, floor pan, and wings.
In the winter, the underbody must be cleanedperiodically. For additional information, see “Cor-rosion protection” in the “7. Appearance andcare” section.
For additional protection against rust and corrosion,which may be required in some areas, consult aNISSAN dealer or qualified workshop.
Starting and driving 5-67

NOTE
5-68 Starting and driving
6 In case of emergencyIn case of emergency
Hazard warning flasher switch ................................. 6-2Spare tyre................................................................ 6-2Temporary-use spare tyre (where fitted) .............. 6-2Conventional spare tyre (where fitted)................. 6-2
Flat tyre ................................................................... 6-3Stopping the vehicle ........................................... 6-3Changing flat tyre (Models with spare wheel,where fitted) ....................................................... 6-3Tyre Pressure Monitoring System (TPMS)(where fitted) ...................................................... 6-7Repairing flat tyre (Models with emergencytyre puncture repair kit)....................................... 6-8
Jump-starting ........................................................... 6-11Push-starting ........................................................... 6-13Engine overheat....................................................... 6-13Tow truck towing ..................................................... 6-14Towing precautions ............................................ 6-14Recommended towing for two-wheel drive(2WD) models .................................................... 6-15Recommended towing for four-wheel drive(4WD) models .................................................... 6-15Towing eye......................................................... 6-16Freeing the vehicle from sand, snow or mud ....... 6-16
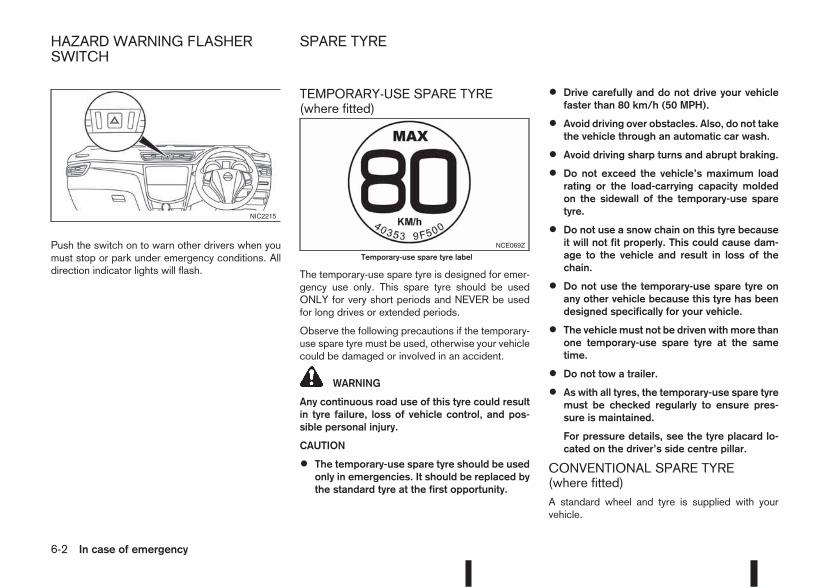
Push the switch on to warn other drivers when youmust stop or park under emergency conditions. Alldirection indicator lights will flash.
TEMPORARY-USE SPARE TYRE(where fitted)
The temporary-use spare tyre is designed for emer-gency use only. This spare tyre should be usedONLY for very short periods and NEVER be usedfor long drives or extended periods.
Observe the following precautions if the temporary-use spare tyre must be used, otherwise your vehiclecould be damaged or involved in an accident.
WARNING
Any continuous road use of this tyre could resultin tyre failure, loss of vehicle control, and pos-sible personal injury.
CAUTION
• The temporary-use spare tyre should be usedonly in emergencies. It should be replaced bythe standard tyre at the first opportunity.
• Drive carefully and do not drive your vehiclefaster than 80 km/h (50 MPH).
• Avoid driving over obstacles. Also, do not takethe vehicle through an automatic car wash.
• Avoid driving sharp turns and abrupt braking.
• Do not exceed the vehicle’s maximum loadrating or the load-carrying capacity moldedon the sidewall of the temporary-use sparetyre.
• Do not use a snow chain on this tyre becauseit will not fit properly. This could cause dam-age to the vehicle and result in loss of thechain.
• Do not use the temporary-use spare tyre onany other vehicle because this tyre has beendesigned specifically for your vehicle.
• The vehicle must not be driven with more thanone temporary-use spare tyre at the sametime.
• Do not tow a trailer.
• As with all tyres, the temporary-use spare tyremust be checked regularly to ensure pres-sure is maintained.
For pressure details, see the tyre placard lo-cated on the driver’s side centre pillar.
CONVENTIONAL SPARE TYRE(where fitted)A standard wheel and tyre is supplied with yourvehicle.
NIC2215
NCE069Z
Temporary-use spare tyre label
HAZARD WARNING FLASHERSWITCH
SPARE TYRE
6-2 In case of emergency
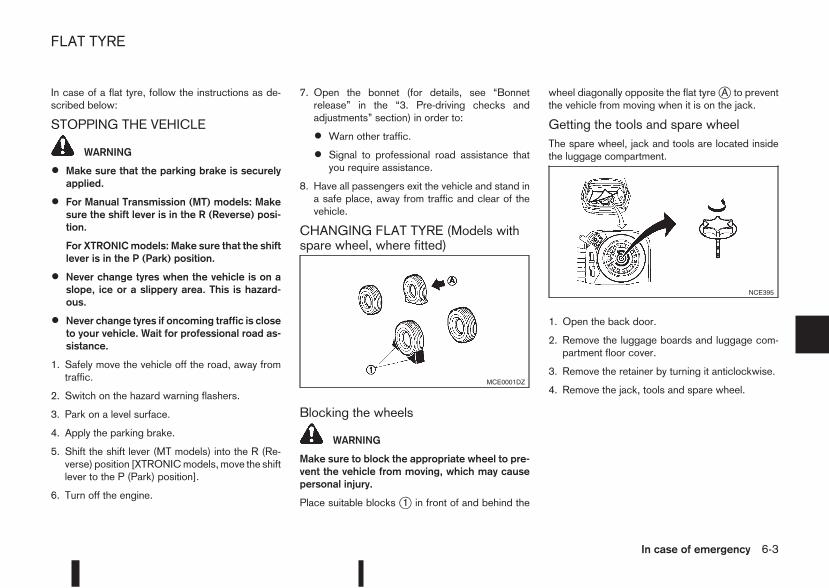
In case of a flat tyre, follow the instructions as de-scribed below:
STOPPING THE VEHICLE
WARNING
• Make sure that the parking brake is securelyapplied.
• For Manual Transmission (MT) models: Makesure the shift lever is in the R (Reverse) posi-tion.
For XTRONICmodels: Make sure that the shiftlever is in the P (Park) position.
• Never change tyres when the vehicle is on aslope, ice or a slippery area. This is hazard-ous.
• Never change tyres if oncoming traffic is closeto your vehicle. Wait for professional road as-sistance.
1. Safely move the vehicle off the road, away fromtraffic.
2. Switch on the hazard warning flashers.
3. Park on a level surface.
4. Apply the parking brake.
5. Shift the shift lever (MT models) into the R (Re-verse) position [XTRONICmodels, move the shiftlever to the P (Park) position].
6. Turn off the engine.
7. Open the bonnet (for details, see “Bonnetrelease” in the “3. Pre-driving checks andadjustments” section) in order to:
• Warn other traffic.
• Signal to professional road assistance thatyou require assistance.
8. Have all passengers exit the vehicle and stand ina safe place, away from traffic and clear of thevehicle.
CHANGING FLAT TYRE (Models withspare wheel, where fitted)
Blocking the wheels
WARNING
Make sure to block the appropriate wheel to pre-vent the vehicle from moving, which may causepersonal injury.
Place suitable blocks j1 in front of and behind the
wheel diagonally opposite the flat tyrejA to preventthe vehicle from moving when it is on the jack.
Getting the tools and spare wheelThe spare wheel, jack and tools are located insidethe luggage compartment.
1. Open the back door.
2. Remove the luggage boards and luggage com-partment floor cover.
3. Remove the retainer by turning it anticlockwise.
4. Remove the jack, tools and spare wheel.MCE0001DZ
NCE395
FLAT TYRE
In case of emergency 6-3
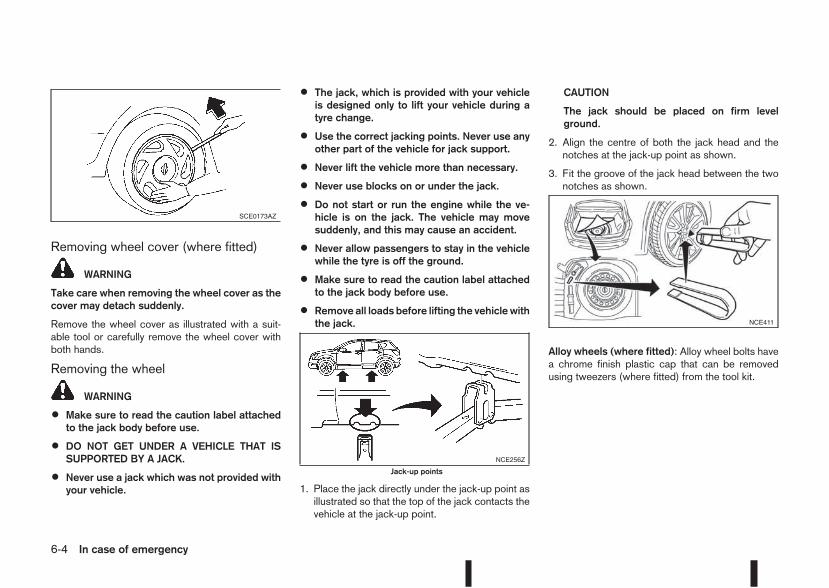
Removing wheel cover (where fitted)
WARNING
Take care when removing the wheel cover as thecover may detach suddenly.
Remove the wheel cover as illustrated with a suit-able tool or carefully remove the wheel cover withboth hands.
Removing the wheel
WARNING
• Make sure to read the caution label attachedto the jack body before use.
• DO NOT GET UNDER A VEHICLE THAT ISSUPPORTED BY A JACK.
• Never use a jack which was not provided withyour vehicle.
• The jack, which is provided with your vehicleis designed only to lift your vehicle during atyre change.
• Use the correct jacking points. Never use anyother part of the vehicle for jack support.
• Never lift the vehicle more than necessary.
• Never use blocks on or under the jack.
• Do not start or run the engine while the ve-hicle is on the jack. The vehicle may movesuddenly, and this may cause an accident.
• Never allow passengers to stay in the vehiclewhile the tyre is off the ground.
• Make sure to read the caution label attachedto the jack body before use.
• Remove all loads before lifting the vehicle withthe jack.
1. Place the jack directly under the jack-up point asillustrated so that the top of the jack contacts thevehicle at the jack-up point.
CAUTION
The jack should be placed on firm levelground.
2. Align the centre of both the jack head and thenotches at the jack-up point as shown.
3. Fit the groove of the jack head between the twonotches as shown.
Alloy wheels (where fitted): Alloy wheel bolts havea chrome finish plastic cap that can be removedusing tweezers (where fitted) from the tool kit.
SCE0173AZ
NCE256Z
Jack-up points
NCE411
6-4 In case of emergency
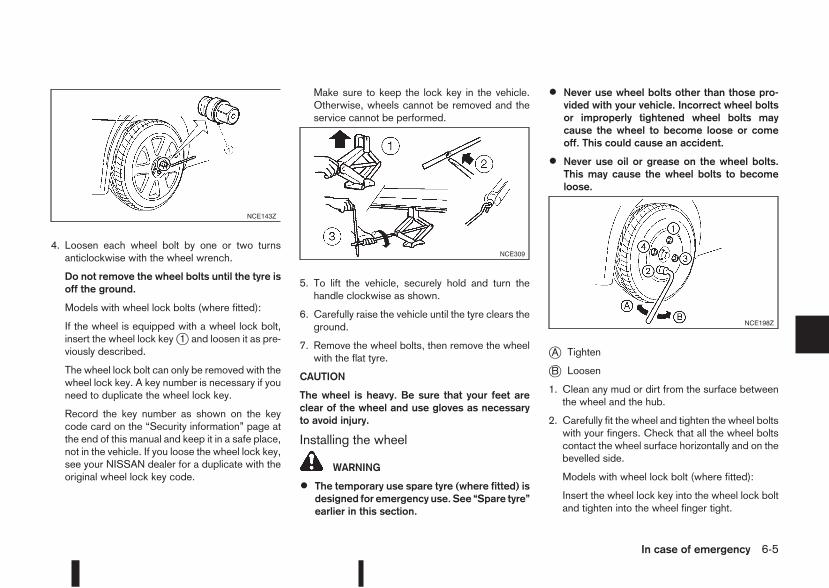
4. Loosen each wheel bolt by one or two turnsanticlockwise with the wheel wrench.
Do not remove the wheel bolts until the tyre isoff the ground.
Models with wheel lock bolts (where fitted):
If the wheel is equipped with a wheel lock bolt,insert the wheel lock keyj1 and loosen it as pre-viously described.
The wheel lock bolt can only be removed with thewheel lock key. A key number is necessary if youneed to duplicate the wheel lock key.
Record the key number as shown on the keycode card on the “Security information” page atthe end of this manual and keep it in a safe place,not in the vehicle. If you loose the wheel lock key,see your NISSAN dealer for a duplicate with theoriginal wheel lock key code.
Make sure to keep the lock key in the vehicle.Otherwise, wheels cannot be removed and theservice cannot be performed.
5. To lift the vehicle, securely hold and turn thehandle clockwise as shown.
6. Carefully raise the vehicle until the tyre clears theground.
7. Remove the wheel bolts, then remove the wheelwith the flat tyre.
CAUTION
The wheel is heavy. Be sure that your feet areclear of the wheel and use gloves as necessaryto avoid injury.
Installing the wheel
WARNING
• The temporary use spare tyre (where fitted) isdesigned for emergency use. See “Spare tyre”earlier in this section.
• Never use wheel bolts other than those pro-vided with your vehicle. Incorrect wheel boltsor improperly tightened wheel bolts maycause the wheel to become loose or comeoff. This could cause an accident.
• Never use oil or grease on the wheel bolts.This may cause the wheel bolts to becomeloose.
jA Tighten
jB Loosen
1. Clean any mud or dirt from the surface betweenthe wheel and the hub.
2. Carefully fit the wheel and tighten the wheel boltswith your fingers. Check that all the wheel boltscontact the wheel surface horizontally and on thebevelled side.
Models with wheel lock bolt (where fitted):
Insert the wheel lock key into the wheel lock boltand tighten into the wheel finger tight.
NCE143Z
NCE309
NCE198Z
In case of emergency 6-5
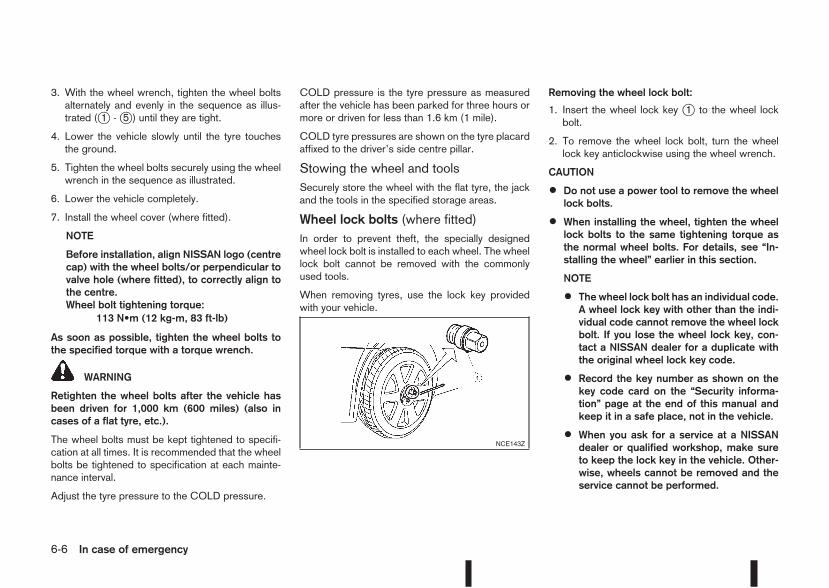
3. With the wheel wrench, tighten the wheel boltsalternately and evenly in the sequence as illus-trated (j1 -j5 ) until they are tight.
4. Lower the vehicle slowly until the tyre touchesthe ground.
5. Tighten the wheel bolts securely using the wheelwrench in the sequence as illustrated.
6. Lower the vehicle completely.
7. Install the wheel cover (where fitted).
NOTE
Before installation, align NISSAN logo (centrecap) with the wheel bolts/or perpendicular tovalve hole (where fitted), to correctly align tothe centre.Wheel bolt tightening torque:
113 N•m (12 kg-m, 83 ft-lb)
As soon as possible, tighten the wheel bolts tothe specified torque with a torque wrench.
WARNING
Retighten the wheel bolts after the vehicle hasbeen driven for 1,000 km (600 miles) (also incases of a flat tyre, etc.).
The wheel bolts must be kept tightened to specifi-cation at all times. It is recommended that the wheelbolts be tightened to specification at each mainte-nance interval.
Adjust the tyre pressure to the COLD pressure.
COLD pressure is the tyre pressure as measuredafter the vehicle has been parked for three hours ormore or driven for less than 1.6 km (1 mile).
COLD tyre pressures are shown on the tyre placardaffixed to the driver’s side centre pillar.
Stowing the wheel and toolsSecurely store the wheel with the flat tyre, the jackand the tools in the specified storage areas.
Wheel lock bolts (where fitted)In order to prevent theft, the specially designedwheel lock bolt is installed to each wheel. The wheellock bolt cannot be removed with the commonlyused tools.
When removing tyres, use the lock key providedwith your vehicle.
Removing the wheel lock bolt:
1. Insert the wheel lock key j1 to the wheel lockbolt.
2. To remove the wheel lock bolt, turn the wheellock key anticlockwise using the wheel wrench.
CAUTION
• Do not use a power tool to remove the wheellock bolts.
• When installing the wheel, tighten the wheellock bolts to the same tightening torque asthe normal wheel bolts. For details, see “In-stalling the wheel” earlier in this section.
NOTE
• The wheel lock bolt has an individual code.A wheel lock key with other than the indi-vidual code cannot remove the wheel lockbolt. If you lose the wheel lock key, con-tact a NISSAN dealer for a duplicate withthe original wheel lock key code.
• Record the key number as shown on thekey code card on the “Security informa-tion” page at the end of this manual andkeep it in a safe place, not in the vehicle.
• When you ask for a service at a NISSANdealer or qualified workshop, make sureto keep the lock key in the vehicle. Other-wise, wheels cannot be removed and theservice cannot be performed.
NCE143Z
6-6 In case of emergency
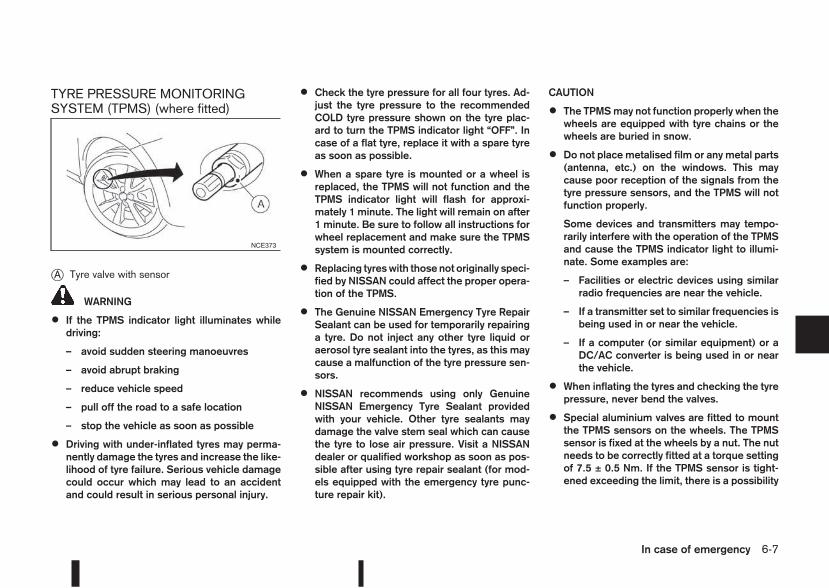
TYRE PRESSURE MONITORINGSYSTEM (TPMS) (where fitted)
jA Tyre valve with sensor
WARNING
• If the TPMS indicator light illuminates whiledriving:
– avoid sudden steering manoeuvres
– avoid abrupt braking
– reduce vehicle speed
– pull off the road to a safe location
– stop the vehicle as soon as possible
• Driving with under-inflated tyres may perma-nently damage the tyres and increase the like-lihood of tyre failure. Serious vehicle damagecould occur which may lead to an accidentand could result in serious personal injury.
• Check the tyre pressure for all four tyres. Ad-just the tyre pressure to the recommendedCOLD tyre pressure shown on the tyre plac-ard to turn the TPMS indicator light “OFF”. Incase of a flat tyre, replace it with a spare tyreas soon as possible.
• When a spare tyre is mounted or a wheel isreplaced, the TPMS will not function and theTPMS indicator light will flash for approxi-mately 1 minute. The light will remain on after1 minute. Be sure to follow all instructions forwheel replacement and make sure the TPMSsystem is mounted correctly.
• Replacing tyreswith those not originally speci-fied by NISSAN could affect the proper opera-tion of the TPMS.
• The Genuine NISSAN Emergency Tyre RepairSealant can be used for temporarily repairinga tyre. Do not inject any other tyre liquid oraerosol tyre sealant into the tyres, as this maycause a malfunction of the tyre pressure sen-sors.
• NISSAN recommends using only GenuineNISSAN Emergency Tyre Sealant providedwith your vehicle. Other tyre sealants maydamage the valve stem seal which can causethe tyre to lose air pressure. Visit a NISSANdealer or qualified workshop as soon as pos-sible after using tyre repair sealant (for mod-els equipped with the emergency tyre punc-ture repair kit).
CAUTION
• The TPMSmay not function properly when thewheels are equipped with tyre chains or thewheels are buried in snow.
• Do not place metalised film or any metal parts(antenna, etc.) on the windows. This maycause poor reception of the signals from thetyre pressure sensors, and the TPMS will notfunction properly.
Some devices and transmitters may tempo-rarily interfere with the operation of the TPMSand cause the TPMS indicator light to illumi-nate. Some examples are:
– Facilities or electric devices using similarradio frequencies are near the vehicle.
– If a transmitter set to similar frequencies isbeing used in or near the vehicle.
– If a computer (or similar equipment) or aDC/AC converter is being used in or nearthe vehicle.
• When inflating the tyres and checking the tyrepressure, never bend the valves.
• Special aluminium valves are fitted to mountthe TPMS sensors on the wheels. The TPMSsensor is fixed at the wheels by a nut. The nutneeds to be correctly fitted at a torque settingof 7.5 ± 0.5 Nm. If the TPMS sensor is tight-ened exceeding the limit, there is a possibility
NCE373
In case of emergency 6-7
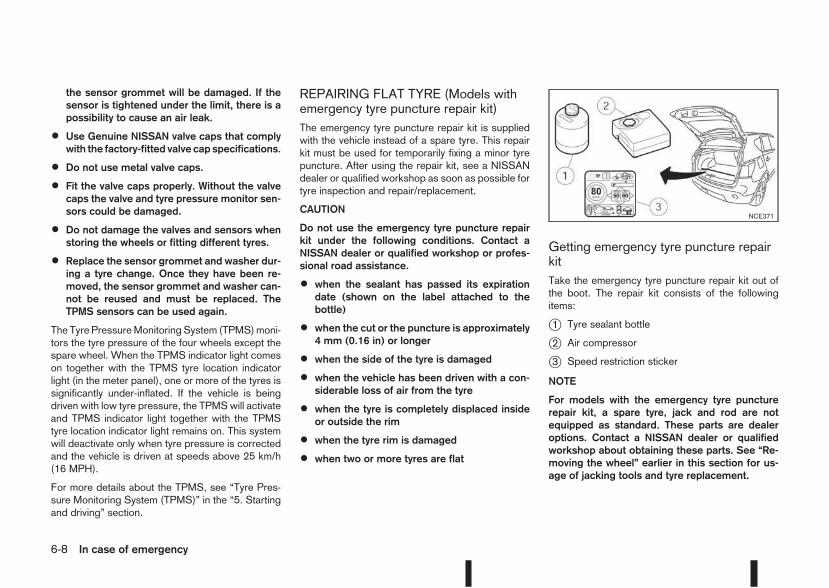
the sensor grommet will be damaged. If thesensor is tightened under the limit, there is apossibility to cause an air leak.
• Use Genuine NISSAN valve caps that complywith the factory-fitted valve cap specifications.
• Do not use metal valve caps.
• Fit the valve caps properly. Without the valvecaps the valve and tyre pressure monitor sen-sors could be damaged.
• Do not damage the valves and sensors whenstoring the wheels or fitting different tyres.
• Replace the sensor grommet and washer dur-ing a tyre change. Once they have been re-moved, the sensor grommet and washer can-not be reused and must be replaced. TheTPMS sensors can be used again.
The Tyre PressureMonitoring System (TPMS)moni-tors the tyre pressure of the four wheels except thespare wheel. When the TPMS indicator light comeson together with the TPMS tyre location indicatorlight (in the meter panel), one or more of the tyres issignificantly under-inflated. If the vehicle is beingdriven with low tyre pressure, the TPMSwill activateand TPMS indicator light together with the TPMStyre location indicator light remains on. This systemwill deactivate only when tyre pressure is correctedand the vehicle is driven at speeds above 25 km/h(16 MPH).
For more details about the TPMS, see “Tyre Pres-sure Monitoring System (TPMS)” in the “5. Startingand driving” section.
REPAIRING FLAT TYRE (Models withemergency tyre puncture repair kit)The emergency tyre puncture repair kit is suppliedwith the vehicle instead of a spare tyre. This repairkit must be used for temporarily fixing a minor tyrepuncture. After using the repair kit, see a NISSANdealer or qualified workshop as soon as possible fortyre inspection and repair/replacement.
CAUTION
Do not use the emergency tyre puncture repairkit under the following conditions. Contact aNISSAN dealer or qualified workshop or profes-sional road assistance.
• when the sealant has passed its expirationdate (shown on the label attached to thebottle)
• when the cut or the puncture is approximately4 mm (0.16 in) or longer
• when the side of the tyre is damaged
• when the vehicle has been driven with a con-siderable loss of air from the tyre
• when the tyre is completely displaced insideor outside the rim
• when the tyre rim is damaged
• when two or more tyres are flat
Getting emergency tyre puncture repairkitTake the emergency tyre puncture repair kit out ofthe boot. The repair kit consists of the followingitems:
j1 Tyre sealant bottle
j2 Air compressor
j3 Speed restriction sticker
NOTE
For models with the emergency tyre puncturerepair kit, a spare tyre, jack and rod are notequipped as standard. These parts are dealeroptions. Contact a NISSAN dealer or qualifiedworkshop about obtaining these parts. See “Re-moving the wheel” earlier in this section for us-age of jacking tools and tyre replacement.
NCE371
6-8 In case of emergency
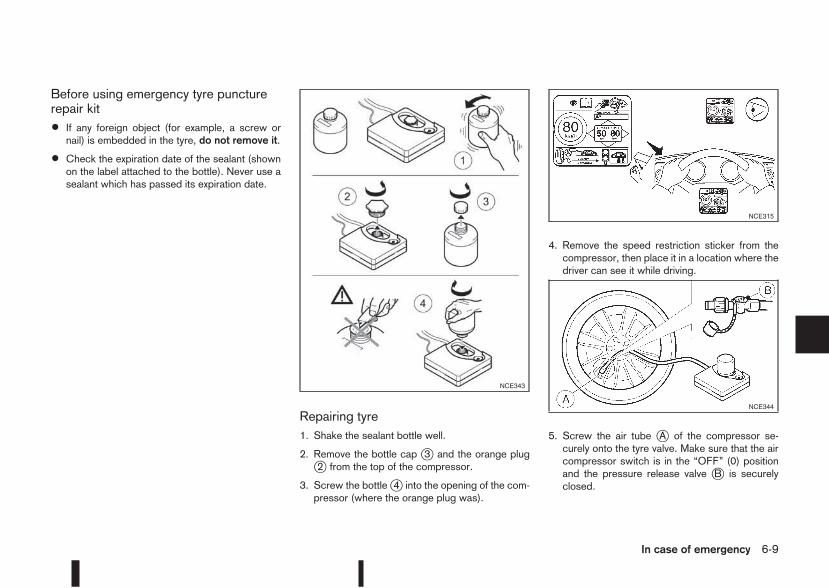
Before using emergency tyre puncturerepair kit
• If any foreign object (for example, a screw ornail) is embedded in the tyre, do not remove it.
• Check the expiration date of the sealant (shownon the label attached to the bottle). Never use asealant which has passed its expiration date.
Repairing tyre1. Shake the sealant bottle well.
2. Remove the bottle cap j3 and the orange plugj2 from the top of the compressor.
3. Screw the bottlej4 into the opening of the com-pressor (where the orange plug was).
4. Remove the speed restriction sticker from thecompressor, then place it in a location where thedriver can see it while driving.
5. Screw the air tube jA of the compressor se-curely onto the tyre valve. Make sure that the aircompressor switch is in the “OFF” (0) positionand the pressure release valve jB is securelyclosed.
NCE343
NCE315
NCE344
In case of emergency 6-9
6. Insert its power plug into the power outlet in thevehicle. Make sure no other accessories are fit-ted to the power outlet. For details, see “Poweroutlet” in the “2. Instruments and controls” sec-tion.
7. Turn the ignition switch to the Acc position.
8. Switch on the compressor, and inflate the tyre tothe pressure that is specified on the tyre placardaffixed to the driver’s side centre pillar.
CAUTION
Do not operate the compressor for more than 10minutes.
If the tyre pressure does not increase to the speci-fied pressure within 10 minutes, the tyre may beseriously damaged and the tyre cannot be repairedwith this tyre repair kit. Contact a NISSAN dealeror qualified workshop.
9. Remove the air compressor from the tyre valve.Immediately drive the vehicle at a speed of 80km/h (50 MPH) or less.
10. After 10 minute or 10 km (6 miles) drive, checkthe tyre pressure. The temporary repair is com-pleted if the tyre pressure does not drop.
If the tyre pressure is lower than specified, re-peat the steps from step 5.
If the pressure drops again or under 130 kPa(1,3 bar, 19 psi), the tyre cannot be repairedwith this tyre repair kit. Contact a NISSANdealer or qualified workshop.
After repairing tyreSee a NISSAN dealer or qualified workshop for tyrerepair/replacement, inspection/replacement of theTPMS sensor and for a new tyre sealant bottle andhose, as soon as possible.
6-10 In case of emergency

WARNING
• Incorrect jump-starting can lead to a batteryexplosion. The battery explosion may result insevere injury or death. It may also result indamage to the vehicle. Be sure to follow theinstructions in this section.
• Explosive hydrogen gas is always present inthe vicinity of the battery. Keep all sparks andflames away from the battery.
• Always wear suitable eye protection glassesand remove rings, bracelets, and any otherjewellery whenever working on or near a bat-tery.
• Never lean over the battery while jump-start-ing.
• Never allow battery fluid to come into contactwith eyes, skin, clothes or the vehicle’spainted surfaces. Battery fluid is a corrosivesulphuric acid which can cause severe burns.If the fluid comes into contact with anything,immediately flush the contacted area withplenty of water.
• Keep the battery out of the reach of children.
• The booster battery must be rated at 12 volts.Use of an incorrectly rated battery will dam-age your vehicle.
• Never attempt to jump-start a frozen battery.It could explode and cause serious injury.
1. Check if the parking brake is applied.If not, after connecting the vehicle with thebooster battery (after step 8), apply the parkingbrake.Vehicle has an electric parking brake, for moreinformation see, “Parking brake switch” in the“3. Pre-driving checks and adjustments” section
2. Prepare vehicle jA with the booster battery forthe vehiclejB being jump-started.
CAUTION
Do not allow the two vehicles to touch.
3. Shift the shift lever (MT models) into the N (Neu-tral) position [CVT models, move the shift leverto the P (Park) position].
NCE397
JUMP-STARTING
In case of emergency 6-11
4. Switch off all unnecessary electrical systems(headlights, hazard lights etc,).
5. Ensure that the ignition switch of the vehicle be-ing jump-started is in the LOCK position.
6. Open the bonnet. For details, see “Bonnetrelease” in the “3. Pre-driving checks andadjustments” section.
7. Remove the vent caps (where fitted) on the bat-tery and cover the battery with an old cloth.
8. Connect the jump leads in the sequence (j1 →j2 → j3 → j4 ) as illustrated.
CAUTION
• Always connect positive j+ to positive j+and negative j- to body ground (for ex-ample, engine mount, etc.) – not to thebattery’s negativej- .
• An incorrect connection could damage thecharging system.
• Be sure that the jumper cables do nottouch moving parts in the engine compart-ment.
• Be careful not to allow contact betweenthe positive jump lead connector and thevehicle or the negative lead during con-nection and disconnection.
9. Start the engine of the other vehiclejA and let itrun for a few minutes. Keep the engine speed atabout 2,000 rpm.
10. Start the engine of your vehicle jB in the nor-mal way.
CAUTION
Do not keep the starter motor engaged formore than 10 seconds. If the engine does notstart immediately, turn the ignition switch to“OFF” and wait 10 seconds before tryingagain.
11. After starting the engine of your vehicle, care-fully disconnect the negative lead and then thepositive lead (j4 → j3 → j2 → j1 ).
12. Remove and dispose of the cloth that was usedto cover the vent holes as it may be contami-nated with corrosive acid.
13. Install the vent caps (where fitted).
14. Close the bonnet.
NOTE
For models which incorporate the Stop/StartSystem:
• Ensure that the battery fitted is the specialbattery that is enhanced with regard to thecharge-discharge capacity and life perfor-mance. Avoid using any other battery for theStop/Start System, as this may cause earlydeterioration of the battery or a malfunctionof the Stop/Start System. It is recommendedthat a Genuine NISSAN battery is fitted. Formore information, contact a NISSAN dealer orqualified workshop
• If the battery terminal is disconnected (for bat-tery replacement, etc.) and then reconnected,there may be some delay before the Stop/Start System reactivates.
6-12 In case of emergency
CAUTION
• Three-way catalyst equipped models (wherefitted) should not be started by pushing thevehicle as the three-way catalyst may be dam-aged.
• XTRONIC transmission (CVT) models cannotbe started by pushing the vehicle. This maycause transmission damage.
• Never try to start the vehicle by towing it; whenthe engine starts, the forward surge couldcause the vehicle to collide with the tow ve-hicle.
WARNING
• Never continue driving if the engine of yourvehicle overheats. Doing so could cause a ve-hicle fire.
• Never open the bonnet if steam is comingout.
• Never remove engine coolant reservoir capwhen the engine is hot. If the engine coolantreservoir cap is removed while the engine ishot, pressurised hot water will spurt out andpossibly cause burning, scalding or seriousinjury.
• If steam or coolant is coming out of the en-gine, stand clear of the vehicle to prevent get-ting injured.
• The engine cooling fan will start whenever thecoolant temperature exceeds preset degrees.
• Be careful not to allow your hands, hair, jewel-lery or clothing to come into contact with, orget caught in, the cooling fan or drive belts.
If the engine of your vehicle is overheating (indi-cated by the engine coolant temperature gauge) orif you feel a lack of engine power, detect unusualnoise, etc., proceed as follows:
1. Move and park the vehicle safely off the road andaway from traffic.
2. Turn on the hazard warning flasher lights.
3. Apply the parking brake.
4. Shift the shift lever (MT models) into the N (Neu-tral) position, XTRONIC transmission (CVT)models: move the shift lever to the P (Park) posi-tion.
DO NOT STOP THE ENGINE.
5. Open all windows.
6. Switch off the air conditioner system (where fit-ted).
7. Set the heater or air conditioner temperaturecontrol to maximum “HOT” and fan speed con-trol to maximum speed.
8. Exit the vehicle.
9. Visually inspect and listen for steam or coolantescaping from the radiator before opening thebonnet. Wait until no steam or coolant can beseen before proceeding.
10. Open the bonnet. For details, see “Bonnetrelease” in the “3. Pre-driving checks andadjustments” section.
11. Visually check if the cooling fan is running.
12. Visually check the radiator and radiator hosesfor leakage.
WARNING
If coolant is leaking, the cooling fan belt ismissing or loose or the cooling fan is not run-ning, stop the engine.
PUSH-STARTING ENGINE OVERHEAT
In case of emergency 6-13
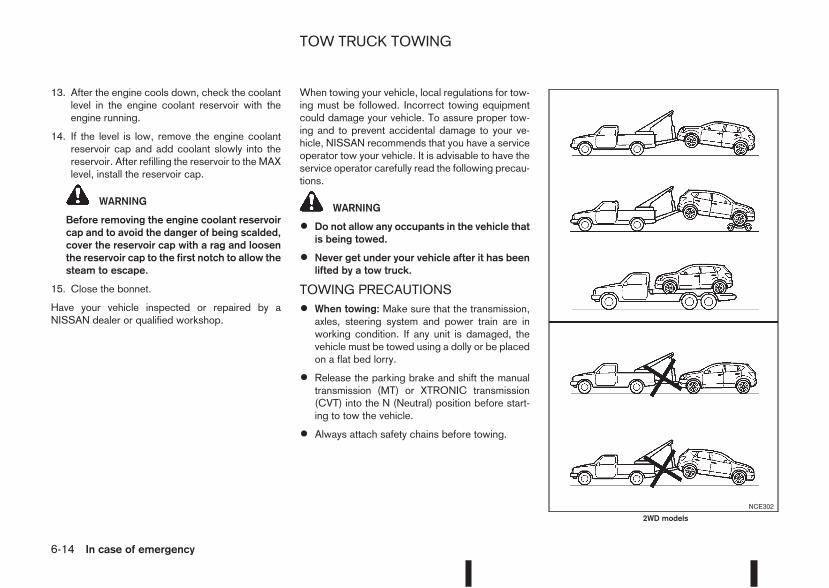
13. After the engine cools down, check the coolantlevel in the engine coolant reservoir with theengine running.
14. If the level is low, remove the engine coolantreservoir cap and add coolant slowly into thereservoir. After refilling the reservoir to the MAXlevel, install the reservoir cap.
WARNING
Before removing the engine coolant reservoircap and to avoid the danger of being scalded,cover the reservoir cap with a rag and loosenthe reservoir cap to the first notch to allow thesteam to escape.
15. Close the bonnet.
Have your vehicle inspected or repaired by aNISSAN dealer or qualified workshop.
When towing your vehicle, local regulations for tow-ing must be followed. Incorrect towing equipmentcould damage your vehicle. To assure proper tow-ing and to prevent accidental damage to your ve-hicle, NISSAN recommends that you have a serviceoperator tow your vehicle. It is advisable to have theservice operator carefully read the following precau-tions.
WARNING
• Do not allow any occupants in the vehicle thatis being towed.
• Never get under your vehicle after it has beenlifted by a tow truck.
TOWING PRECAUTIONS
• When towing: Make sure that the transmission,axles, steering system and power train are inworking condition. If any unit is damaged, thevehicle must be towed using a dolly or be placedon a flat bed lorry.
• Release the parking brake and shift the manualtransmission (MT) or XTRONIC transmission(CVT) into the N (Neutral) position before start-ing to tow the vehicle.
• Always attach safety chains before towing.
NCE302
2WD models
TOW TRUCK TOWING
6-14 In case of emergency

RECOMMENDED TOWING FORTWO-WHEEL DRIVE (2WD) MODELSCAUTION
NEVER tow XTRONIC transmission (CVT) modelswith the front wheels on the ground or with allfour wheels on the ground (forwards or back-wards), this may cause serious and expensivedamage to the transmission. If it is necessary totow the vehicle with the rear wheels raised, al-ways use towing dollies under the front wheels.
NISSAN recommends that your vehicle should betowed with the driving (front) wheels off the groundor that the vehicle be placed on a flat bed lorry asillustrated.
When towing with the front wheels – on theground (MT models only) or – on towing dollies:
Turn the ignition switch to the “OFF” position, thensecure the steering wheel in a straight ahead posi-tion using a rope or similar device. Never place theignition switch in the LOCK position. This will re-sult in damage to the steering lock mechanism.
RECOMMENDED TOWING FORFOUR-WHEEL DRIVE (4WD) MODELSCAUTION
NEVER tow the vehicle with any wheels on theground as this may cause serious and expensivedamage to the transmission.
NISSAN recommends that towing dollies be usedwhen towing your vehicle or that the vehicle beplaced on a flat bed lorry as illustrated.
When towing with the front wheels on towing dol-lies:
Turn the ignition switch to the “OFF” position, thensecure the steering wheel in a straight ahead posi-tion using a rope or similar device. Never place theignition switch in the LOCK position. This will re-sult in damage to the steering lock mechanism.
NCE303
4WD models
In case of emergency 6-15
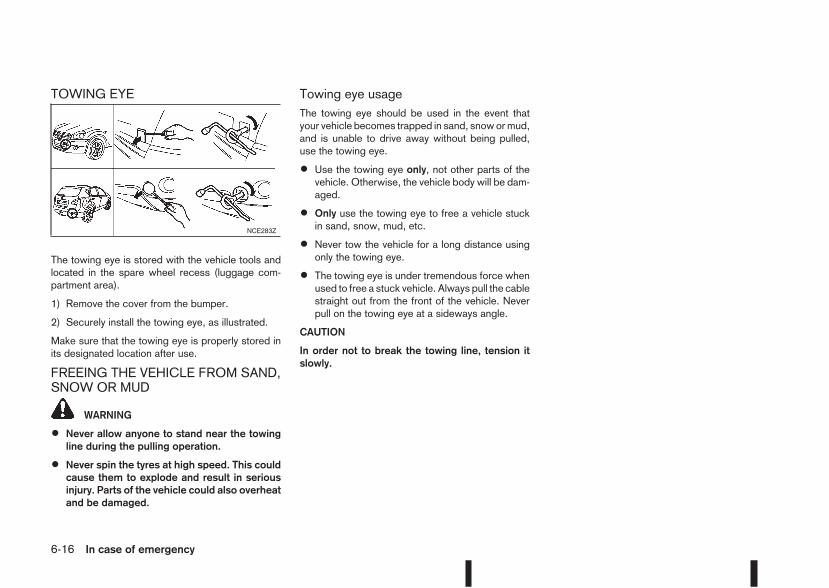
TOWING EYE
The towing eye is stored with the vehicle tools andlocated in the spare wheel recess (luggage com-partment area).
1) Remove the cover from the bumper.
2) Securely install the towing eye, as illustrated.
Make sure that the towing eye is properly stored inits designated location after use.
FREEING THE VEHICLE FROM SAND,SNOW OR MUD
WARNING
• Never allow anyone to stand near the towingline during the pulling operation.
• Never spin the tyres at high speed. This couldcause them to explode and result in seriousinjury. Parts of the vehicle could also overheatand be damaged.
Towing eye usageThe towing eye should be used in the event thatyour vehicle becomes trapped in sand, snowormud,and is unable to drive away without being pulled,use the towing eye.
• Use the towing eye only, not other parts of thevehicle. Otherwise, the vehicle body will be dam-aged.
• Only use the towing eye to free a vehicle stuckin sand, snow, mud, etc.
• Never tow the vehicle for a long distance usingonly the towing eye.
• The towing eye is under tremendous force whenused to free a stuck vehicle. Always pull the cablestraight out from the front of the vehicle. Neverpull on the towing eye at a sideways angle.
CAUTION
In order not to break the towing line, tension itslowly.
NCE283Z
6-16 In case of emergency

7 Appearance and careAppearance and care
Cleaning exterior...................................................... 7-2Washing............................................................. 7-2Removing spots.................................................. 7-2Waxing ............................................................... 7-2Cleaning glass.................................................... 7-3Cleaning rear-view camera (where fitted) ............ 7-3Underbody ......................................................... 7-3Care of wheels ................................................... 7-3Cleaning alloy wheels ......................................... 7-3Chrome parts ..................................................... 7-3
Cleaning interior ...................................................... 7-4Monitor display’s maintenance (where fitted)....... 7-4
Air fresheners ..................................................... 7-4Floor mats .......................................................... 7-4Cleaning Glass................................................... 7-5Plastic parts........................................................ 7-5Seat belts ........................................................... 7-5
Corrosion protection................................................ 7-5Most common factors contributing to vehiclecorrosion ............................................................ 7-5Environmental factors influence the rate ofcorrosion ............................................................ 7-5To protect your vehicle from corrosion ................ 7-6
In order to maintain the appearance of your vehicle,it is important to take proper care of it.
Whenever possible, park your vehicle inside a ga-rage or in a covered area to minimise the chancesof damaging the paint surface of your vehicle.
When it is necessary to park outside, park in a shadyarea or protect the vehicle with a body cover. Becareful not to scratch the paint surface when put-ting on or removing the body cover.
WASHINGIn the following instances, wash your vehicle as soonas possible to protect the paint surface:
• After a rainfall, to prevent possible damage fromacid rain.
• After driving on coastal roads.
• When contaminants such as soot, bird drop-pings, tree sap, metal particles or insects get onthe paint surface.
• When dust or mud builds up on the paint sur-face.
1. Wash the vehicle surface with a wet sponge andplenty of water.
2. Clean the vehicle surface gently and thoroughlyusing amild soap or a special vehicle wash sham-poo mixed with clean, lukewarm (never hot) wa-ter.
CAUTION
• Do not wash the vehicle with strong house-hold soap, strong chemical detergents, petrolor solvents.
• Do not wash the vehicle in direct sunlight orwhile the vehicle body is hot, as the paint sur-face may become water-spotted.
• Avoid using tight-napped or rough cloths,such as washing mitts. Care must be takenwhen removing caked-on dirt or other foreignsubstances so the paint surface is notscratched or damaged.
3. Rinse the vehicle thoroughly with plenty of cleanwater.
4. Use a damp chamois to dry the paint surface toavoid leaving water spots.
When washing the vehicle, take care of the follow-ing:
• Inside flanges, joints and folds on the doors, backdoor and bonnet are particularly vulnerable tothe effects of road salt. Therefore, these areasmust be cleaned regularly.
• Be sure that the drain holes in the lower edge ofthe doors are not clogged.
• Spray water to the underbody and in the wheelwells to loosen the dirt and/or wash away roadsalt.
• If using a high pressure washer always followthe recommendations on the equipment (pres-sure and spraying distance).
CAUTION
Do not spray directly into the engine compart-ment with a high-pressure washer/hose thiscould damage the engine.
• If there are damaged areas on the vehicle (e.g.painted bumpers or headlamp assembly), it isnot recommended to direct the high pressure jeton to them. Carefully wash these areas by hand.
• Avoid the entry of water into the locks.
REMOVING SPOTSRemove tar and oil spots, industrial dust, insects,and tree sap as quickly as possible from the paintsurface to avoid lasting damage or staining. Specialcleaning products are available at a NISSAN dealeror any automotive accessory store.
WAXINGRegular waxing protects the paint surface and helpsto retain a new vehicle appearance.
After waxing, polishing is recommended to removebuilt-up residue.
A NISSAN dealer or qualified workshop can assistyou in choosing the appropriate waxing products.
CAUTION
• Wash your vehicle thoroughly and completelybefore applying wax to the paint surface.
CLEANING EXTERIOR
7-2 Appearance and care
• Always follow the manufacturer’s instructionssupplied with the wax.
• Do not use a wax containing any abrasives,cutting compounds or cleaners that may dam-age the vehicle finish.
• If the vehicle surface cannot polish easily, ap-ply a road tar remover prior to waxing the ve-hicle.
• Machine compounding or aggressive polish-ing on a base coat/clear coat paint finish maydull the finish or leave swirl marks.
CLEANING GLASSUse glass cleaner to remove smoke and dust filmfrom the glass surfaces. It is normal for glass tobecome coated with a film after the vehicle is parkedin the hot sun. Glass cleaner and a soft cloth willeasily remove this film.
CLEANING REAR-VIEW CAMERA(where fitted)Clean the transparent camera cover regularly. If dirt,rain or snow attaches to the cover, the monitor maynot display objects clearly.
CAUTION
• Do not use alcohol, benzine or thinner to cleanthe transparent camera cover. This will causediscoloration. To clean the cover, first use acloth dampened with diluted mild cleaningagent and then wipe with a dry cloth.
• Do not use body wax on the transparent cam-era cover.
• When washing the vehicle with a high pres-sure water spray, make sure not to spray itaround the transparent camera cover. Other-wise, water may enter the camera unit caus-ing water condensation on the lens and it mayresult in a malfunction or an electric shock.
UNDERBODYIn areas where road salt is used in the winter, thevehicle’s underbody must be cleaned regularly. Thiswill prevent dirt and salt from building up and caus-ing underbody and suspension corrosion.
Before the winter period and again in the spring, theunderseal must be checked and, if necessary, re-treated.
CARE OF WHEELS
• Wash the wheels when washing the vehicle tomaintain their appearance.
• Clean the inner side of the wheels when thewheel is changed or the underside of the vehicleis washed.
• Do not use abrasive cleaners when washing thewheels.
• Inspect wheel rims regularly for dents or corro-sion. This may cause loss of pressure or damagethe tyre bead.
• NISSAN recommends that the road wheels bewaxed to protect against road salt in areas whereit is used during winter.
CLEANING ALLOY WHEELSWash the wheels regularly with a sponge damp-ened in a mild soap solution, especially during win-ter in areas where road salt is used. The salt residuefrom road salt could discolour the wheels if it is notwashed off regularly.
CAUTION
Follow the directions as described below in orderto avoid staining or discolouring of the wheels.
• Do not use a cleaner that contains strong con-tents of acid or alkali to clean the wheels.
• Do not apply wheel cleaner when the wheelsare hot. The wheel temperature should be thesame as ambient temperature.
• Rinse the wheel to completely remove thecleaner within 15 minutes after the cleanerhas been applied.
CHROME PARTSClean all chrome parts regularly with a nonabrasivechrome polish to maintain the finish.
Appearance and care 7-3
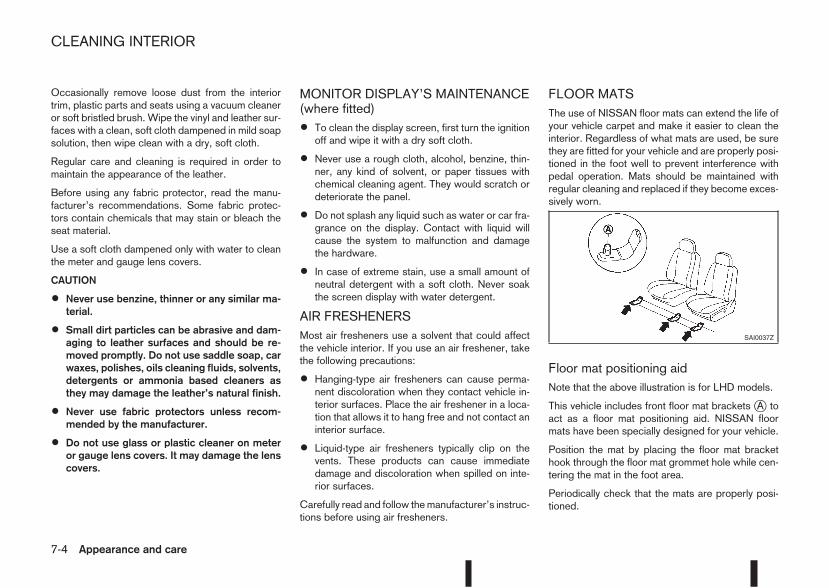
Occasionally remove loose dust from the interiortrim, plastic parts and seats using a vacuum cleaneror soft bristled brush. Wipe the vinyl and leather sur-faces with a clean, soft cloth dampened in mild soapsolution, then wipe clean with a dry, soft cloth.
Regular care and cleaning is required in order tomaintain the appearance of the leather.
Before using any fabric protector, read the manu-facturer’s recommendations. Some fabric protec-tors contain chemicals that may stain or bleach theseat material.
Use a soft cloth dampened only with water to cleanthe meter and gauge lens covers.
CAUTION
• Never use benzine, thinner or any similar ma-terial.
• Small dirt particles can be abrasive and dam-aging to leather surfaces and should be re-moved promptly. Do not use saddle soap, carwaxes, polishes, oils cleaning fluids, solvents,detergents or ammonia based cleaners asthey may damage the leather’s natural finish.
• Never use fabric protectors unless recom-mended by the manufacturer.
• Do not use glass or plastic cleaner on meteror gauge lens covers. It may damage the lenscovers.
MONITOR DISPLAY’S MAINTENANCE(where fitted)
• To clean the display screen, first turn the ignitionoff and wipe it with a dry soft cloth.
• Never use a rough cloth, alcohol, benzine, thin-ner, any kind of solvent, or paper tissues withchemical cleaning agent. They would scratch ordeteriorate the panel.
• Do not splash any liquid such as water or car fra-grance on the display. Contact with liquid willcause the system to malfunction and damagethe hardware.
• In case of extreme stain, use a small amount ofneutral detergent with a soft cloth. Never soakthe screen display with water detergent.
AIR FRESHENERSMost air fresheners use a solvent that could affectthe vehicle interior. If you use an air freshener, takethe following precautions:
• Hanging-type air fresheners can cause perma-nent discoloration when they contact vehicle in-terior surfaces. Place the air freshener in a loca-tion that allows it to hang free and not contact aninterior surface.
• Liquid-type air fresheners typically clip on thevents. These products can cause immediatedamage and discoloration when spilled on inte-rior surfaces.
Carefully read and follow themanufacturer’s instruc-tions before using air fresheners.
FLOOR MATSThe use of NISSAN floor mats can extend the life ofyour vehicle carpet and make it easier to clean theinterior. Regardless of what mats are used, be surethey are fitted for your vehicle and are properly posi-tioned in the foot well to prevent interference withpedal operation. Mats should be maintained withregular cleaning and replaced if they become exces-sively worn.
Floor mat positioning aidNote that the above illustration is for LHD models.
This vehicle includes front floor mat brackets jA toact as a floor mat positioning aid. NISSAN floormats have been specially designed for your vehicle.
Position the mat by placing the floor mat brackethook through the floor mat grommet hole while cen-tering the mat in the foot area.
Periodically check that the mats are properly posi-tioned.
SAI0037Z
CLEANING INTERIOR
7-4 Appearance and care
CLEANING GLASSUse glass cleaner to remove smoke and dust filmfrom the glass surfaces. It is normal for glass tobecome coated with a film after the vehicle is parkedin the hot sun. Glass cleaner and a soft cloth willeasily remove this film.
CAUTION
When cleaning the inside of the windows, do notuse sharp-edged tools, abrasive cleaners or chlo-rine-based disinfectant cleaners. They coulddamage elements in the rear windows (such asthe window defogger).
Inside rear-view mirror (Automaticanti-dazzling, where fitted)Use a soft cloth dampened only with water to cleanthe automatic anti-dazzling inside rear view mirror(where fitted).
CAUTION
Do not use glass cleaner. Doing so will reducethe sensitivity of the sensor, resulting in improperoperation.
PLASTIC PARTSPlastic parts can be cleaned with a mild soap solu-tion. If the dirt cannot be easily removed, use a plas-tic cleaner. Do not use any solvents.
SEAT BELTS
WARNING
• Do not allow wet seat belts to roll up in theretractor.
• Never use bleach, dye or chemical solvents toclean the seat belts, since these materialsmay severely weaken the seat belt webbing.
The seat belts can be cleaned by wiping them witha sponge dampened in a mild soap solution.
Allow the belts to dry completely in the shade beforeusing them.
MOST COMMON FACTORSCONTRIBUTING TO VEHICLECORROSION
• The accumulation of moisture-retaining dirt anddebris in body panel sections, cavities, and otherareas.
• Damage to the paint surface and other protec-tive coatings caused by gravel and stone chipsor minor traffic accidents.
ENVIRONMENTAL FACTORSINFLUENCE THE RATE OFCORROSION
MoistureAccumulation of sand, dirt and water on the vehiclebody underside can accelerate corrosion. Wet floorcoverings will not dry completely inside the vehicle,and should be removed for drying to avoid floor pan-els corrosion.
Relative humidityCorrosion will be accelerated in areas of high rela-tive humidity, especially those areas where the tem-peratures stay above freezing, where atmosphericpollution exists and road salt is used.
TemperatureA temperature increase will accelerate the rate ofcorrosion to those parts which are not well venti-lated.
CORROSION PROTECTION
Appearance and care 7-5
Corrosion will also accelerate in areas where thetemperatures stay above freezing.
Air pollutionIndustrial pollution, the presence of salt in the air incoastal areas, or heavy road salt use will acceleratethe corrosion process. Road salt will also acceler-ate the disintegration of paint surfaces.
TO PROTECT YOUR VEHICLE FROMCORROSION
• Wash and wax your vehicle often to keep thevehicle clean.
• Always check for minor damage to the paint sur-face and if any exists, repair it as soon as pos-sible.
• Keep the drain holes at the bottom of the doorsand back door opened to avoid water accumula-tion.
• Check the vehicle underbody for accumulationof sand, dirt or salt. If present, wash with wateras soon as possible.
CAUTION
• Never remove dirt, sand or other debris fromthe passenger compartment by washing it outwith a hose. Remove dirt with a vacuumcleaner or broom.
• Never allow water or other liquids to come incontact with electronic components inside thevehicle as this may damage them.
Chemicals used for road surface de-icing are ex-
tremely corrosive. They accelerate corrosion anddeterioration of underbody components such as theexhaust system, fuel and brake lines, brake cables,floor pan and fenders.
In the winter, the underbody must be cleanedperiodically.
For additional protection against rust and corrosion,which may be required in some areas, consult aNISSAN dealer or qualified workshop.
7-6 Appearance and care

NOTE
Appearance and care 7-7

8 Maintenance and do-it-yourselfMaintenance and do-it-yourself
Maintenance requirements ....................................... 8-2Scheduled maintenance...................................... 8-2General maintenance.......................................... 8-2Where to go for service ...................................... 8-2
General maintenance............................................... 8-2Explanation of general maintenance items ........... 8-2
Maintenance precautions ......................................... 8-4Engine compartment................................................ 8-5Engine cooling system ............................................. 8-6Checking engine coolant level............................. 8-6Changing engine coolant .................................... 8-6
Engine oil................................................................. 8-8Checking engine oil level .................................... 8-8Changing engine oil ............................................ 8-9Changing engine oil filter .................................... 8-10Protect the environment ...................................... 8-12
Fuel filter (Diesel engine models) ............................. 8-13Draining water .................................................... 8-13Bleeding the fuel system..................................... 8-13
XTRONIC Continuously variable transmission(CVT) fluid ............................................................... 8-13Brakes..................................................................... 8-13Checking parking brake...................................... 8-13Checking brake pedal......................................... 8-13Brake booster..................................................... 8-14
Brake and clutch fluid .............................................. 8-14Window washer fluid/headlight cleaner fluid(where fitted) ........................................................... 8-15Battery..................................................................... 8-16Vehicle battery.................................................... 8-16
Jump-starting ...................................................... 8-18Integrated keyfob/Intelligent Key batteryreplacement........................................................ 8-18
Drive belts ............................................................... 8-20Spark plugs (Petrol engine models).......................... 8-21Air duct removal....................................................... 8-21Air cleaner filter........................................................ 8-23Viscous paper type ............................................. 8-23Dry paper type (where fitted) .............................. 8-23
Wiper blades ........................................................... 8-24Cleaning............................................................. 8-24Front window wiper replacement ........................ 8-24Back door window wiper replacement ................ 8-24Windscreen washer nozzle ................................. 8-25
Fuses ...................................................................... 8-25Passenger compartment ..................................... 8-25Engine compartment........................................... 8-26
Lights ...................................................................... 8-27Headlights .......................................................... 8-28Exterior lights...................................................... 8-29Interior lights....................................................... 8-29Light locations .................................................... 8-30
Wheels and tyres..................................................... 8-33Tyre inflation pressure......................................... 8-33Types of tyres..................................................... 8-33Snow chains....................................................... 8-34Tyre rotation ....................................................... 8-34Tyre wear and damage ....................................... 8-35Tyre age ............................................................. 8-35Changing tyres and wheels................................. 8-35
Four-wheel drive (4WD) models ......................... 8-35Wheel balance.................................................... 8-36Spare tyre .......................................................... 8-36Care of wheels ................................................... 8-36

Some day-to-day and regular maintenance is essen-tial to maintain your NISSAN’s good mechanicalcondition, as well as its emission and engine perfor-mance.
It is the owner’s responsibility to make sure that thespecified maintenance, as well as general mainte-nance, is performed.
As the vehicle owner, you are the only one who canensure that your vehicle receives the proper mainte-nance care.
SCHEDULED MAINTENANCEFor your convenience, the required scheduled main-tenance items are described and listed in the sepa-rate Warranty Information and Maintenance book-let. You must refer to that booklet to ensure thatnecessary maintenance is performed on yourNISSAN vehicle at regular intervals.
GENERAL MAINTENANCEGeneral maintenance includes those items whichshould be checked during normal day-to-day opera-tion of the vehicle. They are essential if your vehicleis to continue to operate properly. It is your respon-sibility to perform these procedures regularly as pre-scribed.
Performing general maintenance checks requiresminimal mechanical skill and a few general automo-tive tools.
These checks or inspections can be done by your-self, a qualified technician or, if you prefer, yourNISSAN dealer or qualified workshop.
WHERE TO GO FOR SERVICEIf maintenance service is required or your vehicleappears to malfunction, have the systems checkedand tuned by an authorised NISSAN dealer or quali-fied workshop.
During the normal day-to-day operation of the ve-hicle, general maintenance should be performedregularly as prescribed in this section. If you detectany unusual sounds, vibrations or smell, be sure tocheck for the cause or have a NISSAN dealer orqualified workshop do it promptly. In addition, youshould notify a NISSAN dealer or qualified work-shop if repairs are required.
When performing any checks or maintenance work,closely observe the “Maintenance precautions” laterin this section.
EXPLANATION OF GENERALMAINTENANCE ITEMSAdditional information on the following itemswithan asterisk (*) is found later in this section.
The maintenance items listed here should be per-formed from time to time, unless otherwise speci-fied.
Outside the vehicleBack door, doors and bonnet:
Check that the back door, all doors and the bonnetoperate properly. Also ensure that all latches locksecurely. Lubricate hinges and latches if necessary.Make sure that the secondary latch keeps the bon-net from opening when the primary latch is released.
When driving in areas using road salt or other cor-rosive materials, check for lubrication frequently.
MAINTENANCE REQUIREMENTS GENERAL MAINTENANCE
8-2 Maintenance and do-it-yourself

Lights*:
Clean the headlights on a regular basis. Make surethat the headlights, stop lights, tail lights, turn signallights, and other lights are all operating properly andinstalled securely. Also check headlight aim.
Tyres*:
Check the pressure with a gauge periodically whenat a service station (including the spare) and adjustto the specified pressure if necessary. Check care-fully for damage, cuts or excessive wear.
Tyre rotation*:
Tyres should be rotated every 10,000 km (6,000miles) for Two-Wheel Drive (2WD) models and5,000 km (3,000miles) for Four-Wheel Drive (4WD)models. However, the timing for tyre rotation mayvary according to your driving habits and road sur-face conditions.
Tyre Pressure Monitoring System (TPMS)transmitter components (where fitted):
Replace the TPMS transmitter grommet seal, valvecore and cap when the tyres are replaced due towear or age.
Wheel alignment and balance:
If the vehicle pull to either side while driving on astraight and level road, or if you detect uneven orabnormal tyre wear, there may be a need for wheelalignment. If the steering wheel or seat vibrates atnormal highway speeds, wheel balancing may beneeded.
Wheel nuts:
When checking the tyres, make sure no wheel nutsare missing, and check for any loose wheel nuts.Tighten if necessary.
Windscreen:
Clean the windscreen on a regular basis. Check thewindscreen at least every six months for cracks orother damage. Have a damaged windscreen re-paired by a qualified repair facility.
Wiper blades*:
Check for cracks or wear if they do not wipe prop-erly.
Under the bonnet and vehicleThe maintenance items listed here should bechecked periodically, e.g. each time you check theengine oil or refuel.
Battery*:
Check if the green indicator on the top of the main-tenance free battery is visible. If it is not visible,replace the battery as soon as possible.
Vehicles operated in high temperatures or undersevere conditions, check the fluid level frequently.
Brake and clutch fluid level*:
Make sure that the brake and clutch fluid level isbetween the MAX and MIN lines on the reservoir.
Engine coolant level*:
Check the coolant level when the engine is cold.
Engine drive belts*:
Make sure that the drive belts are not frayed, worn,cracked or oily.
Engine oil level*:
Check the level after parking the vehicle on a levelsurface and turning off the engine.
Fluid leaks:
Check under the vehicle for fuel, oil, water or otherfluid leaks after the vehicle has been parked for awhile. Water dripping from the air conditioner afteruse is normal. If you should notice any leaks or ifpetrol fumes are evident, check for the cause andhave it corrected immediately.
Window washer fluid*:
Check that there is adequate fluid in the tank.
Inside the vehicleThe maintenance items listed here should bechecked on a regular basis, such as when perform-ing periodic maintenance, cleaning the vehicle, etc.
Accelerator pedal:
Check the pedal for smooth operation and makesure that the pedal does not catch or require uneveneffort. Keep the floor mats away from the pedal.
Brake pedal*:
Check the pedal for smooth operation. If the brakepedal suddenly goes down further than normal, thepedal feels spongy or the vehicle seems to take
Maintenance and do-it-yourself 8-3
longer to stop, contact a NISSAN dealer or qualifiedworkshop immediately. Keep the floor mat awayfrom the pedal.
Parking brake*:
Confirm that your vehicle is held securely on a fairlysteep hill with only the parking brake applied.
Seats:
Check seat position controls such as seat adjust-ers, seatback recliner, etc. to ensure they operatesmoothly and all latches lock securely in every posi-tion. Check that the head restraints move up anddown smoothly and the locks hold securely in alllatched positions.
Seat belts:
Check that all parts of the seat belt system (e.g.buckles, anchors, adjusters and retractors) operateproperly and smoothly, and are installed securely.Check the belt webbing for cuts, fraying, wear ordamage. See “Seat belts” in the “1. Safety—Seats,Seat belts and Supplemental Restraint System” sec-tion for further details.
Steering wheel:
Check for any change in the steering conditions,such as excessive free play, hard steering or strangenoises.
Warning lights and audible reminders:
Make sure that all warning/indicator lights and au-dible reminders are operating properly.
Windscreen defogger:
Check that the air comes out of the defogger outletsproperly when operating the heater or air condi-tioner.
Windscreen wiper and washer*:
Check that the wipers and washer operate properlyand that the wipers do not streak.
When performing any inspection or maintenancework on your vehicle, always take care to preventserious accidental injury to yourself or damage tothe vehicle. The following are general precautionswhich should be closely observed.
• Park the vehicle on a level surface, apply theparking brake securely and block the wheelsto prevent the vehicle from moving. Formanual transmission models, move the shiftlever to N (Neutral) position.For continuouslyvariable transmission models: move the shiftlever to P (Park) position.
• Do not work under the engine bonnet whilethe engine is hot. Turn off the engine and waituntil it cools down.
• Be sure to turn the ignition switch to the “OFF”or LOCK position.
When the ignition switch is in the ON or Accposition, the cooling fan may start to operatesuddenly even when the engine is not run-ning. To avoid injury, always disconnect thenegative battery cable before working nearthe engine.
• If you must work with the engine running,keep your hands, clothing, hair and tools awayfrommoving fans, belts and any other movingparts.
• It is advisable to remove ties and any jewel-lery, such as rings, watches, etc. before work-ing on your vehicle.
MAINTENANCE PRECAUTIONS
8-4 Maintenance and do-it-yourself
• If you must run the engine in an enclosedspace such as a garage, be sure there isproper ventilation for exhaust gases.
• DO NOT GET UNDER A VEHICLE THAT ISSUPPORTED BY A JACK.
• Keep smoking materials, flame and sparksaway from fuel and battery.
• Never connect or disconnect either the bat-tery or any transistorised component connec-tor while the ignition switch is in the ON posi-tion.
• Never leave the engine or transmission re-lated component harness connector discon-nected while the ignition switch is in the ONposition.
• On petrol engine models with the multiportfuel injection (MFI) system, the fuel filter orfuel lines should be serviced by a NISSANdealer or qualified workshop because the fuellines are under high pressure even when theengine is off.
• Always wear eye protection whenever youwork on your vehicle.
• Failure to follow these or other common senseguidelines may lead to serious injury or ve-hicle damage.
NISSAN Blue Citizenship
Improperly disposed engine oil and/or othervehicle fluids can pollute the environment. Al-ways conform to local regulations for disposalof vehicle fluid.
This section gives instructions regarding only thoseitems which are relatively easy for an owner to per-form.
You should be aware that incomplete or improperservicing may result in operating difficulties or ex-cessive emissions, and could affect your warrantycoverage. If in doubt about any servicing, have itdone by your NISSAN dealer or qualified work-shop.
For an overview of the engine compartment, see“Engine compartment” in the “0. Illustrated tableof contents” section.
ENGINE COMPARTMENT
Maintenance and do-it-yourself 8-5
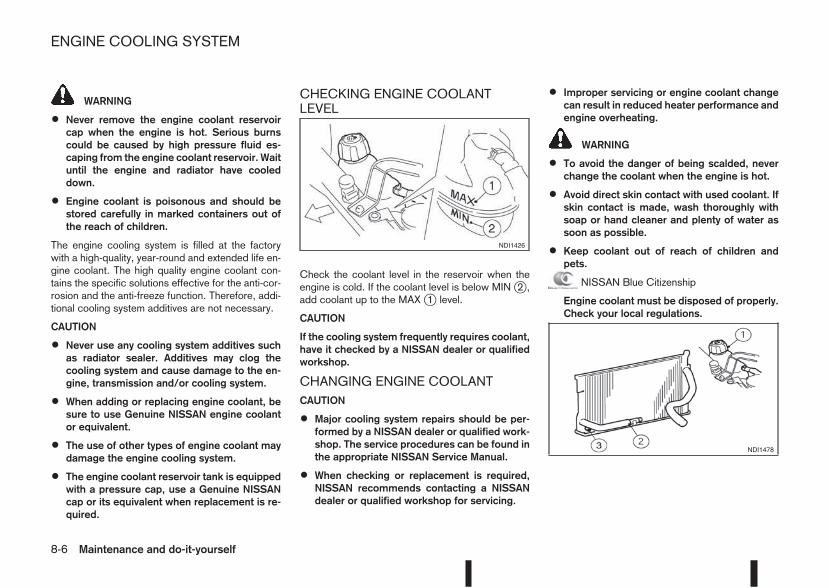
WARNING
• Never remove the engine coolant reservoircap when the engine is hot. Serious burnscould be caused by high pressure fluid es-caping from the engine coolant reservoir. Waituntil the engine and radiator have cooleddown.
• Engine coolant is poisonous and should bestored carefully in marked containers out ofthe reach of children.
The engine cooling system is filled at the factorywith a high-quality, year-round and extended life en-gine coolant. The high quality engine coolant con-tains the specific solutions effective for the anti-cor-rosion and the anti-freeze function. Therefore, addi-tional cooling system additives are not necessary.
CAUTION
• Never use any cooling system additives suchas radiator sealer. Additives may clog thecooling system and cause damage to the en-gine, transmission and/or cooling system.
• When adding or replacing engine coolant, besure to use Genuine NISSAN engine coolantor equivalent.
• The use of other types of engine coolant maydamage the engine cooling system.
• The engine coolant reservoir tank is equippedwith a pressure cap, use a Genuine NISSANcap or its equivalent when replacement is re-quired.
CHECKING ENGINE COOLANTLEVEL
Check the coolant level in the reservoir when theengine is cold. If the coolant level is below MINj2 ,add coolant up to the MAXj1 level.
CAUTION
If the cooling system frequently requires coolant,have it checked by a NISSAN dealer or qualifiedworkshop.
CHANGING ENGINE COOLANTCAUTION
• Major cooling system repairs should be per-formed by a NISSAN dealer or qualified work-shop. The service procedures can be found inthe appropriate NISSAN Service Manual.
• When checking or replacement is required,NISSAN recommends contacting a NISSANdealer or qualified workshop for servicing.
• Improper servicing or engine coolant changecan result in reduced heater performance andengine overheating.
WARNING
• To avoid the danger of being scalded, neverchange the coolant when the engine is hot.
• Avoid direct skin contact with used coolant. Ifskin contact is made, wash thoroughly withsoap or hand cleaner and plenty of water assoon as possible.
• Keep coolant out of reach of children andpets.
NISSAN Blue Citizenship
Engine coolant must be disposed of properly.Check your local regulations.
NDI1426
NDI1478
ENGINE COOLING SYSTEM
8-6 Maintenance and do-it-yourself
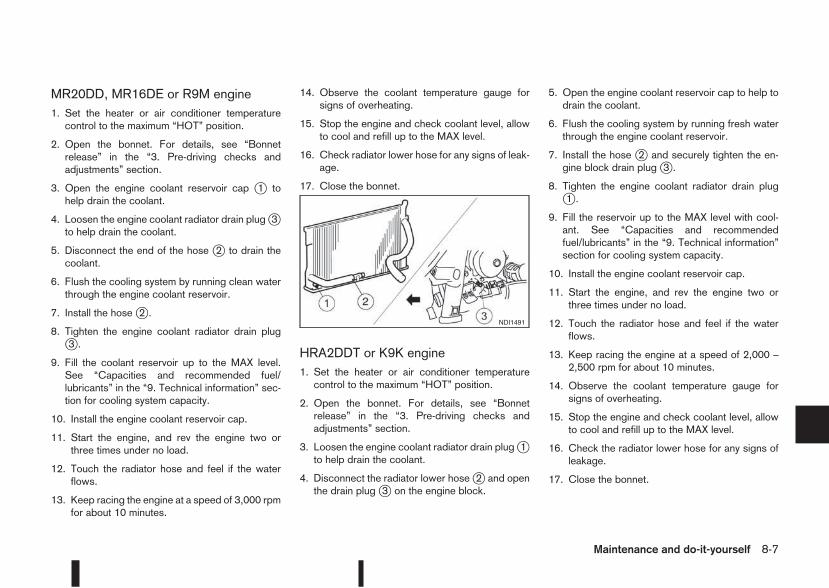
MR20DD, MR16DE or R9M engine1. Set the heater or air conditioner temperaturecontrol to the maximum “HOT” position.
2. Open the bonnet. For details, see “Bonnetrelease” in the “3. Pre-driving checks andadjustments” section.
3. Open the engine coolant reservoir cap j1 tohelp drain the coolant.
4. Loosen the engine coolant radiator drain plugj3to help drain the coolant.
5. Disconnect the end of the hose j2 to drain thecoolant.
6. Flush the cooling system by running clean waterthrough the engine coolant reservoir.
7. Install the hosej2 .
8. Tighten the engine coolant radiator drain plugj3 .
9. Fill the coolant reservoir up to the MAX level.See “Capacities and recommended fuel/lubricants” in the “9. Technical information” sec-tion for cooling system capacity.
10. Install the engine coolant reservoir cap.
11. Start the engine, and rev the engine two orthree times under no load.
12. Touch the radiator hose and feel if the waterflows.
13. Keep racing the engine at a speed of 3,000 rpmfor about 10 minutes.
14. Observe the coolant temperature gauge forsigns of overheating.
15. Stop the engine and check coolant level, allowto cool and refill up to the MAX level.
16. Check radiator lower hose for any signs of leak-age.
17. Close the bonnet.
HRA2DDT or K9K engine1. Set the heater or air conditioner temperaturecontrol to the maximum “HOT” position.
2. Open the bonnet. For details, see “Bonnetrelease” in the “3. Pre-driving checks andadjustments” section.
3. Loosen the engine coolant radiator drain plugj1to help drain the coolant.
4. Disconnect the radiator lower hosej2 and openthe drain plugj3 on the engine block.
5. Open the engine coolant reservoir cap to help todrain the coolant.
6. Flush the cooling system by running fresh waterthrough the engine coolant reservoir.
7. Install the hose j2 and securely tighten the en-gine block drain plugj3 .
8. Tighten the engine coolant radiator drain plugj1 .
9. Fill the reservoir up to the MAX level with cool-ant. See “Capacities and recommendedfuel/lubricants” in the “9. Technical information”section for cooling system capacity.
10. Install the engine coolant reservoir cap.
11. Start the engine, and rev the engine two orthree times under no load.
12. Touch the radiator hose and feel if the waterflows.
13. Keep racing the engine at a speed of 2,000 –2,500 rpm for about 10 minutes.
14. Observe the coolant temperature gauge forsigns of overheating.
15. Stop the engine and check coolant level, allowto cool and refill up to the MAX level.
16. Check the radiator lower hose for any signs ofleakage.
17. Close the bonnet.
NDI1491
Maintenance and do-it-yourself 8-7
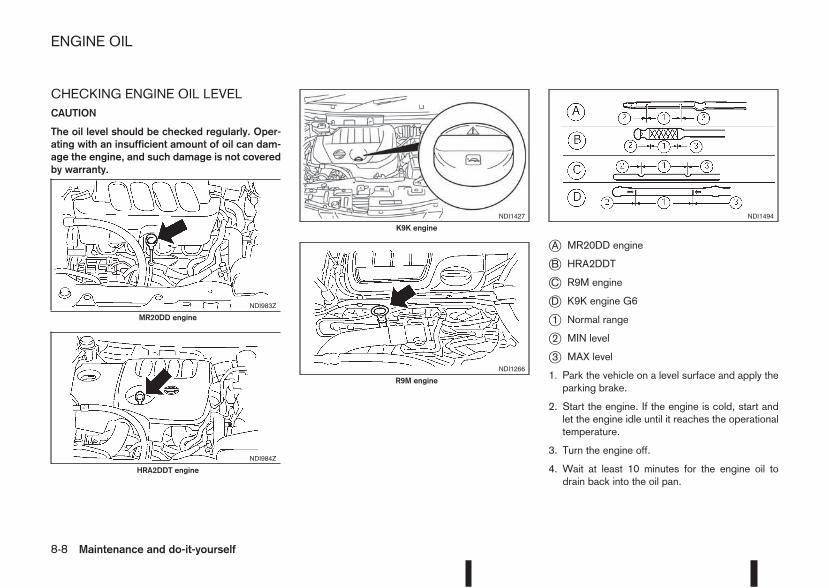
CHECKING ENGINE OIL LEVELCAUTION
The oil level should be checked regularly. Oper-ating with an insufficient amount of oil can dam-age the engine, and such damage is not coveredby warranty.
jA MR20DD engine
jB HRA2DDT
jC R9M engine
jD K9K engine G6
j1 Normal range
j2 MIN level
j3 MAX level
1. Park the vehicle on a level surface and apply theparking brake.
2. Start the engine. If the engine is cold, start andlet the engine idle until it reaches the operationaltemperature.
3. Turn the engine off.
4. Wait at least 10 minutes for the engine oil todrain back into the oil pan.
NDI983Z
MR20DD engine
NDI984Z
HRA2DDT engine
NDI1427
K9K engine
NDI1266
R9M engine
NDI1494
ENGINE OIL
8-8 Maintenance and do-it-yourself
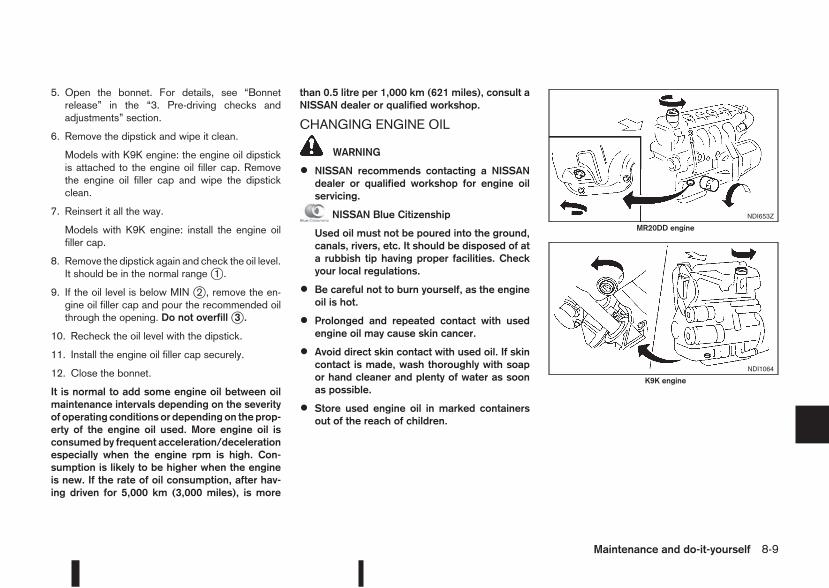
5. Open the bonnet. For details, see “Bonnetrelease” in the “3. Pre-driving checks andadjustments” section.
6. Remove the dipstick and wipe it clean.
Models with K9K engine: the engine oil dipstickis attached to the engine oil filler cap. Removethe engine oil filler cap and wipe the dipstickclean.
7. Reinsert it all the way.
Models with K9K engine: install the engine oilfiller cap.
8. Remove the dipstick again and check the oil level.It should be in the normal rangej1 .
9. If the oil level is below MIN j2 , remove the en-gine oil filler cap and pour the recommended oilthrough the opening. Do not overfillj3 .
10. Recheck the oil level with the dipstick.
11. Install the engine oil filler cap securely.
12. Close the bonnet.
It is normal to add some engine oil between oilmaintenance intervals depending on the severityof operating conditions or depending on the prop-erty of the engine oil used. More engine oil isconsumed by frequent acceleration/decelerationespecially when the engine rpm is high. Con-sumption is likely to be higher when the engineis new. If the rate of oil consumption, after hav-ing driven for 5,000 km (3,000 miles), is more
than 0.5 litre per 1,000 km (621 miles), consult aNISSAN dealer or qualified workshop.
CHANGING ENGINE OIL
WARNING
• NISSAN recommends contacting a NISSANdealer or qualified workshop for engine oilservicing.
NISSAN Blue Citizenship
Used oil must not be poured into the ground,canals, rivers, etc. It should be disposed of ata rubbish tip having proper facilities. Checkyour local regulations.
• Be careful not to burn yourself, as the engineoil is hot.
• Prolonged and repeated contact with usedengine oil may cause skin cancer.
• Avoid direct skin contact with used oil. If skincontact is made, wash thoroughly with soapor hand cleaner and plenty of water as soonas possible.
• Store used engine oil in marked containersout of the reach of children.
NDI653Z
MR20DD engine
NDI1064
K9K engine
Maintenance and do-it-yourself 8-9
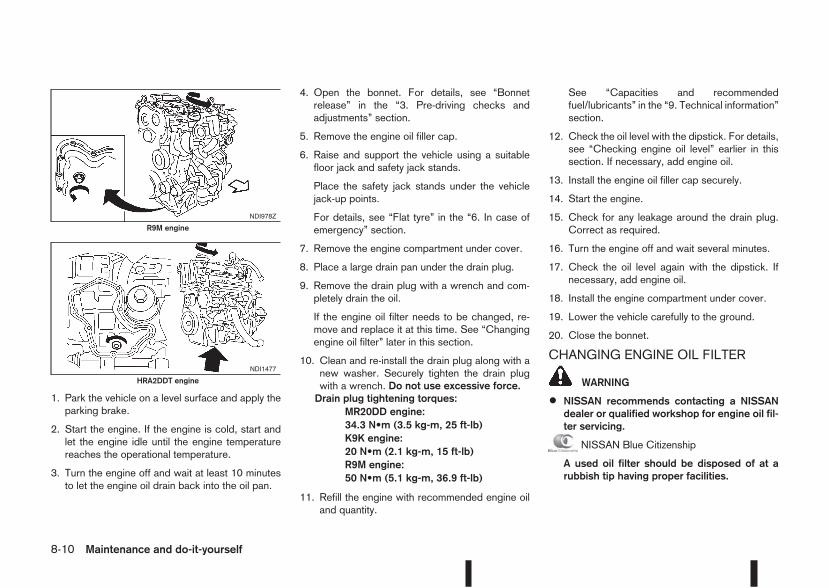
1. Park the vehicle on a level surface and apply theparking brake.
2. Start the engine. If the engine is cold, start andlet the engine idle until the engine temperaturereaches the operational temperature.
3. Turn the engine off and wait at least 10 minutesto let the engine oil drain back into the oil pan.
4. Open the bonnet. For details, see “Bonnetrelease” in the “3. Pre-driving checks andadjustments” section.
5. Remove the engine oil filler cap.
6. Raise and support the vehicle using a suitablefloor jack and safety jack stands.
Place the safety jack stands under the vehiclejack-up points.
For details, see “Flat tyre” in the “6. In case ofemergency” section.
7. Remove the engine compartment under cover.
8. Place a large drain pan under the drain plug.
9. Remove the drain plug with a wrench and com-pletely drain the oil.
If the engine oil filter needs to be changed, re-move and replace it at this time. See “Changingengine oil filter” later in this section.
10. Clean and re-install the drain plug along with anew washer. Securely tighten the drain plugwith a wrench. Do not use excessive force.Drain plug tightening torques:
MR20DD engine:34.3 N•m (3.5 kg-m, 25 ft-lb)K9K engine:20 N•m (2.1 kg-m, 15 ft-lb)R9M engine:50 N•m (5.1 kg-m, 36.9 ft-lb)
11. Refill the engine with recommended engine oiland quantity.
See “Capacities and recommendedfuel/lubricants” in the “9. Technical information”section.
12. Check the oil level with the dipstick. For details,see “Checking engine oil level” earlier in thissection. If necessary, add engine oil.
13. Install the engine oil filler cap securely.
14. Start the engine.
15. Check for any leakage around the drain plug.Correct as required.
16. Turn the engine off and wait several minutes.
17. Check the oil level again with the dipstick. Ifnecessary, add engine oil.
18. Install the engine compartment under cover.
19. Lower the vehicle carefully to the ground.
20. Close the bonnet.
CHANGING ENGINE OIL FILTER
WARNING
• NISSAN recommends contacting a NISSANdealer or qualified workshop for engine oil fil-ter servicing.
NISSAN Blue Citizenship
A used oil filter should be disposed of at arubbish tip having proper facilities.
NDI978Z
R9M engine
NDI1477
HRA2DDT engine
8-10 Maintenance and do-it-yourself
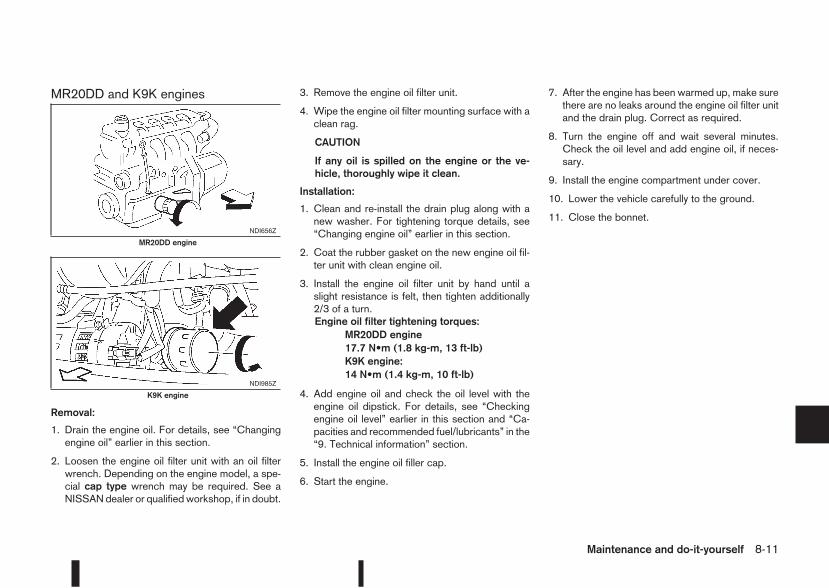
MR20DD and K9K engines
Removal:
1. Drain the engine oil. For details, see “Changingengine oil” earlier in this section.
2. Loosen the engine oil filter unit with an oil filterwrench. Depending on the engine model, a spe-cial cap type wrench may be required. See aNISSANdealer or qualified workshop, if in doubt.
3. Remove the engine oil filter unit.
4. Wipe the engine oil filter mounting surface with aclean rag.
CAUTION
If any oil is spilled on the engine or the ve-hicle, thoroughly wipe it clean.
Installation:
1. Clean and re-install the drain plug along with anew washer. For tightening torque details, see“Changing engine oil” earlier in this section.
2. Coat the rubber gasket on the new engine oil fil-ter unit with clean engine oil.
3. Install the engine oil filter unit by hand until aslight resistance is felt, then tighten additionally2/3 of a turn.Engine oil filter tightening torques:
MR20DD engine17.7 N•m (1.8 kg-m, 13 ft-lb)K9K engine:14 N•m (1.4 kg-m, 10 ft-lb)
4. Add engine oil and check the oil level with theengine oil dipstick. For details, see “Checkingengine oil level” earlier in this section and “Ca-pacities and recommended fuel/lubricants” in the“9. Technical information” section.
5. Install the engine oil filler cap.
6. Start the engine.
7. After the engine has been warmed up, make surethere are no leaks around the engine oil filter unitand the drain plug. Correct as required.
8. Turn the engine off and wait several minutes.Check the oil level and add engine oil, if neces-sary.
9. Install the engine compartment under cover.
10. Lower the vehicle carefully to the ground.
11. Close the bonnet.NDI656Z
MR20DD engine
NDI985Z
K9K engine
Maintenance and do-it-yourself 8-11
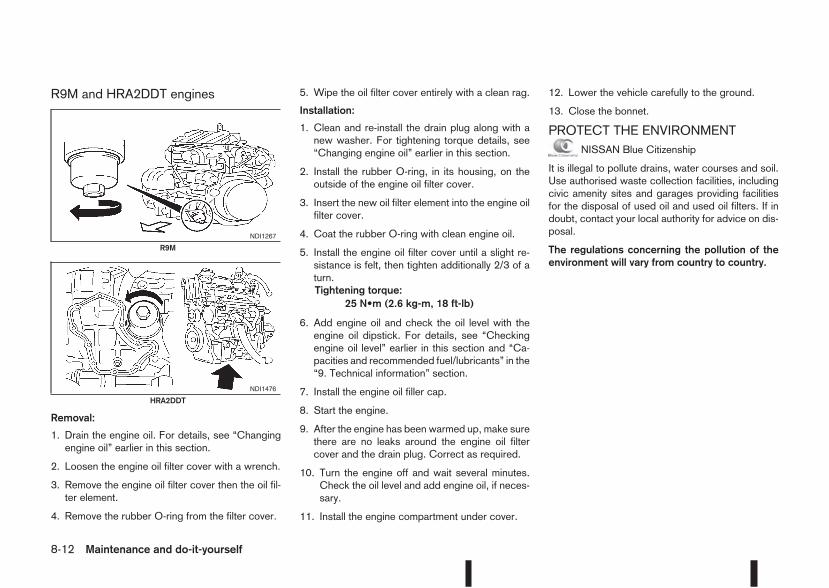
R9M and HRA2DDT engines
Removal:
1. Drain the engine oil. For details, see “Changingengine oil” earlier in this section.
2. Loosen the engine oil filter cover with a wrench.
3. Remove the engine oil filter cover then the oil fil-ter element.
4. Remove the rubber O-ring from the filter cover.
5. Wipe the oil filter cover entirely with a clean rag.
Installation:
1. Clean and re-install the drain plug along with anew washer. For tightening torque details, see“Changing engine oil” earlier in this section.
2. Install the rubber O-ring, in its housing, on theoutside of the engine oil filter cover.
3. Insert the new oil filter element into the engine oilfilter cover.
4. Coat the rubber O-ring with clean engine oil.
5. Install the engine oil filter cover until a slight re-sistance is felt, then tighten additionally 2/3 of aturn.Tightening torque:
25 N•m (2.6 kg-m, 18 ft-lb)
6. Add engine oil and check the oil level with theengine oil dipstick. For details, see “Checkingengine oil level” earlier in this section and “Ca-pacities and recommended fuel/lubricants” in the“9. Technical information” section.
7. Install the engine oil filler cap.
8. Start the engine.
9. After the engine has been warmed up, make surethere are no leaks around the engine oil filtercover and the drain plug. Correct as required.
10. Turn the engine off and wait several minutes.Check the oil level and add engine oil, if neces-sary.
11. Install the engine compartment under cover.
12. Lower the vehicle carefully to the ground.
13. Close the bonnet.
PROTECT THE ENVIRONMENTNISSAN Blue Citizenship
It is illegal to pollute drains, water courses and soil.Use authorised waste collection facilities, includingcivic amenity sites and garages providing facilitiesfor the disposal of used oil and used oil filters. If indoubt, contact your local authority for advice on dis-posal.
The regulations concerning the pollution of theenvironment will vary from country to country.
NDI1267
R9M
NDI1476
HRA2DDT
8-12 Maintenance and do-it-yourself
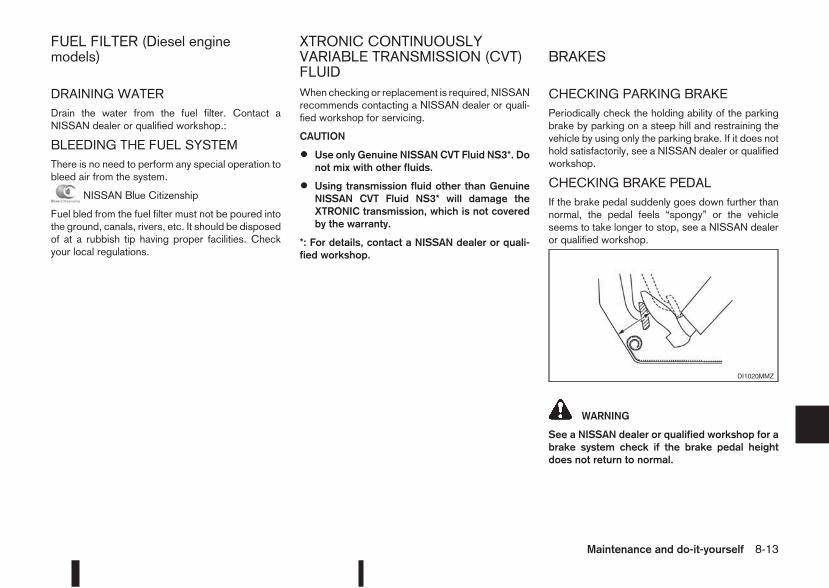
DRAINING WATERDrain the water from the fuel filter. Contact aNISSAN dealer or qualified workshop.:
BLEEDING THE FUEL SYSTEMThere is no need to perform any special operation tobleed air from the system.
NISSAN Blue Citizenship
Fuel bled from the fuel filter must not be poured intothe ground, canals, rivers, etc. It should be disposedof at a rubbish tip having proper facilities. Checkyour local regulations.
When checking or replacement is required, NISSANrecommends contacting a NISSAN dealer or quali-fied workshop for servicing.
CAUTION
• Use only Genuine NISSAN CVT Fluid NS3*. Donot mix with other fluids.
• Using transmission fluid other than GenuineNISSAN CVT Fluid NS3* will damage theXTRONIC transmission, which is not coveredby the warranty.
*: For details, contact a NISSAN dealer or quali-fied workshop.
CHECKING PARKING BRAKEPeriodically check the holding ability of the parkingbrake by parking on a steep hill and restraining thevehicle by using only the parking brake. If it does nothold satisfactorily, see a NISSAN dealer or qualifiedworkshop.
CHECKING BRAKE PEDALIf the brake pedal suddenly goes down further thannormal, the pedal feels “spongy” or the vehicleseems to take longer to stop, see a NISSAN dealeror qualified workshop.
WARNING
See a NISSAN dealer or qualified workshop for abrake system check if the brake pedal heightdoes not return to normal.
DI1020MMZ
FUEL FILTER (Diesel enginemodels)
XTRONIC CONTINUOUSLYVARIABLE TRANSMISSION (CVT)FLUID
BRAKES
Maintenance and do-it-yourself 8-13
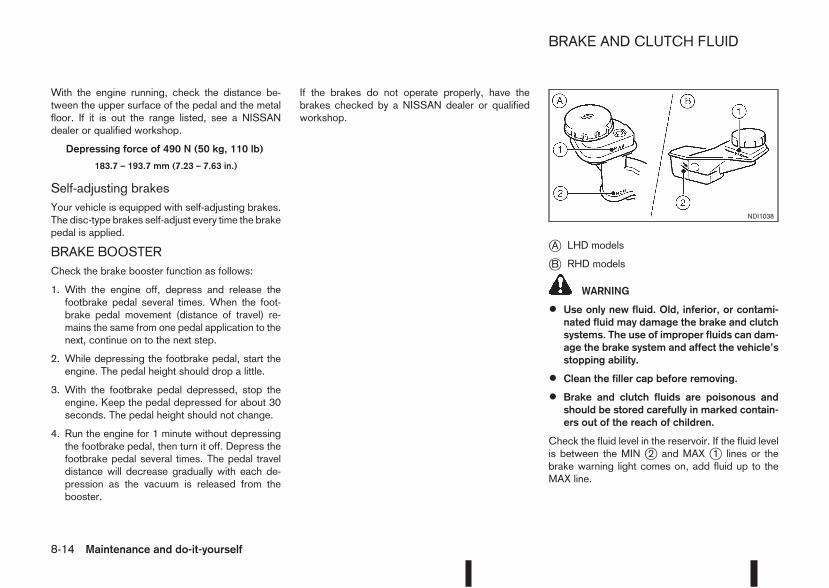
With the engine running, check the distance be-tween the upper surface of the pedal and the metalfloor. If it is out the range listed, see a NISSANdealer or qualified workshop.
Depressing force of 490 N (50 kg, 110 lb)
183.7 – 193.7 mm (7.23 – 7.63 in.)
Self-adjusting brakesYour vehicle is equipped with self-adjusting brakes.The disc-type brakes self-adjust every time the brakepedal is applied.
BRAKE BOOSTERCheck the brake booster function as follows:
1. With the engine off, depress and release thefootbrake pedal several times. When the foot-brake pedal movement (distance of travel) re-mains the same from one pedal application to thenext, continue on to the next step.
2. While depressing the footbrake pedal, start theengine. The pedal height should drop a little.
3. With the footbrake pedal depressed, stop theengine. Keep the pedal depressed for about 30seconds. The pedal height should not change.
4. Run the engine for 1 minute without depressingthe footbrake pedal, then turn it off. Depress thefootbrake pedal several times. The pedal traveldistance will decrease gradually with each de-pression as the vacuum is released from thebooster.
If the brakes do not operate properly, have thebrakes checked by a NISSAN dealer or qualifiedworkshop.
jA LHD models
jB RHD models
WARNING
• Use only new fluid. Old, inferior, or contami-nated fluid may damage the brake and clutchsystems. The use of improper fluids can dam-age the brake system and affect the vehicle’sstopping ability.
• Clean the filler cap before removing.
• Brake and clutch fluids are poisonous andshould be stored carefully in marked contain-ers out of the reach of children.
Check the fluid level in the reservoir. If the fluid levelis between the MIN j2 and MAX j1 lines or thebrake warning light comes on, add fluid up to theMAX line.
NDI1038
BRAKE AND CLUTCH FLUID
8-14 Maintenance and do-it-yourself
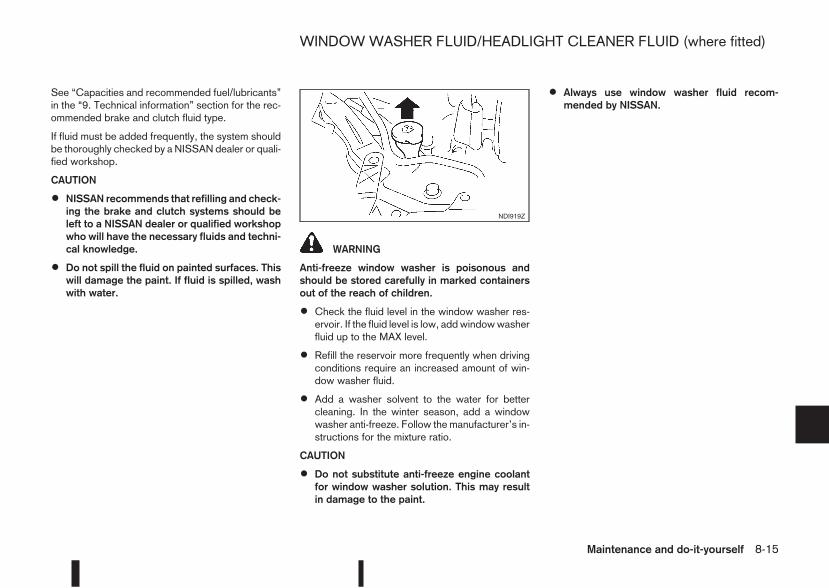
See “Capacities and recommended fuel/lubricants”in the “9. Technical information” section for the rec-ommended brake and clutch fluid type.
If fluid must be added frequently, the system shouldbe thoroughly checked by a NISSAN dealer or quali-fied workshop.
CAUTION
• NISSAN recommends that refilling and check-ing the brake and clutch systems should beleft to a NISSAN dealer or qualified workshopwho will have the necessary fluids and techni-cal knowledge.
• Do not spill the fluid on painted surfaces. Thiswill damage the paint. If fluid is spilled, washwith water.
WARNING
Anti-freeze window washer is poisonous andshould be stored carefully in marked containersout of the reach of children.
• Check the fluid level in the window washer res-ervoir. If the fluid level is low, addwindowwasherfluid up to the MAX level.
• Refill the reservoir more frequently when drivingconditions require an increased amount of win-dow washer fluid.
• Add a washer solvent to the water for bettercleaning. In the winter season, add a windowwasher anti-freeze. Follow the manufacturer’s in-structions for the mixture ratio.
CAUTION
• Do not substitute anti-freeze engine coolantfor window washer solution. This may resultin damage to the paint.
• Always use window washer fluid recom-mended by NISSAN.
NDI919Z
WINDOWWASHER FLUID/HEADLIGHT CLEANER FLUID (where fitted)
Maintenance and do-it-yourself 8-15
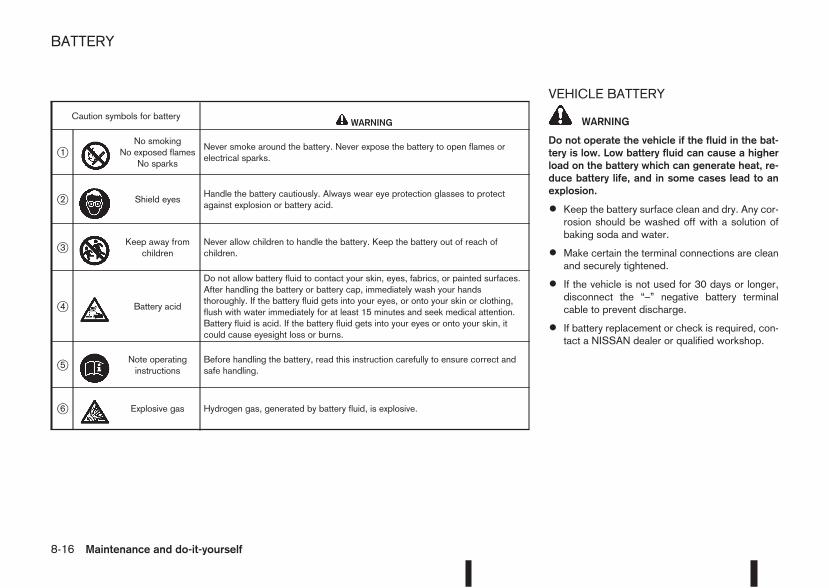
VEHICLE BATTERY
WARNING
Do not operate the vehicle if the fluid in the bat-tery is low. Low battery fluid can cause a higherload on the battery which can generate heat, re-duce battery life, and in some cases lead to anexplosion.
• Keep the battery surface clean and dry. Any cor-rosion should be washed off with a solution ofbaking soda and water.
• Make certain the terminal connections are cleanand securely tightened.
• If the vehicle is not used for 30 days or longer,disconnect the “–” negative battery terminalcable to prevent discharge.
• If battery replacement or check is required, con-tact a NISSAN dealer or qualified workshop.
Caution symbols for battery m WARNING
j1 mNo smoking
No exposed flamesNo sparks
Never smoke around the battery. Never expose the battery to open flames orelectrical sparks.
j2 m Shield eyesHandle the battery cautiously. Always wear eye protection glasses to protectagainst explosion or battery acid.
j3 mKeep away from
childrenNever allow children to handle the battery. Keep the battery out of reach ofchildren.
j4 m Battery acid
Do not allow battery fluid to contact your skin, eyes, fabrics, or painted surfaces.After handling the battery or battery cap, immediately wash your handsthoroughly. If the battery fluid gets into your eyes, or onto your skin or clothing,flush with water immediately for at least 15 minutes and seek medical attention.Battery fluid is acid. If the battery fluid gets into your eyes or onto your skin, itcould cause eyesight loss or burns.
j5 mNote operatinginstructions
Before handling the battery, read this instruction carefully to ensure correct andsafe handling.
j6 m Explosive gas Hydrogen gas, generated by battery fluid, is explosive.
BATTERY
8-16 Maintenance and do-it-yourself
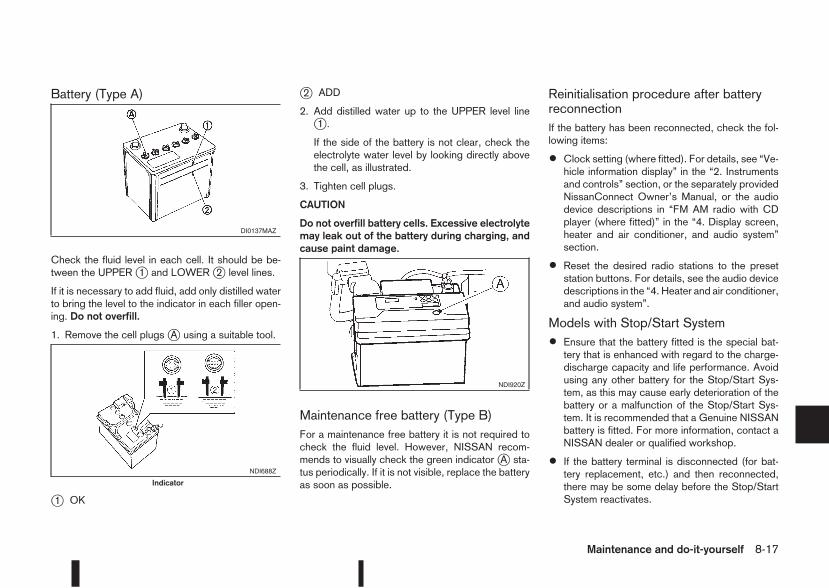
Battery (Type A)
Check the fluid level in each cell. It should be be-tween the UPPERj1 and LOWERj2 level lines.
If it is necessary to add fluid, add only distilled waterto bring the level to the indicator in each filler open-ing. Do not overfill.
1. Remove the cell plugsjA using a suitable tool.
j1 OK
j2 ADD
2. Add distilled water up to the UPPER level linej1 .
If the side of the battery is not clear, check theelectrolyte water level by looking directly abovethe cell, as illustrated.
3. Tighten cell plugs.
CAUTION
Do not overfill battery cells. Excessive electrolytemay leak out of the battery during charging, andcause paint damage.
Maintenance free battery (Type B)For a maintenance free battery it is not required tocheck the fluid level. However, NISSAN recom-mends to visually check the green indicatorjA sta-tus periodically. If it is not visible, replace the batteryas soon as possible.
Reinitialisation procedure after batteryreconnectionIf the battery has been reconnected, check the fol-lowing items:
• Clock setting (where fitted). For details, see “Ve-hicle information display” in the “2. Instrumentsand controls” section, or the separately providedNissanConnect Owner’s Manual, or the audiodevice descriptions in “FM AM radio with CDplayer (where fitted)” in the “4. Display screen,heater and air conditioner, and audio system”section.
• Reset the desired radio stations to the presetstation buttons. For details, see the audio devicedescriptions in the “4. Heater and air conditioner,and audio system”.
Models with Stop/Start System
• Ensure that the battery fitted is the special bat-tery that is enhanced with regard to the charge-discharge capacity and life performance. Avoidusing any other battery for the Stop/Start Sys-tem, as this may cause early deterioration of thebattery or a malfunction of the Stop/Start Sys-tem. It is recommended that a Genuine NISSANbattery is fitted. For more information, contact aNISSAN dealer or qualified workshop.
• If the battery terminal is disconnected (for bat-tery replacement, etc.) and then reconnected,there may be some delay before the Stop/StartSystem reactivates.
DI0137MAZ
NDI688Z
Indicator
NDI920Z
Maintenance and do-it-yourself 8-17
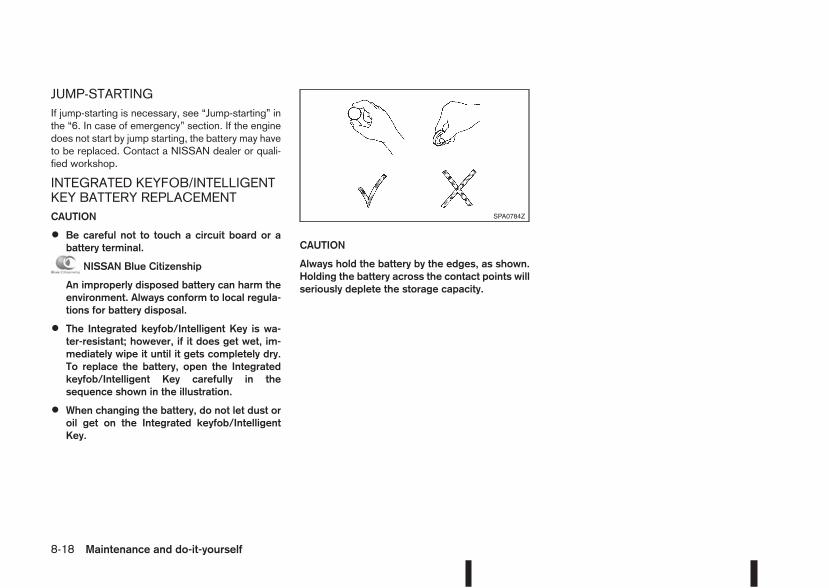
JUMP-STARTINGIf jump-starting is necessary, see “Jump-starting” inthe “6. In case of emergency” section. If the enginedoes not start by jump starting, the battery may haveto be replaced. Contact a NISSAN dealer or quali-fied workshop.
INTEGRATED KEYFOB/INTELLIGENTKEY BATTERY REPLACEMENTCAUTION
• Be careful not to touch a circuit board or abattery terminal.
NISSAN Blue Citizenship
An improperly disposed battery can harm theenvironment. Always conform to local regula-tions for battery disposal.
• The Integrated keyfob/Intelligent Key is wa-ter-resistant; however, if it does get wet, im-mediately wipe it until it gets completely dry.To replace the battery, open the Integratedkeyfob/Intelligent Key carefully in thesequence shown in the illustration.
• When changing the battery, do not let dust oroil get on the Integrated keyfob/IntelligentKey.
CAUTION
Always hold the battery by the edges, as shown.Holding the battery across the contact points willseriously deplete the storage capacity.
SPA0784Z
8-18 Maintenance and do-it-yourself
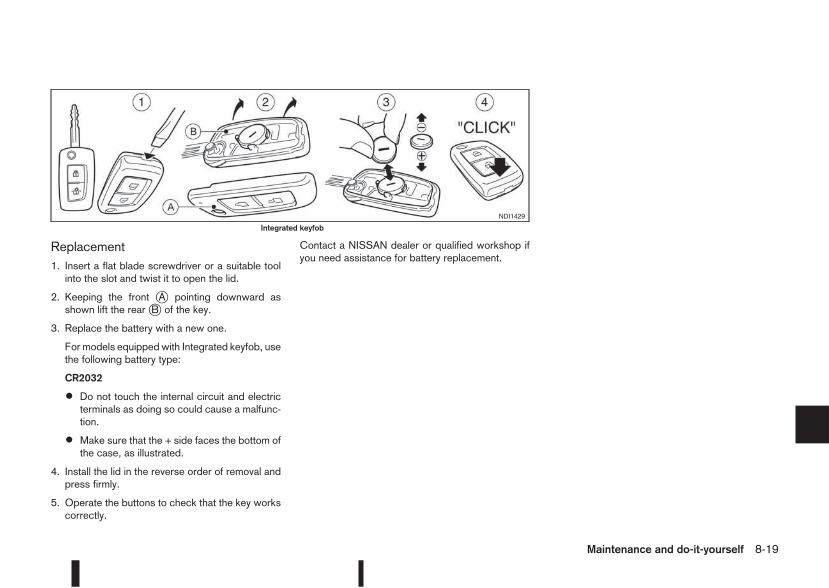
Replacement1. Insert a flat blade screwdriver or a suitable toolinto the slot and twist it to open the lid.
2. Keeping the front jA pointing downward asshown lift the rearjB of the key.
3. Replace the battery with a new one.
For models equipped with Integrated keyfob, usethe following battery type:
CR2032
• Do not touch the internal circuit and electricterminals as doing so could cause a malfunc-tion.
• Make sure that the + side faces the bottom ofthe case, as illustrated.
4. Install the lid in the reverse order of removal andpress firmly.
5. Operate the buttons to check that the key workscorrectly.
Contact a NISSAN dealer or qualified workshop ifyou need assistance for battery replacement.
NDI1429
Integrated keyfob
Maintenance and do-it-yourself 8-19
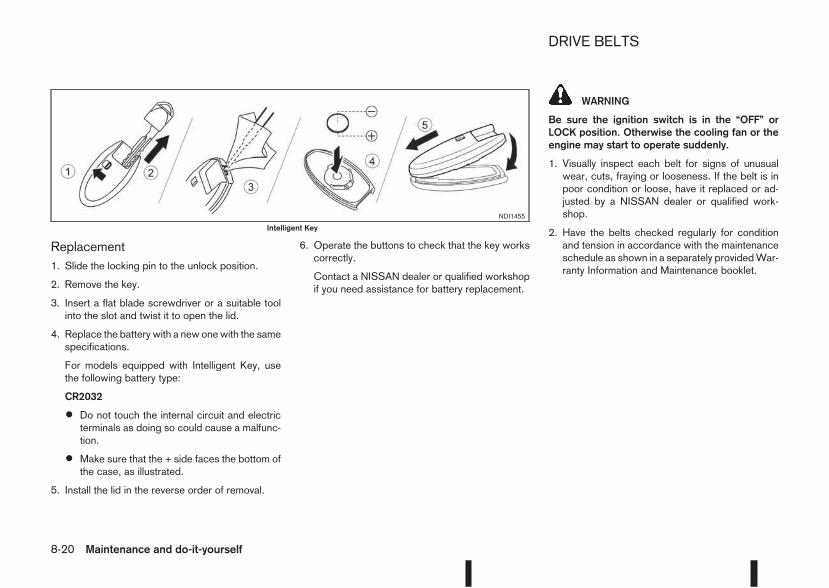
Replacement1. Slide the locking pin to the unlock position.
2. Remove the key.
3. Insert a flat blade screwdriver or a suitable toolinto the slot and twist it to open the lid.
4. Replace the battery with a new onewith the samespecifications.
For models equipped with Intelligent Key, usethe following battery type:
CR2032
• Do not touch the internal circuit and electricterminals as doing so could cause a malfunc-tion.
• Make sure that the + side faces the bottom ofthe case, as illustrated.
5. Install the lid in the reverse order of removal.
6. Operate the buttons to check that the key workscorrectly.
Contact a NISSAN dealer or qualified workshopif you need assistance for battery replacement.
WARNING
Be sure the ignition switch is in the “OFF” orLOCK position. Otherwise the cooling fan or theengine may start to operate suddenly.
1. Visually inspect each belt for signs of unusualwear, cuts, fraying or looseness. If the belt is inpoor condition or loose, have it replaced or ad-justed by a NISSAN dealer or qualified work-shop.
2. Have the belts checked regularly for conditionand tension in accordance with the maintenanceschedule as shown in a separately providedWar-ranty Information and Maintenance booklet.
NDI1455
Intelligent Key
DRIVE BELTS
8-20 Maintenance and do-it-yourself
WARNING
Be sure the engine and ignition switch are offand that the parking brake is engaged securely.
CAUTION
• Be sure to use the correct socket to removethe spark plugs. An incorrect socket cancause damage to the spark plugs.
• Always replace spark plugs with recom-mended or equivalent ones.
Replace spark plugs according to the maintenanceschedule shown in the separately provided War-ranty Information & Maintenance Booklet.
If replacement is required, see a NISSAN dealer orqualified workshop for servicing.
NOTE
Some maintenance procedures require the re-moval of the air duct.
Be sure the ignition switch is in the “OFF” orLOCK position before working in the engine com-partment.
SPARK PLUGS (Petrol enginemodels)
AIR DUCT REMOVAL
Maintenance and do-it-yourself 8-21
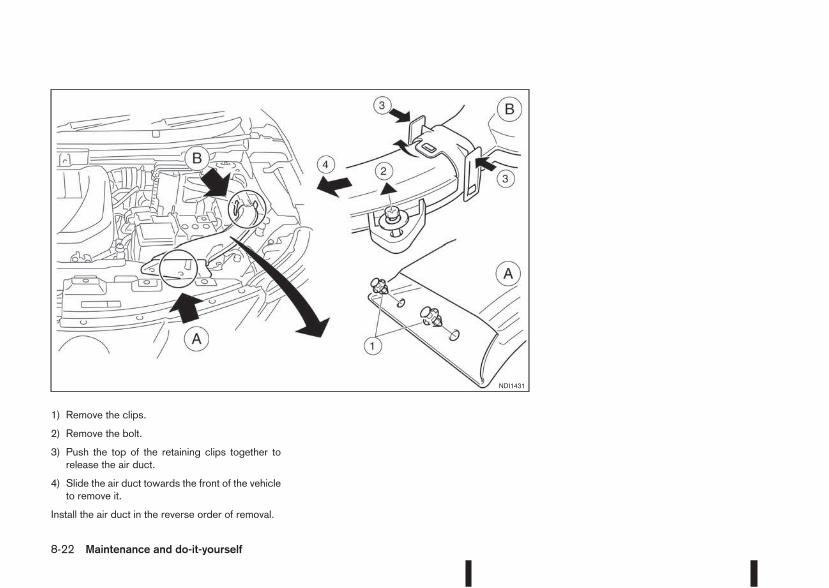
1) Remove the clips.
2) Remove the bolt.
3) Push the top of the retaining clips together torelease the air duct.
4) Slide the air duct towards the front of the vehicleto remove it.
Install the air duct in the reverse order of removal.
NDI1431
8-22 Maintenance and do-it-yourself
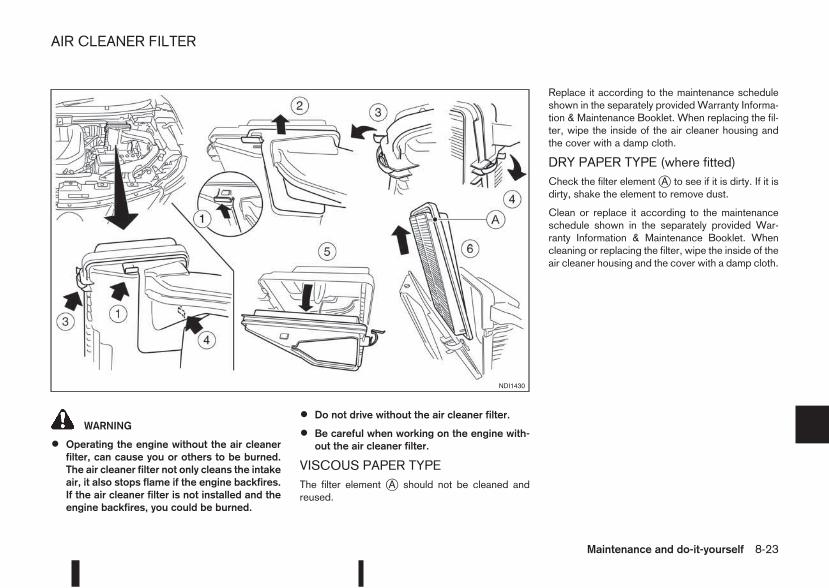
WARNING
• Operating the engine without the air cleanerfilter, can cause you or others to be burned.The air cleaner filter not only cleans the intakeair, it also stops flame if the engine backfires.If the air cleaner filter is not installed and theengine backfires, you could be burned.
• Do not drive without the air cleaner filter.
• Be careful when working on the engine with-out the air cleaner filter.
VISCOUS PAPER TYPEThe filter element jA should not be cleaned andreused.
Replace it according to the maintenance scheduleshown in the separately provided Warranty Informa-tion & Maintenance Booklet. When replacing the fil-ter, wipe the inside of the air cleaner housing andthe cover with a damp cloth.
DRY PAPER TYPE (where fitted)Check the filter elementjA to see if it is dirty. If it isdirty, shake the element to remove dust.
Clean or replace it according to the maintenanceschedule shown in the separately provided War-ranty Information & Maintenance Booklet. Whencleaning or replacing the filter, wipe the inside of theair cleaner housing and the cover with a damp cloth.
NDI1430
AIR CLEANER FILTER
Maintenance and do-it-yourself 8-23
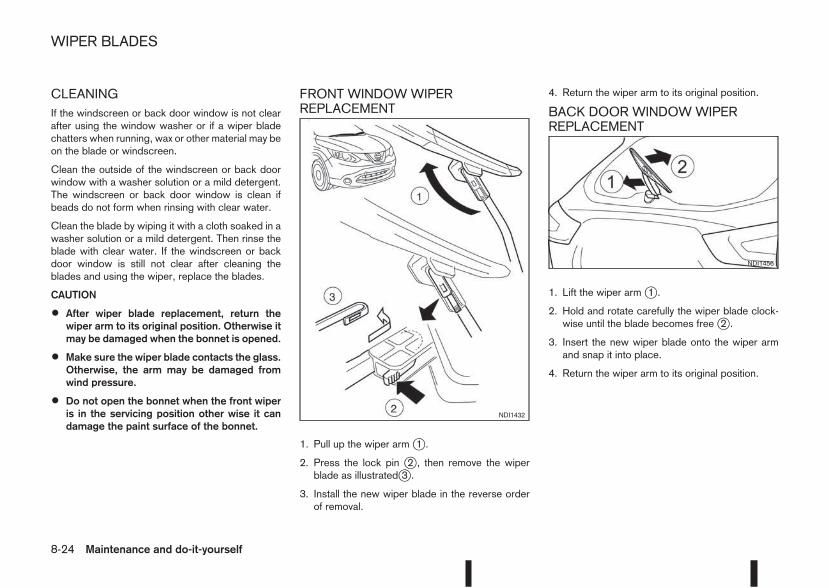
CLEANINGIf the windscreen or back door window is not clearafter using the window washer or if a wiper bladechatters when running, wax or other material may beon the blade or windscreen.
Clean the outside of the windscreen or back doorwindow with a washer solution or a mild detergent.The windscreen or back door window is clean ifbeads do not form when rinsing with clear water.
Clean the blade by wiping it with a cloth soaked in awasher solution or a mild detergent. Then rinse theblade with clear water. If the windscreen or backdoor window is still not clear after cleaning theblades and using the wiper, replace the blades.
CAUTION
• After wiper blade replacement, return thewiper arm to its original position. Otherwise itmay be damaged when the bonnet is opened.
• Make sure the wiper blade contacts the glass.Otherwise, the arm may be damaged fromwind pressure.
• Do not open the bonnet when the front wiperis in the servicing position other wise it candamage the paint surface of the bonnet.
FRONT WINDOWWIPERREPLACEMENT
1. Pull up the wiper armj1 .
2. Press the lock pin j2 , then remove the wiperblade as illustratedj3 .
3. Install the new wiper blade in the reverse orderof removal.
4. Return the wiper arm to its original position.
BACK DOOR WINDOWWIPERREPLACEMENT
1. Lift the wiper armj1 .
2. Hold and rotate carefully the wiper blade clock-wise until the blade becomes freej2 .
3. Insert the new wiper blade onto the wiper armand snap it into place.
4. Return the wiper arm to its original position.
NDI1432
NDI1456
WIPER BLADES
8-24 Maintenance and do-it-yourself
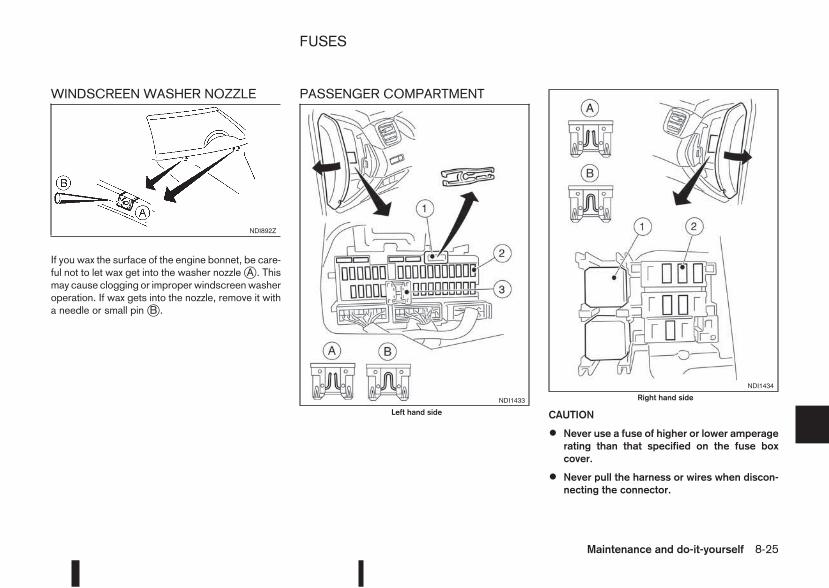
WINDSCREEN WASHER NOZZLE
If you wax the surface of the engine bonnet, be care-ful not to let wax get into the washer nozzlejA . Thismay cause clogging or improper windscreenwasheroperation. If wax gets into the nozzle, remove it witha needle or small pinjB .
PASSENGER COMPARTMENT
CAUTION
• Never use a fuse of higher or lower amperagerating than that specified on the fuse boxcover.
• Never pull the harness or wires when discon-necting the connector.
NDI892Z
NDI1433
Left hand side
NDI1434
Right hand side
FUSES
Maintenance and do-it-yourself 8-25
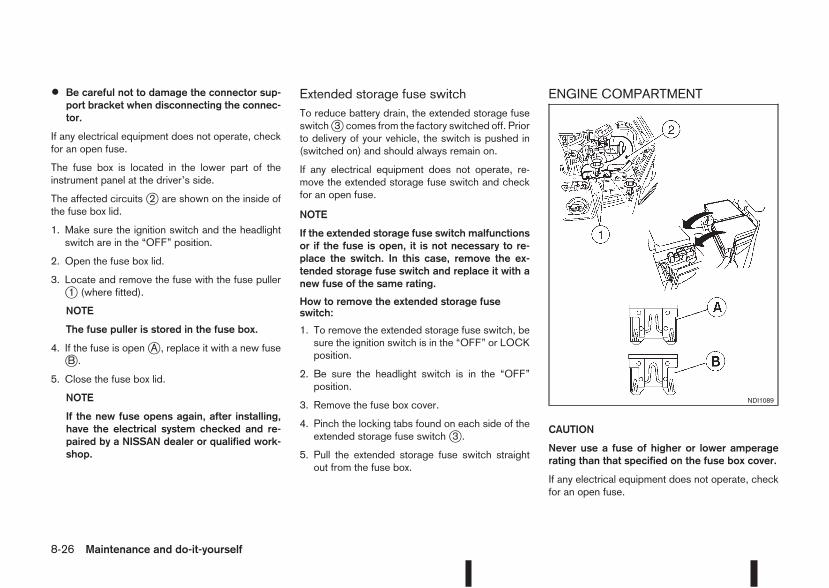
• Be careful not to damage the connector sup-port bracket when disconnecting the connec-tor.
If any electrical equipment does not operate, checkfor an open fuse.
The fuse box is located in the lower part of theinstrument panel at the driver’s side.
The affected circuitsj2 are shown on the inside ofthe fuse box lid.
1. Make sure the ignition switch and the headlightswitch are in the “OFF” position.
2. Open the fuse box lid.
3. Locate and remove the fuse with the fuse pullerj1 (where fitted).
NOTE
The fuse puller is stored in the fuse box.
4. If the fuse is openjA , replace it with a new fusejB .
5. Close the fuse box lid.
NOTE
If the new fuse opens again, after installing,have the electrical system checked and re-paired by a NISSAN dealer or qualified work-shop.
Extended storage fuse switchTo reduce battery drain, the extended storage fuseswitchj3 comes from the factory switched off. Priorto delivery of your vehicle, the switch is pushed in(switched on) and should always remain on.
If any electrical equipment does not operate, re-move the extended storage fuse switch and checkfor an open fuse.
NOTE
If the extended storage fuse switch malfunctionsor if the fuse is open, it is not necessary to re-place the switch. In this case, remove the ex-tended storage fuse switch and replace it with anew fuse of the same rating.
How to remove the extended storage fuseswitch:
1. To remove the extended storage fuse switch, besure the ignition switch is in the “OFF” or LOCKposition.
2. Be sure the headlight switch is in the “OFF”position.
3. Remove the fuse box cover.
4. Pinch the locking tabs found on each side of theextended storage fuse switchj3 .
5. Pull the extended storage fuse switch straightout from the fuse box.
ENGINE COMPARTMENT
CAUTION
Never use a fuse of higher or lower amperagerating than that specified on the fuse box cover.
If any electrical equipment does not operate, checkfor an open fuse.
NDI1089
8-26 Maintenance and do-it-yourself
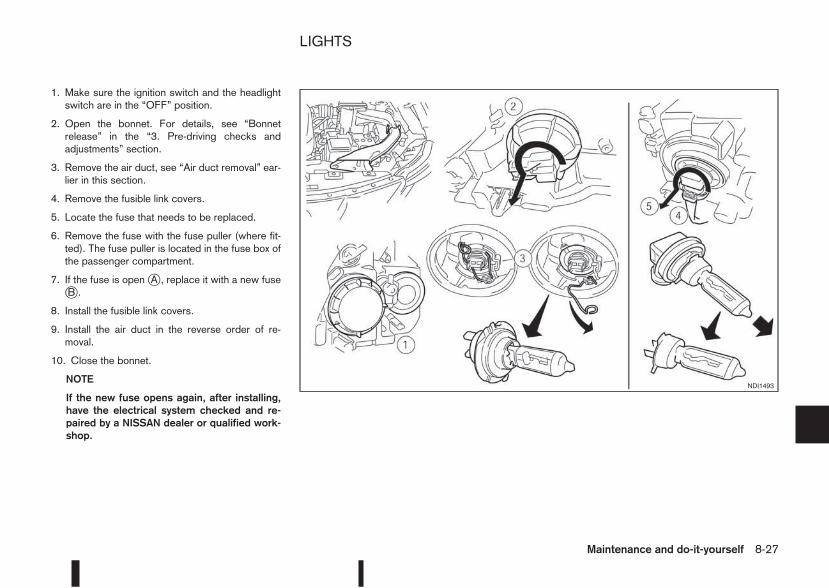
1. Make sure the ignition switch and the headlightswitch are in the “OFF” position.
2. Open the bonnet. For details, see “Bonnetrelease” in the “3. Pre-driving checks andadjustments” section.
3. Remove the air duct, see “Air duct removal” ear-lier in this section.
4. Remove the fusible link covers.
5. Locate the fuse that needs to be replaced.
6. Remove the fuse with the fuse puller (where fit-ted). The fuse puller is located in the fuse box ofthe passenger compartment.
7. If the fuse is openjA , replace it with a new fusejB .
8. Install the fusible link covers.
9. Install the air duct in the reverse order of re-moval.
10. Close the bonnet.
NOTE
If the new fuse opens again, after installing,have the electrical system checked and re-paired by a NISSAN dealer or qualified work-shop.
NDI1493
LIGHTS
Maintenance and do-it-yourself 8-27
HEADLIGHTS
LED headlight (where fitted)The LED headlight is a projector style which uses aLED module without serviceable parts.
CAUTION
• To prevent an electric shock, never attempt tomodify or disassemble the LED headlights as-sembly.
• If replacement is required, contact a NISSANdealer or qualified workshop.
Replacing the halogen headlight bulbCAUTION
• High pressure halogen gas is sealed insidethe halogen bulb. The bulb may break if theglass envelope is scratched or the bulb isdropped.
• When handling the bulb, DO NOT TOUCH THEGLASS ENVELOPE.
• Use the same number type and wattage asoriginally installed.
• Aiming is usually not necessary after replac-ing the bulb. When aiming adjustment is nec-essary, contact a NISSAN dealer or qualifiedworkshop.
• Do not leave the bulb out of the headlightreflector for a long period of time as dust,
moisture or smoke may enter the headlightbody and affect the performance of the head-light.
The headlight is a semi-sealed beam type whichuses a replaceable headlight (halogen) bulb. A bulbcan be replaced from inside the engine compart-ment without removing the headlight assembly.
Contact a NISSAN dealer or qualified workshop, ifyou need assistance for bulb replacement.
High beam bulb replacement:
1. Open the bonnet. For details, see “Bonnetrelease” in the “3. Pre-driving checks andadjustments” section.
2. Disconnect the negative (—) battery cable.
3. When the broken bulb is located in the headlightassembly under the air duct, carefully remove theair duct, see “Air duct removal” earlier in thissection.
4. Remove the connector from the back of the coverassemblyj1 .
5. Turn the cover assembly 1/4 of a turn in the anticlockwise direction and remove the cover by dis-connecting the internal connectorj2 .
6. Push and turn the retaining pin to loosen itj3 .
7. Remove the headlight bulb. Do not shake or ro-tate the bulb when removing it.
8. Install the new bulb in the reverse order of re-moval.
9. Re-install the covers internal connector on theback of the bulb.
10. Re-install the cover by turning the cover assem-bly 1/4 of a turn in the clockwise direction.
11. Re-install the connector on the back of the coverassembly.
12. Where removed (step 3.), re-install the air duct,bolt and clips in the reverse order of removal.
13. Reconnect the negative (—) battery cable andclose the bonnet.
Low beam bulb replacement:
1. Open the bonnet. For details, see “Bonnetrelease” in the “3. Pre-driving checks andadjustments” section.
2. Disconnect the negative (—) battery cable.
3. When the broken bulb is located in the headlightassembly under the air duct, carefully remove theair duct, see “Air duct removal” earlier in thissection.
4. Remove the connector from the back of the bulbassemblyj4 .
5. Turn the bulb assembly 1/8 of a turn in the anticlockwise direction and remove the headlightbulbj5 .
6. Install the new bulb in the headlight body by turn-ing it clockwise until it is securely sealed withinthe headlight body.
7. Re-install the connector on the back of the bulbassembly.
8-28 Maintenance and do-it-yourself
8. Where removed (step 3.), re-install the air duct,bolt and clips in the reverse order of removal.
9. Reconnect the negative (—) battery cable andclose the bonnet.
NOTE
Fog may temporarily form inside the lens of theexterior lights in the rain or in a car wash. The fogis caused by a temperature difference betweenthe inside and the outside of the lens. This is nota malfunction. If large droplets can be seen, thencontact a NISSAN dealer or qualified workshop.
EXTERIOR LIGHTSItem Wattage (W)
Front combination light
Headlight (Low beam: H11type)
55
Headlight (High beam: H7type)
60
Headlight (Low or high beam:LED type, where fitted) *1
LED
Front turn signal light 21
Front side light *1 LED
Front fog light (H8 type, wherefitted) *1
35
Side turn signal light *1 LED
Rear combination light
Turn signal light 21
Stop/Tail light *1 LED
Reverse light *1 16
High-mounted stop light *1 LED
Number plate light 5
Rear fog light 21
*1: If replacement is required, contact a NISSAN dealeror qualified workshop.
INTERIOR LIGHTSItem Wattage
(W)
Room light/Map lights (where fitted)Foot well light (where fitted)
53
Room light — rear (where fitted) 5
Reading lights — rear (where fitted) 8
Luggage compartment light 5
Maintenance and do-it-yourself 8-29

LIGHT LOCATIONS
j1 Side turn signal light
j2 Room light/Map lights (where fitted)
j3 Low beam headlight
j4 High beam headlight
j5 Front side light
j6 Front turn signal light
j7 Front fog light (where fitted)
j8 Footwell light (where fitted)
j9 Room light (where fitted)
j10 High mounted stop light
j11 Number plate light
j12 Rear fog light (where fitted)
j13 Reverse light
j14 Stop light
j15 Tail light
Replacing procedures
All other lights are either type A, B, C or D.When replacing a bulb, first remove the lensand/or cover.
m REMOVE
m INSTALL
NDI1453
Light locations
NDI707
8-30 Maintenance and do-it-yourself
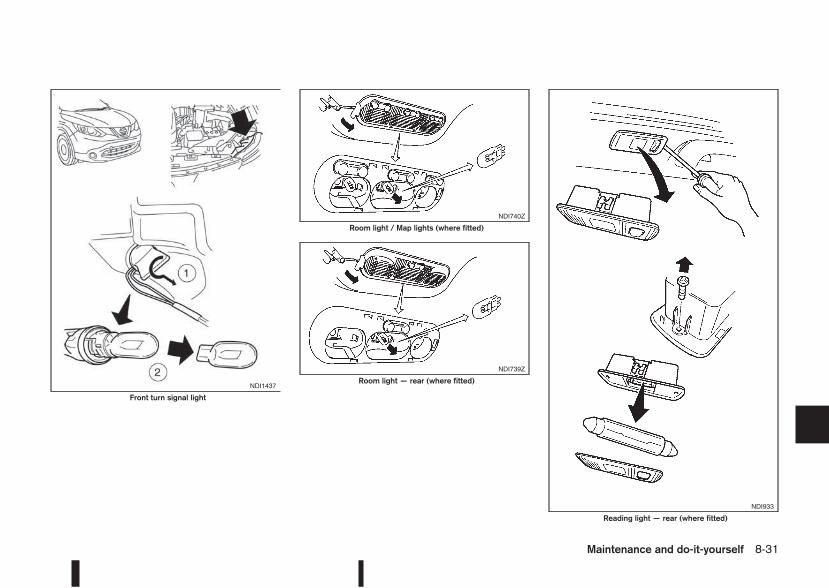
NDI1437
Front turn signal light
NDI740Z
Room light / Map lights (where fitted)
NDI739Z
Room light — rear (where fitted)
NDI933
Reading light — rear (where fitted)
Maintenance and do-it-yourself 8-31

NDI1097
Foot well light (where fitted)
NDI1457
Luggage compartment light
NDI1458
Number plate light
8-32 Maintenance and do-it-yourself
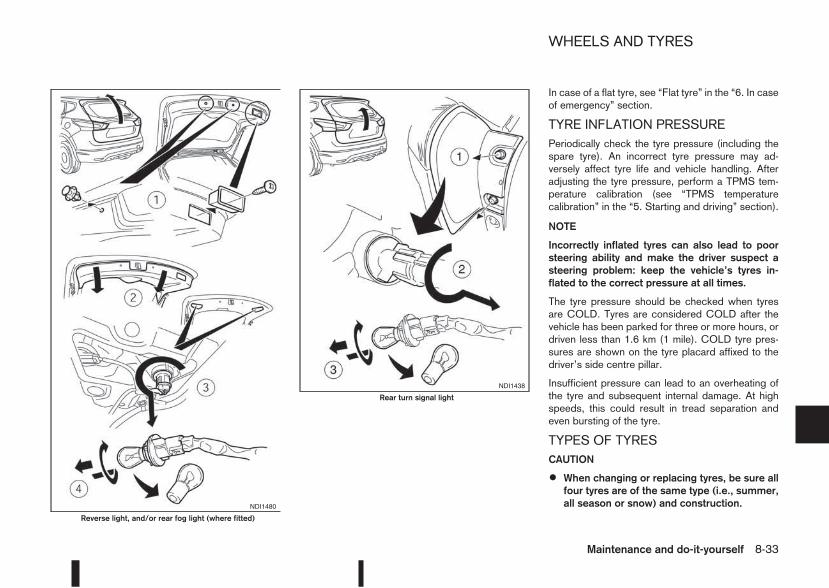
In case of a flat tyre, see “Flat tyre” in the “6. In caseof emergency” section.
TYRE INFLATION PRESSUREPeriodically check the tyre pressure (including thespare tyre). An incorrect tyre pressure may ad-versely affect tyre life and vehicle handling. Afteradjusting the tyre pressure, perform a TPMS tem-perature calibration (see “TPMS temperaturecalibration” in the “5. Starting and driving” section).
NOTE
Incorrectly inflated tyres can also lead to poorsteering ability and make the driver suspect asteering problem: keep the vehicle’s tyres in-flated to the correct pressure at all times.
The tyre pressure should be checked when tyresare COLD. Tyres are considered COLD after thevehicle has been parked for three or more hours, ordriven less than 1.6 km (1 mile). COLD tyre pres-sures are shown on the tyre placard affixed to thedriver’s side centre pillar.
Insufficient pressure can lead to an overheating ofthe tyre and subsequent internal damage. At highspeeds, this could result in tread separation andeven bursting of the tyre.
TYPES OF TYRESCAUTION
• When changing or replacing tyres, be sure allfour tyres are of the same type (i.e., summer,all season or snow) and construction.NDI1480
Reverse light, and/or rear fog light (where fitted)
NDI1438
Rear turn signal light
WHEELS AND TYRES
Maintenance and do-it-yourself 8-33

• A NISSAN dealer or qualified workshop maybe able to help you with information abouttyre type, size, speed rating and availability.
• Replacement tyres may have a lower speedrating than the factory equipped tyres, andmay notmatch the potential maximum vehiclespeed. Never exceed themaximum speed rat-ing of the tyre.
All season tyresNISSAN specifies all season tyres on some modelsto provide good performance for use all year around,including snowy and icy road conditions. All seasontyres are identified by ALL SEASON and/or M&Son the tyre sidewall. Snow tyres have better snowtraction than all season tyres and may be more ap-propriate in some areas.
Summer tyresNISSAN specifies summer tyres as standard fit.These tyres provide superior performance undertypical mild weather conditions.
If you plan to operate your vehicle in snowy or icyconditions, NISSAN recommends the use of SNOWor ALL SEASON tyres on all four wheels.
Snow tyresIf snow tyres are needed, it is necessary to selecttyres equivalent in size and load rating to the originalequipment tyres. If you do not, it can adversely af-fect the safety and handling of your vehicle.
Generally, snow tyres will have lower speed ratings
than factory equipped tyres and may not match thepotential maximum vehicle speed. Never exceed themaximum speed rating of the tyre.
For additional traction on icy roads, studded tyresmay be used. However, some provinces and statesprohibit their use. Check local, state and provinciallaws before installing studded tyres. Skid and trac-tion capabilities of studded snow tyres, on wet ordry surfaces, may be poorer than that of non-stud-ded snow tyres.
SNOW CHAINSUse of snow chains may be prohibited in some ar-eas. Check the local laws before installing snowchains.When installing snow chains, make sure theyare of proper size for the tyres on your vehicle andare installed according to the chain manufacturer’ssuggestions. Use chain tensioners when recom-mended by the snow chain manufacturer to ensurea tight fit. Loose end links of the snow chain must besecured or removed to prevent the possibility ofwhipping action damage to the fenders or undercar-riage.
In addition, drive at a reduced speed. Otherwise,your vehicle can be damaged and/or vehicle han-dling and performance may be adversely affected.
Snow chains must be installed only on the frontwheels and not on the rear wheels.
CAUTION
• Never install snow chains on a temporary-useor small size spare tyre.
• Do not drive with snow chains on paved roadswhich are clear of snow. Driving with chains insuch conditions can cause damage to thevarious mechanisms of the vehicle due tosome overstress. When driving on clear pavedroads, be sure to change to 2WD mode, see“Four-wheel Drive (4WD) (where fitted)” in the“5. Starting and driving” section.
TYRE ROTATION
NISSAN recommends that tyres be rotated every10,000 km (6,000 miles) for Two-Wheel Drive(2WD) vehicles and 5,000 km (3,000 miles) forFour-Wheel Drive (4WD) vehicles. After rotatingtyres and adjusting the tyre pressure, perform aTPMS temperature calibration (see “TPMS tem-perature calibration” in the “5. Starting and driving”section).
See “Flat tyre” in the “6. In case of emergency” sec-tion for tyre replacing procedures.
NDI762Z
8-34 Maintenance and do-it-yourself
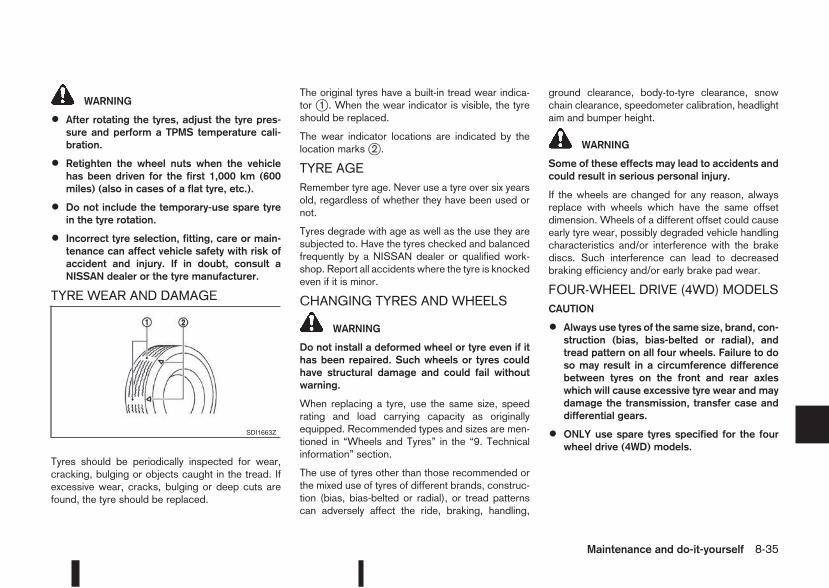
WARNING
• After rotating the tyres, adjust the tyre pres-sure and perform a TPMS temperature cali-bration.
• Retighten the wheel nuts when the vehiclehas been driven for the first 1,000 km (600miles) (also in cases of a flat tyre, etc.).
• Do not include the temporary-use spare tyrein the tyre rotation.
• Incorrect tyre selection, fitting, care or main-tenance can affect vehicle safety with risk ofaccident and injury. If in doubt, consult aNISSAN dealer or the tyre manufacturer.
TYRE WEAR AND DAMAGE
Tyres should be periodically inspected for wear,cracking, bulging or objects caught in the tread. Ifexcessive wear, cracks, bulging or deep cuts arefound, the tyre should be replaced.
The original tyres have a built-in tread wear indica-tor j1 . When the wear indicator is visible, the tyreshould be replaced.
The wear indicator locations are indicated by thelocation marksj2 .
TYRE AGERemember tyre age. Never use a tyre over six yearsold, regardless of whether they have been used ornot.
Tyres degrade with age as well as the use they aresubjected to. Have the tyres checked and balancedfrequently by a NISSAN dealer or qualified work-shop. Report all accidents where the tyre is knockedeven if it is minor.
CHANGING TYRES AND WHEELS
WARNING
Do not install a deformed wheel or tyre even if ithas been repaired. Such wheels or tyres couldhave structural damage and could fail withoutwarning.
When replacing a tyre, use the same size, speedrating and load carrying capacity as originallyequipped. Recommended types and sizes are men-tioned in “Wheels and Tyres” in the “9. Technicalinformation” section.
The use of tyres other than those recommended orthe mixed use of tyres of different brands, construc-tion (bias, bias-belted or radial), or tread patternscan adversely affect the ride, braking, handling,
ground clearance, body-to-tyre clearance, snowchain clearance, speedometer calibration, headlightaim and bumper height.
WARNING
Some of these effects may lead to accidents andcould result in serious personal injury.
If the wheels are changed for any reason, alwaysreplace with wheels which have the same offsetdimension. Wheels of a different offset could causeearly tyre wear, possibly degraded vehicle handlingcharacteristics and/or interference with the brakediscs. Such interference can lead to decreasedbraking efficiency and/or early brake pad wear.
FOUR-WHEEL DRIVE (4WD) MODELSCAUTION
• Always use tyres of the same size, brand, con-struction (bias, bias-belted or radial), andtread pattern on all four wheels. Failure to doso may result in a circumference differencebetween tyres on the front and rear axleswhich will cause excessive tyre wear and maydamage the transmission, transfer case anddifferential gears.
• ONLY use spare tyres specified for the fourwheel drive (4WD) models.
SDI1663Z
Maintenance and do-it-yourself 8-35
WHEEL BALANCEUnbalanced wheels may affect vehicle handling andtyre life. Even with regular use, wheels can get outof balance. Therefore, they should be balanced asrequired.
Wheel balance service should be performed withthe wheels off the vehicle. Spin balancing the frontwheels on the vehicle could lead to transmissiondamage.
SPARE TYREThe temporary-use spare wheel/tyre can be identi-fied by the temporary-use spare tyre label whichcontrasts to the standard road wheels. If in doubt,contact a NISSAN dealer, qualified workshop orsee “Spare tyre” in the “6. In case of emergency”section.
Emergency tyre puncture repair kit(where fitted)The emergency tyre puncture repair kit is suppliedto the vehicle instead of a spare tyre. The repair kitmust be used for temporarily fixing a minor tyrepuncture. After using the repair kit, see a NISSANdealer or qualified workshop as soon as possible fortyre inspection and repair/replacement.
CAUTION
Do not use the emergency tyre puncture repairkit under the following conditions. Contact aNISSAN dealer or qualified workshop or profes-sional road assistance.
• when the sealant has passed its expirationdate (shown on the label attached to the seal-ant bottle)
• when the cut or the puncture is approximately4 mm (0.16 in) or longer
• when the side of the tyre is damaged
• when the vehicle has been driven with a con-siderable loss of air from the tyre
• when the tyre is completely displaced insideor outside the rim
• when the tyre rim is damaged
• when two or more tyres are flat
See “Spare tyre” in the “6. In case of emergency”section for more details.
CARE OF WHEELSFor details, see “Care of wheels” in the “7. Appear-ance and care” section.
8-36 Maintenance and do-it-yourself
9 Technical informationTechnical information
Capacities and recommended fuel/lubricants ........... 9-2Fuel information .................................................. 9-4Recommended SAE viscosity number................. 9-4
Engine ..................................................................... 9-5Wheels and Tyres.................................................... 9-5Dimensions.............................................................. 9-6When travelling or transferring your registration toanother country........................................................ 9-6Vehicle identification ................................................ 9-6Vehicle identification plate................................... 9-6Vehicle identification number (VIN) (chassisnumber).............................................................. 9-7
Engine serial number .......................................... 9-7Tyre placard ....................................................... 9-8Air conditioner specification label (wherefitted).................................................................. 9-8
Approval numbers.................................................... 9-8NISSAN Anti-Theft System (NATS), Intelligentor remote keyless system.................................... 9-8Tyre Pressure Monitoring System (TPMS)(Transmitter) ....................................................... 9-9
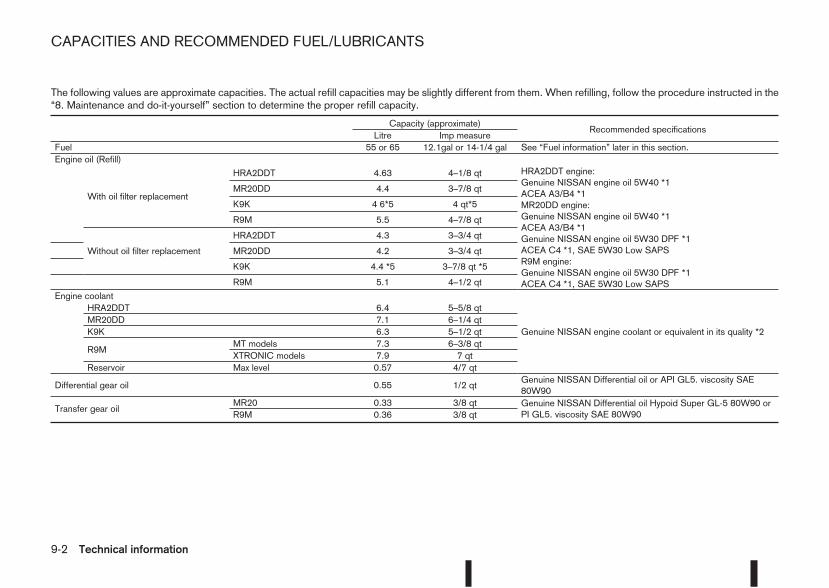
The following values are approximate capacities. The actual refill capacities may be slightly different from them. When refilling, follow the procedure instructed in the“8. Maintenance and do-it-yourself” section to determine the proper refill capacity.
Capacity (approximate)Recommended specifications
Litre Imp measureFuel 55 or 65 12.1gal or 14-1/4 gal See “Fuel information” later in this section.Engine oil (Refill)
With oil filter replacement
HRA2DDT 4.63 4–1/8 qt HRA2DDT engine:Genuine NISSAN engine oil 5W40 *1ACEA A3/B4 *1MR20DD engine:Genuine NISSAN engine oil 5W40 *1ACEA A3/B4 *1Genuine NISSAN engine oil 5W30 DPF *1ACEA C4 *1, SAE 5W30 Low SAPSR9M engine:Genuine NISSAN engine oil 5W30 DPF *1ACEA C4 *1, SAE 5W30 Low SAPS
MR20DD 4.4 3–7/8 qt
K9K 4 6*5 4 qt*5
R9M 5.5 4–7/8 qt
Without oil filter replacement
HRA2DDT 4.3 3–3/4 qt
MR20DD 4.2 3–3/4 qt
K9K 4.4 *5 3–7/8 qt *5
R9M 5.1 4–1/2 qt
Engine coolant
Genuine NISSAN engine coolant or equivalent in its quality *2
HRA2DDT 6.4 5–5/8 qtMR20DD 7.1 6–1/4 qtK9K 6.3 5–1/2 qt
R9MMT models 7.3 6–3/8 qtXTRONIC models 7.9 7 qt
Reservoir Max level 0.57 4/7 qt
Differential gear oil 0.55 1/2 qtGenuine NISSAN Differential oil or API GL5. viscosity SAE80W90
Transfer gear oilMR20 0.33 3/8 qt Genuine NISSAN Differential oil Hypoid Super GL-5 80W90 or
PI GL5. viscosity SAE 80W90R9M 0.36 3/8 qt
CAPACITIES AND RECOMMENDED FUEL/LUBRICANTS
9-2 Technical information
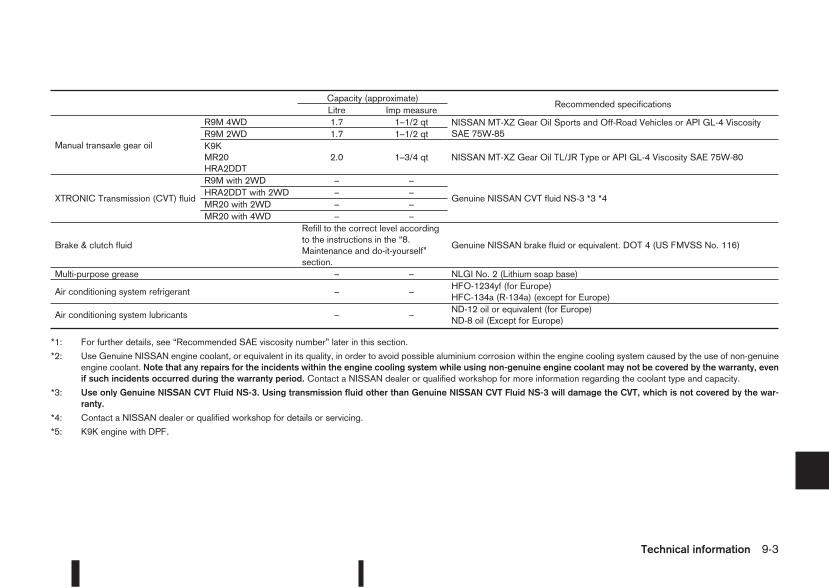
Capacity (approximate)Recommended specifications
Litre Imp measure
Manual transaxle gear oil
R9M 4WD 1.7 1–1/2 qt NISSAN MT-XZ Gear Oil Sports and Off-Road Vehicles or API GL-4 ViscositySAE 75W-85R9M 2WD 1.7 1–1/2 qt
K9KMR20HRA2DDT
2.0 1–3/4 qt NISSAN MT-XZ Gear Oil TL/JR Type or API GL-4 Viscosity SAE 75W-80
XTRONIC Transmission (CVT) fluid
R9M with 2WD – –
Genuine NISSAN CVT fluid NS-3 *3 *4HRA2DDT with 2WD – –MR20 with 2WD – –MR20 with 4WD – –
Brake & clutch fluid
Refill to the correct level accordingto the instructions in the “8.Maintenance and do-it-yourself”section.
Genuine NISSAN brake fluid or equivalent. DOT 4 (US FMVSS No. 116)
Multi-purpose grease – – NLGI No. 2 (Lithium soap base)
Air conditioning system refrigerant – –HFO-1234yf (for Europe)HFC-134a (R-134a) (except for Europe)
Air conditioning system lubricants – –ND-12 oil or equivalent (for Europe)ND-8 oil (Except for Europe)
*1: For further details, see “Recommended SAE viscosity number” later in this section.
*2: Use Genuine NISSAN engine coolant, or equivalent in its quality, in order to avoid possible aluminium corrosion within the engine cooling system caused by the use of non-genuineengine coolant. Note that any repairs for the incidents within the engine cooling system while using non-genuine engine coolant may not be covered by the warranty, evenif such incidents occurred during the warranty period. Contact a NISSAN dealer or qualified workshop for more information regarding the coolant type and capacity.
*3: Use only Genuine NISSAN CVT Fluid NS-3. Using transmission fluid other than Genuine NISSAN CVT Fluid NS-3 will damage the CVT, which is not covered by the war-ranty.
*4: Contact a NISSAN dealer or qualified workshop for details or servicing.
*5: K9K engine with DPF.
Technical information 9-3
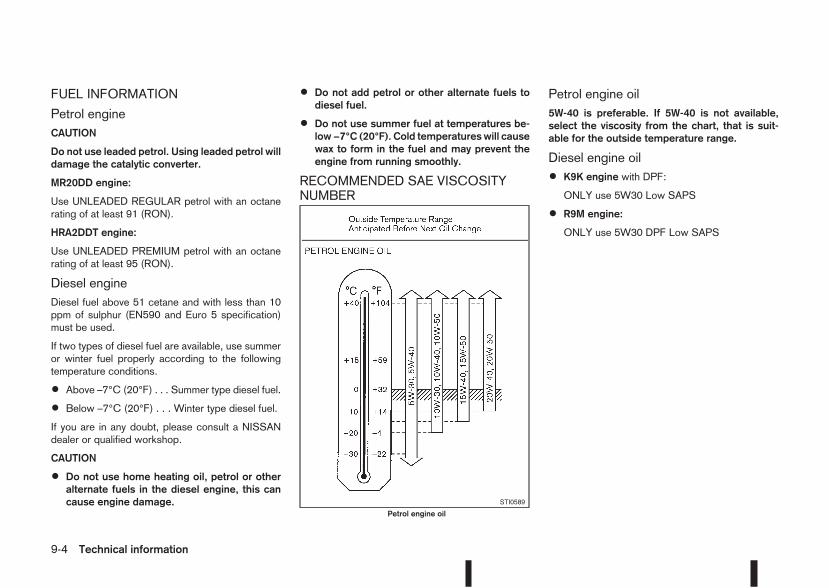
FUEL INFORMATION
Petrol engineCAUTION
Do not use leaded petrol. Using leaded petrol willdamage the catalytic converter.
MR20DD engine:
Use UNLEADED REGULAR petrol with an octanerating of at least 91 (RON).
HRA2DDT engine:
Use UNLEADED PREMIUM petrol with an octanerating of at least 95 (RON).
Diesel engineDiesel fuel above 51 cetane and with less than 10ppm of sulphur (EN590 and Euro 5 specification)must be used.
If two types of diesel fuel are available, use summeror winter fuel properly according to the followingtemperature conditions.
• Above –7°C (20°F) . . . Summer type diesel fuel.
• Below –7°C (20°F) . . . Winter type diesel fuel.
If you are in any doubt, please consult a NISSANdealer or qualified workshop.
CAUTION
• Do not use home heating oil, petrol or otheralternate fuels in the diesel engine, this cancause engine damage.
• Do not add petrol or other alternate fuels todiesel fuel.
• Do not use summer fuel at temperatures be-low −7°C (20°F). Cold temperatures will causewax to form in the fuel and may prevent theengine from running smoothly.
RECOMMENDED SAE VISCOSITYNUMBER
Petrol engine oil5W-40 is preferable. If 5W-40 is not available,select the viscosity from the chart, that is suit-able for the outside temperature range.
Diesel engine oil
• K9K engine with DPF:
ONLY use 5W30 Low SAPS
• R9M engine:
ONLY use 5W30 DPF Low SAPS
STI0589
Petrol engine oil
9-4 Technical information
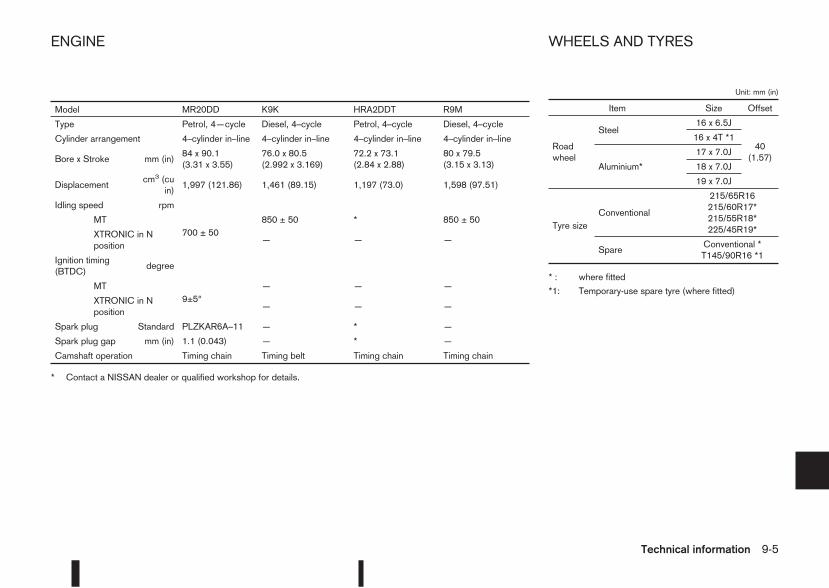
Unit: mm (in)
Item Size Offset
Roadwheel
Steel16 x 6.5J
40(1.57)
16 x 4T *1
Aluminium*
17 x 7.0J
18 x 7.0J
19 x 7.0J
Tyre sizeConventional
215/65R16215/60R17*215/55R18*225/45R19*
SpareConventional *T145/90R16 *1
* : where fitted
*1: Temporary-use spare tyre (where fitted)
Model MR20DD K9K HRA2DDT R9M
Type Petrol, 4—cycle Diesel, 4–cycle Petrol, 4–cycle Diesel, 4–cycle
Cylinder arrangement 4–cylinder in–line 4–cylinder in–line 4–cylinder in–line 4–cylinder in–line
Bore x Stroke mm (in)84 x 90.1(3.31 x 3.55)
76.0 x 80.5(2.992 x 3.169)
72.2 x 73.1(2.84 x 2.88)
80 x 79.5(3.15 x 3.13)
Displacementcm3 (cu
in)1,997 (121.86) 1,461 (89.15) 1,197 (73.0) 1,598 (97.51)
Idling speed rpm
MT700 ± 50
850 ± 50 * 850 ± 50
XTRONIC in Nposition
— — —
Ignition timing(BTDC)
degree
MT9±5°
— — —
XTRONIC in Nposition
— — —
Spark plug Standard PLZKAR6A–11 — * —
Spark plug gap mm (in) 1.1 (0.043) — * —
Camshaft operation Timing chain Timing belt Timing chain Timing chain
* Contact a NISSAN dealer or qualified workshop for details.
ENGINE WHEELS AND TYRES
Technical information 9-5
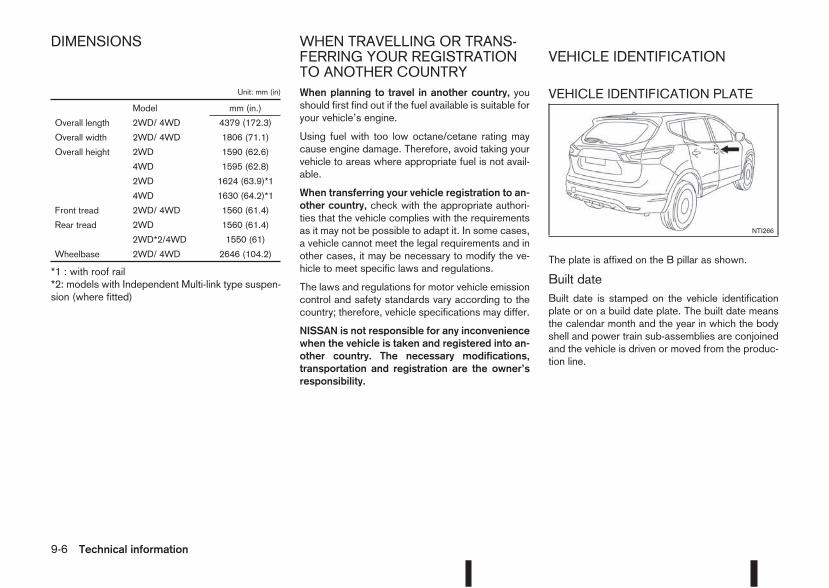
Unit: mm (in)
Model mm (in.)
Overall length 2WD/ 4WD 4379 (172.3)
Overall width 2WD/ 4WD 1806 (71.1)
Overall height 2WD 1590 (62.6)
4WD 1595 (62.8)
2WD 1624 (63.9)*1
4WD 1630 (64.2)*1
Front tread 2WD/ 4WD 1560 (61.4)
Rear tread 2WD 1560 (61.4)
2WD*2/4WD 1550 (61)
Wheelbase 2WD/ 4WD 2646 (104.2)
*1 : with roof rail*2: models with Independent Multi-link type suspen-sion (where fitted)
When planning to travel in another country, youshould first find out if the fuel available is suitable foryour vehicle’s engine.
Using fuel with too low octane/cetane rating maycause engine damage. Therefore, avoid taking yourvehicle to areas where appropriate fuel is not avail-able.
When transferring your vehicle registration to an-other country, check with the appropriate authori-ties that the vehicle complies with the requirementsas it may not be possible to adapt it. In some cases,a vehicle cannot meet the legal requirements and inother cases, it may be necessary to modify the ve-hicle to meet specific laws and regulations.
The laws and regulations for motor vehicle emissioncontrol and safety standards vary according to thecountry; therefore, vehicle specifications may differ.
NISSAN is not responsible for any inconveniencewhen the vehicle is taken and registered into an-other country. The necessary modifications,transportation and registration are the owner’sresponsibility.
VEHICLE IDENTIFICATION PLATE
The plate is affixed on the B pillar as shown.
Built dateBuilt date is stamped on the vehicle identificationplate or on a build date plate. The built date meansthe calendar month and the year in which the bodyshell and power train sub-assemblies are conjoinedand the vehicle is driven or moved from the produc-tion line.
NTI266
DIMENSIONS WHEN TRAVELLING OR TRANS-FERRING YOUR REGISTRATIONTO ANOTHER COUNTRY
VEHICLE IDENTIFICATION
9-6 Technical information

VEHICLE IDENTIFICATION NUMBER(VIN) (chassis number)
The VIN number is located as shown.
ENGINE SERIAL NUMBER
The number is stamped on the engine as shown.
NTI267
NTI265
HRA2DDT engine
NTI099Z
K9K engine
NTI193
R9M engine
NTI097Z
MR20DD engine
Technical information 9-7
TYRE PLACARD
1 Right Hand Drive models
2 Left Hand Drive models
The cold tyre pressure is shown on the tyre placardfixed to the side of the driver’s side centre pillar.
AIR CONDITIONER SPECIFICATIONLABEL (where fitted)Open the bonnet. The label is affixed at the frontsection of the bonnet.
All radio frequency or audio frequency products fit-ted to the NISSAN range during production con-form to the requirements of the R&TTE Directive.
NISSAN ANTI-THEFT SYSTEM(NATS), INTELLIGENT OR REMOTEKEYLESS SYSTEM
Remote keyless entry system(where fitted)Hereby, ALPS ELECTRIC CO.,LTD. declares thatKeyless Transmitter, model TWB1G767 is in com-pliance with the essential requirements and otherrelevant provisions of Directive 1999/5/EC.
CAUTION
• Do not expose to excessive heat such as sun-shine, fire or the like.
• Danger of explosion if battery is incorrectlyreplaced. Replace only with the same orequivalent type.
m
Intelligent Key system (where fitted)
• Intelligent Key (where fitted):
– Manufacturer name:
Continental Automotive GmbH
– Model name:
S180144104
• Alarm (Siren) system (where fitted):
– 116RAI-002868
– 116RI-002869NTI268
APPROVAL NUMBERS
9-8 Technical information
NISSAN Anti-Theft System (NATS)immobilizerHereby, Continental Automotive GmbH declaresthat this ANT ASSY-IMMOBILISER modelS180192102 is in compliance with the essential re-quirements and other relevant provisions of Direc-tive 1999/5/EC.
mTYRE PRESSURE MONITORINGSYSTEM (TPMS) (Transmitter)Hereby, Continental Automotive GmbH, declaresthat this S180052048/S180052050 is in compli-ance with the essential requirements and other rel-evant provisions of Directive 1999/5/EC
NTI269 NTI250
Technical information 9-9
NTI251
9-10 Technical information

NOTE
Technical information 9-11

NOTE
9-12 Technical information

NOTE
Technical information 9-13

NOTE
9-14 Technical information

NOTE
Technical information 9-15

NOTE
9-16 Technical information
10 IndexIndex
A
Active engine brake ............................................................. 5-63Active ride control ............................................................... 5-64Active trace control ............................................................. 5-62Air cleaner filter ................................................................... 8-23Air conditioner– Air conditioner filter .............................................. 4-19, 4-22– Air conditioner specification label ..................................... 9-8– Automatic air conditioner ............................................... 4-20– Heater and air conditioner .............................................. 4-15– Manual air conditioner ................................................... 4-16– Servicing air conditioner ....................................... 4-19, 4-22Air duct removal .................................................................. 8-21Alarm system ...................................................................... 3-12Antenna .............................................................................. 4-23Anti-hijack – unlock mode ...................................................... 3-5Anti-Lock Braking System (ABS) ......................................... 5-59Anti-Theft System (NISSAN) ................................................ 3-13Approval numbers ................................................................. 9-8Armrest ................................................................................. 1-5Around View Monitor ............................................................. 4-4– Around View Monitor settings ........................................ 4-13– Moving object detection (MOD) ..................................... 4-12– Operating tips ............................................................... 4-13Around view monitor operation .............................................. 4-7Audible reminders, warning/indicator lights ............................ 2-4Audio– Audio operation precautions .......................................... 4-23– Audio system ................................................................. 4-23– AUX socket ................................................................... 4-30
– Bluetooth® audio streaming main operation ................... 4-34– FM AM radio with CD player ......................................... 4-24– iPod® player operation .................................................. 4-31– NissanConnect .............................................................. 4-38– Steering-wheel switch for audio control ......................... 4-38– USB Memory operation ................................................. 4-30
B
Battery ....................................................................... 5-66, 8-16– Caution label ................................................................. 8-16– Integrated keyfob battery replacement ........................... 8-18– Intelligent Key battery discharge .................................... 5-14– Intelligent Key battery replacement ................................. 8-18– Vehicle battery ............................................................... 8-16Before starting the engine ..................................................... 5-2Blind Spot Warning (BSW)– BSW driving situations .................................................. 5-32– BSW system operation .................................................. 5-30Blind Spot Warning (BSW) system ..................................... 5-30Bluetooth® .......................................................................... 4-39– Bluetooth® mobile phone feature .................................. 4-39– Bluetooth® operation .................................................... 4-32– Bluetooth® settings ....................................................... 4-32Bonnet release .................................................................... 3-14Boot .................................................................................... 2-47Brake .................................................................................. 8-13– Brake booster ............................................................... 8-14– Brake fluid ..................................................................... 8-14– Brake precautions ......................................................... 5-58– Brake system ................................................................ 5-58
– Checking brake pedal ................................................... 8-13– Checking parking brake ................................................. 8-13– Parking brake ................................................................ 3-16– Trailer brakes ................................................................ 5-55
C
Cable slots .......................................................................... 2-43Capacities and recommended fuel/lubricants ......................... 9-2– Fuel information ............................................................... 9-4Car phone or CB radio ........................................................ 4-45Care when driving ............................................................... 5-10Cargo compartment– Cargo floor .................................................................... 2-47CENTRE mark on rear centre seat ...................................... 1-12Changing– Changing engine coolant ................................................. 8-6– Changing engine oil ......................................................... 8-9– Changing engine oil filter ............................................... 8-10– Changing tyres and wheels ........................................... 8-35Chassis control ................................................................... 5-62Checking– Checking brake pedal ................................................... 8-13– Checking engine coolant level ......................................... 8-6– Checking engine oil level ................................................. 8-8– Checking parking brake ................................................. 8-13Child restraint anchorage .................................................... 1-22Child restraint and ISOFIX information ................................. 1-16Child restraint installation using 3-point type seat belt .......... 1-25Child restraint installation using ISOFIX ............................... 1-23Child restraint systems (CRS)– ISOFIX .......................................................................... 1-17– Recommended .............................................................. 1-17– Suitable ......................................................................... 1-17Child restraints .................................................................... 1-15
Child safety .................................................................. 1-14, 1-9Cleaning– Alloy wheels .................................................................... 7-3– Chrome parts .................................................................. 7-3– Exterior ............................................................................ 7-2– Glass ....................................................................... 7-3, 7-5– Interior ............................................................................ 7-4– Plastic parts .................................................................... 7-5– Rear-view camera lens .................................................... 7-3– Removing spots ............................................................... 7-2– Underbody ...................................................................... 7-3Clutch fluid .......................................................................... 8-14Coat hooks ......................................................................... 2-44Cold weather driving ........................................................... 5-66Console box ........................................................................ 2-43Continuously variable transmission– Continuously variable transmission fluid ......................... 8-13– Driving with continuously variable transmission ............. 5-18Coolant– Changing engine coolant ................................................. 8-6– Checking engine coolant level ......................................... 8-6– Engine coolant ............................................................... 5-66– Engine coolant temperature gauge ................................... 2-3– Engine cooling system ..................................................... 8-6Corrosion protection .................................................... 5-67, 7-5– Environmental factors ...................................................... 7-5Cruise control ..................................................................... 5-36Cruise control system operations ......................................... 5-37CVT– Driving with XTRONIC transmission .............................. 5-18
D
Defogger switch– Outside mirror defogger ................................................ 2-35– Rear window defogger .................................................. 2-35
10-2 Index
Difference between predictive and actual distances ............... 4-9Dimensions ........................................................................... 9-6Door locks ............................................................................ 3-8– Back door ..................................................................... 3-11– Child safety rear door locks ........................................... 3-11– Locking/unlocking with the key — vehicle dead battery .... 3-9– Power door lock switch ................................................. 3-10– Remote keyless entry system ........................................... 3-4– Super Lock system .......................................................... 3-8– When leaving the vehicle ............................................... 3-10Drive belts ........................................................................... 8-20Driving– Care when driving ......................................................... 5-10– Cold weather driving ..................................................... 5-66– Driving four-wheel drive (4WD) safely ............................ 5-28– Driving on wet road ....................................................... 5-10– Driving the vehicle ......................................................... 5-17– Driving under winter conditions ...................................... 5-10– Driving with manual transmission ................................... 5-17– On-pavement and off-road driving precautions ................. 5-9– Precautions when starting and driving .............................. 5-3– Stop/Start System ......................................................... 5-22
E
ECO mode system .............................................................. 5-65Electric power steering system ............................................ 5-57Electronic Stability Programme (ESP) system ...................... 5-60– ESP OFF switch ........................................................... 5-61Emergency tyre puncture repair kit ............................... 6-8, 8-36Emergency/mechanical key ................................................... 3-3Engine– Before starting the engine ................................................ 5-2– Changing engine coolant ................................................. 8-6– Changing engine oil ......................................................... 8-9– Changing engine oil filter ............................................... 8-10
– Checking engine coolant level ......................................... 8-6– Checking engine oil level ................................................. 8-8– Data ................................................................................ 9-5– Engine cold start period ................................................. 5-10– Engine compartment .............................................. 0-11, 8-5– Engine coolant ............................................................... 5-66– Engine coolant temperature gauge ................................... 2-3– Engine cooling system ..................................................... 8-6– Engine oil ........................................................................ 8-8– Engine overheat ............................................................. 6-13– Engine serial number ....................................................... 9-7– Fuel filter (Diesel engine models) ................................... 8-13– Starting engine .............................................................. 5-15Exhaust gas (Carbon Monoxide) ............................................ 5-3Exterior lights ...................................................................... 8-29
F
Filter– Air cleaner filter ............................................................. 8-23– Air conditioner filter .............................................. 4-19, 4-22– Fuel filter (Diesel engine models) ................................... 8-13Floor mats ............................................................................. 7-4Fluid– Brake and clutch fluid .................................................... 8-14– Continuously variable transmission fluid ......................... 8-13– Window washer/headlight cleaner fluid .......................... 8-15Fog light– Front fog light ................................................................ 2-38– Rear fog light ................................................................. 2-39Forward emergency braking system .................................... 5-40Four-wheel drive (4WD) ...................................................... 5-26– Driving four-wheel drive (4WD) safely ............................ 5-28– Four-wheel drive (4WD) model (Tyres) .......................... 8-35– Four-wheel drive mode indicator light ............................. 5-28
Index 10-3
Fuel– Bleeding the fuel system ................................................ 8-13– Capacities and recommended fuel/lubricants ................... 9-2– Draining water (Fuel filter) .............................................. 8-13– Fuel filter (Diesel engine models) ................................... 8-13– Fuel gauge ...................................................................... 2-2– Fuel information ............................................................... 9-4Fuel filler lid– Cap ............................................................................... 3-15– Opener lever ................................................................. 3-15Fuses .................................................................................. 8-25– Engine compartment ...................................................... 8-26– Passenger compartment ................................................ 8-25
G
Gauges– Engine coolant temperature gauge ................................... 2-3– Fuel gauge ...................................................................... 2-2– Meters and gauges .......................................................... 2-2Glass roof ........................................................................... 2-49– Sunshade operation ...................................................... 2-50Glove box ............................................................................ 2-42Guide lines ............................................................................ 4-7
H
Hazard warning flasher switch ............................................... 6-2Head restraint– Adjustment ...................................................................... 1-6Headlight– Headlight aiming control switch ..................................... 2-39– Headlight and turn signal switch .................................... 2-36– Headlight cleaner .......................................................... 2-40– Headlight switch ............................................................ 2-36
– Headlights (bulb replacement) ....................................... 8-28– Replacement (bulb) ....................................................... 8-28– Turn signal switch .......................................................... 2-38Heated seats ....................................................................... 2-41Heater and air conditioner ................................................... 4-15Hill Start Assist (HSA) system ............................................. 5-64Horn ................................................................................... 2-41How to adjust the screen view ............................................. 4-13
I
Ignition– Ignition switch ............................................................... 5-11Ignition switch ..................................................................... 5-12Ignition switch positions ...................................................... 5-13Immobilizer– NISSAN Anti-Theft System (NATS) ............................... 3-12Indicator lights ....................................................................... 2-4Injured persons ................................................................... 1-10Inside rear-view mirror ......................................................... 3-18Instrument and control layout .......................................... 0-8, 0-9Integrated keyfob (remote control system) ............................. 3-4– Battery replacement ...................................................... 8-18– Ignition switch ............................................................... 5-11– Keyfob operation failure ................................................... 3-5– Locking the doors ............................................................ 3-5– Setting the unlock mode .................................................. 3-5– Super Lock system .......................................................... 3-5– Unlocking the doors ......................................................... 3-5Intelligent Key operating range ............................................... 3-6Intelligent Key system ................................................... 3-6, 5-12– Anti-hijack mode .............................................................. 3-7– Battery replacement ...................................................... 8-18– Intelligent Key battery discharge .................................... 5-14– Locking/unlocking ........................................................... 3-7
10-4 Index
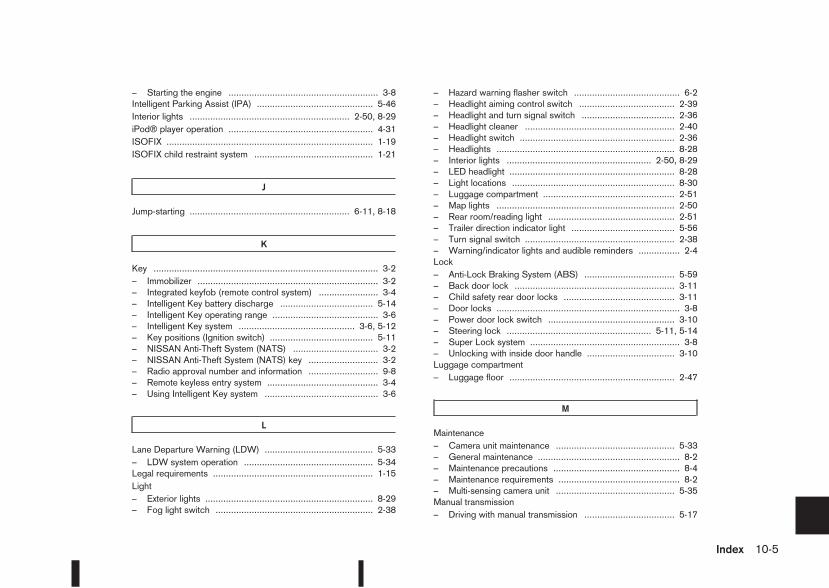
– Starting the engine .......................................................... 3-8Intelligent Parking Assist (IPA) ............................................. 5-46Interior lights .............................................................. 2-50, 8-29iPod® player operation ........................................................ 4-31ISOFIX ................................................................................ 1-19ISOFIX child restraint system .............................................. 1-21
J
Jump-starting .............................................................. 6-11, 8-18
K
Key ....................................................................................... 3-2– Immobilizer ...................................................................... 3-2– Integrated keyfob (remote control system) ....................... 3-4– Intelligent Key battery discharge .................................... 5-14– Intelligent Key operating range ......................................... 3-6– Intelligent Key system ............................................. 3-6, 5-12– Key positions (Ignition switch) ........................................ 5-11– NISSAN Anti-Theft System (NATS) ................................. 3-2– NISSAN Anti-Theft System (NATS) key ........................... 3-2– Radio approval number and information ........................... 9-8– Remote keyless entry system ........................................... 3-4– Using Intelligent Key system ............................................ 3-6
L
Lane Departure Warning (LDW) .......................................... 5-33– LDW system operation .................................................. 5-34Legal requirements .............................................................. 1-15Light– Exterior lights ................................................................. 8-29– Fog light switch ............................................................. 2-38
– Hazard warning flasher switch ......................................... 6-2– Headlight aiming control switch ..................................... 2-39– Headlight and turn signal switch .................................... 2-36– Headlight cleaner .......................................................... 2-40– Headlight switch ............................................................ 2-36– Headlights ..................................................................... 8-28– Interior lights ........................................................ 2-50, 8-29– LED headlight ................................................................ 8-28– Light locations ............................................................... 8-30– Luggage compartment ................................................... 2-51– Map lights ..................................................................... 2-50– Rear room/reading light ................................................. 2-51– Trailer direction indicator light ........................................ 5-56– Turn signal switch .......................................................... 2-38– Warning/indicator lights and audible reminders ................ 2-4Lock– Anti-Lock Braking System (ABS) ................................... 5-59– Back door lock .............................................................. 3-11– Child safety rear door locks ........................................... 3-11– Door locks ....................................................................... 3-8– Power door lock switch ................................................. 3-10– Steering lock ........................................................ 5-11, 5-14– Super Lock system .......................................................... 3-8– Unlocking with inside door handle .................................. 3-10Luggage compartment– Luggage floor ................................................................ 2-47
M
Maintenance– Camera unit maintenance .............................................. 5-33– General maintenance ....................................................... 8-2– Maintenance precautions ................................................. 8-4– Maintenance requirements ............................................... 8-2– Multi-sensing camera unit .............................................. 5-35Manual transmission– Driving with manual transmission ................................... 5-17
Index 10-5

Map lights ........................................................................... 2-50Maximum load limits (for Australia) ....................................... 5-55Mechanical/emergency key ................................................... 3-3Meter and gauges– Engine coolant temperature gauge ................................... 2-3– Fuel gauge ...................................................................... 2-2– Speedometer .................................................................. 2-2– Tachometer ..................................................................... 2-2Meters and gauges ............................................................... 2-2Mirror .................................................................................. 3-18– Automatic anti-dazzling inside mirror ....................... 3-19, 7-5– Inside rear-view mirror ................................................... 3-18– Outside rear-view mirrors .............................................. 3-19– Vanity mirror .................................................................. 3-20Mobile phone integration for FM AM radio with CD player ... 4-39Monitor display– Monitor display’s maintenance ......................................... 7-4– Rear-view monitor ............................................................ 4-2Moving object detection (MOD) ........................................... 4-12
N
NISSAN Anti-Theft System (NATS) .............................. 3-2, 5-12– NATS key ........................................................................ 3-2– NATS security indicator light .......................................... 3-13– Radio approval number and information ........................... 9-8
O
Odometer/twin trip odometer ................................................ 2-2Oil– Changing engine oil ......................................................... 8-9– Changing engine oil filter ............................................... 8-10– Checking engine oil level ................................................. 8-8– Engine oil ........................................................................ 8-8
– Recommended lubricants ................................................ 9-2– Recommended SAE viscosity number .............................. 9-4On-pavement and off-road driving precautions ....................... 5-9Overheat– Engine overheat ............................................................. 6-13
P
Parcel shelf– Installation ..................................................................... 2-45– Removal ........................................................................ 2-45Parking ............................................................................... 5-43– Ultrasonic parking sensors ............................................. 5-45Parking brake switch ........................................................... 3-16Phone– Bluetooth® .................................................................... 4-39– Mobile phone integration for FM AM radio with CD
player ............................................................................ 4-39Power– Electric power steering system ...................................... 5-57– Power door lock switch ................................................. 3-10– Power outlet .................................................................. 2-42Pre-tensioner seat belt system ............................................. 1-13Precautions– Audio operation precautions .......................................... 4-23– Brake precautions ......................................................... 5-58– Cruise control precautions ............................................. 5-36– Maintenance precautions ................................................. 8-4– On-pavement and off-road driving precautions ................. 5-9– Operating precautions (trailer) ....................................... 5-54– Precautions on push-button ignition switch operation ..... 5-12– Precautions on Supplemental Restraint System ............. 1-29– Safety precautions ........................................................... 4-2– Towing precautions ....................................................... 6-14– When starting and driving ................................................ 5-3Precautions on child restraints ............................................. 1-15
10-6 Index
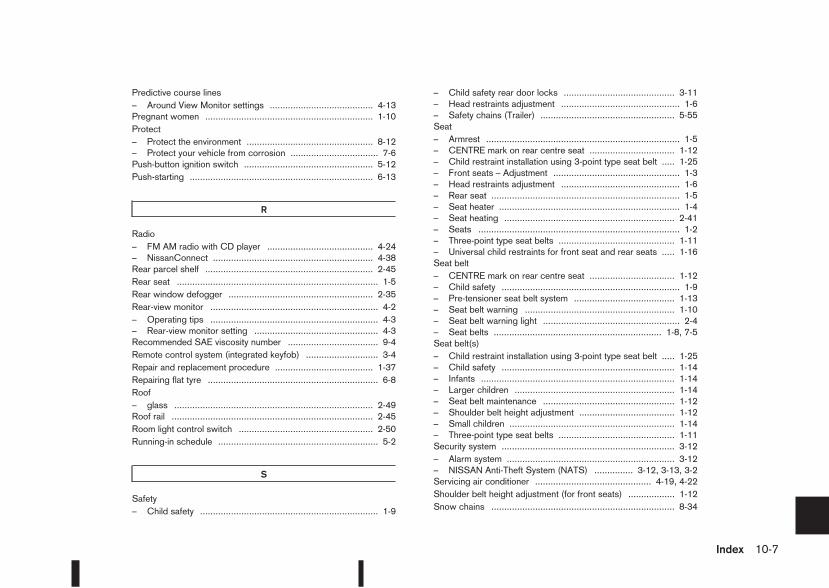
Predictive course lines– Around View Monitor settings ........................................ 4-13Pregnant women ................................................................. 1-10Protect– Protect the environment ................................................. 8-12– Protect your vehicle from corrosion .................................. 7-6Push-button ignition switch .................................................. 5-12Push-starting ....................................................................... 6-13
R
Radio– FM AM radio with CD player ......................................... 4-24– NissanConnect .............................................................. 4-38Rear parcel shelf ................................................................. 2-45Rear seat .............................................................................. 1-5Rear window defogger ........................................................ 2-35Rear-view monitor ................................................................. 4-2– Operating tips ................................................................. 4-3– Rear-view monitor setting ................................................ 4-3Recommended SAE viscosity number ................................... 9-4Remote control system (integrated keyfob) ............................ 3-4Repair and replacement procedure ...................................... 1-37Repairing flat tyre .................................................................. 6-8Roof– glass ............................................................................. 2-49Roof rail .............................................................................. 2-45Room light control switch .................................................... 2-50Running-in schedule .............................................................. 5-2
S
Safety– Child safety ..................................................................... 1-9
– Child safety rear door locks ........................................... 3-11– Head restraints adjustment .............................................. 1-6– Safety chains (Trailer) .................................................... 5-55Seat– Armrest ........................................................................... 1-5– CENTRE mark on rear centre seat ................................. 1-12– Child restraint installation using 3-point type seat belt ..... 1-25– Front seats – Adjustment ................................................. 1-3– Head restraints adjustment .............................................. 1-6– Rear seat ......................................................................... 1-5– Seat heater ...................................................................... 1-4– Seat heating .................................................................. 2-41– Seats .............................................................................. 1-2– Three-point type seat belts ............................................. 1-11– Universal child restraints for front seat and rear seats ..... 1-16Seat belt– CENTRE mark on rear centre seat ................................. 1-12– Child safety ..................................................................... 1-9– Pre-tensioner seat belt system ....................................... 1-13– Seat belt warning .......................................................... 1-10– Seat belt warning light ..................................................... 2-4– Seat belts ................................................................. 1-8, 7-5Seat belt(s)– Child restraint installation using 3-point type seat belt ..... 1-25– Child safety ................................................................... 1-14– Infants ........................................................................... 1-14– Larger children .............................................................. 1-14– Seat belt maintenance ................................................... 1-12– Shoulder belt height adjustment ..................................... 1-12– Small children ................................................................ 1-14– Three-point type seat belts ............................................. 1-11Security system ................................................................... 3-12– Alarm system ................................................................. 3-12– NISSAN Anti-Theft System (NATS) ............... 3-12, 3-13, 3-2Servicing air conditioner ............................................. 4-19, 4-22Shoulder belt height adjustment (for front seats) .................. 1-12Snow chains ....................................................................... 8-34
Index 10-7
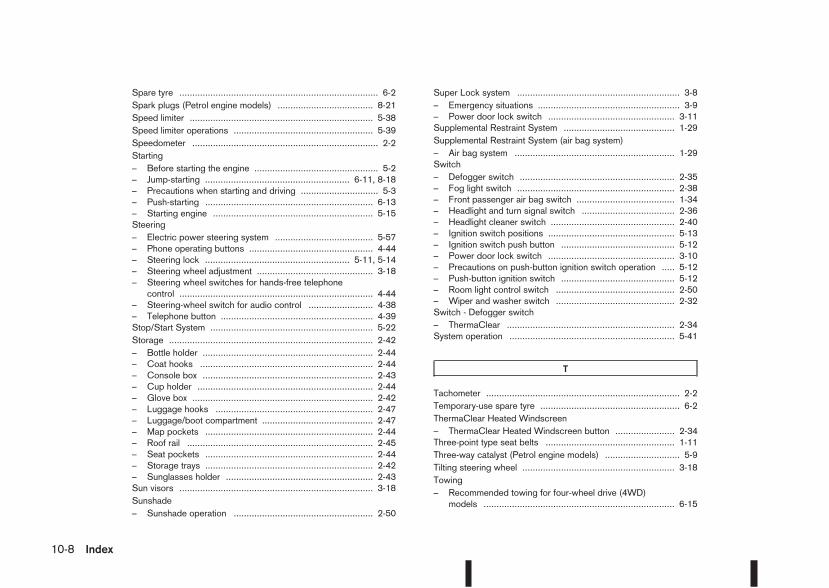
Spare tyre ............................................................................. 6-2Spark plugs (Petrol engine models) ..................................... 8-21Speed limiter ....................................................................... 5-38Speed limiter operations ...................................................... 5-39Speedometer ........................................................................ 2-2Starting– Before starting the engine ................................................ 5-2– Jump-starting ........................................................ 6-11, 8-18– Precautions when starting and driving .............................. 5-3– Push-starting ................................................................. 6-13– Starting engine .............................................................. 5-15Steering– Electric power steering system ...................................... 5-57– Phone operating buttons ................................................ 4-44– Steering lock ........................................................ 5-11, 5-14– Steering wheel adjustment ............................................. 3-18– Steering wheel switches for hands-free telephone
control ........................................................................... 4-44– Steering-wheel switch for audio control ......................... 4-38– Telephone button ........................................................... 4-39Stop/Start System ............................................................... 5-22Storage ............................................................................... 2-42– Bottle holder .................................................................. 2-44– Coat hooks ................................................................... 2-44– Console box .................................................................. 2-43– Cup holder .................................................................... 2-44– Glove box ...................................................................... 2-42– Luggage hooks ............................................................. 2-47– Luggage/boot compartment ........................................... 2-47– Map pockets ................................................................. 2-44– Roof rail ........................................................................ 2-45– Seat pockets ................................................................. 2-44– Storage trays ................................................................. 2-42– Sunglasses holder ......................................................... 2-43Sun visors ........................................................................... 3-18Sunshade– Sunshade operation ...................................................... 2-50
Super Lock system ............................................................... 3-8– Emergency situations ....................................................... 3-9– Power door lock switch ................................................. 3-11Supplemental Restraint System ........................................... 1-29Supplemental Restraint System (air bag system)– Air bag system .............................................................. 1-29Switch– Defogger switch ............................................................ 2-35– Fog light switch ............................................................. 2-38– Front passenger air bag switch ...................................... 1-34– Headlight and turn signal switch .................................... 2-36– Headlight cleaner switch ................................................ 2-40– Ignition switch positions ................................................. 5-13– Ignition switch push button ............................................ 5-12– Power door lock switch ................................................. 3-10– Precautions on push-button ignition switch operation ..... 5-12– Push-button ignition switch ............................................ 5-12– Room light control switch .............................................. 2-50– Wiper and washer switch .............................................. 2-32Switch - Defogger switch– ThermaClear ................................................................. 2-34System operation ................................................................ 5-41
T
Tachometer ........................................................................... 2-2Temporary-use spare tyre ...................................................... 6-2ThermaClear Heated Windscreen– ThermaClear Heated Windscreen button ....................... 2-34Three-point type seat belts .................................................. 1-11Three-way catalyst (Petrol engine models) ............................. 5-9Tilting steering wheel ........................................................... 3-18Towing– Recommended towing for four-wheel drive (4WD)
models .......................................................................... 6-15
10-8 Index
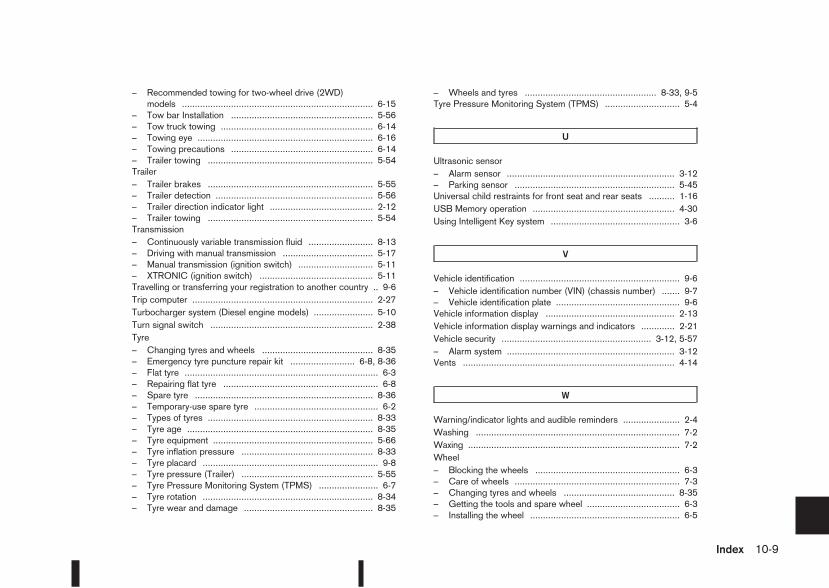
– Recommended towing for two-wheel drive (2WD)models .......................................................................... 6-15
– Tow bar Installation ....................................................... 5-56– Tow truck towing ........................................................... 6-14– Towing eye .................................................................... 6-16– Towing precautions ....................................................... 6-14– Trailer towing ................................................................ 5-54Trailer– Trailer brakes ................................................................ 5-55– Trailer detection ............................................................. 5-56– Trailer direction indicator light ........................................ 2-12– Trailer towing ................................................................ 5-54Transmission– Continuously variable transmission fluid ......................... 8-13– Driving with manual transmission ................................... 5-17– Manual transmission (ignition switch) ............................. 5-11– XTRONIC (ignition switch) ............................................ 5-11Travelling or transferring your registration to another country .. 9-6Trip computer ...................................................................... 2-27Turbocharger system (Diesel engine models) ....................... 5-10Turn signal switch ............................................................... 2-38Tyre– Changing tyres and wheels ........................................... 8-35– Emergency tyre puncture repair kit ......................... 6-8, 8-36– Flat tyre ........................................................................... 6-3– Repairing flat tyre ............................................................ 6-8– Spare tyre ..................................................................... 8-36– Temporary-use spare tyre ................................................ 6-2– Types of tyres ................................................................ 8-33– Tyre age ........................................................................ 8-35– Tyre equipment .............................................................. 5-66– Tyre inflation pressure ................................................... 8-33– Tyre placard .................................................................... 9-8– Tyre pressure (Trailer) ................................................... 5-55– Tyre Pressure Monitoring System (TPMS) ....................... 6-7– Tyre rotation .................................................................. 8-34– Tyre wear and damage .................................................. 8-35
– Wheels and tyres ................................................... 8-33, 9-5Tyre Pressure Monitoring System (TPMS) ............................. 5-4
U
Ultrasonic sensor– Alarm sensor ................................................................. 3-12– Parking sensor .............................................................. 5-45Universal child restraints for front seat and rear seats .......... 1-16USB Memory operation ....................................................... 4-30Using Intelligent Key system .................................................. 3-6
V
Vehicle identification .............................................................. 9-6– Vehicle identification number (VIN) (chassis number) ....... 9-7– Vehicle identification plate ................................................ 9-6Vehicle information display .................................................. 2-13Vehicle information display warnings and indicators ............. 2-21Vehicle security .......................................................... 3-12, 5-57– Alarm system ................................................................. 3-12Vents .................................................................................. 4-14
W
Warning/indicator lights and audible reminders ...................... 2-4Washing ............................................................................... 7-2Waxing .................................................................................. 7-2Wheel– Blocking the wheels ........................................................ 6-3– Care of wheels ................................................................ 7-3– Changing tyres and wheels ........................................... 8-35– Getting the tools and spare wheel .................................... 6-3– Installing the wheel .......................................................... 6-5
Index 10-9
– Removing the wheel ........................................................ 6-4– Removing the wheel cover ............................................... 6-4– Stowing the wheel and tools ............................................ 6-6– Wheel balance .............................................................. 8-36– Wheel lock bolts ....................................................... 6-4, 6-6– Wheel lock key code ....................................................... 6-6– Wheels and tyres ................................................... 8-33, 9-5Wheel lock bolts ................................................................... 6-6Windows ............................................................................. 2-48– Auto-reverse function ..................................................... 2-48– Automatic function ......................................................... 2-48– Locking passengers’ windows ....................................... 2-48– Power windows ............................................................. 2-48– Reinitialisation procedure after battery reconnection ....... 2-49– Window reinitialisation procedure after battery
reconnection ................................................................. 2-49Winter (Special winter equipment) ....................................... 5-67Wiper– Back door window wiper replacement ........................... 8-24– Front window wiper replacement ................................... 8-24– Rain sensor ................................................................... 2-33– Rear window wiper and washer switch .......................... 2-33– Washer nozzle ............................................................... 8-25– Window washer/headlight cleaner fluid .......................... 8-15– Windscreen wiper and washer switch ............................ 2-32– Wiper blades replacement ............................................. 8-24
X
XTRONIC transmission– Continuously variable transmission fluid ......................... 8-13– Driving with XTRONIC transmission .............................. 5-18
10-10 Index

FUEL INFORMATION
Petrol engineCAUTION
Do not use leaded petrol. Using leaded petrol willdamage the catalytic converter.
MR20DD engine:
Use UNLEADED REGULAR petrol with an octanerating of at least 91 (RON).
HRA2DDT engine:
Use UNLEADED PREMIUM petrol with an octanerating of at least 95 (RON).
For further details, see “Fuel information” in the“9. Technical information” section.
Diesel engineDiesel fuel above 51 cetane and with less than 10ppm of sulphur (EN590 and Euro 5 specification)must be used.
For further details, see “Fuel information” in the“9. Technical information” section.
CAUTION
• Do not use home heating oil, petrol or otheralternate fuels in the diesel engine, this cancause engine damage.
• Do not add petrol or other alternate fuels todiesel fuel.
• Do not use summer fuel at temperatures be-low −7°C (20°F). Cold temperatures will causewax to form in the fuel and may prevent theengine from running smoothly.
RECOMMENDED ENGINE OIL*
HRA2DDT engine
• Genuine NISSAN engine oil 5W40
• ACEA A3/B4
MR20DD engine
• Genuine NISSAN engine oil 5W40
• ACEA A3/B4
K9K engine
• Genuine NISSAN engine oil 5W30 DPF
• ACEA C4, SAE 5W30 low SAPS
R9M engine
• Genuine NISSAN engine oil 5W30 DPF
• ACEA C4, SAE 5W30 low SAPS
* For further details, see “Capacities and recom-mended fuel/lubricants” in the “9. Technicalinformation” section.
COLD TYRE PRESSURESee the tyre placard affixed to the driver’s sidecentre pillar.
ENVIRONMENTAL CONCERNBLUE CITIZENSHIP
Today, the efforts made by NISSAN to fulfil ourresponsibilities to protect and sustain the environ-ment are far-reaching. Within NISSAN, we promotethe highest levels of practice in every region and inevery area of operations.
COMPLIANCE AT EVERY STEPNISSAN focuses on ensuring that end of life vehiclecomponents are reused, recycled or recovered, andguarantees compliance with EU legislation (the Endof Life Vehicle Directive).
WE BUILD OUR VEHICLES WITHRECYCLING IN MINDReducing landfill waste, emissions, conserving natu-ral resources, and enhancing recycling activities areemphasised daily in our manufacturing, sales andservice operations and in the disposal of end of lifevehicles (ELV).
Design phaseTo reduce environmental impact we have developedyour NISSAN vehicle to be 95% recoverable. Wemark the components to facilitate dismantling, recy-cling and to reduce hazardous substances. Wecarefully verify and control substances of concern.We have already reduced to a minimum the cad-mium, mercury and lead in your NISSAN vehicle.NISSAN includes recycled material in your vehicleand looks for opportunities to increase the percent-age of recycled materials used.
PETROL STATION INFORMATION ENVIRONMENT (End of LifeVehicles)

Manufacturing phaseNISSAN plants based in the UK and Spain alreadyachieve a recycling rate of over 90% and are look-ing for further improvements. The UK plant installed10 wind turbines to cut carbon dioxide emissions atpower plants by more than 3,000 tonnes per year.NMISA (Spain) uses a solar panel water heatingsystem to save energy. This will generate 33% ofthe energy consumed in the baths during the paint-ing of your vehicle.
Production and distribution phaseUsing resources efficiently to reduce the amount ofwaste generated during the production and distribu-tion stage. NISSAN promotes activities based onReducing, Reusing, and Recycling materials when-ever possible. NISSAN’s goal is to achieve a 100%recycling rate for operations in Japan and globally.
Use and service phaseNISSAN dealers are our window to you, our cus-tomer. In order to meet your expectations they pro-vide not only high quality services but are also envi-ronmentally responsible. NISSAN promotes activi-ties to recycle the waste generated as a result ofservice centre activities.
Disposal phaseRecycle your end of life vehicle or its components.When your NISSAN reaches the end of its life, andis no longer suitable for daily use, it still has value.You can help prevent waste affecting the environ-ment by bringing your NISSAN to be recycled at our
collection networks in your area. Our collection net-works guarantee no cost for the treatment of yourELV. For further information on how and where todispose of your ELV refer to your local NISSANdealer or consult: www.nissan-europe.com or con-sult: www.nissan-global.com.
PROTECT THE ENVIRONMENTWHEN DRIVINGYour driving behaviour has significant impact on fueleconomy and the environment. Follow the tips be-low for better fuel-efficiency, better driving habits,and to be environmentally friendly by reducing emis-sions:
Fuel efficient drivingAnticipating traffic conditions and acting accordinglyreduces fuel consumption, helping to protect of ournatural environment. Take your foot off the accelera-tor while approaching traffic lights and avoid lastminute braking when the light turns red.Avoid speeding, harsh acceleration, and strongbraking. The gain in time does not offset pollution ofthe environment. Try to maintain speed when drivinguphill to reduce fuel consumption and pollution.Maintain speed or allow the vehicle to go slowerwhere traffic allows.
Close windows when drivingDriving with a window open at 100 km/h (62 MPH)increases fuel consumption by up to 4%. Drivingwith the windows closed allows for better fueleconomy.
Use the roof rack only when necessaryOnly install the roof luggage system when you reallyneed it, otherwise put it inside the vehicle or store itin your garage. Do not drive around with an emptyroof rack, kayak holder, or ski rack, this will reduceyour aerodynamic drag significantly.
Optimise the use of air conditioningThe air conditioning system has a positive effect ondriving and vehicle safety through comfort coolingand dehumidifying, drivers are more alert and havebetter visibility when window demisting/defoggingbecomes necessary. However, use of the air condi-tioning system will increase fuel consumption sub-stantially in an urban environment. Optimise the useof air conditioning by using the vents as much aspossible.
Use the parking brake on slopesUse the parking brake when holding your vehicle ona slope. Avoid using the clutch (manual transmis-sion) or the accelerator (continuously variable trans-mission) to hold your vehicle as this leads to unnec-essary fuel consumption and wear.
Maintain a safe distanceAnticipate traffic conditions for a smoother drive andto assure comfort and safety during your trip. Driveand maintain a safe distance from other vehicleswhile in traffic. This will help reduce fuel consump-tion as you will not be constantly tapping yourbrakes.
Check your tyre pressureLow tyre pressure increases fuel consumption aswell as the use of non-recommended tyres. Correcttyre pressure will maximise the grip of your vehicleand optimise fuel consumption.
Have your car serviced regularlyRegular service allows you to run your vehicle inoptimal condition and with the best fuel efficiency.Have your vehicle serviced by your NISSAN dealeror a qualified workshop to ensure that it is main-tained to its original standard.
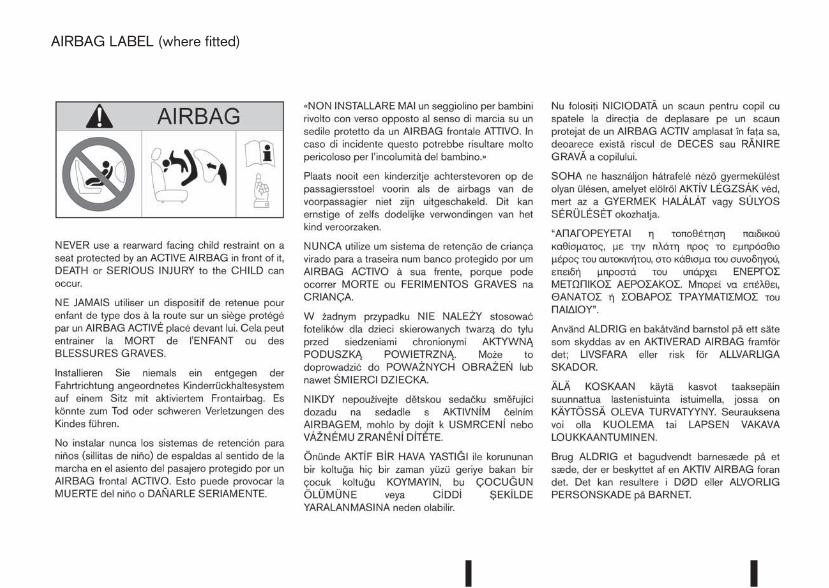
m
AIRBAG LABEL (where fitted)
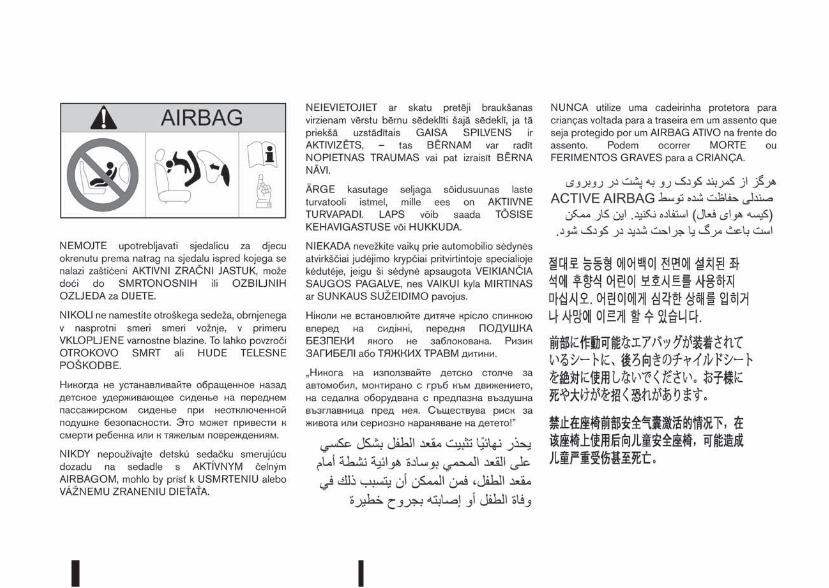
m
• In case of emergency ... 6-2
(Flat tyre, engine will not start, overheating,towing)
• How to start the engine ... 5-15
• How to read the meters and gauges ... 2-2
• Maintenance and do-it-yourself ... 8-2
• Technical information ... 9-2
QUICK REFERENCE

SECURITY INFORMATIONAs owner of this vehicle important codes havebeen supplied to you that may be required byyour NISSAN dealer to duplicate keys or re-pair the radio.
Please fill in the allocated areas or attach stick-er(s) if available. Remove this page and keepit in a safe place, not in the vehicle.
When selling your vehicle, we kindly requestyou to hand over this page to the buyer.
SECURITY INFORMATION
Radio security code(where fitted)
Key number
Wheel lock key code(where fitted)
Remove this page from the manual and keep it in a safe place, not in the vehicle.
When selling your vehicle, we kindly request you to hand over this page to the buyer.

Related Documents