Welcome message from author
This document is posted to help you gain knowledge. Please leave a comment to let me know what you think about it! Share it to your friends and learn new things together.
Transcript
�
�������������
�
�������������������������������������������������
��������������� ����������!���������������"����������
���"������������# !""$�����%���������&&���������
�'��������� !""���'������������&����'����������
���������������������������������������������������(�����
������������"����������������������(�����
)�������*������&���������������������������&����������
!""����+���������+����������������������!""����
����������+���������������''����������������������
������������'�����������������(���������&&��������
��������������� !""��������������'����'�����������
����������+���������������''��,��
�����������������������������������������'���������
������������������&������'��������������'����������
����������������������������������������������
�'��������������������
-����'&���� ��������������������
���������������������������������������������
����������������������.�������/�����0���1������������
���������������(���������'����������������!""��
�
Pizzaform 10-13 3
Premessa IntroductionVorwortAvant-proposPreámbuloВведение
Avvertenze inizialiInitial instructionsEinleitende HinweiseAvertissements préliminairesAdvertencias inicialesНачальные предупреждения
Spiegazione dei simboliExplanation of symbolsErklärung der SymboleExplication des symbolesExplicación de los símbolosОбъяснение символов
Analisi dei rischiRisk analysisRisikoanalyseAnalyse des risquesAnálisis de riesgosАнализ рисков
Dati tecnici “Pizzaform 30-35”Technical data (“Pizzaform 30-35”)Technische Daten “Pizzaform 30-35”Donneés techniques “Pizzaform 30-35”Datos técnicos “Pizzaform 30-35”Технические данные “Pizzaform 30-35”
Dati tecnici “Pizzaform 40-45-50”Technical data (“Pizzaform 40-45-50”)Technische Daten “Pizzaform 40-45-50”Donneés techniques “Pizzaform 40-45-50”Datos técnicos “Pizzaform 40-45-50”Технические данные “Pizzaform 40-45-50”
Caratteristiche generaliGeneral speciUcationsAllgemeine EigenschaftenCaractéristiques généralesCaracterísticas generalesОбщие характеристики
6
78
9
1011
1213
1415
16
Predisposizioni per l’installazioneInstallation requirementsVorbereitungen für die InstallationPréparation à l’installationPredisposiciones para la instalaciónПодготовка для монтажных работ
Distanze di sicurezza Safety distancesSicherheitsabständeDistances de sécuritéDistancias de seguridadРасстояния безопасности
Avvertenze per l’installatore Instructions for the installerHinweise für den InstallateurAvertissements pour l’installateurAdvertencias para el instaladorИнструкции для монтажника
Scarico e trasporto / Preparazione e controllo Unloading and transport / Preparations and checksEntladen und Transport / Vorbereitung und KontrolleDéchargement et transport / Préparation et contrôleDescarga y transporte / Preparación y revisiónВыгрузка и транспортировка / Подготовка и контроль
PosizionamentoPositioningAufstellungInstallationColocaciónПозиционирование
Collegamento elettricoElectrical connectionElektroanschlussBranchement électriqueConexión eléctricaЭлектрическое соединение
Attivazione alimentazioneVeriUca del funzionamentoPower supply activationOperation veriUcationAktivierung SpeisungFunktionsprüfung / VorabnahmeActivation de l’alimentationContrôle du fonctionnementActivación de la alimentaciónComprobación del funcionamientoАктивация системы питанияПроверка функционирования
17
18
1920
21
22
23
24
Indice
Index
Inhaltsverzeichnis
Index
Índice
Указатель
4 Pizzaform 10-13
PrecollaudoPre-testVorabnahmePré-contrôleEnsayo previoПредварительное испытание
Descrizione pannello comandiControl panel descriptionBeschreibung der BedienblendeDescription du panneau de commandeDescripción de cuadro de mandosОписание пульта управления
Avvertenze per l’utilizzatoreInstructions for the userHinweise für den NutzerAvertissements pour l’utilisateurAdvertencias para el usuarioИнструкции для пользователя
AccensioneTurning onEinschaltungAllumageEncendidoВключение
Impostazione temperatura piattiSetting the plate temperatureEinstellung der Teller-TemperaturConUguration de la température des platsProgramación de la temperatura de los platosНастройка температуры пластин
Impostazione del tempo di contatto dei piattiSetting the plate contact timeEinstellung der Teller-KontaktzeitConUguration du temps de contact des platsProgramación del tiempo de contacto de los platosНастройка времени контакта пластин
UtilizzoUseGebrauchUtilisationUsoПрименение
25
2627
2829
30
30
31
31
SpegnimentoShutting o�AusschaltenExtinctionApagadoВыключение
Funzione countdownCountdown functionFunktion CountdownCompte à reboursCuenta atrásФункция отсчета
DiagnosticaTrouble shootingDiagnoseDiagnosticDiagnósticoДиагностика
Funzione conta battuteStrike counting functionSummenzähler-FunktionFonction compte impulsionsFunción cuentaimpulsosФункция счетчика
Risoluzione problemiTroubleshootingProblemlösungRésolution des problèmesResolución de problemasРазрешение проблем
Consigli d’usoRecommendations governing useEmpfehlungen zum GebrauchConseils d’utilisationConsejos para el usoРекомендации по применению
Avvertenze per la manutenzioneMaintenance instructionsHinweise zur WartungAvertissements pour l’entretienAdvertencias para el mantenimientoИнструкции при проведении техобслуживания
32
33
34
35
36
37
3839
Indice
Index
Inhaltsverzeichnis
Index
Índice
Указатель
Pizzaform 10-13 5
ManutenzioneMaintenanceWartungEntretienMantenimientoТехобслуживание
Posizionamento comandi principaliPositioning of main controlsPosition der wichtigsten BedienelementePositionnement des principales commandesSituación de los mandos principales Позиционирование основных команд
Schemi elettrici Wiring diagramSchaltplanSchémas électriquesEsquemas eléctricosЭлектрические схемы
Parti di ricambioSpare partsErsatzteilePièces de rechangePiezas de repuestoЗапасные части
Condizioni di garanziaWarranty conditionsGarantiebedingungenConditions de garantieCondiciones de garantíaГарантийные условия
LimitiLimitsGrenzenLimitesLímitesПределы
EsclusioniExclusionsAusschlüsseExclusionsExclusionesИсключения
40
41
42
50
58
59
60
Indice
Index
Inhaltsverzeichnis
Index
Índice
Указатель
6 Pizzaform 10-13
6 Premessa
Il presente manuale si riferisce ai diversi modelli di formatrici a caldo per pizza a controllo elettro-nico della serie PIZZAFORM.
La lingua originale del presente manuale è l’i-taliano. Altre lingue sono traduzioni. Ci complimentiamo con Lei per aver scelto un prodotto progettato e realizzato con tecnolo-gie all’avanguardia.
Per poter utilizzare al meglio questo prodotto, Vi consigliamo di leggere attentamente il contenu-to del presente manuale, onde evitare spiacevoli inconvenienti.Esso contiene importanti indicazioni e avverten-ze riguardanti l’installazione, l’uso e la manuten-zione del prodotto.
L’apparecchiatura da Voi acquistata è stata pro-gettata e realizzata con la massima cura, sottopo-sta a severi test di collaudo nei nostri laboratori, pertanto assicuriamo l’assoluta sicurezza e fun-zionalità della stessa.
L’installazione deve essere e�ettuata secondo le istruzioni da personale professionalmente qua-liUcato, in grado di assumersi la responsabilità dell’intervento e garantire le migliori condizioni di funzionamento e sicurezza.
ASSISTENZA TECNICAIl produttore è in grado di risolvere qualunque problema tecnico riguardante l’impiego e la manutenzione.Nella remota eventualità di un cattivo funzio-namento o riparazione, rivolgersi esclusiva-mente a personale quali#cato o ai nostri centri di assistenza autorizzati.
Avant-propos
Le présent manuel se réfère aux di�érents mo-dèles de mouleuses à chaud pour pizzas avec contrôle électronique de la série PIZZAFORM.
La langue d’origine du présent manuel est l’italien. Les autres langues sont des traduc-tions. Tous nos compliments pour avoir choisi un produit conçu et fabriqué avec des technolo-gies d’avant-garde.
Pour utiliser au mieux ce produit, nous vous conseillons de lire attentivement le contenu de la présente notice qui vous permettra d’éviter de fâcheux inconvénients.La notice contient des indications importantes et des avertissements sur l’installation, l’utilisa-tion et l’entretien du produit.
L’appareil a été conçu et fabriqué avec le plus grand soin et soumis en usine à de rigoureux tests et contrôles pour en garantir le parfait fonctionnement en toute sécurité.
L’installation doit respecter les indications four-nies et être e�ectuée par du personnel qualiUé en mesure d’en assumer la responsabilité et de garantir les meilleures conditions de fonction-nement et de sécurité.
SERVICE APRÈS-VENTELe fabricant est en mesure de résoudre les problèmes techniques concernant l’utilisa-tion et l’entretien.En cas d’éventuel mauvais fonctionnement ou besoin de réparation, s’adresser exclusi-vement à du personnel quali#é ou au Service Après-Vente agréé.
Introduction
The present manual refers to various electronic control PIZZAFORM pizza hot forming machine models.
The present manual was originally written in Italian. All other languages are translations.Congratulations on selecting a product that was designed and constructed with ad-vanced technology.
We recommend that you read through this manual fully before using this equipment.It contains very important information and in-structions regarding installation, use and main-tenance.
The equipment you have purchased was care-fully designed and constructed and has been subjected to strict inspection tests in our labo-ratories, therefore we can guarantee its abso-lute safety and functionality.
Installation must be done according to the in-structions by professionally qualiUed personnel who are able to take on the responsibility for the installation and guarantee the best condi-tions for operation and safety.
TECHNICAL SUPPORTThe manufacturer is able to solve any tech-nical problem concerning use and mainte-nance.In the remote possibility of poor operation or a repair, only use quali#ed personnel or contact our authorised service centres.
Preámbulo
Este manual se reUere a los diversos modelos de formadoras en caliente para pizza con control electrónico de la serie PIZZAFORM.
El idioma original de este manual es el italia-no. Los demás idiomas son traducciones. Nos alegramos de que haya elegido un pro-ducto diseñado y fabricado con tecnologías de vanguardia.
Para poder usar de la mejor forma posible este producto, le recomendamos que lea atenta-mente el contenido de este manual para evitar inconvenientes desagradables.Este contiene importantes indicaciones y adver-tencias relacionadas con la instalación, el uso y el mantenimiento del producto.
El equipamiento que ha comprado ha sido di-señado y fabricado con el máximo cuidado, sometido a serias pruebas de funcionamiento en nuestros laboratorios y, por lo tanto, asegu-ramos su seguridad y funcionalidad absolutas.
La instalación debe efectuarse según las ins-trucciones, por parte de personal cualiUcado profesionalmente, capaz de asumir la responsa-bilidad de la intervención y garantizar las mejo-res condiciones de funcionamiento y seguridad.
ASISTENCIA TÉCNICAEl fabricante es capaz de resolver cualquier problema técnico relacionado con el uso y el mantenimiento.En la remota eventualidad de un mal funcio-namiento o de reparación, póngase en con-tacto con personal cuali#cado o con nuestros centros de asistencia autorizados.
Vorwort
Dieses Handbuch bezieht sich auf verschiedene Modelle der Heiß-Pizzapresse zur Formgebung mit elektronischer Kontrolle der Reihe PIZZAFORM.
Die Originalsprache dieser Anleitung ist italie-nisch. Bei allen anderen Sprachen handelt es sich um Übersetzungen.Wir möchten Sie dazu beglückwünschen, dass Sie ein Produkt gewählt haben, das mit neuesten Technologien entwickelt und hergestellt wurde.
Um dieses Produkt bestmöglich einzusetzen, empfehlen wir Ihnen, den Inhalt des vorliegenden Handbuchs aufmerksam zu lesen, um Unannehm-lichkeiten zu vermeiden.Es enthält wichtige Angaben und Hinweise zu In-stallation, Gebrauch und Wartung des Produkts.
Der von Ihnen gekaufte Maschine wurde mit äußer-ster Sorgfalt entwickelt und gebaut und in unseren Labors strengen Abnahmeprüfun-gen unterzogen. Daher können wir für die absolute Sicherheit und Funktionstüchtigkeit des Ofens garantieren.
Die Installation muss nach den Anweisungen von qualiUziertem Fachpersonal vorgenommen wer-den, die die Verantwortung für den Eingri� über-nehmen können und die die besten Betriebs- und Sicherheitsbedingungen garantieren können.
TECHNISCHER KUNDENDIENSTDer Hersteller kann jedes technische Problem zu Einsatz und Wartung lösen.Sollte es wirklich zu Betriebsstörungen oder einer Reparatur kommen, wenden Sie sich aus-schließliche an quali#ziertes Personal oder an ei-nes unserer autorisierten Kundendienstzentren.
Введение
Настоящее руководство относится к различным моделям формовочных машин для горячего рас-катывания пицц с системой электронного контро-ля серии PIZZAFORM.
Первоначальным языком данного руковод-ства является итальянский. Другие языки представляют собой переводы. Поздравляем Вас с выбором оборудования, разработанного и реализованного посред-ством передовых технологий.
В целях наилучшего использования данного обо-рудования, рекомендуется внимательно ознако-миться с содержанием данного руководства, в целях предупреждения проблем.В нем содержатся важные сведения и инструкции в отношении монтажа, эксплуатации и техобслу-живания оборудования.
Приобретенная Вами машины была разработана и реализована с максимальным вниманием, была подвержена строгим испытаниям в наших лабора-ториях, поэтому мы гарантируем её полную без-опасность и функциональность.
Монтаж должен производиться в соответствии с инструкциями профессиональным квалифициро-ванным персоналом, который может принять на себя ответственность за выполненное вмешатель-ство и гарантировать наилучшие условия функци-онирования и безопасности.
ТЕХОБСЛУЖИВАНИЕИзготовитель может разрешить любую техни-ческую проблему в отношении эксплуатации и техобслуживания печи.В случае несоответствующего функционирова-ния или необходимости ремонта, обращаться только к квалифицированному персоналу или в наши авторизованные сервисные центры.

Pizzaform 10-13 7
7 Avvertenze iniziali
ATTENZIONE!Il mancato rispetto di quanto descritto nel presente libretto, può compromettere la si-curezza.
ed in luogo accessibile, inoltre deve sempre accompagnare il prodotto nell’arco della sua vita.
Prima dell’installazione e dell’utilizzo dell’ap-parecchiatura è indispensabile leggere at-tentamente il presente manuale ed attenersi scrupolosamente alle indicazioni riportate.
e penale, per danni a persone, cose o animali, derivanti dalla mancata osservanza delle nor-me di sicurezza vigenti, dal mancato rispet-to dei contenuti del presente manuale e da eventuali errori di stampa o trascrizione dello stesso.
Dichiara inoltre di riservarsi il diritto di appor-tare al prodotto, tutte le modiUche che riterrà opportune senza obbligo di preavviso.
-dotto, installazione o uso, accertarsi della idoneità del locale che ospiterà lo stesso. Assicurarsi di aver adottato tutte le misure antinfortunistiche necessarie onde evitare il pericolo di incidenti.
Initial instructions
ATTENTION!Failure to comply with what is described in this handbook could jeopardise safety.
accessible location, it must also always ac-company the product during its life.
Before installing and using the equipment, this manual must be read carefully and the in-structions it contains must be followed scru-pulously.
-nal liability for damage to people, property or animals deriving from the failure to observe current safety regulations, failure to respect the contents of this manual and from any printing or transcription errors.
It also declares that it reserves the right to make any changes to the product that it con-siders appropriate without the obligation to provide notice.
-uct, verify the suitability of the room where it will be located. Make sure that all safety meas-ures have been taken in order to avoid any ac-cidents.
Einleitende Hinweise
ACHTUNG!Eine Nichteinhaltung der Angaben in der vorliegenden Anleitung kann die Sicherheit beeinträchtigen.
Das Handbuch muss an einer zugänglichen Stelle sorgfältig aufbewahrt werden, vor allem muss es das Produkt über den gesamten Le-benszyklus begleiten.
Vor der Installation und der Verwendung des Maschines muss das vorliegende Handbuch unbedingt aufmerksam gelesen werden.
Die hier gemachten Angaben müssen genau-estens eingehalten werden.
-che Haftung für Schäden an Personen, Sachen oder Tieren ab, die aus der Nichteinhaltung der geltenden Sicherheitsvorschriften, der Nichte-inhaltung der Anweisungen im vorliegenden Handbuch oder durch etwaige Druck- oder Kopierfehler im Handbuch entstehen.
Er erklärt darüber hinaus, dass er sich das Recht vorbehält, ohne die P�icht zur vorheri-gen Ankündigung alle zweckmäßigen Ände-rungen am Produkt vorzunehmen.
-tallation und jeder Verwendung ist die Taug-lichkeit des Raumes zu prüfen, in dem es sich beUndet. Es ist sicherzustellen, dass alle not-wendigen Unfallschutzmaßnahmen getro�en wurden, um die Gefahr von Unfäl-len auszu-schalten.
Avertissements préliminaires
ATTENTION !Le non-respect des indications reportées sur la notice peut compromettre la sécurité.
-vée dans un lieu accessible et doit toujours accompagner le produit pendant toute sa durée de vie.
Avant d’installer et d’utiliser l’équipement, il faut lire attentivement la présente notice et respecter scrupuleusement les indications reportées.
-vile et pénale, en cas de dommages aux biens, aux personnes ou aux animaux, consécuties du non-respect des normes en vigueur en matière de sécurité, du non-respect des indi-cations reportées sur la notice et/ou d’erreurs d’impression ou de transcription.
Le fabricant se réserve le droit d’apporter, sans préavis, toutes les modiUcations qu’il jugera utiles à ses produits.
utilisation du produit, vériUer la conformité du local d’installation. VériUer d’avoir adopté toutes les mesures nécessaires pour la pré-vention des accidents.
Advertencias iniciales
¡ATENCIÓN!El incumplimiento de lo descrito en este ma-nual puede comprometer la seguridad.
un lugar accesible; además, debe acompañar siempre el producto a lo largo de su vida útil.
Antes de instalar y utilizar el equipo, es in-dispensable leer atentamente este manual y atenerse escrupulosamente a las indicaciones facilitadas.
-vil y penal por daños a personas, animales o cosas derivados de un incumplimiento de las normas de seguridad vigentes, del incumpli-miento de los contenidos de este manual o de posibles errores de impresión o transcripción de estos.
Declara además que se reserva el derecho de aportar todas las modiUcaciones pertinentes al producto sin obligación de previo aviso.
-ducto, instalación o uso, compruebe la ido-neidad del local que lo alojará. Asegúrese de que ha adoptado todas las medidas de pre-vención de accidentes necesarias para evitar el peligro de accidentes.
Начальные предупреждения
ВНИМАНИЕ!Несоблюдение инструкций данного руко-водства может отрицательно сказаться на безопасности.
в доступном месте, кроме того, оно должно сопровождать оборудование в ходе всего срока службы.
Перед монтажом и использованием машины необходимо внимательно ознакомиться с данным руководством и тщательно придер-живаться приведенных указаний.
уголовную ответственность за ущерб, на-несенный лицам, имуществу или животным, обусловленный несоблюдением действу-ющих правил безопасности, содержания данного руководства, а также возможными содержащимися в нем опечатками или пе-резаписью. Кроме того, компания сохраняет за собой право на внесение в оборудование любых изменений, которые считает нужны-ми, без обязательства предварительного предупреждения.
-плуатацией оборудования убедиться в со-ответствии помещения, в котором оно будет установлено. Убедиться в применении всех мер техники безопасности, необходимых для профилактики несчастных случаев.
8 Pizzaform 10-13
8 Avvertenze iniziali
-sere e�ettuata da personale qualiUcato in ot-temperanza delle norme vigenti.
possono raggiungere temperature elevate. Si consiglia di fare attenzione a non toccare le
superUci e non avvicinare materiali che pos-sono essere inUammabili. La presenza di bam-bini, anziani e/o disabili richiede la vigilanza di un adulto consapevole.
utilizzare l’apparecchiatura e rivolgersi al cen-tro di assistenza più vicino.
da personale addestrato e deve essere sorve-gliata durante il funzionamento.
spianatura di palline di pasta per pizza; ogni altro uso è da ritenersi improprio.
apparecchiatura: almeno una volta l’anno è consigliabile sottoporre l’apparecchiatura ad un controllo, che deve essere e�ettuato da personale qualiUcato e autorizzato.
Disattivare l’apparecchiatura in caso di guasto o cattivo funzionamento.
-dotto rivolgersi esclusivamente a personale autorizzato. Per la sostituzione di componenti usare solo ricambi originali.
Avertissements préliminaires
par du personnel qualiUé et en conformité aux normes en vigueur.
atteindre des températures élevées. Il est conseillé de ne pas en toucher les surfaces et de ne pas y approcher des matériaux in�am-mables. La présence d’enfants, de personnes âgées et/ou handicapées nécessite la surveil-lance d’un adulte responsable.
utiliser le four et s’adresser au Service Après-Vente le plus proche.
-sonnel formé et doit être surveillé pendant le fonctionnement.
de pâte à pizza ; toute autre utilisation doit être considérée comme impropre.
-pareil : au moins une fois par an, il est conseil-lé de soumettre l’appareil à un contrôle, qui doit être e�ectué par un personnel qualiUé et agréé.
Désactiver l’appareil en cas de panne ou de mauvais fonctionnement.
-tion sur le produit, s’adresser exclusivement à du personnel agréé. En cas de remplace-ment de pièces, n’utiliser que des pièces de rechange d’origine.
Initial instructions
personnel in compliance with current regula-tions.
high temperatures. Be careful not to touch the surfaces and to not bring material near the equipment that may be in�ammable. The presence of children, elderly or disabled indi-viduals requires supervision of a responsible adult.
equipment and contact your nearest service centre.
who have been trained in its use and must be supervised during operation.
-gh balls to make pizza: all other uses are dee-med inappropriate.
-king e�ectively: we recommend having the equipment checked at least once a year by qualiUed and authorised personnel.
Disconnect the equipment in the instance of a fault or poor operation.
-sonnel. Use only original spare parts when replacing components.
Advertencias iniciales
por personal cualiUcado en cumplimiento de las normas vigentes.
-den alcanzar altas temperaturas. Se reco-mienda prestar atención para no tocar las su-perUcies y no acercar materiales in�amables. La presencia de niños, ancianos y/o discapa-citados requiere la supervisión de un adulto consciente.
horno y póngase en contacto con el centro de asistencia más cercano.
formado para su uso y debe ser vigilado du-rante el funcionamiento.
de masa para pizza; cualquier otro uso se con-siderará indebido.
equipo: como mínimo una vez al año, se reco-mienda someter el equipo a una revisión, que debe ser realizada por personal cualiUcado y autorizado.
Desactive el equipo en caso de avería o mal funcionamiento.
en el producto, póngase en contacto exclusi-vamente con personal autorizado. Para la sus-titución de componentes, use solo repuestos originales.
Начальные предупреждения
квалифицированным персоналом в соответ-ствии с действующими нормативами.
-гать высоких температур. Рекомендуется со-блюдать осторожность и не касаться поверх-ностей, а также не приближать материалы, которые могут быть возгораемыми. Присут-ствие детей, пожилых людей и/или инвали-дов требует контроль со стороны взрослого.
-вания, не использовать печь и обратиться в ближайший сервисный центр.
-риков теста для пиццы; любое другое исполь-зование должно считаться несоответствую-щим.
-риков теста для пиццы; любое другое исполь-зование должно считаться несоответствую-щим.
работы машины: по меньшей мере, раз в год рекомендуется проводить контроль машины квалифицированным и авторизованным пер-соналом.
Следует отключать машину в случае ее неис-правности или ненадлежащего функциони-рования.
-обходимости проведения ремонтных работ оборудования, обращаться исключительно к авторизованному персоналу. Для замены компонентов использовать только ориги-нальные запасные части.
Einleitende Hinweise
-ziertem Personal unter Einhaltung der gelten-den Bestimmungen durchgeführt werden.
hohe Temperaturen erreichen. Es muss darauf geachtet werden, die Ober�ächen nicht zu berühren und keine Materialien in die Nähe zu bringen, die entzündlich sein können. Sind Kinder, ältere Menschen und/oder Behinderte anwesend, muss eine Überwachung durch ei-nen verantwortungsvollen Erwachsenen erfol-gen.
Maschine nicht mehr verwenden und sich an das nächstgele-gene Kundendienstzentrum wenden.
Maschine darf nur von Personal bedient werden, das in den Gebrauch des Geräts ein-gewiesen wurde und muss während des Be-triebs überwacht werden.
Maschine wurde zum Pressen und Glätten von Pizza-Teigkugeln entwickelt; jeder andere Gebrauch ist nicht geeignet.
Gerätes: Mindestens einmal im Jahr muss das Gerät kontrolliert werden. Diese Kontrolle muss von befugtem Fachpersonal erfolgen.
Schalten Sie das Gerät im Falle von Defekten und Fehlfunktionen aus.
-dukt ausschließlich an autorisiertes Fachperso-nal wenden. Für den Austausch von Teilen nur Original-Ersatzteile verwenden.
Pizzaform 10-13 9
9
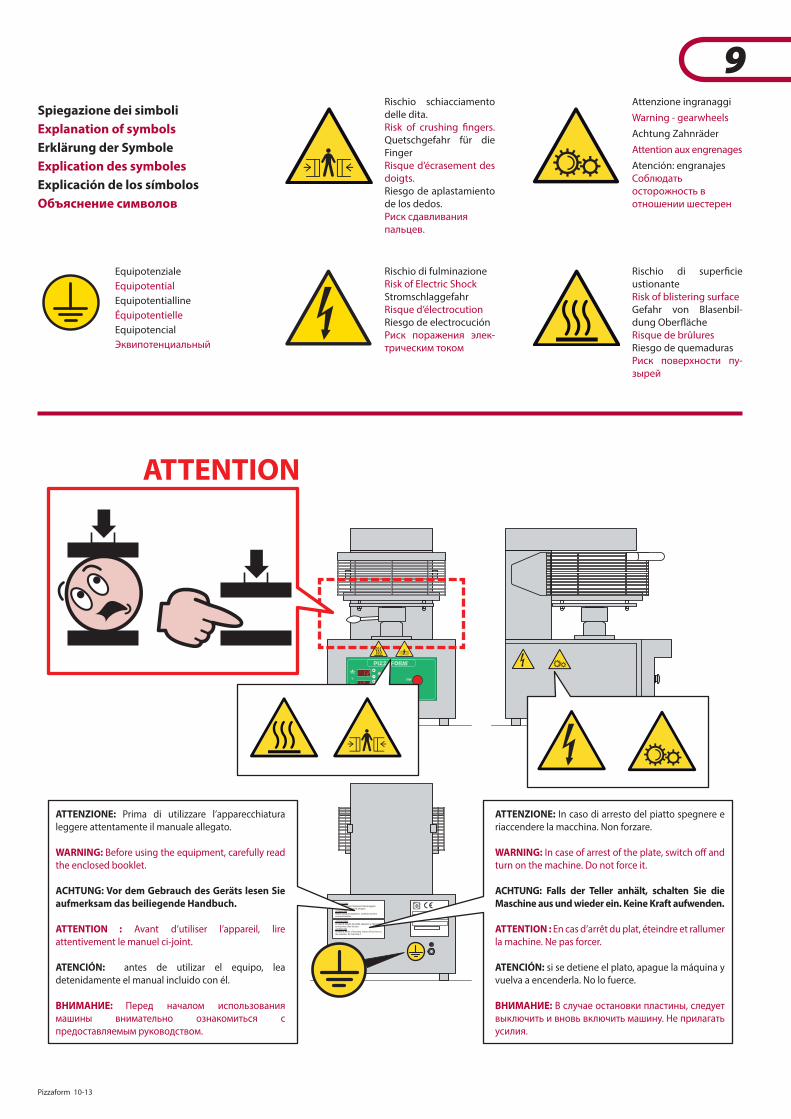
ATTENZIONEPrima di utilizzare l'apparecchiatura leggere attentamente il manuale allegato.ATTENTIONBefore using the appliance, carefully read the enclosed booklet.
ATTENZIONEIn caso di arresto del piatto spegnere e riaccendere la macchina. Non forzare.ATTENTIONIn case of arrest of the plate, switch off and turn on the machine. Do not force it.
ATTENTION
Spiegazione dei simboli
Explanation of symbols
Erklärung der Symbole
Explication des symboles
Explicación de los símbolos
Объяснение символов
Rischio schiacciamento delle dita.Risk of crushing Ungers.Quetschgefahr für die FingerRisque d’écrasement des doigts.Riesgo de aplastamiento de los dedos.Риск сдавливания пальцев.
Attenzione ingranaggi
Warning - gearwheels
Achtung Zahnräder
Attention aux engrenages
Atención: engranajesСоблюдать осторожность в отношении шестерен
ATTENZIONE: Prima di utilizzare l’apparecchiatura leggere attentamente il manuale allegato.
WARNING: Before using the equipment, carefully read the enclosed booklet.
ACHTUNG: Vor dem Gebrauch des Geräts lesen Sie aufmerksam das beiliegende Handbuch.
ATTENTION : Avant d’utiliser l’appareil, lire attentivement le manuel ci-joint.
ATENCIÓN: antes de utilizar el equipo, lea detenidamente el manual incluido con él.
ВНИМАНИЕ: Перед началом использования машины внимательно ознакомиться с предоставляемым руководством.
ATTENZIONE: In caso di arresto del piatto spegnere e riaccendere la macchina. Non forzare.
WARNING: In case of arrest of the plate, switch o� and turn on the machine. Do not force it.
ACHTUNG: Falls der Teller anhält, schalten Sie die Maschine aus und wieder ein. Keine Kraft aufwenden.
ATTENTION : En cas d’arrêt du plat, éteindre et rallumer la machine. Ne pas forcer.
ATENCIÓN: si se detiene el plato, apague la máquina y vuelva a encenderla. No lo fuerce.
ВНИМАНИЕ: В случае остановки пластины, следует выключить и вновь включить машину. Не прилагать усилия.
Rischio di fulminazione Risk of Electric Shock StromschlaggefahrRisque d’électrocution Riesgo de electrocución Риск поражения элек-трическим током
Rischio di superUcie ustionanteRisk of blistering surfaceGefahr von Blasenbil-dung Ober�ächeRisque de brûluresRiesgo de quemadurasРиск поверхности пу-зырей
Equipotenziale
Equipotential
Equipotentialline
Équipotentielle
Equipotencial
Эквипотенциальный
10 Pizzaform 10-13
10 Analisi dei rischi
-rettiva macchine 2006/42/CE e D.Lgs 27 gen-naio 2010 , n. 17.
-tazione della possibile entità del danno quale conseguenza del rischio per la salute e la sicu-rezza degli operatori della macchina in ogget-to, derivante dal veriUcarsi di un pericolo.
legati all’utilizzo della macchina non elimina-bili se non con perdita di funzionalità della macchina e maggiore onere economico.
Tali rischi residui sono:
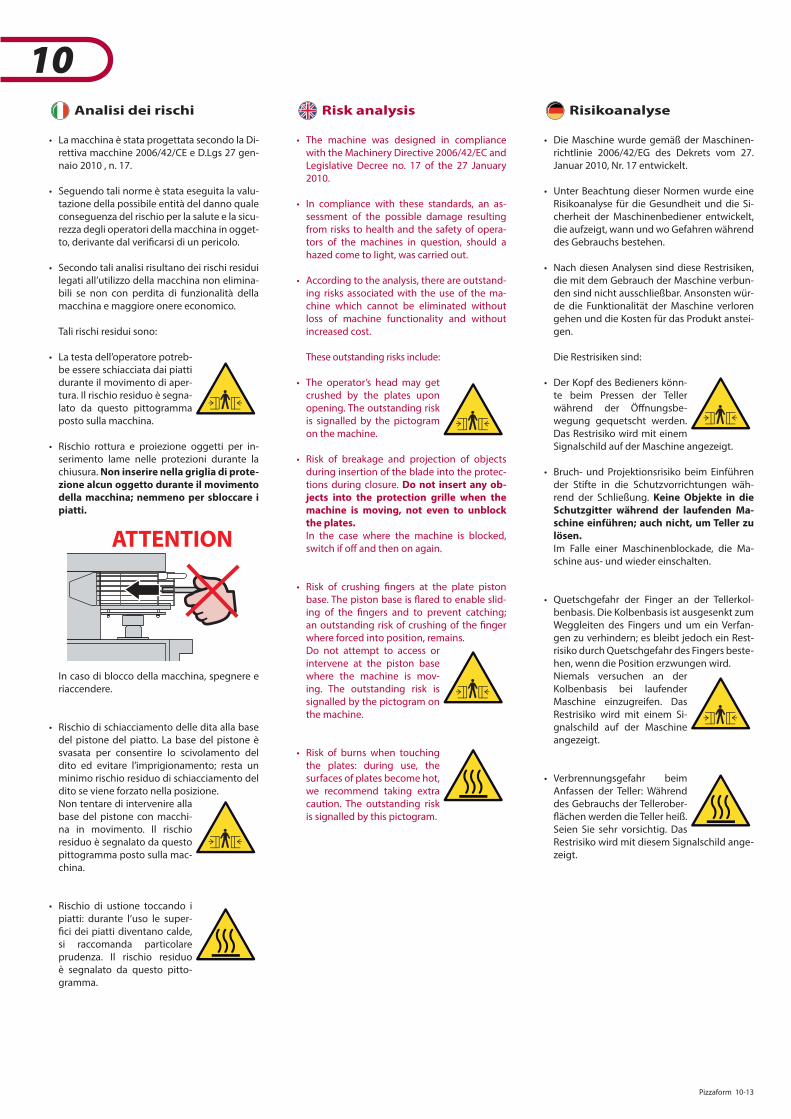
-be essere schiacciata dai piatti durante il movimento di aper-tura. Il rischio residuo è segna-lato da questo pittogramma posto sulla macchina.
-serimento lame nelle protezioni durante la chiusura. Non inserire nella griglia di prote-zione alcun oggetto durante il movimento della macchina; nemmeno per sbloccare i piatti.
In caso di blocco della macchina, spegnere e riaccendere.
del pistone del piatto. La base del pistone è svasata per consentire lo scivolamento del dito ed evitare l’imprigionamento; resta un minimo rischio residuo di schiacciamento del dito se viene forzato nella posizione.
Non tentare di intervenire alla base del pistone con macchi-na in movimento. Il rischio residuo è segnalato da questo pittogramma posto sulla mac-china.
piatti: durante l’uso le super-Uci dei piatti diventano calde, si raccomanda particolare prudenza. Il rischio residuo è segnalato da questo pitto-gramma.
Risk analysis
with the Machinery Directive 2006/42/EC and Legislative Decree no. 17 of the 27 January 2010.
-sessment of the possible damage resulting from risks to health and the safety of opera-tors of the machines in question, should a hazed come to light, was carried out.
-ing risks associated with the use of the ma-chine which cannot be eliminated without loss of machine functionality and without increased cost.
These outstanding risks include:
crushed by the plates upon opening. The outstanding risk is signalled by the pictogram on the machine.
during insertion of the blade into the protec-tions during closure. Do not insert any ob-jects into the protection grille when the machine is moving, not even to unblock the plates.
In the case where the machine is blocked, switch if o� and then on again.
base. The piston base is �ared to enable slid-ing of the Ungers and to prevent catching; an outstanding risk of crushing of the Unger where forced into position, remains.
Do not attempt to access or intervene at the piston base where the machine is mov-ing. The outstanding risk is signalled by the pictogram on the machine.
the plates: during use, the surfaces of plates become hot, we recommend taking extra caution. The outstanding risk is signalled by this pictogram.
Risikoanalyse
-richtlinie 2006/42/EG des Dekrets vom 27. Januar 2010, Nr. 17 entwickelt.
Risikoanalyse für die Gesundheit und die Si-cherheit der Maschinenbediener entwickelt, die aufzeigt, wann und wo Gefahren während des Gebrauchs bestehen.
die mit dem Gebrauch der Maschine verbun-den sind nicht ausschließbar. Ansonsten wür-de die Funktionalität der Maschine verloren gehen und die Kosten für das Produkt anstei-gen.
Die Restrisiken sind:
-te beim Pressen der Teller während der Ö�nungsbe-wegung gequetscht werden. Das Restrisiko wird mit einem Signalschild auf der Maschine angezeigt.
der Stifte in die Schutzvorrichtungen wäh-rend der Schließung. Keine Objekte in die Schutzgitter während der laufenden Ma-schine einführen; auch nicht, um Teller zu lösen.
Im Falle einer Maschinenblockade, die Ma-schine aus- und wieder einschalten.
-benbasis. Die Kolbenbasis ist ausgesenkt zum Weggleiten des Fingers und um ein Verfan-gen zu verhindern; es bleibt jedoch ein Rest-risiko durch Quetschgefahr des Fingers beste-hen, wenn die Position erzwungen wird.
Niemals versuchen an der Kolbenbasis bei laufender Maschine einzugreifen. Das Restrisiko wird mit einem Si-gnalschild auf der Maschine angezeigt.
Anfassen der Teller: Während des Gebrauchs der Tellerober-�ächen werden die Teller heiß. Seien Sie sehr vorsichtig. Das Restrisiko wird mit diesem Signalschild ange-zeigt.
ATTENTION
Pizzaform 10-13 11
11 Analyse des risques
Directive machines 2006/42/CE et D.Lgs 27 janvier 2010 , n. 17.
de la possible entité du dommage comme conséquence du risque pour la santé et la sé-curité des opérateurs de la machine en objet, dérivant d’un danger, a été e�ectuée.
-duels liés à l’utilisation de la machine qui ne peuvent pas être éliminés sinon avec une perte de fonctionnalité de la machine et des coûts supérieurs.
Ces risques résiduels sont :
être écrasée par les plats pen-dant le mouvement d’ouver-ture. Le risque résiduel est signalé par ce pictogramme situé sur la machine.
à l’introduction de lames dans les protections pendant la fermeture. N’introduire aucun objet dans la grille de protection pendant le mouvement de la machine ; même pas pour débloquer les plats.
En cas de blocage de la machine, éteindre et rallumer.
piston du plat. La base du piston est évasée aUn de permettre le glissement du doigt et éviter l’emprisonnement ; il reste un mini-mum de risque résiduel d’écrasement du doigt si celui-ci est forcé dans la position.
Ne pas tenter d’intervenir à la base du piston avec machine en mouvement. Le risque rési-duel est signalé par ce picto-gramme situé sur la machine.
-chant les plats : pendant l’uti-lisation, les surfaces des plats deviennent chaudes, une prudence particulière est par conséquent recommandée. Le risque résiduel est signalé par ce picto-gramme.
Análisis de riesgos
Directiva de Máquinas 2006/42/CE y el D.Lgs italiano n º 17 del 27 de enero de 2010.
la posible entidad de los daños ocasionados como consecuencia del riesgo para la salud y la seguridad de los operadores de la máquina en cuestión, derivado de la aparición de un peligro.
-duales ligados al uso de la máquina que no pueden eliminarse sin provocar un deterioro de la funcionalidad de la máquina y mayores costes económicos.
Dichos riesgos residuales son:
apertura, los platos podrían aplastar la cabeza del opera-dor. El riesgo residual se indica mediante este pictograma que Ugura en la máquina.
introducción de hojas en las protecciones du-rante el cierre. No introduzca ningún objeto en la rejilla de protección durante el mo-vimiento de la máquina, ni siquiera para desbloquear los platos.
Si se bloquea la máquina, apáguela y vuelva a encenderla.
base del pistón del plato. La base del pistón está abocinada para permitir que el dedo se deslice e impedir que quede aprisionado; si-gue existiendo un mínimo riesgo de aplasta-miento del dedo si se fuerza en la posición.
No intente intervenir en la base del pistón cuando la máquina esté en movimiento. El riesgo residual se indica mediante este pictograma que Ugura en la máquina.
-car los platos: durante el uso, las superUcies de los platos se calientan, por lo que se deben extremar las precauciones. El riesgo residual se indica me-diante este pictograma.
Анализ рисков
с Директивой машинного оборудования 2006/42/CE и Законодательным постанов-лением от 27 января 2010, №17.
проведена оценка возможного ущерба с соответствующим риском для здоровья и безопасности персонала, работающего с машиной, при возникновении опасности.
-ны остаточные риски, связанные с исполь-зованием машины, устраняемые только при отключении машины и при больших экономических затратах.
К таким остаточным рискам относятся сле-дующие:
быть зажата между пласти-нами при их открытии. Оста-точный риск сигнализирует-ся данной пиктограммой на машине.
в связи с вводом посторонних элементов в защитные ограждения при закрытии. Не вставлять в защитную решетку какие-либо предметы при работе машины; в том числе для разблокировки пластин.
В случае блокировки машины, следует вы-ключить ее и вновь включить.
поршня пластины. Основание поршня скошено в целях возможности проскаль-зывания пальца и предотвращения его застревания. В любом случае, остается ми-нимальный остаточный риск сдавливания пальца при приложении усилия.
Не пытаться производить вмешательства в основании поршня при работающей ма-шине. Остаточный риск сиг-нализируется данной пикто-граммой на машине.
-стин: при использовании поверхности пла-стин нагреваются, необходимо соблюдать особую осторожность. Оста-точный риск сигнализирует-ся данной пиктограммой.
ATTENTION
12 Pizzaform 10-13
12
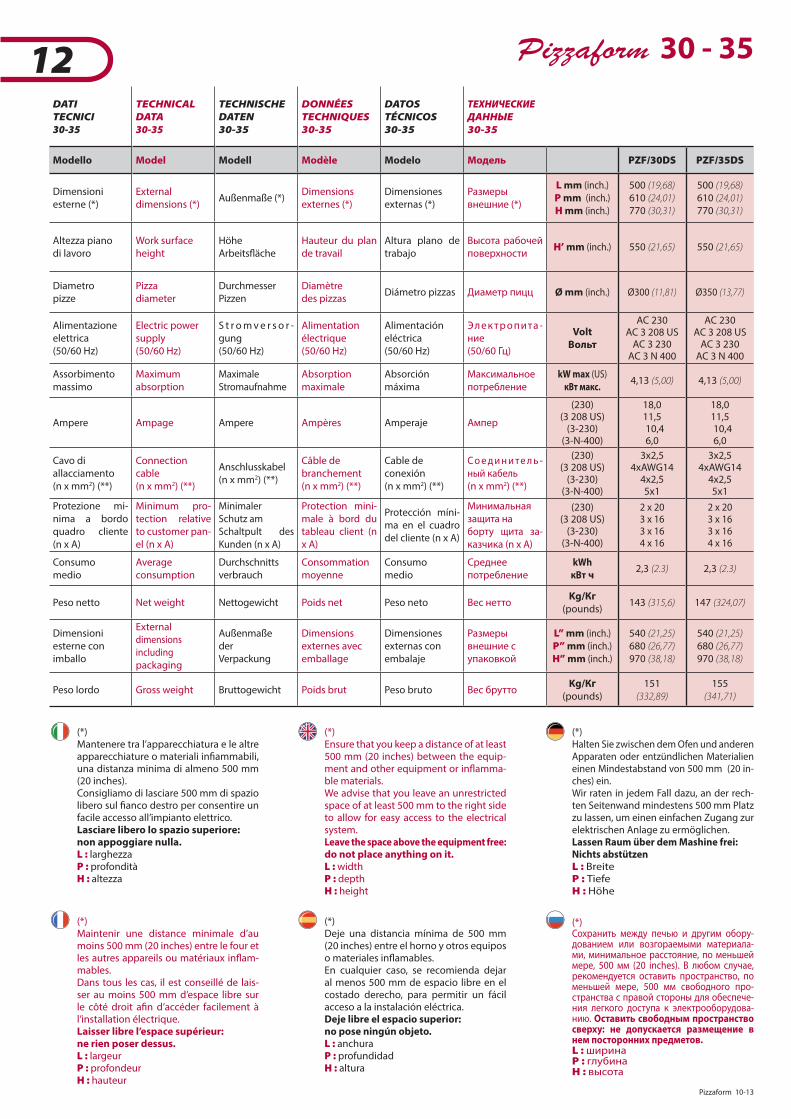
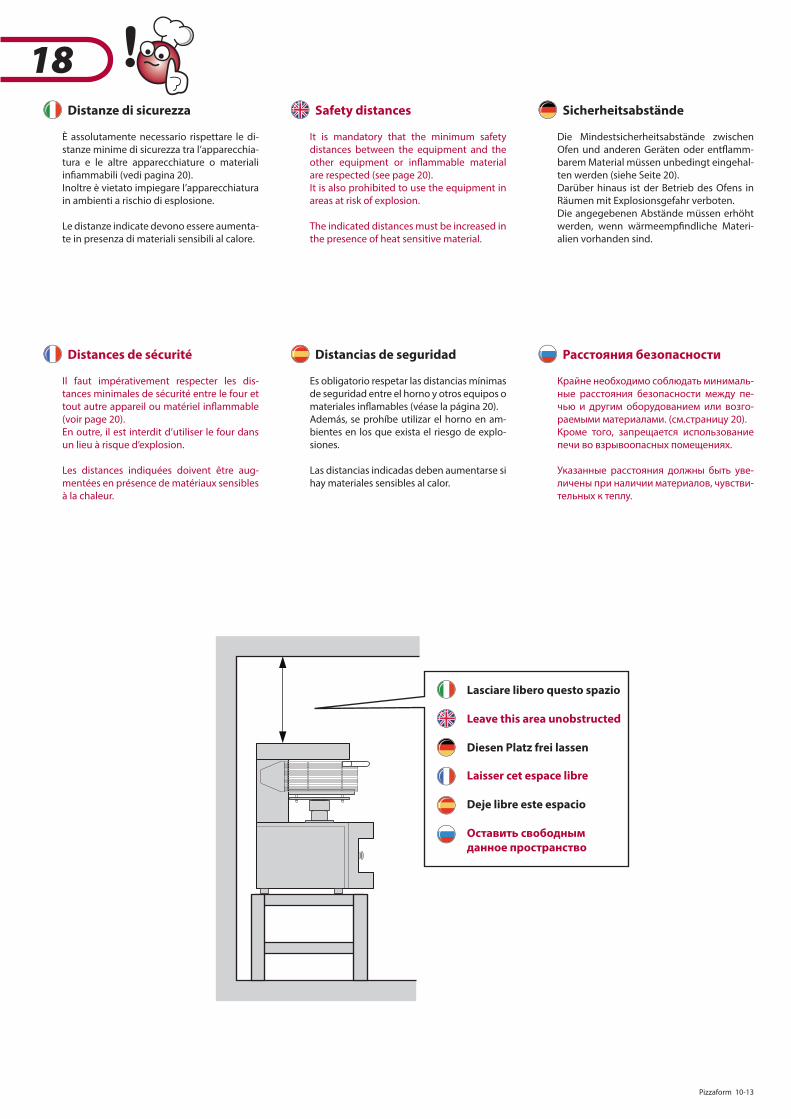
(*)Mantenere tra l’apparecchiatura e le altre apparecchiature o materiali inUammabili, una distanza minima di almeno 500 mm (20 inches).Consigliamo di lasciare 500 mm di spazio libero sul Uanco destro per consentire un facile accesso all’impianto elettrico.Lasciare libero lo spazio superiore:non appoggiare nulla.L : larghezzaP : profonditàH : altezza
(*)Ensure that you keep a distance of at least 500 mm (20 inches) between the equip-ment and other equipment or in�amma-ble materials.We advise that you leave an unrestricted space of at least 500 mm to the right side to allow for easy access to the electrical system.Leave the space above the equipment free:do not place anything on it.L : widthP : depthH : height
(*)Halten Sie zwischen dem Ofen und anderen Apparaten oder entzündlichen Materialien einen Mindestabstand von 500 mm (20 in-ches) ein.Wir raten in jedem Fall dazu, an der rech-ten Seitenwand mindestens 500 mm Platz zu lassen, um einen einfachen Zugang zur elektrischen Anlage zu ermöglichen.Lassen Raum über dem Mashine frei: Nichts abstützenL : BreiteP : TiefeH : Höhe
(*)Maintenir une distance minimale d’au moins 500 mm (20 inches) entre le four et les autres appareils ou matériaux in�am-mables.Dans tous les cas, il est conseillé de lais-ser au moins 500 mm d’espace libre sur le côté droit aUn d’accéder facilement à l’installation électrique.Laisser libre l’espace supérieur:ne rien poser dessus.L : largeurP : profondeurH : hauteur
(*)Deje una distancia mínima de 500 mm (20 inches) entre el horno y otros equipos o materiales in�amables.En cualquier caso, se recomienda dejar al menos 500 mm de espacio libre en el costado derecho, para permitir un fácil acceso a la instalación eléctrica.Deje libre el espacio superior:no pose ningún objeto.L : anchuraP : profundidadH : altura
(*)Сохранить между печью и другим обору-дованием или возгораемыми материала-ми, минимальное расстояние, по меньшей мере, 500 мм (20 inches). В любом случае, рекомендуется оставить пространство, по меньшей мере, 500 мм свободного про-странства с правой стороны для обеспече-ния легкого доступа к электрооборудова-нию. Оставить свободным пространство сверху: не допускается размещение в нем посторонних предметов.L : ширинаP : глубинаH : высота
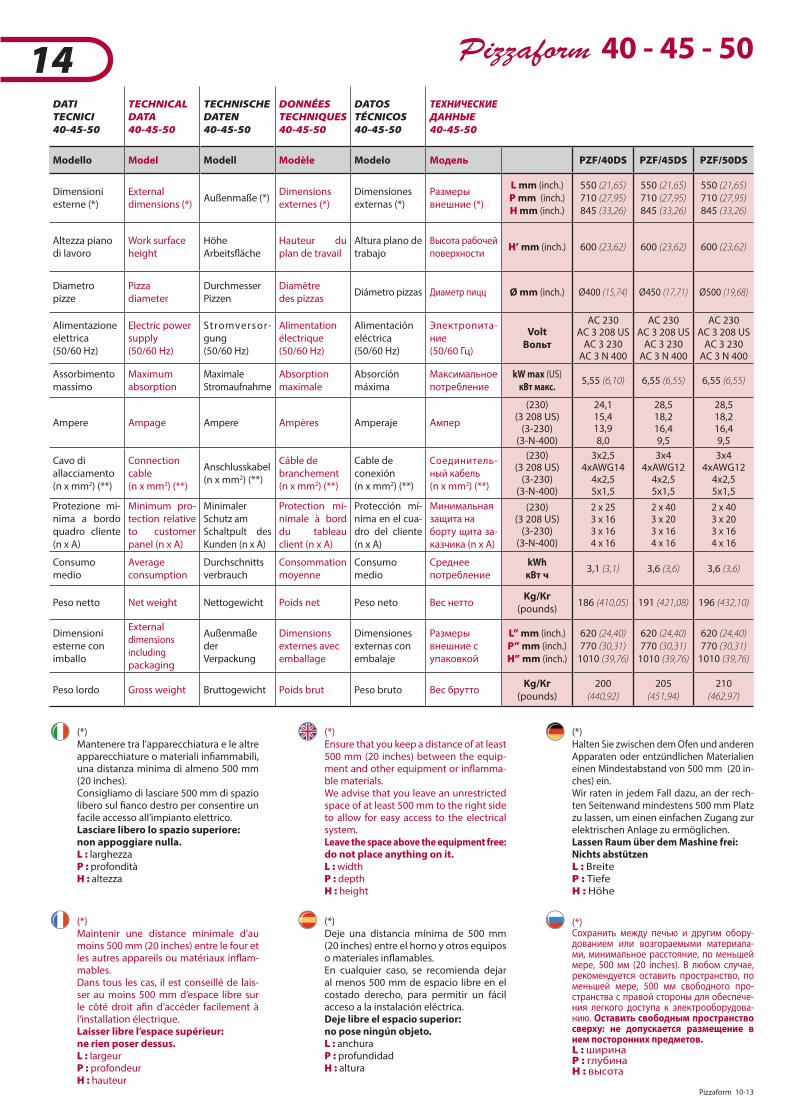
DATITECNICI30-35
TECHNICAL DATA30-35
TECHNISCHE DATEN30-35
DONNÉESTECHNIQUES30-35
DATOSTÉCNICOS30-35
ТЕХНИЧЕСКИЕДАННЫЕ30-35
Modello Model Modell Modèle Modelo Модель PZF/30DS PZF/35DS
Dimensioniesterne (*)
Externaldimensions (*)
Außenmaße (*)Dimensionsexternes (*)
Dimensionesexternas (*)
Размерывнешние (*)
L mm (inch.)P mm (inch.)H mm (inch.)
500 (19,68)610 (24,01)770 (30,31)
500 (19,68)610 (24,01)770 (30,31)
Altezza piano di lavoro
Work surfaceheight
HöheArbeits�äche
Hauteur du plan de travail
Altura plano de trabajo
Высота рабочей поверхности
H’ mm (inch.) 550 (21,65) 550 (21,65)
Diametropizze
Pizzadiameter
DurchmesserPizzen
Diamètre des pizzas
Diámetro pizzas Диаметр пицц Ø mm (inch.) Ø300 (11,81) Ø350 (13,77)
Alimentazione elettrica(50/60 Hz)
Electric power supply(50/60 Hz)
S t r o m v e r s o r -gung(50/60 Hz)
Alimentation électrique(50/60 Hz)
Alimentación eléctrica(50/60 Hz)
Э л е к тр о п и та -ние(50/60 Гц)
VoltВольт
AC 230AC 3 208 US
AC 3 230AC 3 N 400
AC 230AC 3 208 US
AC 3 230AC 3 N 400
Assorbimento massimo
Maximum absorption
Maximale Stromaufnahme
Absorption maximale
Absorciónmáxima
Максимальное потребление
kW max (US)кВт макс.
4,13 (5,00) 4,13 (5,00)
Ampere Ampage Ampere Ampères Amperaje Ампер
(230)(3 208 US)
(3-230)(3-N-400)
18,011,510,46,0
18,011,510,46,0
Cavo di allacciamento(n x mm2) (**)
Connectioncable(n x mm2) (**)
Anschlusskabel(n x mm2) (**)
Câble de branchement(n x mm2) (**)
Cable deconexión(n x mm2) (**)
С о е д и н и т е л ь -ный кабель(n x mm2) (**)
(230)(3 208 US)
(3-230)(3-N-400)
3x2,54xAWG14
4x2,55x1
3x2,54xAWG14
4x2,55x1
Protezione mi-nima a bordo quadro cliente (n x A)
Minimum pro-tection relative to customer pan-el (n x A)
Minimaler Schutz amSchaltpult des Kunden (n x A)
Protection mini-male à bord du tableau client (n x A)
Protección míni-ma en el cuadro del cliente (n x A)
Минимальная защита на борту щита за-казчика (n x A)
(230)(3 208 US)
(3-230)(3-N-400)
2 x 203 x 163 x 164 x 16
2 x 203 x 163 x 164 x 16
Consumomedio
Average consumption
Durchschnittsverbrauch
Consommation moyenne
Consumomedio
Среднее потребление
kWhкВт ч
2,3 (2.3) 2,3 (2.3)
Peso netto Net weight Nettogewicht Poids net Peso neto Вес неттоKg/Кг
(pounds)143 (315,6) 147 (324,07)
Dimensioniesterne conimballo
Externaldimensionsincluding packaging
AußenmaßederVerpackung
Dimensionsexternes avec emballage
Dimensionesexternas con embalaje
Размерывнешние с упаковкой
L” mm (inch.)P” mm (inch.)H” mm (inch.)
540 (21,25)680 (26,77)970 (38,18)
540 (21,25)680 (26,77)970 (38,18)
Peso lordo Gross weight Bruttogewicht Poids brut Peso bruto Вес бруттоKg/Кг
(pounds)151
(332,89)
155(341,71)
Pizzaform 30 - 35
Pizzaform 10-13 13
13
(**)Questi cavi possono essere usati solo se la loro lunghezza non supera 2 m tra il pun-to in cui il cavo o la sua protezione entra nell’apparecchio e l’entrata nella spina.
(**)These cables can only be used provided that their length does not exceed 2 m be-tween the point where the cable or rela-tive protection enters the equipment and the plug input.
(**)Diese Kabel dürfen nur verwendet wer-den, wenn sie nicht die Länge von 2 m zwischen dem Eingangspunkt des Kabels im Gerät und dem Eingang des Steckers nicht überschreiten.
(**)Ces câbles ne peuvent être utilisés que si leur longueur ne dépasse pas 2 m entre le point où le câble ou sa protection entre dans l’appareil et l’entrée dans la prise.
(**)Estos cables pueden utilizarse únicamen-te si su longitud no supera los 2 m entre el punto en que el cable o su protección entran en el equipo y la entrada en el en-chufe.
(**)Эти кабели могут использоваться толь-ко если их длина не превышает 2 метра от точки входа кабеля или его защиты в машину и входом в вилку.
Pizzaform 30 - 35
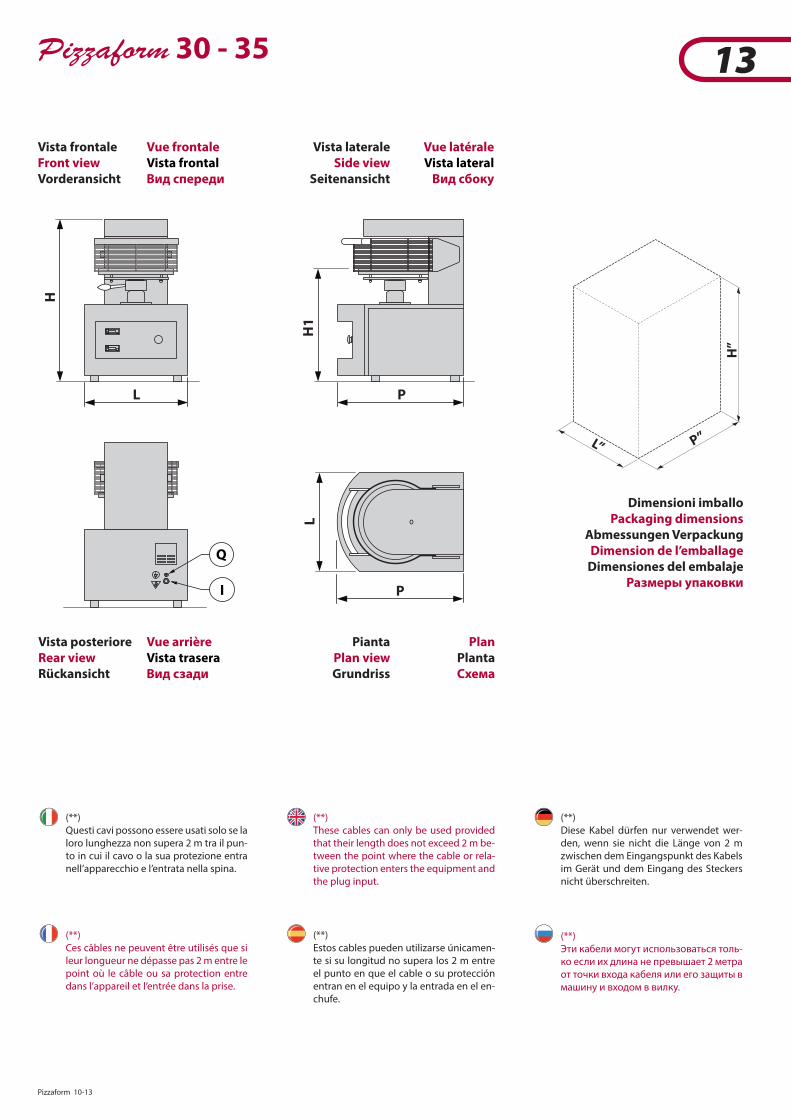
Vista frontaleFront viewVorderansicht
Vista lateraleSide view
Seitenansicht
Vista posterioreRear viewRückansicht
Vue frontaleVista frontalВид спереди
Vue latéraleVista lateral
Вид сбоку
Vue arrièreVista traseraВид сзади
L
H
H1
P
L
P
Q
I
H”
L” P”
Dimensioni imballoPackaging dimensions
Abmessungen VerpackungDimension de l’emballage
Dimensiones del embalajeРазмеры упаковки
PiantaPlan viewGrundriss
PlanPlantaСхема
14 Pizzaform 10-13
14DATITECNICI40-45-50
TECHNICAL DATA40-45-50
TECHNISCHE DATEN40-45-50
DONNÉESTECHNIQUES40-45-50
DATOSTÉCNICOS40-45-50
ТЕХНИЧЕСКИЕДАННЫЕ40-45-50
Modello Model Modell Modèle Modelo Модель PZF/40DS PZF/45DS PZF/50DS
Dimensioniesterne (*)
Externaldimensions (*)
Außenmaße (*)Dimensionsexternes (*)
Dimensionesexternas (*)
Размерывнешние (*)
L mm (inch.)P mm (inch.)H mm (inch.)
550 (21,65)710 (27,95)845 (33,26)
550 (21,65)710 (27,95)845 (33,26)
550 (21,65)710 (27,95)845 (33,26)
Altezza piano di lavoro
Work surfaceheight
HöheArbeits�äche
Hauteur du plan de travail
Altura plano de trabajo
Высота рабочей поверхности
H’ mm (inch.) 600 (23,62) 600 (23,62) 600 (23,62)
Diametropizze
Pizzadiameter
DurchmesserPizzen
Diamètre des pizzas
Diámetro pizzas Диаметр пицц Ø mm (inch.) Ø400 (15,74) Ø450 (17,71) Ø500 (19,68)
Alimentazione elettrica(50/60 Hz)
Electric power supply(50/60 Hz)
Stromversor-gung(50/60 Hz)
Alimentation électrique(50/60 Hz)
Alimentación eléctrica(50/60 Hz)
Электропита-ние(50/60 Гц)
VoltВольт
AC 230AC 3 208 US
AC 3 230AC 3 N 400
AC 230AC 3 208 US
AC 3 230AC 3 N 400
AC 230AC 3 208 US
AC 3 230AC 3 N 400
Assorbimento massimo
Maximum absorption
Maximale Stromaufnahme
Absorption maximale
Absorciónmáxima
Максимальное потребление
kW max (US)кВт макс.
5,55 (6,10) 6,55 (6,55) 6,55 (6,55)
Ampere Ampage Ampere Ampères Amperaje Ампер
(230)(3 208 US)
(3-230)(3-N-400)
24,115,413,98,0
28,518,216,49,5
28,518,216,49,5
Cavo di allacciamento(n x mm2) (**)
Connectioncable(n x mm2) (**)
Anschlusskabel(n x mm2) (**)
Câble de branchement(n x mm2) (**)
Cable deconexión(n x mm2) (**)
Соединитель-ный кабель(n x mm2) (**)
(230)(3 208 US)
(3-230)(3-N-400)
3x2,54xAWG14
4x2,55x1,5
3x44xAWG12
4x2,55x1,5
3x44xAWG12
4x2,55x1,5
Protezione mi-nima a bordo quadro cliente (n x A)
Minimum pro-tection relative to customer panel (n x A)
Minimaler Schutz amSchaltpult des Kunden (n x A)
Protection mi-nimale à bord du tableau client (n x A)
Protección mí-nima en el cua-dro del cliente (n x A)
Минимальная защита на борту щита за-казчика (n x A)
(230)(3 208 US)
(3-230)(3-N-400)
2 x 253 x 163 x 164 x 16
2 x 403 x 203 x 164 x 16
2 x 403 x 203 x 164 x 16
Consumomedio
Average consumption
Durchschnittsverbrauch
Consommation moyenne
Consumomedio
Среднее потребление
kWhкВт ч
3,1 (3,1) 3,6 (3,6) 3,6 (3,6)
Peso netto Net weight Nettogewicht Poids net Peso neto Вес неттоKg/Кг
(pounds)186 (410,05) 191 (421,08) 196 (432,10)
Dimensioniesterne conimballo
Externaldimensionsincluding packaging
AußenmaßederVerpackung
Dimensionsexternes avec emballage
Dimensionesexternas con embalaje
Размерывнешние с упаковкой
L” mm (inch.)P” mm (inch.)H” mm (inch.)
620 (24,40)770 (30,31)
1010 (39,76)
620 (24,40)770 (30,31)
1010 (39,76)
620 (24,40)770 (30,31)
1010 (39,76)
Peso lordo Gross weight Bruttogewicht Poids brut Peso bruto Вес бруттоKg/Кг
(pounds)200
(440,92)
205(451,94)
210(462,97)
Pizzaform 40 - 45 - 50
(*)Mantenere tra l’apparecchiatura e le altre apparecchiature o materiali inUammabili, una distanza minima di almeno 500 mm (20 inches).Consigliamo di lasciare 500 mm di spazio libero sul Uanco destro per consentire un facile accesso all’impianto elettrico.Lasciare libero lo spazio superiore:non appoggiare nulla.L : larghezzaP : profonditàH : altezza
(*)Ensure that you keep a distance of at least 500 mm (20 inches) between the equip-ment and other equipment or in�amma-ble materials.We advise that you leave an unrestricted space of at least 500 mm to the right side to allow for easy access to the electrical system.Leave the space above the equipment free:do not place anything on it.L : widthP : depthH : height
(*)Halten Sie zwischen dem Ofen und anderen Apparaten oder entzündlichen Materialien einen Mindestabstand von 500 mm (20 in-ches) ein.Wir raten in jedem Fall dazu, an der rech-ten Seitenwand mindestens 500 mm Platz zu lassen, um einen einfachen Zugang zur elektrischen Anlage zu ermöglichen.Lassen Raum über dem Mashine frei: Nichts abstützenL : BreiteP : TiefeH : Höhe
(*)Maintenir une distance minimale d’au moins 500 mm (20 inches) entre le four et les autres appareils ou matériaux in�am-mables.Dans tous les cas, il est conseillé de lais-ser au moins 500 mm d’espace libre sur le côté droit aUn d’accéder facilement à l’installation électrique.Laisser libre l’espace supérieur:ne rien poser dessus.L : largeurP : profondeurH : hauteur
(*)Deje una distancia mínima de 500 mm (20 inches) entre el horno y otros equipos o materiales in�amables.En cualquier caso, se recomienda dejar al menos 500 mm de espacio libre en el costado derecho, para permitir un fácil acceso a la instalación eléctrica.Deje libre el espacio superior:no pose ningún objeto.L : anchuraP : profundidadH : altura
(*)Сохранить между печью и другим обору-дованием или возгораемыми материала-ми, минимальное расстояние, по меньшей мере, 500 мм (20 inches). В любом случае, рекомендуется оставить пространство, по меньшей мере, 500 мм свободного про-странства с правой стороны для обеспече-ния легкого доступа к электрооборудова-нию. Оставить свободным пространство сверху: не допускается размещение в нем посторонних предметов.L : ширинаP : глубинаH : высота
Pizzaform 10-13 15
15Pizzaform 40 - 45 - 50
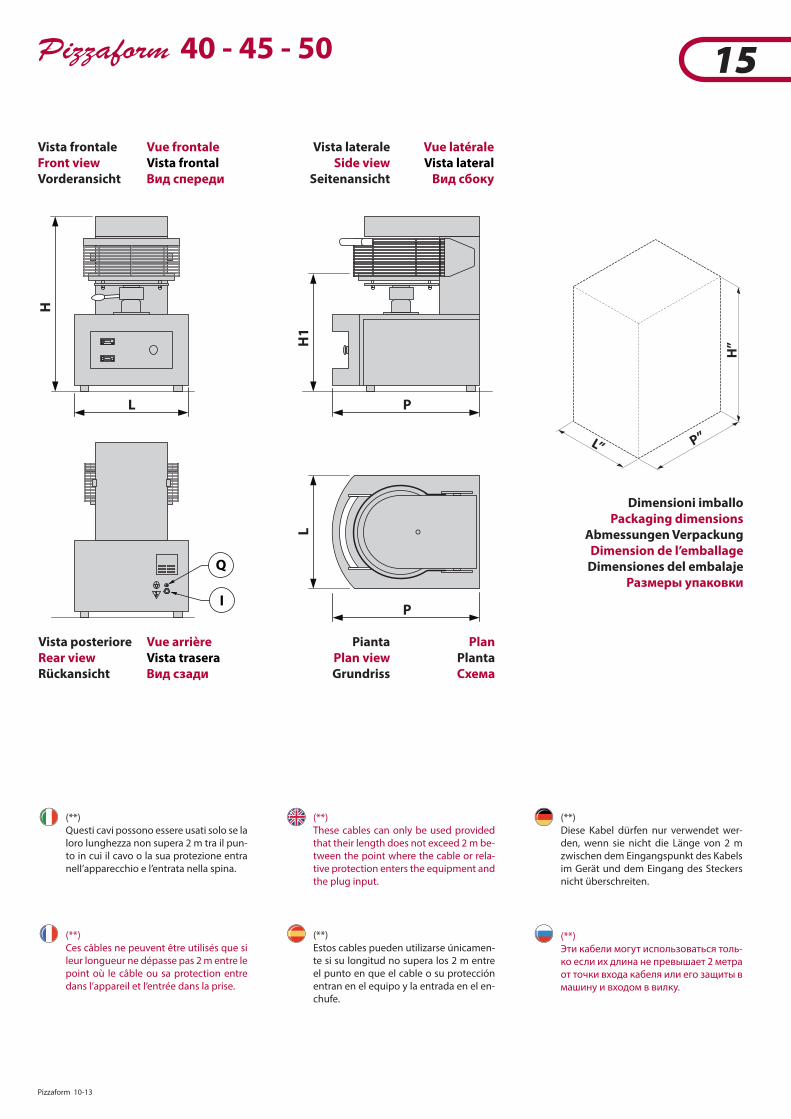
Vista frontaleFront viewVorderansicht
Vista lateraleSide view
Seitenansicht
Vista posterioreRear viewRückansicht
Vue frontaleVista frontalВид спереди
Vue latéraleVista lateral
Вид сбоку
Vue arrièreVista traseraВид сзади
L
H
H1
L
P
P
Q
I
H”
L” P”
Dimensioni imballoPackaging dimensions
Abmessungen VerpackungDimension de l’emballage
Dimensiones del embalajeРазмеры упаковки
PiantaPlan viewGrundriss
PlanPlantaСхема
(**) Questi cavi possono essere usati solo se la
loro lunghezza non supera 2 m tra il pun-to in cui il cavo o la sua protezione entra nell’apparecchio e l’entrata nella spina.
(**) These cables can only be used provided
that their length does not exceed 2 m be-tween the point where the cable or rela-tive protection enters the equipment and the plug input.
(**) Diese Kabel dürfen nur verwendet wer-
den, wenn sie nicht die Länge von 2 m zwischen dem Eingangspunkt des Kabels im Gerät und dem Eingang des Steckers nicht überschreiten.
(**) Ces câbles ne peuvent être utilisés que si
leur longueur ne dépasse pas 2 m entre le point où le câble ou sa protection entre dans l’appareil et l’entrée dans la prise.
(**) Estos cables pueden utilizarse únicamen-
te si su longitud no supera los 2 m entre el punto en que el cable o su protección entran en el equipo y la entrada en el en-chufe.
(**) Эти кабели могут использоваться толь-
ко если их длина не превышает 2 метра от точки входа кабеля или его защиты в машину и входом в вилку.
16 Pizzaform 10-13
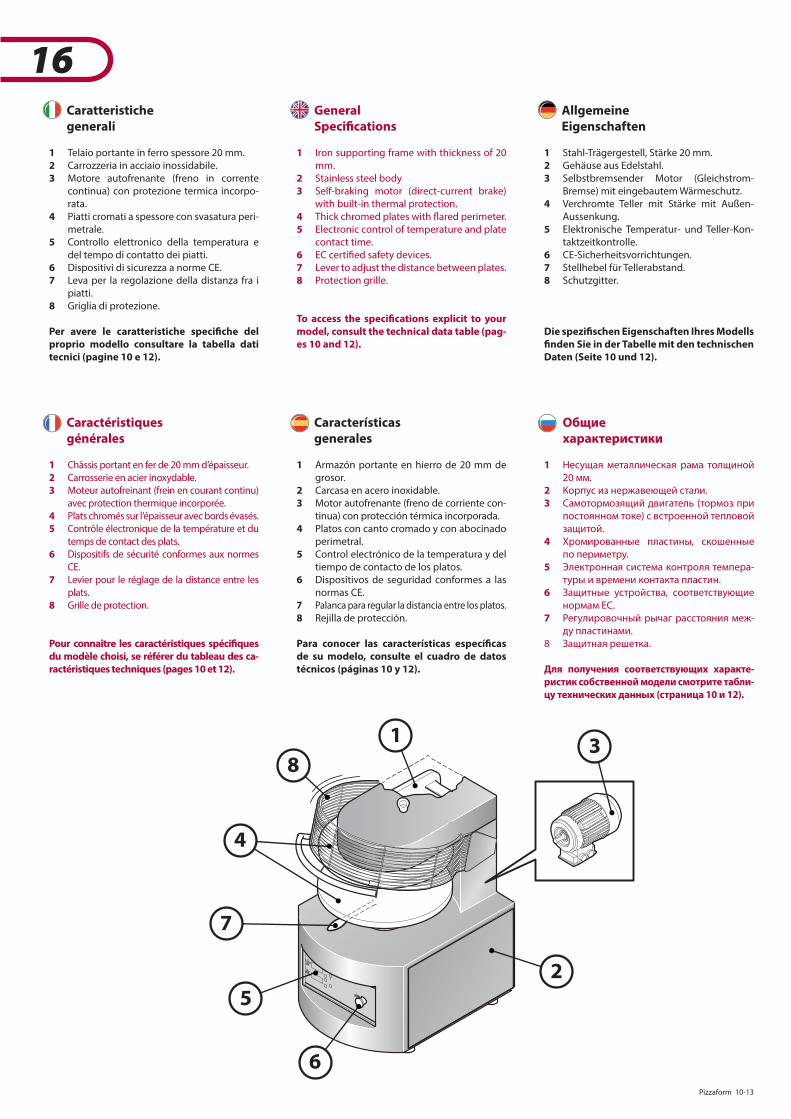
16Caratteristichegenerali
1 Telaio portante in ferro spessore 20 mm.2 Carrozzeria in acciaio inossidabile.3 Motore autofrenante (freno in corrente
continua) con protezione termica incorpo-rata.
4 Piatti cromati a spessore con svasatura peri-metrale.
5 Controllo elettronico della temperatura e del tempo di contatto dei piatti.
6 Dispositivi di sicurezza a norme CE.7 Leva per la regolazione della distanza fra i
piatti.8 Griglia di protezione.
Per avere le caratteristiche speci#che del proprio modello consultare la tabella dati tecnici (pagine 10 e 12).
Caractéristiquesgénérales
1 Châssis portant en fer de 20 mm d’épaisseur.2 Carrosserie en acier inoxydable.3 Moteur autofreinant (frein en courant continu)
avec protection thermique incorporée.4 Plats chromés sur l’épaisseur avec bords évasés.5 Contrôle électronique de la température et du
temps de contact des plats.6 Dispositifs de sécurité conformes aux normes
CE.7 Levier pour le réglage de la distance entre les
plats.8 Grille de protection.
Pour connaître les caractéristiques spéci#ques du modèle choisi, se référer du tableau des ca-ractéristiques techniques (pages 10 et 12).
2
1
8
5
7
6
4
3
GeneralSpeci#cations
1 Iron supporting frame with thickness of 20 mm.
2 Stainless steel body3 Self-braking motor (direct-current brake)
with built-in thermal protection.4 Thick chromed plates with �ared perimeter.5 Electronic control of temperature and plate
contact time.6 EC certiUed safety devices.7 Lever to adjust the distance between plates.8 Protection grille.
To access the speci#cations explicit to your model, consult the technical data table (pag-es 10 and 12).
Característicasgenerales
1 Armazón portante en hierro de 20 mm de grosor.
2 Carcasa en acero inoxidable.3 Motor autofrenante (freno de corriente con-
tinua) con protección térmica incorporada.4 Platos con canto cromado y con abocinado
perimetral.5 Control electrónico de la temperatura y del
tiempo de contacto de los platos.6 Dispositivos de seguridad conformes a las
normas CE.7 Palanca para regular la distancia entre los platos.8 Rejilla de protección.
Para conocer las características especí#cas de su modelo, consulte el cuadro de datos técnicos (páginas 10 y 12).
AllgemeineEigenschaften
1 Stahl-Trägergestell, Stärke 20 mm.2 Gehäuse aus Edelstahl.3 Selbstbremsender Motor (Gleichstrom-
Bremse) mit eingebautem Wärmeschutz.4 Verchromte Teller mit Stärke mit Außen-
Aussenkung.5 Elektronische Temperatur- und Teller-Kon-
taktzeitkontrolle.6 CE-Sicherheitsvorrichtungen.7 Stellhebel für Tellerabstand.8 Schutzgitter.
Die spezi#schen Eigenschaften Ihres Modells #nden Sie in der Tabelle mit den technischen Daten (Seite 10 und 12).
Общие характеристики
1 Несущая металлическая рама толщиной 20 мм.
2 Корпус из нержавеющей стали.3 Самотормозящий двигатель (тормоз при
постоянном токе) с встроенной тепловой защитой.
4 Хромированные пластины, скошенные по периметру.
5 Электронная система контроля темпера-туры и времени контакта пластин.
6 Защитные устройства, соответствующие нормам ЕС.
7 Регулировочный рычаг расстояния меж-ду пластинами.
8 Защитная решетка.
Для получения соответствующих характе-ристик собственной модели смотрите табли-цу технических данных (страница 10 и 12).
Pizzaform 10-13 17
17 Predisposizioni per l’installazione
Prima di procedere con l’installazione verifìcare le seguenti condizioni necessarie per il corretto funzionamento e manutenzione dell’apparec-chiatura:
1) Movimentazione: Accertarsi che la pavimentazione sia in grado
di supportare il peso dell’apparecchiatura. Movimentare l’apparecchiatura imballata
utilizzando un carrello elevatore e/o un tran-spallet.
2) Allacciamento elettrico: Prevedere una scatola di allacciamento alla
rete elettrica nelle immediate vicinanze.
3) Distanze di sicurezza: È assolutamente necessario rispettare le di-
stanze minime di sicurezza tra l’apparecchia-tura e le altre apparecchiature o materiali inUammabili (vedi pagina 20).
Inoltre è vietato impiegare l’apparecchiatura in ambienti a rischio di esplosione.
Le distanze indicate devono essere aumenta-
te in presenza di materiali sensibili al calore.
Préparation pour l’installation
Avant de procéder à l’installation, contrôler les conditions suivantes, nécessaires au bon fonc-tionnement et à l’entretien de l’appareil:
1) Manutention : VériUer que le sol soit en mesure de suppor-
ter le poids de l’appareil. Déplacer l’appareil emballé en utilisant un
chariot élévateur et/ou un transpalette.
2) Branchement électrique : Prévoir un boîtier de branchement au réseau
électrique à proximité de l’appareil.
3) Distances de sécurité : Il faut impérativement respecter les dis-
tances minimales de sécurité entre le four et tout autre appareil ou matériel in�ammable (voir page 20).
En outre, il est interdit d’utiliser le four dans un lieu à risque d’explosion.
Les distances indiquées doivent être aug-
mentées en présence de matériaux sensibles à la chaleur.
Installation requirements
Before starting the installation, check the fol-lowing conditions that are necessary for proper equipment operation and maintenance:
1) Handling: Make sure that the �oor is able to support
the weight of the equipment. Handle the packaged equipment using a
forklift or a pallet truck.
2) Electrical connection: Provide a box for the connection to the
mains power supply in the immediate sur-roundings.
3) Safety distances: It is mandatory that the minimum safety
distances between the equipment and the other equipment or in�ammable material are respected (see page 20).
It is also prohibited to use the equipment in areas at risk of explosion.
The indicated distances must be increased in
the presence of heat sensitive material.
Predisposiciones para la instalación
Antes de proceder con la instalación, comprue-be las siguientes condiciones necesarias para el correcto funcionamiento y mantenimiento del equipamiento:
1) Desplazamiento: Compruebe que el suelo sea capaz de sopor-
tar el peso del equipamiento. Desplace el equipamiento embalado usando
una carretilla elevadora o un transpalet.
2) Conexión eléctrica: Prevea una caja de conexión a la red eléctrica
en la proximidad inmediata.
3) Distancias de seguridad: Es obligatorio respetar las distancias mí-
nimas de seguridad entre el horno y otros equipos o materiales in�amables (véase la página 20).
Además, se prohíbe utilizar el horno en am-bientes en los que exista el riesgo de explo-siones.
Las distancias indicadas deben aumentarse
si hay materiales sensibles al calor.
Vorbereitungen für die Installation
Vor dem Fortfahren mit der Installation prüfen, ob die nachfolgenden notwendigen Bedingun-gen für ordnungsgemäßen Betrieb und korrek-te Wartung des Maschine erfüllt sind:
1) Handling Prüfen, ob der Bodenbelag das Gewicht des
Maschine tragen kann. Für das Handling des verpackten Maschine einen Hubwagen und/oder eine Transpalette verwenden.
2) Elektroanschluss: In der unmittelbaren Umgebung einen An-
schlusskasten an die Stromversorgung vor-sehen.
3) Sicherheitsabstände: Die Mindestsicherheitsabstände zwischen
Ofen und anderen Geräten oder ent�amm-barem Material müssen unbedingt eingehal-ten werden (siehe Seite 20).
Darüber hinaus ist der Betrieb des Ofens in Räumen mit Explosionsgefahr verboten.
Die angegebenen Abstände müssen erhöht werden, wenn wärmeempUndliche Materi-alien vorhanden sind.
Подготовка для монтажных работ
Перед началом проведения монтажных ра-бот проверить наличие следующих условий, необходимых для правильного функциони-рования и техобслуживания машины:
1) Перемещение: Убедиться, что поверхность пола может
выдержать вес машины. Производить перемещение упакованной
машины при использовании автопогруз-чика и/или тележки для поддонов.
2) Электрическое соединение: Предусмотреть соединительную коробку
электрической сети в непосредственной близости.
3) Расстояния безопасности: Крайне необходимо соблюдать минималь-
ные расстояния безопасности между пе-чью и другим оборудованием или возго-раемыми материалами. (см.страницу 20).
Кроме того, запрещается использование печи во взрывоопасных помещениях.
Указанные расстояния должны быть уве-
личены при наличии материалов, чувстви-тельных к теплу.
18 Pizzaform 10-13
18 Distanze di sicurezza
È assolutamente necessario rispettare le di-stanze minime di sicurezza tra l’apparecchia-tura e le altre apparecchiature o materiali inUammabili (vedi pagina 20).
Inoltre è vietato impiegare l’apparecchiatura in ambienti a rischio di esplosione.
Le distanze indicate devono essere aumenta-
te in presenza di materiali sensibili al calore.
Distances de sécurité
Il faut impérativement respecter les dis-tances minimales de sécurité entre le four et tout autre appareil ou matériel in�ammable (voir page 20).
En outre, il est interdit d’utiliser le four dans un lieu à risque d’explosion.
Les distances indiquées doivent être aug-
mentées en présence de matériaux sensibles à la chaleur.
Safety distances
It is mandatory that the minimum safety distances between the equipment and the other equipment or in�ammable material are respected (see page 20).
It is also prohibited to use the equipment in areas at risk of explosion.
The indicated distances must be increased in
the presence of heat sensitive material.
Distancias de seguridad
Es obligatorio respetar las distancias mínimas de seguridad entre el horno y otros equipos o materiales in�amables (véase la página 20).
Además, se prohíbe utilizar el horno en am-bientes en los que exista el riesgo de explo-siones.
Las distancias indicadas deben aumentarse si
hay materiales sensibles al calor.
Sicherheitsabstände
Die Mindestsicherheitsabstände zwischen Ofen und anderen Geräten oder ent�amm-barem Material müssen unbedingt eingehal-ten werden (siehe Seite 20).
Darüber hinaus ist der Betrieb des Ofens in Räumen mit Explosionsgefahr verboten.
Die angegebenen Abstände müssen erhöht werden, wenn wärmeempUndliche Materi-alien vorhanden sind.
Расстояния безопасности
Крайне необходимо соблюдать минималь-ные расстояния безопасности между пе-чью и другим оборудованием или возго-раемыми материалами. (см.страницу 20).
Кроме того, запрещается использование печи во взрывоопасных помещениях.
Указанные расстояния должны быть уве-
личены при наличии материалов, чувстви-тельных к теплу.
Lasciare libero questo spazio
Leave this area unobstructed
Diesen Platz frei lassen
Laisser cet espace libre
Deje libre este espacio
Оставить свободнымданное пространство
Pizzaform 10-13 19
19 Avvertenze per l’installatore
Gli impianti di gas, acqua, energia elettrica e i locali di installazione degli apparecchi devono rispondere alle norme di sicurezza, antinfortunistiche e antincendio in vigore nel Paese di utilizzo; in caso contrario il Co-struttore non risponderà per eventuali danni diretti o indiretti a persone o cose.
ATTENZIONE!Spegnere sempre l’interruttore elettrico principale durante le operazioni di installa-zione, manutenzione o riparazione dell’ap-parecchiatura.
Prima di eseguire il collegamento elettrico, ac-certarsi che la tensione e la frequenza riportate sulla targhetta caratteristiche corrispondano a quelle dell’impianto d’alimentazione.
A monte dell’apparecchiatura deve essere in-stallato un interruttore di protezione automati-co, di portata adeguata, che abbia una distanza d’apertura dei contatti che consenta la discon-nessione completa.(le caratteristiche relative alla distanza di aper-tura dei contatti e alla corrente di dispersione massima vanno comunque recepite dalla nor-mativa vigente).
Avertissements pour l’installateur
Les installations de gaz, d’eau, d’énergie électrique et les locaux d’installation des appareils doivent satisfaire les normes en matière de sécurité, de prévention des acci-dents et de protection incendie en vigueur dans le pays d’utilisation ; en cas contraire, le fabricant ne pourra être reconnu respon-sable en cas de dommage, direct ou indirect, aux biens ou aux personnes.
ATTENTION !Toujours éteindre l’interrupteur électrique principal pendant les opérations d’installa-tion, d’entretien ou de réparation de l’appa-reil.
Avant d’e�ectuer le branchement électrique, vériUer que la tension et la fréquence reportées sur la plaque signalétique correspondent aux valeurs de l’installation électrique.
Un interrupteur de protection automatique doit être installé en amont de l’appareil. Celui-ci de-vra avoir un débit adéquat et un écart d’ouver-ture des contacts en mesure de couper complè-tement l’alimentation électrique.(Les caractéristiques concernant l’écart d’ouver-ture des contacts et le courant maximum de dispersion doivent être toujours être conformes aux normes en vigueur).
Instructions for the installer
The gas, water, electrical systems and the rooms where the equipment will be installed must comply with the safety, accident pre-vention and #re prevention standards ap-plicable in the country of use; otherwise the Manufacturer shall not be liable for any direct or indirect damage to people or prop-erty.
ATTENTION!Always shut o® the main electric switch when installing, servicing or repairing the equipment.
Before making the electrical connection, make sure that the voltage and frequency stated on the speciUcations plate corresponds to those of the power supply.
A circuit breaker with auto-protection and suf-Ucient capacity must be installed upstream of the equipment; it must have a contact opening distance that permits complete disconnection.(the speciUcations regarding the opening dis-tance of the contacts and the maximum leak-age current must be taken from current regula-tions).
Advertencias para el instalador
Las instalaciones de gas, agua, energía eléc-trica y los locales de instalación de los equi-pos deben cumplir las normas de seguridad, de prevención de accidentes y de prevención de incendios vigentes en el país de uso: si no fuera así, el fabricante no responderá por po-sibles daños directos o indirectos a personas o cosas.
¡ATENCIÓN!Apague siempre el interruptor eléctrico prin-cipal durante las operaciones de instalación, mantenimiento o reparación del equipo.
Antes de realizar la conexión eléctrica, com-pruebe que la tensión y la frecuencia indicadas en la placa de características coincidan con las de la instalación de alimentación.
Aguas arriba del equipo, debe instalarse un interruptor de protección automático, de ca-pacidad adecuada, que tenga una separación de los contactos que permita la desconexión completa.En cualquier caso, las características de separa-ción de los contactos y de corriente de disper-sión máxima deben estar previstas por la nor-mativa vigente.
Hinweise für den Installateur
Die Anlagen für Gas, Wasser und Strom, so-wie die Räume für die Installation der Geräte müssen den im Verwendungsland geltenden Vorschriften zu Sicherheit, Unfallverhütung und Brandschutz entsprechen. Andernfalls haftet der Hersteller nicht für etwaige direk-te oder indirekte Personen- oder Sachschä-den.
ACHTUNG!Während der Installations-, Wartungs- oder Reparaturarbeiten immer den elektrischen Hauptschalter ausschalten.
Vor der Ausführung des Elektroanschlusses prü-fen, ob die auf dem Typenschild angegebene Spannung und Frequenz denen der Anlage zur Stromspeisung entsprechen.
Vor dem Gerät muss ein automatischer Schutz-schalter mit ausreichender Leistung installiert werden, dessen Ö�nungsabstand der Kontakte eine vollständige Trennung erlaubt.(Die Eigenschaften zum Ö�nungsabstand der Kontakte und dem maximalen Fehlerstrom müssen in jedem Fall den geltenden Vorschrif-ten entnommen werden).
Инструкции для монтажника
Системы газа, водоснабжения, электрообо-рудование и помещения монтажа оборудо-вания должны отвечать правилам защиты, техники безопасности и противопожарным нормам, действующим в стране использо-вания оборудования; в противном случае, Изготовитель не несет ответственность за возможный прямой или косвенный ущерб, нанесенный людям или имуществу.
ВНИМАНИЕ!Всегда выключать главный электрический выключатель в ходе проведения операций монтажа, техобслуживания или ремонта оборудования.
Перед осуществлением электрических соеди-нений, убедиться, что напряжение и частота, указанные на паспортной табличке, соответ-ствуют параметрам системы питания.
Перед оборудованием должен быть установ-лен защитный автоматический выключатель соответствующей ёмкости, обладающий рас-стоянием размыкания контактов, обеспечива-ющим полное разъединение.(характеристики, соответствующие рассто-янию размыкания контактов и току макси-мального рассеивания, должны соответство-вать действующему нормативу).
20 Pizzaform 10-13
20
Avertissements pour l’installateur
L’appareil doit nécessairement être raccordé à
L’appareil doit également être inclus dans un système équipotentiel, moyennant la vis située à l'arrière de l’appareil en bas à gauche, signalée per le symbole Ce système équipotentiel doit obligatoirement respecter les normes en vigueur.
Installer l’appareil dans un lieu bien aéré car une mauvaise aération empêche le fonctionnement optimal et compromet le “bien-être” des per-sonnes travaillant près de l’appareil.
Ne pas obstruer le système de ventilation du local où l’appareil est installé. Ne pas obstruer les trous d’aération et d’évacuation de l’appareil et/ou de tout autre appareil.
Une fois l’installation terminée, éliminer les pièces d’emballage selon les réglementations environnementales locales.
Les matériaux d’emballage utilisés sont com-patibles avec l’environnement et peuvent être conservés sans danger ou être incinérés dans une installation spéci"que.
Les éléments en plastique sont recyclables et signalés par ce symbole
Avvertenze per l’installatore
E’ indispensabile collegare l’apparecchiatura ad
L’apparecchiatura inoltre deve essere inclusa in un sistema equipotenziale mediante la vite posta sul retro dell’apparecchiatura in basso a
sinistra contrassegnata dal simbolo Tale sistema equipotenziale deve obbligatoria-mente ottemperare alle norme in vigore.
Installare l’apparecchio in un luogo ben aerato poichè un non corretto ricircolo d’aria impe-disce il funzionamento ottimale ed il “benes-sere” delle persone che lavorano in prossimità dell’apparecchiatura.
Non ostruire il sistema di ventilazione dell’am-biente in cui è installata questa apparecchiatu-ra. Non ostruire i fori di aerazione e di scarico di questa o di altre apparecchiature.
Alla "ne dell’installazione, smaltire gli imballi secondo quanto indicato nelle normative eco-logiche e ambientali del luogo.
I materiali usati per l’imballo sono compatibili con l’ambiente e si possono conservare senza pericolo o bruciare in un apposito impianto di combustione dei ri"uti.
I componenti in plastica soggetti a smaltimento con riciclaggio sono contrassegnati con questo simbolo
Advertencias para el instalador
Es indispensable conectar el equipo a una toma de tierra e"caz. El equipo, además, debe incluirse en un sistema equipotencial mediante el tornillo que se en-cuentra en la parte trasera del equipo, abajo a la izquierda, marcado con el símbolo Este sistema equipotencial debe estar obliga-toriamente en conformidad con las normas vi-gentes.
Instale el equipo en un lugar bien ventilado, ya que una circulación incorrecta del aire impide el funcionamiento óptimo y el bienestar de las personas que trabajan cerca del equipo.
No obstruya el sistema de ventilación del am-biente en el que se instala este equipo. No obs-truya los ori"cios de ventilación y de evacuación de este equipo o de otros.
Cuando acabe la instalación, elimine el embala-je según las disposiciones de las normas ecoló-gicas del lugar.
Los materiales usados para el embalaje son compatibles con el medio ambiente y pueden conservarse sin peligro o quemarse en una ins-talación adecuada de incineración de residuos.
Los componentes de plástico sujetos a elimi-nación con reciclaje están marcados con este símbolo .
Instructions for the installer
The equipment must be earth bonded. The equipment must also be connected to an equipotential system using the screw located at the back of the equipment, to the lower left, marked with the symbol This equipotential system must comply with current standards.
Install the equipment in a well ventilated area, as incorrect air recirculation impedes optimal operation and the “wellbeing” of the people working near the equipment.
Do not obstruct the ventilation system in the area where the equipment is installed. Do not obstruct the ventilation and exhaust holes in this or any other equipment.
At the end of installation, dispose of the pack-aging pursuant to local ecological and environ-mental regulations.
The material used for packaging is compatible with the environment and can be kept safely or burnt in a speci"c waste combustion system.
The plastic components subject to disposal with recycling are marked with this symbol
Инструкции для монтажника
Необходимо обеспечить подсоединение обо-рудования к эффективной системе заземления. Кроме того, оборудование должно быть включено в эквипотенциальную систему посредством винта, расположенного с задней нижней левой стороны машины, обозначенного символом .Данная эквипотенциальная система должна обязательно соответствовать действующим нормативам.
Устанавливать оборудование в хорошо проветри-ваемом помещении, так как несоответствующая рециркуляция воздуха препятствует оптималь-ному функционированию и “хорошему самочув-ствию” лиц, работающих рядом с оборудованием.
Не допускать засорения вентиляционной системы помещения, в котором установлено оборудование. Не допускать засорения вентиляционных и выпуск-ных отверстий этого и другого оборудования.
При завершении монтажных работ обеспечить утилизацию упаковки в соответствии с экологиче-скими нормативами, а также защиты окружающей среды, действующими в месте монтажа оборудо-вания.
Материалы, использованные для упаковки, яв-ляются совместимыми с окружающей средой и могут храниться без какой-либо опасности или сжигаться в соответствующей установке для сжи-гания отходов.
Пластиковые компоненты, являющиеся предме-том утилизации с соответствующей переработкой, обозначаются данным символом .
Hinweise für den Installateur
Das Gerät muss unbedingt an eine wirksame Erdung angeschlossen werden. Daneben muss das Gerät an ein Potentialaus-gleichssystem angeschlossen werden, mit Hilfe der Schraube, die sich unten links an der Rücksei-te des Maschine be"ndet, mit dem Zeichen Dieses Potentialausgleichssystem muss unbe-dingt den geltenden Vorschriften entsprechen.
Das Gerät in einem gut gelüfteten Raum instal-lieren, da ein nicht ordnungsgemäßer Rück~uss der Luft den optimalen Betrieb und das «Wohl-be"nden» der Personen, die in der Nähe des Ge-räts arbeiten, verhindert.
Das Ventilationssystem des Raums, in dem die-ses Gerät installiert wurde, nicht versperren. Die Ö�nungen für Zu- und Abluft von diesem oder anderen Geräten nicht versperren.
Nach Beendigung der Installation die Verpak-kung nach den örtlichen Umweltschutzvor-schriften entsorgen.
Die für die Verpackung verwendeten Materi-alien sind nicht umweltschädlich und können gefahrlos aufbewahrt oder in einer entspre-chenden Müllverbrennungsanlage verbrannt werden.
Die Plastikteile, die dem Recycling zugeführt werden müssen, sind gekennzeichnet mit die-
sem Symbol
Pizzaform 10-13 21
21
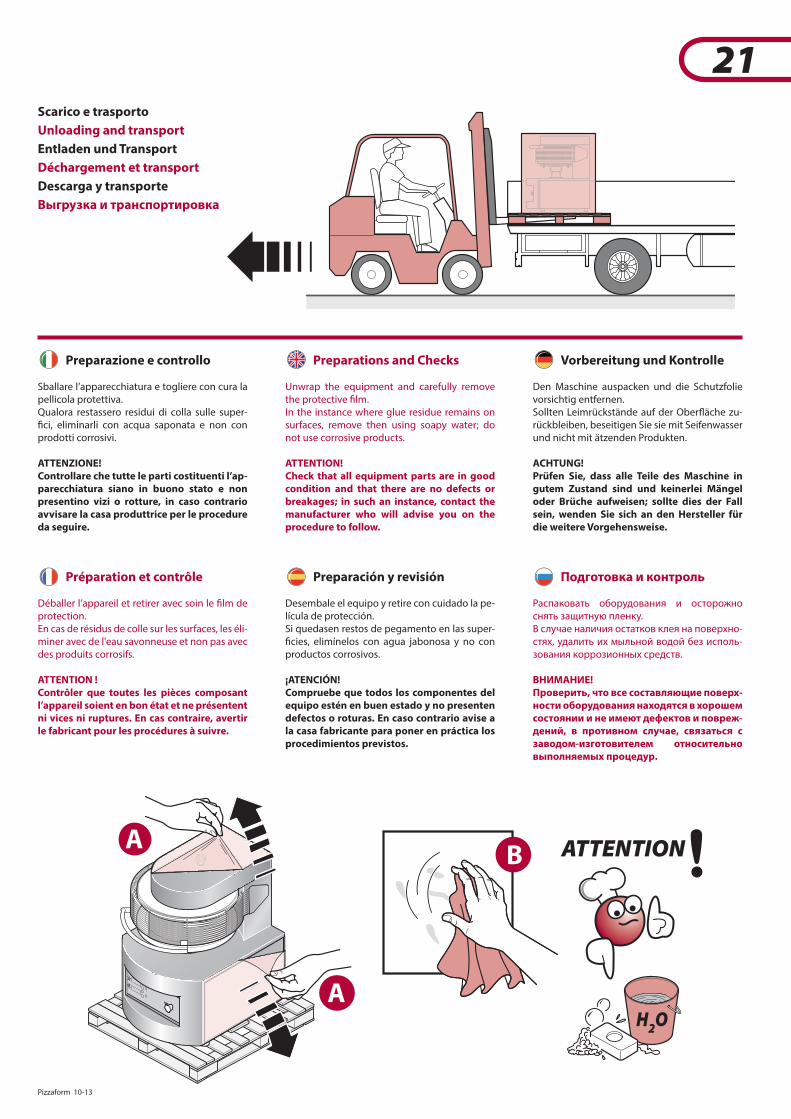
Preparazione e controllo
Sballare l’apparecchiatura e togliere con cura la pellicola protettiva.Qualora restassero residui di colla sulle super-"ci, eliminarli con acqua saponata e non con prodotti corrosivi.
ATTENZIONE!Controllare che tutte le parti costituenti l’ap-parecchiatura siano in buono stato e non presentino vizi o rotture, in caso contrario avvisare la casa produttrice per le procedure da seguire.
Scarico e trasporto
Unloading and transport
Entladen und Transport
Déchargement et transport
Descarga y transporte
Выгрузка и транспортировка
Préparation et contrôle
Déballer l’appareil et retirer avec soin le "lm de protection.En cas de résidus de colle sur les surfaces, les éli-miner avec de l'eau savonneuse et non pas avec des produits corrosifs.
ATTENTION !Contrôler que toutes les pièces composant l’appareil soient en bon état et ne présentent ni vices ni ruptures. En cas contraire, avertir le fabricant pour les procédures à suivre.
A
ATTENTIONB
H2O
A
Preparations and Checks
Unwrap the equipment and carefully remove the protective "lm.In the instance where glue residue remains on surfaces, remove then using soapy water; do not use corrosive products.
ATTENTION!Check that all equipment parts are in good condition and that there are no defects or breakages; in such an instance, contact the manufacturer who will advise you on the procedure to follow.
Preparación y revisión
Desembale el equipo y retire con cuidado la pe-lícula de protección.Si quedasen restos de pegamento en las super-"cies, elimínelos con agua jabonosa y no con productos corrosivos.
¡ATENCIÓN!Compruebe que todos los componentes del equipo estén en buen estado y no presenten defectos o roturas. En caso contrario avise a la casa fabricante para poner en práctica los procedimientos previstos.
Vorbereitung und Kontrolle
Den Maschine auspacken und die Schutzfolie vorsichtig entfernen.Sollten Leimrückstände auf der Ober~äche zu-rückbleiben, beseitigen Sie sie mit Seifenwasser und nicht mit ätzenden Produkten.
ACHTUNG!Prüfen Sie, dass alle Teile des Maschine in gutem Zustand sind und keinerlei Mängel oder Brüche aufweisen; sollte dies der Fall sein, wenden Sie sich an den Hersteller für die weitere Vorgehensweise.
Подготовка и контроль
Распаковать оборудования и осторожно снять защитную пленку.В случае наличия остатков клея на поверхно-стях, удалить их мыльной водой без исполь-зования коррозионных средств.
ВНИМАНИЕ!Проверить, что все составляющие поверх-ности оборудования находятся в хорошем состоянии и не имеют дефектов и повреж-дений, в противном случае, связаться с заводом-изготовителем относительно выполняемых процедур.
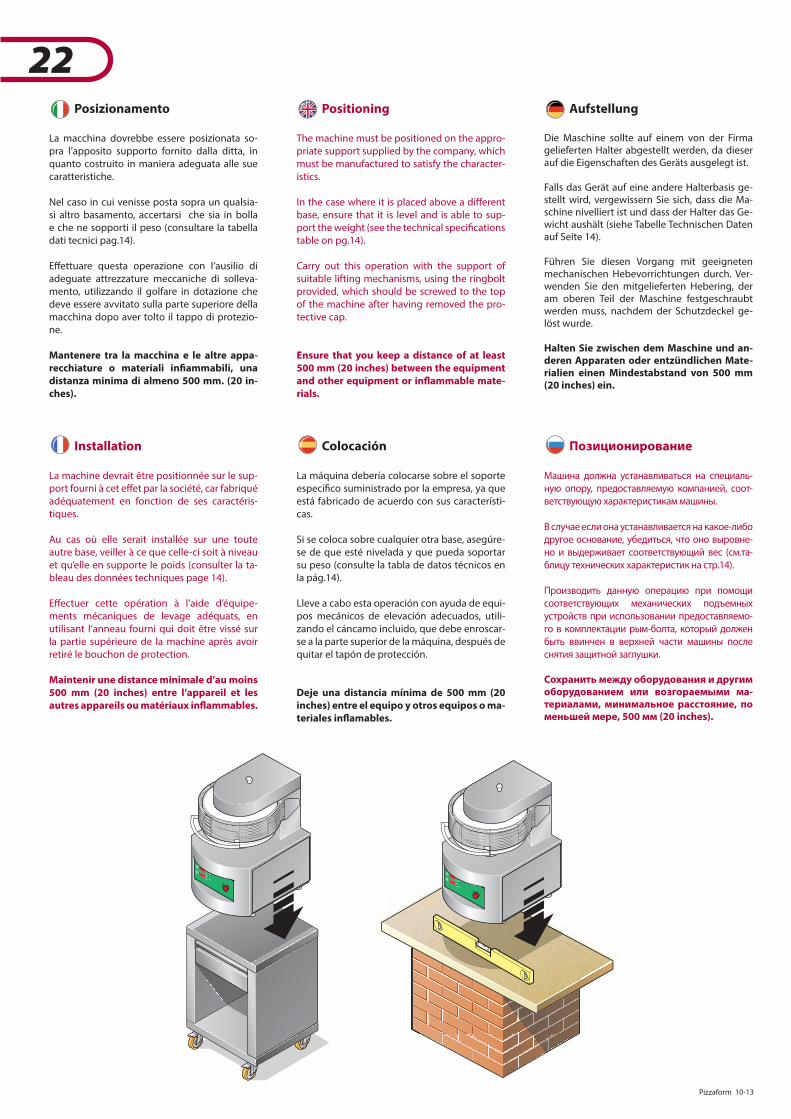
22 Pizzaform 10-13
22Positioning
The machine must be positioned on the appro-priate support supplied by the company, which must be manufactured to satisfy the character-istics.
In the case where it is placed above a di�erent base, ensure that it is level and is able to sup-port the weight (see the technical speci"cations table on pg.14).
Carry out this operation with the support of suitable lifting mechanisms, using the ringbolt provided, which should be screwed to the top of the machine after having removed the pro-tective cap.
Ensure that you keep a distance of at least 500 mm (20 inches) between the equipment and other equipment or in�ammable mate-rials.
Aufstellung
Die Maschine sollte auf einem von der Firma gelieferten Halter abgestellt werden, da dieser auf die Eigenschaften des Geräts ausgelegt ist.
Falls das Gerät auf eine andere Halterbasis ge-stellt wird, vergewissern Sie sich, dass die Ma-schine nivelliert ist und dass der Halter das Ge-wicht aushält (siehe Tabelle Technischen Daten auf Seite 14).
Führen Sie diesen Vorgang mit geeigneten mechanischen Hebevorrichtungen durch. Ver-wenden Sie den mitgelieferten Hebering, der am oberen Teil der Maschine festgeschraubt werden muss, nachdem der Schutzdeckel ge-löst wurde.
Halten Sie zwischen dem Maschine und an-deren Apparaten oder entzündlichen Mate-rialien einen Mindestabstand von 500 mm (20 inches) ein.
Posizionamento
La macchina dovrebbe essere posizionata so-pra l’apposito supporto fornito dalla ditta, in quanto costruito in maniera adeguata alle sue caratteristiche.
Nel caso in cui venisse posta sopra un qualsia-si altro basamento, accertarsi che sia in bolla e che ne sopporti il peso (consultare la tabella dati tecnici pag.14).
E�ettuare questa operazione con l’ausilio di adeguate attrezzature meccaniche di solleva-mento, utilizzando il golfare in dotazione che deve essere avvitato sulla parte superiore della macchina dopo aver tolto il tappo di protezio-ne.
Mantenere tra la macchina e le altre appa-recchiature o materiali in�ammabili, una distanza minima di almeno 500 mm. (20 in-ches).
Colocación
La máquina debería colocarse sobre el soporte especí"co suministrado por la empresa, ya que está fabricado de acuerdo con sus característi-cas.
Si se coloca sobre cualquier otra base, asegúre-se de que esté nivelada y que pueda soportar su peso (consulte la tabla de datos técnicos en la pág.14).
Lleve a cabo esta operación con ayuda de equi-pos mecánicos de elevación adecuados, utili-zando el cáncamo incluido, que debe enroscar-se a la parte superior de la máquina, después de quitar el tapón de protección.
Deje una distancia mínima de 500 mm (20 inches) entre el equipo y otros equipos o ma-teriales in�amables.
Позиционирование
Машина должна устанавливаться на специаль-ную опору, предоставляемую компанией, соот-ветствующую характеристикам машины.
В случае если она устанавливается на какое-либо другое основание, убедиться, что оно выровне-но и выдерживает соответствующий вес (см.та-блицу технических характеристик на стр.14).
Производить данную операцию при помощи соответствующих механических подъемных устройств при использовании предоставляемо-го в комплектации рым-болта, который должен быть ввинчен в верхней части машины после снятия защитной заглушки.
Сохранить между оборудования и другим оборудованием или возгораемыми ма-териалами, минимальное расстояние, по меньшей мере, 500 мм (20 inches).
Installation
La machine devrait être positionnée sur le sup-port fourni à cet e�et par la société, car fabriqué adéquatement en fonction de ses caractéris-tiques.
Au cas où elle serait installée sur une toute autre base, veiller à ce que celle-ci soit à niveau et qu’elle en supporte le poids (consulter la ta-bleau des données techniques page 14).
E�ectuer cette opération à l’aide d’équipe-ments mécaniques de levage adéquats, en utilisant l’anneau fourni qui doit être vissé sur la partie supérieure de la machine après avoir retiré le bouchon de protection.
Maintenir une distance minimale d’au moins 500 mm (20 inches) entre l’appareil et les autres appareils ou matériaux in�ammables.

Pizzaform 10-13 23
23
AC 3 N400
AC 3 230
AC 230
2
1
3
2
1
5
4
3
1
5
4
3
A C D
2
1
5
4
3
=
= N
= T
= S
= R
B
Collegamento elettrico
Il collegamento elettrico deve essere eseguito esclusivamente da personale quali"cato.La targhetta dati tecnici, posta sul retro dell’appa-recchiatura, contiene tutte le informazioni neces-sarie per un corretto allacciamento.L’apparecchio deve essere collegato alla rete di alimentazione con un cavo del tipo H05 RN-F (for-nito dall’installatore).Per e�ettuare questa operazione togliere il pan-nello laterale destro dell’apparecchiatura, collega-re il cavo alla morsettiera e fermarlo con l’appo-sito pressacavo situato sul retro del apparecchio stesso.
Collegare l’apparecchiatura a terra ed inserirla nel circuito equipotenziale; il morsetto atto a tale sco-po si trova sul retro dell’apparecchiatura, ed è con-traddistinto dal simbolo internazionale .Collegare il cavo all’interruttore generale auto-matico (magnetotermico di�erenziale onnipolare con un’apertura dei contatti di almeno 3 mm.), predisposto nelle immediate vicinanze.
Il costruttore declina ogni responsabilità per il mancato rispetto di quanto sopra esposto.
Electrical connections
Only quali"ed personnel must carry out electri-cal connection.The technical data plate, located on the back of the equipment, contains all the necessary infor-mation for correct connection.The equipment must be connected to a power supply with a H05 RN-F type cable (supplied by the installer).To carry out this operation, remove the right side equipment panel, connect the cable to the terminal board and secure it with the relative cable gland located on the back of the equip-ment itself.
Earth the equipment and connect it to the cir-cuit; the terminal intended for this very purpose can be found on the back of the equipment, and is marked with the internationally-recog-nised symbol .Connect the cable to the automatic master switch (omnipolar di�erential magnothermal switch with a contact opening of at least 3 mm), arranged in the immediate vicinity.
The manufacturer will not assume any re-sponsibility in the instance where the above described is not respected.
Elektroanschluss
Der elektrische Anschluss muss von Fachpersonal ausgeführt werden.Das Schild mit den technischen Daten an der Rückseite des Maschine enthält alle erforderlichen Informationen für einen korrekten Anschluss.Der Apparat muss an das Stromnetz mit einem Kabel vom Typ H05 RN-F angeschlossen werden (vom Installateur bereitzustellen).Entfernen Sie dafür das rechte seitliche Paneel, schließen Sie das Kabel an das Klemmenbrett an und blockieren Sie es mit der entsprechenden Zu-gentlastung an der Rückseite des Apparats.
Erden Sie den Maschine und integrieren Sie ihn in das Potentialausgleichssystem; die entsprechen-de Klemme dafür be"ndet sich an der Rückseite des Erden Sie den Maschine und integrieren Sie ihn in das Potentialausgleichssystem und ist durch das internationale Symbol gekennzeichnet.Schließen Sie das Kabel an den automatischen Hauptschalter an (allpoliger FI-LS-Schalter mit mindestens 3 mm Kontaktö�nung), das in unmit-telbarer Nähe vorgesehen ist.
Der Hersteller weist jede Verantwortung für die Nichtbeachtung der obigen Anweisun-gen von sich.
Branchement électrique
Le branchement électrique doit exclusivement être e�ectué par du personnel quali"é.La plaque signalétique, située à l'arrière de l’ap-pareil, contient toutes les informations néces-saires pour un branchement correct.L’appareil doit être branché au réseau d'alimen-tation avec un câble de type H05 RN-F (fourni par l'installateur).Pour e�ectuer cette opération, retirer le pan-neau latéral droit de l’appareil, brancher le câble au bornier et le bloquer avec le serre-câble pré-vu à cet e�et et situé à l'arrière de l'appareil.
Brancher l’appareil à la terre et l'insérer dans le circuit équipotentiel; la borne prévue à cet e�et se trouve à l'arrière de l’appareil et est signalée par le symbole international .Brancher le câble à l'interrupteur général auto-matique (magnétothermique di�érentiel omni-polaire avec une ouverture des contacts d'au moins 3 mm.), prévu à proximité de l'appareil.
Le fabricant décline toute responsabilité en cas de non-respect de ce qui est susmen-tionné.
Conexión eléctrica
La conexión eléctrica debe ser realizada única-mente por personal cuali"cado.La placa de datos técnicos, situada en la parte trasera del equipo, contiene toda la informa-ción necesaria para una conexión correcta.El equipo debe conectarse a la red de alimenta-ción con un cable de tipo H05 RN-F (suministra-do por el instalador).Para realizar esta operación, desmonte el panel lateral derecho del equipo, conecte el cable a la regleta de bornes y fíjelo con el sujetacable previsto, situado en la parte trasera del equipo.
Conecte el equipo a tierra e intégrelo en el cir-cuito equipotencial; el borne destinado a tal "n se encuentra en la parte trasera del horno y está marcado con el símbolo internacional .Conecte el cable al interruptor general auto-mático (magnetotérmico diferencial omnipolar con una separación mínima entre contactos de 3 mm), dispuesto en la proximidad inmediata.
El fabricante declina toda responsabilidad por el incumplimiento de lo arriba expuesto.
Электрическое соединение
Электрическое соединение должно осущест-вляться только квалифицированным персоналом.Табличка технических характеристик, распо-ложенная с задней стороны оборудования, содержит все сведения, необходимые для соот-ветствующего соединения.Печь должна подсоединяться к сети питания посредством кабеля типа H05 RN-F (предостав-ляемого монтажником).Для проведения данной операции снять пра-вую боковую панель оборудования, подсоеди-нить кабель к клеммной колодке и закрепить посредством специального кабельного зажи-ма, расположенного с задней стороны самого устройства.Заземлить соединение и установить ее в эквипо-тенциальный контур; зажим, предусмотренный в данных целях, находится с задней стороны соединение, и обозначен международным сим-волом .Подсоединить кабель к главному автоматиче-скому выключателю (термомагнитный диффе-ренциальный всеполюсный с размыканием контактов, по меньшей мере, 3 мм.), предусмо-тренному в непосредственной близости.
Изготовитель не несет ответственность за несоблюдение вышеуказанных инструкций.
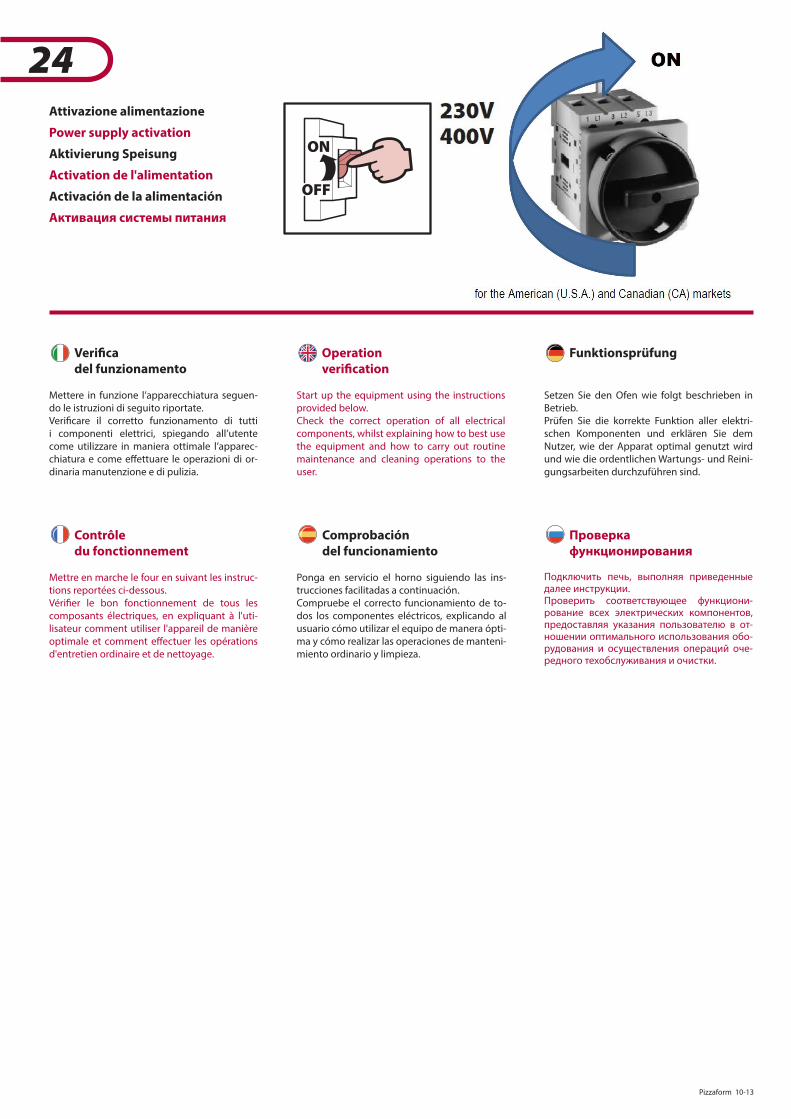
24 Pizzaform 10-13
24230V
400VON
OFF
Attivazione alimentazione
Power supply activation
Aktivierung Speisung
Activation de l'alimentation
Activación de la alimentación
Активация системы питания
Veri�cadel funzionamento
Mettere in funzione l’apparecchiatura seguen-do le istruzioni di seguito riportate.Veri"care il corretto funzionamento di tutti i componenti elettrici, spiegando all’utente come utilizzare in maniera ottimale l’apparec-chiatura e come e�ettuare le operazioni di or-dinaria manutenzione e di pulizia.
Contrôledu fonctionnement
Mettre en marche le four en suivant les instruc-tions reportées ci-dessous.Véri"er le bon fonctionnement de tous les composants électriques, en expliquant à l'uti-lisateur comment utiliser l'appareil de manière optimale et comment e�ectuer les opérations d'entretien ordinaire et de nettoyage.
Operationveri�cation
Start up the equipment using the instructions provided below.Check the correct operation of all electrical components, whilst explaining how to best use the equipment and how to carry out routine maintenance and cleaning operations to the user.
Comprobacióndel funcionamiento
Ponga en servicio el horno siguiendo las ins-trucciones facilitadas a continuación.Compruebe el correcto funcionamiento de to-dos los componentes eléctricos, explicando al usuario cómo utilizar el equipo de manera ópti-ma y cómo realizar las operaciones de manteni-miento ordinario y limpieza.
Funktionsprüfung
Setzen Sie den Ofen wie folgt beschrieben in Betrieb.Prüfen Sie die korrekte Funktion aller elektri-schen Komponenten und erklären Sie dem Nutzer, wie der Apparat optimal genutzt wird und wie die ordentlichen Wartungs- und Reini-gungsarbeiten durchzuführen sind.
Проверкафункционирования
Подключить печь, выполняя приведенные далее инструкции.Проверить соответствующее функциони-рование всех электрических компонентов, предоставляя указания пользователю в от-ношении оптимального использования обо-рудования и осуществления операций оче-редного техобслуживания и очистки.
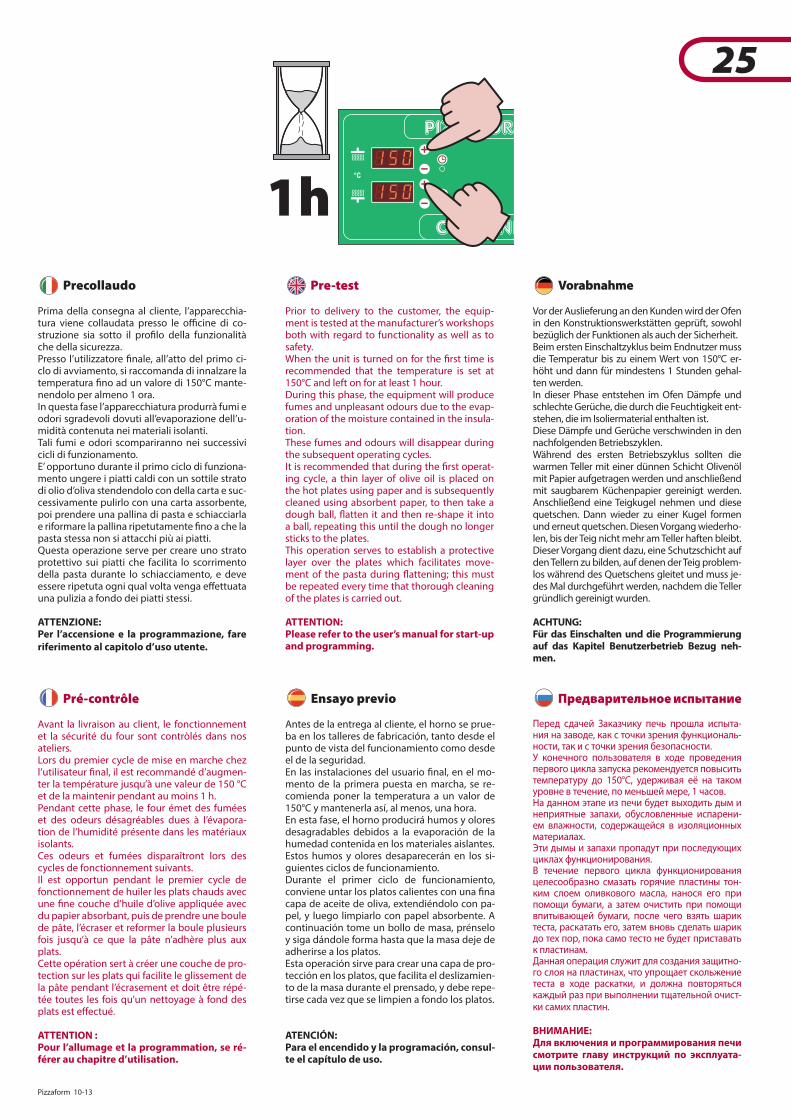
Pizzaform 10-13 25
25
1h
Precollaudo
Prima della consegna al cliente, l’apparecchia--
struzione sia sotto il pro"lo della funzionalità che della sicurezza.Presso l’utilizzatore "nale, all’atto del primo ci-clo di avviamento, si raccomanda di innalzare la temperatura "no ad un valore di 150°C mante-nendolo per almeno 1 ora.In questa fase l’apparecchiatura produrrà fumi e odori sgradevoli dovuti all’evaporazione dell’u-midità contenuta nei materiali isolanti.Tali fumi e odori scompariranno nei successivi cicli di funzionamento.E’ opportuno durante il primo ciclo di funziona-mento ungere i piatti caldi con un sottile strato di olio d’oliva stendendolo con della carta e suc-cessivamente pulirlo con una carta assorbente, poi prendere una pallina di pasta e schiacciarla e riformare la pallina ripetutamente "no a che la pasta stessa non si attacchi più ai piatti.Questa operazione serve per creare uno strato protettivo sui piatti che facilita lo scorrimento della pasta durante lo schiacciamento, e deve essere ripetuta ogni qual volta venga e�ettuata una pulizia a fondo dei piatti stessi.
ATTENZIONE:Per l’accensione e la programmazione, fare riferimento al capitolo d’uso utente.
Pré-contrôle
Avant la livraison au client, le fonctionnement et la sécurité du four sont contròlés dans nos ateliers.Lors du premier cycle de mise en marche chez l’utilisateur "nal, il est recommandé d’augmen-ter la température jusqu’à une valeur de 150 °C et de la maintenir pendant au moins 1 h.Pendant cette phase, le four émet des fumées et des odeurs désagréables dues à l’évapora-tion de l’humidité présente dans les matériaux isolants.Ces odeurs et fumées disparaîtront lors des cycles de fonctionnement suivants.Il est opportun pendant le premier cycle de fonctionnement de huiler les plats chauds avec une "ne couche d’huile d’olive appliquée avec du papier absorbant, puis de prendre une boule de pâte, l’écraser et reformer la boule plusieurs fois jusqu’à ce que la pâte n’adhère plus aux plats.Cette opération sert à créer une couche de pro-tection sur les plats qui facilite le glissement de la pâte pendant l’écrasement et doit être répé-tée toutes les fois qu’un nettoyage à fond des plats est e�ectué.
ATTENTION :Pour l’allumage et la programmation, se ré-férer au chapitre d’utilisation.
Pre-test
Prior to delivery to the customer, the equip-ment is tested at the manufacturer’s workshops both with regard to functionality as well as to safety.When the unit is turned on for the "rst time is recommended that the temperature is set at 150°C and left on for at least 1 hour.During this phase, the equipment will produce fumes and unpleasant odours due to the evap-oration of the moisture contained in the insula-tion.These fumes and odours will disappear during the subsequent operating cycles.It is recommended that during the "rst operat-ing cycle, a thin layer of olive oil is placed on the hot plates using paper and is subsequently cleaned using absorbent paper, to then take a dough ball, ~atten it and then re-shape it into a ball, repeating this until the dough no longer sticks to the plates.This operation serves to establish a protective layer over the plates which facilitates move-ment of the pasta during ~attening; this must be repeated every time that thorough cleaning of the plates is carried out.
ATTENTION:Please refer to the user’s manual for start-up and programming.
Vorabnahme
Vor der Auslieferung an den Kunden wird der Ofen in den Konstruktionswerkstätten geprüft, sowohl bezüglich der Funktionen als auch der Sicherheit.Beim ersten Einschaltzyklus beim Endnutzer muss die Temperatur bis zu einem Wert von 150°C er-höht und dann für mindestens 1 Stunden gehal-ten werden.In dieser Phase entstehen im Ofen Dämpfe und schlechte Gerüche, die durch die Feuchtigkeit ent-stehen, die im Isoliermaterial enthalten ist.Diese Dämpfe und Gerüche verschwinden in den nachfolgenden Betriebszyklen.Während des ersten Betriebszyklus sollten die warmen Teller mit einer dünnen Schicht Olivenöl mit Papier aufgetragen werden und anschließend mit saugbarem Küchenpapier gereinigt werden. Anschließend eine Teigkugel nehmen und diese quetschen. Dann wieder zu einer Kugel formen und erneut quetschen. Diesen Vorgang wiederho-len, bis der Teig nicht mehr am Teller haften bleibt.Dieser Vorgang dient dazu, eine Schutzschicht auf den Tellern zu bilden, auf denen der Teig problem-los während des Quetschens gleitet und muss je-des Mal durchgeführt werden, nachdem die Teller gründlich gereinigt wurden.
ACHTUNG:Für das Einschalten und die Programmierung auf das Kapitel Benutzerbetrieb Bezug neh-men.
Ensayo previo
Antes de la entrega al cliente, el horno se prue-ba en los talleres de fabricación, tanto desde el punto de vista del funcionamiento como desde el de la seguridad.En las instalaciones del usuario "nal, en el mo-mento de la primera puesta en marcha, se re-comienda poner la temperatura a un valor de 150°C y mantenerla así, al menos, una hora.En esta fase, el horno producirá humos y olores desagradables debidos a la evaporación de la humedad contenida en los materiales aislantes.Estos humos y olores desaparecerán en los si-guientes ciclos de funcionamiento.Durante el primer ciclo de funcionamiento, conviene untar los platos calientes con una "na capa de aceite de oliva, extendiéndolo con pa-pel, y luego limpiarlo con papel absorbente. A continuación tome un bollo de masa, prénselo y siga dándole forma hasta que la masa deje de adherirse a los platos.Esta operación sirve para crear una capa de pro-tección en los platos, que facilita el deslizamien-to de la masa durante el prensado, y debe repe-tirse cada vez que se limpien a fondo los platos.
ATENCIÓN:Para el encendido y la programación, consul-te el capítulo de uso.
Предварительное испытание
Перед сдачей Заказчику печь прошла испыта-ния на заводе, как с точки зрения функциональ-ности, так и с точки зрения безопасности.У конечного пользователя в ходе проведения первого цикла запуска рекомендуется повысить температуру до 150°C, удерживая её на таком уровне в течение, по меньшей мере, 1 часов.На данном этапе из печи будет выходить дым и неприятные запахи, обусловленные испарени-ем влажности, содержащейся в изоляционных материалах.Эти дымы и запахи пропадут при последующих циклах функционирования.В течение первого цикла функционирования целесообразно смазать горячие пластины тон-ким слоем оливкового масла, нанося его при помощи бумаги, а затем очистить при помощи впитывающей бумаги, после чего взять шарик теста, раскатать его, затем вновь сделать шарик до тех пор, пока само тесто не будет приставать к пластинам.Данная операция служит для создания защитно-го слоя на пластинах, что упрощает скольжение теста в ходе раскатки, и должна повторяться каждый раз при выполнении тщательной очист-ки самих пластин.
ВНИМАНИЕ:Для включения и программирования печи смотрите главу инструкций по эксплуата-ции пользователя.
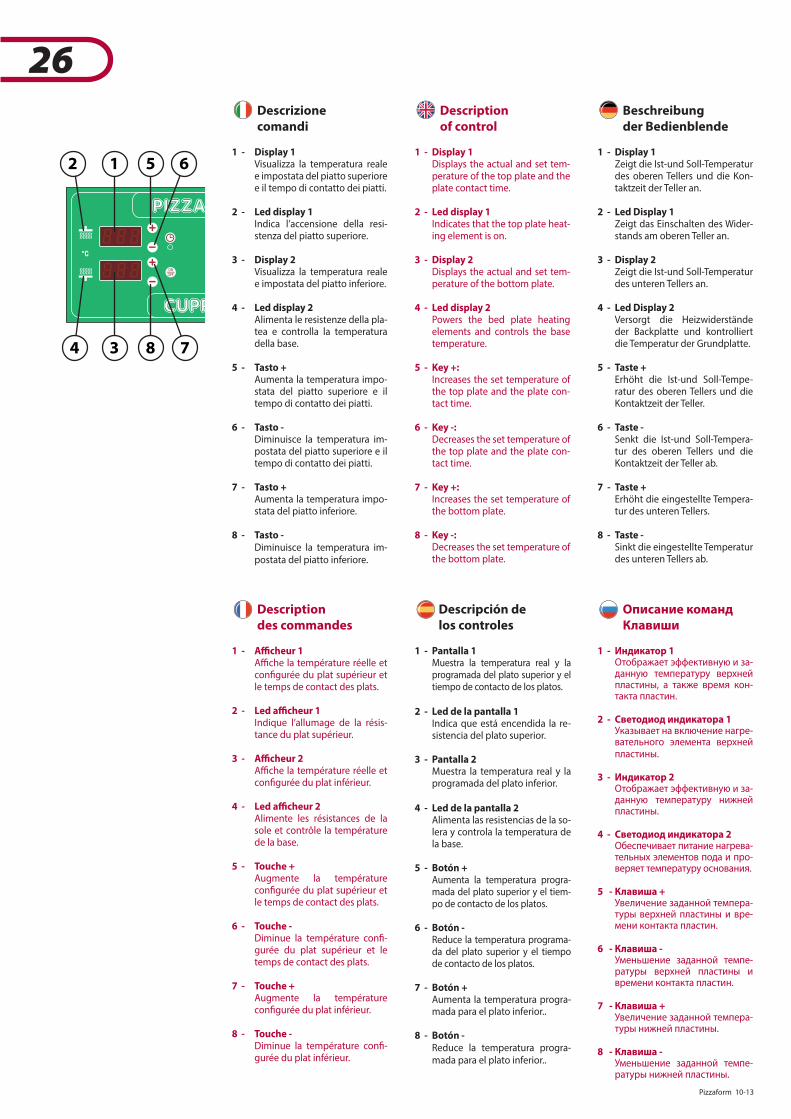
26 Pizzaform 10-13
26Descrizionecomandi
1 - Display 1 Visualizza la temperatura reale
e impostata del piatto superiore e il tempo di contatto dei piatti.
2 - Led display 1 Indica l’accensione della resi-
stenza del piatto superiore.
3 - Display 2 Visualizza la temperatura reale
e impostata del piatto inferiore.
4 - Led display 2 Alimenta le resistenze della pla-
tea e controlla la temperatura della base.
5 - Tasto + Aumenta la temperatura impo-
stata del piatto superiore e il tempo di contatto dei piatti.
6 - Tasto - Diminuisce la temperatura im-
postata del piatto superiore e il tempo di contatto dei piatti.
7 - Tasto + Aumenta la temperatura impo-
stata del piatto inferiore.
8 - Tasto - Diminuisce la temperatura im-
postata del piatto inferiore.
Descriptionof control
1 - Display 1 Displays the actual and set tem-
perature of the top plate and the plate contact time.
2 - Led display 1 Indicates that the top plate heat-
ing element is on.
3 - Display 2 Displays the actual and set tem-
perature of the bottom plate.
4 - Led display 2 Powers the bed plate heating
elements and controls the base temperature.
5 - Key +: Increases the set temperature of
the top plate and the plate con-tact time.
6 - Key -: Decreases the set temperature of
the top plate and the plate con-tact time.
7 - Key +: Increases the set temperature of
the bottom plate.
8 - Key -: Decreases the set temperature of
the bottom plate.
Beschreibungder Bedienblende
1 - Display 1 Zeigt die Ist-und Soll-Temperatur
des oberen Tellers und die Kon-taktzeit der Teller an.
2 - Led Display 1 Zeigt das Einschalten des Wider-
stands am oberen Teller an.
3 - Display 2 Zeigt die Ist-und Soll-Temperatur
des unteren Tellers an.
4 - Led Display 2 Versorgt die Heizwiderstände
der Backplatte und kontrolliert die Temperatur der Grundplatte.
5 - Taste + Erhöht die Ist-und Soll-Tempe-
ratur des oberen Tellers und die Kontaktzeit der Teller.
6 - Taste - Senkt die Ist-und Soll-Tempera-
tur des oberen Tellers und die Kontaktzeit der Teller ab.
7 - Taste + Erhöht die eingestellte Tempera-
tur des unteren Tellers.
8 - Taste - Sinkt die eingestellte Temperatur
des unteren Tellers ab.
Descriptiondes commandes
1 - A�cheur 1
con"gurée du plat supérieur et le temps de contact des plats.
2 - Led a�cheur 1 Indique l’allumage de la résis-
tance du plat supérieur.
3 - A�cheur 2
con"gurée du plat inférieur.
4 - Led a�cheur 2 Alimente les résistances de la
sole et contrôle la température de la base.
5 - Touche + Augmente la température
con"gurée du plat supérieur et le temps de contact des plats.
6 - Touche - Diminue la température con"-
gurée du plat supérieur et le temps de contact des plats.
7 - Touche + Augmente la température
con"gurée du plat inférieur.
8 - Touche - Diminue la température con"-
gurée du plat inférieur.
Описание командКлавиши
1 - Индикатор 1 Отображает эффективную и за-
данную температуру верхней пластины, а также время кон-такта пластин.
2 - Светодиод индикатора 1 Указывает на включение нагре-
вательного элемента верхней пластины.
3 - Индикатор 2 Отображает эффективную и за-
данную температуру нижней пластины.
4 - Светодиод индикатора 2 Обеспечивает питание нагрева-
тельных элементов пода и про-веряет температуру основания.
5 - Клавиша + Увеличение заданной темпера-
туры верхней пластины и вре-мени контакта пластин.
6 - Клавиша - Уменьшение заданной темпе-
ратуры верхней пластины и времени контакта пластин.
7 - Клавиша + Увеличение заданной темпера-
туры нижней пластины.
8 - Клавиша - Уменьшение заданной темпе-
ратуры нижней пластины.
Descripción delos controles
1 - Pantalla 1 Muestra la temperatura real y la
programada del plato superior y el tiempo de contacto de los platos.
2 - Led de la pantalla 1 Indica que está encendida la re-
sistencia del plato superior.
3 - Pantalla 2 Muestra la temperatura real y la
programada del plato inferior.
4 - Led de la pantalla 2 Alimenta las resistencias de la so-
lera y controla la temperatura de la base.
5 - Botón + Aumenta la temperatura progra-
mada del plato superior y el tiem-po de contacto de los platos.
6 - Botón - Reduce la temperatura programa-
da del plato superior y el tiempo de contacto de los platos.
7 - Botón + Aumenta la temperatura progra-
mada para el plato inferior..
8 - Botón - Reduce la temperatura progra-
mada para el plato inferior..
12
4
5 6
3 8 7

Pizzaform 10-13 27
27
13
14
10 9
11
12
Descrizionecomandi
9 - Led Timer Indica lo stato di impostazione
del tempo di contatto.
10 - Tasto Timer Visualizza sul display 1 il tempo
di contatto dei piatti in secondi.
11 - Tasto ON/OFF Accende e spegne la macchina;
attiva la funzione “countdown” .
12 - Pulsante OFF Spegne la macchina e interrom-
pe la risalita del piatto inferiore in caso di emergenza.
13 - Leva regolazione serve per variare la distanza dei
due piatti e quindi lo spessore del disco di pasta; spostando la leva in senso antiorario lo spes-sore diminuisce, spostandola in senso orario lo spessore au-menta.
14 - Griglia di protezione serve per evitare che si possa-
no inserire corpi estranei fra i piatti; se si rilascia la protezione durante lo schiacciamento, il movimento del piatto inferiore viene istantaneamente interrot-to e invertito.
Descriptionof control
9 - Led Timer Indicates the contact time set-
ting status.
10 - Timer Key Presents the plate contact time
in seconds on display 1.
11 - ON/OFF key: Switches the machine on and
o�; activates the “countdown” function.
12 - OFF key Switches the machine o� and
interrupts resurgence of the bottom plate in an emergency.
13 - Adjustment lever adjusts the distance between
the two plates and therefore, the dough disk depth; move the lever anti-clockwise to de-crease the depth and move it clockwise to increase it.
14 - Protection grille prevents foreign bodies pen-
etrating in between the plates; where the protection is released during ~attening, the bottom plate movement is immediately interrupted and diverted.
Beschreibungder Bedienblende
9 - Led Timer Zeigt den Einstellzustand der
Kontaktzeit an.
10 - Timer-Taster Zeigt am Display 1 die Kontakt-
zeit der Teller in Sekunden an.
11 - Taste ON/OFF Schaltet die Maschine ein und
aus; aktiviert die Funktion “Countdown”.
12 - Taster OFF Schaltet die Maschine aus und
unterbricht das Anheben des unteren Tellers im Notfall.
13 - Stellhebel dient zum Verändern des Ab-
stands der beiden Teller und so-mit der Stärke der Teigscheibe; durch Verändern des Hebels im Gegenuhrzeigersinn wird die Stärke kleiner, im Uhrzeigersinn hingegen wird die Stärke grö-ßer.
14 - Schutzgitter verhindert, dass Fremdkörper
zwischen die Teller kommen können; wenn der Schutz wäh-rend des Quetschens gelöst wird, hält die Bewegung des unteren Tellers sofort an und wird umgekehrt.
Descriptiondes commandes
9 - Led Minuteur Indique l’état de con"guration
du temps de contact.
10 - Touche Minuteur
temps de contact des plats en secondes.
11 - Touche ON/OFF Allume et éteint la machine ; active
la fonction “compte à rebours” .
12 - Bouton OFF Éteint la machine et interrompt
la remontée du plat inférieur en cas d’urgence.
13 - Levier de réglage Sert à modi"er la distance des
deux plats et donc l’épaisseur du disque de pâte ; en déplaçant le levier dans le sens contraire des aiguilles d’une montre l’épaisseur diminue, en le déplaçant dans le sens des aiguilles d’une montre l’épaisseur augmente.
14 - Grille de protection Sert à empêcher l’introduction
de corps étrangers entre les plats ; si la protection est relâ-chée pendant l’écrasement, le mouvement du plat inférieur est instantanément interrompu et inversé.
Описание командКлавиши
9 - Светодиод таймера Указывает статус настройки
времени контакта.
10 - Клавиша таймера Отображает на индикаторе 1
время контакта пластин в се-кундах.
11 - Клавиша ON/OFF (ВКЛ./ВЫКЛ.)
Обеспечивает включение и выключение машины; активи-рует функцию “отсчета”.
12 - Кнопка OFF (ВЫКЛ.) Обеспечивает выключение
машины и прерывает подня-тие нижней пластины в ава-рийной ситуации.
13 - Регулировочный рычаг служит для изменения рас-
стояния двух пластин, а поэто-му толщины диска теста, при перемещении рычага против часовой стрелки, толщина уменьшается, при его смеще-нии по часовой стрелке, тол-щина увеличивается.
14 - Защитная решетка служит для предотвращения
попадания посторонних пред-метов между пластинами; при отпускании защиты в ходе рас-катки, движение нижней пла-стины прерывается.
Descripción delos controles
9 - Led del temporizador Indica el estado de programa-
ción del tiempo de contacto.
10 - Botón Temporizador Muestra en la pantalla 1 el tiem-
po de contacto de los platos, en segundos.
11 - Botón ON/OFF Enciende y apaga la máquina;
activa la función “cuenta atrás”.
12 - Botón OFF Apaga la máquina e interrumpe
la subida del plato inferior en caso de emergencia.
13 - Palanca de regulación sirve para variar la distancia de
los dos platos y por tanto el gro-sor del disco de masa; movien-do la palanca en sentido contra-rio al de las agujas del reloj se reduce el grosor, y moviéndolo en el sentido de las agujas del reloj se aumenta.
14 - Rejilla de protección sirve para evitar que se puedan
introducir cuerpos extraños en-tre los platos; si se suelta la pro-tección durante el prensado, el movimiento del plato inferior se interrumpe e invierte inmedia-tamente..

28 Pizzaform 10-13
28Avvertenze perl’utilizzatore
Questa apparecchiatura è stata concepita per la spianatura di palline di pasta per pizza o prodotti alimentari analoghi con le moda-lità indicate in questo libretto.
Un uso diverso da quanto indicato è conside-rato improprio, potenzialmente pericoloso per persone e animali e potrebbe danneg-giare irrimediabilmente l’apparecchiatura.
L’uso improprio dell’apparecchiatura fa de-cadere la garanzia; il costruttore non si ritie-ne inoltre responsabile per danni a persone, animali o cose.
PERICOLO DI INCENDIO:Lasciare l’area intorno all’apparecchiatura libera e pulita da combustibili. Non tenere materiali in�ammabili in prossimità di que-sta apparecchiatura.
Tutti i modelli descritti in questo libretto hanno parti che si scaldano per contatto diretto, per convezione d’aria o fumi e irraggiamento: at-tenzione rischi di ustione! Evitare qualsiasi ma-nipolazione di parti senza adeguate protezioni.
ATTENZIONE:È vietato appoggiare sui piatti solidi o liqui-di in�ammabili, ad esempio superalcolici, durante il funzionamento.Sorvegliare l’apparecchiatura durante tutto il suo funzionamento, non lasciare pietanze sui piatti senza custodia!
Avertissementspour l’utilisateur
Cet appareil est conçu exclusivement pour l’étalage de boules de pâte pour pizzas ou produits alimentaires analogues, selon les conditions indiquées sur la notice.
Tout autre usage doit être considéré comme inapproprié, potentiellement dangereux pour les personnes et les animaux, et sus-ceptible d’endommager l’appareil de ma-nière irréparable.
L’utilisation inappropriée de l’appareil annule le droit à la garantie; le fabricant ne peut étre tenu pour responsable en cas de dommages aux biens, aux personnes ou aux animaux.
RISQUE D’INCENDIE :Laisser un espace libre et sans de combus-tibles autour de l’appareil. Ne placer aucun matériau in�ammable près de l’appareil.
Tous les modèles décrits dans cette notice ont des parties chau�ées par contact direct, par convection d’air ou fumée et par rayonnement : attention au risque de brûlures ! Éviter d’en manipuler les pièces sans porter les protections appropriées.
ATTENTION :il est interdit de poser sur les plats des so-lides ou des liquides in�ammables, comme par exemple des liqueurs, pendant le fonc-tionnement.Surveiller l’appareil pendant toute sa durée de fonctionnement et ne laisser aucun ali-ment sur les plats sans surveillance!
Instructions forthe user
This equipment was designed exclusively for �attening dough balls to make pizza or similar food products as per the methods in-dicated in this booklet.
Any use other than what is indicated is con-sidered improper, potentially dangerous for people and animals and could cause irrepa-rable damage to the equipment.
Improper equipment will void the warranty; furthermore, the manufacturer does not consider itself liable for damage to people, animals or property.
FIRE HAZARDLeave the area around the equipment free and clean of combustibles. Do not keep in-�ammable material near this equipment.
All of the models described in this handbook have parts that are heated by direct contact, by air convection or fumes and radiation: atten-tion - risk of burns! Do not handle parts without suitable protection.
ATTENTION:It is prohibited to place in�ammable solids or liquids, such as spirits, on the plates dur-ing operation.Supervise the equipment when in operation and do not leave food on the plates unsuper-vised!
Advertenciaspara el usuario
Este equipo se ha concebido exclusivamen-te para aplanar bollos de masa para pizza o productos alimentarios similares con las mo-dalidades indicadas en este manual.
Un uso distinto del indicado se considera impropio, potencialmente peligroso para personas y animales, y podría dañar irreme-diablemente el equipo.
El uso impropio del equipo provocará la anu-lación de la garantía. El fabricante no será responsable por daños a personas, animales o cosas.
PELIGRO DE INCENDIO:Deje el área alrededor del equipo libre y lim-pia de combustibles. No mantenga materia-les in�amables cerca de este equipo.
Todos los modelos descritos en este manual tienen partes que se calientan por contacto directo, por convección de aire o humos y por radiación: ¡cuidado con el peligro de quemadu-ras! Evite cualquier manipulación de partes sin protecciones adecuadas.
ATENCIÓN:Está prohibido apoyar en los platos sólidos o líquidos in�amables, como bebidas alcohóli-cas de alta graduación, durante el funciona-miento.Vigile el equipo durante todo su funciona-miento, ¡no deje alimentos en los platos sin supervisión!
Hinweise für den Nutzer
Dieses Gerät wurde ausschließlich für das Pressen und Ebnen von Pizzateig oder ähn-lichen Speisen auf die in diesem Handbuch angegebene Art und Weise entwickelt.Ein von den Anweisungen abweichender Ge-brauch gilt als unsachgemäß, potentiell ge-fährlich für Menschen und Tiere und könnte das Gerät unrettbar beschädigen.
Bei unsachgemäßem Gebrauch des Geräts erlischt die Garantie. Darüber hinaus ist der Hersteller nicht haftbar für Schäden an Per-sonen, Tieren oder Sachen.
BRANDGEFAHR:Den Bereich um das Gerät von brennbaren Sto¬en frei und sauber halten. Keine ent-�ammbaren Materialien in der Nähe dieses Geräts aufbewahren.
Alle Modelle, die in diesem Handbuch beschrie-ben werden, besitzen Teile, die sich durch di-rekten Kontakt, Luftströmung oder Dampf und Strahlung erhitzten: Achtung, Verbrennungsge-fahr! Jede Handhabung von Teilen ohne ange-messenen Schutz vermeiden.
ACHTUNG:Es ist verboten, während des Betriebs ent-zündliche Feststo¬e oder Flüssigkeiten auf die heißen Teller zu legen.Das Gerät während des gesamten Betriebs überwachen, keine Speisen unbeaufsichtigt auf den Tellern lassen!
Инструкции дляпользователя
Данная машина была разработана для раскат-ки шариков теста для пиццы или аналогичных продуктов питания в соответствии с указания-ми, приведенными в данном руководстве.
Использование, отличное от указанного, счи-тается несоответствующим, потенциально опасным для людей и животных, и может при-вести к непоправимому ущербу оборудова-ния.
Несоответствующее использование оборудо-вания приводит к утрате гарантии; изготови-тель не несет ответственность за ущерб, нане-сенный людям, животным или имуществу.
ОПАСНОСТЬ ПОЖАРА:Оставить зону вокруг оборудования свобод-ной и очищенной от горючих материалов. Не допускать хранения возгораемых материалов рядом с данным оборудованием.
Все модели, описанные в данном руководстве, имеют компоненты, нагреваемые при прямом контакте, в связи с воздушной или дымной кон-векцией и излучением: соблюдать осторожность в связи с риском ожогов! Не допускать манипуля-ции частей без соответствующей защиты.
ВНИМАНИЕ:Запрещается позиционировать на пластины возгораемые твердые или жидкие вещества, например, алкогольные напитки, в ходе функ-ционирования.Обеспечивать контроль за машиной в течение всего времени функционирования, не оставлять пищевые продукты на пластинах без присмотра!
Pizzaform 10-13 29
29ATTENZIONE:
Spegnere sempre l’interruttore elettrico principale alla �ne dell’utilizzo dell’apparec-chiatura, soprattutto durante le operazioni di pulizia o in caso di lunga inattività.
Se si nota una qualsiasi anomalia (es. cavo di alimentazione danneggiato, ecc..), cattivo fun-zionamento o guasto, non utilizzare l’apparec-chiatura e contattare un Centro di Assistenza autorizzato dal Costruttore. Esigere parti di ricambio originali pena il decadimento della Garanzia.
Posizionare in un posto visibile i numeri telefo-nici di emergenza.
Questa apparecchiatura non è adatta all’uso da parte di persone (inclusi i bambini) con capacità "siche, sensoriali o mentali, ridotte o con man-canza di esperienza e conoscenza, a meno che una persona responsabile della loro sicurezza fornisca a queste una supervisione o un’istru-zione riguardo l’uso dell’apparecchiatura.
Il personale che utilizza l’apparecchiatura deve essere professionalmente preparato e va periodicamente addestrato sul suo utiliz-zo e sulle norme di sicurezza e prevenzione degli incidenti.
I bambini devono essere sorvegliati per assi-curarsi che non giochino con l’apparecchia-tura o con parti di essa.
ATTENTION :
Toujours éteindre l’interrupteur électrique principal en �n d’utilisation de l’appareil, surtout pendant les opérations de net-toyage ou en cas d’inutilisation prolongée.
En cas d’anomalie (ex: câble d’alimentation abî-mé, etc..), mauvais fonctionnement ou panne, ne pas utiliser l’appareil et contacter le Service Après-Vente agréé. Demander des pièces de rechange d’origine sous peine de suppression de la Garantie.
Placer dans un endroit visible les numéros de téléphone pour les urgences.
Cet appareil n’est pas adapté pour être uti-lisé par des personnes ayant des capacités physiques, sensorielles ou mentales réduites (enfants compris), ou sans l’expérience et les connaissances nécessaires, sauf sous la supervi-sion d’une personne responsable de leur sécu-rité ou en mesure de leur fournir les indications nécessaires sur l’utilisation de l’appareil.
Le personnel utilisant l’appareil doit possé-der une formation professionnelle adéquate et suivre périodiquement une mise à jour sur son utilisation et sur les normes en matière de sécurité et de prévention des accidents.
Les enfants doivent être surveillés pour évi-ter qu’ils ne jouent avec l’appareil ou ses composants.
ATTENTION:
Always turn o¬ the main electrical switch when no longer using the equipment, espe-cially during cleaning operations or a pro-longed period of inactivity.
If you notice any anomaly (ex. damaged power cable, etc...), poor operation or failure, do not use the equipment and contact a service centre authorised by the manufacturer. Original spare parts must be used under penalty of cancella-tion of the warranty.
Place the emergency telephone numbers in a visible location.
This equipment is not suitable for use by peo-ple (including children) with reduced physical, sensorial or mental capacity or those lacking experience and knowledge, unless a person who is responsible for their safety supervises them or provides them with instruction regard-ing equipment use.
Personnel using the equipment must be professionally prepared and periodically trained in its use and in safety and accident prevention regulations.
Children must be supervised to make sure they do not play with the equipment or its parts.
ATENCIÓN:
Apague siempre el interruptor eléctrico prin-cipal cuando acabe de usar el equipo, sobre todo durante las operaciones de limpieza o en caso de un periodo de inactividad largo.
Si nota cualquier anomalía (por ej. cable de ali-mentación dañado, etc.), un mal funcionamien-to o averías, no use el equipo y póngase en con-tacto con un centro de asistencia autorizado por el fabricante. Exija piezas de repuesto originales para evitar la a anulación de la garantía.
Coloque los números de teléfono de emergen-cia en un lugar visible.
Este equipo no es adecuado para su uso por parte de personas (incluidos los niños) con ca-pacidades físicas, sensoriales o mentales redu-cidas o con falta de experiencia o conocimiento, excepto si una persona responsable de su segu-ridad proporciona a estas personas supervisión o instrucción con respecto al uso del equipo.
El personal que usa el equipo debe estar pre-parado profesionalmente y debe formarse periódicamente acerca del uso y de las nor-mas de seguridad y prevención de acciden-tes.
Los niños deben estar supervisados para asegurar que no jueguen con el equipo o con partes de este.
ВНИМАНИЕ:
Всегда выключать главный электрический вы-ключатель при завершении использования оборудования, в большей степени, в ходе про-ведения операций очистки или в случае дли-тельных простоев.
В случае выявления каких-либо аномалий (напри-мер, поврежденный силовой кабель и т.д..), пло-хого функционирования или неисправности, не использовать оборудование и связаться с Сервис-ным Центром, авторизованным Изготовителем. Использовать только оригинальные запасные под угрозой утраты гарантии.
Позиционировать в видимое место аварийные номера телефонов.
Данное оборудование не предназначено для использования лицами (в том числе детьми) со сниженными физическими, чувствительными или умственными способностями, а также при отсут-ствии опыта и знаний, за исключением случаев, когда лицо, отвечающее за их безопасность, обе-спечивает их контроль или обучение в отношении эксплуатации оборудования.
Персонал, использующий оборудование, дол-жен быть профессионально подготовленным и проходить периодическую подготовку в от-ношении эксплуатации, правил техники безо-пасности и профилактики несчастных случаев.
Дети должны находиться под контролем в це-лях гарантии того, чтобы они не играли с обо-рудованием или его частями.
ACHTUNG:
Nach Verwendung des Geräts immer den Hauptschalter ausschalten, vor allem wäh-rend der Reinigungsarbeiten oder bei länge-rem Nichtgebrauch.
Wird eine wie auch immer geartete Störung (Bsp. beschädigtes Zuleitungskabel, usw.), eine Fehlfunktion oder ein Defekt festgestellt, das Gerät nicht mehr benutzen und ein vom Her-steller autorisiertes Kundendienstzentrum kon-taktieren. Verlangen Sie Original-Ersatzteile, da sonst Ihre Garantie erlischt.
Telefonische Notfallnummern gut sichtbar an-bringen.
Dieses Gerät ist nicht für die Nutzung durch Personen (einschließlich Kindern) vorgesehen, die eingeschränkte körperliche oder geistige Fähigkeiten oder Sinnenseinschränkungen be-sitzen, oder Personen mit fehlender Erfahrung und fehlenden Kenntnissen, außer sie werden von einer verantwortlichen Person überwacht oder erhalten von ihr Anweisungen zur Nut-zung des Geräts.
Das Personal, das dieses Gerät verwendet, muss professionell vorbereitet sein und re-gelmäßig geschult bezüglich Nutzung des Geräts, Sicherheitsvorschriften und Unfall-verhütung. Kinder müssen überwacht werden, um si-cherzustellen, dass diese nicht mit dem Ge-rät oder mit Teilen davon spielen.
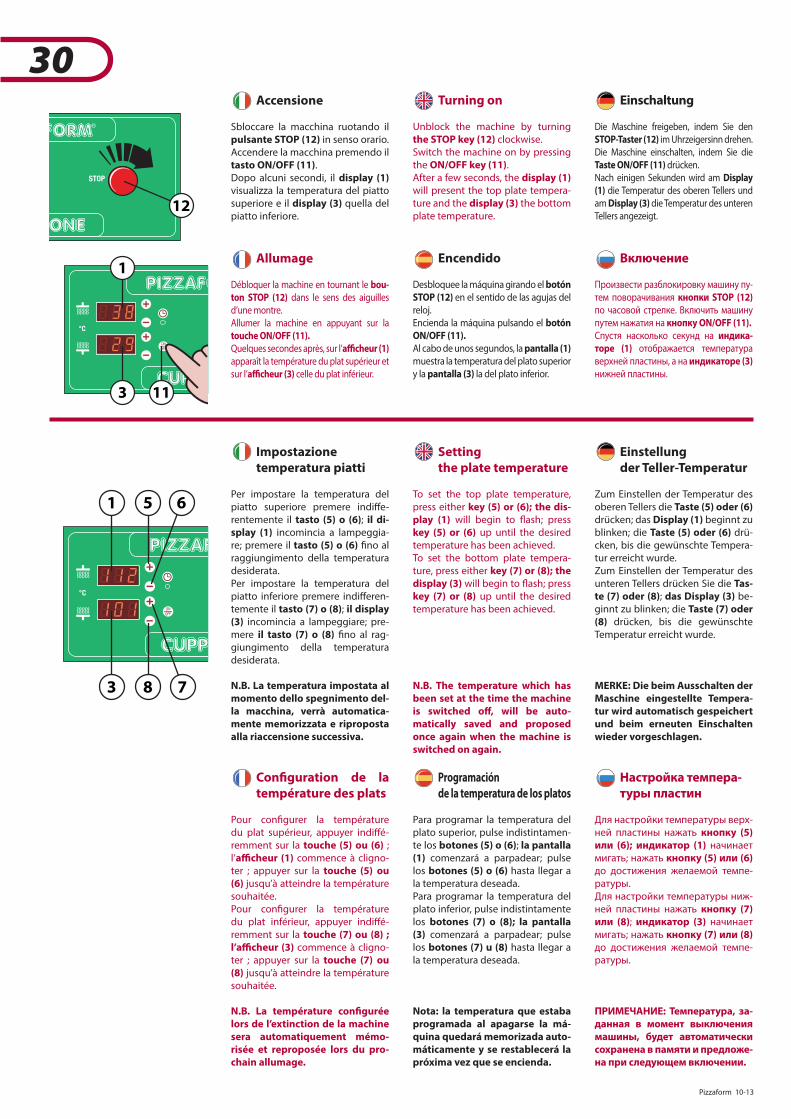
30 Pizzaform 10-13
30Accensione
Sbloccare la macchina ruotando il pulsante STOP (12) in senso orario.Accendere la macchina premendo il tasto ON/OFF (11). Dopo alcuni secondi, il display (1) visualizza la temperatura del piatto superiore e il display (3) quella del piatto inferiore.
Turning on
Unblock the machine by turning the STOP key (12) clockwise.Switch the machine on by pressing the ON/OFF key (11). After a few seconds, the display (1) will present the top plate tempera-ture and the display (3) the bottom plate temperature.
Einschaltung
Die Maschine freigeben, indem Sie den STOP-Taster (12) im Uhrzeigersinn drehen.Die Maschine einschalten, indem Sie die Taste ON/OFF (11) drücken. Nach einigen Sekunden wird am Display (1) die Temperatur des oberen Tellers und am Display (3) die Temperatur des unteren Tellers angezeigt.
Allumage
Débloquer la machine en tournant le bou-ton STOP (12) dans le sens des aiguilles d’une montre.Allumer la machine en appuyant sur la touche ON/OFF (11). Quelques secondes après, sur l’a�cheur (1) apparaît la température du plat supérieur et sur l’a�cheur (3) celle du plat inférieur.
Encendido
Desbloquee la máquina girando el botón STOP (12) en el sentido de las agujas del reloj.Encienda la máquina pulsando el botón ON/OFF (11). Al cabo de unos segundos, la pantalla (1) muestra la temperatura del plato superior y la pantalla (3) la del plato inferior.
Включение
Произвести разблокировку машину пу-тем поворачивания кнопки STOP (12) по часовой стрелке. Включить машину путем нажатия на кнопку ON/OFF (11). Спустя насколько секунд на индика-торе (1) отображается температура верхней пластины, а на индикаторе (3) нижней пластины.
Impostazionetemperatura piatti
Per impostare la temperatura del piatto superiore premere indi�e-rentemente il tasto (5) o (6); il di-splay (1) incomincia a lampeggia-re; premere il tasto (5) o (6) "no al raggiungimento della temperatura desiderata.Per impostare la temperatura del piatto inferiore premere indi�eren-temente il tasto (7) o (8); il display (3) incomincia a lampeggiare; pre-mere il tasto (7) o (8) "no al rag-giungimento della temperatura desiderata.
N.B. La temperatura impostata al momento dello spegnimento del-la macchina, verrà automatica-mente memorizzata e riproposta alla riaccensione successiva.
Setting the plate temperature
To set the top plate temperature, press either key (5) or (6); the dis-play (1) will begin to ~ash; press key (5) or (6) up until the desired temperature has been achieved.To set the bottom plate tempera-ture, press either key (7) or (8); the display (3) will begin to ~ash; press key (7) or (8) up until the desired temperature has been achieved.
N.B. The temperature which has been set at the time the machine is switched o¬, will be auto-matically saved and proposed once again when the machine is switched on again.
Einstellungder Teller-Temperatur
Zum Einstellen der Temperatur des oberen Tellers die Taste (5) oder (6) drücken; das Display (1) beginnt zu blinken; die Taste (5) oder (6) drü-cken, bis die gewünschte Tempera-tur erreicht wurde.Zum Einstellen der Temperatur des unteren Tellers drücken Sie die Tas-te (7) oder (8); das Display (3) be-ginnt zu blinken; die Taste (7) oder (8) drücken, bis die gewünschte Temperatur erreicht wurde.
MERKE: Die beim Ausschalten der Maschine eingestellte Tempera-tur wird automatisch gespeichert und beim erneuten Einschalten wieder vorgeschlagen.
Con�guration de la température des plats
Pour con"gurer la température du plat supérieur, appuyer indi�é-remment sur la touche (5) ou (6) ; l’a�cheur (1) commence à cligno-ter ; appuyer sur la touche (5) ou (6) jusqu’à atteindre la température souhaitée.Pour con"gurer la température du plat inférieur, appuyer indi�é-remment sur la touche (7) ou (8) ; l’a�cheur (3) commence à cligno-ter ; appuyer sur la touche (7) ou (8) jusqu’à atteindre la température souhaitée.
N.B. La température con�gurée lors de l’extinction de la machine sera automatiquement mémo-risée et reproposée lors du pro-chain allumage.
Programación de la temperatura de los platos
Para programar la temperatura del plato superior, pulse indistintamen-te los botones (5) o (6); la pantalla (1) comenzará a parpadear; pulse los botones (5) o (6) hasta llegar a la temperatura deseada.Para programar la temperatura del plato inferior, pulse indistintamente los botones (7) o (8); la pantalla (3) comenzará a parpadear; pulse los botones (7) u (8) hasta llegar a la temperatura deseada.
Nota: la temperatura que estaba programada al apagarse la má-quina quedará memorizada auto-máticamente y se restablecerá la próxima vez que se encienda.
Настройка темпера-туры пластин
Для настройки температуры верх-ней пластины нажать кнопку (5) или (6); индикатор (1) начинает мигать; нажать кнопку (5) или (6) до достижения желаемой темпе-ратуры.Для настройки температуры ниж-ней пластины нажать кнопку (7) или (8); индикатор (3) начинает мигать; нажать кнопку (7) или (8) до достижения желаемой темпе-ратуры.
ПРИМЕЧАНИЕ: Температура, за-данная в момент выключения машины, будет автоматически сохранена в памяти и предложе-на при следующем включении.
1
3 11
12
1 5 6
3 8 7
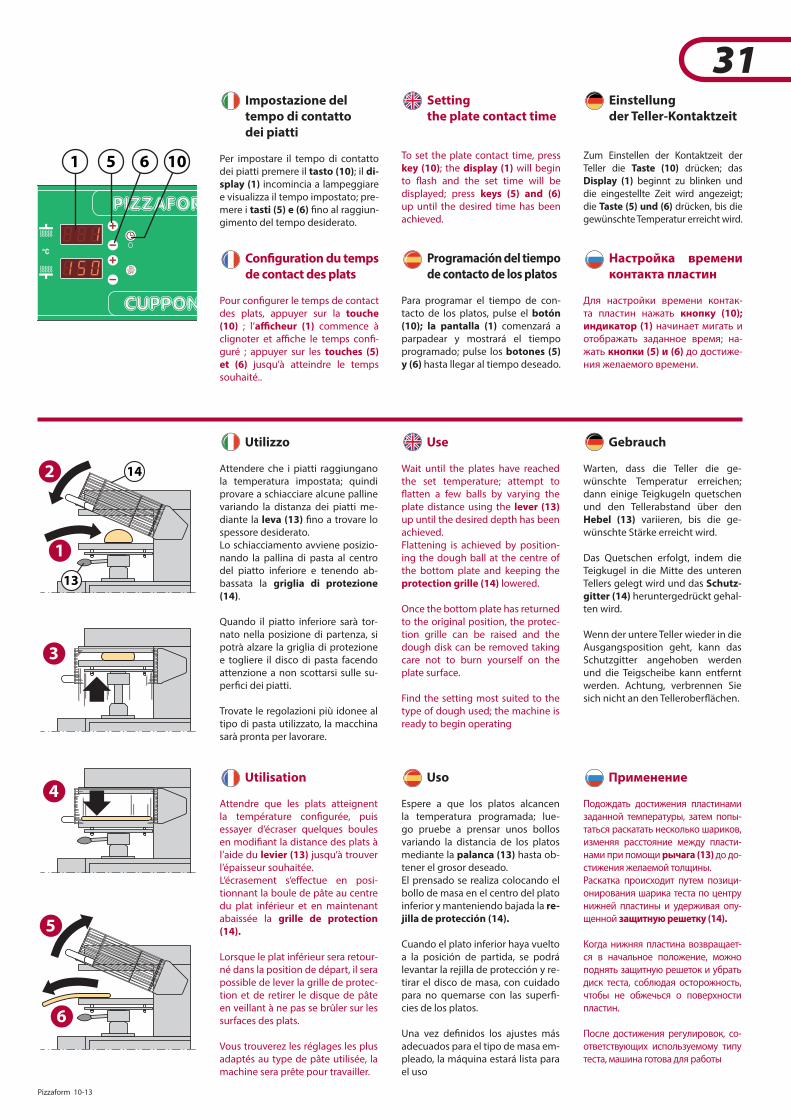
Pizzaform 10-13 31
31Impostazione deltempo di contattodei piatti
Per impostare il tempo di contatto dei piatti premere il tasto (10); il di-splay (1) incomincia a lampeggiare e visualizza il tempo impostato; pre-mere i tasti (5) e (6) "no al raggiun-gimento del tempo desiderato.
Setting the plate contact time
To set the plate contact time, press key (10); the display (1) will begin to ~ash and the set time will be displayed; press keys (5) and (6) up until the desired time has been achieved.
Einstellungder Teller-Kontaktzeit
Zum Einstellen der Kontaktzeit der Teller die Taste (10) drücken; das Display (1) beginnt zu blinken und die eingestellte Zeit wird angezeigt; die Taste (5) und (6) drücken, bis die gewünschte Temperatur erreicht wird.
Con�guration du temps de contact des plats
Pour con"gurer le temps de contact des plats, appuyer sur la touche (10) ; l’a�cheur (1) commence à
-guré ; appuyer sur les touches (5) et (6) jusqu’à atteindre le temps souhaité..
Programación del tiempo de contacto de los platos
Para programar el tiempo de con-tacto de los platos, pulse el botón (10); la pantalla (1) comenzará a parpadear y mostrará el tiempo programado; pulse los botones (5) y (6) hasta llegar al tiempo deseado.
Настройка времени контакта пластин
Для настройки времени контак-та пластин нажать кнопку (10); индикатор (1) начинает мигать и отображать заданное время; на-жать кнопки (5) и (6) до достиже-ния желаемого времени.
Utilizzo
Attendere che i piatti raggiungano la temperatura impostata; quindi provare a schiacciare alcune palline variando la distanza dei piatti me-diante la leva (13) "no a trovare lo spessore desiderato.Lo schiacciamento avviene posizio-nando la pallina di pasta al centro del piatto inferiore e tenendo ab-bassata la griglia di protezione (14).
Quando il piatto inferiore sarà tor-nato nella posizione di partenza, si potrà alzare la griglia di protezione e togliere il disco di pasta facendo attenzione a non scottarsi sulle su-per"ci dei piatti.
Trovate le regolazioni più idonee al tipo di pasta utilizzato, la macchina sarà pronta per lavorare.
Use
Wait until the plates have reached the set temperature; attempt to ~atten a few balls by varying the plate distance using the lever (13) up until the desired depth has been achieved.Flattening is achieved by position-ing the dough ball at the centre of the bottom plate and keeping the protection grille (14) lowered.
Once the bottom plate has returned to the original position, the protec-tion grille can be raised and the dough disk can be removed taking care not to burn yourself on the plate surface.
Find the setting most suited to the type of dough used; the machine is ready to begin operating
Gebrauch
Warten, dass die Teller die ge-wünschte Temperatur erreichen; dann einige Teigkugeln quetschen und den Tellerabstand über den Hebel (13) variieren, bis die ge-wünschte Stärke erreicht wird.
Das Quetschen erfolgt, indem die Teigkugel in die Mitte des unteren Tellers gelegt wird und das Schutz-gitter (14) heruntergedrückt gehal-ten wird.
Wenn der untere Teller wieder in die Ausgangsposition geht, kann das Schutzgitter angehoben werden und die Teigscheibe kann entfernt werden. Achtung, verbrennen Sie sich nicht an den Tellerober~ächen.
Utilisation
Attendre que les plats atteignent la température con"gurée, puis essayer d’écraser quelques boules en modi"ant la distance des plats à l’aide du levier (13) jusqu’à trouver l’épaisseur souhaitée.L’écrasement s’e�ectue en posi-tionnant la boule de pâte au centre du plat inférieur et en maintenant abaissée la grille de protection (14).
Lorsque le plat inférieur sera retour-né dans la position de départ, il sera possible de lever la grille de protec-tion et de retirer le disque de pâte en veillant à ne pas se brûler sur les surfaces des plats.
Vous trouverez les réglages les plus adaptés au type de pâte utilisée, la machine sera prête pour travailler.
Uso
Espere a que los platos alcancen la temperatura programada; lue-go pruebe a prensar unos bollos variando la distancia de los platos mediante la palanca (13) hasta ob-tener el grosor deseado.El prensado se realiza colocando el bollo de masa en el centro del plato inferior y manteniendo bajada la re-jilla de protección (14).
Cuando el plato inferior haya vuelto a la posición de partida, se podrá levantar la rejilla de protección y re-tirar el disco de masa, con cuidado para no quemarse con las super"-cies de los platos.
Una vez de"nidos los ajustes más adecuados para el tipo de masa em-pleado, la máquina estará lista para el uso
Применение
Подождать достижения пластинами заданной температуры, затем попы-таться раскатать несколько шариков, изменяя расстояние между пласти-нами при помощи рычага (13) до до-стижения желаемой толщины.Раскатка происходит путем позици-онирования шарика теста по центру нижней пластины и удерживая опу-щенной защитную решетку (14).
Когда нижняя пластина возвращает-ся в начальное положение, можно поднять защитную решеток и убрать диск теста, соблюдая осторожность, чтобы не обжечься о поверхности пластин.
После достижения регулировок, со-ответствующих используемому типу теста, машина готова для работы
1 5 6 10
2
3
4
5
6
1
13
14
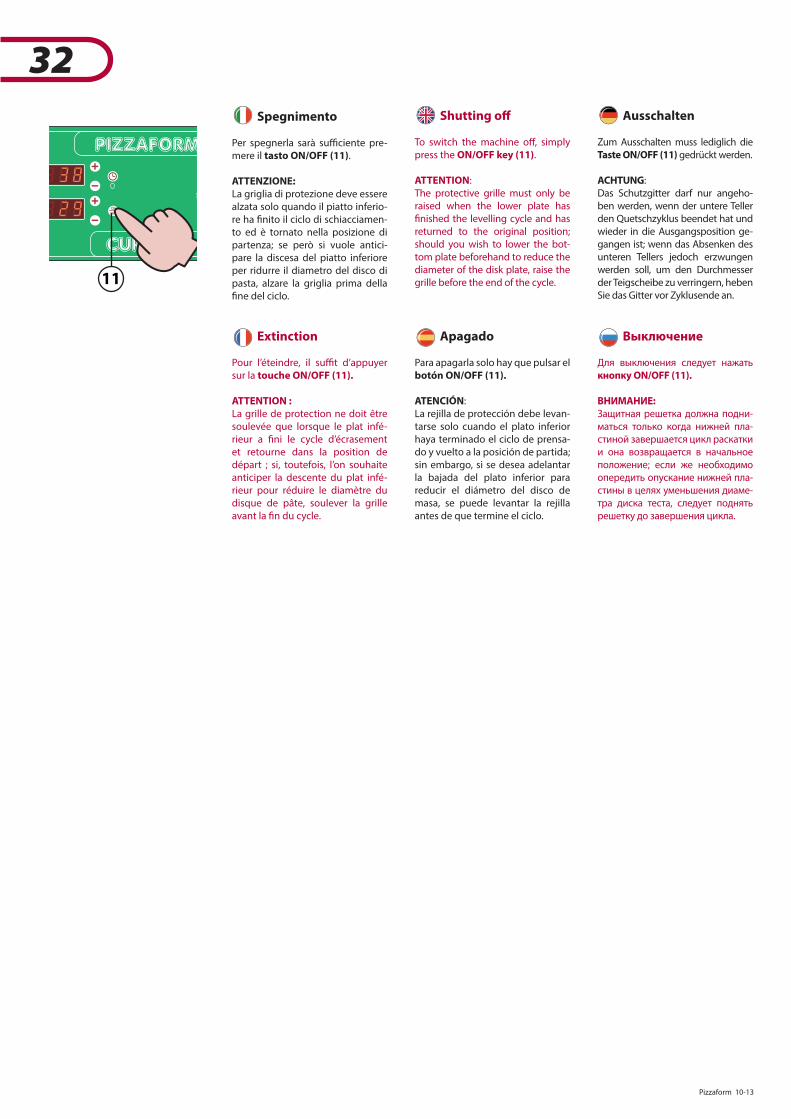
32 Pizzaform 10-13
32Spegnimento
-mere il tasto ON/OFF (11).
ATTENZIONE:La griglia di protezione deve essere alzata solo quando il piatto inferio-re ha "nito il ciclo di schiacciamen-to ed è tornato nella posizione di partenza; se però si vuole antici-pare la discesa del piatto inferiore per ridurre il diametro del disco di pasta, alzare la griglia prima della "ne del ciclo.
Extinction
sur la touche ON/OFF (11).
ATTENTION :La grille de protection ne doit être soulevée que lorsque le plat infé-rieur a "ni le cycle d’écrasement et retourne dans la position de départ ; si, toutefois, l’on souhaite anticiper la descente du plat infé-rieur pour réduire le diamètre du disque de pâte, soulever la grille avant la "n du cycle.
Shutting o¬
To switch the machine o�, simply press the ON/OFF key (11).
ATTENTION:The protective grille must only be raised when the lower plate has "nished the levelling cycle and has returned to the original position; should you wish to lower the bot-tom plate beforehand to reduce the diameter of the disk plate, raise the grille before the end of the cycle.
Apagado
Para apagarla solo hay que pulsar el botón ON/OFF (11).
ATENCIÓN:La rejilla de protección debe levan-tarse solo cuando el plato inferior haya terminado el ciclo de prensa-do y vuelto a la posición de partida; sin embargo, si se desea adelantar la bajada del plato inferior para reducir el diámetro del disco de masa, se puede levantar la rejilla antes de que termine el ciclo.
Ausschalten
Zum Ausschalten muss lediglich die Taste ON/OFF (11) gedrückt werden.
ACHTUNG:Das Schutzgitter darf nur angeho-ben werden, wenn der untere Teller den Quetschzyklus beendet hat und wieder in die Ausgangsposition ge-gangen ist; wenn das Absenken des unteren Tellers jedoch erzwungen werden soll, um den Durchmesser der Teigscheibe zu verringern, heben Sie das Gitter vor Zyklusende an.
Выключение
Для выключения следует нажать кнопку ON/OFF (11).
ВНИМАНИЕ:Защитная решетка должна подни-маться только когда нижней пла-стиной завершается цикл раскатки и она возвращается в начальное положение; если же необходимо опередить опускание нижней пла-стины в целях уменьшения диаме-тра диска теста, следует поднять решетку до завершения цикла.
11
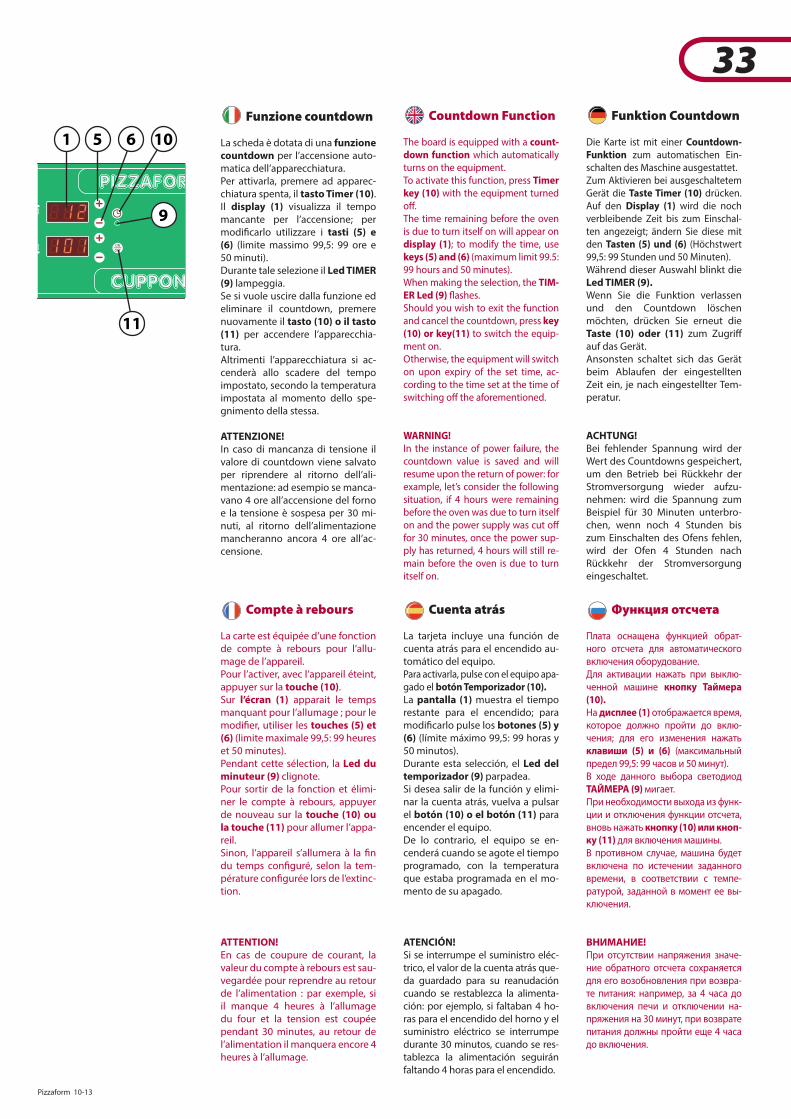
Pizzaform 10-13 33
33Funzione countdown
La scheda è dotata di una funzione countdown per l’accensione auto-matica dell’apparecchiatura.Per attivarla, premere ad apparec-chiatura spenta, il tasto Timer (10).Il display (1) visualizza il tempo mancante per l’accensione; per modi"carlo utilizzare i tasti (5) e (6) (limite massimo 99,5: 99 ore e 50 minuti).Durante tale selezione il Led TIMER (9) lampeggia.Se si vuole uscire dalla funzione ed eliminare il countdown, premere nuovamente il tasto (10) o il tasto (11) per accendere l’apparecchia-tura.Altrimenti l’apparecchiatura si ac-cenderà allo scadere del tempo impostato, secondo la temperatura impostata al momento dello spe-gnimento della stessa.
ATTENZIONE!In caso di mancanza di tensione il valore di countdown viene salvato per riprendere al ritorno dell’ali-mentazione: ad esempio se manca-vano 4 ore all’accensione del forno e la tensione è sospesa per 30 mi-nuti, al ritorno dell’alimentazione mancheranno ancora 4 ore all’ac-censione.
Compte à rebours
La carte est équipée d’une fonction de compte à rebours pour l’allu-mage de l’appareil.Pour l’activer, avec l’appareil éteint, appuyer sur la touche (10).Sur l’écran (1) apparait le temps manquant pour l’allumage ; pour le modi"er, utiliser les touches (5) et (6) (limite maximale 99,5: 99 heures et 50 minutes).Pendant cette sélection, la Led du minuteur (9) clignote.Pour sortir de la fonction et élimi-ner le compte à rebours, appuyer de nouveau sur la touche (10) ou la touche (11) pour allumer l’appa-reil.Sinon, l’appareil s’allumera à la "n du temps con"guré, selon la tem-pérature con"gurée lors de l’extinc-tion.
ATTENTION!En cas de coupure de courant, la valeur du compte à rebours est sau-vegardée pour reprendre au retour de l’alimentation : par exemple, si il manque 4 heures à l’allumage du four et la tension est coupée pendant 30 minutes, au retour de l’alimentation il manquera encore 4 heures à l’allumage.
Countdown Function
The board is equipped with a count-down function which automatically turns on the equipment.To activate this function, press Timer key (10) with the equipment turned o�.The time remaining before the oven is due to turn itself on will appear on display (1); to modify the time, use keys (5) and (6) (maximum limit 99.5: 99 hours and 50 minutes).When making the selection, the TIM-ER Led (9) ~ashes.Should you wish to exit the function and cancel the countdown, press key (10) or key(11) to switch the equip-ment on.Otherwise, the equipment will switch on upon expiry of the set time, ac-cording to the time set at the time of switching o� the aforementioned.
WARNING!In the instance of power failure, the countdown value is saved and will resume upon the return of power: for example, let’s consider the following situation, if 4 hours were remaining before the oven was due to turn itself on and the power supply was cut o� for 30 minutes, once the power sup-ply has returned, 4 hours will still re-main before the oven is due to turn itself on.
Cuenta atrás
La tarjeta incluye una función de cuenta atrás para el encendido au-tomático del equipo.Para activarla, pulse con el equipo apa-gado el botón Temporizador (10).La pantalla (1) muestra el tiempo restante para el encendido; para modi"carlo pulse los botones (5) y (6) (límite máximo 99,5: 99 horas y 50 minutos).Durante esta selección, el Led del temporizador (9) parpadea.Si desea salir de la función y elimi-nar la cuenta atrás, vuelva a pulsar el botón (10) o el botón (11) para encender el equipo.De lo contrario, el equipo se en-cenderá cuando se agote el tiempo programado, con la temperatura que estaba programada en el mo-mento de su apagado.
ATENCIÓN!Si se interrumpe el suministro eléc-trico, el valor de la cuenta atrás que-da guardado para su reanudación cuando se restablezca la alimenta-ción: por ejemplo, si faltaban 4 ho-ras para el encendido del horno y el suministro eléctrico se interrumpe durante 30 minutos, cuando se res-tablezca la alimentación seguirán faltando 4 horas para el encendido.
Funktion Countdown
Die Karte ist mit einer Countdown-Funktion zum automatischen Ein-schalten des Maschine ausgestattet.Zum Aktivieren bei ausgeschaltetem Gerät die Taste Timer (10) drücken.Auf den Display (1) wird die noch verbleibende Zeit bis zum Einschal-ten angezeigt; ändern Sie diese mit den Tasten (5) und (6) (Höchstwert 99,5: 99 Stunden und 50 Minuten).Während dieser Auswahl blinkt die Led TIMER (9).Wenn Sie die Funktion verlassen und den Countdown löschen möchten, drücken Sie erneut die Taste (10) oder (11) zum Zugri� auf das Gerät.Ansonsten schaltet sich das Gerät beim Ablaufen der eingestellten Zeit ein, je nach eingestellter Tem-peratur.
ACHTUNG!Bei fehlender Spannung wird der Wert des Countdowns gespeichert, um den Betrieb bei Rückkehr der Stromversorgung wieder aufzu-nehmen: wird die Spannung zum Beispiel für 30 Minuten unterbro-chen, wenn noch 4 Stunden bis zum Einschalten des Ofens fehlen, wird der Ofen 4 Stunden nach Rückkehr der Stromversorgung eingeschaltet.
Функция отсчета
Плата оснащена функцией обрат-ного отсчета для автоматического включения оборудование.Для активации нажать при выклю-ченной машине кнопку Таймера (10).На дисплее (1) отображается время, которое должно пройти до вклю-чения; для его изменения нажать клавиши (5) и (6) (максимальный предел 99,5: 99 часов и 50 минут).В ходе данного выбора светодиод ТАЙМЕРА (9) мигает.При необходимости выхода из функ-ции и отключения функции отсчета, вновь нажать кнопку (10) или кноп-ку (11) для включения машины.В противном случае, машина будет включена по истечении заданного времени, в соответствии с темпе-ратурой, заданной в момент ее вы-ключения.
ВНИМАНИЕ!При отсутствии напряжения значе-ние обратного отсчета сохраняется для его возобновления при возвра-те питания: например, за 4 часа до включения печи и отключении на-пряжения на 30 минут, при возврате питания должны пройти еще 4 часа до включения.
1 5 6 10
9
11

34 Pizzaform 10-13
34Diagnostica
Nel caso di guasti o malfunziona-menti i display della scheda posso-no visualizzare i seguenti messaggi di errore:
1. “Err” su display (1): termocoppia resistenze supe-
riori guasta.
2. “Err” su display (3) : termocoppia resistenze infe-
riori guasta.
3. “Err” su display (1) e “rot” su display (3) : errore del motore che non ha
compiuto il ciclo nel tempo settato nel parametro “tUP”.
NOTA:“Err” la macchina si spegne.
Per ripristinare le funzioni, spe-gnere e riaccendere la macchina. Se il problema persiste, contatta-re il centro assistenza.
Diagnostic
En cas de panne ou de dysfonc-
d’erreur suivants :
1. “Err” sur a�cheur (1): thermocouple des résistances
supérieures en panne.
2. “Err” sur a�cheur (3) : thermocouple des résistances
inférieures en panne.
3. “Err” sur a�cheur (1) et “ref” sur a�cheur (3) : erreur du moteur qui n’a pas
accompli le cycle selon le temps réglé dans le paramètre “tUP”.
REMARQUE :“Err” la machine s’éteint.
Pour rétablir les fonctions, éteindre et rallumer la machine. Si le problème persiste, contacter le centre d’assistance.
Trouble shooting
In case of a fault and or malfunc-tions, the following error messages will appear on the board display:
1. “Err” on display (1): thermocouple upper heating
element fault.
2. “Err” on display (3): thermocouple lower heating
element fault.
3. “Err” on display (1) and “rot” on display (3) : motor error - cycle not com-
pleted in the time set with the “tUP” parameter.
NOTE:“Err” machine turns o¬.
To reset the functions, switch the machine o¬ and then on again. If the problem persists, contact a service centre.
Diagnóstico
En caso de averías o fallos de fun-cionamiento, las pantallas de la tar-jeta pueden mostrar los siguientes mensajes de error:
1. “Err” en la pantalla (1): termopar de las resistencias
superiores averiado.
2. “Err” en la pantalla (3) : termopar de las resistencias
inferiores averiado.
3. “Err” en la pantalla (1) y “rof” en la pantalla (3) : error del motor, que no ha rea-
lizado el ciclo en el tiempo de-"nido mediante el parámetro “tUP”.
NOTA:“Err” la máquina se apaga.
Para restablecer las funciones, apague la máquina y vuelva a en-cenderla. Si el problema persiste, póngase en contacto con el cen-tro de asistencia.
Diagnose
Bei Defekten oder Fehlfunktionen erscheinen auf dem Displays die folgenden Fehlermeldungen:
1. „Err“ auf Display (1): Thermoelement der oberen
Heizwiderstände defekt.
2. „Err“ auf Display (3): Thermoelement der unteren
Heizwiderstände defekt.
3. „Err“ auf Display (1) und „rot“ auf Display (3): Fehler des Motors, der nicht den
Zyklus in der im Parameter “tUP” eingestellten Zeit beendet hat.
Hinweis:“Err” Gerät schaltet sich ab.
Zum Zurücksetzen der Funktio-nen, die Maschine aus- und wie-der einschalten. Wenn das Pro-blem weiterhin auftritt, wenden Sie sich an den Kundendienst.
Диагностика
В случае неисправностей или сбо-ев дисплеев платы, могут быть ото-бражены следующие сообщения ошибки:
1. “Err” на дисплее (1): термопара верхних нагрева-
тельных элементов неисправна.
2. “Err” на дисплее (3): термопара нижних нагреватель-
ных элементов неисправна.
3. “Err” на дисплее (1) и “ref” на дисплее (3) : ошибка двигателя, который не
выполнил цикл за время, уста-новленное в параметре “tUP”.
ПРИМЕЧАНИЕ:“Err” машина выключается.
Для восстановления функций следует выключить и вновь включить машину. Если пробле-ма не устраняется, обратиться в сервисный центр.
1 1
3
2 1
3
3 1
3
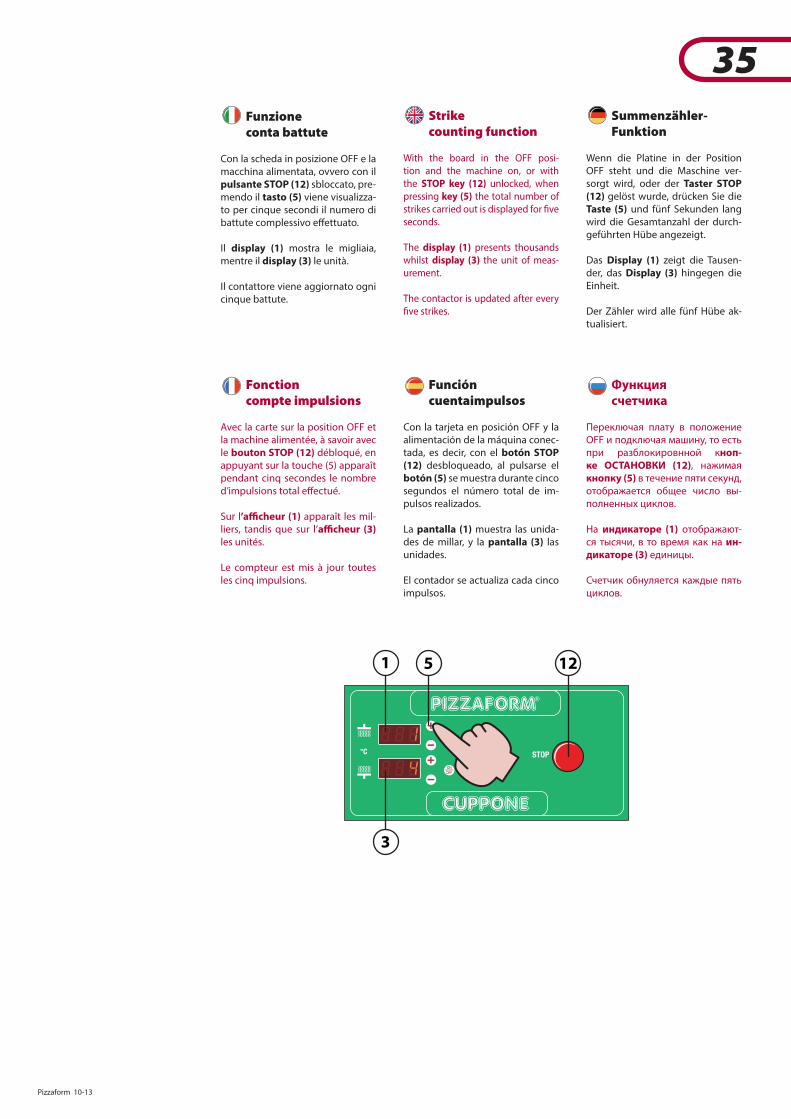
Pizzaform 10-13 35
35Funzioneconta battute
Con la scheda in posizione OFF e la macchina alimentata, ovvero con il pulsante STOP (12) sbloccato, pre-mendo il tasto (5) viene visualizza-to per cinque secondi il numero di battute complessivo e�ettuato.
Il display (1) mostra le migliaia, mentre il display (3) le unità.
Il contattore viene aggiornato ogni cinque battute.
Fonction compte impulsions
Avec la carte sur la position OFF et la machine alimentée, à savoir avec le bouton STOP (12) débloqué, en appuyant sur la touche (5) apparaît pendant cinq secondes le nombre d’impulsions total e�ectué.
Sur l’a�cheur (1) apparaît les mil-liers, tandis que sur l’a�cheur (3) les unités.
Le compteur est mis à jour toutes les cinq impulsions.
Strikecounting function
With the board in the OFF posi-tion and the machine on, or with the STOP key (12) unlocked, when pressing key (5) the total number of strikes carried out is displayed for "ve seconds.
The display (1) presents thousands whilst display (3) the unit of meas-urement.
The contactor is updated after every "ve strikes.
Función cuentaimpulsos
Con la tarjeta en posición OFF y la alimentación de la máquina conec-tada, es decir, con el botón STOP (12) desbloqueado, al pulsarse el botón (5) se muestra durante cinco segundos el número total de im-pulsos realizados.
La pantalla (1) muestra las unida-des de millar, y la pantalla (3) las unidades.
El contador se actualiza cada cinco impulsos.
Summenzähler-Funktion
Wenn die Platine in der Position OFF steht und die Maschine ver-sorgt wird, oder der Taster STOP (12) gelöst wurde, drücken Sie die Taste (5) und fünf Sekunden lang wird die Gesamtanzahl der durch-geführten Hübe angezeigt.
Das Display (1) zeigt die Tausen-der, das Display (3) hingegen die Einheit.
Der Zähler wird alle fünf Hübe ak-tualisiert.
Функция счетчика
Переключая плату в положение OFF и подключая машину, то есть при разблокировнной кноп-ке ОСТАНОВКИ (12), нажимая кнопку (5) в течение пяти секунд, отображается общее число вы-полненных циклов.
На индикаторе (1) отображают-ся тысячи, в то время как на ин-дикаторе (3) единицы.
Счетчик обнуляется каждые пять циклов.
1
3
5 12
36 Pizzaform 10-13
36 Risoluzione problemi
Problema IssueProblem ProblèmeProblema Проблема
Cause CauseUrsache CauseCausa Причина
Soluzione SolutionLösung SolutionSolución Решение
La pasta si attacca sui piatti The dough sticks to the platesDer Teig hängt an den beiden Tellern.La pâte colle aux platsLa masa se adhiere a los platosТесто пристает к пластинам
La temperatura dei piatti è troppo bassaThe plate temperature is too lowDie Temperatur der Teller ist zu niedrigLa température des plats est trop basseLa temperatura de los platos es demasiado bajaСлишком низкая температура пластин
Veri"care la temperatura impostata sui termostati e se è il caso alzarla "no a 150°/160°C.Check the set temperature on the thermostats and where necessary, raise it to 150°-160°C.Die Temperatur an den Thermostaten kontrollieren und ob diese auf 150°/160°C angehoben werden muss.Véri"er que la température con"gurée sur les thermostats et si nécessaire, l›augmenter jusqu›à 150°/160°C.Compruebe la temperatura programada en los termostatos y, en caso necesario, auméntela hasta los 150°/160°C.Проверить заданную температуру на термостатах и в случае необходимости, повысить ее до 150°/160°C.
La forma del disco di pasta non è perfettamente circolareThe shape of the dough disk is not perfectly circularDie Form der Teigscheibe ist nicht perfekt rund.La forme du disque de pate n'est pas parfaitement circulaireLa forma del disco de masa no es perfectamente circularФорма диска теста не совершенно круглая
La pallina non è stata posizionata al centro del piatto.La forma della pallina non è sferica.La temperatura dei piatti è troppo bassa. The ball has not been placed at the centre of the plate.The shape of the ball is not spherical.The plate temperature is too low.Die Kugel wurde nicht in die Mitte des Tellers gelegt.Die Form der Kugel ist nicht rund.Die Temperatur der Teller ist zu niedrig.La boule n’est pas positionnée au centre du plat.La forme de la boule n’est pas sphérique.La température des plats est trop basse.No se ha colocado el bollo en el centro del plato.El bollo no tiene forma esférica.La temperatura de los platos es demasiado baja.Шарик теста не был позиционирован по центру пластины.Форма шарика не является круглой.Слишком низкая температура пластин.
Posizionare la pallina al centro del piatto inferiore.Non alterare la forma sferica della pallina durante la manipolazione.Veri"care la temperatura impostata sui termostati e se è il caso alzarla "no a 150°/160°C.Place the ball at the centre of the bottom plate.Do not alter the spherical shape of the ball when handling.Check the set temperature on the thermostats and where necessary, raise it to 150°-160°C.Die Kugel in der Mitte des unteren Tellers positionieren.Nicht die Kugelform der Kugel während des Bearbeitungsvorgangs verändern.Die Temperatur an den Thermostaten kontrollieren und ob diese auf 150°/160°C angehoben werden muss.Positionner la boule au centre du plat inférieur.Ne pas altérer la forme sphérique de la boule pendant la manipulation.Véri"er que la température con"gurée sur les thermostats et si nécessaire, l’augmenter jusqu’à 150°/160°C.Coloque el bollo en el centro del plato inferior.No altere la forma esférica del bollo durante su manipulación.Compruebe la temperatura programada en los termostatos y, en caso necesario, auméntela hasta los 150°/160°C.Расположить шарик по центру нижней пластины.Не изменять круглую форму шарика в ходе раскатки.Проверить заданную температуру на термостатах и в случае необходимости, повысить ее до 150°/160°C.
Il disco di pasta si ritira dopo la schiacciaturaThe dough disk withdraws after ~atteningDie Teigscheibe geht nach dem Quetschen zurück.Le disque de pâte se retire après l’écrasementEl disco de masa se retrae tras el prensadoДиск теста сжимается после раскатки
La temperatura della pallina di pasta è troppo bassa.The dough ball has not adequately risen.The dough ball temperature is too lowDie Teigkugel ist nicht ausreichend durch die Hefe aufgegangen.Die Temperatur der Teigkugeln ist zu niedrig.
La température de la boule de pâte est trop basse.El bollo de masa no está su"cientemente leudado.La temperatura del bollo de masa es demasiado bajaШарик сделан из недостаточно выброженного теста.Температура шарика теста слишком низкая
Fare lievitare maggiormente la pasta collocandola in un luogo caldo.Allow the dough to rise more by placing it in a hot place.Lassen Sie den Teig weiter aufgehen, indem Sie ihn an einem warmen Ort aufbewahren.Faire lever plus la pâte en la plaçant dans un lieu chaud.Deje leudar la masa durante más tiempo colocándola en un lugar caliente.Обеспечить дополнительное брожение теста, помещая его в теплое место.
Il disco di pasta non ha la dimen-sione desiderataThe dough disk is not the correct sizeDie Teigscheibe hat nicht die gewünschte Größe.Le disque de pâte n’a pas la dimen-sion souhaitée.El disco de masa no tiene el tamaño deseadoНесоответствующие размеры диска теста
La regolazione dello spessore dei piatti non è corretta.La regolazione del timer non è corretta.The plate depth adjustment is not correct.The timer adjustment is not correct.Die Einstellung der Tellerstärke ist falsch.Die Einstellung des Timers ist falsch.Le réglage de l’épaisseur des plats n’est pas correct.Le réglage du minuteur n’est pas correct.No se ha ajustado correctamente el grosor de los platos.No se ha ajustado correctamente el temporizador.Несоответствующая регулировка толщины пластин.Несоответствующая регулировка таймера.
Diminuire o aumentare la distanza fra i piatti.Diminuire o aumentare il tempo di contatto dei piatti.Decrease or increase the distance between plates.Decrease or increase the plate contact time.Den Abstand zwischen den Tellern erhöhen oder absenken.Die Kontaktzeit der Teller erhöhen oder absenken.Diminuer ou augmenter la distance entre les plats.Diminuer ou augmenter le temps de contact des plats.Reduzca o aumente la distancia entre los platos.Reduzca o aumente el tiempo de contacto de los platos.Уменьшить или увеличить расстояние между пластинами.Уменьшить или увеличить время контакта пластин.
Si creano delle bolle sulla super"cie della pizza durante la cotturaBubbles form on the surface of the pizza during cookingEs entstehen Bläschen an der Ober~äche der Pizza während der Garung.Des bulles se forment sur la surface de la pizza pendant la cuisson.Durante la cocción, se forman burbujas en la super"cie de la pizzaНа поверхности пиццы в процессе приготовления образуются пузыри
La lievitazione della pasta non è ottimale.The dough does not rise perfectly.Das Aufgehen des Hefeteigs ist nicht optimal.Le levage de la pâte n’est pas optimal.La masa no está perfectamente leudada.Брожение теста не является оптимальным.
Forare il disco di pasta prima della farcitura con un forapasta.
Löchern Sie die Teigscheibe vor dem Belegen mit einem Teiglocher.Percer le disque de pate avec de le farcir avec un rouleau pour percer la pâte.Agujeree el disco de masa con un rodillo perforador antes de añadir los ingredientes.Сделать отверстие в диске теста перед использованием валика для теста.
Problemlösung
Troubleshooting
Résolution des problèmes
Resolución de problemas Разрешение проблем
Pizzaform 10-13 37
37
Consigli d’uso
Consigliamo di impostare i termostati ad una temperatura di 150/160°C e il timer su un tem-po di contatto pari a 0,8 secondi (questi valori possono subire delle variazioni in base al tipo di pasta utilizzato dall’operatore, al suo grado di lievitazione e alla sua temperatura).
E’ opportuno durante il primo ciclo di funziona-mento ungere i piatti caldi con un sottile stra-to di olio d’oliva stendendolo con della carta; questa operazione serve per creare uno strato protettivo sui piatti che facilita lo scorrimento della pasta durante lo schiacciamento, e deve essere ripetuta ogni qual volta venga e�ettuata una pulizia a fondo dei piatti stessi.
E’ inoltre fondamentale utilizzare della pasta ben lievitata e non fredda (togliere la pasta dal frigo almeno due ore prima di iniziare a lavora-re) e posizionare la pallina, lievemente infarina-ta, esattamente al centro del piatto inferiore.
ATTENZIONEAlzando la griglia di protezione durante la risalita del piatto inferiore, il movimento si blocca e si inverte istantaneamente.Nel caso in cui il piatto inferiore non riesca a completare l’azione di schiacciamento, a causa di pasta non lievitata o di qualche corpo estra-neo posto fra i piatti, alzare subito la protezione per permettere l’inversione del movimento.In caso di arresto del piatto spegnere e riaccen-dere la macchina. Non forzare.
Recommendations governing use
We recommend setting the thermostats to a temperature of 150-160°C and the timer at a contact time equal to 0.8 seconds (these values may be modi"ed based upon the type of dough used by the operator, the rising level and the temperature).
It is recommended that during the "rst operat-ing cycle, a thin layer of olive oil is placed on the hot plates using paper; this operation serves to create a protective layer over the plates which fa-cilitates movement of the pasta during ~attening and this must be repeated every time that thor-ough cleaning of the plates is carried out.
It is also essential to use well risen and not cold dough (remove the dough from the fridge at least two hours before begin work) and place the lightly ~oured ball, exactly at the centre of the bottom plate.
ATTENTIONWhen raising the protective grill during re-surgence of the bottom plate, movement is blocked and is immediately diverted.In the instance where the bottom plate does not complete the ~attening action, owing to the dough which has not risen or owing to a foreign body in between the plates, immediately raise the protection to enable the diversion of the movement.In the case where the plate stops, switch the machine o� and then on again. Do not force it.
Empfehlungen zum Gebrauch
Es wird empfohlen die Thermostate auf eine Tem-peratur von 150/160°C und den Timer auf eine Kontaktzeit von 0,8 Sekunden einzustellen (diese Werte können je nach verwendetem Teigtyp und je nach Aufgehen des Hefeteigs und der Tempe-ratur variieren).
Es ist während des ersten Betriebszyklus möglich, die warmen Teller mit einem dünnen Film Oliven-öl mit Papier aufzutragen; dieser Vorgang dient zum Bilden einer Schutzschicht auf den Tellern, da-mit der Teig während des Quetschens leichter glei-tet und muss immer durchgeführt werden, wenn die Teller gründlich gereinigt werden.
Außerdem ist es grundlegend einen gut aufge-gangenen nicht kalten Hefeteig zu verwenden (mindestens zwei Stunden vorher den zu verar-beitenden Teig aus dem Kühlschrank nehmen) und die leicht eingemehlte Kugel genau in die Mitte des unteren Tellers legen.
ACHTUNGWenn das Schutzgitter während des Hochfah-rens des unteren Tellers angehoben wird, hält die Bewegung an und kehrt sofort um.Wenn der untere Teller den Quetschvorgang nicht abschließen kann, da der Hefeteig nicht aufge-gangen ist oder Fremdkörper zwischen den Tel-lern liegen, sofort das Schutzgitter anheben, um die Bewegung umzukehren.Falls der Teller anhält, schalten Sie die Maschine aus und wieder ein. Keine Kraft aufwenden.
Conseils d’utilisation
Il est conseillé de con"gurer les thermostats à une température de 150/160°C et le minuteur sur un temps de contact égal à 0,8 secondes (ces valeurs peuvent subir des variations en fonction du type de pâte utilisé par l’opérateur, de son degré de levage et de sa température).
Il est opportun pendant le premier cycle de fonctionnement de huiler les plats chauds avec une "ne couche d’huile d’olive appliquée avec du papier ; cette opération sert à créer une couche de protection sur les plats qui facilite le glissement de la pâte pendant l’écrasement et doit être répétée toutes les fois qu’un nettoyage à fond des plats est e�ectué.
Il est par ailleurs fondamental d’utiliser de la pâte bien levée et pas froide (retirer la pâte du réfrigérateur au moins deux heures avant de commencer le travail) et positionner la boule, légèrement farinée, exactement au centre du plat inférieur.
ATTENTIONEn soulevant la grille de protection pendant la remontée du plat inférieur, le mouvement se bloque et s’inverse instantanément.Au cas où le plat inférieur n’arriverait pas à com-pléter l’action d’écrasement, à cause d’une pâte non levée ou de quelque corps étranger situé entre les plats, soulever tout de suite la protec-tion a"n de permettre l’inversion du mouvement.En cas d’arrêt du plat, éteindre et rallumer la machine. Ne pas forcer.
Consejos para el uso
Se recomienda programar los termostatos a una temperatura de 150/160°C y el temporizador a un tiempo de contacto de 0,8 segundos (estos valores pueden variar dependiendo del tipo de masa empleado por el operador, su grado de leudado y su temperatura).
Durante el primer ciclo de funcionamiento, conviene untar los platos calientes con una "na capa de aceite de oliva, extendiéndolo con papel; esta operación sirve para crear una capa de protección en los platos, que facilita el deslizamiento de la masa durante el prensado, y debe repetirse cada vez que se limpien a fondo los platos.
También es fundamental utilizar masa bien leu-dada y que no esté fría (saque la masa del frigo-rí"co como mínimo dos horas antes de comen-zar a trabajar) y colocar el bollo, ligeramente enharinado, exactamente en el centro del plato inferior.
ATENCIÓNSi se levanta la rejilla de protección durante la subida del plato inferior, el movimiento se bloquea y se invierte inmediatamente.Si el plato inferior no logra completar la acción de prensado, porque la masa no está leudada o porque hay algún cuerpo extraño entre los pla-tos, levante inmediatamente la protección para que se invierta el movimiento.Si se detiene el plato, apague la máquina y vuel-va a encenderla.
Рекомендации по применению
Рекомендуется установить термостаты на темпе-ратуру 150/160°C, а таймер на время контакта 0,8 секунд (эти значения могут изменяться в зависи-мости от типа теста, использованного операто-ром, его степенью брожения и температурой).
Целесообразно в ходе первого цикла функциони-рования смазать горячие пластины тонким слоем оливкового масла при использовании бумаги; данная операция служит для образования за-щитного слоя на пластинах, что упрощает сколь-жение теста в ходе раскатки, она должна повто-ряться каждый раз при выполнении тщательной очистки самих пластин.
Кроме того, крайне важно использовать хорошо выброженное и не холодное тесто (вынуть тесто из холодильника, по меньшей мере, за два часа до начала работы) и расположить шарик, слегка обваленный в муке, точно по центру нижней пла-стины.
ВНИМАНИЕПри поднятии защитной решетки в ходе подъема нижней пластины, происходит бло-кировка движения и незамедлительное из-менение направления.В случае когда нижняя пластина не может завер-шить раскатку в связи с невыброженным тестом или наличием посторонних предметов между пластинами, следует незамедлительно поднять защиту в целях выполнения обратной операции.В случае остановки пластины, следует выключить и вновь включить машину. Не прилагать усилий.
38 Pizzaform 10-13
38Avvertenzeper la manutenzione
La targhetta caratteristiche, presente sul retro dell’apparecchiatura, fornisce importanti infor-mazioni tecniche: esse risultano indispensabili in caso di richiesta di intervento per una manu-tenzione o una riparazione dell’apparecchiatu-ra: si raccomanda pertanto di non asportarla, danneggiarla o modi"carla.
ATTENZIONE:Prima di qualsiasi operazione di manuten-zione ordinaria e straordinaria staccare l’a-limentazione dell’apparecchiatura; tale ope-razione va eseguita evitando assolutamente di tirare la spina per il cavo.
Aspettare che i piatti si ra¬reddino.
Una pulizia e¬ettuata con modalità, prodotti o utensili diversi da quelli speci�catamente indicati nel presente libretto è da conside-rarsi impropria, potenzialmente pericolosa e potrebbe danneggiare l’apparecchiatura o pregiudicarne il funzionamento e la durata.
Avertissements pourl’entretien
La plaque signalétique, présente à l’arrière de l’appareil, fournit des informations techniques importantes et indispensables en cas de de-mande d’assistance pour l’entretien ou la répa-ration de l’appareil: il est donc recommandé de ne pas la retirer, ni l’endommager et/ou la modi"er.
ATTENTION :Débrancher l’appareil avant toute opération d’entretien ordinaire et extraordinaire ; évi-ter expressément de débrancher l’appareil en tirant sur le câble.
Attendre que les plats refroidissent.
Tout nettoyage e¬ectué avec des modalités, des produits ou des ustensiles di¬érents de ceux spéci�és sur la notice doit être considé-ré inapproprié, potentiellement dangereux et susceptible d’endommager l’appareil ou d’en compromettre le fonctionnement et la durée de vie.
Maintenanceinstructions
The data plate, located on the back of the equipment, provides important technical infor-mation: this information is essential when mak-ing a request for maintenance or a repair for the equipment: therefore is it recommended not to remove, damage or modify it.
ATTENTION:Prior to any routine or extraordinary mainte-nance operation, disconnect the equipment from the power supply; when performing this operation do not pull on the cable to re-move the plug.
Wait until the plates cool down.
Cleaning the equipment using methods, products or tools that are not speci�cally indicated in this handbook is considered improper, potentially dangerous and could damage the equipment or jeopardise its op-eration or duration.
Advertencias para el mantenimiento
La placa de características, presente en la par-te trasera del equipo, proporciona información técnica importante: esta es indispensable en caso de solicitud de intervención para un man-tenimiento o una reparación del equipo: se re-comienda, por lo tanto, que no la quite, la dañe o la modi"que.
ATENCIÓN:Antes de realizar cualquier operación de mantenimiento ordinario o extraordinario, desconecte la alimentación del equipo. Esta operación se debe realizar sin tirar del en-chufe en ningún caso.
Espere a que se enfríen los platos.
Una limpieza realizada con modalidades, productos o herramientas distintos de los especi�cados en este manual debe conside-rarse impropia y potencialmente peligrosa y podría dañar el equipo o perjudicar su fun-cionamiento y su durabilidad.
Hinweisezur Wartung
Das Schild mit den Eigenschaften an der Rück-seite des Gerätes liefert wichtige technische Informationen: Diese sind unerlässlich bei der Anforderung eines Wartungs- oder Reparatur-eingri�s an dem Gerät, es darf daher nicht ent-fernt, beschädigt oder geändert werden.
ACHTUNG:Vor jeder regelmäßigen oder außerplanmä-ßigen Wartung Gerät von der Stromzufuhr trennen. Bei diesem Vorgang darf der Stek-ker auf keinen Fall durch das Kabel heraus-gezogen werden.
Warten, bis die Teller abkühlen.
Eine Reinigung, die nicht auf die Art und Wei-se und mit den unterschiedlichen Produkten und Werkzeugen durchgeführt wird, die im vorliegenden Handbuch ausgeführt sind, gilt als unsachgemäß, potentiell gefährlich und könnten das Gerät beschädigen, den Betrieb beeinträchtigen oder die Haltbarkeit verringern.
Инструкции при проведении техобслуживания
На паспортной табличке, установленной с задней стороны оборудования, указаны важные технические сведения: они являются необходимыми в случае запроса на вмеша-тельство для проведения работ техобслужи-вания или ремонта оборудования: поэтому не допускать её снятия, повреждения или изменения.
ВНИМАНИЕ:Перед проведением каких-либо операций очередного и внеочередного техобслу-живания необходимо отключить питание оборудования; данная операция должна осуществляться, не допуская тяги вилки за провод.
Подождать охлаждения пластин.
Очистка, осуществляемая в порядке, при использовании средств или инструмен-тов, отличных от указанных в настоящей инструкции, считается несоответствую-щей, потенциально опасной и может при-вести к повреждению оборудования или сказаться на его функционировании и сроке службы.
Pizzaform 10-13 39
39ATTENZIONE !
Non usare prodotti (anche se diluiti) contenenti cloro (ipoclorito sodico, acido cloridrico o mu-riatico, ecc.) per pulire l’apparecchiatura o il pa-vimento sotto l’apparecchiatura.Non usare strumenti metallici o abrasivi per pu-lire l’acciaio (es. spazzole o pagliette tipo Scotch Brite).Non lasciare che sporco, grassi, cibo o altro in-crostino l’apparecchiatura.
Si consiglia di far controllare l’apparecchia-tura da un Centro di Assistenza Autorizzato almeno una volta all’anno.
ATTENTION !
Ne pas utiliser de produits, même si dilués, à base de chlore (hypochlorite de soude, acide chlorhydrique ou muriatique, etc.) pour net-toyer l’appareil ou le sol sous l’appareil.Ne pas utiliser d’instruments métalliques ou abrasifs pour nettoyer l’acier (ex : pailles de fer, brosses, éponges de type Scotch Brite).Éliminer les dépôts de saletés, de graisse, d’ali-ments ou autres.
Il est conseillé de faire contrôler l’appareil au moins une fois par an par le Service Après-Vente agréé.
CAUTION !
Do not use products (even if diluted) that con-tain chlorine (sodium hypochlorite, hydrochlo-ric or muriatic acid, etc.) to clean the equipment or the ~oor under the equipment.Do not use metal or abrasive tools to clean the steel (ex. brushes or scourers, such as Scotch Brite).To not permit dirt, fat, food or other items to form a crust on the equipment.
It is recommended to have the equipment checked by an authorised service centre at least once a year.
ATENCIÓN !
No utilice productos (aunque estén diluidos) que contengan cloro (hipoclorito de sodio, áci-do clorhídrico, etc.) para limpiar el equipo o el suelo situado bajo él.No utilice herramientas metálicas o abrasivas para limpiar el acero (por ej. cepillos o estropa-jos como Scotch Brite).No deje que la suciedad, las grasas, los alimen-tos u otros elementos se incrusten en el equipo.
Se recomienda que haga que un centro de asistencia autorizado revise el equipo, al me-nos, una vez al año.
ACHTUNG !
Keine Produkte verwenden (auch nicht in ver-dünnt), die Chlor enthalten (Natriumhypochlorit, Chlorwassersto�säure oder Salzsäure, usw.), um das Gerät oder den Boden unter dem Gerät zu rei-nigen.Keine Metall- oder Scheuermittel für die Reini-gung des Stahls verwenden (Bsp. Bürsten oder Pads vom Typ Scotch Brite).Das Gerät darf nicht durch Schmutz, Fett, Spei-sereste oder anderes verkrustet sein.
Es wird geraten, das Gerät mindestens ein-mal im Jahr durch ein autorisiertes Kunden-dienstzentrum prüfen zu lassen.
ВНИМАНИЕ !
Не использовать средства (в том числе раз-бавленные), содержащие хлор (гипохлорит натрия, соляная или хлористоводородная кислота и т.д.) в целях очистки оборудования или пола под оборудованием.Не использовать металлические или абра-зивные элементы для очистки стали (напри-мер, щетки или мочалки типа Scotch Brite).Не оставлять грязь, жиры, пищевые продук-ты или другие подобные вещества на обору-довании.
Рекомендуется производить контроль оборудования авторизованным Сервис-ным Центром, по меньшей мере, раз в год.
40 Pizzaform 10-13
40
Manutenzione
Pulire quotidianamente l’apparecchiatura asportando eventuali residui alimentari senza utilizzare sostanze nocive alla salute.
Periodicamente rimuovere il pannello laterale e il pannello posteriore e aspirare i residui di fari-na sul fondo.Pulire le parti esterne con un panno asciutto evitando l’uso di solventi o prodotti contenenti sostanze abrasive o clorate.
in cui si debbano pulire da eventuali residui di pasta.
Nel caso in cui l’apparecchiatura non venga uti-lizzata per lunghi periodi, disinserire l’alimenta-zione elettrica e passare sulle super"ci in acciaio inox un panno imbevuto di olio di vaselina per stendere un velo protettivo.
ATTENZIONE:Non lavare l’apparecchiatura con getti d’ac-qua diretti o in pressione!
Tutti questi accorgimenti sono determi-nanti per la buona conservazione dell’ap-parecchiatura e la loro mancata osservanza potrebbe causare danni che esulano dalla garanzia!
ATTENZIONE: PERICOLO DI INCENDIO!Ogni 3 mesi aprire il vano comandi e aspirare accuratamente gli eventuali depositi di fari-na o polvere!
Maintenance
Clean the equipment every day, removing any food waste without using substances harmful to health. Never use water.
Periodically, remove the side and back panels and vacuum any ~our remains at the bottom.Clean the exterior parts using a dry cloth with-out the use of solvents or products that contain abrasive or chlorinated substances. Pay attention not to scratch the plates when cleaning them to remove any dough remains.
If the equipment is not used for long periods of time, disconnect the electrical power and use a cloth to apply a protective layer of Vaseline oil on the stainless steel surfaces.
ATTENTION:Do not clean the equipment using direct wa-ter sprays or pressure jets!
All of these measures are important for prop-er the equipment care and failure to observe them could cause damage that is not covered by the warranty!
WARNING: RISK OF FIREEvery 3 months, open the control unit and carefully vacuum any �our or dust deposits!
Wartung
Täglich den Maschine reinigen, dabei etwaige Überreste von Lebensmittel ohne gesundheits-gefährdende Sto�e entfernen.
Regelmäßig die seitlichen Paneele und das hin-tere Paneel entfernen und die Mehlreste am Bo-den absaugen.Die äußeren Teile mit einem trockenen Tuch reinigen, dabei keine Lösungsmittel oder Pro-dukte mit scheuernden oder chlorierten Sto�en verwenden.Seien Sie vorsichtig, die Teller nicht zu verkrat-zen, wenn Sie die Teigreste entfernen.
Wenn der Ausrüstung über einen längeren Zeit-raum nicht genutzt wird, von der Stromzufuhr trennen und mit einem in Vaselineöl getränk-tem Tuch über die Ober~ächen aus Edelstahl fahren, um eine Schutzschicht zu erzeugen.
ACHTUNG:Den Ausrüstung nicht mit direktem Strahl-wasser oder Hochdruck reinigen!
Alle diese Eingri¬e sind entscheidend dafür, den guten Zustand des Ausrüstung zu erhal-ten. Eine Nichtbeachtung kann zu Schäden füh-ren, die nicht von der Garantie gedeckt sind!
ACHTUNG: BRANDGEFAHRAlle 3 Monate muss der Raum mit den Steu-erelementen geö¬net werden, um sorgfältig eventuelle Mehl- und Staubablagerungen absaugen zu können!
Entretien
Nettoyer tous les jours l’appareil en retirant les éventuels résidus d’aliments, ceci sans utiliser de substances nocives à la santé.
Périodiquement retirer le panneau latéral et le panneau arrière et aspirer les résidus de farine présents sur le fond.Nettoyer les parties externes avec un chi�on sec en évitant l’emploi de solvants ou de produits à base de chlore ou de substances abrasives.Veiller à ne pas rayer les plats au cas où il serait nécessaire de nettoyer des résidus de pâte.
En cas d’inutilisation prolongée, débrancher l’appareil du secteur et passer un chi�on imbibé d’huile de vaseline sur les surfaces en acier inox pour étendre un voile de protection.
ATTENTION :Ne pas laver l’appareil avec des jets d’eau directs ou sous pression !
Toutes ces précautions sont essentielles pour une bonne conservation du l’appareil. Le non-respect de ces précautions pourrait causer des dommages non couverts par la garantie !
ATTENTION: DANGER D’INCENDIE Tous les 3 mois ouvrir le compartiment des commandes et aspirer soigneusement tout dépôt de farine ou de poussière!
Mantenimiento
Limpie habitualmente el equipo eliminando los posibles residuos alimentarios sin usar sustan-cias dañinas para la salud.
Desmonte periódicamente los paneles lateral y trasero y aspire los restos de harina del fondo.Limpie las partes externas con un paño seco, evitando el uso de disolventes o productos que contengan sustancias abrasivas o con cloro. Tenga cuidado para no rayar los platos si se de-ben eliminar restos de masa.
En caso de que el equipo no se use durante lar-gos periodos de tiempo, desconecte la alimen-tación eléctrica y pase sobre las super"cies de acero inoxidable un paño empapado en aceite de vaselina para extender una capa de protec-ción.
ATENCIÓN:¡No lave el equipo con chorros de agua direc-tos o a presión!
Todas estas medidas son determinantes para la buena conservación del equipo y, si no las cumple, podría causar daños que provoca-rían la anulación de la garantía.
ATENCIÓN: PELIGRO DE INCENDIOCada 3 meses, abra el compartimento de los mandos y aspire todos los depósitos de hari-na o polvo que hubiese!
Техобслуживание
Производить ежедневную очистку машины, удаляя остатки пищевых продуктов, не ис-пользуя вредных для здоровья веществ.
Периодически снимать боковую, а также за-днюю панель и осуществлять вытяжку остат-ков муки на днище.Производить очистку внешних частей сухой тряпкой, избегая использования раствори-телей или средств, содержащих абразивные или хлористые вещества.Соблюдать осторожность, чтобы не царапать пластины в случае необходимости их очист-ки от возможных остатков теста.
В случае простоя машины на протяжении дли-тельных периодов времени, отключить электро-питание и протереть поверхности из нержаве-ющей стали тряпкой, смоченной вазелиновым маслом, в целях нанесения защитного слоя.
ВНИМАНИЕ:Не допускать мытья машины посредством прямых струй воды или под давлением!
Все эти меры являются основополагающи-ми в целях обеспечения соответствующей сохранности машины, поэтому их несо-блюдение может причинить ущерб, в от-ношении которого гарантия не действует!
ВНИМАНИЕ: ОПАСНОСТЬ ПОЖАРАКаждые 3 месяца открывать отсек органов управления и тщательно удалять посред-ством вытяжки остатки муки или пыли!
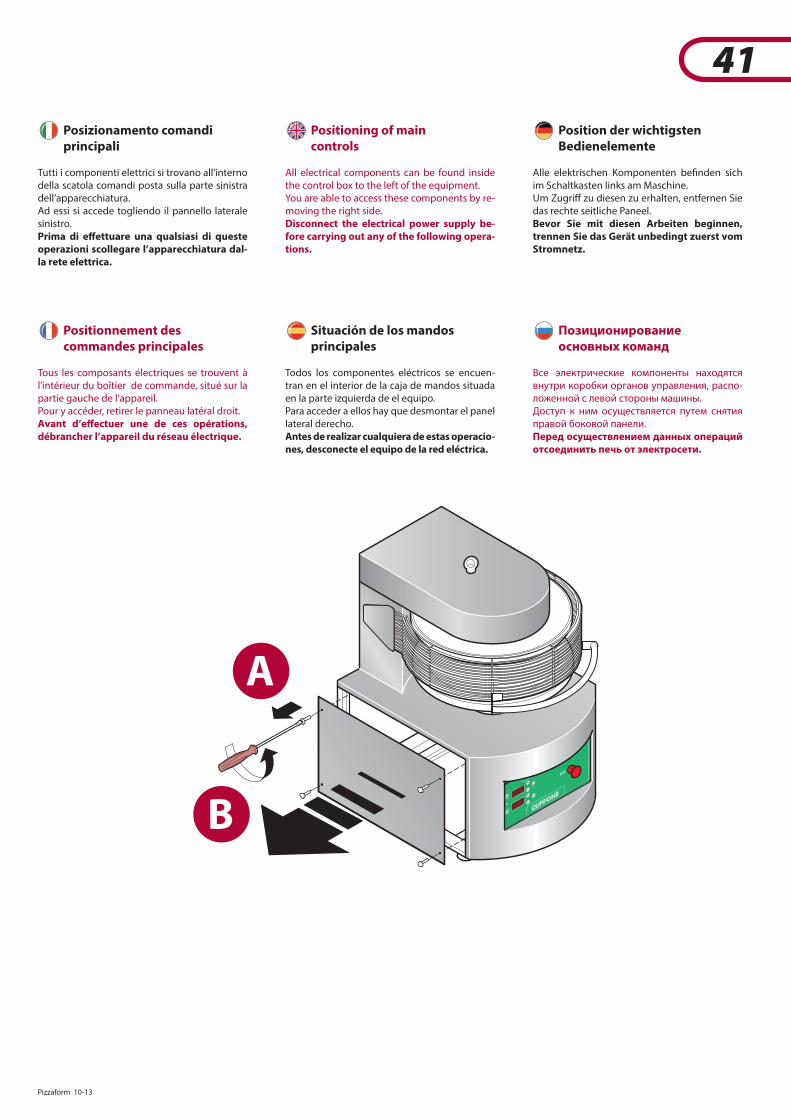
Pizzaform 10-13 41
41
B
A
Posizionamento comandiprincipali
Tutti i componenti elettrici si trovano all’interno della scatola comandi posta sulla parte sinistra dell’apparecchiatura.Ad essi si accede togliendo il pannello laterale sinistro.Prima di e¬ettuare una qualsiasi di queste operazioni scollegare l’apparecchiatura dal-la rete elettrica.
Positioning of maincontrols
All electrical components can be found inside the control box to the left of the equipment.You are able to access these components by re-moving the right side.Disconnect the electrical power supply be-fore carrying out any of the following opera-tions.
Position der wichtigstenBedienelemente
Alle elektrischen Komponenten be"nden sich im Schaltkasten links am Maschine.Um Zugri� zu diesen zu erhalten, entfernen Sie das rechte seitliche Paneel.Bevor Sie mit diesen Arbeiten beginnen, trennen Sie das Gerät unbedingt zuerst vom Stromnetz.
Positionnement descommandes principales
Tous les composants électriques se trouvent à l’intérieur du boîtier de commande, situé sur la partie gauche de l’appareil.Pour y accéder, retirer le panneau latéral droit.Avant d’e¬ectuer une de ces opérations, débrancher l’appareil du réseau électrique.
Situación de los mandosprincipales
Todos los componentes eléctricos se encuen-tran en el interior de la caja de mandos situada en la parte izquierda de el equipo.Para acceder a ellos hay que desmontar el panel lateral derecho.Antes de realizar cualquiera de estas operacio-nes, desconecte el equipo de la red eléctrica.
Позиционированиеосновных команд
Все электрические компоненты находятся внутри коробки органов управления, распо-ложенной с левой стороны машины.Доступ к ним осуществляется путем снятия правой боковой панели.Перед осуществлением данных операций отсоединить печь от электросети.
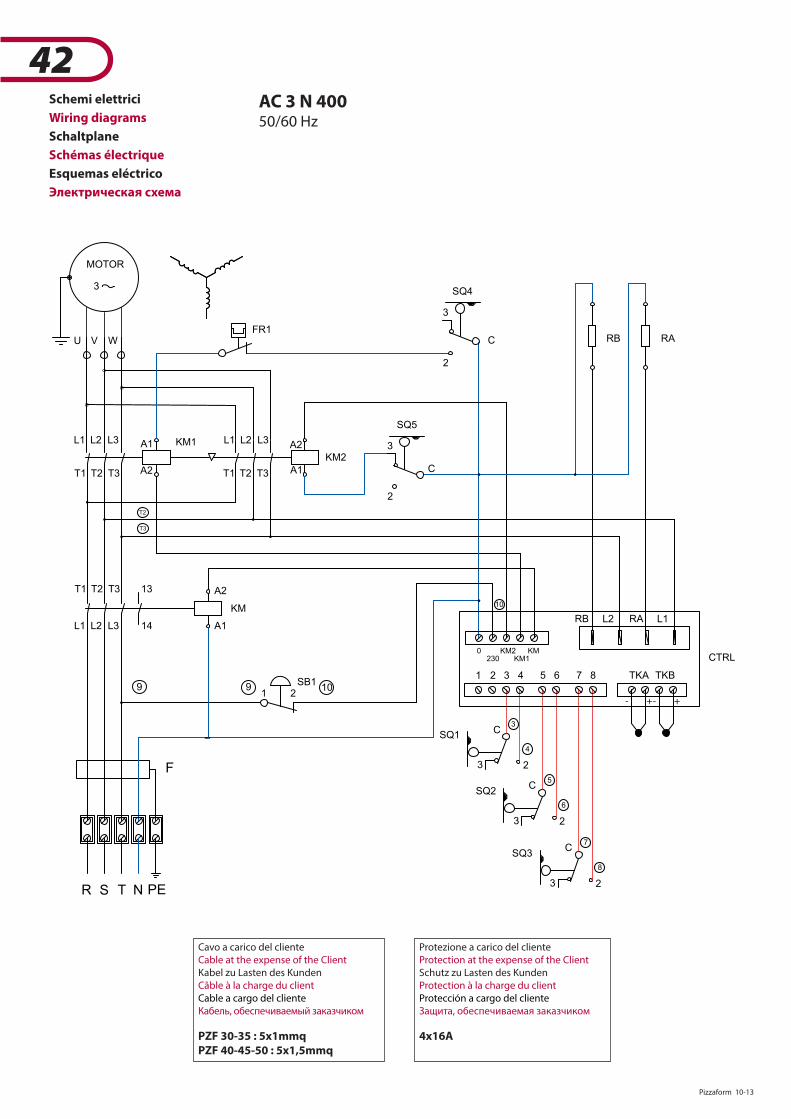
42 Pizzaform 10-13
42Schemi elettrici
Wiring diagrams
Schaltplane
Schémas électrique
Esquemas eléctrico
Электрическая схема
SQ1
10
4
3C
TKBTKA87654321
KMKM1
KM2230
0CTRL
L1RAL2RB
8
7
6
5
C
C
2
2
2
3
3
3
SQ3
SQ2
RB RA
3
2
C
SQ4
FR1
MOTOR
3
V WU
T2
T3
KM1
A2
A1L3L2L1
T3T2T1
KM2
A2
A1T3T2T1
L3L2L1
A213T3T2T1
A114L3L2L1
KM
21SB1
1099
F
PE
- ++-
N
SQ5
C
2
3
TSR
AC 3 N 40050/60 Hz
Protezione a carico del cliente
Protection at the expense of the Client
Schutz zu Lasten des Kunden
Protection à la charge du client
Protección a cargo del cliente
Защита, обеспечиваемая заказчиком
4x16A
Cavo a carico del clienteCable at the expense of the ClientKabel zu Lasten des KundenCâble à la charge du clientCable a cargo del clienteКабель, обеспечиваемый заказчиком
PZF 30-35 : 5x1mmq
PZF 40-45-50 : 5x1,5mmq
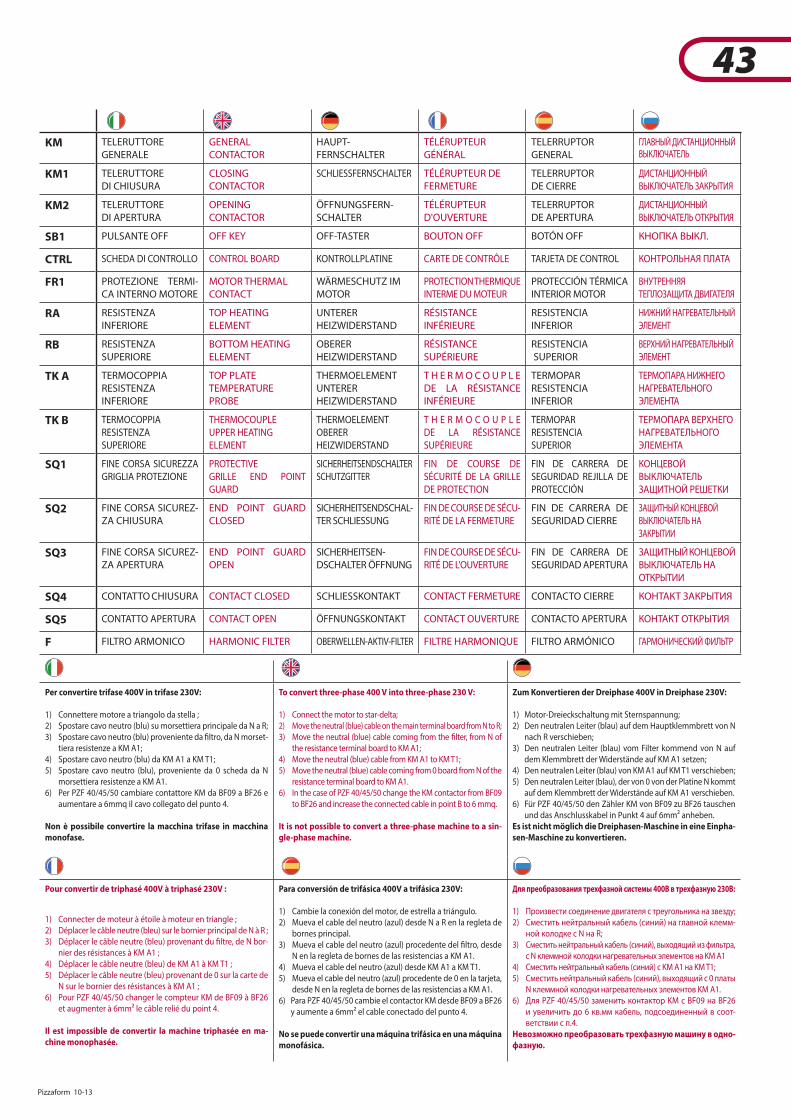
Pizzaform 10-13 43
43
KM TELERUTTOREGENERALE
GENERALCONTACTOR
HAUPT-FERNSCHALTER
TÉLÉRUPTEUR GÉNÉRAL
TELERRUPTORGENERAL
ГЛАВНЫЙ ДИСТАНЦИОННЫЙВЫКЛЮЧАТЕЛЬ
KM1 TELERUTTOREDI CHIUSURA
CLOSINGCONTACTOR
SCHLIESSFERNSCHALTER TÉLÉRUPTEUR DE FERMETURE
TELERRUPTOR DE CIERRE
ДИСТАНЦИОННЫЙ ВЫКЛЮЧАТЕЛЬ ЗАКРЫТИЯ
KM2 TELERUTTOREDI APERTURA
OPENINGCONTACTOR
ÖFFNUNGSFERN-SCHALTER
TÉLÉRUPTEURD'OUVERTURE
TELERRUPTOR DE APERTURA
ДИСТАНЦИОННЫЙ ВЫКЛЮЧАТЕЛЬ ОТКРЫТИЯ
SB1 PULSANTE OFF OFF KEY OFF-TASTER BOUTON OFF BOTÓN OFF КНОПКА ВЫКЛ.
CTRL SCHEDA DI CONTROLLO CONTROL BOARD KONTROLLPLATINE CARTE DE CONTRÔLE TARJETA DE CONTROL КОНТРОЛЬНАЯ ПЛАТА
FR1 PROTEZIONE TERMI-CA INTERNO MOTORE
MOTOR THERMAL CONTACT
WÄRMESCHUTZ IM MOTOR
PROTECTION THERMIQUE INTERME DU MOTEUR
PROTECCIÓN TÉRMICA INTERIOR MOTOR
ВНУТРЕННЯЯ ТЕПЛОЗАЩИТА ДВИГАТЕЛЯ
RA RESISTENZAINFERIORE
TOP HEATING ELEMENT
UNTERERHEIZWIDERSTAND
RÉSISTANCEINFÉRIEURE
RESISTENCIA INFERIOR
НИЖНИЙ НАГРЕВАТЕЛЬНЫЙ ЭЛЕМЕНТ
RB RESISTENZASUPERIORE
BOTTOM HEATING ELEMENT
OBERERHEIZWIDERSTAND
RÉSISTANCESUPÉRIEURE
RESISTENCIA SUPERIOR
ВЕРХНИЙ НАГРЕВАТЕЛЬНЫЙ ЭЛЕМЕНТ
TK A TERMOCOPPIA RESISTENZA INFERIORE
TOP PLATE TEMPERATUREPROBE
THERMOELEMENT UNTERER HEIZWIDERSTAND
T H E R M O C O U P L E DE LA RÉSISTANCE INFÉRIEURE
TERMOPARRESISTENCIA INFERIOR
ТЕРМОПАРА НИЖНЕГО НАГРЕВАТЕЛЬНОГО ЭЛЕМЕНТА
TK B TERMOCOPPIA RESISTENZASUPERIORE
THERMOCOUPLE UPPER HEATING ELEMENT
THERMOELEMENT OBERER HEIZWIDERSTAND
T H E R M O C O U P L E DE LA RÉSISTANCE SUPÉRIEURE
TERMOPAR RESISTENCIA SUPERIOR
ТЕРМОПАРА ВЕРХНЕГО НАГРЕВАТЕЛЬНОГО ЭЛЕМЕНТА
SQ1 FINE CORSA SICUREZZA GRIGLIA PROTEZIONE
PROTECTIVE GRILLE END POINT GUARD
SICHERHEITSENDSCHALTER SCHUTZGITTER
FIN DE COURSE DE SÉCURITÉ DE LA GRILLE DE PROTECTION
FIN DE CARRERA DE SEGURIDAD REJILLA DE PROTECCIÓN
КОНЦЕВОЙ ВЫКЛЮЧАТЕЛЬ ЗАЩИТНОЙ РЕШЕТКИ
SQ2 FINE CORSA SICUREZ-ZA CHIUSURA
END POINT GUARD CLOSED
SICHERHEITSENDSCHAL-TER SCHLIESSUNG
FIN DE COURSE DE SÉCU-RITÉ DE LA FERMETURE
FIN DE CARRERA DE SEGURIDAD CIERRE
ЗАЩИТНЫЙ КОНЦЕВОЙ ВЫКЛЮЧАТЕЛЬ НА ЗАКРЫТИИ
SQ3 FINE CORSA SICUREZ-ZA APERTURA
END POINT GUARD OPEN
SICHERHEITSEN-DSCHALTER ÖFFNUNG
FIN DE COURSE DE SÉCU-RITÉ DE L'OUVERTURE
FIN DE CARRERA DE SEGURIDAD APERTURA
ЗАЩИТНЫЙ КОНЦЕВОЙ ВЫКЛЮЧАТЕЛЬ НА ОТКРЫТИИ
SQ4 CONTATTO CHIUSURA CONTACT CLOSED SCHLIESSKONTAKT CONTACT FERMETURE CONTACTO CIERRE КОНТАКТ ЗАКРЫТИЯ
SQ5 CONTATTO APERTURA CONTACT OPEN ÖFFNUNGSKONTAKT CONTACT OUVERTURE CONTACTO APERTURA КОНТАКТ ОТКРЫТИЯ
F FILTRO ARMONICO HARMONIC FILTER OBERWELLEN-AKTIV-FILTER FILTRE HARMONIQUE FILTRO ARMÓNICO ГАРМОНИЧЕСКИЙ ФИЛЬТР
Per convertire trifase 400V in trifase 230V:
1) Connettere motore a triangolo da stella ;2) Spostare cavo neutro (blu) su morsettiera principale da N a R;3) Spostare cavo neutro (blu) proveniente da �ltro, da N morset-
tiera resistenze a KM A1;4) Spostare cavo neutro (blu) da KM A1 a KM T1;5) Spostare cavo neutro (blu), proveniente da 0 scheda da N
morsettiera resistenze a KM A1.6) Per PZF 40/45/50 cambiare contattore KM da BF09 a BF26 e
aumentare a 6mmq il cavo collegato del punto 4.
Non è possibile convertire la macchina trifase in macchina
monofase.
To convert three-phase 400 V into three-phase 230 V:
1) Connect the motor to star-delta;2) Move the neutral (blue) cable on the main terminal board from N to R;3) Move the neutral (blue) cable coming from the �lter, from N of
the resistance terminal board to KM A1;4) Move the neutral (blue) cable from KM A1 to KM T1;5) Move the neutral (blue) cable coming from 0 board from N of the
resistance terminal board to KM A1.6) In the case of PZF 40/45/50 change the KM contactor from BF09
to BF26 and increase the connected cable in point B to 6 mmq.
It is not possible to convert a three-phase machine to a sin-
gle-phase machine.
Zum Konvertieren der Dreiphase 400V in Dreiphase 230V:
1) Motor-Dreieckschaltung mit Sternspannung;2) Den neutralen Leiter (blau) auf dem Hauptklemmbrett von N
nach R verschieben;3) Den neutralen Leiter (blau) vom Filter kommend von N auf
dem Klemmbrett der Widerstände auf KM A1 setzen;4) Den neutralen Leiter (blau) von KM A1 auf KM T1 verschieben;5) Den neutralen Leiter (blau), der von 0 von der Platine N kommt
auf dem Klemmbrett der Widerstände auf KM A1 verschieben.6) Für PZF 40/45/50 den Zähler KM von BF09 zu BF26 tauschen
und das Anschlusskabel in Punkt 4 auf 6mm² anheben.Es ist nicht möglich die Dreiphasen-Maschine in eine Einpha-
sen-Maschine zu konvertieren.
Pour convertir de triphasé 400V à triphasé 230V :
1) Connecter de moteur à étoile à moteur en triangle ;2) Déplacer le câble neutre (bleu) sur le bornier principal de N à R ;3) Déplacer le câble neutre (bleu) provenant du �ltre, de N bor-
nier des résistances à KM A1 ;4) Déplacer le câble neutre (bleu) de KM A1 à KM T1 ;5) Déplacer le câble neutre (bleu) provenant de 0 sur la carte de
N sur le bornier des résistances à KM A1 ;6) Pour PZF 40/45/50 changer le compteur KM de BF09 à BF26
et augmenter à 6mm² le câble relié du point 4.
Il est impossible de convertir la machine triphasée en ma-
chine monophasée.
Para conversión de trifásica 400V a trifásica 230V:
1) Cambie la conexión del motor, de estrella a triángulo.2) Mueva el cable del neutro (azul) desde N a R en la regleta de
bornes principal.3) Mueva el cable del neutro (azul) procedente del �ltro, desde
N en la regleta de bornes de las resistencias a KM A1.4) Mueva el cable del neutro (azul) desde KM A1 a KM T1.5) Mueva el cable del neutro (azul) procedente de 0 en la tarjeta,
desde N en la regleta de bornes de las resistencias a KM A1.6) Para PZF 40/45/50 cambie el contactor KM desde BF09 a BF26
y aumente a 6mm² el cable conectado del punto 4.
No se puede convertir una máquina trifásica en una máquina
monofásica.
Для преобразования трехфазной системы 400В в трехфазную 230В:
1) Произвести соединение двигателя с треугольника на звезду;2) Сместить нейтральный кабель (синий) на главной клемм-
ной колодке с N на R;3) Сместить нейтральный кабель (синий), выходящий из фильтра,
с N клеммной колодки нагревательных элементов на KM A14) Сместить нейтральный кабель (синий) с KM A1 на KM T1;5) Сместить нейтральный кабель (синий), выходящий с 0 платы
N клеммной колодки нагревательных элементов KM A1.6) Для PZF 40/45/50 заменить контактор KM с BF09 на BF26
и увеличить до 6 кв.мм кабель, подсоединенный в соот-ветствии с п.4.
Невозможно преобразовать трехфазную машину в одно-
фазную.
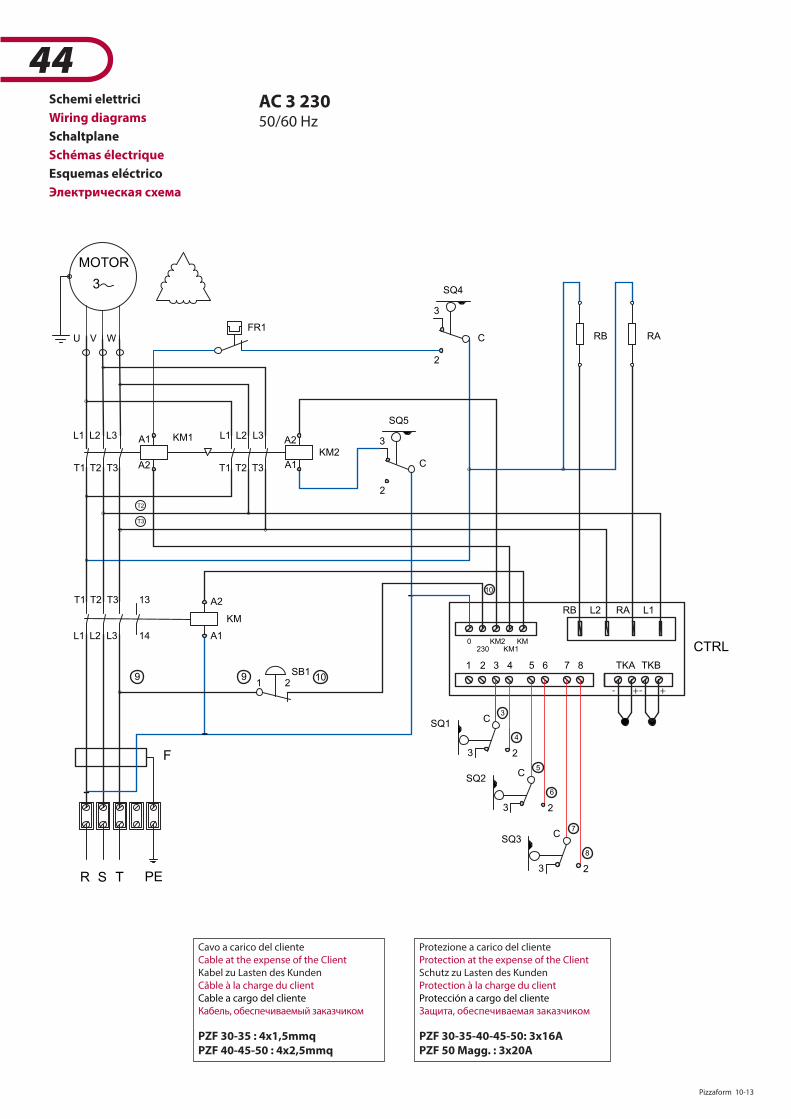
44 Pizzaform 10-13
44Schemi elettrici
Wiring diagrams
Schaltplane
Schémas électrique
Esquemas eléctrico
Электрическая схема
R S T
10
SQ5
C
2
3KM1
FR1
- + +-
PE
F
9 9 10SB1
1 2
KM
L1 L2 L3 14 A1
T1 T2 T3 13 A2
L1 L2 L3
T1 T2 T3 A1
A2
KM2
T1 T2 T3
L1 L2 L3 A1
A2
T3
T2
U WV
3
MOTOR
SQ4
C
2
3
RARB
SQ2
SQ3
3
3
3
2
2
2
C
C
5
6
7
8
RB L2 RA L1
CTRL0
230KM2
KM1KM
1 2 3 4 5 6 7 8 TKA TKB
C3
4
SQ1
AC 3 23050/60 Hz
Protezione a carico del clienteProtection at the expense of the ClientSchutz zu Lasten des KundenProtection à la charge du clientProtección a cargo del clienteЗащита, обеспечиваемая заказчиком
PZF 30-35-40-45-50: 3x16A
PZF 50 Magg. : 3x20A
Cavo a carico del clienteCable at the expense of the ClientKabel zu Lasten des KundenCâble à la charge du clientCable a cargo del clienteКабель, обеспечиваемый заказчиком
PZF 30-35 : 4x1,5mmq
PZF 40-45-50 : 4x2,5mmq
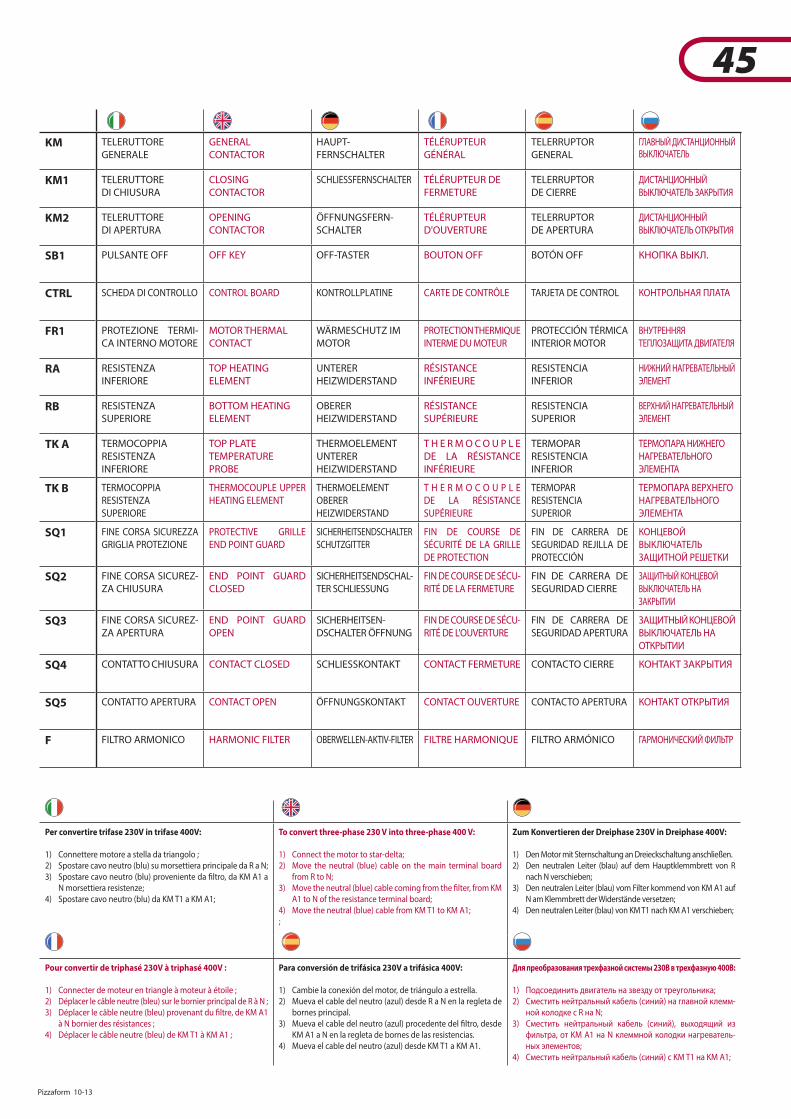
Pizzaform 10-13 45
45
KM TELERUTTOREGENERALE
GENERALCONTACTOR
HAUPT-FERNSCHALTER
TÉLÉRUPTEUR GÉNÉRAL
TELERRUPTORGENERAL
ГЛАВНЫЙ ДИСТАНЦИОННЫЙВЫКЛЮЧАТЕЛЬ
KM1 TELERUTTOREDI CHIUSURA
CLOSINGCONTACTOR
SCHLIESSFERNSCHALTER TÉLÉRUPTEUR DE FERMETURE
TELERRUPTOR DE CIERRE
ДИСТАНЦИОННЫЙ ВЫКЛЮЧАТЕЛЬ ЗАКРЫТИЯ
KM2 TELERUTTOREDI APERTURA
OPENINGCONTACTOR
ÖFFNUNGSFERN-SCHALTER
TÉLÉRUPTEURD'OUVERTURE
TELERRUPTOR DE APERTURA
ДИСТАНЦИОННЫЙ ВЫКЛЮЧАТЕЛЬ ОТКРЫТИЯ
SB1 PULSANTE OFF OFF KEY OFF-TASTER BOUTON OFF BOTÓN OFF КНОПКА ВЫКЛ.
CTRL SCHEDA DI CONTROLLO CONTROL BOARD KONTROLLPLATINE CARTE DE CONTRÔLE TARJETA DE CONTROL КОНТРОЛЬНАЯ ПЛАТА
FR1 PROTEZIONE TERMI-CA INTERNO MOTORE
MOTOR THERMAL CONTACT
WÄRMESCHUTZ IM MOTOR
PROTECTION THERMIQUE INTERME DU MOTEUR
PROTECCIÓN TÉRMICA INTERIOR MOTOR
ВНУТРЕННЯЯ ТЕПЛОЗАЩИТА ДВИГАТЕЛЯ
RA RESISTENZAINFERIORE
TOP HEATING ELEMENT
UNTERERHEIZWIDERSTAND
RÉSISTANCEINFÉRIEURE
RESISTENCIA INFERIOR
НИЖНИЙ НАГРЕВАТЕЛЬНЫЙ ЭЛЕМЕНТ
RB RESISTENZASUPERIORE
BOTTOM HEATING ELEMENT
OBERERHEIZWIDERSTAND
RÉSISTANCESUPÉRIEURE
RESISTENCIASUPERIOR
ВЕРХНИЙ НАГРЕВАТЕЛЬНЫЙ ЭЛЕМЕНТ
TK A TERMOCOPPIA RESISTENZA INFERIORE
TOP PLATE TEMPERATUREPROBE
THERMOELEMENT UNTERER HEIZWIDERSTAND
T H E R M O C O U P L E DE LA RÉSISTANCE INFÉRIEURE
TERMOPAR RESISTENCIA INFERIOR
ТЕРМОПАРА НИЖНЕГО НАГРЕВАТЕЛЬНОГО ЭЛЕМЕНТА
TK B TERMOCOPPIA RESISTENZASUPERIORE
THERMOCOUPLE UPPER HEATING ELEMENT
THERMOELEMENT OBERER HEIZWIDERSTAND
T H E R M O C O U P L E DE LA RÉSISTANCE SUPÉRIEURE
TERMOPAR RESISTENCIA SUPERIOR
ТЕРМОПАРА ВЕРХНЕГО НАГРЕВАТЕЛЬНОГО ЭЛЕМЕНТА
SQ1 FINE CORSA SICUREZZA GRIGLIA PROTEZIONE
PROTECTIVE GRILLE END POINT GUARD
SICHERHEITSENDSCHALTER SCHUTZGITTER
FIN DE COURSE DE SÉCURITÉ DE LA GRILLE DE PROTECTION
FIN DE CARRERA DE SEGURIDAD REJILLA DE PROTECCIÓN
КОНЦЕВОЙ ВЫКЛЮЧАТЕЛЬ ЗАЩИТНОЙ РЕШЕТКИ
SQ2 FINE CORSA SICUREZ-ZA CHIUSURA
END POINT GUARD CLOSED
SICHERHEITSENDSCHAL-TER SCHLIESSUNG
FIN DE COURSE DE SÉCU-RITÉ DE LA FERMETURE
FIN DE CARRERA DE SEGURIDAD CIERRE
ЗАЩИТНЫЙ КОНЦЕВОЙ ВЫКЛЮЧАТЕЛЬ НА ЗАКРЫТИИ
SQ3 FINE CORSA SICUREZ-ZA APERTURA
END POINT GUARD OPEN
SICHERHEITSEN-DSCHALTER ÖFFNUNG
FIN DE COURSE DE SÉCU-RITÉ DE L'OUVERTURE
FIN DE CARRERA DE SEGURIDAD APERTURA
ЗАЩИТНЫЙ КОНЦЕВОЙ ВЫКЛЮЧАТЕЛЬ НА ОТКРЫТИИ
SQ4 CONTATTO CHIUSURA CONTACT CLOSED SCHLIESSKONTAKT CONTACT FERMETURE CONTACTO CIERRE КОНТАКТ ЗАКРЫТИЯ
SQ5 CONTATTO APERTURA CONTACT OPEN ÖFFNUNGSKONTAKT CONTACT OUVERTURE CONTACTO APERTURA КОНТАКТ ОТКРЫТИЯ
F FILTRO ARMONICO HARMONIC FILTER OBERWELLEN-AKTIV-FILTER FILTRE HARMONIQUE FILTRO ARMÓNICO ГАРМОНИЧЕСКИЙ ФИЛЬТР
Per convertire trifase 230V in trifase 400V:
1) Connettere motore a stella da triangolo ;2) Spostare cavo neutro (blu) su morsettiera principale da R a N;3) Spostare cavo neutro (blu) proveniente da �ltro, da KM A1 a
N morsettiera resistenze;4) Spostare cavo neutro (blu) da KM T1 a KM A1;
To convert three-phase 230 V into three-phase 400 V:
1) Connect the motor to star-delta;2) Move the neutral (blue) cable on the main terminal board
from R to N;3) Move the neutral (blue) cable coming from the �lter, from KM
A1 to N of the resistance terminal board;4) Move the neutral (blue) cable from KM T1 to KM A1;;
Zum Konvertieren der Dreiphase 230V in Dreiphase 400V:
1) Den Motor mit Sternschaltung an Dreieckschaltung anschließen.2) Den neutralen Leiter (blau) auf dem Hauptklemmbrett von R
nach N verschieben;3) Den neutralen Leiter (blau) vom Filter kommend von KM A1 auf
N am Klemmbrett der Widerstände versetzen;4) Den neutralen Leiter (blau) von KM T1 nach KM A1 verschieben;
Pour convertir de triphasé 230V à triphasé 400V :
1) Connecter de moteur en triangle à moteur à étoile ;2) Déplacer le câble neutre (bleu) sur le bornier principal de R à N ;3) Déplacer le câble neutre (bleu) provenant du �ltre, de KM A1
à N bornier des résistances ;4) Déplacer le câble neutre (bleu) de KM T1 à KM A1 ;
Para conversión de trifásica 230V a trifásica 400V:
1) Cambie la conexión del motor, de triángulo a estrella.2) Mueva el cable del neutro (azul) desde R a N en la regleta de
bornes principal.3) Mueva el cable del neutro (azul) procedente del �ltro, desde
KM A1 a N en la regleta de bornes de las resistencias.4) Mueva el cable del neutro (azul) desde KM T1 a KM A1.
Для преобразования трехфазной системы 230В в трехфазную 400В:
1) Подсоединить двигатель на звезду от треугольника;2) Сместить нейтральный кабель (синий) на главной клемм-
ной колодке с R на N;3) Сместить нейтральный кабель (синий), выходящий из
фильтра, от KM A1 на N клеммной колодки нагреватель-ных элементов;
4) Сместить нейтральный кабель (синий) с KM T1 на KM A1;
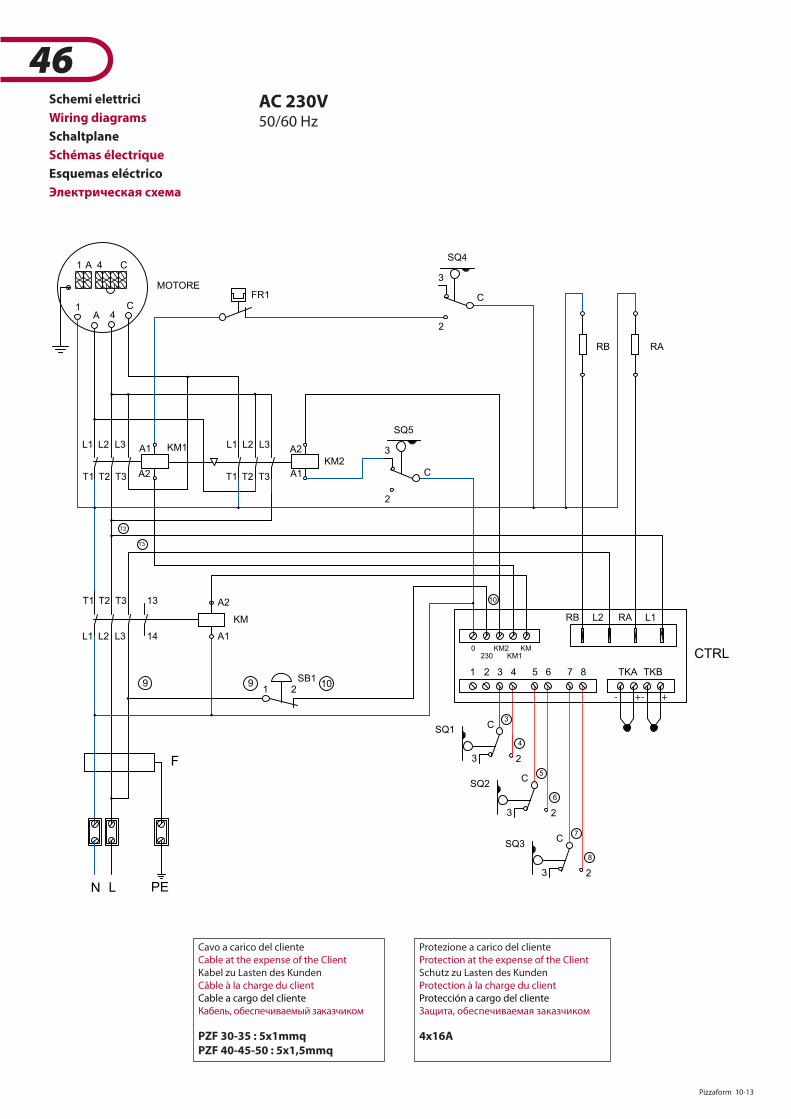
46 Pizzaform 10-13
46Schemi elettrici
Wiring diagrams
Schaltplane
Schémas électrique
Esquemas eléctrico
Электрическая схема
8
7
6
5
4
3
C
C
C
2
2
2
3
3
3
SQ3
SQ2
SQ1
TKBTKA87654321
KMKM1
KM2230
0CTRL
L1RAL2RB
10
C
3
2
SQ4C4A1
C4A
1
MOTOREFR1
KM2
A2
A1
T2
T3
A2
A1
T3T2T1
L3L2L1L3L2L1
T3T2T1
KM
A2
A1
13T3T2T1
14L3L2L1
21SB1
1099
F
PEN L
- ++-
RARB
KM1
SQ5
C
2
3
AC 230V50/60 Hz
Protezione a carico del clienteProtection at the expense of the ClientSchutz zu Lasten des KundenProtection à la charge du clientProtección a cargo del clienteЗащита, обеспечиваемая заказчиком
4x16A
Cavo a carico del clienteCable at the expense of the ClientKabel zu Lasten des KundenCâble à la charge du clientCable a cargo del clienteКабель, обеспечиваемый заказчиком
PZF 30-35 : 5x1mmq
PZF 40-45-50 : 5x1,5mmq
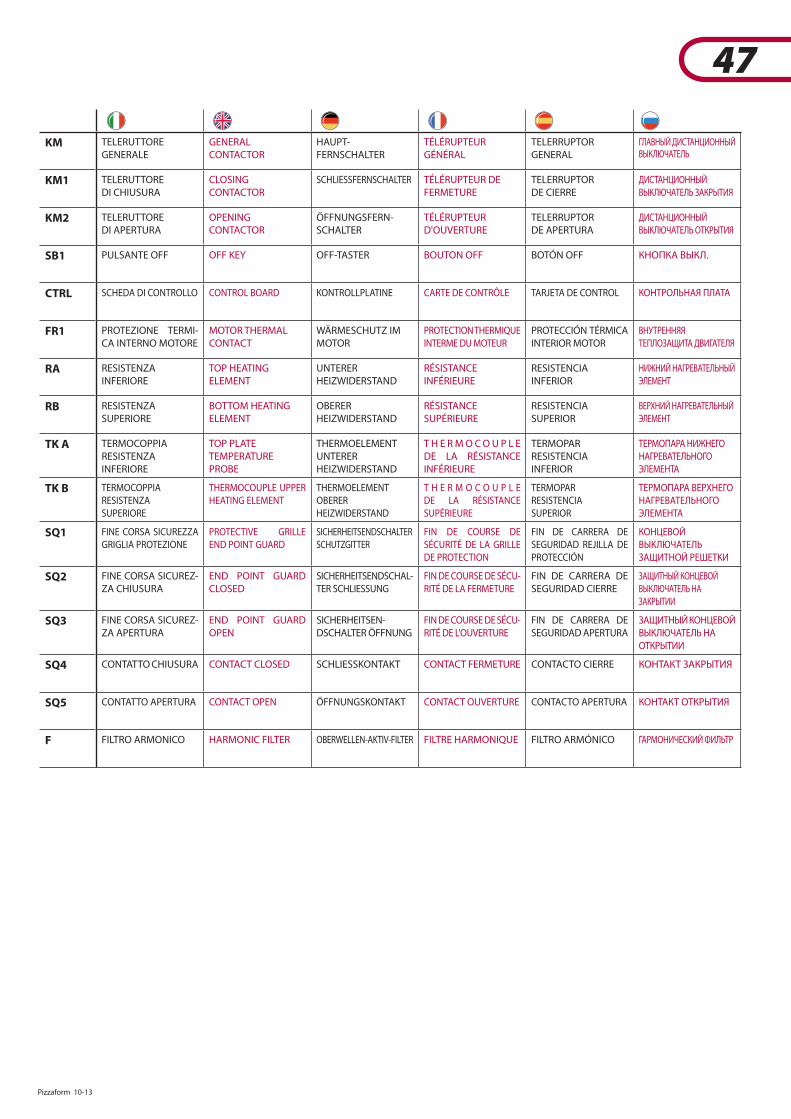
Pizzaform 10-13 47
47
KM TELERUTTORE
GENERALE
GENERAL
CONTACTOR
HAUPT-
FERNSCHALTER
TÉLÉRUPTEUR GÉNÉRAL
TELERRUPTORGENERAL
ГЛАВНЫЙ ДИСТАНЦИОННЫЙВЫКЛЮЧАТЕЛЬ
KM1 TELERUTTOREDI CHIUSURA
CLOSINGCONTACTOR
SCHLIESSFERNSCHALTER TÉLÉRUPTEUR DE FERMETURE
TELERRUPTOR DE CIERRE
ДИСТАНЦИОННЫЙ ВЫКЛЮЧАТЕЛЬ ЗАКРЫТИЯ
KM2 TELERUTTOREDI APERTURA
OPENINGCONTACTOR
ÖFFNUNGSFERN-SCHALTER
TÉLÉRUPTEURD'OUVERTURE
TELERRUPTOR DE APERTURA
ДИСТАНЦИОННЫЙ ВЫКЛЮЧАТЕЛЬ ОТКРЫТИЯ
SB1 PULSANTE OFF OFF KEY OFF-TASTER BOUTON OFF BOTÓN OFF КНОПКА ВЫКЛ.
CTRL SCHEDA DI CONTROLLO CONTROL BOARD KONTROLLPLATINE CARTE DE CONTRÔLE TARJETA DE CONTROL КОНТРОЛЬНАЯ ПЛАТА
FR1 PROTEZIONE TERMI-CA INTERNO MOTORE
MOTOR THERMAL CONTACT
WÄRMESCHUTZ IM MOTOR
PROTECTION THERMIQUE INTERME DU MOTEUR
PROTECCIÓN TÉRMICA INTERIOR MOTOR
ВНУТРЕННЯЯ ТЕПЛОЗАЩИТА ДВИГАТЕЛЯ
RA RESISTENZAINFERIORE
TOP HEATING ELEMENT
UNTERERHEIZWIDERSTAND
RÉSISTANCEINFÉRIEURE
RESISTENCIA INFERIOR
НИЖНИЙ НАГРЕВАТЕЛЬНЫЙ ЭЛЕМЕНТ
RB RESISTENZASUPERIORE
BOTTOM HEATING ELEMENT
OBERERHEIZWIDERSTAND
RÉSISTANCESUPÉRIEURE
RESISTENCIASUPERIOR
ВЕРХНИЙ НАГРЕВАТЕЛЬНЫЙ ЭЛЕМЕНТ
TK A TERMOCOPPIA RESISTENZA INFERIORE
TOP PLATE TEMPERATUREPROBE
THERMOELEMENT UNTERER HEIZWIDERSTAND
T H E R M O C O U P L E DE LA RÉSISTANCE INFÉRIEURE
TERMOPARRESISTENCIA INFERIOR
ТЕРМОПАРА НИЖНЕГО НАГРЕВАТЕЛЬНОГО ЭЛЕМЕНТА
TK B TERMOCOPPIA RESISTENZASUPERIORE
THERMOCOUPLE UPPER HEATING ELEMENT
THERMOELEMENT OBERER HEIZWIDERSTAND
T H E R M O C O U P L E DE LA RÉSISTANCE SUPÉRIEURE
TERMOPAR RESISTENCIA SUPERIOR
ТЕРМОПАРА ВЕРХНЕГО НАГРЕВАТЕЛЬНОГО ЭЛЕМЕНТА
SQ1 FINE CORSA SICUREZZA GRIGLIA PROTEZIONE
PROTECTIVE GRILLE END POINT GUARD
SICHERHEITSENDSCHALTER SCHUTZGITTER
FIN DE COURSE DE SÉCURITÉ DE LA GRILLE DE PROTECTION
FIN DE CARRERA DE SEGURIDAD REJILLA DE PROTECCIÓN
КОНЦЕВОЙ ВЫКЛЮЧАТЕЛЬ ЗАЩИТНОЙ РЕШЕТКИ
SQ2 FINE CORSA SICUREZ-ZA CHIUSURA
END POINT GUARD CLOSED
SICHERHEITSENDSCHAL-TER SCHLIESSUNG
FIN DE COURSE DE SÉCU-RITÉ DE LA FERMETURE
FIN DE CARRERA DE SEGURIDAD CIERRE
ЗАЩИТНЫЙ КОНЦЕВОЙ ВЫКЛЮЧАТЕЛЬ НА ЗАКРЫТИИ
SQ3 FINE CORSA SICUREZ-ZA APERTURA
END POINT GUARD OPEN
SICHERHEITSEN-DSCHALTER ÖFFNUNG
FIN DE COURSE DE SÉCU-RITÉ DE L'OUVERTURE
FIN DE CARRERA DE SEGURIDAD APERTURA
ЗАЩИТНЫЙ КОНЦЕВОЙ ВЫКЛЮЧАТЕЛЬ НА ОТКРЫТИИ
SQ4 CONTATTO CHIUSURA CONTACT CLOSED SCHLIESSKONTAKT CONTACT FERMETURE CONTACTO CIERRE КОНТАКТ ЗАКРЫТИЯ
SQ5 CONTATTO APERTURA CONTACT OPEN ÖFFNUNGSKONTAKT CONTACT OUVERTURE CONTACTO APERTURA КОНТАКТ ОТКРЫТИЯ
F FILTRO ARMONICO HARMONIC FILTER OBERWELLEN-AKTIV-FILTER FILTRE HARMONIQUE FILTRO ARMÓNICO ГАРМОНИЧЕСКИЙ ФИЛЬТР
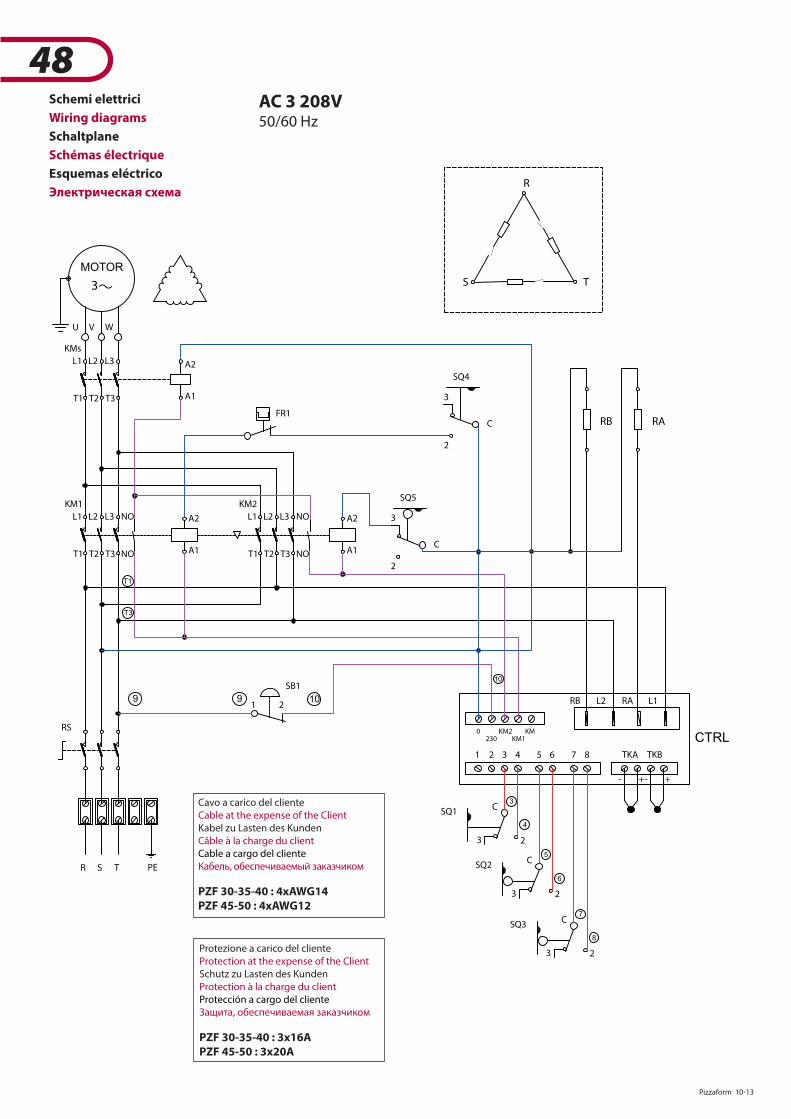
48 Pizzaform 10-13
48Schemi elettrici
Wiring diagrams
Schaltplane
Schémas électrique
Esquemas eléctrico
Электрическая схема
CTRL
MOTOR
L1 L2 L3
T1 T2 T3 A1
A2
KMs
SQ1
4
3C
TKBTKA87654321
KM
KM1
KM2
230
0
L1RAL2RB
8
7
6
5
23
SQ3
SQ2
RB RA
3
2
C
SQ4
3
V WU
T1
T3
21
SB1
1099
PER S T
- ++-
FR1
SQ5
10
RS
2
3
C
KM1
T3T2T1
L3L2L1 NO
NO A1
A2
NO
NOL1 L2 L3
T1 T2 T3
KM2
A1
A2
C
23
C
23
T
R
S
AC 3 208V50/60 Hz
Cavo a carico del clienteCable at the expense of the ClientKabel zu Lasten des KundenCâble à la charge du clientCable a cargo del clienteКабель, обеспечиваемый заказчиком
PZF 30-35-40 : 4xAWG14
PZF 45-50 : 4xAWG12
Protezione a carico del clienteProtection at the expense of the ClientSchutz zu Lasten des KundenProtection à la charge du clientProtección a cargo del clienteЗащита, обеспечиваемая заказчиком
PZF 30-35-40 : 3x16A
PZF 45-50 : 3x20A
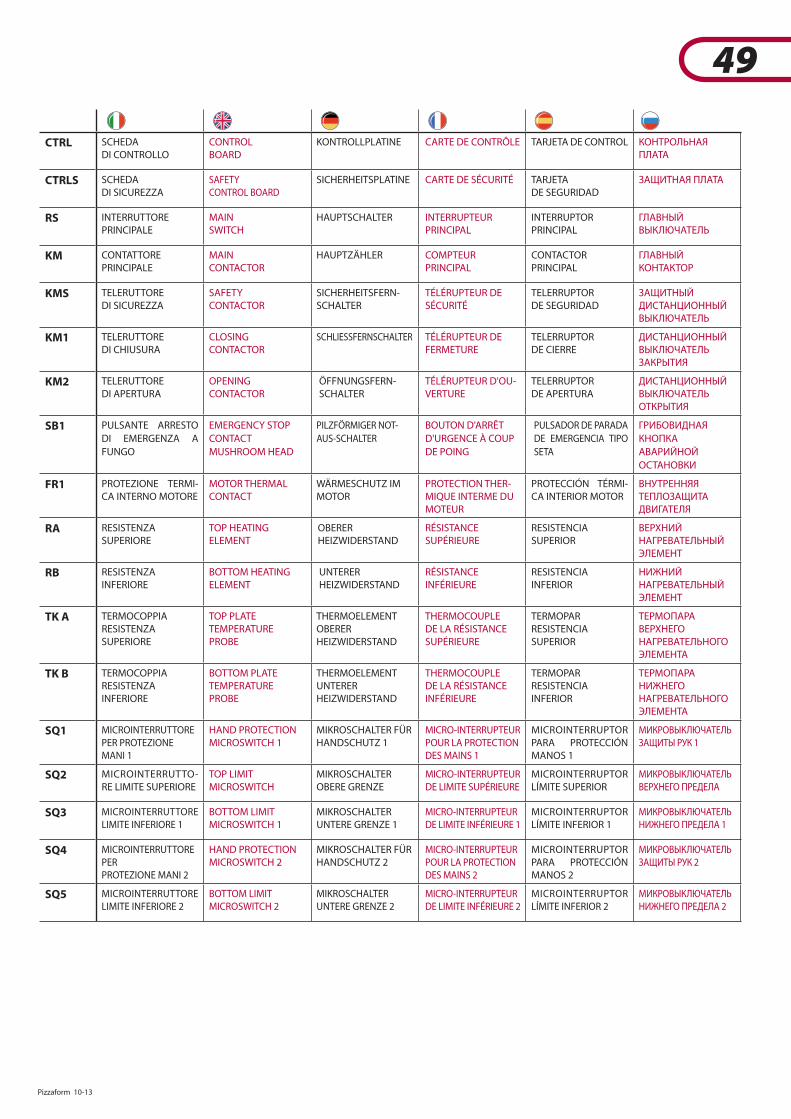
Pizzaform 10-13 49
49
CTRL SCHEDADI CONTROLLO
CONTROLBOARD
KONTROLLPLATINE CARTE DE CONTRÔLE TARJETA DE CONTROL КОНТРОЛЬНАЯ ПЛАТА
CTRLS SCHEDADI SICUREZZA
SAFETYCONTROL BOARD
SICHERHEITSPLATINE CARTE DE SÉCURITÉ TARJETADE SEGURIDAD
ЗАЩИТНАЯ ПЛАТА
RS INTERRUTTORE PRINCIPALE
MAINSWITCH
HAUPTSCHALTER INTERRUPTEUR PRINCIPAL
INTERRUPTORPRINCIPAL
ГЛАВНЫЙ ВЫКЛЮЧАТЕЛЬ
KM CONTATTORE PRINCIPALE
MAINCONTACTOR
HAUPTZÄHLER COMPTEUR PRINCIPAL
CONTACTORPRINCIPAL
ГЛАВНЫЙ КОНТАКТОР
KMS TELERUTTOREDI SICUREZZA
SAFETYCONTACTOR
SICHERHEITSFERN-SCHALTER
TÉLÉRUPTEUR DE SÉCURITÉ
TELERRUPTORDE SEGURIDAD
ЗАЩИТНЫЙ ДИСТАНЦИОННЫЙ ВЫКЛЮЧАТЕЛЬ
KM1 TELERUTTOREDI CHIUSURA
CLOSINGCONTACTOR
SCHLIESSFERNSCHALTER TÉLÉRUPTEUR DE FERMETURE
TELERRUPTORDE CIERRE
ДИСТАНЦИОННЫЙ ВЫКЛЮЧАТЕЛЬ ЗАКРЫТИЯ
KM2 TELERUTTOREDI APERTURA
OPENINGCONTACTOR
ÖFFNUNGSFERN-SCHALTER
TÉLÉRUPTEUR D'OU-VERTURE
TELERRUPTORDE APERTURA
ДИСТАНЦИОННЫЙ ВЫКЛЮЧАТЕЛЬ ОТКРЫТИЯ
SB1 PULSANTE ARRESTO DI EMERGENZA A FUNGO
EMERGENCY STOPCONTACT MUSHROOM HEAD
PILZFÖRMIGER NOT-AUS-SCHALTER
BOUTON D'ARRÊT D'URGENCE À COUP DE POING
PULSADOR DE PARADADE EMERGENCIA TIPO SETA
ГРИБОВИДНАЯ КНОПКА АВАРИЙНОЙ ОСТАНОВКИ
FR1 PROTEZIONE TERMI-CA INTERNO MOTORE
MOTOR THERMAL CONTACT
WÄRMESCHUTZ IM MOTOR
PROTECTION THER-MIQUE INTERME DU MOTEUR
PROTECCIÓN TÉRMI-CA INTERIOR MOTOR
ВНУТРЕННЯЯ ТЕПЛОЗАЩИТА ДВИГАТЕЛЯ
RA RESISTENZASUPERIORE
TOP HEATING ELEMENT
OBERER HEIZWIDERSTAND
RÉSISTANCE SUPÉRIEURE
RESISTENCIASUPERIOR
ВЕРХНИЙ НАГРЕВАТЕЛЬНЫЙ ЭЛЕМЕНТ
RB RESISTENZAINFERIORE
BOTTOM HEATING ELEMENT
UNTERER HEIZWIDERSTAND
RÉSISTANCE INFÉRIEURE
RESISTENCIAINFERIOR
НИЖНИЙ НАГРЕВАТЕЛЬНЫЙ ЭЛЕМЕНТ
TK A TERMOCOPPIARESISTENZASUPERIORE
TOP PLATETEMPERATUREPROBE
THERMOELEMENT OBERER HEIZWIDERSTAND
THERMOCOUPLE DE LA RÉSISTANCE SUPÉRIEURE
TERMOPAR RESISTENCIA SUPERIOR
ТЕРМОПАРА ВЕРХНЕГО НАГРЕВАТЕЛЬНОГО ЭЛЕМЕНТА
TK B TERMOCOPPIARESISTENZAINFERIORE
BOTTOM PLATETEMPERATUREPROBE
THERMOELEMENT UNTERER HEIZWIDERSTAND
THERMOCOUPLE DE LA RÉSISTANCE INFÉRIEURE
TERMOPARRESISTENCIAINFERIOR
ТЕРМОПАРА НИЖНЕГО НАГРЕВАТЕЛЬНОГО ЭЛЕМЕНТА
SQ1 MICROINTERRUTTORE PER PROTEZIONE MANI 1
HAND PROTECTION MICROSWITCH 1
MIKROSCHALTER FÜR HANDSCHUTZ 1
MICRO-INTERRUPTEUR POUR LA PROTECTION DES MAINS 1
MICROINTERRUPTOR PARA PROTECCIÓN MANOS 1
МИКРОВЫКЛЮЧАТЕЛЬ ЗАЩИТЫ РУК 1
SQ2 MICROINTERRUTTO-RE LIMITE SUPERIORE
TOP LIMITMICROSWITCH
MIKROSCHALTER OBERE GRENZE
MICRO-INTERRUPTEUR DE LIMITE SUPÉRIEURE
MICROINTERRUPTOR LÍMITE SUPERIOR
МИКРОВЫКЛЮЧАТЕЛЬ ВЕРХНЕГО ПРЕДЕЛА
SQ3 MICROINTERRUTTORE LIMITE INFERIORE 1
BOTTOM LIMITMICROSWITCH 1
MIKROSCHALTER UNTERE GRENZE 1
MICRO-INTERRUPTEUR DE LIMITE INFÉRIEURE 1
MICROINTERRUPTOR LÍMITE INFERIOR 1
МИКРОВЫКЛЮЧАТЕЛЬ НИЖНЕГО ПРЕДЕЛА 1
SQ4 MICROINTERRUTTORE PER PROTEZIONE MANI 2
HAND PROTECTION MICROSWITCH 2
MIKROSCHALTER FÜR HANDSCHUTZ 2
MICRO-INTERRUPTEUR POUR LA PROTECTION DES MAINS 2
MICROINTERRUPTOR PARA PROTECCIÓN MANOS 2
МИКРОВЫКЛЮЧАТЕЛЬ ЗАЩИТЫ РУК 2
SQ5 MICROINTERRUTTORE LIMITE INFERIORE 2
BOTTOM LIMITMICROSWITCH 2
MIKROSCHALTER UNTERE GRENZE 2
MICRO-INTERRUPTEUR DE LIMITE INFÉRIEURE 2
MICROINTERRUPTOR LÍMITE INFERIOR 2
МИКРОВЫКЛЮЧАТЕЛЬ НИЖНЕГО ПРЕДЕЛА 2
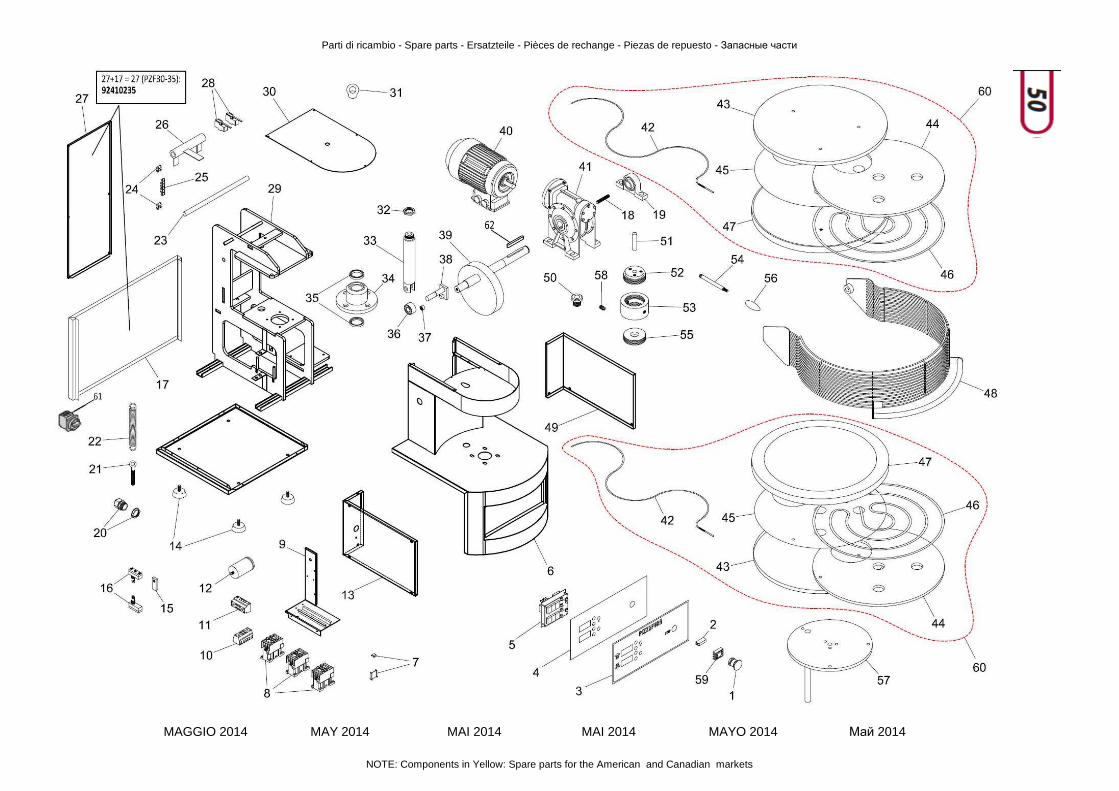
Parti di ricambio - Spare parts - Ersatzteile - Pièces de rechange - Piezas de repuesto - Запасные части
MAGGIO 2014 MAY 2014 MAI 2014 MAI 2014 MAYO 2014 Май 2014
NOTE: Components in Yellow: Spare parts for the American and Canadian markets
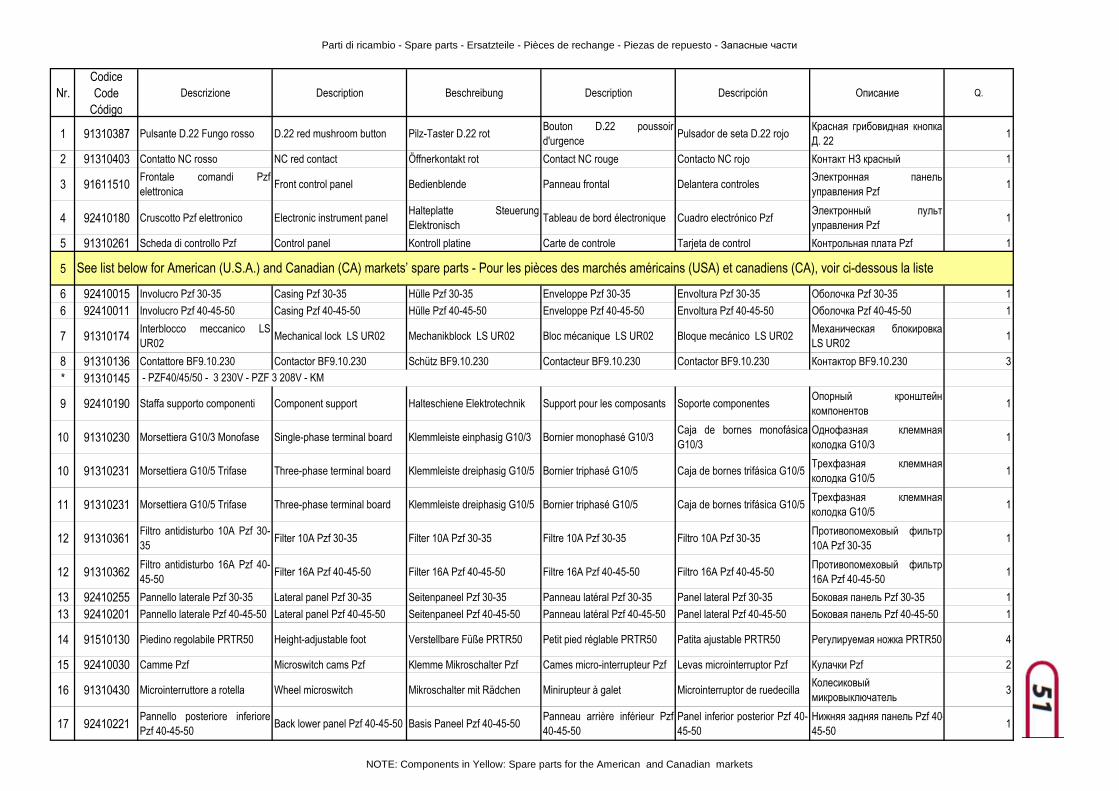
Parti di ricambio - Spare parts - Ersatzteile - Pièces de rechange - Piezas de repuesto - Запасные части
Nr.CodiceCode
CódigoDescrizione Description Beschreibung Description Descripción Описание Q.
1 91310387 Pulsante D.22 Fungo rosso D.22 red mushroom button Pilz-Taster D.22 rot Bouton D.22 poussoird'urgence
Pulsador de seta D.22 rojo Красная грибовидная кнопкаД. 22
1
2 91310403 Contatto NC rosso NC red contact Öffnerkontakt rot Contact NC rouge Contacto NC rojo Контакт НЗ красный 1
3 91611510Frontale comandi Pzfelettronica
Front control panel Bedienblende Panneau frontal Delantera controlesЭлектронная панельуправления Pzf
1
4 92410180 Cruscotto Pzf elettronico Electronic instrument panelHalteplatte SteuerungElektronisch
Tableau de bord électronique Cuadro electrónico PzfЭлектронный пультуправления Pzf
1
5 91310261 Scheda di controllo Pzf Control panel Kontroll platine Carte de controle Tarjeta de control Контрольная плата Pzf 1
5
6 92410015 Involucro Pzf 30-35 Casing Pzf 30-35 Hülle Pzf 30-35 Enveloppe Pzf 30-35 Envoltura Pzf 30-35 Оболочка Pzf 30-35 1
6 92410011 Involucro Pzf 40-45-50 Casing Pzf 40-45-50 Hülle Pzf 40-45-50 Enveloppe Pzf 40-45-50 Envoltura Pzf 40-45-50 Оболочка Pzf 40-45-50 1
7 91310174Interblocco meccanico LSUR02
Mechanical lock LS UR02 Mechanikblock LS UR02 Bloc mécanique LS UR02 Bloque mecánico LS UR02 Механическая блокировкаLS UR02
1
8 91310136 Contattore BF9.10.230 Contactor BF9.10.230 Schütz BF9.10.230 Contacteur BF9.10.230 Contactor BF9.10.230 Контактор BF9.10.230 3
* 91310145
9 92410190 Staffa supporto componenti Component support Halteschiene Elektrotechnik Support pour les composants Soporte componentesОпорный кронштейнкомпонентов
1
10 91310230 Morsettiera G10/3 Monofase Single-phase terminal board Klemmleiste einphasig G10/3 Bornier monophasé G10/3Caja de bornes monofásicaG10/3
Однофазная клеммнаяколодка G10/3
1
10 91310231 Morsettiera G10/5 Trifase Three-phase terminal board Klemmleiste dreiphasig G10/5 Bornier triphasé G10/5 Caja de bornes trifásica G10/5Трехфазная клеммнаяколодка G10/5
1
11 91310231 Morsettiera G10/5 Trifase Three-phase terminal board Klemmleiste dreiphasig G10/5 Bornier triphasé G10/5 Caja de bornes trifásica G10/5Трехфазная клеммнаяколодка G10/5
1
12 91310361Filtro antidisturbo 10A Pzf 30-35
Filter 10A Pzf 30-35 Filter 10A Pzf 30-35 Filtre 10A Pzf 30-35 Filtro 10A Pzf 30-35Противопомеховый фильтр10A Pzf 30-35
1
12 91310362Filtro antidisturbo 16A Pzf 40-45-50
Filter 16A Pzf 40-45-50 Filter 16A Pzf 40-45-50 Filtre 16A Pzf 40-45-50 Filtro 16A Pzf 40-45-50Противопомеховый фильтр16A Pzf 40-45-50
1
13 92410255 Pannello laterale Pzf 30-35 Lateral panel Pzf 30-35 Seitenpaneel Pzf 30-35 Panneau latéral Pzf 30-35 Panel lateral Pzf 30-35 Боковая панель Pzf 30-35 1
13 92410201 Pannello laterale Pzf 40-45-50 Lateral panel Pzf 40-45-50 Seitenpaneel Pzf 40-45-50 Panneau latéral Pzf 40-45-50 Panel lateral Pzf 40-45-50 Боковая панель Pzf 40-45-50 1
14 91510130 Piedino regolabile PRTR50 Height-adjustable foot Verstellbare Füße PRTR50 Petit pied réglable PRTR50 Patita ajustable PRTR50 Регулируемая ножка PRTR50 4
15 92410030 Camme Pzf Microswitch cams Pzf Klemme Mikroschalter Pzf Cames micro-interrupteur Pzf Levas microinterruptor Pzf Кулачки Pzf 2
16 91310430 Microinterruttore a rotella Wheel microswitch Mikroschalter mit Rädchen Minirupteur à galet Microinterruptor de ruedecillaКолесиковый микровыключатель
3
17 92410221Pannello posteriore inferiorePzf 40-45-50
Back lower panel Pzf 40-45-50 Basis Paneel Pzf 40-45-50 Panneau arrière inférieur Pzf40-45-50
Panel inferior posterior Pzf 40-45-50
Нижняя задняя панель Pzf 40-45-50
1
- PZF40/45/50 - 3 230V - PZF 3 208V - KM
See list below for American (U.S.A.) and Canadian (CA) markets’ spare parts - Pour les pièces des marchés américains (USA) et canadiens (CA), voir ci-dessous la liste
NOTE: Components in Yellow: Spare parts for the American and Canadian markets
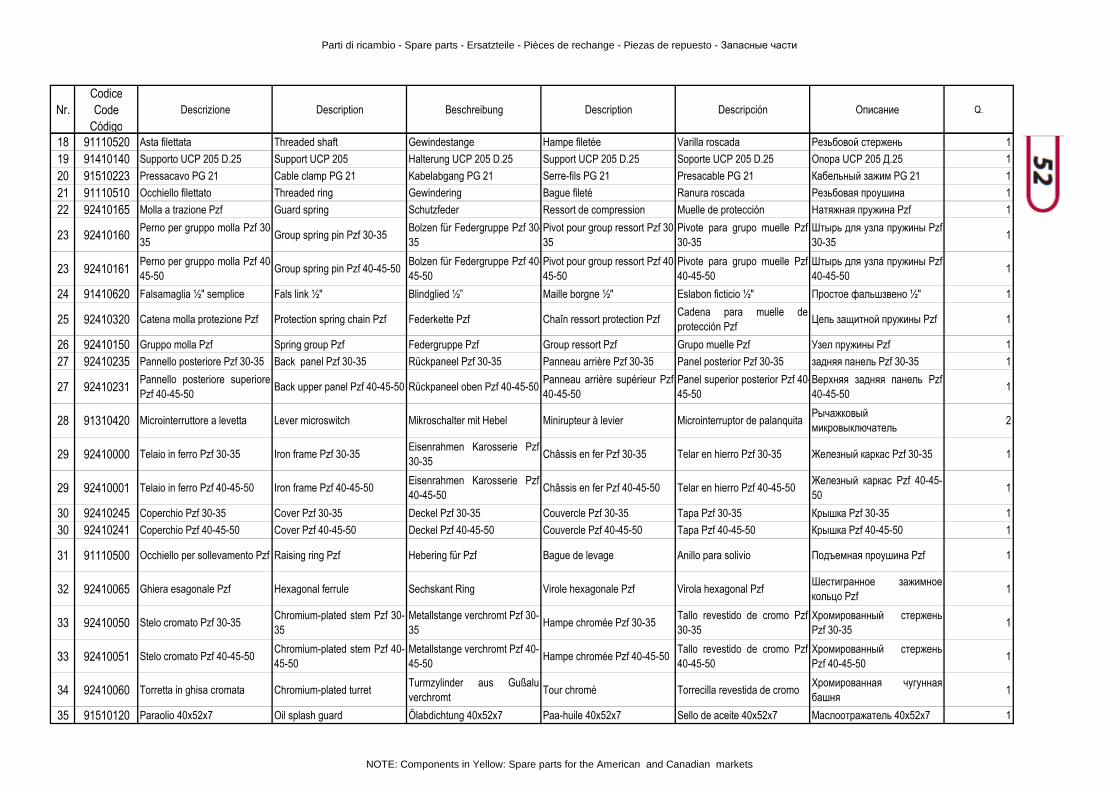
Parti di ricambio - Spare parts - Ersatzteile - Pièces de rechange - Piezas de repuesto - Запасные части
Nr.CodiceCode
CódigoDescrizione Description Beschreibung Description Descripción Описание Q.
18 91110520 Asta filettata Threaded shaft Gewindestange Hampe filetée Varilla roscada Резьбовой стержень 1
19 91410140 Supporto UCP 205 D.25 Support UCP 205 Halterung UCP 205 D.25 Support UCP 205 D.25 Soporte UCP 205 D.25 Опора UCP 205 Д.25 1
20 91510223 Pressacavo PG 21 Cable clamp PG 21 Kabelabgang PG 21 Serre-fils PG 21 Presacable PG 21 Кабельный зажим PG 21 1
21 91110510 Occhiello filettato Threaded ring Gewindering Bague fileté Ranura roscada Резьбовая проушина 1
22 92410165 Molla a trazione Pzf Guard spring Schutzfeder Ressort de compression Muelle de protección Натяжная пружина Pzf 1
23 92410160Perno per gruppo molla Pzf 30-35
Group spring pin Pzf 30-35Bolzen für Federgruppe Pzf 30-35
Pivot pour group ressort Pzf 30-35
Pivote para grupo muelle Pzf30-35
Штырь для узла пружины Pzf30-35
1
23 92410161Perno per gruppo molla Pzf 40-45-50
Group spring pin Pzf 40-45-50Bolzen für Federgruppe Pzf 40-45-50
Pivot pour group ressort Pzf 40-45-50
Pivote para grupo muelle Pzf40-45-50
Штырь для узла пружины Pzf40-45-50
1
24 91410620 Falsamaglia ½" semplice Fals link ½" Blindglied ½” Maille borgne ½" Eslabon ficticio ½" Простое фальшзвено ½" 1
25 92410320 Catena molla protezione Pzf Protection spring chain Pzf Federkette Pzf Chaîn ressort protection PzfCadena para muelle deprotección Pzf
Цепь защитной пружины Pzf 1
26 92410150 Gruppo molla Pzf Spring group Pzf Federgruppe Pzf Group ressort Pzf Grupo muelle Pzf Узел пружины Pzf 1
27 92410235 Pannello posteriore Pzf 30-35 Back panel Pzf 30-35 Rückpaneel Pzf 30-35 Panneau arrière Pzf 30-35 Panel posterior Pzf 30-35 задняя панель Pzf 30-35 1
27 92410231Pannello posteriore superiorePzf 40-45-50
Back upper panel Pzf 40-45-50 Rückpaneel oben Pzf 40-45-50Panneau arrière supérieur Pzf40-45-50
Panel superior posterior Pzf 40-45-50
Верхняя задняя панель Pzf40-45-50
1
28 91310420 Microinterruttore a levetta Lever microswitch Mikroschalter mit Hebel Minirupteur à levier Microinterruptor de palanquitaРычажковый микровыключатель
2
29 92410000 Telaio in ferro Pzf 30-35 Iron frame Pzf 30-35Eisenrahmen Karosserie Pzf30-35
Châssis en fer Pzf 30-35 Telar en hierro Pzf 30-35 Железный каркас Pzf 30-35 1
29 92410001 Telaio in ferro Pzf 40-45-50 Iron frame Pzf 40-45-50Eisenrahmen Karosserie Pzf40-45-50
Châssis en fer Pzf 40-45-50 Telar en hierro Pzf 40-45-50Железный каркас Pzf 40-45-50
1
30 92410245 Coperchio Pzf 30-35 Cover Pzf 30-35 Deckel Pzf 30-35 Couvercle Pzf 30-35 Tapa Pzf 30-35 Крышка Pzf 30-35 1
30 92410241 Coperchio Pzf 40-45-50 Cover Pzf 40-45-50 Deckel Pzf 40-45-50 Couvercle Pzf 40-45-50 Tapa Pzf 40-45-50 Крышка Pzf 40-45-50 1
31 91110500 Occhiello per sollevamento Pzf Raising ring Pzf Hebering für Pzf Bague de levage Anillo para solivio Подъемная проушина Pzf 1
32 92410065 Ghiera esagonale Pzf Hexagonal ferrule Sechskant Ring Virole hexagonale Pzf Virola hexagonal PzfШестигранное зажимноекольцо Pzf
1
33 92410050 Stelo cromato Pzf 30-35Chromium-plated stem Pzf 30-35
Metallstange verchromt Pzf 30-35
Hampe chromée Pzf 30-35Tallo revestido de cromo Pzf30-35
Хромированный стерженьPzf 30-35
1
33 92410051 Stelo cromato Pzf 40-45-50Chromium-plated stem Pzf 40-45-50
Metallstange verchromt Pzf 40-45-50
Hampe chromée Pzf 40-45-50Tallo revestido de cromo Pzf40-45-50
Хромированный стерженьPzf 40-45-50
1
34 92410060 Torretta in ghisa cromata Chromium-plated turretTurmzylinder aus Gußaluverchromt
Tour chromé Torrecilla revestida de cromoХромированная чугуннаябашня
1
35 91510120 Paraolio 40x52x7 Oil splash guard Ölabdichtung 40x52x7 Paa-huile 40x52x7 Sello de aceite 40x52x7 Маслоотражатель 40x52x7 1
NOTE: Components in Yellow: Spare parts for the American and Canadian markets
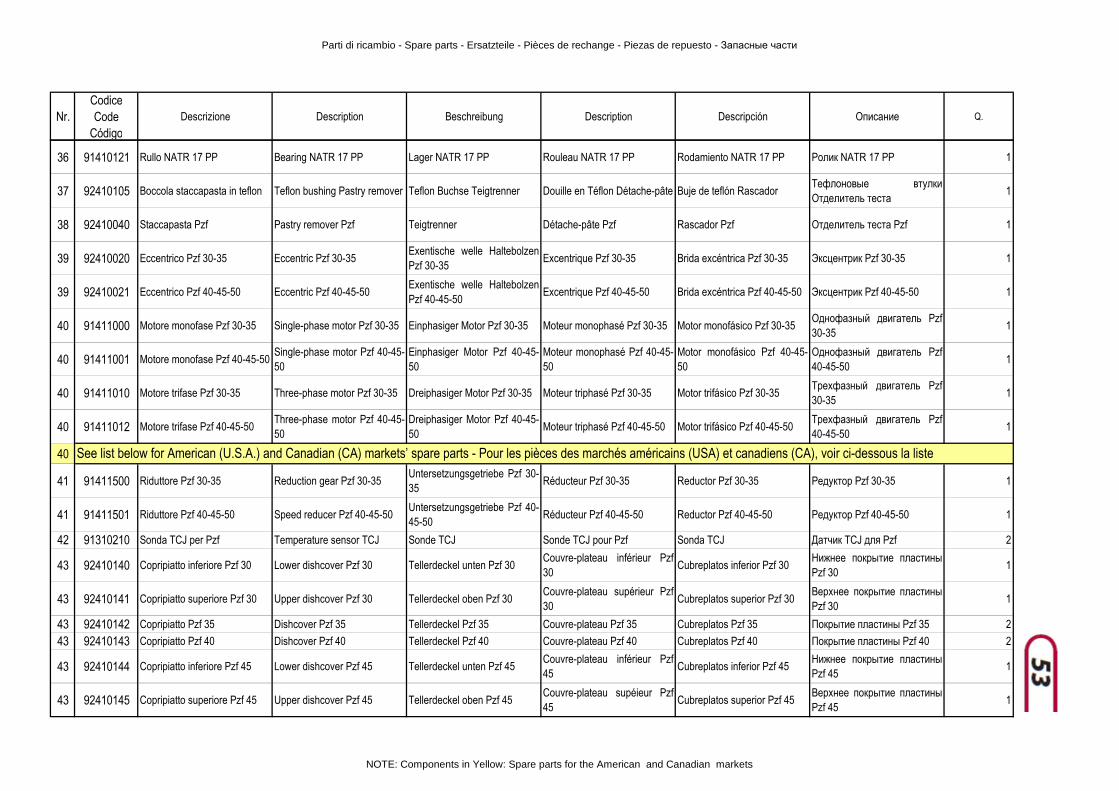
Parti di ricambio - Spare parts - Ersatzteile - Pièces de rechange - Piezas de repuesto - Запасные части
Nr.CodiceCode
CódigoDescrizione Description Beschreibung Description Descripción Описание Q.
36 91410121 Rullo NATR 17 PP Bearing NATR 17 PP Lager NATR 17 PP Rouleau NATR 17 PP Rodamiento NATR 17 PP Ролик NATR 17 PP 1
37 92410105 Boccola staccapasta in teflon Teflon bushing Pastry remover Teflon Buchse Teigtrenner Douille en Téflon Détache-pâte Buje de teflón RascadorТефлоновые втулкиОтделитель теста
1
38 92410040 Staccapasta Pzf Pastry remover Pzf Teigtrenner Détache-pâte Pzf Rascador Pzf Отделитель теста Pzf 1
39 92410020 Eccentrico Pzf 30-35 Eccentric Pzf 30-35Exentische welle HaltebolzenPzf 30-35
Excentrique Pzf 30-35 Brida excéntrica Pzf 30-35 Эксцентрик Pzf 30-35 1
39 92410021 Eccentrico Pzf 40-45-50 Eccentric Pzf 40-45-50Exentische welle HaltebolzenPzf 40-45-50
Excentrique Pzf 40-45-50 Brida excéntrica Pzf 40-45-50 Эксцентрик Pzf 40-45-50 1
40 91411000 Motore monofase Pzf 30-35 Single-phase motor Pzf 30-35 Einphasiger Motor Pzf 30-35 Moteur monophasé Pzf 30-35 Motor monofásico Pzf 30-35Однофазный двигатель Pzf30-35
1
40 91411001 Motore monofase Pzf 40-45-50Single-phase motor Pzf 40-45-50
Einphasiger Motor Pzf 40-45-50
Moteur monophasé Pzf 40-45-50
Motor monofásico Pzf 40-45-50
Однофазный двигатель Pzf40-45-50
1
40 91411010 Motore trifase Pzf 30-35 Three-phase motor Pzf 30-35 Dreiphasiger Motor Pzf 30-35 Moteur triphasé Pzf 30-35 Motor trifásico Pzf 30-35Трехфазный двигатель Pzf30-35
1
40 91411012 Motore trifase Pzf 40-45-50Three-phase motor Pzf 40-45-50
Dreiphasiger Motor Pzf 40-45-50
Moteur triphasé Pzf 40-45-50 Motor trifásico Pzf 40-45-50Трехфазный двигатель Pzf40-45-50
1
40
41 91411500 Riduttore Pzf 30-35 Reduction gear Pzf 30-35Untersetzungsgetriebe Pzf 30-35
Réducteur Pzf 30-35 Reductor Pzf 30-35 Редуктор Pzf 30-35 1
41 91411501 Riduttore Pzf 40-45-50 Speed reducer Pzf 40-45-50Untersetzungsgetriebe Pzf 40-45-50
Réducteur Pzf 40-45-50 Reductor Pzf 40-45-50 Редуктор Pzf 40-45-50 1
42 91310210 Sonda TCJ per Pzf Temperature sensor TCJ Sonde TCJ Sonde TCJ pour Pzf Sonda TCJ Датчик TCJ для Pzf 2
43 92410140 Copripiatto inferiore Pzf 30 Lower dishcover Pzf 30 Tellerdeckel unten Pzf 30Couvre-plateau inférieur Pzf30
Cubreplatos inferior Pzf 30Нижнее покрытие пластиныPzf 30
1
43 92410141 Copripiatto superiore Pzf 30 Upper dishcover Pzf 30 Tellerdeckel oben Pzf 30Couvre-plateau supérieur Pzf30
Cubreplatos superior Pzf 30Верхнее покрытие пластиныPzf 30
1
43 92410142 Copripiatto Pzf 35 Dishcover Pzf 35 Tellerdeckel Pzf 35 Couvre-plateau Pzf 35 Cubreplatos Pzf 35 Покрытие пластины Pzf 35 2
43 92410143 Copripiatto Pzf 40 Dishcover Pzf 40 Tellerdeckel Pzf 40 Couvre-plateau Pzf 40 Cubreplatos Pzf 40 Покрытие пластины Pzf 40 2
43 92410144 Copripiatto inferiore Pzf 45 Lower dishcover Pzf 45 Tellerdeckel unten Pzf 45Couvre-plateau inférieur Pzf45
Cubreplatos inferior Pzf 45Нижнее покрытие пластиныPzf 45
1
43 92410145 Copripiatto superiore Pzf 45 Upper dishcover Pzf 45 Tellerdeckel oben Pzf 45Couvre-plateau supéieur Pzf45
Cubreplatos superior Pzf 45Верхнее покрытие пластиныPzf 45
1
See list below for American (U.S.A.) and Canadian (CA) markets’ spare parts - Pour les pièces des marchés américains (USA) et canadiens (CA), voir ci-dessous la liste
NOTE: Components in Yellow: Spare parts for the American and Canadian markets
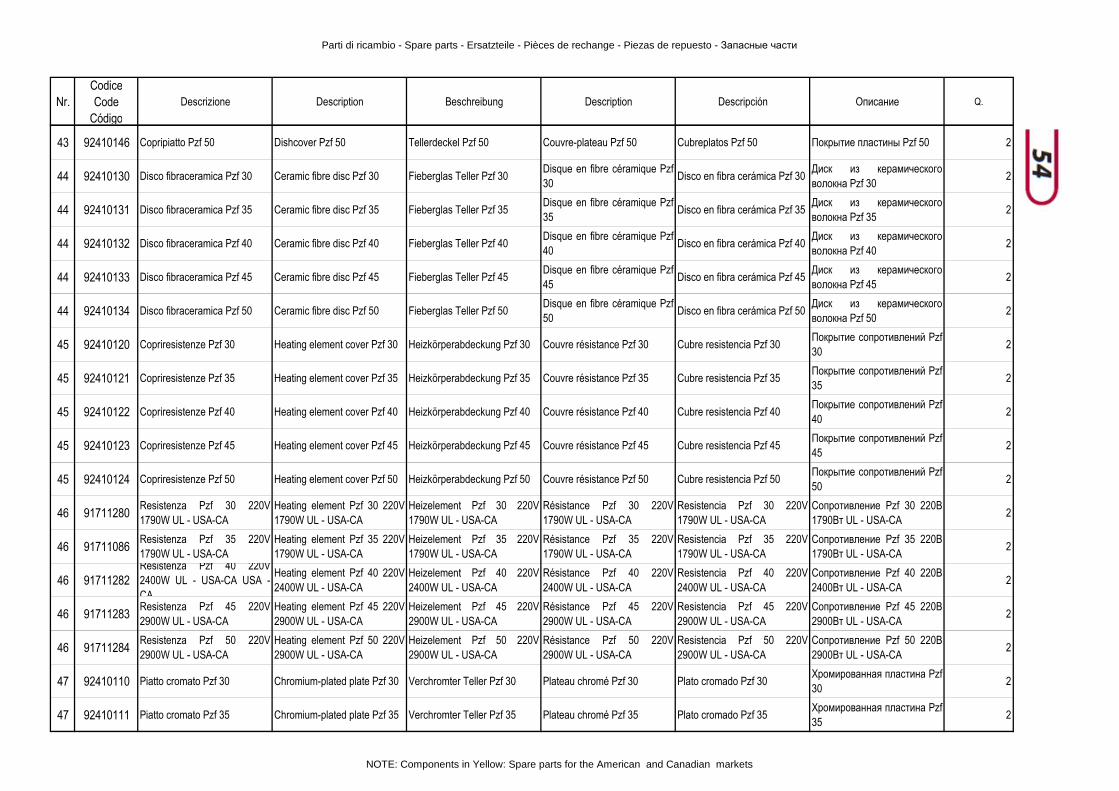
Parti di ricambio - Spare parts - Ersatzteile - Pièces de rechange - Piezas de repuesto - Запасные части
Nr.CodiceCode
CódigoDescrizione Description Beschreibung Description Descripción Описание Q.
43 92410146 Copripiatto Pzf 50 Dishcover Pzf 50 Tellerdeckel Pzf 50 Couvre-plateau Pzf 50 Cubreplatos Pzf 50 Покрытие пластины Pzf 50 2
44 92410130 Disco fibraceramica Pzf 30 Ceramic fibre disc Pzf 30 Fieberglas Teller Pzf 30Disque en fibre céramique Pzf30
Disco en fibra cerámica Pzf 30Диск из керамическоговолокна Pzf 30
2
44 92410131 Disco fibraceramica Pzf 35 Ceramic fibre disc Pzf 35 Fieberglas Teller Pzf 35Disque en fibre céramique Pzf35
Disco en fibra cerámica Pzf 35Диск из керамическоговолокна Pzf 35
2
44 92410132 Disco fibraceramica Pzf 40 Ceramic fibre disc Pzf 40 Fieberglas Teller Pzf 40Disque en fibre céramique Pzf40
Disco en fibra cerámica Pzf 40Диск из керамическоговолокна Pzf 40
2
44 92410133 Disco fibraceramica Pzf 45 Ceramic fibre disc Pzf 45 Fieberglas Teller Pzf 45Disque en fibre céramique Pzf45
Disco en fibra cerámica Pzf 45Диск из керамическоговолокна Pzf 45
2
44 92410134 Disco fibraceramica Pzf 50 Ceramic fibre disc Pzf 50 Fieberglas Teller Pzf 50Disque en fibre céramique Pzf50
Disco en fibra cerámica Pzf 50Диск из керамическоговолокна Pzf 50
2
45 92410120 Copriresistenze Pzf 30 Heating element cover Pzf 30 Heizkörperabdeckung Pzf 30 Couvre résistance Pzf 30 Cubre resistencia Pzf 30Покрытие сопротивлений Pzf30
2
45 92410121 Copriresistenze Pzf 35 Heating element cover Pzf 35 Heizkörperabdeckung Pzf 35 Couvre résistance Pzf 35 Cubre resistencia Pzf 35Покрытие сопротивлений Pzf35
2
45 92410122 Copriresistenze Pzf 40 Heating element cover Pzf 40 Heizkörperabdeckung Pzf 40 Couvre résistance Pzf 40 Cubre resistencia Pzf 40Покрытие сопротивлений Pzf40
2
45 92410123 Copriresistenze Pzf 45 Heating element cover Pzf 45 Heizkörperabdeckung Pzf 45 Couvre résistance Pzf 45 Cubre resistencia Pzf 45Покрытие сопротивлений Pzf45
2
45 92410124 Copriresistenze Pzf 50 Heating element cover Pzf 50 Heizkörperabdeckung Pzf 50 Couvre résistance Pzf 50 Cubre resistencia Pzf 50Покрытие сопротивлений Pzf50
2
46 91711280Resistenza Pzf 30 220V1790W UL - USA-CA
Heating element Pzf 30 220V1790W UL - USA-CA
Heizelement Pzf 30 220V1790W UL - USA-CA
Résistance Pzf 30 220V1790W UL - USA-CA
Resistencia Pzf 30 220V1790W UL - USA-CA
Сопротивление Pzf 30 220В1790Вт UL - USA-CA
2
46 91711086Resistenza Pzf 35 220V1790W UL - USA-CA
Heating element Pzf 35 220V1790W UL - USA-CA
Heizelement Pzf 35 220V1790W UL - USA-CA
Résistance Pzf 35 220V1790W UL - USA-CA
Resistencia Pzf 35 220V1790W UL - USA-CA
Сопротивление Pzf 35 220В1790Вт UL - USA-CA
2
46 91711282Resistenza Pzf 40 220V2400W UL - USA-CA USA -CA
Heating element Pzf 40 220V2400W UL - USA-CA
Heizelement Pzf 40 220V2400W UL - USA-CA
Résistance Pzf 40 220V2400W UL - USA-CA
Resistencia Pzf 40 220V2400W UL - USA-CA
Сопротивление Pzf 40 220В2400Вт UL - USA-CA
2
46 91711283Resistenza Pzf 45 220V2900W UL - USA-CA
Heating element Pzf 45 220V2900W UL - USA-CA
Heizelement Pzf 45 220V2900W UL - USA-CA
Résistance Pzf 45 220V2900W UL - USA-CA
Resistencia Pzf 45 220V2900W UL - USA-CA
Сопротивление Pzf 45 220В2900Вт UL - USA-CA
2
46 91711284Resistenza Pzf 50 220V2900W UL - USA-CA
Heating element Pzf 50 220V2900W UL - USA-CA
Heizelement Pzf 50 220V2900W UL - USA-CA
Résistance Pzf 50 220V2900W UL - USA-CA
Resistencia Pzf 50 220V2900W UL - USA-CA
Сопротивление Pzf 50 220В2900Вт UL - USA-CA
2
47 92410110 Piatto cromato Pzf 30 Chromium-plated plate Pzf 30 Verchromter Teller Pzf 30 Plateau chromé Pzf 30 Plato cromado Pzf 30Хромированная пластина Pzf30
2
47 92410111 Piatto cromato Pzf 35 Chromium-plated plate Pzf 35 Verchromter Teller Pzf 35 Plateau chromé Pzf 35 Plato cromado Pzf 35Хромированная пластина Pzf35
2
NOTE: Components in Yellow: Spare parts for the American and Canadian markets
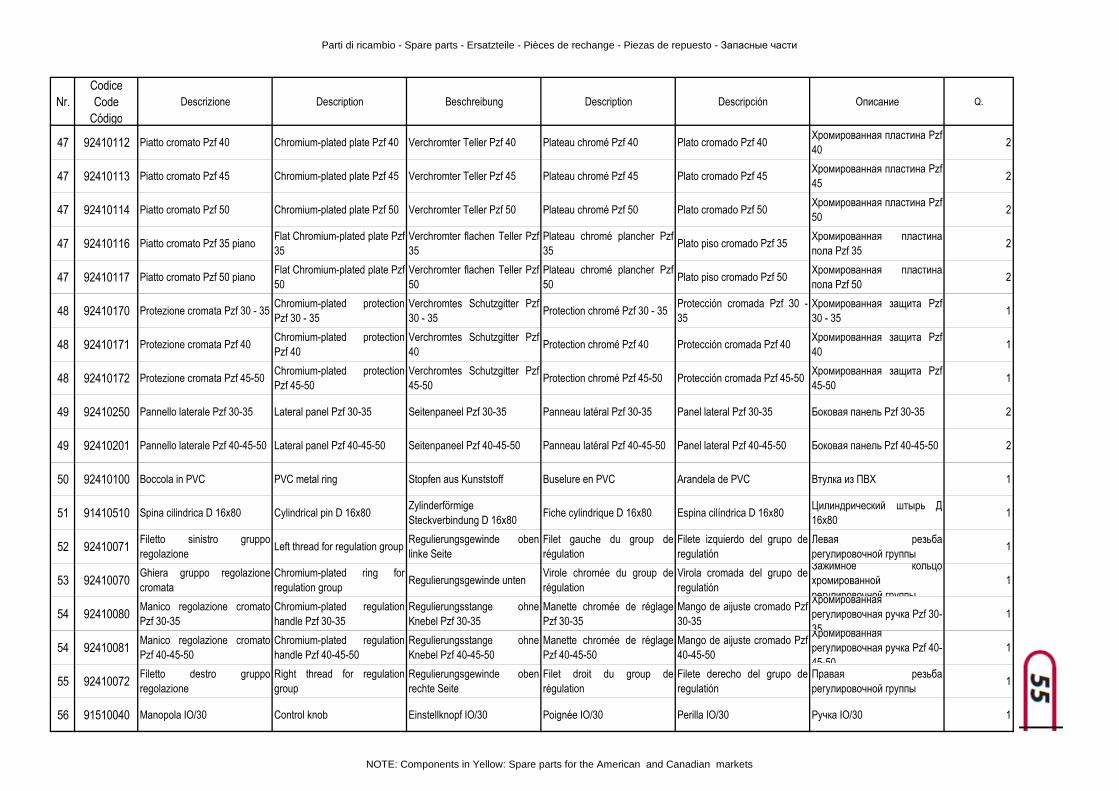
Parti di ricambio - Spare parts - Ersatzteile - Pièces de rechange - Piezas de repuesto - Запасные части
Nr.CodiceCode
CódigoDescrizione Description Beschreibung Description Descripción Описание Q.
47 92410112 Piatto cromato Pzf 40 Chromium-plated plate Pzf 40 Verchromter Teller Pzf 40 Plateau chromé Pzf 40 Plato cromado Pzf 40Хромированная пластина Pzf40
2
47 92410113 Piatto cromato Pzf 45 Chromium-plated plate Pzf 45 Verchromter Teller Pzf 45 Plateau chromé Pzf 45 Plato cromado Pzf 45Хромированная пластина Pzf45
2
47 92410114 Piatto cromato Pzf 50 Chromium-plated plate Pzf 50 Verchromter Teller Pzf 50 Plateau chromé Pzf 50 Plato cromado Pzf 50Хромированная пластина Pzf50
2
47 92410116 Piatto cromato Pzf 35 pianoFlat Chromium-plated plate Pzf35
Verchromter flachen Teller Pzf35
Plateau chromé plancher Pzf35
Plato piso cromado Pzf 35Хромированная пластинапола Pzf 35
2
47 92410117 Piatto cromato Pzf 50 pianoFlat Chromium-plated plate Pzf50
Verchromter flachen Teller Pzf50
Plateau chromé plancher Pzf50
Plato piso cromado Pzf 50Хромированная пластинапола Pzf 50
2
48 92410170 Protezione cromata Pzf 30 - 35Chromium-plated protectionPzf 30 - 35
Verchromtes Schutzgitter Pzf30 - 35
Protection chromé Pzf 30 - 35Protección cromada Pzf 30 -35
Хромированная защита Pzf30 - 35
1
48 92410171 Protezione cromata Pzf 40Chromium-plated protectionPzf 40
Verchromtes Schutzgitter Pzf40
Protection chromé Pzf 40 Protección cromada Pzf 40Хромированная защита Pzf40
1
48 92410172 Protezione cromata Pzf 45-50Chromium-plated protectionPzf 45-50
Verchromtes Schutzgitter Pzf45-50
Protection chromé Pzf 45-50 Protección cromada Pzf 45-50Хромированная защита Pzf45-50
1
49 92410250 Pannello laterale Pzf 30-35 Lateral panel Pzf 30-35 Seitenpaneel Pzf 30-35 Panneau latéral Pzf 30-35 Panel lateral Pzf 30-35 Боковая панель Pzf 30-35 2
49 92410201 Pannello laterale Pzf 40-45-50 Lateral panel Pzf 40-45-50 Seitenpaneel Pzf 40-45-50 Panneau latéral Pzf 40-45-50 Panel lateral Pzf 40-45-50 Боковая панель Pzf 40-45-50 2
50 92410100 Boccola in PVC PVC metal ring Stopfen aus Kunststoff Buselure en PVC Arandela de PVC Втулка из ПВХ 1
51 91410510 Spina cilindrica D 16x80 Cylindrical pin D 16x80Zylinderförmige Steckverbindung D 16x80
Fiche cylindrique D 16x80 Espina cilíndrica D 16x80Цилиндрический штырь Д16x80
1
52 92410071Filetto sinistro grupporegolazione
Left thread for regulation groupRegulierungsgewinde obenlinke Seite
Filet gauche du group derégulation
Filete izquierdo del grupo deregulatión
Левая резьбарегулировочной группы
1
53 92410070Ghiera gruppo regolazionecromata
Chromium-plated ring forregulation group
Regulierungsgewinde untenVirole chromée du group derégulation
Virola cromada del grupo deregulatión
Зажимное кольцохромированной регулировочной группы
1
54 92410080Manico regolazione cromatoPzf 30-35
Chromium-plated regulationhandle Pzf 30-35
Regulierungsstange ohneKnebel Pzf 30-35
Manette chromée de réglagePzf 30-35
Mango de aijuste cromado Pzf30-35
Хромированная регулировочная ручка Pzf 30-35
1
54 92410081Manico regolazione cromatoPzf 40-45-50
Chromium-plated regulationhandle Pzf 40-45-50
Regulierungsstange ohneKnebel Pzf 40-45-50
Manette chromée de réglagePzf 40-45-50
Mango de aijuste cromado Pzf40-45-50
Хромированная регулировочная ручка Pzf 40-45-50
1
55 92410072Filetto destro grupporegolazione
Right thread for regulationgroup
Regulierungsgewinde obenrechte Seite
Filet droit du group derégulation
Filete derecho del grupo deregulatión
Правая резьбарегулировочной группы
1
56 91510040 Manopola IO/30 Control knob Einstellknopf IO/30 Poignée IO/30 Perilla IO/30 Ручка IO/30 1
NOTE: Components in Yellow: Spare parts for the American and Canadian markets
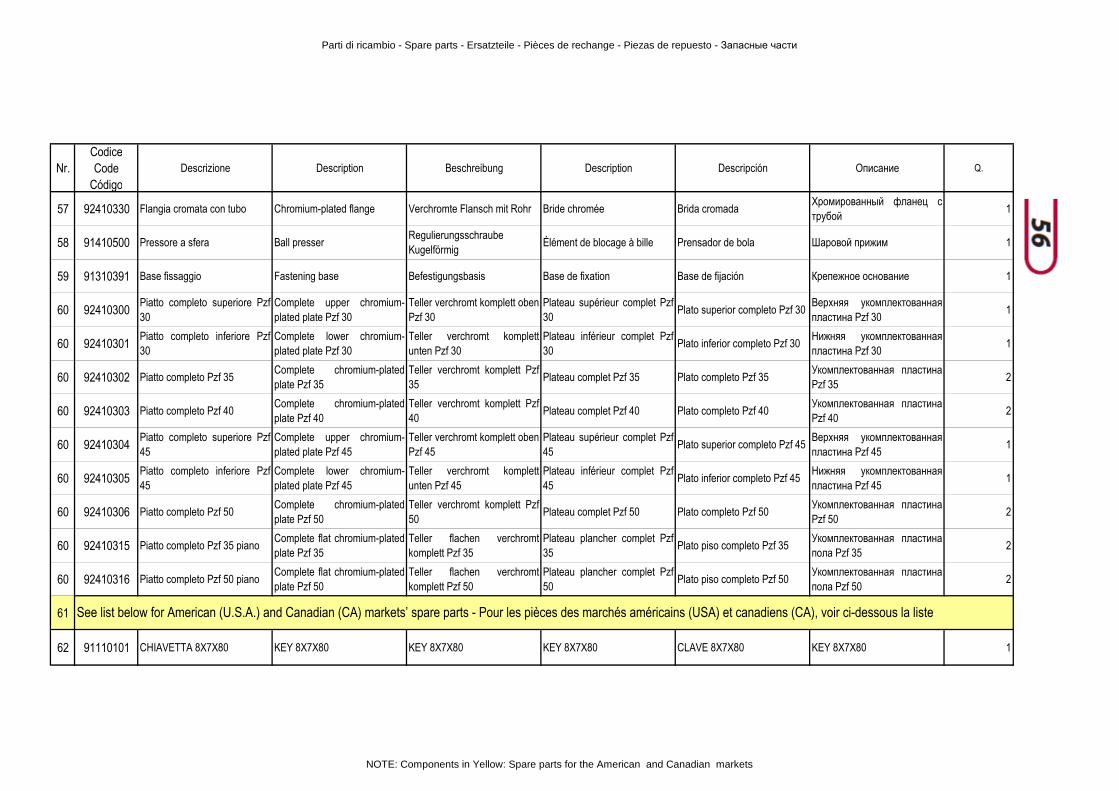
Parti di ricambio - Spare parts - Ersatzteile - Pièces de rechange - Piezas de repuesto - Запасные части
Nr.CodiceCode
CódigoDescrizione Description Beschreibung Description Descripción Описание Q.
57 92410330 Flangia cromata con tubo Chromium-plated flange Verchromte Flansch mit Rohr Bride chromée Brida cromadaХромированный фланец струбой
1
58 91410500 Pressore a sfera Ball presserRegulierungsschraube Kugelförmig
Élément de blocage à bille Prensador de bola Шаровой прижим 1
59 91310391 Base fissaggio Fastening base Befestigungsbasis Base de fixation Base de fijación Крепежное основание 1
60 92410300Piatto completo superiore Pzf30
Complete upper chromium-plated plate Pzf 30
Teller verchromt komplett obenPzf 30
Plateau supérieur complet Pzf30
Plato superior completo Pzf 30Верхняя укомплектованнаяпластина Pzf 30
1
60 92410301Piatto completo inferiore Pzf30
Complete lower chromium-plated plate Pzf 30
Teller verchromt komplettunten Pzf 30
Plateau inférieur complet Pzf30
Plato inferior completo Pzf 30Нижняя укомплектованнаяпластина Pzf 30
1
60 92410302 Piatto completo Pzf 35Complete chromium-platedplate Pzf 35
Teller verchromt komplett Pzf35
Plateau complet Pzf 35 Plato completo Pzf 35Укомплектованная пластинаPzf 35
2
60 92410303 Piatto completo Pzf 40Complete chromium-platedplate Pzf 40
Teller verchromt komplett Pzf40
Plateau complet Pzf 40 Plato completo Pzf 40Укомплектованная пластинаPzf 40
2
60 92410304Piatto completo superiore Pzf45
Complete upper chromium-plated plate Pzf 45
Teller verchromt komplett obenPzf 45
Plateau supérieur complet Pzf45
Plato superior completo Pzf 45Верхняя укомплектованнаяпластина Pzf 45
1
60 92410305Piatto completo inferiore Pzf45
Complete lower chromium-plated plate Pzf 45
Teller verchromt komplettunten Pzf 45
Plateau inférieur complet Pzf45
Plato inferior completo Pzf 45Нижняя укомплектованнаяпластина Pzf 45
1
60 92410306 Piatto completo Pzf 50Complete chromium-platedplate Pzf 50
Teller verchromt komplett Pzf50
Plateau complet Pzf 50 Plato completo Pzf 50Укомплектованная пластинаPzf 50
2
60 92410315 Piatto completo Pzf 35 pianoComplete flat chromium-platedplate Pzf 35
Teller flachen verchromtkomplett Pzf 35
Plateau plancher complet Pzf35
Plato piso completo Pzf 35Укомплектованная пластинапола Pzf 35
2
60 92410316 Piatto completo Pzf 50 pianoComplete flat chromium-platedplate Pzf 50
Teller flachen verchromtkomplett Pzf 50
Plateau plancher complet Pzf50
Plato piso completo Pzf 50Укомплектованная пластинапола Pzf 50
2
61
62 91110101 CHIAVETTA 8X7X80 KEY 8X7X80 KEY 8X7X80 KEY 8X7X80 CLAVE 8X7X80 KEY 8X7X80 1
See list below for American (U.S.A.) and Canadian (CA) markets’ spare parts - Pour les pièces des marchés américains (USA) et canadiens (CA), voir ci-dessous la liste
NOTE: Components in Yellow: Spare parts for the American and Canadian markets
Parti di ricambio - Spare parts - Ersatzteile - Pièces de rechange - Piezas de repuesto - Запасные части
Nr.CodiceCode
CódigoDescrizione Description Beschreibung Description Descripción Описание Q.
Nr.CodiceCode
CódigoDescrizione Description Beschreibung Description Descripción Описание
5 91310265 Scheda di controllo Pzf UL UL Control panel UL Kontroll platine Carte de controle UL Tarjeta de control UL Контрольная плата Pzf UL 1
40 91411015 Motore trifase Pzf 30-35 ULThree-phase motor Pzf 30-35UL
Dreiphasiger Motor Pzf 30-35UL
Moteur triphasé Pzf 30-35 UL Motor trifásico Pzf 30-35 ULТрехфазный двигатель Pzf30-35 UL
1
40 91411016 Motore trifase Pzf 40-45-50 ULThree-phase motor Pzf 40-45-50 UL
Dreiphasiger Motor Pzf 40-45-50 UL
Moteur triphasé Pzf 40-45-50UL
Motor trifásico Pzf 40-45-50 ULТрехфазный двигатель Pzf40-45-50 UL
1
60 92410311Piatto completo superiore Pzf30 PIANO
Complete upper chromium-plated plate Pzf 30 FLAT
Teller verchromt komplett obenPzf 30 flache Platte
Plateau supérieur complet Pzf30 assiette plate
Plato superior completo Pzf 30placa plana
Верхняя укомплектованнаяпластина Pzf 30 плоскаяпластина
1
60 92410312Piatto completo inferiore Pzf30 PIANO
Complete lower chromium-plated plate Pzf 30 FLAT
Teller verchromt komplettunten Pzf 30 flache Platte
Plateau inférieur complet Pzf30 assiette plate
Plato inferior completo Pzf 30placa plana
Нижняя укомплектованнаяпластина Pzf 30 плоскаяпластина
1
61 91310784Interruttore sez. 40A 3P 90G(U.S.A.)
Switch sec. 40A 3P 90G(U.S.A.)
Trennschalter 40A 3P 90G(U.S.A.)
Interrupteur sect. 40A 3P 90G(U.S.A.)
Interruptor secc. 40A 3P 90G(U.S.A.)
выключатель 40A 3П 90G 1
For American (U.S.A.) and Canadian (CA) markets’ spare parts - Pour les pièces des marchés américains (USA) et canadiens (CA)
NOTE: Components in Yellow: Spare parts for the American and Canadian markets
58 Pizzaform 10-13
58Condizioni di garanzia
La ditta “Cuppone F.lli s.r.l.” garantisce que-sto prodotto per 1 anno dalla data di acqui-sto per i difetti di fabbricazione e dei mate-riali.
“Cuppone F.lli s.r.l.” assicura che tutti i suoi prodotti sono fabbricati con materiali della mi-gliore qualità e con tecniche di lavorazione che
Se durante il normale utilizzo degli stessi si do-vessero riscontrare particolari difettosi o mal funzionanti si e£ettuerà la sostituzione gratuita di tali particolari.Per i prodotti venduti all’estero le stesse sosti-tuzioni saranno sempre in conto gratuito franco ns. stabilimento ad eccezione di particolari con-dizioni concordate in sede di contrattazione con il distributore estero.
La responsabilità di “Cuppone F.lli s.r.l.” è limi-tata alla fornitura dell’apparecchio, il quale deve essere installato a regola d’arte da personale con qualiTca seguendo le indicazioni contenu-te negli opuscoli in dotazione al prodotto acqui-stato e conformemente alle leggi in vigore.
Non vi sarà responsabilità da parte di “Cuppo-ne F.lli s.r.l.” in caso di mancato rispetto delle indicazioni per l’installazione, uso e manuten-zione dell’omonimo manuale allegato ad ogni prodotto.Gli impianti nei luoghi pubblici sono sottoposti ad una regolamentazione particolare.
Conditions de garantie
La société “Cuppone F.lli s.r.l.” garantit l’ap-pareil pendant 1 an à compter de la date d’achat. La garantie couvre les vices de fabri-cation et le matériel.
“Cuppone F.lli s.r.l.” garantit que tous ses produits sont fabriqués avec du matériel de la meilleure qualité et selon des processus de fabrication qui en garantissent un parfait fonc-tionnement.En cas de mauvais fonctionnement ou de pièces défectueuses constatés pendant l’utilisation normale du produit, “Cuppone F.lli s.r.l.” rempla-cera gratuitement les éléments défectueux.Pour les produits vendus à l’étranger, le rem-placement de pièces est toujours gratuit franco notre établissement, sauf autres conditions sti-pulées avec le distributeur local.
La responsabilité de “Cuppone F.lli s.r.l.” se limite à la fourniture de l’appareil qui doit être installé selon les règles de l’art par du personnel qualiTé en suivant les indications contenues sur les notices jointes au produit et conformément aux lois en vigueur.
La société “Cuppone F.lli s.r.l.” ne pourra être retenue responsable en cas de non-respect des indications fournies pour l’installation, l’utilisa-tion et l’entretien, comme reporté sur la notice jointe à chaque produit.Les appareils installés en lieu public sont disci-plinés par une réglementation spéci!que.
Warranty conditions
“Cuppone F.lli s.r.l.” guarantees this product for 1 year from its date of purchase for manu-facturing and material defects.
“Cuppone F.lli s.r.l.” ensures that all of its prod-ucts were constructed using the best quality materials and with work techniques that guar-
If defective or malfunctioning parts are discov-ered during normal use, these parts will be re-placed free of charge.For products sold abroad, the replacements will be provided free of charge ex our works, with the exception of particular conditions agreed upon during the contract phase with the for-eign distributor.
The liability of “Cuppone F.lli s.r.l.” is limited to the supply of the device, which must be in-stalled in a workmanlike manner by qualiTed personnel following the instructions contained in the booklet provided with the purchased product and in compliance with current laws.
“Cuppone F.lli s.r.l.” shall not be liable in the case of failure to observe the installation, use and maintenance instructions in the same man-ual provided with each product.Systems that are installed in public areas are subjected to particular regulations.
Condiciones de garantía
Cuppone F.lli s.r.l. garantiza este producto durante un año a partir de la fecha de com-pra contra defectos de fabricación y de ma-teriales.
Cuppone F.lli s.r.l. asegura que todos sus pro-ductos están fabricados con materiales de la mejor calidad y con técnicas de elaboración que garantizan su total e!ciencia.Si, durante el uso normal de estos, se detecta-ran componentes defectuosos o que funcionen mal, se realizará la sustitución gratuita de dichos componentes.Para los productos vendidos al extranjero, las mismas sustituciones será gratuitas franco nuestro establecimiento, salvo condiciones es-peciales acordadas en el momento de la contra-tación con el distribuidor extranjero.
La responsabilidad de Cuppone F.lli s.r.l. se limita al suministro del equipo, que debe ins-talarse a la perfección por parte de personal cualiTcado, siguiendo las indicaciones inclui-das en los manuales suministrados con el pro-ducto adquirido y en conformidad con las leyes vigentes.
No habrá responsabilidad para Cuppone F.lli s.r.l. en caso de que no se respeten las indica-ciones de instalación, uso y mantenimiento del manual de dicho nombre que se adjunta con cada producto.Las instalaciones en lugares públicos están so-metidas a reglas especiales.
Garantiebedingungen
Die Firma “Cuppone F.lli s.r.l.” übernimmt die Garantie für dieses Produkt für 1 Jahr ab Kaufdatum für Herstellungs- und Material-fehler.“Cuppone F.lli s.r.l.” versichert, dass alle seine Produkte mit Materialien von höchster Qualität hergestellt werden, sowie mit Bearbeitungsme-thoden, deren vollkommene Leistungsfähigkeit garantiert ist.Wenn sich während des normalen Gebrauchs an den Produkten defekte oder nicht korrekt funktionierende Einzelteile zeigen, werden die-se Teile kostenlos ausgetauscht.Für Produkte, die ins Ausland verkauft werden, gilt immer eine kostenlose Ersetzung Ab Werk, mit Ausnahme von besonderen Bedingungen, die im Vertrag mit dem ausländischen Händler vereinbart wurden.
Die Haftung von“Cuppone F.lli s.r.l.” ist be-schränkt auf die Lieferung des Geräts, das von qualiTziertem Personal fachgerecht instal-liert werden muss, nach den Anweisungen der dem gekauften Produkt beiliegenden Bro-schüren und unter Einhaltung der geltenden Gesetze.
“Cuppone F.lli s.r.l.” übernimmt keine Haftung, wenn die Hinweise zu Installation, Gebrauch und Wartung des gleichnamigen Handbuchs, das jedem Produkt beiliegt, nicht beachtet wer-den.Anlagen in ö£entlichen Räumen unterliegen besonderen Bestimmungen.
Гарантийные условия
Компания “Cuppone F.lli s.r.l.” предоставляет гарантию на данное оборудование в отноше-нии заводских дефектов и материалов сро-ком 1 год с даты приобретения.
Компания “Cuppone F.lli s.r.l.” гарантирует, что все выпускаемое ей оборудование изготовлено при использовании высококачественных мате-риалов посредством методов обработки, гаран-тирующих полную эффективность.Если в ходе нормального использования будут выявлены дефекты или несоответствующее функционирование некоторых компонентов, они будут заменены безвозмездно.Для оборудования, проданного в зарубежных странах, такая замена производится безвозмезд-но на условиях франко-завод, за исключением особых условий, согласованных в фазе размеще-ния заказа с зарубежным дистрибьютором.
Ответственность компании “Cuppone F.lli s.r.l.” ограничивается поставкой оборудования, которое должно устанавливаться соответ-ствующим образом квалифицированным персоналом, в соответствии с указаниями, со-держащимися в прилагаемых инструкциях на приобретенную продукцию, согласно действую-щих законов.
Компания “Cuppone F.lli s.r.l.” не несет ответ-ственность в случае несоблюдения инструкций по установке, эксплуатации и техобслуживанию руководства, прилагаемого к оборудованию.Оборудование, устанавливаемое в обществен-ных местах, является предметом особых усло-вий.
Pizzaform 10-13 59
59Limiti
La garanzia viene riconosciuta a condizione che:
1. l’apparecchio venga installato da un tecnico quali!cato o da persona capace che valuti idonee tutte le caratteristiche tecniche dell’im-pianto dove sarà collegato l’apparecchio, che comunque devono necessariamente essere conformi a quanto richiesto nell’opuscolo in dotazione su tutti i prodotti;
2. l’installatore confermi di aver e£ettuato con successo il collaudo del prodotto dopo l’instal-lazione dello stesso.
3. l’apparecchio sia utilizzato come prescritto dal manuale di istruzioni in dotazione su tutti i prodotti.
La garanzia non si applica per danni causati da:
1. agenti atmosferici, chimici, incendi, difetti dell’impianto elettrico del locale, uso impro-prio del prodotto, mancanza di manutenzione, modi!che o manomissioni del prodotto, inef-!cacia e/o inadeguatezza della canna fumaria e/o altre cause non dipendenti dal prodotto.
2. tutti i danni causati dal trasporto (per i quali risponde il vettore) pertanto si raccomanda di controllare accuratamente la merce al mo-mento del ricevimento, avvisando immediata-mente il rivenditore di ogni eventuale danno, riportando l’annotazione sul documento di trasporto e sulla copia che resta al trasportato-re.
Limites
La garantie est valable à condition que :
1. l’appareil soit installé par un technicien qua-li!é ou par une personne capable d’évaluer la conformité de toutes les caractéristiques techniques de l’installation à laquelle l’ap-pareil sera raccordé, ces caractéristiques devant obligatoirement être conformes aux indications reportées sur les notices jointes à tous les produits ;
2. l’installateur atteste d’avoir e£ectué cor-rectement les tests et contrôles du produit après son installation ;
3. l’appareil soit utilisé comme prescrit sur le mode d’emploi joint à tous les produits.
La garantie ne couvre pas les dommages causés par :
1. agents atmosphériques, chimiques, incen-die, défauts sur l’installation électrique, uti-lisation inappropriée du produit, manque d’entretien, modi!cations ou altérations du
du conduit de fumée et/ou autres causes non imputables au produit.
2. dommages causés par le transport (respon-sabilité incombant au transporteur), il est donc recommandé de contrôler soigneu-sement la marchandise lors de la réception et d’avertir immédiatement le revendeur en cas de dommages, en les signalant sur le document de transport et sur la copie conservée par le transporteur.
Limits
The warranty shall be acknowledged under the following conditions:
1. the device is installed by a quali!ed technician or capable person who assesses as suitable all of the technical speci!cations of the sys-tem where the equipment will be connected, which in any case must be compliant with what is required in the booklet provided with all products;
2. the installer con!rms to have successfully test-ed the product after installing it;
3. the equipment is used as described in the in-struction manual provided with all products.
The warranty shall not apply for damage caused by:
1. atmospheric agents, chemicals, !res, electrical system defects, improper product use, lack of maintenance, changes to or tampering with the product, an ine£ective and/or unsuitable �ue and/or other causes independent of the product.
2. all damage caused by transport (for which the carrier is responsible) therefore it is recom-mended to carefully check the goods upon receipt, immediately informing the retailer of any damage, reporting the information on the transport document and on the copy that the transporter keeps.
Límites
La garantía se reconoce siempre que:
1. El equipo sea instalado por un técnico cua-li!cado o por una persona capaz que consi-dere idóneas todas las características técni-cas de la instalación donde se conectará el equipo que, en cualquier caso, deben estar necesariamente en conformidad con lo de-mandado en el manual que se entrega con todos los productos;
2. El instalador con!rme haber realizado con éxito el ensayo del producto después de su instalación;
3. El equipo se use como se indica en el ma-nual de instrucciones que se entrega con todos los productos.
La garantía no se aplica en caso de daños causados por:
1. Agentes atmosféricos, químicos, incendios, defectos de la instalación eléctrica, uso im-propio del producto, falta de mantenimien-to, modi!caciones del producto, ine!cacia o falta de adecuación del cañón de humos y otras causas que no dependan del producto.
2. Todos los daños causados durante el trans-porte (de los que debe responder el trans-portista); por lo tanto, se recomienda con-trolar minuciosamente la mercancía en el momento de la recepción, avisando inme-diatamente al distribuidor de cualquier posi-ble daño e indicándolo en el documento de transporte y en la copia para el transportista.
Grenzen
Die Garantie wird unter folgenden Bedingun-gen anerkannt:
1. Das Gerät wird von einem quali!zierten Tech-niker oder einer dazu fähigen Person instal-liert, die alle technischen Eigenschaften der Anlage, an die das Gerät angeschlossen wird, für ausreichend hält, wobei jedoch in jedem Fall die Angaben in der Broschüre, die jedem unserer Produkte beiliegt, eingehalten werden müssen.
2. Der Installateur bestätigt, dass er nach der In-stallation des Geräts eine erfolgreiche Abnah-me des Geräts durchgeführt hat.
3. Das Gerät so verwendet wird, wie in der Be-triebsanleitung angegeben, die jedem Produkt beiliegt.
Die Garantie gilt nicht für Schäden, die entstan-den sind durch:
1. Wetterein�üsse, Chemikalien, Brände, Defek-te an der Elektroanlage, unsachgemäßer Ge-brauch des Produkts, fehlende Wartung, Ände-rungen am Produkt oder Ö£nen des Produkts, unwirksamer und/oder nicht angemessener Rauchfang und/oder weitere Gründe, die nicht in Abhängigkeit zum Produkt stehen.
2. Alle Transportschäden (für die der Frachtführer haftbar ist), daher wird geraten, die Ware bei der Annahme sorgfältig zu prüfen und den Verkäufer unverzüglich über jeden etwaigen Schaden zu unterrichten, sowie einen Hinweis auf dem Transportdokument und der Kopie, die beim Transporteur verbleibt, zu vermerken.
Пределы
Гарантия признается при следующих условиях:
1. оборудование устанавливается квалифи-цированным техником или лицом, кото-рое может признать соответствующими все технические характеристики систе-мы, к которой подсоединяется оборудо-вание, в любом случае, соответствующей требованиям, приведенным в руковод-стве, прилагаемом к оборудованию;
2. монтажник подтверждает успешное осу-ществление испытания оборудования по-сле его монтажа;
3. оборудование используется в соответ-ствии с инструкциями руководства, пре-доставляемого с продукцией.
Гарантия не распространяется на ущерб, вызванный следующими явлениями:
1. атмосферные, химические агенты, по-жар, дефекты электрической системы, несоответствующее использование обо-рудования, отсутствие техобслуживания, изменения или вмешательства в обору-дование, неэффективность и/или несо-ответствие дымохода и/или другие при-чины, не обусловленные оборудованием.
2. ущерб, вызванный транспортировкой (за который отвечает грузоперевозчик), поэтому рекомендуется тщательно про-верять оборудование в момент прием-ки, незамедлительно извещая продавца о возможном ущербе, делая запись на транспортном документе и на копии, ко-торая остается перевозчику.
60 Pizzaform 10-13
60
Exclusions
La garantie ne couvre pas les pièces sujettes à l’usure, tels que :
Joints, vitres céramiques, lampes, câbles élec-triques et pierres réfractaires.
Sont exclus de la garantie les éventuels réglages ou adaptations du produit en fonction du type d’installation.
Cette garantie n’est valable que pour l’acheteur et ne peut être transférée à des tiers.En cas de remplacement de pièces, la garantie n’est pas prolongée.Aucune indemnité ne sera reconnue pour la période de non fonctionnement du produit.Seule cette garantie est valable et nul n’est au-torisé à fournir d’autres garanties au nom et au compte de “Cuppone F.lli s.r.l.”.
GARANTIE PIÈCES ET MAIN D’ŒUVRE
En cas de défauts ou de ruptures constatés pen-dant la période de garantie, l’utilisateur, muni de la preuve d’achat et du coupon dûment rem-pli, doit s’adresser directement à son revendeur dans les deux mois qui suivent.
En cas de juste réclamation, l’intervention sous garantie prévoit la réparation gratuite de l’appa-reil comme prévu par les lois en vigueur.
TRIBUNALEn cas de litige, seul le Tribunal de Trévise est compétent.
Esclusioni
Sono esclusi da garanzia tutti i particolari soggetti a normale usura, tra cui:
Le guarnizioni, tutti i vetri ceramici, le lampade ed i cavi elettrici.
Sono escluse da garanzia eventuali tarature o regolazioni del prodotto in base al tipo di instal-lazione.
Questa garanzia è valida solo per l’acquirente e non può essere trasferita.In caso di sostituzione di particolari la garanzia non viene prolungata.
viene riconosciuto alcun indennizzo.Questa è l’unica garanzia valida e nessuno è au-torizzato a fornirne altre in nome o per conto di “Cuppone F.lli s.r.l.”.
INTERVENTI IN GARANZIAQualora durante il periodo di garanzia compa-iano difetti o si veri!chino delle rotture, l’utente deve rivolgersi con il documento !scale ed il tagliando allegato debitamente compilato, di-rettamente al proprio rivenditore entro 2 mesi dalla data in cui ha riscontrato il difetto.
In caso di reclamo motivato l’intervento in ga-ranzia prevede la riparazione dell’apparecchio senza alcun addebito come previsto dalla legge in vigore.
FOROPer qualsiasi controversia viene eletto come foro competente quello di Treviso.
Exclusions
The guarantee does not include parts sub-ject to normal wear, such as:
Gaskets, ceramic glass, lamps and electric ca-bles.
The warranty does not cover product calibra-tion or adjustments based on the type of instal-lation.
This warranty is only valid for the purchaser and cannot be transferred.In the case of part replacement, the warranty shall not be extended.No compensation shall be acknowledged for a
This is the only valid warranty and no one else is authorised to provide others in the name of or on behalf of “Cuppone F.lli s.r.l.”.
WARRANTY SERVICESIf during the warranty period defects appear or breakage is veri!ed, the user must contact his reseller within 2 months of the date in which the defect was discovered with a tax document.
In the case of a justi!ed claim, the warranty service includes equipment repair without any charge as foreseen by current law.
FORUMFor any dispute, the competent court will be the court of Treviso.
Exclusiones
Se excluyen de la garantía todos los compo-nentes sujetos a normal desgaste, como:
Las juntas, los vidrios cerámicos, las bombillas y los cables eléctricos.
Se excluyen de la garantía los posibles calibra-dos o regulaciones del producto, dependiendo del tipo de instalación.
Esta garantía es válida solo para el comprador y no puede transferirse.En caso de sustitución de componentes, la ga-rantía no se prolongará.No se reconocerá indemnización alguna para el periodo de ine!ciencia del equipo.Esta es la única garantía válida, y nadie está au-torizado para proporcionar otra en nombre de “Cuppone F.lli s.r.l.”.
INTERVENCIONES EN GARANTÍA
Si, durante el periodo de garantía, aparecen de-fectos o se dan roturas, el usuario deberá acudir directamente al distribuidor, con el documento de compra y el cupón adjunto debidamente cu-bierto, antes de que pasen dos meses desde la fecha en la que ha hallado el defecto.
En caso de reclamación fundada, la garantía prevé la reparación del equipo sin adeudo algu-no, como prevé la ley en vigor.
TRIBUNALPara cualquier controversia, será tribunal com-petente el de Treviso.
Ausschlüsse
Von der Garantie ausgeschlossen sind alle Teile, die normalem Verschleiß unterliegen, darunter:Dichtungen, Keramikscheiben, Lampen und Elektrokabel.Von der Garantie ausgeschlossen sind etwaige Eichungen oder Einstellungen am Produkt auf-grund der Art der Installation.
Diese Garantie gilt nur für den Käufer und ist nicht übertragbar.Bei einem Austausch von Einzelteilen verlän-gert sich die Garantie nicht.Für einen Zeitraum, in dem das Gerät nicht be-triebsbereit ist, wird keinerlei Entschädigung anerkannt.Dies ist die einzige gütige Garantie, niemand ist autorisiert, im Namen und auf Rechnung von “Cuppone F.lli s.r.l.” andere Garantien zu ver-einbaren.
GARANTIEEINGRIFFEWenn während der Garantiezeit Mängel auf-treten oder Beschädigungen sichtbar werden, muss der Nutzer sich mit dem Rechnung in-nerhalb von 2 Monaten nach bekannt werden des Mangels direkt an seinen Wiederverkäufer wenden.
Bei einer begründeten Reklamation sieht der Garantieeingri£ eine kostenfreie Reparatur des Geräts vor, wie von der geltenden Gesetzge-bung verlangt.
GERICHTSSTANDJede Streitigkeit fällt unter die Zuständigkeit des Gerichts von Treviso.
Исключения
В гарантию не включены все компоненты, подвергающиеся нормальному износу, то есть:Прокладки, керамическое стекло, лампы и электрические кабели.
В гарантию не включены возможные кали-бровки или регулировки оборудования, в за-висимости от типа установки.Данная гарантия действительна только для по-купателя и не может передаваться другим лицам.В случае замены компонентов, срок гарантии не продлевается.Не допускается возмещение ущерба в связи с периодом неэффективности оборудования.Это единственная действительная гарантия, и никто другой не может предоставлять ка-кие-либо другие гарантии за счет и от имени компании “Cuppone F.lli s.r.l.”.
РАБОТЫ, ПРОИЗВОДИМЫЕ НА УСЛОВИЯХ ГАРАНТИИ
Если в течение гарантийного периода наблю-даются дефекты или поломки, пользователь должен обратиться с налоговым документом непосредственно к продавцу в течение 2 ме-сяцев с даты выявления дефекта.В случае мотивированной жалобы, вме-шательство по гарантии предусматривает ремонт оборудования без начисления ка-ких-либо расходов, в соответствии с действу-ющими законами.
СУДВ случае каких-либо противоречий в качестве компетентного суда выбирается суд Тревизо.

Pizzaform 10-13 61

62 Pizzaform 10-13

Pizzaform 10-13 63
Cuppone F.lli s.r.l.
Via Sile, 3631057 SileaTreviso - Italia
C.F. / P.IVA it 01950360261Tel. +39 0422 361143Fax +39 0422 360993
www.cuppone.comE-mail: [email protected]
made in Italy
9191
5580
- Pi
zzaf
orm
10
-136
4
pro
get
to g
ra!
co: a
rtli
ne
a s
nc
Cuppone F.lli S.r.l.IT08020000002207
Related Documents