© gotwind.org 07 DIY 4 Foot PVC Propeller (Including new blade revisions) This is a design for a 3 blade 4 foot swept area propeller,that has good start up speed coupled with high rpm, and has excellent UV protection. The design could be scaled down to accommodate a 3 foot diameter if desired - longer blades have more power generally.

Welcome message from author
This document is posted to help you gain knowledge. Please leave a comment to let me know what you think about it! Share it to your friends and learn new things together.
Transcript
© gotwind.org 07
DIY 4 Foot PVC Propeller
(Including new blade revisions)
This is a design for a 3 blade 4 foot swept area propeller,that has good start up speed coupled with high rpm, and has excellent UV protection.
The design could be scaled down to accommodate a 3 foot diameter
if desired - longer blades have more power generally.

© gotwind.org 07
The blades are constructed using UV resistant P.V.C, found at DIY stores. You may use either 4 or 6" diameter tube.
The 4" will give a little extra torque as it is more curved at its root. The 6" should produce a higher speed.
Please note: You must use the 4 or 6" Grey electrical conduit as apposed to the brown waste water pipe.
The reason being is the grey has additives to the PVC which makes it UV resistant from the elements, The brown waste water pipe can become
brittle over time from exposure to the suns U.V radiation - Last thing you want is a Propeller shattering at 1000 rpm !
The drawing below (if viewed from the front) would rotate the hub clockwise.
If your generator needs to be run counter-clockwise the angled side needs to be on the opposite side (like mine)
Whichever direction of rotation, ensure all 3 blades are the same.
Clockwise rotation

© gotwind.org 07
Counter-Clockwise rotation
I found the use of masking tape - carefully applied to the outside of the tube ideal as a line to cut the angle.
The use of a jigsaw is advised for cutting the tube, although it can be done by hand with a coping saw.

© gotwind.org 07
You can produce a chamfer or bevel on the leading edge (the angled side) with a plane or sharp knife - worked away from the body.
The holes can be drilled later when the hub has been made - the holes can be spotted through with a 1/4" drill.
A couple of coats of exterior paint should be applied to give added UV protection, white is good as it also reflect the light.
The Steel Hub
The hub is made from a piece of 8"X8" square1/8th" thick mild steel plate, the actual shape of the plate isn't critical, but the hole centres and balance need to be accurate.
The design below involves a lot of sawing, which can be difficult with a hacksaw. A simple equilateral triangle shape would be okay, or even keep the plate square
as long as the centre hole is central.

© gotwind.org 07
Step one: Centre punch the central hole in the centre of the plate and mark out the 6 mount holes accurately using a rule, protractor and scribe.
Step two: Centre punch mount holes and drill an 1/8th" pilot hole, then open out to 1/4".
Step three: Accurately mark out and band saw or hacksaw shape, file edges and debur holes.
Step four: Two good coats of exterior gloss paint should be applied.

© gotwind.org 07
Three bracing strips should be made from the remainder of the 1/4" mild steel plate to spread the clamping forces on the front of the blade.
N.B - not shown on photos
Assembly and Balancing
N:B the blades are fitted on one side of the hub only.
Using six 1"x 1/4" bolts, washers and locknuts the blades can be assembled.
Ben
Comment on Text
Should be1/8th"

© gotwind.org 07
Make sure the straight part of the blade is running flush down the hub. The holes should line up and leave over
half of the hub arm behind the blade for support.
You should NOT be able to see any of the hub arm behind the blade if you have it fitted correctly.
Balancing on a Horizontal Surface
Place the prop upside-down on a smooth round object that will not go through the centre hole, but still allows
the hub to rest on the hole (not on the blades). A snooker ball resting a piece of pipe works well.
If the blades pull down on one side or the other add another ¼” flat washer to the side that rose up, or Carve a
bit more of the heavy blade.
Continue with this process until the blades do not try to slide off the object they are resting on. A slight tilt will
not have that much effect on blades.
Balancing using a smooth turning shaft
Bolt the hub onto your shaft.
Slowly turn the blades and allow them to fall to the heavy side. (Example; if you push the blade slightly CW and
it moves back CCW on its own, the blade that is heavy is on the bottom.
Add weight to the top arm of the hub and then turn the blade ¼ of a turn and see if it is balanced or if it still
needs more weight. If it sits still it is balanced.
NOTE: you must try the blade with each of the blades starting at 10 or 2 o’clock. If they sit still in each position - the blade is balanced. Have Fun!!!!!

© gotwind.org 07
DIY 4 Foot PVC Propeller – Update
This update uses the 6” PVC pipe and offers better start up, having more torque than the previous blades.

© gotwind.org 07
Hacksaw the pipe squarely to 24” in length and clamp either end to a work surface.
Glue the paper profile to the pipe and bandsaw carefully to size, repeat to create your 3 blades.
File the blades smooth, and add a chamfer to the leading edge (the curved section).
Clamp all 3 blades together, lining up the right angle and drill the ¼” diameter holes. Balancing is very important, particularly with these heavier blades. Any vibration could shake the
generator to bits in high wind conditions.
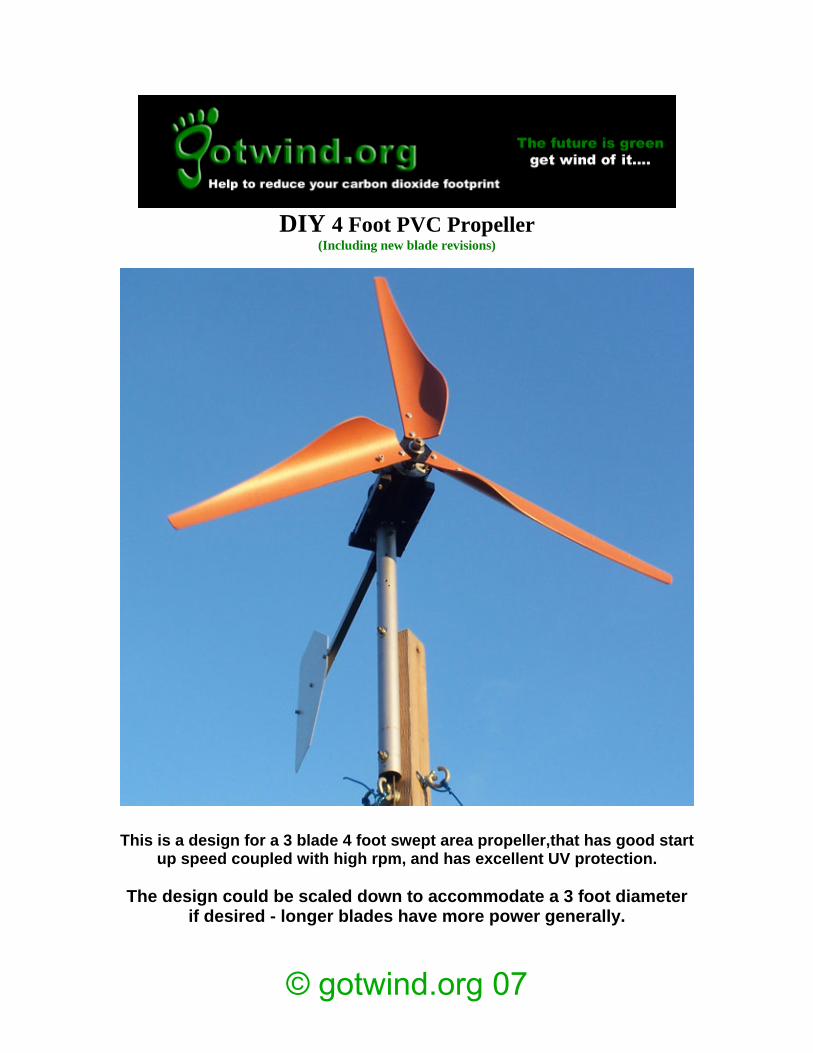
Mount the blades on to the steel hub and balance, as described above.
You can print the images below onto 3 sheets of paper as your template. The vertical lines are position markers, so you can line up the paper, tape the 3 pieces together.
Go to File > Print and select pages 11 to 13 to print at 100%
Then simply cut out the profile with scissors.


© gotwind.org 07
Legal matters.
gotwind.org accepts no responsibility or liability in any form whatsoever, either directly or indirectly, as a result of your use
of these plans. Since we have no control over what you ‘the constructor’ does when carrying out the instructions
described in these plans, we cannot, and will not, be held responsible of any losses, damage to persons or property,
injury to persons or animals, or any consequential losses occurring from your use of these instructions.
Children should not be allowed to ‘play’ with these turbines, since serious personal injury could occur. Some parts are
heavy, and are mounted high in the air where they pose the potential of becoming a ‘falling hazard’ in fault conditions or in
high winds, and as such, every effort should be made to keep a safe area free from people, animals, buildings and vehicles around your turbine at all times.
All material, graphics and text are the copyright of gotwind.org, and the use of these plans is based solely on the understanding that you will not attempt to sell in part or in whole any aspect of them to any third parties or businesses, and that you agree to use them for your own personal use only.
Related Documents