Pulse Connect Secure SA/MAG Series to PSA Series and MAG Series to PSA-V Appliance Migration Guide Release Number Published Date Document Version 9.0R1 February 2019 1.2

Welcome message from author
This document is posted to help you gain knowledge. Please leave a comment to let me know what you think about it! Share it to your friends and learn new things together.
Transcript

Pulse Connect Secure SA/MAG Series to PSA Series and MAG Series to PSA-V Appliance Migration Guide
Release Number Published Date Document Version
9.0R1 February 2019 1.2

SA/MAG Series to PSA Series and MAG Series to PSA-V Series Appliance Migration Guide
© 2019 by Pulse Secure, LLC. All rights reserved 2
Pulse Secure, LLC
2700 Zanker Road, Suite 200 San Jose, CA 95134
https://www.pulsesecure.net
Pulse Secure assumes no responsibility for any inaccuracies in this document. Pulse Secure reserves the
right to change, modify, transfer, or otherwise revise this publication without notice.
Products made or sold by Pulse Secure or components thereof might be covered by one or more of the
following patents that are owned by or licensed to Pulse Secure: U.S. Patent Nos. 5,473,599, 5,905,725,
5,909,440, 6,192,051, 6,333,650, 6,359,479, 6,406,312, 6,429,706, 6,459,579, 6,493,347, 6,538,518,
6,538,899, 6,552,918, 6,567,902, 6,578,186, and 6,590,785.
Pulse Secure MAG Series to PSA-V Appliance Migration Guide
Copyright © 2019, Pulse Secure, LLC. All rights reserved.
Printed in USA.

SA/MAG Series to PSA Series and MAG Series to PSA-V Series Appliance Migration Guide
© 2019 by Pulse Secure, LLC. All rights reserved 3
Revision History
Release Document
Version Date Description
9.0R1 1.2 February 2019
Old GUI screenshots are replaced with new GUI
screenshots in section “Migration from
SA/MAG to PSA”
9.0R1 1.1 November 2018 Merge the content in single document as most
of the content was similar.
9.0R1 1.0 July 2018
Change in Guide name from “Upgrade” to
“Migration”.
Also, “upgrade” word references are changed to
“migrate” (wherever applicable) inside the
document.

SA/MAG Series to PSA Series and MAG Series to PSA-V Series Appliance Migration Guide
© 2019 by Pulse Secure, LLC. All rights reserved 4
Contents
Revision History ................................................................................................................................................... 3
Overview ............................................................................................................................................................... 5
Pre-requisite for Migration ............................................................................................................................... 5
Procedure ............................................................................................................................................................. 6
Migration from SA/MAG to PSA .............................................................................................................. 6 Migration from MAG to PSA-V............................................................................................................... 19
References .......................................................................................................................................................... 31
PSA Hardware Guides ............................................................................................................................. 31 Pulse Connect Secure Administration Guide .................................................................................... 31 KB discussing supported network type for clustering .................................................................... 31 PSA-related KBs ........................................................................................................................................ 31

SA/MAG Series to PSA Series and MAG Series to PSA-V Series Appliance Migration Guide
© 2019 by Pulse Secure, LLC. All rights reserved 5
Overview
This document describes guidelines and procedures for successfully migrating older Secure Access and
MAG platforms to the new PSA hardware platforms and MAG platforms to the new PSA-V platforms,
where source configurations are either as standalone device or as a 2-node/multi-mode cluster
configuration.
Binary configurations and selective XML configuration export from old device and import of these
configurations to the new device is the recommended way to transfer configuration and settings.
Following the steps in this document will ensure successful configuration migration to the next
generation PSA devices.
Note: IVS migration is not supported directly from Pulse Connect Secure SA devices to the new
hardware and should be individually migrated (manually) to become a root IVS which can then later be
migrated over to the new hardware devices. This document does not discuss this process.
Pre-requisite for Migration Listed below are necessary items for the migration preparation:
1. Site assessment: Ensure proper cooling and ventilation; and also ensure network between nodes
that are to be clustered are in high bandwidth, low latency LAN type connection (See
https://kb.pulsesecure.net/articles/Pulse_Secure_Article/KB26035).
Hardware: Ensure that hardware components and part are complete (chassis, cables, connectors,
and rack mount kits)
Licenses: Needed licenses should be procured and ready, and whether you need to configure as
license member in an Enterprise Licensing Server environment.
2. Software: PSA Series devices are delivered with 8.1R4.1 factory build, and PSA-V Series devices are
delivered with 9.0R1 factory build, so, determine what software version will be used for the new
devices and migrate accordingly. Next generation PSA devices do not support downgrading to
previous software versions from its factory default software version or build.
3. Configuration backup: It is a preferred to backup the system.cfg and user.cfg binary files, along
with XML export of Networking Settings immediately prior to migration.
IVS.cfg (if upgrading from SAx500 platform) is not going to be usable for PSA Series as it does not
support it, but back it up for any IVS manual conversion (not covered in this document).
4. Configuration documentation: Local settings that are mostly kept in system.cfg should be
documented, as some of these may need to be manually re-entered to the PSA and PSA-V Series
device/s such as cluster configurations.
In A/A cluster, attention should be given to the Network>VPN Tunneling> IP address filter and VPN
Tunneling Profile IP pool settings. Also, some of the configurable settings such as SNMP, Log
settings, and Syslog can be configured in either cluster mode or individual nodes.
Note:

SA/MAG Series to PSA Series and MAG Series to PSA-V Series Appliance Migration Guide
© 2019 by Pulse Secure, LLC. All rights reserved 6
1. If converting a cluster, all PSA and PSA-V series devices to be put in cluster should have same
version and build of software, and same hardware platforms e.g.;
PSA300/PSA3000/PSA5000/PSA7000c/PSA7000f.
2. If converting a cluster, ensure to form with same cluster name and port definitions before
importing XML, else, import will fail. Examples are external port enabling, cluster name and node
names.
3. If converting from any platform to PSA7000f or PSA7000c, XML import of networks settings may
fail due to network interface differences, ensure to edit XML changing port settings to “Auto”.
4. If converting from a platform that has management port to one without, delete the
<Management-Port> section from XML before importing XML
5. If you are using Active Directory or ACE authentication servers, there may be a need to recreate
the AD computer objects for the new PSA and PSA-V series devices, and/or for ACE, to
regenerate/re-import the SDCONF.REC file to the devices if authentication fails after import.
6. It is assumed during this migration that the replacement PSA Series devices will be installed in
the same networks as the SA/MAG devices it is replacing, and PSA-V Series devices will be
installed in the same networks as the MAG devices it is replacing.
Procedure
The below procedure applies to both standalone and cluster migration. The few major steps additional
to clustering configurations that may need to be performed are:
1. Mapping certificates to ports
2. Setting up licensing client if using Enterprise Licensing server
3. Checking SNMP settings, checking and setting up of VPN profiles
4. Ensuring configs are fully transferred
5. Manually adding or correcting discrepancies, if any
Migration from SA/MAG to PSA
Following are the steps for migration from SA/MAG to PSA:
1. On the existing SA/MAG platform, log in to the standalone device or the primary node of the cluster
(where the cluster was first formed) and export its binary configs (system.cfg and user.cfg), and the
XML Network settings configurations.
To export the binary configurations from the PCS device:
a. In the admin console, select Maintenance > Import/Export > Configuration.
b. Under Export, enter a password if you’d like to password-protect the configuration file.
c. Click Save Config As to save the file. By default, the filename will be system.cfg.

SA/MAG Series to PSA Series and MAG Series to PSA-V Series Appliance Migration Guide
© 2019 by Pulse Secure, LLC. All rights reserved 7
Figure: Configuration
d. In the admin console, select Maintenance > Import/Export > User Accounts.
e. Under Export, enter a password if you’d like to password-protect the configuration file.
f. Click Save Config As to save the file. By default, the filename will be user.cfg.
Figure: User Accounts
To export the XML Network Configuration:
a. In the admin console, select Maintenance > Import/Export > Export XML.
b. Under Export, expand System Settings and select Network > All.
c. Click Export and save the XML file.

SA/MAG Series to PSA Series and MAG Series to PSA-V Series Appliance Migration Guide
© 2019 by Pulse Secure, LLC. All rights reserved 8
Figure: XML Import/Export
2. Make notes of all the local settings for both nodes (if not yet done during preparation stage): IP
information, clustering, virtual ports, VLANs, hosts, routes, DNS settings, SNMP (if configured), Syslog.
3. Shut down old SA/MAG cluster or standalone devices.
4. Configure the new PSA devices with same internal/external/management ports IPs with same IP
addresses as the old SA devices and the proper DNS settings. Do not configure any other settings at

SA/MAG Series to PSA Series and MAG Series to PSA-V Series Appliance Migration Guide
© 2019 by Pulse Secure, LLC. All rights reserved 9
this time.
5. Apply the proper licenses for the new PSA devices. If the SA/MAG is a member of an Enterprise
License Server, you have to manually recreate the client and re-establish connection to the license
server later at the end of migration.
Note: If upgrading a non-clustered SA/MAG device, proceed to Step-11.
6. In the new PSA device (first device), manually create a new cluster with same name and settings with
same node names as the old SA/MAG cluster.
Figure: Create New Cluster
Figure: Confirm Create Cluster
7. Add the second device to the cluster in the primary node cluster configuration and save the settings.
a. Click Add Members to add a member.

SA/MAG Series to PSA Series and MAG Series to PSA-V Series Appliance Migration Guide
© 2019 by Pulse Secure, LLC. All rights reserved 10
Figure: Clustering Status
b. Enter member node name and IP and check netmask and gateway, then click Add.
Figure: Add Cluster Member
c. Click on Save Changes.
Figure: Save Changes
d. Check cluster status, it should go transitioning for short period, then first node becomes
enabled and status should be Leader, the second node remains Enabled, Unreachable until it

SA/MAG Series to PSA Series and MAG Series to PSA-V Series Appliance Migration Guide
© 2019 by Pulse Secure, LLC. All rights reserved 11
joins the cluster.
Figure: Clustering Status
8. If the XML config is exported from an Active/Passive Cluster, following needs to be done prior to
XML Import:
a. Configure External Port for the Cluster Members (if external ports are configured in cluster)
b. Go to Clustering > Cluster Properties page on the IVE. Change the Cluster Type from
Active/Active to Active/Passive and add the cluster VIP address/es (the example here does not
use external port).

SA/MAG Series to PSA Series and MAG Series to PSA-V Series Appliance Migration Guide
© 2019 by Pulse Secure, LLC. All rights reserved 12
Figure: Active/Passive Configuration
c. Save the cluster configuration settings.
Figure: Advanced Settings
d. Change confirmation will appear confirming change from Active/Active to Active/Passive.

SA/MAG Series to PSA Series and MAG Series to PSA-V Series Appliance Migration Guide
© 2019 by Pulse Secure, LLC. All rights reserved 13
Figure: Change Confirmation
9. Log in to the second MAG device and join this node to the cluster by Clustering > Join Cluster.
Figure: Join Existing Cluster
In confirmation page, click Join.

SA/MAG Series to PSA Series and MAG Series to PSA-V Series Appliance Migration Guide
© 2019 by Pulse Secure, LLC. All rights reserved 14
Figure: Confirm Join Cluster
After successful join, admin session will be forced off the secondary node that just joined.
10. Log in to primary node and check cluster status and it should stabilize in a few minutes.
Figure: Clustering Status
11. In the standalone environment or primary node of the new cluster, do the XML Import of
Networking Settings. All networking settings would get imported, including the following:
• Internal Virtual Ports
• External Virtual Ports
• Management Ports
• VLANs
• Static Routes
• Port settings
Go to Maintenance > Import/Export and, select Import XML, then browse for the XML network
settings file, then click Import.

SA/MAG Series to PSA Series and MAG Series to PSA-V Series Appliance Migration Guide
© 2019 by Pulse Secure, LLC. All rights reserved 15
Figure: Import XML
If it errors out with interface issues like upgrading to PSA7000f or PSA7000c, edit XML as follows
before import: (Set link-speed to “auto”)
<internal-port>
<node>SSLVPN-NODEX</node>
<settings>
<ip-address>10.10.10.n</ip-address>
<netmask>255.255.255.224</netmask>
<default-gateway>10.10.10.1</default-gateway>
<link-speed>auto</link-speed>
<arp-ping-timeout>5</arp-ping-timeout>
<mtu>1500</mtu>
</settings>
<virtual-ports>
</virtual-ports>
<arp-cache>
</arp-cache>
<routes>
</routes>
</internal-port>

SA/MAG Series to PSA Series and MAG Series to PSA-V Series Appliance Migration Guide
© 2019 by Pulse Secure, LLC. All rights reserved 16
Figure: Import Progress
Figure: Detailed Information
Note: If the Source device has Management Port (e.g. MAG-SM360), and the Destination
IVE does not have Management Port (e.g. PSA300), the XML import would fail with the
following error:
Figure: Error Message
To work-around this issue, remove the Management Port settings (highlighted below) from the XML
and then retry the XML Import.

SA/MAG Series to PSA Series and MAG Series to PSA-V Series Appliance Migration Guide
© 2019 by Pulse Secure, LLC. All rights reserved 17
Figure: Management Port Settings
12. In the standalone environment or primary node of the new cluster, import the system.cfg (this is the
same process in a standalone mode migrate).
Note: This export process is the same for upgrading a standalone device.
To import the system configurations on the PSA device:
a. In the admin console, select Maintenance > Import/Export > Configuration.
b. Specify whether you want to import the Secure Access Service certificate.
Note: The certificate is not imported unless you select the Import Device Certificate(s)?
check box.
c. Select Import everything except network settings and licenses — This option imports all
configuration settings except the network, cluster and license settings.
d. Browse to the configuration file, which is named system.cfg by default.
e. Enter the password you specified for the file. If you did not specify a password before exporting
the file, then leave this field blank.

SA/MAG Series to PSA Series and MAG Series to PSA-V Series Appliance Migration Guide
© 2019 by Pulse Secure, LLC. All rights reserved 18
f. Click Import Config.
Figure: System.cfg
System settings and certificates are imported.
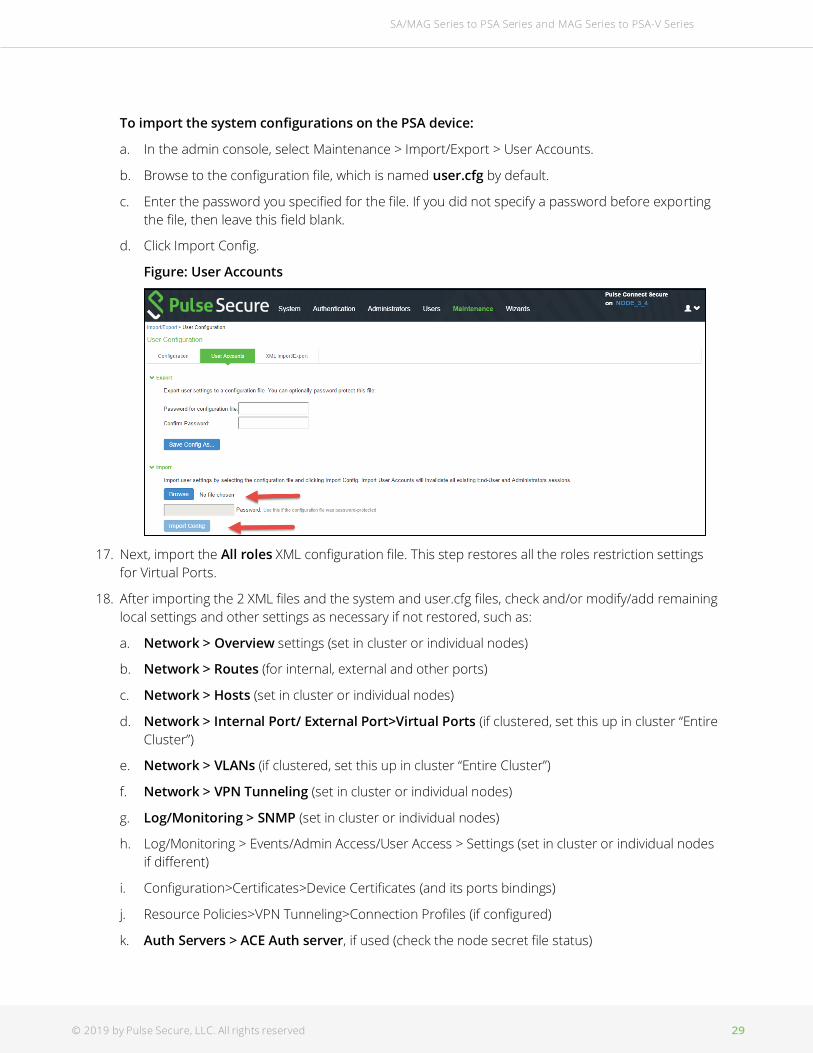
13. Next, in the same primary node, import the user.cfg binary file.
Note: This export process is the same for upgrading a standalone device.
To import the system configurations on the PSA device:
a. In the admin console, select Maintenance > Import/Export > User Accounts.
b. Browse to the configuration file, which is named user.cfg by default.
c. Enter the password you specified for the file. If you did not specify a password before exporting
the file, then leave this field blank.
d. Click Import Config.

SA/MAG Series to PSA Series and MAG Series to PSA-V Series Appliance Migration Guide
© 2019 by Pulse Secure, LLC. All rights reserved 19
Figure: user.cfg
14. After importing XML, system and user.cfg files, check and/or modify/add remaining local settings and
other settings such as:
a. Network > Overview settings (set in cluster or individual nodes)
b. Network > Routes (for internal, external and other ports)
c. Network > Hosts (set in cluster or individual nodes)
d. Network > Internal Port/ External Port>Virtual Ports (if clustered, set this up in cluster “Entire
Cluster”)
e. Network > VLANs (if clustered, set this up in cluster “Entire Cluster”)
f. Network > VPN Tunneling (set in cluster or individual nodes)
g. Log/Monitoring > SNMP (set in cluster or individual nodes)
h. Configuration>Certificates>Device Certificates (and its ports bindings)
i. Resource Policies>VPN Tunneling>Connection Profiles (if configured)
j. Auth Servers > ACE Auth server, if used (check the node secret file status)
Configuration > Licensing - License client-server settings (if used as license client in Enterprise
Licensing Server environment), proper licenses installed
15. Check cluster status (if clustered) and test operation by logging in to the cluster VIPs (or the
standalone PSA device IP). Test the authentication using AD, ACE, etc., and all other functionalities
enabled, such as NC or Pulse.
16. This completes the SA/PSA to PSA hardware platform migration.
Migration from MAG to PSA-V
Following are the steps for migration from MAG to PSA-V:

SA/MAG Series to PSA Series and MAG Series to PSA-V Series Appliance Migration Guide
© 2019 by Pulse Secure, LLC. All rights reserved 20
1. On the existing SA/MAG platform, log in to the standalone device or the primary node of the cluster
(where the cluster was first formed) and export its binary configs (system.cfg and user.cfg), and the
XML Network settings configurations.
To export the binary configurations from the PCS device:
a. In the admin console, select Maintenance > Import/Export > Configuration.
b. Under Export, enter a password if you’d like to password-protect the configuration file.
c. Click Save Config As to save the file. By default, the filename will be system.cfg.
Figure: Configuration
d. In the admin console, select Maintenance > Import/Export > User Accounts.
e. Under Export, enter a password if you would like to password-protect the configuration file.
f. Click Save Config As to save the file. By default, the filename will be user.cfg.
Figure: Save Config As – user.cfg
To export the XML Network Configuration:
a. In the admin console, select Maintenance > Import/Export > Export XML.
b. Under Export, expand System Settings and select Network > All.
c. Click Export and save the XML file.

SA/MAG Series to PSA Series and MAG Series to PSA-V Series Appliance Migration Guide
© 2019 by Pulse Secure, LLC. All rights reserved 21
Figure: XML Import/Export
2. Make notes of all the local settings for both nodes (if not yet done during preparation stage): IP
information, clustering, virtual ports, VLANs, hosts, routes, DNS settings, SNMP (if configured), Syslog.
3. Shut down old MAG cluster or standalone devices.
4. Configure the new PSA-V devices with same internal/external/management ports IPs with same IP
addresses as the old MAG devices and the proper DNS settings. Do not configure any other settings

SA/MAG Series to PSA Series and MAG Series to PSA-V Series Appliance Migration Guide
© 2019 by Pulse Secure, LLC. All rights reserved 22
at this time.
5. Apply the proper licenses for the new PSA-V devices. If the MAG is a member of an Enterprise
License Server, you have to manually recreate the client and re-establish connection to the license
server later at the end of migration.
Note: If upgrading a non-clustered MAG device, proceed to step-10.
6. Now, admin must install the core licenses. Without core licenses, the clustering option is not
enabled and admin cannot create a cluster in a PSA-V. From 8.3R3 and later releases, core licenses
can be downloaded from PCLS. Refer to the License Configuration for VA-SPE/PSA-V Appliances
Deployment Guide for detailed steps. If admin is deploying 8.3R1 and then upgrading to 8.3Rx, core
license is not needed.
7. In the new PSA-V device (first device), manually create a new cluster with same name and settings
with same node names as the old MAG cluster.
Figure: Create
Figure: Confirm Create Cluster
8. Add the second device to the cluster in the primary node cluster configuration and save the settings.

SA/MAG Series to PSA Series and MAG Series to PSA-V Series Appliance Migration Guide
© 2019 by Pulse Secure, LLC. All rights reserved 23
a. Add a member by clicking Add Members.
Figure: Add Members
b. Enter member node name and IP and check netmask and gateway, then click Add.
Figure: Mode Name
c. Click on Save Changes.
Figure: Save Changes
d. Check cluster status, it should go transitioning for short period, then first node becomes
enabled and status should be Leader, the second node remains Enabled, Unreachable until it
joins the cluster.

SA/MAG Series to PSA Series and MAG Series to PSA-V Series Appliance Migration Guide
© 2019 by Pulse Secure, LLC. All rights reserved 24
Figure: Status
9. If the XML config is exported from an Active/Passive Cluster, following needs to be done prior to
XML Import:
a. Configure External Port for the Cluster Members (if external ports are configured in cluster)
b. Go to Clustering > Cluster Properties page on the IVE. Change the Cluster Type from
Active/Active to Active/Passive and add the cluster VIP address/es (the example here does not
use external port).
Figure: Cluster Properties
c. Save the cluster configuration settings.

SA/MAG Series to PSA Series and MAG Series to PSA-V Series Appliance Migration Guide
© 2019 by Pulse Secure, LLC. All rights reserved 25
Figure: Advanced Settings
d. Change confirmation will appear confirming change from Active/Active to Active/Passive.
Figure: Confirmation Change
10. Log in to the second PSA-V device and join this node to the cluster by Clustering > Join Cluster.
Figure: Join Existing Cluster
In confirmation page, click Join.

SA/MAG Series to PSA Series and MAG Series to PSA-V Series Appliance Migration Guide
© 2019 by Pulse Secure, LLC. All rights reserved 26
Figure: Confirm Join Cluster
After successful join, admin session will be forced off the secondary node that just joined.
11. Log in to primary node and check cluster status and it should stabilize in a few minutes.
Figure: Cluster Status
12. In the primary node of the new cluster, do the XML Import of Networking Settings. All networking
settings would get imported, including the following:
• Internal Virtual Ports
• External Virtual Ports
• Management Ports
• VLANs
• Static Routes
• Port settings
a. Go to Maintenance > Import/Export, select Import XML, then browse for the XML network
settings file, then click Import.

SA/MAG Series to PSA Series and MAG Series to PSA-V Series Appliance Migration Guide
© 2019 by Pulse Secure, LLC. All rights reserved 27
Figure: XML Import/Export
13. Now assign VLANs (if any):
a. Go to System > Traffic Segregation > Default Network.
b. Move the interfaces from the Available Interfaces to Selected Interfaces.
c. Click on Save Changes.
Figure: Traffic Segregation
14. In the primary node of the new cluster, do the same XML Import process for Logs and SNMP
settings, by importing the Logs and Settings XML done in step 1.2.c. All log settings would get
imported, including the following:
• Events
• User Access
• Admin Access
• Sensors
• Log Filters
• SNMP
15. In the primary node of the new cluster, import the system.cfg (this is the same process in a
standalone mode migrate).
Note: This export process is the same for upgrading a standalone device.

SA/MAG Series to PSA Series and MAG Series to PSA-V Series Appliance Migration Guide
© 2019 by Pulse Secure, LLC. All rights reserved 28
To import the system configurations on the PSA device:
a. In the admin console, select Maintenance > Import/Export > Configuration.
b. Specify whether you want to import the Secure Access Service certificate. Note: The certificate is
not imported unless you select the Import Device Certificate(s)? check box.
c. Select Import everything except network settings and licenses — This option imports all
configuration settings except the network, cluster and license settings.
d. Browse to the configuration file, which is named system.cfg by default.
e. Enter the password you specified for the file. If you did not specify a password before exporting
the file, then leave this field blank.
f. Click Import Config.
Figure: Configuration
g. System settings and certificates are imported.
16. Next, in the same primary node, import the user.cfg binary file.
Note: This export process is the same for upgrading a standalone device.
SA/MAG Series to PSA Series and MAG Series to PSA-V Series Appliance Migration Guide
© 2019 by Pulse Secure, LLC. All rights reserved 29
To import the system configurations on the PSA device:
a. In the admin console, select Maintenance > Import/Export > User Accounts.
b. Browse to the configuration file, which is named user.cfg by default.
c. Enter the password you specified for the file. If you did not specify a password before exporting
the file, then leave this field blank.
d. Click Import Config.
Figure: User Accounts
17. Next, import the All roles XML configuration file. This step restores all the roles restriction settings
for Virtual Ports.
18. After importing the 2 XML files and the system and user.cfg files, check and/or modify/add remaining
local settings and other settings as necessary if not restored, such as:
a. Network > Overview settings (set in cluster or individual nodes)
b. Network > Routes (for internal, external and other ports)
c. Network > Hosts (set in cluster or individual nodes)
d. Network > Internal Port/ External Port>Virtual Ports (if clustered, set this up in cluster “Entire
Cluster”)
e. Network > VLANs (if clustered, set this up in cluster “Entire Cluster”)
f. Network > VPN Tunneling (set in cluster or individual nodes)
g. Log/Monitoring > SNMP (set in cluster or individual nodes)
h. Log/Monitoring > Events/Admin Access/User Access > Settings (set in cluster or individual nodes
if different)
i. Configuration>Certificates>Device Certificates (and its ports bindings)
j. Resource Policies>VPN Tunneling>Connection Profiles (if configured)
k. Auth Servers > ACE Auth server, if used (check the node secret file status)

SA/MAG Series to PSA Series and MAG Series to PSA-V Series Appliance Migration Guide
© 2019 by Pulse Secure, LLC. All rights reserved 30
l. Configuration > Licensing - License client-server settings (if used as license client in Enterprise
Licensing Server environment), proper licenses installed
19. Check cluster status (if clustered) and test operation by logging in to the cluster VIPs (or the
standalone PSA device IP). Test the authentication using AD, ACE, etc., and all other functionalities
enabled, such as NC or Pulse.
20. This completes the MAG to PSA-V platform migration.

SA/MAG Series to PSA Series and MAG Series to PSA-V Series Appliance Migration Guide
© 2019 by Pulse Secure, LLC. All rights reserved 31
References
PSA Hardware Guides
https://www.pulsesecure.net/download/techpubs/current/502/pulseappliances/psa/p
sa7000HardwareGuide.pdf
https://www.pulsesecure.net/download/techpubs/current/501/pulseappliances/psa/p
sa5000HardwareGuide.pdf
https://www.pulsesecure.net/download/techpubs/current/500/pulseappliances/psa/p
sa3000HardwareGuide.pdf
https://www.pulsesecure.net/download/techpubs/current/499/pulseappliances/psa/p
sa300HardwareGuide.pdf
Pulse Connect Secure Administration Guide
https://docs.pulsesecure.net/WebHelp/PCS/9.0R1/Home.htm
https://www.pulsesecure.net/download/techpubs/current/1219/pulse-connect-
secure/pcs/9.0rx/ps-pcs-sa-9.0r1-admin-guide.pdf
KB discussing supported network type for clustering
https://kb.pulsesecure.net/articles/Pulse_Secure_Article/KB26035
PSA-related KBs
https://kb.pulsesecure.net/articles/Pulse_Secure_Article/KB40034/?q=kb40034&l=en_US&fs=Sear
ch&pn=1&atype=
https://kb.pulsesecure.net/articles/Pulse_Secure_Article/KB40035/?q=kb40034&l=en_US&fs=Sear
ch&pn=1&atype=
• 8.3R3 PCS and 5.4R3 PPS Service Provider Virtual Appliance Deployment Guide
• 8.3R3 PCS and 5.4R3 PPS License Configuration for VA-SPE/PSA-V Appliances: On-Premise and
Cloud
Related Documents