PS2 GDS User Manual

Welcome message from author
This document is posted to help you gain knowledge. Please leave a comment to let me know what you think about it! Share it to your friends and learn new things together.
Transcript

PS2 GDS User Manual
CONTENTS
IMPORTANT NOTICES ........................................................................................................................................................ I
SAFETY INFORMATION....................................................................................................................................................... I
1. Introduction ................................................................................................................................................................. 1
1.1. Product Overview ................................................................................................................................................................. 1
1.2. Component Descriptions ...................................................................................................................................................... 1
1.2.1. PS2 GDS Scan Tool ......................................................................................................................................................... 1
1.2.2. Cables, Connectors and other Accessories .................................................................................................................... 3
1.2.3. Technical Specification ................................................................................................................................................... 3
1.3. Power on the Scan Tool & Getting Started ........................................................................................................................... 4
1.4. Home Screen ........................................................................................................................................................................ 5
1.5. Bottom Menus ...................................................................................................................................................................... 5
1.6. Printer Paper Installation .................................................................................................................................................... 11
2. PS2 GDS Operation and Functions ................................................................................................................................11
2.1. Connect the Cable .............................................................................................................................................................. 11
2.2. Enter the Vehicle Information and Select the System to Be Tested ................................................................................... 13
2.3. Select the Diagnostic Function ........................................................................................................................................... 16
2.3.1. Read codes ................................................................................................................................................................... 16
2.3.2. Clear Codes .................................................................................................................................................................. 17
2.3.3. Live Data ...................................................................................................................................................................... 19
2.3.4. Actuation Test .............................................................................................................................................................. 20
3. Special Functions (The information varies by vehicle models) ........................................................................................23
3.1. Immobilizer (Key Programming) ......................................................................................................................................... 23
3.2. Mileage adjustment ............................................................................................................................................................ 27
3.3. TPS: Throttle Position Sensor reset .................................................................................................................................... 32
3.4. Maintenance Reset (Oil Reset) ........................................................................................................................................... 35
3.5. Electrical Park Brake (EPB) .................................................................................................................................................. 38
4. Software Update ..........................................................................................................................................................42
5. Maintenance, Warranty & Service ................................................................................................................................44
5.1. Cleaning the Touch Screen ................................................................................................................................................. 44
5.2. Cleaning and Inspecting the Unit ........................................................................................................................................ 44
5.3. Quick Troubleshooting Tips ................................................................................................................................................ 44
5.4. Service Procedures ............................................................................................................................................................. 44
5.4.1. Technical Service .......................................................................................................................................................... 44
5.4.2. Repair Service .............................................................................................................................................................. 44
5.5. Limited One Year Warranty ................................................................................................................................................. 44

I
IMPORTANT NOTICES
IMPORTANT
Before operating or maintaining this unit, please read this manual carefully and pay extra attention to the safety warnings and
precautions.
For technical assistance, please contact XTOOL or the selling agent.
COPYRIGHTS
No part of this manual may be reproduced, stored in a retrieval system or transmitted, in any form or by any means, electronic,
mechanical, photocopying, recording, or otherwise, without the prior written permission of XTOOL.
DISCLAIMER
All information, illustrations, and specifications in this manual are based on the latest information available at the time of
publication. XTOOL reserves the right to make changes at any time without notice. Further, XTOOL shall not be liable for errors
contained herein or for incidental or consequential damages (including lost profits).
All software screens shown in this manual are examples. Actual test screens vary for each vehicle being tested.
TRADEMARKS
XTOOL is the trademark of XTOOLTECH Co, Ltd registered in China, the United States and other countries.
All other marks are trademarks or registered trademarks of their respective holders.
SAFETY INFORMATION
DANGER: When an engine is operating, keep the service area WELL
VENTILATED or attach a building exhaust removal system to the engine exhaust system.
Engines produce carbon monoxide, an odorless, poisonous gas that causes slower reaction time and can lead to serious
personal injury or loss of life.
SAFETY DEFINITIONS
Follow all DANGER, WARNING, IMPORTANT, and NOTE messages in this manual. These safety messages are defined as follows:
DANGER or WARNING: Means you risk bodily harm and /or possible loss of life.
IMPORTANT: Means the information demands special attention or that you risk damage to the vehicle or the tool.
NOTE: Provides clarity and helpful tips.
WARNINGS AND IMPORTANTS:
The safety messages cover situations XTOOL is aware of. XTOOL cannot know, evaluate or advise you as to all of the possible
hazards. You must be certain that any conditions or service procedures encountered do not jeopardize your personal safety.
Always perform automotive testing in a safe environment.
Wear safety eye protection that meets ANSI standards.
Keep the things such clothes, hair, hands and tools away from the moving or hot engine parts.
Operate the vehicle in a well-ventilated work area: Exhaust gases are poisonous.
Put the transmission in PARK (for automatic transmission) or NEUTRAL (for manual transmission)
And make sure the parking brake is engaged.
Put blocks in front of the drive wheels and never leave the vehicle unattended while running tests.
Use extreme caution when working around the ignition coil, distributor cap, ignition wires and spark plugs. These

components create hazardous voltages when the engine is running.
Keep a fire extinguisher suitable for gasoline/chemical/electrical fires nearby.
Don't connect or disconnect any test equipment while the ignition is on or the engine is running.
Keep the scan tool dry, clean, free from oil/water or grease. Use a mild detergent on a clean cloth to clean the outside
of the scan tool when necessary.
Do not drive the vehicle and operate the scan tool at the same time. Any distractions may cause an accident.
Refer to the service manual for the vehicle being serviced and adhere to all diagnostic procedures and precautions.
Failure to do so could result in personal injury or otherwise unneeded repair.
To avoid damaging the scan tool or generating false data, make sure the vehicle battery is fully charged and the
connection to the vehicle DLC is clean and secure.
Do not place the scan tool on the distributor of a vehicle. Strong electro-magnetic interference can damage the scan
tool.
1
1. Introduction
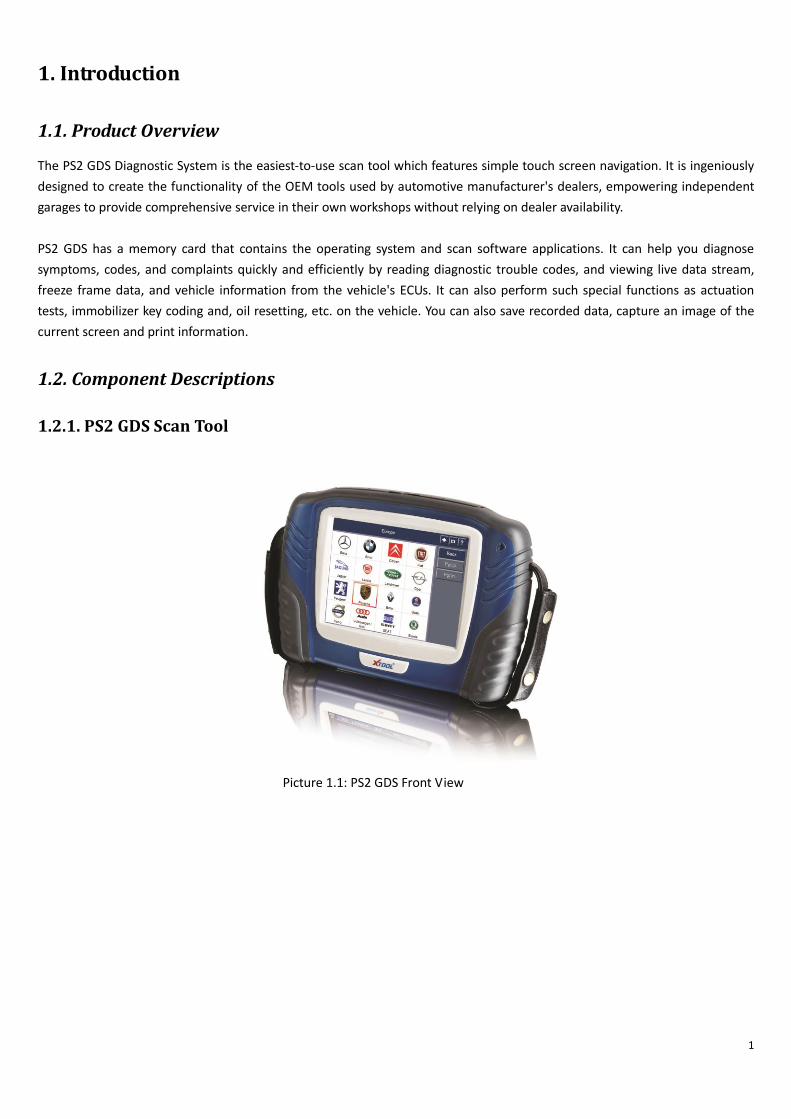
1.1. Product Overview
The PS2 GDS Diagnostic System is the easiest-to-use scan tool which features simple touch screen navigation. It is ingeniously
designed to create the functionality of the OEM tools used by automotive manufacturer's dealers, empowering independent
garages to provide comprehensive service in their own workshops without relying on dealer availability.
PS2 GDS has a memory card that contains the operating system and scan software applications. It can help you diagnose
symptoms, codes, and complaints quickly and efficiently by reading diagnostic trouble codes, and viewing live data stream,
freeze frame data, and vehicle information from the vehicle's ECUs. It can also perform such special functions as actuation
tests, immobilizer key coding and, oil resetting, etc. on the vehicle. You can also save recorded data, capture an image of the
current screen and print information.
1.2. Component Descriptions
1.2.1. PS2 GDS Scan Tool
Picture 1.1: PS2 GDS Front View

2
Picture 1.2: PS2 GDS Back View
Picture 1.3: PS2 GDS Top View
①Power Switch: Start/shut down the Mainframe
②USB Interface: Interface for synchronizing data between the mainframe and PC
③VGA Interface: Interface for connect to an external monitor(800*600 pixel)
④Main Cable Interface: Interface for connecting the main cable to vehicle diagnosis
⑤Power Interface: External power supply to the host
⑥Touch Pen
Picture 1.4: PS2 GDS Down View
①Serial ports Interface: Debug port
②Memory card slot

3
③Paper port: Paper output of the printer
NOTE: No internal battery power is provided with this scan tool.
NOTE: Do not remove memory card from the scan tool unless performing software updates to card.
1.2.2. Cables, Connectors and other Accessories
1. DLC Cables
The PS2 GDS unit can be powered through the DLC cable when connected to an OBD-II vehicle. The DLC cable connects the
scan tool to the vehicle's data link connector (DLC).
2. Connectors and other Cables
We provided connectors such as OBD II-16, SELF TEST, BWM-20, HONDA-3, NISSAN-14, KIA-20, etc.
And you can also see that we provide you some cables such as AUDI-4, CITROEN-2, FIAT-3, etc.
3. Other Accessories
AC/DC External Power Adapter, Clipper Cable, Card Reader, Thermal Paper, etc.
1.2.3. Technical Specification
Operating System: WINCE
CPU: SAMSUNG 32-bit processor,frequency 400MHZ
RAM: SDRAM 64M bytes
Program Memory: FLASH 64M bytes
External Memory: SD card
Mainframe Power Source: DC12V
Mainframe Power: 25W
Printer: Micro high-speed thermal printer
Display Screen: 8-inch color touch screen,800*600 resolution with LED backlight
Operating Temperature: -20—50℃
Relative Humidity: <90%
Overall Dimensions: 305.2mm*215.2mm*85mm
Protocols: ISO 9141-2, K/L line, SAE-J1850 VPW, SAE-J1850 PWM, CAN ISO 11898 ISO

4
1.3. Power on the Scan Tool & Getting Started
This section describes the software currently available for the scan tool.
When you turn on the scan tool, the Home Screen displays options for selecting the software applications in the scan tool as
shown below:
1. PS2 GDS Display Screen initialization: Click on the screen to enter calibration mode at the boot screen.
Picture1.5: PS2GDS Display Screen of Initialization
2. Follow the on screen instruction to do calibration of the screen. You may be request to click the cross cursor on different
area of the screen, then click to save the calibration values before continuation.
Picture 1.6: Calibration
Note:
>The touch screen also can be calibrated in the main menu setting function after boot.
>Calibration only needed when the touch function not accurate.
5
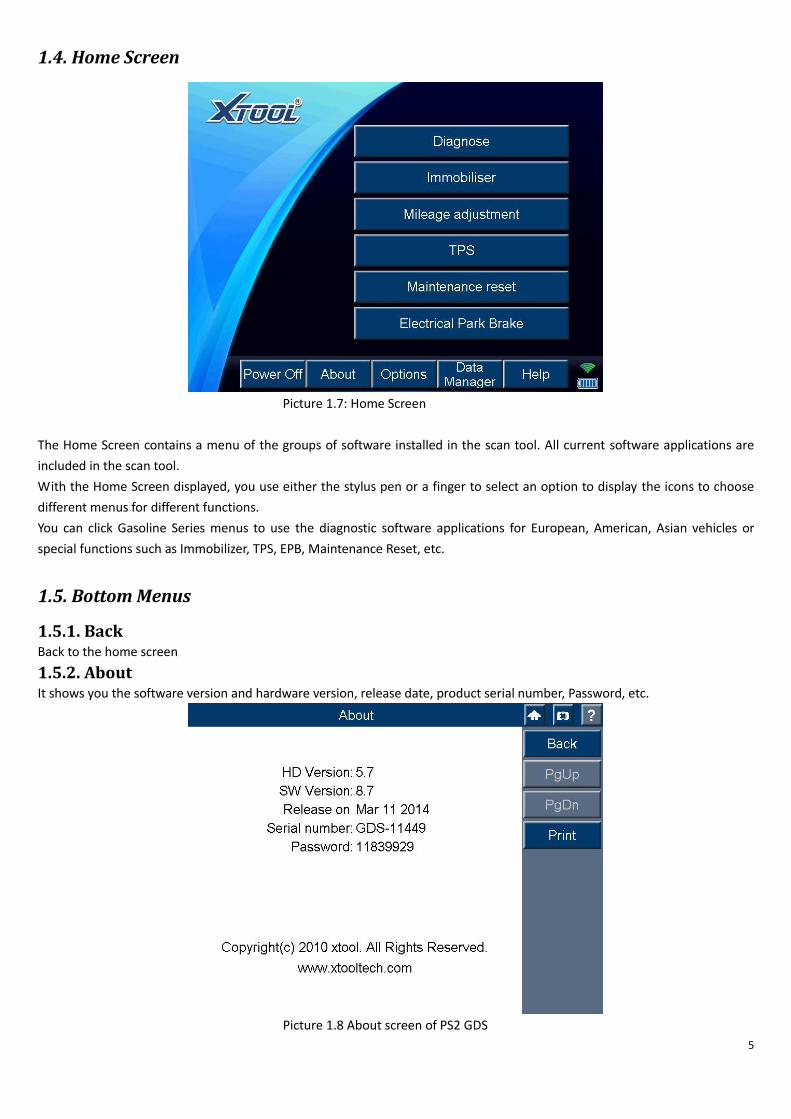
1.4. Home Screen
Picture 1.7: Home Screen
The Home Screen contains a menu of the groups of software installed in the scan tool. All current software applications are
included in the scan tool.
With the Home Screen displayed, you use either the stylus pen or a finger to select an option to display the icons to choose
different menus for different functions.
You can click Gasoline Series menus to use the diagnostic software applications for European, American, Asian vehicles or
special functions such as Immobilizer, TPS, EPB, Maintenance Reset, etc.
1.5. Bottom Menus
1.5.1. Back
Back to the home screen
1.5.2. About
It shows you the software version and hardware version, release date, product serial number, Password, etc.
Picture 1.8 About screen of PS2 GDS
6
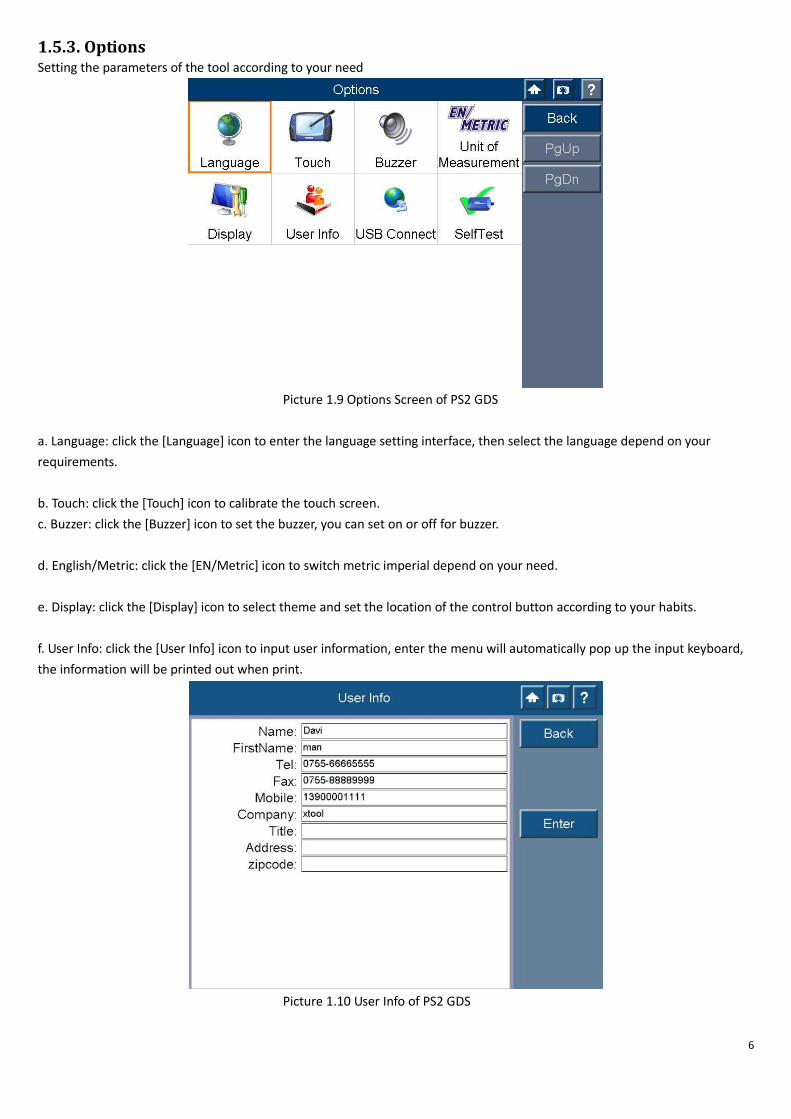
1.5.3. Options
Setting the parameters of the tool according to your need
Picture 1.9 Options Screen of PS2 GDS
a. Language: click the [Language] icon to enter the language setting interface, then select the language depend on your
requirements.
b. Touch: click the [Touch] icon to calibrate the touch screen.
c. Buzzer: click the [Buzzer] icon to set the buzzer, you can set on or off for buzzer.
d. English/Metric: click the [EN/Metric] icon to switch metric imperial depend on your need.
e. Display: click the [Display] icon to select theme and set the location of the control button according to your habits.
f. User Info: click the [User Info] icon to input user information, enter the menu will automatically pop up the input keyboard,
the information will be printed out when print.
Picture 1.10 User Info of PS2 GDS

7
g. USB Connection Setting: click the [USB Connection] icon to set the mainframe forbidden or allowed to connect with PC for
communication.
h. Self Test: connect the self test connector to PS2 GDS and start the self test.
Picture 1.11 Self Test Connection of PS2 GDS
Picture 1.12 Self Test Result Screen
8
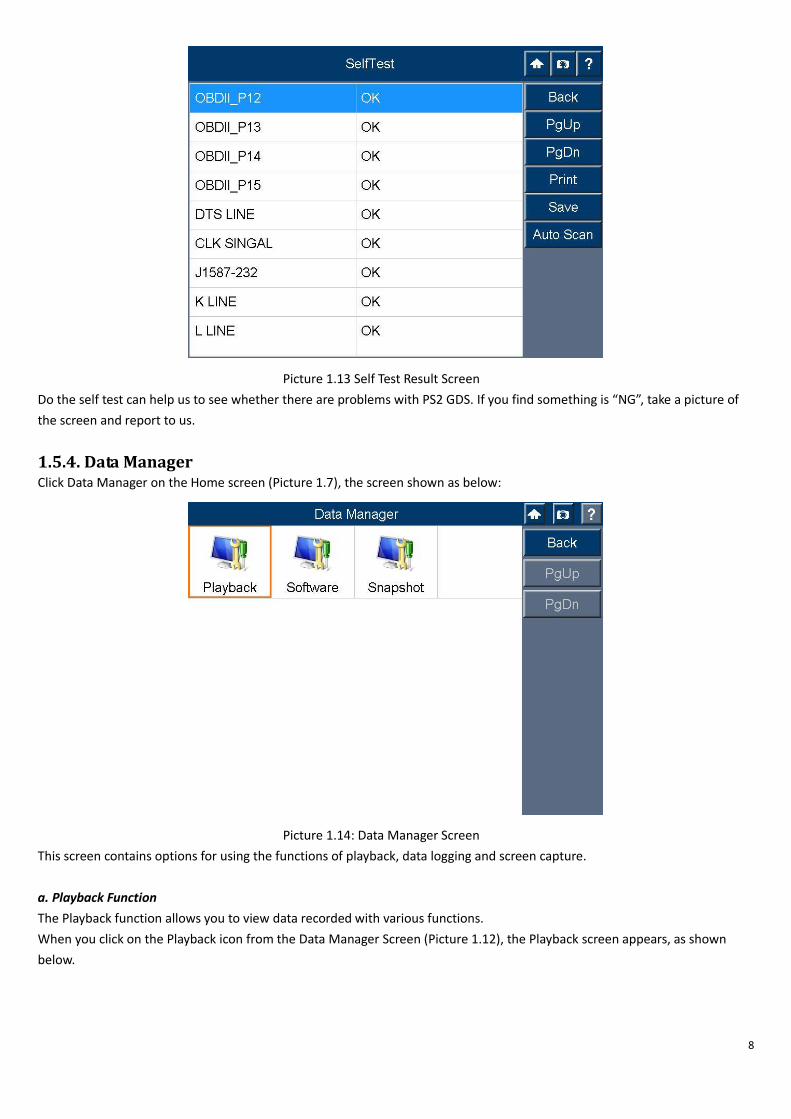
Picture 1.13 Self Test Result Screen
Do the self test can help us to see whether there are problems with PS2 GDS. If you find something is “NG”, take a picture of
the screen and report to us.
1.5.4. Data Manager
Click Data Manager on the Home screen (Picture 1.7), the screen shown as below:
Picture 1.14: Data Manager Screen
This screen contains options for using the functions of playback, data logging and screen capture.
a. Playback Function
The Playback function allows you to view data recorded with various functions.
When you click on the Playback icon from the Data Manager Screen (Picture 1.12), the Playback screen appears, as shown
below.

9
Picture 1.15: Playback Screen
b. Software
You can delete the versions of the software which you not want here.
Picture 1.16: Software Screen
c. Screen Snapshot
The Screen Capture function is used to take an image by the scan tool to record the visible items displayed on the monitor. The
screen shots can be used to demonstrate a particular problem a user might be having so that he can show the output to
customer support engineers for help. When you select the Screen Capture icon from the Data Manager screen (Picture 1.12),
the Screen Capture screen appears, as shown below.

10
Picture 1.17: Snapshot Screen
1.5.5. Help
Help function shows you how to use the diagnostic tool. There are some FAQs for your reference.
Picture 1.18: Help Screen

11
1.6. Printer Paper Installation
(1) Take off the cover of the printer, by push the cover at the direction as shown below.▼
Picture 1.19: The Cover of Printer (open direction)
(2) Take the roller out and put into the paper roll, then assemble it back. ▼
Picture 1.20: The Printer Paper
(3) On installation, pull a part of paper out, make sure the edges are parallel to the slot then assemble the cover back to the
slot▼
Picture 1.21: Printer Cover (close direction)
(4) The printer will be ready for print after the paper installation. Check the installation if the paper can’t be printed. ▼
2. PS2 GDS Operation and Functions
2.1. Connect the Cable
The method used to connect the scan tool to a vehicle's DLC depends on the vehicle's configuration as follows:
A vehicle equipped with an On Board Diagnostics Two (OBD II) vehicle management system supplies both communication and
12-volt power through a standardized J-1962 data link connection (DLC).
A vehicle not equipped with an OBD II system supplies communication through a DLC connection and sometimes supplies
12-volt power through the cigarette lighter receptacle or a connection to the battery.
Vehicle & Cable Connection
This type of connection generally requires the 15-pin main cable and an OBD II adapter. To connect the 15-pin main cable,

12
please follow these steps:
Locate the required OBD II adapter and connect it into the 15-pin male connector of the main cable.
Connect the cable's 15-pin female adapter to the DB 15-pin port on the top of the scan tool.
Picture 2.1: Main Cable Connection to the Scan Tool
Connect the cable's OBD II adapter into the vehicle's DLC, normally located under the vehicle dash.
Picture 2.2: OBD II Cable Connection to Vehicle DLC
If the DLC connection does not supply power to the scan tool, connection to the cigarette lighter receptacle will be needed.
Please follow these steps:
1. Connect the cigarette lighter with the scan tool.
2. Connect the cable's power plug into the vehicle's cigarette lighter receptacle.
Picture 2.3: Plug into the Vehicle's Cigarette Lighter Receptacle
NOTE: The vehicle's DLC is not always located under the dash as shown above. NOTE: Some adapters may have more than
one adapter or may have test leads instead of an adapter. Whatever the case, make the required connections to the
vehicle's DLC.
13
If the cigarette lighter connection does not provide power either, connection to the vehicle's battery is necessary. Follow these
steps:
1. Connect the cigarette lighter to the clipper cable.
2. Connect the clipper cable to the vehicle's battery.
NOTE: The vehicle's battery is usually located beside the engine.
NOTE: Please connect the red clipper to the anode and the black clipper to the cathode.
WARNING: The clippers might be hot after use. Be careful not to be burnt.
You can conveniently obtain power supply through power adaptor connection to the scan tool if any power socket is within
reach.
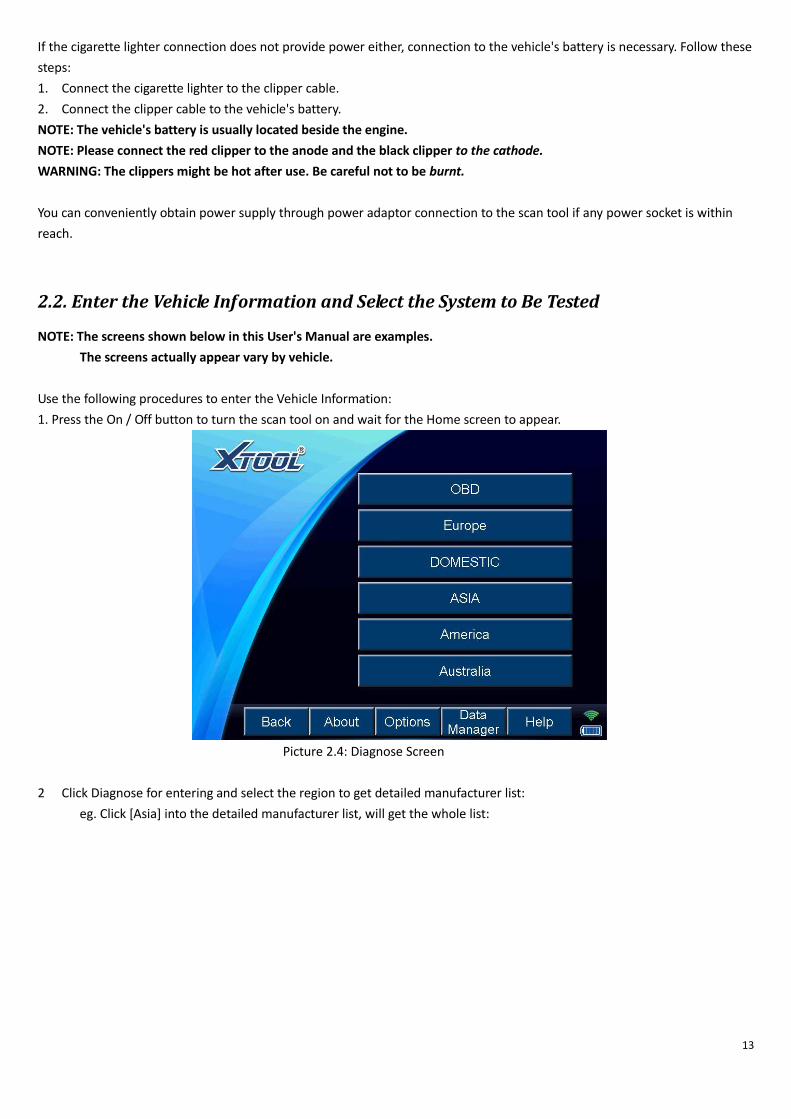
2.2. Enter the Vehicle Information and Select the System to Be Tested
NOTE: The screens shown below in this User's Manual are examples.
The screens actually appear vary by vehicle.
Use the following procedures to enter the Vehicle Information:
1. Press the On / Off button to turn the scan tool on and wait for the Home screen to appear.
Picture 2.4: Diagnose Screen
2 Click Diagnose for entering and select the region to get detailed manufacturer list:
eg. Click [Asia] into the detailed manufacturer list, will get the whole list:
14
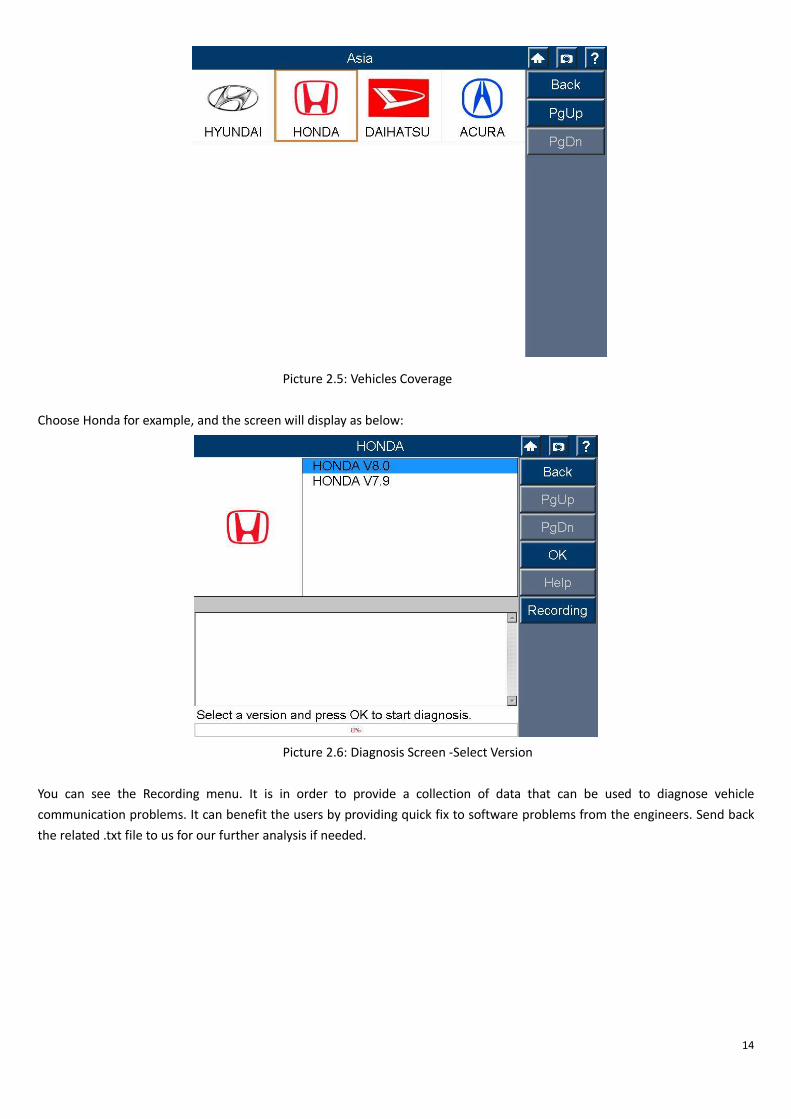
Picture 2.5: Vehicles Coverage
Choose Honda for example, and the screen will display as below:
Picture 2.6: Diagnosis Screen -Select Version
You can see the Recording menu. It is in order to provide a collection of data that can be used to diagnose vehicle
communication problems. It can benefit the users by providing quick fix to software problems from the engineers. Send back
the related .txt file to us for our further analysis if needed.

15
Picture 2.7: Diagnosis Screen -Select Function
Select a system to display the function menu and start testing
Picture 2.8: Diagnosis Screen -Select System

16
Here we select PGM_F1.
The screen is shown as below:
Picture 2.9: Diagnosis Screen -Select Connector
Select 16 PIN CONNECTOR.
2.3. Select the Diagnostic Function
After you enter, choose the option for the diagnostic function to perform.
2.3.1. Read codes
Select Read Trouble Code to view and clear diagnostic trouble codes:
Picture 2.10: Diagnosis Screen -Read Trouble Code
17
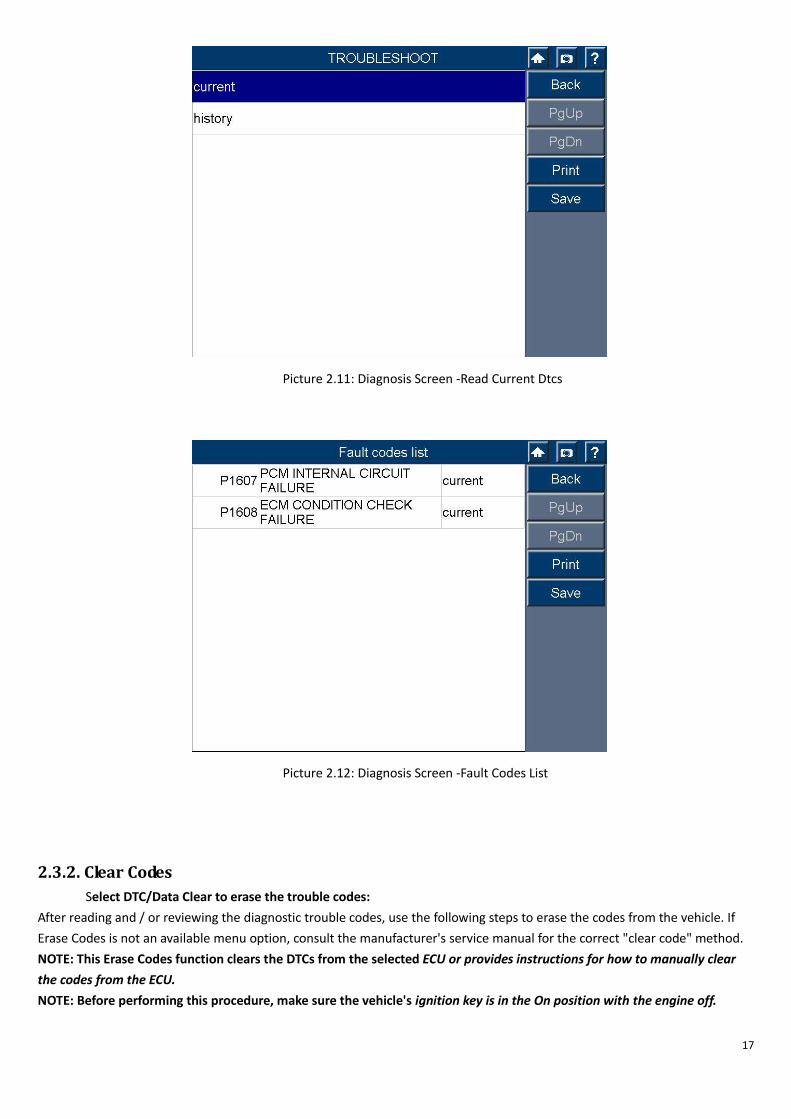
Picture 2.11: Diagnosis Screen -Read Current Dtcs
Picture 2.12: Diagnosis Screen -Fault Codes List
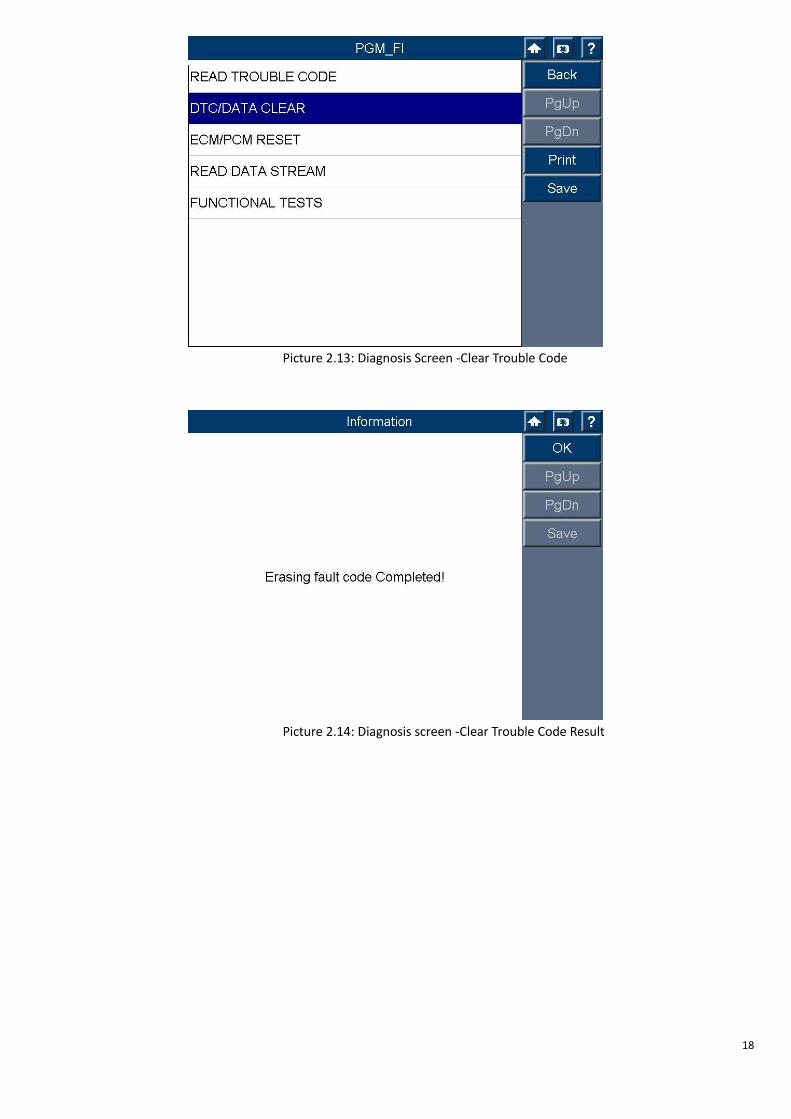
2.3.2. Clear Codes
Select DTC/Data Clear to erase the trouble codes:
After reading and / or reviewing the diagnostic trouble codes, use the following steps to erase the codes from the vehicle. If
Erase Codes is not an available menu option, consult the manufacturer's service manual for the correct "clear code" method.
NOTE: This Erase Codes function clears the DTCs from the selected ECU or provides instructions for how to manually clear
the codes from the ECU.
NOTE: Before performing this procedure, make sure the vehicle's ignition key is in the On position with the engine off.
18
Picture 2.13: Diagnosis Screen -Clear Trouble Code
Picture 2.14: Diagnosis screen -Clear Trouble Code Result

19
2.3.3. Live Data
Select Read Data Stream to view live data from ECU:
By comparing the real time live data, problems can be easily determined.
Picture 2.15: Read Data Stream
Picture 2.16: Data Stream Screen 1
20
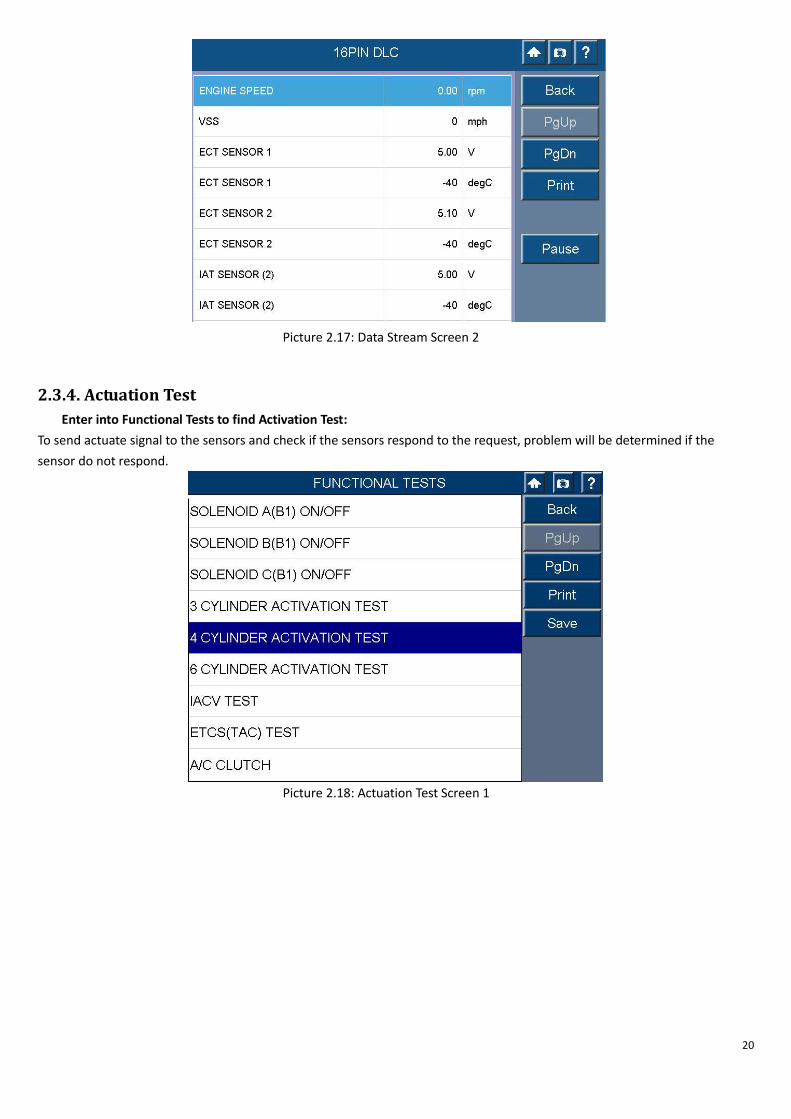
Picture 2.17: Data Stream Screen 2
2.3.4. Actuation Test
Enter into Functional Tests to find Activation Test:
To send actuate signal to the sensors and check if the sensors respond to the request, problem will be determined if the
sensor do not respond.
Picture 2.18: Actuation Test Screen 1
21
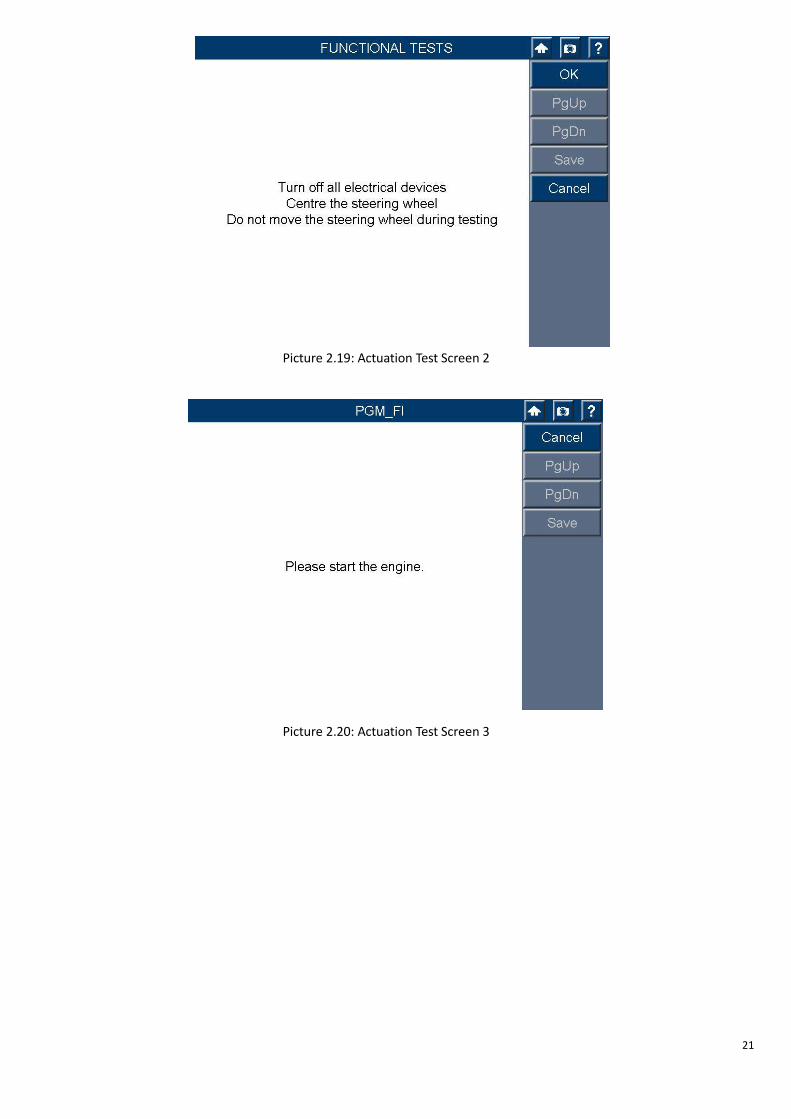
Picture 2.19: Actuation Test Screen 2
Picture 2.20: Actuation Test Screen 3
22
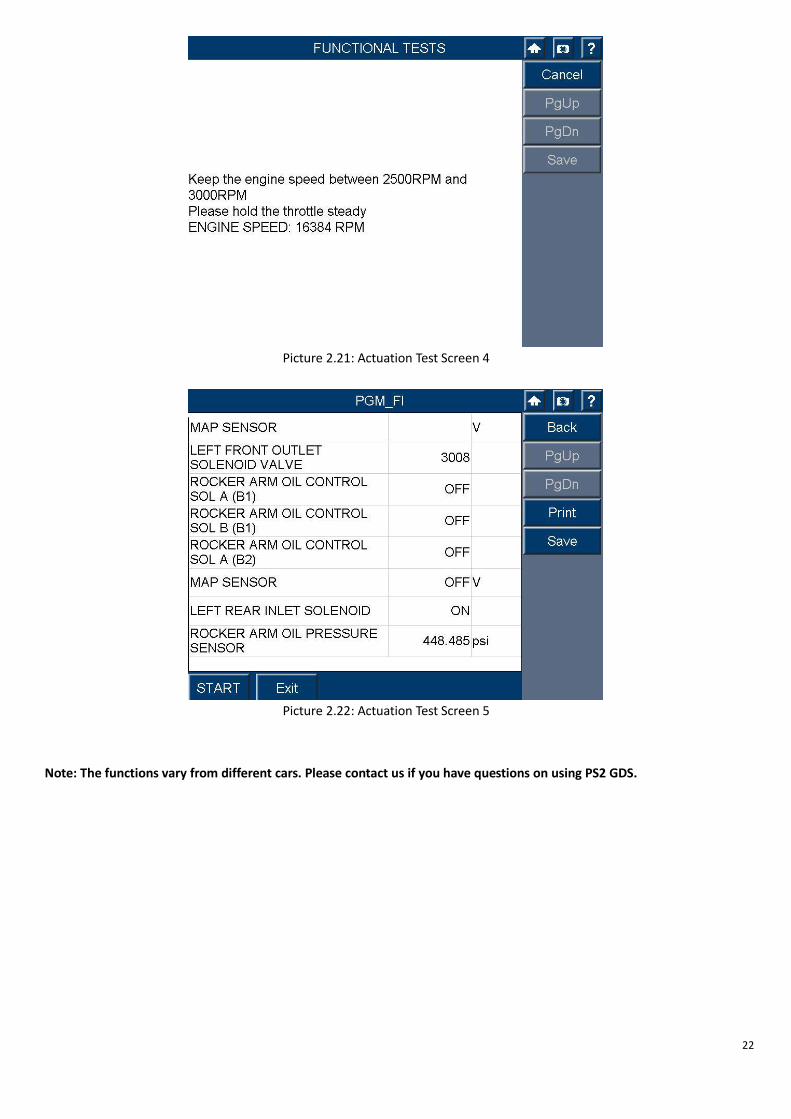
Picture 2.21: Actuation Test Screen 4
Picture 2.22: Actuation Test Screen 5
Note: The functions vary from different cars. Please contact us if you have questions on using PS2 GDS.

23
3. Special Functions (The information varies by vehicle models)
3.1: Special Functions Overview
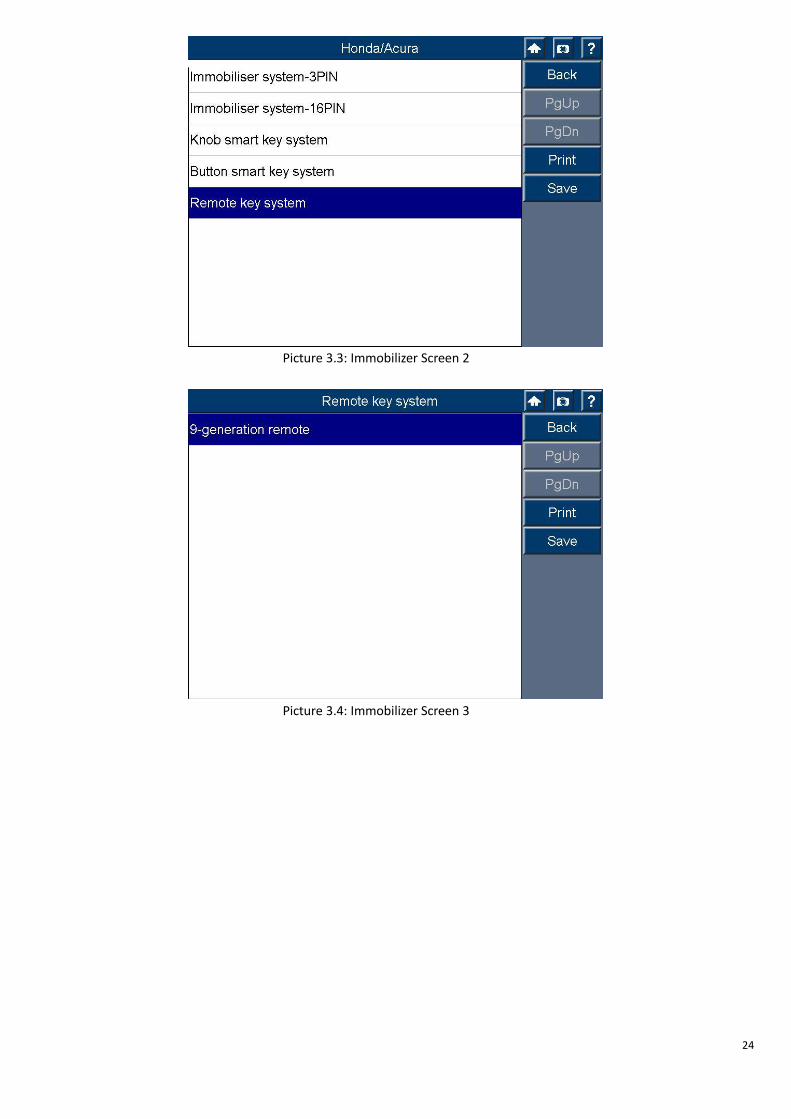
3.1. Immobilizer (Key Programming)
Insert the empty key into the vehicle, and follow the instructions on the screen step by step
Picture 3.2: Immobilizer screen 1
24
Picture 3.3: Immobilizer Screen 2
Picture 3.4: Immobilizer Screen 3
25
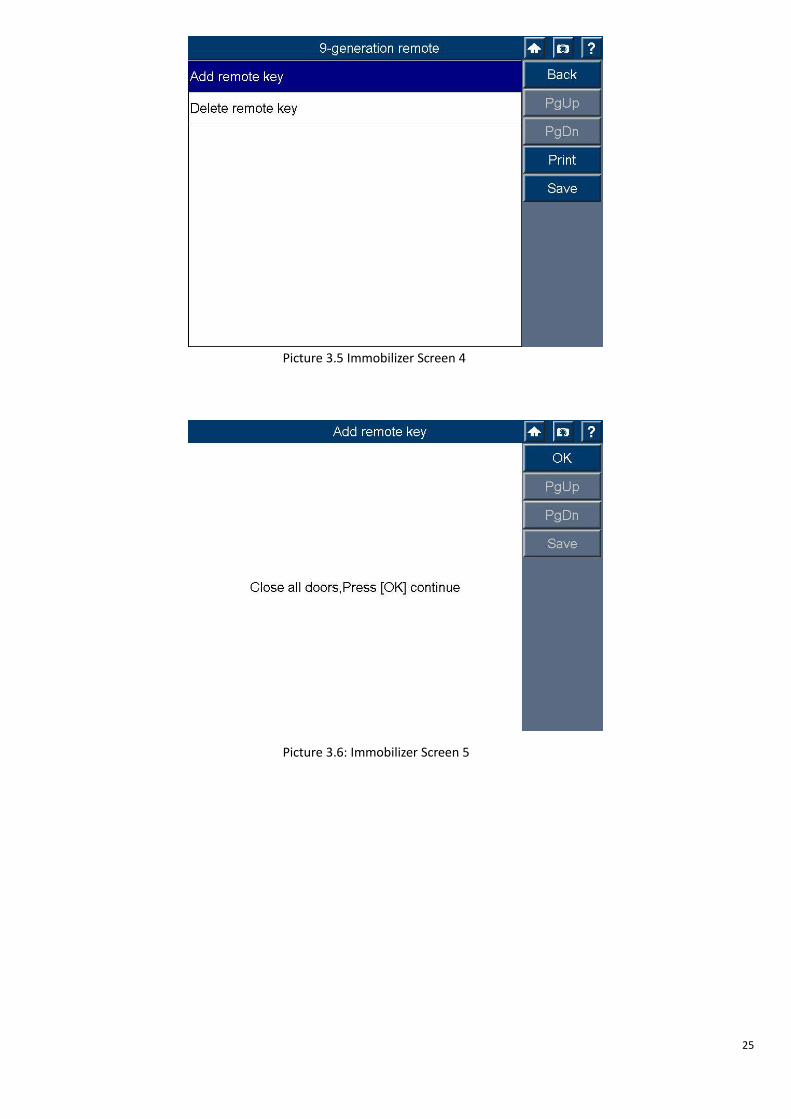
Picture 3.5 Immobilizer Screen 4
Picture 3.6: Immobilizer Screen 5

26
Picture 3.7: Immobilizer Screen 6
Picture 3.8: Immobilizer Screen 7

27
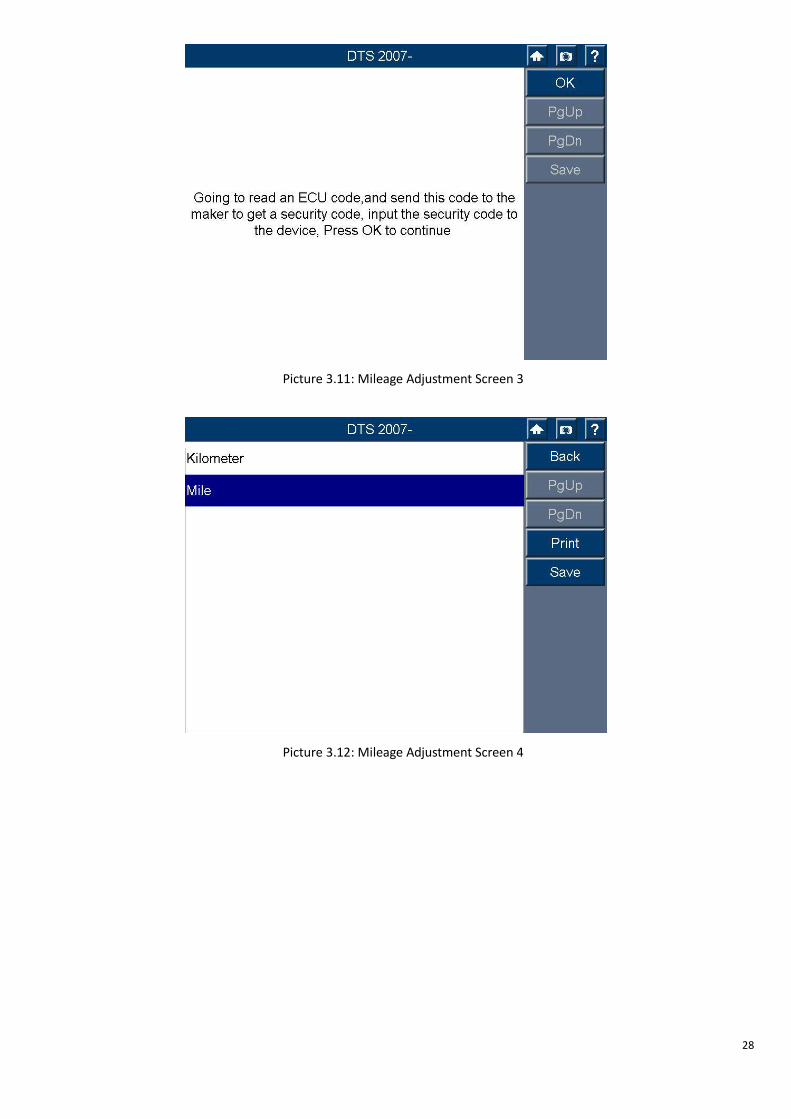
3.2. Mileage adjustment
Picture 3.9: Mileage Adjustment Screen 1
Picture 3.10: Mileage Adjustment Screen 2
28
Picture 3.11: Mileage Adjustment Screen 3
Picture 3.12: Mileage Adjustment Screen 4
29
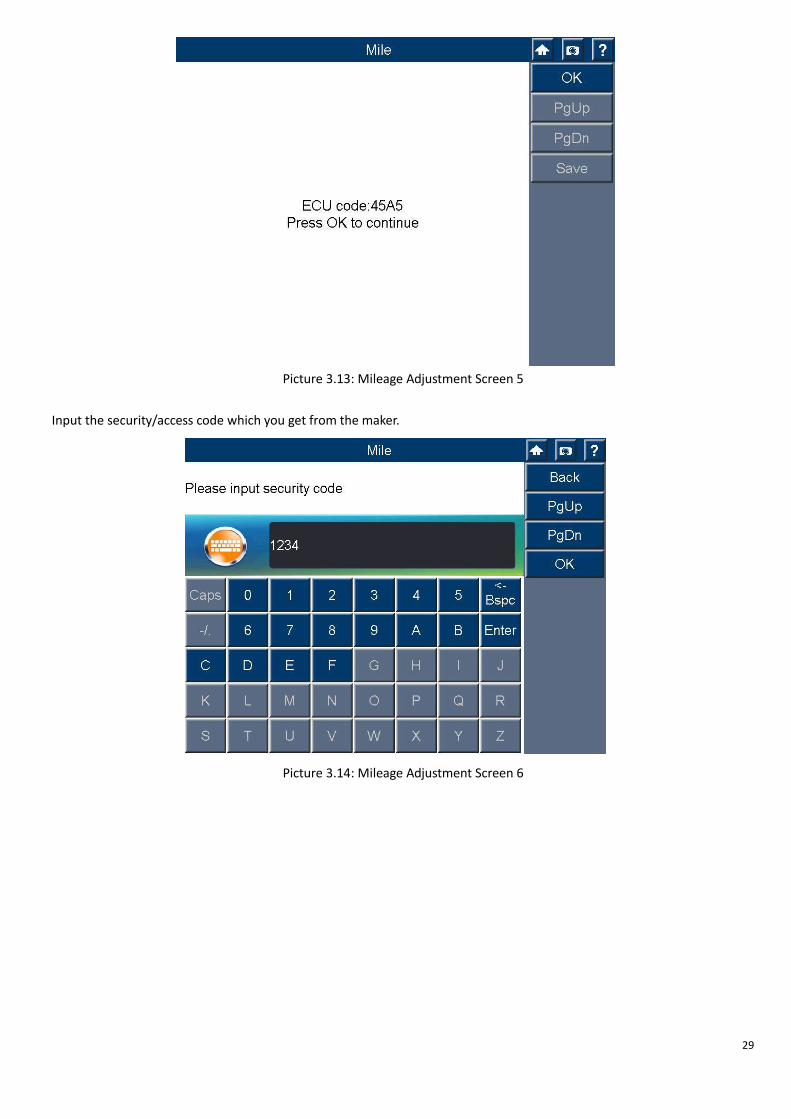
Picture 3.13: Mileage Adjustment Screen 5
Input the security/access code which you get from the maker.
Picture 3.14: Mileage Adjustment Screen 6
30
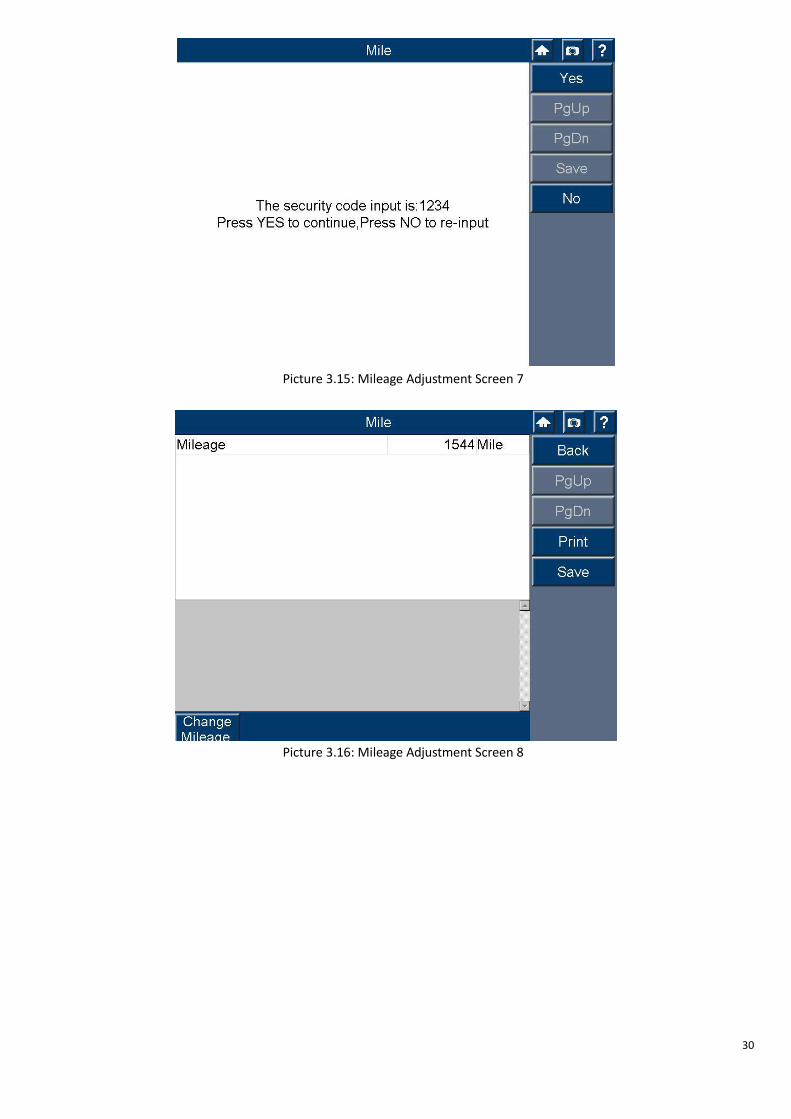
Picture 3.15: Mileage Adjustment Screen 7
Picture 3.16: Mileage Adjustment Screen 8
31
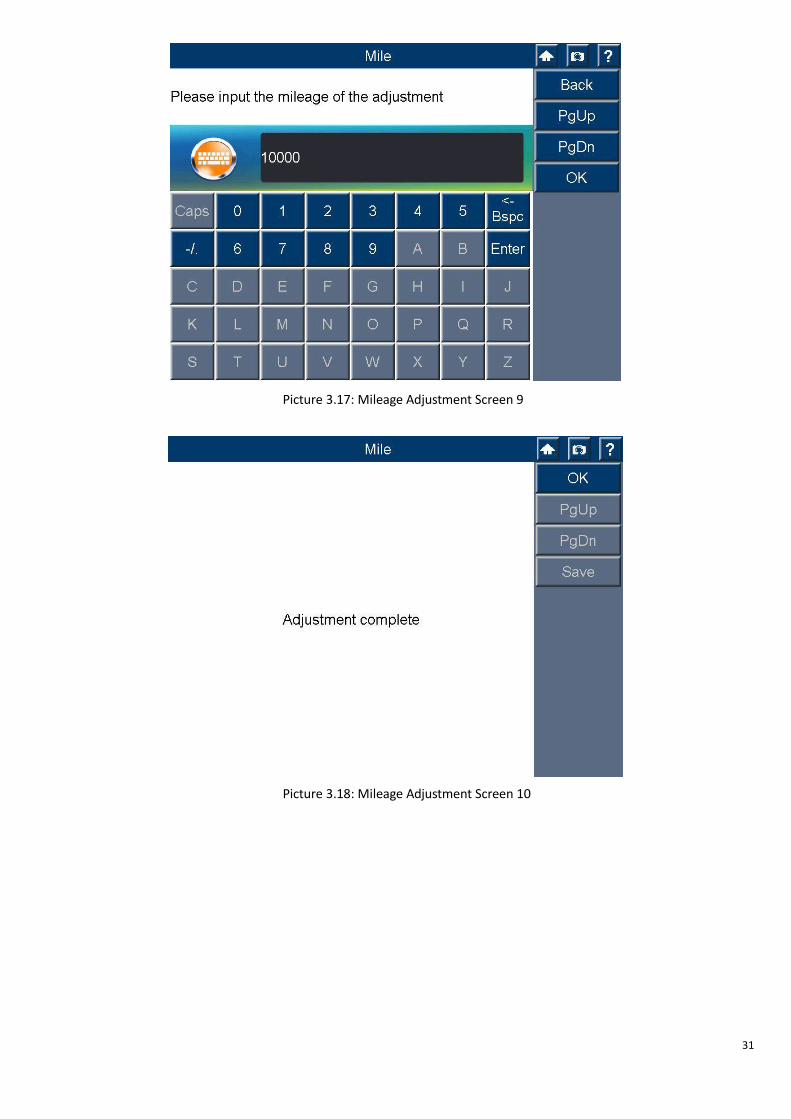
Picture 3.17: Mileage Adjustment Screen 9
Picture 3.18: Mileage Adjustment Screen 10
32
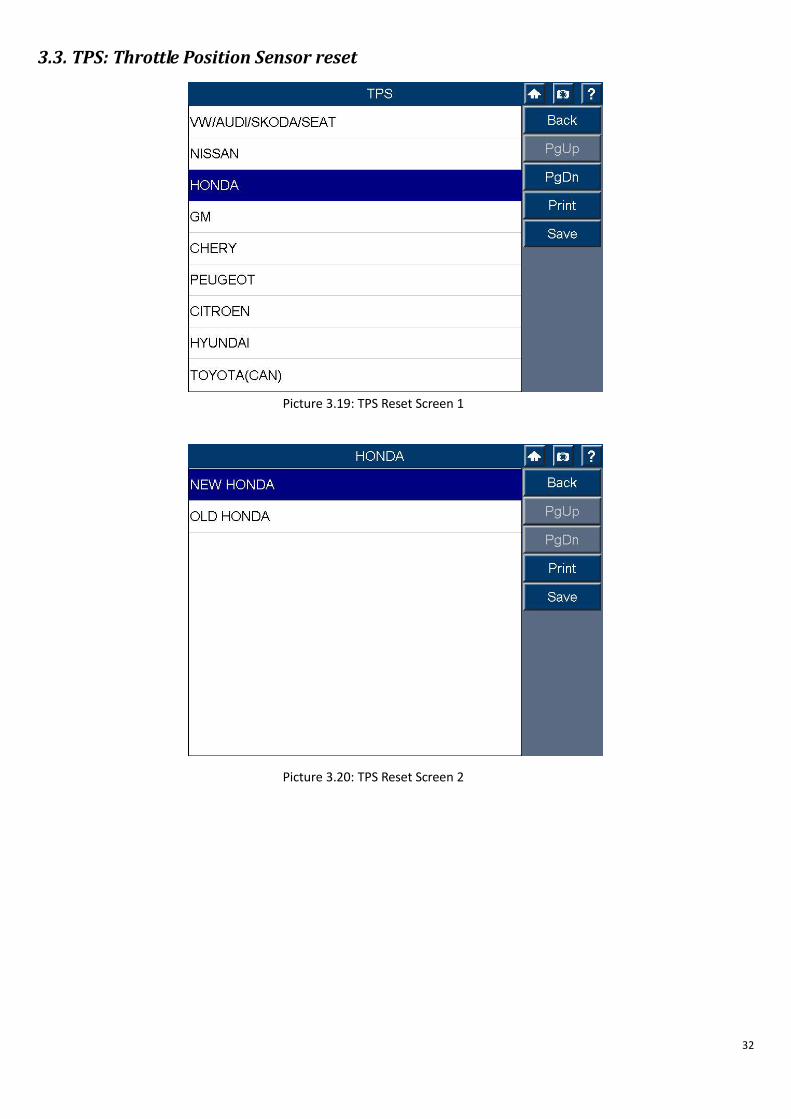
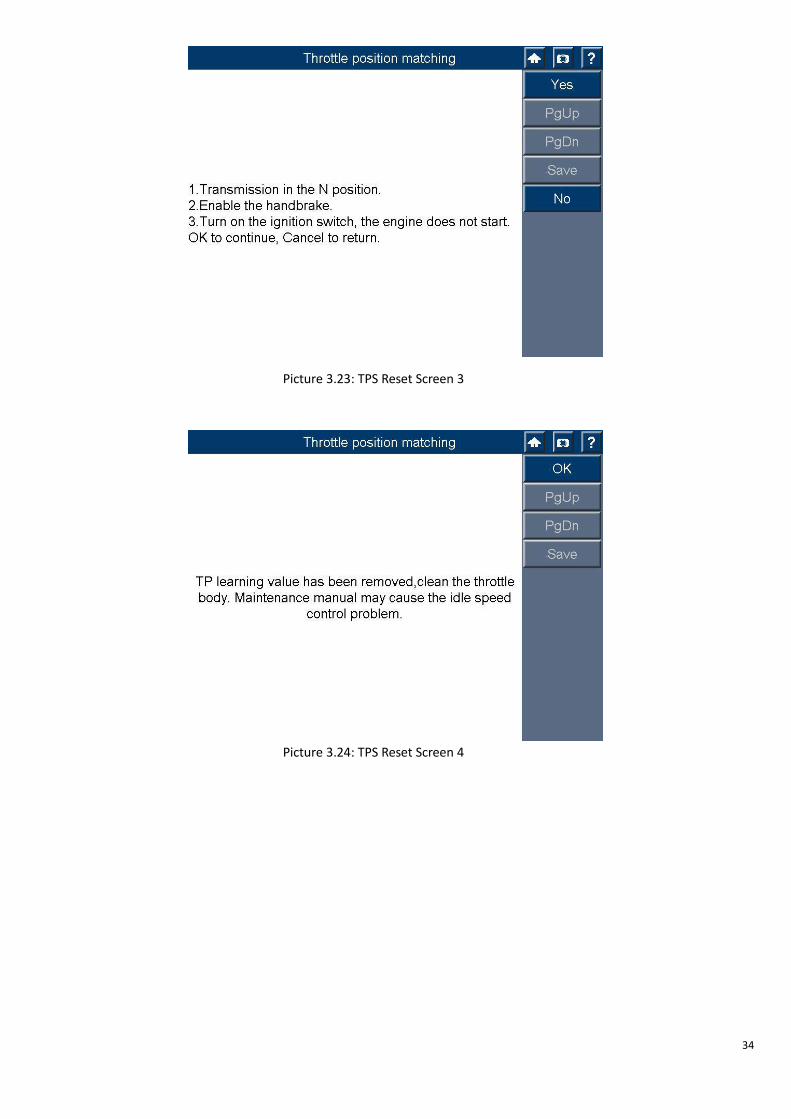
3.3. TPS: Throttle Position Sensor reset
Picture 3.19: TPS Reset Screen 1
Picture 3.20: TPS Reset Screen 2
33
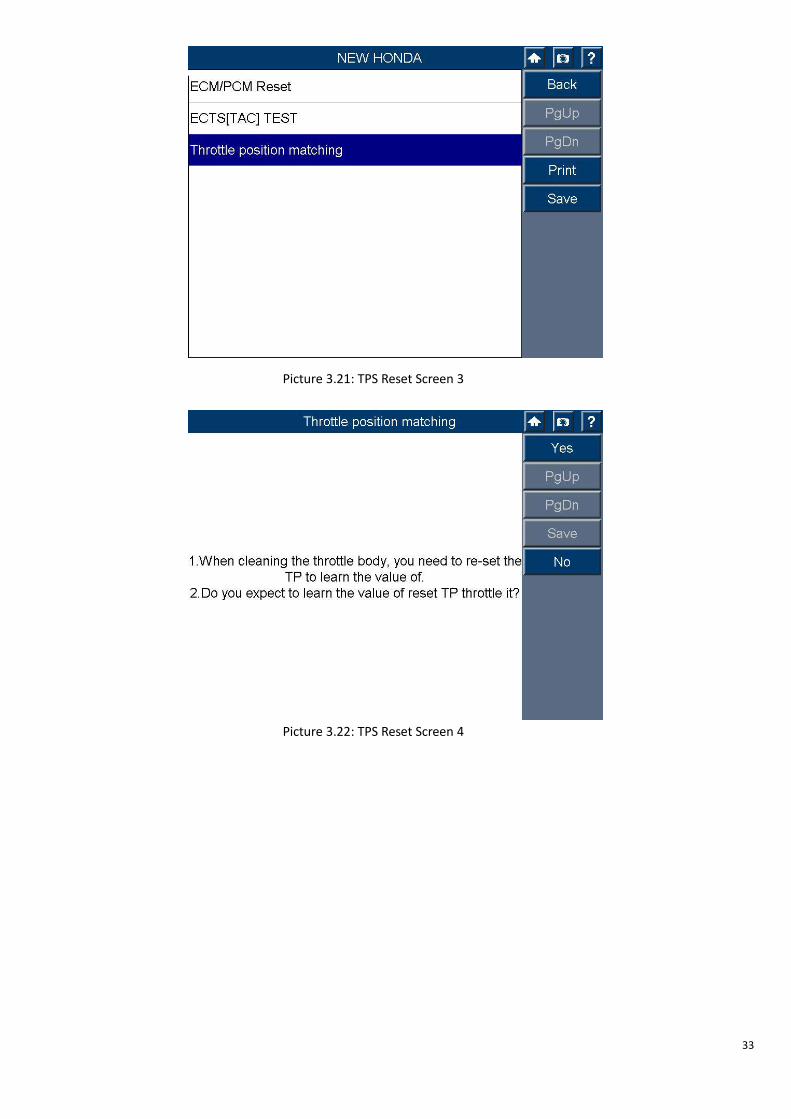
Picture 3.21: TPS Reset Screen 3
Picture 3.22: TPS Reset Screen 4
34
Picture 3.23: TPS Reset Screen 3
Picture 3.24: TPS Reset Screen 4
35
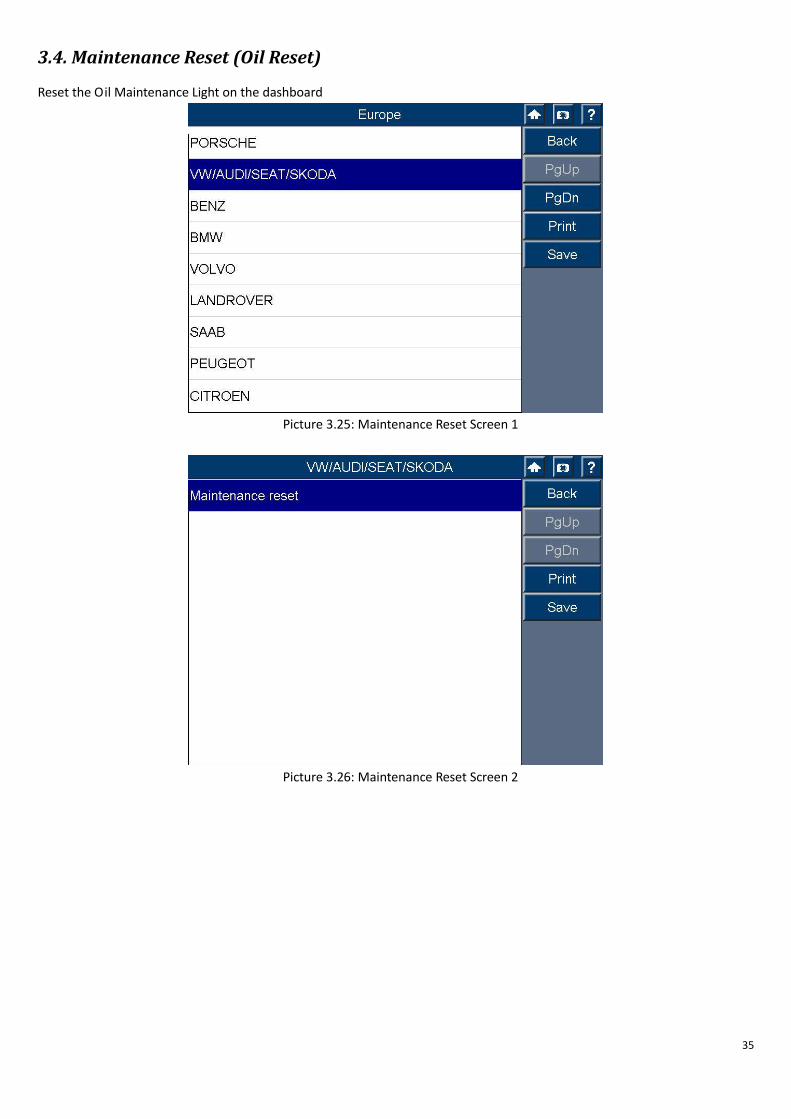
3.4. Maintenance Reset (Oil Reset)
Reset the Oil Maintenance Light on the dashboard
Picture 3.25: Maintenance Reset Screen 1
Picture 3.26: Maintenance Reset Screen 2

36
Picture 3.27: Maintenance Reset Screen 3
Picture 3.28: Maintenance Reset Screen 4

37
Picture 3.29: Maintenance Reset Screen 5
Picture 3.30: Maintenance Reset Screen 6

38
Picture 3.31: Maintenance Reset Screen 7
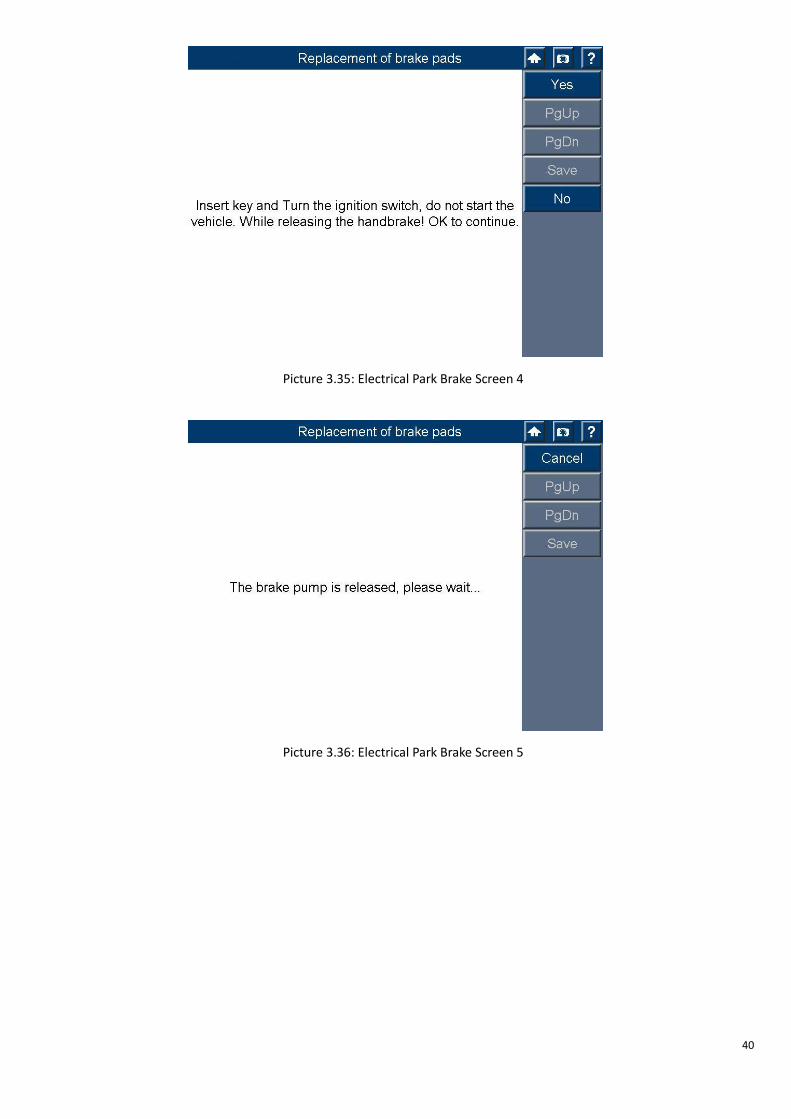
3.5. Electrical Park Brake (EPB)
Performs park brake function needed to service & repair brake systems
Picture 3.32: Electrical Park Brake Screen 1

39
Picture 3.33: Electrical Park Brake Screen 2
Picture 3.34: Electrical Park Brake Screen 3
40
Picture 3.35: Electrical Park Brake Screen 4
Picture 3.36: Electrical Park Brake Screen 5

41
Picture 3.37: Electrical Park Brake Screen 6
Picture 3.38: Electrical Park Brake Screen 7

42
Picture 3.39: Electrical Park Brake Screen 8
Picture 3.40: Electrical Park Brake Screen 9
4. Software Update
XTOOL frequently releases software updates that you can download. The Update feature makes it very easy to determine and
get exactly what you need.
The Update Tool allows you to update the scan tool software via a computer. Please download it from www.xtooltech.com .
Update the Scan Tool Software via a Computer
43
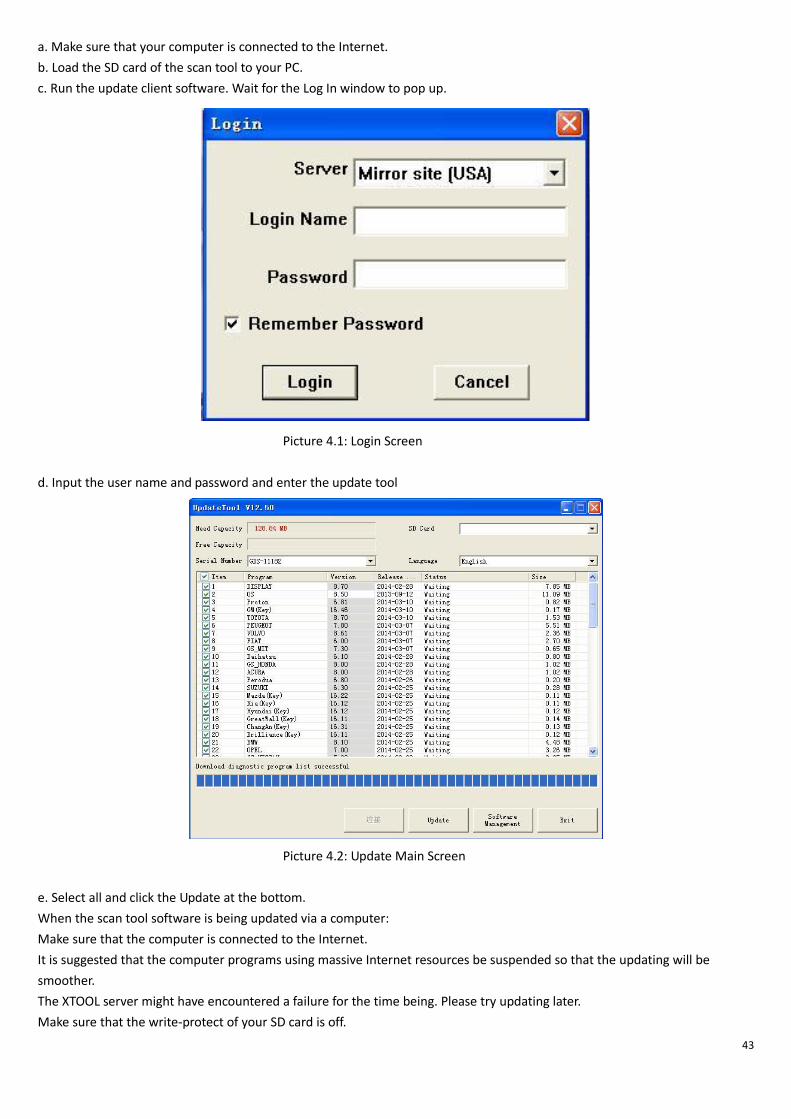
a. Make sure that your computer is connected to the Internet.
b. Load the SD card of the scan tool to your PC.
c. Run the update client software. Wait for the Log In window to pop up.
Picture 4.1: Login Screen
d. Input the user name and password and enter the update tool
Picture 4.2: Update Main Screen
e. Select all and click the Update at the bottom.
When the scan tool software is being updated via a computer:
Make sure that the computer is connected to the Internet.
It is suggested that the computer programs using massive Internet resources be suspended so that the updating will be
smoother.
The XTOOL server might have encountered a failure for the time being. Please try updating later.
Make sure that the write-protect of your SD card is off.
44
5. Maintenance, Warranty & Service
5.1. Cleaning the Touch Screen
The touch Screen can be cleaned with a soft cloth and alcohol or a mild window cleaner.
IMPORTANT: Do not use any abrasive cleansers or automotive chemicals on the touch Screen.
5.2. Cleaning and Inspecting the Unit
When using the PS2 GDS unit, make sure to do the following:
1. Check the housing, wiring, and adaptors for dirt and damage before and after each use.
2. At the end of each working day, clean the PS2 GDS housing, wiring, and adapters with a clean damp cloth.
IMPORTANT: Do not use any abrasive cleansers or automotive chemicals on the PS2 GDS unit.
5.3. Quick Troubleshooting Tips
1. Ensure that the scan tool is connected to a power source.
2. Ensure that the SD card is inserted into the scan tool.
3. Ensure that the scan tool has been registered.
4. Ensure that the system software and diagnostic application software are properly updated.
5. Ensure that the scan tool is connected to the Internet.
6. Check all cables, connections and indicators to see if the signal is being received.
7. Do not use the scan tool beside microwave ovens, cordless phones and some medical or scientific instruments to prevent
signal interference.
8. Ensure that the computer installed with the PCLink software is connected to a printer.
9. Ensure that the computer is connected to a network if any of the scan tool's functions are to be realized on the computer.
NOTE: If your problems persist, please contact XTOOL Tech Support or your local selling agent.
5.4. Service Procedures
5.4.1. Technical Service
If you have any questions on the operation of the product, please Call 0086-755-83467556 or send us emails. You can also
contact the local selling agent.
5.4.2. Repair Service
If it becomes necessary to return the scan tool for repair, please contact your agent or us to get the address for sending back.
5.5. Limited One Year Warranty
XTOOL warrants to its customers that this product will be free from all defects in materials and workmanship for a period of
one (1) year from the date of the original purchase, subject to the following terms and conditions:

45
1. The sole responsibility of XTOOL under the Warranty is limited to either the repair or, at the option of XTOOL, replacement
of the scan tool at no charge with Proof of Purchase. The sales receipt may be used for this purpose.
2. This warranty does not apply to damages caused by improper use, accident, flood, lightning, or if the product was altered
or repaired by anyone other than the Manufacturer's Service Center.
3. XTOOL shall not be liable for any incidental or consequential damages arising from the use, misuse, or mounting of the
scan tool. Some states do not allow limitations on how long an implied warranty lasts, so the above limitations may not
apply to you.
4. All information in this manual is based on the latest information available at the time of publication and no warranty can
be made for its accuracy or completeness. XTOOL reserves the right to make changes at any time without notice.
Related Documents