PS QUERY 201 i PeopleSoft Query 201 Intermediate Data services Oct 2016 Paula McDaniel, Data Analytics Learning and Education Instructor Washington State Board of Community and Technical Colleges, Data Services

Welcome message from author
This document is posted to help you gain knowledge. Please leave a comment to let me know what you think about it! Share it to your friends and learn new things together.
Transcript
PS QUERY 201
i
PeopleSoft Query 201
Intermediate
Data services
Oct 2016
Paula McDaniel, Data Analytics Learning and Education Instructor
Washington State Board of Community and Technical Colleges, Data Services

PS QUERY 201
Page | ii
Table of ContentsCourse Goal .................................................................................................................................................................................................. 1
Course Learning Objectives ..................................................................................................................................................................... 1
How to Use This Manual .......................................................................................................................................................... 1
Section 1 Introduction ................................................................................................................................................................................ 2
Adding Criteria to a Left Outer Join ...................................................................................................................................................... 2
Effective Data ................................................................................................................................................................................................ 4
Effective Date, Effective Sequence, and Effective Status.................................................................................................... 4
Effective Date and Query ......................................................................................................................................... 4
Effective Status and Query ....................................................................................................................................... 6
Effective Sequence and Query ................................................................................................................................ 7
Effective Dates and Left Outer Joins ...................................................................................................................................... 8
Multiple Effective Dated Records ........................................................................................................................... 9
Queries of Queries .................................................................................................................................................................................. 11
Finding the Record and Field Information .......................................................................................................................................... 14
CTRL+SHIFT+J shortcut keys .............................................................................................................................................. 14
CTRL+SHIFT+C shortcut keys ............................................................................................................................................ 16
PS Chrome Extension ............................................................................................................................................................. 16
Field Information Icon ........................................................................................................................................... 17
Page Information Icon ........................................................................................................................................... 17
MetaLink ..................................................................................................................................................................................... 18
Record Information ................................................................................................................................................ 19
Field Information ..................................................................................................................................................... 20
Verifying Your Query Results ............................................................................................................................................................... 21
Section 1 Review ....................................................................................................................................................................................... 22
Section 1 Knowledge Test...................................................................................................................................................................... 23
Section 1 Exercises Campus Solutions ................................................................................................................................................ 25
Section 1 Exercises Human Capital ..................................................................................................................................................... 26
Section 1 Exercises Financials ................................................................................................................................................................ 27
Section 2 Introduction ............................................................................................................................................................................. 28
Aggregate Functions ................................................................................................................................................................................. 28
Applying Aggregate Functions ............................................................................................................................................... 29
Having Criteria .......................................................................................................................................................................................... 30
Using the Having tab ............................................................................................................................................................... 30
Expressions ................................................................................................................................................................................................. 31
How to Write Expressions ................................................................................................................................................... 31
Using Expressions as Comparison Values for Criteria ................................................................................................... 33
Using Expressions as Columns in Query Output ............................................................................................................ 33
Expression Types ..................................................................................................................................................................... 35
Conversion Expressions ........................................................................................................................................ 35

PS QUERY 201
Page | iii
STRING FUNCTIONS ........................................................................................................................................... 35
NUMERIC AND DATE FUNCTIONS ............................................................................................................... 36
ADVANCED FUNCTIONS .................................................................................................................................. 37
Section 2 Review ....................................................................................................................................................................................... 38
Section 2 Knowledge Test ...................................................................................................................................................................... 38
Section 2 Exercises Campus Solutions ................................................................................................................................................ 39
Section 2 Exercises Human Capital ...................................................................................................................................................... 40
Section 2 Exercises Financials ................................................................................................................................................................ 41
Section 3 Introduction ............................................................................................................................................................................. 42
BIND Records in Population Selection Queries ............................................................................................................................... 42
What is a BIND record? ......................................................................................................................................................... 42
Pop Select Query Protocol .................................................................................................................................................... 43
MetaLink ..........................................................................................................................................................................................................
44
Viewing MetaLink Data Dictionary Reports ...................................................................................................................... 44
Record Information ................................................................................................................................................. 46
Field Information ...................................................................................................................................................... 47
MetaLink Query Search .......................................................................................................................................................... 48
All Types ..................................................................................................................................................................... 48
Folders ........................................................................................................................................................................ 49
Free Text Search ...................................................................................................................................................... 49
Query Field Names ................................................................................................................................................. 51
Combine Search Criteria ....................................................................................................................................... 52
Search Results ........................................................................................................................................................... 53
MetaLink Report Search ......................................................................................................................................................... 54
All Pillars ..................................................................................................................................................................... 54
All Modules ................................................................................................................................................................ 55
Name and/or Description ...................................................................................................................................... 55
Search Results ........................................................................................................................................................... 55
View Script Search .................................................................................................................................................................... 56
Adding Information to MetaLink ........................................................................................................................................... 57
BI Publisher Introduction ........................................................................................................................................................................ 58
BI Publisher Query Report Viewer ...................................................................................................................................... 58
Basic Search ............................................................................................................................................................... 58
Advanced Search ...................................................................................................................................................... 59
BI Publisher Query Report Scheduler ................................................................................................................................. 60
Adding a New Run Control ID ............................................................................................................................ 60
Using an Existing Run Control ID ........................................................................................................................ 62
BI Publisher Report Search .................................................................................................................................................... 64
Section 3 Review ....................................................................................................................................................................................... 64

PS QUERY 201
Page | iv
Section 3 Knowledge Test...................................................................................................................................................................... 65
Section 3 Exercises Campus Solutions ................................................................................................................................................ 66
Section 3 Exercises Human Capital ..................................................................................................................................................... 67
Section 3 Exercises Financials ................................................................................................................................................................ 68
Course Review .......................................................................................................................................................................................... 69
Simplified Instructions 101 Basics Skills .............................................................................................................................................. 70
Scheduling through Query Viewer/Manager – Simplified Instructions for a New Run Control ID ................... 70
Scheduling through Query Viewer/Manager – Simplified Instructions for an Existing Run Control ID ............ 70
Scheduling through Schedule Query Menu Path – Simplified Instructions for a New Run Control ID ............ 71
Scheduling through Schedule Query Menu Path – Simplified Instructions for an Existing Run Control ID ..... 71
Creating a Simple Query - Simplified Instructions .......................................................................................................... 72
Creating a Join - Simplified Instructions ............................................................................................................................. 72
Adding Criteria - Simplified Instructions ............................................................................................................................ 74
Required Prompt with Lookup List – Simplified Instructions ....................................................................................... 75
Optional Prompt with Lookup List – Simplified Instructions ....................................................................................... 75
Optional Prompt with No Lookup List – Simplified Instructions ................................................................................ 75
Date Prompt – Simplified Instructions ............................................................................................................................... 76
Date Range Prompt – Simplified Instructions ................................................................................................................... 76
Optional Numeric Prompt with No Lookup List – Simplified Instructions .............................................................. 78
Prompt with wildcard (%)– Simplified Instructions ......................................................................................................... 79
Simplified Instructions 201 Intermediate Skills .................................................................................................................................. 79
Adding Criteria to a Left Outer Join – Simplified Instructions .................................................................................... 79
Adding EFFDT Criteria to a Left Outer Join – Simplified Instructions ...................................................................... 79
Create a Query of Queries ................................................................................................................................................... 80
Create a Query of Queries with Definition Search Capabilities ................................................................................. 80
To create a Wildcard Prompt: ............................................................................................................................................. 82
Searching Record and Field Information – CTRL+SHIFT+J .......................................................................................... 83
Searching Record and Field Information – CTRL+SHIFT+C ........................................................................................ 84
Searching Record and Field Information – PSCHROME Extension ............................................................................ 84
Using the PSChrome Extension Simplified Instructions ................................................................................ 84
Searching Record and Field Information – MetaLink ...................................................................................................... 84
Applying Aggregate Functions ............................................................................................................................................... 85
Applying Having Criteria ........................................................................................................................................................ 85
Using an Expression as a Column ........................................................................................................................................ 85
BI Publisher Reports ................................................................................................................................................................ 85
Adding a new Run Control ID ............................................................................................................................. 86
Using an Existing Run Control ID ....................................................................................................................... 86
Glossary ...................................................................................................................................................................................................... 87
PS Query 201 Training Evaluation ........................................................................................................................................................ 89

PS QUERY 201
Page | 1
Course Goal The goal of this course is to empower Query Developers with the tools and skills needed to create and
manage more complex Queries.
Course Learning Objectives At the end of this course users will:
Be able to add Criteria to a Left Outer Join.
Be able to apply effective data logic to Queries.
Utilize Queries of Queries to effectively search for Query data information.
Efficiently find Record and Field information using the front end of PeopleSoft in conjunction with other
tools.
Gain the knowledge and skills to check your Query results to be certain of Query accuracy.
Effectively apply Aggregate Functions to Query results.
Utilize the Having tab to add Criteria to Fields using Aggregate Functions.
Be able to create Expressions to allow complex refining of Query results.
Understand BIND records and how they affect Query development.
Effectively use MetaLink to search and create Query metadata.
Understand how to run reports created with BI Publisher.
How to Use This Manual
The PS Query 201 Training Guide is comprised of 3 sections.
Section 1 covers when and how Criteria should be added to a join and how effective data can affect Query
results and how to use this functionality to achieve the desired output. We will also learn about how to use
a Query to search Queries for specific information as well as how to find record and field information from
the front end of PeopleSoft. Finally we will see how to best check the accuracy of Query results.
Section 2 is where we will learn how to apply Aggregate Functions and use the Having tab to add Criteria to
fields where Aggregate Functions have been applied. Finally, we will cover using Expressions in Queries
which will allow for complex refining of results.
Section 3 details the effect of BIND records on Queries and how to use Metalink for searching Query,
Record and Field, Report and Script metadata as well as how to run BI Publisher reports
Each section will include:
Section Introduction
Section Review
Knowledge test
Hands on exercises where appropriate
Valuable information will be designated throughout the manual at the appropriate
places. As we work our way through the training manual, be on the lookout for
these icons which indicates areas of special interest or exercises.
I C O N K E Y
Valuable information
Test your knowledge
Hands on exercise
Section intro & review

PS QUERY 201
Page | 2
Section 1 Introduction Welcome to PeopleSoft Query 201 Intermediate Course!
At the end of this section you will:
Be able to add Criteria to a Left Outer Join.
Be able to apply effective data logic to Queries.
Utilize Queries of Queries to effectively search for Query data information.
Efficiently find record and field information using the front end of PeopleSoft in conjunction with other tools.
Gain the knowledge and skills to check your Query results to be certain of Query accuracy.
Adding Criteria to a Left Outer Join
When adding Criteria to a Query that contains a Left Outer Join you will notice
that there will be the option of where to place the join in the SQL code; on the
ON clause of the Left Outer Join or on the WHERE clause. The ON clause
applies the Criteria to the results of the Left Outer Join whereas the WHERE
clause applies the Criteria to the entire result set.
The basic rule of thumb is to always place the Criteria on the clause of the record
corresponding to the field used in Expression Type 1. In the example to the
right, we are placing Criteria on the Expression 1 Type field ACAD_CAREER from
the B record. Thus, when indicating where to place the Criteria we will select the
corresponding ON clause of outer join B. If the field belongs to the A record,
which is always the base record, then the Criteria will belong to the WHERE clause.
Say you want a complete list of students but only want to see their grade if they took Math. To do this you create a
Query from a student record and then create a Left Outer Join with a second record that will display the subject
and grades received.
Since you only want to see students who took Math you will need to create Criteria for this. Where you place that
Criterion is KEY to how PS Query will determine the result set. Basically, how PS Query determines the results is
entirely dependent on the placement of the Criteria in the SQL code; either on the WHERE clause or the ON
clause.
The reason for this is because there is a subtle but marked distinction in how PeopleSoft Query displays the results
of the Query based on the position of the Criteria clause. Again, The ON clause applies the Criteria only to the
results of the Left Outer Join whereas the WHERE clause applies the Criteria to the entire Query result set.
To see how this difference works, let’s take a look at an example of how this placement of the code will affect the
results. Let’s look at a Query where the Criterion has been placed on the ON clause of Outer Join B as it should
be. The ON clause applies the Criteria only to the Left Outer Join and is actually applied before the join is
completed. What this means is that the ON clause will compile a list where either Math or NULL is the result and
then the Left Outer Join will compare that list to Record A to determine the match. So the end result is that the
Query will display all students from Record A and then display either Math or NULL in the subject field along with
the corresponding grade if they took Math exactly as we intended.
Criteria placed on the ON Clause.

PS QUERY 201
Page | 3
Results correctly display both MATH and NULL.
Now let’s look at a Query where the Criteria has been placed on the WHERE clause. In the initial calculations done
by PeopleSoft Query, the Left Outer Join returns all students, even if they didn't take Math. However, if they didn't
take Math, then the joined row that is returned by the Left Outer Join will have NULLs in all the columns from the
grades table. So as PeopleSoft Query continues the calculations and the WHERE clause comes along, it displays only
those rows where Math is the subject since we put the condition of Math on the Where clause. So, since NULL isn't
Math, students who didn't take Math disappear from the final calculated result set.
So, in essence by placing the Criteria on the WHERE clause we are negating the Left Outer Join and asking
PeopleSoft Query to only return results where the student took Math which is not what we wanted to happen.
Criteria placed on the WHERE Clause.
Results incorrectly display only MATH.
Below is a chart that details how PeopleSoft Query processes a request to place Criteria on the ON Clause as well
as how it deals with a request to place Criteria on the WHERE Clause when using a Left Outer Join in Query
creation.

PS QUERY 201
Page | 4
Effective Data There is frequently a need to keep track of historical changes to information within the database. The student status
will change as he or she enrolls or graduates, etc. Name, addresses, service indicators, or amounts are also often
kept as historical references. There may also be a need to store something that will be effective in the future.
Effective Date, Effective Sequence, and Effective Status
PeopleSoft uses three different fields in many records to enable having data be effective only at certain times –
Effective Date (EFFDT), Status as of Effective Date (EFF_STATUS) and Effective Sequence (EFFSEQ).
Effective-dated records/tables contain the field EFFDT. This is the most commonly used of the three fields and is
used throughout PeopleSoft applications to give data a historical perspective and allows for viewing data changes
over time. Whenever users add a row of data to the table, they specify the date on which that data becomes
effective. PeopleSoft will keep the new date as the current effective date and the previous row as a historical
effective date.
Effective status indicates which row is currently active and which rows were previously active (inactive) for
configuration history. This field is generally used in configuration tables.
Effective sequence tracks the sequence of changes in rows for transactional history. Generally used in transactional
tables, this field is used when same day changes are expected.
Effective Date and Query
With Effective dated Records, rows of data are classified in one of three categories:
1. Current – The latest effective date that is less than or equal to today’s date. Only the current row will
display in the Query results.
2. History – The effective date is less than the current effective date.
3. Future – The effective date is greater than the current date.
The EFFDT field allows users to display the following in their Query results based on the Criteria selected for the
EFFDT field:
All rows, regardless of their effective dates.
Rows which are currently effective.
Rows which were effective in the past.
Rows which will be effective in the future.
E FFECT IV E DAT E BASE DAT E
You may notice some records displaying an effective date of 01/01/1901. This is the default effective date added by
PeopleSoft when there is no other effective date available and indicates the first instance of the effective dated item.

PS QUERY 201
Page | 5
E FFECT IV E DAT E CR IT E R IA
When you select an effective dated record for your Query a pop up widow will appear letting you know that an
Effective Date Criteria has been automatically added for this record.
This message is telling you that the database will automatically give you the very latest dated row for the Criteria. It
is equal to or less than the current date (today) and will display only results which meet this Criterion. To return
results that differ from the default, you may remove or alter the Criterion that has been automatically created.
E FFECT IV E DAT E OP ERA TORS
As previously stated automatically added Effective Date Criteria will return one effective dated row of information
per item which will be the latest dated row. You can then select different options to compare the effective date
against such as a date in the future or the past. While all of the standard operators are available for use with
Criteria, you will find that there are some special Effective Date Condition Types also available. Each of these
operators will return the last effective dated result equal to or less than today by default.
Special Effective Date Condition Types (operators) are:
Note that when using the special Effective Date Condition Types there are only 4 options for Expression 2
Type in the Edit Criteria Properties Page:
EffDate<= Returns the one row that is closest or equal to
the Expression 2 date value without exceeding it.
If Expression 2 is “Current Date”,
then Query will retrieve the most current
row from the table.
EffDate< Returns the one row that is closest to the
Expression 2 date value without exceeding it.
Eff Date >= Returns the one row that is the nearest
to being equal to or greater than the Expression 2
date.
Eff Date > Returns the one row that is nearest to and
greater than the Expression 2 date.
First Effective Date Returns the row with the oldest effective date,
usually the first row that is entered for an item.
Last Effective Date Returns the row with the latest effective date,
even if that date is still in the future.

PS QUERY 201
Page | 6
Field – Will pull up a list of available date fields in
the records that can be used as the comparison
value.
Expression – Allows for the creation of an
Expression as the comparison value.
Constant – Displays a date field where the date to
be used as the comparison value is entered.
Current Date – Defaults to the current date as the
comparison value.
Again, the standard Condition Types are available so you are able to select between
certain dates, NULL, etc. Two operators of note are “not less than” and “not greater
than”. These operators function the same as “equal to or less than” or “equal to or
greater than”. The “not less than” operator will return all rows equal to or higher
than the Expression 2 date (future dated rows) and “not greater than” will return all
rows equal to or less than the Expression 2 date (historical rows).
Effective Status and Query
The EFF_STATUS works in conjunction with the EFFDT field and provides a status as of
the effective date. The EFF_STATUS field has two values: Active and Inactive. You are
able to specify if you would like to see only rows that are active or inactive by using
Criteria on your EFF_STATUS field. No automatic Criteria are added for this field and the default is to show all
available statuses, both active and inactive.
Statuses can also be entered into the database before they will become effective or after the date for the
status change has already passed. For example, the academic plan below was set to change to inactive as of
6/29/16.

PS QUERY 201
Page | 7
Effective Sequence and Query
Effective Sequence (EFFSEQ) also works in conjunction with EFFDT and enables the entry of more than one row
with the same effective date. The system assigns a unique sequence number to each row that has the same effective
date. So if more than one event occurs for a given key on the same date, the EFFSEQ is used as a key to uniquely
identify each row. The earliest event is numbered 0 and the highest number in this key is the most current for the
given date. By default when using EFFSEQ only the last action will display. The Criteria that is automatically added
will display as Eff Date <= Current Date (EffSeq = Last) as shown below.
With the effective sequence set to last the results will only display one row with the last entry for the effective
sequence.
In order to display a different sequencing, select to edit the Criteria and then choose to change the default of Last
and select either First for the first sequenced entry or All for all sequenced rows.
The Criteria will then display as shown below:
Now the results for the Query will display all available sequencing information for the entry.

PS QUERY 201
Page | 8
Effective Dates and Left Outer Joins
The Criteria for effective dating will always be placed on the WHERE clause which is a notable exception to the rule
for where to place Criteria in the SQL code that we learned in the Adding Criteria to a Left Outer Join module of
this manual.
When using a Standard join there is no need to add any special Criteria to your Query, however, if using a Left
Outer Join, you must provide an option for the effective date to be NULL in order for the Left Outer Join to
function as desired. This is because the result of any Left Outer Join will either contain data or be NULL and all
EFFDT Criteria is automatically added to the WHERE clause thus there must be an option for the EFFDT to be
NULL as well or only records that meet the EFFDT Criteria will display – negating the Left Outer Join.
As an example, take record STDNT_CAR_TERM as record A and STDNT_GRPS_HIST Left Outer Joined as
record B. The desired result is to see all students regardless if the student belongs to a particular student
group. For the Left Outer Join to function correctly and display blanks if there is not a match between
records, we must add the additional EFFDT can be NULL Criteria and group it with the existing EFFDT
Criteria with a logical operator of OR. If this step is skipped, the Left Outer Join will be negated and the join
will behave as a standard join.
Let’s take a closer look at this. In the example below, effective dated Criteria has been automatically added
by PeopleSoft to effective dated record B, STDNT_GRPS_HIST, which has been Left Outer Joined to record
A STDNT_CAR_TERM.
Even though record B has been Left Outer Joined to record A, there is no option for the EFFDT to also be
NULL. So if the Query is ran it will only return results where there is an effective dated match between both
records. In essence, it will behave as a standard join. Remember EFFDT Criteria is added to the WHERE
clause so the EFFDT Criteria is being applied to the entire result set.

PS QUERY 201
Page | 9
However, if we add the option for the effective date to be NULL and group the two Effective Date Criteria together
with an OR logical operator then the Left Outer Join functionality will be restored and the results returned will
show blank for any rows where there is not an effective dated match between records.
Once the Criterion has been added in the correct manner the results will now display as a Left Outer Join.
Multiple Effective Dated Records
When joining two effective dated records together it is very important to understand how PeopleSoft Query
reads effective dating logic as this will determine what data is returned by your Query.
PeopleSoft Query will read the Effective Date Criteria used in EACH record and return results based on that
Criteria regardless of join type (both standard and Left Outer Joins allow this). Meaning that if, for example,
record A is asking to return results that are equal to or less than today and record B is asking to return
Group EFFDT Criteria
PS QUERY 201
Page | 10
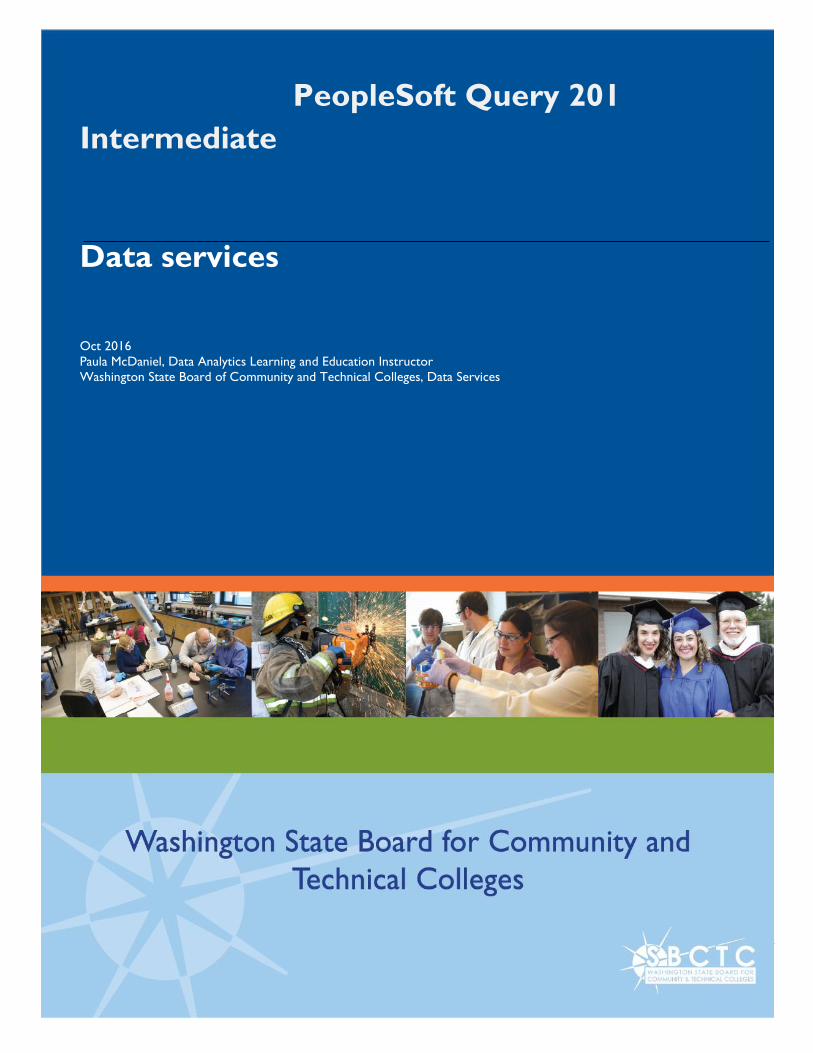
results from a specific time period, Query is able to handle this request easily even though the Effective Date
Criteria is not the same for each record. In the example below record A (JOB) is pulling employees who have
an active employee effective date of equal to or less the current date. Record B (LIFE_ADD_BEN) is pulling
employees whose effective date of a benefit enrollment is between 1/1/16 and 12/31/16. The join is a
standard join type so there is no need to add NULL as an effective date option for record B. Any and all
subsequent effective dated records Left Outer Joined must allow the effective date to be NULL.
When the Query is ran it returns results for active employees who added life or accidental death insurance in the
year 2016.
PS QUERY 201
Page | 11
Queries of Queries
It can be very useful to have the ability to write Queries that return results ABOUT a particular query or group of
Queries. Many people are interested in finding Queries written by themselves or someone else in their institution.
Or perhaps you would like to find when a particular Query was last ran or who created the Query. There are in
fact records that contain information about Queries themselves that we can use to write Queries. For example, to
search the Definition field for institution code you would write a Query that searches the Definition Field. What
record does this information live in? There are actually many records that hold Query data and they all start with
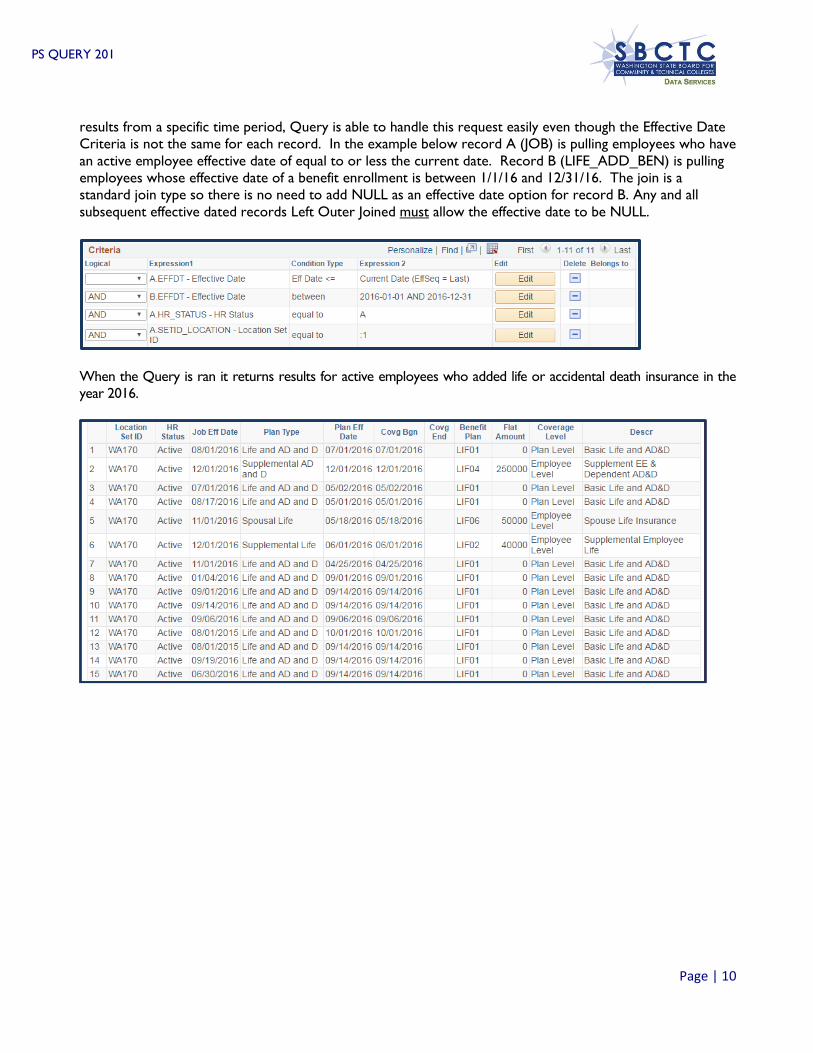
PSQRY. As of 8.54 there are the following Query Records available in ctcLink.
PSQRYBIND – Stores all run-time prompt data
PSQRYBINDLANG - Related language record for PSQRYBIND
PSQRYCRITERIA – Stores all Criteria Expressions in code format
PSQRYDEFN – Stores high-level query definitions with version numbers.
PSQRYFIELD – Stores all fields used in all aspects of query operation
PSQRYDEL – Stores operator ID, query name and version
PSQRYEXECLOG – Stores information on the execution of Queries
PSQRYEXPR – Stores the text associated with each Criteria Expression
PSQRYFIELD – Stores all fields used in all aspects of query operation
PSQRYFIELDLANG - Related language record for PSQRYFIELD
PSQRYLINK – Stores the relationships to child Queries
PSQRYRECORD – Stores all records used in all aspects of query creation
PSQRYSELECT – Stores all SELECT requirements by select type, i.e. union, subselect, join,….
PSQRYSTATS – Stores run time statistics
In addition there are also records which store page or panel information.
PSPNLDEFN - Panel Definition
PSPNLDEFN_VW - Panel Definition View
PSPNLFIELD - Panel Field
PSPNLFIELD_VW - Panel Field View
PSPNLGDEFNLANG - Panel Group Related Lang
PSPNLGROUP - Panel Group
PSPNLGROUPLANG - Panel Group Related Language
PSPNLGRPDEFN - Panel Group Definition
PSPNLHTMLAREA - Panel HTML Area
PSPNLTREECTRL - Panel Tree Control
So as you can see there are quite a few tables available for use in creating a query of Queries and all sorts of useful
information we can extract. To create a query of Queries using the PSQRYDEFN record, in Query Manager select
to create a new Query with PSQRYDEFN as the A record. Join PSQRYSTATS as record B. Make your field
selections and execute the Query.

PS QUERY 201
Page | 12
The snapshot below shows the results of a Query in FS created as in the example above.
To make the Query more valuable you can make the definition field searchable by adding a wildcard prompt on the
DESCRLONG (Definition) field and you can then search for Queries created by a certain college code, email
address or name. (Step by Step found in this Manual in the Simplified Instructions Glossary).
It is also possible to use a Query of Queries when searching for Record and Field information as we will see in the
next module.
Using the PSPNLFIELD Record users are able to search out Record and Field information regarding a PeopleSoft
front end page name. While, there are Queries already created to use for this purpose we will still review the steps
here.
Go to Query Manager in the Pillar where you would like to create the Query and opt to Create a New Query.
Search for the Record: PSPNLFIELD
Make your Field selections

PS QUERY 201
Page | 13
Create a prompt where end users will be able to enter in a specific page name found in the front end of PeopleSoft.
Save changes to your Query and run it to test.

PS QUERY 201
Page | 14
Finding the Record and Field Information
There may be times when you know a specific field is needed in a Query but you don’t know which record the field
lives in or you may not know the exact field name used by the database. Perhaps you have a record in mind but
want to find out more information about it first. There are a few ways to find information on records and fields from
the front end and/or using other methods.
CTRL+SHIFT+J shortcut keys
CTRL +SHIFT+C shortcut keys
PSChrome Extension
Metalink
The idea is to find the page name that the field is found on and then search that page name in a PSPNLFIELD Query
for details regarding the name of the field and the record where the field can be found or to search out this record
and field information directly from the front end, depending on the process.
CTRL+SHIFT+J shortcut keys
Note: this process is not available in the production environment.
CTRL+SHIFT+J allows users to find the page name that can then be looked up in a PSPNLFIELD Query to find
record and field information. This process requires the user to press the Control key simultaneously with the Shift
key and the J key to bring up a data sheet that details information specific to the page requested. For example, if the
user navigates to the Student Groups page (Main Menu Records and Enrollment Career and Program
Information Student Groups). And there wants to see field and record information from that page to use in their
Query, the user could press CTRL+SHIFT+J to access the data sheet for that page. NOTE: in Chrome the user
must input CTRL+SHIFT+J TWICE for the process to work.
c
The data sheet lists the name of the PeopleSoft page which can be used to find which fields can be found on that
page. In this example the page name is STDNT_GRPS. Note or copy the page name and then navigate to
PeopleSoft Query Manager or Query Viewer.

PS QUERY 201
Page | 15
Each Pillar has a Query already available where users are able to search information related to a particular page
name. Those Queries are:
QCS_PSPNLFIELD
QHC_PSPNLFIELD
QFS_PSPNLFIELD
In our example we are in the CS Pillar so we would search for the Query - QCS_ PSPNLFIELD in Query Manager
or Query Viewer.
Run the QCS_PSPNLFIELD Query to HTML and when prompted, enter the page name in the Prompt window then
click View Results.
The results display the names of the fields found in the page and the record where each field lives. The column Label
Text holds the field description while the Lavel ID column holds the field name as used in the database. The record
where the field is found is in the Record column.
Note: some records displayed are derived and cannot be used in this process. A "derived table" is essentially a
statement-local temporary table created by means of a subquery in the FROM clause of a SQL SELECT statement. It
exists only in memory and behaves like a standard view or table but cannot be used as a data source in PeopleSoft
Query. WRK tables behave in a similar fashion and can also not be used as a data source for PeopleSoft Query.

PS QUERY 201
Page | 16
CTRL+SHIFT+C shortcut keys
The CTRL+SHIFT+C option will only work in Chrome and Firefox. This tool is not available in Internet Explorer.
The shortcut keys work in a similar fashion to the CTRL+SHIFT+J shortcut, however instead of displaying the Panel
Page, they display the name of the record where a field on the front end will store its data when the mouse is
hovered over the field. The example below shows that the field Reason on the Enrollment page will write to the
record STDNT_ENRL and the field name is
ENRL_ACTN_RSN
PS Chrome Extension
Install this extension and use it anywhere in the front end to get Record and Field information. Go to
https://google.com/chrome/webstore from within the Chrome browser.
Click on The Chrome Webstore hyperlink under
Distribution Options.
Search for "PeopleSoft" in the search bar.
Click on “Add to Chrome” next to the PSChrome
Extension.
Now you are ready to start using the PSChrome Chrome Extension in PeopleSoft. You will see the following group
of icons now available for use when working in PeopleSoft.

PS QUERY 201
Page | 17
To use the icons, navigate to the page where the field you want to query on is found in the front end of
PeopleSoft. For example, for Student Groups go to Main Menu Records and Enrollment Career and
Program Information Student Groups.
Field Information Icon
The Field Information Icon will return the name of the field as it appears in the database.
To use the field click on it and the screen will change to display red dotted line boxes
around the names of the field as the record where it lives as well as any current values
will display
Click inside the red dotted line box then scroll to the bottom of your screen to see the
resulting information. The name of the field and the value currently entered will display.
Page Information Icon
The Page Information Icon will display the page information when clicked, including the Page Name which can be
used in the PSPNLFIELD Queries.
Using the same example of Student Groups used before, let’s see how
to retrieve the page name using the Page Information Icon. After
navigating to the Student Groups Page (Main Menu Records and
Enrollment Career and Program Information Student Groups)
click on the Page Information Icon.
The Page Information will display, including the Page Name which can
be used in the PSPNLFIELD Queries.

PS QUERY 201
Page | 18
Here, you would again simply navigate to Query Manager or Query Viewer to use the PSPNFIELD Query.
Run the QCS_PSPNLFIELD Query to HTML and when prompted, enter the page name in the Prompt window then
click View Results.
The results display the names of the fields found in the page and the record where each field lives.
Note: some records displayed are derived and cannot be used in this process. A "derived table" is essentially a
statement-local temporary table created by means of a subquery in the FROM clause of a SQL SELECT statement. It
exists only in memory and behaves like a standard view or table but cannot be used in PeopleSoft Query.
MetaLink
MetaLink is a data dictionary provided by Data Services where users can search for Queries, Reports, Records and
View Scripts. Use MetaLink to search records for both field and record information to gain valuable insight into the
data structure.
The MetaLink app will support the college system by providing key information about the data stored within the
tables and columns in Golden Gate, which are replicated from the ctcLink production database. The key information
is critical to the accurate use of PeopleSoft data for reporting and/or analysis.
The key features of MetaLink allows designated users to:
Document structures and properties for a given record or field.
View completed data dictionary reports.
View the ctcLink reporting catalog.
Search for available PeopleSoft data Queries.
In order to gain access to MetaLink you must first request a password. Please submit all requests for
MetaLink passwords to: Carmen McKenzie or Paula McDaniel. [email protected] or
You may often find similar records and wonder what the differences are between them. MetaLink can help with
that. Let’s examine the following three records:
STDNT_GRPS
STDNT_GRP_TBL
STDNT_GRPS_HIST
Navigate to http://dataservicesmetalink.sbctc.edu/
Click on in the upper right hand corner of the screen and enter in your login credentials.
PS QUERY 201
Page | 19
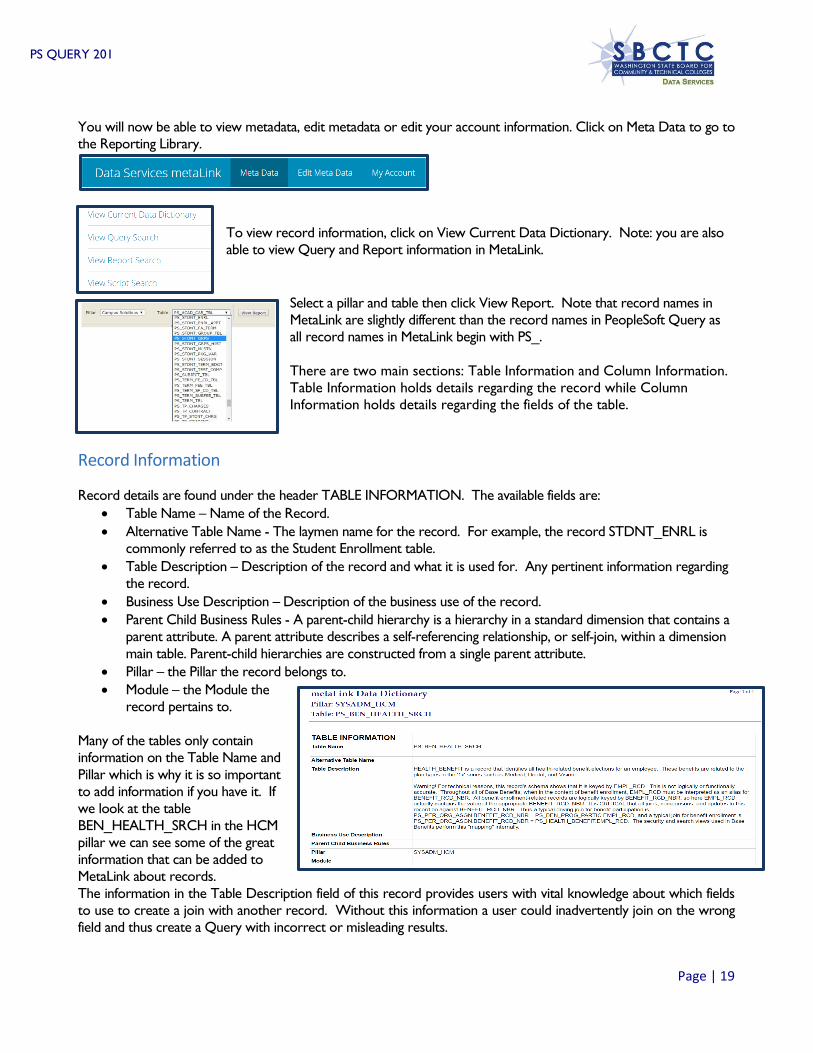
You will now be able to view metadata, edit metadata or edit your account information. Click on Meta Data to go to
the Reporting Library.
To view record information, click on View Current Data Dictionary. Note: you are also
able to view Query and Report information in MetaLink.
Select a pillar and table then click View Report. Note that record names in
MetaLink are slightly different than the record names in PeopleSoft Query as
all record names in MetaLink begin with PS_.
There are two main sections: Table Information and Column Information.
Table Information holds details regarding the record while Column
Information holds details regarding the fields of the table.
Record Information
Record details are found under the header TABLE INFORMATION. The available fields are:
Table Name – Name of the Record.
Alternative Table Name - The laymen name for the record. For example, the record STDNT_ENRL is
commonly referred to as the Student Enrollment table.
Table Description – Description of the record and what it is used for. Any pertinent information regarding
the record.
Business Use Description – Description of the business use of the record.
Parent Child Business Rules - A parent-child hierarchy is a hierarchy in a standard dimension that contains a
parent attribute. A parent attribute describes a self-referencing relationship, or self-join, within a dimension
main table. Parent-child hierarchies are constructed from a single parent attribute.
Pillar – the Pillar the record belongs to.
Module – the Module the
record pertains to.
Many of the tables only contain
information on the Table Name and
Pillar which is why it is so important
to add information if you have it. If
we look at the table
BEN_HEALTH_SRCH in the HCM
pillar we can see some of the great
information that can be added to
MetaLink about records.
The information in the Table Description field of this record provides users with vital knowledge about which fields
to use to create a join with another record. Without this information a user could inadvertently join on the wrong
field and thus create a Query with incorrect or misleading results.

PS QUERY 201
Page | 20
Field Information
Field details are found under the header COLUMN INFORMATION. The available fields are:
Alternative Column Name - The laymen name for the column. For example, the column name STRM is
commonly referred to as Session/Term.
Description - The description of the field and what it is used for. Any pertinent information regarding the
field should be included.
Primary Key - Indicates if this field is part of the primary key for the record (table). The combination of
primary key fields represent the uniqueness of the row in the record.
Data Type - A classification identifying one of various types of data, such as integer, text or decimal, that
determines the possible values for that type.
Size - The length or scale of the field value. Size is directly related to the Data Type.
Nullable - Indicates of the field can contain null or blank values.
Data Classification - The WA State Office of the Chief Information Officer (OCIO) data
classification. Category 1 thru 4 are used with Category 1 being public information and category 4
being confidential information requiring special handling.
o For a detailed description of each category, see the Data Classification Brief
here: http://www.sbctc.edu/resources/documents/colleges-staff/data-services/data-warehouse/DataClassificationBrief.pdf
History: Includes any historical changes to the field such as inclusions or exclusions of values.
Accountable Commission: Designated by the Data Governance Committee and indicates which system
commission is ultimately accountable for this specific data element.
Examples of Use: Provides examples of how/when to use the field. Information about auto-joins and how
they might affect the Query, etc.
Converted: The table and field name of the legacy source record if converted during implementation.
Common Column: Used only by SBCTC.
Notes – Any other notes, pertinent information regarding the field.
Valid Values – field values and their meanings.
You will see how the information presented could be useful. For example, when studying the tables, we see that the
STDNT_GRPS table does not have an Effective Status yet the STDNT_GRPS_HIST does have Effective Status. This
means that whenever you need a query to display students in an inactive status you must use the
STDN’T_GRPS_HIST table. Also, note the STDNT_GROUP_TBL defines student group codes making it an
excellent choice for a prompt table.
We will cover the other options available in MetaLink in Section 3 of this manual.

PS QUERY 201
Page | 21
Verifying Your Query Results
With all of the time and effort that goes into creating a Query one of the most important aspects of Query creation
comes at the very end; verifying your results. Below is a list of ways that you can ensure your Query results are
correct.
Check the Front End
o Select a unique identifier (EMPLID, Account Number, etc.) and go to the front end of PeopleSoft
and check the information available there against the information retrieved in your Query results.
Compare
o Compare your results with known reports that are up-to-date and accurate.
Perform a "sanity check"
o Ask yourself if the information you are presenting is reasonable. For example, if there are generally
no classes at your institution that enroll more than 100 students per class, then a query returning a
class enrollment of 250 students is probably not correct.
Estimate
o Try to estimate likely results before executing the query.
Break it down
o Break down large amounts of data to its components, and then add them to be sure that the entire
amount is accounted for. For example, if searching for undergraduate Hispanic female students,
look at: all Hispanic students, male Hispanic students, etc. to check the accuracy of your query.
Ask a SME (Subject Matter Expert)
o Ask someone who knows the data to check your results.
Get Detailed Information from the Report Requester
o Ask the requestor of the report what results to expect. Ask if they can suggest an existing report
that you can use against which to check your results. If your query is getting results that are not
anywhere near what was expected then your query may be in error.
Become an Expert
o Become as familiar and knowledgeable as you can about your data records. Participate in the Data
Services WebEx’s and trainings. Also, consider using MetaLink as a source to learn as much as you
can about the records you use.
Review the Output
o Reviewing the Query results is always a good idea and sometimes it will help you to spot mistakes.
Select a single Account or EMPLID
o Check the data in the Query against the front end of the system.

PS QUERY 201
Page | 22
Section 1 Review
In this section we learned about the WHERE clause and ON clause and how to place Criteria appropriately
to a Left Outer Join and to apply effective date logic to Queries and Left Outer Joins allowing understanding
of how this logic can affect the results from your Queries.
We also discussed important information on how to find information about where a field found in the front
end of the system lives in the backend and how you can use this information in your Query development.
Finally we learned how to create and use Queries which search existing Queries for specified information and
how to check the results of your Queries to ensure accurate reporting.
Notes:

PS QUERY 201
Page | 23
Section 1 Knowledge Test
1. The ON clause of a Left Outer Join applies the Criteria to the:
2. The WHERE clause applies the Criteria to the:
3. Why is it important where the SQL code for Criteria is placed on a Left Outer Join?
4. What three fields are used in determining effective logic in PeopleSoft Query?
5. What does EFFSEQ track?
A. Effective Date
B. Effective Status
C. Changes to an effective dated row that take place on the same EFFDT
6. With Effective dated Queries, rows of data are classified in one of three categories. These are:
1.
2.
3.
4. If creating a Left Outer Join using an Effective dated record, users must provide an option for the effective date
to be in order for the Left Outer Join to function as desired.
5. If one effective dated record in a Query has the effective dated Criteria set a certain way, all of the other
effective dated records in the Query must have their effective dated Criteria set up in the same way.
True False
6. What are 4 ways to find information about records and fields?
1.
2.
3.
4.

PS QUERY 201
Page | 24
7. Records that begin with PSQRY all contain data about .
8. What are three ways to verify your Query results? Choose the three that you think you will find the most
beneficial.
1.
2.
3.

PS QUERY 201
Page | 25
Section 1 Exercises Campus Solutions
1. Create a Query using the effective dated record STDNT_GRPS_HIST and update the EFFDT Criteria to
only see results which have an EFFDT of between the two dates – 1/1/2016 and 1/1/2017. Save your
changes. Write the name of your Query here:
2. Create a new Query and use the record STDNT_ATTR_TBL as your base record then add
FA_APP_SRC_TBL as a Left Outer Join. Arrange the Effective Date Criteria for record B to have the
option for the effective date to be NULL for the second record. Save your changes. Write the name of
your Query here:
3. Go to the Student Enrollment page by following the menu path Main Menu Records and Enrollment
Enroll Students Enrollment. Enter the EMPLID 101000242. Using CNTL+SHIFT+J find the page name
to use in the QCS_PSPNLFIELD Query to determine the database name of the field “Reason” and what
record it lives in. Write the database field name and record here:
4. Navigate back to the Student Enrollment page by following the menu path Main Menu Records and
Enrollment Enroll Students Enrollment. Enter the EMPLID 101000242. This time use
CTRL+SHIFT+C to find out the name of the “Program” field in the database and the record where it lives.
Write the database field name and record name here:
5. Go to Query Manager and create a new Query using the record PSQRYSTATS. Select all of the fields and
then run the Query to determine how many times Query CTC_SR_PS_ID_LOOKUP has been ran and its
last update date/time. Discard your changes. Write the number of times ran and last update date/time.
PQA -

PS QUERY 201
Page | 26
Section 1 Exercises Human Capital
1. Create a Query using the effective dated record ADDRESSES and update the EFFDT Criteria to only see
results which have an EFFDT of between the two dates – 1/1/2013 and 1/1/2014. Save your changes. Write
the name of your Query here:
2. Create a new Query and use the record JOBCODE_TBL as your base record then add
PRIMARY_JOBS_VW as a Left Outer Join. Select any fields based on your preference. Arrange the
Effective Date Criteria to add the option for the effective date to be NULL for the B Record. Save your
changes. Write the name of your Query here:
3. Go to the Phone Numbers page by following the menu path Main Menu Self Service Personal
Information Phone Numbers. Enter the EMPLID 101004733. Using CNTL+SHIFT+J find the page name
to use in the QHC_PSPNLFIELD Query to determine the database name of the field “Telephone” and
what record it lives in. Write the database field name and record here:
4. Go to the Phone Numbers page by following the menu path Main Menu Self Service Personal
Information Phone Numbers. Enter the EMPLID 101004733. This time use CTRL+SHIFT+C to find out
the name of the “Benefit Plan” field in the database and the record where it lives. Write the database field
name and record here:
5. Go to Query Manager and create a new Query using the record PSQRYSTATS. Select all of the fields and
then run the Query to determine how many times Query QHC_PY_PAY_EARNINGS has been ran and its
last update date/time. Discard your changes. Write the number of times ran and last update date/time.
PQA -

PS QUERY 201
Page | 27
Section 1 Exercises Financials
1. Create a Query using the effective dated record ASSET_CLASS_TBL and update the EFFDT Criteria to
only see results which have an EFFDT of between the two dates – 1/1/2013 and 1/1/2014. Save your
changes. Write the name of your Query here:
2. Create a new Query and use the record PO_HDR as your base record then add VENDOR_ADDR as a
Left Outer Join. Arrange the Effective Date Criteria to add the option for the effective date to be NULL for
the second record. Save your changes. Write the name of your Query here:
3. Go to the Items page by following the menu path Main Menu Items Review Item Information
Items. Search using a SETID of WACTC. Select Item 005-70 Pumice Stone. Using CNTL+SHIFT+J find
the page name to use in the QFS_PSPNLFIELD Query to determine the database name of the field “Item
ID” and what record it lives in. Write the database field name and record here:
4. Navigate back to the Items page by following the menu path Main Menu Items Review Item
Information Items. Search using a SETID of WACTC. Select Item 005-70 Pumice Stone. This time use
CTRL+SHIFT+C to find out the name of the “Item Group” field in the database and the record where it
lives. Write the database field name and record here:
5. Go to Query Manager and create a new Query using the record PSQRYSTATS. Select all of the fields and
then run the Query to determine how many times Query CTC_WA220_KK_PRJ_DTL_EXP_REV has
been ran and its last update date/time. Discard your changes. Write the number of times ran and last
update date/time.
PQA –
PS QUERY 201
Page | 28
Section 2 Introduction
At the end of this section you will be able to:
Effectively apply Aggregate Functions to Query results.
Utilize the Having tab to add Criteria to Fields using Aggregate Functions.
Be able to create Expressions to allow complex refining of Query results.
Aggregate Functions
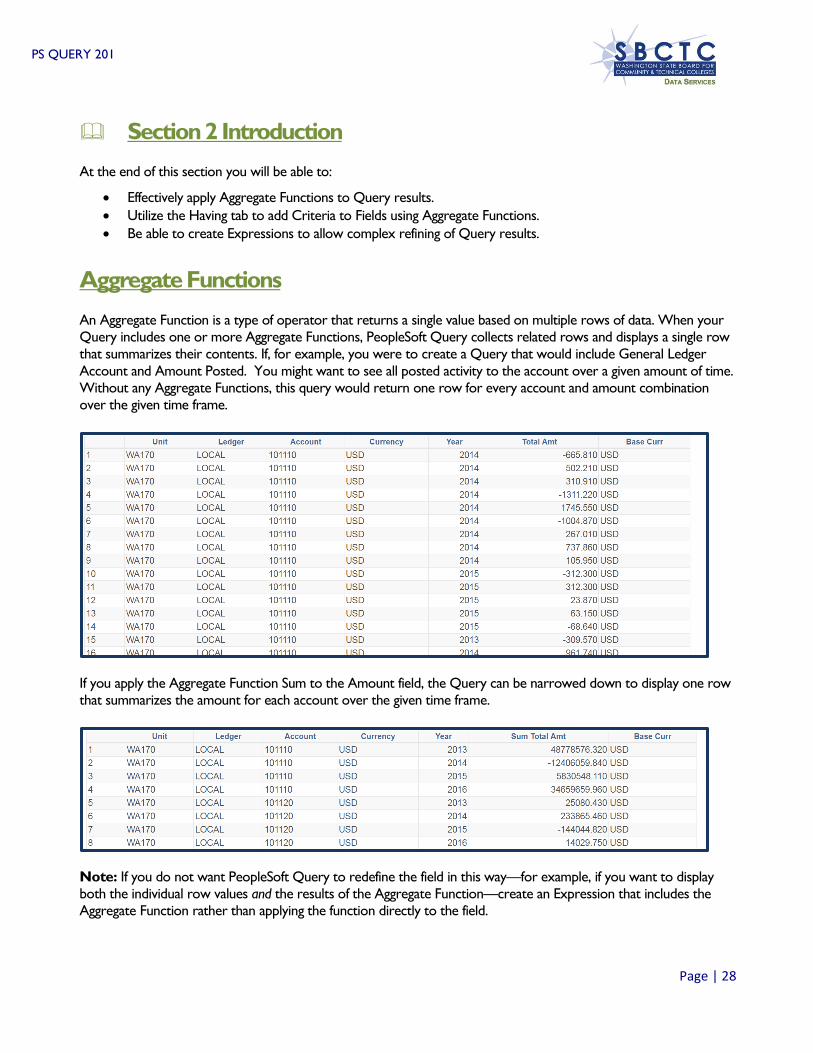
An Aggregate Function is a type of operator that returns a single value based on multiple rows of data. When your
Query includes one or more Aggregate Functions, PeopleSoft Query collects related rows and displays a single row
that summarizes their contents. If, for example, you were to create a Query that would include General Ledger
Account and Amount Posted. You might want to see all posted activity to the account over a given amount of time.
Without any Aggregate Functions, this query would return one row for every account and amount combination
over the given time frame.
If you apply the Aggregate Function Sum to the Amount field, the Query can be narrowed down to display one row
that summarizes the amount for each account over the given time frame.
Note: If you do not want PeopleSoft Query to redefine the field in this way—for example, if you want to display
both the individual row values and the results of the Aggregate Function—create an Expression that includes the
Aggregate Function rather than applying the function directly to the field.

PS QUERY 201
Page | 29
In the same way, if you wanted to total the amount by Fund Code/Account/Year simply add in the Fund code to the
Query to find the results with the Aggregate Function Sum still on the Amount field.
When you apply an Aggregate Function to a field, you are redefining how PeopleSoft Query uses the field
throughout the query. Essentially, the Query replaces the field, wherever it occurs, with the results of the function. If
you select the field as a display column, PeopleSoft Query displays the aggregate values. If you use the field as an
order by column, the application organizes the results in an order that is based on the aggregate values.
Aggregates cannot be used to count or sum in every type of Query. If you are selecting multiple fields that will
generate unique results the count/sum may not produce the results you are expecting. If the data requested is
unique there is no way for the system to present the unique data and provide a count.
Applying Aggregate Functions
You can apply the following Aggregate Functions to a field:
• Sum: Adds the values from each row and displays the total.
• Count: Counts the number of rows.
• Min: Checks the value from each row and returns the lowest one.
• Max: Checks the value from each row and returns the highest one.
• Average: Adds the values from each row and divides the result by the number of rows.
To apply an Aggregate Function, navigate to the Fields Tab in your Query and select the field where you would like
to apply the function. Click on the Edit button to the right of the field. The Edit Field Properties box will appear
where you can select the Aggregate Function. Click on Ok and then run your Query.

PS QUERY 201
Page | 30
Now the Query will display one row that summarizes the aggregate request.
Having Criteria
SQL does not support the use of Aggregate Functions in WHERE clauses. Because the WHERE clause is where
standard Criteria is automatically added by PeopleSoft Query this means that once you have added an Aggregate
Function to a field you can no longer use that field for standard Criteria. Hence, the need for Having Criteria. The
Having tab creates a HAVING clause where Criteria are placed in the SQL code for results based on an Aggregate
Function.
In SQL, a HAVING clause is similar to a WHERE clause for rows of data that have been aggregated into a single row
of output. The system evaluates WHERE clauses by looking at the individual table rows before they are grouped by
the Aggregate Function, and then it evaluates HAVING clauses after applying the function. So if you want to add
Criteria the value that is returned by the function, you must define a HAVING criterion.
When you click the Add Criteria icon from the Fields or Query pages for an aggregate field, you will be taken
directly to the Having tab instead of the Criteria Tab. If you try to add Criteria to the aggregated field through the
Add Criteria tab, the aggregated Field will not display as an option from the Field selection screen. You will add your
Criteria filters using the Having tab in the same way that you add Criteria using the Criteria Tab.
Keep in mind that PeopleSoft Query compares the result of applying the Aggregate Function to the comparison
value.
Using the Having tab
Continuing with the example from the Aggregate module of this manual, we will walk through how to display only
GL Accounts that have posted more than $10,000.
To add Having Criteria to your Query, click on the Add Criteria
Icon to the right of the field with the aggregate value. You will be
directed to the Having tab. Enter the values as you would
normally in the Criteria Tab. All options available on the Criteria
Tab remain available on the Having tab.
In the example to the right we are looking for values equal to or
greater than 10,000 by using the “not less than” operator.

PS QUERY 201
Page | 31
Run your Query to test the results.
Expressions
Expressions are calculations that PeopleSoft Query performs as part of a query. Use them when you must
calculate a value that PeopleSoft Query does not provide by default—for example, to add the values from two
fields together or to multiply a field value by a constant. In essence, an Expression is some form of operation
involving numbers, character strings, or dates and times. It can use values taken from specific fields in a table,
constant values or a combination. Expressions can
define constants or can derive calculations.
Character string can be concatenated (linked
together) into a new field. Numerical or date
columns can have mathematical operations applied.
The functions in Query Expressions are special
types of command words written in SQL. They are
usually one-word commands which manipulate data
items and return a single value which can be
determined by various input parameters. A typical
Expression appears as in the example to the right.
You work with an Expression as if it were a field in
the Query, meaning you can select it to display in
the output, change its column heading, or choose it as an “order by” column.
In Query Manager, you can use Expressions in two ways:
As comparison values in selection Criteria.
As columns (fields) in the query output.
How to Write Expressions
Before learning about all the different Expression types, let’s take a look at some formatting basics on how to
write Expressions. As we have already discussed, Expressions are calculations using functions. Functions are
special types of command words written in SQL. You will be learning many of these command words

PS QUERY 201
Page | 32
(functions) later in this module but we must first learn the formatting basics of SQL Expressions before we
will be able to effectively use Expressions in our Queries.
Below are some of the most common delimiters used and their meanings. Understanding these delimiters and
their meanings will help in comprehending Expressions.
Delimiter Meaning + Addition operator ' Character string delimiter || Concatenation operator / Division operator ( Expression or list delimiter (begin) ) Expression or list delimiter (end) , Item separator * Multiplication operator = Relational operator (equal) <> Relational operator (not equal) < Relational operator (less than) > Relational operator (greater than) <= Relational operator (less than or equal) >= Relational operator (greater than or equal) ; Statement terminator - Subtraction operator

PS QUERY 201
Page | 33
Using Expressions as Comparison Values for Criteria
You may use an Expression as the Expression 1 or
Expression 2 Type on both the Criteria Properties or
Having Criteria Properties pages.
The value in the selected Expression 1 is
compared to an Expression 2 you enter
When you've selected Expression as the
Expression 2 comparison type, as shown to the
right, the Define Expression dialog box appears.
In the text box, enter a valid SQL Expression.
To use a Field or Prompt in the Expression,
click the Add Field link or the Add Prompt link.
Note: while it is important to understand the concept of using an Expression as a Comparison Value it is
not often used in Query development at SBCTC.
Using Expressions as Columns in Query Output
Expressions can also be (and are much more commonly) used as columns in your Query through the
Expressions Tab.
Note: if using an existing Field from your Query as part of the function, the Expression Type MUST match the
Format of the selected Field. It is best to review the Field Format of the before creating the Expression.
To see the Field Format, click on the Fields tab and look in the Format
Column. In the Record ANTC_AID_TERM, note the Field A.
NEW_AWARD_AMT is SNm11.2 (Signed Number, 11 characters, 2
decimals) so any Expression that uses that Field must have an Expression
Type of Signed Number.
To add an Expression to your Query, navigate to the Expressions Tab and
click on “Add Expression”. Here you will select the Expression Type.
Available options are:
Character
Datetime
Drilling URL
Long Character
Date
Number
Signed Number
Time

PS QUERY 201
Page | 34
Next, select the length and, if applicable, the decimal points for the Expression and enter in the Expression
function in the Expression Text field. If the Expression contains an aggregate value such as SUM, AVG, or
COUNT then select the Aggregate Function check box. Once done, click OK.
Note: The Aggregate Checkbox has some exceptions to the rule of selecting it if using an aggregate value. Be
prepared to search for other ways to make your Query return the expected results.
Click on the hyperlink “Use as Field” to use this Expression in your Query as a Field. Note: as this calculated
data is now considered a field by PeopleSoft Query you are also able to add additional Criteria to the field
through the Criteria tab (or Add Criteria Icon) and edit the Field properties in the Fields tab.
Once you have clicked “Use as Field” you will be taken directly to the Fields tab where you will be able to
Edit the Field properties as usual. The Field name will default to the actual Expression function entered in the
Expression Text field. It is recommended to change this to a more user friendly Field name. In this case it has
been changed it to “Monthly Award”. The Record.Fieldname will remain as the Expression Text.

PS QUERY 201
Page | 35
Expression Types
There are five general types of Expressions used in PeopleSoft Query.
Conversion
String/Character
Numeric
Date and Time
Advanced
Conversion Expressions
Conversion: Change or convert values from one data type to another (character to numeric, numeric to
character, character to date or date to character)
Function Usage Expression Example Result
TO_CHAR Converts a number or date to a string. TO_CHAR((SYSDATE),'
mm-dd-yyyy')
01-11-2017
TO_CHAR Converts a number or date to a string. TO_CHAR((A.ACTION
_DT),'mm-dd-yyyy')
June 05, 2016
TO_NUMBER Converts a string to a number. TO_NUMBER(‘12345.67’
,’99999.99’)
12345.67
STRING FUNCTIONS
String (also referred to as Character): perform operations on a string (char/varchar) input value and return a
string or numeric value.
Function Usage Example Result
CONCATENATION Concatenate two or more strings
together into a single string.
CONCAT( ‘Data Services’, ‘
Rocks!’)
Data Services
Rocks!
CONCATENATION Concatenate two or more strings
together into a single string.
‘Data Services’ || ‘ Rocks!’ Data Services
Rocks!
INITCAP Sets the first character in each
word to uppercase and the rest
to lowercase.
INITCAP(A.ACAD_PROG) Acadm
LOWER Converts a string to all lowercase
characters.
LOWER(A.ACAD_PROG) acadm
UPPER Converts a string to all uppercase
characters.
UPPER(A.CITY) SEATTLE
SUBSTR Extracts a portion of a string or
field.
SUBSTR(A.VENDOR_ID, 7,4) 4116
LENGTH Returns the number of
characters in a string or field.
LENGTH(A A.VENDOR_ID) 10
TRIM Removes all specified characters
either from the beginning of a
string, the end of a string or
both.
TRIM(' Tech '
TRIM(LEADING '000' FROM
'000123')
TRIM(TRAILING '1' FROM
'Tech1')
Tech
123
Tech
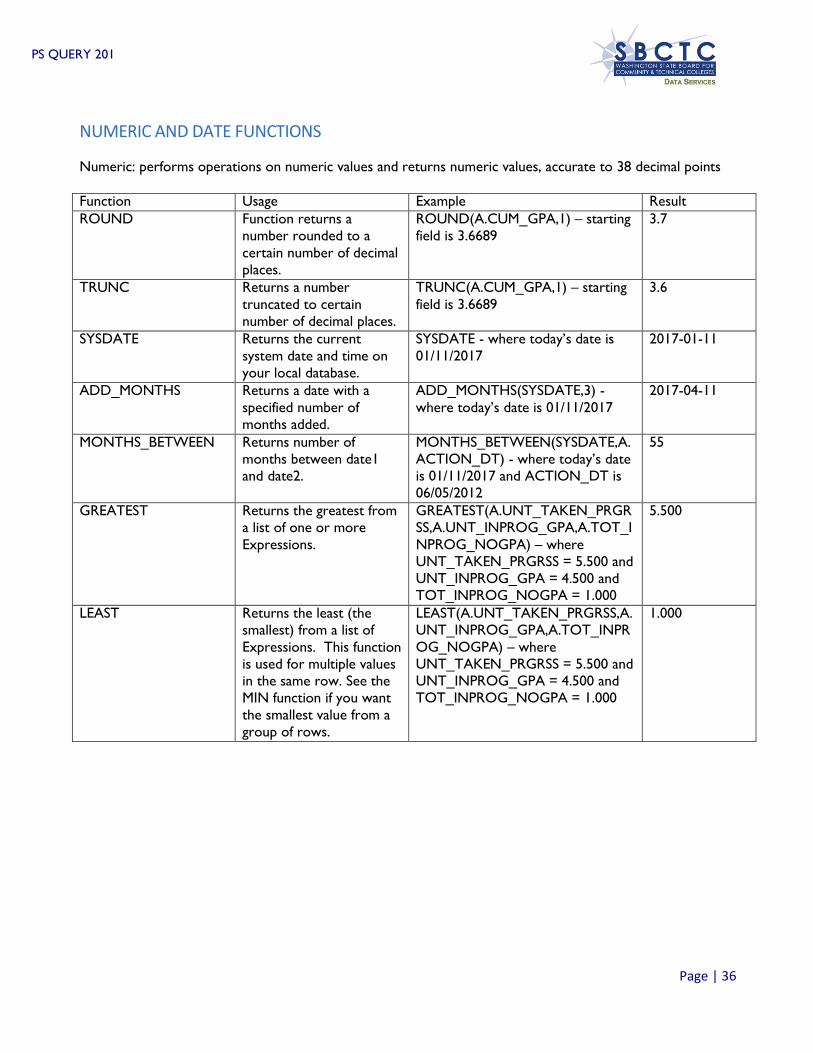
PS QUERY 201
Page | 36
NUMERIC AND DATE FUNCTIONS
Numeric: performs operations on numeric values and returns numeric values, accurate to 38 decimal points
Function Usage Example Result
ROUND Function returns a
number rounded to a
certain number of decimal
places.
ROUND(A.CUM_GPA,1) – starting
field is 3.6689
3.7
TRUNC Returns a number
truncated to certain
number of decimal places.
TRUNC(A.CUM_GPA,1) – starting
field is 3.6689
3.6
SYSDATE Returns the current
system date and time on
your local database.
SYSDATE - where today’s date is
01/11/2017
2017-01-11
ADD_MONTHS Returns a date with a
specified number of
months added.
ADD_MONTHS(SYSDATE,3) -
where today’s date is 01/11/2017
2017-04-11
MONTHS_BETWEEN Returns number of
months between date1
and date2.
MONTHS_BETWEEN(SYSDATE,A.
ACTION_DT) - where today’s date
is 01/11/2017 and ACTION_DT is
06/05/2012
55
GREATEST Returns the greatest from
a list of one or more
Expressions.
GREATEST(A.UNT_TAKEN_PRGR
SS,A.UNT_INPROG_GPA,A.TOT_I
NPROG_NOGPA) – where
UNT_TAKEN_PRGRSS = 5.500 and
UNT_INPROG_GPA = 4.500 and
TOT_INPROG_NOGPA = 1.000
5.500
LEAST Returns the least (the
smallest) from a list of
Expressions. This function
is used for multiple values
in the same row. See the
MIN function if you want
the smallest value from a
group of rows.
LEAST(A.UNT_TAKEN_PRGRSS,A.
UNT_INPROG_GPA,A.TOT_INPR
OG_NOGPA) – where
UNT_TAKEN_PRGRSS = 5.500 and
UNT_INPROG_GPA = 4.500 and
TOT_INPROG_NOGPA = 1.000
1.000

PS QUERY 201
Page | 37
ADVANCED FUNCTIONS
Like the name implies, advanced functions are used for more advanced functionality. Advanced functions can
achieve results such as returning the least or the greatest or they can be used to define if/then statements or
limit the number of rows returned, to name just a few.
Function Usage Example Result
NVL Allows you to substitute a
value when a NULL value is
encountered.
Example 1: NVL(SUPPLIER_CITY,
‘n/a’)
If Supplier City
is populated
this will return
the city name,
if NULL it will
return ‘n/a’.
NVL2 Extends the functionality
found in the NVL function.
It lets you substitute a
value when a NULL value is
encountered as well as
when a non-NULL value is
encountered.
Example 1: NVL2(SUPPLIER_CITY,
‘Completed’, ‘n/a’)
If Supplier City
is populated
this will return
‘Completed’, if
NULL it will
return ‘n/a’.
ROWNUM Assigns a number indicating
the order in which each
row is returned by a query.
ROWNUM 2931
ROWNUM Limits the number of rows
returned in a result set.
ROWNUM < 10 Returns 9 rows
of results.
CASE Performs the functionality
of an “IF-THEN-ELSE”
statement
CASE
WHEN condition_1 THEN
result_1
WHEN condition_2 THEN
result_2
WHEN condition_3 THEN
result_3
ELSE result
END
CASE
WHEN A.ACAD_CAREER =
'UGRD' THEN 'Undergraduate
Student'
WHEN A.ACAD_CAREER =
'GRAD' THEN 'Graduate Student'
WHEN A.ACAD_CAREER = ‘SRSR’
THEN 'Running Start Student'
ELSE 'Check Career'
END
Undergraduate
Student

PS QUERY 201
Page | 38
Section 2 Review
In this section we learned how to effectively apply Aggregate Functions to Query results as well as use the
Having tab to add Criteria to fields using Aggregate Functions.
Finally, we learned basic Expression formatting and how to create Expressions to allow complex refining of
Query results.
Section 2 Knowledge Test
1. If an Aggregate Function is applied to a field then Query will replace the field, wherever it occurs, with
the results of the function. (circle one)
True False
2. To apply an Aggregate Function, navigate to the tab and select the edit
button next to the selected field.
3. SQL does not support adding Criteria to a field with an Aggregate Function. (circle one)
True False
4. In order to place Criteria on the results of the Aggregate Function users should create the Criteria on
the tab.
5. Expressions are that PeopleSoft Query performs as part of a query.
6. In Query Manager, you can use Expressions in two ways:
As in selection Criteria.
As in the query output.
7. What are the four Expression types?
1.
2.
3.
4.

PS QUERY 201
Page | 39
Section 2 Exercises Campus Solutions Create a new Query using the record STDNT_ENRL joined with ITEM_DUE_SF via a standard join type.
Select the following fields in your Query.
A.INSTITUTION - Academic Institution
A.STDNT_ENRL_STATUS - Student Enrollment Status
A.STATUS_DT - Status Date
A.ENRL_ADD_DT - Enrollment Add Date
B.SA_ID_TYPE - ID Type
B.ITEM_NBR - Item Nbr
B.DUE_DT - Due Date
B.DUE_AMT - Due Amount
Go to the Fields tab and edit the properties of the DUE_AMT field to apply the Aggregate Function SUM to
this field.
Add Criteria to the DUE_AMT Aggregate Function results to display only amounts equal to or greater
$200,000 using the Add Criteria icon. Note that this will take you directly to the Having tab. Hint: to
create Criteria of equal to or greater than use the operator “not less than”.
Add a prompt to your Query to allow the end user to select the institution. Add in a default institution of
WA220. Make sure to label the prompt accordingly.
Review the View SQL tab and note that there is now a WHERE clause as well as a HAVING clause.
Go to the Expressions tab and create a CASE Expression to show how much over $100,000 the amount
due is. Also make sure to check the Aggregate box as this field has an aggregate value associated with it.
Remember to use the correct terminology. CASE
WHEN
THEN
END
Select to use the Expression as a field and then go to the Fields tab to change the Heading to say “Amount
due over $100,000”
Save your changes
Run your Query

PS QUERY 201
Page | 40
Section 2 Exercises Human Capital Create a new Query using the record FED_TAX_DATA joined with DIVERSITY via a standard join type.
Select the following fields in your Query.
A.SPECIAL_FWT_STATUS - Special FWT Status
A.FWT_MAR_STATUS - FWT Marital Status
A.FWT_ADDL_AMT - FWT Additional Amount
B.CAN_VISBL_MINORITY - Visible Minority
Go to the Fields tab and edit the properties of the FWT_ADDL_AMT field to apply the Aggregate Function
SUM to this field.
Add Criteria to the FWT_ADDL_AMT Aggregate Function results to display only amounts equal to or
greater $100 using the Add Criteria icon. Note that this will take you directly to the Having tab. Hint: to
create Criteria of equal to or greater than use the operator “not less than”.
Add a prompt to your Query to allow the end user to select the company. Add in a default company of
170. Make sure to label the prompt accordingly.
Review the View SQL tab and note that there is now a WHERE clause as well as a HAVING clause.
Go to the Expressions tab and create a CASE Expression to show how much over $5,000 the amount due
is. Make sure to select the correct Expression Type (hint: go to the Fields tab first and look in the Format
column). Also make sure to check the Aggregate box as this field has an aggregate value associated with it.
Remember to use the correct terminology. CASE
WHEN
THEN
END
Select to use the Expression as a field and then go to the Fields tab to change the Heading to say “FWT
over $5000”
Save your changes
Run your Query

PS QUERY 201
Page | 41
Section 2 Exercises Financials
Create a new Query using the record VR_BAL_AR_VW joined with VENDOR_LOC via a standard join
type. Select the following fields in your Query. A.VENDOR_ID - Supplier ID
A.BUSINESS_UNIT - Business Unit
A.GROSS_AMT - Gross Invoice Amount
B.VNDR_LOC - Supplier Location
A.VCHR_COUNT - Count of Vouchers
B.EFF_STATUS - Status as of Effective Date
Go to the Fields tab and edit the properties of the GROSS_AMT field to apply the Aggregate Function SUM
to this field.
Add Criteria to the GROSS_AMT Aggregate Function results to display only amounts equal to or greater
$10000 using the Add Criteria icon. Note that this will take you directly to the Having tab. Hint: to create
Criteria of equal to or greater than use the operator “not less than”.
Add a prompt to your Query to allow the end user to select the business unit. Add in a default business
unit of WA220. Make sure to label the prompt accordingly.
Review the View SQL tab and note that there is now a WHERE clause as well as a HAVING clause.
Go to the Expressions tab and create a CASE Expression to show how much over $10,000 the amount due
is. Make sure to select the correct Expression Type (hint: go to the Fields tab first and look in the Format
column). Also make sure to check the Aggregate box as this field has an aggregate value associated with it.
Remember to use the correct terminology. CASE
WHEN
THEN
END
Select to use the Expression as a field and then go to the Fields tab to change the Heading to say “Gross
Invoice > $10,000”
Save your changes
Run your Query

PS QUERY 201
Page | 42
Section 3 Introduction
At the end of this section you will be able to:
Understand BIND records and how they affect Query development.
Effectively use Metalink to search Query metadata.
Have knowledge of how to run reports created with BI Publisher.
BIND Records in Population Selection Queries
Population selection (Pop Select) is a feature in PeopleSoft that allows for the selection of specific individuals or
organization ID’s to be selected through a Query for a particular batch process based on specific parameters. For
example, if an acceptance letter should be sent to all newly accepted students there is a batch process for this which
uses a specific Query that retrieves all new students flagged as application accepted. BIND records are used in
conjunction with Pop Select processes. Each batch process will require certain fields be used in the Query in order
to properly execute and the corresponding BIND record contains these required fields.
What is a BIND record?
A BIND record is simply a database record that stores the required field/fields that are needed for a particular
population select process to run successfully. Any and all key fields in a BIND record MUST be displayed in the
Query result set for the batch process associated with the Query to properly execute.
Let’s take a look at a BIND record to examine in more detail. If we pull up the Query:
CTC_SR_MIS_NATID_POPSEL we see that there are 5 records used in the Query and one of them is a BIND
record (SCC_PS_STRM_BND).

PS QUERY 201
Page | 43
If we expand the SCC_PS_STRM_BND record we see that there are 4 key fields associated to it. We just learned
that any and all key fields in a BIND record must be displayed in the Query result set, however in the example
below only two of the key fields have been selected for output.
The reason for this is that as long as the fields are selected to be a part of the result set they can be selected from
ANY record in the Query. If we expand record A, STDN’T_CAR_TERM, we will see that EMPLID and
INSTITUTION, the two missing key fields of the BIND record, have been selected here. Thus we have fulfilled the
requirement of displaying each and every key field from the BIND record in the Query result set.
Pop Select Query Protocol
Pop Select Queries have the following protocol:
1. Identify the Query/Batch Process relationship. If unsure what the relationship is submit a ticket to ERP
Support to ensure that the correct Query is tied to the correct process.
2. All key fields in the BIND record must be displayed in the Query results.
3. Only display the BIND record key fields in the Query results.
a. In some batch processes if any other column is displayed besides a BIND record key field it will
cause the process to fail. If it is desired to use the Pop Select Query for data values in addition to
its use in the batch process it is recommended to create two separate Queries.
4. Always include POP or POPSEL in the Query name at the end of the Query. For example,
CTC_SR_MIS_NATID_POPSEL.
5. Describe the Query as a Pop Select Query in the description.
6. Provide a full Definition, including the batch process the Query is tied to.

PS QUERY 201
Page | 44
MetaLink
As we saw in Section 1, MetaLink is a data dictionary provided by Data Services where users can search for Queries,
Reports, Records and View Scripts. Use MetaLink to search records for both field and record information to gain
valuable insight into the data structure.
The MetaLink app will support the college system by providing key information about the data stored within the
tables and columns in Golden Gate, which are replicated from the ctcLink production database. The key information
is critical to the accurate use of PeopleSoft data for reporting and/or analysis.
The key features of MetaLink allow designated users to:
• Document structures and properties for a given record or field.
• View completed data dictionary reports.
• View the ctcLink reporting catalog.
• Search for available PeopleSoft data Queries.
In order to gain access to MetaLink you must first request a password. Please submit all requests for
MetaLink passwords to: Carmen McKenzie or Paula McDaniel. [email protected] or
Viewing MetaLink Data Dictionary Reports
One of the key features of MetaLink is the ability to find information about records and/or fields. There is always
basic system information in each of the records and fields; however more pertinent information needs to be added
by Query Developer’s and Data Services. Working together we will be able to build out this tool to the benefit of
all.
In order to access MetaLink data dictionary reports navigate to http://dataservicesmetalink.sbctc.edu/ and log
in to MetaLink.
You will now be able to view metadata, edit metadata or edit your account information.
Click on Meta Data to go to the Reporting Library.
To view Record information, click on View Current Data Dictionary.

PS QUERY 201
Page | 45
Select a pillar and table then click View Report. Note that record names in MetaLink are slightly different than the
record names in PeopleSoft Query as all record names in MetaLink begin with PS_.
There are two main sections: Table Information and Column Information. Table Information holds details regarding
the record while Column Information holds details regarding the fields of the table.

PS QUERY 201
Page | 46
Record Information
Record details are found under the header TABLE INFORMATION. The available fields are:
Table Name – Name of the Record.
Alternative Table Name - The laymen name for the record. For example, the record STDNT_ENRL is
commonly referred to as the Student Enrollment table.
Table Description – Description of the record and what it is used for. Any pertinent information regarding
the record.
Business Use Description – Description of the business use of the record.
Parent Child Business Rules - A parent-child hierarchy is a hierarchy in a standard dimension that contains a
parent attribute. A parent attribute describes a self-referencing relationship, or self-join, within a dimension
main table. Parent-child hierarchies are constructed from a single parent attribute.
Pillar – the Pillar the record belongs to.
Module – the Module the record pertains to.
Many of the tables only contain information on the Table Name and Pillar which is why it is so important to add
information if you have it. If we look at the table BEN_HEALTH_SRCH in the HCM pillar we can see some of the
great information that can be added to MetaLink about records.
The information in the Table Description field of this record provides users with vital knowledge about which fields
to use to create a join with another record. Without this information a user could inadvertently join on the wrong
field and thus create a Query with incorrect or misleading results.

PS QUERY 201
Page | 47
Field Information
Field details are found under the header COLUMN INFORMATION. The available fields are:
Alternative Column Name - The laymen name for the column. For example, the column name STRM is
commonly referred to as Session/Term.
Description - The description of the field and what it is used for. Any pertinent information regarding the
field should be included.
Primary Key - Indicates if this field is part of the primary key for the record (table). The combination of
primary key fields represent the uniqueness of the row in the record.
Data Type - A classification identifying one of various types of data, such as integer, text or decimal, that
determines the possible values for that type.
Size - The length or scale of the field value. Size is directly related to the Data Type.
Nullable - Indicates of the field can contain null or blank values.
Data Classification - The WA State Office of the Chief Information Officer (OCIO) data
classification. Category 1 thru 4 are used with Category 1 being public information and category 4
being confidential information requiring special handling.
o For a detailed description of each category, see the Data Classification Brief
here: http://www.sbctc.edu/resources/documents/colleges-staff/data-services/data-
warehouse/DataClassificationBrief.pdf
History: Includes any historical changes to the field such as inclusions or exclusions of values.
Accountable Commission: Designated by the Data Governance Committee and indicates which system
commission is ultimately accountable for this specific data element.
Examples of Use: Provides examples of how/when to use the field. Information about auto-joins and how
they might affect the Query, etc.
Converted: The table and field name of the legacy source record if converted during implementation.
Common Column: Used only by SBCTC.
Notes – Any other notes, pertinent information regarding the field.
Valid Values – field values and their meanings.
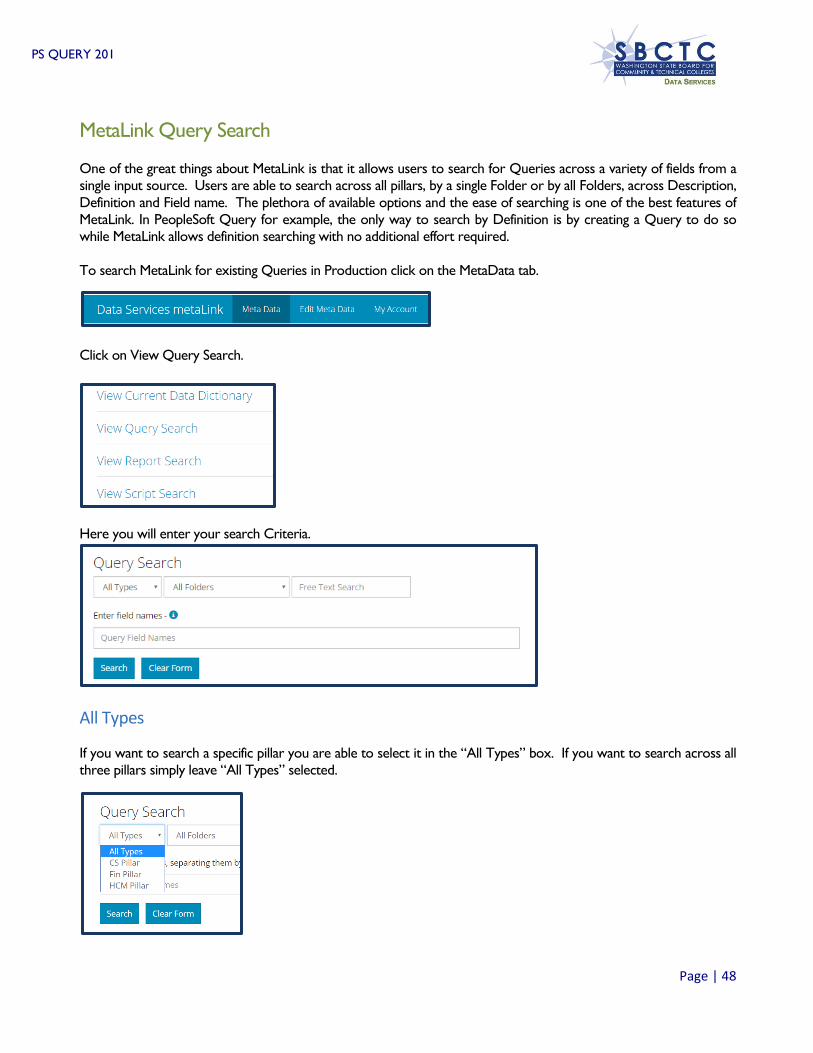
PS QUERY 201
Page | 48
MetaLink Query Search
One of the great things about MetaLink is that it allows users to search for Queries across a variety of fields from a
single input source. Users are able to search across all pillars, by a single Folder or by all Folders, across Description,
Definition and Field name. The plethora of available options and the ease of searching is one of the best features of
MetaLink. In PeopleSoft Query for example, the only way to search by Definition is by creating a Query to do so
while MetaLink allows definition searching with no additional effort required.
To search MetaLink for existing Queries in Production click on the MetaData tab.
Click on View Query Search.
Here you will enter your search Criteria.
All Types
If you want to search a specific pillar you are able to select it in the “All Types” box. If you want to search across all
three pillars simply leave “All Types” selected.

PS QUERY 201
Page | 49
Folders
In the next box you are able to search for Queries in either a specific folder or across all folders if ‘All
Folders” is selected.
Free Text Search
The “Free Text Search” box will search across Folder, Query Name, Description and Definition (Long
Description). Free Text will allow for multiple criteria separated with a comma or a space. Be aware that the
comma acts as an “OR” separator while spaces act as an “AND” separator.
For example, if we search for “Financials” in the Free Text Search box as shown below we will see results of
“Financials” in all four columns.

PS QUERY 201
Page | 50
Below we see the results with “Financials” in one or more columns.
Pillar Folder Query Name Description Long Description
FIN BTF_BUS_UNIT_TBL_FS PS/Financials Business Units
CS CTC_SF_ACCTNG_LN Student Financials
Transaction
CS STUDENT
FINANCIALS
CTC_SF_ACCTNG_LN_BY_DATE Student Financials
Transaction
Modified CTC_SF_ACCTNG_LN
890:[email protected] Prompts
added: 1. Specify Business Unit (e.g.,
district) 2. Specify Operating Unit (e.g.,
college) - ability to select one or all
colleges in a multi-college district 3.
Specify beginning and ending
ACCTG_DATE or Journal date 890:
[email protected] Paula McDaniel
9/27/16 Modified Query 9/27/16 to
remove certain fields and rearrange the
order. Modified the Item Type prompt
range to be optional.
CS STUDENT
FINANCIALS
CTC_SF_ACCTNG_LN_BY_TERM Student Financials
Transaction
Modified CTC_SF_ACCTNG_LN
890:[email protected] Prompts
added: 1. Specify Business Unit (e.g.,
district) 2. Specify Operating Unit (e.g.,
college) - ability to select one or all
colleges in a multi-college district 3.
Specify ITEM_TERM (e.g., 2157, 2165)
890: [email protected] Paula
McDaniel 9/27/16 Modified Query 9/27/16
to remove certain fields and rearrange the
order. Modified the Item Type prompt
range to be optional.
CS CTC_SF_CG_DATASRC SF CommGen Data Source Student Financials CommGen Data
Source query SQL
CS DUPES_STUDENT_FINANCIALS Student Financials checking for dupes
FIN PC_PROJECT_FINANCIALS Project Financials
CS SF_EXTERNAL_ORGS List of all external organizations used for
Student Financials Third Party Contracts.

PS QUERY 201
Page | 51
Query Field Names
In the last box, Enter Field Names, users are able to enter multiple field names to find results. Commas again
act as an “OR” separator and spaces act as an “AND” separator.

PS QUERY 201
Page | 52
Combine Search Criteria
In the same way as the Advanced Search in PeopleSoft all of the fields used for searching in MetaLink can be
combined with other fields to narrow down your search results to find specifically the Queries you are most
interested in.
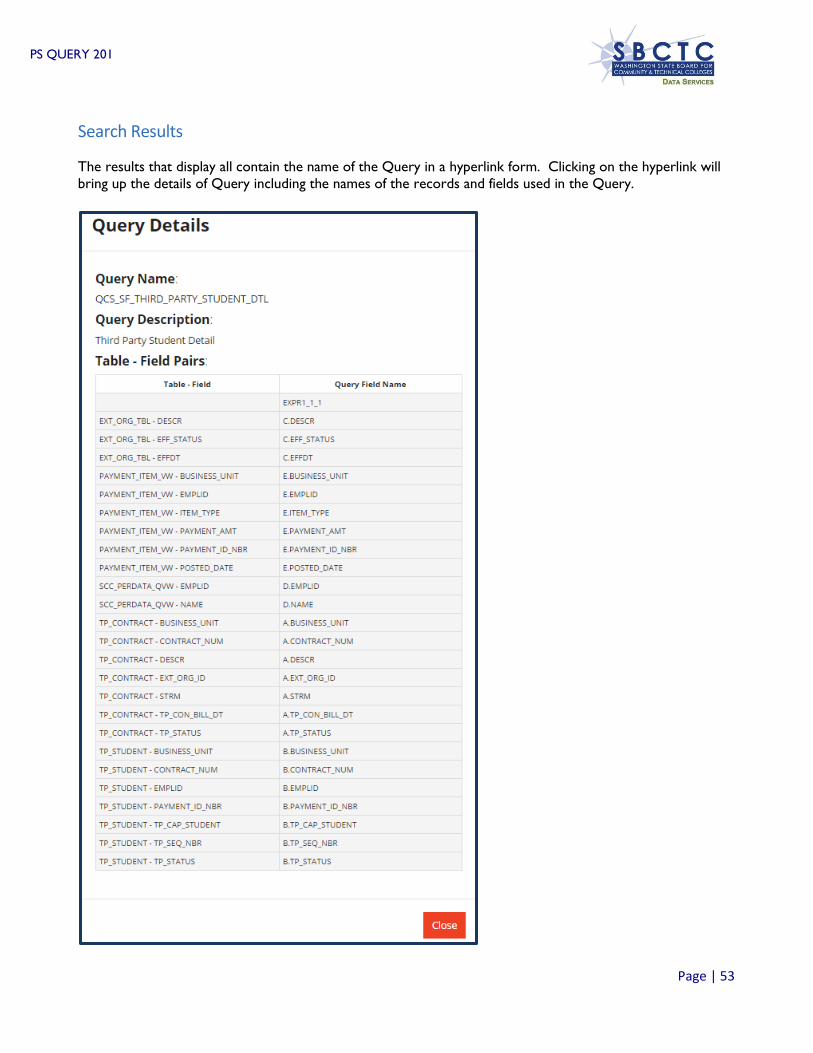
PS QUERY 201
Page | 53
Search Results
The results that display all contain the name of the Query in a hyperlink form. Clicking on the hyperlink will
bring up the details of Query including the names of the records and fields used in the Query.

PS QUERY 201
Page | 54
MetaLink Report Search
The MetaLink Report Search allows for searching on both PeopleSoft delivered reports as well as custom built
reports. You are able to search for reports based on Pillar, Module and Name and/or Description search terms
separated by commas or spaces. Click on Meta Data to go to the Reporting Library.
Click on View Report Search.
Here you will enter your search terms. Remember a comma acts as an OR separator and a space acts as an
AND separator.
All Pillars
Enter the Pillar you would like to search in or search across all pillars.

PS QUERY 201
Page | 55
All Modules
You are also able to search within a specific module or across all modules.
Name and/or Description
Finally you are able to enter in either the name of the report and/or description search terms to narrow
down the search results.
Search Results
You will note that all of the search results returned list the report name as a hyperlink. Click on the hyperlink to
view details about the report.
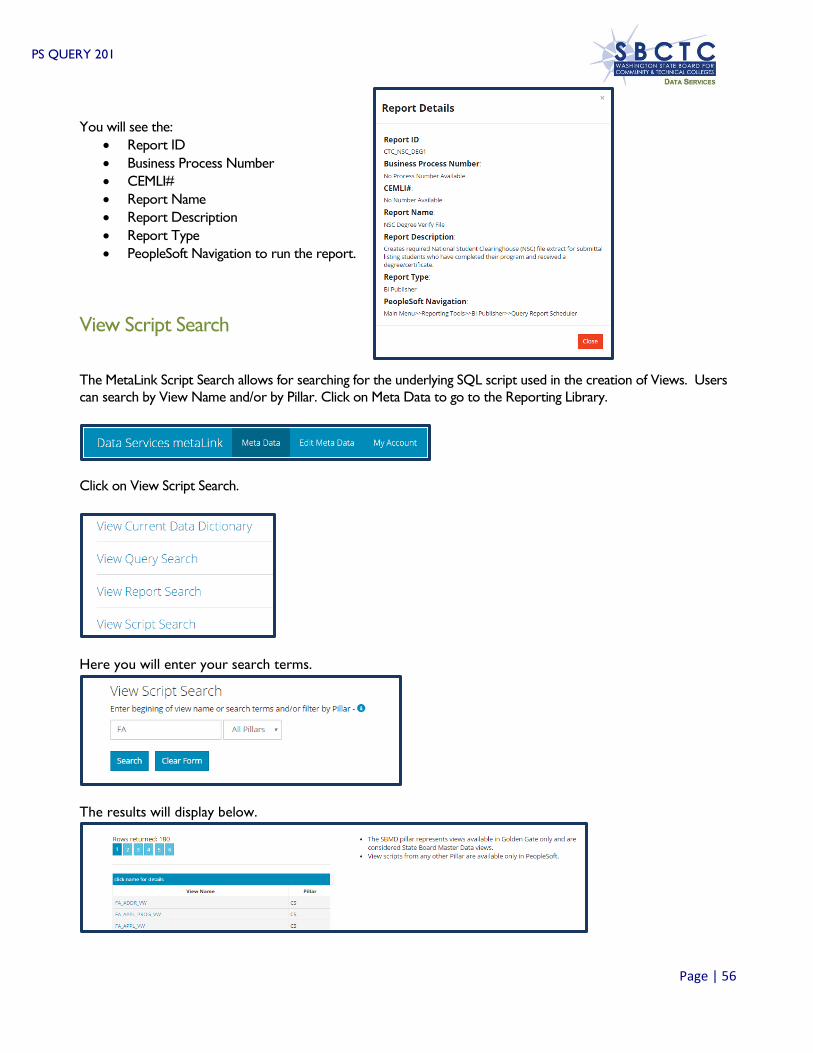
PS QUERY 201
Page | 56
You will see the:
Report ID
Business Process Number
CEMLI#
Report Name
Report Description
Report Type
PeopleSoft Navigation to run the report.
View Script Search
The MetaLink Script Search allows for searching for the underlying SQL script used in the creation of Views. Users
can search by View Name and/or by Pillar. Click on Meta Data to go to the Reporting Library.
Click on View Script Search.
Here you will enter your search terms.
The results will display below.

PS QUERY 201
Page | 57
Click on the hyperlink of the View Name to see the underlying SQL code.
Adding Information to MetaLink
Adding information to MetaLink is one of the most important tasks we have as Query Developer’s. As we gain
information about data structure and business uses of different Fields and Records we have an obligation to all our
fellow Query Developer’s to share it. It is quick and easy to add in information.
Click on Edit Meta Data
To update the Record – select only the Pillar and Record. To update a Field within a Record – select the Pillar,
Record and Field you would like to modify. Type in the new information.
Scroll to the bottom of the screen when finished and click Save Data.

PS QUERY 201
Page | 58
BI Publisher Introduction
Oracle Business Intelligence Publisher (BI Publisher, formerly XML Publisher) is an enterprise reporting solution that
streamlines report and form generation. BI Publisher enables you to design and create report layout templates with
the more common desktop applications of Microsoft Word and Adobe Acrobat, and renders XML data based on
those templates. With a single template, it can generate reports in many formats (PDF, RTF, Excel, HTML, and so
on) in many languages. This approach to reporting can dramatically reduce report maintenance, enabling power
business users to adjust report templates without involvement of IT resources.
In essence BI Publisher allows the State Board to create actual formatted reports using Queries, Connected Queries
or other data sources and then allow the end users the option of how the report should be rendered. Users are
able to select to view a report on the Web, in Excel, Word or Adobe. BI Publisher is basically a translator of data.
It takes the raw format of Query results and translates those results into a nicely formatted report.
The BI Publisher report naming convention prefixes will be:
BCS - Campus Solutions
BFS - Finance
BHC - Human Capital Management
The rest of the BIP report name will follow the standard query naming convention.
For the purpose of this class we are going to be looking at how to view Query based BI Publisher reports through
Query Report, how to run a BI Publisher report using Query Report Scheduler and using BI Publisher Report
search.
BI Publisher Query Report Viewer
The BI Publisher Query Report Viewer allows end users to run Query based BI Publisher reports. Note: BI
Publisher reports with data sources other than Query do not appear in search results and will need to be scheduled
to run.
Navigate to Query Report Viewer: Main Menu Reporting Tools BI Publisher Query Report Viewer
There are two search methods: Basic Search and Advanced Search.
Basic Search
Basic Search allows users to search by:
Data Source ID
Data Source Owner
Object Owner ID
Report Category ID
Report Description
Report Name
Template Type

PS QUERY 201
Page | 59
Wildcards % and_ are also available to use in your searches here.
“Begins With” is the only available operator in Basic Search.
Advanced Search
The Advanced Search allows for the same searching options but with different operators available. Users can
combine search Criteria in the Advanced Search to narrow the results returned.
Wildcards % and _ are also available to use in your searches here.
Enter your search Criteria or simply hit enter for a list of all available reports.
Users are able to select how the report should be displayed in the Format column. Available options are:
HTM
RTF
XLS

PS QUERY 201
Page | 60
Once the Format selection is made, click on “View Report” to see the report results.
BI Publisher Query Report Scheduler
The Query Report Scheduler is similar to Schedule Query in that users are able to schedule reports to run at a
specific time/date or immediately. All BI Publisher reports with data sources of Query or Connected Query are
available to be run through this tool.
Note: Do not schedule any Queries or Reports to run between the hours of 1 am and 3 am as this time is
reserved for IT.
The BI Publisher Query Report Scheduler is very similar in use and appearance to Schedule Query. Each report is
assigned a Run Control ID which will tell the system when, where and how to run the report saving the report
parameters (prompts) to the Run Control ID. Run Control ID’s are personal and are not shared across the system.
Adding a New Run Control ID
Navigate to Query Report Viewer: Main Menu Reporting Tools BI Publisher
Query Report Scheduler
If adding a new Run Control ID, select the Add a New Value tab. Enter the Run
Control ID and click on “Add”. This will take you to the Query Report Scheduler
Page.
On this page select the Report Name. Either type it in or click on the magnifying glass next to the Report Name
Field to search for your report. Once you have made the selection if there are prompts in the report you will be
asked to enter in the values.

PS QUERY 201
Page | 61
Note that once the Report Name is entered the remainder of the fields will fill in automatically with the exception of
Template as of Date where users can select a particular version of the template they want the report to be based
on. Click on Run in the upper right corner to run the report.
This will take you to the Process Scheduler Request page where final selections are made including the Date and
Time to run the report as well as Type and Format. Once done with the selections click OK to schedule the report.
You will be directed back to the Query Report Scheduler page where you will be able to check the Process Monitor
and the Report Manager for your report.

PS QUERY 201
Page | 62
Using an Existing Run Control ID
Navigate to Query Report Viewer: Main Menu Reporting Tools BI Publisher Query Report Scheduler
From the main Query Report Scheduler page you are also able to search for an existing Run Control ID.
There are two search methods: Basic Search and Advanced Search.
B AS IC SE ARCH
Basic Search allows users to search by:
Data Source ID
Data Source Type
Description
Language Code
Report Name
Run Control ID
Wildcards % and_ are also available to use in your searches here.
“Begins With” is the only available operator in Basic Search.
ADVAN CED SE ARCH
The Advanced Search allows for the same searching options but with
different operators available. Users can combine search Criteria in the
Advanced Search to narrow the results returned.
Wildcards % and _ are also available to use in your searches here.
Enter your search Criteria or simply hit enter for a list of all Run
Control ID’s. Remember they are personal to you so only Run Control
ID’s you have created will display here.
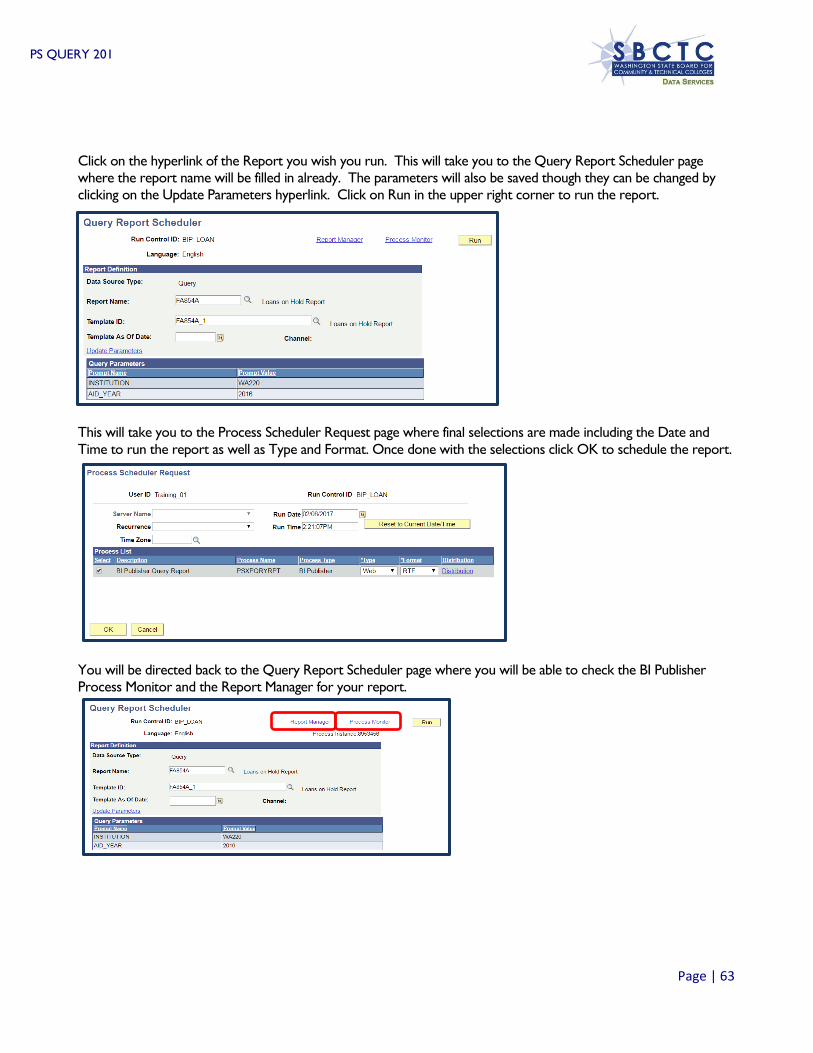
PS QUERY 201
Page | 63
Click on the hyperlink of the Report you wish you run. This will take you to the Query Report Scheduler page
where the report name will be filled in already. The parameters will also be saved though they can be changed by
clicking on the Update Parameters hyperlink. Click on Run in the upper right corner to run the report.
This will take you to the Process Scheduler Request page where final selections are made including the Date and
Time to run the report as well as Type and Format. Once done with the selections click OK to schedule the report.
You will be directed back to the Query Report Scheduler page where you will be able to check the BI Publisher
Process Monitor and the Report Manager for your report.

PS QUERY 201
Page | 64
BI Publisher Report Search
The BI Publisher Report Search will allow users to search
specifically for the results of their scheduled BI Publisher
reports. It is similar to Report Manager. In the example to
the right the search was made for all BI Publisher Reports
ran within the last 30 days.
Also note that users are able to access the BI Publisher
Process Monitor and BI Publisher Report Manager from
this page.
Click on the hyperlink in the Report column to go the
Report Index page to view the report.
To download and/or view the report click on the Report Name in the File List box.
It is interesting to note that while there appears to be separate Process Monitors and Report Viewers for BI
Publisher with different menu paths they are actually the same Query Process Monitor and Report Viewer as found
when scheduling standard Queries. You will be able to view both BI Publisher reports and standard scheduled
Queries from either navigation. At the same time, only BI Publisher run Control ID’s will display when finding an
existing value in BI Publisher Query Report Scheduler and only Run Control ID’s for standard Queries will display in
Schedule Query.
Section 3 Review
In this section we learned to understand BIND records and how they affect Population Selection Query
development.
We also looked at how to effectively use MetaLink to search for and create Query metadata.
Finally we saw how to run reports created with BI Publisher.

PS QUERY 201
Page | 65
Section 3 Knowledge Test
1. What is a BIND record?
2. Population selection (Pop Select) is a feature in PeopleSoft that allows for the selection of specific individuals or
organization ID’s to be selected for a particular batch process based on specific parameters.
True False
3. Any and all in a BIND record MUST be displayed in the Query
result set for the batch process associated with the Query to properly execute.
4. If creating a Pop Select Query, how should the Query be named? (What designation should appear at the end of
the Query name)?
5. MetaLink is a data dictionary provided by Data Services where users can search for ,
and .
6. MetaLink allows users to search Queries using a variety of methods, some of which are not available in standard
PeopleSoft Query searching?
True False
7. One of the great functions of BI Publisher is that it allows end users the option of how to view the final report.
The four output options are:
1.
2.
3.
4.
8. BI Publisher Query Report Viewer only allows for viewing BI Publisher reports which have
as a data source.
9. The Query Report Scheduler is similar to .

PS QUERY 201
Page | 66
Section 3 Exercises Campus Solutions
1. Navigate to Data Services MetaLink and click on the Meta Data tab. In the Current Data Dictionary find the
field GRADING_BASIS in the PS_ACAD_CAR_TBL record. What does the Value OPT stand for in this field?
2. Going to Query Search look in the CS Pillar in the Student Financials Folder for Queries that have the code 890
in the definition and use the fields: ADVR_LOAD_ENRL. How many Queries match these Criteria?
3. Now go to Report Search and look in the CS Pillar in the Financial Aid folder for Queries which have a name or
description with “Student”. How many reports match these Criteria?
4. When searching in MetaLink a space acts as an separator and a comma acts as
an separator.
5. MetaLink allows users to search across all pillars by Folder, Description, Definition and Query Name?
True False
6. The BI Publisher report naming convention prefix for Campus Solutions will be:
7. BI Publisher Query Report Viewer allows end users to run based BI Publisher reports.

PS QUERY 201
Page | 67
Section 3 Exercises Human Capital
1. Navigate to Data Services MetaLink and click on the Meta Data tab. In the Current Data Dictionary find the
field EMPLID_TYPE in the PS_PAY_CHECK record. What does the Value E stand for in this field?
2. Going to Query Search look in the HCM Pillar in All Folders for Queries that have the code 890 in the
definition and use the fields: ACCOUNT. How many Queries match these Criteria?
3. Now go to Report Search and look in the HCM Pillar in the HR Core Objects folder for Queries which have a
name or description with “Salary”. How many reports match these Criteria?
4. When searching in MetaLink a space acts as an separator and a comma acts as
an separator.
5. MetaLink allows users to search across all pillars by Folder, Description, Definition and Query Name?
True False
6. The BI Publisher report naming convention prefix for Campus Solutions will be:
7. BI Publisher Query Report Viewer allows end users to run based BI Publisher reports.

PS QUERY 201
Page | 68
Section 3 Exercises Financials
1. Navigate to Data Services MetaLink and click on the Meta Data tab. In the Current Data Dictionary find the
field VAT_ACCOUNT_FLG in the PS_GL_ACCOUNT_TBL record. What does the Value N stand for in this
field?
2. Going to Query Search look in the FIN Pillar in the Expenses folder for Queries that have the code 890 in the
definition and use the fields: ACCOUNT. How many Queries match these Criteria?
3. Now go to Report Search and look in the FIN Pillar in the Payables folder for Queries which have a name or
description with “1099”. How many reports match these Criteria?
4. When searching in MetaLink a space acts as an separator and a comma acts as
an separator.
5. MetaLink allows users to search across all pillars by Folder, Description, Definition and Query Name?
True False
6. The BI Publisher report naming convention prefix for Campus Solutions will be:
7. BI Publisher Query Report Viewer allows end users to run based BI Publisher reports.

PS QUERY 201
Page | 69
Course Review
The goal of this course was to empower Query Developers with the tools and skills needed to create and
manage more complex Queries.
The objectives for this course were to:
Add Criteria to a Left Outer Join.
Be able to apply effective data logic to Queries.
Utilize Queries of Queries to effectively search for Query data information.
Efficiently find Record and Field information using the front end of PeopleSoft in conjunction with other
tools.
Gain the knowledge and skills to check your Query results to be certain of Query accuracy.
Effectively apply Aggregate Functions to Query results.
Utilize the Having tab to add Criteria to Fields using Aggregate Functions.
Be able to create Expressions to allow complex refining of Query results.
Understand BIND records and how they affect Query development.
Effectively use MetaLink to search and create Query metadata.
Understand how to run reports created with BI Publisher.
To meet the Goal and Objectives we learned in Section 1 about:
The WHERE clause and ON clause and how to place Criteria appropriately to a Left Outer Join and to
apply effective date logic to Queries allowing understanding of how this logic can affect the results from
your Queries.
How to create and use Queries which search existing Queries for specified information. We also learned
how to find Record and Field information using the front end of PeopleSoft and the PSChrome Extension
and how you can use this information in your Query development.
How to check the results of your Queries to ensure accurate reporting.
In Section 2 we learned how to:
Effectively apply Aggregate Functions to Query results as well as use the Having tab to add Criteria to fields
using Aggregate Functions.
How to create Expressions to allow complex refining of Query results.
In Section 3 we learned how to:
Understand BIND records and how they affect Query development.
Effectively use Metalink to search Query metadata.
Run reports created with BI Publisher
Now get out there and have fun developing top notch Queries!

PS QUERY 201
Page | 70
Simplified Instructions 101 Basics Skills
Find below all of the step by step instructions provided in this manual.
Scheduling through Query Viewer/Manager – Simplified Instructions for a New
Run Control ID
Go to Query Manager or Query Viewer and search for the desired Query and click on "Schedule
"from the list of results
The Query name will automatically populate based on the Query selected from Query Viewer or
Query Manager.
Click on Add New Value and enter a Run Control ID.
Click on the “Add” button.
If there are prompts (parameters) in the Query a pop up box will appear where they can be filled in.
To update existing parameters click on Update Parameters.
Enter a description for the Query Run Control ID in the Description Field. This will be the Report
Name.
Click Apply
On the Process Scheduler page select the Time Zone, Date and Time to run the Query, if desired.
Also change the default output Type and Format, if desired
Click OK
Note the Process Instance Number
View the status of the run via Process Monitor
View the results of the report via Report Manager
Scheduling through Query Viewer/Manager – Simplified Instructions for an Existing
Run Control ID
Go to Query Manager or Query Viewer and search for the desired Query and click on "Schedule
"from the list of results
The Query name will automatically populate based on the Query selected from Query Viewer or
Query Manager.
Click on Find an Existing Value and search for the Run Control ID.
Click on the the hyperlink for the Report Name or Run Control ID in the search results.
If there are prompts (parameters) in the Query a pop up box will appear where they can be filled in.
To update existing parameters click on Update Parameters.
Click Apply
On the Process Scheduler page select the Time Zone, Date and Time to run the Query, if desired.
Also change the default output Type and Format, if desired
Click OK
Note the Process Instance Number
View the status of the run via Process Monitor
View the results of the report via Report Manager

PS QUERY 201
Page | 71
Scheduling through Schedule Query Menu Path – Simplified Instructions for a
New Run Control ID
Navigate to Schedule Query: Main Menu Reporting Tools Query Schedule Query.
Click on Add a New Value to create a new Run Control ID. Enter a Run Control ID.
Click on the “Add” button.
Enter the Query name or search for the Query.
Enter a description for the Query Run Control ID in the Description Field. This will be the Report
Name.
If there are prompts (parameters) in the Query a pop up box will appear where they can be filled in. To
update existing parameters click on Update Parameters.
Click Run.
On the Process Scheduler page select the Time Zone, Date and Time to run the Query, if desired.
Also change the default output Type and Format, if desired.
Click OK.
Note the Process Instance Number.
View the status of the run via Process Monitor.
View the results of the report via Report Manager.
Scheduling through Schedule Query Menu Path – Simplified Instructions for an
Existing Run Control ID
Navigate to Schedule Query: Main Menu Reporting Tools Query Schedule Query.
Click on Find an Existing Value and select the correct Run Control ID
If there are prompts (parameters) in the Query a pop up box will appear where they can be filled in. To
update existing parameters click on Update Parameters.
Click Run.
On the Process Scheduler page select the Time Zone, Date and Time to run the Query, if desired. Also
change the default output Type and Format, if desired.
Click OK.
Note the Process Instance Number.
View the status of the run via Process Monitor.
View the results of the report via Report Manager.

PS QUERY 201
Page | 72
Creating a Simple Query - Simplified Instructions
Navigate to Query Manager.
Click on “Create New Query”.
On the Records tab search for and select the Record to use in the Query.
On the Query tab, select the Fields from the selected Record to use in the Query.
On the Fields tab, make any edits to the display of the heading text, translate values, field order or sort
order.
Optional – On the Criteria tab, add any
desired Criteria to the Query.
Optional – On the Prompts tab (or from the Fields tab) create any desired Prompts to use in the Query.
Save Changes
Creating a Join - Simplified Instructions
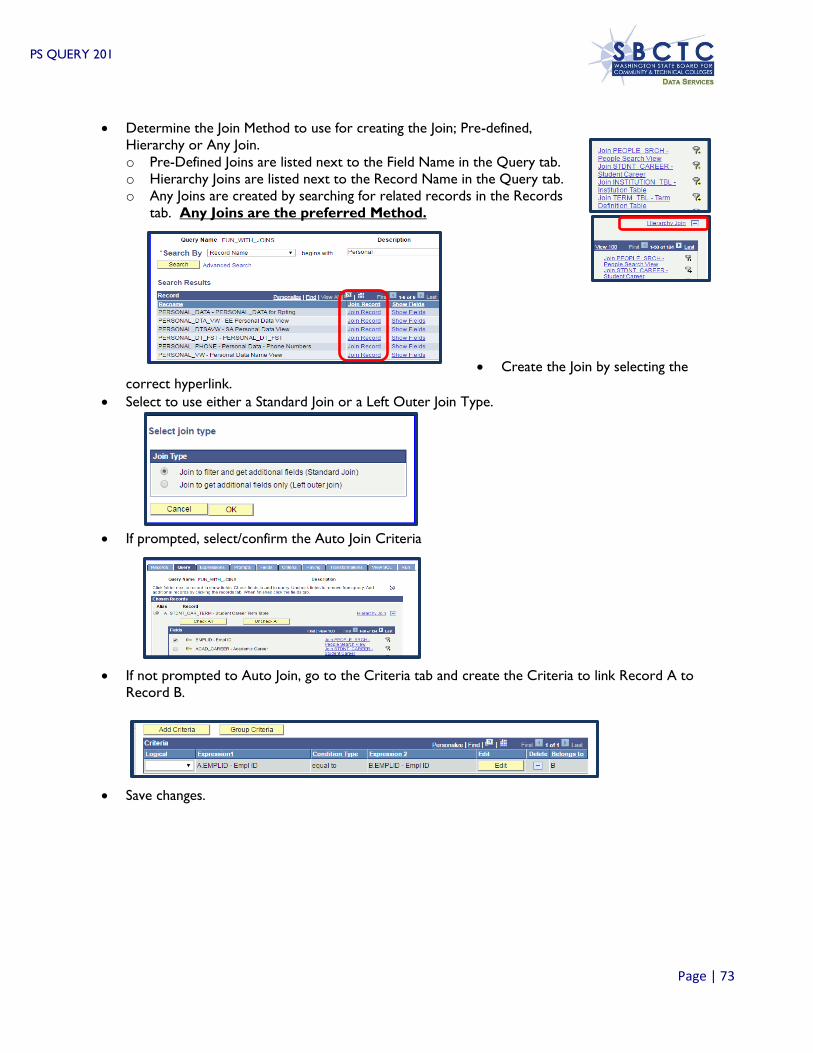
PS QUERY 201
Page | 73
Determine the Join Method to use for creating the Join; Pre-defined,
Hierarchy or Any Join.
o Pre-Defined Joins are listed next to the Field Name in the Query tab.
o Hierarchy Joins are listed next to the Record Name in the Query tab.
o Any Joins are created by searching for related records in the Records
tab. Any Joins are the preferred Method.
Create the Join by selecting the
correct hyperlink.
Select to use either a Standard Join or a Left Outer Join Type.
If prompted, select/confirm the Auto Join Criteria
If not prompted to Auto Join, go to the Criteria tab and create the Criteria to link Record A to
Record B.
Save changes.

PS QUERY 201
Page | 74
Adding Criteria - Simplified Instructions
From the Criteria tab click on “Add Criteria” button.
OR From the Query or Fields tab, click on the “Add Criteria” icon.
If not preselected, select Expression 1 Type
Select the Field or Expression to use as Criteria (or create the New Expression) for Expression 1 depending on
the prior selection.
or
Select the Condition Type.
Select the Expression 2 Type.
Select the Expression 2 to use as Criteria.
If using a Left Outer Join, select where the Criteria belongs, either the WHERE clause or on the Left Outer Join.
Click OK.
Select the Logical Operator for each Criteria.
Group or Reorder the Criteria as necessary.
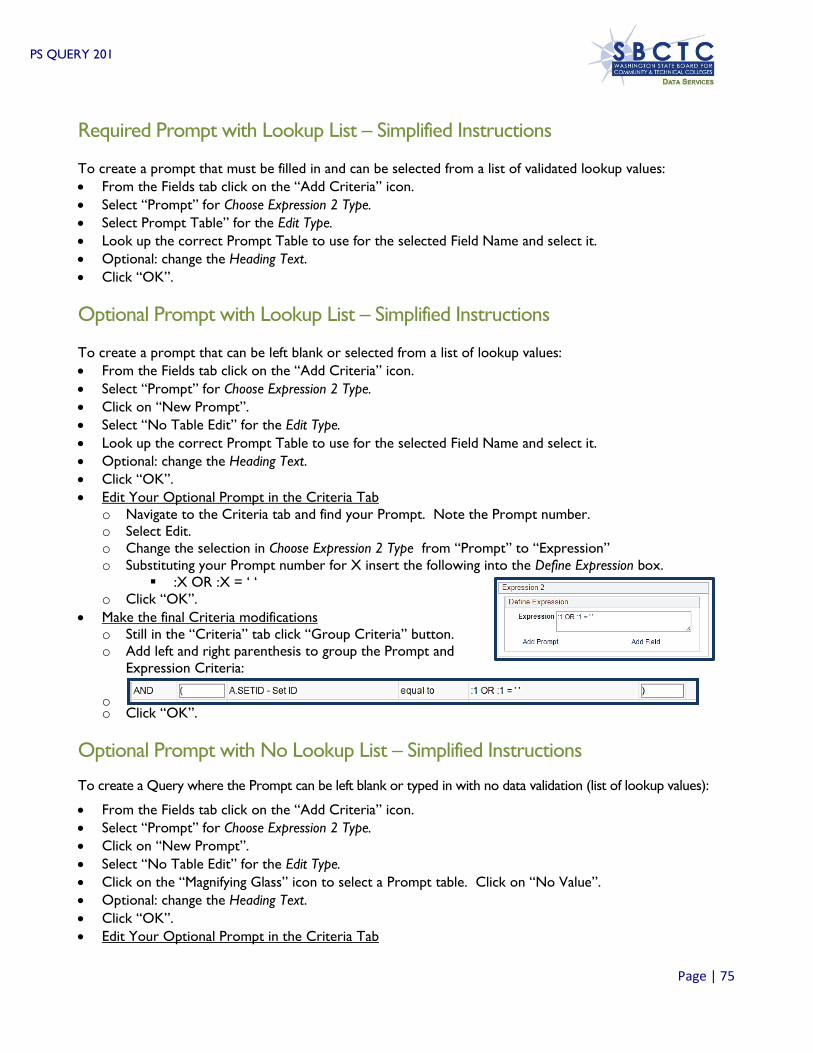
PS QUERY 201
Page | 75
Required Prompt with Lookup List – Simplified Instructions
To create a prompt that must be filled in and can be selected from a list of validated lookup values:
From the Fields tab click on the “Add Criteria” icon.
Select “Prompt” for Choose Expression 2 Type.
Select Prompt Table” for the Edit Type.
Look up the correct Prompt Table to use for the selected Field Name and select it.
Optional: change the Heading Text.
Click “OK”.
Optional Prompt with Lookup List – Simplified Instructions
To create a prompt that can be left blank or selected from a list of lookup values:
From the Fields tab click on the “Add Criteria” icon.
Select “Prompt” for Choose Expression 2 Type.
Click on “New Prompt”.
Select “No Table Edit” for the Edit Type.
Look up the correct Prompt Table to use for the selected Field Name and select it.
Optional: change the Heading Text.
Click “OK”.
Edit Your Optional Prompt in the Criteria Tab
o Navigate to the Criteria tab and find your Prompt. Note the Prompt number.
o Select Edit.
o Change the selection in Choose Expression 2 Type from “Prompt” to “Expression”
o Substituting your Prompt number for X insert the following into the Define Expression box.
:X OR :X = ‘ ‘
o Click “OK”.
Make the final Criteria modifications
o Still in the “Criteria” tab click “Group Criteria” button.
o Add left and right parenthesis to group the Prompt and
Expression Criteria:
o o Click “OK”.
Optional Prompt with No Lookup List – Simplified Instructions
To create a Query where the Prompt can be left blank or typed in with no data validation (list of lookup values):
From the Fields tab click on the “Add Criteria” icon.
Select “Prompt” for Choose Expression 2 Type.
Click on “New Prompt”.
Select “No Table Edit” for the Edit Type.
Click on the “Magnifying Glass” icon to select a Prompt table. Click on “No Value”.
Optional: change the Heading Text.
Click “OK”.
Edit Your Optional Prompt in the Criteria Tab

PS QUERY 201
Page | 76
o Navigate to the Criteria tab and find your Prompt. Note the Prompt number.
o Select Edit.
o Change the selection in Choose Expression 2 Type from “Prompt” to “Expression”
o Substituting your Prompt number for X insert the following into the Define Expression box.
:X OR :X = ‘ ‘
o Click “OK”.
Make the final Criteria modifications
o Still in the “Criteria” tab click “Group Criteria” button.
o Add left and right parenthesis to group the Prompt and Expression
Criteria:
o o Click “OK”.
Date Prompt – Simplified Instructions
To create a Standard Date Prompt:
Create the Date Prompt
o Go to Prompts tab and click on “Add Prompt”.
o Leave the Field Name blank.
o On Type drop down select Date.
o Optional: Type the name of the Prompt in the Heading Text Field.
o On Format drop down select None.
o On Edit Type select No Table Edit.
o Click the "Magnifying Glass" on the Prompt Table and click on the “No Value” button.
o Click the “Ok” button.
Link the Date Prompt to the Selected Field as Query Criteria
o From the Criteria Tab click on “Add Criteria”.
o Select Field for Choose Expression 1 Type.
o In Expression 1 select the Date Field where to tie the Prompt by using the “Magnifying Glass” icon.
o Select the Operator.
o In "Choose Expression 2 Type select Expression
o In Expression 2 click on “Add Prompt”.
o Select the Date Prompt previously created.
o Click “Ok”.
o Click “Save”
Date Range Prompt – Simplified Instructions
To create a Date Range prompt where random date range can be select it is necessary to create 2 Date
prompts then link them through a criteria added to the date field.
Create the First Date Prompt
o Go to the Prompts tab and click on “Add Prompt”.
o Heading Text should be Text.
o Type “From Date” in the Heading Text Field.
o Select Date on the Type drop down list.

PS QUERY 201
Page | 77
o On the Format drop down list, select None.
o On Edit Type select No Table Edit.
o For the Prompt Table click on the "Magnifying Glass" icon and click on the “No Value” button.
o Click “Ok”.
Create the Second Date Prompt
o Go to the Prompts tab and click on “Add Prompt”.
o Heading Text should be Text.
o Type “To Date” in the Heading Text Field.
o Select Date on the Type drop down list.
o On the Format drop down list, select None.
o On Edit Type select No Table Edit.
o For the Prompt Table click on the "Magnifying Glass" icon and click on the “No Value” button.
o Click “Ok”.
Match your Prompts to the Selected Date Field and Add as Query Criteria
o Go to the Fields tab and identify the Date Field to tie to your Prompts.
o Click on the “Add Criteria” icon.
o As this was done from the Fields tab Choose Expression 1 and Expression 1 – Choose Record and Field
will be already filled in with the information from the selected Field.
o For Condition Type select Between from the drop down list.
o For Choose Expression 2 Type select the Expr – Expr radio button.
o On Expression 2 – Define Expression click “Add Prompt”.
o Select and link the “From Date” Prompt.
o On Expression2 – Define Expression 2 click “Add Prompt”
o Select and link the “To Date” Prompt.
o "Save".

PS QUERY 201
Page | 78
Optional Numeric Prompt with No Lookup List – Simplified Instructions
This is a special case since the Field used is numeric and the user wants to have the option to enter a numeric
value without having a list to choose from or leave the field blank. This combination doesn’t work with a
regular “Prompt-Expression” combination. It is necessary to convert the “Numeric” field to a “TO-CHAR”
format to make this Prompt work.
Create a new Expression in the Expression tab.
o For Expression Type select Character from the drop down list.
o Match the original numeric length in the Length Field.
o Enter TO_CHAR(X.FIELD_NAME) where X.FIELD_NAME is the name of the Field.
o Click “OK” button to save the new Expression.
o Back on the Expression tab click “Use as Field” link, to add the Expression as a Field. Make sure to
test it.
Run your Query to test the results.
o If it runs correctly, re-name the Expression Field and remove the original numeric Field.
Create the Optional Numeric Prompt
• Back at the Fields tab click the “Add Criteria” icon next to the TO_CHAR Field.
• Choose Expression 1Type and Expression 1 will be already filled in with the information from the
selected Field.
• On Choose Expression 2 Type select the Prompt radio button.
• Click “New Prompt” button to create a new Prompt.
• Leave Field Name blank.
• Optional: Name the Prompt in the Heading Text Field.
• Match the original numeric length in the Length field.
• Make sure Edit Type is No Table Edit.
• Leave Prompt Table blank.
• Click the “OK” button.
• Add as Query Criteria
o Navigate to the Criteria tab and find your Prompt. Note the Prompt number.
o Select Edit.
o Change the selection in Choose Expression 2 Type from “Prompt” to “Expression”
o Substituting your Prompt number for X insert the following into the Define Expression box.
:X OR :X = ‘ ‘
o Click “OK”.
Make the final Criteria modifications
o Still in the “Criteria” tab click “Group Criteria” button.
o Add left and right parenthesis to group the Prompt and Expression Criteria:
o Click “OK”.

PS QUERY 201
Page | 79
Prompt with wildcard (%)– Simplified Instructions
This prompt allows users to select either one value or multiple values. For example, if using Union Codes the
user could type in W% to search all codes beginning with W or the partial code 17% to find all codes starting
with 17 or simply % to search all possible codes.
Create a new Expression in the Expression tab.
o In Expression Text enter: ‘ ‘ (apostrophe-space-apostrophe).
o Click “OK”.
Add your Expression as an Optional Prompt to the Query Criteria
o Go to the Criteria tab click the “Add Criteria” button.
o Select Expression in Expression1 Type.
o Click on the "Magnifying Glass" icon to search for the desired Expression in Expression 1 – and click to
select.
o Select Prompt in Choose Expression 2 Type.
o Select “New Prompt” in Expression 2 – Define Prompt to create the Optional Prompt.
o Leave the Field Name blank.
o Select Text from the Heading Text drop down list.
o Type the Prompt Name in the Heading Text Field. Be sure to include instructions regarding Wildcard.
o The Edit Type Field should be No Table Edit.
o Click on the “Magnifying Glass” icon to select a Prompt table. Click on “No Value”.
Match the Selected Field to the Optional Prompt
o Go to the Fields tab and click on the “Add Criteria” icon next to the Field to be used for the Prompt.
o Select the Condition Type of Like.
o Select Prompt for the Choose Expression 2 Type.
o Click on the "Magnifying Glass" icon to search for the Optional Prompt and click to select it.
o Click "OK".
Make the final Criteria modifications
o Navigate to the Criteria Tab.
o Click the “Group Criteria” button.
o Add left and right parenthesis to group both criteria:
o Click “OK”.
o Change the operator in the Logical column to Or and click "Save".
Simplified Instructions 201 Intermediate Skills
Adding Criteria to a Left Outer Join – Simplified Instructions
Using a Query that has a Left Outer Join, select a field from the Record which has been Left Outer
Joined and add Criteria to it, either from the Criteria tab or the Add Criteria Icon.
In the “Criteria Belongs To” box select the Outer Join clause that matches the Record alias (for
example, Record B)
Adding EFFDT Criteria to a Left Outer Join – Simplified Instructions

PS QUERY 201
Page | 80
Using a Query that has a Left Outer Join where Record B contains and EFFDT. Add additional Criteria to
the EFFDT Field of Record B where the EFFDT is NULL.
Group both the EFFDT Criteria with an OR Logical Operator.
Create a Query of Queries
Create a Query using one of the PSQRY tables found below.
o PSQRYBIND – Stores all run-time prompt data
o PSQRYBINDLANG - Related language record for PSQRYBIND
o PSQRYCRITERIA – Stores all Criteria Expressions in code format
o PSQRYDEFN – Stores high-level query definitions with version numbers.
o PSQRYFIELD – Stores all fields used in all aspects of query operation
o PSQRYDEL – Stores operator ID, query name and version
o PSQRYEXECLOG – Stores information on the execution of Queries
o PSQRYEXPR – Stores the text associated with each Criteria Expression
o PSQRYFIELD – Stores all fields used in all aspects of query operation
o PSQRYFIELDLANG - Related language record for PSQRYFIELD
o PSQRYLINK – Stores the relationships to child Queries
o PSQRYRECORD – Stores all records used in all aspects of query creation
o PSQRYSELECT – Stores all SELECT requirements by select type, i.e. union, subselect, join,….
o PSQRYSTATS – Stores run time statistics
In addition there are also records which store page or panel information.
o PSPNLDEFN - Panel Definition
o PSPNLDEFN_VW - Panel Definition View
o PSPNLFIELD - Panel Field
o PSPNLFIELD_VW - Panel Field View
o PSPNLGDEFNLANG - Panel Group Related Lang
o PSPNLGROUP - Panel Group
o PSPNLGROUPLANG - Panel Group Related Language
o PSPNLGRPDEFN - Panel Group Definition
o PSPNLHTMLAREA - Panel HTML Area
o PSPNLTREECTRL - Panel Tree Control
Create a Query of Queries with Definition Search Capabilities
To make the Query more valuable you can make the definition field searchable by adding a wildcard prompt on the
DESCRLONG (Definition) field and you can then search for Queries created by a certain college code, email
address or name.
Text fields are not searchable so we must convert it to a Character field. Hence, you will need to convert the
DESCRLONG (Definition) field to a character field before being able to prompt with a wildcard on it. While we will
cover Expressions much more in depth later in the class, let’s see how to use them now to convert a Text Field to a
Character Field.

PS QUERY 201
Page | 81
On the fields tab of the Query QFS_QRY_DEFINITION we see that the DESCRLONG, which is the Query
Definition field, is a Text Field and so it must be converted to a Character field, which is searchable.
Go to the Expressions tab and click on Add Expression. In the Expression Test type in
TO_CHAR(A.DESCRLONG). Make sure to update the length allowed. Click OK.
Now click on "Use as Field” to use this new Expression as a field in your Query.
Go to the fields tab and change the heading text of your field from TO_CHAR(A.DESCRLONG) to Query
Definition.

PS QUERY 201
Page | 82
You will now be able to create a Wildcard Prompt on the Definition Field. For step by step instructions on creating
a Wild Card Prompt see below.
To create a Wildcard Prompt:
CR EATE A NE W EXPRE SS ION IN T HE EXPRESS IO N T AB .
o In Expression Text enter: ‘ ‘ (apostrophe-space-apostrophe).
o Click “OK”.
ADD YOUR EXP RE SS ION AS AN OPT ION AL PROM PT TO TH E QUE RY
CR ITER I A
o Go to the Criteria tab click the “Add Criteria” button.
o Select Expression in Expression1 Type.
o Click on the "Magnifying Glass" icon to search for the desired Expression in Expression 1 – and click
to select.
o Select Prompt in Choose Expression 2 Type.
o Select “New Prompt” in Expression 2 – Define Prompt to create the Optional Prompt.
o Leave the Field Name blank.
o Select Text from the Heading Text drop down list.
o Type the Prompt Name in the Heading Text Field. Be sure to include instructions regarding
Wildcard.
o The Edit Type Field should be No Table Edit.
o Click on the “Magnifying Glass” icon to select a Prompt table. Click on “No Value”.
M ATCH T HE SELE CTED F I ELD TO TH E OPT IO NAL PROMPT
o Go to the Fields tab and click on the “Add Criteria” icon next to the Field to be used for the
Prompt.
o Select the Condition Type of Like.
o Select Prompt for the Choose Expression 2 Type.
o Click on the "Magnifying Glass" icon to search for the Optional Prompt and click to select it.
o Click "OK".
M AKE THE F IN AL CR IT E R IA MO DI F ICAT ION S
o Navigate to the Criteria Tab.
o Click the “Group Criteria” button.
o Add left and right parenthesis to group both criteria:
o Click “OK”.
o Change the operator in the Logical column to Or and click "Save".
Once the Query is complete you are able to search by any standard in the Definition Field.

PS QUERY 201
Page | 83
Searching Record and Field Information – CTRL+SHIFT+J
Note: this process is not available in the production environment.
Navigate to the front end page where you are looking to find Record and Field information.
Press CTRL+SHIFT+J to access the data sheet for that page.
o NOTE: in Chrome the user must input CTRL+SHIFT+J TWICE for the process to work.
Note or copy the page name and then navigate to PeopleSoft Query Manager or Query Viewer.
Use one of the following Queries in PQA or PTDV3 as appropriate to the pillar:
o QCS_PSPNLFIELD
o QHC_PSPNLFIELD
o QFS_PSPNLFIELD
Run the QXX_PSPNLFIELD Query to HTML and when prompted, enter the page name in the Prompt
window then click View Results.
The results display the names of the fields found in the page and the record where each field lives.

PS QUERY 201
Page | 84
Searching Record and Field Information – CTRL+SHIFT+C
Note: this process is not available in Internet Explorer.
Navigate to the front end page where you are looking to find Record and Field information.
Press CTRL+SHIFT+C to access the information for that page.
Hover your mouse over the desired Field and look in the black box that appears above for the Record and
Field information.
Searching Record and Field Information – PSCHROME Extension
Install this extension and use it anywhere in the front end to get Record and Field information. Go to
https://google.com/chrome/webstore from within the Chrome browser.
Click on The Chrome Webstore hyperlink under Distribution Options.
Search for "PeopleSoft" in the search bar.
Click on “Add to Chrome” next to the PSChromeExtension.
Now you are ready to start using the PSChrome Chrome Extension in PeopleSoft.
Using the PSChrome Extension Simplified Instructions
TH E F I ELD INFORMATIO N I CON
Navigate to the front end page where you are looking to find Record and Field information.
Click on the Field Information icon
Red dotted line boxes will appear around the Fields
Click inside the red dotted line box on the “I” icon then scroll to the bottom of your screen to see the
resulting information. The name of the field and the value currently entered will display.
TH E PAGE I NFORMATION I CON
Navigate to the front end page where you are looking to find Record and Field information.
Click on the Page Information icon
The Page information box will appear
Note or copy the page name and then navigate to PeopleSoft Query Manager or Query Viewer.
Use one of the following Queries in PQA or PTDV3 as appropriate to the pillar:
o QCS_PSPNLFIELD
o QHC_PSPNLFIELD
o QFS_PSPNLFIELD
Run the QXX_PSPNLFIELD Query to HTML and when prompted, enter the page name in the Prompt
window then click View Results.
The results display the names of the fields found in the page and the record where each field lives.
Searching Record and Field Information – MetaLink
Click on Meta Data to go to the Reporting Library.
Click on View Current Data Dictionary.
Select a pillar and table then click View Report.
Table Information holds details regarding the record while Column Information holds details regarding the
fields of the table.

PS QUERY 201
Page | 85
Applying Aggregate Functions
Create a new Query or edit an existing Query
Go to the Fields tab
Select the Field to which to apply the Aggregate Function
Click on the Edit box next to the selected Field
Click on the radio button corresponding to the desired Aggregate Function
Click Ok
Applying Having Criteria
Create a new Query or edit an existing Query
Go to the Fields tab and select the Field with the Aggregate Function to which to apply the Having Criteria
Click on the Add Criteria icon
Add the Having Criteria to the Field
Click OK
Using an Expression as a Column
Create a new Query or edit an existing Query
Note the Field Format of the Field to be used in the Expression
Go to the Expression tab and add a new Expression
Match the Expression Type to the Field Format and if needed adjust the Length and Decimals of the
Expression field
Click the Aggregate Function box if applicable
Enter the Expression in the Expression Text box
Click OK
Click the hyperlink “Use As Field”
Change the Field Heading Text in the Fields tab
BI Publisher Reports
Navigate to Query Report Viewer: Main Menu Reporting Tools BI Publisher Query Report Viewer
Search for a Report
Select the desired format in which to view the Report
Click on View Report
PS QUERY 201
Page | 86
Adding a new Run Control ID
Navigate to Query Report Viewer: Main Menu Reporting Tools BI Publisher Query Report
Scheduler
Click the Add a New Value tab. Enter the Run Control ID and click on “Add”.
This will take you to the Query Report Scheduler Page.
On this page select the Report Name. Either type it in or click on the magnifying glass next to the Report
Name Field to search for your report. Once you have made the selection if there are prompts in the
report you will be asked to enter in the values.
Note that once the Report Name is entered the remainder of the fields will fill in automatically with the
exception of Template as of Date where users can select a particular version of the template they want the
report to be based on. Click on Run in the upper right corner to run the report.
This will take you to the Process Scheduler Request page where final selections are made including the Date
and Time to run the report as well as Type and Format. Once done with the selections click OK to
schedule the report.
You will be directed back to the Query Report Scheduler page where you will be able to check the Process
Monitor and the Report Manager for your report.
Using an Existing Run Control ID
Navigate to Query Report Viewer: Main Menu Reporting Tools BI Publisher Query Report
Scheduler
Search for an existing Run Control ID. To search for all Run Control ID’s simply press enter or click
Search
This will show you a list of all available Run Control ID’s.
Click on the hyperlinked name of the desired Run Control ID.
This will take you to the Query Report Scheduler page where the report name will be filled in already. The
parameters will also be saved though they can be changed by clicking on the Update Parameters hyperlink.
Click on Run in the upper right corner to run the report.
This will take you to the Process Scheduler Request page where final selections are made including the Date
and Time to run the report as well as Type and Format. Once done with the selections click OK to
schedule the report.
You will be directed back to the Query Report Scheduler page where you will be able to check the Process
Monitor and the Report Manager for your report.

PS QUERY 201
Page | 87
Glossary
Column/Field: In a database context, a field is the same as a column. For example, a record of people could
contain separate fields such as name, address, phone, etc.
Criteria: Specifying criteria in your Query allows you to set conditions which limit the results returned by the
Query to only those data that you are interested in. Criteria are viewed and maintained on the “Criteria” tab.
Example: You may want to set criteria to limit your Query to retrieve a relevant subset of data such as active
undergraduate students as opposed to returning results for all active students.
Condition Type (Edit Criteria Properties Page) – The operator used to determine how the Criteria will be
compared.
Criteria Tab - The purpose of the Criteria tab is to allow users a place to create and/or view Criteria that will
refine the results of their Queries.
Expression 1 Type (Edit Criteria Properties Page) - Defines WHAT the Criteria is being added to. Can be a
Field or an Expression.
Expression 1 (Edit Criteria Properties Page) – The Field or Expression the Criteria is being compared to.
Expression 2 Type (Edit Criteria Properties Page) - Defines where the VALUE the Criteria is being
compared against will come from. Generally from a Field, Expression, Prompt, Constant or Subquery though the
options can change based on the condition Type selected..
Expression 2 (Edit Criteria Properties Page) – The Value the Criteria will be compared against.
Expressions Tab – The purpose of the Expressions tab is to allow users a place01
Expression Text – Area where to write the Expression.
Fields Tab - The purpose of the Fields tab is to show a list of all of the Fields selected for the Query and to
determine how those fields should be displayed in the Query results
Having Tab - The purpose of the Having tab is to allow users a place to create and/or view Criteria that will refine
the results of their Queries for Fields which have Aggregate Functions applied to them.
Join: The process of combining data from two or more Records using matching keys.
Primary Key: A column in a Record whose values uniquely identify the rows in the Record. A primary key value
cannot be NULL.
Private Query: Private Queries are only viewable by the individual who created the Query. They can be shared
with others individually, however.
Prompts Tab - The purpose of the Prompts tab is to create and display prompts
PS QUERY 201
Page | 88
Public Query: Public Queries are viewable and editable by any user with access to Query Manager and the proper
Record access. Public Queries are available for use by many different users, so please do not save any changes that
you make to a public Query.
Query: A Query is a SQL SELECT statement that reads data from Records and views within the database, and
returns the result set to the requester. PS Queries cannot change data within the database.
Query Tab - The purpose of the Query tab is to provide a location where all of the Records used in the Query
can be displayed and where Fields can be selected to use in the Query.
Relational Database: A database system in which the database is organized and accessed according to the
relationships between data items without the need for any consideration of physical orientation and relationship.
Relationships between data items are expressed by means of tables (records).
Record/Table: Records/Tables are the foundation of the Query tool. A record stores data that is arranged by
rows (entries) and columns (fields). For example, a record/table containing data about “people” would have a row
for each individual person and columns (fields) for each piece of data stored for that individual (ex: name, address,
phone). Records can be added to a Query from the “Records” tab.
Records Tab - The purpose of the Records tab is to provide a location where users are able to search for and
select one or more Records to use in their Queries.
Run Control ID – A unique system identifier that remembers parameters for a scheduled Query.
Run Tab - The purpose of the Run tab is to allow users to view the results of the Query.
SQL: Structured Query Language (SQL) is a language that provides an interface to relational database systems. It
was developed by IBM in the 1970s for use in System R. SQL is a de facto standard, as well as an ISO and ANSI
standard. Some people pronounce SQL "sequel".
View SQL Tab - The purpose of the View SQL tab is to allow users to review the SQL statements being used in
the Query.

PS QUERY 201
Page | 89
PS Query 201 Training Evaluation
Please take a moment to answer the following questions. Your comments are an important contribution
as we design learning experiences to meet your professional needs.
What will you do differently as a result of this training?
What do you feel were the strengths of this course?
What do you feel were the weaknesses of this course?
How can we improve this course?
What additional training-development in PS Query do you require?
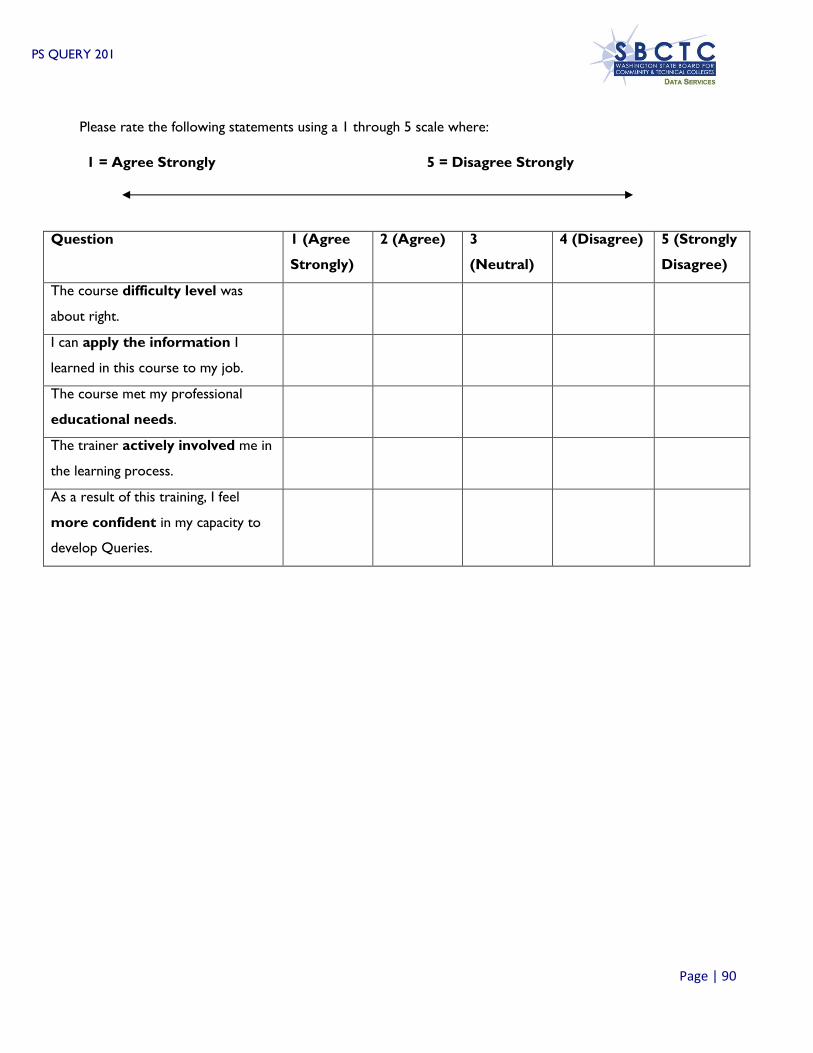
PS QUERY 201
Page | 90
Please rate the following statements using a 1 through 5 scale where:
1 = Agree Strongly 5 = Disagree Strongly
Question 1 (Agree
Strongly)
2 (Agree) 3
(Neutral)
4 (Disagree) 5 (Strongly
Disagree)
The course difficulty level was
about right.
I can apply the information I
learned in this course to my job.
The course met my professional
educational needs.
The trainer actively involved me in
the learning process.
As a result of this training, I feel
more confident in my capacity to
develop Queries.
Related Documents