Adobe Photoshop CC Beginner Course Copyright ©2017 Studio Anders 1 Ps Adobe Photoshop CC Creative Cloud Beginner prepare images for presentation puposes

Welcome message from author
This document is posted to help you gain knowledge. Please leave a comment to let me know what you think about it! Share it to your friends and learn new things together.
Transcript
Adobe Photoshop CC Beginner Course Copyright ©2017 Studio Anders 1
Ps AdobePhotoshop CC
Creative Cloud Beginnerprepare images for presentation puposes
Adobe Photoshop CC Beginner Course Copyright ©2017 Studio Anders 2
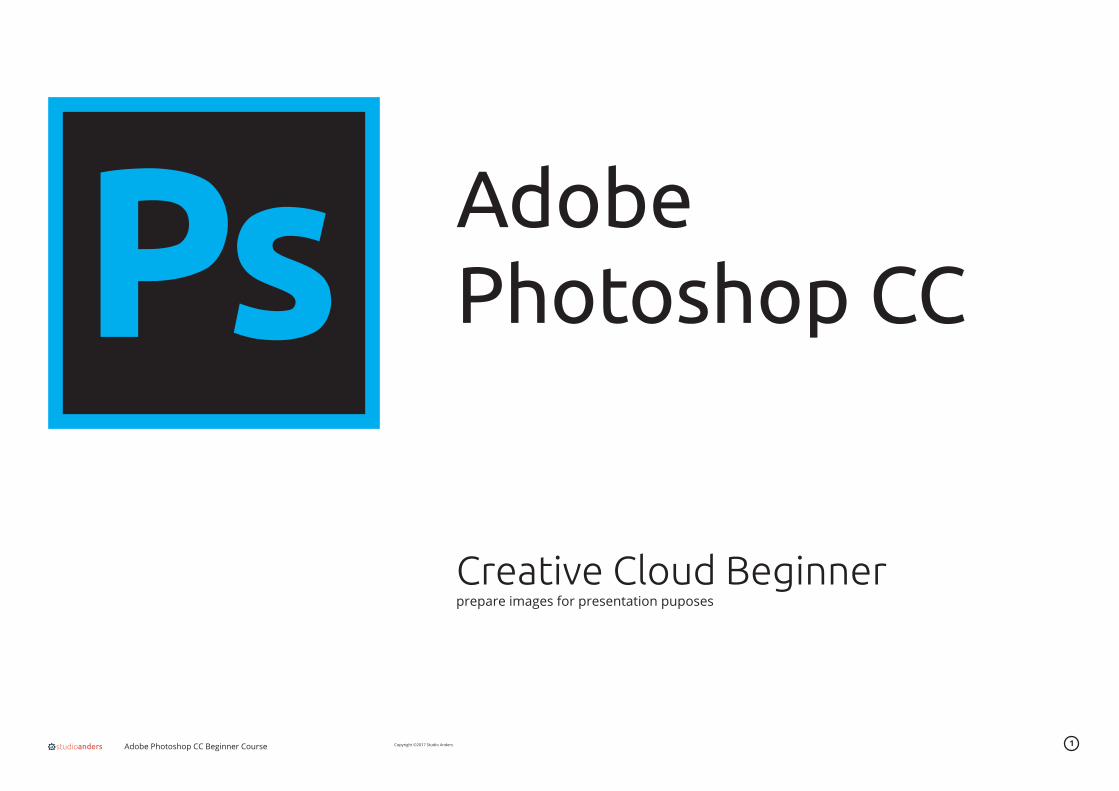
Vector and Pixel based imagesThere are two kinds of images: vector and pixel based images. A vector is a drawn line that can be filled with a colour, pattern or gradient. On that line a stroke can be added. Most common vector based images are logo’s, fonts and graphics.
A pixel is a square dot on your screen. This dot can be filled with a colour or can be transparent (called alpha). Depending the resolution, a picture’s size depends on how many pixels there are in roughly
one square inch (pixels per inch). Most common pixel based images are photographs. Illustrator is a ‘vector based’ application.
Vector images are scalable, without loosing quality and sharpness. Pixel images lose quality while scaling. So when making graphics, use Illustrator to keep the image sharp at any size. For photographs, use the resolution (width and height) you need for output. The amount of pixels only tells something
about the amount per square inch (pixels/dots per inch). The more pixels you have on a screen, the more detail you can see.
Photoshop is an application that is used to edit or make pixel based images.
Vector Pixel
Adobe Photoshop CC Beginner Course Copyright ©2017 Studio Anders 3
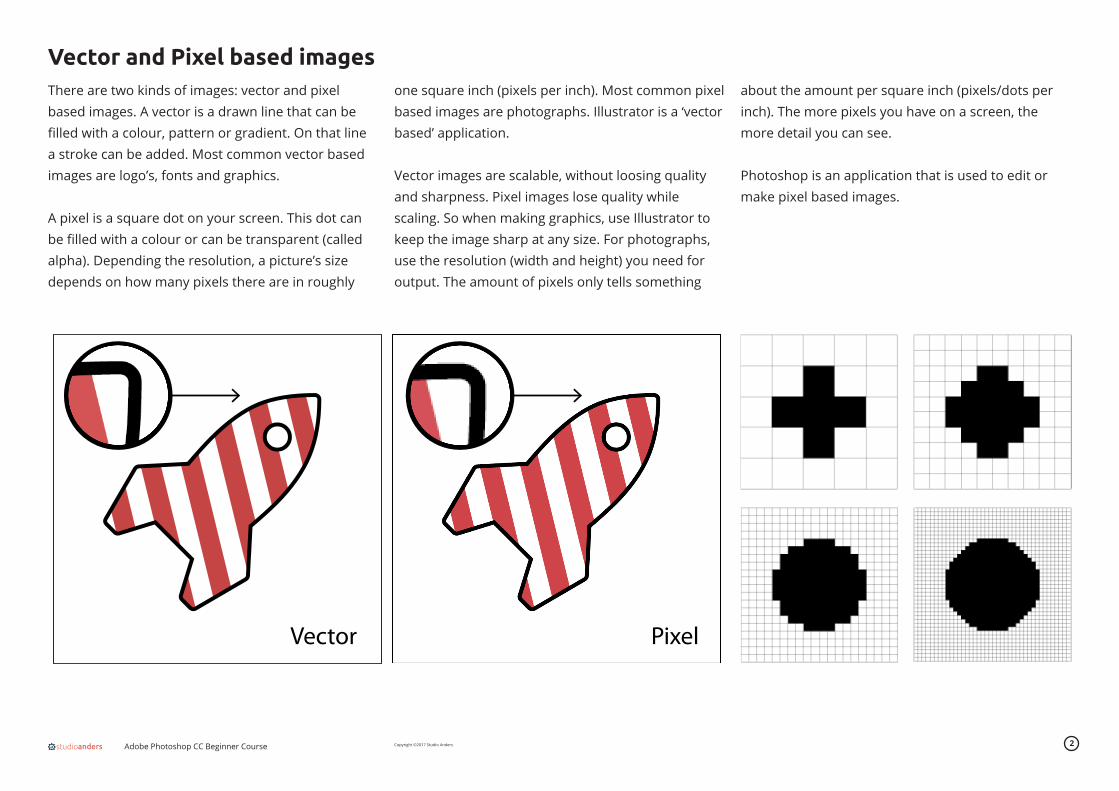
Before using Photoshop, you have to make an organized structure of folders on your computer or cloud drive. This way you are sure all images you use can be found on the same spot.
When preparing a Photoshop document, it is wise to store all elements (photographs and graphics) near the original Photoshop file you are working on. Adobe uses a ‘links’ folder to store all files used in a document.
1. First make a project folder on your computer or cloud drive.
2. Inside that project folder, make a links folder
3. Start Photoshop, open a new print document and save it inside the project folder.
It should look something like this:
Organizing documentationAfter setting up your project folder, start collecting all images you want to use for your project. This way you don’t have to search for these while editing in Photoshop. When you do, store these files inside the ‘links’ folder so you can find them fast while working in Photoshop.
Prepare your files:
Find a rubber duckSearch the internet for an image of a rubber duck or something you like more. This has to be a JPG of PNG file.
Find a t-shirtAfter that, find a vector image of a T-shirt. This has to an EPS or AI file. So, type ‘vector image t-shirt’ in your search box. This file has to be stored in the ‘Links’ folder as well.

Adobe Photoshop CC Beginner Course Copyright ©2017 Studio Anders 4
Start using PhotoshopGetting startedThe Start workspace in Photoshop gives you quick access to your recent files, libraries, and mobile creations. Depending on your subscription status, the Start workspace may also display content tailored for your requirements. You can also look for the right Adobe Stock asset for your project directly from within the Start workspace.
Photoshop displays the Start workspace at launch or whenever no documents are open.
While creating a document in Photoshop, instead of beginning with a blank canvas, you can choose from a wide variety of templates, including templates from Adobe Stock.
In addition to templates, you can also create a document by selecting one of the numerous presets available in Photoshop.
Adobe Photoshop CC Beginner Course Copyright ©2017 Studio Anders 5
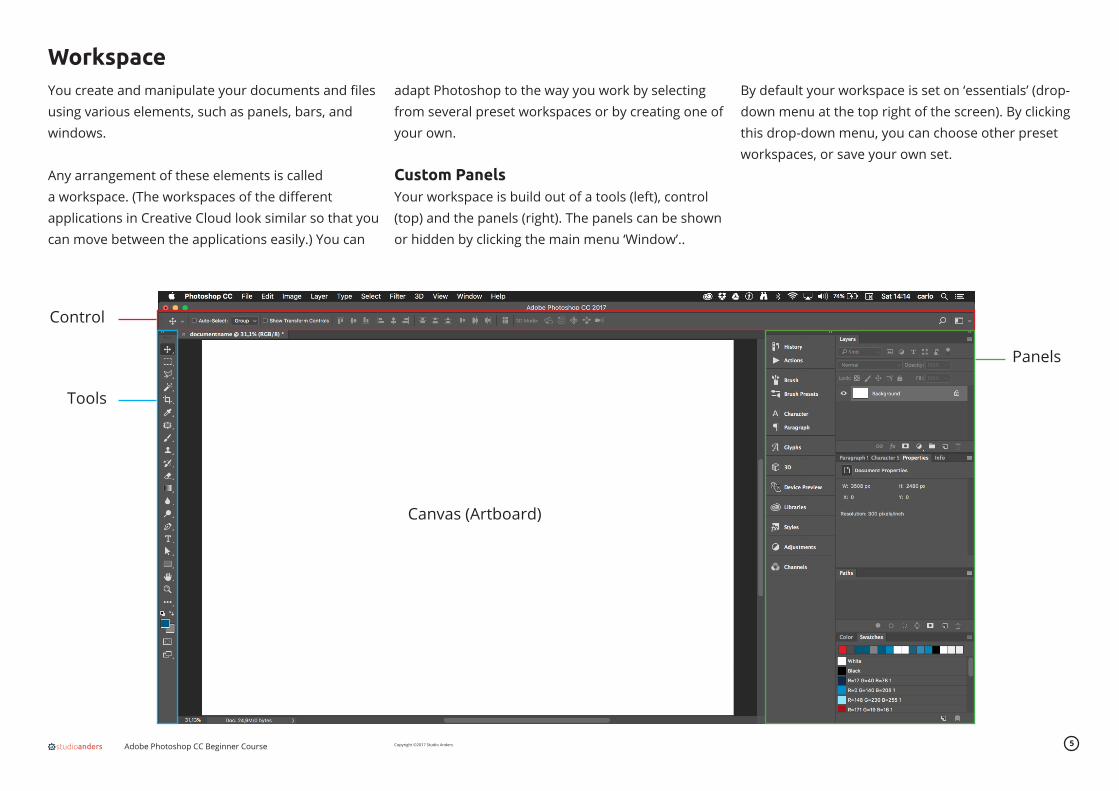
WorkspaceYou create and manipulate your documents and files using various elements, such as panels, bars, and windows.
Any arrangement of these elements is called a workspace. (The workspaces of the different applications in Creative Cloud look similar so that you can move between the applications easily.) You can
adapt Photoshop to the way you work by selecting from several preset workspaces or by creating one of your own.
Custom PanelsYour workspace is build out of a tools (left), control (top) and the panels (right). The panels can be shown or hidden by clicking the main menu ‘Window’..
By default your workspace is set on ‘essentials’ (drop-down menu at the top right of the screen). By clicking this drop-down menu, you can choose other preset workspaces, or save your own set.
Tools
Control
Panels
Canvas (Artboard)
Adobe Photoshop CC Beginner Course Copyright ©2017 Studio Anders 6
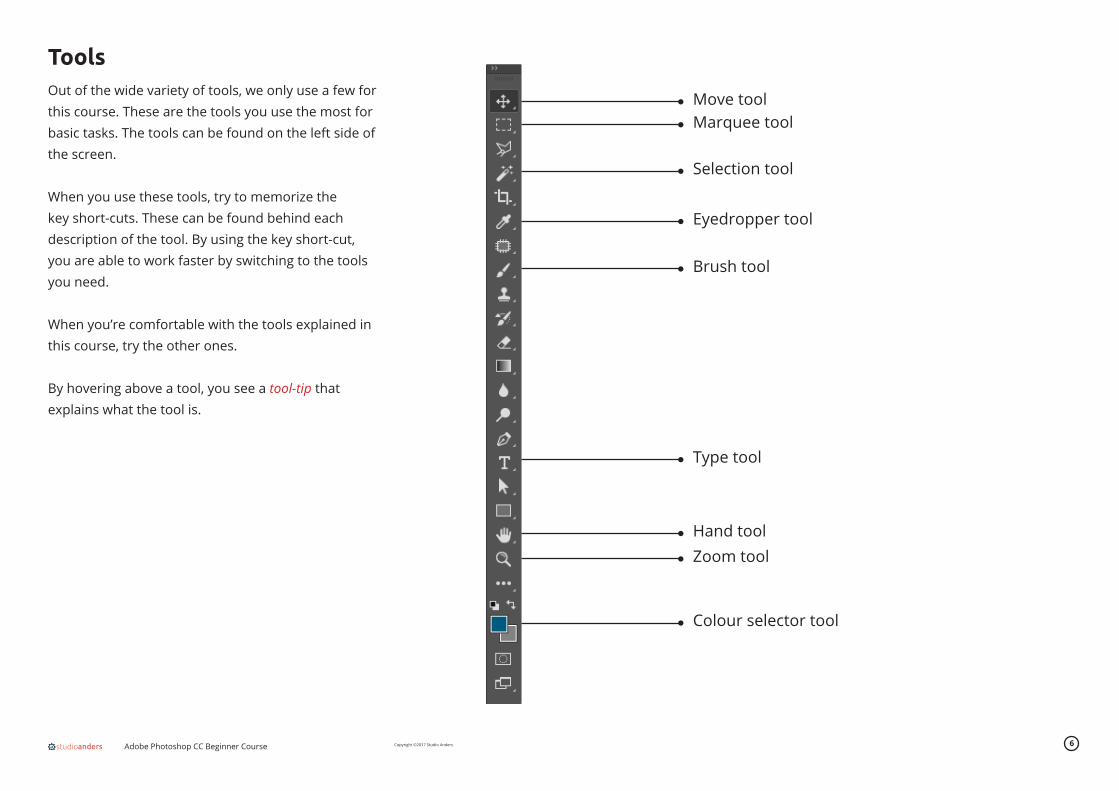
Out of the wide variety of tools, we only use a few for this course. These are the tools you use the most for basic tasks. The tools can be found on the left side of the screen.
When you use these tools, try to memorize the key short-cuts. These can be found behind each description of the tool. By using the key short-cut, you are able to work faster by switching to the tools you need.
When you’re comfortable with the tools explained in this course, try the other ones.
By hovering above a tool, you see a tool-tip that explains what the tool is.
Tools
Move toolMarquee tool
Selection tool
Eyedropper tool
Brush tool
Type tool
Hand toolZoom tool
Colour selector tool
Adobe Photoshop CC Beginner Course Copyright ©2017 Studio Anders 7
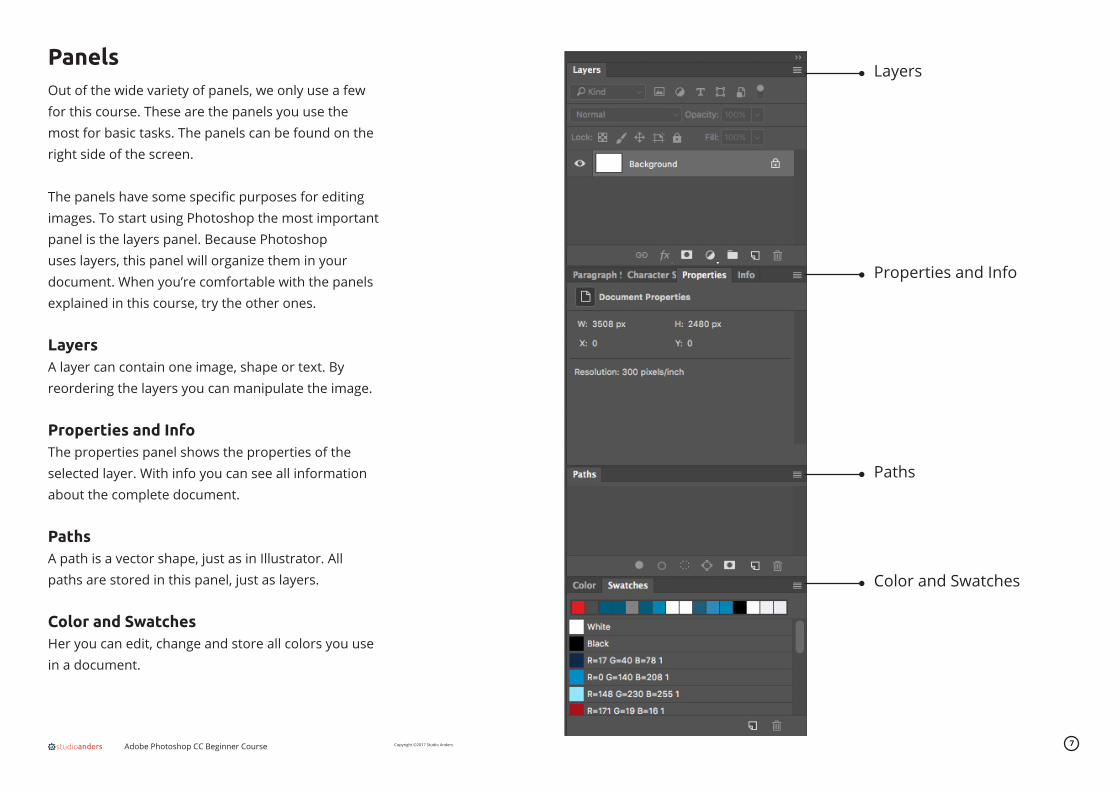
Out of the wide variety of panels, we only use a few for this course. These are the panels you use the most for basic tasks. The panels can be found on the right side of the screen.
The panels have some specific purposes for editing images. To start using Photoshop the most important panel is the layers panel. Because Photoshop uses layers, this panel will organize them in your document. When you’re comfortable with the panels explained in this course, try the other ones.
LayersA layer can contain one image, shape or text. By reordering the layers you can manipulate the image.
Properties and InfoThe properties panel shows the properties of the selected layer. With info you can see all information about the complete document.
PathsA path is a vector shape, just as in Illustrator. All paths are stored in this panel, just as layers.
Color and SwatchesHer you can edit, change and store all colors you use in a document.
PanelsLayers
Properties and Info
Paths
Color and Swatches
Adobe Photoshop CC Beginner Course Copyright ©2017 Studio Anders 8
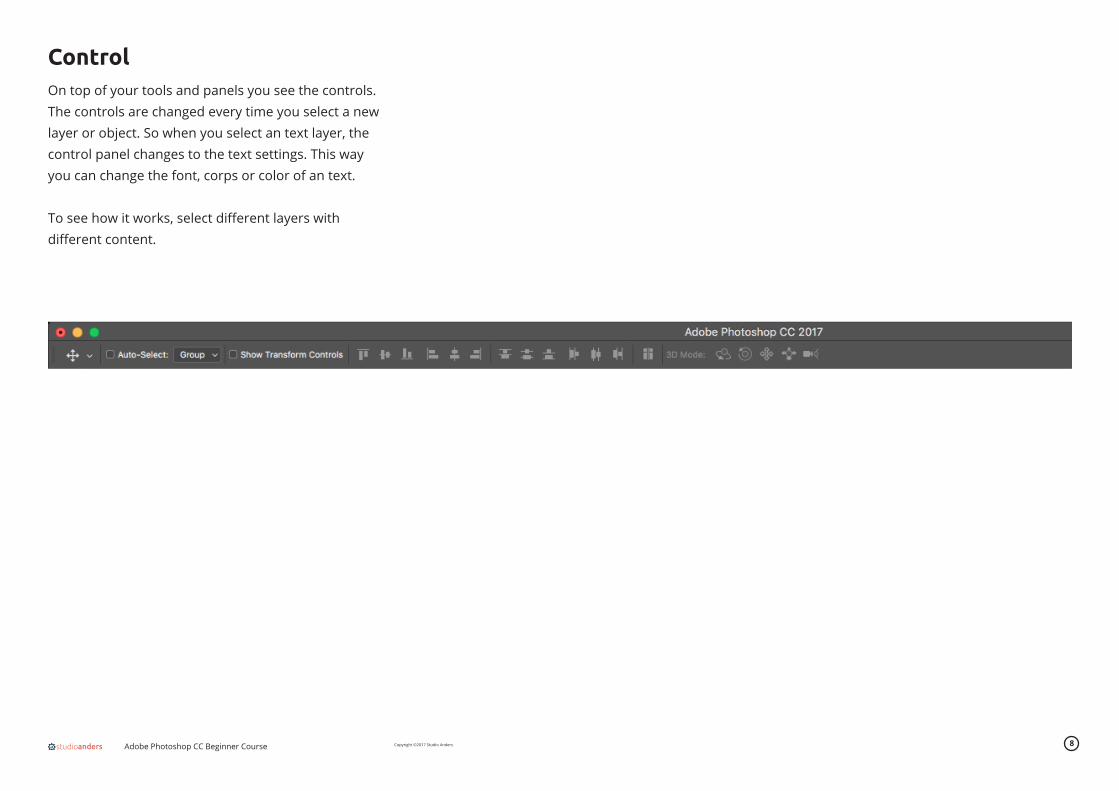
On top of your tools and panels you see the controls. The controls are changed every time you select a new layer or object. So when you select an text layer, the control panel changes to the text settings. This way you can change the font, corps or color of an text.
To see how it works, select different layers with different content.
Control
Adobe Photoshop CC Beginner Course Copyright ©2017 Studio Anders 9
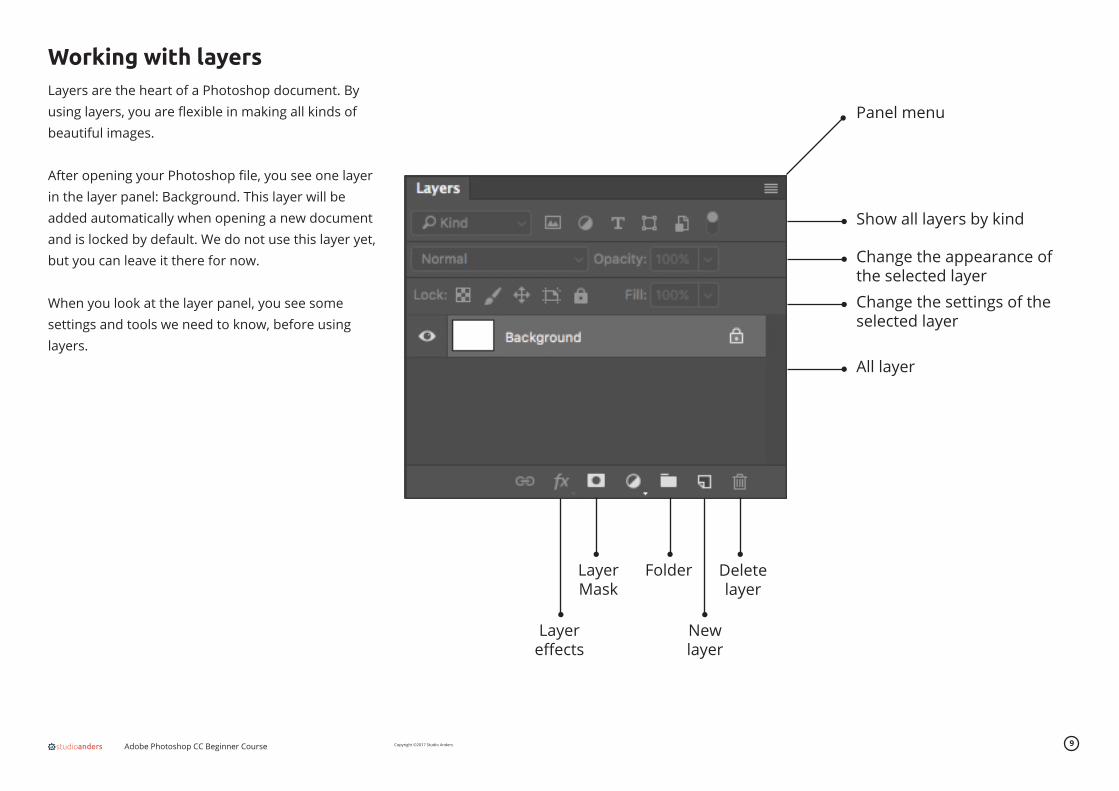
Layers are the heart of a Photoshop document. By using layers, you are flexible in making all kinds of beautiful images.
After opening your Photoshop file, you see one layer in the layer panel: Background. This layer will be added automatically when opening a new document and is locked by default. We do not use this layer yet, but you can leave it there for now.
When you look at the layer panel, you see some settings and tools we need to know, before using layers.
Working with layers
Show all layers by kind
Panel menu
Change the appearance of the selected layerChange the settings of the selected layer
All layer
Layer effects
New layer
Layer Mask
Folder Delete layer
Adobe Photoshop CC Beginner Course Copyright ©2017 Studio Anders 10
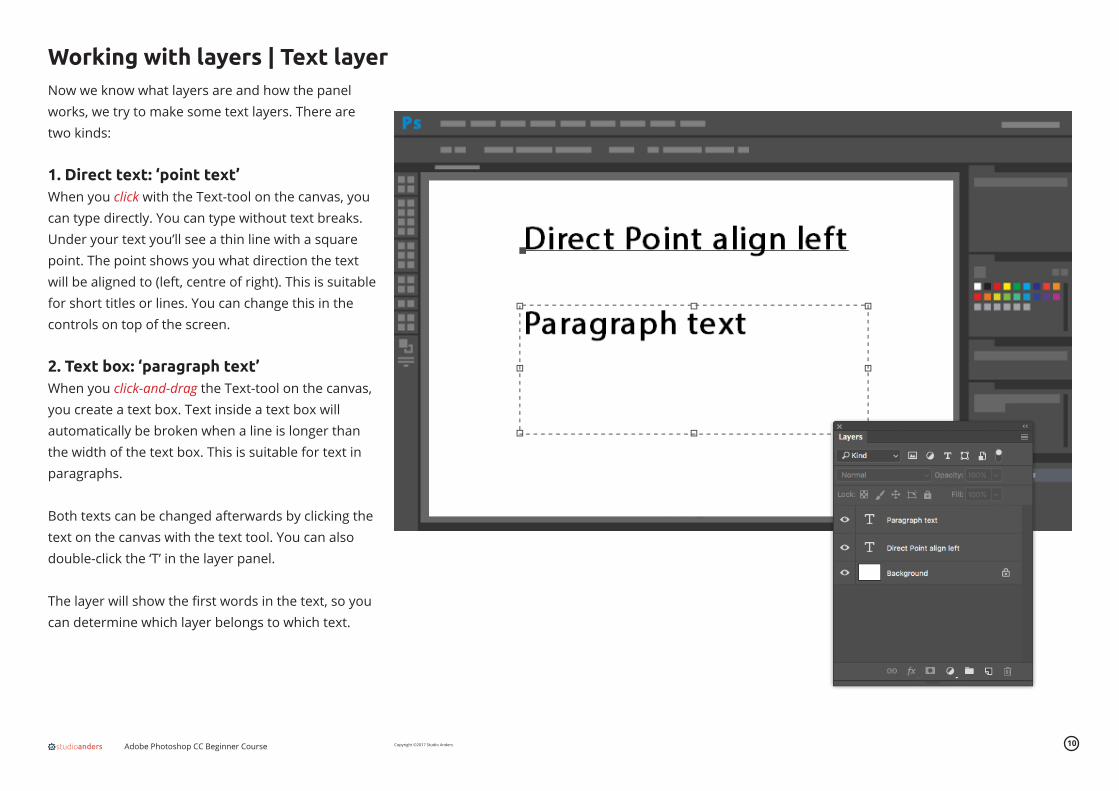
Now we know what layers are and how the panel works, we try to make some text layers. There are two kinds:
1. Direct text: ‘point text’When you click with the Text-tool on the canvas, you can type directly. You can type without text breaks. Under your text you’ll see a thin line with a square point. The point shows you what direction the text will be aligned to (left, centre of right). This is suitable for short titles or lines. You can change this in the controls on top of the screen.
2. Text box: ‘paragraph text’When you click-and-drag the Text-tool on the canvas, you create a text box. Text inside a text box will automatically be broken when a line is longer than the width of the text box. This is suitable for text in paragraphs.
Both texts can be changed afterwards by clicking the text on the canvas with the text tool. You can also double-click the ‘T’ in the layer panel.
The layer will show the first words in the text, so you can determine which layer belongs to which text.
Working with layers | Text layer

Adobe Photoshop CC Beginner Course Copyright ©2017 Studio Anders 11
Now we’ve made some text, it’s time to place some image. We use the ‘linked image’ method in this tutorial.
Place the duckSelect the Background layer. Photoshop always places an image above the selected layer.
Click on the File menu en choose Place Linked from the drop-down menu. Go to your project folder, open the ‘links’ folder and choose the image of the rubber duck.
Resize and moveNow you can resize the image to any size you want. To maintain the proportions, hold the shift-key and drag the images-box from the corners. Move the image by dragging it from the middle of the image.
FinalizingWhen you’re done, double-click the box to make the placement final.
Now, in the layer panel you see an small image of the duck with an chain-icon. This way you can see that the image in this layer is linked to an external file.
While editing this layer, the original will be untouched. With an external file, resizing is always possible, without quality loss (enlargement to 100%).
Working with layers | Linked Image layer
Adobe Photoshop CC Beginner Course Copyright ©2017 Studio Anders 12
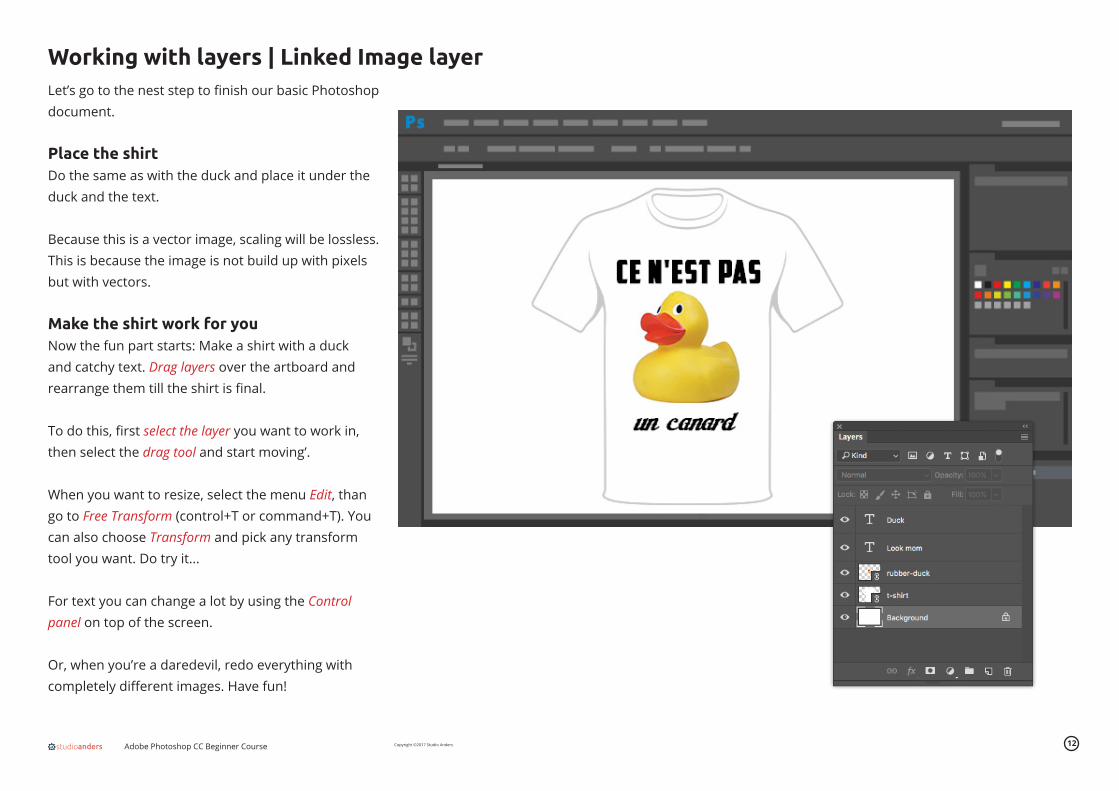
Let’s go to the nest step to finish our basic Photoshop document.
Place the shirtDo the same as with the duck and place it under the duck and the text.
Because this is a vector image, scaling will be lossless. This is because the image is not build up with pixels but with vectors.
Make the shirt work for youNow the fun part starts: Make a shirt with a duck and catchy text. Drag layers over the artboard and rearrange them till the shirt is final.
To do this, first select the layer you want to work in, then select the drag tool and start moving’.
When you want to resize, select the menu Edit, than go to Free Transform (control+T or command+T). You can also choose Transform and pick any transform tool you want. Do try it...
For text you can change a lot by using the Control panel on top of the screen.
Or, when you’re a daredevil, redo everything with completely different images. Have fun!
Working with layers | Linked Image layer
Adobe Photoshop CC Beginner Course Copyright ©2017 Studio Anders 13
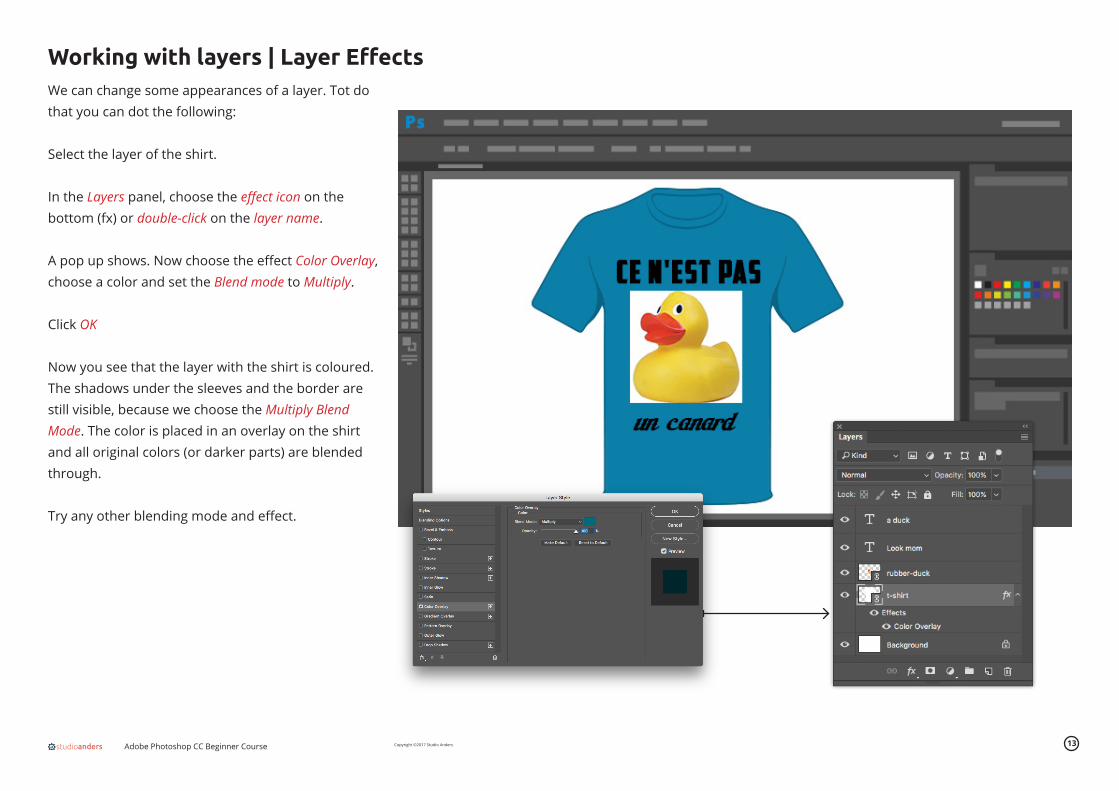
We can change some appearances of a layer. Tot do that you can dot the following:
Select the layer of the shirt.
In the Layers panel, choose the effect icon on the bottom (fx) or double-click on the layer name.
A pop up shows. Now choose the effect Color Overlay, choose a color and set the Blend mode to Multiply.
Click OK
Now you see that the layer with the shirt is coloured. The shadows under the sleeves and the border are still visible, because we choose the Multiply Blend Mode. The color is placed in an overlay on the shirt and all original colors (or darker parts) are blended through.
Try any other blending mode and effect.
Working with layers | Layer Effects
Adobe Photoshop CC Beginner Course Copyright ©2017 Studio Anders 14
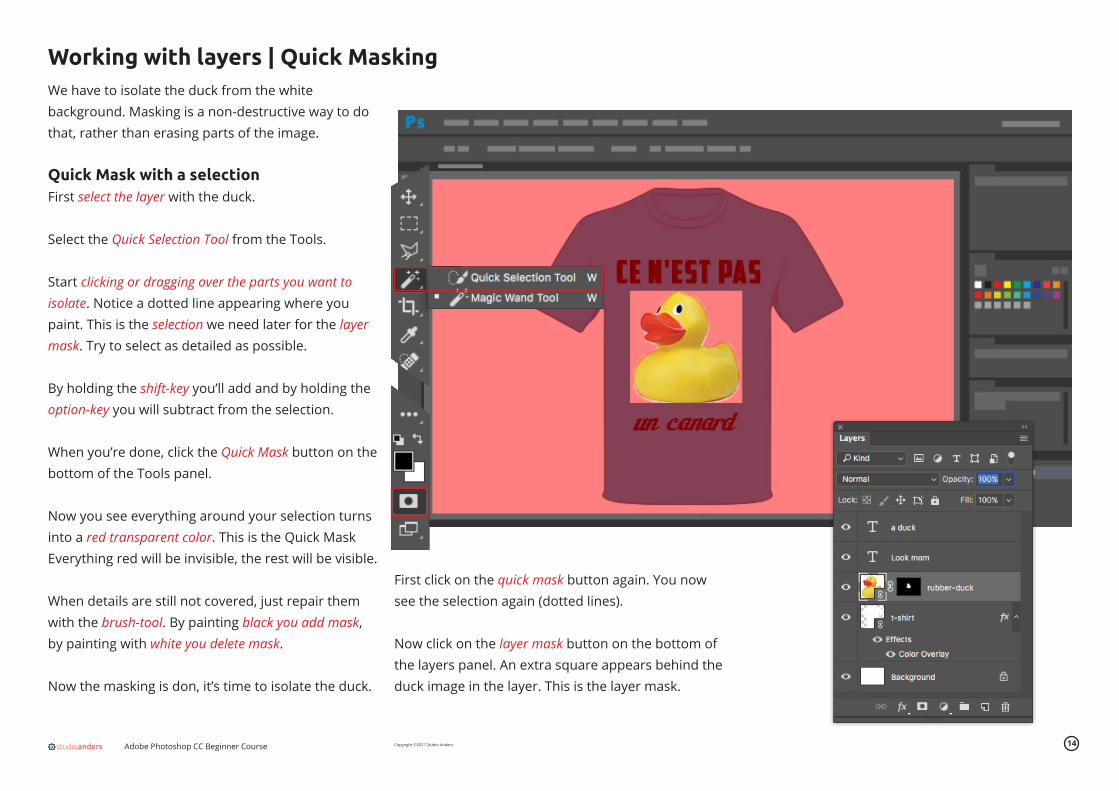
We have to isolate the duck from the white background. Masking is a non-destructive way to do that, rather than erasing parts of the image.
Quick Mask with a selectionFirst select the layer with the duck.
Select the Quick Selection Tool from the Tools.
Start clicking or dragging over the parts you want to isolate. Notice a dotted line appearing where you paint. This is the selection we need later for the layer mask. Try to select as detailed as possible.
By holding the shift-key you’ll add and by holding the option-key you will subtract from the selection.
When you’re done, click the Quick Mask button on the bottom of the Tools panel.
Now you see everything around your selection turns into a red transparent color. This is the Quick Mask Everything red will be invisible, the rest will be visible.
When details are still not covered, just repair them with the brush-tool. By painting black you add mask, by painting with white you delete mask.
Now the masking is don, it’s time to isolate the duck.
Working with layers | Quick Masking
First click on the quick mask button again. You now see the selection again (dotted lines).
Now click on the layer mask button on the bottom of the layers panel. An extra square appears behind the duck image in the layer. This is the layer mask.
Adobe Photoshop CC Beginner Course Copyright ©2017 Studio Anders 15
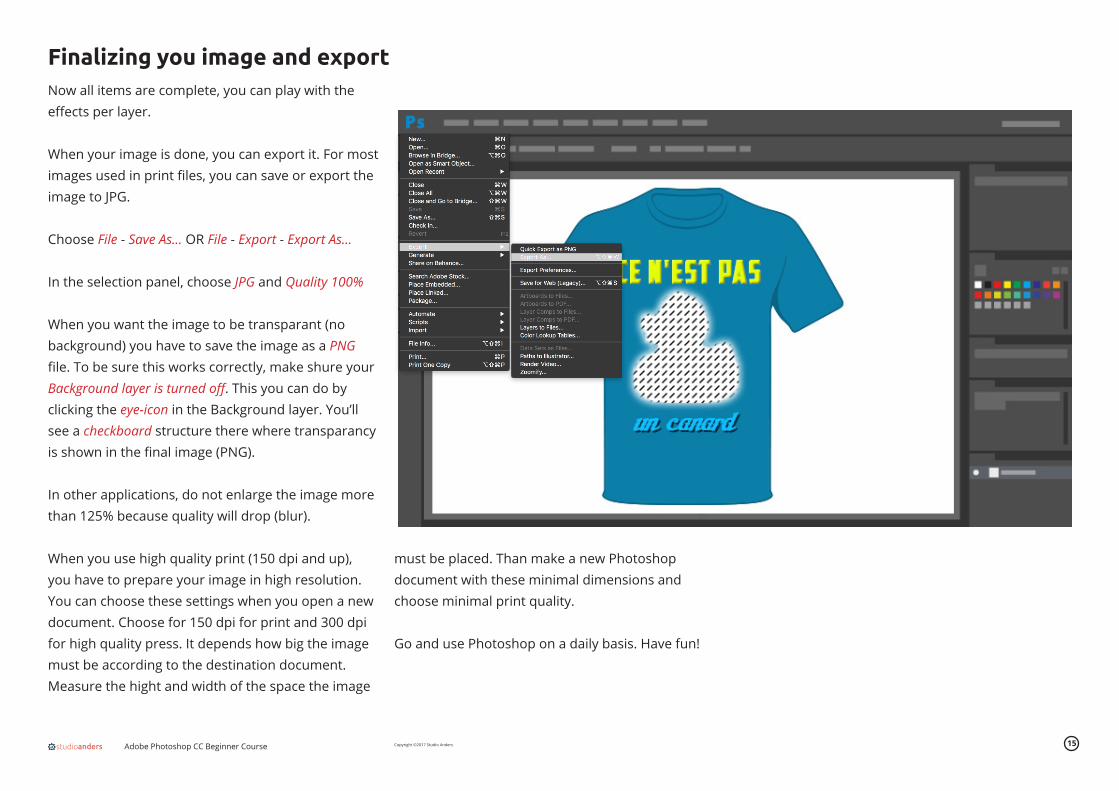
Now all items are complete, you can play with the effects per layer.
When your image is done, you can export it. For most images used in print files, you can save or export the image to JPG.
Choose File - Save As... OR File - Export - Export As...
In the selection panel, choose JPG and Quality 100%
When you want the image to be transparant (no background) you have to save the image as a PNG file. To be sure this works correctly, make shure your Background layer is turned off. This you can do by clicking the eye-icon in the Background layer. You’ll see a checkboard structure there where transparancy is shown in the final image (PNG).
In other applications, do not enlarge the image more than 125% because quality will drop (blur).
When you use high quality print (150 dpi and up), you have to prepare your image in high resolution. You can choose these settings when you open a new document. Choose for 150 dpi for print and 300 dpi for high quality press. It depends how big the image must be according to the destination document. Measure the hight and width of the space the image
Finalizing you image and export
must be placed. Than make a new Photoshop document with these minimal dimensions and choose minimal print quality.
Go and use Photoshop on a daily basis. Have fun!
Related Documents